Leaderboard
Popular Content
Showing content with the highest reputation on 12/01/23 in all areas
-
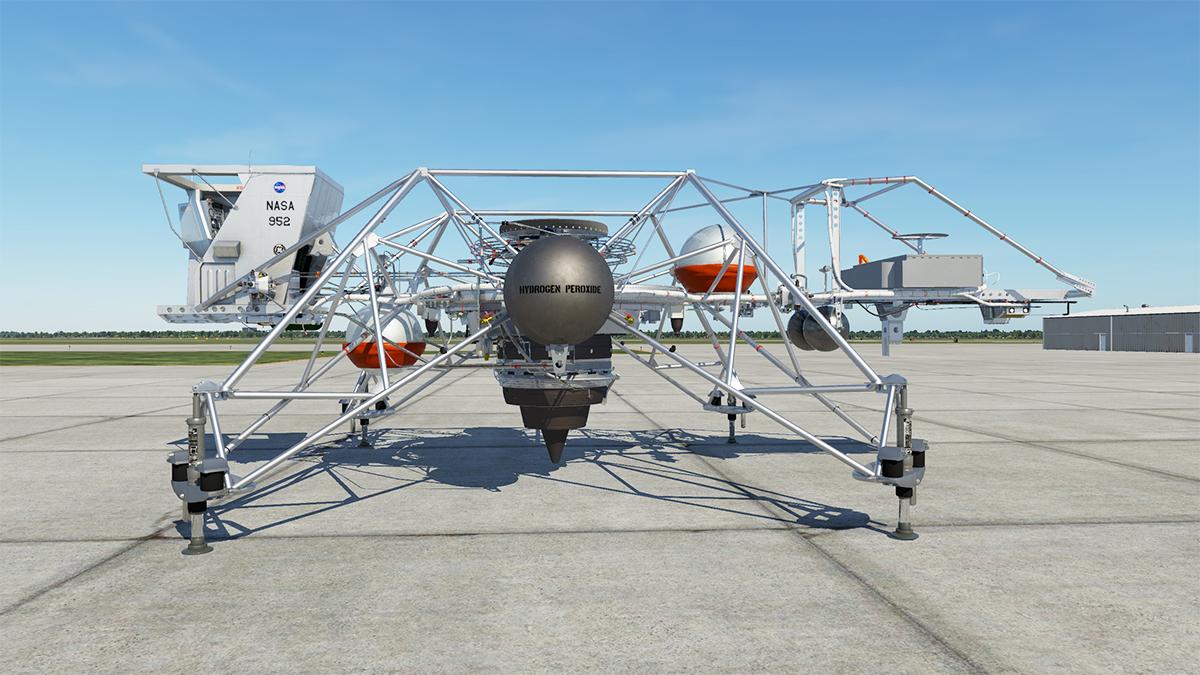
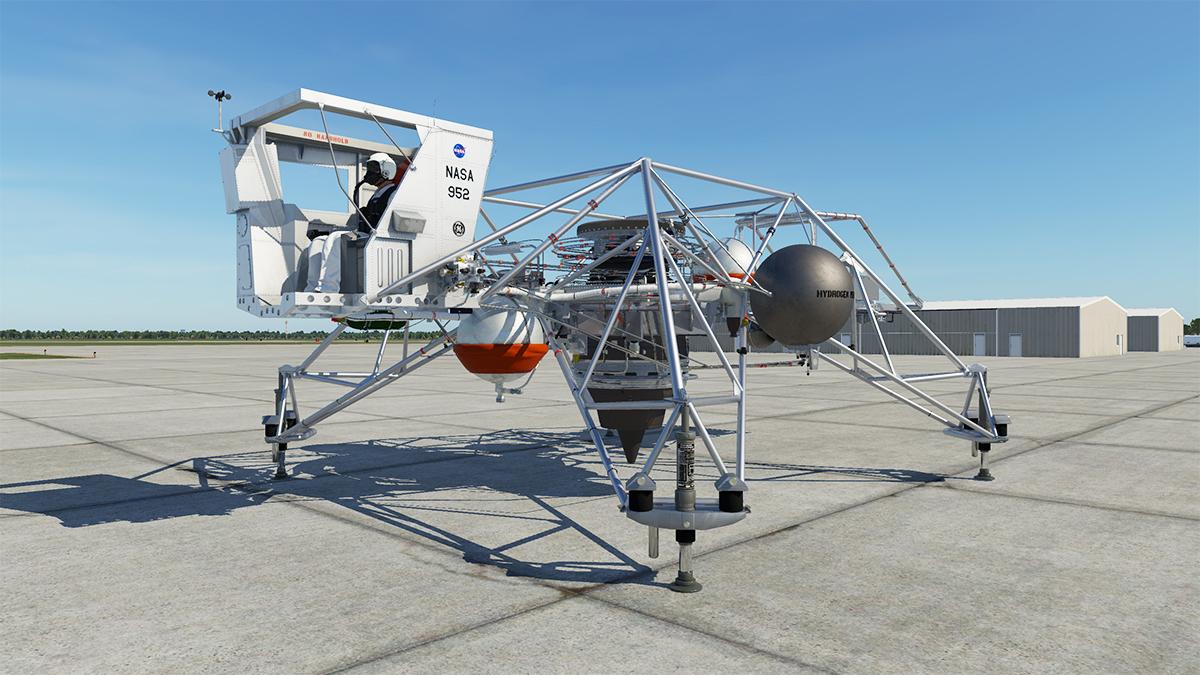
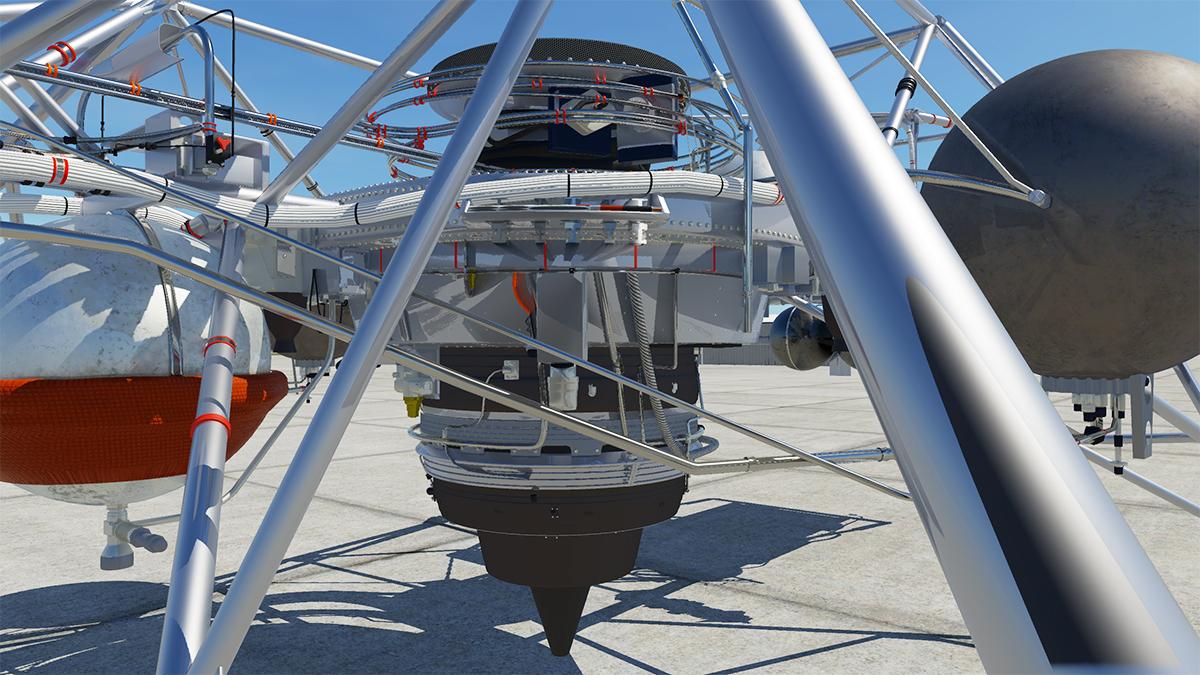
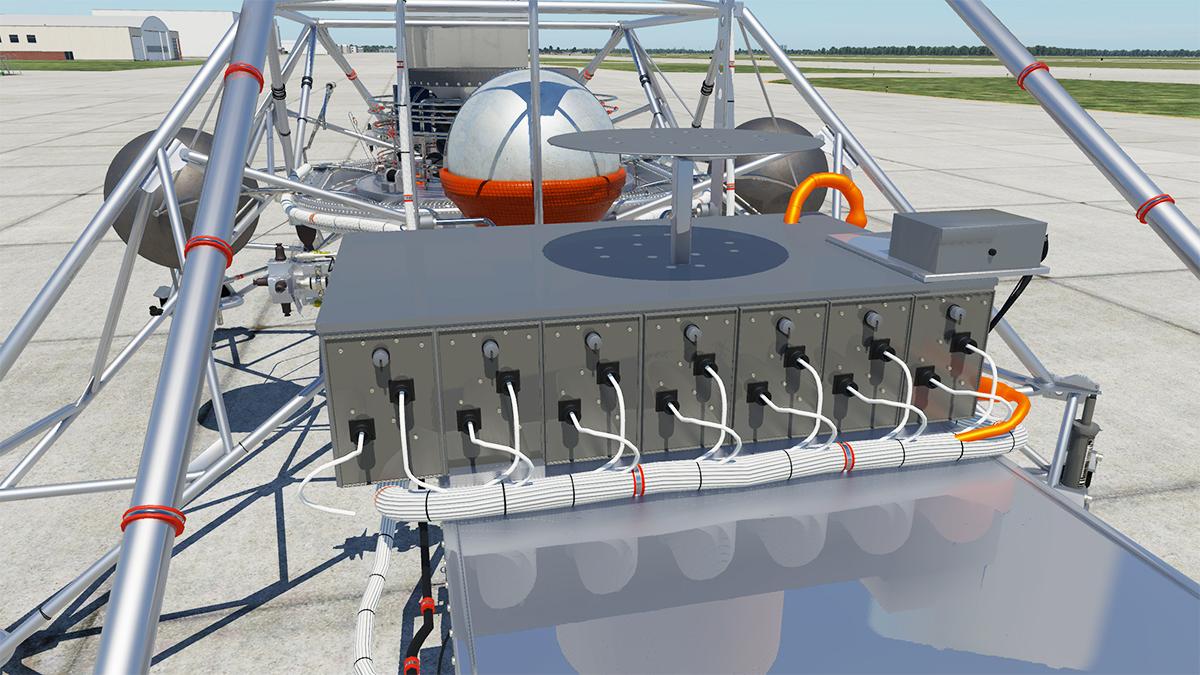
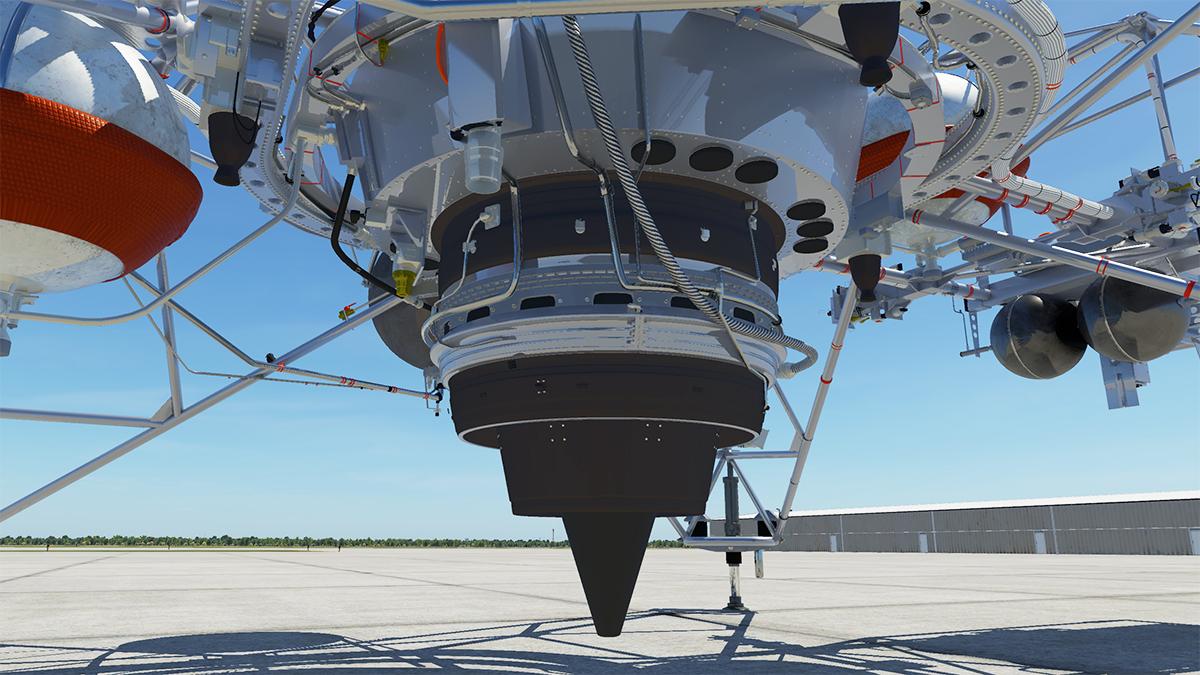
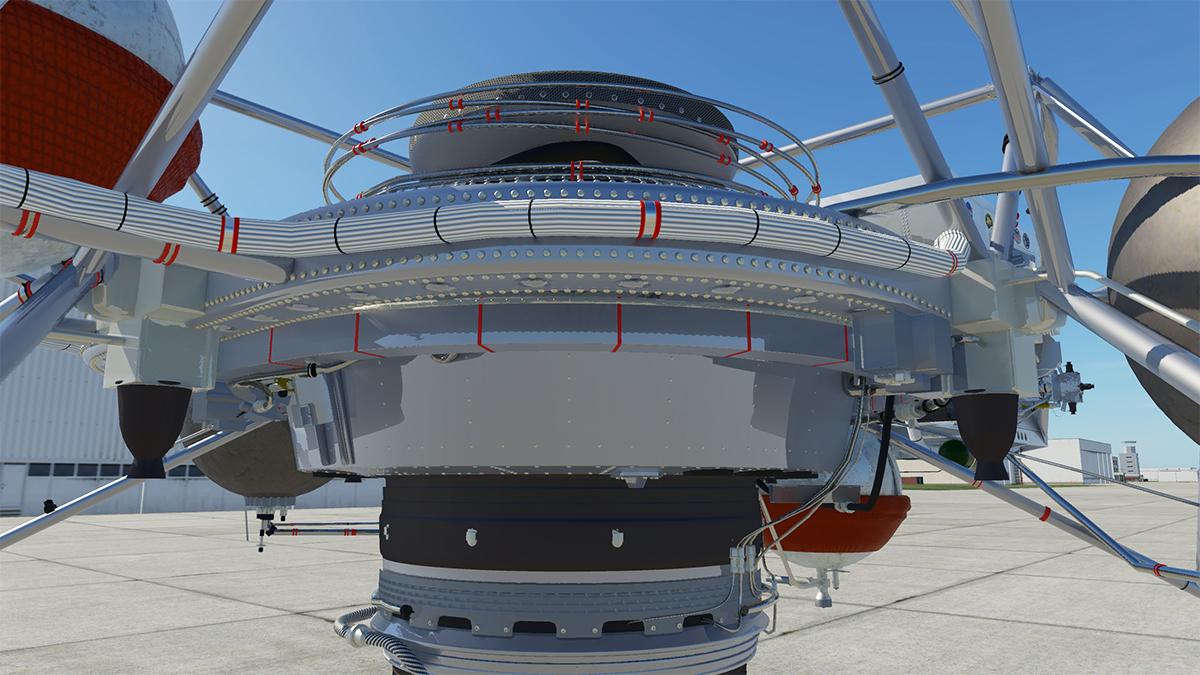
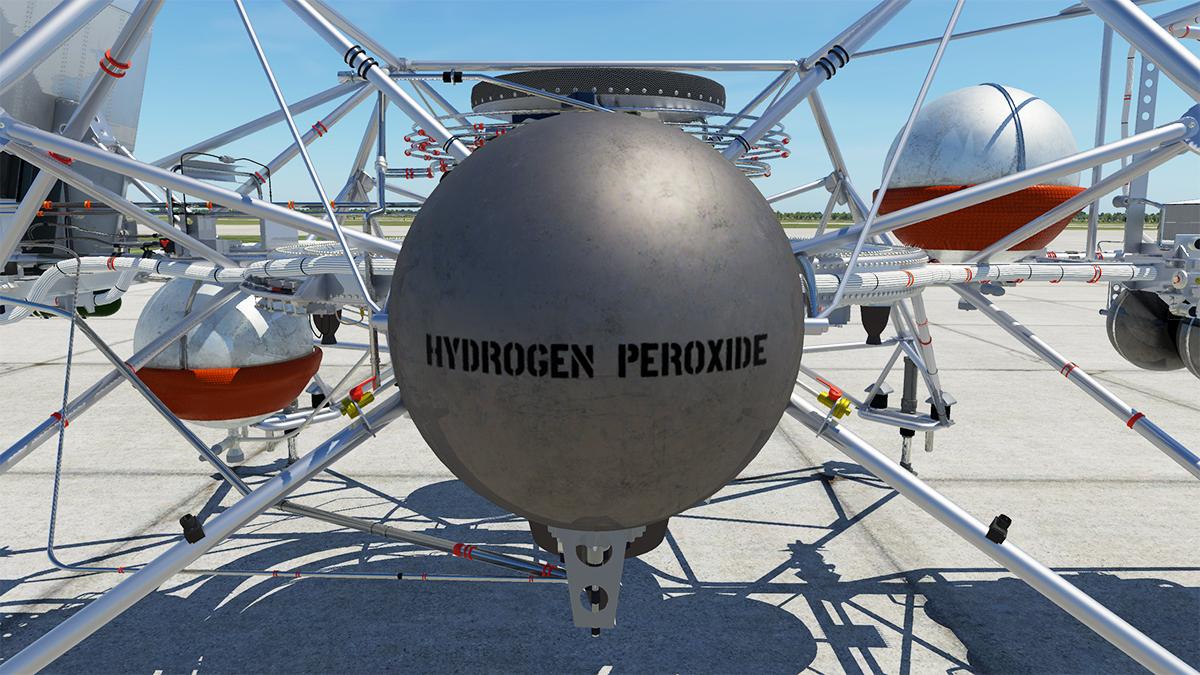
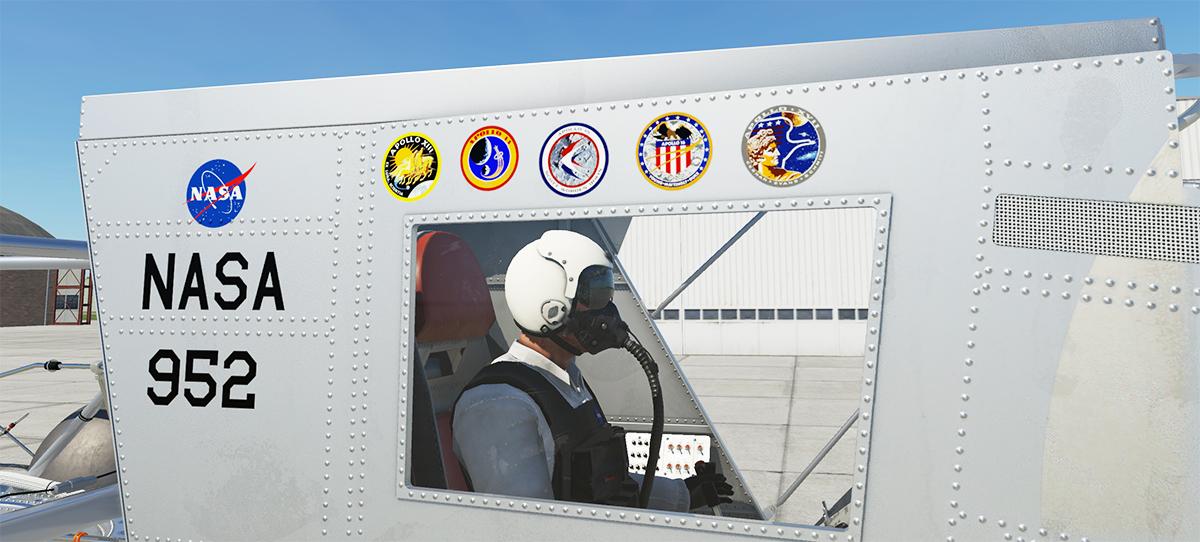
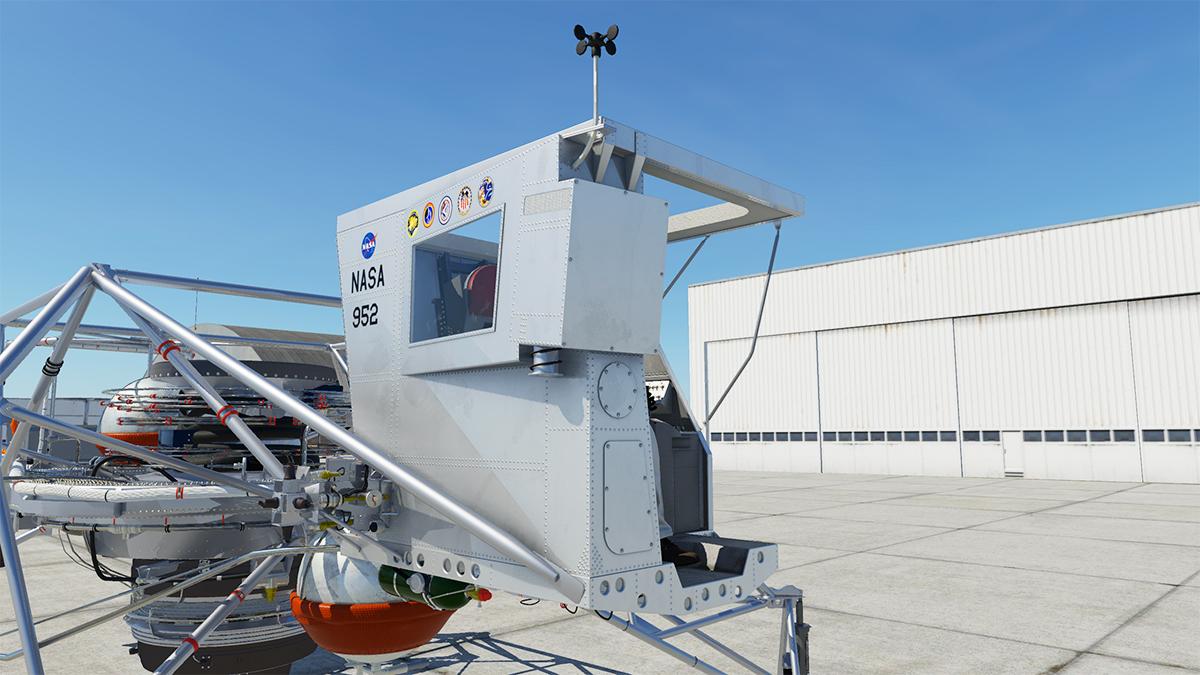
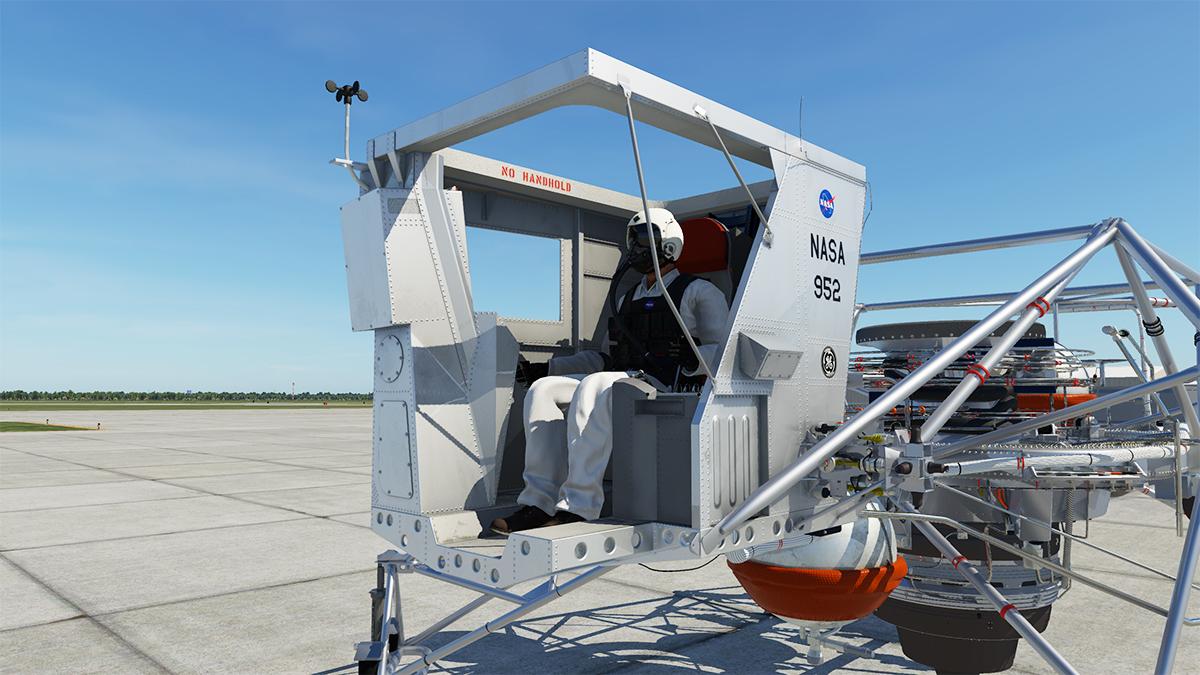
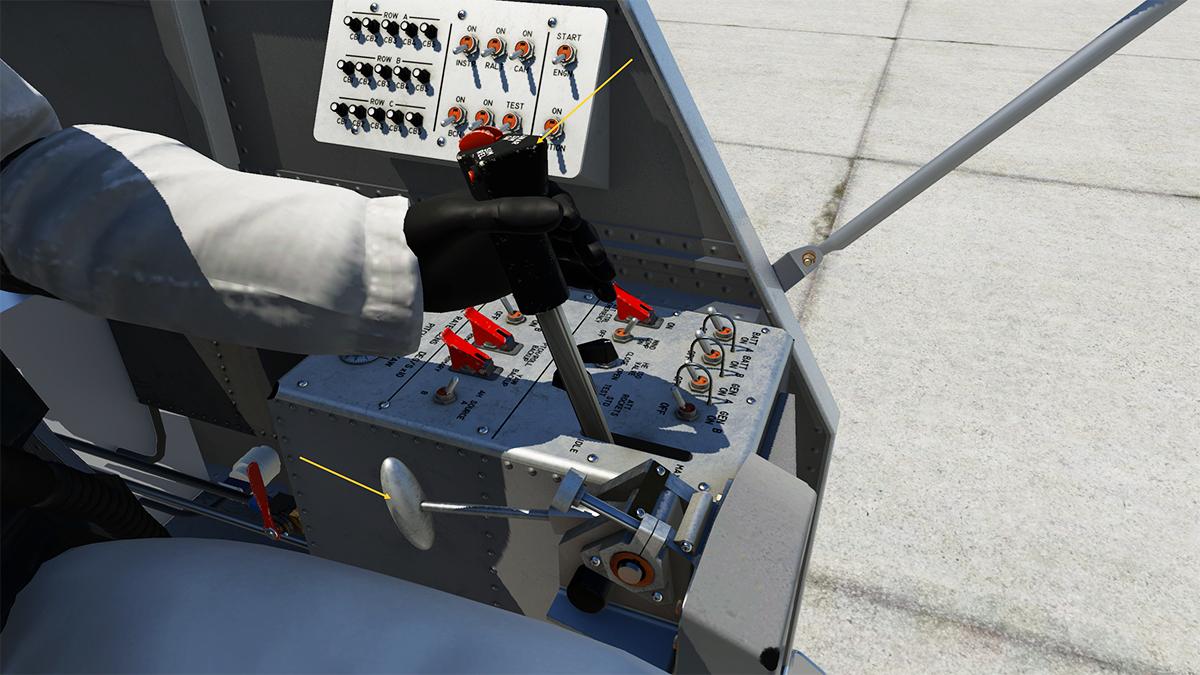
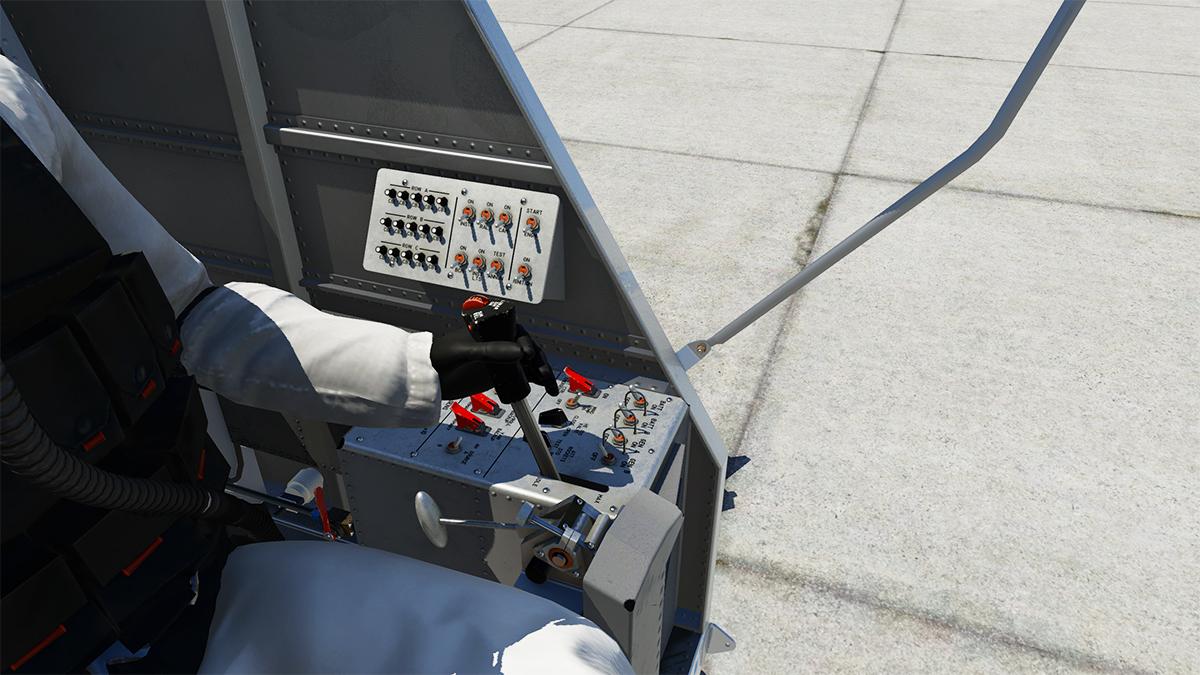
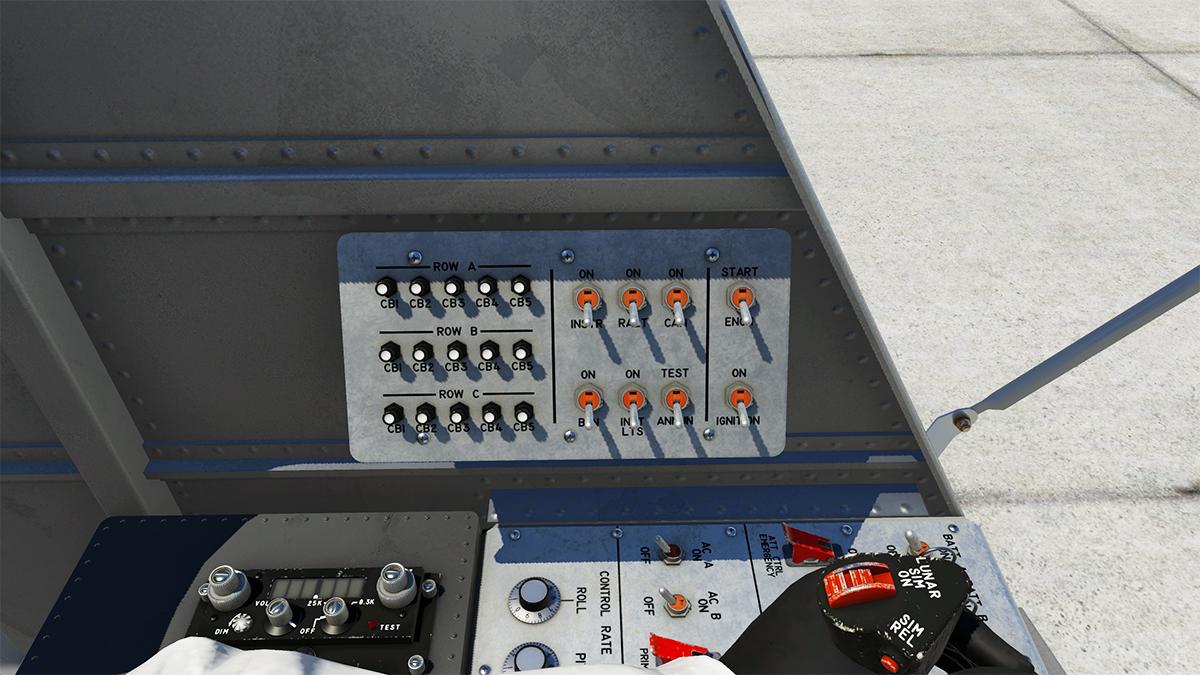
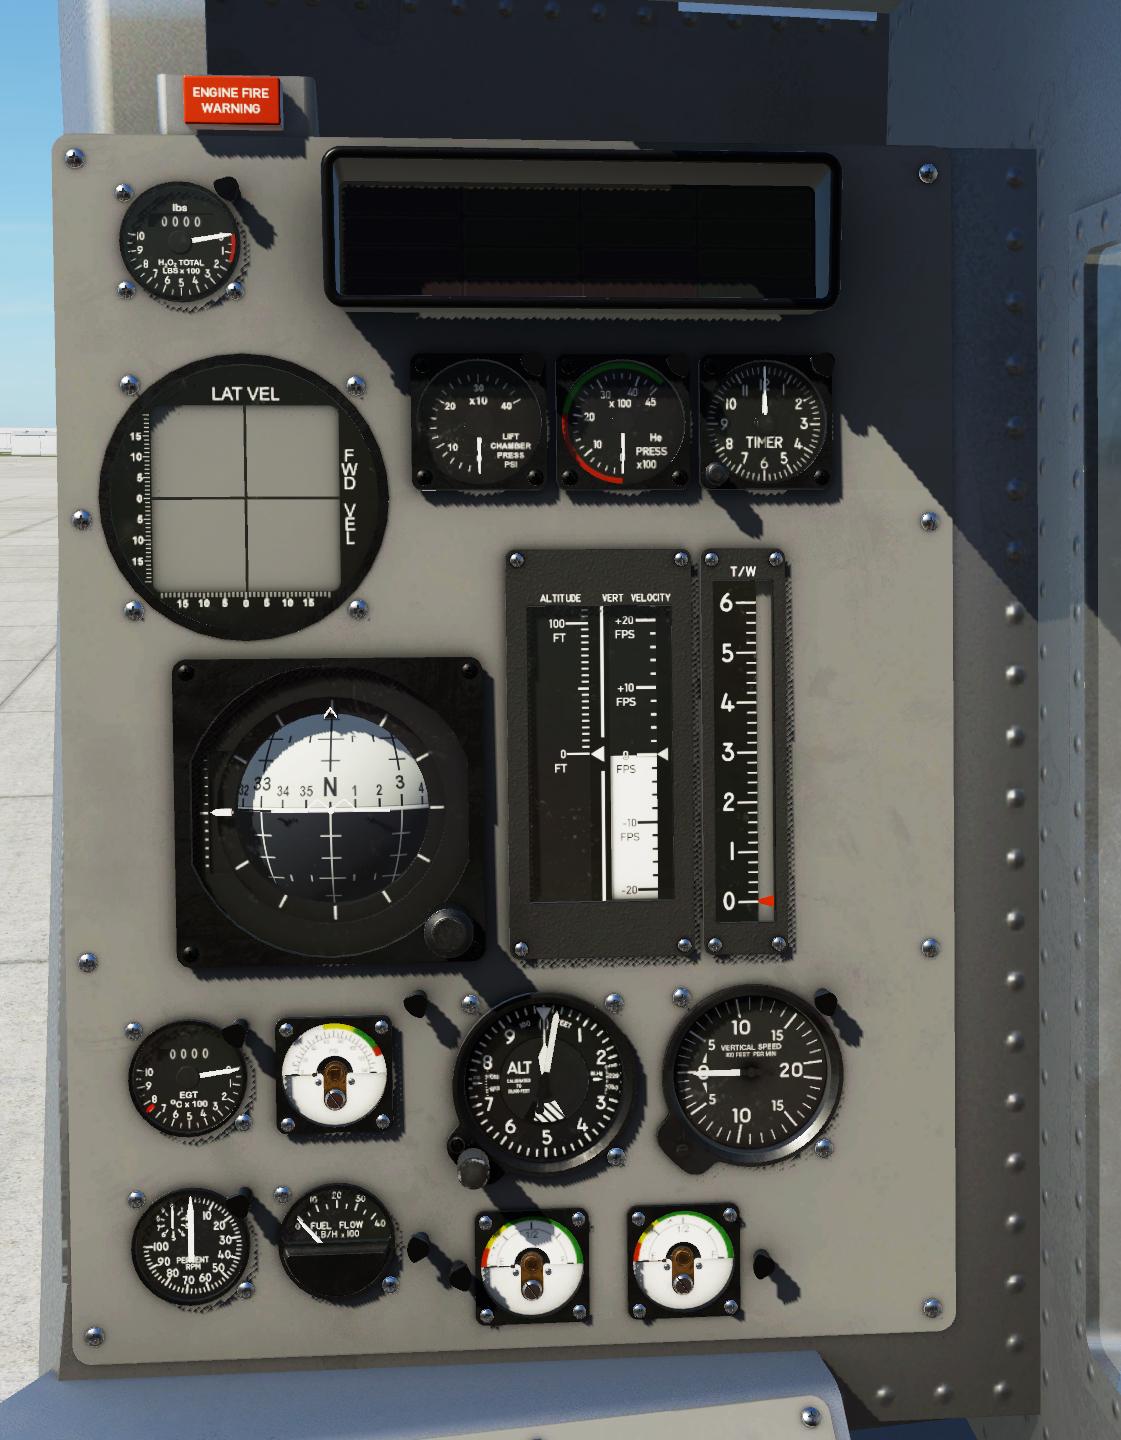
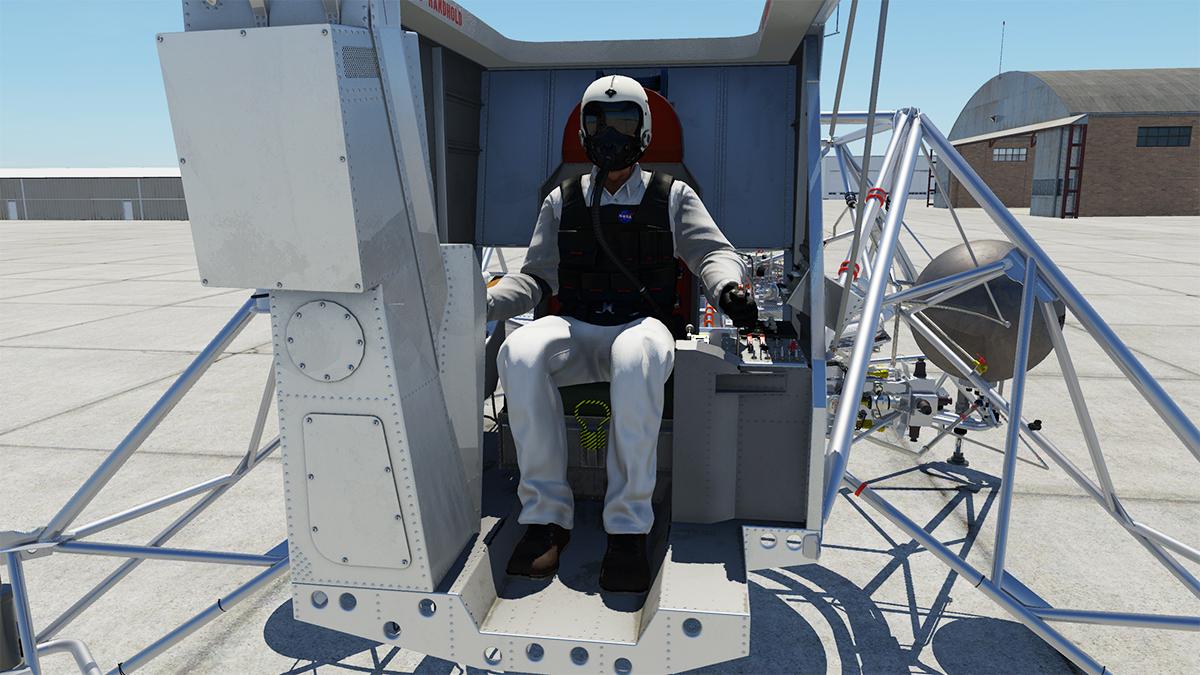
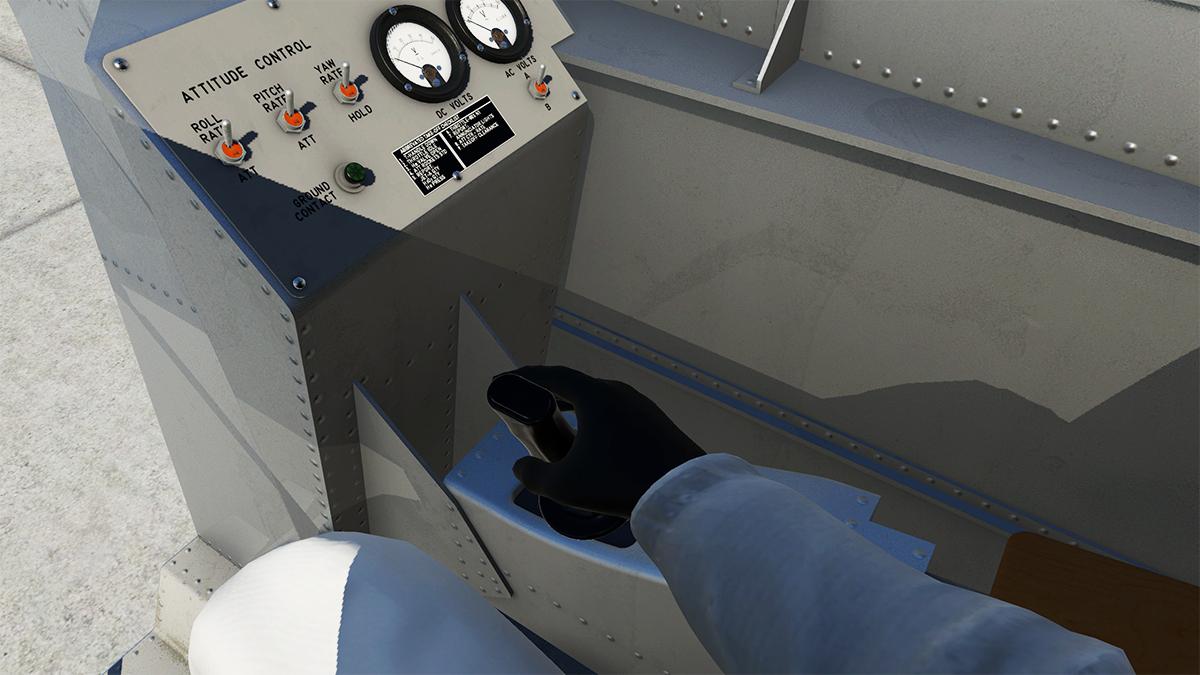
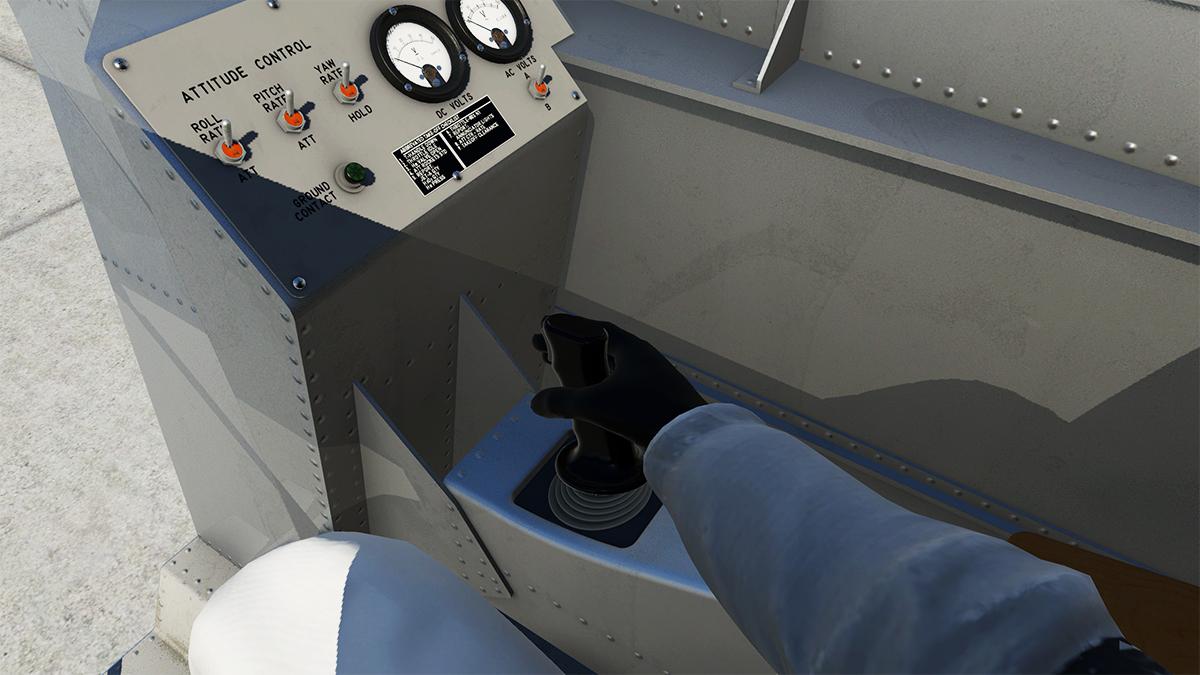
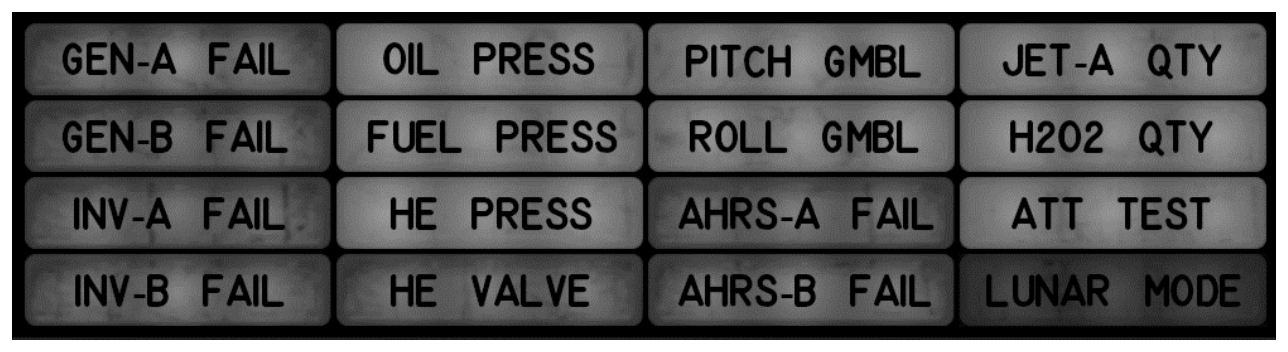
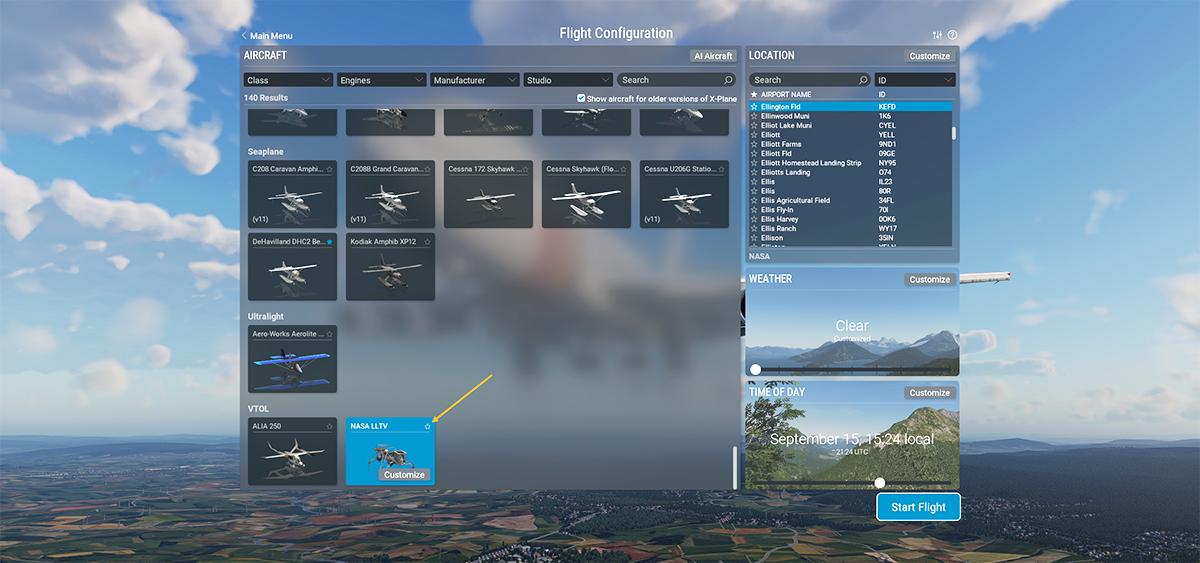
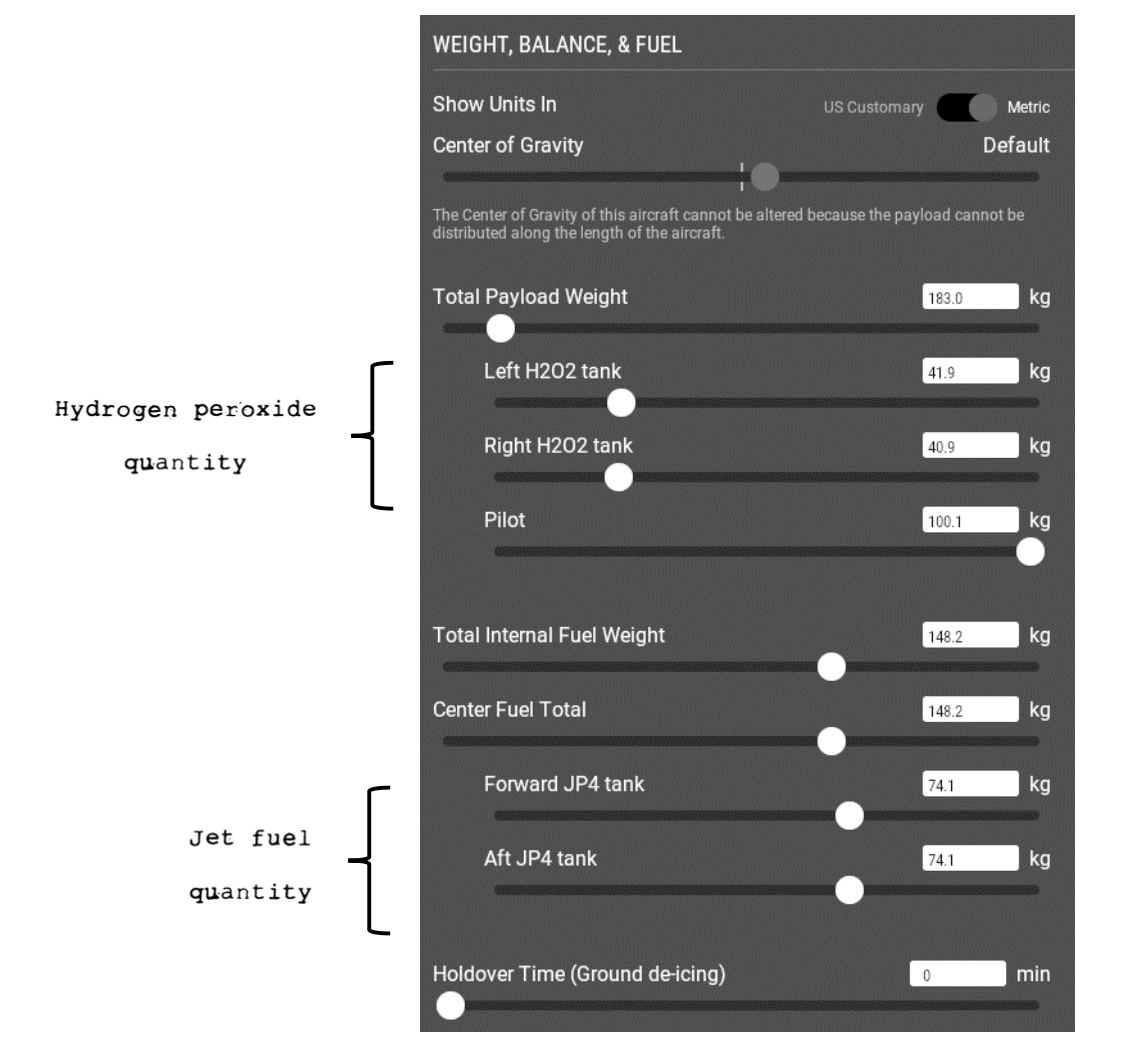
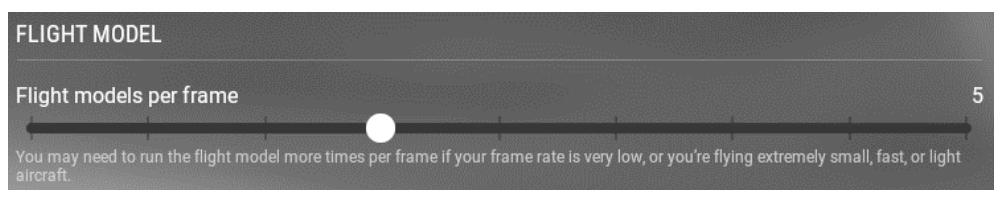
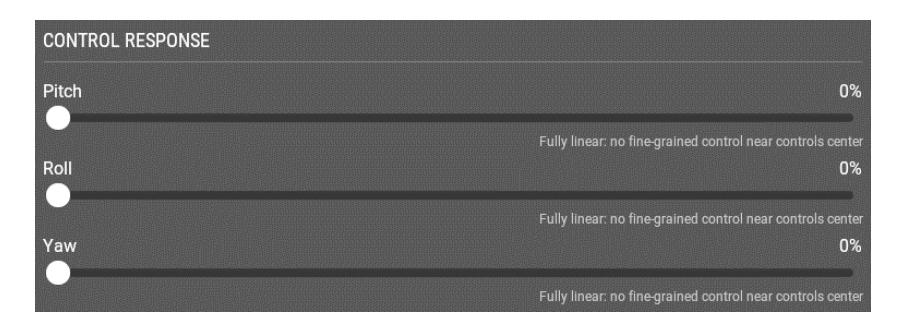
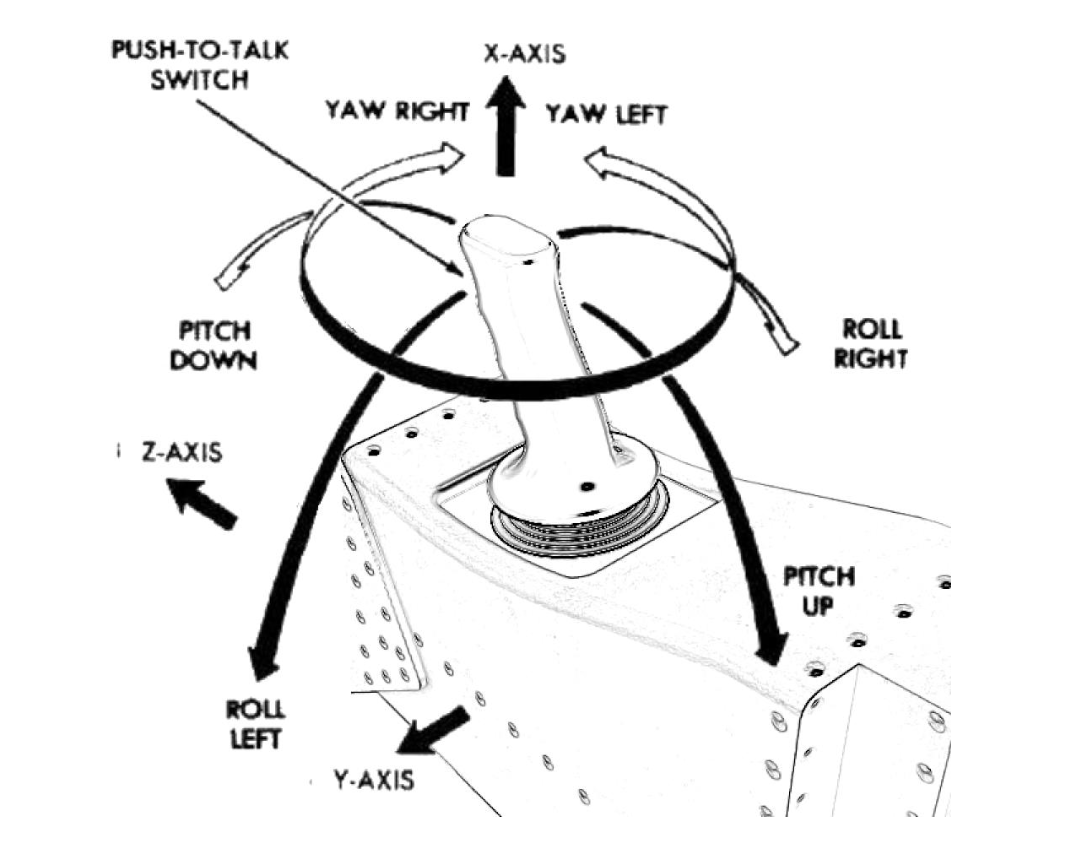
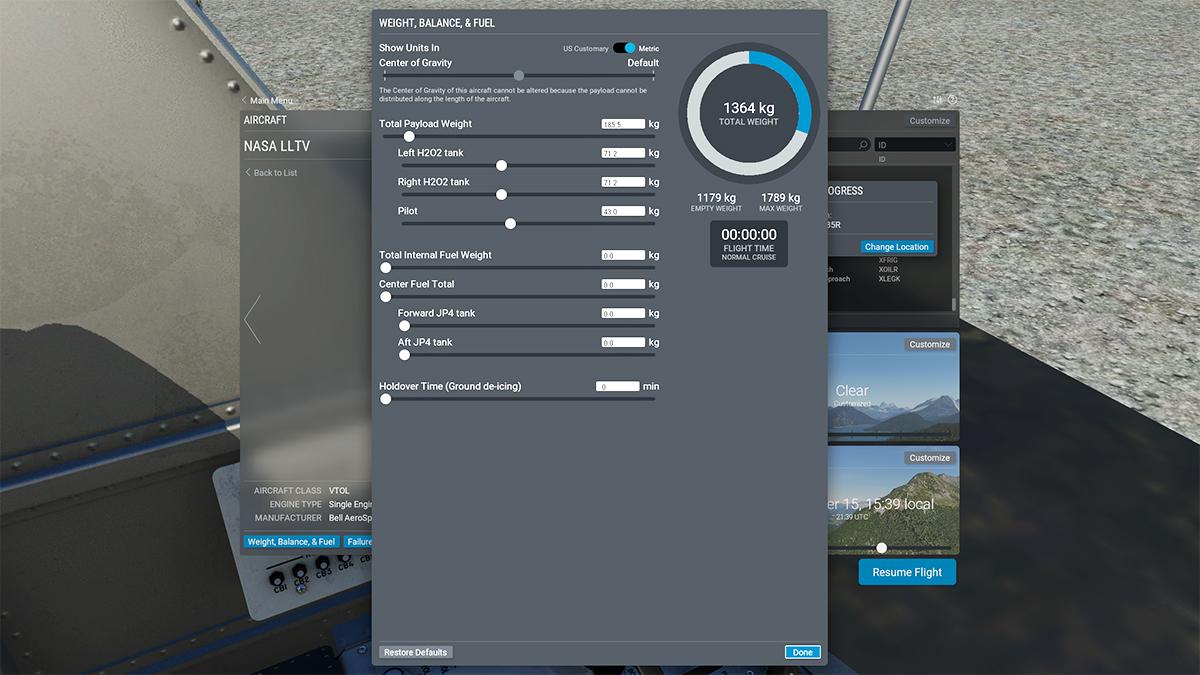
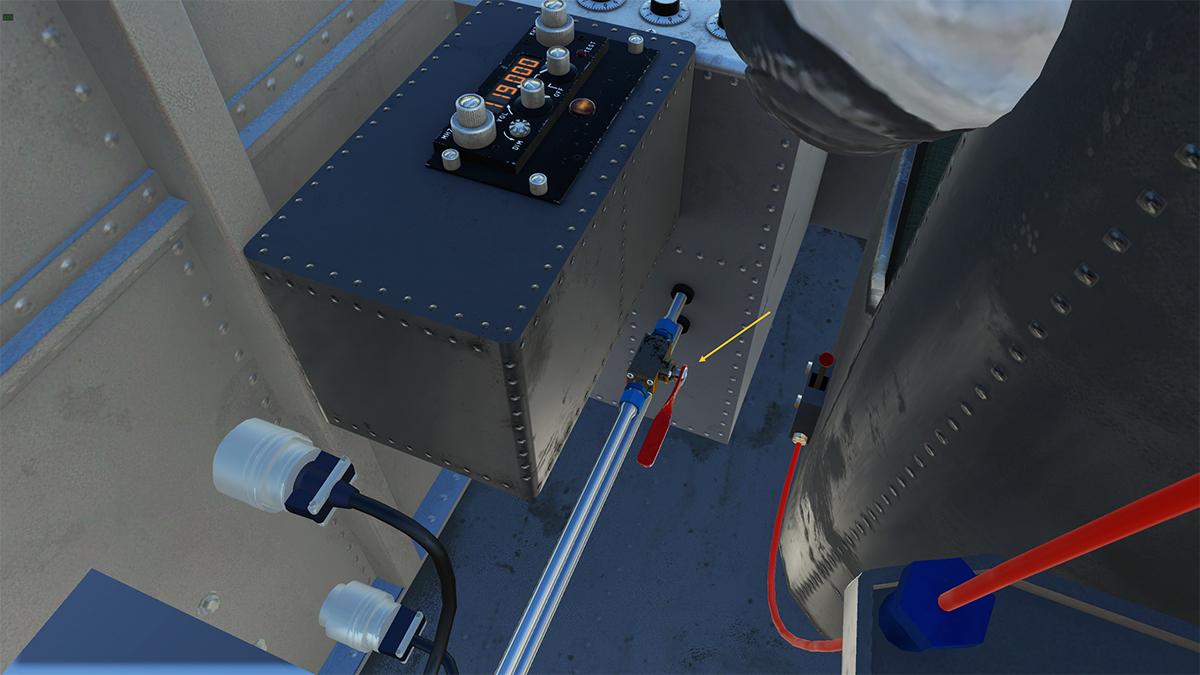
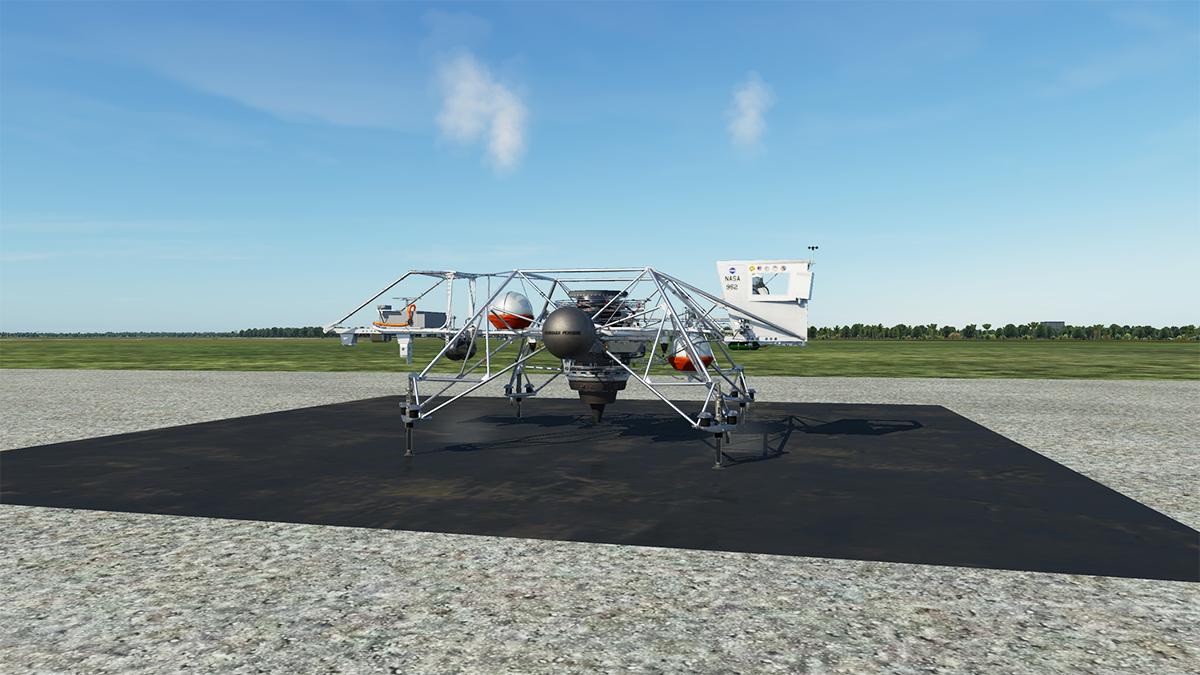
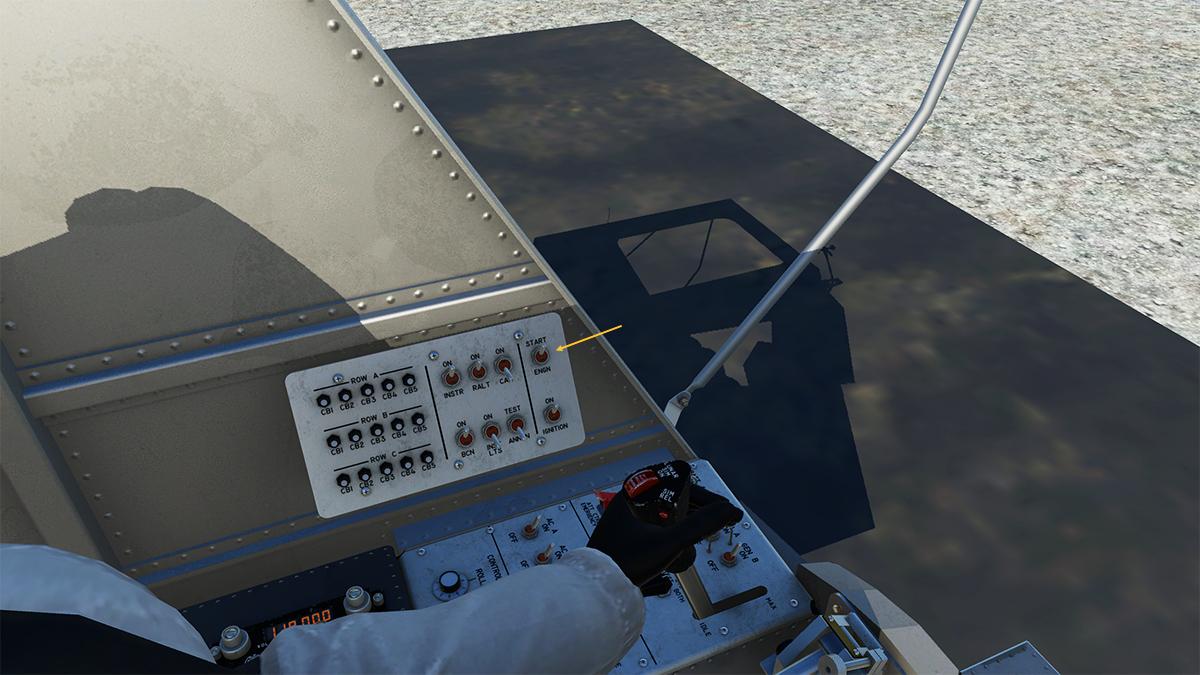
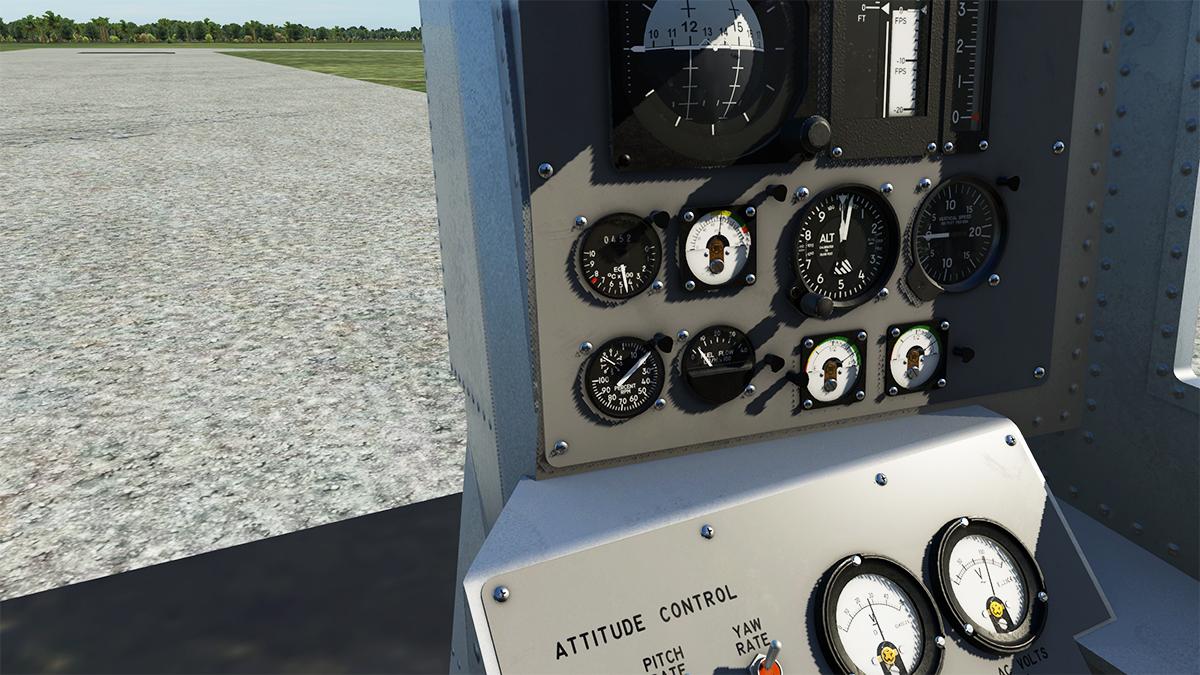
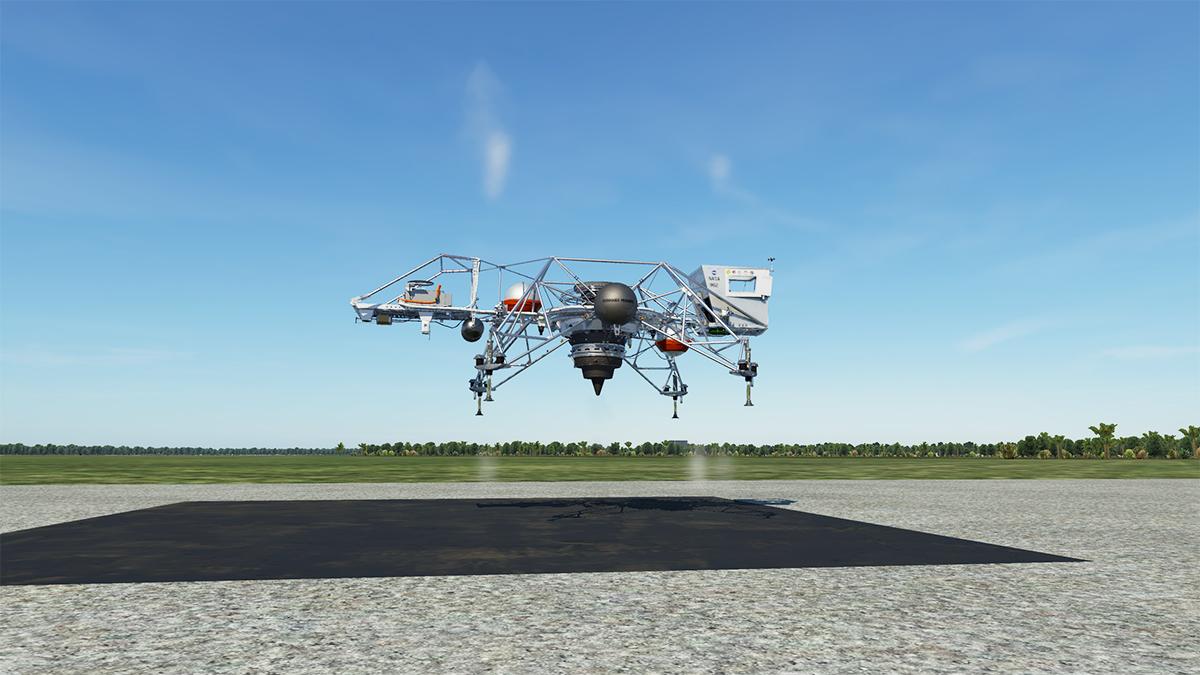
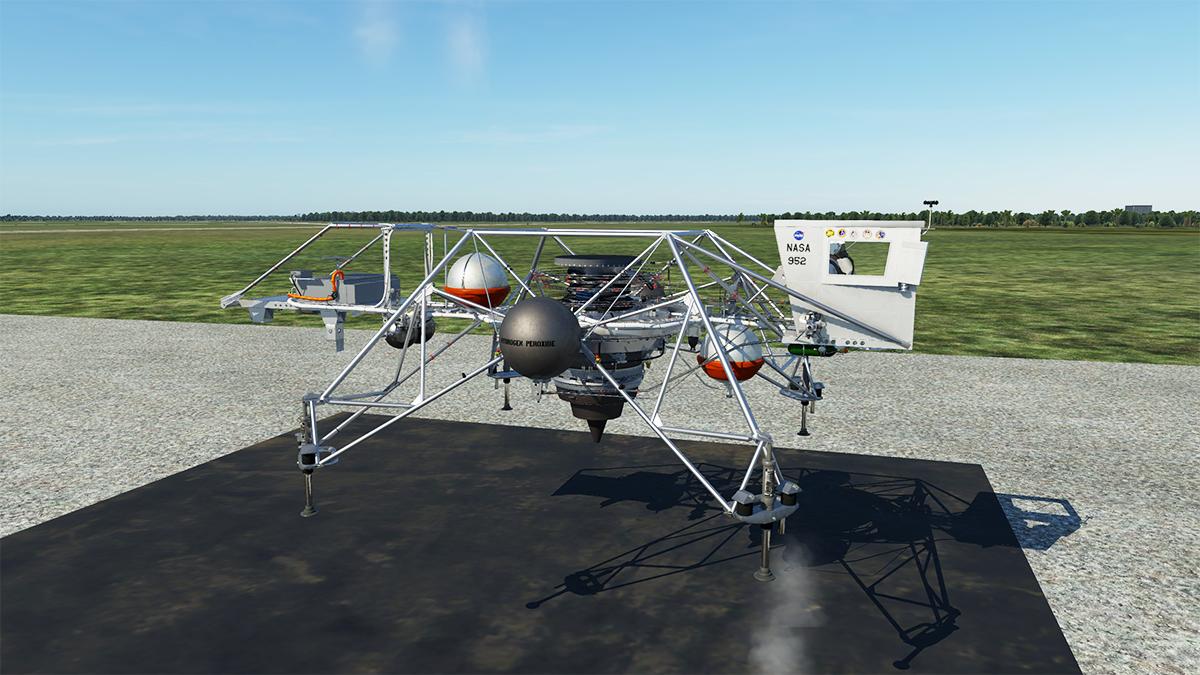
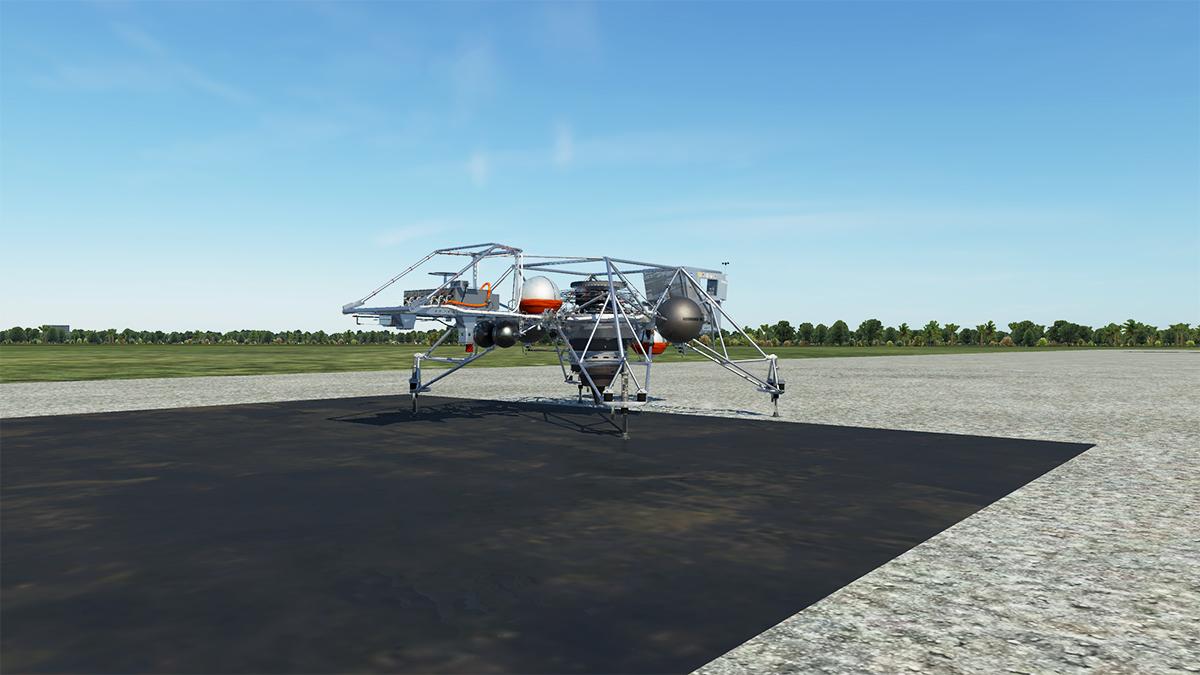
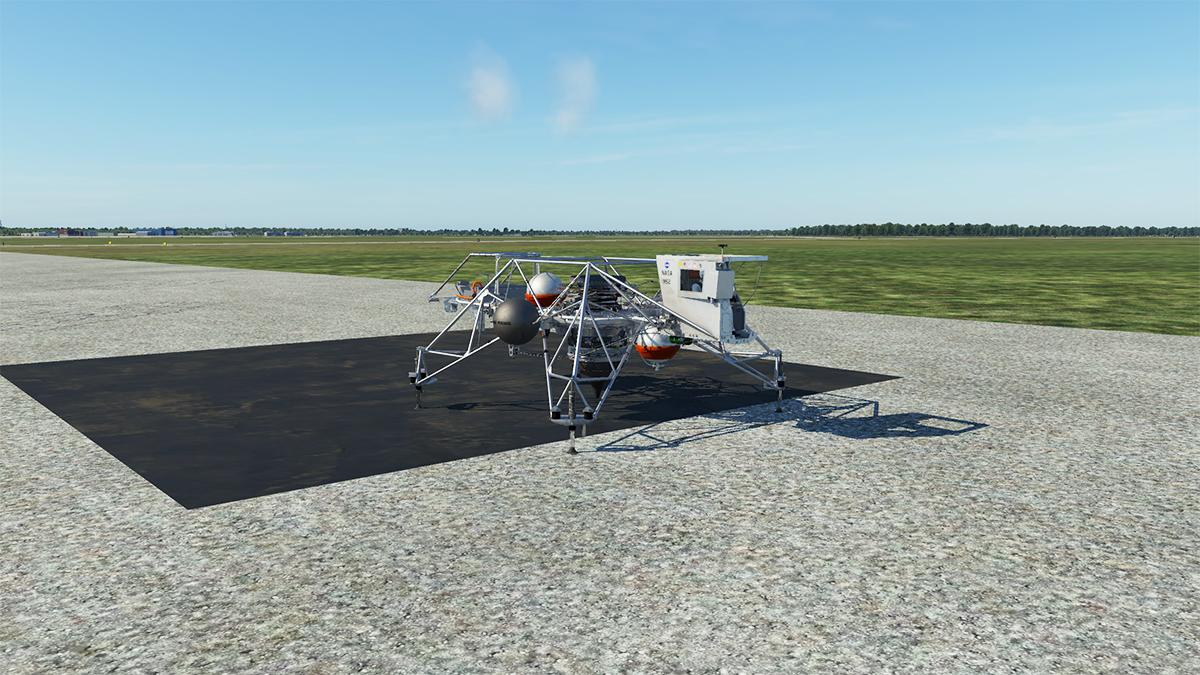
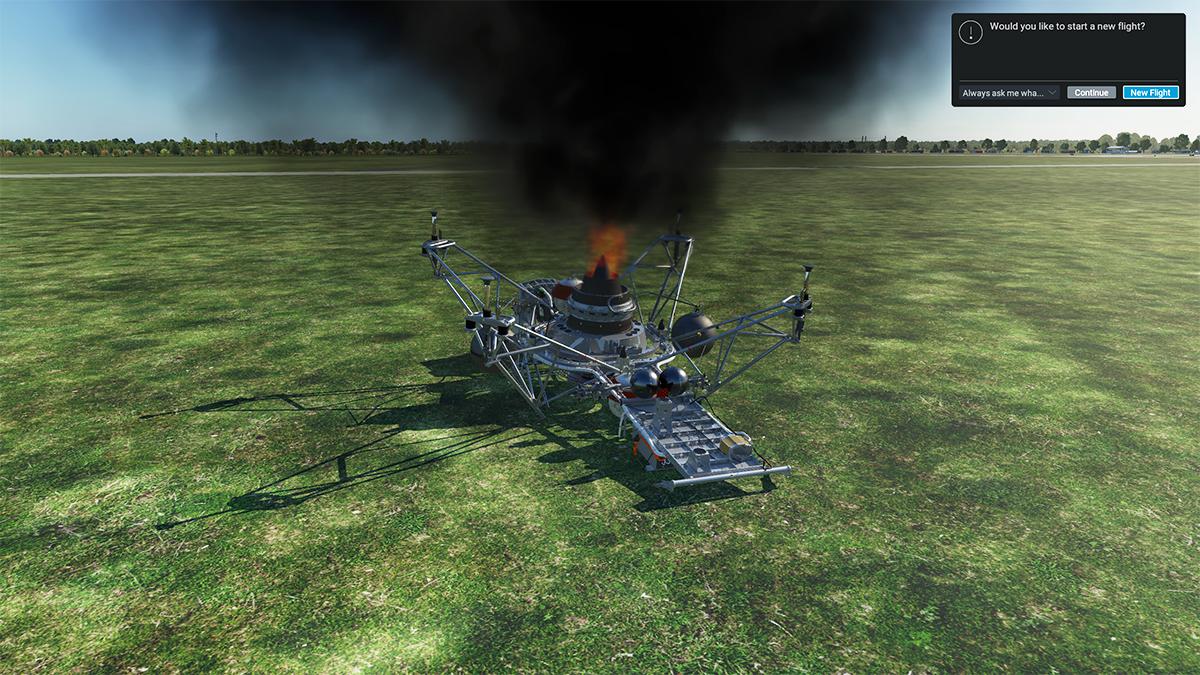
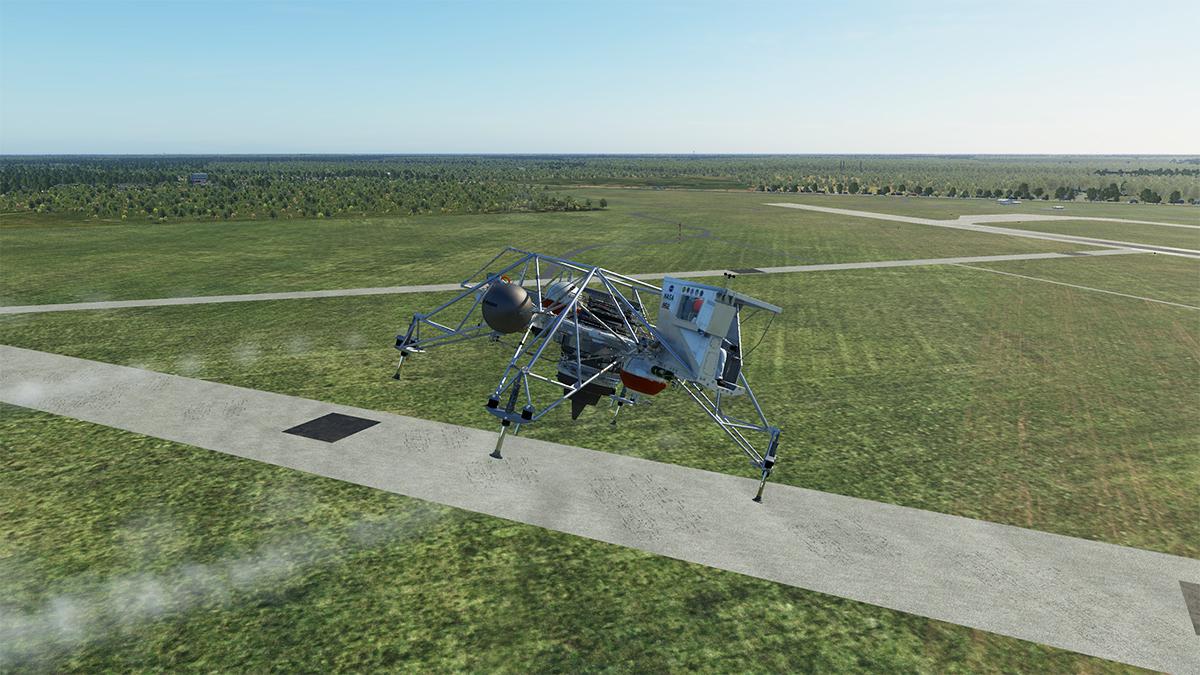
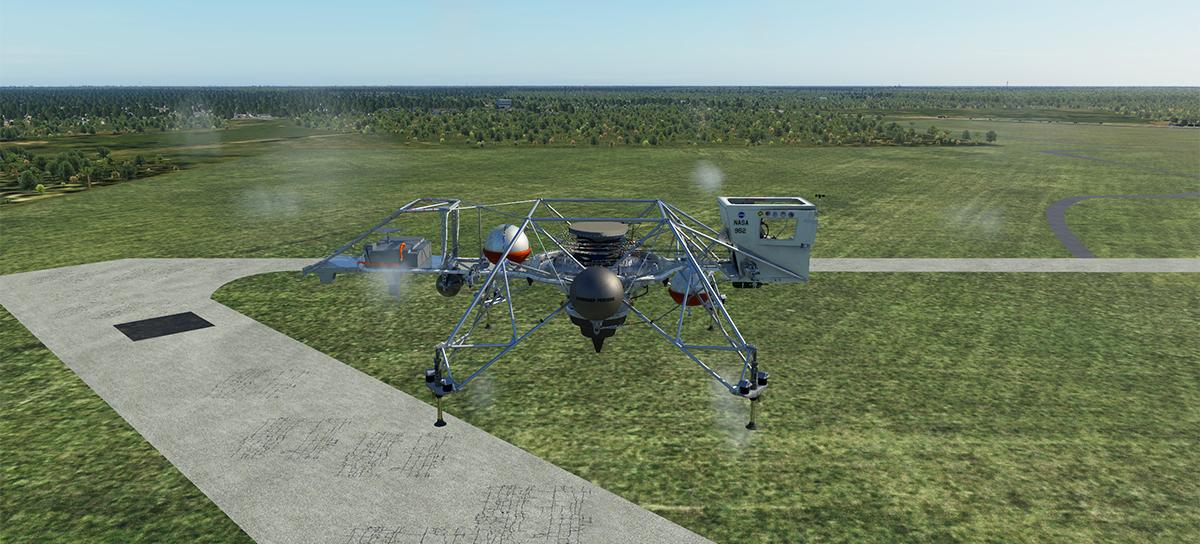
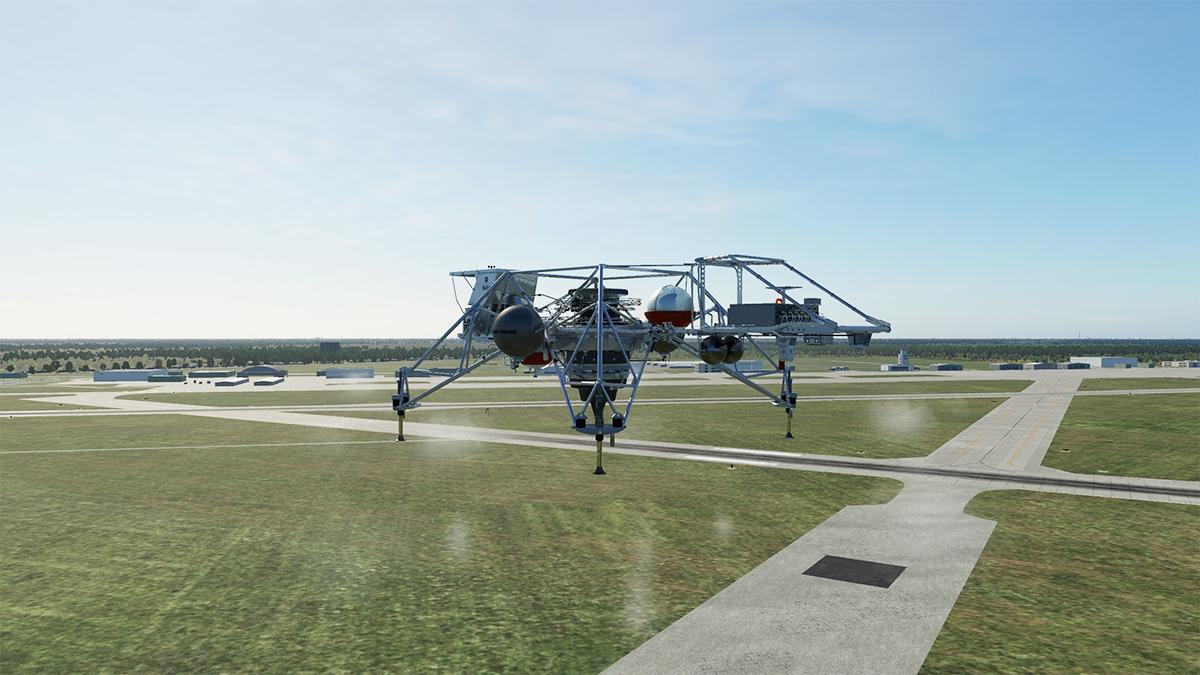
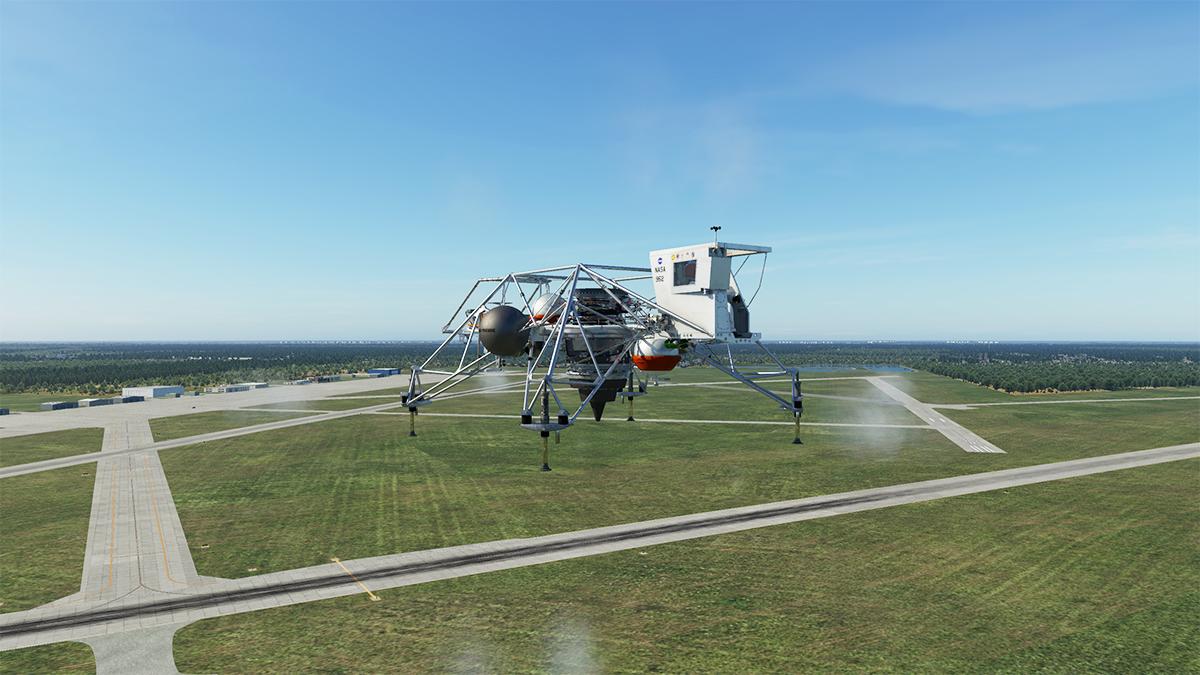
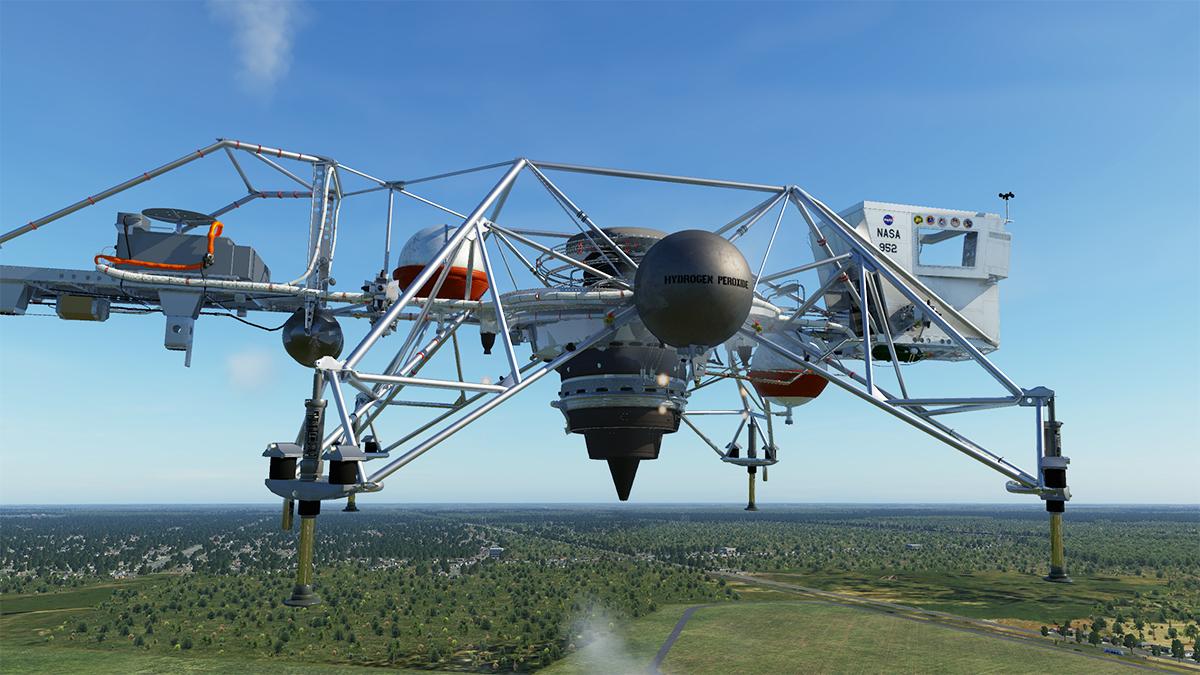
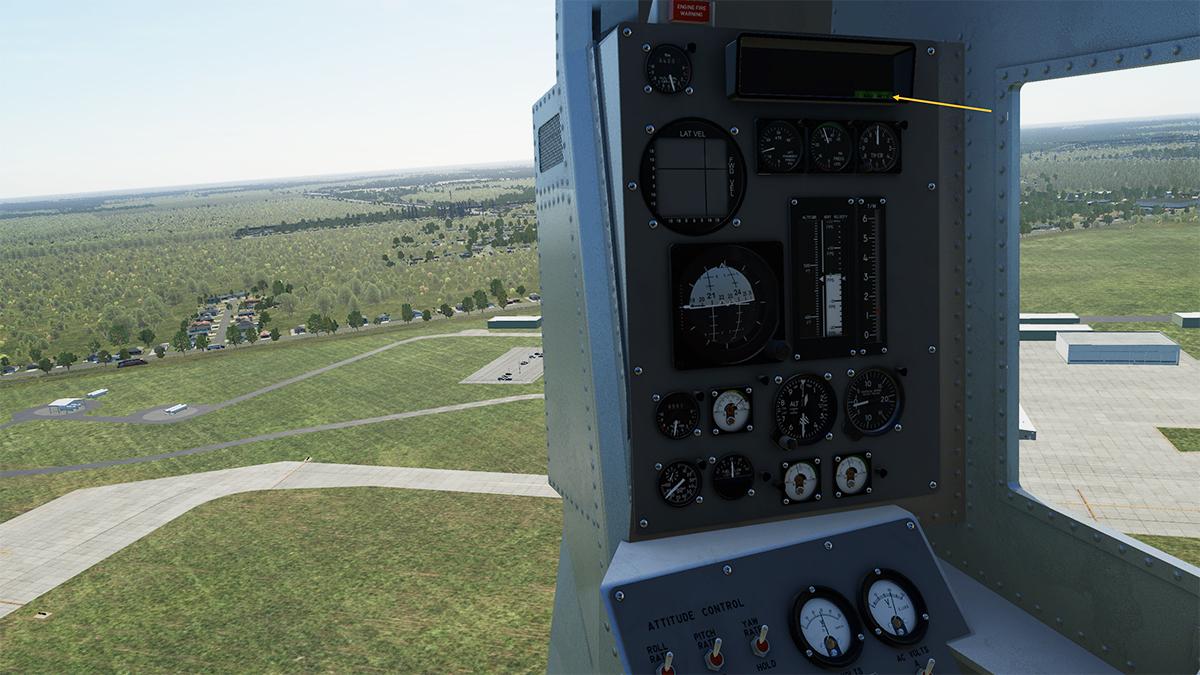
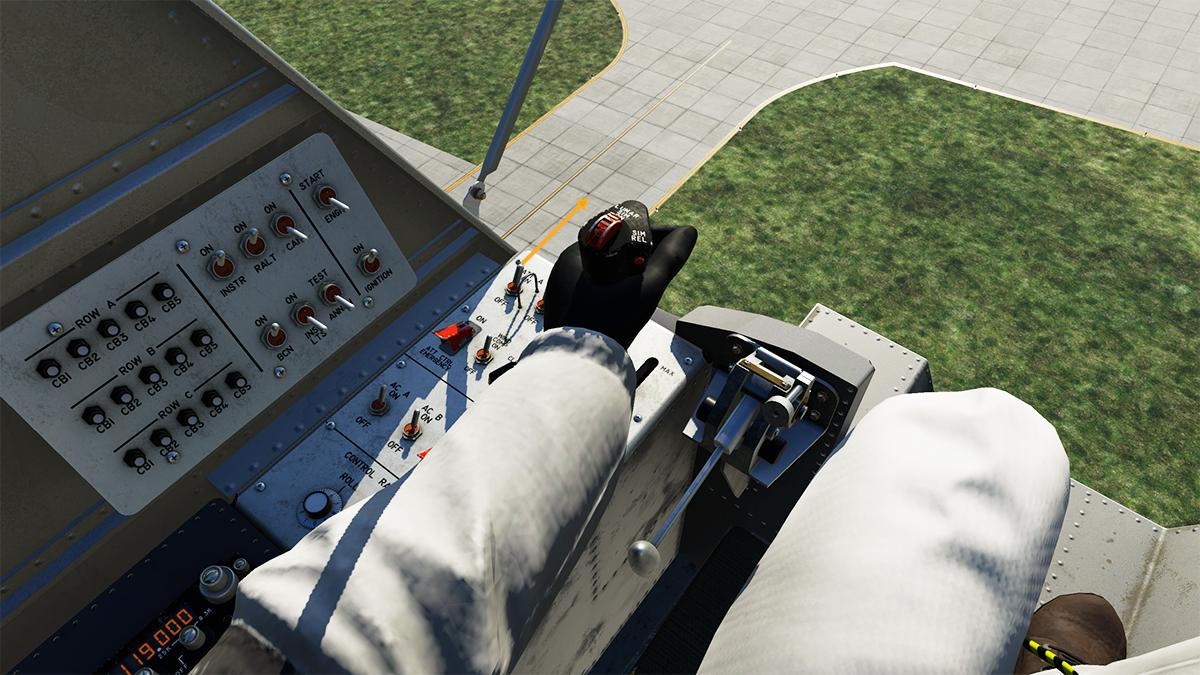
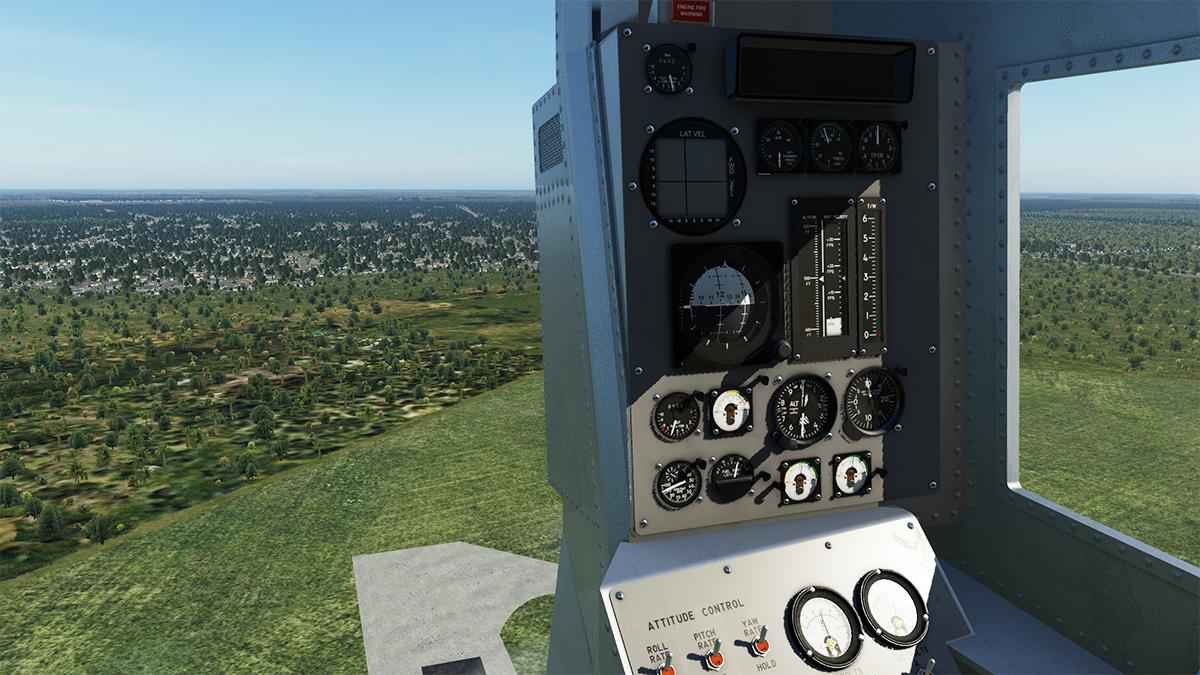
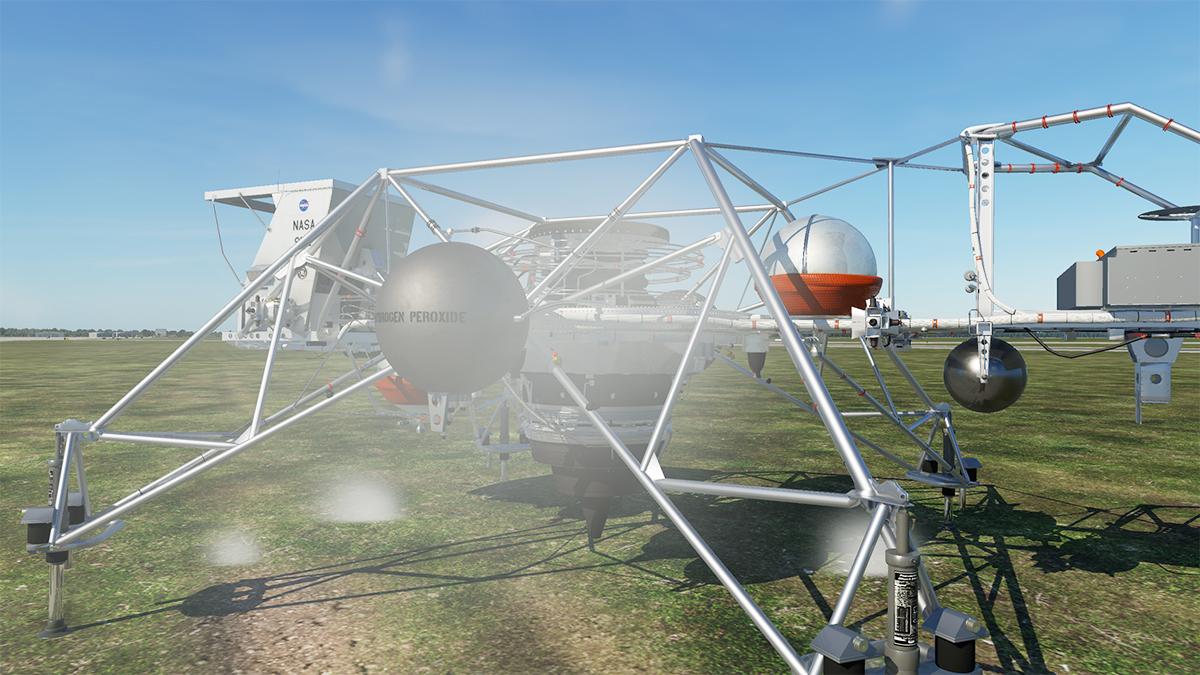
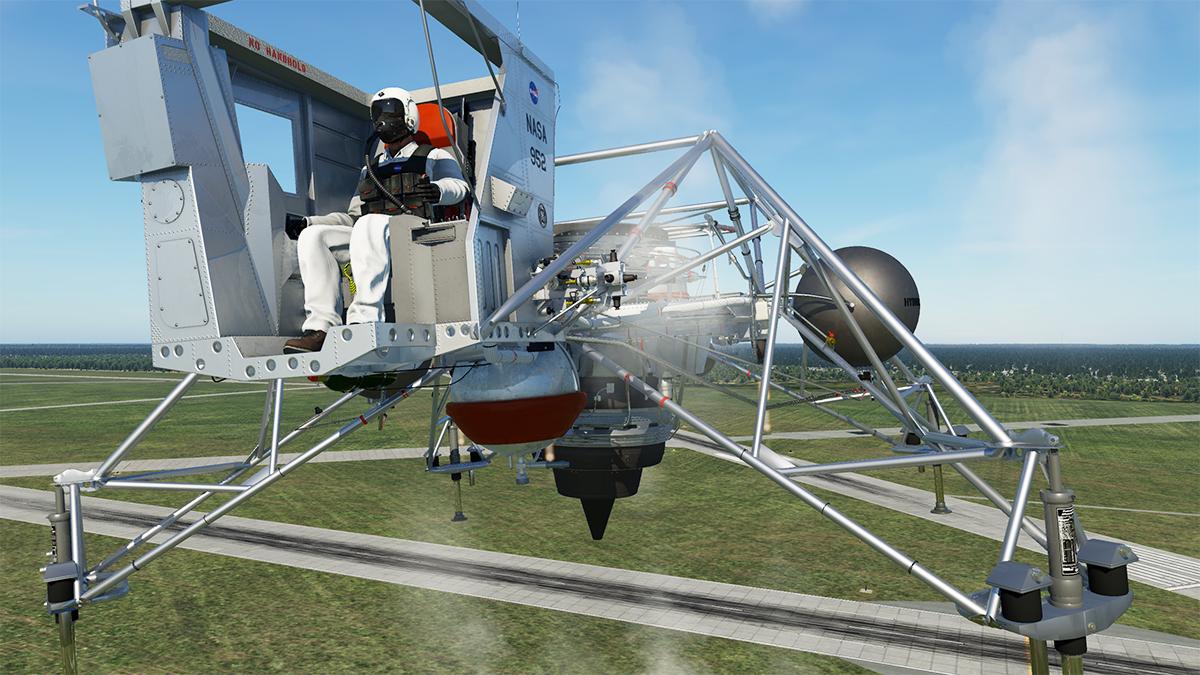
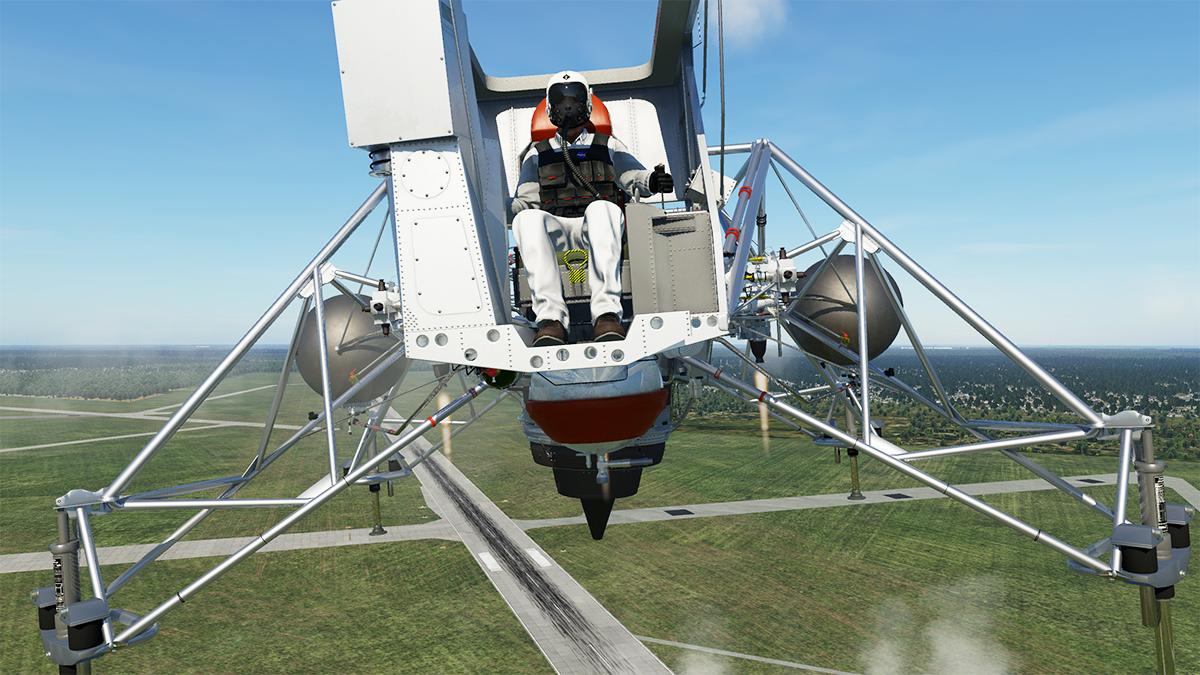
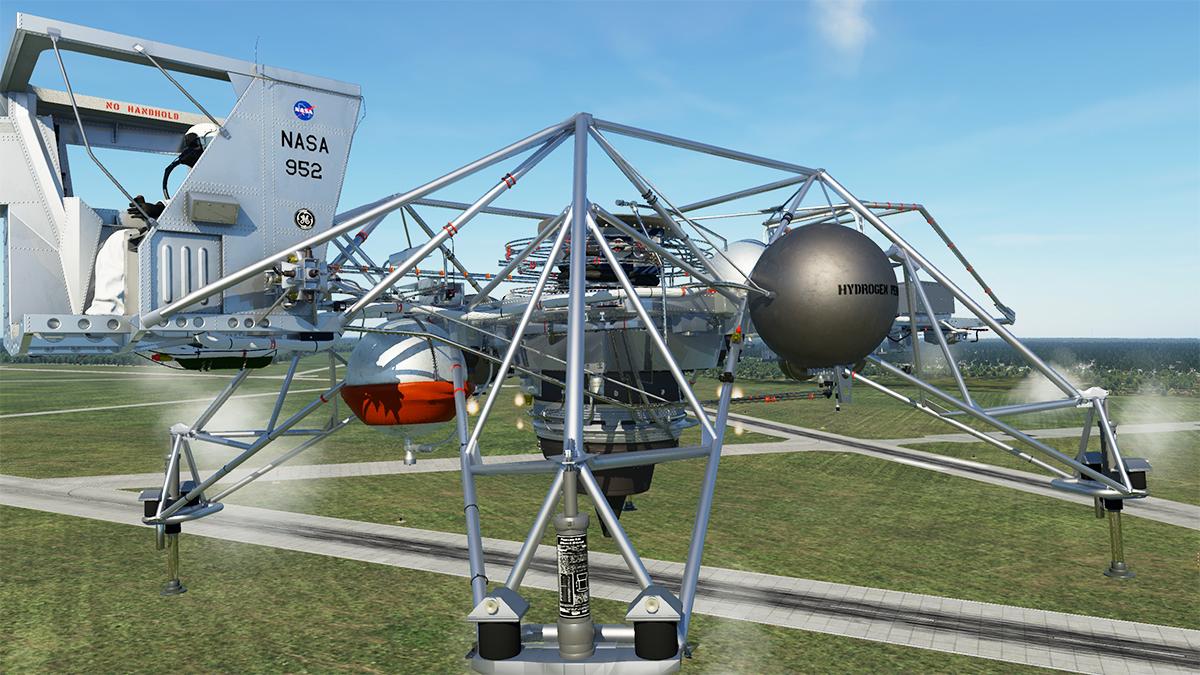
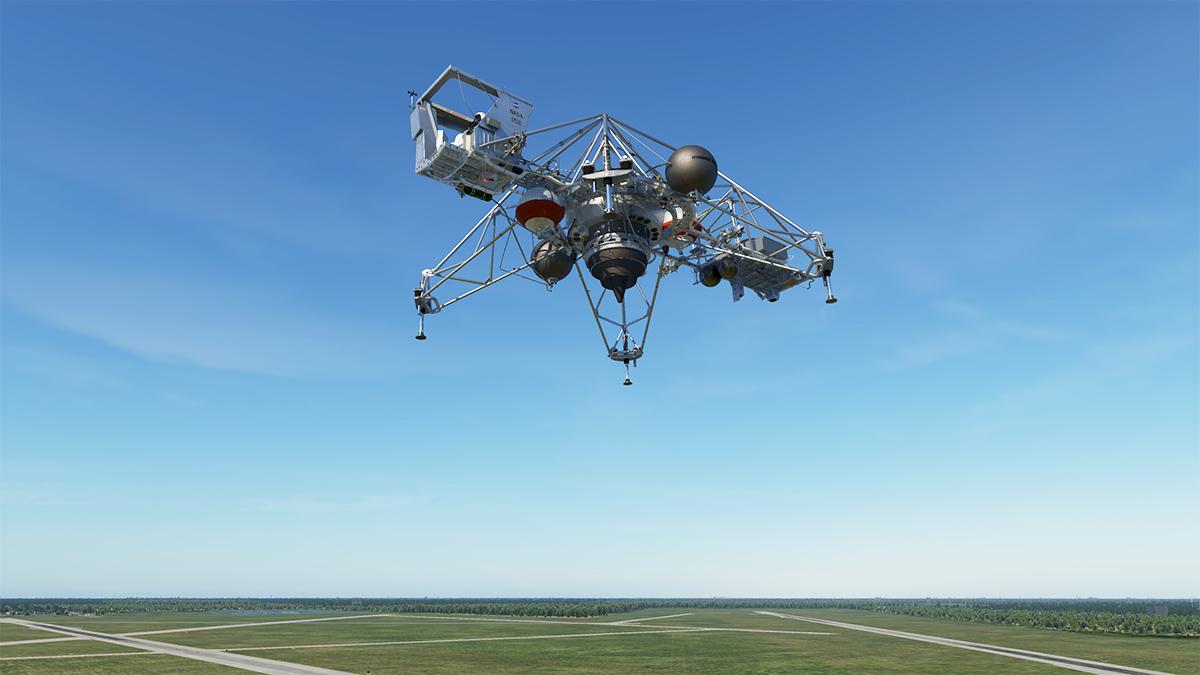
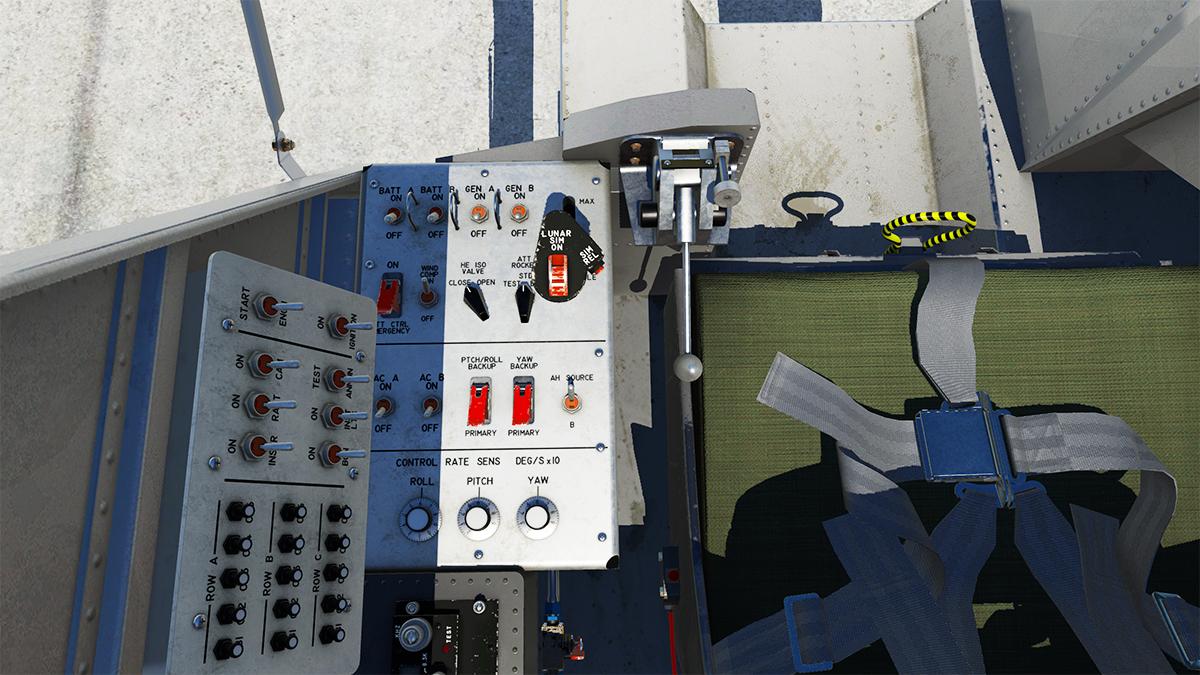
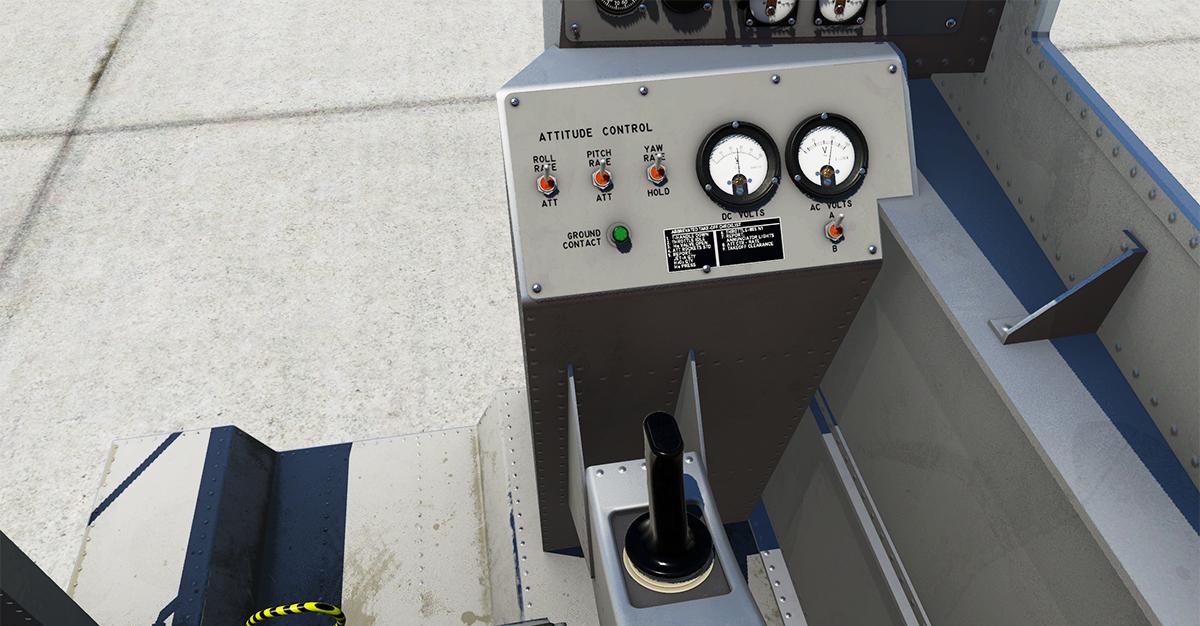
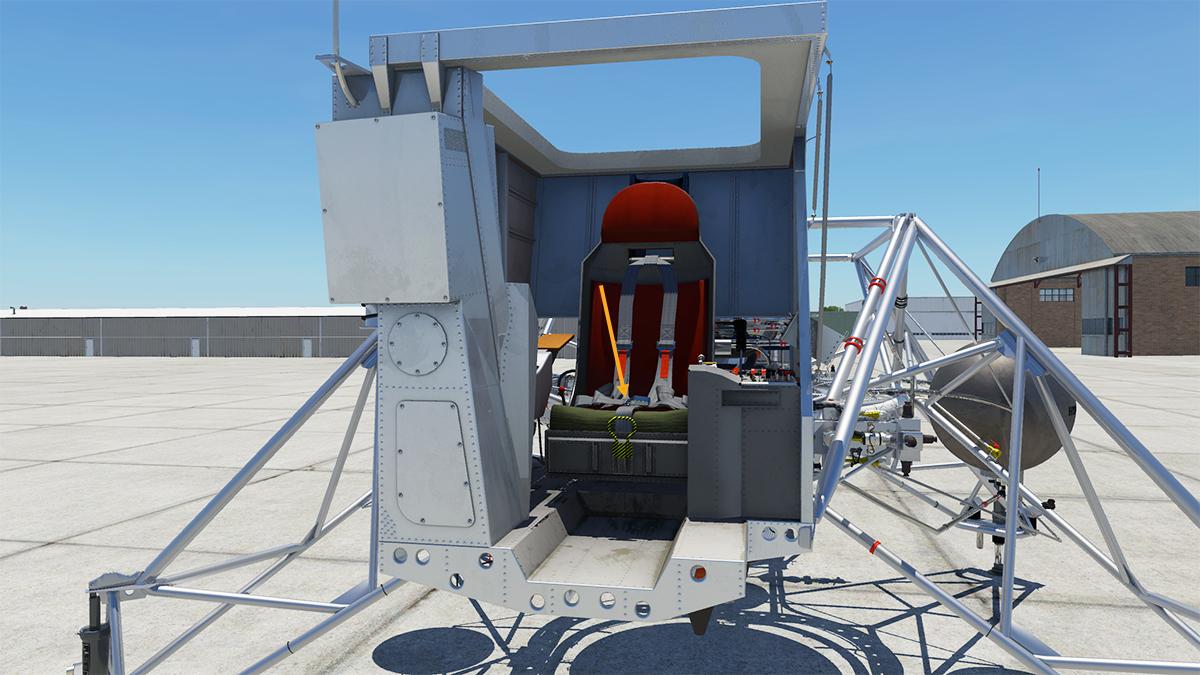
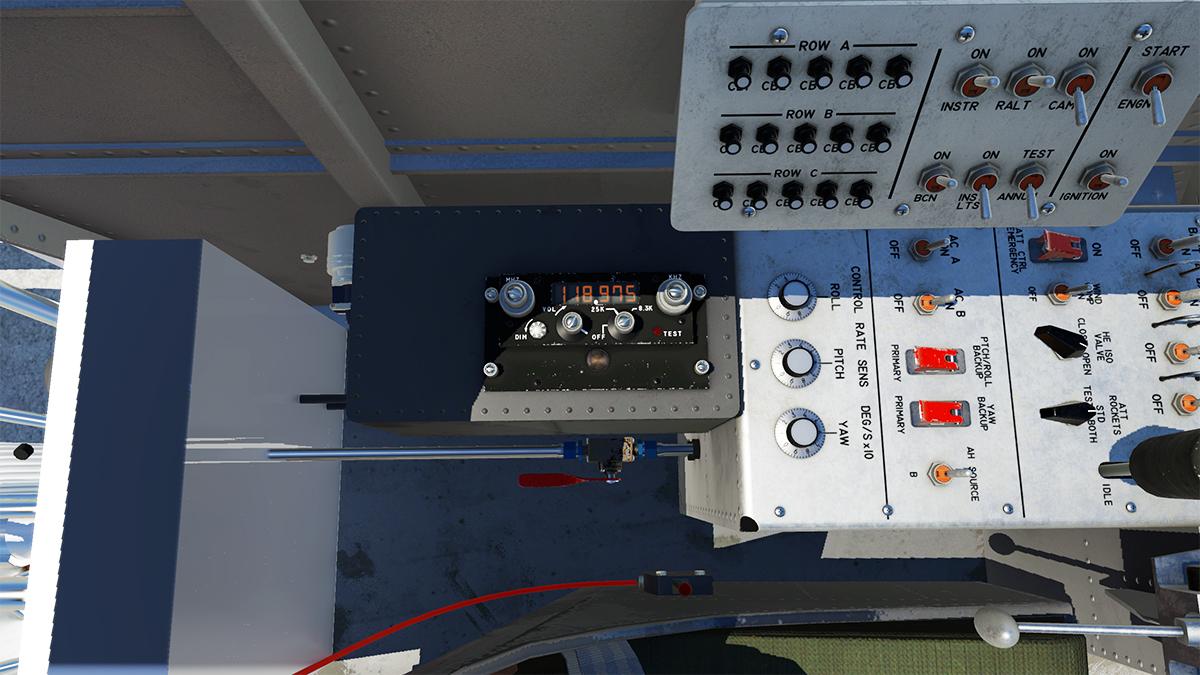
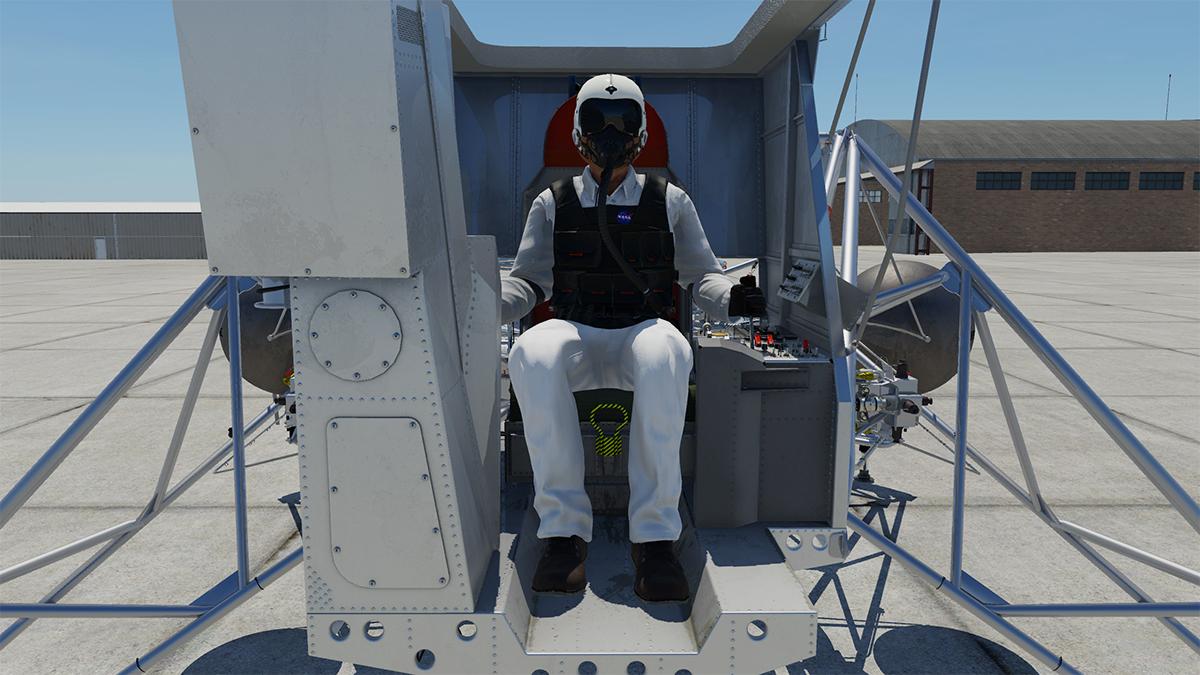
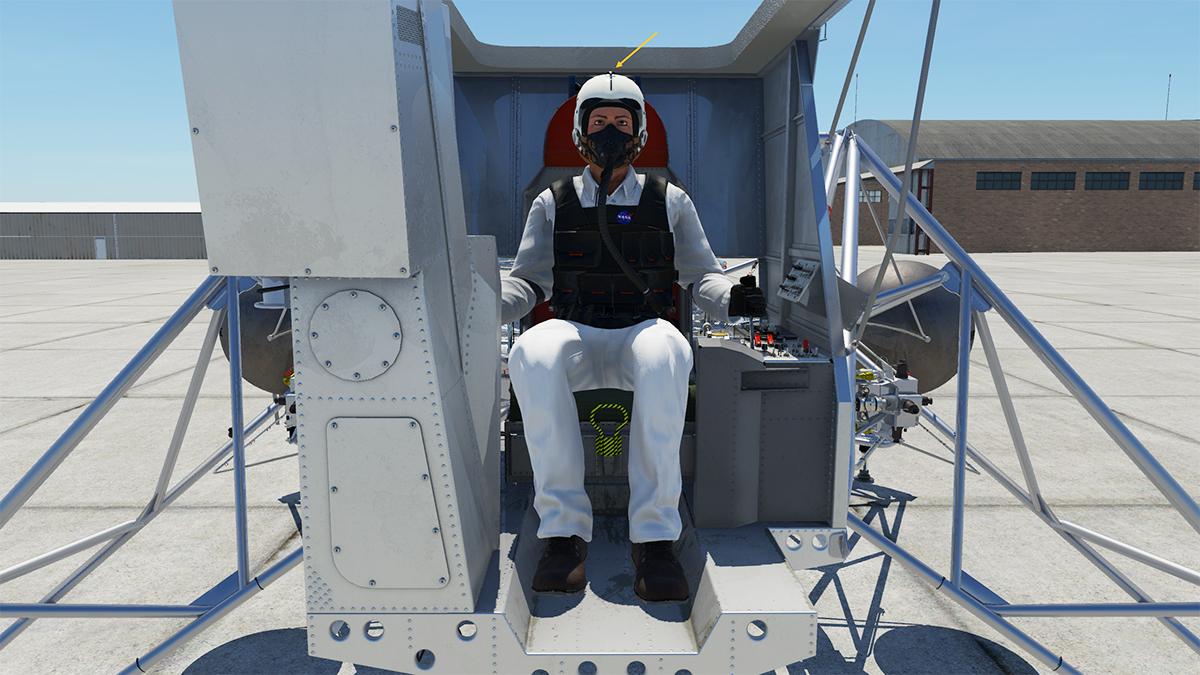
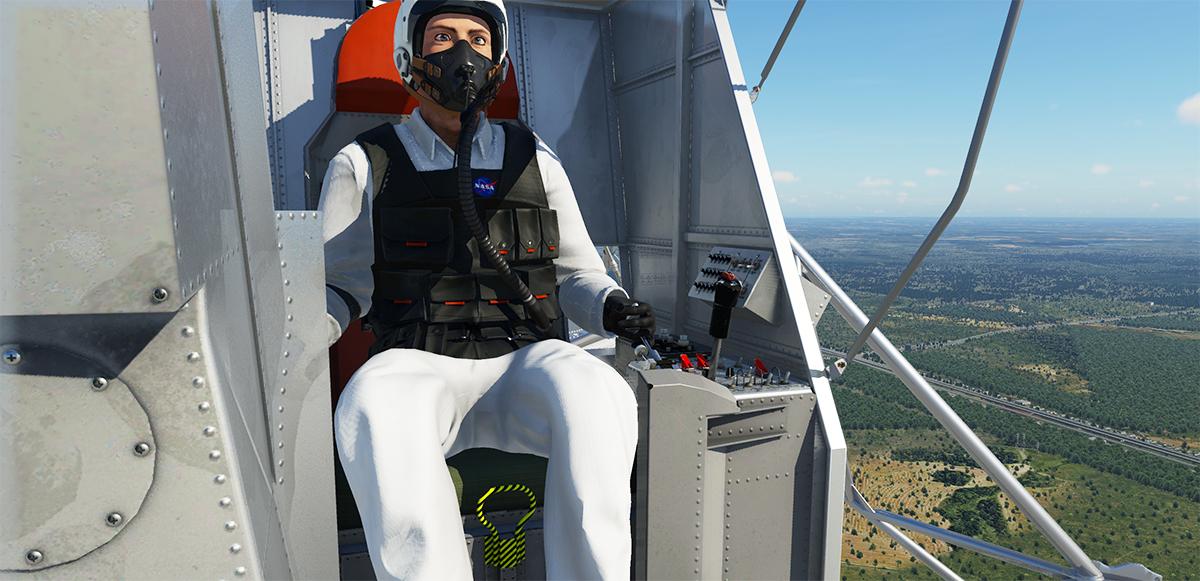
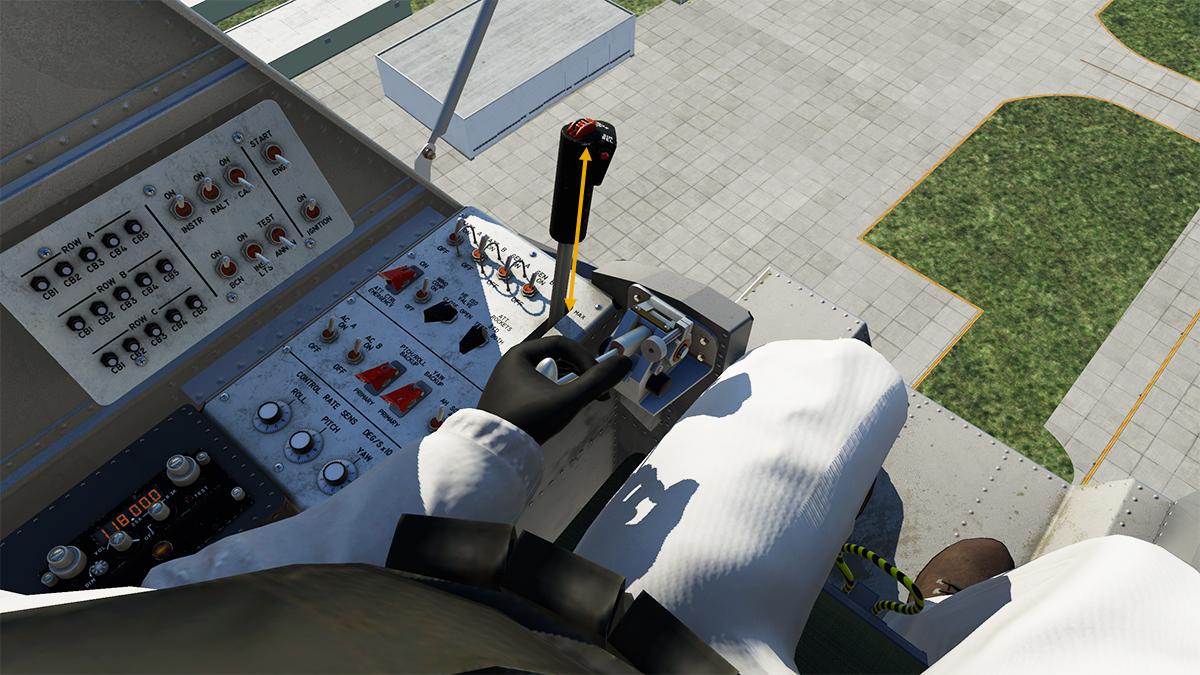
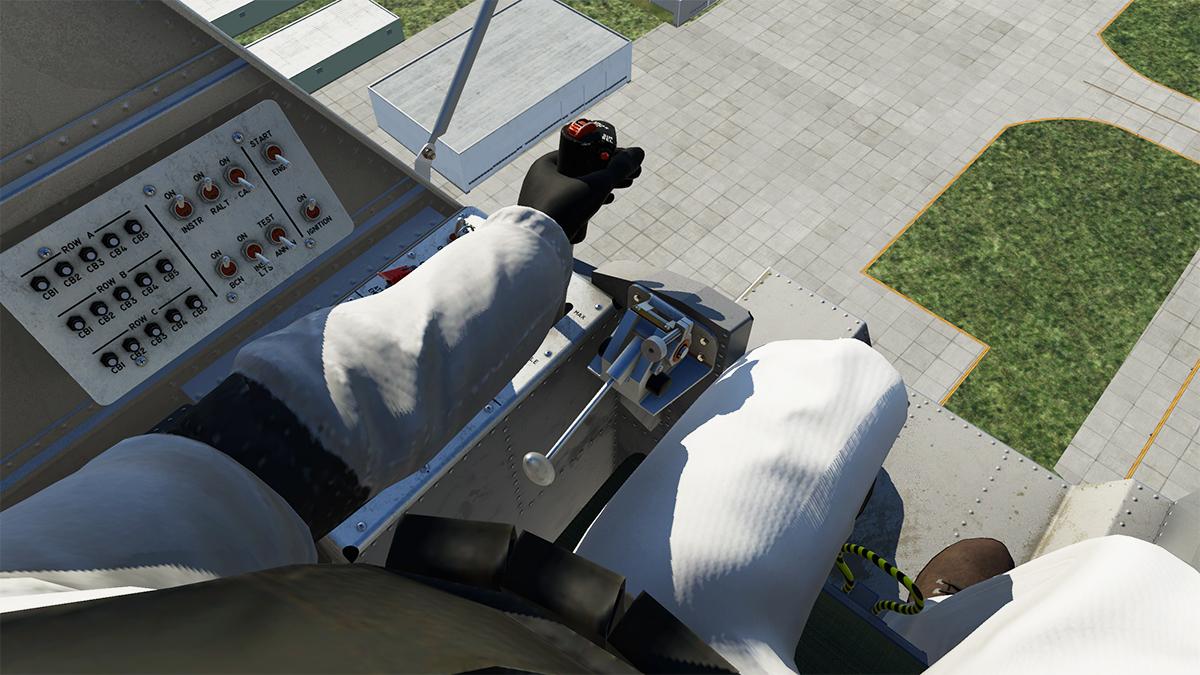
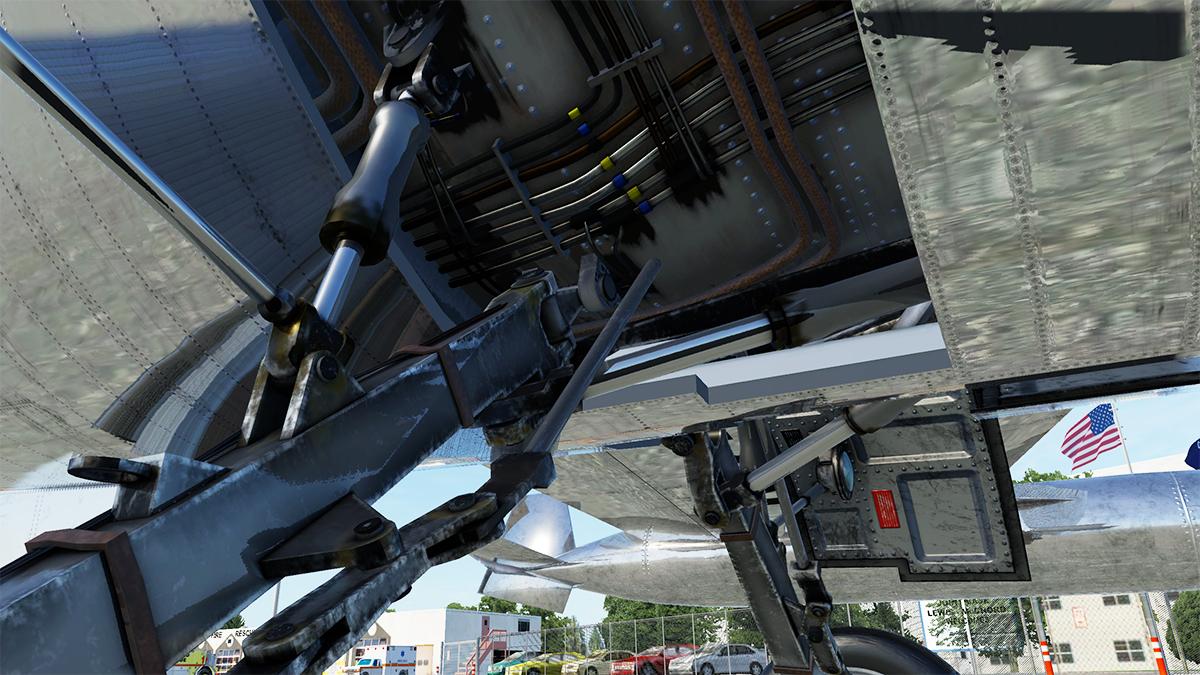
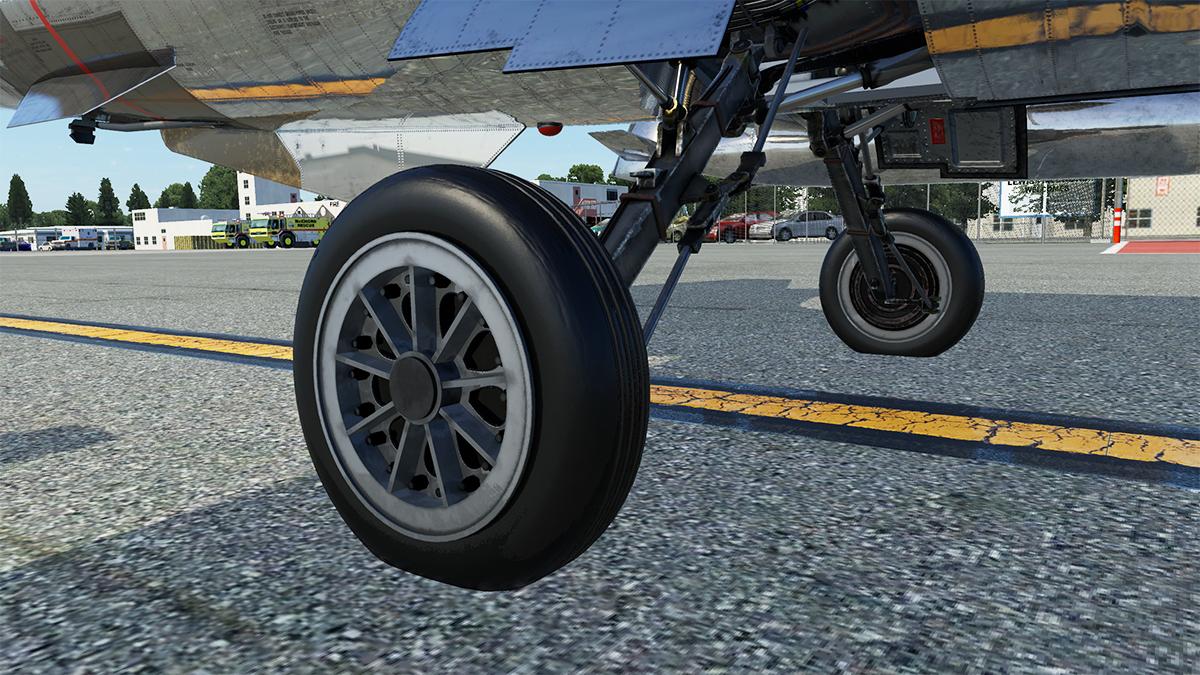
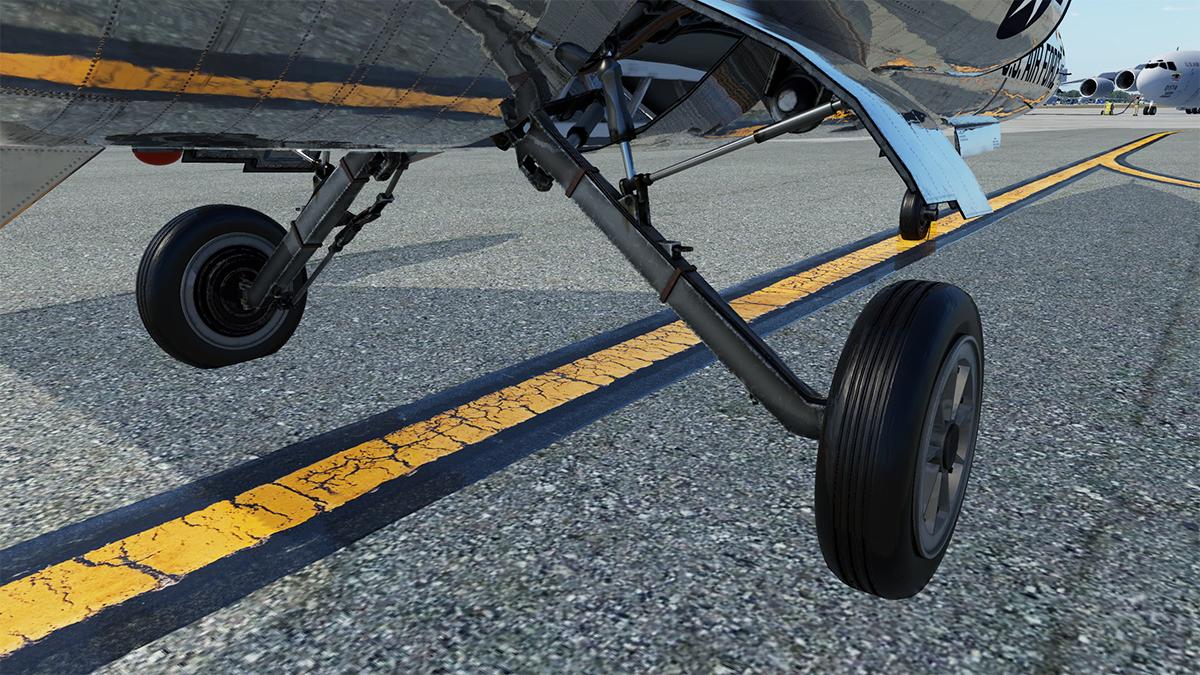
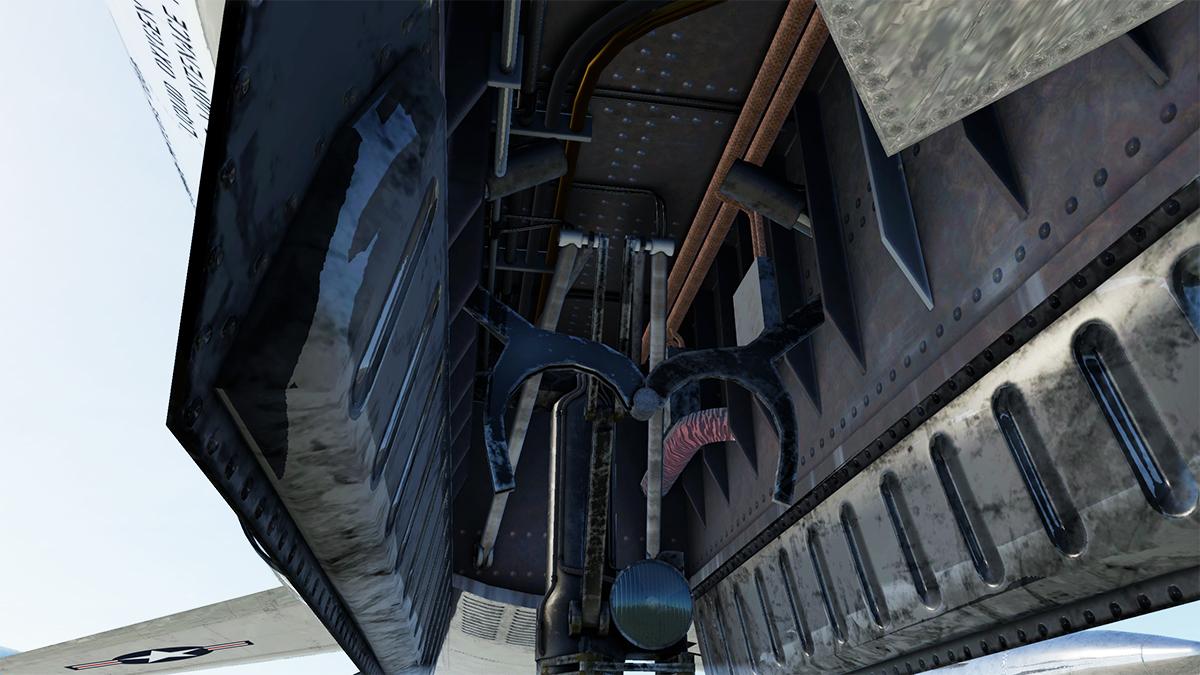
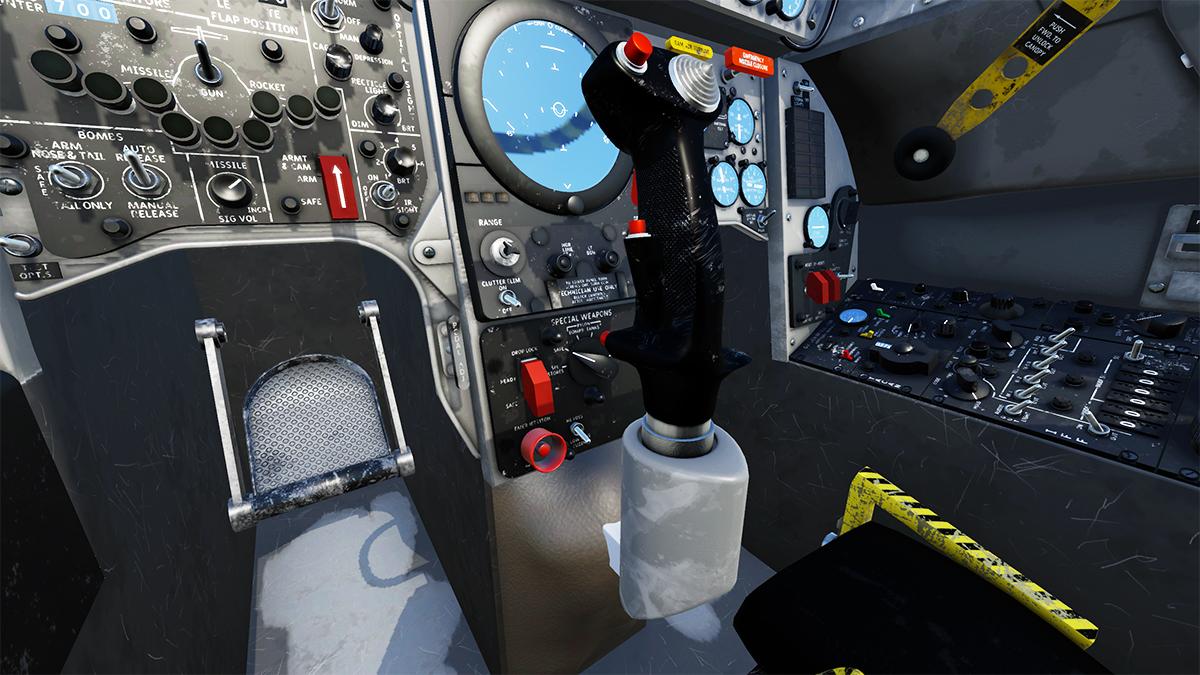
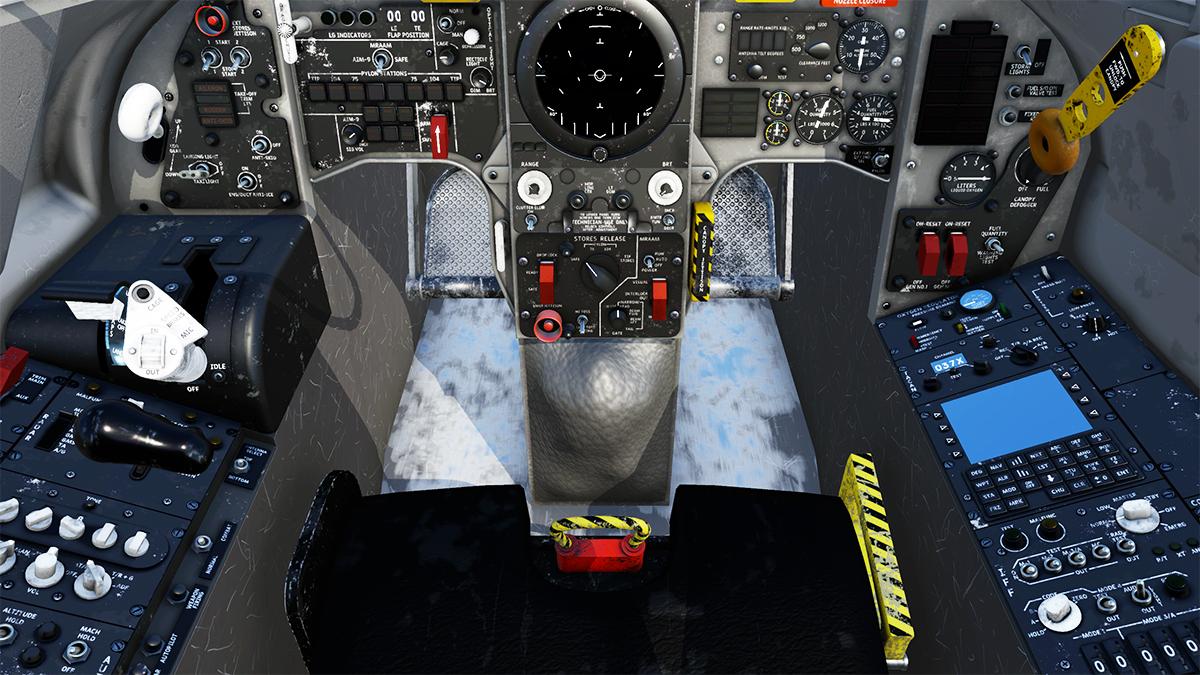
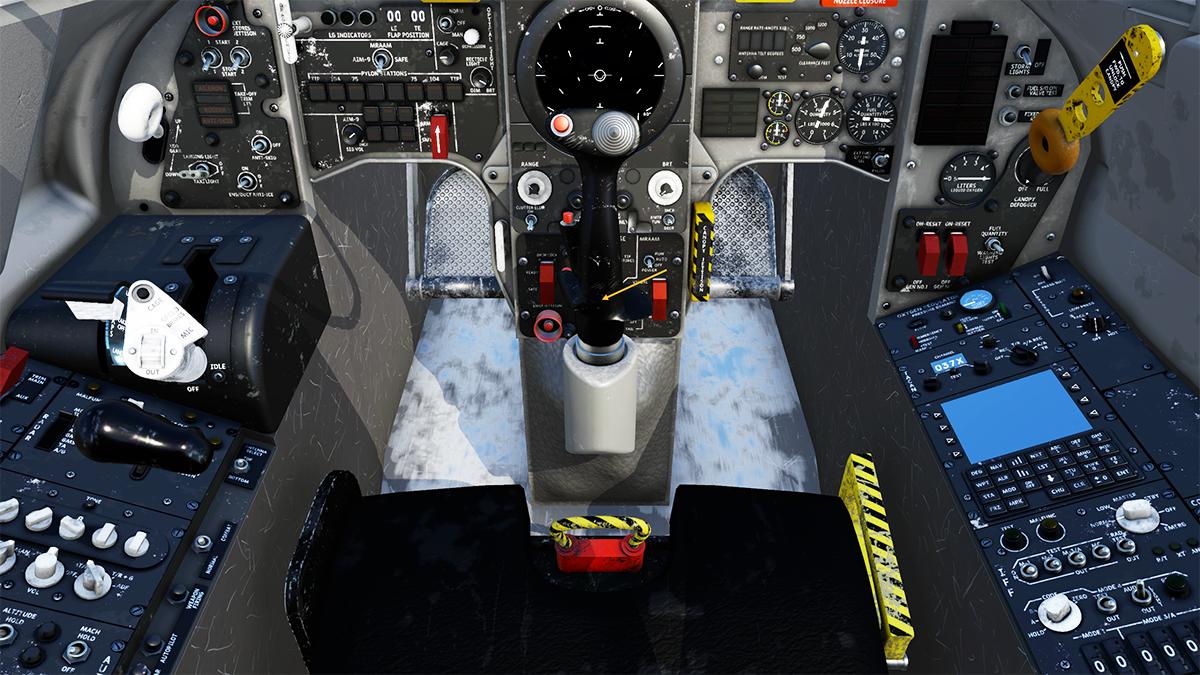
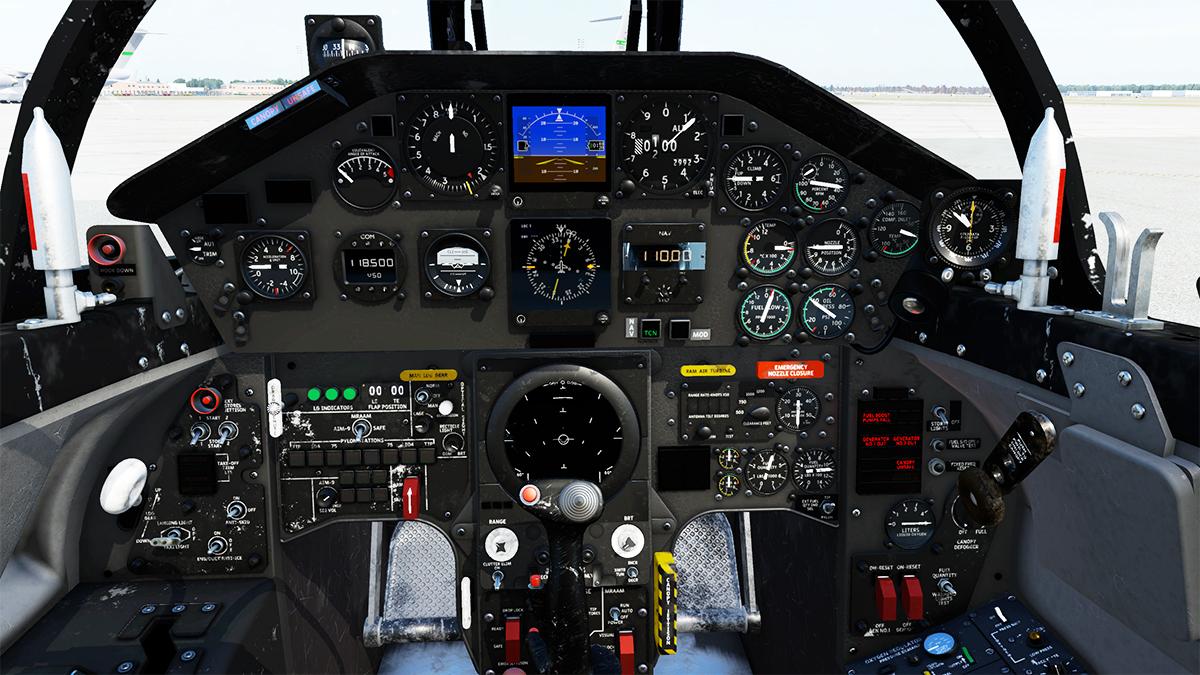
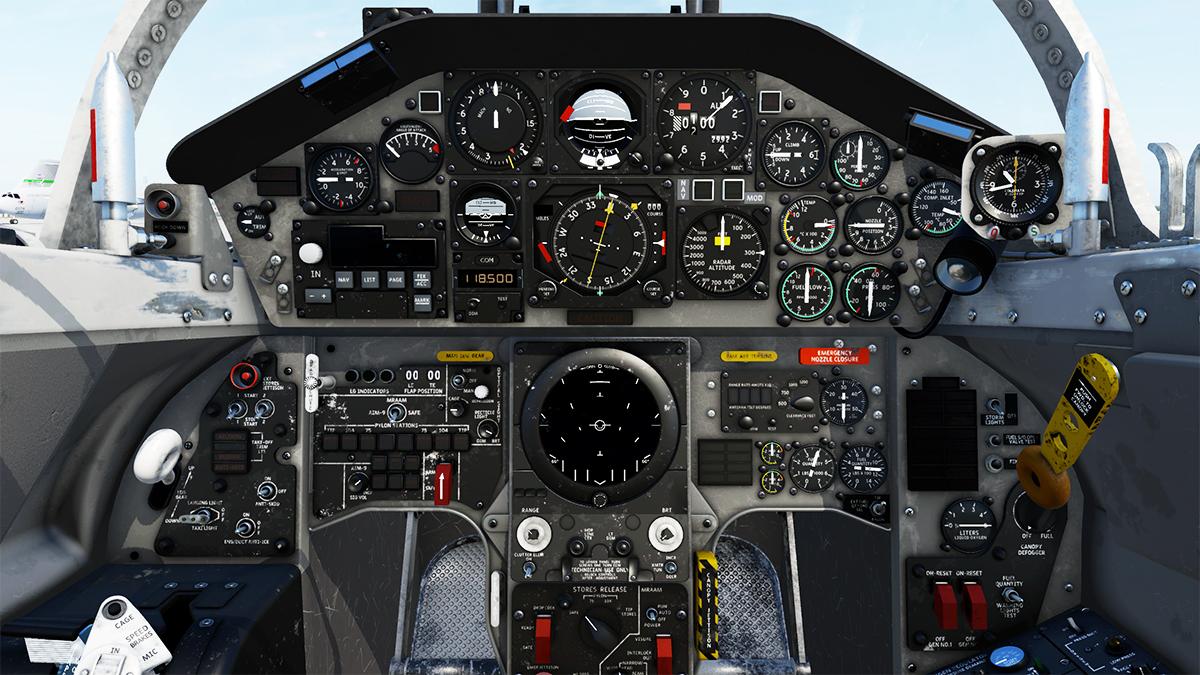
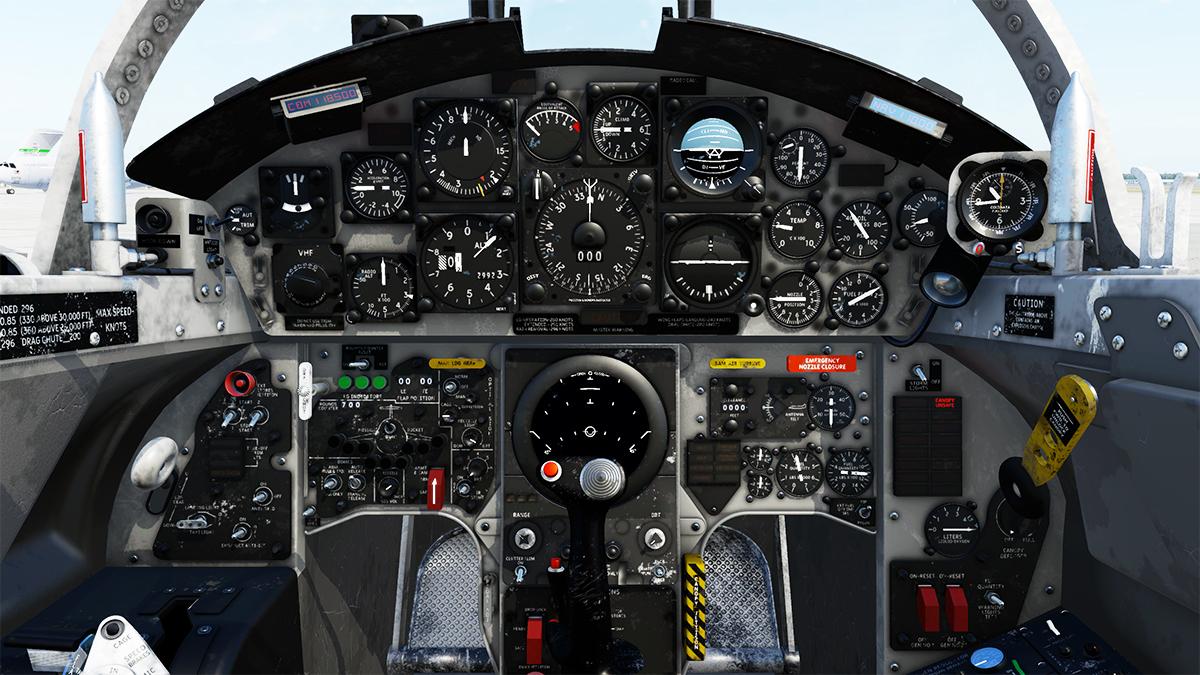
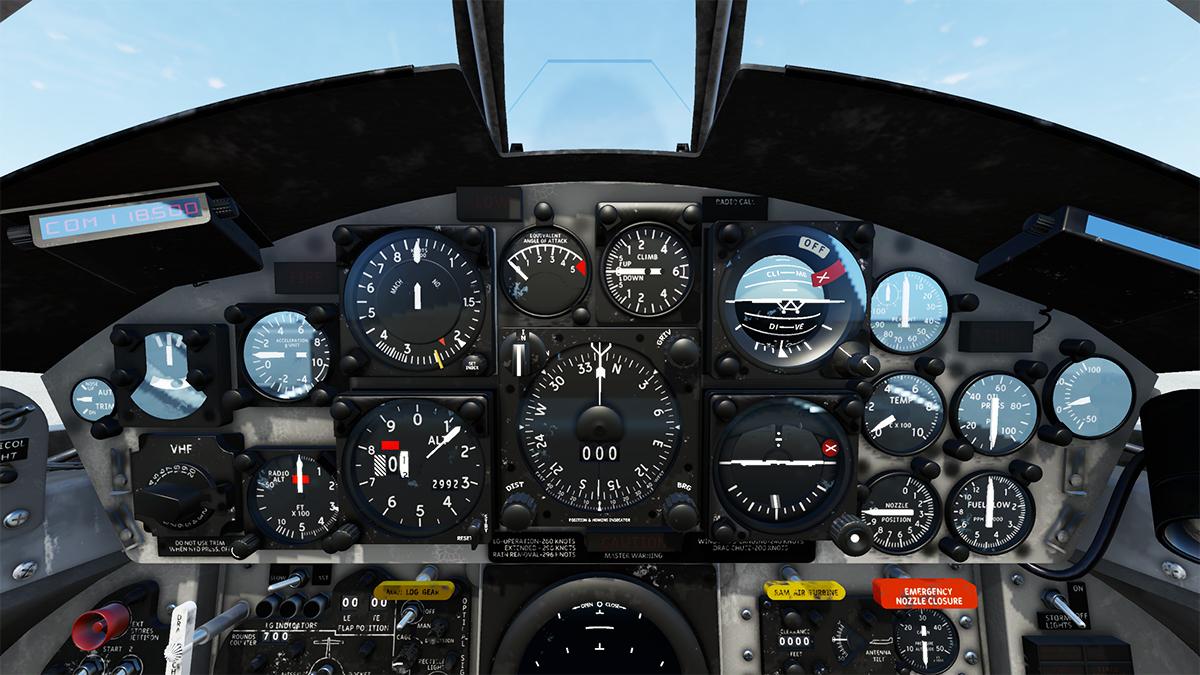
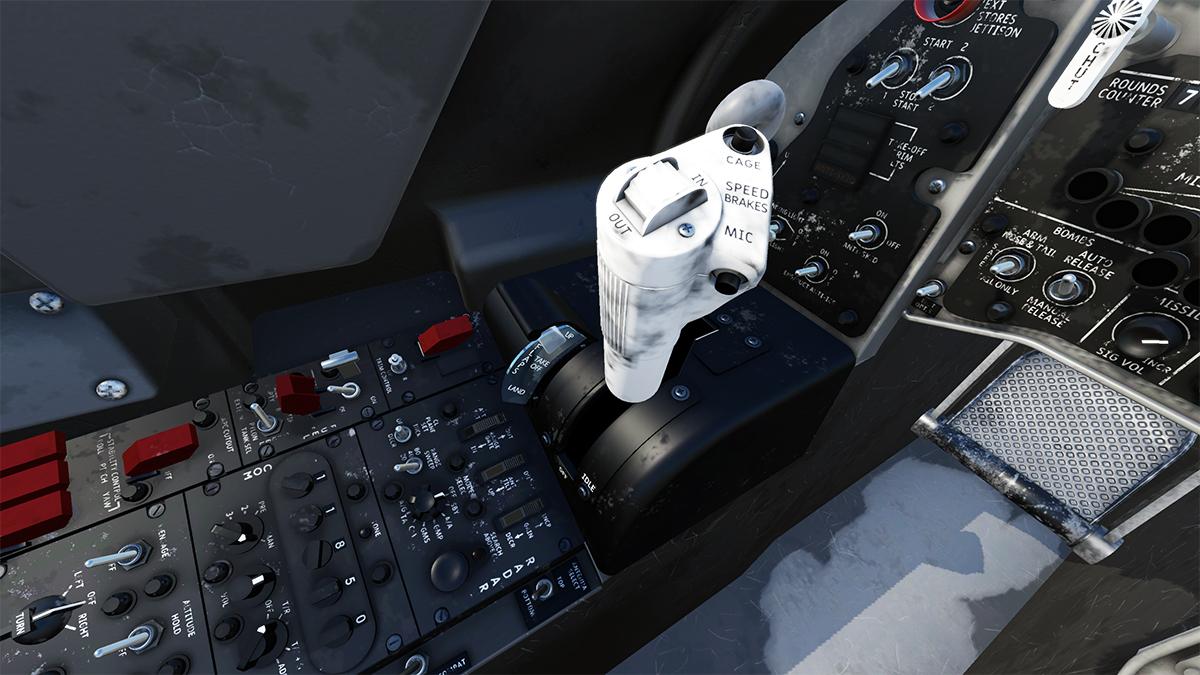
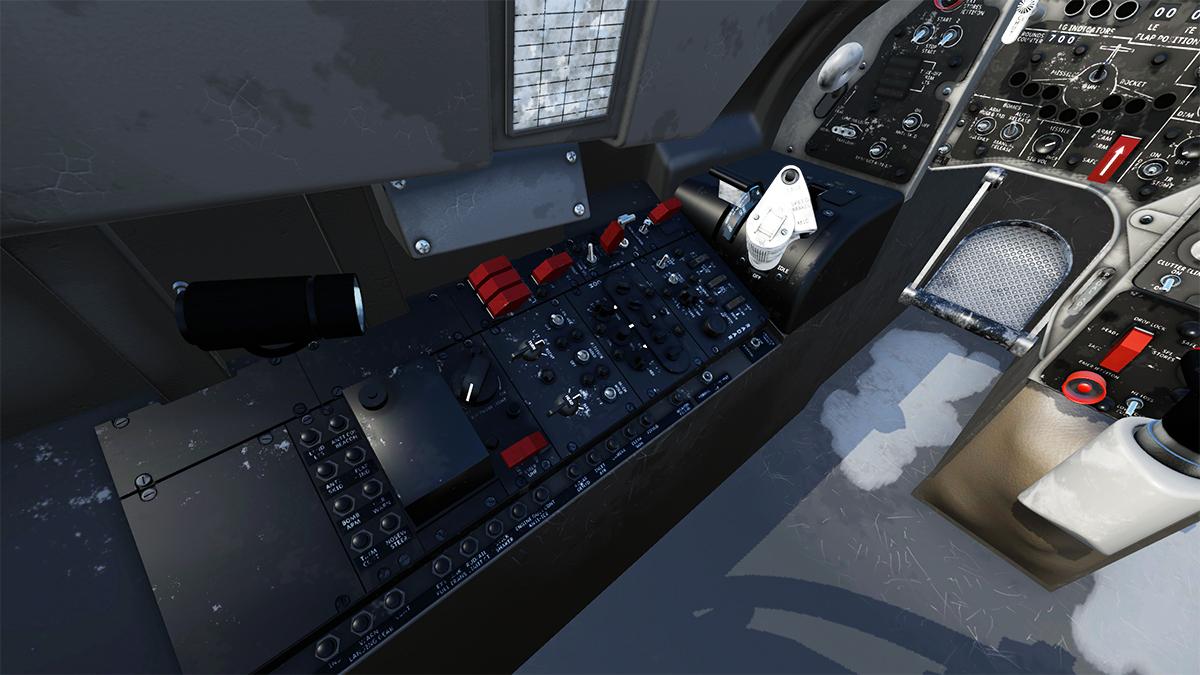
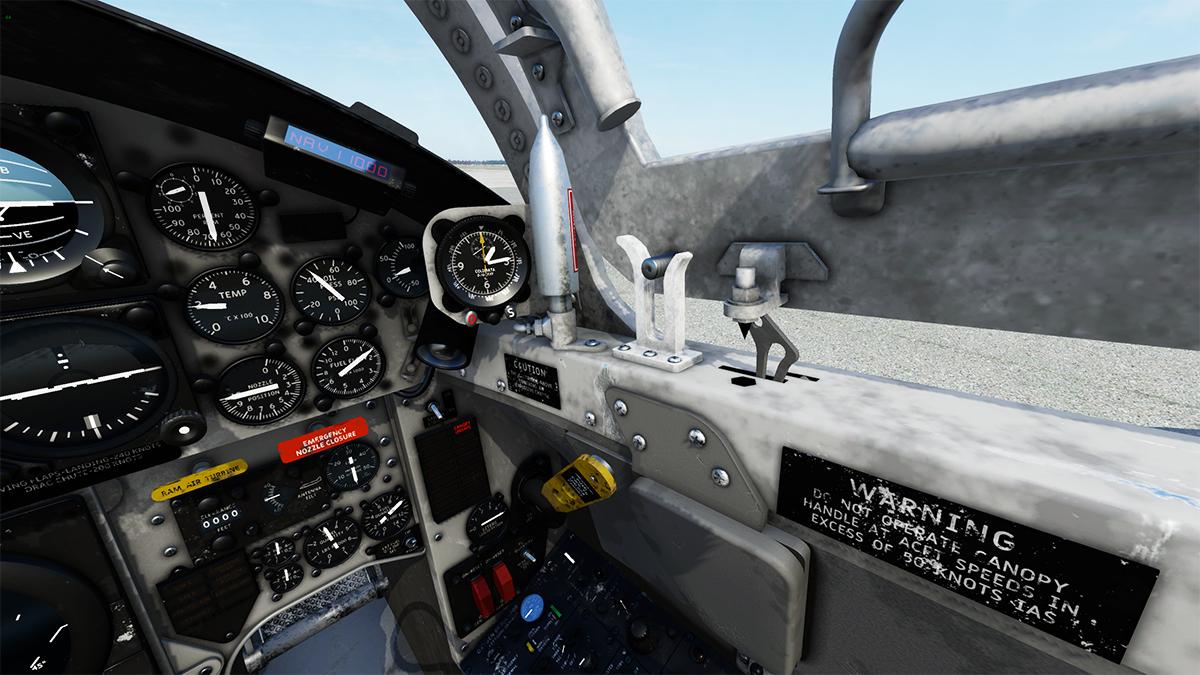
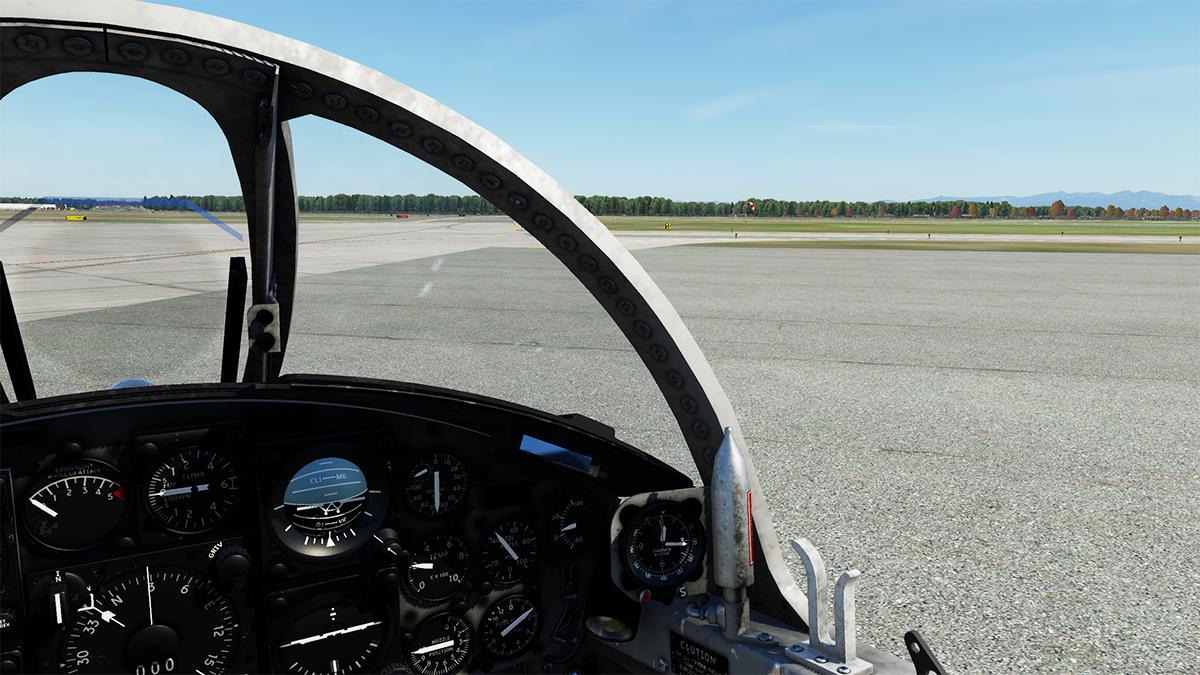
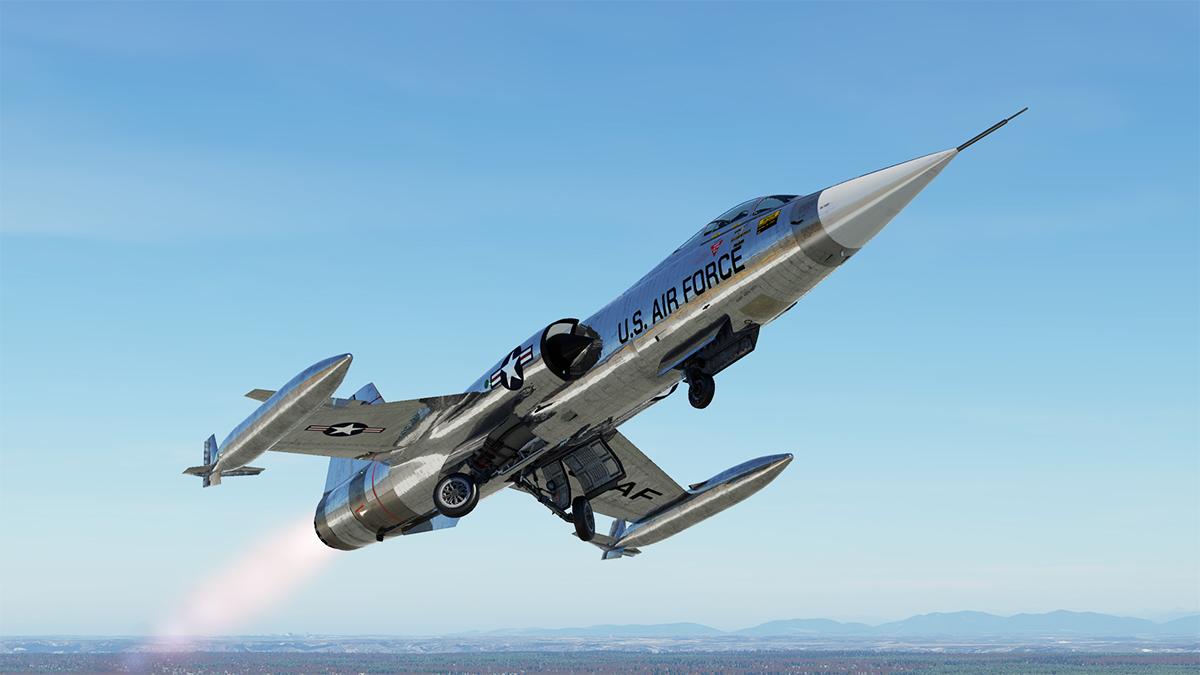
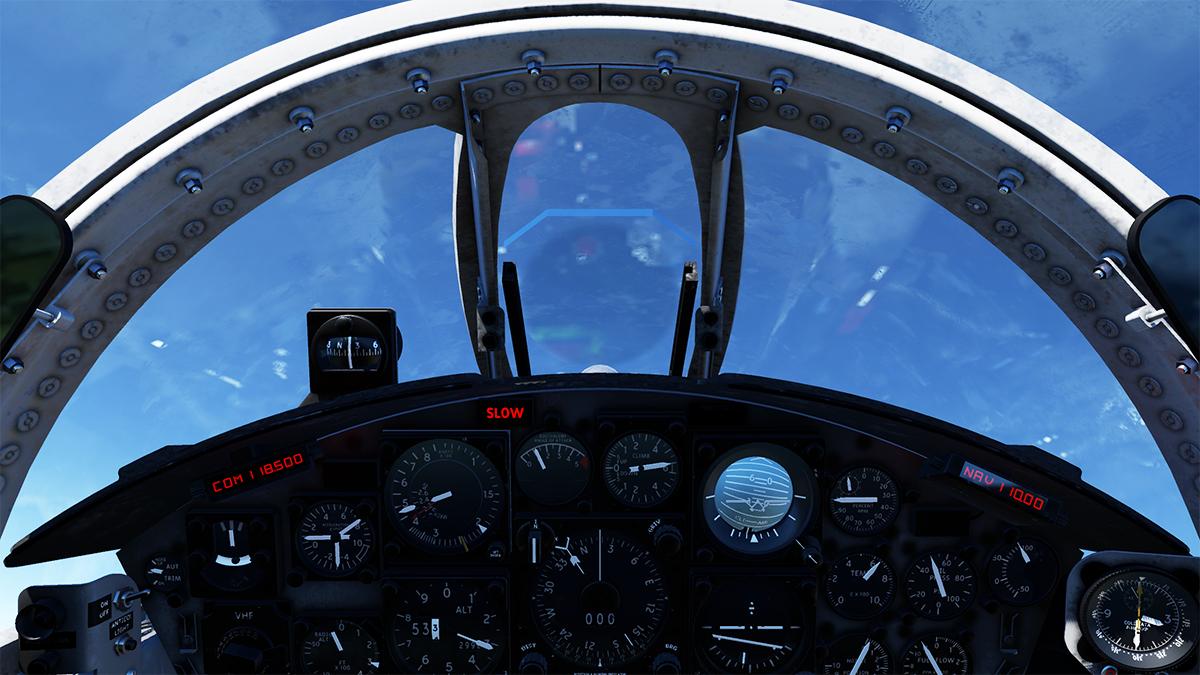
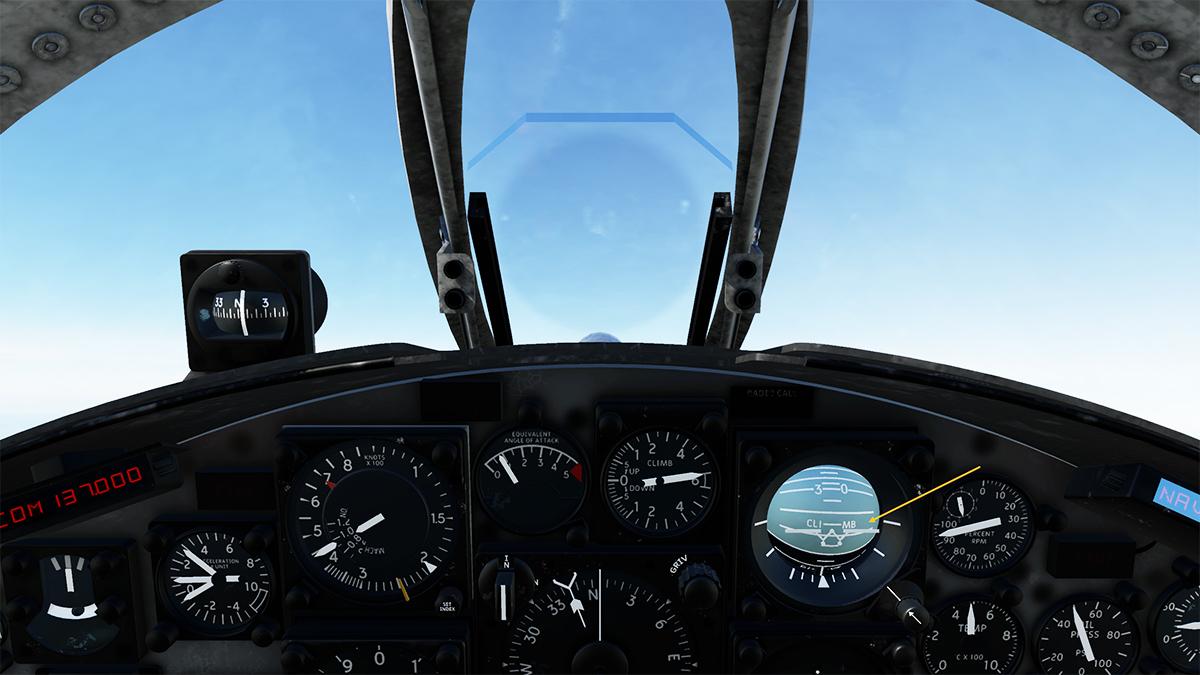
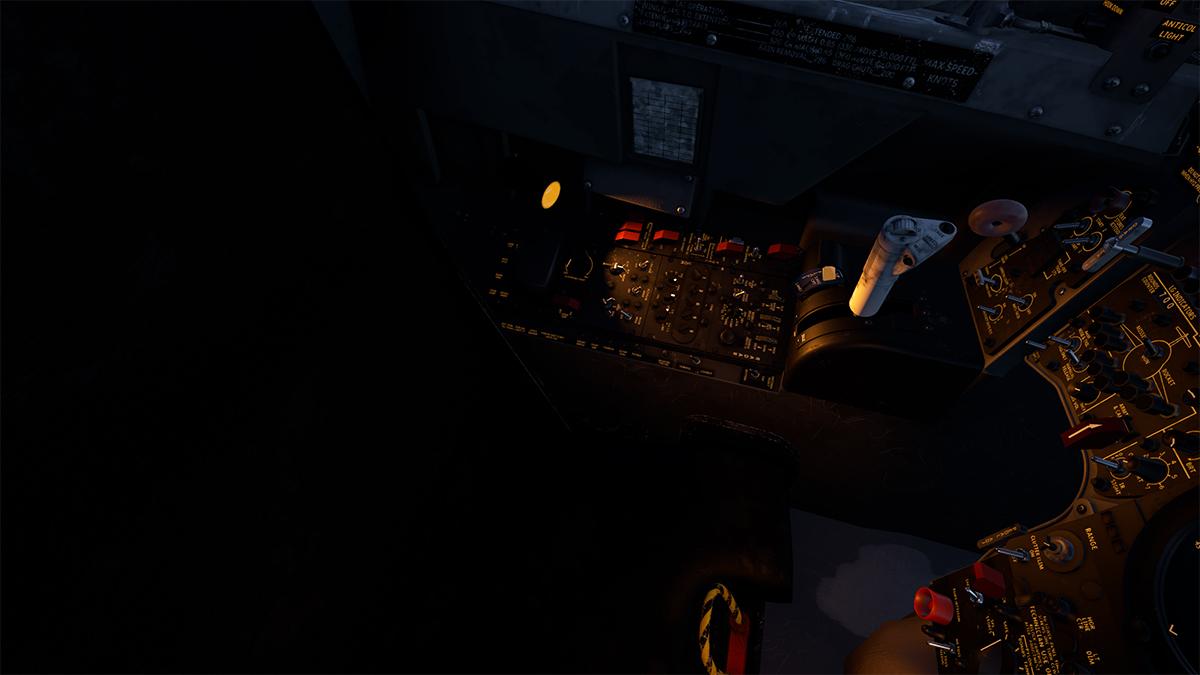
Experimental Vehicle Review : LLTV - Lunar Landing Training Vehicle by NHAdrian It was a moment of inertia. A pause in the air that could have changed history as we know it. It is 6th May 1968 at Houston’s Ellington Air Force Base (AFB) in Texas. As the strange web framed vehicle was now suddenly frozen at 200ft above the ground with the sudden loss of helium pressure, that then caused the depletion of the hydrogen peroxide that was used for the reserve attitude thrusters. The pilot only had one option, "to get the hell out of there", he did so by ejecting upwards as the machine twirled downwards into the ground and violently exploded beneath him, he landed safely by parachute with only a few aches to his back and a bit tongue from the intense jerk upwards... in two hours he was back at his desk at the Houston Space Centre, doing paperwork. The pilot in question here was Neil Alden Armstrong. The same person that commanded the Apollo 11 mission, during which he became the first man to set foot on the moon (20th July 1969). That infamous moment was captured on film, observing it closely, you saw the nerves of steel to defeat the jaws of death, just like Armstrong had done a few times before. In Korea, as he was making a low bombing run at 350 mph (560 km/h) when 6 feet (1.8 m) of his wing was torn off after it collided with a cable that was strung across the hills as a booby trap. He planned to eject over the water and await rescue by Navy helicopters, but his parachute was blown back over land. A jeep driven by a roommate from the flight school picked him up. Then again in a Boeing B-29 Superfortress, which was to air-drop a Douglas D-558-2 Skyrocket. Climbing to 30,000 feet (9 km), the number-four engine stopped and the propeller began windmilling (rotating freely) in the airstream, then the propeller disintegrated. Pieces of it damaged the number-three engine and hit the number-two engine. Butchart and Armstrong were forced to shut down the damaged number-three engine, along also with the number-one engine, due to the torque it created. They then made a slow, circling descent from 30,000 ft (9 km) using only the number-two engine, and landed safely. Then the most dangerous moment of all in orbit in Gemini 8. While out of contact with the ground, the docked spacecraft began to roll, and Armstrong attempted to correct this with the Gemini's Orbit Attitude and Maneuvering System (OAMS). Following the earlier advice of Mission Control, they undocked, but the roll increased dramatically until they were turning rotations about once per second, indicating a problem with Gemini's attitude control. Armstrong engaged the Reentry Control System (RCS) and turned off the OAMS. Mission rules dictated that once this system was turned on, the spacecraft had to reenter at the next possible opportunity. Armstrong was a cat that had 10 lives, so they sent him to the moon, were he saved the long landing in the LEM (Lunar Excursion Module) and made history, which brings us to our weird looking machine in this review. The Bell Aerosystems Lunar Landing Research Vehicle LLTV (nicknamed the "Flying Bedstead") was a Project Apollo era program to build a simulator for the Moon landings. But lets clear something up first. There was five of these vehicles built, the first two were the LLRV or "Research Vehicle". Then later three more were commissioned and called LLTV or "Training Vehicle", they are in design almost identical, but the LLTV's were slightly improved and the forward Styrofoam cockpit enclosure (to simulate the LEM's cockpit) had also the roof removed, to stop an excessive yawing force. Secondly they also had a new mode introduced, called "Lunar Simulation Mode"... of which we will see later. Built of aluminum alloy trusses, the LLRVs (and LLTV) were powered by a General Electric CF700-2V turbofan engine with a thrust of 4,200 lbf (19 kN), mounted vertically in a gimbal. The engine lifted the vehicle to the test altitude of 500ft, and was then throttled back to support five-sixths of the vehicle's weight, simulating the reduced gravity of the Moon. Two hydrogen peroxide lift rockets with thrust that could be varied from 100 to 500 lbf (440 to 2,200 N) handled the vehicle's rate of descent and horizontal movement. Sixteen smaller hydrogen peroxide thrusters, mounted in pairs, gave the pilot control in pitch, yaw and roll. The LLTV is an ungainly insect like machine. Really well designed and produced here by NHAdrian, a developer known for his quirky but very interesting machines, a flying AirCar anybody? The LLRV evolved out of the Bell X-14 (Bell Type 68) experimental VTOL aircraft, but it had problems with ground effects. The X-14 had the reverse effects of helicopters, in that when close to ground, a helicopter needs less power to stay aloft, were as the X-14 needed exactly the opposite in a huge amount of downward thrust. The LLRVs were built by Bell Aerosystems and were used by the FRC (Flight Research Centre) now known as the NASA Armstrong Flight Research Center, at Edwards Air Force Base, California, to study these VTOL dynamics. Helicopters were the obvious choice to simulate Lunar Control Characteristics. And astronauts at the time who were very familiar with helicopters, pushed heavily for them to be used as the LEM training vehicles. But Dick Day the simulations expert at the FRC, pushed heavily for the LLRV to become the better (or correct) vehicle to do the LEM simulations. The person put in charge of the conversion was no other person than Neil Armstrong (the reason he was not on the Apollo 1 fire committee) and was and in the early part of the LLTV "Design Engineering Inspection" that was the selection committee for the program. He quickly deduced that to build a fully modified LEM Trainer, which he called "prohibitively time consuming and expensive" was not the answer, and noted that the characteristics of the LLRV was not at all that different in physical size, and had the same control rocket geometry from the Lunar Lander. When the earlier VTOL program had been completed, the two LLRV's were shipped to Houston in December (12th) 1966, and three new vehicles in trainers with modifications were ordered by NASA, these were the LLTVs, all five machines were used in Lunar training. The earlier LLRV's were reassigned as LLTV A1 and LLTV A2, the new LLTV's were designated LLTV B1, B2 and B3. Neil Armstrong's strong views against Helicopters was against the current normal thinking. This was because Armstrong was noted as a "Engineer Pilot", and not a "Training Pilot", so basically Helicopter pilots were flying Lunar Simulations on Earth, were as Neil Armstrong was studying and flying Lunar Simulations on the Moon. It was a critical assignment that produced an Historic moment. He of course later had that vexatious moment in LLTV A1 in the final 100 ft of descent going into land when his controls had suddenly degraded. By a rule Apollo Commanders had twenty-two flights to certify them for the mission, but for backup commanders in the later stages of the program, these numbers of flights were reduced to maybe a dozen. The LLTV's design is beyond simple, a frame holds the CF700-2V and surrounding it are the four downward facing HP thrusters (earlier LLRV had only two), then the clusters of HP directional thrusters are positioned on the outer frame, it is all a very spacecraft LEM like in design. Tanks hold the Jet-A1 fuel and the twin globes of Hydrogen Peroxide (HP) are outer centre, rear is balance weights and the large equipment/avionics pack. The whole design has been intricately recreated for your flying pleasure, everything is perfectly done here, like noted, very simple, but intricate at the same time to get it all perfectly authentic... and yes you can spend a lot of time just looking at all of the design and on how it all works, this is one clever aspect of a Simulator, as you have almost the real thing on view for your inspection. Can this be called a cockpit? sort of. The original LLRV just had the pilot hanging out on the front on the frame, in the LLTV version is was boxed in to recreate the feeling of the inside of the LEM. The light metal frame construction and riveting is totally excellent, and note the nice touch of the Apollo mission patches... but there is an important one missing? An oversight or just a small trivia question by the developer? The cockpit layout is very familiar if you are also familiar with the LEM's controls. The hand controls both sides, and the instrument box right. Left side here are two levers, the "Lift Engine Control Lever", and the secondary "Lift Thrusters Control Lever" known as the "T-Stick". Top left panel is the CB Control Panel, with Circuit Breakers (fuses) and system switches. Note the rear COM Radio with 25khz and 8.33 khz modes and fuel cock lower. The "Main Control Panel" covers Battery A/B and Generator A/B switches, Altitude Controller over-ride, Lunar Simulation wind compensation switch, Helium Isolation valve, Altitude Thrusters operations mode, Inverter A/B switches, Pitch/Roll AHRS source, Artificial Horizon source and Altitude controller rate sensitivity adjustment knobs for; Pitch, Roll and Yaw. Right side is the "Main Instrument Panel", from top; Engine Fire annunciator and test button, HD quantity indicator, Annunciator Panel, Lateral/Forward velocity indicator, lift rockets chamber pressure, Helium Pressure, analog stop-watch/button cycle, Artificial Horizon, Radio Altimeter and V/S (vertical Speed) indicator, Thrust-to-Weight ratio indicator LSM mode, EGT (Exhaust Gas Temperature gauge), Oil Pressure, Analog Altimeter, Analog Variometer, N1 Indicator, Jet fuel quantity and aft Jet fuel quantity. On the right is the actual LEM panel for comparison, and the main flying instruments in layout are almost identical. The Annunciator panel has 4x4 block of warnings and failures. Note the "LUNAR MODE" selection. Bottom right is the "Right Control Panel". It includes; "Attitude Control mode switches", DC Volts and AC Volts, "Source Switch A/B and finally the same famous "Ground Contact" light. Right hand joystick is fully animated in forward-back and left/right movements, as is the well done NASA pilot in his arm movements... let us call him "Neil". You can hide "Neil" by pressing the seat base, but be careful, it is very easy to mix up the hotspot of the "Ejection Seat", and just disappear. If you move the slider on the pilot's helmet... it will push down the visor, also then go into "Sunglasses" mode, in dimming the view, honestly I'm not sure about this while flying, as you need as much a clear view as possible, and an option to turn it off, but the idea is very clever. _____________ Installation and Settings In X-Plane, you will find the LLTV in the "VTOL" section at the bottom of the "Flight Configuration" page. There are no liveries (laughs) LLTV Authorization is standard with a key, then a restart is required. Control settings are for all the "Control Response" (Pitch,Roll and Yaw) sliders to be at the minimum setting, and at least "5 Flight Models" per frame, it is highly recommended to have at least a 30 frames or more capacity, if not it will struggle to simulate. The LLTV fuel and weights are setup via the X-Plane "Weight, Balance & Fuel" Page, the HP is top, and the Jet Fuel is set lower, note the correct CoG (Centre of Gravity). If you have (or I recommend) a 3-Axis Joystick... then move your Yaw axis to the Joystick X-Axis from the rudder pedals for an authentic feel of the machine, the LEM did not have rudder pedals as both pilots stood up side by side together. A final tip is to set the "Lunar Simulation Mode" to a Toggle or "On/Off" switch, I used the hat on my joystick, the custom command is available and as all the usable "Custom Commands" are noted in the manual. This action will reduce the distraction of the switch between the different modes, and keep your hands on the controls. ____________________ Flying the Lunar Landing Training Vehicle I found that before every flight you have to set your fuel quantity, it resets back to zero if you don't, in other times also top up the H202 tanks, the LLTV guzzles fuel like nothing else, so this is always your first action. The fuel cock is down under the COM Radio, and this needs to be horizontal for fuel flow, then it is the simple need just to flick up the Ignition switch, then the START ENG switch, the system does the rest of the startup sequence, when done it will settle down around 20% RPM and EGT around 450º The startup whine and thrust from the CF700-2V is very good, then becomes a roar if you add in a bit of throttle, plus there is the puffs and blasts of Hydrogen Peroxide all around the vehicle, and you haven't done anything yet? Increasing the throttle increases the noise and the activity from the thrusters as they intensely fire off (really well done) the HP, and slowly your off the ground... and your first target is just to hover. Honestly it's not that hard, just like flying a drone in every aspect... up/down... hover. Then your just glad to lower the LLTV back onto the ground... safety. Confidence restored, "Lets try that again". This time I hovered far higher, the limits are 500 ft and 2 minutes of fuel, and the clock is ticking. Again it was easy to climb and hold, twist the throttle grip and turn easily in the yaw, left or right... then front or back with a slight dip in each direction... "easy peasy" Trickier is sideways... any slip has to be carefully coordinated, and keeping the vehicle almost upright. Push too far in angle or speed and you will easily lose the LLTV, and there is no coming back, except for an explosive crash on the ground. A note that there is an "Ejection" to do an "Armstrong" and get the "hell out of there". There are two modes, the first is really the "Drone" mode were the LLTV flies basically just like a drone. Second flying mode is called "Lunar Simulation Mode" that is activated on the joystick. The difference between them is that with the first (drone) mode the CF700-2V is locked in it's cradle, so the thrust is completely downwards. In Lunar Simulation Mode (LSM)" the engine is now loose on a Gimbal to still produce the balance thrust, but the vehicle angle can now change, however the engine (thrust) stays relative to the ground to simulate the Moon's gravity (1.625 m/s2, about 16.6% to that on Earth's surface or 0.166 ɡ), to replicate the same propulsion system on the LEM. Several other actions also happen when you initiate LSM, first you change levers to the T-Stick, this lever now controls the downward thrusters and in giving you only control over them (disengages the Jet Engine) and lifts the rockets thrust between 20% and 100% power range. Note... there has been an update, v1.01 now has the animation working that moves "Neil's" hand from the throttle to the T-Stick, and the T-Stick movements are now animated as well... The LSM system won't work unless you are at 500ft (or slightly more), then you flick the switch to change the modes... Then the "Luna Mode" light is illuminated to show you are in the active mode. The transition between modes is seemless, initially you can't tell the difference, but adjust the T-Stick and you are quickly aware of the more heavier thrust at your disposal, with both the Jet engine and thrusters now producing lift, actually altitude control is far more easier, you as you have significantly now more control over the machine, but there is more and more lag in reactions the closer you get to the ground. Yaw and slip is still the same, so be careful... but the flying of the "Bedstead" was far easier than I had imagined, you would love to stay here in this controlled environment all day, but your now guzzling fuel at a ferocious rate, so it is time to descend and do a nice controlled landing. The amount of thrust power is excellent, and in reality you do feel what piloting the LEM would actually be like, I was amazing on the amount of power that was available to you, even on the moon! The trick here of course is to learn an actual moon LEM sequence landing, moving forward and picking your landing spot, controlling the flow of the descent and the angle of approach to a hover position and then a "Contact". It would take a fair bit of practice and familiarity with the LLTV to get that all right, but the adrenalin rush would be worth it, remember the old "Lunar Lander" game, well this is far more better and in 3d, you also have the same limited amount of fuel as well! Armstrong noted on his return from the moon. "Eagle (the Lunar Module) flew very much like the Lunar Landing Training Vehicle which I had flown more than 30 times at Ellington Air Force Base near the Space Center. I had made from 50 to 60 landings in the trainer, and the final trajectory I flew to the landing was very much like those flown in practice. That, of course, gave me a good deal of confidence — a comfortable familiarity" Considering the traumatic events on 6th May 1968, then the LLRV and the later LLTV, were actually very reliable over thousands of test flights. Actually only two crashed, the LLTV A1 (Armstrong) and Test pilot Stuart Present ejected again safely from crashing LLTV-2, 29th January 1971, the surviving rest are listed below LLRV-2 (LLRV NASA 951) is on display at the Air Force Flight Test Museum at Edwards Air Force Base. It was lent to the museum by NASA in 2016. LLTV-3 (LLTV NASA 952) is on display at the Johnson Space Center. A Replica of NASA 952 is in a partially complete state in the aircraft boneyard at the Yanks Air Museum. __________________ Summary So how do you replicate landing on the Moon when you have never actually been there? This was the problem facing NASA in 1966. To build a full trainer of the Lunar Excursion Module, or LEM, that was the lunar descent vehicle, was considered then be too expensive and even impractical. Then came the idea to convert two VTOL experimental aircraft at the FRC (Flight Research Centre) now known as the NASA Armstrong Flight Research Center, at Edwards Air Force Base, California. These were LLRVs, later renamed LLTVs (A1/A2) and to build three more for training lunar astronauts in the skills of using the lunar lander in B1/B2 and B3. The LLTV vehicle is reproduced here by NHAdrian, and brilliantly good it is. This is not a helicopter, more drone in skills, but the "LUNAR MODE" is replicated in absolute realism, in allowing you to practise Lunar Landings on Earth, or to practise this significant skill set, and actually get the feel of what flying the LEM was really like. Sounds and the feel of the machine are simply excellent here (it's very loud), the rocket pulses perfectly synchronised, there are no extras or liveries, but a very well detained machine. The LLTV is also fully VR (Virtual Reality) ready, for an even more authentic immersion. With the update v1.01, the T-Stick in "Lunar Mode" is now also animated as well as the throttle control... It is all very clever, very X-Plane as well, and the modeling detail and systems recreated here are exceptional, it is also very Lunar Lander, the 1979 video game, you get addicted to it, and try over and over again to achieve your goal... of landing on the Moon. Highly recommended, and great authentic fun. __________________________ Yes! - the LLTV - Lunar Landing Training Vehicle by NHAdrian is NOW available from the X-Plane.Org Store here : LLTV - Lunar Landing Training Vehicle Price is US$19.95 Requirements X-Plane 12 Windows, Mac (using Rosetta) or Linux 4GB VRAM Minimum - 8GB+ VRAM Recommended Download Size: 331 MB Current Version : 1.0 (December 1st 2023) Important note for MAC OS X users: please read this article about enabling Rosetta: https://www.x-plane.com/kb/using-x-plane-11-addons-with-x-plane-12-on-mac-systems/ Designed by NHAdrian - Support forum for the LLTV by NHAdrian Installation Installation of LLTV is done via a download of 296 Mb... With a total installation size of 566Mb into the Aircraft Folder. Authorization is required, then a full X-Plane restart. As noted above there is a requirement to use Rosetta on the Mac System There is one basic highly detailed Manual pdf (29 pages) with an install, set up, description of the LLTV, plus full checklists. The menu design is to replicate an official NASA document. Review System Specifications Windows - 12th Gen IS1700 Core i7 12700K 12 Core 3.60 GHz CPU - 64bit -32 Gb single 1067 Mhz DDR4 2133 - PNY GeForce RTX 3080 10GB XLR8 - Samsung 970 EVO+ 2TB SSD Software: - Windows 11 Pro - X-Plane 12.08b3 (This is a Beta review). Plugins: Traffic Global - JustFlight-Traffic (X-Plane.OrgStore) US$52.99 : Global SFD plugin US$30.00 Scenery or Aircraft - KEFD - Ellington Field - X-Plane default - Free ___________________________ News by Stephen Dutton 1st December 2023 Copyright©2023: X-Plane Reviews (Disclaimer. All images and text in this review are the work and property of X-PlaneReviews, no sharing or copy of the content is allowed without consent from the author as per copyright conditions) All Rights Reserved
 1 point
 -
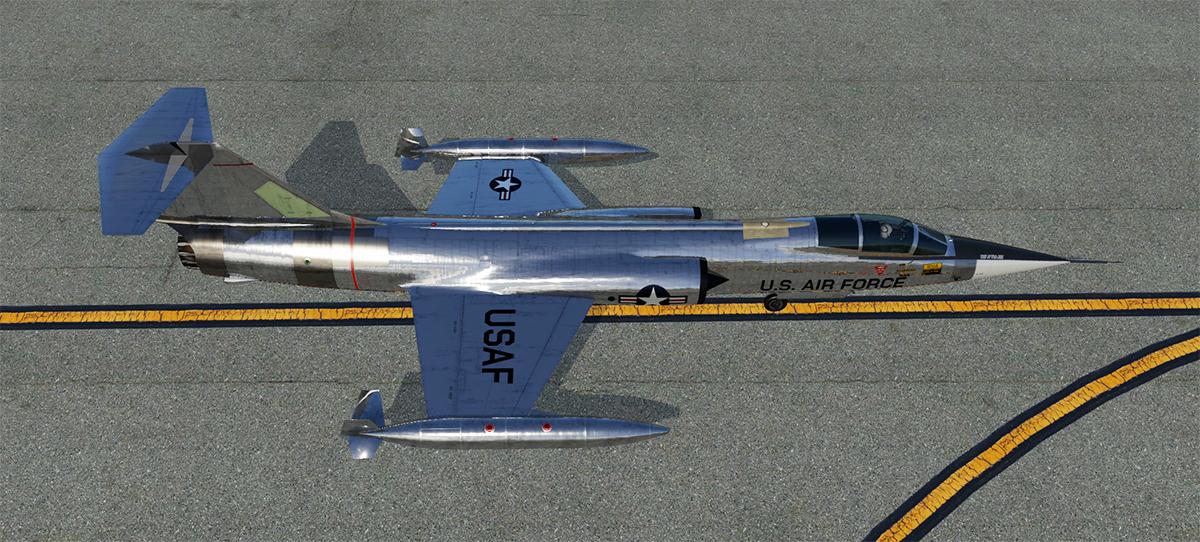
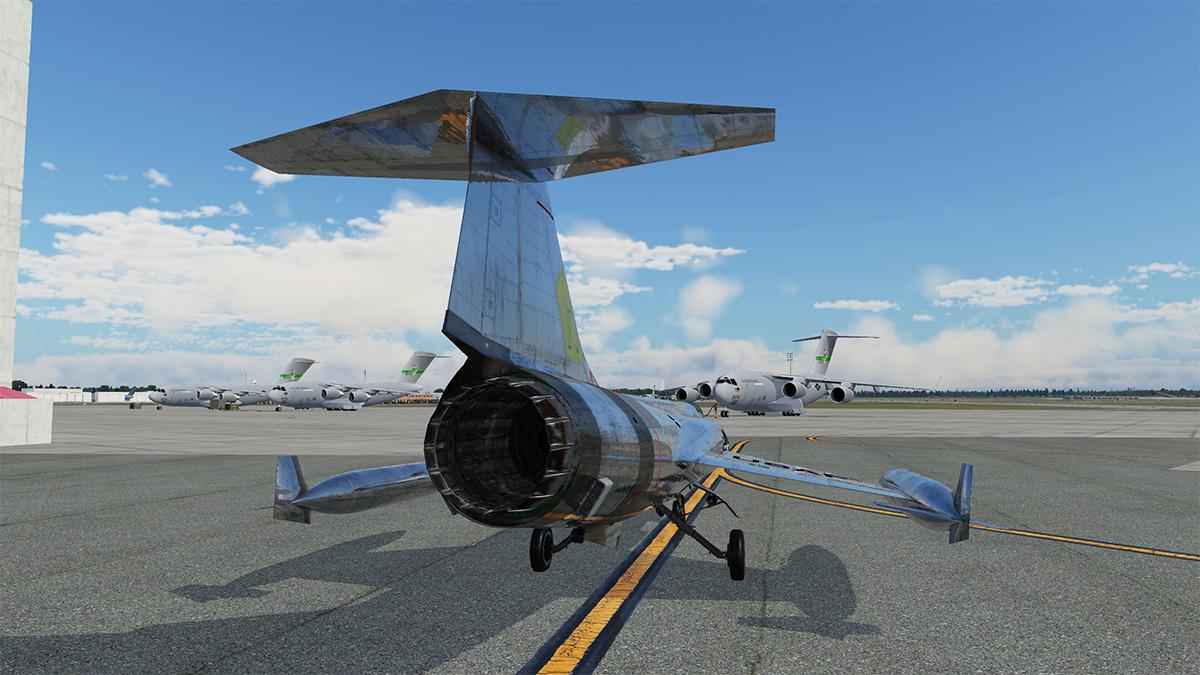
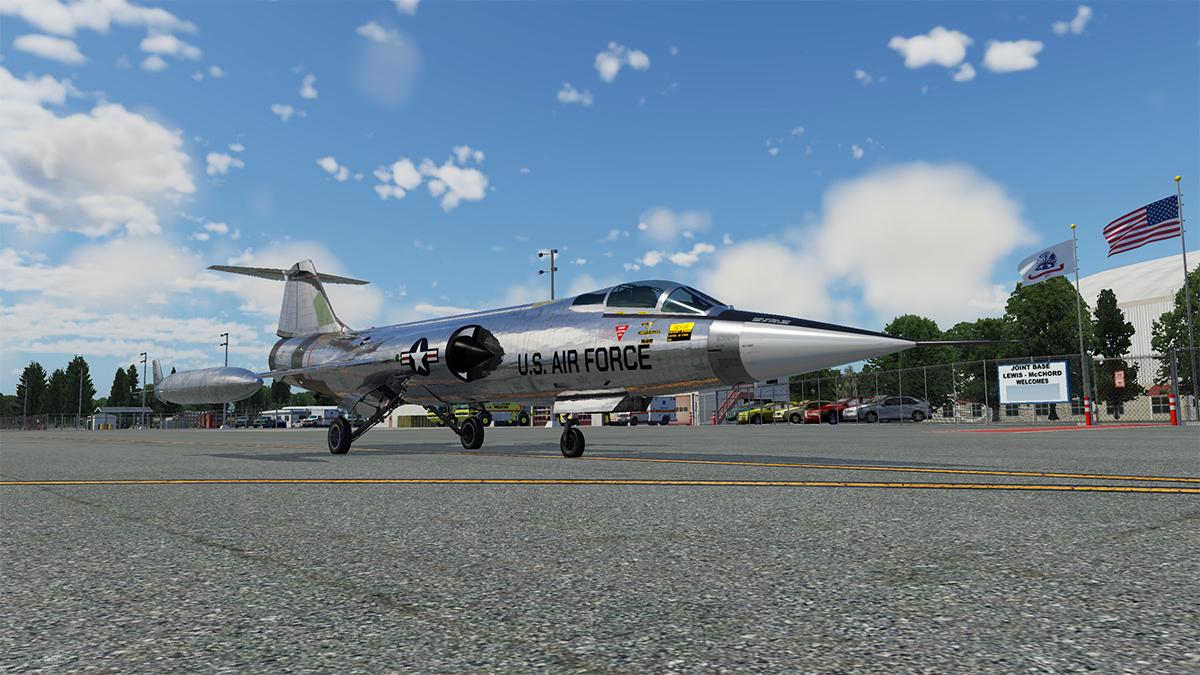
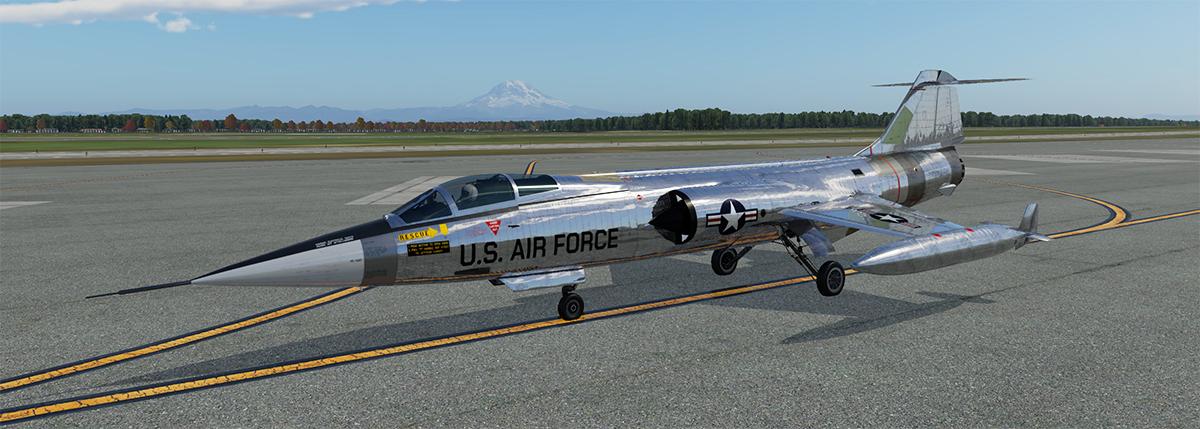
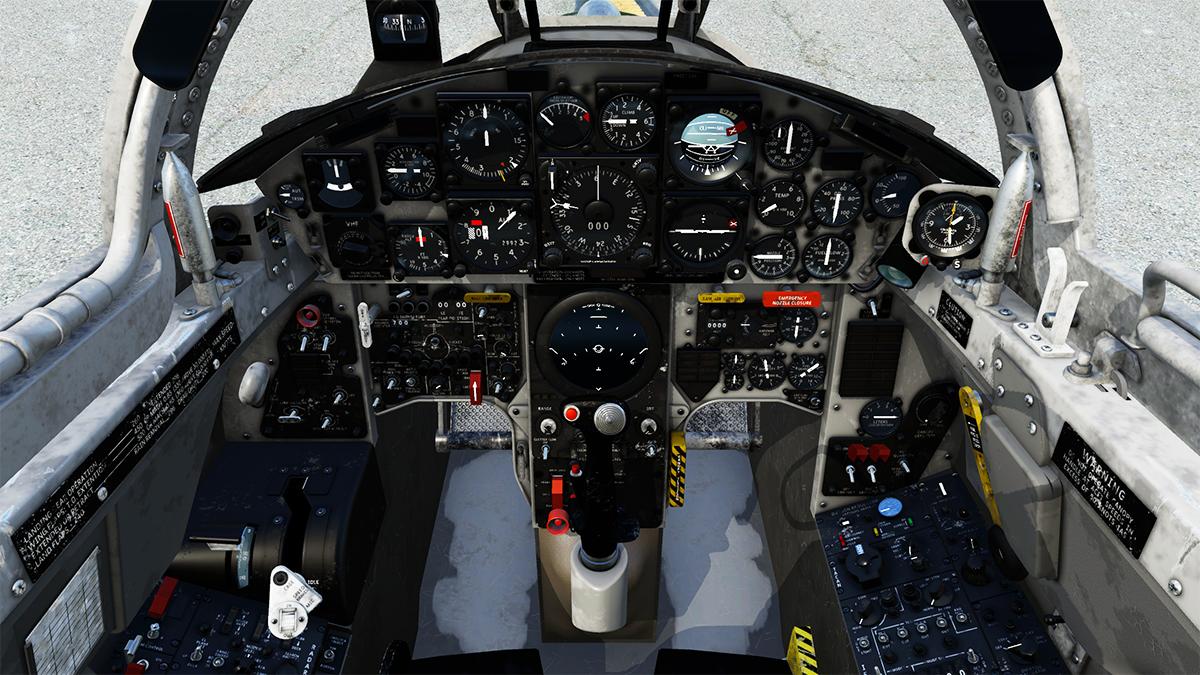
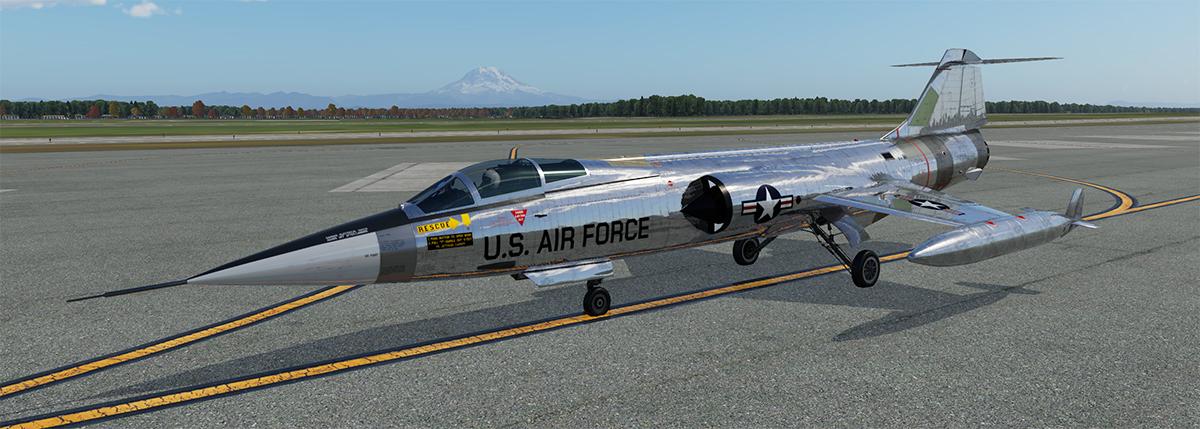
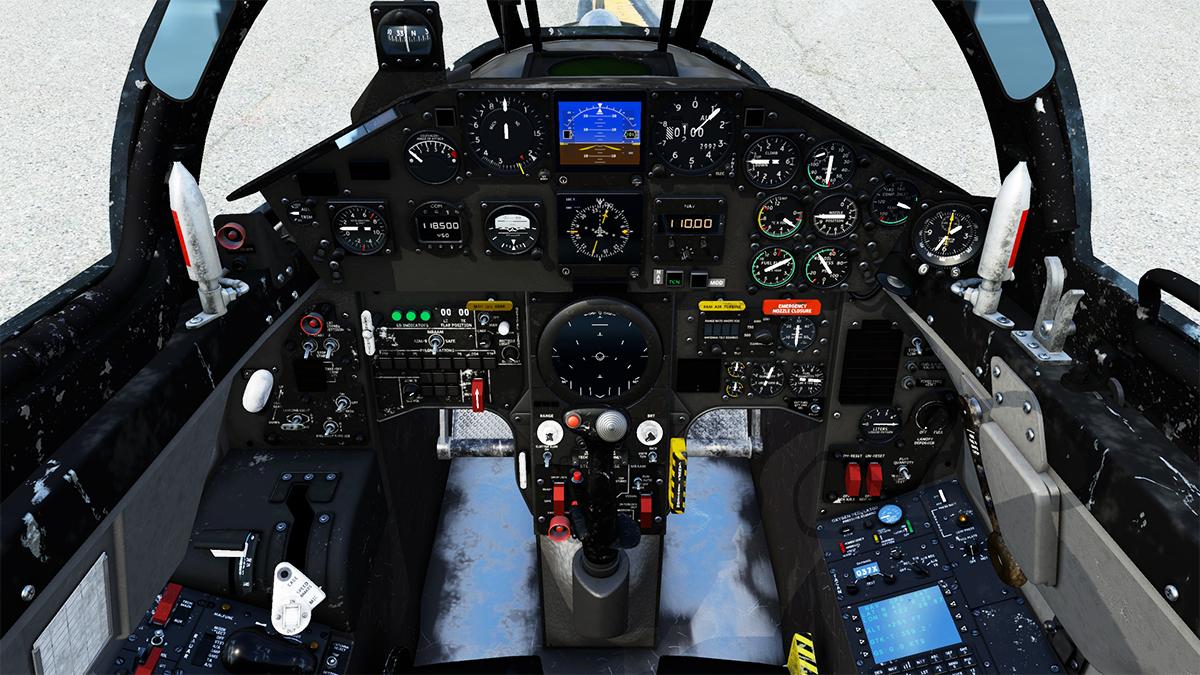
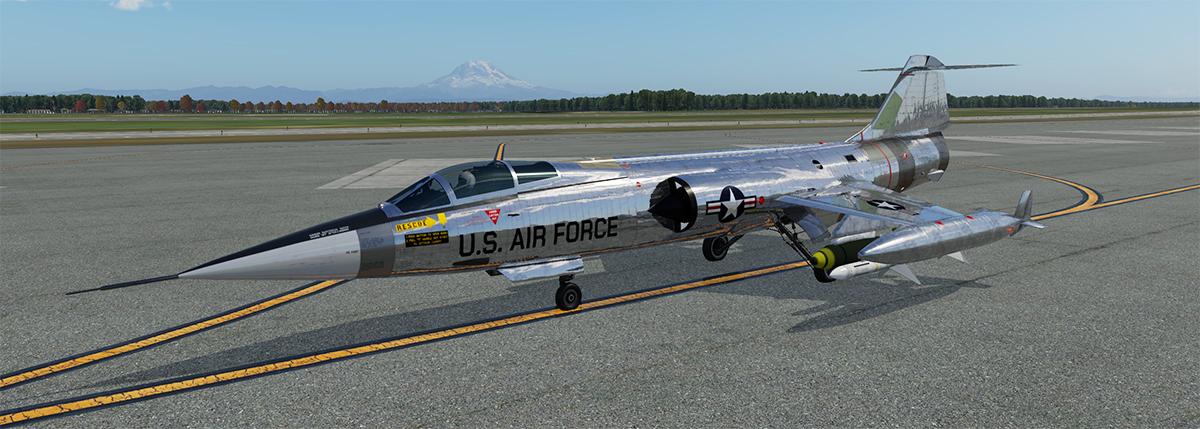
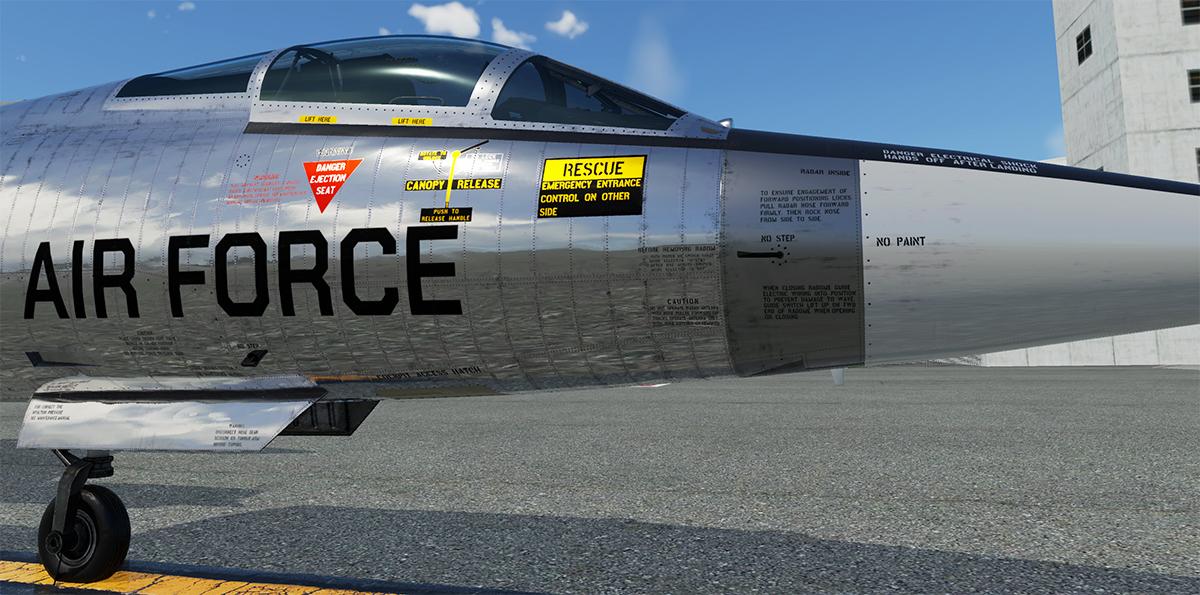
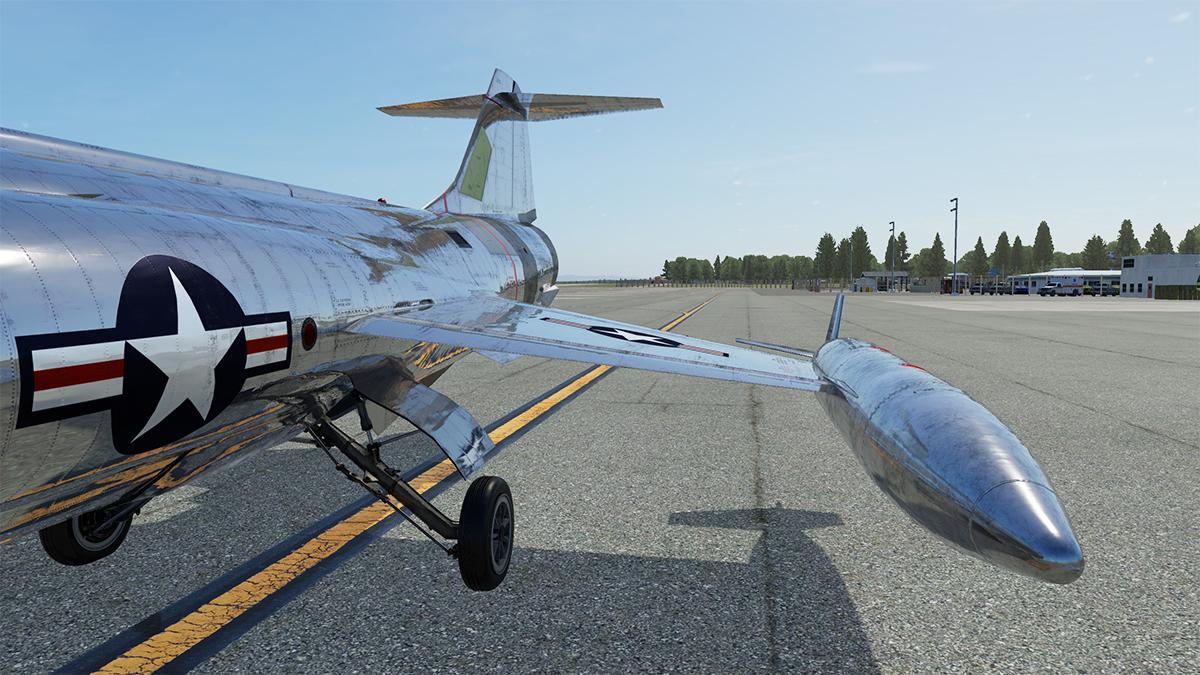
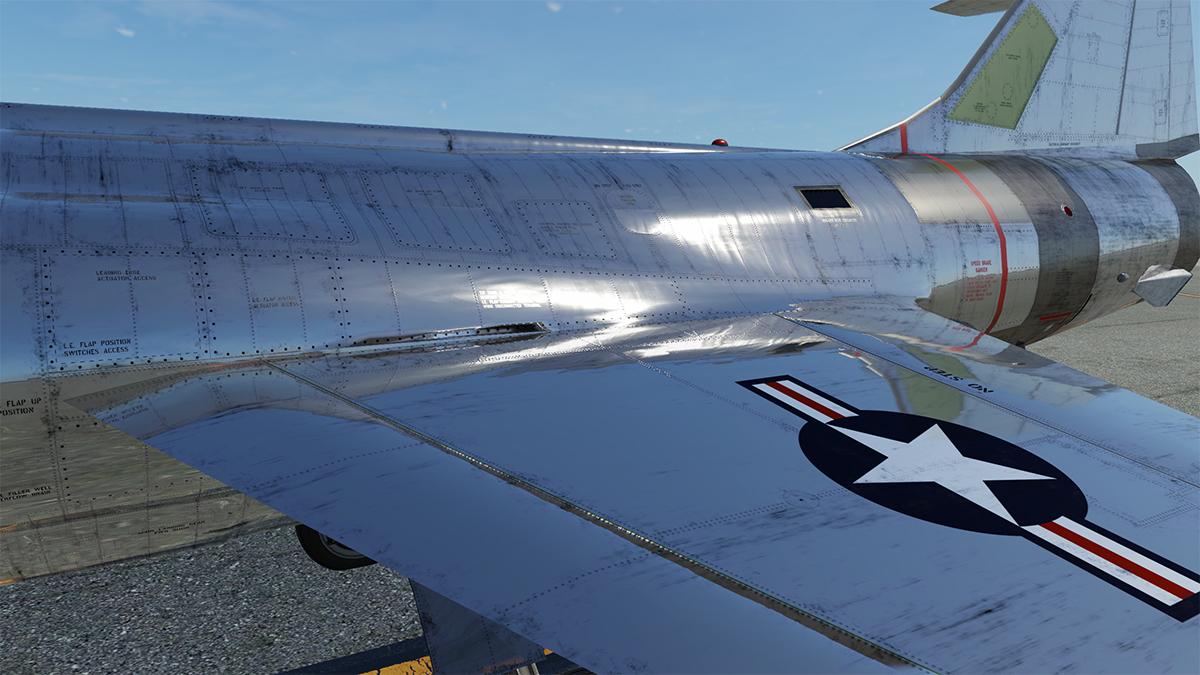
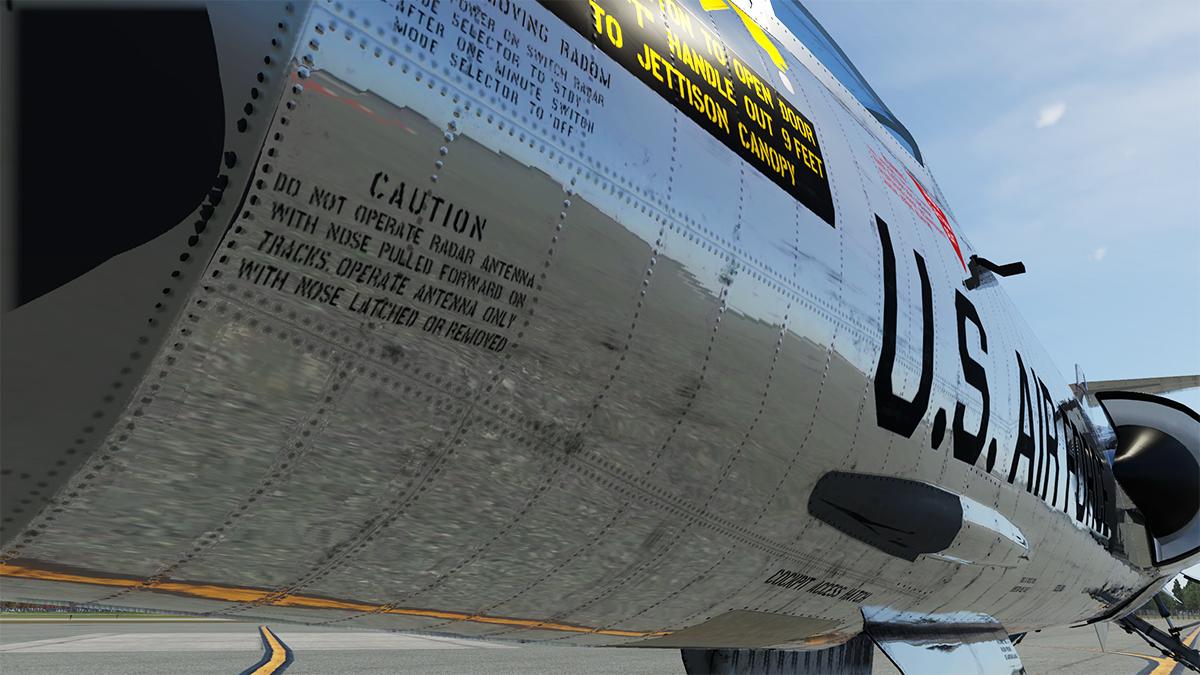
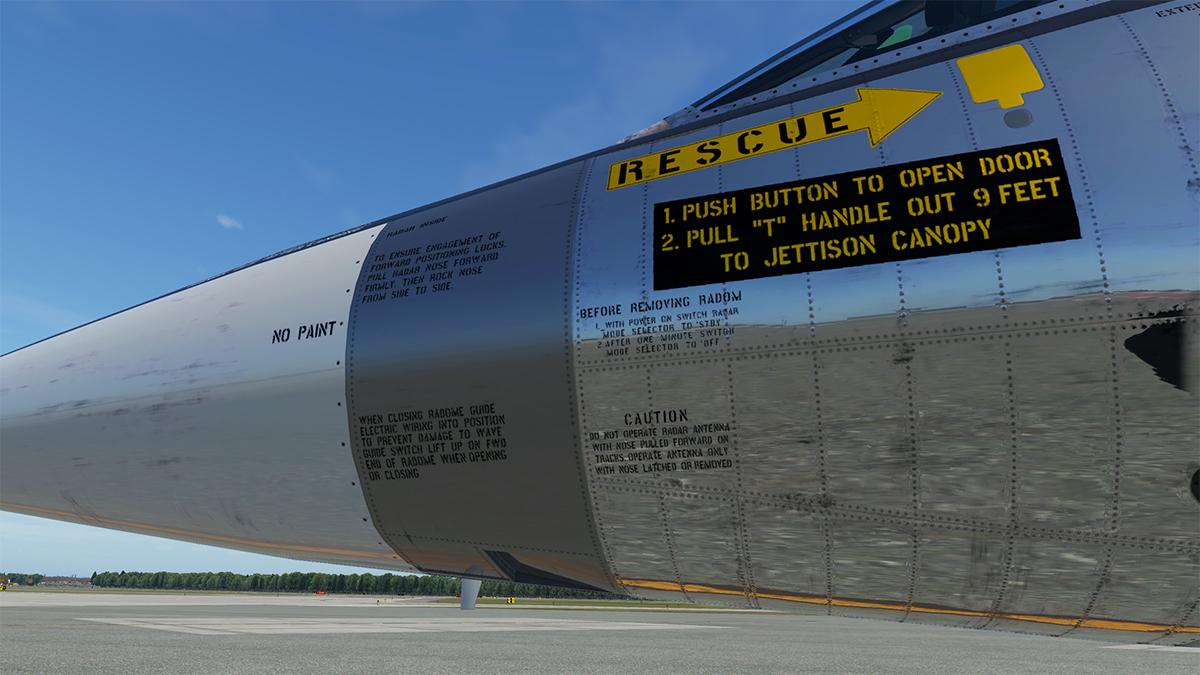
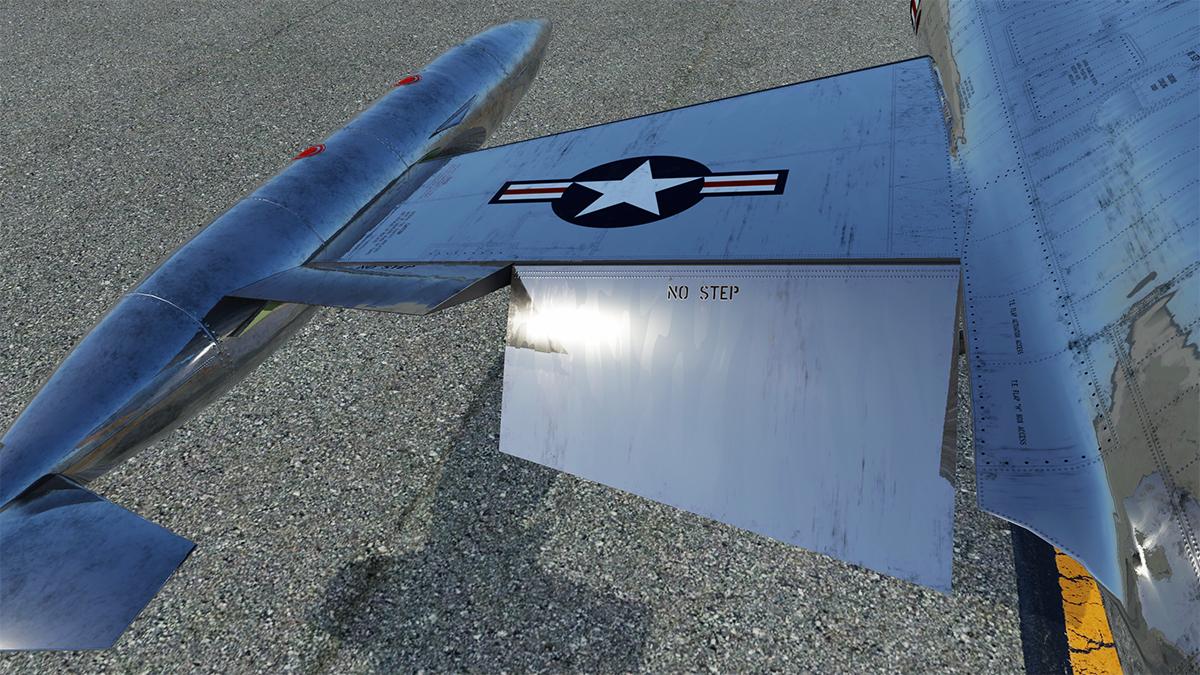
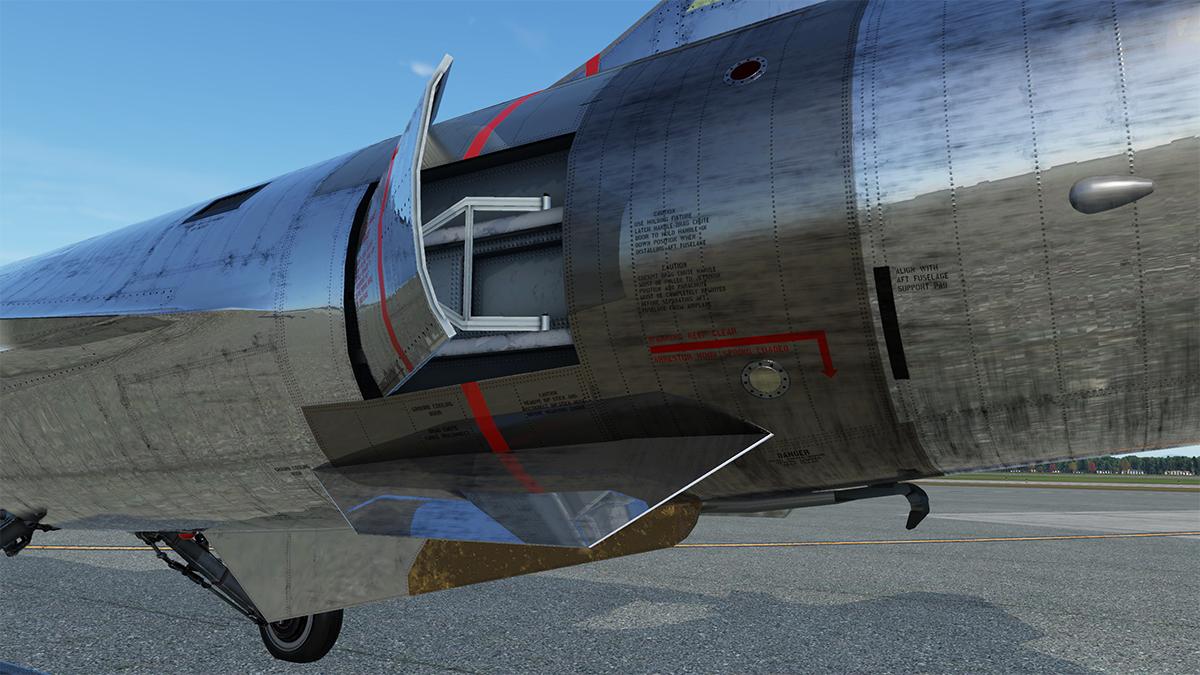
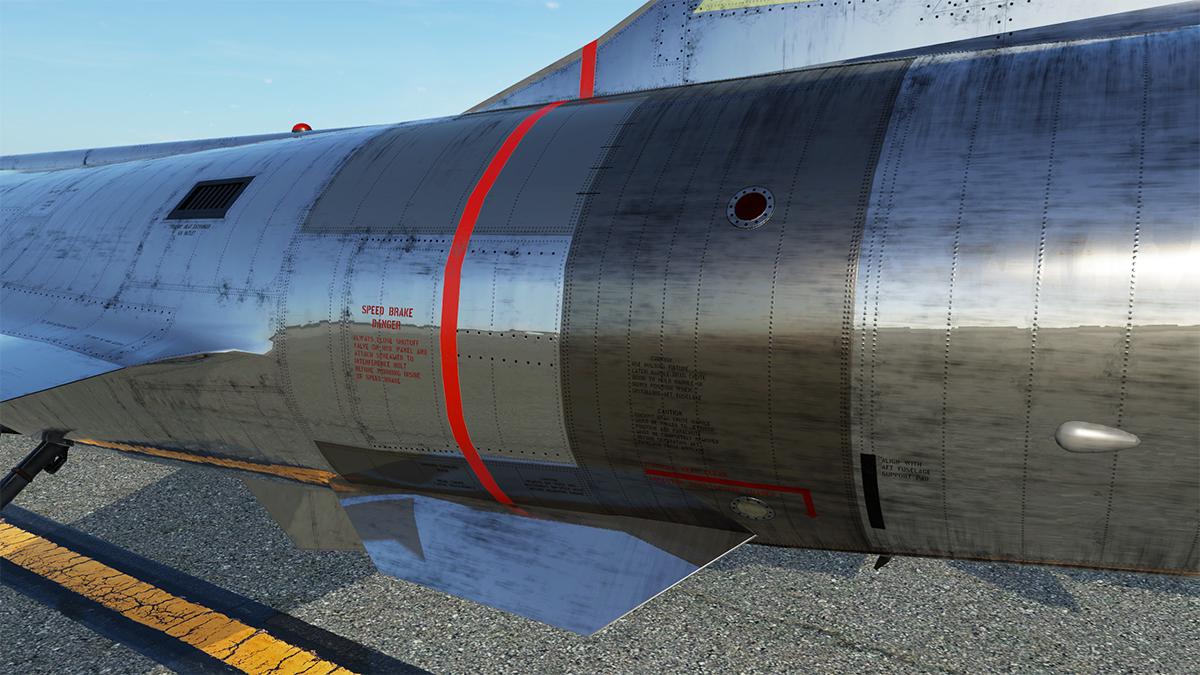
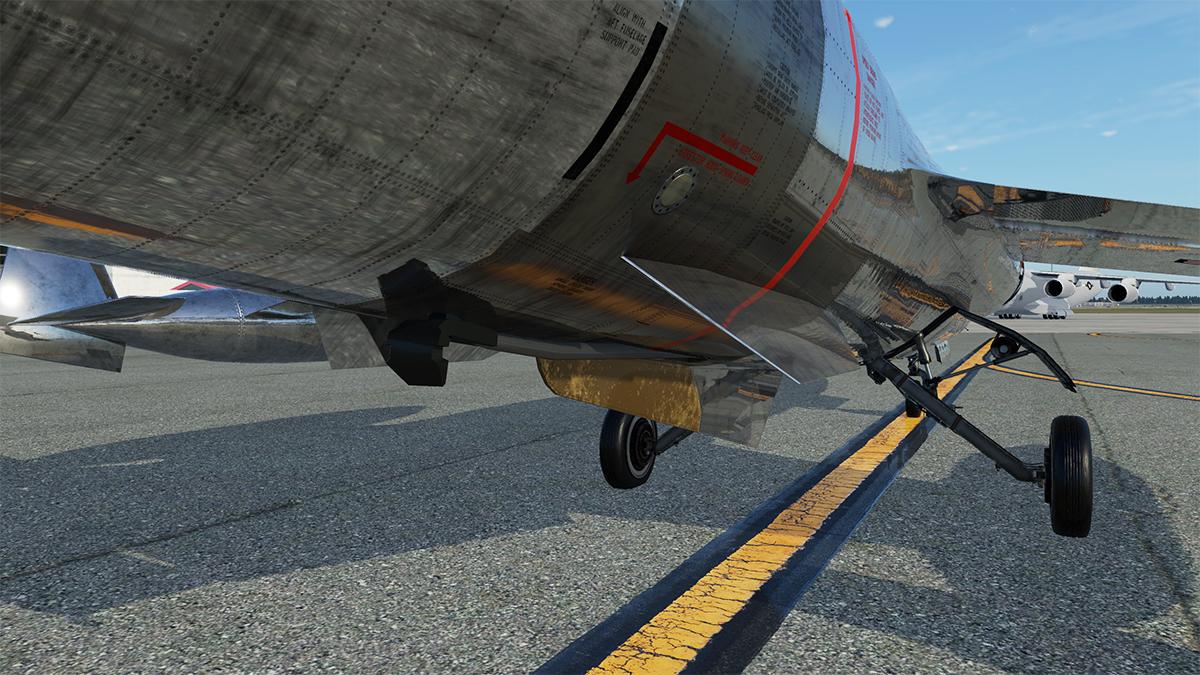
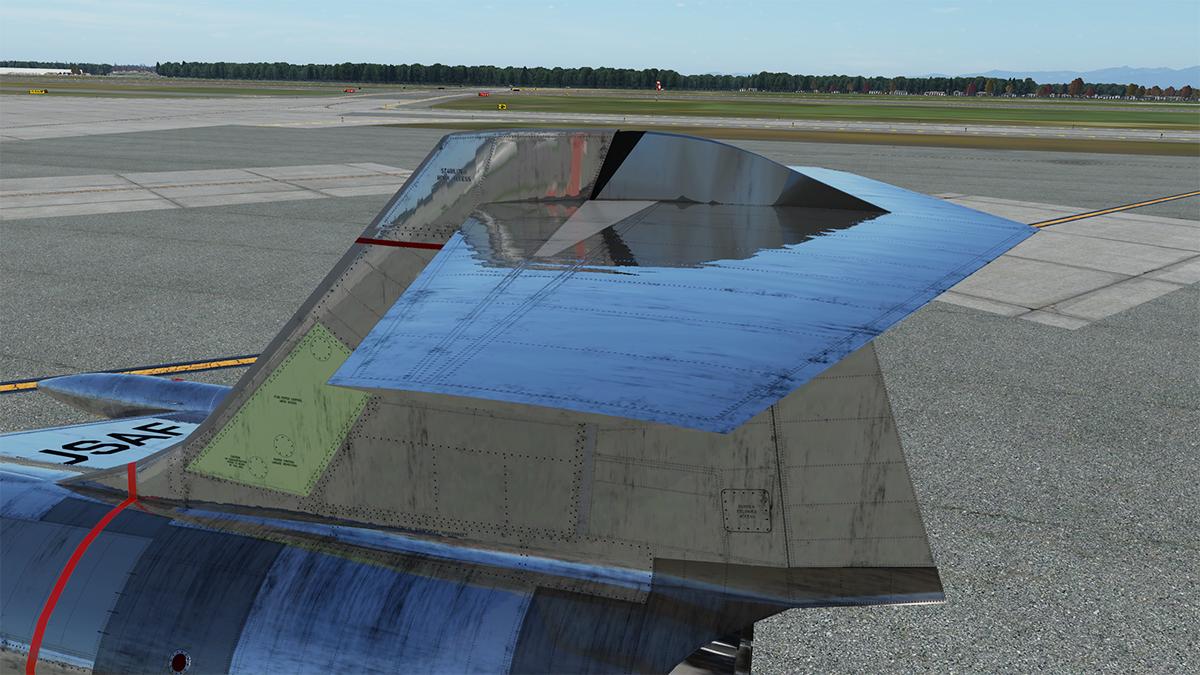
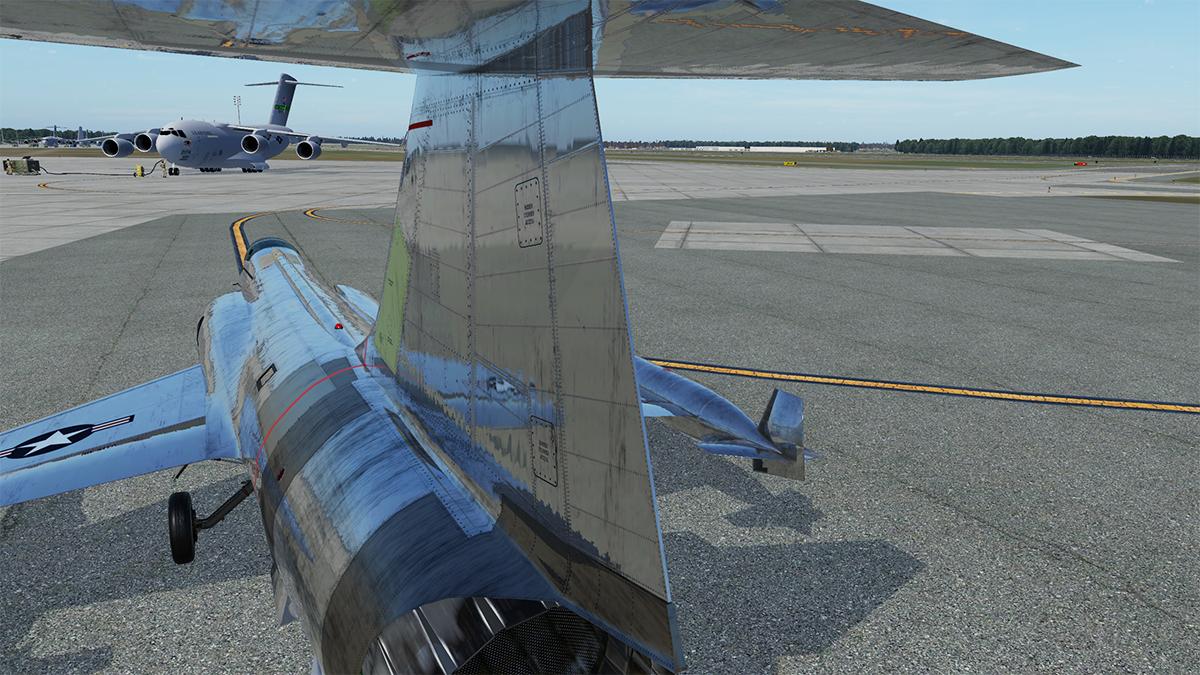
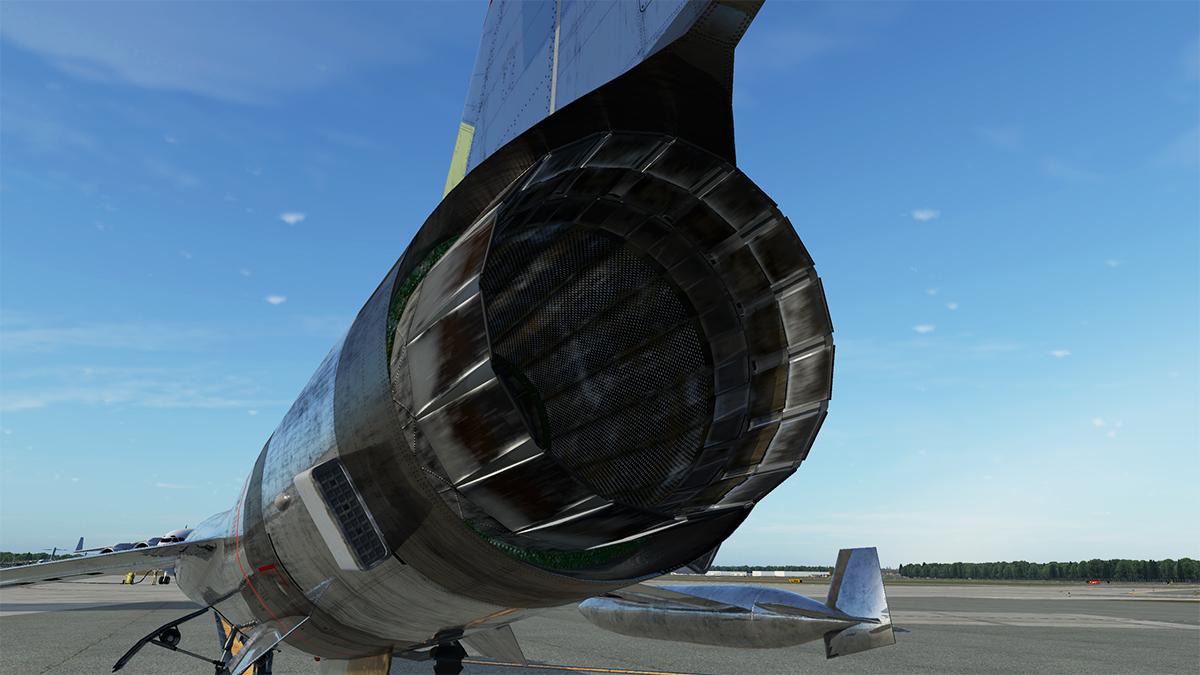
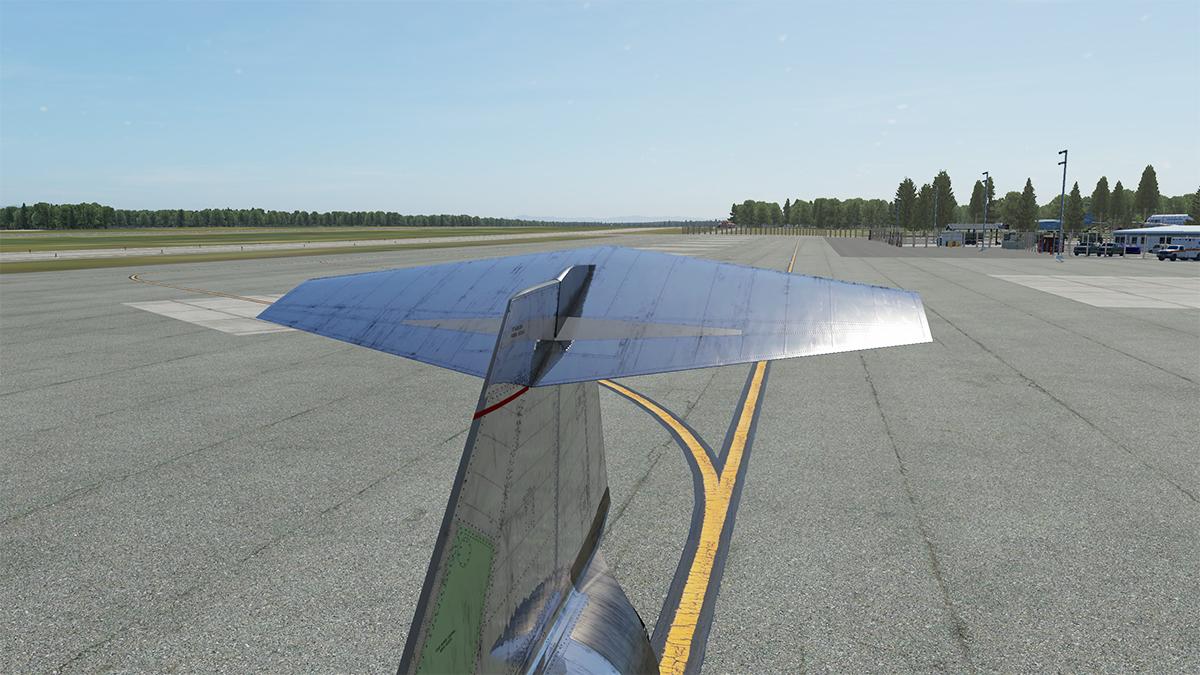
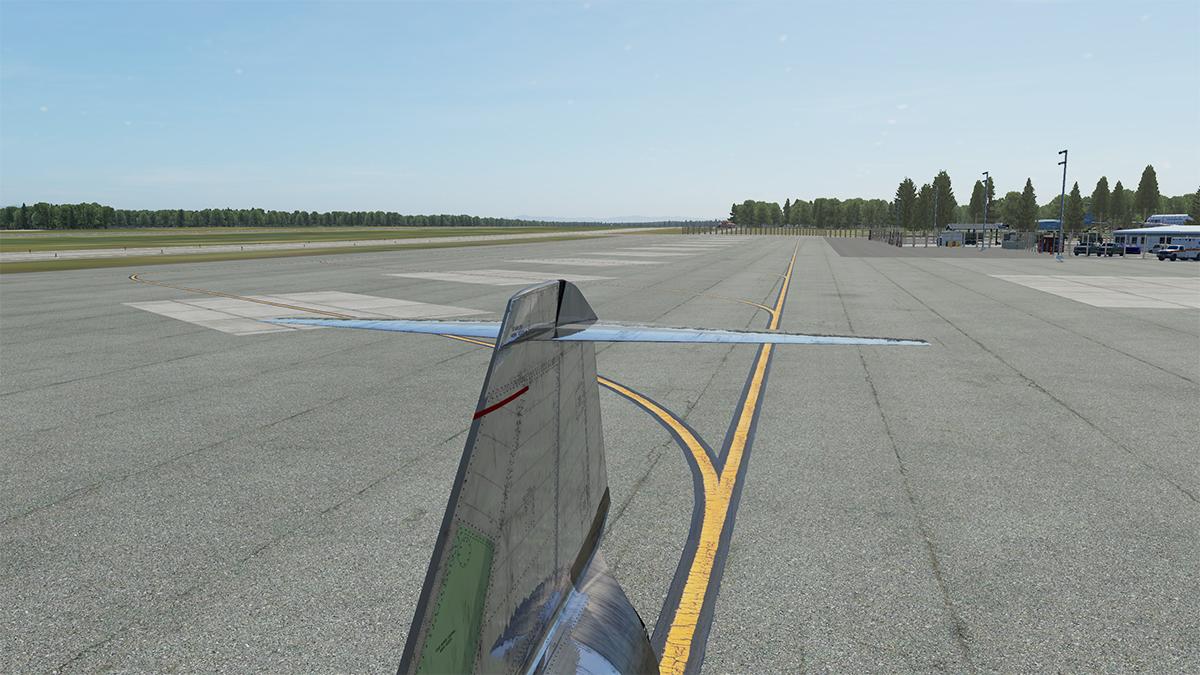
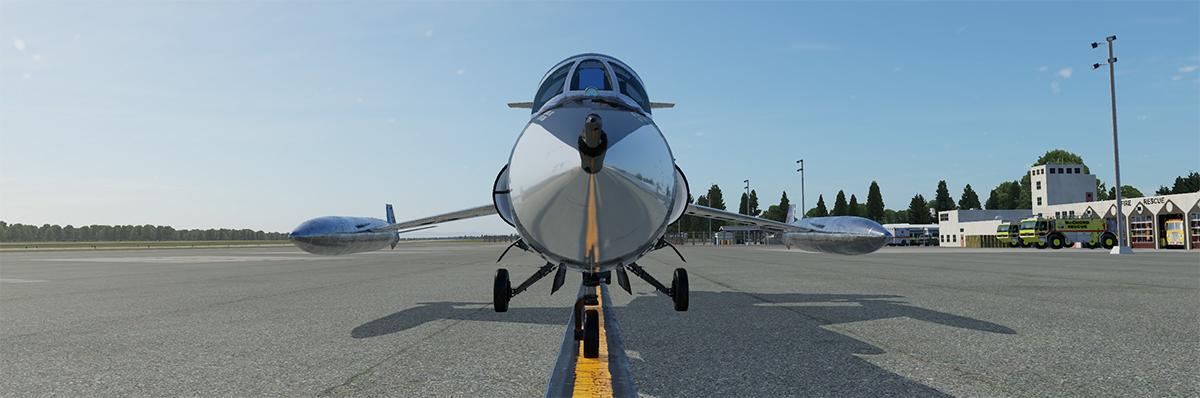
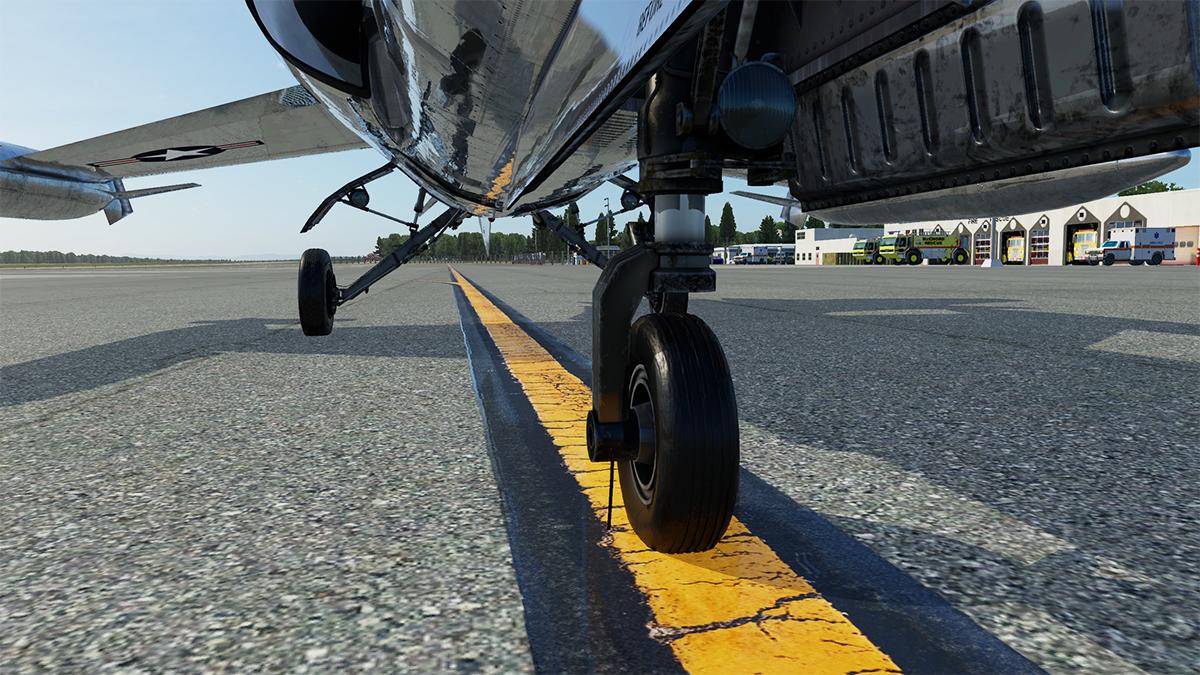
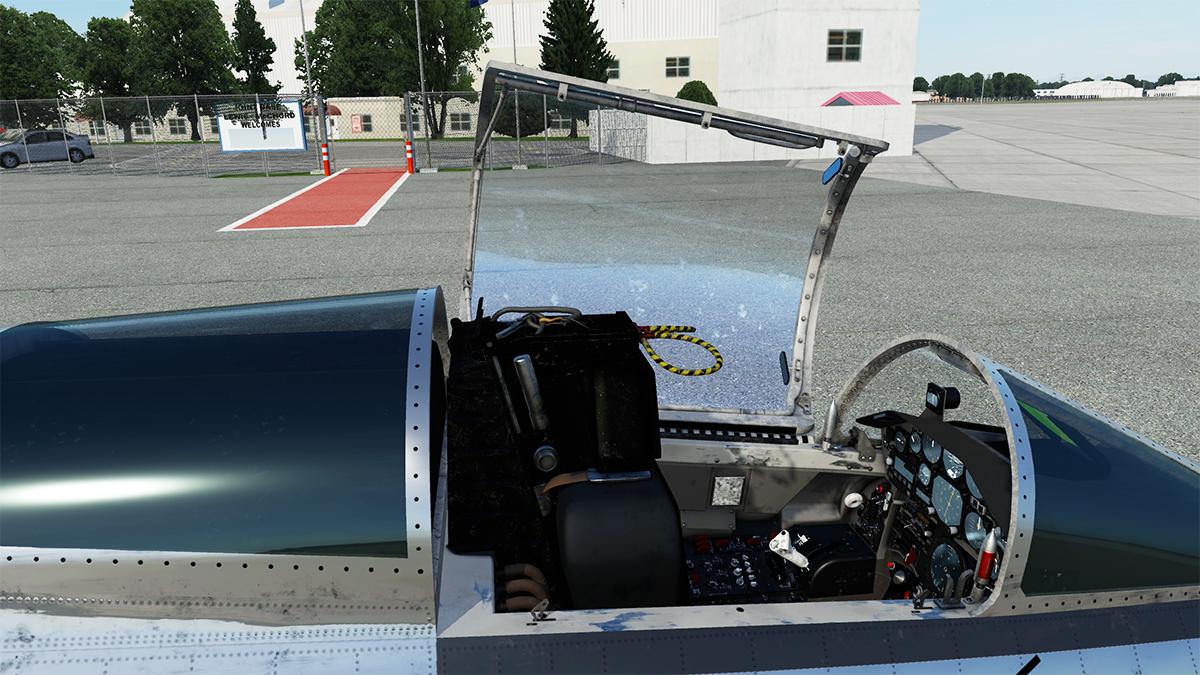
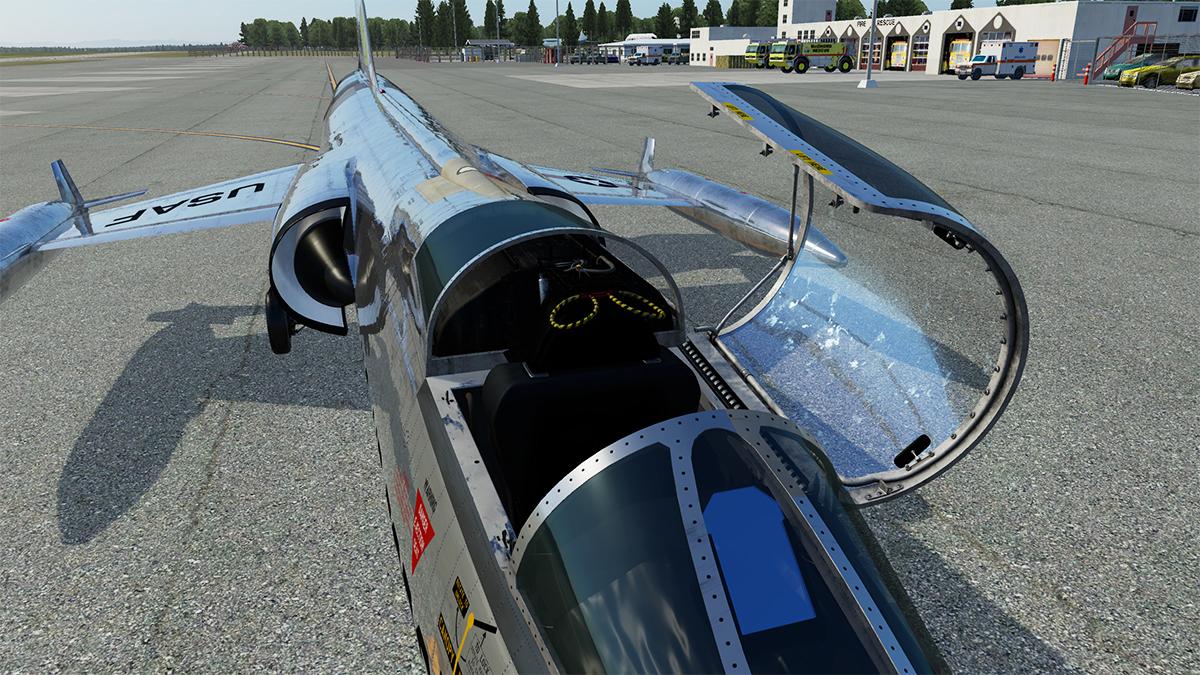
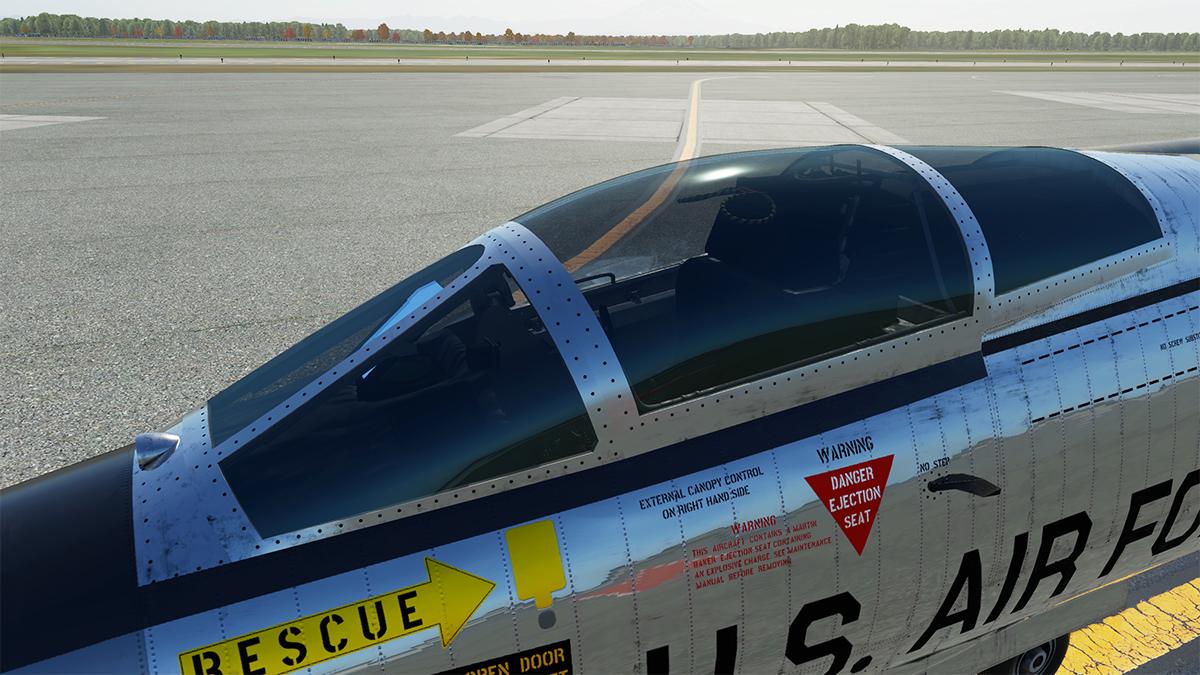
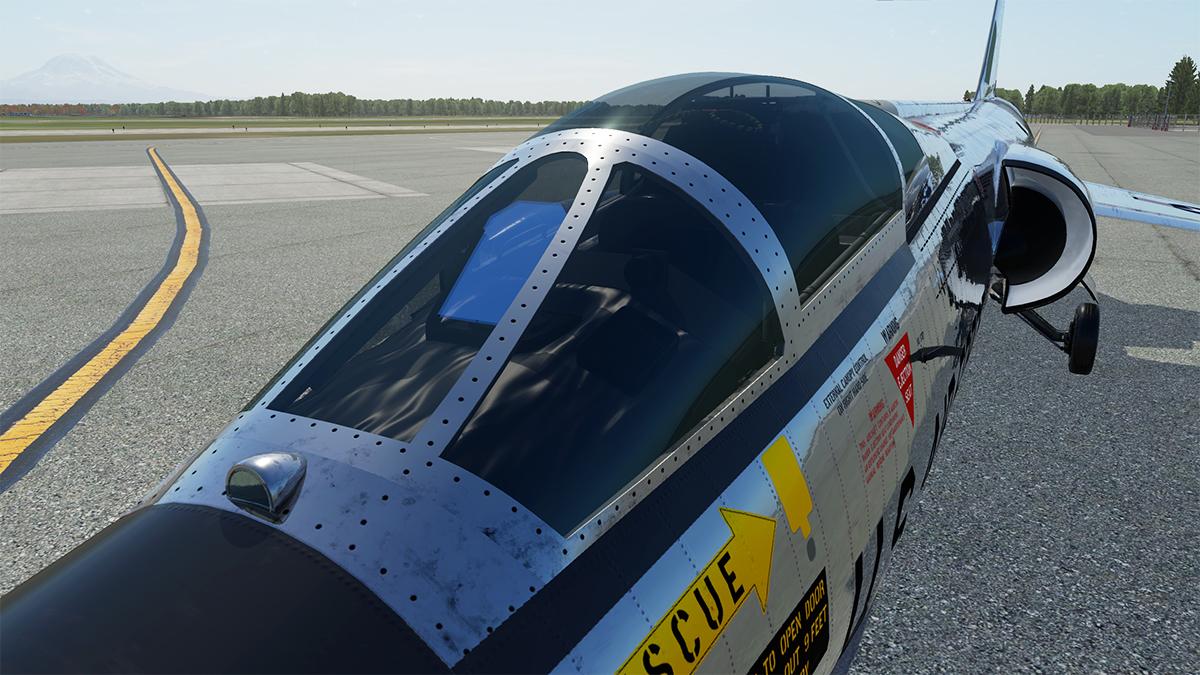
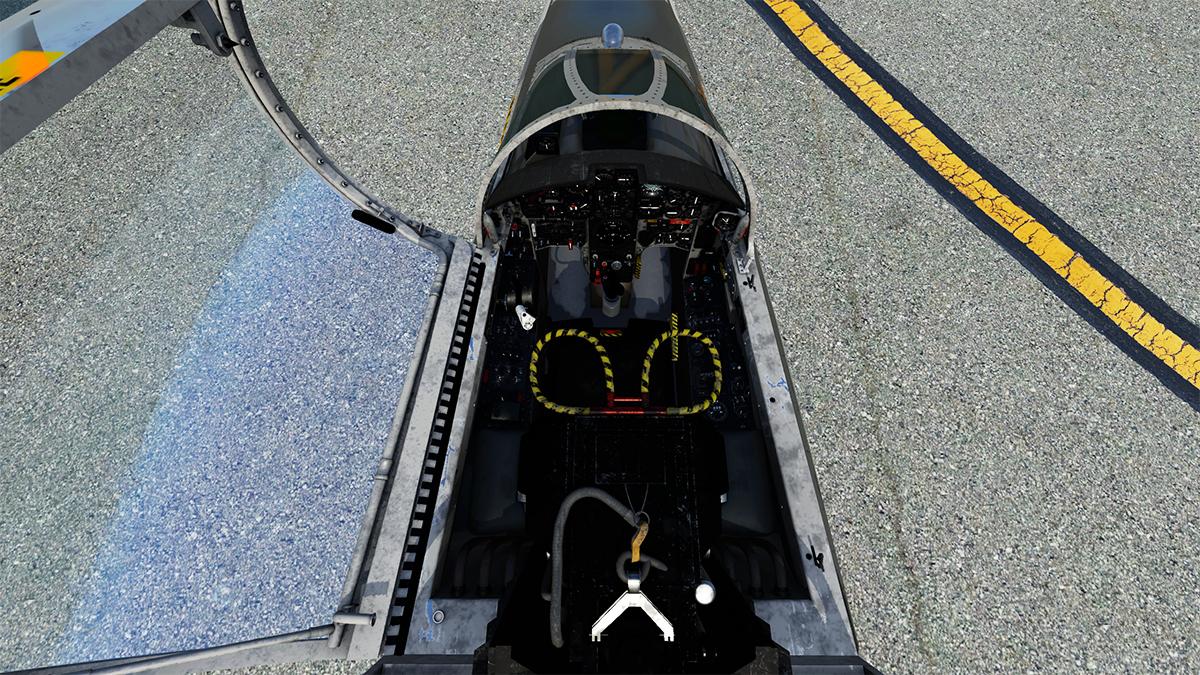
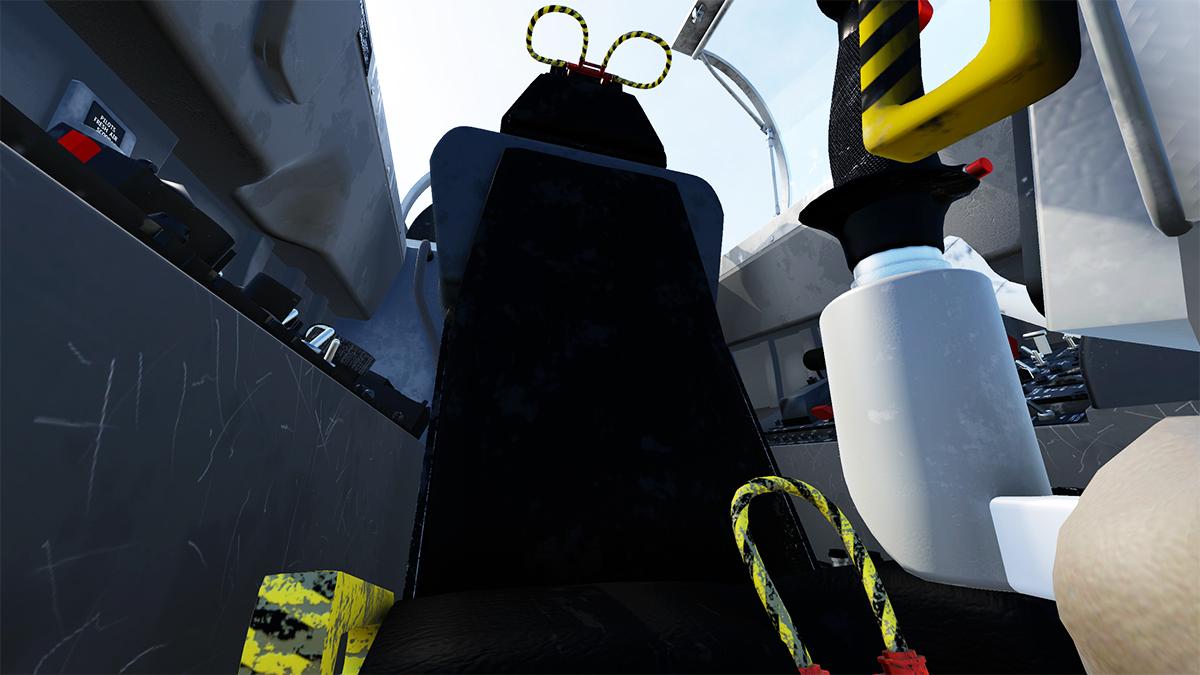
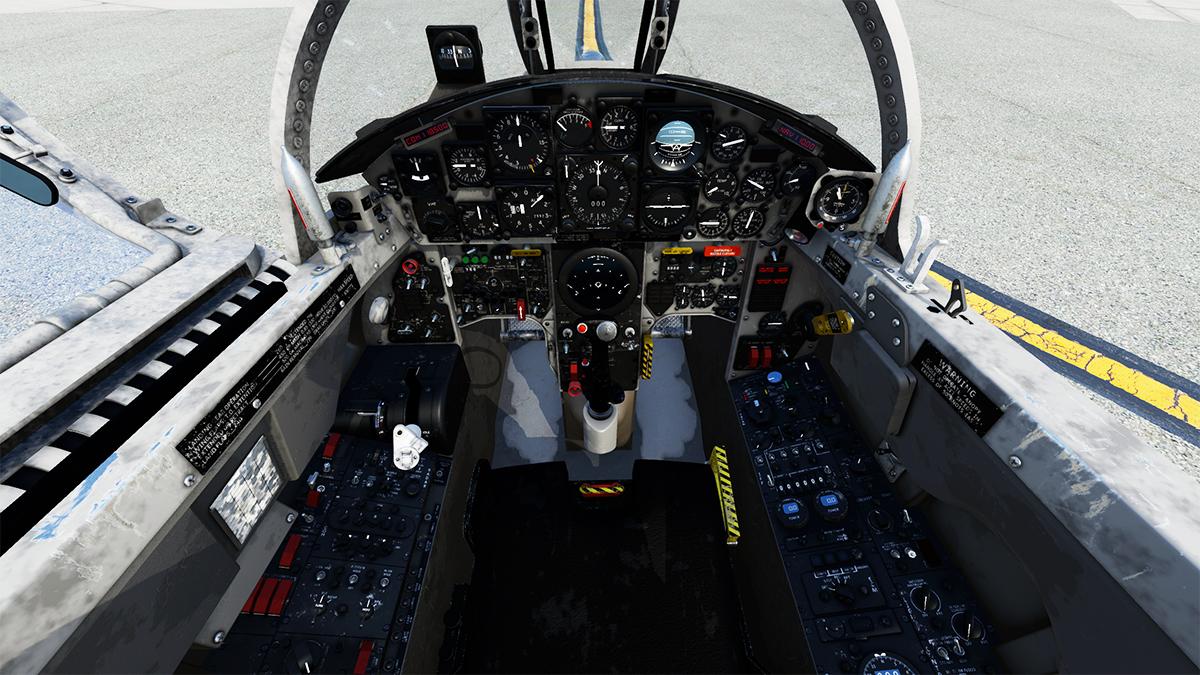
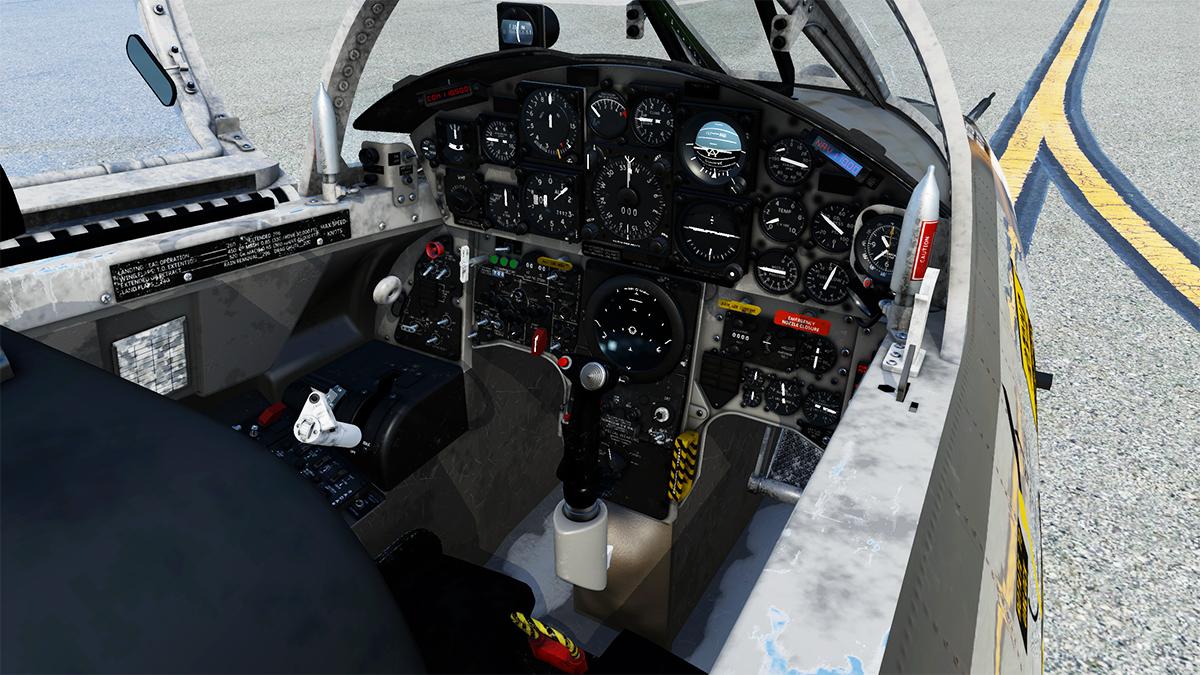
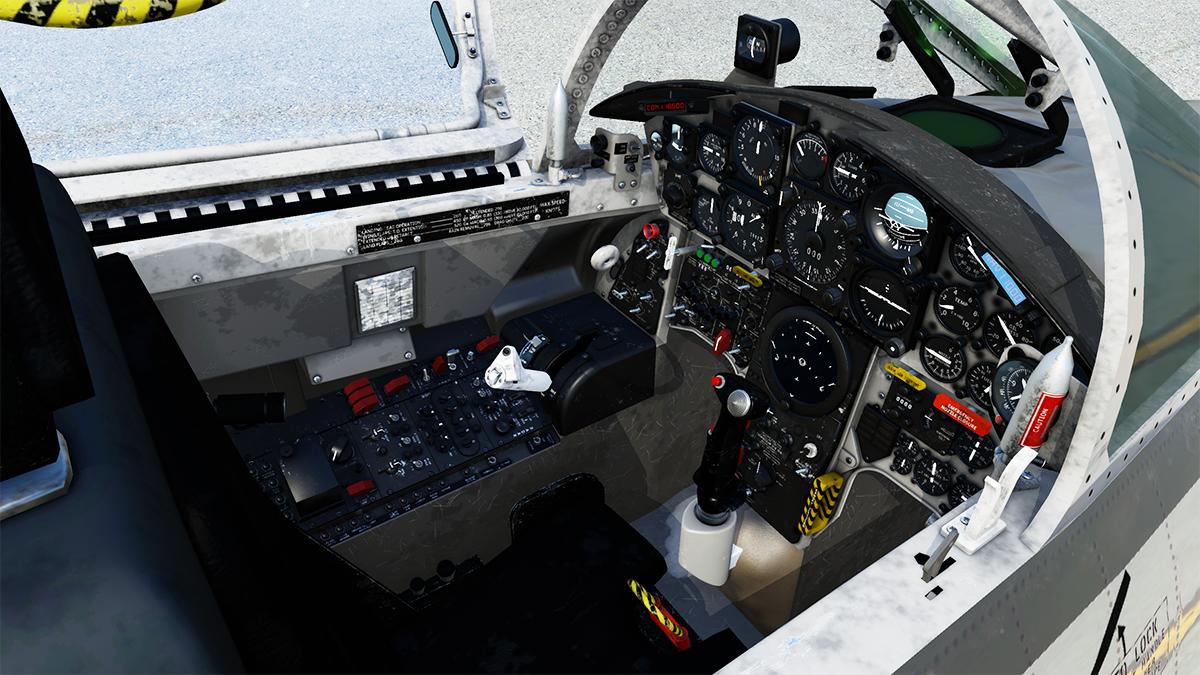
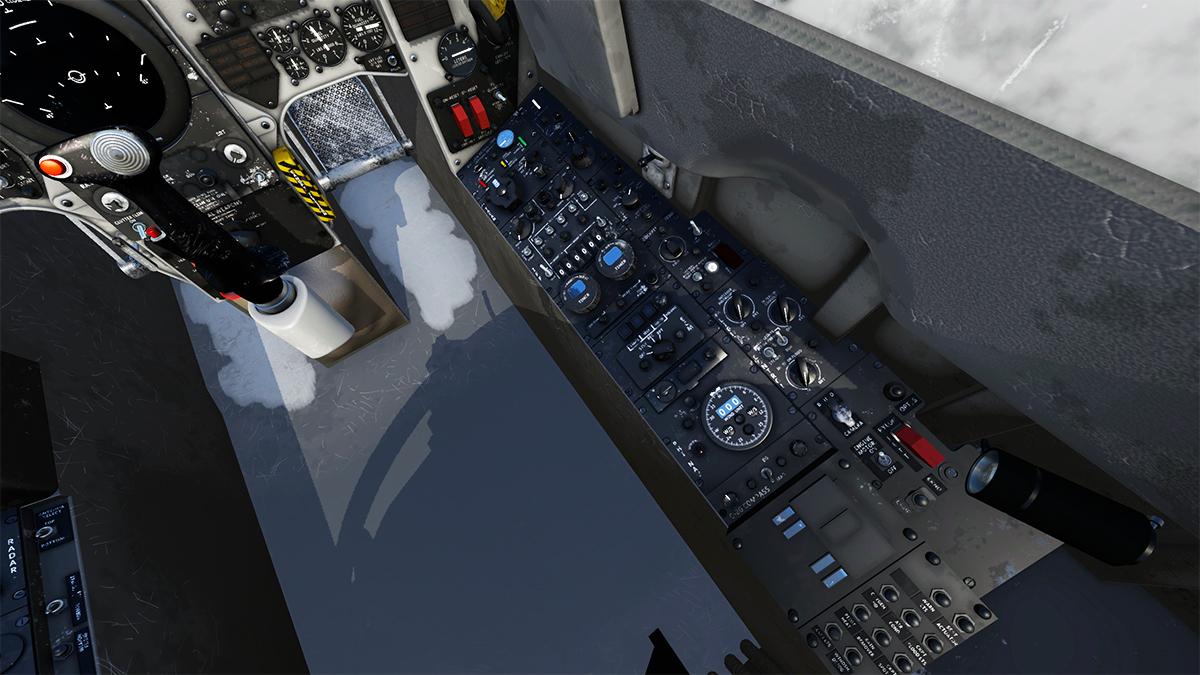
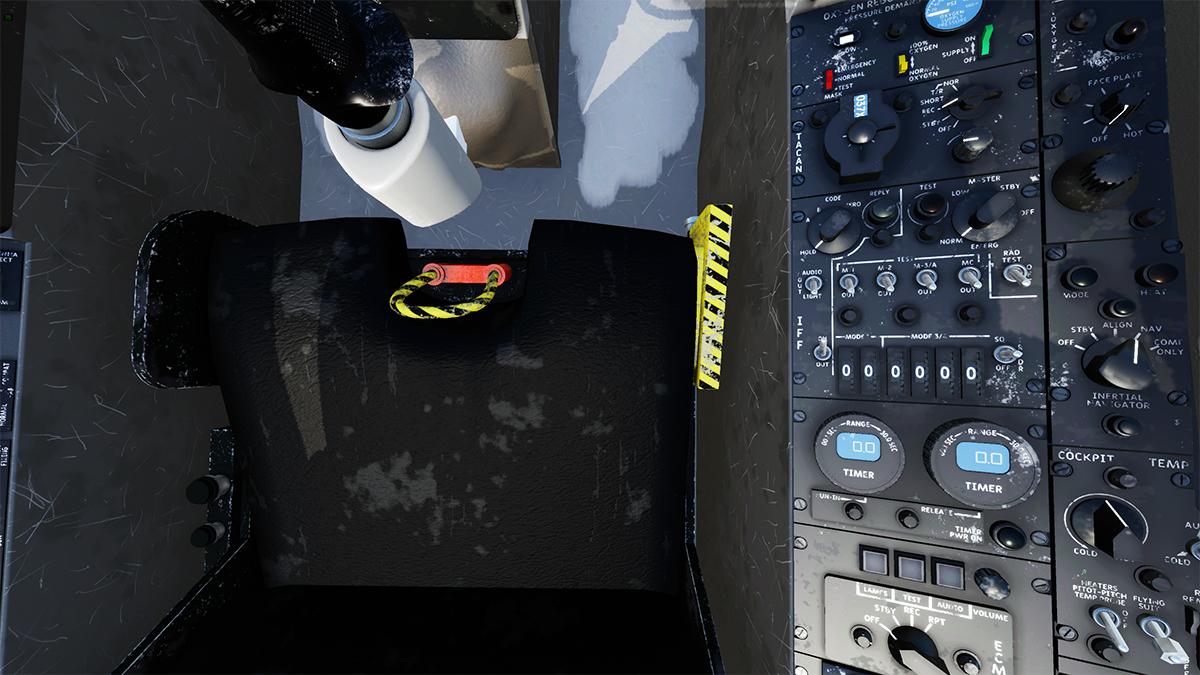
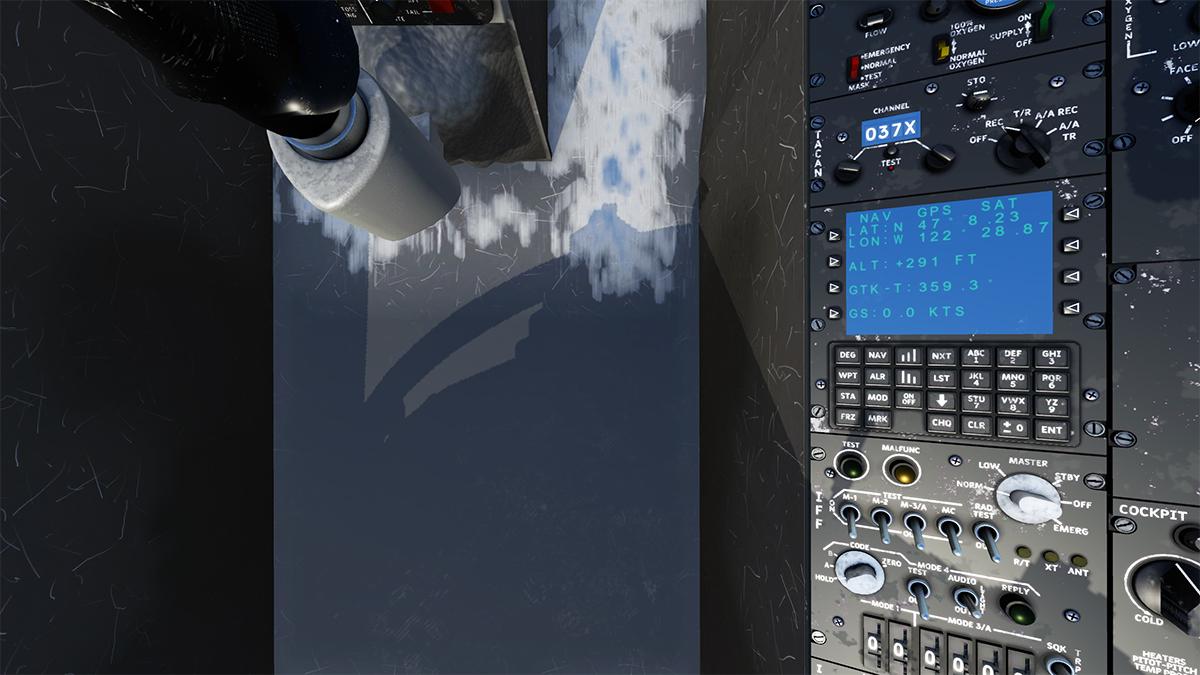
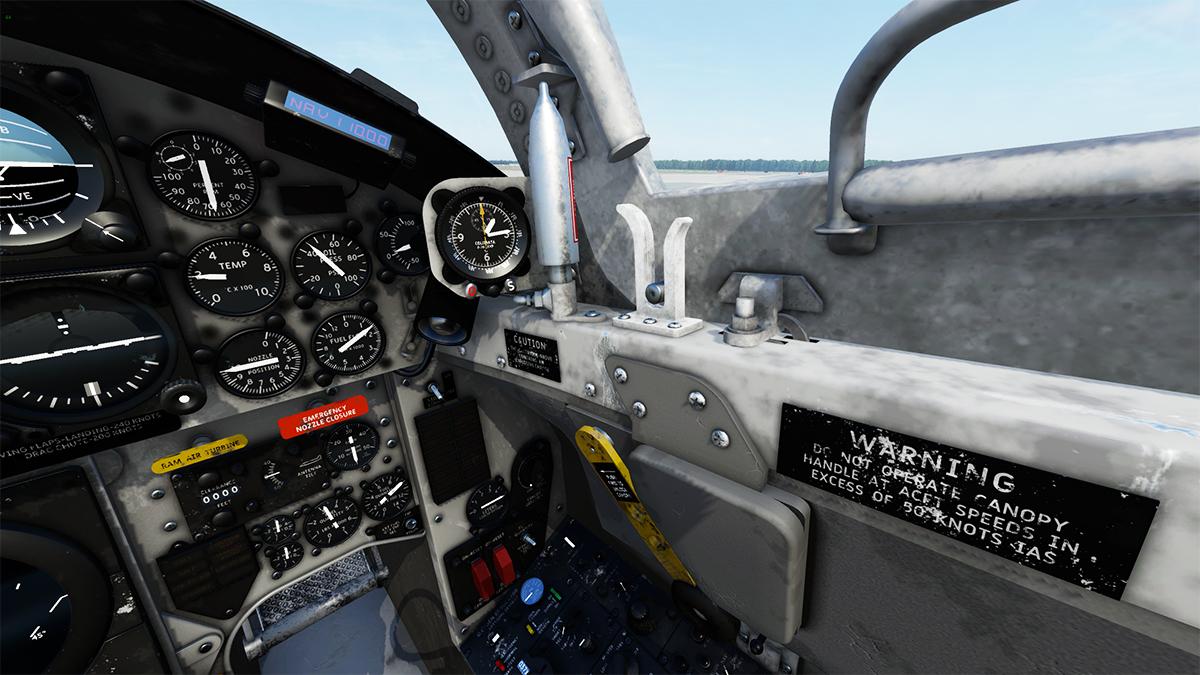
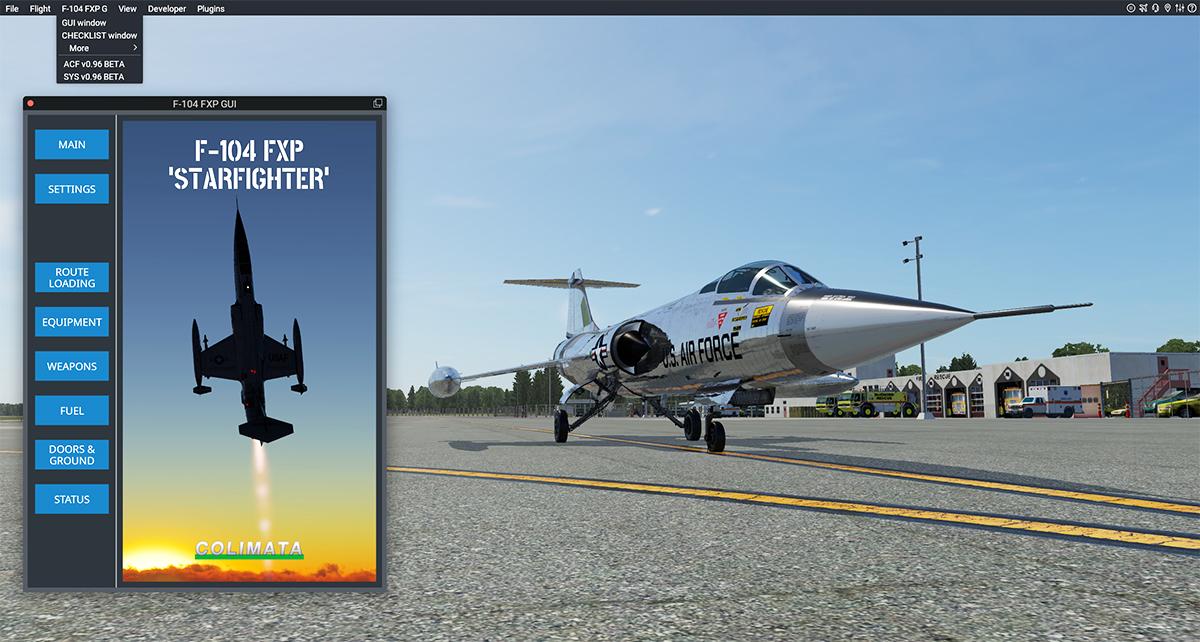
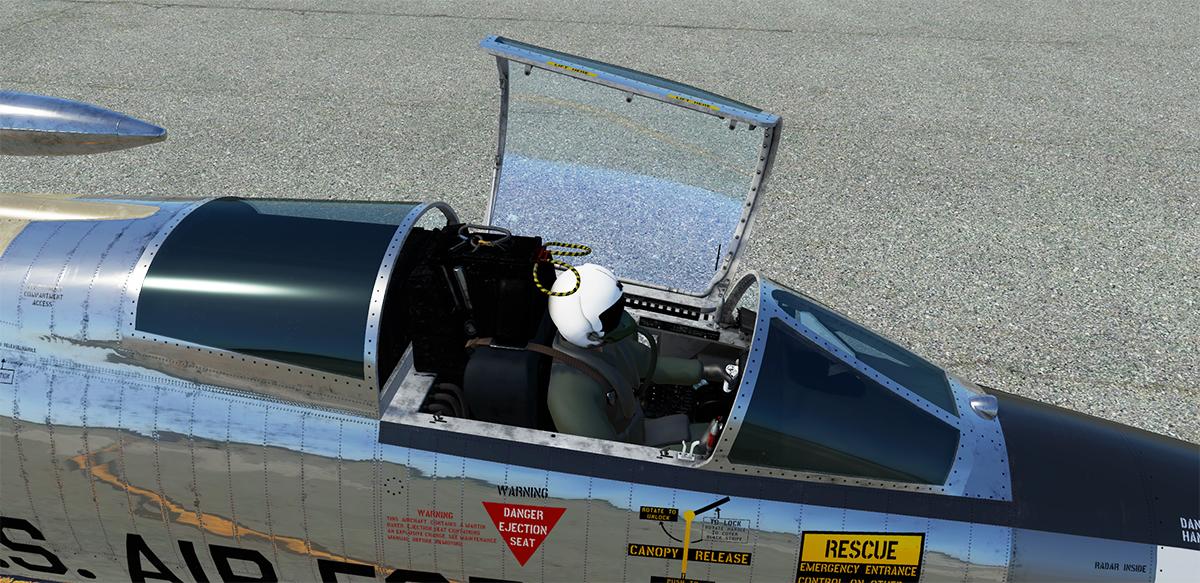
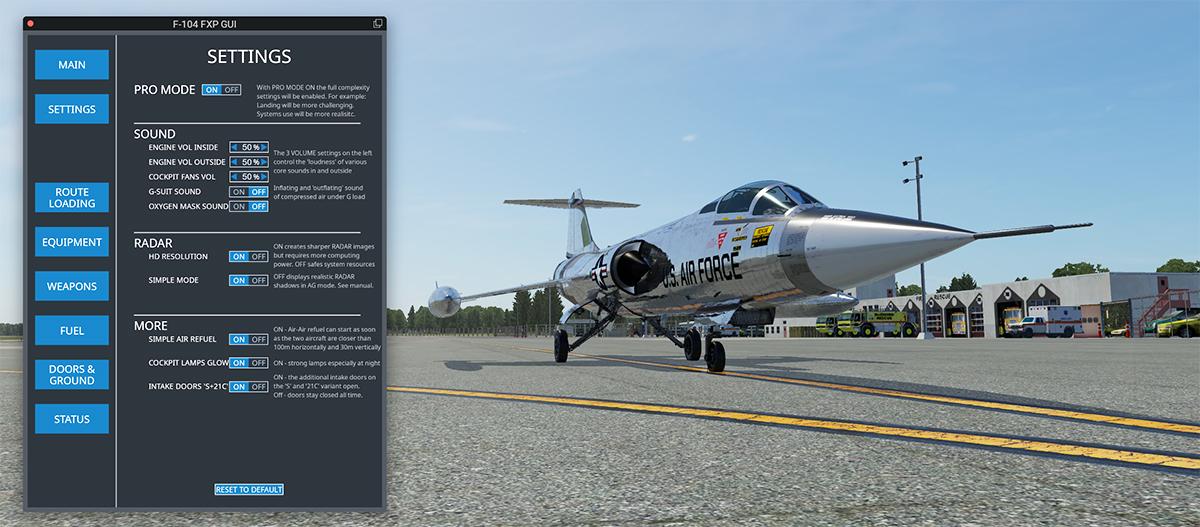
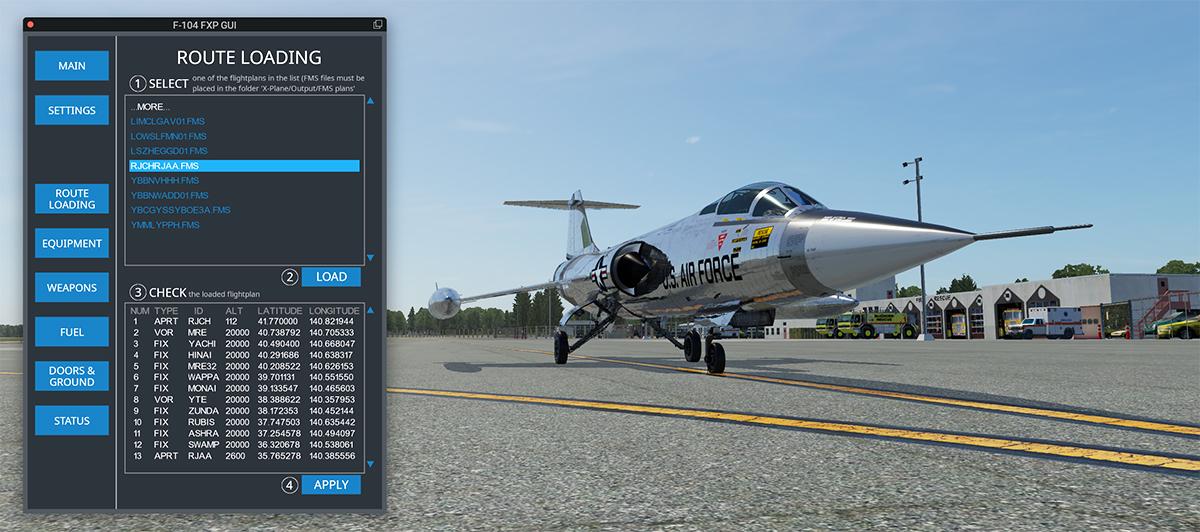
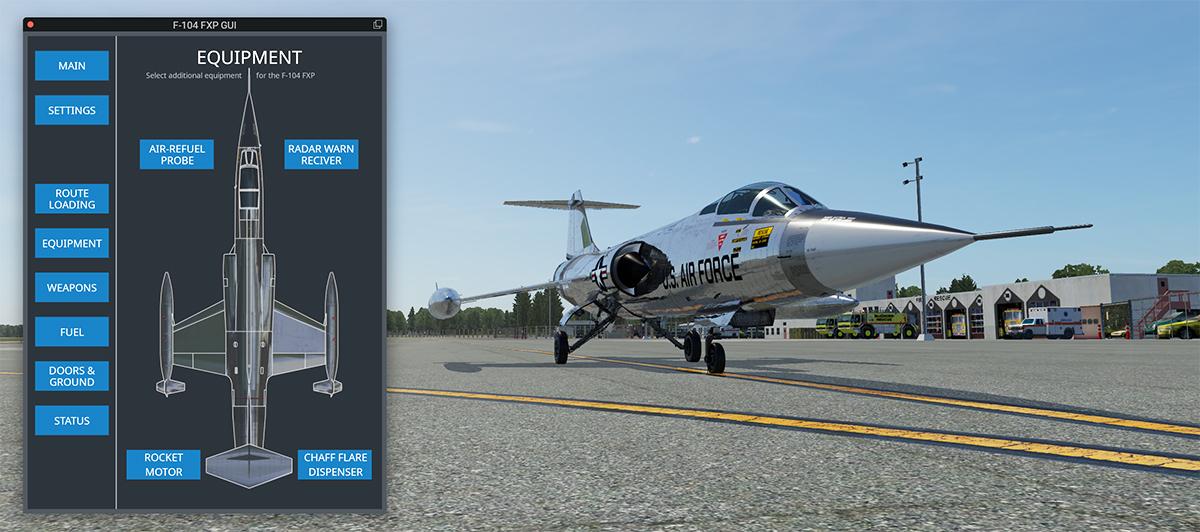
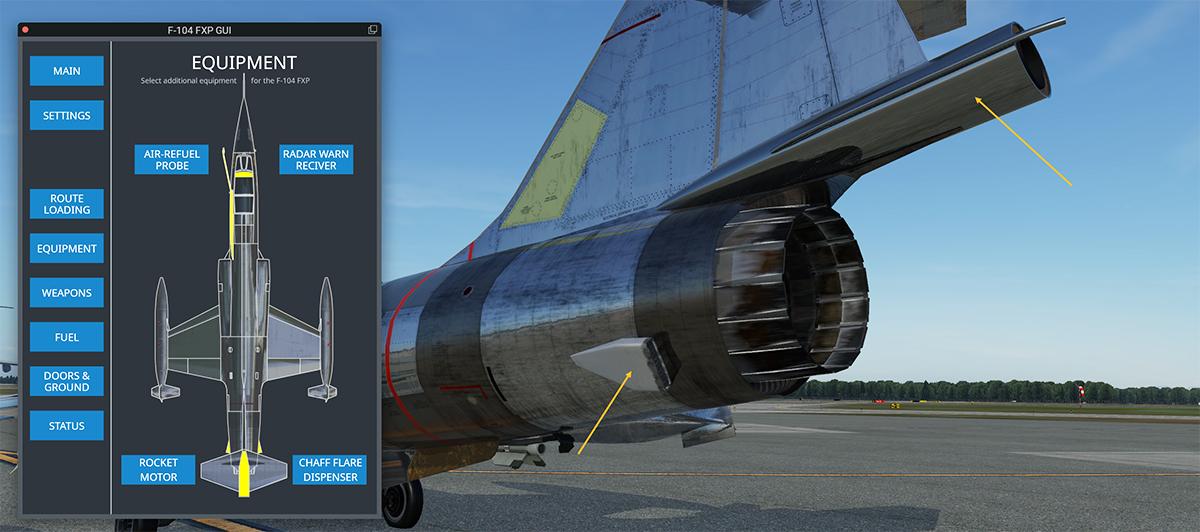
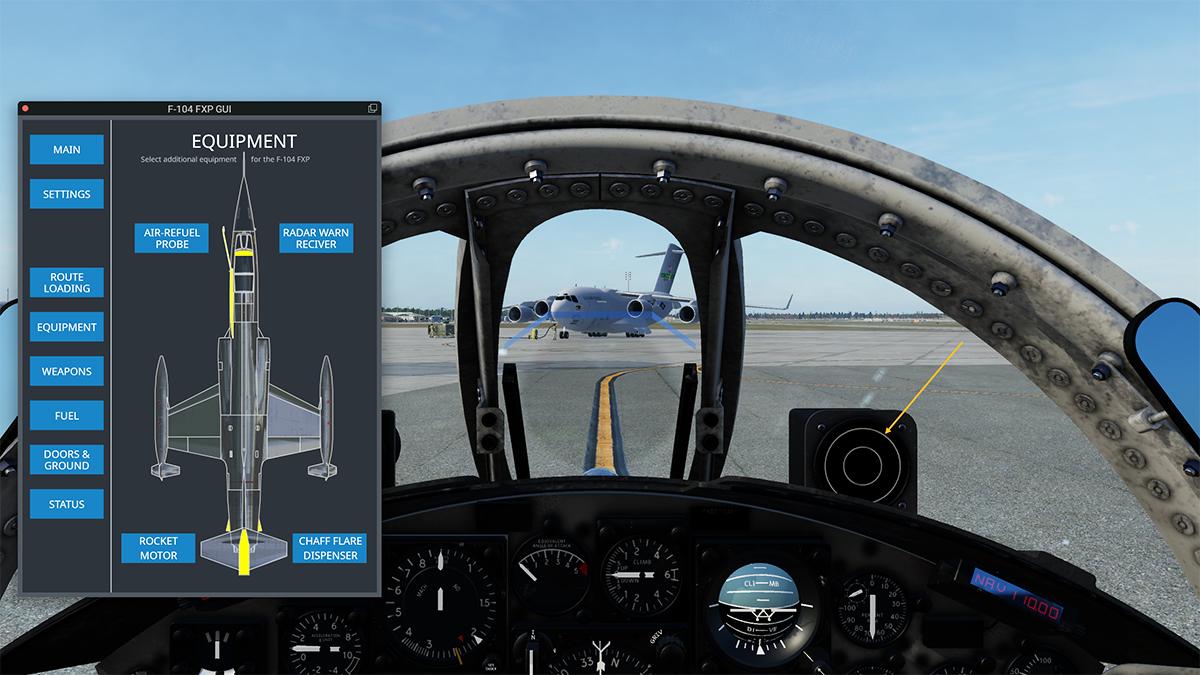
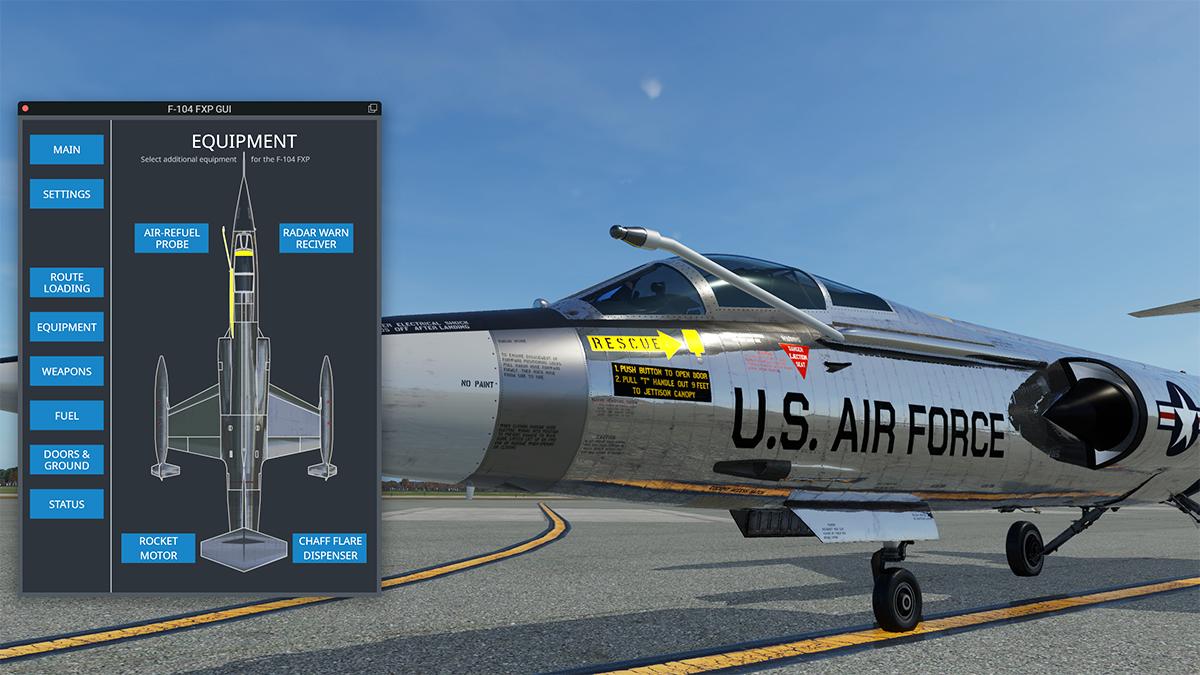
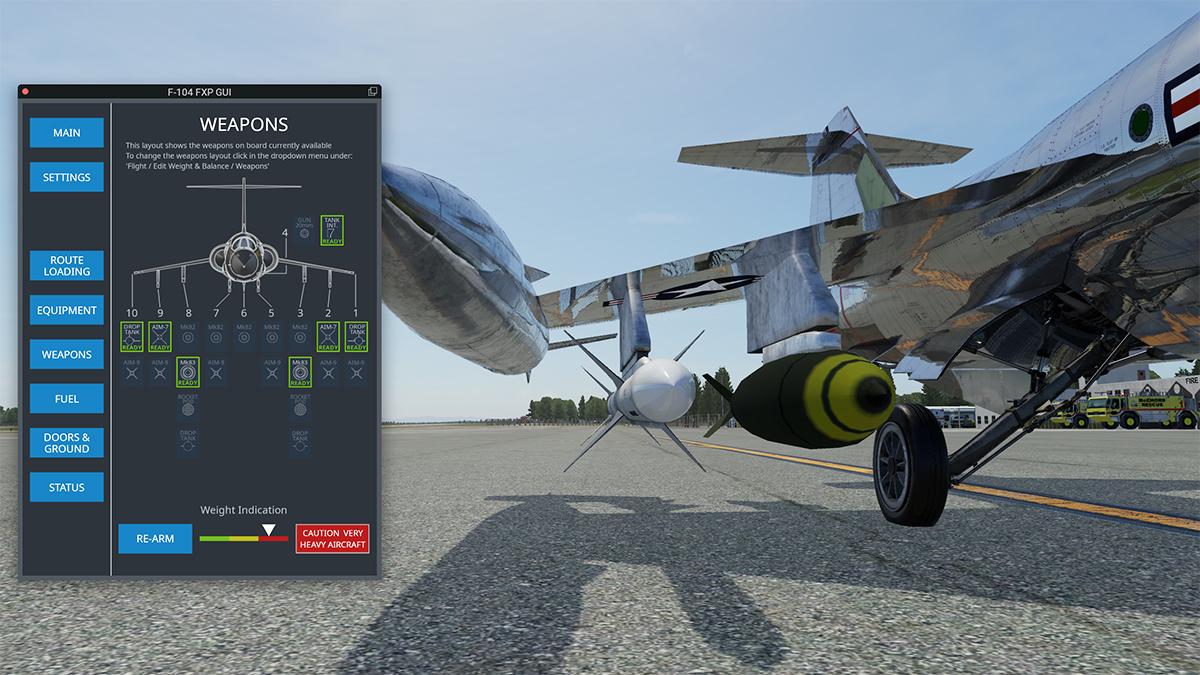
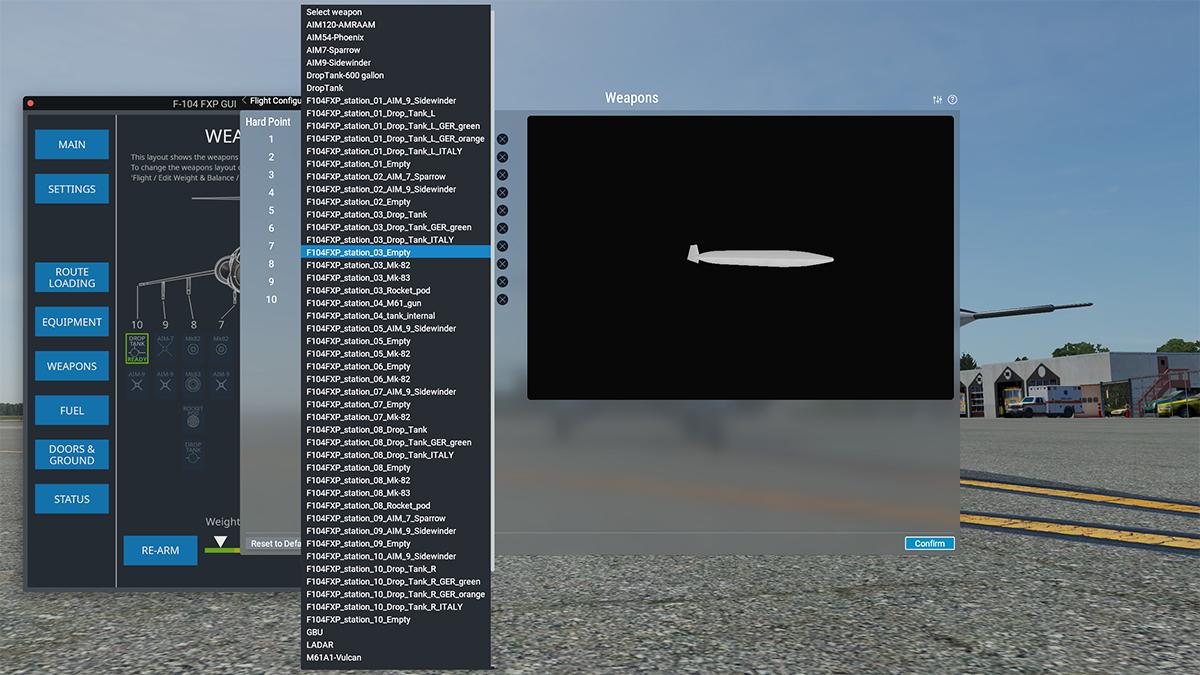
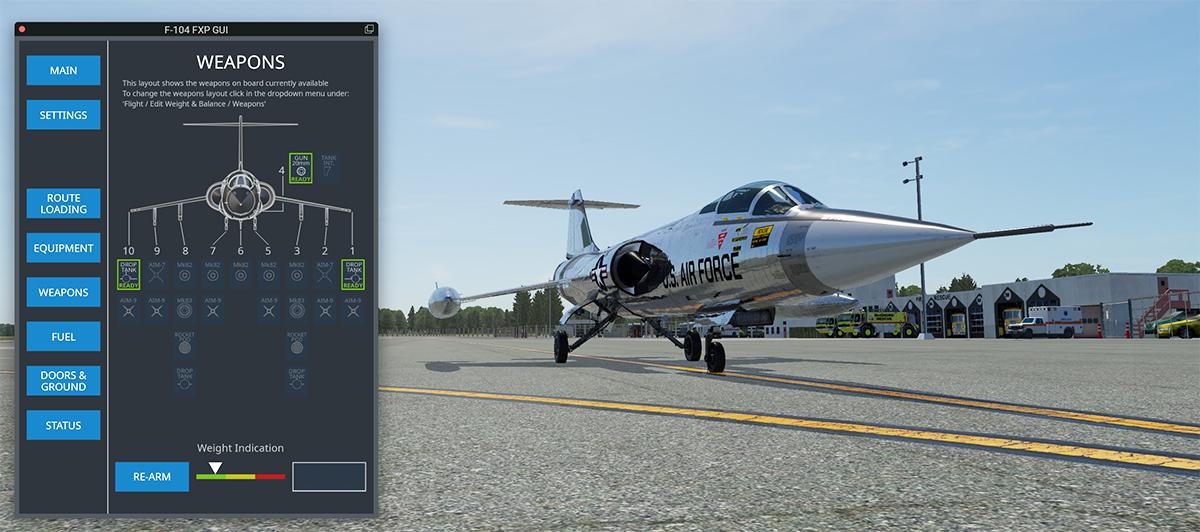
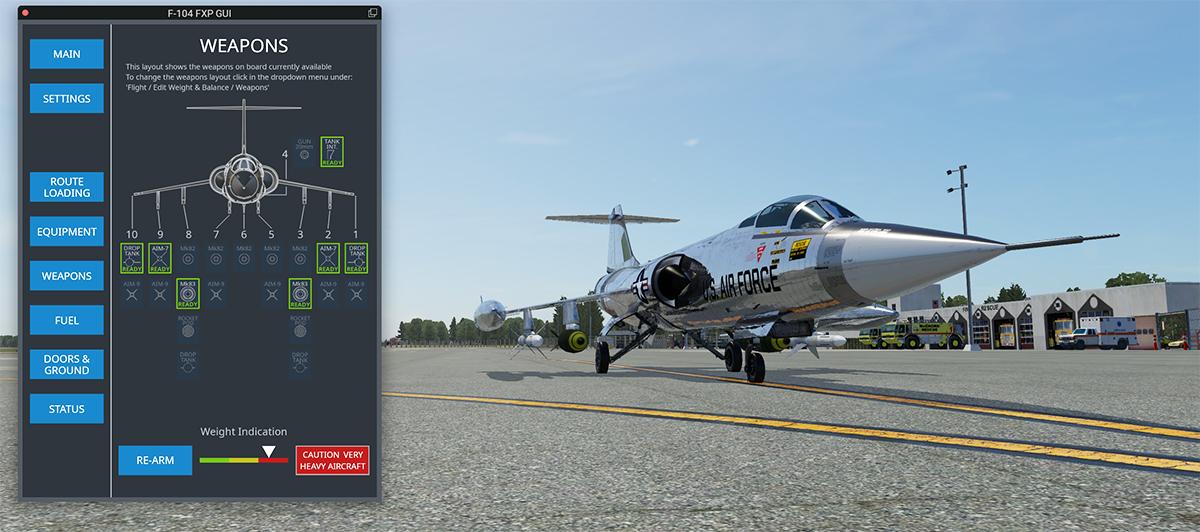
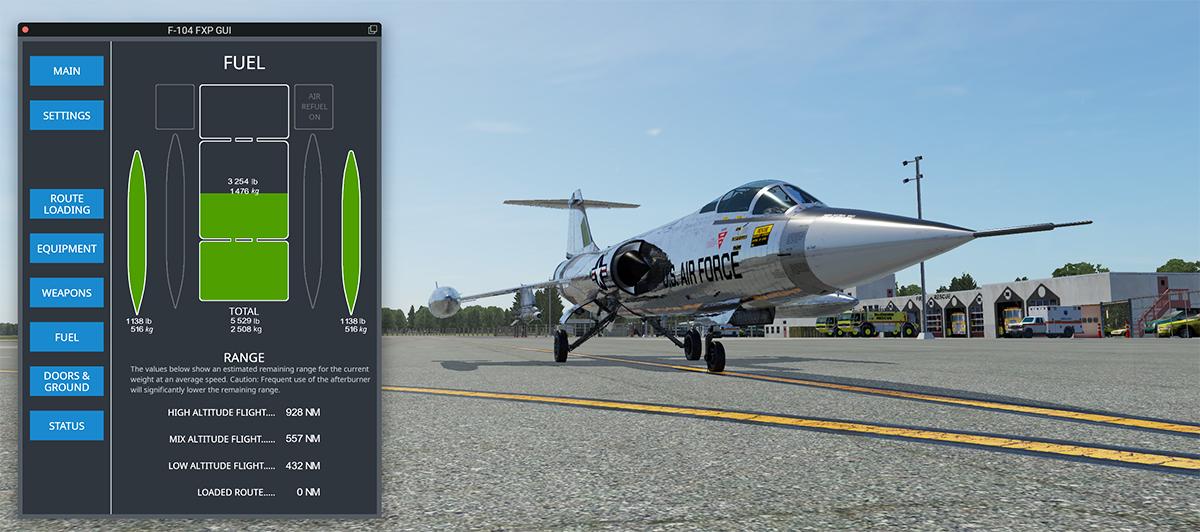
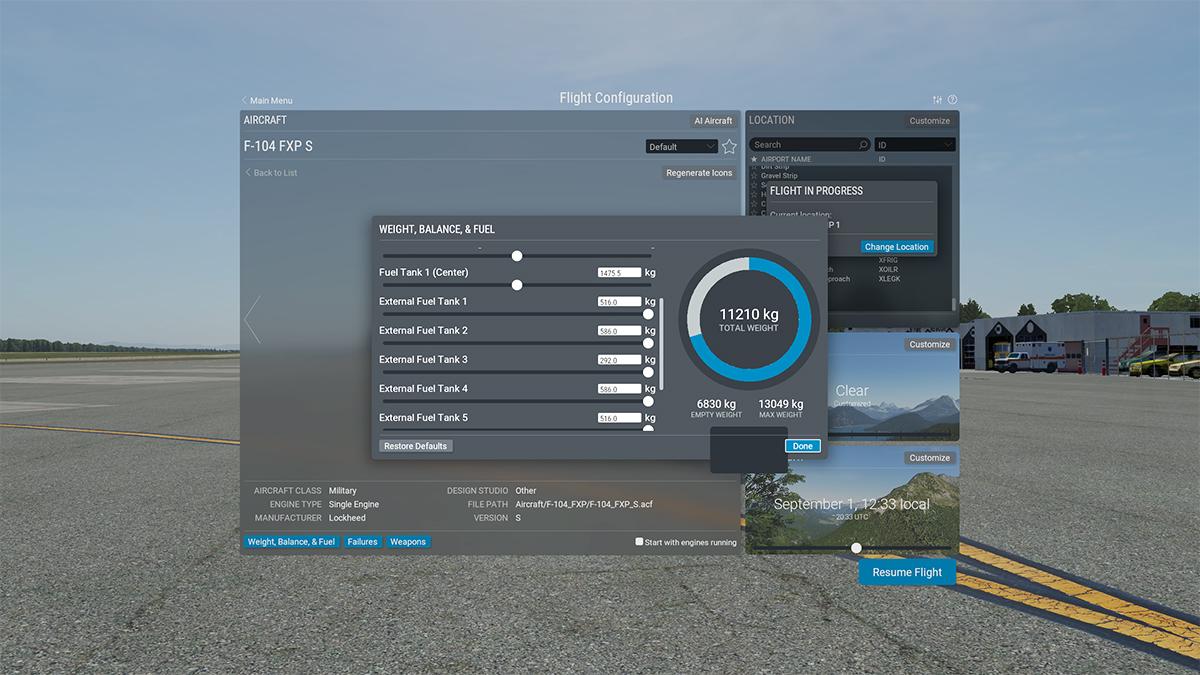
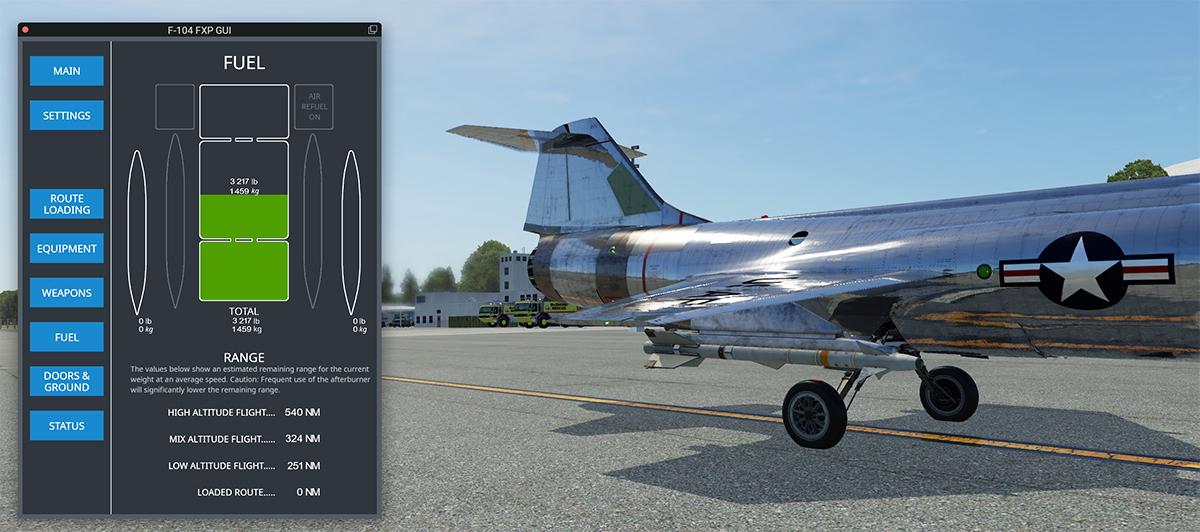
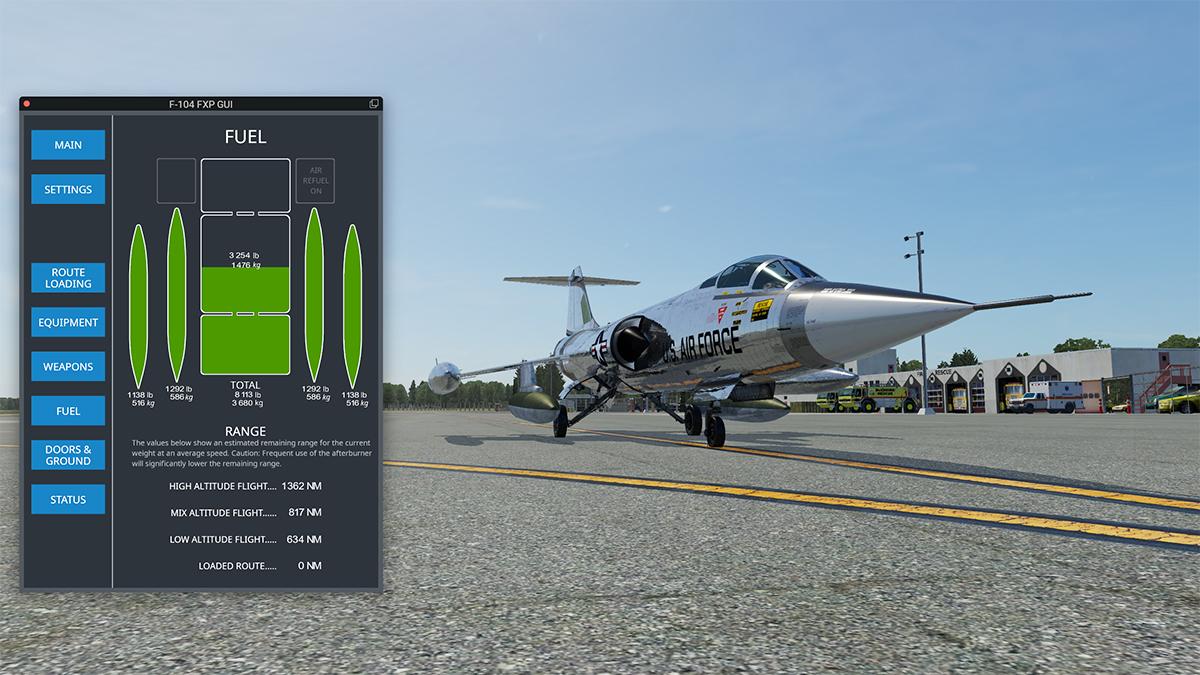
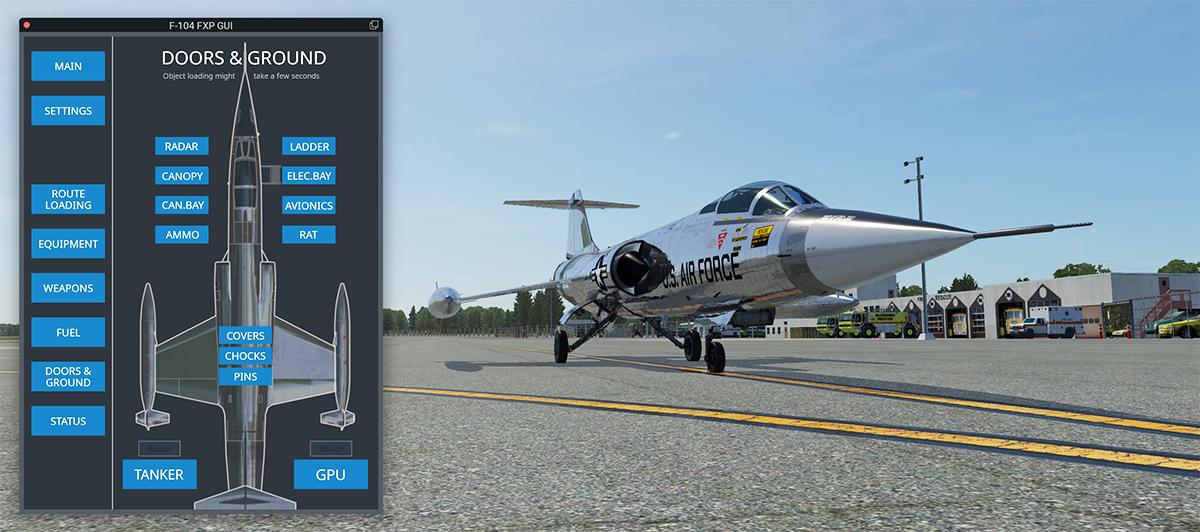
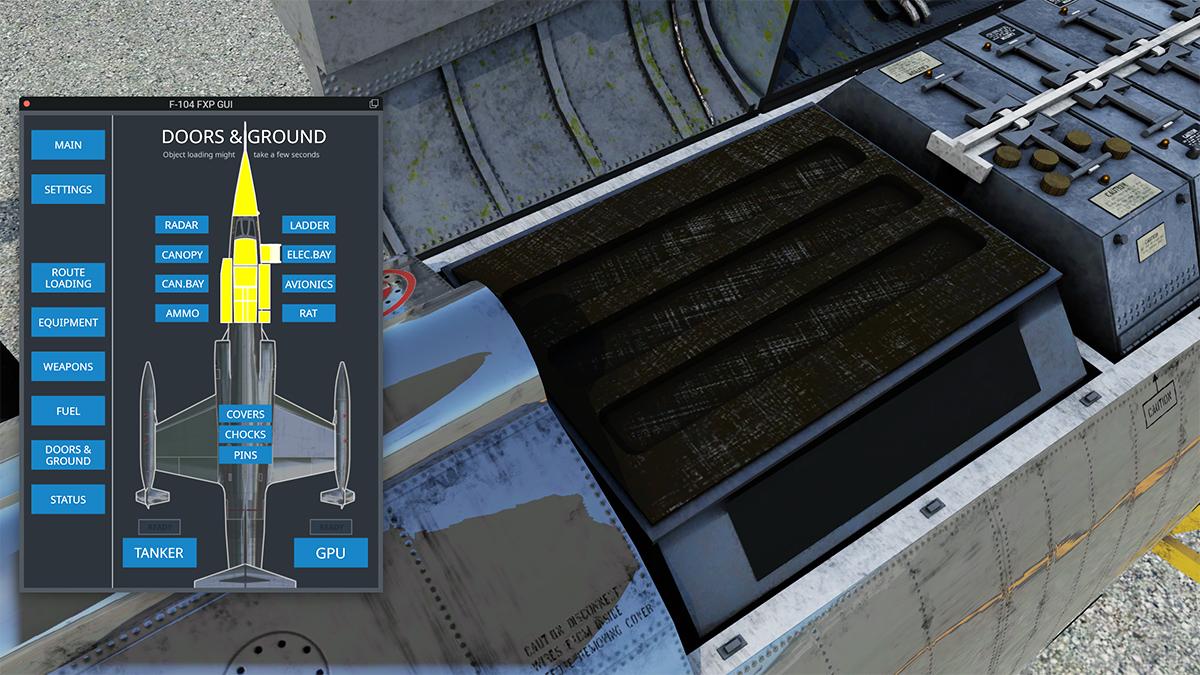
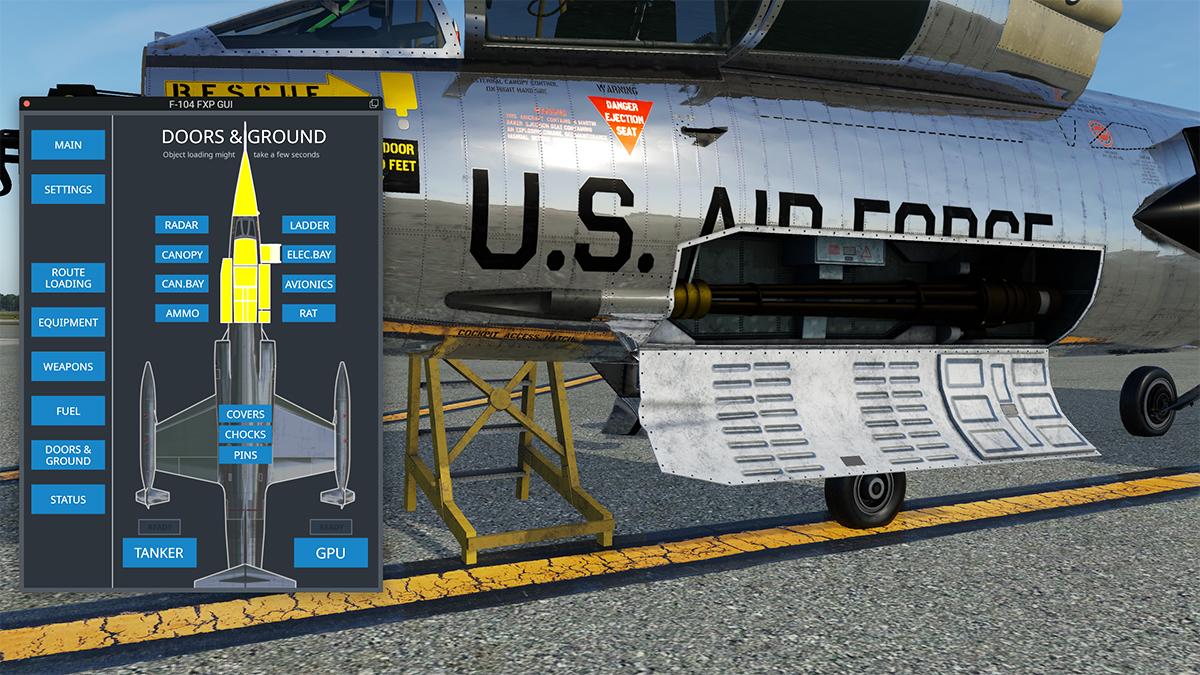
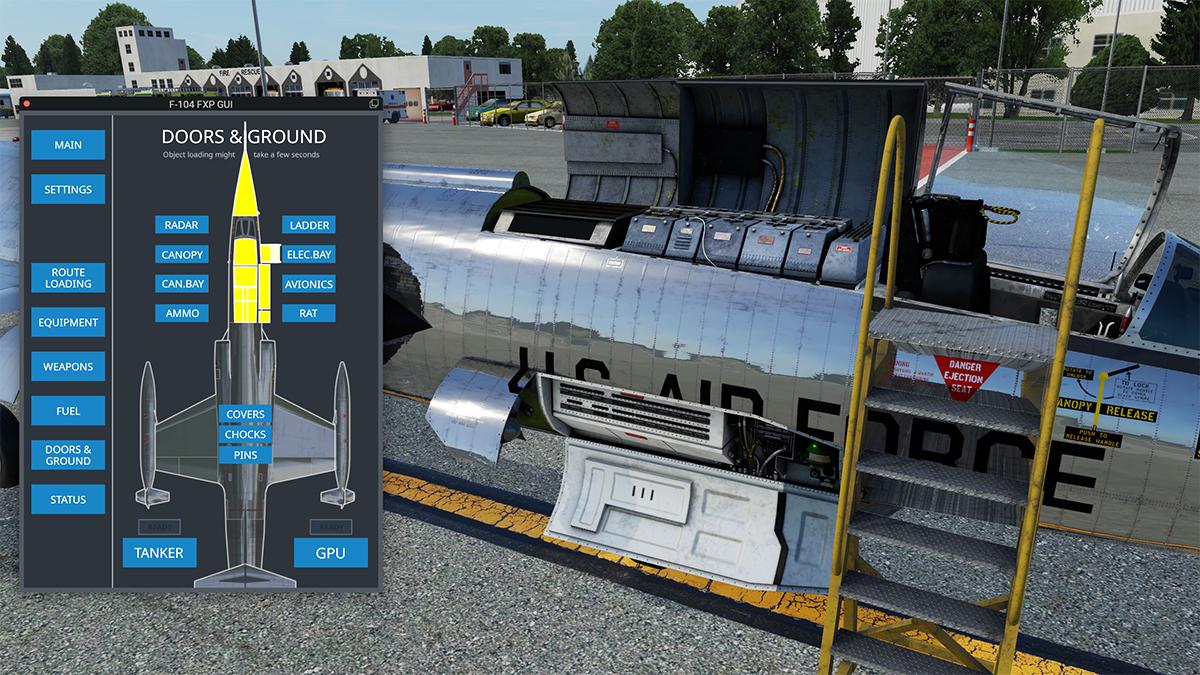
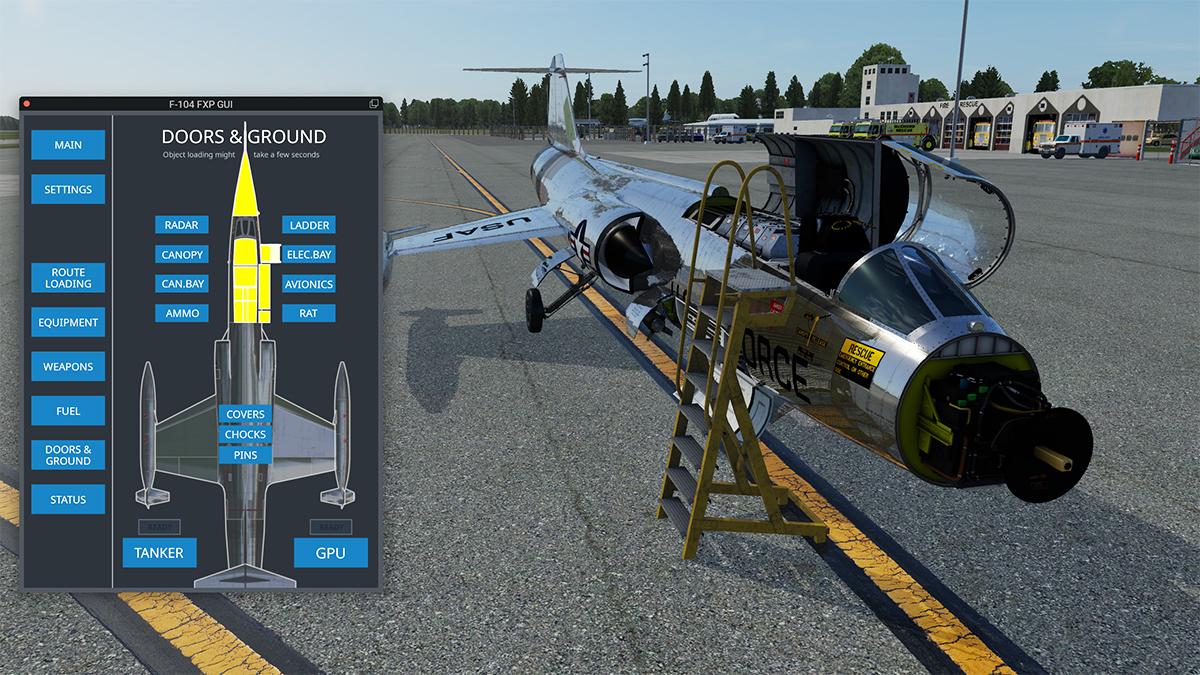
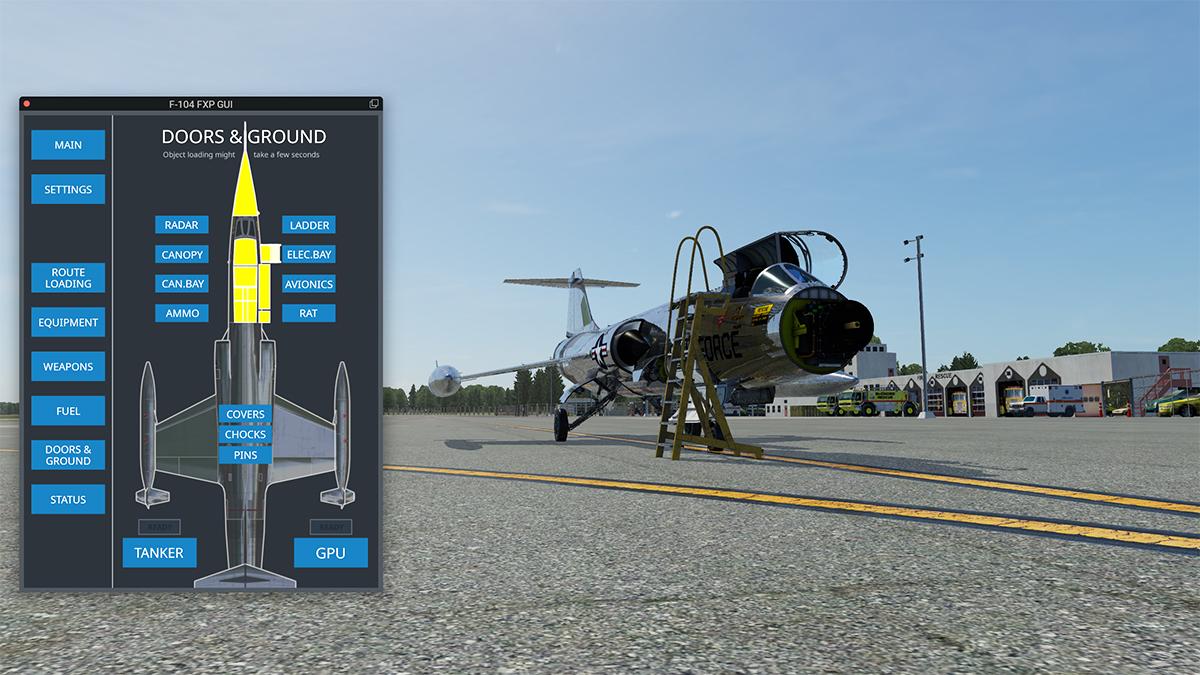
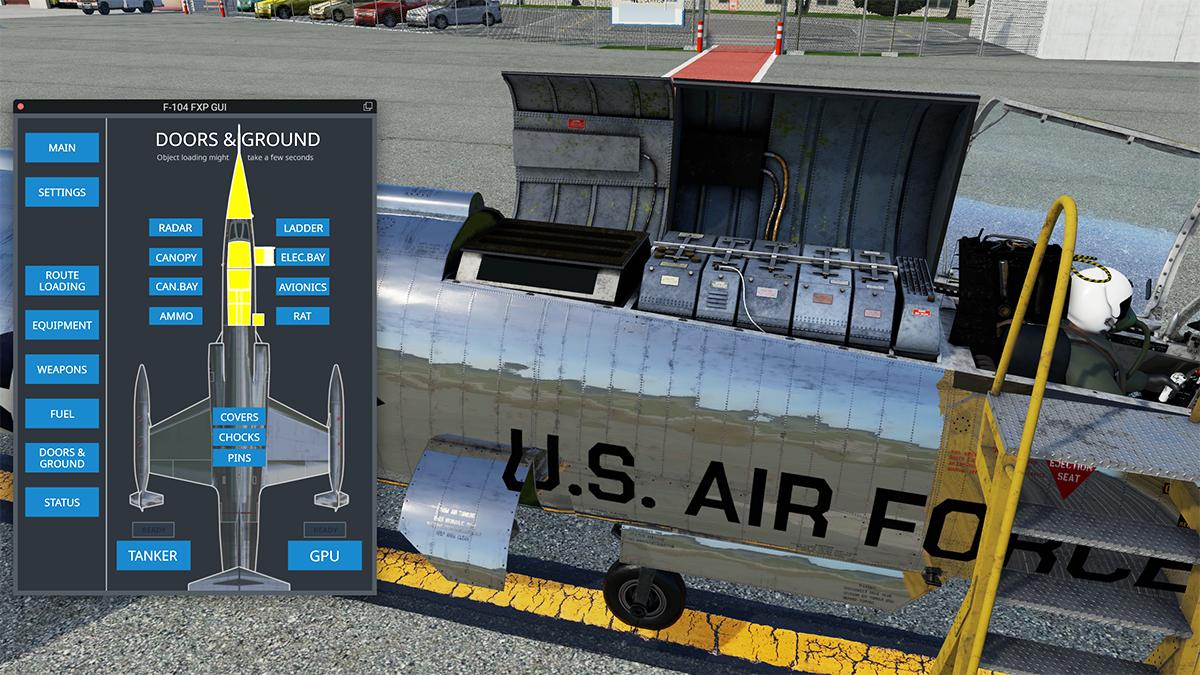
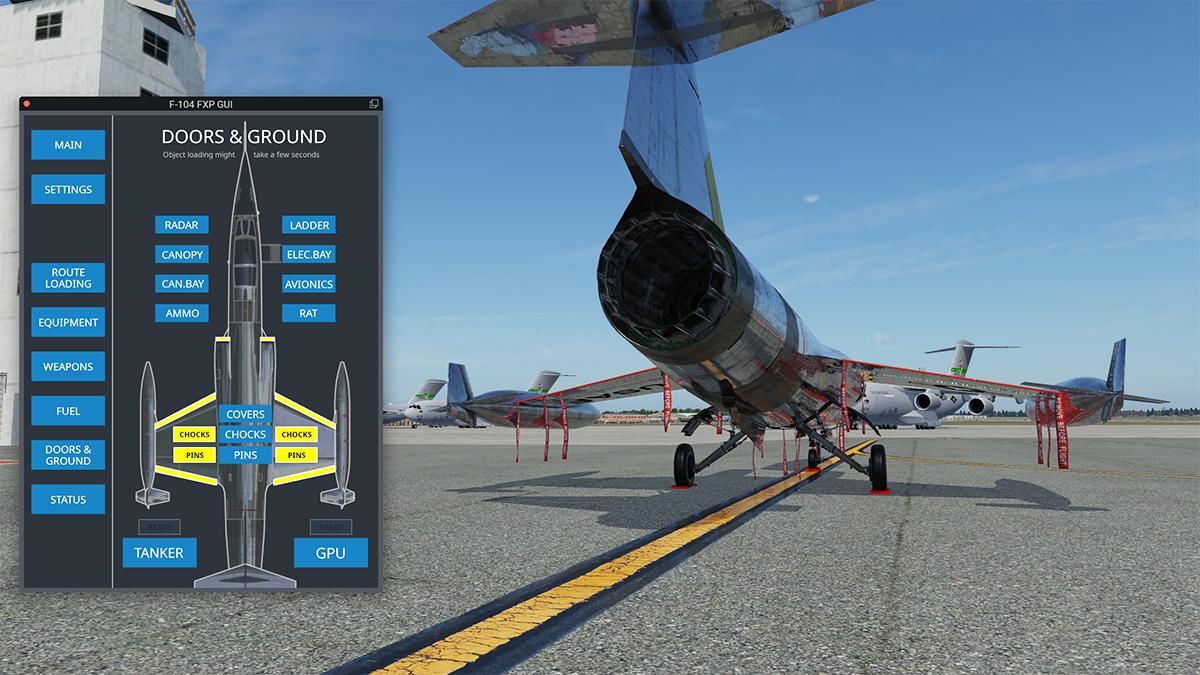
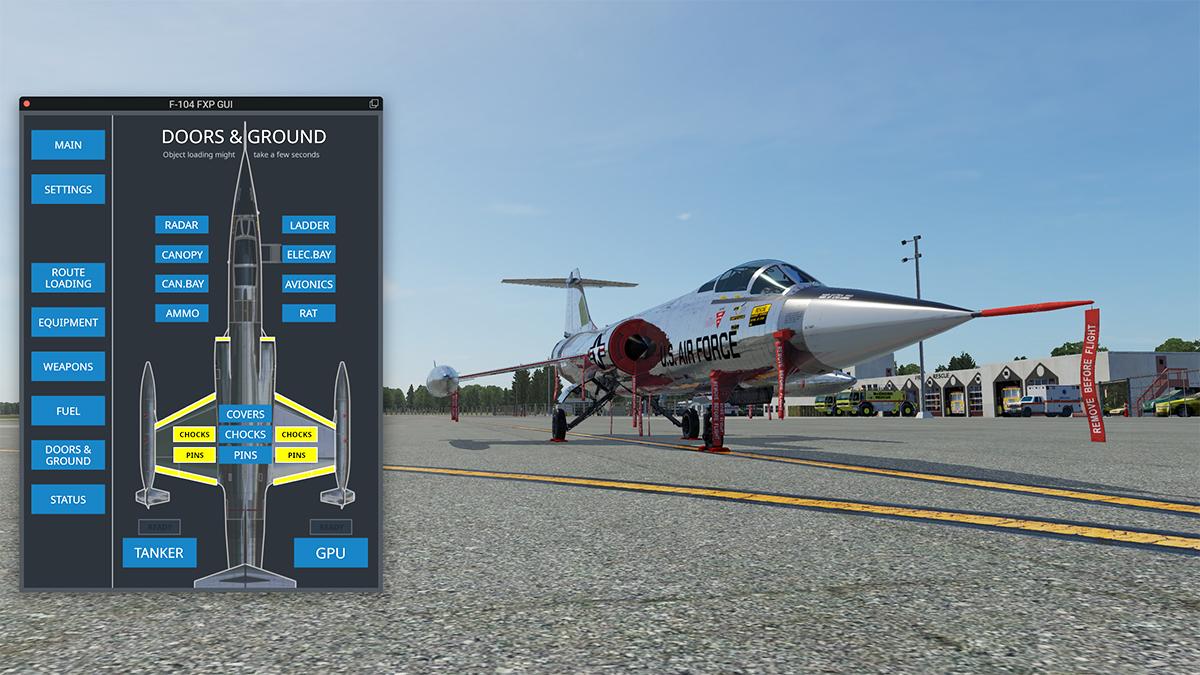
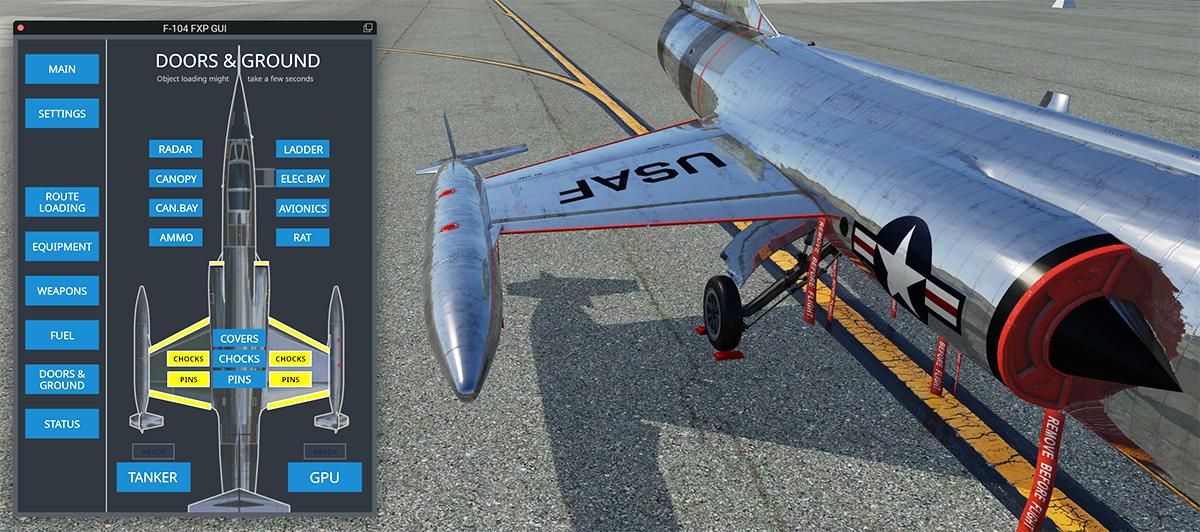
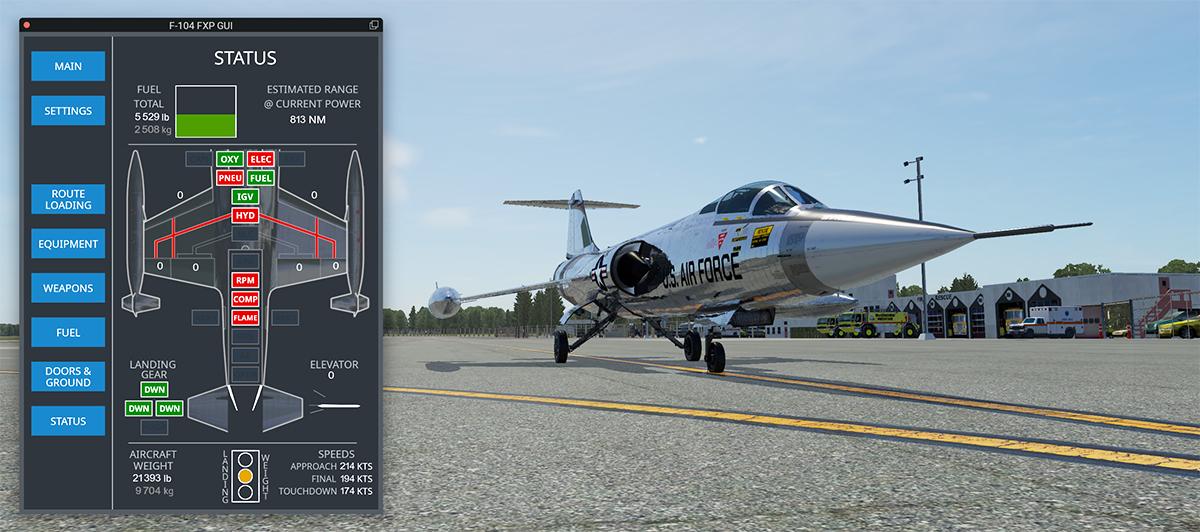
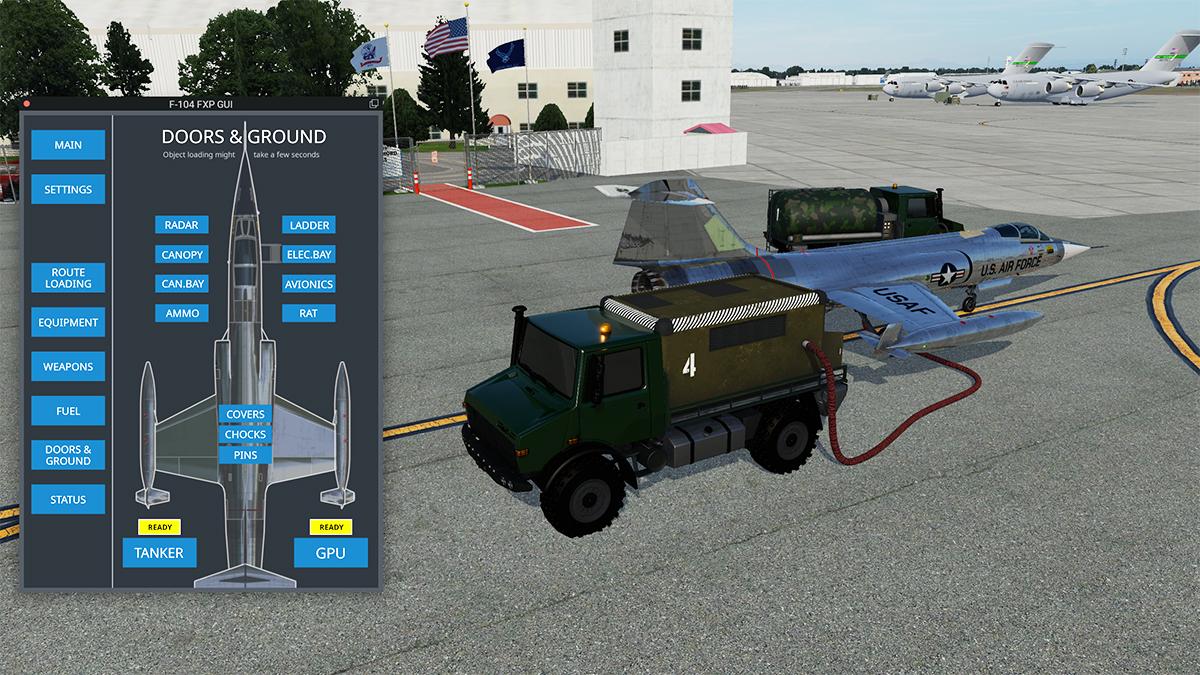
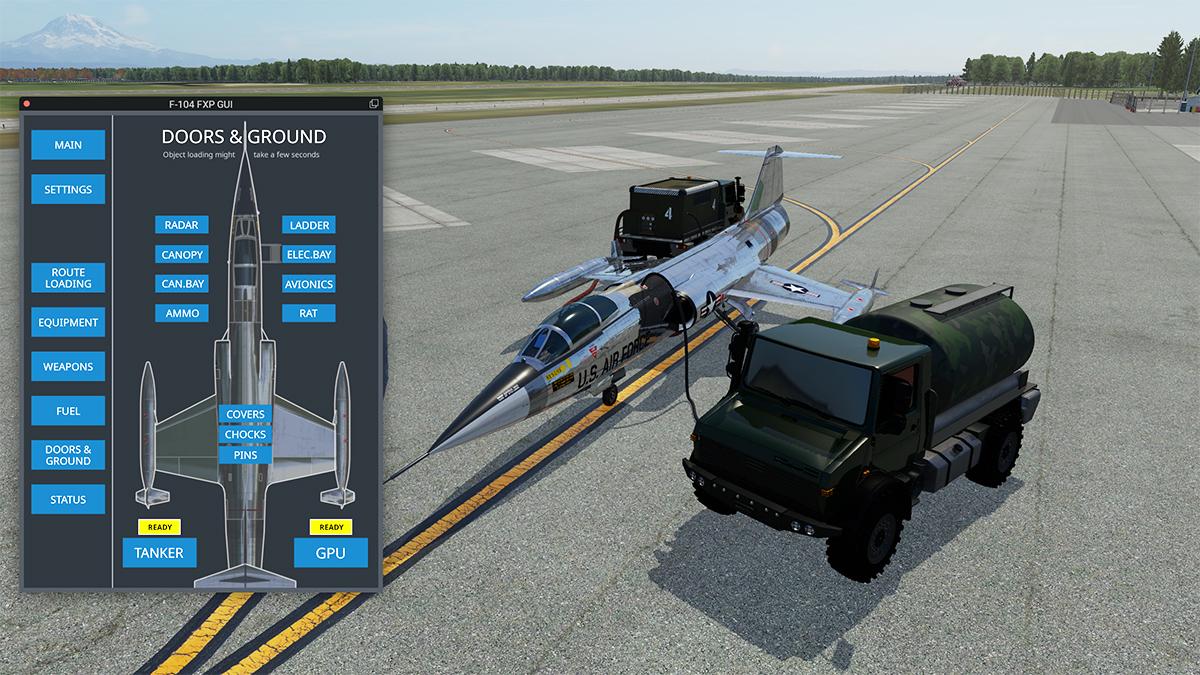
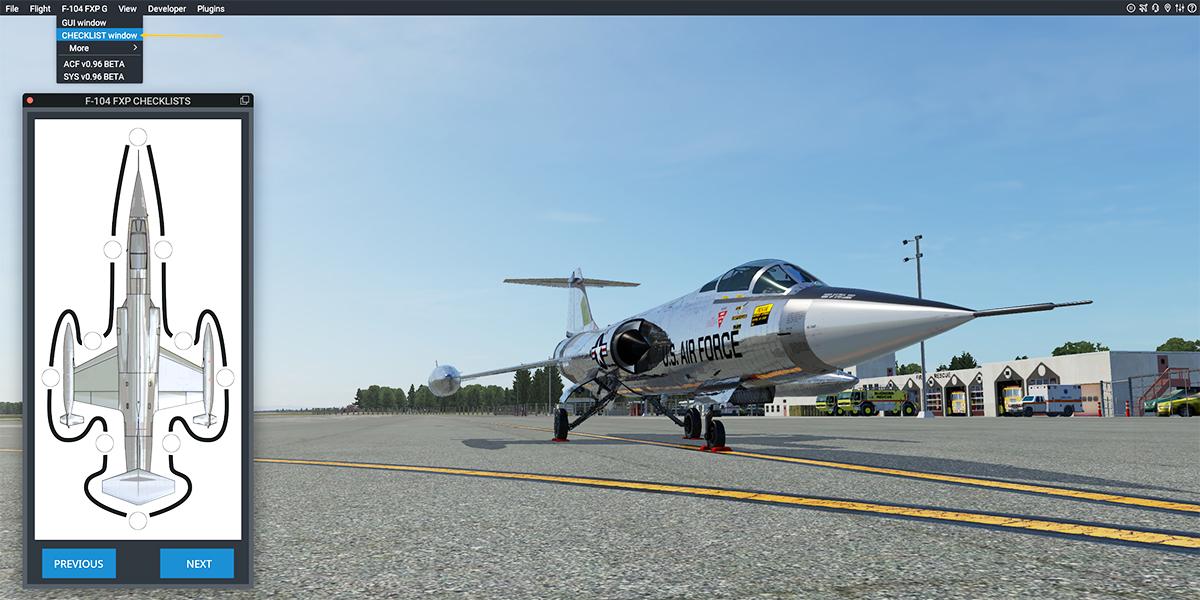
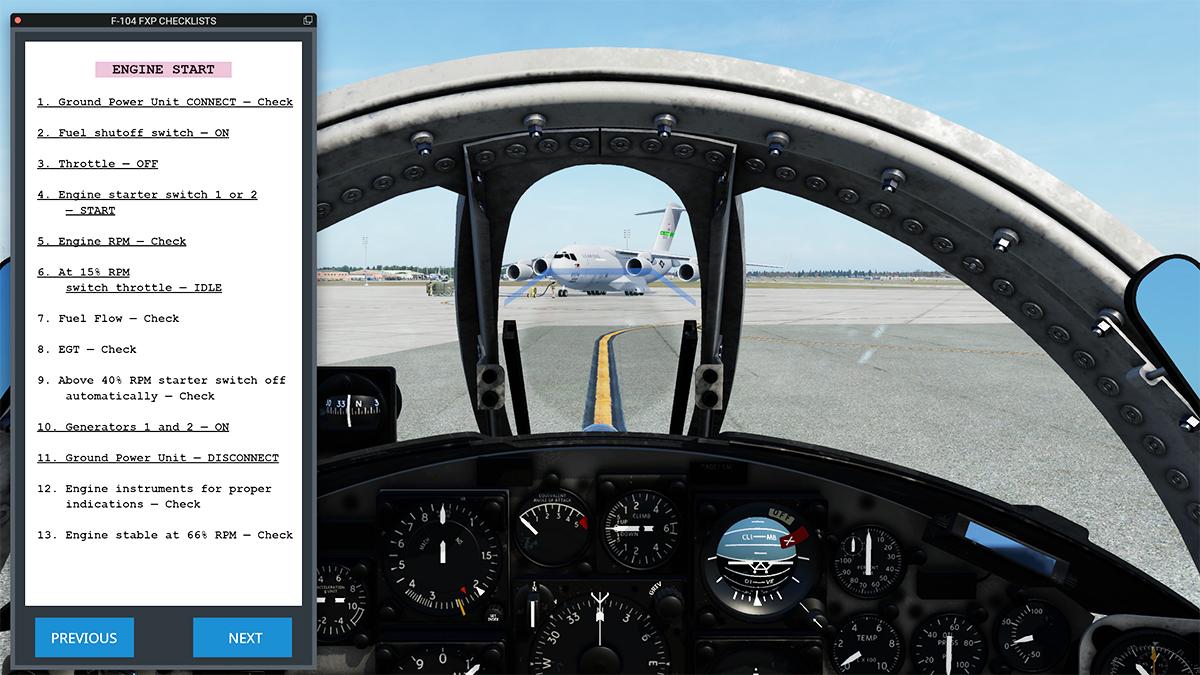
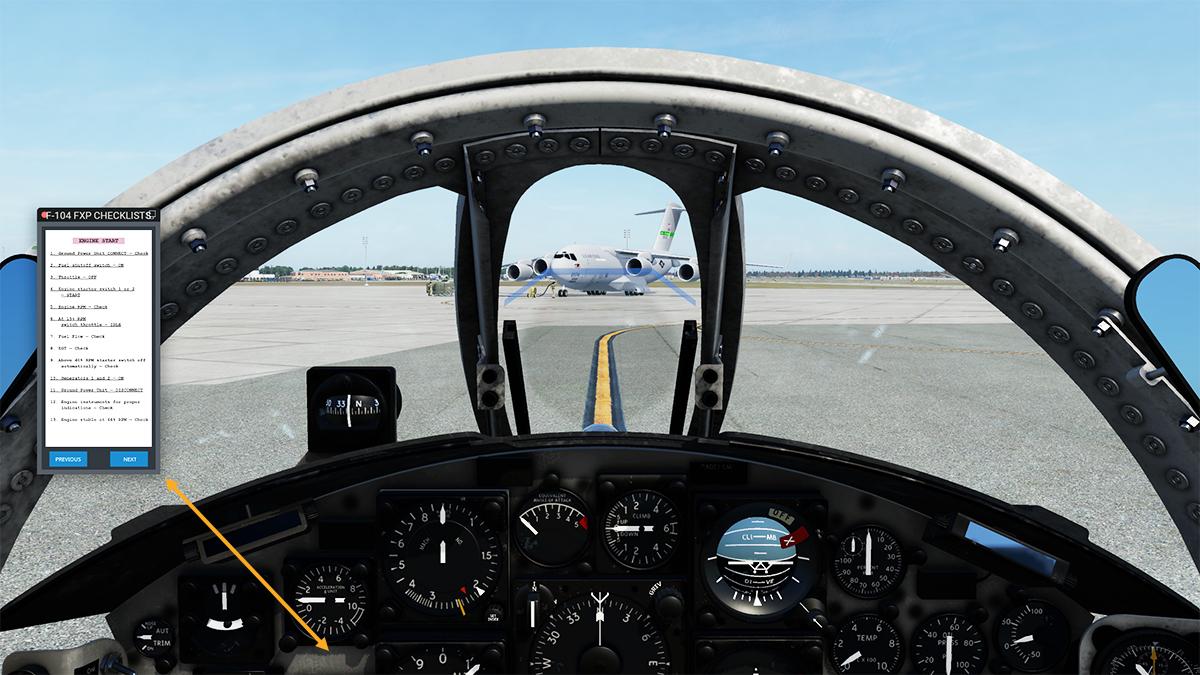
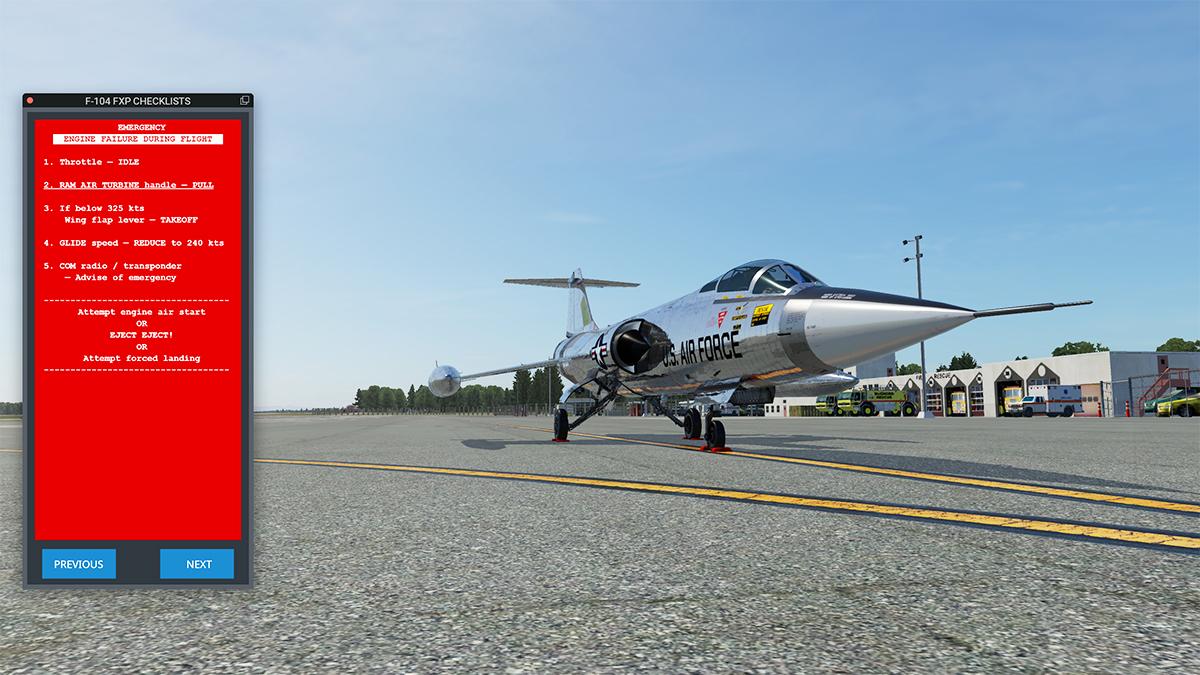
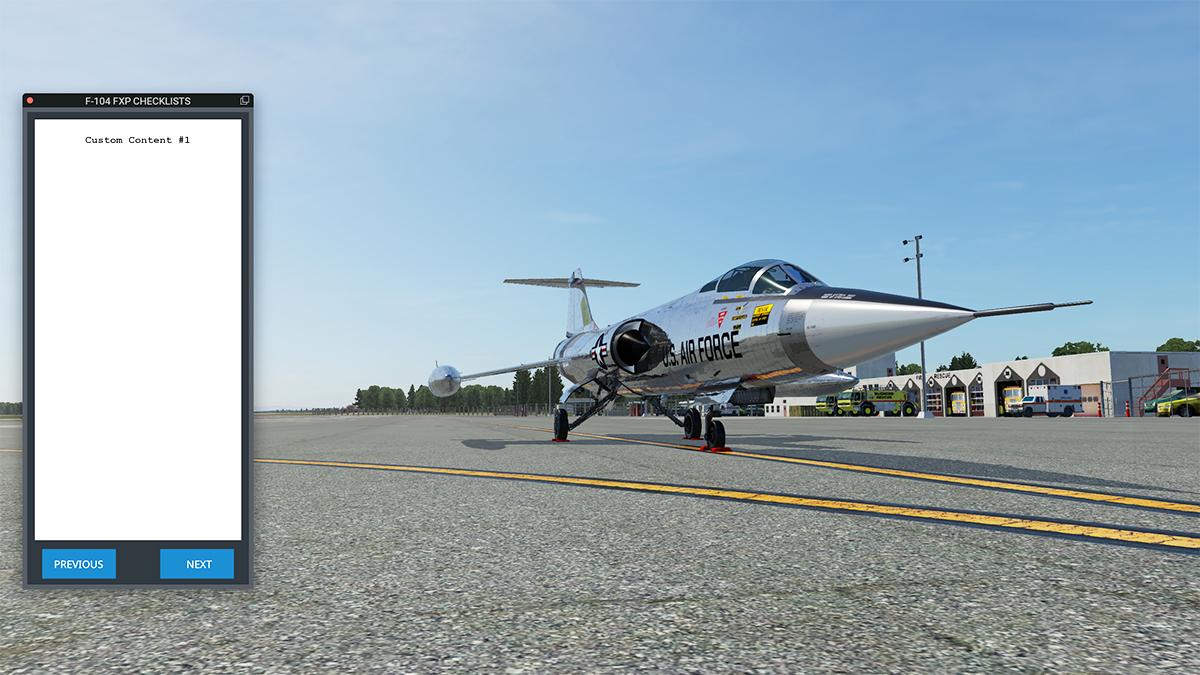
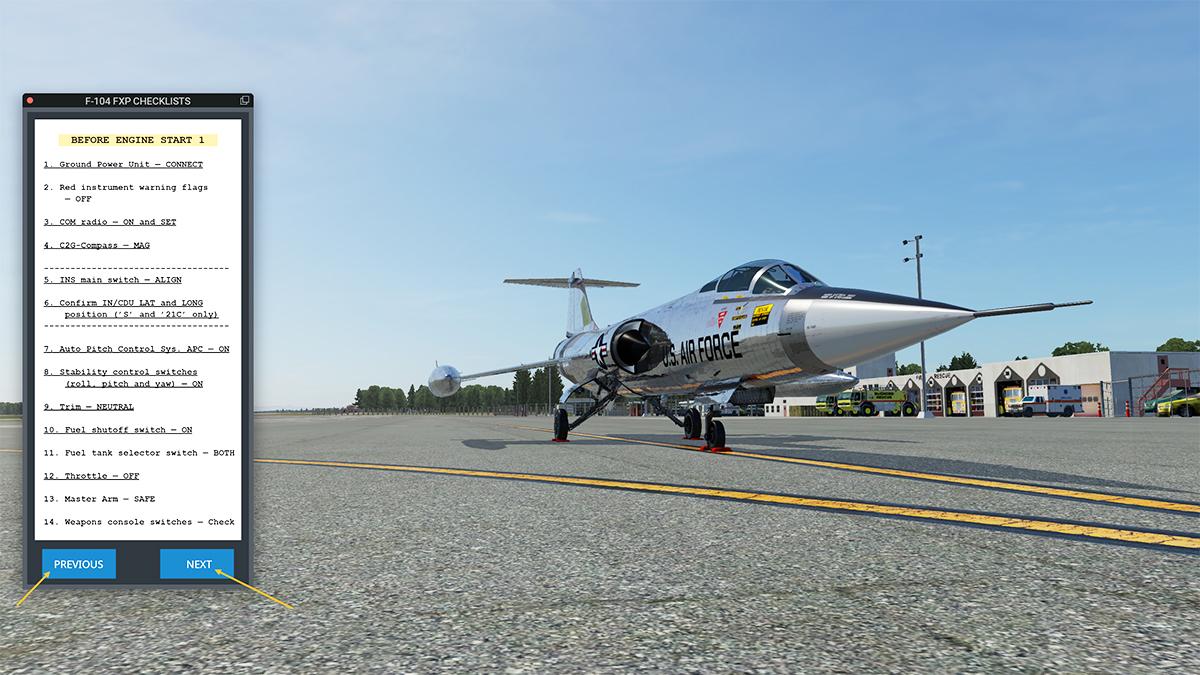
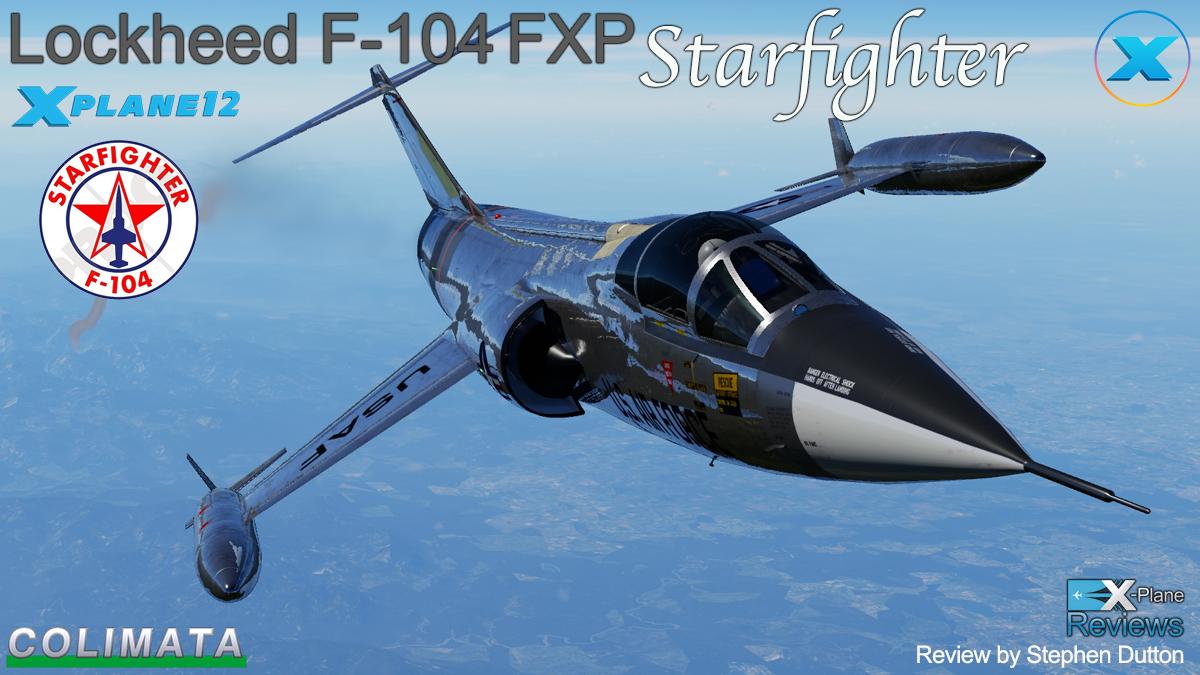
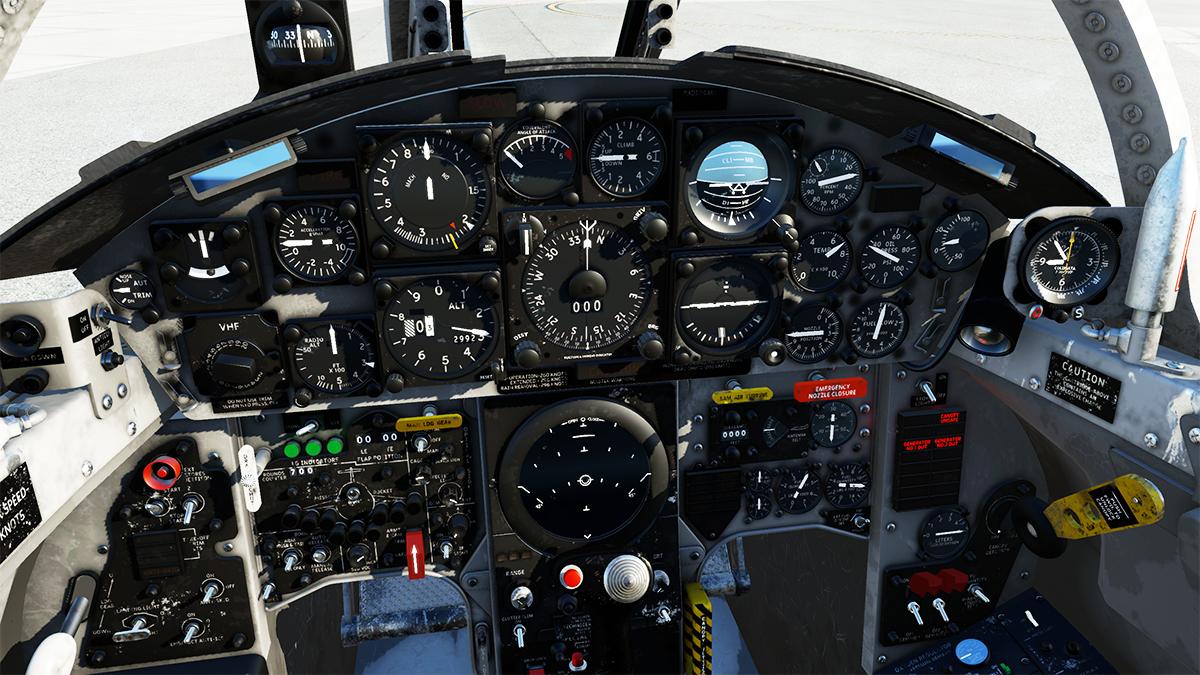
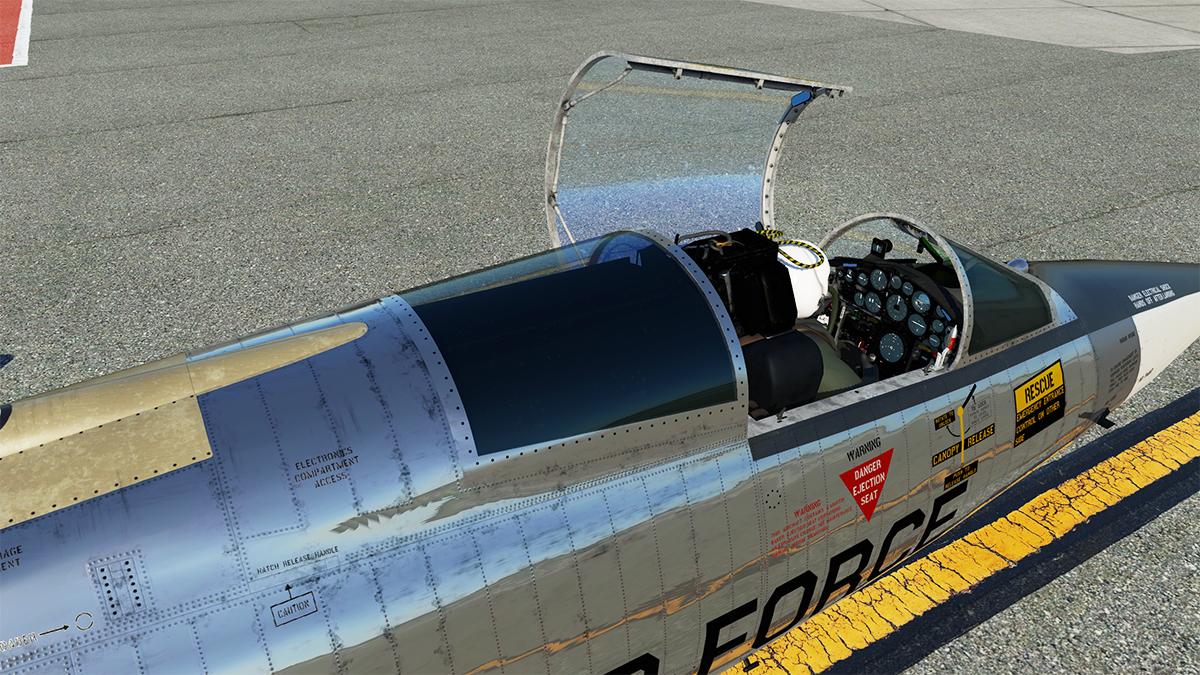
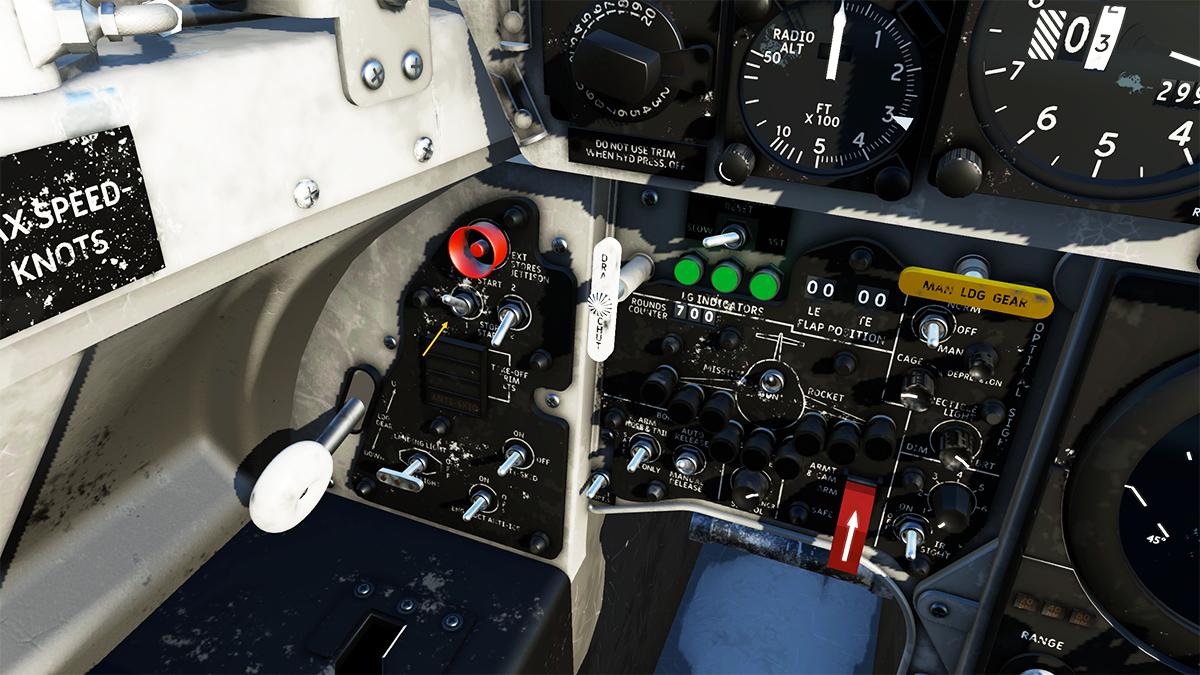
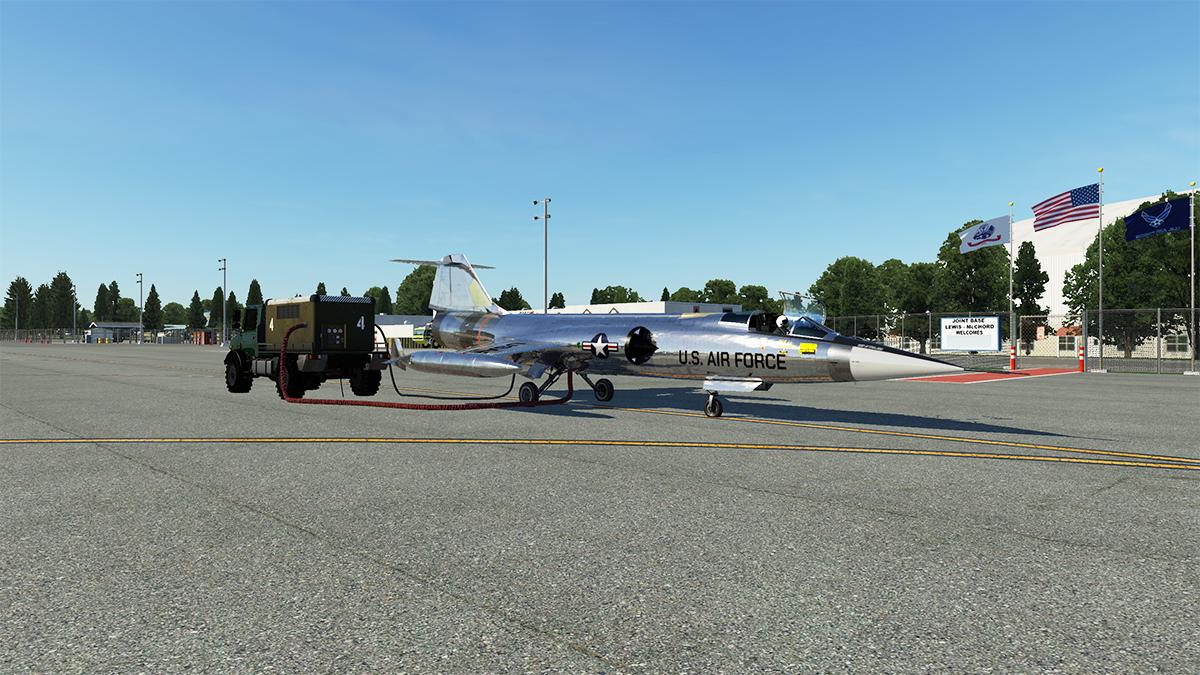
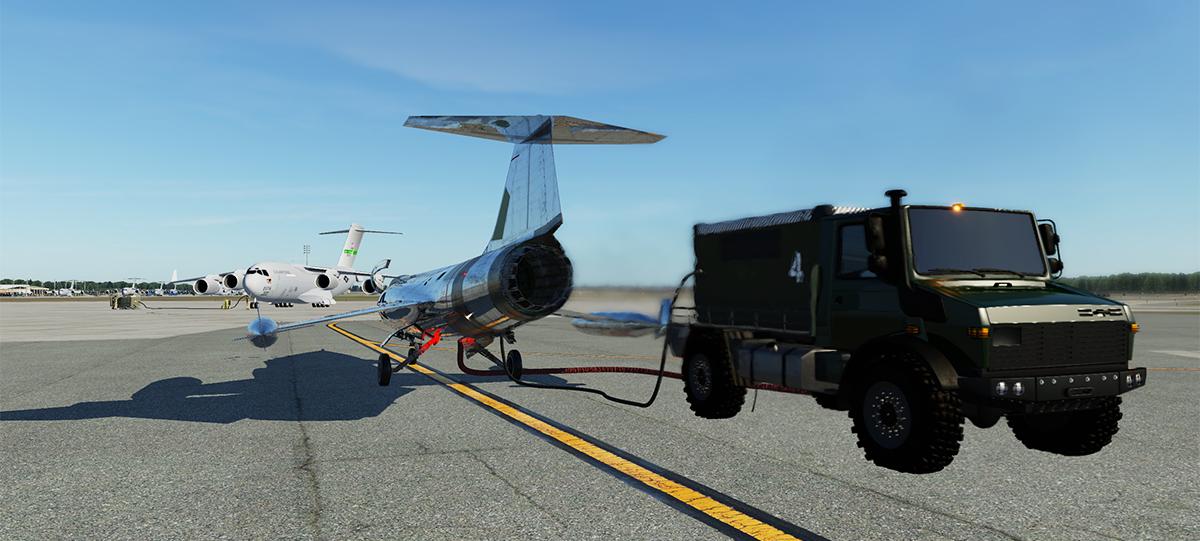
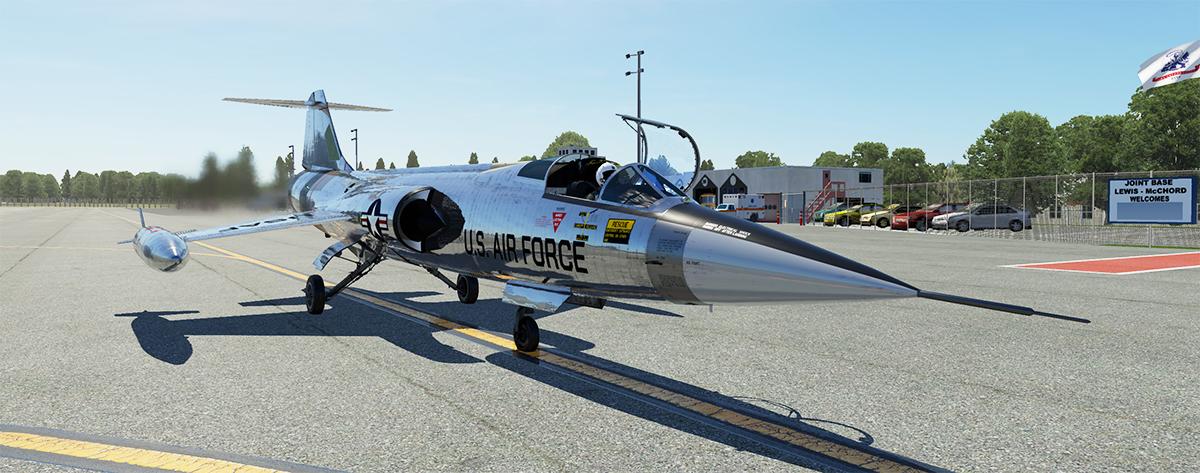
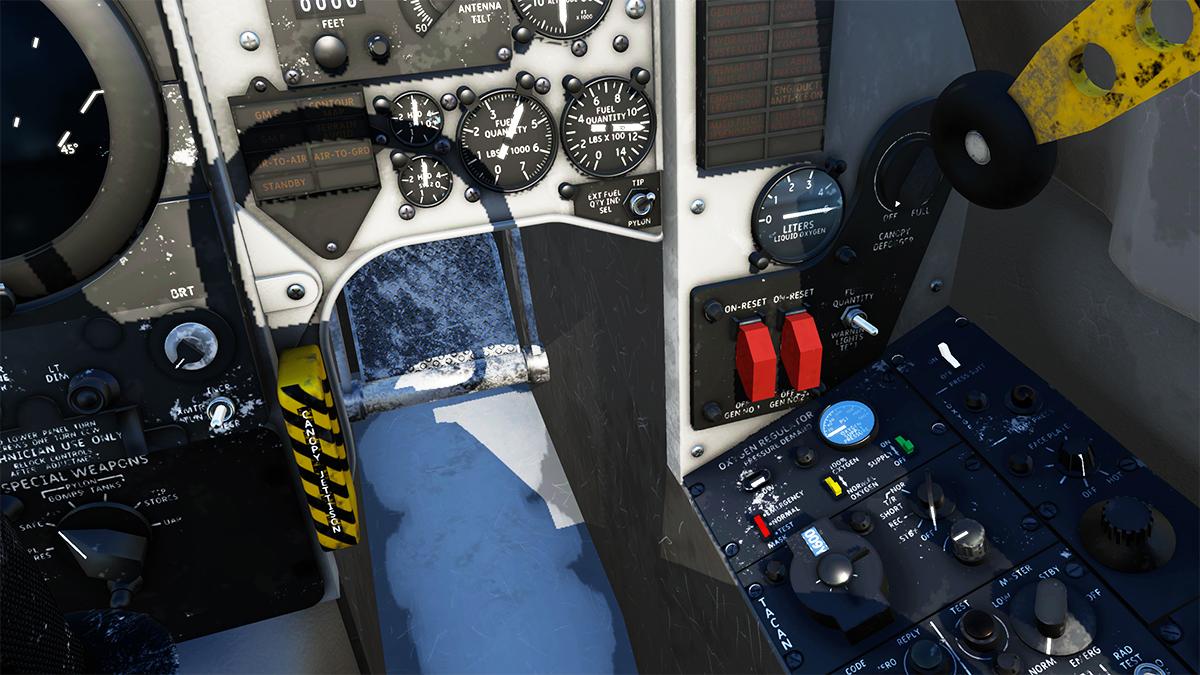
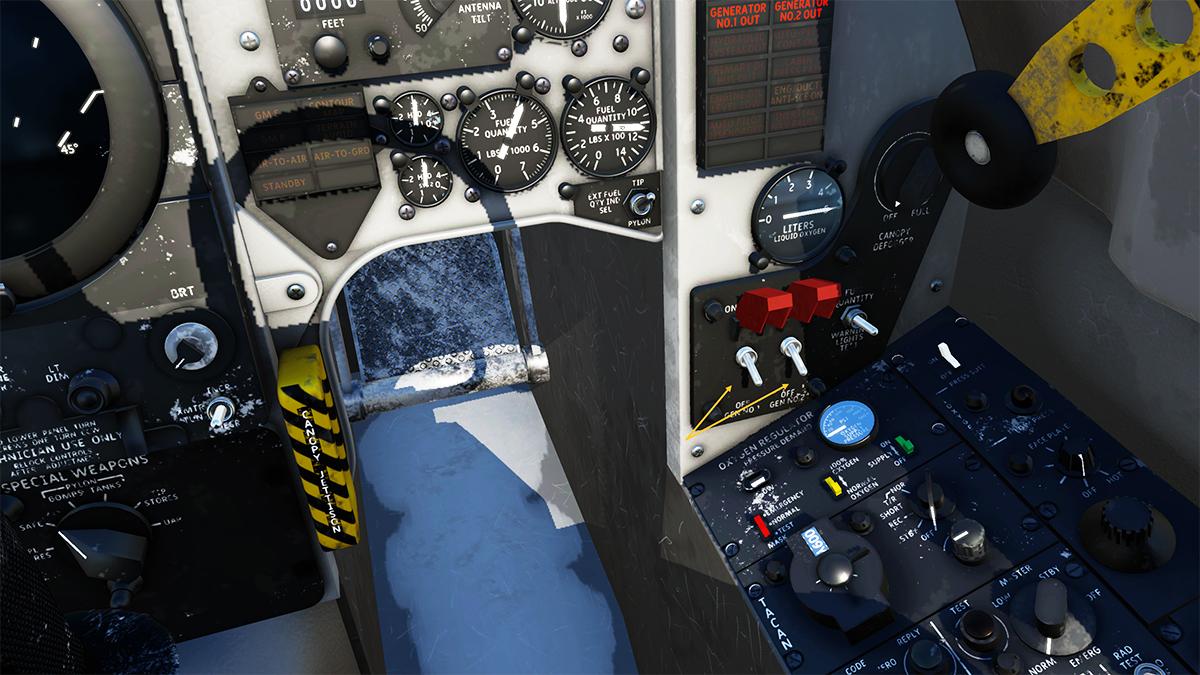
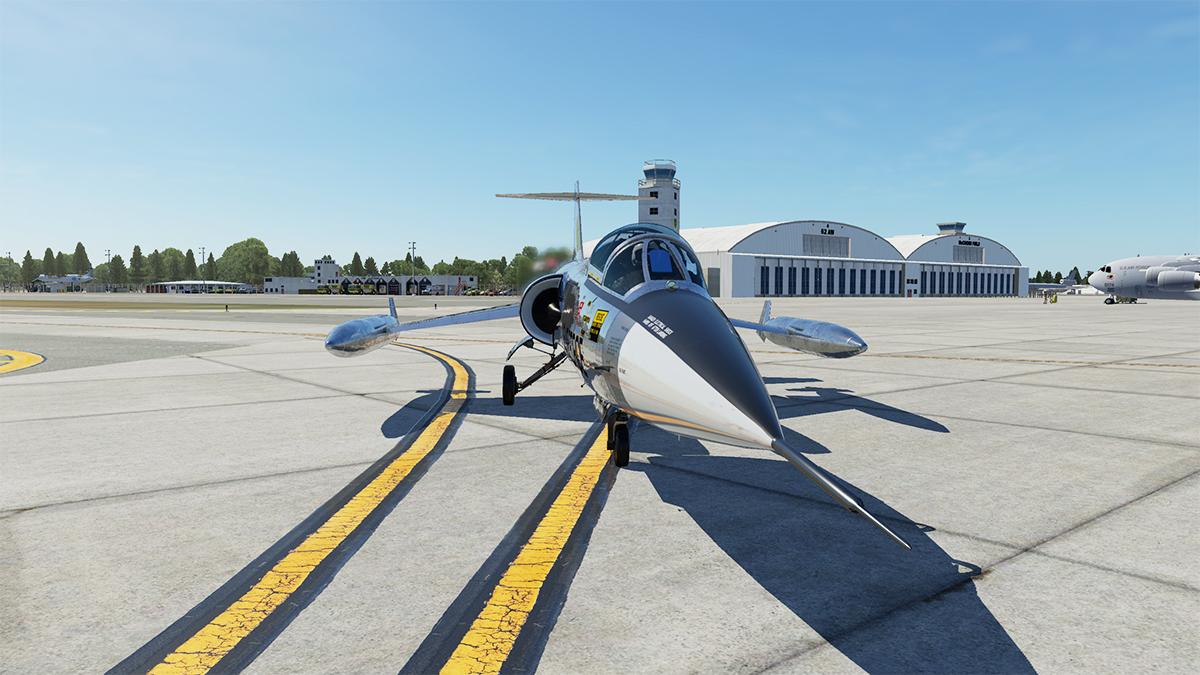
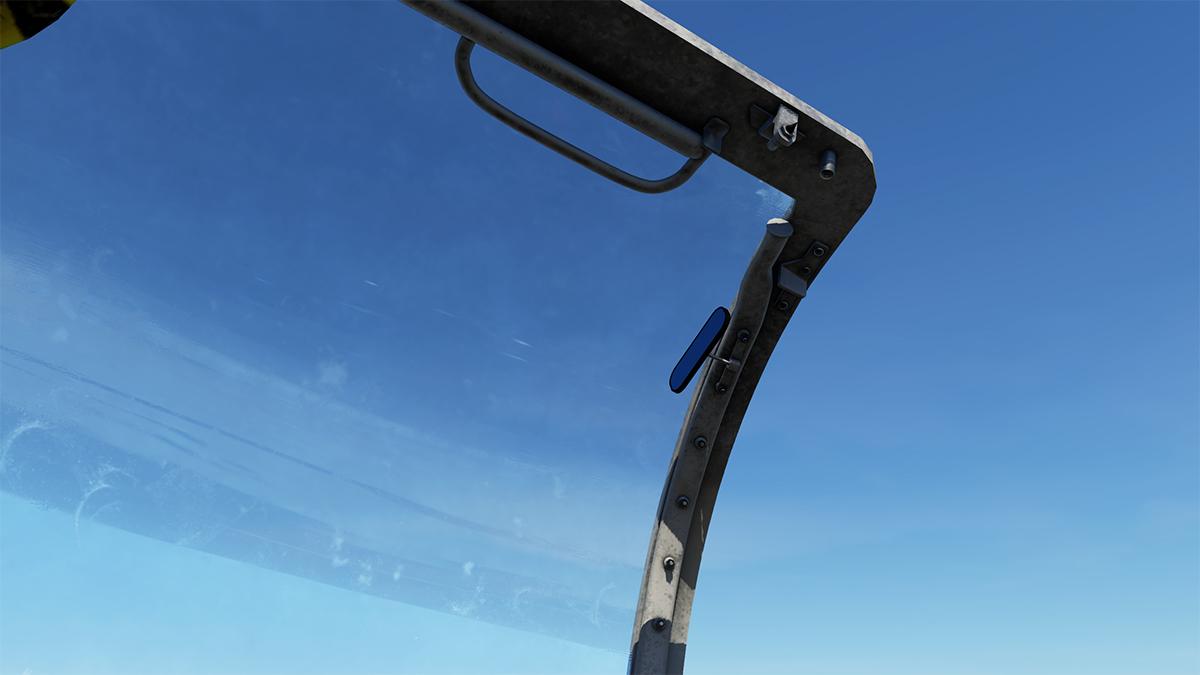
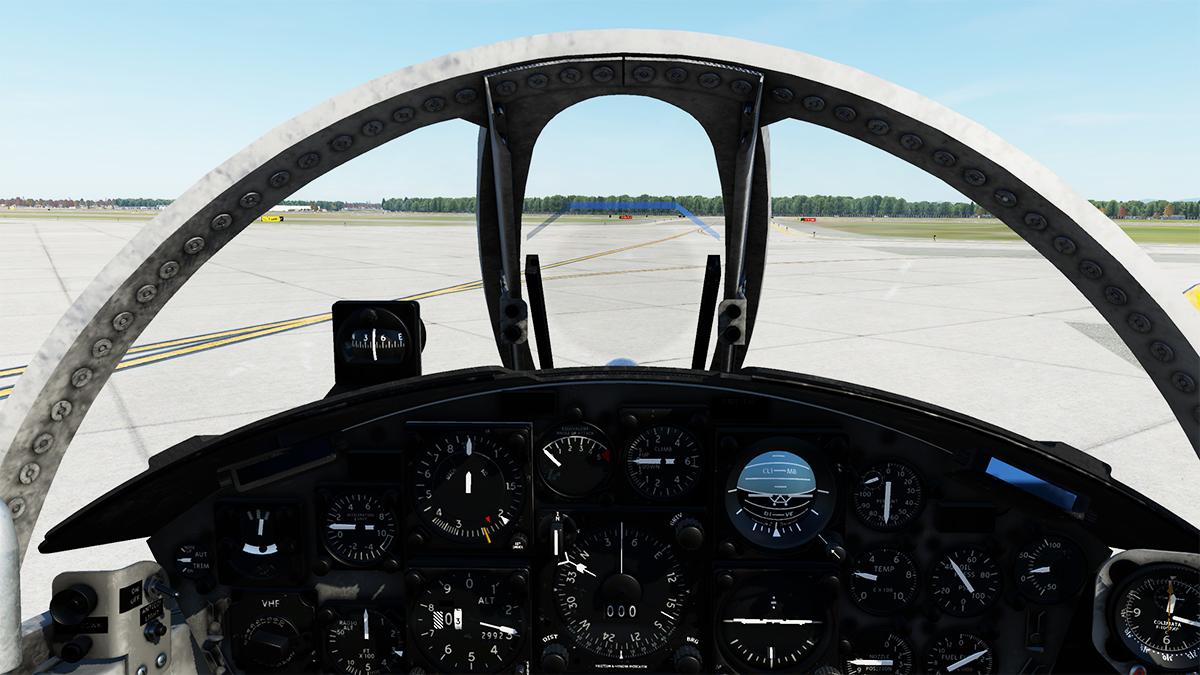
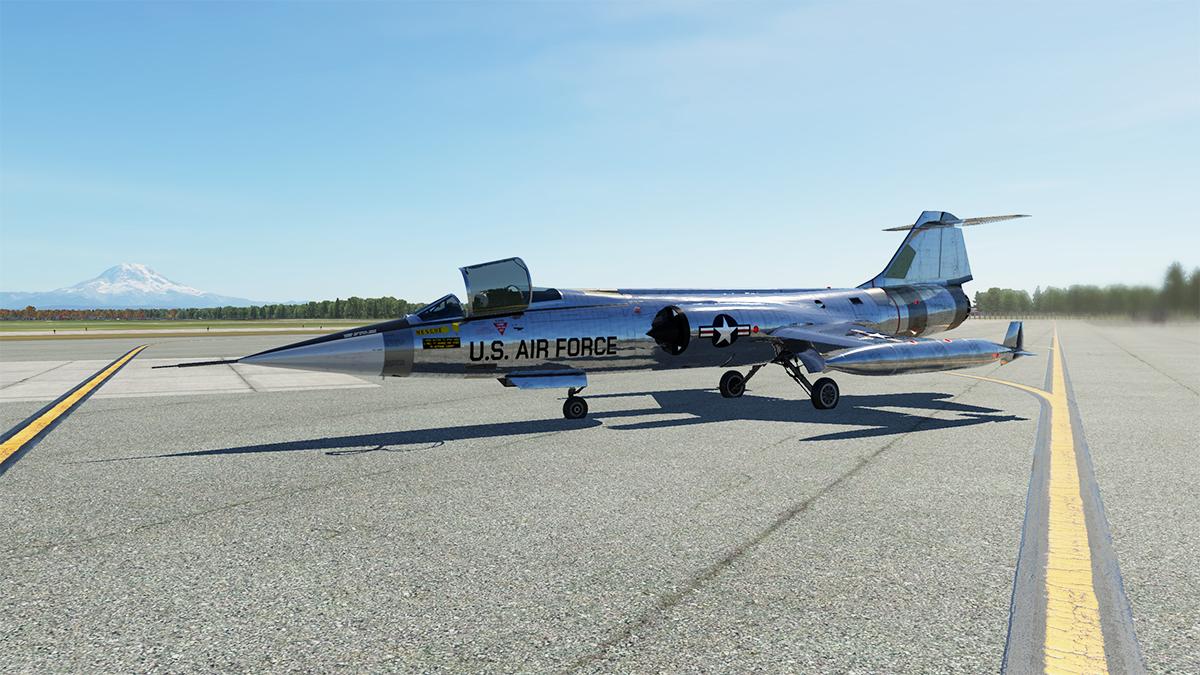
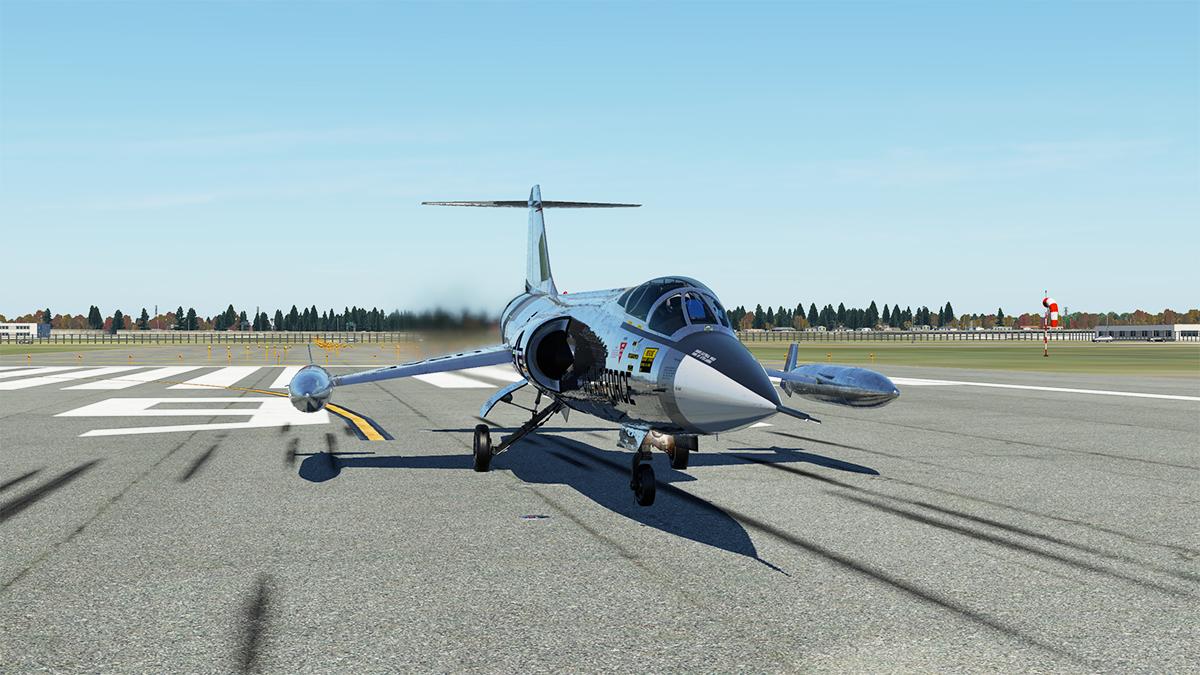
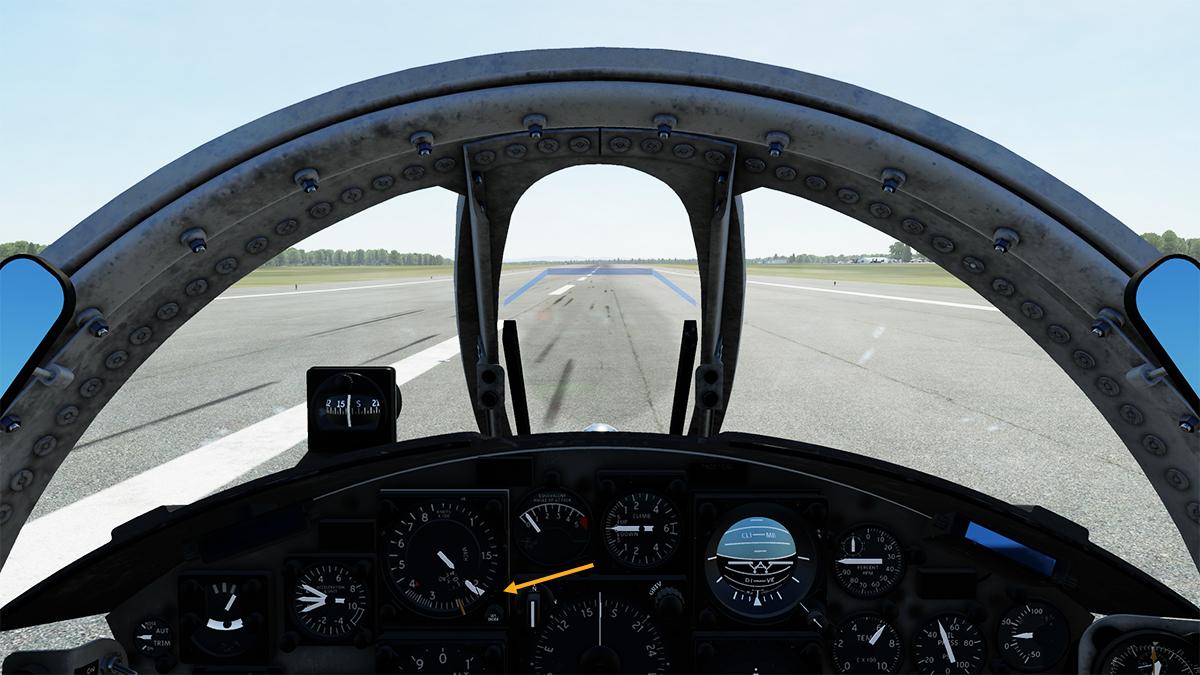
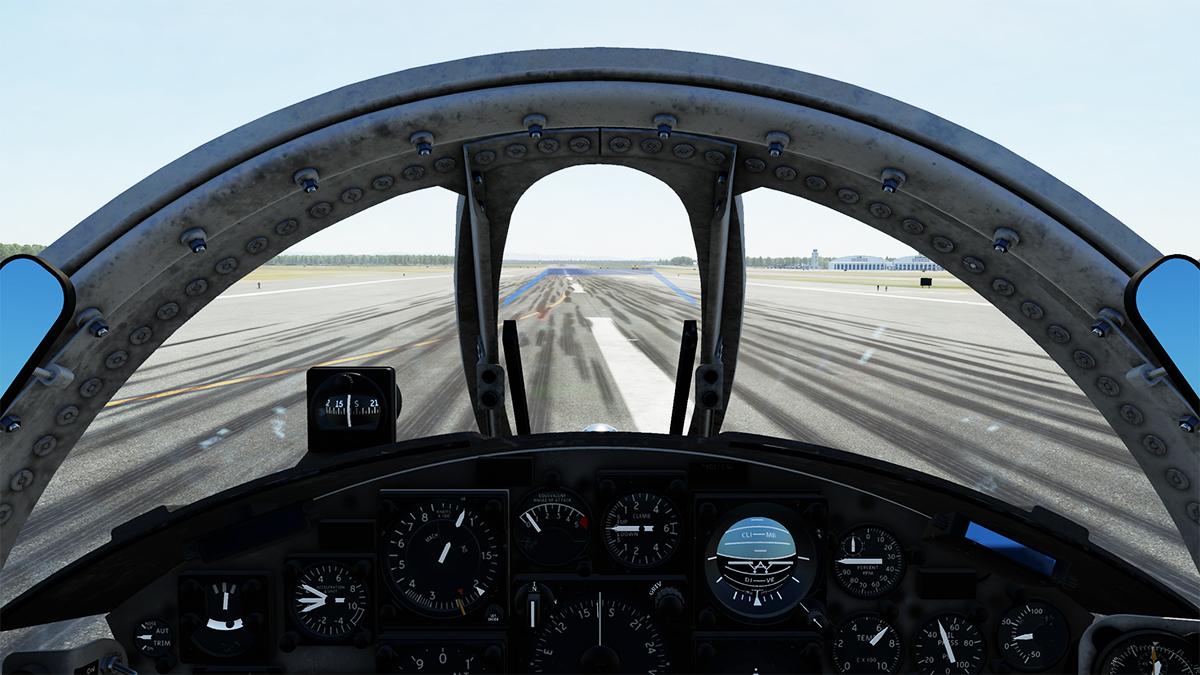
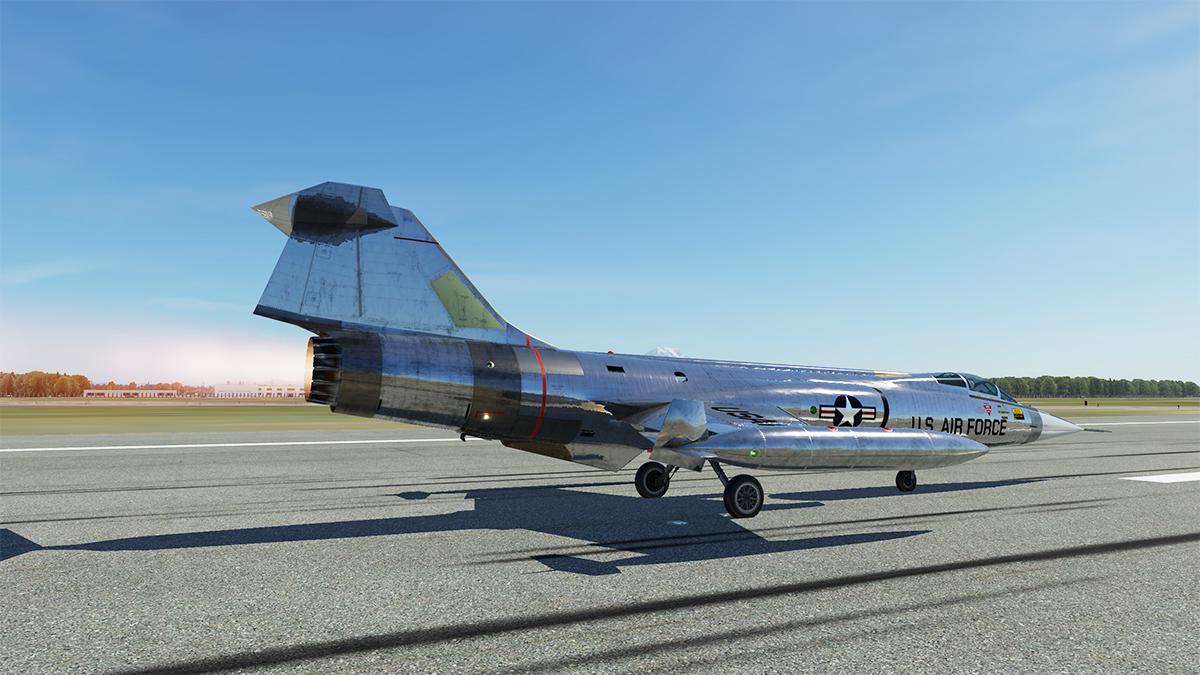
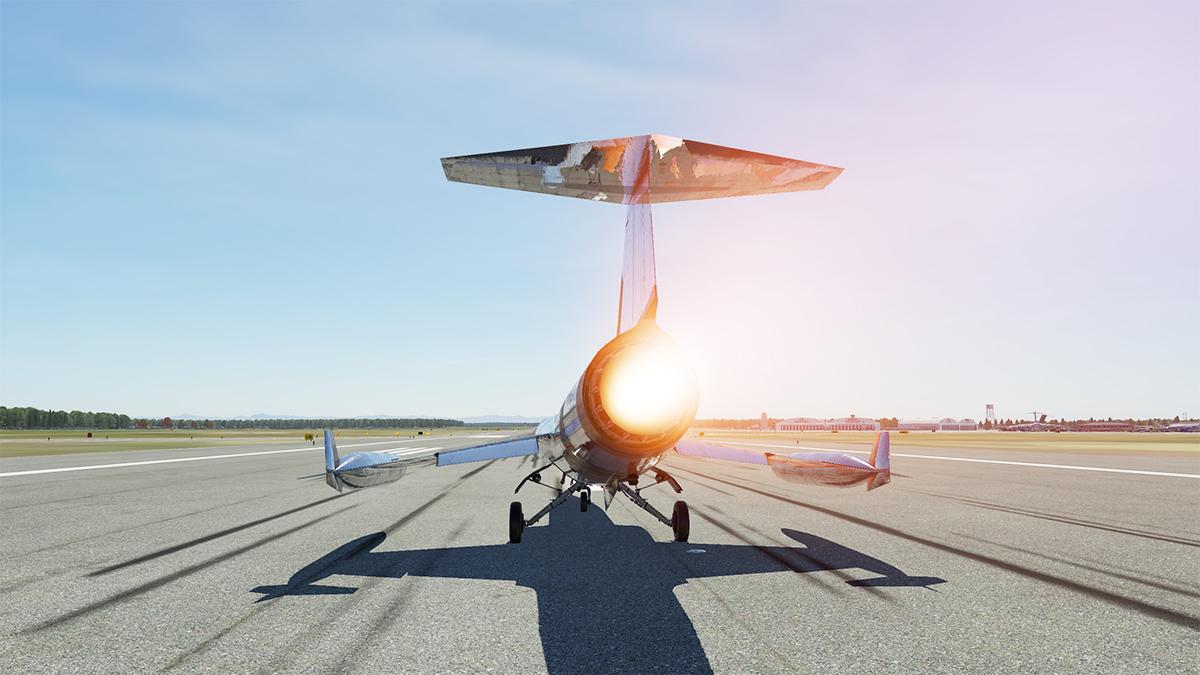
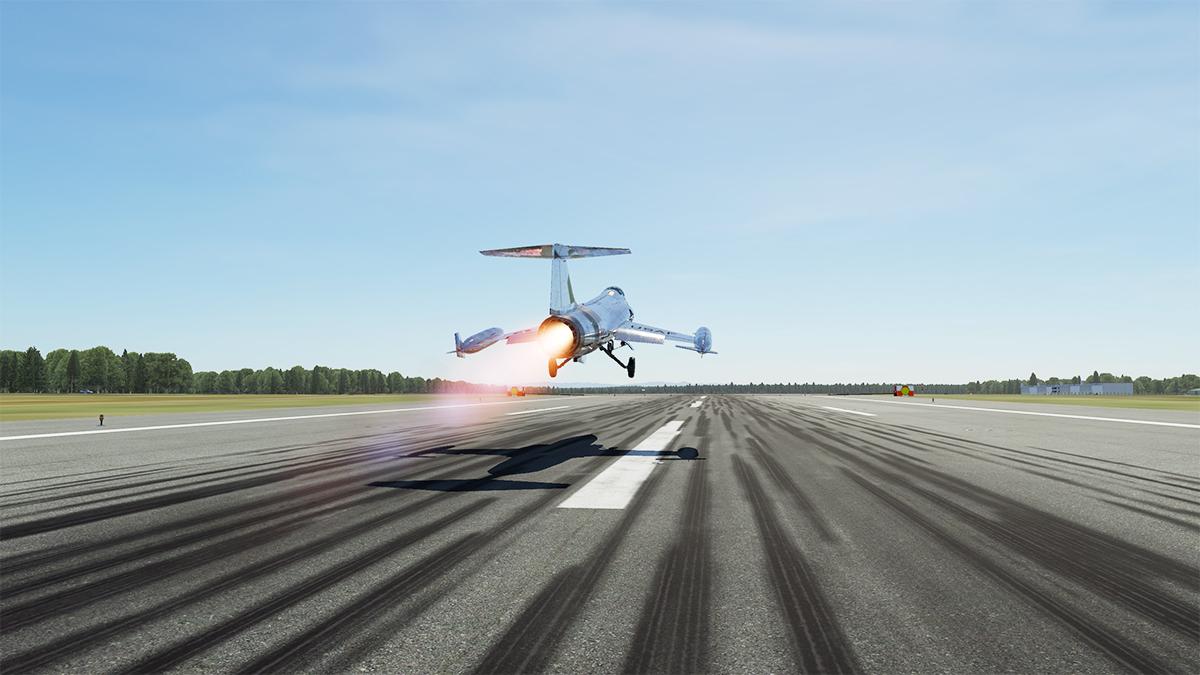
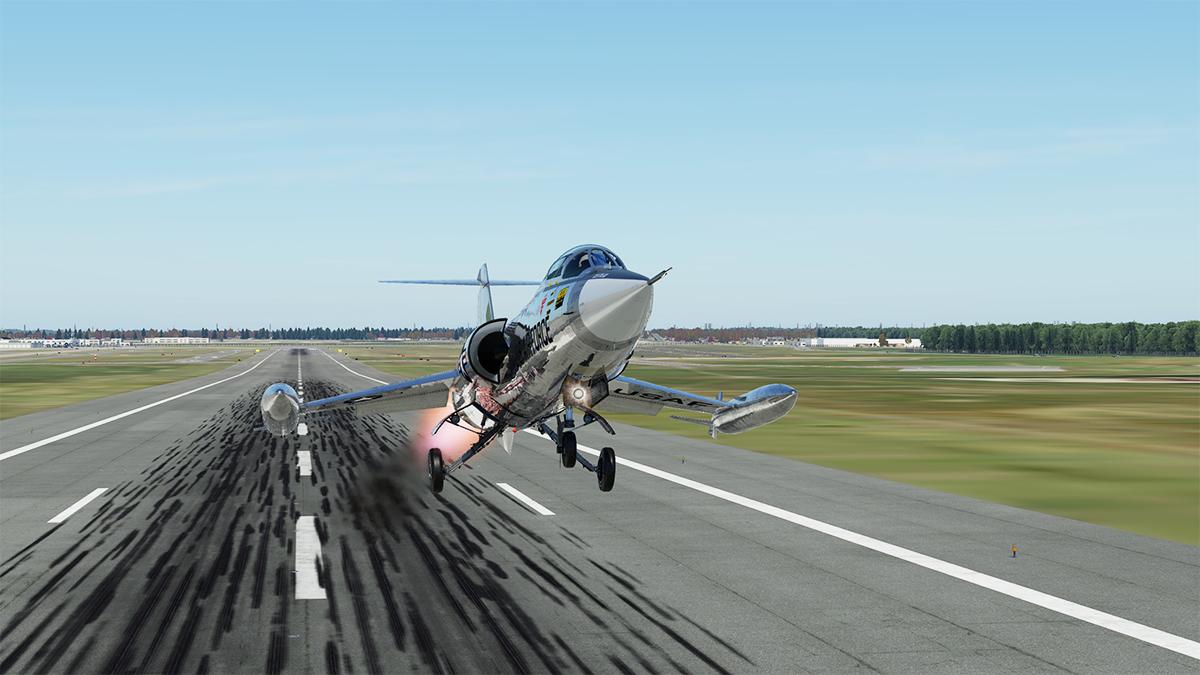
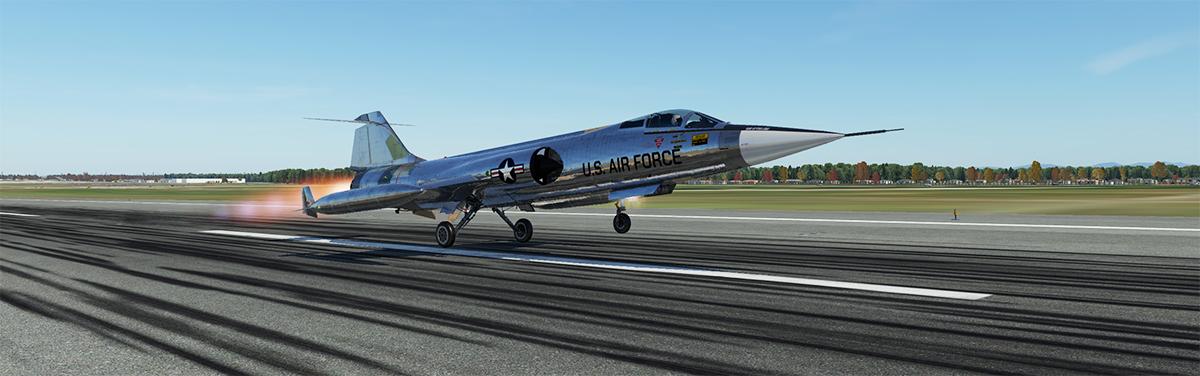
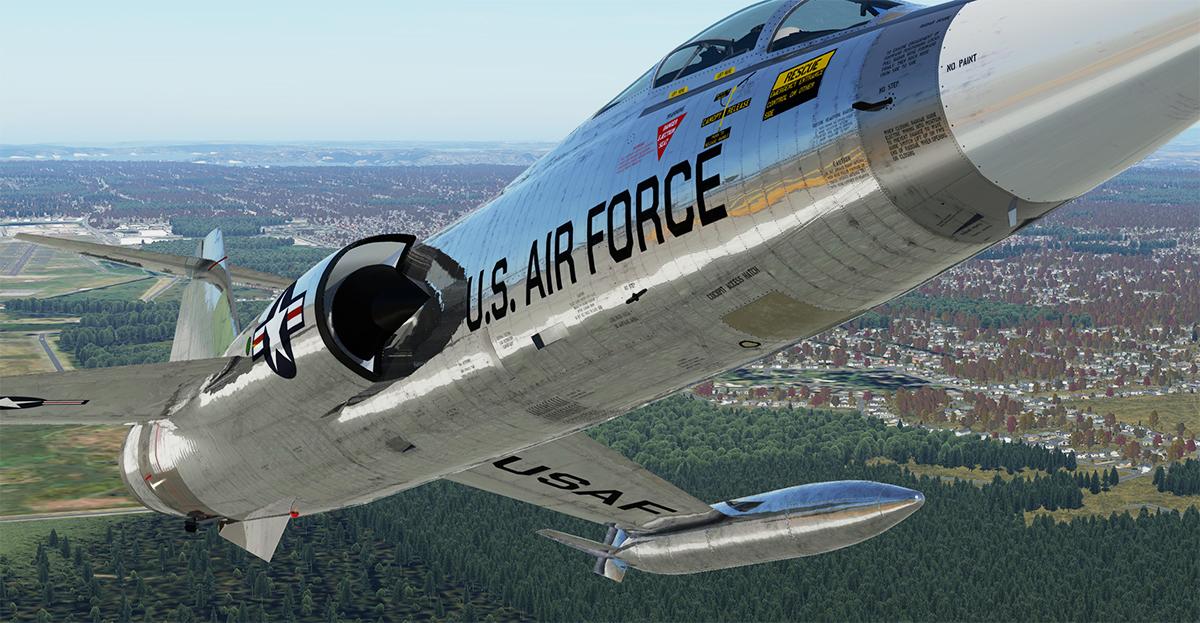
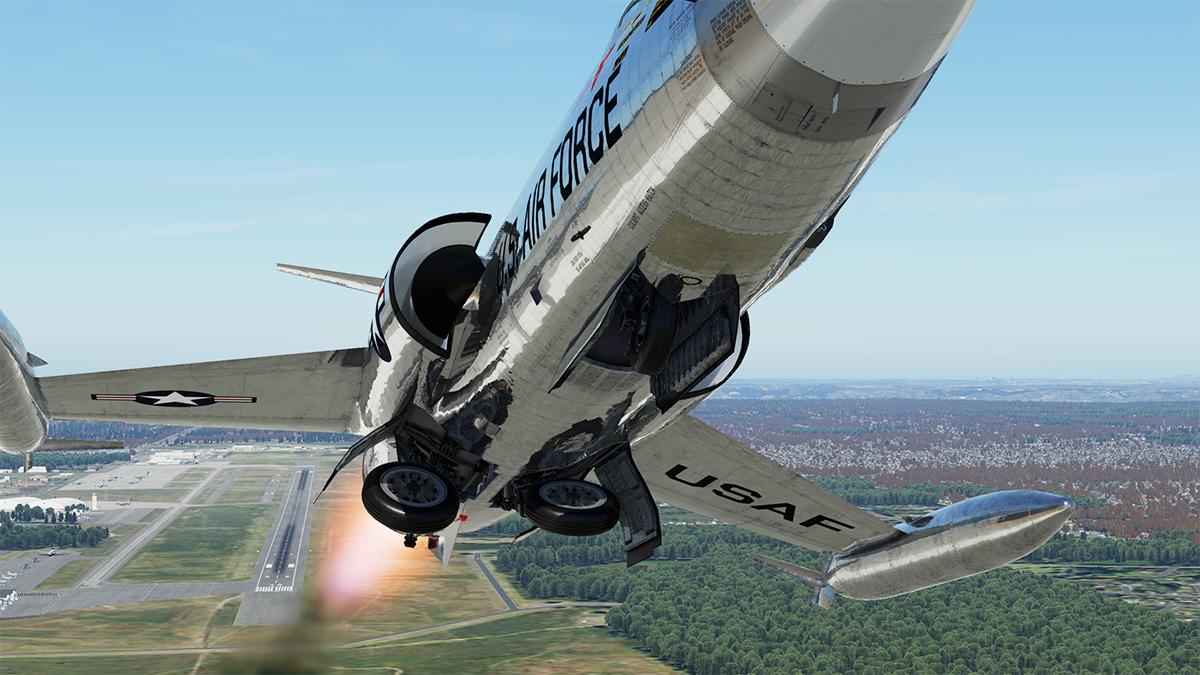
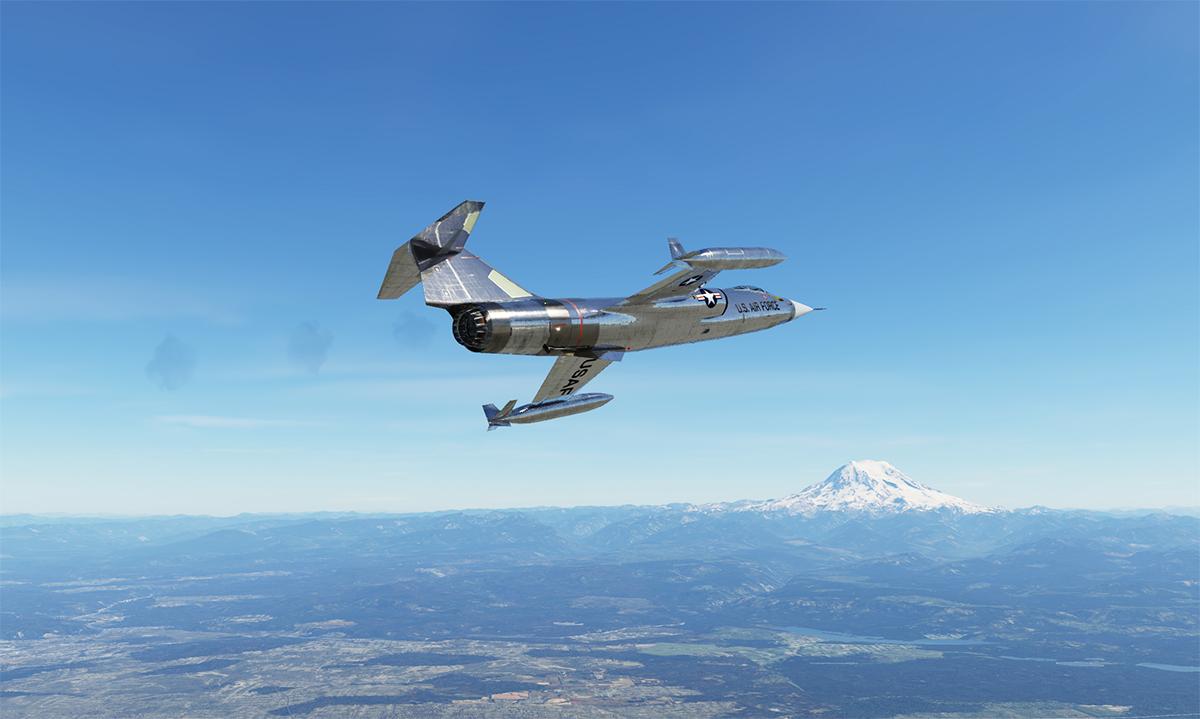
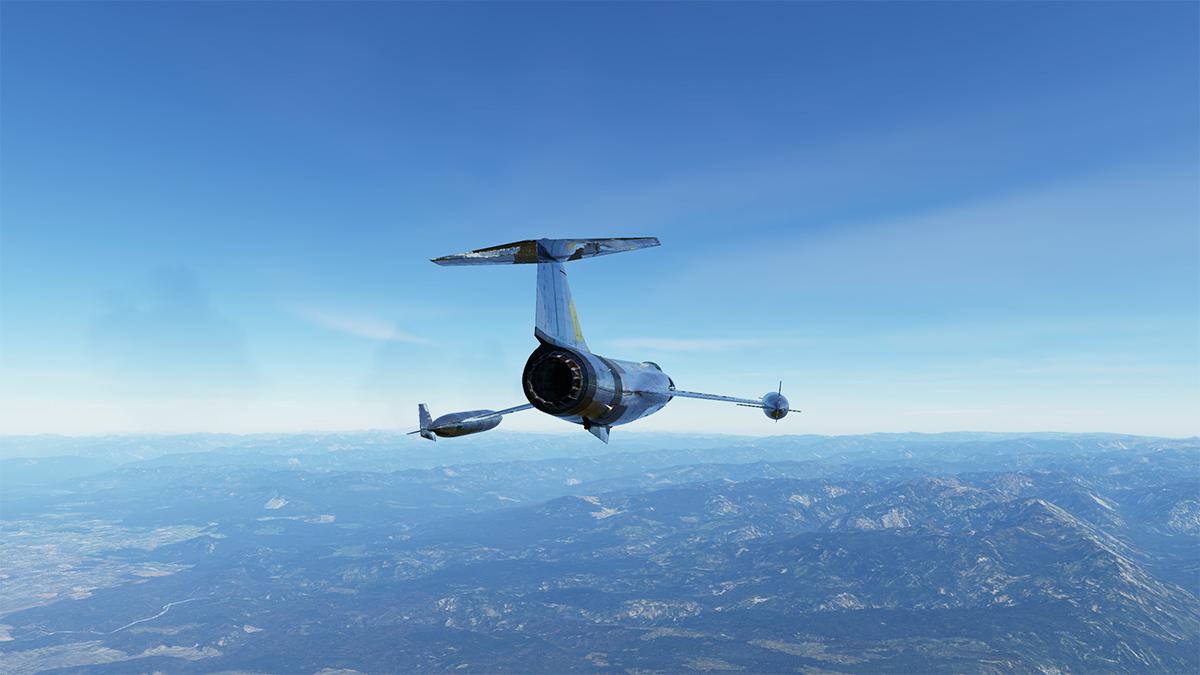
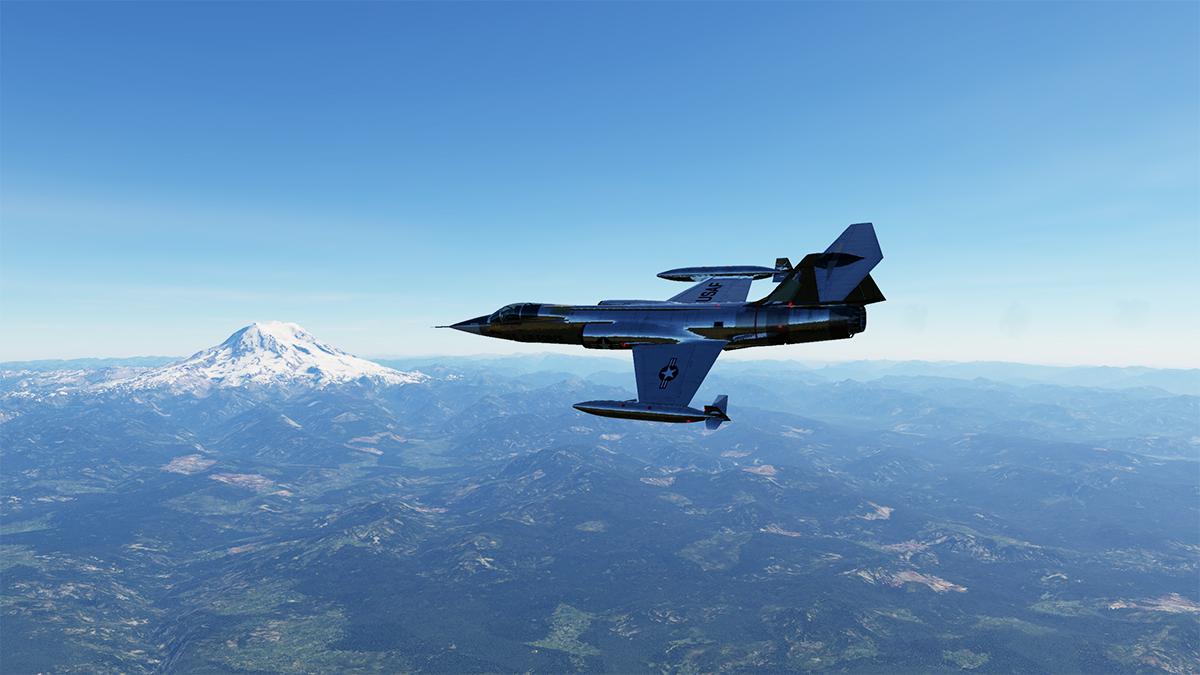
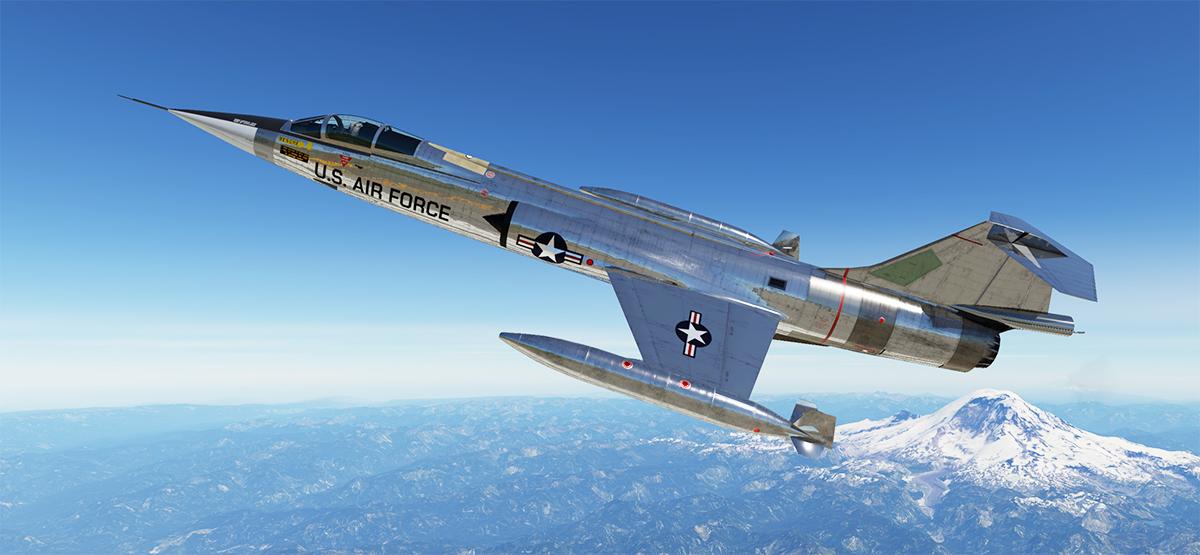
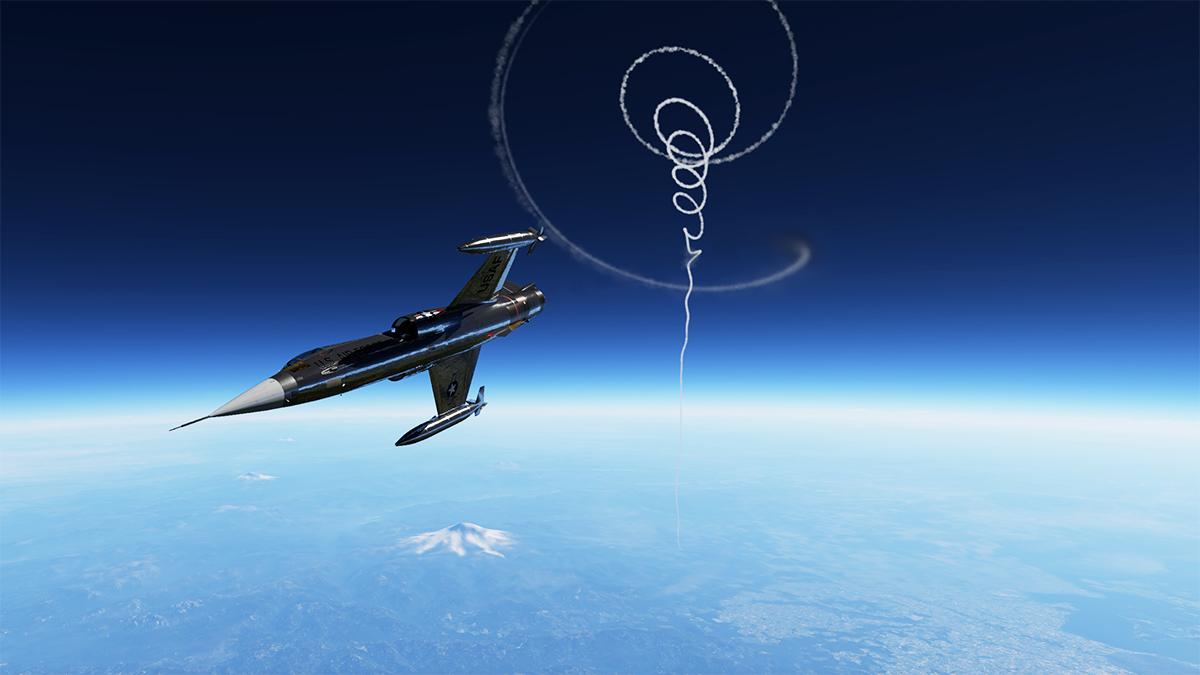
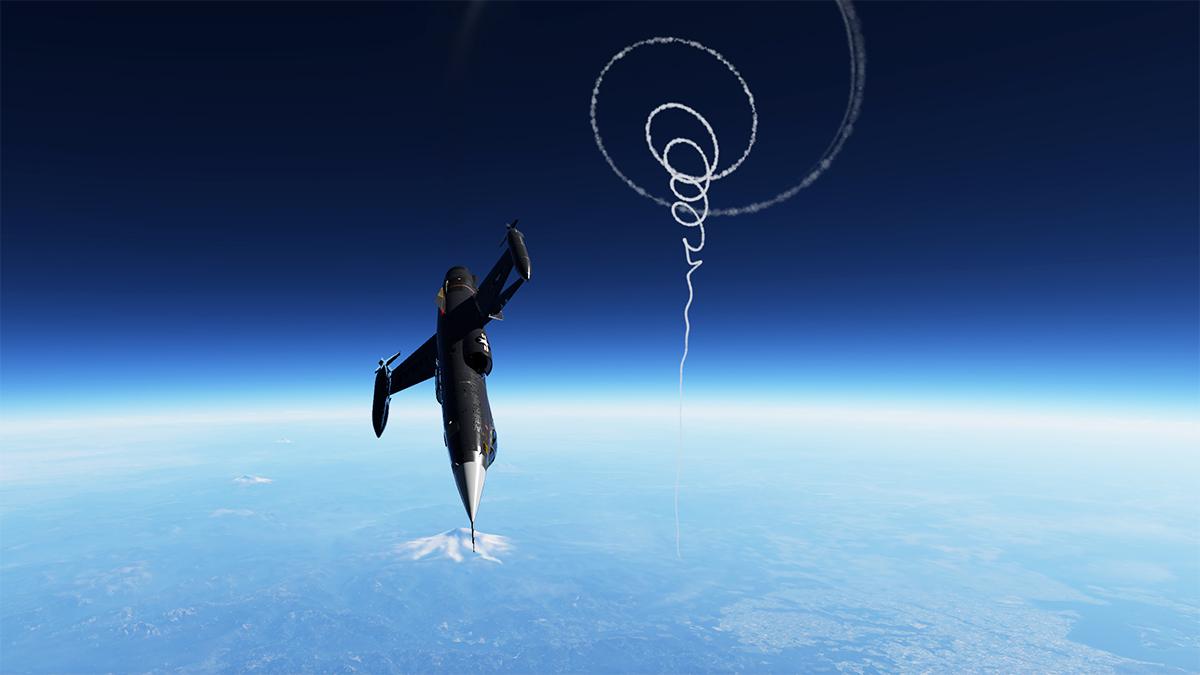
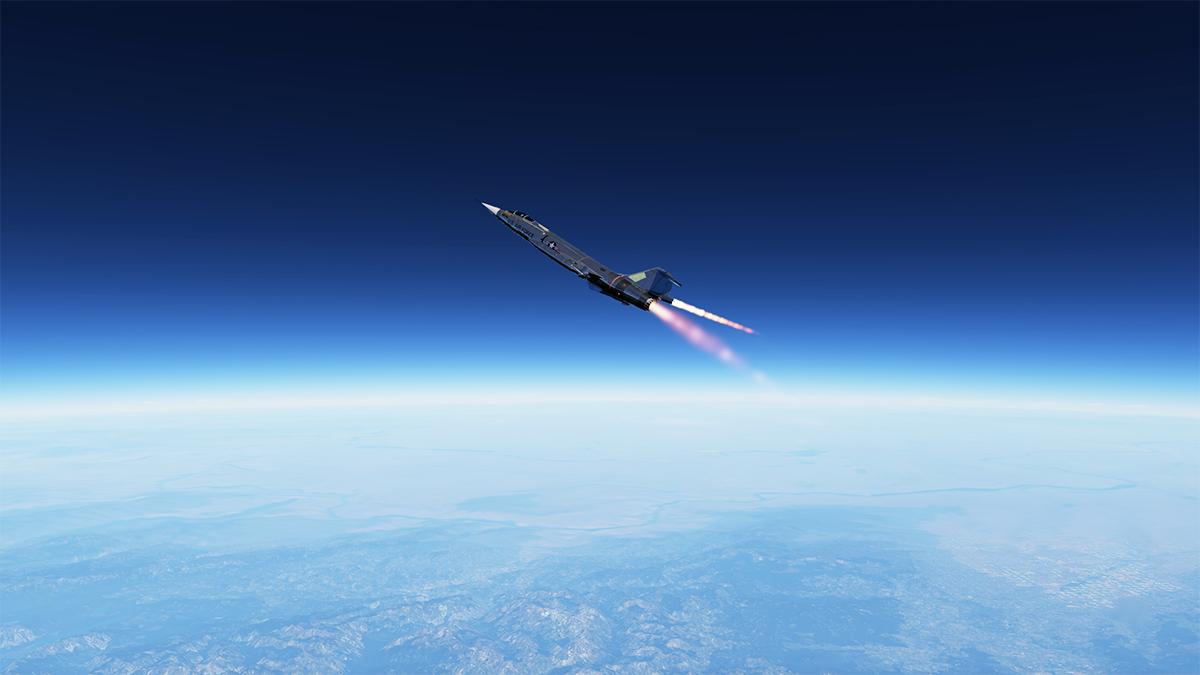
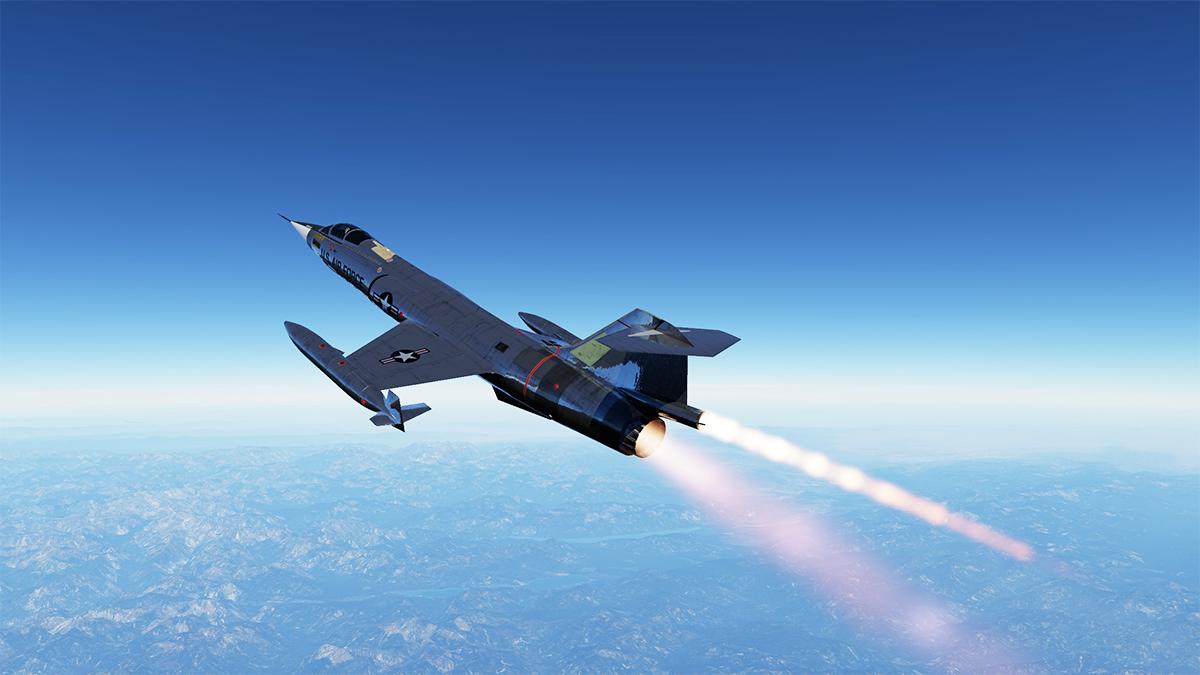
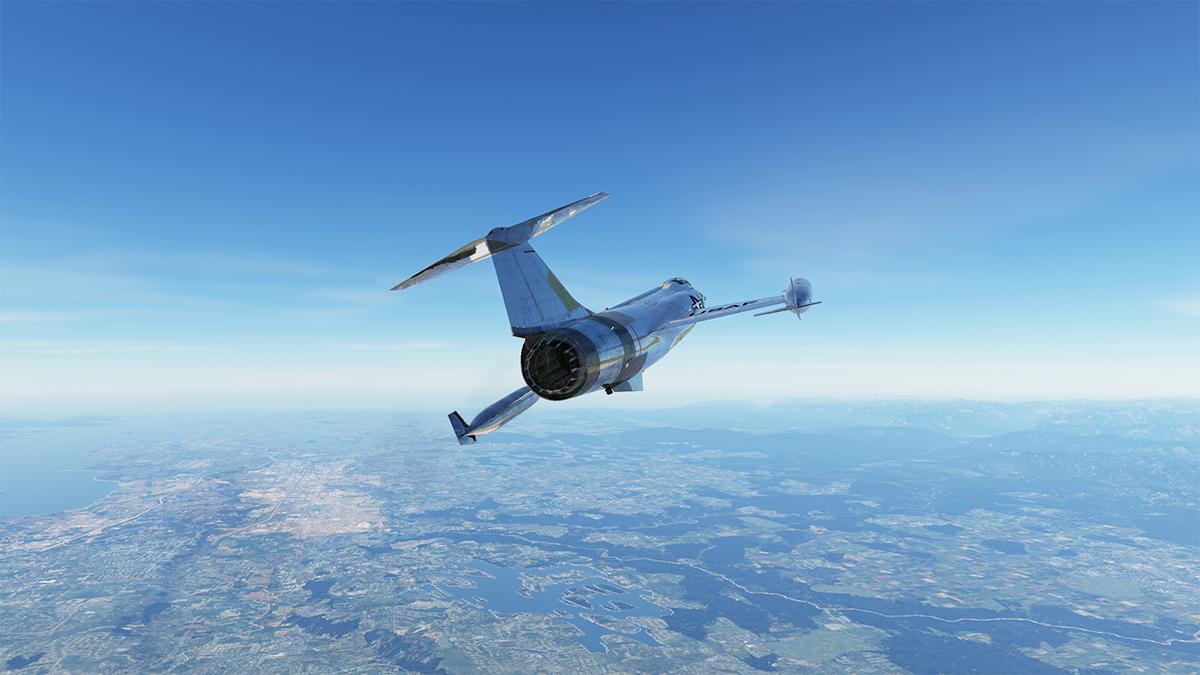
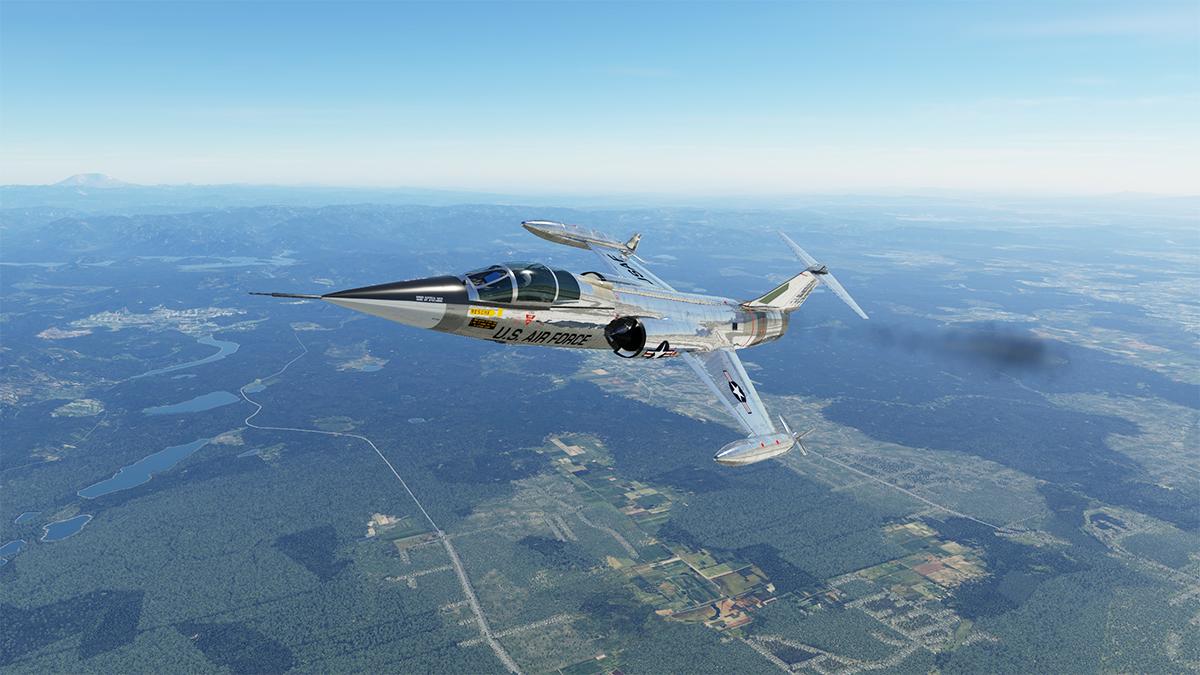
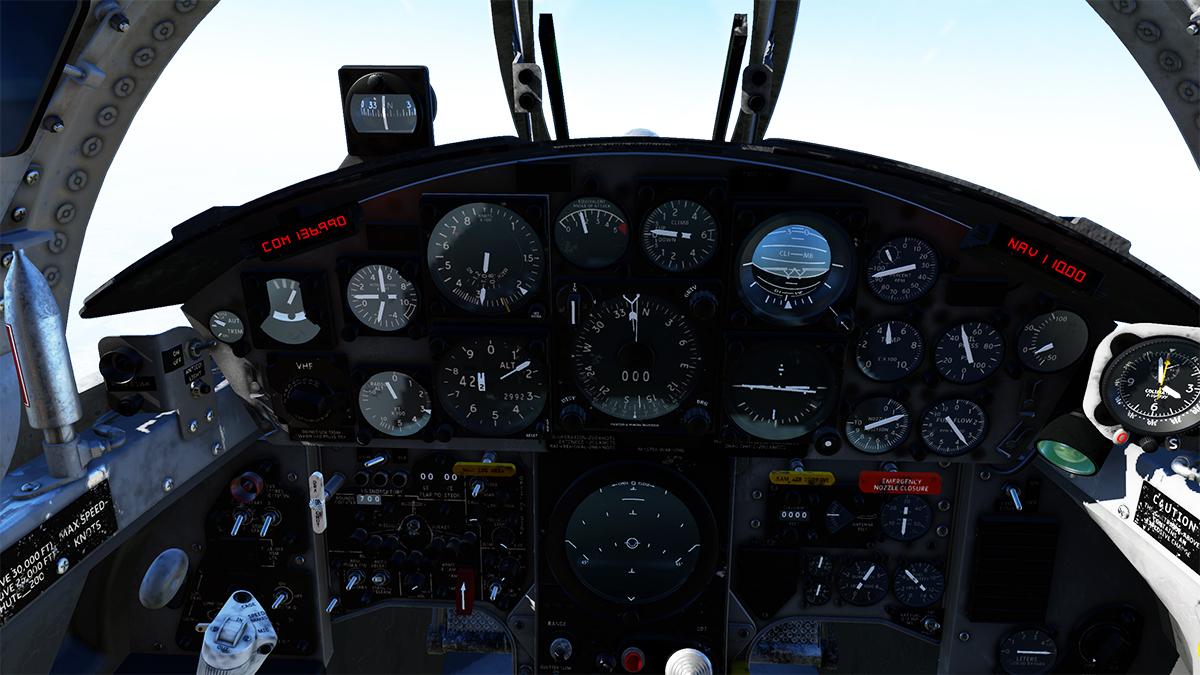
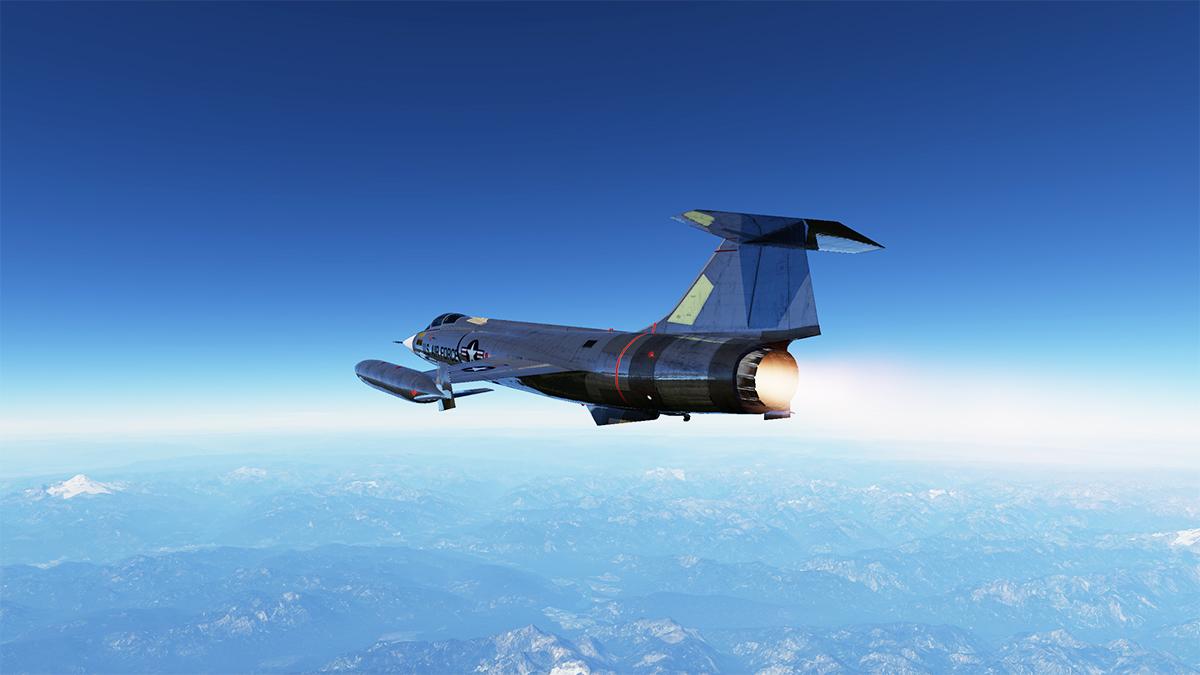
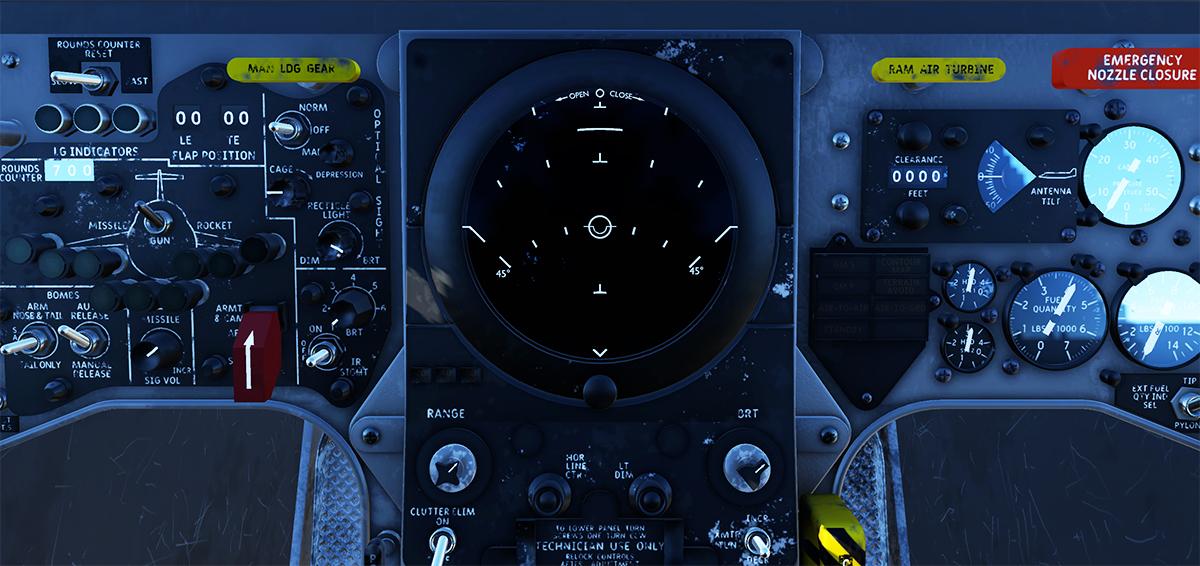
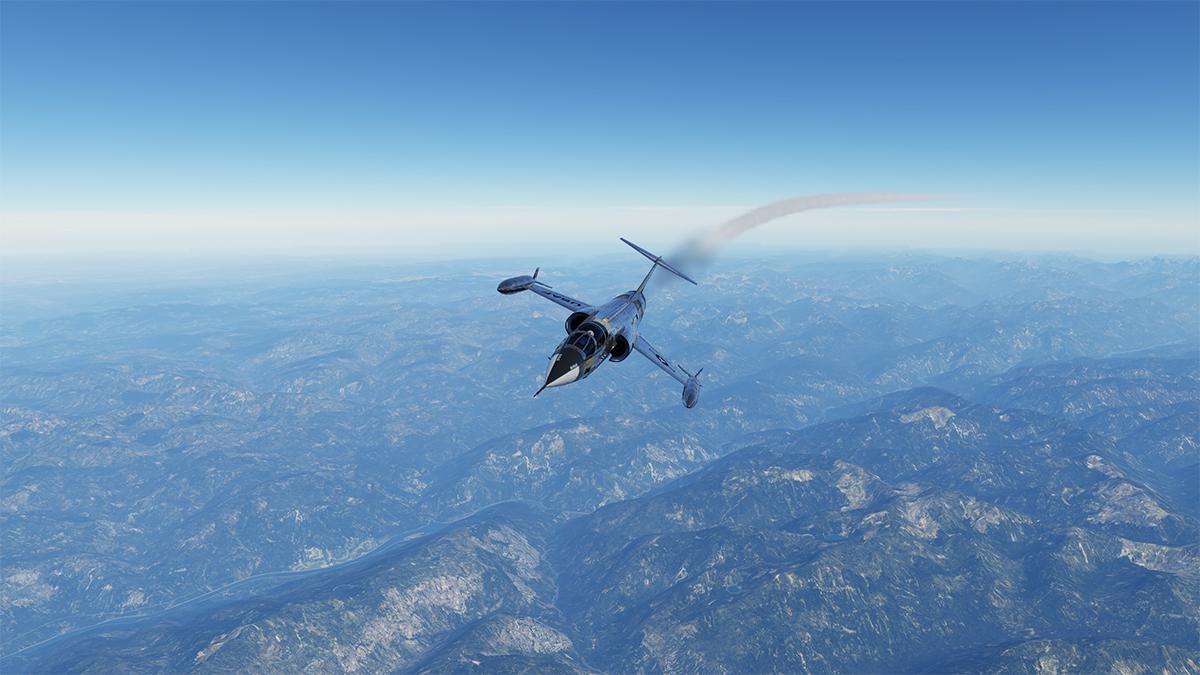
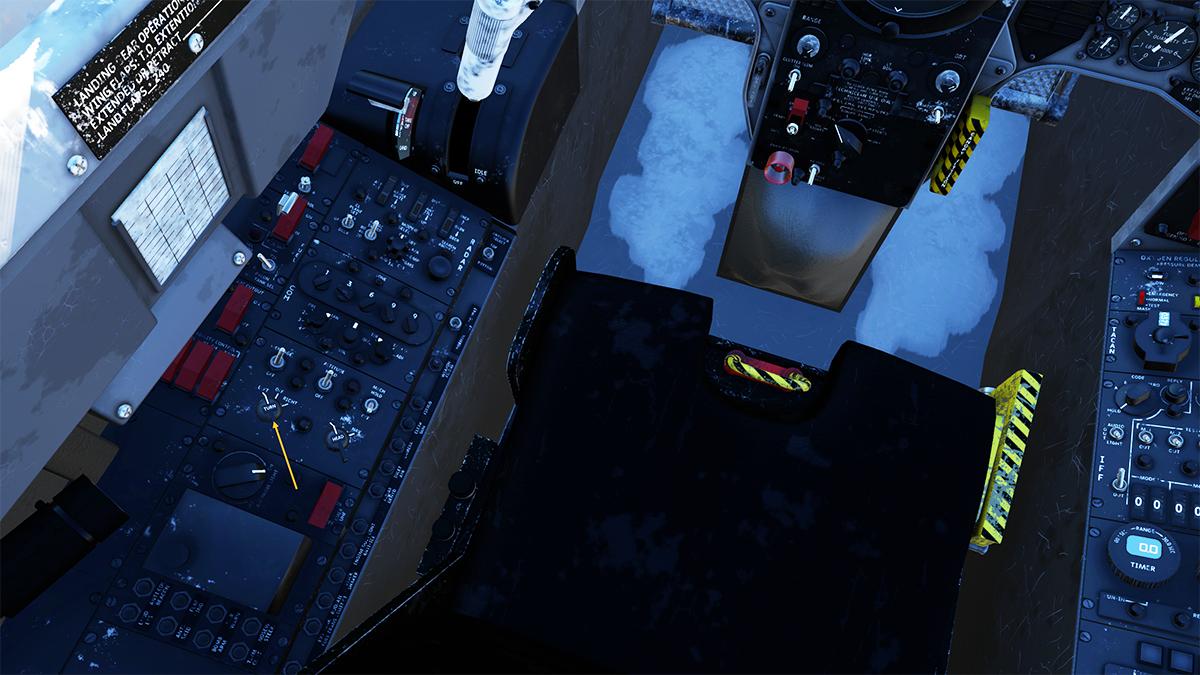
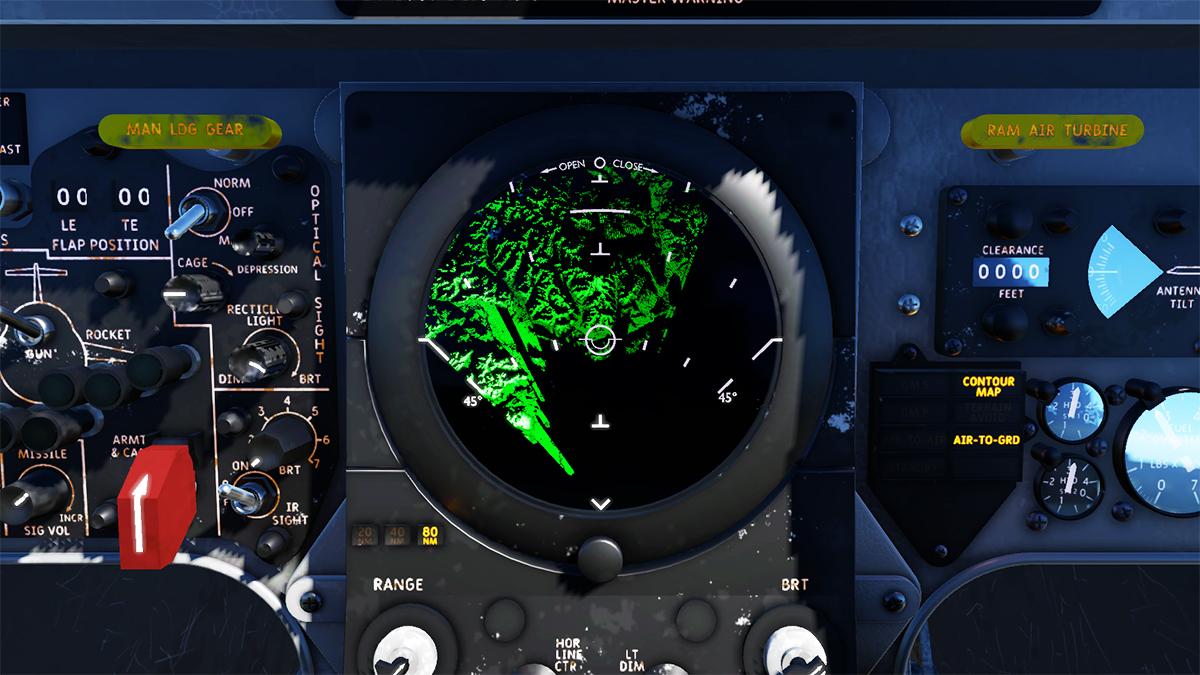
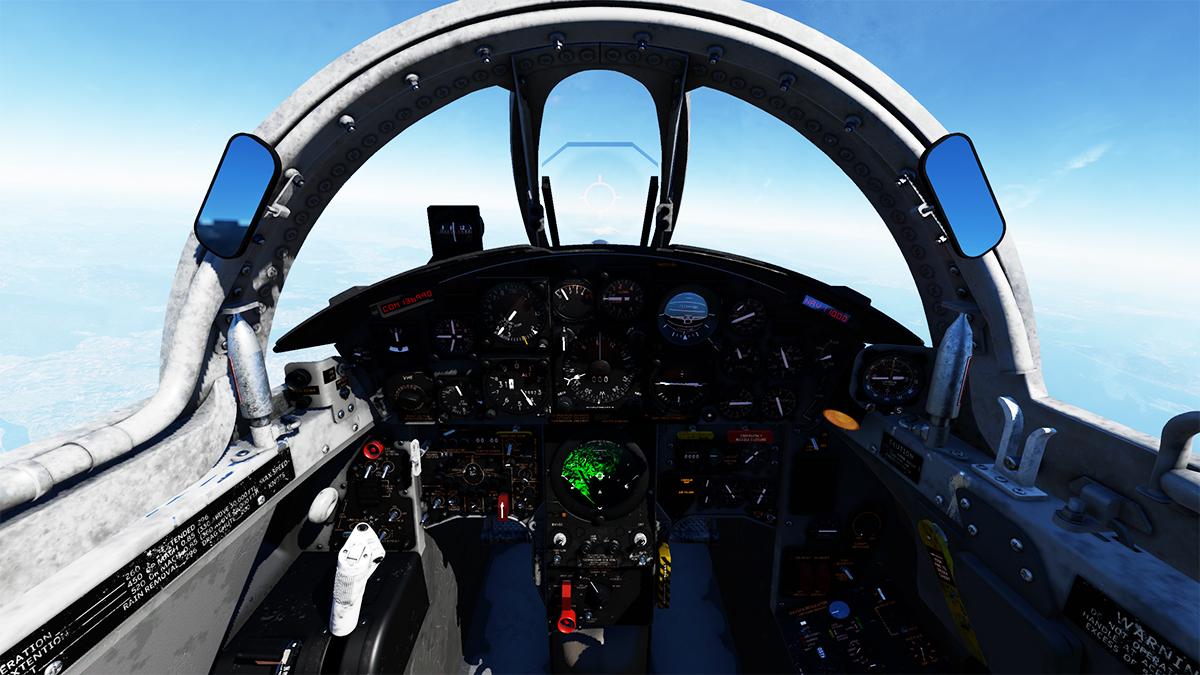
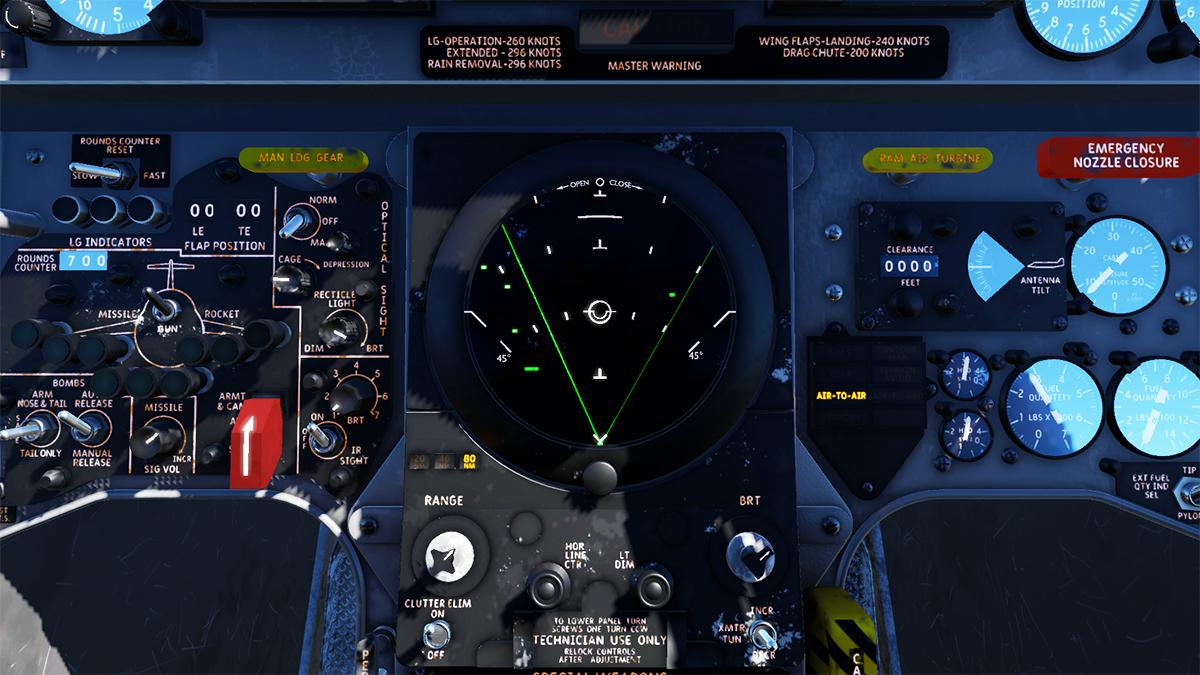
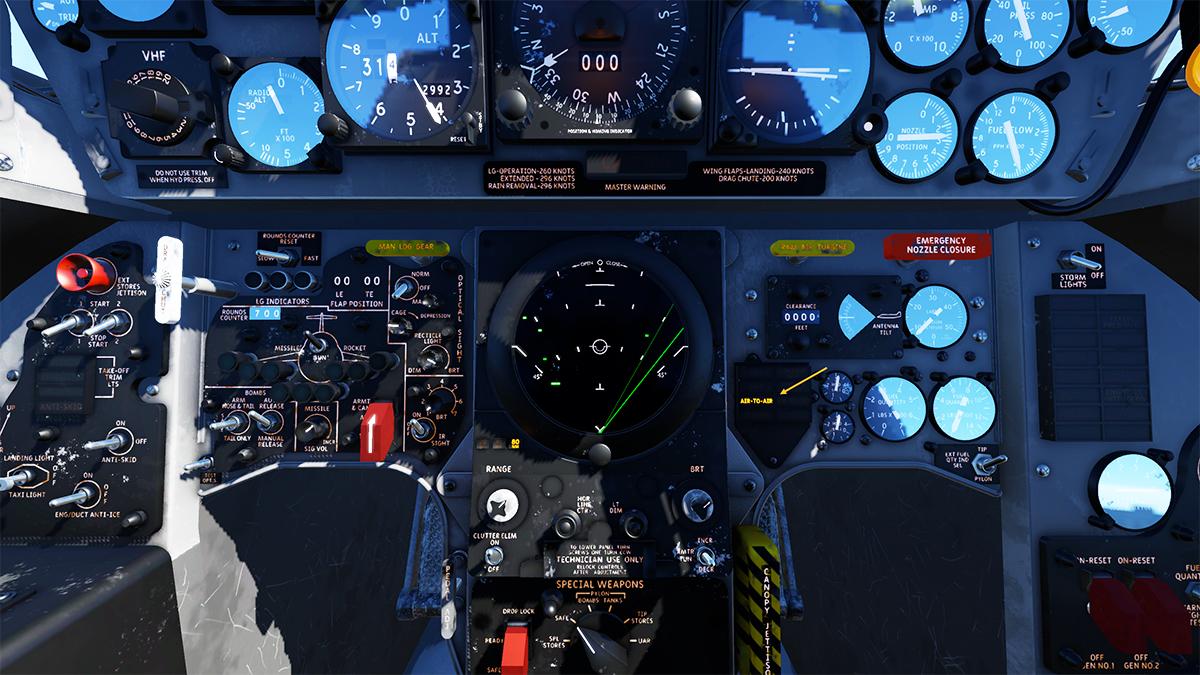
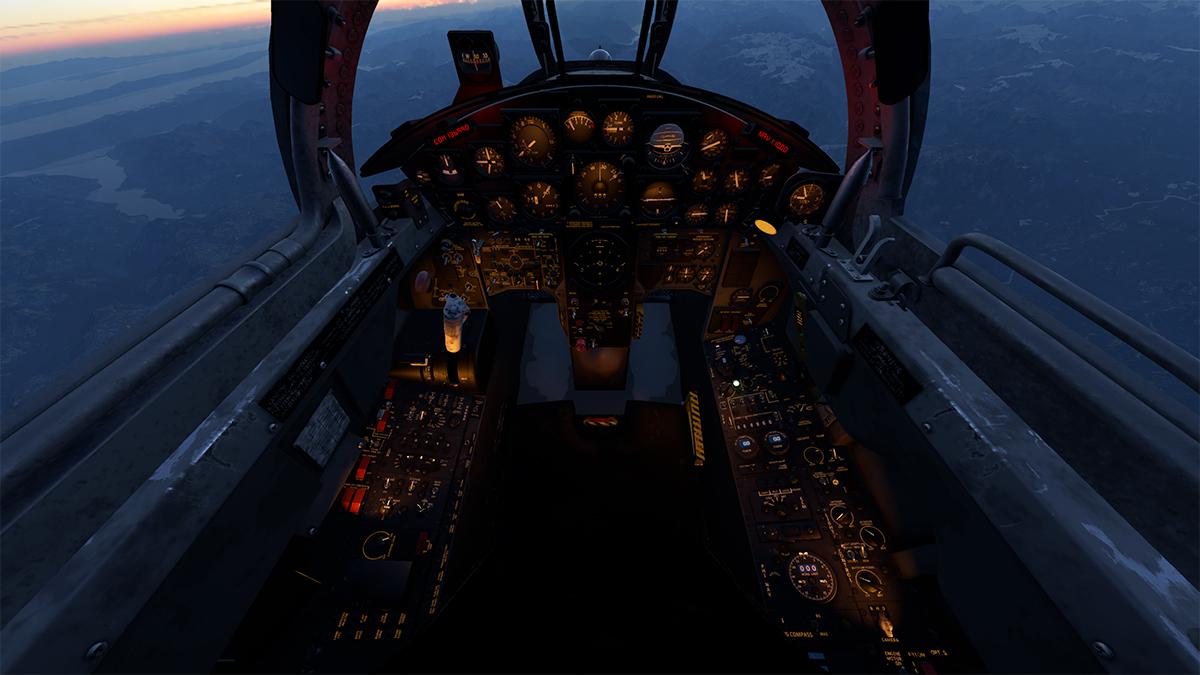
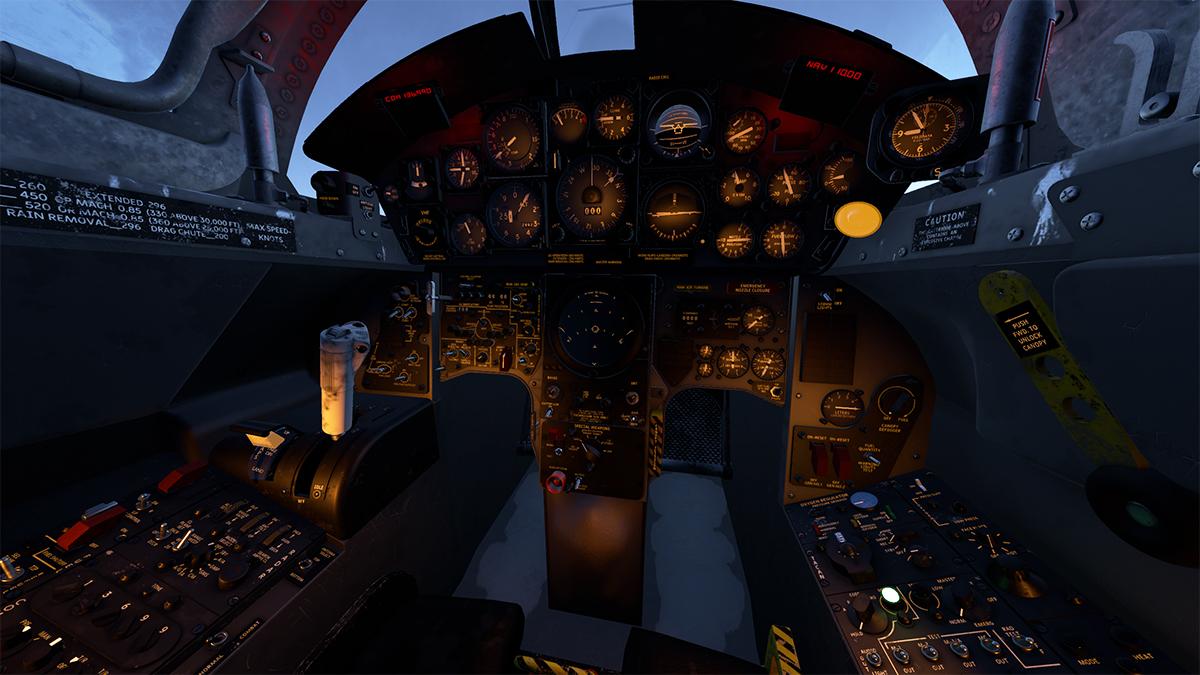
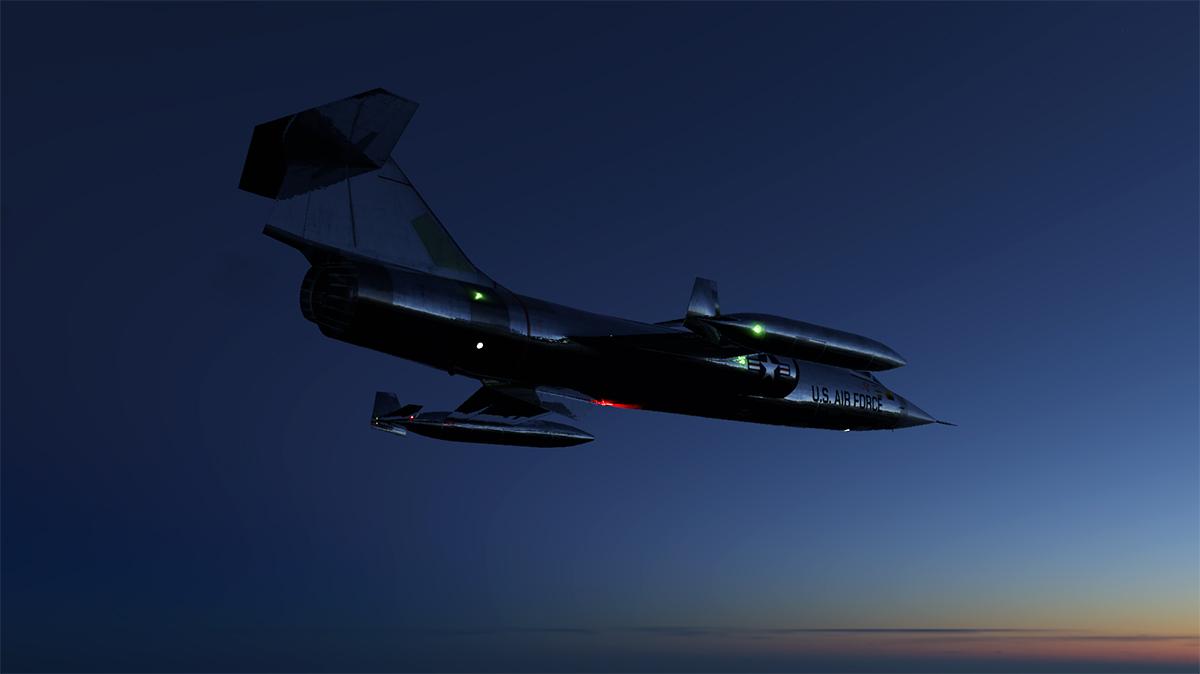
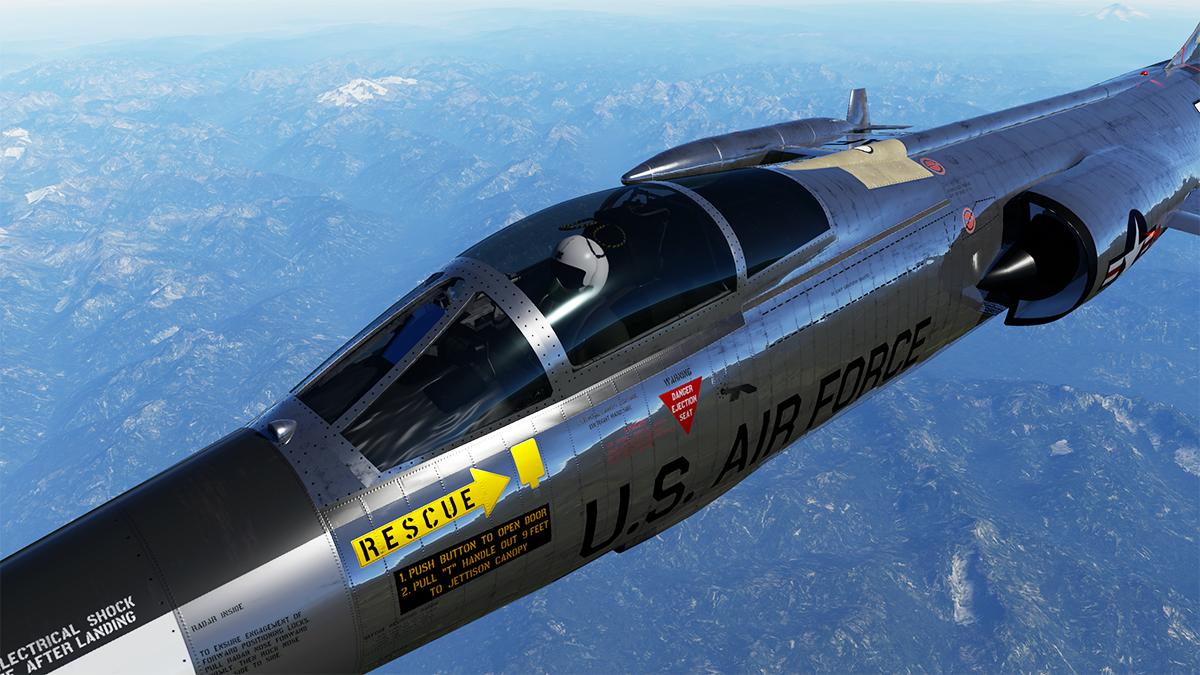
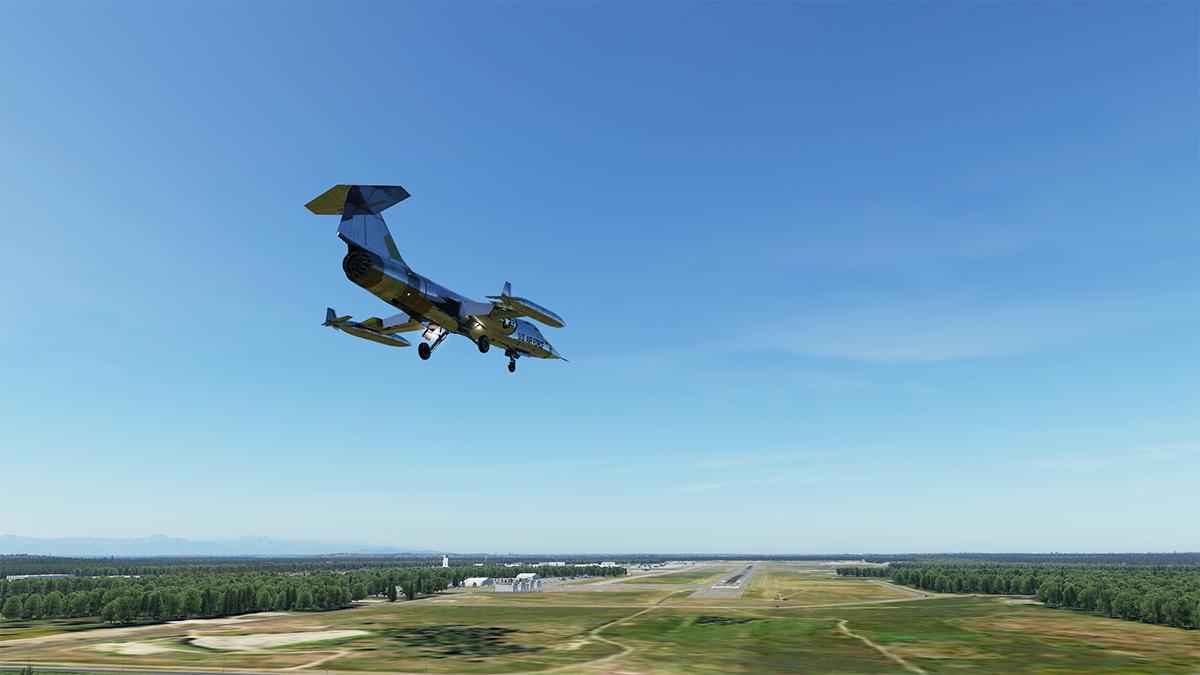
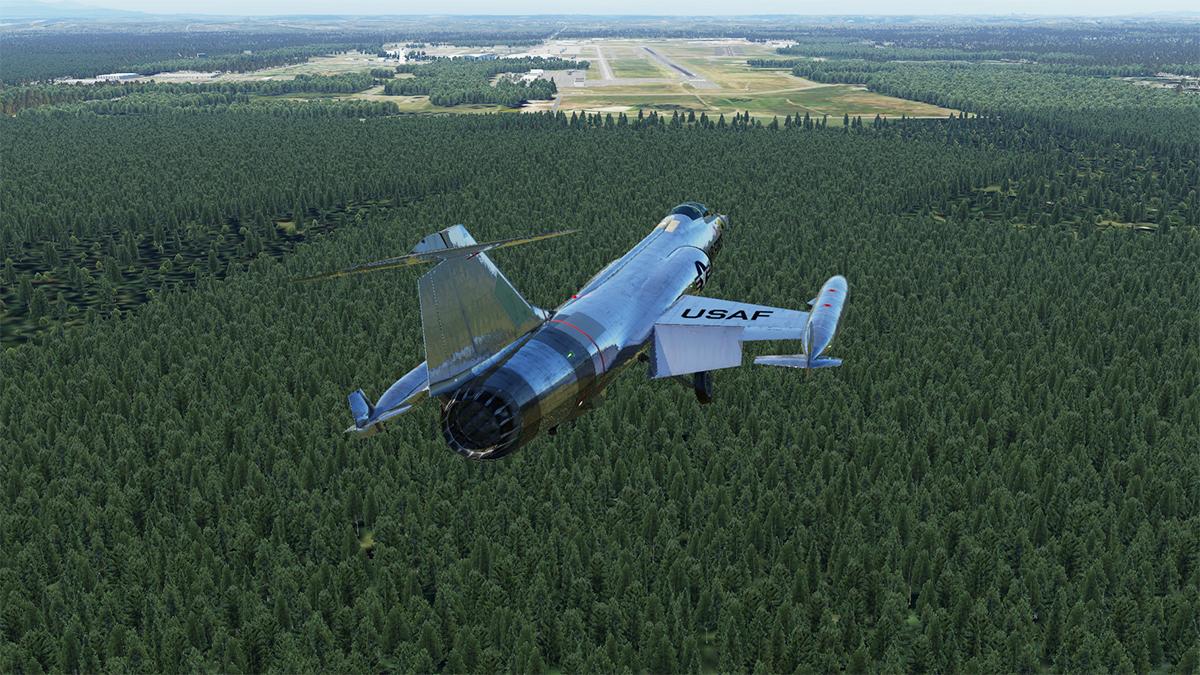
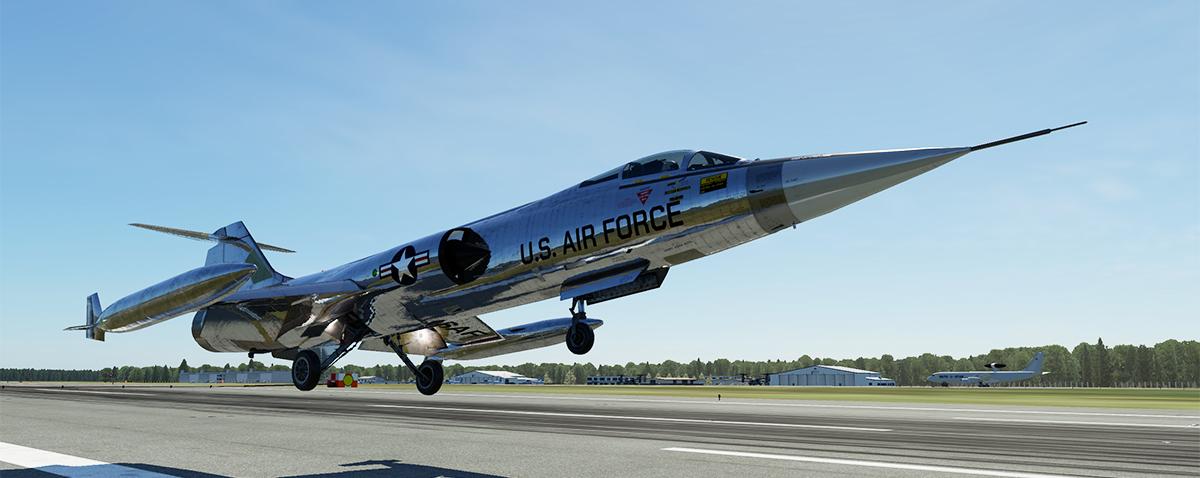
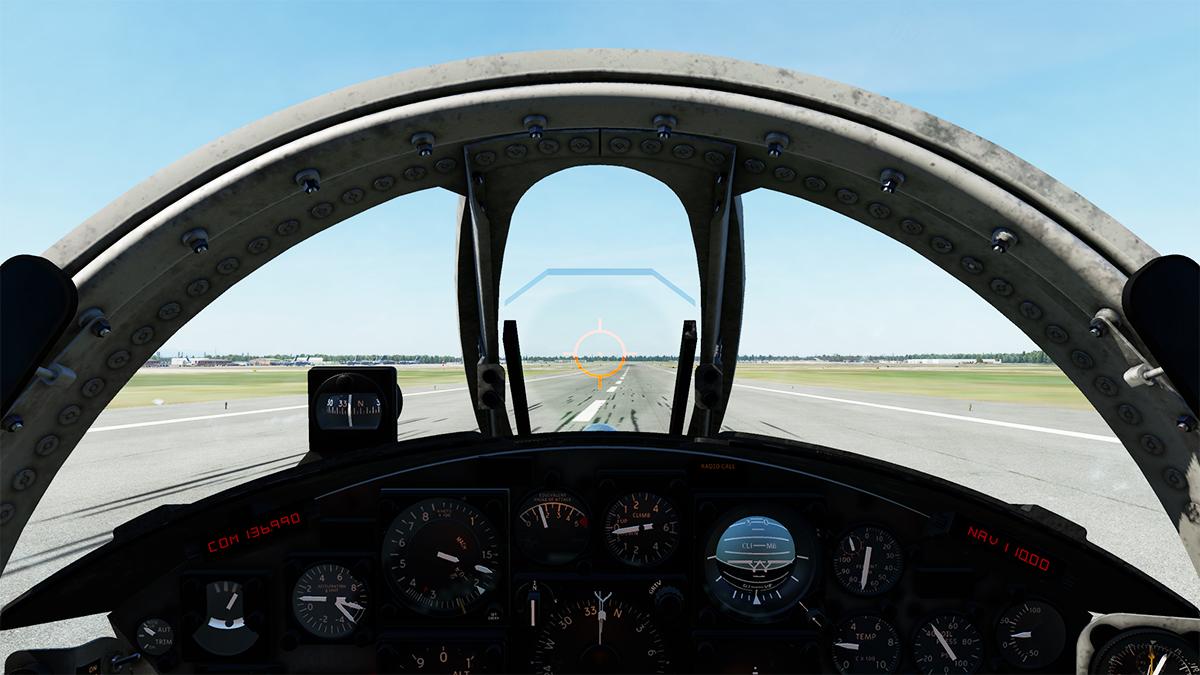
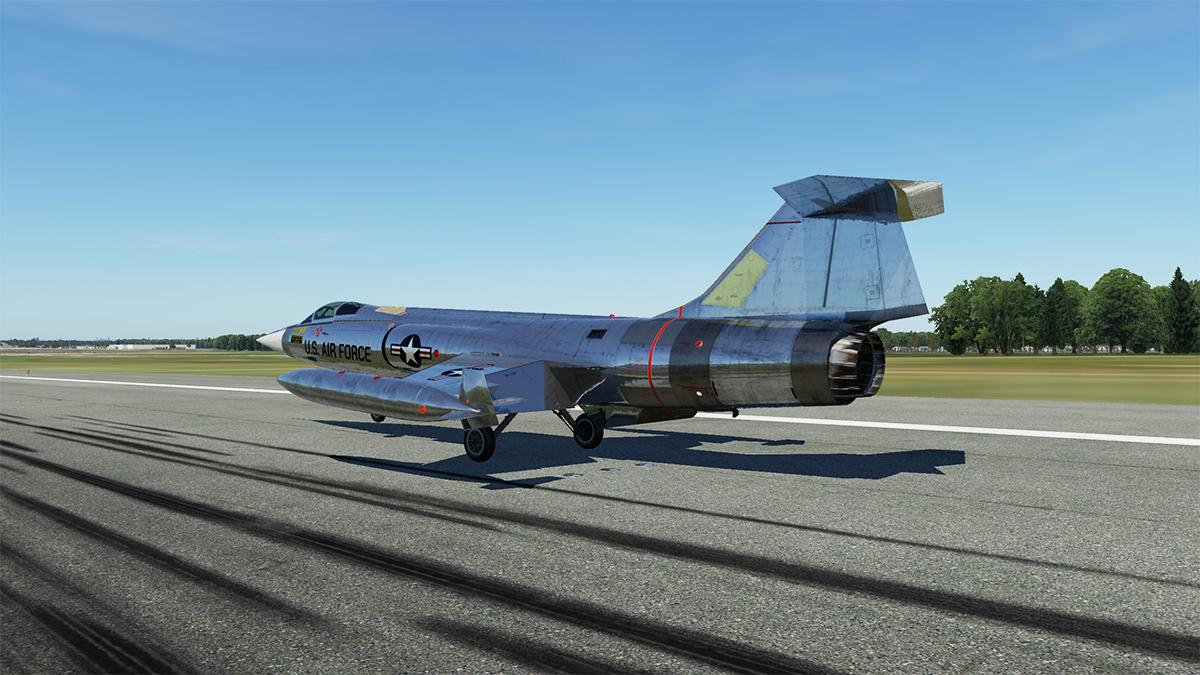
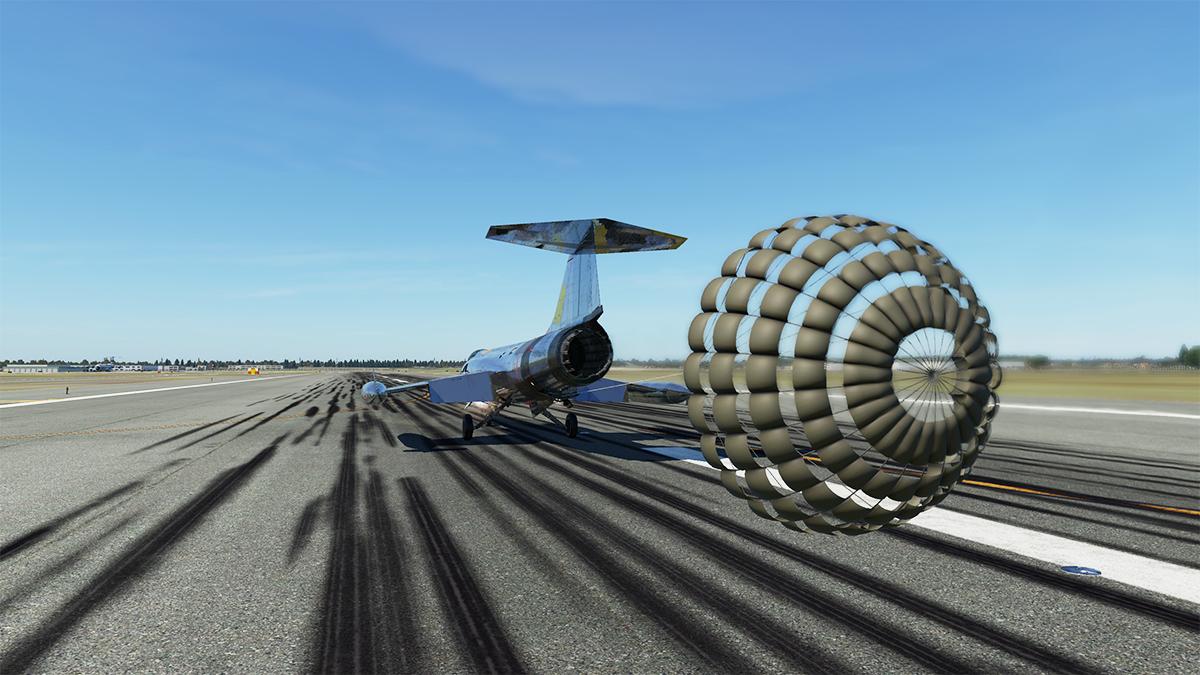
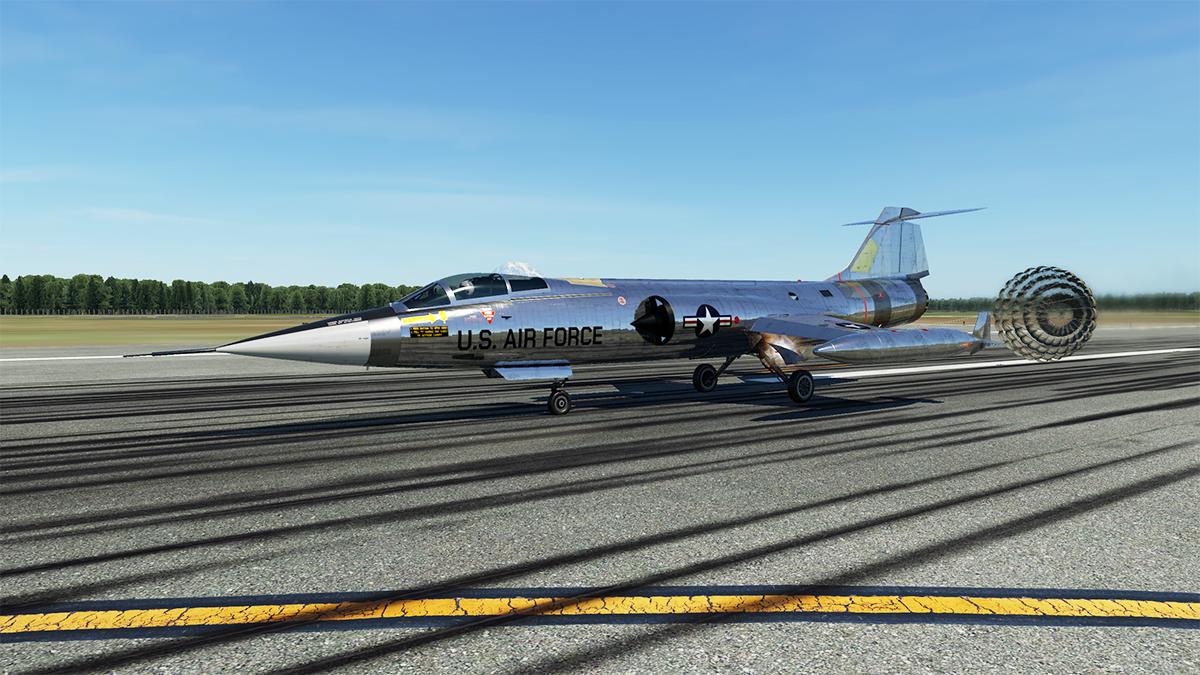
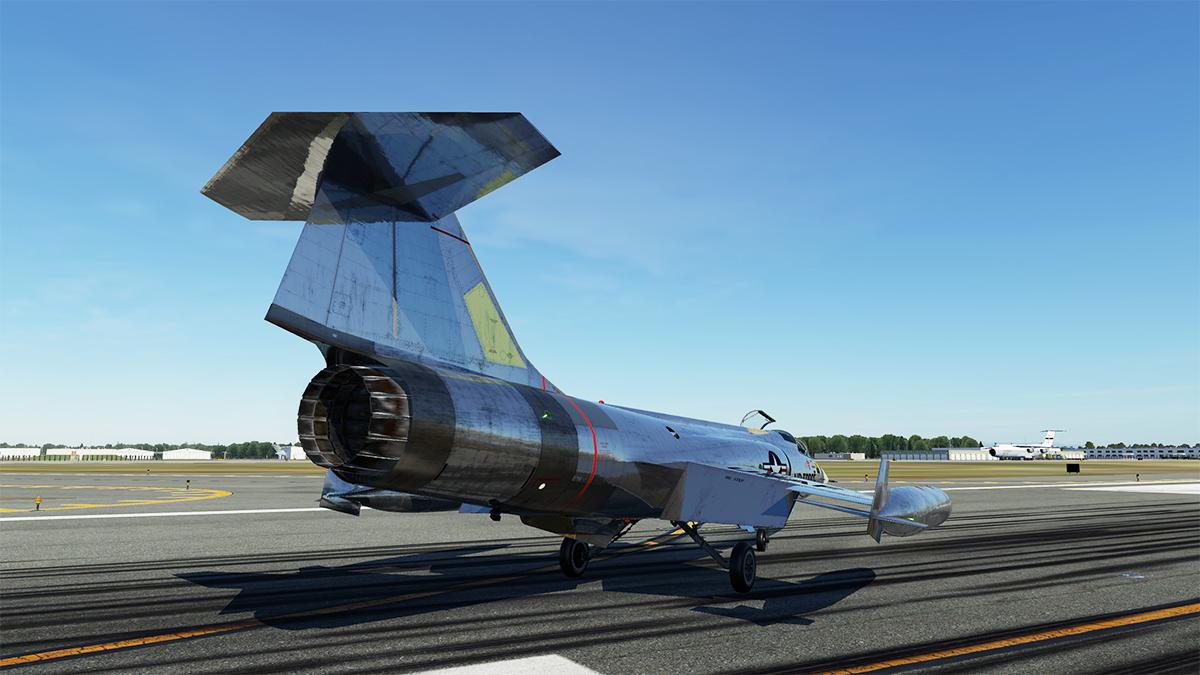
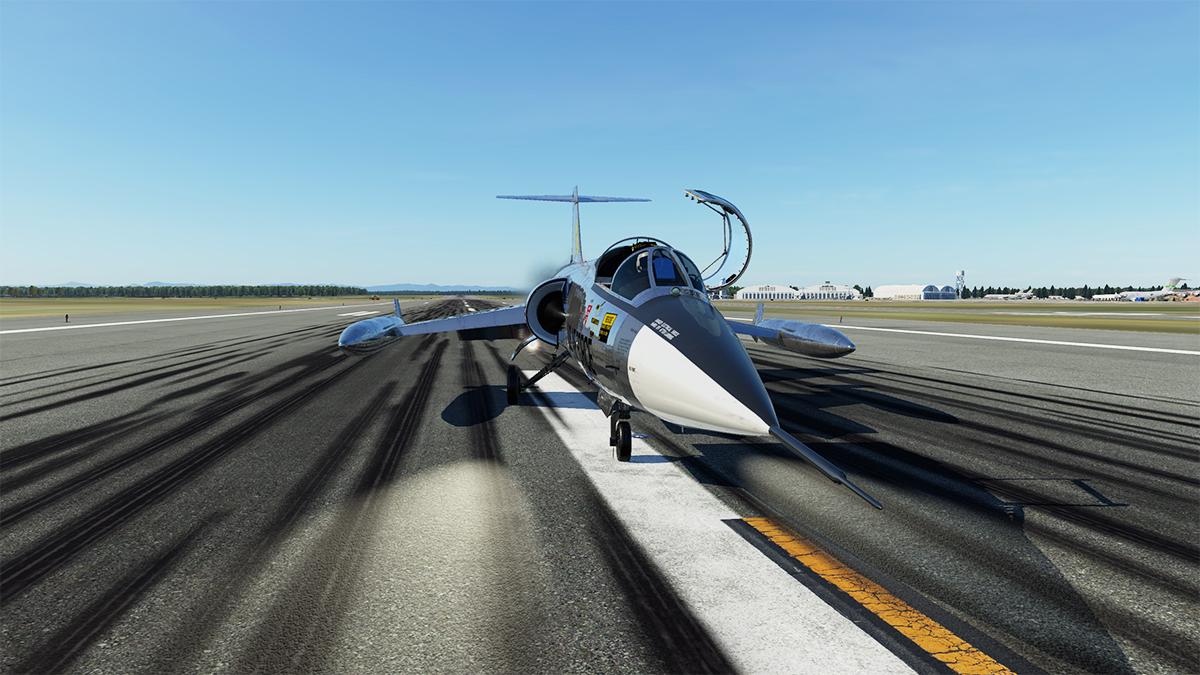
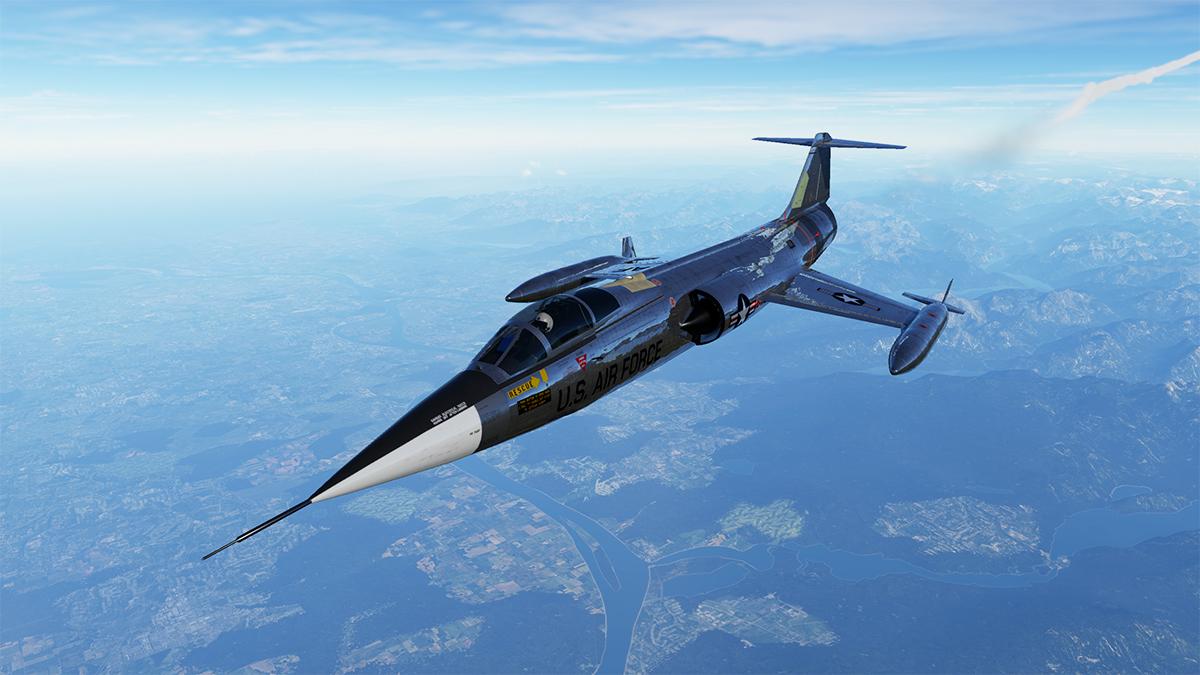
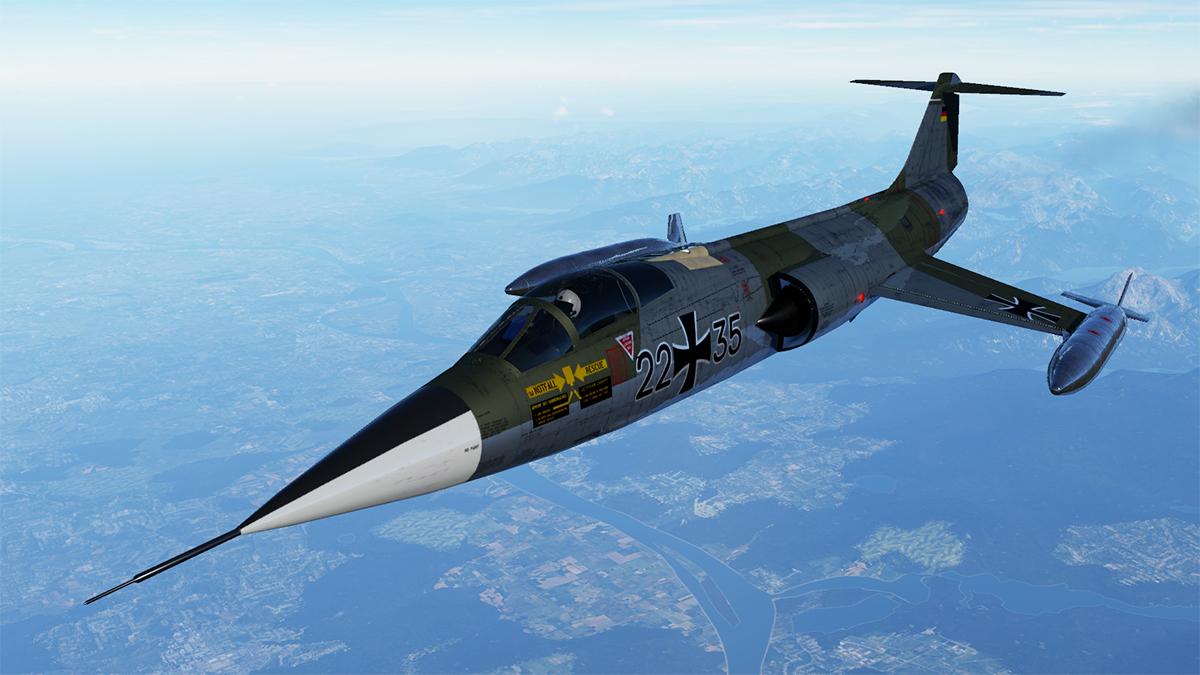
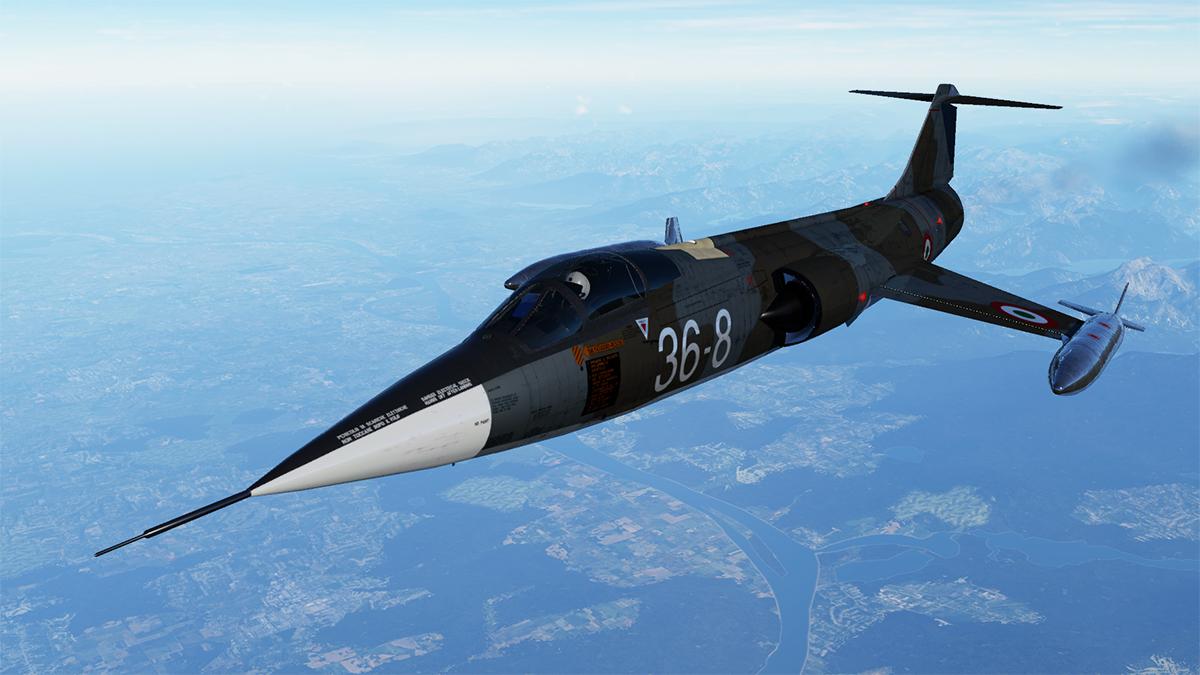
Aircraft Review : F-104 FXP Starfighter by Colimata This is the first operational fighter aircraft to fly a sustained twice the speed of sound. It is of course the Lockheed F-104 "Starfighter", or otherwise known as a "Missile with a man in it". The F-104 is a pure machine built for pure speed, it looks fast... Supersonic fast, just a long pointy fuselage, with those small straight, mid-mounted, trapezoidal wings, and a high stabilator (fully moving horizontal stabilizer) which was mounted atop the fin to reduce inertia coupling, it was the ultimate interceptor aircraft. Of course NASA loved it, the USAF not so much. But an iconic aircraft it still was. The F-104 is an American single-engine, supersonic air superiority fighter which was extensively deployed as a fighter-bomber during the Cold War. Created as a day fighter by Lockheed as one of the "Century Series" of fighter aircraft for the United States Air Force (USAF), it was developed into an all-weather multi-role aircraft in the early 1960s and was produced by several other nations, seeing widespread service outside the United States than within. Clarence L. "Kelly" Johnson, vice president of engineering and research at Lockheed's Skunk Works, visited USAF air bases across South Korea in November 1951 to speak with fighter pilots about what they wanted and needed in a fighter aircraft. At the time, the American pilots were confronting the MiG-15 with North American F-86 Sabres, and many felt that the MiGs were superior to the larger and more complex American fighters. The pilots requested a small and simple aircraft with excellent performance, especially high-speed and high-altitude capabilities.[4] Johnson started the design of such an aircraft upon his return to the United States. In March 1952, his team was assembled; they studied over 100 aircraft configurations, ranging from small designs at just 8,000 lb (3,600 kg), to large ones up to 50,000 lb (23,000 kg). To achieve the desired performance, Lockheed chose a small and simple aircraft, weighing in at 12,000 lb (5,400 kg) with a single powerful engine. The engine chosen was the new General Electric J79 turbojet, an engine of dramatically improved performance in comparison with contemporary designs. Colimata is a well known X-Plane developer of considerable skills. His main claim to fame has been the extraordinary Concorde FXP project, complex but truly original to the most famous airliner ever built. Colimata is not immune to fast military jets either, as his earlier projects were the FA18-F Super Hornet and the MiG-29 Fulcrum. This F-104 however is all new, and available only for X-Plane 12. First the F-104 Starfighter by Colimata comes in three different variants, the FXP G, the FXP S and the FXP 21C (21st century). You can see what variant you are flying by the menu notice in the X-Plane Banner. ‘G’ F-104G was the most-produced version of the F-104 family, a multi-role fighter-bomber with a total of 1,127 aircraft built. They were manufactured by Lockheed, as well as under license by Canadair and a consortium of European companies that included Messerschmitt/MBB, Fiat, Fokker, and SABCA. The type featured a strengthened fuselage, wing, and empennage structures; the larger vertical fin with fully powered rudder as used on the two-seat versions; fully powered brakes, a new anti-skid system, and larger tires; revised flaps for improved combat maneuvering; and a larger braking chute. Upgraded avionics included the Autonetics NASARR F15A-41B radar with air-to-air, ground-mapping, contour-mapping, and terrain-avoidance modes, as well as the Litton LN-3 inertial navigation system (the first on a production fighter). Here the "G" is the most authentic and the base version of the F-104 package. "S" F-104S was upgraded for the interception role, adding the NASARR R-21G/H radar with moving-target indicator and continuous-wave illuminator for semi-active radar homing missiles (initially the AIM-7 Sparrow), two additional wing and two underbelly hardpoints (increasing the total to nine), the more powerful J79-GE-19 engine, and added were two additional ventral fins to increase stability. The M61 cannon was sacrificed to make room for the missile avionics in the interceptor version, but was retained for the fighter-bomber variant. Typically two Sparrow and two (and sometimes four or six) Sidewinder missiles were carried on all the hardpoints except the central (underbelly), or up to seven 750 lb (340 kg) bombs (normally two to four 500–750 lb [230–340 kg] bombs). The F-104S was cleared for a higher maximum takeoff weight, allowing it to carry up to 7,500 lb (3,400 kg) of stores; other Starfighters had a maximum external load of 4,000 lb (1,800 kg). Its combat radius was up to 775 mi (1,247 km) with four external fuel tanks "21C" or 21st Century. It is the most modern variant which can be seen immediately from the cockpit instruments with the digital displays. It doesn't exist obviously, as there is no real "21C" but F-104's do come with digital instruments as shown in the video. Debatable here is there should be a YF-104A variant, this is the NASA No.818, and this aircraft was flown for 19 years as a flying test bed and a chase plane. The Colimata F-104 comes in that original skin metal only livery. The airframe was all-metal, primarily duralumin with some stainless steel and titanium as part of the structure. The fuselage was approximately two and a half times as long as the airplane's wingspan. The wings were centered on the horizontal reference plane, or along the longitudinal centerline of the fuselage, and were located substantially farther aft on the fuselage than most contemporary designs. The aft fuselage was elevated from the horizontal reference plane, resulting a "lifted" tail, and the nose was "drooped". This caused the aircraft to fly nose up, helping to minimize drag. As a result, the pitot tube, air inlet scoops, and engine thrust line were all canted slightly from centerline of the fuselage. The Colimata F-104 is beautifully done, it glows in the X-Plane 12 sunshine, the light bouncing off the metal realistic skin. You can feel the "Skunk Works" talent here, in the way they created and crafted these formidable machines, metallurgy at it's finest. The panels and rivet patterns are beautifully crafted, and of course those razor sharp wings... notable this is the "S" variant. The wing design was extremely thin, with a thickness-to-chord ratio of only 3.36% and an aspect ratio of 2.45. The wing's leading edges were so thin (.016 in; 0.41 mm) that they were a hazard to ground crews. Hence, protective guards were installed on them during maintenance. The thinness of the wings required the fuel tanks and landing gear to be placed within the fuselage, and the hydraulic cylinders driving the ailerons were limited to 1-inch (25 mm) thickness to fit. You can see the different types of metal here to absorb the engine output heat, and the built in fuselage Speedbrake doors Flaps are "Barn Door" deep, and note the extremely large aileron for supersonic control and manoeuvrability. Notable is the Boundary Layer Control System (BLCS) at the rear side of the wings right above the flaps. Compressed air is taken from the compressor of the engine and injected in the airflow right above the flaps. This improves lift by reducing the probability of turbulent airflow above the flaps. This way reasonable landing speeds were achieved. Because the vertical fin was only slightly shorter than the length of each wing and nearly as aerodynamically effective, it could act as a wing-on-rudder application, rolling the aircraft in the opposite direction of rudder input. To offset this effect, the wings were canted downward at a 10° negative-dihedral (anhedral) angle. This downward canting also improved roll control during high-G maneuvers, common in air-to-air combat. Under the fuselage are both the central ventral fin, and this being the "S", the twin empennage structures. The maw of the jetpipe exhaust is excellent, not only externally, but deep internally as well in finite detail. The stabilator is also razor thin, and has a very wide tilt angle, all set in a T-Tail configuration. The undercarriage is a simple three wheel setup, basically very basic in a system to fold up into the tight fuselage. Extremely well executed here by Colimata with metal hydraulic piping the highlight, and all of the internal bay detail is a feast for the eyes, links and joints are also perfectly created, and note the taxiway lights mounted internally on the outer bay doors. Single nose wheel is again simple, with the single landing light on the front strut, again the internal bay detail is excellent, notice with the way the twin doors frame and clamp the strut when closed. Glass is excellent as well... a deep dark green tint, shows off the thickness of the glass, and reflections are perfect. The canopy opens to the left side, and you can see the mottled glass detail... the frame is extraordinary in it's perfect detailing. Externally there is a well developed "Cold War" style pilot, he is not animated, but looks authentic. Cockpit This is the ultimate "Cold War" warrior, the next generation up from the Second World War fighters. The detail is very black, but worn, highly realistic and authentic. Colimata has done a really great workmanship in getting the details right, right down to the worn text, that needs a second glance to read it. Bit of trivia... the original F-104 had a Stanley C-1 Ejection Seat, and this seat ejected downwards through the floor at 500ft, this was to clear the high T-Tail for a safe ejection from the aircraft... later F-104s used the Martin Baker Q7 seat, this seat was now powerful enough to clear that troublesome tail. Here it is the later Q7. The ejector seat works! so don't pull the hoop unless you want to vacate the aircraft, oh and get rid of the canopy first as well.. The simple stick has no operational buttons or switches, but can be hidden via "hotspot" on the base. The three different G, S and 21C instrument panels are all quite different with their layouts. It is best to study them all and then select the one you like, as each have a very different role. I'm going to stay with the original "G" layout. It is a complicated panel layout, and you would need a little study before serious use. The manual provided "Quickstart", is in my mind a little bit too under detailed for the complexity here, you need the areas to be broken down and explained, this is only a "Quickstart" so a better manual as noted might follow, it is needed. Dials and gauges are beautifully created and reflective, very realistic. Centre seven dials cover (anti-clockwise) AirSpeed, Angle of Attack, Vertical Speed (V/S), Artificial Ball Horizon, Turn and Bank rate, a Position & Homing Indicator (sort of Heading Indicator) and Altitude. Left is a G-Meter, Radio Altimeter, and right are the engine RPM, Temperature, Oil Pressure, Fuel Flow and Nozzle Position, the Whisky Compass is upper left glareshield... sticking out far right is a intricate clock/chronometer. Lower panel is the Engine Start and Landing/Taxi lights far left, then the Weapons panel, landing gear switch is here as well. Central is the huge RADAR system, that covers both AIR to AIR mode and AIR to GROUND mode. Right lower panel is the Cabin Pressure, and internal and external fuel gauges. Oxygen is far right. Side panels are again quite different between the variants. On the "G" the layout is smaller and less detailed, highlight is the lovely white stubby throttle lever, the Flap position indicator is set behind, but you can also hide the throttle if you want to. Left side has radio, fuel switches, Radar position lever (nice) and Stability Control. Right side has Oxygen Regulator, IFF (Identification Friend or Foe), IN Inertial/flightplan (note here, this panel tends to move around, on the 21C it is lower left Instrument panel) and ECM. There are various types of displays between the G and S/21C. Here there is no flightplan screen on the G, but on the other variants. The G has a "Range Timer", the S the fully interactive flightplan panel. The autopilot is very basic, in a set the aircraft and "HOLD" the situation in Altitude and Mach, you can TURN left or right via the lower switch. But it is in the extreme detailing that you get here, something simple like opening the canopy is a marvel to watch, the catches are all animated and reassuring that the canopy will be safely locked down at Mach 2, they click and clank as well... it's all beautifully done, and more importantly VR (Virtual Reality) ready, with the goggles on, you will be immersed in a Cold War environment like no other. Menu The menu GUI is accessed on the X-Plane banner Menu under the aircraft title, the CHECKLIST window is here as well. There are Eight tabs to select on the menu; MAIN, SETTINGS, ROUTE LOADING, EQUIPMENT, WEAPONS, FUEL, DOORS & GROUND and STATUS. If you have Colimata;s Concorde they are all quite familiar in design and use. MAIN tab is a welcome screen. SETTINGS: Covers PRO Mode. This mode changes the aircraft from simple (aerodynamics and systems) to the PRO mode, where you get access to everything, but be aware the already difficult F-104 is far more harder to fly and use. SOUND, Includes Engine Volume internal and external, cockpit fans, G-Suit sounds and Oxygen mask sounds, RADAR, HD Resolution and Simple mode or heavy shadows, MORE includes, Simple Air-refueling, Cockpit lamp glow and Intake doors... here you can have the optional variable (moving) intake doors on the "S" and "21C" variants. Before we go any further. You will find that most systems here on the Colimata F-104 are very X-Plane default based, so if you know how X-Plane systems work, then you will easily understand how to set up and use the F-104. ROUTE LOADING: Here is a Flightplan Loading tool. flightplans are stored in the X-Plane "Output/FMS plans" folder and can be accessed and loaded via this tab. Obviously they have to saved in the .fms format. EQUIPMENT: There are four options on the "Equipment" tab... Selecting the Air Re-Fuel Probe, Radar Warn Receiver.. which is located top right instrument panel, Chaff Flare Dispensers... which are both located on each side of the rear exhaust pipe, and the Rocket Motor! WEAPONS: Weapons are selected via the X-Plane "Flight/Weight&Balance/Weapons menu, standard X-Plane default settings. The list is huge at a mix of 22 armaments and fuel tanks for the 10 stations on the aircraft. Overload and you get a RED weight indication "Caution Very Heavy Aircraft". FUEL: If you add on Fuel tanks in the "Weapons" menu. Then the tank(s) selected will appear in the Flight/Weight,Balance & Fuel Menu to add in more fuel onto the aircraft, again watch the weight as the F-104 is very easily overloaded. A point to make is that if you "Drop" the both wing-tip tanks then you get the "Stubby" wing version of the F-104 Lower menu the page notes your RANGE, in High altitude flight, Mix Altitude flight and Low Altitude flight... Also if your route is loaded, it will note the distance available in NM (Nautical Miles). Also noted if your AIR REFUEL is switched on or not. DOORS & GROUND: This menu gives you options on the ground. You can reveal the RCA AN/ASG-14T1 ranging radar. Put a very nice ladder on the right side of the aircraft, Open/Close the Canopy. There are also four bays you can access... lower right Electronics bay, the left lower Cannon Bay of which is the 20 mm (0.79 in) M61 Vulcan auto-cannon, Top forward is the Avionics bay, and behind it is the Ammunition bay... lower left rear is the RAT (Ram Air Turbine). Centre selections include, a load of flags, pins covers and chocks. There are far too many to even count! Note the lovely wing edge covers and authentic engine inlet covers. Lower D&S menu covers two static items in vehicles. A military Heavy Duty Tanker and GPU (Ground Power Unit) STATUS: The final menu tab is the "Status" of the aircraft. This is a one look view of the total status of the F-104. Included is Fuel and your current Range, System status in Oxygen, Hydraulics, Pneumatics, Fuel (system), Landing Gear, Elevator (Trim Position), Aircraft Weight and required Approach, Final and Touchdown speeds. CHECKLIST As noted also on the menu bar is the F-104 Checklist tool The first page is a "walkaround" diagram, it's not animated by set views, but just a guide around the aircraft. The menu window is moveable and scaleable around your screen. There are thirteen checklists from Pre-Flight to (engine) Shutdown. Then four "Emergency" pages and five "Custom Content" pages for your own use. Navigation is via the two PREVIOUS and NEXT buttons. Altogether it is a very comprehensive and detailed menu, certainly very well done by Colimata... Easy to use and has loads of current required data avalable. _____________________ Flying the Lockheed F-104 Starfighter The Startup sequence will not find a battery switch inside the cockpit. Electric energy is only available as soon as the GPU is connected externally. Complete the cockpit checks, then make sure that the Fuel Shutoff switch is in the ON position. Engage a starter switch. Switch 1 on uneven days, Switch 2 on even days. The engine will start spooling up. Now click on the lower right side of the throttle to bring it from OFF to IDLE position. With this the engine will continue its spool up and the dials start to revolve. This is a very "Ground Crew" aircraft start, you almost want to stick your hand up out of the cockpit and twirl your hand. Engine start up sounds are seriously "Amazing", first the startup compressor, then that familiar whine out of the J79 turbojet, it fills the air in the cockpit (always have the canopy open), the starter switches will go off automatically, when the engine is above 40%, then engage the Generators GEN1 and GEN2. You don't want to close that canopy yet, but to hear the noise, absorb your surroundings. Let of the brakes and a slight throttle and your rolling.. You soak up the feeling, this iconic jet aircraft. Now quickly it is also time to get down to business, and you pull down the canopy... ... suddenly your immersed in another world, a tightly contained space, a cold-war scenario, and the F-104 feels of what it is, a Skunk Works project to go very fast. You need a very long and wide runway to takeoff, those petit fine wings don't give off much lift, so you need a lot of air around them to make them work. Hold the brakes, then put up the throttle to full thrust, yes you will need everything you have for the initial push... You get a dragons ROAR! out of the rear, and when you let the brakes go, the F-104 bounces with the forces, it moves, but slowly at first then gradually gains speed, you need a lot of runway to get enough to get around 200 knts, there is a marker you can adjust for your rotate moment, tracking needs full concentration in keeping the Starfighter tight and straight to the lift point. Even then the lift is slow, worse you have to have a very steady firm hand to keep the F-104 stiff and clean, if not the nose will bounce... Immediately you clean up the flaps, more clean lift is now required, speed as well, more lift... then your climbing out. Gear up next, and the undercarriage all folds into the fuselage and gives you a very nice shiny clean underside, the gear animations are extremely well done by Colimata, very professional. Shredded of it's earthly bounds, the Starfighter will now seriously climb, so you tone the throttle back a bit, rate of climb here is 48,000 ft/min (240 m/s) Initially... fast, really fast, needed as you can fly as high as 73,000 ft (22,000 m), almost in space, SR71 territory (84,000ft). Some points here. The F-104 bounces around a lot, not wind mind you, but just nervy. The nose jiggle is very disconcerting. You can tone this down a little via the X-Plane settings to dull the controls out a lot, then to perfect the trim and it can really help, problem is? that flying like this even for a short time is very tiring, you are working consistently hard all the time in just flying the aircraft. It does get better with familiarity, but the F-104 is not an easy aircraft to fly. The Autopilot is of only a minor help, or relief, so your workload is high in here. A trick is to use the AOA ‘Angles Of Attack’ equivalent gauge. It does not show the exact angles, but a scale that informs you about how near to the maximum AoA the aircraft currently is... the so trick is staying within the boundaries. There is also the APC "Automatic Pitch Control" system which provides additional safety. If AoA value limits are exceeded too far it will even ‘kick’ the stick forward to get back to safe levels, but not when landing gear is down. There was a special version of the F-104 was that ‘NF-104’. It was equipped with a rocket motor in addition to the jet engine. In the 1960s the NF-104 broke many records and it was used in the training for the X-15. The motor can be switched on and off, and the thrust can be set between 50 % and 100 %. The rocket provides thrust for 90 seconds. The rocket panel is only visible if the "Rocket Motor" is selected, situated on the left side. Since air is super thin at high altitudes, the conventional flight controls will loose authority. For this an RCS ‘Reaction Control System’ can be activated. It provides controllability in very thin air. There are both controls for the actual rocket motor, and the RCS system. Re-heat the J79 turbojet, then flick the switch and your head slams back like in the "Right Stuff", and your climbing like.... well "Hell, hang on" actually... dials are twirling and you really can't make any sense of them, you are just along for the ride! Passing through 65,000ft and that air is now extremely thin, and your controls don't respond as they should... the F-104 is EXTREMELY hard to fly up here, slight movements you will are all you need, but if you lose it, then there is no coming back... and you will simply spiral away to your death. It took a few high-altitude flights to get the feel of it all right and to get the use of the RCS system, exhilarating, certainly. Worse is that at these extreme altitudes the jet engine will switch off, and it is required to be restarted during the reentry. If the jet engine nozzle stays open, close it via the emergency engine nozzle handle before the restart attempt. This is not a Air-superiority fighterjet, an agile, lightly armed aircraft and ready to eliminate any challenge over control of the airspace. Even turning is an effort for the F-104, you bank, but you will still take a very wide circumference to go to your new heading. The word "Interceptor", says it all, and in reality it is all the F104 can really do, go fast, go high and "Intercept!" First you climb as high as you need. There is a marker on the Artificial Horizon to get the 15º climb angle perfect, then up you go, almost to 4000fpm... ... now at a high altitude, you can let the F-104 loose, on goes the burner again and your soon pushing a mach, then m.1.5. The aircraft is a handful to keep in a straight bullet line, turning... only for the faint-hearted. I can see and feel why it was called the "Widowmaker". Yes the Starfighter is bullet, but more X-15 than fighter jet. The Autopilot takes ages to settle down on a course and altitude, but in time will hold the aircraft with a "hands off the stick" relief, turning is tricky with the turning knob "left-Right", again it works, but difficult to put the aircraft on a straight heading again, so you readjust with ENGAGE off, then when at a set altitude and heading, then (Re)ENGAGE the Autopilot... and hopefully it will HOLD either the speed or the altitude, you can't have both. The F-104 ships with a sophisticated RADAR system covering AIR to AIR mode and AIR to GROUND mode, in the AIR to GROUND mode can require quite a few computer system resources. It is therefore possible to switch it from HD ‘High Definition’ to a lower definition. Furthermore the interpretation of the AG ‘Air to Ground’ image can be complex. Therefore the system comes with a "Standard-Simple mode" and a "Complex" mode. In "Complex" mode we see the same landscape from above but with ‘RADAR shadows’. If the RADAR beam is blocked by an obstacle, everything behind is in its ‘RADAR shadow’ and will then be displayed black. In AIR to AIR mode or AA mode, we can track and lock on to other aircraft. The available ranges are 20 nm, 40 nm and 80 nm. The RADAR beam sweeps 45° on both sides in the ‘G’ variant and 60° in the ‘S’ and ‘21C’ variants. To lock an enemy aircraft the target line can be moved left or right. When the target line is aligned with the target aircraft, press the ‘lock’ button or use the custom command. When the aircraft is locked (on target) the symbology on the display changes. We then see a circle that represents the distance to the target. The smaller the circle diameter the closer we are to the target. It shows direction and altitude to the enemy jet relative to our aircraft. The system is very good, but needs time to study and work it all out. To be honest I only had the "Quick" guide for information, and you really need a detailed depth of information to use it. Nightlighting Very night fighter... that is the feeling inside the "Starfighter" cockpit, there are a lot of instrument adjustments, but the knobs are spread around both sides of the instruments. Three separate knobs covers the instrument lighting; INTERIOR INSTRUMENT, INTERIOR CONSOLE (sides) and INTERIOR FLOOD. The lighting is the instrument backlighting and two spot lights each side of the pilot. All set at full BRT and it is all a bit overwhelming in the brightness... So the trick is to tone it all down, even below the halfway marker, then it becomes all "Very Nice". Externally you have some very (very) nice rotating beacon's top and lower, and Navigation lights, that can be set to FLASH or STEADY. As noted there are two landing lights on the inner gear doors and a single nose taxi light. Landing is probably one of the trickiest treat of them all. The wings here are relatively small, and therefore they need substantial speed to keep you airborne. The ‘BLC’ Boundary Layer Control’ system above the flaps is of great help and the engine is very powerful in case we need to get out of critical situations. So you need to engage the burner to prevent sinking or even stalling, or for a worst case scenario, for a go-around At the lower speed, the flaps and with the gear lowered the roll rate is also significantly reduced, in other words the stick and rudder responses are dull, laggy. It keeps you on your toes to get the speed right at around 200 knts - 190 kts, that's very fast, with not much control response. If your clean and straight, then all you want to do is plant the aircraft, no groundeffect or lift to help you here, it is a carrier shot in reverse. Touched down should be around 150 knts. Even before the nose hits the ground, you release the "Chute", no reverser thrust here to slow you down, but the "Parachute" is extremely effective, you don't (or even dare) touch the brakes. I recommend to set a key command to deploy or lose the chute, your too busy to look down in the cockpit for the hard to find white "DRAG CHUTE" handle. At taxi speed, you let go of the "chute", then flip the catch and open up the canopy... now you can "Breath". We have to be very clear here, that the Starfighter F-104 has some very, very unsual flying characteristics, this is not a forgiving aircraft, rewarding yes, but totally unforgiving... to fly the aircraft well, it would need a lot of commitment and focus, as it is though all its different flight phases, the one aircraft that changes personalities consistently, it is your job to understand each one of them and master the differences, for the novice, not really, even the usual pro's will find it a challenge, but a major repect to those with the "Right Stuff". In the release I had (early) there was only three liveries; The Metal default, a German Luftwaffe and an Italian Air Force. More liveries will be available for download at no additional cost. __________________________ Summary The first operational fighter aircraft to fly a sustained twice the speed of sound. It is of course the Lockheed F-104 "Starfighter", or otherwise known as a "Missile with a man in it". The F-104 is an American single-engine, supersonic air superiority fighter which was extensively deployed as a fighter-bomber during the Cold War. Created as a day fighter by Lockheed as one of the "Century Series" of fighter aircraft for the United States Air Force (USAF), later it was also a NASA test aircraft. Loved more by international Airforces than the American ones. It was created by the famous Lockheed "Skunk Works", and in performance and design it has a the same particular traits as the later SR-71, just to go exceedingly fast. F-104 Starfighter by Colimata comes in three different variants, the FXP G, the FXP S and the FXP 21C (21st century). Known for his excellent Concorde FXP project, Colimata is also not immune to fast military jets either, as his earlier projects were the FA18-F Super Hornet and the MiG-29 Fulcrum. This F-104 however is all new, and only available for X-Plane 12. The F-104 is sensationally designed and developed here, in reality X-Plane, and X-Plane 12 gives this aircraft one of the best positions in Simulation, the top and the best, a very high accolade. It's top notch stuff, the best you can invest in. The quality and detail is excellent, nothing is missed here, that is from the shiny metal skin to the worn but highly detailed cockpit and instruments, super detailed 4k textures and complex landing gear and brake chute. Features are as long as your arm, with an extensive menu. With panels that can open up (Electronics bay, gun bay, avionics bay, radar dome and canopy), ladder, full tags, wing covers and chocks, featured GPU and Fuel trucks, and an NF-104 Rocket and Reaction Control System. There are extensive weapons, with highly replicated "Cold War" era weapon and radar systems, the later 21c has modern glass instruments and avionics. It is extremely tricky to fly, as was the original "Widowmaker", but that is a major part of the attraction to this sort of Simulation, so what you will put in, is what you get out of the aircraft, it is demanding, but highly rewarding as well as it brings out the best of your "Right Stuff", those generation of pilot's that pushed the extreme boundaries of speed and space. This Starfighter aircraft allows you to experience that era and fly something very unique, an icon, a classic... the best of it's time. __________________________ Yes! - the F-104 FXP Starfighter by Colimata is NOW available from the X-Plane.Org Store here : F-104 FXP Starfighter Price is : US$45.00 Requirements -Plane 12 Only Windows, Mac and Linux 8 GB+ VRAM Download Size: 941 MB Versions 1.01 - December 1st 2023 Developed by Colimata Support forum the F-104 FXP Installation Installation of F-104 FXP Starfighter XP12 is done via a download of 825 Mb... With a total installation size of 1.17Gb. There is one basic Manual pdf (45 pages) Review System Specifications Windows - 12th Gen IS1700 Core i7 12700K 12 Core 3.60 GHz CPU - 64bit -32 Gb single 1067 Mhz DDR4 2133 - PNY GeForce RTX 3080 10GB XLR8 - Samsung 970 EVO+ 2TB SSD Software: - Windows 11 Pro - X-Plane 12.08b3 (This is a Beta review). Plugins: Traffic Global - JustFlight-Traffic (X-Plane.OrgStore) US$52.99 : Global SFD plugin US$30.00 Scenery or Aircraft - KTCM - McChord AFB - Seattle - Boeing Country 10.5 by Tom Curtis (Sorry not now available) ___________________________ Classic Aircraft Review by Stephen Dutton 1st December 2023 Copyright©2023: X-Plane Reviews (Disclaimer. All images and text in this review are the work and property of X-PlaneReviews, no sharing or copy of the content is allowed without consent from the author as per copyright conditions) All Rights Reserved
1 point
-

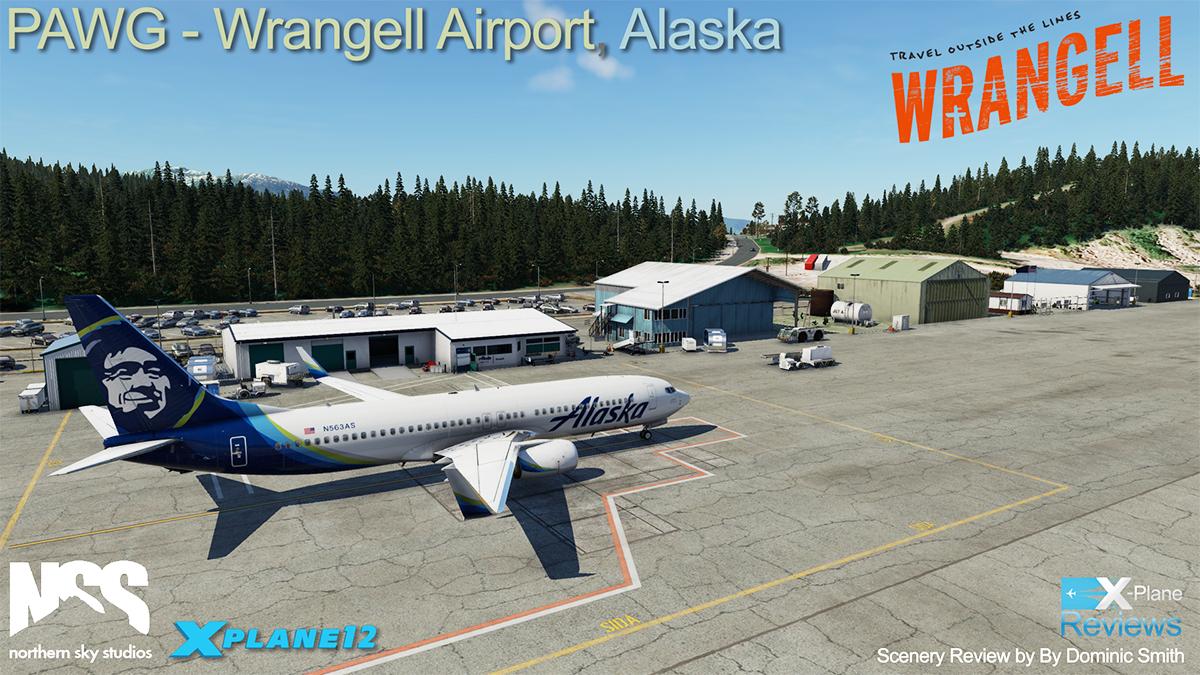
Scenery Review: PAWG - Wrangell Airport by Northern Sky Studio
rudeboy1988 reacted to Dominic Smith for a topic
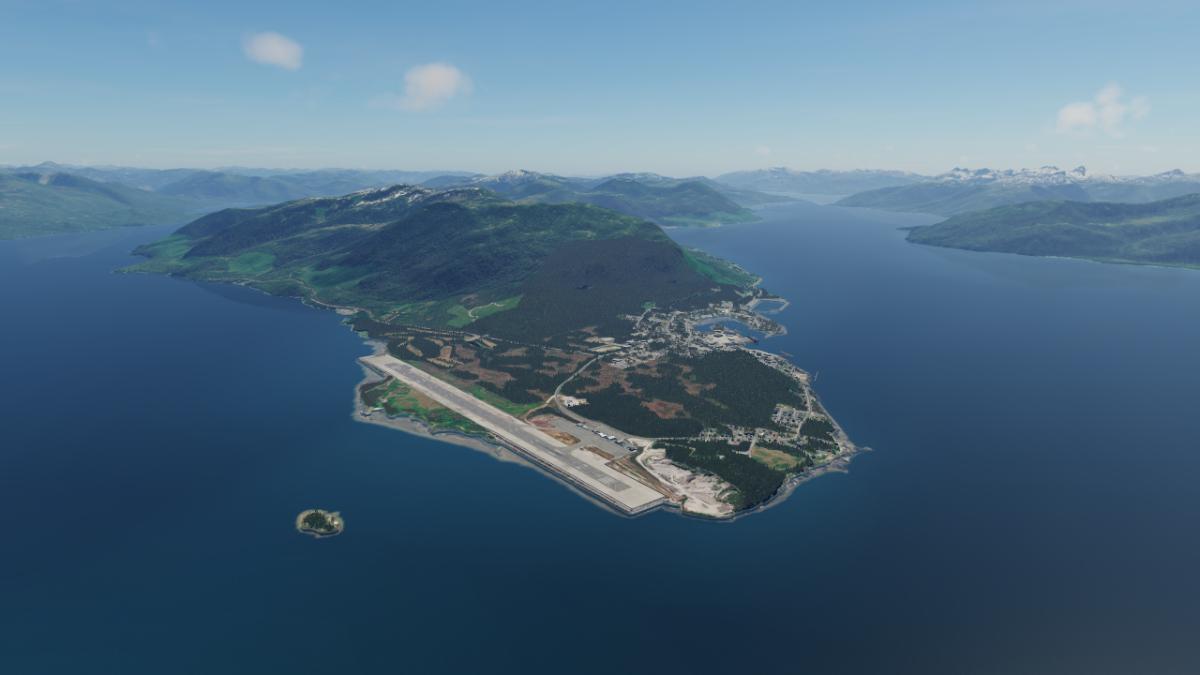
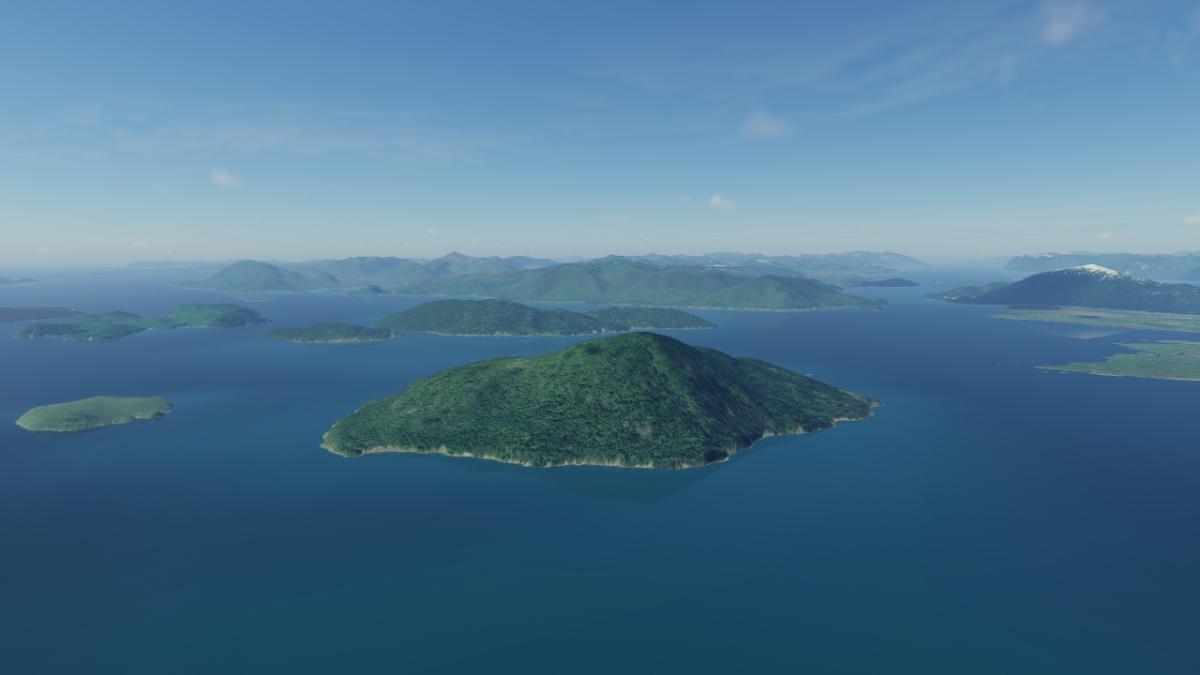
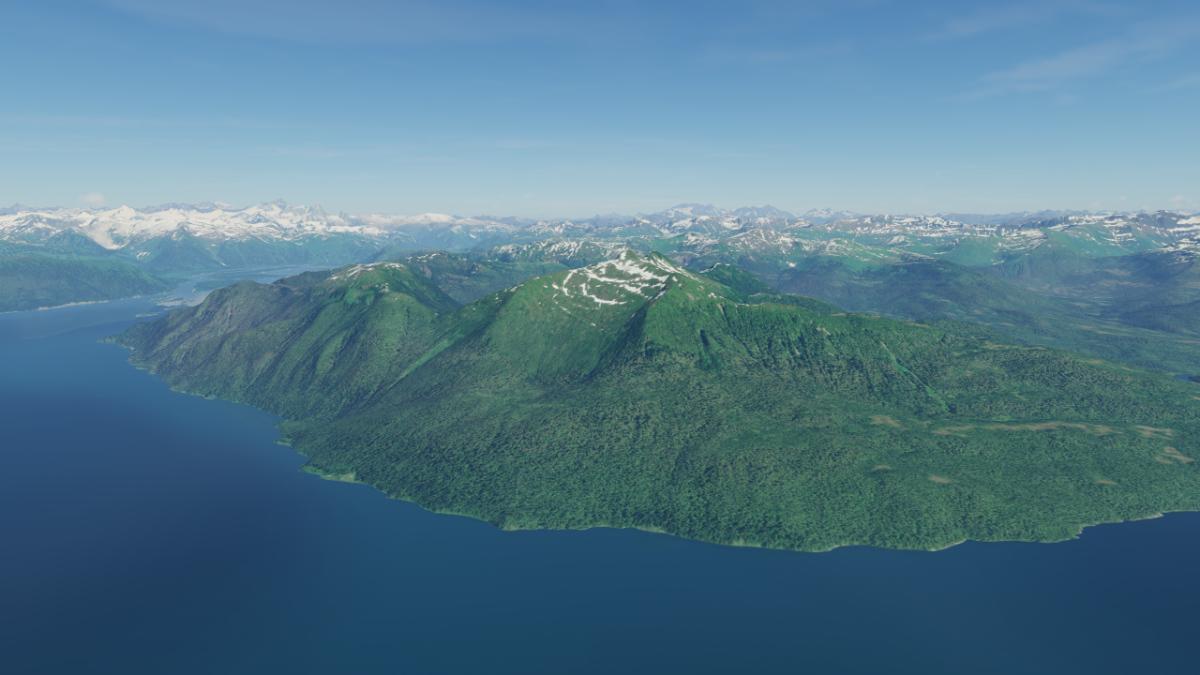
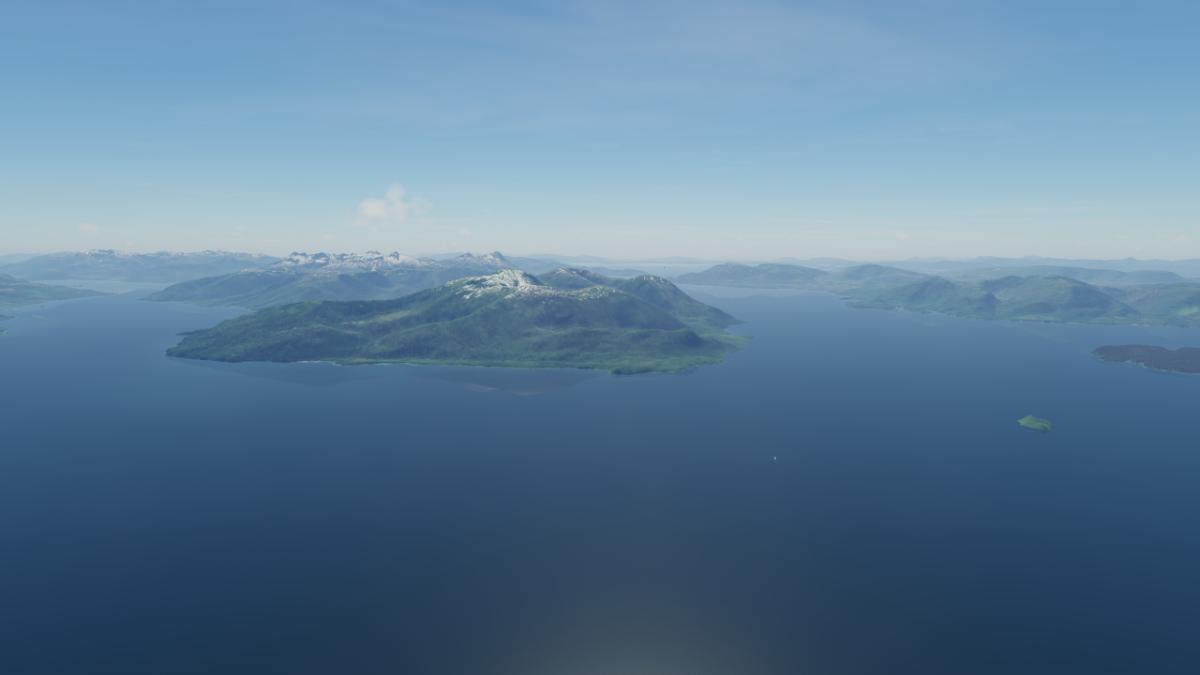
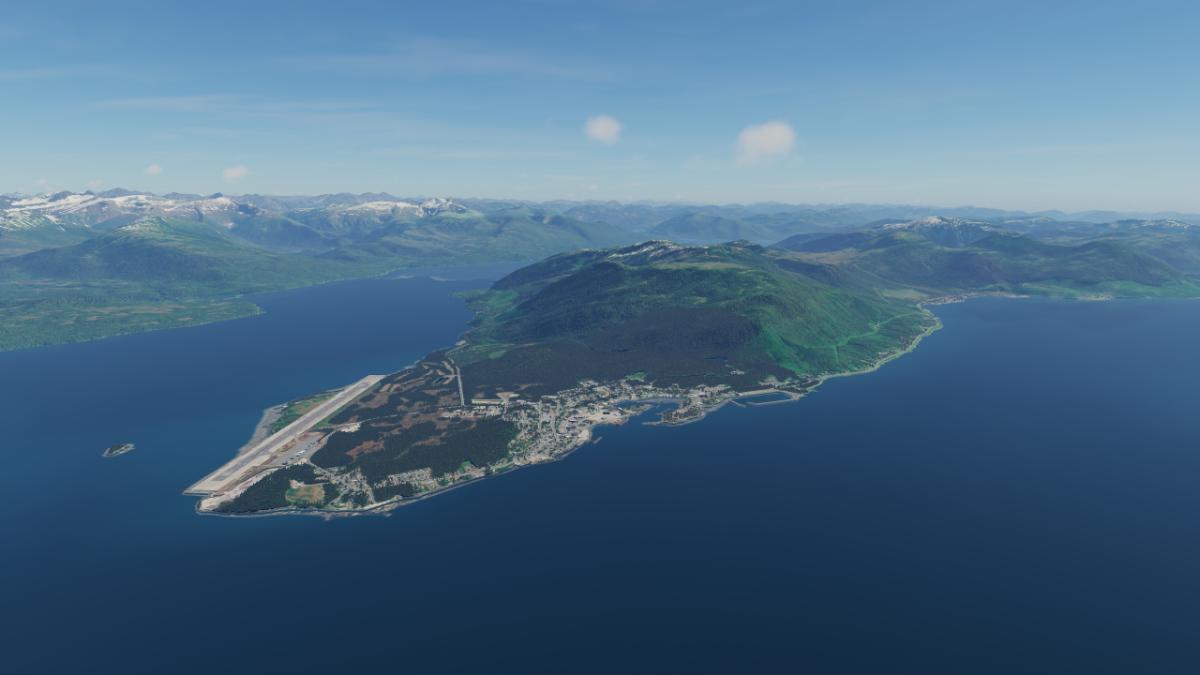
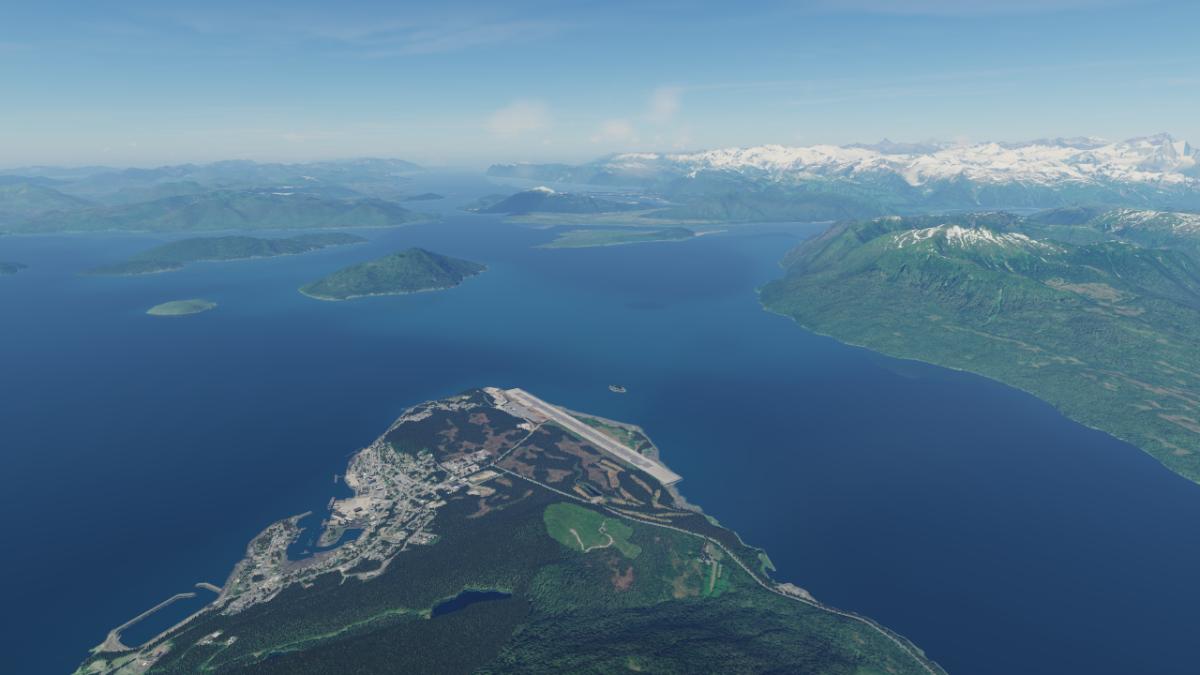
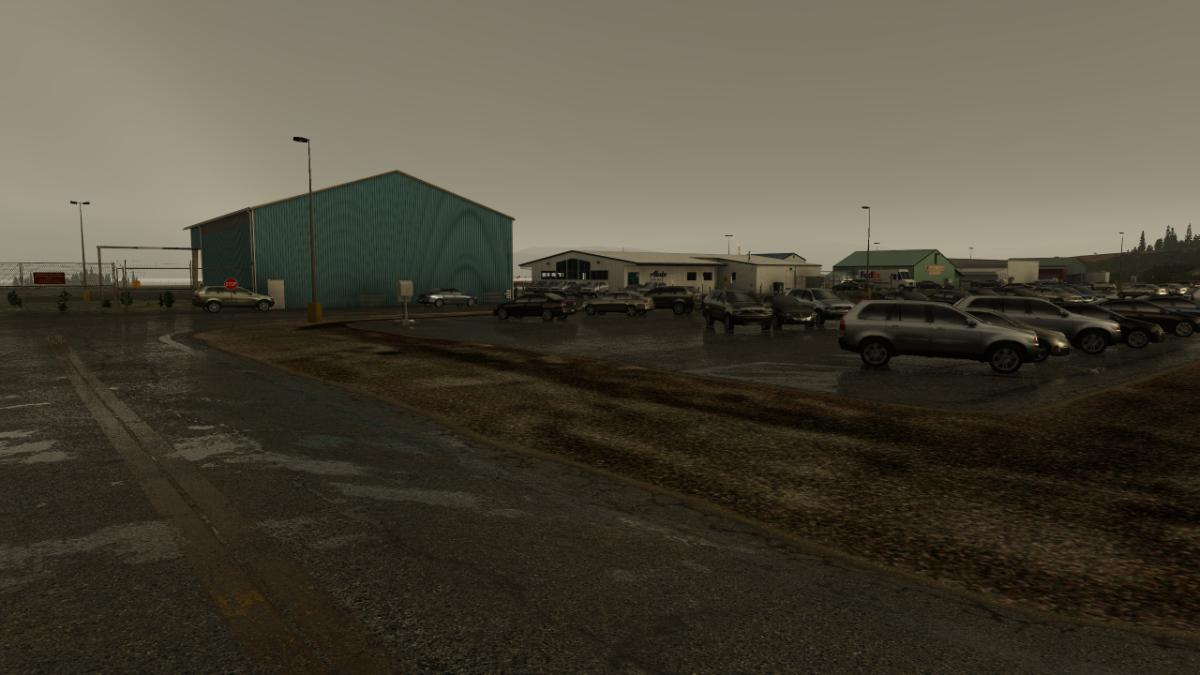
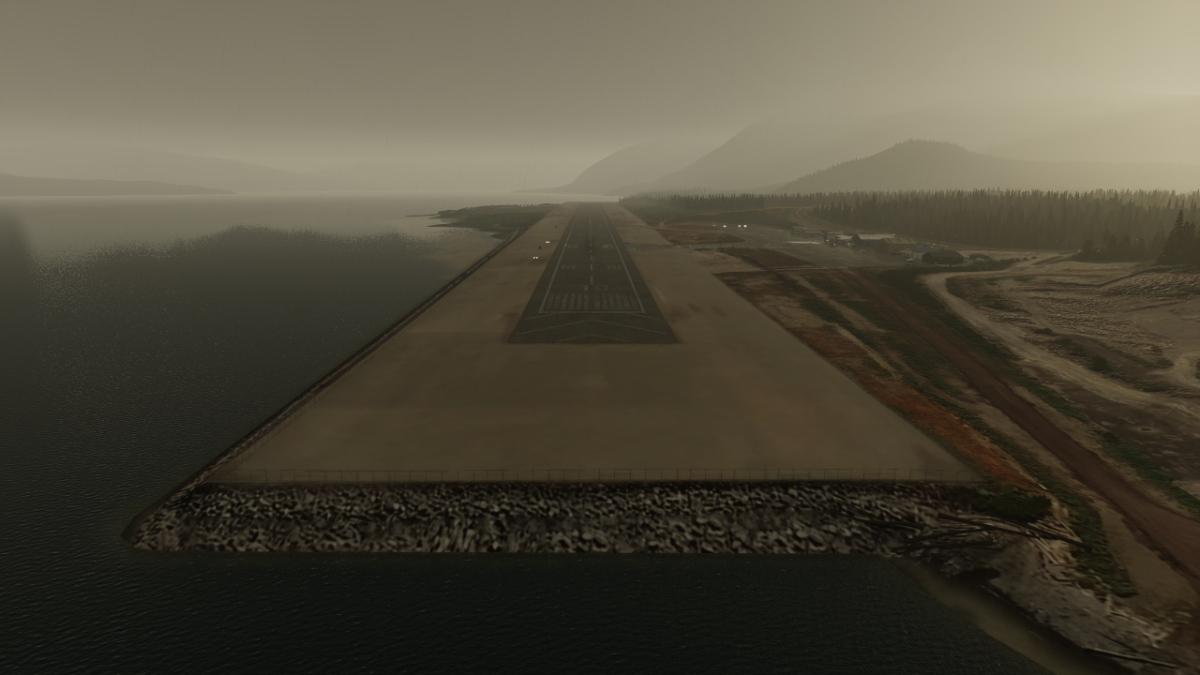
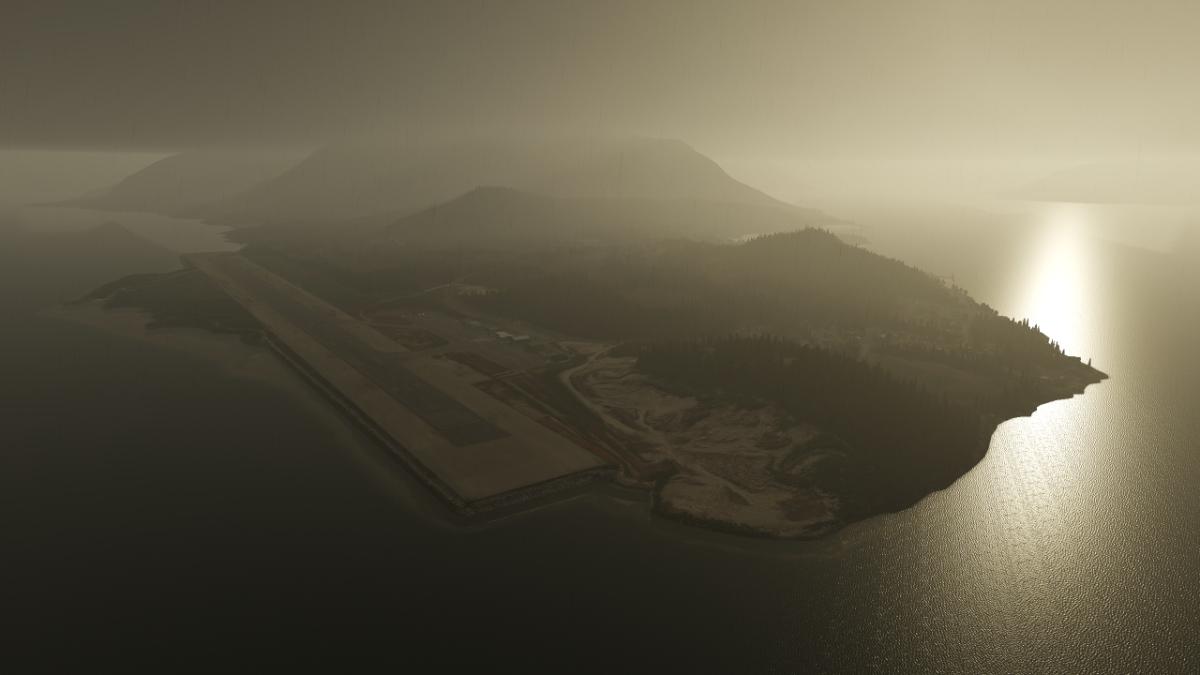
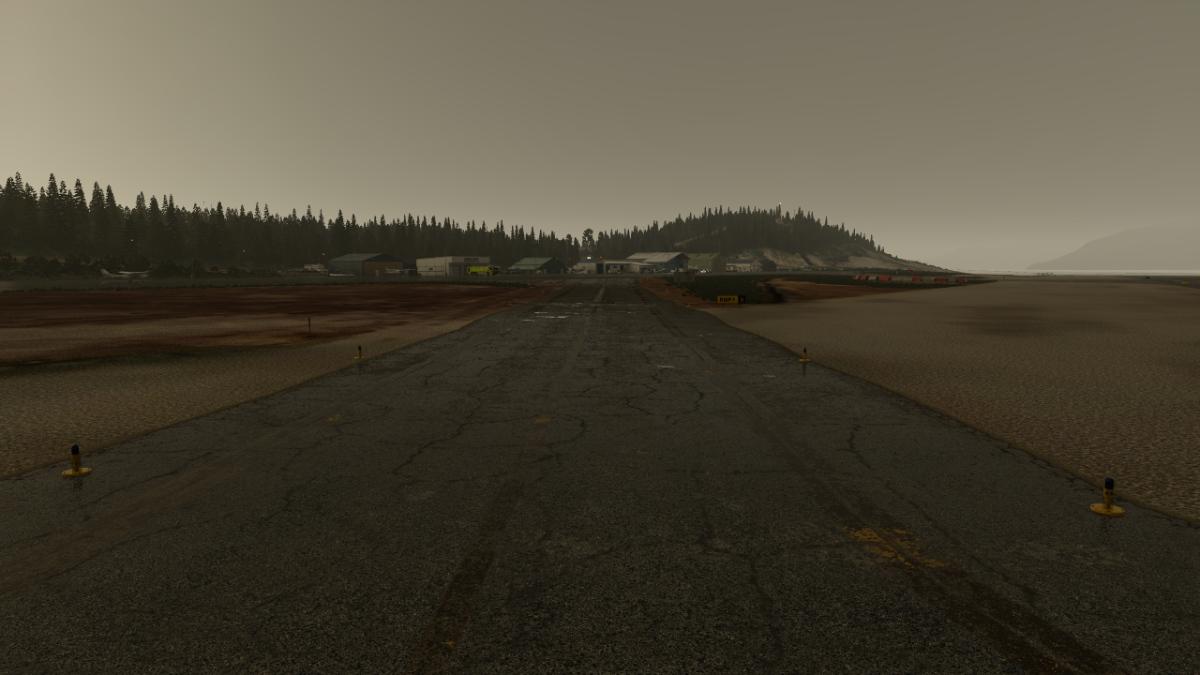
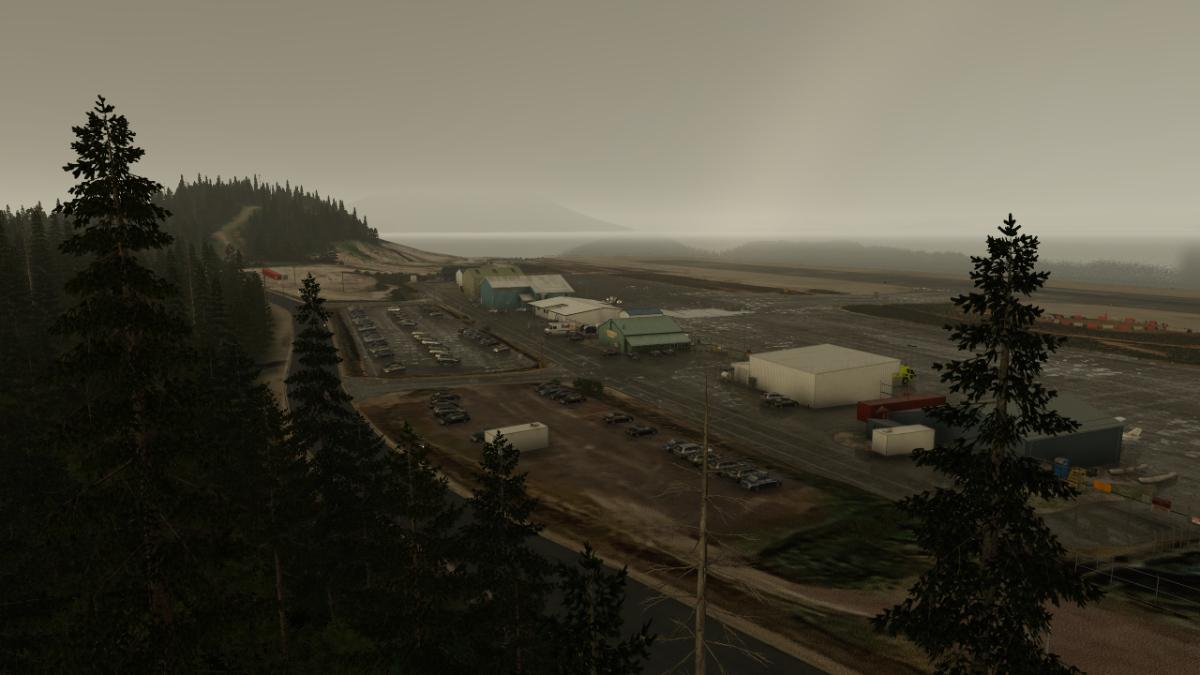
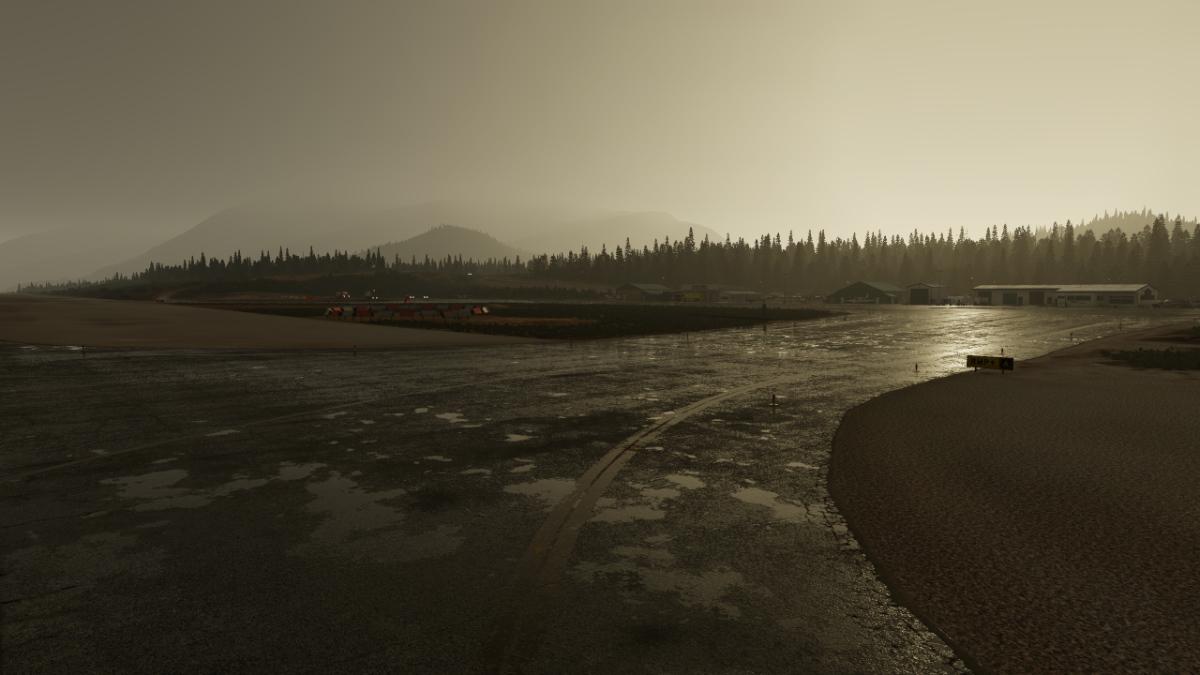
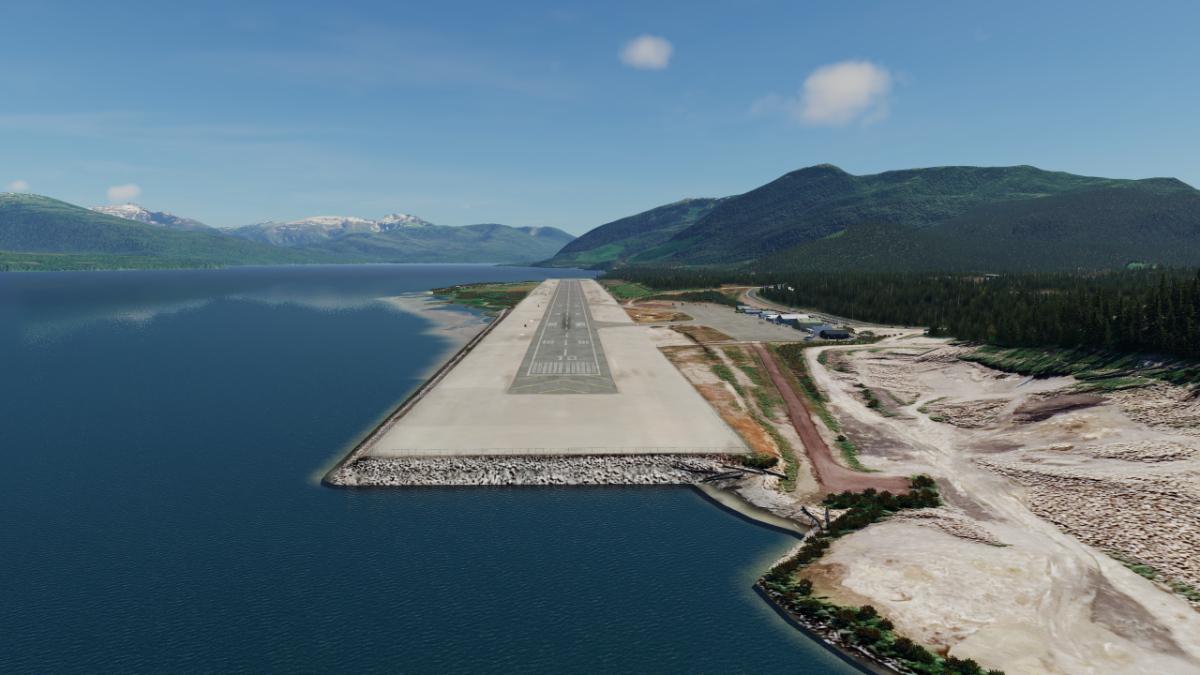
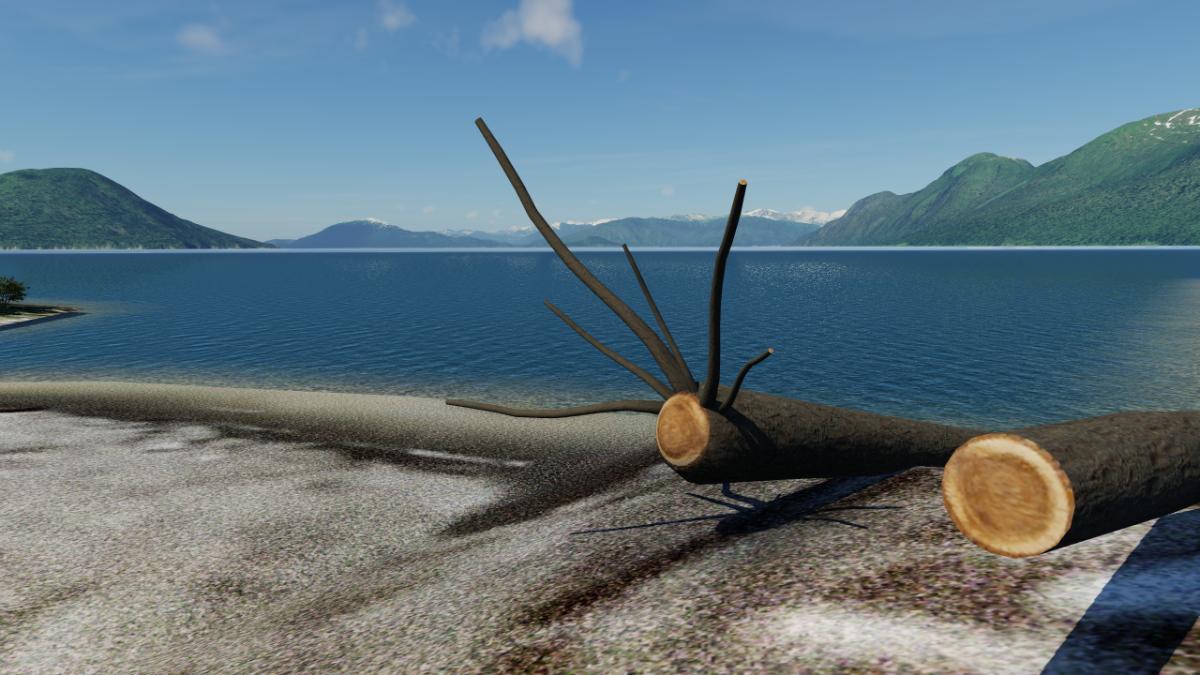
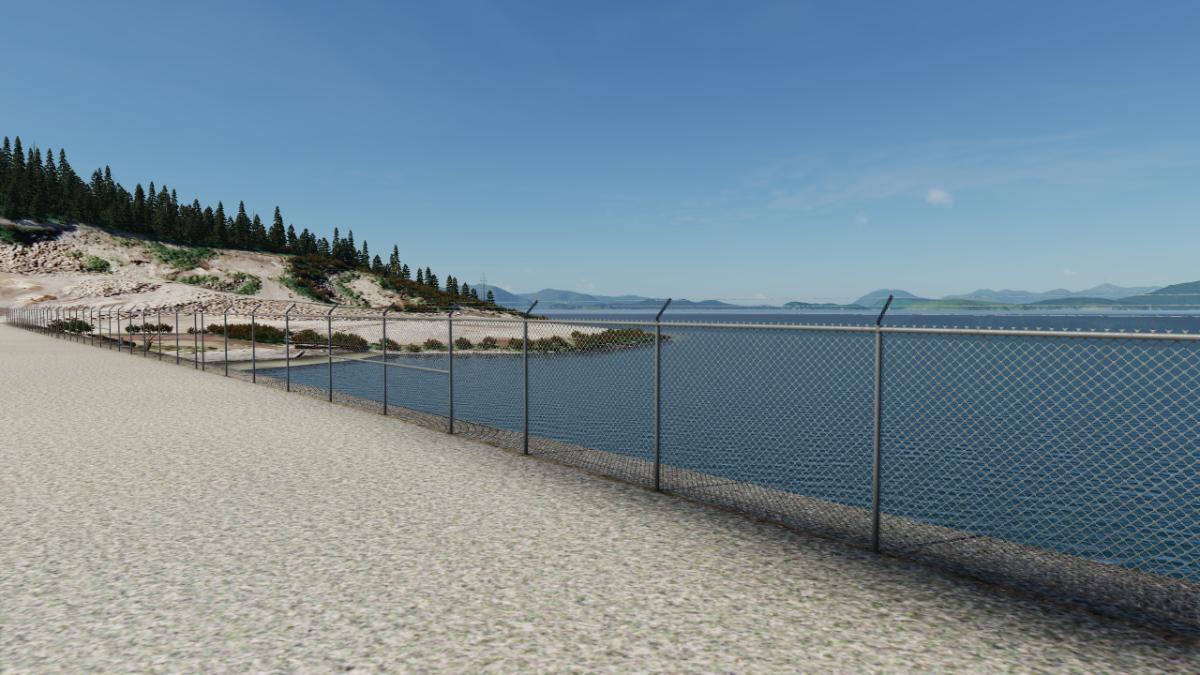
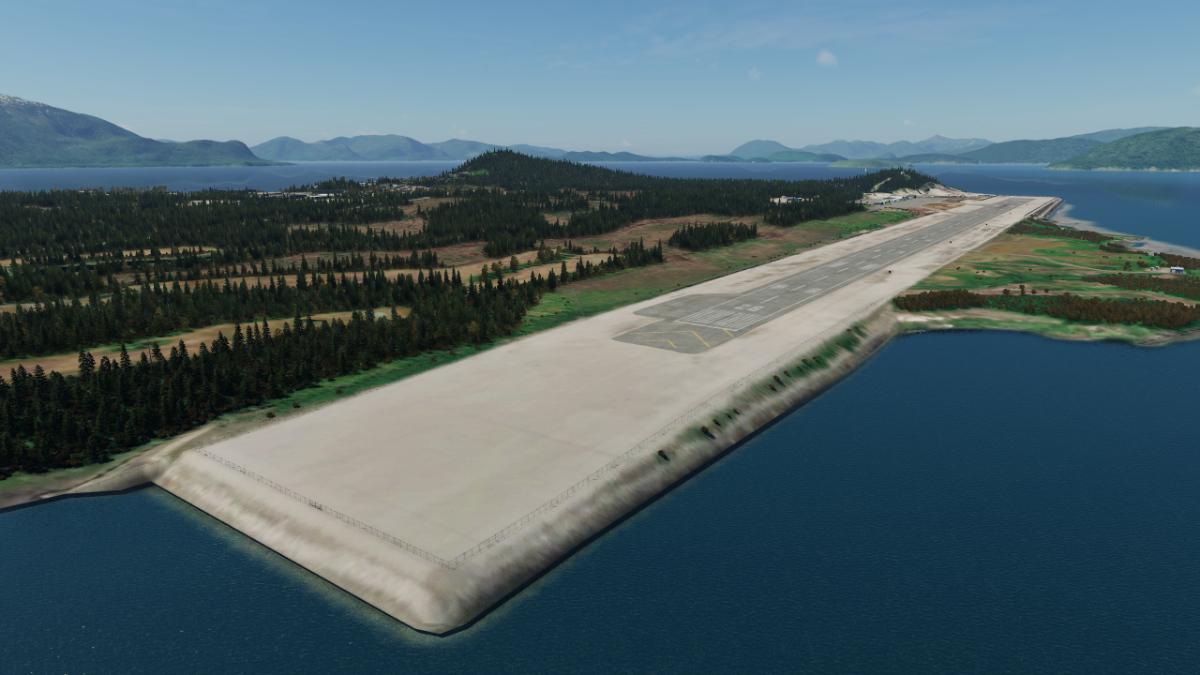
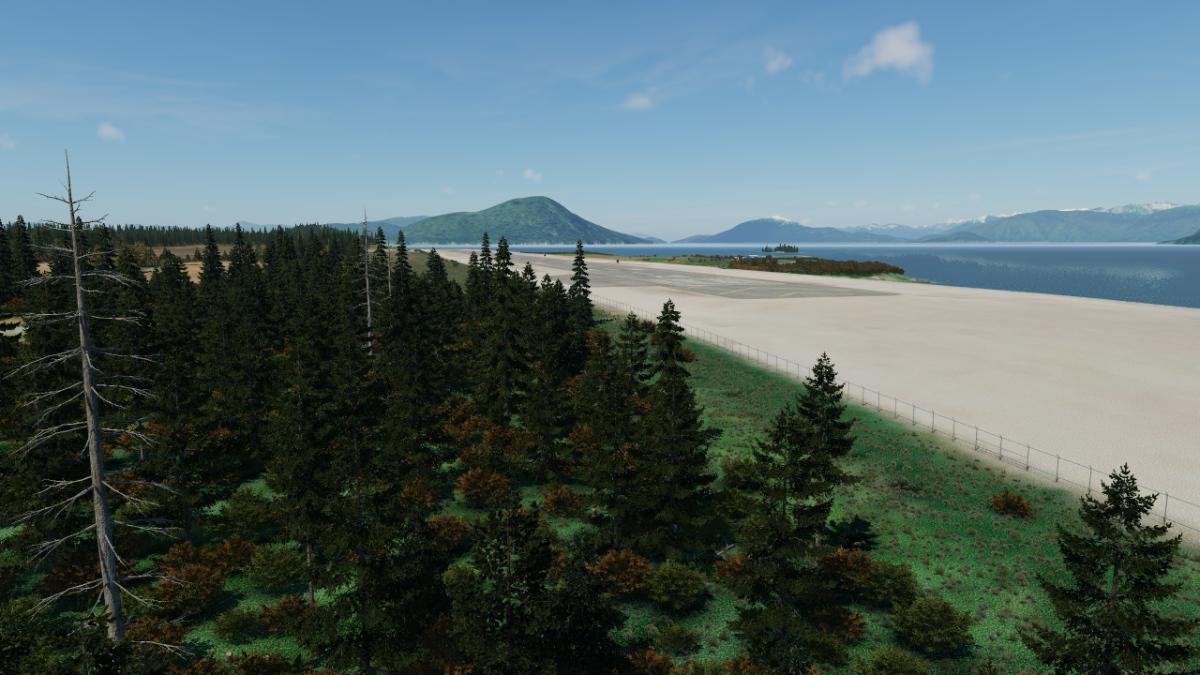
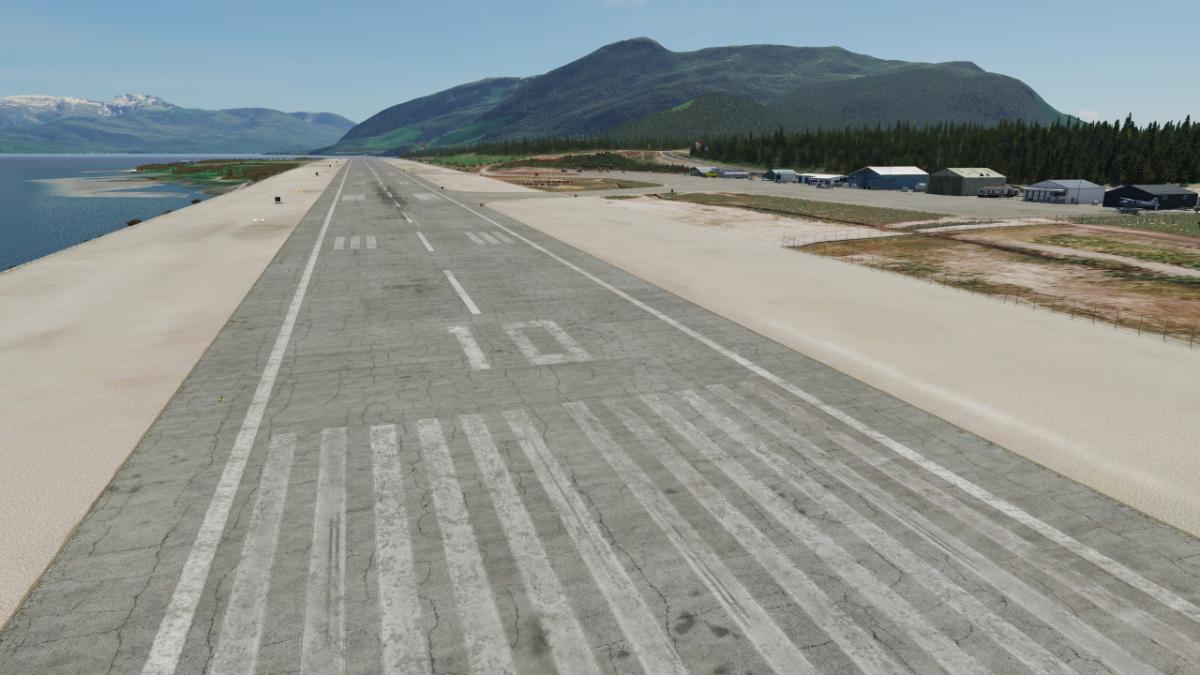
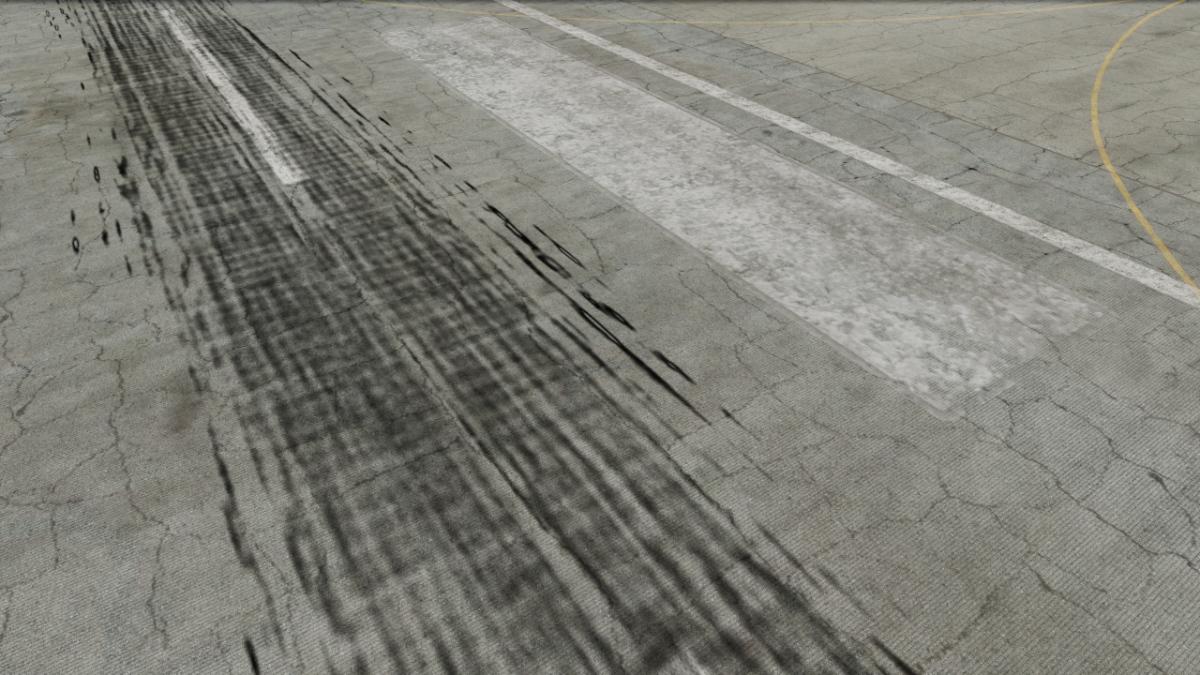
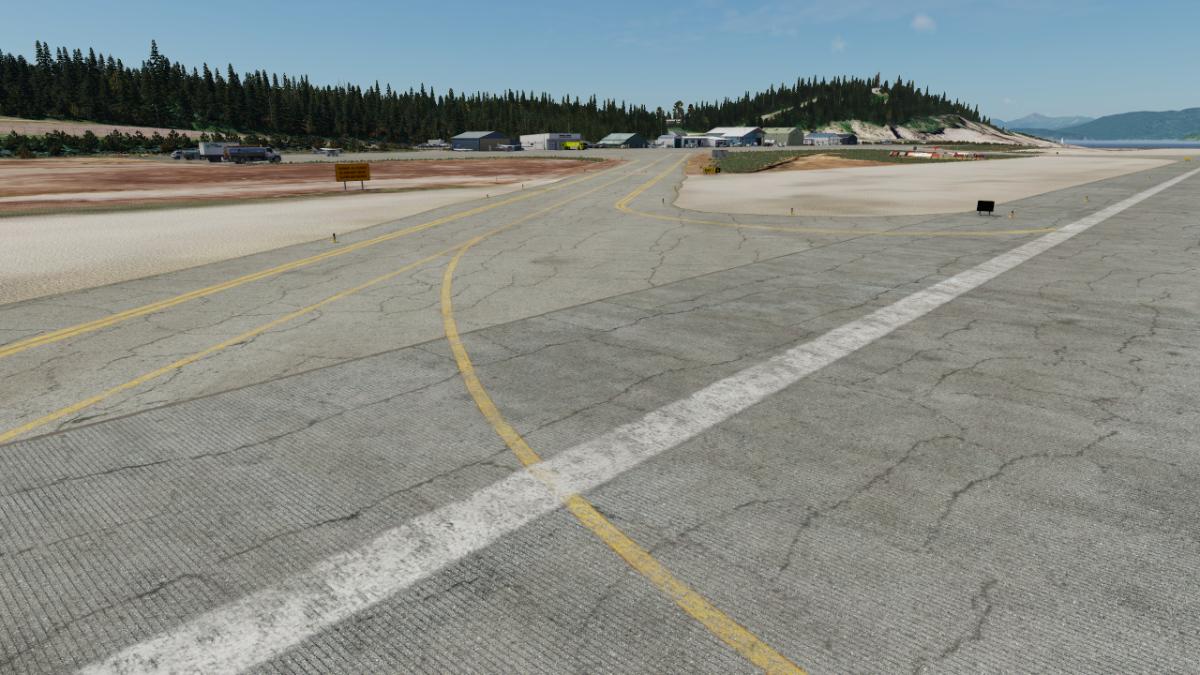
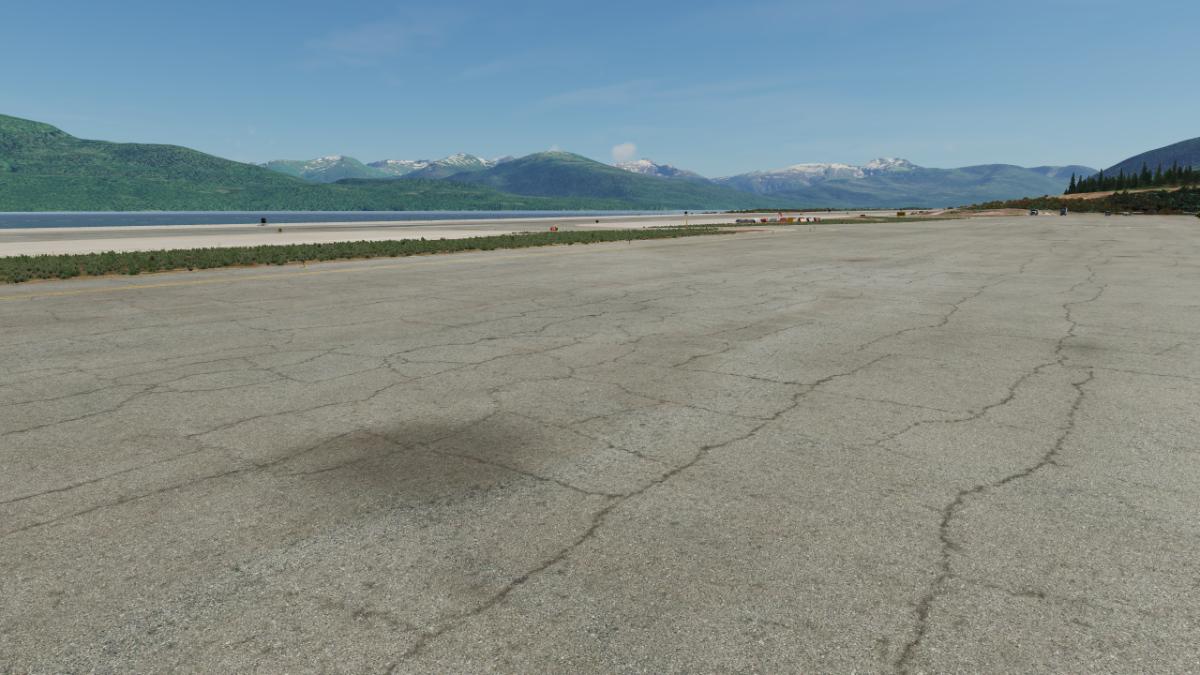
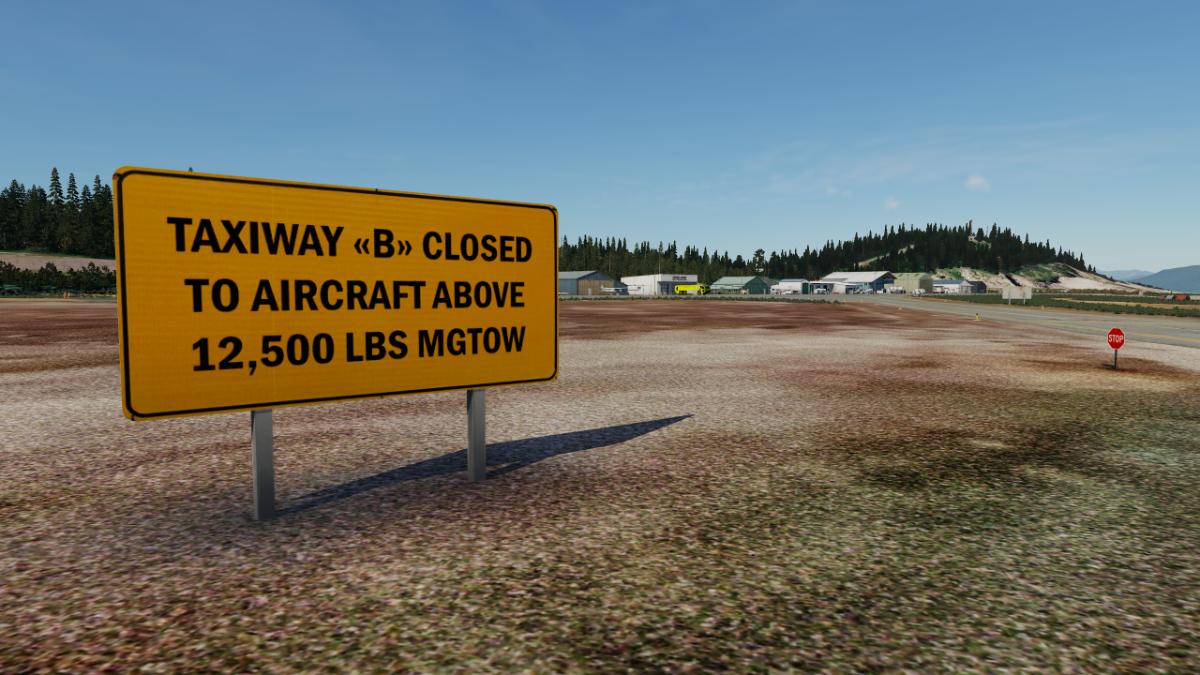
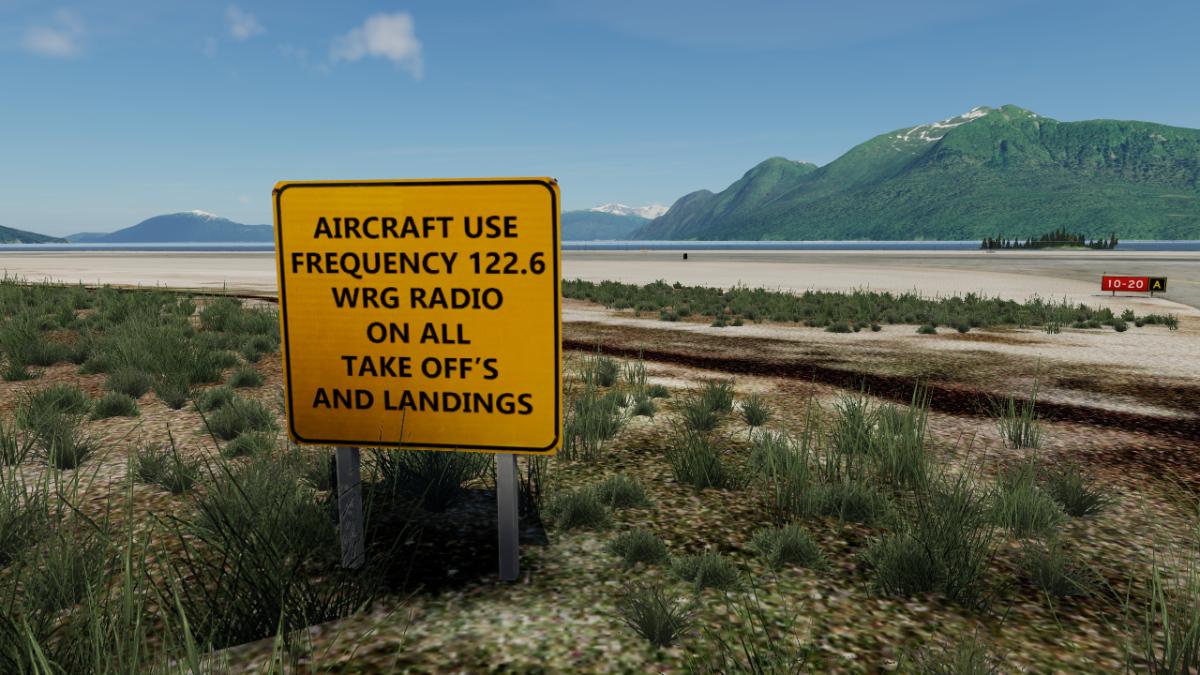
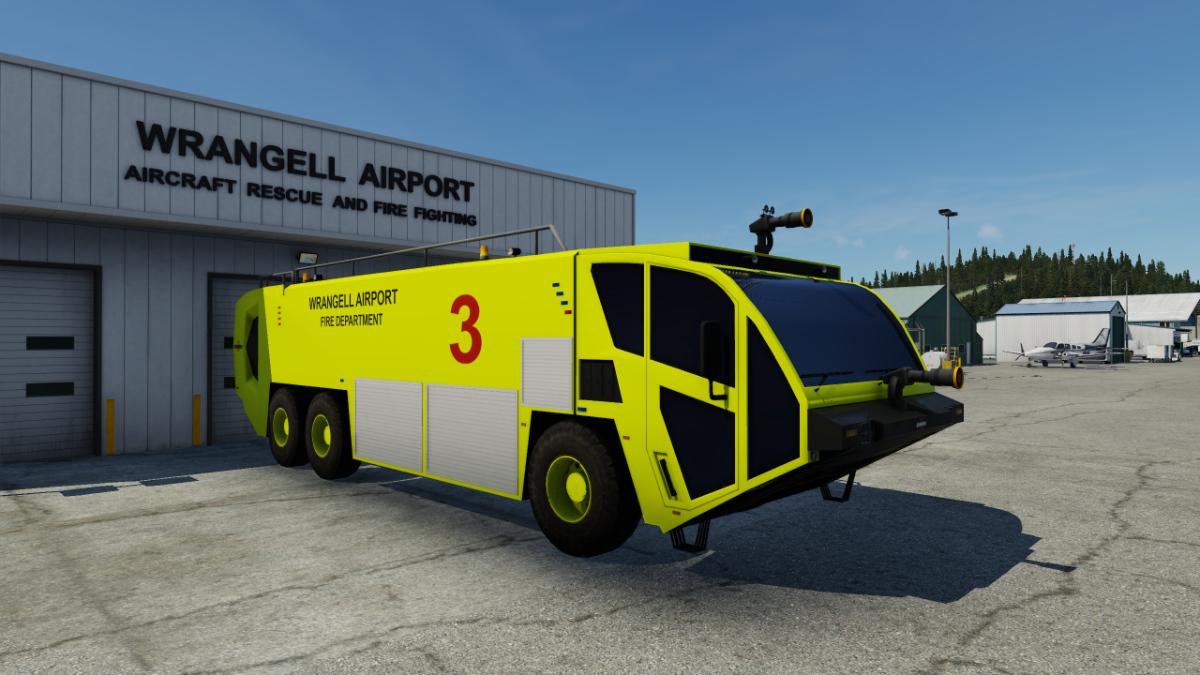
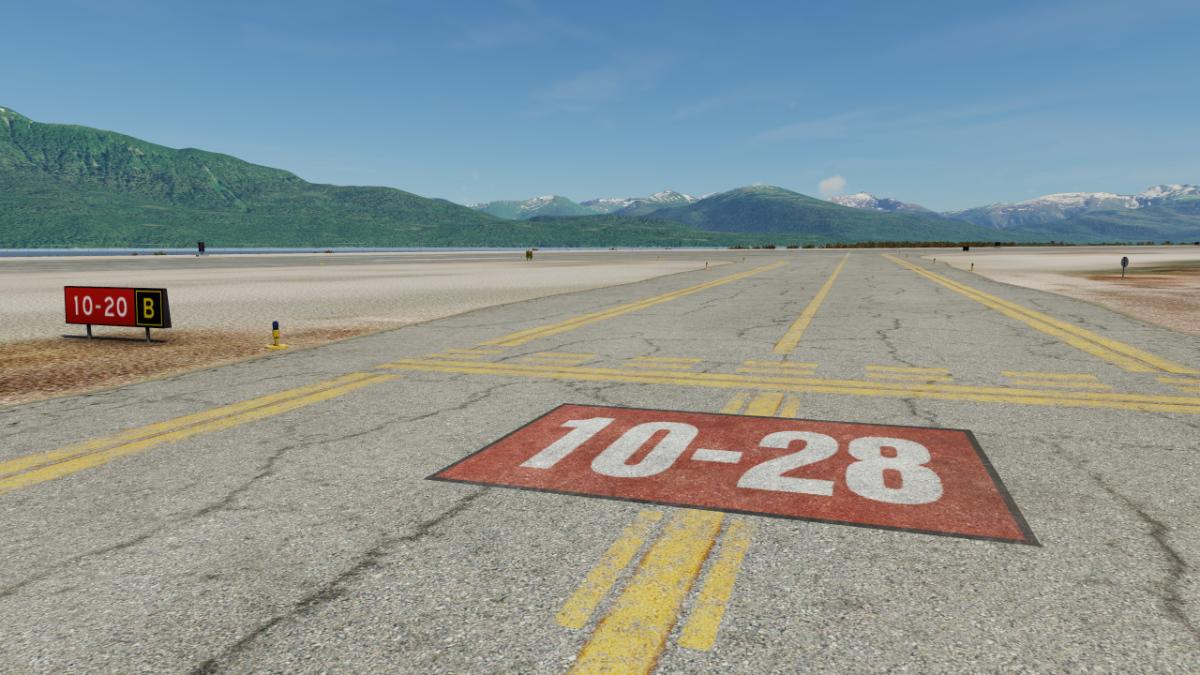
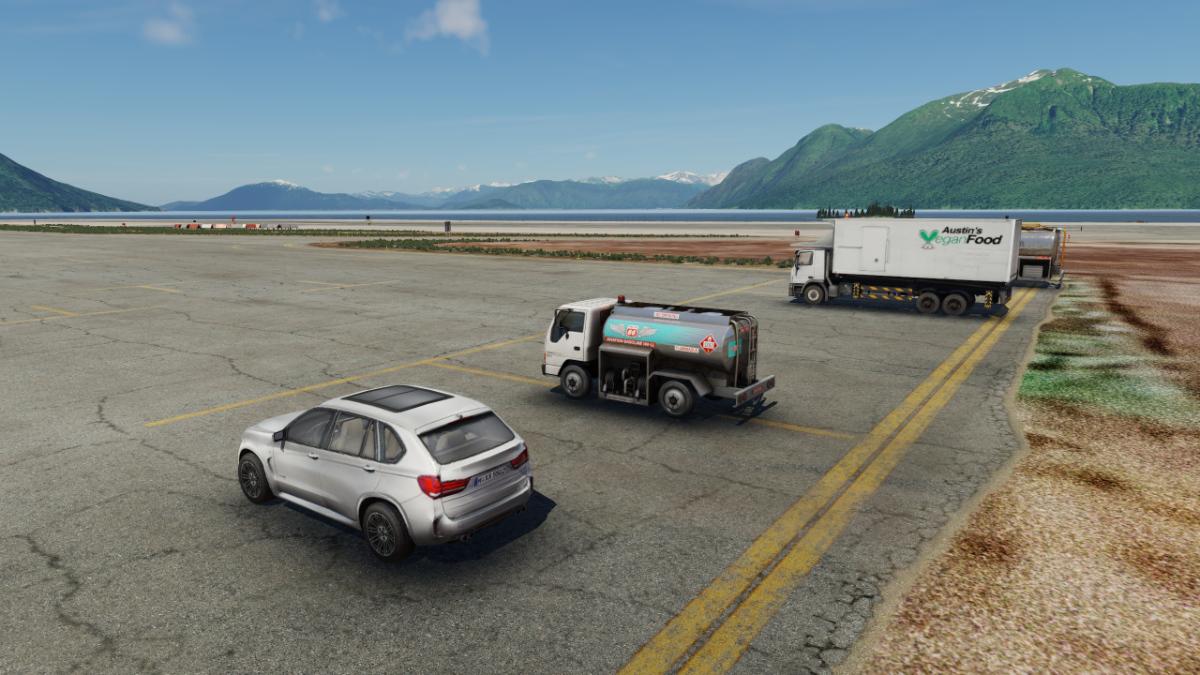
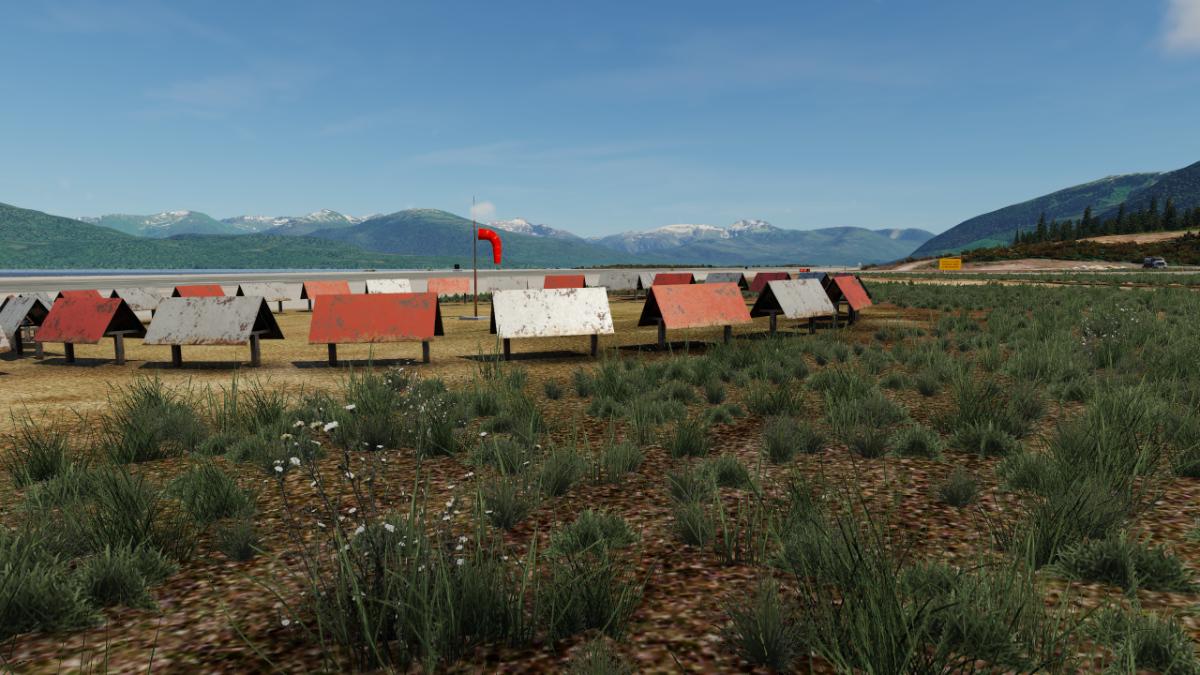
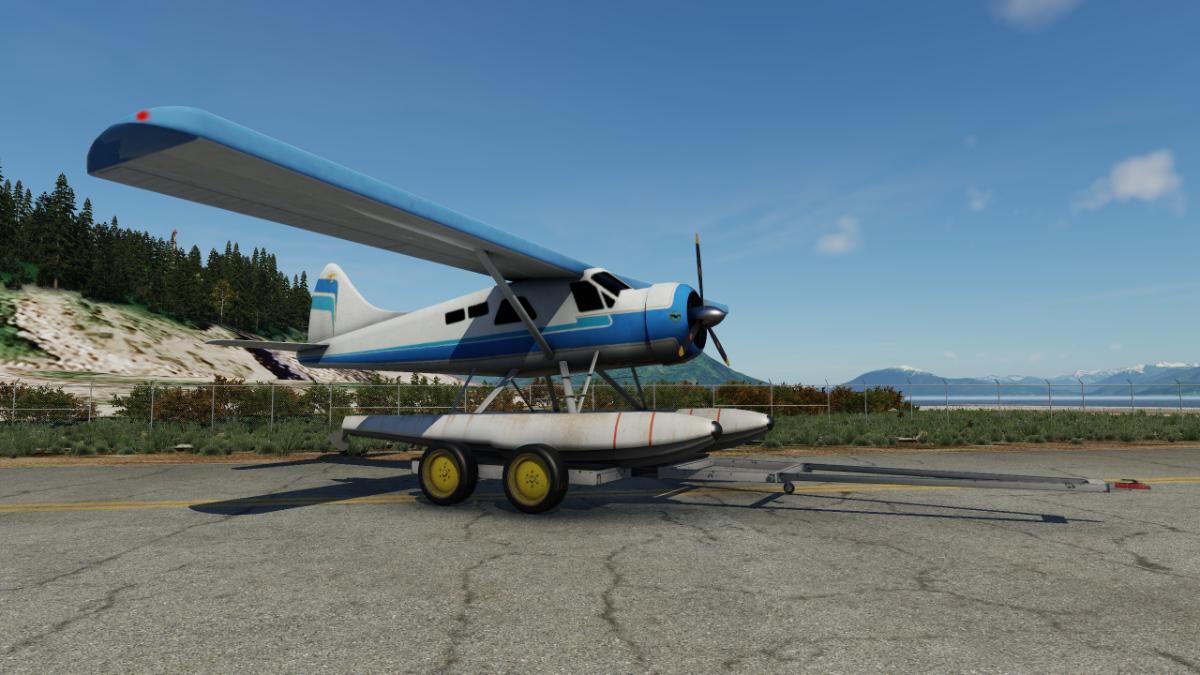
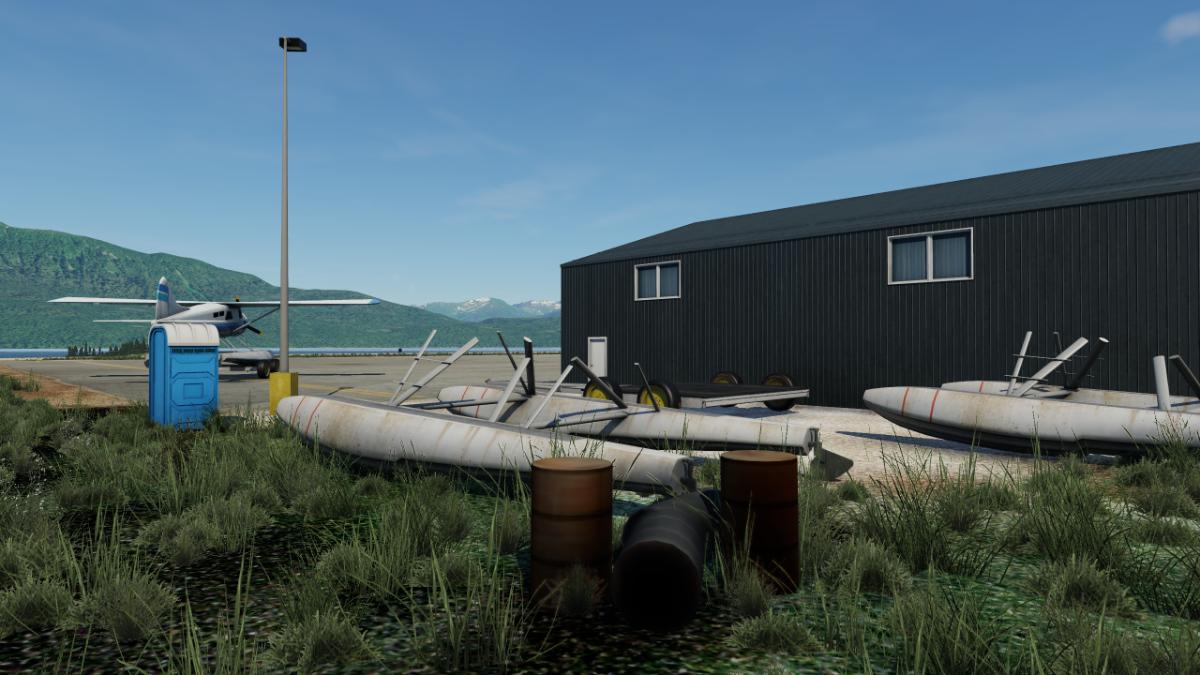
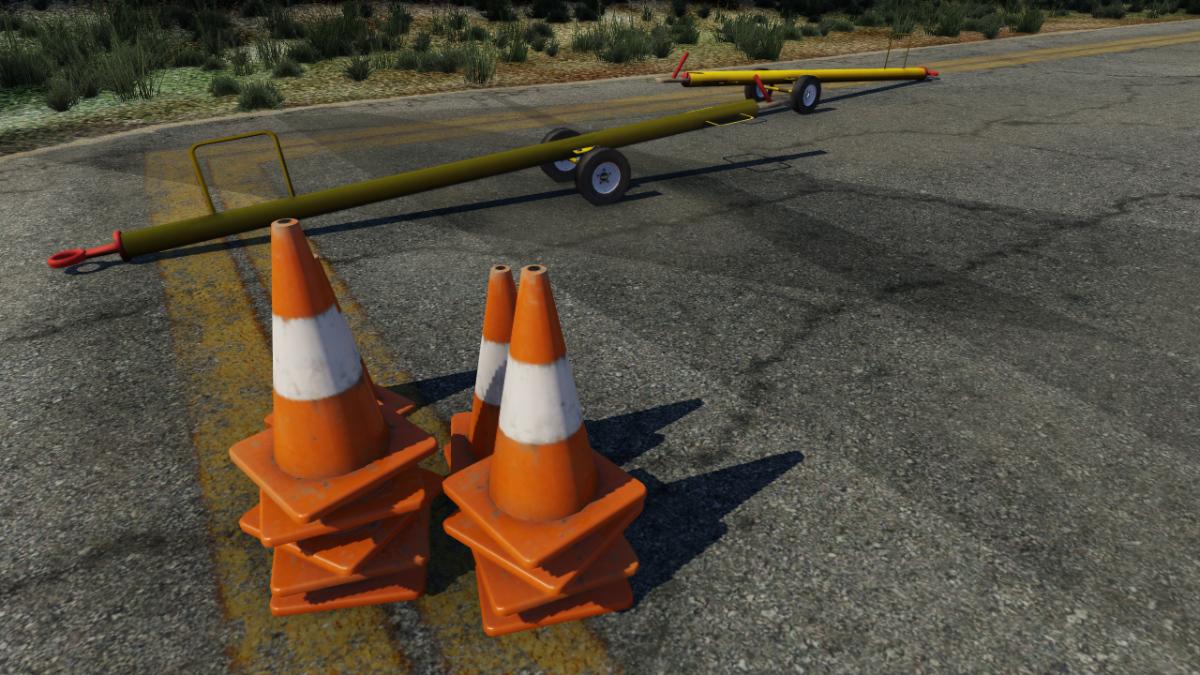
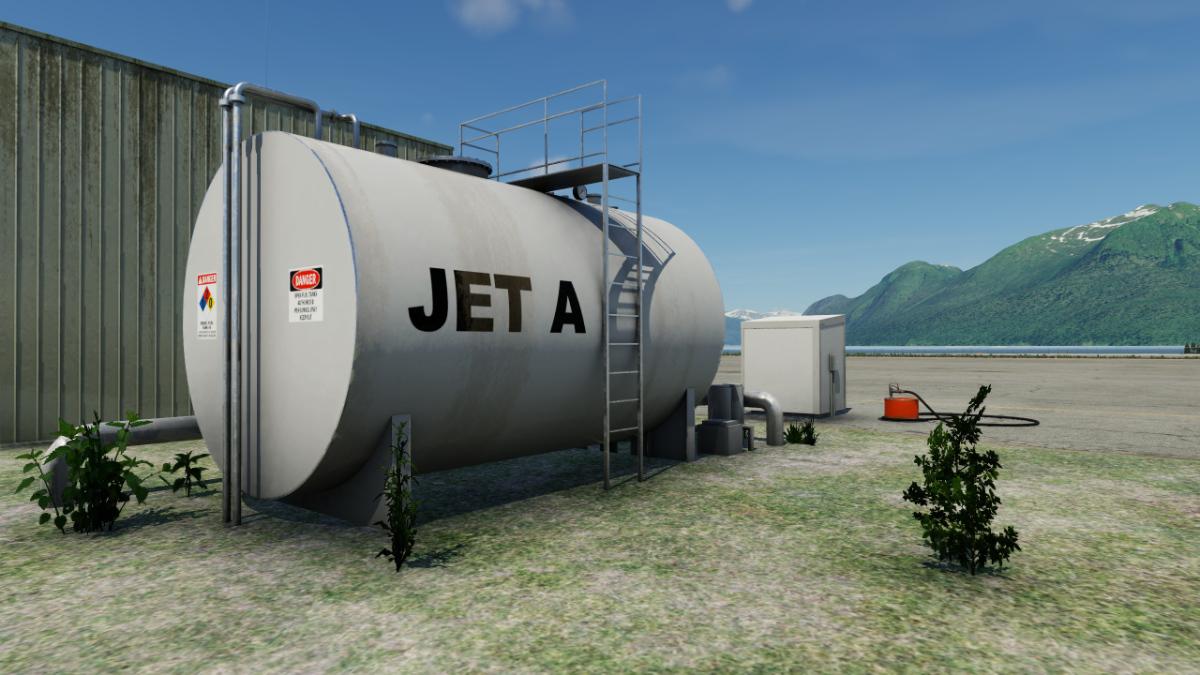
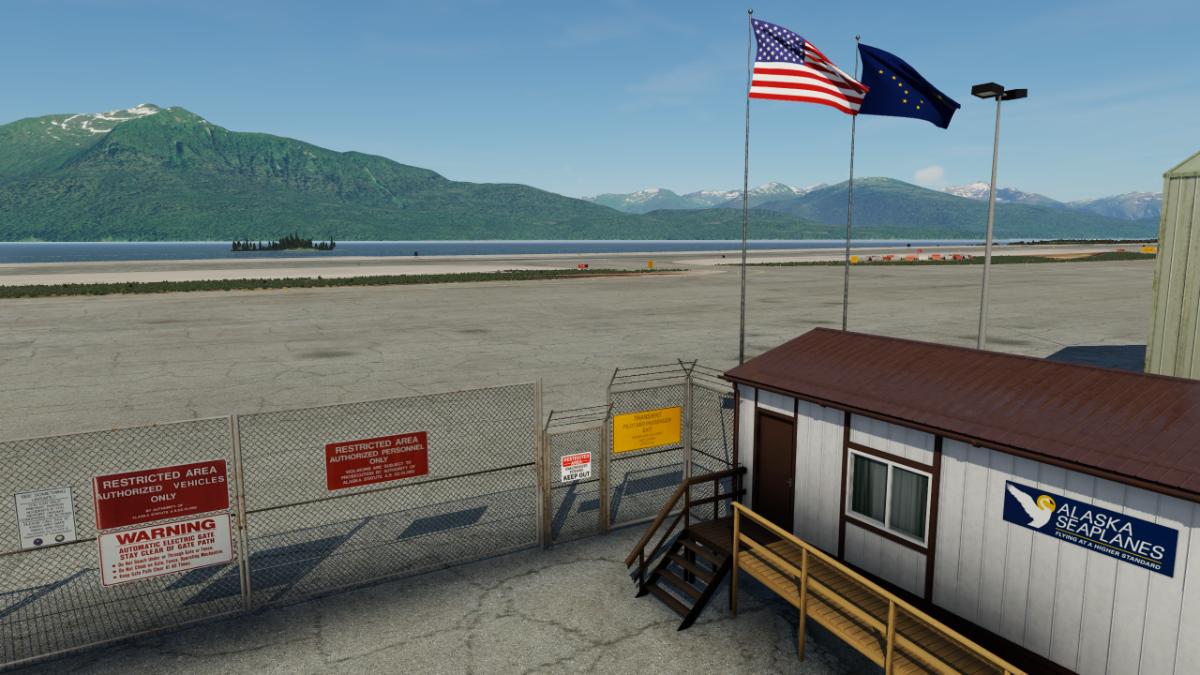
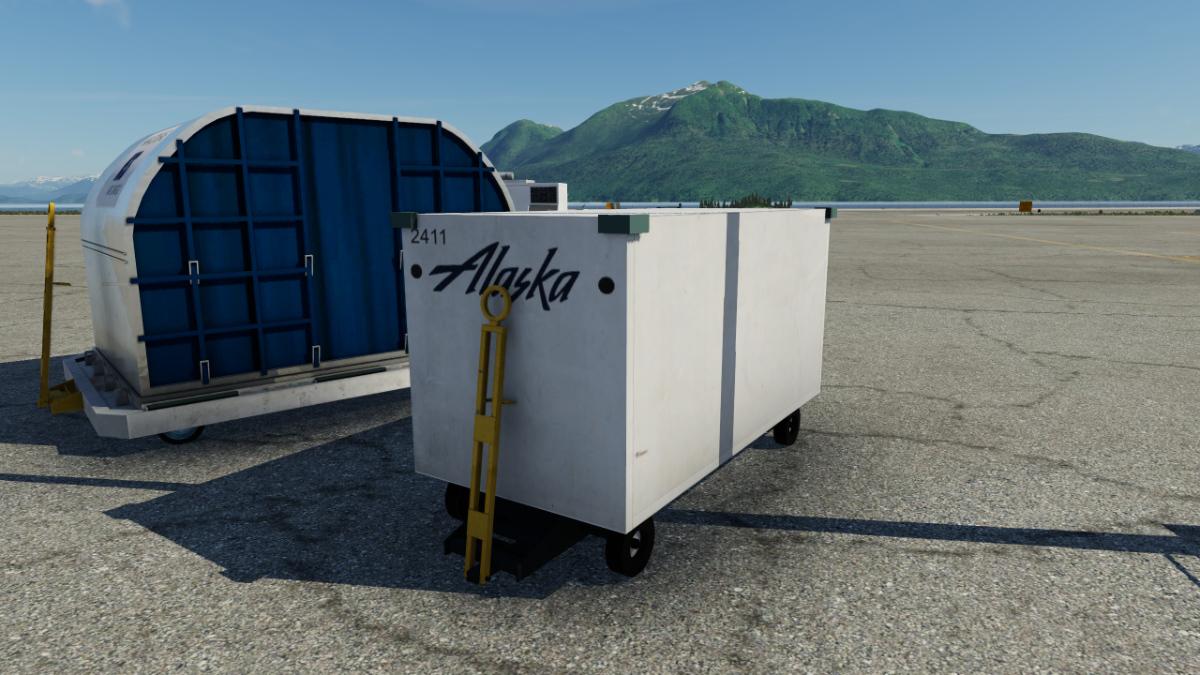
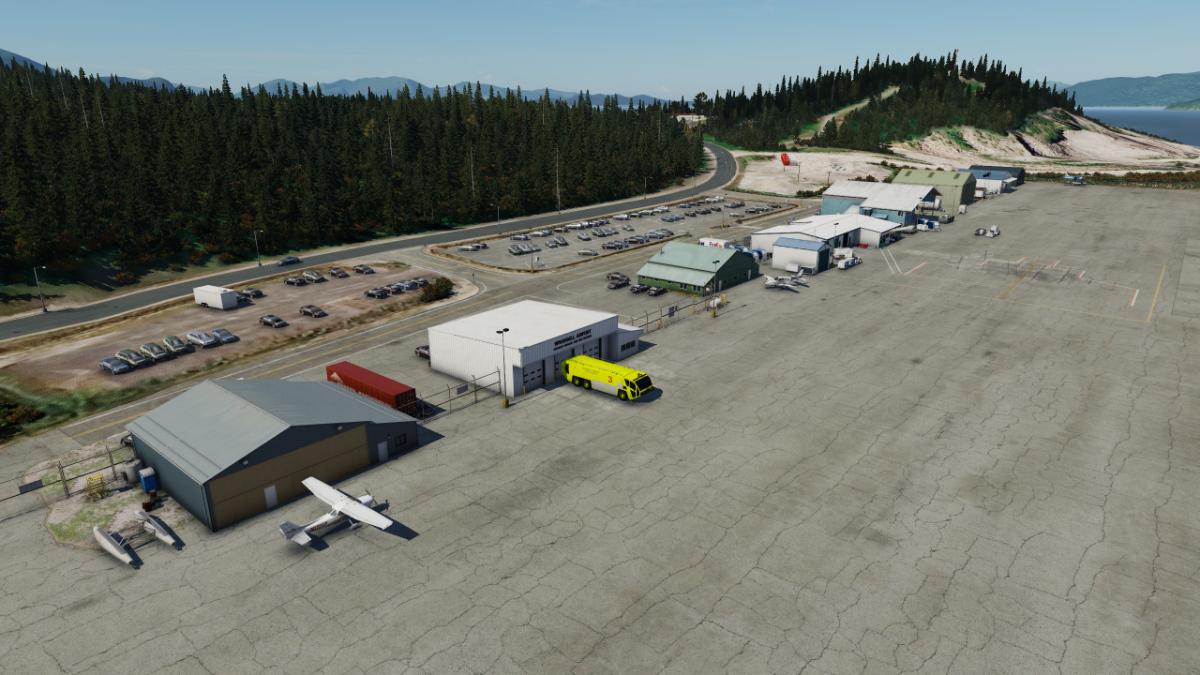
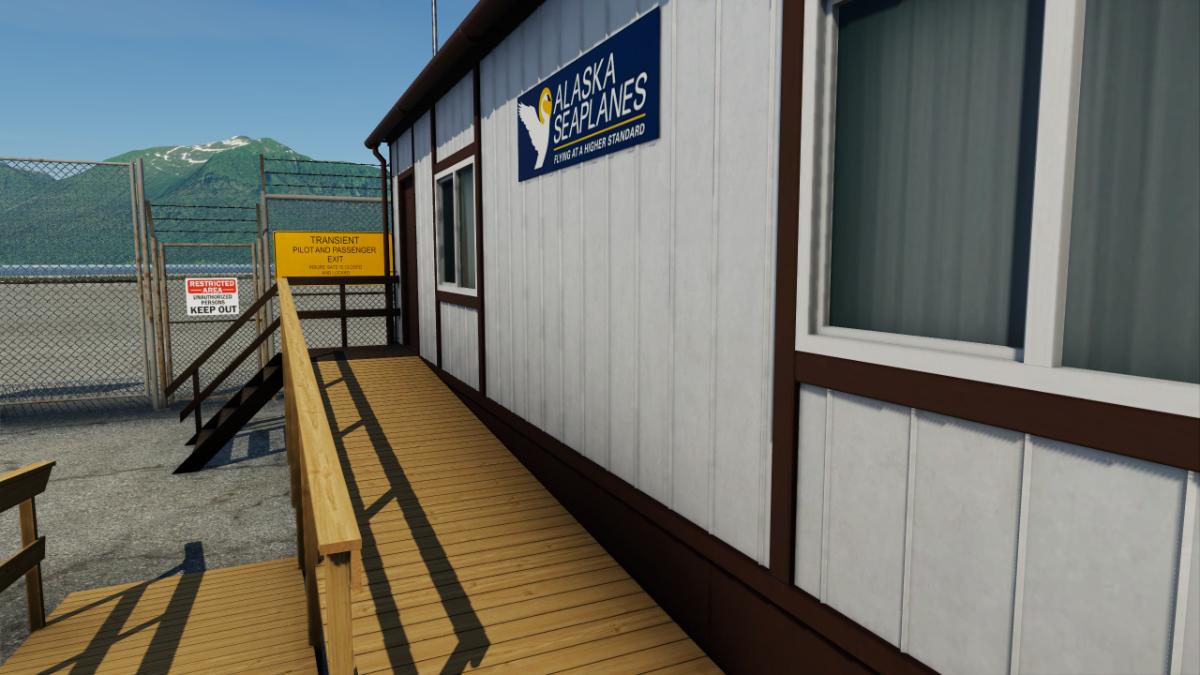
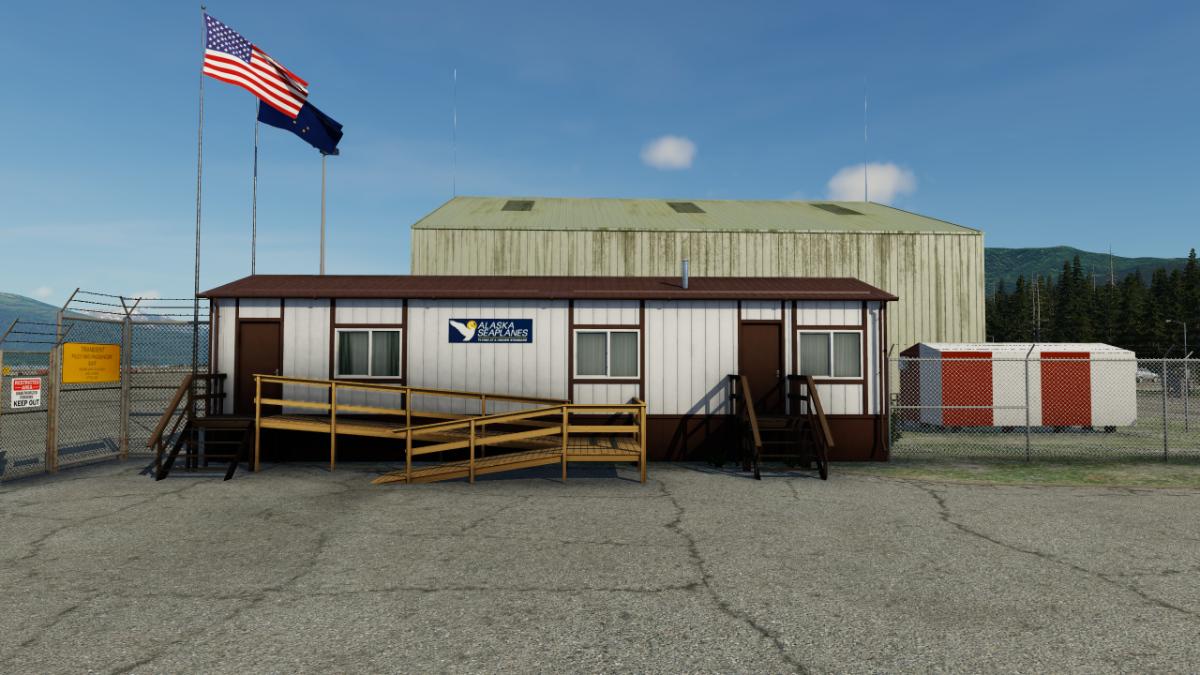
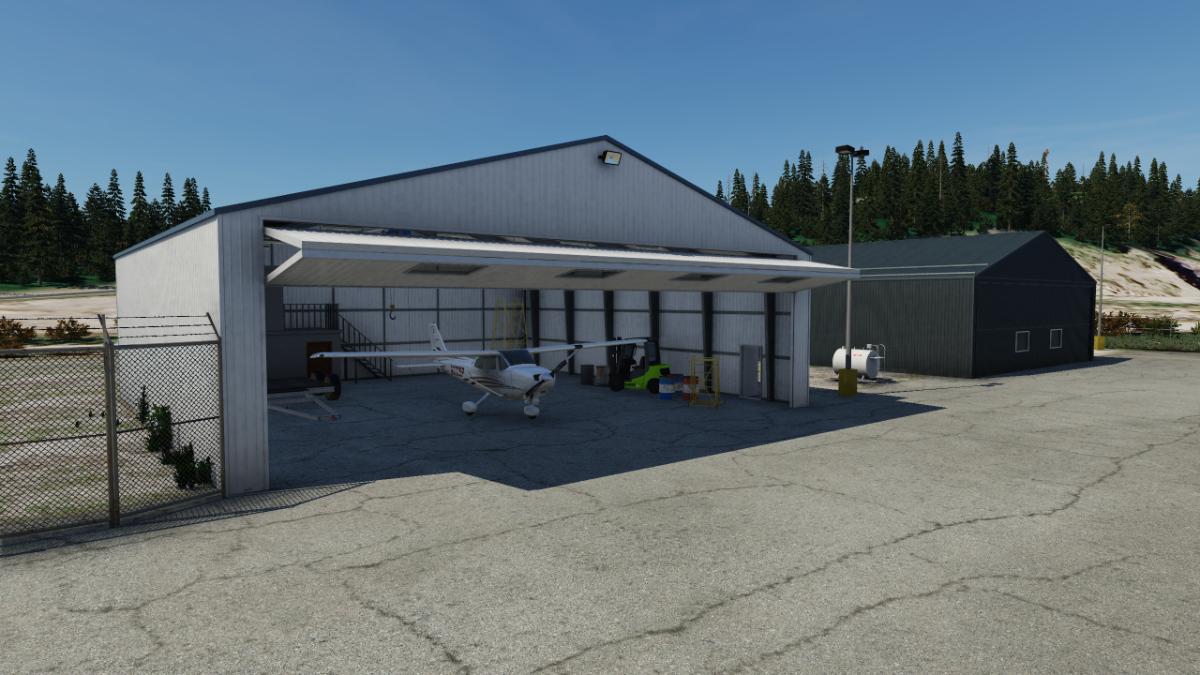
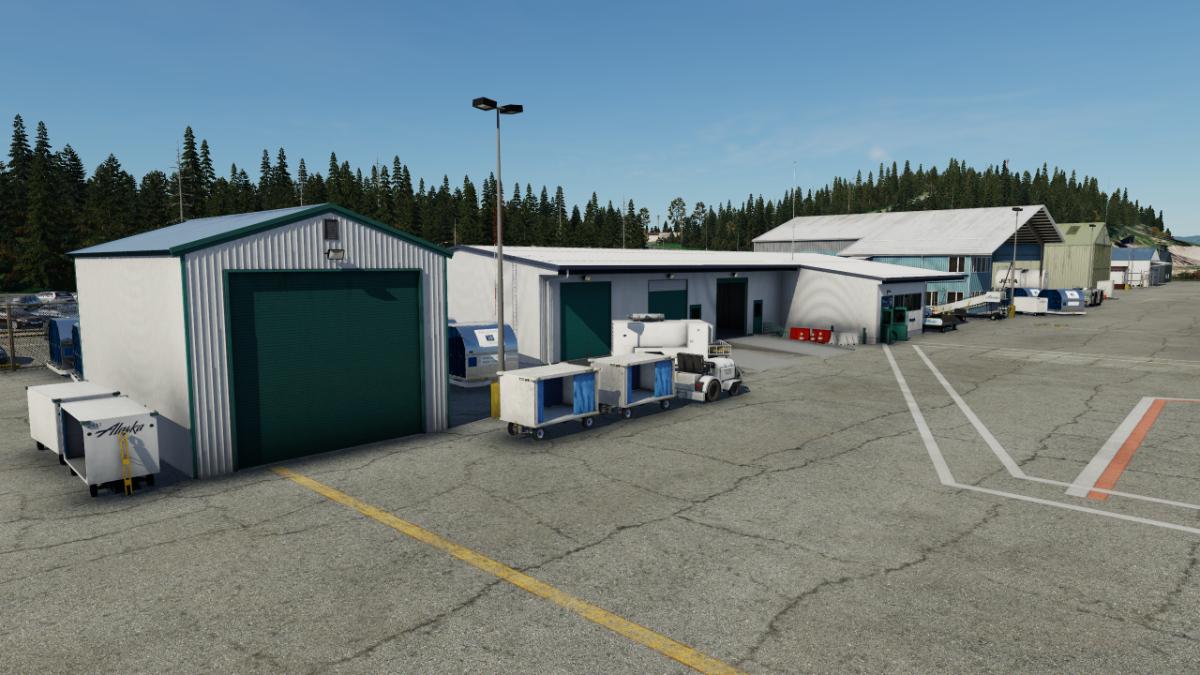
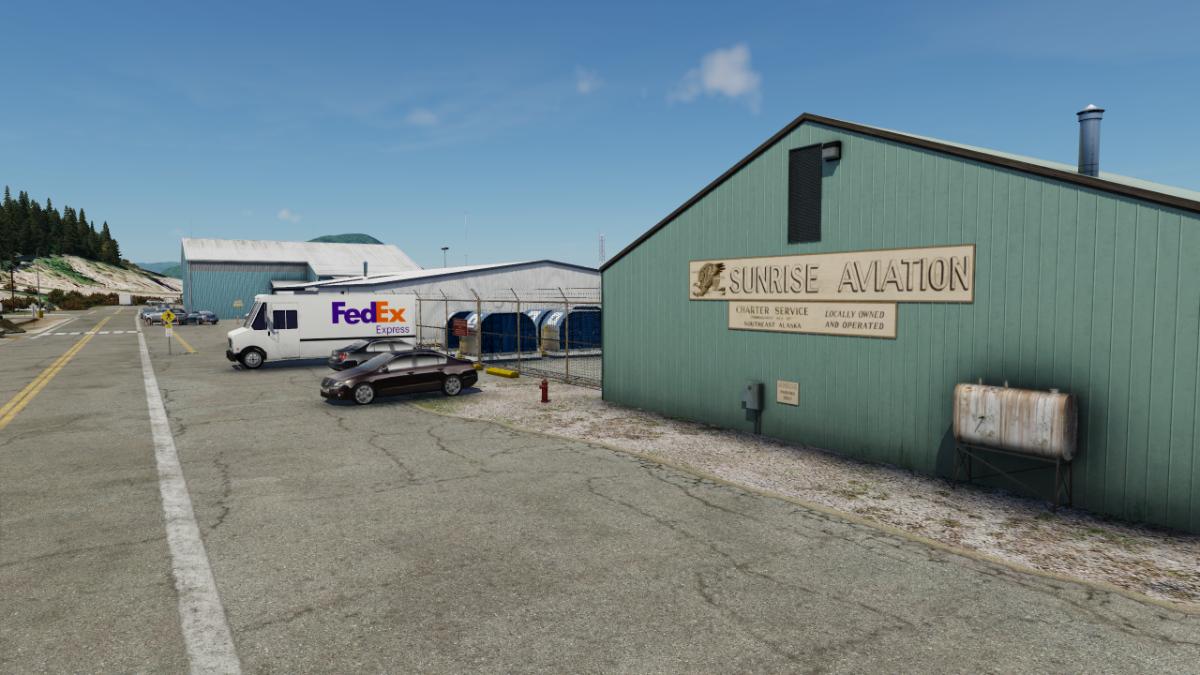
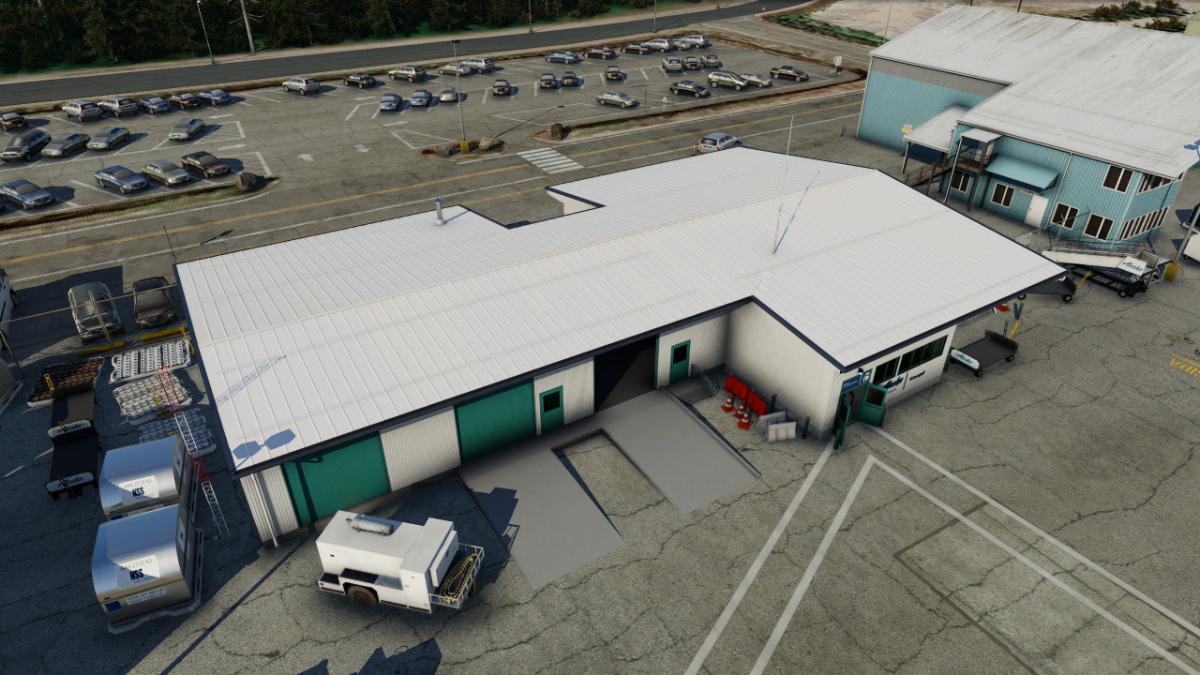
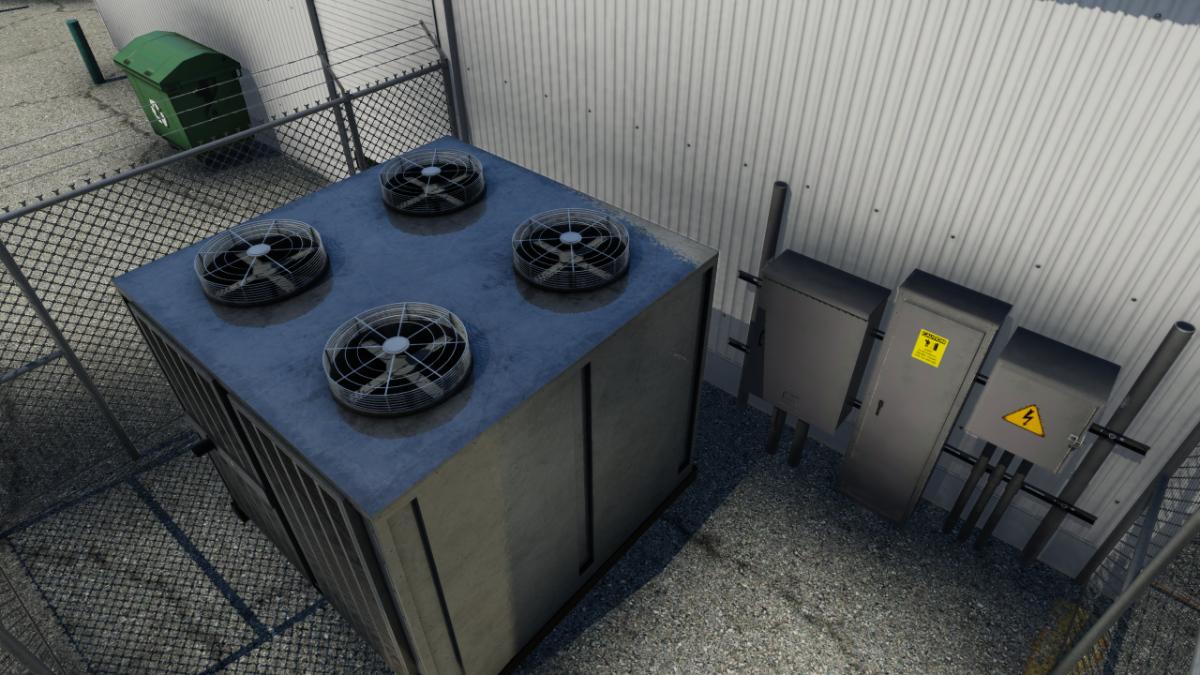
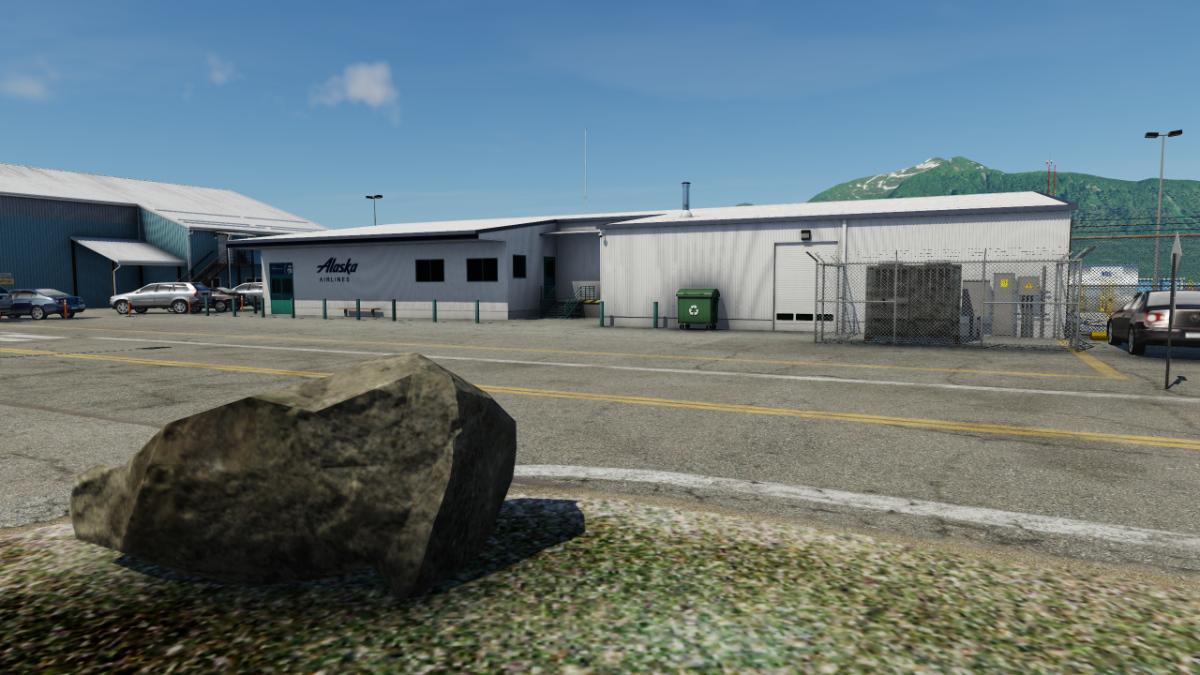
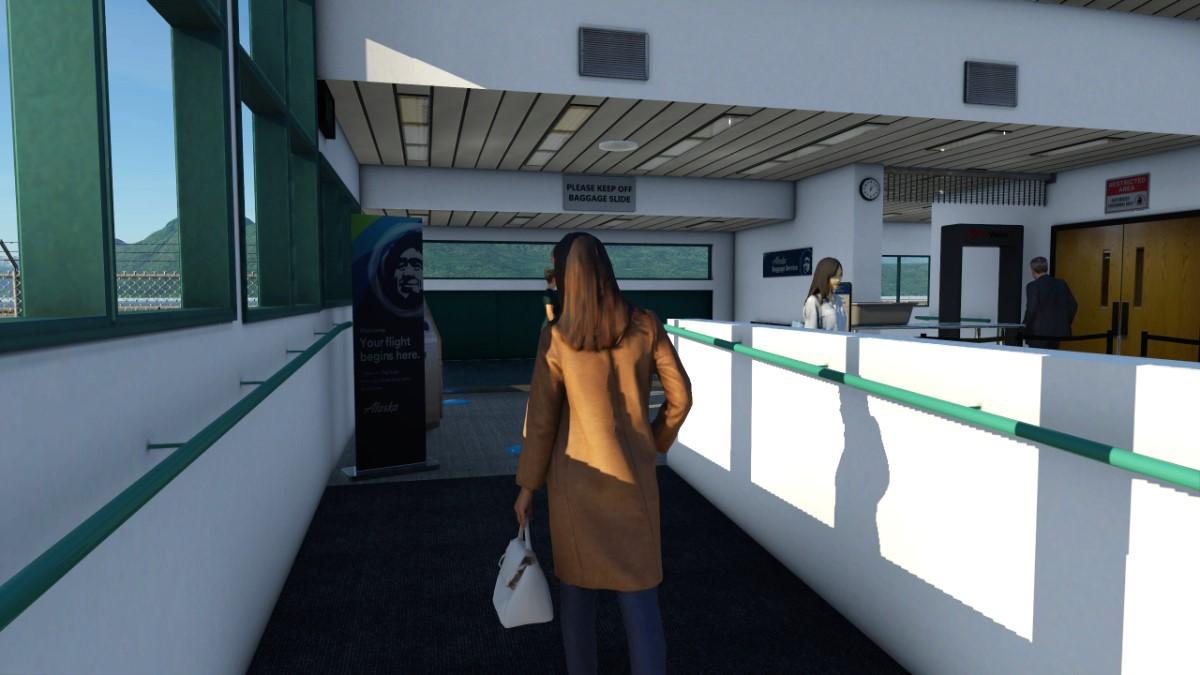
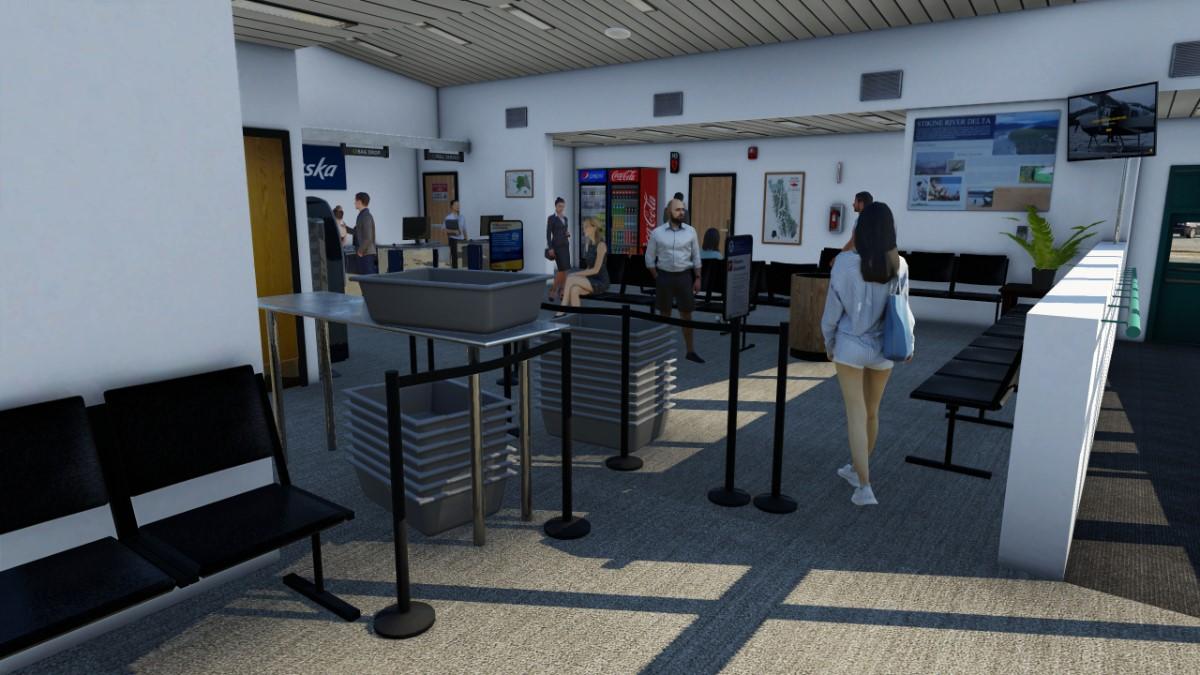
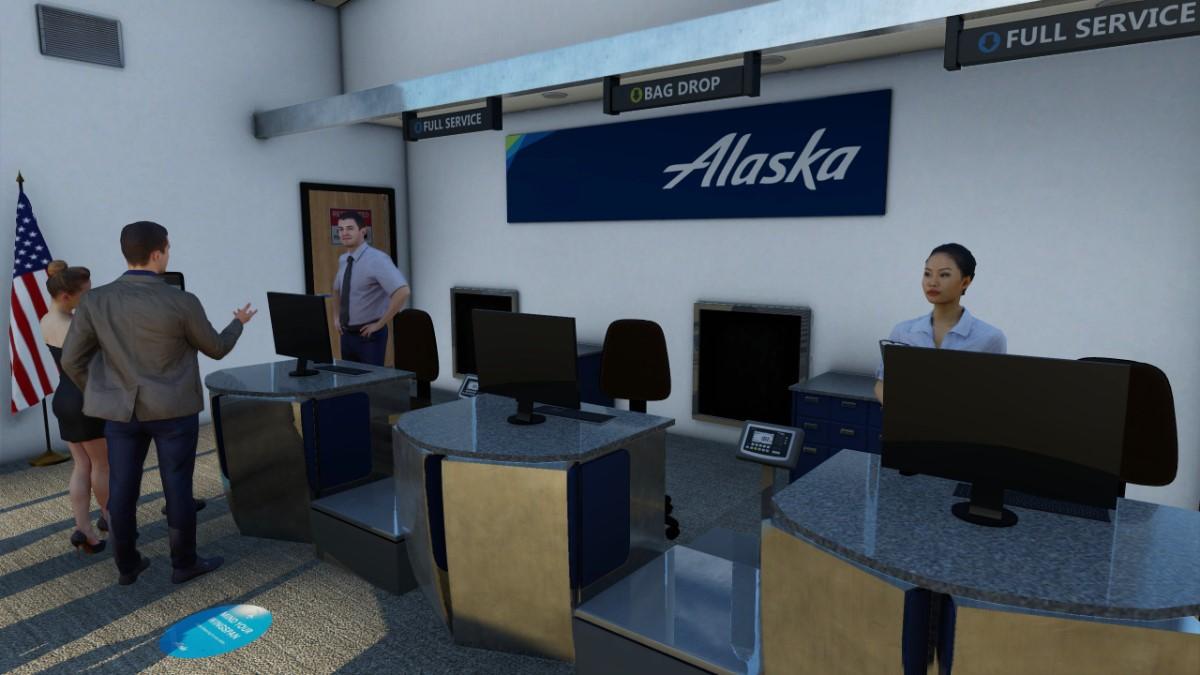
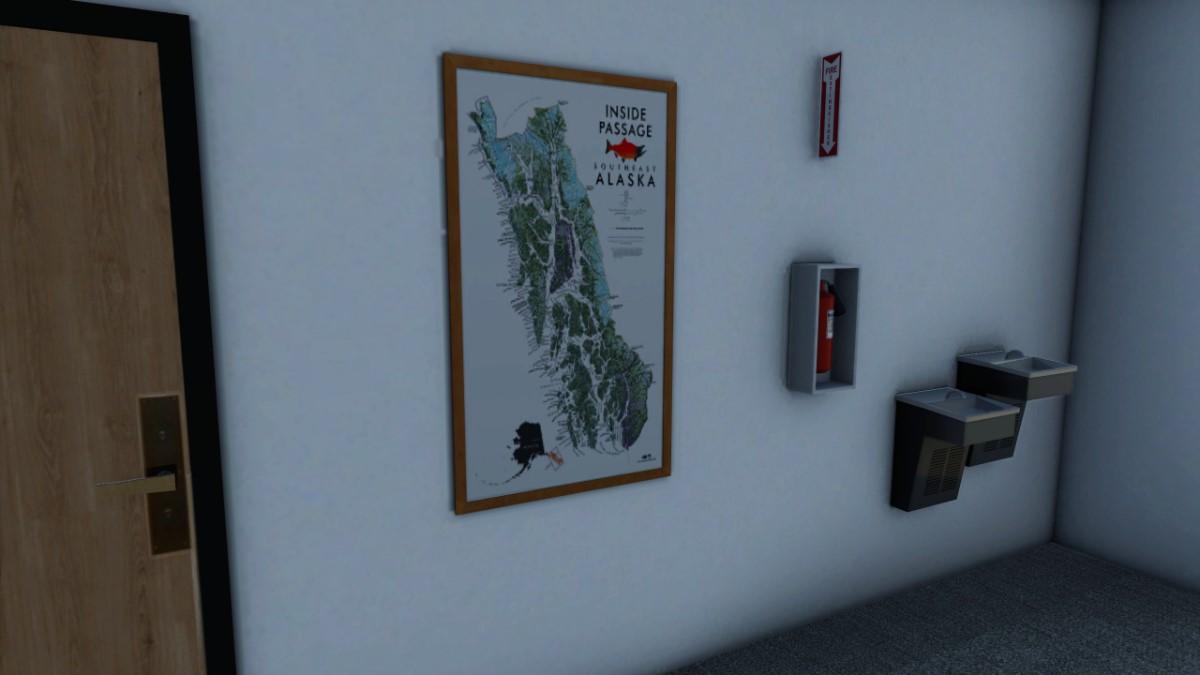
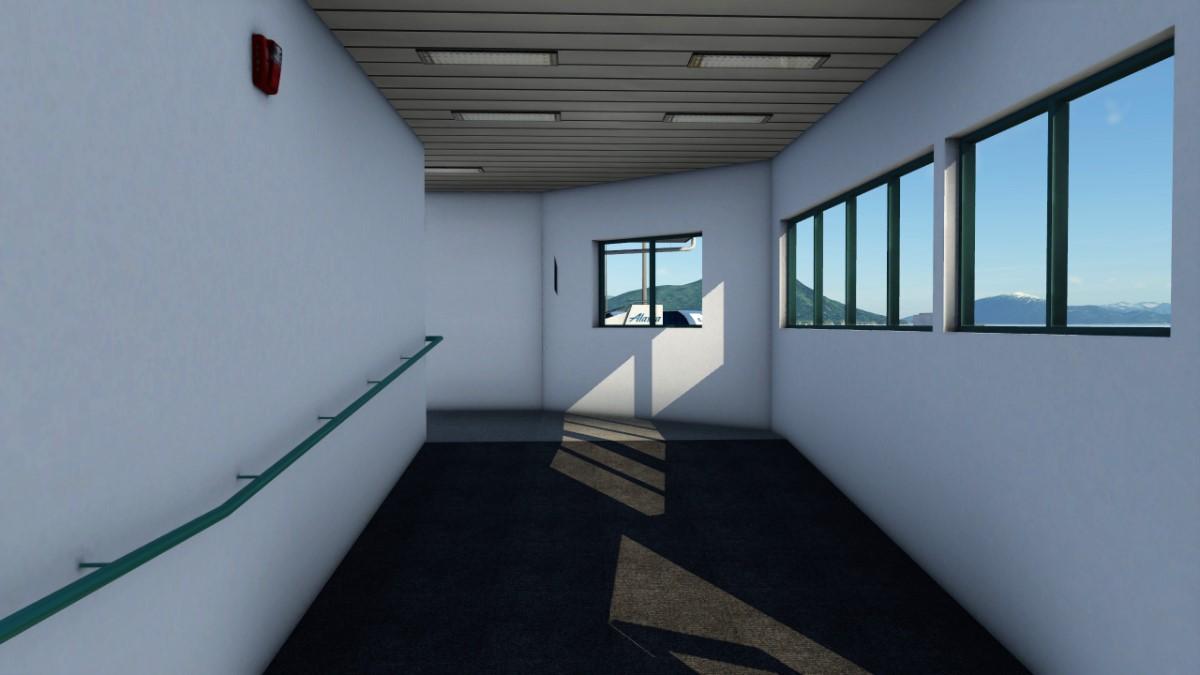
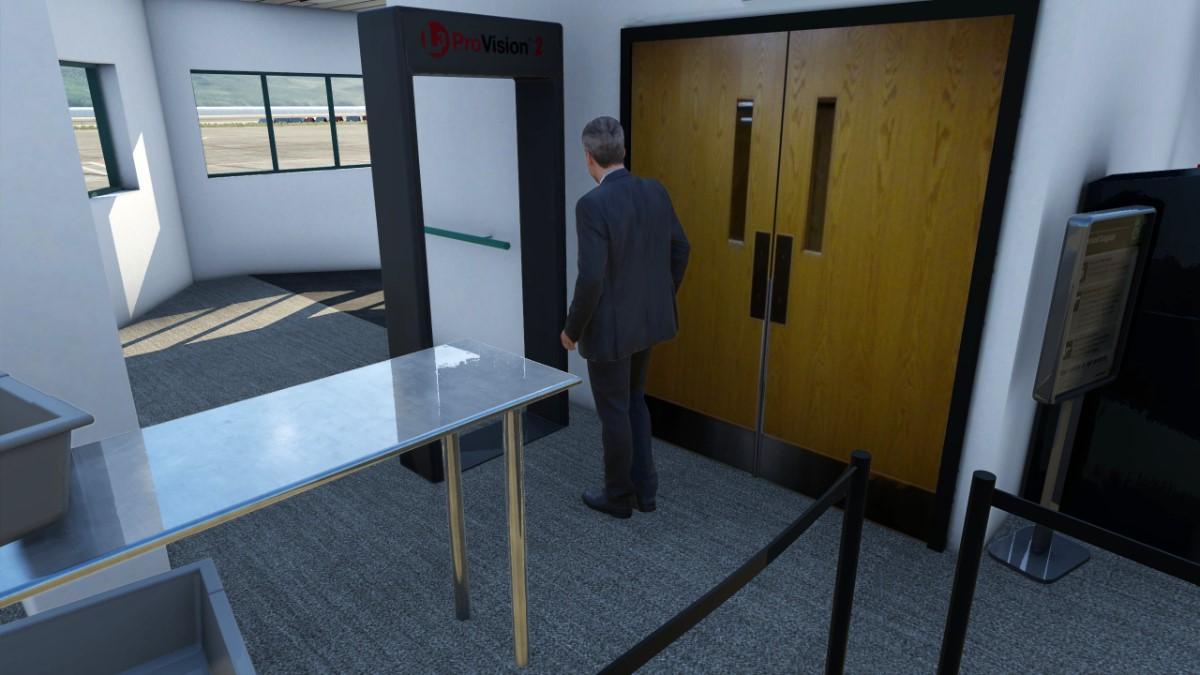
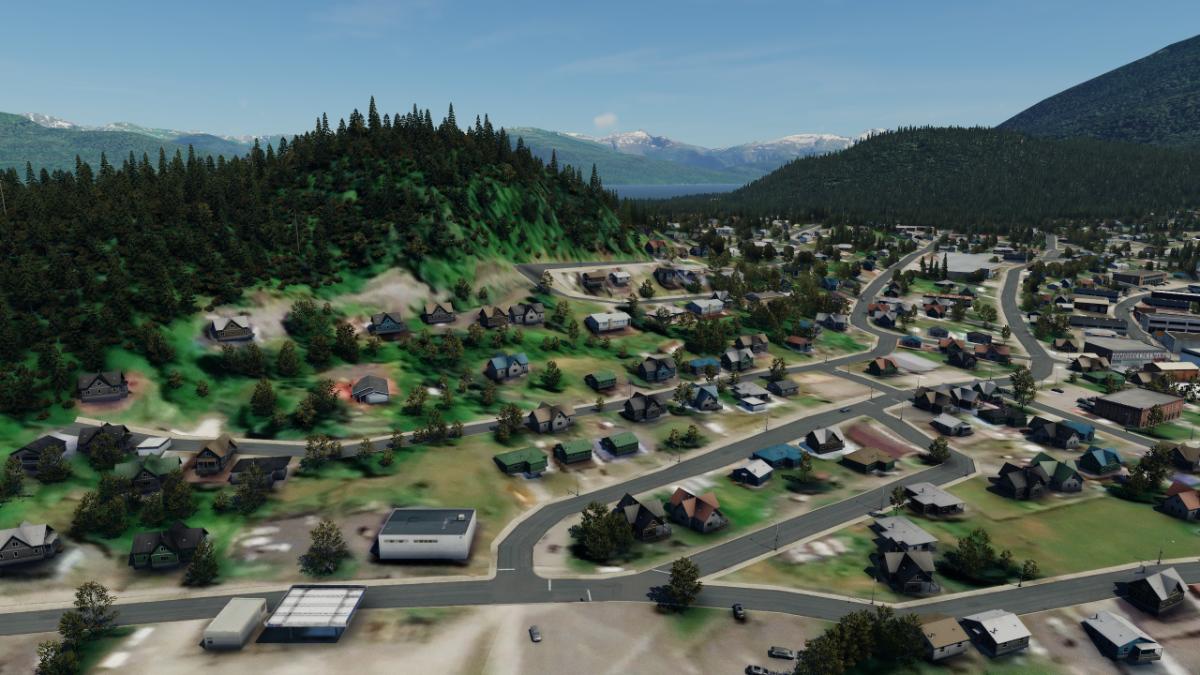
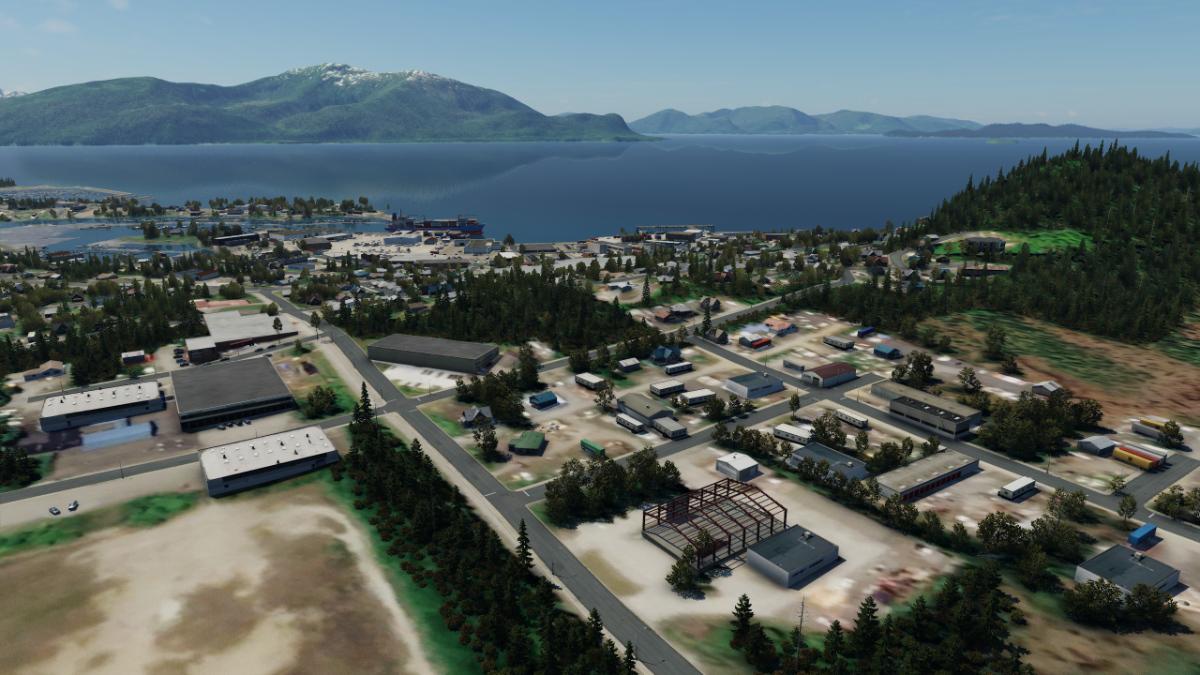
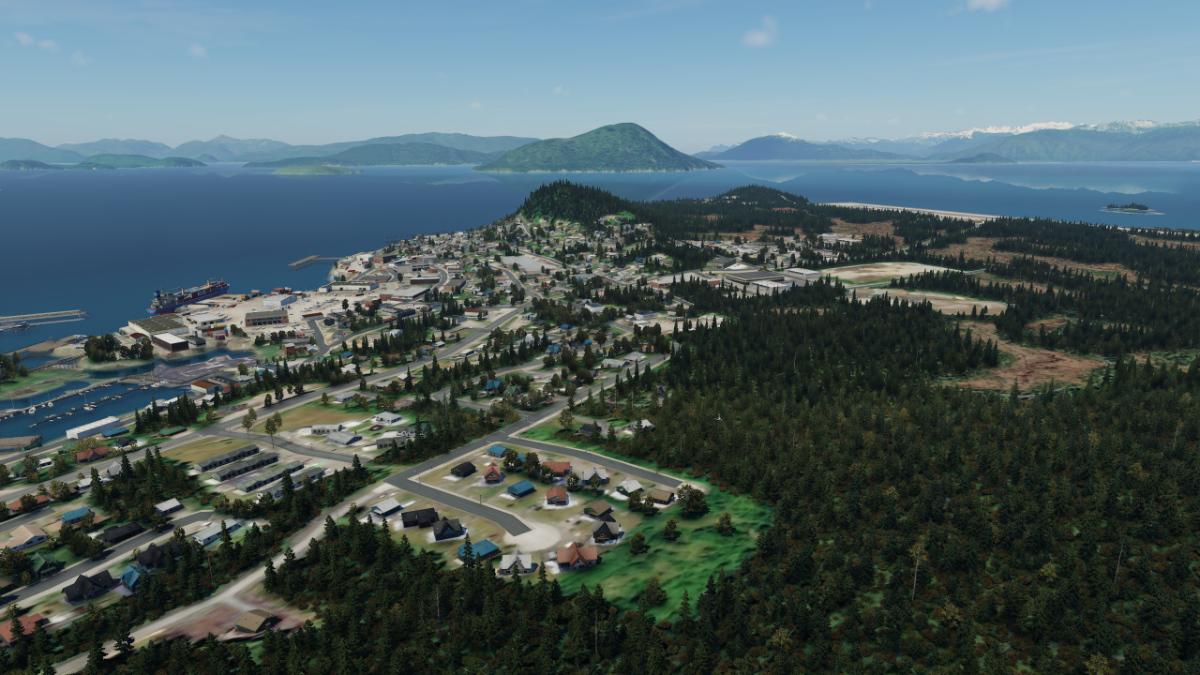
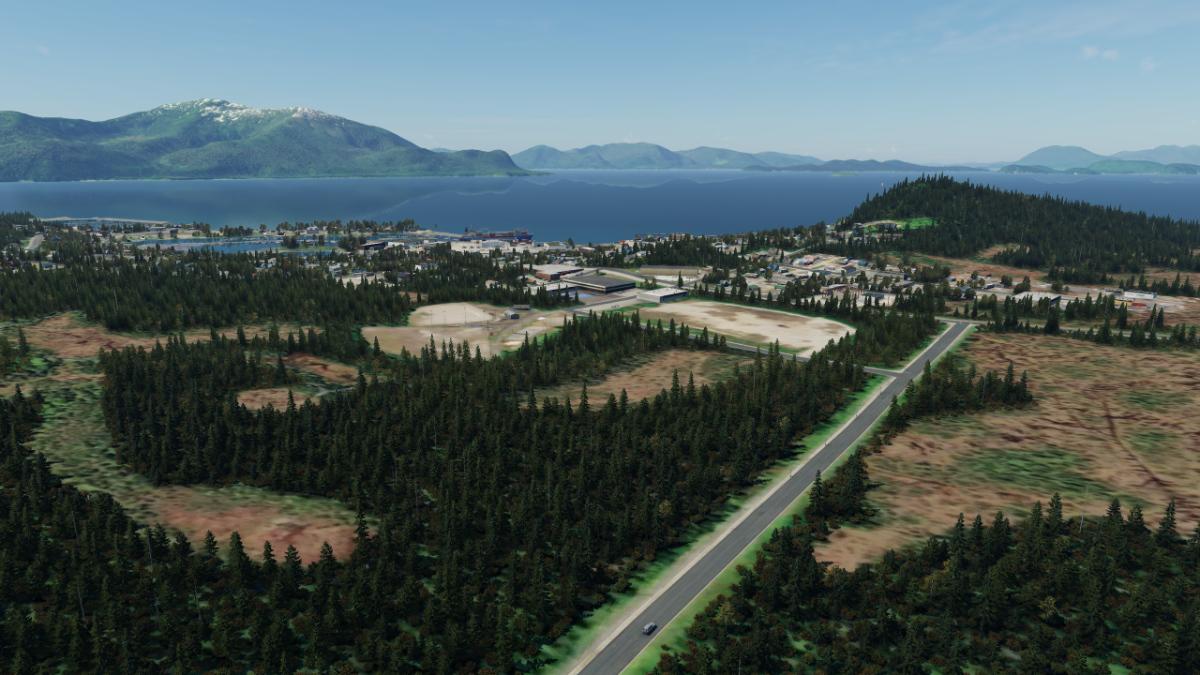
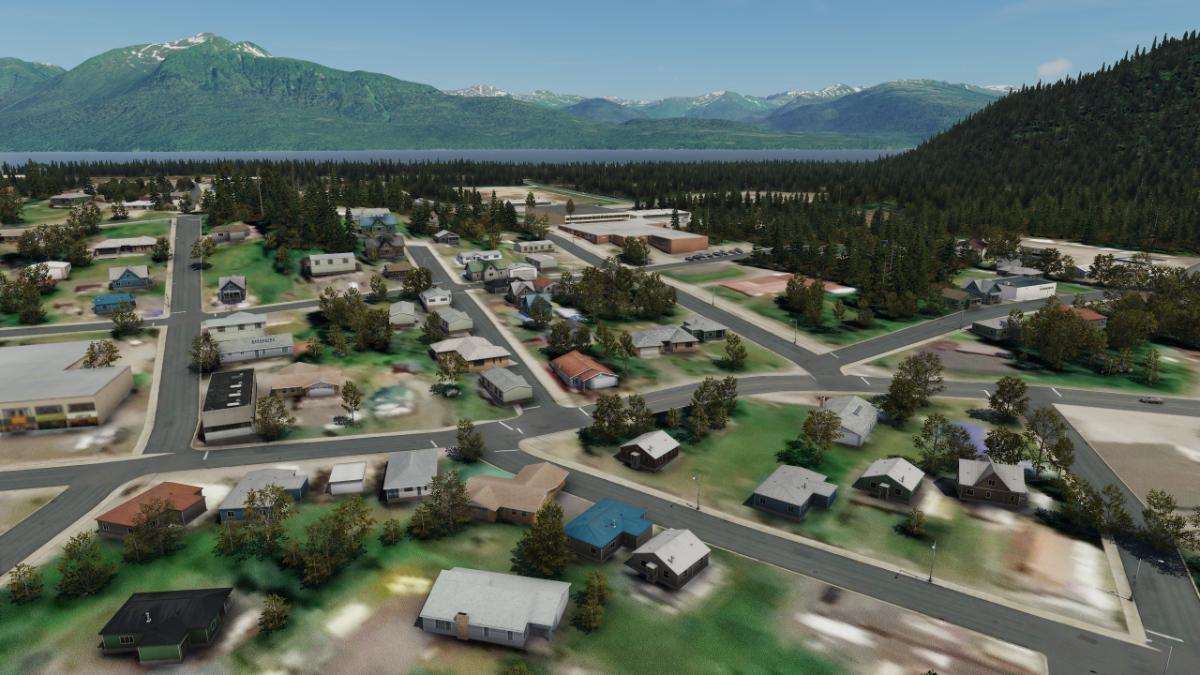
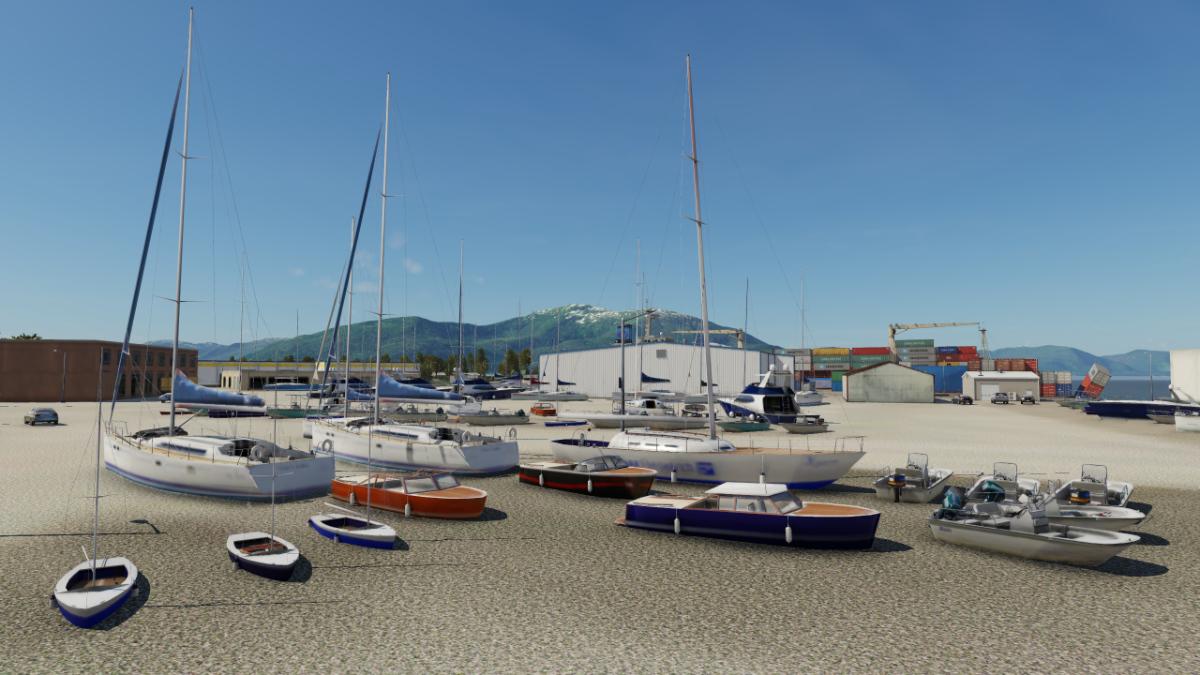
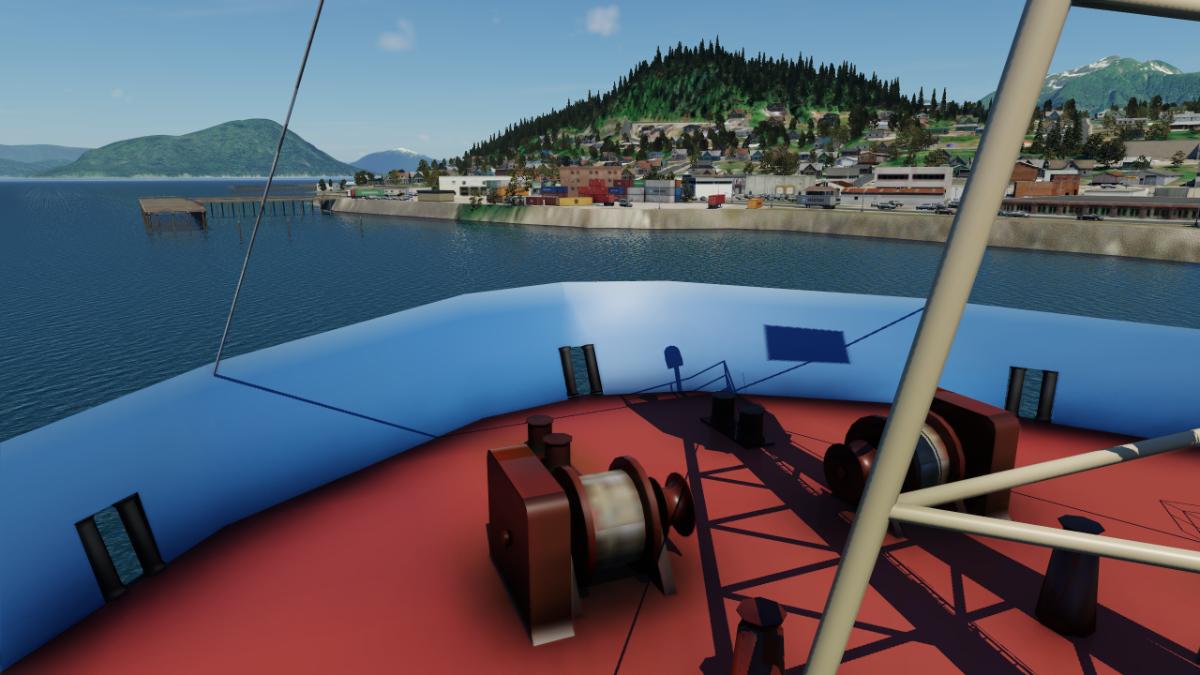
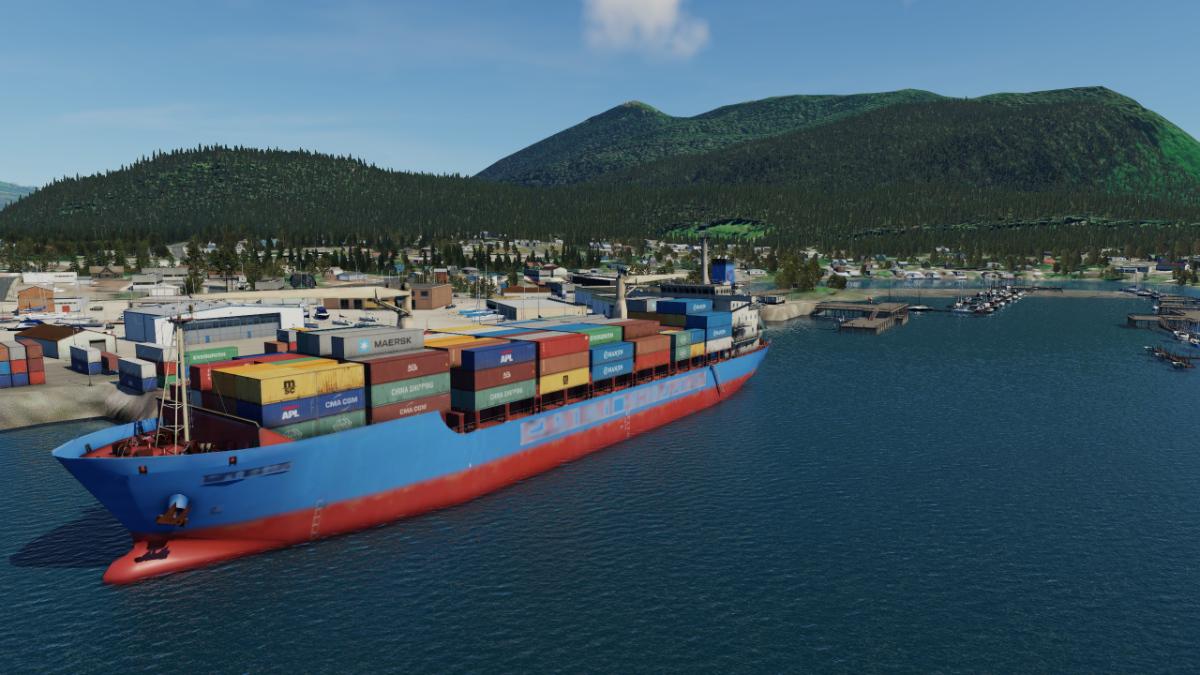
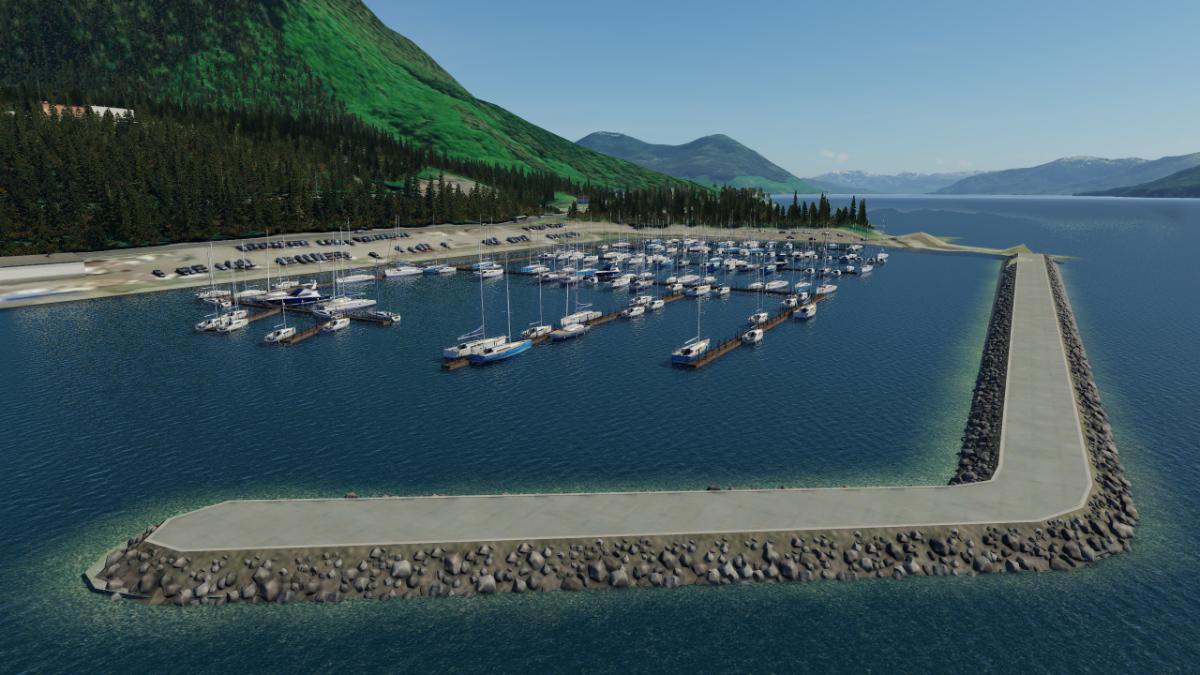
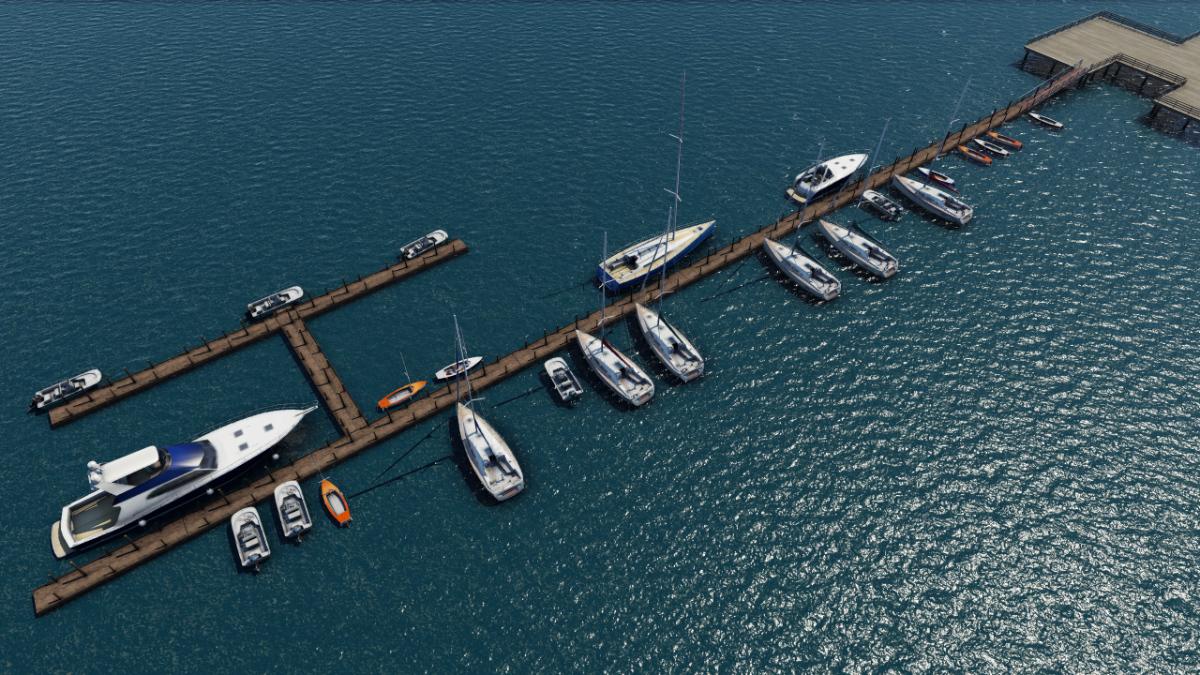
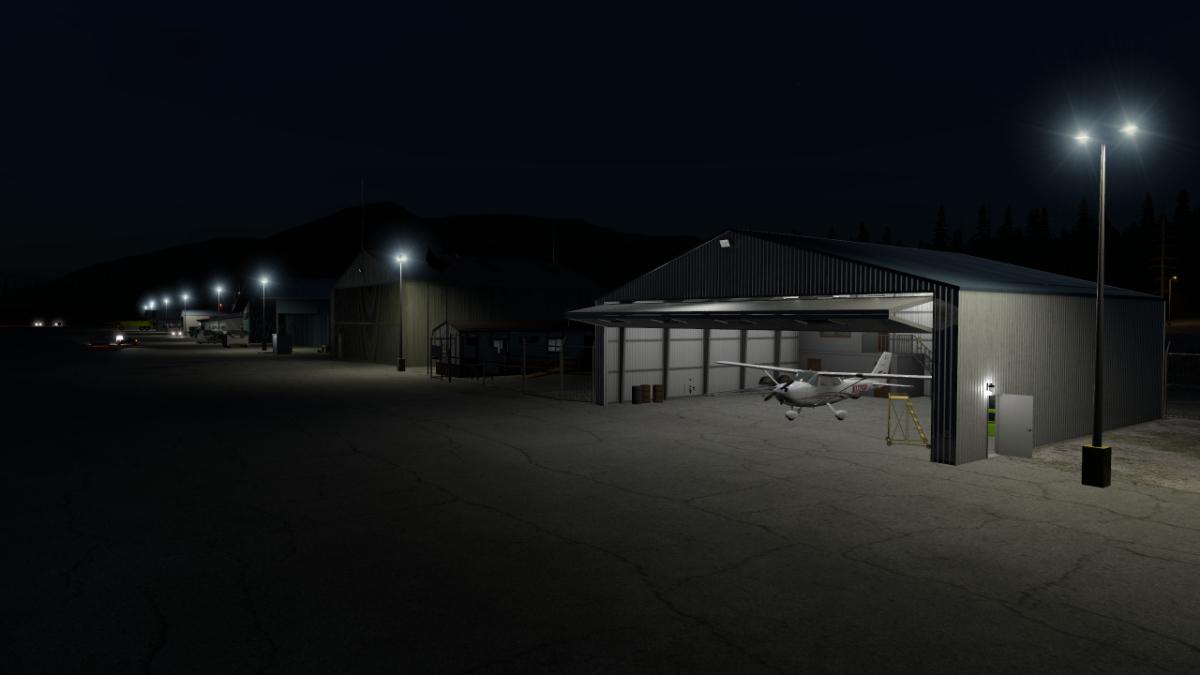
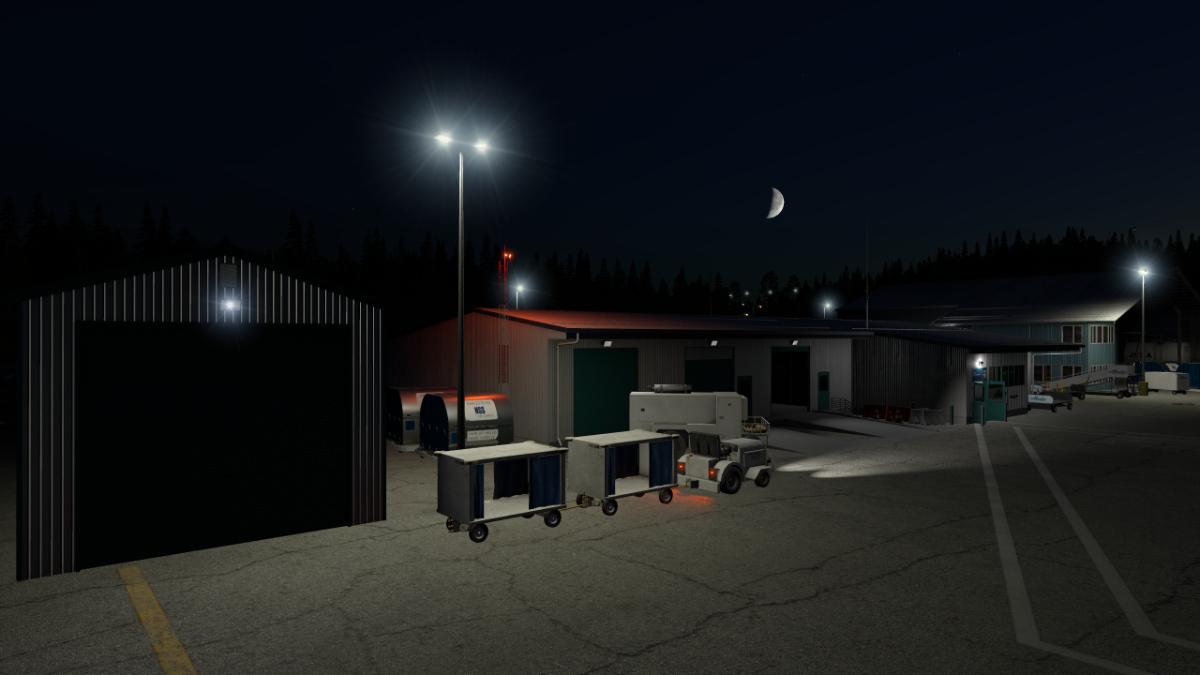
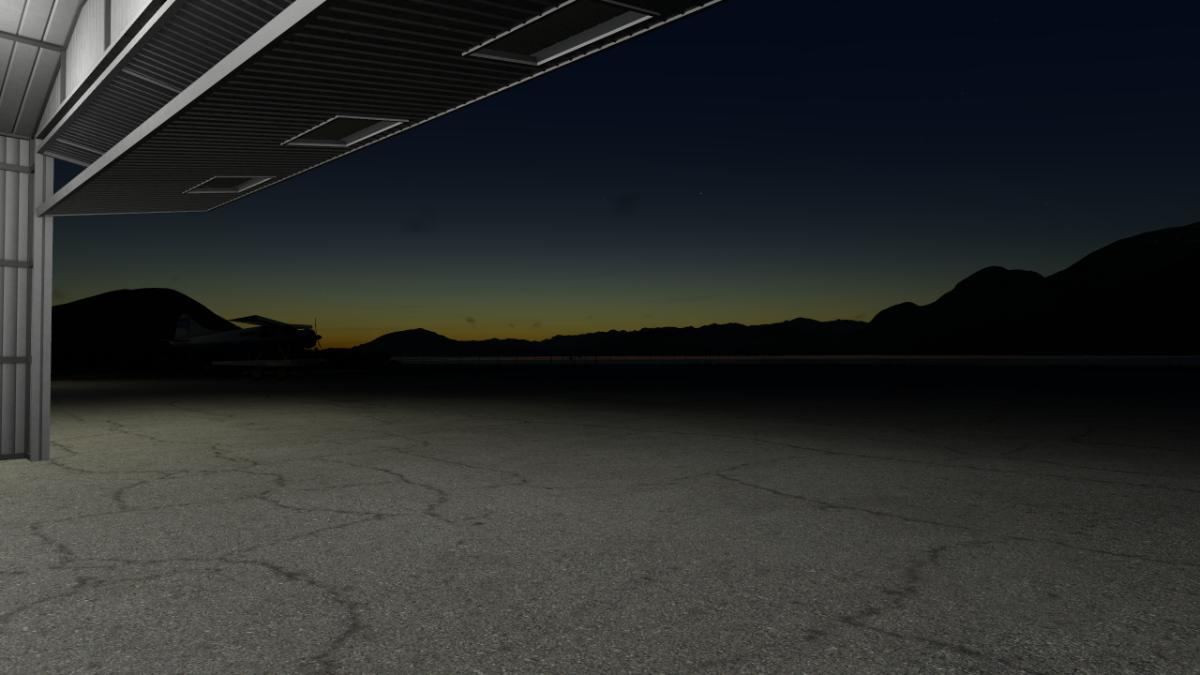
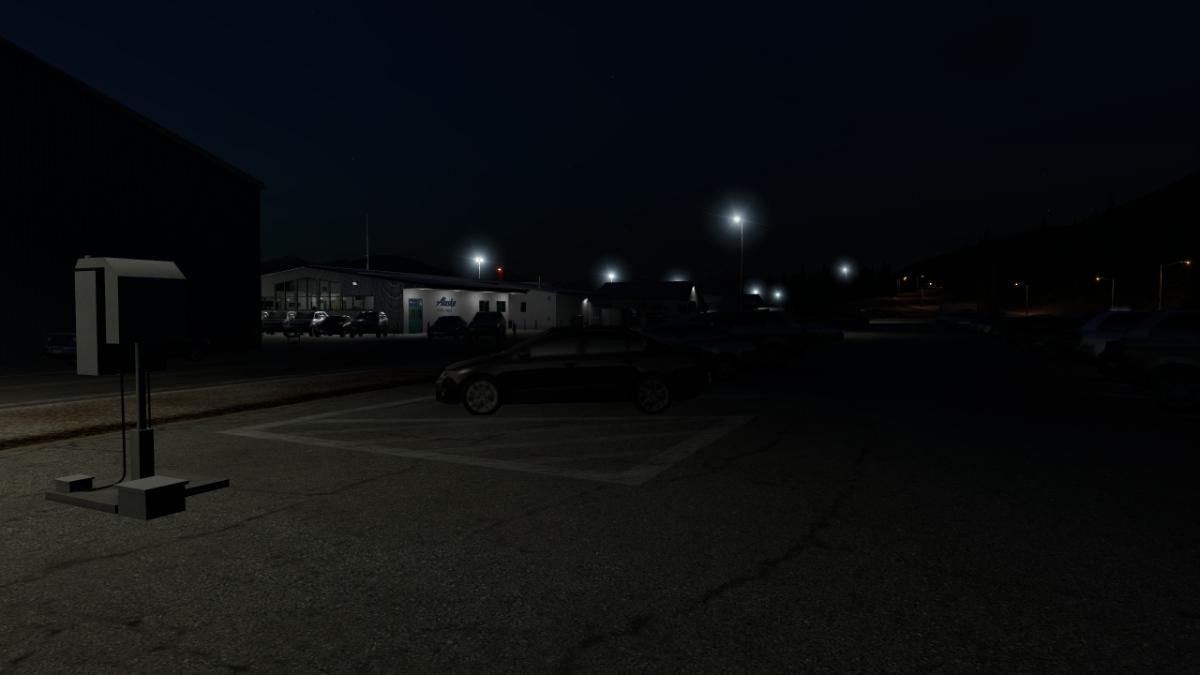
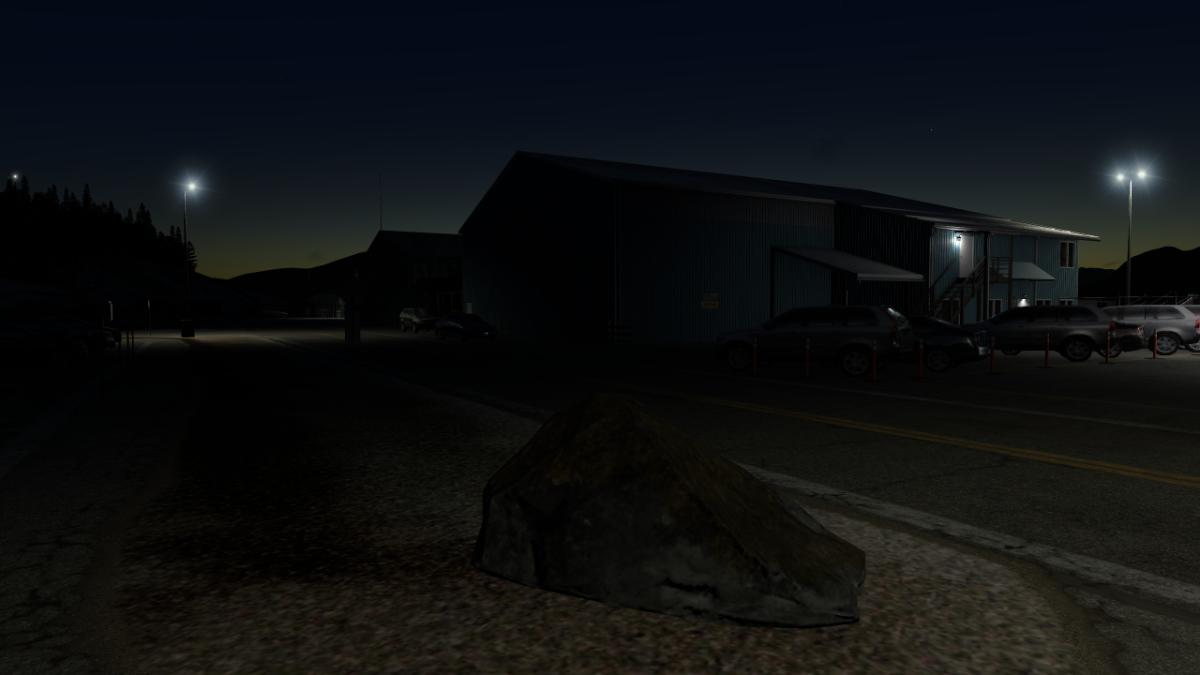
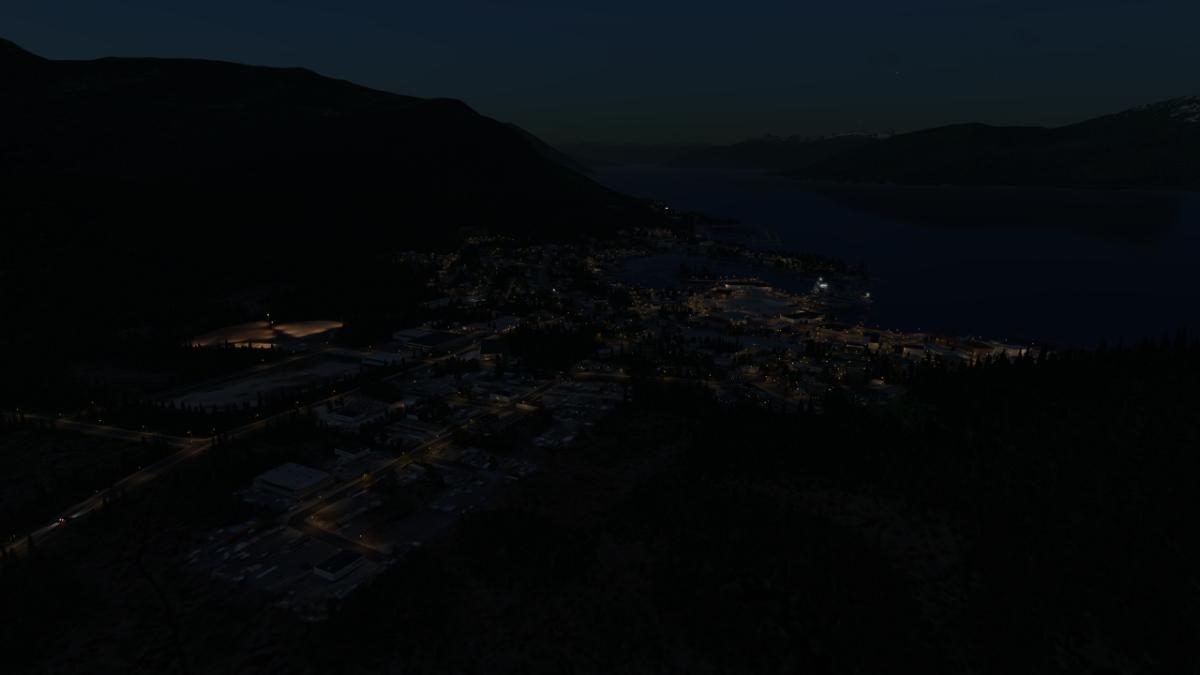
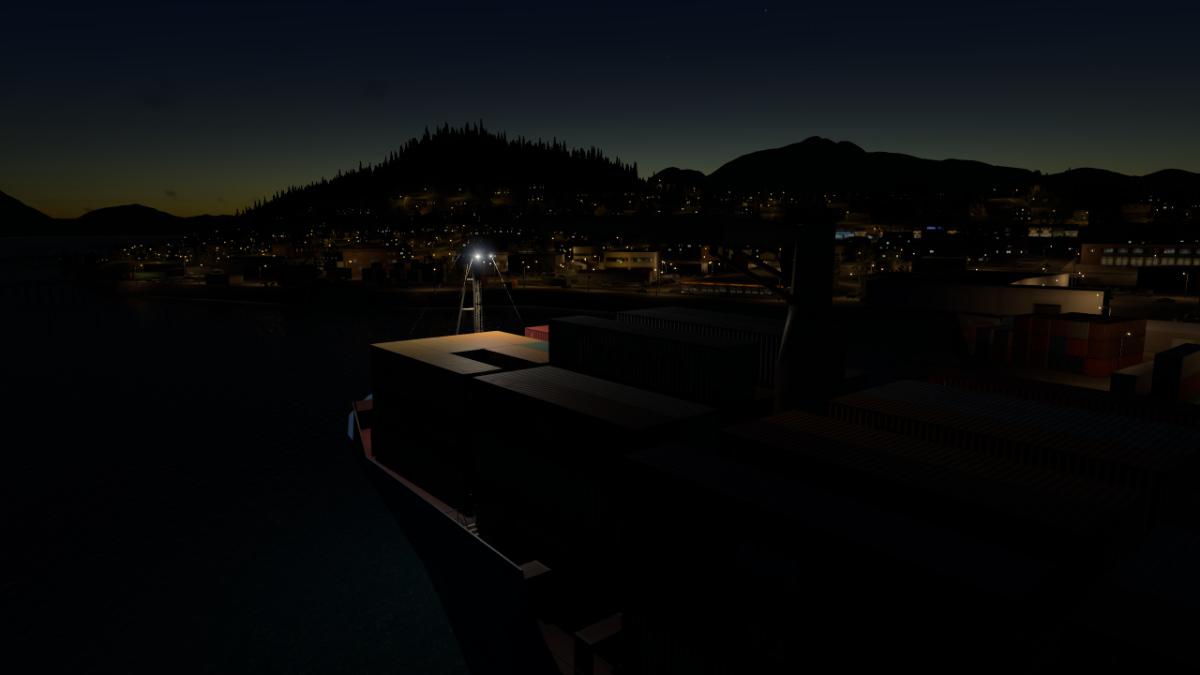
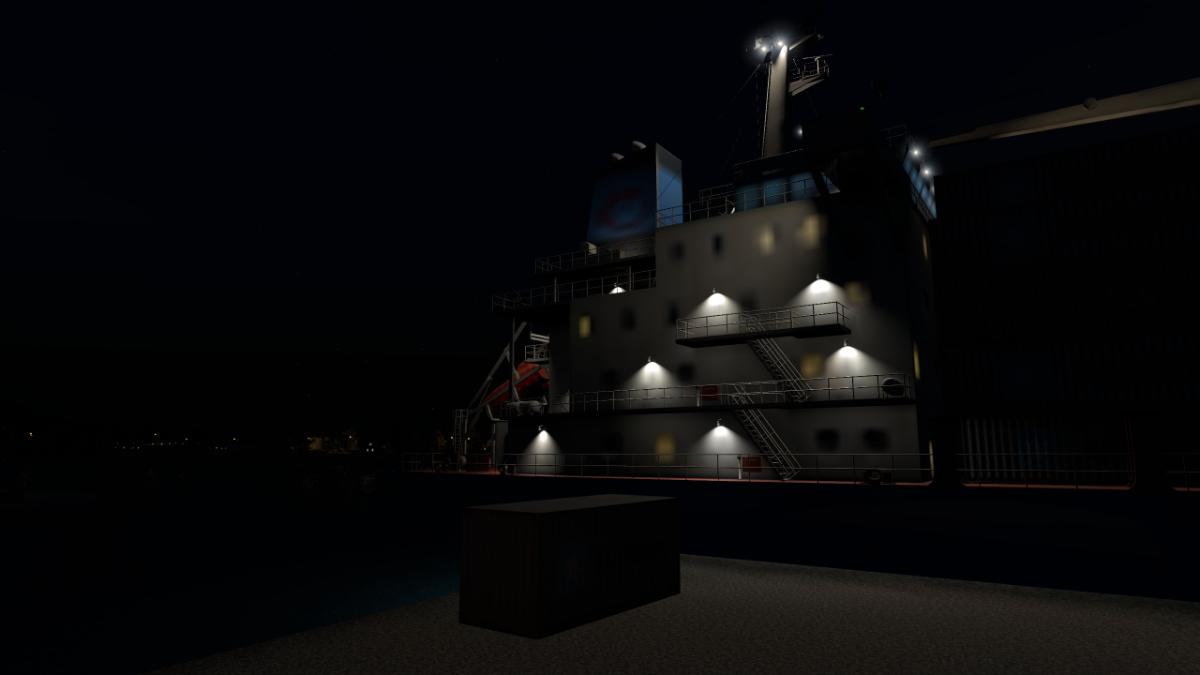
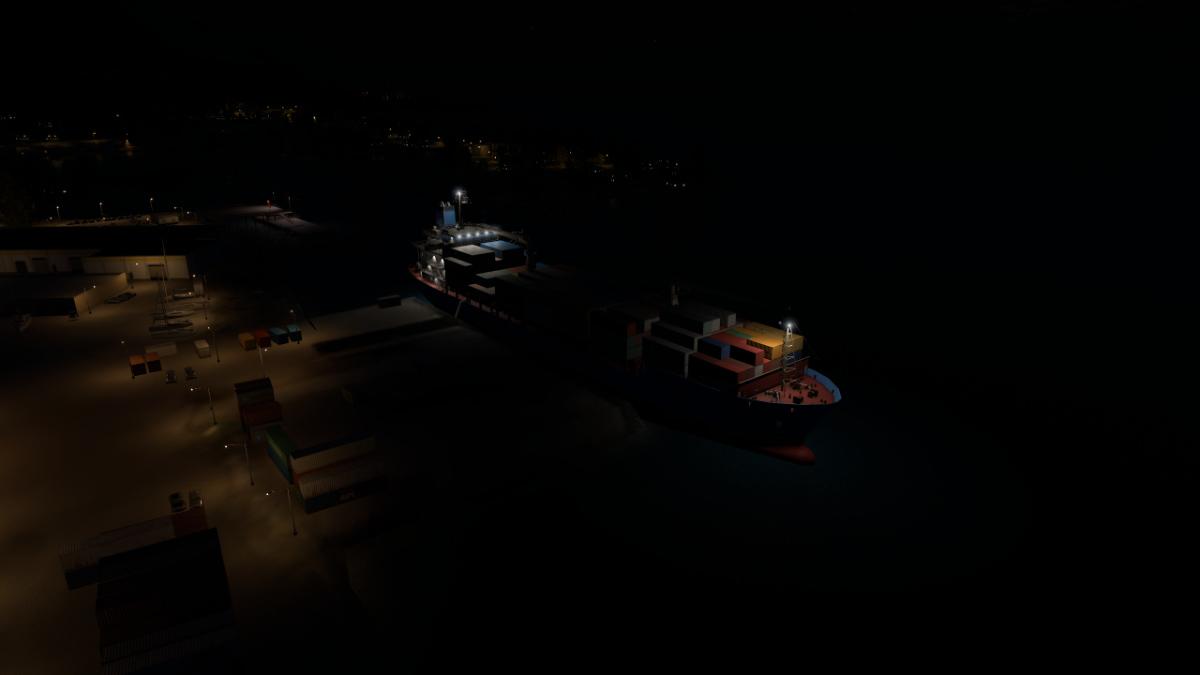
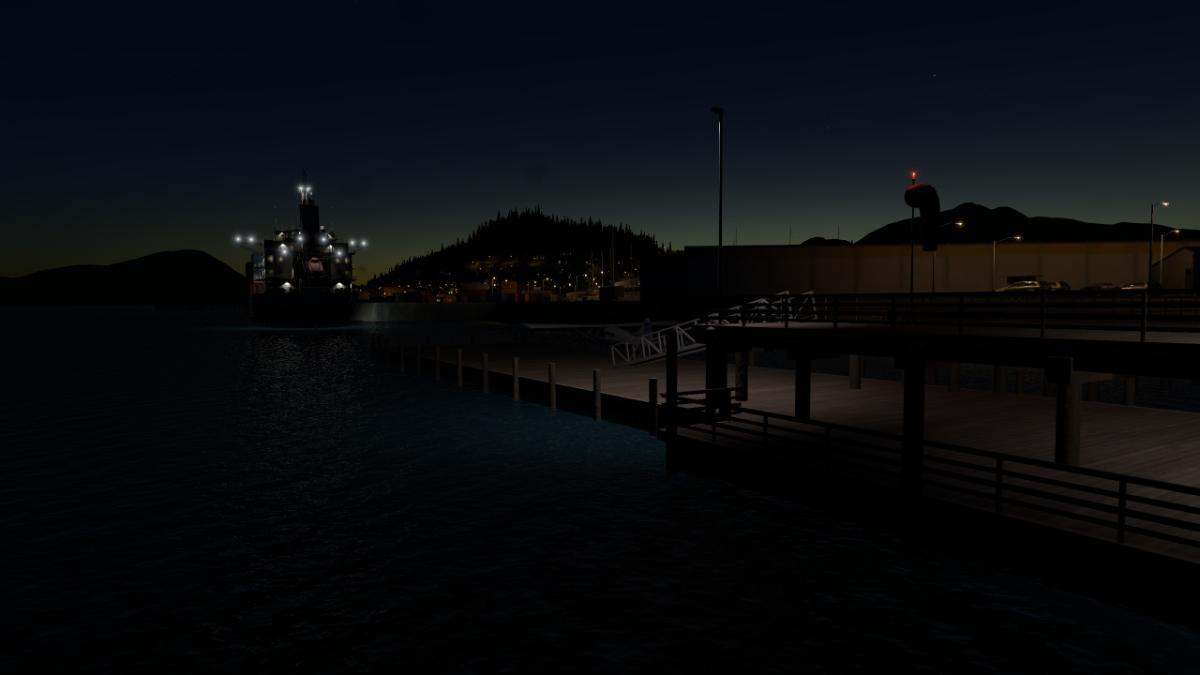
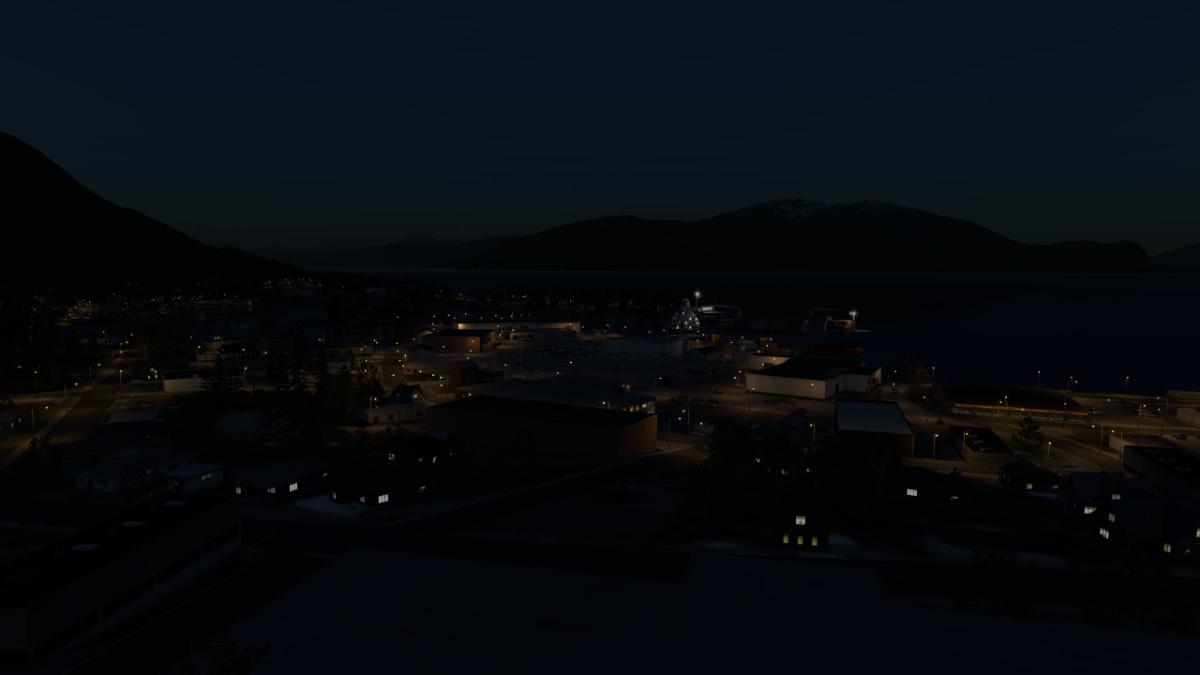
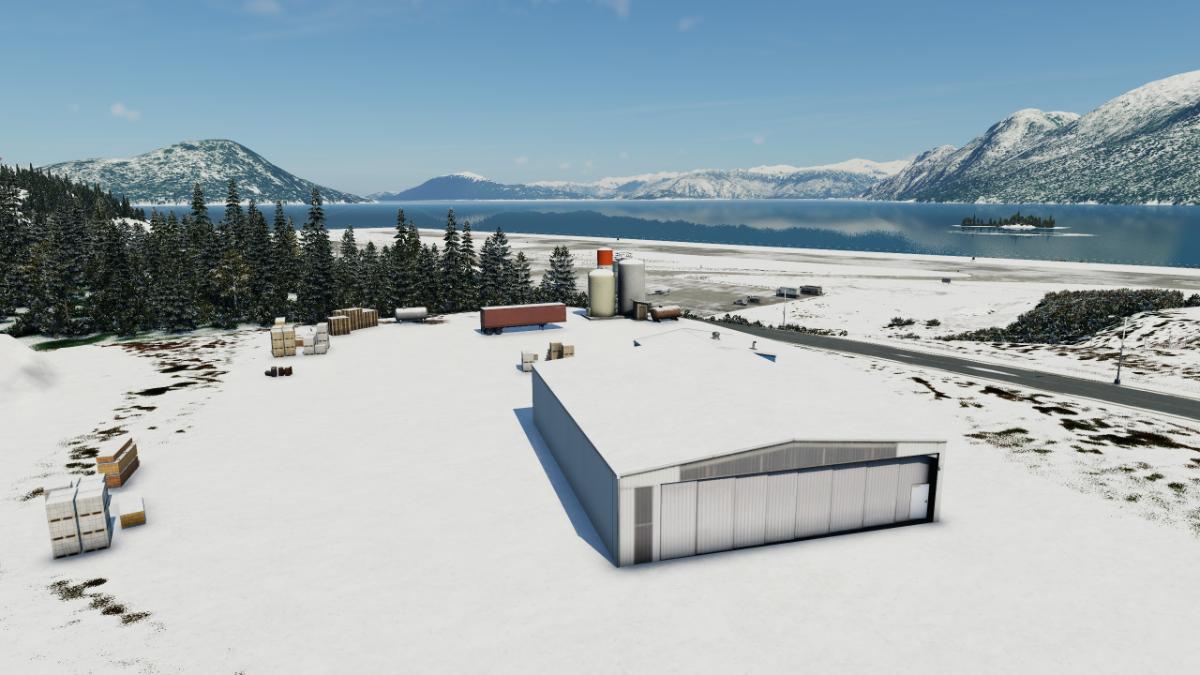
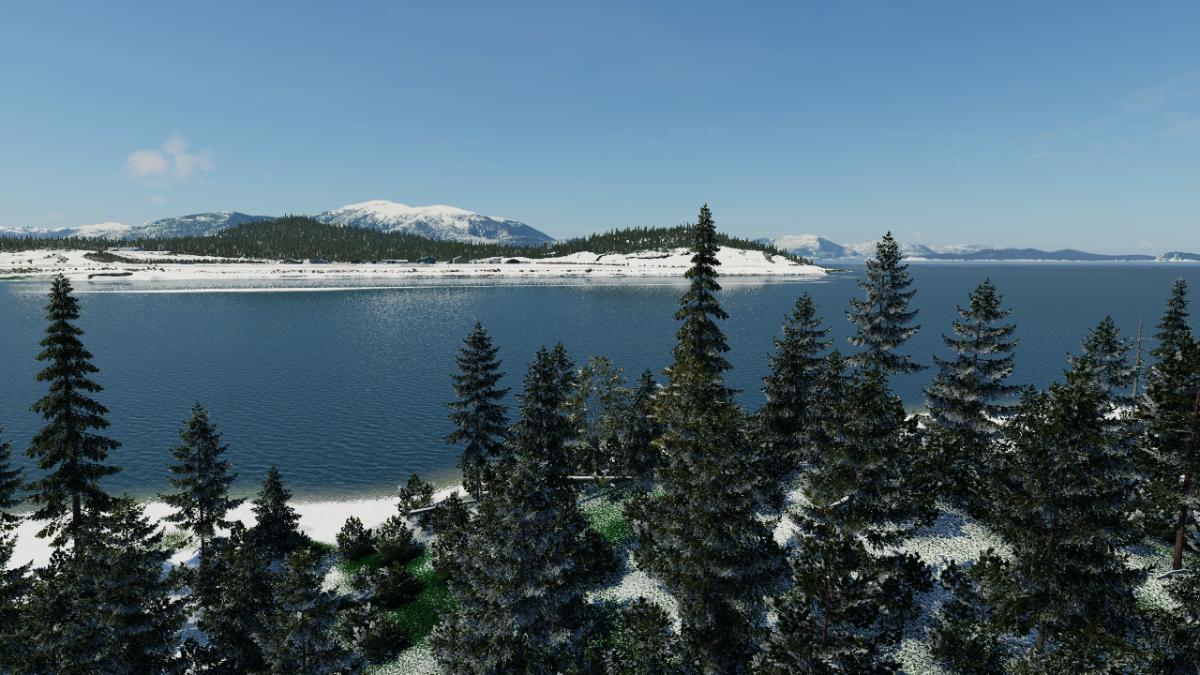
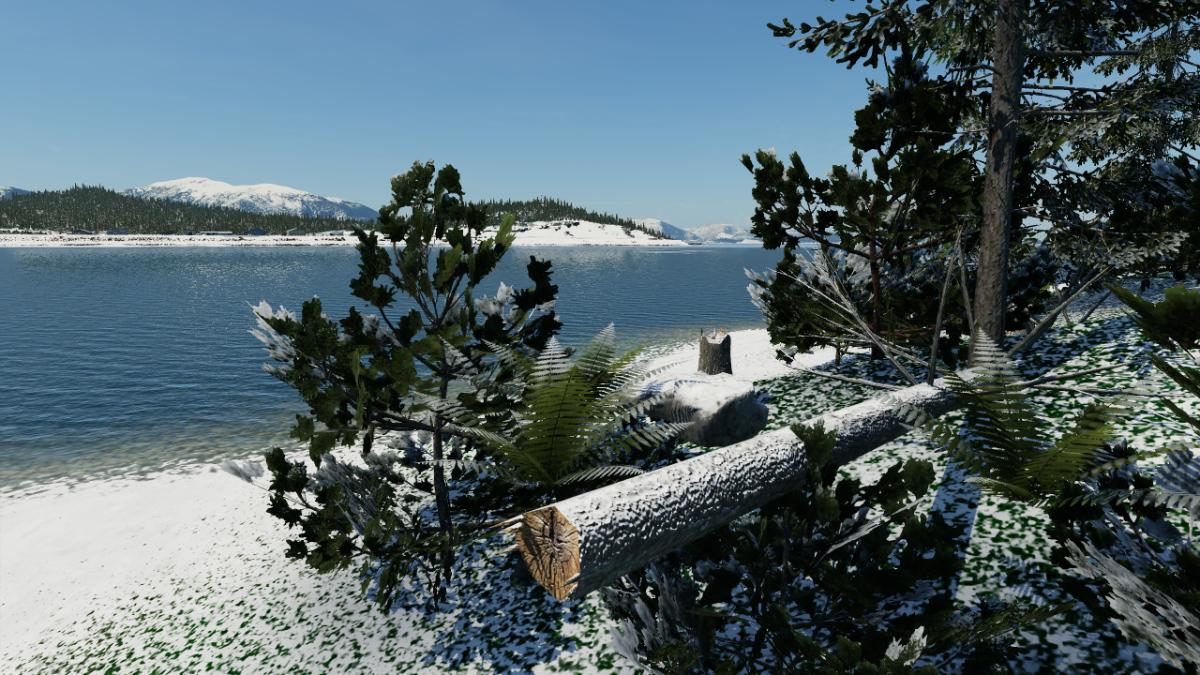
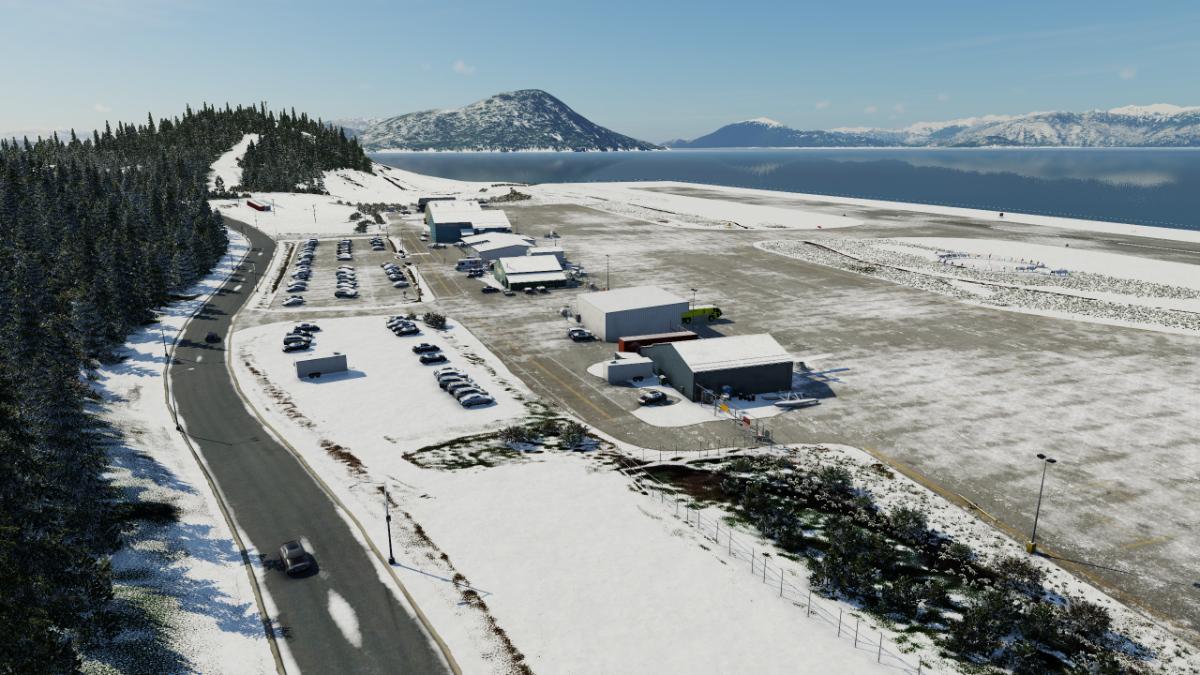
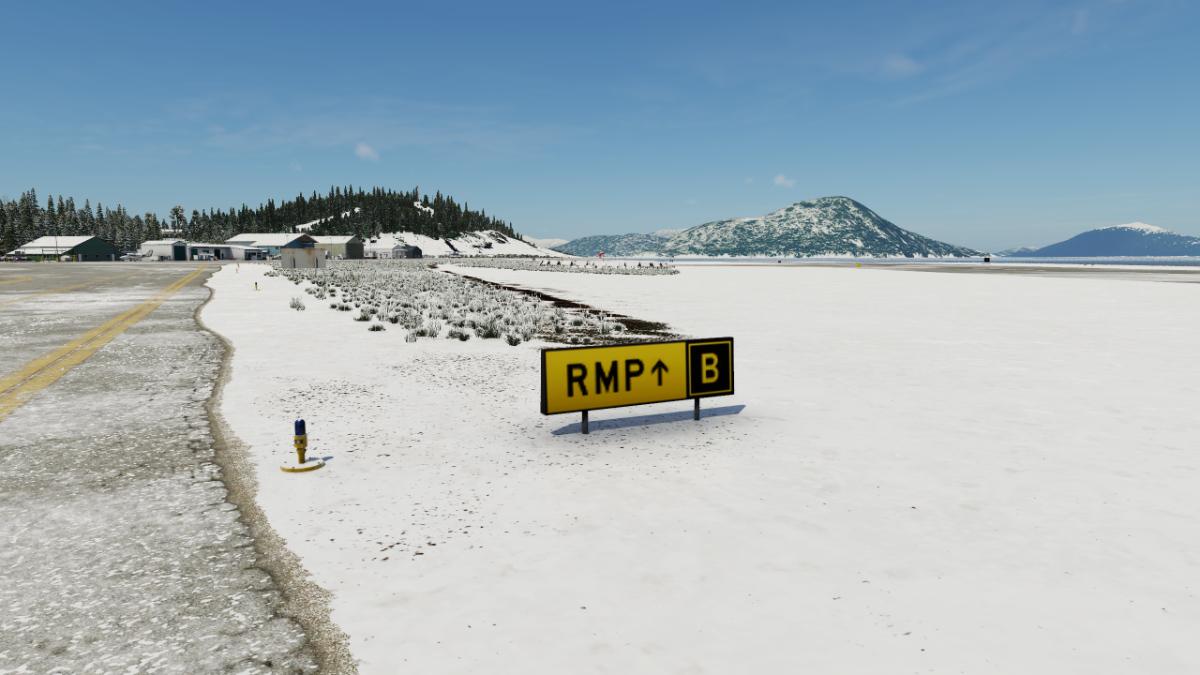
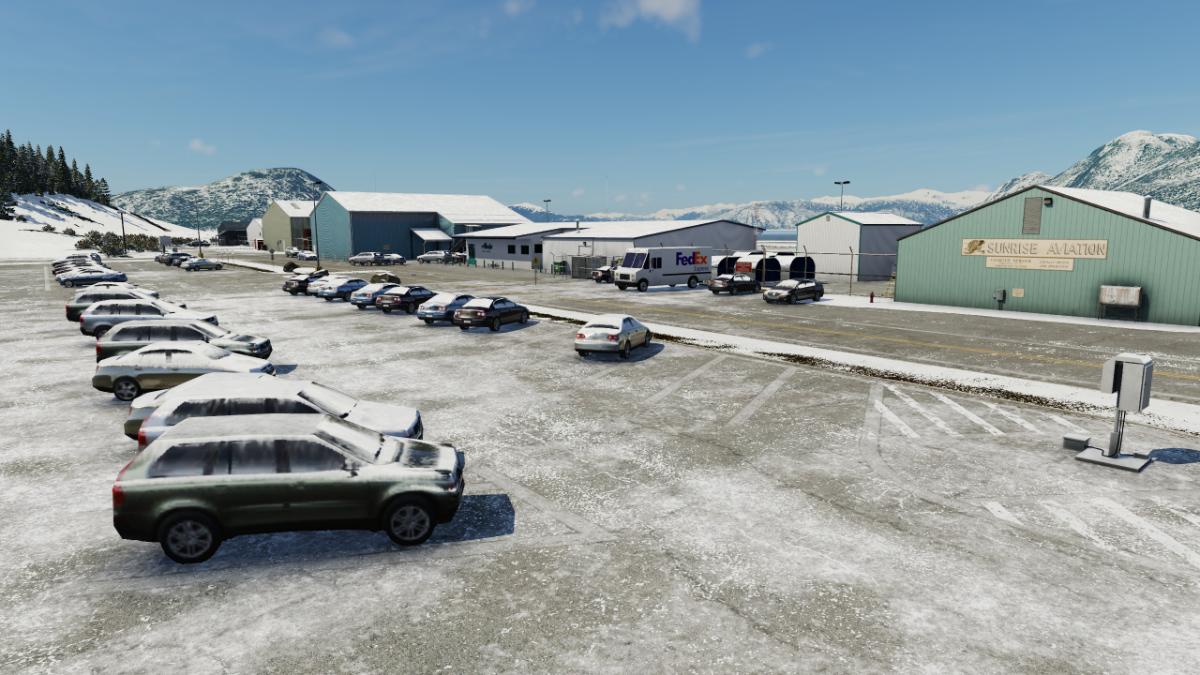
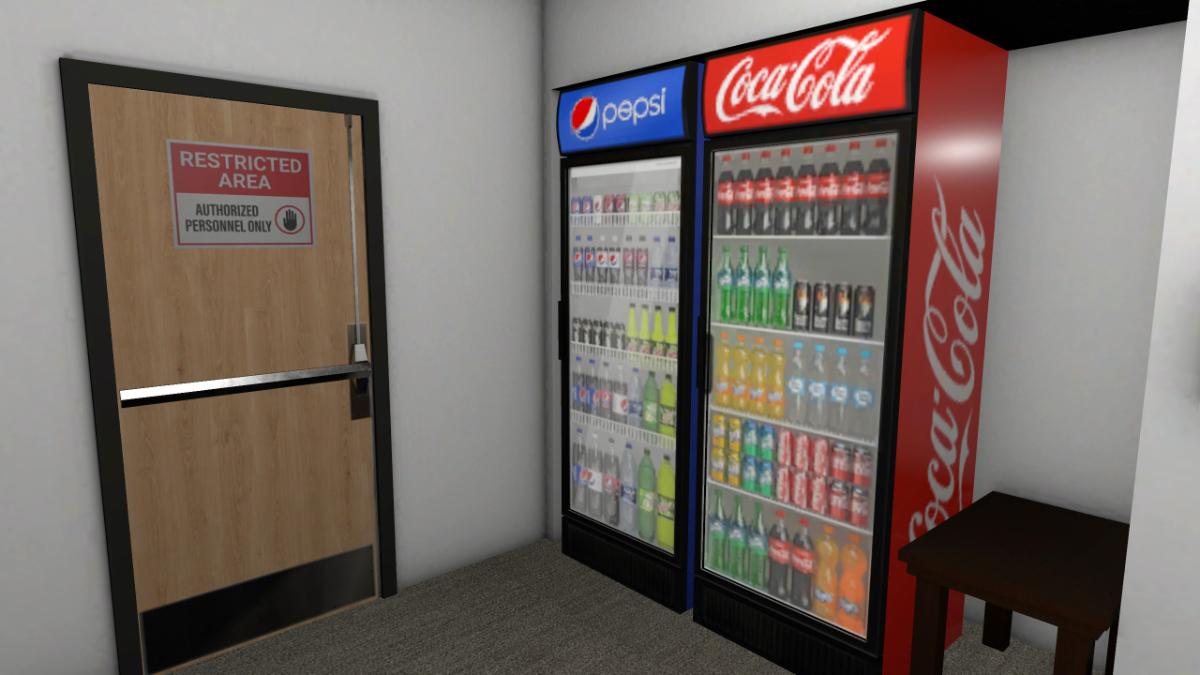
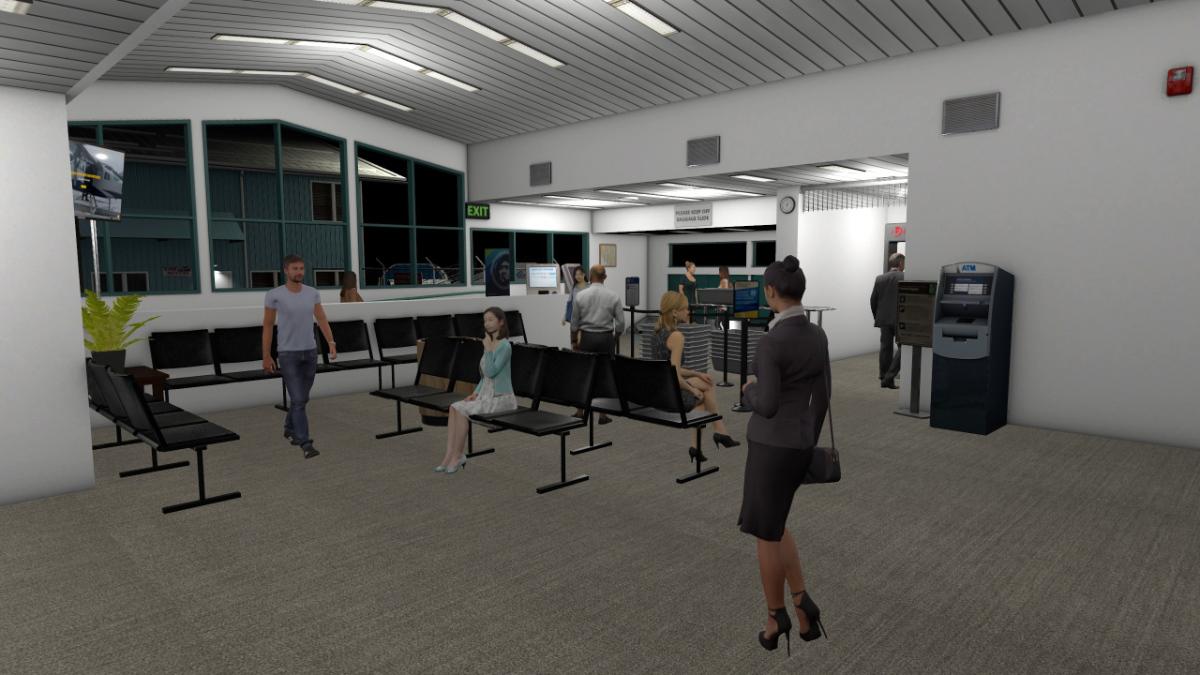
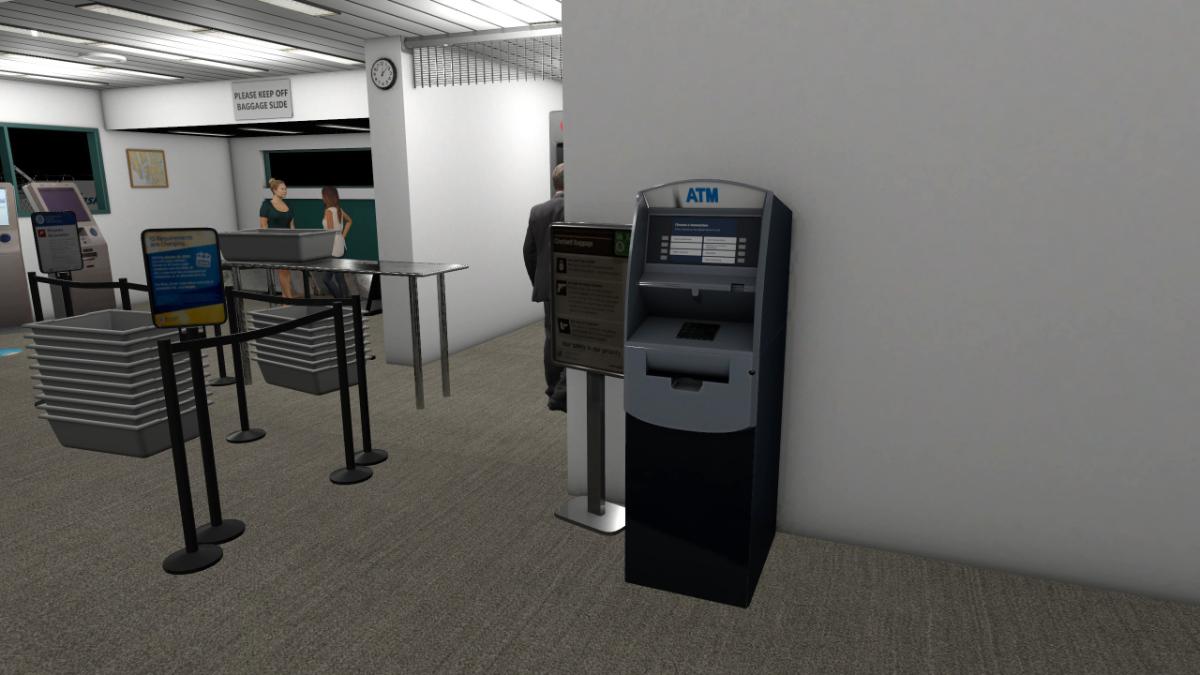
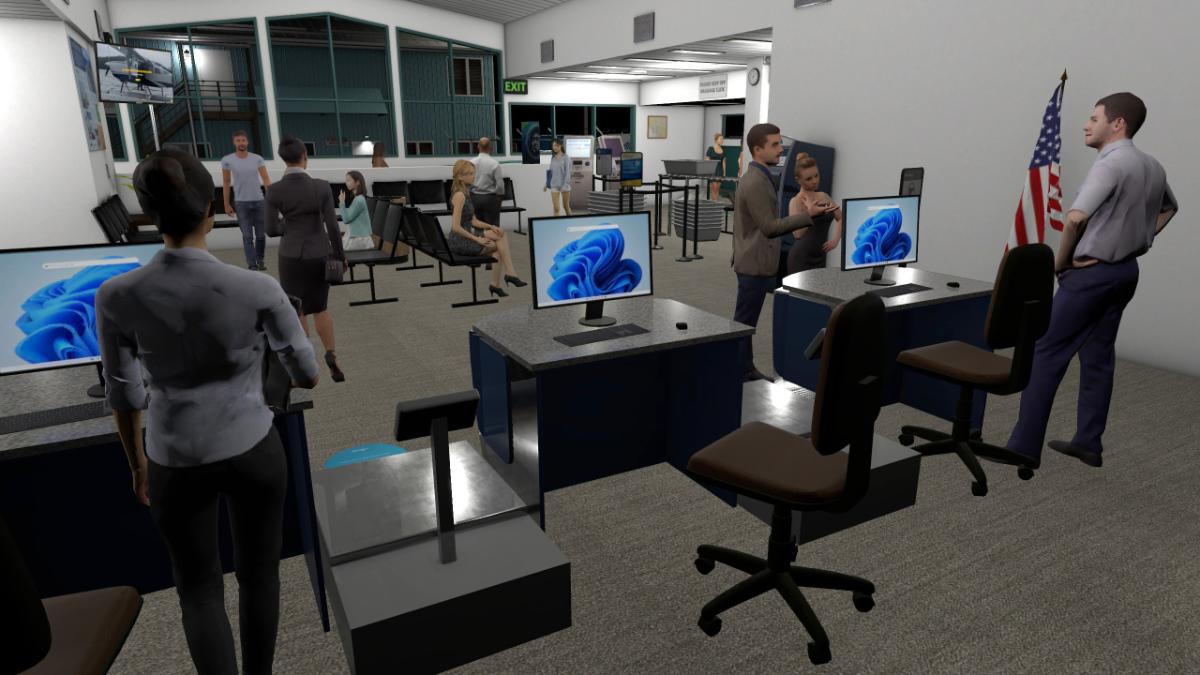
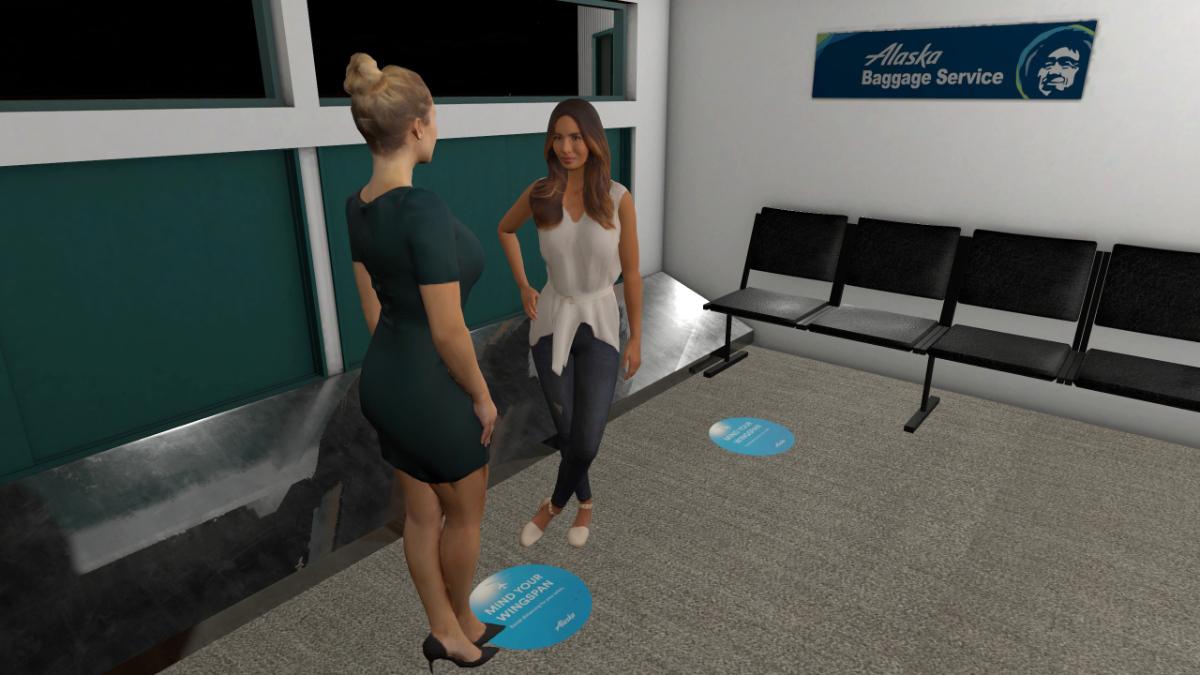
Scenery Review: PAWG - Wrangell Airport by Northern Sky Studio By Dominic Smith Introduction Tucked away amidst Alaska's stunning landscape, Wrangell Airport (PAWG) stands as a vital hub to the awe-inspiring natural beauty of America's wilderness frontier. Primarily serving as a general aviation terminal, this airport is an essential lifeline for the community of Wrangell. With its backdrop of rugged mountains, lush forests, and endless waterways, the airport encapsulates the raw allure that Alaska is renowned for. My first meaningful encounters with Alaskan airports, specifically Wrangell and Ketchikan, were thanks to Tom Curtis' memorable Final Frontier and Inside Passages packages. These weren't just ordinary scenery additions for me; they were the linchpin that tethered me to the X-Plane realm, even when FSX was a compelling alternative. There's something about Alaska that mirrors the untamed beauty of Scotland, albeit on a grander scale that staggers the imagination. Following their impressive release of Kenai Airport, Northern Sky Studio is back with their take on Wrangell Airport. Available for both X-Plane 11 and 12, this package aims to capture the unique charm of this Alaskan locale. But can it live up to the high bar set by their previous release? Let's dive in and find out. Installation Upon completing your purchase, you'll discover two versions of the scenery in your account—one tailored for X-Plane 11 and another for X-Plane 12, the latter being the focus of this review. The downloaded package tips the scales at just above 2.5GB, expanding to nearly 3.4GB once unpacked. Within it, you'll find two primary folders: one dedicated to the airport and another named 'terrain'. The installation procedure is as straightforward as they come, as it’s simply a matter of dragging and dropping the relevant folders into your X-Plane 12's Custom Scenery directory. For those with an eye for detail, an additional orthophoto file is available. This will add another 2.5GB to your download but enhances the area with photographic scenery. While not a requirement for this package, I also chose to install X-World America, a separate but optional download, that is recommended by the developer. Documentation The documentation that comes with this package is, to put it plainly, rather sparse. It consists of a one-page PDF that provides just the essentials; guidance for installation and a list of optional add-ons that can enhance the scenery, as mentioned above. While this minimalist guide does cover the installation basics, it leaves much to be desired for those of us who crave a deeper understanding of the airport and its surroundings. There's a noticeable absence of historical context, airport charts, or even a simple map of the area. For simmers keen on learning more about the intricacies of Wrangell Airport or seeking additional context, the provided documentation leaves a lot to be desired. If you're hungry for more information, Google is your friend for digging deeper into the history and layout of the airport. First Look Upon first glance from the skies, the scenery is nothing short of majestic. The snow-capped mountains in the distance serve as a dramatic backdrop, lending a sense of awe and scale that is hard to describe. It's an expansive landscape that truly makes you feel like a small speck in a grand tapestry of nature. The sight of the surrounding area, sprinkled with small islands near and far, evokes a sense of nostalgia. It's reminiscent of my earlier days flying through Tom Curtis' sceneries in X-Plane 9. A trip down memory lane, if you will, to simpler but happy times. The optional orthophoto download proves to be a valuable addition. Not only does it enhance the realism, but it also replaces X-Plane's default ground textures, which often fall short in conveying the proper scale, a crucial element for a scenery like this. As you make your approach, the runway extends invitingly just beyond the mainland, a captivating sight for any pilot. The surrounding ortho scenery retains its sharpness, even at low altitudes, enhancing the overall experience. Near the runway threshold, the area takes on a rustic atmosphere, marked by scattered broken trees that add character to the landscape. The custom runway textures deserve special mention for delivering a realistic look, complete with weathering effects like cracks, oil stains, and rubber marks. The carefully placed foliage along the taxiways is also well-judged, adding a touch of realism without overloading your system's VRAM or affecting framerates. Northern Sky Studio has complemented the default X-Plane signage with their own custom signs, which are crisp and easy to read. These additional signs display essential frequencies and taxiway instructions, offering pilots an extra layer of guidance. The airport also hosts a diverse range of ground vehicles, from standard fuel and catering trucks to a specially modelled fire engine. A static De Havilland Beaver, complete with an extra pair of floats, is a delightful sight, as are the animated flags, which add a lively touch to the scenery. The airport is also populated with the typical clutter you'd expect at a place like Wrangell, such as cones, bins, and ladders. Maintenance buildings and hangars are carefully modelled, conveying a good sense of realism. One hangar in particular even offers an inside look, revealing a static aircraft and various maintenance gear. The Alaska Seaplanes hut is another nice addition, as is the well-populated car park at the rear…or front, depending on how you arrived at the airport. Main Airport Building The airport's main building, much like Kenai, is the highlight of this package. The exterior has been modelled with a meticulous attention to detail, mimicking the appearance of white corrugated metal, which lends it an authentic air. Stepping inside reveals a terminal bustling with life, a feature that has become something of a signature for Northern Sky Studio. If you recall my review of their Kenai Airport scenery a few months back, the interior detail of the main airport building, was without doubt, its standout feature. Wrangell, while not quite reaching those dizzying heights, comes incredibly close. The interior is animated with 3D models of passengers and staff, adding a real sense of life and atmosphere to the building. From seating, an ATM, a drinks machine, and a wall clock to bins and a map of the "Inside Passage", every detail is accounted for. Further Afield Venturing beyond the airport, and there’s yet more to see, as the package also includes a nicely modelled representation of Wrangell's central area. Situated in the northwest corner of Wrangell Island, the urban section is another testament to the developer's attention to detail. While the ortho scenery near the airport remains impressively sharp even at low altitudes, the textures in Wrangell's urban core could benefit from a higher resolution. They tend to look a bit washed out when flying at a lower altitude, which is a bit of a letdown. However, it's worth noting that they are still a significant improvement over the default X-Plane 12 textures. For the most part, the ortho provides a good solid foundation for building placement, but it's not flawless. A few structures appear to be out of alignment or even out of place. Not a game-changer, but worth mentioning for those who appreciate the finer details. The dock area is a focal point, made even more vibrant by a container ship that adds a touch of industrial character. Around the dock, you'll find various small boats, most likely in for maintenance or storage. It's a scene that almost begs for human interaction, but which is sadly missing here. The scenery rounds off with a series of piers and jetties, each teeming with boats of various types, from luxurious speedboats to more modest wooden vessels. The addition of breakwaters adds that final touch of realism to this part of Wrangell. Night Lighting Let's get this out of the way, the runway at Wrangell is as dark as a winter's night in Scotland, staying true to its real-world counterpart. If you're contemplating a night landing, I'd advise against it, unless you fancy a game of aviation roulette! The runway may lack illumination, but the surrounding area doesn't suffer the same fate. Streetlamps dot the vicinity, casting a warm and dynamic light on nearby buildings. It's a small but impactful feature that adds depth to the night-time experience. The main airport building serves as a well-lit oasis amid the airport's limited runway lighting. The interior lighting strikes a perfect balance, as it’s neither too harsh nor too subdued. So, while night flights may be off the table, the terminal provides a cozy, well-lit space where you could comfortably pass the time, perhaps even with a good book…just not the Shining! Finishing off our night-time tour is the container ship docked at the harbour, bathed in dynamic lighting. The stern and aft are particularly well-illuminated, adding a dash of spectacle to Wrangell's nocturnal scene. While the scenery presents an inviting vista during favourable weather conditions, one can't help but ponder how different the experience would be in more adverse conditions. The contrast between a sunny summer day and the harsh realities of an Alaskan winter could be like night and day, adding layers of complexity and challenge to the flying experience. Performance Running on what I'd describe as a midrange setup, Wrangell Airport delivers a performance that's pretty much on the money. My tests showed framerates hovering between 30 and 60 FPS, and that's with most settings cranked up, except for antialiasing, which I kept at a modest 2x (though I bumped it up to 4x for screenshot purposes). VRAM consumption was well-behaved, never exceeding 7GB, even at my go-to resolution of 1440p. I did notice that as the sun dipped below the horizon, the framerate tended to linger more towards the 30 FPS mark. This isn't a Wrangell-specific issue; X-Plane 12 seems to struggle with maintaining consistent framerates during the twilight and nighttime hours. While I've seen some improvements in this department over recent months, X-Plane still needs to iron out these framerate dips during the visually demanding periods of sunset and night. Given the level of detail that this scenery offers, it’s a credit to the developer for managing to keep things as smooth as they have. Conclusion Northern Sky Studio's Wrangell Airport for X-Plane 12 is a highly commendable piece of work, offering a balanced blend of stunning aerial views and meticulous ground-level detail. The main airport building stands as a testament to the developer's skill, with an intricately modelled exterior and a bustling interior that brings a virtual slice of Alaska to your X-Plane world. While it may not quite reach the heights of their previous Kenai release, it certainly stands as a strong offering in its own right, providing an authentic Alaskan experience for X-Plane enthusiasts. The package does have room for improvement though, most notably in its documentation and some minor building alignment issues. However, these are minor gripes and should not detract from an otherwise stellar package, especially considering the low asking price. Beyond the airport, the package includes a detailed representation of Wrangell's urban core, adding value and immersion to your Alaskan flying adventures. Optional ortho imagery and dynamic lighting in this area, only go to enhance its appeal, despite some resolution limitations. In conclusion, if you're an X-Plane enthusiast with a love for Alaska, Northern Sky Studio's Wrangell Airport is a highly recommended addition to your virtual hangar. It impressively balances visual richness with performance, ensuring a rewarding flying, or even just sightseeing experience. ________________________ PAWG - Wrangell Airport by Northern Sky Studio is now available from the X-Plane.Org Store here: PAWG - Wrangell Airport Priced at $16.95 Features Both X-Plane 12 and X-Plane 11 versions included The most detailed replica of airport buildings and vehicles EDGE, REIL and Taxiway lights can be enabled on 122.600 COM1 Custom hand-placed autogen High resolution ground textures / Custom runway textures High resolution building textures Compatible with all X-Plane 12 features Custom mesh for the airport area (Ortho4XP) All materials created for full PBR Shading and occlusion (texture baking) effects on all airport buildings High-resolution building textures Custom orthophoto for the airport and surrounding areas World Traffic 3 compatible Not compatible with a default mesh Requirements X-Plane 12 or X-Plane 11 Windows, Mac, or Linux 8 GB+ VRAM Recommended Download Size: 2.7 GB Current version: 1.0 (October 16th, 2023) Review System Specifications Intel i5 10400 – 32GB RAM - Nvidia Asus RTX 3060 – Windows 10 Home 64 Bit __________________________________ Scenery Review by Dominic Smith 25th October 2023 Copyright©2023: X-Plane Reviews (Disclaimer. All images and text in this review are the work and property of X-PlaneReviews, no sharing or copying of the content is allowed without consent from the author as per copyright conditions).
1 point -

Scenery Review: PAWG - Wrangell Airport by Northern Sky Studio
Dominic Smith reacted to rudeboy1988 for a topic
Hi @Dominic Smith! Thank you for the great review! The scenery will get a few updates next year I suppose. BTW runway lights work and can be (should be) turned on by the pilot. I should describe this in the manual. EDGE, REIL, and Taxiway lights can be enabled on 122.600 COM1 Next coming PAPG will have custom models for lights and this feature too. 122.5 for lights there.
1 point -

Scenery Review: PAWG - Wrangell Airport by Northern Sky Studio
rudeboy1988 reacted to RobdeVries for a topic
Thank you Dominic. Based on your reveiws I bought the whole range of Northern Sky Studios airfields. Makes a great trip up north!1 point