Leaderboard
Popular Content
Showing content with the highest reputation on 07/10/15 in all areas
-
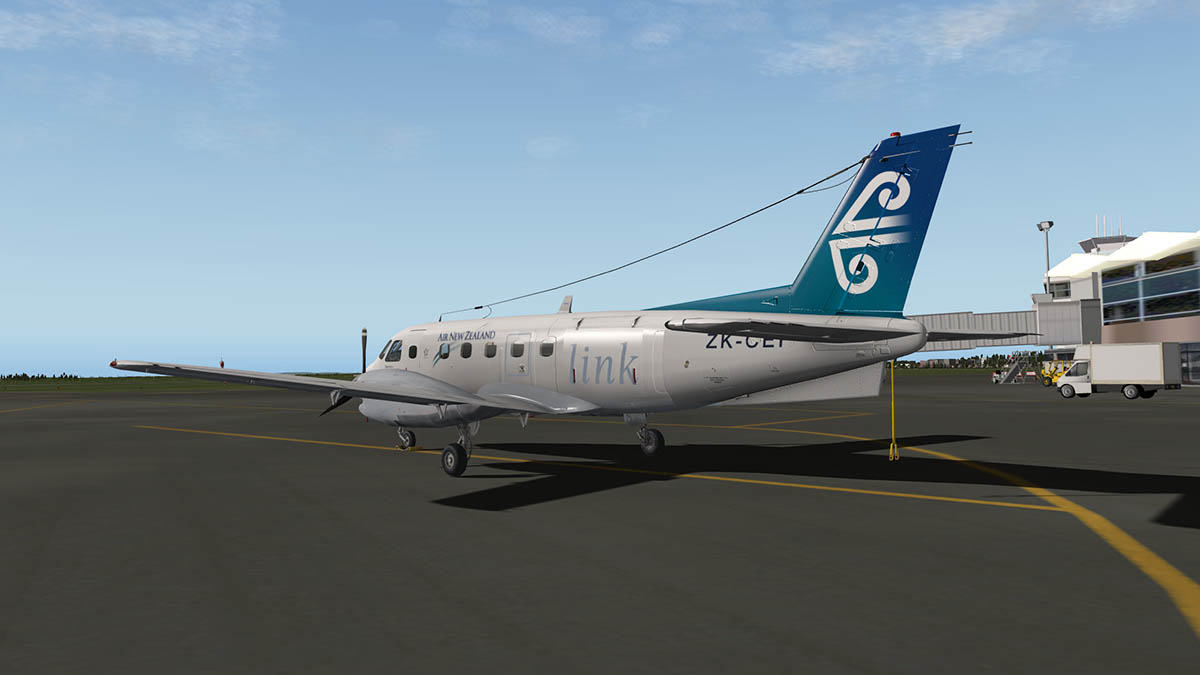
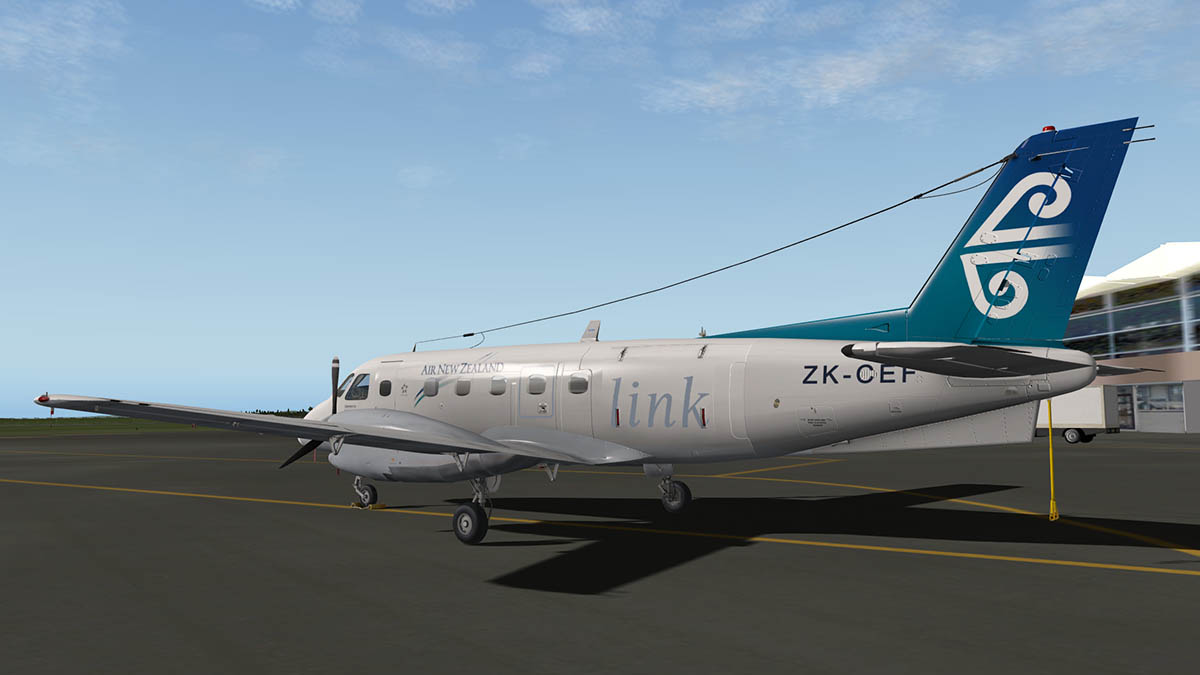
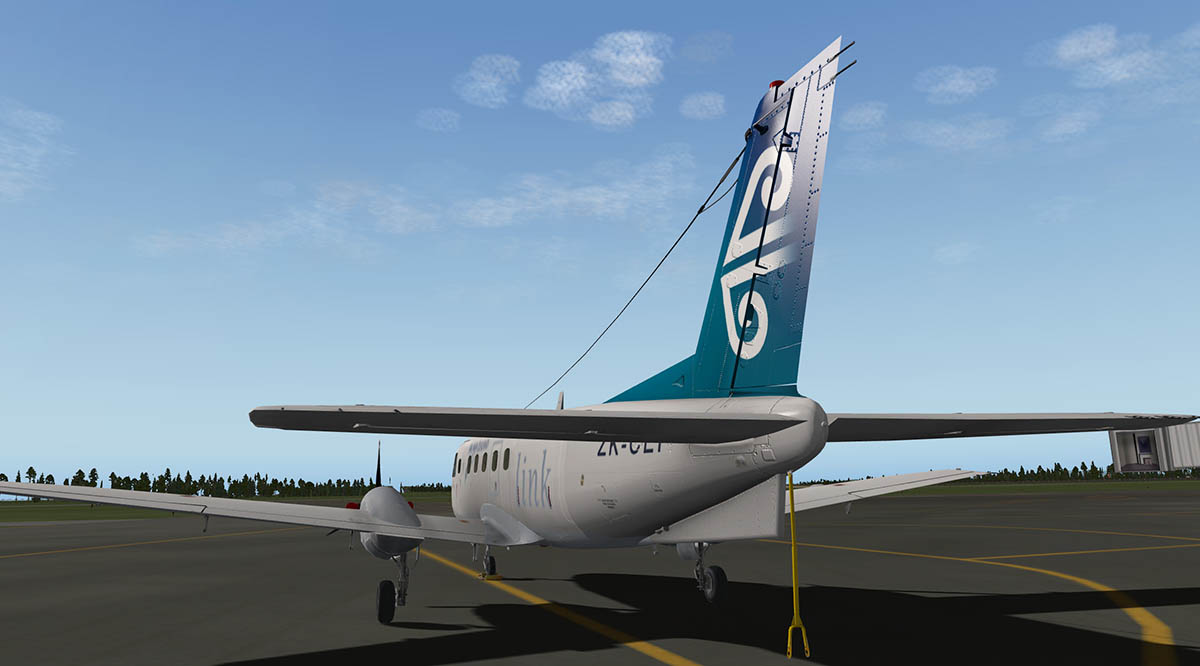
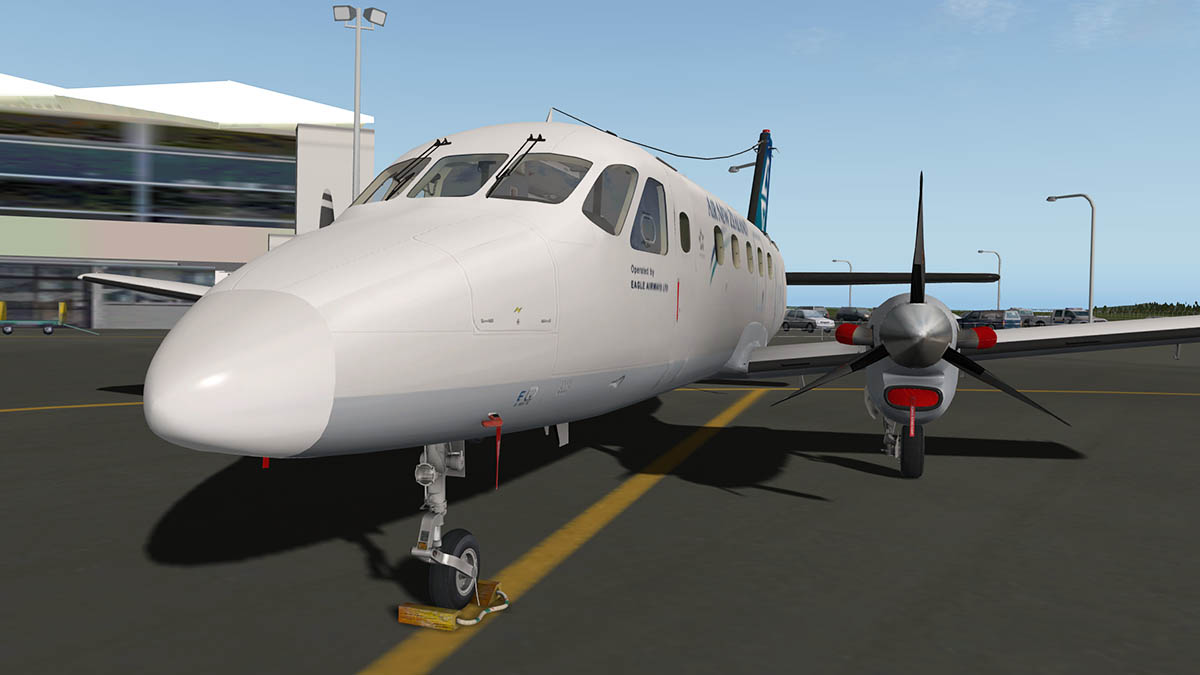
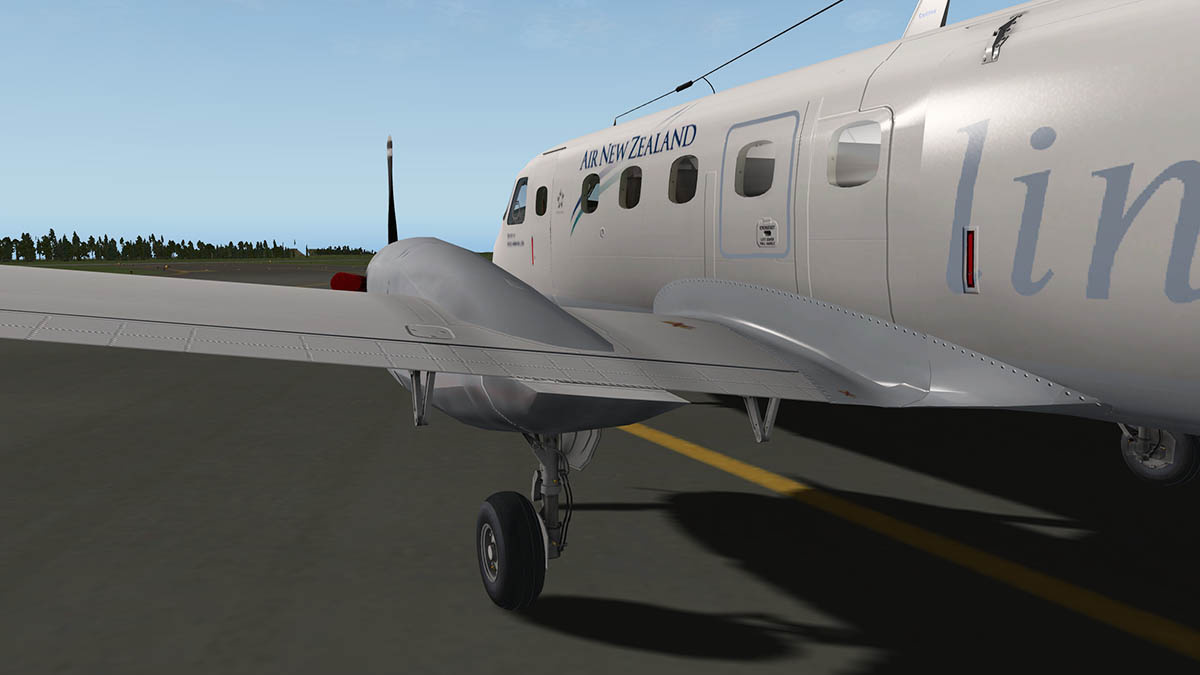
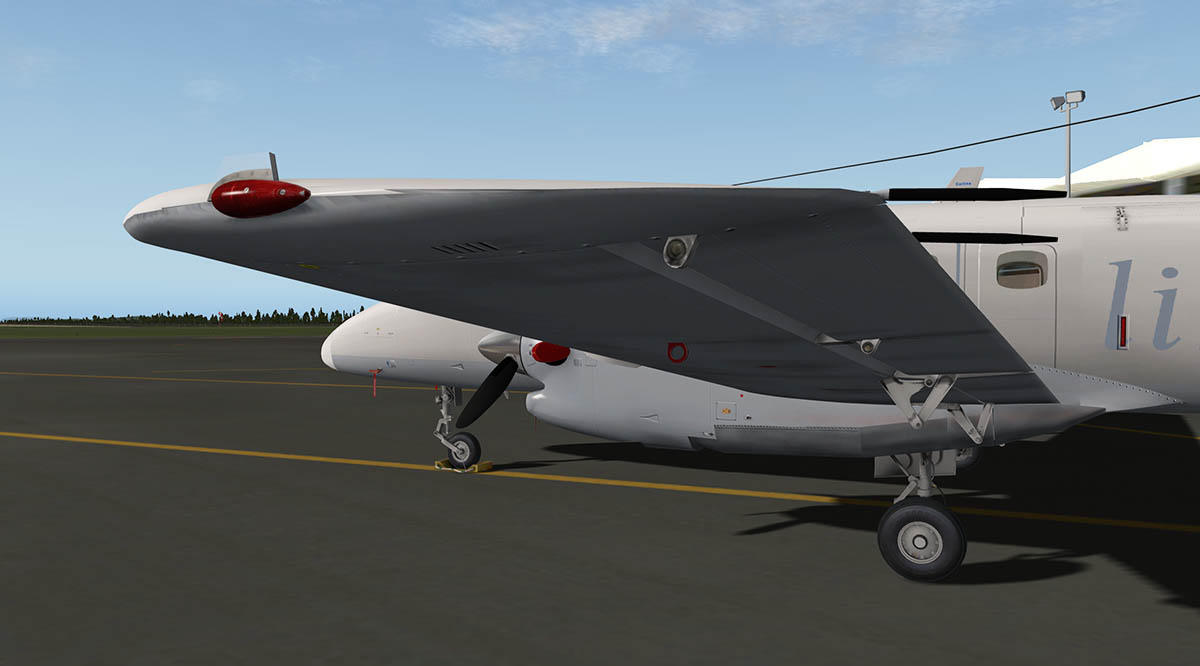
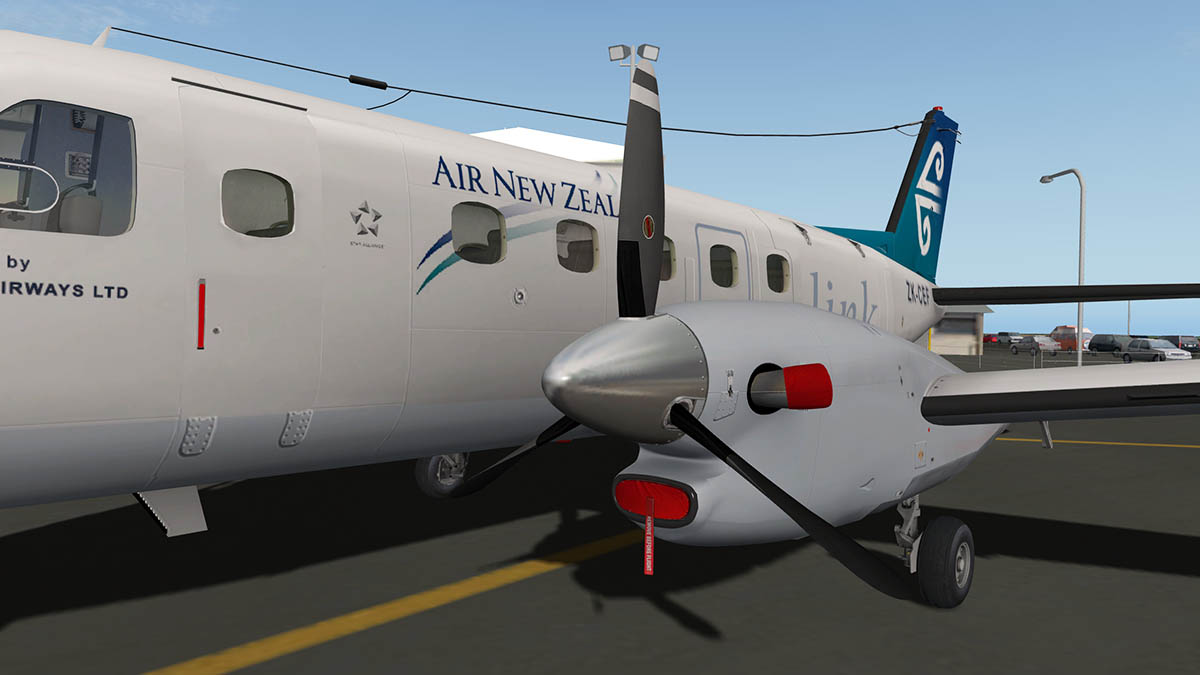
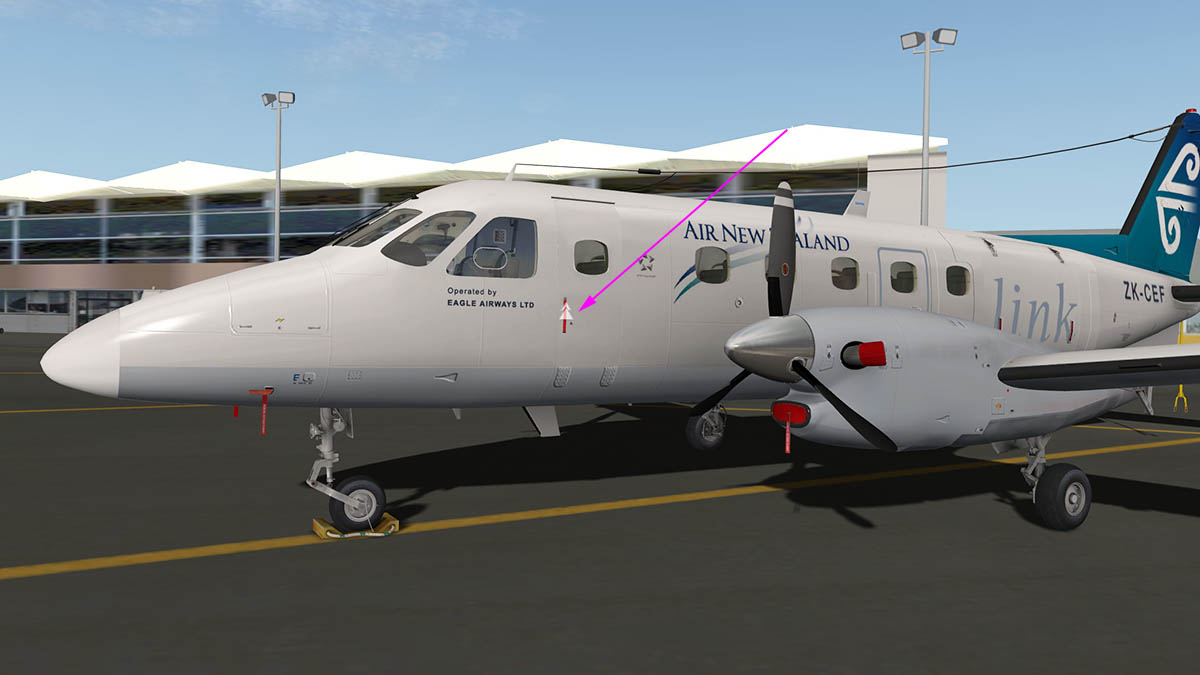
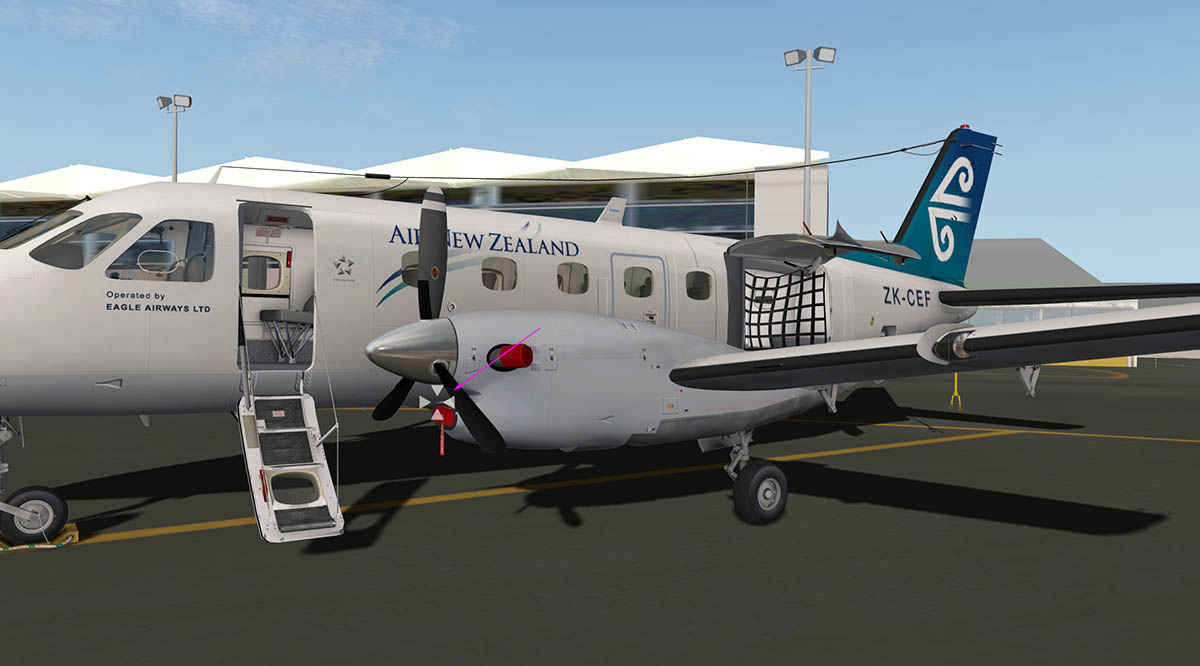
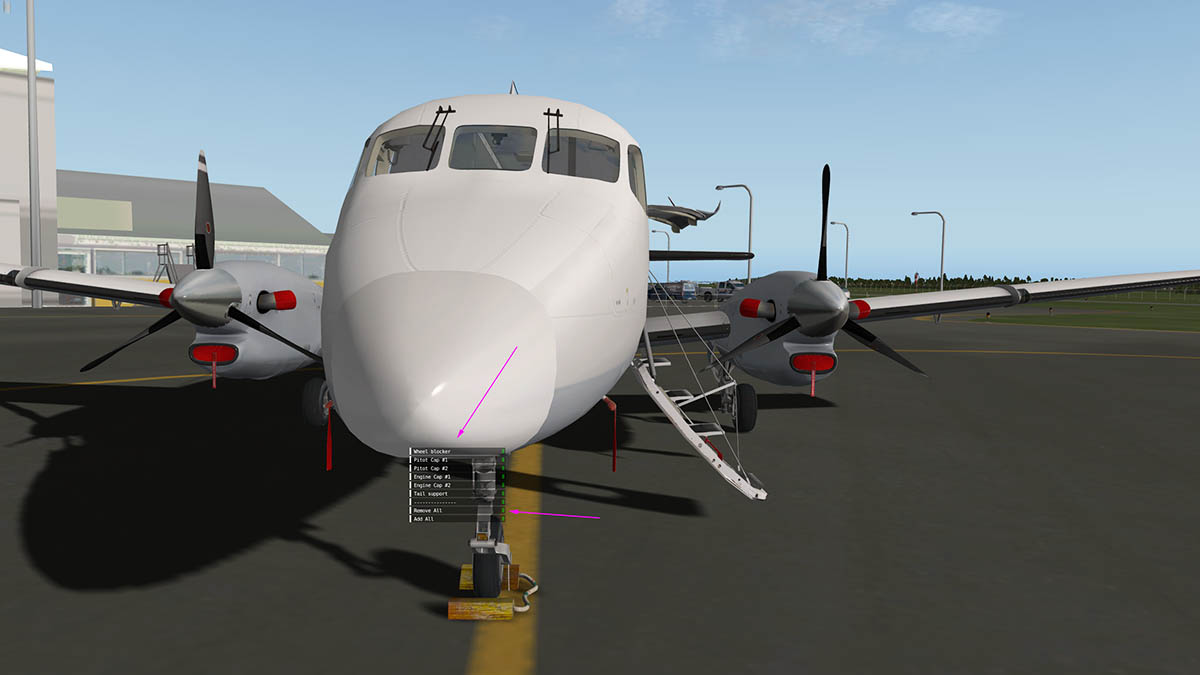
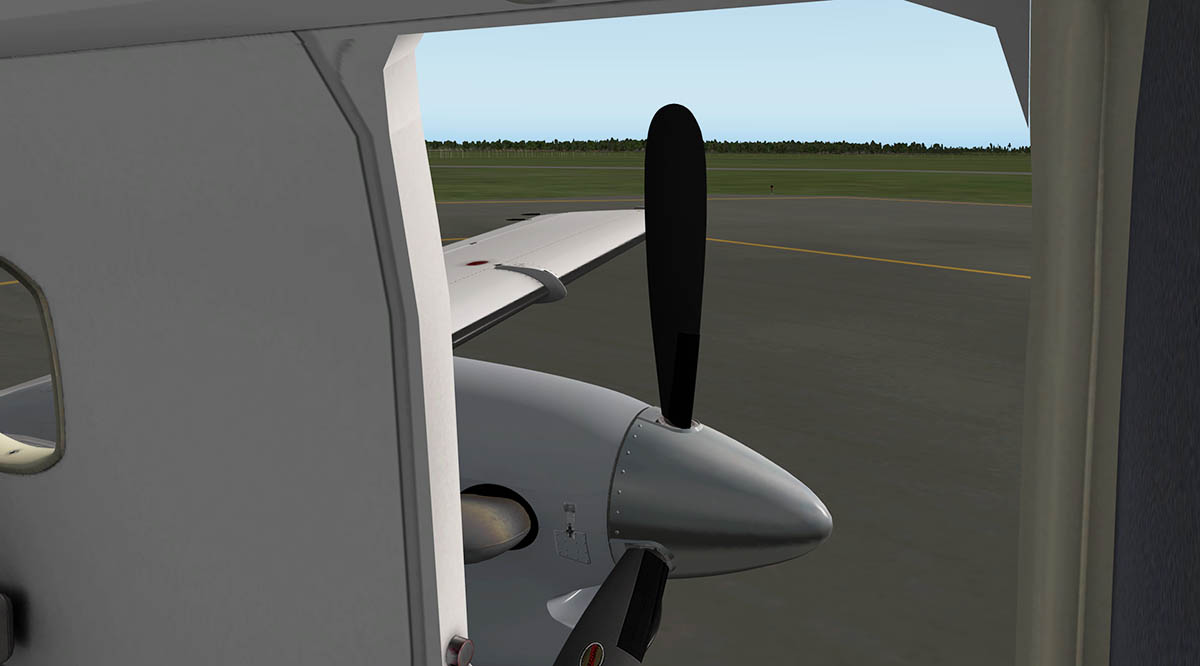
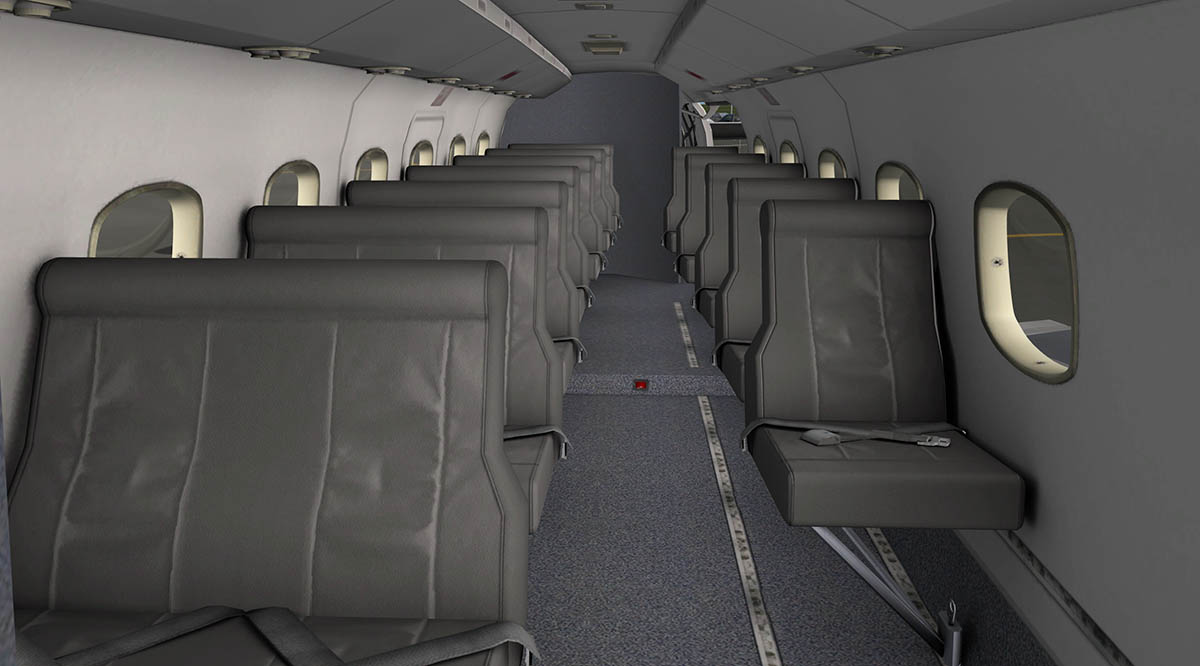
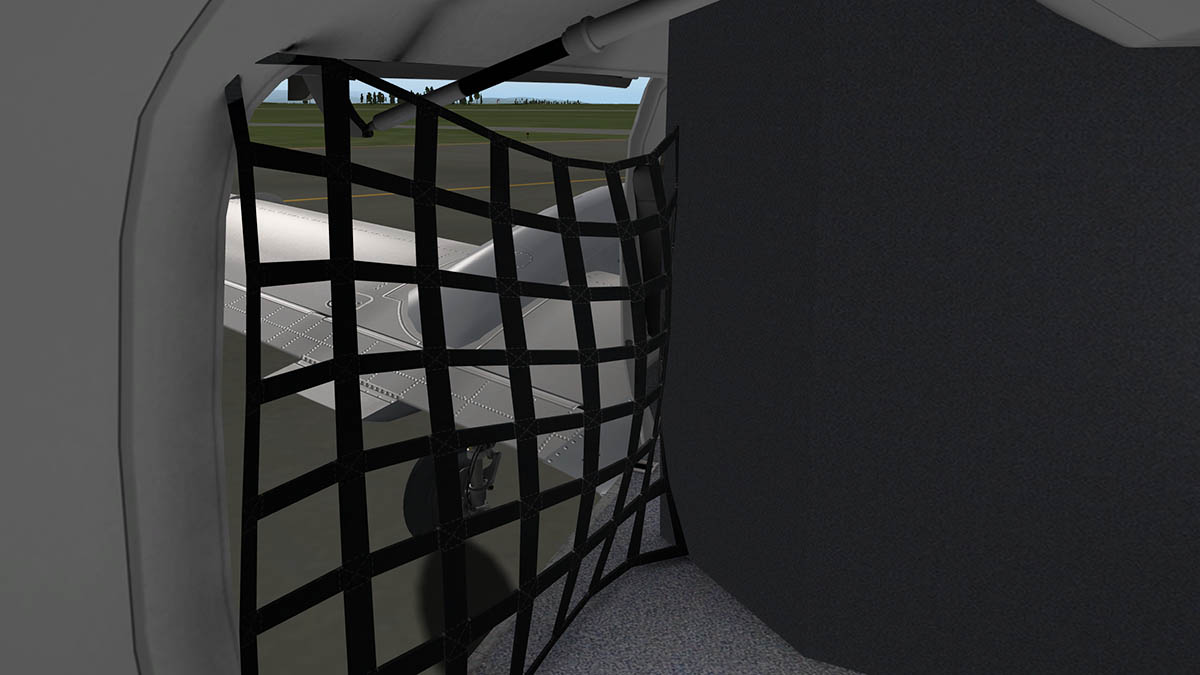
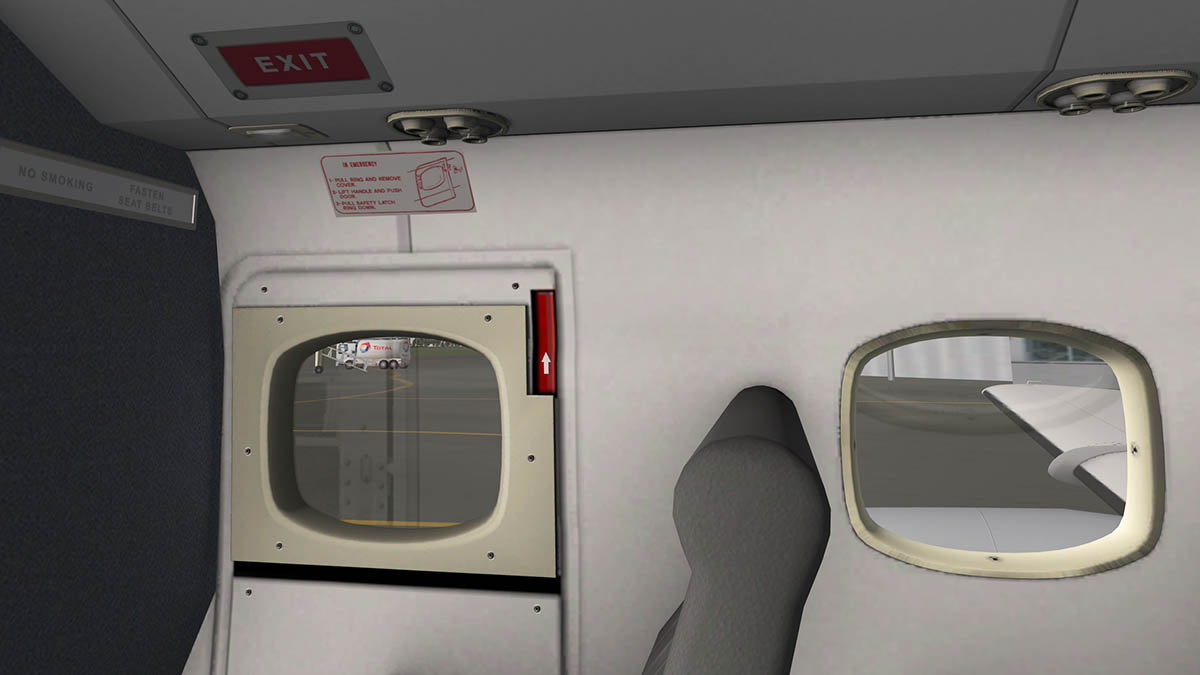
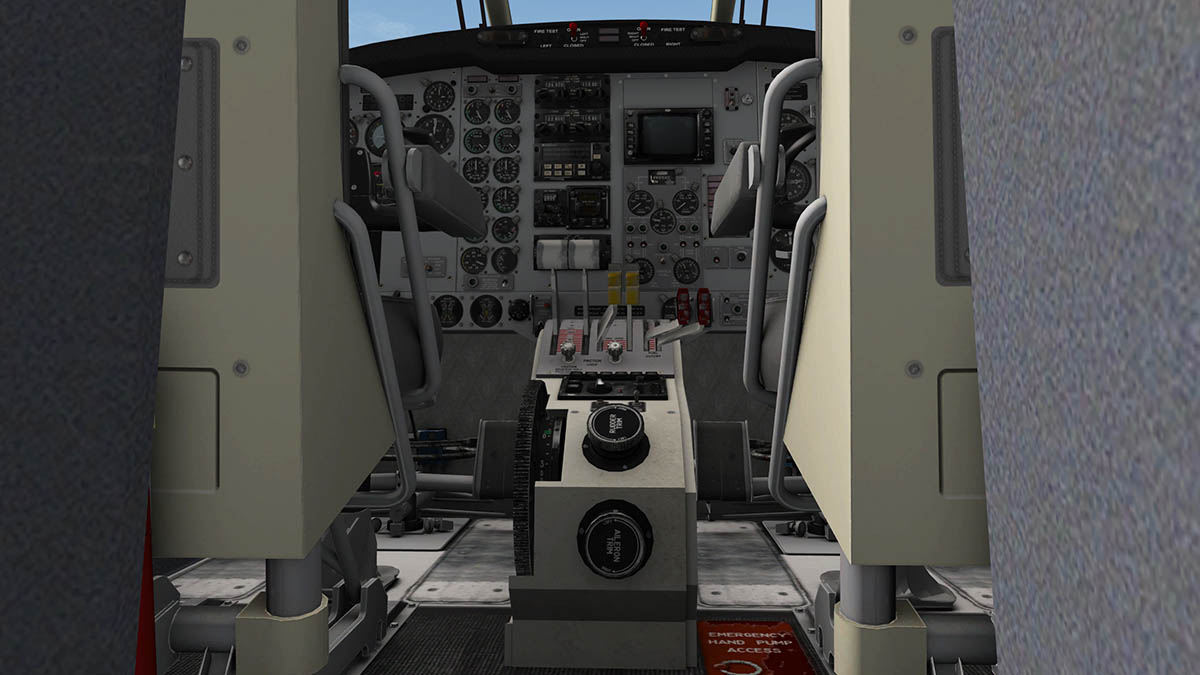
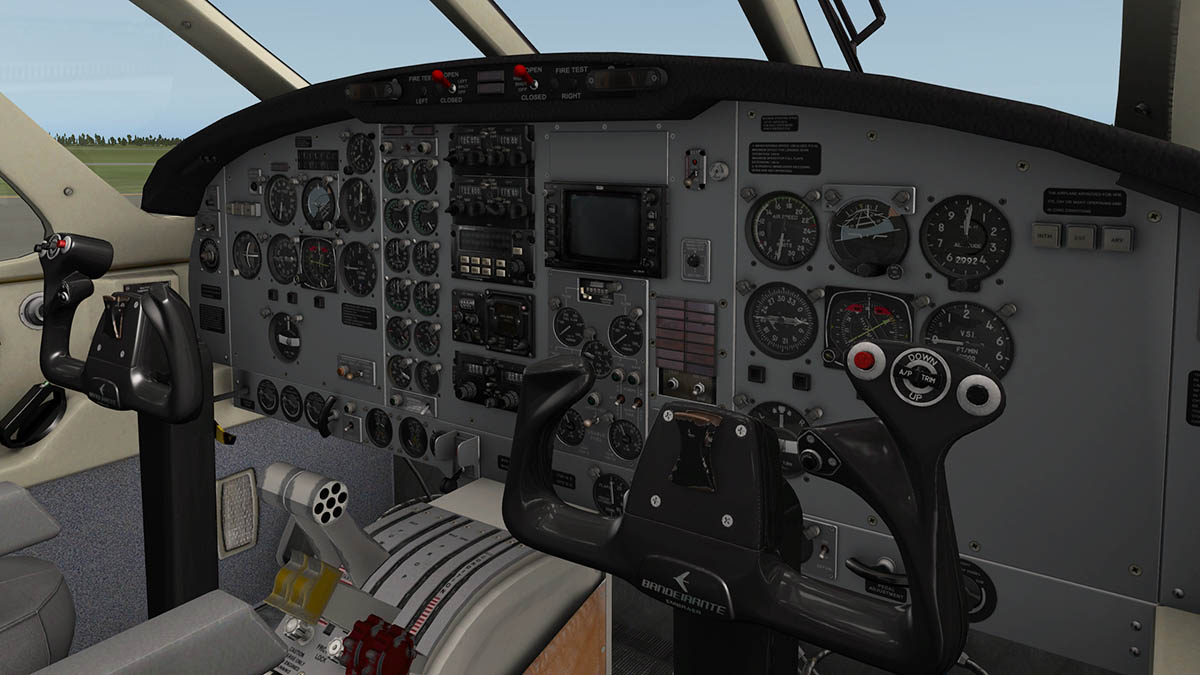
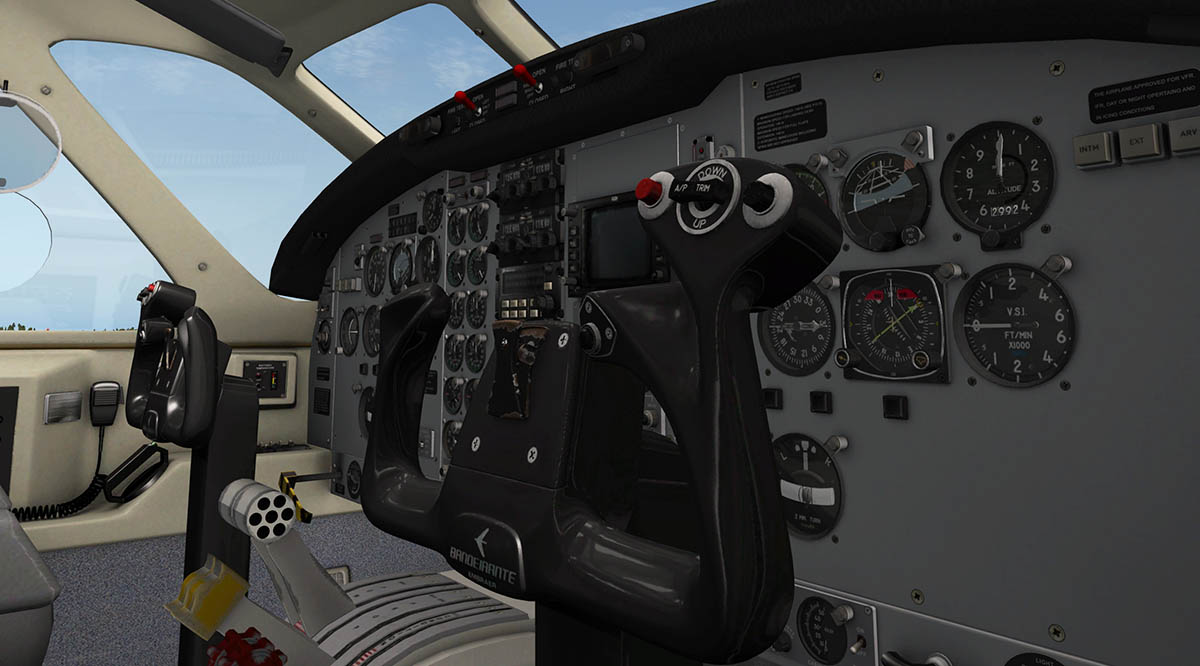
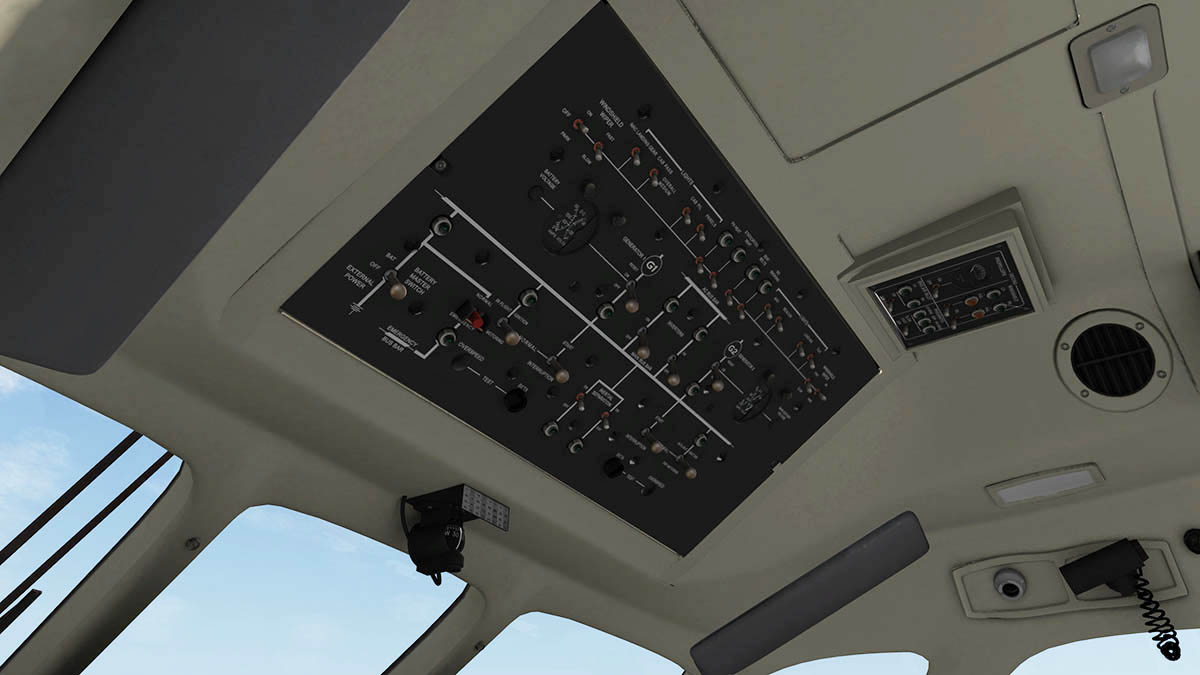
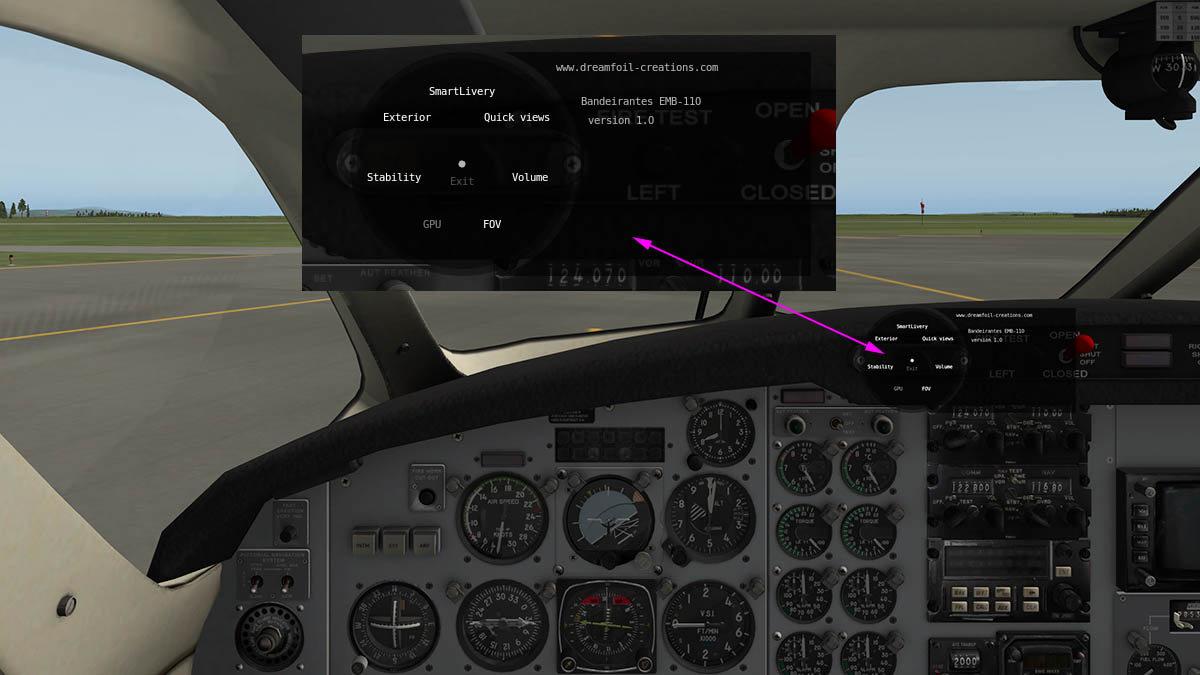
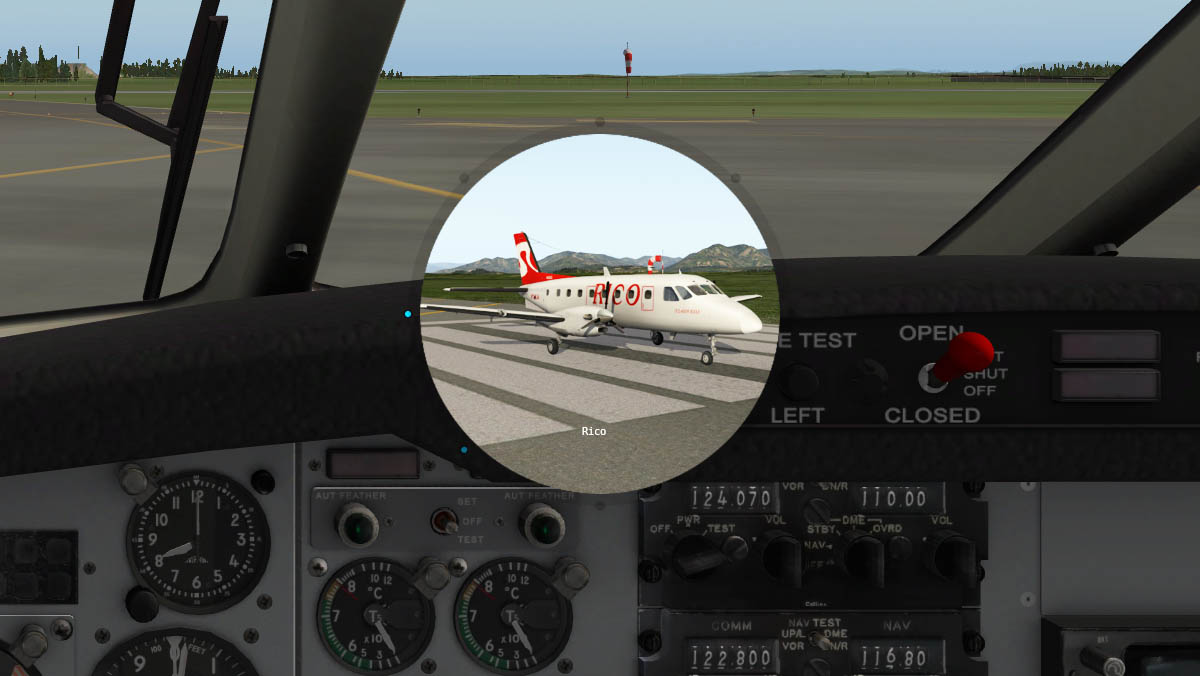
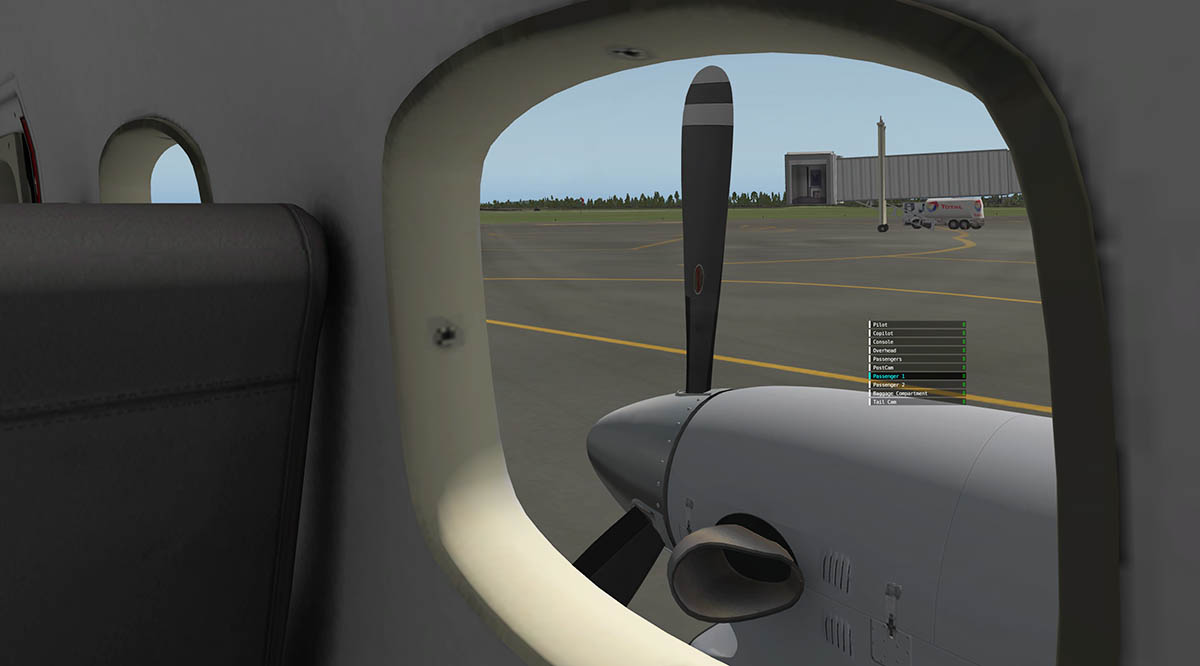
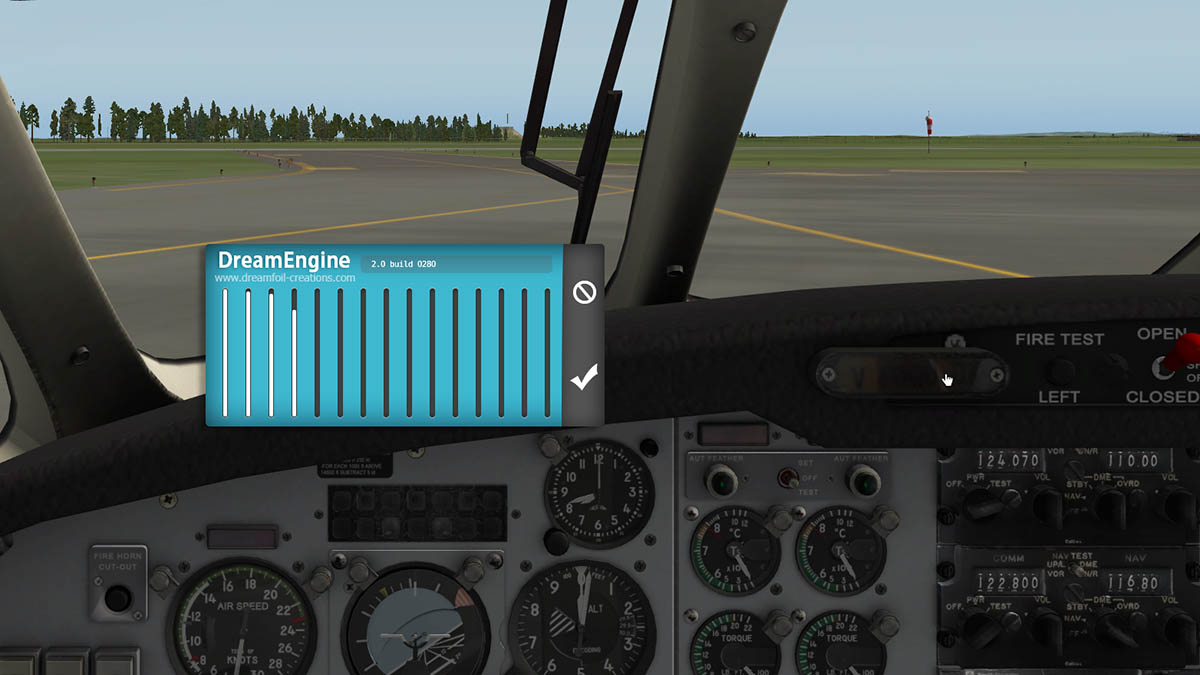
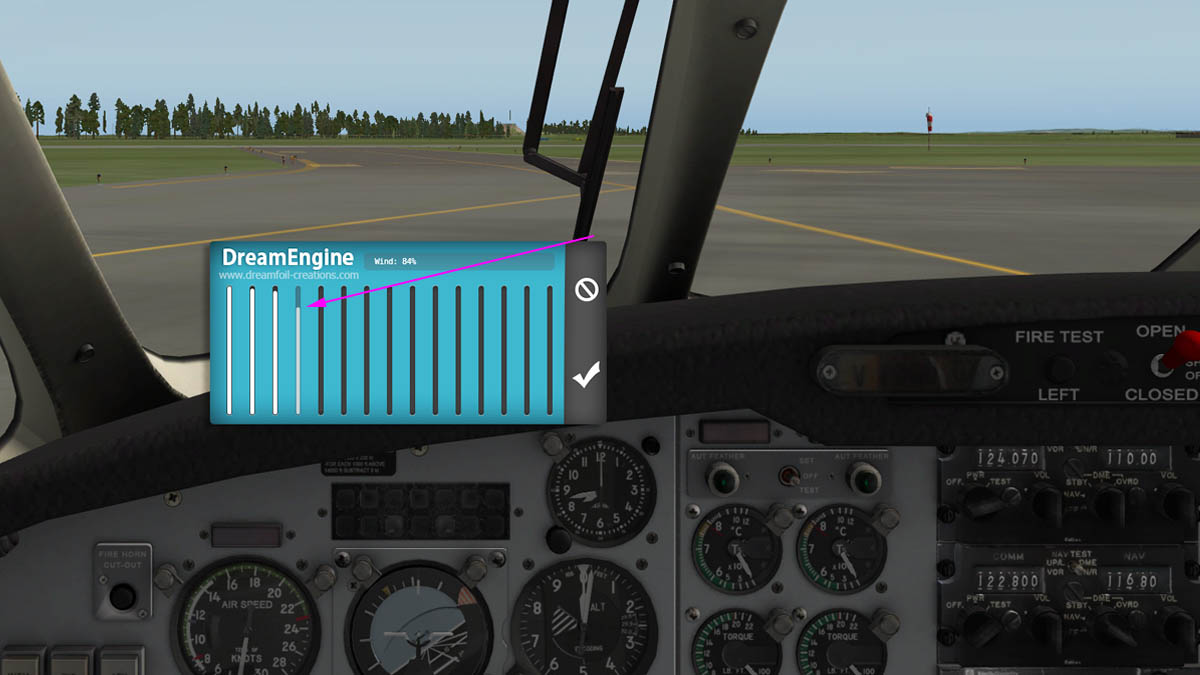
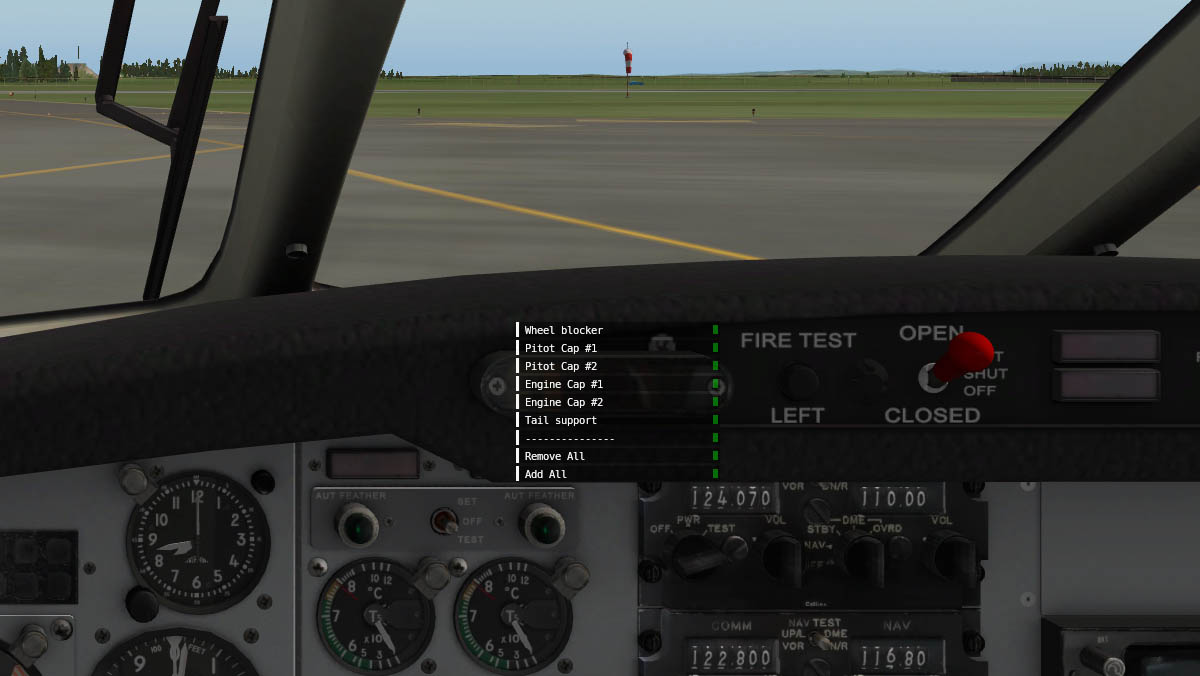
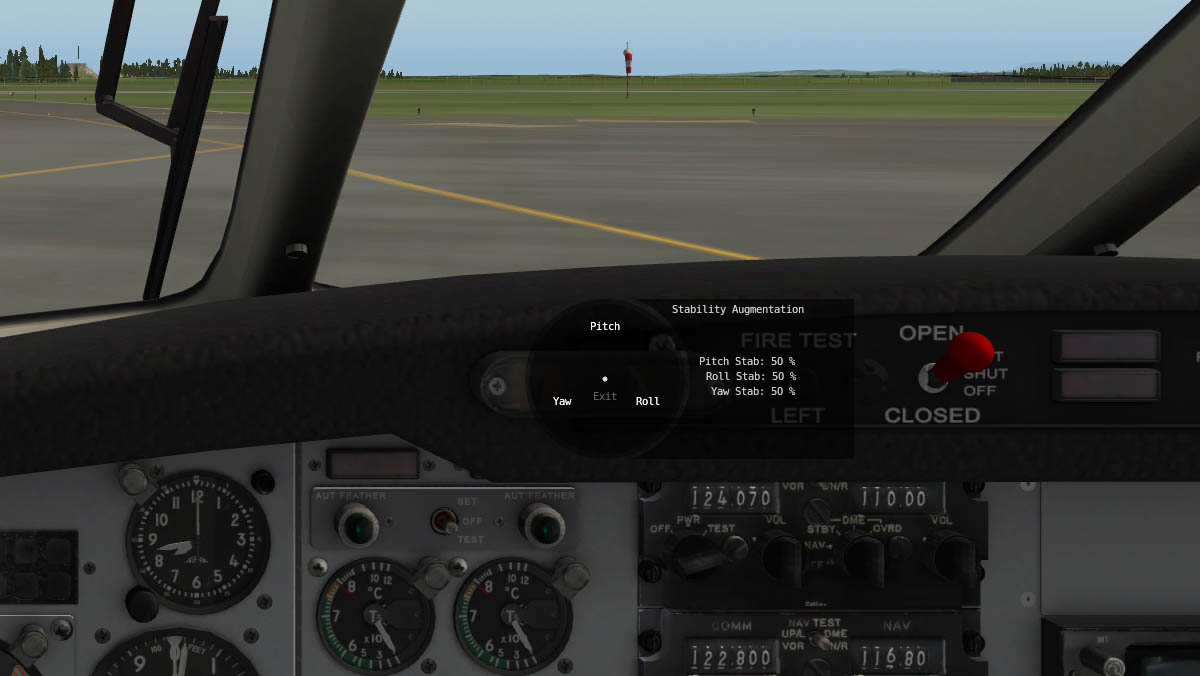
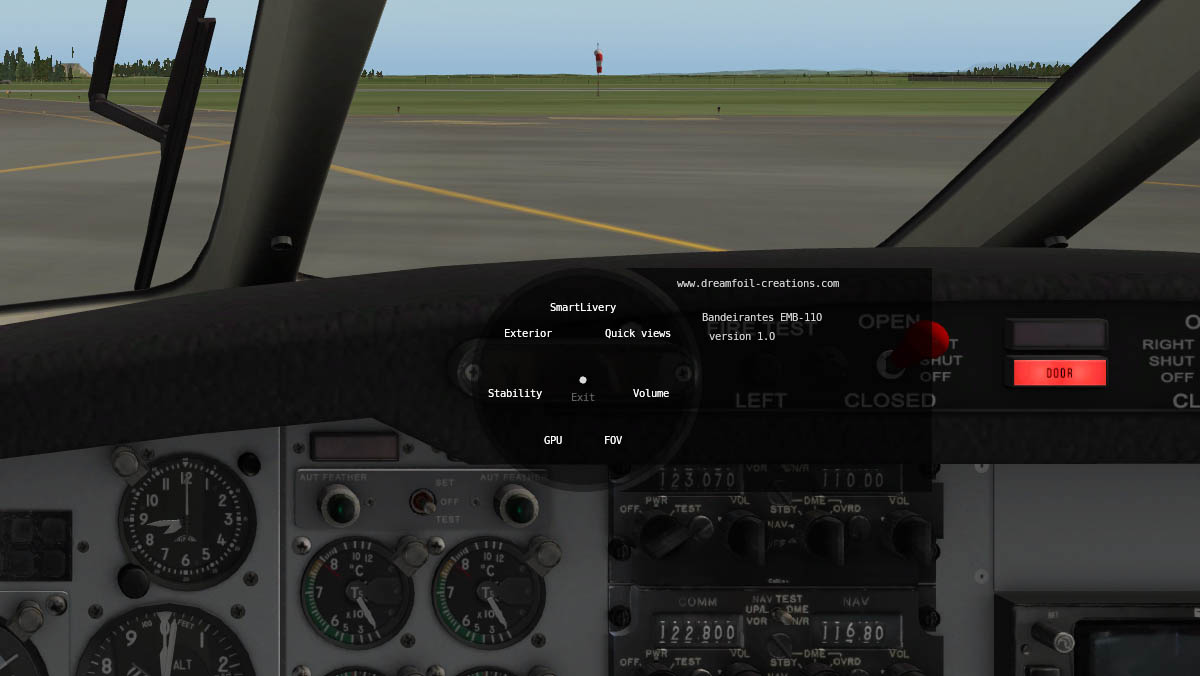
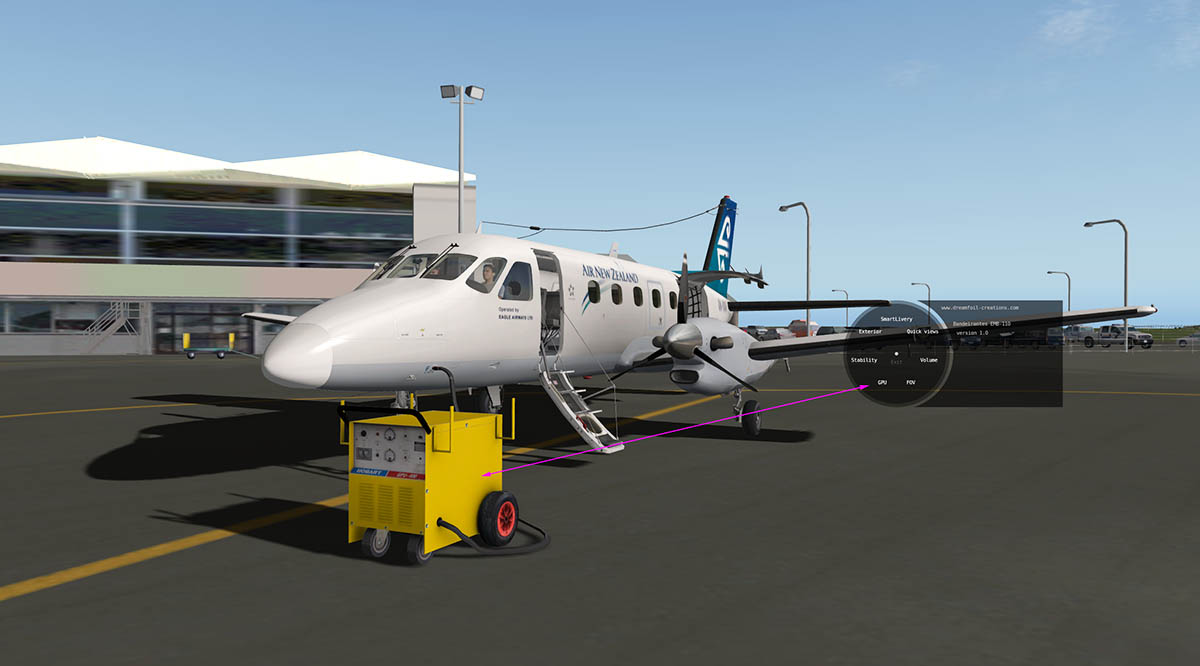
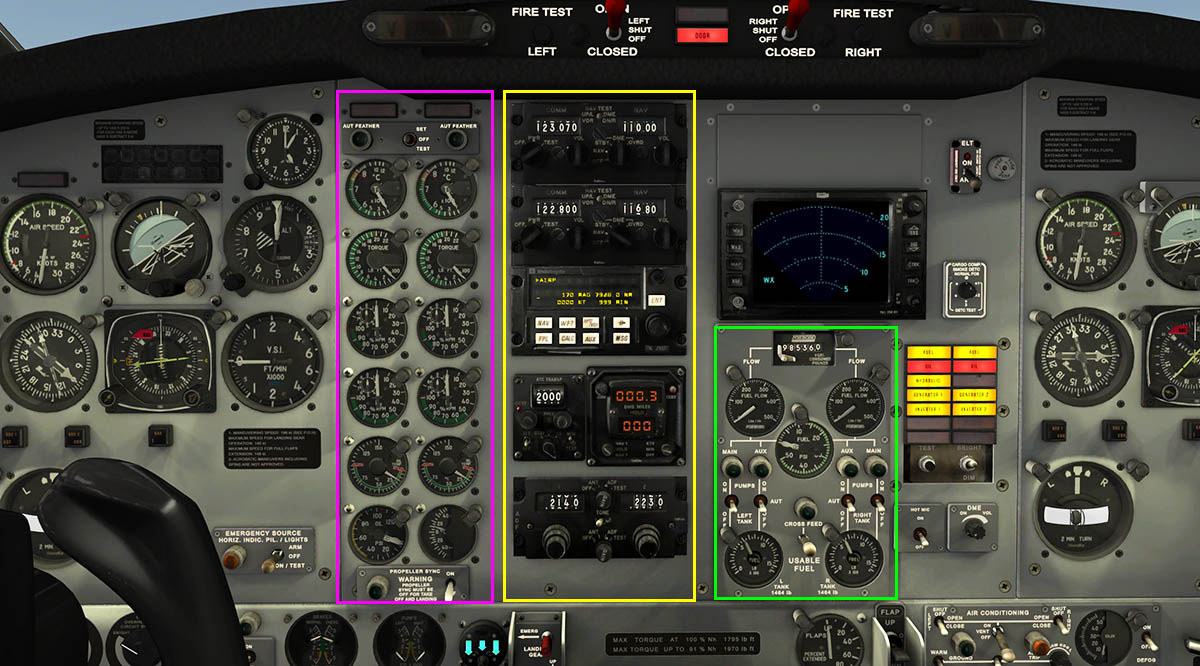
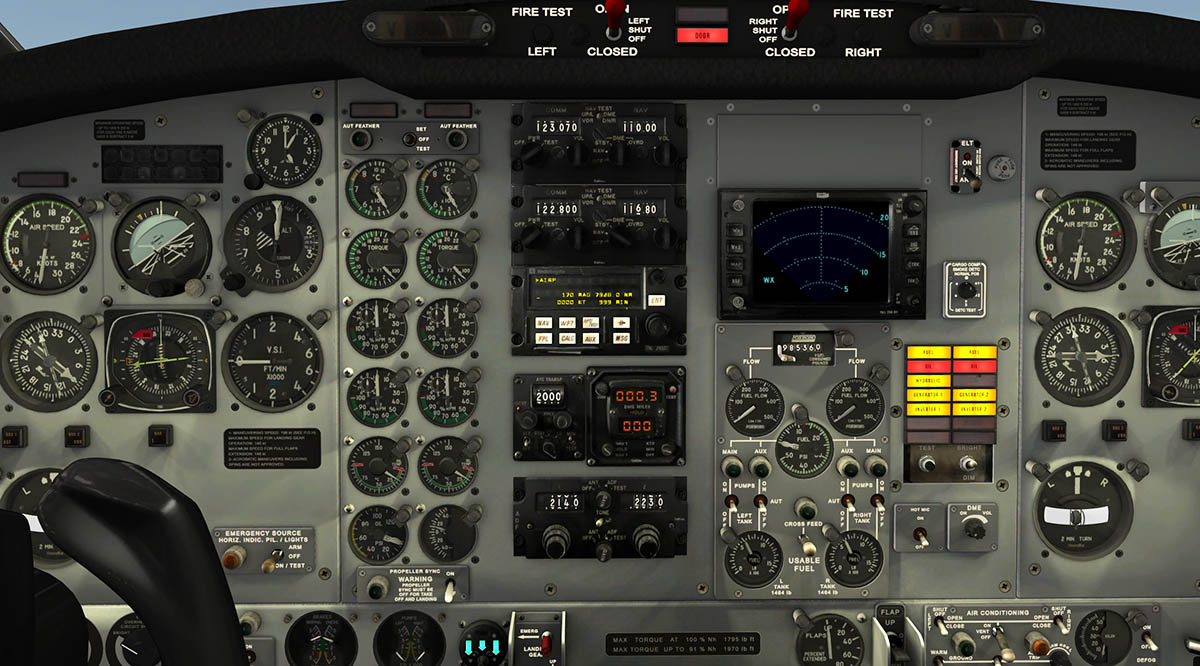
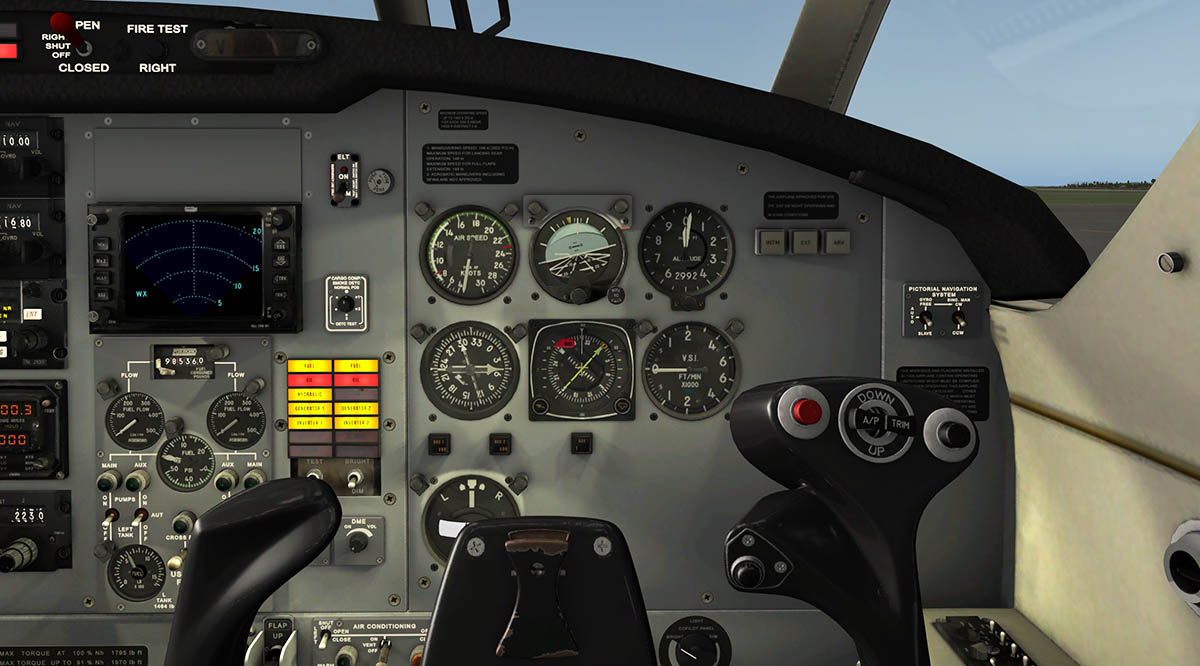
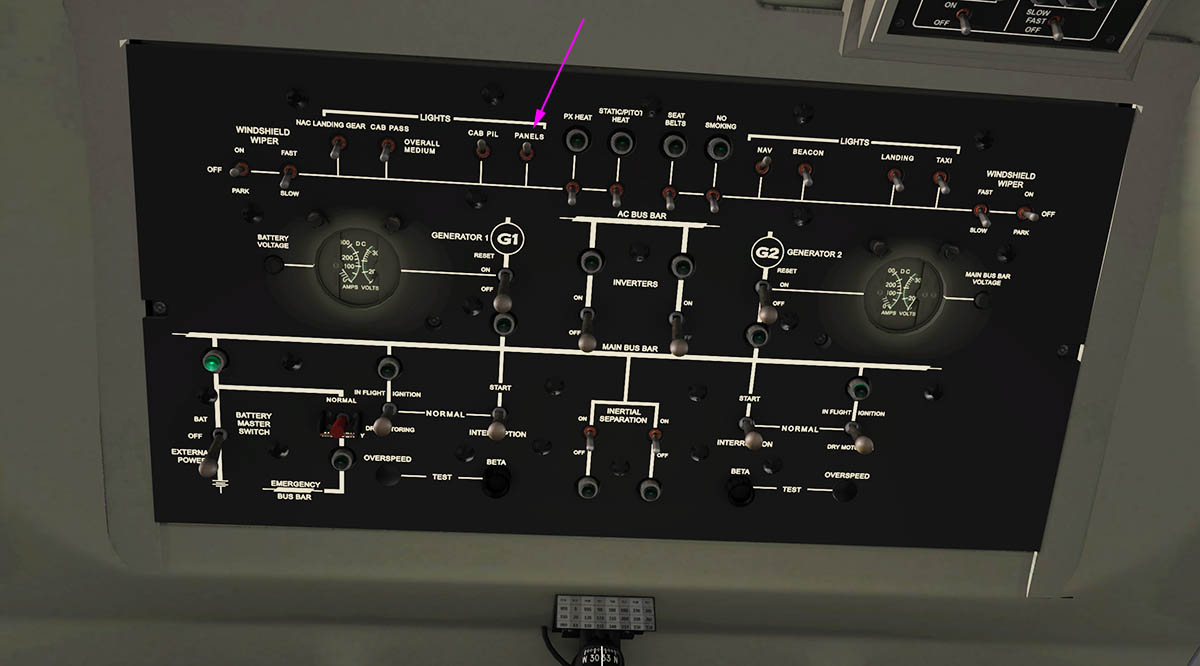
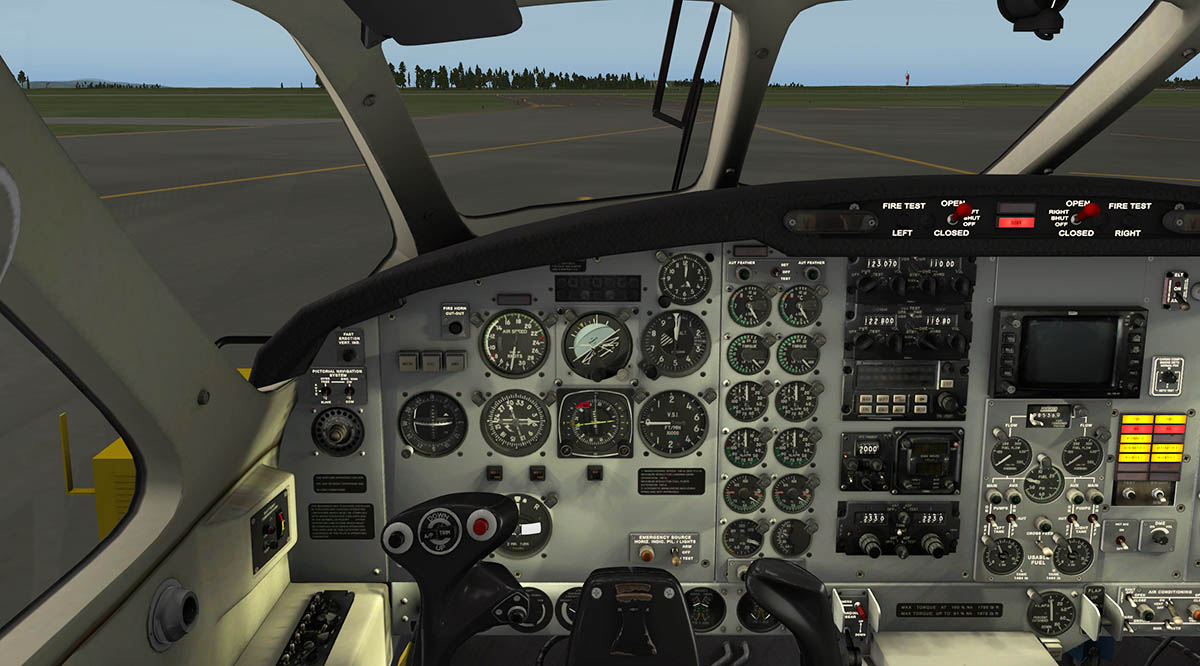
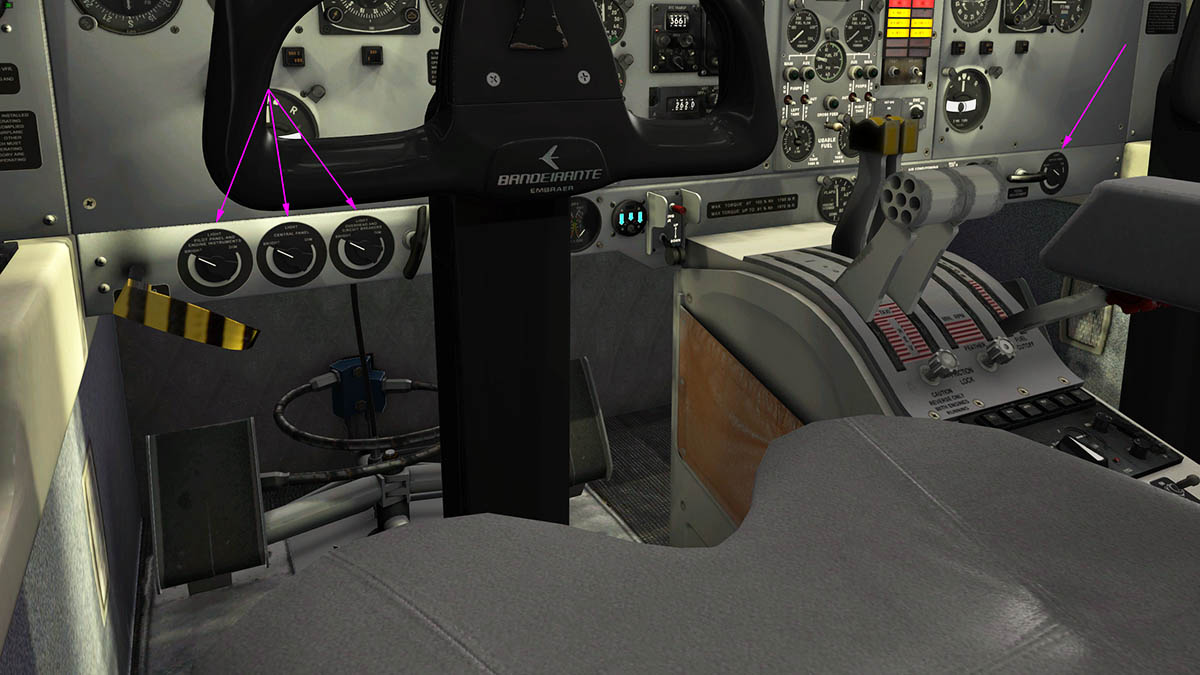
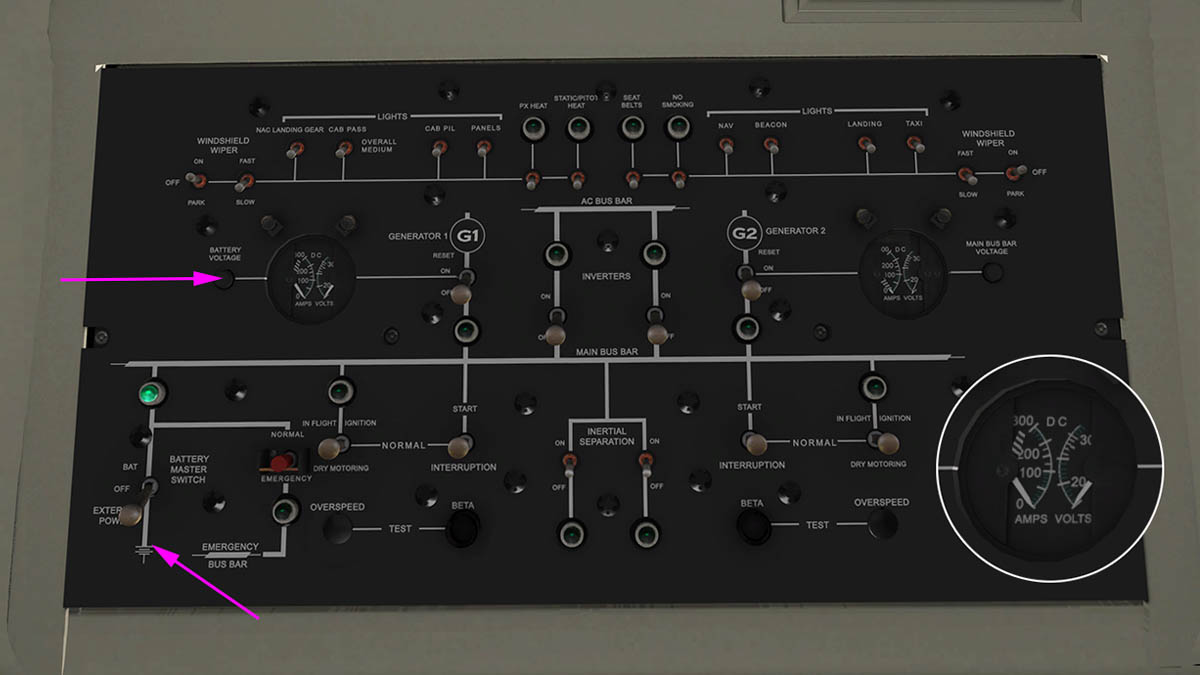
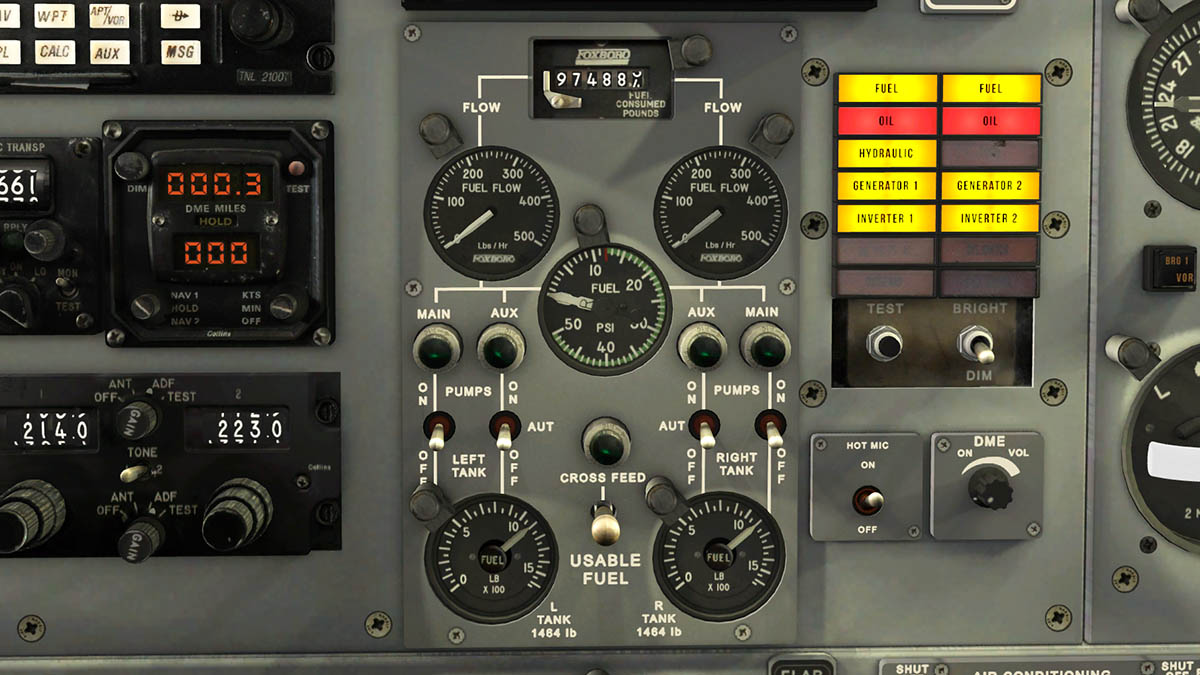
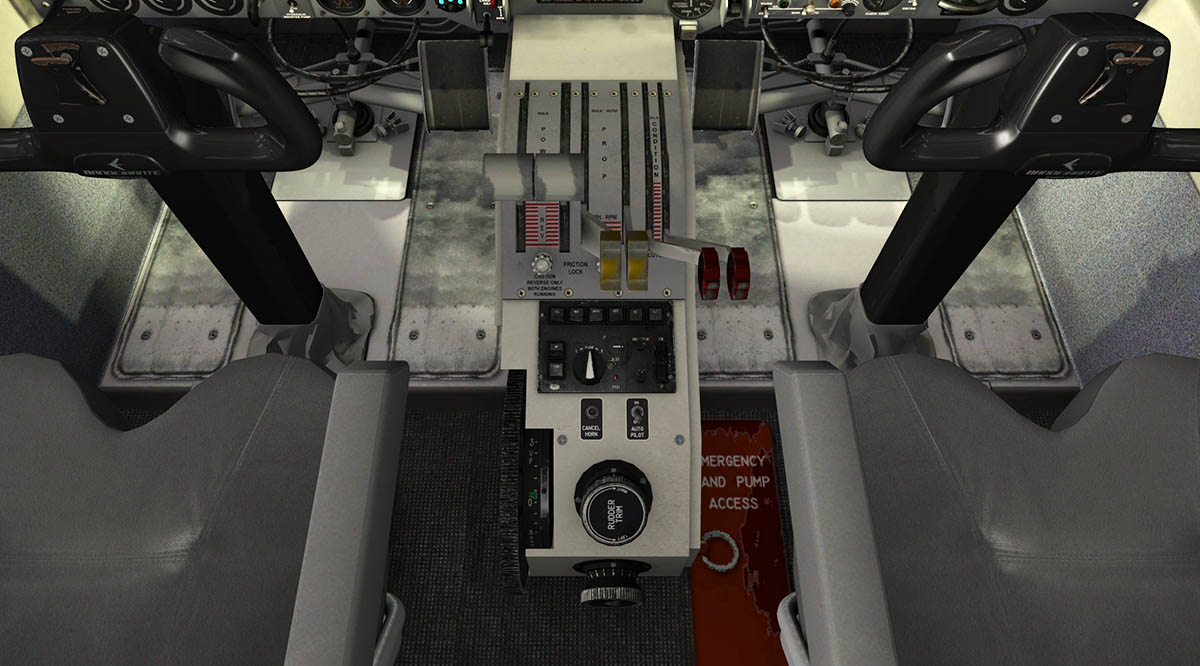
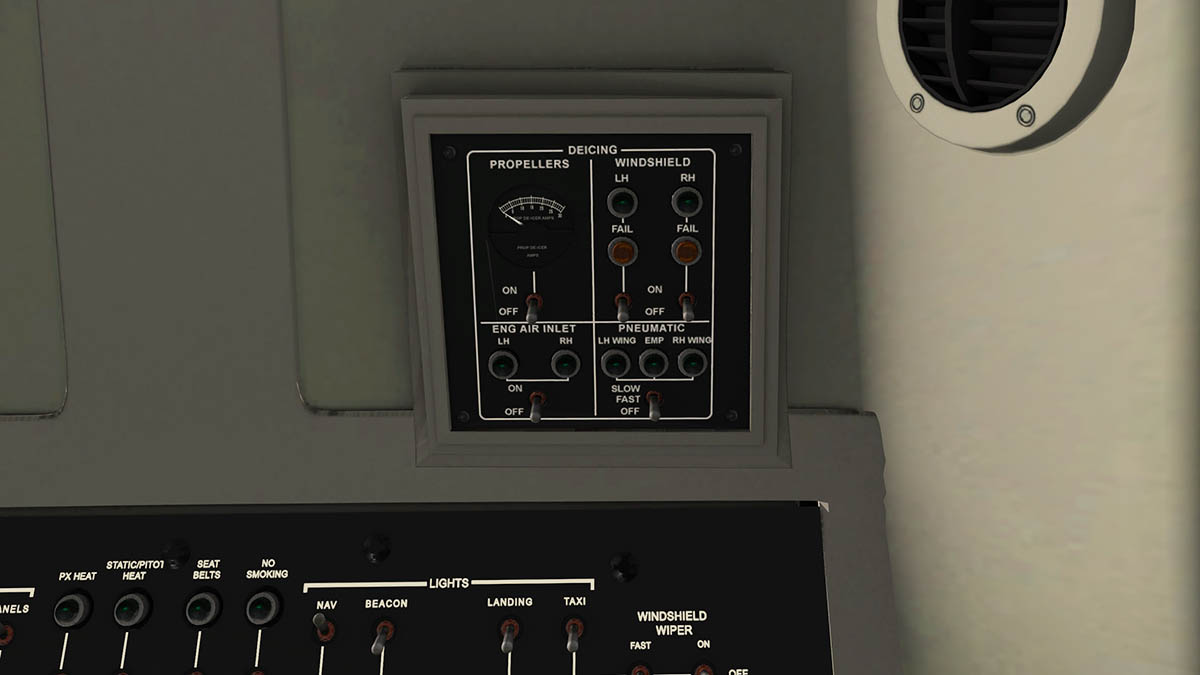
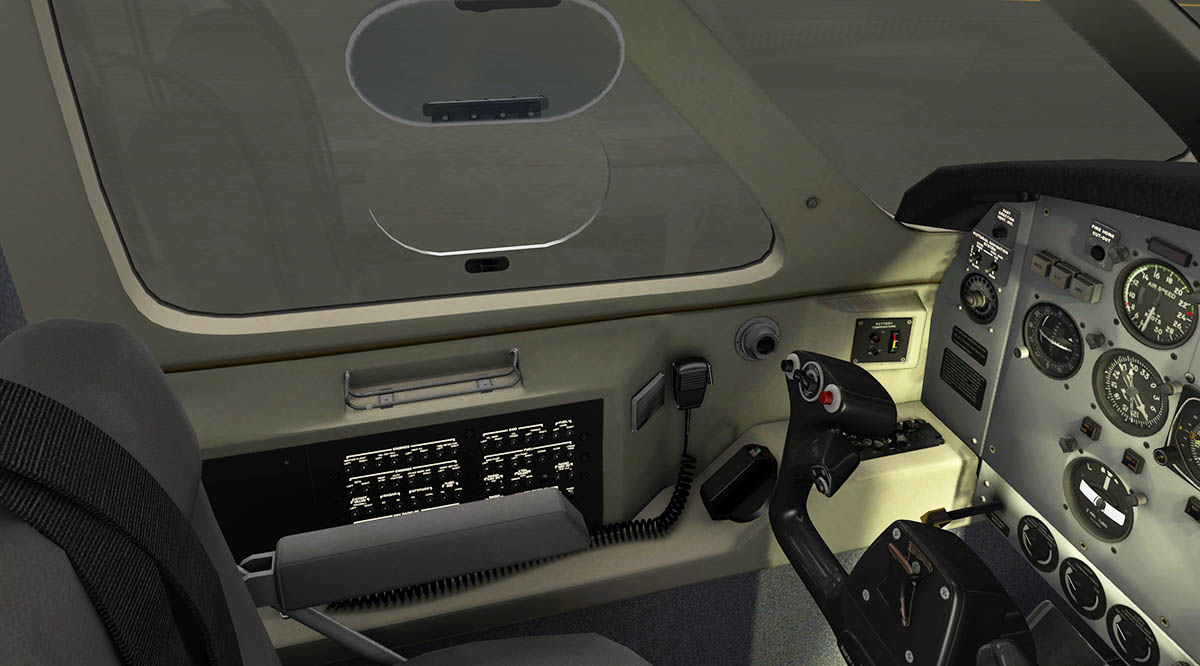
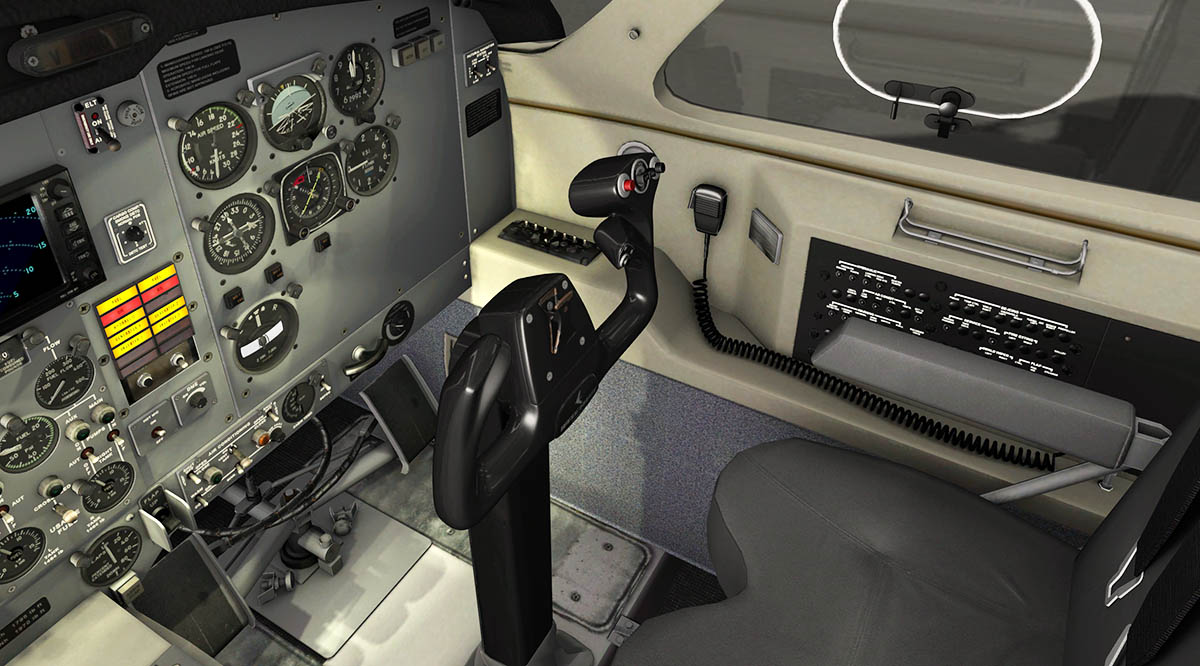
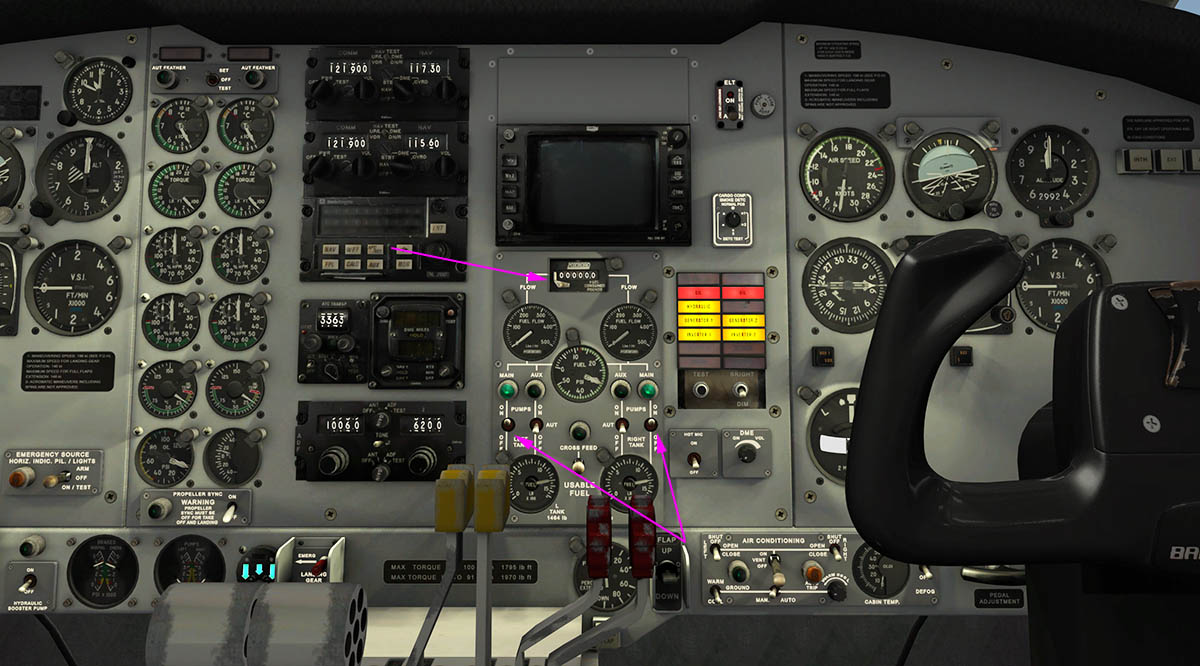
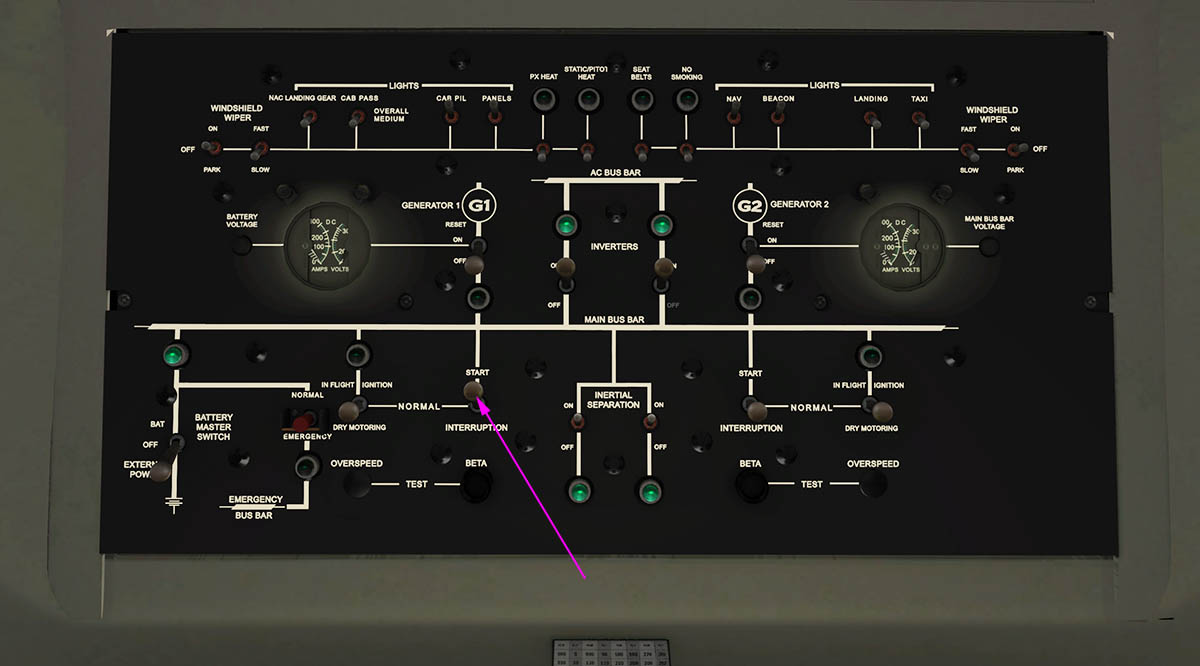
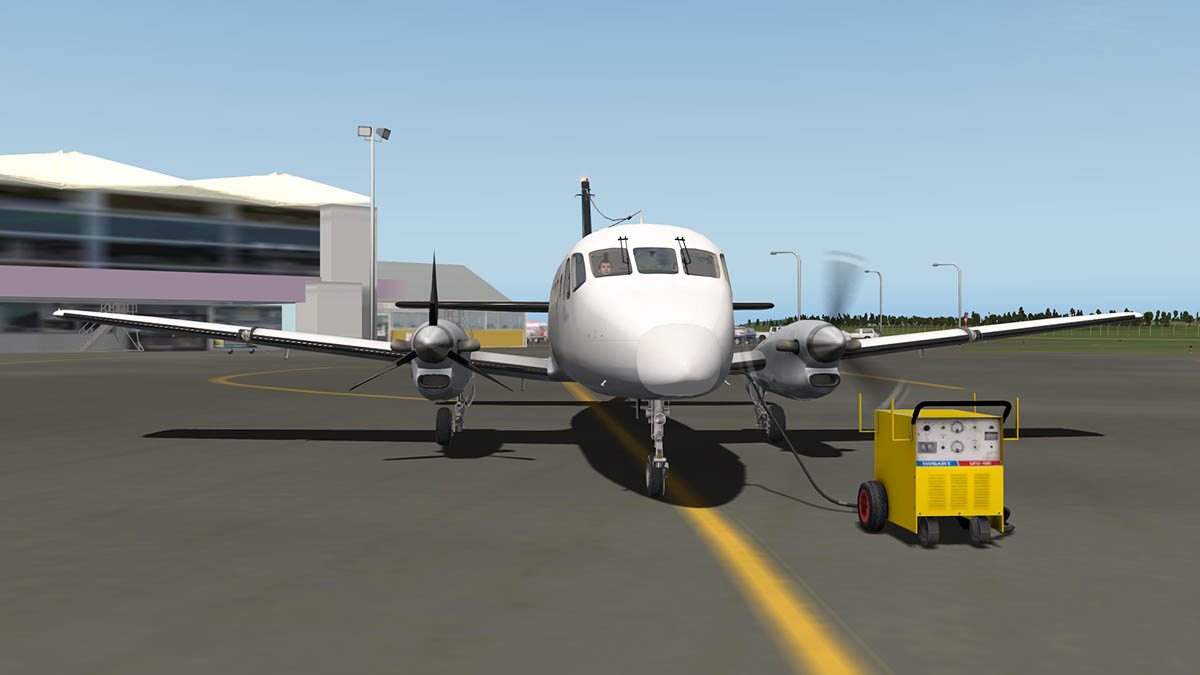
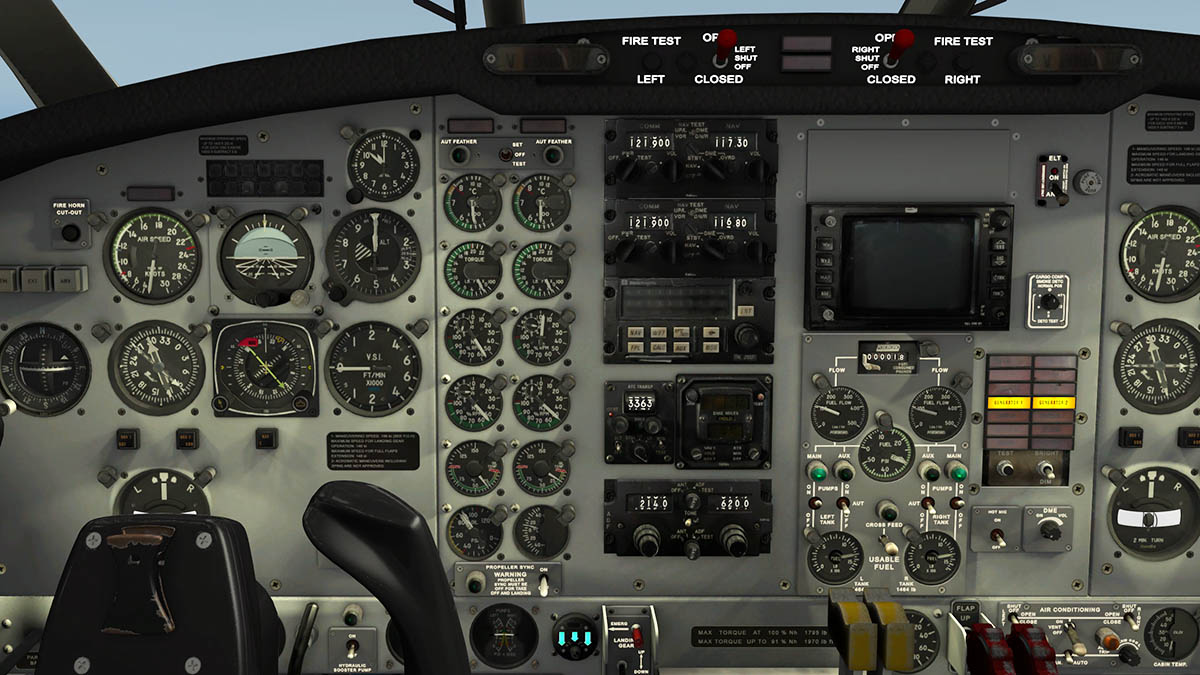
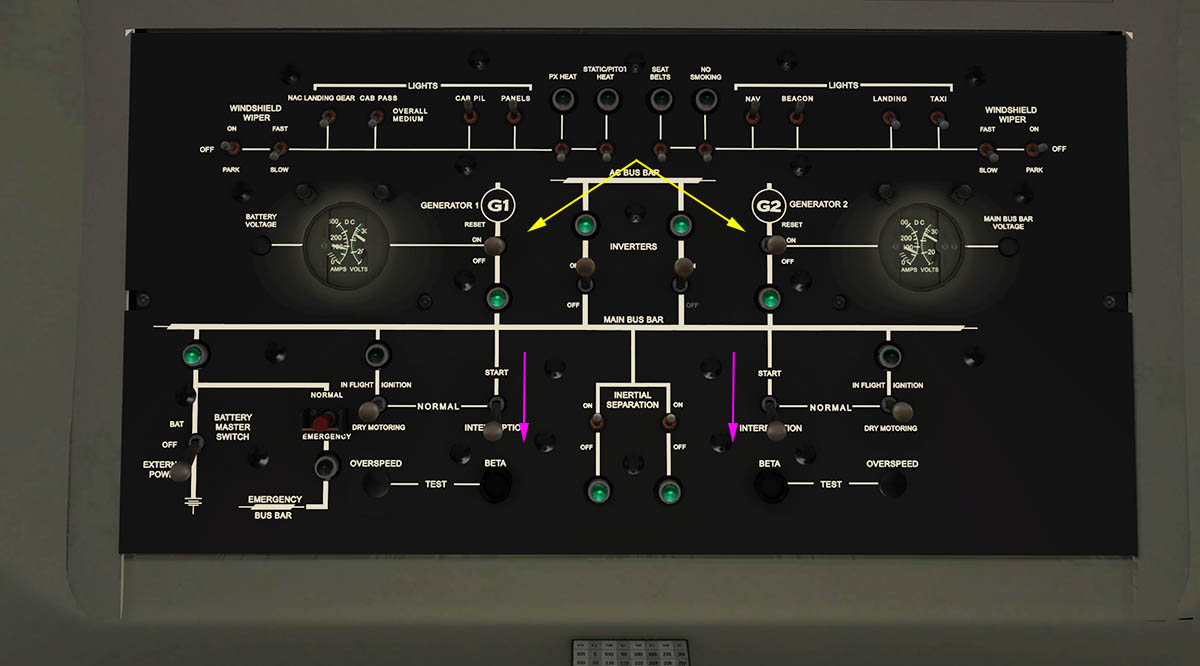
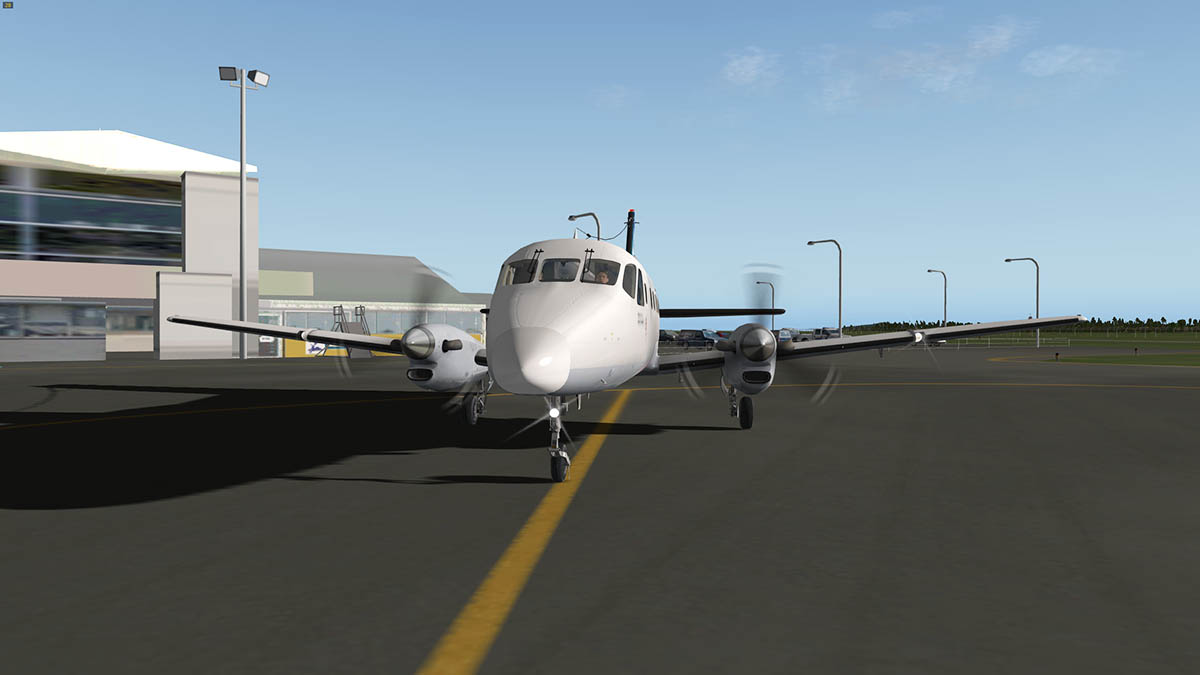
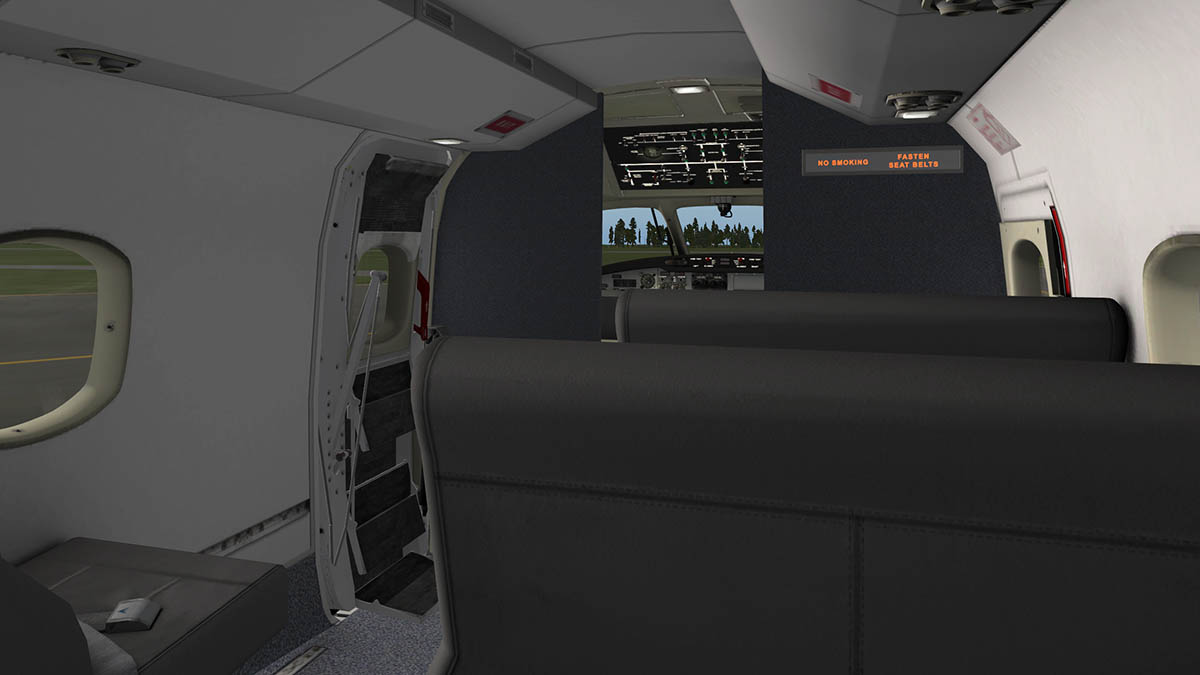
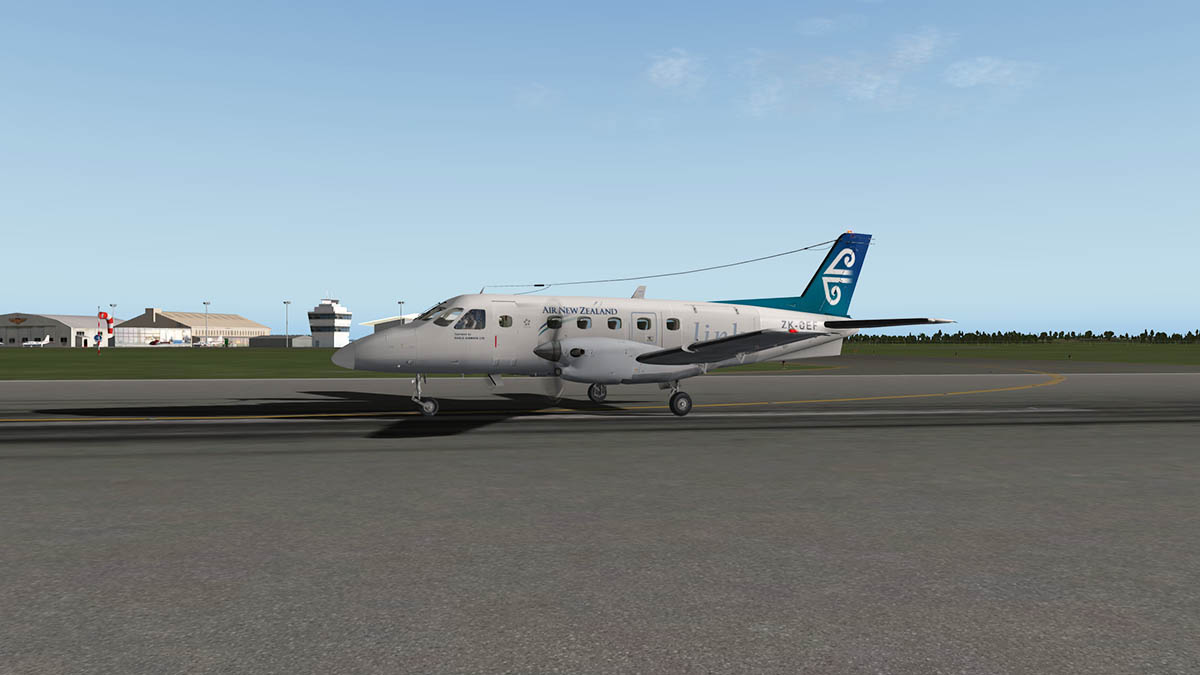
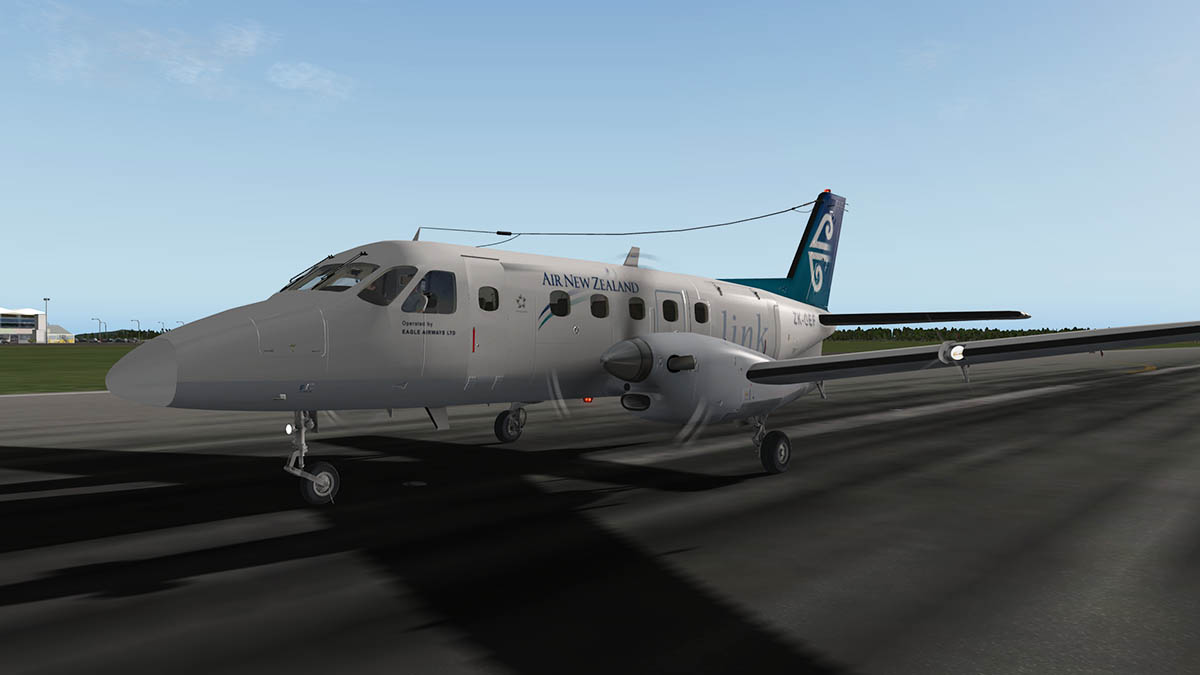
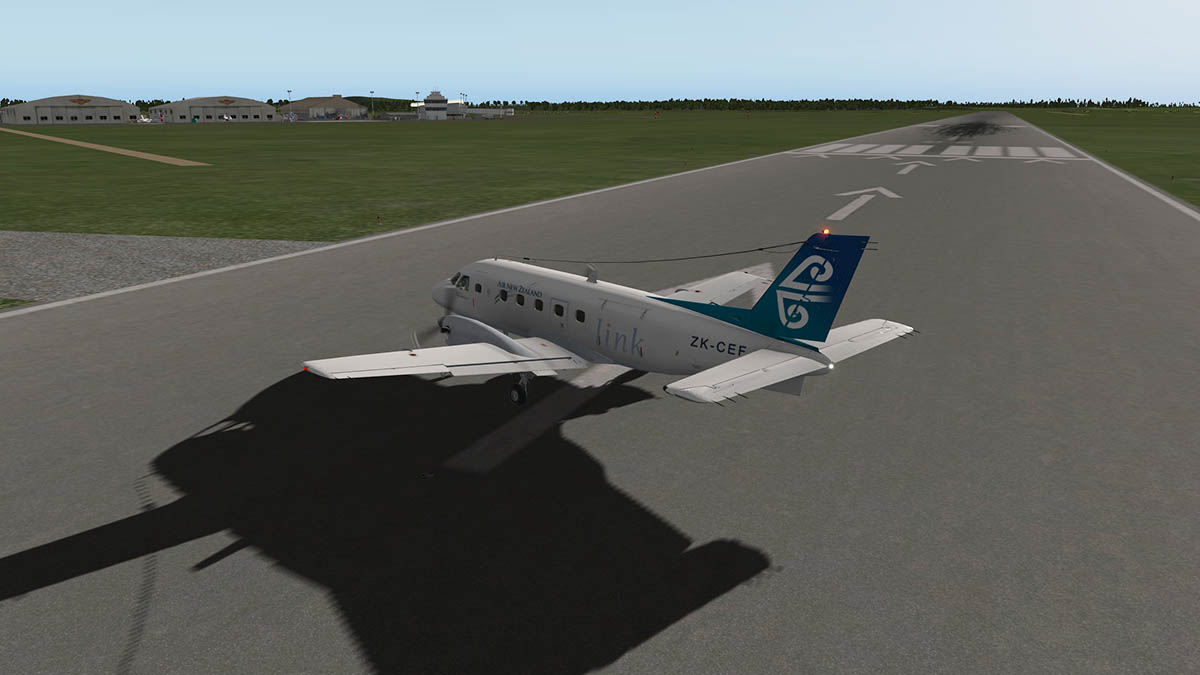
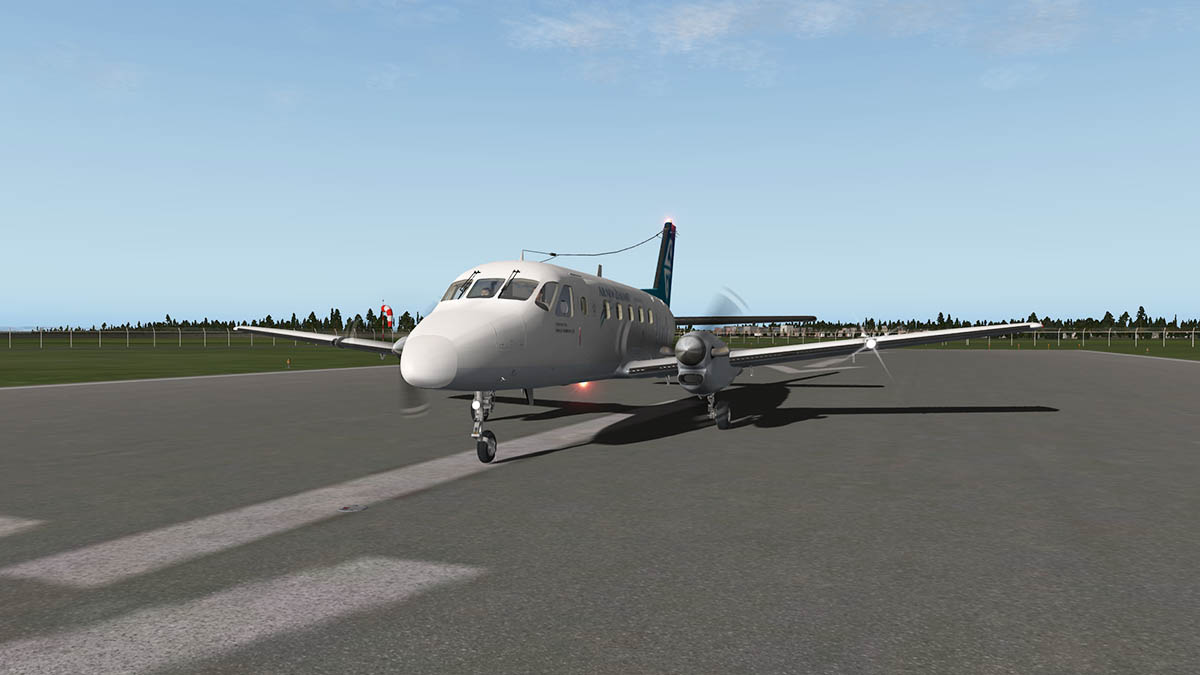
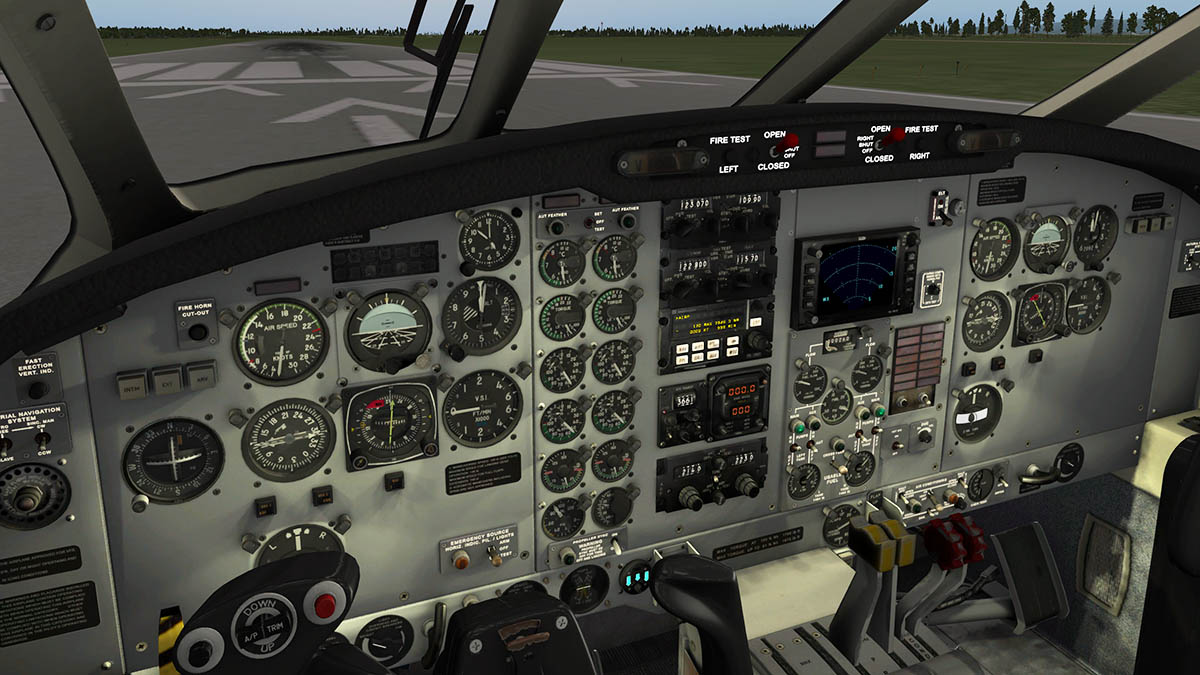
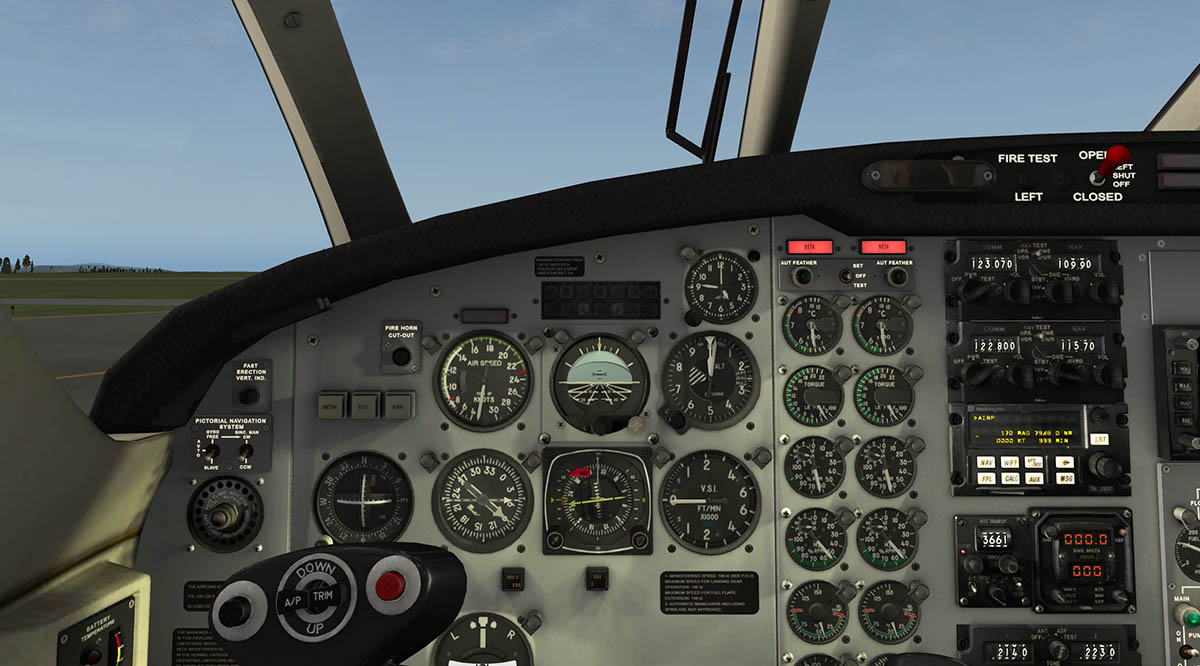
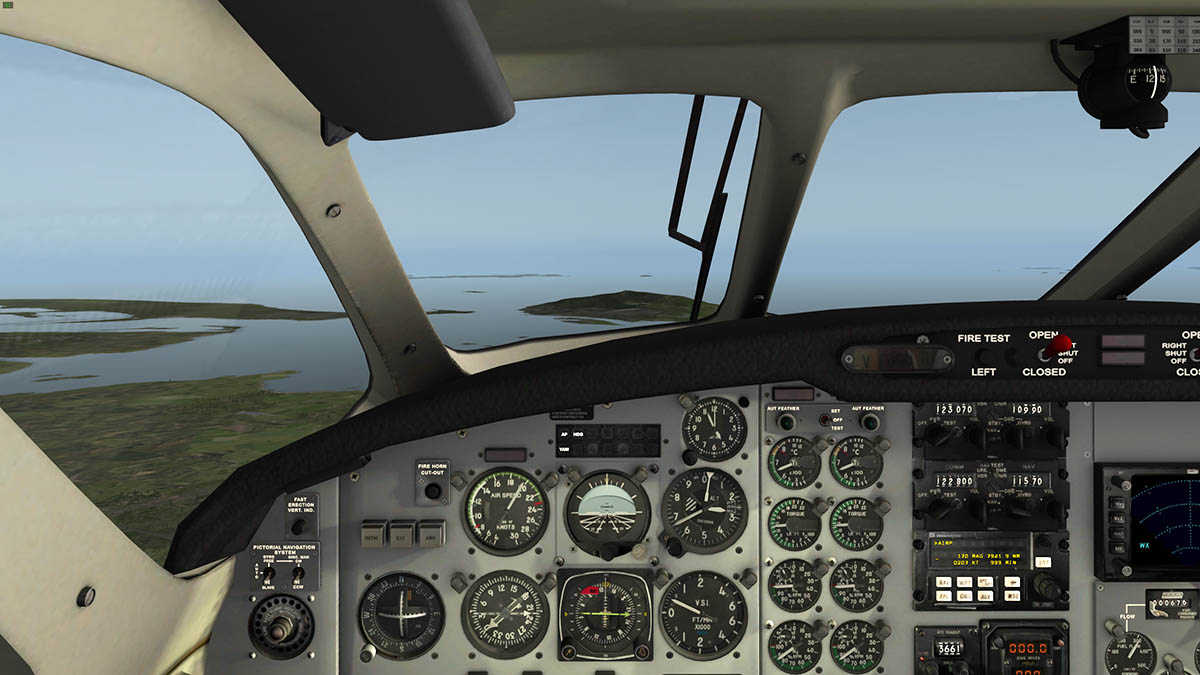
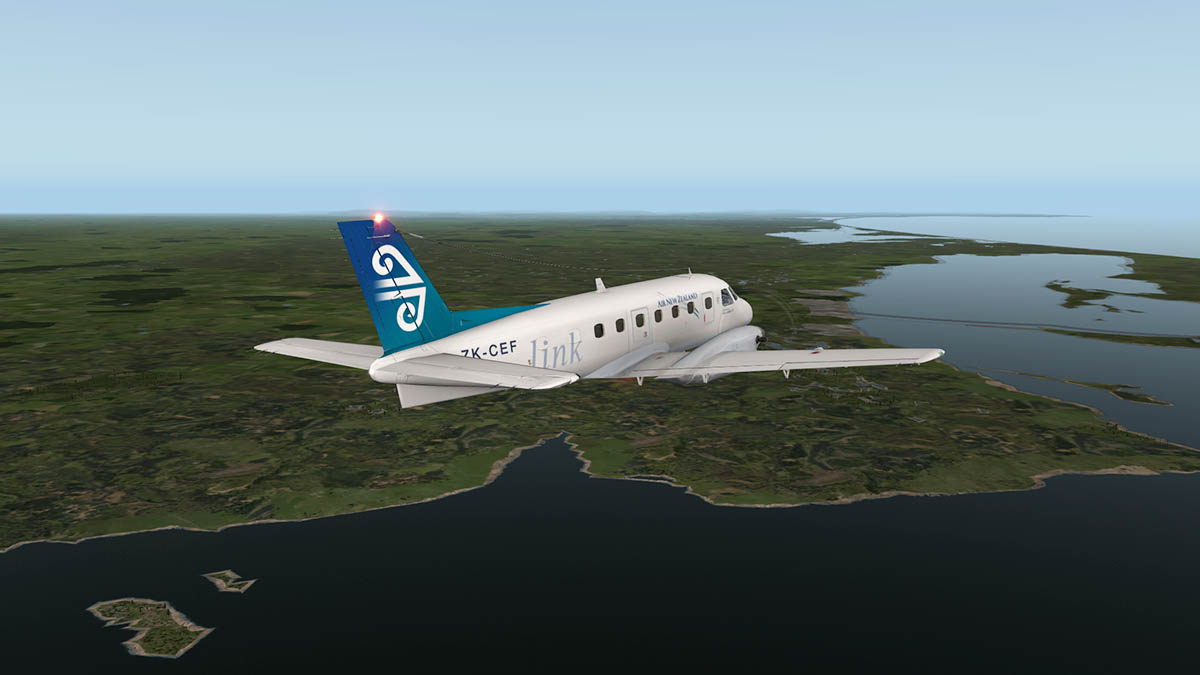
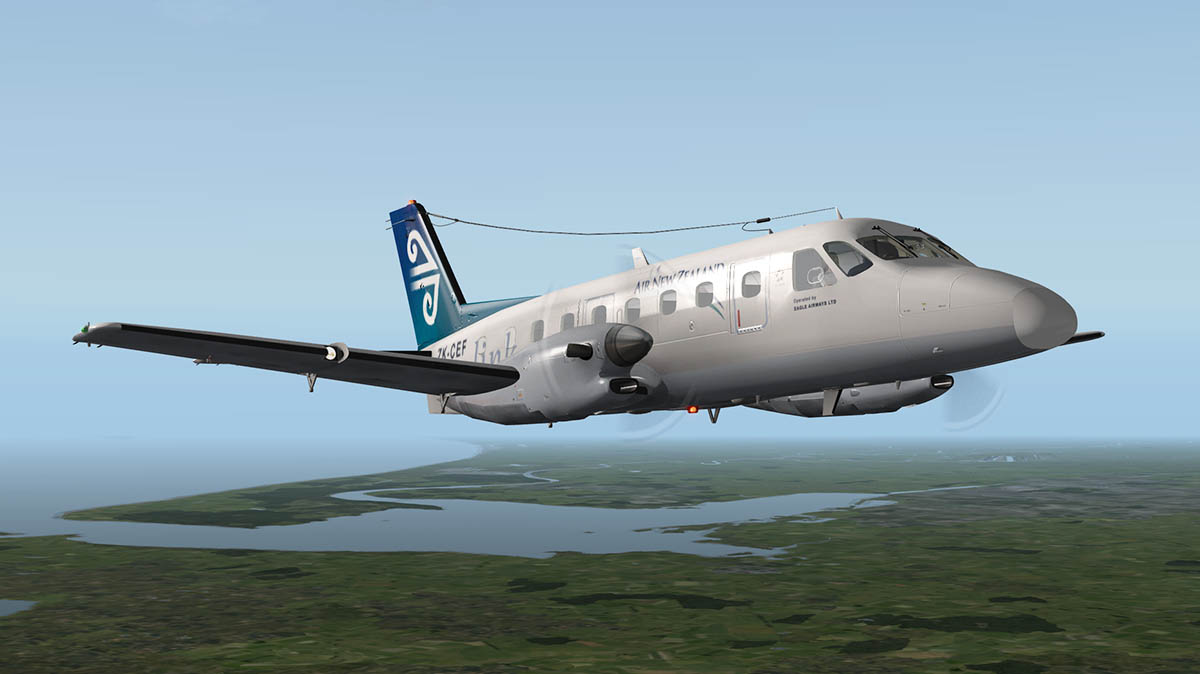
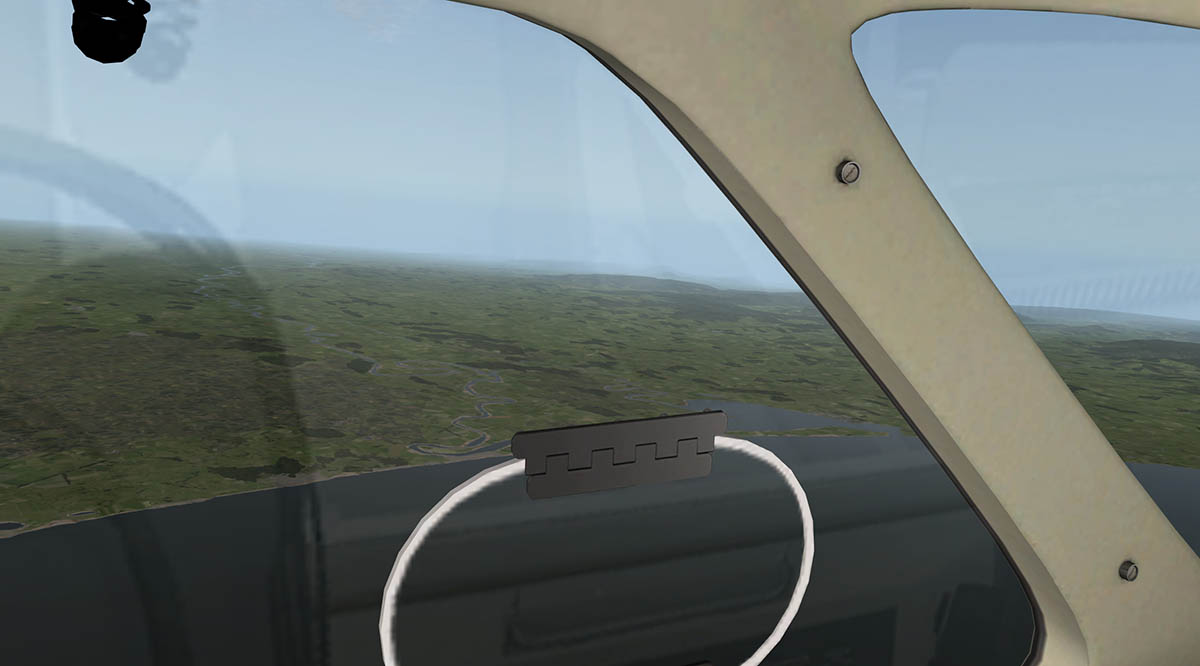
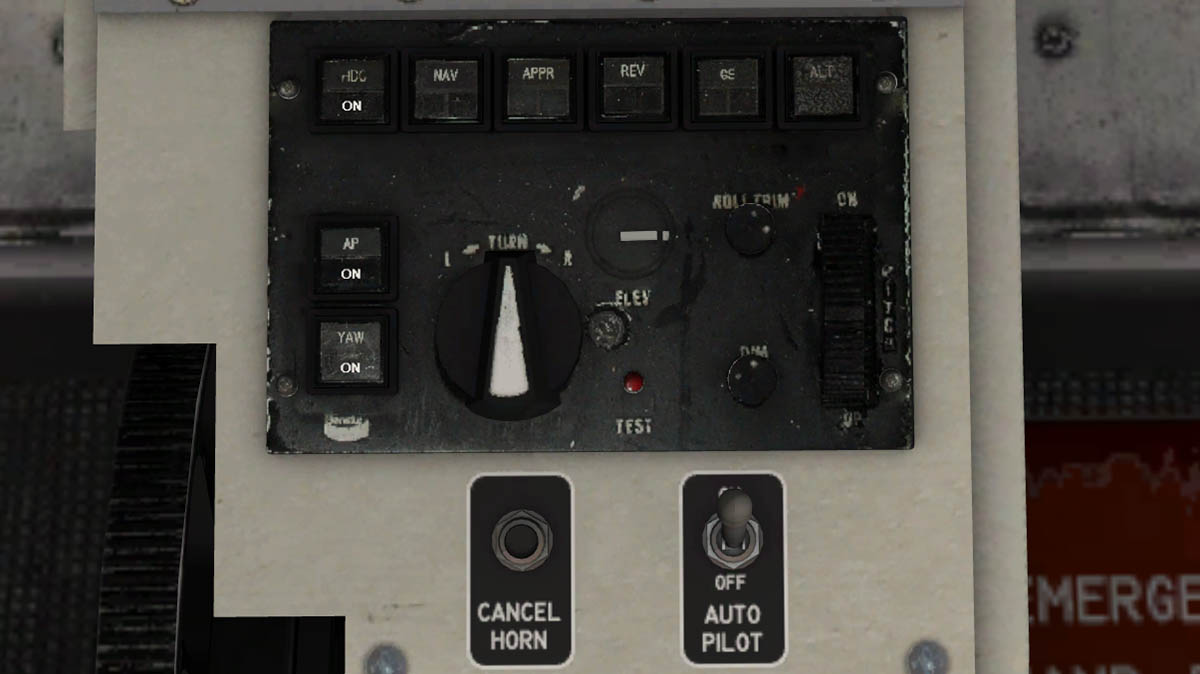
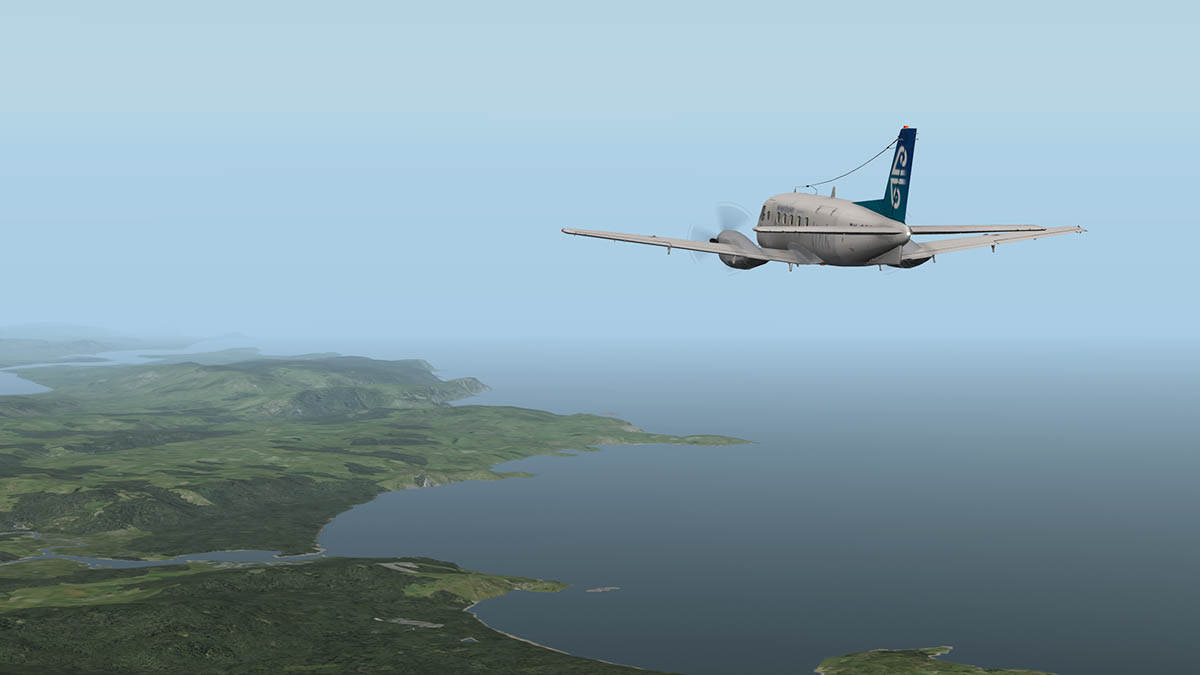
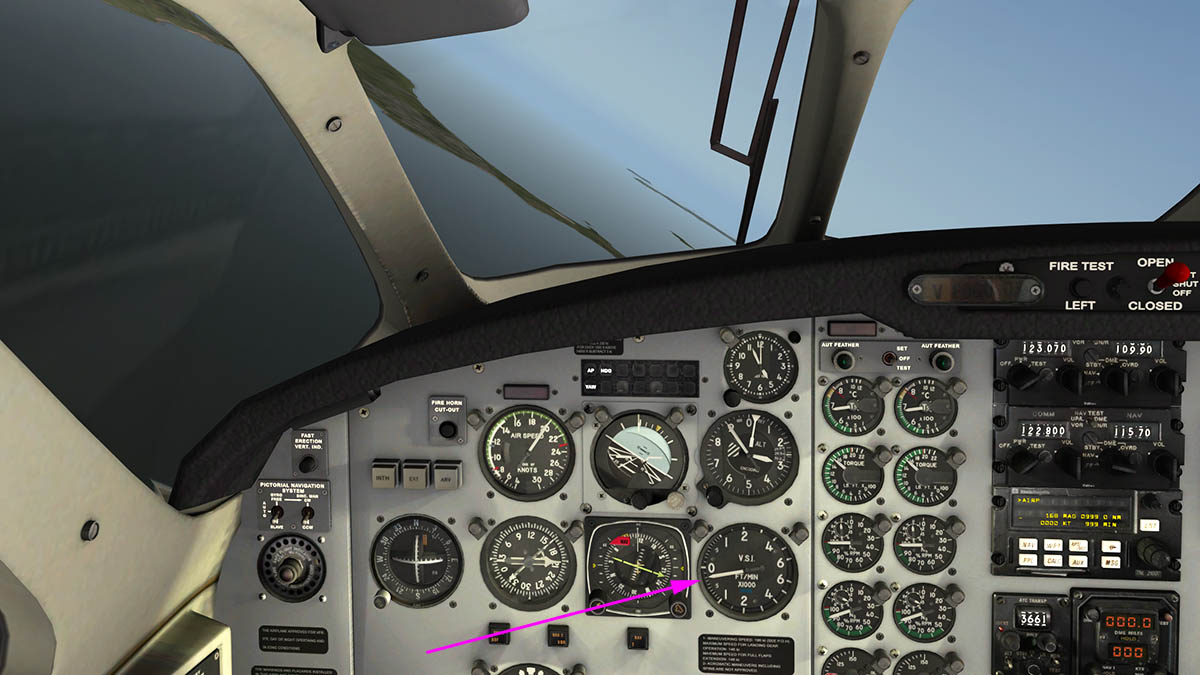
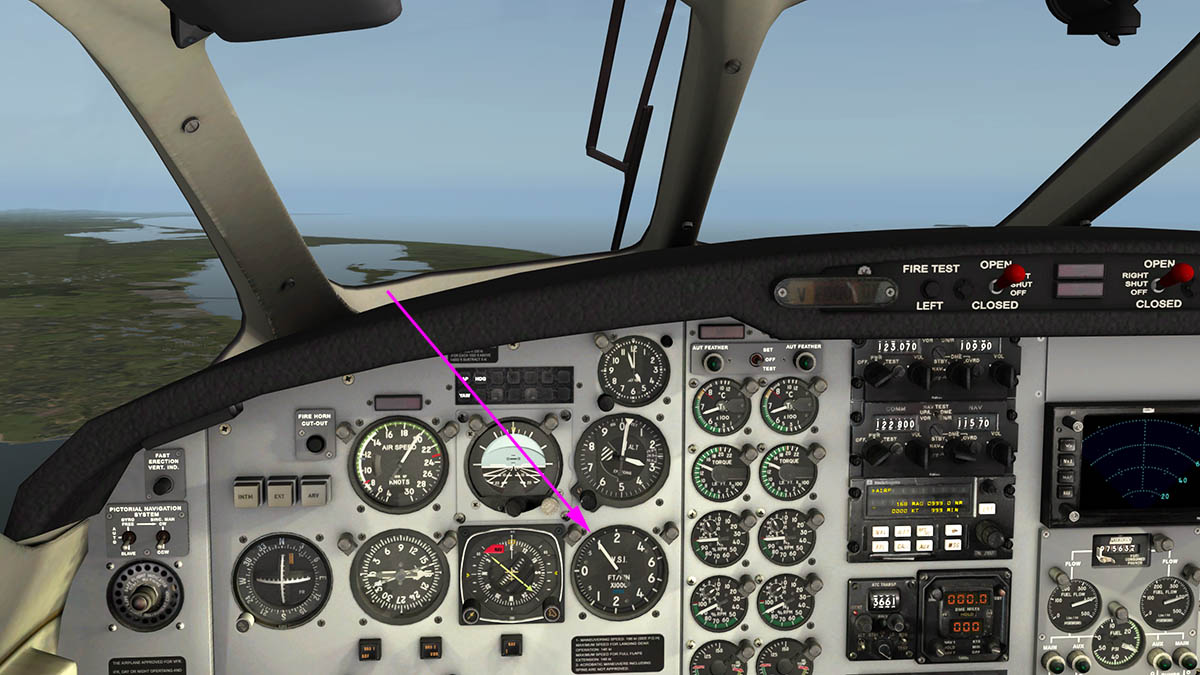
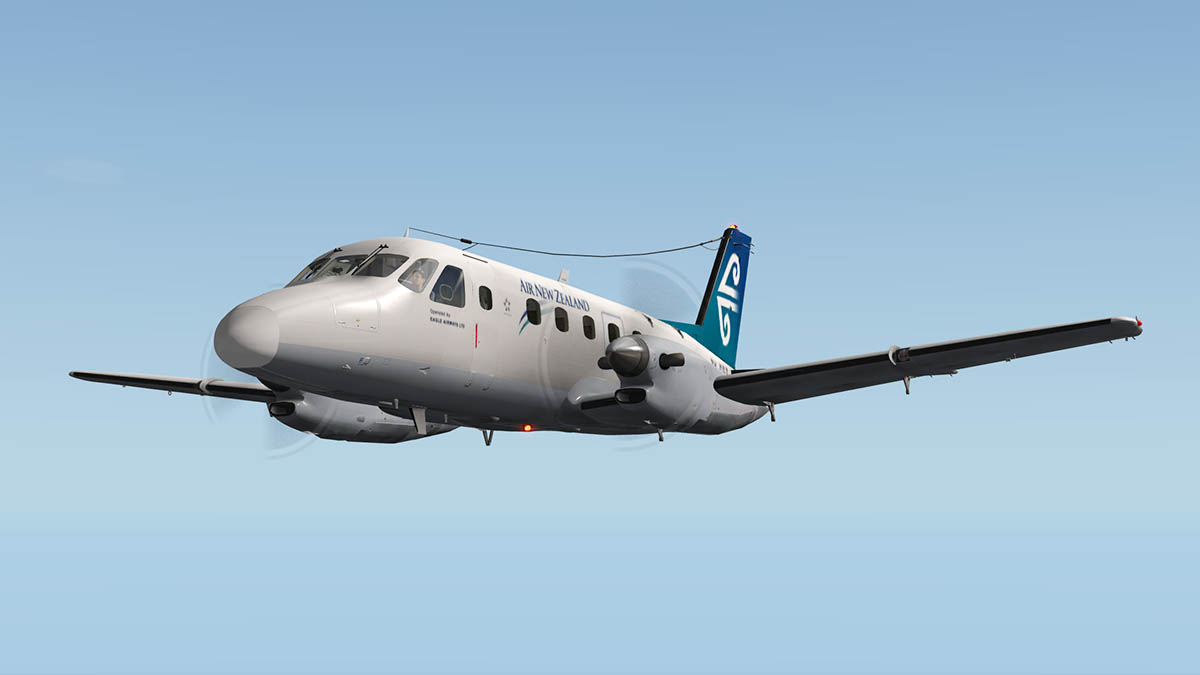
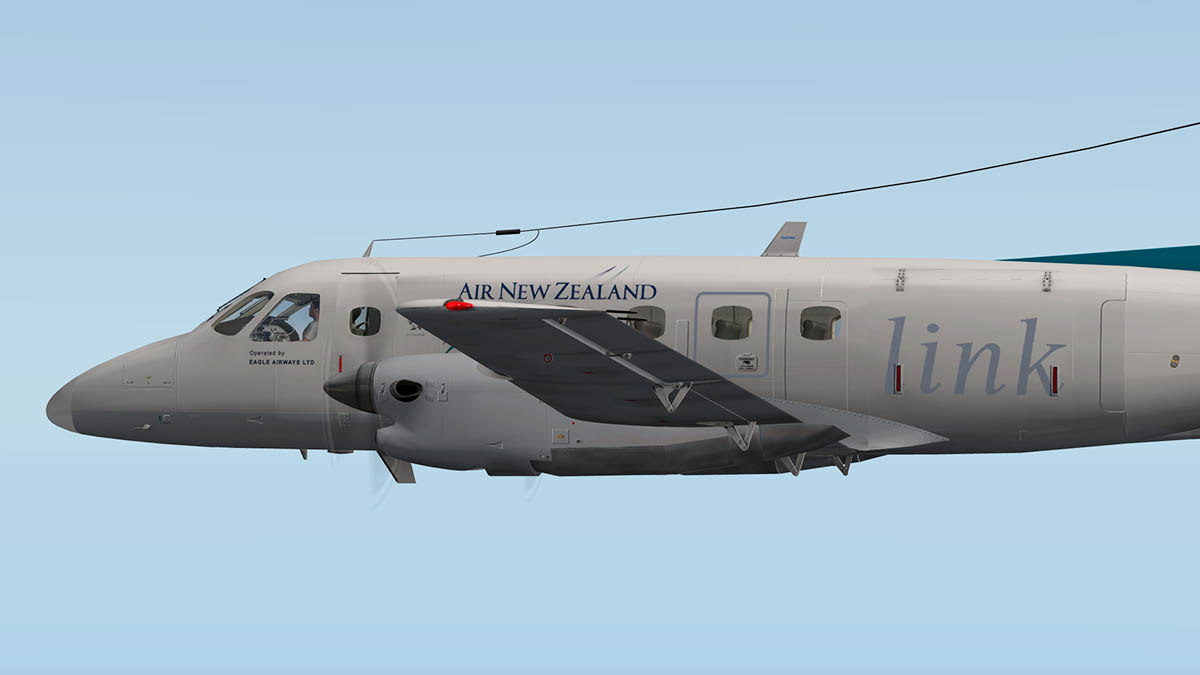
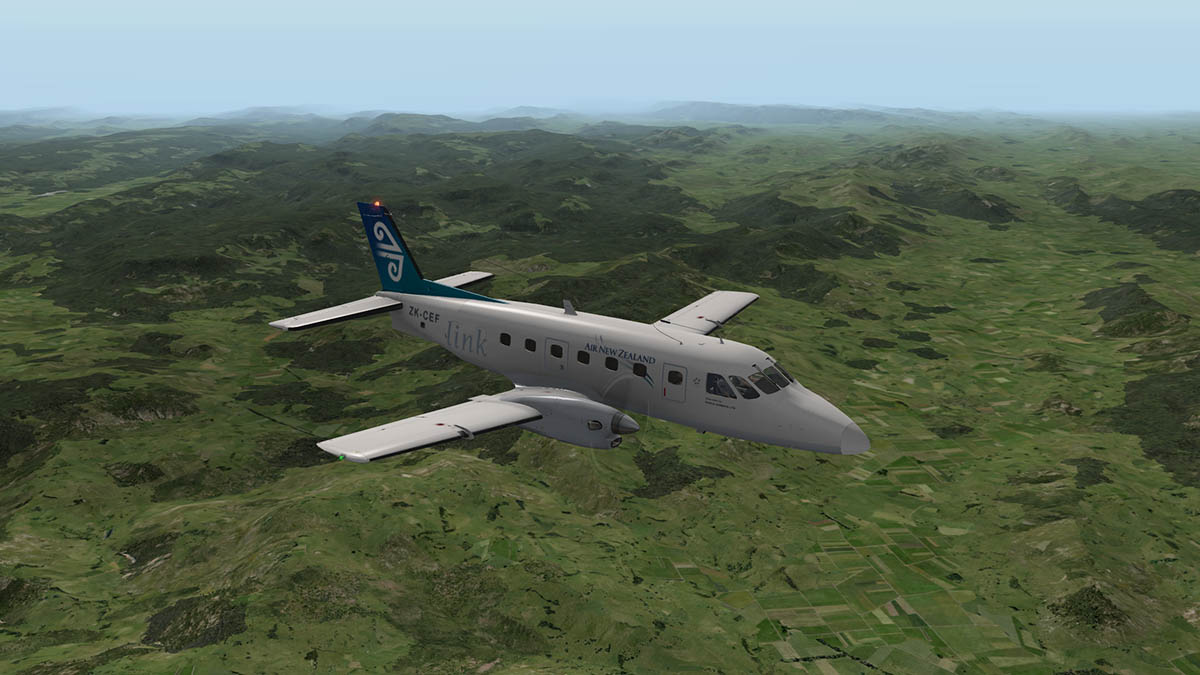
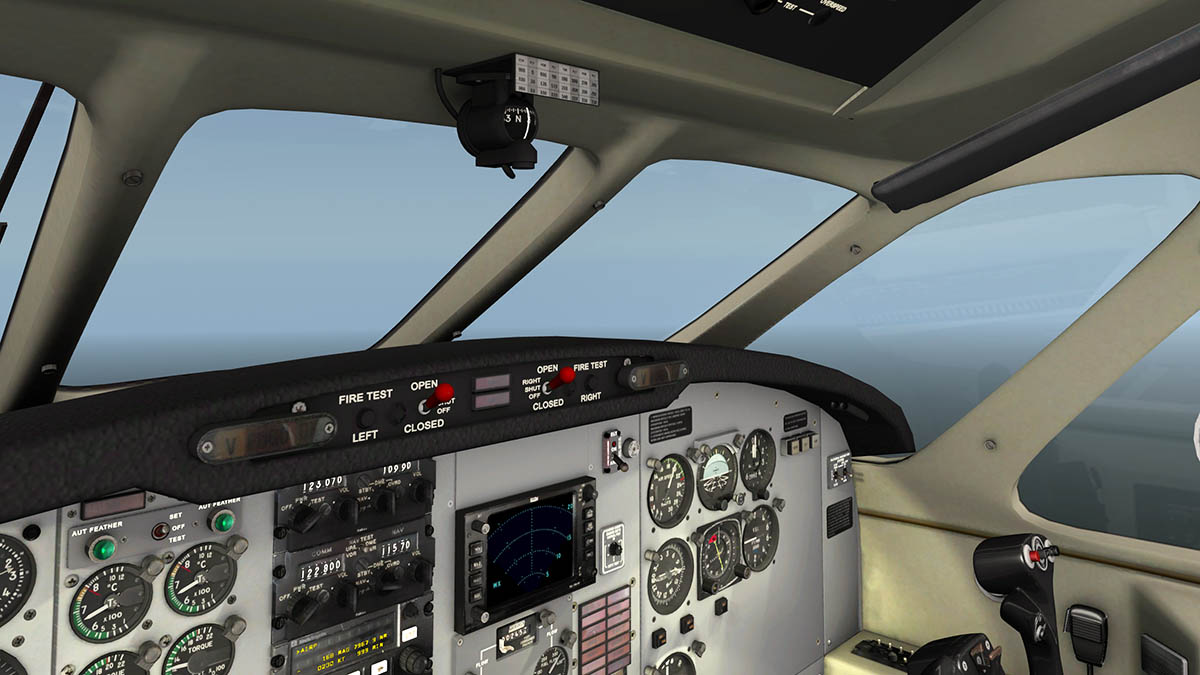
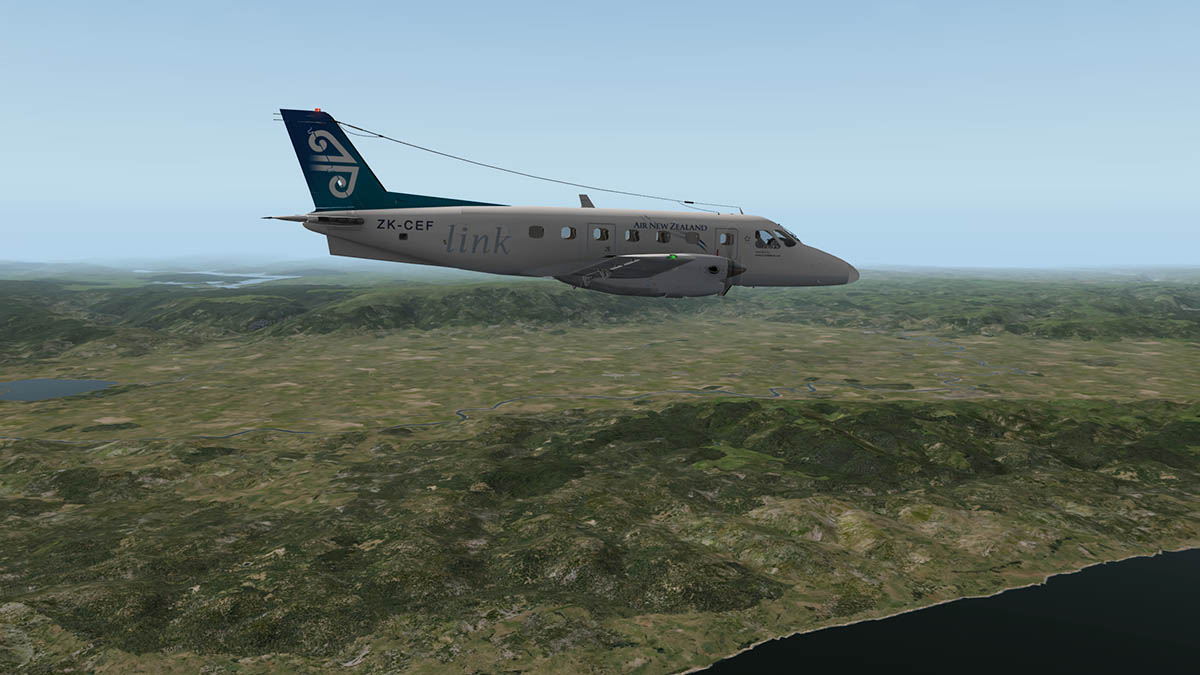
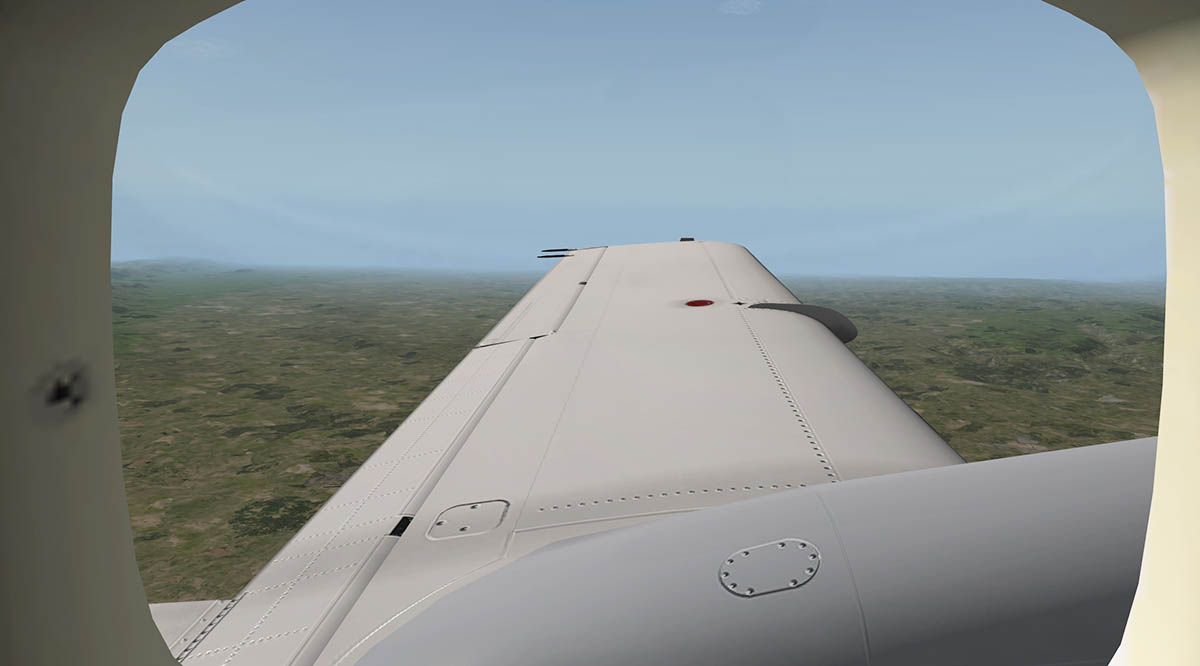
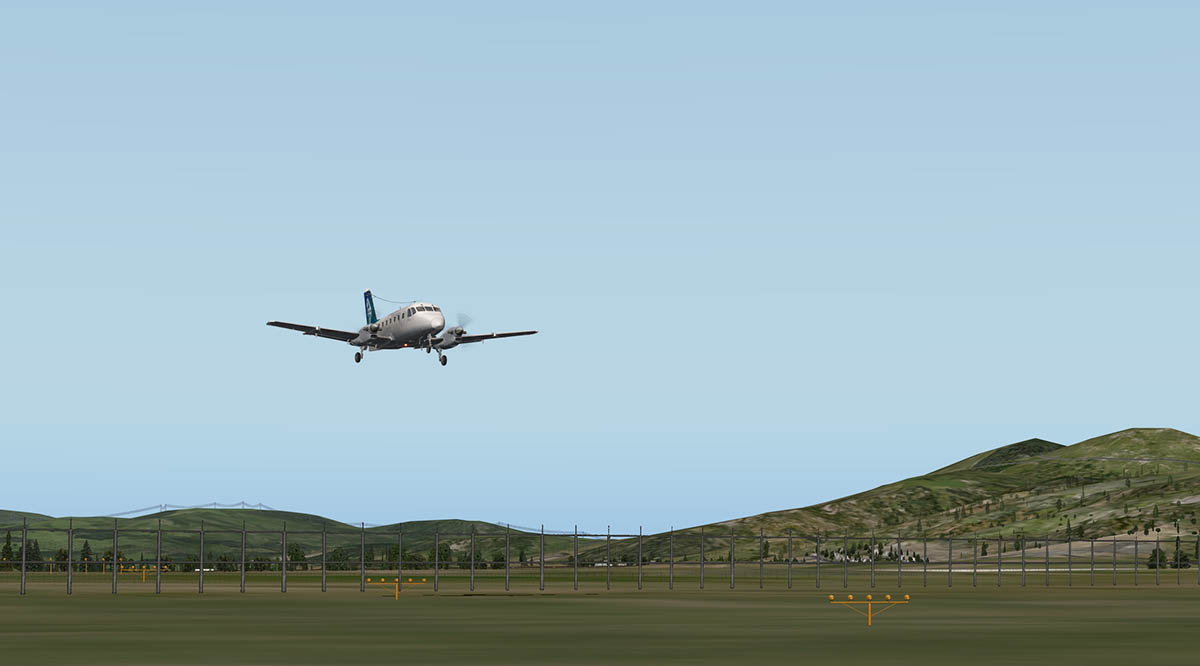
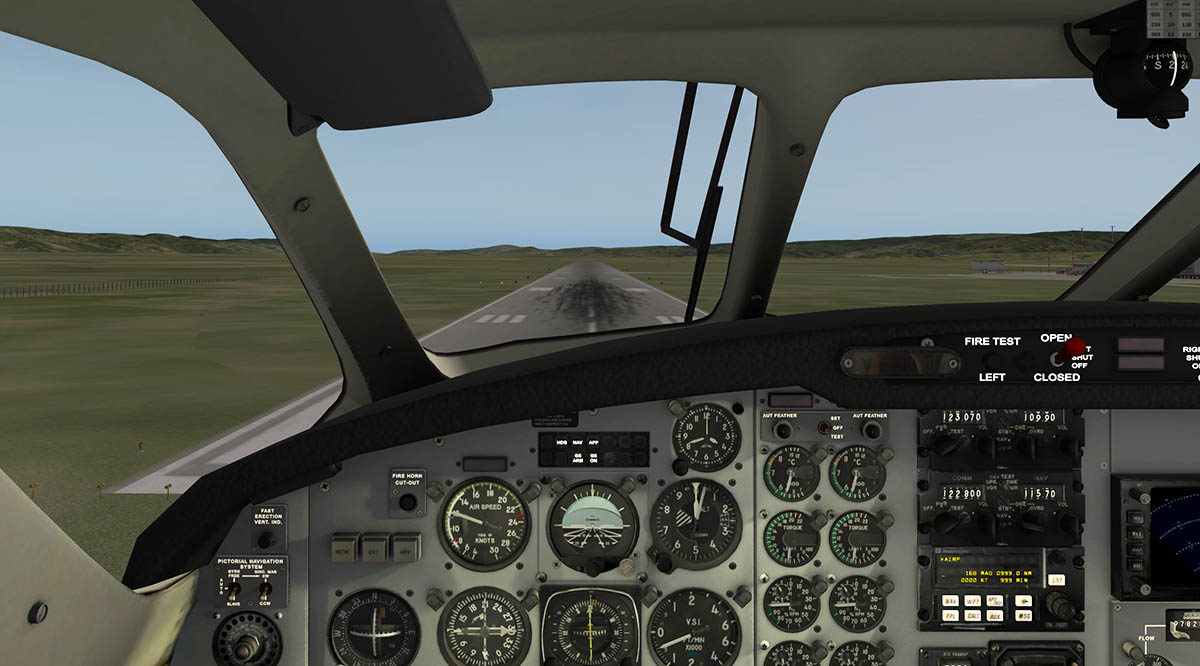
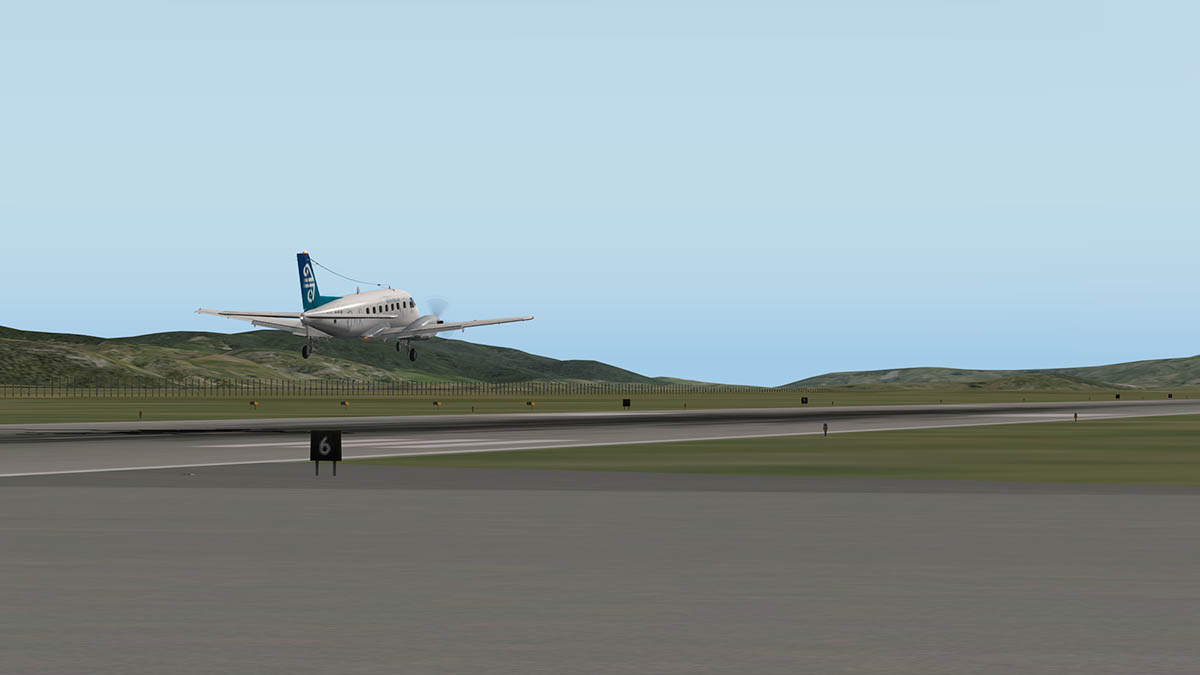
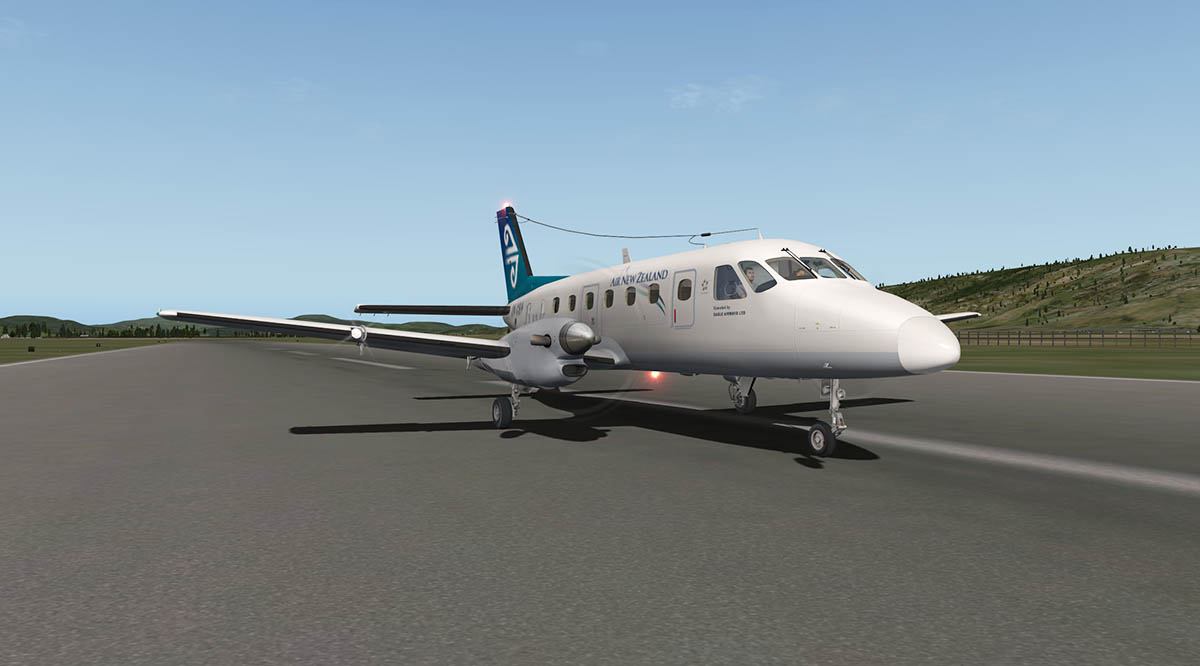
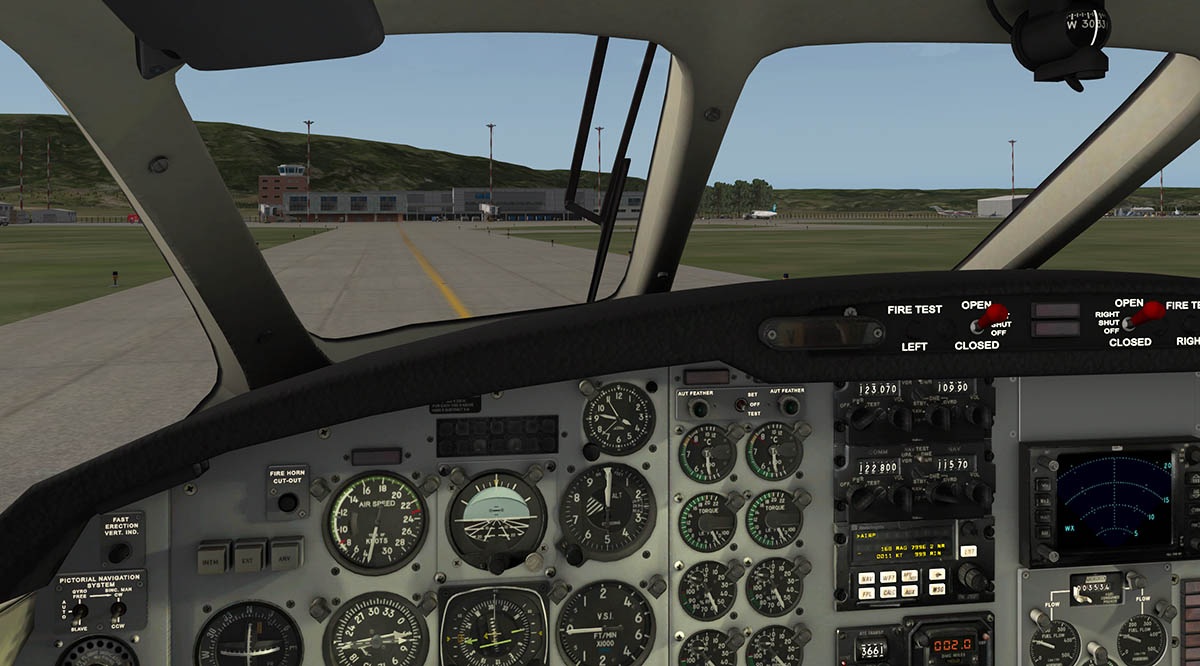
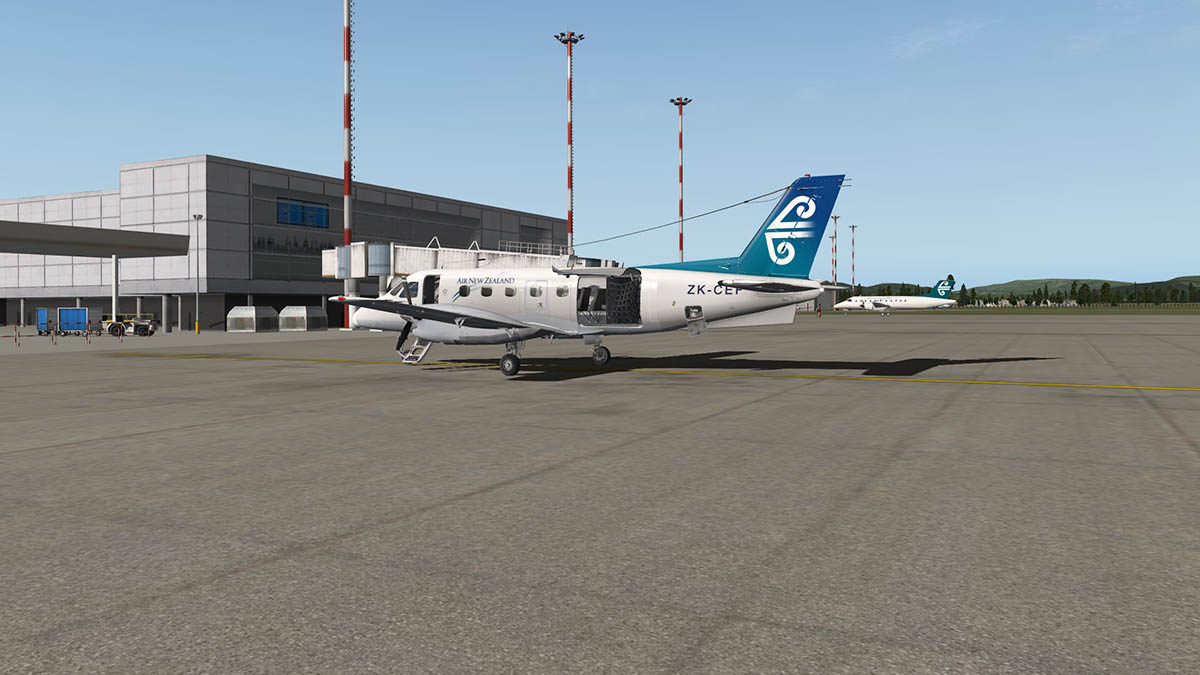
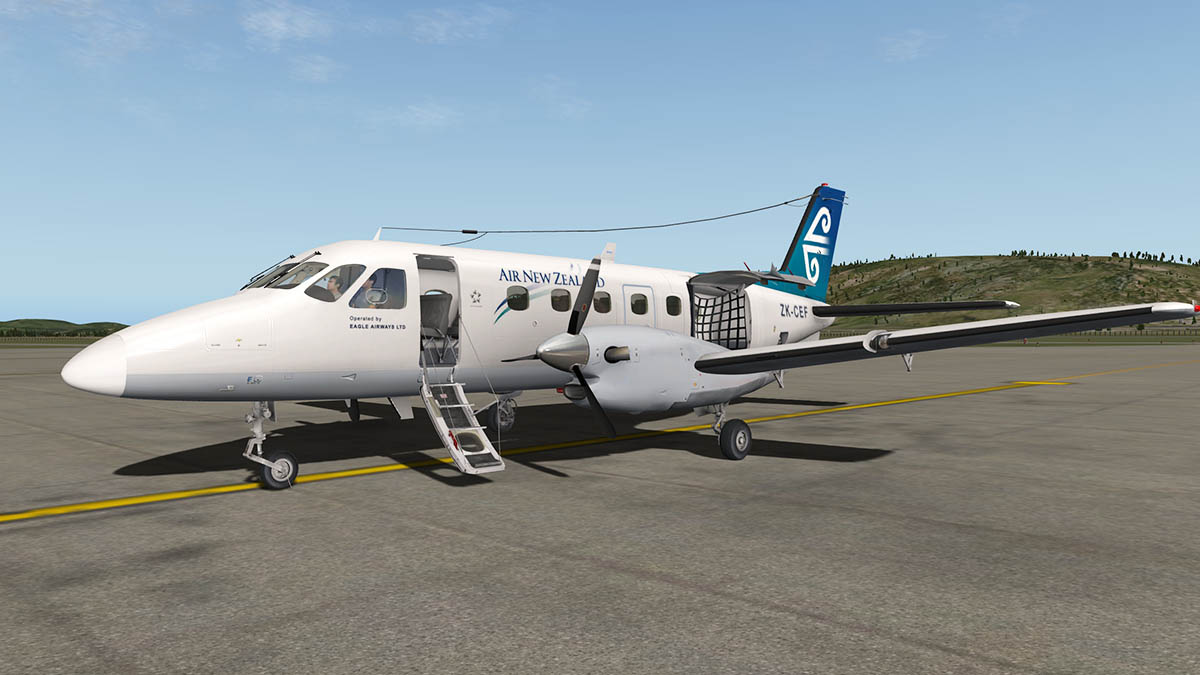
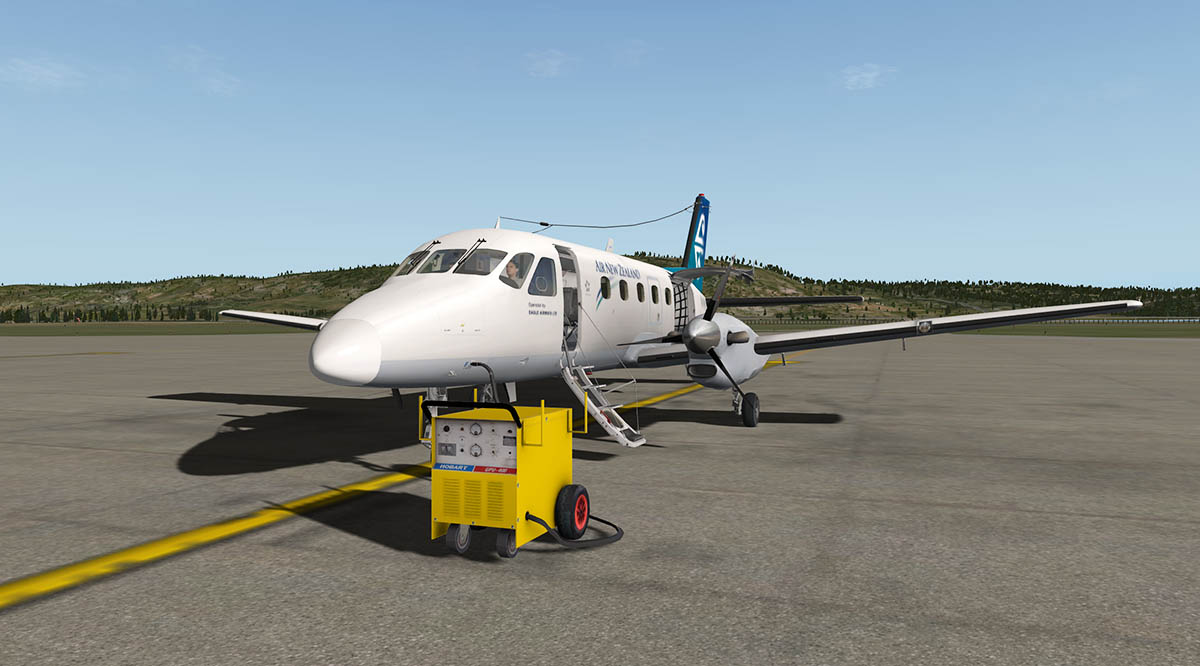
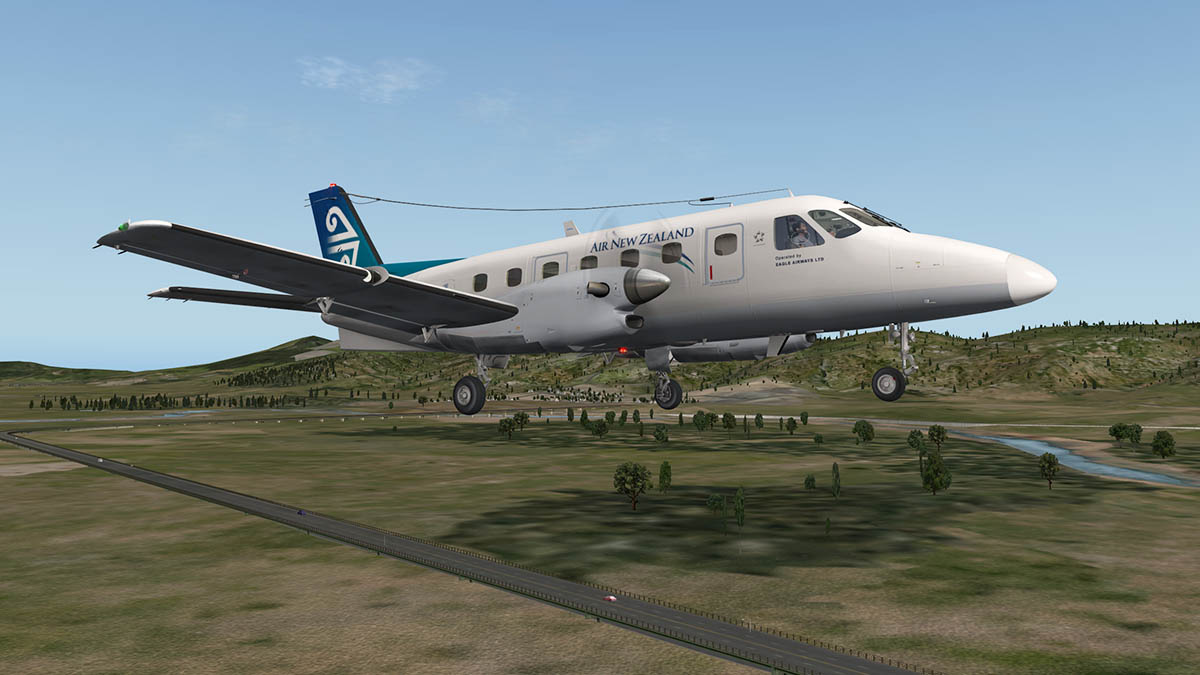
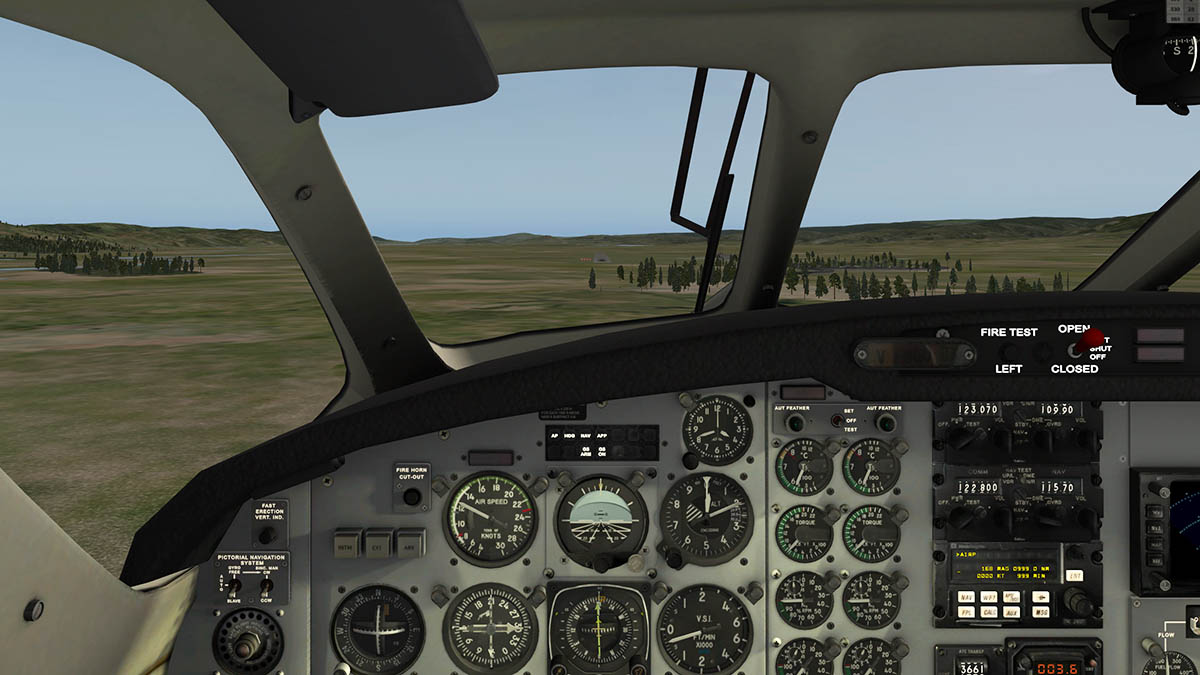
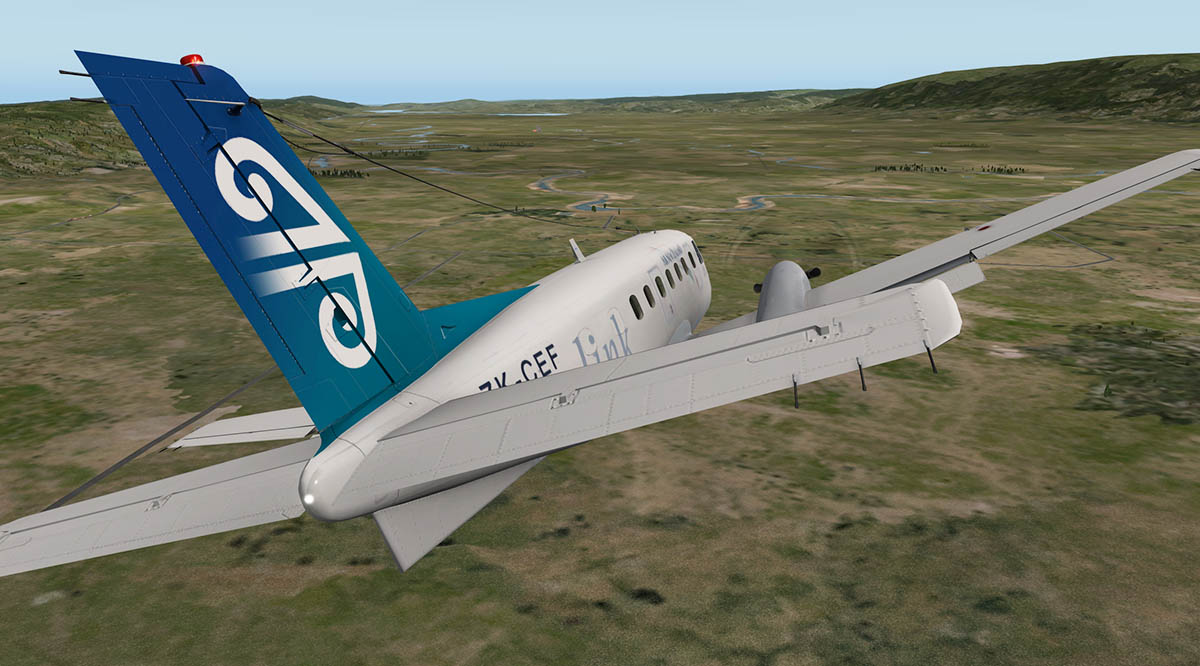
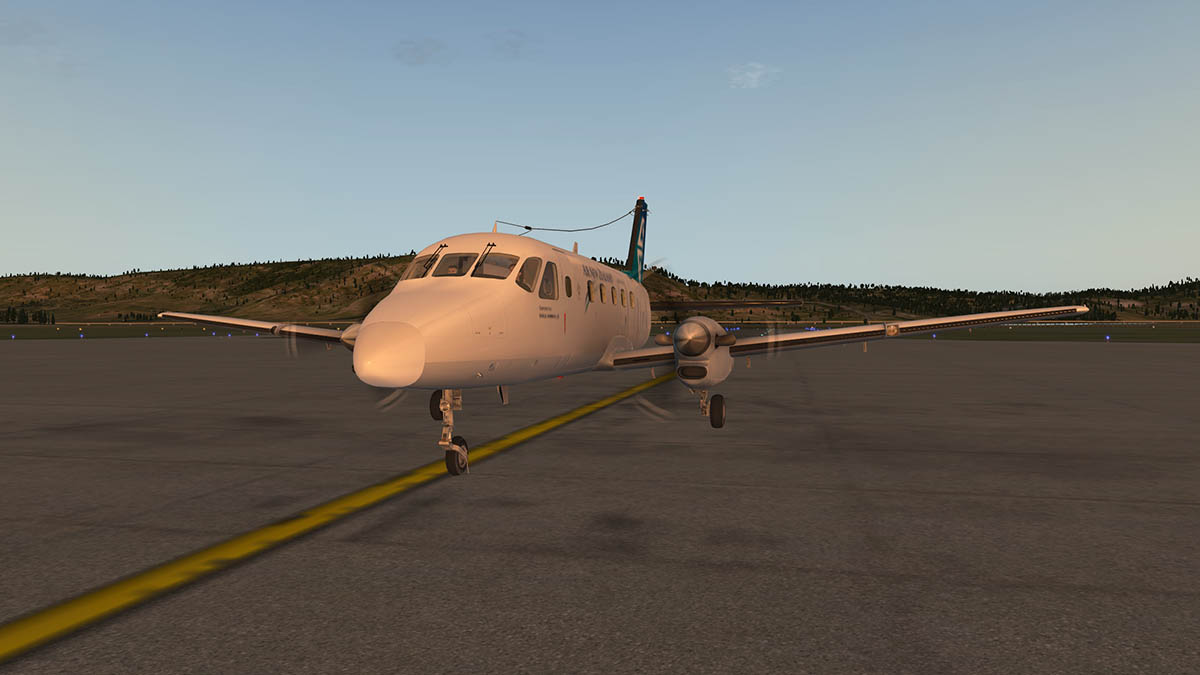
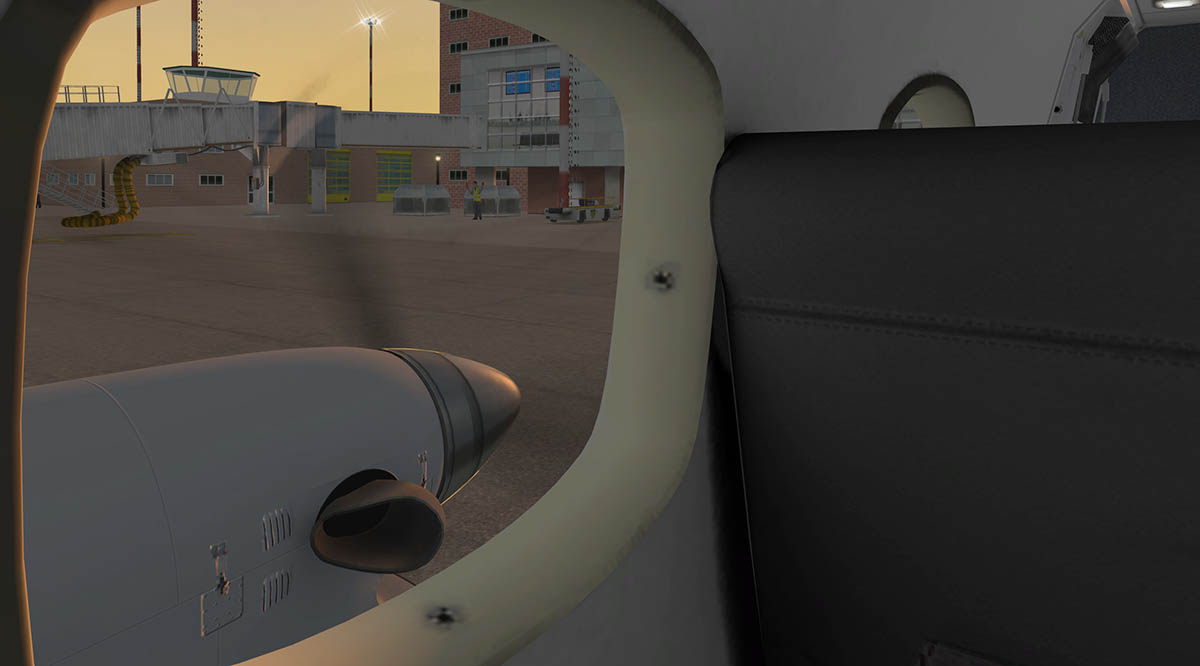
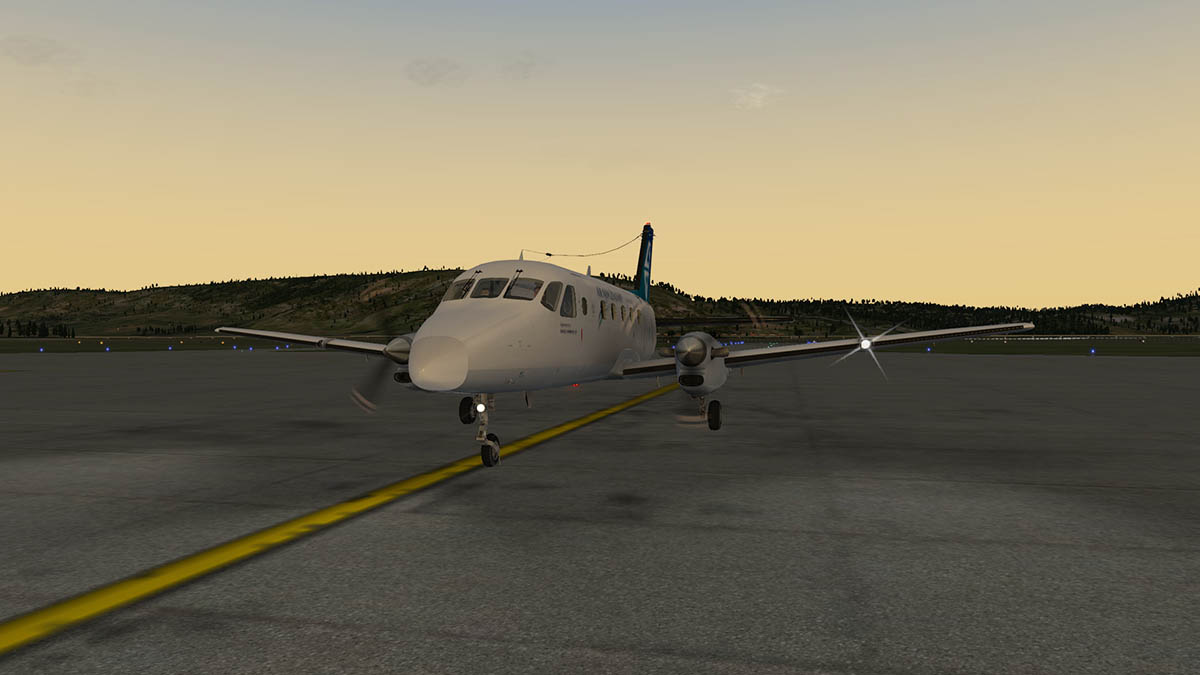
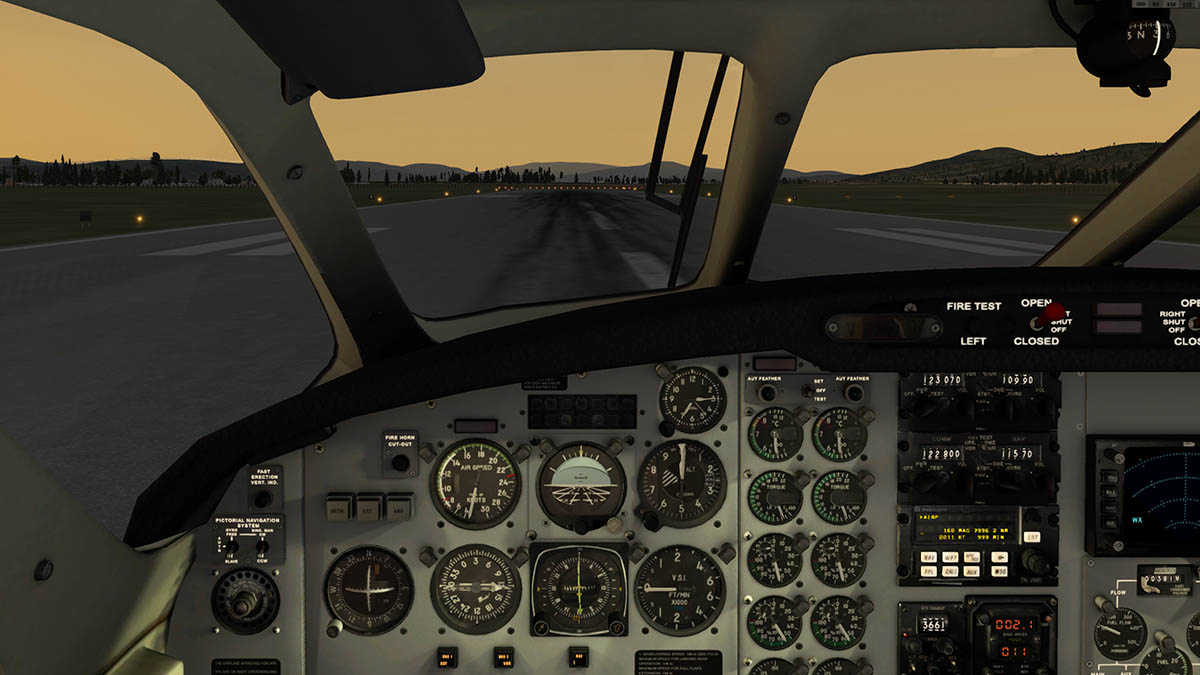
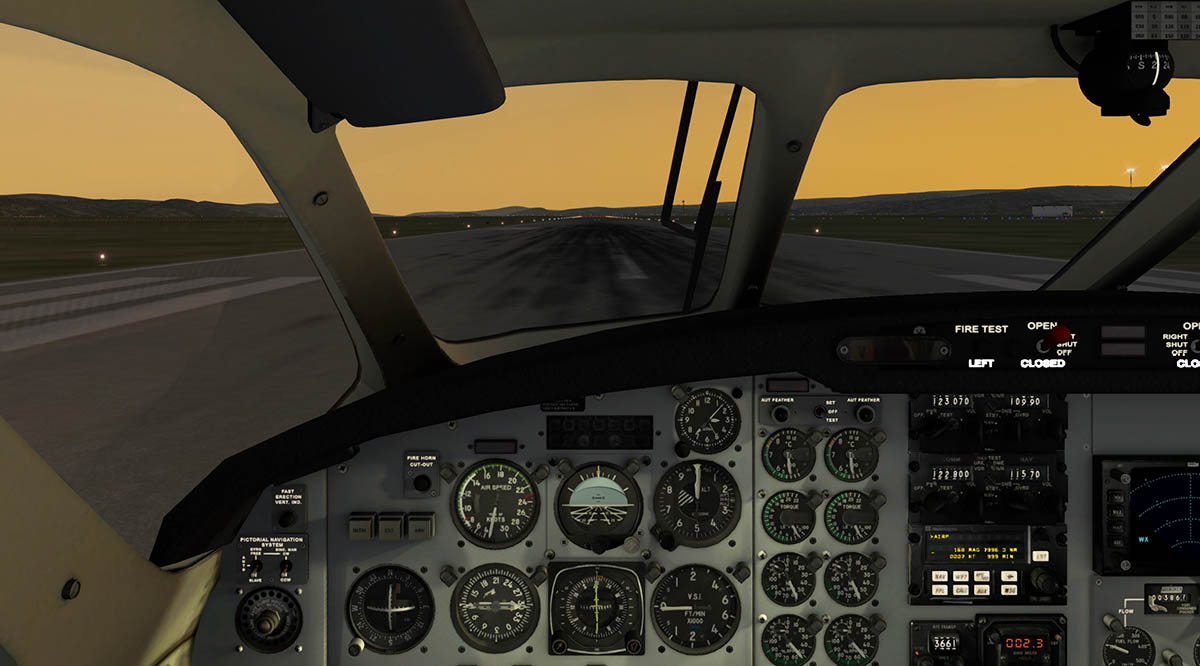
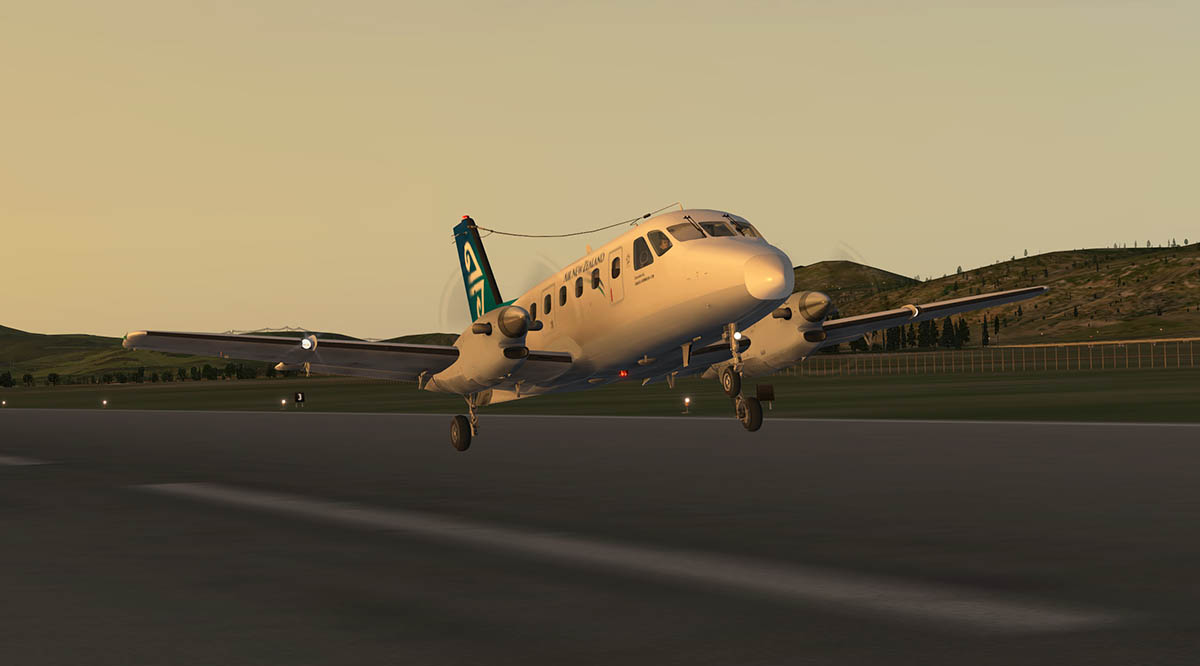
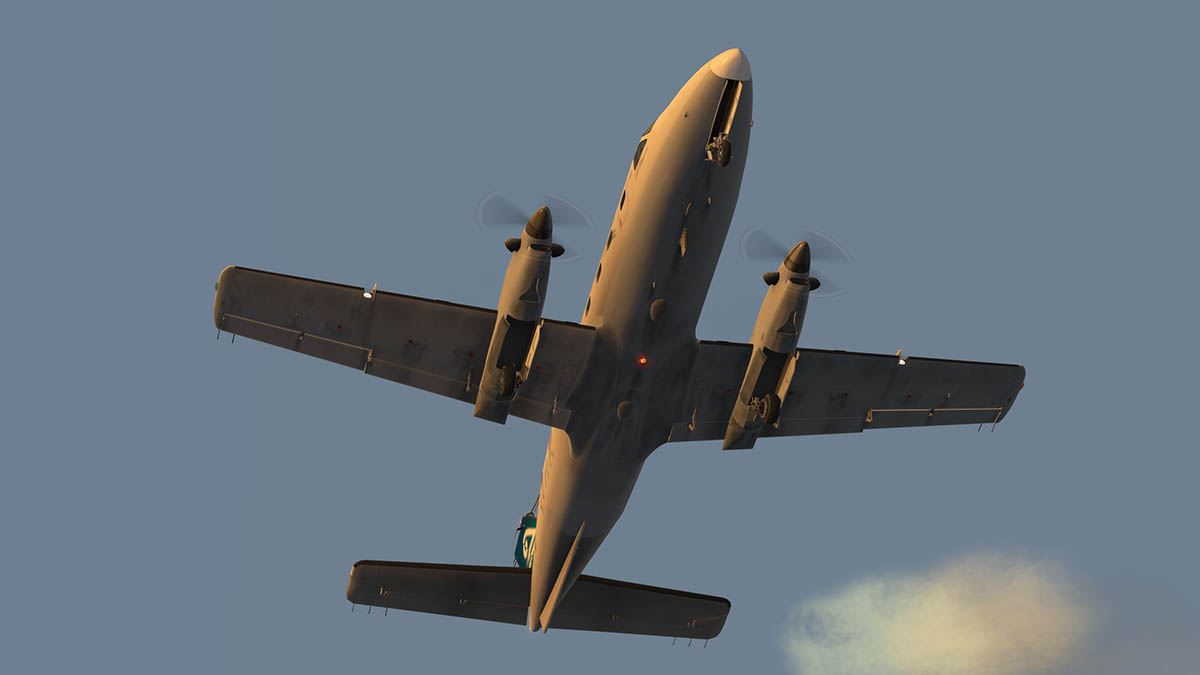
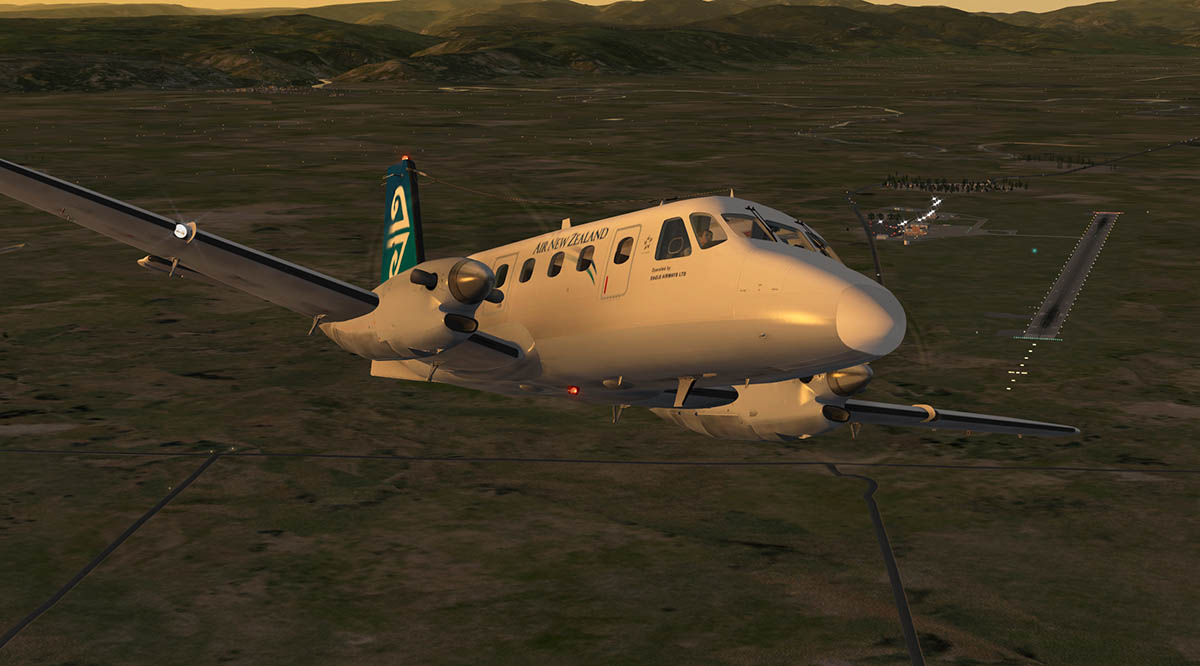
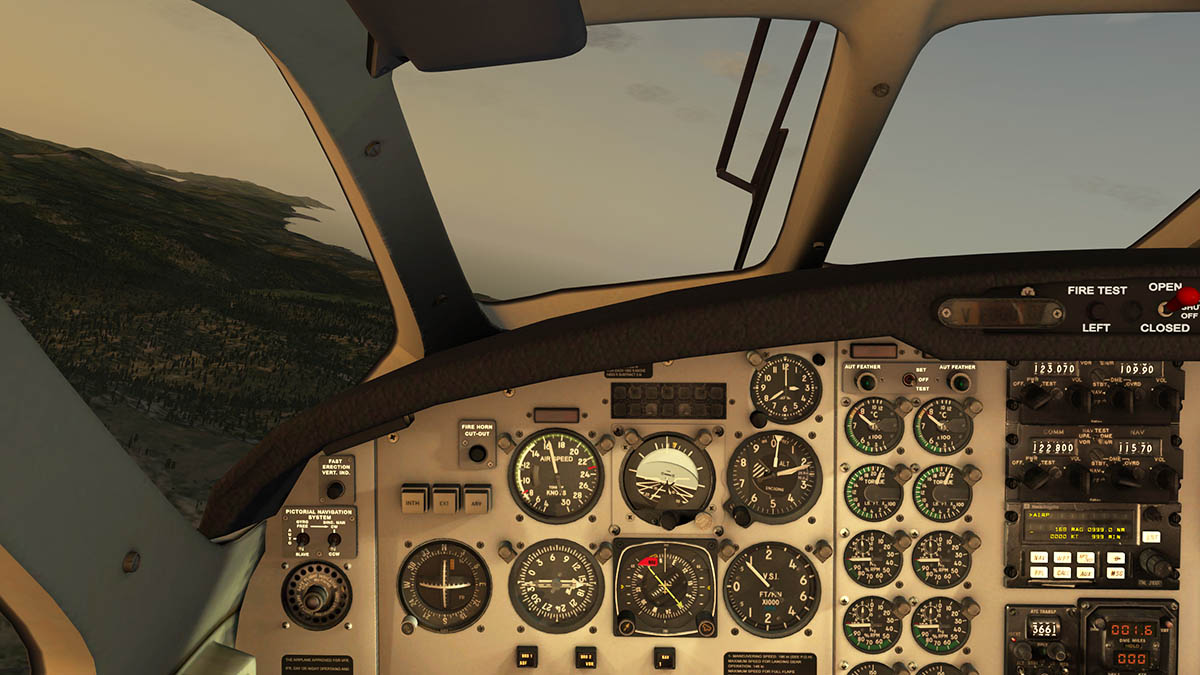
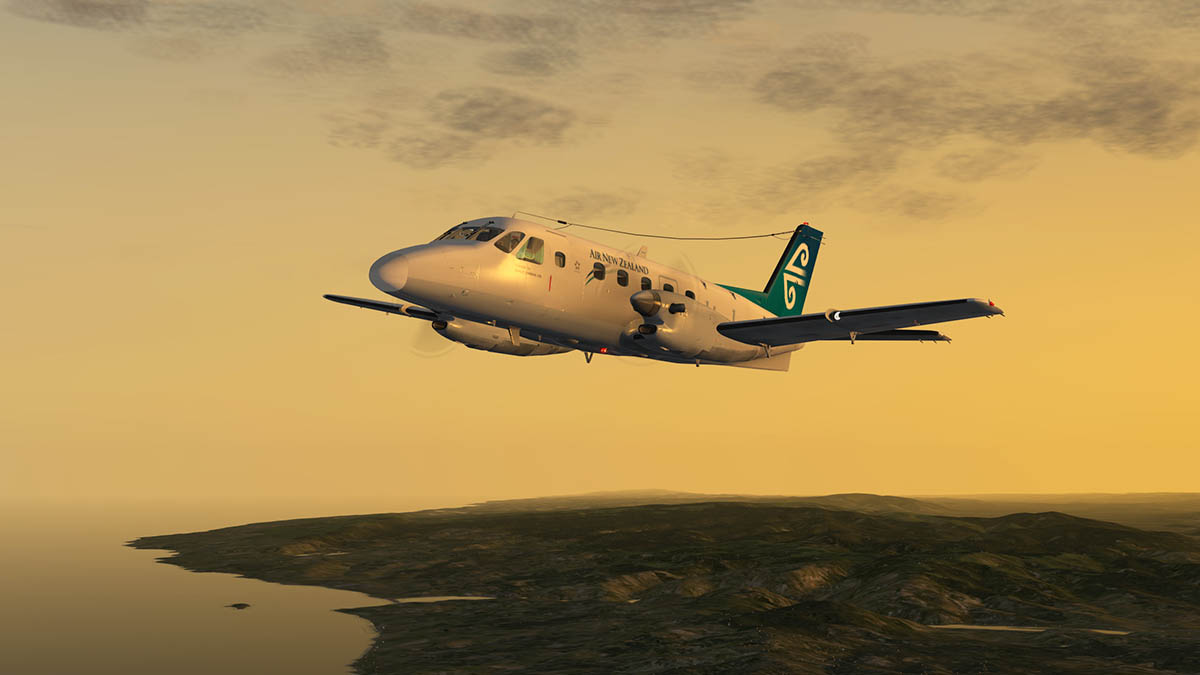
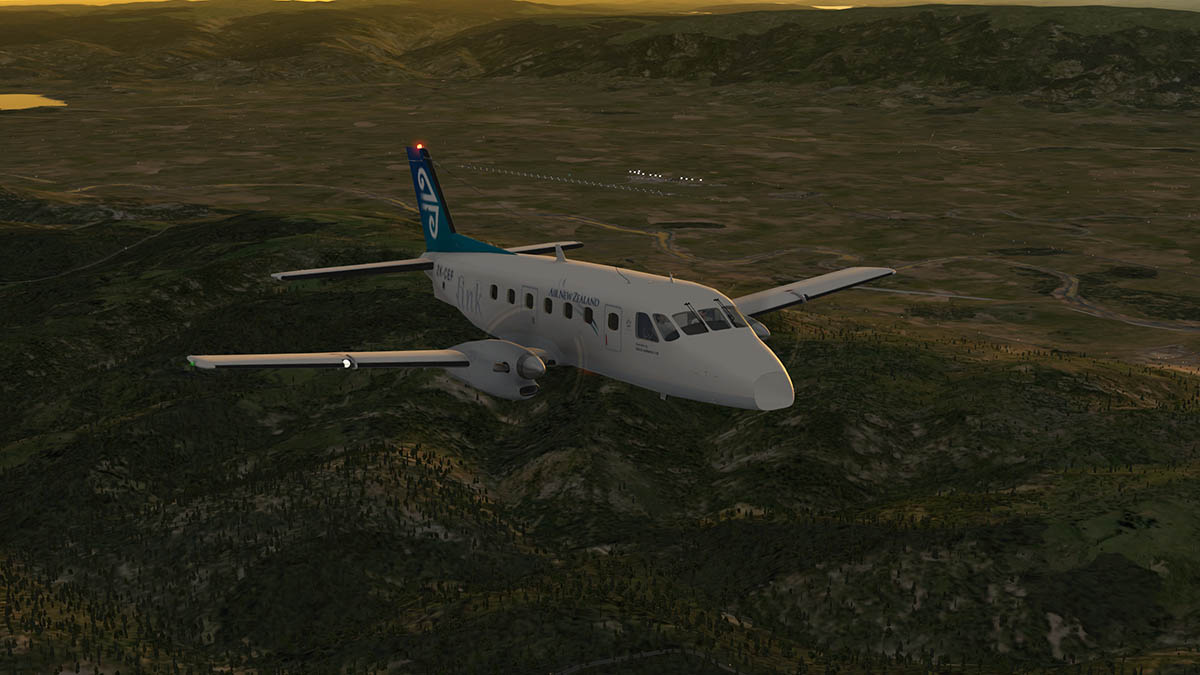
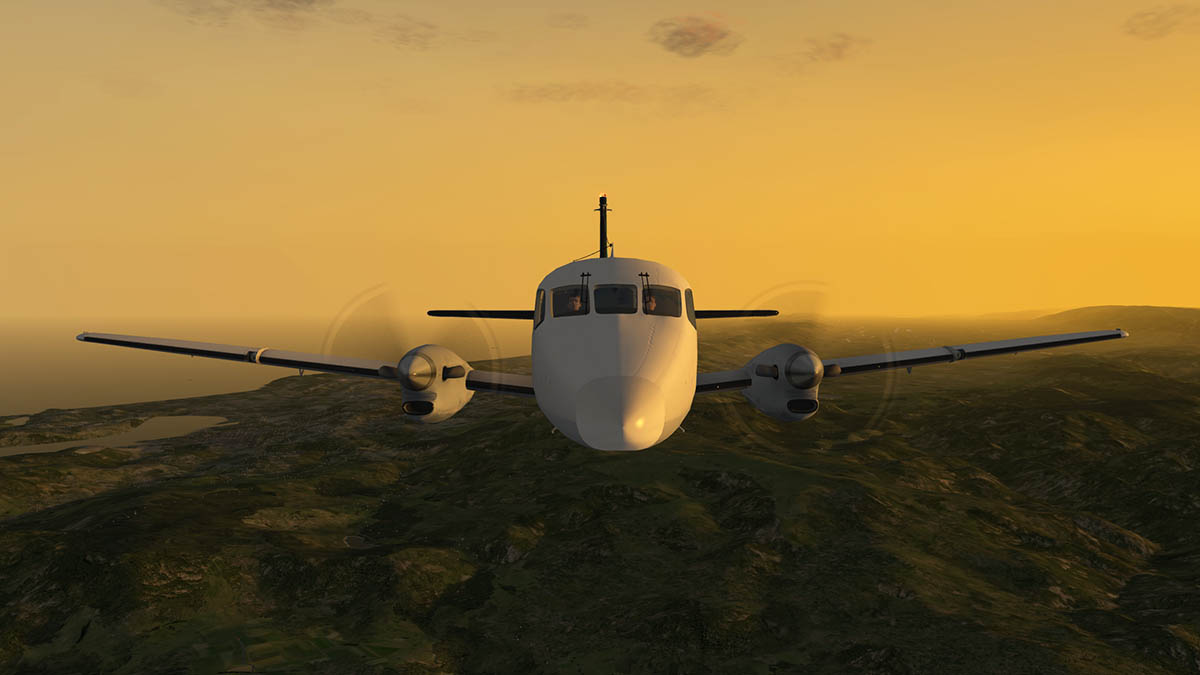
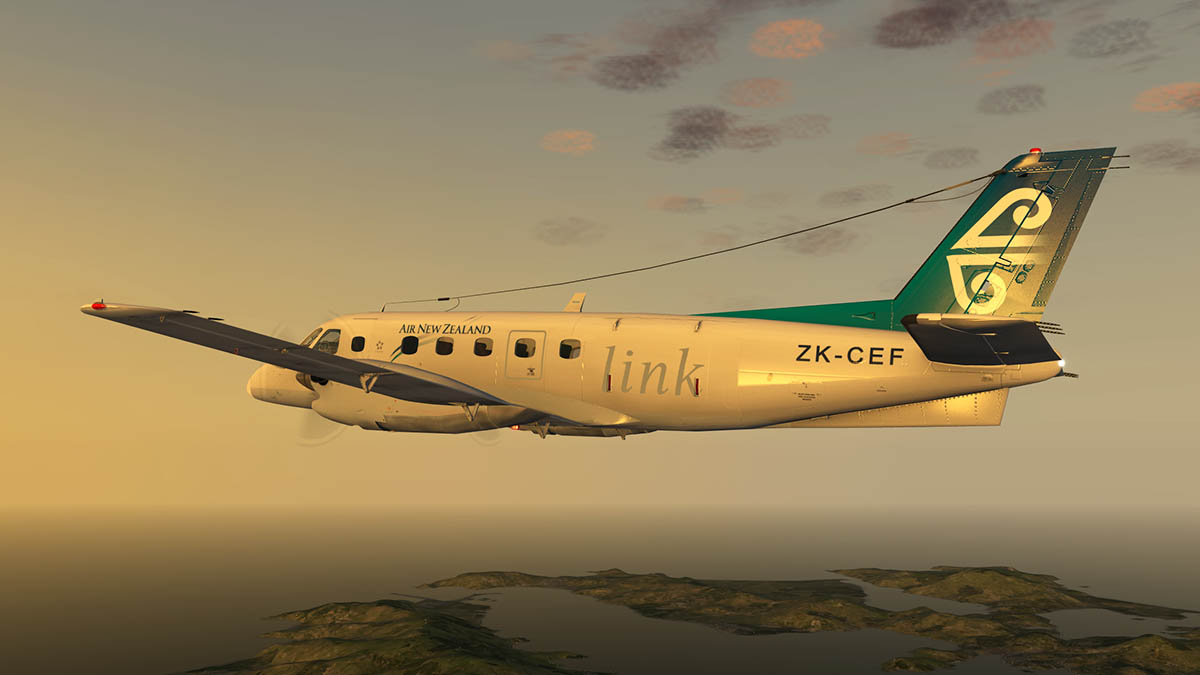
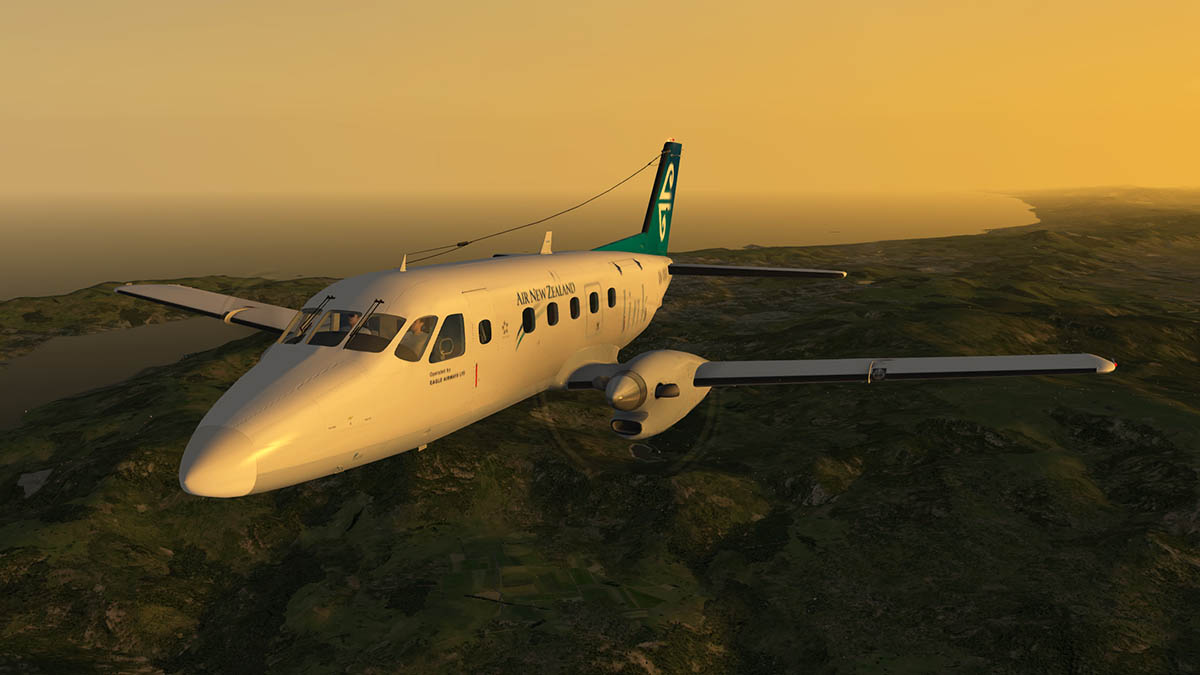
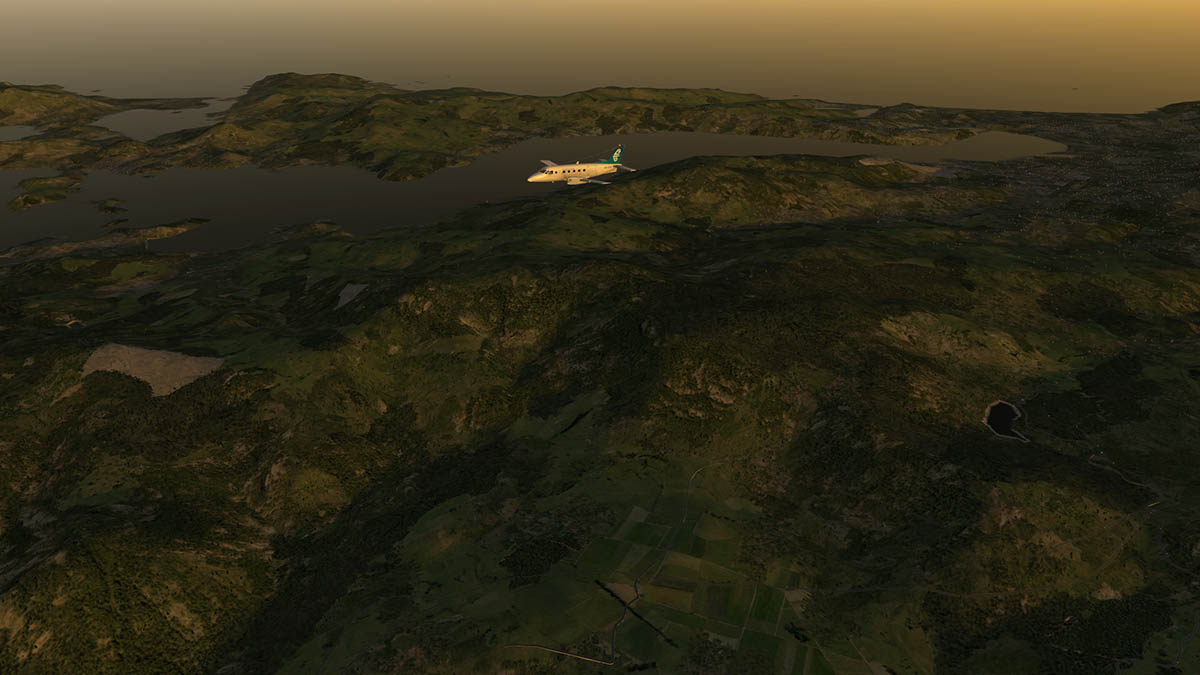
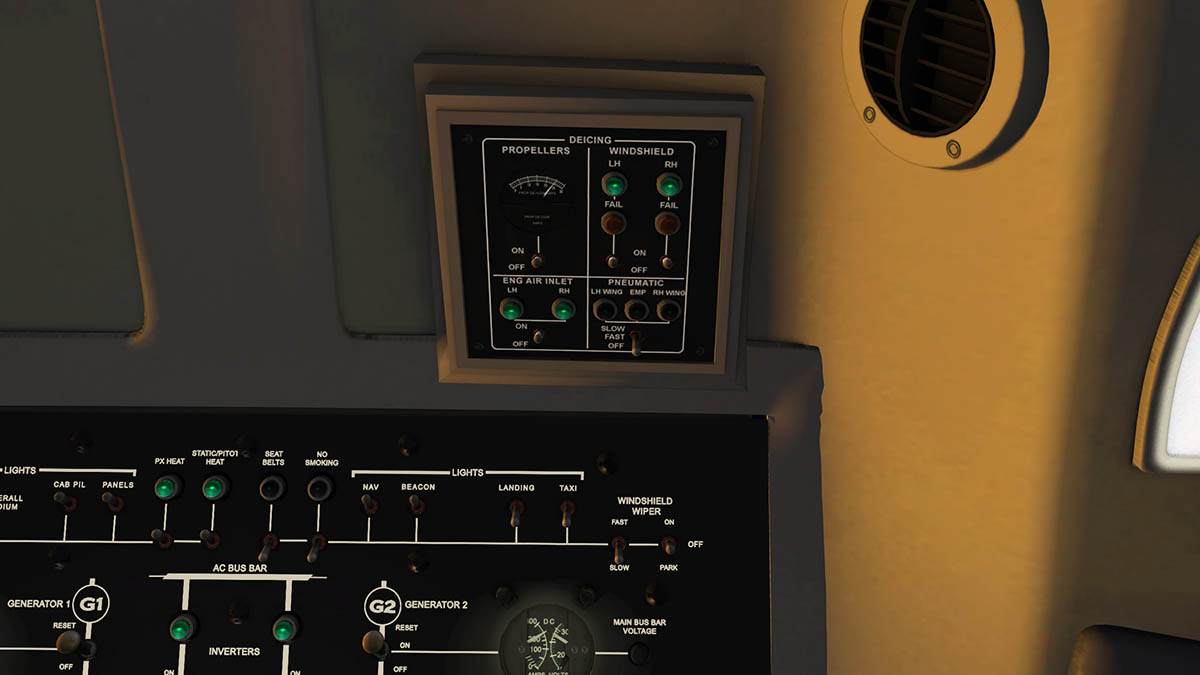
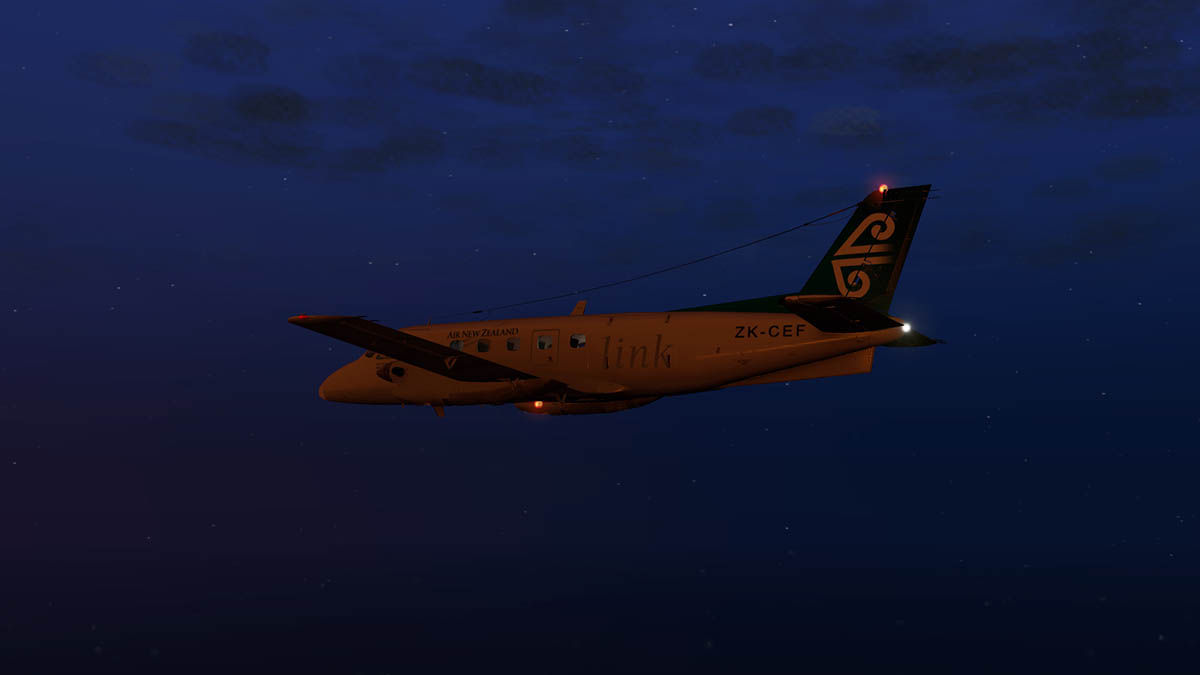
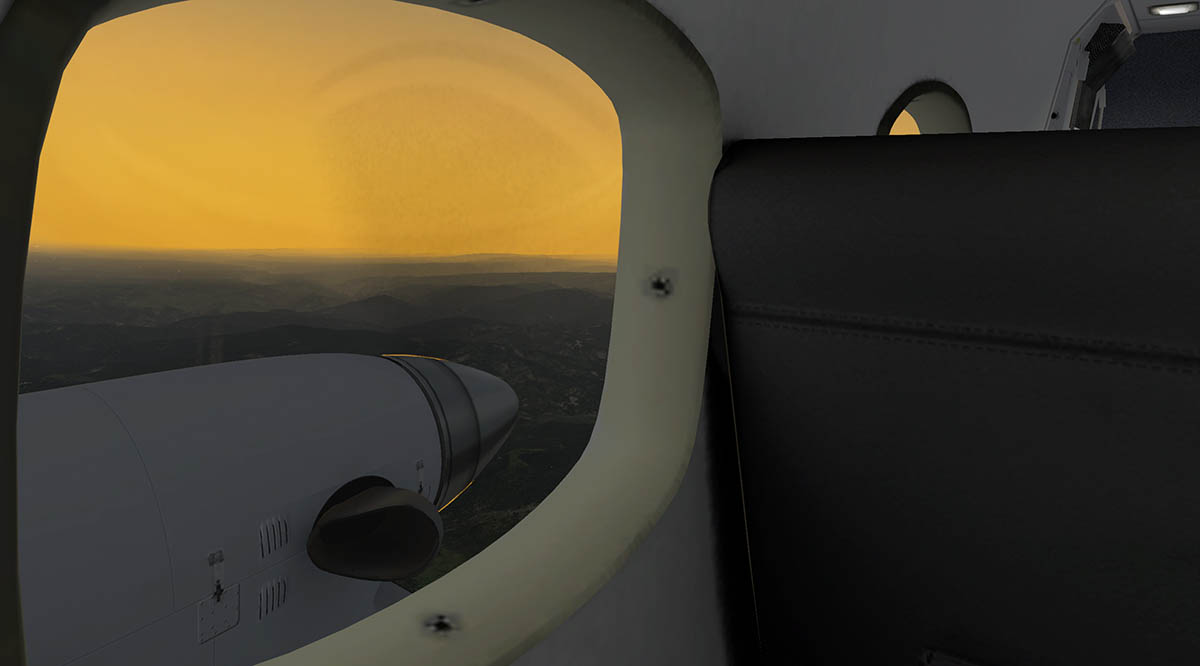
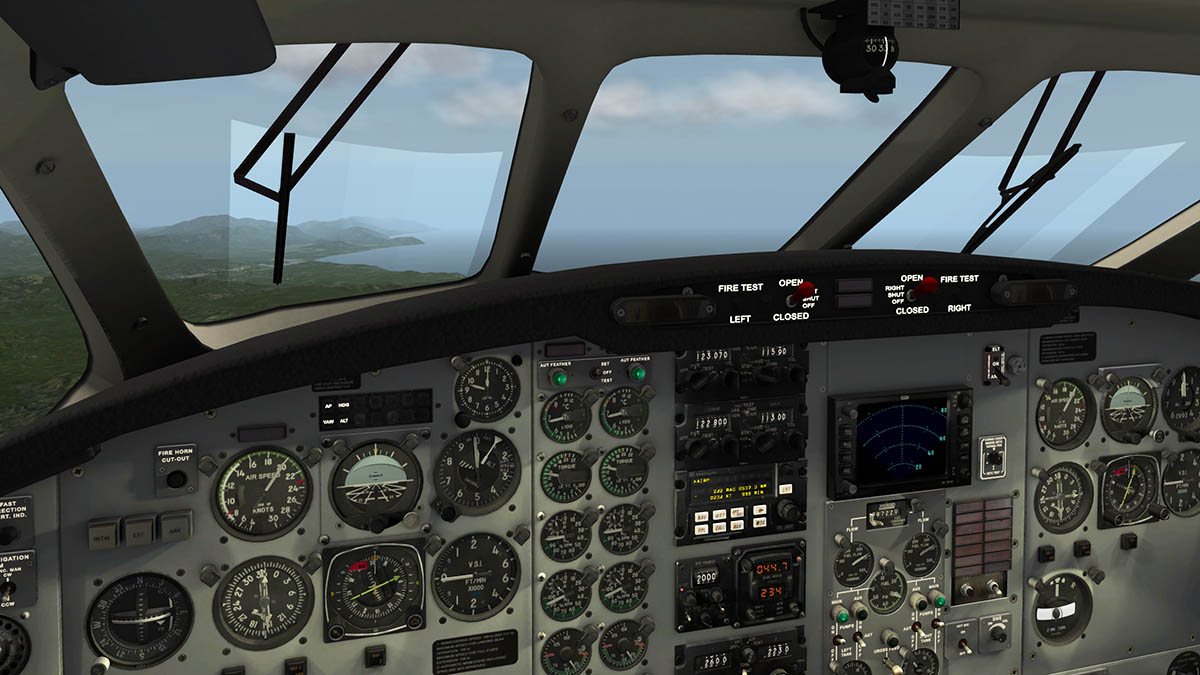
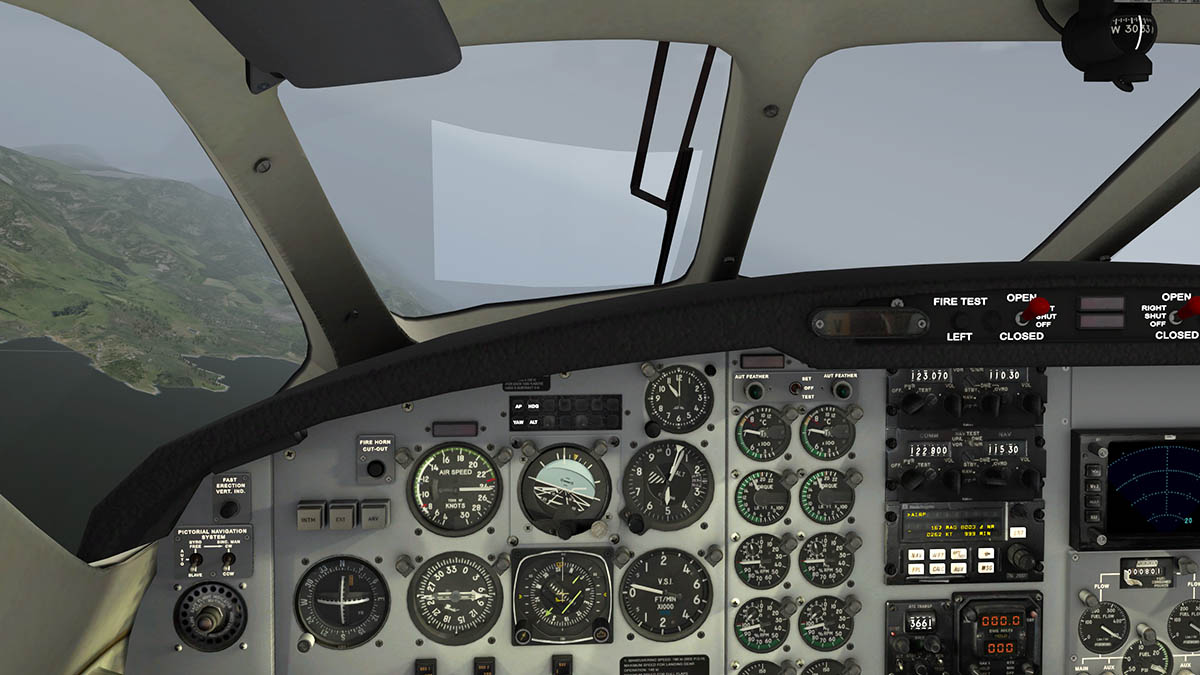
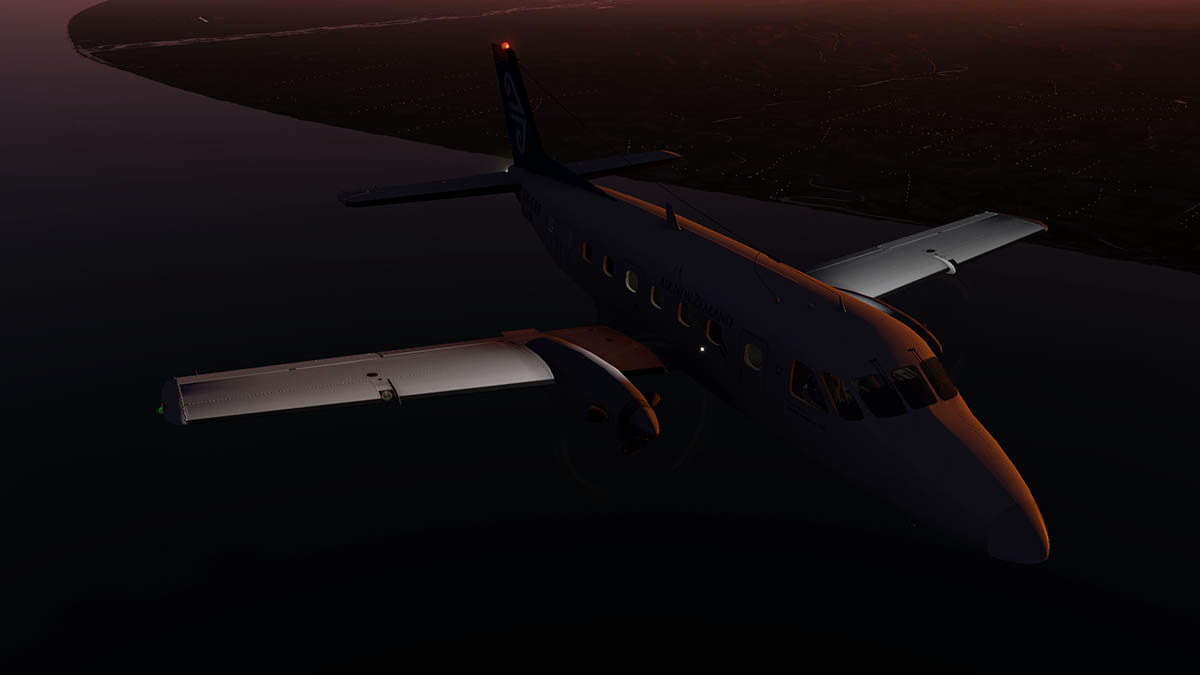
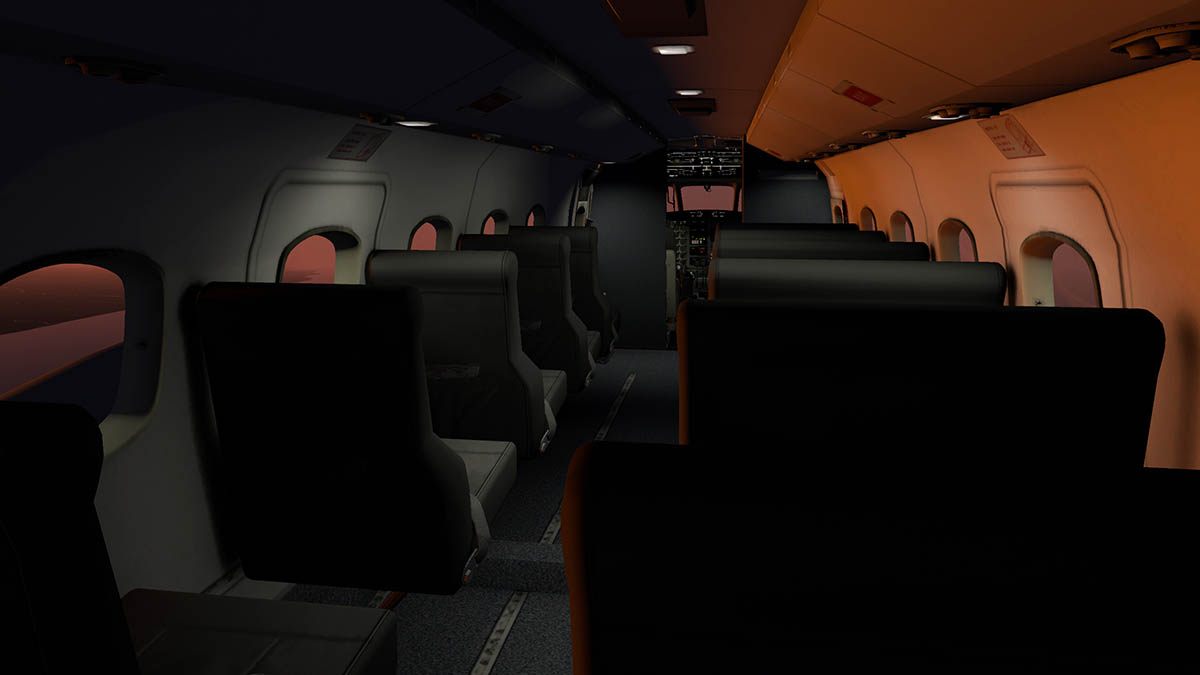
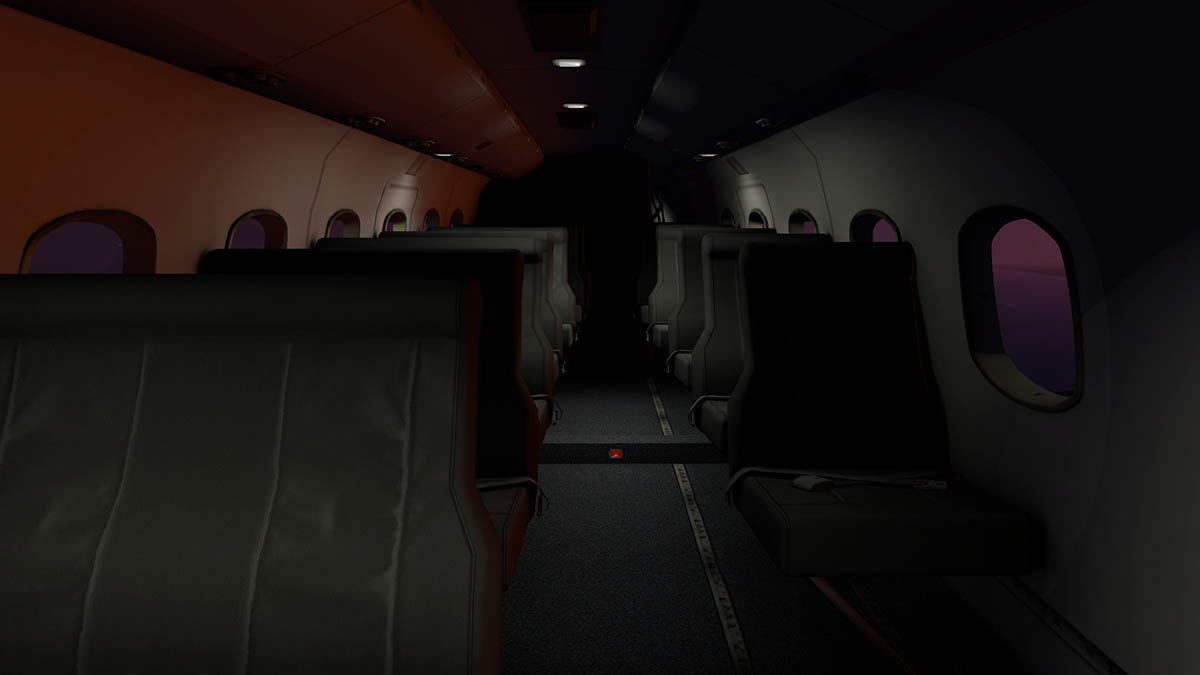
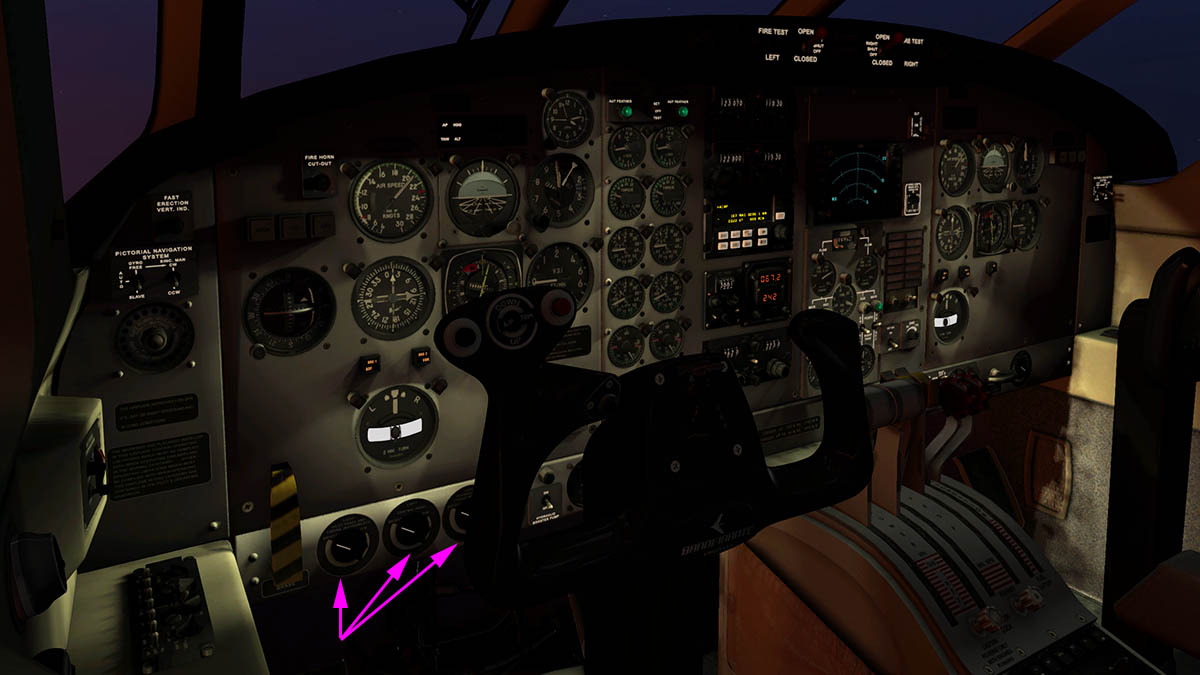
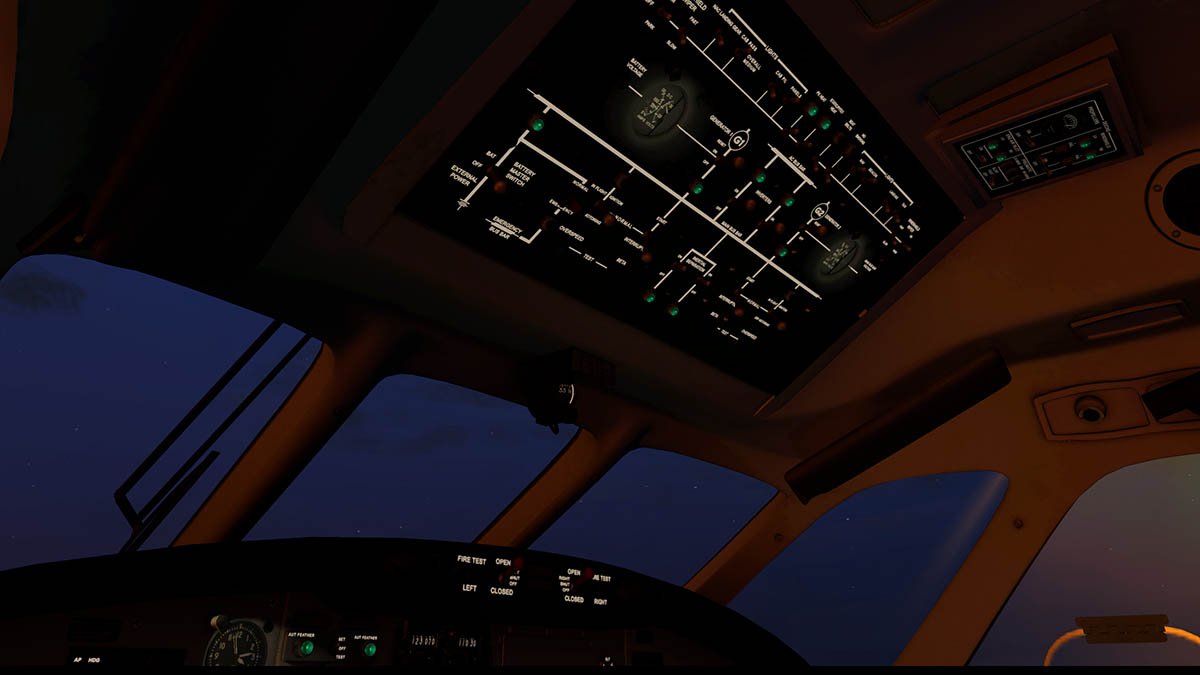
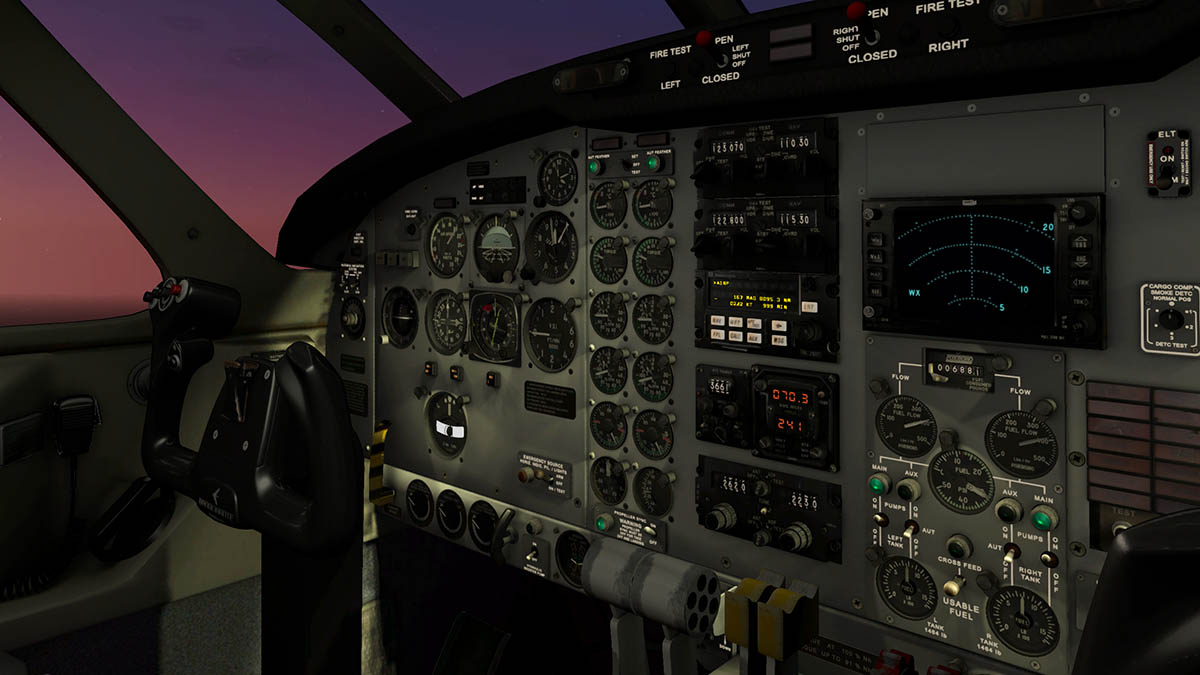
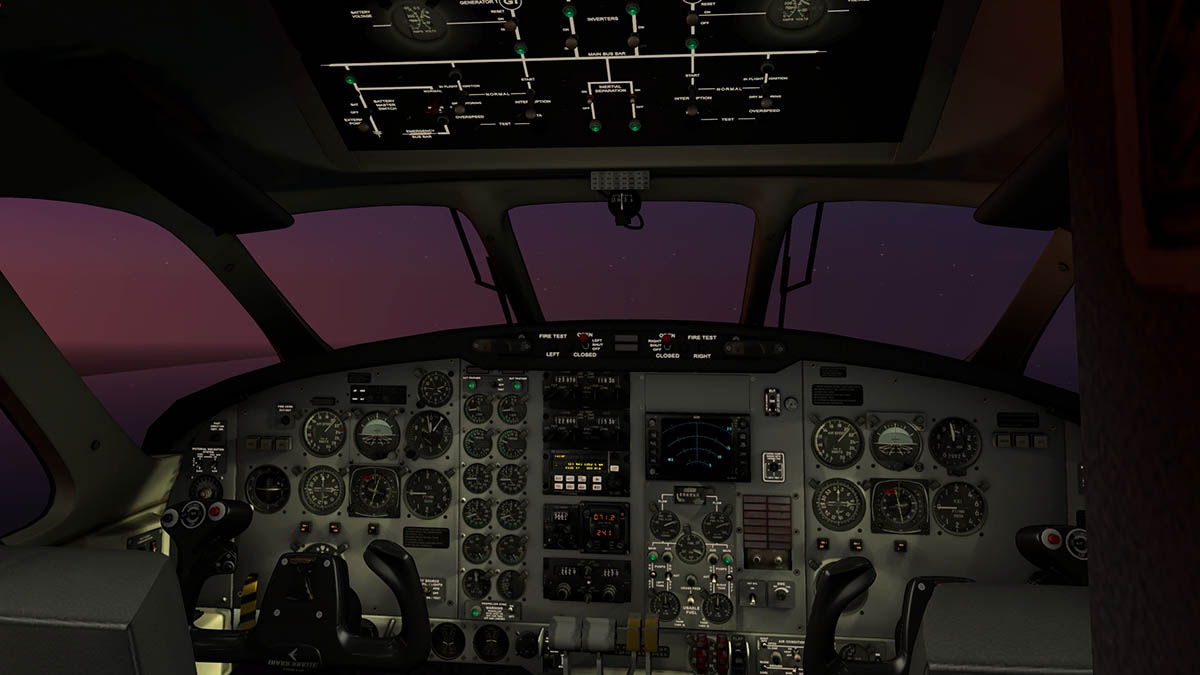
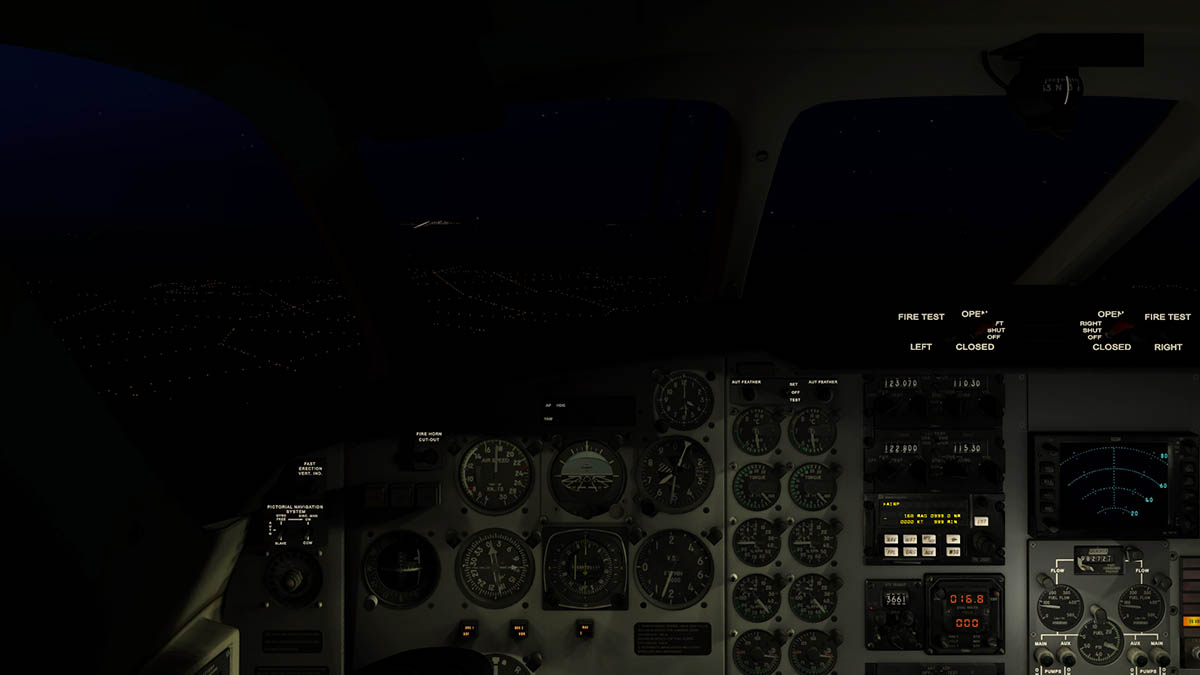
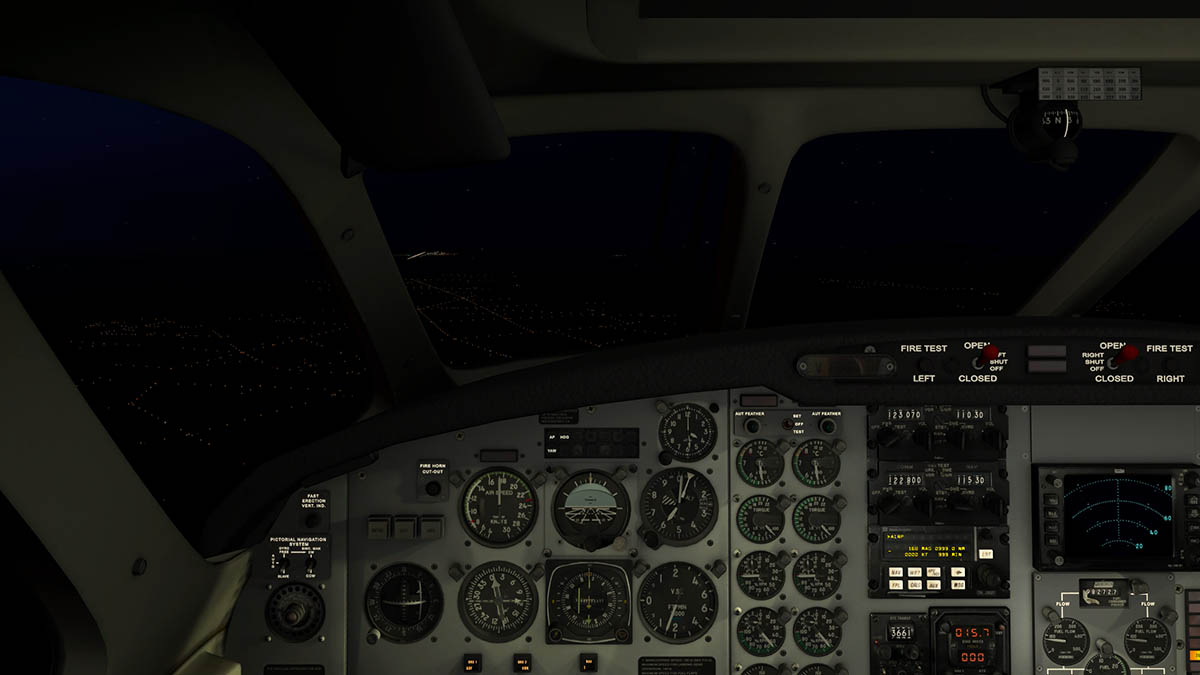
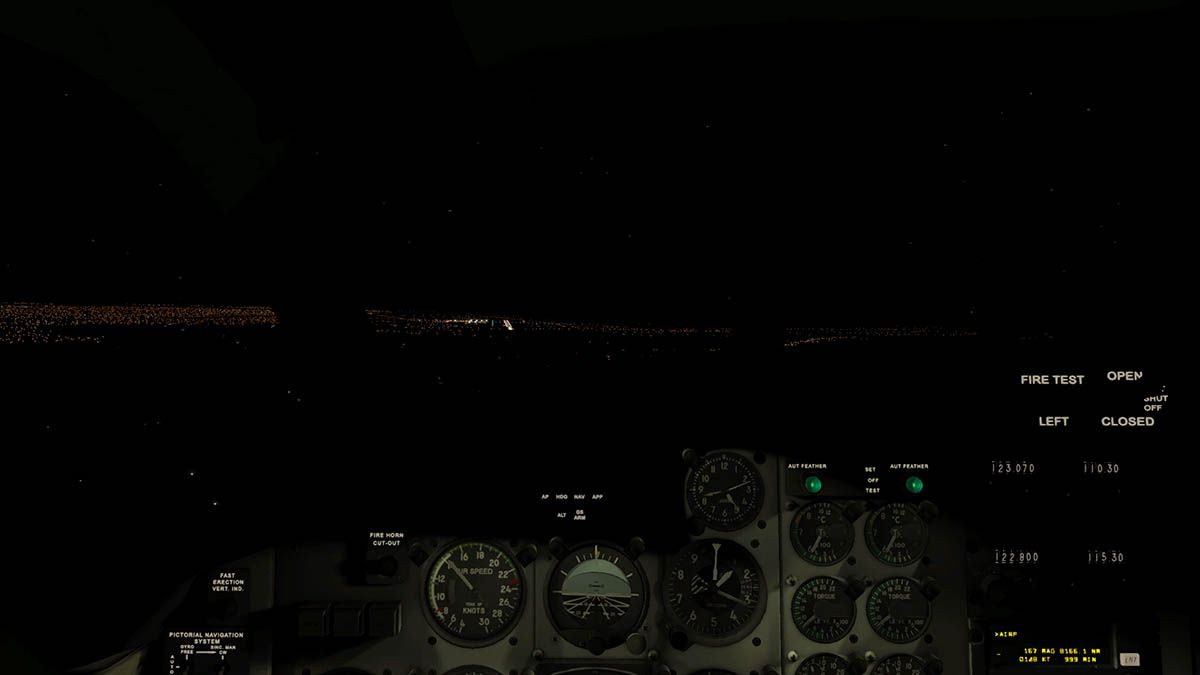
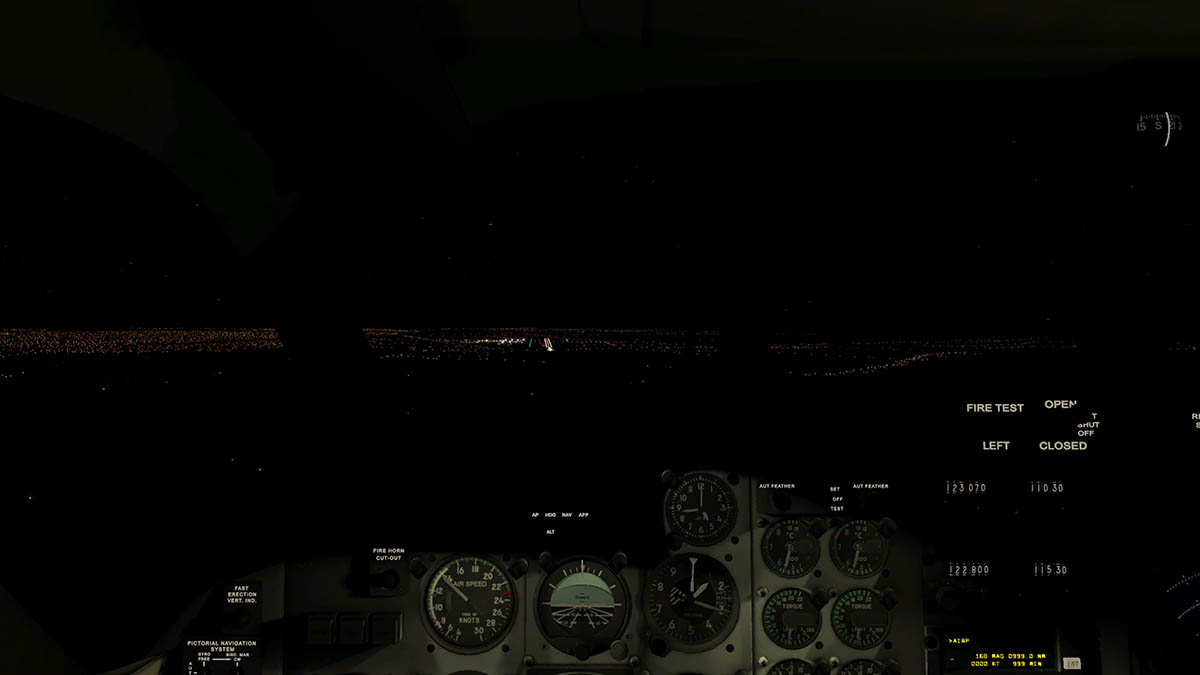
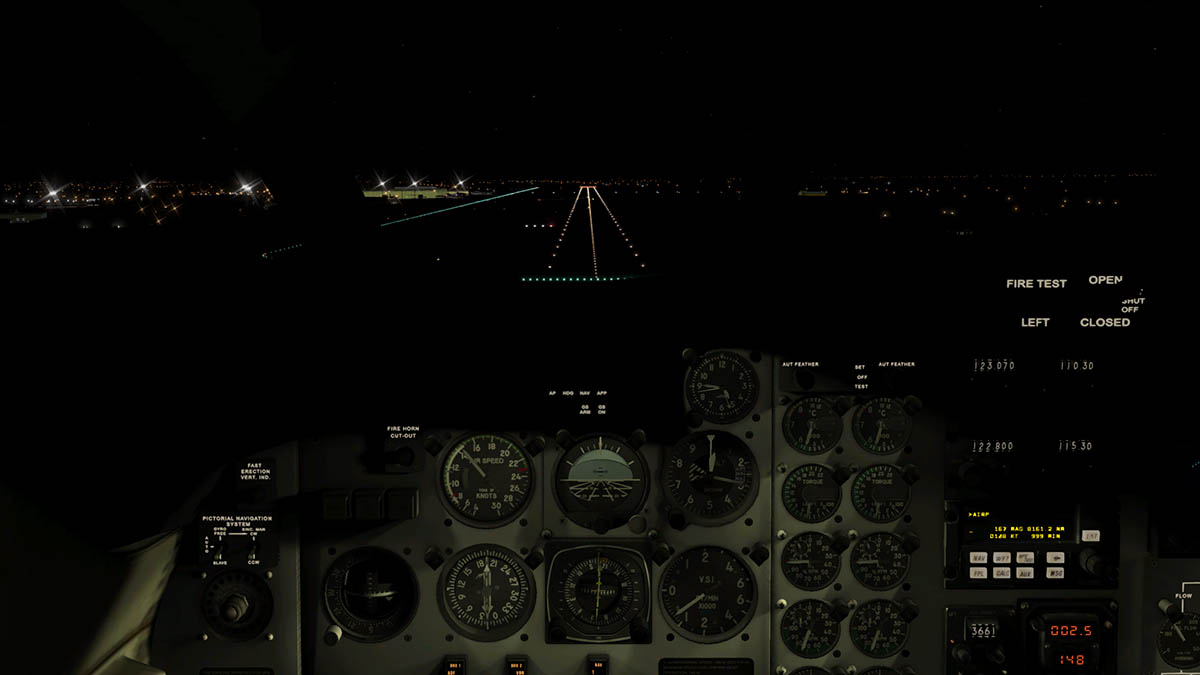
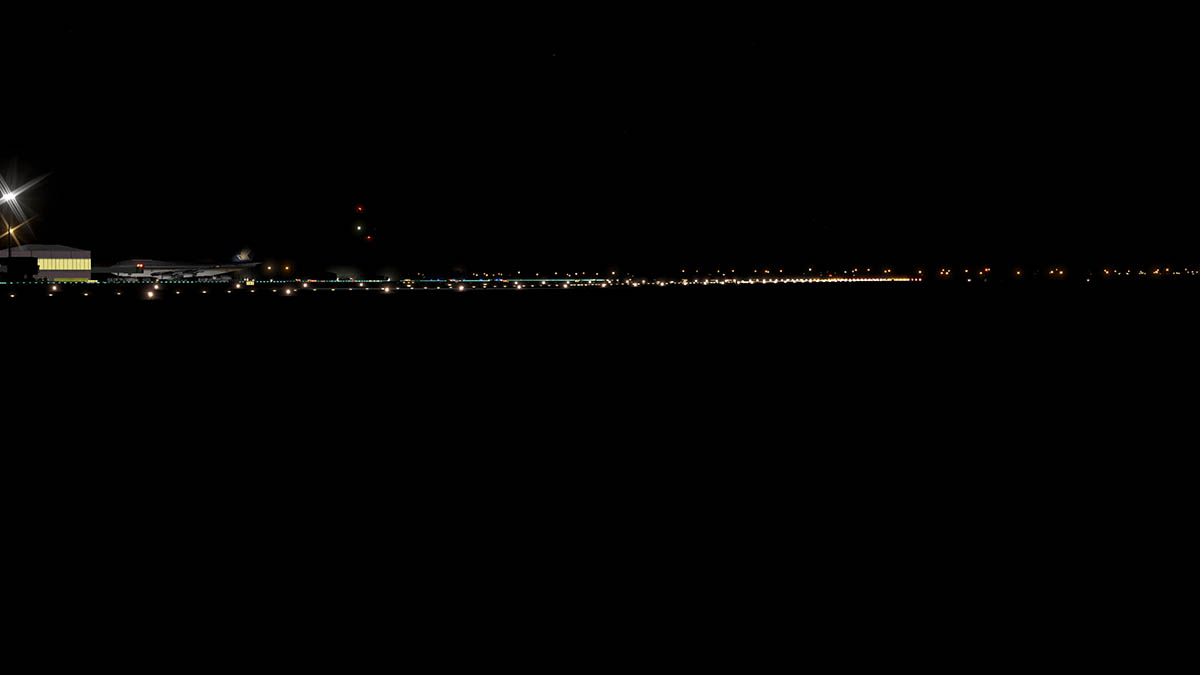
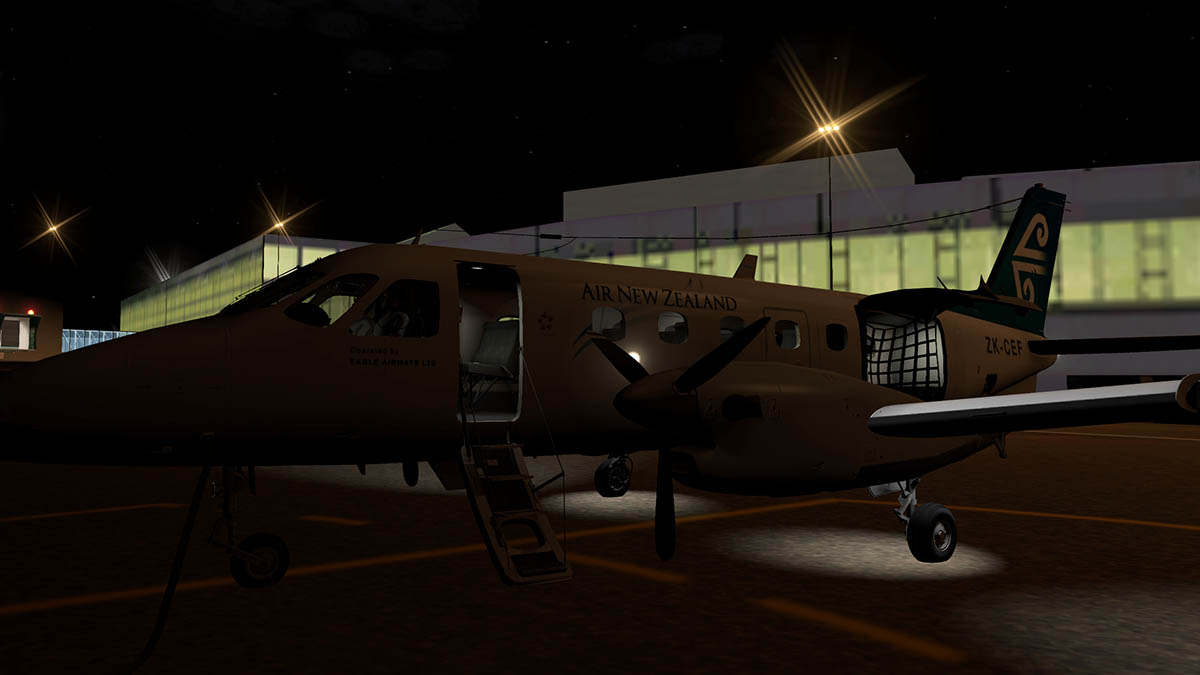
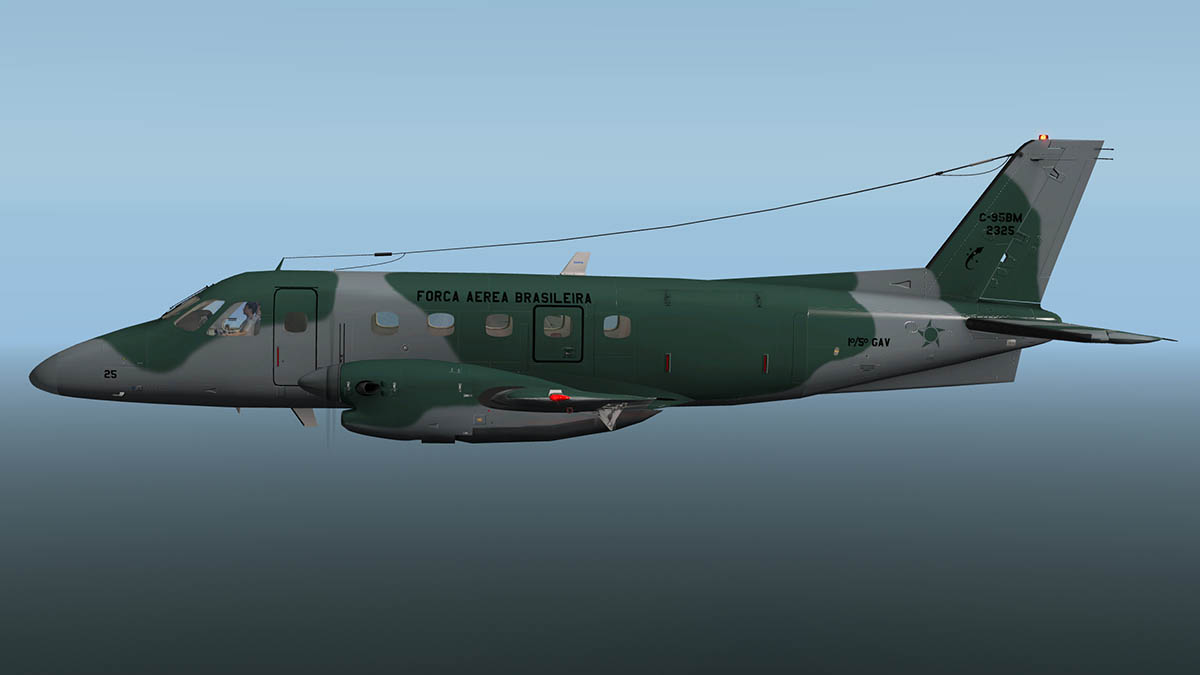
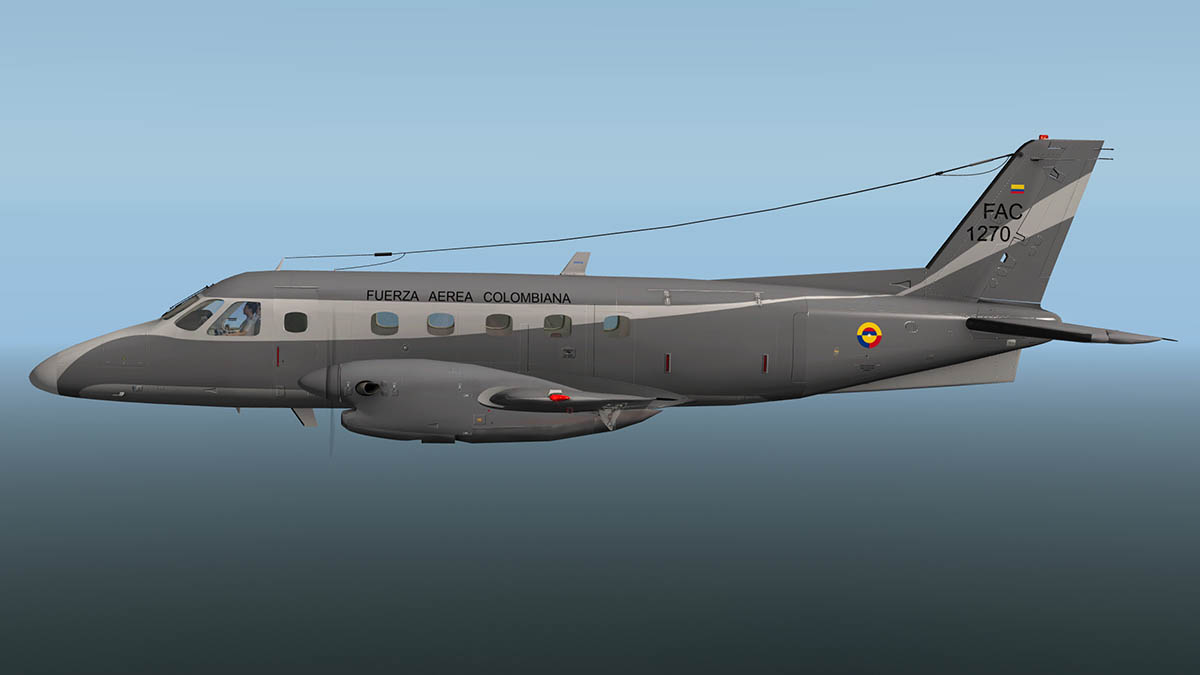
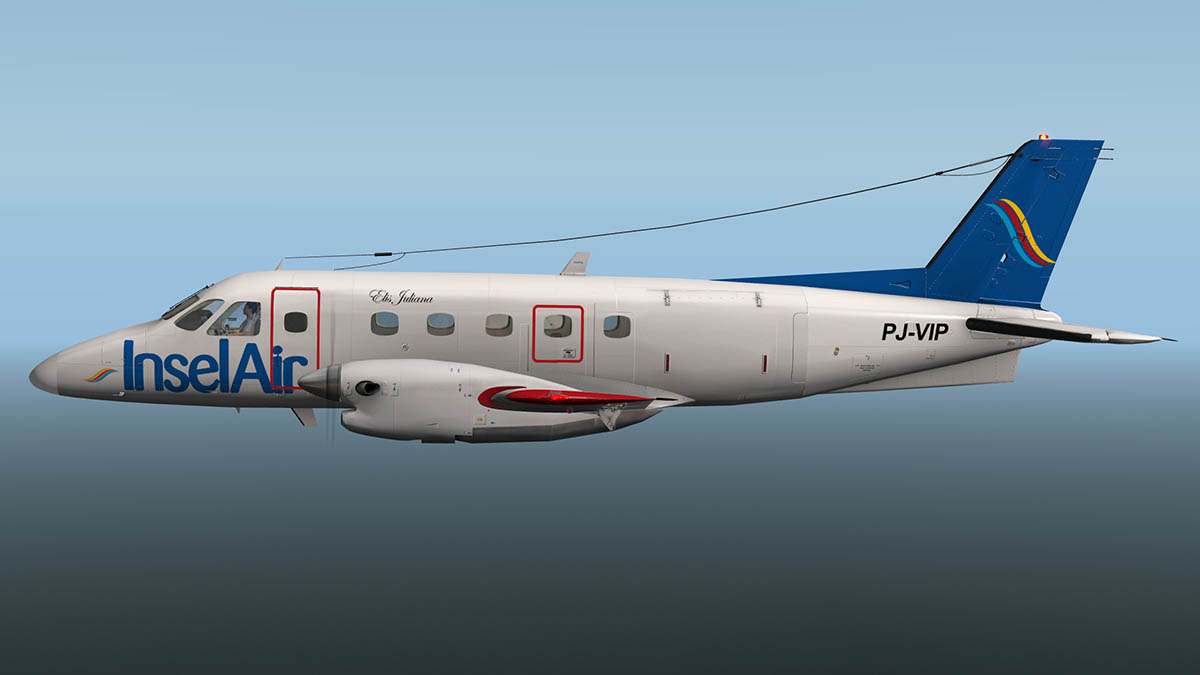
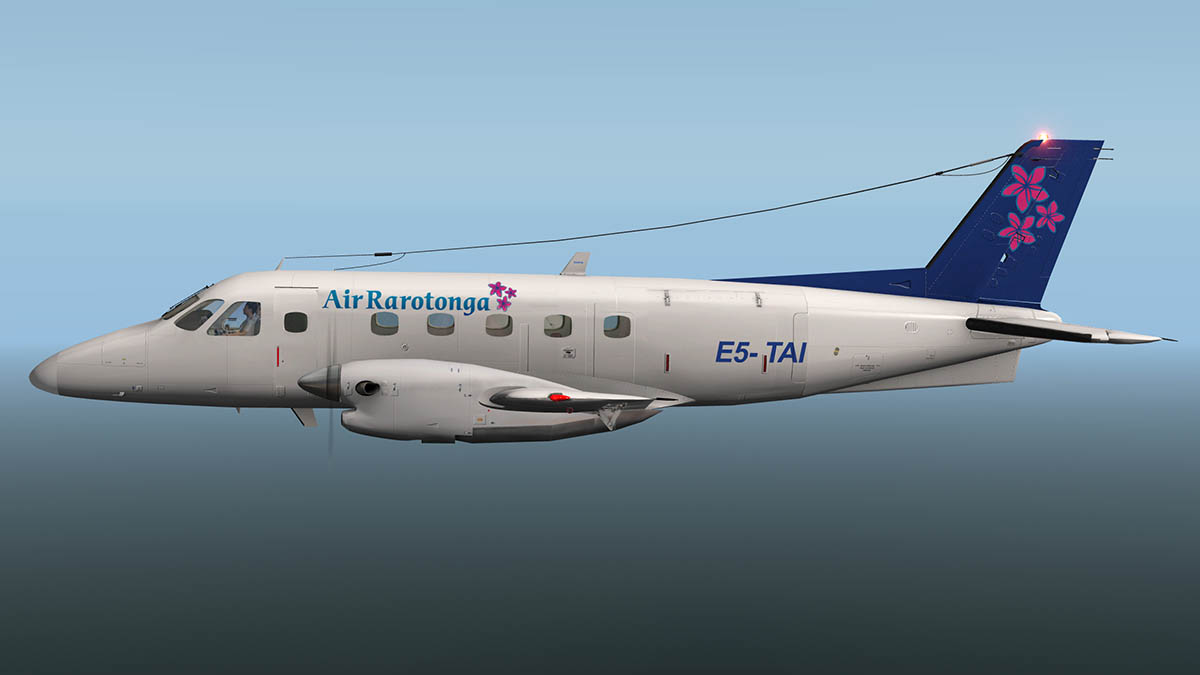
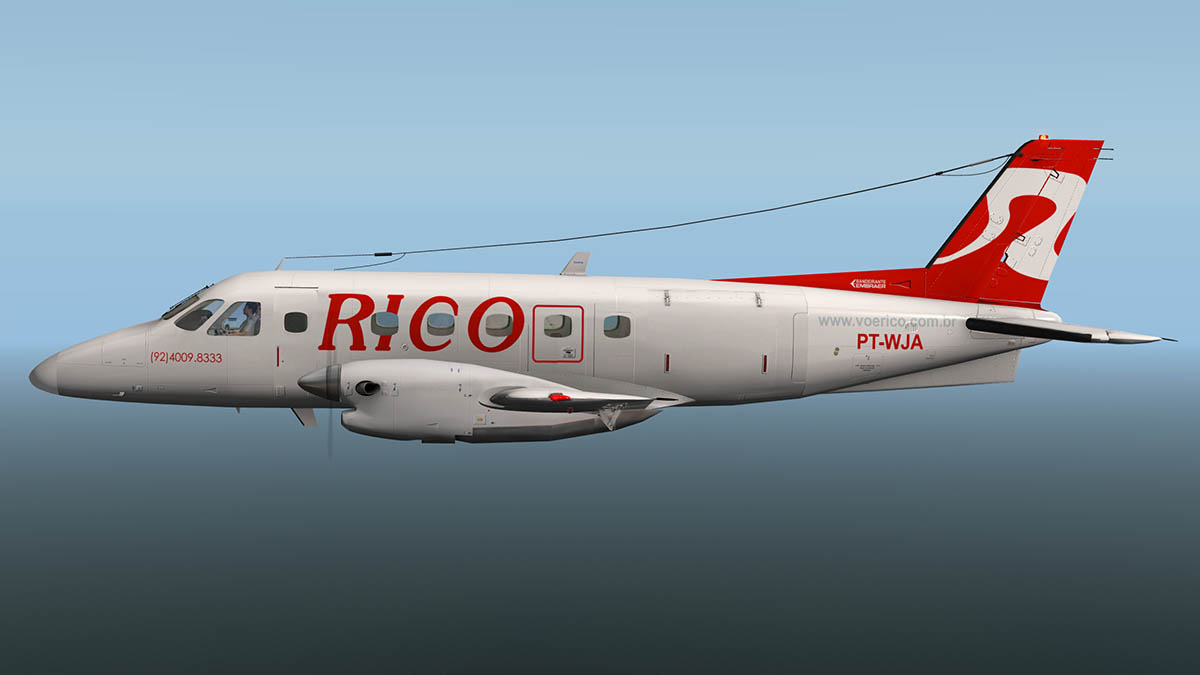
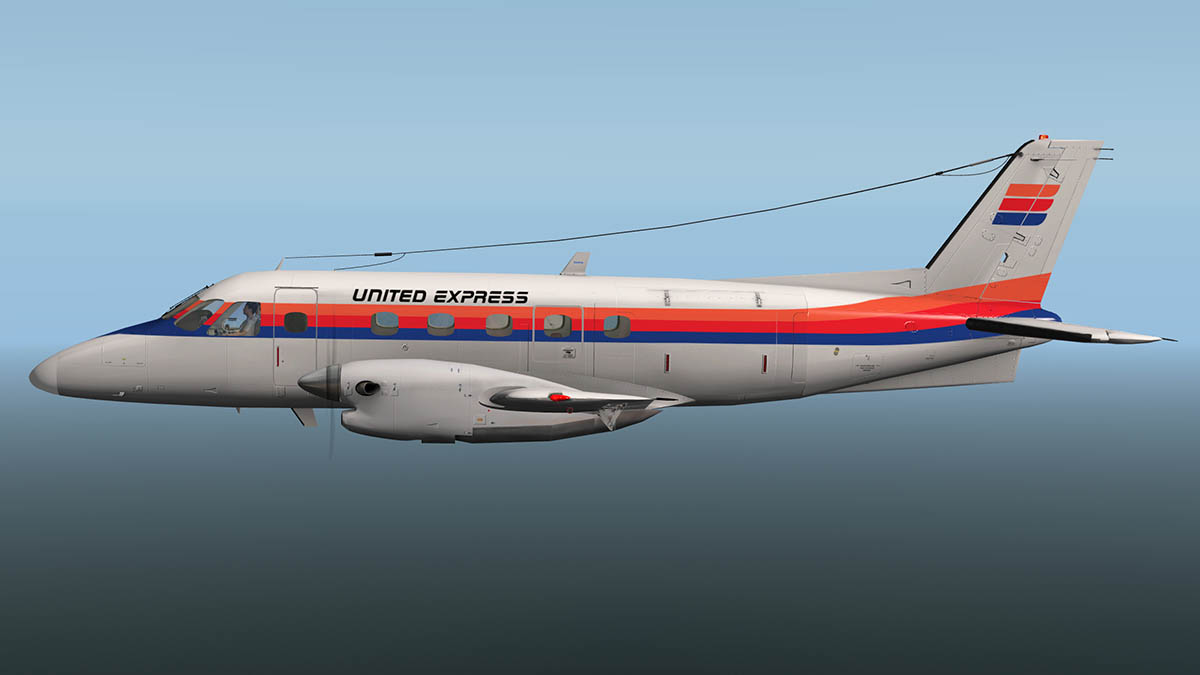
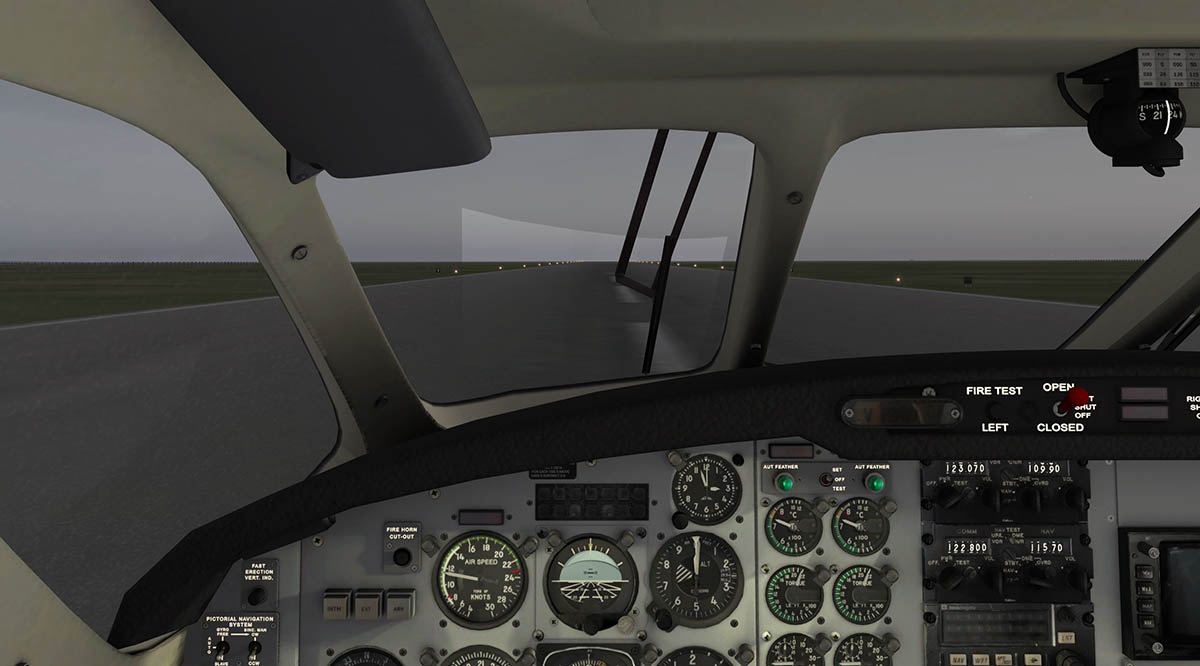
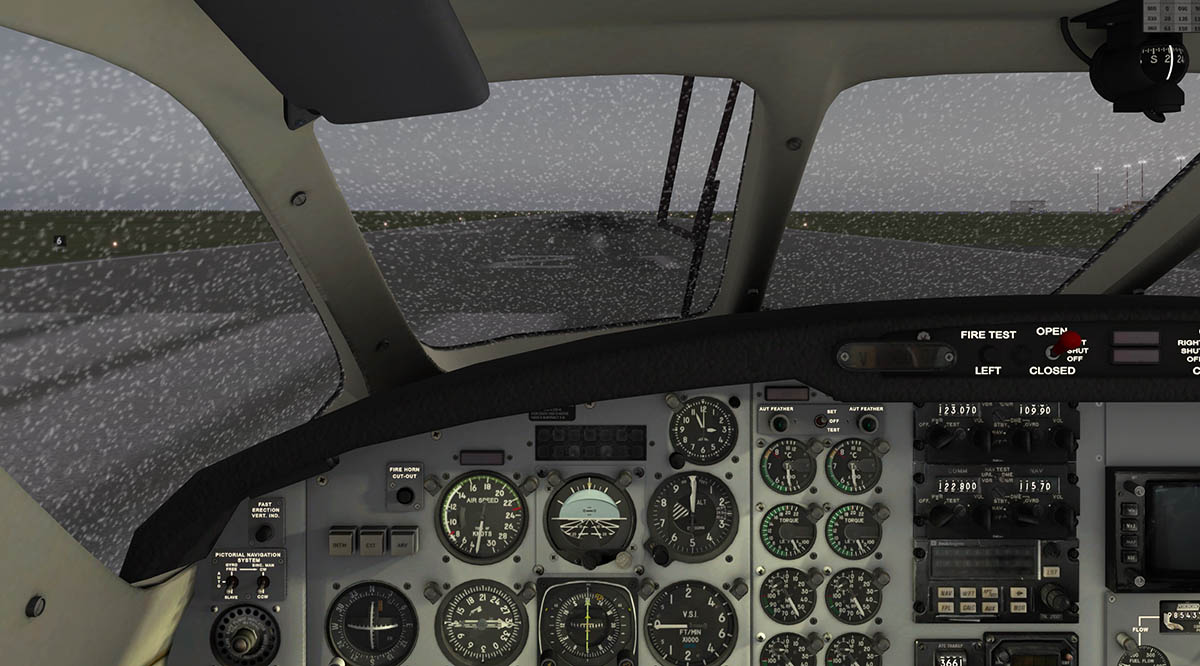
Aircraft Review - Embraer EMB -110 Bandeirante by Dreamfoil Creations Dreamfoil Creations are better known for their excellent Helicopters than a Twin-Engined commuter aircraft but here you have one in the Embraer EMB -110 Bandeirante (Pioneer), but in respect the aircraft was created by Lidimar Santos and not Conex but he was still expertly part of the team in adding the Dreamfoil Creations Plugins, SmartMenu and DreamEngine. Also in another aspect you could follow the development of the aircraft on the X-Plane.Org development page since early 2014. In most cases you would usually drop into the Dev page every now and again and see the latest work, but it was a sudden and total surprise when it was suddenly released early June 2015. The first thought was that... "Is it Ready?" It was and an even bigger surprise was how very complete it was, more so is that how good it actually is as well. So surprise here comes in many different forms, adding to the fact on how quickly the aircraft became an X-Plane favorite of one of the really (really) good commuter aircraft (which is a very crowded and loved market) available for the simulator. History The EMB-110 Bandeirante was the first aircraft built by Empresa Brasileira de Aeronáutica or Embraer as we now know the Brazilian aerospace company that started out building Piper Aircraft light planes under license. Piper had first put together knock-down kits in their US factory for Embraer to assemble and market in Brazil and Latin America. The EMB 110 was designed by the French engineer Max Holste following the specifications of the IPD-6504 program set out by the Brazilian Ministry of Aeronautics in 1965.And the goal was to create a general purpose aircraft, suitable for both civilian and military roles with a low operational cost and high reliability. The first prototype, with the military designation YC-95, was flown on 26 October 1968 and two other prototypes were built and were known as the EMB 100. By 1969 an order was placed for 80 production aircraft, by now known as EMB 110 Bandeirante, for the Brazilian Air Force (FAB) with the now newly formed aircraft company Embraer. The EMB - 110 was very successful, but the ambitious company quickly ceased further development of the EMB 110 which was halted by the manufacturer in order to shift focus to the larger, faster, and pressurized 30-seat EMB 120 Brasilia, but still over the next 21 years Embraer built 494 aircraft in numerous configurations for a variety of roles. Embraer EMB -110 by Dreamfoil The first thing that you are aware of when first encountering the EMB -110 is the quality. The aircraft is certainly in Carenado territory in style, feel and design. It has a quality air all around it. And that will certainly create a love at first sight (not flight). It is not a Carenado of course but the detailing and execution of the high quality work is highly visible. This is quite obviously if you look at the aircraft the best design for a 15-20 passenger commuter machine you could develop and build, and yet you would be hard pressed to recognise one at your local airfield unlike a Twin-Otter that is far more famous and fills out more airline fleets. Maybe Embraer should have developed the aircraft more and then realised its full market potential. Once familiar then the aircraft tends to appear everywhere, I have found four around me here in Queensland, Australia that I never knew existed, so there you go. And there is now some smug boasting in noting that "That is a Bandeirante" to your fellow observers in knowing the aircraft's better status. For this review we are flying the EMB -110 from the south coast of New Zealand and Invercargill (NZNV) to Dunedin (NZDN) and then on to Christchurch (NZCH) in a commuter connection role. My first impressions are that the aircraft is powered down, tagged up and waiting my preparation and ready for flight. Approaching the machine I really love the aircraft, the Bandeirante looks a workhorse and ready to do a day's (or week's) work. Unlocking the aircraft is one of the best solutions yet and a DreamFoil Creation feature. You have a set of small arrows on the door locks that opens the doors... The rear large cargo door lock is not on the actual door but on the door switching panel behind (and you can spend ten minutes banging on the cargo door like an idiot like I did in trying to find it?), but no doubt well done. You can access the door menu from the inside as well if you need to. Secondary ground "Static Elements" are very good with engine inlet/exhaust covers, rear support bar and wheel chocks. Again you can press each arrow marker to make them appear or disappear, or press on the nose for the full menu which you can again select each element separately or use the "Remove All" or "Add All" selections. Static elements sorted it was time to climb aboard. Note the great set of stairs, great animation as well. Internally in the cabin it is an impressive fitout. Realistic seating for 19 passengers give off that worn leather look, although the single seats look a little narrrow? Rear of the bulkhead is the rear cargo area with excellent netting but no luggage or cargo. A sample image of the side wall paneling gives you the quality of the cabin design, panels/window surrounds are perfect, signs and passenger air feeders are beautifully created in detail, so the cabin is perfectly realised. A step up to the cockpit entrance and you are spellbounded! Good, great amazing or just brilliant as any statement says how brilliant this is. It is good in every respect, get down low and look at the detailing under the crew's seats, the pedestal the detail everywhere is overwhelming. The panel itself is again fabulously created, perfectly realised in every aspect... almost real. There is so much detail to take it can easily be overwhelming. We have had so much great cockpit design lately and the Carenado PC12 (Pilatus PC12 HD Series) comes to mind, but here again X-Plane and Dreamfoil Creation delivers a great experience. The contrasting cream/beige cockpit formed fittings is excellent, with minute detailing as small as clips on the edge of the overhead panel holding it on to the roof. More setup options are available with the internal menu (disk) system when you click the top of the central glareshield clickzone. Anyone who has flown any of Dreamfoil's other aircraft will be very familiar with this circular disc selection system called Smartmenu. Going counterclockwise the top one is the "SmartLivery" selection. Here you can rotate through all the liveries and easily select the one you require, the livery is shown in the centre of the disk... Next is the set views that includes positions of the: Pilot, Co-Pilot, Console, Overhead, Passengers, PostCam, Passenger 1, Passenger 2, Baggage Compartment and Tail Cam... all are excellent. The aircraft comes with Dreamfoil's excellent sound DreamEngine which includes over +50 sounds, Doppler Effect and Atmospheric Attenuation, Realistic turboprop sounds with real-time propeller dynamic and relative sustain effect for startup and shutdown. You can adjust the volumes here on the menu disk to your specific liking. FDV ,,,,,, . Your GPU (external power) can be selected here (You can also use the lower point on the battery switch on the "Overhead" panel) and the Stability options allow you to adjust the aircraft's % in Pitch, Roll and Yaw. Finally here is the internal, external (static element) selection menu. The menu system is very easy to use, The aircraft's version is also noted, but here it is only shown as v1.0 when this is the current v1.3 release. Panel With the external GPU connected you can turn on the power flow. On the overhead panel (OHP) the green source button light comes on, but you can check the actual voltage via the button "Battery Voltage" by the voltage gauge, the gauge is a double needle for AC/DC so it is highlighted here to see the voltage. Power on you can then bring the aircraft to life, panel lighting switchgear is across the top of the OHP. And the lighting adjustment dials are (hidden) behind the yokes in three dials on the Pilot's side and one on the Co-Pilot's side. Note the excellent rudder pedal construction, brilliantly done and even the rear looped cables are animated and move with the rudder pedal alignment. With the power on and the aircraft feels more active. In this pilot view position the forward view is beyond fabulous in that those deep porthole style front windows actually enhance the closed cockpit feeling, you can understand why flyers took very quickly to the aircraft, it is a great experience just sitting in the aircraft... Like most dial/gauge driven cockpits (sometimes known as "clockwork") they can look easily very complicated and complex. But when you break them down they are quite easy to fly and understand. Left to right across the panel, we will start with the pilots station. As for the flying instruments placed they are quite basic. The standard six: Altimeter, Speed, Heading Indicator or RMI, V/S (Vertical/Speed) and Horizontal Horizon are all well represented with the ADF and VOR directional points in the heading indicator and a CDI "Course deviation indicator". The rate of turn indicator is also set out below, all these set seven instruments are duplicated on the Co-Pilot's panel station. There is a bigger CDI on the far left of the pilot's panel and analog clock at the top. Brake and pump pressure (PSI) are noted low down. Undercarriage and Flap indicator is central and Cabin Temperature is on the Co-Pilot's lower panel. The central panel is divided up into sections. Left (magenta) are the twin sets of engine dials and gauges, from the top is: Engine Temp ºC, Torque(lb-ft), RPM% (Nh), RPM% (Ng), Oil Temp ºC, Oil Pressure PSI and ºC. Middle (yellow) is the exquisite radio panel consisting of mostly Collins sets for Comm 1/VOR1-Comm 2/VOR2, ATC Transponder, VOR 2 directional radio and ADF radio. In the middle of the stack is a basic lovely Trimble Navigation TNL 2100 GPS. The VOR 2 panel can be quite stiff to switch (In fact I didn't think it worked) but you can turn the knobs to get it to show your distance and speed... very nice it is, I loved it (when I got it to work). Right centre panel is a Benedix/King WX weather radar set (tube style) which is also a great unit, with a warning annunciator panel below. The aircraft comes with a full Air Conditioner simulation system that is very effective and usable with the Air-Con panel situated down left of the Co-Pilot on the lower panel. The fuel panel is a thing of beauty by itself!, gorgeous in design with gauges for fuel flow (top), Fuel Pressure PSI, and usable fuel lbs x 2 below. Main, Aux tank switches and crossfeed. There is a "Foxbaro" fuel used counter at the top that can reset to zero on startup, so you know the perfect quantity of fuel consumed... Which is great for telling the airport controller that you have used X amount of your fuel while waiting for clearance. Fuse panels sit on both side cockpit panels with radio switches. The cut-out windows open and the arm rests can be stowed upwards. The pedestal is quite basic, but beautifully crafted. Main twin-levers for throttle, Prop and Condition. The aircraft has a "beta" mode, that can be used as reverse thrust, a lot of developers haven't separated the two items yet, but the "beta" mode is still changing. Three trim knobs are good and easy to use, and central pedestal is an Autopilot (AP) panel. The AP is quite basic in mostly hold modes and a dial for turns and thumb wheel for pitch. But it is the position that makes it hard to use. Carenado uses a pop-out panel with their AP in this position and you really miss that feature here? You mostly have to set up a viewpoint that shows both the AP and the instruments to use both, so it is a little like flying the aircraft while face down on the floor with your legs situated back in the passenger cabin while looking over the pedestal? There is an "De-Icing" panel right top of the OHP that we will see in operation while flying. So the cockpit looks complex but it is in reality quite easy to use, the main point is the way you interact with the aircraft, and that is in a wonderful way. Switches are big, functional and lights large (usualy green) and glow... It is a great place to be. Startup Ready to go!, passengers in and luggage loaded and the aircraft is secured. Beacon and Nav lights on, fuel pumps on... I have 2,800lbs of fuel on board to make the distance to Christchurch and not to refuel at Dunedin. On the OHP I set the AC BUS Bar switches on, Inertial Separation switches to on (condition levers to up) and to start is a simple switch up of the "Start" switch. The turbo-whine starts up outside of one of the Pratt & Whitney PT6A-34 turboprop engines (Same as in the King Airs, PC12 and Twin-Otters) and each engine gives you 783 eshp and 750 shp. Throw another switch and you get another whine from the second engine and the start-up procedure is fully automatic. The Ng RPM will settle down at idle around 52%, and the excellent as mentioned DreamEngine sounds will give you the full voice from whine startup to idle revolution power. If you are connected up to a sound system (like I am) then be prepared to feel the turbo power on the hairs on the back of your neck. It is great stuff. Once the engines are running you can then switch down both "Start" switches to "Interruption" and turn on both G1 and G2 engine generators, Then close down the external GPU... I locked in the VOR 2 (Invercargill "NV" 116.80) more for a distance completed note than direction, and the ADF "Berridale" NDB (394) as a direction pointer. You can choose which ADF/VOR needle you want by the buttons below the RMI. The ADF does not show yet as it is not in range. Off the brakes and a small push of power with the throttles gets the aircraft moving. You tell the passengers to belt up and stub out the cigarettes, which is old fashioned now as not many airlines allow smoking on domestic routes, but the cabin signs are highly effective. If you pull back the throttle you get the "beta" lights on both engines for taxiing, tt works but be careful not to go into full reverse pitch. Flying the Pioneer Flaps 25%, brakes off and throttle up... The Bandeirante will track the runway very well, but when you lift off around 135knts with that 1500shp power pulling you upwards but with the thrust going slightly sideways the aircraft will very quickly roll right, if you are not prepared for that slip to the right you are very quickly going off the departing runway centre line. So you are working the rudder and yoke to keep the aircraft in a nice straight line while holding a 5º-7º pitch. The first time the slip will easily catch you out but after a few runs to adjust to it and love the feel of this lively machine in your hands. Rolling to a new heading needs a firm hand but it is easier than you think it would be, and you need flaps up (or 0º) before you are out of the slow (white zone) at 148knts. Speed is then set at 91% Nh. The pitch can be a bit wavy from 500fpm to 500fpm if you don't keep a firm hand on it, but the aircraft will climb nicely with control... and remember I am quite heavy with 9 passengers and a full load of fuel. The EMB -110 is a great looking aircraft in the air, so well modeled by DreamFoil Creations and is very realistic. I really like the design. The only odd thing is the nose as from certain viewpoints it looks inverted and the nose square and flat? It is an optical illusion of course but noticeable. As noted the Autopilot is hard to use by its placement. A switch turns it on (a nice touch) but you have to make sure your heading is spot on unless you get a thunk when selecting HDG. You don't need to hit the V/S thumb-wheel because when you turn the AP on it will hold the pitch anyway, just press the ALT when you have reached your altitude. My first impressions of the first release Bandeirante were not that great in the turn. I found the aircraft badly pitched up and down... ... when in a higher speed turn, either in manual hands-on-mode but far worse in AP mode, and sometimes a 1000ft or more each way... In fact I hated it. I inquired from a few other flyers if I was wrong? Most of the replies were "it was great", "perfect mate" but I still wasn't happy with it? I found a bit of yoke pushing and pulling (In auto mode?) would soften the turn, but deep down I doubted the real aircraft could really fly like this without the passengers bouncing off the ceiling. For the pitch issue and a few other minor bugs Dreamfoil Creations have issued two patches, Patch 1.3 fixed the pitch issue perfectly and the aircraft flies quite normally now in high speed turns. You still need sometimes a slight to and fro nudge on the yoke to keep the aircraft tight, the trick is to keep the aircraft around the set Autopilot ALT (here 12,000ft) and if you let the aircraft gain too much height or lose height in the turn the V/S will compensate for you but in a heavy pitch fashion up or down... get it right and she flies beautifully. There is a wiper feature that creates a rain drop effect the windscreen, then when the wipers are working you get this gap in the windscreen to squint through, as you gather speed the rain fades away. I love struggling into airports with wet limited visibility, so it works for fine here for me. Dunedin (NZDN) Flying up the southern east coast of New Zealand with the great HD mesh (X-Plane 10 UHD Mesh Scenery gave you an exceptional experience, but it was now time for our first stop. NZDN is set deep in a valley that is hard to approach, easier from the south but far harder from the north to RWY 21 as you have to hold an altitude and then drop down and in before the range. There is a slight gap to go though on a heading directly to the approach NDB MOSGIEL (MI 358) its tight but doable. The EMB -110 does not help you in this regard. The speed zone in the slower approach speeds is quite limited with a range of only between 145knts to 120knts (or the white zone on the airspeed dial) that is only 25knts to play with, Over the 145knts or closer to 150knts and the aircraft will visibly show you it is not happy by rising the nose and drop below that 120knts and the aircraft will very quickly lose altitude or even stall? With such a small margin of speed to use, lowering the flaps is a tricky business to get a smooth flow and keep your descent without any sudden lift, so it is a balance of throttle input and speed to keep the aircraft in the right margin. Too much throttle and you can't descend, too little and you lose height... so its a real tricky dicky one. This is also highlighted on an ILS approach. Usually when you catch the beams you drop your speed a little to compensate for the extra descent speed, but here if you get your speed to low... even by a slight amount, you are going off the vertical beam and descending to quickly. So in this context landings can be challenging, and sometimes you can usually be flying quite fast when going over the fence. Flap and undercarriage design and animation is excellent, great detail and beautifully created. The main gear track is quite wide so you have to make sure your landings are quite level, or if not the aircraft will bounce on one wheel (tip the wing up) and then the other before both settle down. If you carry too much speed into the flare (very easy to do) then you have to watch you don't pull back the throttle too quickly and lose lift, so "easy goes" until the Embraer settles. There are a few notes that the wing on the the aircraft is not very flexible, and I can believe that. So in lower speeds the aircraft is certainly challenging, but that is what simulation is about and if all aircraft were just easy it wouldn't be fun... would it. But study and understand the aircraft and you can get into the rhythm of the machine, it will take few flights to really get every motion right, but suddenly it will all come together and then the EMB -110 delivers in spades. Engine shutdown and the GPU connected for ground power... I can't sit on the ground too long because for one I have a connection to meet in Christchurch and two it is becoming dark. With X-Planes HDR feature switched on the Embraer's lighting is very good. The landing lights are very wide and spread apart so with the nose wheel taxi-light on you get a great spread and handy here to turn around with at the end of RWY21 to fly out to the south of NZDN. The panel lighting is very good as well. The adjustments give you great overhead and panel control, although it does highlight the top left pilot's panel knob "Fast Erection Vert. Ind", I'm not into smutty humour but I'm quite sure the male of our species would find the item amusing and some very handy? Now with a full passenger and luggage load but less fuel on board the aircraft feels the same as I left Invercargill only an hour or so before. The fading light highlights the design and you feel into the rhythm and enjoy the aircraft immensely as you climb to 10,000ft and turn again north along the coast. Ice Panel and Lighting The colder night air shows there could be ice around. Although in July in Northern Europe or the United States it is summer, but in New Zealand this is middle winter and it can get very cold. The "Deicing" panel is high right above the Co-Pilot on the roof, and you have deIcing options for the propellers, windshield, engine inlets and pneumatic wing boots. You can check your wings for ice with the excellent wing lighting, and otherwise the external lighting is quite basic in Nav, top and bottom Beacons, and tail light. Cockpit lighting is controlled by four rotary dials, three on the pilot's side and one on the Co-Pilot's. It is excellent at night, fully adjustable and you can turn off the overhead lighting on the OHP. No doubt a very nice place to work in. There are map reading lights each side, but they didn't work? HDR lighting switched off does not mean an inferior night flying experience (above), in fact it is very good and certainly in the approach phase if you have the cockpit lighting switched off, to many it may even be a better option and a big frame-rate gain. There are main overhead lights and two set each side above the pilots and rear. In the cabin it is excellent, but not everyone get a light over their seat. They are more there for embarking or disembarking the aircraft. In the darker light the aircraft is quite dark, and can be hard to see except for the external lights. Christchurch (NZCH) Soon the lights of New Zealand's biggest southern city are spread out in front of the Embraer. Arrival at NZCH is via RWY20 so that means like at Dunendin I have to track more north to NDB WOODEND (OD 262) to turn directly around for a direct reverse approach to the airport. I used the RWY20 ILS (IHW 110.30) because I want to be safe in the darkness. It was very dark out there, but I was nice and snug in here and enjoying the dark cockpit, I turned the passenger cabin lights off (no door!) with just the "fasten your seatbelts" and "no smoking" signs red glow to keep the rear seated travellers alert. It was again tricky under the ILS to keep on the beam, I hated the idea of being too low and hitting the ground before being over the runway so I was extra vigilant on the throttle and speed to hold those CDI markers as central as I could. Otherwise I was tuning in well with the aircraft. Once down those wide lights gave me a good path to the terminal, and because my domestic ramp position was in semi-darkness the wing iceing lighting proved very good to show the path to the terminal entrance. Note the excellent lighting on the undercarriage when the aircraft is on the ground, which is great for night inspections. Liveries There are eight liveries with the aircraft in six commercial and two South American military FAB/FAC, and all are very high HD quality, but the range is quite small for such an aircraft. In a small way that limits your choices of where and how to fly the aircraft (There are no European Liveries for example, but there is now a nice "Jersey European" on the X-Plane.Org) Summary In reality the verdict is already out on the Embraer EMB - 110 Bandeirante. As already many fliers have taken the aircraft to true classic status and a must have in any hangar, and it is not very hard to see why. The quality is overwhelming, certainly in the Carenado class in every area. In many respects if you let someone fly the aircraft the first words would be "Carenado have done it again!" only the Bandeirante is not from that great company. It also shows the depth of Dreamfoil Creation's talent and skill as well, with the combination of the best features in menu's, external animations and their great sound system of the 3d reality DreamEngine effects. In moving into a new realm with an aircraft Dreamfoil Creations has created a masterpiece that is a pure immersion in a classic commuter aircraft, in other words Dreamfoil Creations have done a brilliant job. It is a very challenging aircraft to fly, make no mistake about that and certainly at slower speeds. But with aircraft like these it is the skill set and learning to master the machine that is part of the reason that aviation is so attractive. To fly the Bandeirante well is like going for your masters degree, and once held it can open up the door to experiences that gives you the feedback to understand how good you can actually be behind a set of controls. Don't expect to get there overnight either, it will take time and effort to discover the full breadth (or heights) of where you can go with this aircraft and I will get back to you in a few years to still tell you how great it is. No doubt this aircraft has been one of the great surprises of the year in 2015, by the way it was released and how good it is and at a price just below US$30 it is absolutely excellent value as well... I could go on.... but I want to now just fly it again it is that good, so I will. _____________________________________________________________________ The Dreamfoil Creations Embraer EMB -110 Bandeirante is available from the New X-Plane.Org Store here : Embraer EMB-110 Bandeirante And is priced at only US$29.95 Current version is v1.3 The release version was v1.0 but there has been several updates or patches since the release. The latest patch (to date) is v1.3 which is available here: patch 1.3 b2 The X-Plane.Org Store version is the correct updated version, just go to your X-Plane.OrgStore account and update. If you have not updated from the original release version (1.0) I Strongly recommend to update the patch or redownload the current version. _____________________________________________________________________ Installation : Download file size is 324.90mb to your X-Plane - Aircraft Folder. Installed file size is 468.50mb Notes: The Aircraft comes with two aircraft (.acf) files in the standard "EMB110" and the "EMB110WD" The standard is without dihedral and the WD version has 10º diehdral in the elevator. Documents : Four documents that cover a main Pilot's manual (13 pages), real Embraer performance tables and normal, emergency procedures. Requirements : Windows XP, MAC, Linux - X-Plane 10.30+ (any edition). 32 and 64bit compatible - Pentium 3 GHz+ - 1Gb VRAM Recommended Current version: 1.30 (last update June 15th 2015) Developer Support Site : Embraer 110 by Dreamfoil Creations .Org Support _____________________________________________________________________________________ Fully featured and including: Two versions: without dihedral and with 10º diehdral in the elevator. Cabin, Cockpit and Instruments lights available with great effects. Full simulation of all switches Hydraulic simulation Hotstart simulation for manual startup Caps for turbine inlet, outlet and pitot GPU (Ground Power Unit) available Air Conditioner simulation Prop Disc effects feature 3D holographic side view, which changes depending on prop settings Fully articulated and animated sun visors Very accurate flight characteristics. Windshield rain effects: rain drops move realistically in accordance with airspeed, get cleared by wipers, and repopulate after wipers are shut off. Wx radar simulation Sounds: Over +50 sounds included Doppler Effect and Atmospheric Attenuation Realistic TurboProp sounds with real-time propeller dynamics Relative Sustain effect for startup and shutdown _____________________________________________________________________________________ Review by Stephen Dutton 10th July 2015 Copyright©2015: X-Plane Reviews Review System Specifications: Computer System: - 2.66 Ghz Intel Core i5 iMac 27”- 9 Gb 1067 Mhz DDR3 - ATI Radeon HD 6970M 2048 mb- Seagate 512gb SSD Software: - Mac OS Yosemite 10.10.1 - X-Plane 10 Global ver 10.35 (final) Addons - Saitek x52 Pro system Joystick and Throttle : Sound - Bose Soundlink Mini Scenery or Aircraft - NZNV - Invercargill Airport by Royaloak (X-Plane.Org) - Free - NZDN - Dunedin 1.1 by tdg (X-Plane.Org) - Free - NZCH - Christchurch New Zealand International Airport (ISDG) by Chris K (X-Plane.Org) - Free
 1 point