Stephen
-
Posts
2734 -
Joined
-
Last visited
-
Days Won
355
Content Type
Profiles
Forums
Articles
Everything posted by Stephen
-
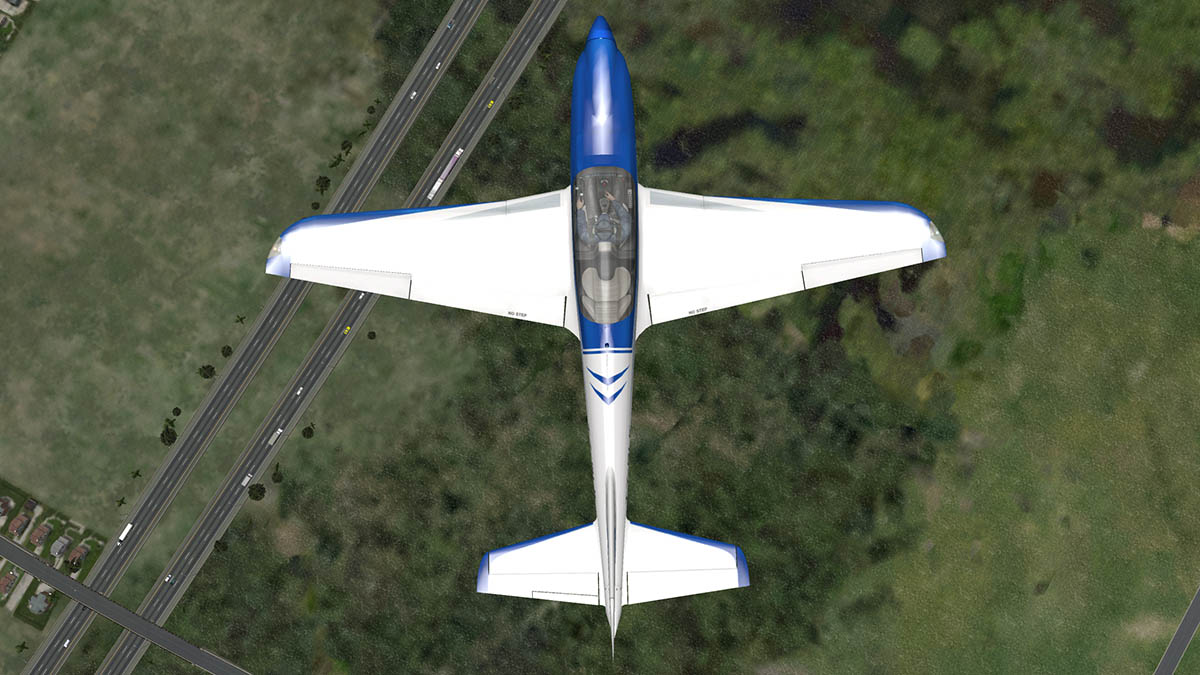
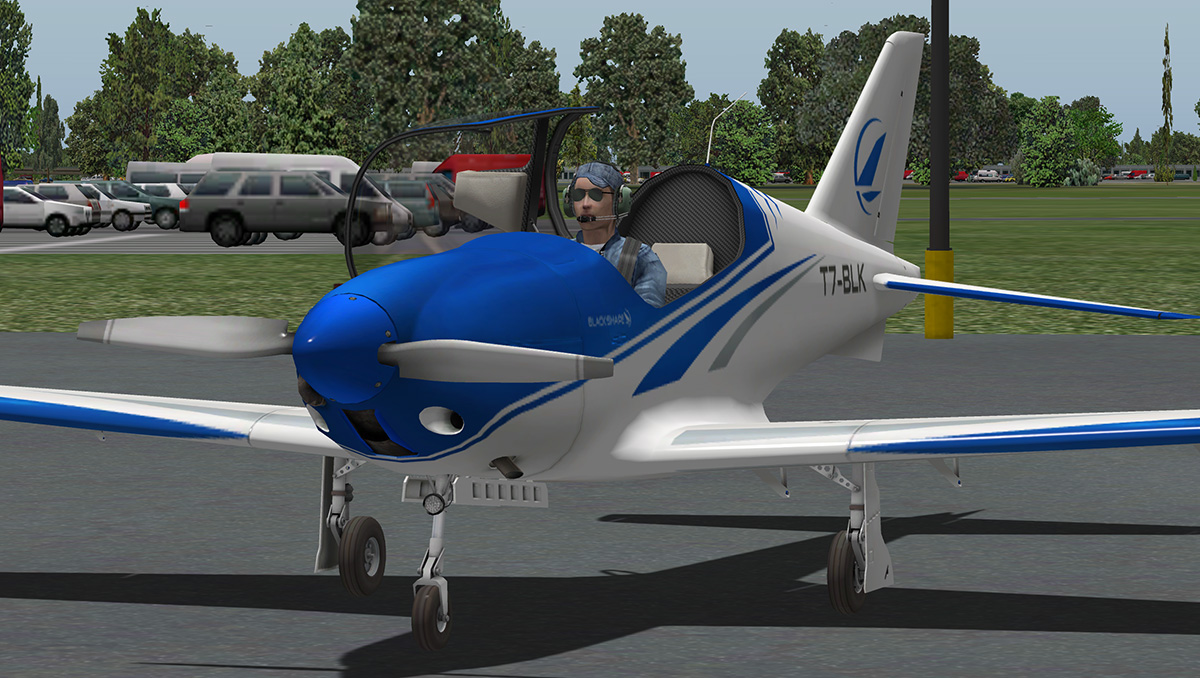
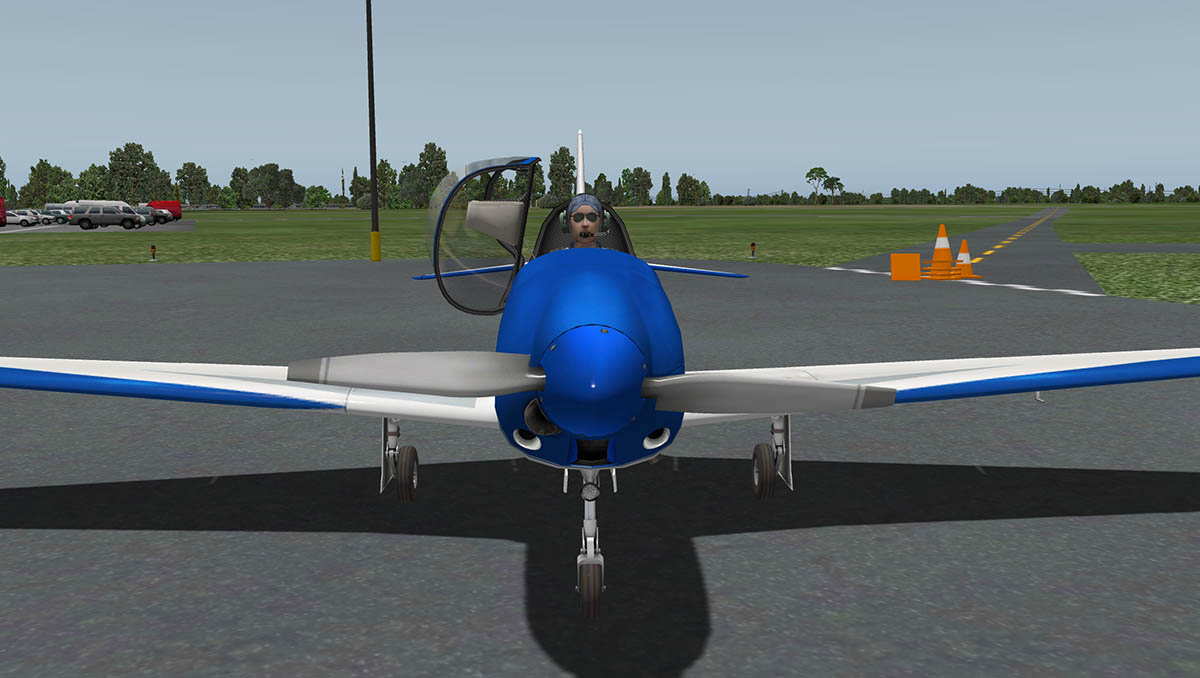
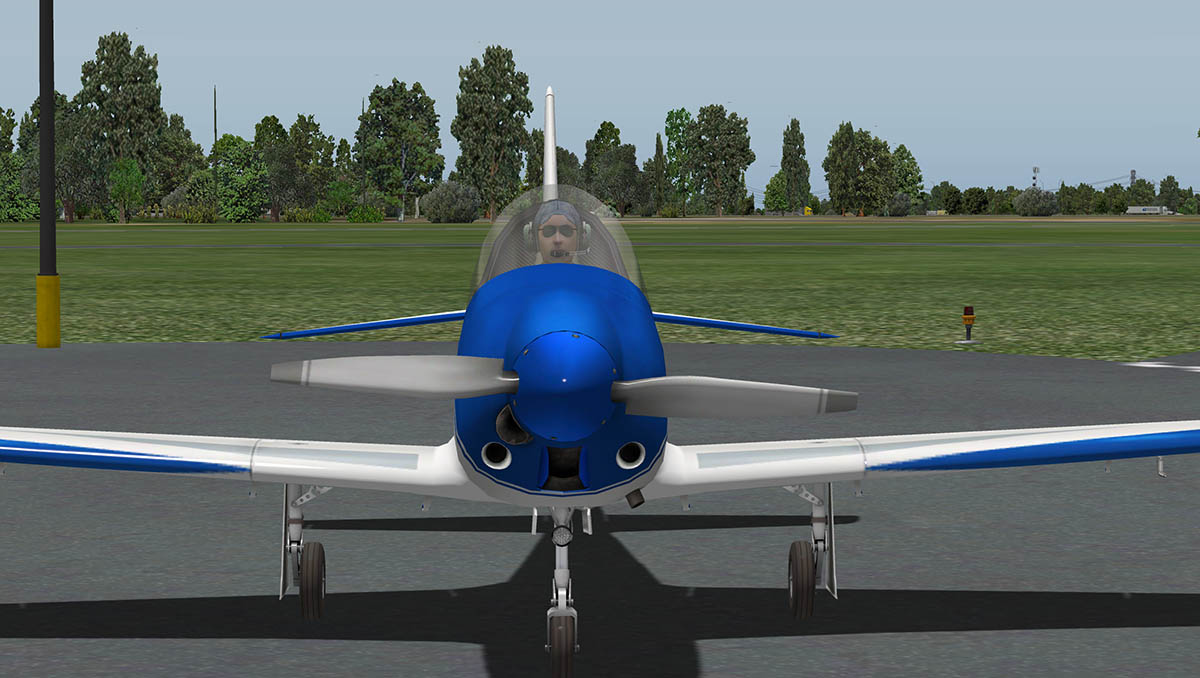
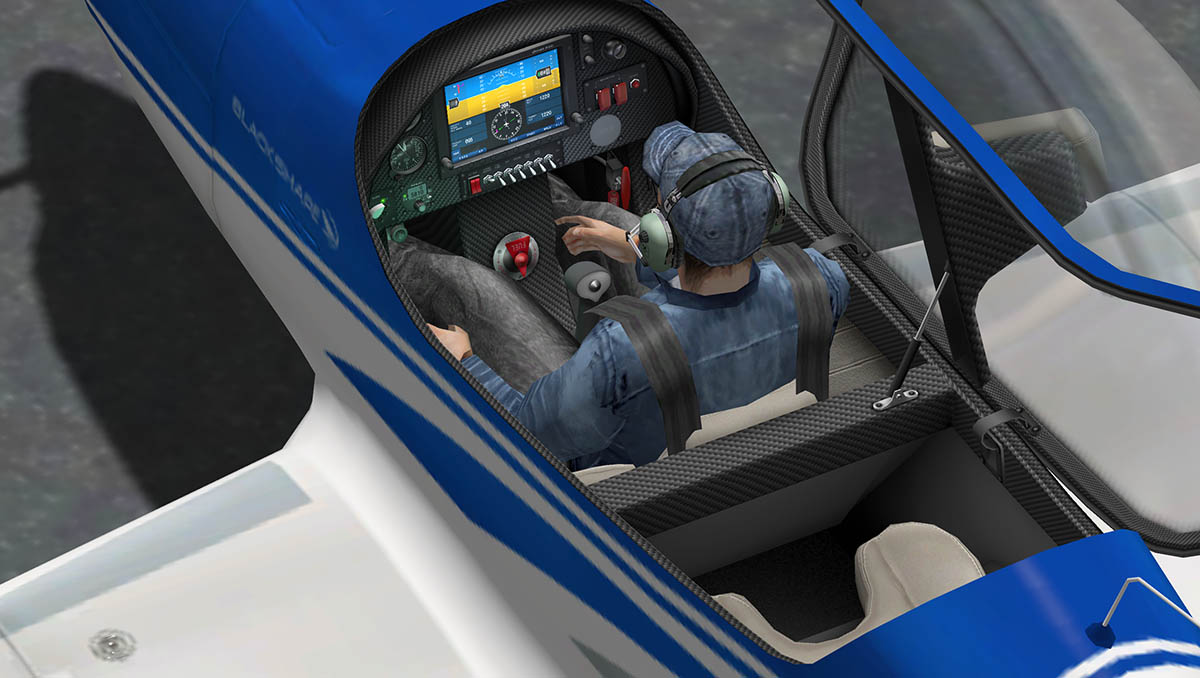
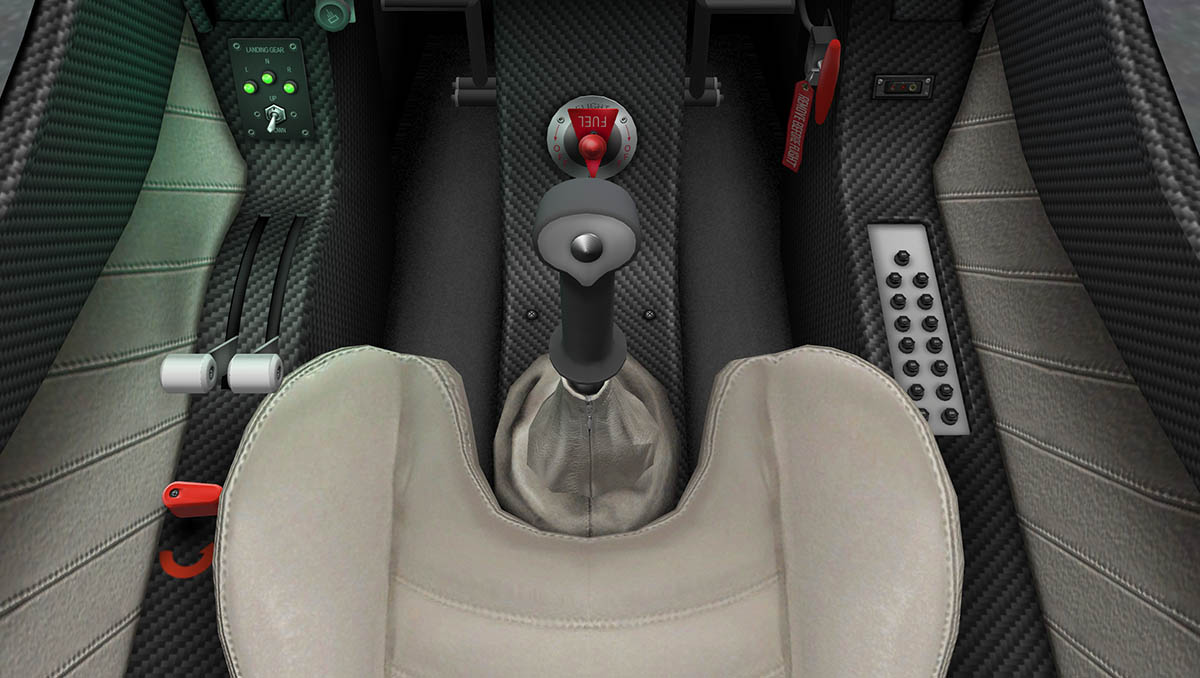
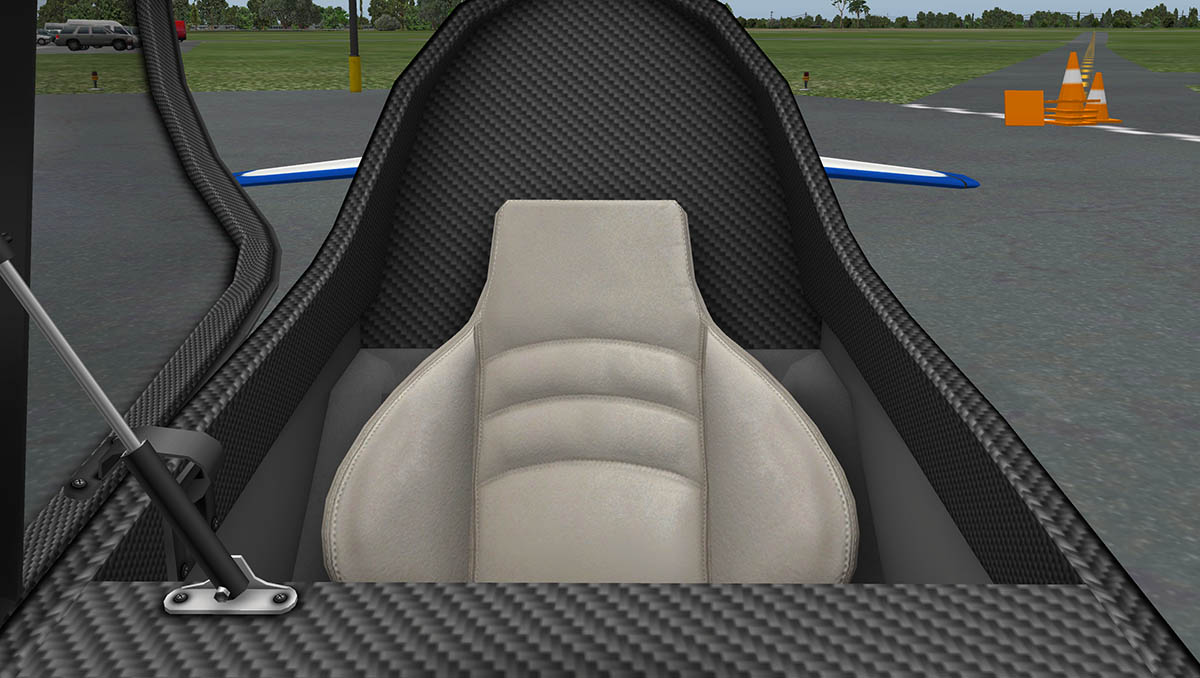
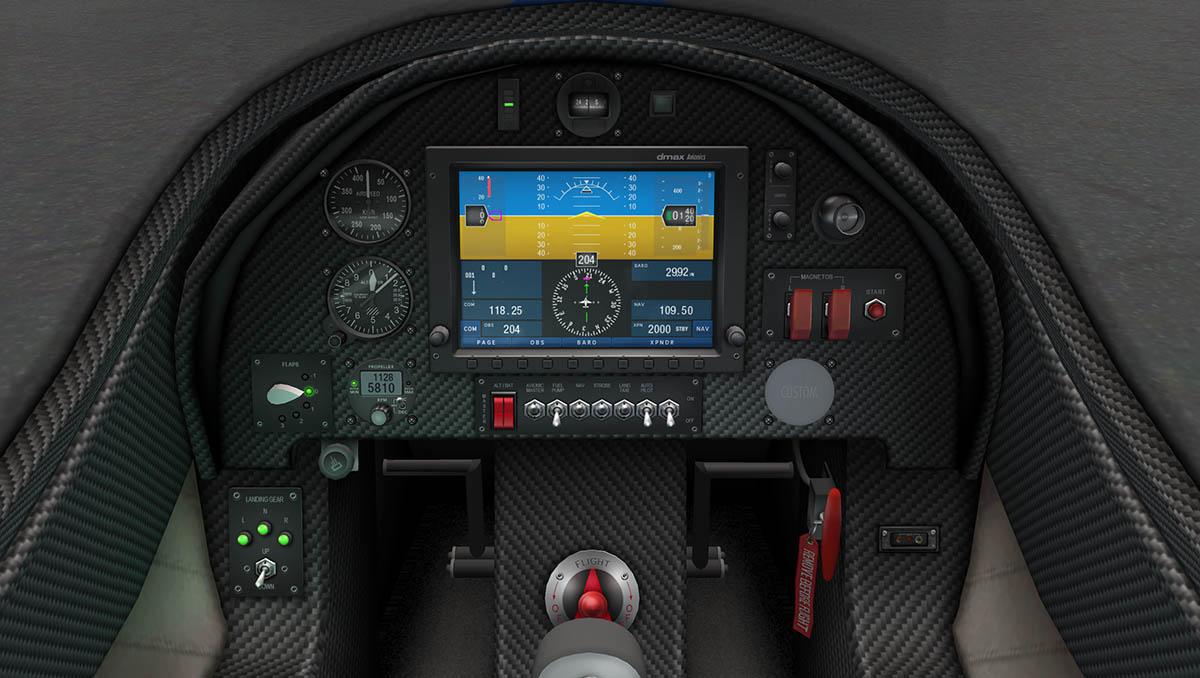
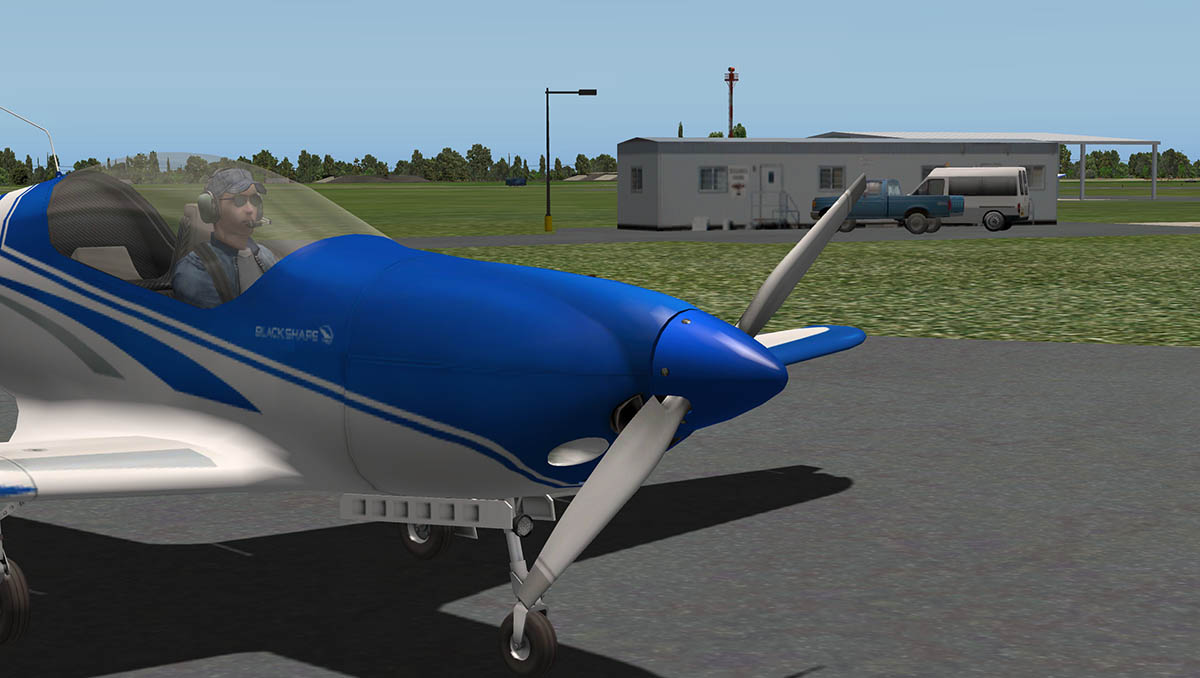
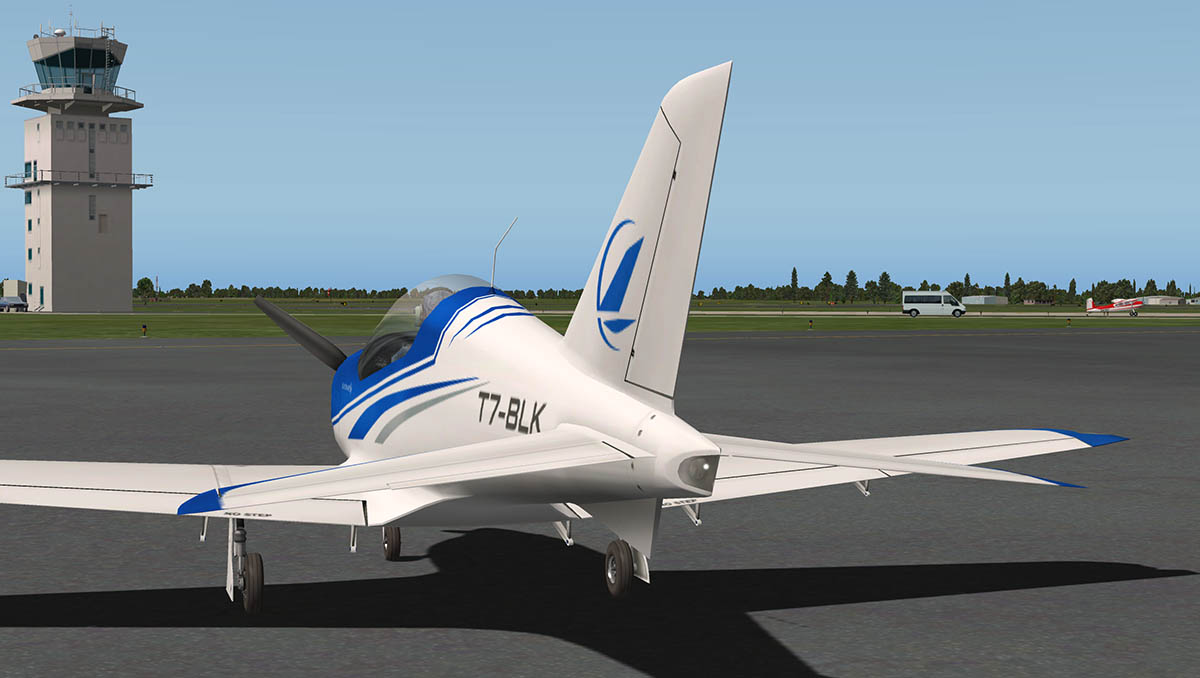
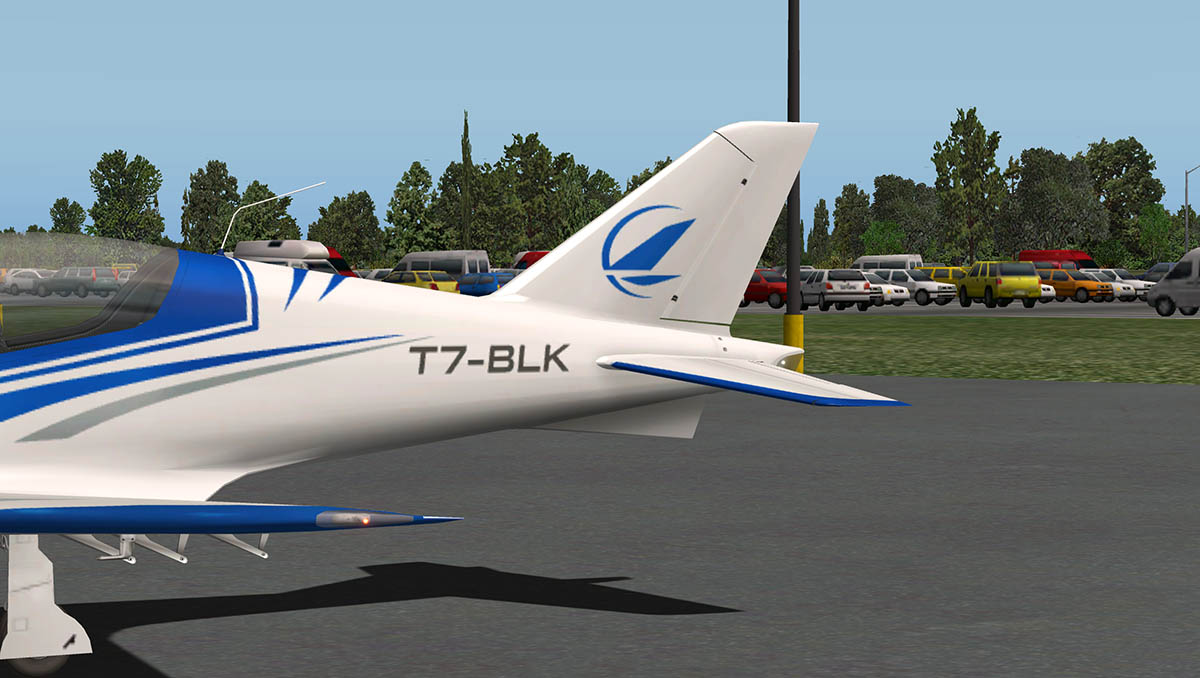
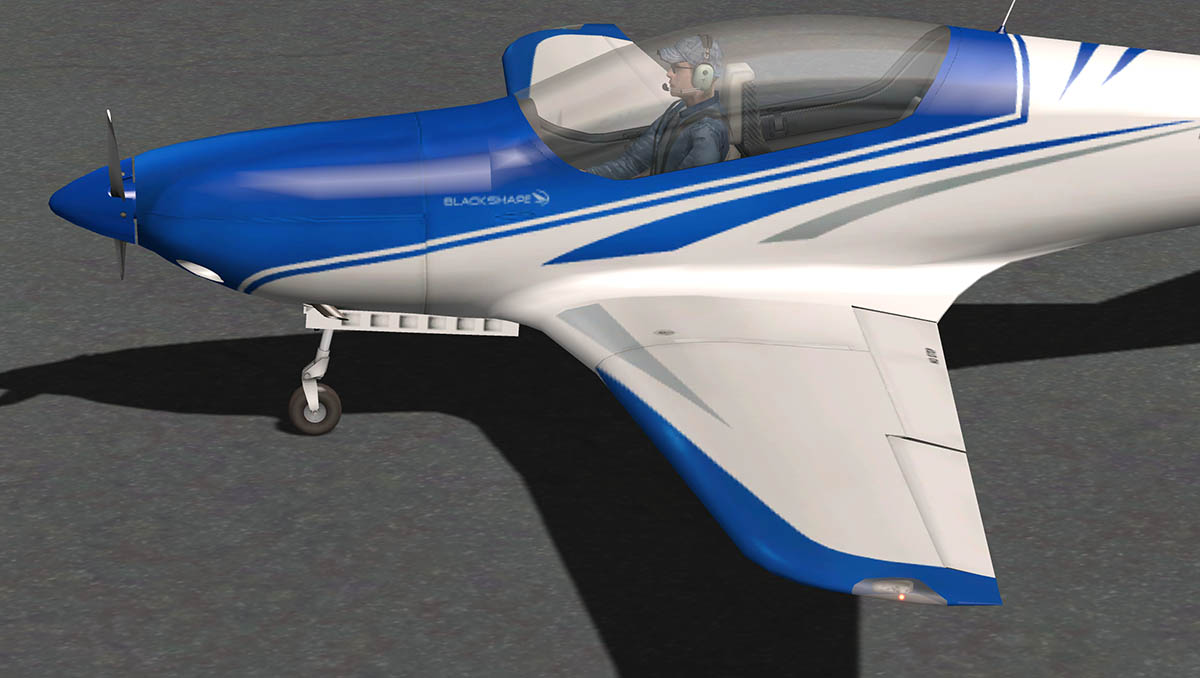
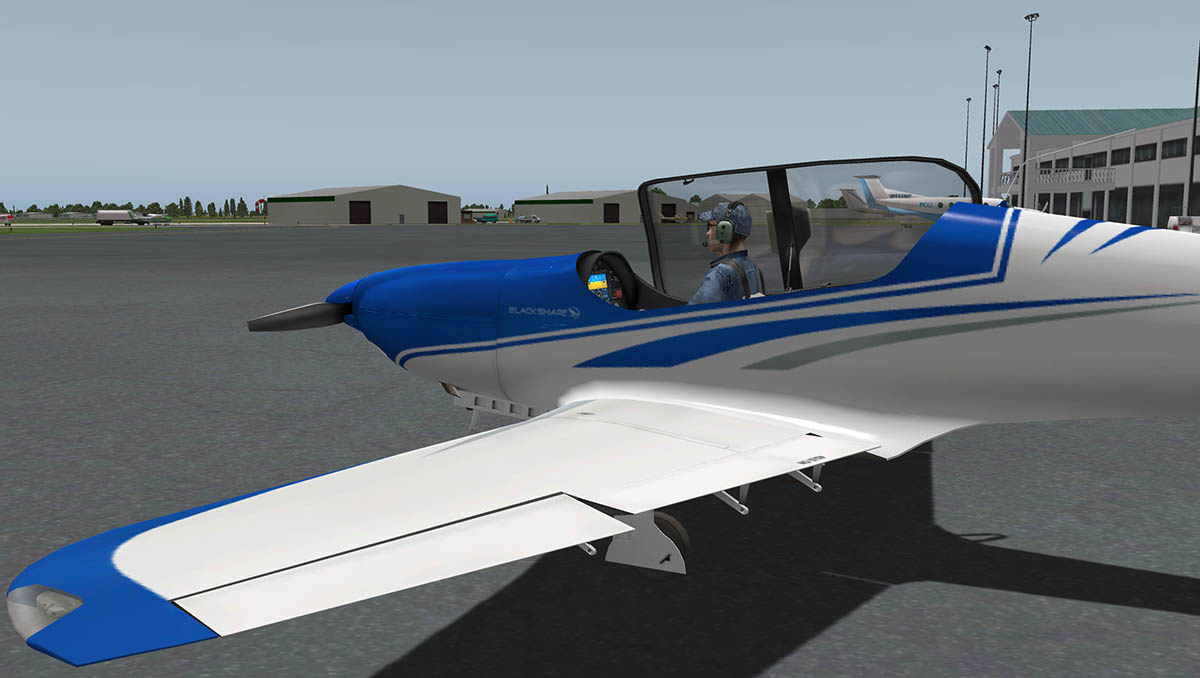
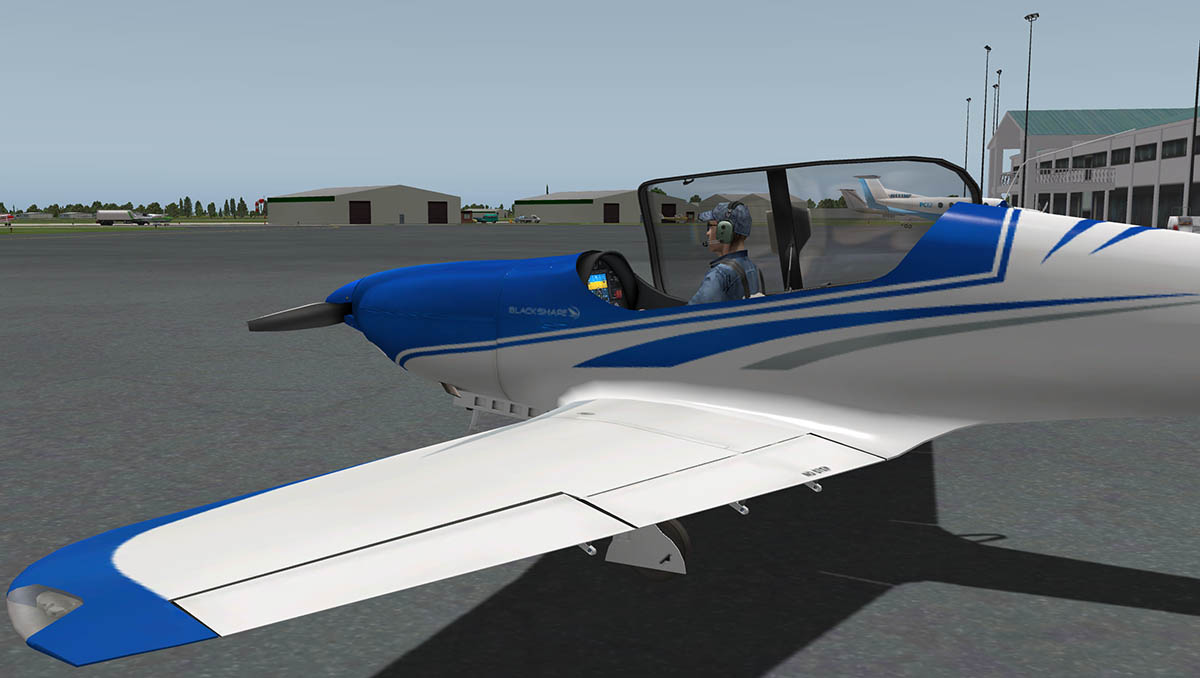
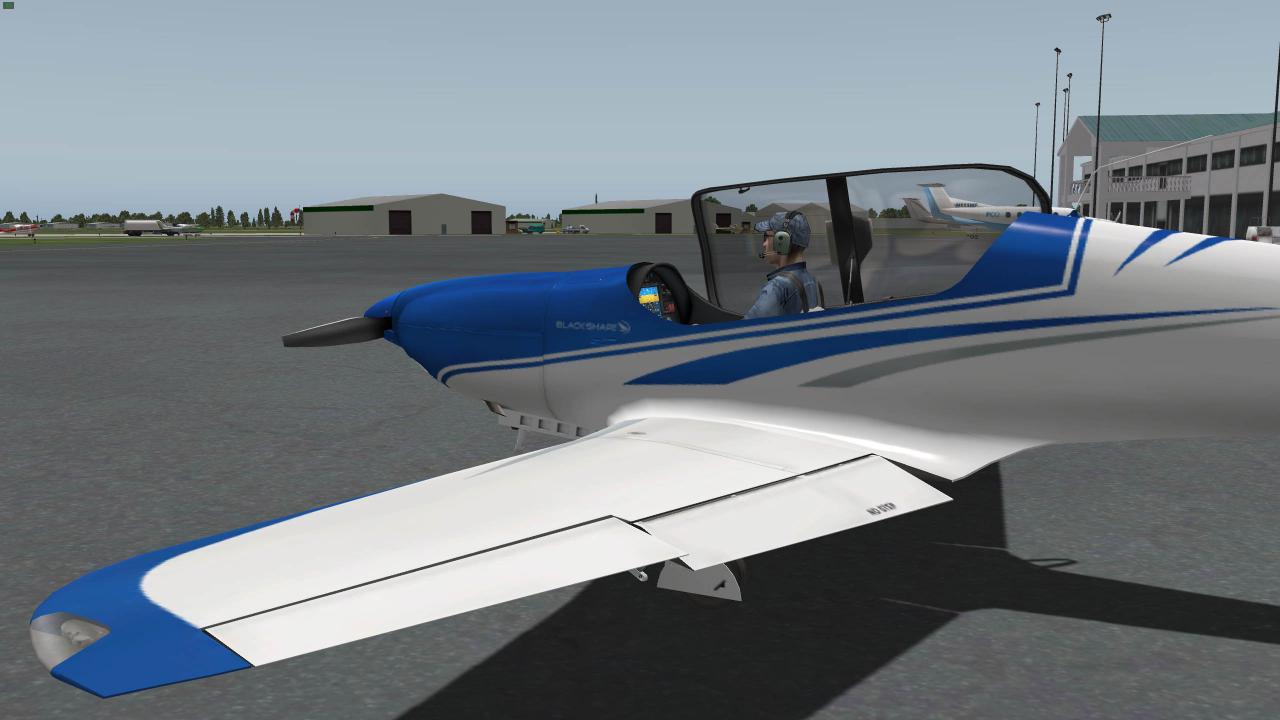
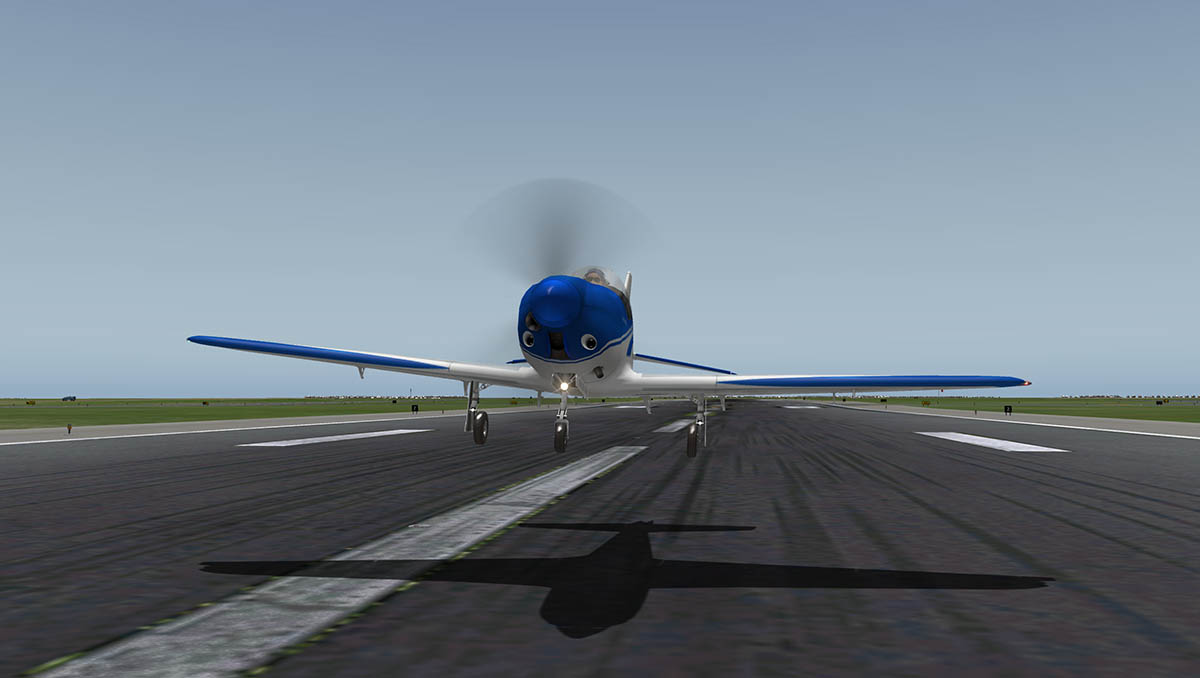
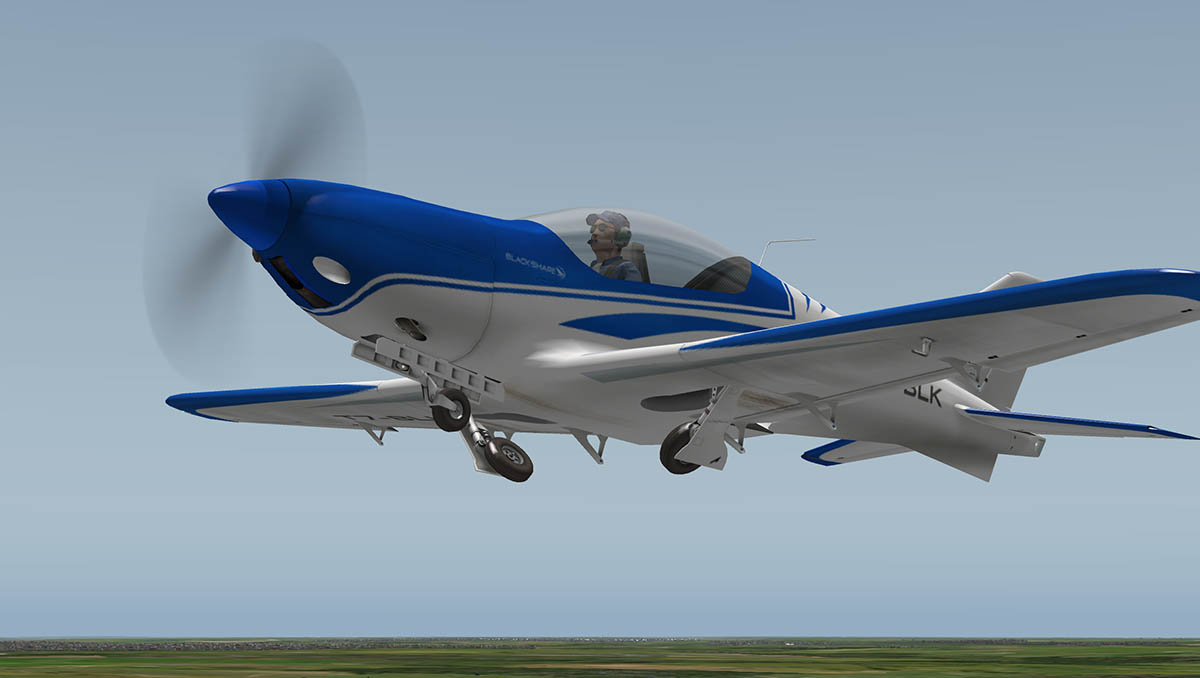
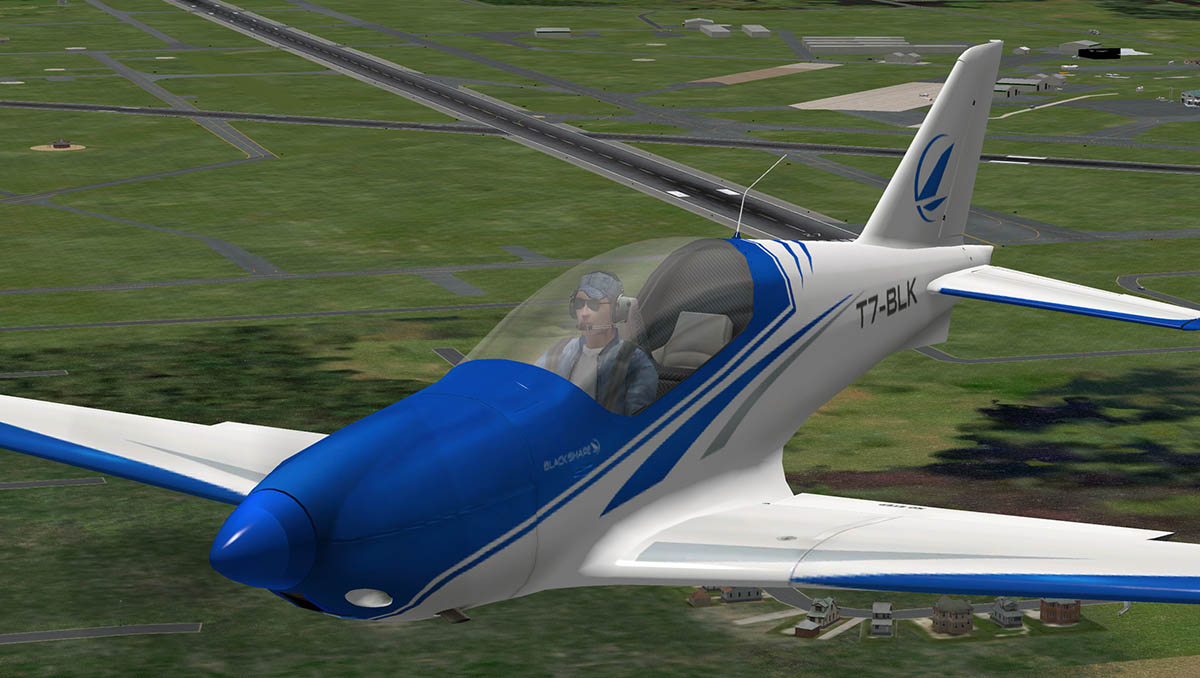
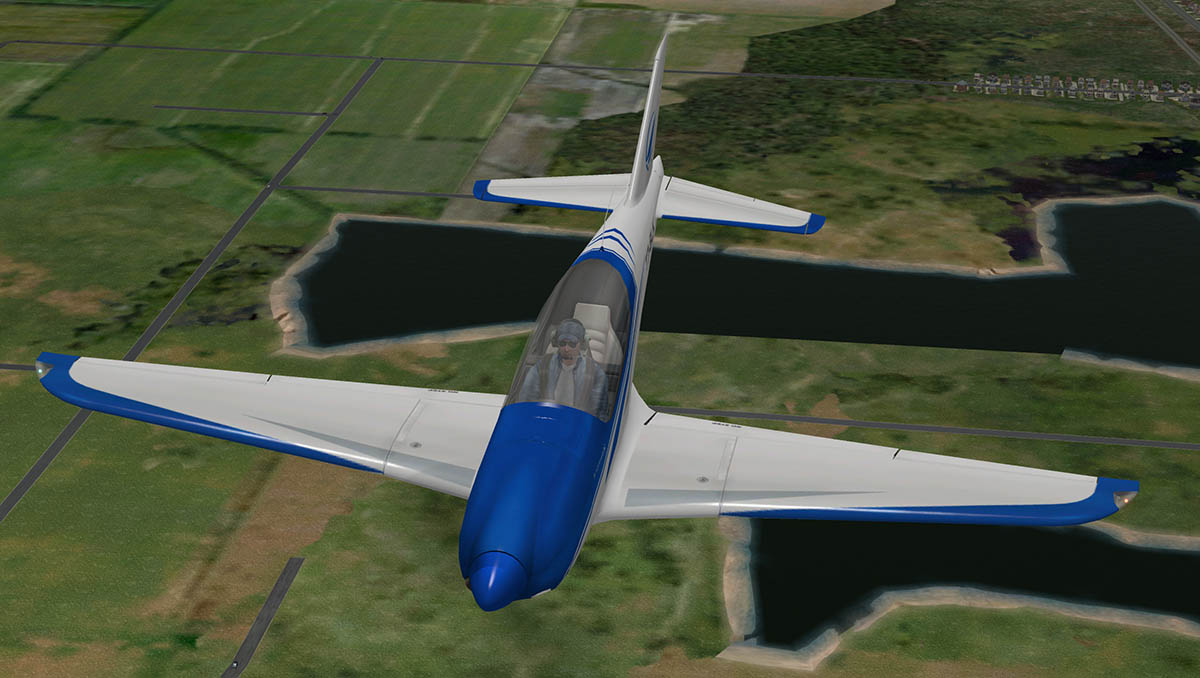
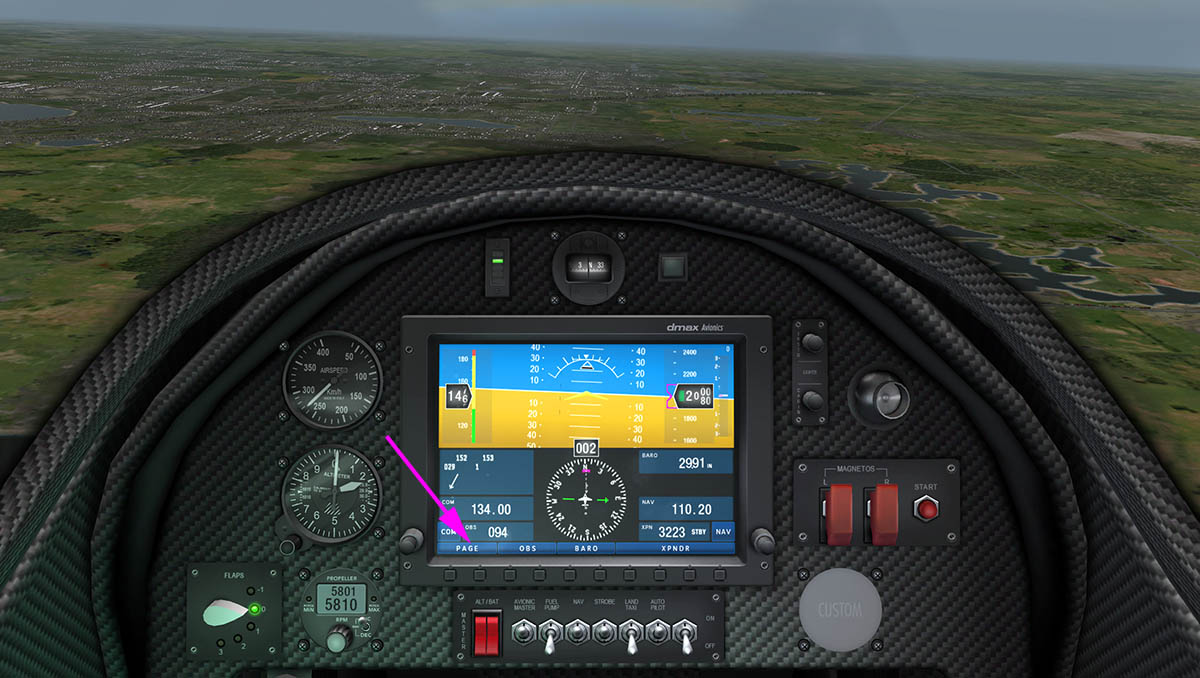
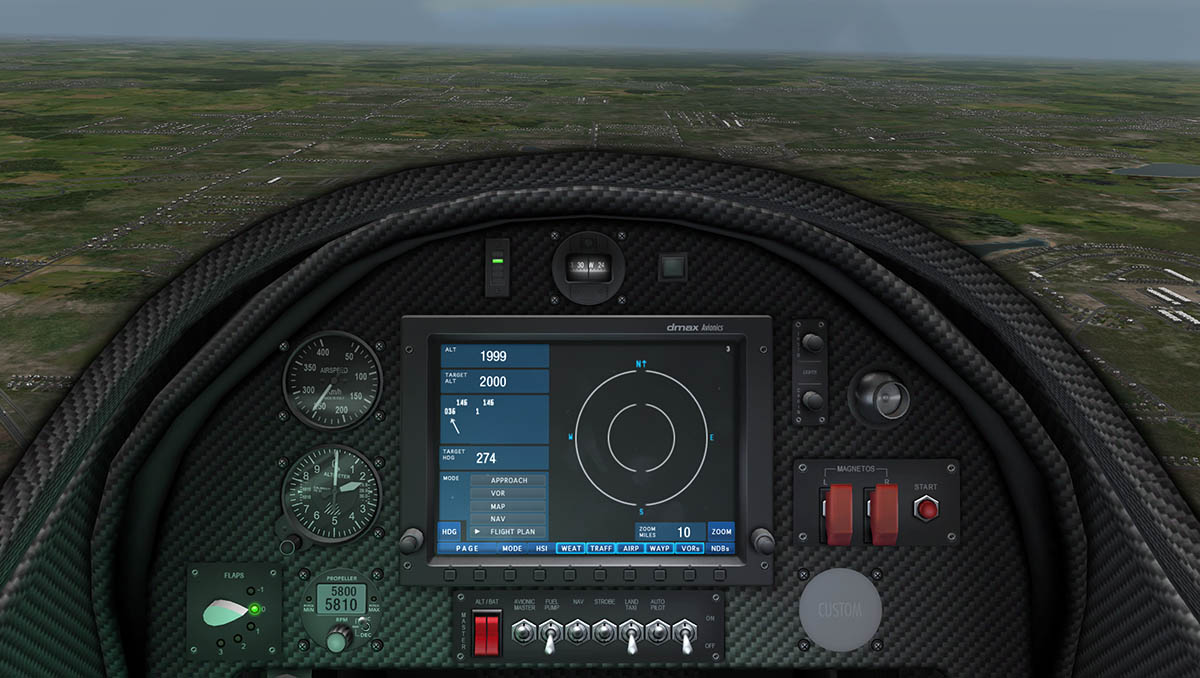
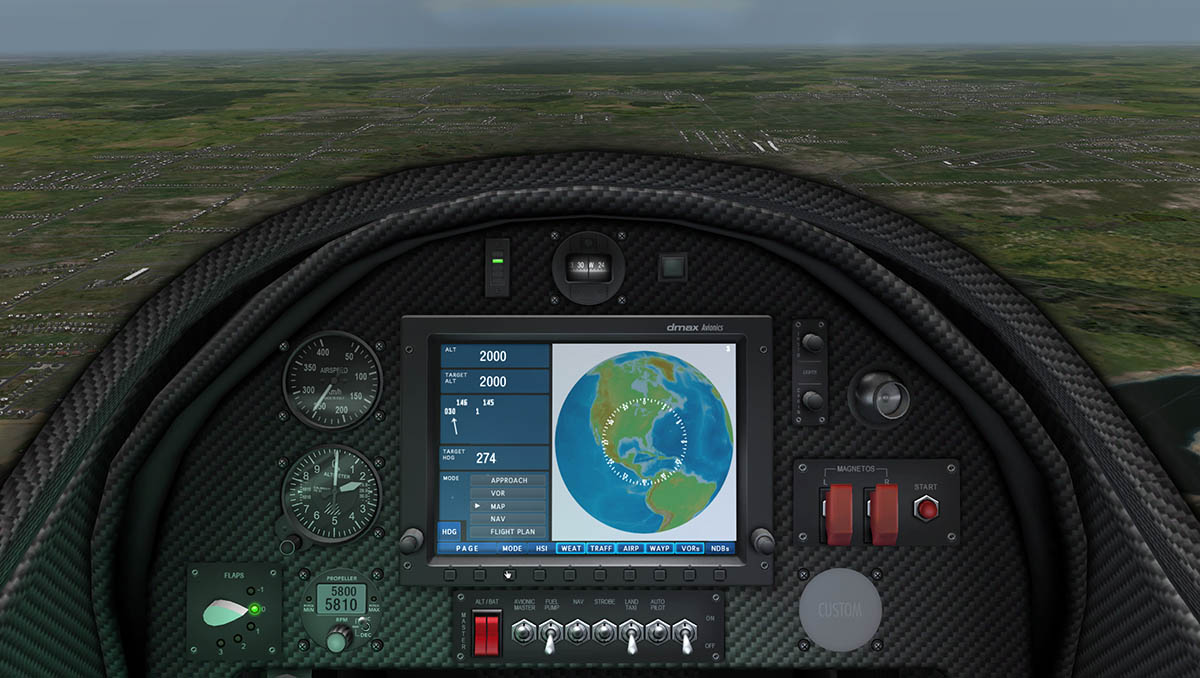
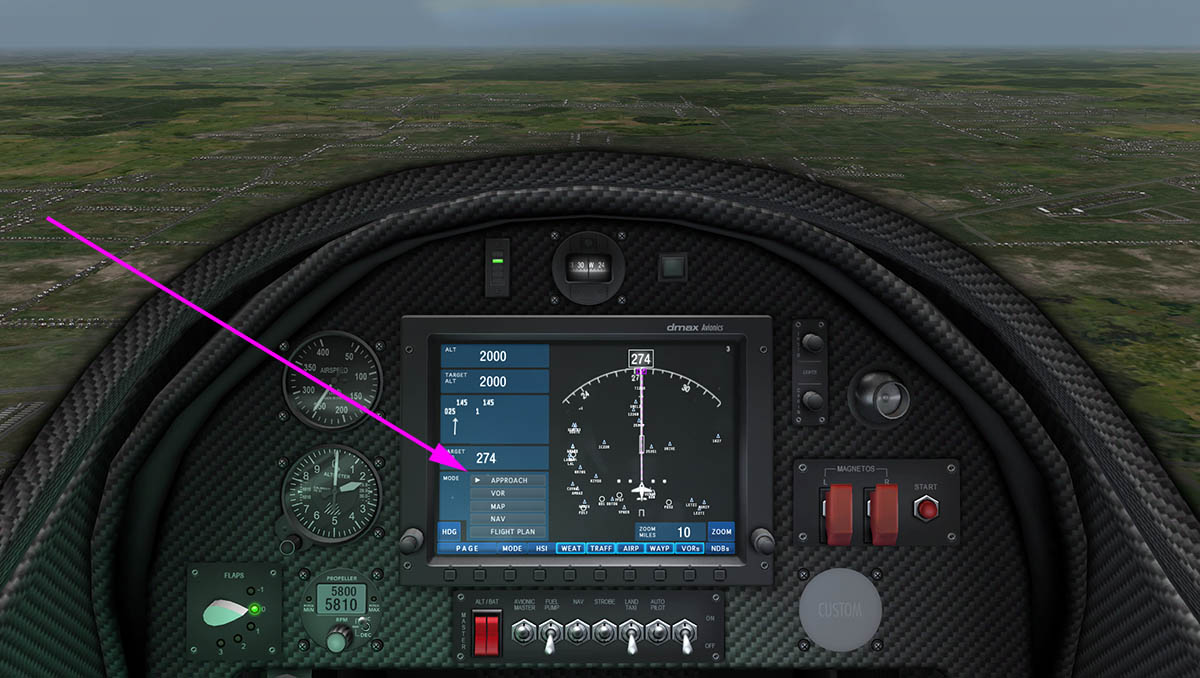
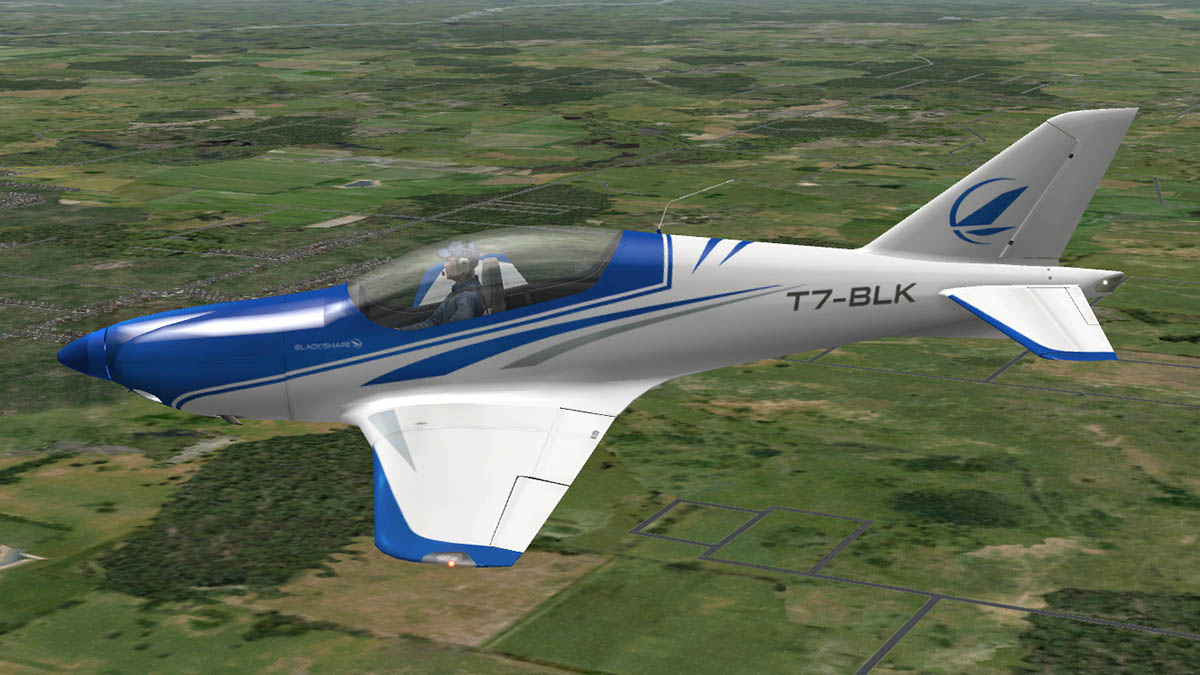
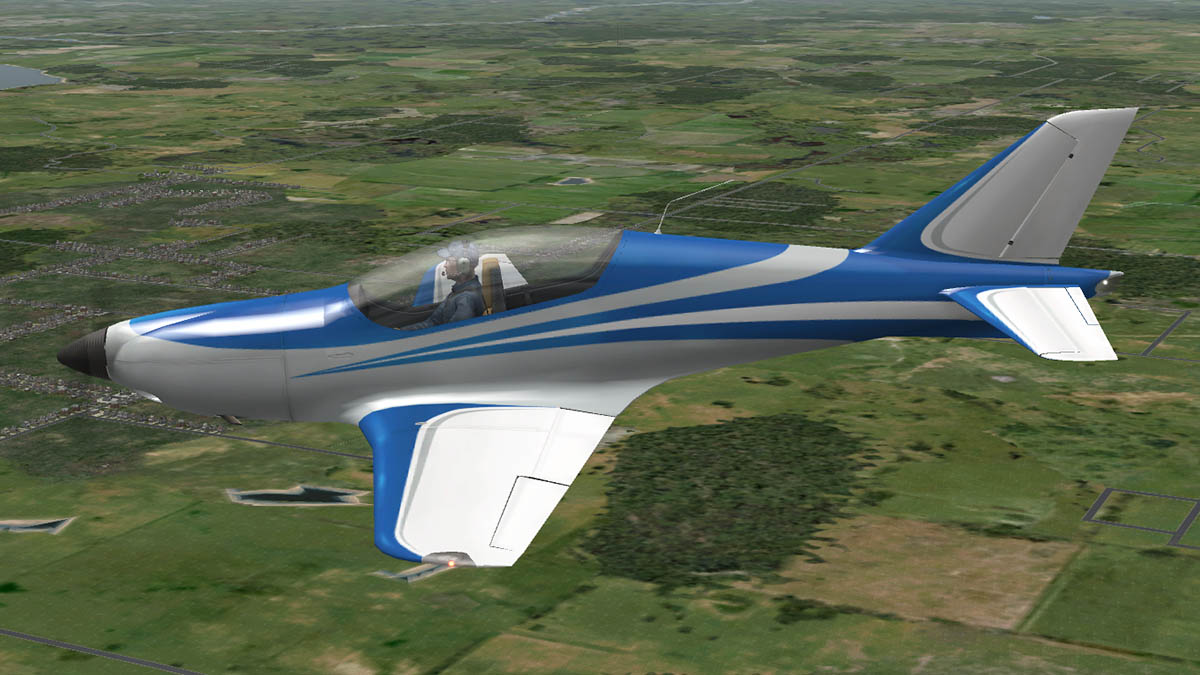
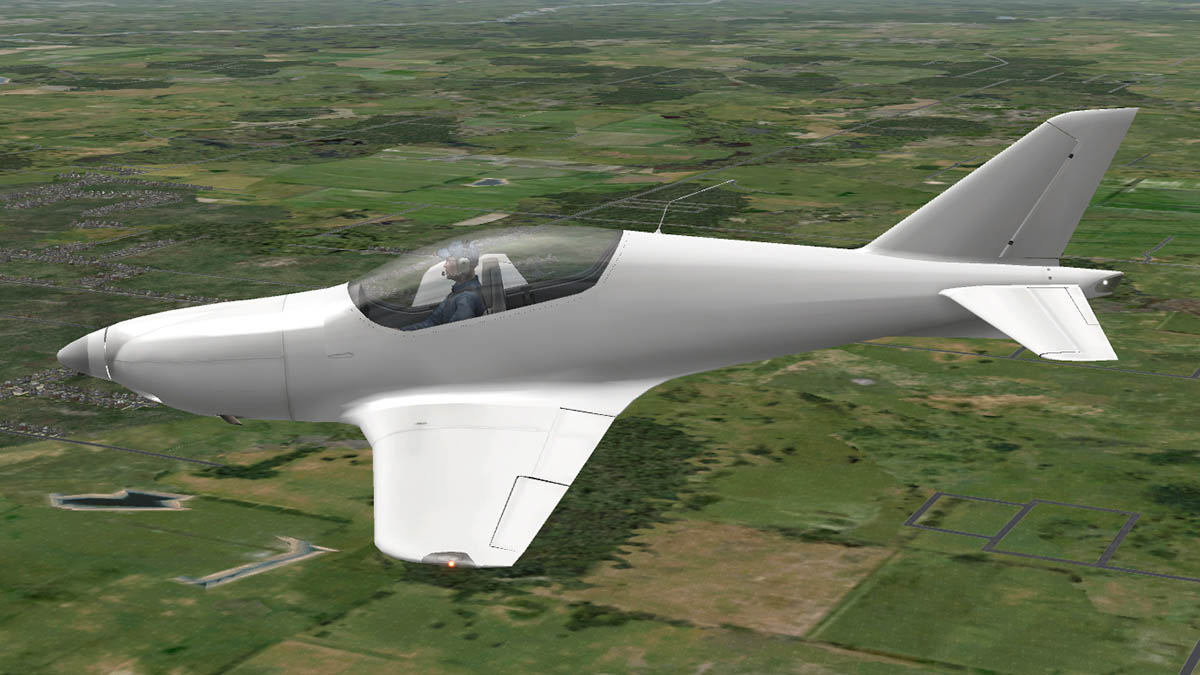
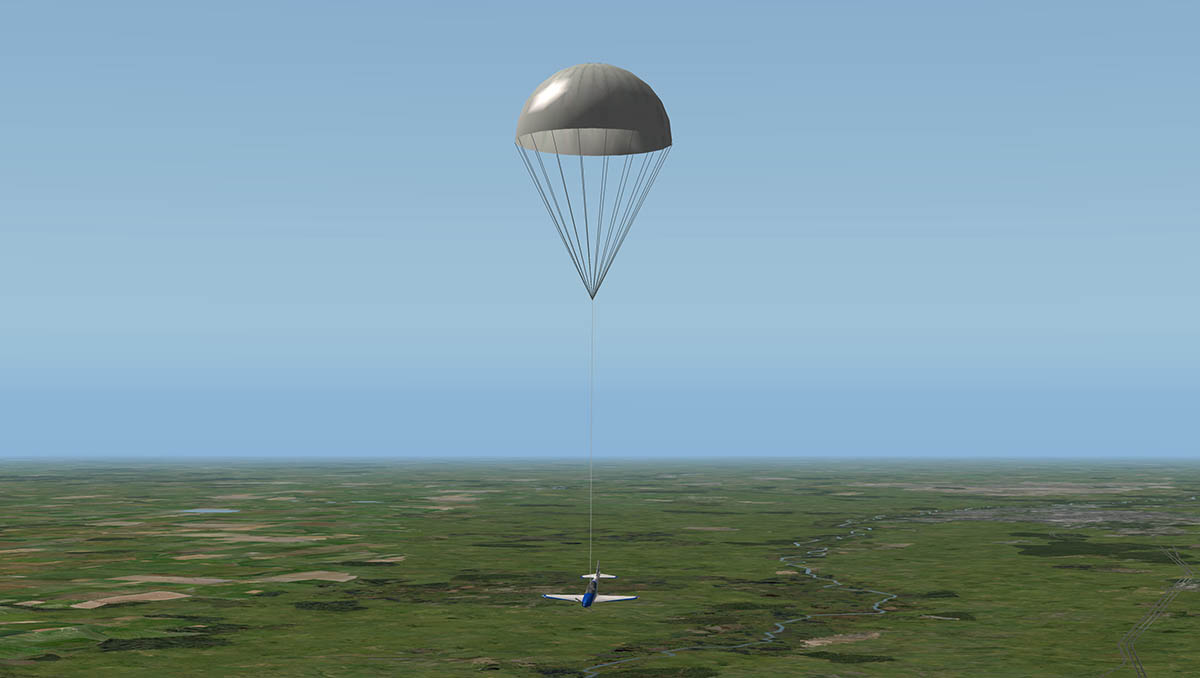
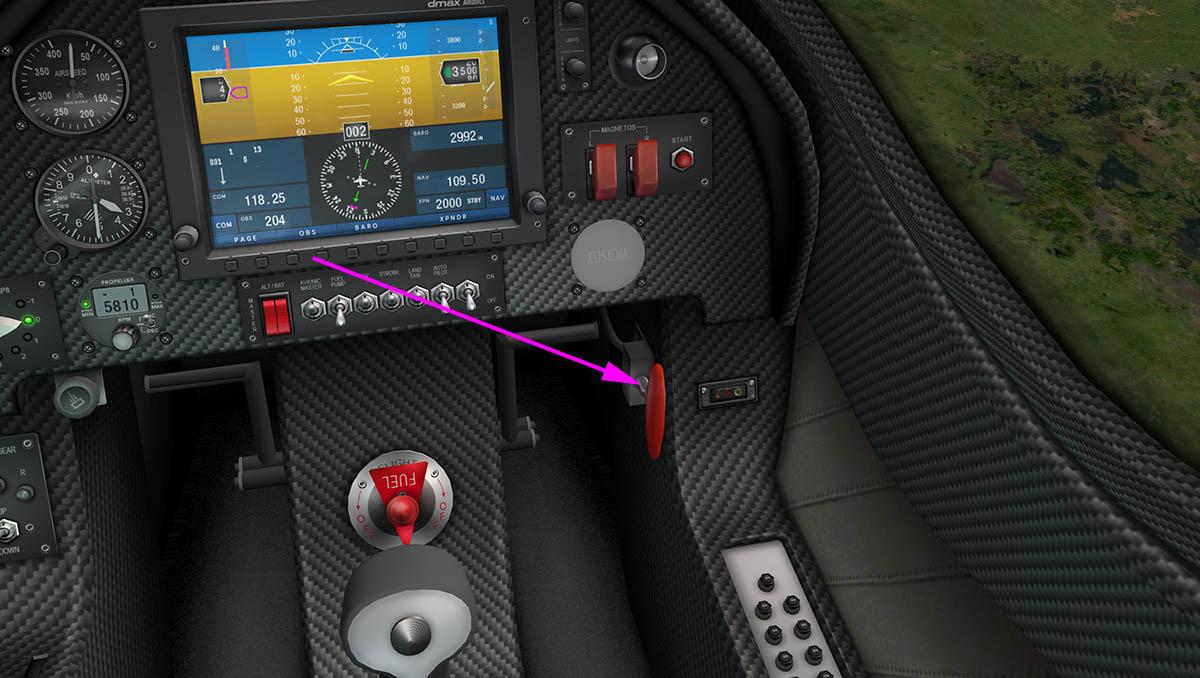
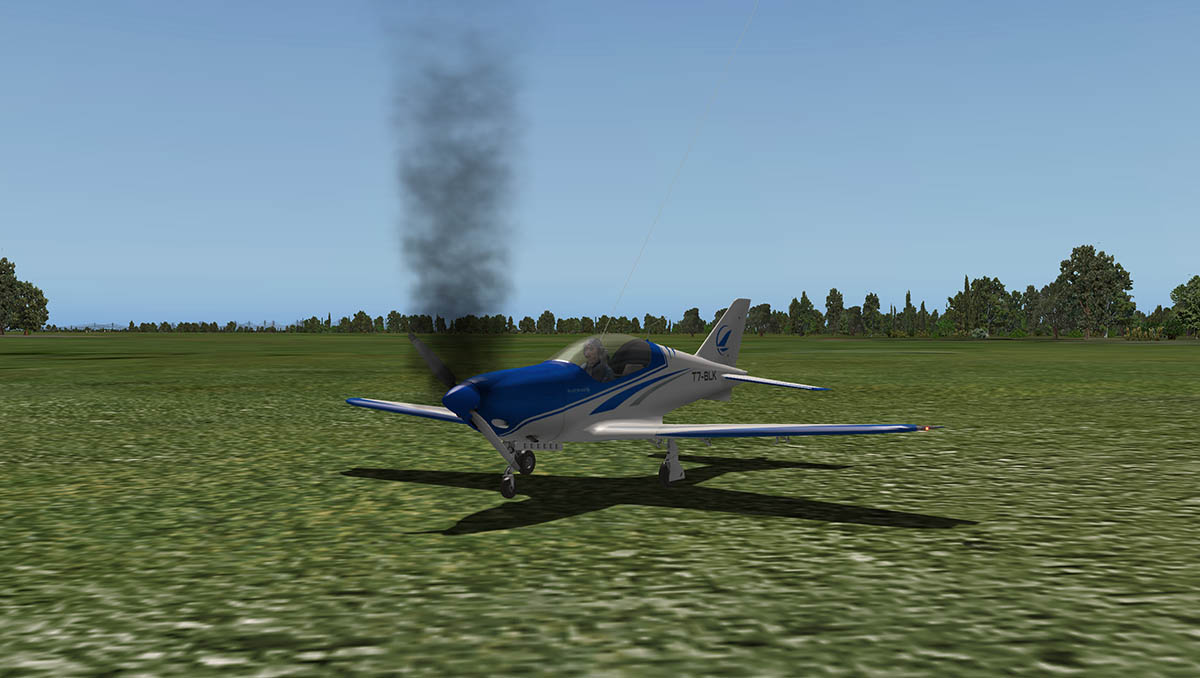
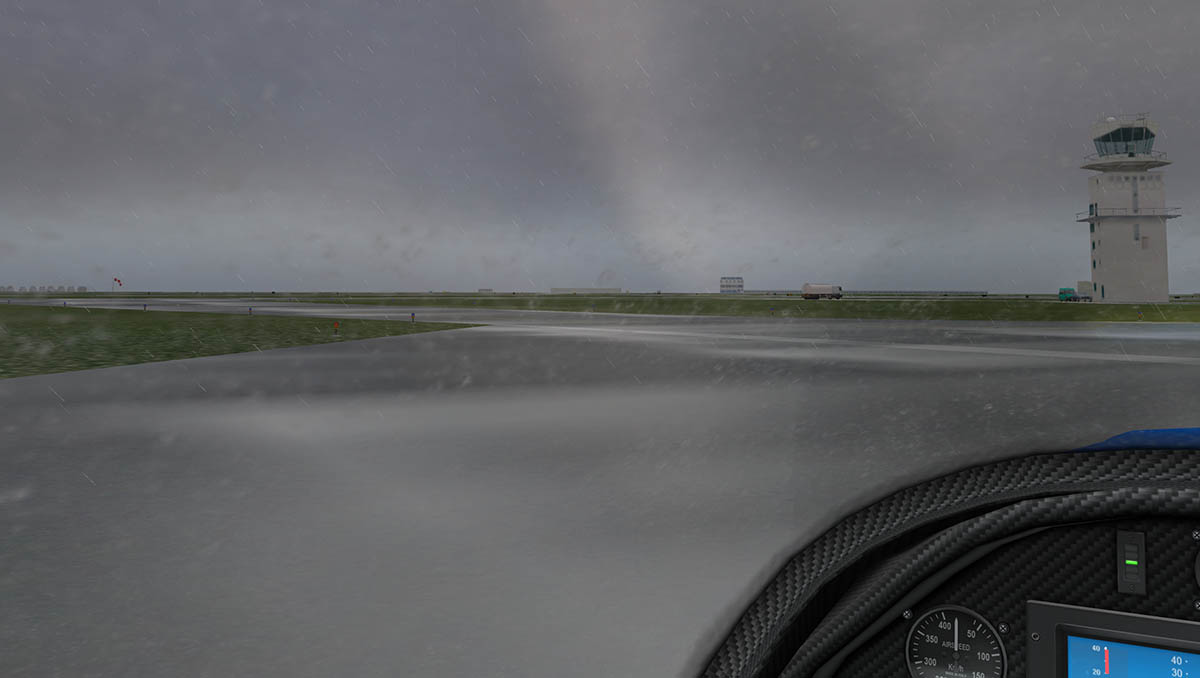
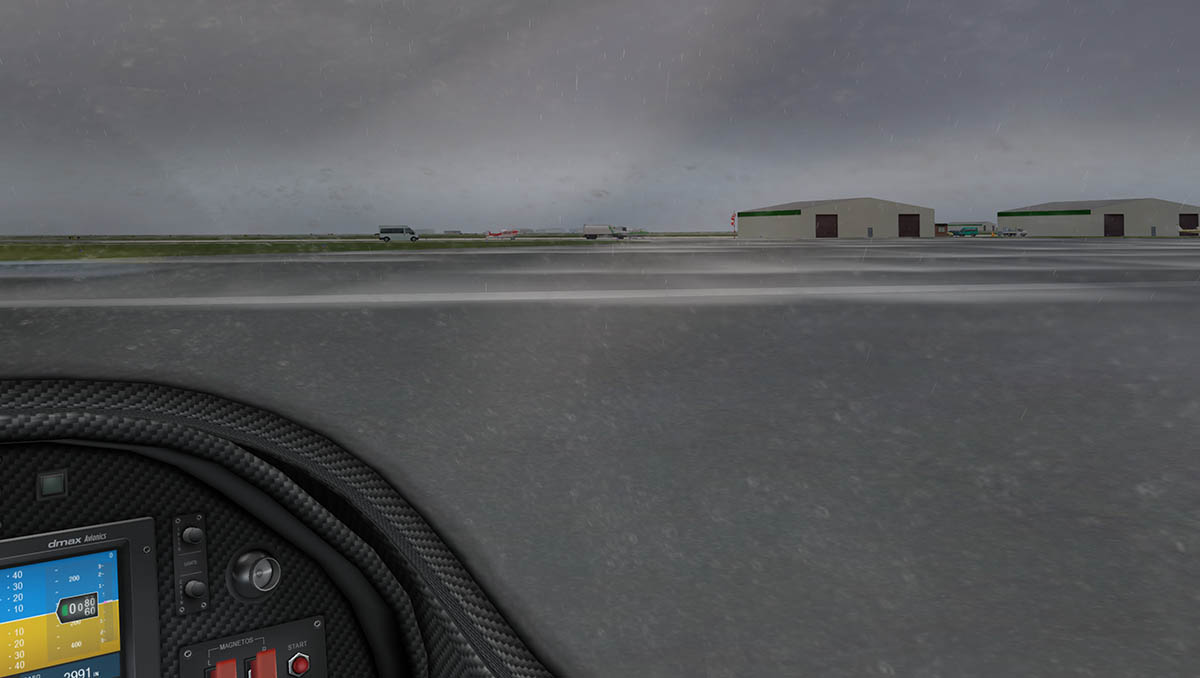
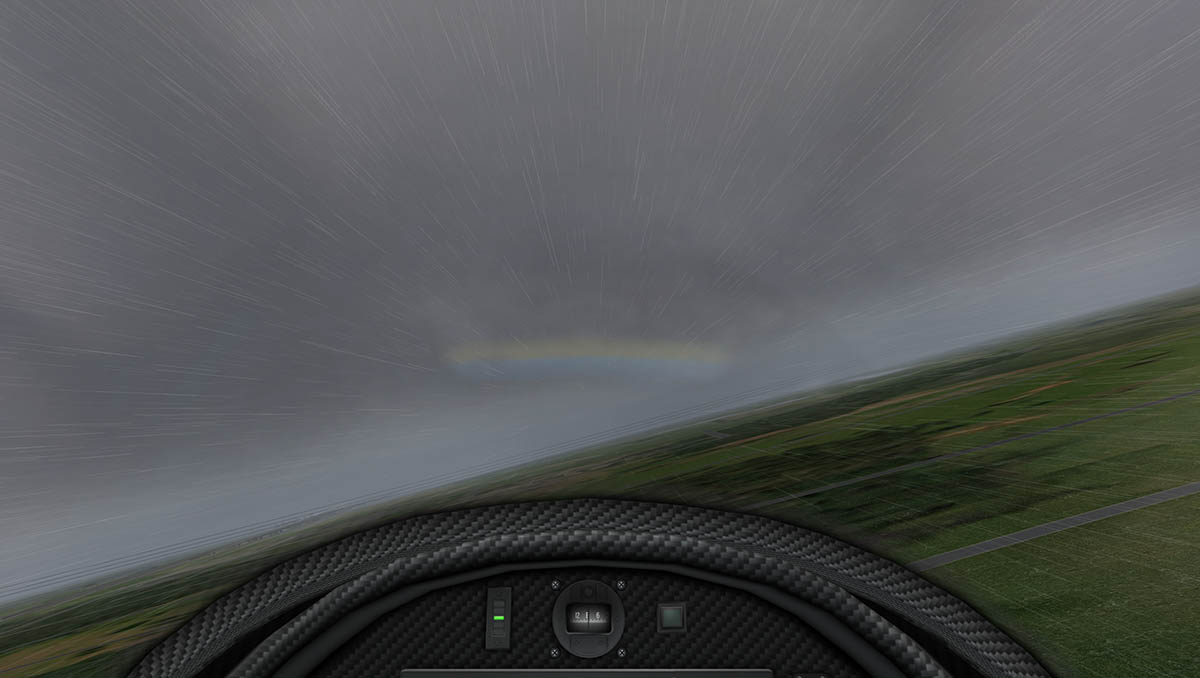
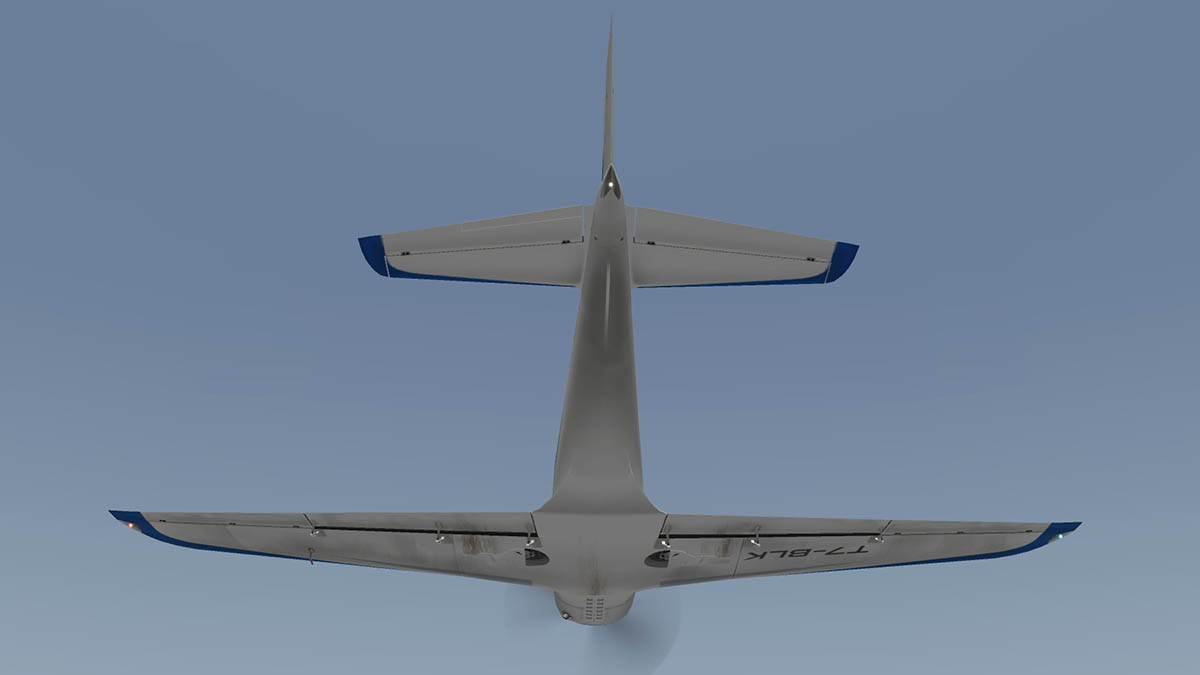
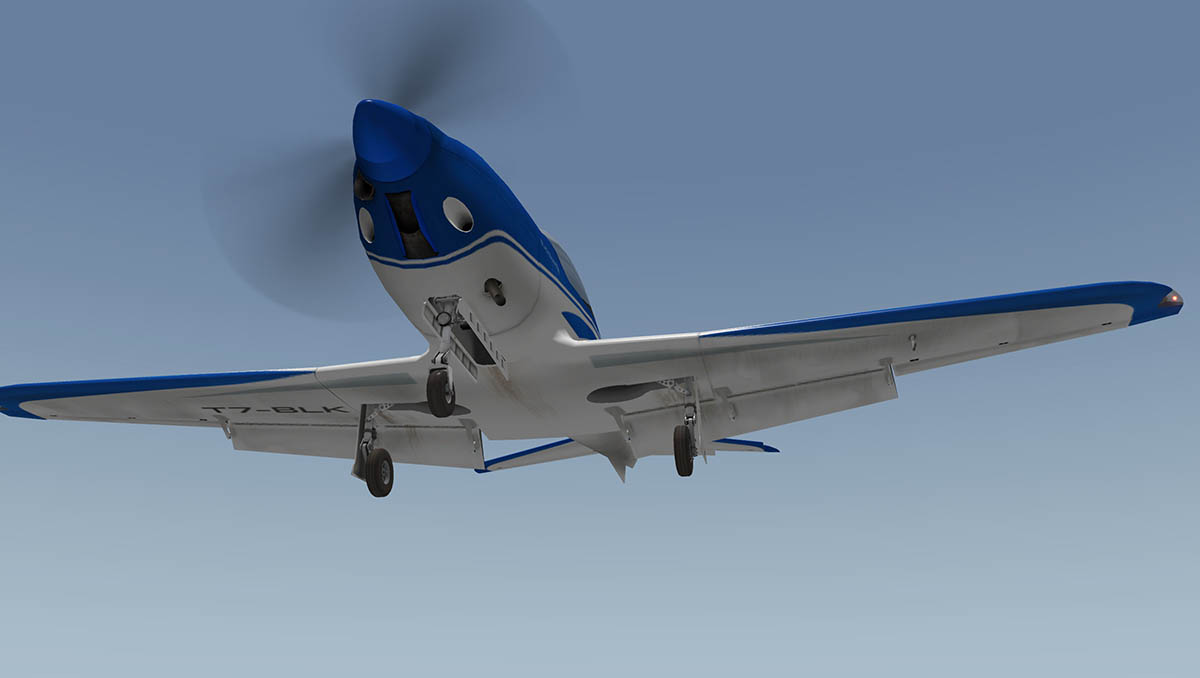
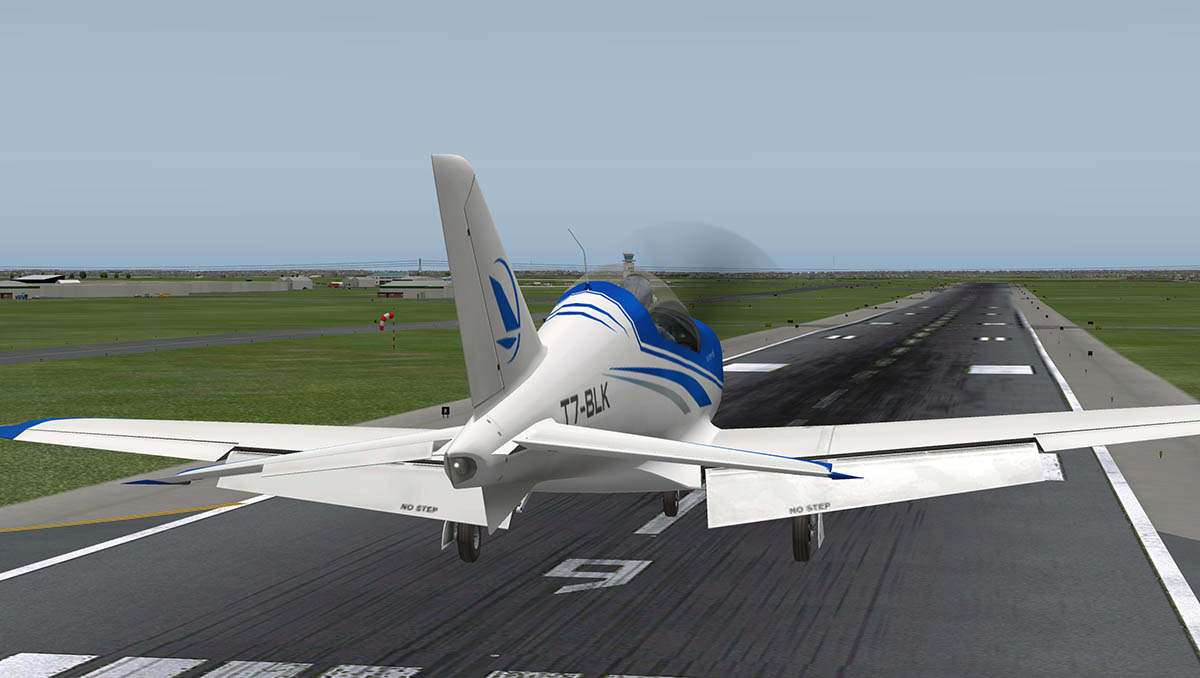
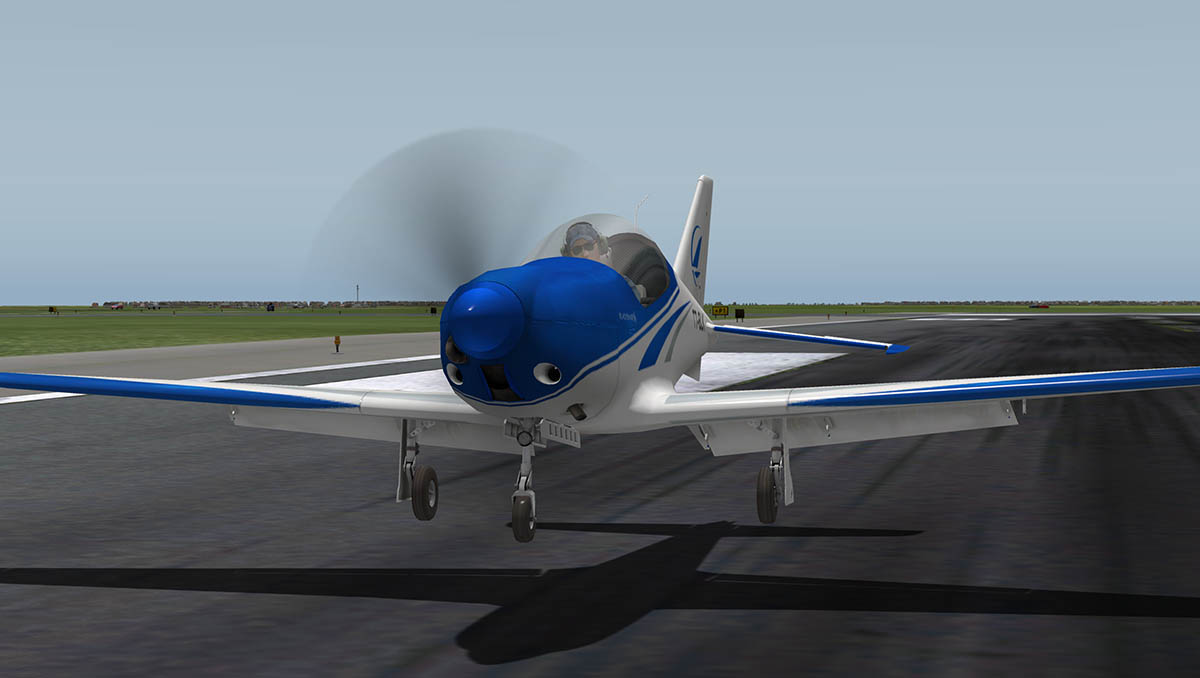
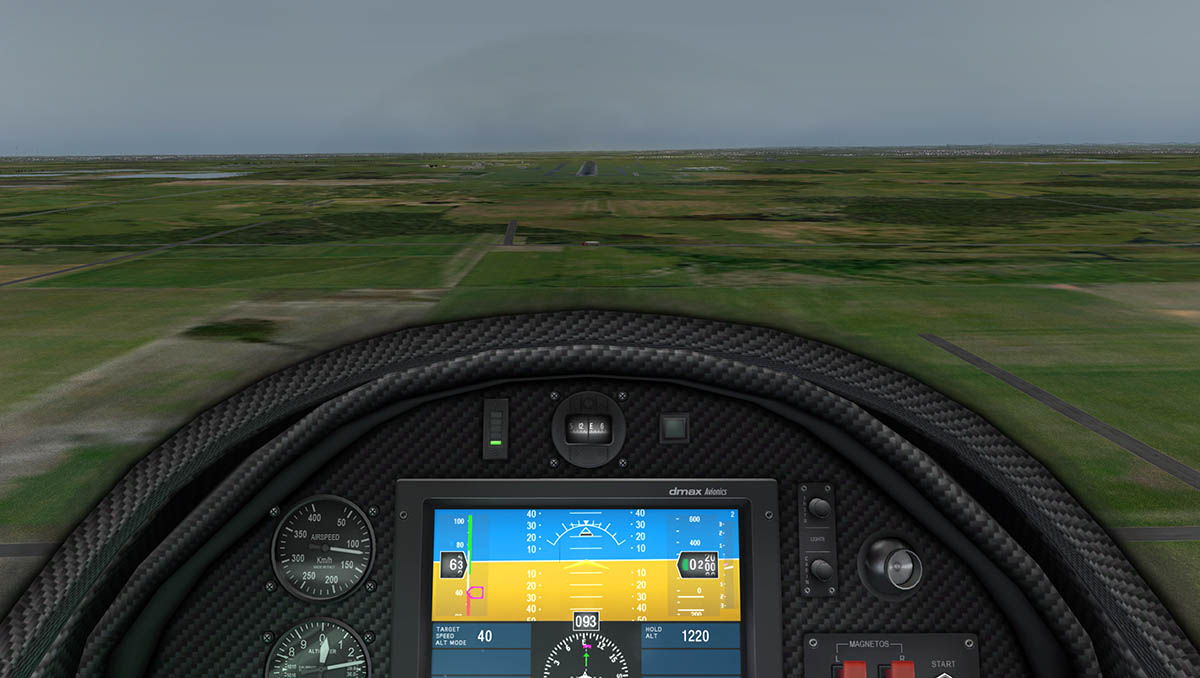
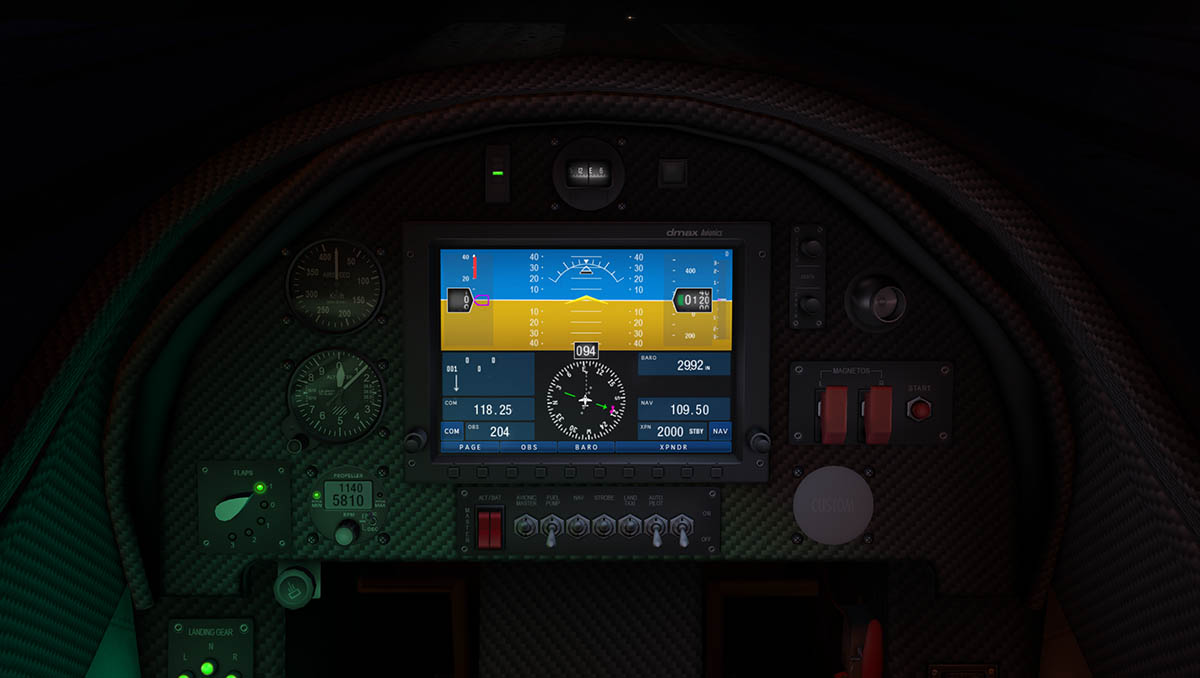
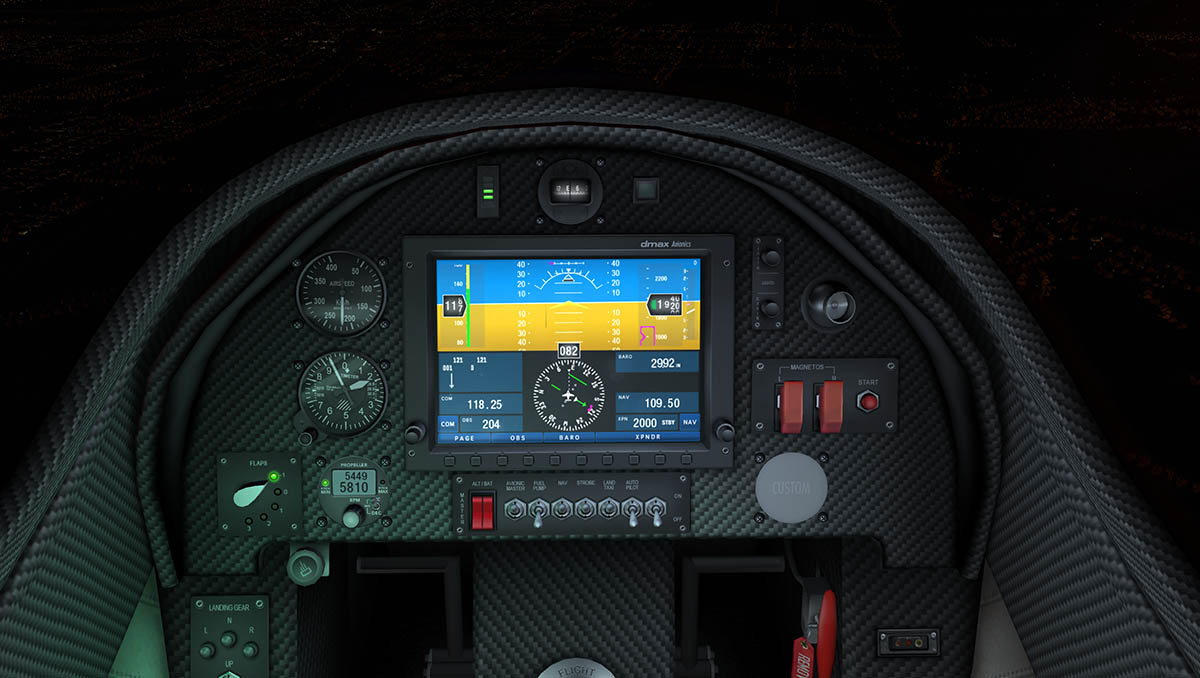
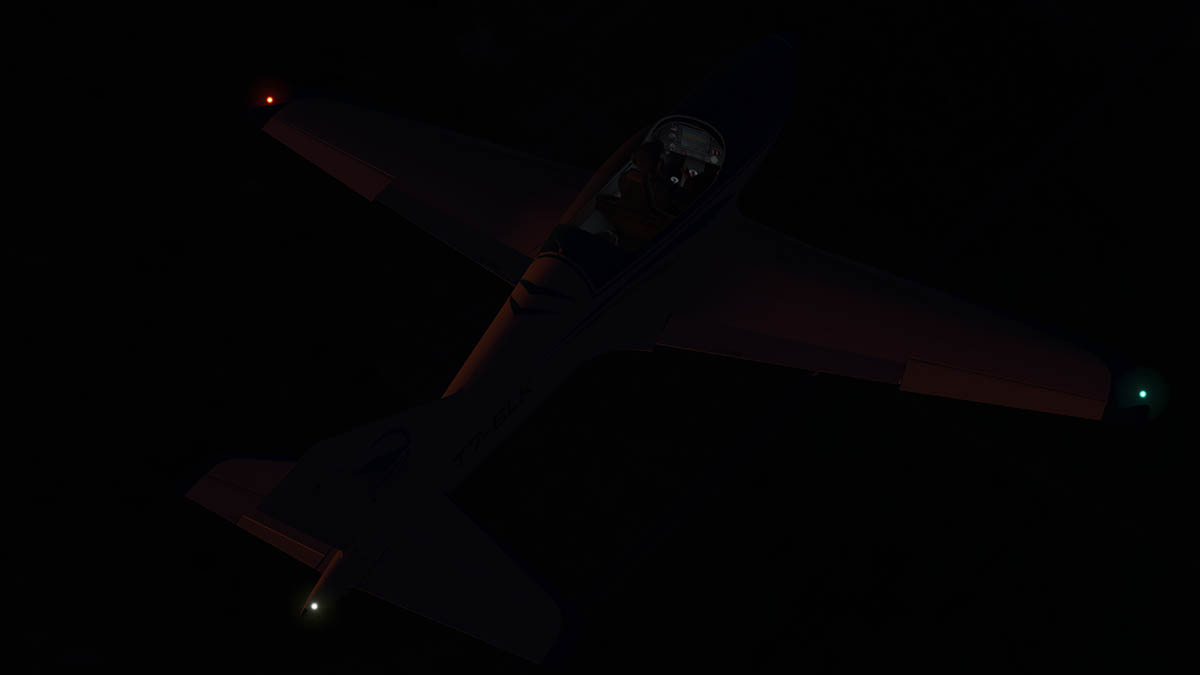
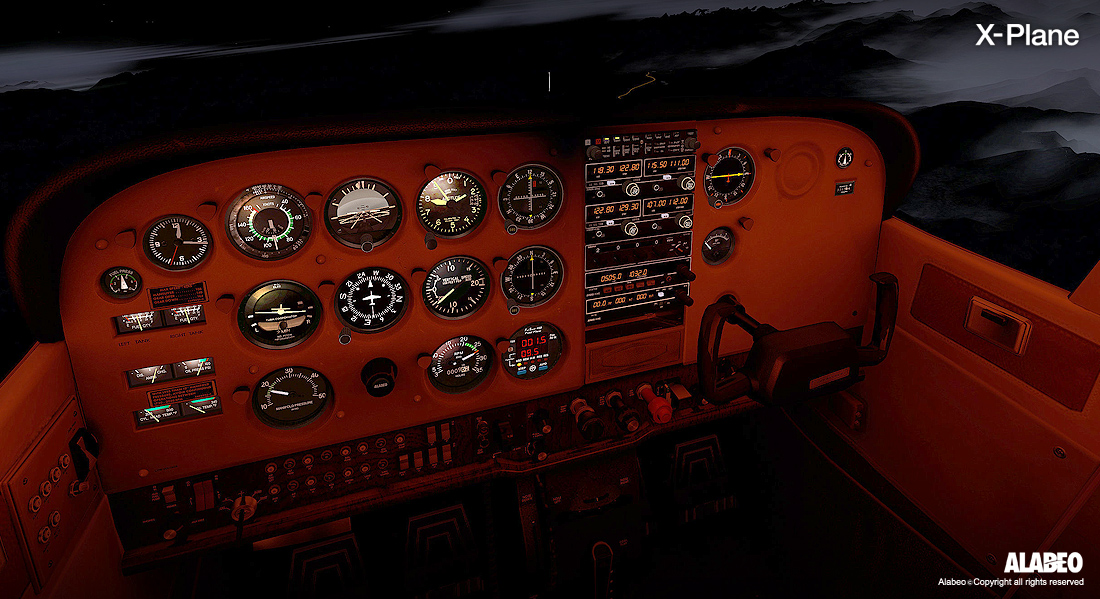
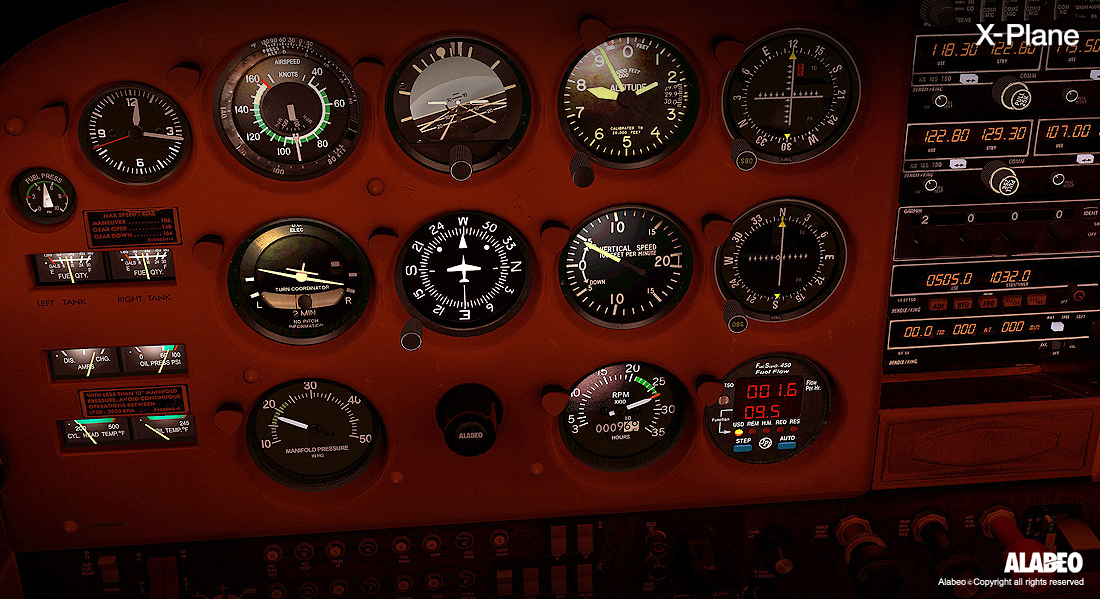
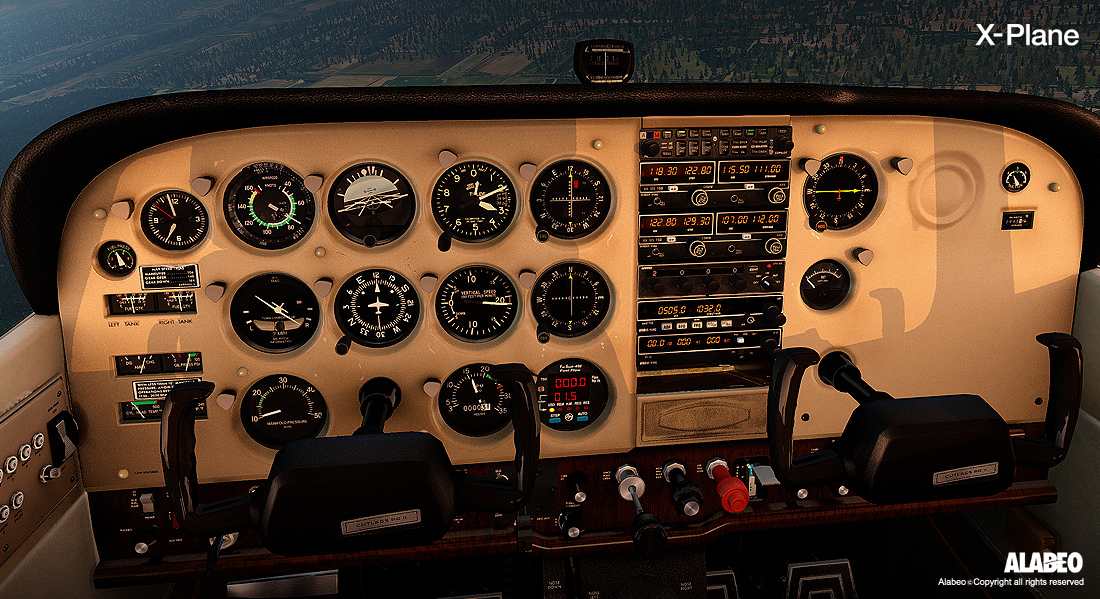
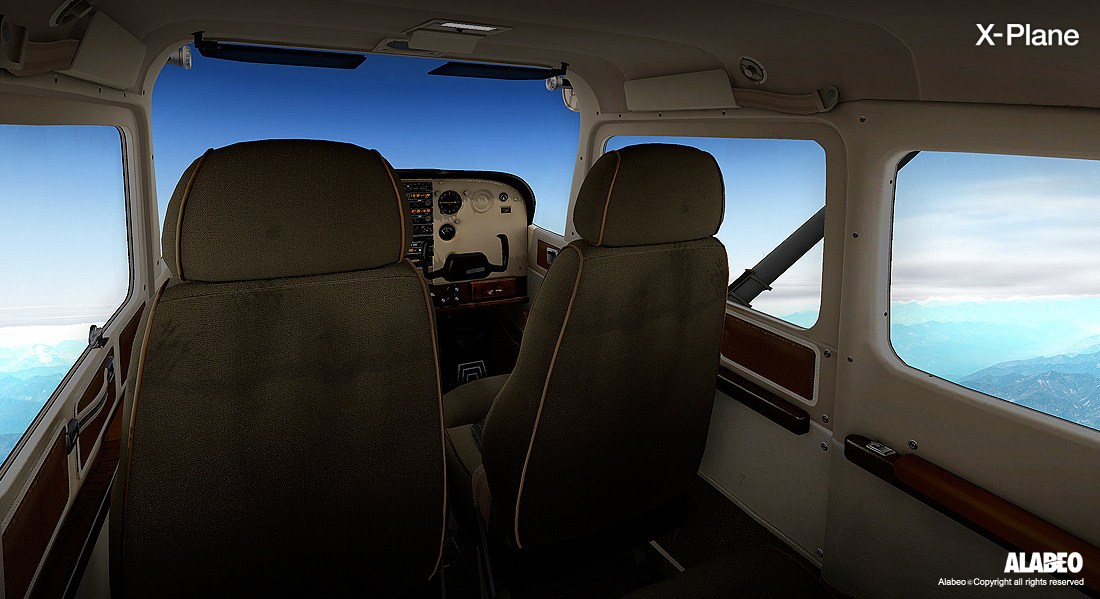
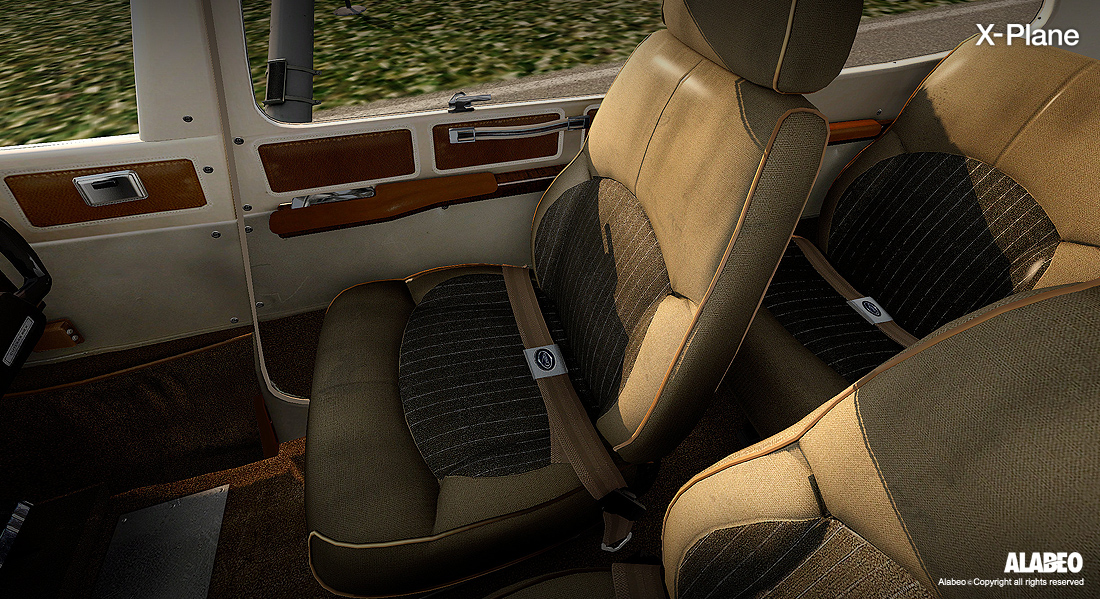
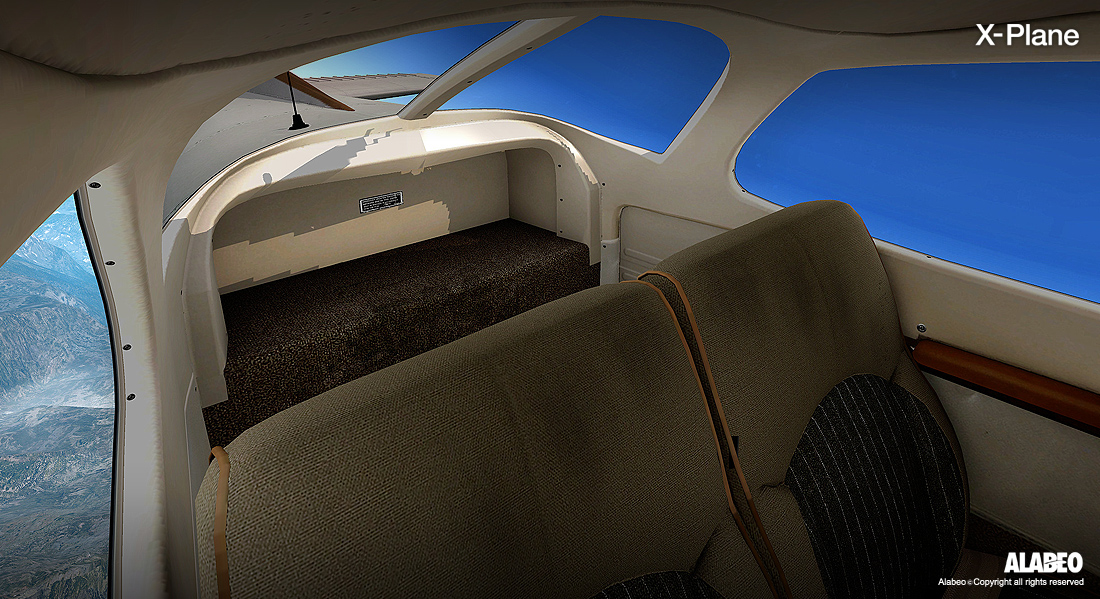
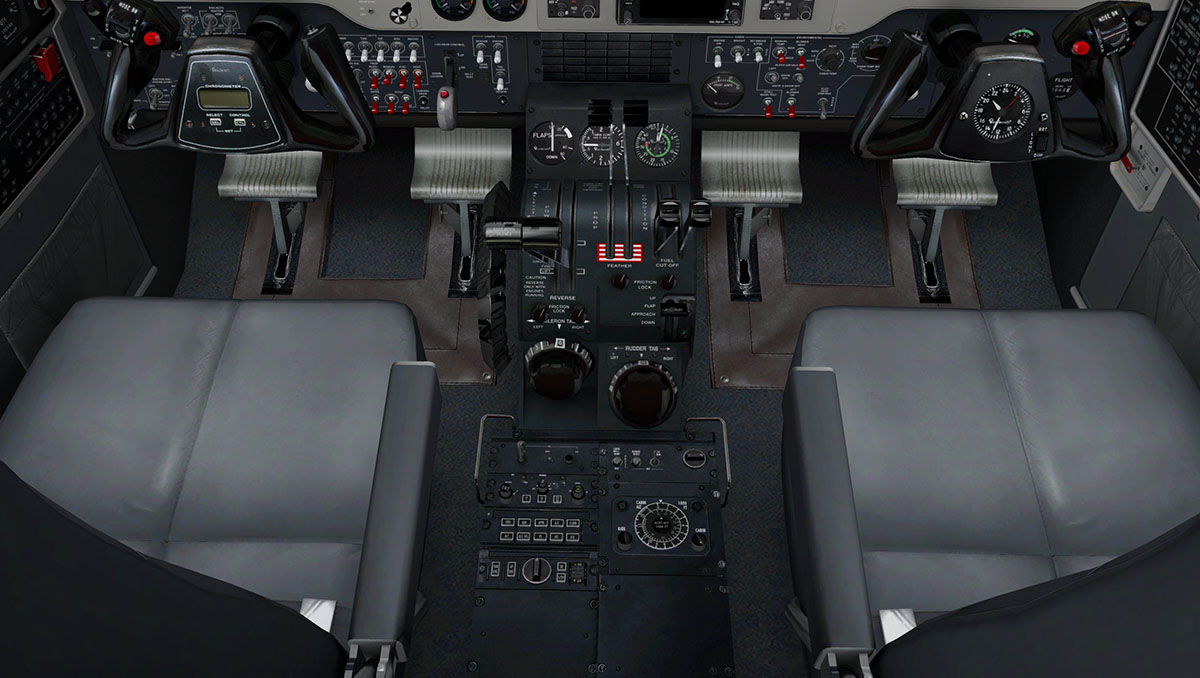
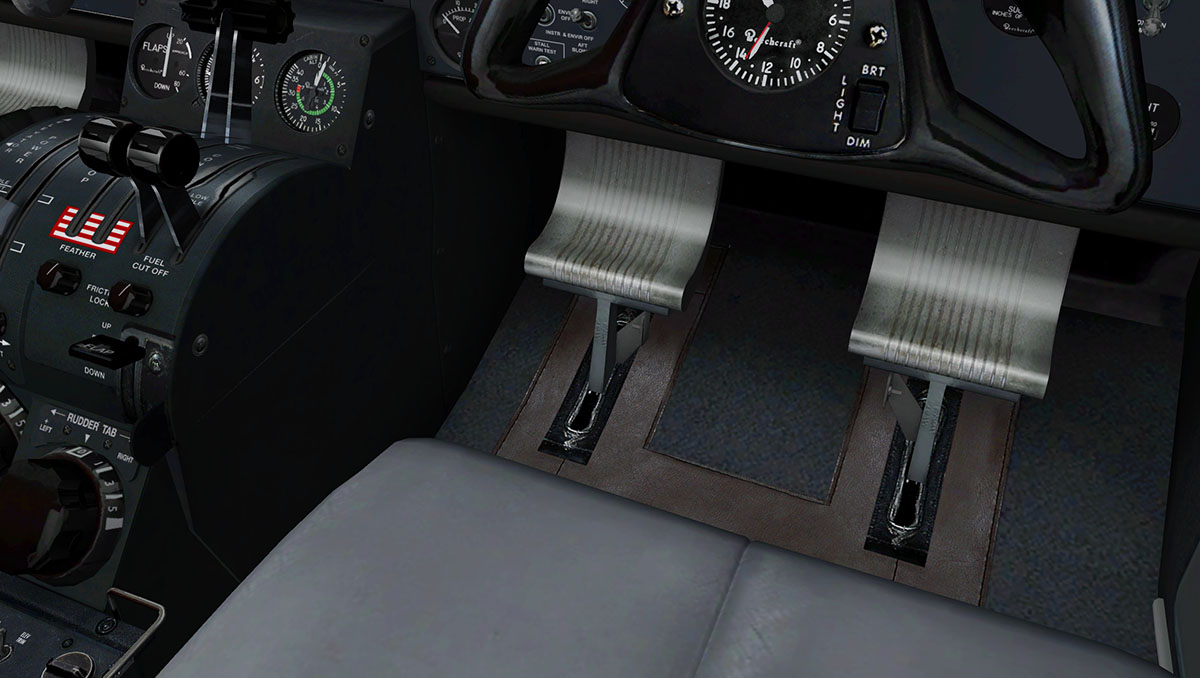
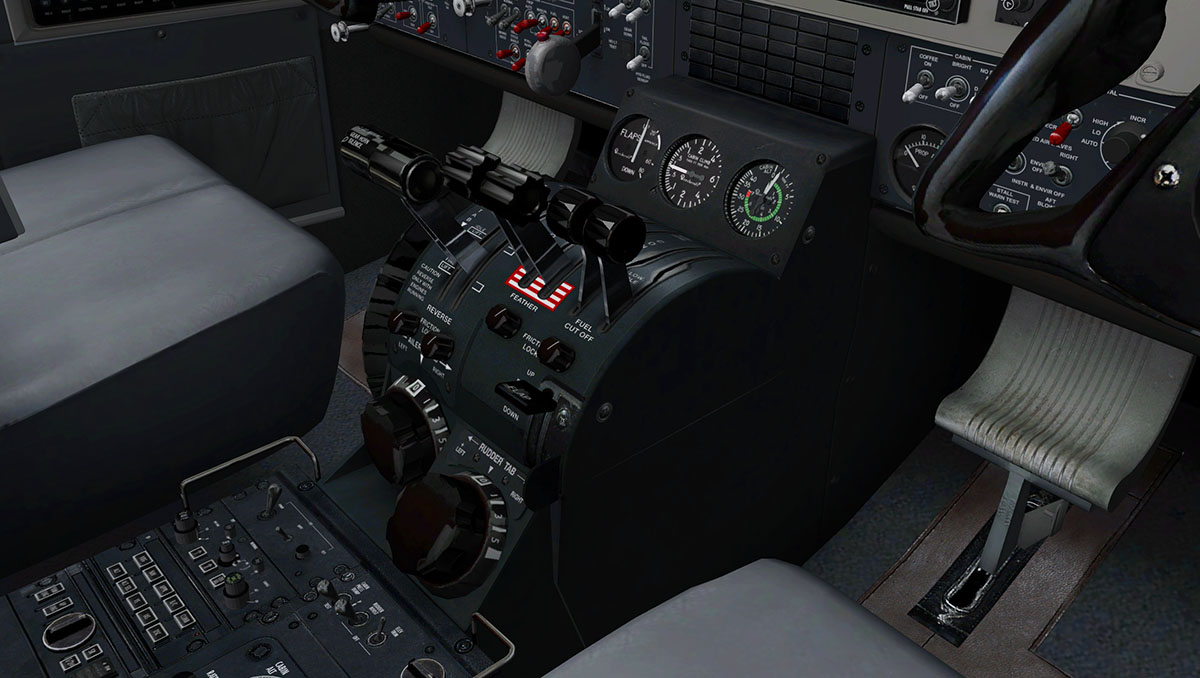
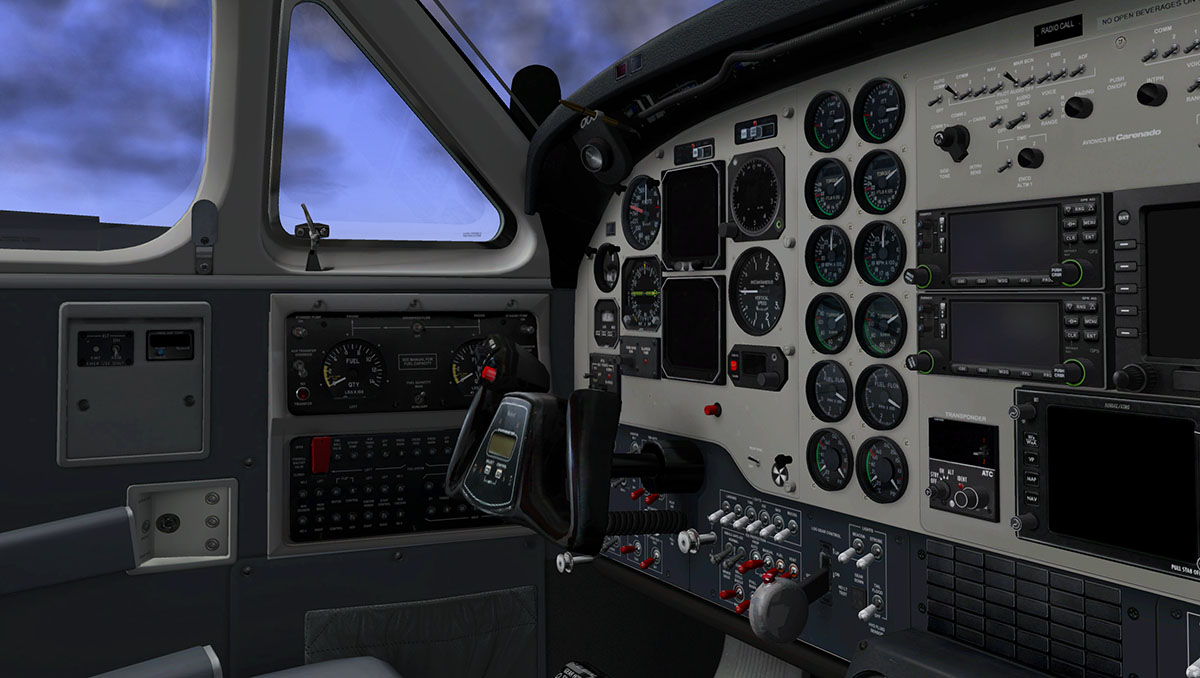
 Aircraft Review : Blackshape Prime v1.3 by dmax3d The BlackShape Prime is a revolutionary ultralight aircraft developed by the italian BlackShape company of Monopoli, Italy, and features a full carbon-fibre frame which makes for an extremely strong and low weight aircraft. The Prime is an evolutionary design that began life as an all-wood ultra-light aircraft designed by Guiseppe Vidor of Italy. Then airplane became the Millennium Master, produced by Millennium Aircraft of Italy in 2007, and was first shown in its current form at an Aero show held in Friedrichshafen in 2009. The aircraft is made from pre-preg carbon fibre. And its 7.94 m (26.0 ft) span wing has an area of 9.96 m2 (107.2 sq ft) and double slotted flaps. The standard engine available is the 100 hp (75 kW) Rotax 912ULS four-stroke powerplant, driving a two bladed constant speed propeller, which gives it a maximum level speed of 300 km/h (186 mph) and a cruise speed of 275 km/h (171 mph). The Prime is classed as an "Ultralight". In the United States it is classed as an "Light Sport Aircraft", But you have to have a special license (rated) in the U.S. because the aircraft has a three leg retractable undercarriage. dmax3d dmax is well known to anyone who has purchased X-Plane because his Cirrus Jet, Stinson L5 Sentinel, Cessna 172 SP and Columbia 400 are part of the X-Plane10 default series that comes with the simulator. He is also well known for several aircraft including the Tecnam P92 and P2002 aircraftand great version of the Typhoon Eurofighter (free here). As modelling goes the Prime is excellent. It is hard to reproduce carbon-fibre or plastic looking aircraft because it can come off a little false (or just plasticky), The Prime does not look like that, it very well modelled. However the textures are not great in their resolution, so they can even when you are set at a high texture resolution come still across when close as a little jaggy and buzzy. A shame as the 3D work underneath is excellent. This is highlighted by the woven carbon-fibre matting on the cockpit tub which is excellent and of a high quality even if the weave is a little large. The same could be said for the entire interior which is very well executed in detail and design, highlights are the excellent control stick and well created seats for two. The rear seat is empty unless you increase the weight to over 265 lb. from the X-Plane "Aircraft/Weight and Fuel menu" and then a female passenger appears. Another highlight is the excellent bubble canopy. It looks very realistic and has a feel of quality about it. You open and close it with the 3d handle or the “canopy_toggle” function. The aircraft does have a very nice shape about it. and is quietly different from the normal style of ultra-light machine. From the rear the Prime reminds me of a BAE Hawk that the Red Arrows display team fly, the Prime is no jet of course but the tail shape and rear elevators do have the same ring to them leading on to the bubble canopy. The wings are also a lovely efficient shape that are beautifully modeled here. The edge wing lighting is well done in quality as well. The three stage flaps are 0° (neutral) - 10° (take off) 20° and full flap 30°. There is an extra -10° (negative "aps or up) stage as well that is used when at speed in flight to keep the nose level... This flap function is not on the real aircraft. Add together an extremely light airframe and a powerful engine for its class and the aircraft is going to perform well. there is a electronic propeller control. Which is a small toggle switch on the controller that can be used to manually adjust the propeller pitch instead of a mixture lever, which I set at 6000rpm. And with the quick on the power you will find that the takeoff rolls are extremely short at around 180 m to 200m to the point of takeoff and landing rolls are about the same distance. The Prime will climb easily at around 1500fpm with the gear down then accelerate to around 2000fpm with the gear retracted. I found the best band still at 1500fpm to still give you plenty of power in reserve. Cruising speed is around 200 Km/h (110kts) with top speed around 305 kmh (183 kts) but you will never go there. You feel tight and enclosed in the aircraft and with the passenger on board behind you it feels like you are sitting in a glider arrangement. The large display is very well designed by dmax. You have to be careful in that it is easy to concentrate more on the screen than on the horizon (It is so large), so you are soon fiddling around and flicking the aircraft around as it is so nimble, you will then find it is quite touchy in your hands, slowing down and finding the smoothness is something you will need to concentrate on to fly the aircraft well. Besides the main display there are the two beautiful Altimeter and Speed dials. Like most modern displays the buttons are located below the screen. The main one is the "pages" selector that has the selections of the - main flight display - engine conditions - Map. The MAP displays will show the usual - Approach - VOR - MAP- NAV and flightplan pages. with zoom located on the right hand side. Like all menu driven displays it will take a little time to navigate effectively around them all. But this system is more simplistic than most. All radio settings (Comm 1/VOR1/Transponder) are via the display. Liveries Liveries by and large are quite sparse?... The white one can be a basis for a livery, but there is a paintkit supplied. The Blue livery is the default and there is the "Millennium" livery that looks half completed? Features Their are two features that are interesting. First the escape parachute! If your engine conks out on the Prime then you will not die a thousand deaths... As you have an escape parachute! Pull off the safety tag off and then pull out the red handle and you will be pulled violently upwards by a large parachute. It is then a very serenely slow ride and float down until you hit the ground with a backbreaking thud! After a short stay in hospital you can then resume your flying career. Secondly are the wet, cold and frost features. Rain and ice effects on glass are becoming the normal in X-Plane. The effects here are one of the best I have seen yet. The rain drops are very clever in fitting around that lovely bubble canopy, go colder and you get mist and fog in there as well. When airborne the drops are moved on by the wind but the effects are still there, so it becomes very realistic. Note the excellent glow of the panel display screen on your forward view, again very realistic. Version 1.3 The changes in this new version are minimal but essential. New EFIS with multifunction buttons Autopilot fully integrated Fixed some issues with the mechanical altimeter Fixed magnetos switches: now work as expected Carb heat knob now is working Every one wondered why the carb heat didn't work when it is a standard feature in X-Plane, now that is now fixed. The autopilot is now more refined, but I still found it hard in the aspects of V/S vertical speed changes. get it wrong and the aircraft will zoom up to the next set altitude while you hang on, going down is very hard, and makes it hard work in the approach mode when wanting to lose altitude for a landing position. The aircraft is extremely light, So in the POH (supplied) you need an approach speed of 150Km/h (80 kts) before dropping the gear down and a maximum speed of 120 Km/h before you drop the flaps a notch. You will get a lot of drag, not only from the gear in the airstream, but the flaps kick in a fair amount as well. Adding in power a lot helps, but then you have the situation of a very light airframe pulling against a lot of drag. Add in some spice with some light winds (or worse bad crosswinds) and then you have a handful on the stick. Your approach speed is about 100 Km/h (54 kts) so you don't come come up on to the runway at a slow speed, but you slowly sort of gradually sort of get there... eventually. Once over the threshold it will nicely sit down and do a short roll to a stop, but are you sweating there a little? The lightweight is what makes the Prime fun. You have to fly this aircraft in the lower speeds with skill, but it also has the power when clean to go quite fast. Lighting You have two knobs to set the lighting. One for lighting the panel (Instruments) and one for lighting the cockpit. Between the two adjustments you can find the best conditions that suits you. Outside there is only one landing light and the standard Nav/strobe lights. _______________________________________________________ Summary An interesting aircraft that is a very light-weight design, but still extremely fast (for its class). Makes the Prime a great aircraft for buzzing around and enjoying a machine that is not only very modern in design but can at points be a challenge to master under very low speeds. Its is a fun machine is the best way to sum it up. Textures are average and the liveries feel like an afterthought, but the design and details were it counts are excellent and overall the aircraft is very good. At just under US$16 it is very good value as well. Installation : Blackshape Prime 1.3 is a download of 44mb and is expanded into your X-Plane Aircraft folder at 55.1mb. Some downloads have the issue of the EFIS and partial panel that only fills the entire 1920x1080 screen with no outside view in 2d? If you get this you can re-download or fix it yourself by opening the acf in PlaneMaker and go to: standard menu -> viewpoint window -> view tab and then check the "show cockpit obj in: 2-d forward panel views". Docs : 1 POH (70 Pages) and 1 QuickOperationHandbook (13 Pages) The Blackshape Prime v1.3 is now available from the X-Plane.Org Store. Blackshape Prime v1.3 Price is currently US$15.95 Technical Requirements: Windows Vista or Windows 7 (32 or 64 bits) or MAC OS 10.6(or higher) or Linux X-Plane 10.20 (or higher) - 32 and 64 bit compatible Cuurent version: 1.3 (last updated June 15th 2014) Developer Site: dmax3D _______________________________________________________ Review By Stephen Dutton 21st June 2014 Copyright©2014: X-Plane Reviews Review System Specifications: Computer System: - 2.66 Ghz Intel Core i5 iMac 27” - 6 Gb 1067 Mhz DDR3 - ATI Radeon HD 4850 512mb Software: - Mac OS Mavericks 10.9.2 - X-Plane 10 Global ver 10.22 (final) Addons - Saitek x52 Pro system Joystick and Throttle
-
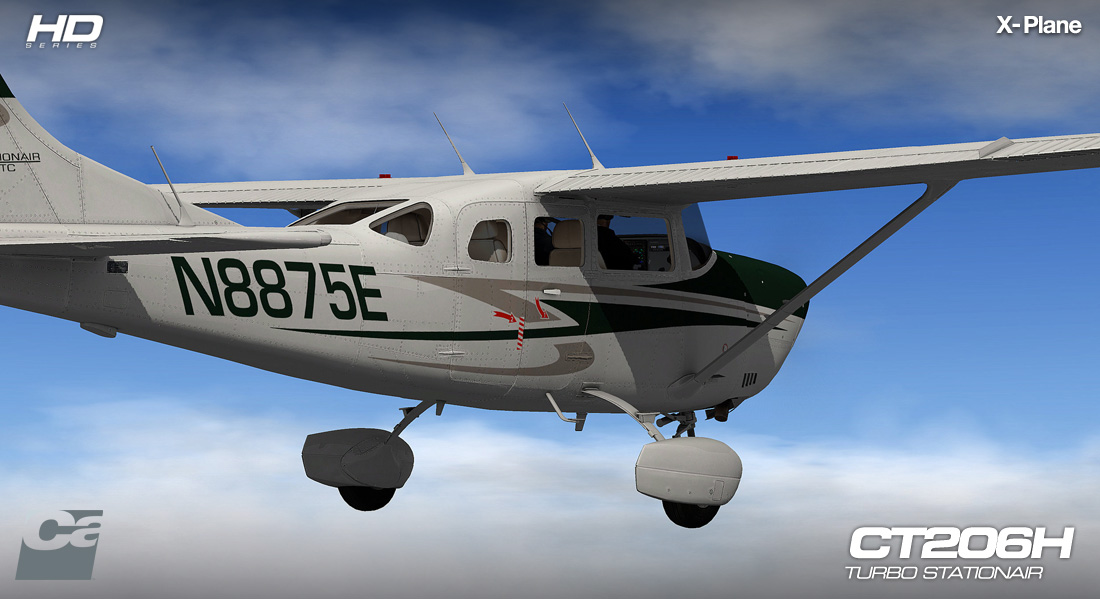
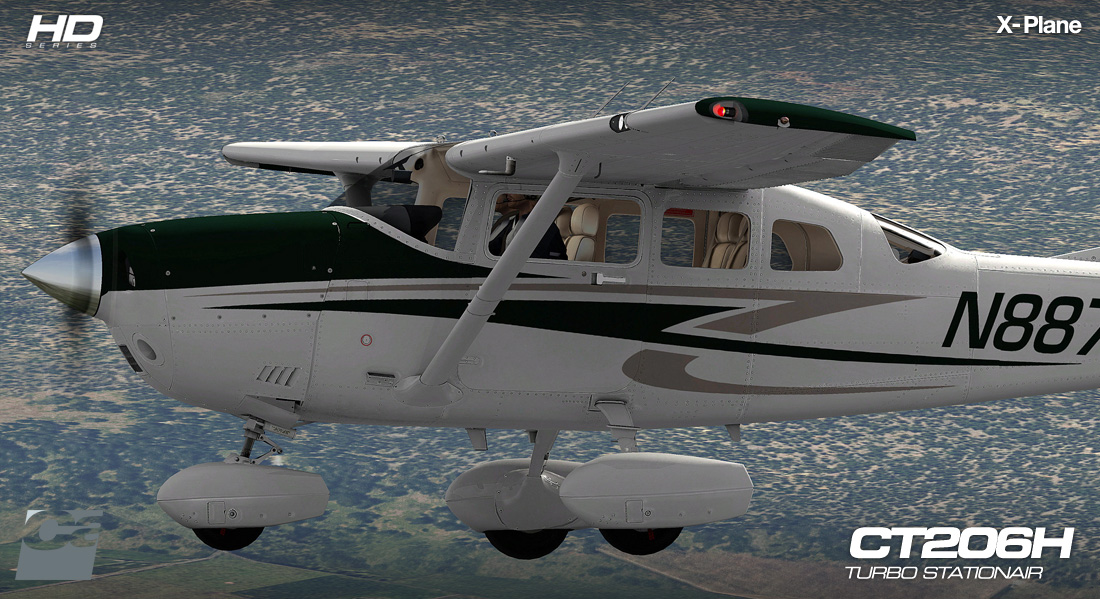
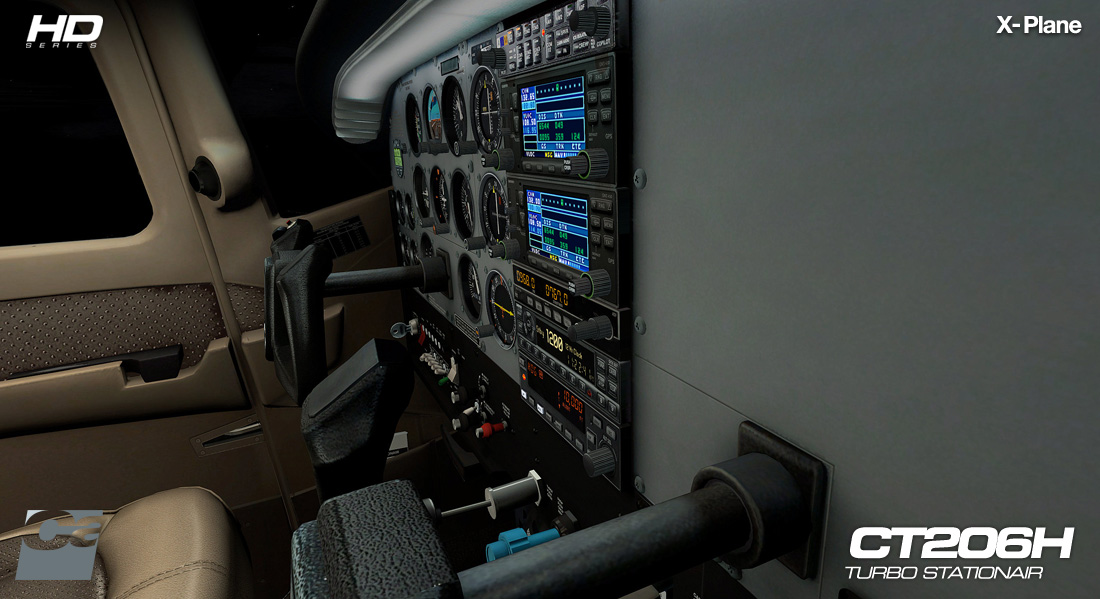
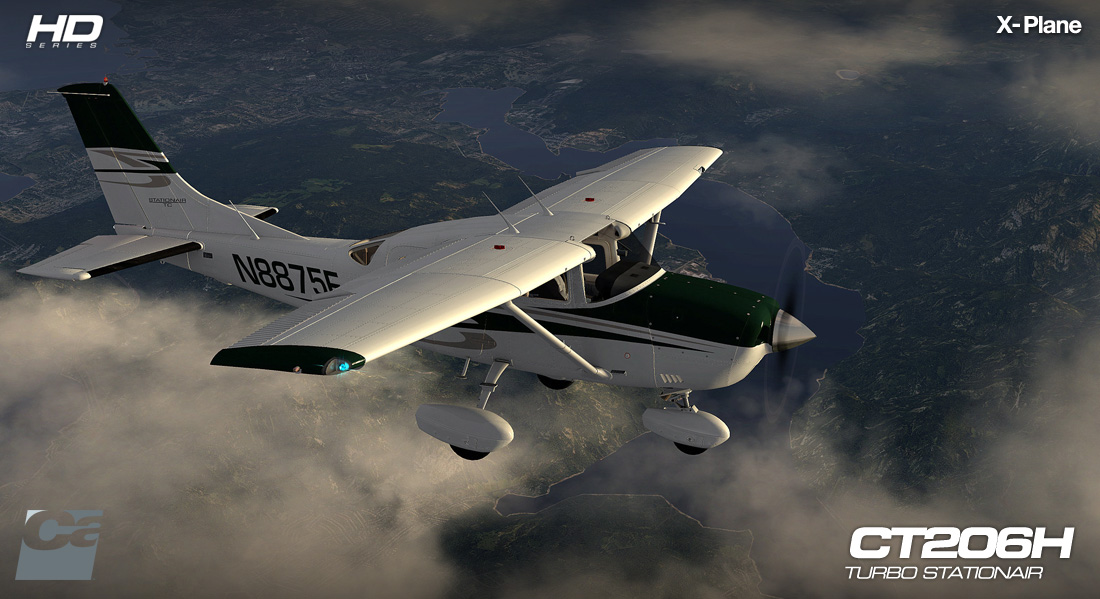
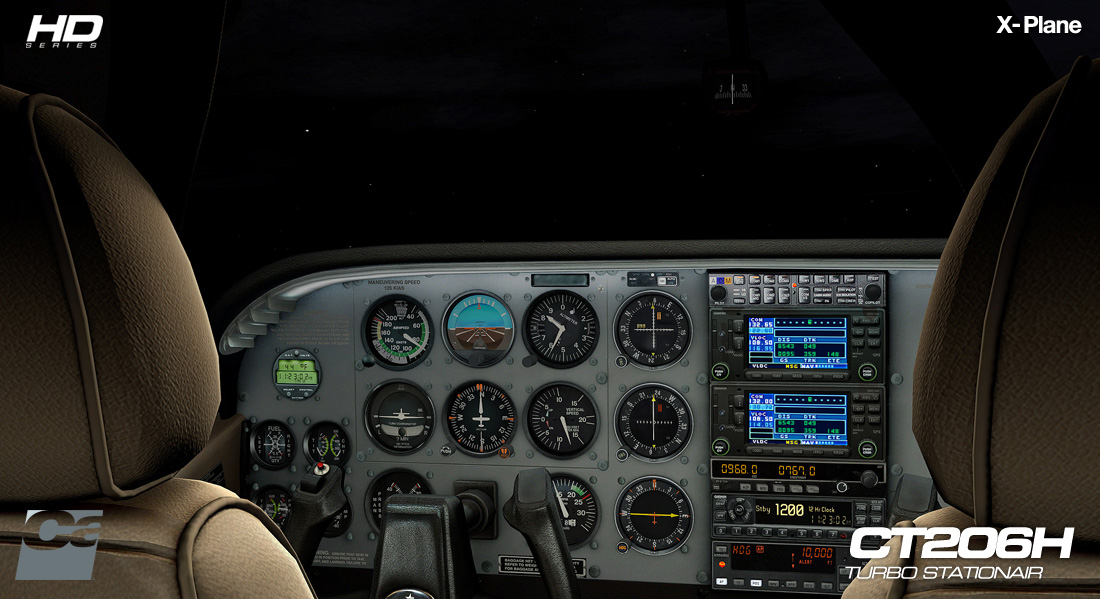
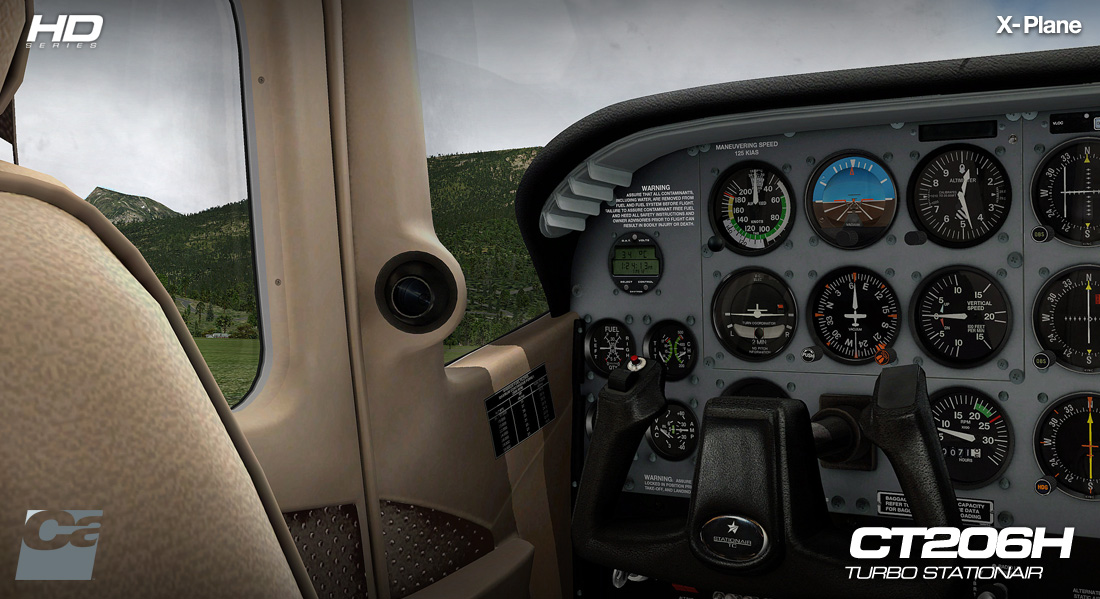
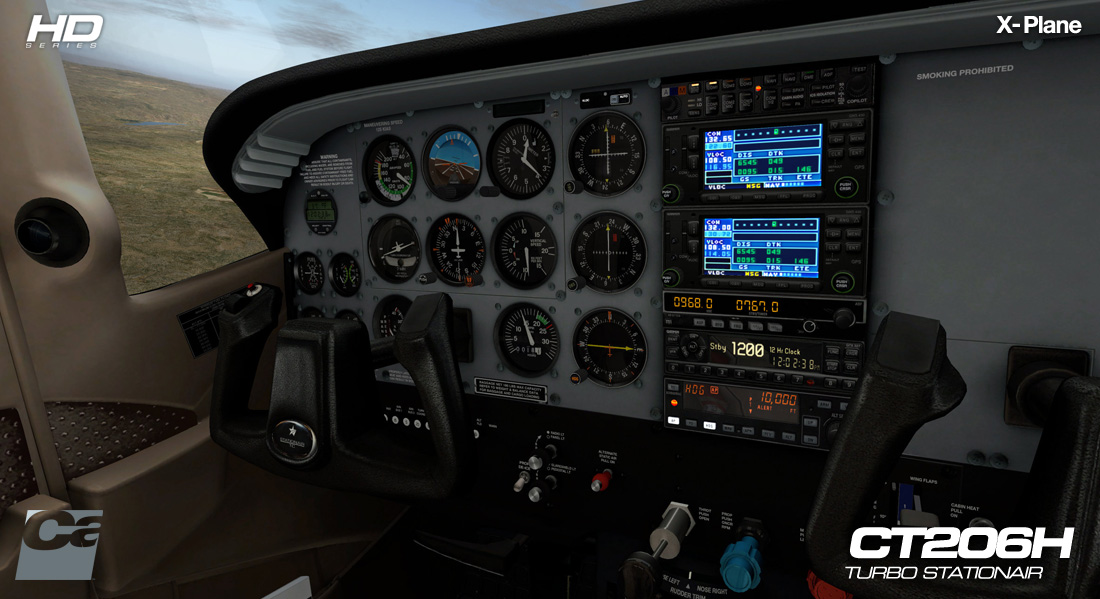
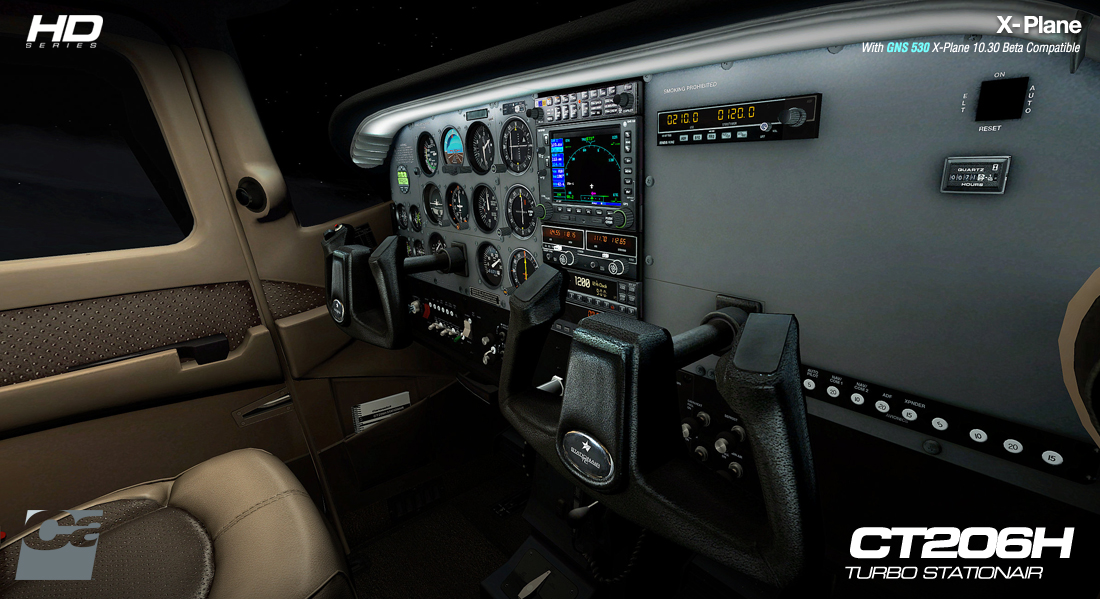
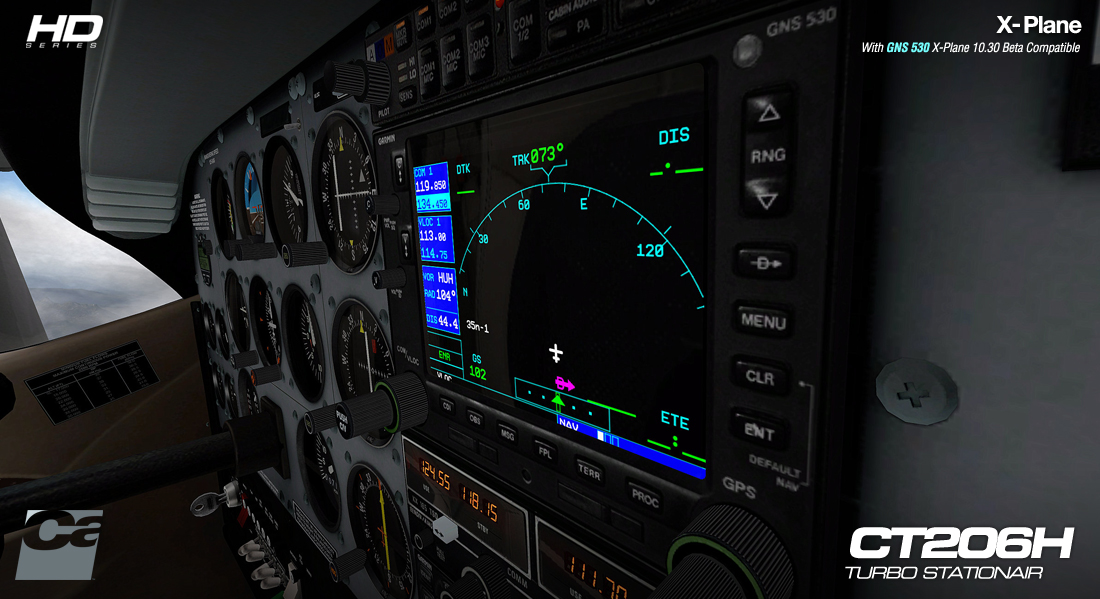
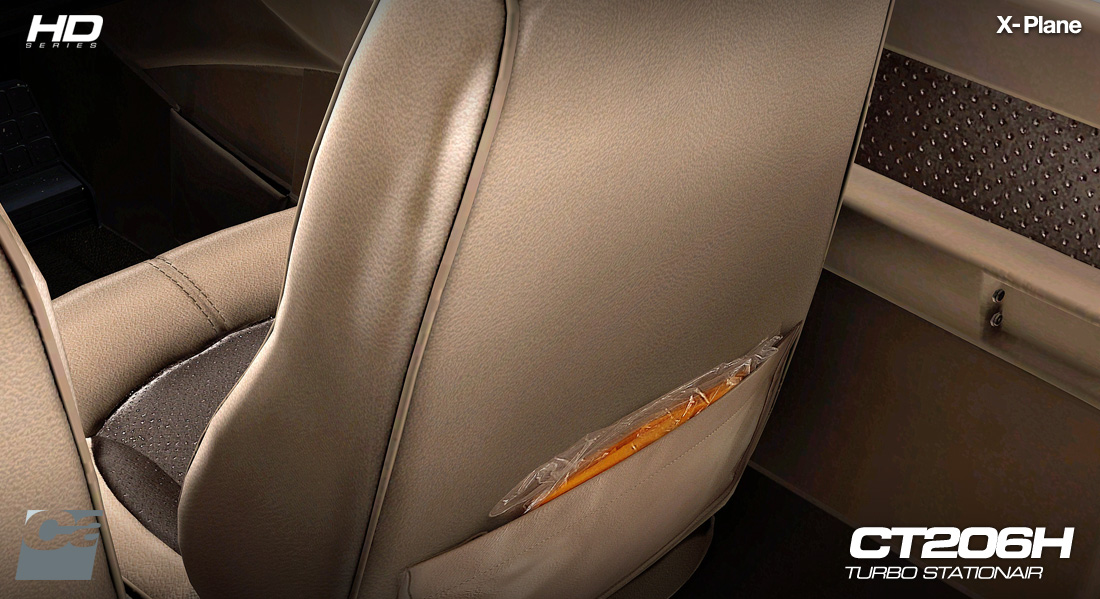
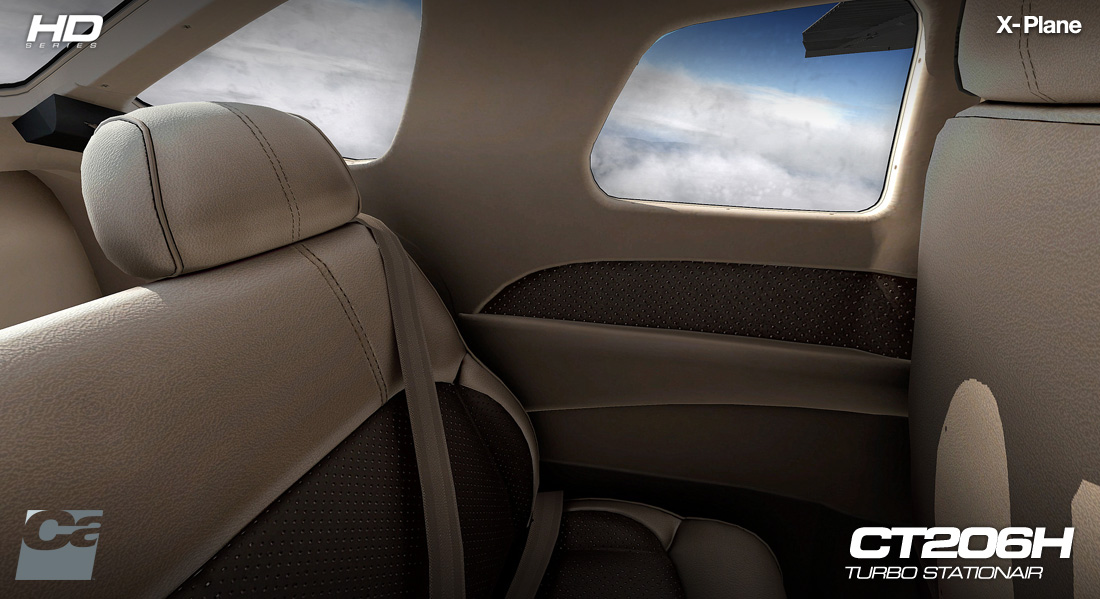
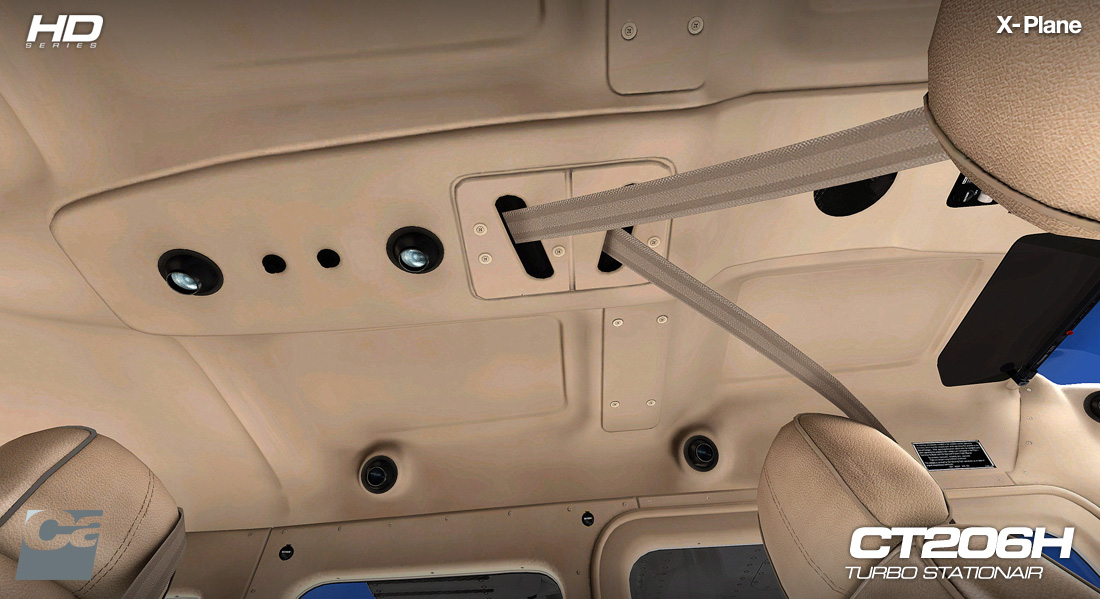
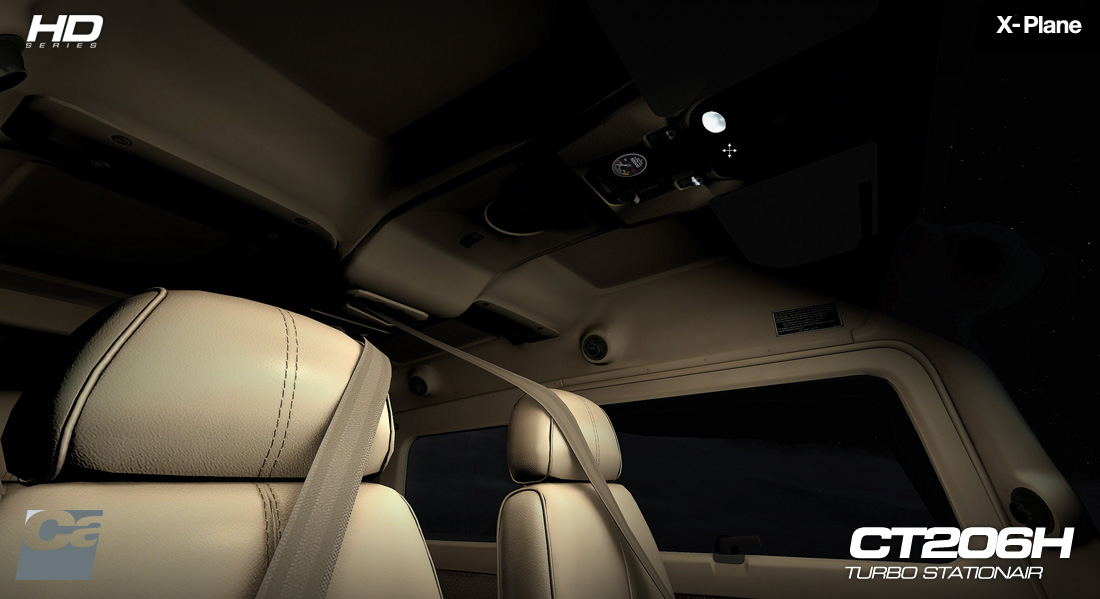
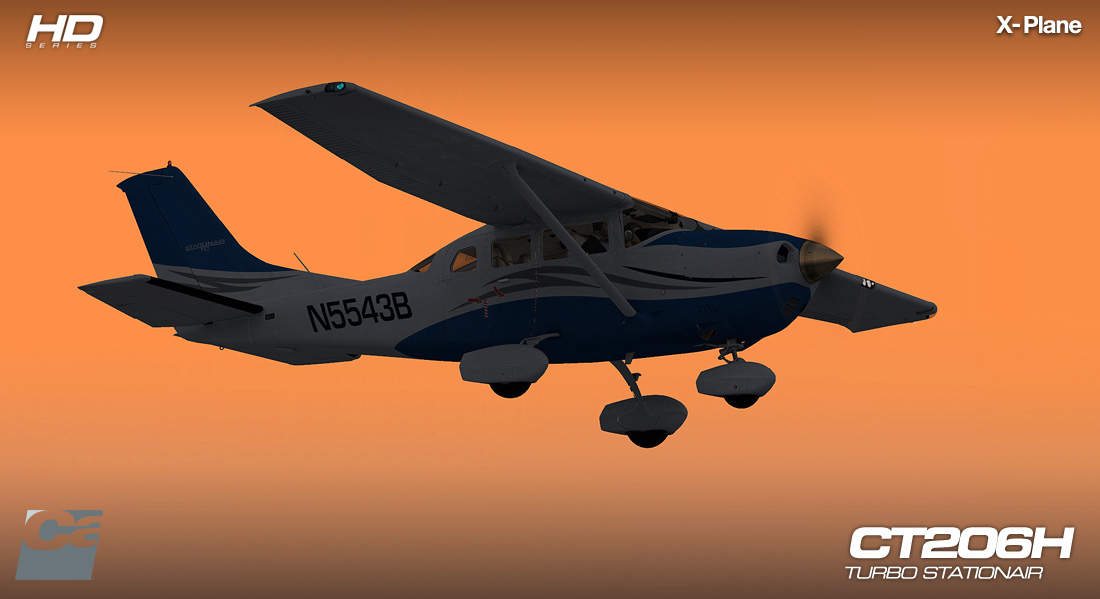
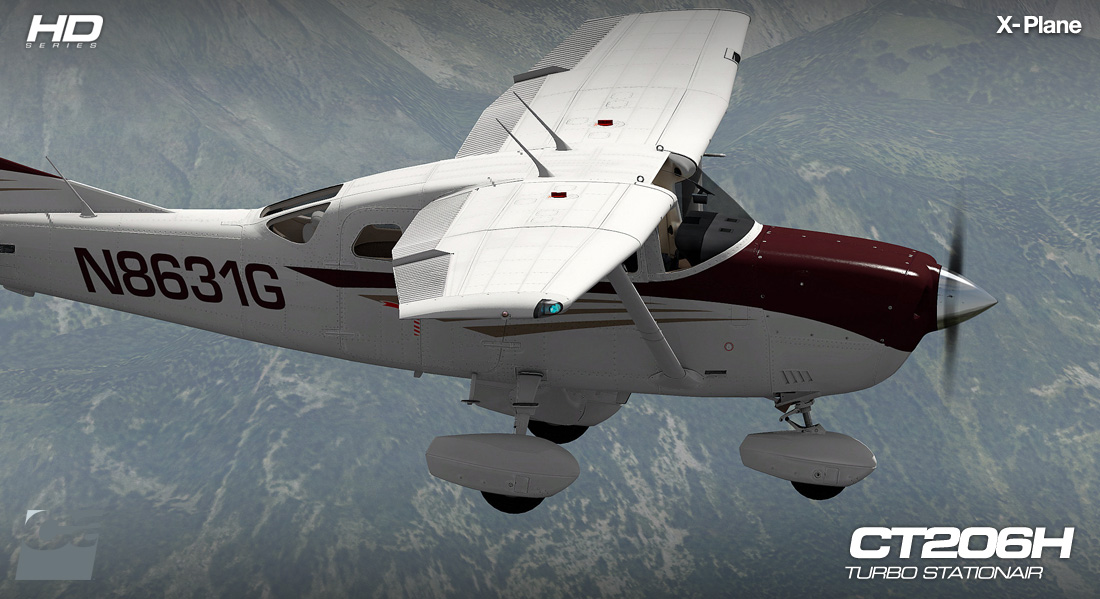
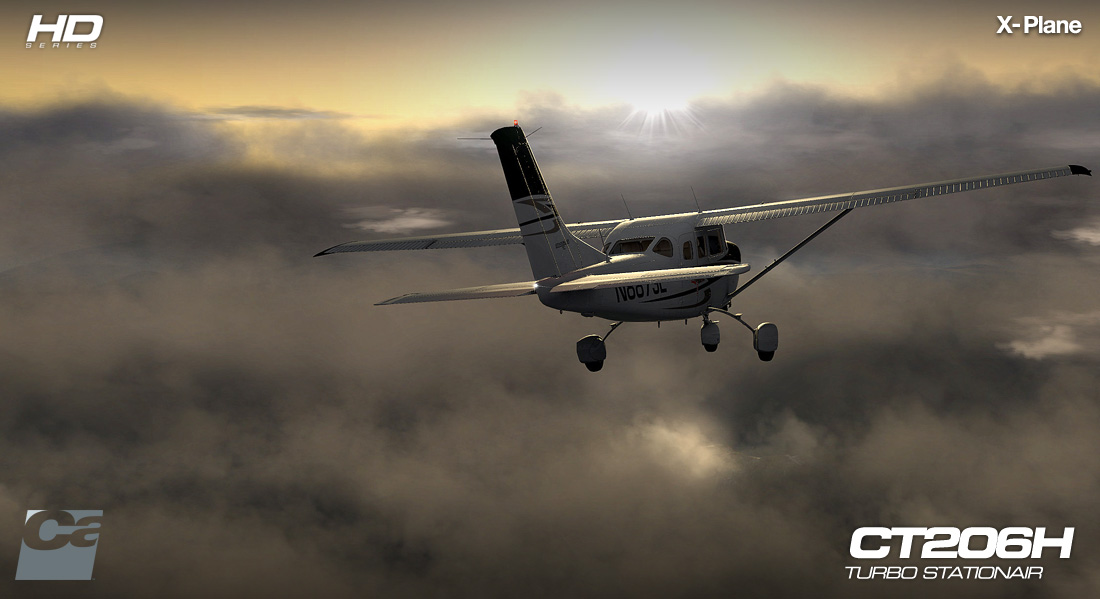
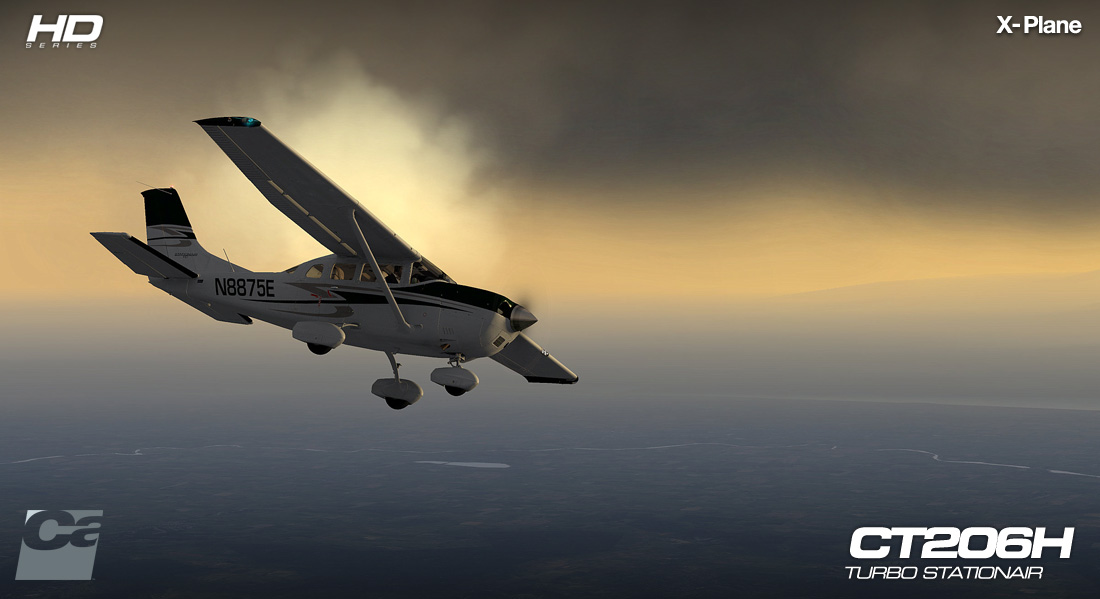
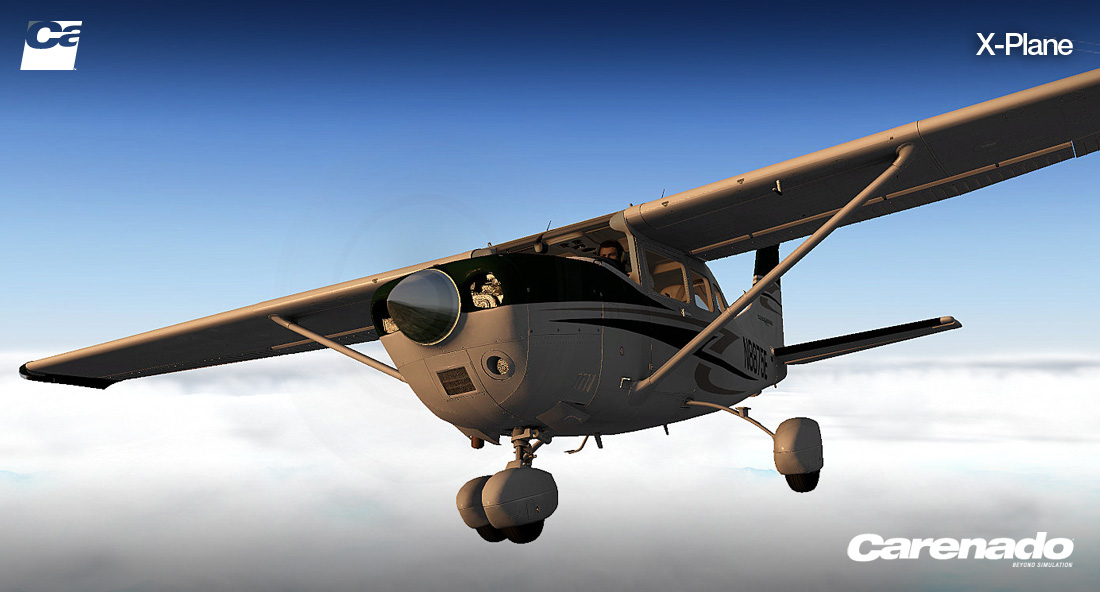
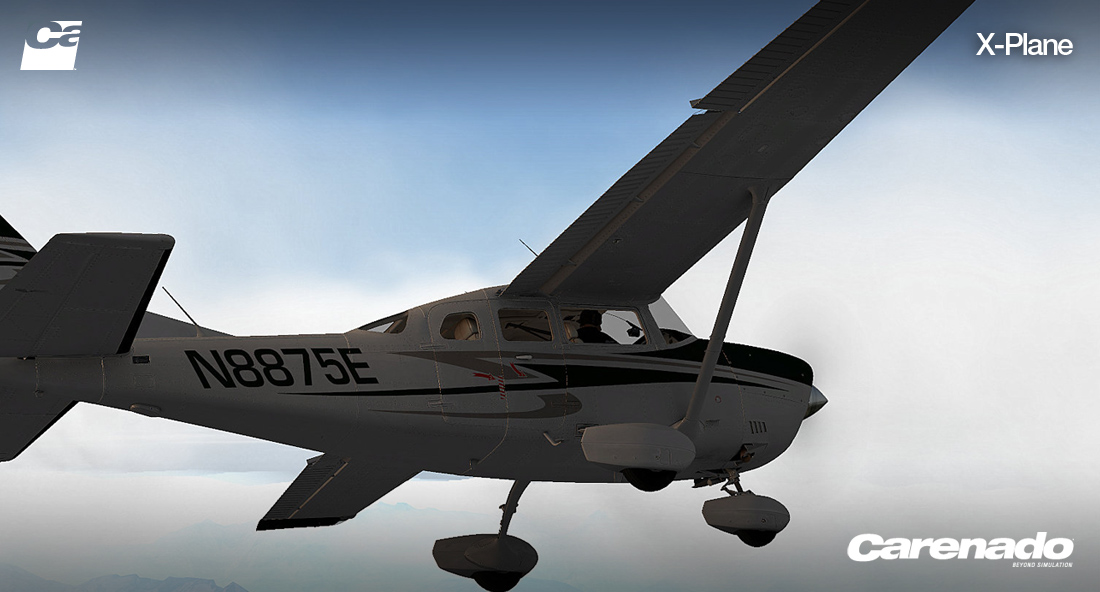
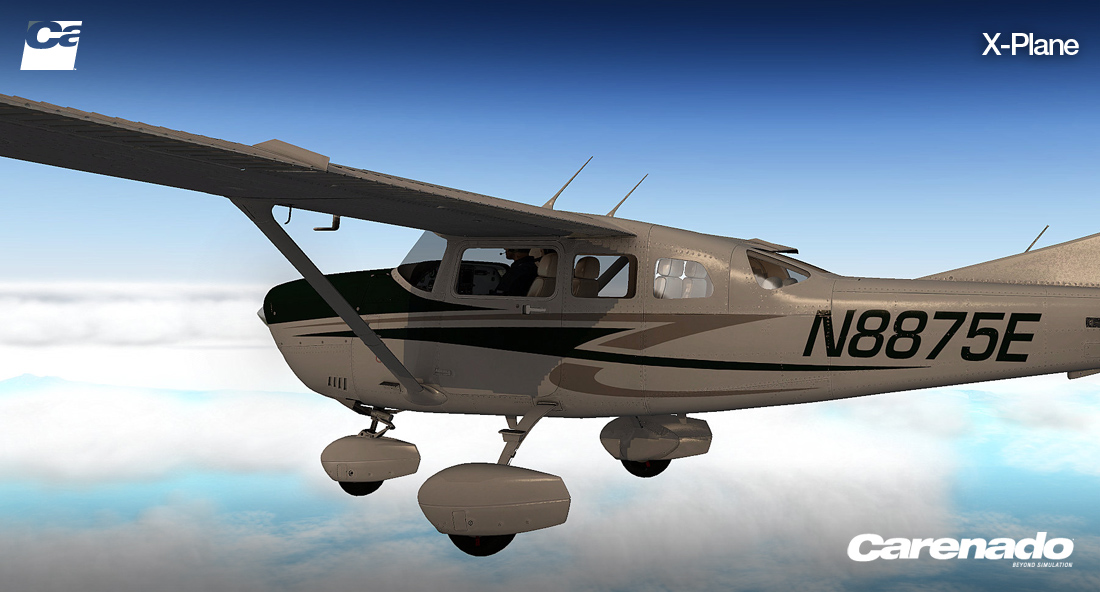
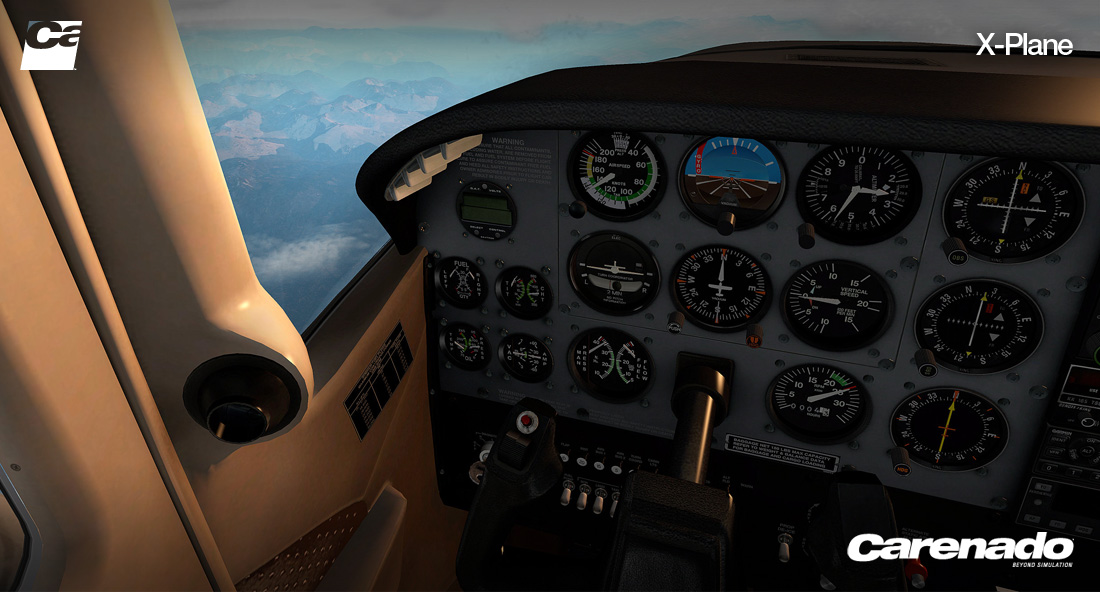
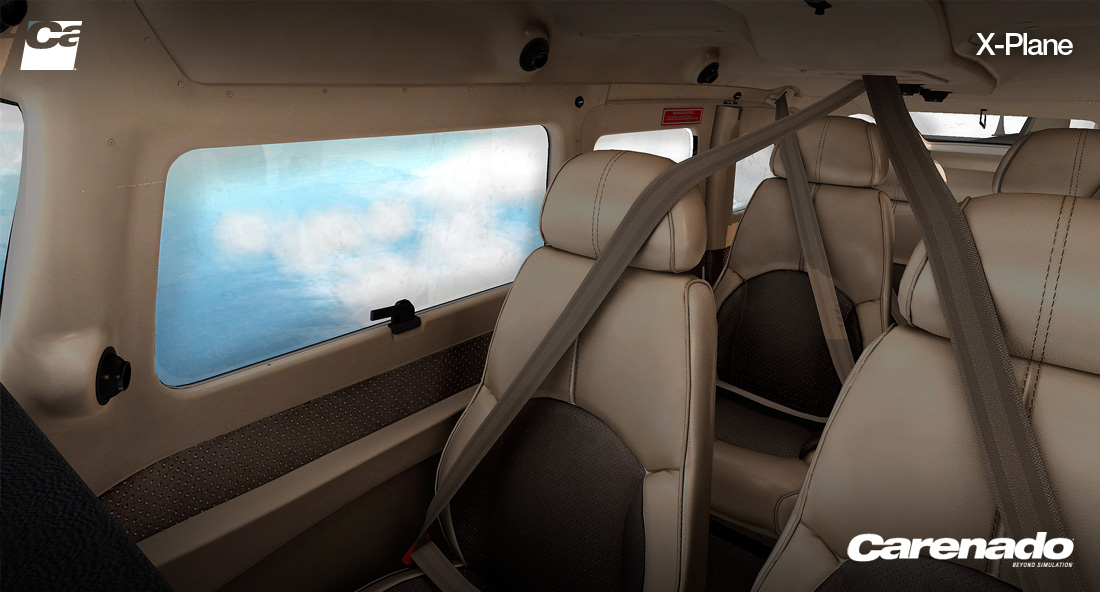
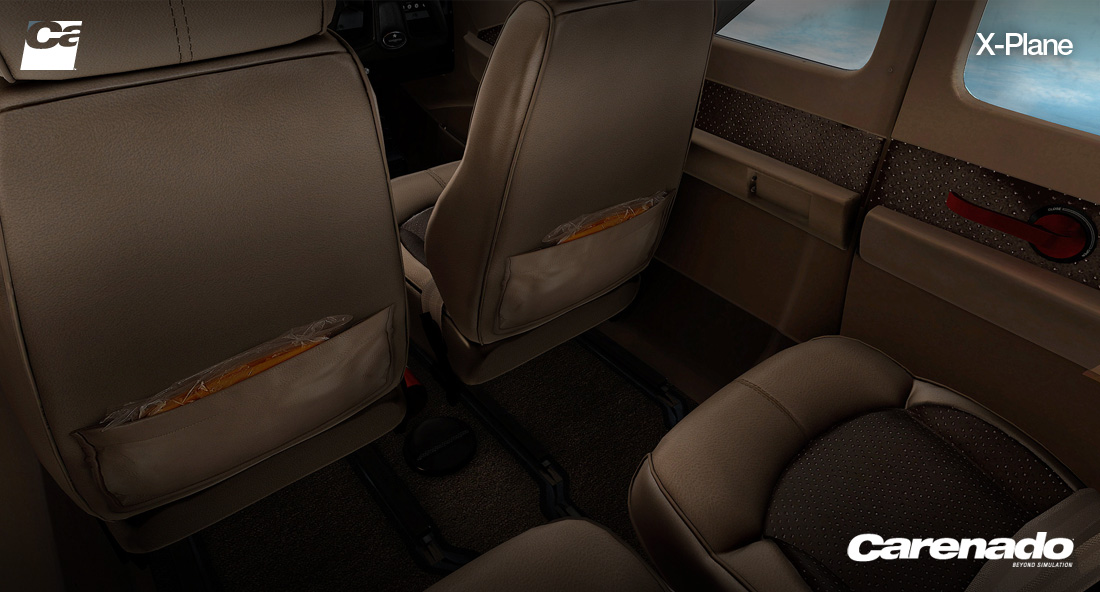
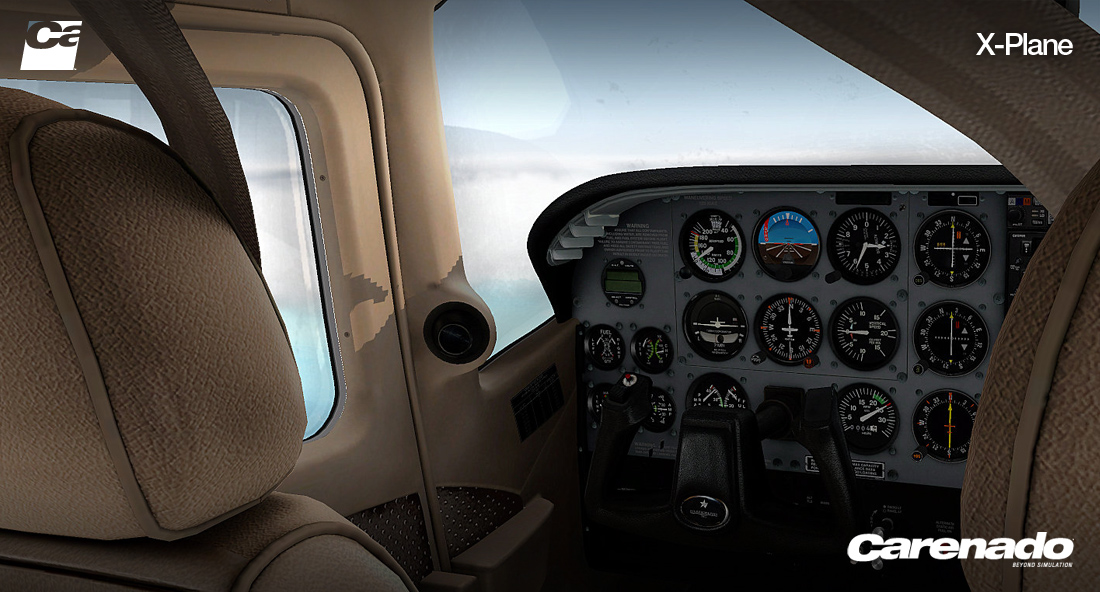
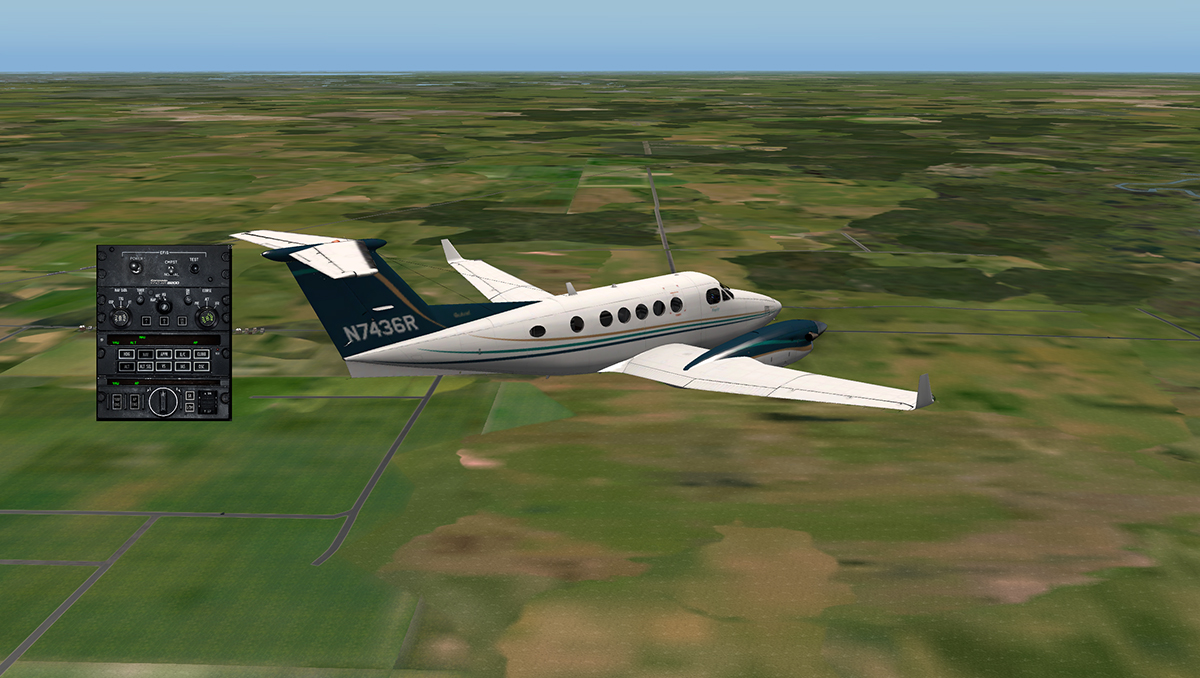
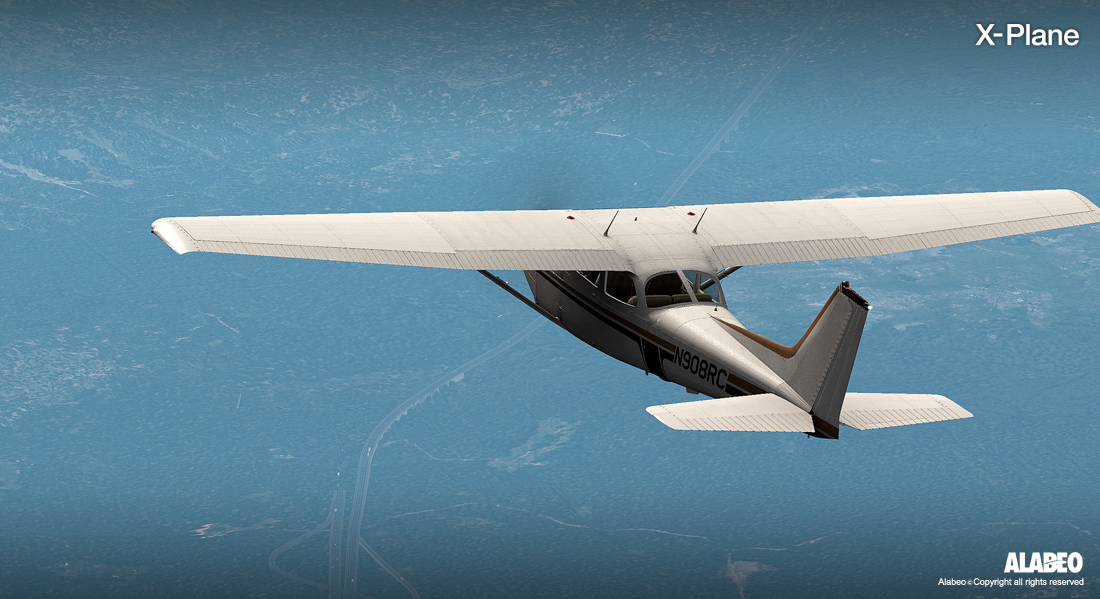
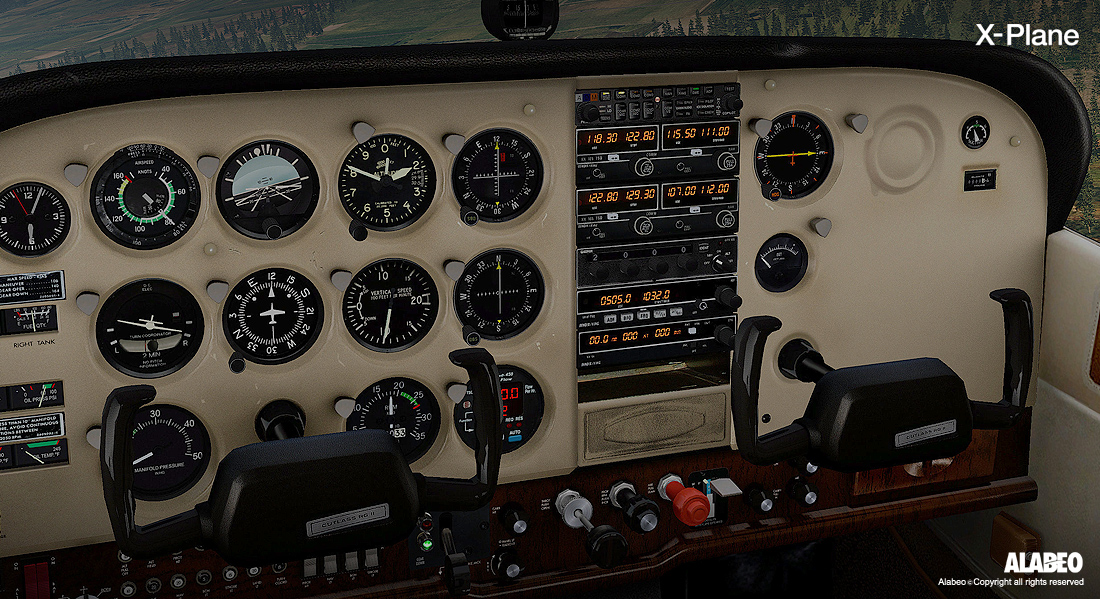
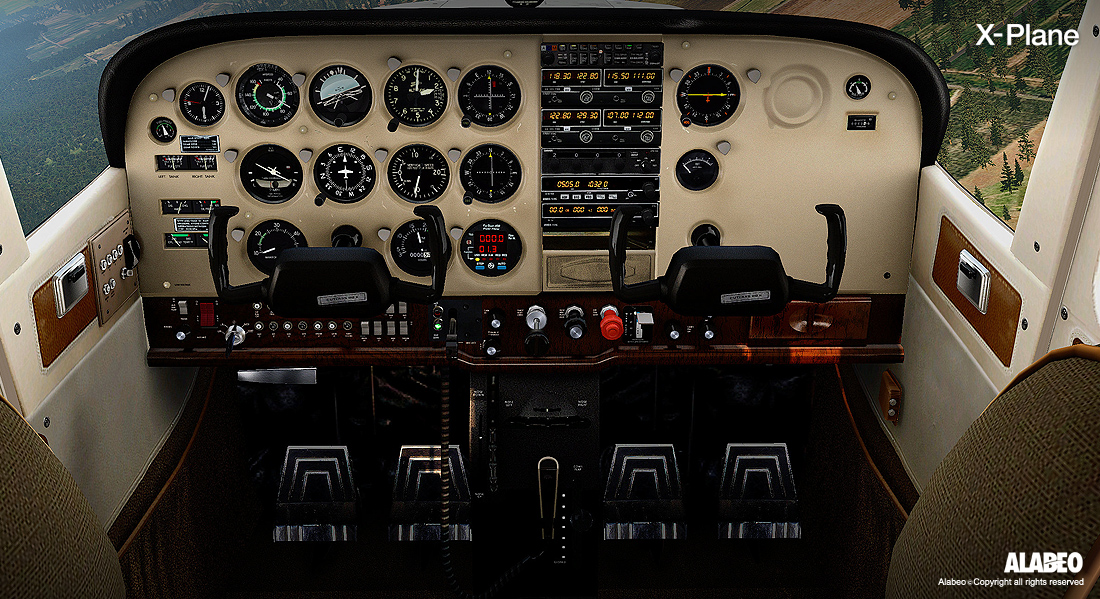
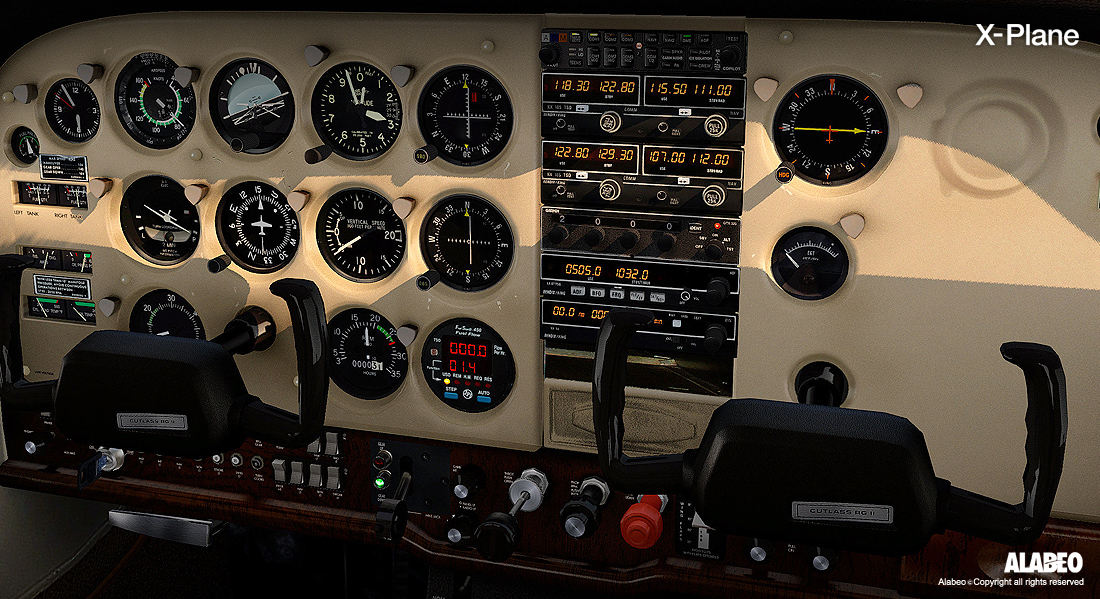
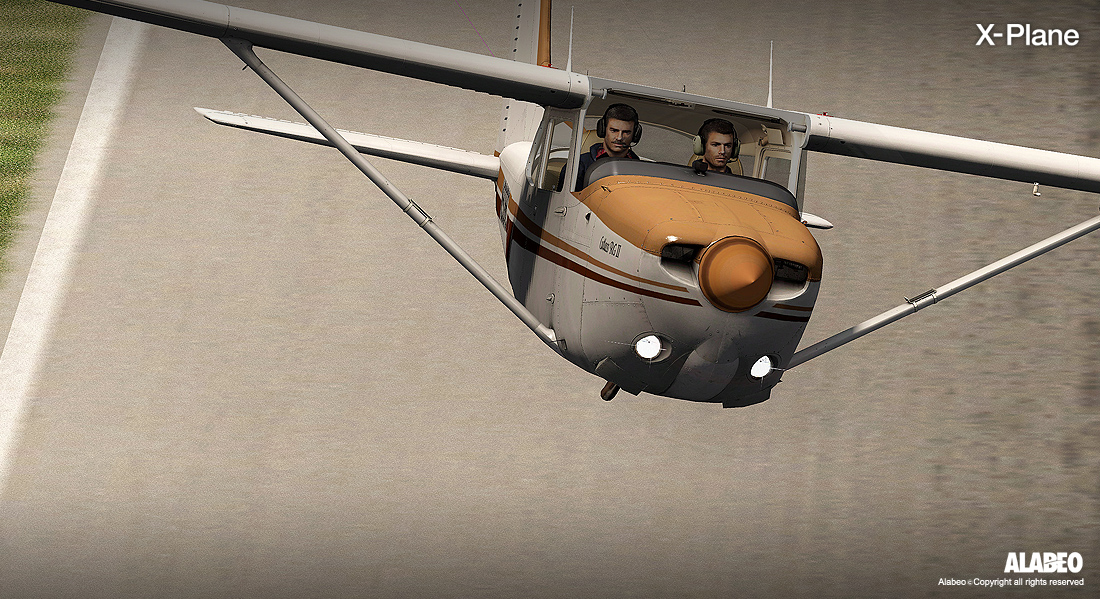
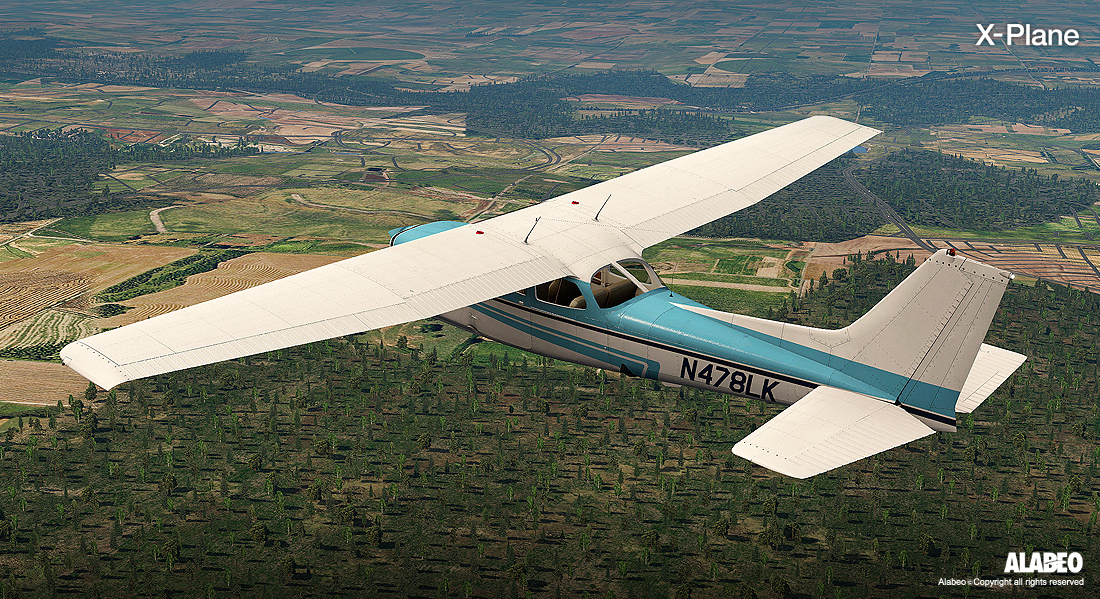
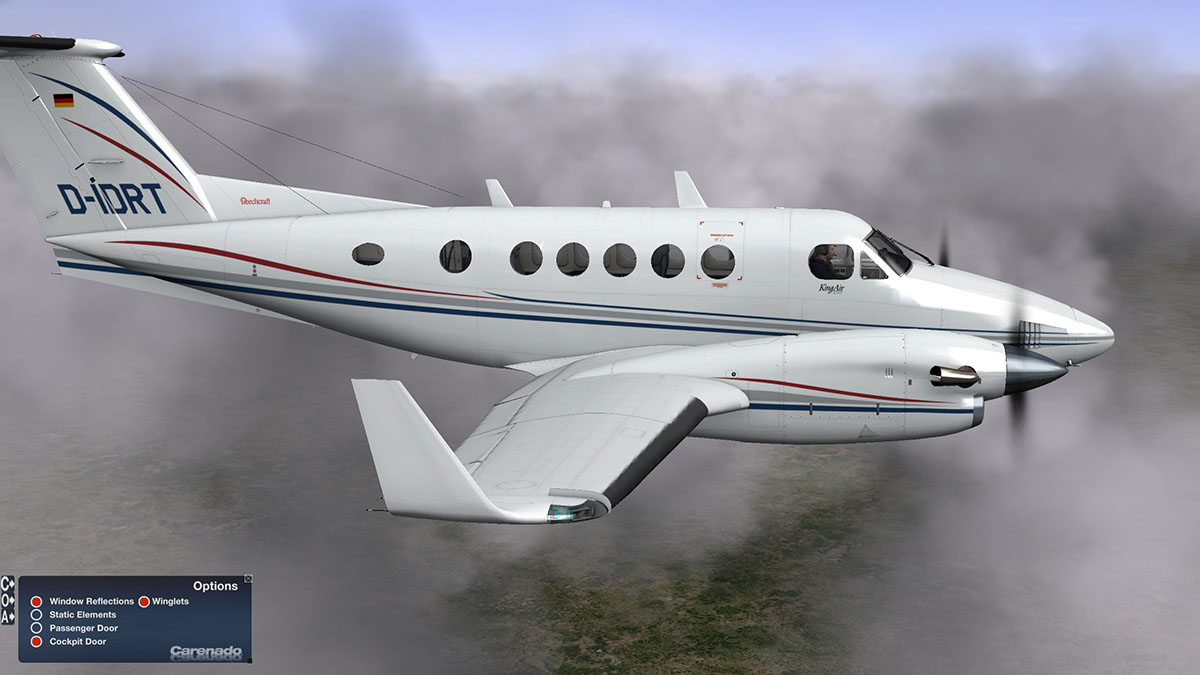
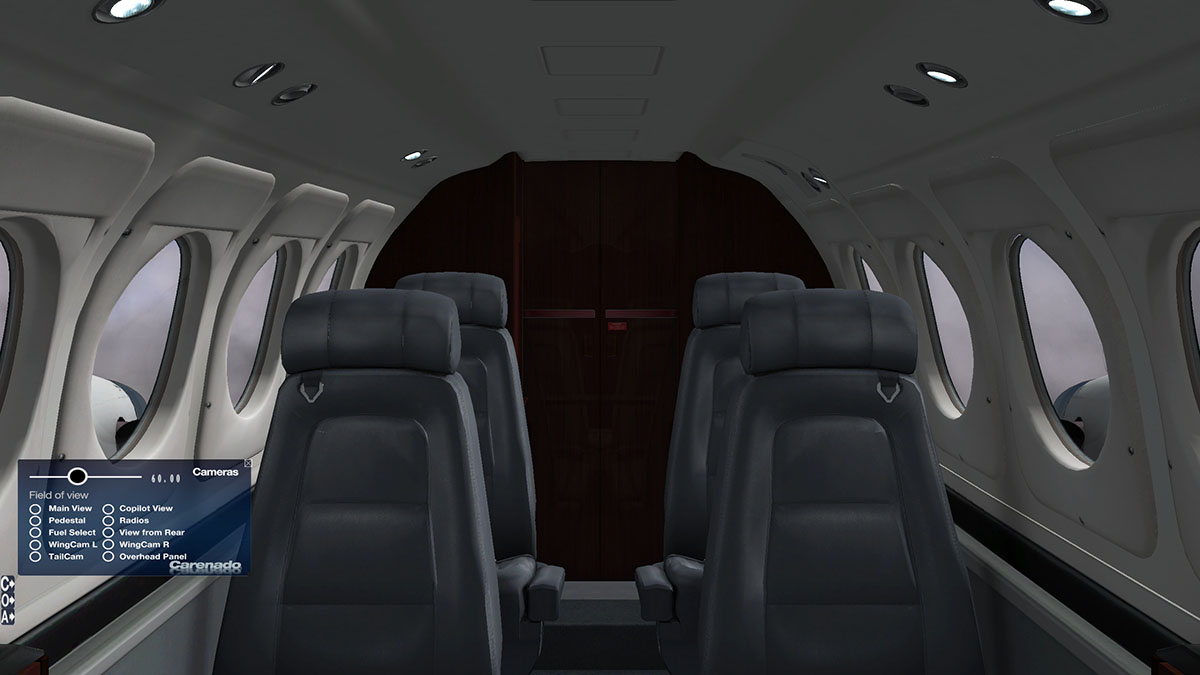
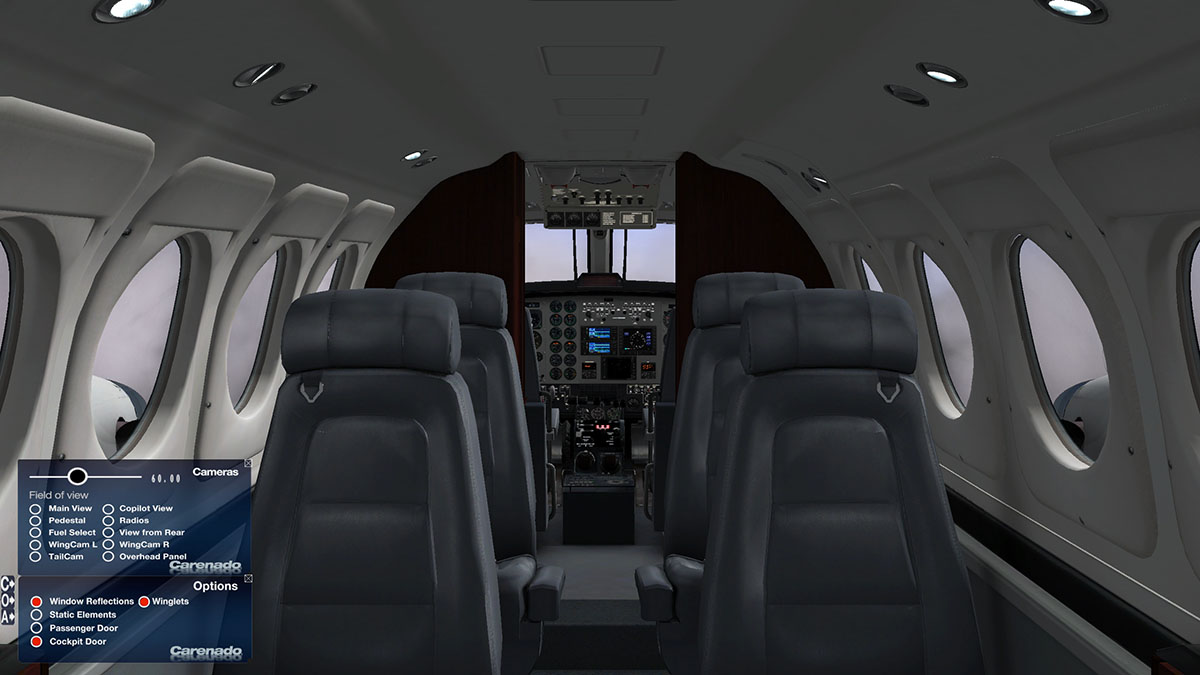
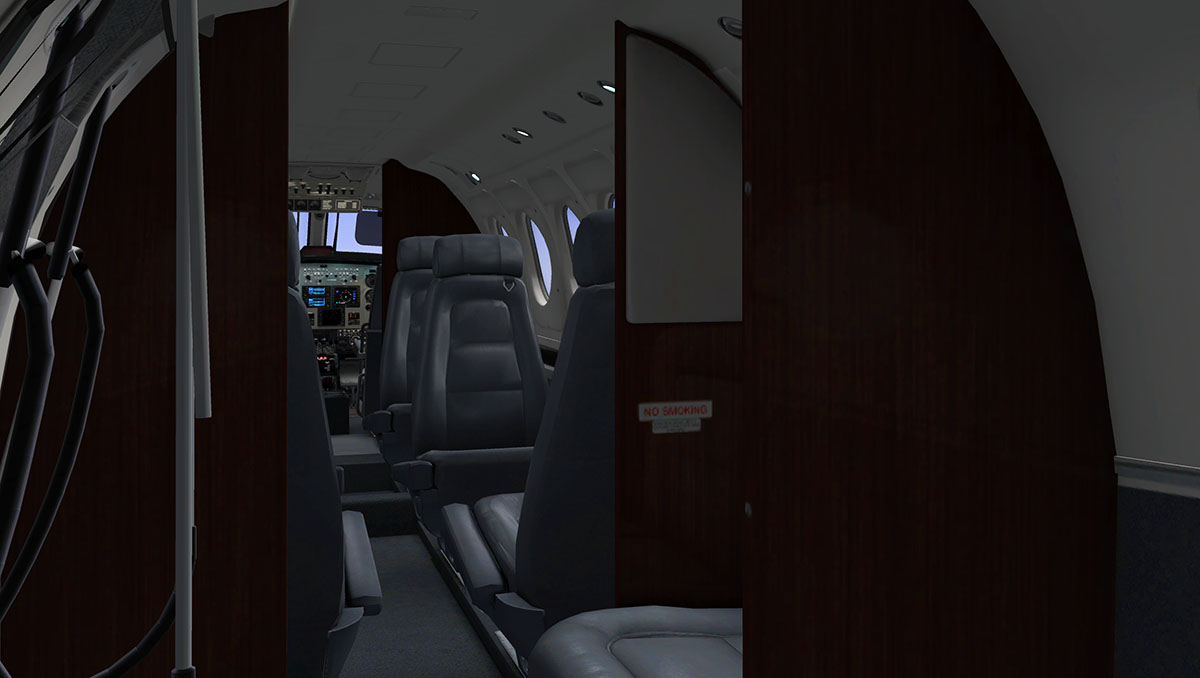
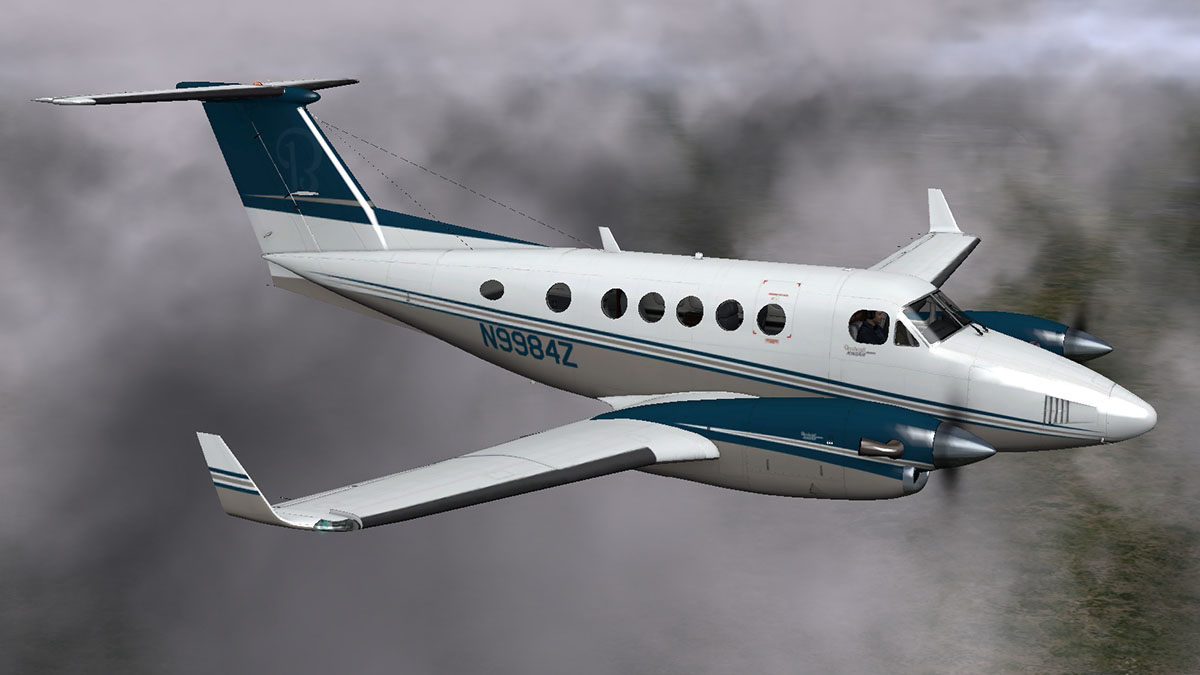
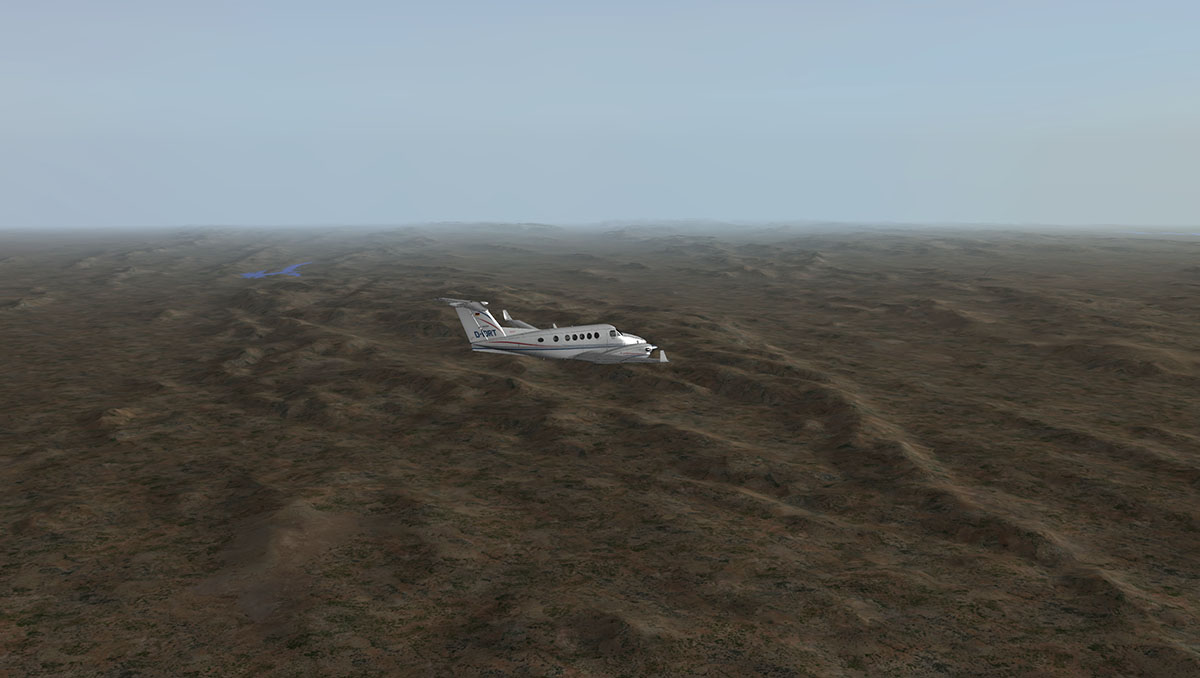
Aircraft Release : CT206H Stationair by Carenado Carenado have released the next aircraft in their Cessna series which is the CT206H Stationair. Note this release is the first aircraft that comes with the new default GARMIN GNS530 if you are using the new 10.30 beta (You can also add the GNS430 into the B200 Kingair if you want to). Another step is that the aircraft is also only available for X-Plane10 and from v21 or higher. That point taken means that any new Carenado's from now on will be only V10 and 64bit compatible... Which means that no more XP9 aircraft will be available to that X-Plane Version. Now for some nice pictures! Special Features Only for X-Plane 10.21 or higher. X-Plane 64 bits compatible. Hide/unhide fairings option Volumetric side view prop effect Default GNS530 when using X-Plane 10.30 (Beta) or higher. Life should not be this good... but it is! The larger GNS530 is sublimely good with that larger screen. Features: HD quality textures 3D gauges Original HQ digital stereo sounds recorded directly from the real aircraft Cold and Dark or ready to taxi options for start the simulation. Customizable panel for controlling windows transparency, instrument reflections and static elements such as wheel chocks and sights props. Realistic behavior compared to the real airplane. Real weight and balance. Tested by real pilots. Realistic night lights effects on panel and cockpit. The interior is luxurious. And up to the usual Carenado standard. Included in the package: 5 HD liveries. 1 HD Blank livery 2 models (1 and 2 pilots on board) CT206H Emergency Checklist PDF CT206H Normal Procedures PDF CT206H Performance Tables PDF CT206H Reference PDF KFC225 Autopilot PDF Recommended Settings PDF Technical Requirements: Windows XP - Vista - 7 (32 or 64 bits) or MAC OS 10.6 (or higher) or Linux X-Plane10.21 (or higher) 2.5 GHz processor - 4GB RAM - 1GB VRAM 335MB available hard disk space Price of the CT206H Stationair is US$29.95 Developer site : Carenado Stephen Dutton 20th June 2014 Copyright©2014 : X-Plane Reviews All images are courtesy of Carenado©
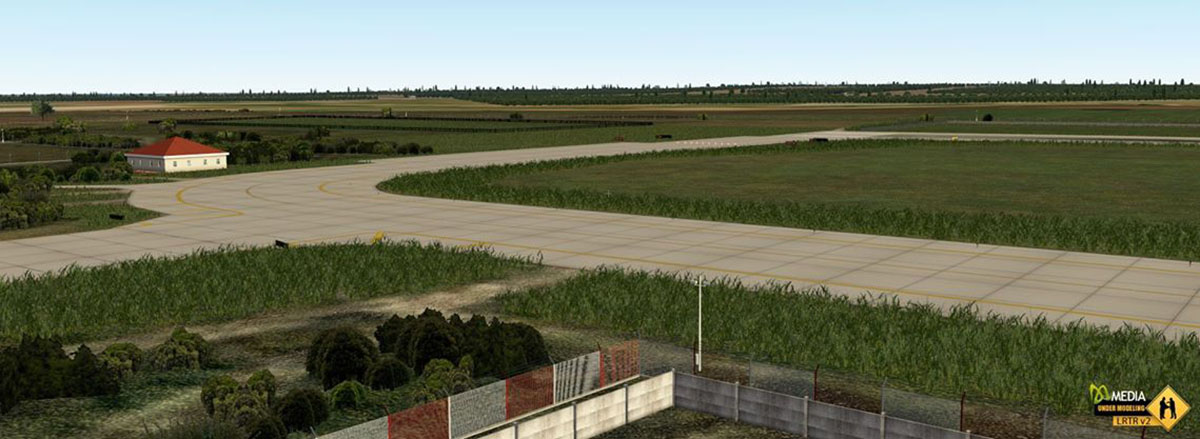
-
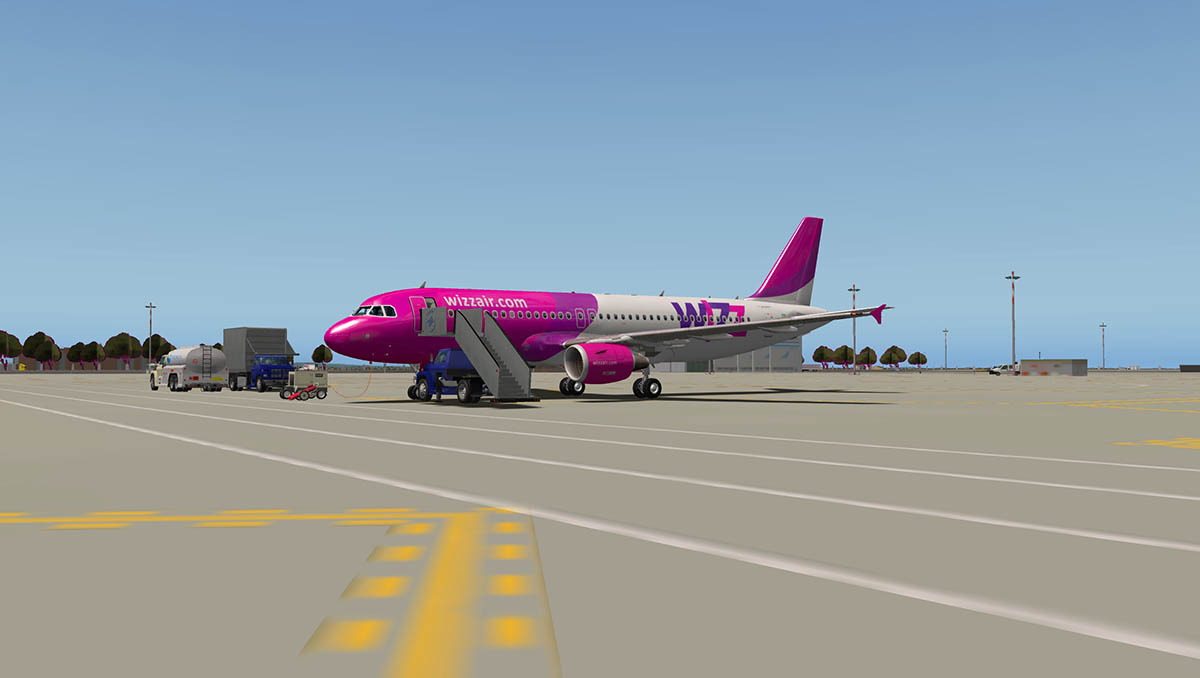
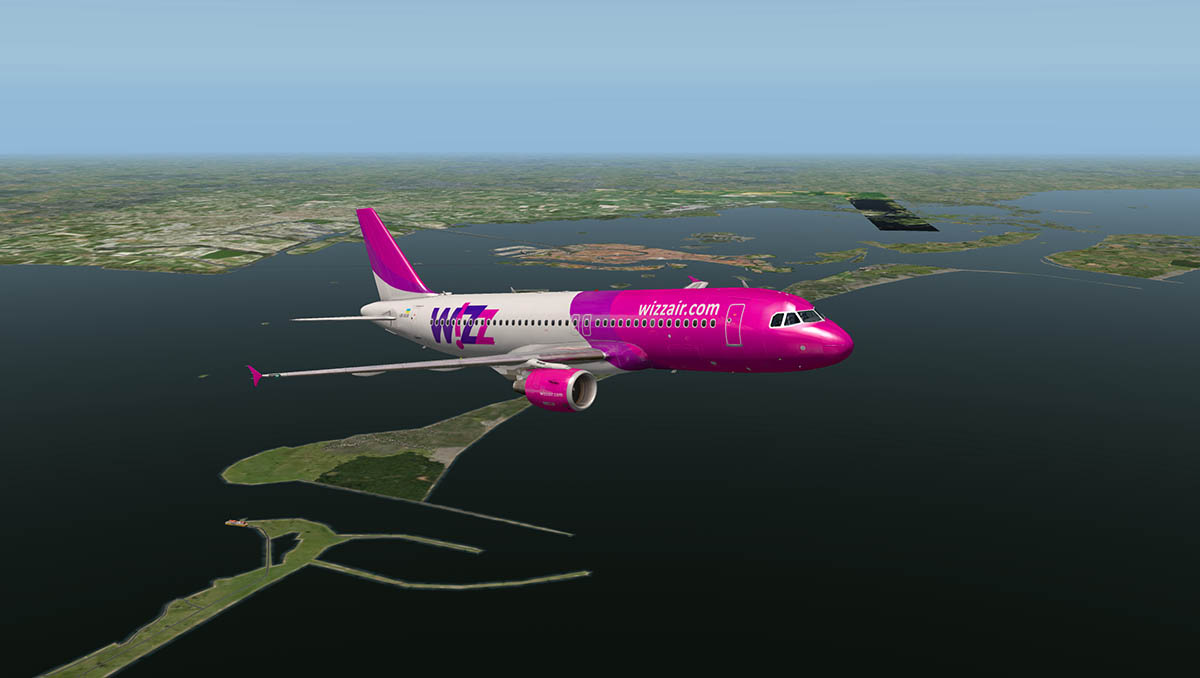
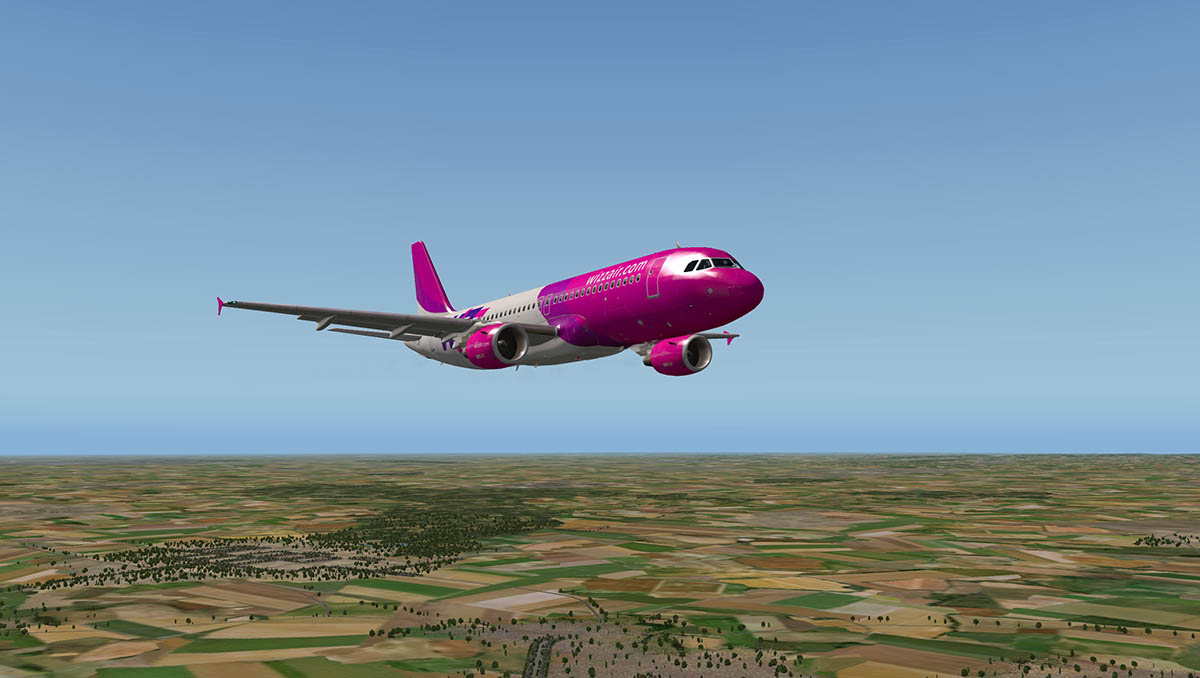
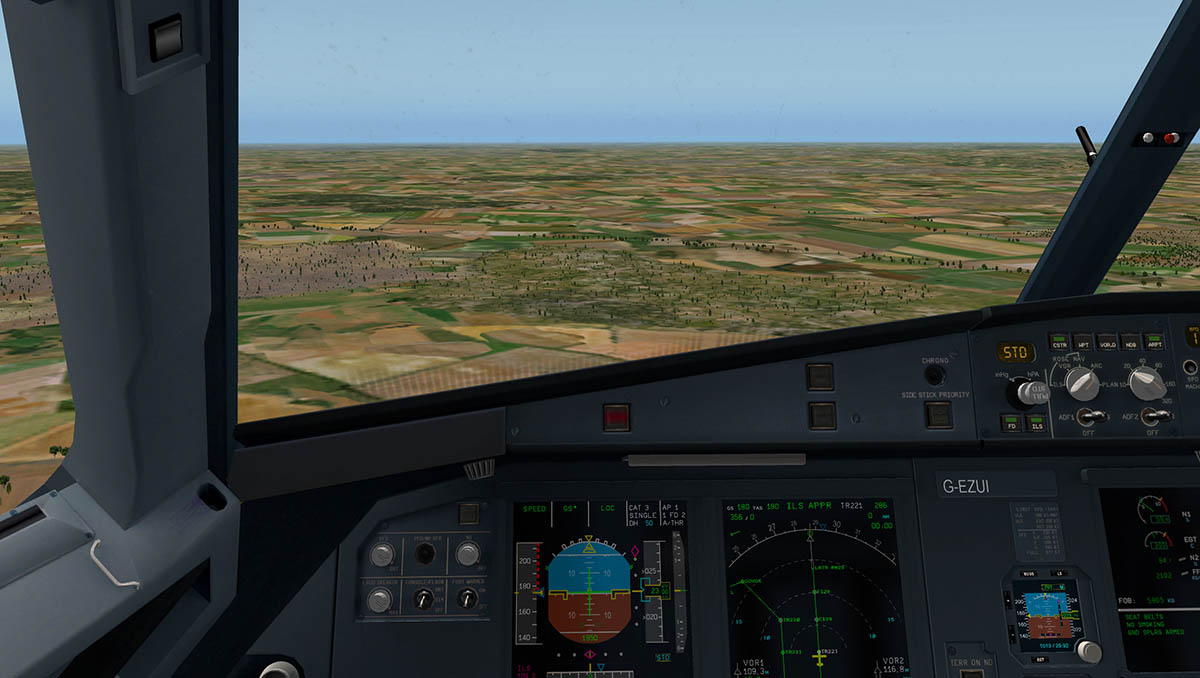
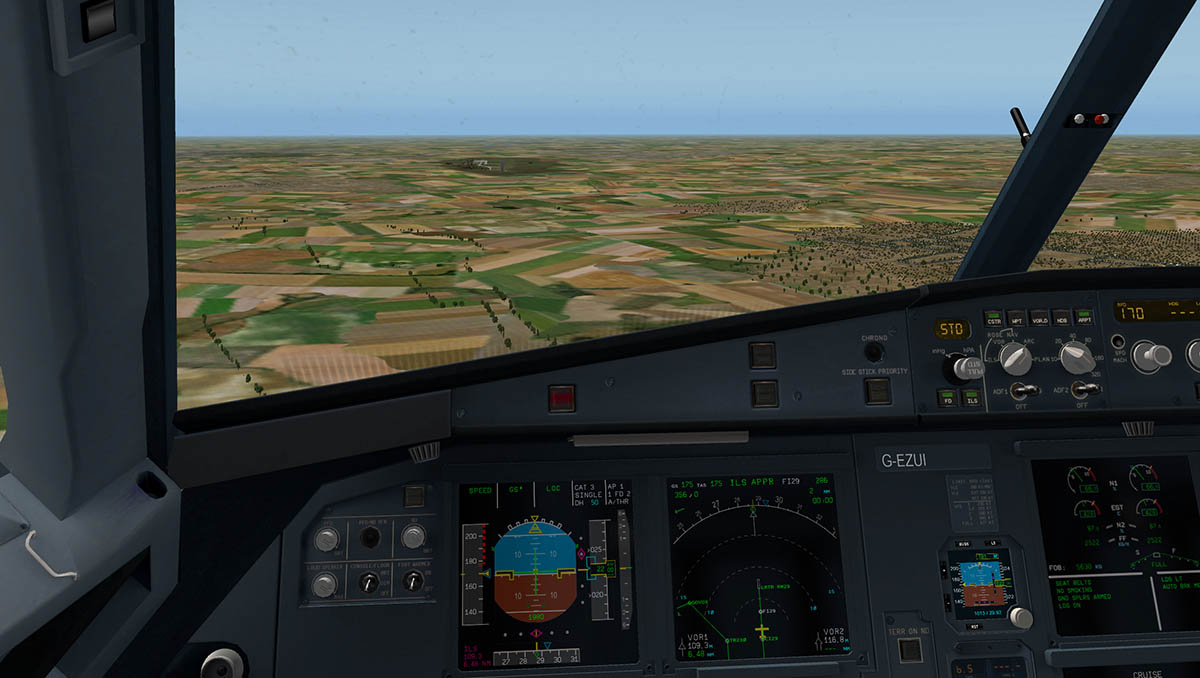
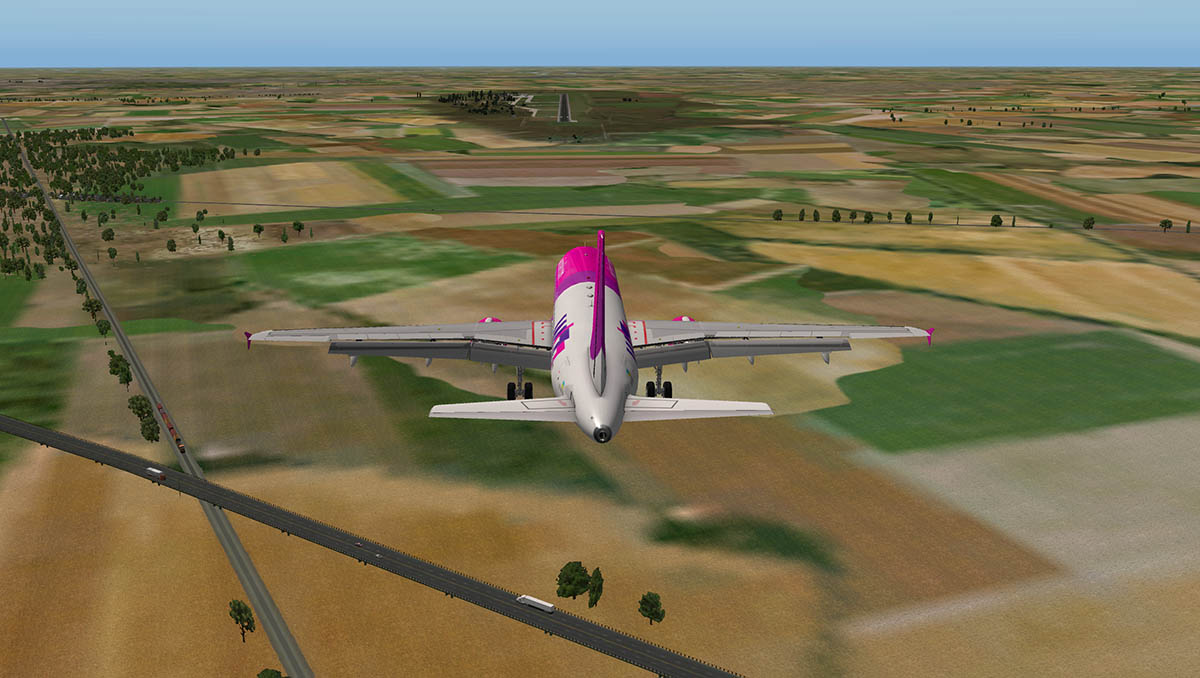
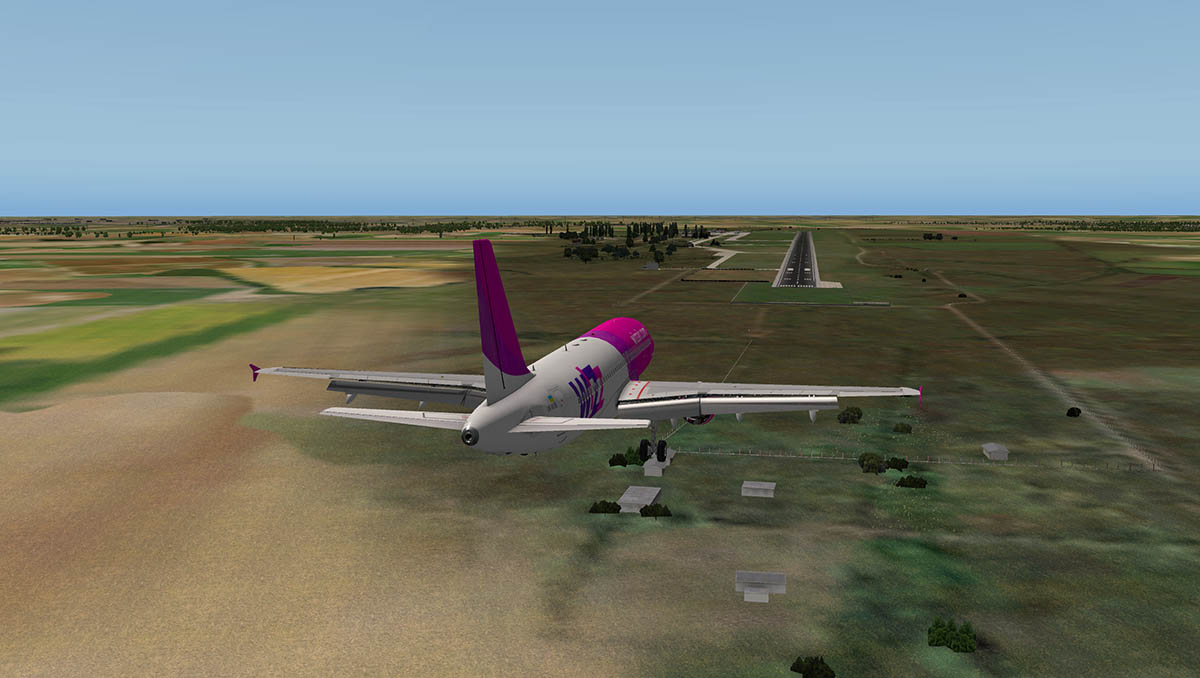
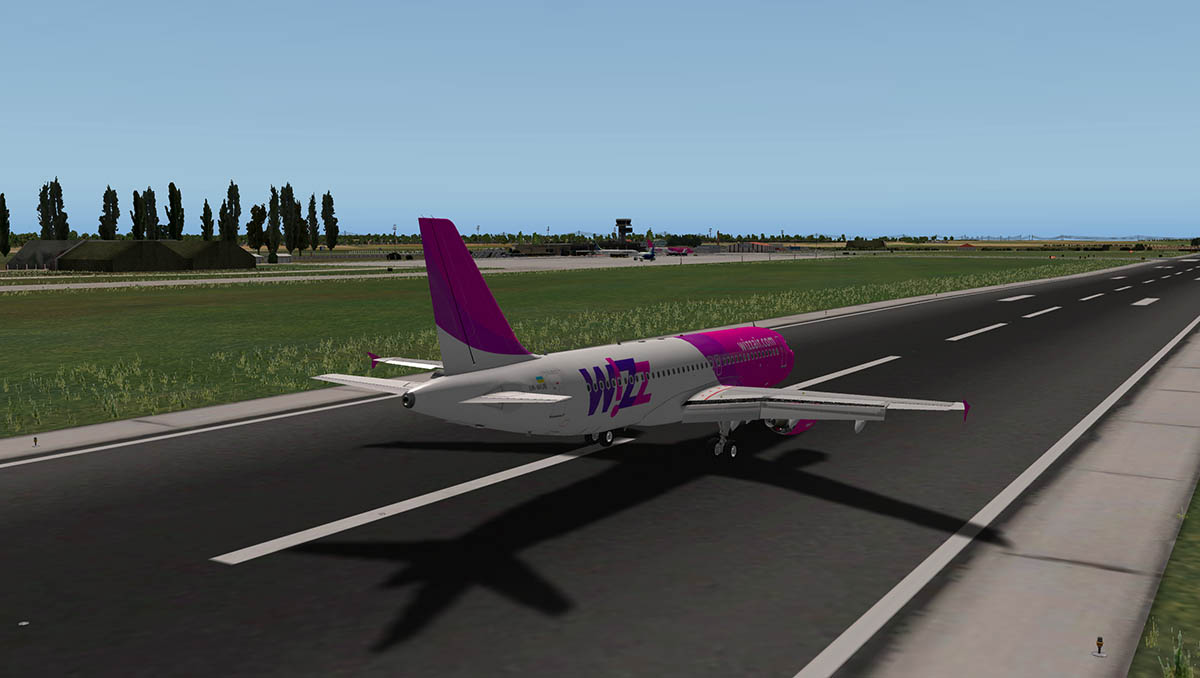
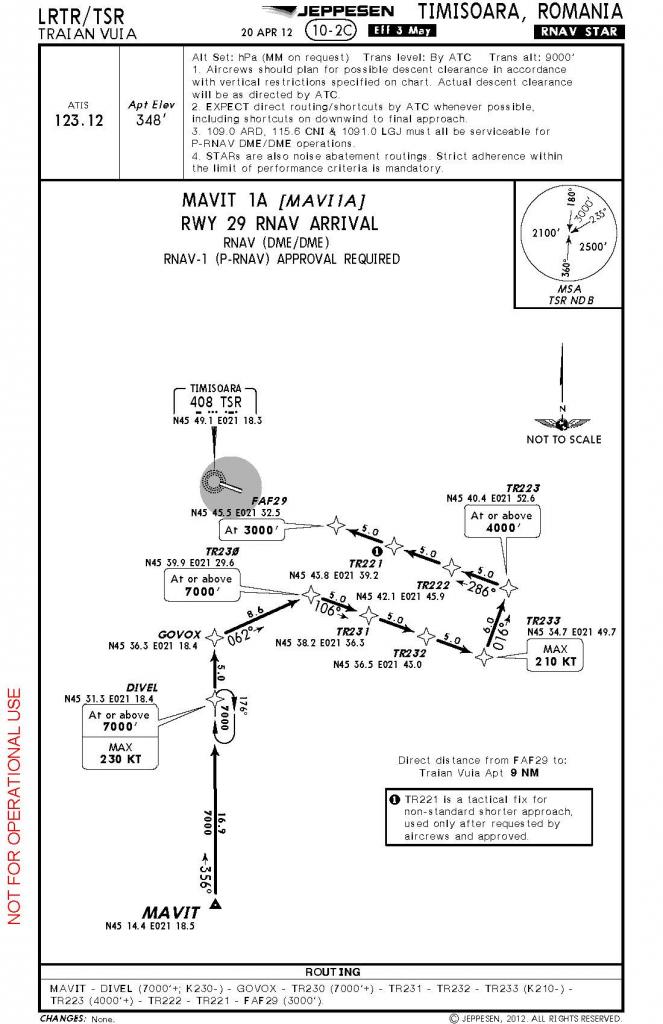
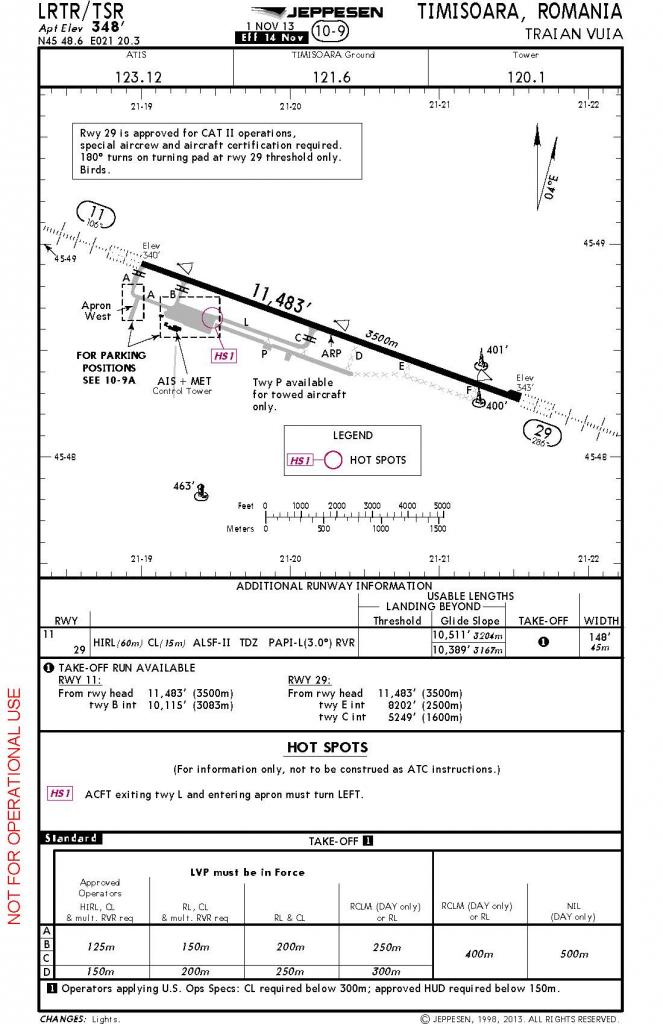
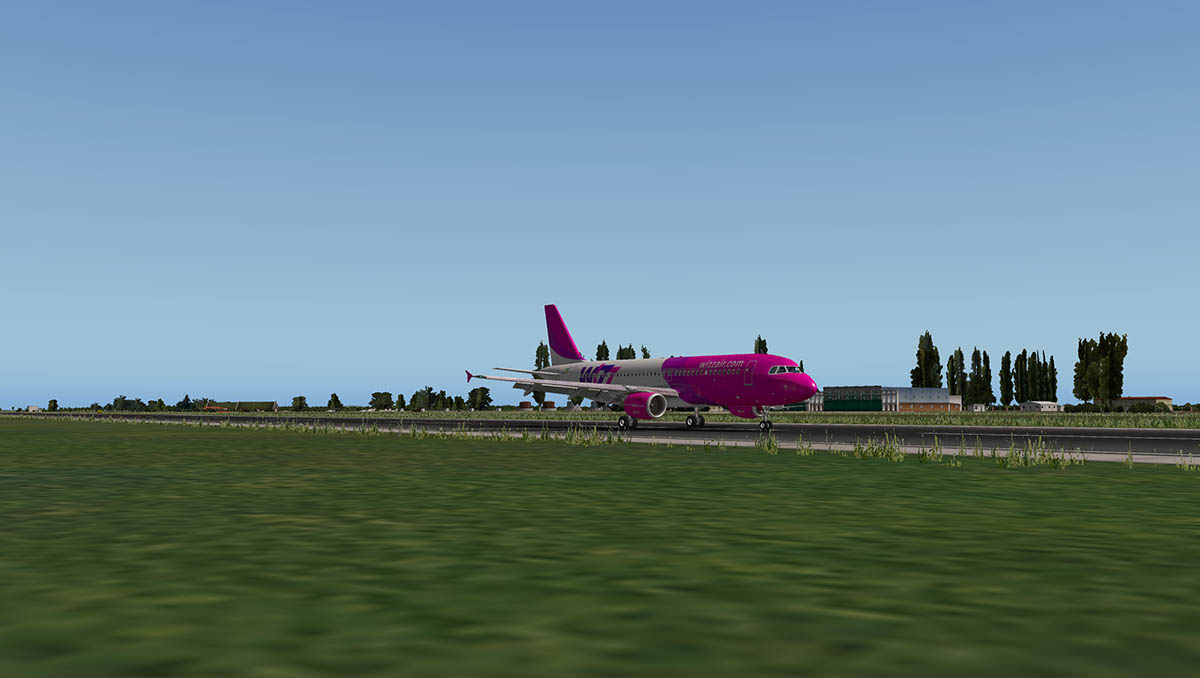
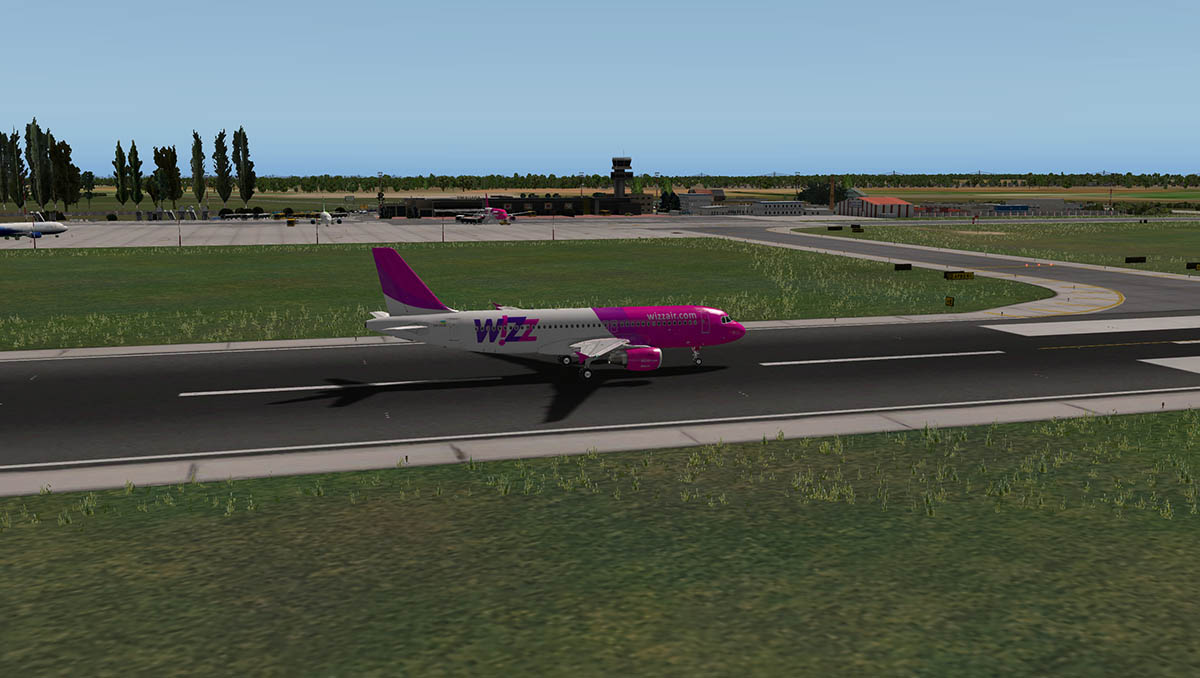
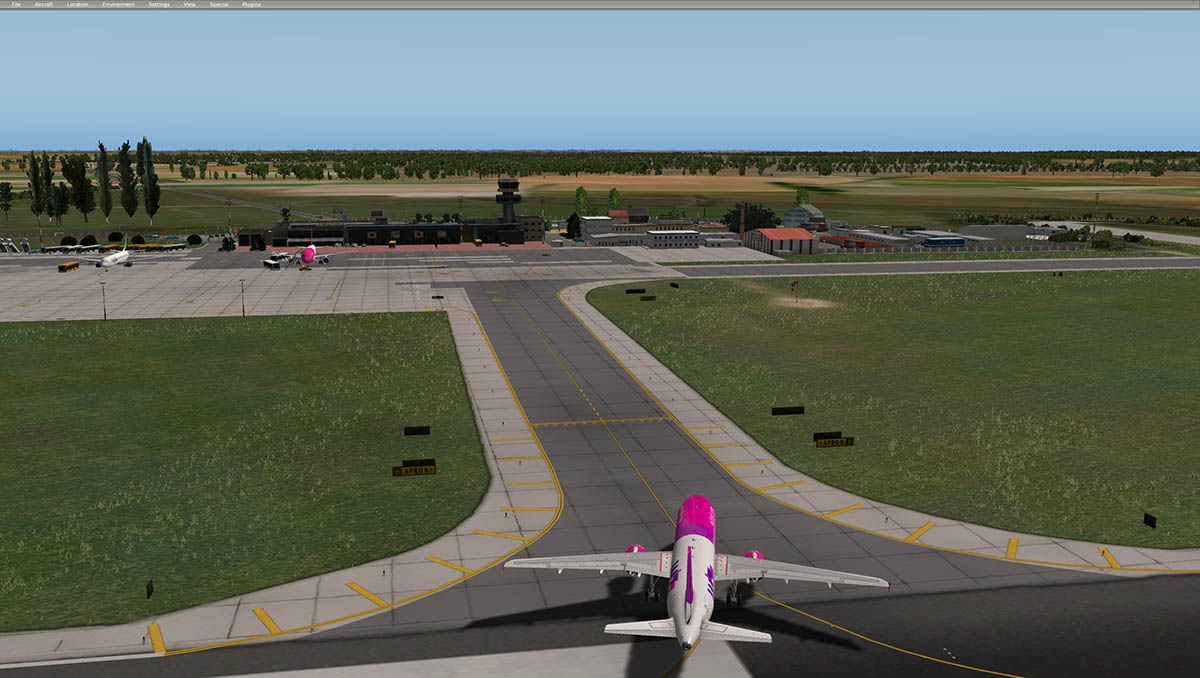
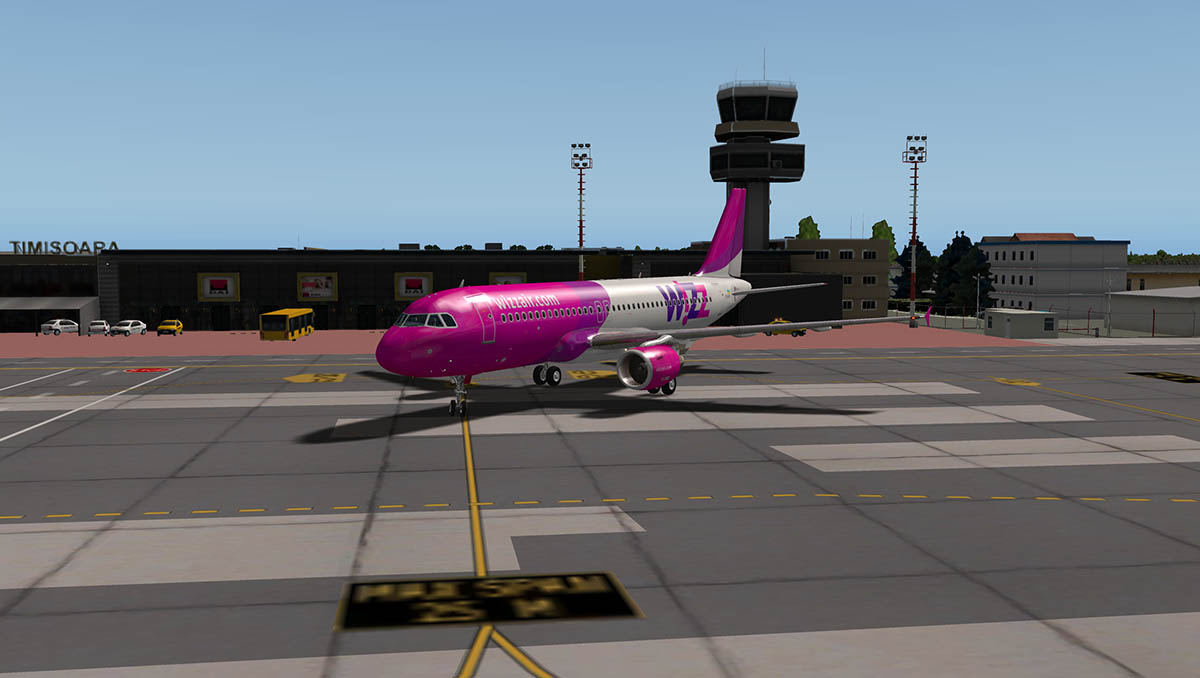
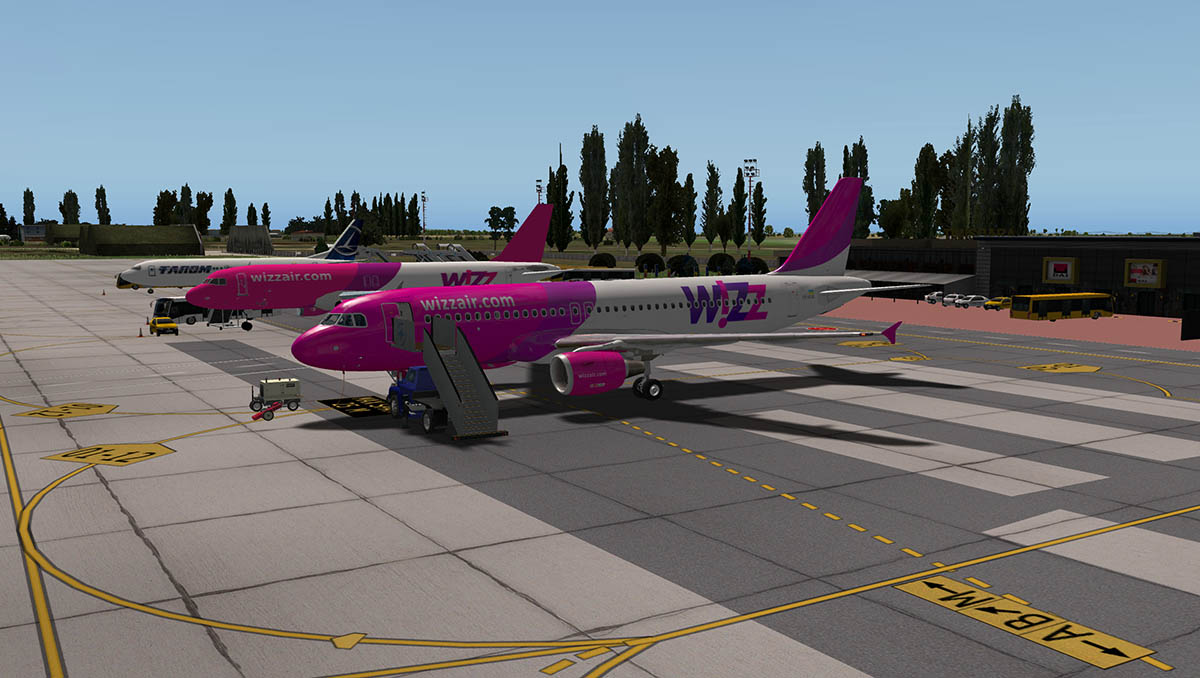
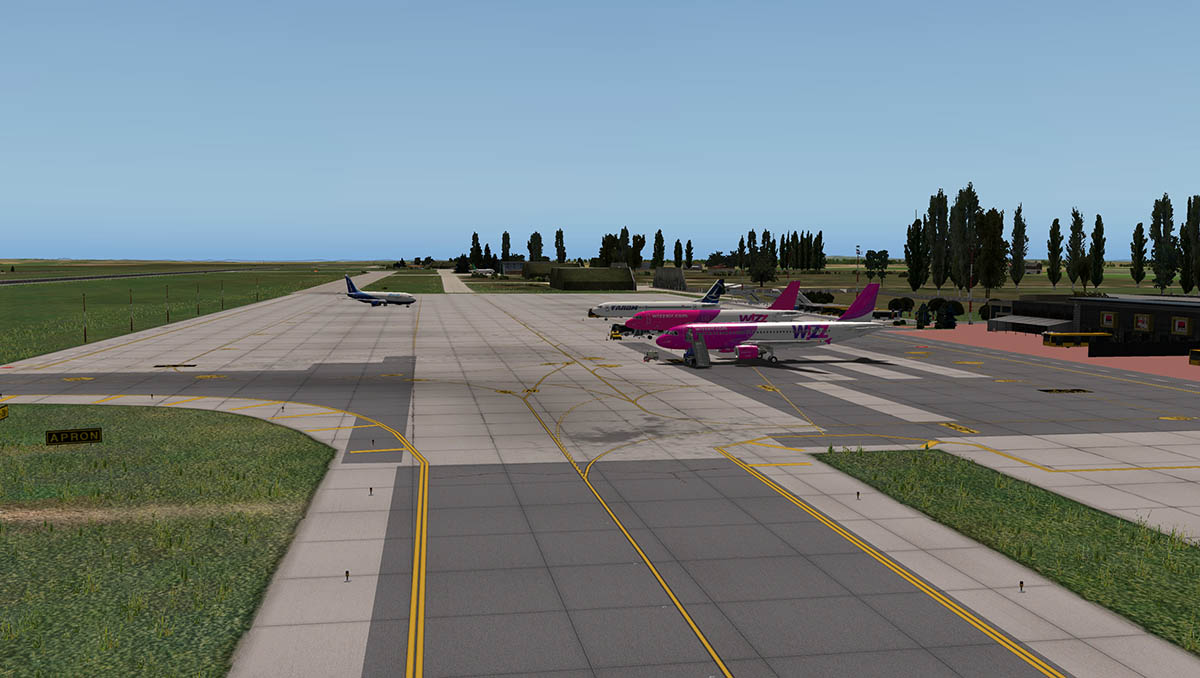
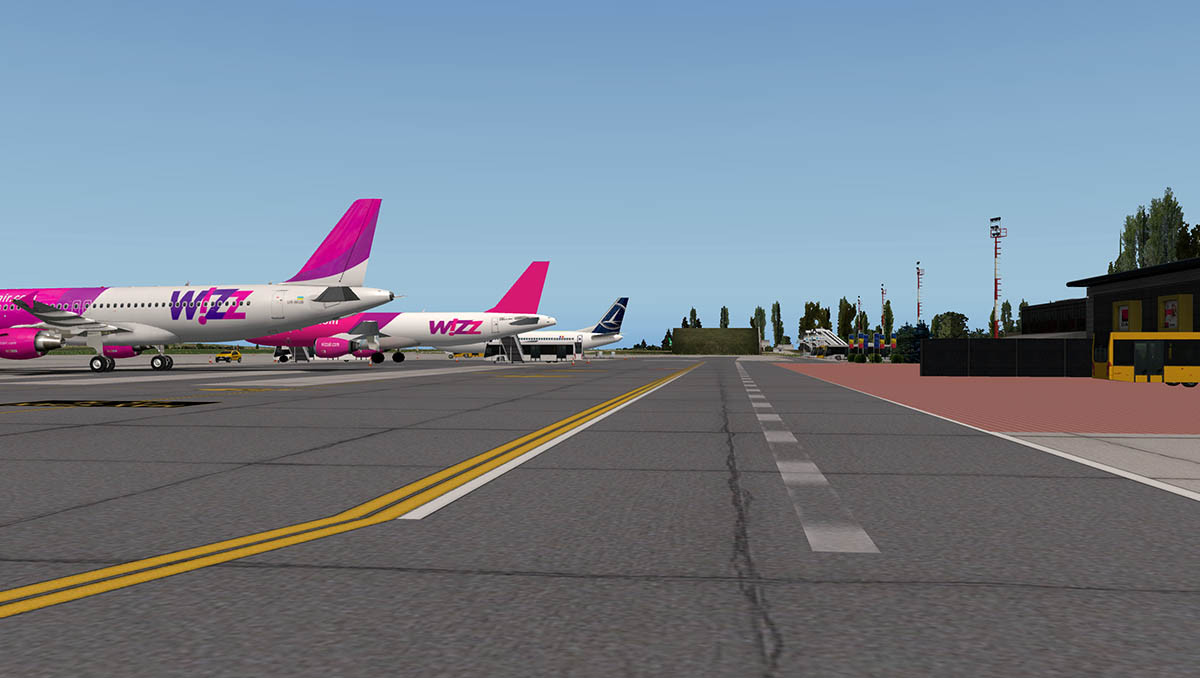
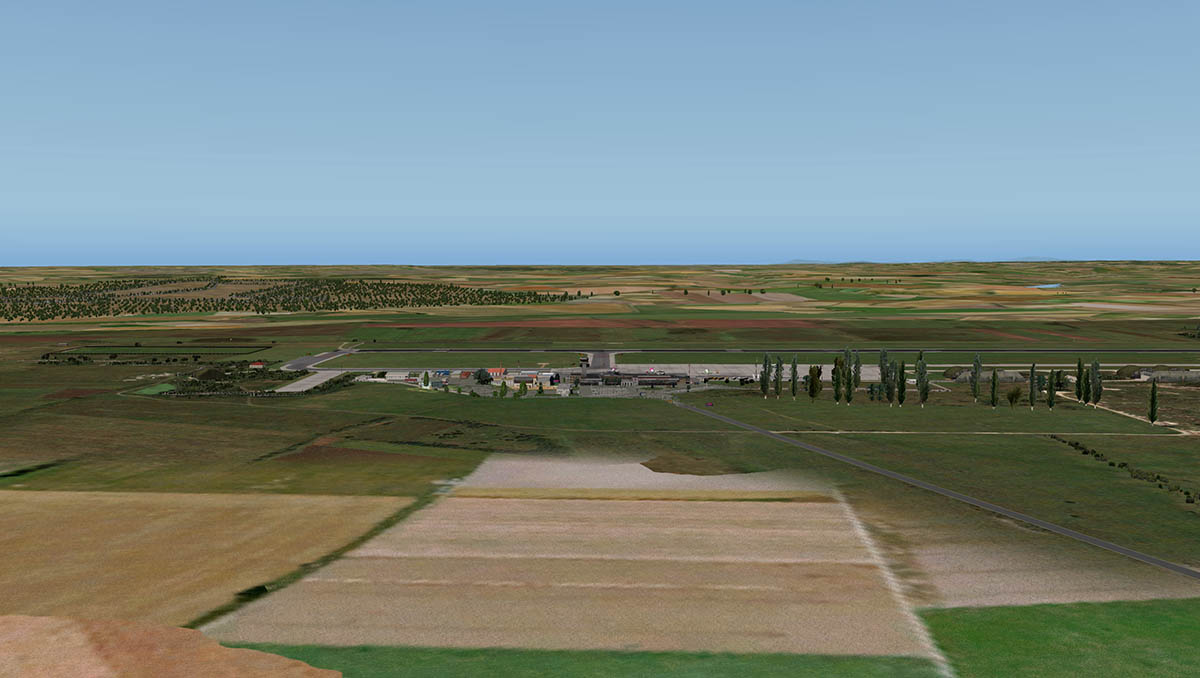
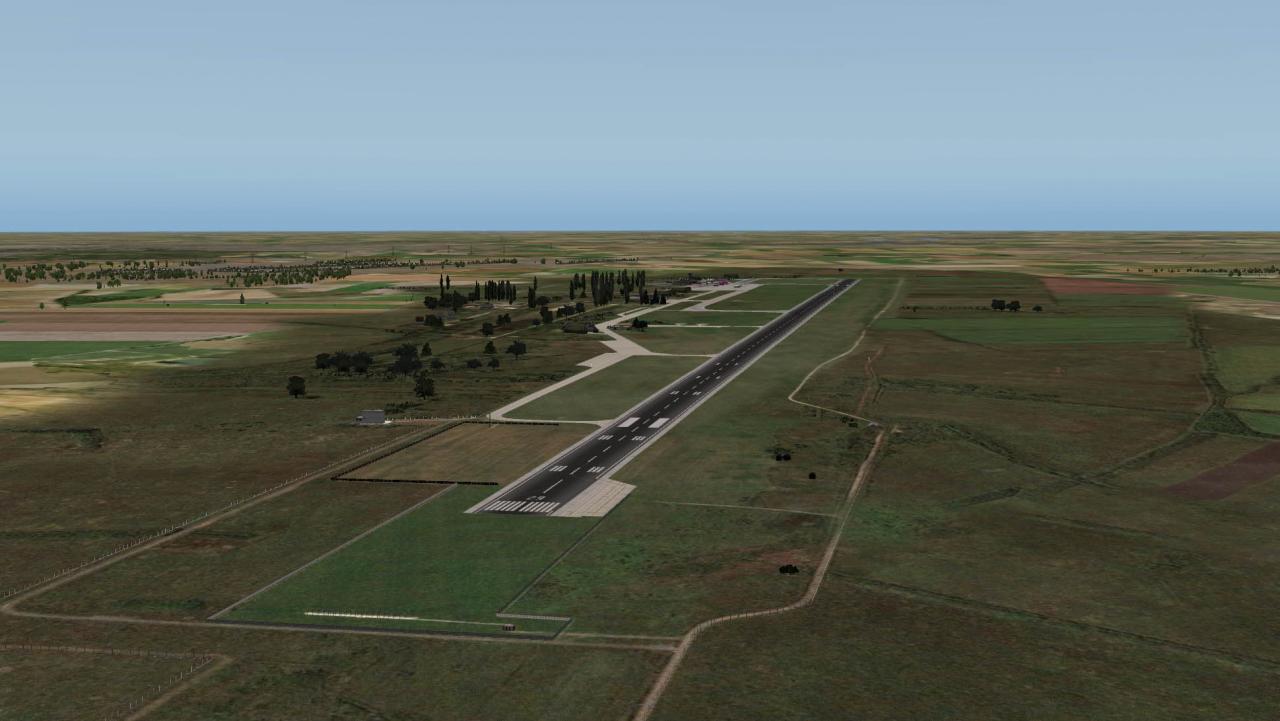
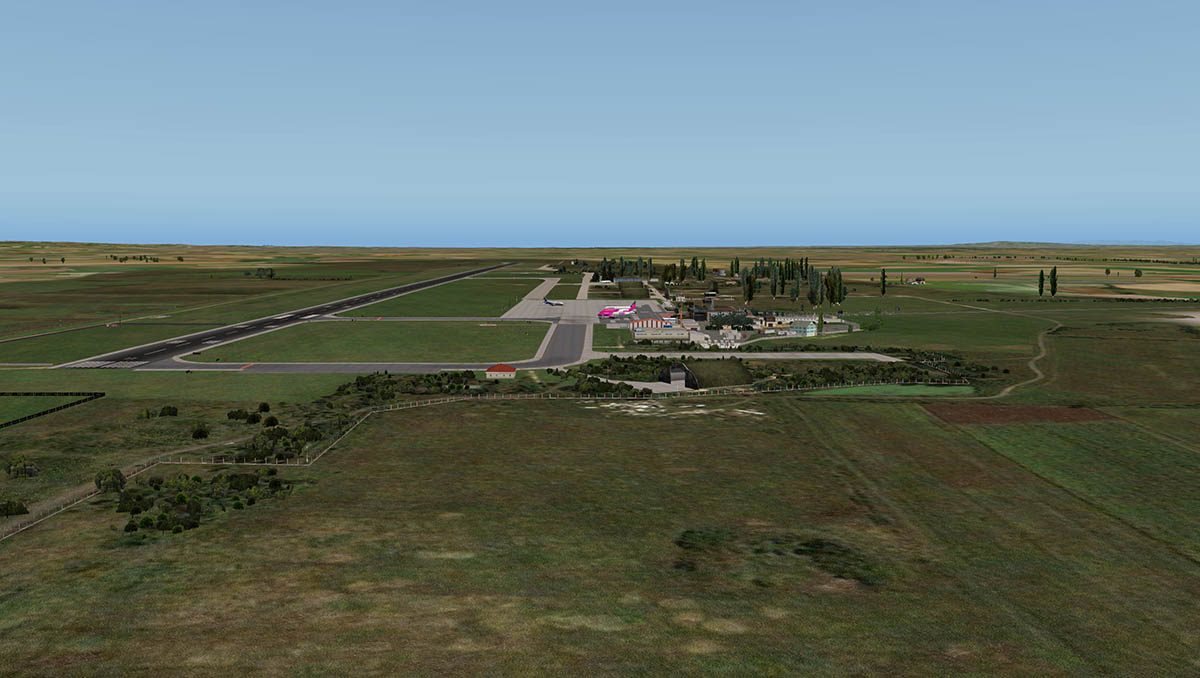
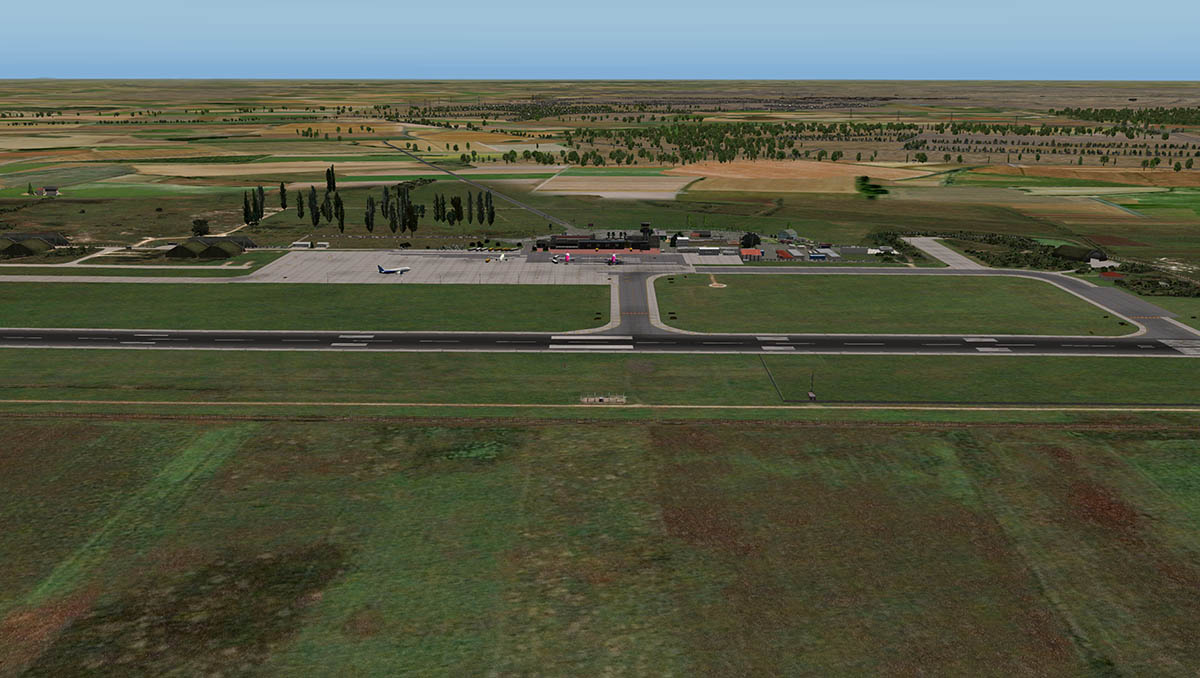
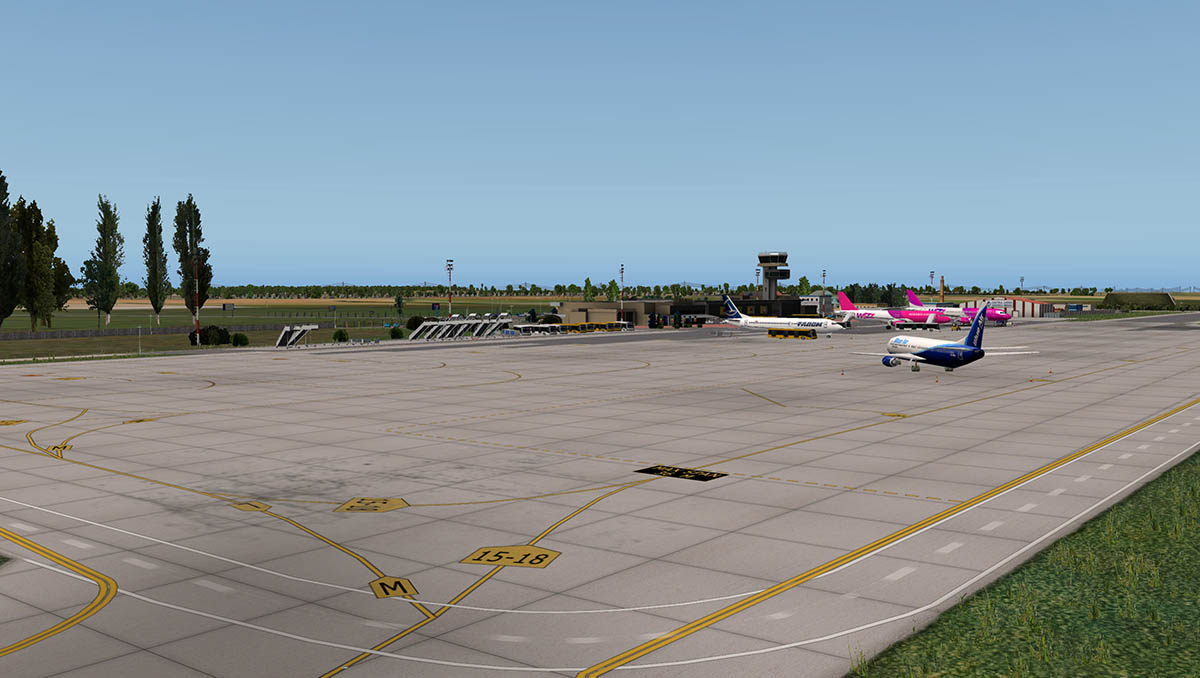
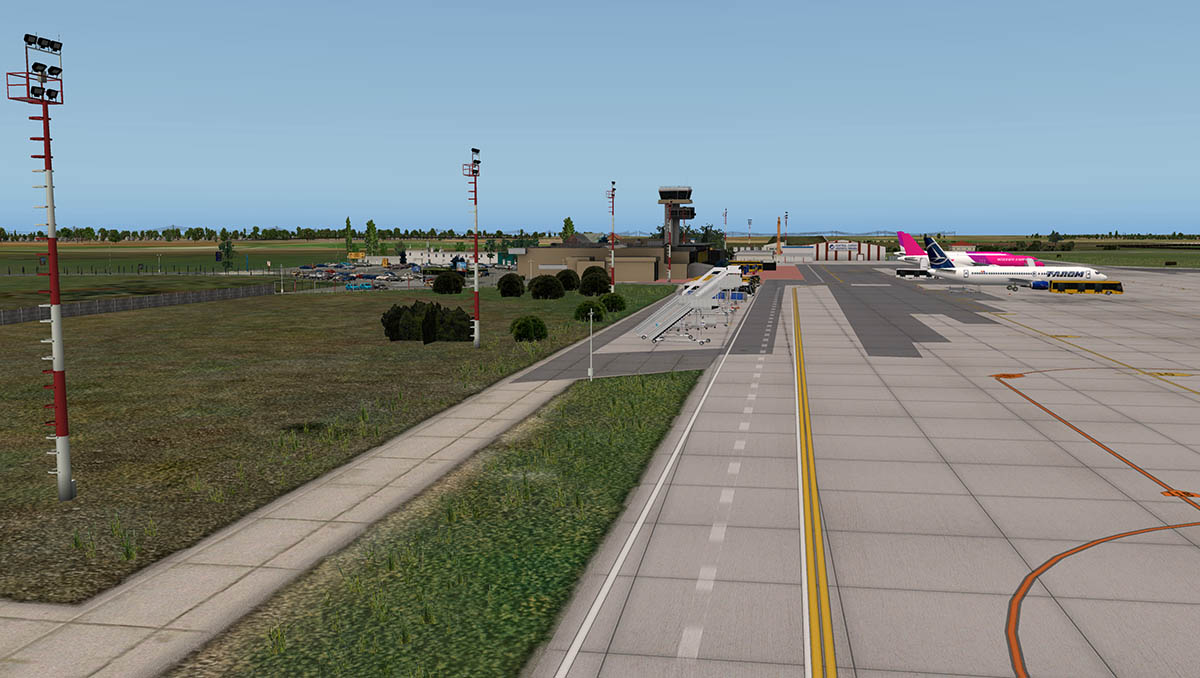
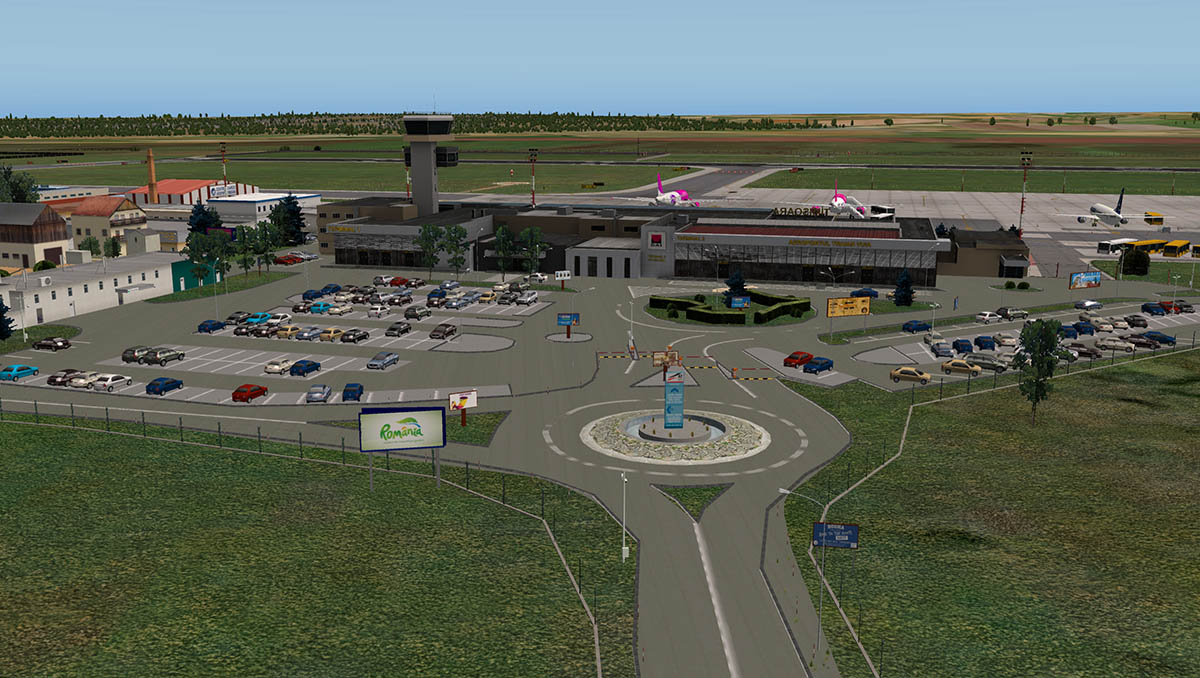
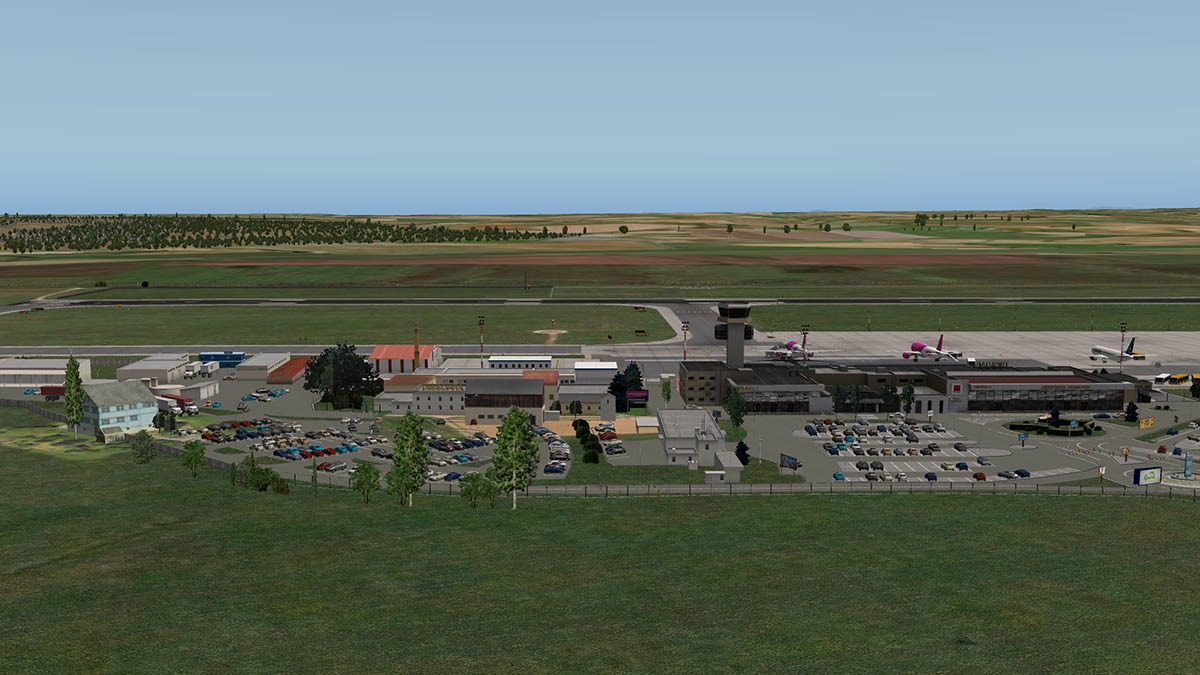
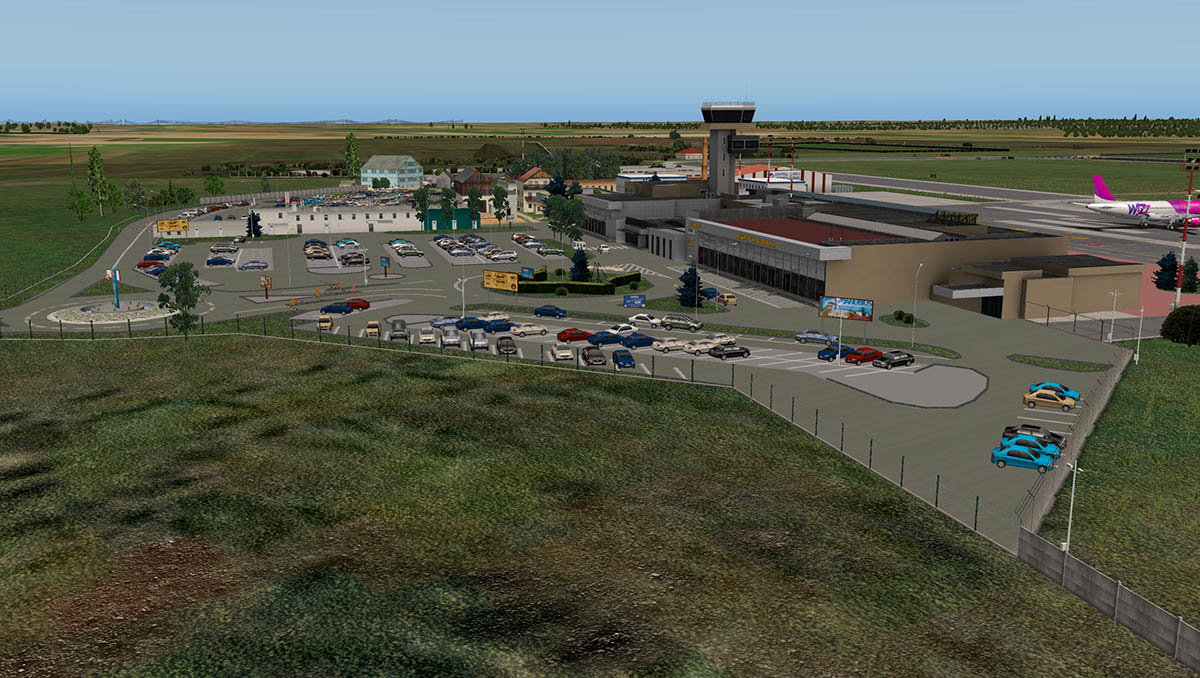
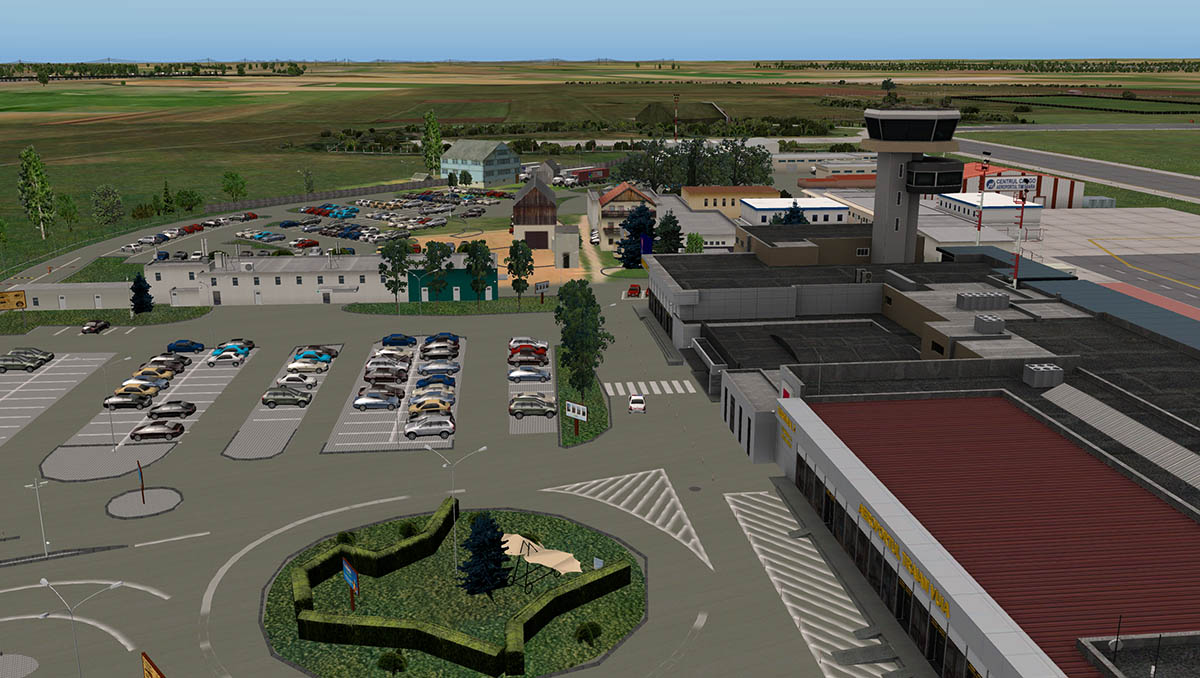
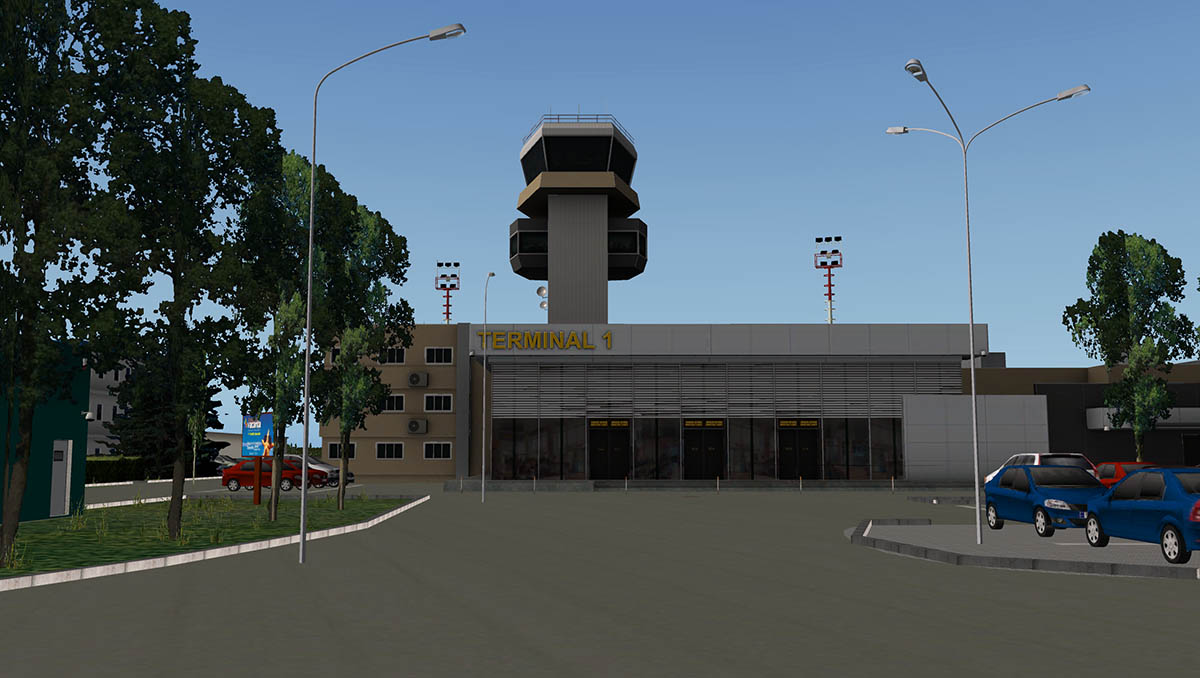
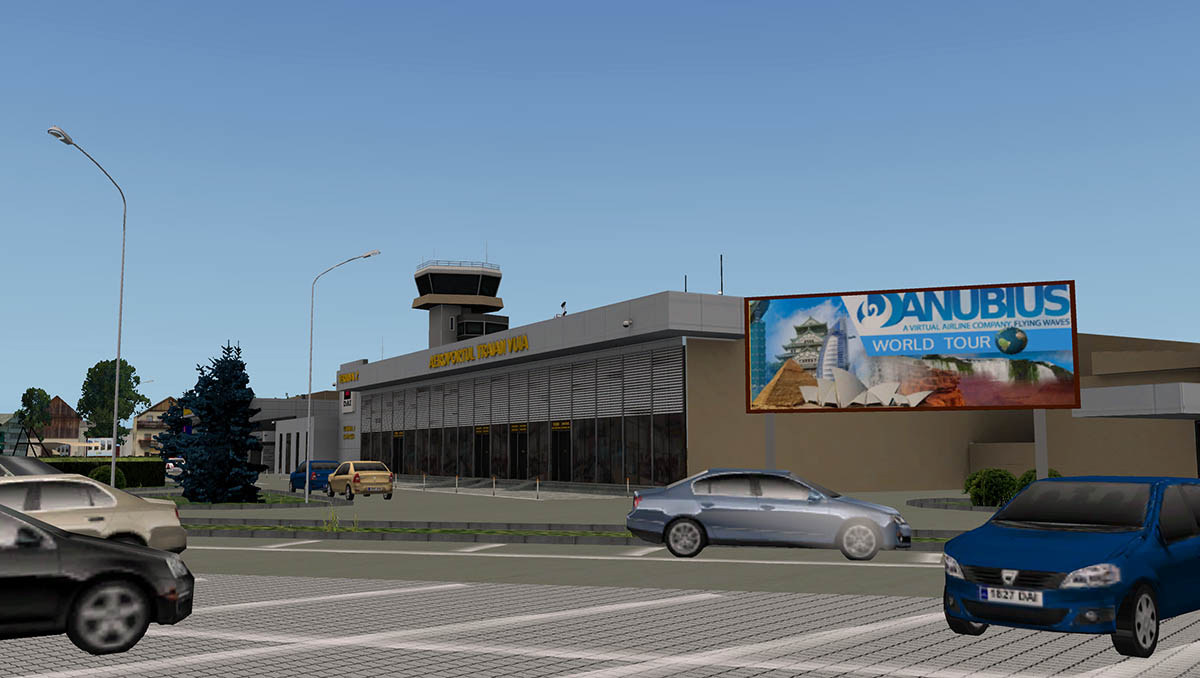
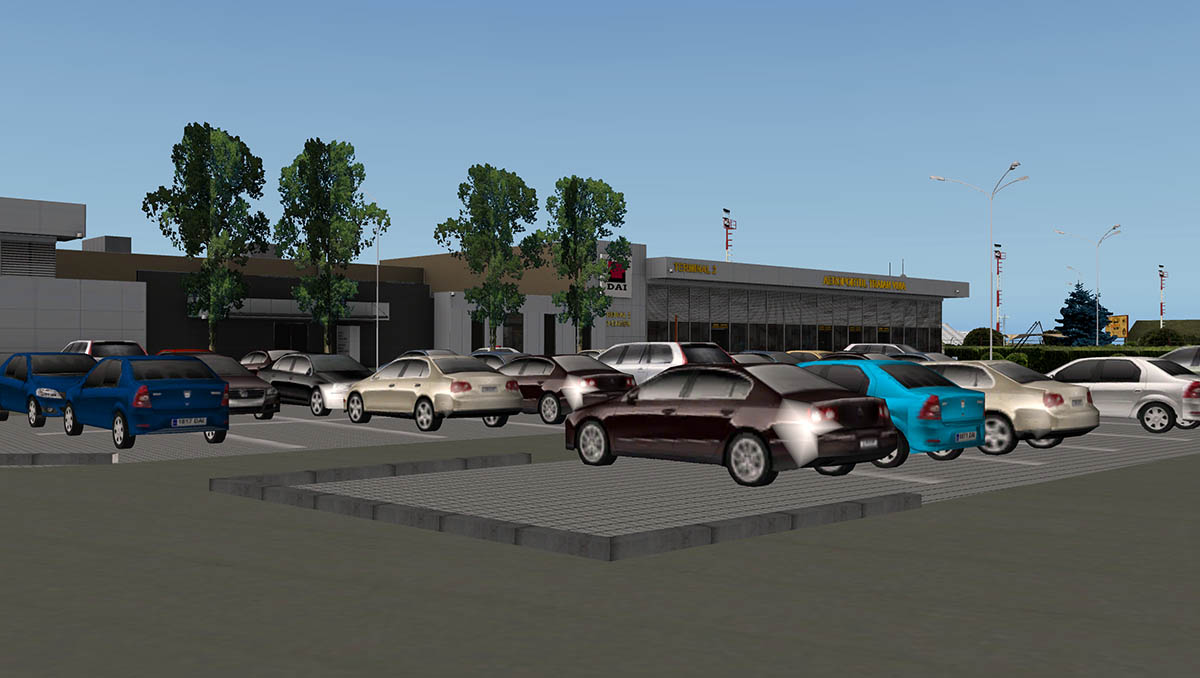
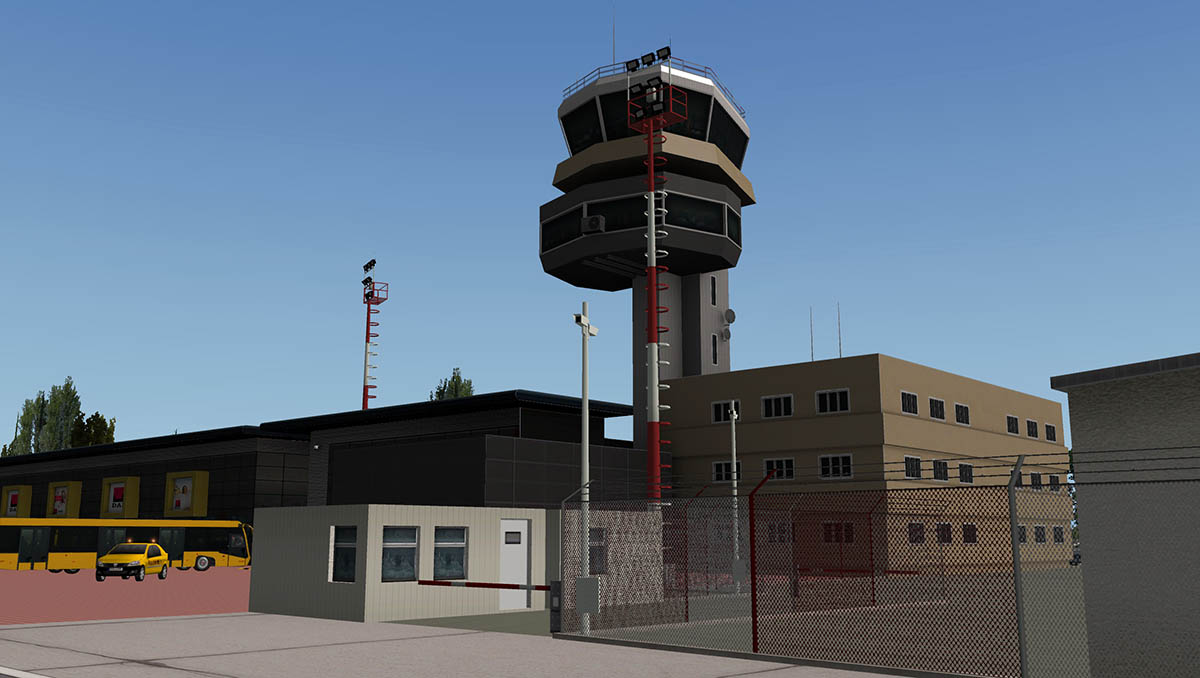
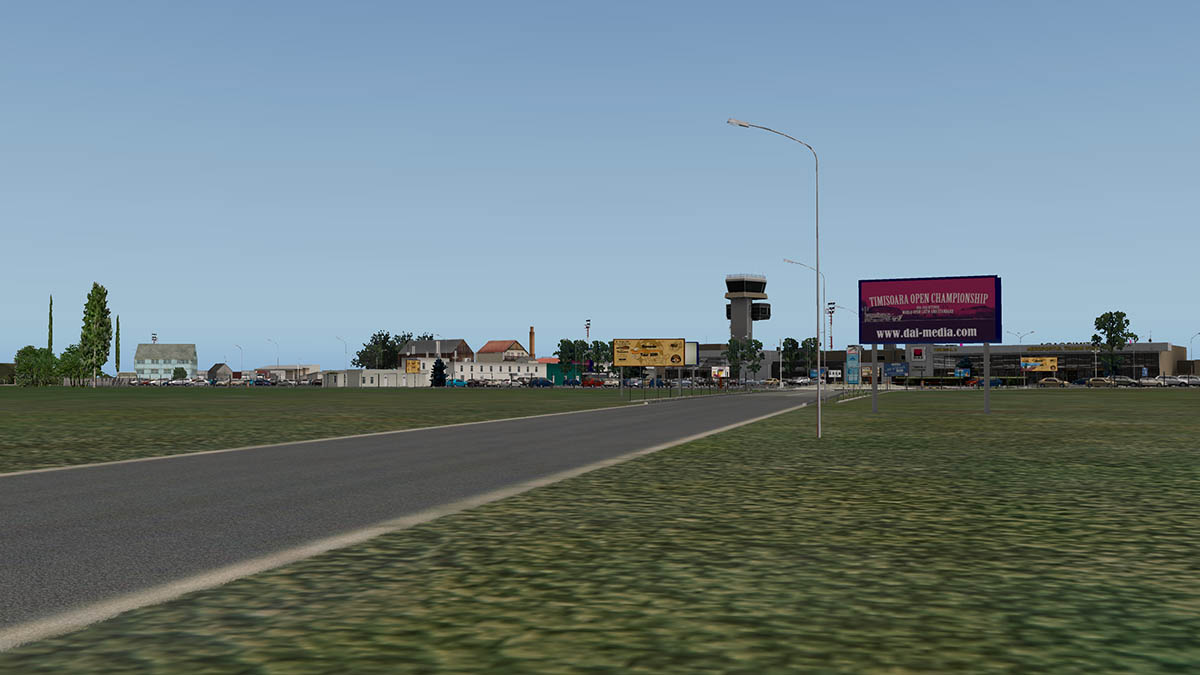
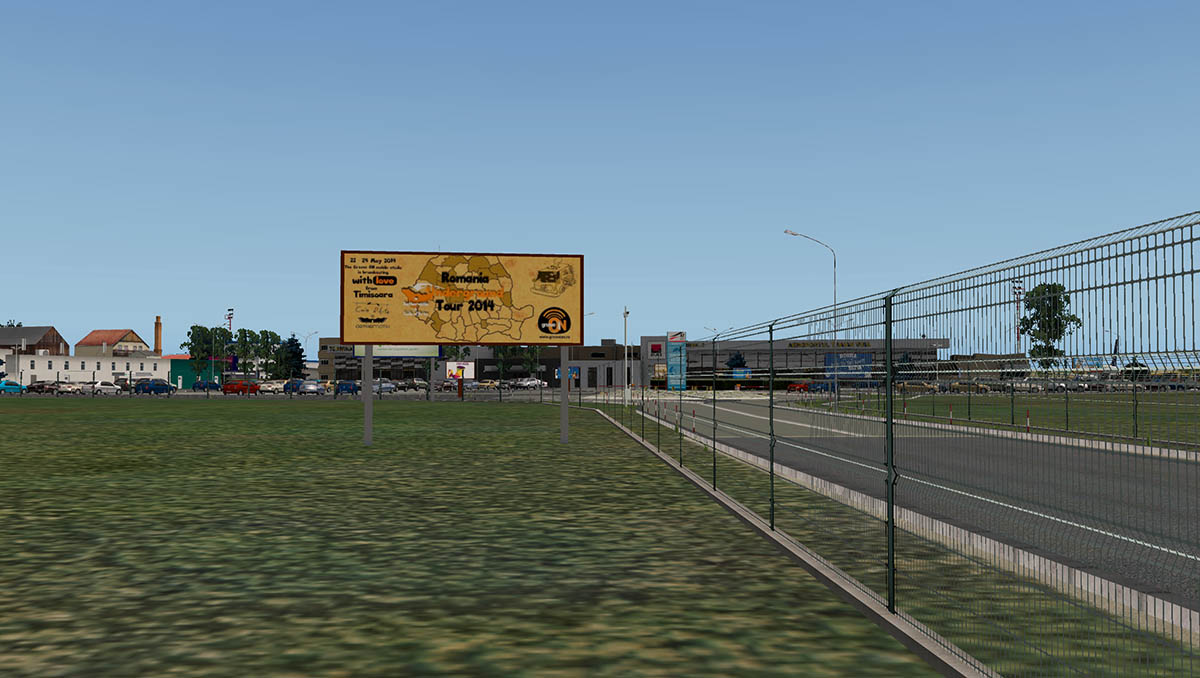
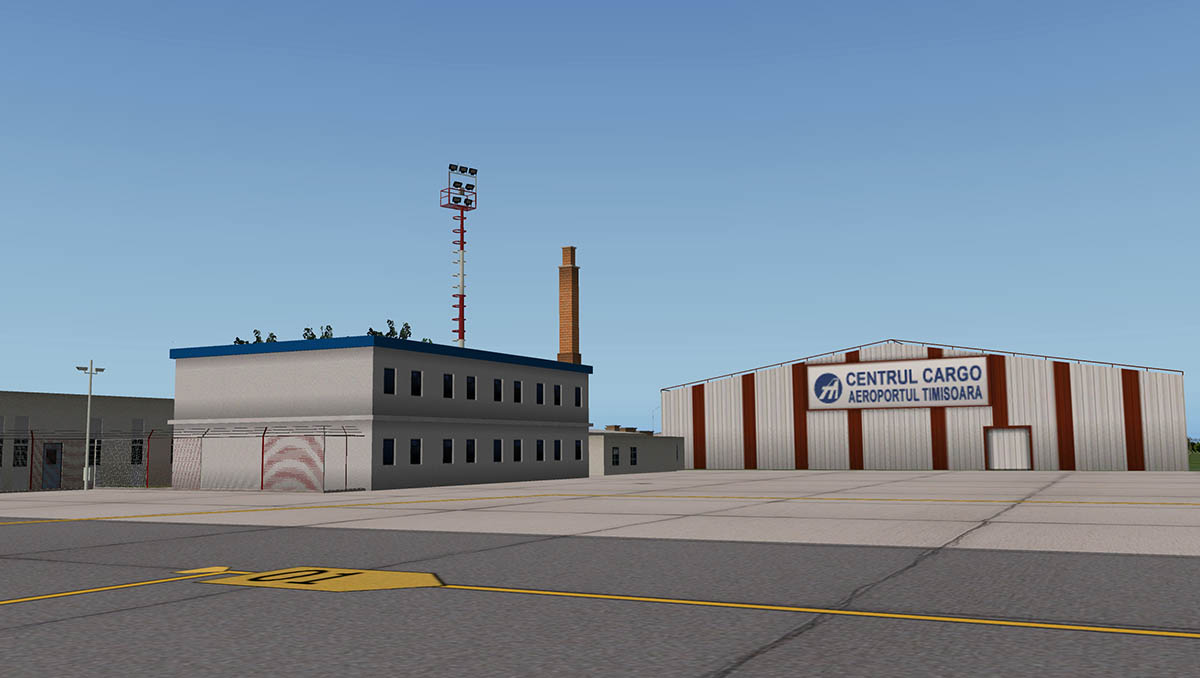
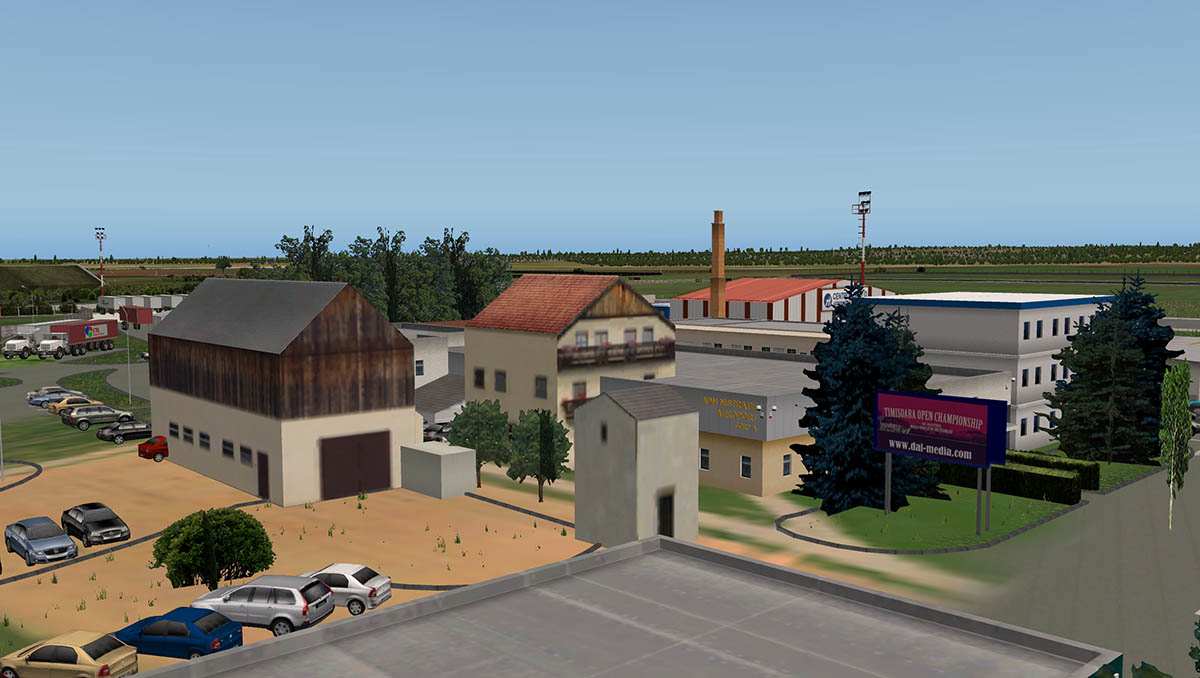
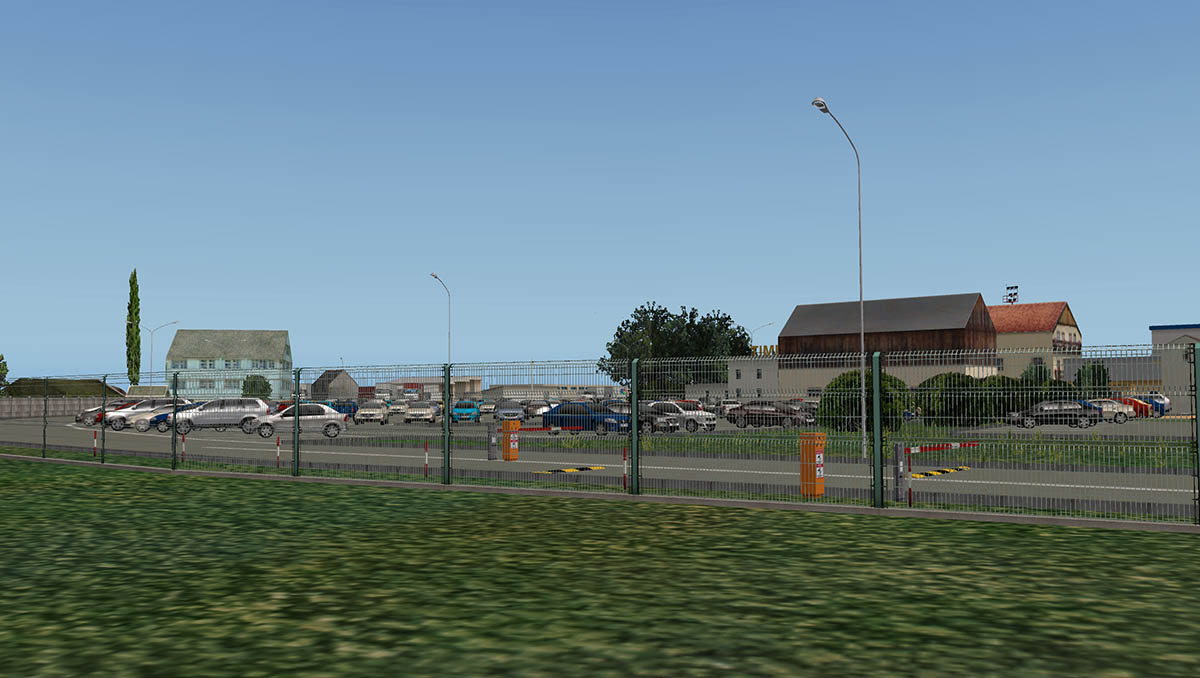
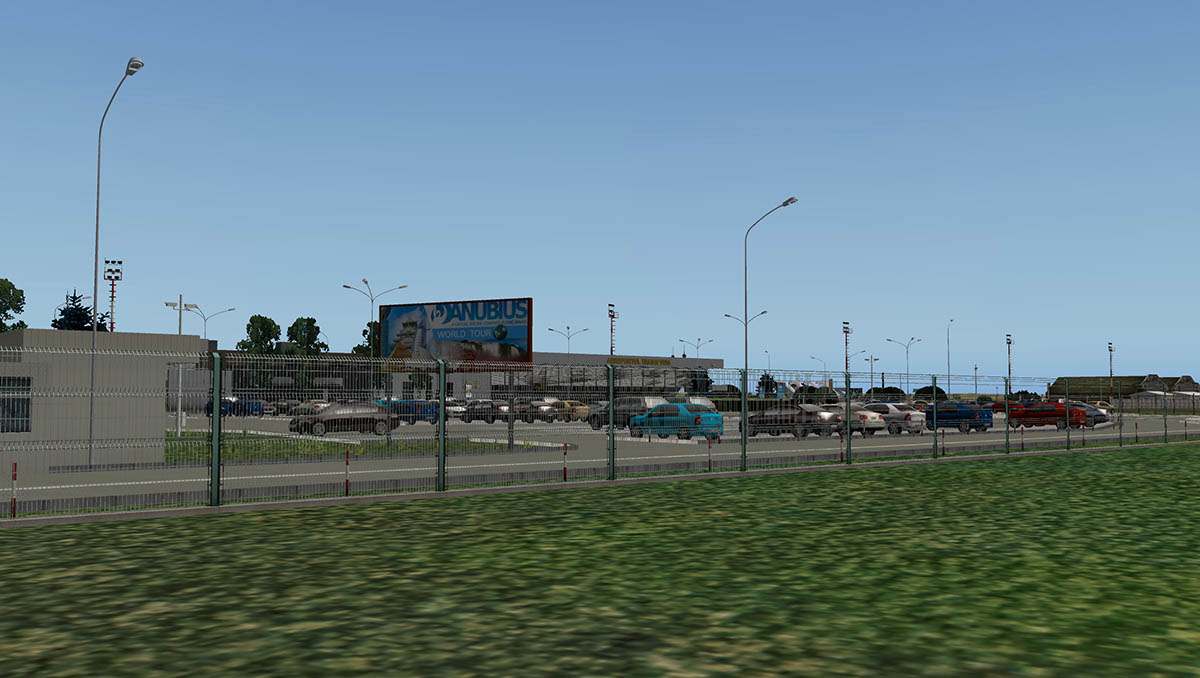
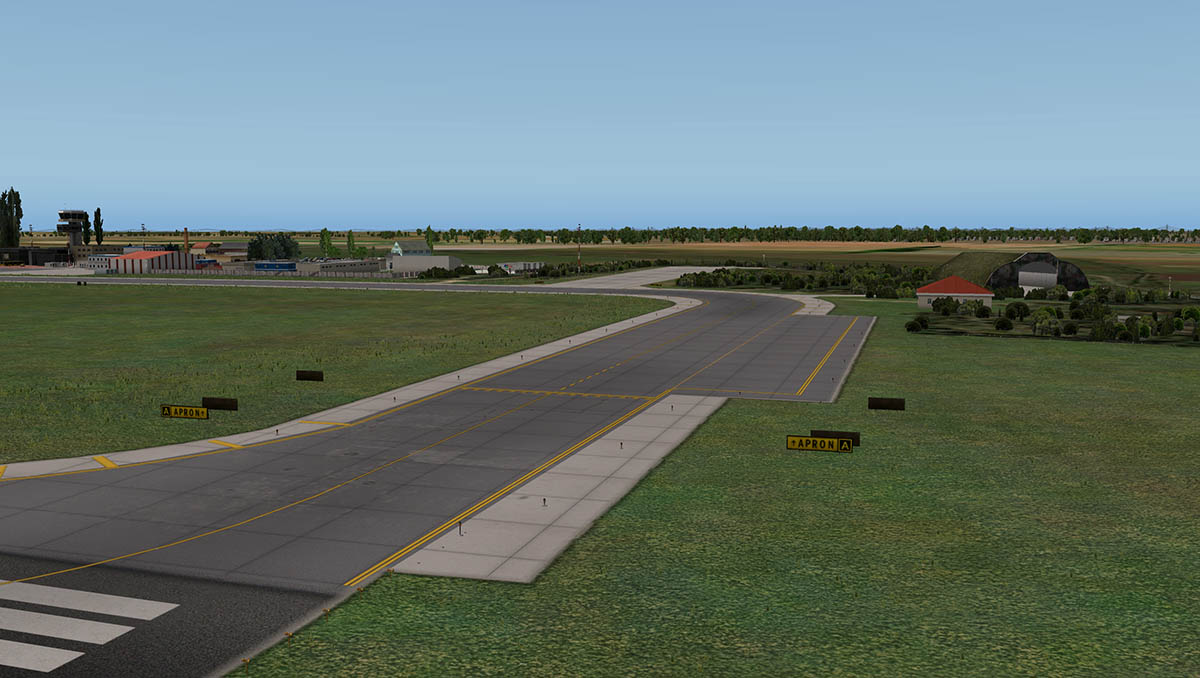
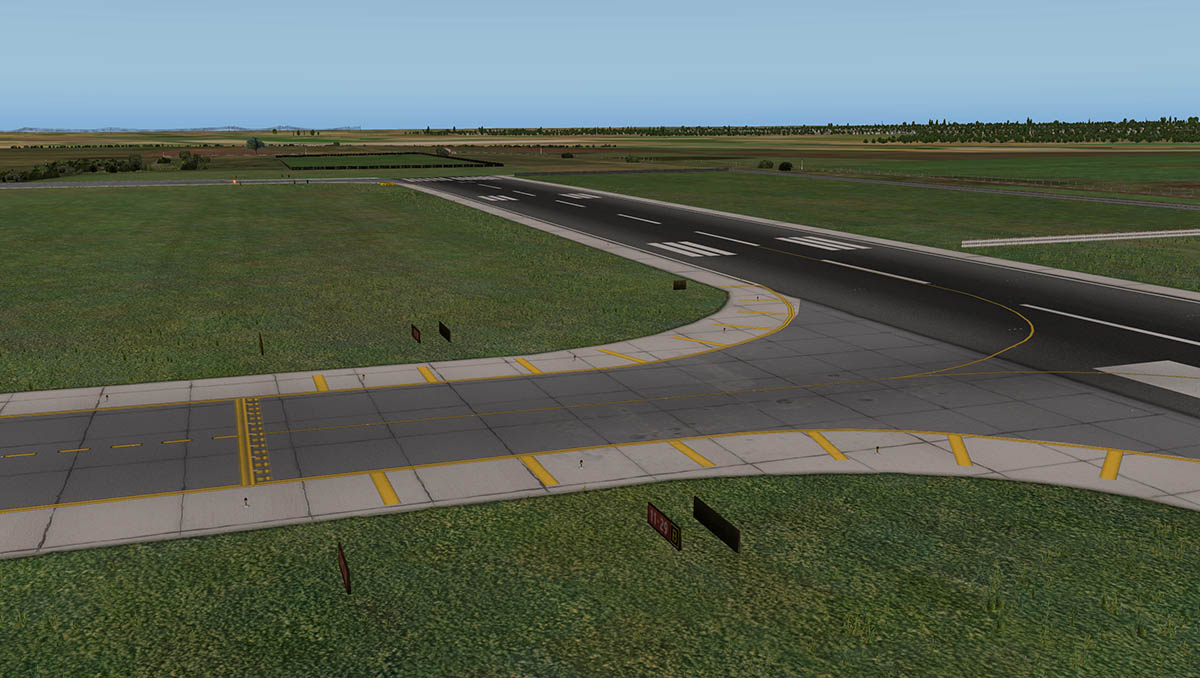
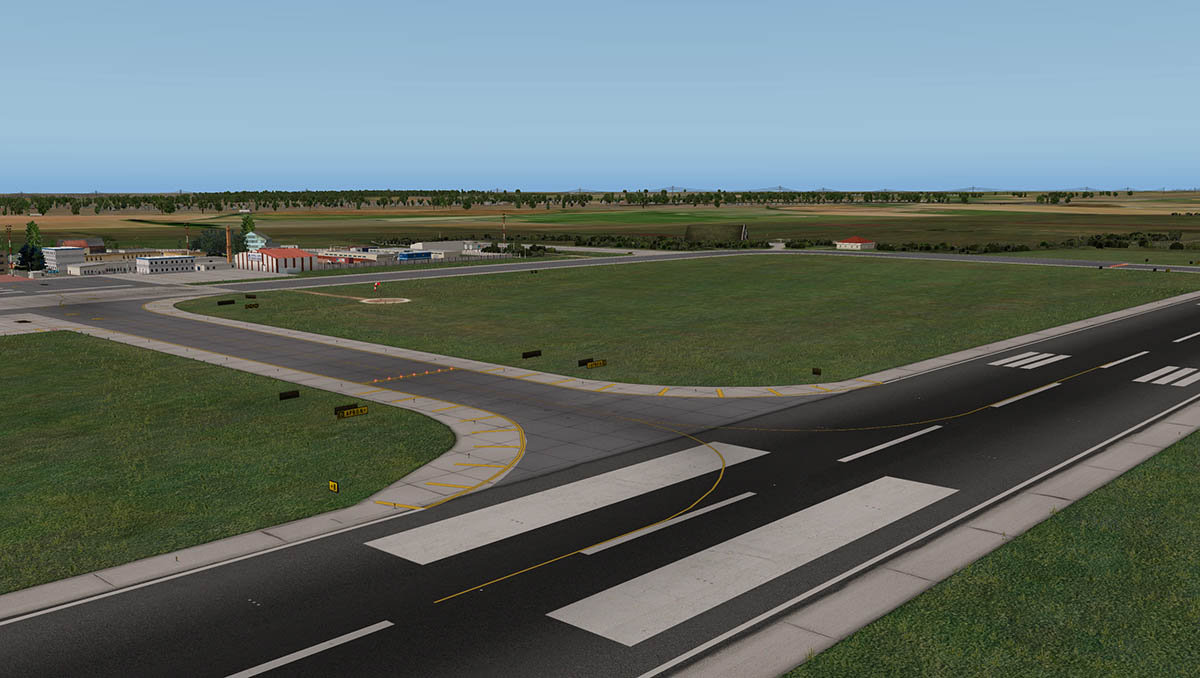
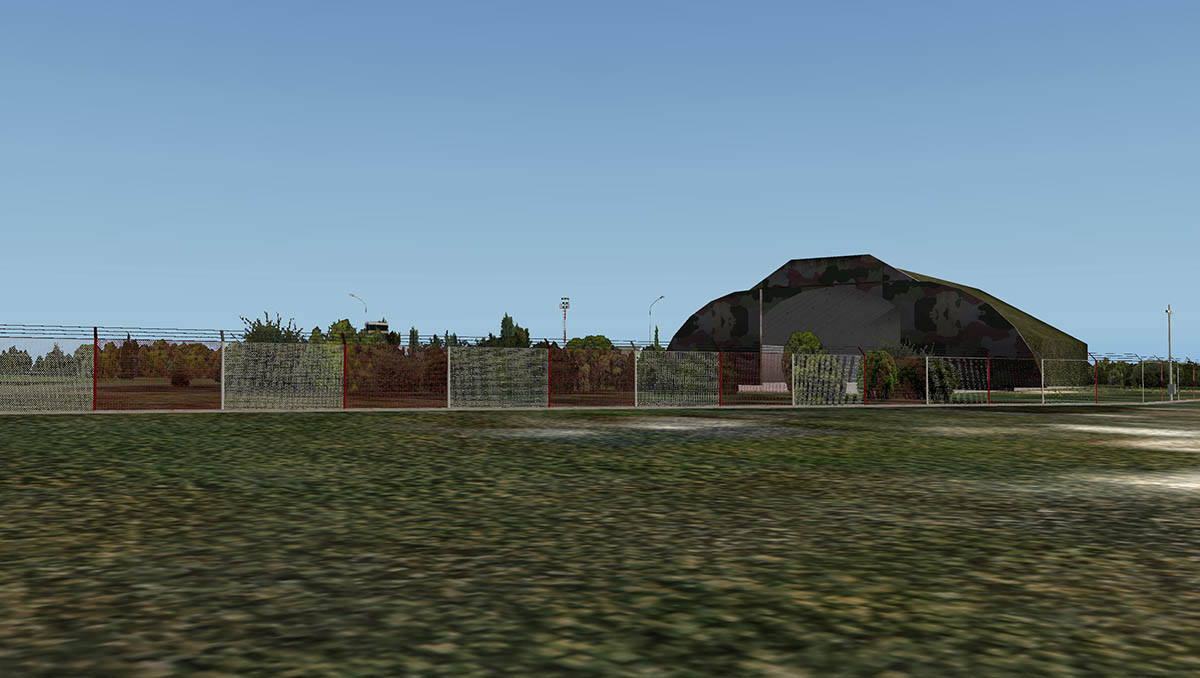
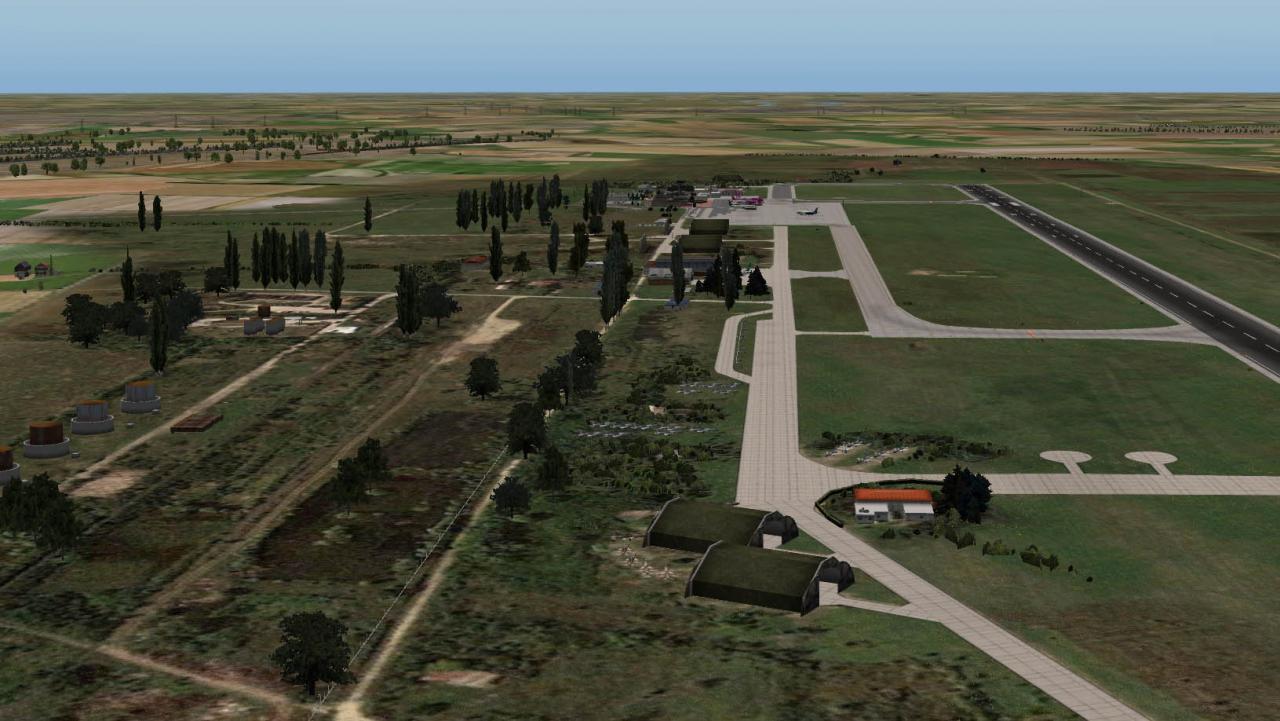
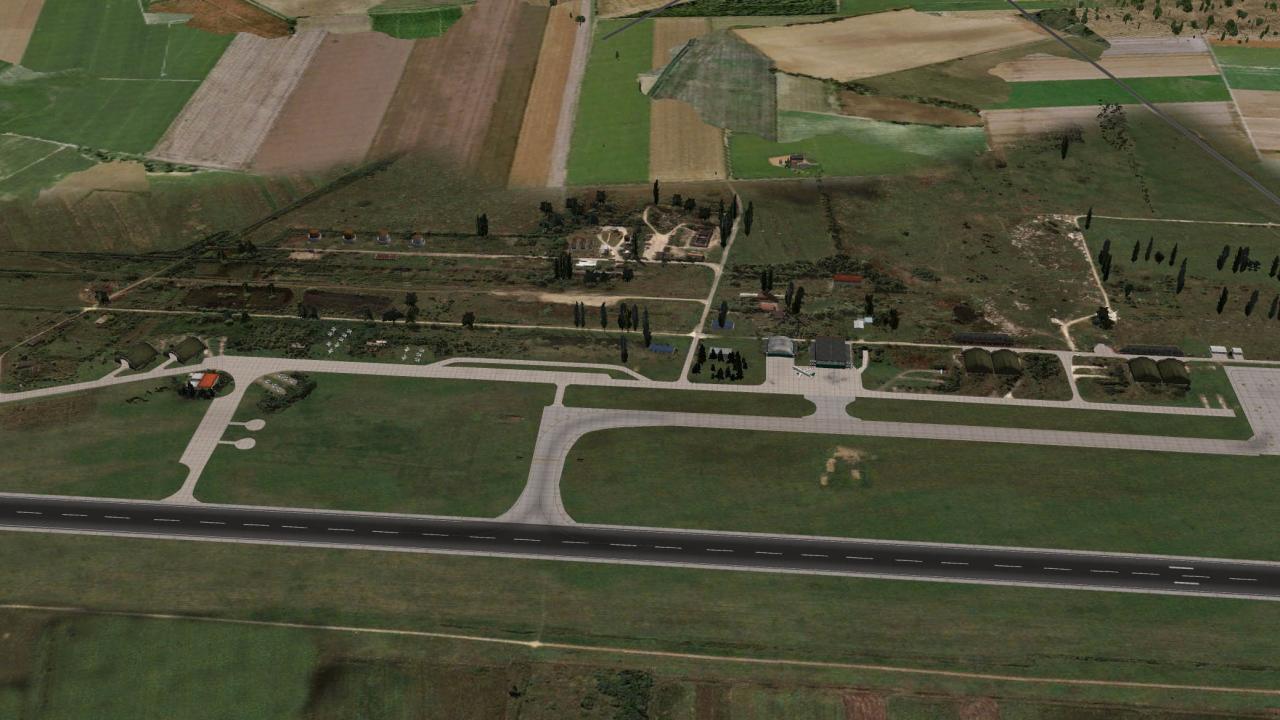
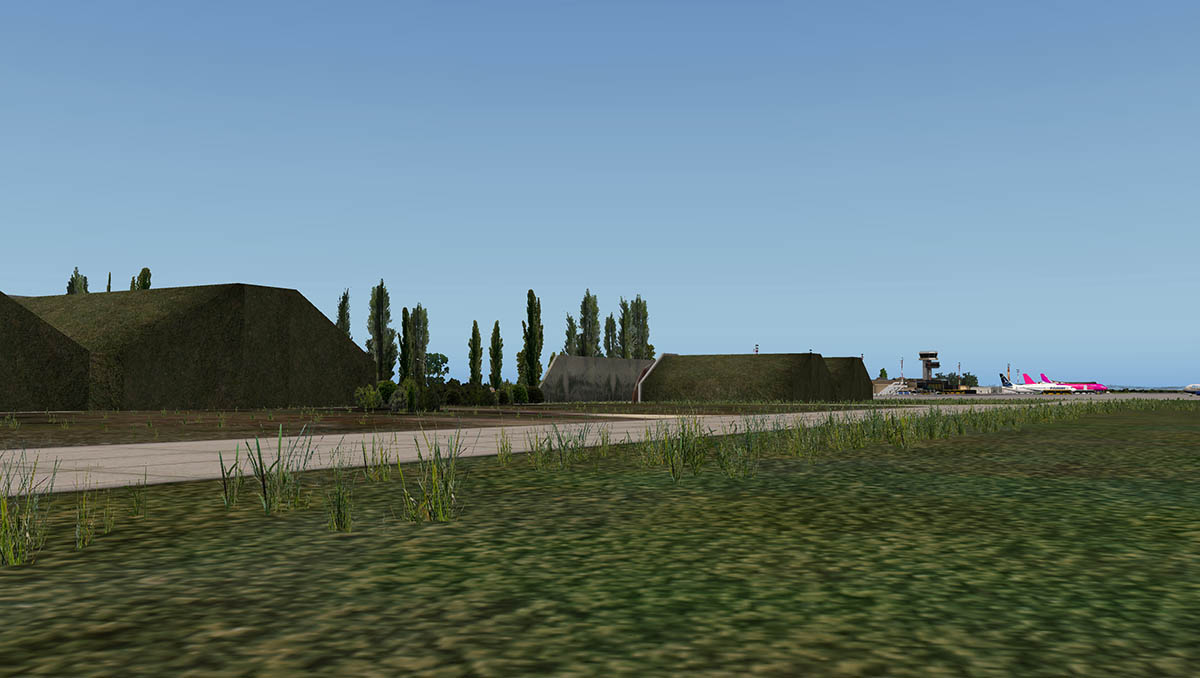
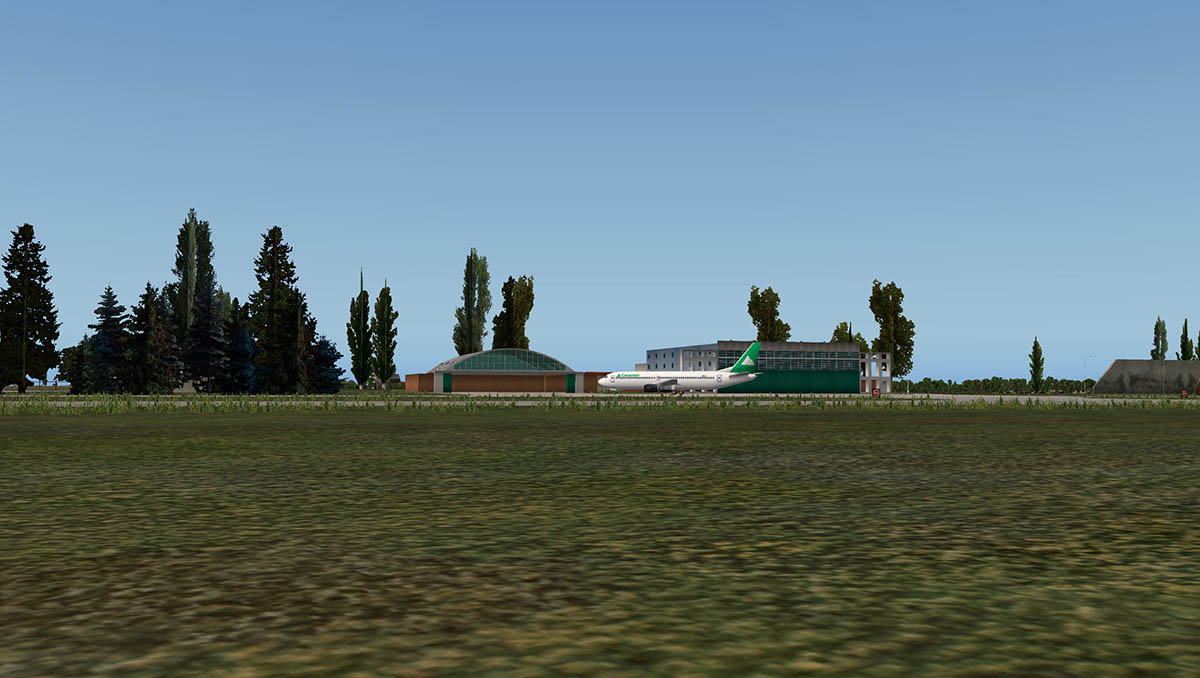
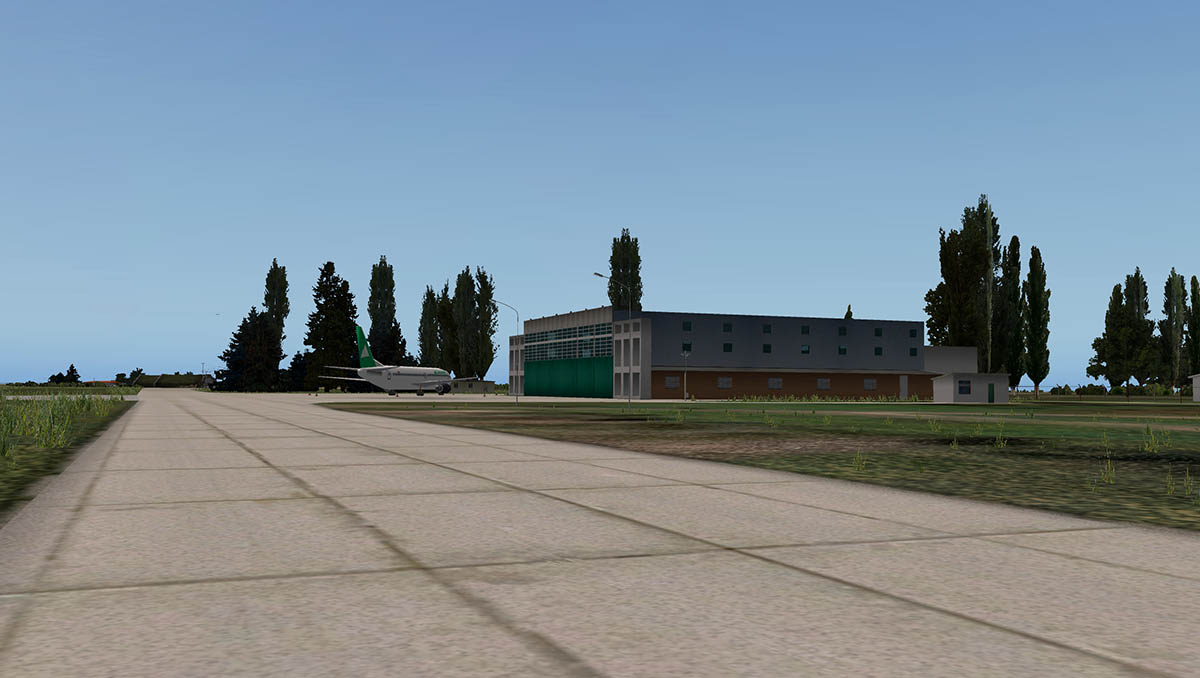
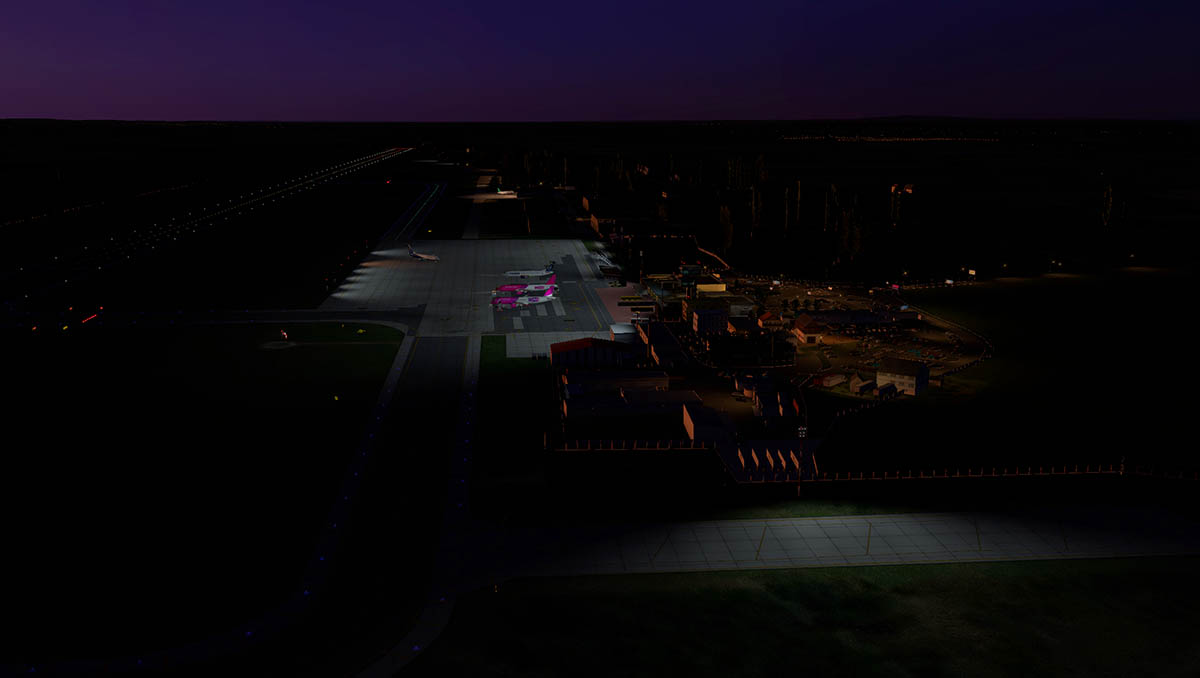
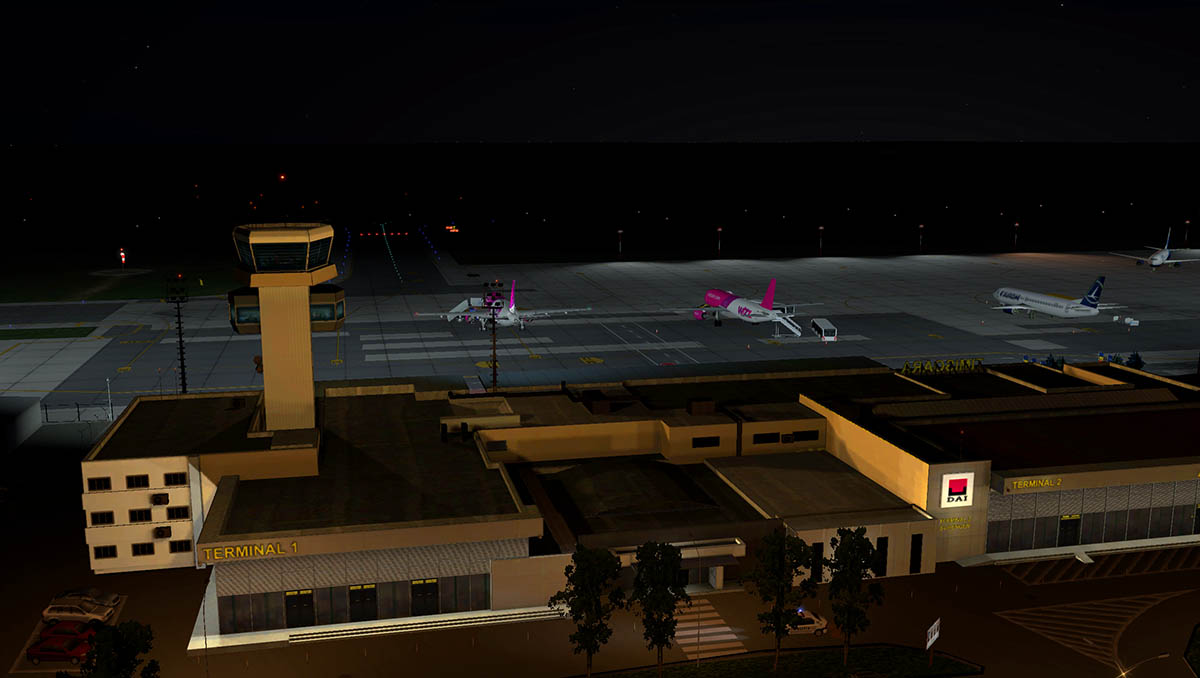
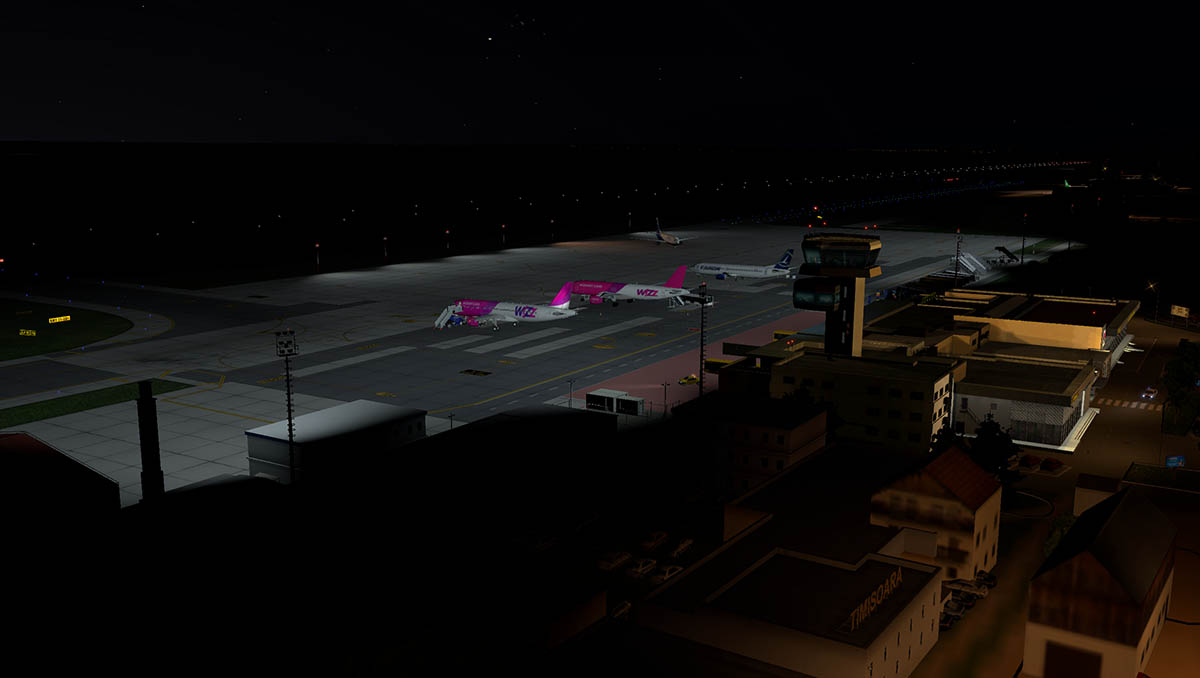
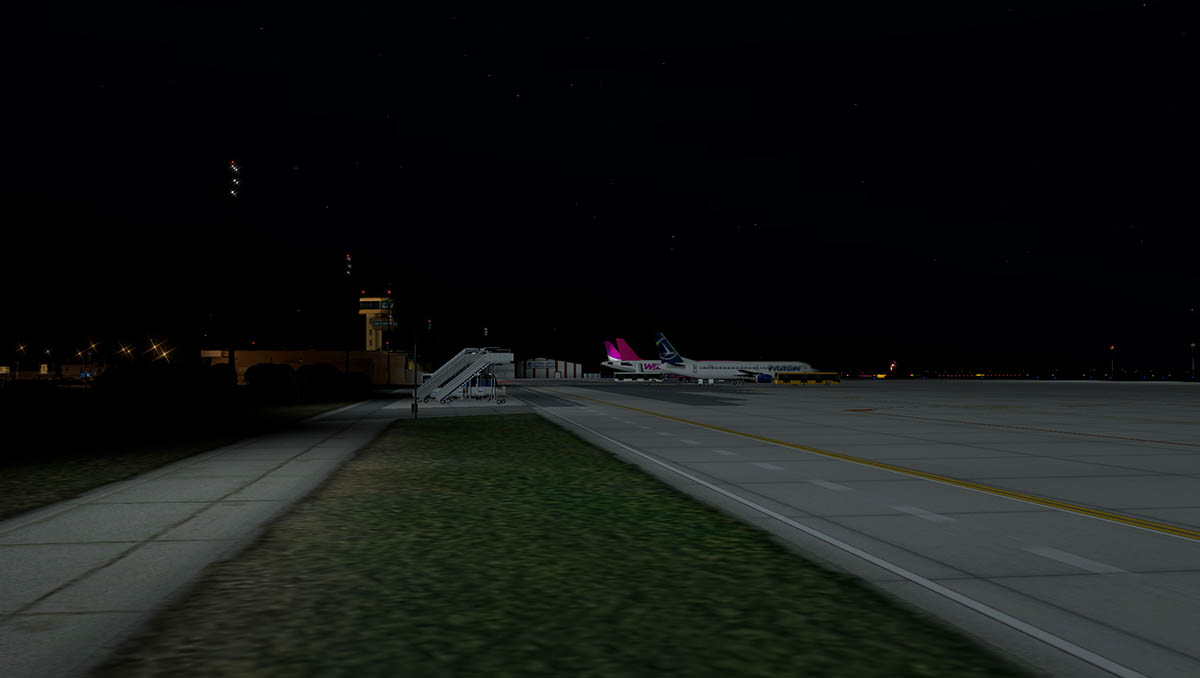
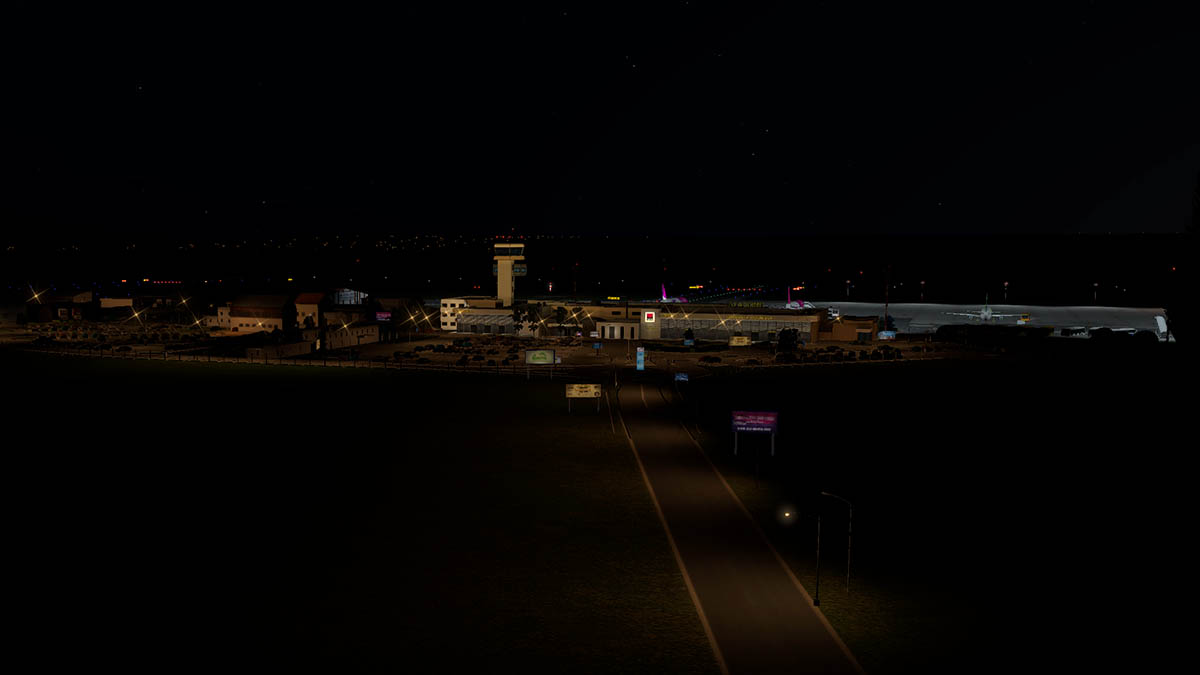
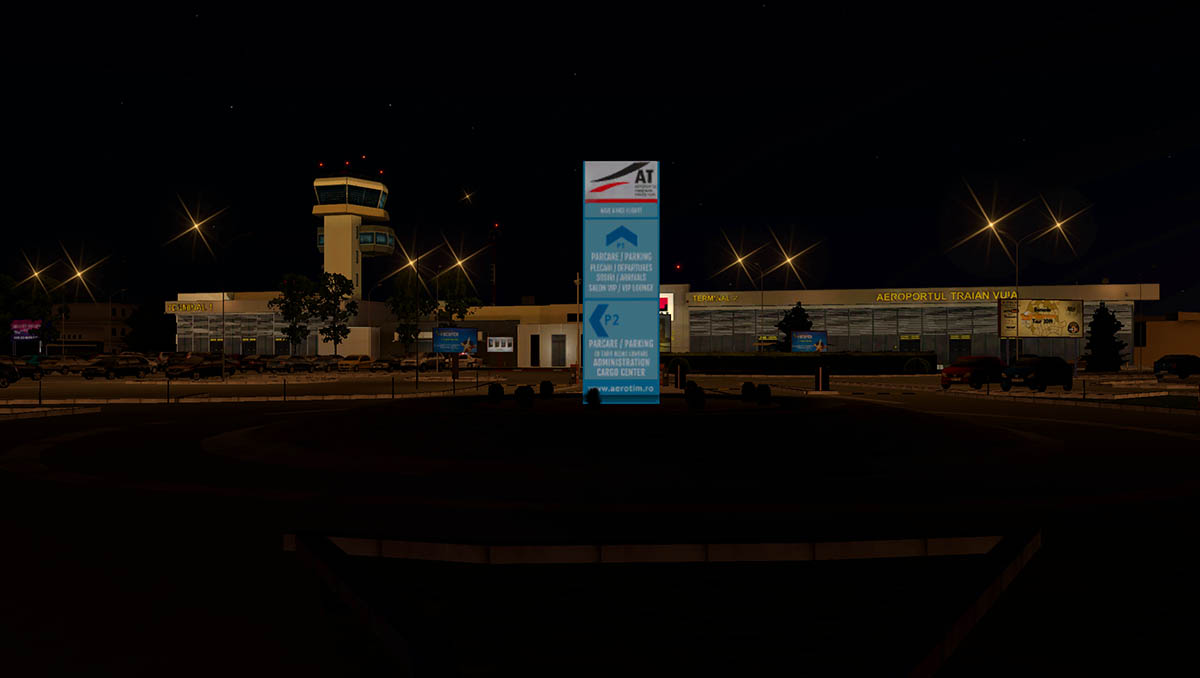
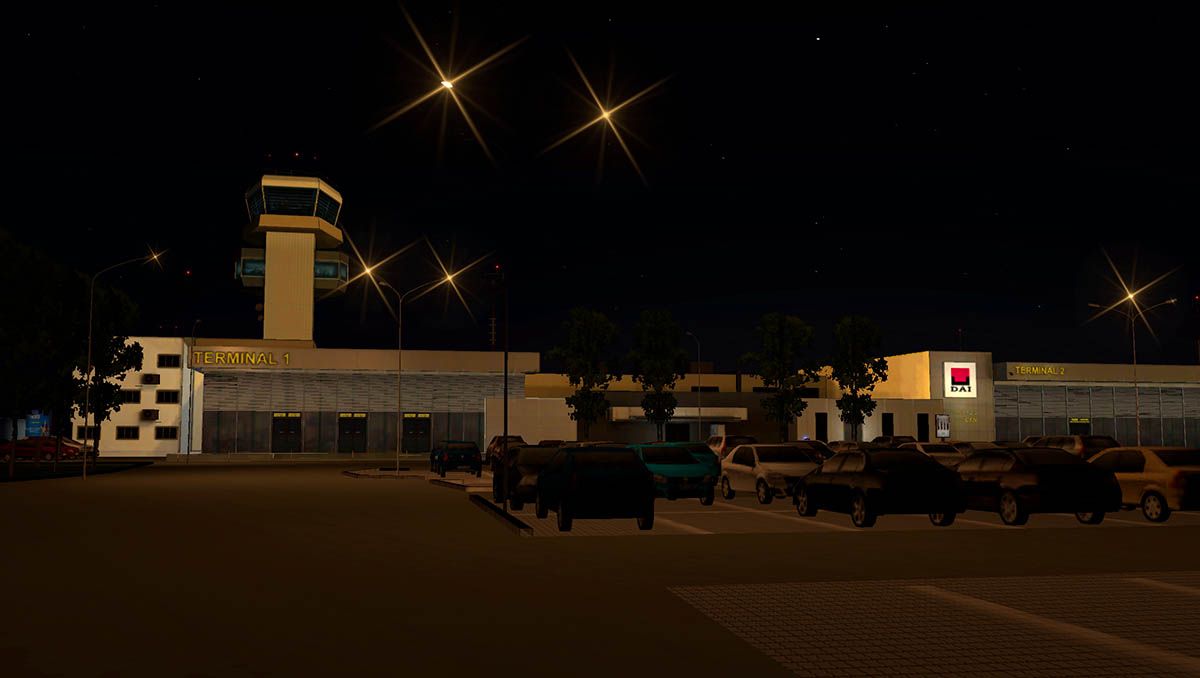
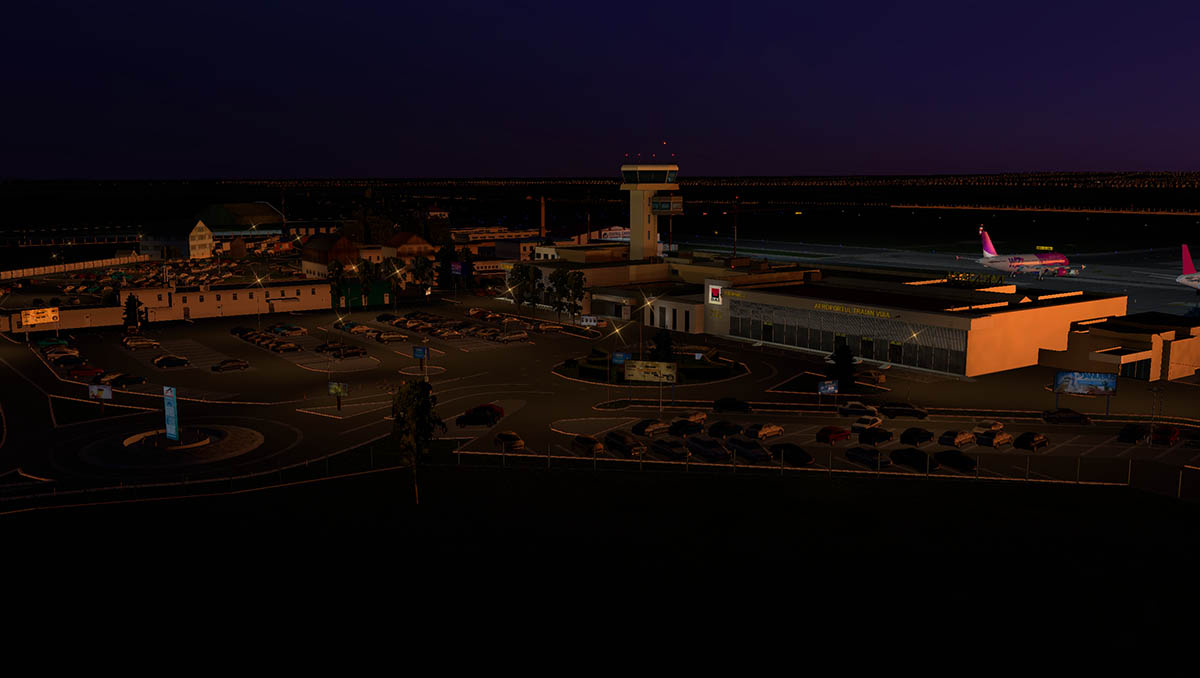
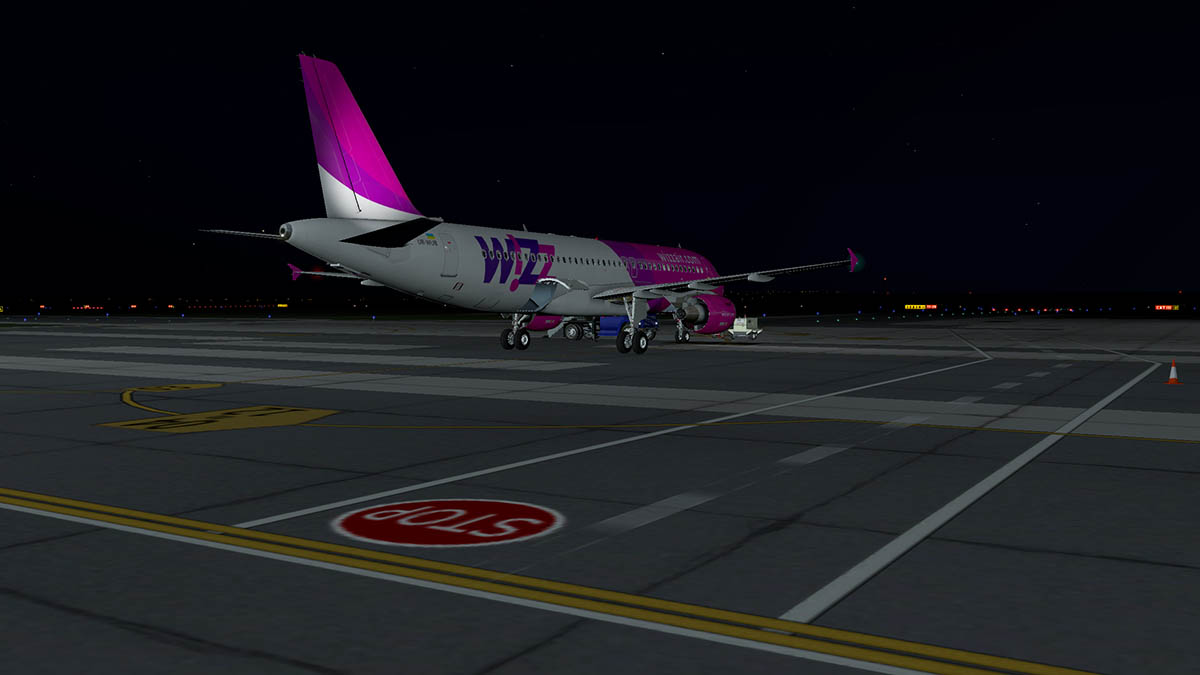
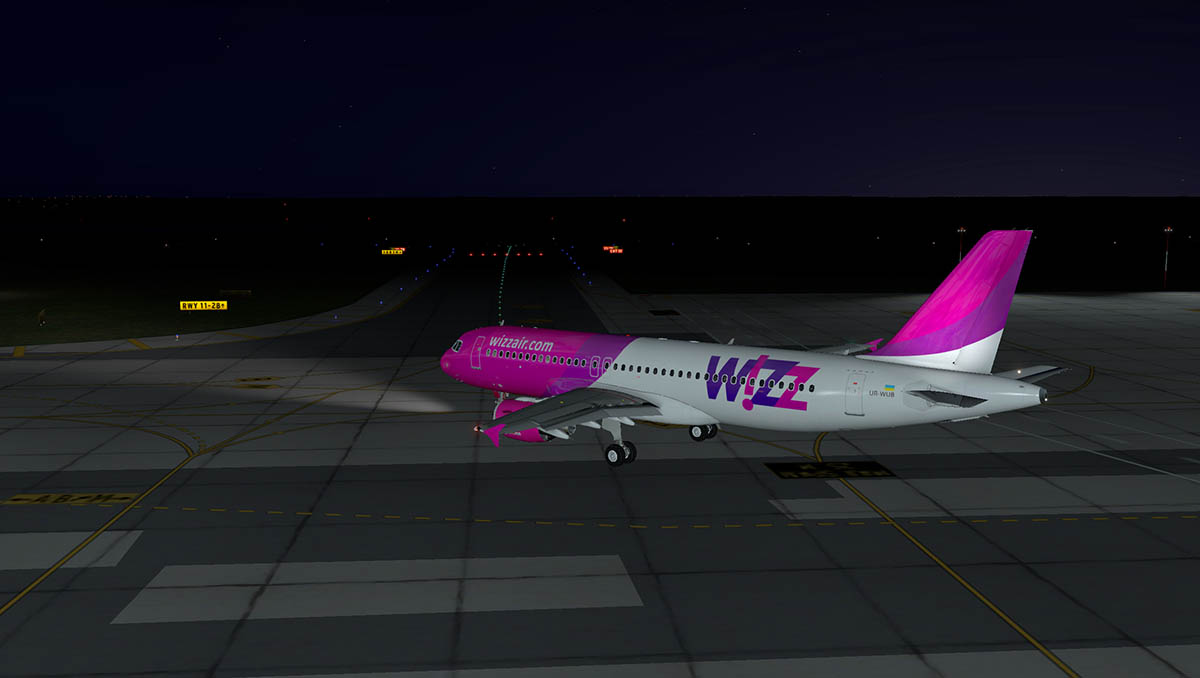
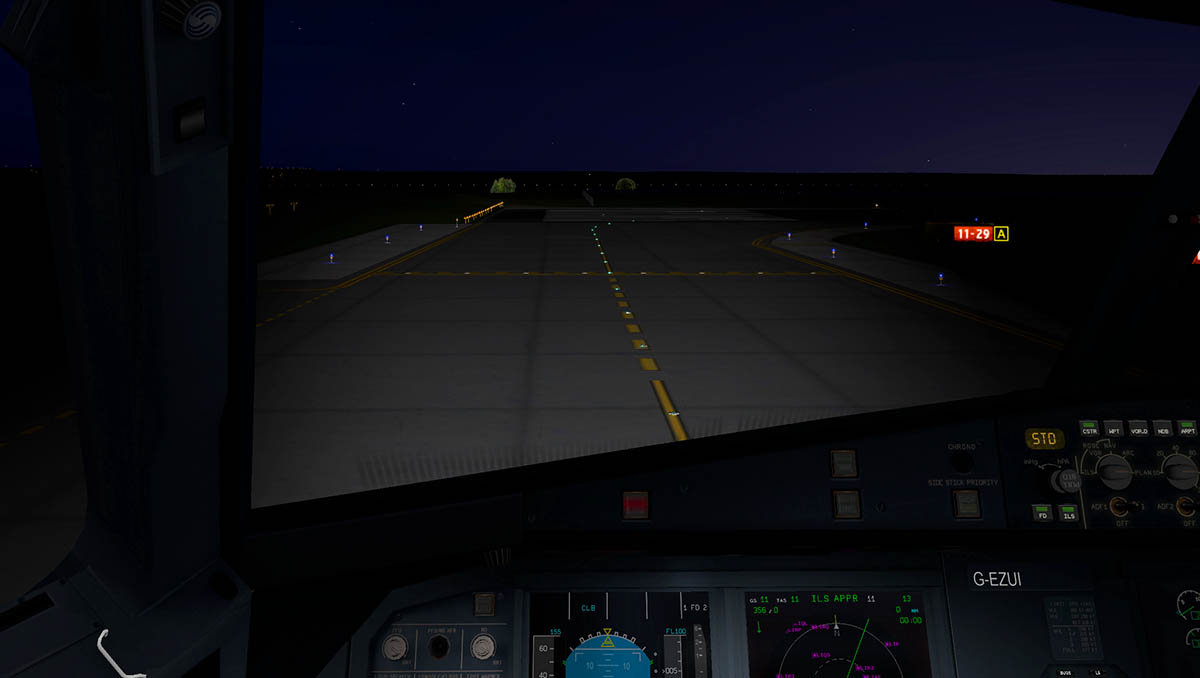
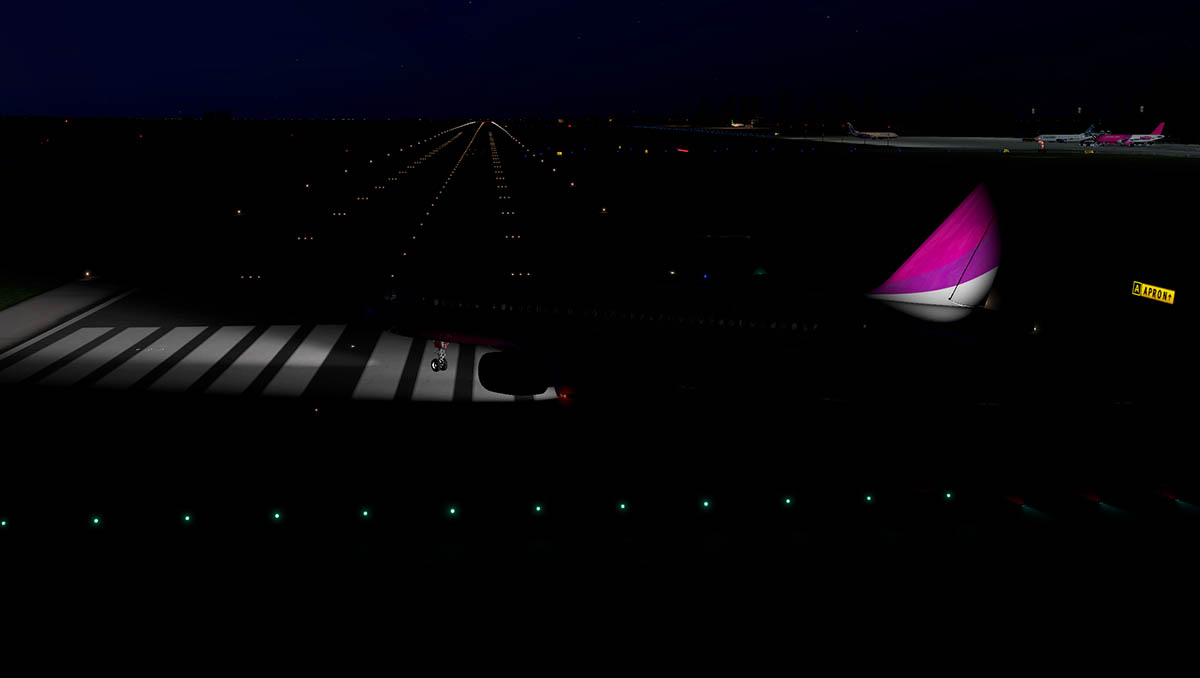
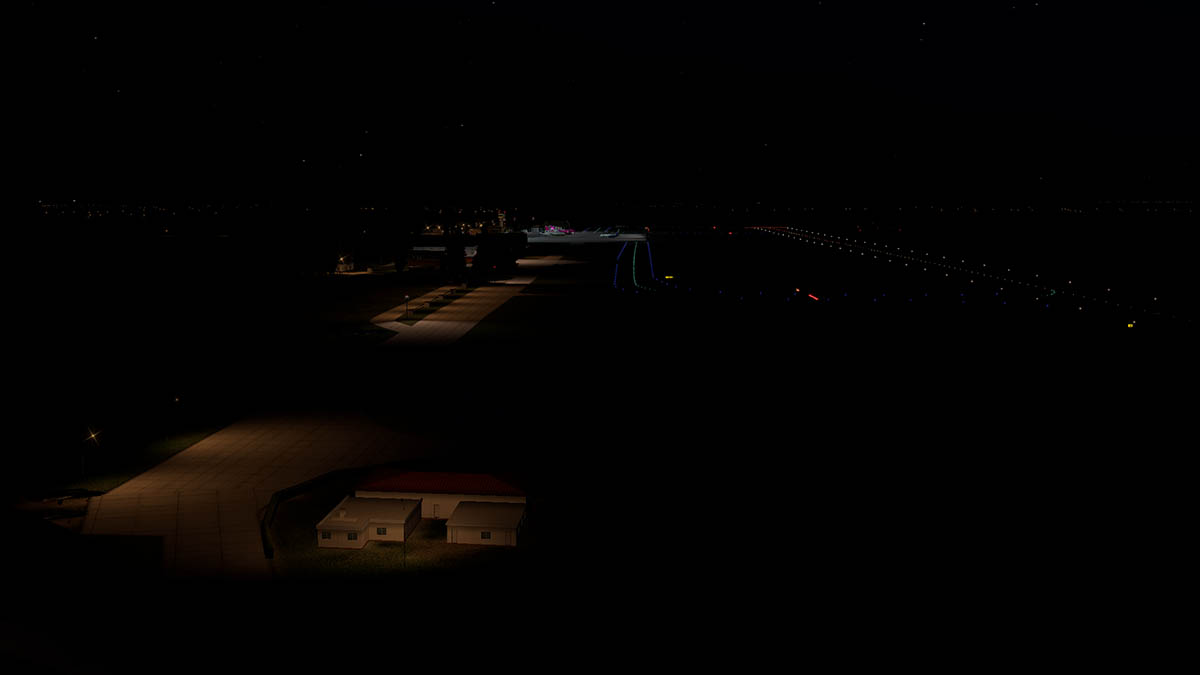
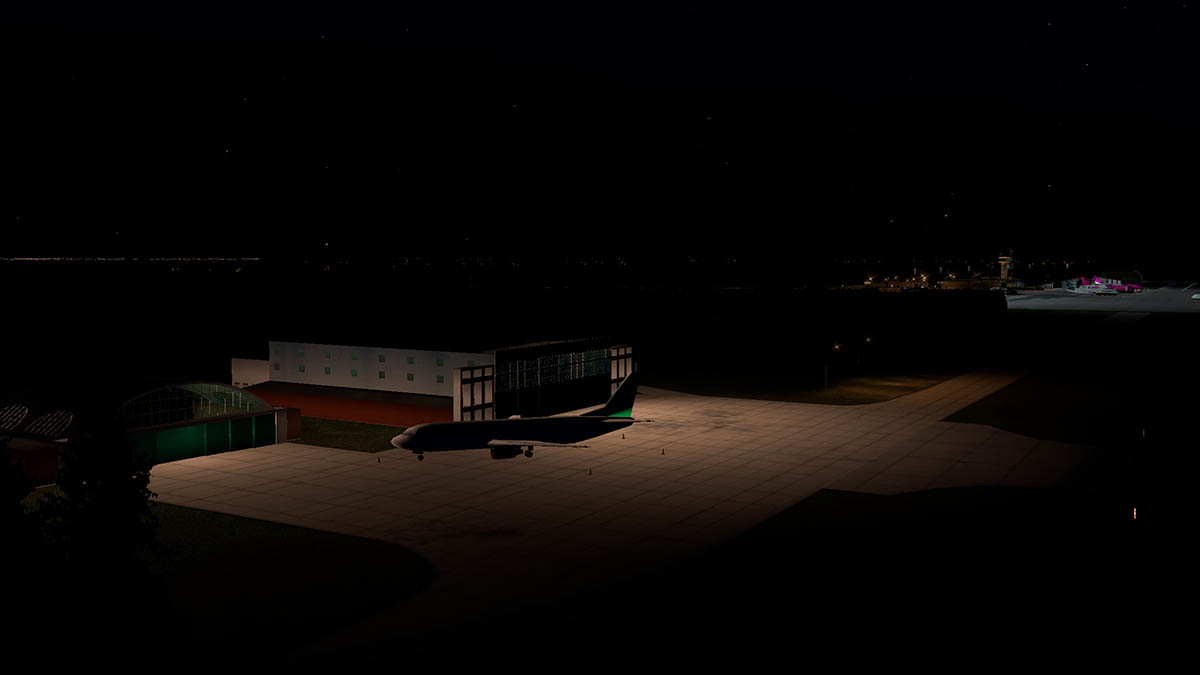
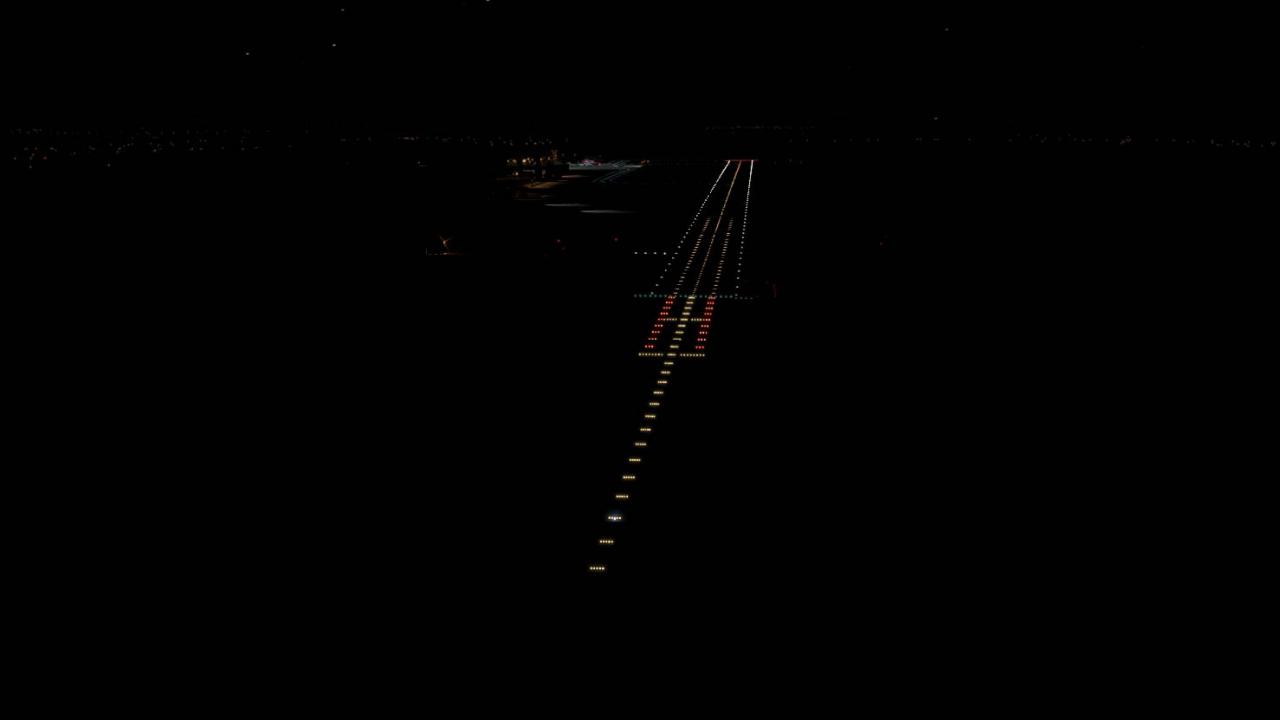
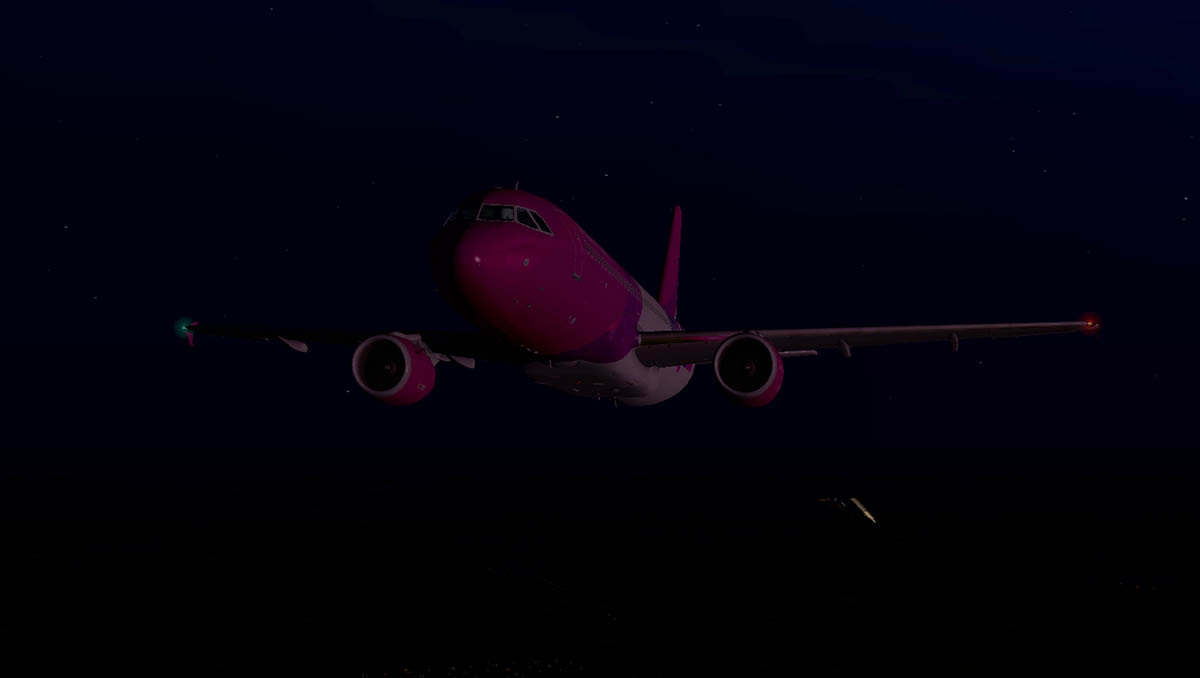
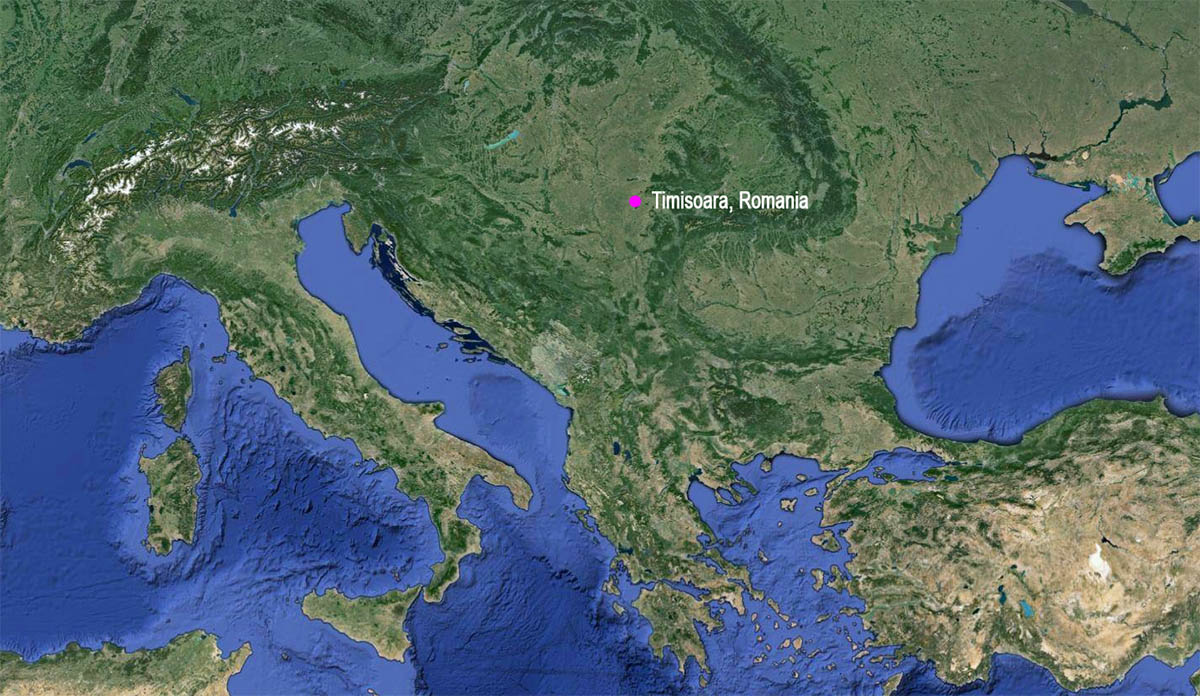
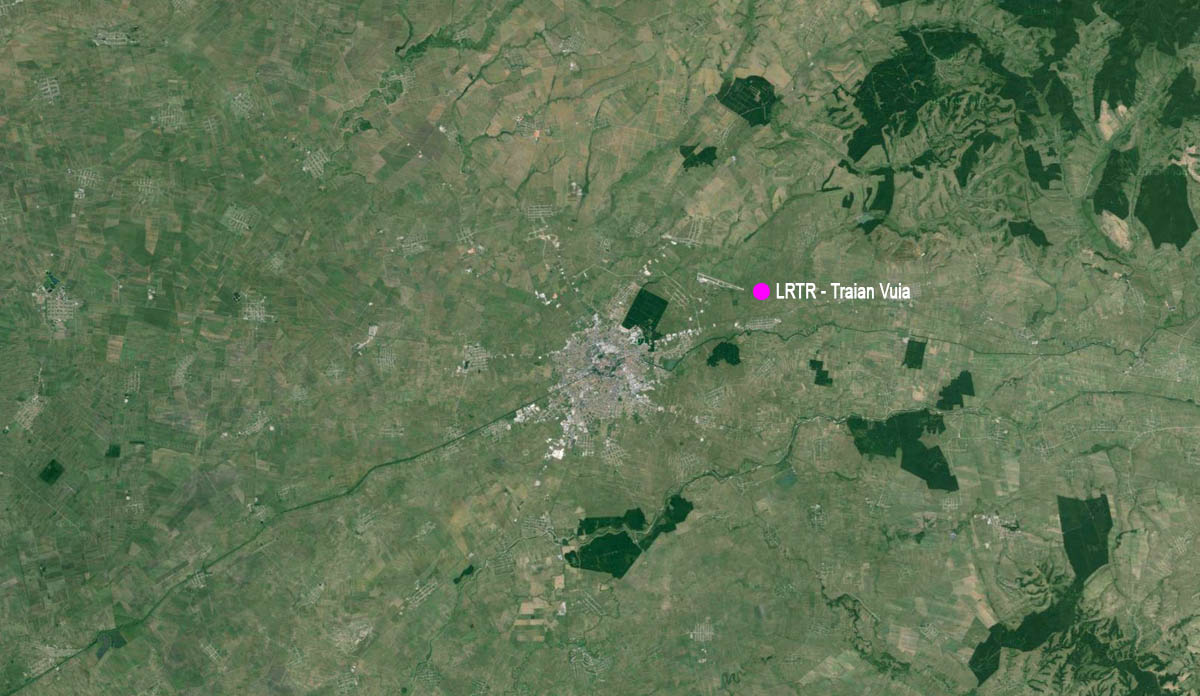
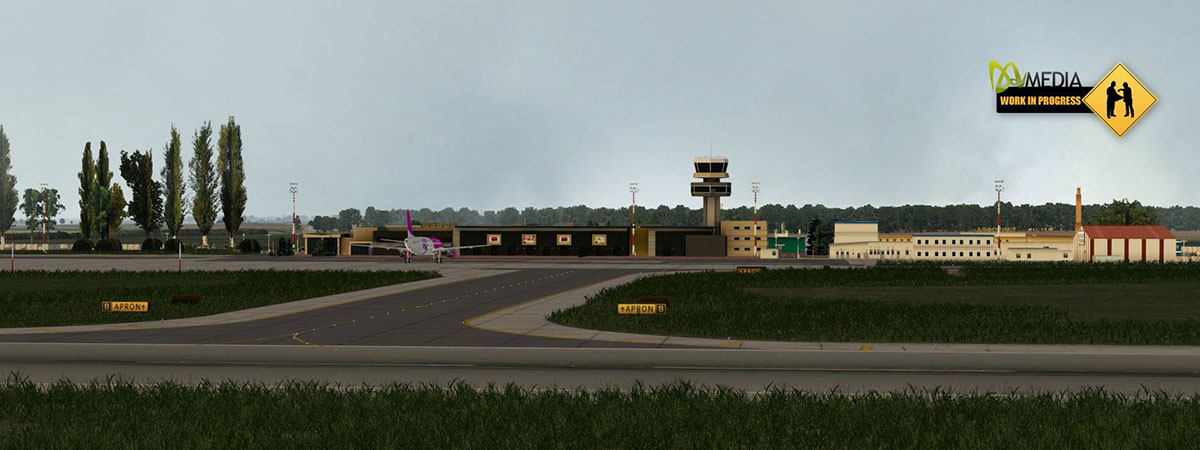
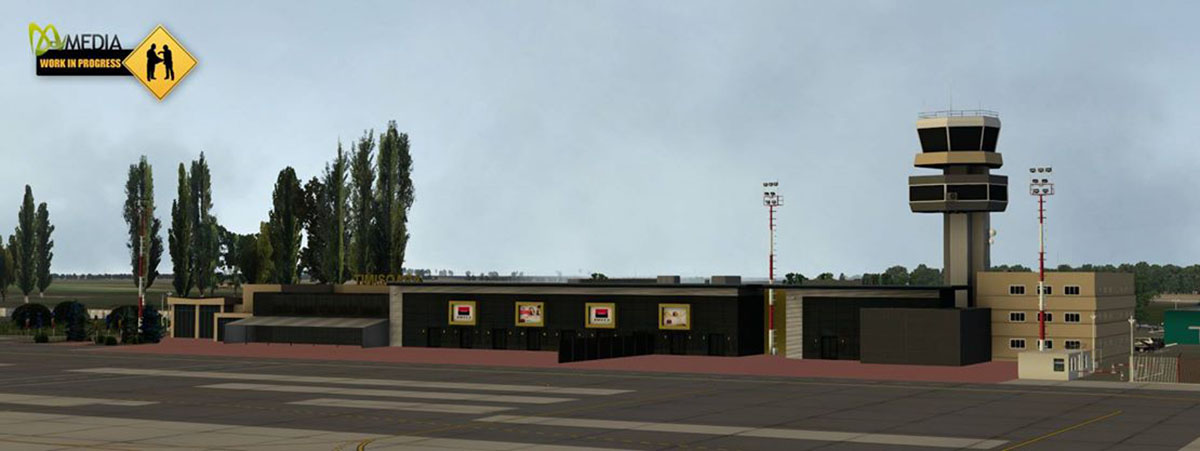
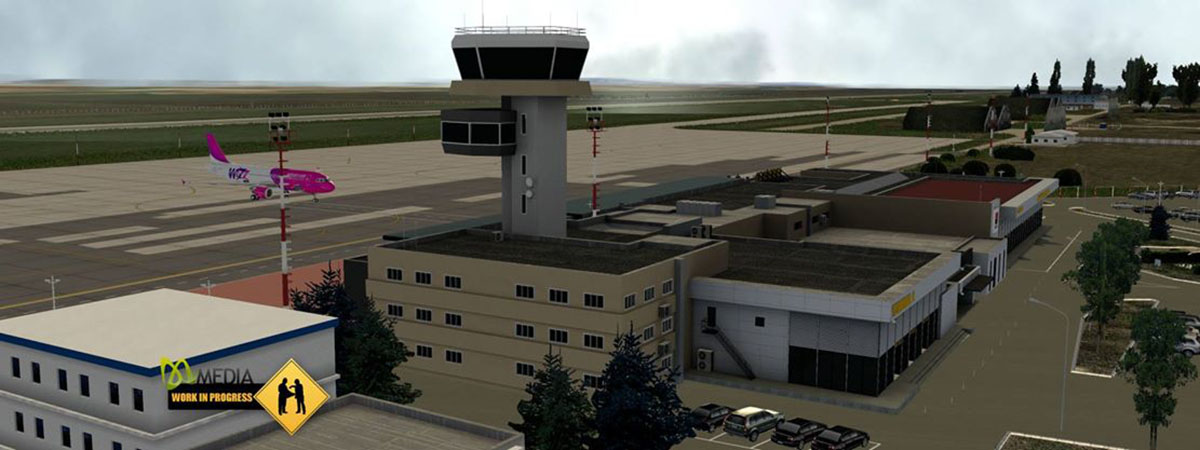
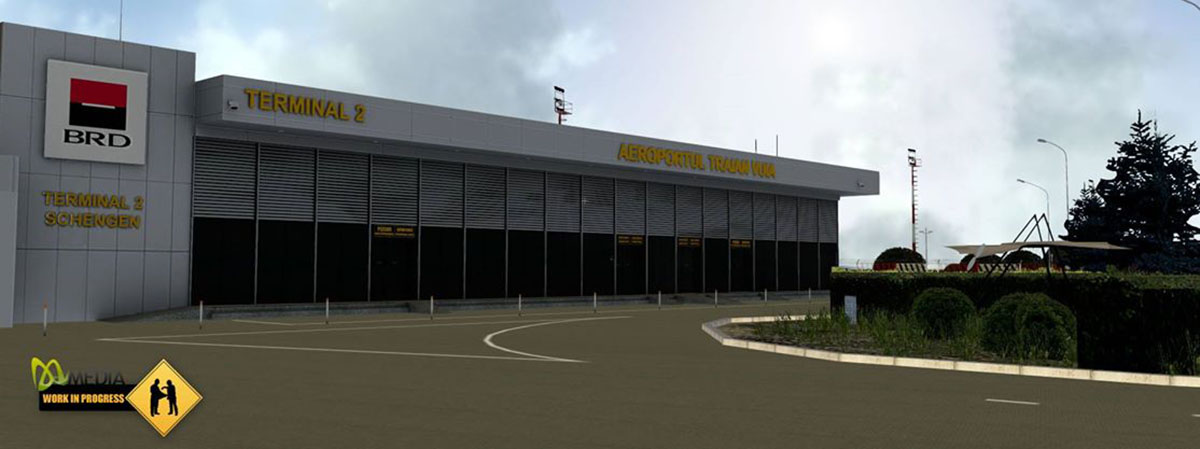
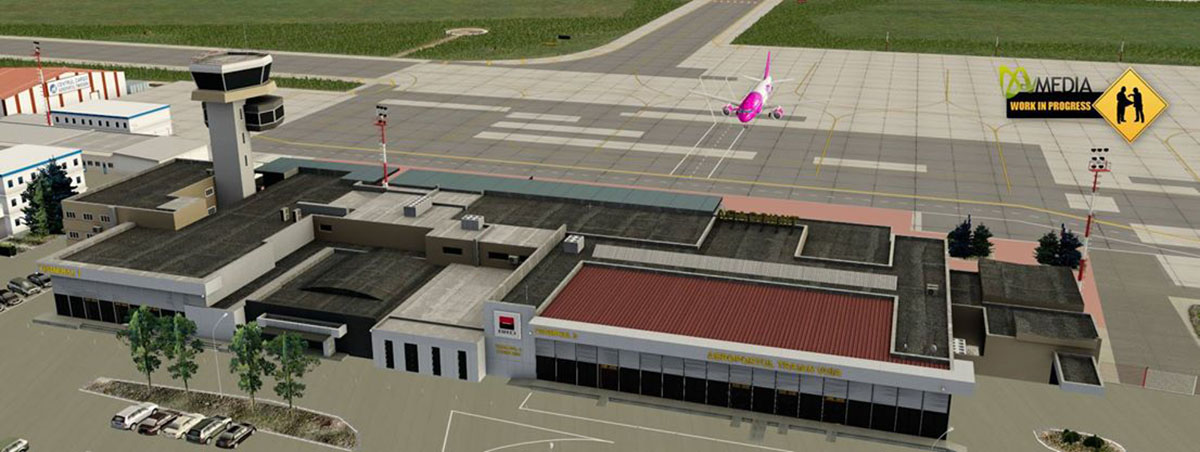
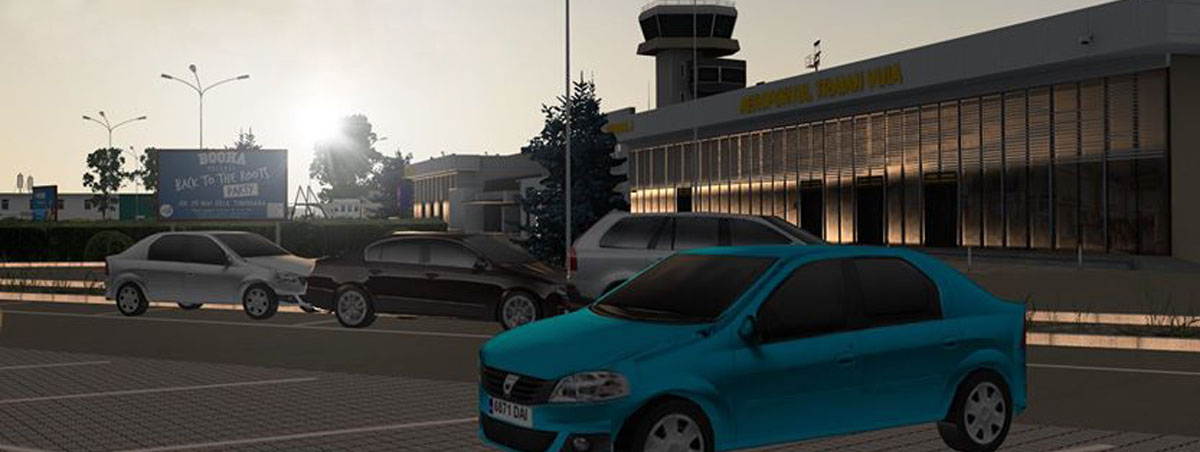
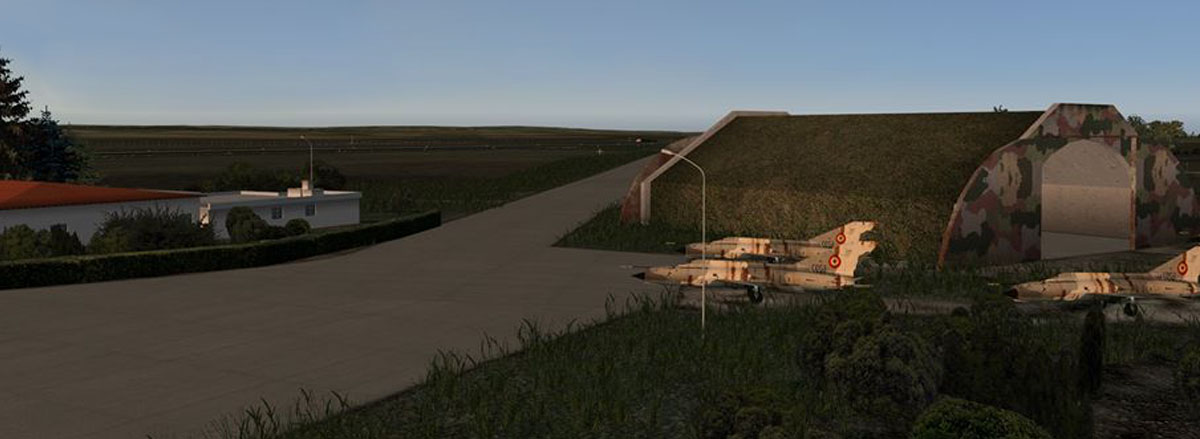
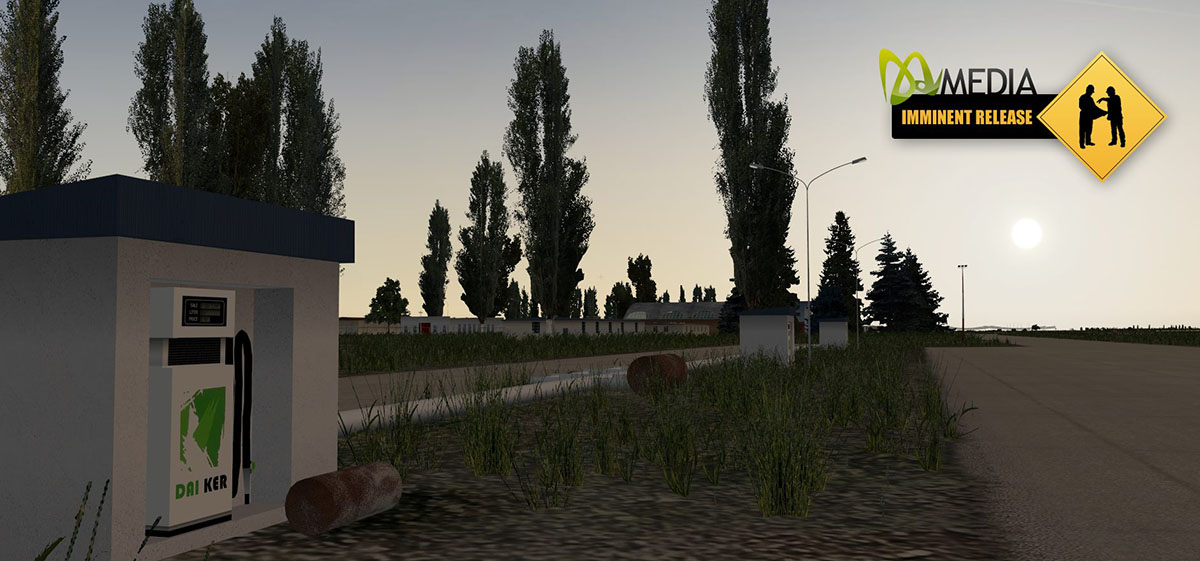
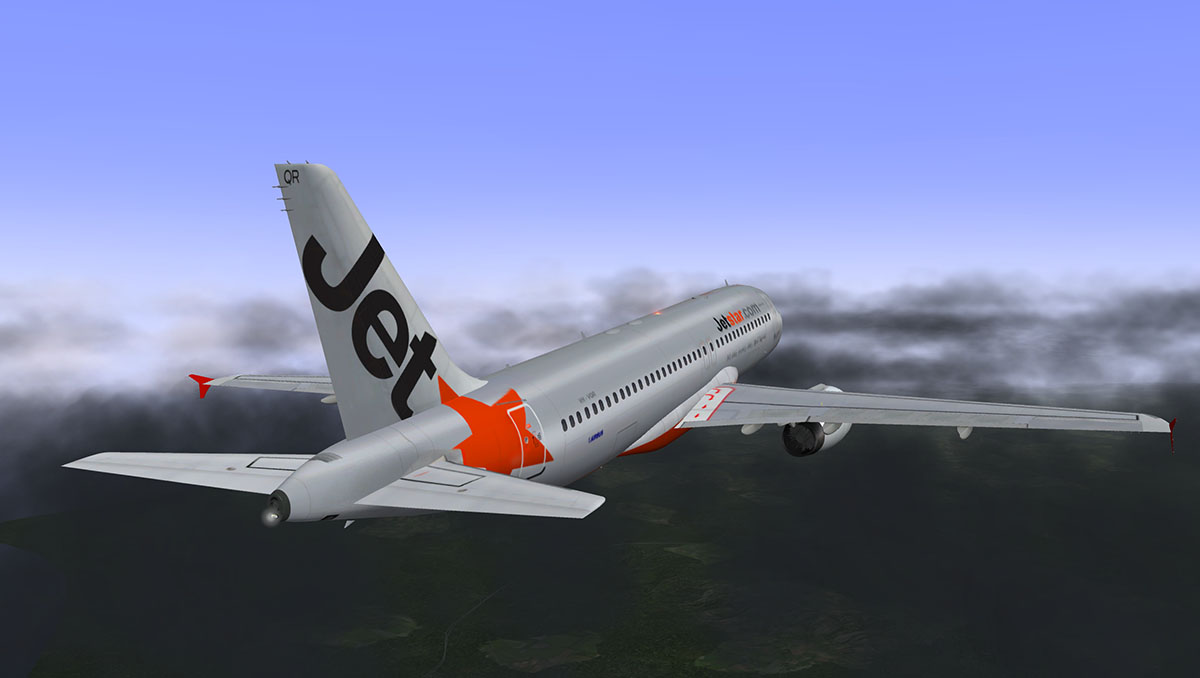
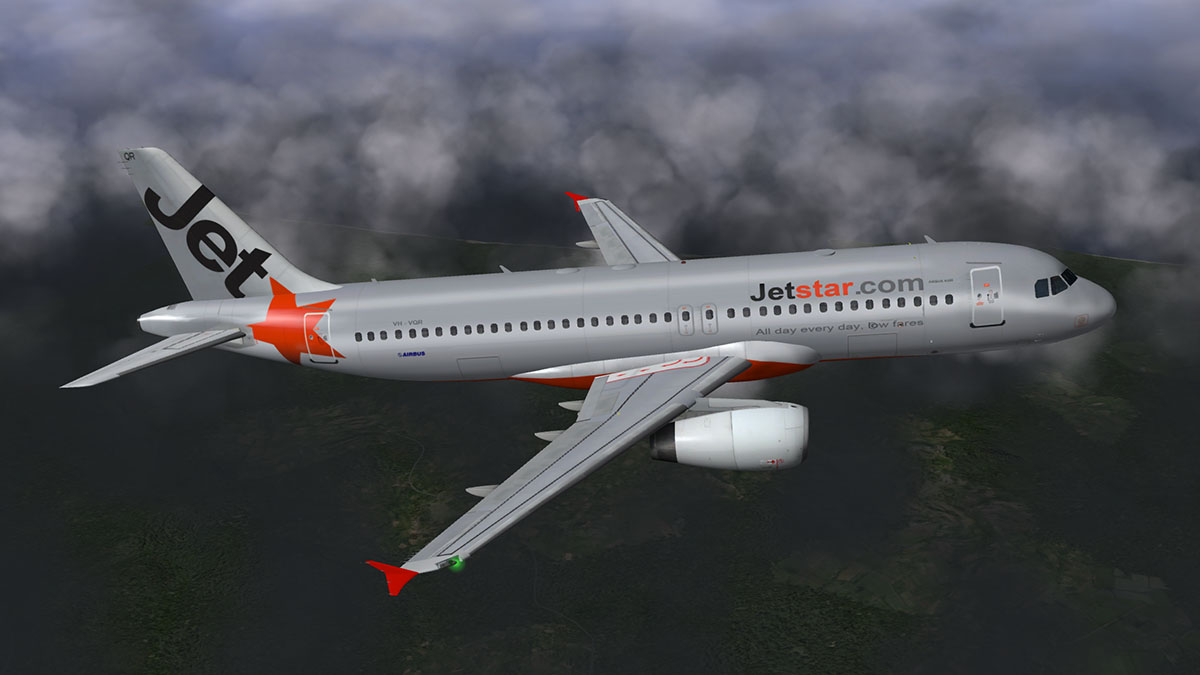
Scenery Review : LRTR - Timișoara "Traian Vuia" International, Romania by DAI-Media Route : LIPZ - Venice Tessera Marco Polo (venezia) to LRTR - Timișoara Another release from DAI-Media in their collection of Romanian airports is LRTR at Timișoara (IATA: TSR, ICAO: LRTR) . Traian Vuia International is the third largest Romanian airport in terms of air traffic, and the main air transportation hub for the western part of Romania. Timișoara's first airport (Timișoara Communal Airport) was built a few kilometers away from the current airport's position, in the village of Moșnița Veche. The first airplane landed there on 17 July 1935. And the airport was then rebuilt in its current position in the 1960s and then became known as Giarmata Airport. The domestic flights terminal was opened in 1964 and In 1980, it received International Airport status with flights to Frankfurt, New York, Chicago. On February 6th 2003, the airport found its spiritual identity in the person of the world aeronautics pioneer - Traian Vuia and the airport was then named after the pioneer who was born in Banat. Then on May 19th the transit terminal was also inaugurated and the airport become an air hub, linking important cities in Romania with cities in Italy and Germany. Traian Vuia International has ILS CAT-IIIa status. Giarmata Airport was home to the Romanian Air Force RoAF 93rd Air Base, founded in 1953. The 93rd Air Base was disbanded in August 2004 with the MiG-21 Lancers and IAR-330 moving to Câmpia Turzii for reassignment to 71st Air Base. The air base also operated the MiG-23 Flogger, which was retired in early 2002. Over 30 MiG-23s are in storage at Timișoara Airport. Today the military section of the airport is an annex of the 71st Air Base and operates the 714th Transport Helicopter Squadron, with the IAR 330 in service. First Impressions of LRTR - Traian Vuia Hungarian Wizz Air dominates "Traian Vuia" as an operating base and as headquarters for Carpatair. So it was only fitting to use their Airbus A320 to fly into LRTR... You don't have much choice on aircraft with Wizz Air as they only fly one type of equipment and they are all A320-232's with another 37 on order, an order for 26 A321-200's will expand the fleet out into the future. 11/29 3,500m (11,483ft) Asphalt - Elev 348ft Departure was from LIPZ runway 22L and then a reverse course East towards Slovenia and crossing the coast just south of Trieste. From there it was directly to Zagreb, flightlevel was FL320. There are not very many fixes or Nav-Aids surrounding LRTR, certainly no runway approach line of fixes to guide you in. There is an ILS (Cat-III) on runway 29 (109.30mhz), but there are notes in the manual to add in RWY11. The odd thing the ILS for RWY11 was in there anyway? So flying in with a programmable FMGS was going to be a little tricky, but I found an excellent STAR arrival in MAVIT (1A) and the problem was solved. MAVIT (1A) points you directly at the airport before starting a left hand circuit at GOVOX back to RWY29. At the point at the right turn at GOVOX I found the airport hard to position from the air, It was just not there? A couple of notes is required in that 1) you need the "Runways Follow Terrain Contours" switched on with LRTR, unless you will get the plateau effect with the runway situated high on top of a flat plateau. (I call it the "Lost World" look)... and 2) I had to fine adjust the alignment of the Runway 29 to the scenery in X-Plane's edit mode on the Local Map. After completing the required 90º two turns I was on a direct approach to RWY29, and at 2200ft (I make very low approaches, with included Apt Elev 348ft), LRTR was still a darker smudge on the horizon than a full airport of buildings and distinct objects. You will find that most of the terminal buildings are obscured by trees and the Military Zone facing the west approach means they don't stand out. Over the threshold and the runway is now very distinct and well detailed. One of the specialities of DAI-Media is their excellent ground textures, and Timișoara does not disappoint. The use of textures and photo underlay is excellent in creating a perfect realism from the air and from the ground, and all areas are blended perfectly into the surrounding X-Plane default textures. No big large square flat ugly photo plates here. Once on the runway the grass is well laid out and the surrounding trees and bushes complete the whole immersion effect. Runway and taxiway textures are also first rate with excellent taxiway signage and detailing. I found the ramp lineage excellent in quality but slightly confusing in how to park the aircraft? It looked like a nose in parking, but the static aircraft where situated nose out?, so i did a uturn and parked in the line up. The ramp was excellent, with good static aircraft a ramp detailing in vehicles and equipment, nothing was overloaded and it all felt realistic, only the static aircraft textures were slightly more softer and more poorer in lower texture settings. Sitting in the cockpit and resetting the aircraft ready for the next service to LIRF (Rome) it looked very realistic out of the windows, but there is no ground traffic animation. LRTR - "Traian Vuia" International The earlier views are deceiving because there is a quite a complex and detailed scenery layout when you get in closer. Everything is very well laid out and perfectly formed from the runway to the concrete taxiways. The ramp area is very large with plenty of space and as noted very well marked out with excellent linage. There are no blank areas or areas that have been just thinly designed, the whole scenery is very well detailed and full of objects and buildings. Terminal Area The central terminal area is dominated by two terminals and both very modern in design, Terminal one has the well crafted Control Tower built above it. Annoyingly the "Tower" view is down low on the ramp?... a minor oversight. The metallic blinds on the terminals do flash noisily as you move around, but that is caused by the fine detail. But you simply can't fault the detailing in the area. Everything is close to perfection and with so much detailing that every angle is covered, from the carparking to the static cars to small signs, the excellent fencing and lighting towers and the perfect road and carparking linage. Perfectly formed also is the green areas with trees and bushes which complete the full picture. The ramp side of the terminals are much darker in appearance and are harder to get as much light into as on the sunny southern side. Airport signage is outstanding, really well done and nothing in detail was spared. Cargo warehouse is small but very well done. Outside of the central area there is a mixture of modern office and administration buildings with some old Romanian buildings that give the area an eastern European look. The texture quality however is a slight mixture up close, with some perfect and some textures slightly poor in resolution. The airport however is away from any major complex default scenery (Timișoara is well to the south-west of the airport) that can hurt your framerate. So that means you can run your texture settings quite high, you don't need to be extreme but any settings in the middle of the range will give you the difference in texture quality. Overall you just can't fault the detailing here. On the western boundary it becomes a little more spacious, with fewer smaller buildings and one large military hangar. The taxiway work is again excellent in design and lineage. Note the excellent fencing. To the east of the main terminal area are the old military sites. From above they are hard to make out (as they should be), but at ground level the old hangars and stored Mig warplanes are well sited and very well done. The groundmanship of the foliage is really excellent. Note... the old fuel storage tanks behind the hangars. Middle between the main ramp and the military sites is are maintenance hangars for Carpatair. There is an older brick hangar and a newer larger steel and glass hangar. The detailing is again excellent and all hangars come with a special feature. Between certain hours of the day or night, the doors will open and close. The times of operation are noted in the manual. Night-Lighting Night-lighting with HDR on is also a highlight. There are great contrasts in the lighting between the working areas like on the ramps and the other public areas. The lighting is highly detailed and very well laid out. The softer arrival side lighting to the terminals is very good with well lit and with highly realistic signage, all roads are lit and lighting throws are very good. The terminals are well lit and with very subtle inside scenes and the internal detail is more noticeable in the darkened control tower. Away from the terminal areas the lighting and good spot lighting is up the same standard. Night Departure With the LRTR - LIRF service loaded and the departure time close it was time to get clearance to leave. With the excellent ramp lighting you are not stuttering around in the dark. Lines with taxiway signage and lighting is perfect in finding your way around the airport and easily finding the runway. There is a feature that shows you the red stop lights at the entrance to the runway. When you have ATC clearance the red lights will go out allowing you to pass... Clever. Runway lighting is the best in the class, as all lighting is perfectly realised. As this is a CAT-III there is an approach lighting system (ALS) with sequenced flashing - RAIL lights as well. Which will be good with fog bound landings. Operators and Routes Passenger Fly Romania operated by Ten Airways : Bucharest, Verona Lufthansa Regional operated by Lufthansa CityLine : Munich TAROM : Bucharest Wizz Air : Barcelona, Beauvais, Bergamo, Bologna, Dortmund, London-Luton, Madrid, Rome-Ciampino, Treviso, Valencia. As noted WIZZ Air dominate the schedules, but charter airlines are quite frequent during the summer. Aegean Airlines - Seasonal charter: Heraklion Air Bucharest - Seasonal charter: Antalya, Rhodes (begins 17 June 2014) Freebird Airlines - Seasonal charter: Antalya (begins 12 June 2014) Tunisair - Seasonal charter: Tunis Tarom - Seasonal charter: Skiathos Cargo ABC Air Hungary : Budapest Farnair Hungary : Budapest, Vienna, Zagreb TAROM Cargo : Bucharest-Henri Coandă UPS Airlines operated by Farnair Switzerland : Cologne/Bonn, Sofia Like LRSB Sibiu you can get quite a lot of work flying regularly between Italy and Germany, and combining LRSB and LRTR with these destinations it is very interesting point to point flying. Summary At first glance there seems to be not a lot at LRTR - Traian Vuia, but that is very deceiving really. This is first rate scenery and perfectly done. From landing to departure you are well within this scenery and it is a great destination. Combined with other DAI-Media sceneries of LRSB Sibiu and LROP (Otopeni), Bucharest you can build up a very nice little regional airport network. Great small features in the opening and closing of hangar doors and end of runway stop lighting are clever and interesting... some ground vehicle animation would be nice though and the tower view position is annoying. Lighting all round is exceptional. DAI-Media's sceneries are mostly medium to large airports and their is one I use almost all the time and are all of a high quality. Ground textures are always of a very high standard and so is the integration into the surrounding X-Plane countryside... Here again LRTR is of no exception with the same quality and cost that you have come to expect from this excellent scenery designer house. So from DAI-Media here is another great airport in LRTR - Traian Vuia which is also very good solid extremely well detailed scenery that is great to go to at anytime as a destination. Yes! the LRTR - Traian Vuia is now Available from DAI-Media : LRTR - Traian Vuia Price is Euro 17.00 € (US$23.00 - current conversion 17th June 14) Installation : Download is 165.70mb that is unzipped into your "Custom Scenery" folder (178.70mb) with a 3 page "read me" manual. Charts are noted but you have to join (and pay) to acquire them. Requirements: - Software platform: X-Plane 10.25 - Specification: Same like X-Plane 10.25, runways follow contours - IVAO / VATSIM, compatible. Review by Stephen Dutton 17th June 2014 ©copyright X-Plane Reviews 2014 Review System Specifications: Computer System: - 2.66 Ghz Intel Core i5 iMac 27” - 6 Gb 1067 Mhz DDR3 - ATI Radeon HD 4850 512mb Software: - Mac OS Mavericks 10.9 - X-Plane 10 Global ver 10.25 (final) Addons - Saitek x52 Pro system Joystick and Throttle Aircraft - JARDesign Airbus-A320neo - X-Plane.OrgStore $59.95 Scenery - ISD Project - LIPZ Venice Tessera 2010. Geppetto
-
Aircraft Announcement : Cessna CT206H by Carenado Carenado has announced their next release for X-Plane in the CT206H which is also known as the Stationair. This is a extremely popular general aviation aircraft. it was named the “Stationair”, which a contraction of “Station Wagon of the Air”, which is a good description of the aircraft's intended role. The panel and the interior is up to the usual very high standards of quality we have come to expect from Carenado. Carenado usually announce their new aircraft about a week or so from release... Developer site : Carenado Stephen Dutton 13th June 2014 Copyright©2014 : X-Plane Reviews All images are courtesy of Carenado©
-
Simulation Matters : Do you check yourself? The heart of simulation is for pilots to practise and analyse their flying skills without the absorbent costs of flying real world aircraft. In no way can simulation replace real world flying in matters of experience and knowledge, but it can fine tune skills if you have a fairly decent desktop setup with a yoke and rudder system. It also allows for you to get deeper into working systems better. The newly updated v10.30 GARMIN GNS430/530 is a godsend here for pilots in finally giving them a real world system to use in a simulation world and is a huge plus for X-Plane in the practise and training of flying General Aviation (GA) aircraft. In the last few years X-Plane has also jumped considerably forward for real world pilots by having the Carenado range of GA's available for purchase. I do not doubt for one moment that there are other good GA's out there for practise and training, but Carenado's range and most of all the quality to mirror the same flying aspects and abilities of the most popular GA aircraft, in that if you own a real GA aircraft, there is a very good chance it will be available in Carenado's range for you to practise with and fly. Available to you is most aircraft in most classes from light single engined aircraft to heavy single engined aircraft, Light twins and now lately heavier twins, and even coming soon light jets. But it is the ability to work out routes and gather information and even fly to test them out in simulation that can give you more time and readiness in the cockpit. In other words you can create flightplans and then fly the route and be aware of the environments that you will encounter on departure or arrival of your flight that will allow you to be more prepared when faced with the real experience. Which brings up to the point of "Do you check yourself". In the real world of professional aviation it is constant round of "checks" that keep you in cockpit. There has been some debate that with the more automated flying has become then the basic standards of flying are not being adhere to or are being lost in the procedures and manuals of data entry. Two incidents that have highlighted this issue is the loss of Air France Flight 447 and the bizarre landing of the Boeing 777 Asiana Airlines Flight 214 at San Francisco... and maybe yet be the cause of the lost Malaysian Airlines MH370. It came to light that the captain of the lost MH370 had a very good simulation setup at home to test his skills even when he was not in the cockpit of the real airliner, (The theory that he planned the loss of the aircraft on his simulation setup is a very good one, but I doubt it as the records would have shown up to the investigators of when and were he flew the simulator even if he had wiped his hard drive, It was also noted the simulator was inoperable at the time of the incident). So for many real world pilots is that simulation is a tool of the trade to help them with their skills and airmanship knowledge. In fact most of their time on their simulators would be used practising those skills and fine tuning their abilities while dreaming and flying a Boeing 777 for fun. But for many of us, real world flying is not possible though age, cost or in many cases a disability. For them or us simulation opens up a world of complete freedom to fly almost anything we want to, and most of us do that. Again over the last few years simulation has reached bounds in systems and integration that was only dreamed of only half a decade ago. And that to use the level of equipment we have to now understand and learn skills from the manuals of real world airliners and GA aircraft. But the question remains in "how good are you really?" Many simulation users will note that they can fly anything, and they probably can. Jumping from a huge heavy to a GA with an aplomb of skill and assurance... but how often do you really practise? If you note the way real world pilots fly in that they do stand to stay on one or two types of equipment for long periods, mostly for years. So should you do the same in simulation? Even more than that do you regularly just do circuits? ....again just like the real pilots do. It is pressured within the aviation industry that pilots should do a least a few circuits every few months at least if they are not frequent flyers. Tone up the skills and get familiar with the cockpit again. So should simulation fliers do the same. Many certainly do, but I have learnt that it does certainly help with your skills. For one I have about ten aircraft that I constantly update my skills on and two that I use for circuits and general flying skills. In other words I "Check" myself about once a month. Usually I set aside a morning and just fly, by doing circuits and short consistent flights to set destinations and return (usually from KLAL - Lakeland). Boring! not really because the aim is to focus on your skills and constantly refine them. It is also a very good barometer on how the simulator itself is doing, because with any version updates you will find that some of the basic parameters of the simulator have changed or moved (usually for the better). But if you are not aware of the changes would make you wonder if your flying is not doing what it was doing only months before... In other words the way you interact with the simulator is as important as the way you fly. That is flying GA's on a basic flying level, just flying circuits. Then suddenly you realise that those refined skills are making their way into you whole flying sensory and skill base. At various points in time you realise you are quite good at this, in that "was a nice takeoff" or that "landing was spot on the money". And you can easily repeat the situation again and again without any serious effort. Flying heavier aircraft usually brings in a very different aspect. The systems are deep and the aircraft's profiles in weights and procedures and most of all the flight profile in takeoff, climb, step and descent. To get these parameters working and programming the FMS to the point of perfection takes time and skill. And if you don't keep yourself fresh on the aircraft your skills will deteriorate. And flying these heavies the same way all the time is not the answer? "Well isn't that a bit of a strange comment after noting you should practise often?" No, because flying often will just put you into a pattern that means you just go through the same motions and set up the aircraft the same way for the same result. In flying heavies they all require different parameters to achieve different goals. It is about knowing how the aircraft will react to the changes that makes them interesting and that is your skill base. So I "check" myself on my certain heavies at certain periods of time to make sure my skill base does not deteriorate. I flew one after not flying it for over a year an a half and found I was completely well off my usual skill base on that aircraft, it took me a fortnight of reusing the aircraft to get that skill base back to the level I had before. So yes you can lose your sharper skills if you don't revisit certain cockpits often. Helicopters are far worse as you are constantly always looking to fine tune those balance skills, so your practise levels in rotary craft will always be higher than aircraft. This summary came about because I did my regular "check" on Peter's A388, and flew the aircraft LH from Frankfurt (EDDF) to San Fransisco (KSFO). I will note I passed my "check" and was very pleased with myself, and was reacquainted with one of the great aircraft in X-Plane. But the inherent skill was still needed to complete the service competently. But in every point of the flight I made sure to learn and understand even more aspects of how the aircraft operates and at this level of service. So I take my simulation seriously, that is my fun. And yes I do also fly for fun as well in that many times I just fly and don't come even come close to the actual performance and tight boundaries that are required for real world aviation. You can do that as well in simulation. But nothing comes really close to getting the numbers and flight profiles just right, and getting it down right down to the correct taxi speed and the tight times of real world schedules. Fly sometimes five or six hard sectors a day like the real fly boys and girls do, and then get it just right at ever level. It is very exhausting and tiring flying.... But that also is still the best high of all in doing really good simulation. Stephen Dutton 12th June 2014 Copyright©2014: X-Plane Reviews
-
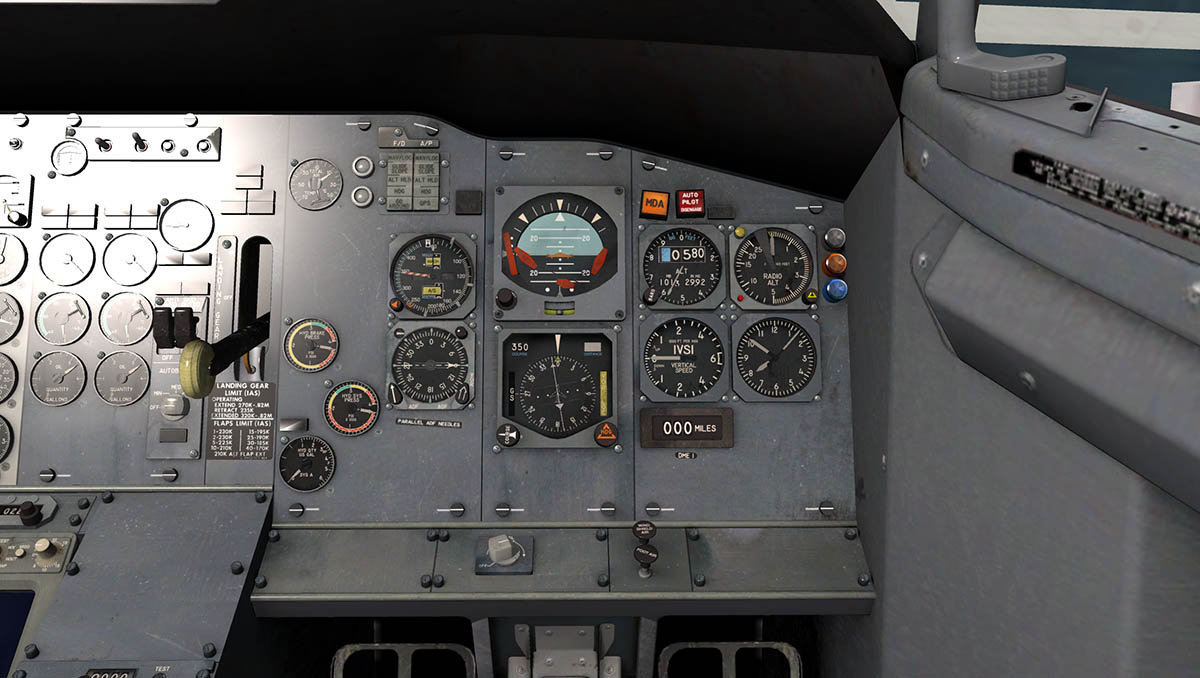
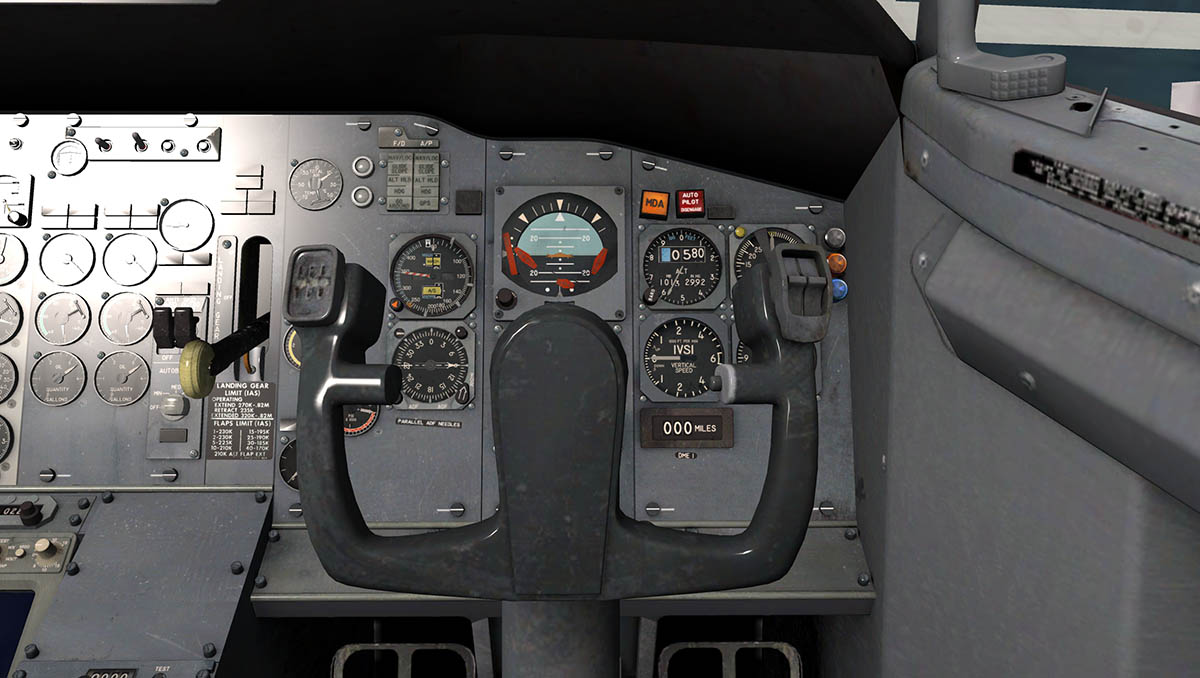
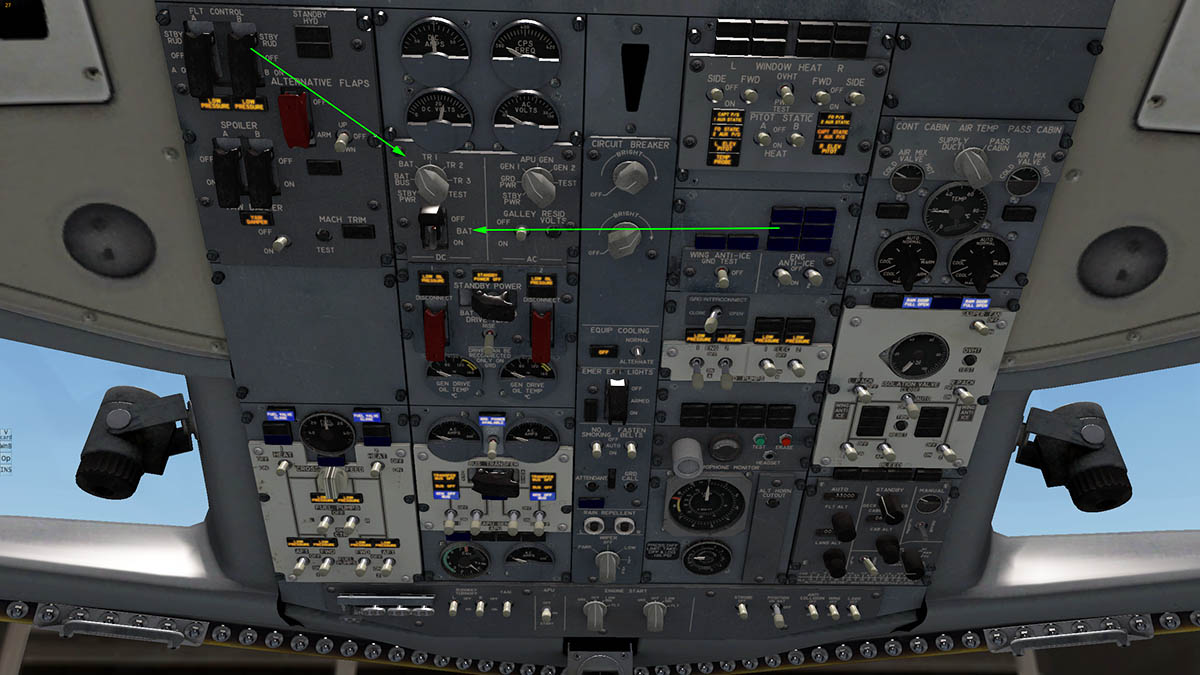
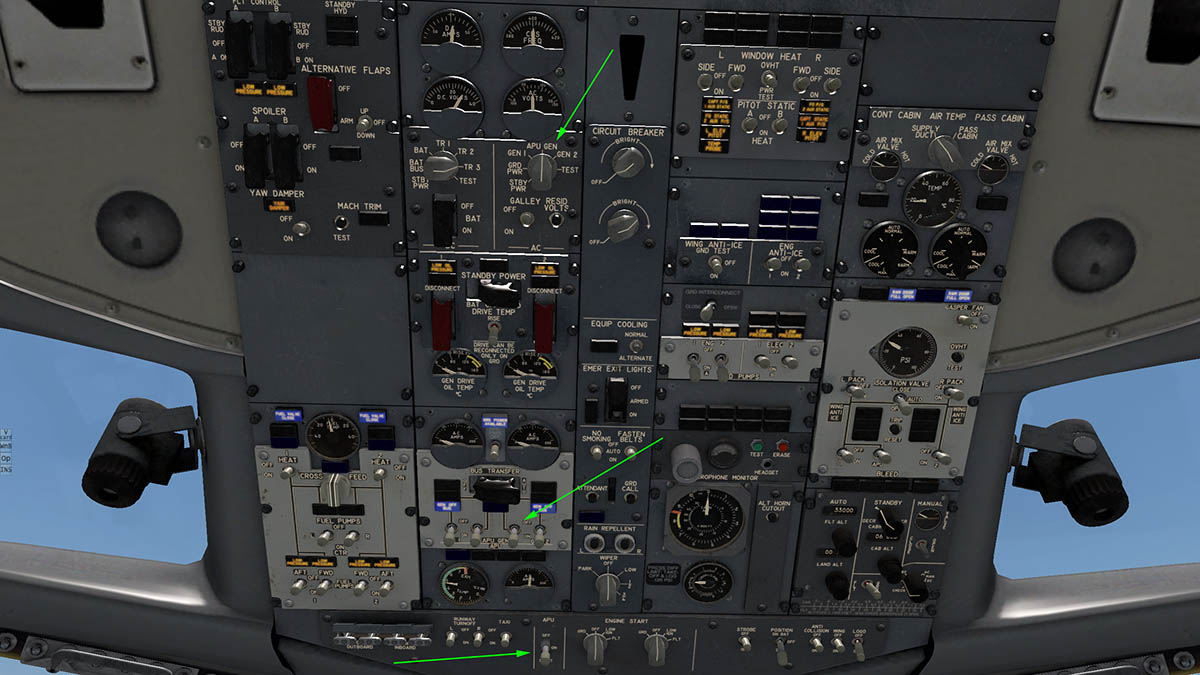
Aircraft Thoughts and Opinions: FlyJSim 732 TwinJet
Stephen replied to Joe's topic in Airliners Reviews
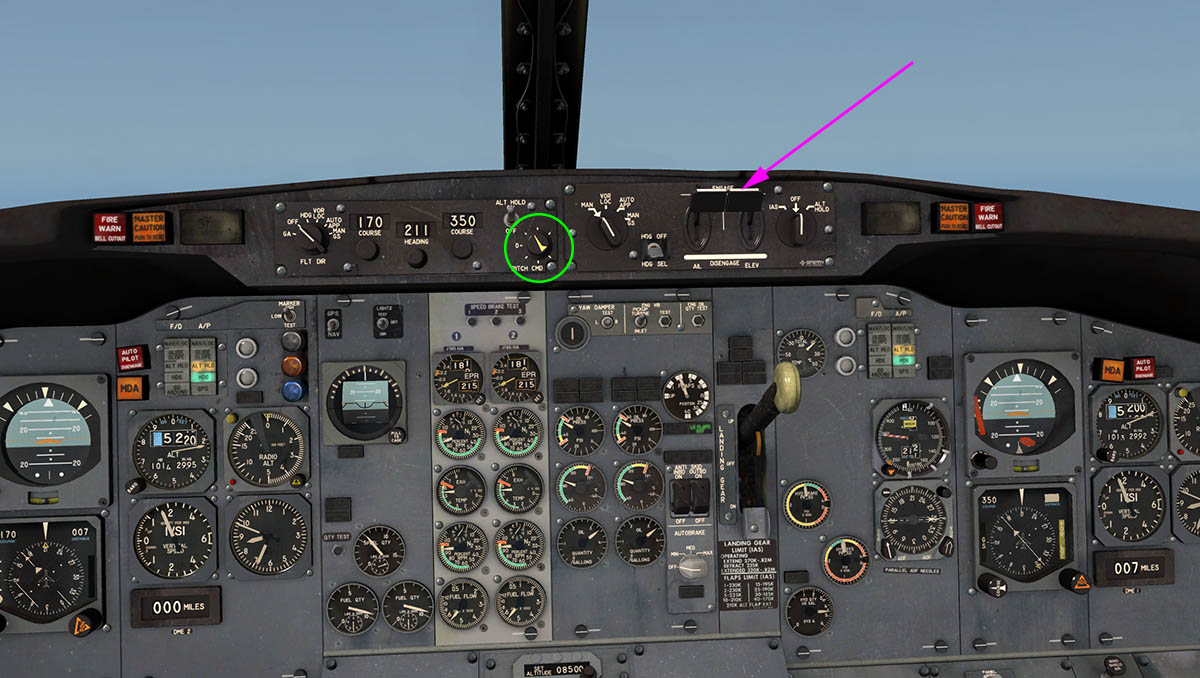
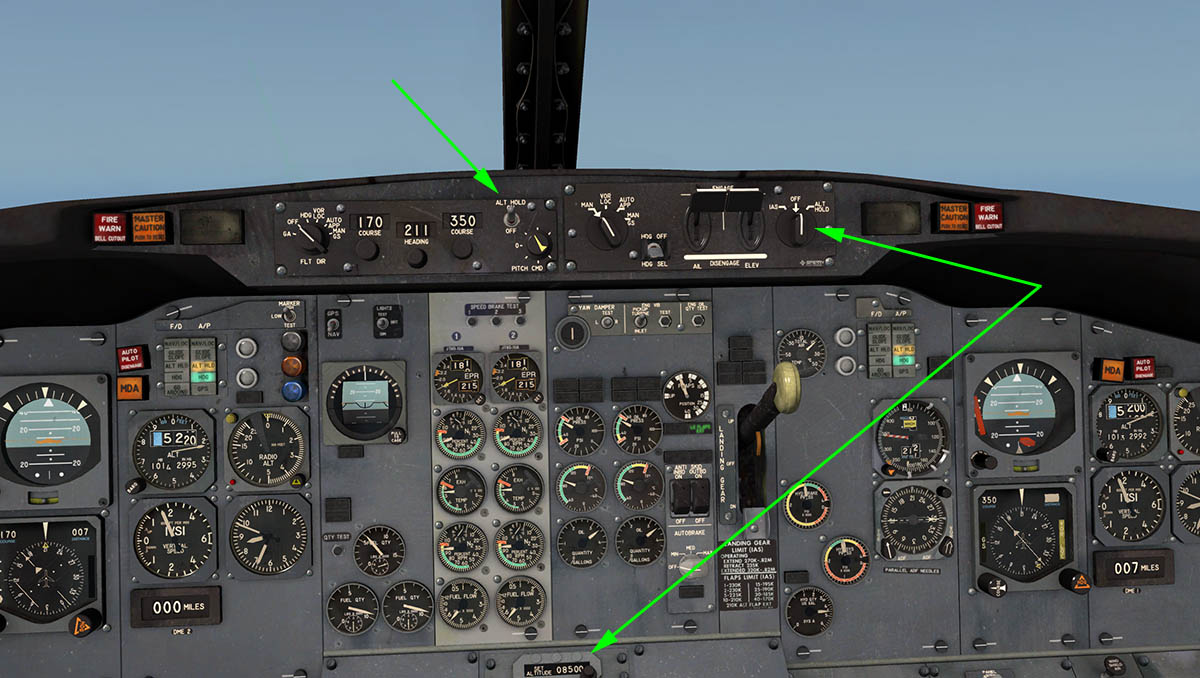
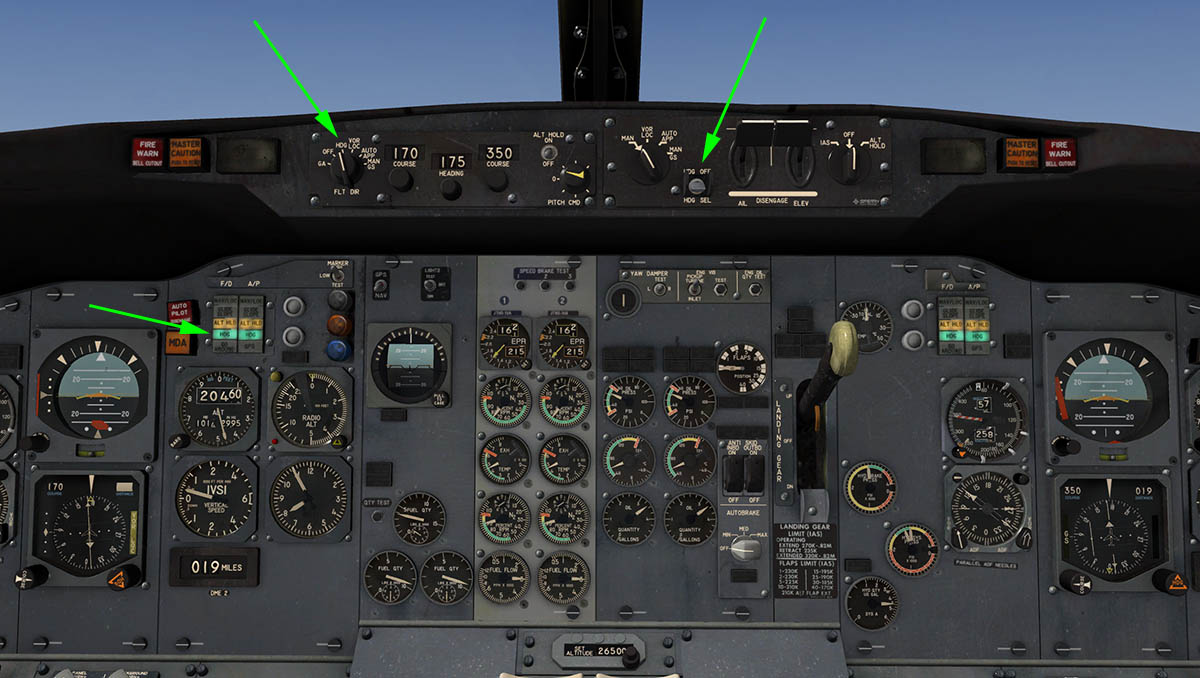
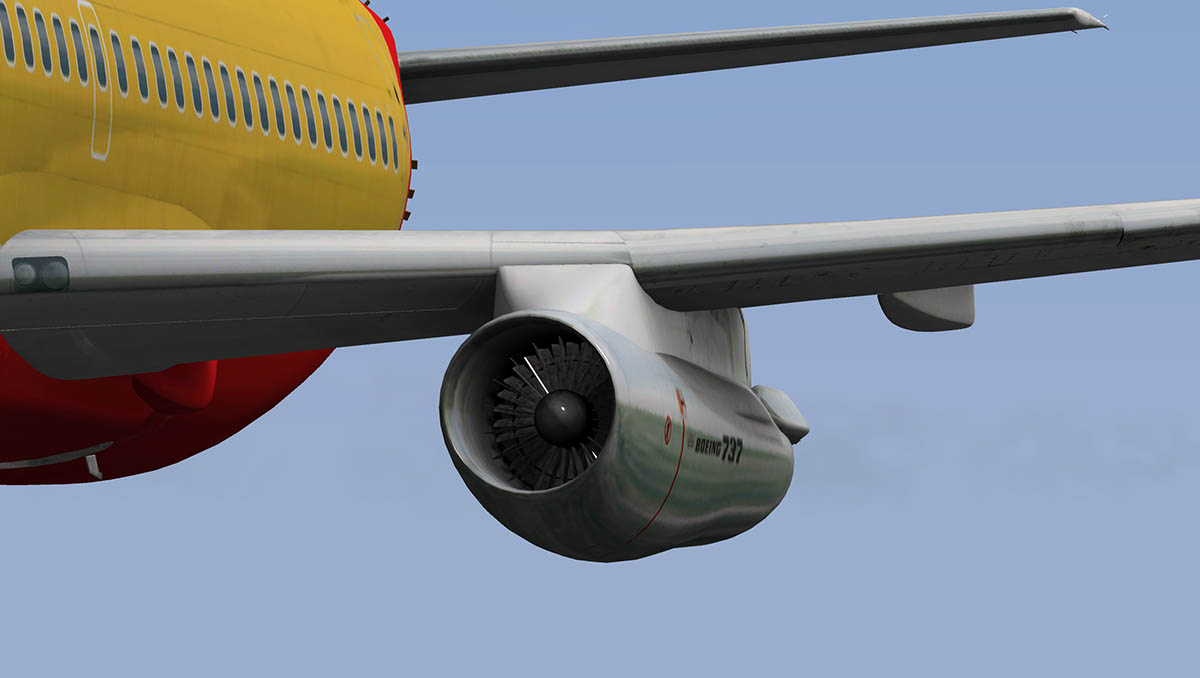
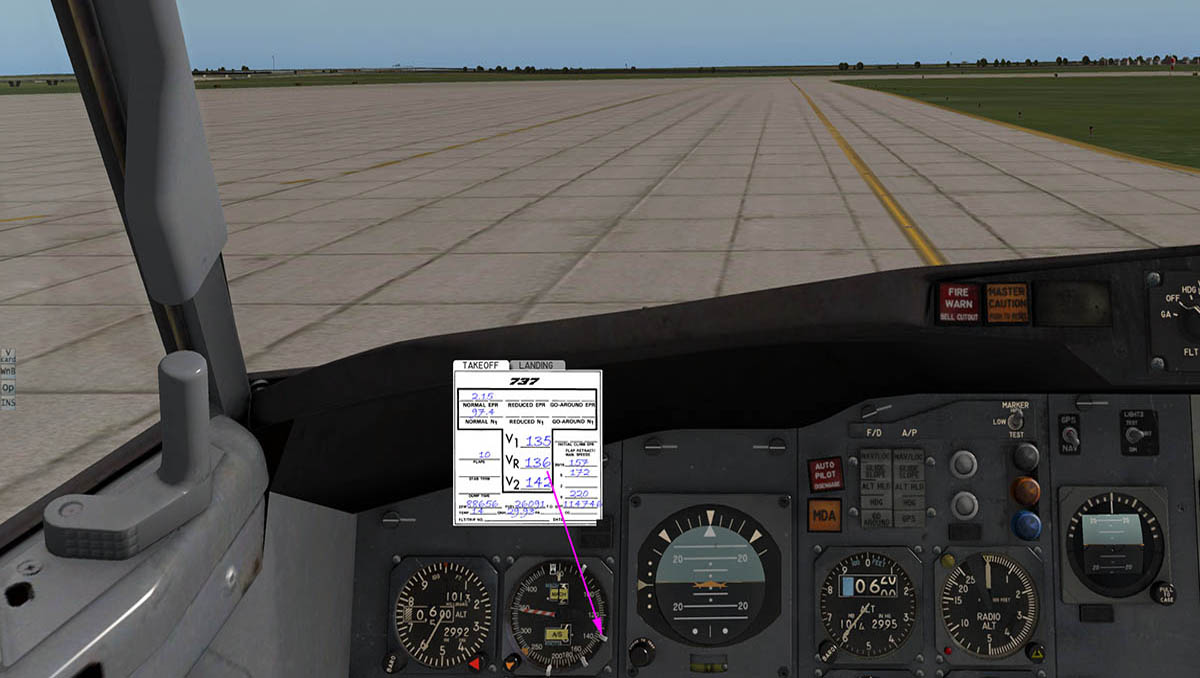
These engines are very old fashioned!... you just can't push up the power and let the engine management do the job of protecting them. You are now the engine management as the engines will burn out quickly. So easy does it on the throttle, yes you can give 100% power on takeoff, but then get the power well back into the safety zone as quickly as possible. And then manage the power... SD -
Scenery Preview : LRTR - Timisoara by DAI-Media The next scenery from DAI-Media is LRTR - Timisoara in Romania. The full name of LRTR is "Timișoara "Traian Vuia" International" and it is situated in Ghiroda, Timiș County in Western Romania. I am a big fan of DAI-Media's work and their LEVC - Valencia Manises () is one of my favorites that I have used constantly since its release. So anything coming out of this excellent studio is well worth checking out. DAI-Media have released preview images of the coming release of LRTR - Timisoara. The Terminal building modeling is exceptional. Full terminal areas are covered, and the detailing is very good. One of the trademarks of DAI-Media's scenerys is their excellent grass and ground textures, and the way the airports blend very well into the surroundings (the best in the business) Here in LRTR they are trying out even better new elements and animation on hanger doors and other special effects. The airport is a operating base for Wizz air, so certainly LRTR will be worth checking out when it is released which is very soon. Other sceneries that are noted in progress by DAI-Media are : Aeroport Castello - LECS (not to be confused with Seville) which will be a free scenery! And another coming soon is a worthy one to certainly wait for is... Barcelona–El Prat Airport - LEBL. For more information then check out DAI-Media's : Facebook And their site is : DAI-Media - Sceneries for X-Plane Stephen Dutton 9th June 2014 Copyright©2014 : X-Plane Reviews All Images courtesy of DAI-Media
-
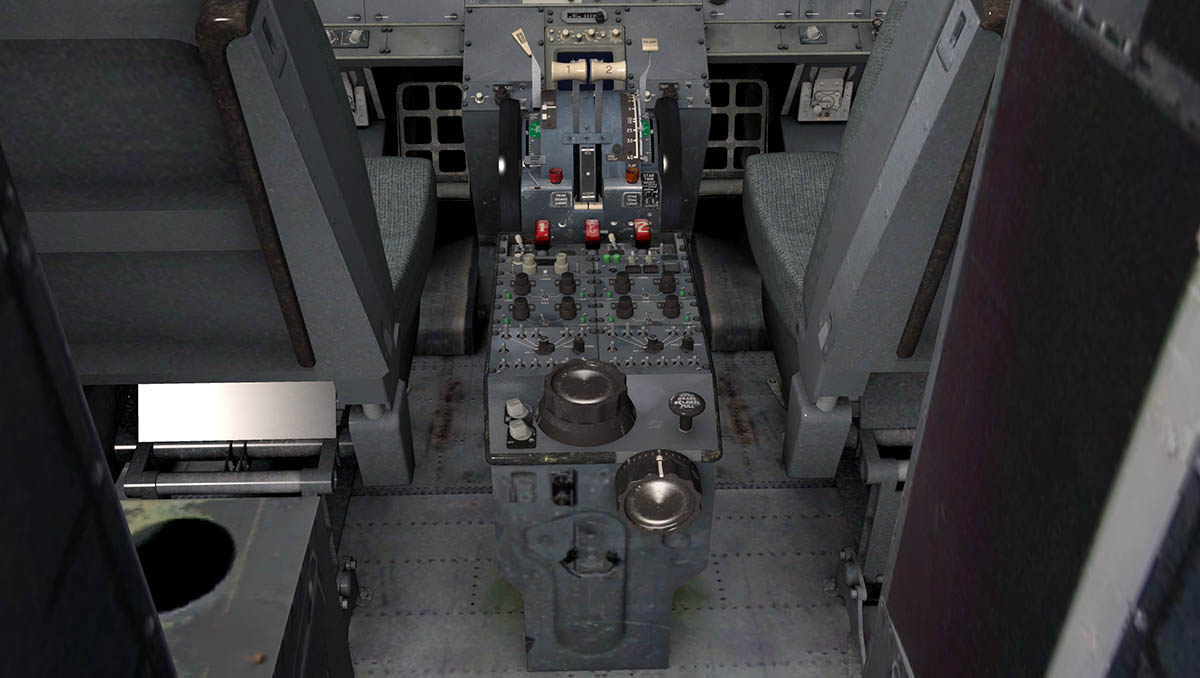
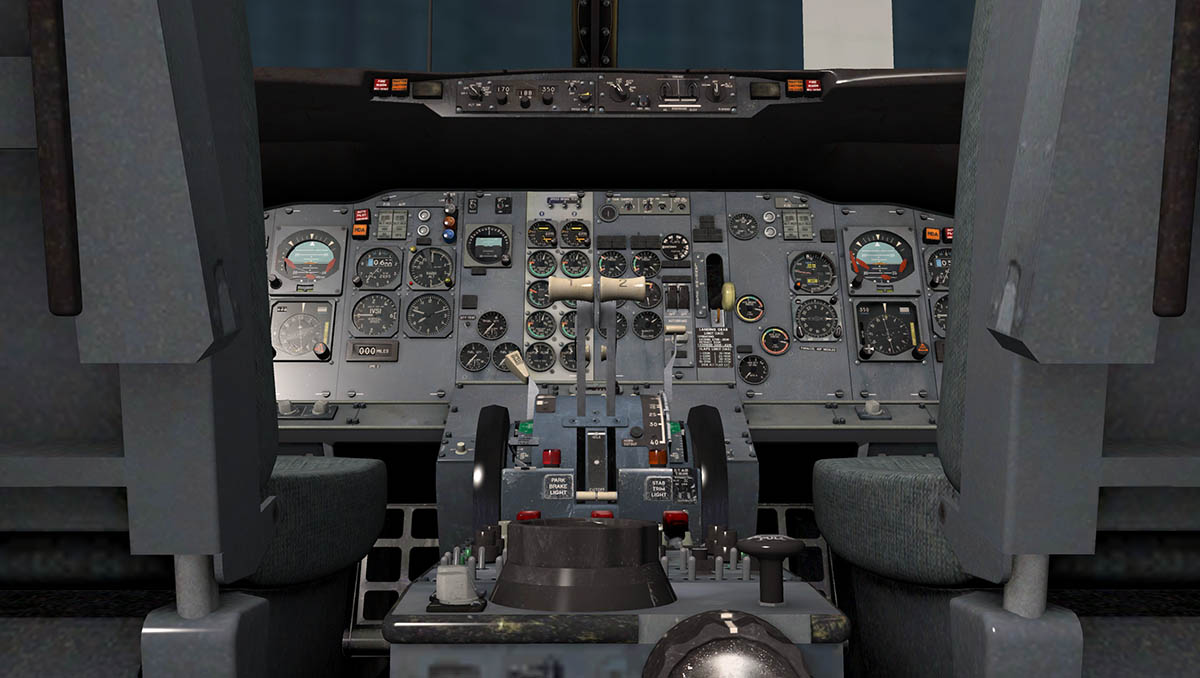
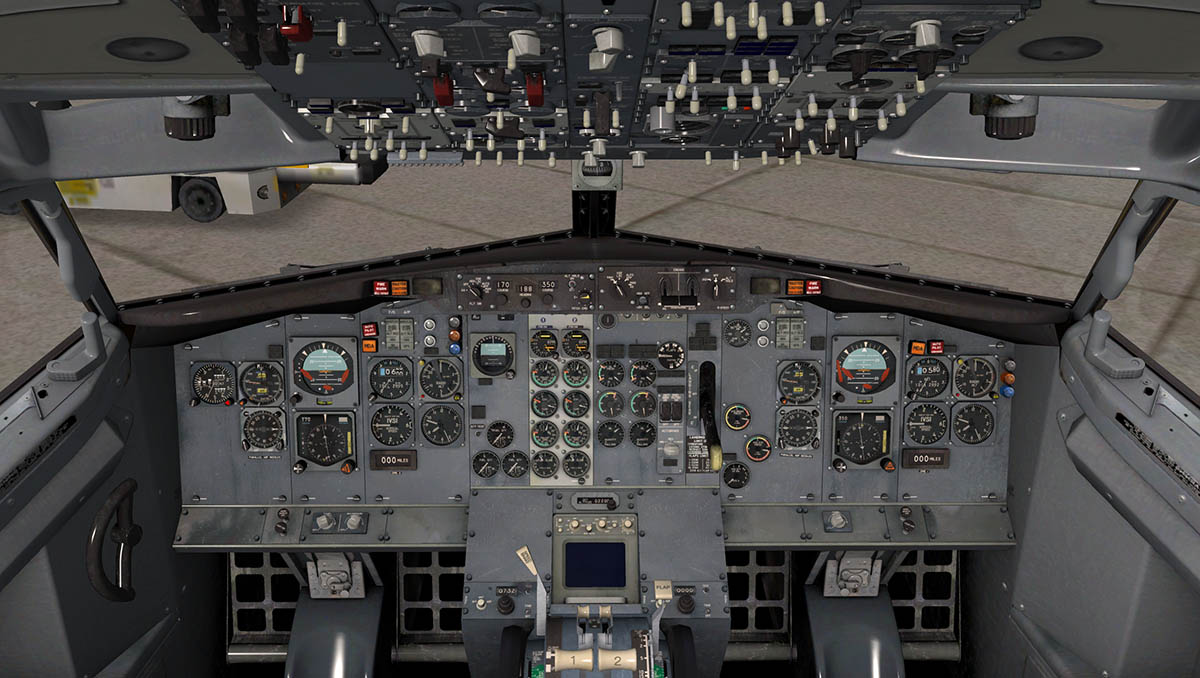
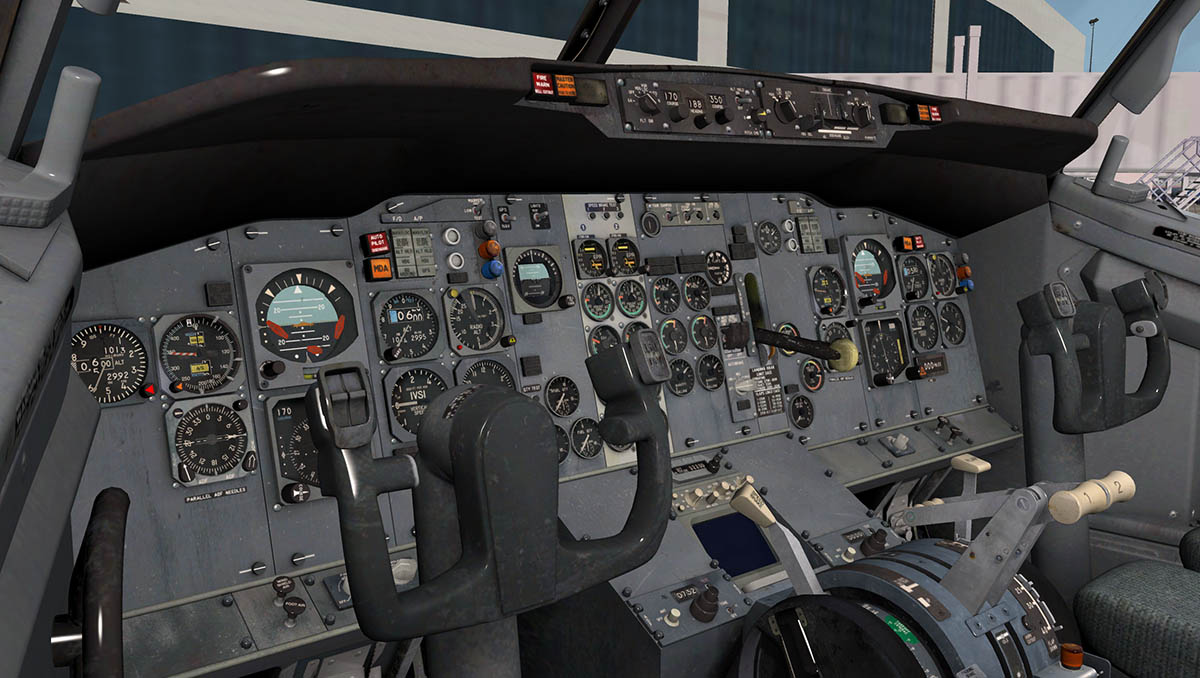
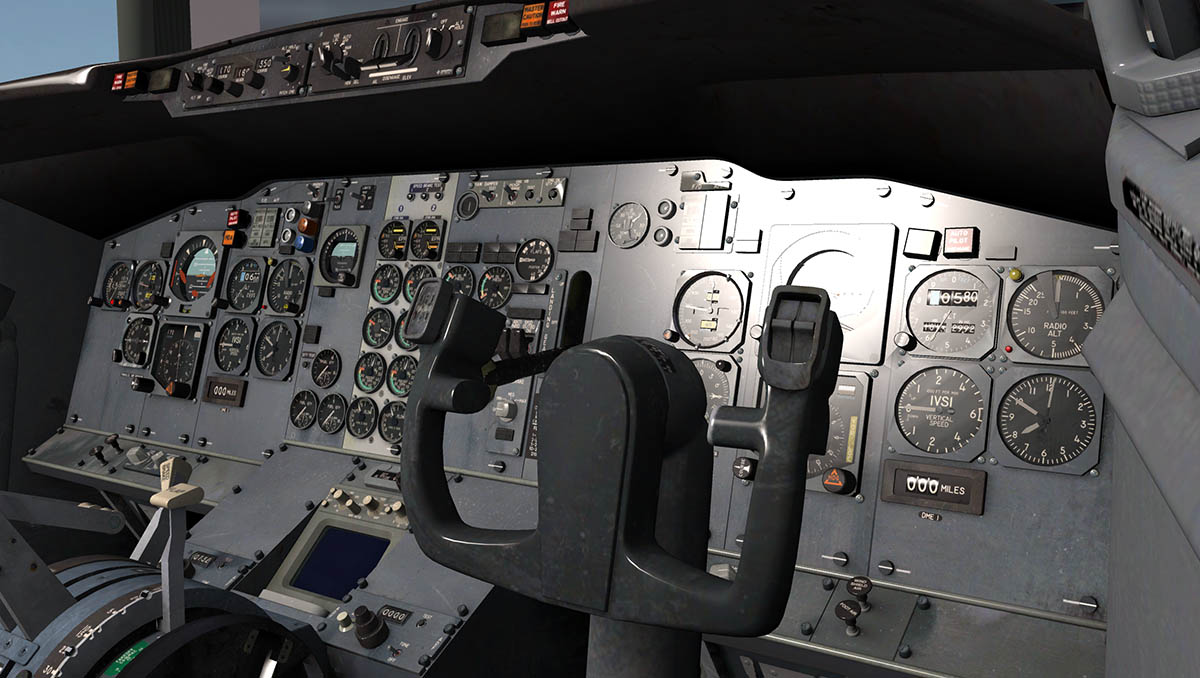
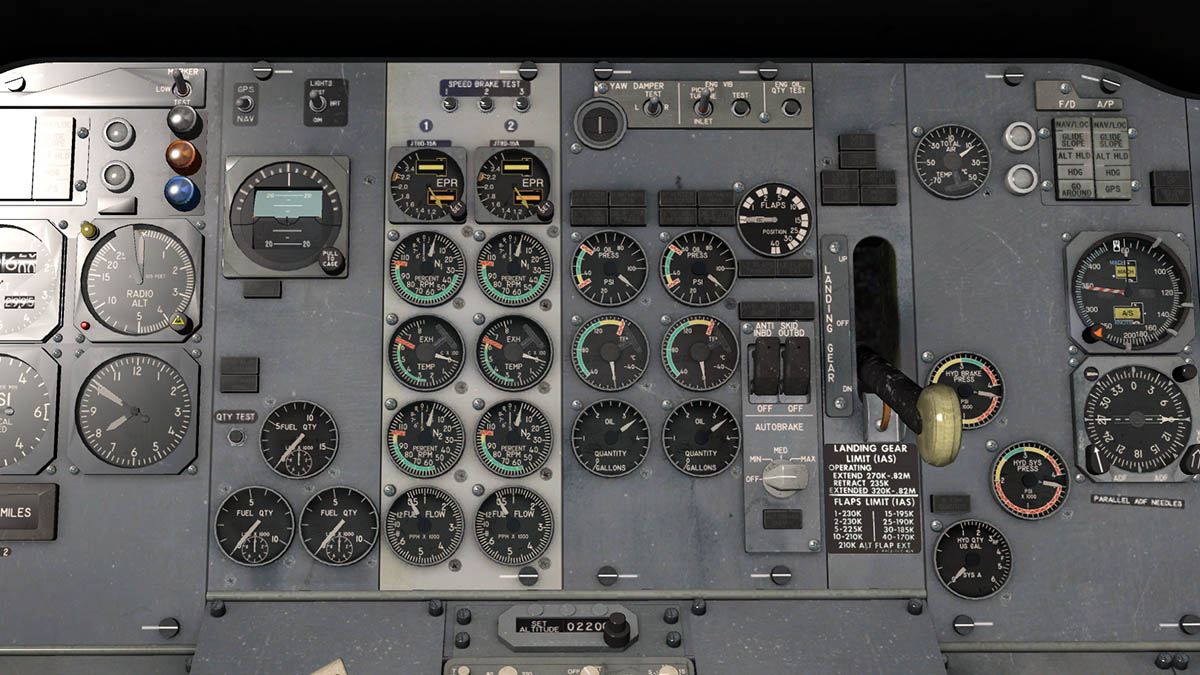
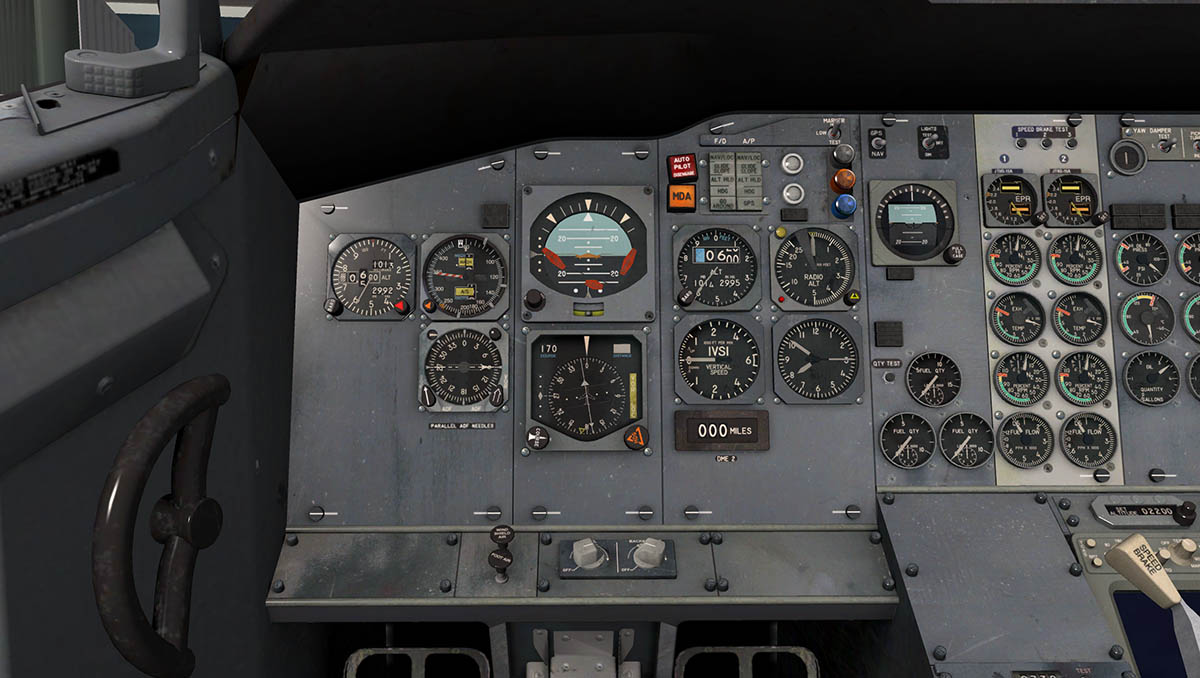
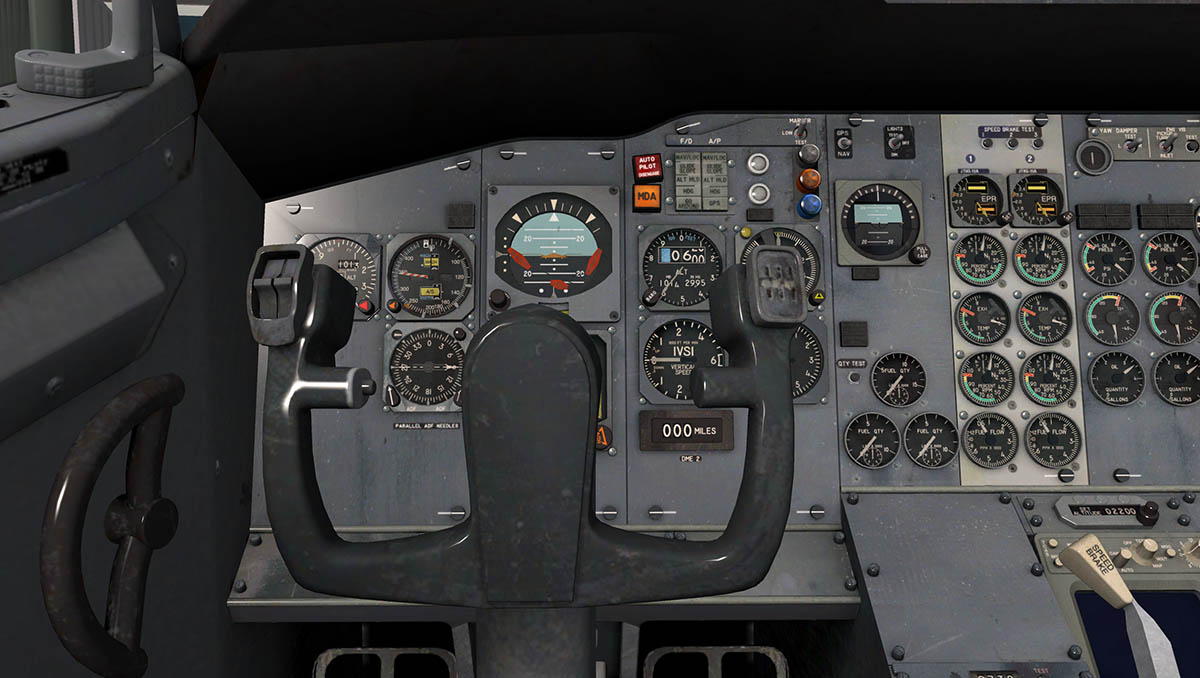
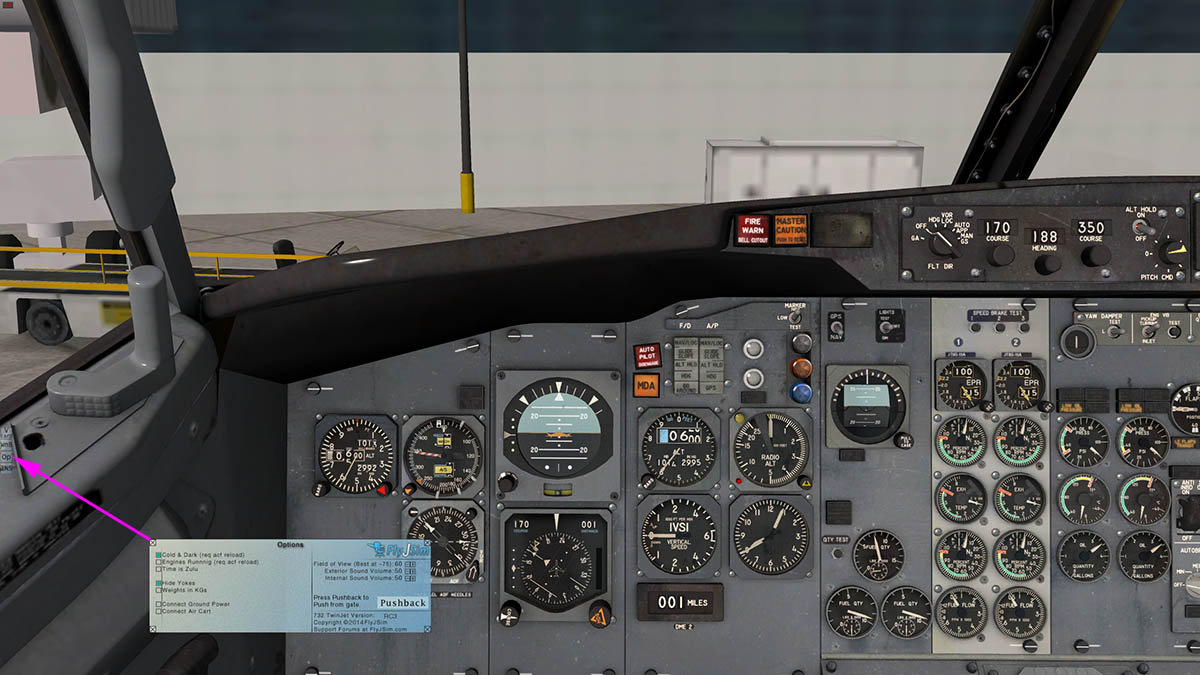
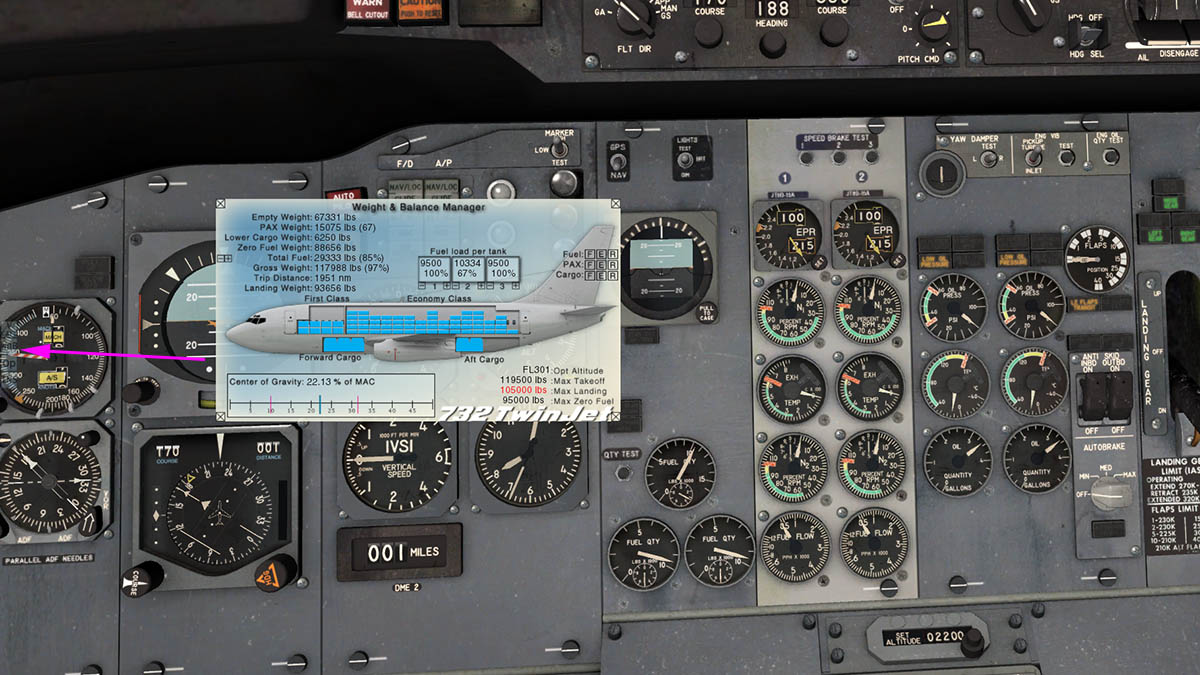
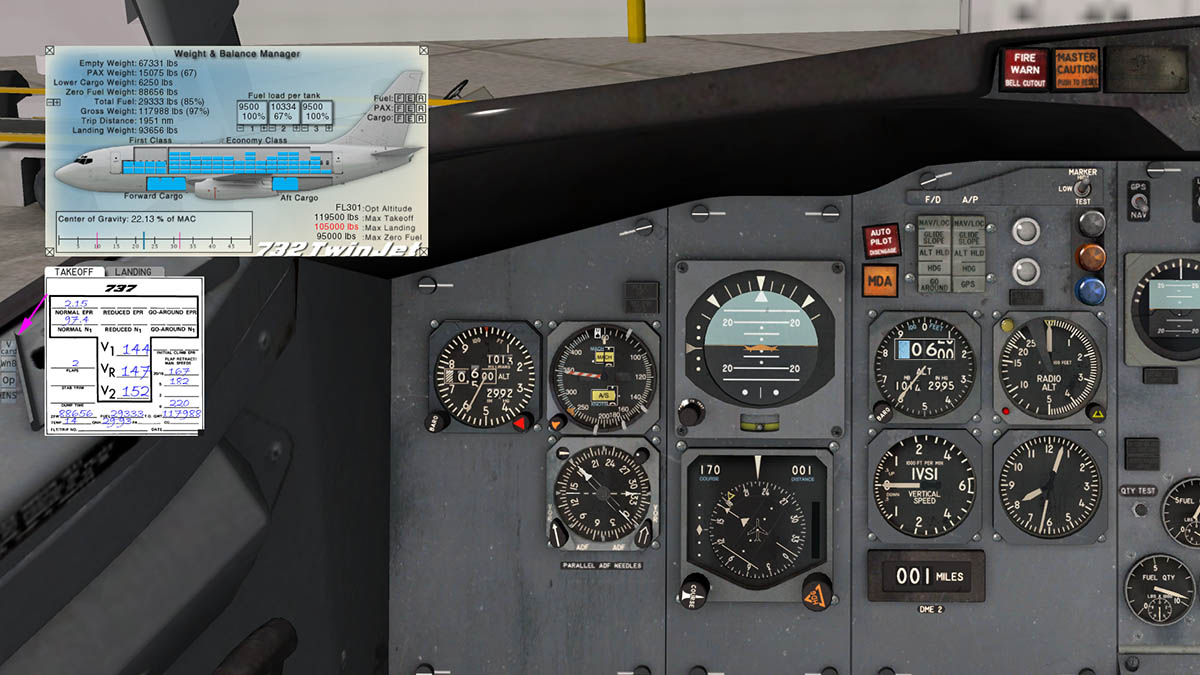
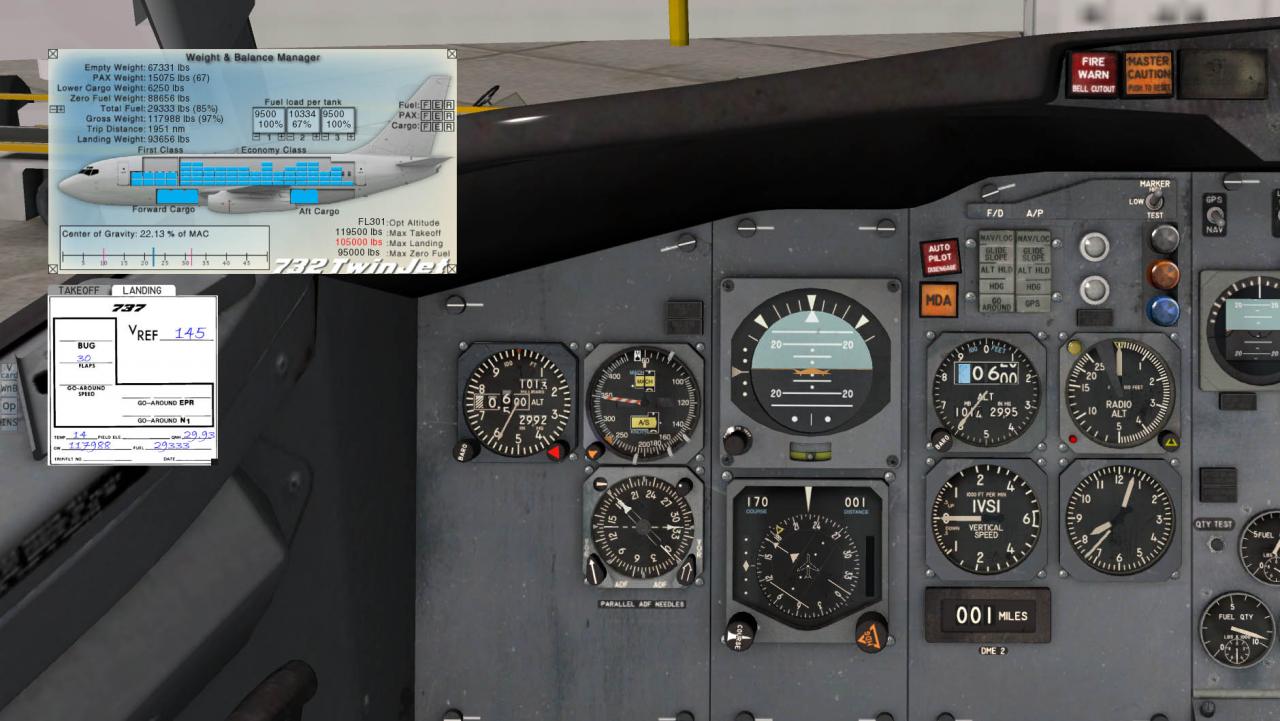
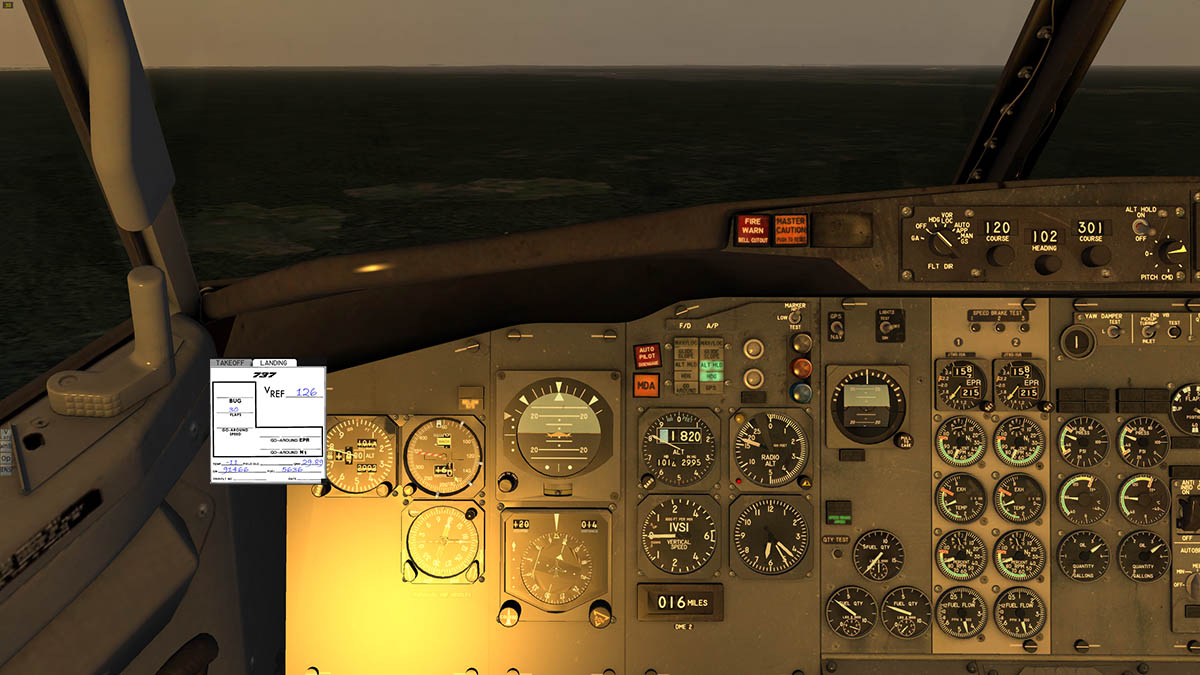
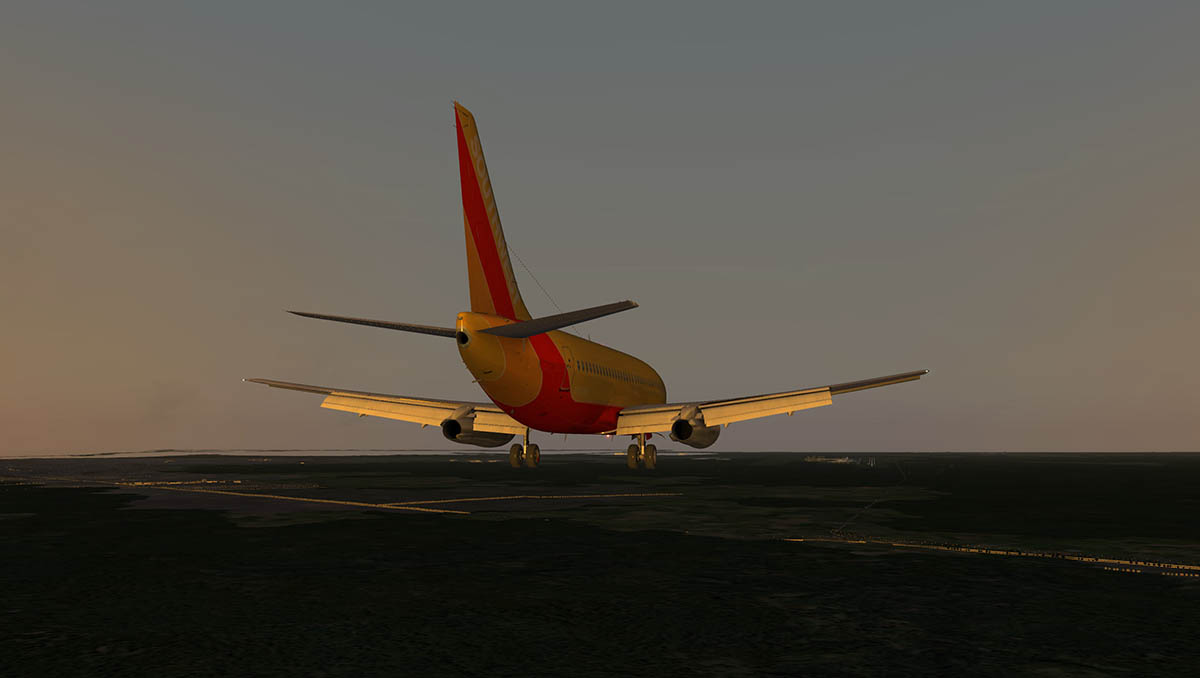
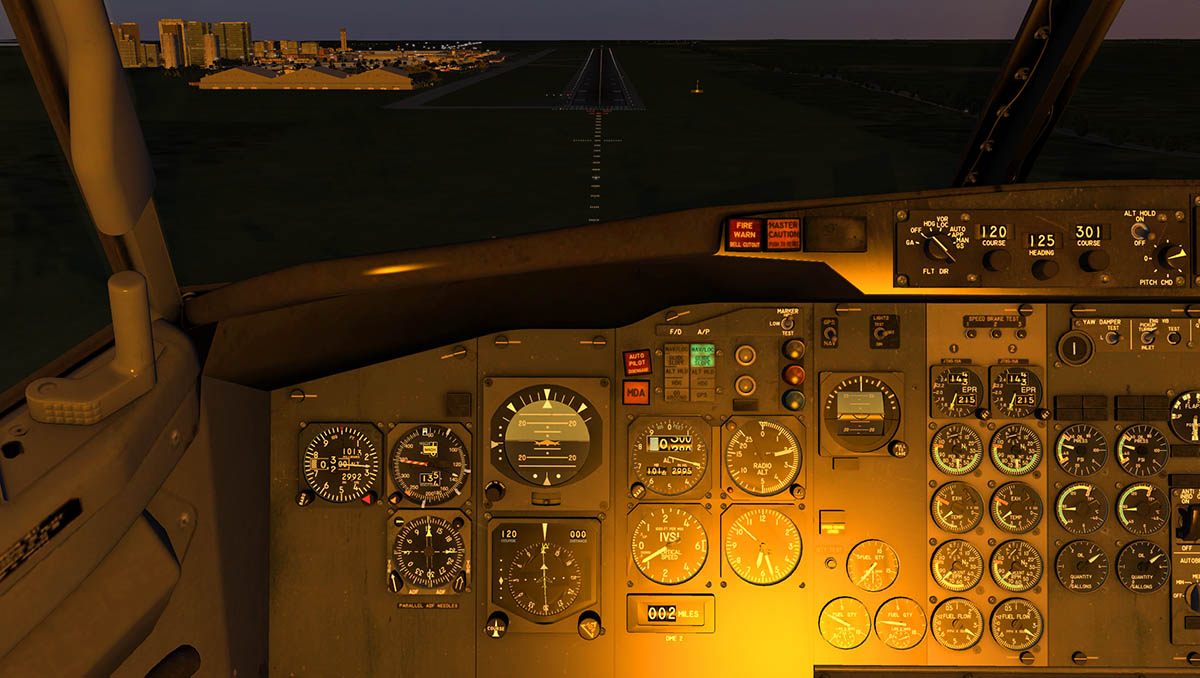
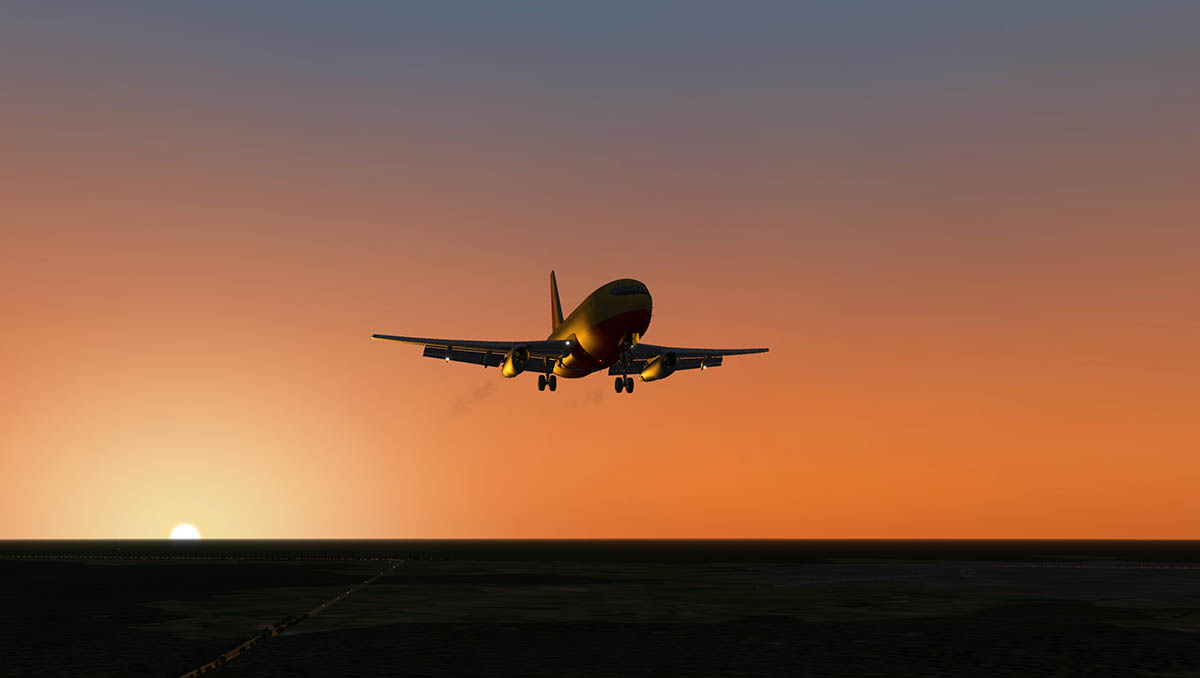
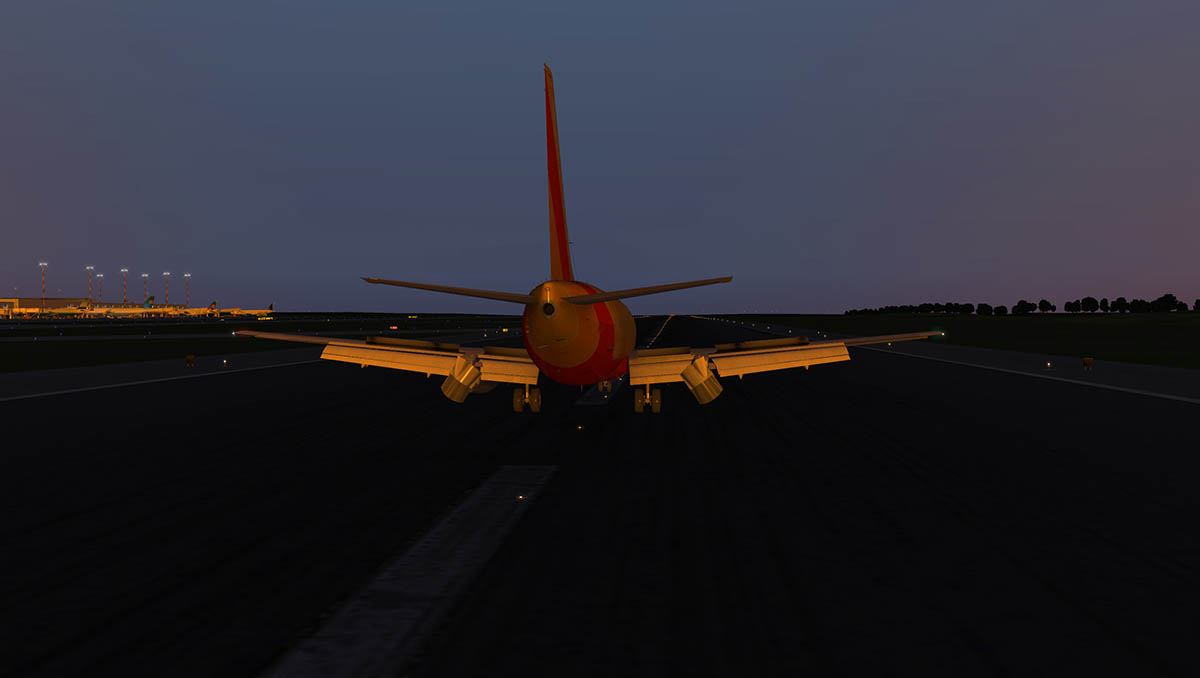
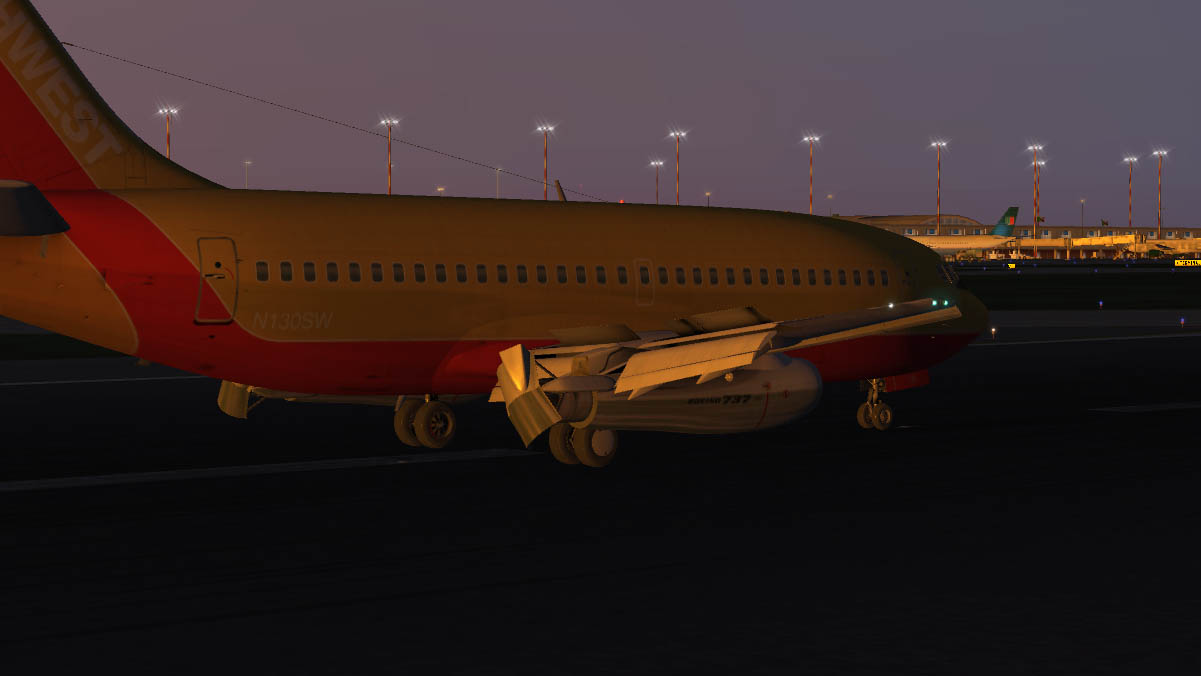
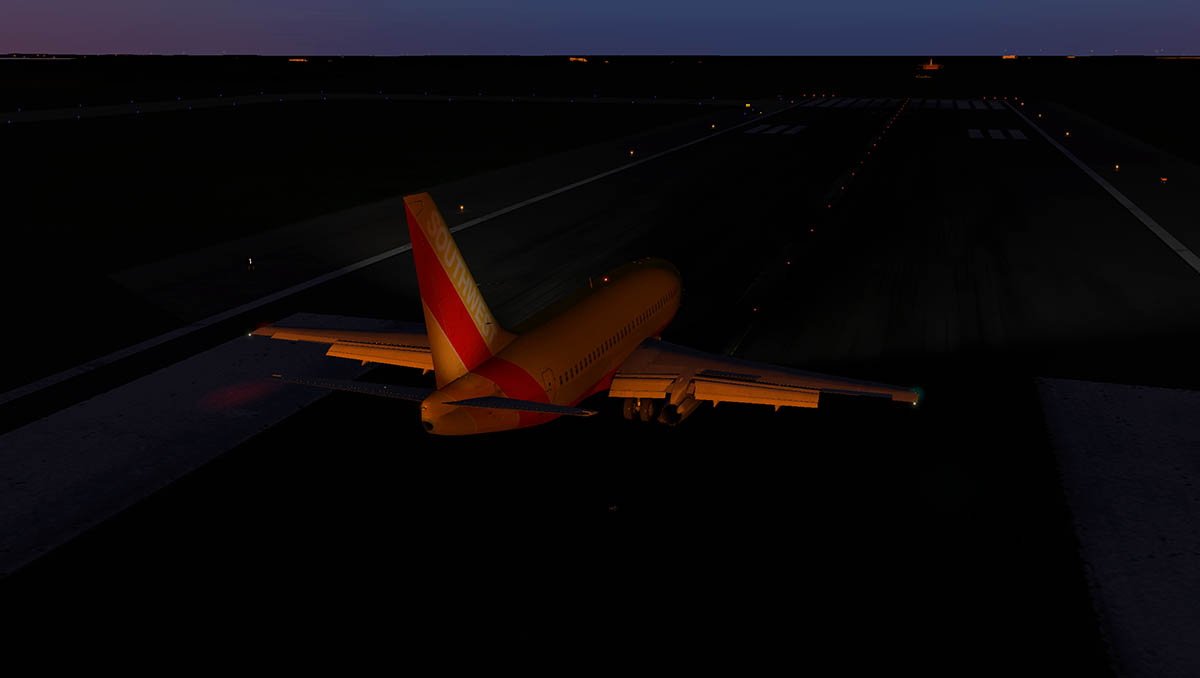
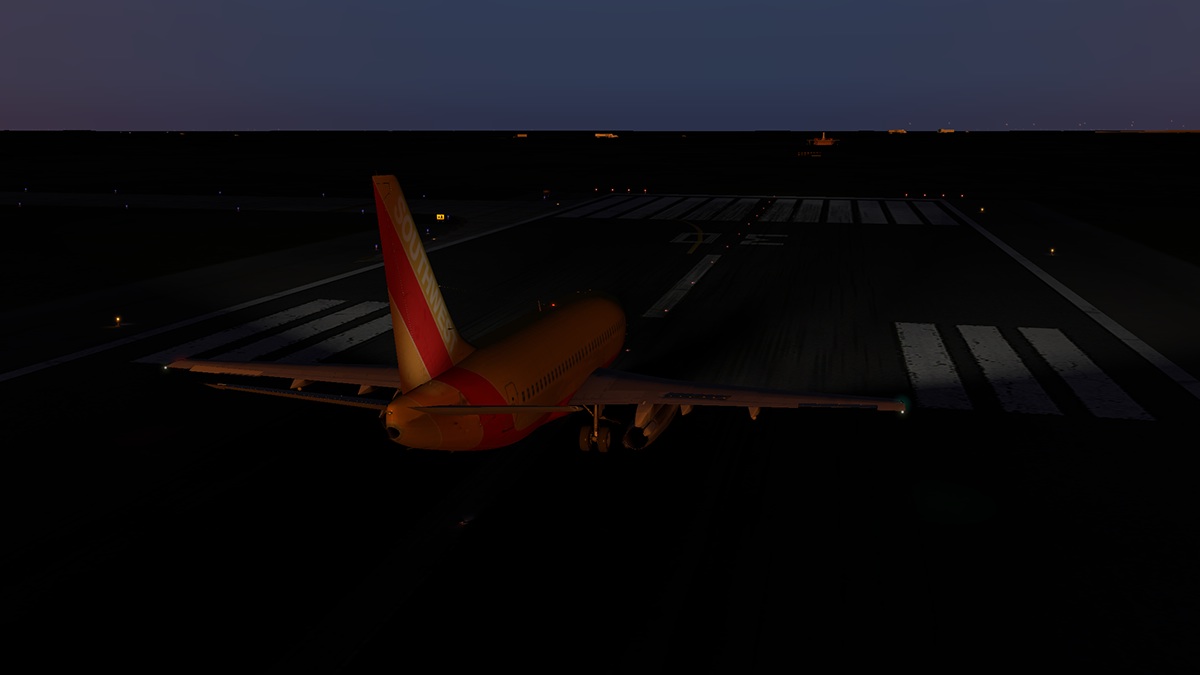
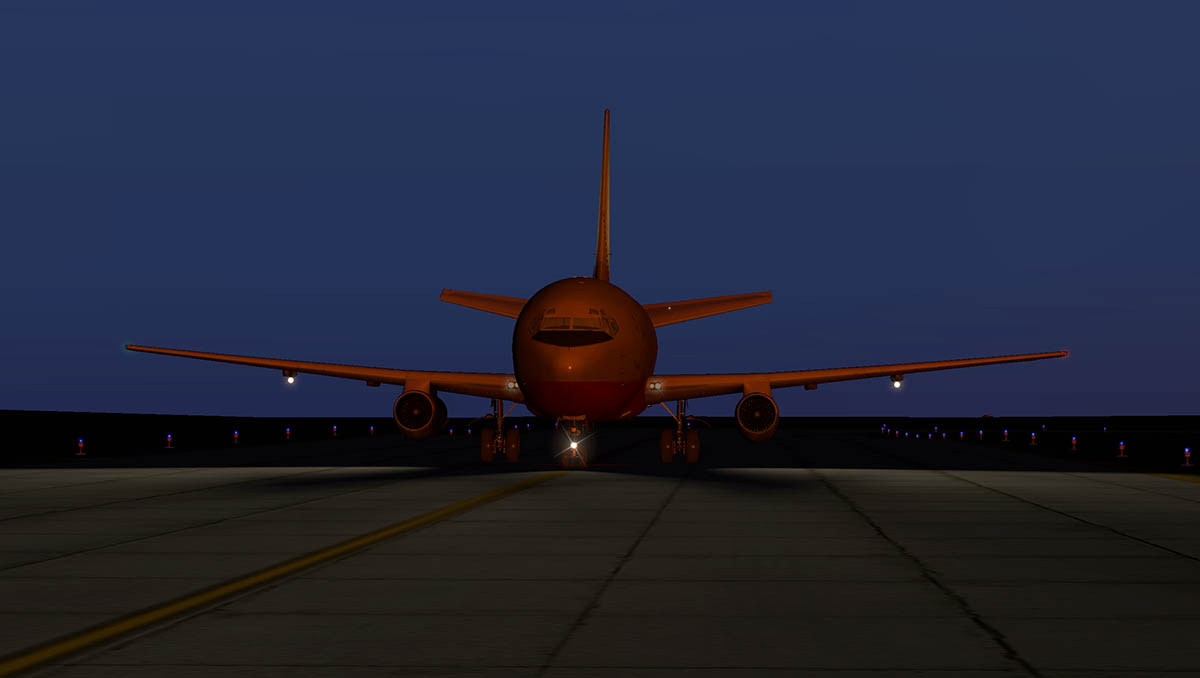
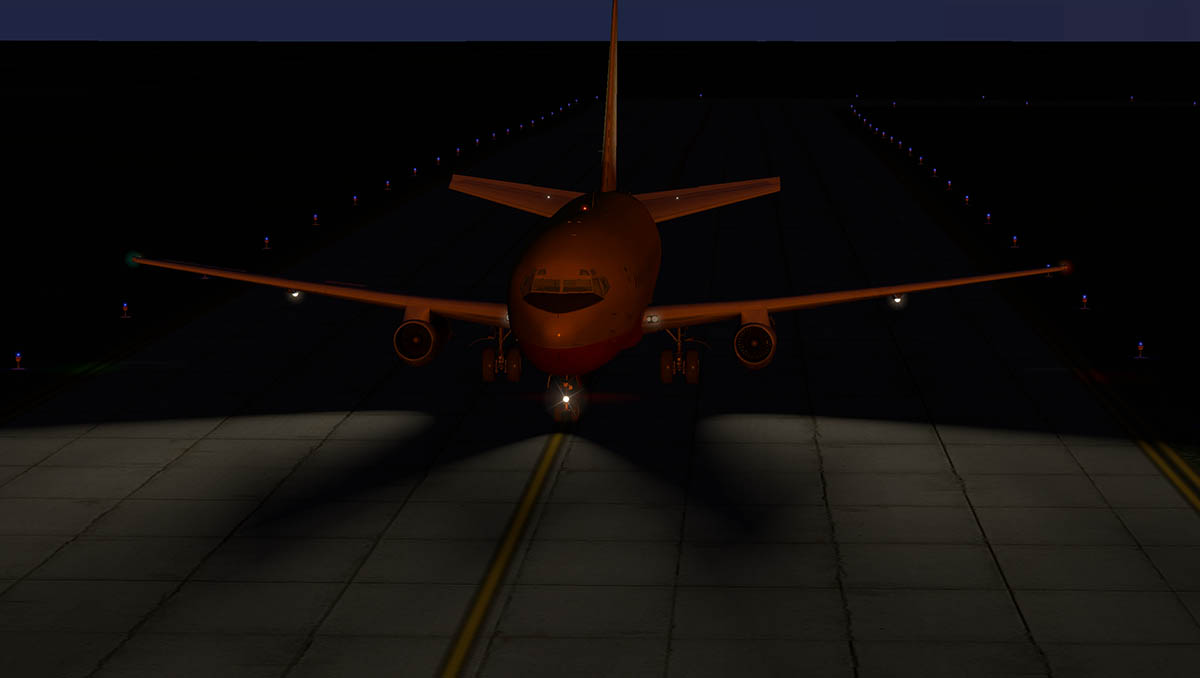
Aircraft Review : Boeing 732 TwinJet by FlyJSim
Stephen replied to Stephen's topic in Airliners Reviews
Well you have users wanting to take pilots out... And others wanting to put them in? Most pilots look pretty awful really and some are downright creepy so I am in the out club. But it may be interesting to see what it looks like. SD -
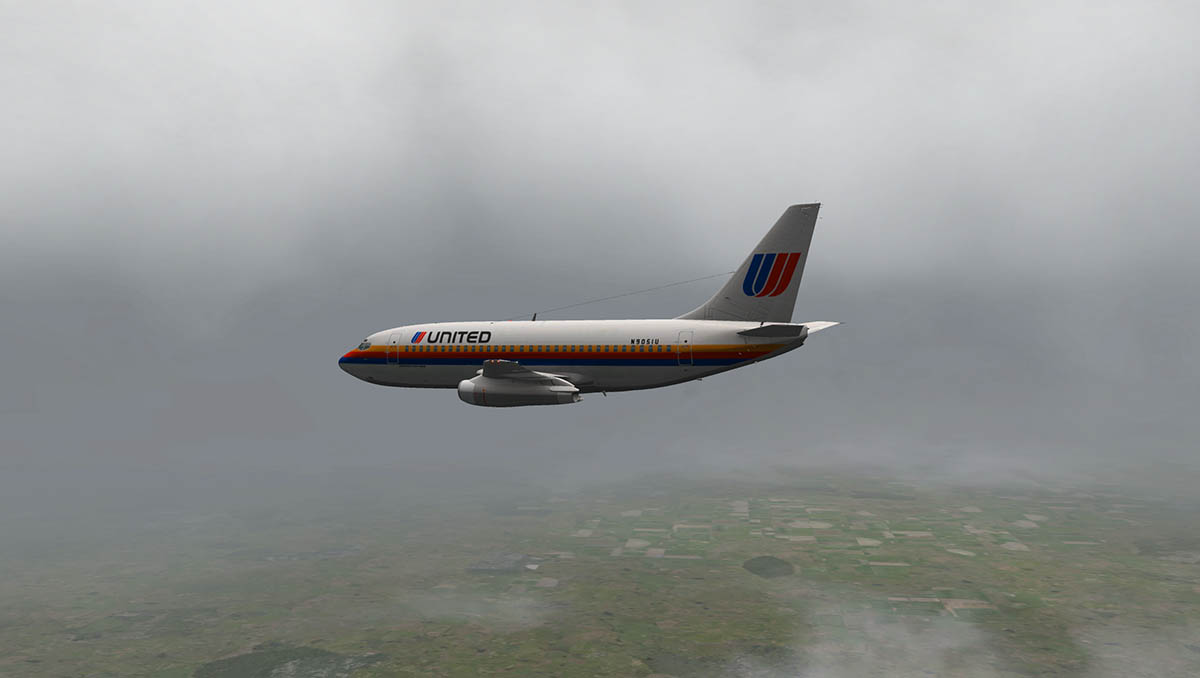
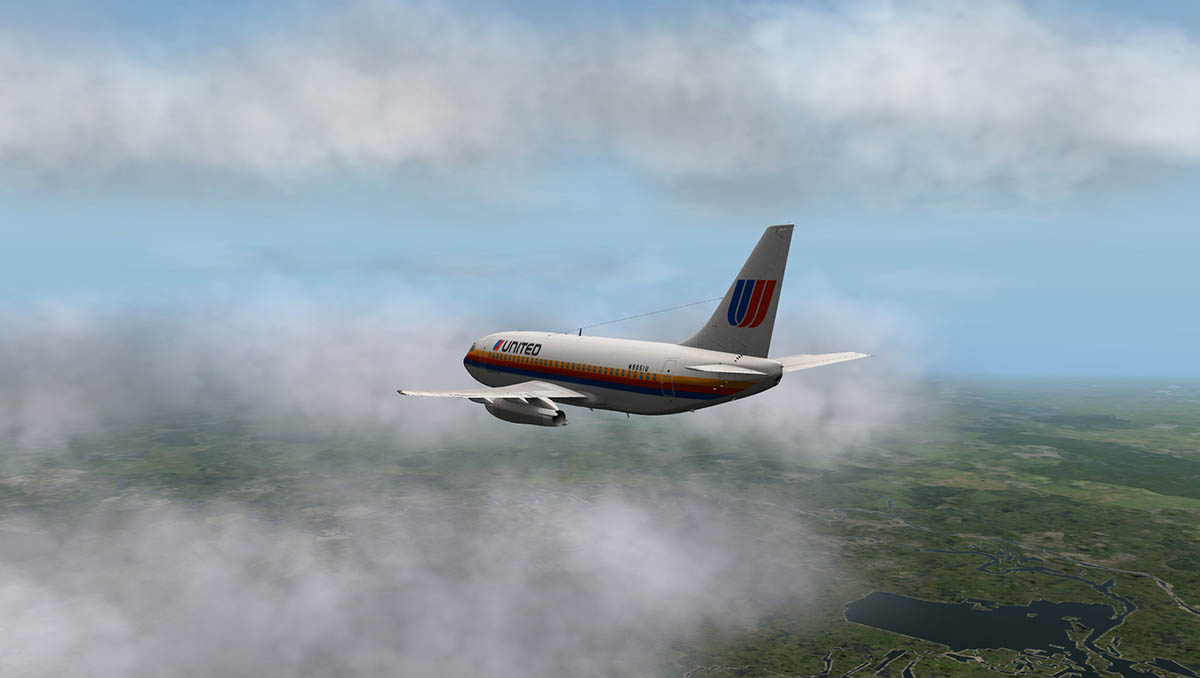
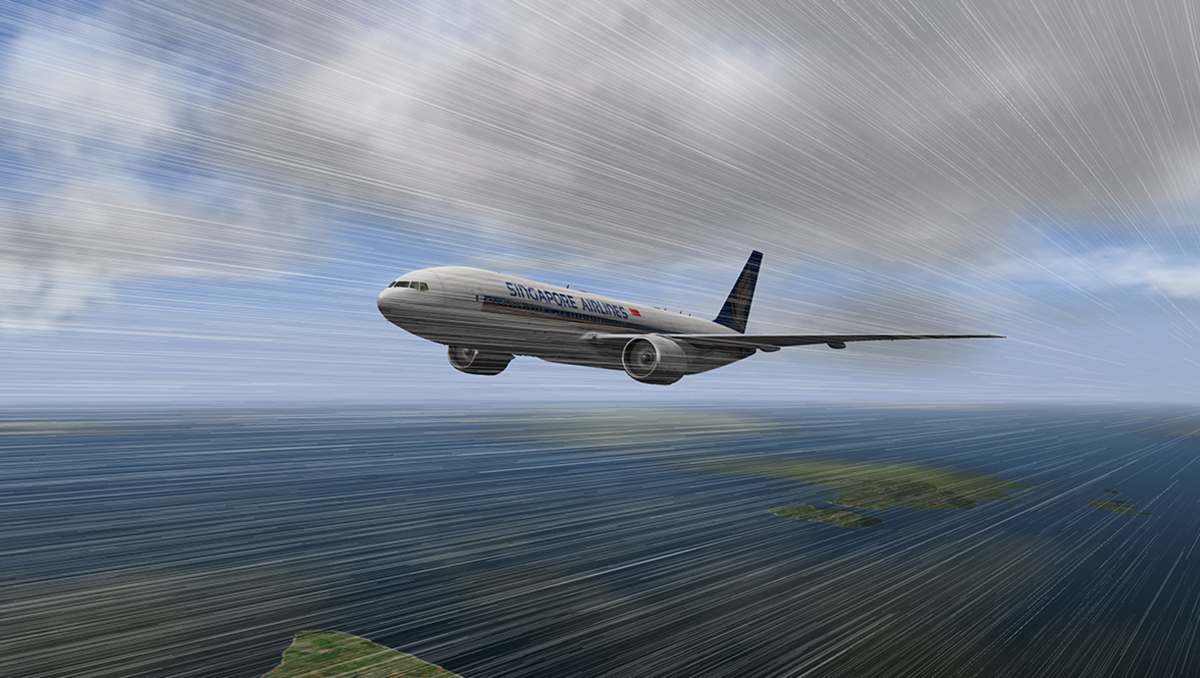
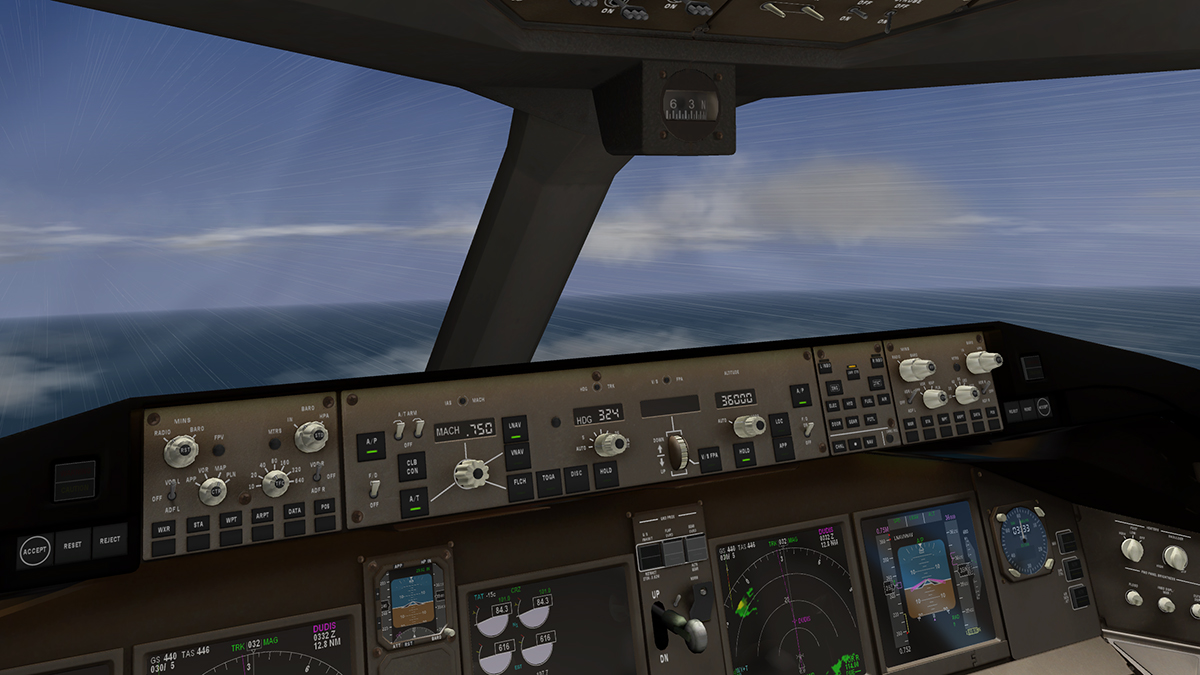
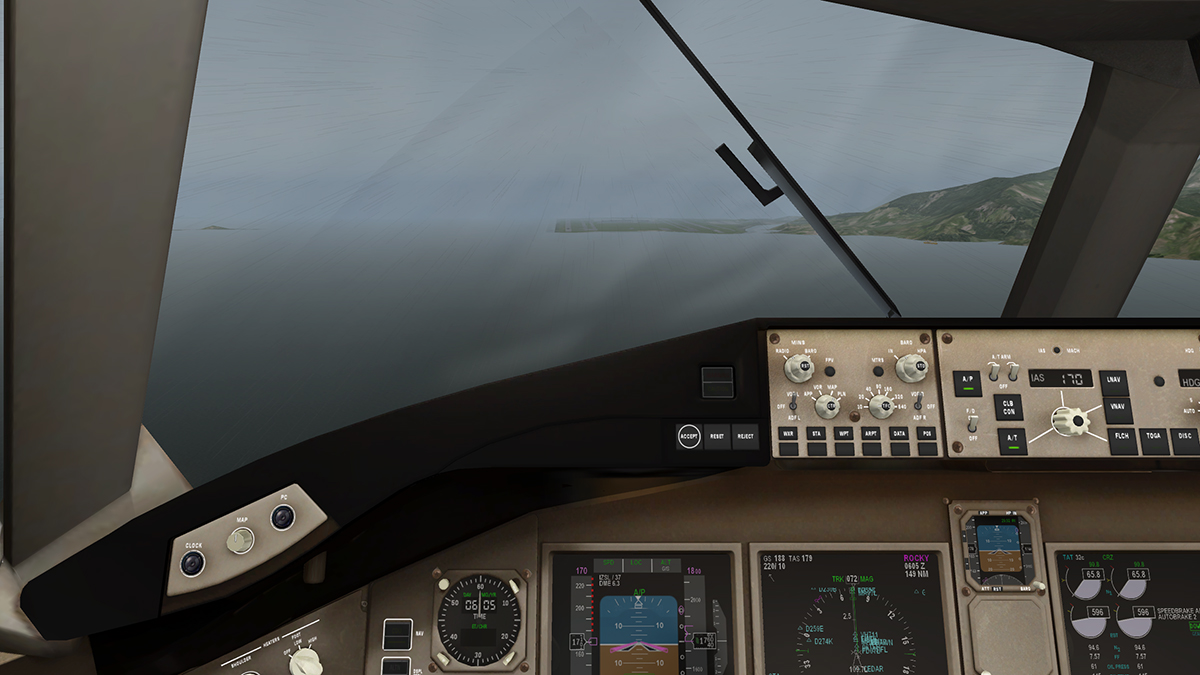
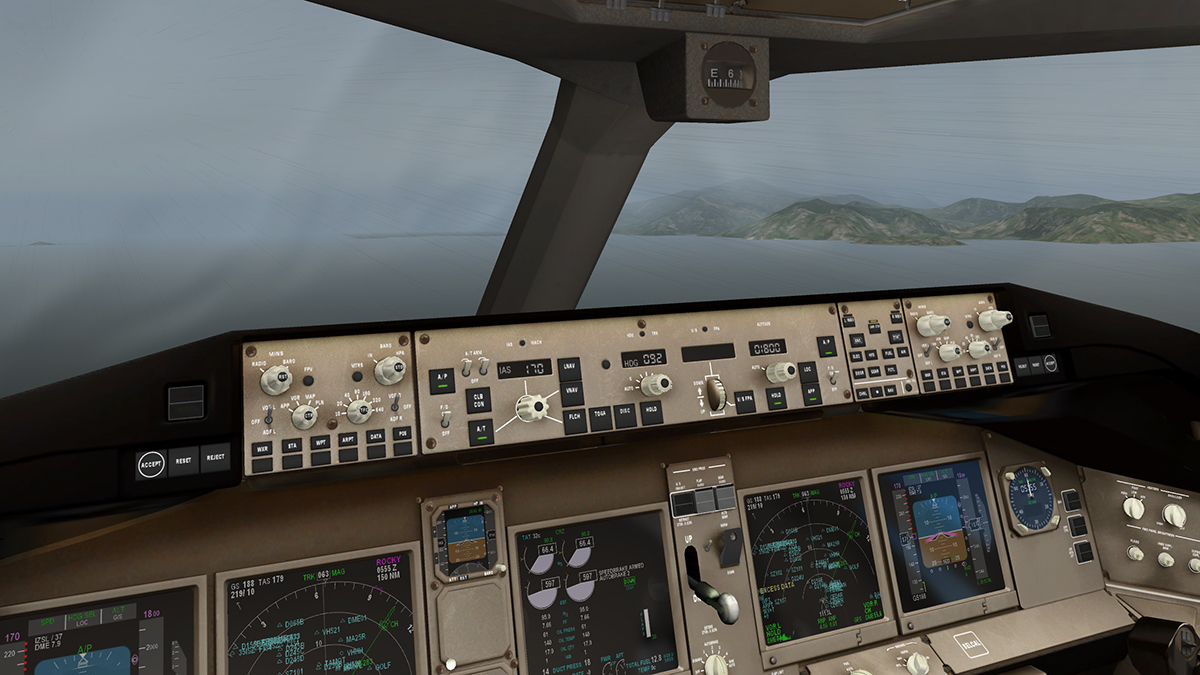
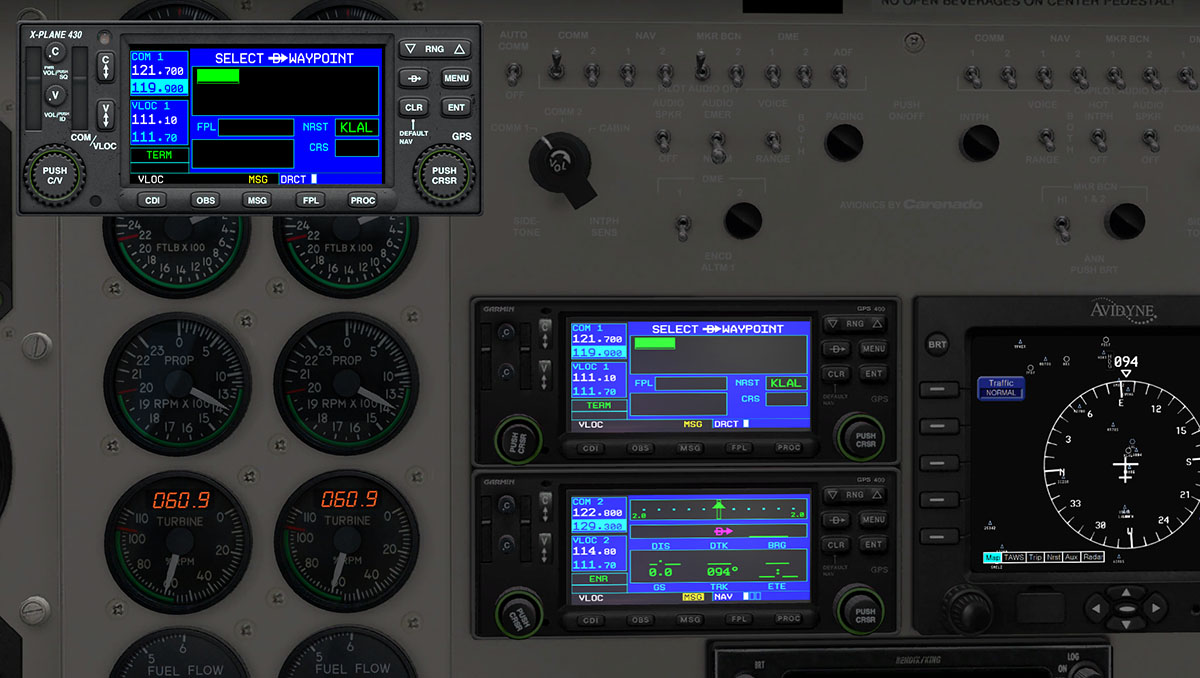
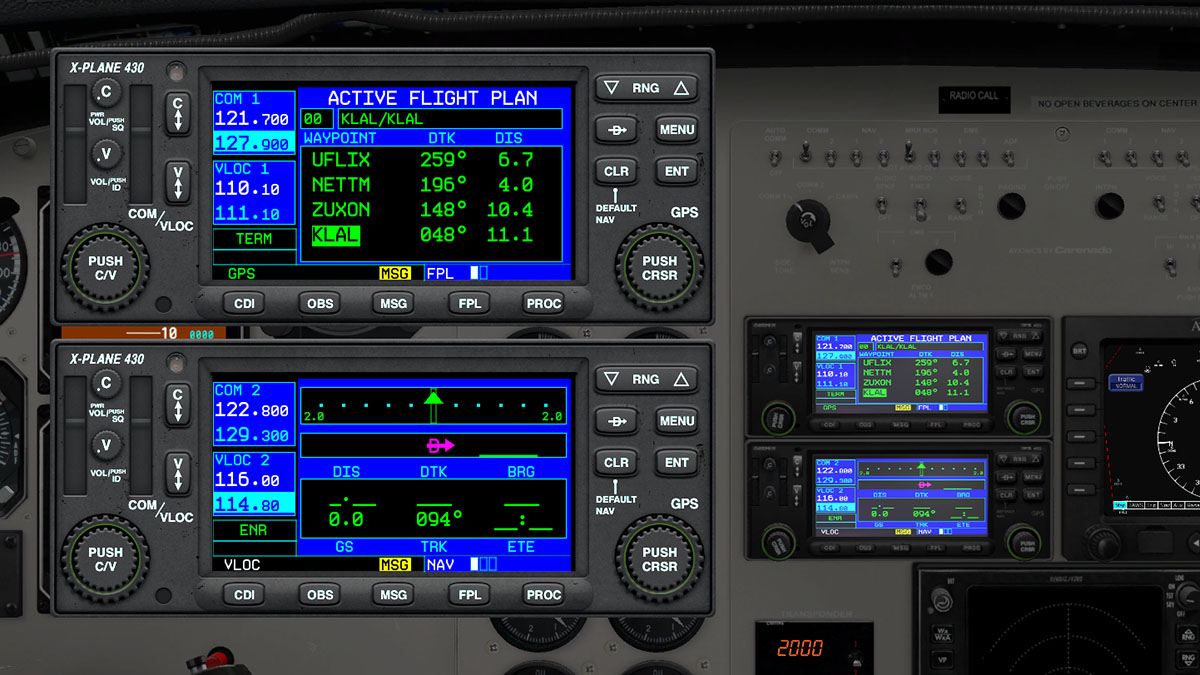
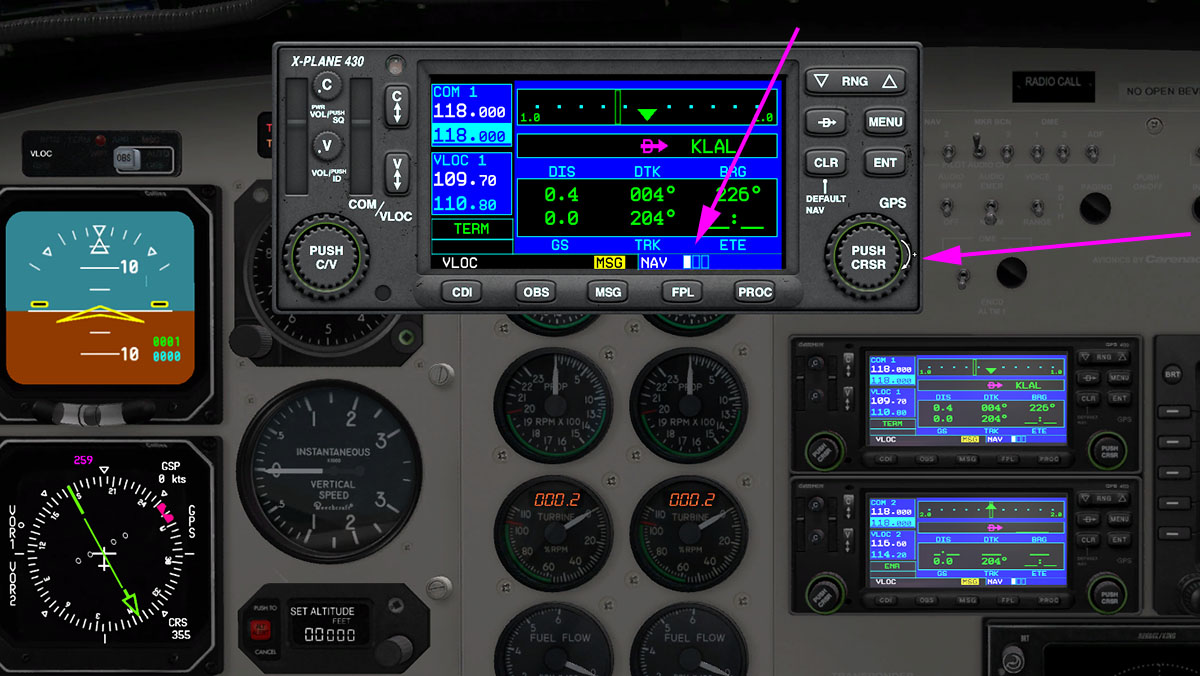
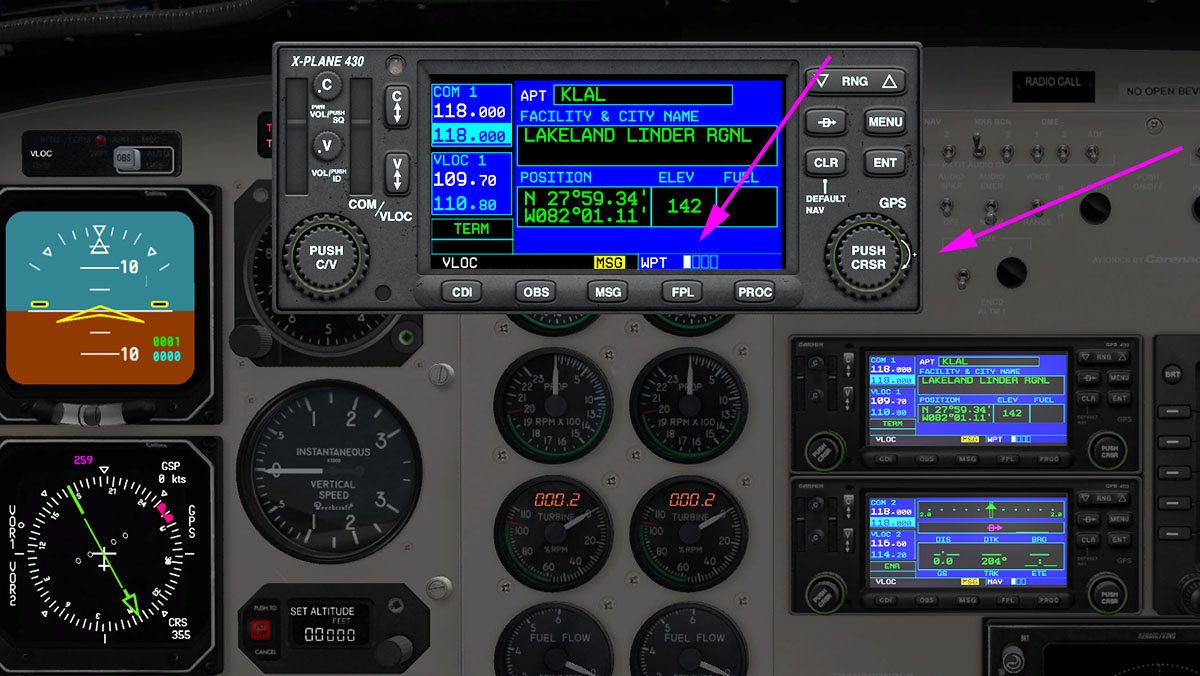
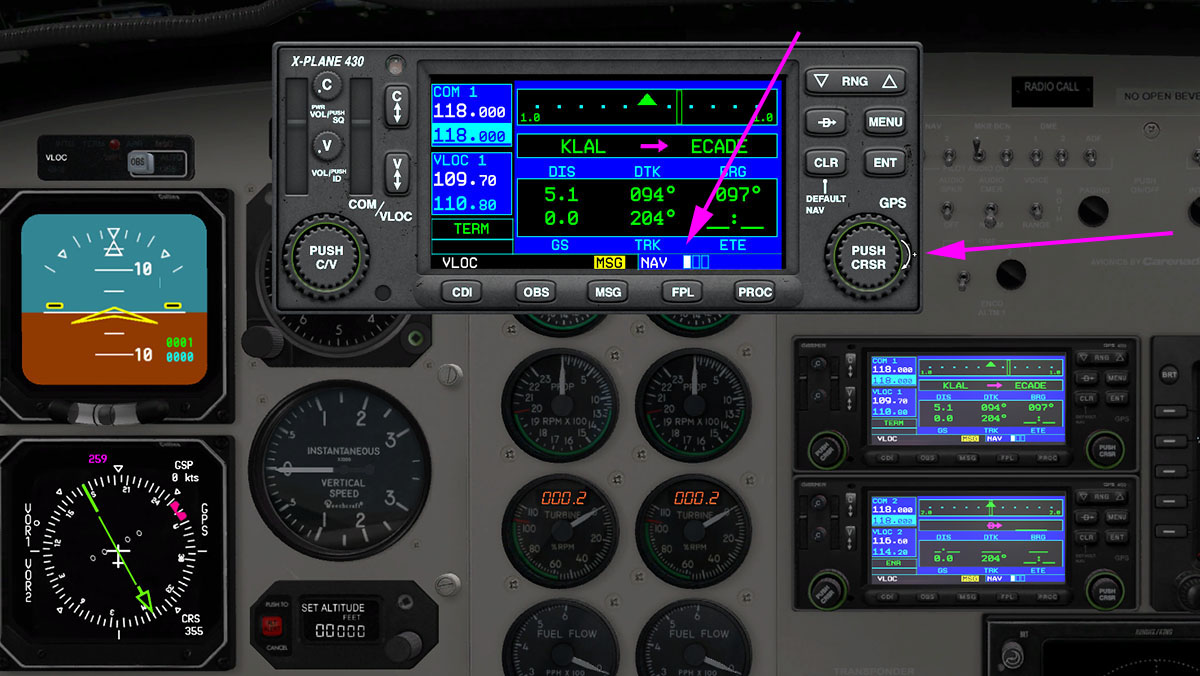
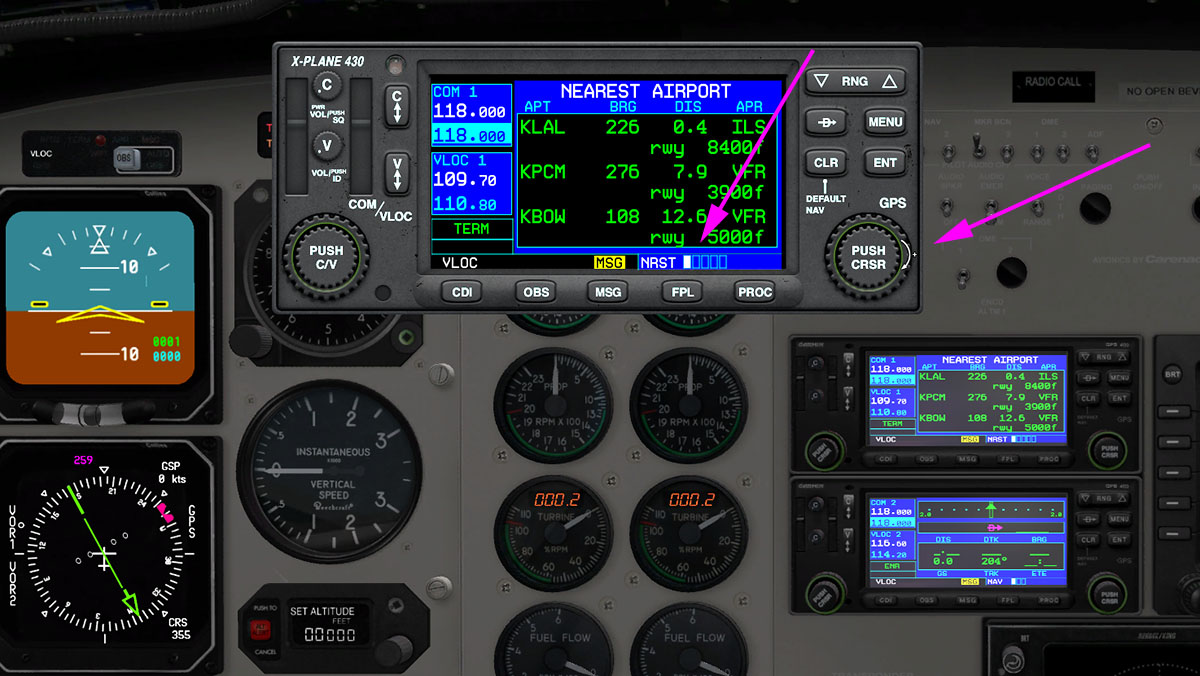
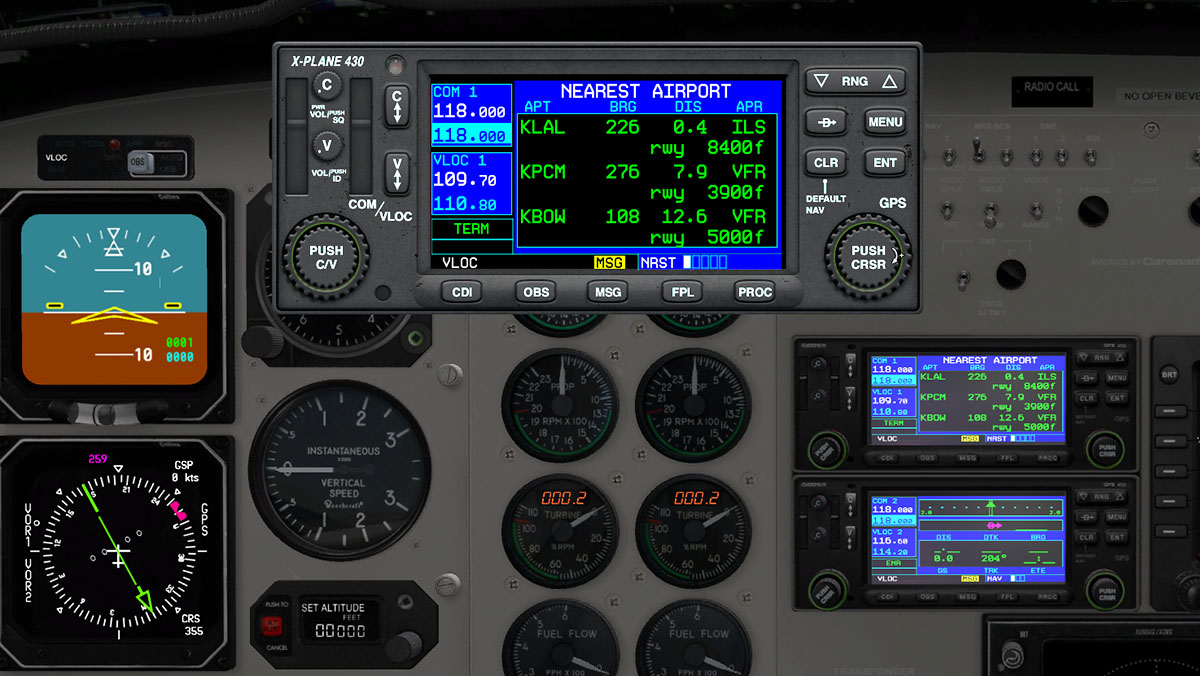
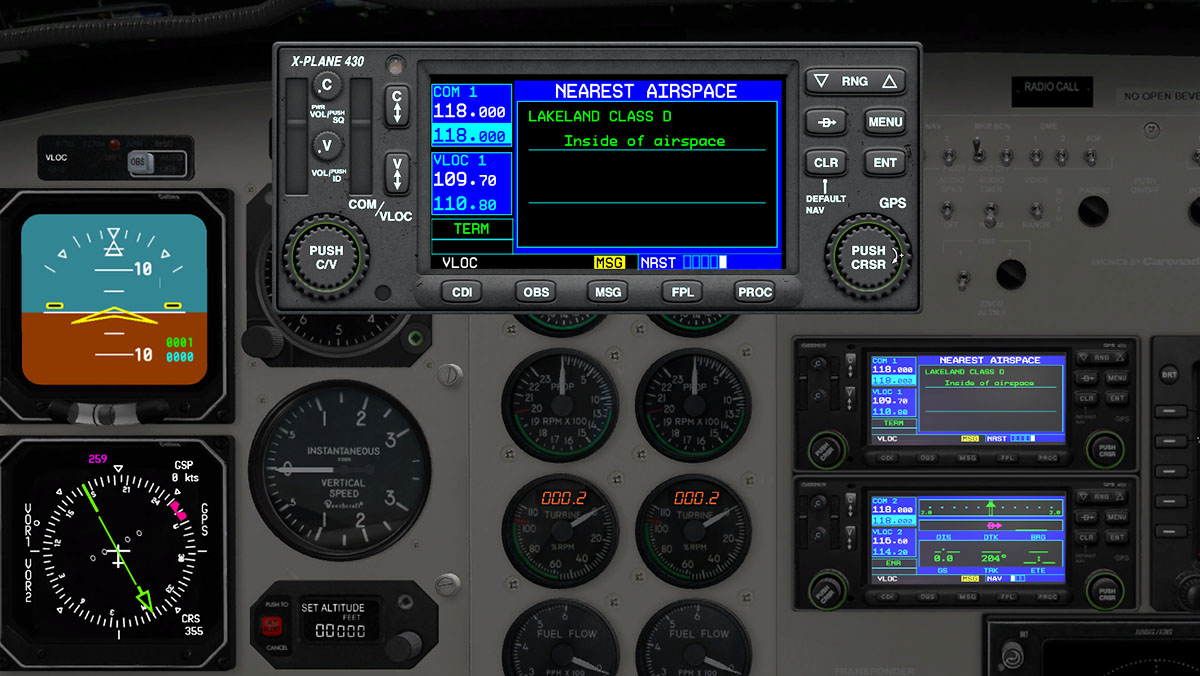
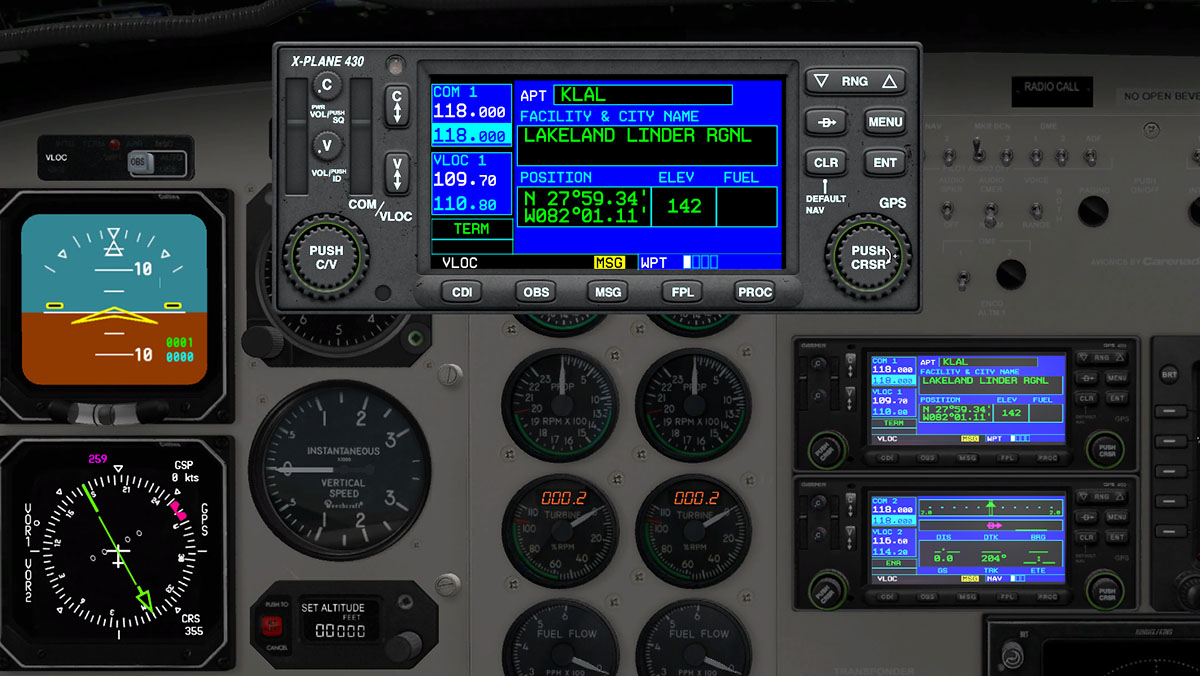
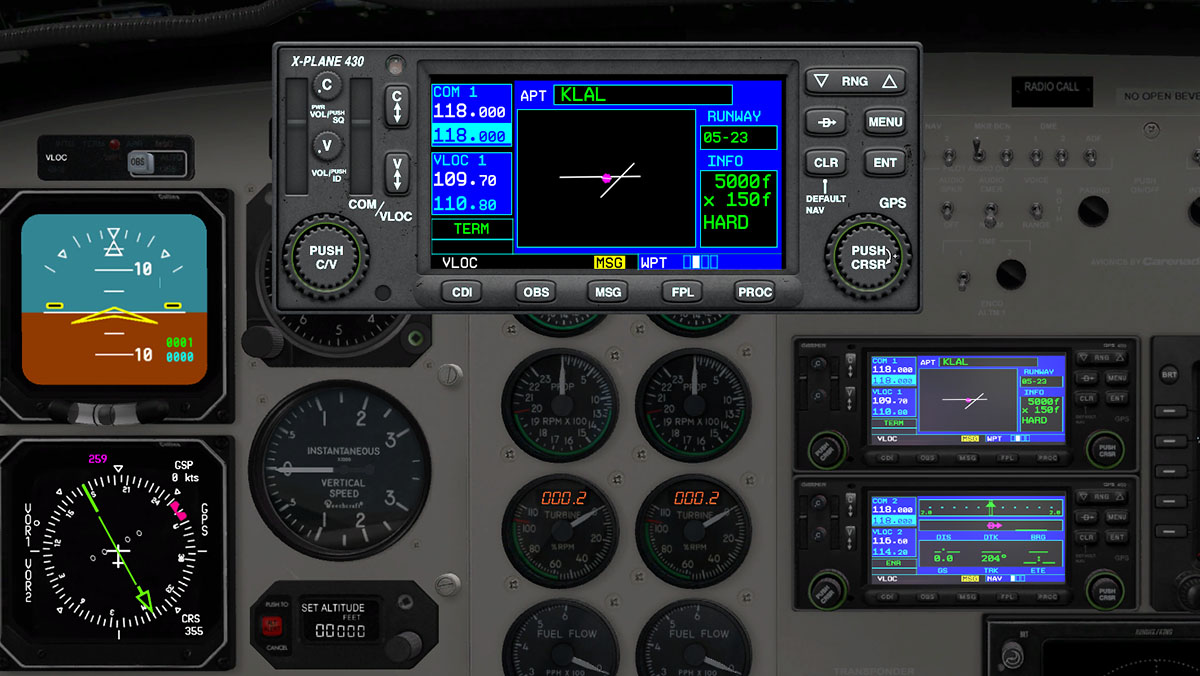
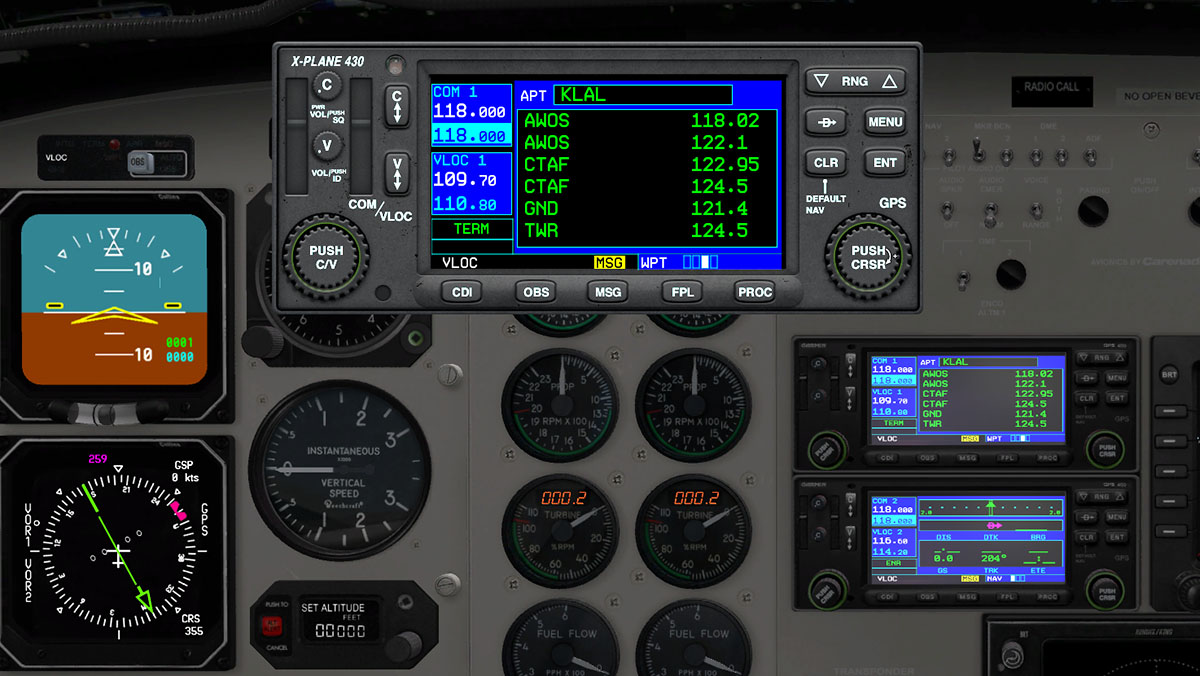
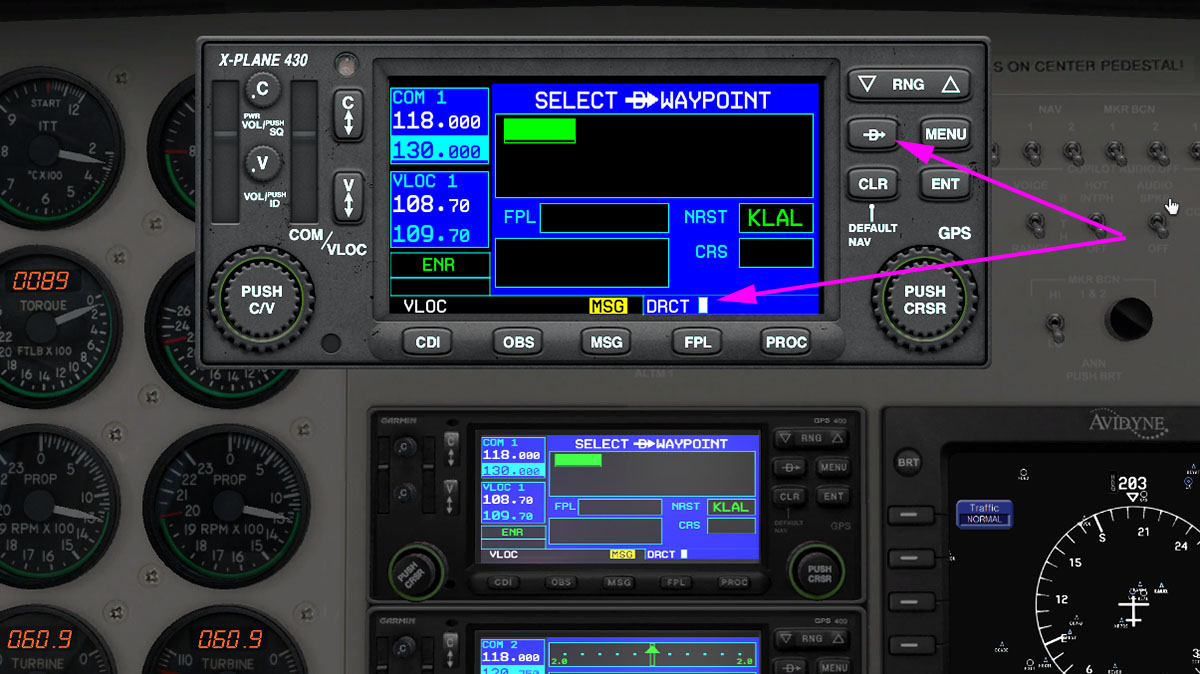
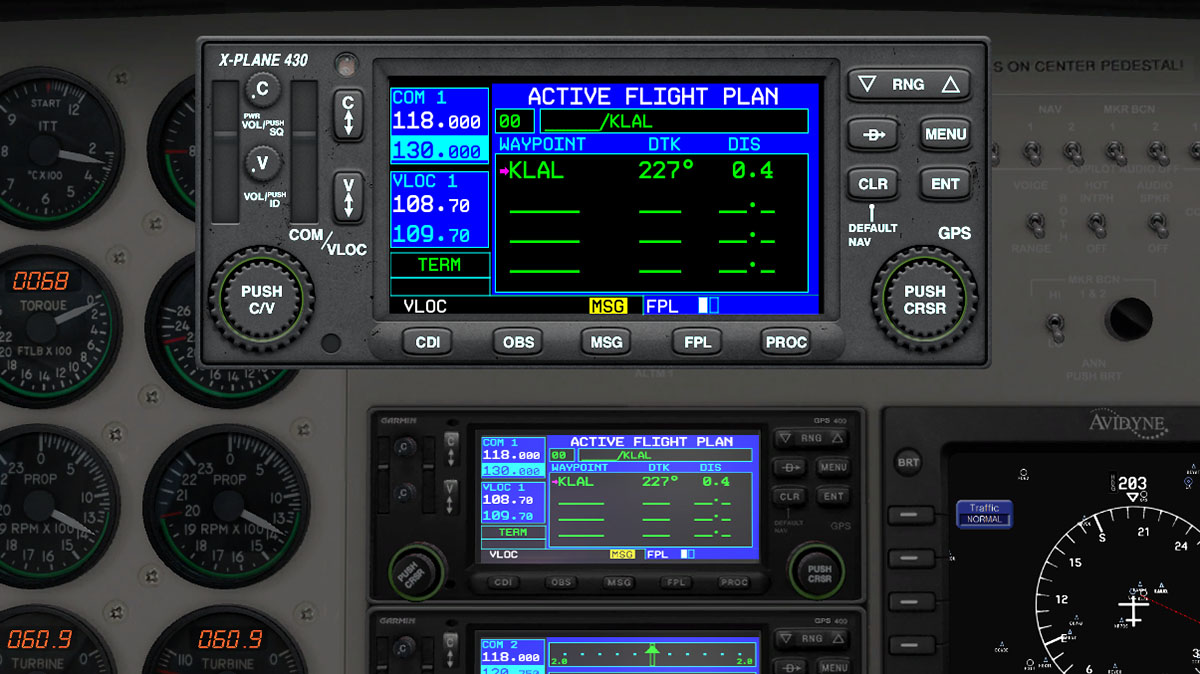
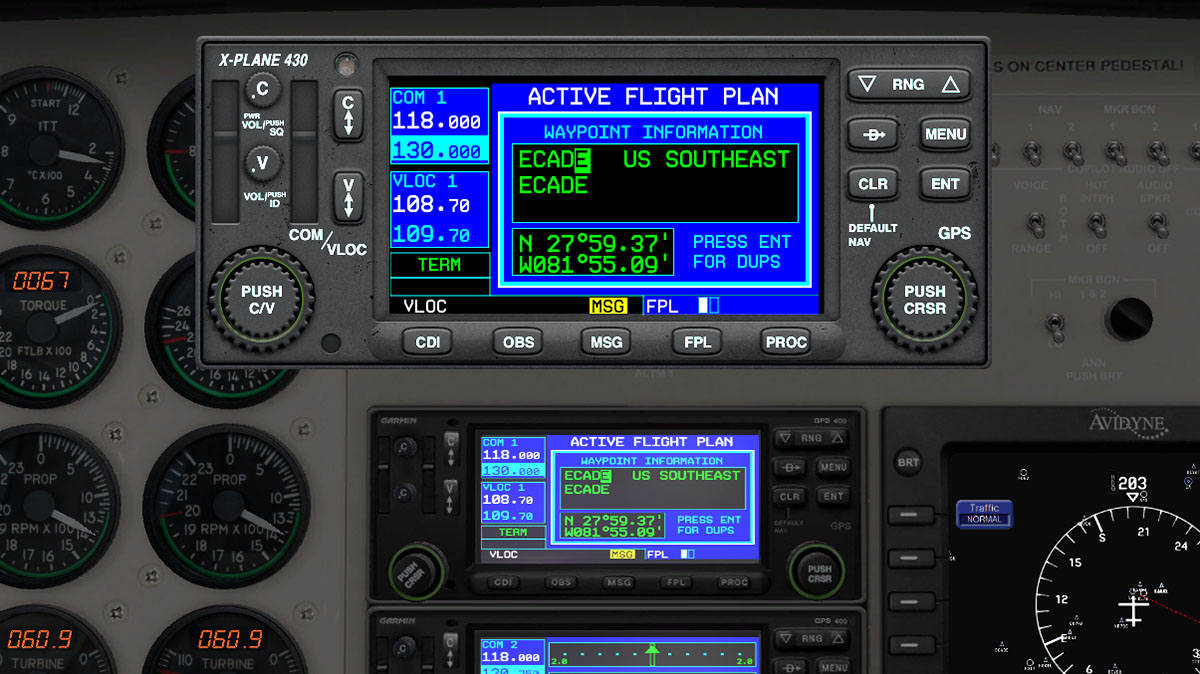
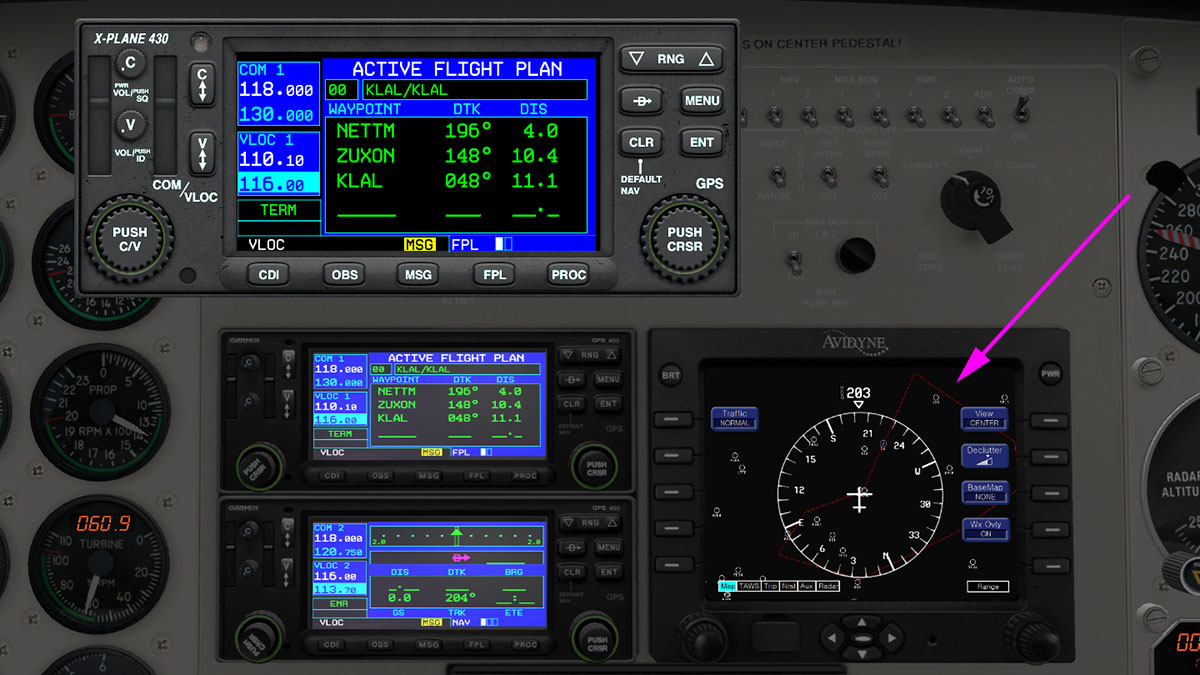
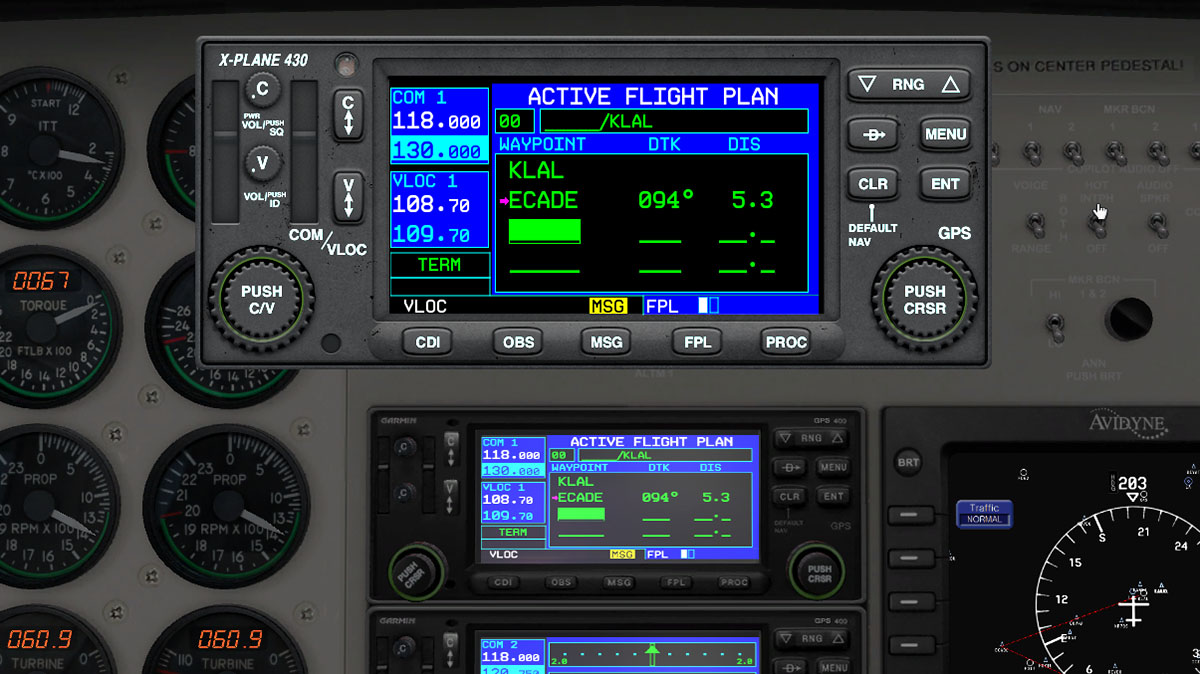
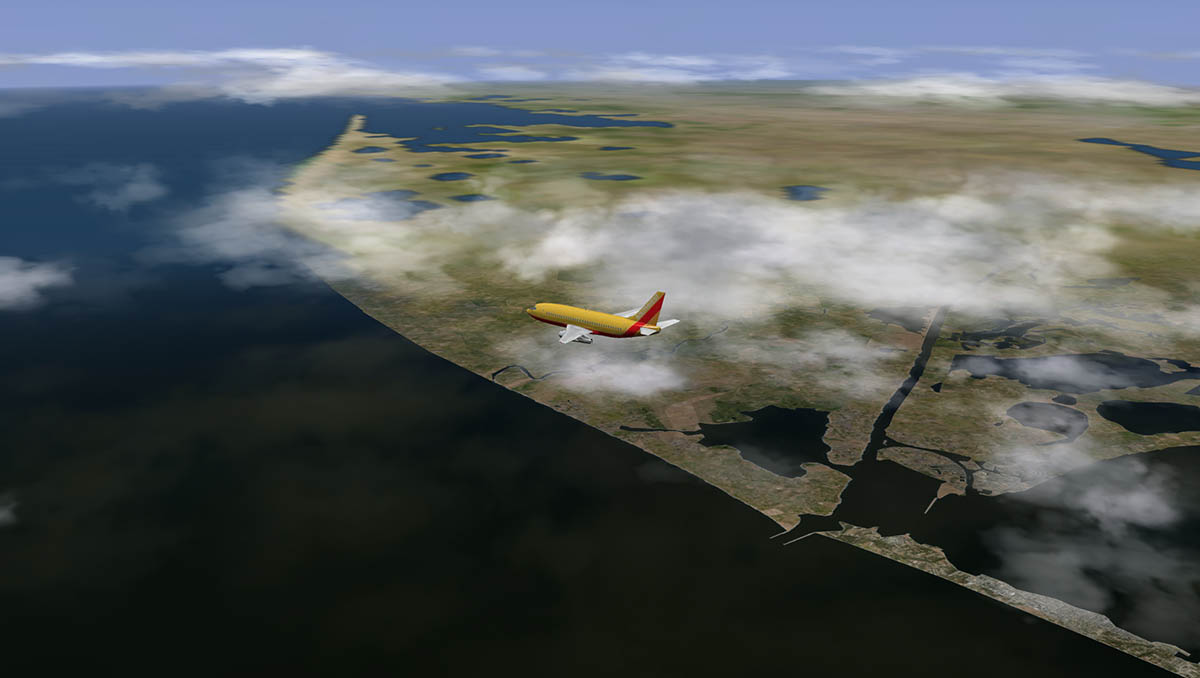
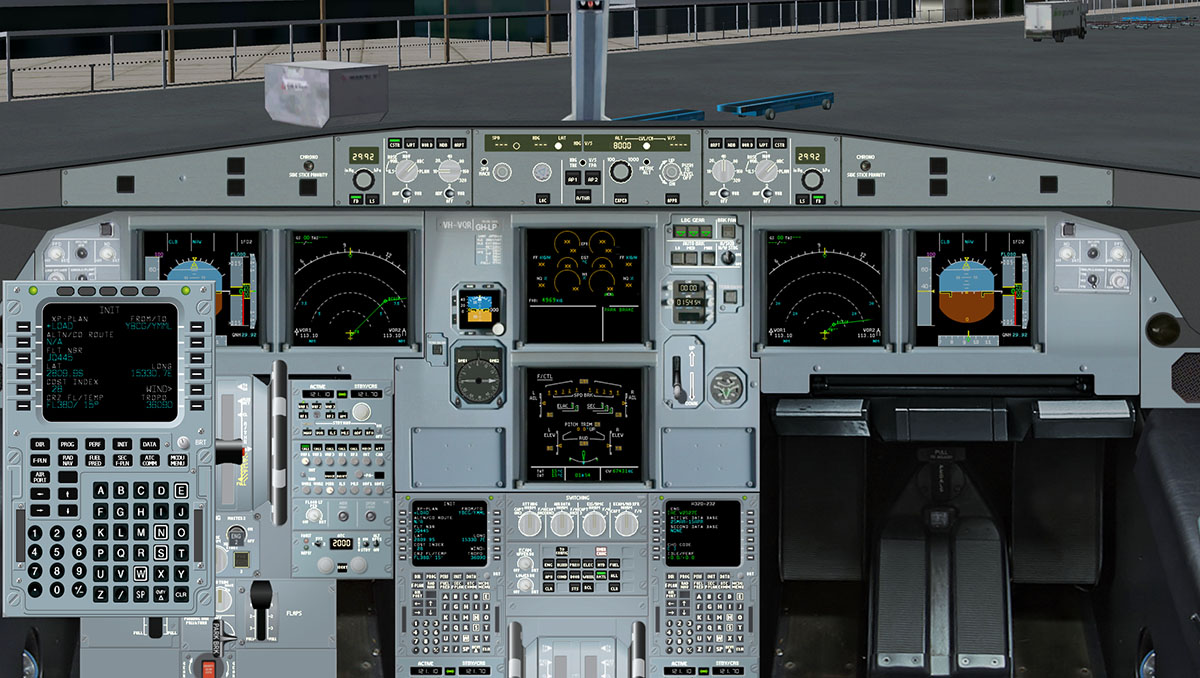
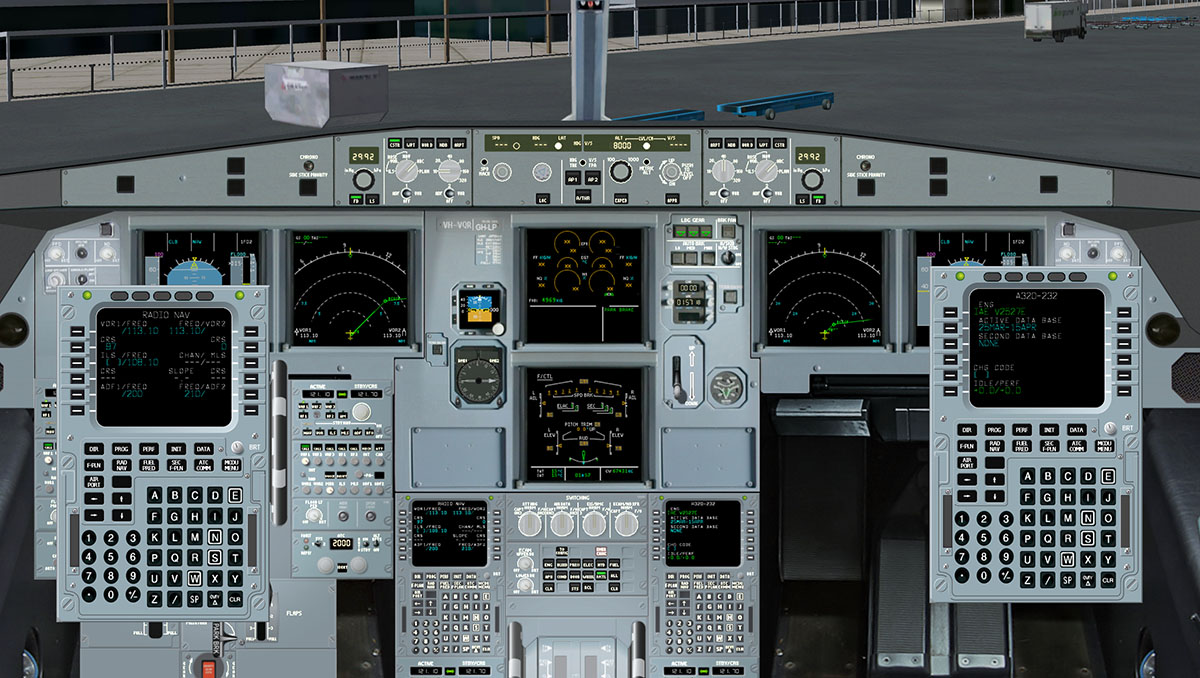
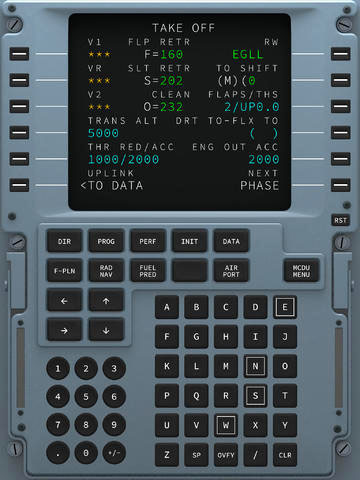
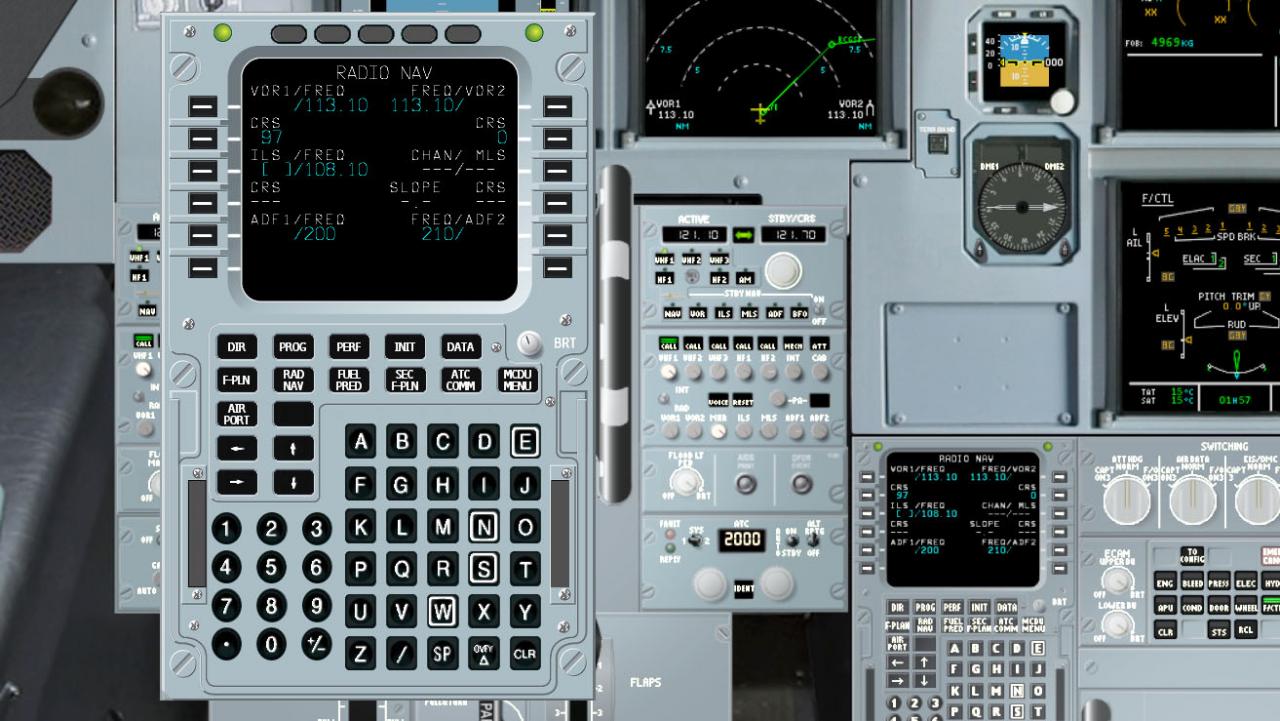
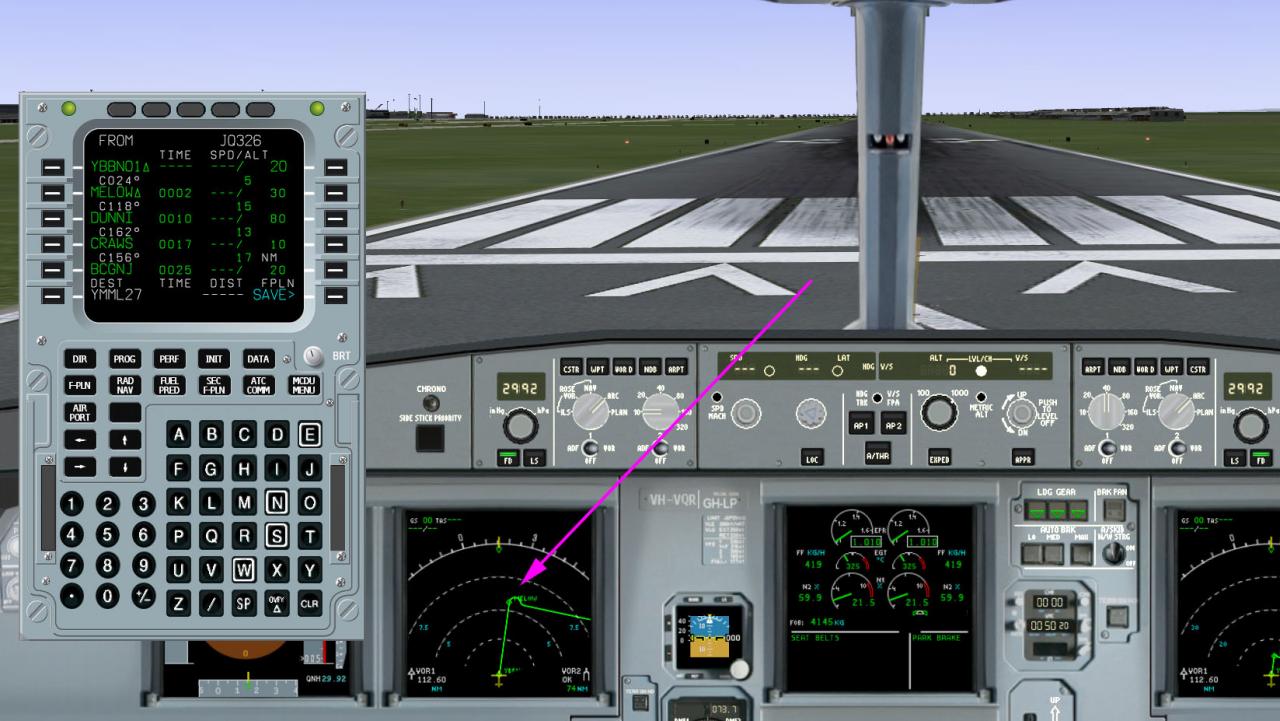
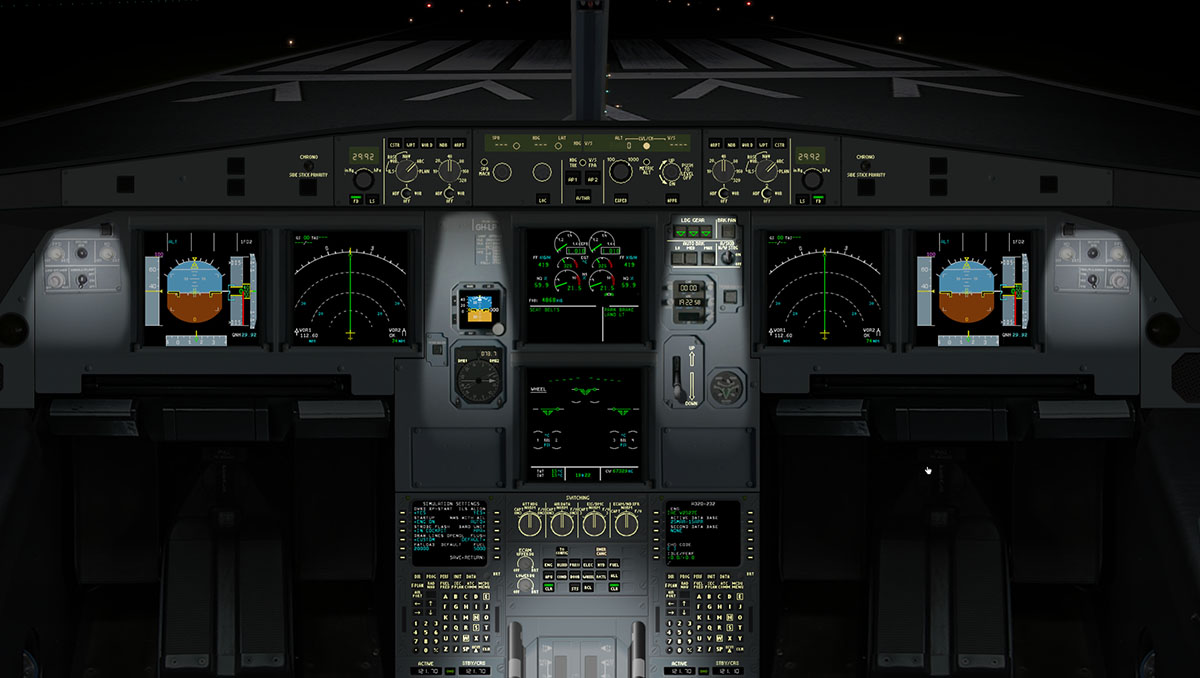
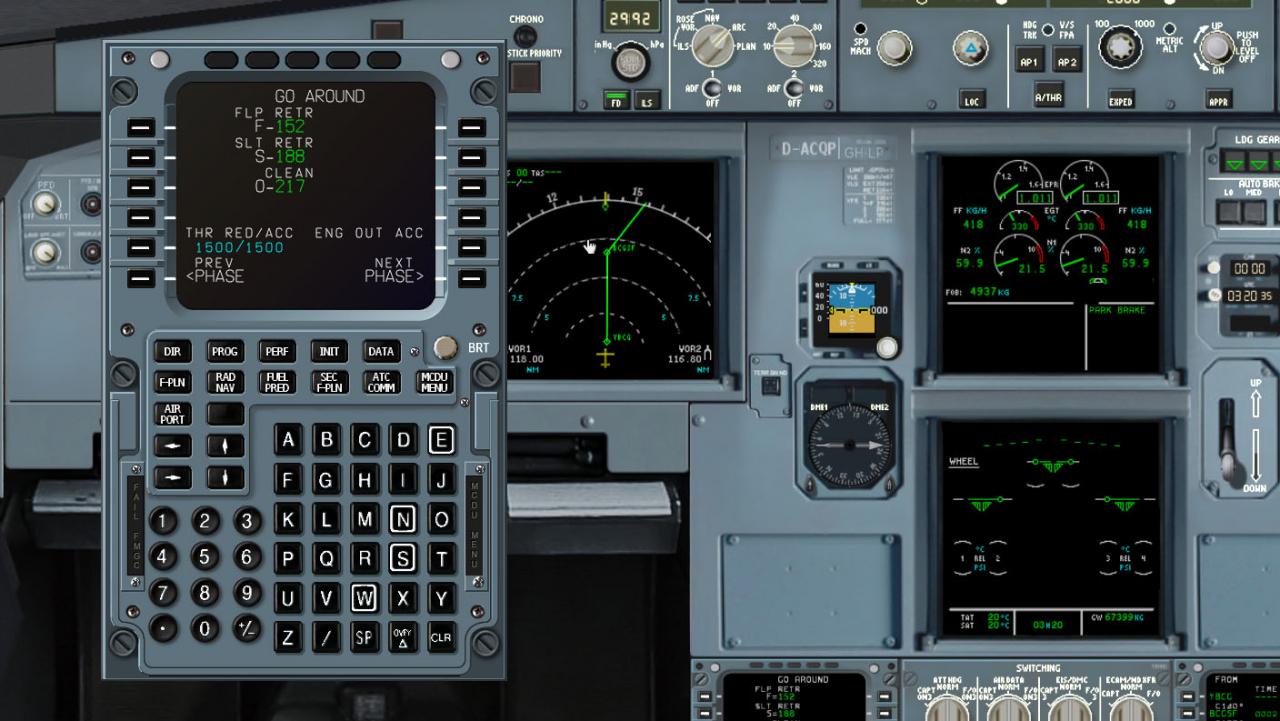
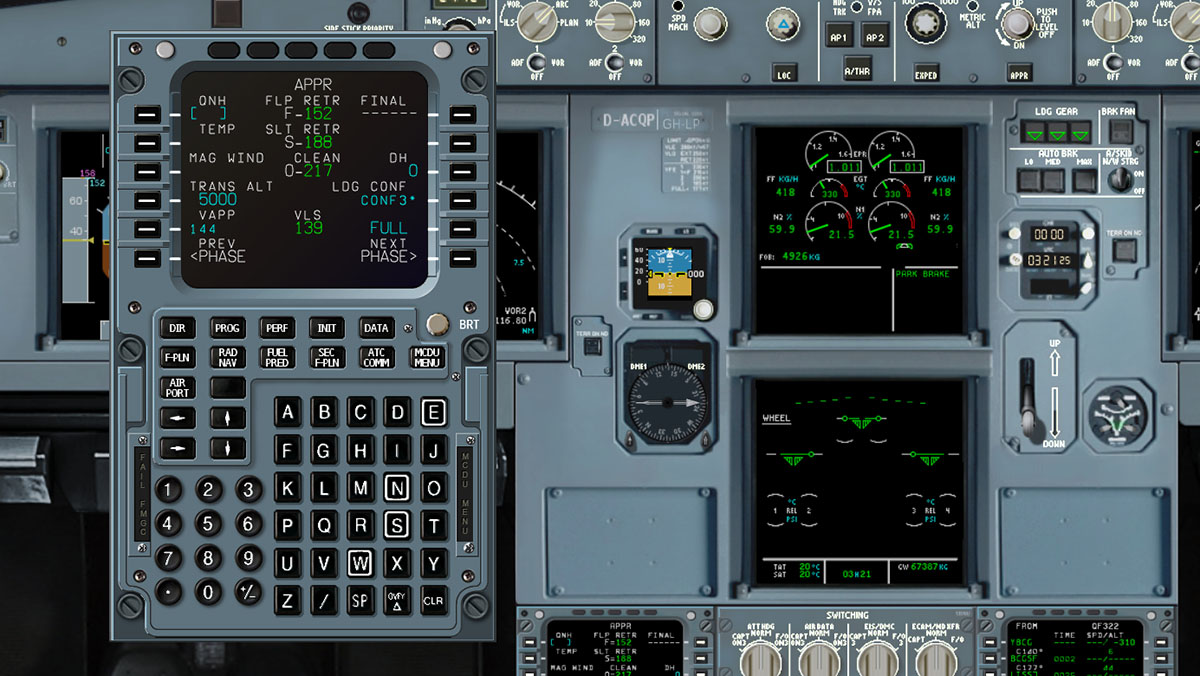
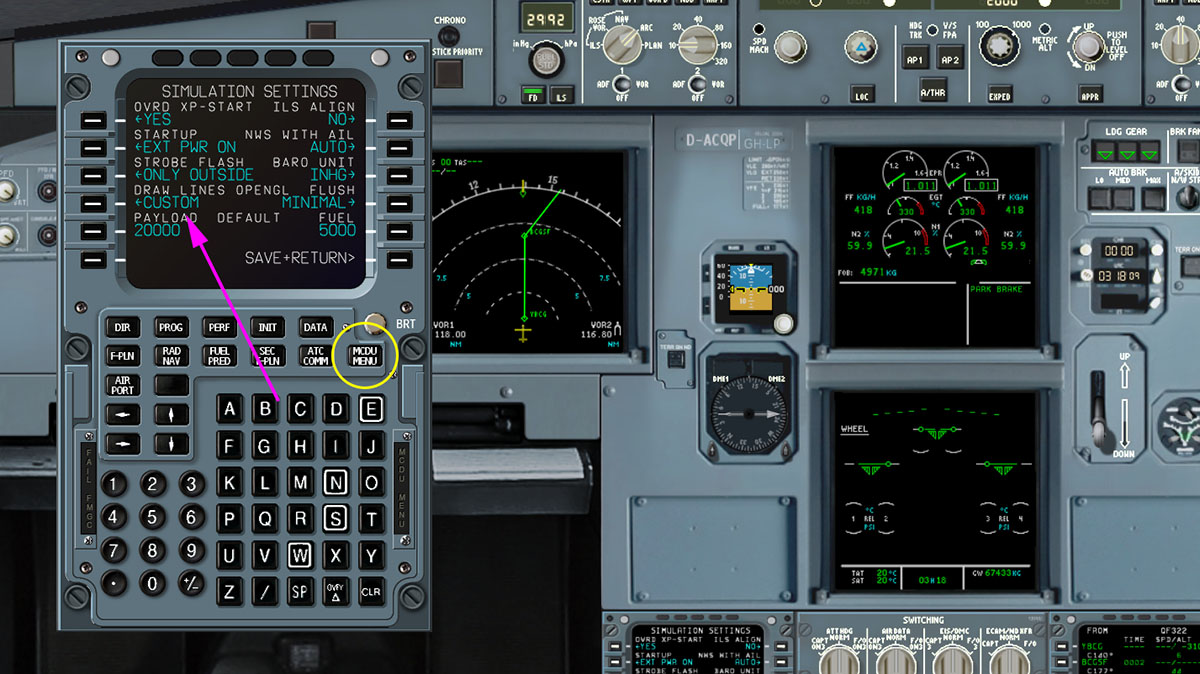
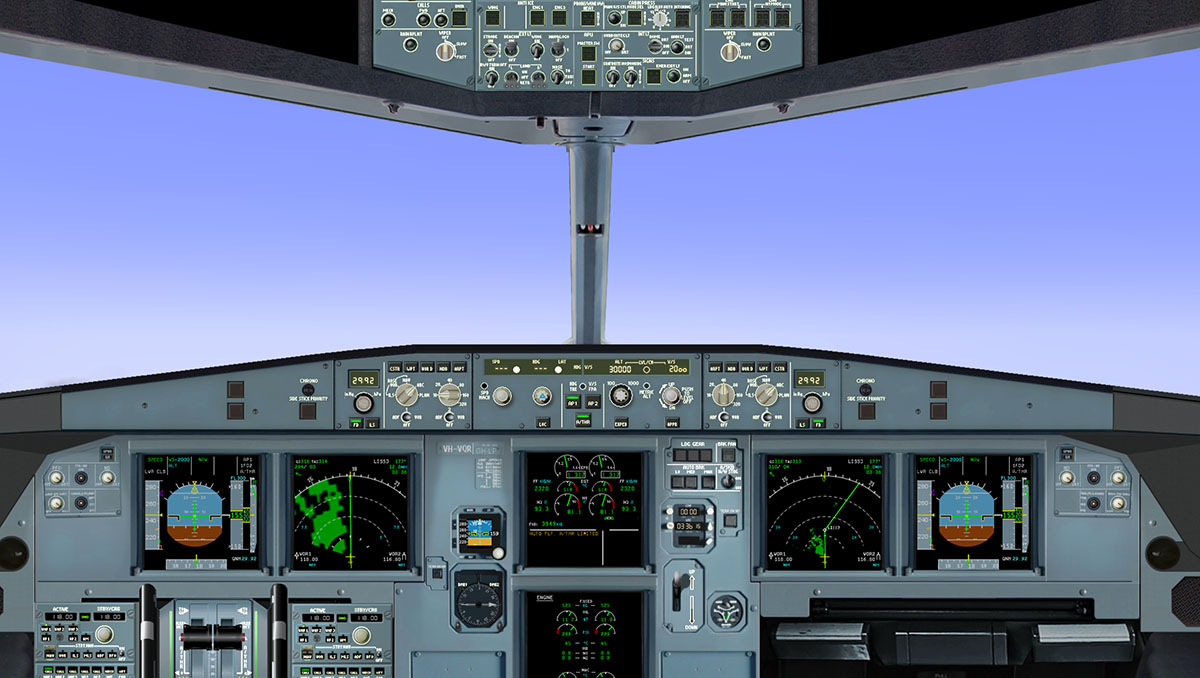
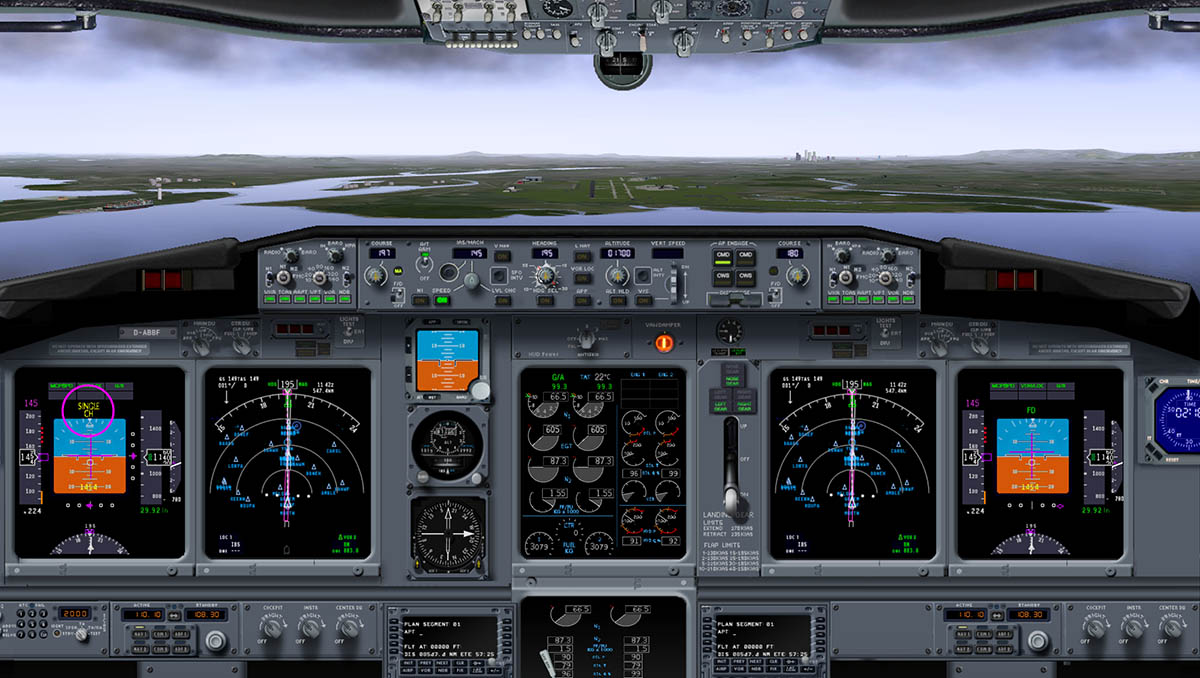
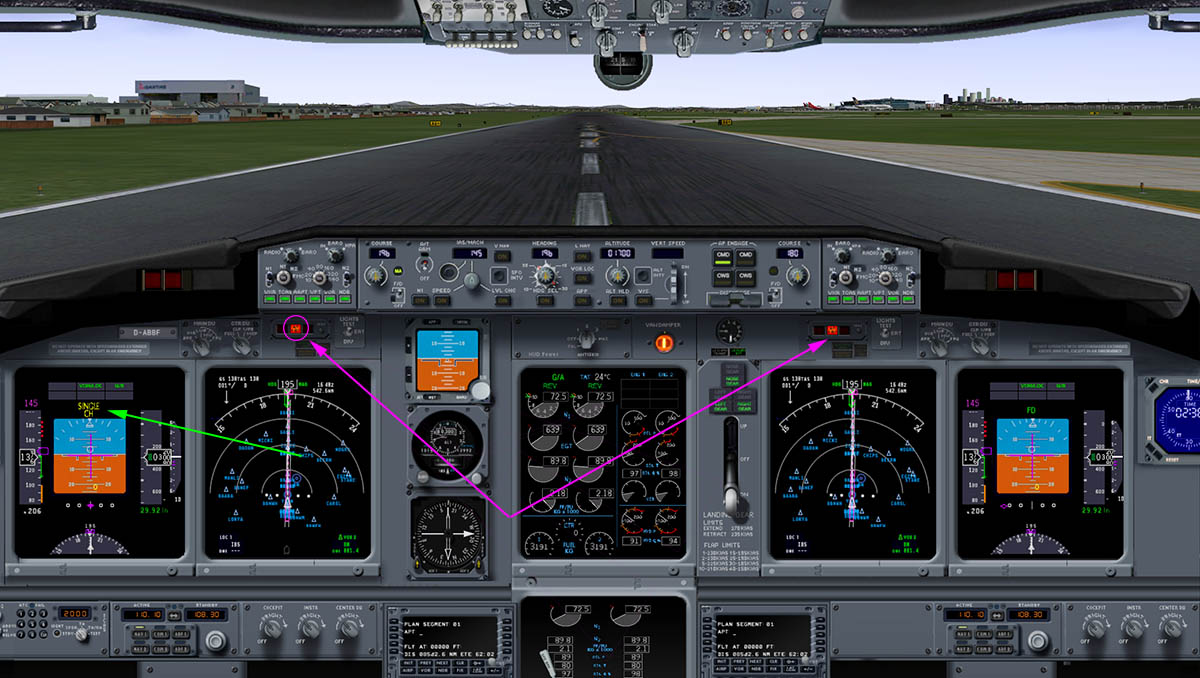
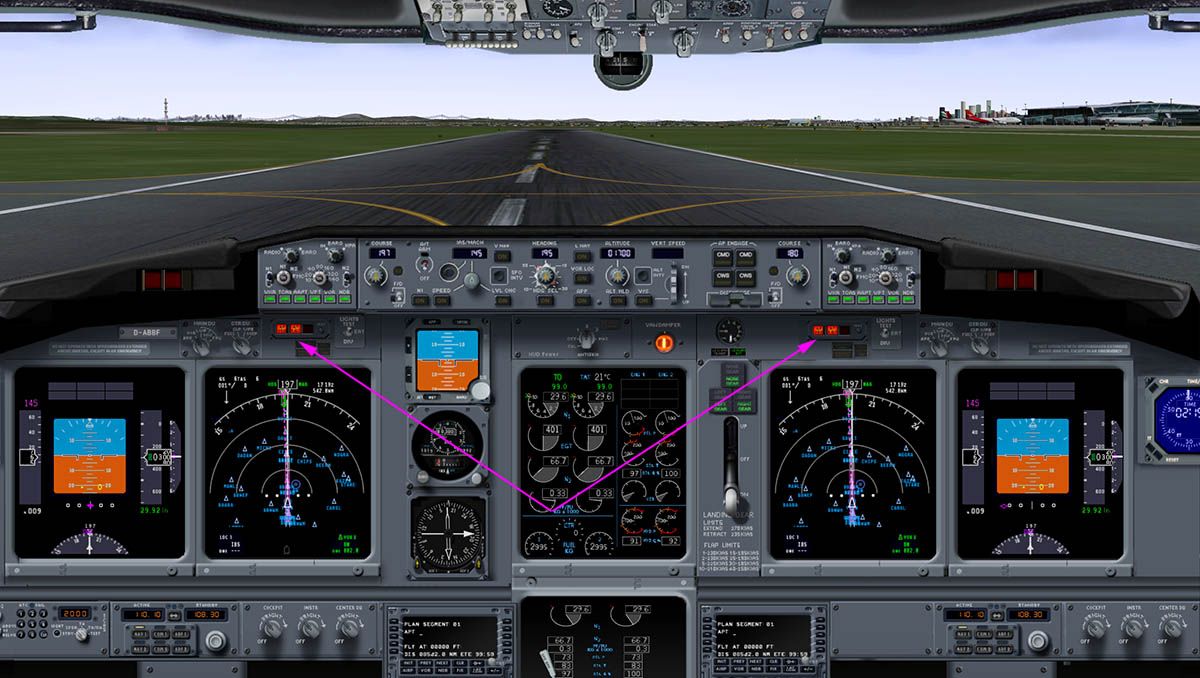
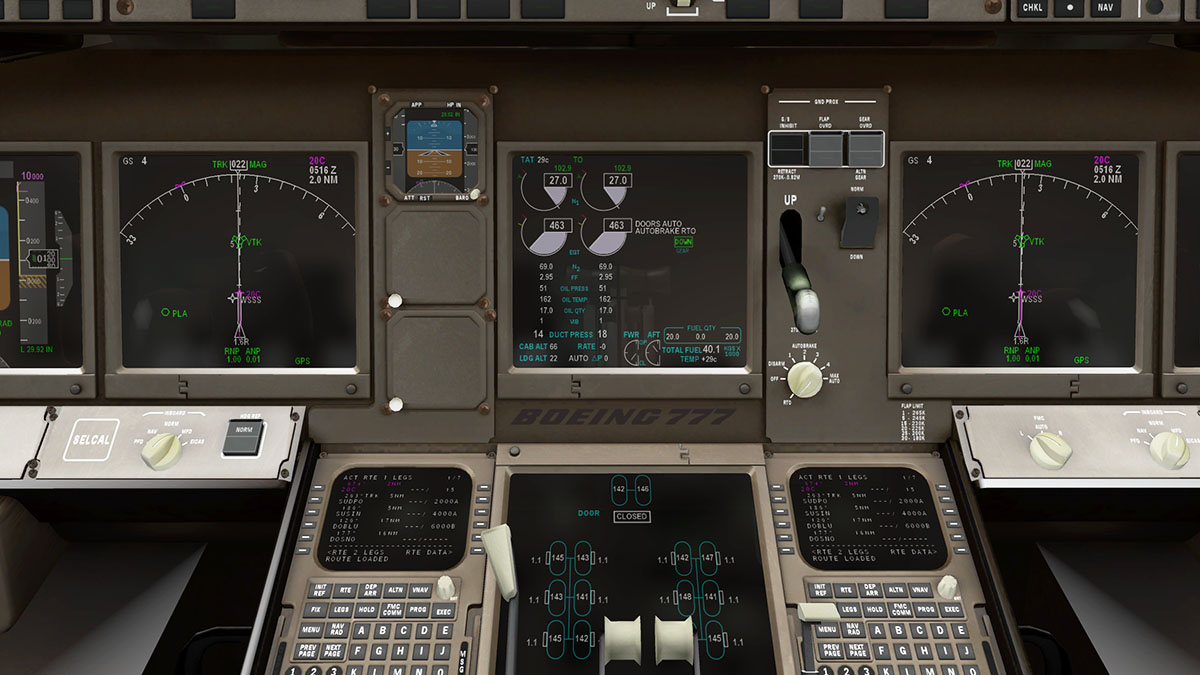
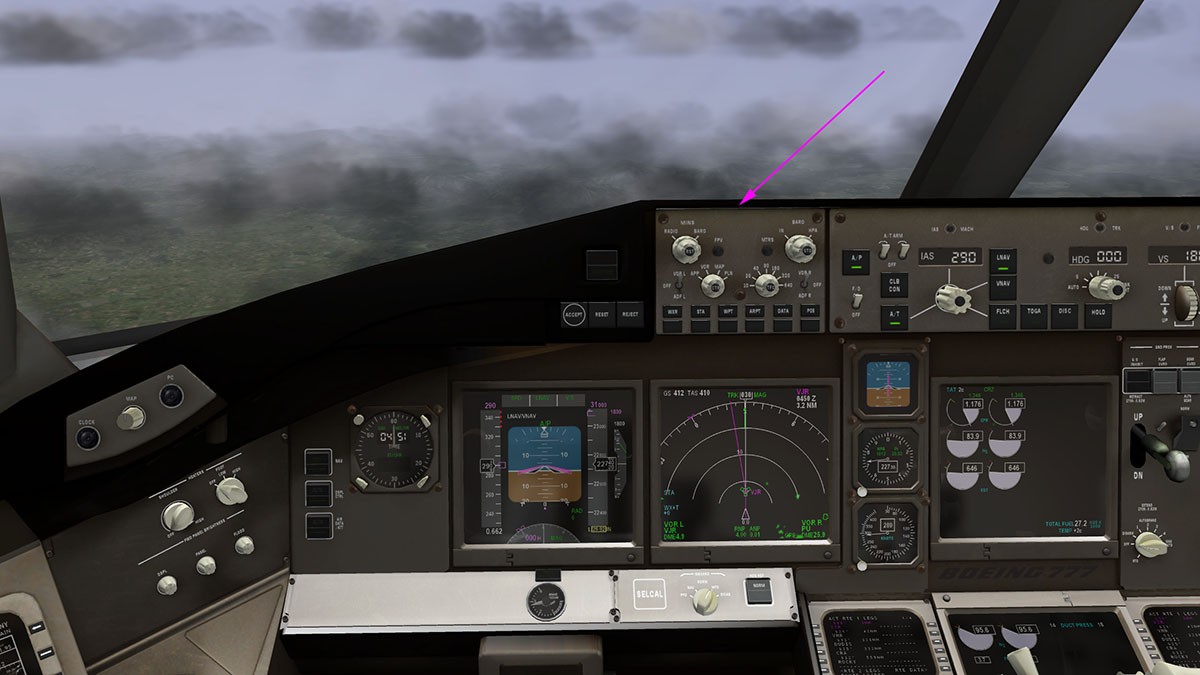
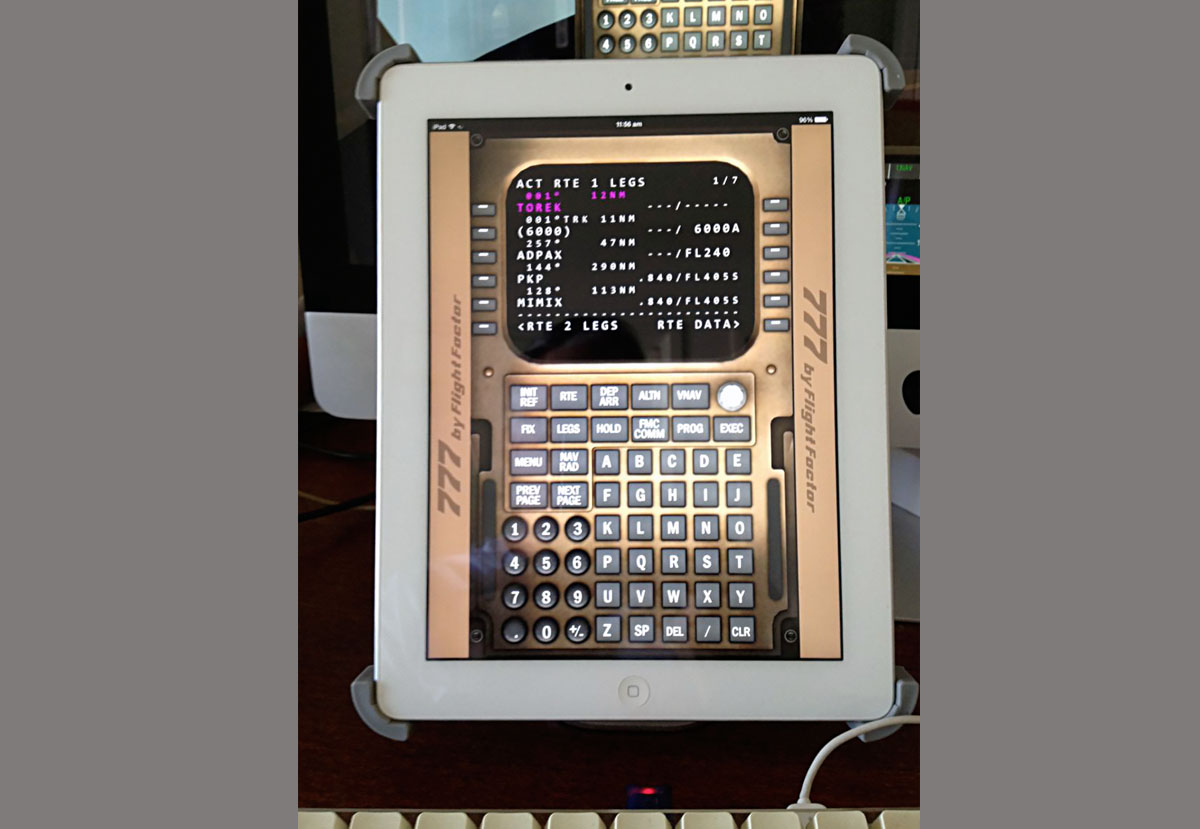
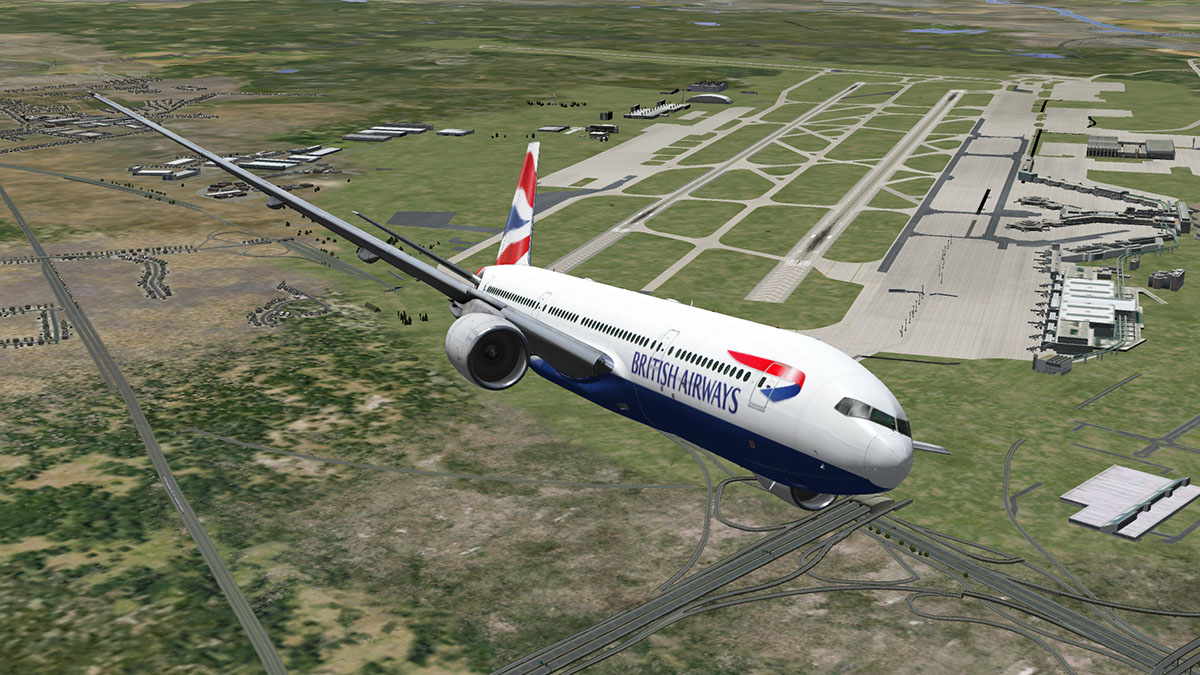
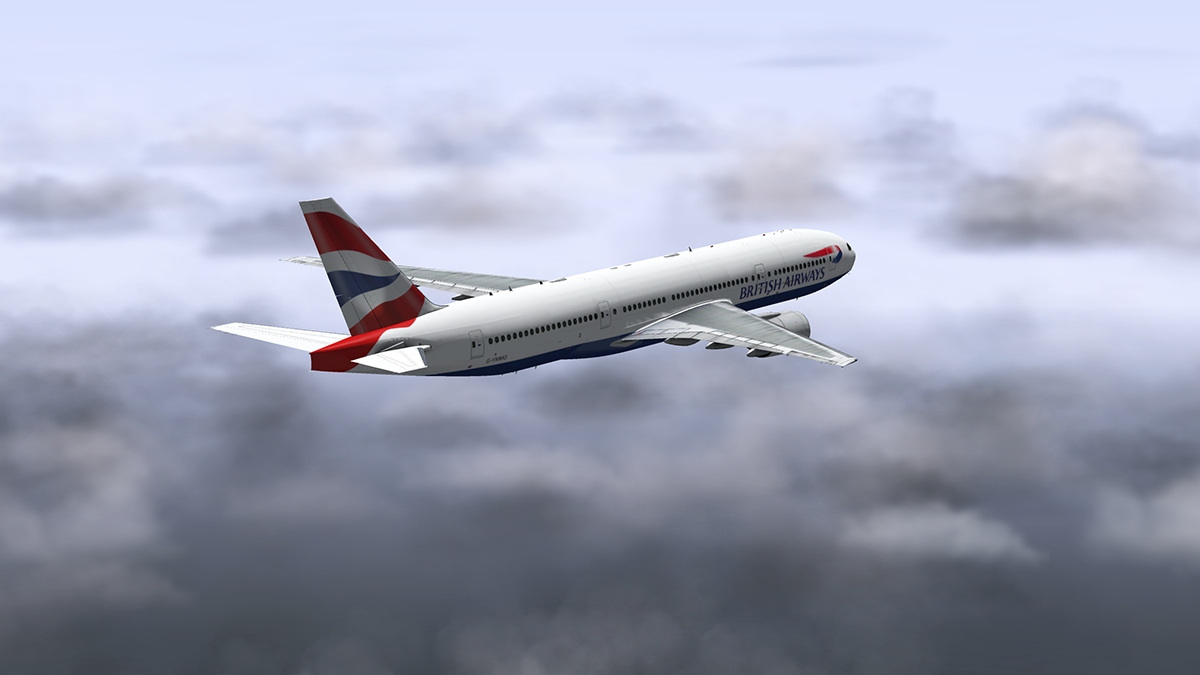
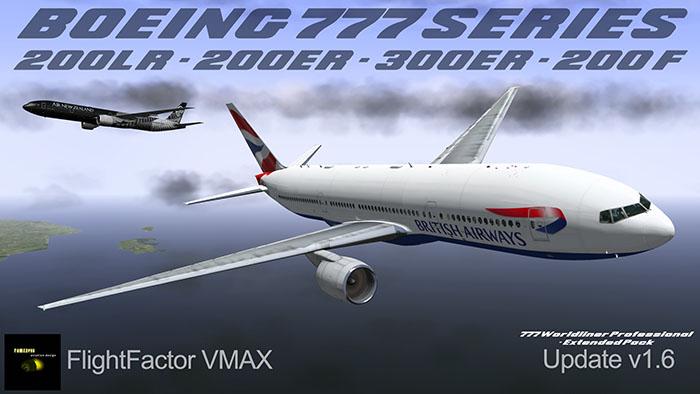
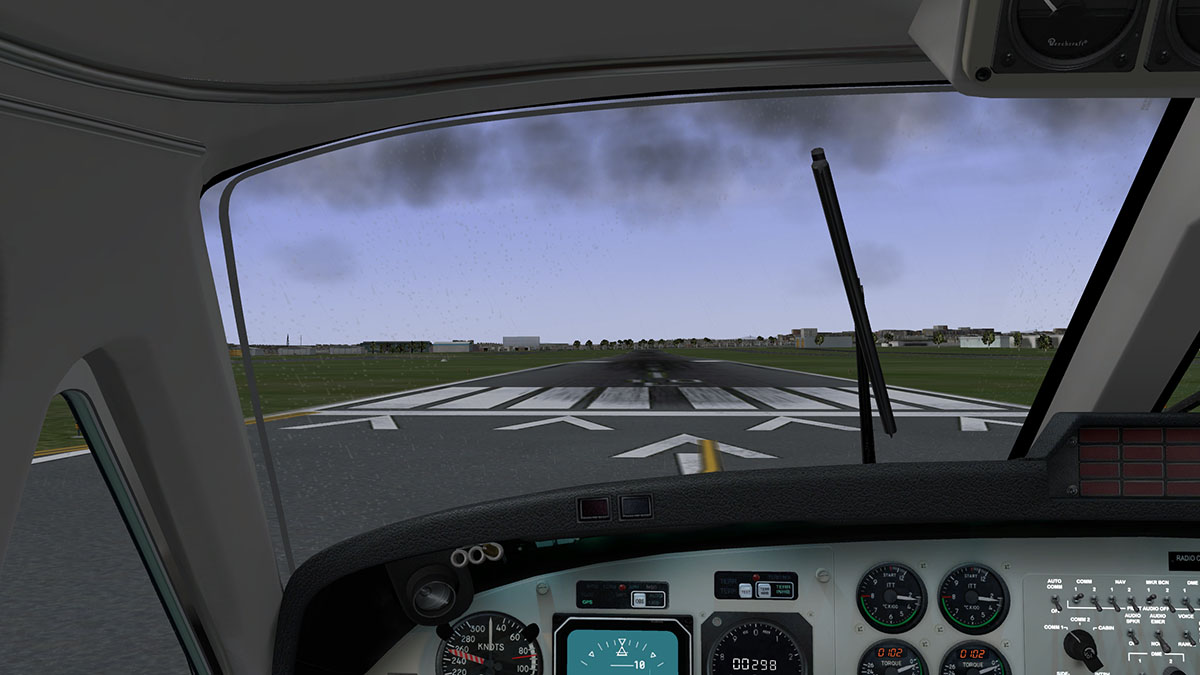
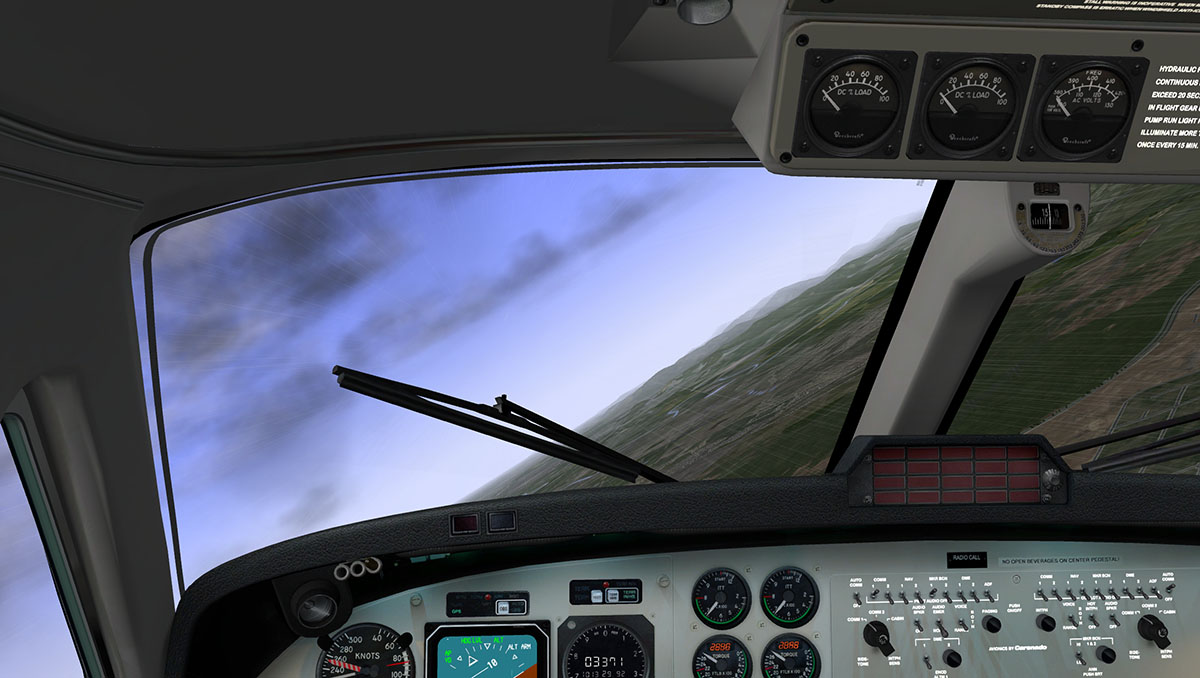
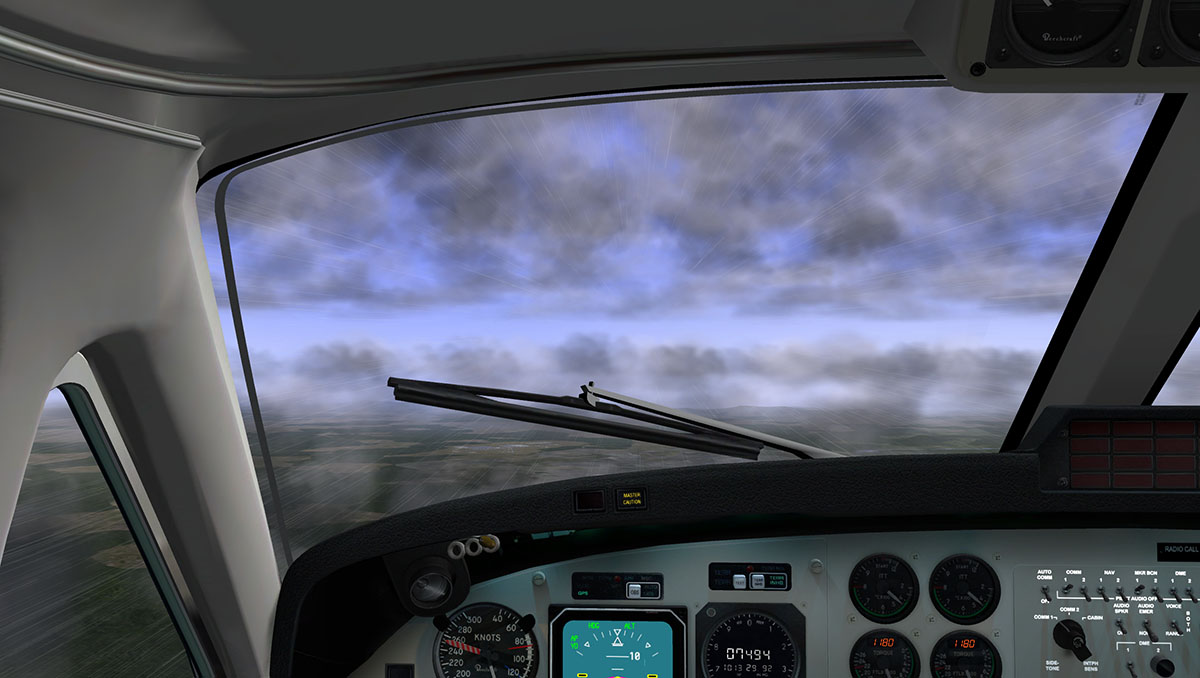
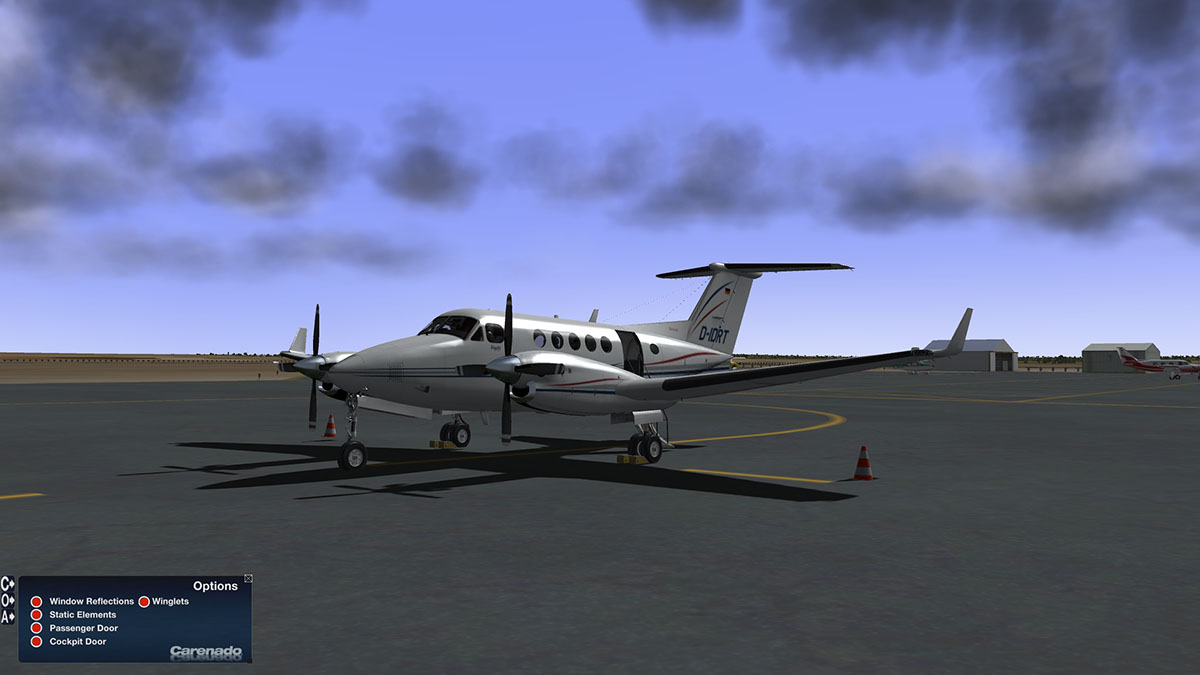
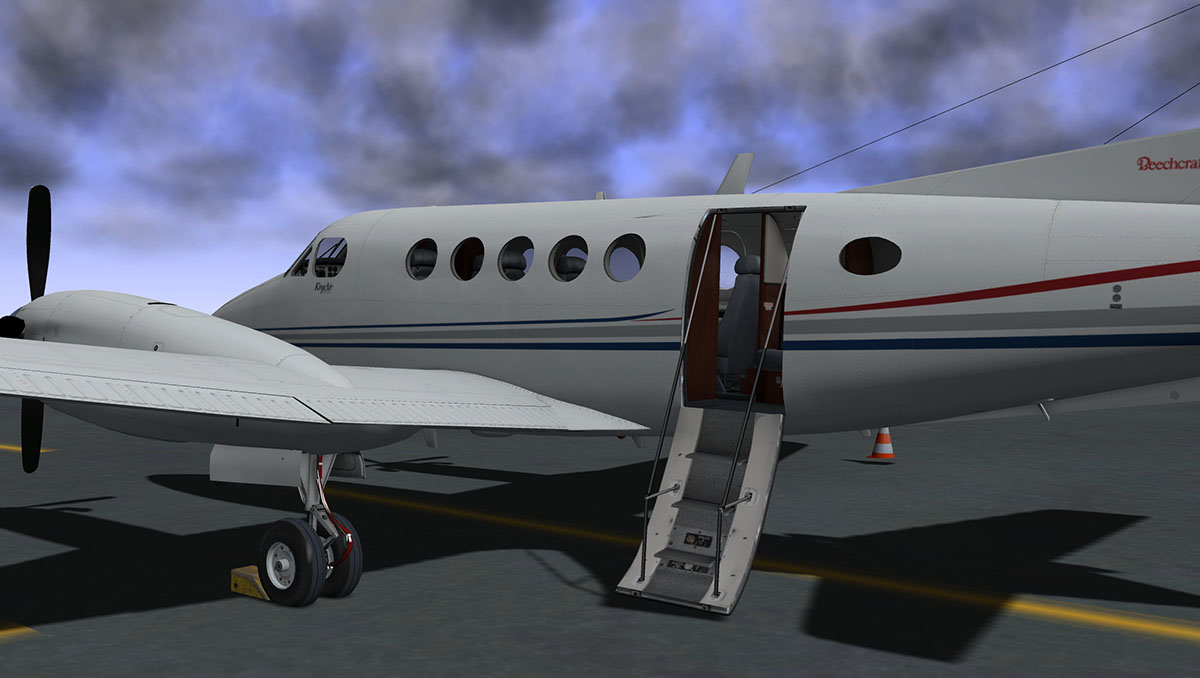
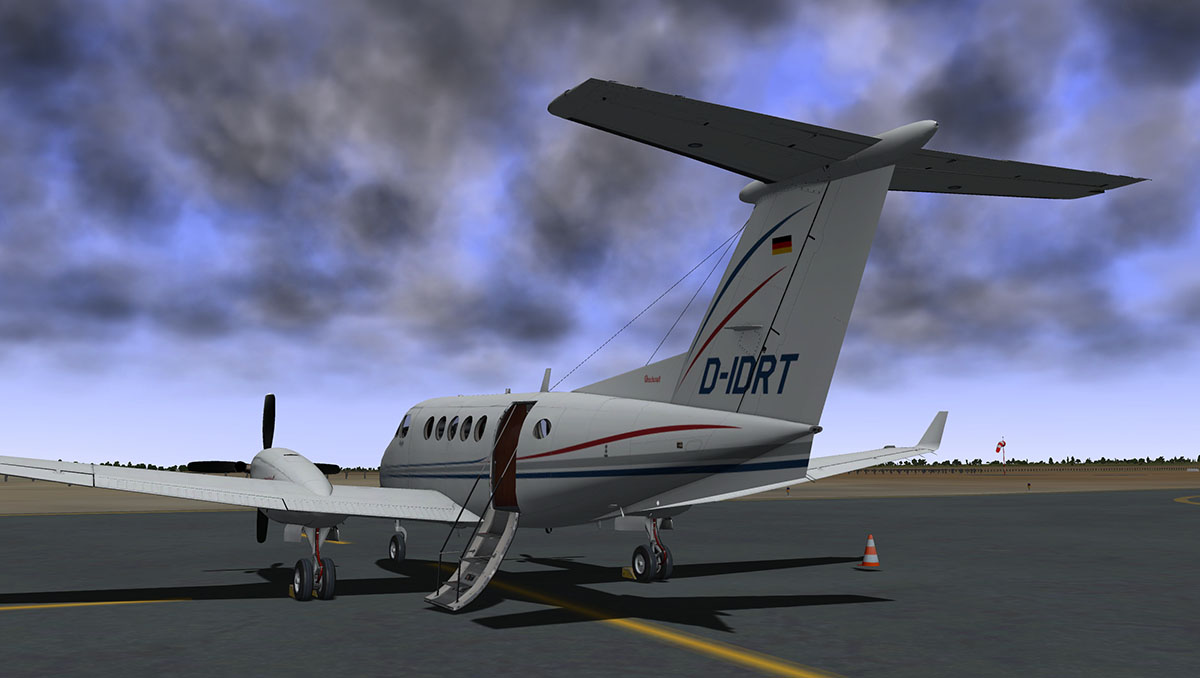
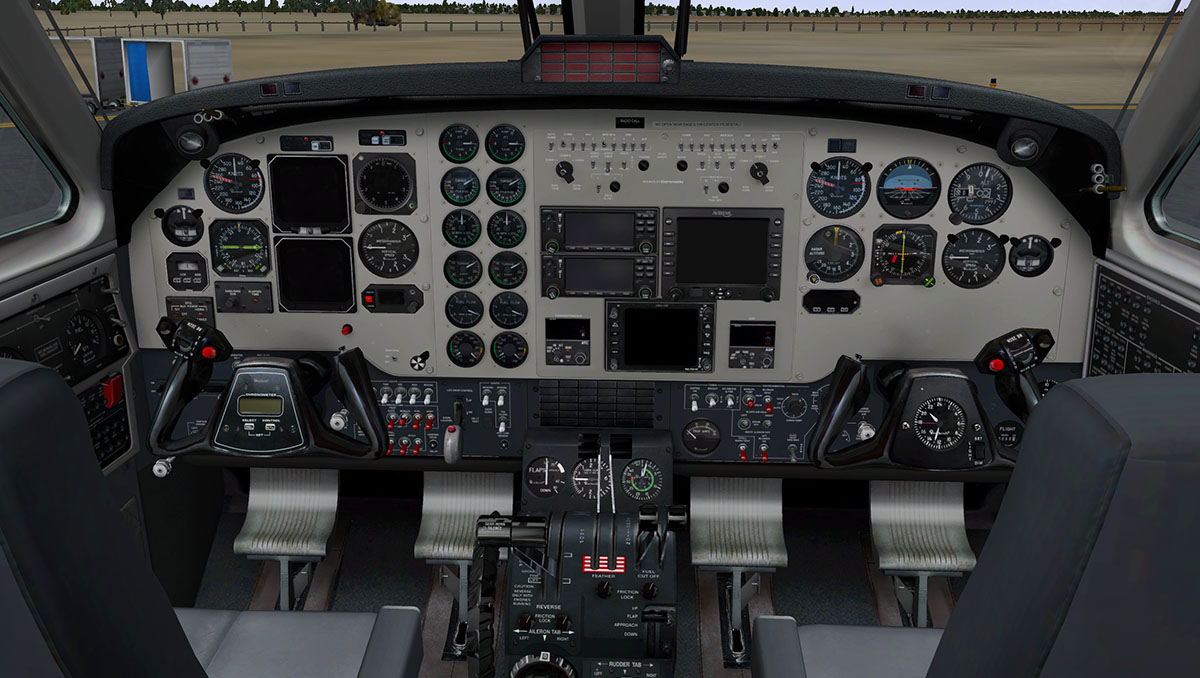
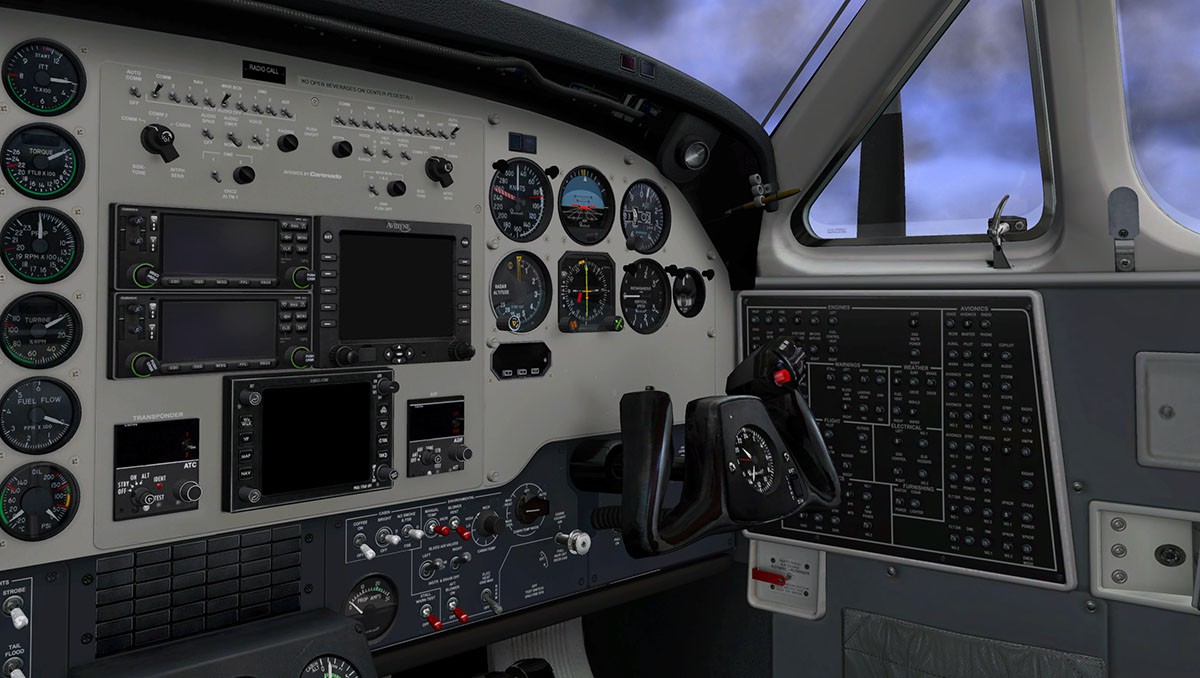
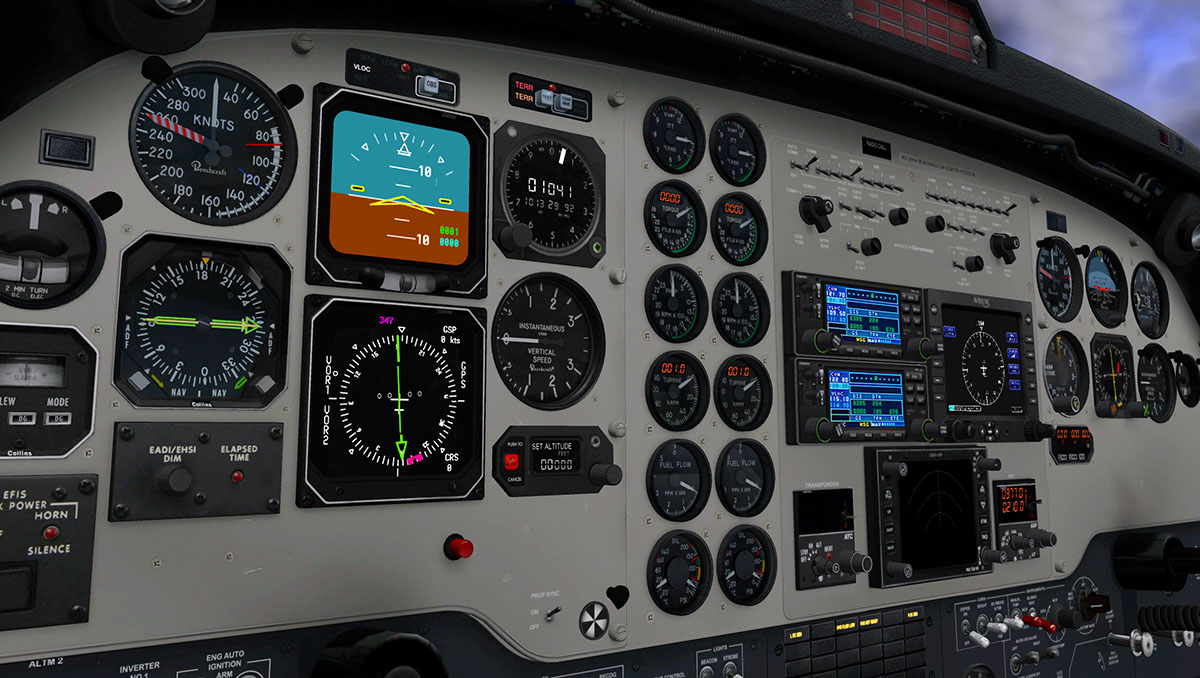
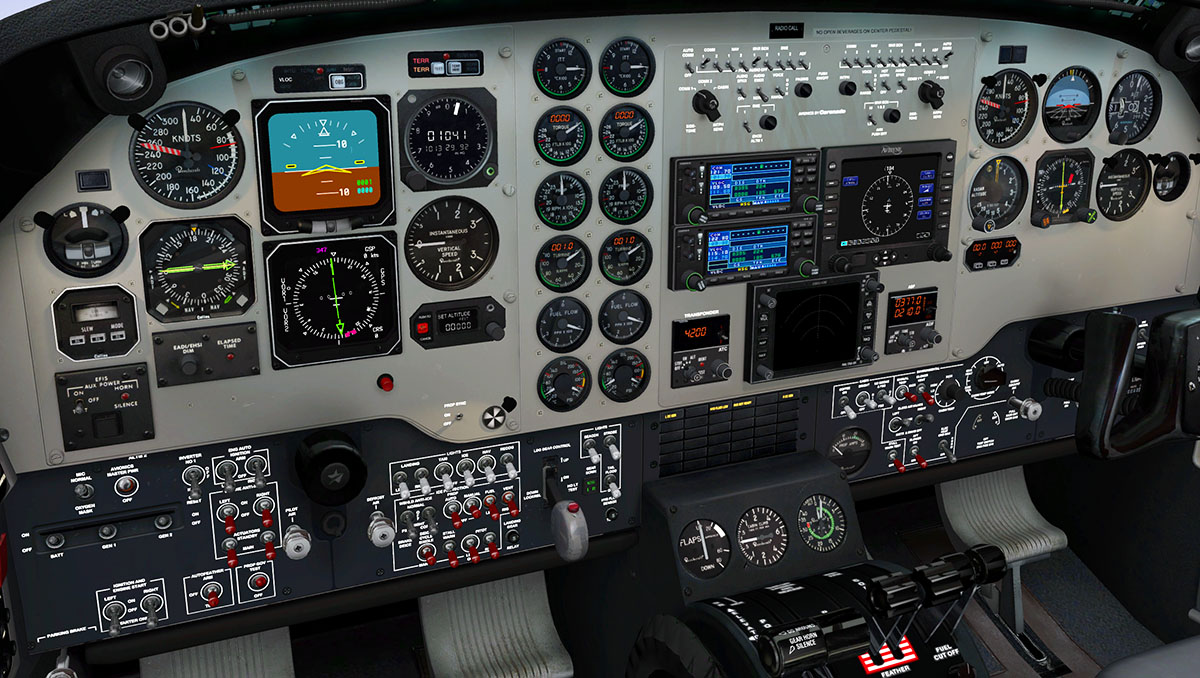
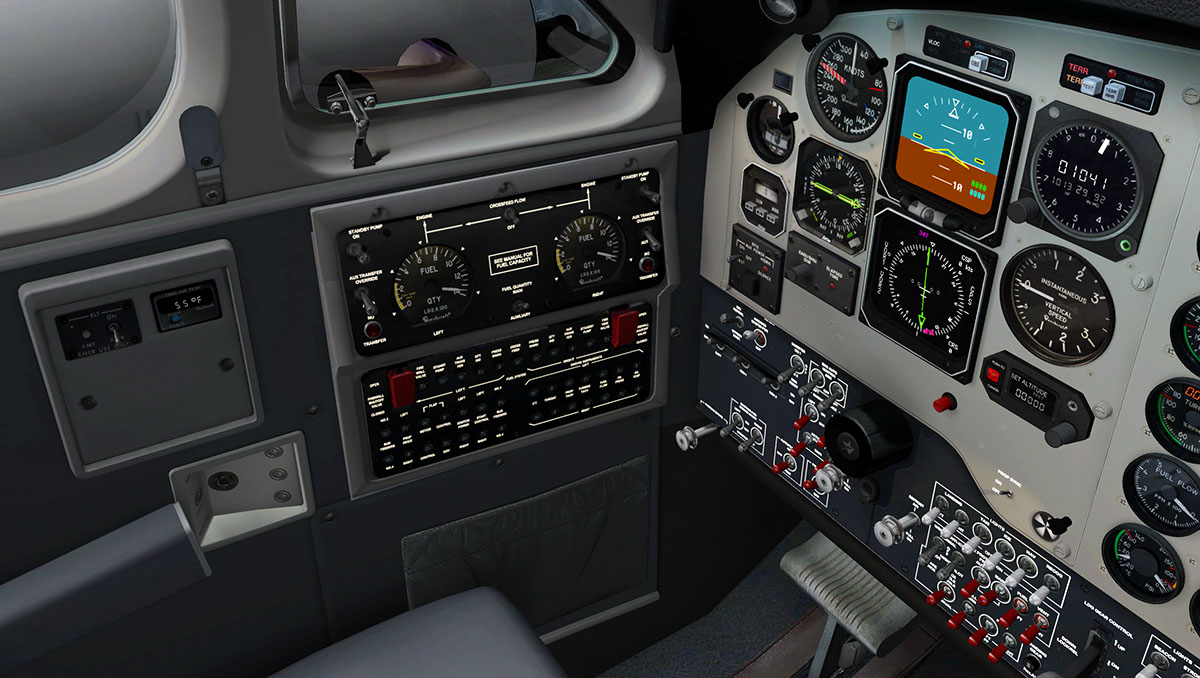
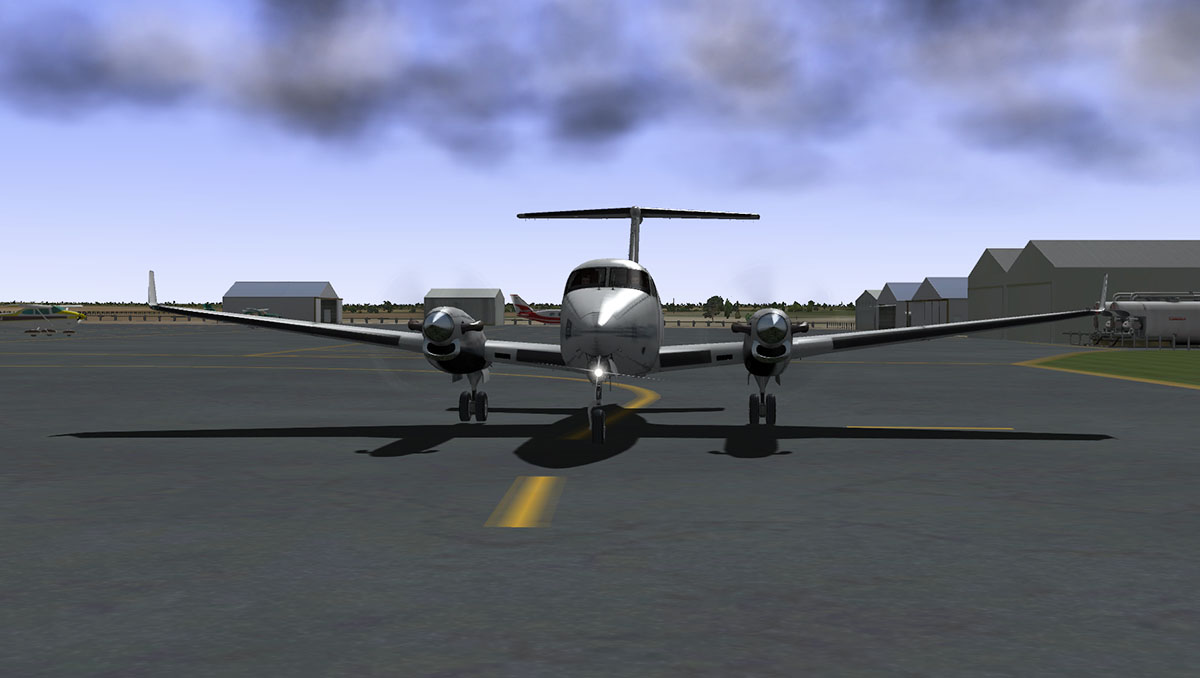
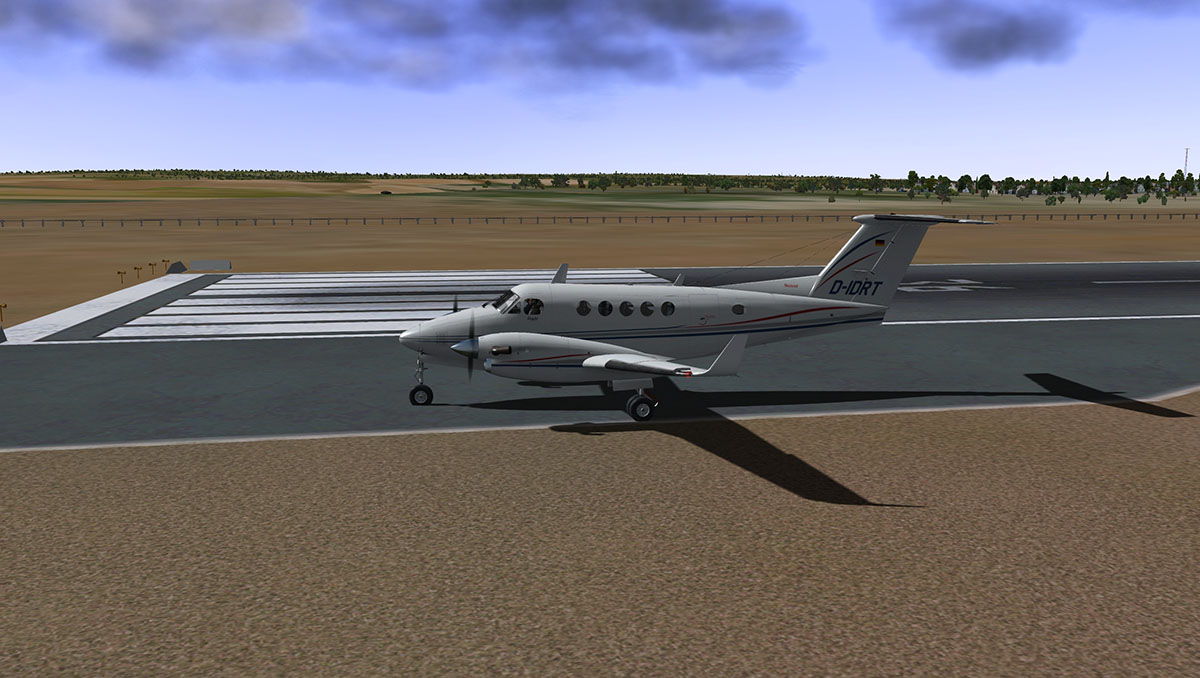
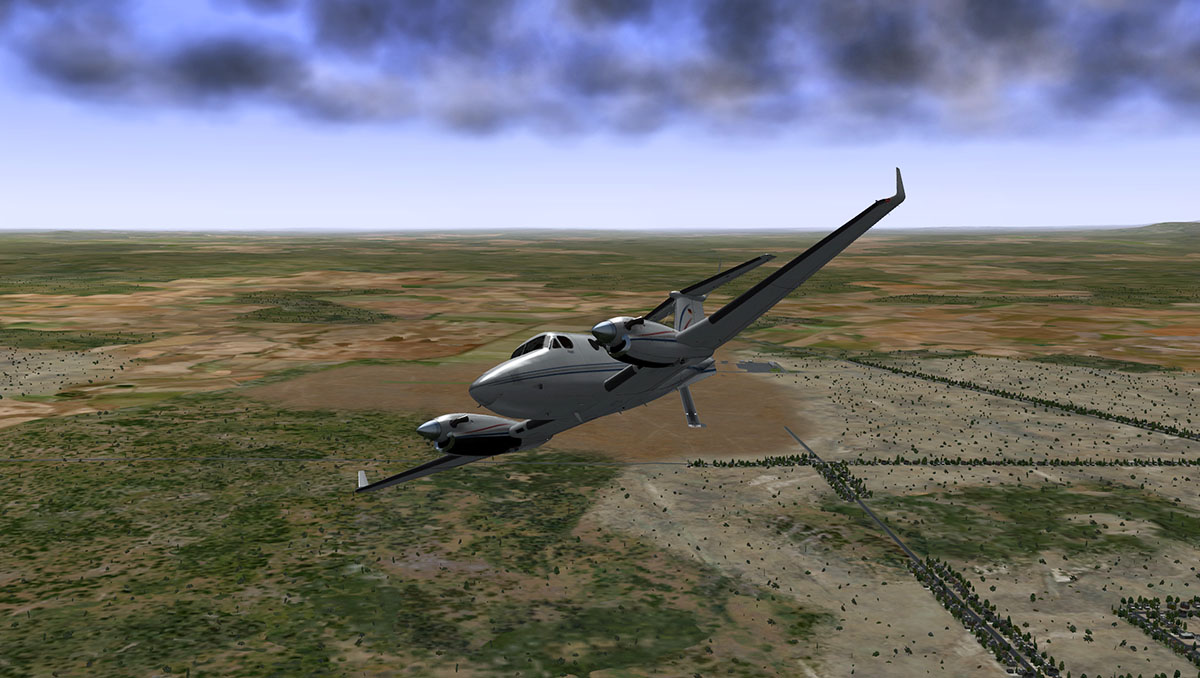
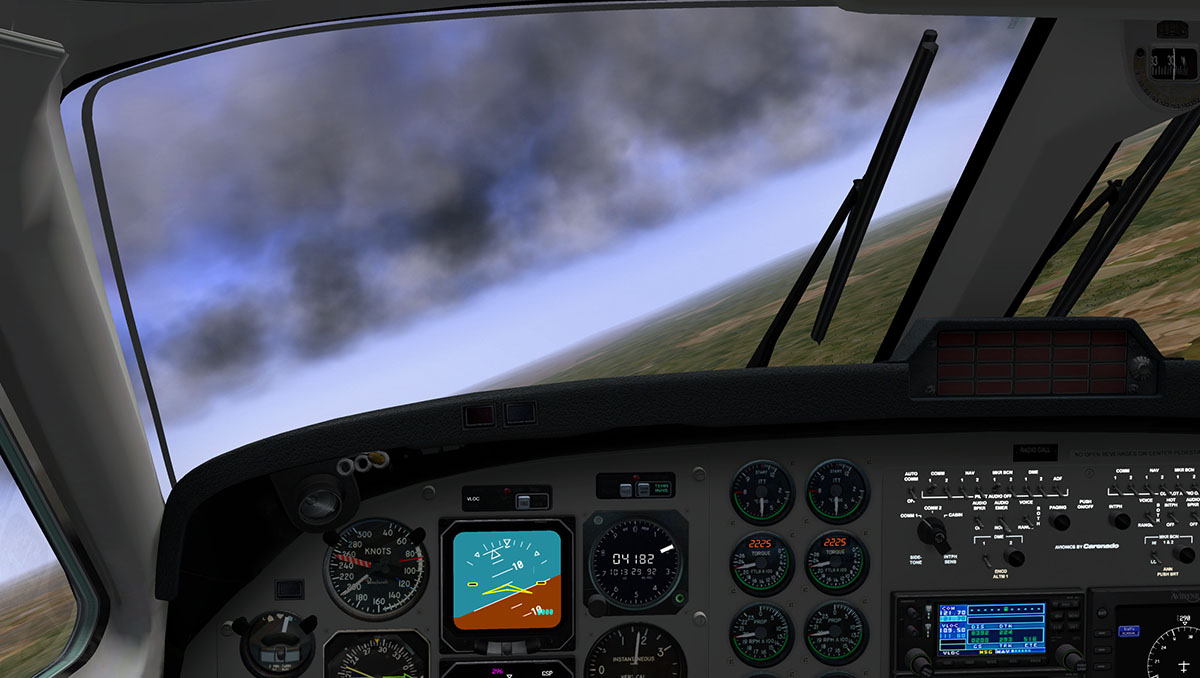
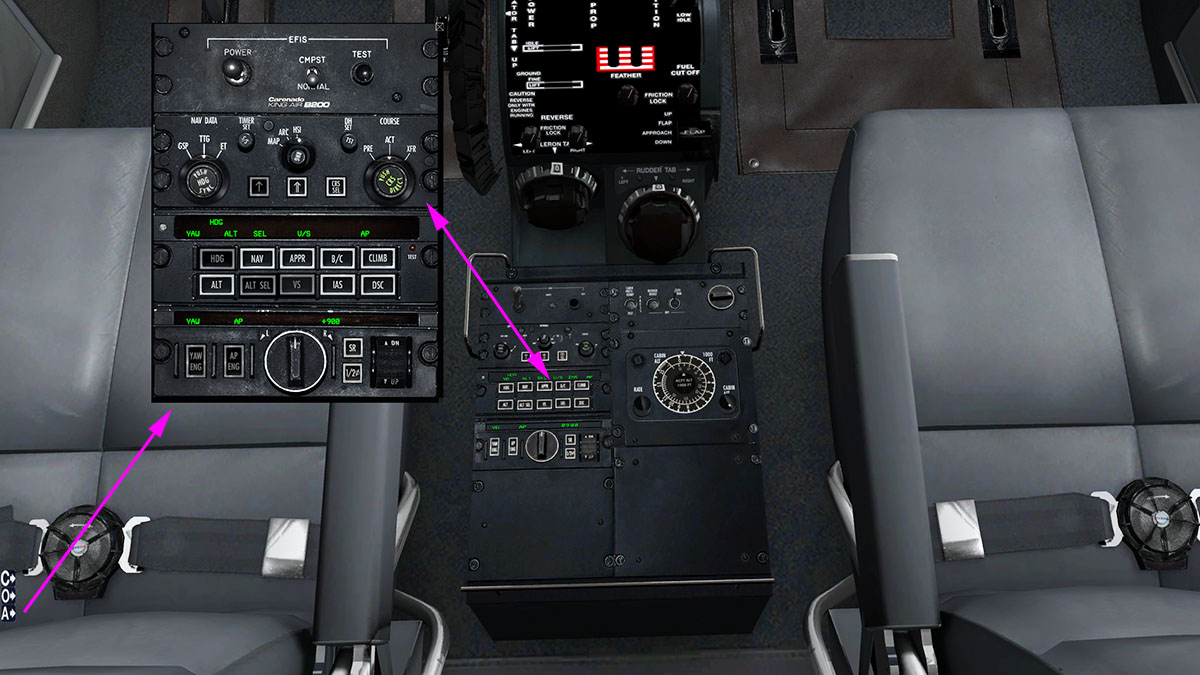
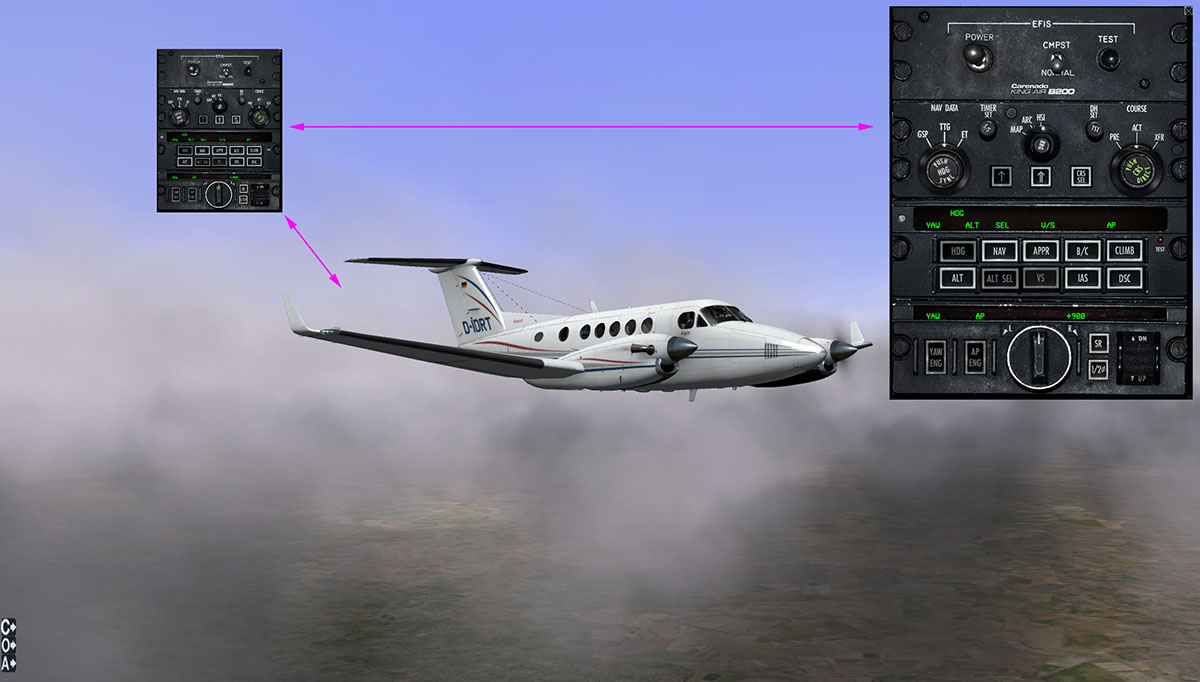
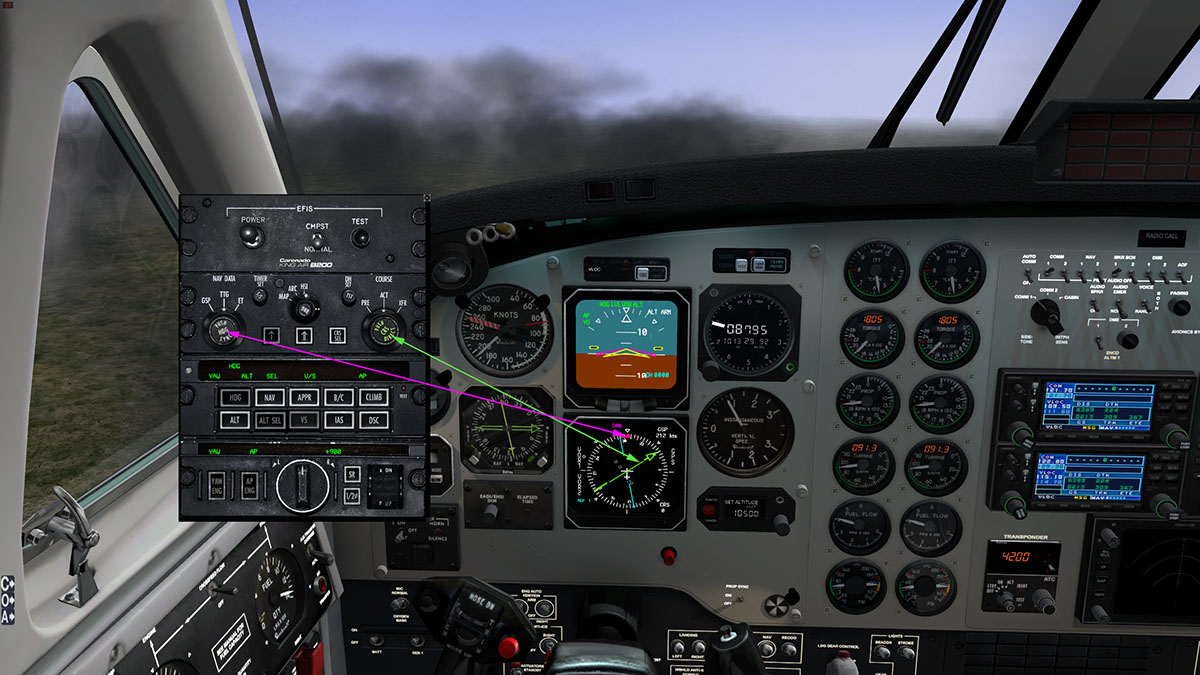
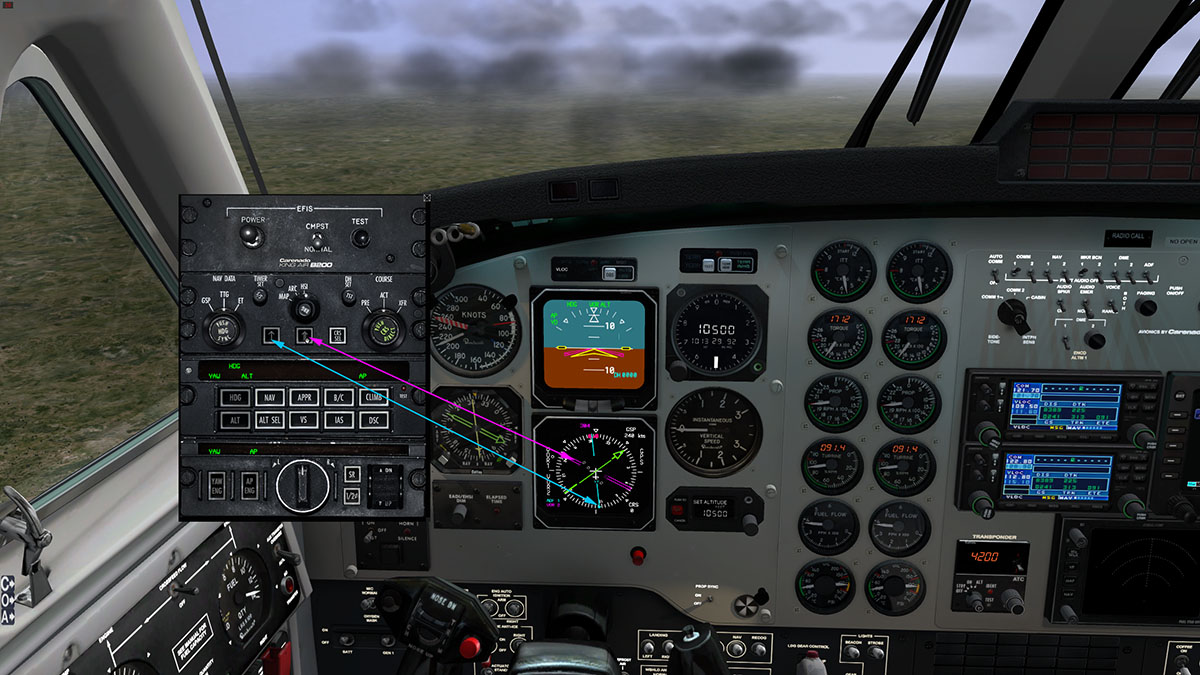
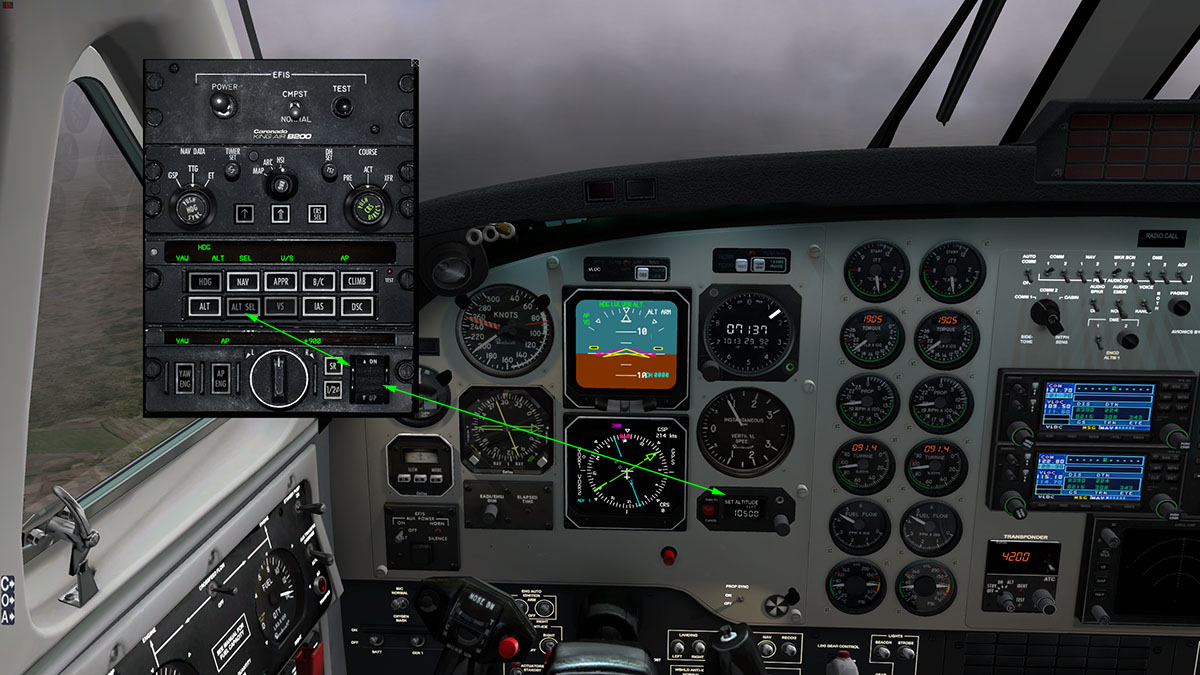
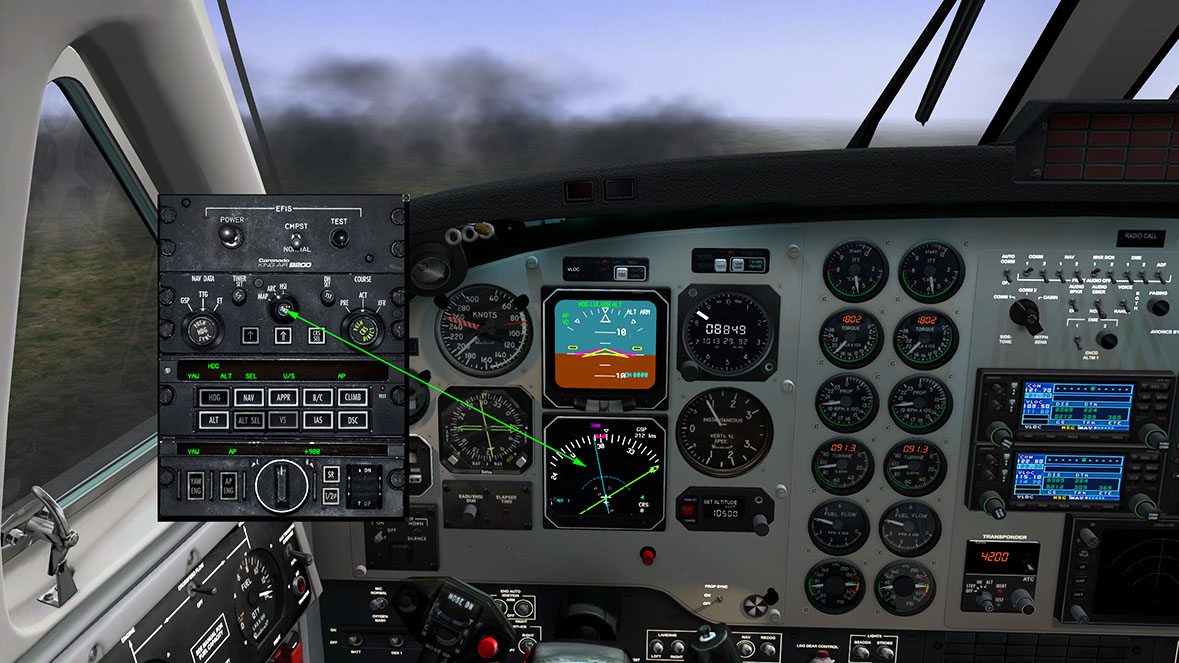
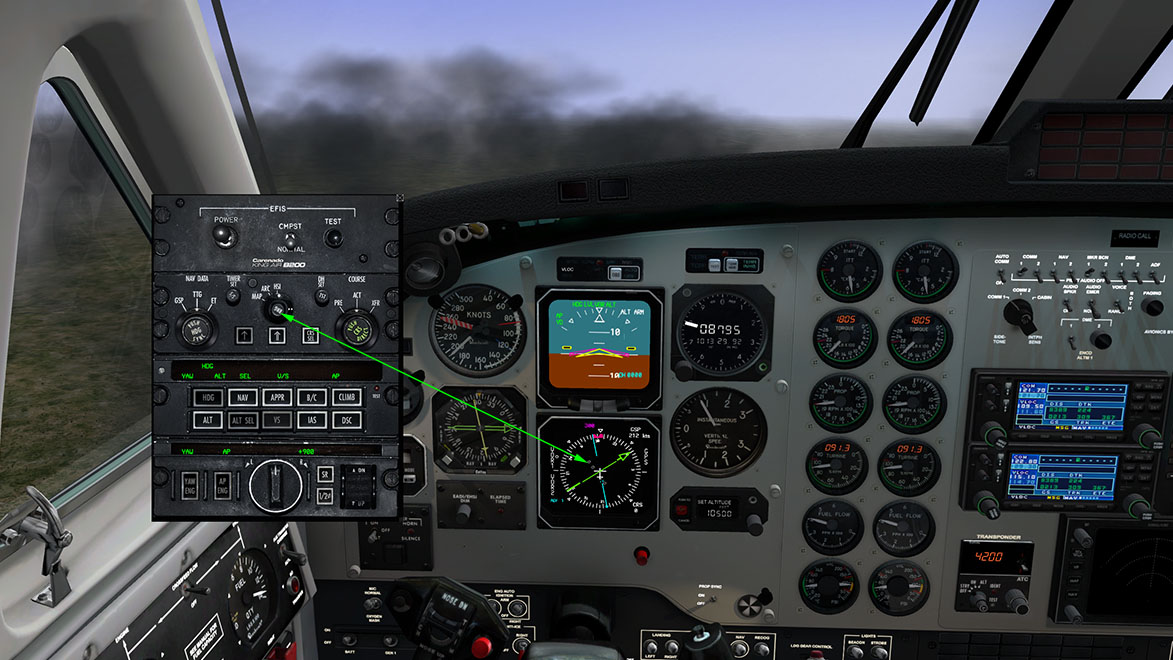
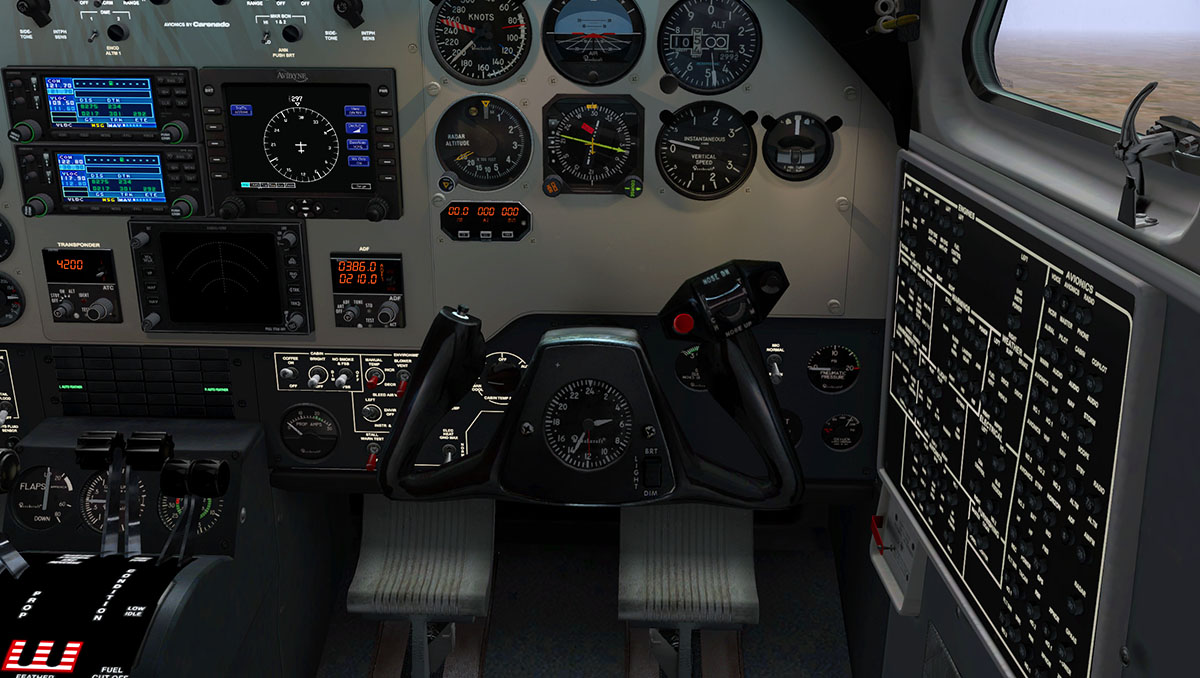
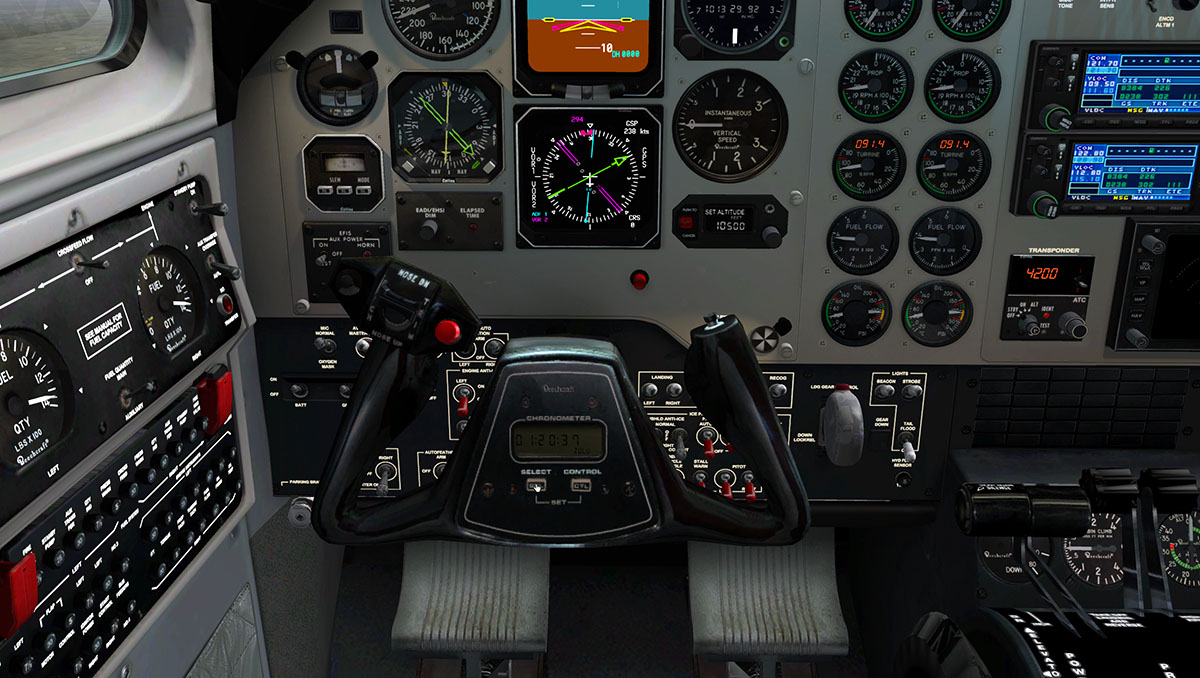
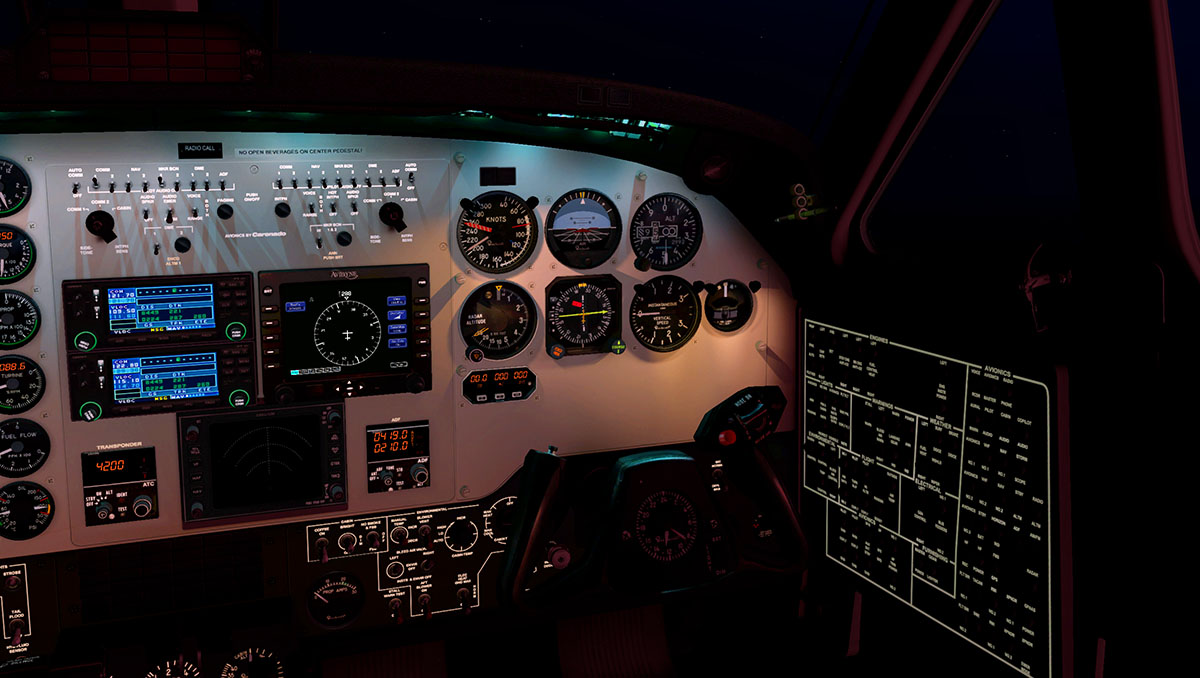
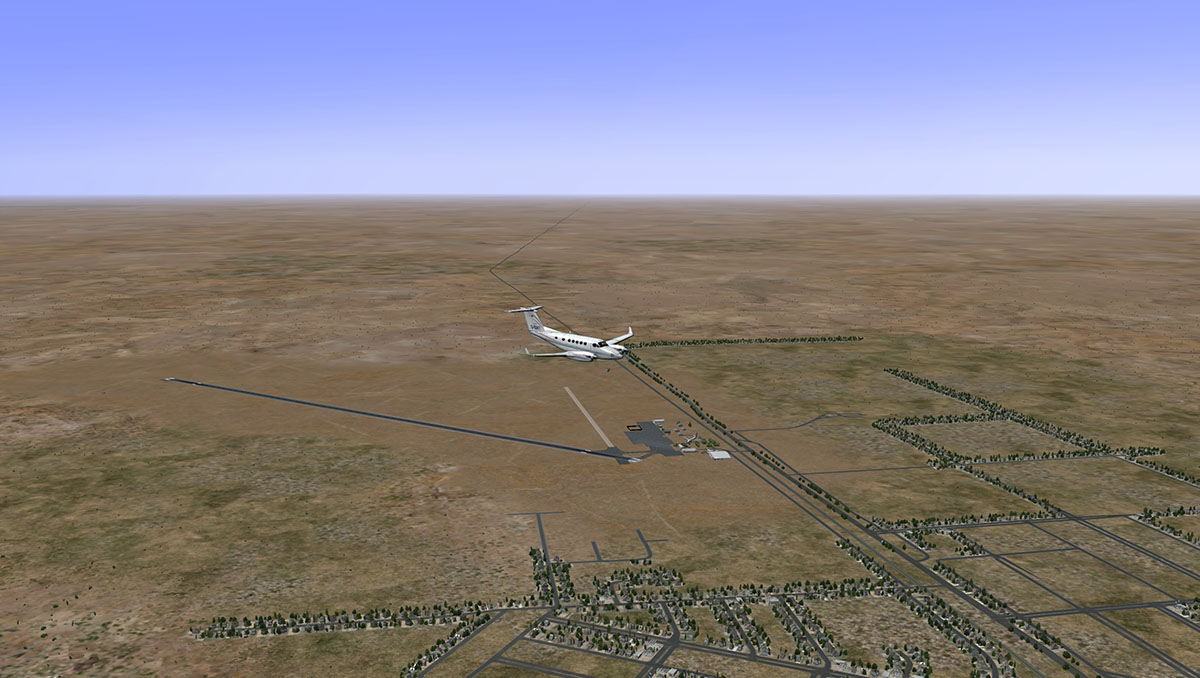
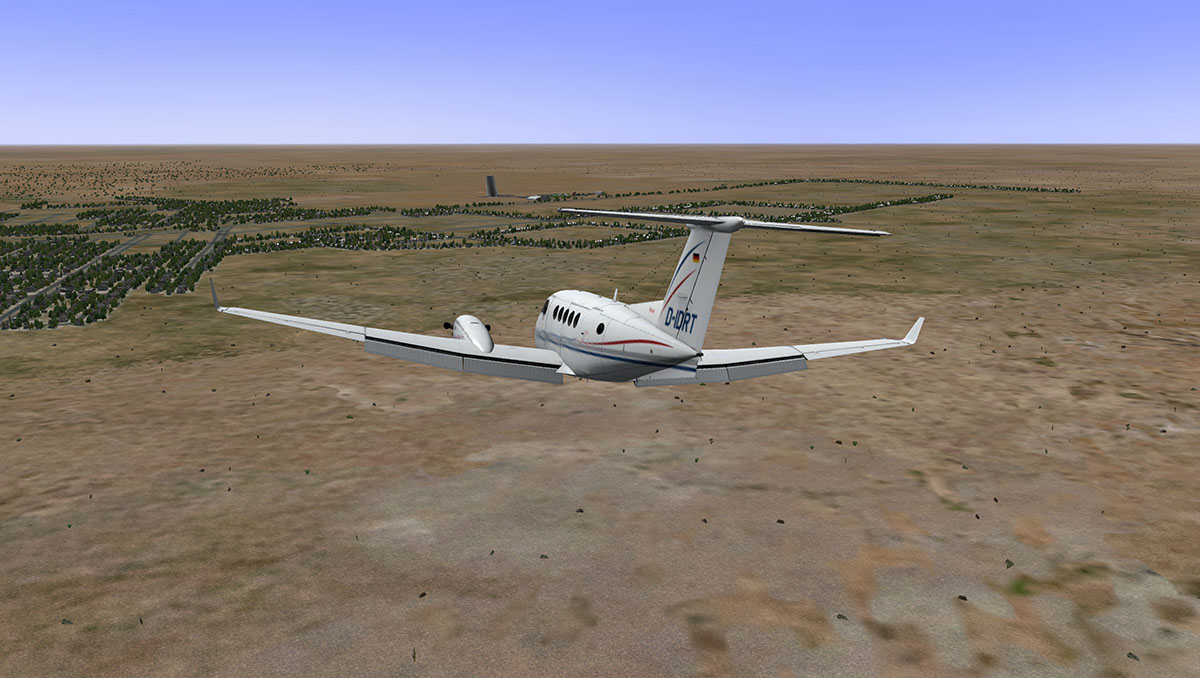
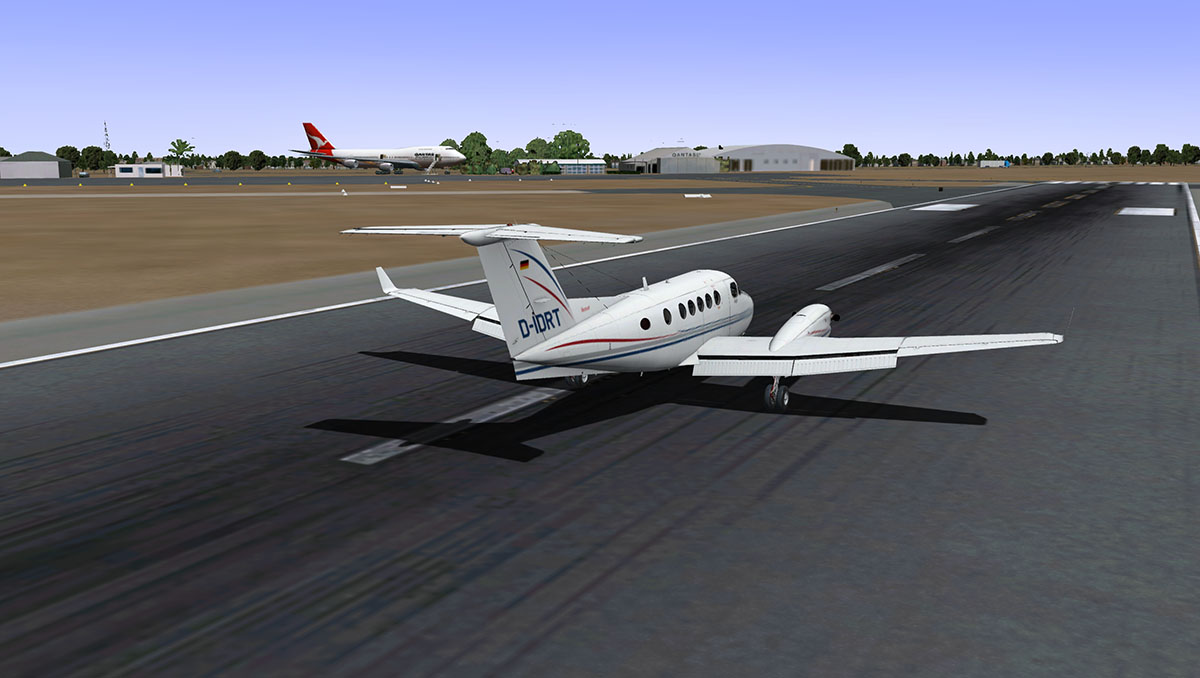
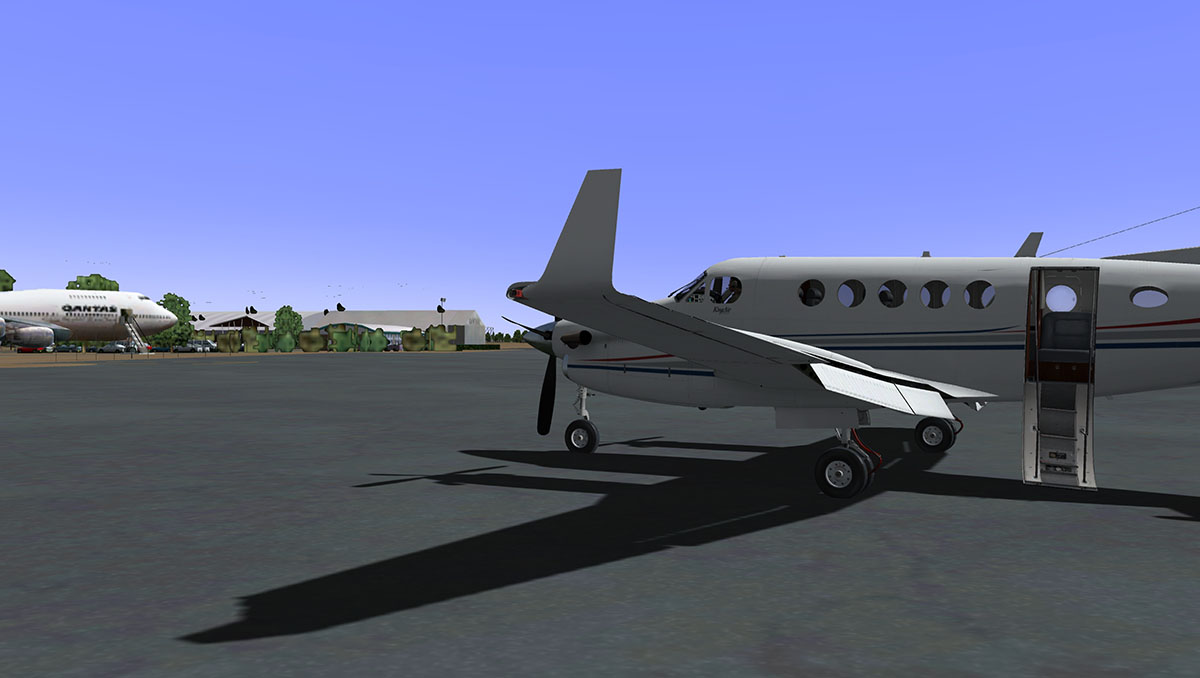
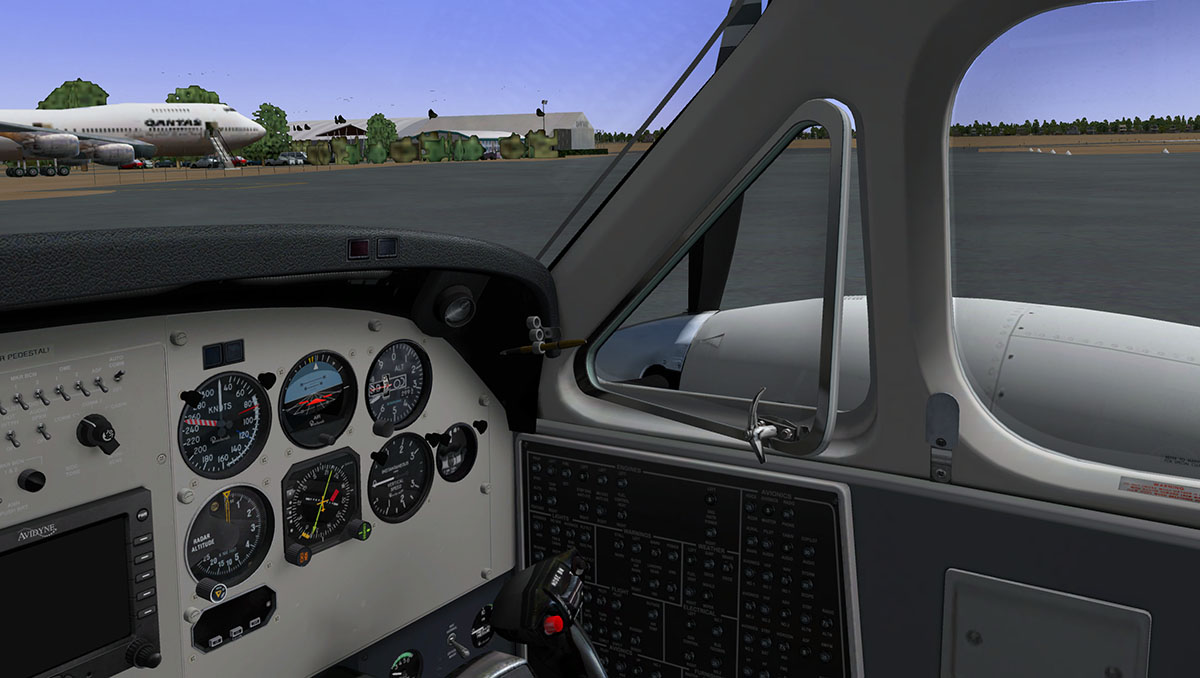
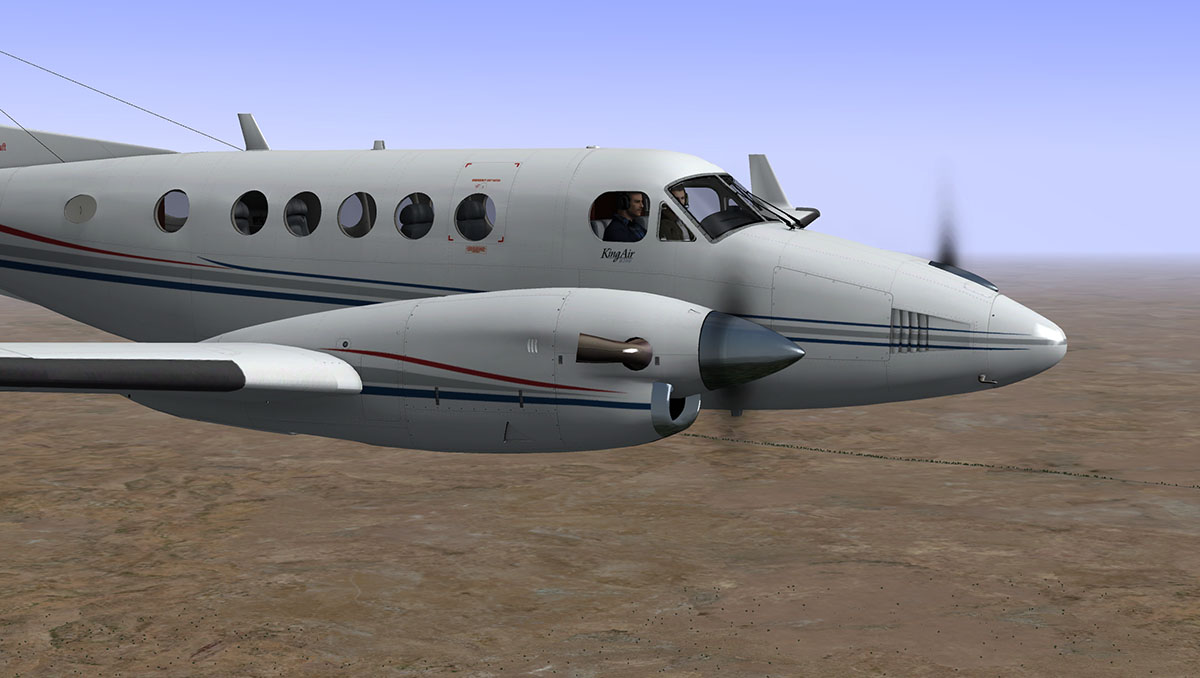
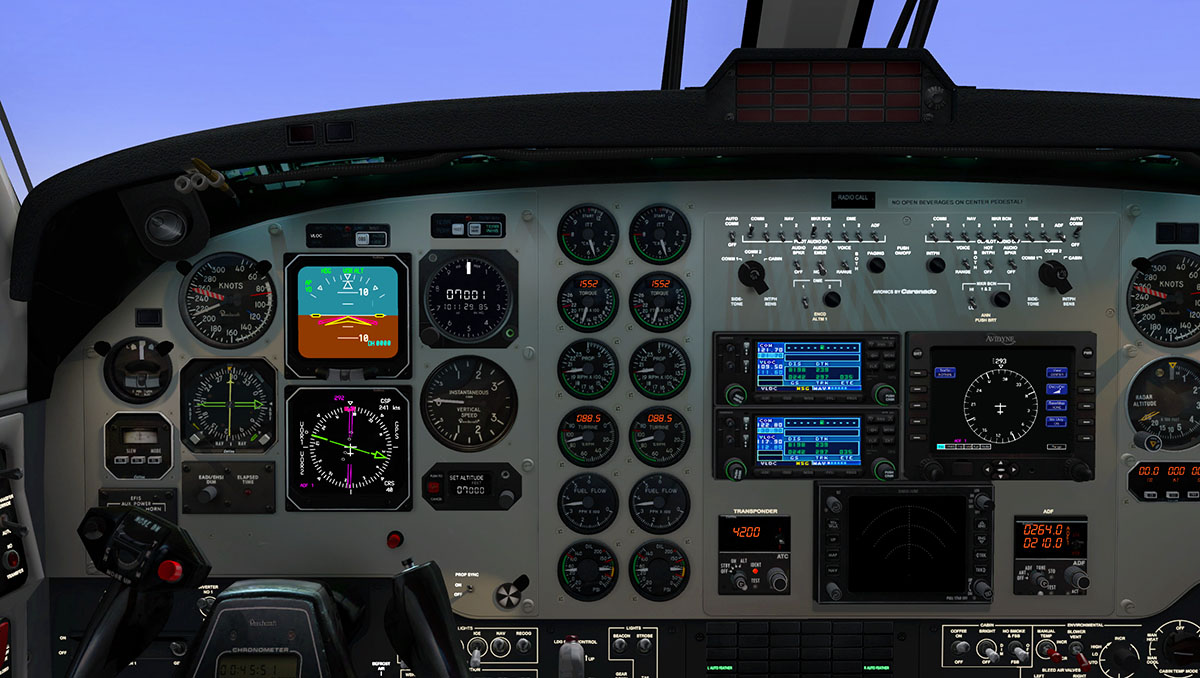
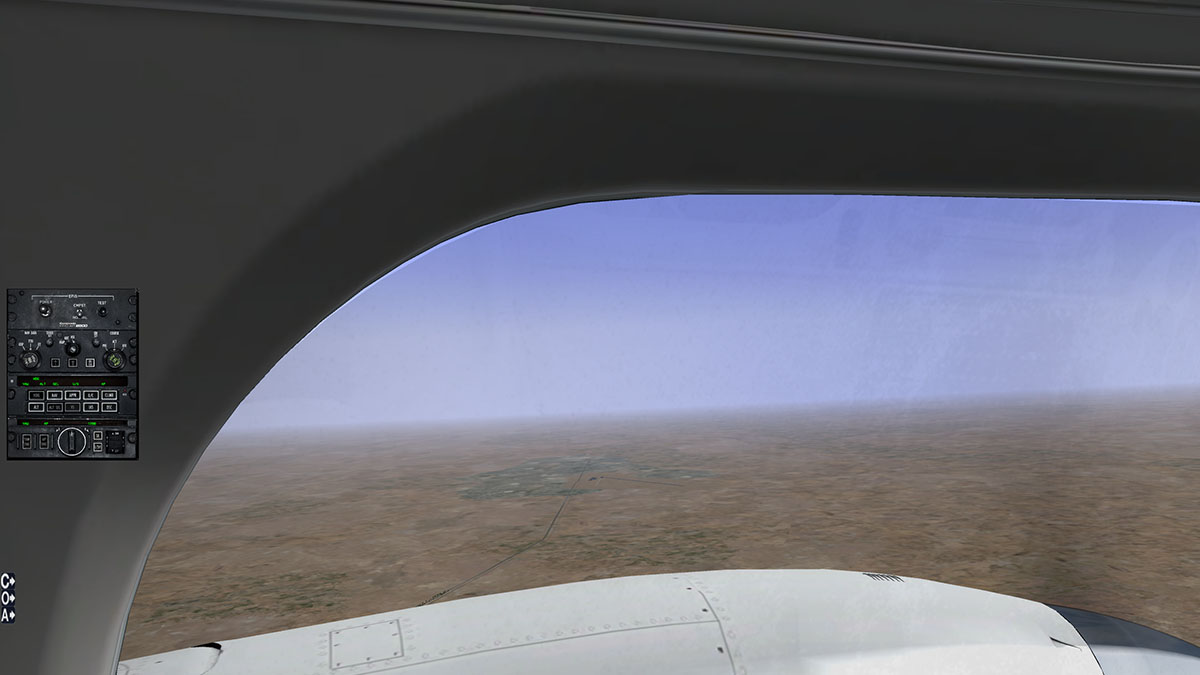
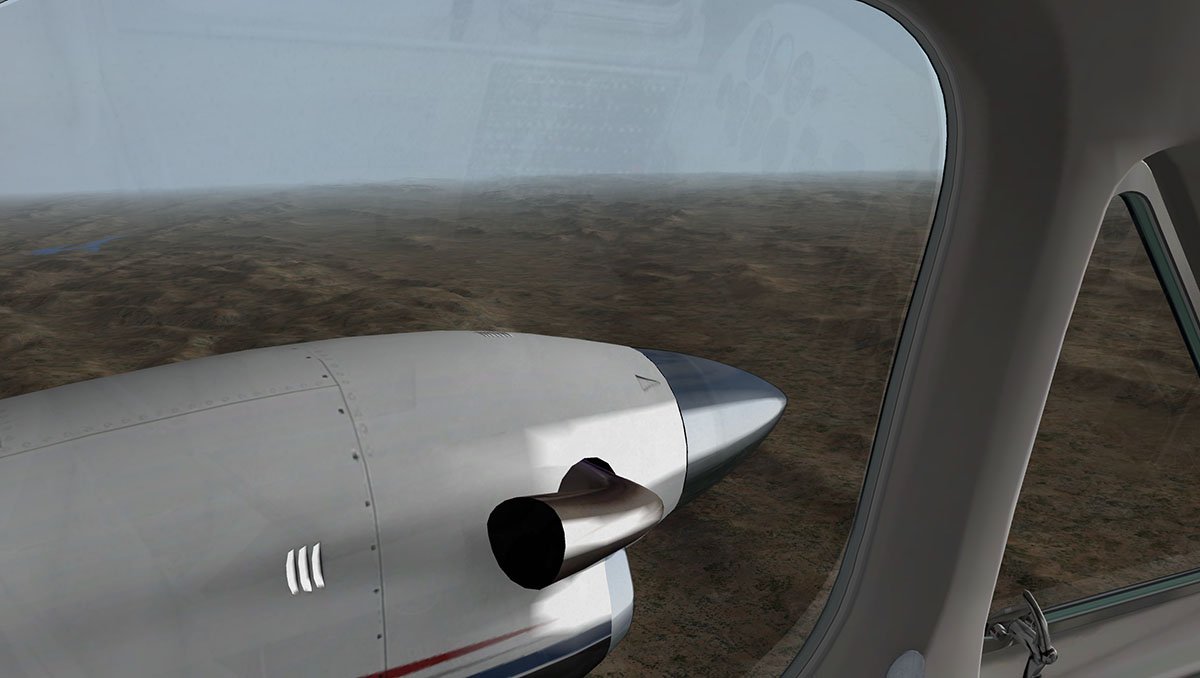
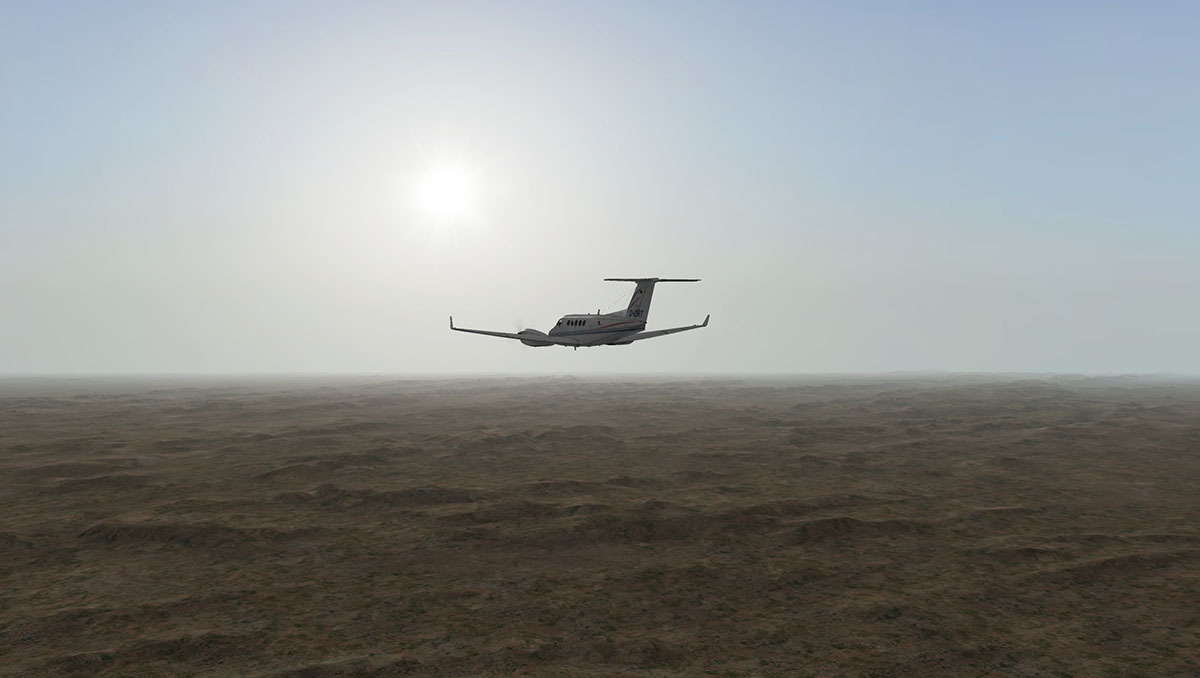
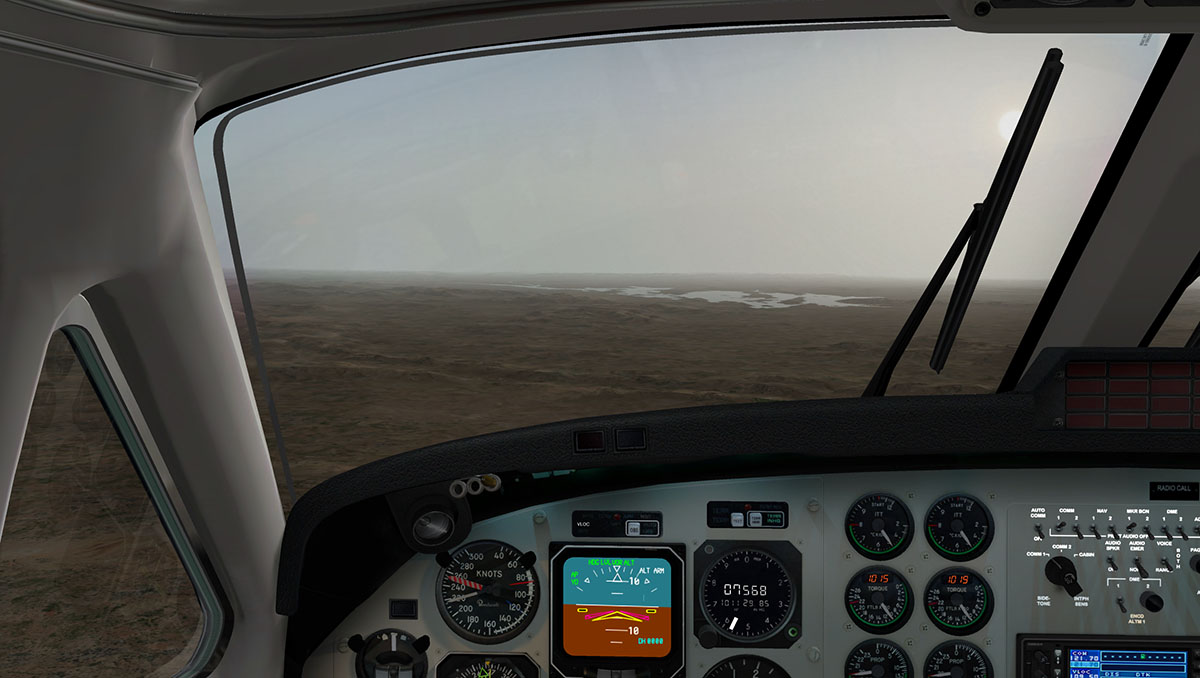
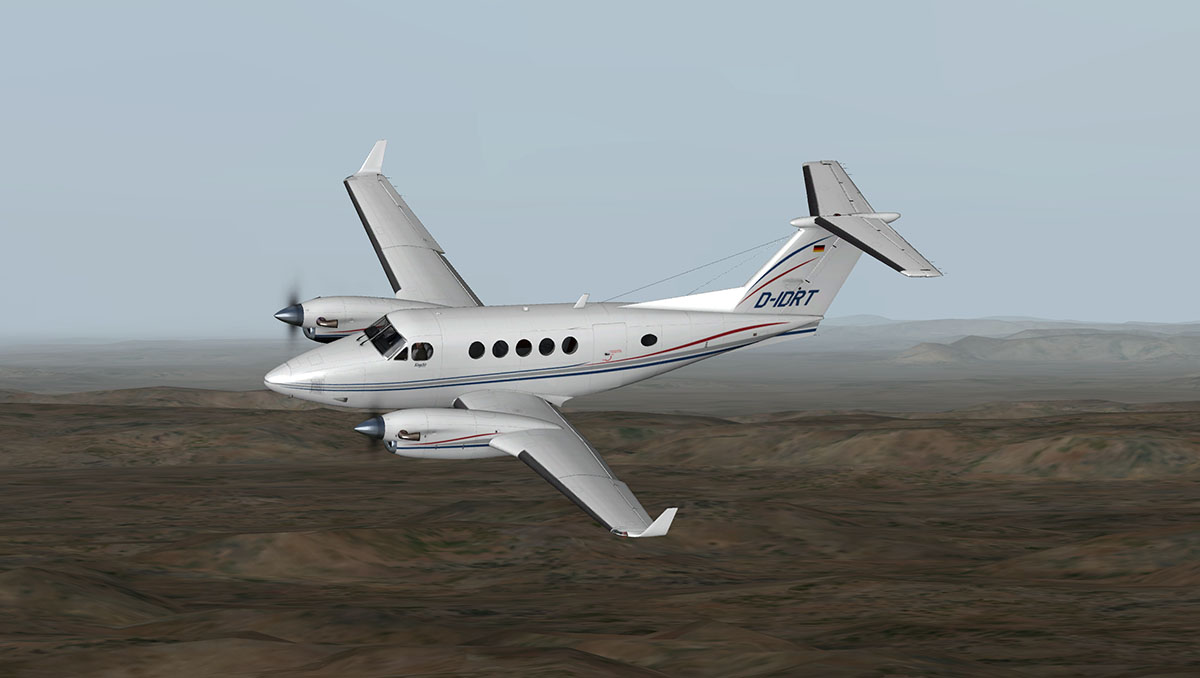
Beta Release : Beta version 10.30 release... First Look. Sunday Morning is a first joy at the sighting that the beta 10.30b1 had been released. In doing reviews I test a lot of add-ons and plugins and mostly I just throw everything in the usual various X-Plane file buckets as I download them (mostly into the custom Scenery folder). So as this beta has been a fair while coming it was time to get back to basics and do a complete file cleanout. So for the first time in a long while my X-Plane simulator is as close to Austin's godliness and vision that it has ever been. The download for me was 1.3gb and it took about 81min to perform the actions. I noticed a lot of ground textures were replaced with most going into the "1000 world terrain" folder. start up of the X-Plane Simulator with 10.30b1 was smooth with no issues or resetting required. The first run of the simulator was to spread a smile over my face. X-Plane v10.25 was not very kind to me frame-rate wise, I found myself battling the render page quite often to just get some substance and any speed out of the simulator. In most cases I failed, 10.25 just was not good to me. My guess work it was the new (urban) ground textures that my processor really hated, as even if I was flying at over 30,000ft, and if I downcasted my view and the areas set below me were full of city grey, the red of my frame-rate counter would show immediately and the stuttering would begin. It made for frustrating work. Austin Meyer noted that 10.30 "We just got into HUNDREDS of little details in the sim to make it really work as people should expect. Adding a fancy new feature or two is easy… going in and cleaning up all the details to make the whole sim run exactly as people would expect is much much harder." and you certainly noticed that in the first running of the beta there were no glaring issues and it does run smoother, and 10.20b2 felt even better. There are two main features that were forecasted in a new Clouds system and new Garmin GNS430/530 GPS/Nav. It must be noted that 10.30 is a rolling roll out. So we get the basic foundation now, and then other small features will be added as the beta progresses. Clouds When the X-Plane version 10 was released a new cloud system was one of top features of the simulator. It didn't really live up to the its full promise. It was really just puffs of cloud that went well... "puffy". Only going a slight distance into the formations and your world went hard grey. Worse the clouds were a framerate breaker in the heavy sense (unless you were in the grey). In most cases I had to switch them off unless my framerate was 40+ and that usually brought me back to the 20fr limit. A small revision came and went early in X-Plane10's release, but it was obvious that a totally reworking of the idea was required. The clouds do look slightly different. The "Puffs" are still there but there is a translucent quality to the blanker areas that was missing before. It is when you get closer or within the clouds, in that you now flow through them and actually feel the misty shrouds around you. When the clouds get thicker, they do just that in getting denser and denser until you do finally fade into the grey. But still in there the grey you get is now very slight shades of translucent thinness that can come and go away as noted here with the FlyJSim B732... All very realistic. Whispy clouds are now just that in whispy, and they touch you around the aircraft. So did all this come with that dreaded frame-rate penalty... Well no and yes? Certainly the cloud system has been refined. It is now far, far better in frame-rate than what it was before, I can run now with the cloud system on all time and that has to be a very good thing, which was simply impossible before. However in the past the grey blanks would always cut in to boost my frame-rate through the roof just at the point of it hitting the dreaded stutter point. Now that has changed, as in light or medium clouds the system will cope easily. But as the clouds get denser and darker and denser, so does the hit on your frame-rate because the old grey saving grace is not going to cut in now until you (or me) are down at single digits on your frame-rate. So the rule is, keep well away from very heavy cloud formations if your system can't cope, as there is no cut off now even at the lower frame numbers. Ben Supnik notes on the developers site that there is still more cloud refining to come with this 10.30beta rollout. If Laminar can get this area even with a slightly better absorbability in the denser clouds we will certainly be on to a winner. This does not mean the default cloud system is now perfect. But it is a major step in the right direction. I flew from Singapore to Hong Kong at FL360 in the flightfactor B777 Worldliner and everything flew very well and I was very impressed in the various cloud formations. Some things did stand out though. The rain did look more heavier in that the lines were very significant and to the point quite annoying. I still had this rain effect even at FL360 and flying at .75mach? Is that normal? I can't really see that. One thing I will note of significance was the horizon looked far better than I remembered it. It is a more slightly hazy join between sky and sea, it made a big difference to the feel of the simulator. No doubt the ground textures look sharper as well for the a higher altitude. both very small changes but highly noticeable. The ground visibility in X-Plane is 25 nm (about 46 km) so you don't see off the edge of the scenery tile. However what is it like when you go to a high flightlevel? Not very good. 10.30 is supposed to give us a better (or greater distance) to help in this restriction. This extra distance is not in there yet, but the higher resolution ground textures are in there and the global planet textures have received a one-notch resolution increase. For me the planet textures didn't look enough, so I am going back to ISDG's Hi-Res version, not perfect but still better than the default textures. However overall the higher flight-levels do look better. It will be interesting when the tile sizes are larger in that how much better again this area of the simulator will be? The visibility is now a lower limit to 100 meters, as per the minimums for a Cat-3 approaches, but until the "fog" is more refined (coming soon to 10.30) will it be perfect. You can still see the differences though even now, It is not a complete blanket, but softer and more translucent, which must have been carried over from the cloud work. Here on approach to VHHH (Hong Kong) the visibility factor kept me on my toes, it was very impressive. Overall the clouds are a significant step forward, at least I can even run them regularly now of which was not possible before. Garmin GNS430/530 The other touted big feature was the Garmin GNS430/530 GPS/NAV. Disappointingly Laminar Research didn't update any of their default aircraft with the GNS430 with the beta release, LR note they will be converted before the end of the b10.30 rollout. But this meant that many of the punters (meaning you) couldn't see the new gizmo in action. However if you own the Carenado KingAir B200, you can simply convert it over to the new setup by just changing around couple of items in Planemaker. Mr Daniel Klaue notes on how to do this here. Very impressive the new GNS units certainly are and light years away from the old standard versions. But they are not simple to use as they are nothing like the old versions. You will learn it in time like anything else new that is thrown at you. But the menu system is highly complex to something or anything at all in that just a few buttons and the right lower right knob does almost every adjustment you will usually need to do (the lower left knob is for the radio/nav frequencies and is pretty well straight forward). First off is that the unit pops out very easily (by pressing the centre of the GNS unit, press again to close). here we have a single and the double units popped out from the panel. Again like the standard unit the top one is for Comm1/VOR1 and the lower unit is for Comm2/VOR2. I can't see being new to the unit how you could fly and twiddle around with these complex menus. I suppose in time they would have an easier pattern of operation and automatic application of use. It does certainly help to program and complete the routes on the ground before flight. Menus GNS430 This is a brief layout on how the menus work, No real detail here as that is for another time. First there is the main Menu selection in - FPL (FlightPlan) - NAV (Navigation) - NRST (Nearest) - WPT (Waypoint) To move between these main Menu selections you use the larger (outside) scroll manipulator. Then each selection has its own selection (or page) that is changed by the inner scroll manipulator. FPL The flightplan (FPL) has two active pages. The first page will allow you to create a route and the second allows you to "LOAD" a default X-Plane .fms flightplan. You can save a created flightplane to the X-Plane FMS Folder as well. NAV The navigation (NAV) pages (three) are mostly for the display of your route and your position.. The first page is interesting because it shows your current flightplan waypoint in "From" to "To" and your position in distance and heading, It is very powerful in operation. Page 2 is your position on a moving map and final (3) page is your "Vertical Information" or altitude. NRST The NRST (Nearest) pages of which there are five cover information of your closest Airports and NAV-AID choices. 1) Nearest Airport - 2) Nearest Intersection (airway) - 3) Nearest NDB (Nav-Aid) - 4) Nearest VOR (Nav-Aid) - 5) Nearest Airspace. WPT There are four waypoint (WPT) pages that give you information on the airport, waypoint or fix of that position. First page is the Airport information in position and Elev, second page is the "Runway information", third page is the Airport Radio Frequencies and finally on the fourth page is airports ILS runway information. Direct Button In creating a route is is always best to select an airport and use the "Direct" button to insert it into the first place of your flightplan. This operation has three uses in that, one to start a flightplan, but to also clear an old flightplan for a new one by inserting a new Airport to start from. The third use is if flying and then inserting a "Direct" position you will set the unit to fly you directly to that airport or Nav-Aid. Pressing the "Direct" button will clear the screen and allow you to insert the "Direct" to waypoint or insert the first waypoint of your flightplan, you can of course still have the option to still clear the flightplan under the Menu button in "Delete Flightplan?" (you can save your Flightplan here also). Flightplan To add in another waypoint then press the center of the right hand knob to highlight the waypoint and turn the outer larger (outside) scroll manipulator (knob) to go down a line and insert another waypoint, in this case "ECADE" and then you continue with all the waypoints you require until you have a complete flightplan. In this case I did a circuit of KLAL to KLAL. Your route should be on the map display of the aircraft. In the air you can see how powerful the unit is... The flightplan notes your current position in the list of waypoints (arrow), and the NAV waypoint position is excellent. You can press the PROC (Procedure) button for options on various procedures in flight or landing, and finally the MSG (Messages) button can provide messages that help you during the flight. To activate the GNS430/530 unit you change the VLOCK to "GPS" under the CDI button. You can easily get lost as the (right hand) knobs do more than one operation, and you can easily get confused. But I found that in time it became clearer in operation. Powerful the GARMIN GNS340/350 unit is, and a huge step forward for any X-Plane user for GA flying. Certainly if you are flying over a distance, this unit will open up navigation possibilities that were just not available til now. Summary I found beta10.30b2 very, very stable and far better than 10.25. Yes this is still a beta and there are a zillion bugs to sort out, but crashes are rare. As the beta version is so good this early in the piece, I am sure that Laminar will now roll out more of the 10.30 features sooner than later. This one smooth beta... more to come as the beta is heading to final. NOTE: Laminar Research have moved the beta release notes from the beta Wiki to a new "10.30 Release Notes" page. Go here for full bug and change notes. Stephen Dutton 3rd June 2014 Copyright©2014 : X-Plane Reviews
-
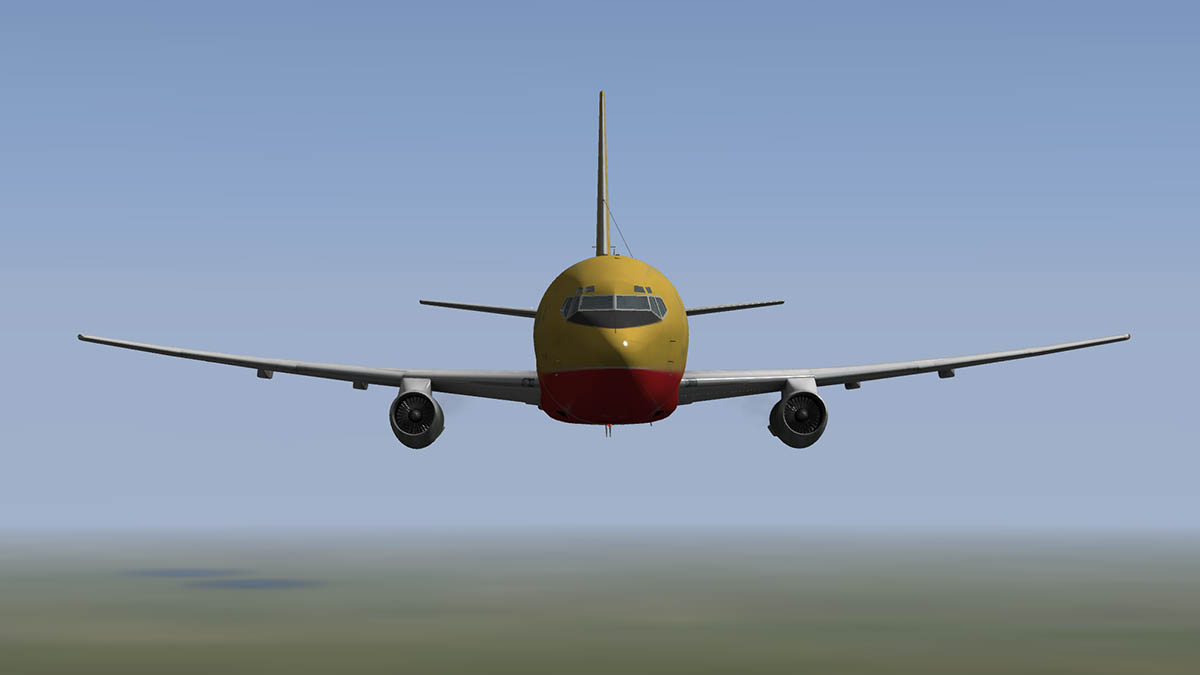
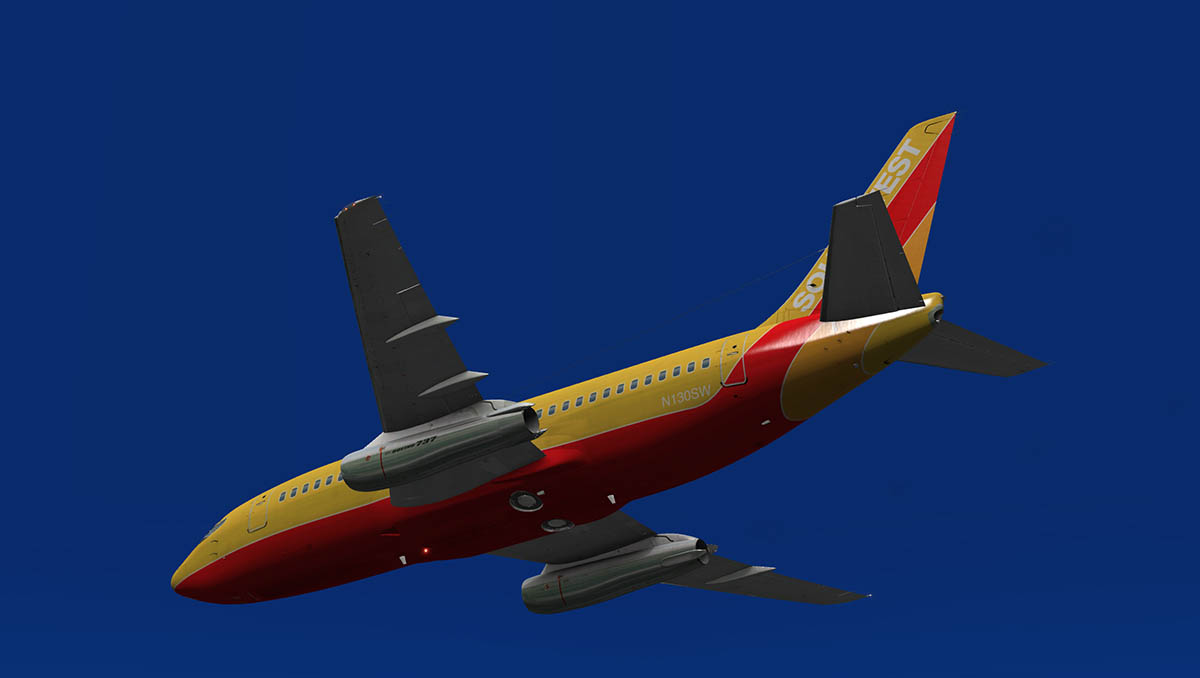
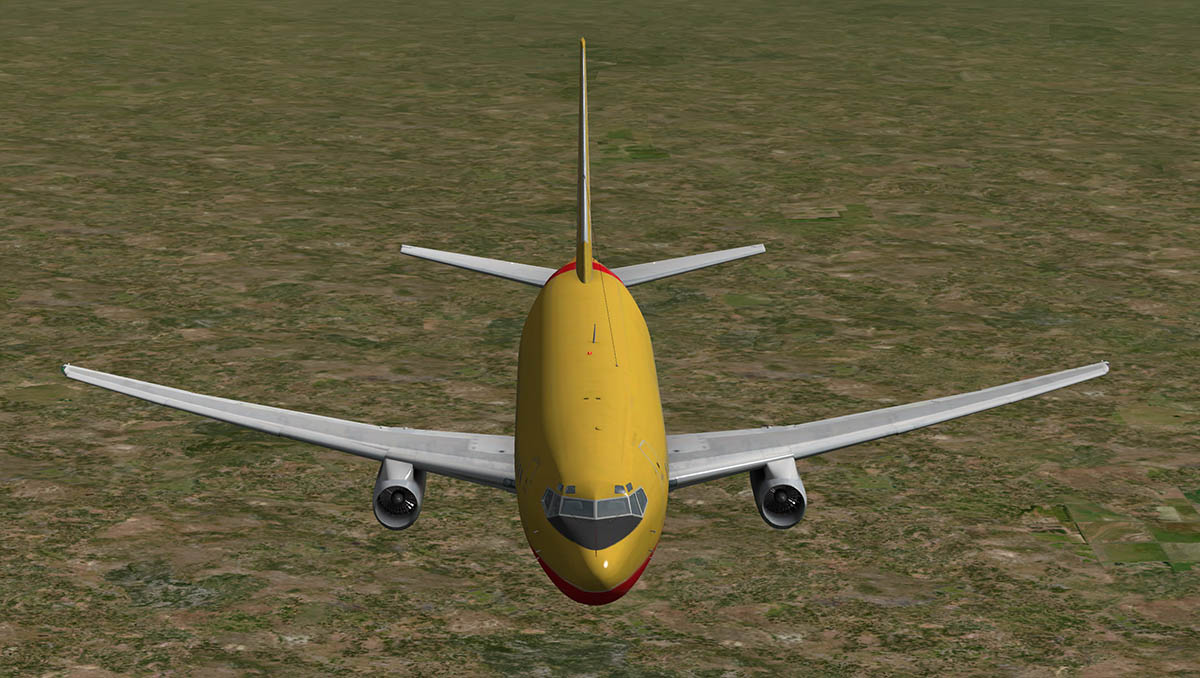
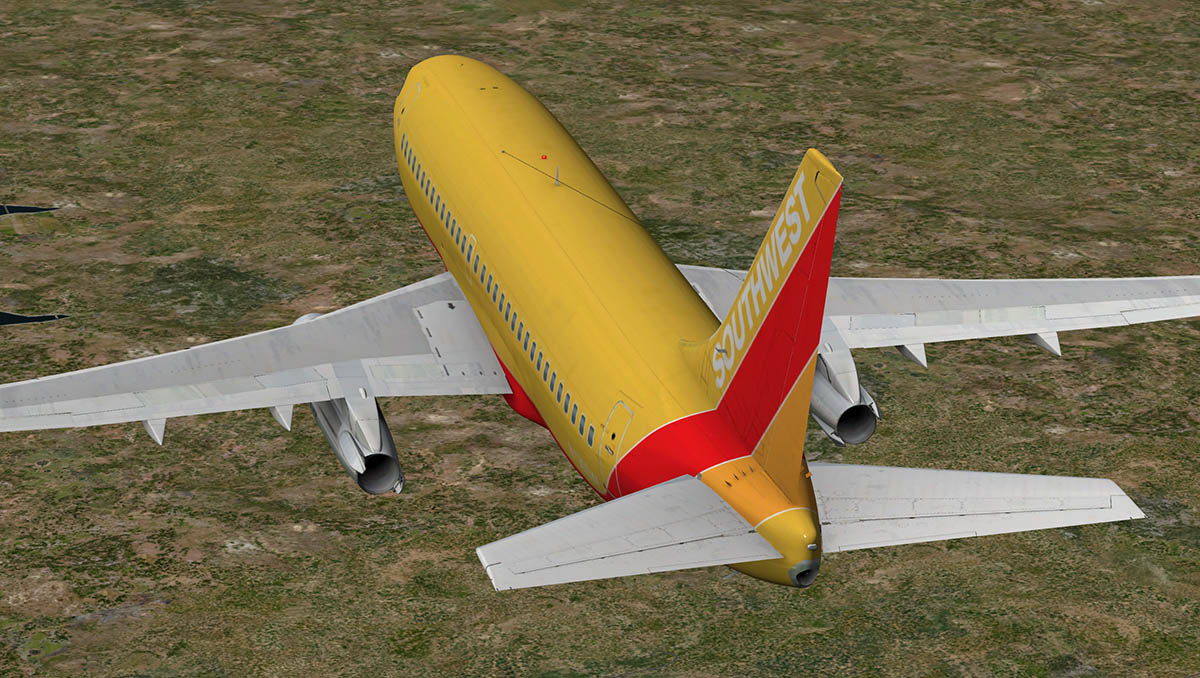
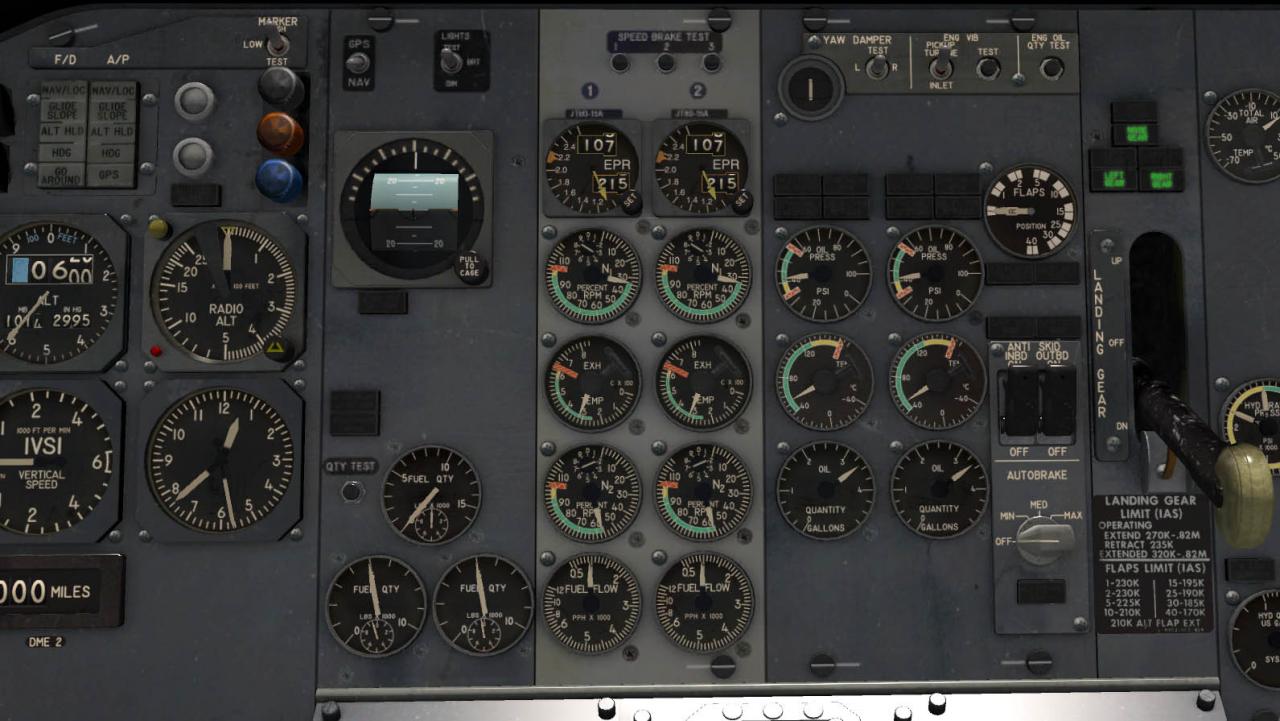
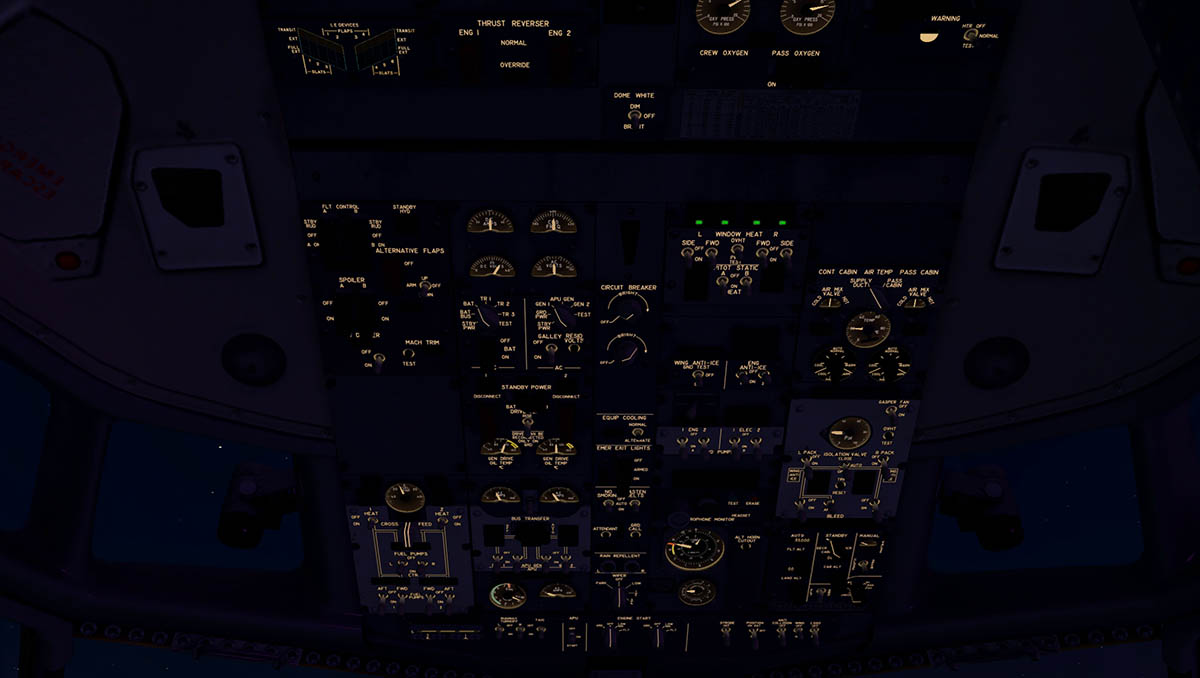
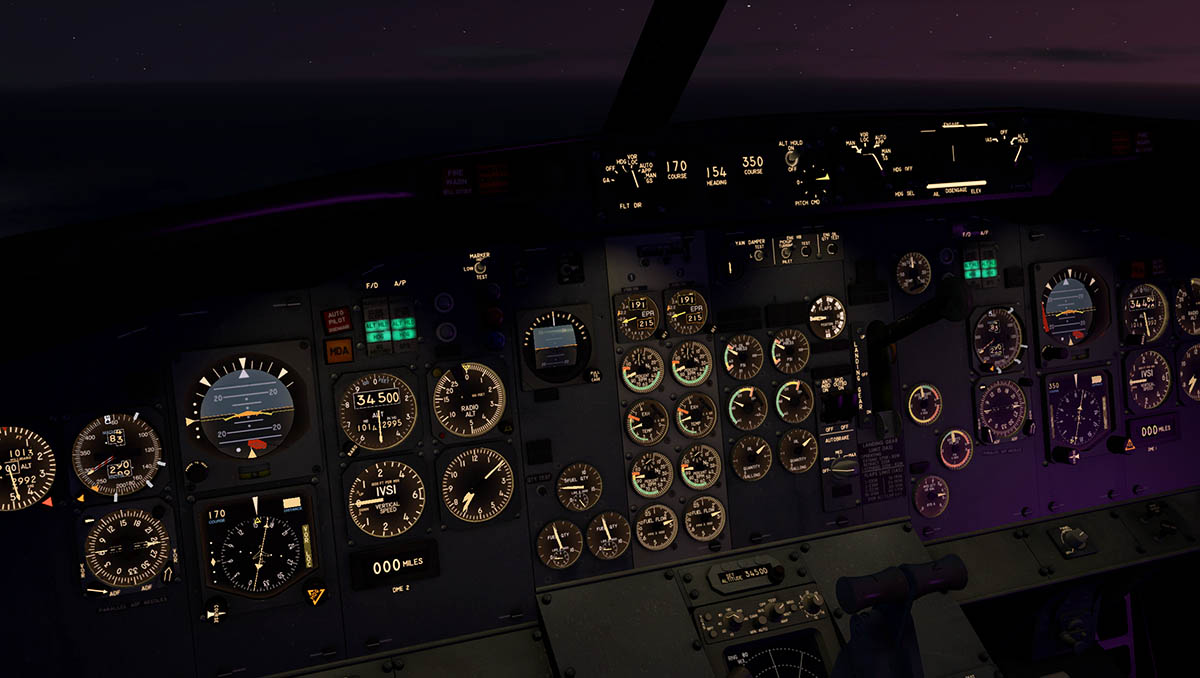
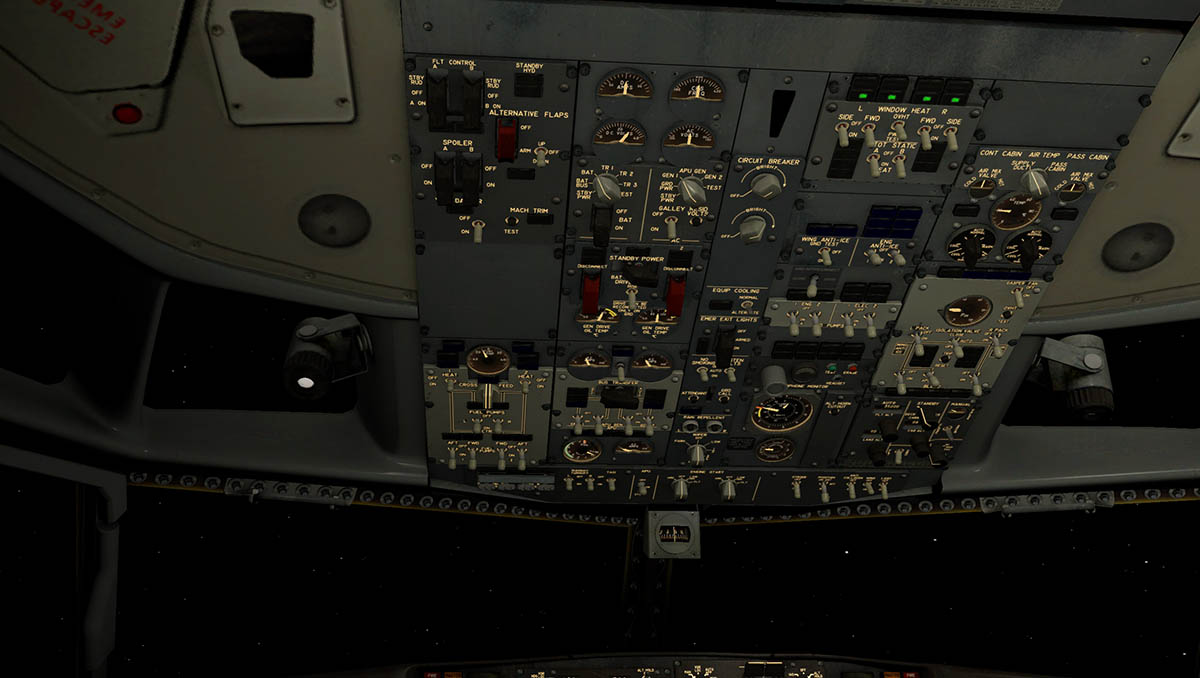
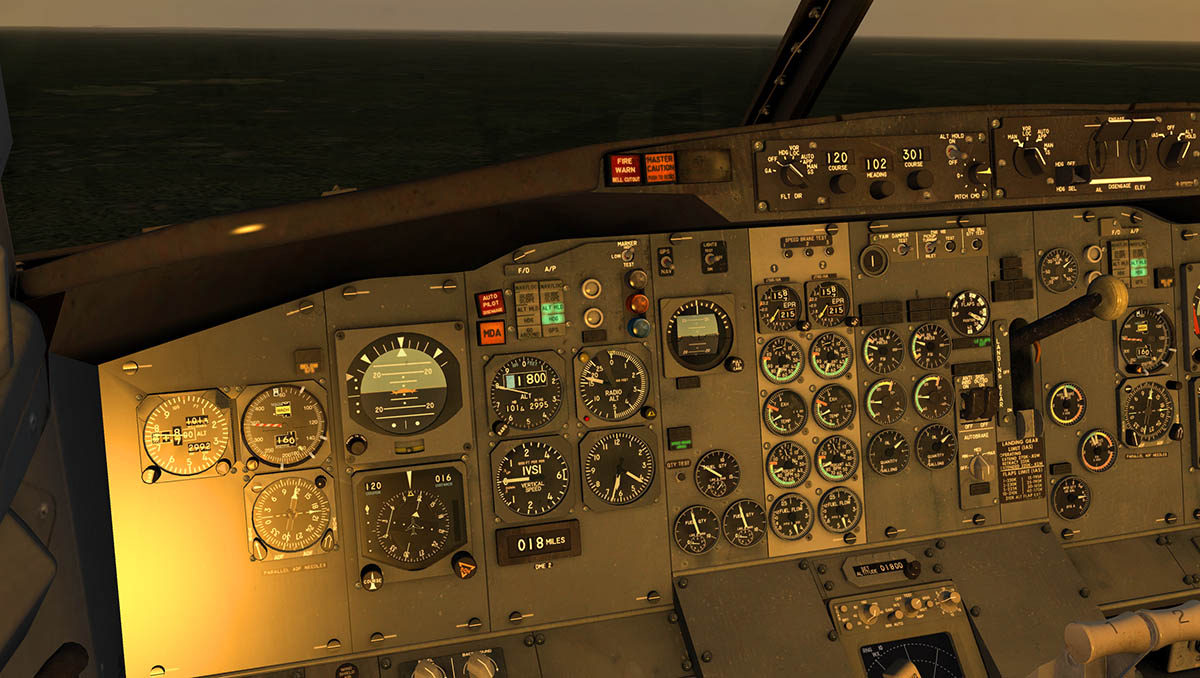
Aircraft Review : Boeing 732 TwinJet by FlyJSim
Stephen replied to Stephen's topic in Airliners Reviews
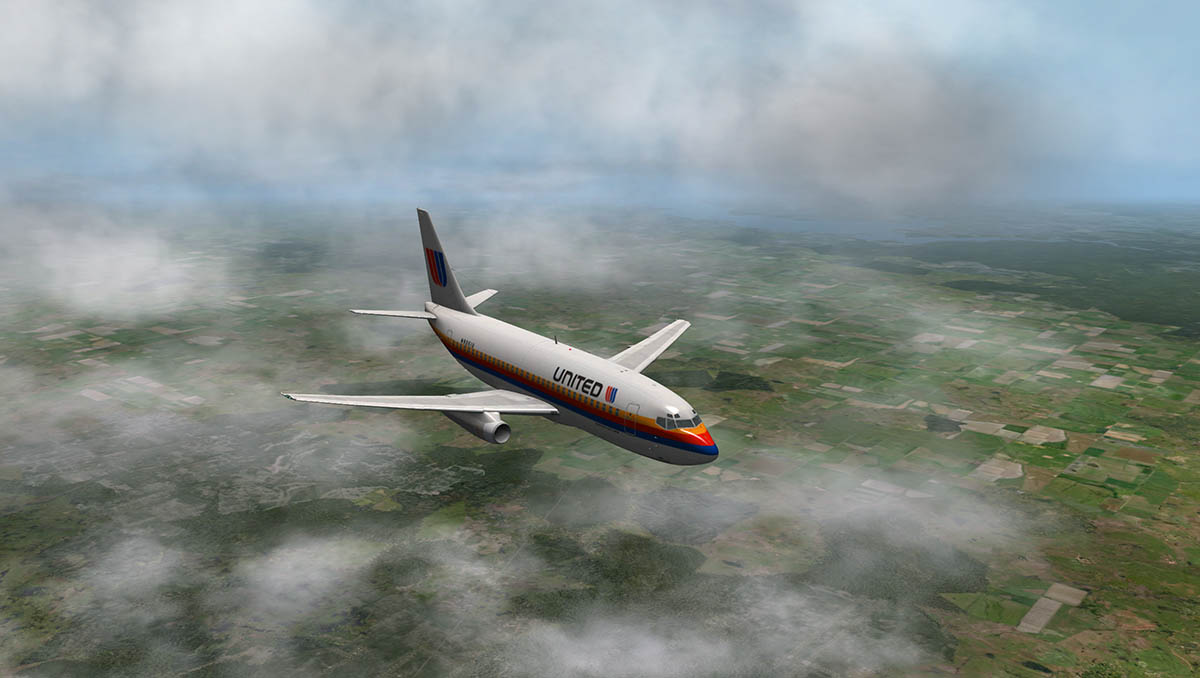
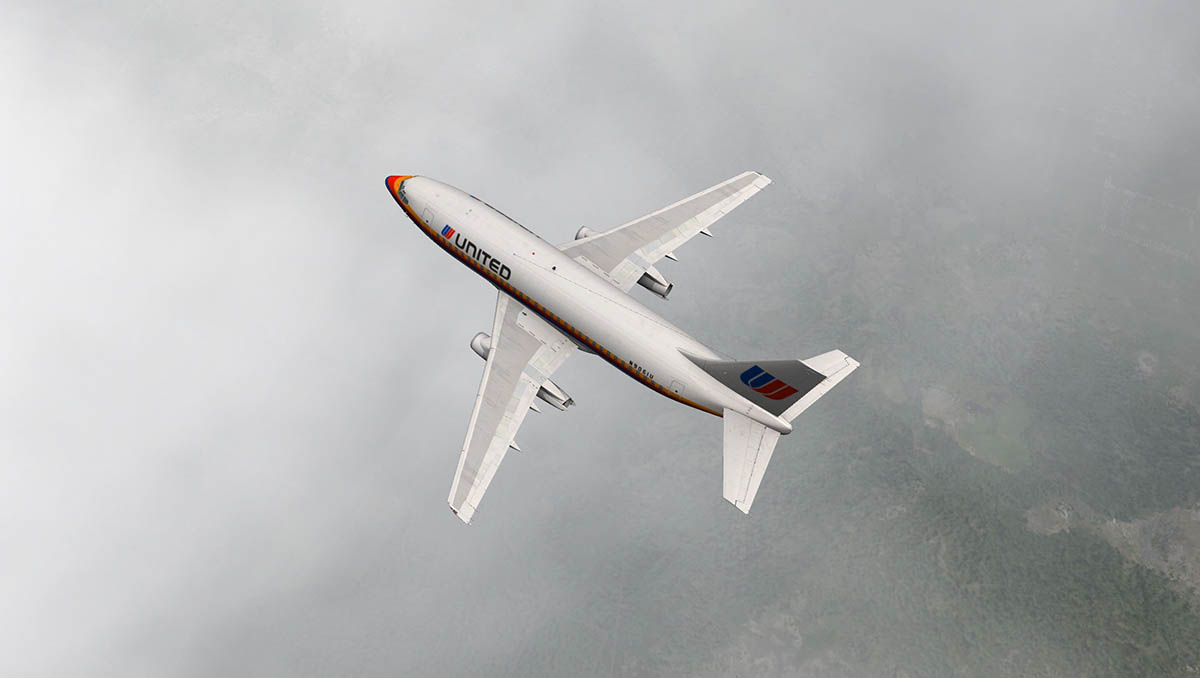
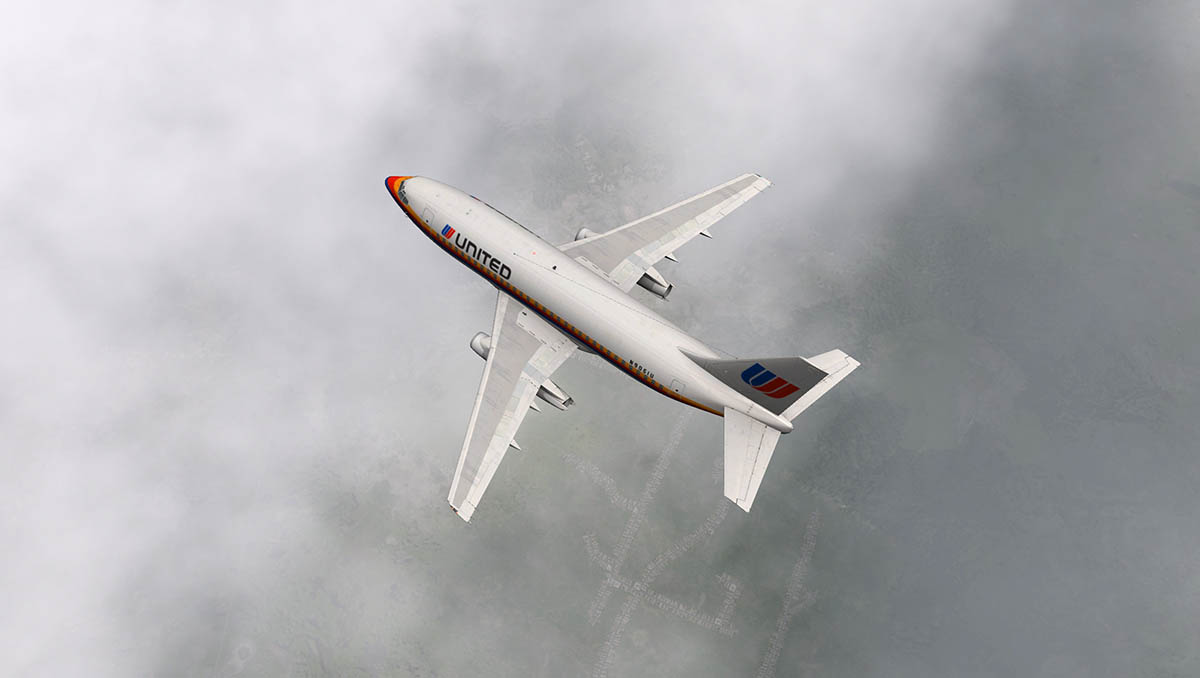
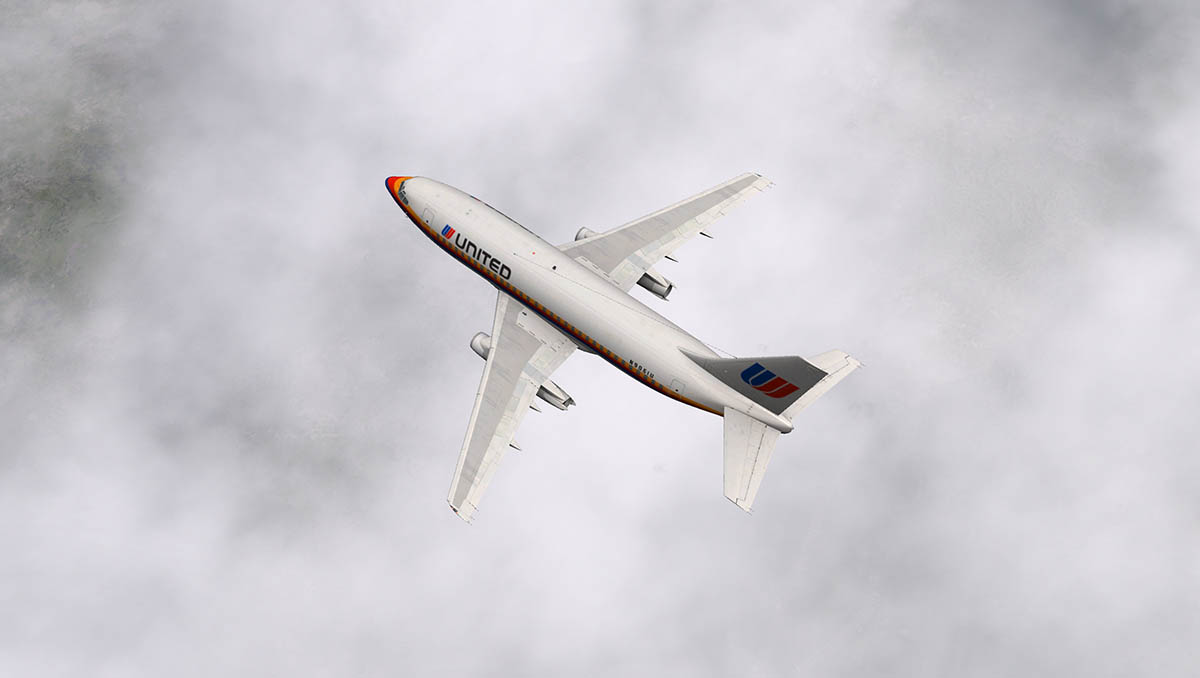
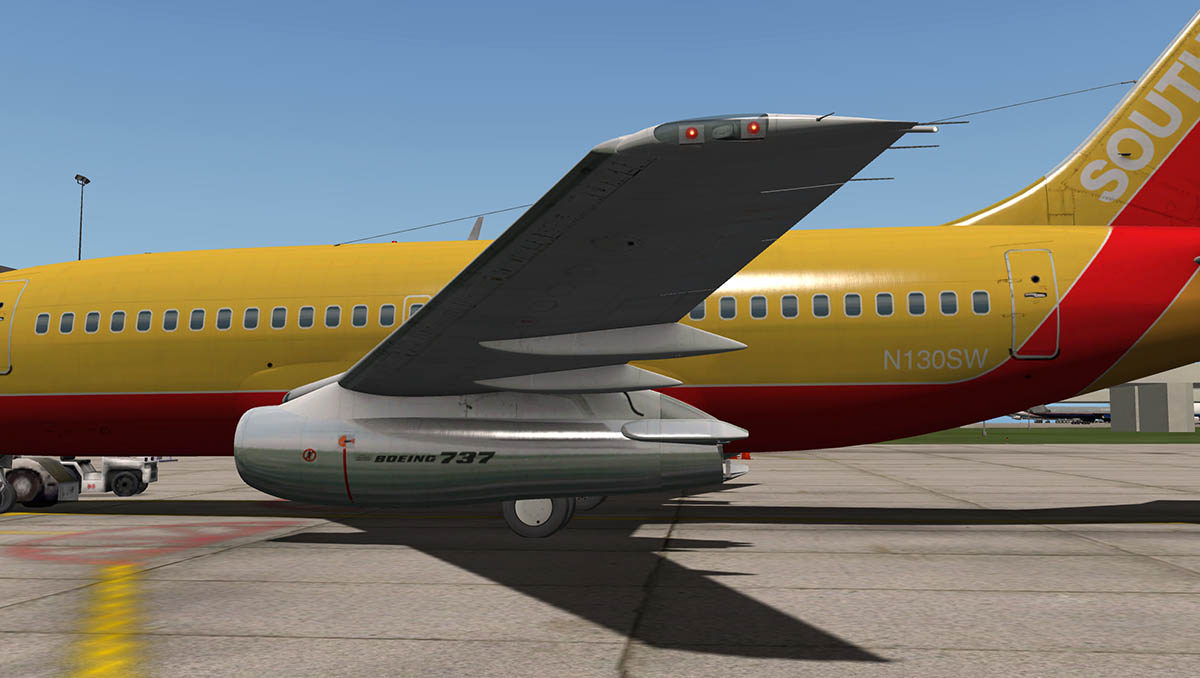
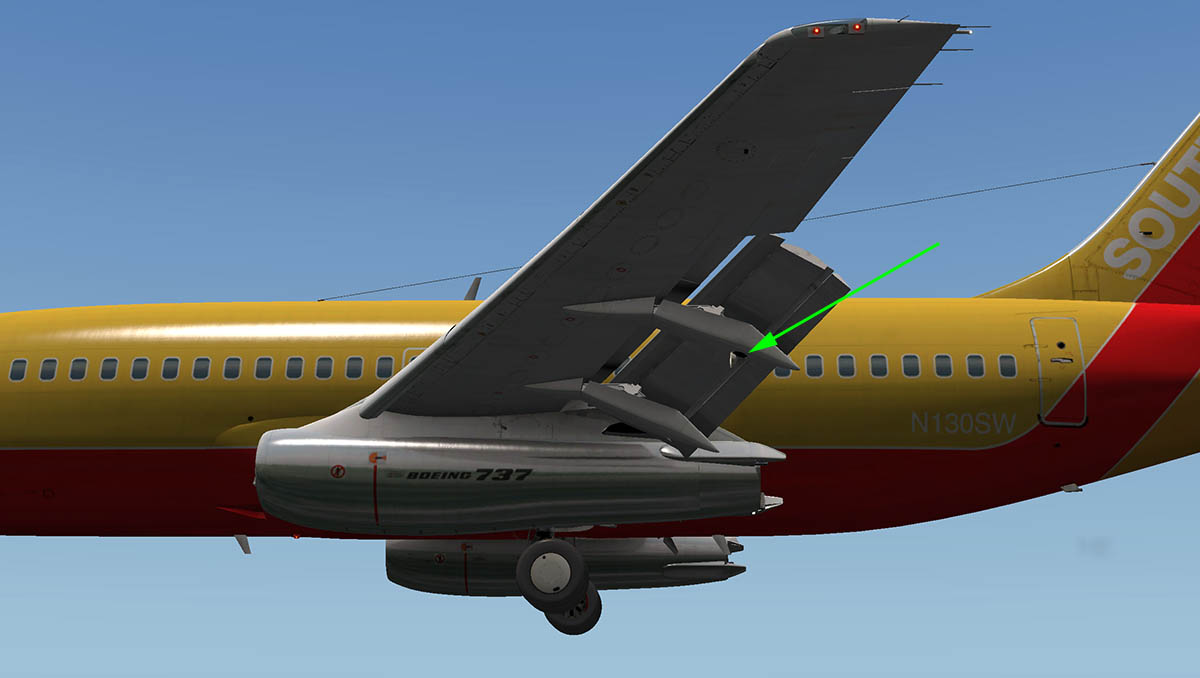
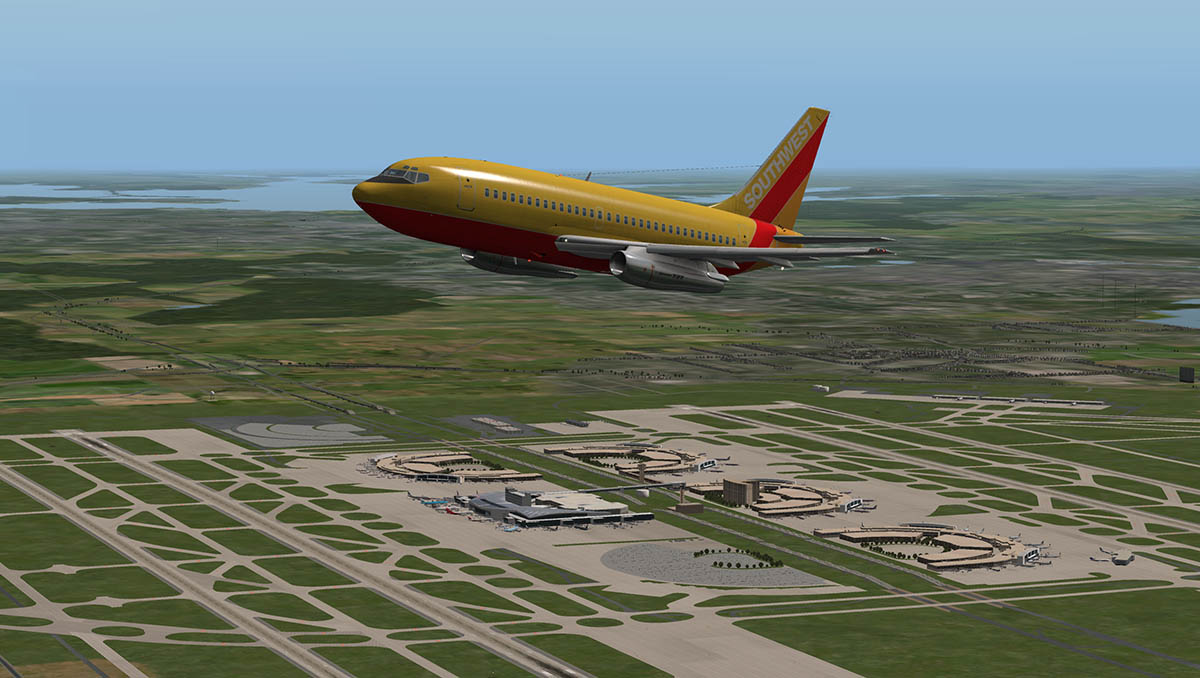
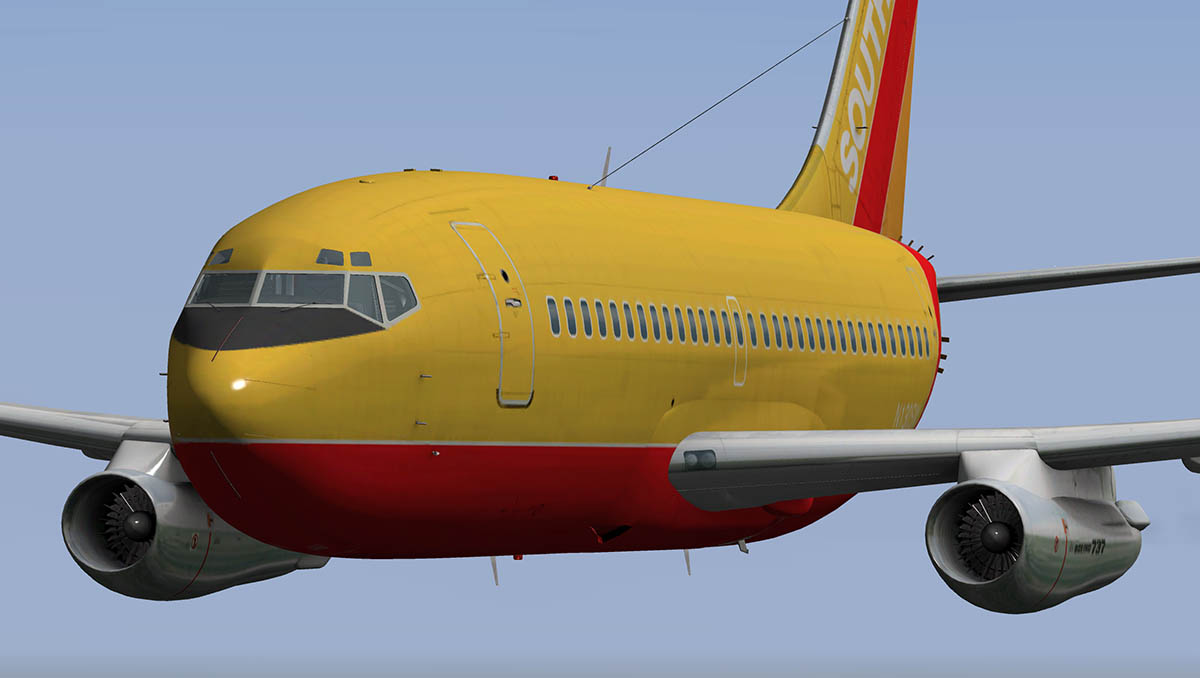
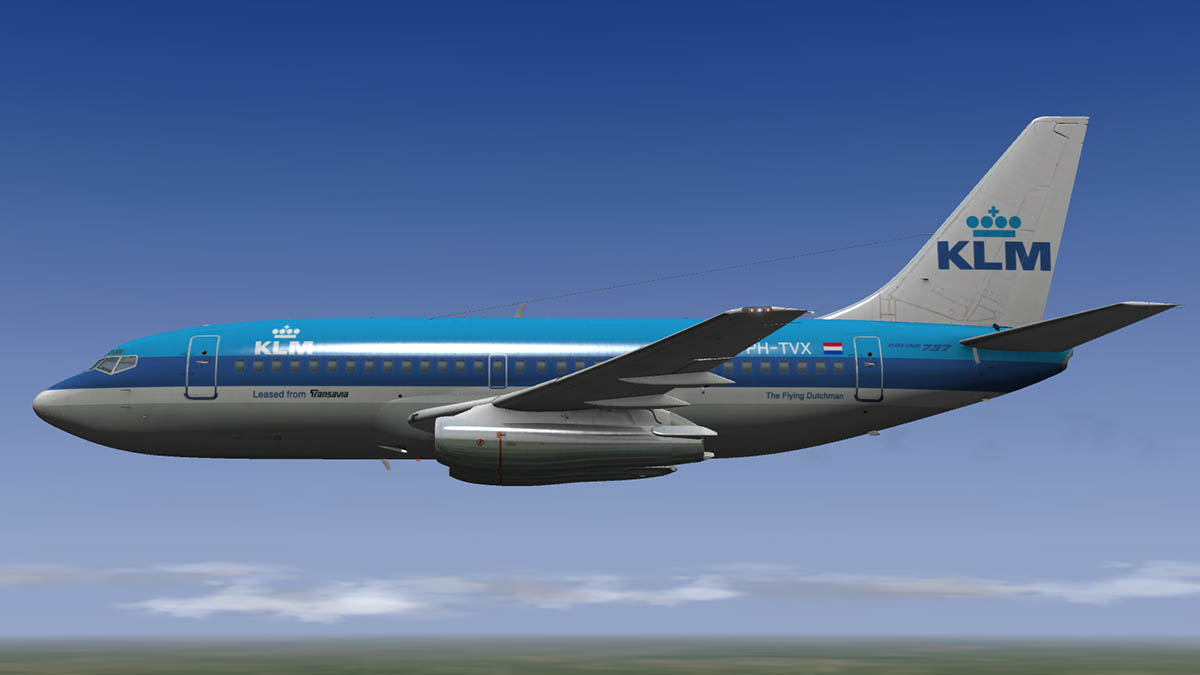
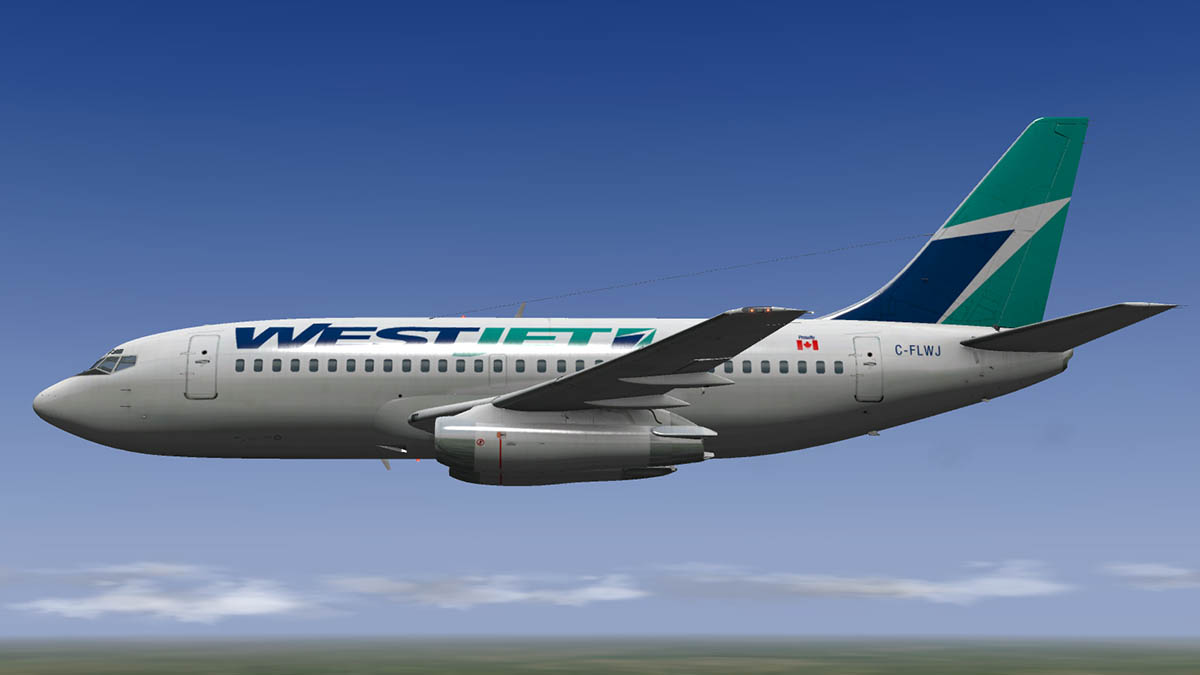
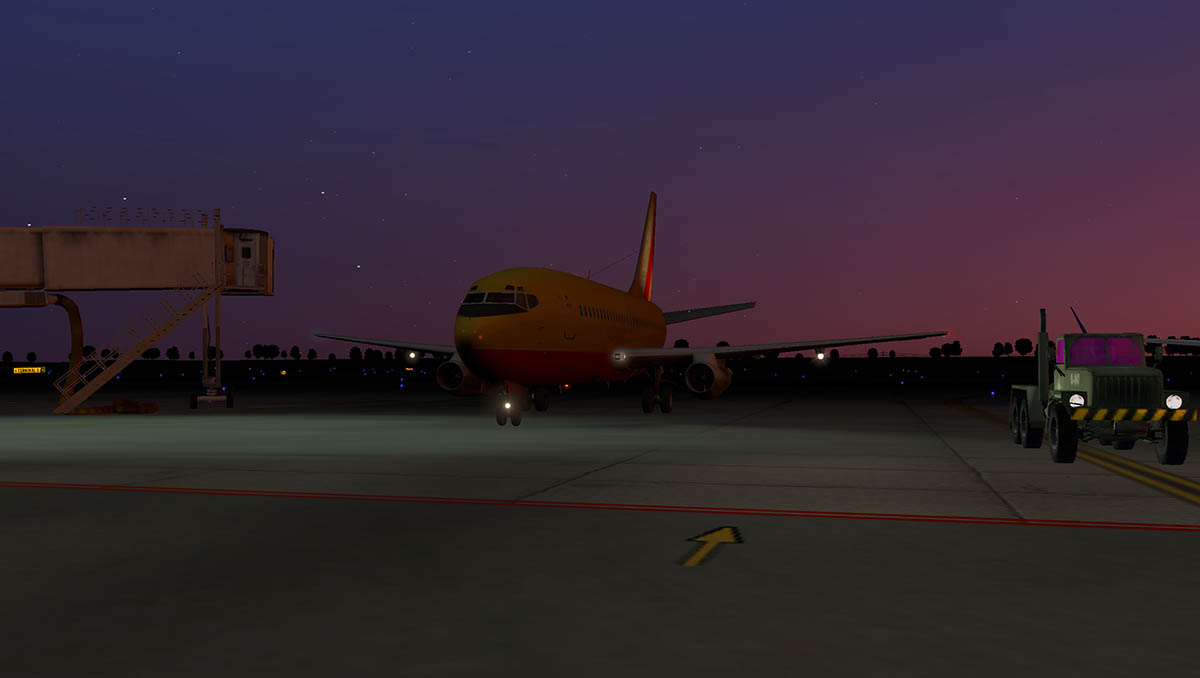
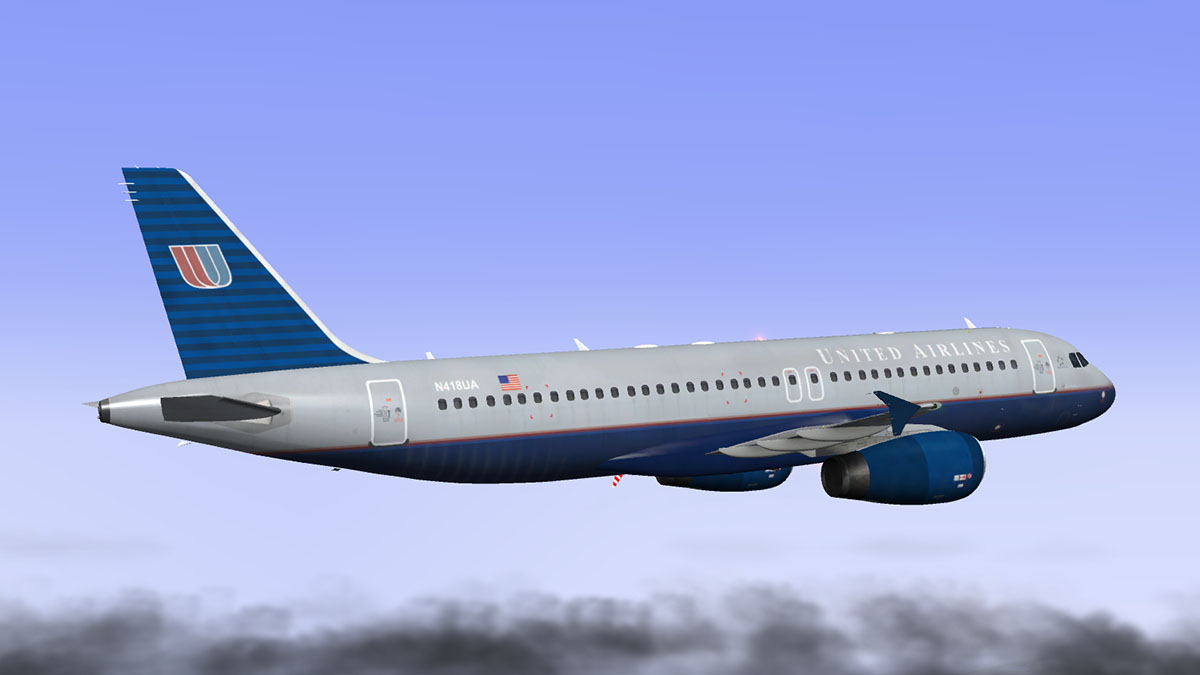
Yes it is a great aircraft. I miss the Love! Already we have great liveries popping up for this aircraft on the .org, look here: The retro United is exceptional... get them now they are free! X-Plane.Org
-
Aircraft Review : Boeing 732 TwinJet by FlyJSim Route: KDFW (Dallas Fort Worth) to MMUN (Cancun) The Boeing 732 TwinJet is the third major release from FlyJSim after the Bombardier Dash-8 and the Boeing 727 Series. Without doubt the Boeing 727 Series was the aircraft of the year for X-Plane in 2013 (It was released just before Christmas 2012) and this Baby Boeing is in a very similar if not a perfect compliment to the bigger Tri-Jet. The 8000th Boeing 737 has just been delivered and that makes it the most built Jetliner in history, But this Boeing 737-200 known as the B732 is very different and from another totally different era than the common -800NG series that dominates our skies today. First thing to note is which Boeing 737 is which. The launch aircraft that was rolled out on January 17, 1967 was the -100 version of which only 30 737-100s were ordered and delivered. Then there was the -200 version rolled only months after the -100 version June 29, 1967, and entered service in 1968 of which was an extended fuselage version of the -100. This aircraft and this aircraft released here by FlyJSim was successful at 991 sales (C-Cargo 104), but not straightaway as in fact In 1970, Boeing received only 37 orders and facing financial difficulties. Then after the cancellation of the Boeing Supersonic Transport and the scaling back of 747 production, enough funds were freed up to continue the project. Next was the Boeing 737 Classic -300/-400/-500 Series built between 1984 to 2000, 1,988 aircraft were delivered. The next version was the Boeing 737 Next Generation −600/-700/-800/-900 Series, commonly abbreviated as Boeing 737NG. which brings us up to the present day. 4,887 737NG aircraft have been delivered by the end of April 2014, with more than 6,700 ordered. In the future is the coming 737MAX and that aircraft is scheduled for first delivery in 2017. The Boeing 737 is a short- to medium-range twinjet narrow-body airliner. Originally developed as a shorter, lower-cost twin-engined airliner derived from Boeing's 707 and 727, the 737 it has developed into a family of nine passenger models with a capacity of 85 to 215 passengers. The 737 is Boeing's only narrow-body airliner now in production. The -200 seats 136 (maximum) and 97 (2-class, typical) and is powered by the Pratt & Whitney JT8D 14,500–17,400 lbf (64–77 kN) low-bypass (0.96 to 1) turbofan engine that is also in the Boeing 727. Performance : Maximum speed Mach 0.82 (544 mph, 876 km/h) - Cruising speed Mach 0.74 (485 mph, 780 km/h) - Maximum range, fully loaded 1,900–2,300 nmi (3,500–4,300 km; 2,200–2,600 mi) - Service Ceiling 35,000 ft (10,700 m) Weights: 69,800 lb (31,700 kg) empty : 128,100 lb (58,100 kg) Takeoff. FlyJSim Boeing 732 TwinJet This review has to be considered in if the user has flown the FlyJSim Boeing 727 series or not. If you have then the conversion to the B732 is quite straight forward and although the cockpits are arranged quite differently (The B727 has a third flight crew member in a Flight Engineer) the systems are organised and used is a similar way but for two engines on the B732 and not the three on the B727. If you are new to the FlyJSim Boeing aircraft then there is a bit of a learning curve to understand the various systems and procedures. The aircraft handle very differently as well, in mostly their age and the era that they flew in... There are no mod-cons on offer here. However like with our Aircraft Profile : Boeing 727 Series by FlyJSim (Part Two) "Flying the Boeing 727" we found a certain and if not more fulfilling and simplistic way to fly these aircraft and the B732 here is no exception. Looking into the cockpit of a cold (unpowered) B732 aircraft and the difference of the era compared to today's glass cockpit driven aircraft is quite a shock. How could you believe that these aircraft could and did transport millions of passengers with such naked little instrumentation, mostly from the navigation perspective. They did and they did the work very well and even today there are some aircraft still flying around up there still doing so. There are some great detailed cockpits in X-Plane today, but in both the B727 and here in the B732 the design is simply brilliant. Big clunky switchgear and almost to the touch flick switches, you are in cockpit heaven. The cockpit panel is all dials and gauges (sometimes known as clockwork cockpits) and the detail is simply overwhelming. You really do get the feel of the sixties style cockpit in perfect perspective. The chunky (and quite worn) Pilot and Co-Pilot yokes do take up a lot of the panel view, removed you can now see the instrumentation clearer. The standard six aircraft instruments are as they should be are front and centre. Very clear and easily readable. The Standard Six are - Artificial Horizon (sometimes known as the attitude indicator) with built in turn indicator, Heading with built in OBI, Compass, Vertical- Descent Speed, Altimeter and Speed (in knots and Mach speed). Then there are the back up instruments of Artificial Horizon, Altitude (spare), Radio Altitude, Clock (large) and the DME 2 - NAV 2 (distance) is also situated lower down. The compass allows for the VOR and NDB to be switched on two separate pointer needles, VOR 2 on the pilot's side and VOR1 on the Co-Pilot's side. The Co-Pilots set of instruments are very similar except they have the (outside) air-temperature, hydraulic Sys, Oil and Brake temperatures and the DME 1 - NAV 1 (distance) indicator. The landing gear lever is also on the right side of the panel. Centre stage of the panel are the main engine instrument sets of two engine dials covering "Engine Pressure Ratio" (EPR), N1, EXH (Exhaust) Temp, N2 (Percent RPM) and Fuel flow to each engine. Left of the main engine dials are the three fuel tank gauges, and to the right the twin Engine Oil - Pressure, Temp and tank quantity. Finally the Auto-brake selection switch is here as well. If you know the B727 panel you would feel right at home here as the differences are quite small, just twin dials instead of the three on the larger jet. The biggest difference of a few years of development between the Boeing 727 and the Boeing 737 is the "Sperry SP-77 (option version)" auto-pilot (A/P). In the B727 it was a very simplistic system set behind the pedestal. But here it is more of a modern version set out on the glareshield. Not quite the standard layout version we know today, as that A/P version was fitted to the later B737-200ADV. It is split between the F/D (Flight Director) on the left and the A/P (Auto Pilot) on the right. Still simplistic in nature, it was and is very powerful in operation as we will see in flight. Besides the change of position of the A/P to the glareshield. The removal of the Flight Engineer's station on the B727 also moved the aircraft's systems and operations to the now more familiar place on the overhead panel (OHP). looking over the panel quickly it hasn't really changed much since either on the subsequent B737's versions, and yet it would be very familiar to you as well as it was laid out on the B727 engineers station. Only now a few items have been made automated. They are however still grouped together in their various areas of systems (mostly in long tall sections) in hydraulics, boost fuel pump switches, electrical, APU, air-conditioning, de-ice, bleed and all the various lighting switches. The engine start is now the familiar GND-OFF-LOW IGN -FLT switches. The pedestal is almost identical to the B727 version except it is now for two engines and not three. In craftsman like work the pedestal can not really be bettered. It is sublime in detail and so real in operation you can't really believe it is only a computer generated image. in the cockpits 3d world it is realistic in every form. Besides the beautifully crafted throttle levers there is the speed-brakes (with auto), park brake, engine fuel flow idle/cutoff's levers, stab trim (electric) and flap indicators for the outbound and Inbound flaps (0º, 2º, 5º, 15º, 20º, 25º, 30º and 40º settings). The radio is set out behind the pedestal below the three red fire handles (two for engines and one for the APU) and is very easy in operation. Just set you frequencies and flick a switch to make one or the other active... how easy can that be. Comm's and (early digital!) transponder are set out here as well. Above the pedestal is an early weather radar that just shows the standard X-Plane weather images. Detailing on the rudder pedal's is to be admired. Like everything else here in the B732 cockpit they are extremely well crafted and designed. Missing from the radio panel however are the ADF knobs... they are both (one each side) situated high up besides the throttle part of the pedestal, and have a three way setting that is excellent and very easy to tune. Powering up the Boeing 732 TwinJet Nothing is more exciting than bringing a machine to life. Certainly with a flying machine, and the B732 is no exception. But first we have to set up the aircraft. There are four menu options on the middle-lower left of your screen - V/Card - WnB (Weights and Balances) - OP (Options) and INS. We will start with the "Weights and Balances" menu (manager). Here you can set all the aircraft's weights and fuel and passenger/cargo loads. And as you do so the system will calculate for you the correct number relating to the aircraft's status and also show you your CofG (Centre of Gravity). The important number is your "Max landing" number shown in red. Here I have made the aircraft quite heavy at 117988lbs but I have a fair distance to go so I will certainly be under the landing weight. Cleverly if you open the Vref menu (or V/Card) the Vref's are calculated for you correctly and so are the landing vRef's, note that if you change the flap degree the vRef will change as well to compensate... a more clever idea again. Another note is that the landing speed is incorrect at this point because the aircraft's weight is wrong, this will change as you burn off the fuel or the weight. The other Menu item is the "Options" card. Here you can set all your options in: Cold and Dark startup or Engines running (hot) and set the time to Zulu. Hide the yokes and set weights to Kg's and finally select if required the Ground Power and Air Cart (to start the engines). Views and sound adjustments can also be adjusted. Weights and fuel set we can now power up the aircraft. Battery on via the "battery switch", You know that this does give the aircraft power but not for very long. You do have the Ground Power and Air Cart in the options menu to use. I found that in many instances they don't work? or connect up to the aircraft, which is slightly annoying. You don't get a power cart or air cart either outside the aircraft which are now usually de rigueur with aircraft of this price category. Here at KDFW it does connect and you can connect up the power via the switch and turn the AC switch to GND/PWR. Another option is the APU (Auxiliary Power Unit), start it up via the switch and wait, the unit takes it time to warm up... and then switch it over to APU/GEN on the A/C bus. Now ready to start the engines we can switch on the fuel pumps and hydraulics and the outside anti-collision beacons. The panel is "if it is lit, it is not active" so as you do the start up the OHP should clear until all the lights go out. Here FlyJSim has done a brilliant amount of work to make the panel so authentic, in most cases we take it for granted by using it all the time. But this is great work in that how you interact with the panel now is so real. APU to bleed and make sure the L & R Packs (air-con) are off and you are ready to turn on the engine switches to GND (start) if you are flying you then re-start via the FLT (start). As the engines power up then add in the fuel via the levers on the pedestal, and the rest of the engine start up is automatic. The engine gauges in the centre panel will spiral and note the conditions of the engine to the idle position. then all you have to do now is clean up the OHP with turning on the aircraft electrics (buses), pitot heaters and when running at idle turn off the APU bleed and the (air-con) packs on. As they say "A clean panel is a good panel" and you are good to go. One other option is the INS menu... You can purchase the Delco Carousel IV-A Inertial Navigation System. Nicknamed "CIVA", CIVA Navigation System for $US10.00 that is a basic navigation system that can give automatic navigation of up to 9 waypoints. (you can load X-Plane .fms plans) and it can be used in the FlyJSim B727 as well as other aircraft of that era. Well worth the addition cost. The JT8D's are whining now outside, sounds are excellent and 3d in rotation of the aircraft and has the "Realistic Sound" engine provided by DreamEngine & Turbine Sound Studio sounds. These early engines are noisy and smoky, but you certainly miss today the futuristic missile look of those long engine pods, beautifully done here... they just were not what the future turned out to be. The original engine nacelles incorporated thrust reversers taken from the 727 outboard nacelles. Unfortunately they proved to be relatively ineffective and apparently tended to lift the aircraft up off the runway when deployed. This reduced the downforce on the main wheels thereby reducing the effectiveness of the wheel brakes. In 1968, an improvement to the thrust reversal system was introduced. A 48-inch tailpipe extension was added and new, target-style, thrust reversers were incorporated. The thrust reverser doors were set 35 degrees away from the vertical to allow the exhaust to be deflected inboard and over the wings and outboard and under the wings.[ The improvement became standard on all aircraft after March 1969, and a retrofit was provided for active aircraft. This accounts for the odd angle of the thrust reverser doors and the very long tail pipe, but the main reason was that in thrust reversal deployment the original B727 version would actually lift the aircraft off the runway on landing! The undercarriage is excellent as well, great linkages, legs, tyres and animation. the engines hide most of the work, but it is worth checking out. The wings are very similar to the B727 in forward leading edge slats (inner and outer) and the seven position trailing edge flaps. wing and flap detailing is overwhelming and work to be admired, certainly in the powering out of those flap extensions. The landing light pops out under the wing(s) as well on the flap runners, the lower the flap position then the lower and change of angle of the landing light... great detailing. Flying The Boeing 732 On the options menu you have a pushback built in. No truck outside but the aircraft will pushback when the brakes are off and you press the pushback tab. It moves a little to quickly for me, and turning is via the rudders. Brake to stop and disconnect the pushback. A final check of the takeoff vRef charts shows me my markers, note that vR (rotate) is vR (vRef) +15knts, the bugs will call out the vRef's as you pass them (you get the landing heights as well) which is very authentic. A last check of the gauges at the hold and when cleared the B732 is on the KDFW runway 17R. Power goes up but the JT8D's take a little while to build up the thrust, once there the push is long and quite powerful, the noise builds as well into that unmuffeted roar. Vr and you only need a light pull back of the stick to get airborne, once clear of the runway and you are heading slightly to the right and you can feel the great central balance of the aircraft in the yoke, the aircraft is just under MTW, but the B732 feels very good and turns and climbs without much drama. Boeing pilots note it was always the best handling version of the B737 series, and here you can quickly feel why. In this era it was mostly VOR to VOR navigation, with a few NDB's thrown in for good measure. If you have the mentioned CIVA then you have a flightplan to fly to, If not then the navigation come down to you. It is best to be well prepared with the correct headings and VOR/NDB frequencies at hand. I found like with the B727 that the VOR's can be a little slow coming on line sometimes. NDB's seem to be slightly better for giving out the right direction. It helps here that the NDB knobs are in a great place just down to your right (pilot's side, left Co-Pilot) so I found I used them more in the B732. You want to fly the B732 by hand all the way to your destination as the B732 is so easy on you. But the autopilot is very good as well, if not excellent. You do wonder if change does make system better. In this case the A/P is so simple but so powerful you wonder why they had to change it. The Sperry SP-77 (option version) is a brilliant bit of kit. As you are already pitching in your correct angle, you will notice the pitch knob is following you, engage the autopilot via the big switches and the aircraft just holds the pitch! Select the altitude you want (8500ft transition) and click on the ALT HOLD on the top of the A/P panel. Make sure the IAS-OFF-ALT HOLD switch is in the off position (It should be already) and the aircraft will then climb and level out to the selected height. Want to hold any altitude then flick the switch to ALT HOLD. Note: that to change the pitch (climb or descend) you have to OFF the ALT HOLD first. The pitch is analog so you have to be aware that it won't go back to dead centre when leveling off, It seems to wander around, in that you set it correctly on the straight and level, you could however be descending down (or up) a little. The pitch is also a little big in its click settings as well, A click up or down and you are going 400ft, a second click is nearer 2000ft in pitch, you really need more intermediate settings to get a finer pitch adjustment. but overall the pitch system is excellent in just turn the knob (ALT HOLD off) and up or down you go... You have to click on a separate switch to activate the heading mode, and the Flight Director (FLT-DIR) switch as well, then the aircraft will turn to the heading bug. you can adjust the heading bug on the A/P panel and on the heading instrument as well for ease of use... In fact it is good to note that most adjustments have two sets of manipulators, arrows and curves and both work fine to what you like to use best. The VOR needle will note your direction and the distance is shown in the lower display. The aircraft will climb very easily but don't over stress the engines (they will burn out), keep everything well with in the green or with just a little yellow if required on the dials. As noted you don't need to stress the aircraft even while it is still quite heavy. I am flying quite high at FL350 and only 500ft under the service ceiling, That will cost me a little in a fuel penalty, but still better than the stronger winds just below. At altitude the aircraft is nice and clean everywhere (OHP is nice and blank) and I only have to watch the navigation points. The route took me down the east coast of Mexico as far as Corpus Christi. The Boeing 737-200 could not operate over water as there was no ETOPS (Extended range Twin Operations) allowed in the 60's and 70's in fact only one B732 was made certifiable. most 2-engined jets were restricted by the 60-minute rule. So I kept a visual sight to the coast all the way down before heading out to cross the coast at Campeche. Liveries You get seven liveries with the aircraft and unlike the B727 there will be no livery packs for the B732. A paintkit is coming. All liveries are excellent, but a few more American based liveries would have been nice... The Westjet is the best on the aircraft, the KLM is good as well. Also I checked and there was no hull fatigue cracks on the Aloha... so you are safe there. Night-lighting The cockpit lighting in HDR is gorgeous and yet you only have two adjusters in behind the dials and a flood up high. But you can find that perfect lighting setting and just the dials for landing in the dark. There are two fully adjustable spot lights overhead either side of the OHP. Turn on at night with the switches by the captain left side you can illuminate almost anything, the lighting detailing and reflection is amazingly good. Beacon, navigation, tail (logo) and strobe lighting is very good, but the cabin windows are dark and not lit making the aircraft a black hole at night, FlyJSim says this will be fixed in the update. Landing at Cancun You have to watch your speed on the descent. Pulling back the throttles means losing the power, but the aircraft will still gather speed as it descends. so allow for a period of space to get the speed corrected just under 200knts before your final approach. Yes you can use the speed-brakes but most pilot's pride themselves on not doing so, however sometimes you have no choice if you stay at the cruising altitude to long. The speed can be controlled though but don't expect it to recover until the aircraft is absolutely level again, and then the speed falls off quickly. You will again find the handling of the aircraft to your wishes while manoeuvring the aircraft though the turn to the heading of the airport and switch the A/P back on to use the near perfect VOR alignment to the runway for Cancun MMUN's runway 12R. Be careful though as RWY12L is noted and displayed, but it does not exist in reality? So don't select that one unless you want to land on the grass. Be careful of the speedbrake arm as it doesn't click into a position, only a green light on the panel shows you it is armed. Autobrakes are set to MED. Coming in close to the airport I recheck my land vRef card at 30º flap I can use 126knts, which is very slow... As the flaps go down each notch you need to work the throttles to keep the aircraft from not going into the stall while still losing off the speed. I settled at 130knts going into the ILS system and the really slow approach allows you the one thing you never get in big jets... time. One thing noticeable was that it was also in the daylight back at Dallas are the strong light reflections from the panel. Here on approach with the setting sun behind me some parts of the panel were blanked out, it is authentic no doubt, but it makes you work just that a little bit harder. At 130knts your ride over the runway keys is very slow and the B732 giving you all the time in the world to position the aircraft down on the tarmac right where you want it. No autoland here either, so watch that float. Those wonderful clamshell engine reverser doors bang into place and start the pushing out thrust to slow your speed, but they are not nowhere near as powerful as today's powerful reversers, so don't rely totally on them to slow you down. Power off and you are in the pace taxi mode and clean up the aircraft ready for the exit to the taxiway. X-Plane's HDR lighting is great on the ground. Strobes, strobe brightly and red and green nav lights illuminate the runway, you have four landing lights that can all be turn on with a flick of a small panel behind all the switches. there are also taxiway turning lights and a turning front wheel position taxi light. All lights illuminate the areas around the aircraft to making taxiing at night one of the best and easiest yet. (hard to do in X-Plane) only the RWY turn taxi-lighting is a little dim at the source, the actual lighting is however fine. A taxi to the bay and the flight distance was 1114nm, Fuel was getting low as well with that high altitude at just over 5000lbs left. But a shutdown and connection to EXT Power and the aircraft was ready for the morning return to KDFW. Summary The Boeing 732 will be certainly compared to the FlyJSim Boeing 727 Series. If you liked the B727 then you will certainly want the B732 and you won't be disappointed. In quality and detail they are exactly the same. The B727 was a bit of a drama queen, but then that is what you really loved about the aircraft. The B732 is a more neutral flying aircraft and is really more composed in balance compared to its bigger sibling. The B732 feels smaller than the B727 and in that context you may feel your not getting as much aircraft even though you are paying less (there was three variants as well for the B727 with the full series). But that will be missing the point. there is really not much to slip between both aircraft, They would really depend on your mood in that if you want to wrestle an aircraft (B727) or if you would just want a good no-nonsense aircraft (B732) that is very nice to fly over a continental distance, and both have a time and a place and both aircraft hark back to an era in that when aircraft were in a period of a glorious adventure and breaking aviation records. If you have flown the B727 then you will easily slip into the left or right seat of the B732 and feel right at home. If you are new to these FlyJSim 60's era aircraft, then yes there is a bit of a system's and operation's learning curve, but the results are well worth the effort. All aircraft systems including: Air systems - Anti-Ice - Autopilot(SP77) - Com/Nav radios - Electrical - Fire protection - Hydraulics - Fuel - Weather radar - Warning systems and cockpit call outs are fully active. There are a few more benefits with the B732, the Sperry Autopilot is a gem to use and not hidden away behind the throttles (B727) but right there where it should be on the glareshield. The lighting (except for no cabin lighting?) is excellent and the whole aircraft is so well put together in every area. You don't get a lot of extra features with FlyJSim aircraft, but you do get quality and great flying machines. And the Boeing is certainly a great if not a sensational aircraft to fly and great overall value. _____________________________________________________________________________________ Yes! the Boeing 732 TwinJet from FlyJSim update is now available from the new X-Plane.Org Store here : Boeing 732 TwinJet - Price is US$47.00 Installation and documents: Download is 294.40meg and the aircraft is deposited in the "Heavy Aircraft" X-Plane folder at 381.80 meg and requires a key-code for activation. Note: If you have purchased the xCIVA navigation package it goes in the B732 aircraft "plugin" folder and not in the X-Plane plugin folder... There are three documents covering the aircraft: -Designed by FlyJSim (Jack Skieczius and Joe Vermeulen) Developer Site: FlyJSim Dev Support : FlyJSim Support Small note : in that the actual review was conducted in X-Plane version 10.25, I also flew the aircraft in the b10.30b1 to check for any differences (there was none and the frame-rate was excellent in both versions) a few of the images however were taken in b10.30b1 to check out the clouds... In frame-rate it is worth noting that if you switch off the "draw per pixel lighting" which highlights textures you will gain 30frames!. The aircraft will look slightly plainer outside, but 30frames is still 30frames... And yes I know that Southwest Airlines fly from Dallas Love Field and not KDFW, but there is sadly no KDAL scenery in X-Plane? _____________________________________________________________________________________ Review By Stephen Dutton 30th May 2014 Copyright (2014) : X-PlaneReviews 2014 Technical Requirements: Windows, MAC or Linux X-Plane 10.20 or higher - 32 and 64 bit compatible. X-Plane 9 is not supported Recommended: 1+ GB of VRAM, and 8+ GB of system memory Current version: 1.0 ( v1.1405.1025 ) - Last updated May 28th 2014 Review System Specifications: Computer System: - 2.66 Ghz Intel Core i5 iMac 27” - 6 Gb 1067 Mhz DDR3 - ATI Radeon HD 4850 512mb Software: - Mac OS Mavericks 10.9.2 - X-Plane 10 Global ver 10.25 (final) - Hi rez planet textures from ISDG - Hi-Res Runway textures by Jack Skieczius Addons - Saitek x52 Pro system Joystick and Throttle Scenery - KDFW - Dallas/Ft. Worth International Airport by Brian Godwin (X-Plane.org) - MMUN - Cancun International Airport Mexico by 5171 (X-Plane.org)
-
Beta Release : Beta version 10.30 release imminent... details By definition X-Plane Reviews is a review site. But we will always look at beta releases because they go to the foundation of the simulator we use everyday, and have a large affect on the way we use the simulator. Beta 10.30 is a very significant release, mainly because it has been a very long time coming at well over a year (We don't count b10.25 because it was really just an art update). If that much of time was spent on the development then we are expecting it to dazzle, but it is not going to be totally a game changer for a while yet... Why? Well first many of the items listed will need to filter down through aircraft and scenery updates, and that will take time. A few will buzz out quickly, but the top end aircraft will need careful testing and to make sure of their compatibility to the new X-Pane10 version. Top of all in the b10.30 list is of course the new Garmin GNS430-530 GPS from Philipp Münzel. As noted in the following notes, you can not just drop it in the current aircraft panel as it is a very different size and resolution than the old version, hence the time frame for the GPS/FMS system to appear in aircraft that are really worthy of this exciting feature. For more information on the GNS430-530 I did an overview here : Other major features include - Cloud and Atmosphere Changes - New Art Assets - Fuselage Mounted Speedbrakes, Change in Flight Model - New parameters for steered and castoring gears - Plugins and Datarefs - Correct Blended Drawing in the 3-D World - Plugin-Added Forces - Plugin-Added Electrical Bus Loads - Controls for Networked External Visuals and for real world pilots - Playback and analyze your REAL flights in X-Plane. As noted you as read through the details, you will notice how many of the features in b10.30 are directly relevant to the operations and actions of the aircraft modelling itself. And importantly it is to remember in that this first portion of b10.30 is not the full total package of the upgrade, as there will be more to come as the rollout continues over a few months. One thing that has been promised by Laminar Research on this beta is that it is far more polished and complete than earlier beta releases (In other words it has been refined and tested to death). As the rollout continues X-Plane Reviews will analyse and give you feedback on how the beta upgrade is going and the highlights explained. So for now until we actually install the upgrade, here is the full description of b10.30 and bug fix details as noted by Ben Supnik of Laminar Reseach in the b10.30 release notes. (X-Plane10 Developer Blog) : X-Plane 10.30 is Coming Real Soon Now™ New GPS navigators X-430 and X-530 Select the new GPS/FMS system in the Systems screen of Plane Maker to get it into your aircraft. Two slots are available for pilot- and copilot side. New instruments are available in the panel editor to enable screens of the 430 and 530 for 3d-cockpits. The old GNS430 instrument is very small, so it is treated based on the size in the panel: If the instrument is given a REALLY SMALL spot (e.g. 62 pixels tall) it draws a compact display with just frequencies – not realistic, but at least readable. If the new instrument is given a BIGGER spot (The cutover is 96 pixels vertically, but authors SHOULD give it the full 240) you get the full instrument layout, and how sharp it is will be a function of the spot size – at 240 pixels tall you get the ideal look. At all times, at any size, you can click on the NEW instrument’s screen in 3-d or 2-d and get a POPUP that runs at full size and full sharpness. The new GPS navigator reads instrument approaches from a database with near-worldwide coverage which is provided by Aerosoft. Subscribe to Aerosoft Navdata Pro to get monthly updates for all instrument procedures world-wide! The new GPS navigator also provides a better interaction with HSIs and CDIs in the panel, and allows for more realistic autopilot set-up. Be sure to read the tech notes on http://developer.x-plane.com to understand how to set up your plane correctly. Playback and analyze your REAL flights in X-Plane! Xavion is now a Flight Data Recorder! With ZERO input required from you, Xavion records every flight you make. Then, with X-Plane you can simply go to the File menu and select IMPORT XAVION FLIGHT to see your real flight… in X-Plane! This brings flight data recording and visualization from the test pilots and professionals right to you, with a very easy user interface in X-Plane to get and display the data! Fun! Cloud and Atmosphere Changes Cloud code has been bug fixed a bit. Notable bug fixes: Fixed the “white-out” bug – no more loss of visibility when near clouds. The transition out of the bottom of clouds should be consistently close to the bases set in the weather screen when you set up a non-stormy stratus system; this is good for practicing ILS break-outs at a specific elevation. Transition into clouds should be less visually jarring. Lighting calculations for cloud puffs rebuilt to look better. Textures shuffled to save VRAM. This patch changes the scaling of the cloud rendering slider, so you will want to re-tune your cloud rendering settings for optimal framerate on your hardware. A few notes for cloud-tweakers: The texture layout for clouds may be further juggled during beta; I’ll post notes on the new layout of the textures when they’re finalized. The cloud lighting constants will almost certainly be tweaked. Clouds will be affected by fog changes, which are not complete as of beta 1. The white band of fog in high-altitude views has been fixed. Please note that as of beta 1, not all fog-related changes are in the sim yet; TBD whether these make it into a later beta or become their own release as soon as they are ready. There is now an official override for clouds (sim/operation/override/override_clouds) – setting this to one gets rid of all cloud puffs and white-out; it is no longer necessary to use art controls to replace X-Plane’s built-in clouds. Using this override saves CPU time that would have been spent building clouds and VRAM that would have been spent storing cloud meshes. Controls for Networked External Visuals The options for controlling networked computers for multiple visuals have changed in 10.30. In the External Visual tab of the networking setup, there is now just one checkbox to make this machine a networked “slave” and enter the IP address of the master. The controls to make it an extra visual, extra cockpit, or extra anything are located elsewhere. In the External Visual tab of the networking setup, each entry for the IP of an extra visual has a checkbox to determine whether the external visual tracks the view of the master. If this is off, the views are controlled on the slave machine. If this is on, the view is set to be the same as the master, but modified by the view offsets in the Rendering options. The Rendering Options have three choices for the Default view. (The Default view is what you get with the “w” key and is the view that you first get when you load the aircraft.) - forward view with panel (X-Plane’s default) - forward view with scenery only (no HUD) - forward view in the 3D cockpit (with 3D view controls active) The Rendering Options menu has a new checkbox to lock the view to the default. If set, the view will always be the default cockpit view and cannot be changed by view controls or the network master machine. lateral offset can go -9.99 to 9.99, as per customer request New Art Assets Several enhanced and 38 new textures: an extended set of tropical ones, providing more climatic nuances, enhanced cold-dry regions and some special landuses for HD-sceneries. Autogen library tweaked to avoid having tall buildings on approach paths to airports. For example, KBOS 22L is no longer blocked. This fixes the case where the autogen is “medium density” but the art asset being mapped via the library was incorrectly a tall building. Tweaks to urban terrain textures. A number of DDS files have been re-ground from their PNG sources to improve color fidelity. Aircraft Conversion from V9 The interpretation of the trim setting datarefs changed from X-Plane 9 to X-Plane 10. The datarefs in question are sim/cockpit2/controls/elevator_trim sim/cockpit2/controls/aileron_trim sim/cockpit2/controls/rudder_trim In X-Plane 9, the values returned by the datarefs were the trim setting as a fraction of total control surface travel, corresponding to the way trim range was declared in PlaneMaker. In X-Plane 10, the values of the data refs are the trim setting as a fraction of total trim range, meaning the range returned is always +1.0 to -1.0. To compute the actual control surface deflection in degrees, multiply the trim setting by the trim range in degrees. Fuselage Mounted Speedbrakes – Change in Flight Model There is a minor change in the flight model for fuselage mounted speedbrakes. Prior to 10.30, only positive extension angles caused drag. As of 10.30, drag is based on the net extension angle, meaning the difference between the current speedbrake angle and its retracted angle. This means that speedbrakes with negative retracted angles (for example, to match a tapered fuselage) will create more drag than they used to. To get accurate drag on deployment, it is important to specify an accurate retracted angle. (You get one degree for free to allow retracted speedbrakes to hide in the fuselage.) New parameters for steered and castoring gears Better support for castoring versus steered gears and better tail-wheel lock function: If you enter a steering angle in Plane-Maker for a given gear, then that gear is considered to be a wheel that can pivot, not a fixed wheel like a main gear. If you enter a wheel as CASTORING in Plane-Maker for a given gear, then that gear is also considered to be a wheel that can pivot… not a fixed wheel like a main gear. Once a wheel has been defined as one that can pivot (either by entering a steering angle or checking the box that the wheel is castoring), then: If the tailwheel lock is engaged or nosewheel steering is on, that gear will move through the steering angle (which may well be zero for a castoring gear, which simply locks that wheel at zero). If the nosewheel steering is off or the tailwheel lock is off, then the wheel free-castors. So, simply put, by entering a steering angle or “this wheel castors” checkbox in Plane-Maker, you define that wheel as being able to pivot. If the tailwheel lock is on or or the nosewheel steering is on, it will do so through the commanded steering angle… very possibly zero for castoring gear! And once the nosewheel steering is off or tailwheel is unlocked, all such gear will castor. Plugins and Datarefs As we modernize X-Plane’s use of OpenGL, the plugin system will start to catch illegal drawing – that is, drawing outside of a drawing callback. If your plugin is drawing at an illegal time, you may see a message in the log with your plugin’s name (and the OpenGL code will not be executed). If you see these error messages but believe your plugin is operating according to spec, please contact us. Bug fix: Custom operating-system-provided cursors work for plugins. (This feature worked in X-Plane 10.10 and was broken in 10.20.) Datarefs: The second GPS unit is available – virtually all GPS datarefs have been cloned for GPS2 8.33 khz tuning is available on all COM radios All sound preferences are available as datarefs – see sim/operation/sound/. The winch default parameters can be customized – see sim/world/winch/ Rotor brake strength can be customized – see sim/cockpit2/switches/rotor_brake_ratio sim/flightmodel/position now has angles both in OpenGL coordinates (useful for drawing, available since X-Plane 6) and in a coordinate system relative to level flight (new to 1030); therefore you can use these new angles to create custom instruments without “jumps” when X-Plane loads scenery. X-Plane’s built-in clouds can be disabled with sim/operation/override/override_clouds Correct Blended Drawing in the 3-D World A new dataref lets 3-d drawing callbacks differentiate between the solid part of drawing (where OBJs can be rendered with correct shadows) and the translucent part of drawing (where alpha effects can be over-drawn without HDR artifacts). See this technote. sim/graphics/view/plane_render_type Plugin-Added Forces New datarefs let your plugin add arbitrary forces to the aircraft – see this technote for more info on how to write them and how to share them. sim/flightmodel/forces/fside_plug_acf sim/flightmodel/forces/fnrml_plug_acf sim/flightmodel/forces/faxil_plug_acf sim/flightmodel/forces/L_plug_acf sim/flightmodel/forces/M_plug_acf sim/flightmodel/forces/N_plug_acf Plugin-Added Electrical Bus Loads Plugins can add custom electrical loads to any of X-Plane’s 6 buses via a new dataref: sim/cockpit2/electrical/plugin_bus_load_amps Please note that this dataref is not meant to be shared – only a plugin installed with the dataref can write to this because there is no provision for coordination between plugins.* Miscellaneous New Features New view commands: direct selection of all 8 view directions. Assign these to an 8-way hat switch. Increased limit on lateral view offset in the rendering options for offset monitors. Commands to control APU bleed air. Commands to toggle DME audio. Commands and plugin datarefs to enable/disable TrackIR. Option to automatically dismiss error messages for extra visuals and aircraft under control of an IOS. Added commands for setting the directional gyros: “sim/instruments/DG_sync_down” “sim/instruments/DG_sync_up” “sim/instruments/copilot_DG_sync_down” “sim/instruments/copilot_DG_sync_up” Added commands for helo governor and clutch: “sim/engines/governor_on” ,”Throttle-governor on.” “sim/engines/governor_off” ,”Throttle-governor off.” “sim/engines/clutch_on” ,”Clutch on.” “sim/engines/clutch_off” ,”Clutch off.” Dome projection EXPERIMENT allowed without key. You can test dome and cylinder projection for your setup before buying a Pro Key. Added commands and datarefs to control carriers and frigates from plugins better. Added command for carrier cat-shot Carriers are not replaced when they are under plugin control Added internet output option for SkyDemon Added FlyQ as a supported iPad app for X-Plane data output Planet textures receive a one-notch resolution increase. This will help the look of the planet at a relatively low VRAM cost for most users. New Features for Aircraft Authors New equipment option in the special equipment in plane-maker: fire warning bell equipped! check this to get the fire bell. NOTE: previous versions of x-plane ALWAYS gave you a fire bell if there was an engine fire. Now, you must check this box to get that warning! New Plane-Maker feature to not draw the OBJs, but draw the ACF flight-model geometry when editing so you can edit the acf and see what yor are doing without having the flight model geometry hidden by OBJ Updated propeller control for turbo props: prop can now go into beta when pulled to idle, as real props do! Then, the prop goes into reverse when pulled aft over the gate. This is activated by a checkbox in Plane-Maker that must be checked in order to simulate that behavior of PT6-like turbo props. Autopilot can now track nav courses based on GPS, LOC, OBS setting or heading bug, depending on type of autopilot. See the technote on autopilot sources for more info! See the technote on HSI sources for more information on how to get the new GPS in your plane, and the new GPS technote on how the new GPS will interact with the autopilot. Plane-Maker and Airfoil-Maker are available as 64-bit apps for Linux users. Generic lights numbers 16-63 can now be used, for up to 64 generic lights on an aircraft. (In X-Plane 10.25 only the first 16 were independently controllable.) Generic needle instrument can now take deflection sources for pitch. This lets you build a crude mechanical artificial horizon strictly out of generic instruments. Attached objects have a new mode: “prefill only”. If all of the objects in your aircraft are too ‘heavy’ to do efficient cockpit prefilling (e.g. they have too many vertices or too many animations), you can make a new dedicated object that will be used only for prefill and crudely mask out most of the cockpit without users seeing it. The existing mode (object is used for prefill and drawn) is still available, and existing planes do not need any modifications. The texture resolution check-boxes for attached objects correctly reflect how objects will be loaded when there is texture sharing between objects. If you set the “high res texture” option for one object, all objects sharing the texture receive the same setting. GLOBAL_cockpit_lit now works with panel regions that are not a power of 2 or do not cover the entire 3-d panel. This was a screwy case for 3-d cockpits and did not work correctly in 10.25. If your panel’s UV map seems screwed up in 10.30, please contact Ben for advice on how to fix your aircraft. New Features for Scenery Authors and Modelers The “frame rate” data output now contains two fields: CPU and GPU. These times show the time the CPU and GPU spent drawing one frame (on average) in milliseconds. This means that not only can you tell whether your framerate is CPU or GPU limited (the larger number is the limiting factor), but you can tell the relative loading of the CPU and GPU, and you can measure improvements in CPU or GPU use even if they are not the dominant factor. GPU time on OS X is only available in OS X 10.9 and later. There is a new art control “hdr/debug_lights” that, when set to 1, will show you the cone area of all spill lights. The cone area of the spill lights on screen is a good indicator of how much GPU power the spill light is taking. If your scenery or airplane is very slow at night in HDR mode, turn on light debugging and look for huge, wasteful spill light cones. If you can make these smaller you may improve GPU performance. The road.net file format has a new directive LOCKED_POWERLINES – if put on its own line, it indicates that X-Plane should not attempt to “optimize” power-line tower placement for this road network. Instead, power line towers will be placed in every junction and vertex from the original data (in the DSF, with no extras added). You can use this directive if you want to cleanly control powerline tower placement when you generate your custom scenery. DSFs now support multiple road.net files, including different road.net files in different overlay layers. Autogen blocks contain a number of new features, including selectable sub-grids, to support development of the next update to the urban autogen art assets. Miscellaneous Bug Fixes Individual prop pitch controls (Prop1, Prop2, etc.) control only the prop they are assigned to. Joystick centering logic handles joysticks with an offset center so they still have full control input. Autopilot course tracking on VORs with an offset magvar now works correctly. Accuracy improvements in long range VOR and glideslope tracking. OBS knob operates the correct HSI when used with a fixed source HSI (e.g., HSI to Nav 1 only). HSI source selector is reset to Nav 1 when a new aircraft is loaded. Local map retains its zoom level when you use the weather menu. “Show our ILS” and glideslope display in the local map identify the approach more reliably. “Shutdown tailwind ILS” now works reliably in gusting crosswinds and doesn’t switch ILSs on and off every other second Joystick buttons are now numbered consistently in the Basic and Advanced button assignment menus. Save Situation and Save Replay work when “Save Preferences on Exit” is disabled. Turning off “Save Preferences on Exit” no longer causes a crash warning on the next startup. Aircraft count is automatically adjusted when you add multiplayer aircraft. Multiplayer aircraft are removed from the environment when you turn off the IP connection. Networked IOS now reliably loads aircraft and airports on the student machine. Space Shuttle: Initial speed for the final approach is set to the correct 300 kias. Custom chord offsets in V9 aircraft import correctly into V10. Trim speed in V9 aircraft imports correctly into V10. Retracted angle setting for fuselage mounted speedbrakes is back in PlaneMaker. Brake response more realistic, with the whole plane not being held back by just a smidgeon of brakes if the craft was stopped before The FCU (fuel control unit) of turbo props now takes the highest of throttle and backup throttle, like it does on a real PT-6 The sync real-time checkbox is no longer required for Xavion Corrected depiction of landing gear deflection in Plane Maker Changed a constant to get the transonic drag down just a hair, as it needs to be according to testing with the citation X, and a (real) F-18 pilot testing with the falcon 7-X indicates that this is needed for the high-subsonic aircraft Joystick UI shows that null zone applies to toe brakes and it does indeed apply to toe brakes Reverse thrust sound variation much reduced, as per notes from numerous real pilots Manual weather-dragging scaled better now, you can get levels of thunderstorms and clouds much more readily Planes used to lean off to the right ever so slightly. It turned out this was due to an error in the computation of flow along the spar direction in cases where wings had dihedral – Some component of this lateral flow took an axial component after sweep was applied, so the right wings were moving slightly slower than they should have been the effect was a fraction of a knot, but till just enough to lean the plane to the right a hair. That is now fixed! Turn coordinator now reflects bank rate as well as turn rate to give a more immediate response, as does the real one The data output was not showing the total bus amperages correctly since it was displaying the data while it was still in the process of being summed. Now, we show the total bus loads in the data output Logic error fixed on when to apply rotor dynamics Foreflight output is now working at 1 hertz like it should Improved response of external visuals on network computers Fixed saving situation files from the map screen Plane-Maker VIEWPOINT, ENGINES and SPECIAL EQUIP screens re-organized Mouse-dragging of the throttle now syncs for beta and reverse according to the settings in Plane Maker Fixed circle camera view jerks when a new scenery tile was loaded Flight Data Recorder (FDR) and XAvion recorded flights can now be up to 4 hours long Fixed X-Plane going into replay mode when you just opened the FDR window without actually selecting a file. Fixed the virtual cockpit viewpoint of the Avanti Raised max wind speed enterable in the weather window to 150 knots – winds aloft can really be that strong at times! Made over-wing condensation effect stronger by just a hair Fixed X-Plane hang when ADSB weather out is selected. Improved output for XAvion to correctly emulate a Sagetech Clarity ADSB receiver. Added nominal bus voltages to the Flight Data Recorder so we can see what the plane is doing Improved eagle claw gears to look better, considering the pitch of the aircraft, and to handle the inverted eagle claw case as well When running a REAL Garmin GPS and NAV/COM hardware unit from X-Plane, failures now are properly labelled, and functional in the way you would normally expect. Also, the setting of the left input to go into COM or VLOC is now available as a dataref Fixed pro-use key mis-match message across a network to indicate what PC has a key, and what one does not, to help debugging what machine needs a key Set visibility lower limit to 100 meters, as per the minimums for a Cat-3 approach, and the lowest vis that you can encounter in clouds Failure screen shows only air inlet heat failures for engines that we actually have, and put them in engines: de-ice where they belong Fixed a bug in anchoring sea-planes: the anchor was not always dropped where the flight was started. Now the anchor should go to the right place when seaplanes start (no matter how they start: placed by menu, dragged on the map, whatever) Ice now accumulates mass on the aircraft with something closer to surface area than aircraft weight, so that is more realistic New METAR-interpretation engine from Xavion: It is now much much more robust, and capable of handling online weather data from European and Russian reports just fine as well! Flap handle and flap surfaces now follow the Flight Data Recorder properly now, so you can analyze accidents caused by flap failures properly in replay. Transmission temperature comes up at a more realistic rate, getting to terminal temperature in a reasonable time-frame New variable added to the electrical accessors to let people add their own bus voltage if they like, as per various requests. The new dataref is: sim/cockpit2/electrical/plugin_bus_load_amps float[4] this is bus load that a plugin can add to the total loads, if desired If an electrical bus is down due to failure or under-voltage, then it will not build up amperage, which should be more realistic A new dataref sim/cockpit2/switches/rotor_brake_ratio float is now avail to control the amount of rotor brake being applied Clarified the various settings for FADEC and critical altitude in Plane-Maker Commands to move prop governor #1 no longer affect all props by mistake Datarefs added for winch control, to control the line length, ramp-up time, and speed ATIS works even if both com1 and com2 audio monitor are selected, as it should in the real plane Improved simulating the physics of VOR needles and flags better, especially visible when switching between sources for a mechanical HSI Added command to bring up acf load menu Fixed the autopilot and instruments and added datarefs to make the GPS 2 (co-pilot GPS) useable. Direction of heat blur is fixed! You don’t need to change your aircraft; the heat blur will simply be drawn in the expected direction of exhaust. VRAM optimized for non-power-of-2 3-d panels. CDI deflection range on needle generic instrument fixed. Fixed black line in the center of the screen when HDR is enabled and the window is an odd number of pixels tall. Lit level on generic triggers now work. CPU type is correctly logged for OSX. AI airplanes should pick different start locations at gate. Warning: if your airport layout has too few gates, the airports will stack up. You may need to add more gates to the airport. This fix will only work when there are enough gate slots. If an airplane fails to load, flight parameters are reset – avoids some rare crashes. Reading of manipulators used to take place between the solid and blended phase of darwing; this could cause animations to appear out of sync between parts of the plane in the 3-d cockpit. Animations are now always in sync between the different parts of the plane. Beta 10.30 should be available over the next few days, run your X-Plane10 installer and make sure you have your beta checkbox, checked to receive the 10.30 update... Stephen Dutton 24th May 2014
-
Aircraft Update : North American B25J Mitchell v1.1 by Khamsin Studio The excellent North American B25J Mitchell has been updated by Khamsin to version 1.1 (v1.1). The most notable change with the update is that there is now a new variant to compliment the original "Bomber" version that had the glass panel nose. This variant is called the "Strafer" and now the nose is fully enclosed. Here is the original "Bomber" version... And the "Strafer"... In detail. The "Strafer" also comes with three new liveries - (top) Confederate - Devil Dog (certainly my favorite), (lower) Hot Gen - Betty’s Dream (default livery) Since the release of the original B25J Mitchell there has been an extra three liveries added to the (Bomber) package as well... First the three liveries with the original package: (top) Martha Jean (default), (lower) VMB 611 - Briefing Time. The three new liveries are: (Top) Apache Princess, (Lower) Pacific Prowler - Miss Mitchell There has been a few aircraft modifications as well to v1.1, but nothing worth noting. This B25J Mitchell is still a top rate version of this iconic aircraft, Detailing is excellent... In the cockpit: And the excellent internal structure... Features include: Highly detailed and animated Crisp and easy to use panel and cockpit functions WWII pilot copilot and gunners Checklist on panel Operational bomb bays Advanced Fuel Management (the B-25 has 7 tanks) The North American B-25 Mitchell was an American twin-engined medium bomber manufactured by North American Aviation. It was used by many Allied air forces, in every theater of World War II, as well as many other air forces after the war ended, and saw service across four decades. The B-25 was named in honor of General Billy Mitchell, a pioneer of U.S. military aviation. By the end of its production, nearly 10,000 B-25s in numerous models had been built. An improvement of the NA-40B, dubbed the NA-62, was the basis for the first actual B-25. Due to the pressing need for medium bombers by the army, no experimental or service-test versions were built. Any necessary modifications were made during production runs, or to existing aircraft at field modification centers around the world. A significant change in the early days of B-25 production was a redesign of the wing. In the first nine aircraft, a constant-dihedral wing was used, in which the wing had a consistent, straight, slight upward angle from the fuselage to the wingtip. This design caused stability problems, and as a result, the dihedral angle was nullified on the outboard wing sections, giving the B-25 its slightly gull wing configuration. Less noticeable changes during this period included an increase in the size of the tail fins and a decrease in their inward cant. A total of 6,608 B-25s were built at North American's Fairfax Airport plant in Kansas City, Kansas. The majority of B-25s in American service were used in the Pacific. It fought on Papua New Guinea, in Burma and in the island hopping campaign in the central Pacific. It was in the Pacific that the aircraft’s potential as a ground-attack aircraft was discovered and developed. The jungle environment reduced the usefulness of standard-level bombing, and made low-level attack the best tactic. The ever-increasing amount of forward firing guns was a response to this operational environment, making the B-25 a formidable strafing aircraft. In Burma, the B-25 was often used to attack Japanese communication links, especially bridges in central Burma. It also helped supply the besieged troops at Imphal in 1944. In the Pacific, the B-25 proved itself to be a very capable anti-shipping weapon, sinking many ships. Later in the war, the distances between islands limited the usefulness of the B-25, although it was used against Guam and Tinian. It was also used against Japanese-occupied islands that had been bypassed by the main campaign, as which had happened in the Marshall Islands. The B-25 was a safe and forgiving aircraft to fly. With an engine out, 60° banking turns into the dead engine were possible, and control could be easily maintained down to 145 mph (230 km/h). However, the pilot had to remember to maintain engine-out directional control at low speeds after takeoff with rudder; if this maneuver was attempted with ailerons, the aircraft would snap out of control. The tricycle landing gear made for excellent visibility while taxiing. The only significant complaint about the B-25 was the extremely high noise level produced by its engines; as a result, many pilots eventually suffered from varying degrees of hearing loss. The high noise level was due to design and space restrictions in the engine cowlings which resulted in the exhaust "stacks" protruding directly from the cowling ring and partly covered by a small triangular fairing. This arrangement directed exhaust and noise directly at the pilot and crew compartments. Crew members and operators on the airshow circuit frequently comment that "the B-25 is the fastest way to turn aviation fuel directly into noise". Many B-25s now in civilian ownership have been modified with exhaust rings that direct the exhaust through the outboard bottom section of the cowling. The Mitchell was an exceptionally sturdy aircraft that could withstand tremendous punishment. One well-known B-25C of the 321st Bomb Group was nicknamed "Patches" because its crew chief painted all the aircraft's flak hole patches with high-visibility zinc chromate primer. By the end of the war, this aircraft had completed over 300 missions, was belly-landed six times and sported over 400 patched holes. The airframe was so bent askew that straight-and-level flight required 8° of left aileron trim and 6° of right rudder, causing the aircraft to "crab" sideways across the sky. An interesting characteristic of the B-25 was its ability to extend range by using one-quarter wing flap settings. Since the aircraft normally cruised in a slightly nose-high attitude, about 40 gal (150 l) of fuel was below the fuel pickup point and thus unavailable for use. The flaps-down setting gave the aircraft a more level flight attitude, which resulted in this fuel becoming available, thus slightly extending the aircraft's range. By the time a separate United States Air Force was established in 1947, most B-25s had been consigned to long-term storage. However, a select number continued in service through the late 1940s and 1950s in a variety of training, reconnaissance and support roles. Its principal use during this period was for undergraduate training of multi-engine aircraft pilots slated for reciprocating engine or turboprop cargo, aerial refueling or reconnaissance aircraft. Still others were assigned to units of the Air National Guard in training roles in support of Northrop F-89 Scorpion and Lockheed F-94 Starfire operations. TB-25J-25-NC Mitchell, 44-30854, the last B-25 in the USAF inventory, assigned at March AFB, California as of March 1960, was flown to Eglin AFB, Florida, from Turner Air Force Base, Georgia, on 21 May 1960, it was the last flight by a USAF B-25. (wikipedia) So this is a great update to a great aircraft. Great to fly and a perfect rendition of a warrior with class... The North American B25J Mitchell v1.1 update is now available from the X-Plane.Org Store. Price is currently US$24.95 : Get the - North American B25 Mitchell - Here. The v1.1 update is free to all users that have purchased the North American B25J Mitchell. Just go to to your X-Plane.Org Store account and login Documents and Install, Download is 250.60mb, that is unzipped into your fighter folder of 311.70mb. There is one pdf manual (20 pages) Support forum for the - Khamsin - Planes and Sceneries Update By Stephen Dutton 22nd May 2014 Technical Requirements: Windows , MAC OS 10.6 (or higher) or Linux X-Plane 10.20 (or higher) - 32 and 64 bit compatible 4GB RAM/512Mb VRAM (1Gb Recommended)- 250MB available hard disk space Version 1.1 (last updated May 21st 2014) Specifications:Computer System: - 2.66 Ghz Intel Core i5 iMac 27” - 6 Gb 1067 Mhz DDR3 - ATI Radeon HD 4850 512mb Software: - Mac OS Mavericks 10.9.2 - X-Plane 10 Global ver 10.25 (final) Addons - Saitek x52 Pro system Joystick and Throttle Change Log for version 1.1: - Added a Strafer version of B-25J Mitchell (solid nose) - 3 new liveries for Strafer version
-
Aircraft Update : Airbus A320-232 v2.0.2 Basic by QPAC Route : YBCG (Gold Coast) to YMML (Melbourne) QPAC (QualityPark AviationCenter) have updated their Airbus A320-232 v2 to final in the basic package. Here is the current roll-out plan from QPAC of their A320-232. - Basic (Now Available) - US$25.00 - Shop.OrgStore : QPAC Airbus A320-232 - Plus (2014) - Premium (2015) This update date now completes the "Basic" package. So what is in the basic v2 package. Plugin in written in plain C (avoids SASL/lua issues) XP 10 performance and user interface tuning Standard model (QPAC A320 V1.1) with 2D panel QPAC’s ILS auto-align feature Large choice of startup configurations Improved PFD and ND synoptic Large pop-up PFD and ND in 2D panel mode Highly realistic implementation of the Airbus “normal law” Basic flight planning (based on X-plane FMS) Compatible with XFMC “What you see is what you fly” flight path indication on ND 2 fully independent MCDUs with pages INIT, FPLN (main page), DIR, and PERF. Also pages MCDU Menu, RADNAV and DATA SID/STAR support* Implementation of all Airbus AP modes (except non-precision approach and LOC backcourse) Choice between HDG-VS and TRK-FPA (includes FPV indication on PFD, if TRK-FPA selected) Fully independent AP1 and AP2 Complete ADIRU model (10) Ability to simultaneously tune 1 ILS and 2 VOR Complete fuel system model, including gravity feed, fuel transfer and center tank pump logic Complete hydraulic system model, including electrical pump, PTU engagement and RAT deployment logics Complete electrical system model, including all bus reconfigurations upon failure. Basic air-conditioning model, including custom cabin pressure and temperature regulation FBW flight control computer simulation Basic electrical interdependency package Advanced ECAM actions pack Most features are based on the Airbus flight laws and A320-232 systems, and they are quite comprehensive now even in this basic package. Outwardly the 2d panel looks the same (a 3d cockpit is coming later later and you can pay a fee to upgrade from the Basic or Plus packages). But the features are coming in here now to separate the payware version from the freeware aircraft. Now you have two rear pop-up pedestal units on each side. It is time to note that now you are to think in left seat and right seat settings and operations as the aircraft is now not just set right across both operations (or all together), but the operations have been divided up to be flown from the left or right seat independently of each other. This is more important with the FMC (Flight Mangangement Computer) or MCDU (Mulifunction Control Display Unit) in Airbus speak. You now have two independent MCDU's that are accessible from the left or right seat positions, both can be popped out for programming and if you have the AirFMC plugin (iTunes - $13.99) you can use the pop-ups on your iPad. You can however load a standard X-Plane .fms flight-plan and the aircraft will convert your basic X-Plane flight-plan into a full realistic FMS data style flightplan, and you can now add in SID/STAR's that are based on the fms file based SID/STAR support system and the Navigraph database (coming in the Plus and Premium versions). There is a full description in the Manual on how to create the SID/STAR's you require to create a X-Plane fms based SID/STAR files. There are also 36 flightplans already completed ready in the system to show you what they do and how they perform. This creates an interesting flightplan programming procedure. It is quick but very functional as you can still add in your waypoint OVFY (overfly - flyby) and FAF (Final Approach Fix) and IAF (Initial Approach Fix) fixes. Notice how the flightplan will adjust to your route on hard 90º turns in creating the correct adjusted flightpath. So you can programme the whole flightplan very quickly and still have it look very authentic. In this version you can now do autotuning of the ILS for departure and arrival (when you choose the runway). The "Direct To" function is very good. Want to change your flightplan or like I did takeoff in the opposite direction with a wind change and the "Direct To" function will then easily put you were you want to go. Vref's are excellent as well but you do have to get your homework right in your FLEX temps as it affects the aircraft's performance in noticeable ways. This an important point with the A320-232 from QPAC. The systems are very finely calculated and you have to have all your calculations in good order to get the very best out of the aircraft right through the flying profile,. get it wrong and it shows on the performance. All settings like default weight and fuel are now fully customizable. "Cruise","Go Around" and "Approach" references are also available. Under the MCDU-MENU button there is a settings page. You can adjust many settings here including the way you want to start up the A320 in X-Plane. Full "Cold" where you just want to start with a blank cockpit, With the ADRIU (and or IRS align) and finally with the EXT power supply attached or full "hot" start. Strobe flash in cabin or just outside in HDR mode - Draw lines in OPEN GL, this setting is a must turned on. It makes the displays far brighter and the aircraft much more sharper in the textures, it is very noticeable in all the images here. - Baro type - flush textures and finally default fuel and payload. The MCDU can also display the IRS positioning of of the aircraft in the three different modes available. There is now added an excellent PROG (Progress) page that shows distances (to destination) and flight progress. If want to you can also pop out the main displays, crude but usable for certain requirements The panel looks really great at night as it has had a refinement of the lighting. The outside lighting has had some refinement as well, and is very good under HDR conditions. Update Summery I flew the QPAC A320-232 on my usual YBCG to YMML route that I have flown the various versions of QPAC A320's over the years. First thing to note is that the aircraft has a custom plugin to control a lot of what X-Plane does by default. This can interfere sometimes with the standard X-Plane practices. One area is the nosewheel steering. I use a Saitek x52pro joystick and throttle arrangement and in the yaw you will find that the nosewheel and rudder don't see eye to eye. The only way to fix this is to use the "nosewheel steering" option in the X-Plane settings menu to assign the nosewheel steering to a turning knob on my throttle control. The nosewheel turns very slowly with a slight delay as well which can take a little getting used to. But fly the aircraft and you can see the significant differences now over the original (freeware?) A320-232. It is a complex machine, but now very capable. At first glance they did look very much the same, but there has been a lot of touch ups and finer detailing done and the "Open GL" setting makes the liveries look far more sharper than the original, the frame-rate usage has been significantly reduced as well, so the aircraft is more efficient in the simulator. There are still a few bland areas like around the front windows, but overall you really notice the differences and the aircraft feels very good if you have done your homework in the flight profile programming. As a 2d panel it is now very effective, but you can see the benefits the 3d VC cockpit will bring when connected to all these systems and that powerful MCDU. The ability to set up the flexible panel to the left and right positions is simply very good and I really like the radar swish that scans the weather on the displays. Sounds have been updated as well with flyboy2006's custom A320 sounds which are again better than the original versions. The turnaround at MEL was quick as I was able to reprogramme the MCDU very quickly for the return service to OOL Gold Coast, (You only have 25min to do so). So overall I found the aircraft very good now and certainly the QPAC team are delivering on what they have promised. And the gap between the original (freeware) version and the basic version is now significant. Liveries... well there are a zillion for this aircraft, but the ones that come with the package are: And a final note in that the QPAC A320-323 has been selected for show at the The ILA Berlin Air Show on May 20–25, 2014 which is the marketplace and meeting place for the global aerospace industry, suppliers, service providers and international customers. The QPAC A320 Simulator is on show at the ILA 2014 in Hall 3 at the QPAC/BBAA stand 3430A. The QPAC A320-232 is available for both X-Plane10 and X-Plane9 platforms. Installation and Documents : Download is 258.30mb, expanded to 160.20mb with the Xplane10 version installed (you can select which platform version in XP10 or XP9 that you require) to drop into your Heavy Aircraft folder. Support forum for the - QPAC A320-232 v2 Review By Stephen Dutton 19th May 2014 Copyright©2014: X-Plane Reviews Technical Requirements: Windows , Mac or Linux X-Plane 10 fully updated. 32 or 64 bit. X-Plane 9.70 4GB RAM/512 MB VRAM Current version : 2.02 Final (last updated May 15th 2014) Review System Specifications: Computer System: - 2.66 Ghz Intel Core i5 iMac 27” - 6 Gb 1067 Mhz DDR3 - ATI Radeon HD 4850 512mb Software: - Mac OS Mavericks 10.9.3 - X-Plane 10 Global ver 10.25 (final) Addons - Saitek x52 Pro system Joystick and Throttle Full V2.0.2 update details: - XFMC compatibility ensured - Popup MCDU - Autotuning of ILS - SID/STAR capability with dedicated fms files (see Tutorial flight for details) - More customizable settings like default weight and fuel. - Added papelin's panel modification kit - Added custom sounds with the kind permission from flyboy2006 - Loads of bug fixes
-
Aircraft Review : Airbus A320 VC package by Peters Aircraft
Stephen replied to Stephen's topic in Airliners Reviews
No it is general problem, I have had the issue checked on other more powerful machines. In most cases I can usually find out where the issue is, in this case it is as you note a real graphic card killer because the textures with the VC have not been refined for the simulator. The B777 and the SSG B748i both had the same issues when released but both are very good now framerate wise for aircraft of their texture quality and size. The A320 should really have no issues of this magnitude, and if these other aircraft can do so well, then why can't this aircraft also. SD -
Aircraft Review : Messerschmitt 262 A-1a Schwalbe (Swallow) by MLADG The Messerschmitt 262 Schwalbe (Swallow) was the first operational jet-fighter in history, It was also the first jet-bomber as well, but nothing heavy in 2 × 250 kg (550 lb) bombs or 2 × 500 kg (1,100 lb) loads. Other uses for the Me 262 were for reconnaissance, and even a few experimental night fighter versions. There was no doubt this was an aircraft before its time, as the aircraft itself was a vision of the future for fighters. But the engines were not in the same category as the requirements for high quality alloys (and materials in short supply in the war) kept the aircraft on the ground instead of in the air for most of WW2. The Me 262 was conceived well before the Second World War as for the potential for aircraft that used the jet engine, that was constructed by Hans Joachim Pabst von Ohain in 1936. After the successful test flights of the first jet of the world, the Heinkel He 178, they adopted the jet engine for an advanced fighter aircraft. The result was the Me 262 which was already under development as Projekt 1065 (P.1065). The jet engine program was also initially lacking as many high-ranking officials thought the war could easily be won with conventional fighters Among those were Hermann Göring, head of the Luftwaffe, who cut the engine development program to just 35 engineers in February 1940, But the Luftwaffe's finest pilot Major General Adolf Galland who had supported Messerschmitt through the early development years, and was then flying the Me 262 himself on 22 April 1943. By that time the problems with engine development had slowed production of the aircraft considerably. One particularly acute problem arose with the lack of an alloy with a melting point high enough to endure the high temperatures involved. Construction for time was highly evolve in the the project aerodynamicist on the design of the Me 262 was Ludwig Bölkow. He initially designed the wing using NACA airfoils modified with an elliptical nose section. Later in the design process, these were changed to AVL derivatives of NACA airfoils, the NACA 00011-0.825-35 being used at the root and the NACA 00009-1.1-40 at the tip. The elliptical nose derivatives of the NACA airfoils were used on the horizontal and vertical tail surfaces. Wings were of single-spar cantilever construction, with stressed skins, varying from 3 mm (0.12 in) thick at the root to 1 mm (0.039 in) at the tip. As a conservation measure, late in the war, wing interiors would not be painted. And the wings were fastened to the fuselage at four points, using a pair of 20 mm (0.79 in) and 42 8 mm (0.31 in) bolts. The first test flights began on 18 April 1941, with the Me 262 V1 example, bearing its Stammkennzeichen radio code letters of PC+UA, but since its intended BMW 003 turbojets were not ready for fitting, a conventional Junkers Jumo 210 engine was mounted in the V1 prototype's nose, driving a propeller, to test the Me 262 V1 airframe. When the BMW 003 engines were installed, the Jumo was retained for safety, which proved wise as both 003s failed during the first flight and the pilot had to land using the nose-mounted engine alone. The V1 through V4 prototype airframes all possessed what would become an uncharacteristic feature for most later jet aircraft designs, a fully retracting conventional gear setup with a retracting tailwheel — indeed, the very first prospective German "jet fighter" airframe design ever flown. On 19 April 1944, Erprobungskommando 262 was formed at Lechfeld just south of Augsburg, as a test unit (Jäger Erprobungskommando Thierfelder, commanded by Hauptmann Werner Thierfelder) to introduce the 262 into service and train a corps of pilots to fly it. On 26 July 1944, Leutnant Alfred Schreiber with the 262 A-1a W.Nr. 130 017 damaged a Mosquito reconnaissance aircraft of No. 540 Squadron RAF PR Squadron. It was the first victory for a turbojet fighter aircraft in aviation history. The Me 262 was difficult for its opponents to counter because its high speed and rate of climb made it extremely hard to intercept. As with all other early jets, the Me 262's engines did not provide a lot of thrust at low air speeds (a key criterion for good turn performance at low speeds), and throttle response was slow. Another disadvantage all early jet engines shared was a relatively high risk of flameout if the pilot used the throttle too aggressively (as is common in a dogfight). Luftwaffe pilots eventually learned how to handle the Me 262's higher speed, and the Me 262 soon proved a formidable air superiority fighter, with pilots such as Franz Schall managing to shoot down 12 enemy fighters in the Me 262, 10 of them American P-51 Mustangs. Pilots soon learned that the Me 262 was quite maneuverable, despite its high wing loading and lack of low-speed thrust, especially if attention was drawn to its effective maneuvering speeds. The controls were light and effective right up to the maximum permissible speed and perfectly harmonized. The inclusion of full span automatic leading edge slats, which was something of a "tradition" on Messerschmitt fighters dating back to the original Bf 109's outer wing slots of a similar type, helped increase the overall lift produced by the wing by as much as 35% in tight turns or at low speeds, greatly improving the aircraft's turn performance as well as its landing and take off characteristics. And as many pilots soon found out, the Me 262's clean design also meant that it, like all jets, held its speed in tight turns much better than conventional propeller-driven fighters, which was a great potential advantage in a dogfight as it meant better energy retention in maneuvers. Luftwaffe test pilot and flight instructor Hans Fey stated, "The 262 will turn much better at high than at slow speeds and, due to its clean design, will keep its speed in tight turns much longer than conventional type aircraft." About 1,400 Me 262s were produced, but a maximum of 200 were operational at the same time. According to sources they destroyed from 300 to 450 enemy planes, with the Allies destroying about 100 Me 262s in the air which is a good ratio. The Czechoslovak aircraft industry continued to produce single-seat (Avia S-92) and two-seat (Avia CS-92) variants of the Me 262 after World War II. From August 1946, a total of nine S-92s and three two-seater CS-92s were completed and test flown. They were introduced in 1947 and in 1950 were supplied to the 5th Fighter Squadron, becoming the first jet fighters to serve in the Czechoslovak Air Force. These were kept flying until 1951. Messerschmitt 262 Schwalbe by MLADG This is a very well conceived design by MLADG of the iconic Me 262. It is quite a change to sit in and just feel a Pre-WW2 fighter, but to understand on how much as well this aircraft was very advanced for its time. The proportions and shape is excellent, Highlights are the excellent engine pods with their authentic Jumo 004B yellow fans showing through the inlets, cockpit design and those four lethal 30mm MK 108 cannons with short barrels and low muzzle velocity of 540 m/s. The undercarriage is of similar design, very good even if those tyres do look a little huge. The canopy can be opened or ejected completely, inside the view is excellent upwards but restricted forwards by the high panel. It is important to note the setting "draw per pixel lighting" which if not switched on in your render settings menu page can make the aircraft over shiny, worse you lose the great panel effect over the aircraft's exterior and the excellent riveting, which is very much of the period. Still there are a few shiny areas that should not throw spots of light. The aircraft is strangely dark, and very hard to get any light or colour into the design... the cockpit is a blackhole. Which is a shame because the cockpit is really well done, all the instruments are all recreated (in German script, so you will need to read the manual), It is very well done and as authentic as they come. You need time in here to understand all the instruments and dials. and the throttle levers are a work of art. So basically you have your levers and handles on the left and and fuel and electrics with the starter buttons on your right. Note - the wide set rudder pedals. Main panel includes Clock/ Timer Display - Altimeter Shows - Airspeed indicator - Artificial Horizon - Gyro compass - Gun rounds with remaining rounds in white, the switch on the instrument is used to arm the guns. blank here is if pressurization is used (on the knee-board option) - Vertical speed indication - ASN display which is used to display the bearing to a radio station. Radios can be tuned on the knee-board - Engines RPM displays and Differential Pressure indications Show difference between engine inlet and outlet pressure. The knee-board is a checklist and options panel all in one. MLADG has created a system in to recreate the venerability of the era's poor reliability... In other words the aircraft breaks down all the time. So you get failure after failure that lights up your X-Plane "Equipment Failures" menu like a Christmas Tree, you can rectify the situation by the options panel in resetting the repair work which is all noted in the knee-board. In theory it is a great idea, but it got to point of head scratching and few non-printable words, of where the engines just would not run?... I reset everything again and again for 20 minutes until I gave up and reloaded the download file to get in the air. oddly the aircraft has a habit of plonking its tail on the ground as well? On the options you have - Blocks: Remove the control surface blocks - Riedel fuel: Required to start the engines - RATO: May be used on short fields - Oxygen supply: use this to “refill” the oxygen bottles - Pressurized Cabin: option to use a pressurized cabin instead of oxygen-bottles - Head movement: Head will move according to accelerations - I checked my plane. I checked and rechecked items but nothing seemed to work? except the Pressurized Cabin option. Just me... maybe. But I found it frustrating. It is explained in the manual, but I feel not enough. ditto to change the armaments on the X-Plane (Aircraft/Weight & Balance & Fuel) menu in "Ordnance", I found I could change anything except it would trail the aircraft and not fit under the wings so gave up there also. Flying the Me 262 You can't see much looking forward out of the Me 262, it is a very restricted view forward and the gunsight takes up a lot of the space. You can thankfully tip it out of the way. The artificial horizon is virtually unusable, As I actually can't see the actual artificial horizon in there? The engines are pre-war which means you have fly them with care. If you push the power way up you are going to simply make them fail, so 8500 rpm is about as Max as you dare. Let off the brakes and you are not going anywhere very fast, and you are going to need a long runway or the RATO option. But then the power builds, and builds and builds... very authentic and you are soon going at quite a pace. Once in the air you can't just hit the undercarriage lever to retract the gear, if you do you will blow the tyres! ( you can fix that in "Equipment Failures"). The trick is to brake the wheels until they stop turning and then retract them, only you can't do that either? There is a metal plate stop on the buttons that retracts the undercarriage and lets you also drop the flaps (yes buttons and not levers), so my usual "gear up" on my Saitek x52 Pro buttons don't work... I lied they do, but you have to move that bar and then get it right in that the gear retracted and then they didn't and then did again?But once in the air aircraft is gorgeous, you can see why it was so lethal and a good weapons platform. The Me 262 is so smooth and jelly in your hands. Climbs really well, but the low speed handling is exceptional and stable... you could easily swan (or swallow) around the sky all day twisting this way and that looking for victims. And mine were now coming into focus... I was after FedEx trucks! Stopping brand world domination of companies by taking their trucks out one by one (a tough job but someone has to stand up and stop this diabolical world mastery plan). It was easy pickings as I found and swooped and took out seven to nine trucks (some I missed and I lost count) but with the fire power of the Me 262, it was just like a lone survivor on an empty road that had no chance when attacked from the air. In liveries you have four liveries with the Green6 as the default, with the Green4 and White5 (belly) There is a gaudy aerobatic livery that is noted as the paint? Out of ammunition it was time to go home, I cruised back at 8,500ft (max 11,500ft) to take in the scenery and enjoy the aircraft. Ready for landing and I had a fight again to get the undercarriage to drop down (it is a double switch flick B, but hard to do with external switches), fixed that and another fight to get the flaps down as well. I did both but it can't be this hard can it? Once sorted though the Me 262 was superb on the approach, the Me 262 had those really advanced full span automatic leading edge slats and the flaps work well in lowering the speed and still giving you the correct lift. The design work is very good in the leading edge slats and the excellent flap work. Although noted in Kilometer's Per Hour (250kph), your speed is only 135 knts, and the Me 262 is as stable as a rock. Again you can do anything with the aircraft and a slight downward glide and curved approach to the runway is very nice to fly. Once on the hard stuff there is not much to slow you down except for a long runway. But the speed falls off easily till you brake the rest off and come down to taxi speed. Note - the RATO pack that was not there when I took off? Summery The aircraft in the Me 262 is a great aircraft to fly, really great. You get to feel this excellent WW2 era machine and how good it really was. Could have Me 262 turned the tide in the war if it had been available in the earlier years is a debate for the historians. But this was really an 50/60's era aircraft in the 30's and 40's... so yes it could have made an interesting impact overall.In design the Me 262 is very well done but comes with some odd bits that annoy you. I will admit that a few weeks to sort the niggles out or get them sorted properly would have changed a few views in this review, however it is noted here as I approached the aircraft in that the way anyone would for the first time. Things changed around for no reason? The RATO pack was there and then wasn't... and then it was there again? Ditto the aim-cross in the gunsight, it came and went? Trying to change around the armaments did not work and I gave up there as well... RATO, I gave that six or seven goes and gave that one away as well. The aircraft was dark in the light and the aircraft felt dark, but there is very good texture work and detailing. It stopped and stayed dead until I replaced the complete aircraft folder? So... yes the manual needs to be more though in explaining how these systems operate to get more out of the aircraft earlier and get it into the air. But get past that and the aircraft is simply excellent in the operation and has the feel of the iconic aircraft, And it was simply a great aircraft to fly and the Me 262 was really good at slow speeds. Ultimately its flying abilities is the lasting impression, and you do want to climb back into that cockpit and go up and hunting again (DHL trucks this time?), and that is a great thing and in that context the Me 262 is one of the really great aircraft of the past. ___________________ The Messerschmitt 262 A-1a Schwalbe is now available from the X-Plane.Org Store. Messerschmitt 262 A-1a Price is currently US$18.00 Documents and Install, Download is 78.90mb, that is unzipped into your fighter folder of 127mb. There is one pdf manual (25 pages) Support forum for the - Me262 Review By Stephen Dutton 17th May 2014 Technical Requirements: Windows, MAC or LinuxX-Plane 10.25 or higher - 32 and 64 bit compatible. (X-Plane 9 not supported) (frame-rates no issues, well within normal limits, if very high frame-rates) Current version: v1.01 Last updated: May 10th, 2014 Review System Specifications:Computer System: - 2.66 Ghz Intel Core i5 iMac 27” - 6 Gb 1067 Mhz DDR3 - ATI Radeon HD 4850 512mb Software: - Mac OS Mavericks 10.9.2 - X-Plane 10 Global ver 10.25 (final) Addons - Saitek x52 Pro system Joystick and Throttle
-
It is in the smaller detailing like opening windows and lighting effects, but overall the gap is closing between the two. I feel like I noted that Alabeo will take over the lower end of the scale while Carenado go further up to larger aircraft.
-
Aircraft Release : C172RG Cutlass II by Alabeo Alabeo have released the C172RG Cutlass II The 172RG is the retractable landing gear version of the Cessna 172 Series. It is also has over the standard version a variable pitch, constant-speed propeller and the more powerful Lycoming O-360-F1A6 engine of 180 horsepower (130 kW). The 172RG sold for about US$19,000 more than the standard 172 of the same year and produced an optimal cruise speed of 140 knots (260 km/h), compared to 122 knots (226 km/h) for the contemporary C172 - 160 horsepower (120 kW) version. Yet again Alabeo have produced a wonderful quality design, and the gap between Alabeo and Carenado is certainly narrowing. Even in price as the Cutless is $22.95 and it seems that the Alabeo's are now really a lower cost Carenado, as Carenado is now more into the larger aircraft market at sub $30 to $35 for its aircraft. The panel is beautifully designed but this C172RG is a basic trainer aircraft at its heart. The aircraft is well fitted out as well, and the detail really stands out. But this is still an Alabeo, so you won't get the absolute full functionality of the Carenado series, however the options are good. Features include: HD Textures Superb material shines and reflections. Volumetric side view prop effect. Dynamic propeller shines effect. High quality 3D model and textures. Blank texture for creating your own designs. Accurately flight characteristics Also Included: 5 hd liveries 1 Blank texture Emergency Procedures PDF Normal Procedures PDF Performance tables PDF Quick Reference PDF For more information then go to Alabeo : C172RG CUTLASS II Technical Requirements: Windows XP or Windows Vista or Windows 7 (32 or 64 bits) or MAC OS 10.6 (or higher) or Linux X-Plane 10.21 (or higher) Pentium 2 GHz - 4GB RAM/512 MB VRAM 212MB available hard disk space Stephen Dutton 16th May 2014 Copyright©2014: X-Plane Reviews All images supplied courtesy of Alabeo©
-
Aircraft Review : Bombardier Challenger 300 by Dden Design
Stephen replied to Stephen's topic in Airliners Reviews
I haven't seen one? so I can't help you there. -
Done thanks... don't know how that happened?
-
Developer Update : X737 Version 4.9.0 by EADT EADT has updated the x737 to version 4.9.0. No aircraft has won more awards or had more acclaim in X-Plane than EADT's x737 Series. Their Boeing 737-800 has been in constant development for years now and through many different X-Plane simulator versions as well. The aircraft is available for Mac/Windows and Linux, and in both X-Plane10 and X-Plane9 versions. Version 4.9.0 So what has changed in v4.9.0? This is not the really big change we are waiting for in the 3D Cockpit for the x737, that will be v5. No time yet set on that 3d dream still, but it must be starting to come closer. So the feeling of this update in 4.9 is to finally clear up that bug list and get the aircraft ready for v5. That long list is now very short and the aircraft feels very good and tight, but there are a few enhancements here and interesting ones as well. The flaps have had a rework and are now quite different past the 30º setting. There has been an extension flap added on and they look excellent. The functionality of the "speedbrake" is changed in that now it arms in the first detent, next is flight detent which is maximum in flight, last is full up ground spoilers. Another area that has changed is the actual "Arming" of the Speedbrakes. Before you just hit the speedbrake selector forward and the speedbrakes were armed. Now that does not work? To "Arm" the speedbrake you now have to use a keyboard or Joystick button This is found under the main MENU in SETTINGS/JOYSTICKS & EQUIPMENT. You have to click the plugin checkbox (Top-Right) to access the specific "Custom Commands" from the plugin. The "Speedbrake" assignment is at the bottom. In fact I don't think any other aircraft out there has so many assignable custom commands to the keyboard or joystick (throttle). The list is very long and very usable - My (ARM) assignment is to my Saitek x52 Pro throttle buttons, I already have the Speedbrake assignments for "speedbrakes up +1 or down -1" and (All flaps) Down already set on my throttle controller. I found when armed that in reversing the engines brought the speedbrakes up and a retraction of the airfoils on the reverse thrust completion... looked great to me. The x737 over the years has had a few issues with collecting the ILS correctly. And that was corrected in an earlier version. However the VORLOC did not work... That has now been corrected and works well, If the VOR is close to the runway (like at YBBN RWY19) it is very easy to lock into the VOR and then when aligned then go straight to the APP approach command. Another change to the ILS is that now the "Single Channel" ILS approaches has no auto flare mode, like in the Boeing 738 plane, So it is now necessary to fly manually during final approach. This is shown by a warning on the PFD (Primary Flight Display). An alert warning then comes on as you get into the actual flare and a final warning is in the roll-out. You can assigning a button on the yoke/stick for CMDA/B OFF. and Double clicking that button will cancel the disconnect alert sound. A few services has confirmed the aircraft is very good and tight, however I have found that if you don't follow the procedures correctly (or perfectly) any x737 will start to freeze in autopilot actions in certain conditions. In other words don't try to jump across the logic, it confuses it and you can sometimes reset the A/P by "Disengaging" the A/P and restarting, but sometimes you have start the aircraft (or reset the logic) from scratch. It is just that sort of aircraft. Ground Power gives you a power cable but no Power-Cart?... I recommend Joans - Ground Services - Pushback, Refueling alpha-5 to fill in the gap. The logo-light has been fixed (finally), but still takes an age to brighten to its full brightness and the lighting has been touched over for X-Plane10. There is a zillion liveries (over 200+) and two new ones in Kingfisher and Westjet Disney. Full list of changes are: Dramatically improved flightmodel and performance New exterior flap model for flap 30 Significant improvements on all autopilot modes Improved interior and exterior sounds Stability improvements New liveries Bugfixes The x737 is freeware from EADT : x737 Project Development thread is : x737 Support ... And finally everyone "show the love" by donating to the EADT cause on their website, and thanking Benedikt and Pierre for their dedication in creating this great aircraft. Stephen Dutton 12th May 2014 Copyright©2014 : X-Plane Reviews
-
Aircraft Review : Bombardier Challenger 300 by Dden Design
Stephen replied to Stephen's topic in Airliners Reviews
Considering its age the C300 is a phenomenal machine. The best experience in X-Plane for Private Jets. -
Garmin G1000 : X-Plane Integration and cost.
Stephen replied to Stephen's topic in X-Plane Plugins and Simulator Addons
Not yet no... But the Garmin 1000 layout has to be on the radar soon. With the GNS430/530 update in v10.30 I would take a big guess and say the G1000 would have to be next. -
Aircraft Update : Boeing 777 Worldliner Pro + Extended Pack V1.6 by Flightfactor/VMAX Flightfactor-VMAX have updated the Boeing 777 Worldliner Professional and the Extended Pack to v1.6. The biggest thing to note in this new version is that there has been another addition to the "Extended Pack" of variants in the 777-200ER with the Pratt&Whitney PW4090 engine option. That now takes all the aircraft variants in the Series (Extended) to four. Boeing 777-200 LR - (Boeing Worldliner Professional) Boeing 777-200 ER - (Extended Pack) Boeing 777-200 F - (Extended Pack) Boeing 777-300 ER - (Extended Pack) Boeing 777-200 ER After the initial launch of the standard -200 version of the Boeing 777, Boeing quickly developed an increased gross weight variant of the 777-200 with a greater range and payload capability. It was Initially named 777-200IGW, but the offical name was the 777-200ER which first flew on October 7, 1996, and received FAA and JAA certification on January 17, 1997. The aircraft entered service with British Airways on February 9, 1997, and the -200ER variant was and until the -300ER version was released in 2004 the biggest 777 series seller in 422 aircraft being sold. If the -300ER variant was noticeable because of its long extra length over the -200LR. The -200ER is significant because the Pratt&Whitney PW4090 engines are noticeably smaller than those giant GE90-115B turbofans on the -200LR. GE90-115B PW4090 Pratt&Whitney PW4090 The third family of the PW4000 Series is the 112 inch (2.8 m) diameter fan engine that was developed specifically for Boeing's 777 where it was the launch engine on that airframe. It has a certified thrust from 86,760 to 99,040 lbf (386 to 441 kN). and covers the model numbers of the PW4074, PW4077, PW4077D, PW4084, PW4084D, PW4090, and PW4098 engines. The third series engine entered service in June 1995 with United Airlines, and was the first jet engine to enter service with 180-minute ETOPS certification. It can power all the 777 versions except the 300ER and 200LR. The third series is a "Two Spool-high bypass" ratio Turbofan, which is 163.1 in (4.14 m) in length. The Compressor consits of a 1 stage fan, 5 stage low pressure compressor, 15 stage (5 variable) high pressure compressor and the combustors are annular. The Turbine consists of a 2 stage high pressure turbine and a 5 stage low pressure turbine. Overall pressure ratio is 32.0:1 - 35.4:, the Bypass ratio is 5.3:1, with the Turbine inlet temperature (TIT) at 707. The engines Thrust-to-Weight ratio is ~6 - 7. And the engine has Full Authority Digital Engine Control (FADEC). FlightFactor have noted that the Boeing 777-200ER PW4090 engines have the correct performance and fuel consumption - sound set - EEC with EPR as primary control parameter - EICAS differences for EPR-controlled engines and the correct FMC performance parameters. I haven't flown the B777-200ER over a long route yet, but the engines certainly feel smoother and softer, and yes they have far less power than the GE90-115B which is rated at 115,300 lbf (514 kN). They do sound different and not like that painful grinding noise on the GE that sounds like something very expensive is being slowly cut down to size and a dual engine change is imminent. I actually really like the sound of the Pratt & Whitney, It has a more in the past darker engine feel than the high whiners of modern turbofans. Other changes to the -200ER is that the panel has more backup in three classic standby instruments. The -200LR/-300ER/-200F have a single ISFD as standby instrument (I bet you never noticed that they were missing before, well you were not wrong as they were, but now they are gone) The wings are different as well without the -200LR raked wingtips on the -200ER So yes the new -200ER it is another different variation again on a theme. And yes I like it very much, it does not have that immense huge range of the -200LR at 9,380 nmi compared to 7,725 nmi for the -200ER, but just over 7000 nmi is still pretty good range. Boeing-200LR/-300ER/-200F (Cargo) The rest of the variants have had a lot of improvements as well. I will note again that the B777-200LR Worldliner Professional is a singe package and only the "Extended Package", Includes the three variants in the -200ER/-300ER/-200F. The full list of changes in v1.6 (below) however does cover all the Series. So what are the different variants... 777- 200LR This is the original Worldliner Professional version. To think back to its release and then to where it is now, is to realise how big a change in X-Plane this aircraft really was. It really is outstanding in every area. 777-300ER The B777-300ER is a 33ft stretch over the standard Boeing 777. And it looks like it... but still not with the pencil like look with the A340-600HGW aircraft. Now one of the most common B777 version with 721 ordered and only 250 aircraft left to be delivered, you will see plenty of these at your major local hub. 777-200F (Cargo) I have spent a lot of hours on this variant (shuttling the F1 race cars all over the world) and it is simply the best freighter in X-Plane right now... nothing even comes close. The range is phenomenal, and shipping a full MPW (Maximum Payload Weight) from Shanghai to the UK at around 5000nm is a breeze. Some things I don't get on the F (cargo) is that why can't we have the forward opening doors and the stairs option that are on the passenger variants? How are we supposed to get (in or) out after a long flight, A rope out of the cargo door? And speaking of that huge rear door it is excellent... but don't open it in flight as I have mistakenly done (F1 key) as it takes ages to reset the altitude pressure. (idiot) Cockpit The B777 cockpit is again one of the very best in X-Plane. And one of the most functional. all the aircraft's systems are replicated to perfection. It can take time to be really on top of this aircraft because the systems are so deep. but you want the best in simulation, well you have it here. but there are a (very) few niggles. My pet hate is the gap above the panel right at the top display adjustment panel. It drives me to distraction. As you spend hours here at a time you end up fixated on the damn thing. Just looking at the shafts of light that come through. Worse is coming into land in that the ground colours/or night runway lighting come through and distracting you, a really small thing but annoying. On the pedestal why doesn't the centre CDU work? or just be shown? I also find the manipulation of the Fuel run/cutoff controls annoyingly hard to switch? You are coming up to 25% on the startup procedure and you just can't flick them in, "Awwwh hell" and other blasphemous saying are always on the go as the switch seems to be set the wrong way around in up to down for the switches to go up? Why can't you access the Co-Pilots display adjustments? You have now found it commonplace in aircraft of this caliber to be able to adjust the Co-Pilots screens to other modes, ditto the Co-Pilots CDU, in that it is fixed to the Pilots selected screens? FMS - Flight Management System The FMS on the FlightFactor/VMAX B777/757 is certainly the best system in X-Plane. It is very complex but very useable in that it is very more forgiving if you want to change your runway selection and SID/STAR (usually at the last minute). FlightFactor has done a few fixes and slight changes in v1.6 to the system. Covered is: - fixed a bug in direct-to logic where two subsequent directs would delete a wrong waypoint. - fixed reading Fix-to-DME-distance legs from Navigraph navdata (again!) - fixed enumeration of SID transitions, now all available transitions are selectable. - improved depiction of manual intercept courses on the temporary flightplan. - added intercept-from functionality to the FMS. Now you can create intercepts into radials going from arbitrary waypoints. - fixed a bug where several waypoint combinations in transitions would collapse into one waypoint. - added DEL key assignment for CDU popup. - fixed a bug in entering LAT/LON waypoints in full format. - fixed a bug in the display of ETA on T/C and T/D pseudowaypoints. - fixed a bug in VNAV where a lower speed for a speed restriction was activated too early. - fixed a bug in VNAV where too high a speed was selected after a crossing restriction - improved holdings in cross wind situations. - fixed LNAV ignoring the first waypoint of the flightplan if no departure runway was selected (Thank God for that one) - fixed a bug in the descend speed logic that would override descend speed transitions with higher restriction speeds from previous waypoints. - working EXEC light on the remote CDU. These fixes and enhancements will just tighten up the system that much more, there was a lot of adjustments to the LNAV and VNAV in: - fixed a bug in VNAV where a lower speed for a speed restriction was activated too early. - fixed a bug in VNAV where too high a speed was selected after a crossing restriction. - corrected autopilot bank limits in LNAV mode. - improved prediction of the turn radius in LNAV mode, generating much smoother interceptions to next leg. - reworked autoflight behavior with direct-intercept function. Now the autopilot will revert to LNAV arm when the plane is laterally off a manually selected intercept by more than 2.5nm. Intercepting a manually selected course must now be flown in HDG mode until LNAV engages. This is exactly how the real plane works. And remember you have a terminal procedure database with RNAV approaches and transitions already built in there. Jumping back into the earlier v1.5.1.1 you really notice how wide those radius's were, and how far off the track you went. I do recommend to have the latest AIRAC (Aeronautical Information Regulation And Control) data, I tried the cheaper option of using the default data that comes with the aircraft, but the latest data gives you more flexibility in your selections, It is a cost expense to use the Navigraph or Aerosoft data. But at this level you really need the correct data, so it is well worth the investment. Another several other areas in v1.6 that have had a little refining is there is an improved autobrake behavior and added autobrake disarm on speedbrake retraction, and engine mods in changed auto-thrust vs thrust-limit logic. It is now possible to manually increase takeoff power over the preset target when in A/T is in HOLD mode - changed EEC characteristic for N1/EPR and command arcs to work more realistically and improved interaction of A/T and EEC. iPad The iPad external connection is simply excellent, not only does it save time but the functionality is simply excellent. Totally in love, and certainly one of the really great features of this FF/VMAX series. Summary Once an aircraft get to a certain point in its life. It gets left behind because more modern aircraft take center stage. But that is not the case here. The B777 Series from FlightFactor/VMAX is just as fresh as the day it was launched but now a hell of a lot better as well. If you have the full "Extended Pack" then the extra three variants are well worth the extra over the standard "Worldliner Professional" aircraft. Not only in they are different variants, but in the fact they all perform different roles as well. The new PW4090 variant is simply excellent. You get so much value in this series for your investment, and it is an amazing aircraft to fly as well. It is complex, and the FMS - Flight Management System will give you a few months of homework as well to truly get the ultimate performance out of the Big-Twin Boeing and in v1.6 it is even better than ever. ________________________ The 1.6 update is now available from the X-Plane.Org Store here : Price is US$59.95 - Boeing 777 Worldliner Professional Price is US$84.95 - Boeing 777 Worldliner Professional - Extended Pack - Designed by FlightFactor (Philipp and Ramzzess) and produced by VMAX The 1.6 update is free to all users that have purchased the Boeing 777 (Pro and Ext) Series. Just goto to your X-Plane.Org Store account and login Developer Site: facebook Dev Thread : X-Plane.org Update Review By Stephen Dutton 9th May 2014 Technical Requirements: Windows XP or Windows Vista or Windows 7 / 8 (32 or 64 bits) or MAC OS 10.7 (or higher) or Linux X-Plane 10 fully updated. 32 or 64 bit 4GB RAM/512 MB VRAM (1GB VRAM Recommended)- 1Gb available hard disk space Current version : 1.60 (last updated May 5th 2014) Review System Specifications: Computer System: - 2.66 Ghz Intel Core i5 iMac 27” - 6 Gb 1067 Mhz DDR3 - ATI Radeon HD 4850 512mb Software: - Mac OS Mavericks 10.9.2 - X-Plane 10 Global ver 10.22 (final) Addons - Saitek x52 Pro system Joystick and Throttle (Full v1.6 Change-log) Extended Pack only: -added 777-200ER variant with Pratt&Whitney PW4090 engine option. This variant comes as a different aircraft with lots of new liveries. The new aircraft variant has distinct characteristics of: --wing without the raked wingtips --performance and fuel consumption --sound set --EEC with EPR as primary control parameter --EICAS differences for EPR-controlled engines --FMC performance parameters -fixed tutorial quick zoom functions for the 300ER model -new standby instruments: the -200LR, -LRF and -300ER now have an ISFD as standby instrument, the -200ER has three classic standby instruments -corrected reflection and windows on the -300ER model All models (on X-Plane 10 64bit): -new SASL version to fix several crash and DRM problems -fixed right engine anti-ice -brought back the flap speed placard -corrected pushback truck logic -corrected the compact fuel indicator and its display logic -fixed fuel jettison logic -several fixes for the flightcontrol page of the EICAS -improved autobrake behavior -added autobrake disarm on speedbrake retraction -added pdf 2 png HD application, for those who have memory and want more resolution for the maps on the EFB -fixed a possible crash in the pax/cargo loading menu -fixed a bug where an invisible "blue freeze" screen could cause the mouse pointer to no work anymore -fixed the plane refueling itself after reposition through the XP map view -implemented fuel temperature indication -fixed a bug in direct-to logic where two subsequent directs would delete a wrong waypoint -fixed reading Fix-to-DME-distance legs from Navigraph navdata (again!) -fixed enumeration of SID transitions, now all available transitions are selectable -reworked autoflight behavior with direct-intercept function. Now the autopilot will revert to LNAV arm when the plane is laterally off a manually selected intercept by more than 2.5nm. Intercepting a manually selected course must now be flown in HDG mode until LNAV engages. This is exactly how the real plane works. -improved depiction of manual intercept courses on the temporary flightplan -added intercept-from functionality to the FMS. Now you can create intercepts into radials going from arbitrary waypoints. -fixed a bug where several waypoint combinations in transitions would collapse into one waypoint -fixed a bug that could cause the plane fly parallel to the route after an intercept -added DEL key assignment for CDU popup -changed auto-thrust vs thrust-limit logic. It is now possible to manually increase takeoff power over the preset target when in A/T is in HOLD mode -changed EEC characteristic for N1/EPR and command arcs to work more realistically -improved interaction of A/T and EEC -improved finding of alternate airports -fixed a bug that could cause the FMC to not accept new airway entries -added the possibility to load flight plans in .flp format, which can be exported by flight planning tools like PFPX and also by online services like simbrief.com -corrected FMC and autopilot behavior in the approach phase of non-precision approaches -improved autoland capabilities. For all improvements to work, X-Plane 10.30 is required -fixed a bug that caused performance info on primary route to be deleted when secondary route was entered -fixed a bug in entering LAT/LON waypoints in full format -fixed a bug in the display of ETA on T/C and T/D pseudowaypoints -fixed a bug in VNAV where a lower speed for a speed restriction was activated too early -fixed a bug in VNAV where too high a speed was selected after a crossing restriction -improved holdings in cross wind situations -fixed several bugs related to flightplan saving and loading. Particularly, approaches with procedure turns and holdings in lieu of procedure turns will now also work when loaded from a saved flightplan -improved the calculation of turn radius in holdings. The predicted holding patterns will now match the real performance more closely -fixed a bug that could cause indefinitely small holdings to be generated -fixed LNAV ignoring the first waypoint of the flightplan if no departure runway was selected -improved generating fix-to-DME-distance legs from Aerosoft navdata -corrected autopilot bank limits in LNAV mode -improved prediction of the turn radius in LNAV mode, generating much smoother interceptions to next leg -fixed a bug in turn radius calculation that caused the aircraft to jiggle in procedure turns when flying very slow -greatly improved interception of legs at high speeds, i.e. large course changes in the cruise portion of the flightplan will be much smoother -added absolute altitude labels to TCAS display -corrected TCAS symbol colors and shapes as per TCAS 7.1 specification -added DMOD and ZTHR logic to displayed TCAS threats -changed TCAS implementation to work on different datarefs for online traffic from xsquawkbox and X-IVAP -improved FMC climb predictions especially for long climbs -fixed a bug in the autopilot that could cause it to stay in LNAV arm but never engage it even close to the calculated route -fixed a bug in the descend speed logic that would override descend speed transitions with higher restriction speeds from previous waypoints -working EXEC light on the remote CDU Copyright©2014: X-Plane Reviews
-
Aircraft Review : B200 King Air HD Series by Carenado Route : Archerfield (YBAF) to Roma (YROM) to Longreach (YLRE) and Mt Isa (YBMA) : Distance 979.31nm This is the B200 is second King Air release from Carenado after the C90B in November 2013. Both aircraft very much the same from the cockpit forward, but they are very different in design and by length at the rear by 8.3ft and the B200 has a distinctive large T-Tail configuration that came out of the development of the 100 series that had the longer fuselage over the C90 Series but still kept its conventional tail arrangement. The Model 200 series and Model 300 series as they became known were originally marketed as the "Super King Air" family, but the "Super" was dropped in 1996, but the B200 is still in most cases called the Super King Air. The Model 200 was originally conceived as the Model 101 in 1969. Apart from the T-tail, other changes included Pratt & Whitney Canada PT6A-41 engines rated at 1,015 shp (757 kW) instead of the 805 shp (600 kW) engines of the Model A100 then in production, and a wing of increased span and extra fuel capacity.Overall, the 200 series was 3 ft 10 in (1.17 m) longer than the A100, with wingspan 4 ft 3 in (1.29 m) greater, containing 60 US gallons (230 L) more fuel. Maximum Take-Off Weight (MTOW) was increased by 1,000 lb (450 kg). After protracted development that including extensive wind tunnel testing of the design (especially of the T-tail which was tunnel-tested for 375 hours),the first 200 Series prototype flew for the first time on October 27, 1972; a second prototype took to the air on December 15th of the same year. Three production aircraft were also built in 1972 and delivered to the U.S. Army, these three were designated Model A100-1s by Beechcraft and were given the military designation RU-21J, which was the first of some 400 T-tail King Airs to be ordered by the U.S. armed forces. The 200 received civil certification in December 1973 and the first civil delivery took place in February 1974. Performance : Maximum speed: 339 mph (294 knots, 545 km/h) at 25,000 ft (7,600m) - Cruise speed: 333 mph (289 knots, 536 km/h) at 25,000 ft (7,620 m) (max cruise) - Stall speed: 86 mph (75 knots, 139 km/h) IAS (flaps down) - Range: 2,075 mi (1,800 nm, 3,338 km)with maximum fuel and 45 minutes reserve - Service ceiling: 35,000 ft (10,700 m) - Rate of climb: 2,450 ft/min (12.5 m/s). Royal Flying Doctor Service. One of the largest operators of the B200 King Air is the Royal Flying Doctor Service of Australia. In Australia the aircraft is very wildly recognised more through the familiarity of the aircraft as it is an icon of the outback of the services it provides. The RFD service has 12 Beechcraft B200 (Basic) King Air's, 20 Beechcraft B200C King Air's and 2 Beechcraft B300C King Air's with 34 aircraft in total (latest add-ons to the fleet include C208 Caravans). The Model 200C in was introduced in 1979, and this version had a large cargo door on the LH side of the rear fuselage with an airstair door similar to the Model 200's door built into it. The door opening was 4 ft 4 in (1.33 m) high and 4 ft 4 in (1.33 m) wide, allowing a large range of items to be loaded into the cabin. The Model 200C found favour with many operators who fitted them out internally as Air Ambulances like with the RFDS. The 200C was built from scratch rather than as a modification of the Model 200. The RFDS is a very old service that was created by the Reverend John Flynn had worked in rural and remote areas of Victoria and was commissioned by the Presbyterian Church to look at the needs of Outback people. His report to the Presbyterian Assembly in 1912 resulted in the establishment of the Australian Inland Mission (AIM), of which he was appointed Superintendent. In 1928, he formed the AIM Aerial Medical Service a 1-year experiment based in Cloncurry, Queensland. This experiment later became The Royal Flying Doctor Service. Today the RFDS is based at Alice Springs. The RFDS is made up of seven legal entities – National Office, Central Operations, Queensland Section, South Eastern Section, Tasmania, Victoria and Western Operations. The RFDS operates in a federated structure and each of the seven entities has its own Board and Management. Each entity operates independently, both financially and operationally. Every now and then the RFDS has to replace aircraft in the fleet and being a commercial self-funded operation the fleet is a mixture of old and new aircraft. So here we are going to deliver a second-hand German aircraft that had been delivered to Brisbane in Queensland for delivery to the Central Australian Alice Springs base,. But first it has to flown from Archerfield to Mt Isa for a RFDS paint job and registration change. Departure from Archerfield was wet and cold. Which is very unusual for Queensland which is situated in the tropics. Sometimes you get a southern wind that comes all the way up from the Antartica, and that plummets the weather from a very nice 22º to a freezing cold 4º in one day. The B200 comes with great rain and ice effects and a misty cabin to make you feel at home, and a new feature of an exhaust gas shimmering effect on the turbines. You have to look pretty hard to find it, but it is there.The aircraft is noticeable in several areas in the B200 than the C90 and it is that first is that the big T-Tail makes the aircraft very twitchy in strong winds. I had a nasty 16knt side-wind and you worked very hard to keep the aircraft straight while going down the runway and it was even more apparent once you were airborne and climbing up through the gusts. So you are working hard in keeping the aircraft smooth and straight. You can't over power the turbines either. Once clear of the runway you have to dial the power back to at least 88% torgue or they will start to fail on you. The B200 does not like the default scenery much either. The C90B had an issue with those 2K textures (Which were X-Plane9 left-overs) on your frame-rate, the B200 has the newer larger 4K textures and they are heavily revised to help in the frame-rate and so dropping the texture resolution has no effect on the frame-rate and even under my 512mb VRAM limit (around 362mb was the average). However if you put any default autogen around the aircraft and then the frame-rate dropped markedly, The weather did not help things either, but even in clear weather the aircraft did still not enjoy any heavy autogen? But the slightly extra length of the aircraft and the high tail makes this King Air a lovely machine in the air. It is beautifully constructed by Carenado and the aircraft has a great physical presence. You notice the 2K textures, but only from some angles, in other angles the livery looks really good and clean and I can easily live with that. You have the option to either have the standard wing or one with winglets. Both are well designed, but the winglet's are simply beautiful in their curved shape out of the wing. The aircraft looks stunning in any point of view with them selected. By any stretch of the imagination, Australia is a big place. It is the size of America in that after the Mississippi it is then just desert all the way to California. More than that the barren emptiness starts only a few hundred kilometers inland from the sea, all Australians mostly just cling desperately to the cooler ring of the coast. Our first stop is at Roma which is only 252.42nm inland from Brisbane at an average of 220knts, so you were there in just a little over an hour and a half. In the lighter inland 5knt winds I find the aircraft nicer under the controls. In all the landings here I never found the sweet spot to drop the first of the three stage flaps. Dropping the speed to just below 120knts still gave me a lift I didn't need and then all the full power I had to bring the speed back up to counteract the drag, I tried different ideas of finding the right place (speed) to drop the flap (To Approach) to make it smoother, but I never found it. But under the yoke and rudder however the B200 was very easy to control in the descent and lining up of the runway, even fun really as the aircraft reacted the right way you wanted it to. But the devil was in that if you struck the lower high-winds the aircraft suddenly became very twitchy again. Outside lighting is excellent with a taxi-light on the front undercarriage strut with two landing lights, outboard on each wing was an extra landing light that created a full lighting effect right across the landing runway. This arrangement would be ideal for landing at a dirt strip at light. The rest of the outside lighting is excellent as well, with a high tail beacon, three strobes (wings and tail) and Navigation lights. Roma Approaching the aircraft the next morning you can see what options you have to play with. There are three pop-up menu options in typical Carenado fashion down on the lower left of your screen. 1) is the Views or © Camera, 2) is the Options (O) and 3) is the Autopilot (A). A walk around the aircraft notes the excellent entry door on the left rear, Carenado leave nothing to spoil the completeness of the design. Everything is totally detailed to perfection. The riveting and paneling, the wing panels with those excellent leading edge rubber ice-boots. That high towering T-Tail that is so significant to this design. The undercarriage is very well constructed with perfect linkages (animation) and piping connected to the well designed braking units on the hubs, The undercarriage when retracted is still semi-exposed (the tyres). Smaller detailing is well covered in all the required pitot tubes, radio annennas (and cables) and moving trailing edge Static dischargers. (O) Options gives you access to - Window Reflections - Winglets - Static Elements - Passenger Door (rear exit) and finally the Cockpit door that separates the cabin from the cockpit. The cold cockpit is very familiar if you have come straight from the C90B, it is almost an exact replica here except for the two Garmin GNS430 units (Com 1 - VOR 1 and Com 2 - VOR 2). Panel detailing is phenomenal almost overwhelmingly good, note the metal sliders on the rudder pedals and you can see how far Carenado will go with almost every nut and bolt, switch and knob created to an intimate detail. Lower pilots panel behind the (hidden) yokes. The switch gear covers all the lighting and electrical elements of the aircraft with engine anti-ice and Ice protection. The battery and the Generator switches (1 & 2) are hidden under a panel. Turn on the power supply and the panel comes to life. Instruments on both the pilots and the Co-Pilots positions are basic in just the standard six instruments on both sides. (the altitude display is digital) but updated with the built in EFSI (Electronic Flight Instrument System) that is connected to the Electronic Attitude Director Indicator (EADI) and the Electronic Horizontal Situation Indicator (EHSI) on the main (PFD) aircraft panel, this system works in conjunction with the autopilot. You have a set of instruments set at the top of the pedestal that covers the Flap position, Cabin Climb (pressure) and Cabin altitude. There is a twin set of gauges set down the panel that covers the engine ITT (*Cx100) - (Interstage Turbine Temperature), Torque (FTLB x 100), Prop - RPM, Turbine % RPM, Fuel Flow and Oil temps. Besides the two Garmin GNS340's there is a AVIDYNE Entegra EX500. This unit is very good but also limited in application. Each engine has its own "Ignition ON" switch, and then another switch to start the each engine that both sets are situated low and behind the yoke. It takes awhile to wind up and then start each turbine to full power. Multi-track stereo sounds are excellent as the whine and then the power as the engine comes into life. When running, don't forget to turn off the Ignition ON switches as displayed on the glareshield. I found an odd note in that the alert panel showed "Battery Chg" on all the time unless you switch the battery switch off, On starting the aircraft hot the alert stayed off with the battery switch in the on position? Lighting is control by a battery of knobs on the overhead panel. You have master to turn them all on together, or you can adjust them individually. The spot lights in the cockpit by the OHP and the rear cabin can be adjusted to point light in any direction. Panel lighting is indirectly and not from behind the instruments and dials... Overall the lighting and switchgear lettering is brilliantly lit and very clearly readable. However I did find in some circumstances the main panel "Instrument Indirect lights" like on the C90B could affect the frame-rate by 20fr, and at other times it did not? switching it off meant flying with a dark panel until conditions changed to use it again? You have twin fuel tanks and the gauges are on a panel on the left side of the pilot. I put in 13.5 x 100lbs per tank to give me 2700lbs of fuel and enough fuel capacity to get me now all the way to Mt Isa. The panel also has two backup switches for standby pumps. The pedestal has twin levers for both engines in the throttles, prop pitch (feather) and condition/fuel cutoff. The condition levers have an idle position (thankfully) and the best placement for taxiing is about half-way from the idle notch to the full throttle position. The aircraft still needs a heavy shove from the throttles to get it moving, but once you are you can do the turns with just the brakes to slip off a little speed. Many runways in Australia are a single runway with a slight space at each end to turn the aircraft around, no problems with the B200 with just a slight nudge from the throttle to get through the tight u-turn. Distance to Longreach is 378.45nm or about 2 hours flying time on a good day, but again those pesky winds came and went with regularity. I had help though with the aircraft's autopilot (AP) system that is located on the rear of the pedestal. You can thankfully use the AP panel as a pop-up by pressing (A) on the menu selection. It is resizable from the very large unit that takes up a big proportion of your screen space to something smaller, it will work outside the cockpit as well which is great if you like to fly like that and still set the autopilot with out ruining the view by having to dip into the cockpit. Without the pop-up functionality you will know if you have used the X-Plane default King Air of how hard it is to set and reset the unit by it being down and away behind you... how many times have you looked up to see yourself cartwheeling into the water after takeoff by just a glance away from the window? As noted the AP is part of the EFSI (Electronic Flight Instrument System) that controls many functions over the aircraft. The AP itself is quite straightforward in the standard settings are all set out as usual. Here you can select the Heading-HDG - NAV (a note here in that right now the NAV function is fairly useless, however with the new GPS in v10.30 then it will come into its own) - APPR (Approach selection) - B/C - ALT (To hold an altitude) ALT-SEL (Altitude Select with the V/S mode) - V/S (Vertical Speed), the vertical speed is used with the DN/UP button to select the feet per minute (fpm) in - or + in the pitch of the aircraft. I found the aircraft climbed very nicely at 1200fpm and reduced to 800fpm over the last 2000ft (to 10.500ft), The B200 will climb easily at even 2500fpm but a warning in that if you over-torque for longer than 5 minutes with those engines, they will fail, throw smoke and ruin your whole day. You set the Altitude via the altitude select display on the lower panel and use the ALT-SEL to stop the aircraft at the selected height. There are also two CLIMB and DSC selections as well, but they climb and descend in a quick go/to manner. I never used CLIMB/DSC and always the V/S system. AP engage and YAW engage is on the lower panel with the large turn selection knob. Two large selection knobs above the main AP selection buttons are for the HEADING Selection and the COURSE Selection. These are both shown on the main Heading display. The Course needle has a built in CDI (Course Deviation Indicator) The smaller middle selector knob allows you to change the Heading display into three modes - Rose - ARC and MAP. Out here and way out in the outback of Australia the MAP function is fairly useless with just a few dots, all nav-aids are too small anyway except for a few points on lining up to a runway with a lot of fixes. In the center of the AP pop-up panel are two arrow buttons that allow you to select on the Heading display either the ADF bearing or a VOR bearing, the other button can be used to select the VOR 2 bearing that shows information on a separate display on the side of the Co-Pilot. There is a manual version for NDF/VOR just next (left) and slightly above to the electronic one. All autopilot selections are displayed on the electronic Artificial Horizon display. The whole instrument package is exactly the same as the version in the C90B. If you love that one, then you will also feel right at home here. The yokes are well in keeping in with the quality of the aircraft. The pilot's yoke has switchable clocks in real time, zulu time and elapsed time that you can start or stop. On the Co-Pilots yoke there is a clever 24 clock that you have to glance at a few times to see how it works. There is a point in every journey when you just fall into the rhythm. It is constant background sounds and it is usually the engines and the slight rushing of air around the body of the aircraft. You are not bored and yet there is very little to do except to watch the gauges and click of the passing numbers of speed and height. There are blinds that you swing around the main windows to block out the sharper light. They make the cockpit even more smaller, more intimate, now and then you look out of the windows of sometimes complete nothingness, a flat landscape with no visual clues on where you are going or where you have come from. Australia is like that in parts, just empty space and you feel very small in the landscape. The main cabin has 6 luxury leather seats with 4 in a club layout, another seat is set behind the rear partition opposite the door/entrance and by a large empty luggage bay. The windows give a great view out outside and the whole cabin feels more like a personal jet than a turboprop. You can adjust the polarized rear cabin windows, as they can be darkened by dragging a handle around in semi-circle. A opening door is situated between the cockpit and the cabin, but this is a delivery flight so we keep it open most of the time. Tables can be stored or open for the pasengers. You can use the excellent menu © Camera or views menu to easily move around inside and outside of the aircraft and change the pilots POV (Point of view). Night-lighting With tbe HDR on the lighting effects are excellent. Every cockpit and cabin roof light is both adjustable for brightness and for direction. This shows how good and effective the X-Plane lighting effects really are when executed with skill. If you swivel the lighting in certain ways you can see the effects from the outside of the aircraft. The panel lighting highlights how far and how good the aircraft lighting has come from the of clever lighting tricks in 2d cockpits and XP9. The cockpit is dream of reality and lighting sources and the lit text that fills up all the your view in any direction. It is a nice place to be in the dark. Out of the windows and the green is getting sparse, the drier and hot inner continent is now coming out as life slowly recedes away. The straight line of the Landsborough Highway, the only connection between the the few townships out here and the rest of the world comes into view. Each way you look it just one line from horizon to horizon, but for us a link to something man-made and a pointer to our next destination. Longreach We could have flown directly to Mt Isa from Roma. But this diversion is only slightly off the main track and being way out here you can't miss the chance to pass by a bit of history. Longreach is part of the birth of QANTAS or "Queensland and Northern Territory Aerial Services". Which was founded in November 1920 in Winton 177 kilometres (110 mi) northwest of Longreach, it began flying international services in May 1935. Between these small god forsaken towns an airline that took on the world was conceived out of necessity more than profit, as again the aircraft was the only real means to cover these impossible long distances. There is a museum here to the airline which moved its operations here in 1921, called the "Qantas Founders Outback Museum", which includes amongst its displays a decommissioned Qantas Boeing 747-200 aircraft, registration VH-EBQ, "The City of Bunbury." and QANTAS's first jet aircraft VH-XBA (formerly VH-EBA), a Boeing 707, "The City of Canberra.", Douglas Corporation DC-3 VH-EAP and the heritage listed original Qantas hangar, combining historical artifacts. Yes they landed that huge B742 in knowing it would never leave here again, It was a close landing... very close. The midday sun is hot here and in opening the small side windows on the B200 you would think would let in some cooler air, but it just made the cockpit worse as more heat came in than the hot cockpit had in the first place. Cloncurry The next leg was to Cloncurry at 284.44nm. It should have been a breeze but it wasn't. It was hot and airless on the ground at Longreach, but once we had reached our normal 10,500ft altitude the gusty winds made the ride rough and tough. They were blowing at 19knts and it was tough going, At higher altitudes the wind force was even higher at 23knts and so after a fair while of being bounced around we dropped the aircraft down to under 7000ft and the lesser of two evils at 14knts of gusty winds that was not as hard on the aircraft. The red ore like landscape is the reason that Mt Isa is way out here. It is a mining town, a rough and tumble place were fortunes are made and lost. After still following the Landsborough Highway and passing over Winton until it joined up with the other trans-state Flinders highway over Central Queensland, Cloncurrry was now visible and the very last leg to "The Isa" was only a short 64nm after a heading turn west. Liveries You have the standard Carenado white livery and 6 HD (High-Definition) liveries to choose from in 5 Civilian and one military in the Swedish FLYGVAPNET... Sounds are as expected very good. But the main outside high buzzy whine can give you a headache after flying for the many hours as I did here. I ended up with a set of headphones on if I had the aircraft on flying over the scenery which was getting more and more interesting as the fading light was now showing the immense ripples of the formations of rock lying below us. You can understand why this B200 aircraft is so important out here. It has the speed and the range to cover very large distances and then land on a rough runway on a homestead or cut out of the bush for the RFDS next to the highway of which there was many over the distance of the Landsborough and Flinders Highways. It is a very nice aircraft to fly, but that T-Tail has to be respected. Sounds The 3d surround sounds are overall excellent. But there is a buzzy high whine with the main side on outside view that tired out my ears and gave me a headache after many hours of flying. From that point on I needed the headset on to stop the buzzyness to give my ears a rest if I was flying over the landscape and if I wanted to view the vista below. Mt Isa Lake Moondarra gives you a focal point to aim for and a turn over the far side bank of the lake gives you a direct lineup to Mt Isa's YBMA RWY16, By now though the several landings with the B200 have learnt of how it behaves and how the aircraft feels like at the lower speeds. And enjoy the slight touch landing... The engines have a reverse thrust/prop to help the drop down the speed, but in most cases you don't need to use it as the aircraft easily drifts off the speed. Sadly X-Plane does not render "The Isa" backdrop very well, The town is an industrial skyline of company mining infrastructure, X-Plane only gives you the usual low housing estates of California. It has taken the B200 only two flying days to cover the the 979.31nm from Archerfield to Mt Isa. Impressive for a general aviation aircraft and it was how the aircraft covered the distance with ease. The aircraft still has on this journey another 660nm still to go to the RFDS base at Alice Springs, no doubt that would have to be completed in one flying hop, but you have no issues with that sort of distance as the range at 1600nm is phenomenal for an aircraft of this size. In those few days you almost become one with the aircraft, In this case it was easier than most. Summary There is always going to be with both these King Airs the controversial comparison between the C90B and the B200. In most cases they share most of exactly the same equipment and both have the same excellent EFSI (Electronic Flight Instrument System) and sitting behind the panel it is hard to tell them apart. No doubt the B200 is the far more powerful and the larger of the two aircraft. And that comes through with the way the aircraft behaves, the differences are subtle but there are still small very noticeable differences, The power to climb and cruise is much more apparent and you feel the difference of that large T-Tail, this with the added slightly different CoG (Center of Gravity) and the extra length is noticeable in the handling which makes the B200 a very nice aircraft to control, except certainly in gusty winds were it gets very twitchy. On this journey I certainly got to understand the aircraft better the more distance I put on the airframe. However more time would allow you to find still more of those subtleties, to find even more control at the limits of the low speed handling. The aircraft needs constantly a firm but fair hand. The aircraft however behaves like the B90C with strange effects on the frame-rate. It does not like added special effects like the autogen and any weather and that is not down to the textures either as it reacted the same at the high autogen of Archerfield as it did once it felt the far smaller autogen arrangement at Mt Isa. The "Instrument Indirect lights" adjustment on the OVH for the main panel also was a sucker of power when it felt like it and so a 20fr loss will come and go at a whim for no reason and it will be interesting how much difference the X-Plane 10.30 upgrade will effect the aircraft and take away these niggles, even with the weather upgrade I feel v10.30 would would give you an substantial improvement here. If you have the power to overcome this, then it is not an issue. It is noted that you do require 1gb of VRAM to run the aircraft correctly, other than these niggles I didn't have problems with that with my 512mb limit. Carenado's quality in their aircraft is always a sign of the depth of design over any other developer. The B200 certainly comes with all those hallmarks of the sheer design quality that you expect, and the aircraft is on a top level with any other quality aircraft, it is one of the best in X-Plane in this category. In a few areas like the inside lighting it excels. In systems the EFSI package is simply excellent for flying those really long distances like we have done here. When the X-Plane 10.30 upgrade to the GPS is released it will be a significant advantage to the B200. The framework is already in place for the new GPS and that will then give the aircraft an excellent way to fly these very long routes without only just the select few NDB's and VOR's to chose from in these sort of open distance areas (you can use a basic route now in the current Garmin GNS430, but it is just that... very basic). The B200 has excellent features with great effects in that rain drops move realistically in accordance with airspeed, and then are cleared by wipers, and repopulate after wipers are shut off. Ice can be cleared with de-icing options and the internal lighting is above the usual HDR standard, all animations and intimate detailing here is simply first-rate. Overall the Carenado B200 is one of the best of current series of larger aircraft that are being released by this outstanding developer. It is certainly a highly distinctive and dramatic aircraft in flight with its tall T-Tail arrangement and slightly longer fuselage. For an investment you would certainly do no better as the aircraft would deliver many years of great flying with its outstanding natural abilities and excellent features. The Carenado B200 HD Series is now available from the X-Plane.Org Store. Price is currently US$34.95 : Get the - B200 King Air HD Series - Here. Documents and Install, Download is 207.50mb, that is unzipped into your General Aviation Folder of 265.20mb. Developer Site: Carenado Review By Stephen Dutton 6th May 2014 Technical Requirements: Windows XP, Vista 7 or 8 (32 or 64 bits) or MAC OS 10.6 (or higher) or LinuxX-Plane 10.25 (or higher - 64 bit compatible) Not compatible with X-Plane 94GB RAM/1GB VRAMVersion 1.1 (last updated May 5th 2014) updated store# Review System Specifications: Computer System: - 2.66 Ghz Intel Core i5 iMac 27” - 6 Gb 1067 Mhz DDR3 - ATI Radeon HD 4850 512mb Software: - Mac OS Mavericks 10.9.2 - X-Plane 10 Global ver 10.22 (final) Addons - Saitek x52 Pro system Joystick and Throttle Scenery- VOZ Australian Scenery by B Roberts - Aussie Scenery Packages (you do also need to download the AussiePak7)