Stephen
-
Posts
2728 -
Joined
-
Last visited
-
Days Won
353
Content Type
Profiles
Forums
Articles
Everything posted by Stephen
-
 Yes I agree, I heard that Butnaru is going to upgrade his sceneries, so KFLL may be one of them? SD
 -
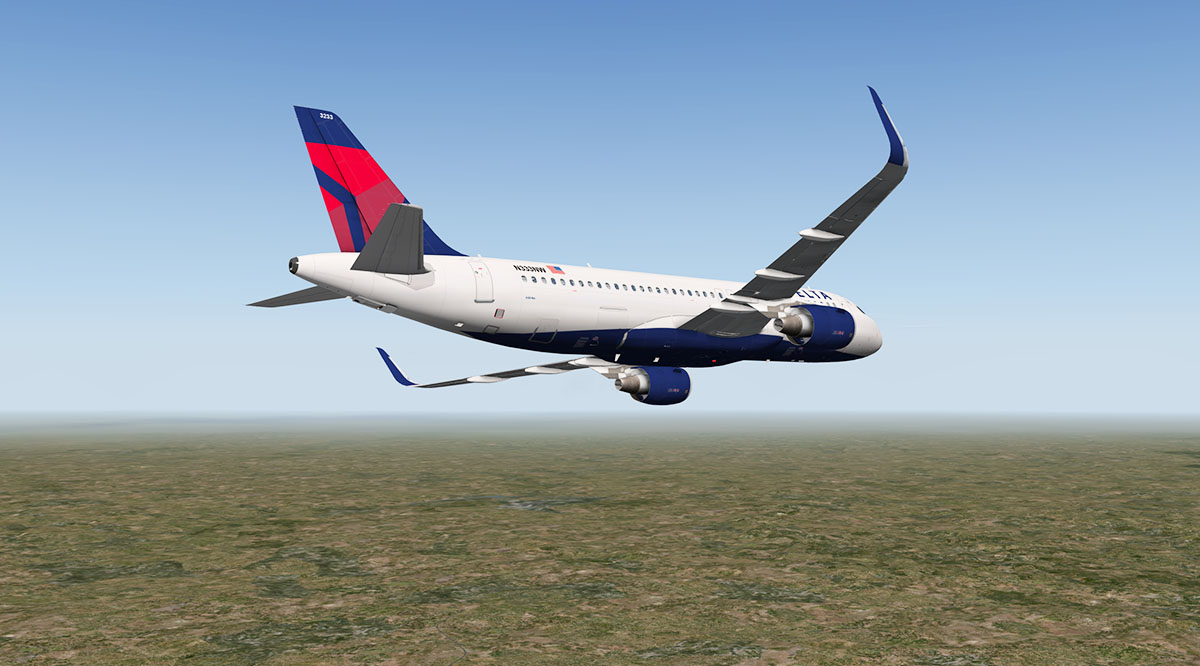
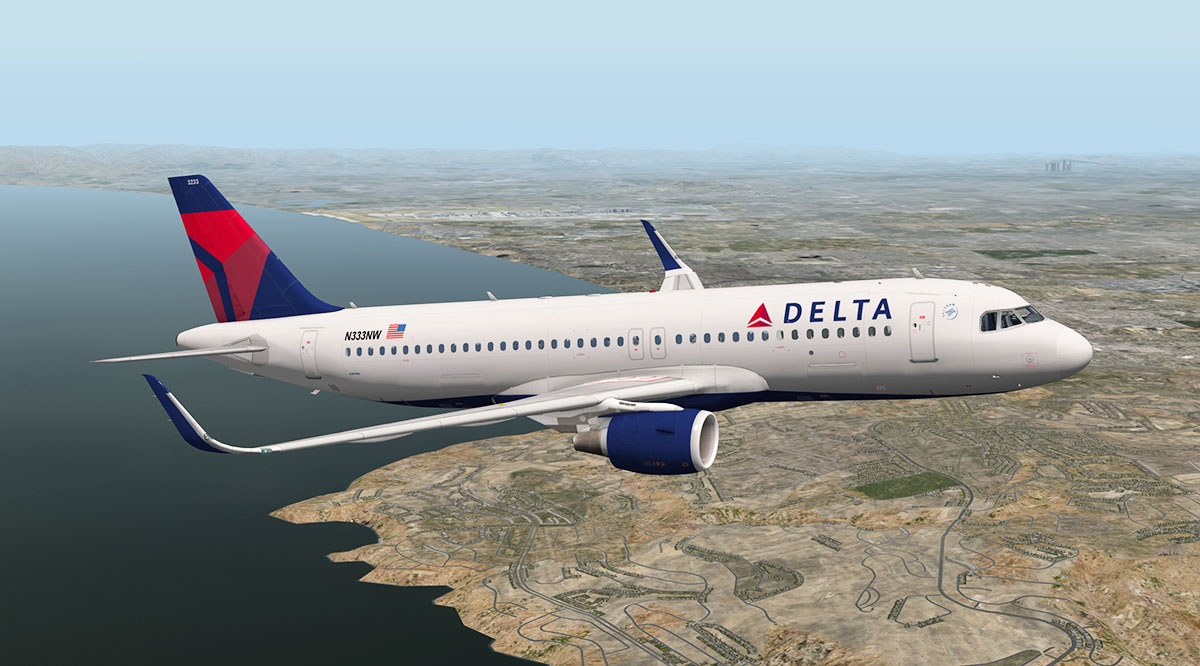
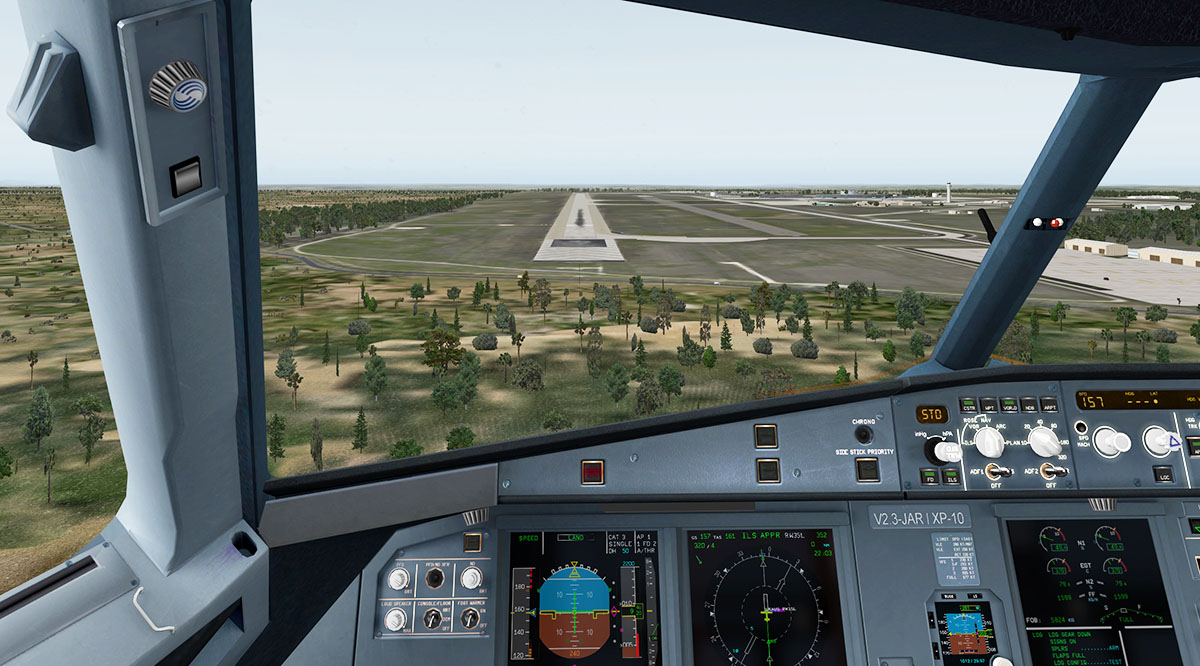
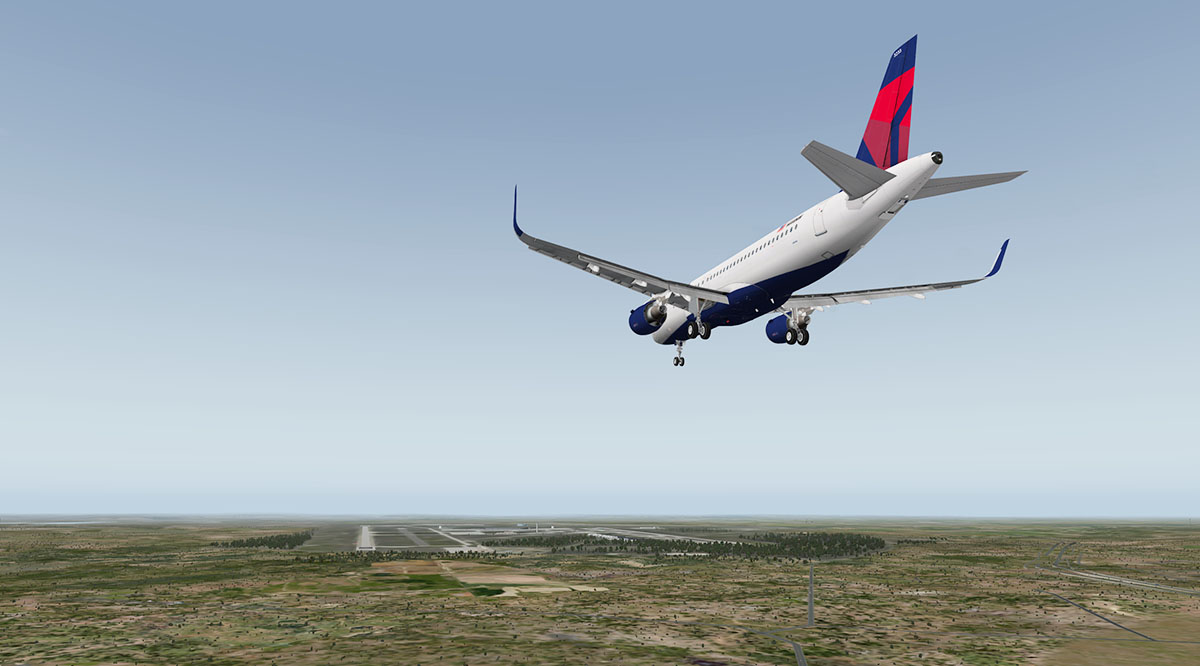
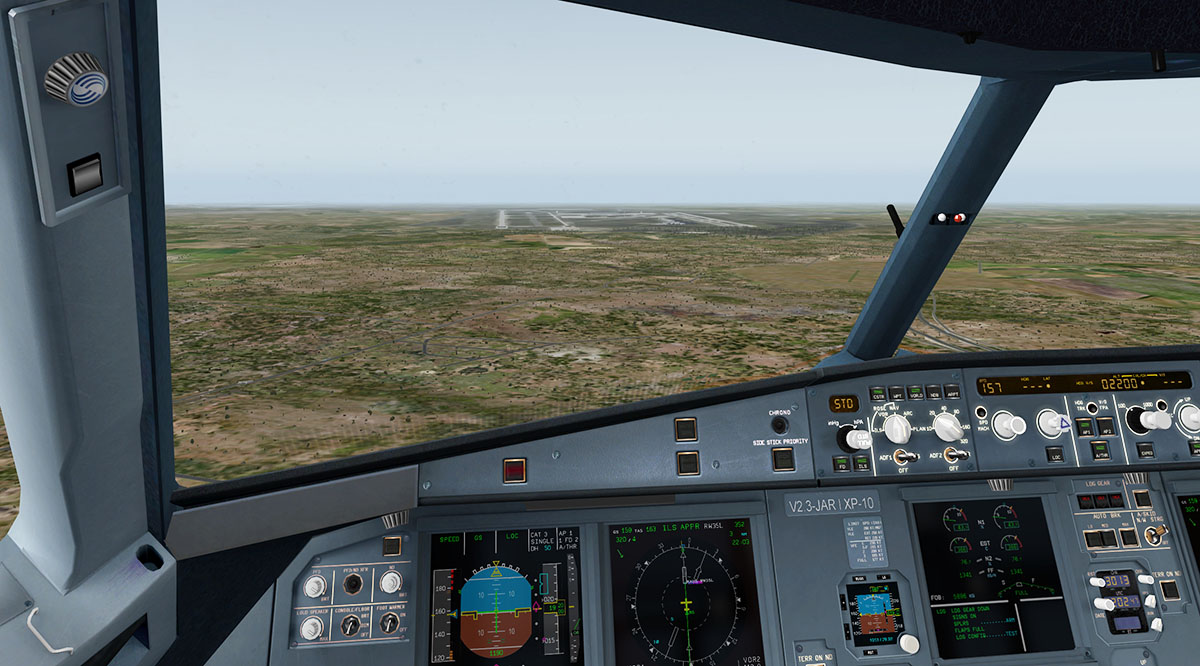
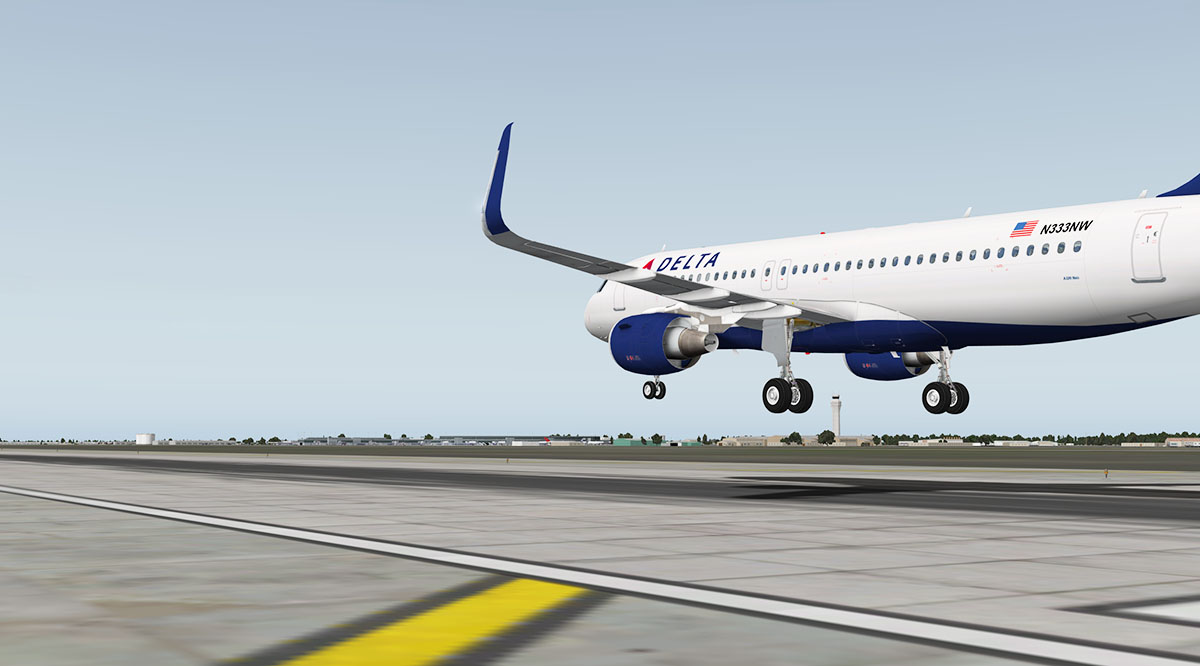
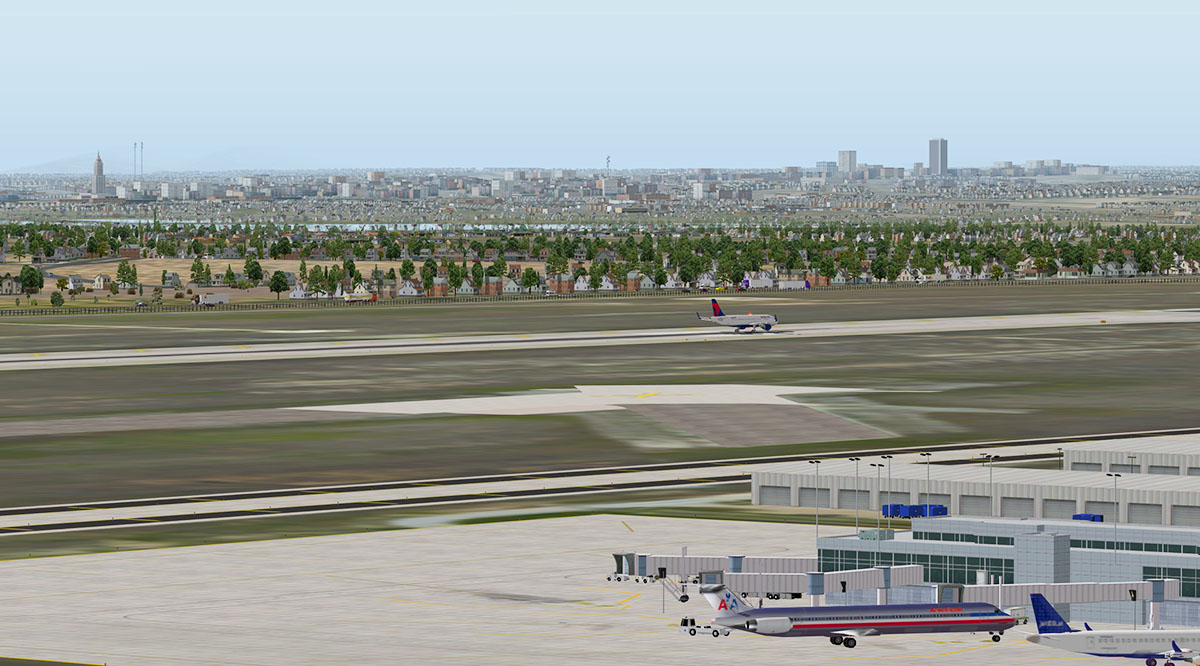
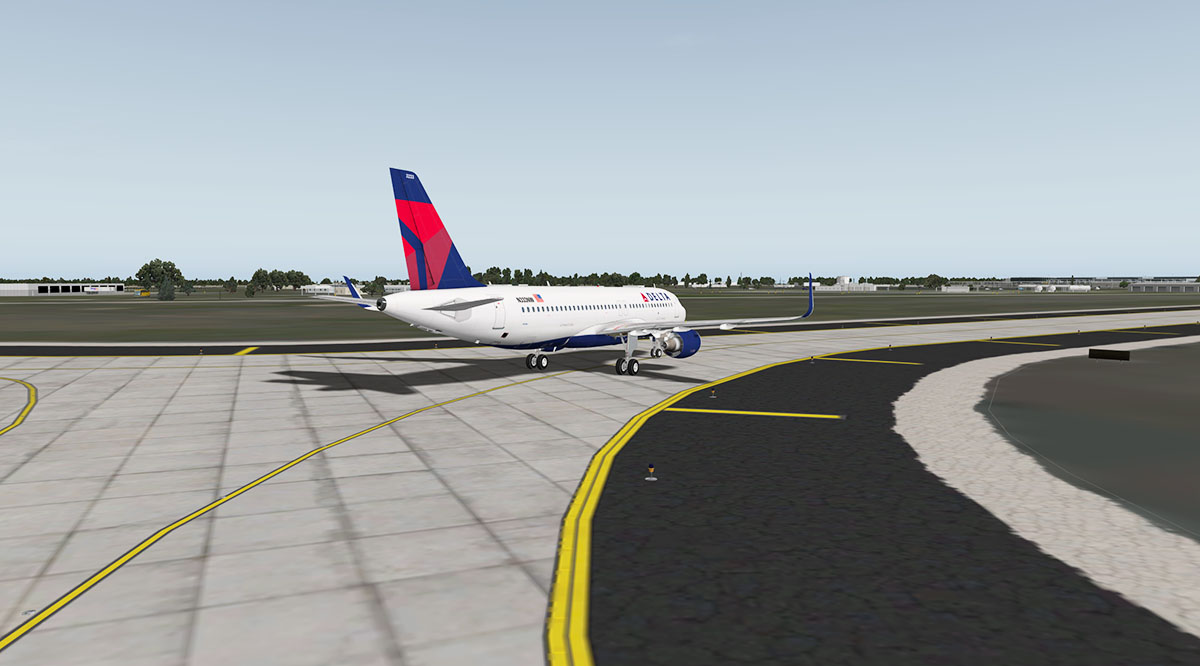
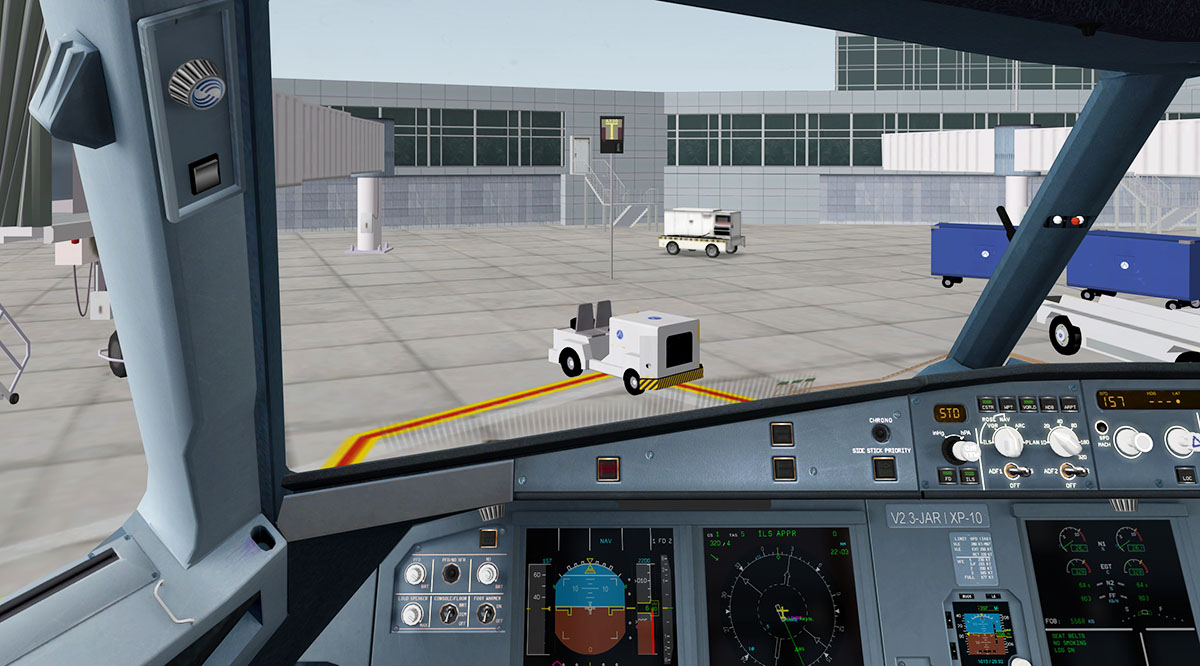
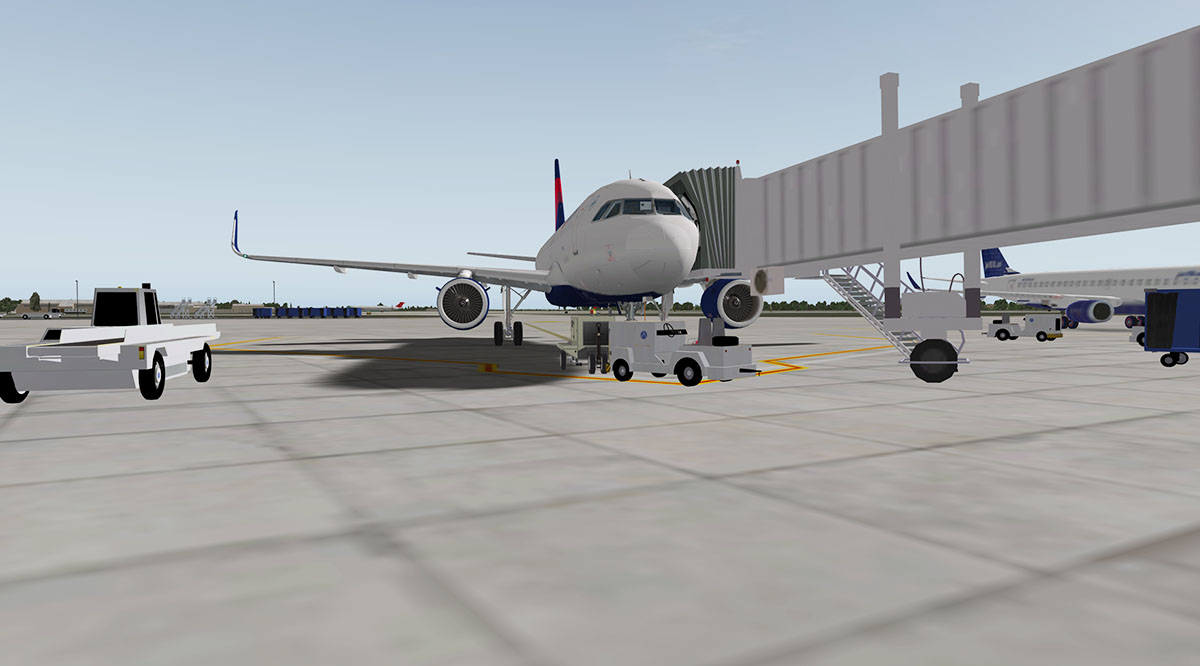
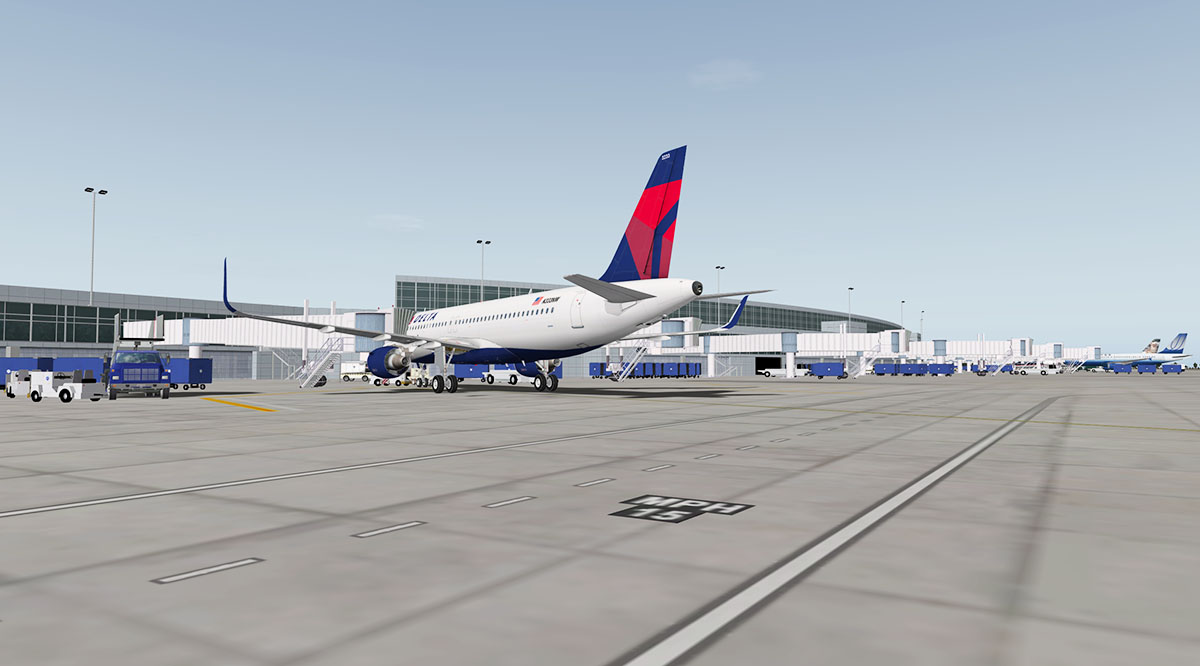
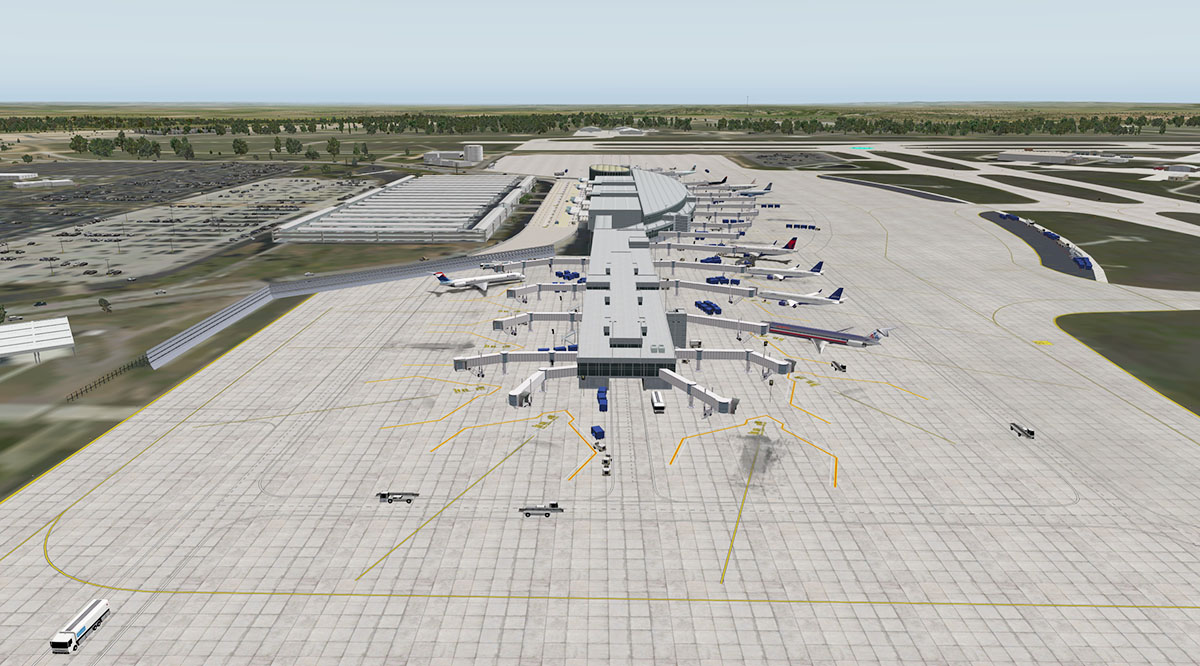
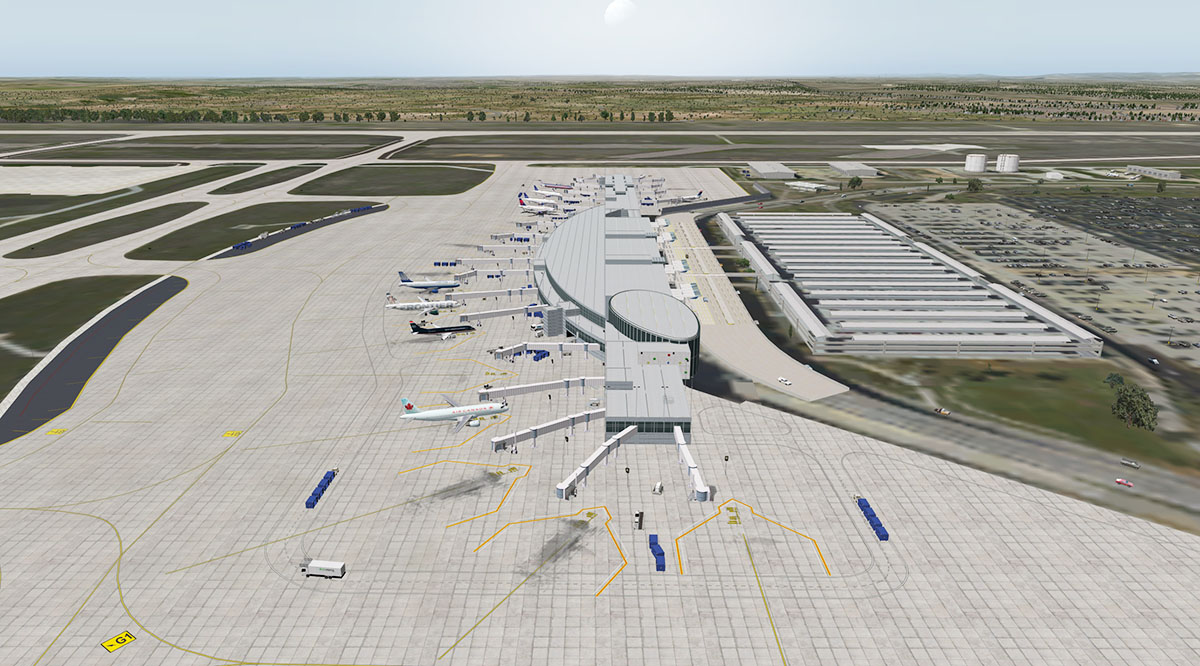
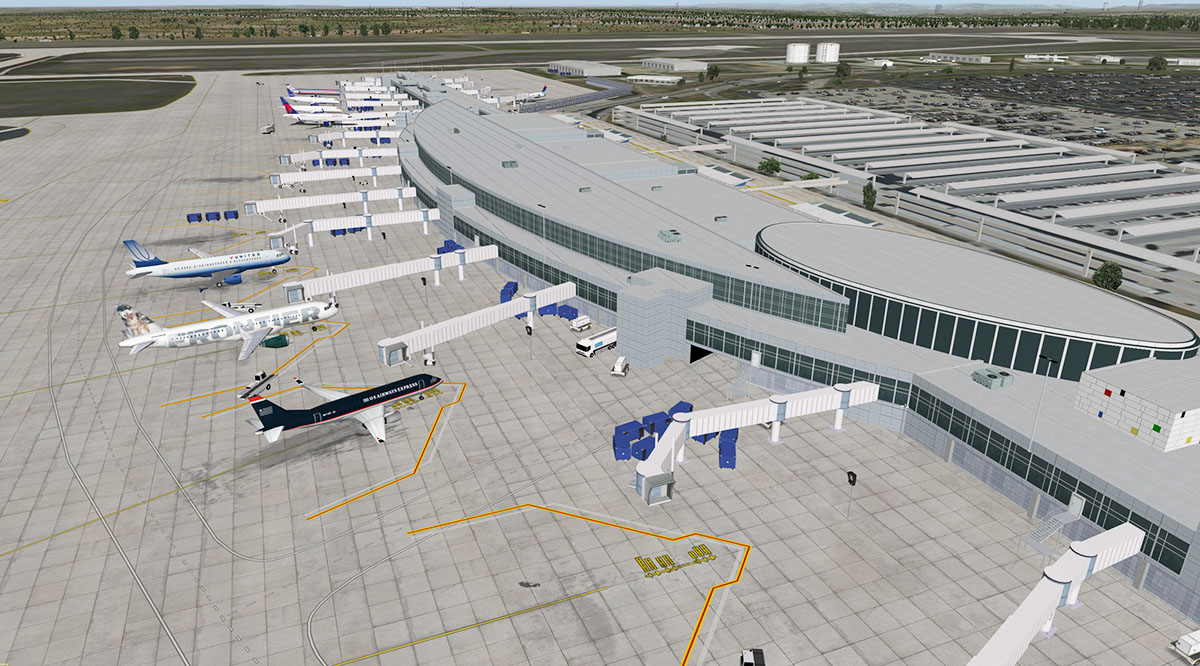
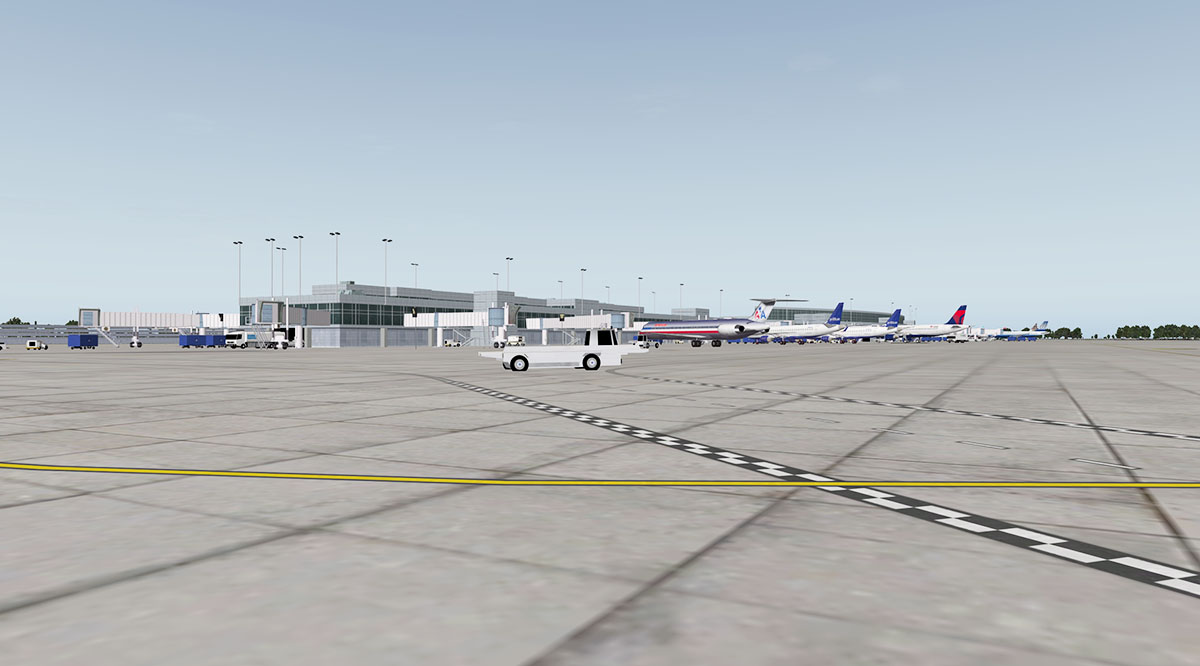
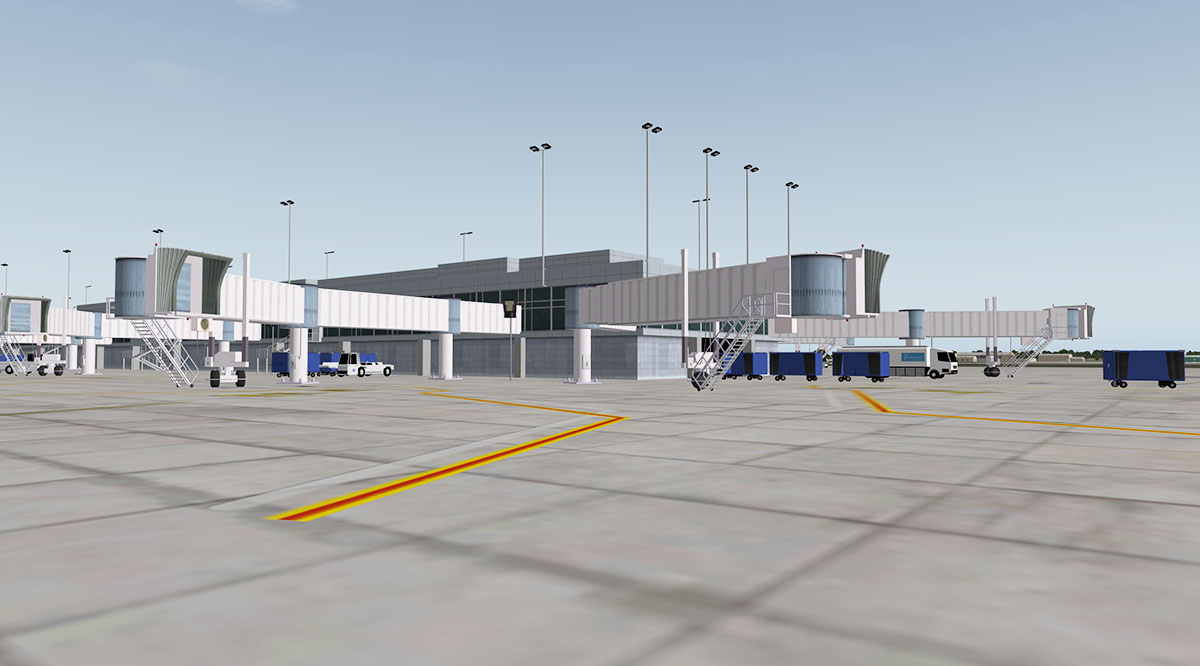
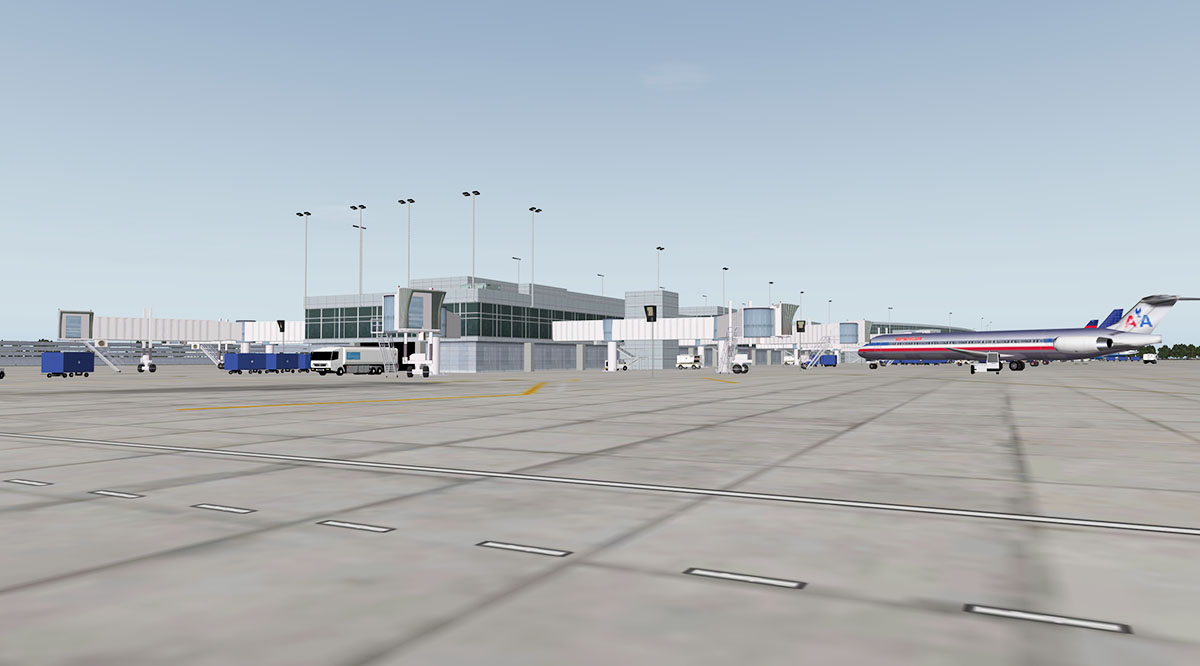
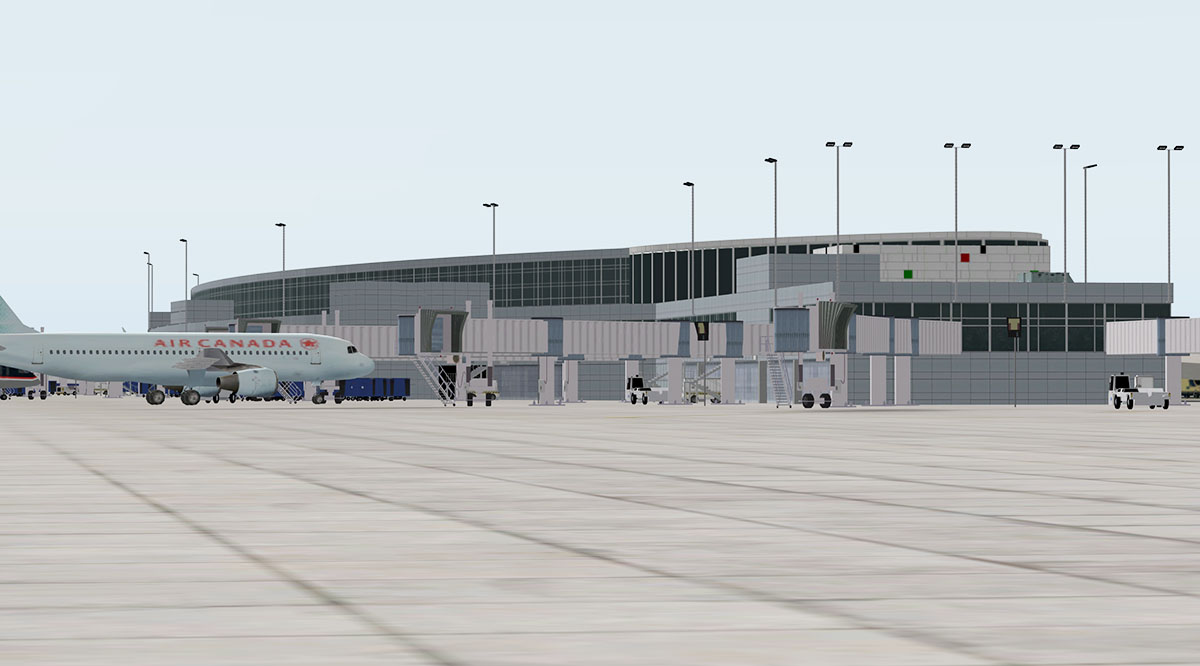
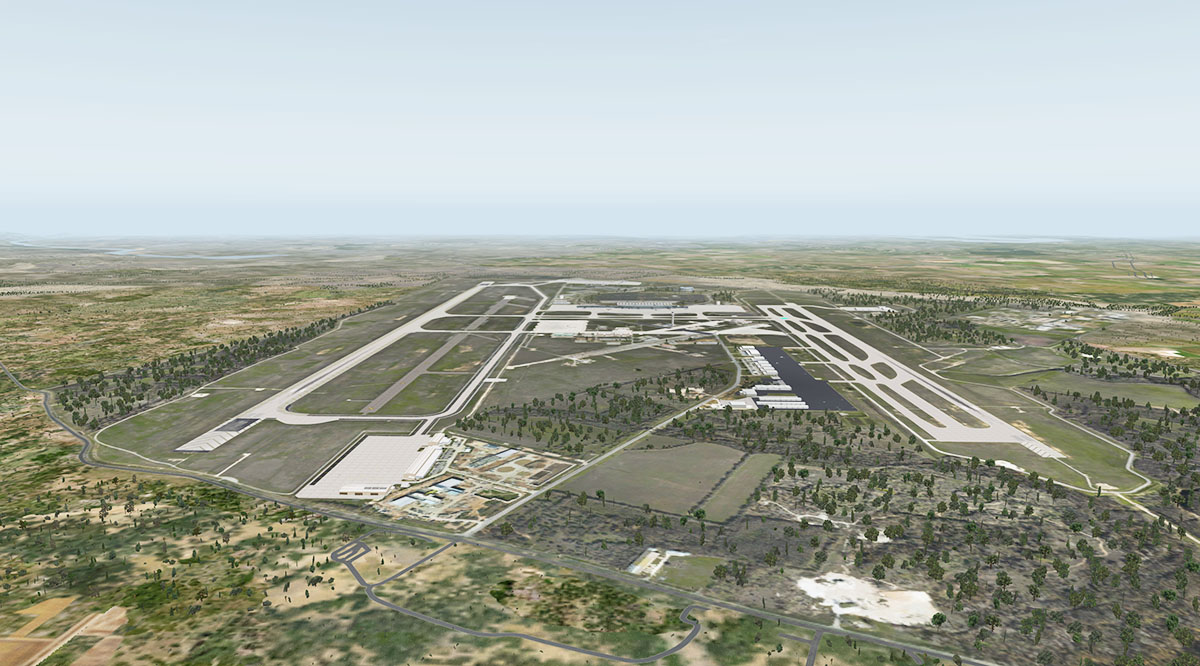
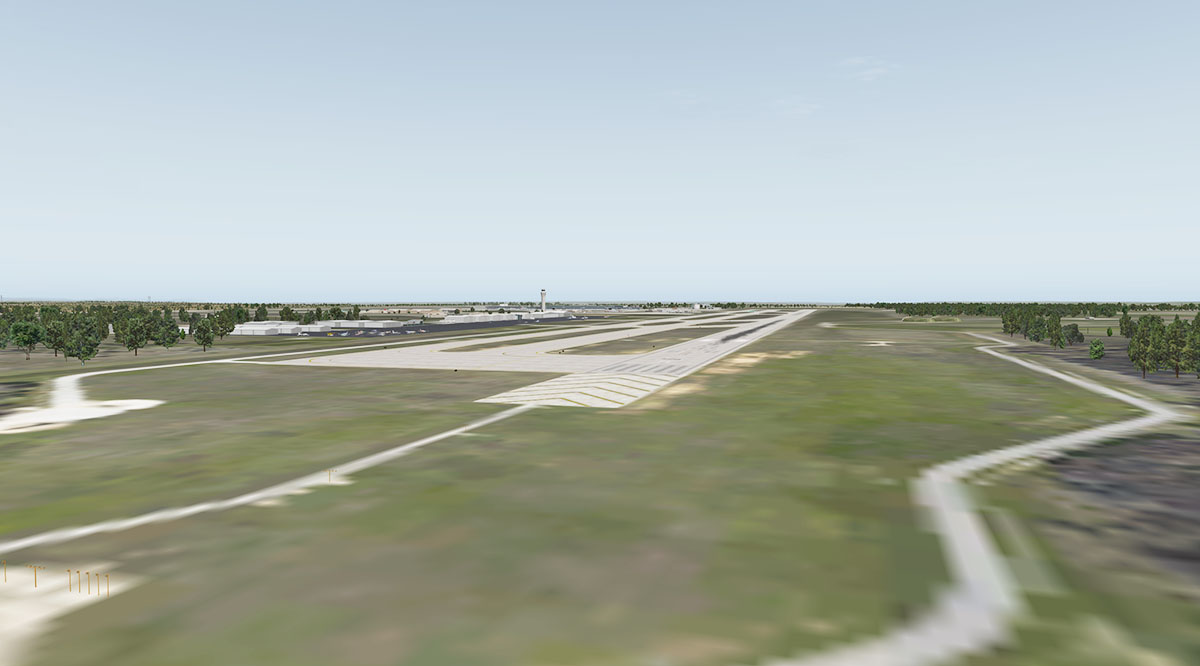
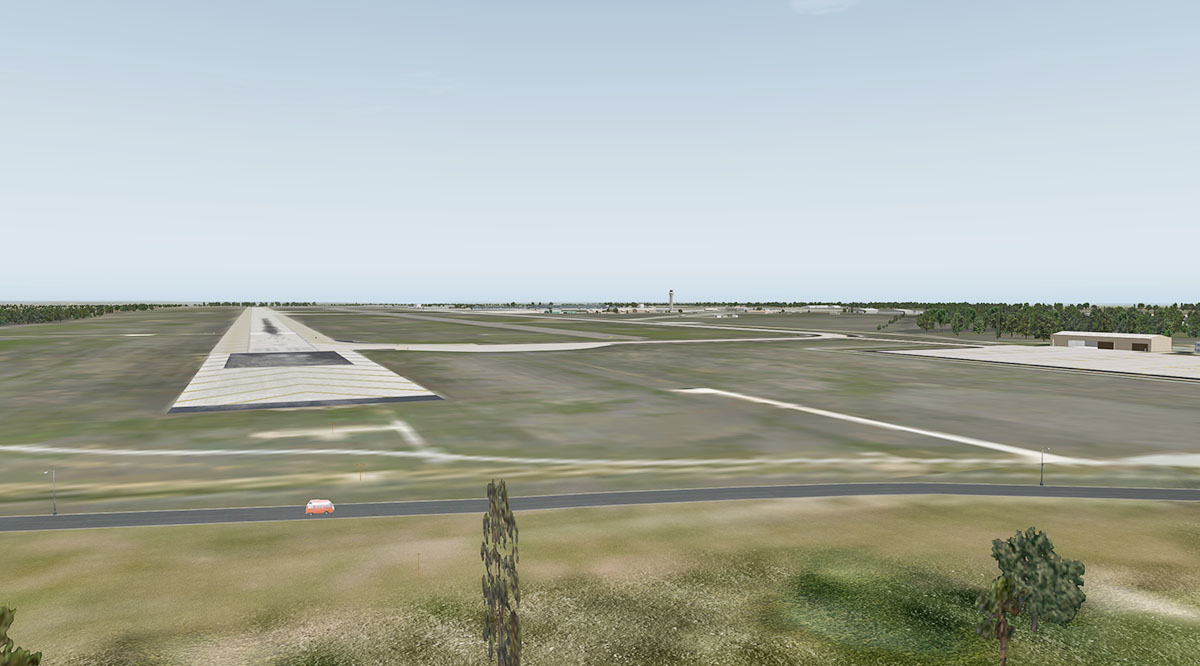
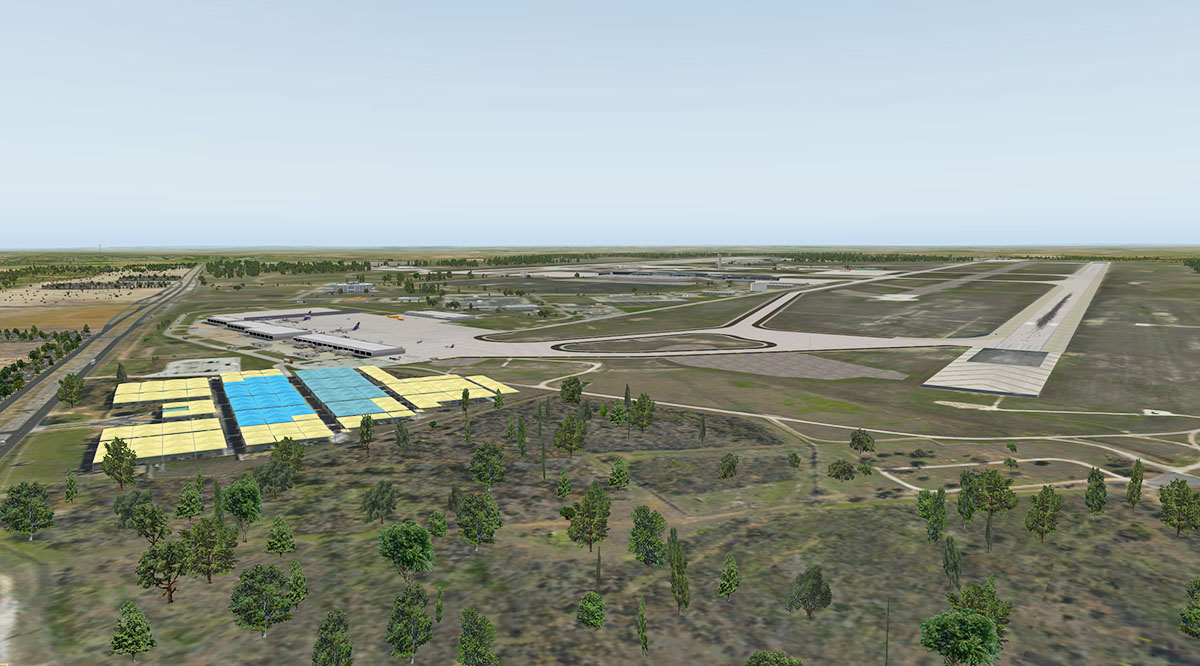
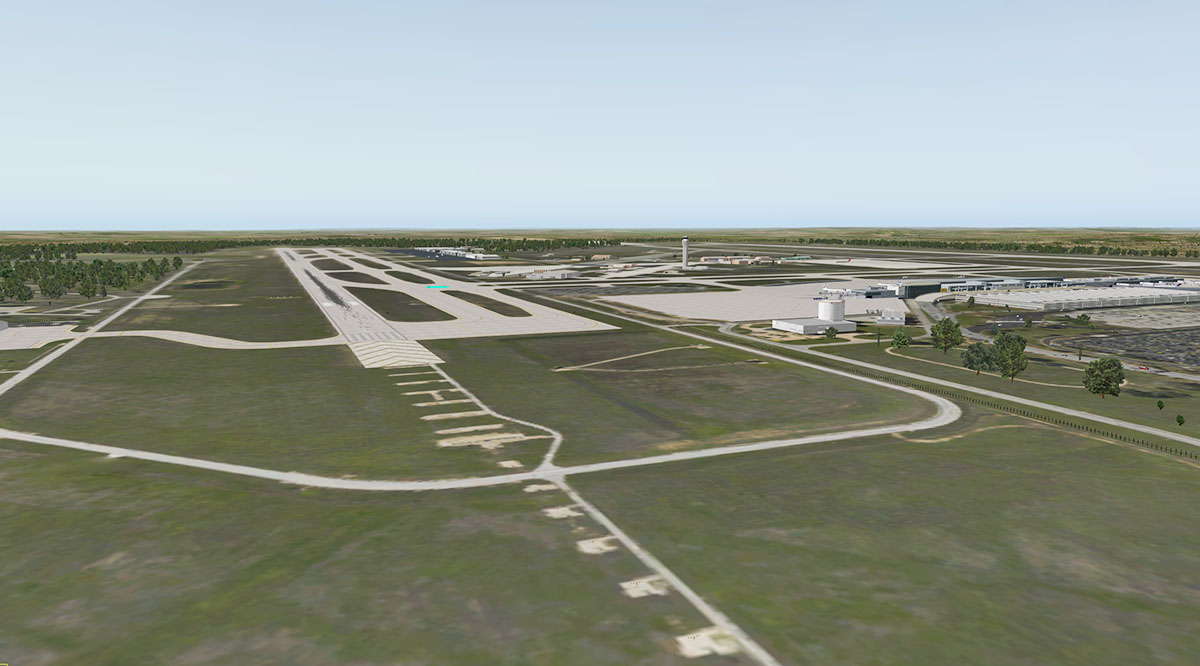
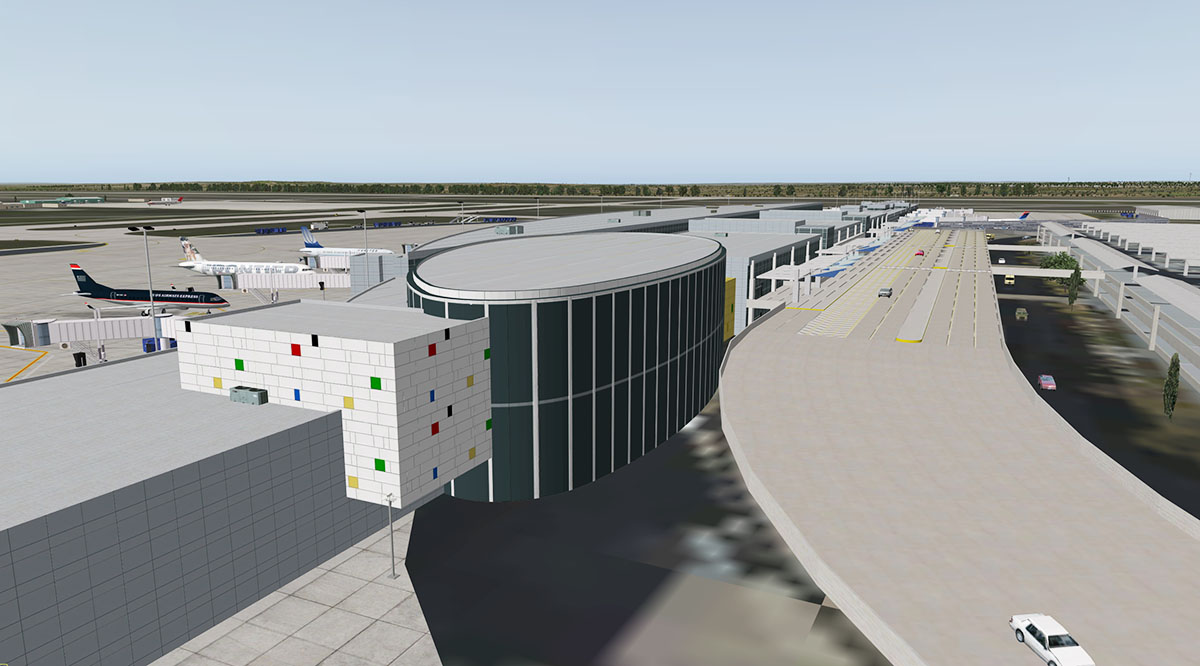
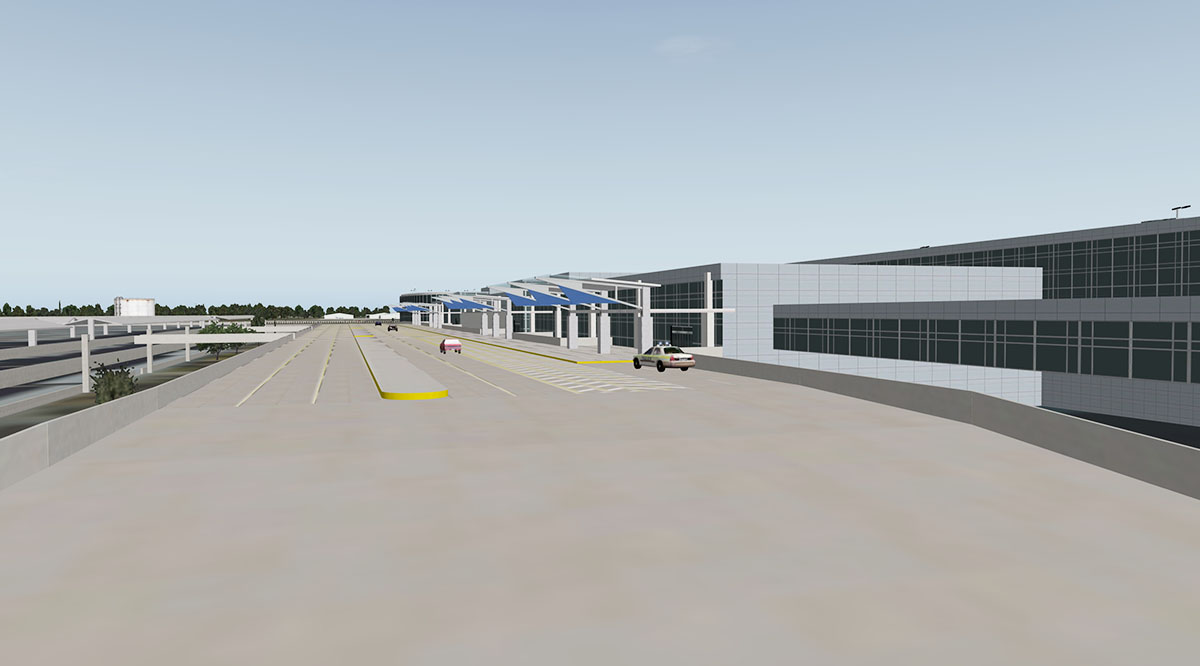
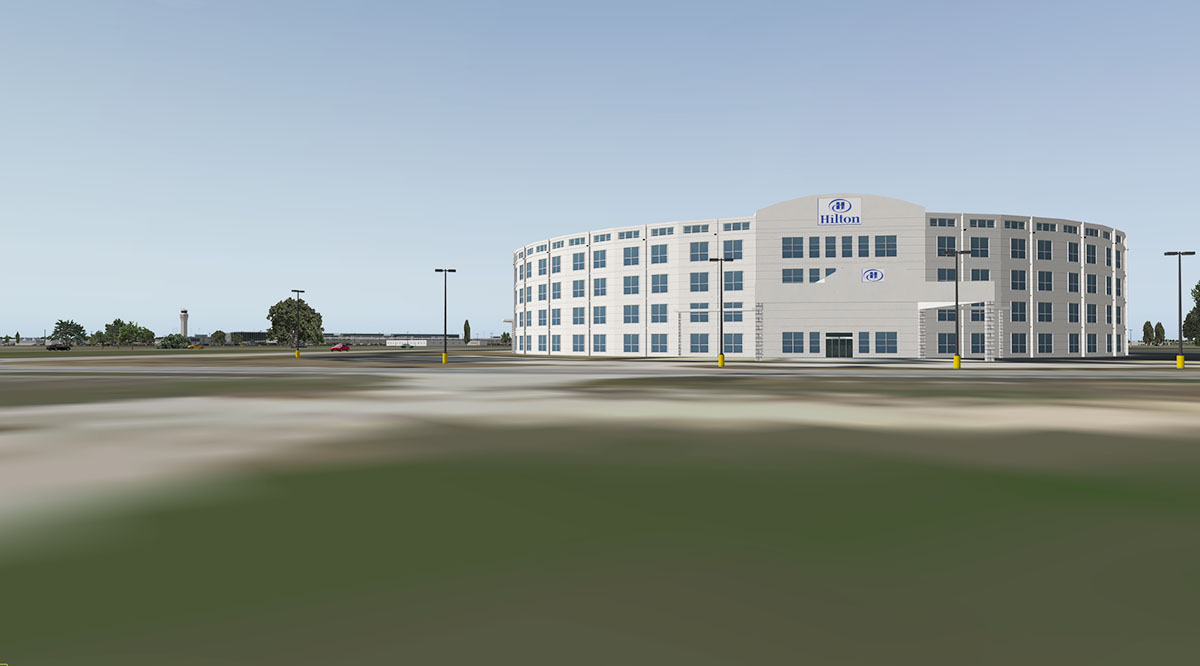
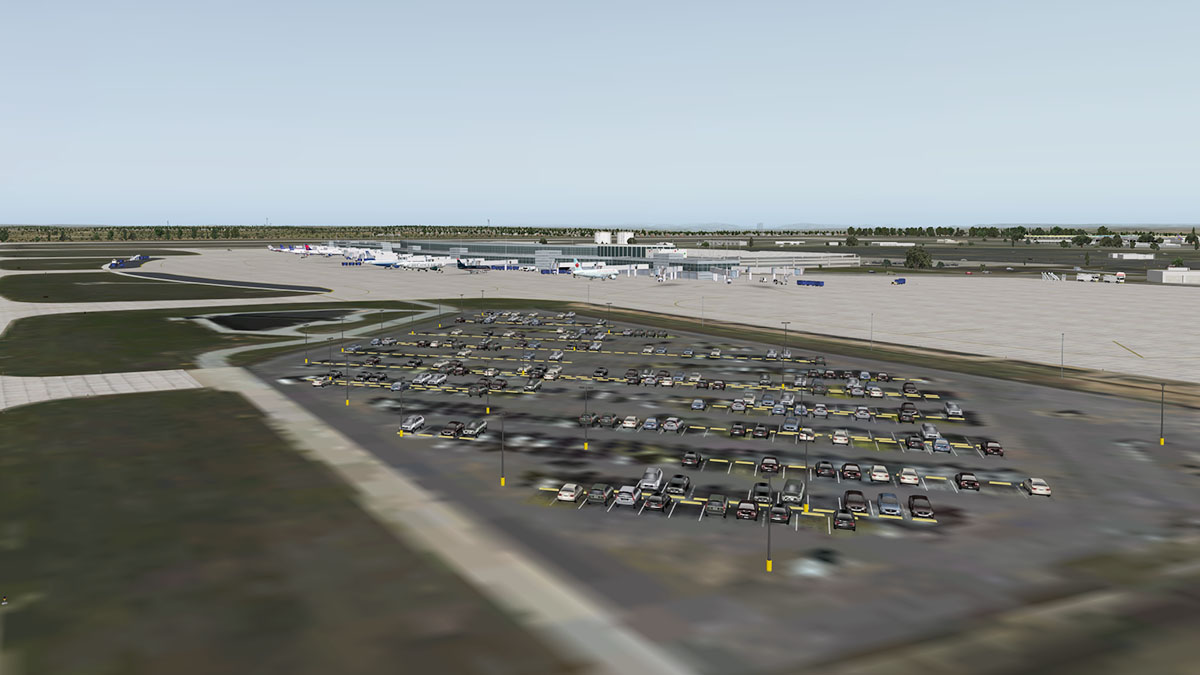
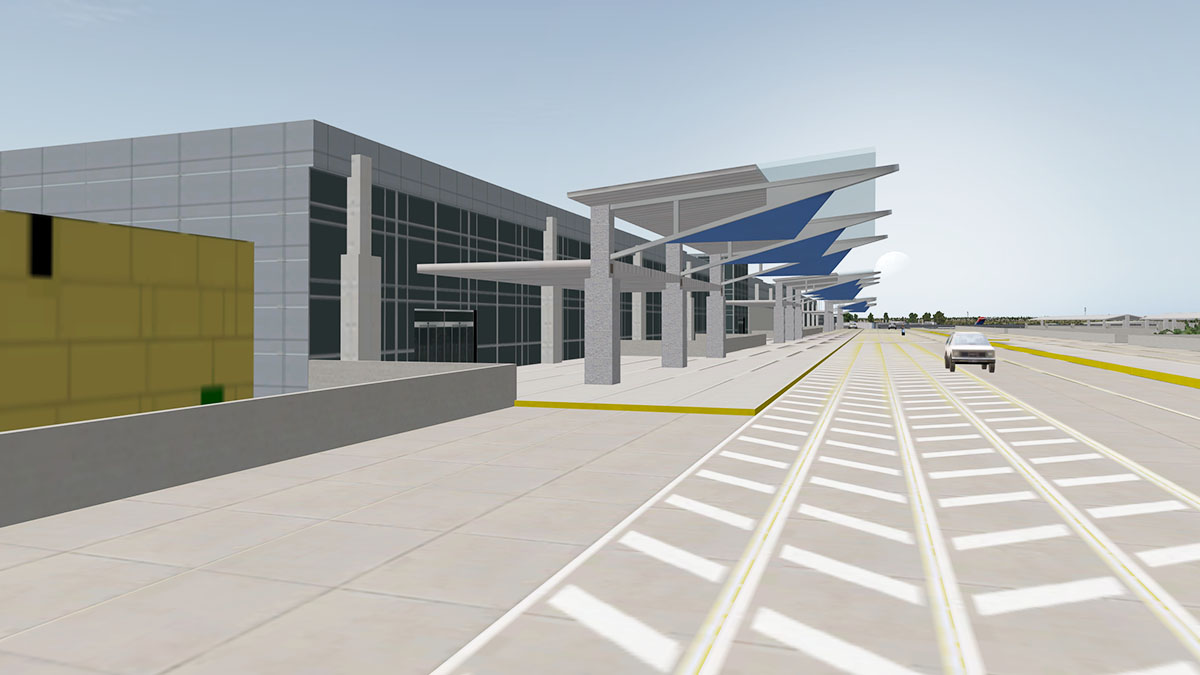
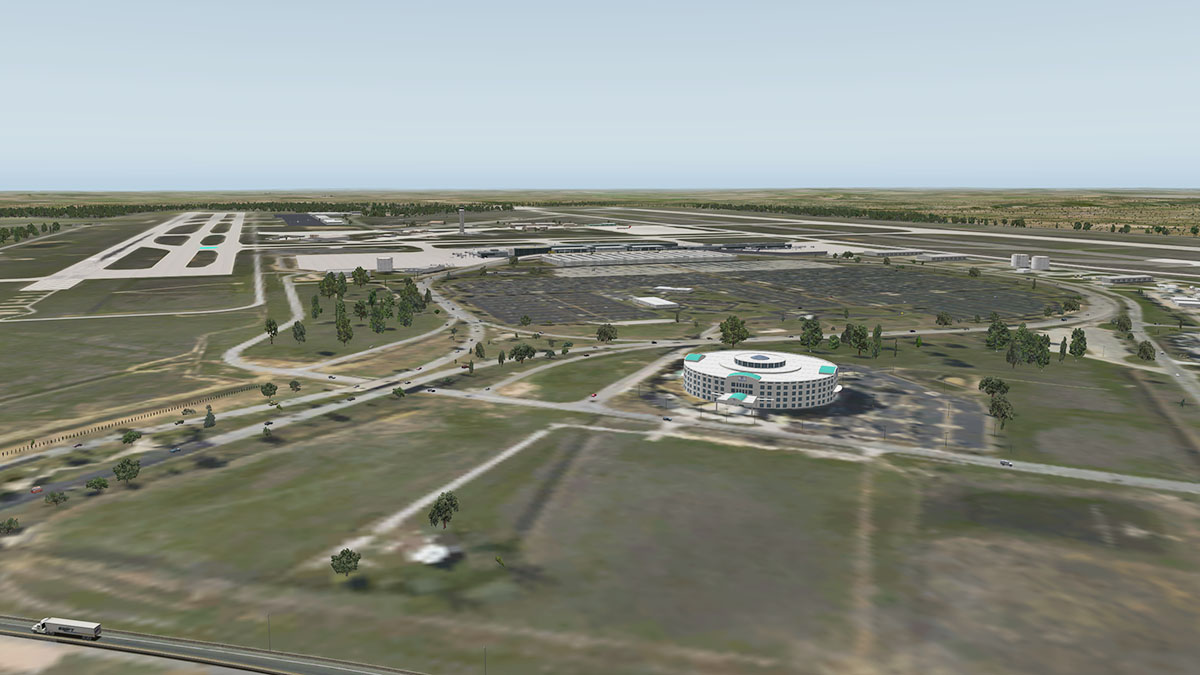
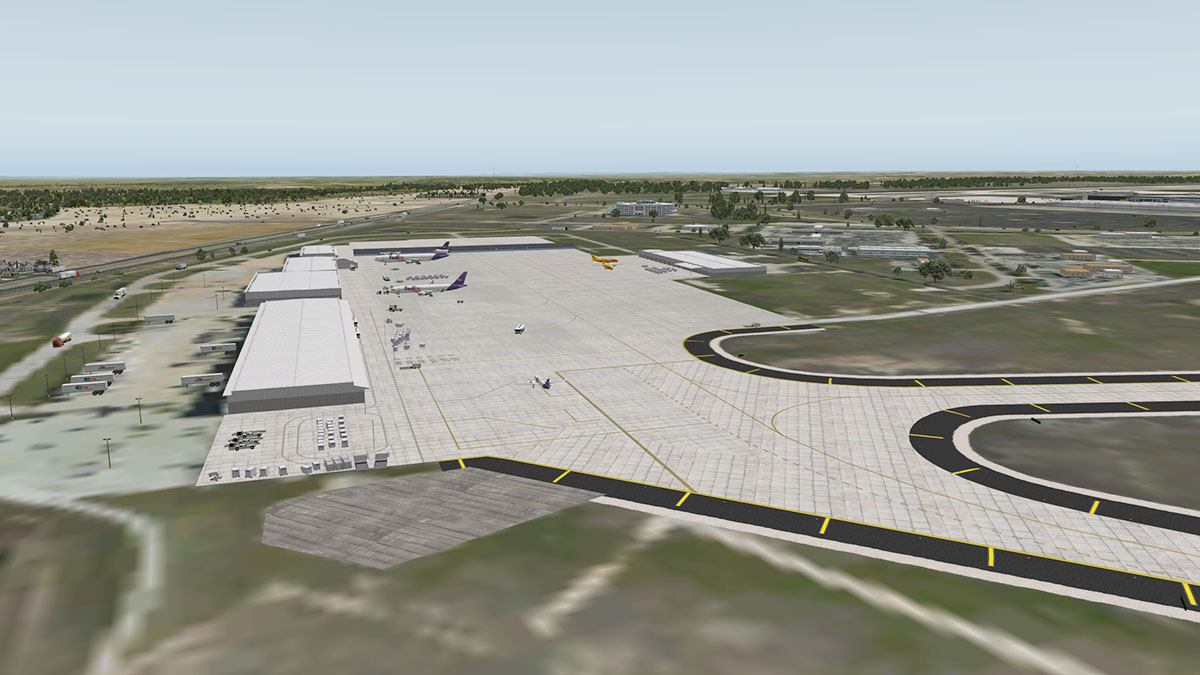
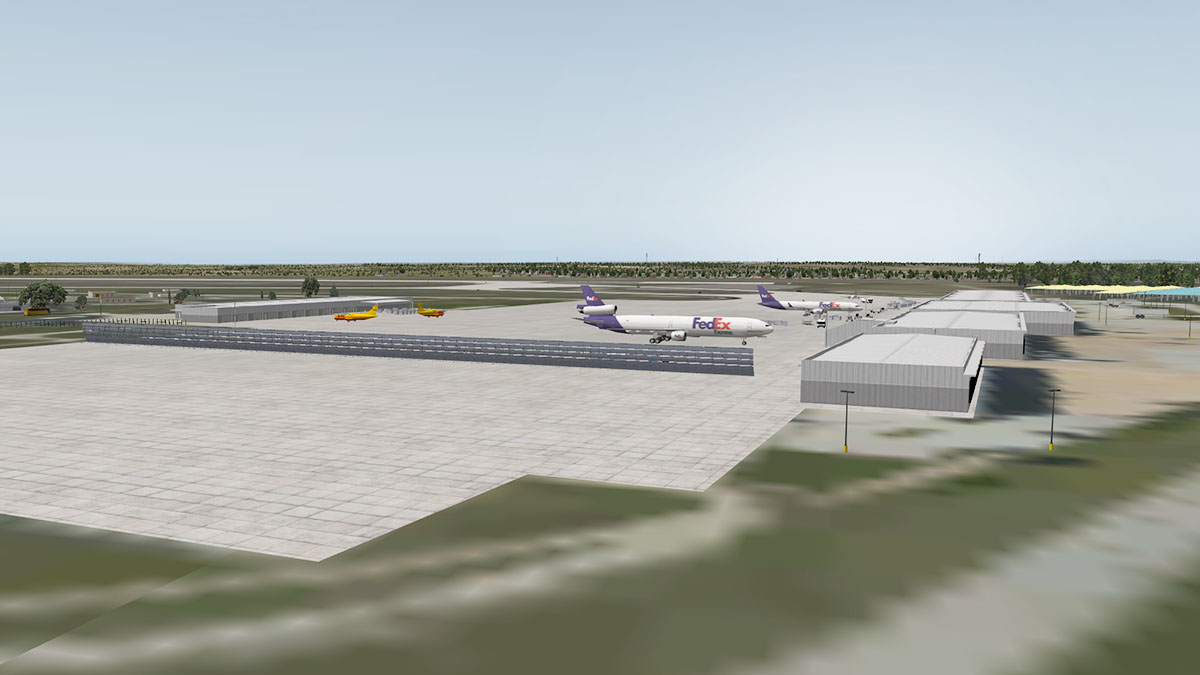
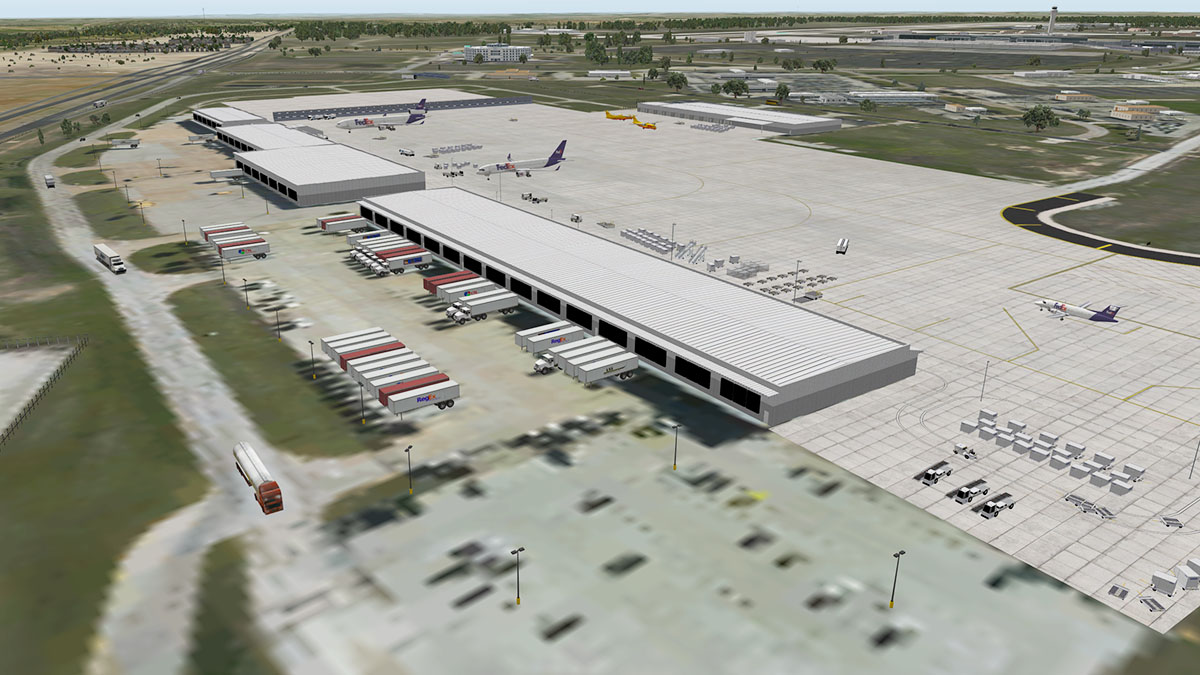
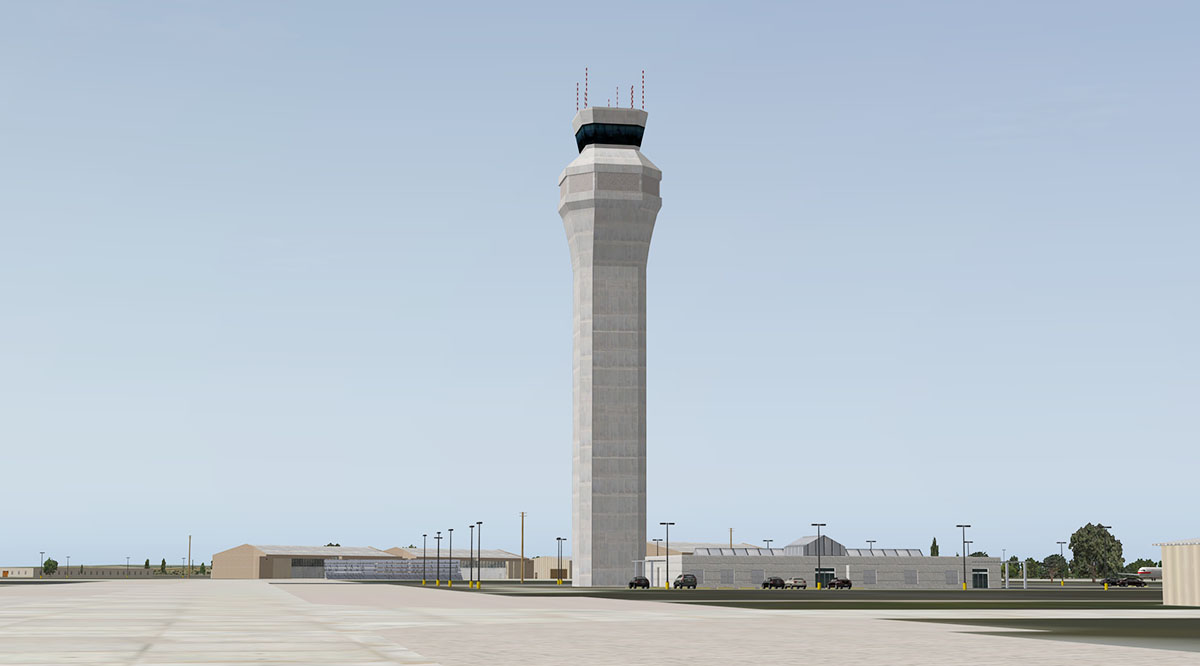
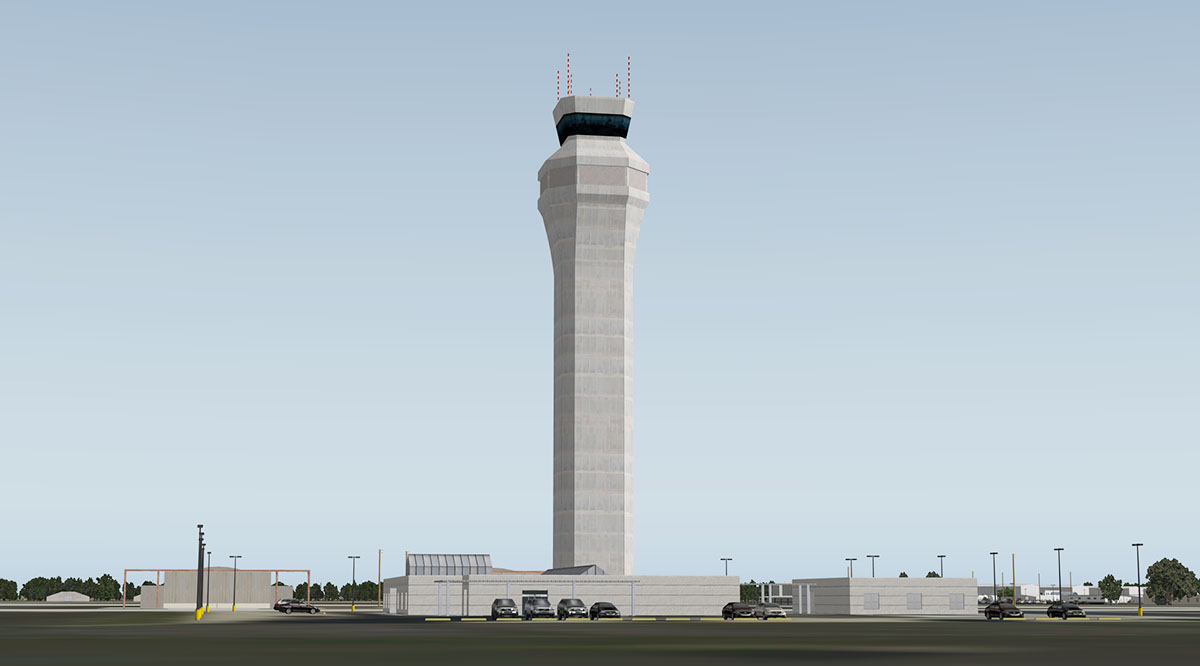
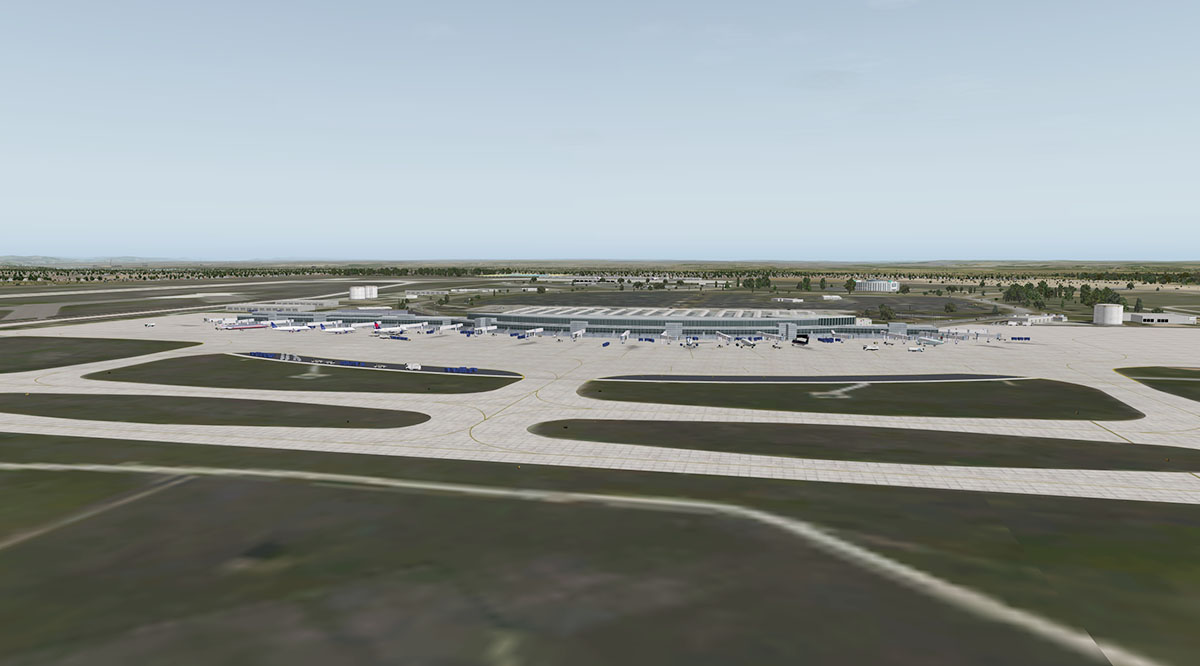
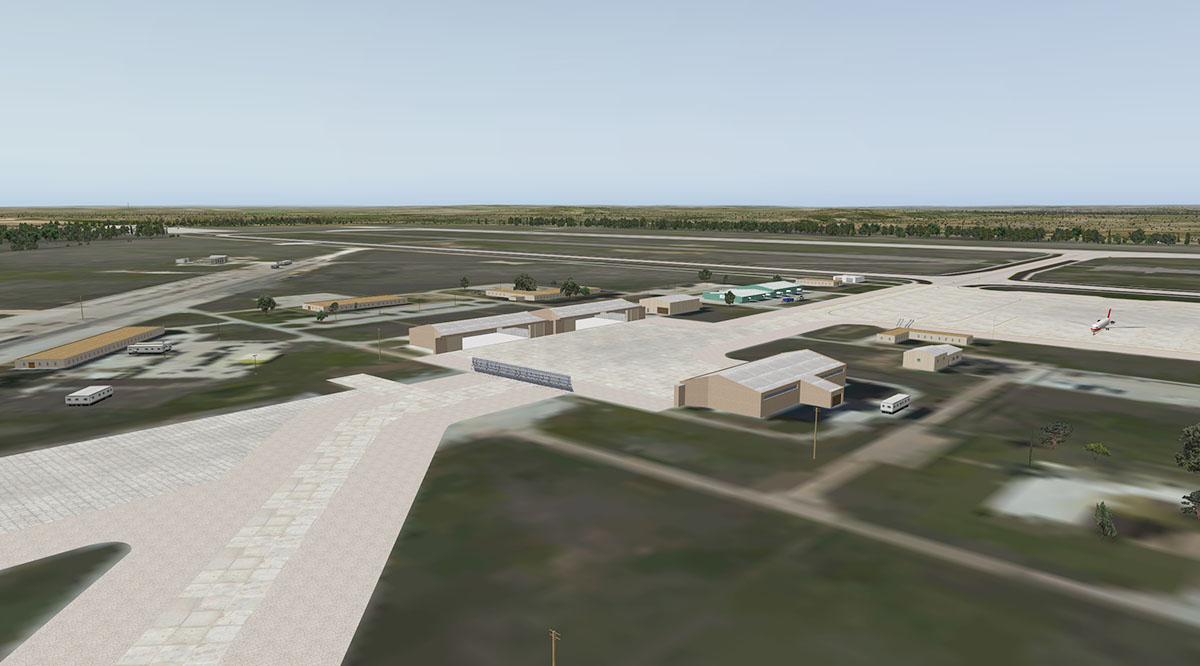
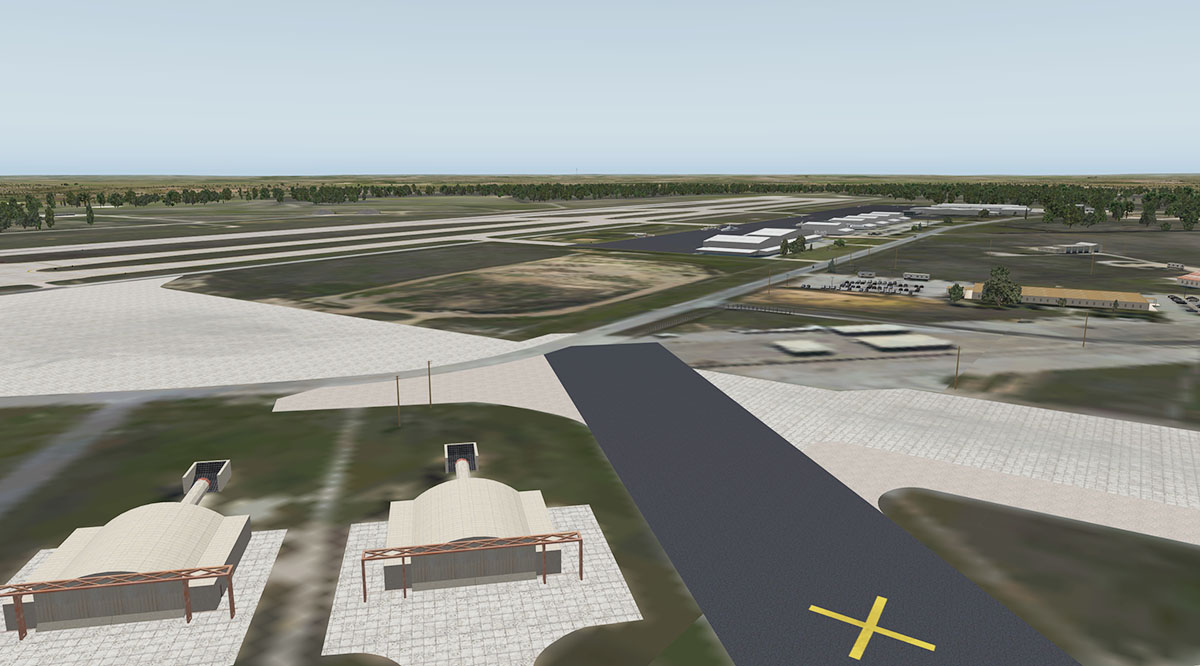
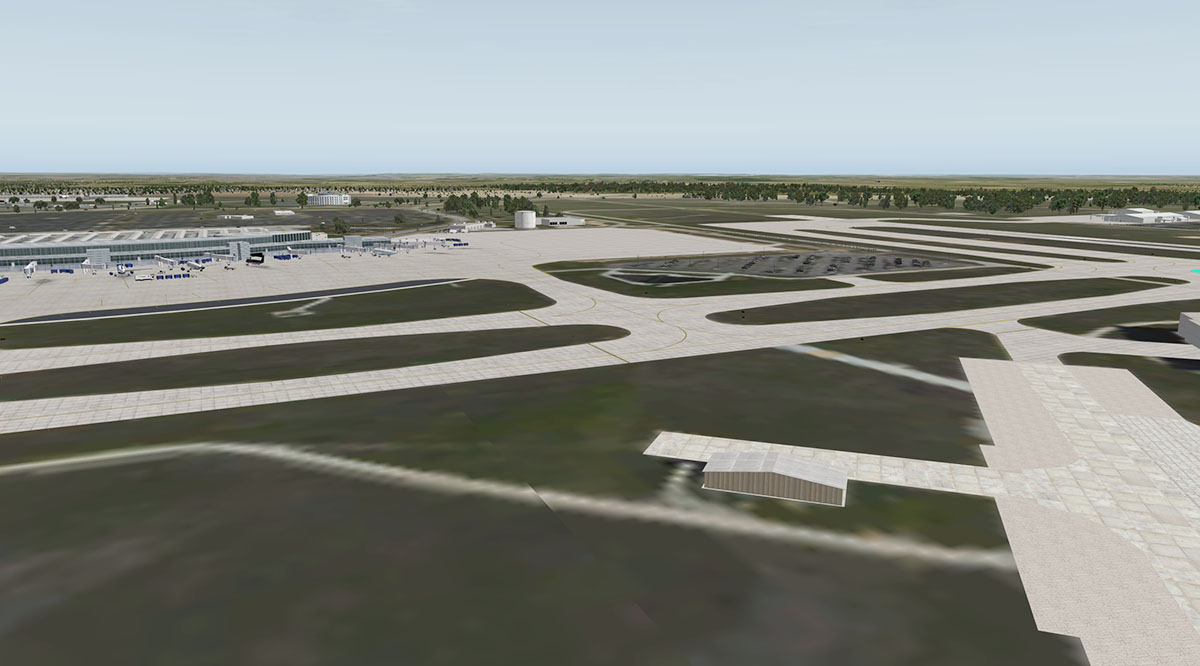
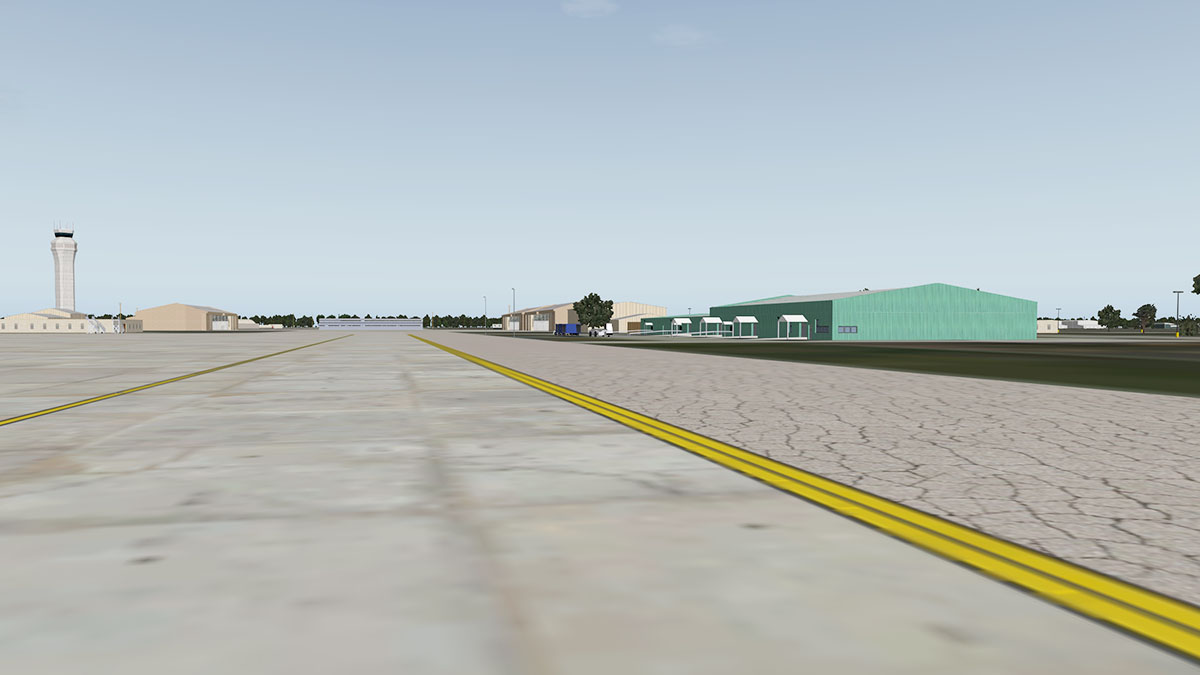
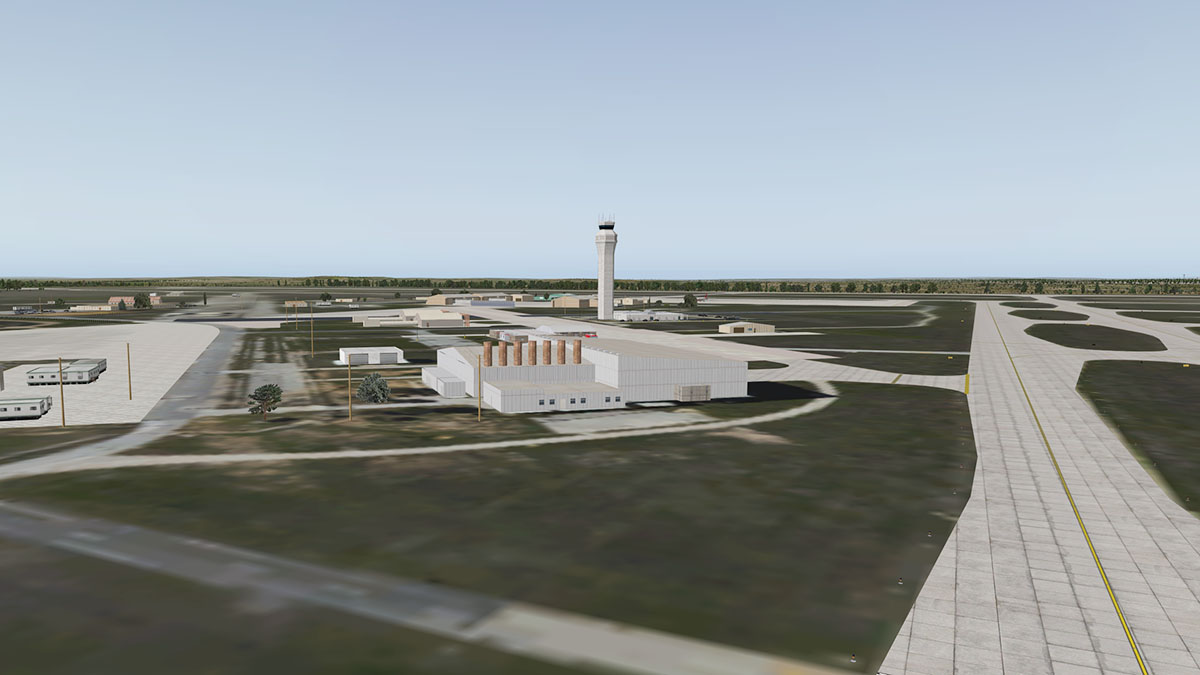
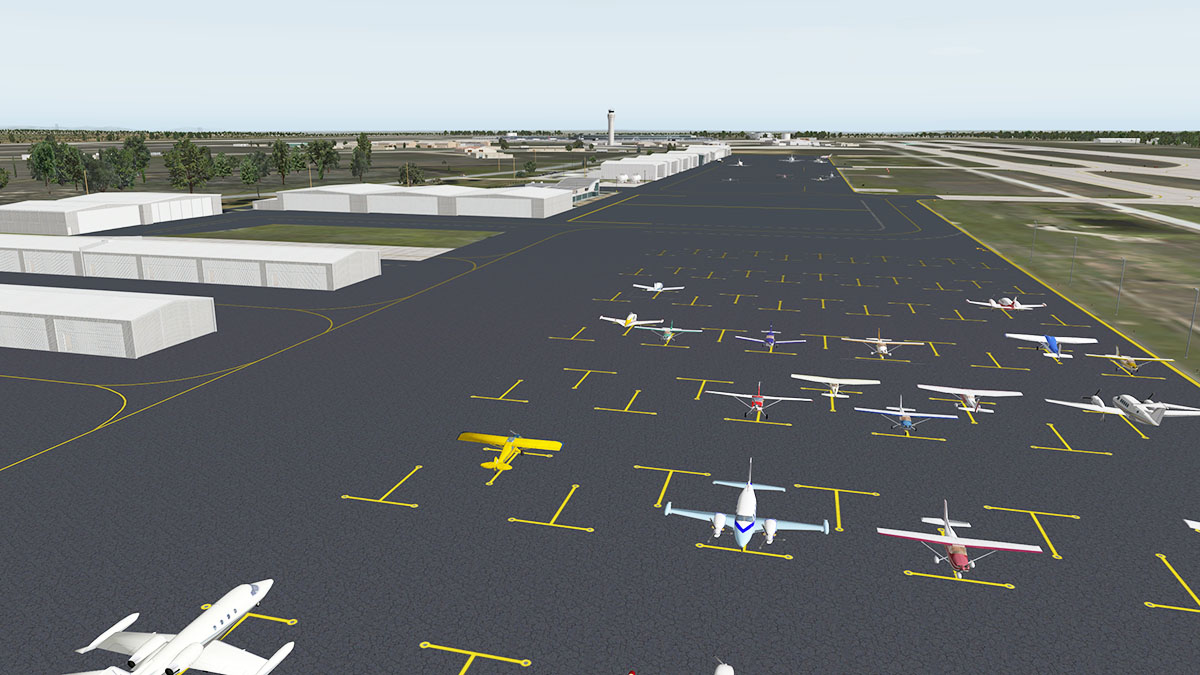
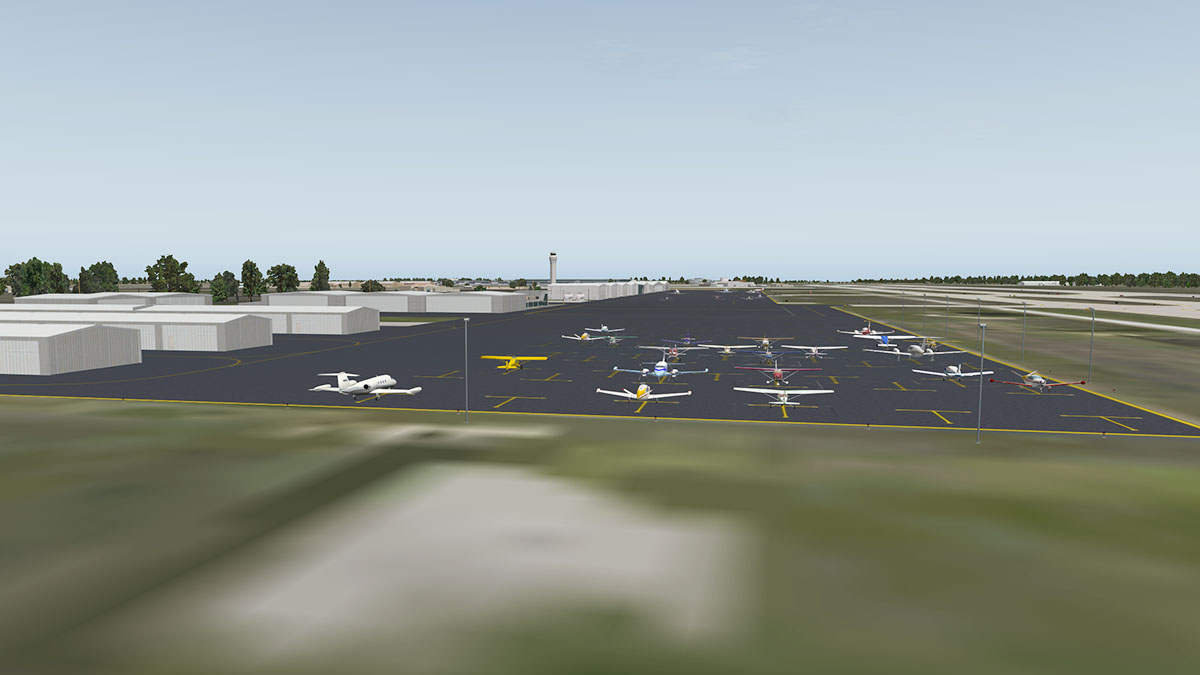
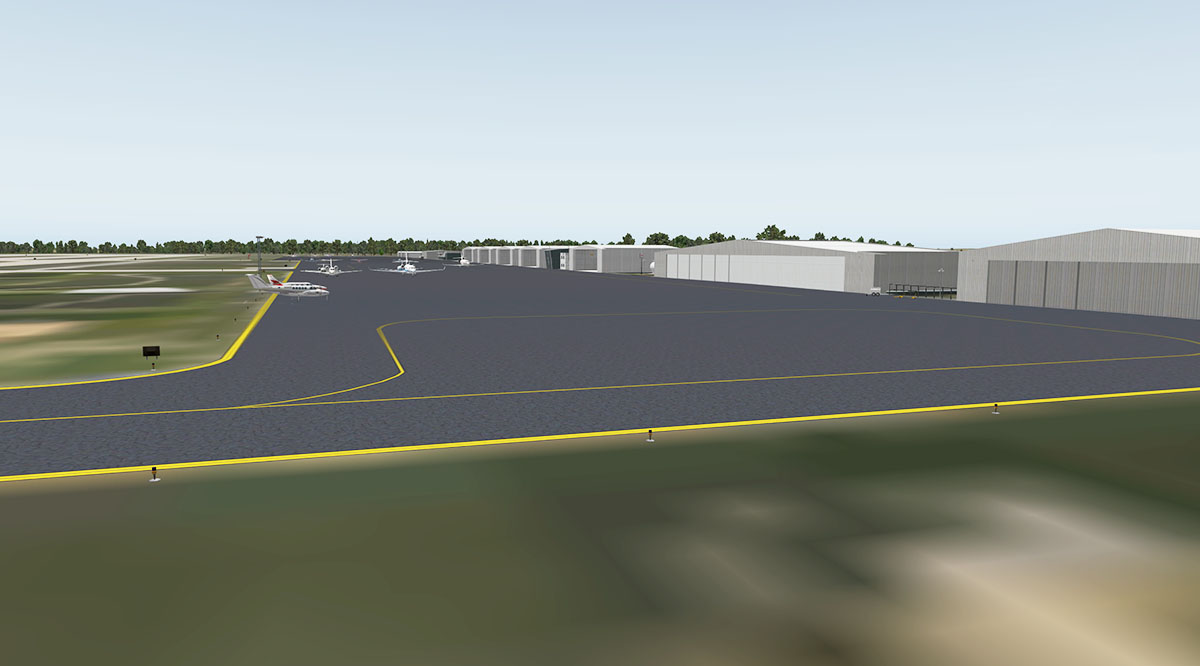
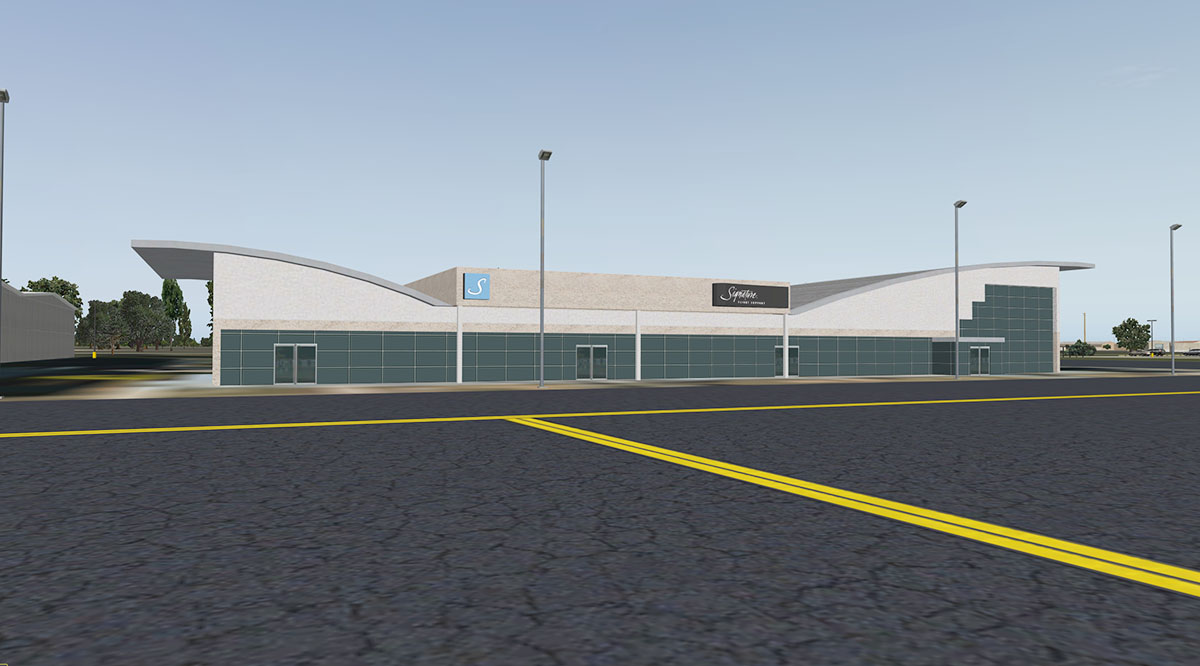
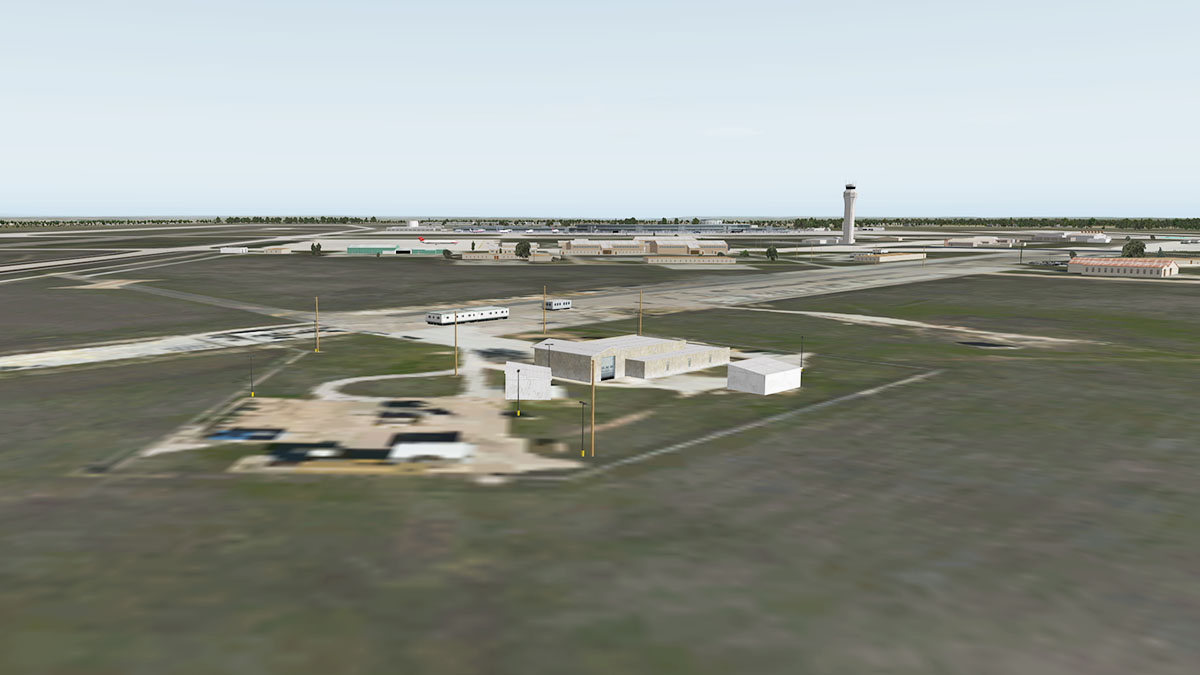
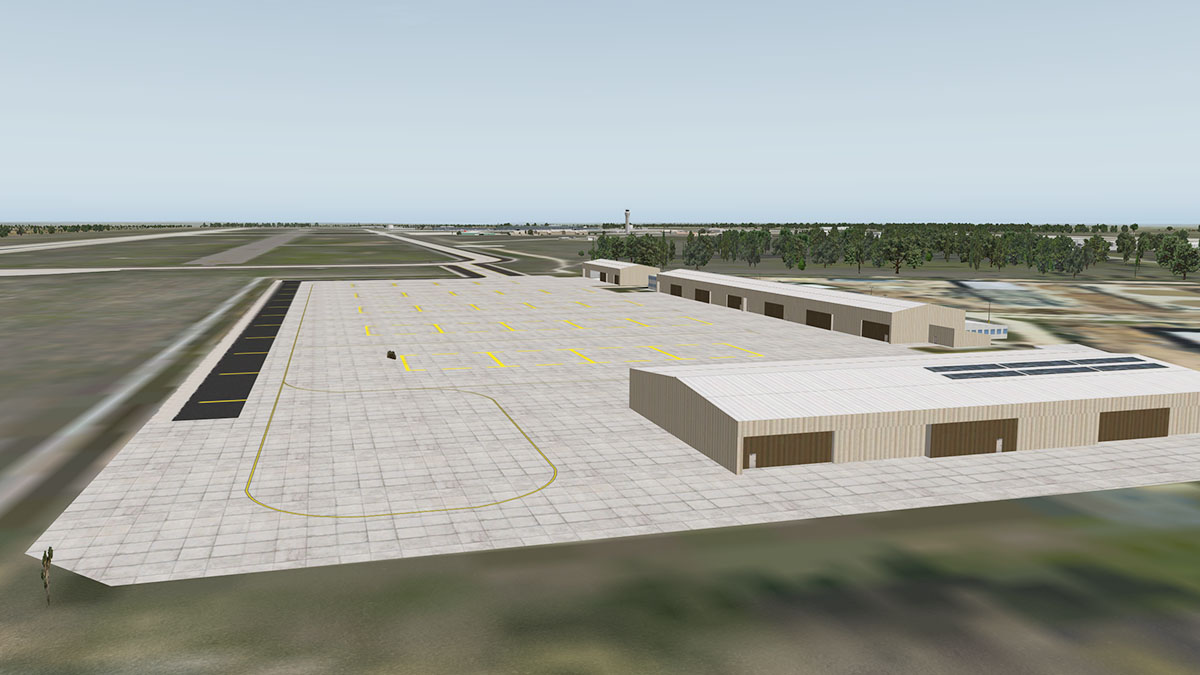
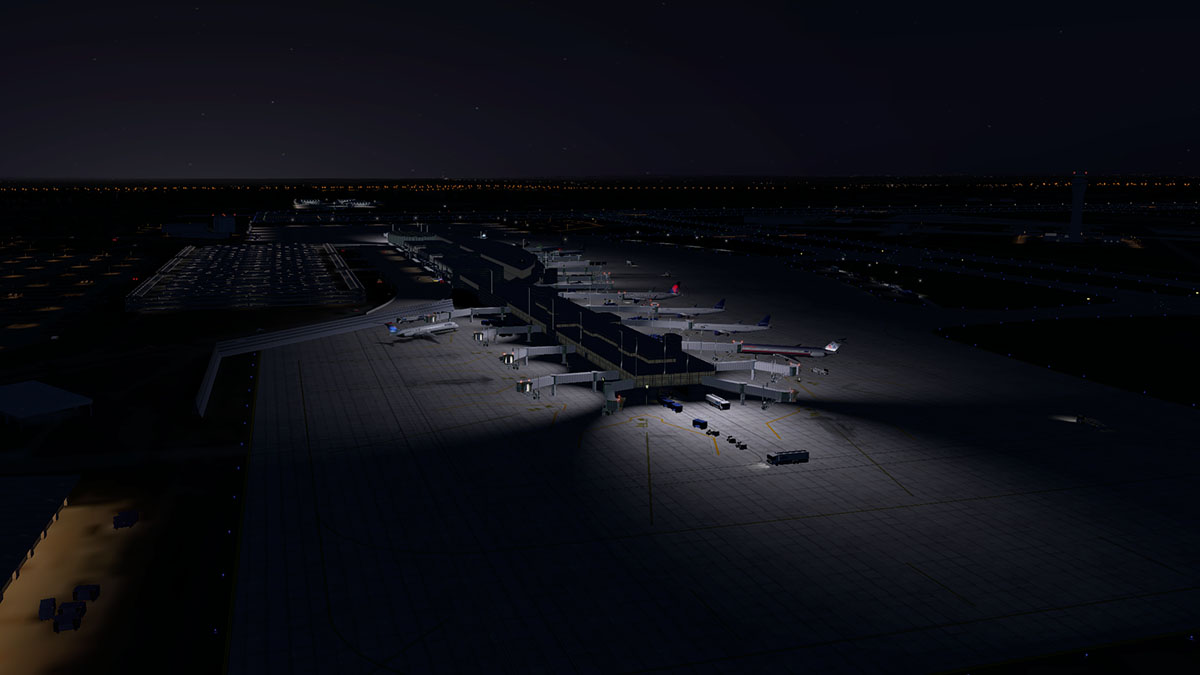
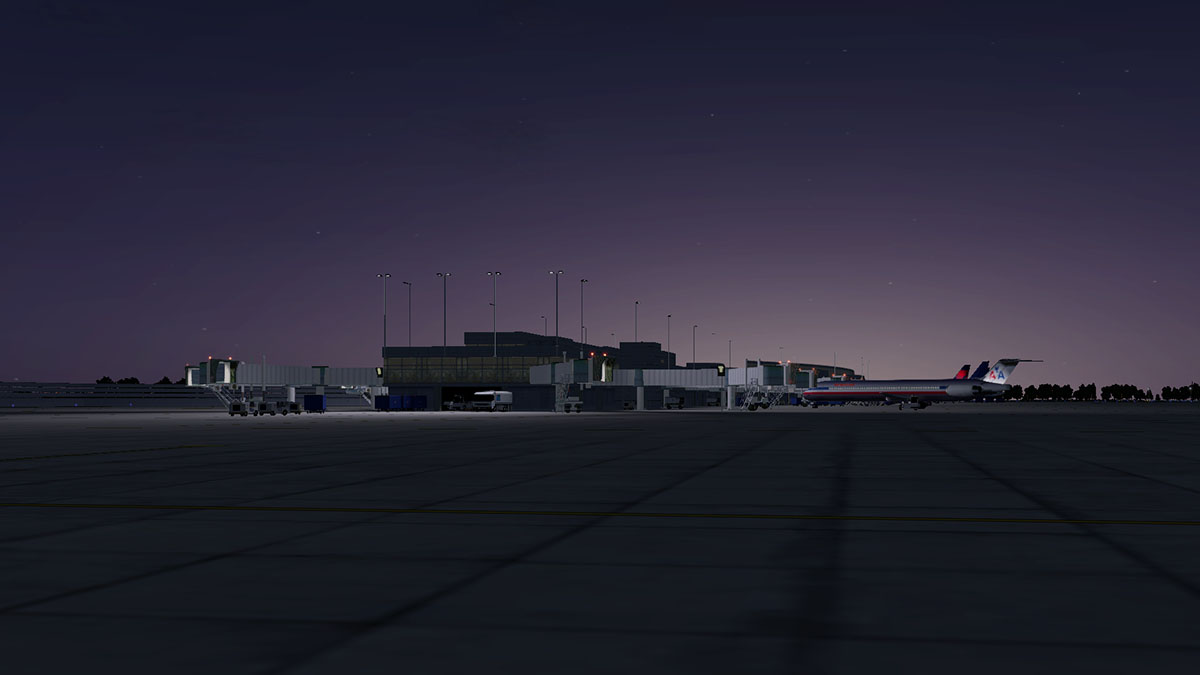
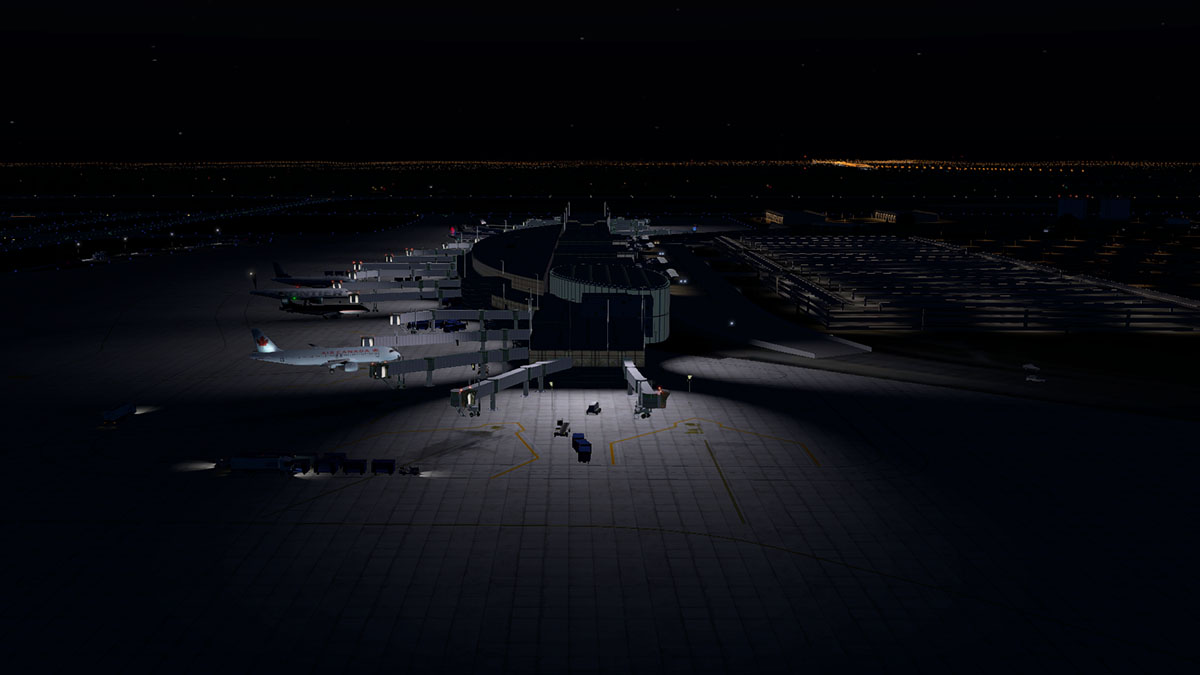
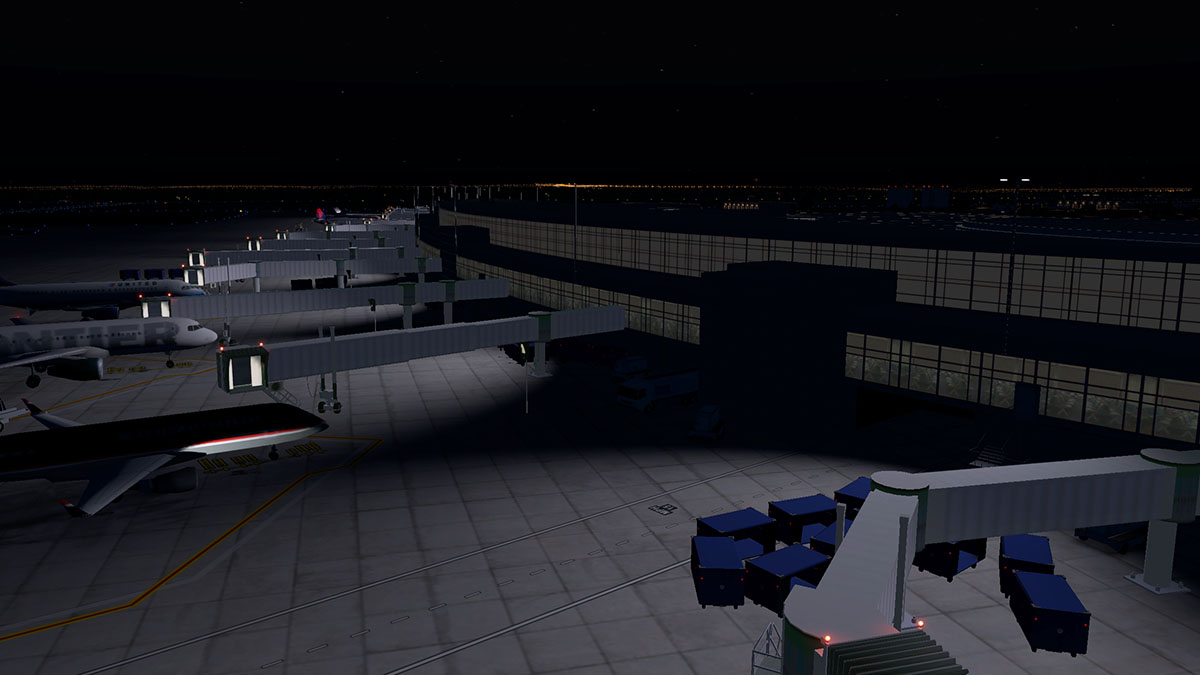
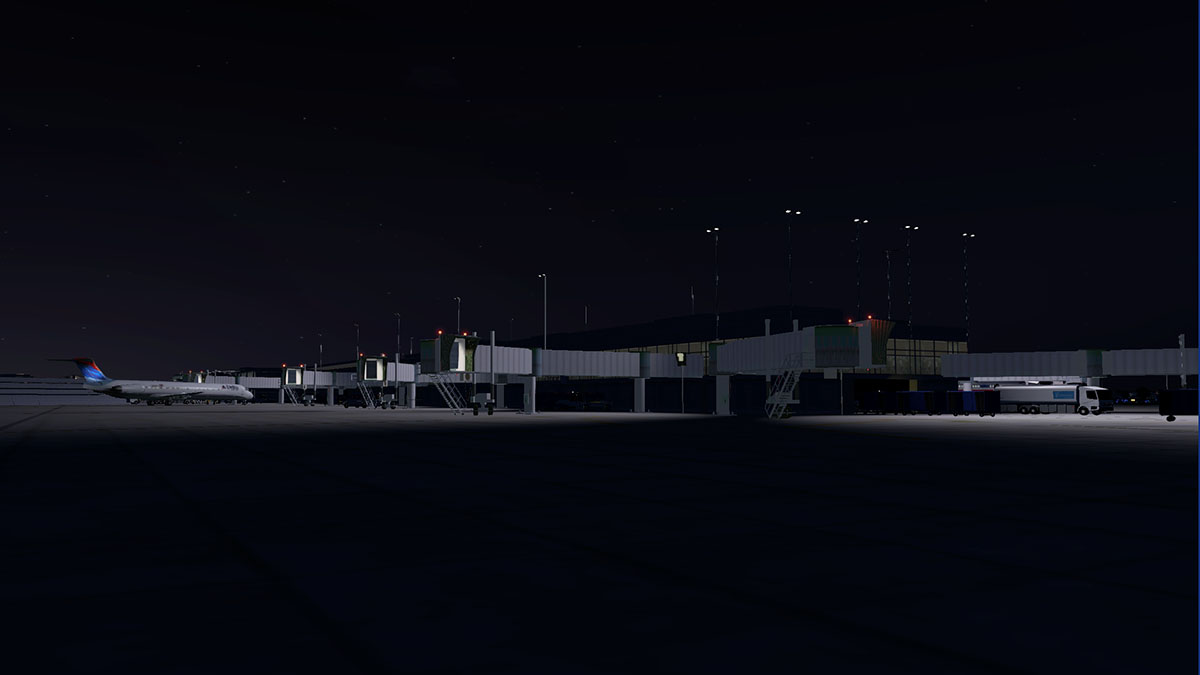
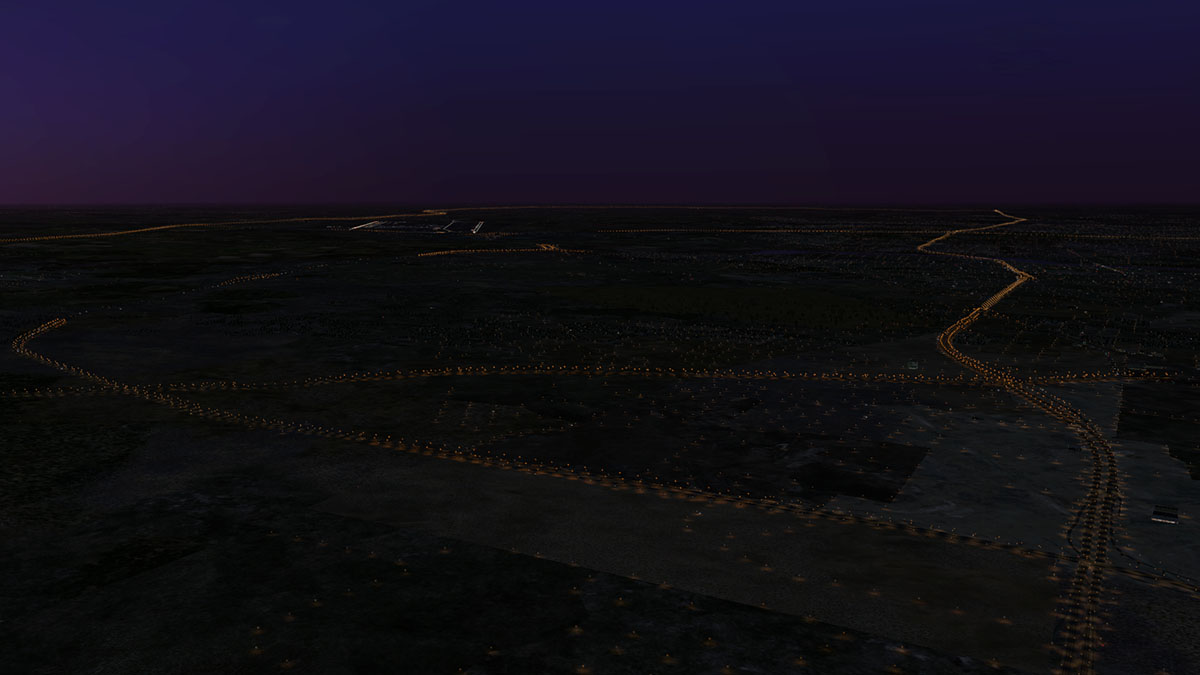
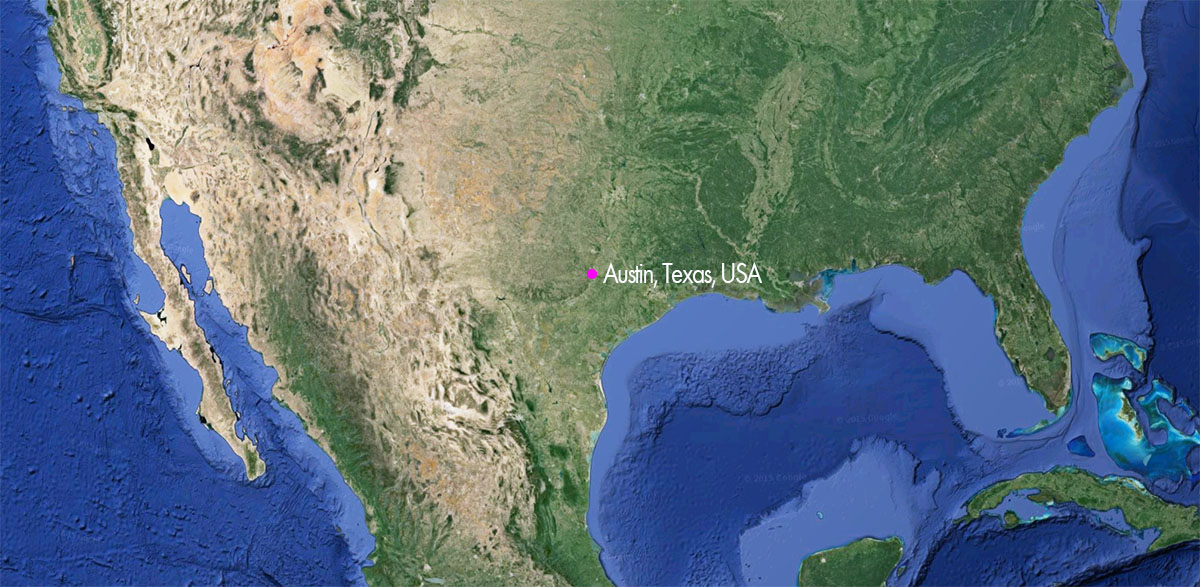
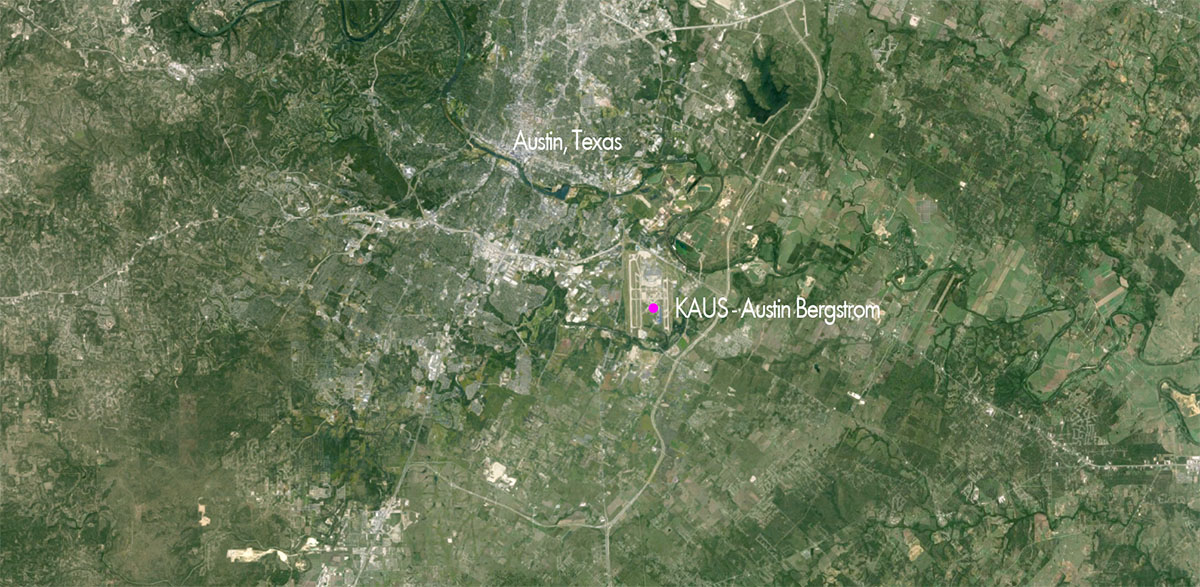
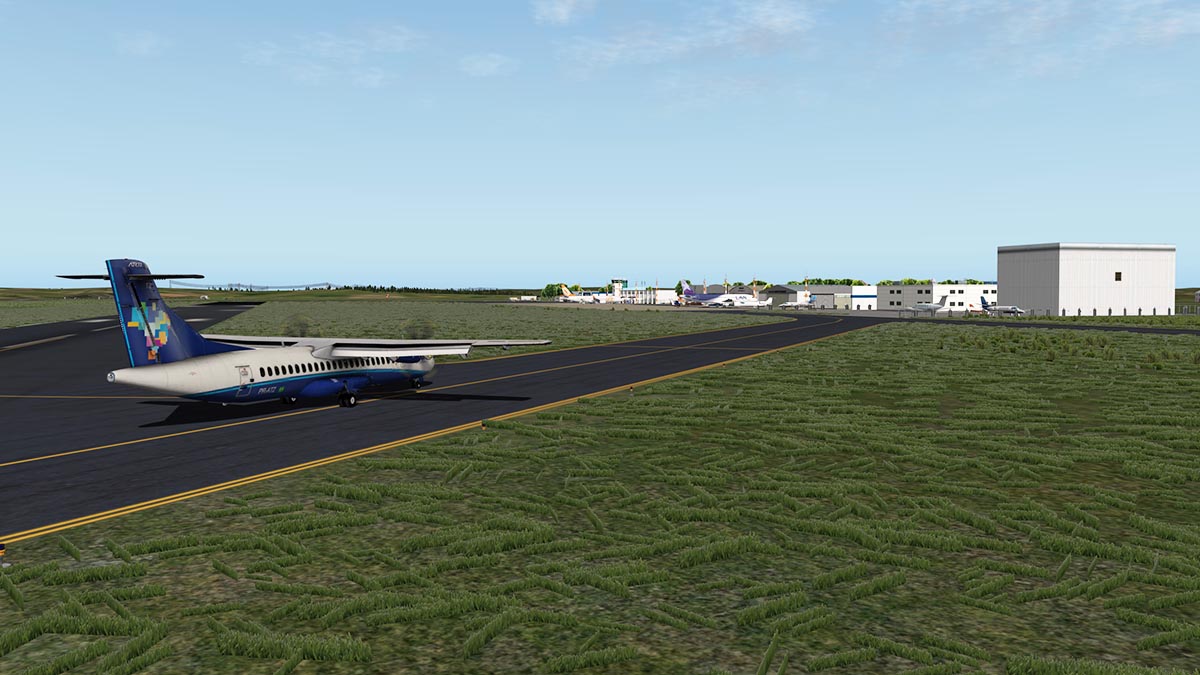
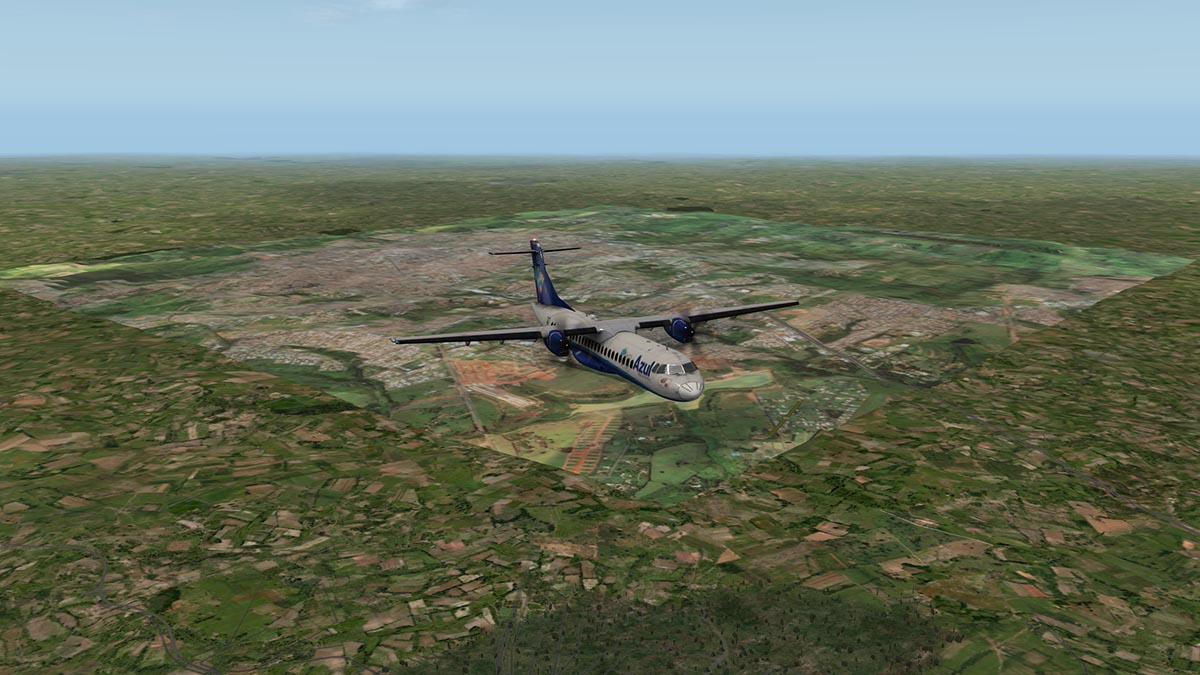
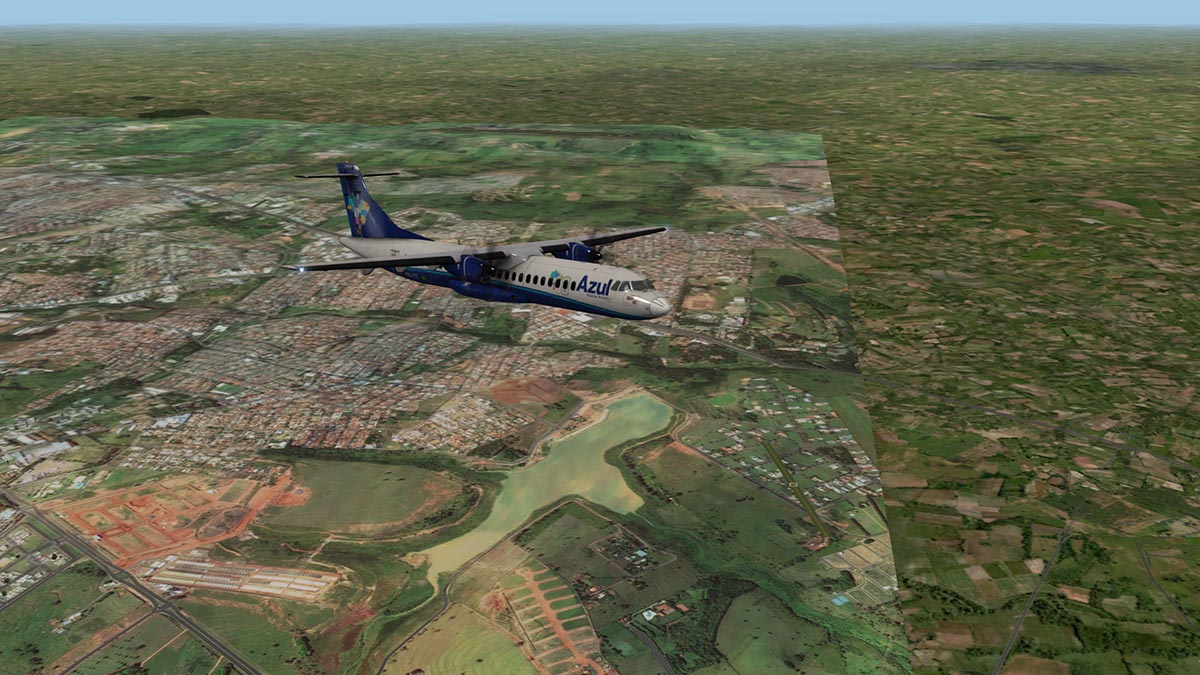
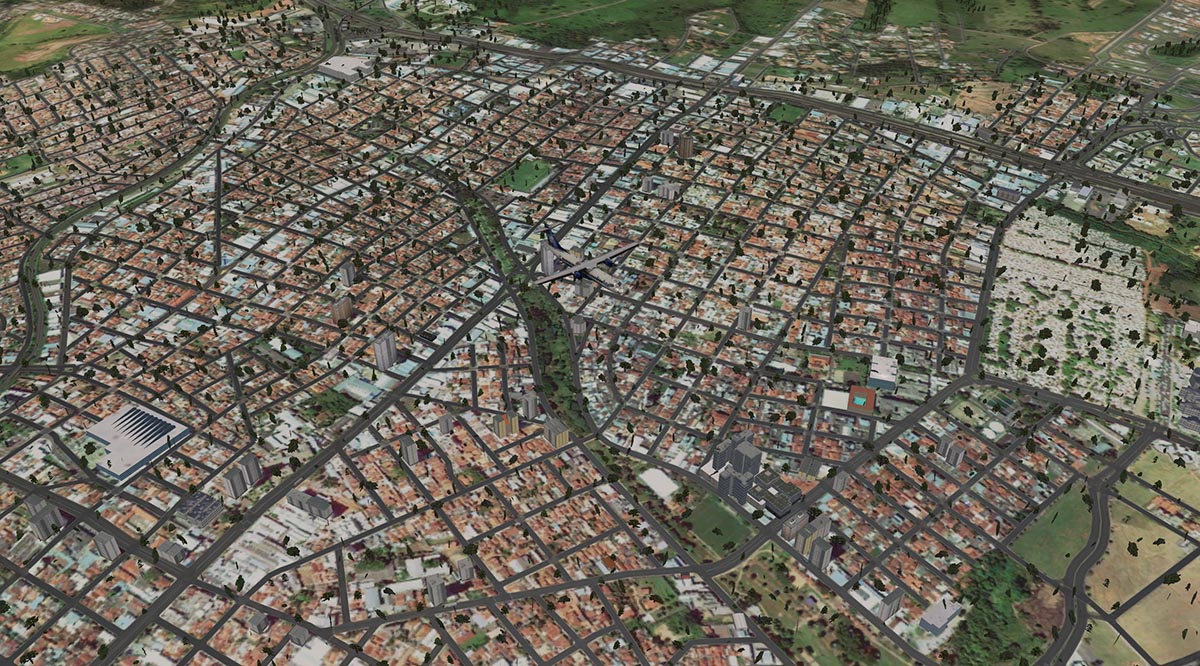
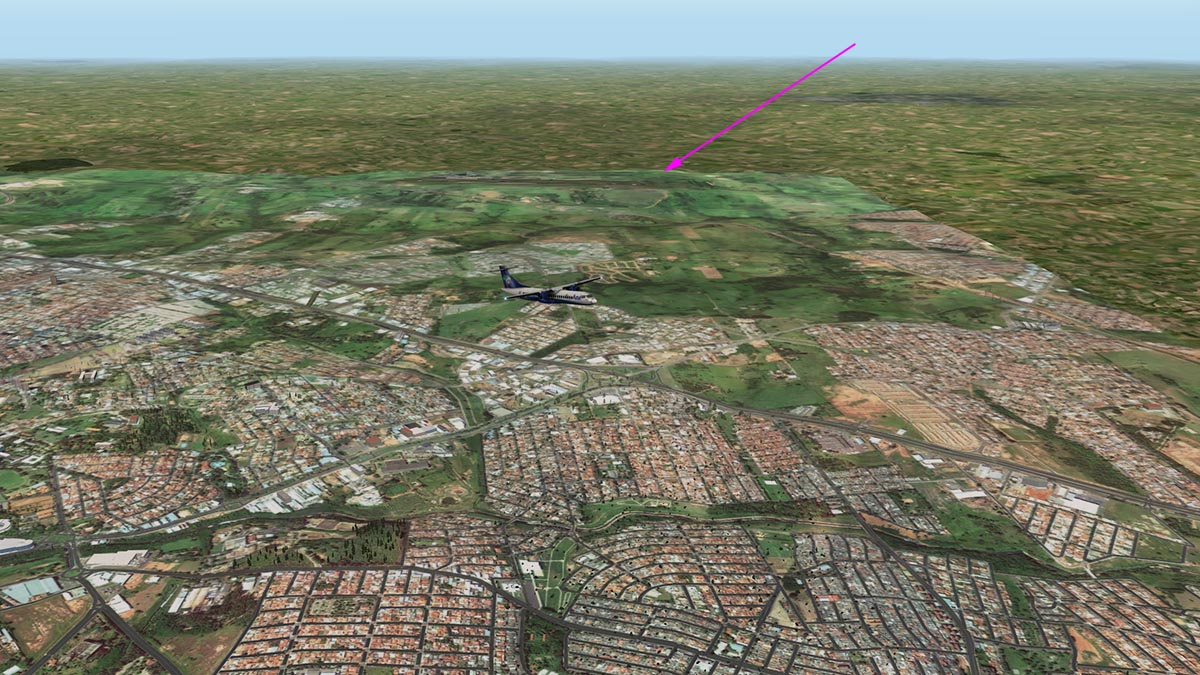
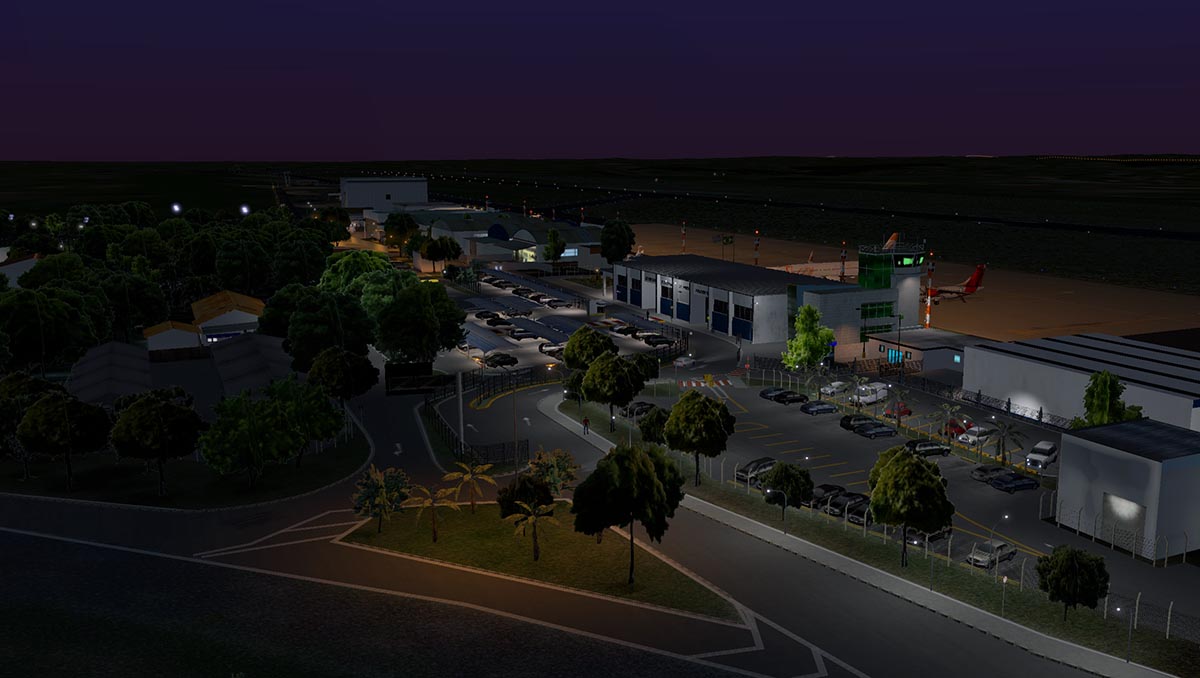
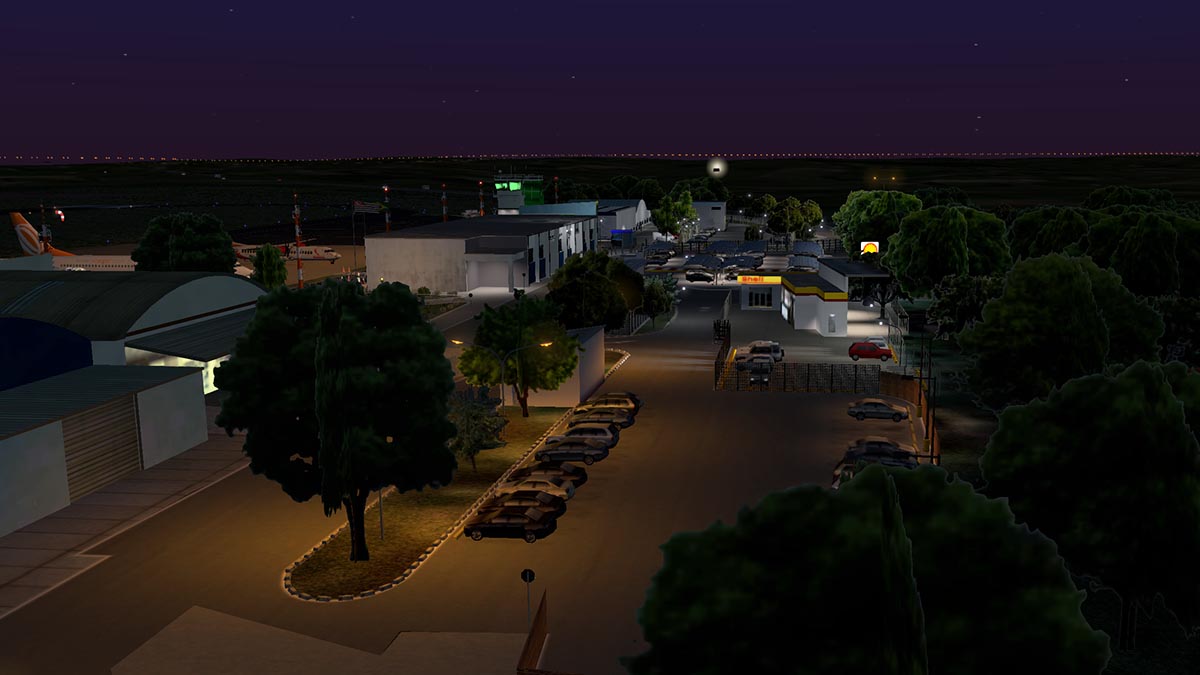
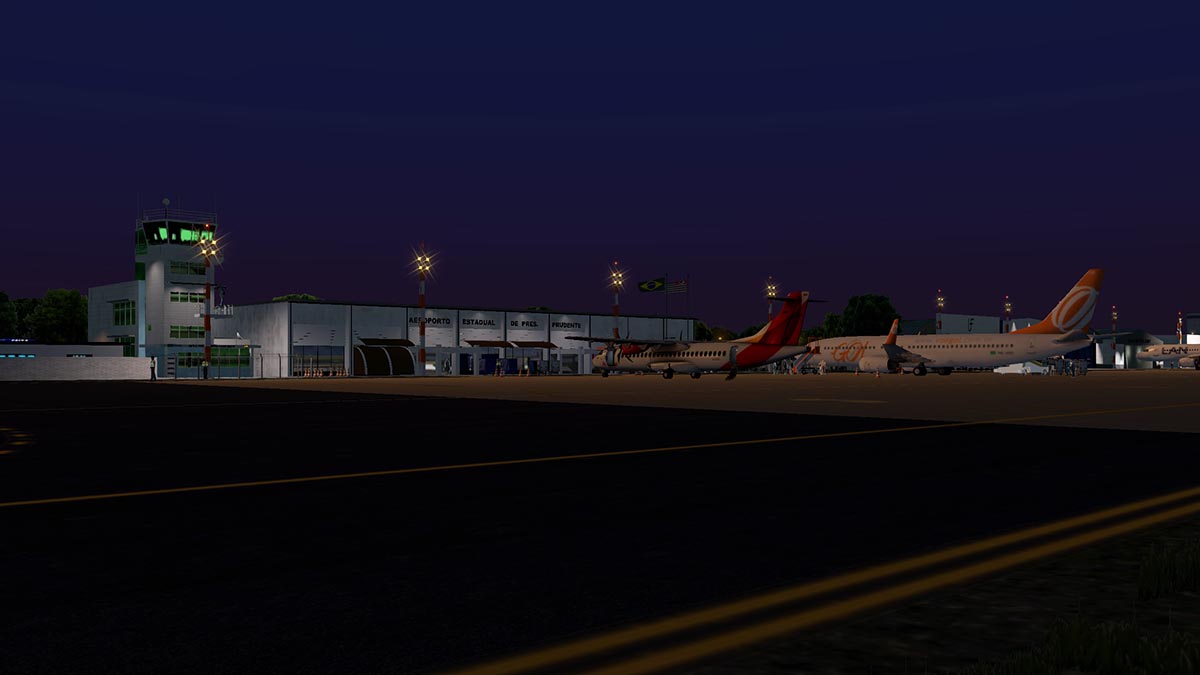
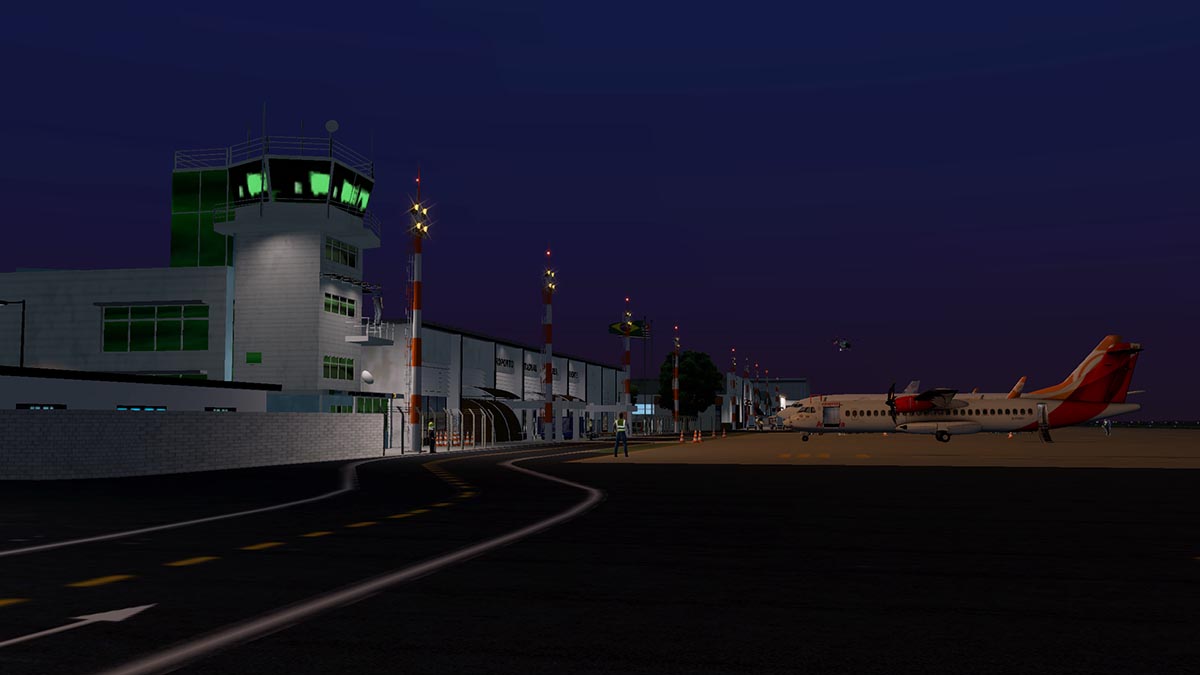
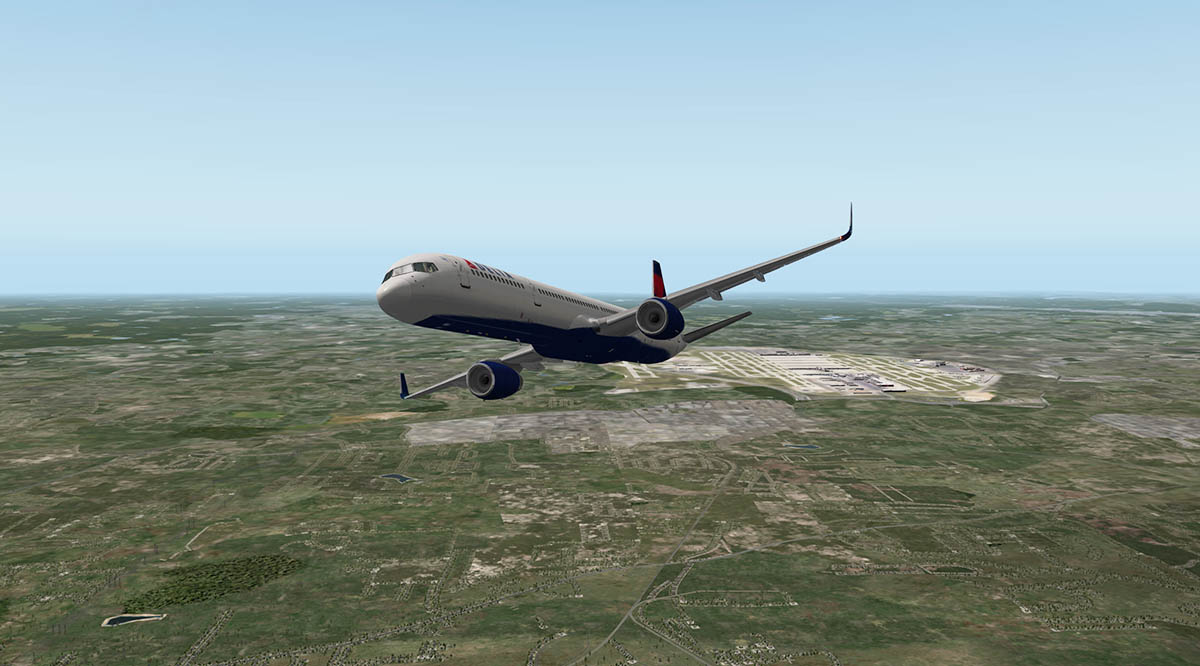
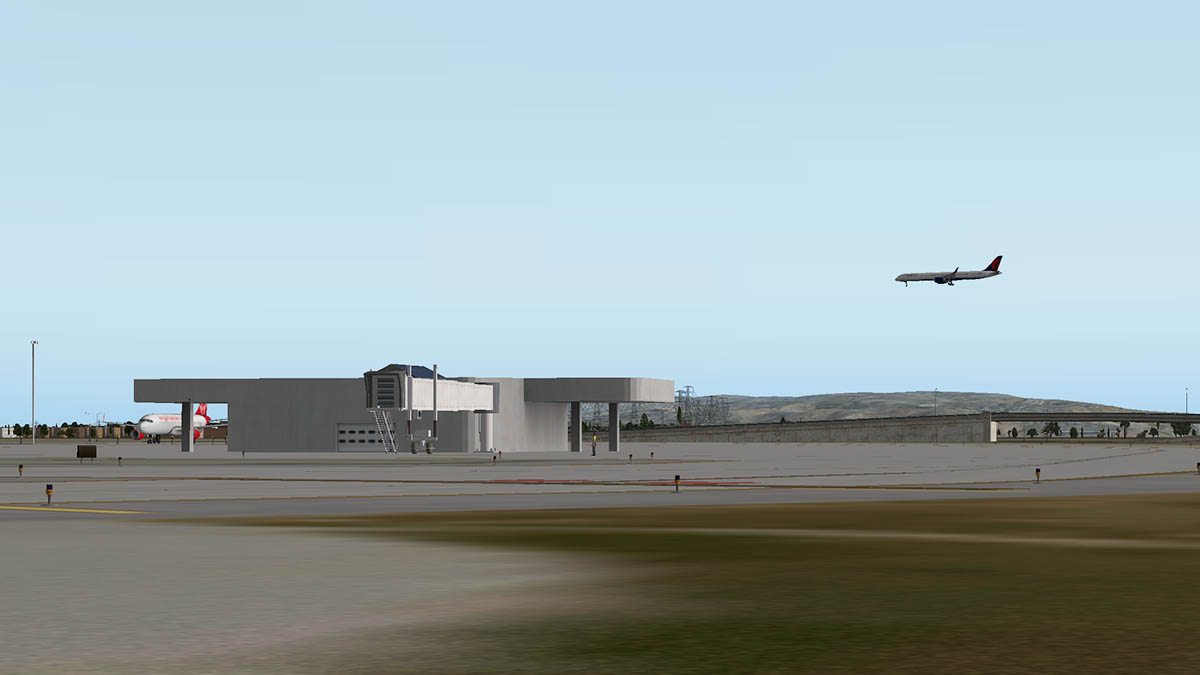
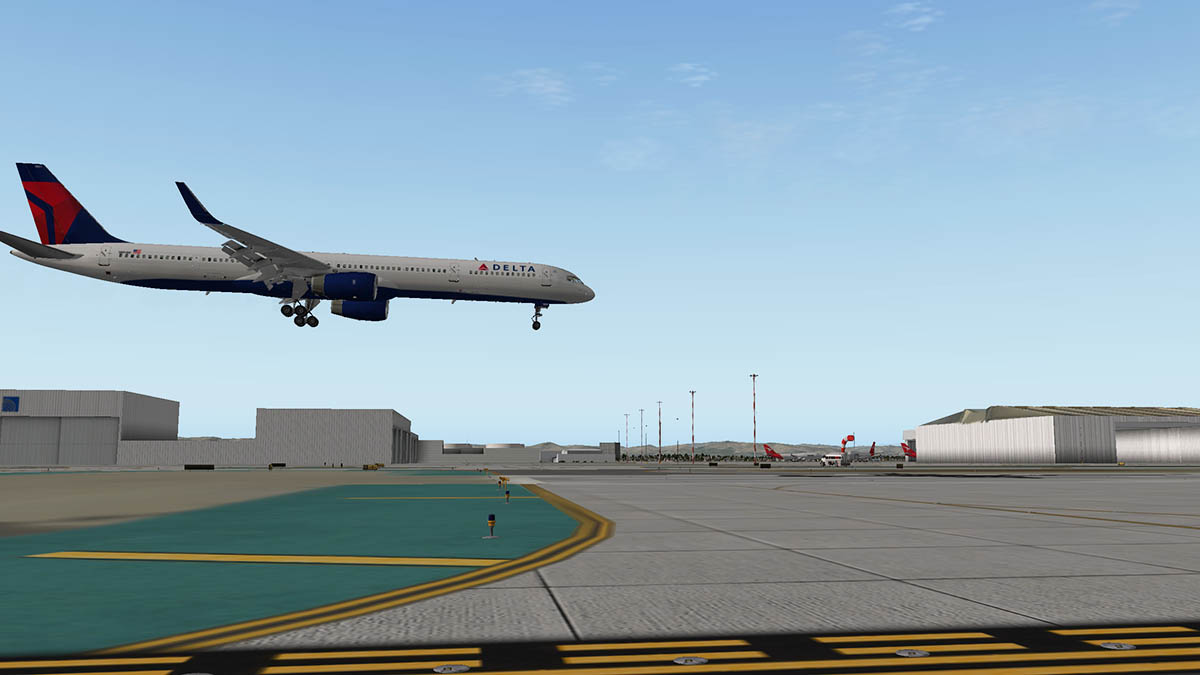
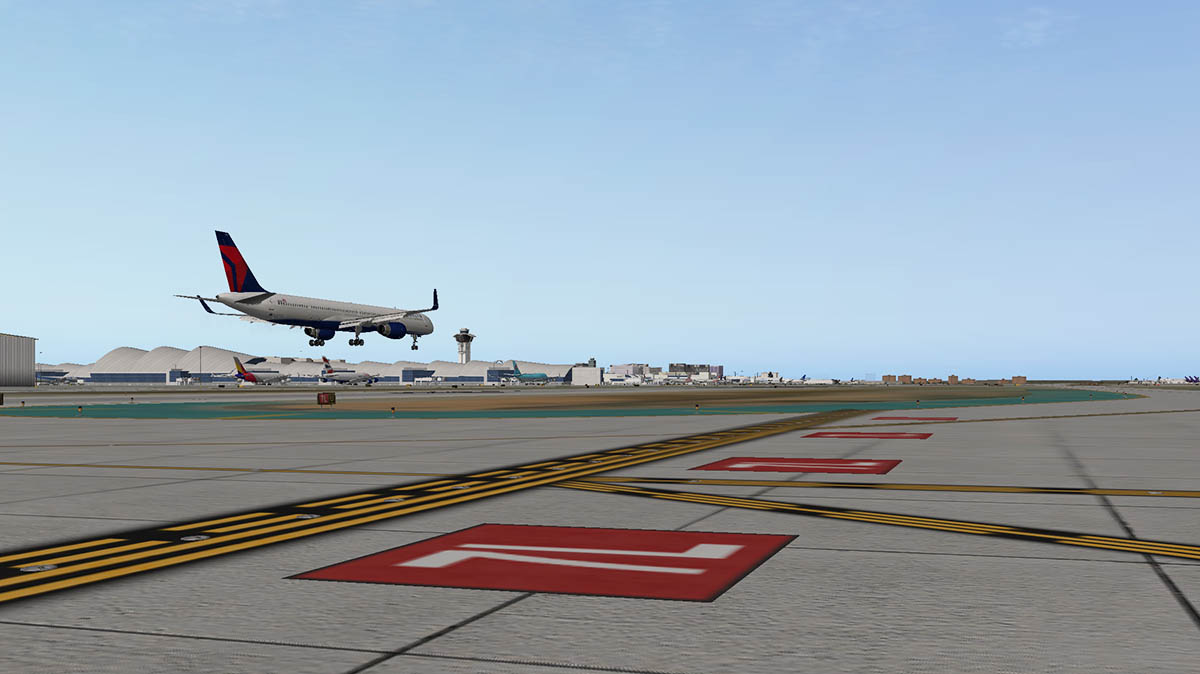
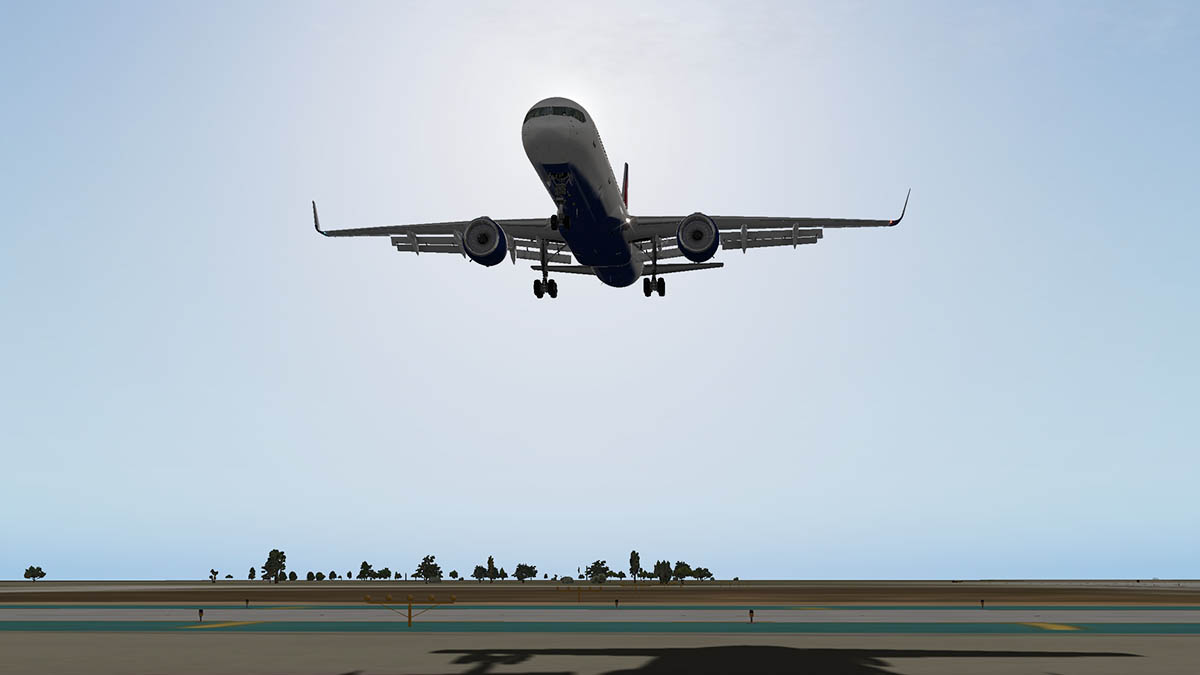
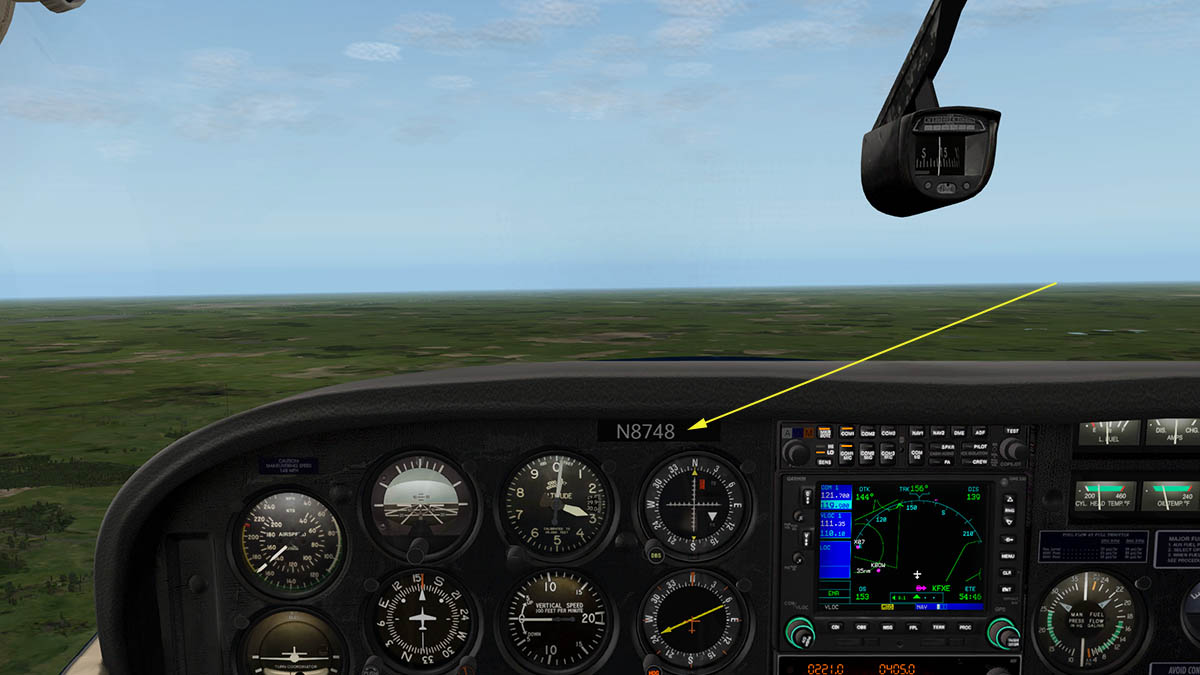
Airport Review : KAUS Austin-Bergstrom International, TX by Airportech When you consider only a few years ago on how many really good destination scenery choices you had in X-Plane, you could really easily count them all on two hands, certainly in the United States. Scenery was without doubt the weakness in the simulator. But that empty feeling is now starting to dissolve away. What was a few great destinations are now becoming a flood of good places to use not only your continental routes, but also your state to state and regional areas. Texas is one region in particular, once there was really nothing here, but now there is a very good Dallas-Fort Worth KDFW and Houston KHIA and now from a new scenery designer called Airportech is KAUS Austin-Bergstrom. First Impressions My route today to Austin, Texas is from KLAX - Los Angeles to KAUS - Austin-Bergstrom and it is around 3 hours (2h 55m) depending on the taxi holds at LAX. Distance is 1078 nautical miles. My equipment is the JARDesign A320neo in Delta colours. Departure was via RWY25R and the SID was via Ocean (OCN). Overall it was a clean beautiful day, but those high winds (22knts) around Tuscan even at FL355 was making the flight a bit nervy for the passengers, then as soon as the winds had come they suddenly smoothed out to 9knts once we passed over Texas border. I found setting up the A320's FMC was a bit of a struggle, mostly in finding a decent STAR to go into KAUS via runway 35L, I finally created my own arrival via STV (Stonewall), RU (Garrys) and JOREN to BS (Creed) on approach. Airportech do (thankfully) supply a full set of approach (RNAV/ILS), arrival and departure charts with a layout of the airport. But even with them you still have to set up those final approach vectors to the runway. The area around Austin arriving from the south is quite flat, and the airport blends in very well to the scenery surrounding it. There are two main runways in 17L/35R 9000ft and 17R/35L at 12248ft both are concrete. Your first impression of Austin-Bergstrom is of space, and lots of it. It feels very large, spread out (4,242 acres (1,717 ha) and almost empty with a lot of areas of just ramps. The reason is not that the scenery is not completed or the areas have not been filled. It is because the actual airport is based on an old Airforce Base... Bergstrom Air Force Base (1942–1993) or earlier Del Valle Army Air Base. Austin's original municipal airport, Robert Mueller Municipal Airport, had become overcrowded and noise complaints increased from residents of the lower-income housing subdivisions built in the flight path. The current commercial Austin-Bergstrom opened to the public on May 23, 1999. It is named after Captain John August Earl Bergstrom, an officer who served for the 19th Bombardment Group. Runway 17R/35L, to the west of the terminal, is the original runway that was built and used by the Air Force. The 12,248-foot-long (3,733 m) runway was reconditioned when Austin–Bergstrom was built. The 23-inch-deep (580 mm) concrete runway is dedicated to former President Lyndon B. Johnson. Runway 17L/35R is a new 9,000 foot (2,700 m) runway on the east side of the terminal and parallel with runway 17R/35L. This runway is dedicated to former Congressman J. J. "Jake" Pickle. This runway contains a Category IIIB instrument landing system. The point is they both look very new, of which to a point they are. So landing and taxiing at KAUS it feels very modern (compared to most American Airfields) with not only clean runways but heavily marked approaches and taxiway markings, of which are well presented here. The Airport is located only 5 miles (8 km) southeast of Downtown Austin, and you can see the city just on the horizon. Taxi to the terminal area is a long way even if the terminal is only situated about slightly north mid-field. The view from the cockpit in taxi, is very good. There is a lot of detail (considering the very size of the airports area), from the ground perspective it was very good. looking over the carparks were full and I liked the fuel storage tanks that looked very realistic. Into the single (large) terminal area and you had a row of gates to chose from. There are 25 gates, two of which can be used for international arrivals (Mexico, Canada and the UK) in gates 2 & 3. The terminal is under going a new seven gate expansion on the east side of the terminal where the international gates are currently located to add in more international gates... Gates 21 & 24 can also be used as International gates. First thing you notice is the huge amount of animated traffic in trucks buses and baggage carts all going about their business. In fact the whole airport has a lot of animations in traffic, and most of it spills around the terminal and carpark areas. Static aircraft are well spread around, Gate 2 is left open for any international aircraft. You will find if you park a larger aircraft (A330/B777) at the other gates it will stick out quite significantly and stop the animated traffic? Static aircraft are an option and the package can be downloaded from Airportech's site. All gates have airbridge (autogate) animations and they work very well. The gates are well furnished, but the trucks and various ramp items are a little too clean and 3d like. Ramp markings and gate directions are excellent. Airport Overview 17L/35R 9,000 (2,743m) Concrete 17R/35L 12,248 (3,733m) Concrete H1 60 18 Concrete H2 60 18 Concrete H3 50 15 Concrete Elevation AMSL 542 ft / 165 m (google) The scenery does use underlying photo (Ortho) textures, but you have to be close on the ground level to notice that (they get a little buzzy there) otherwise the photo layer is very well inserted into the scenery, there are no sharp boundaries and the colour matching is excellent. A bit of bright colours is created by a parking area with sails as covers down on the north west by the cargo area. But as a layout the airport is excellent from the air and on the ground. Terminal (Barbara Jordan) The terminal was designed by the Austin firm of Page Southerland Page and has a live music stage on which local bands perform in keeping with the spirit of Austin's proclamation as "The Live Music Capital of the World". This is very modern clean terminal design, it looks like it is a semi-circle but in reality it is long straight terminal building. but the detailing is very good and the architectural construction is well reproduced but slightly bland in that modern way. Gate areas are first rate, and you now note how far we are coming along with X-Plane scenery as now these sort of more complex ramp areas are full and well filled to recreate the right environment and visual keys to make scenery authentic. Finally scenery developers are filling out carparks! There was nothing worse than flat photos of carpark areas? I hated that. But now we have full areas of cars and in KAUS's situation in that there is a carpark by taxiway G and to have that correct is again a great viewpoint on arrival. But the significant point is that the views across airports are now substantially more effective because of the realism of parked areas of cars from the ground and even from the air on arrival... so "viva the revolution!". North and Cargo The entrance to Austin-Bergstrom Airport is from the north and this is dominated by the Hilton Hotel. The Hilton hotel has been well reproduced here. It may look like a green field new construction, but actually it is the old airbase Twelfth Air Force Headquarters. Cargo is on the north west side of the airport and is well represented. The usual freight suspects all run from KAUS including FedEx (Memphis), UPS and DHL (Houston) with FedEx Express local. The Cargo area is well documented and highly usable. I have a personal investment in this area as it one of the destinations of the F1 - Formula One World Racing Championship races noted as the USGP. And the Austin round was a big hole in my flyaway calendar... not any more. Control Tower and South Terminal The original AirForce Base control tower was demolished and a new one for the commercial operations at the airport was completed a full year (1998) before the passenger section of the airport was opened and didn't become operational to passenger traffic till January 1999, it is 69.19m high. Design and ground buildings are very good and well represented. Airfield view is excellent and every point and runways on the airport can be seen and focused on. There a few of the old airbase buildings still left (most were demolished) and those are mostly hangers, and the buildings with the area just below the tower which was the old airport terminal area known as South Terminal Austin. ... now it is mostly vacant or used as an aircraft parking area (at this point in time it is just empty and noted as a maintenance area). South Terminal Austin was originally approved by the Austin City Council in order to accommodate the arrival of Mexican-based, low-cost airline, VivaAerobus, which launched operations on May 1, 2008. This terminal had three gates without airbridges—passengers walked to the aircraft at parking stands and boarded by stairs. The South Terminal was however closed on June 1, 2009, after VivaAerobus terminated service to the US due to an epidemic of swine flu in Mexico that resulted in high cancellation and no-show rates. General Aviation Area Situated to the south-east is the general Aviation area (GA). The large aircraft parking ramp has just been refurbished and relaid with fresh (black) surface and newly relined. Plenty of parking and refueling options here and the area is overlooked by a Signature franchise. The building is very well recreated. Hangars throughout the scenery have animations that open and close the doors. There are many smaller groups of buildings and areas that have been filled in, too many here to be noted individually and they all add up to the correct points of view of the airport. Most are storage areas, but there is one good parking ramp noted as "Mil" at the approach of Runway 35L. Nightlighting Observers note Austin-Bergstrom Airport as quite dark except in the terminal/cargo ramp areas, and so it is here. Lighting around the terminal is bright and modern. There is a lot of spot lighting, but overall the lighting is not overwhelming. The terminal windows are quite dull and Airportech note they are heavily tinted. Runway lighting is fine and so is the taxiway and its signage lighting, but the green guiding lights don't guide you on to the runway itself. From above in the air at night the airport looks very realistic and realism is what it all about. There is a lot of traffic and major highways surrounding the KAUS airport so have your traffic and roads set high to get the best traffic effect on all approaches. Services No doubt the national carriers dominate KAUS, with at this point mostly just British Airways being the main non-North American international carrier. Within that national carrier framework you have a lot of choice, but for me it would be a West Coast to East Coast stopover with either Atlanta or Florida as my ongoing destinations or vice versa. Air Canada Express - Toronto–Pearson (begins May 18, 2015) Alaska Airlines - Seattle/Tacoma Allegiant Air - Las Vegas, Orlando/Sanford - Seasonal: Cincinnati (begins June 4, 2015) American Airlines Chicago–O'Hare, Dallas/Fort Worth, Los Angeles, Miami, New York–JFK American Eagle Chicago-O'Hare (begins May 7, 2015) British Airways London–Heathrow Branson Air Express operated by Buzz Airways - Branson (MO) (begins May 8, 2015) Delta Air Lines - Atlanta, Minneapolis/St. Paul, New York–JFK - Seasonal: Detroit, Salt Lake City Delta Connection - Detroit, Los Angeles, Minneapolis/St. Paul, Salt Lake City - Seasonal: Orlando Frontier Airlines - Atlanta, Chicago–O'Hare, Denver, Las Vegas (begins April 30, 2015) JetBlue Airways - Boston, Fort Lauderdale, Long Beach, New York–JFK, Orlando Southwest Airlines - Atlanta, Baltimore, Chicago–Midway, Dallas–Love, Denver, El Paso, Fort Lauderdale, Harlingen, Houston–Hobby, Las Vegas, Los Angeles, Lubbock, Nashville, Newark, New Orleans, Oakland, Orange County (CA) (begins June 25, 2015), Orlando, Phoenix, San Diego, San Jose (CA), St. Louis (begins June 25, 2015), Tampa, Washington–National - Seasonal: Cancún, Portland (OR) (begins June 22, 2015), San José del Cabo Texas Sky Airways operated by Corporate Flight Management - Dallas/Fort Worth, Victoria (TX) United Airlines - Chicago–O'Hare, Denver, Houston–Intercontinental, Newark, San Francisco - Seasonal: Cancún, San José del Cabo, Washington–Dulles United Express - Chicago–O'Hare, Denver, Houston–Intercontinental, Newark , Los Angeles, San Francisco, Washington–Dulles US Airways operated by American Airlines Philadelphia, Phoenix - Seasonal: Charlotte US Airways Express - Charlotte, Phoenix Virgin America - Dallas–Love (begins April 28, 2015), San Francisco Statistics Currently Southwest Airlines is the airline flying with the most passengers out of ABIA. In 2014, Southwest flew a total of 4,001,663. American Airlines combined with merger partner US Airways flew a total of 2,417,567 passengers and United flew a total of 1,779,561, with Delta, Jetblue, Frontier Airlines and Alaska Airlines also carrying a significant number of passengers in 2013. New carriers in 2014 included British Airways and Texas Sky. A new customs facility was completed in December 2014 to help accommodate the recent growth in international travelers. Busiest domestic routes from AUS (November 2013 – October 2014) 1 Dallas/Fort Worth, TX 615,000 American 2 Atlanta, GA 432,000 AirTran, Delta, Southwest 3 Denver, CO 328,000 Frontier, Southwest, United 4 Dallas, TX (DAL) 316,000 Southwest 5 Houston, TX (IAH) 310,000 United 6 Los Angeles, CA 260,000 American, Delta, Southwest, United 7 Phoenix, AZ 250,000 Southwest, US Airways 8 Chicago, IL (ORD) 221,000 American, United 8 San Francisco,CA (SFO) 213,000 jetBlue, United, Virgin America 10 New York, NY (JFK) 188,000 American, Delta, jetBlue Top Airlines 1 Southwest Airlines (Including Airtran Airways) 4,001,663 2 American Airlines 1,928,520 3 United Airlines 1,779,561 4 Delta Airlines 1,332,449 5 Jetblue Airways 587,451 6 US Airways 489,047 7 Frontier Airlines 188,216 8 Alaska Airlines 116,572 9 Virgin America 111,729 10 British Airways 96,973 Summary For a first time scenery from Airportech, then KAUS - Austin-Bergstrom Airport is a great introduction to producing quality scenery. It is in the area of Tom Curtis and Butnaru's type of scenery, but I would put Austin-Bergstrom Airport just a level above in the way the ortho (photo) is well inserted into the scenery, and that all the outer areas have been well covered and filled out. Any negatives? not much but a little more dark (dirtier) textures on buildings and vehicles would make them more realistic, but I do note that from the ground level the effect of the scenery is very good and realistic. Animations and the general buzz of the airport is excellent and again you can see the strides X-Plane is making in realistic environments and movement. all the feature like autogates and open hangar doors are in here, so it is highly usable. KAUS - Austin-Bergstrom has the need to be used. So don't just overfly it, but use the airport as a stopover or as regional service to the rest of Texas and Mexico and you will be glad of the business. And again this scenery fills in another significant part of your North American network. Yes this airport is a great investment and a quality scenery, but KAUS's greatest advantage is in its position. KAUS Austin-Bergstrom International, TX by Airportech is now available from the New X-Plane.Org Store here : KAUS - Austin, TX International and is priced at only US$19.95 Installation : Download is 59.80mb that is unzipped in to 218.10 into your Custom Scenery folder. the GroundTraffic plugin from Marginal for the airport traffic animations is built into the scenery, but you need X-Plane10 for it to work. Turn off "Runway Follows Terrain Contours" in Rendering Options settings. Documents There is one airport chart and 11 (RNAV/ILS) Approach Charts, 7 STAR Charts and 12 SID departure charts. Features: Detailed 3D models of all airport buildings Orthophotos for complete immersion High resolution textures Accurate airport layout and ATC routing Animated jetways with docking guidance system Animated ground traffic Animated, opening hangars Full HDR night lighting support Scenery Developer Site: Airportech Requirements: X-Plane 10.30+ Windows, Mac or Linux Review by Stephen Dutton 22nd April 2015 Copyright©2015: X-Plane Reviews Review System Specifications: Computer System: - 2.66 Ghz Intel Core i5 iMac 27” - 9 Gb 1067 Mhz DDR3 - ATI Radeon HD 6970M 2048 mb - Seagate 256gb SSD Software: - Mac OS Yosemite 10.10.1 - X-Plane 10 Global ver 10.35 (final) Addons - Saitek x52 Pro system Joystick and Throttle - Bose - Soundlink Mini Aircraft - Airbus A320 Neo by JARDesign (X-Plane.OrgStore) US$59.95 Scenery - KLAX - Los Angeles International 1.01 by misterX6 (X-Plane.org) Free

-
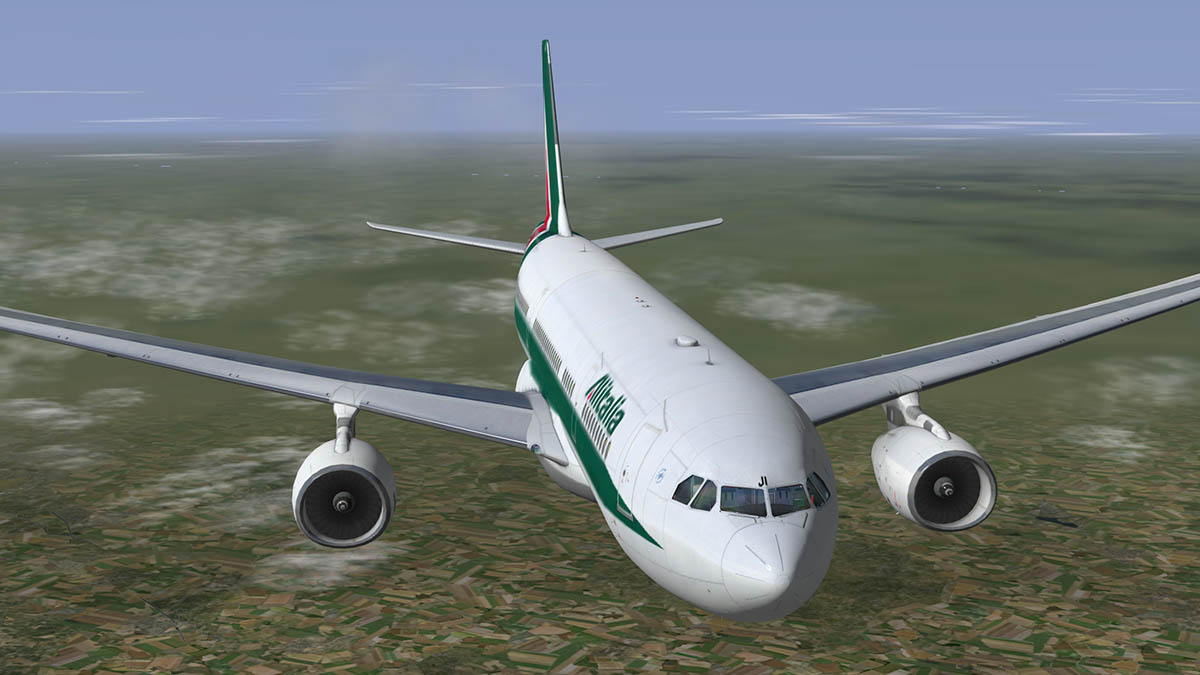
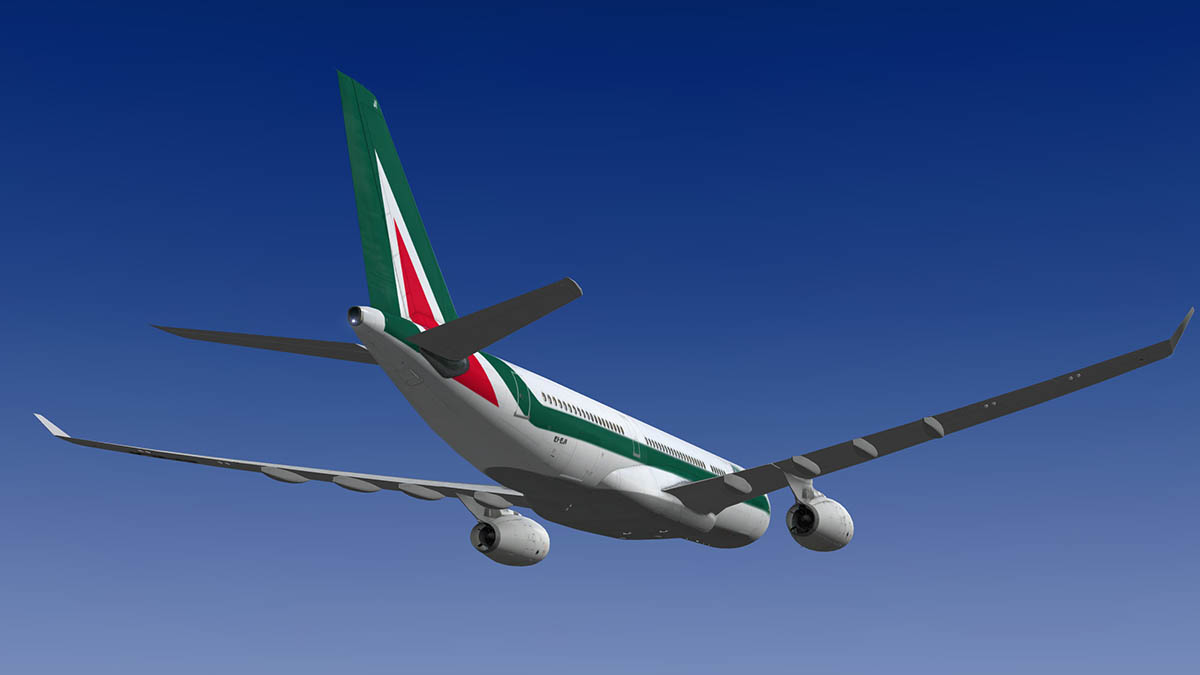
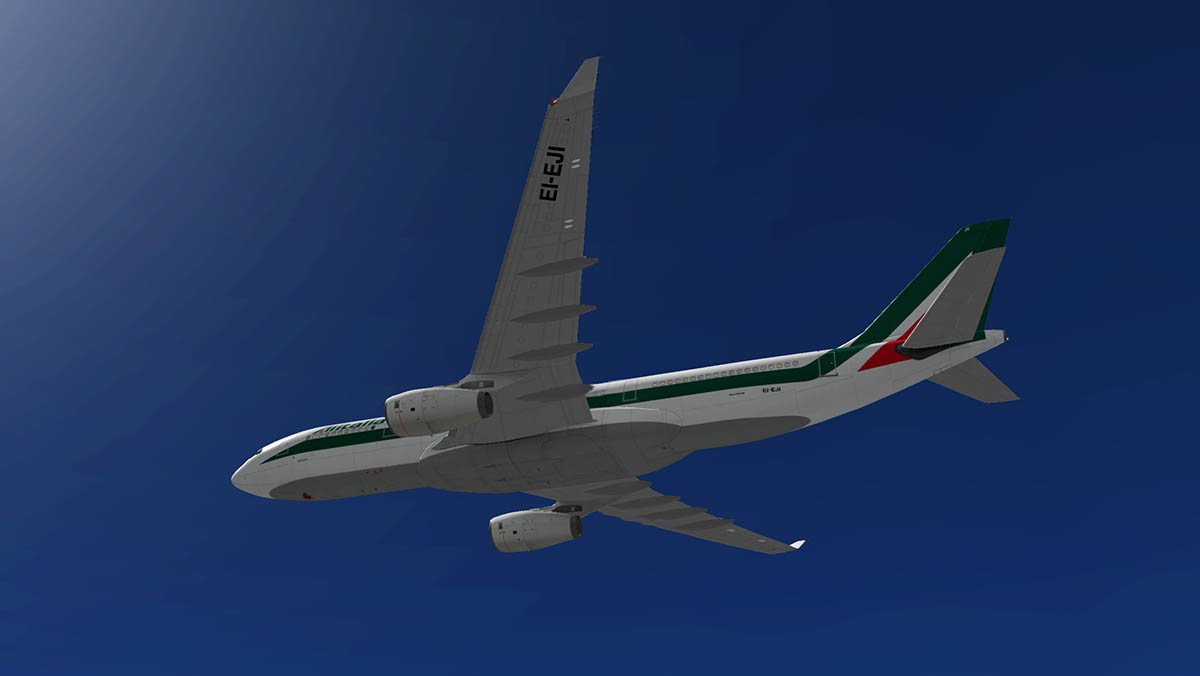
Aircraft Review : Airbus A330-243 by JARDesign
Stephen replied to Stephen's topic in Airliners Reviews
Correct, under the "Fault Panel" as noted in the review. But it is mostly a display notice in the E/WD... I'll check it out deeper? SD -
Aircraft Review : Airbus A330-243 by JARDesign
Stephen replied to Stephen's topic in Airliners Reviews
Thank You... The systems are very well represented on the A330, but it does not have those system failure options that is a big feature of the FlightFactor designs, the X-Plane failures still work though. -
Aircraft Review : Airbus A350 XWB Advanced by FlightFactor
Stephen replied to Stephen's topic in Airliners Reviews
There is a slight issue with crashes on the Mac with the A350, but also the A332. I have extensively tested both... They both fine on a Mac, my personal thoughts are with a clean SASL start up, If you start the aircraft from the desktop then the SASL plugin will start correctly, but if you move the aircraft in X-Plane via the local map or place it at a gate via airport, it screws up the plugin in not restarting correctly. Be aware of this issue and all aircraft that use the SASL plugin will be perfectly fine. -
Aircraft Review : Airbus A330-243 by JARDesign
Stephen replied to Stephen's topic in Airliners Reviews
I'll check that Michael, the switch is for the Nav and logo, I always thought that one click for nav and one for logo as well. -
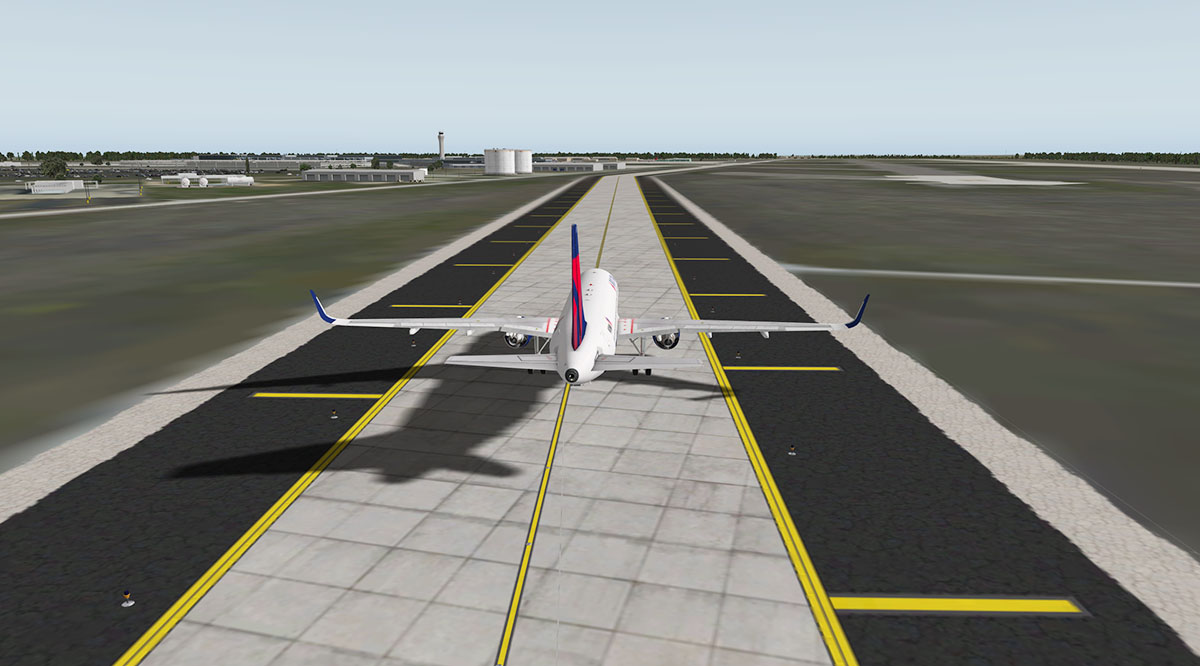
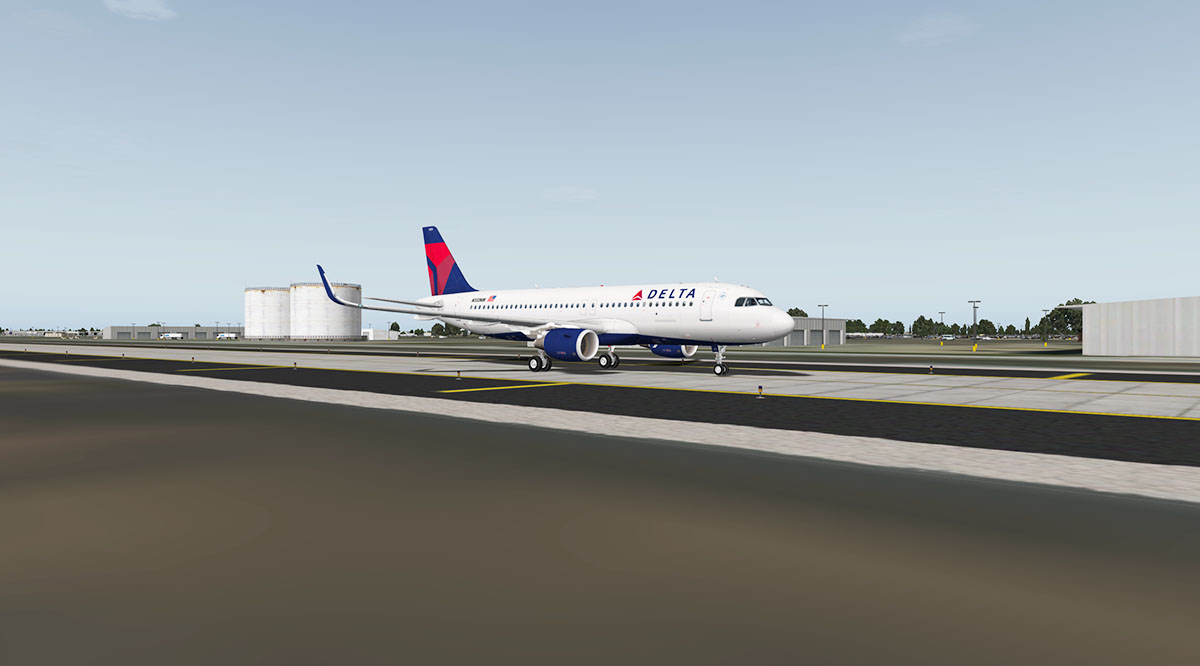
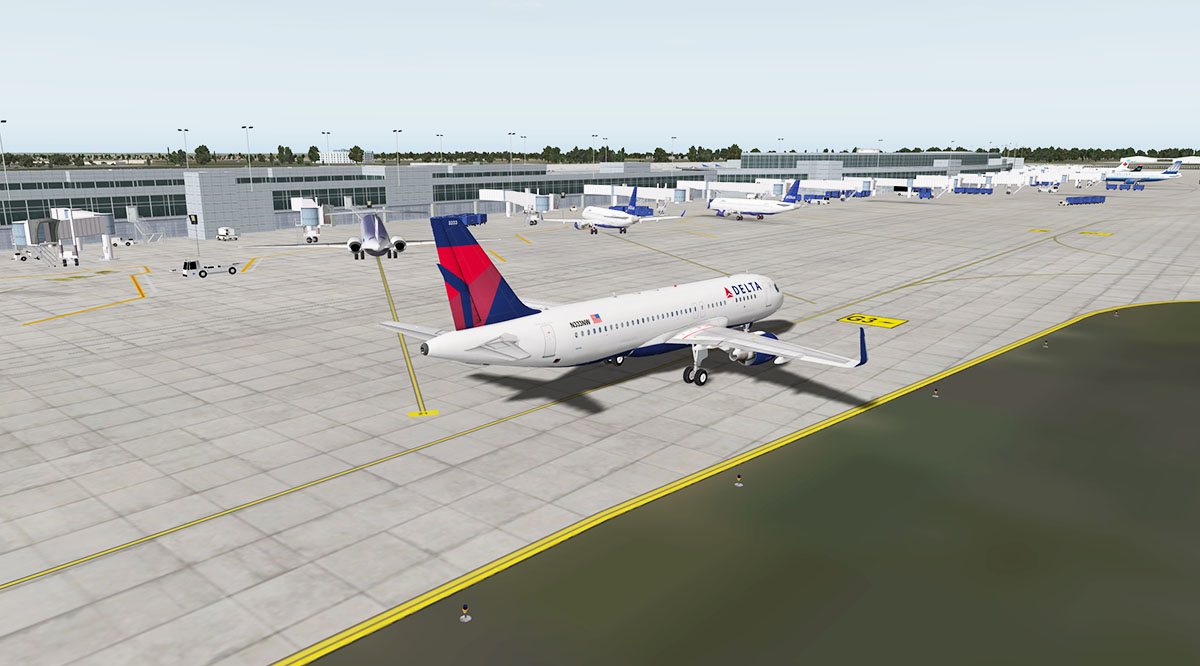
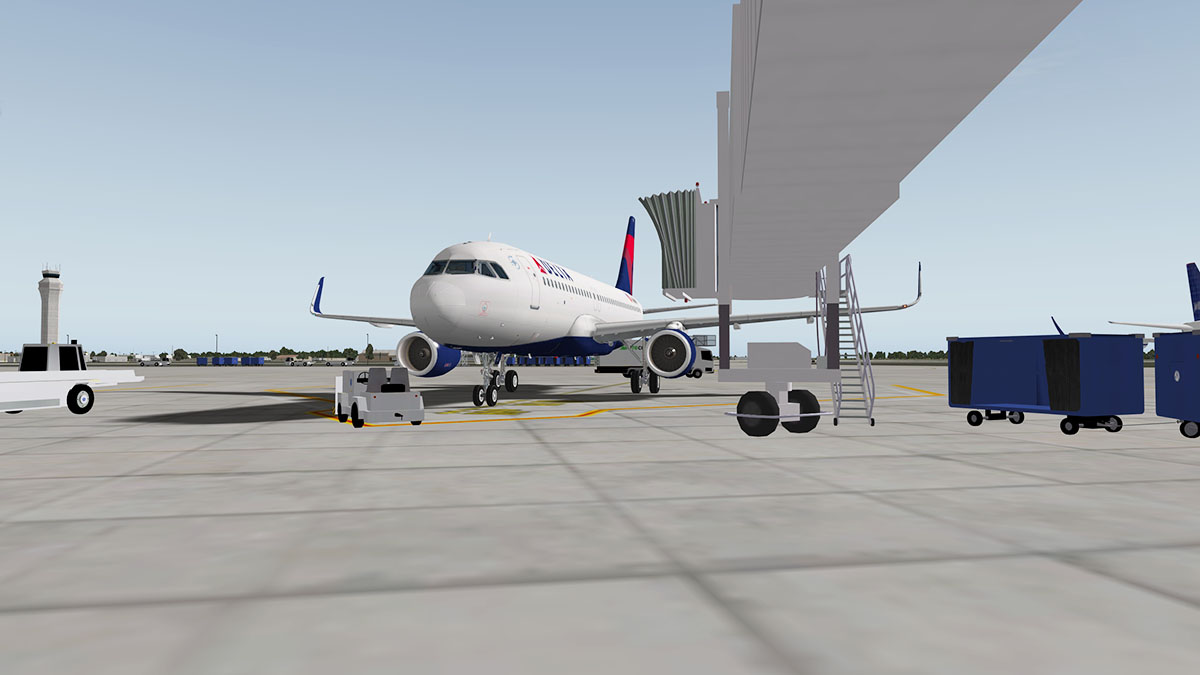
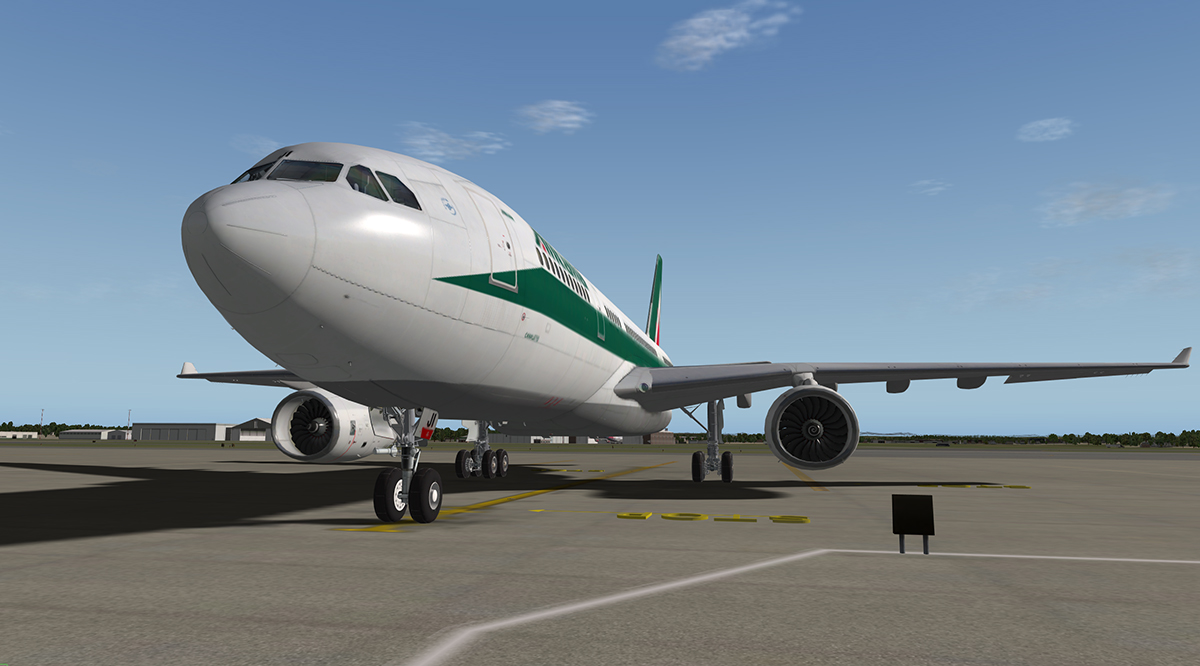
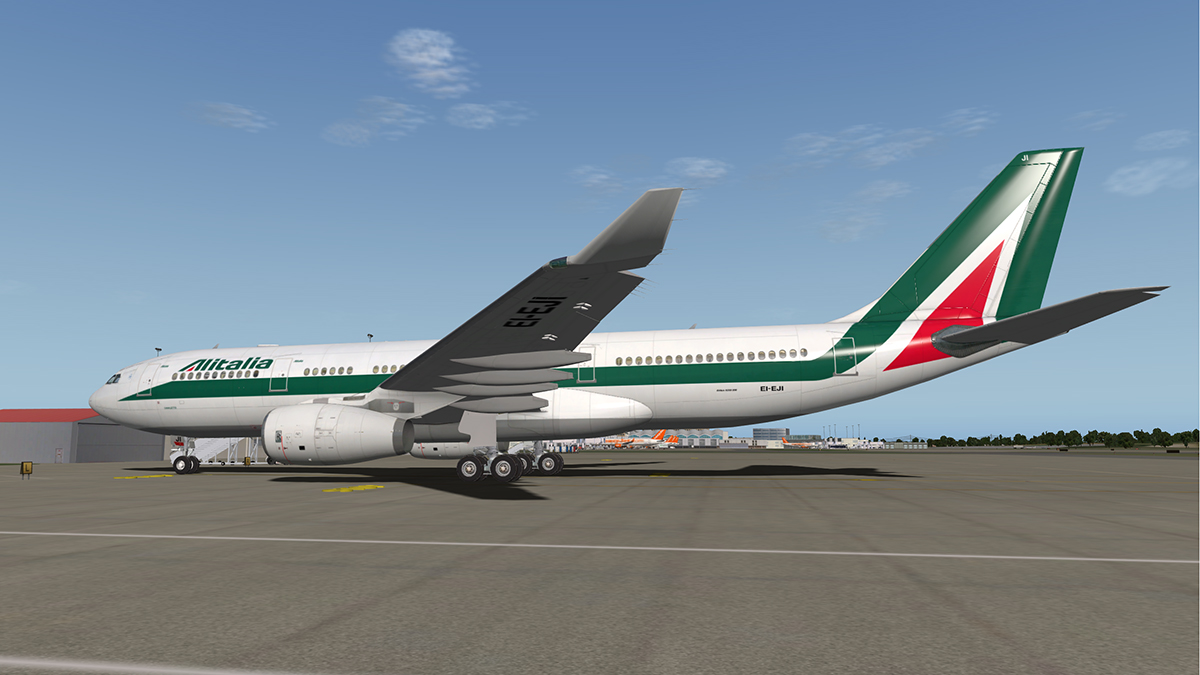
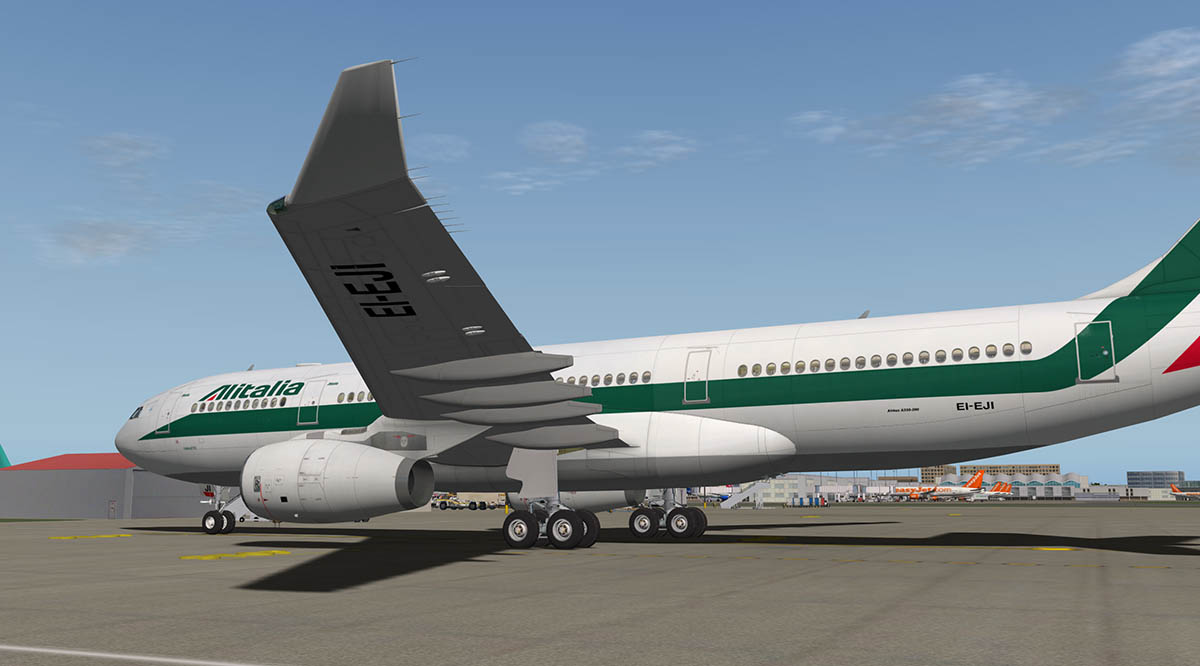
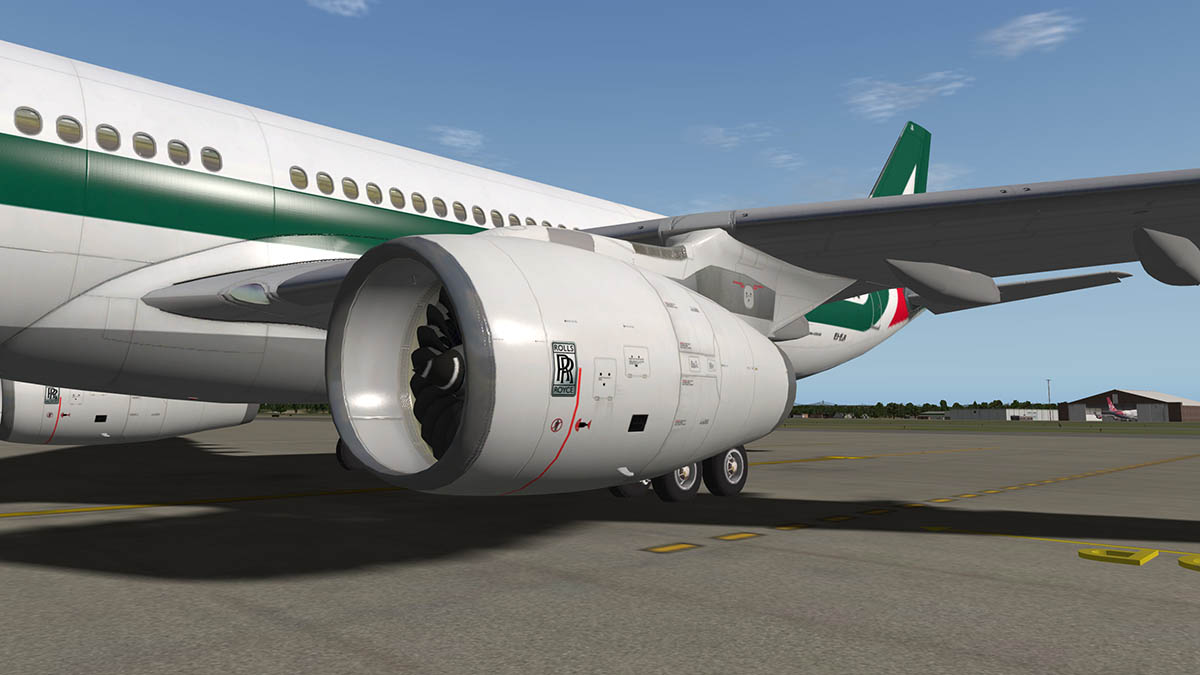
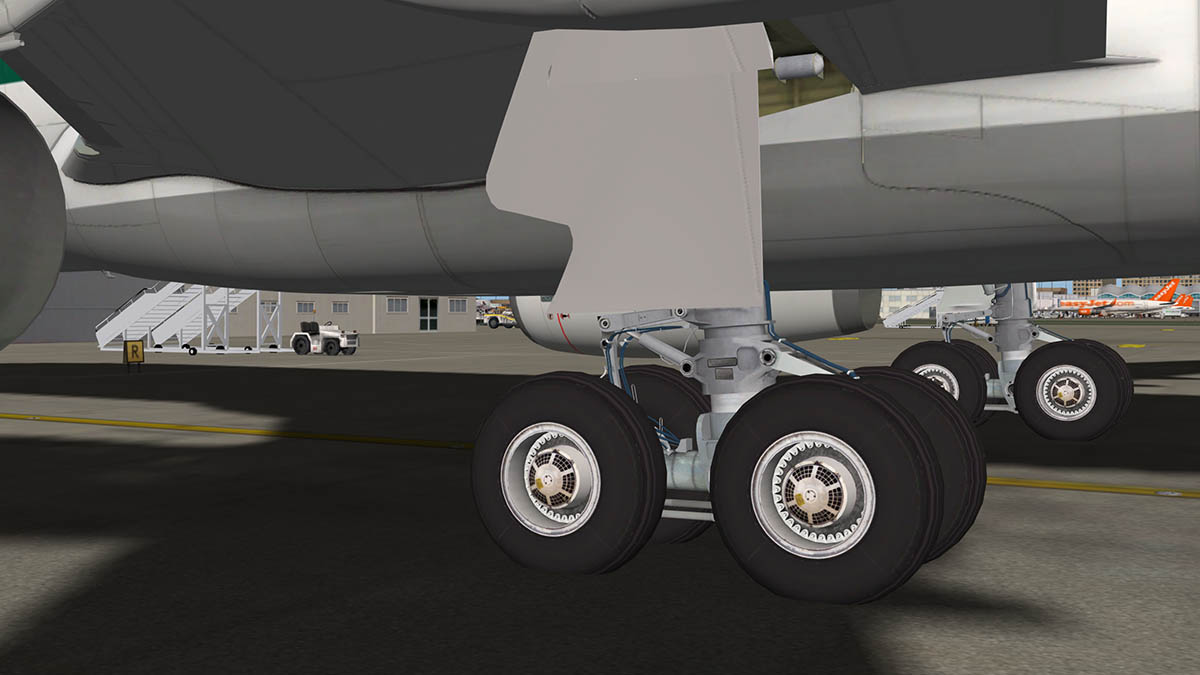
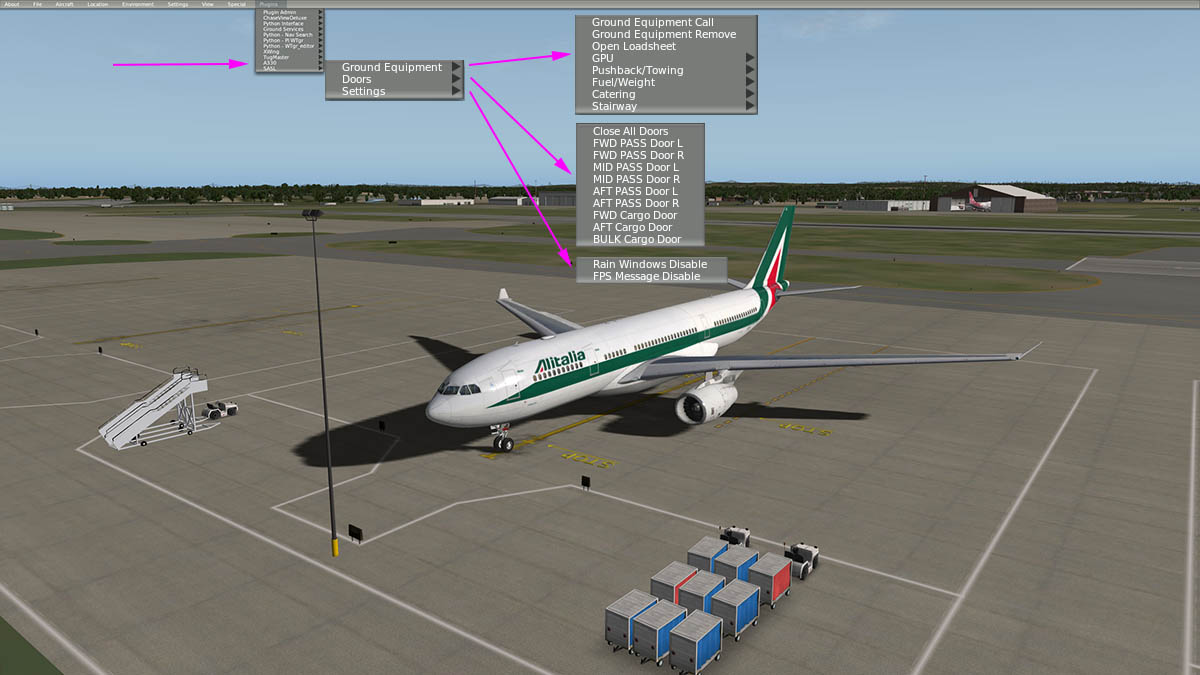
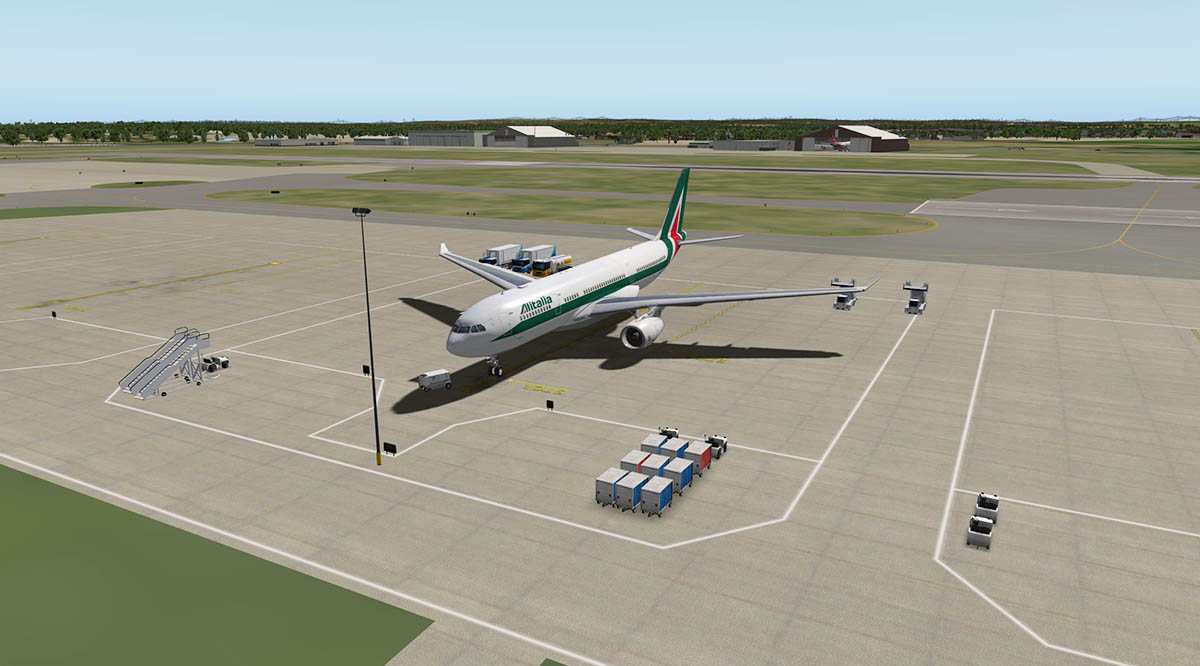
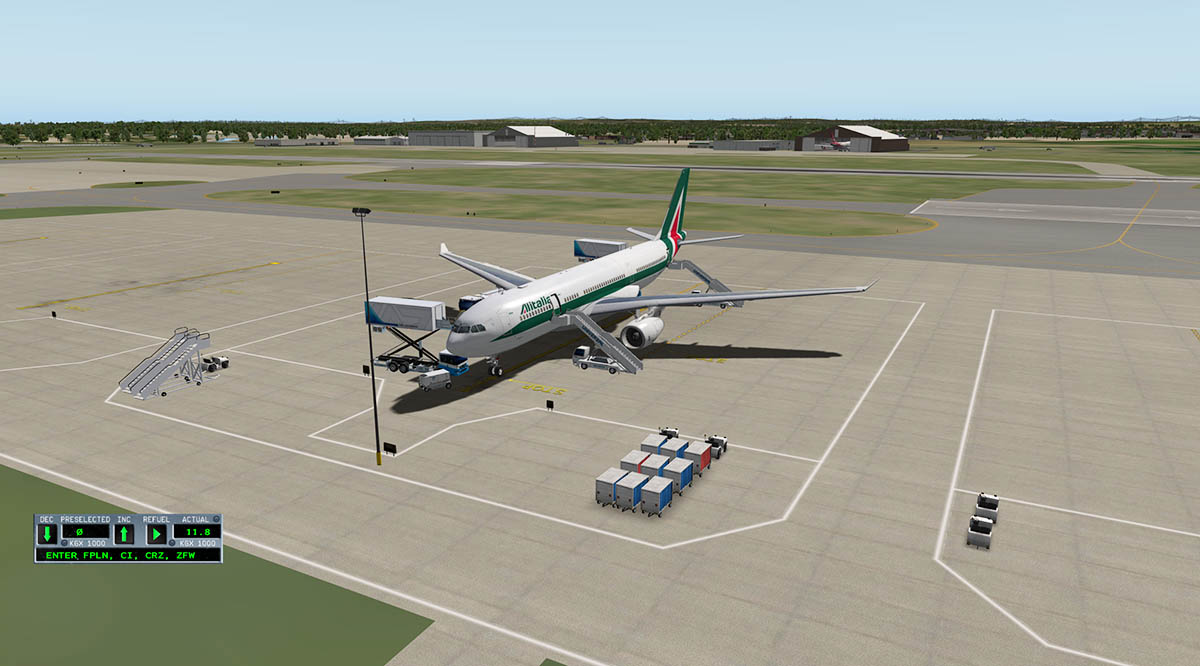
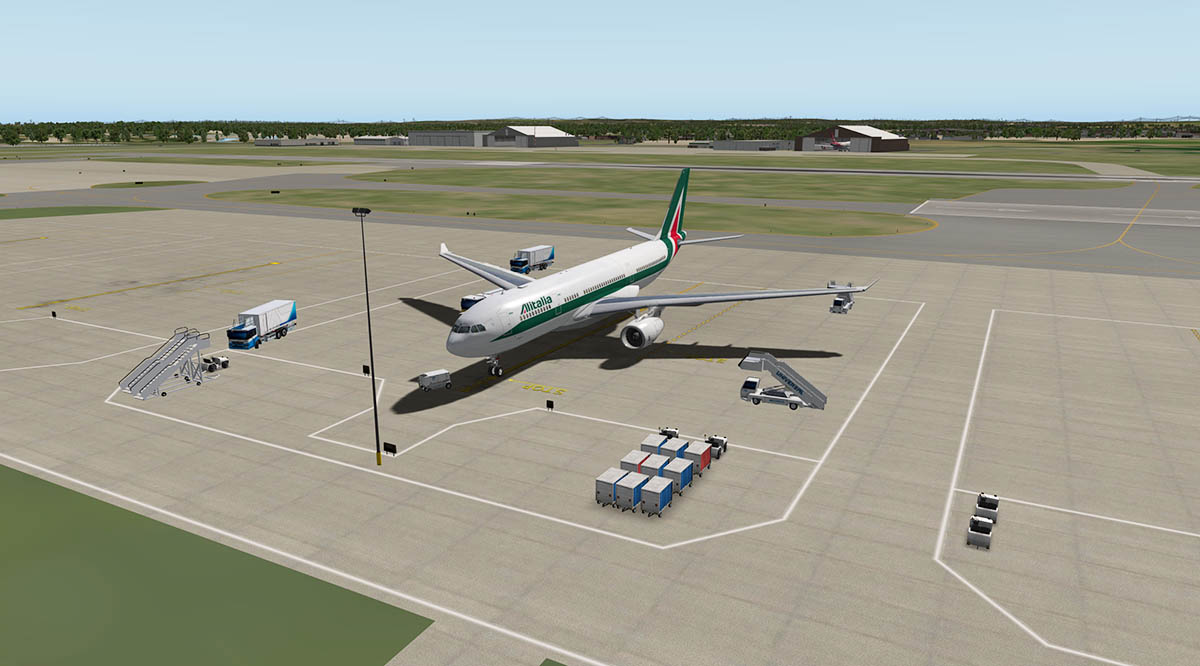
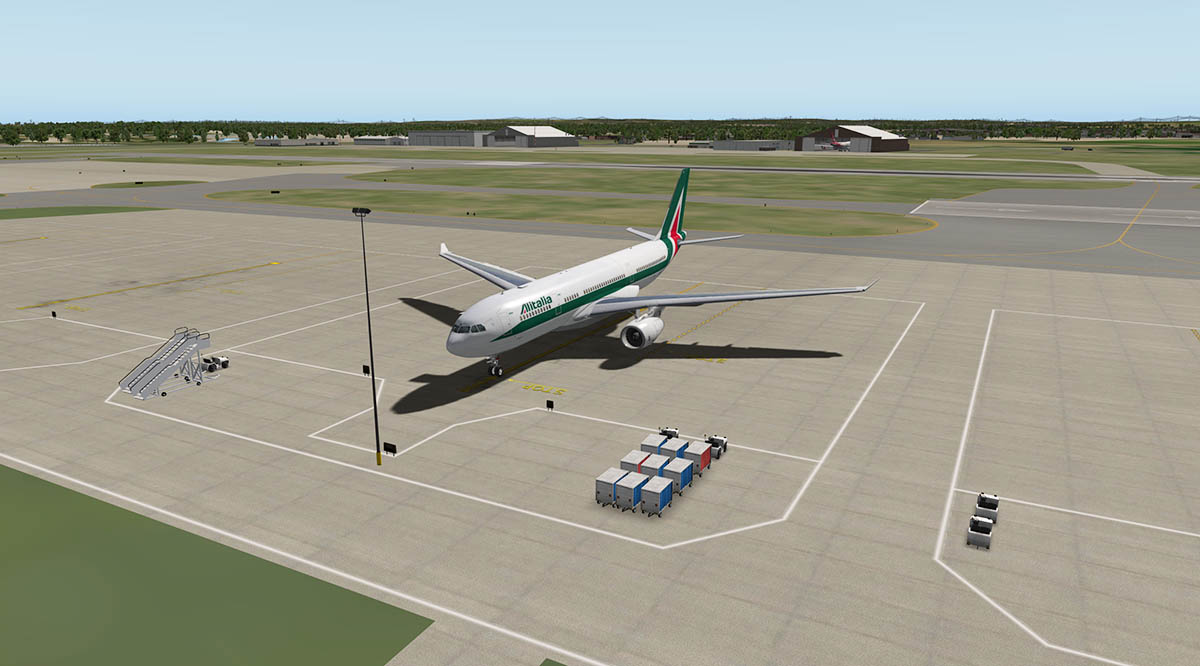
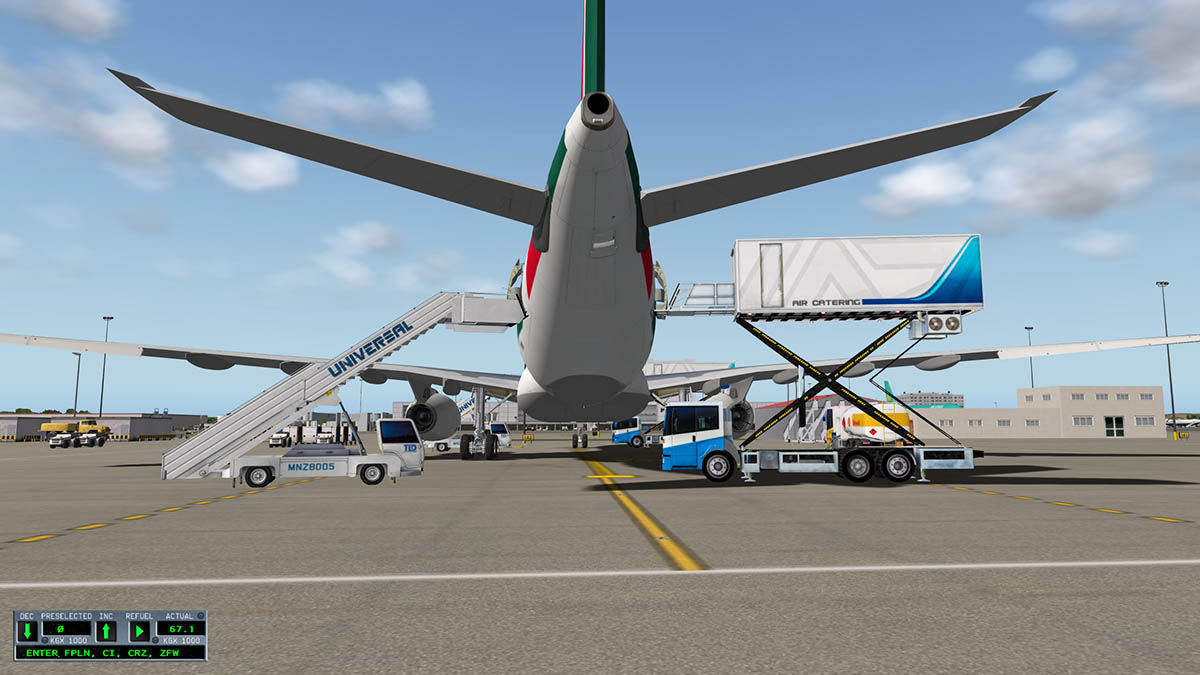
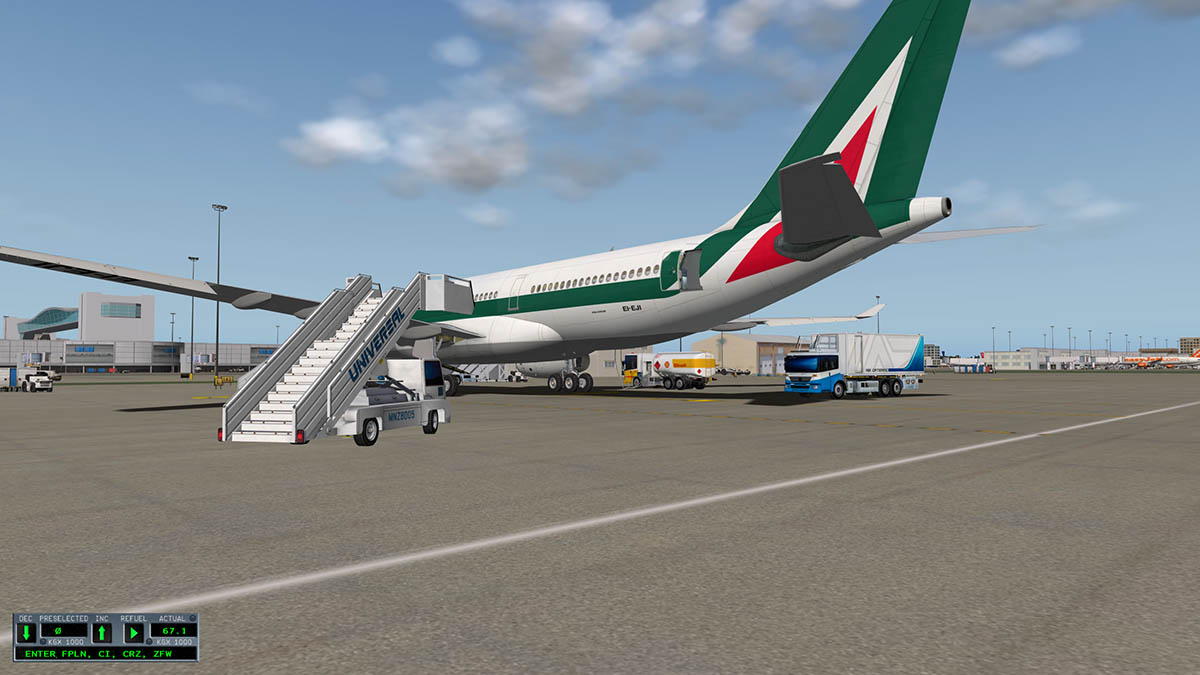
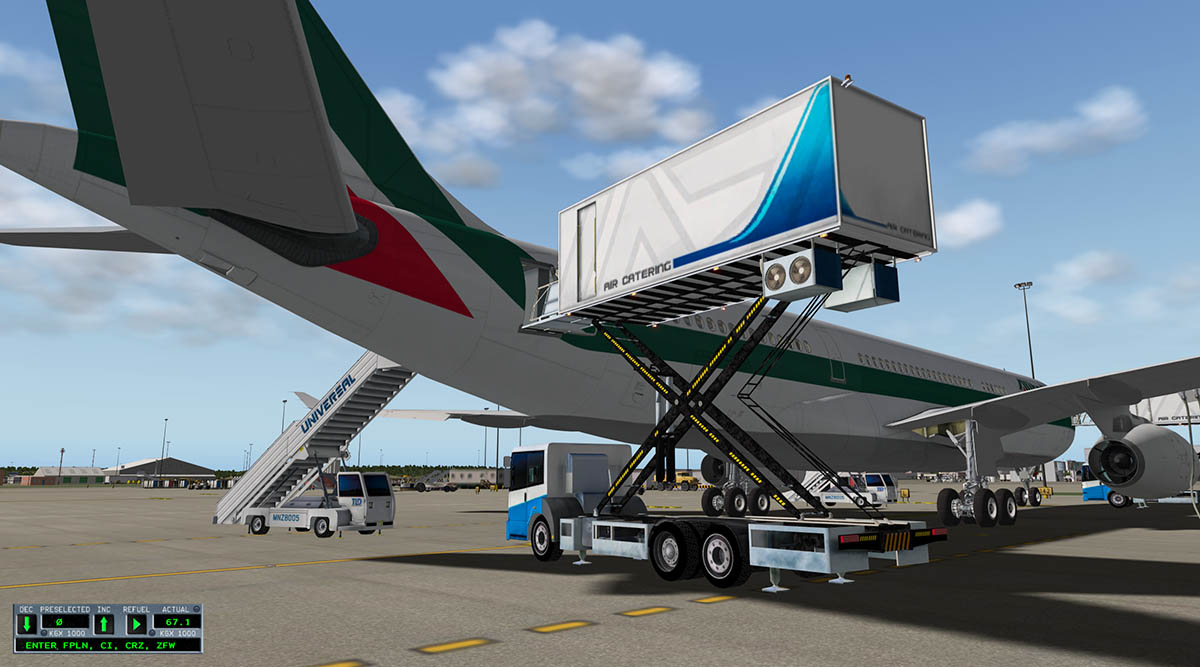
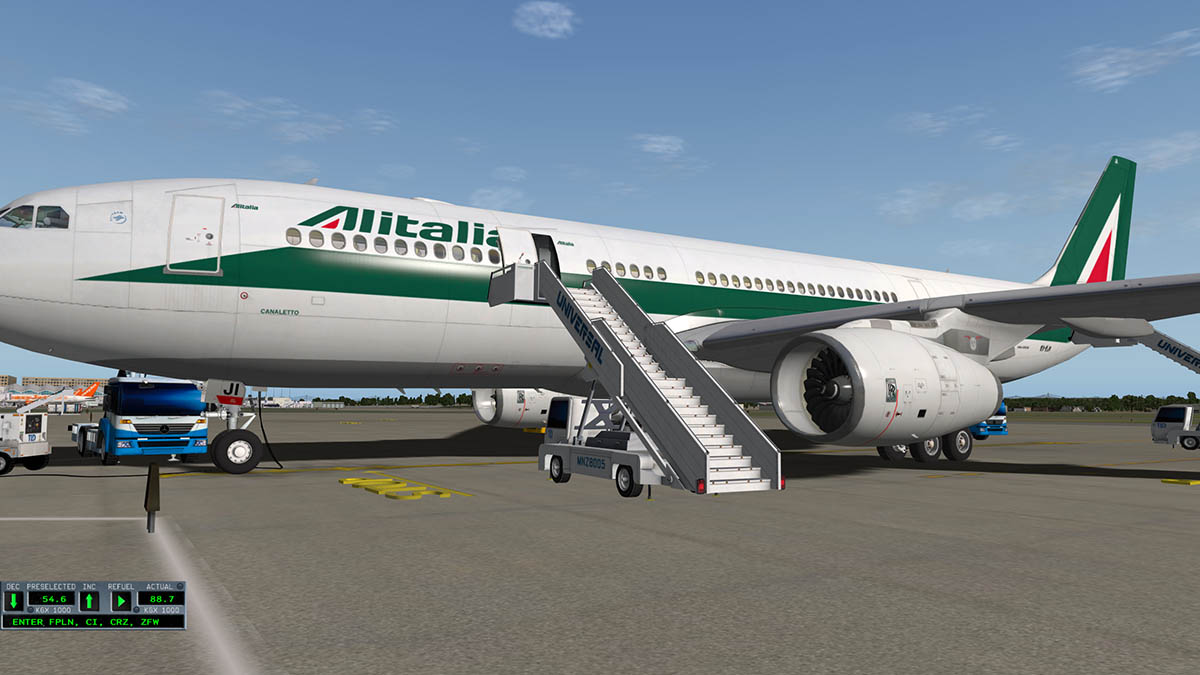
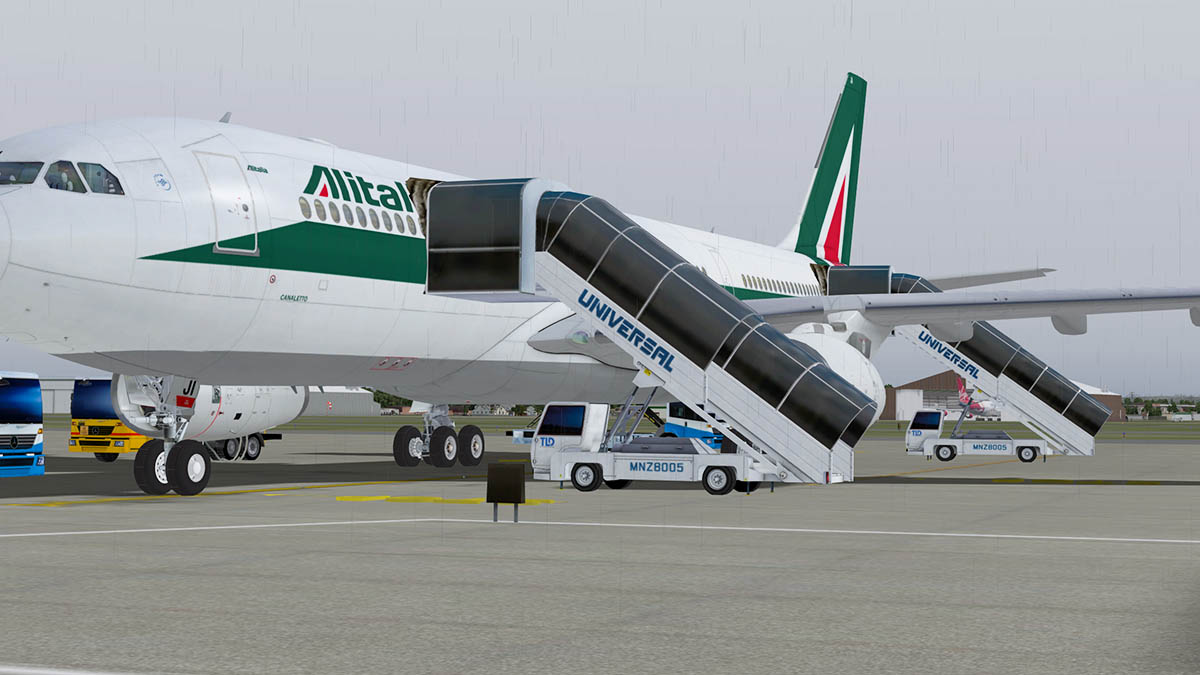
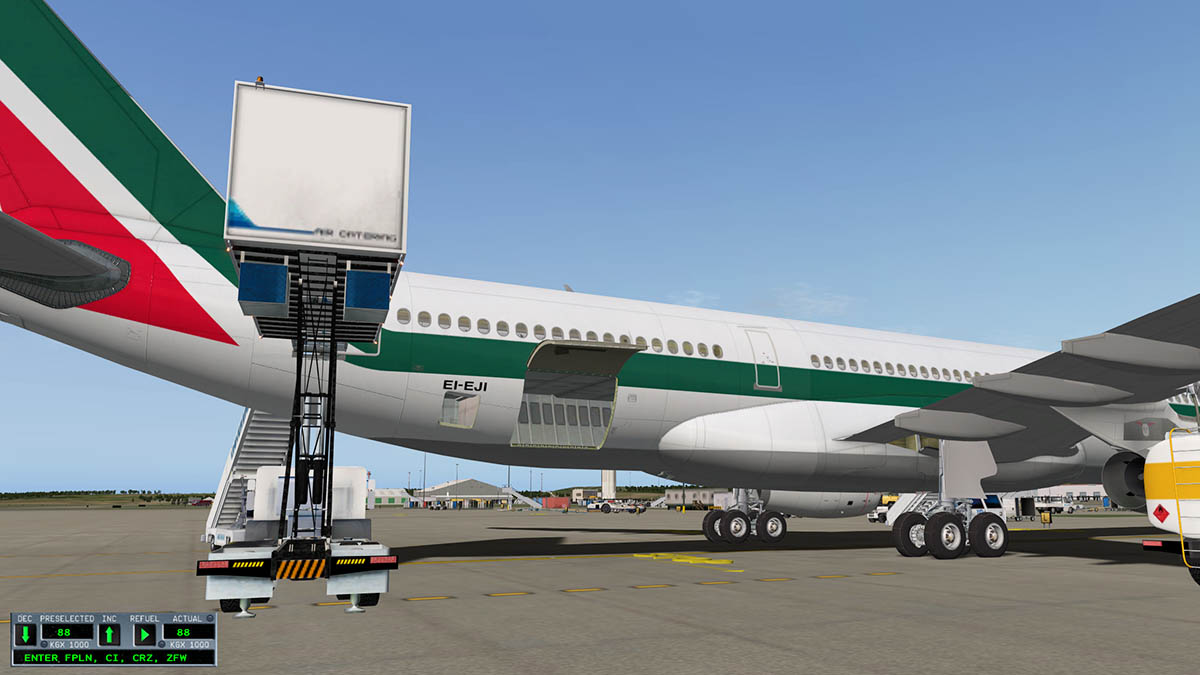
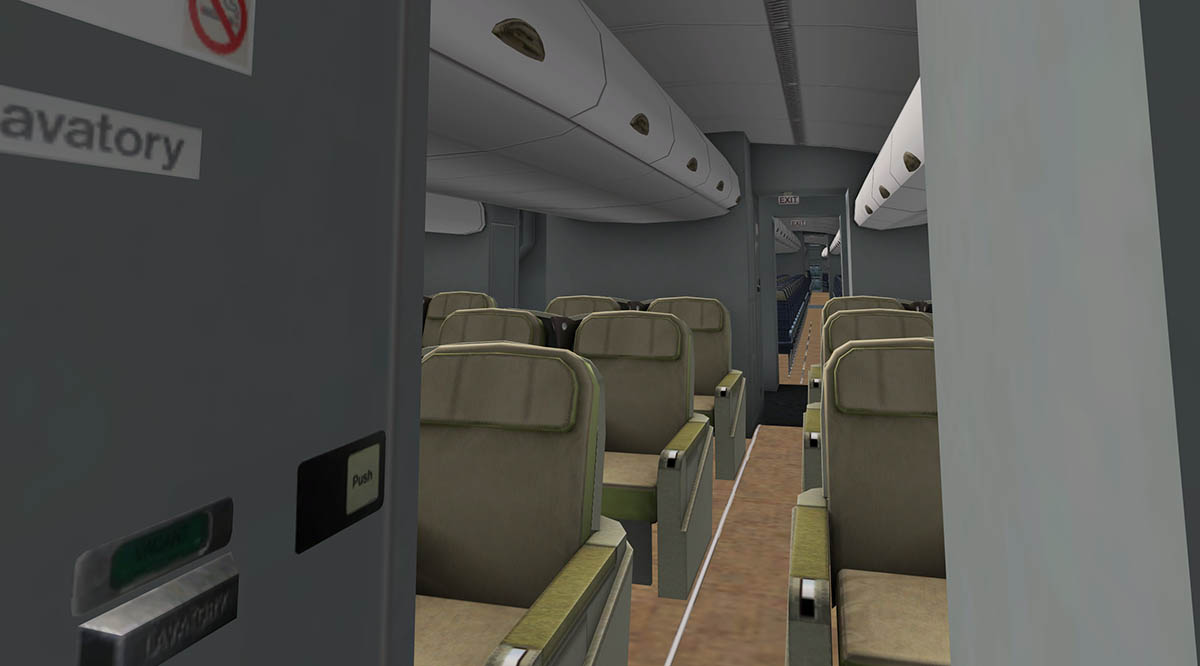
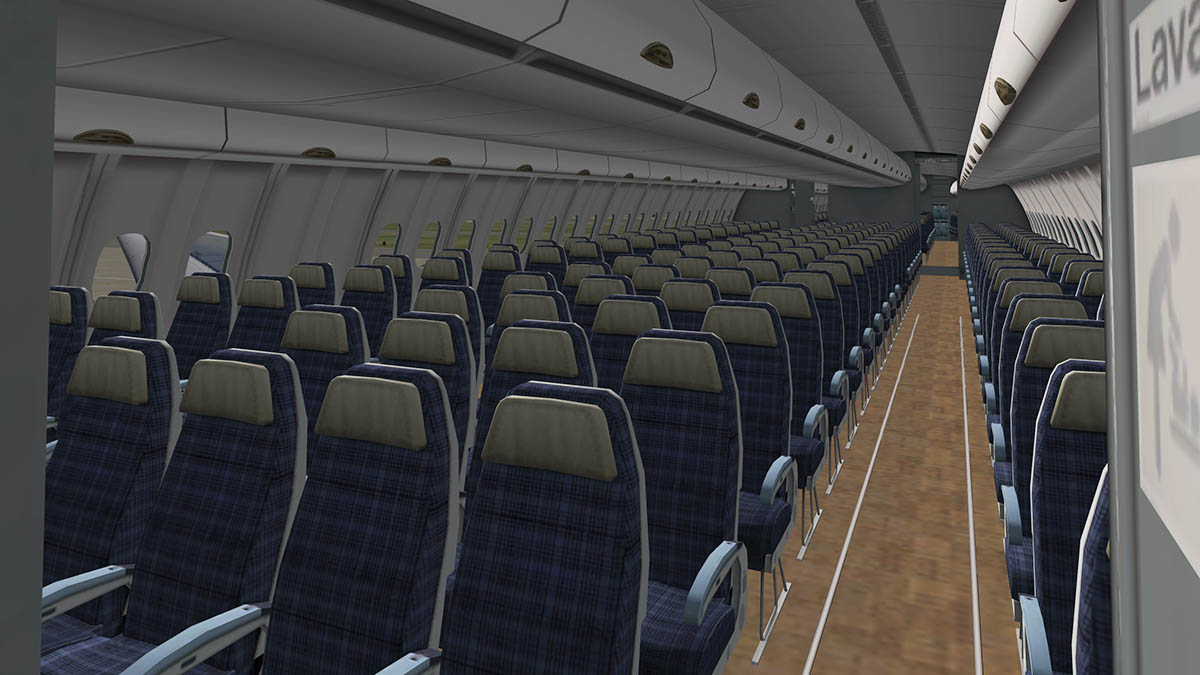
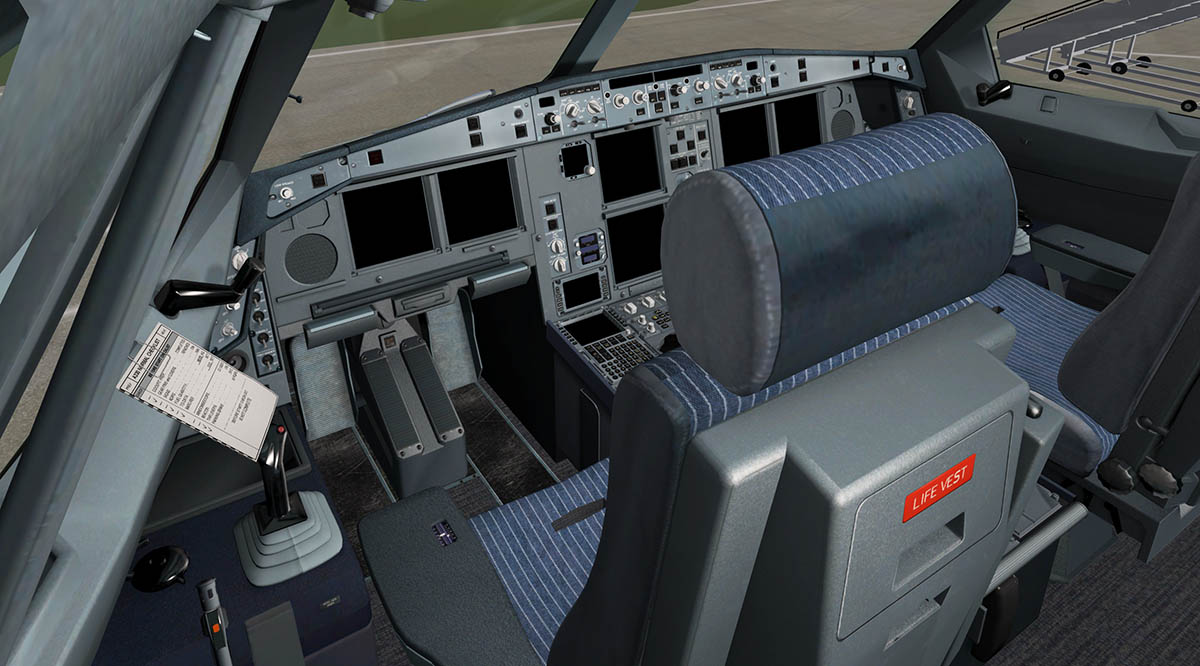
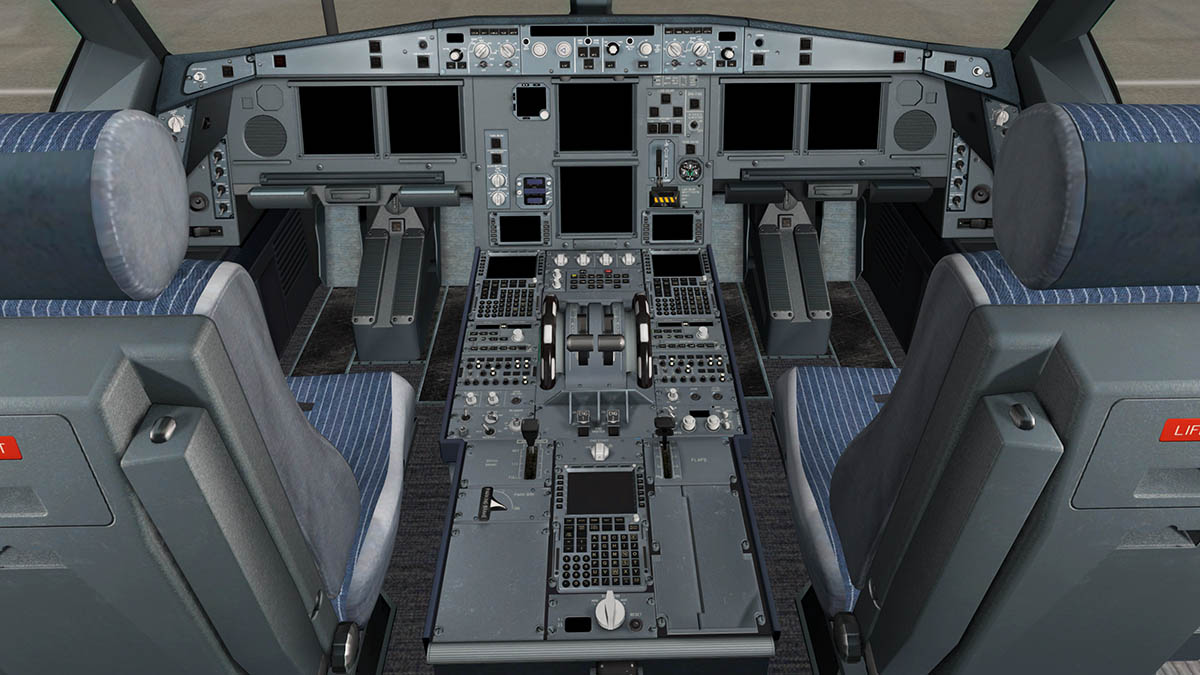
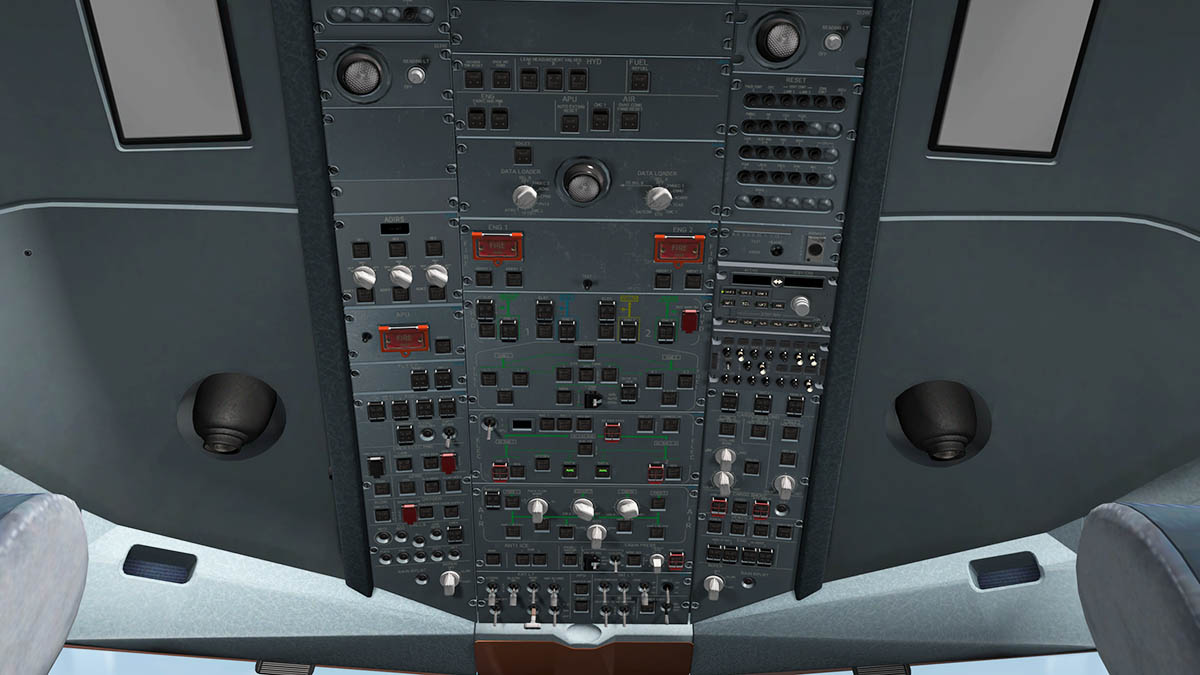
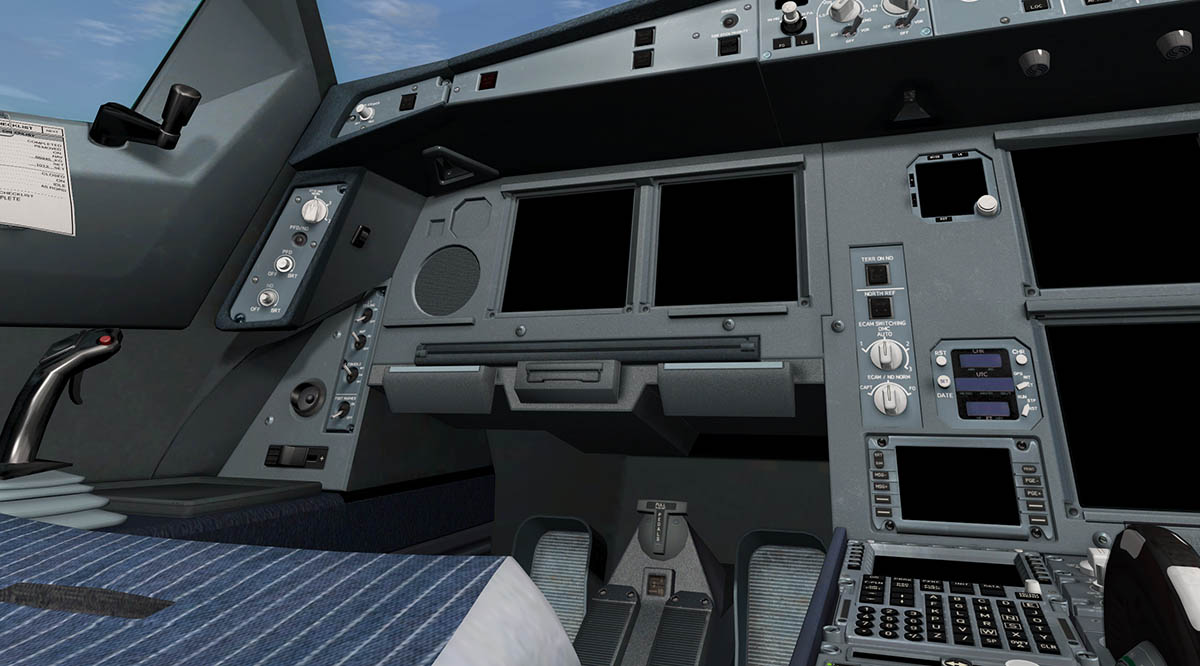
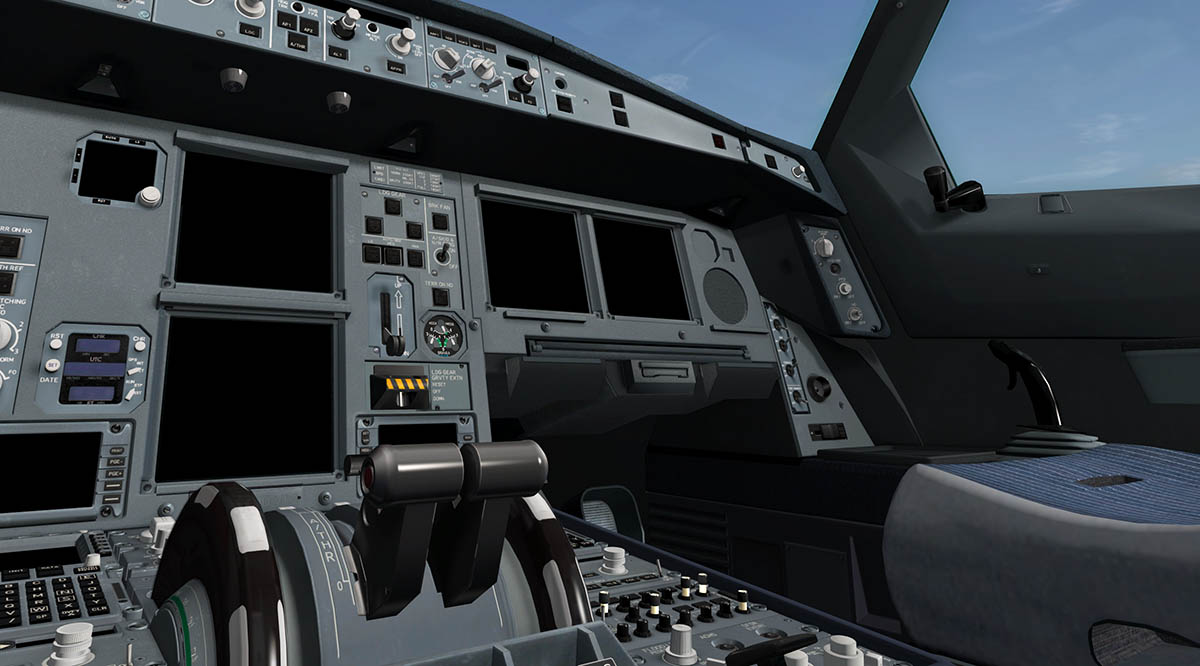
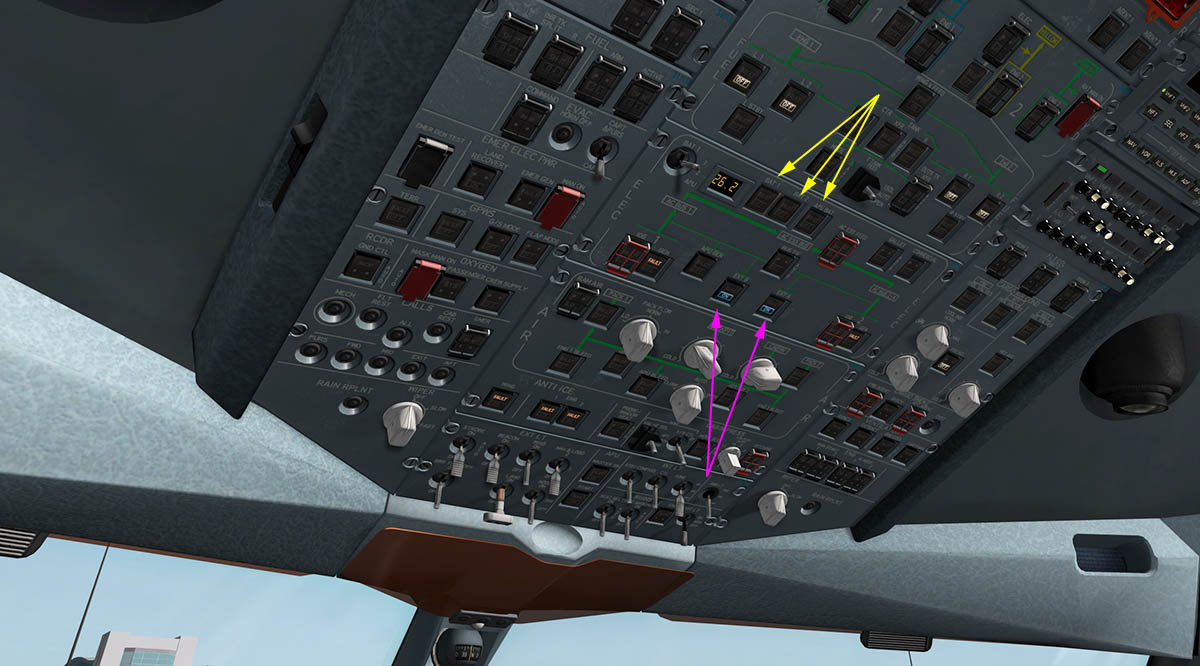
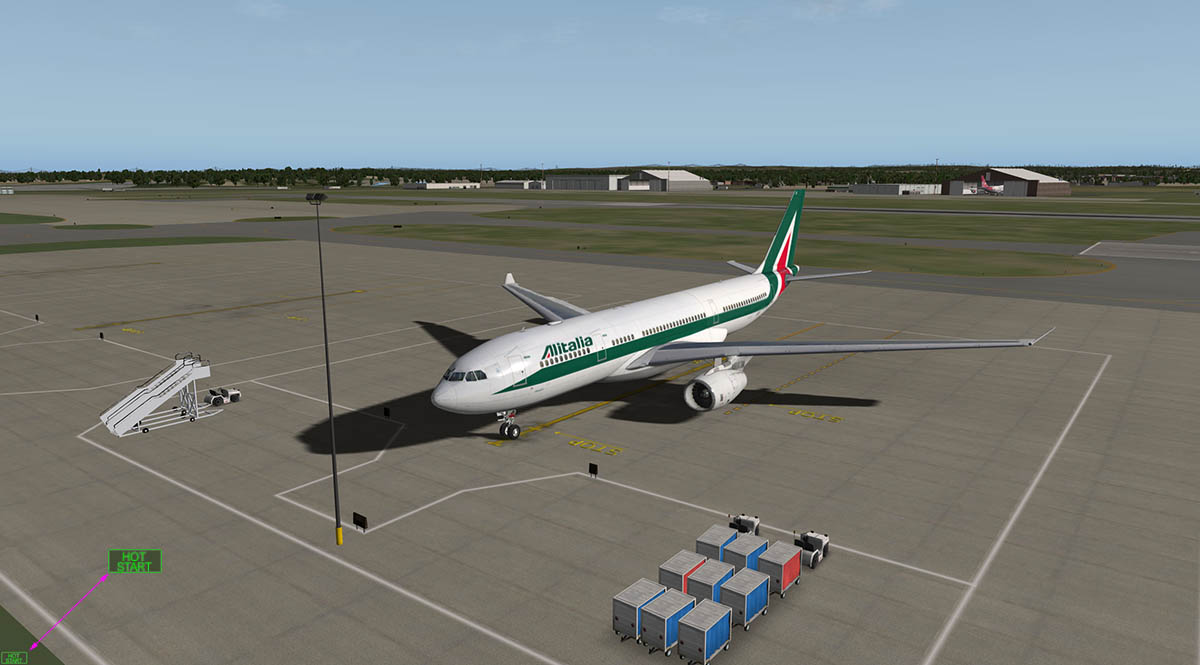
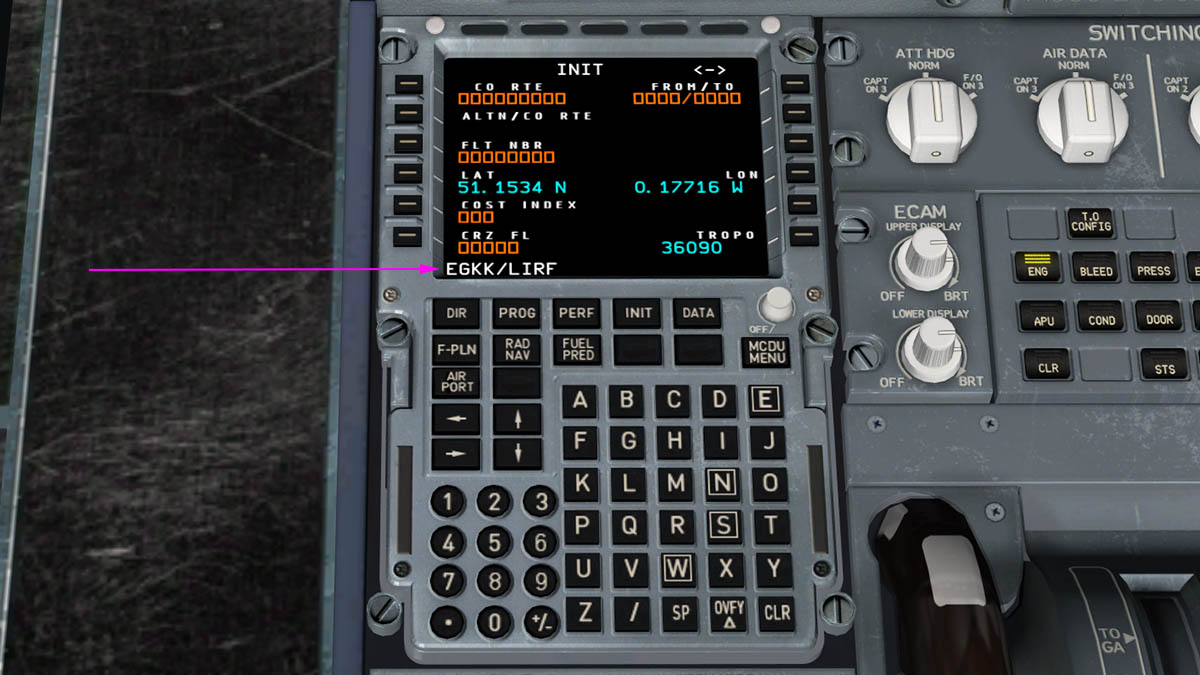
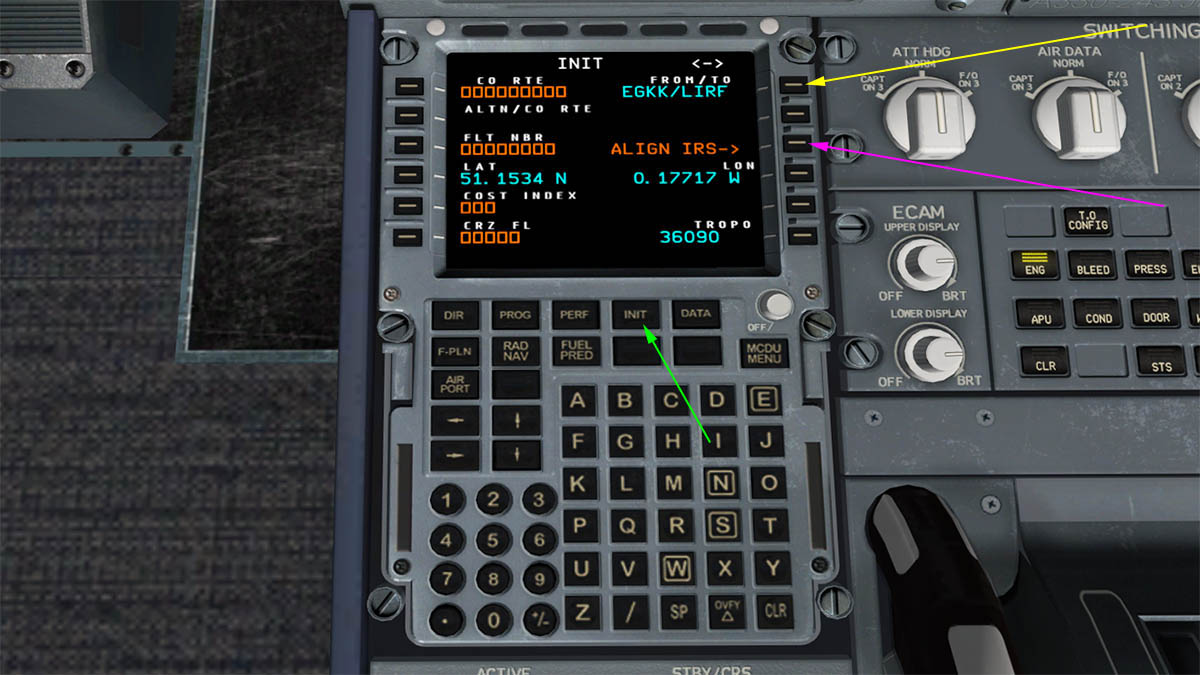
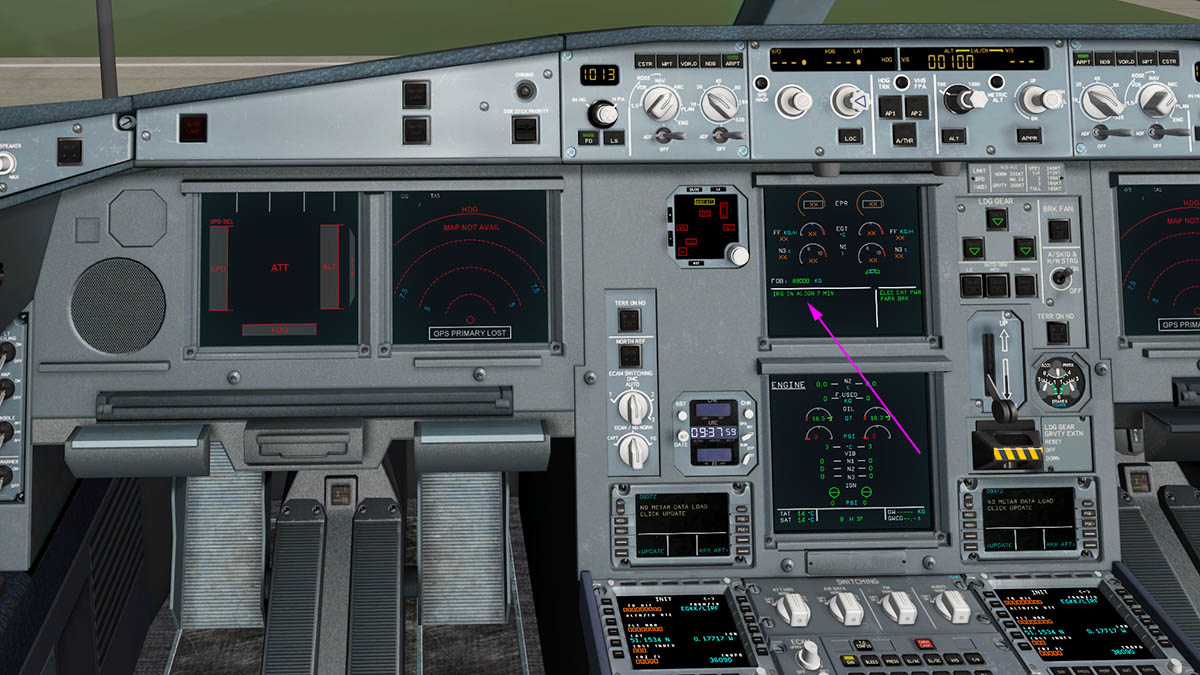
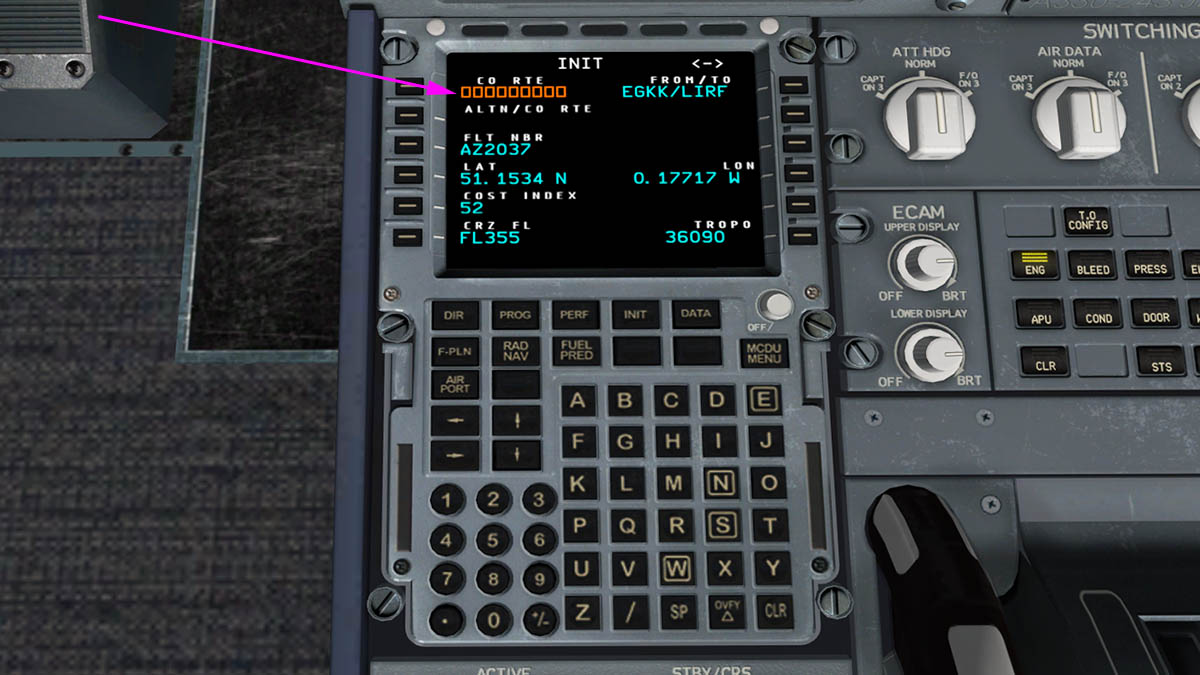
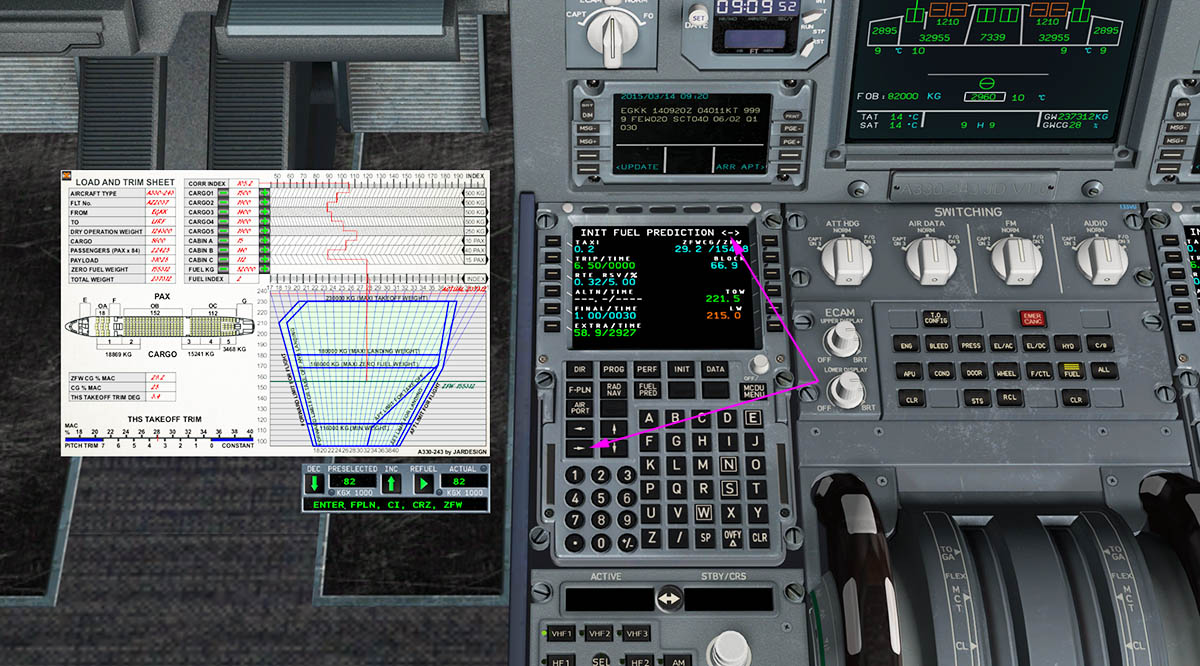
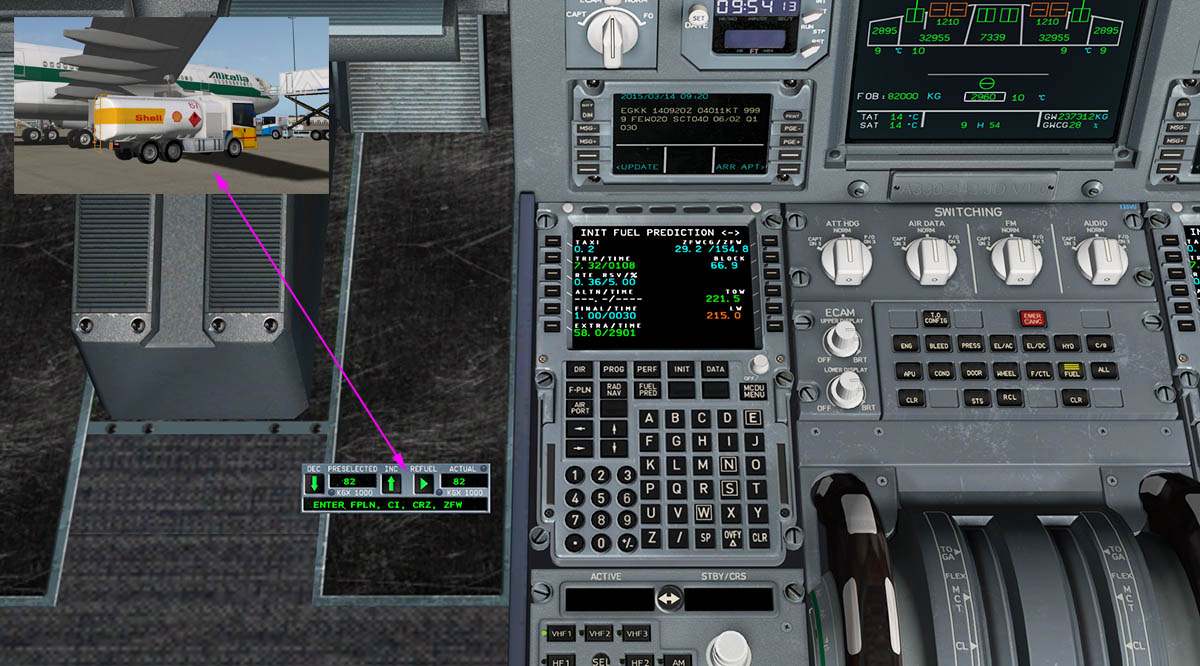
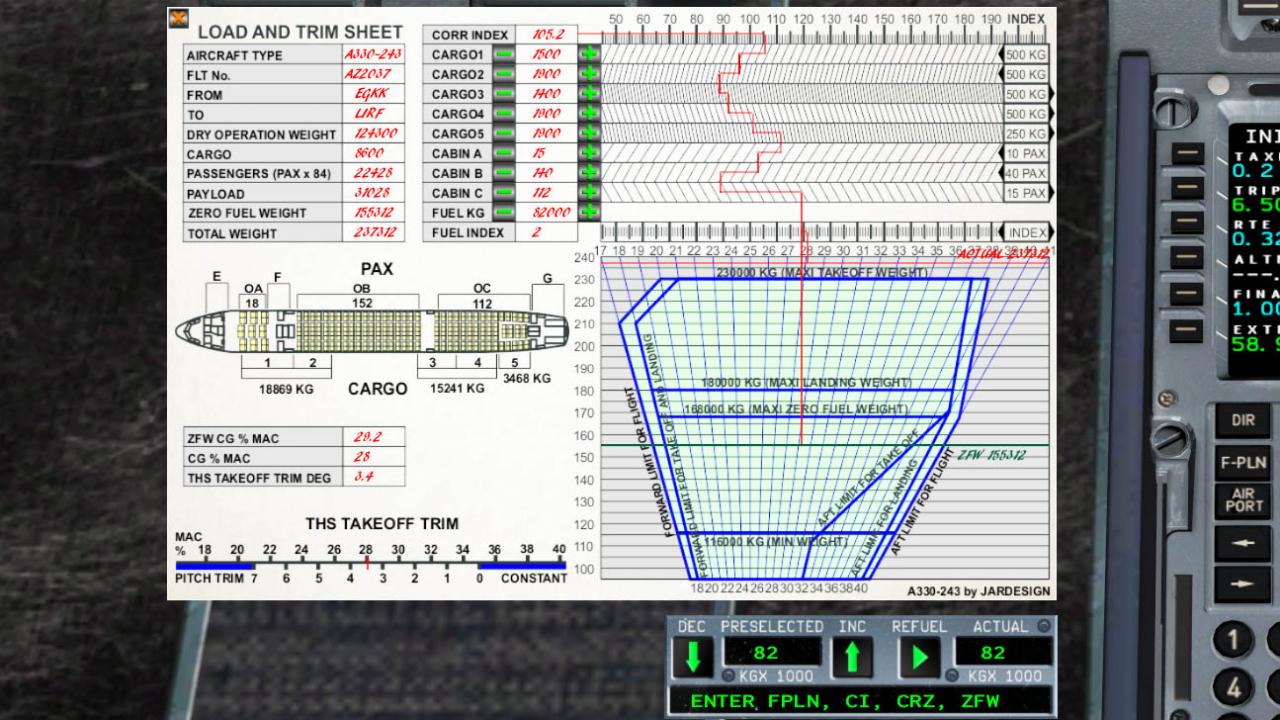
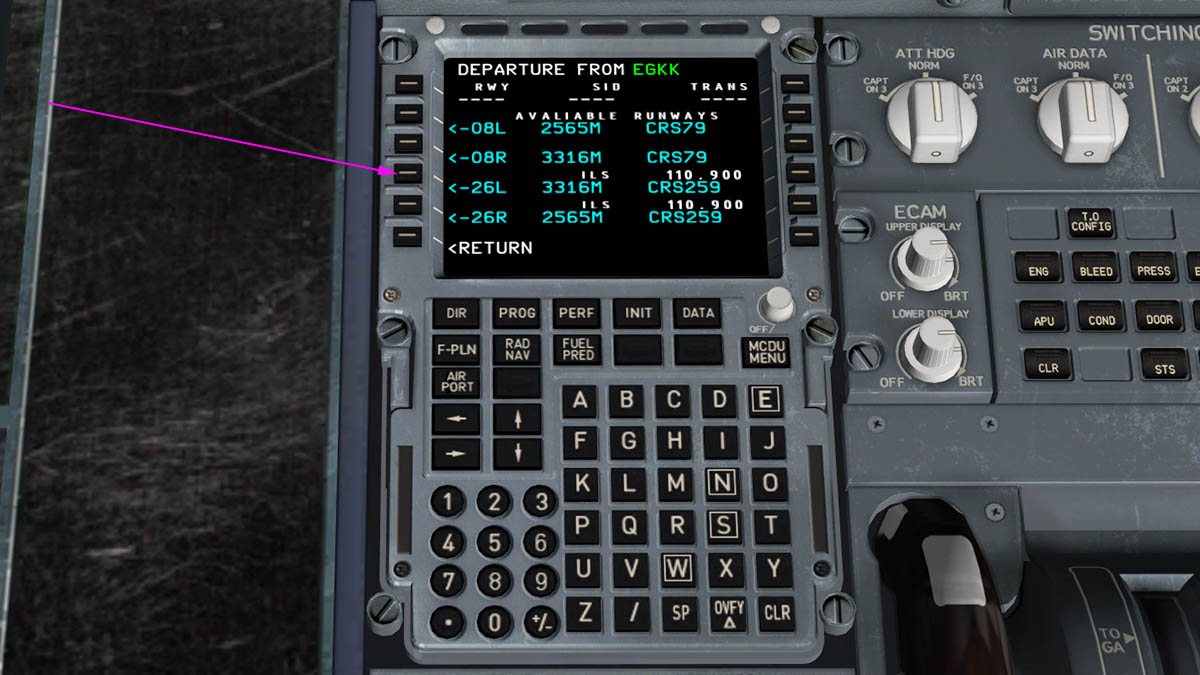
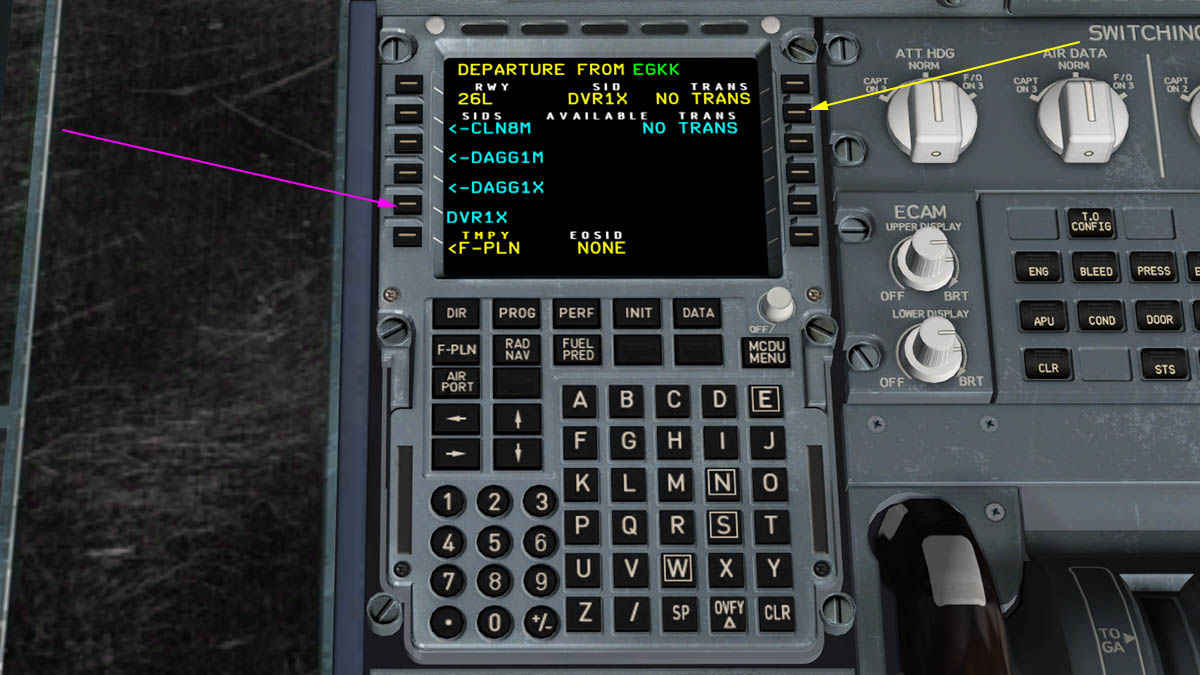
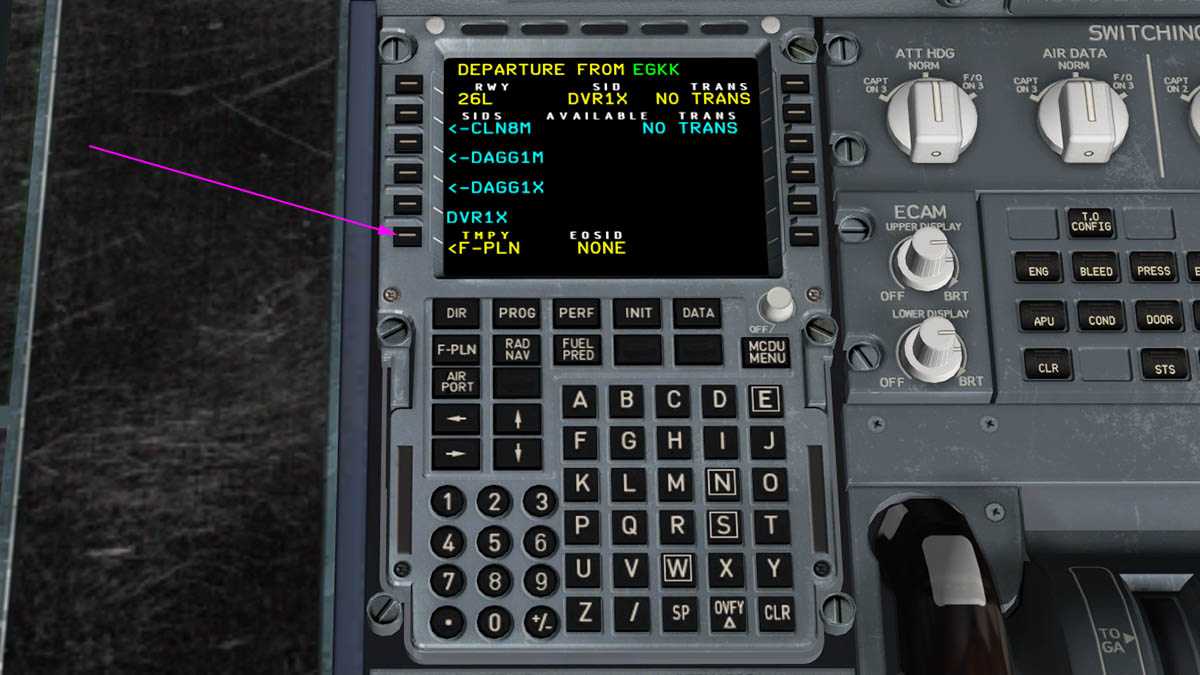
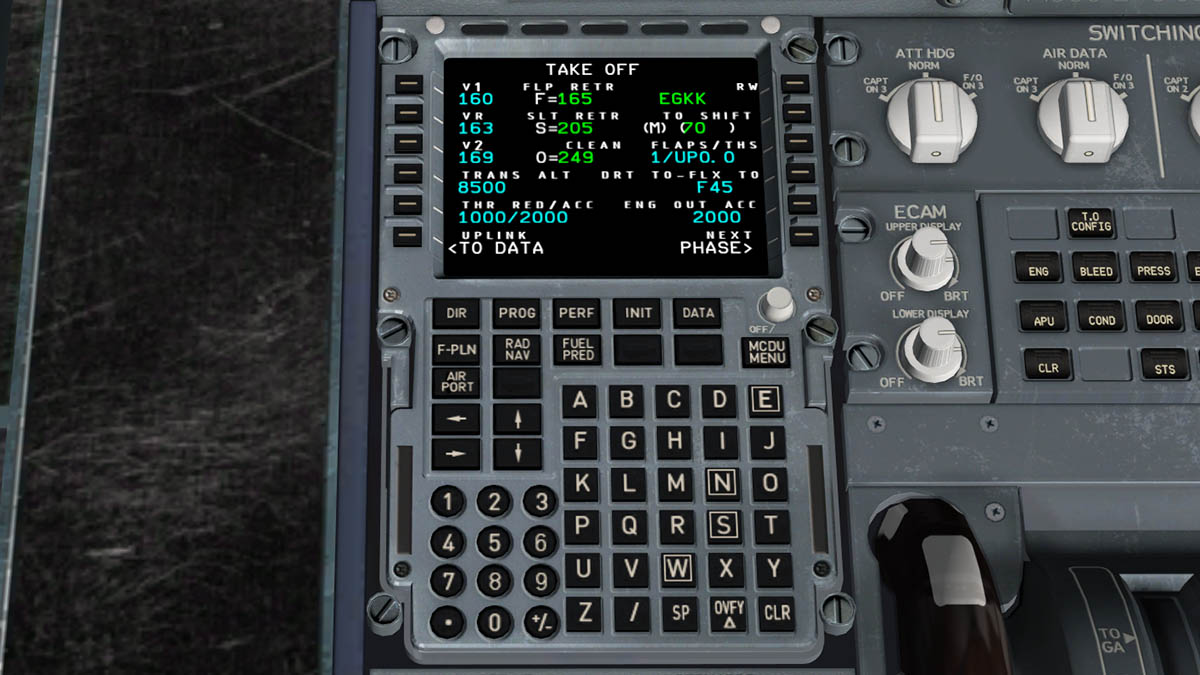
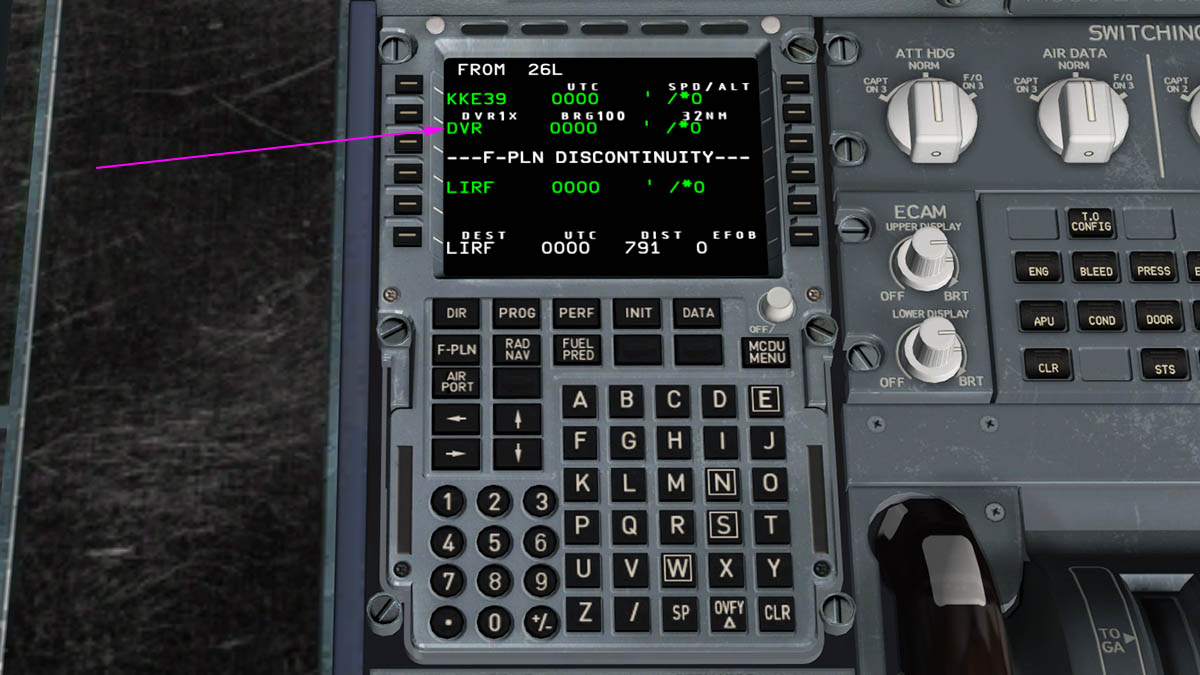
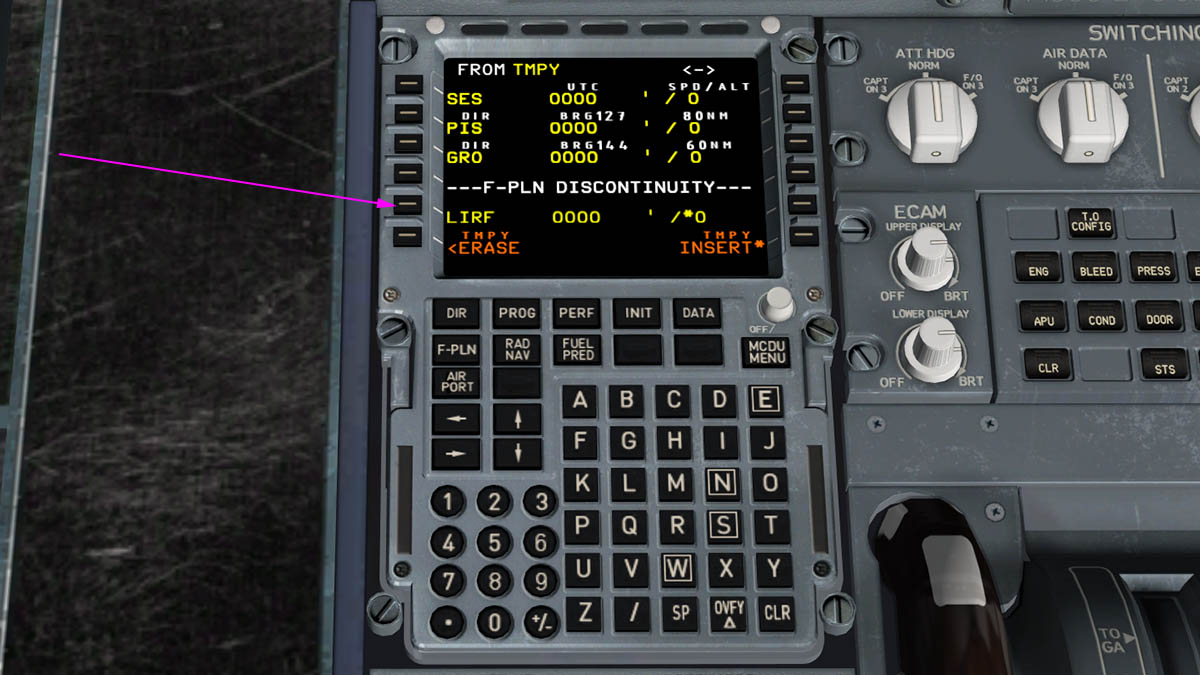
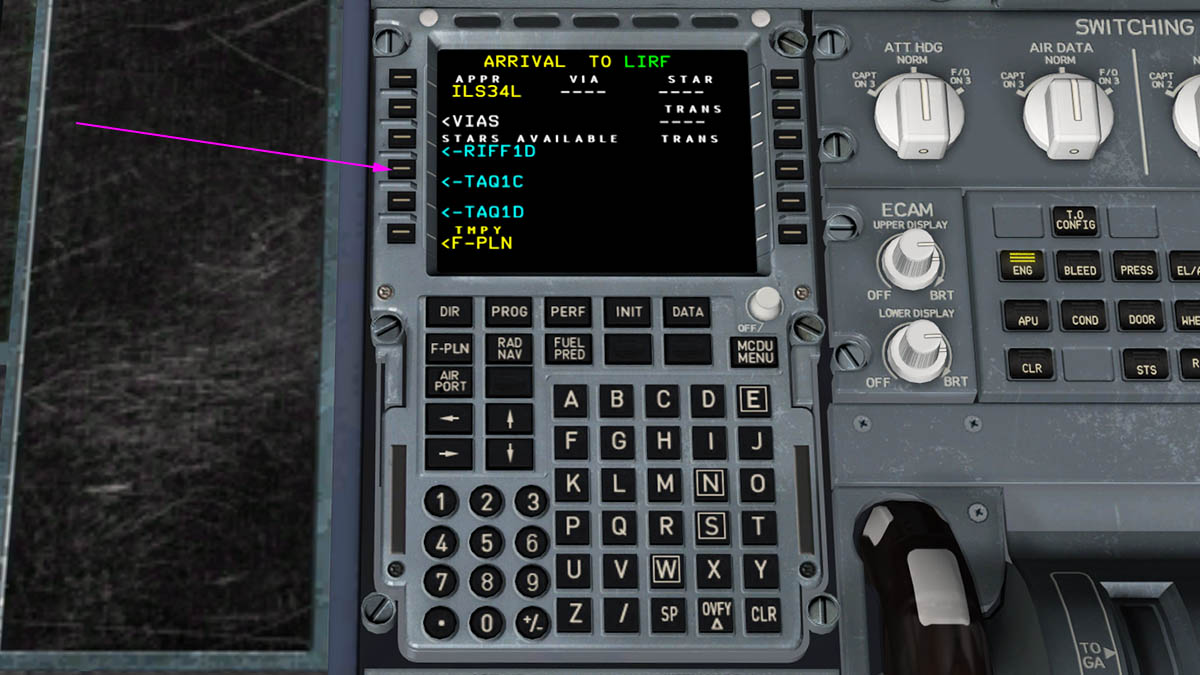
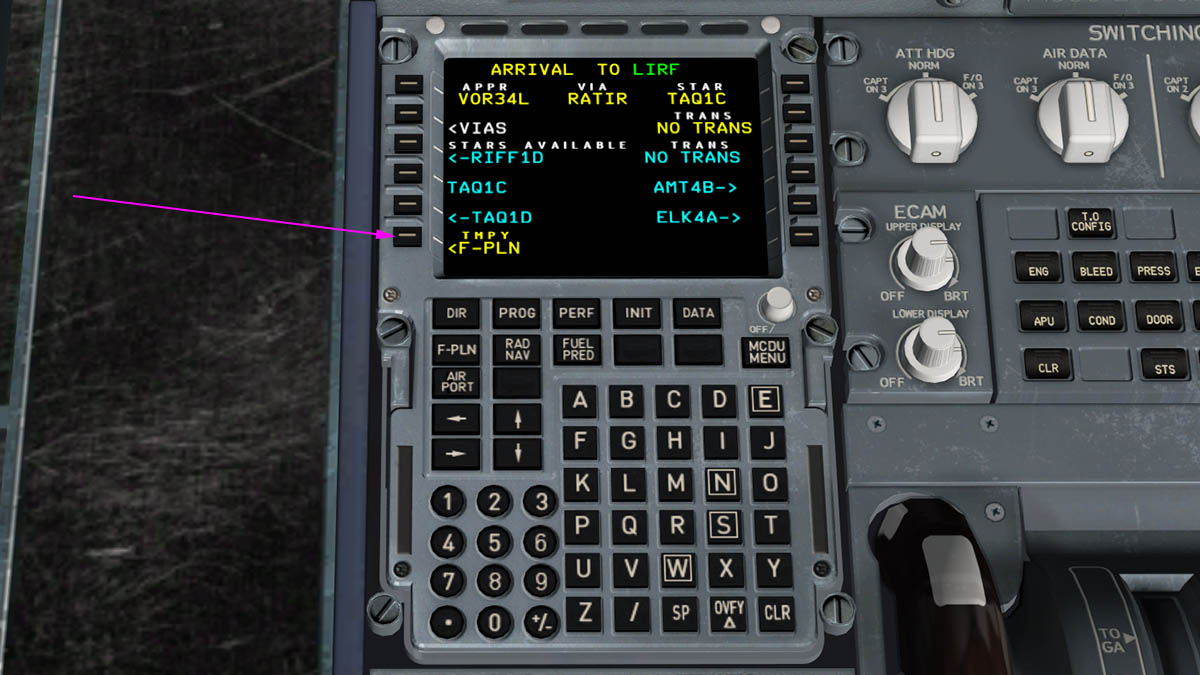
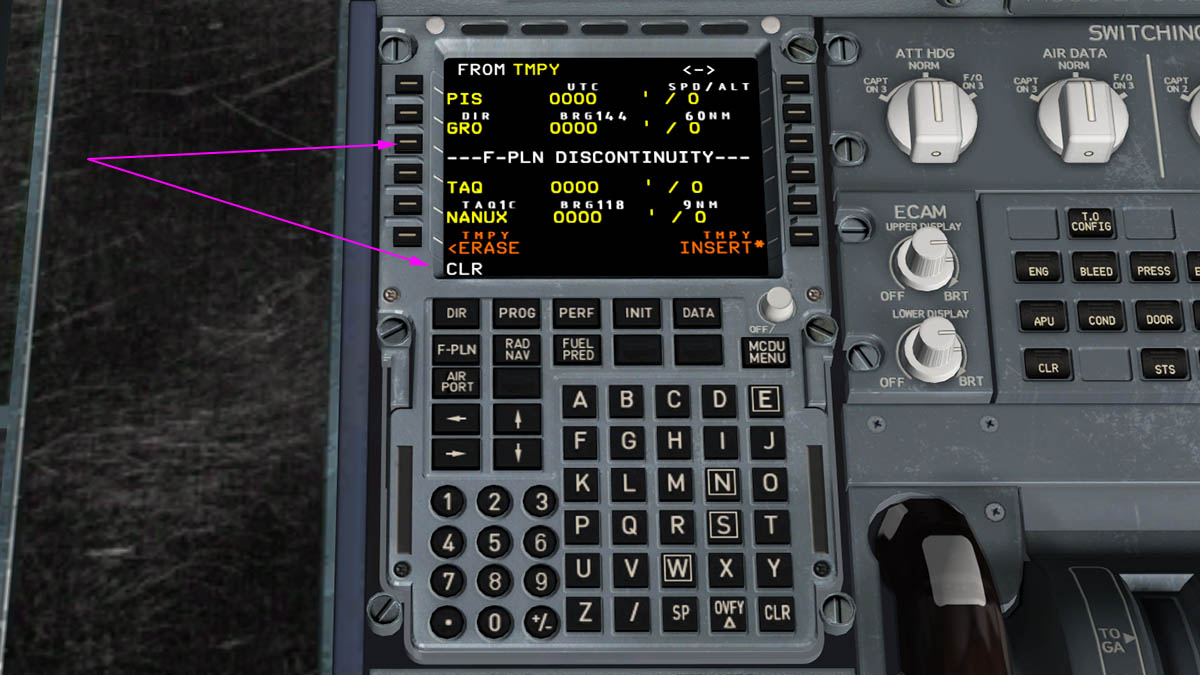
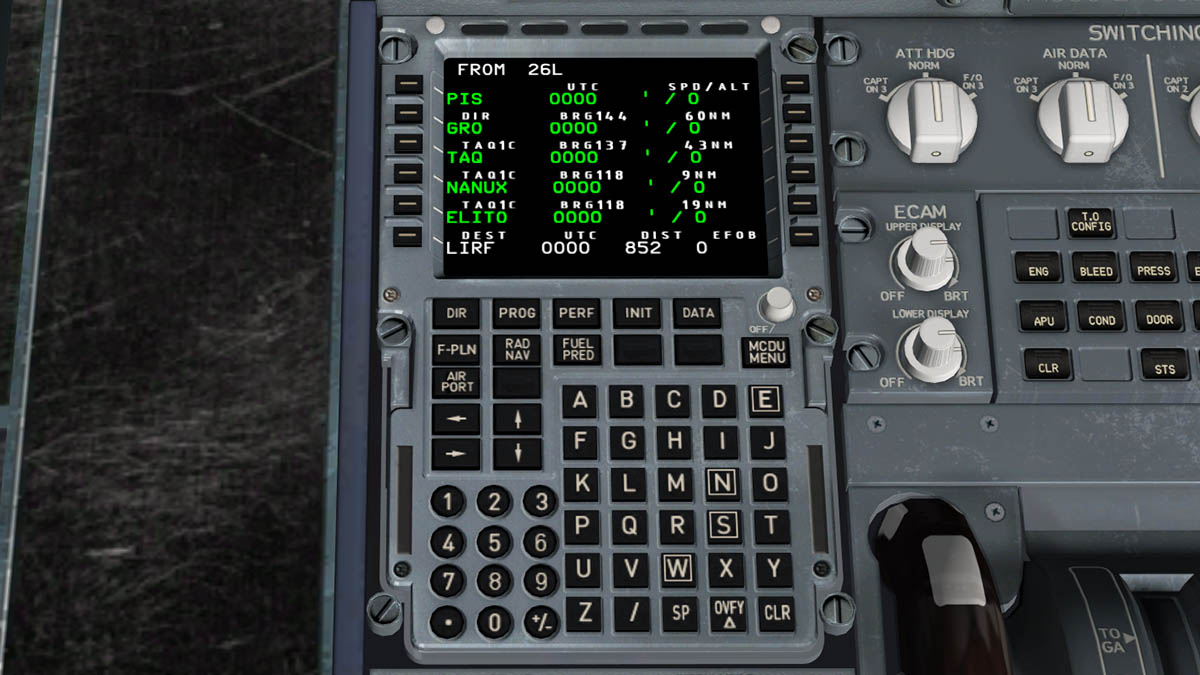
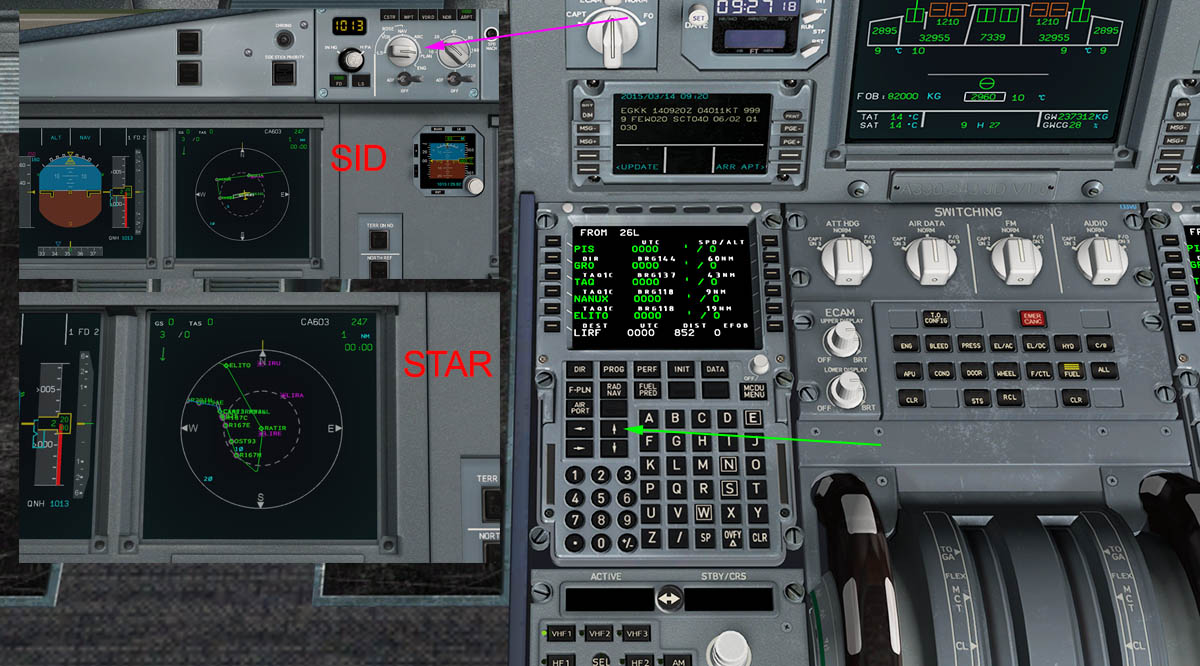
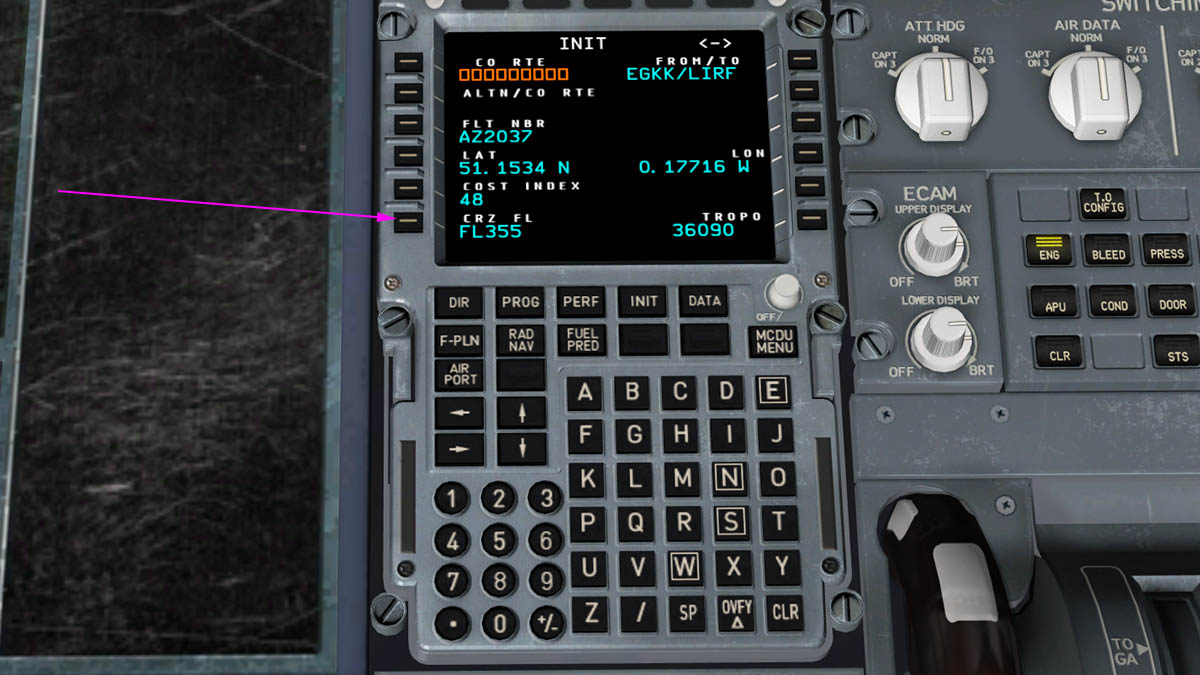
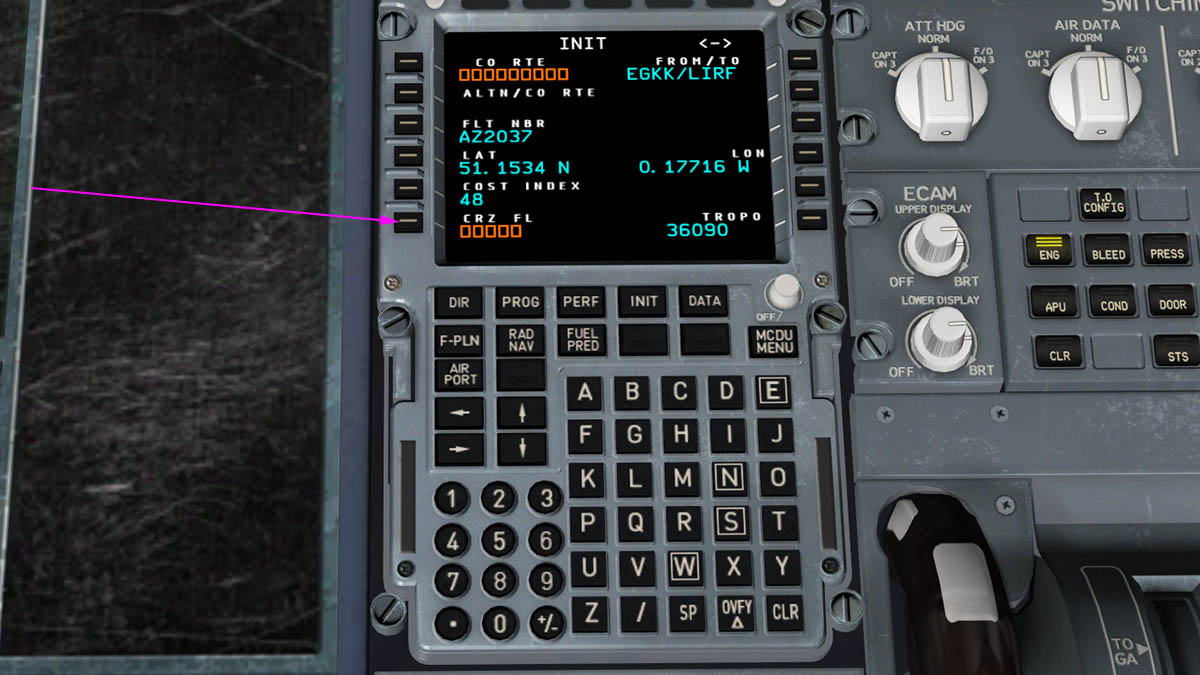
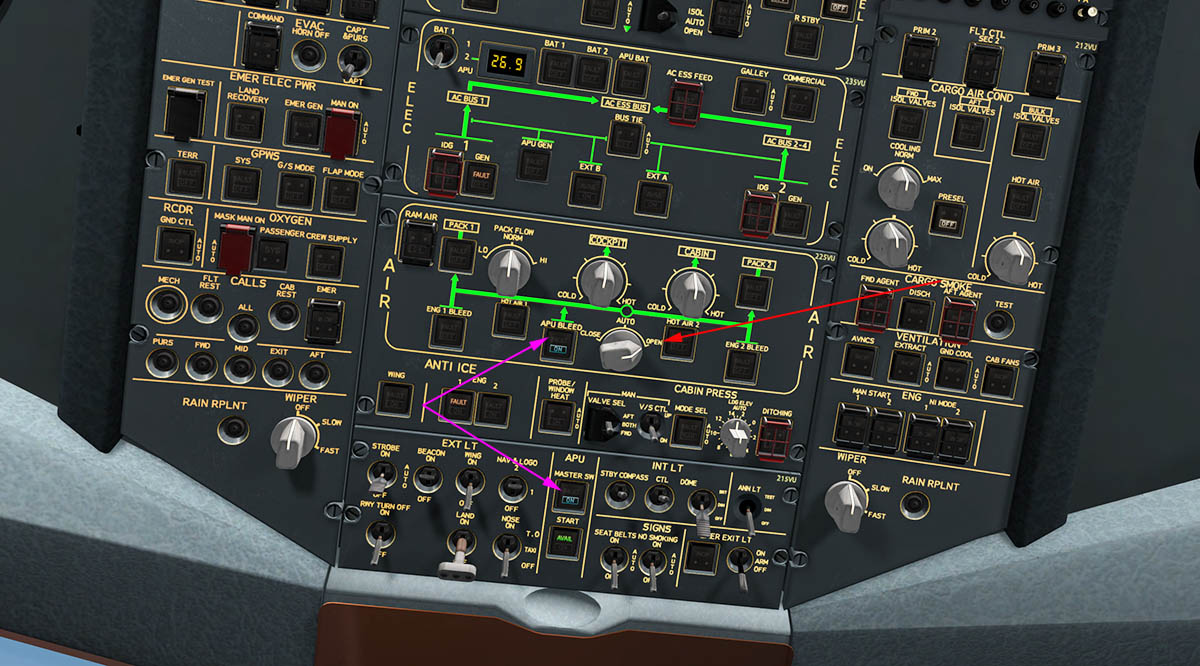
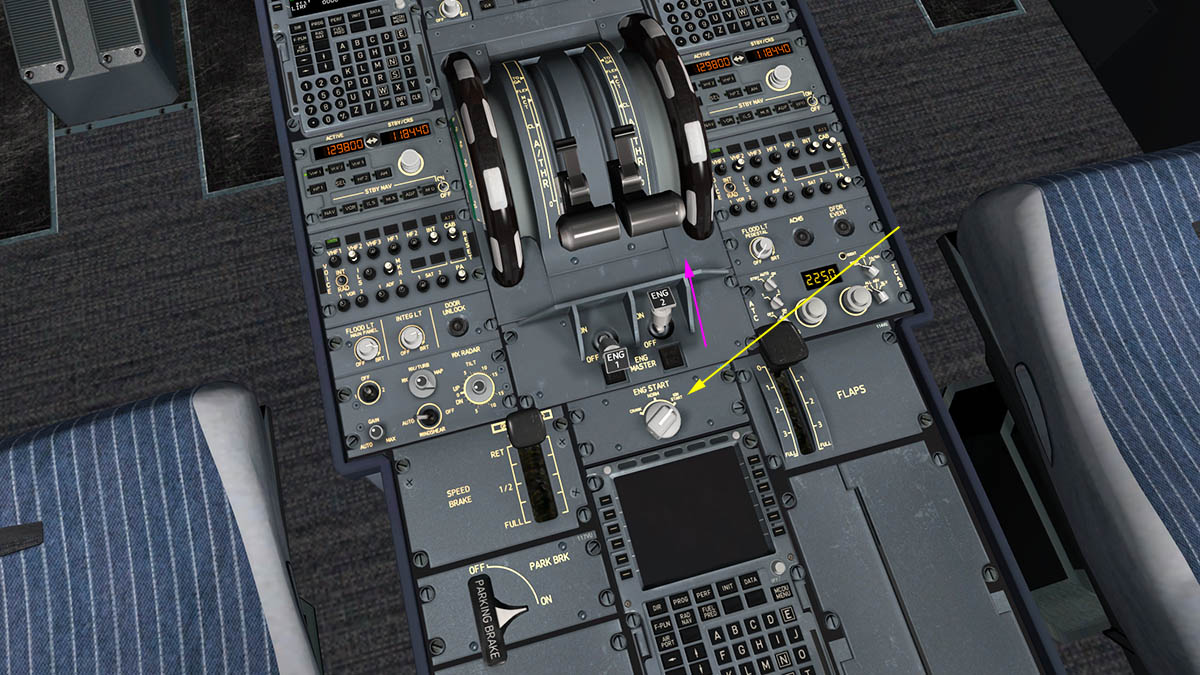
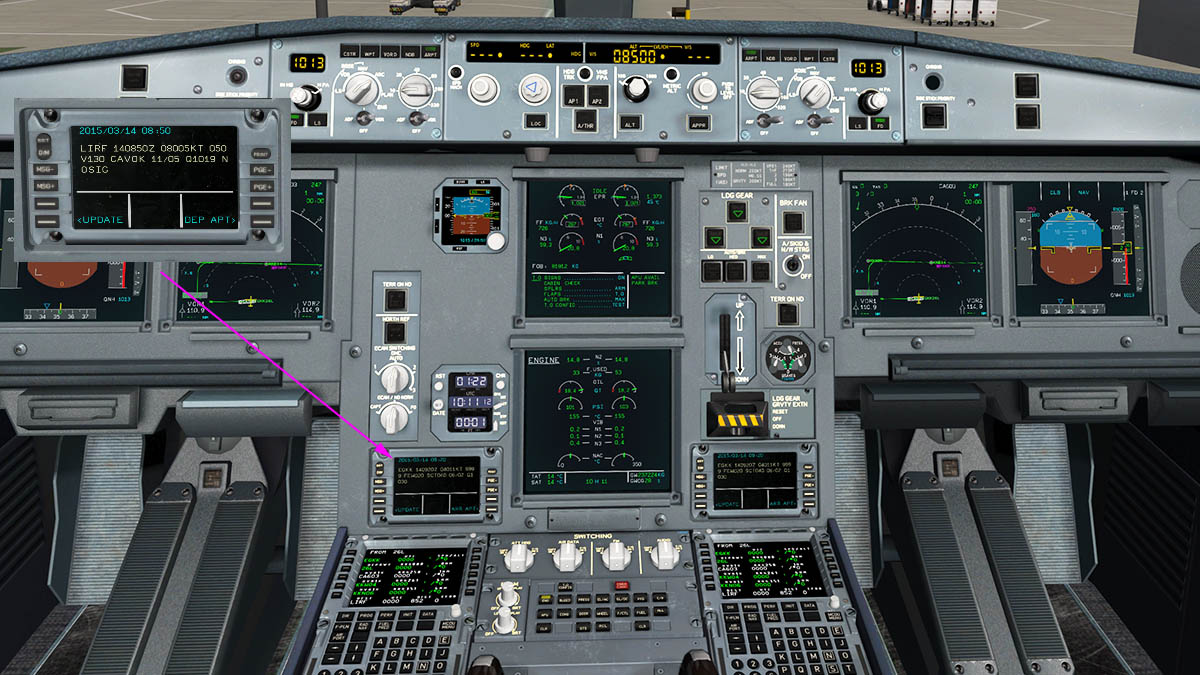
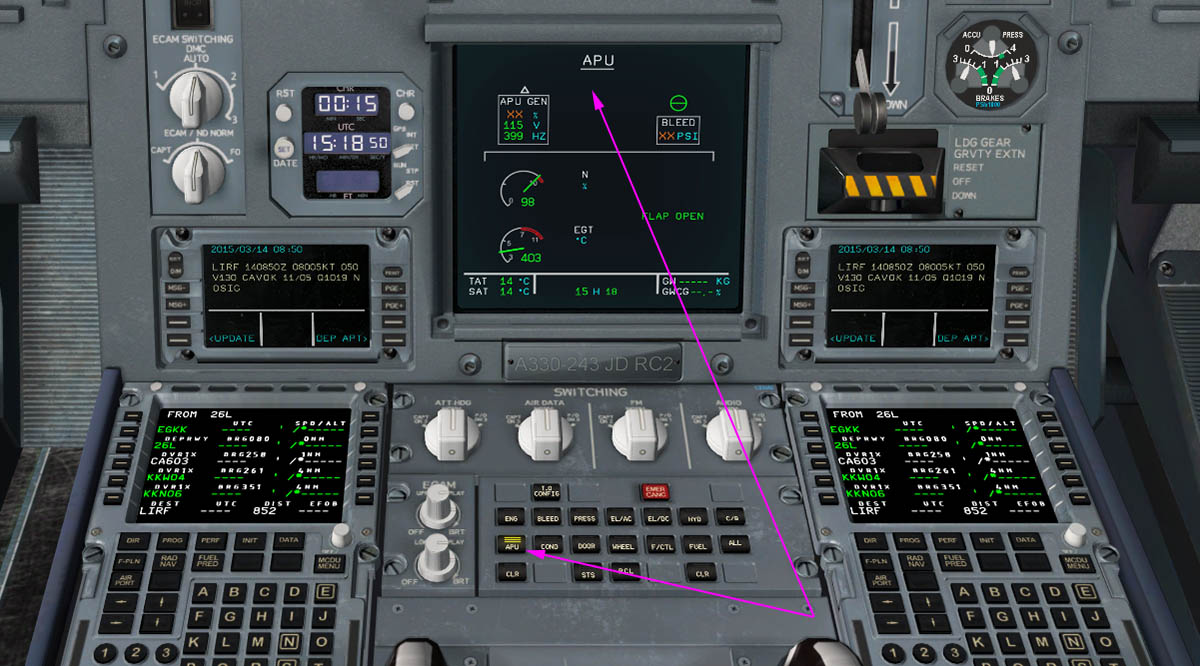
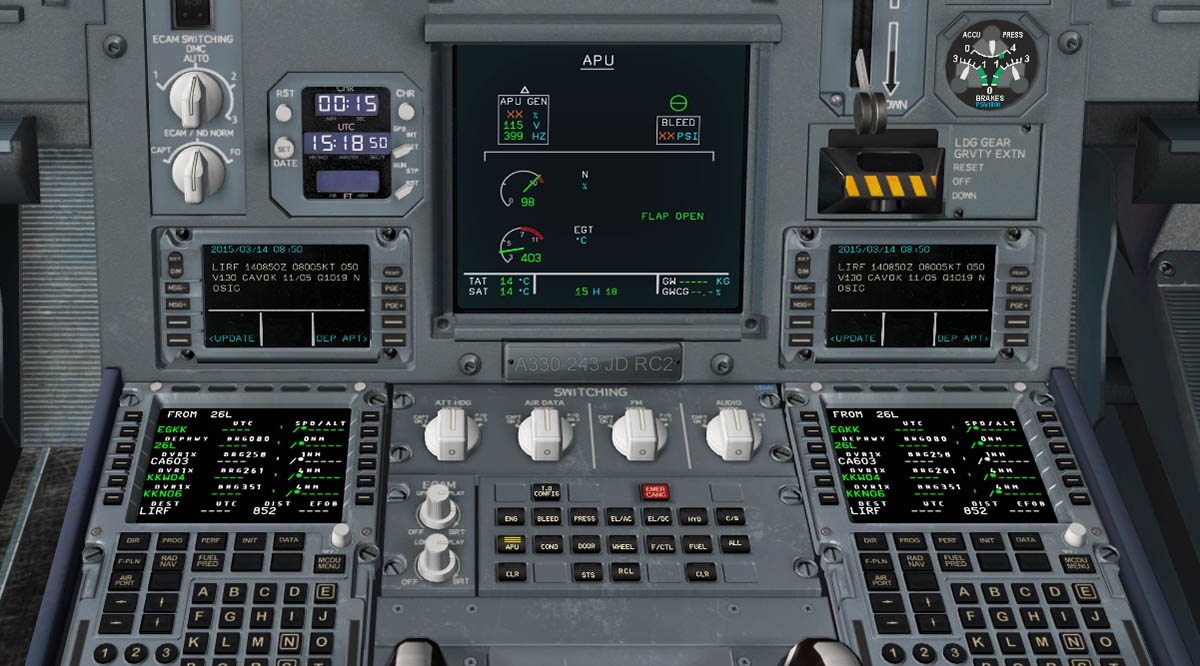
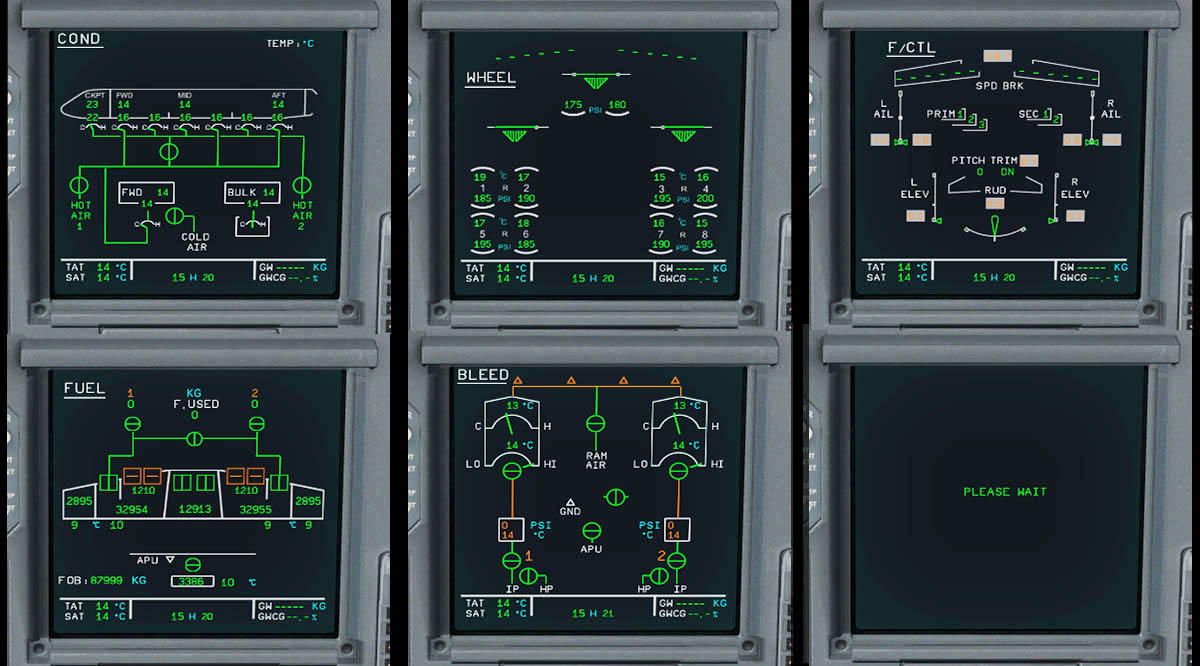
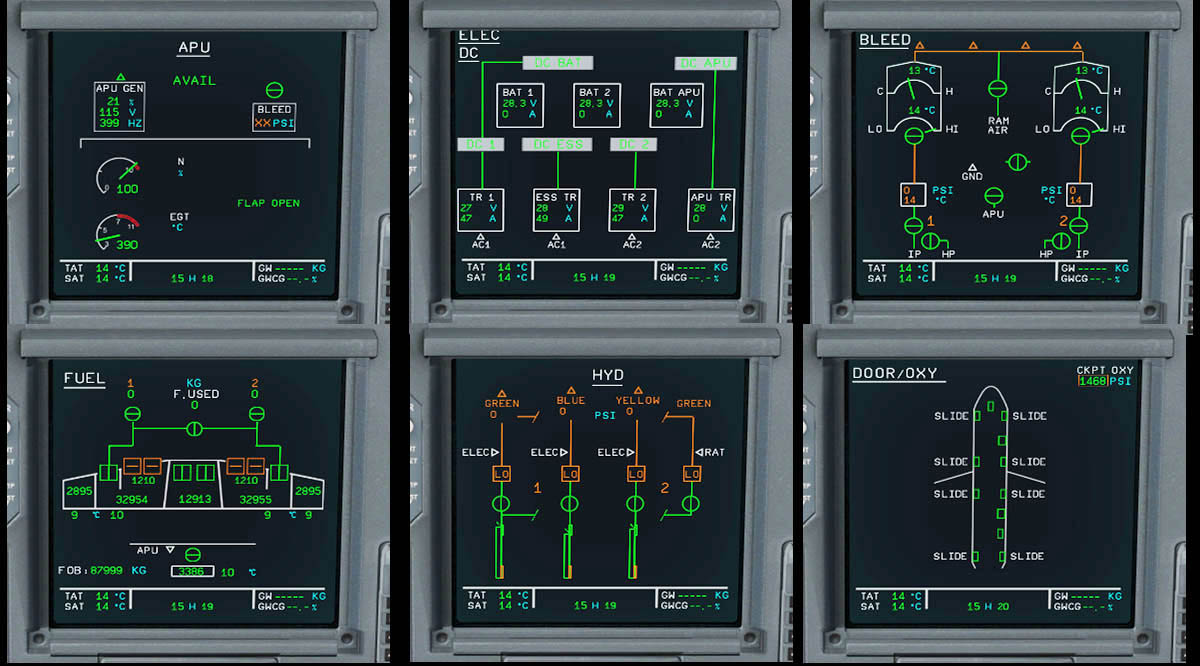
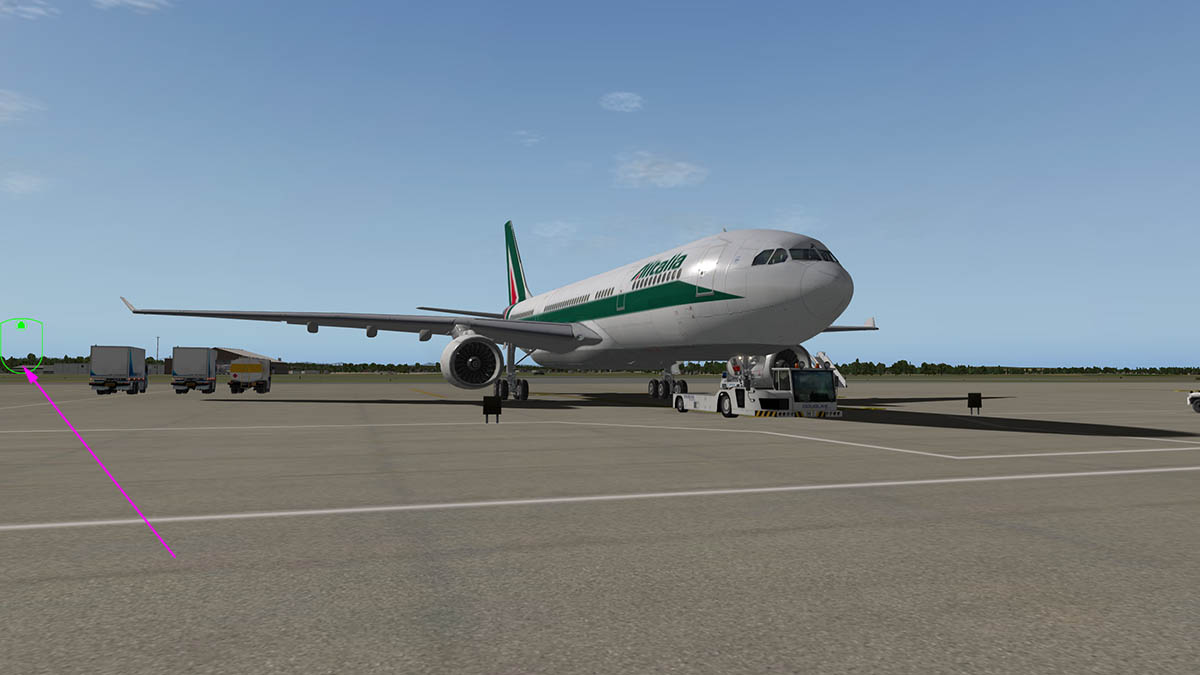
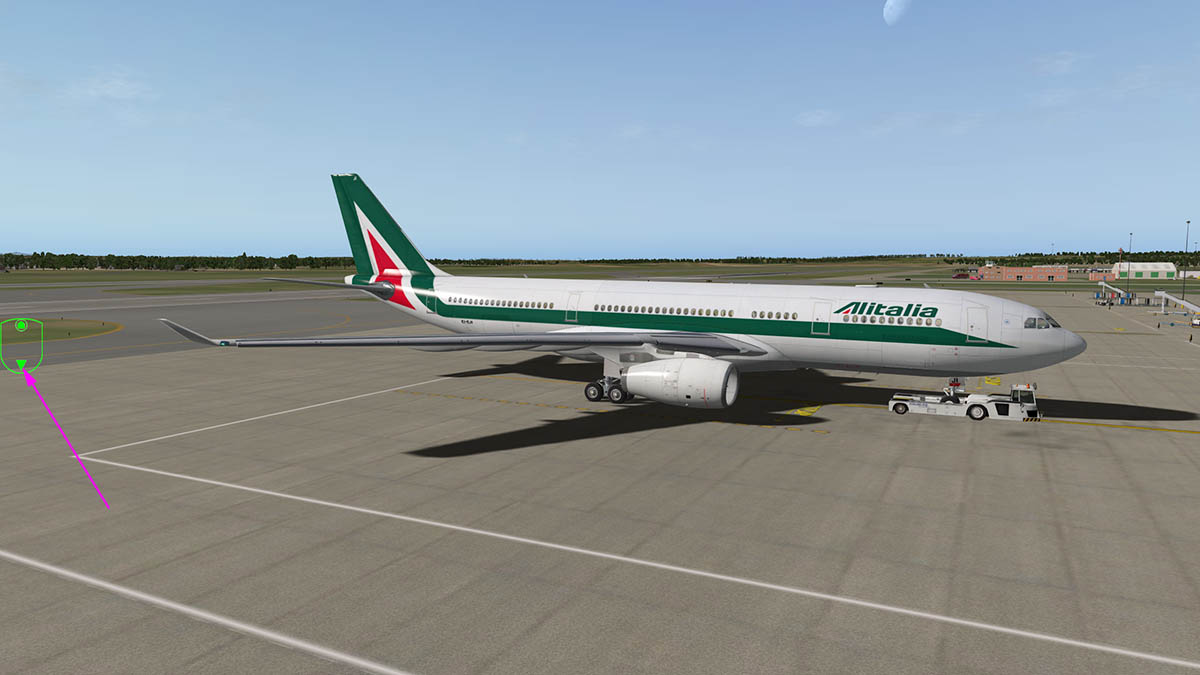
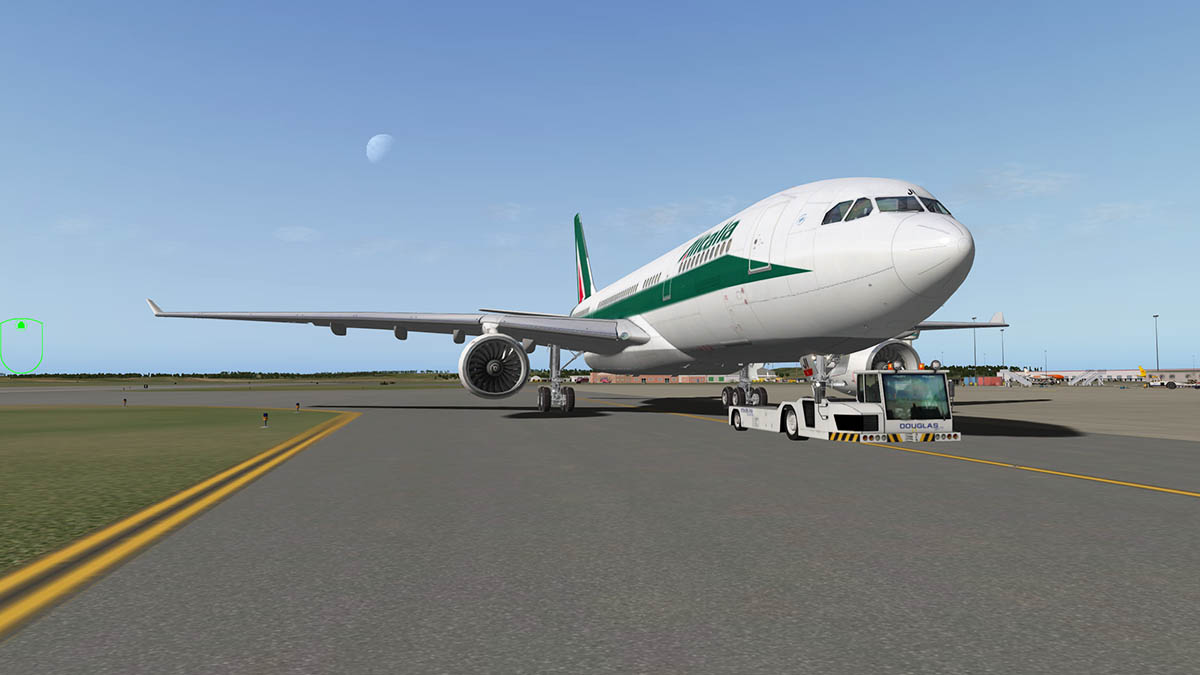
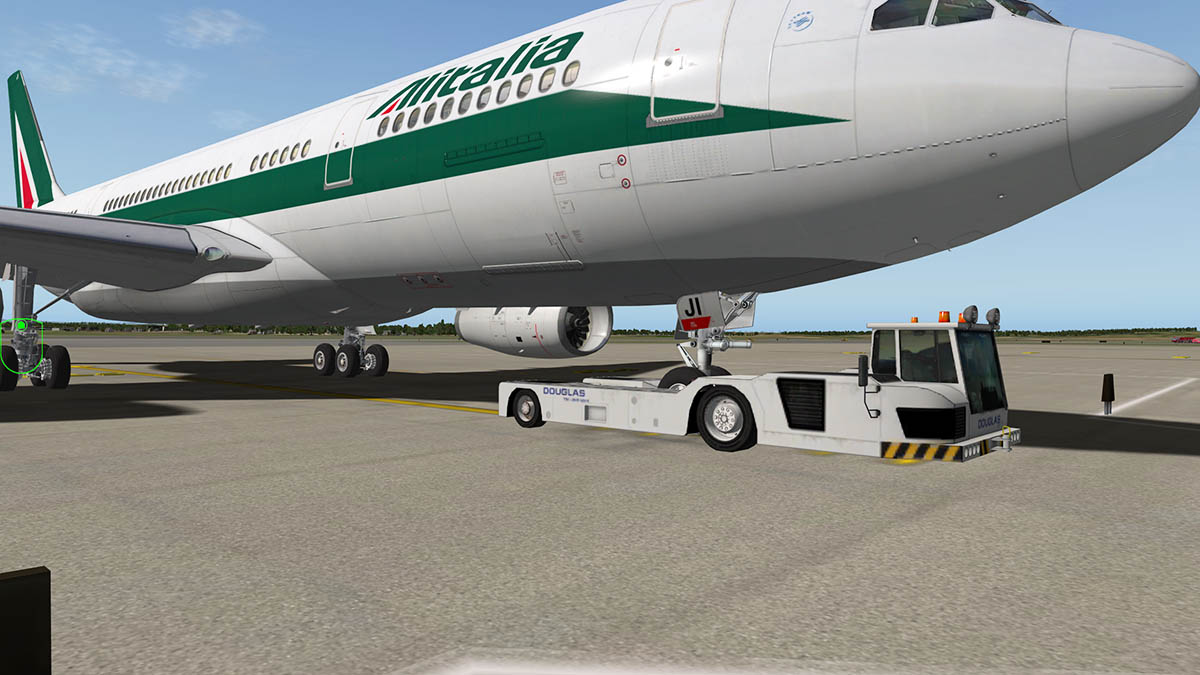
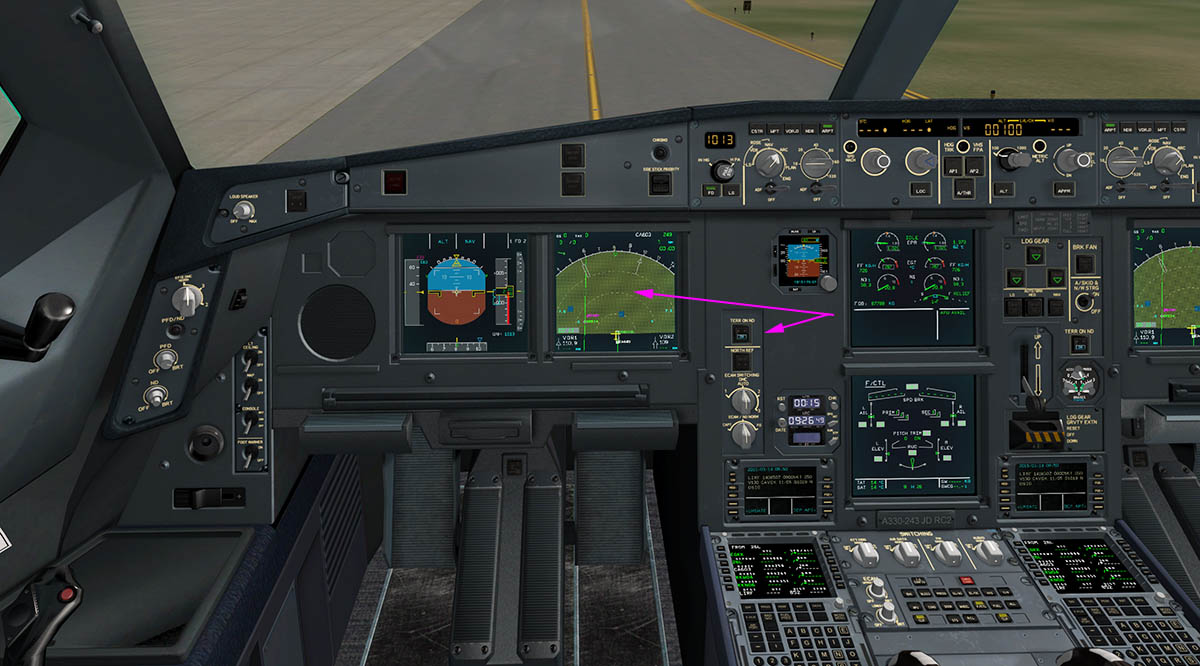
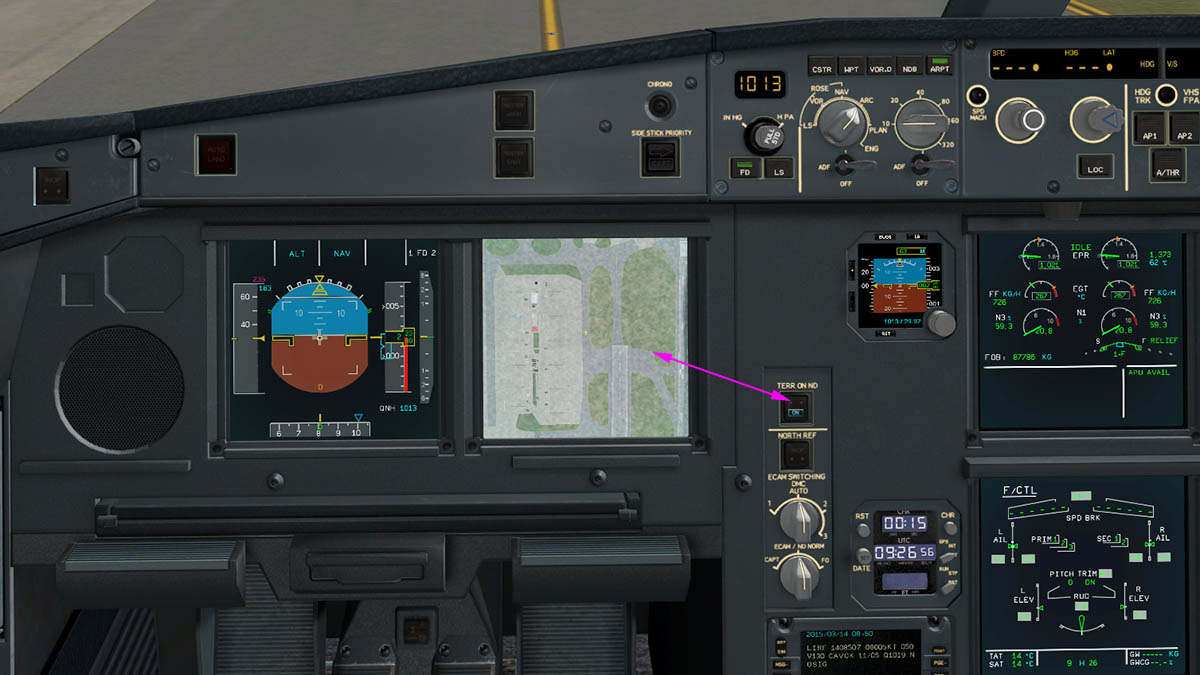
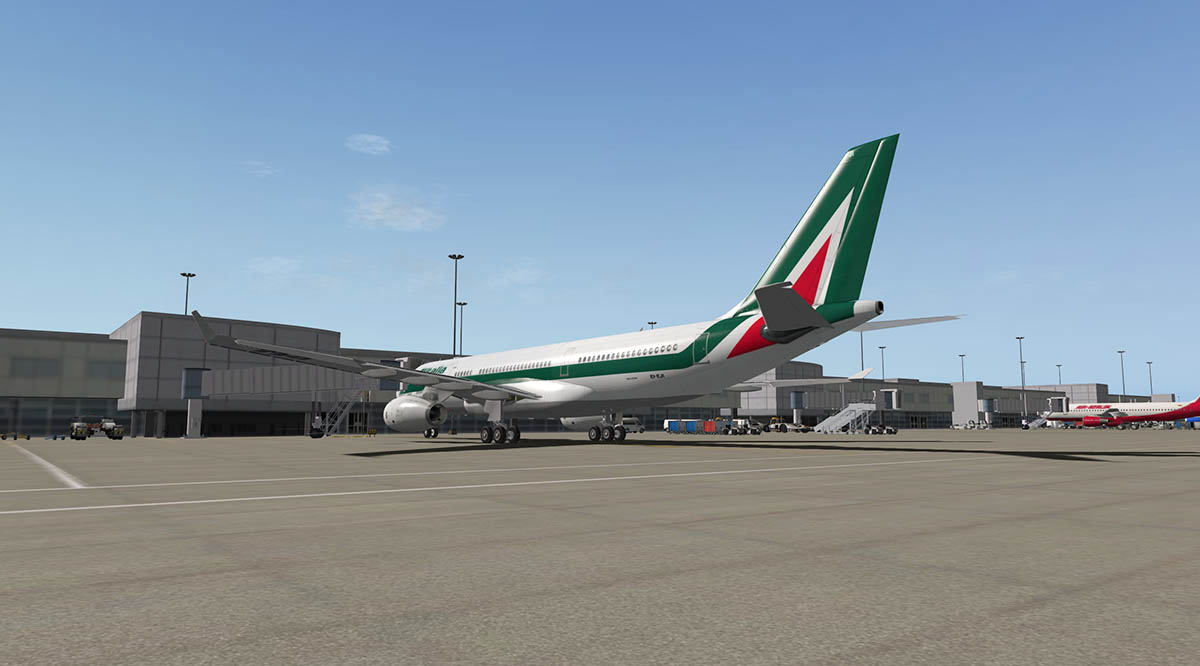
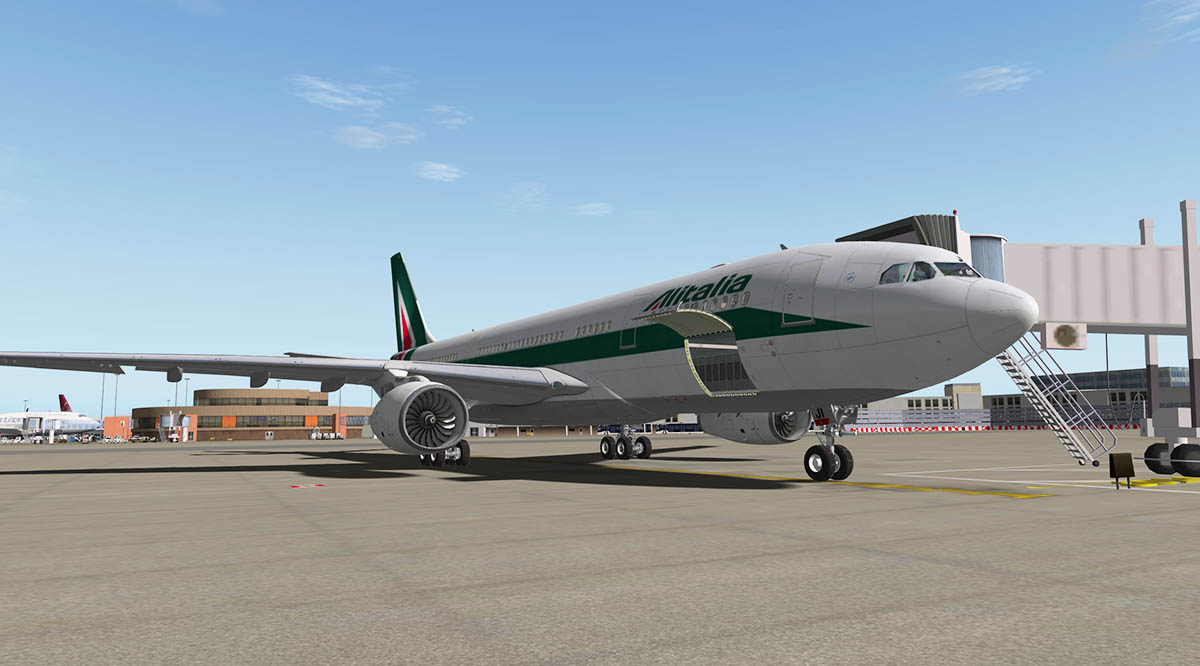
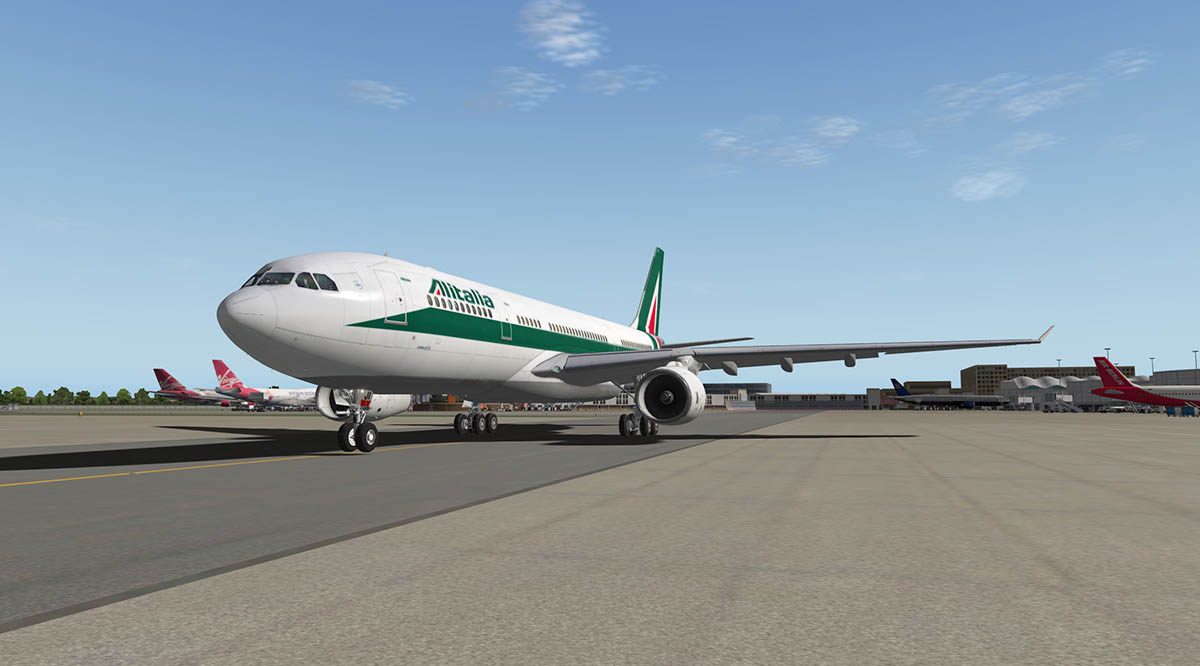
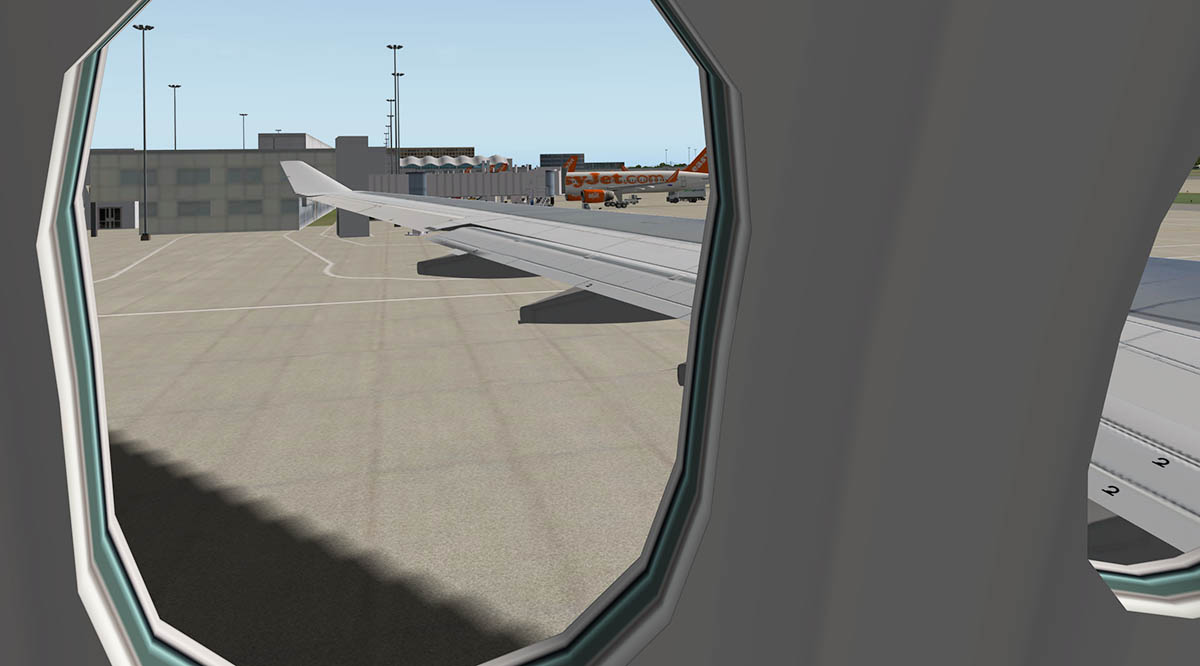
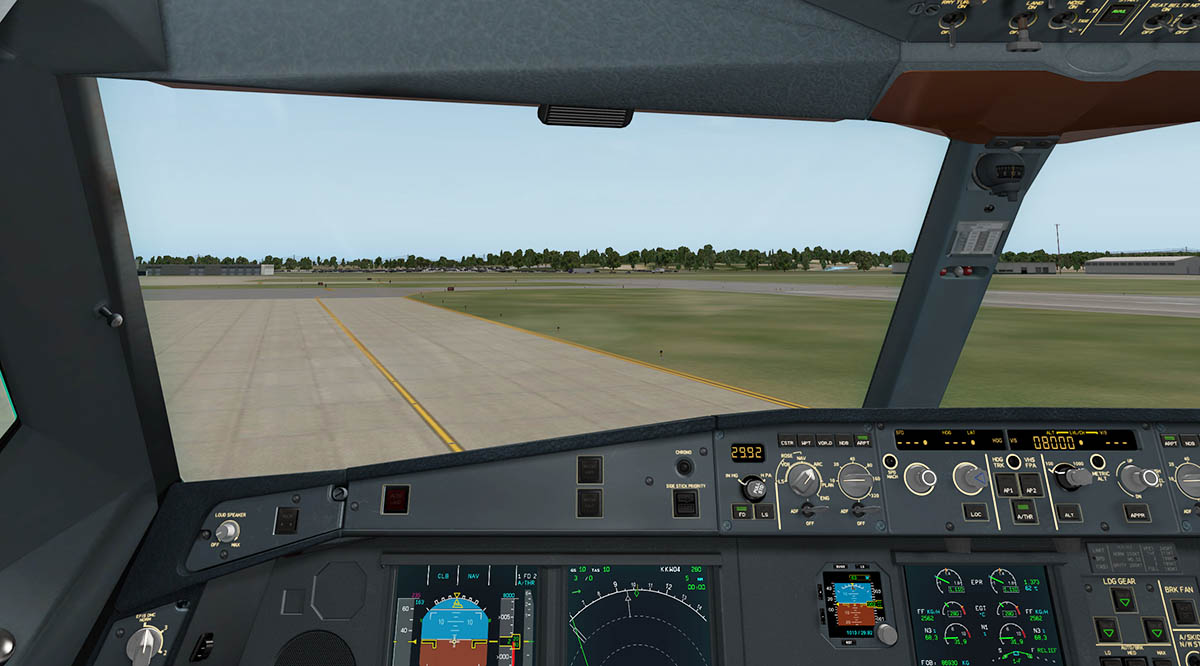
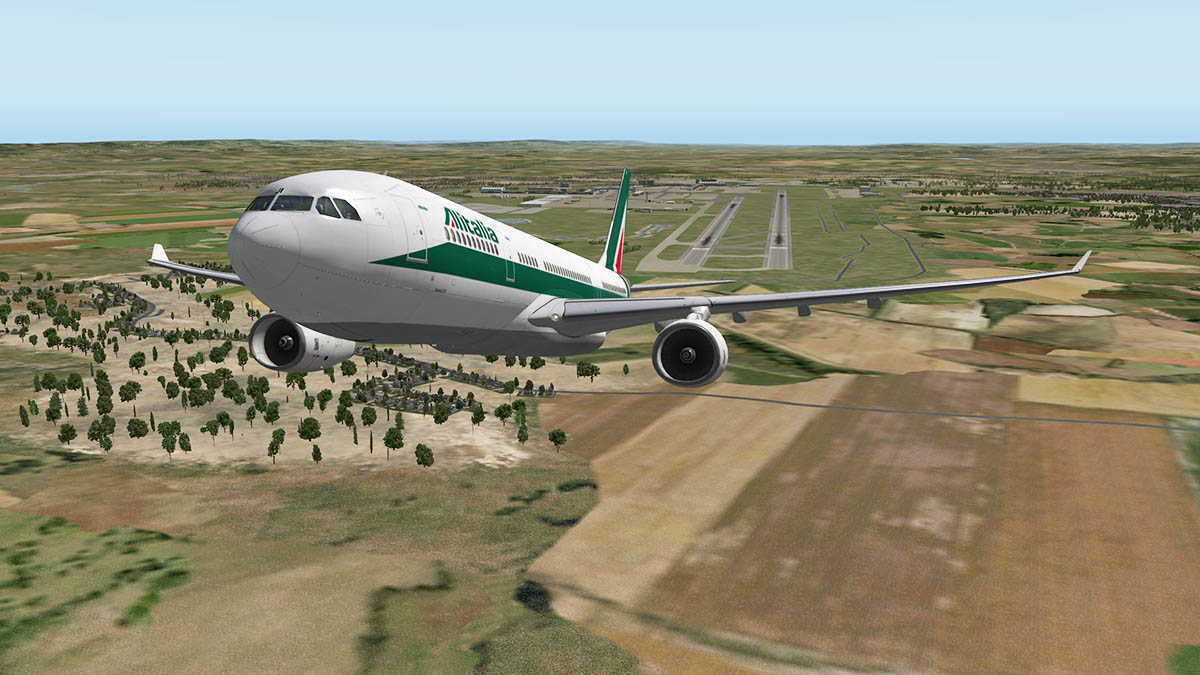
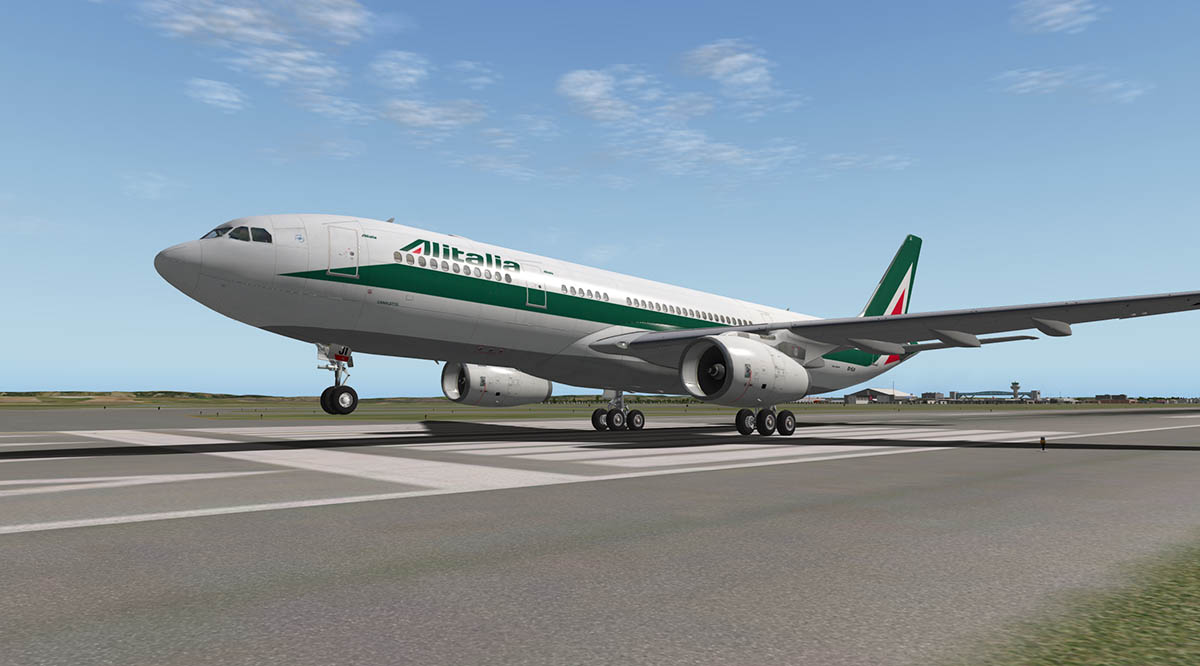
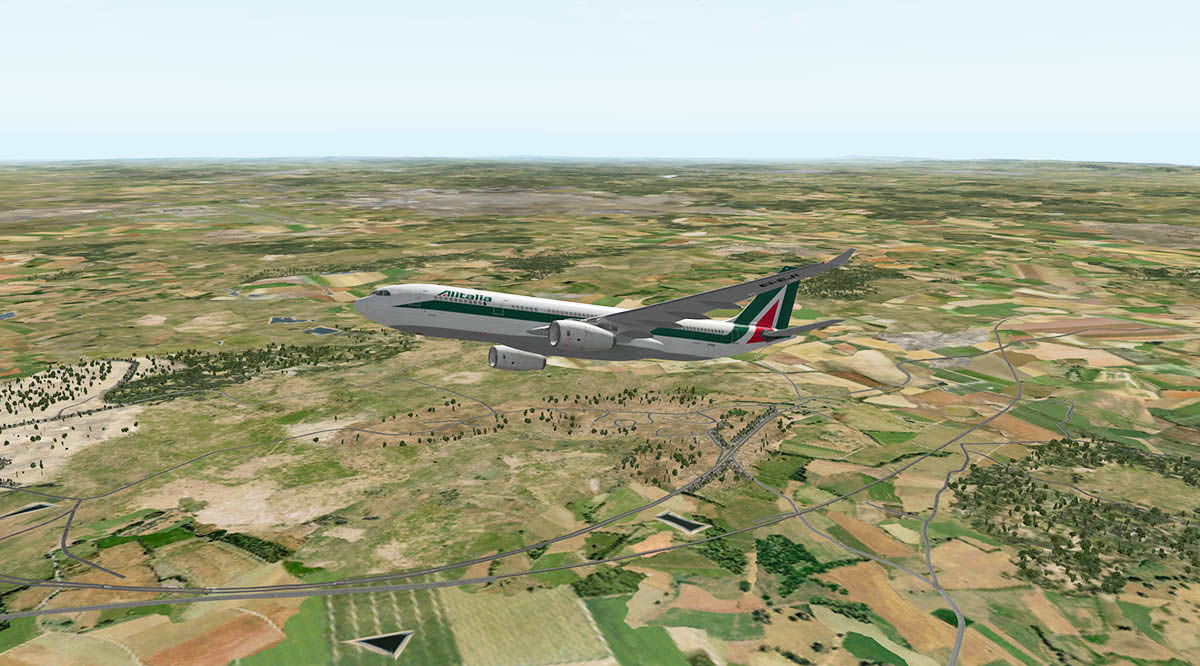
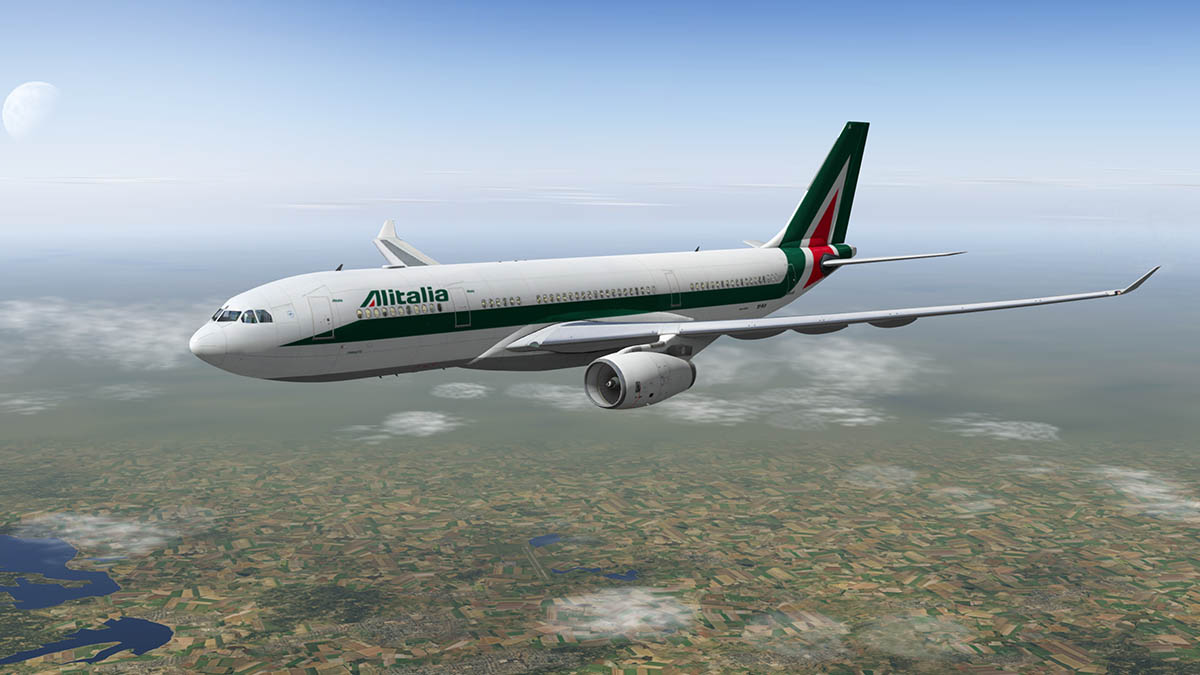
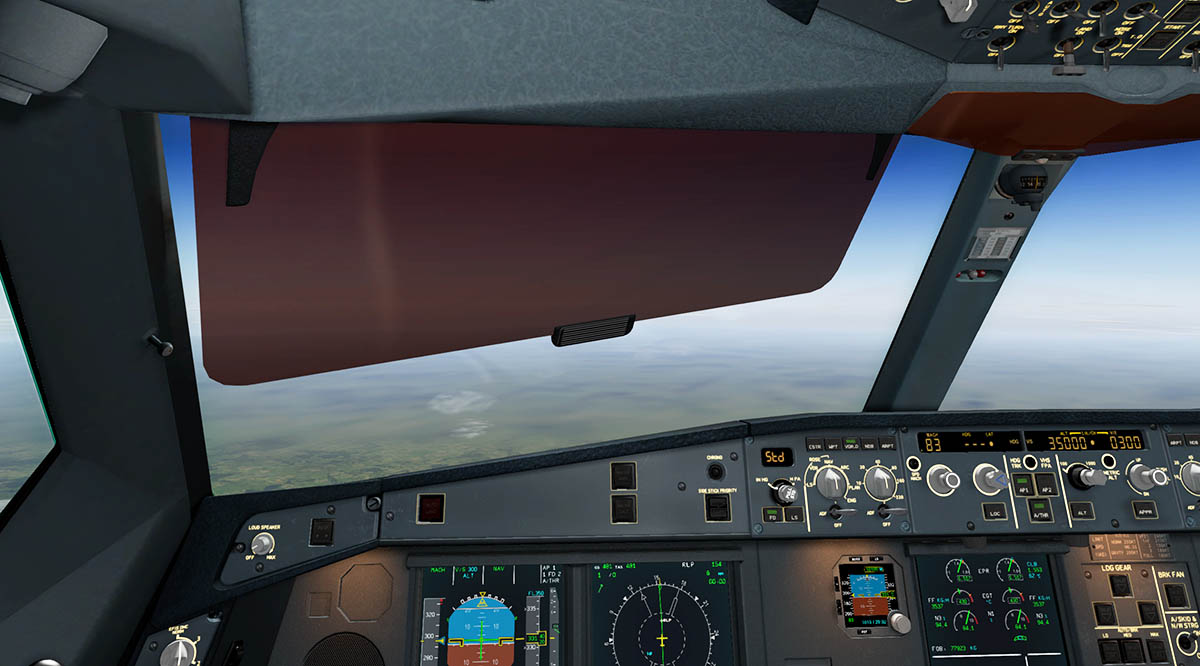
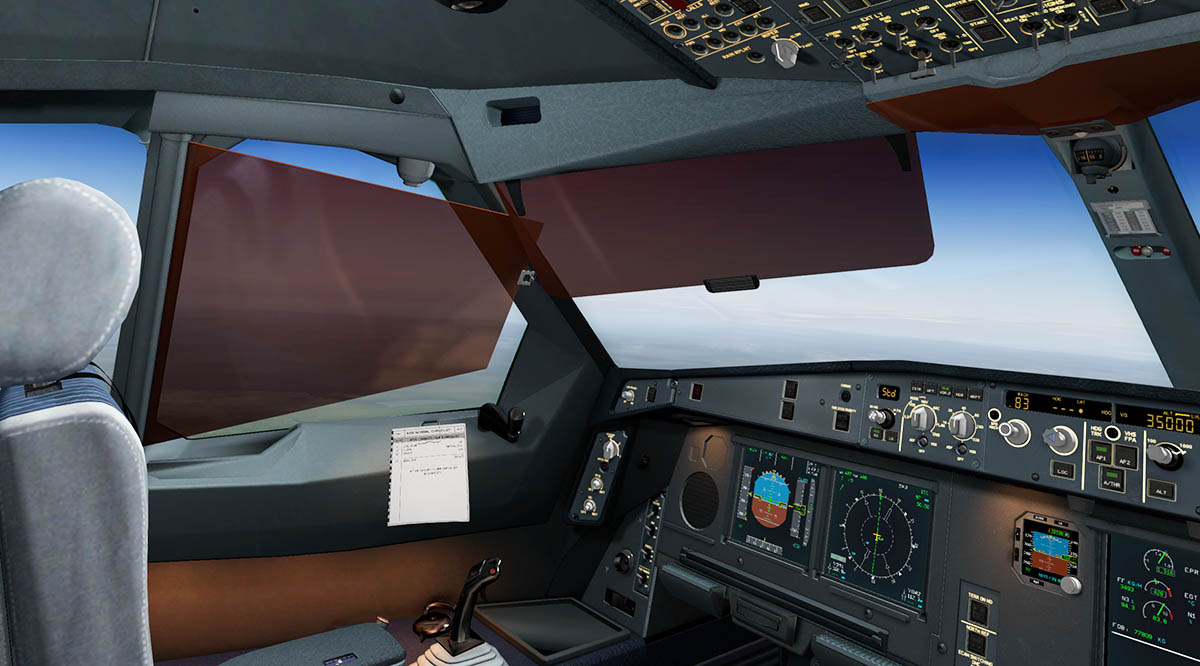
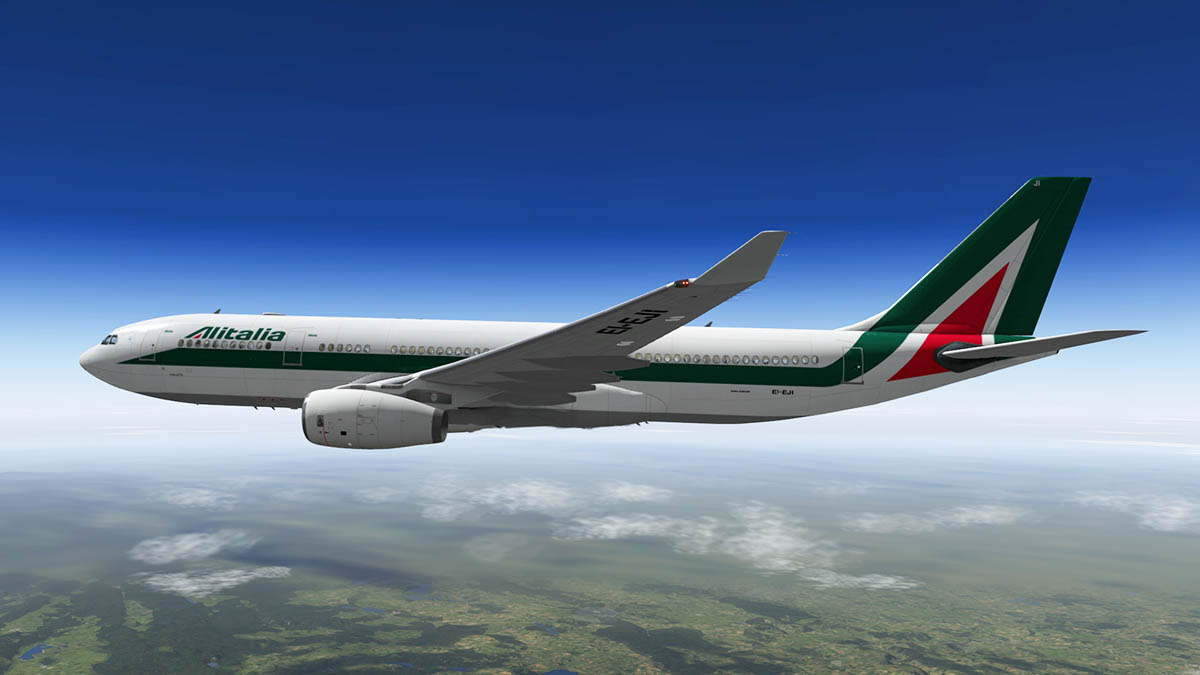
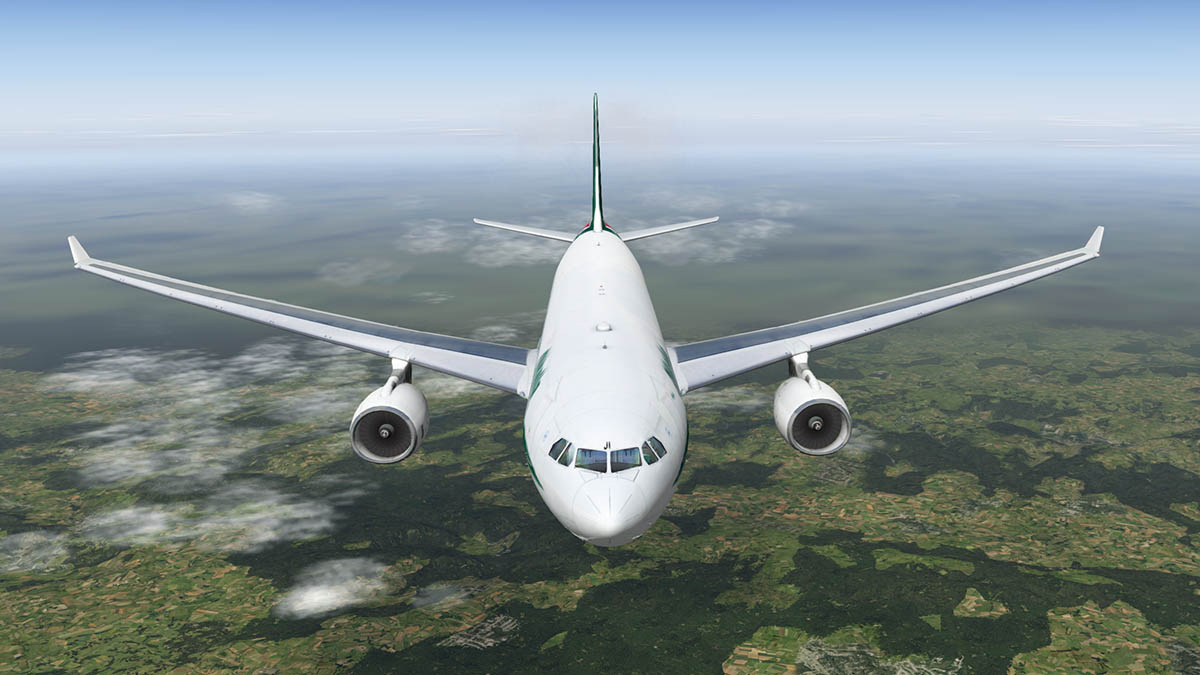
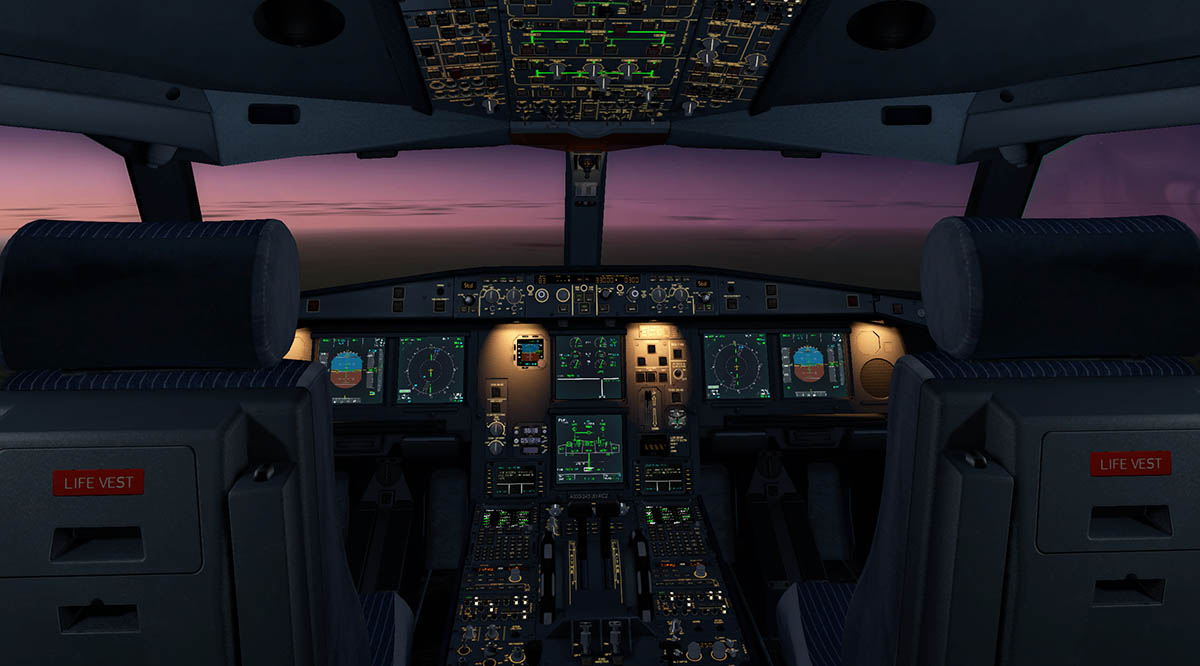
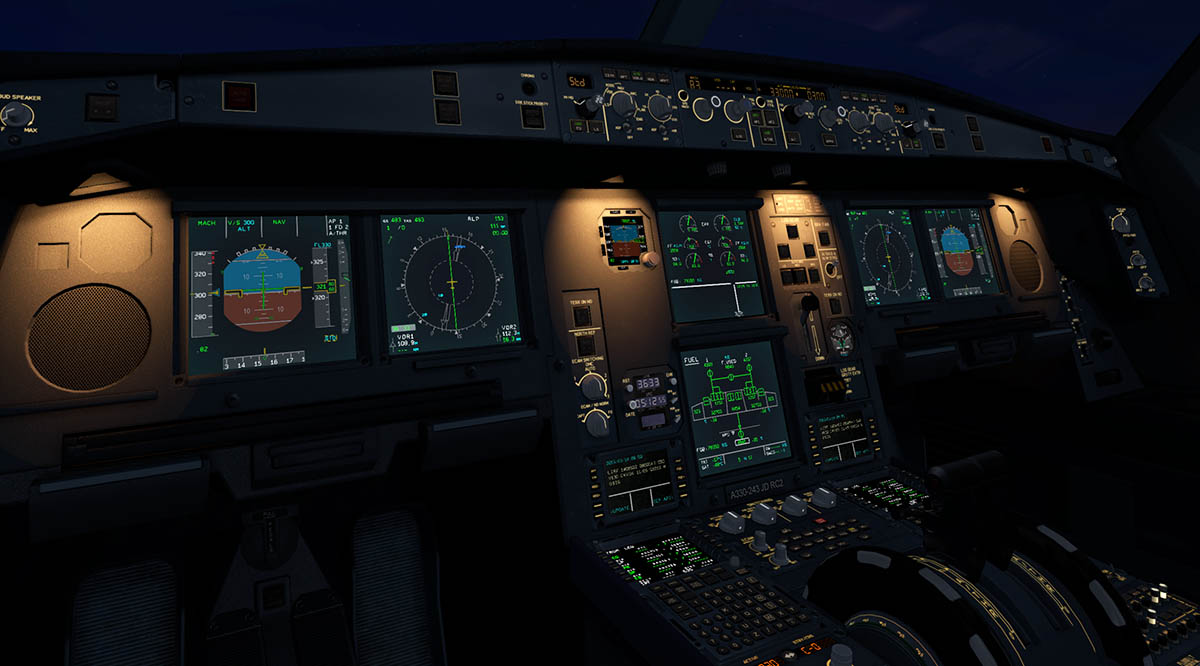
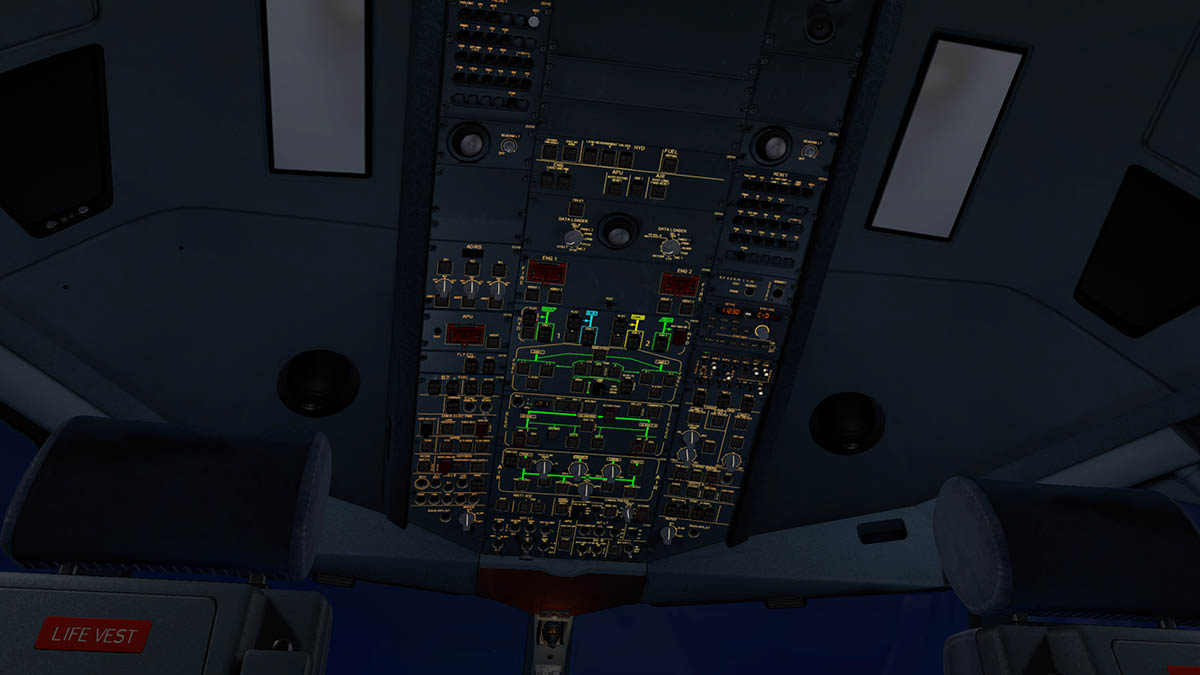
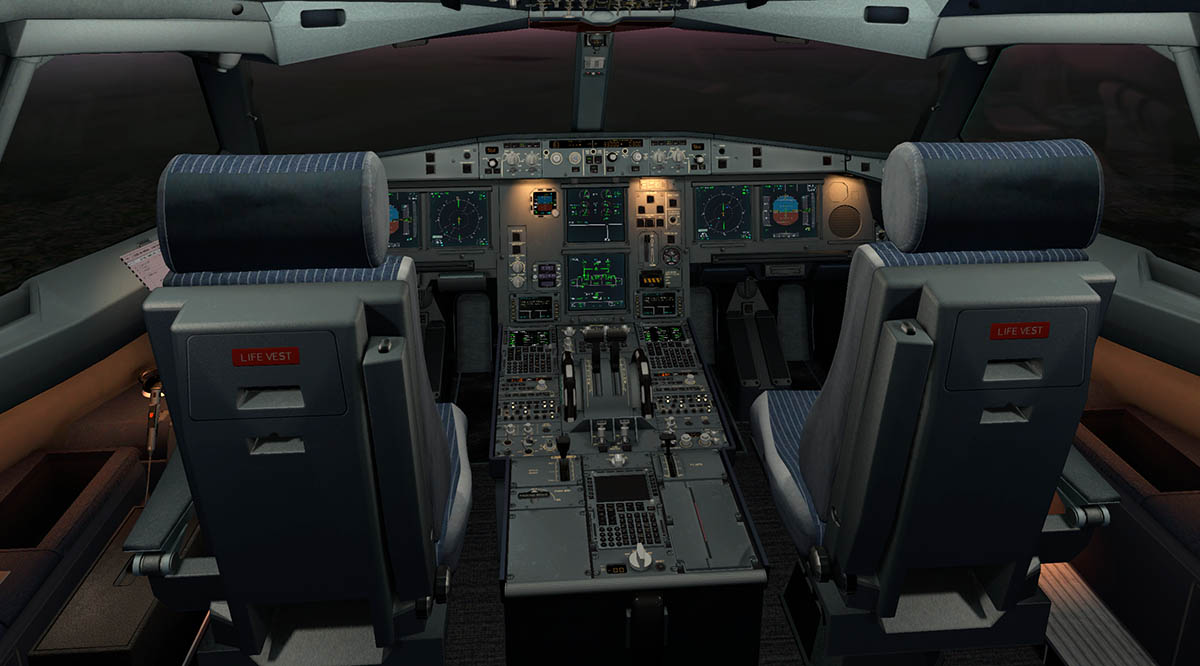
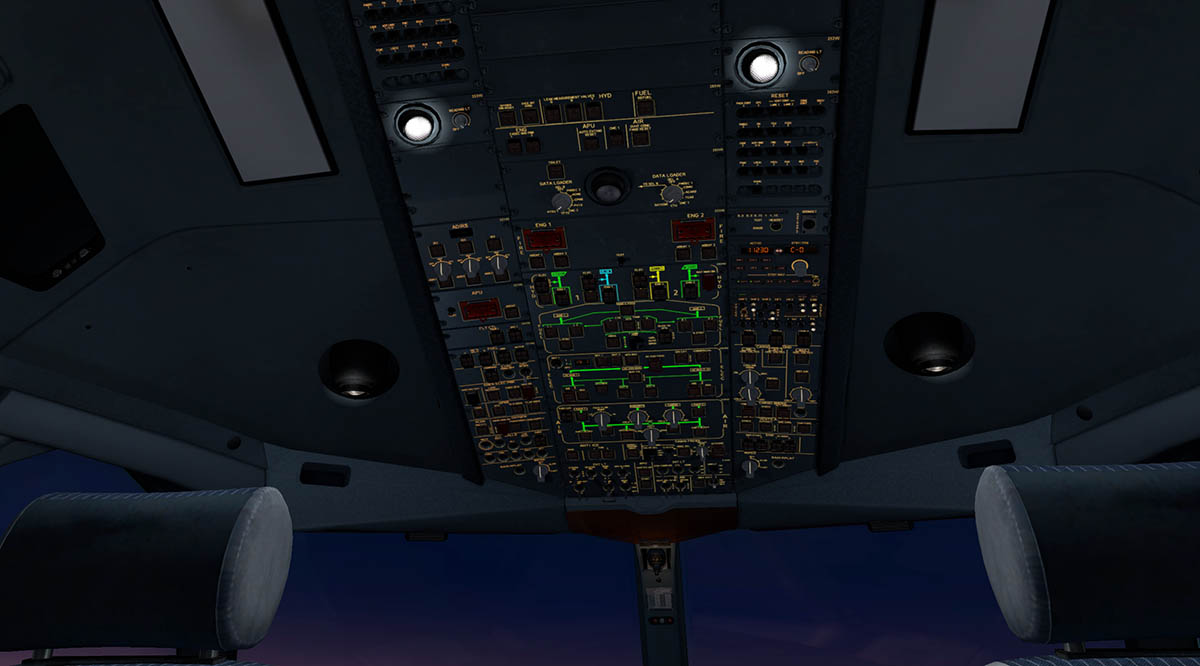
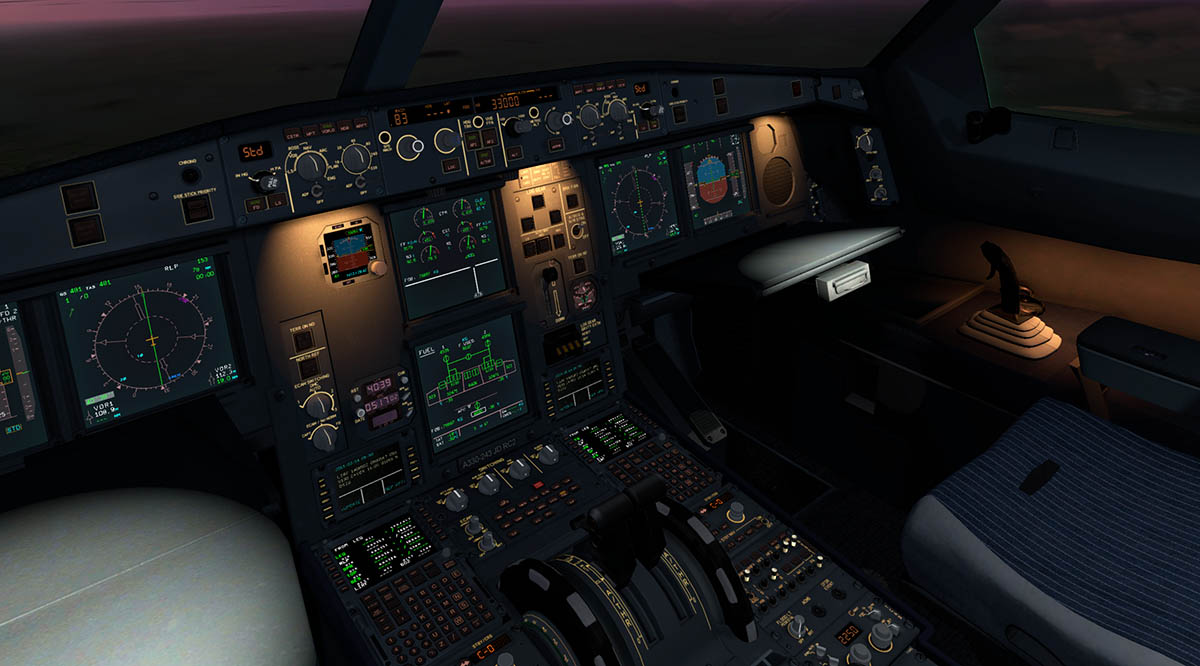
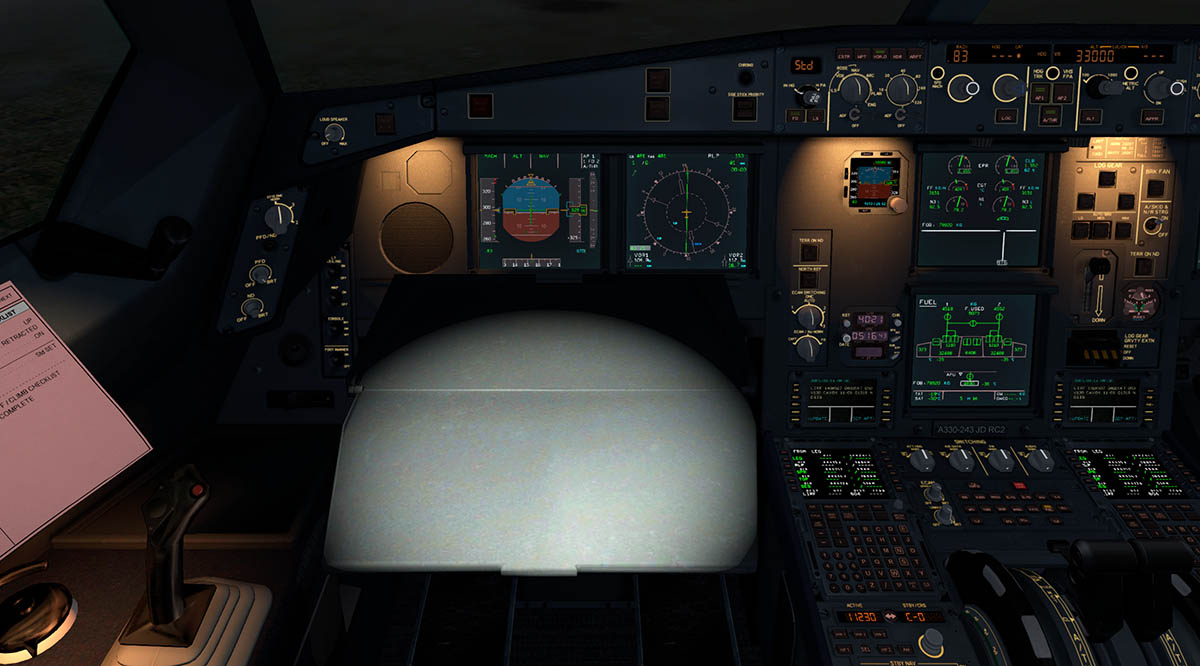
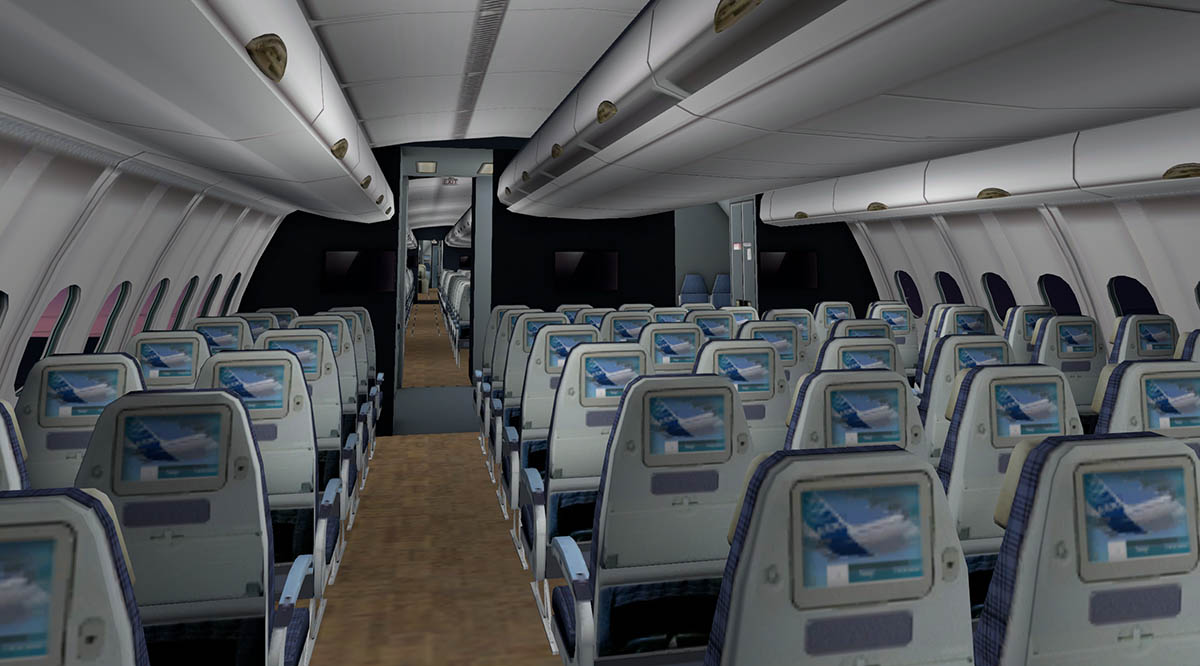
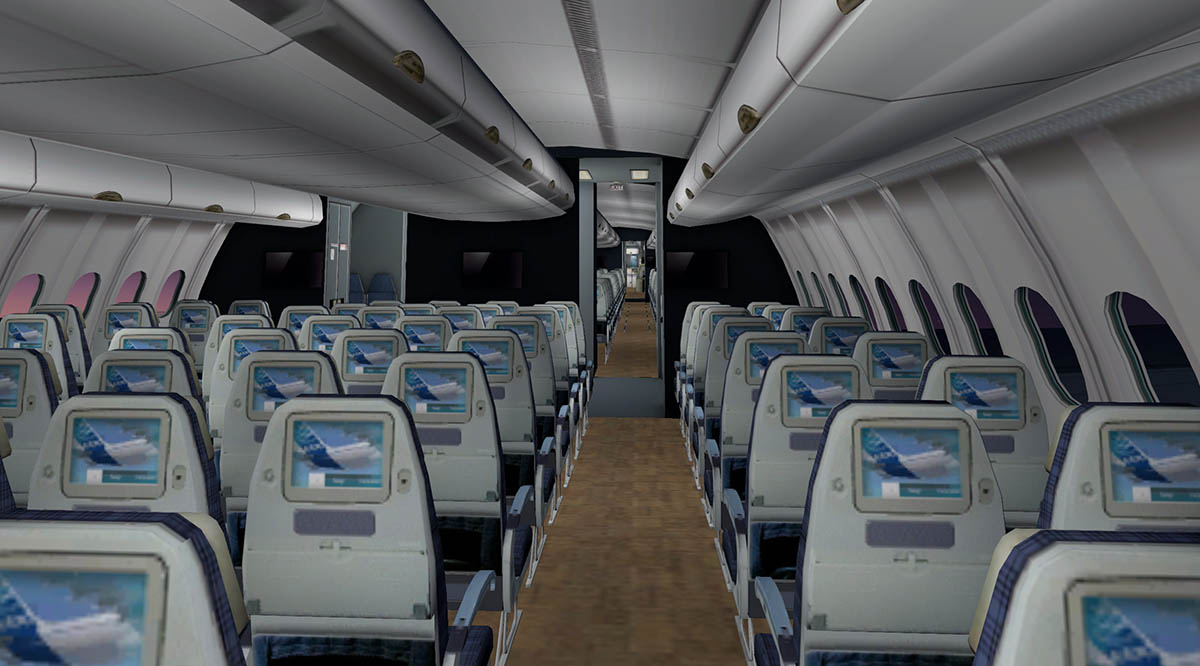
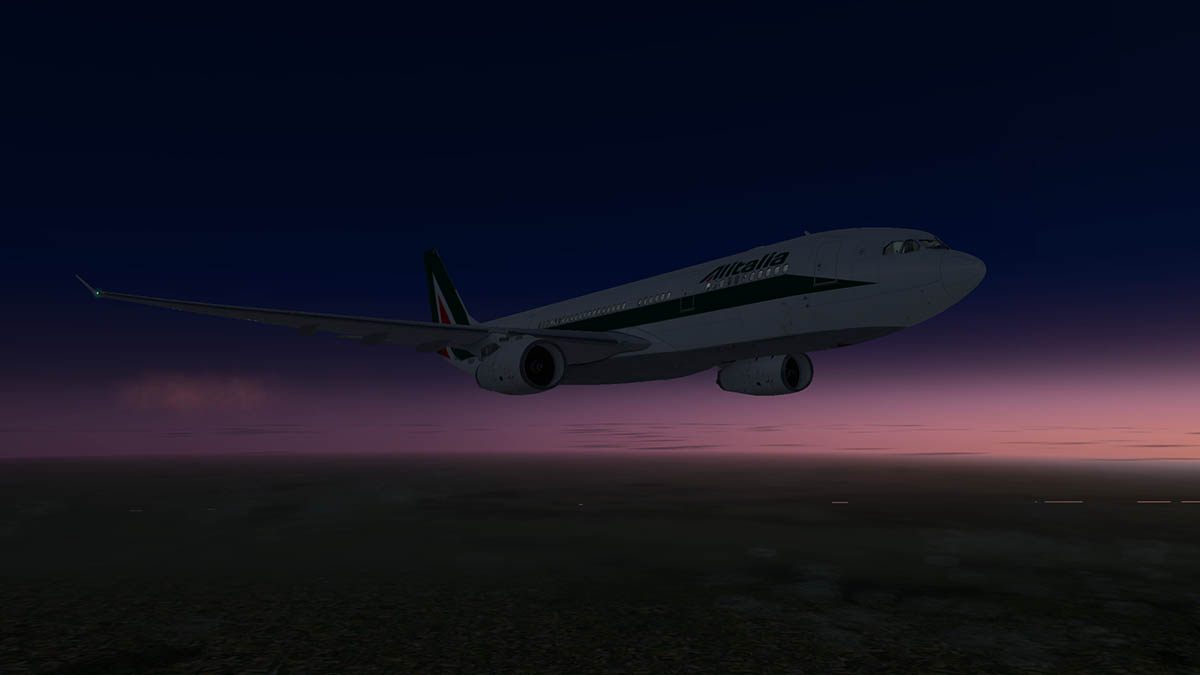
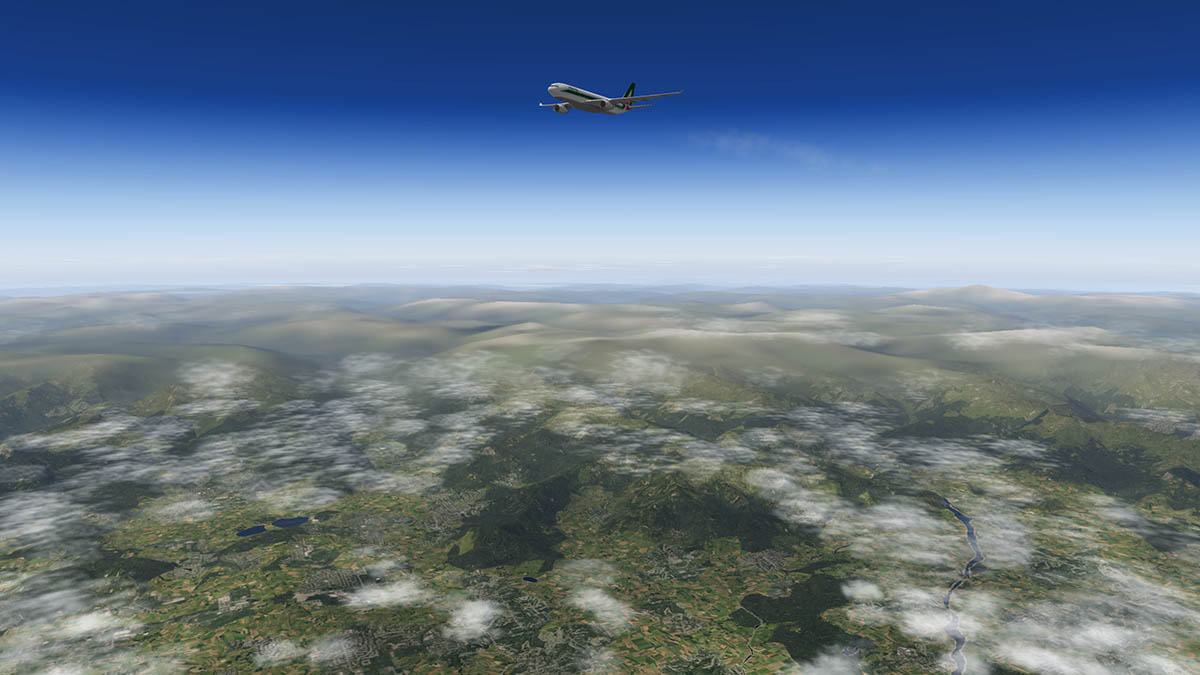
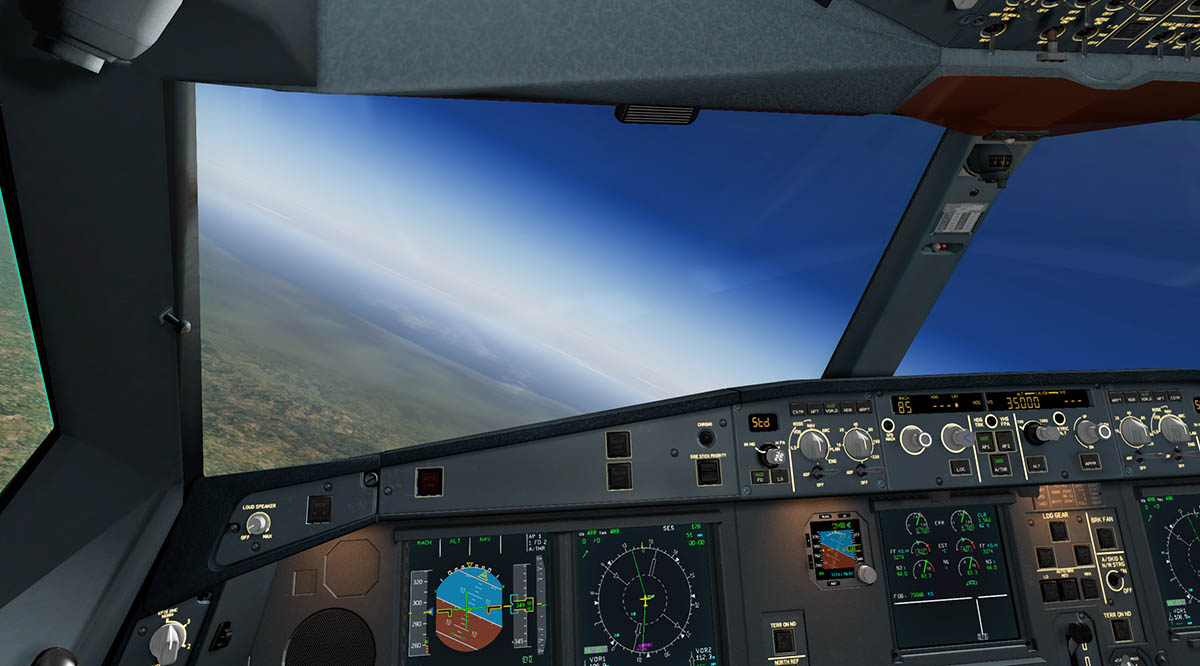
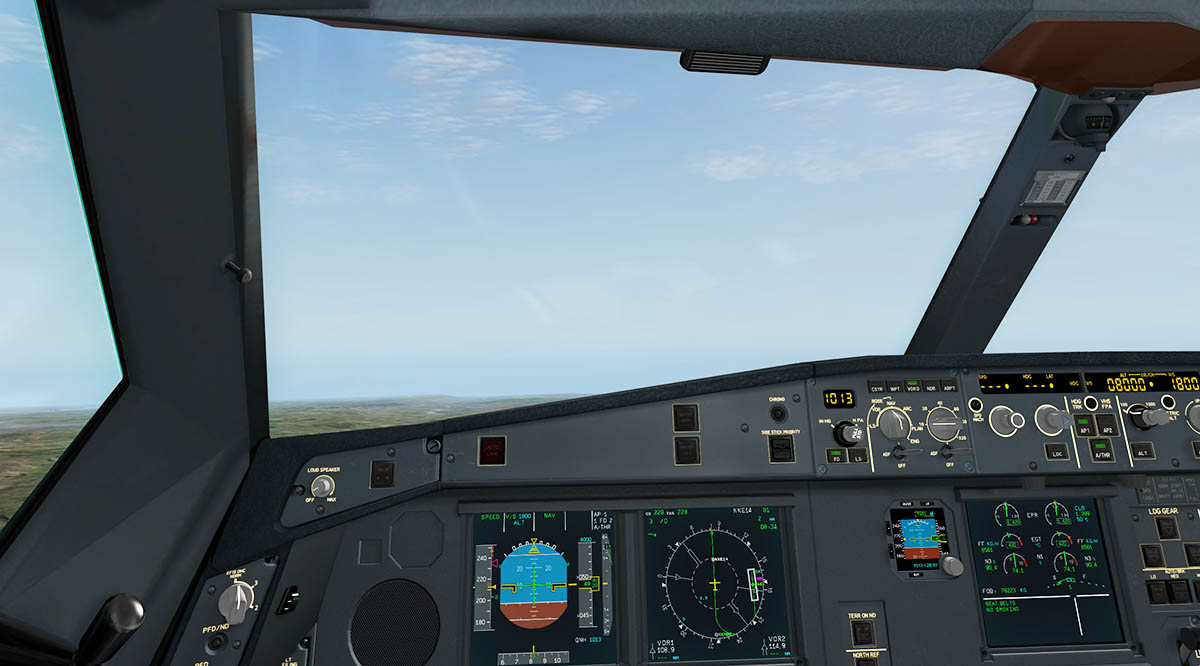
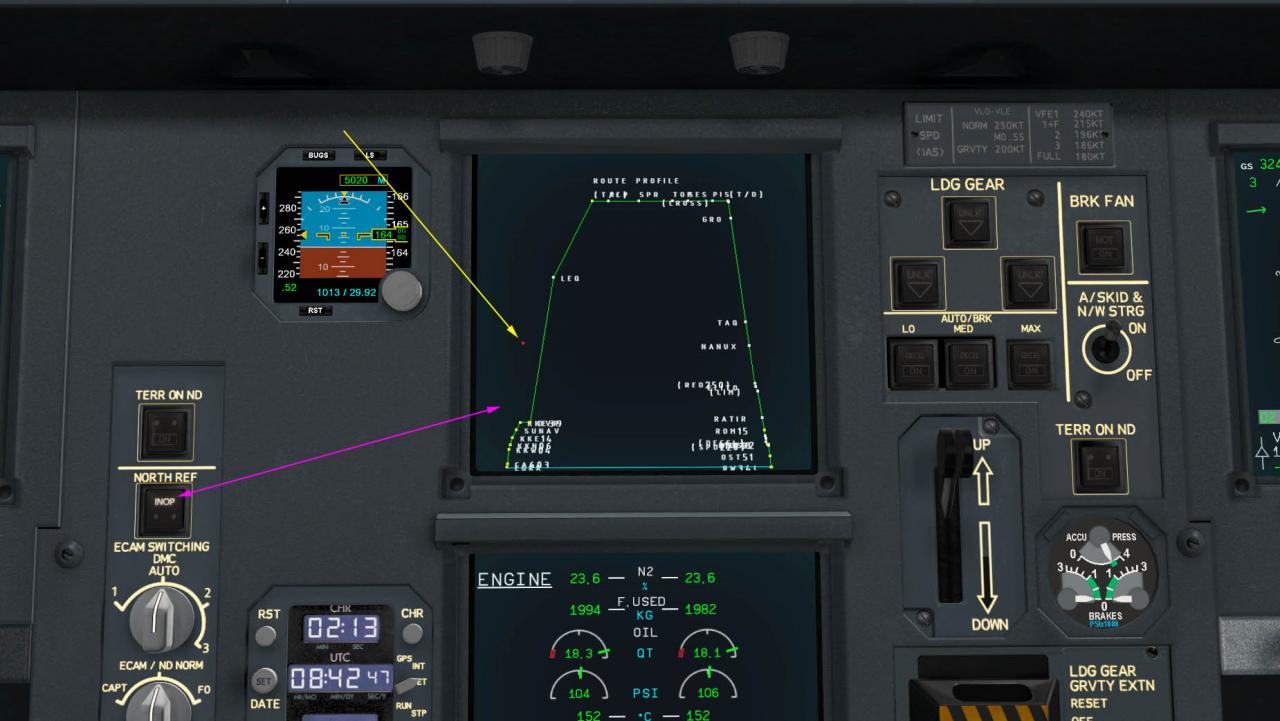
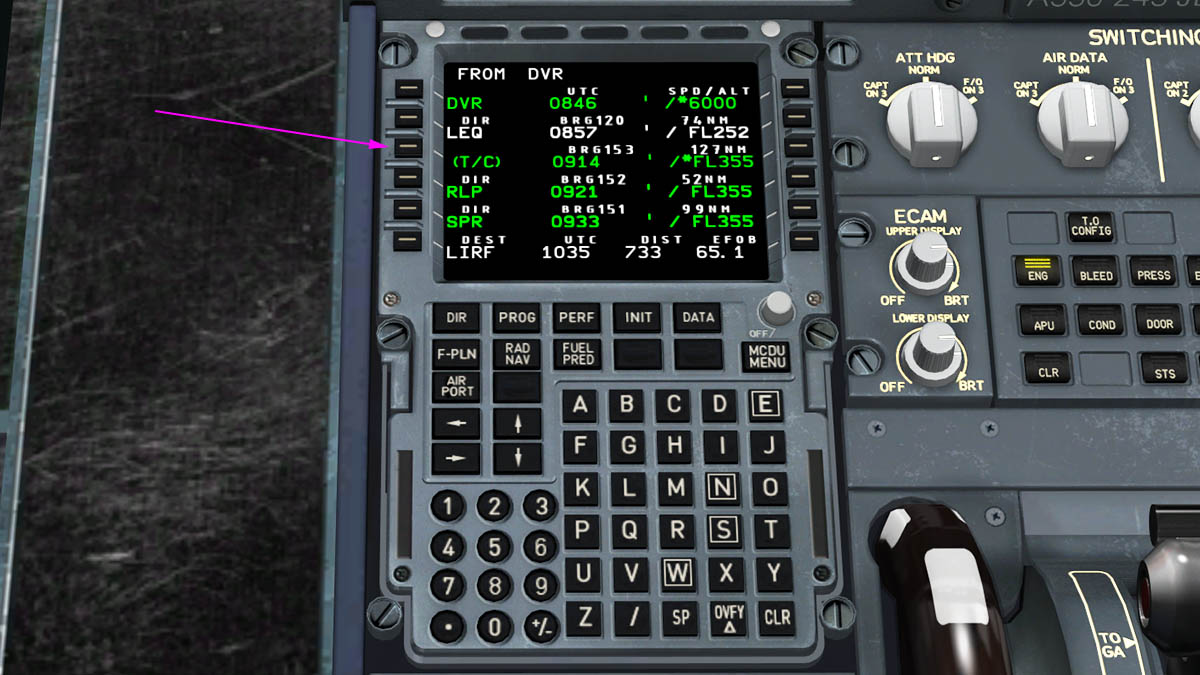
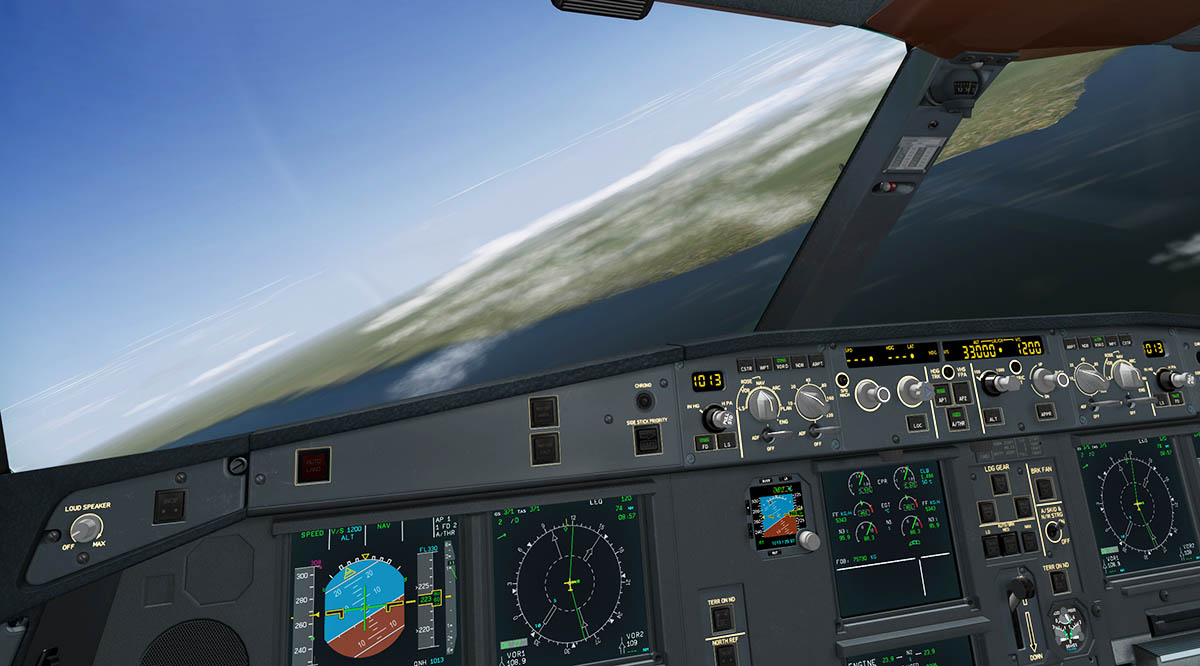
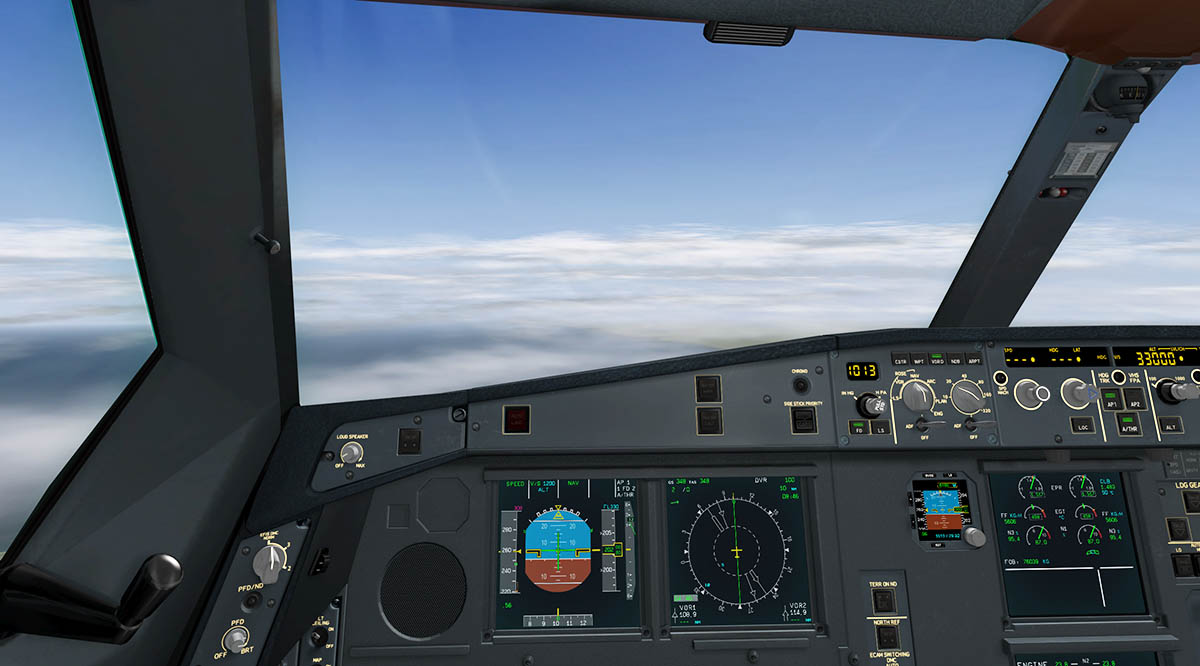
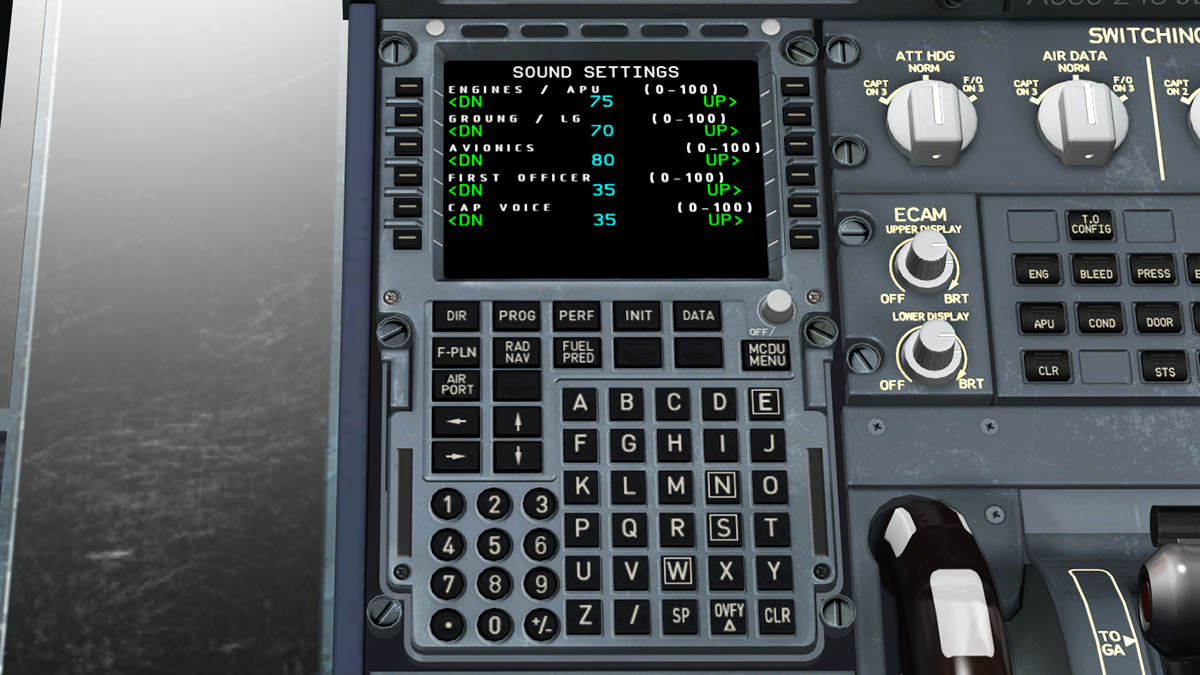
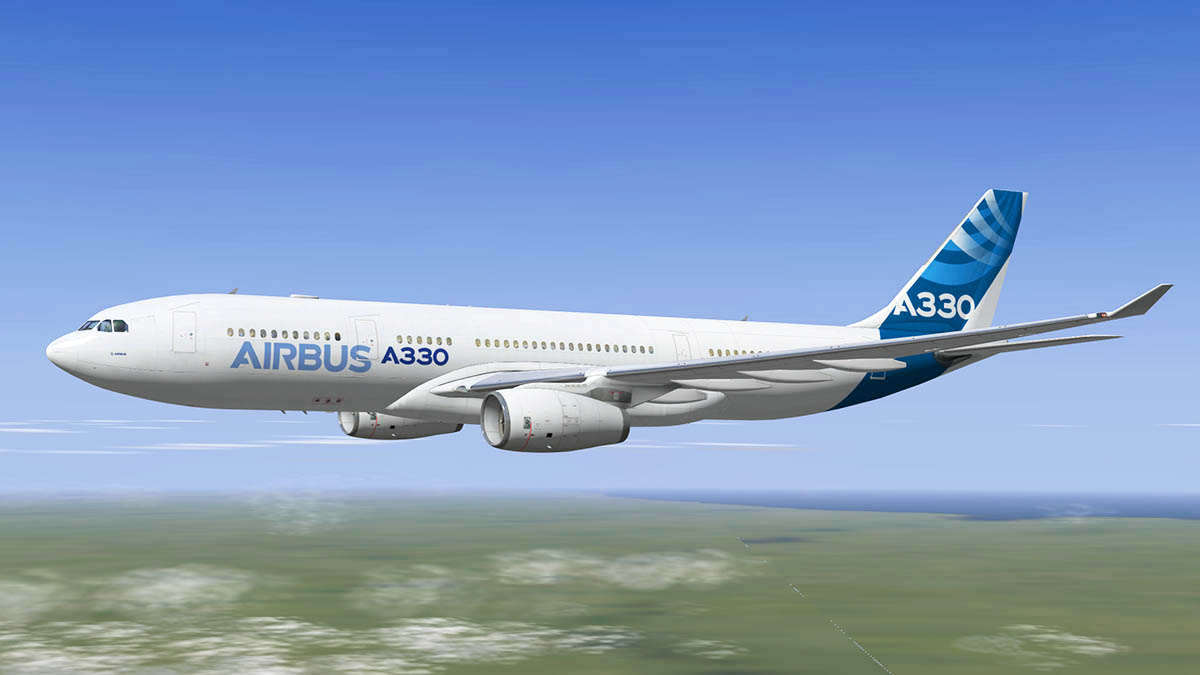
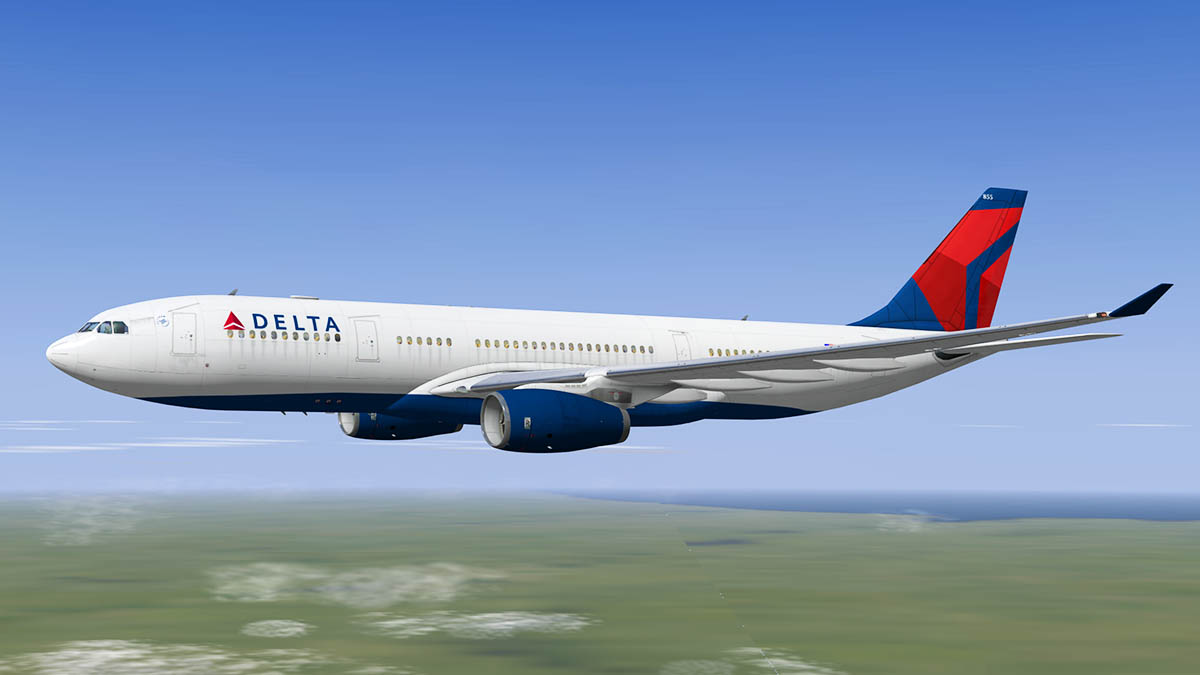
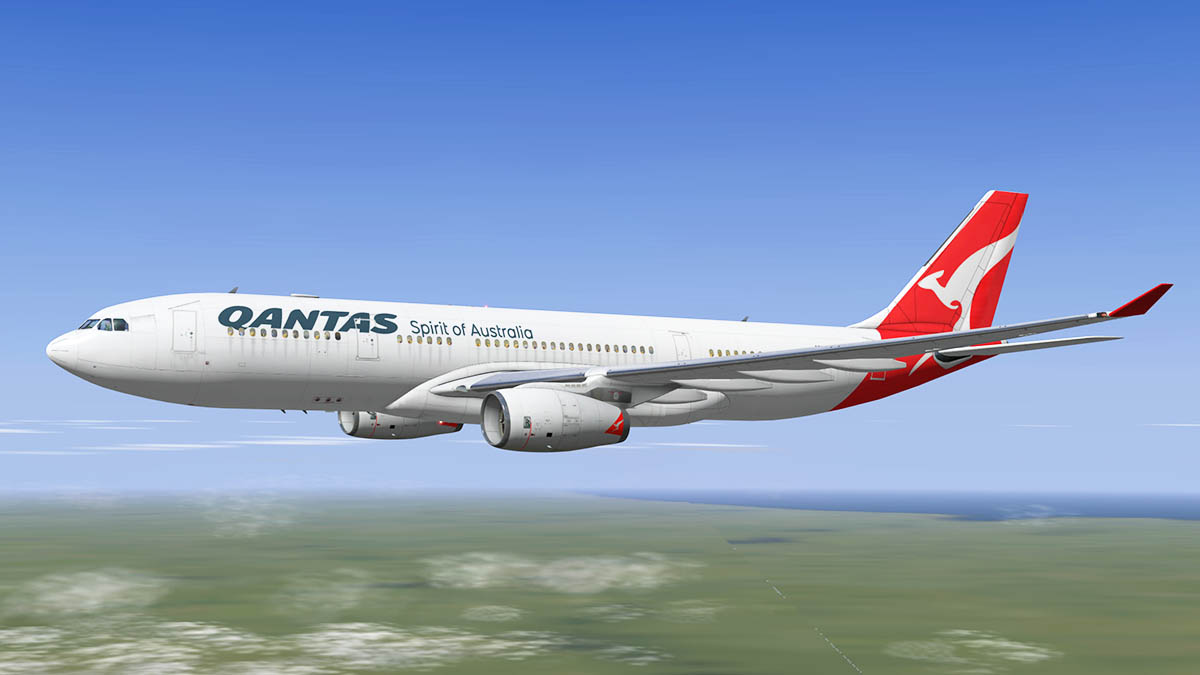
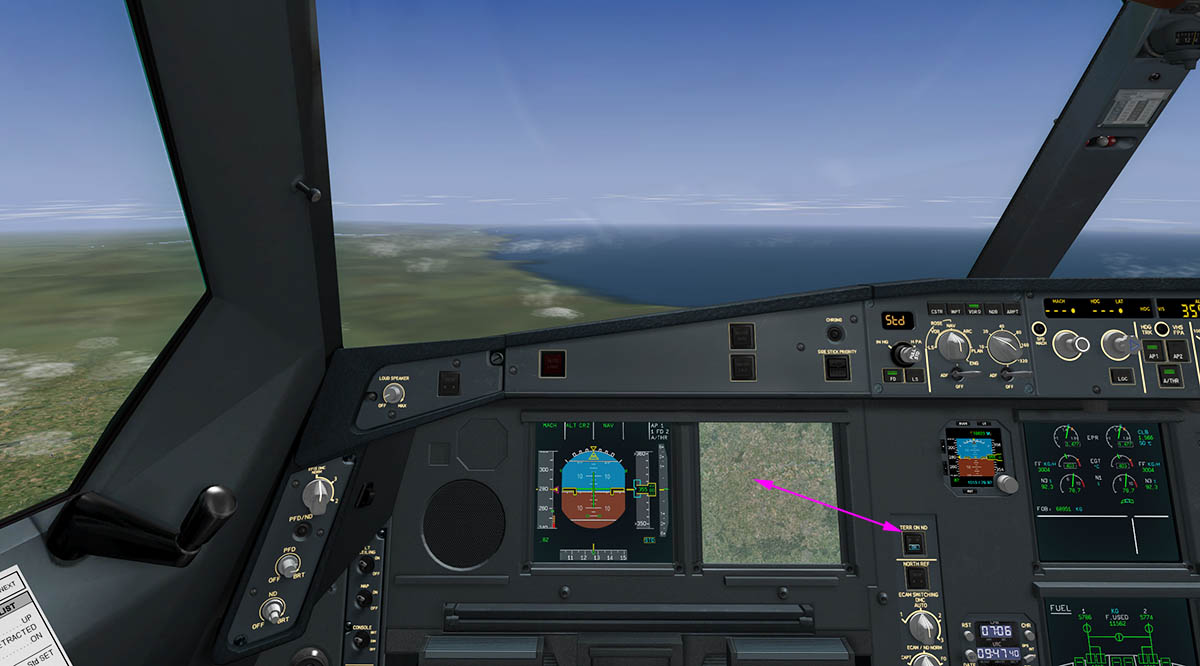
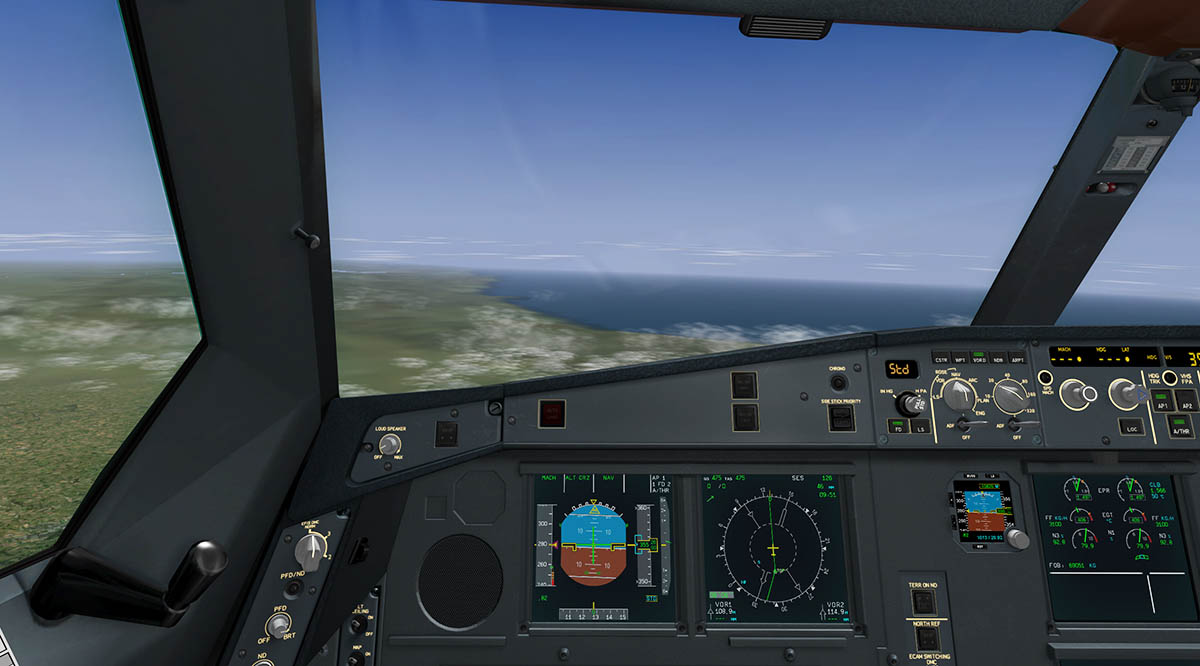
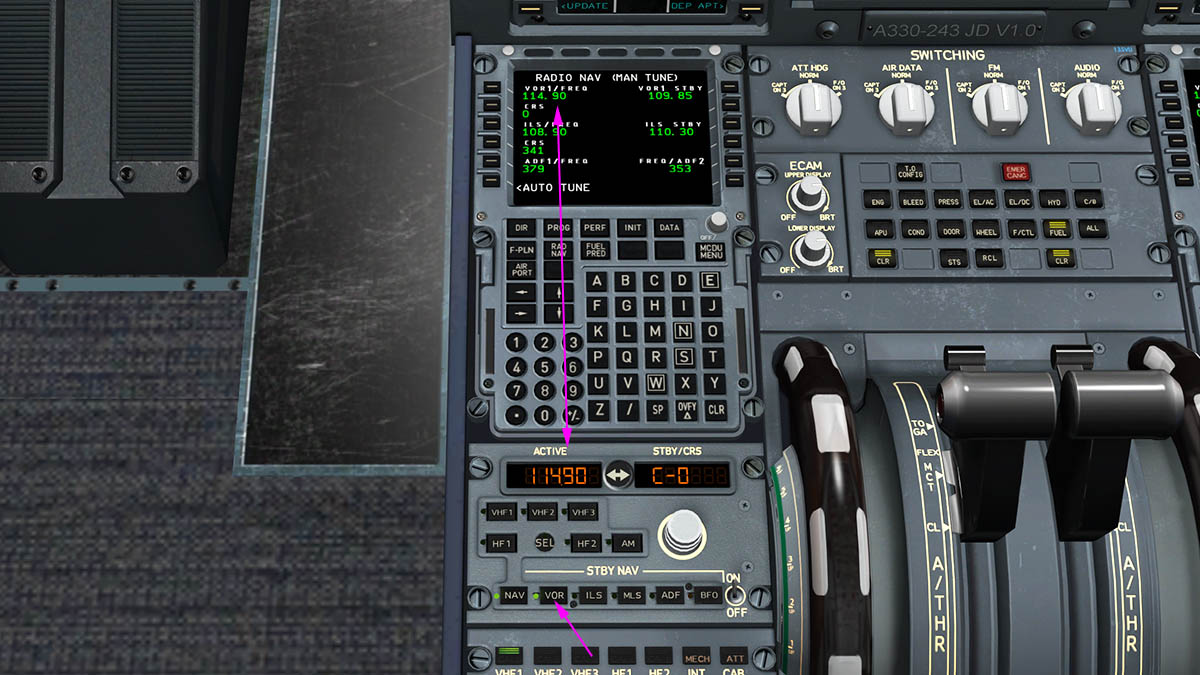
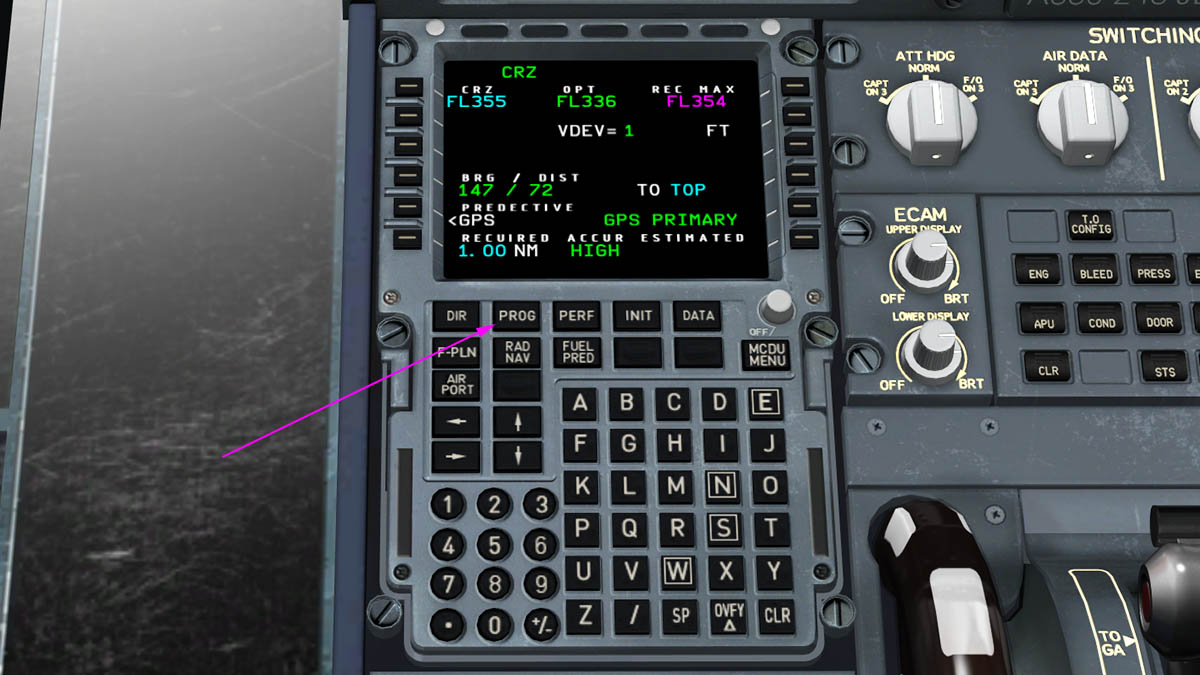
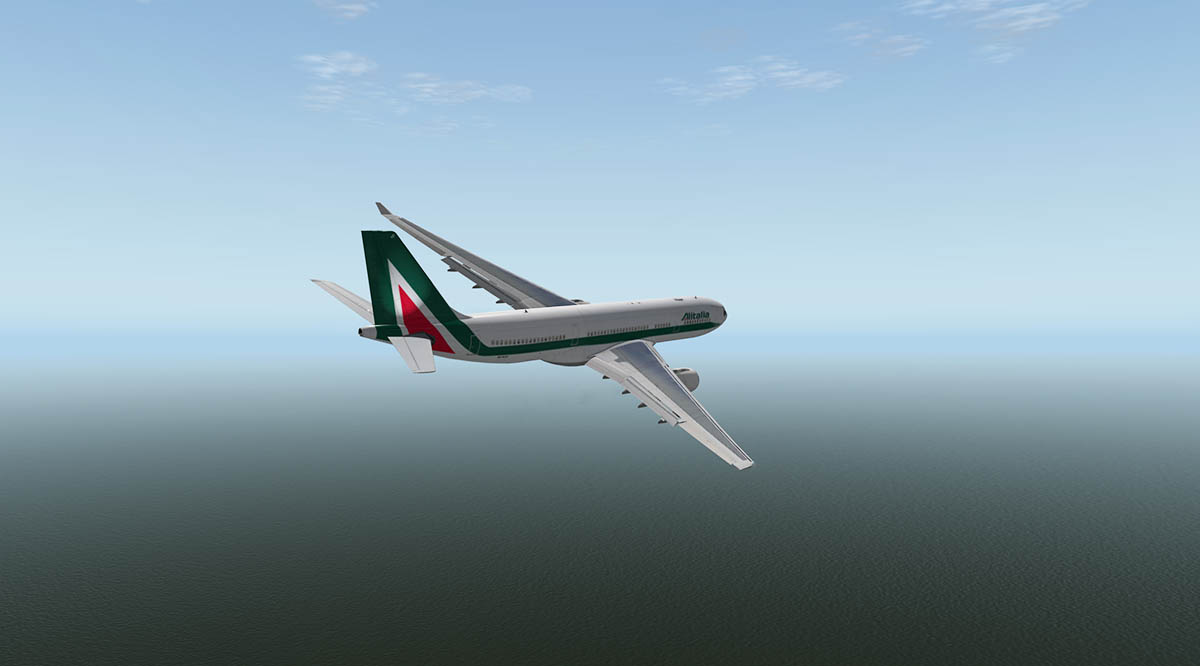
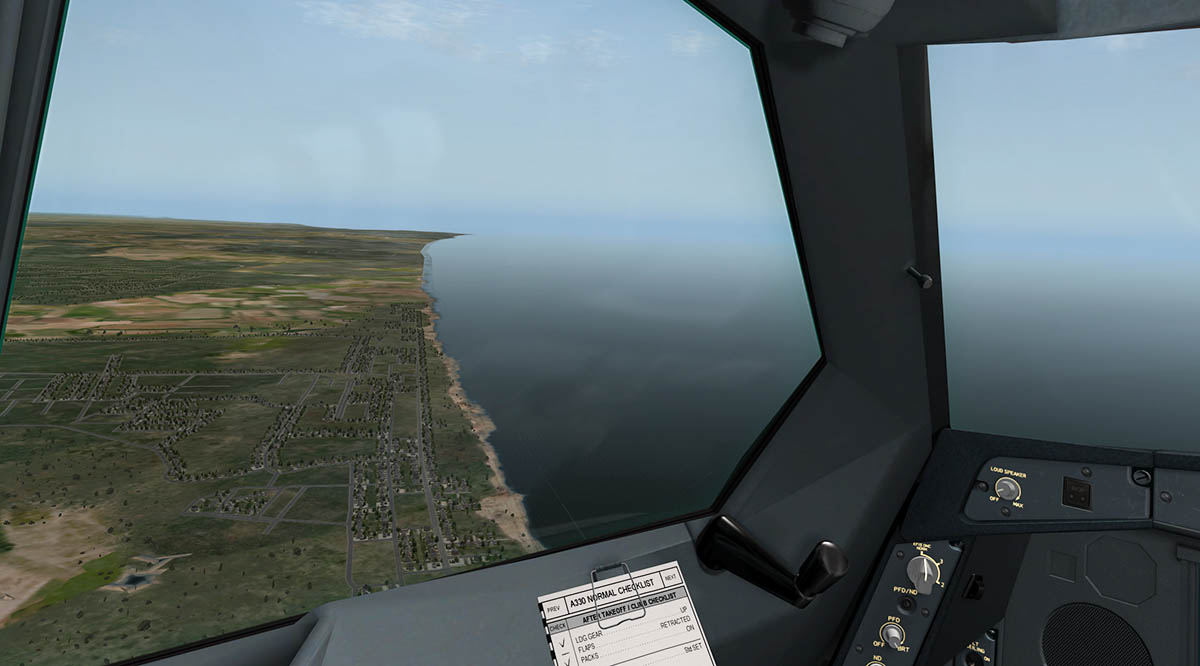
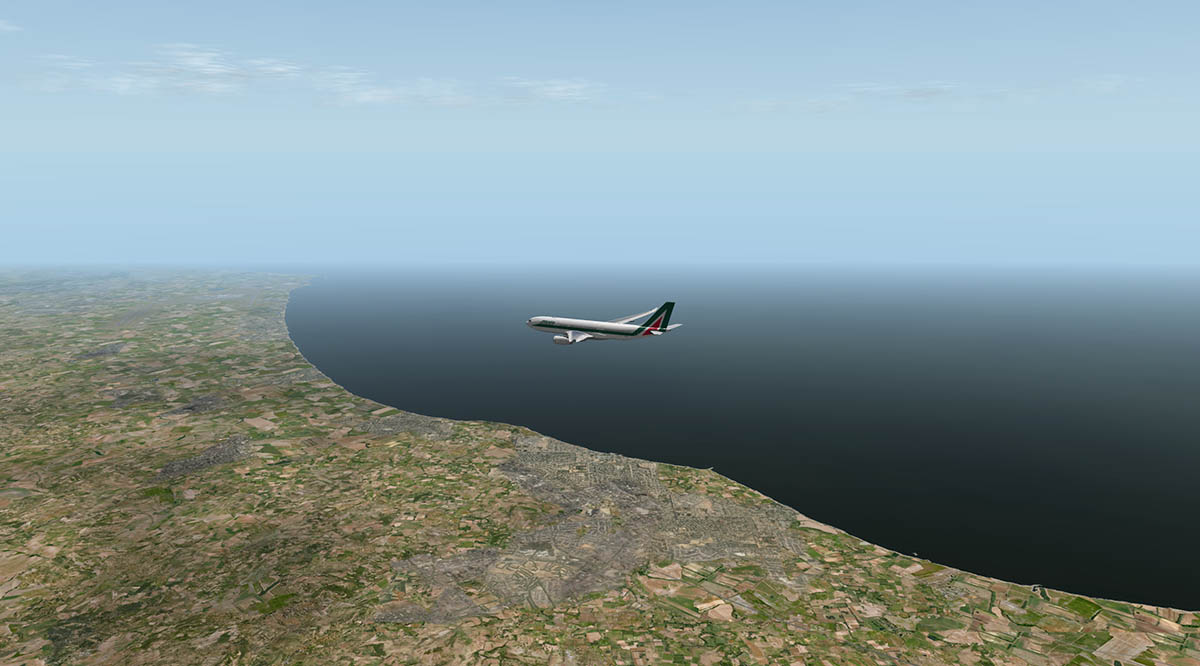
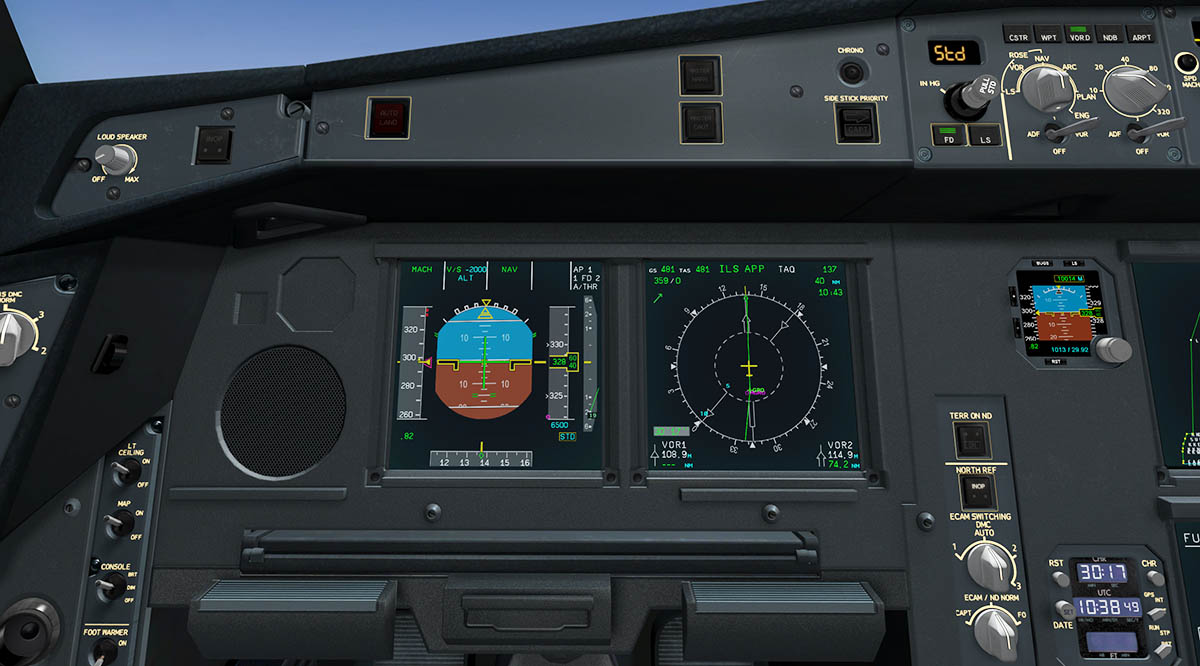
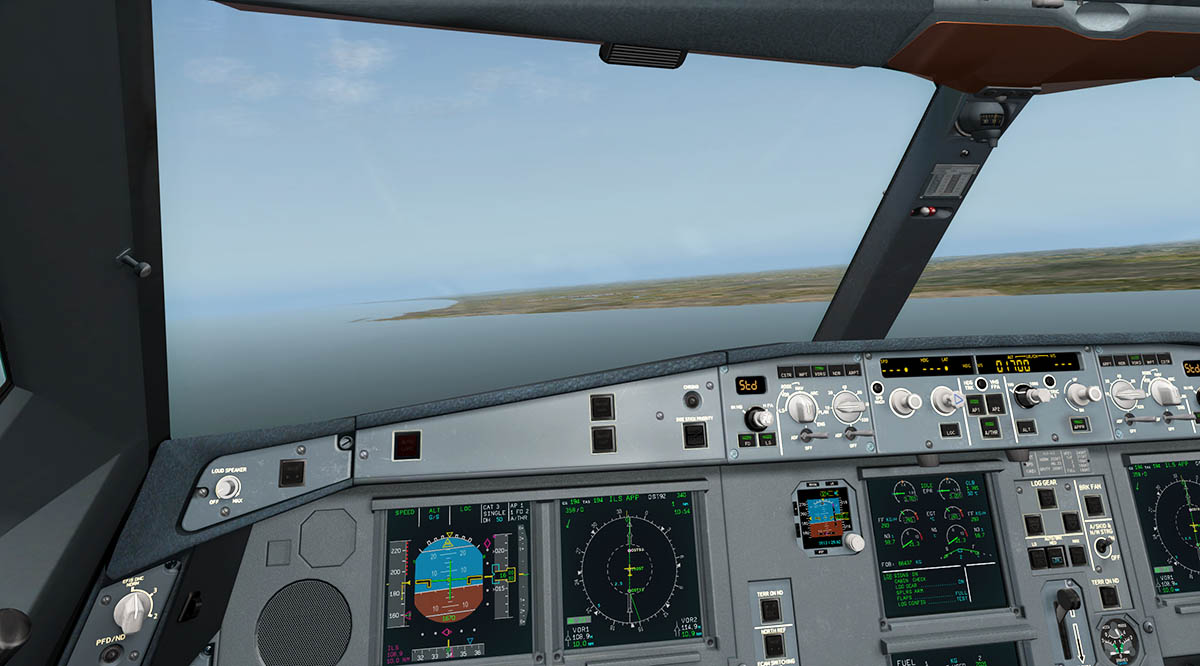
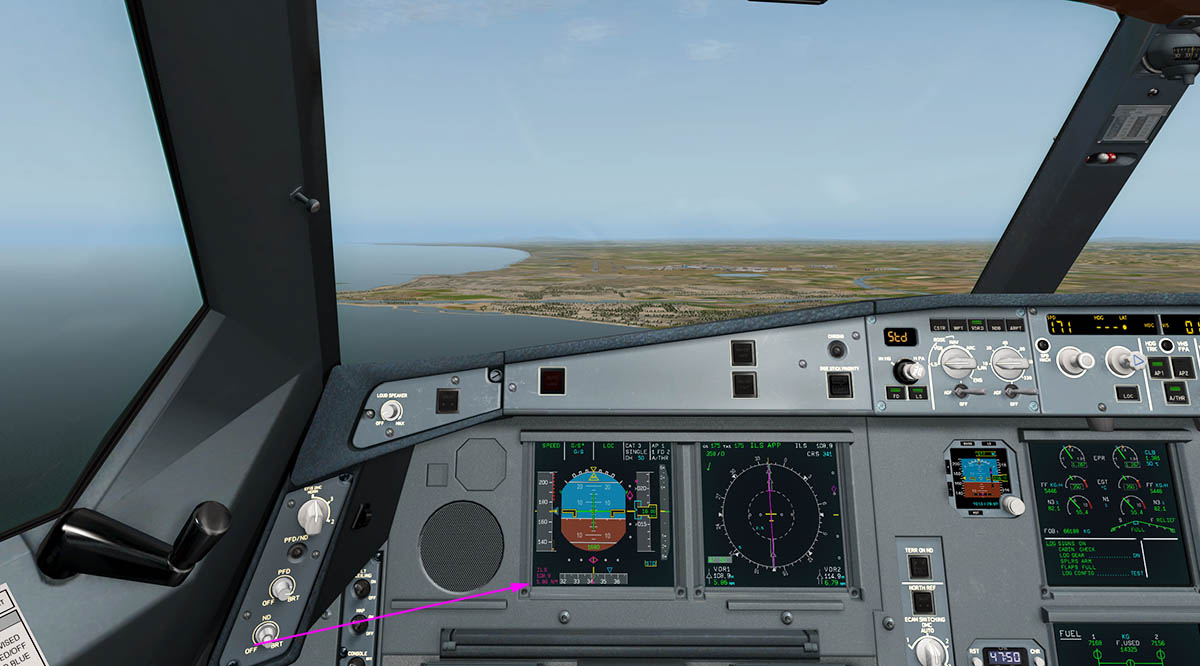
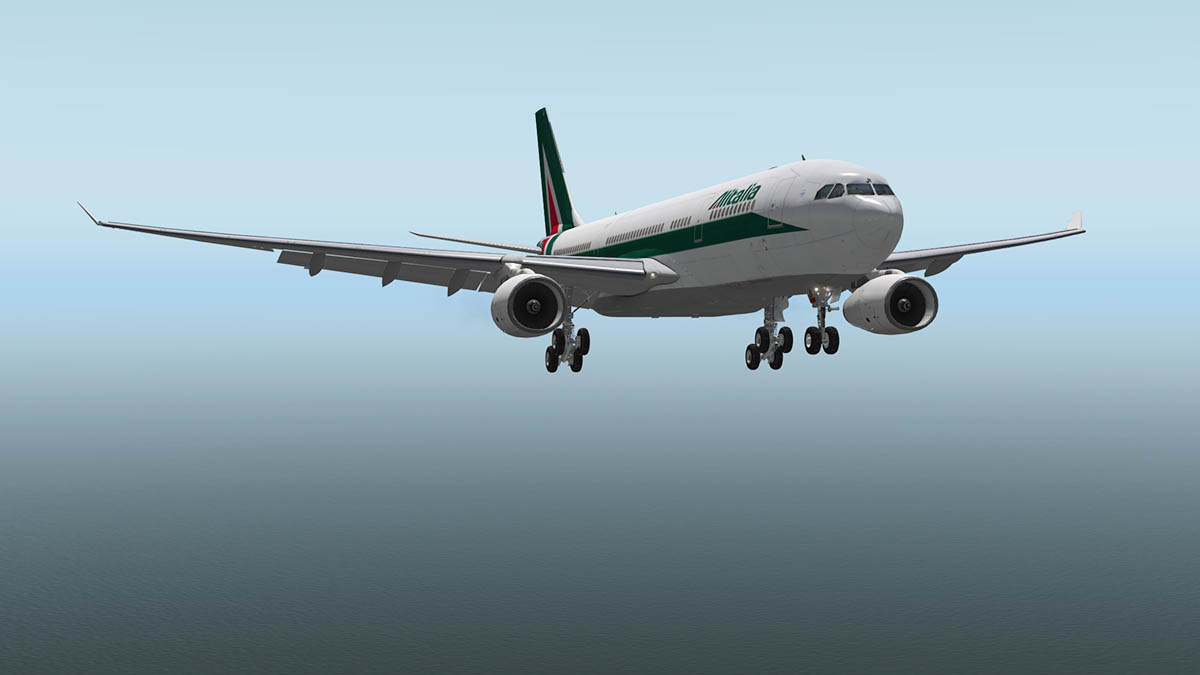
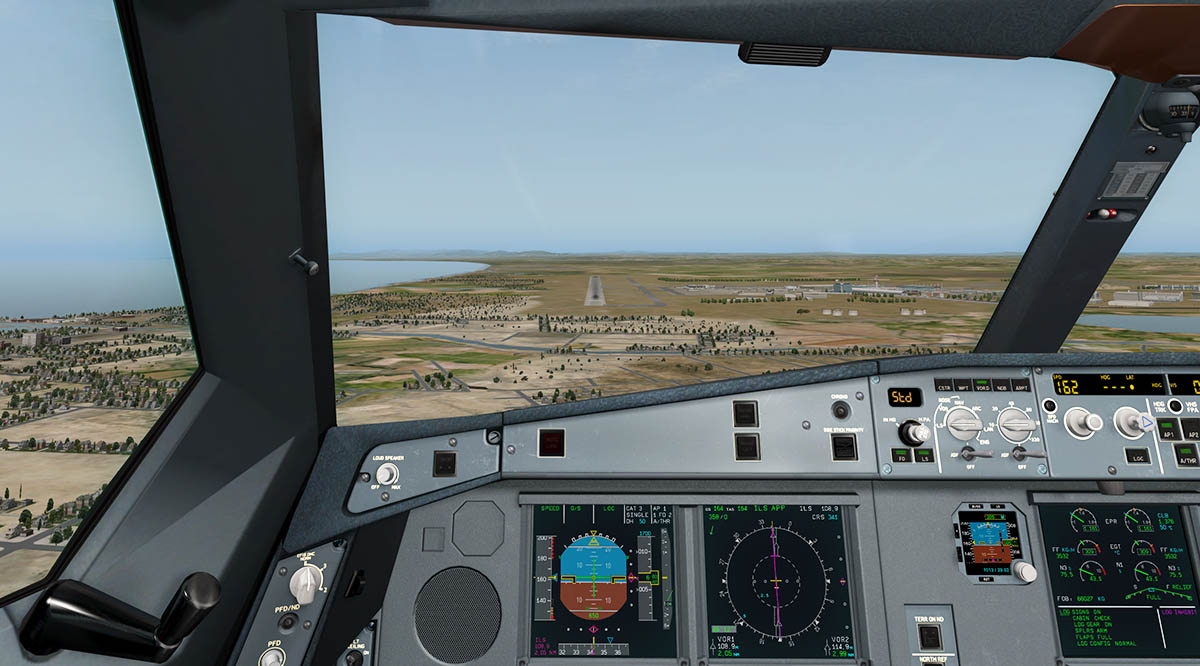
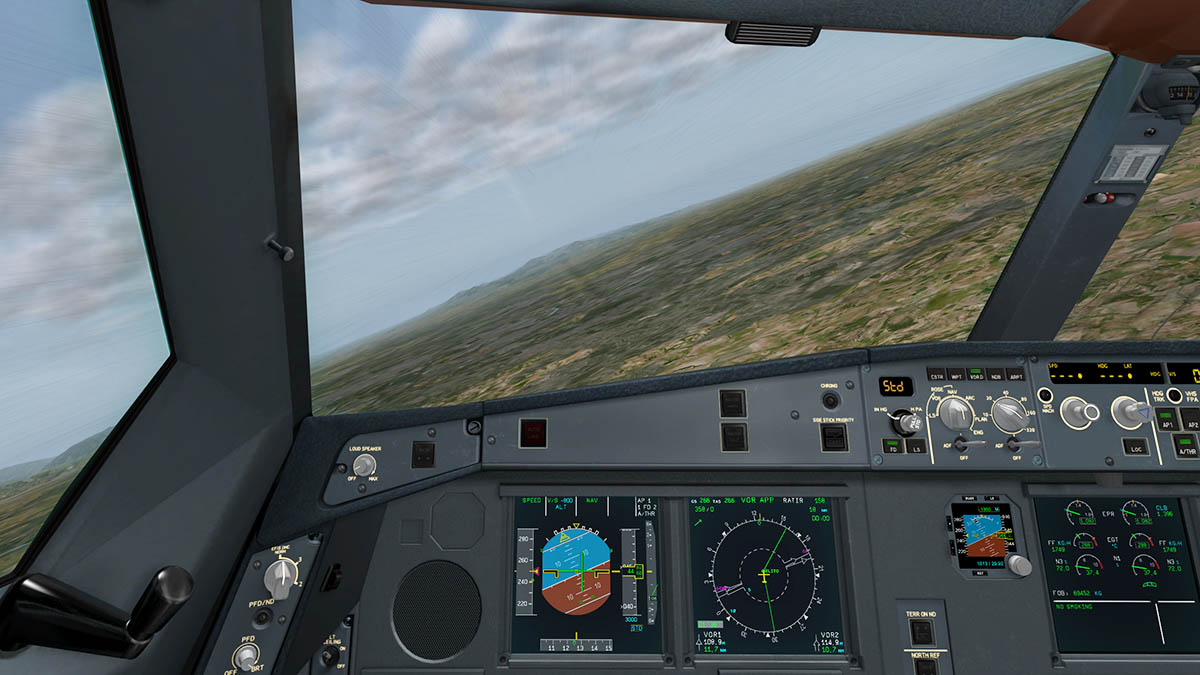
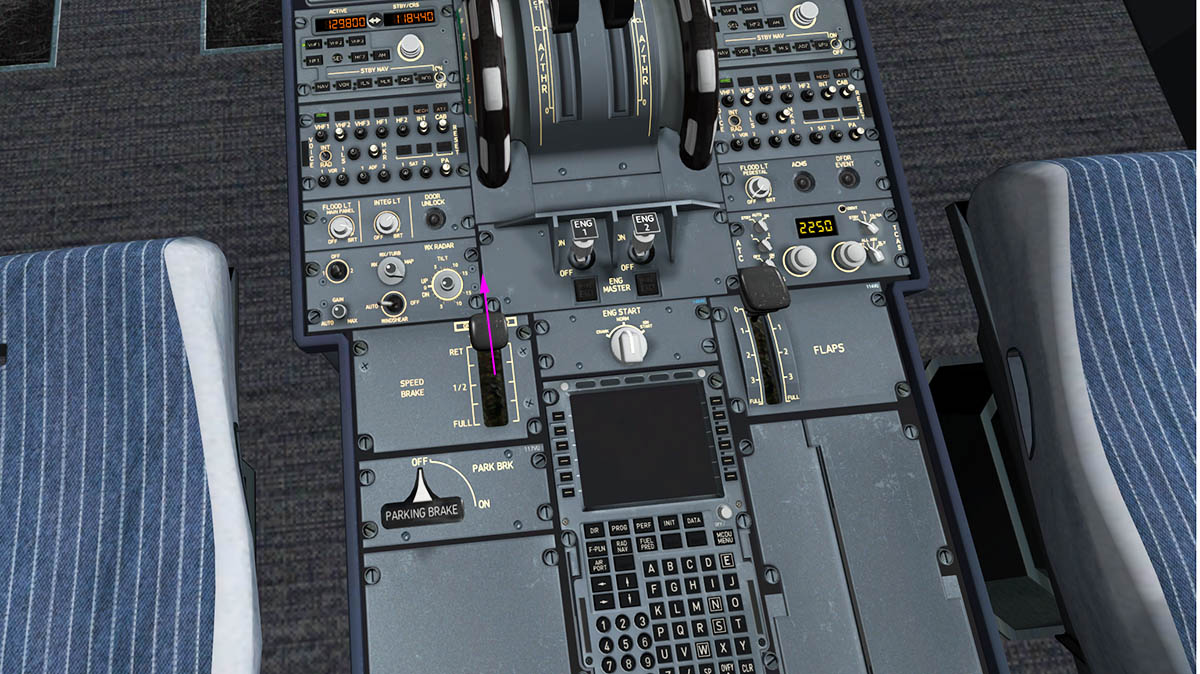
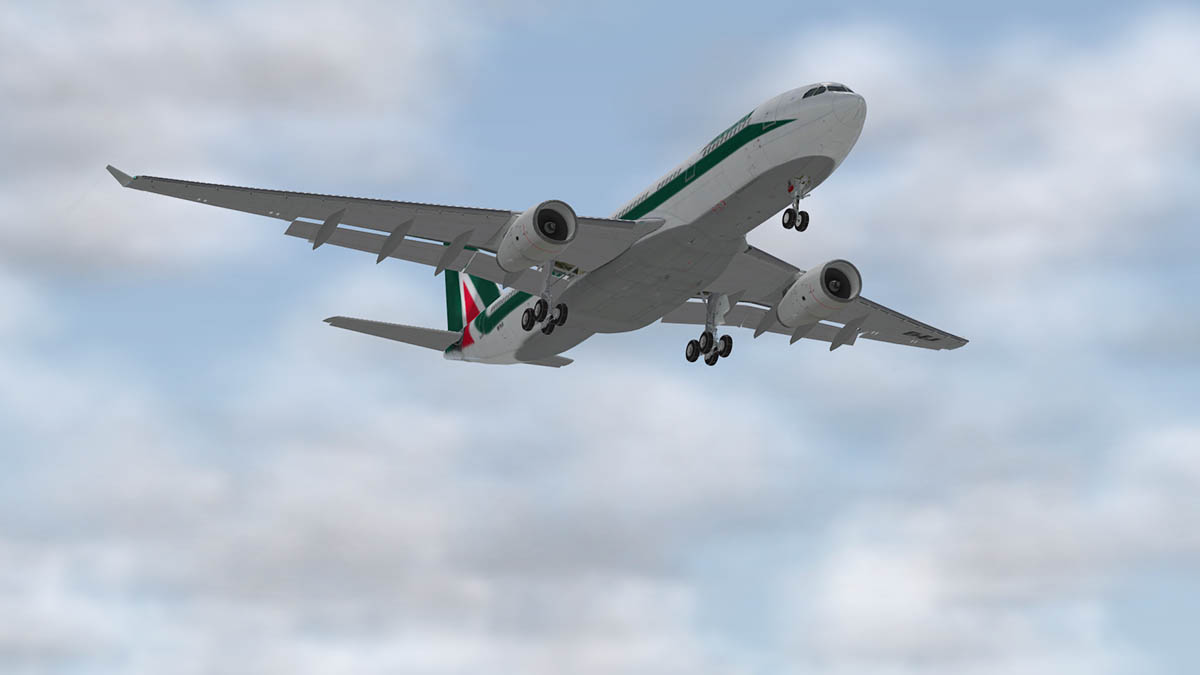
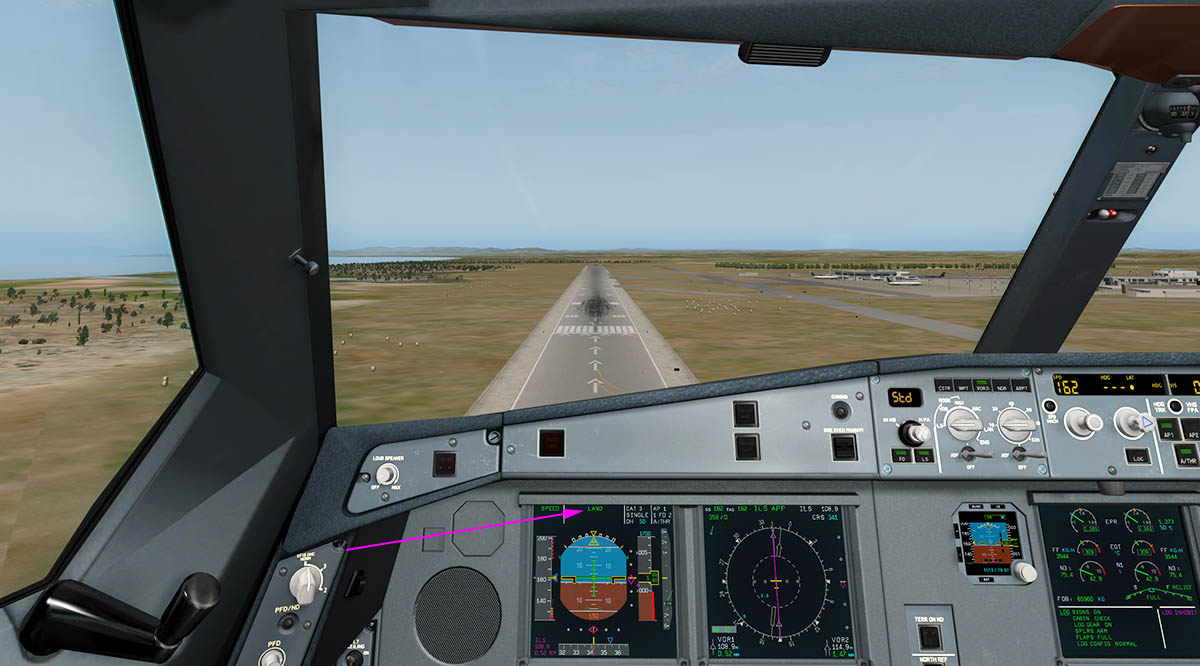
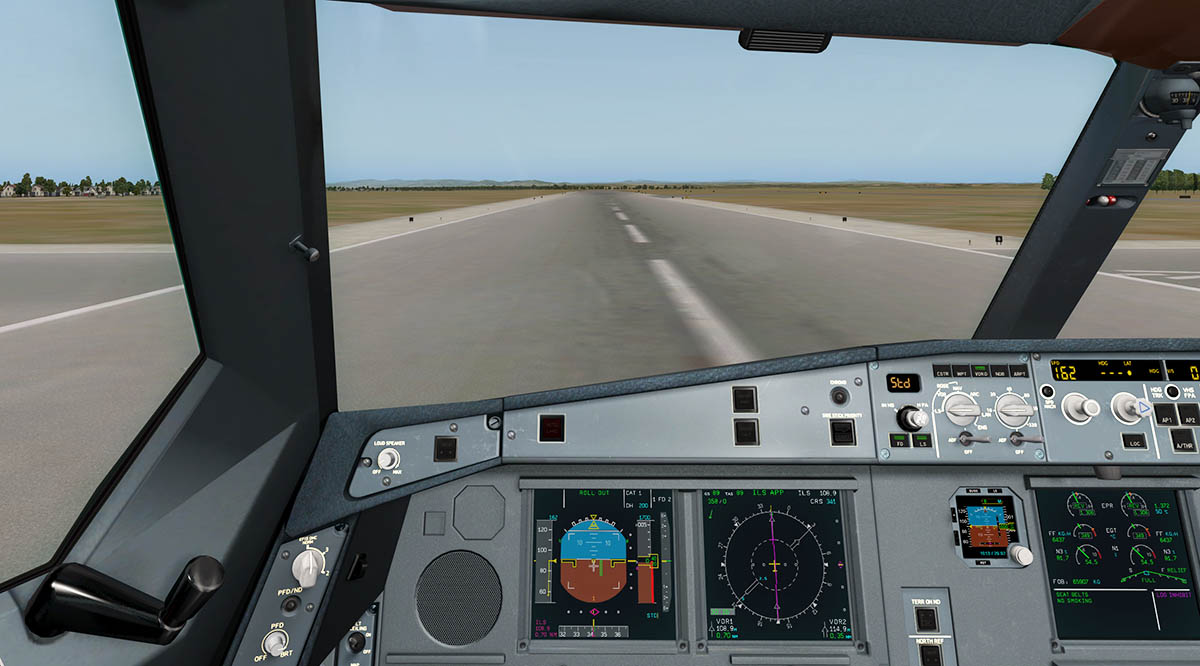
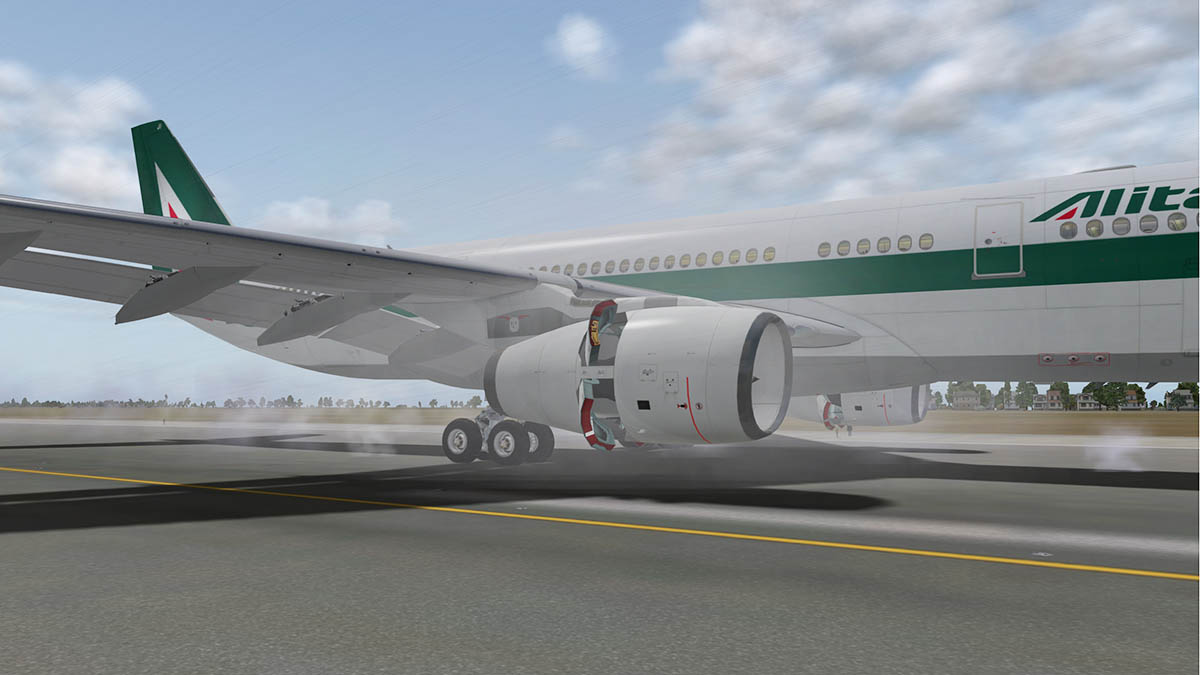
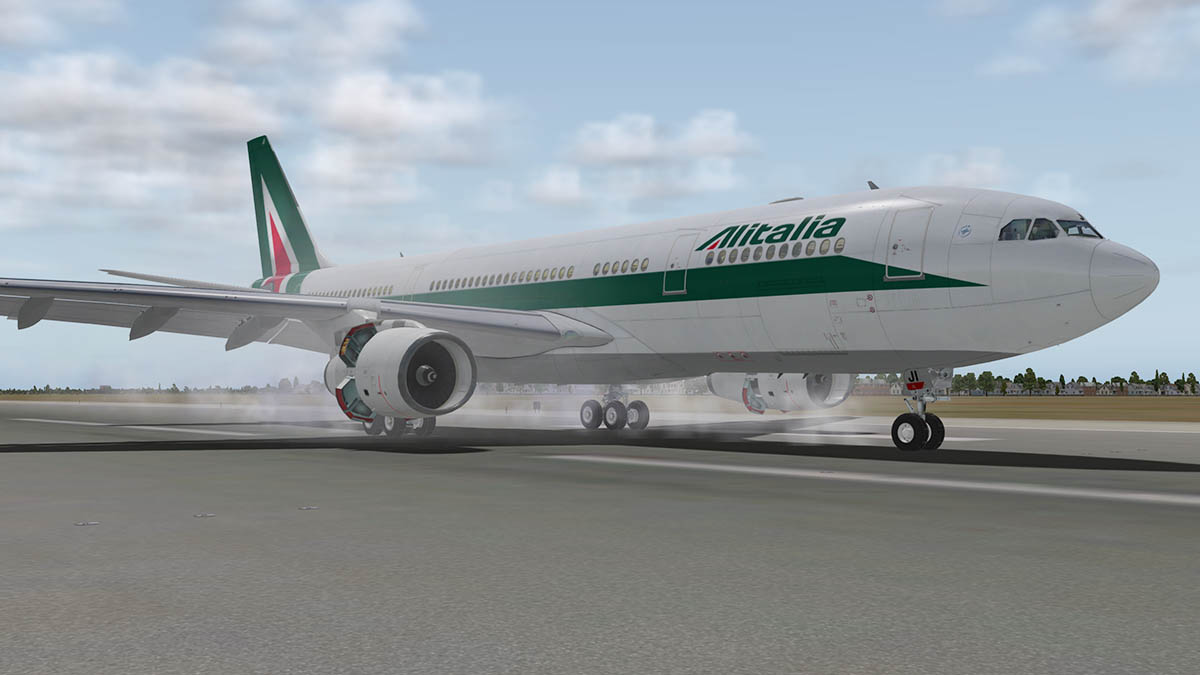
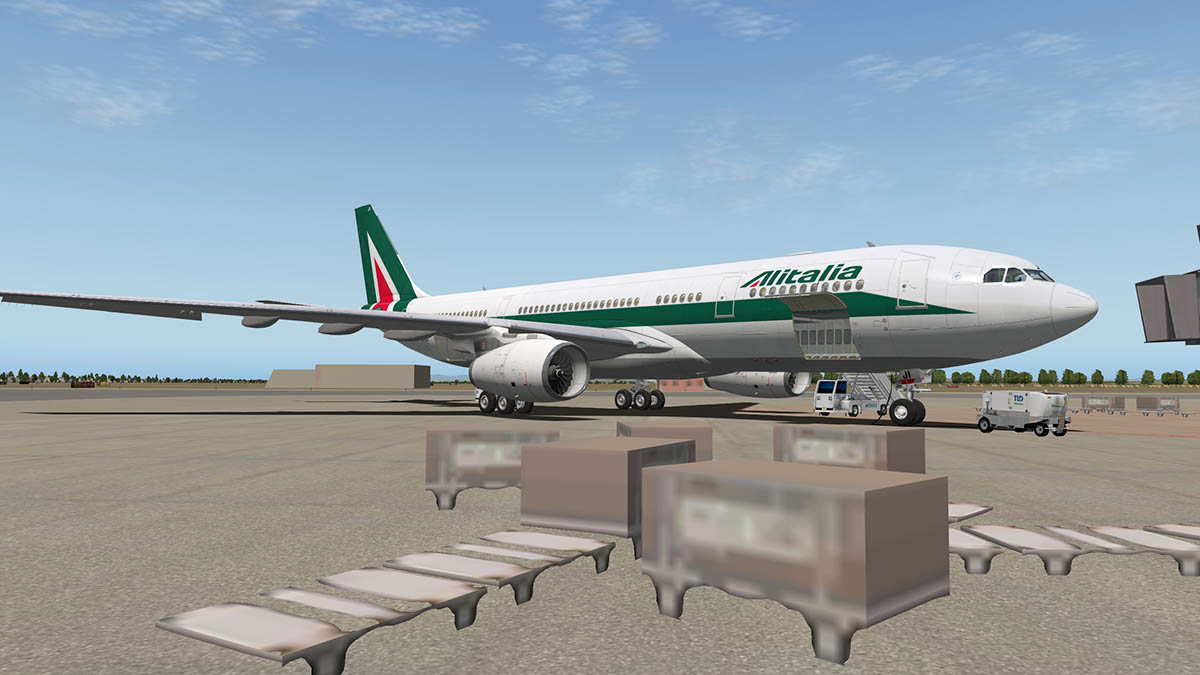
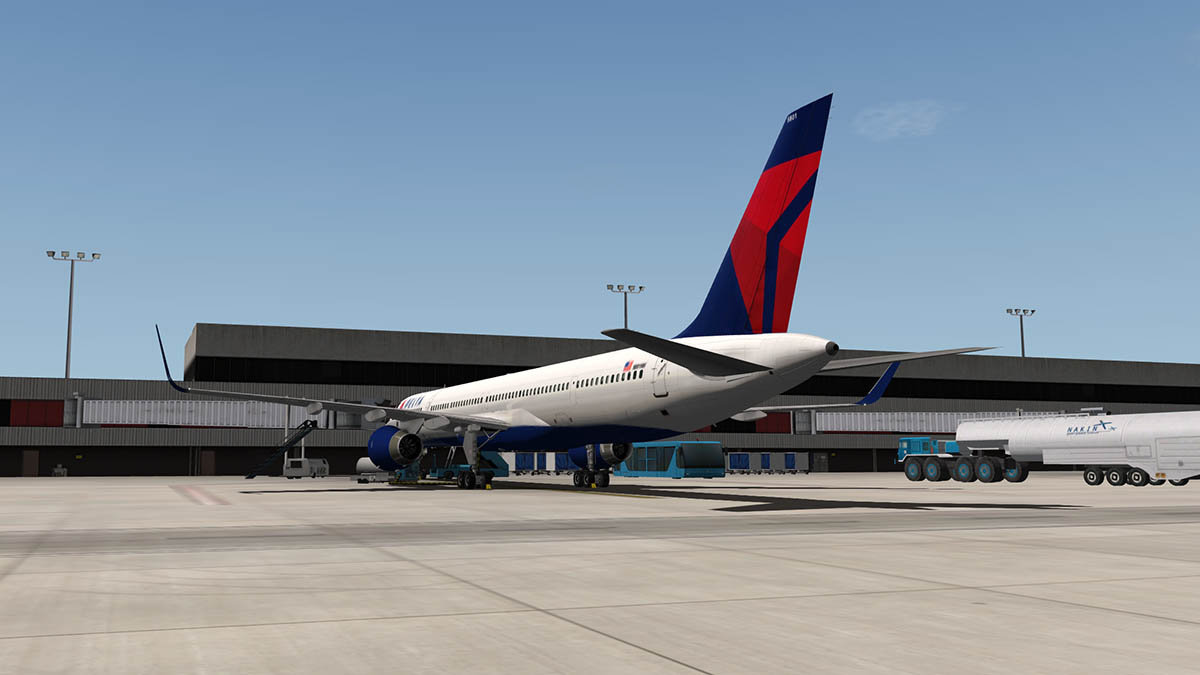
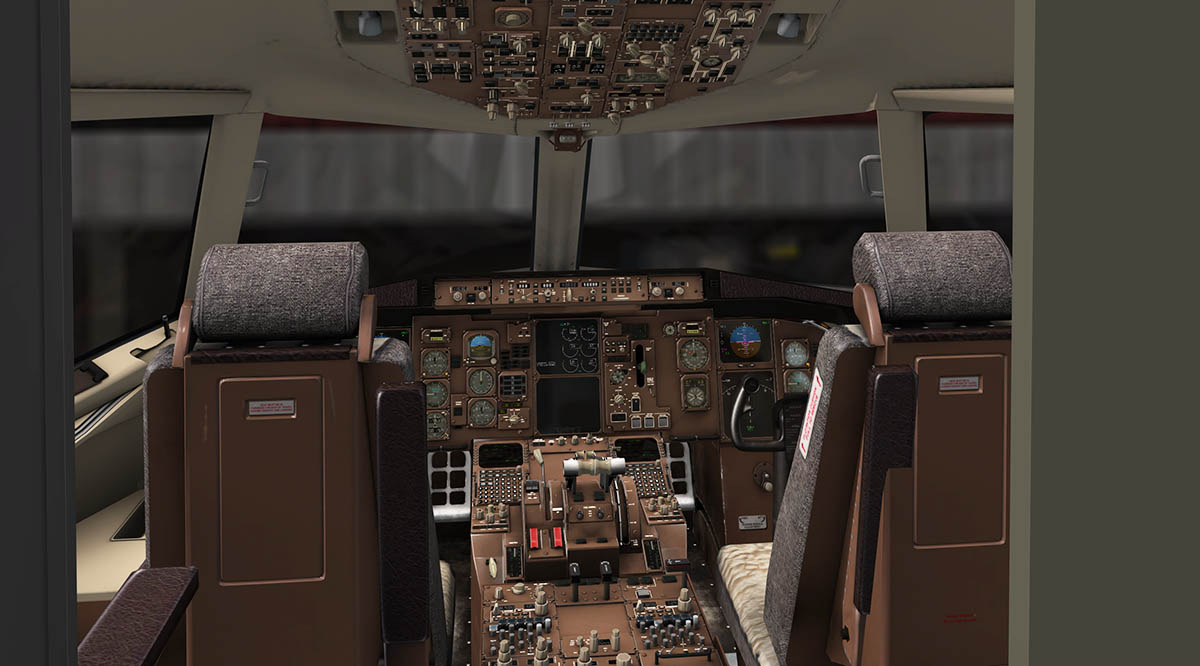
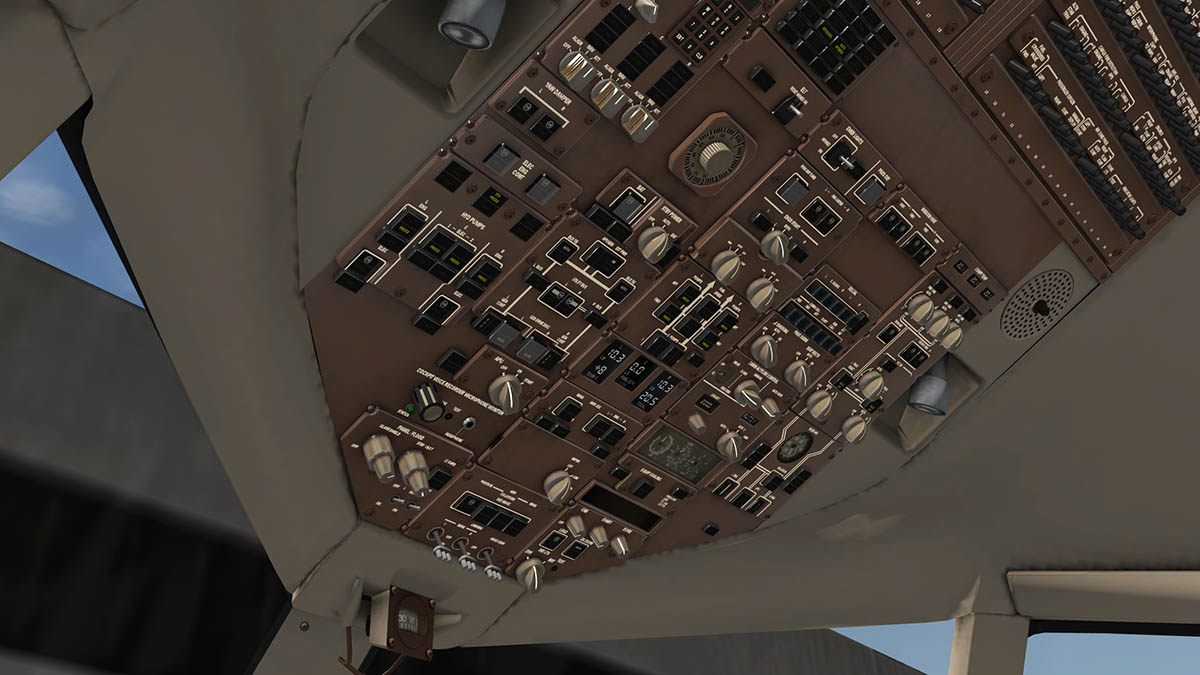
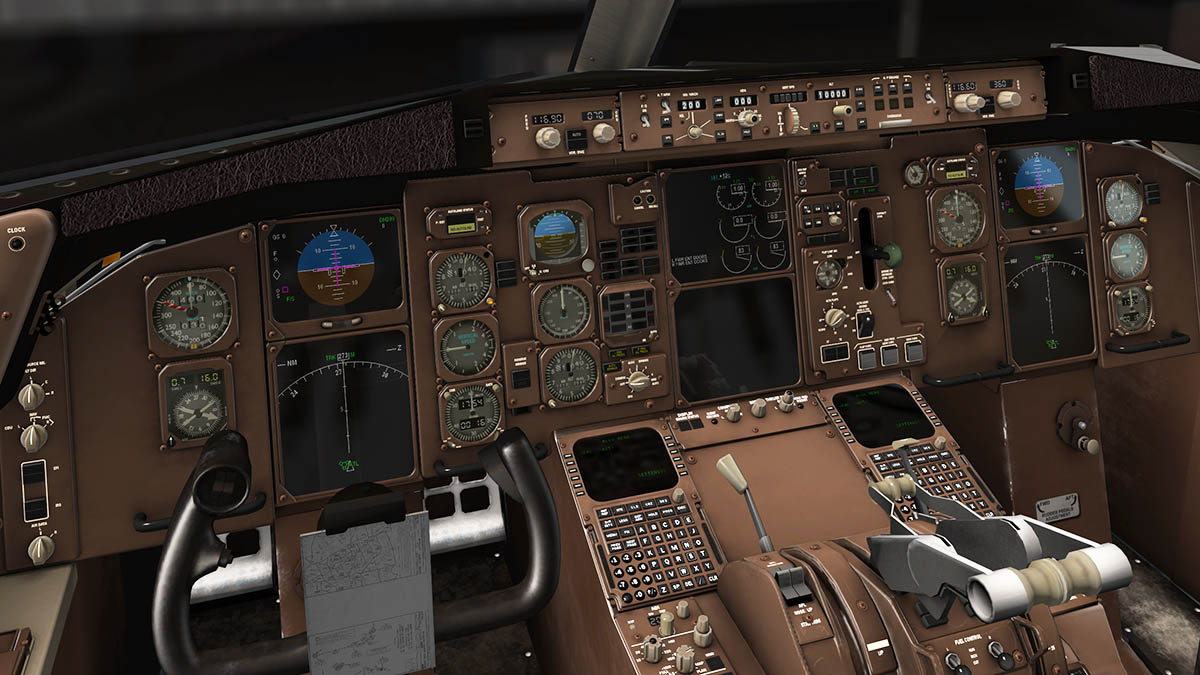
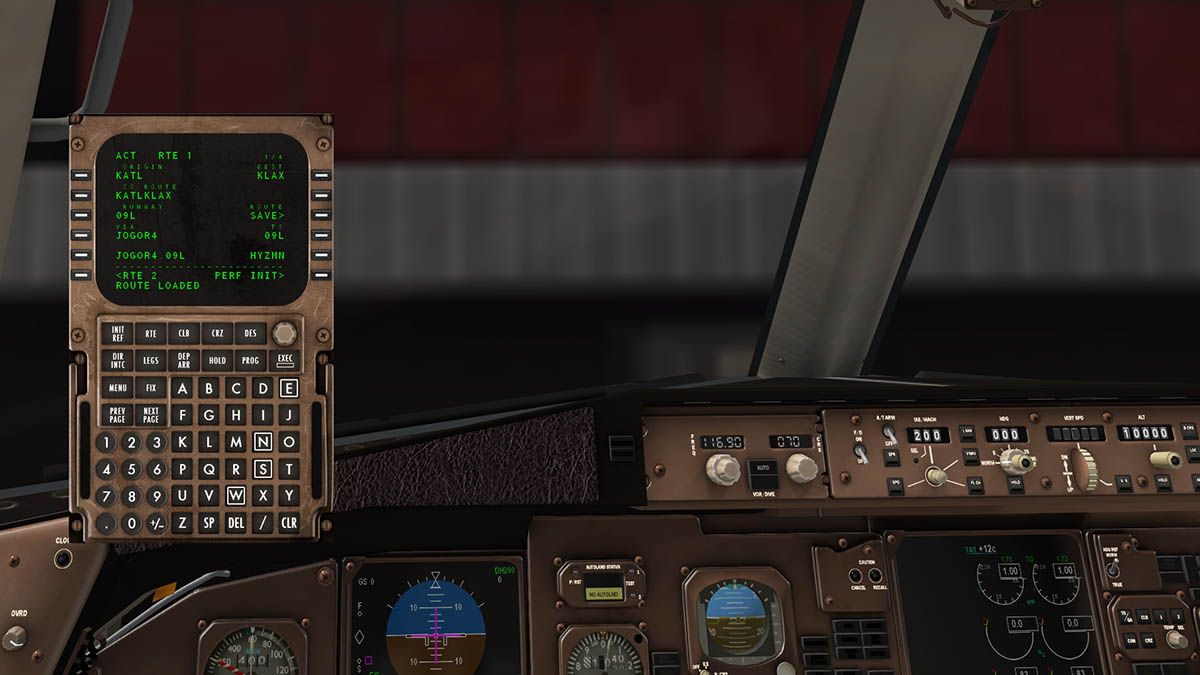
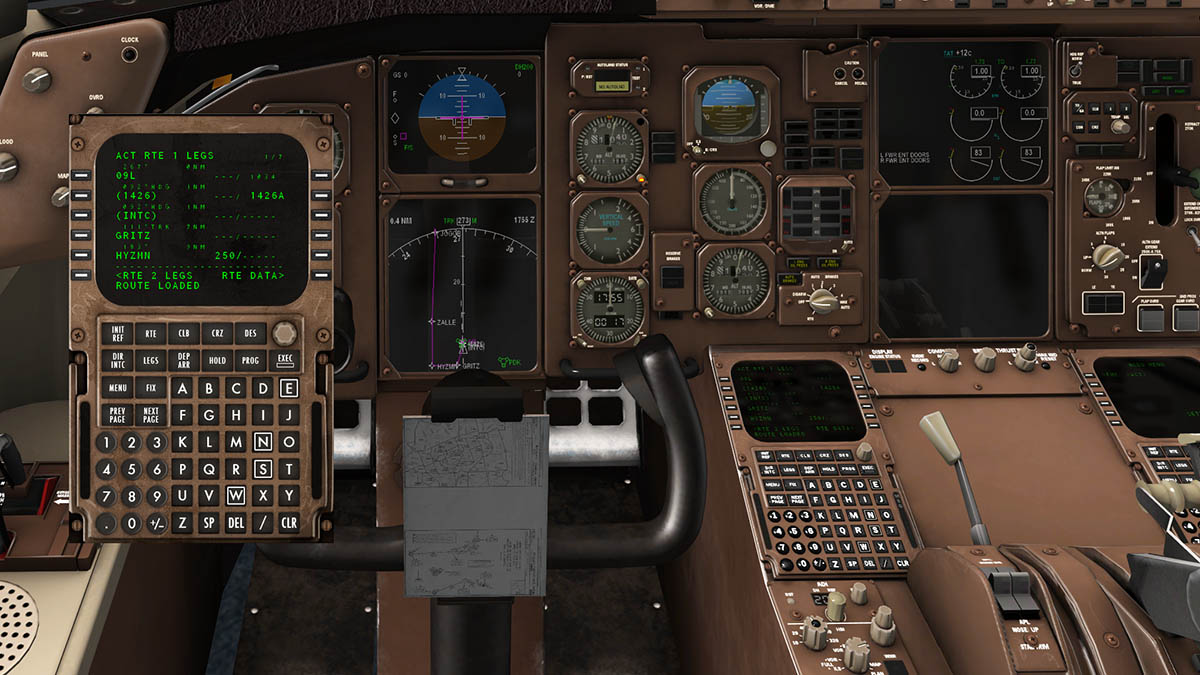
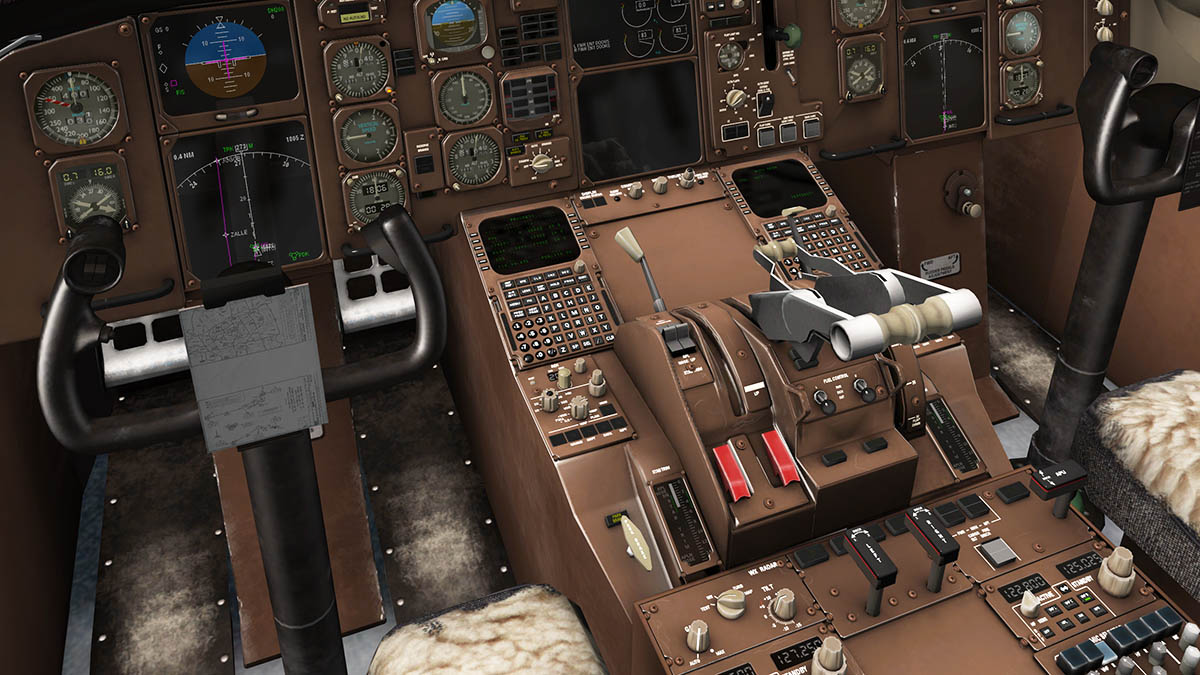
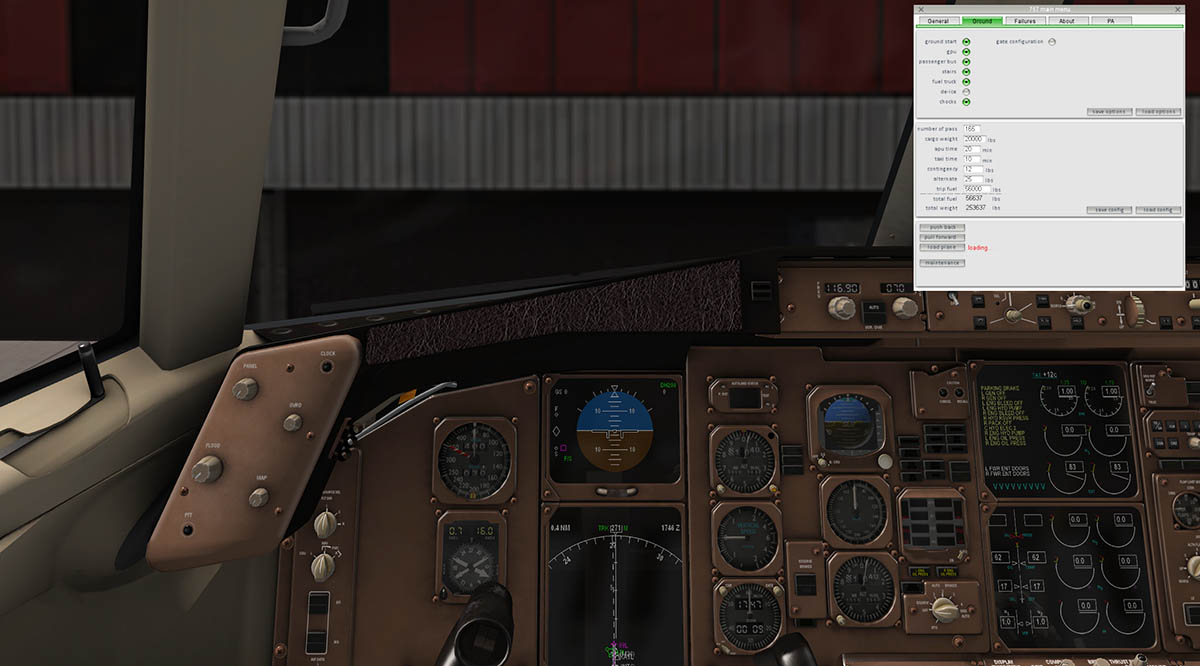
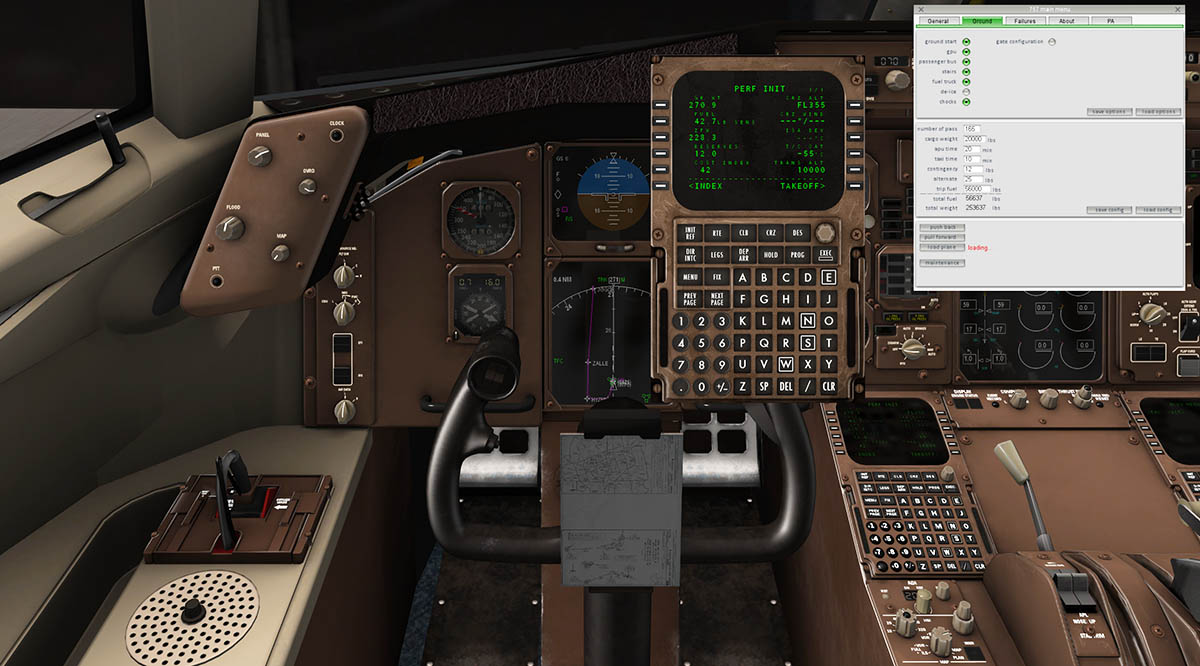
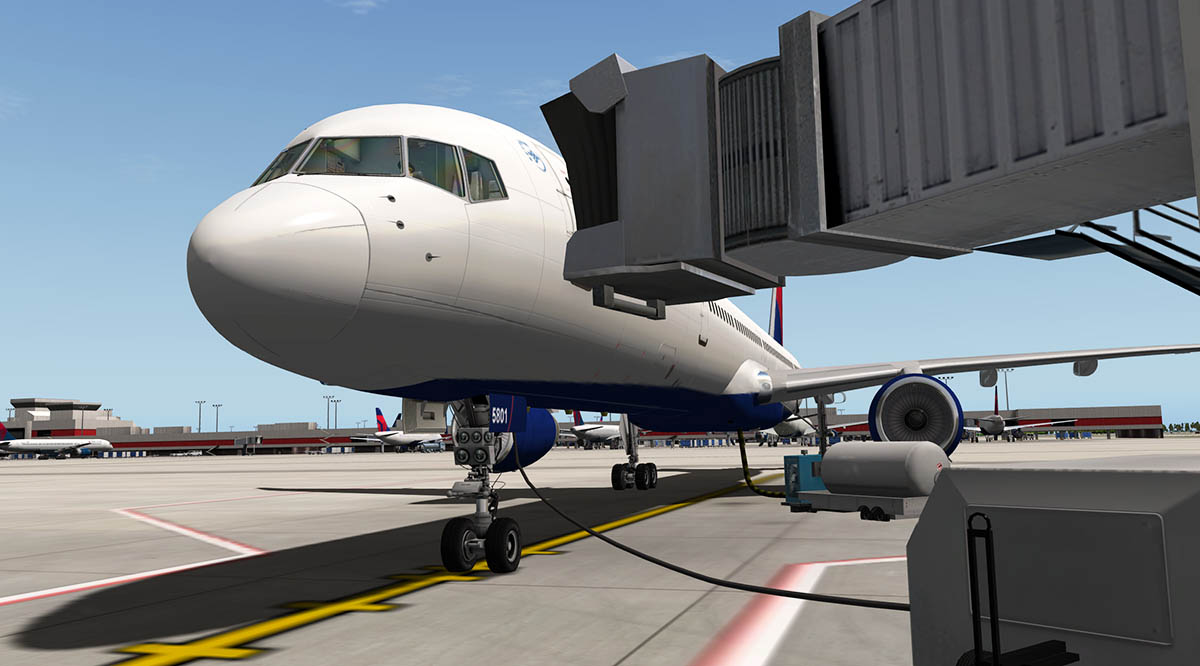
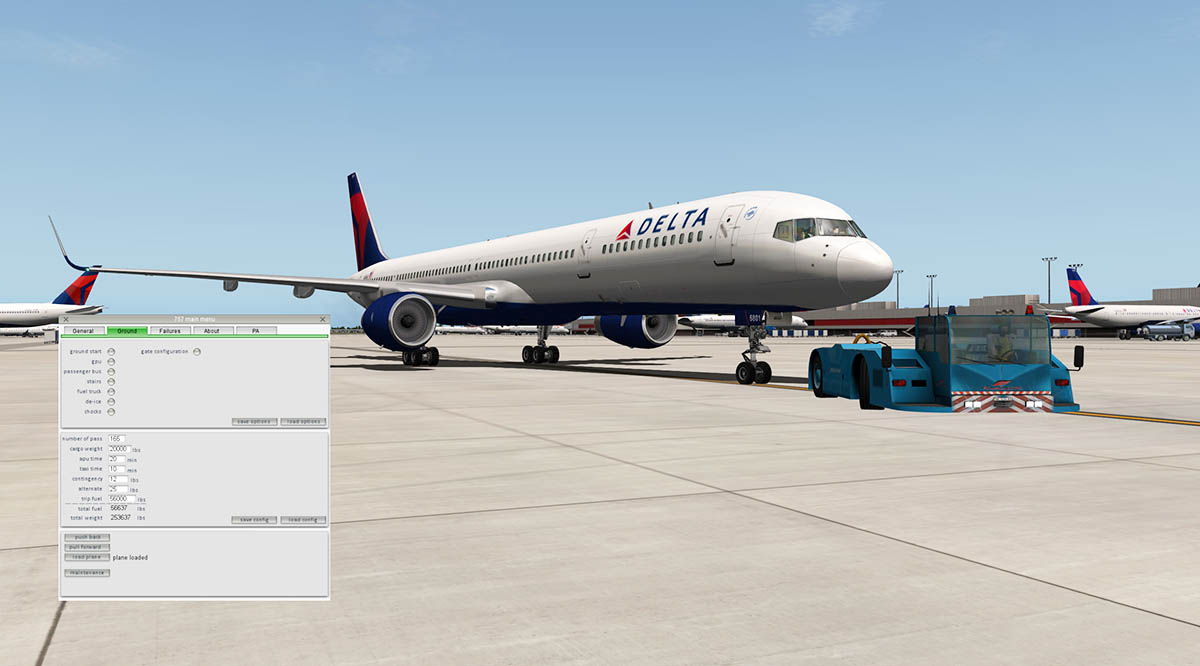
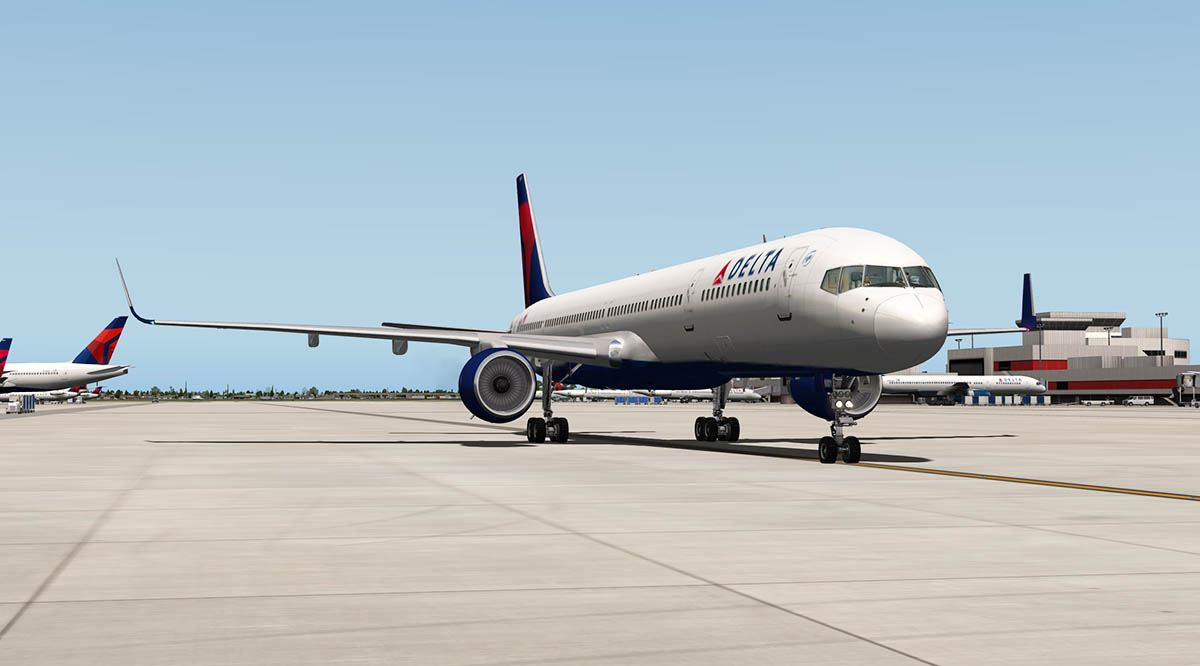
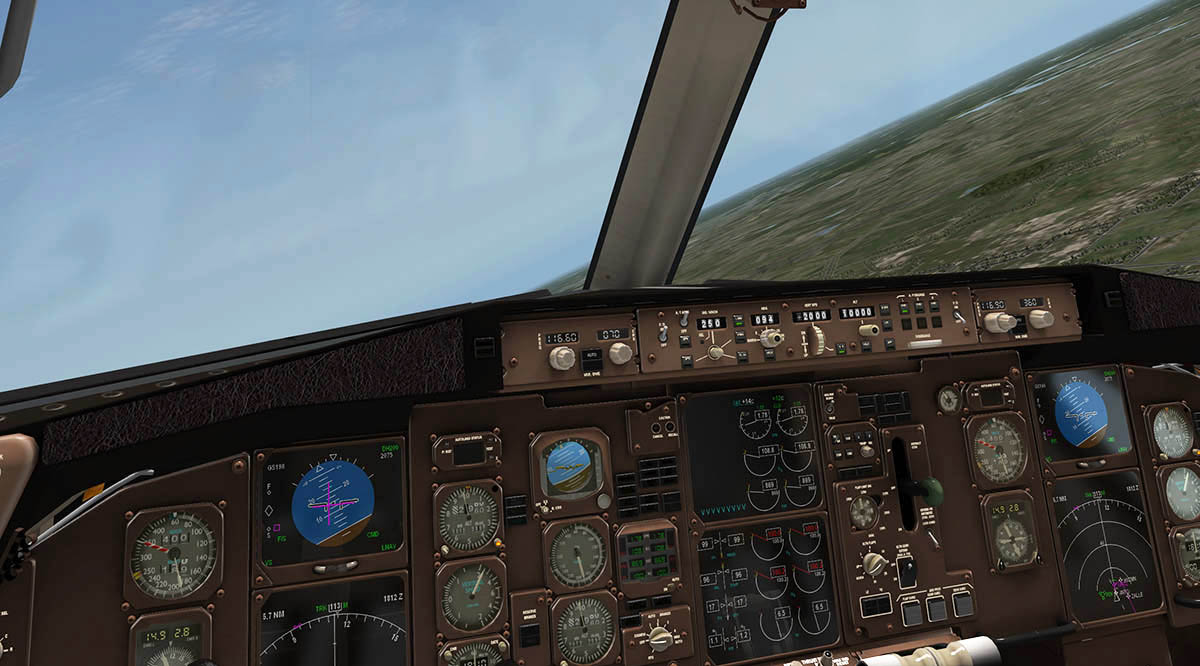
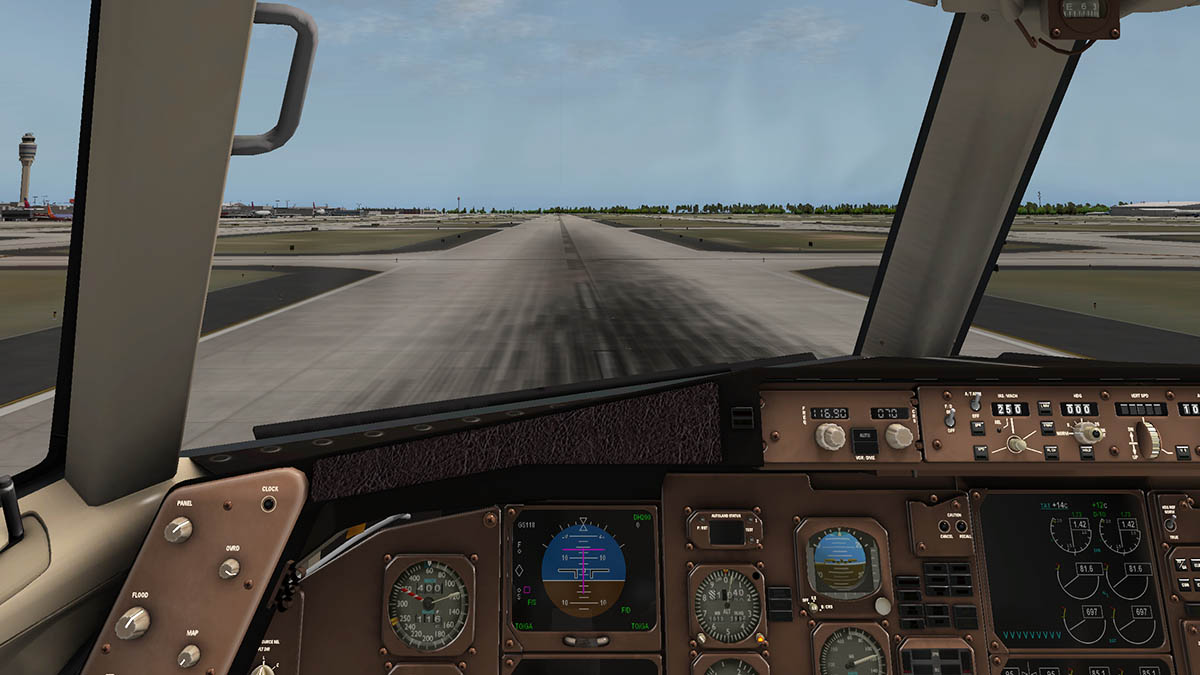
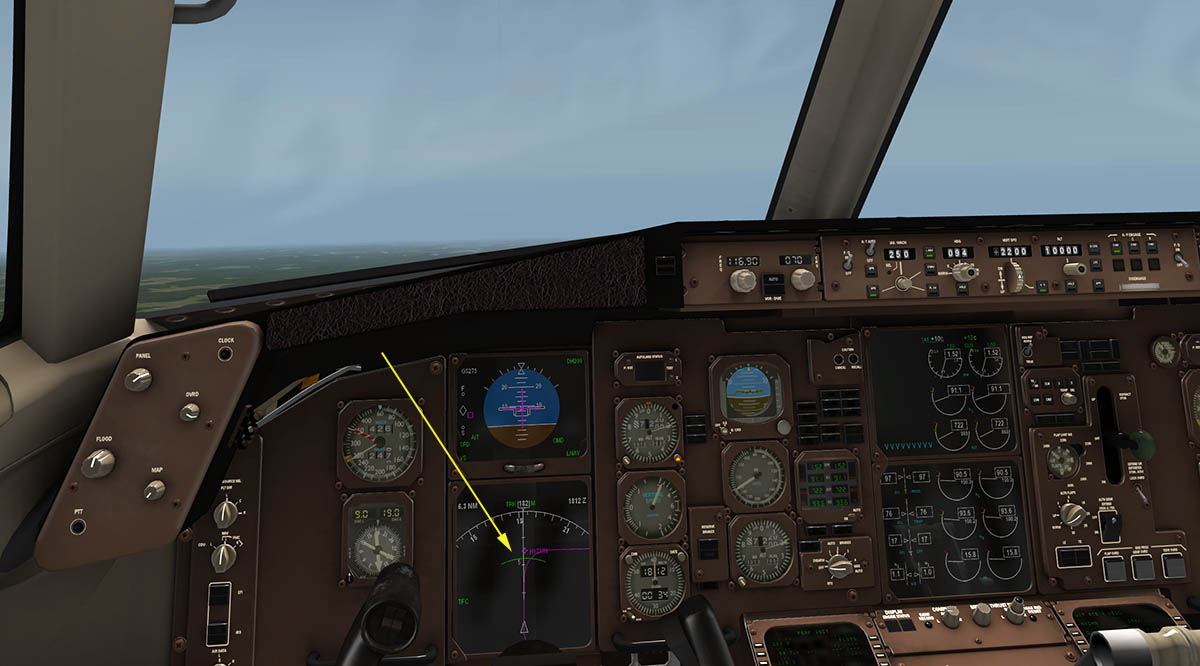
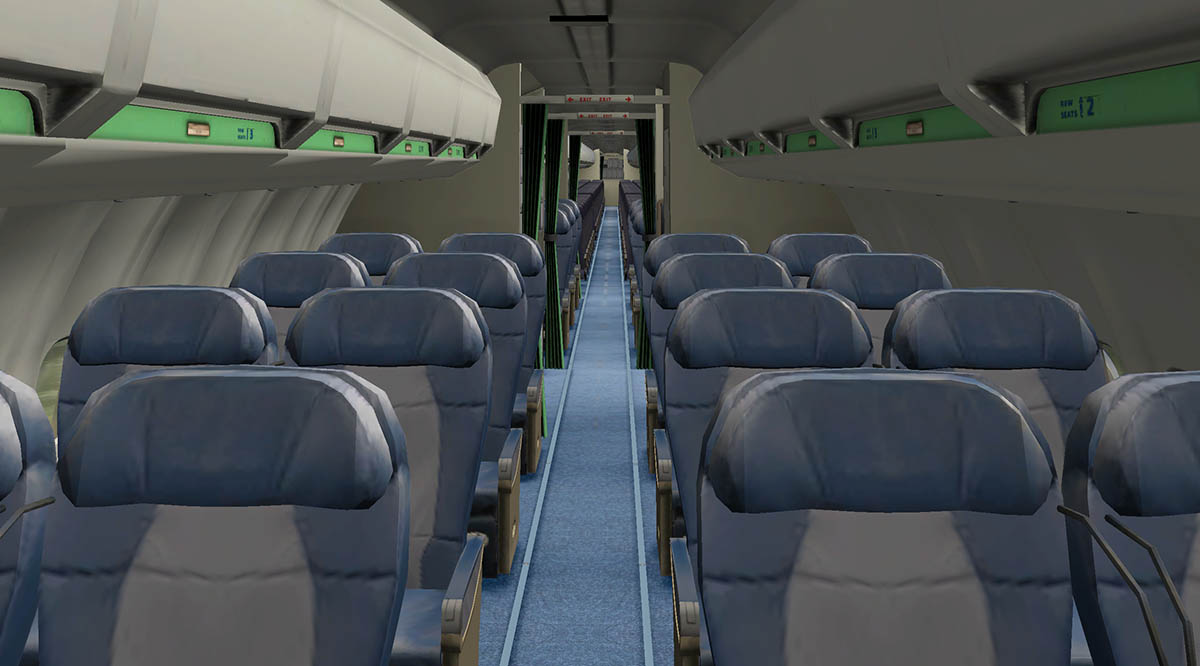
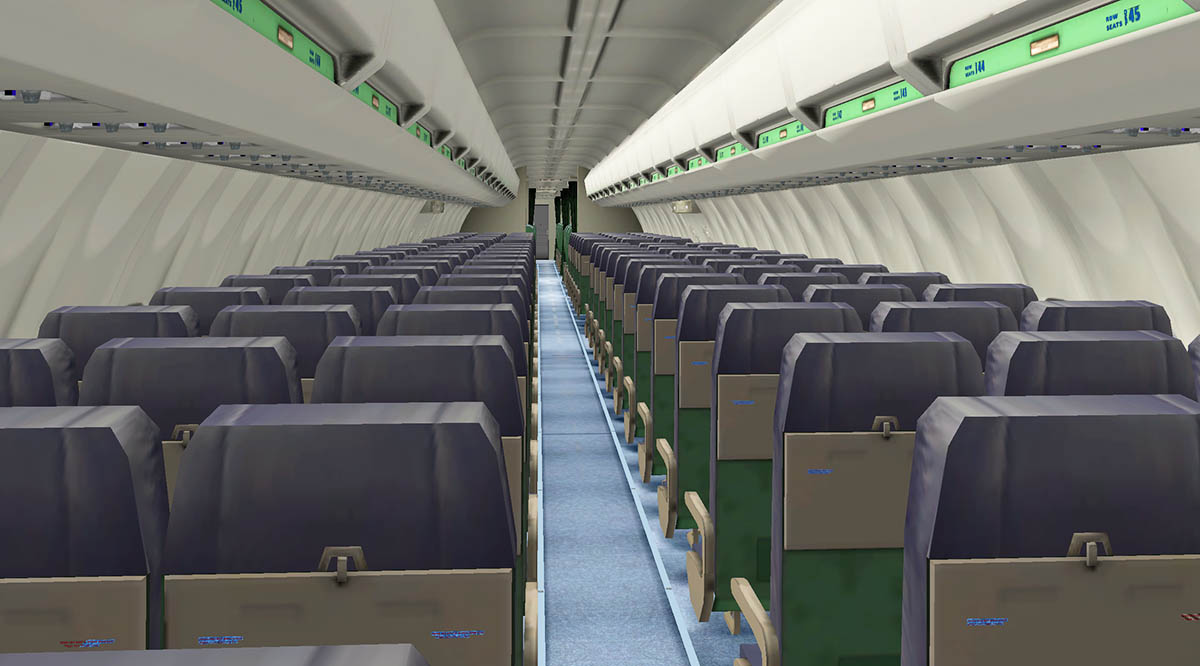
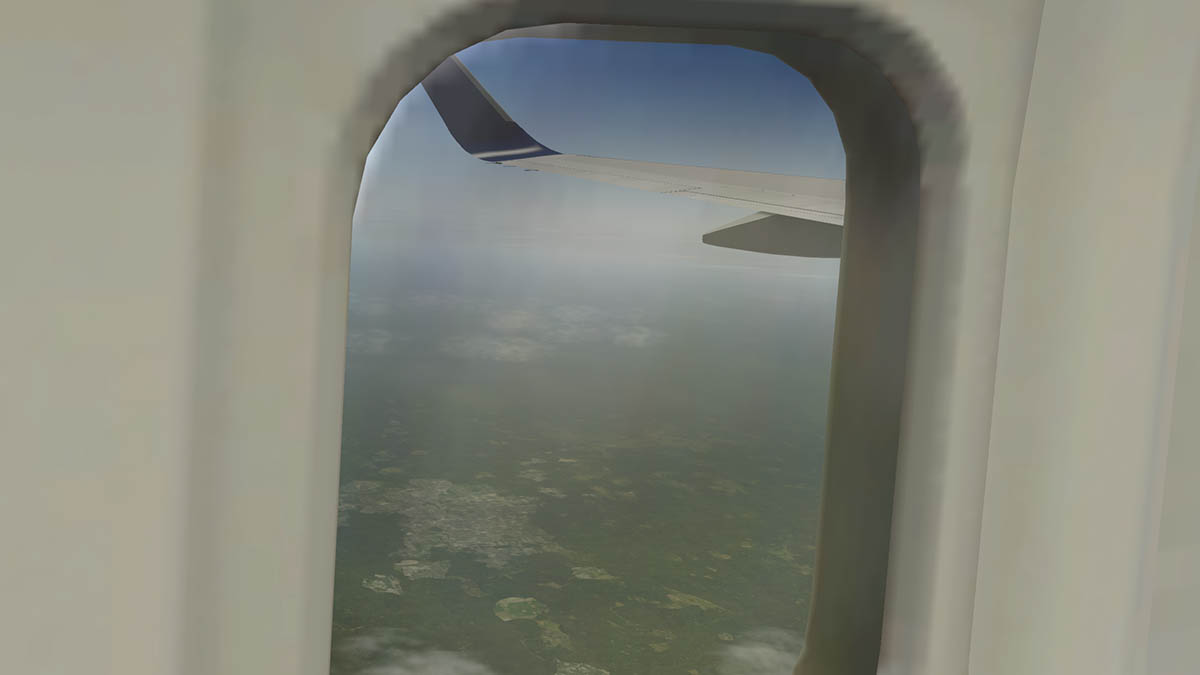
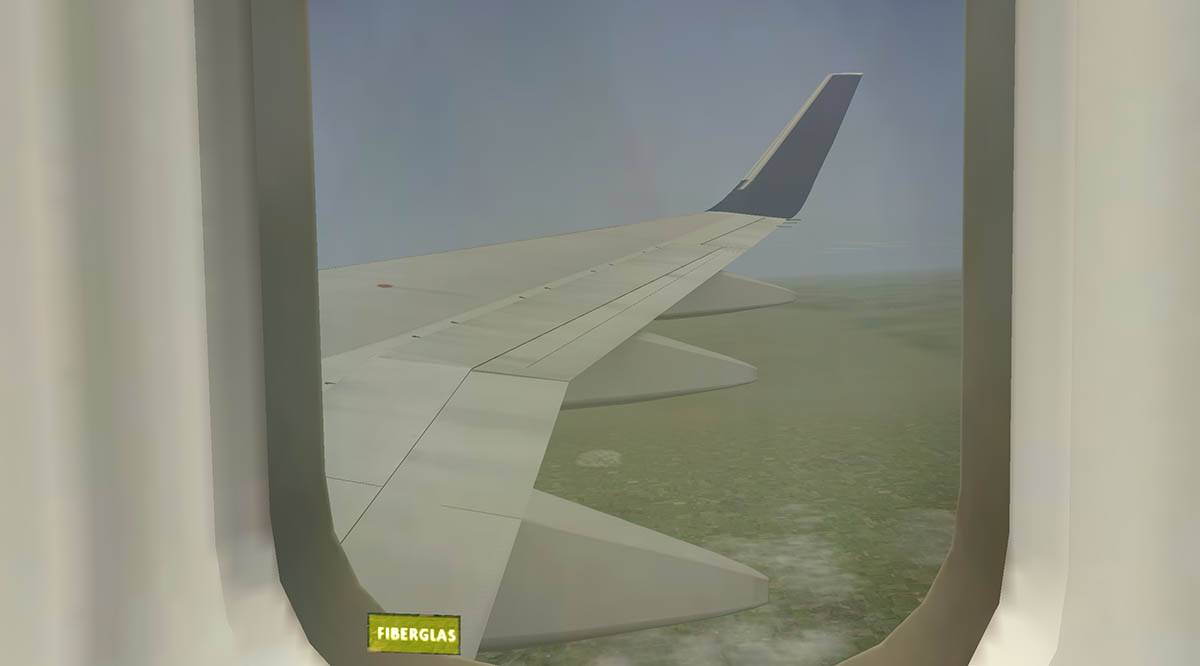
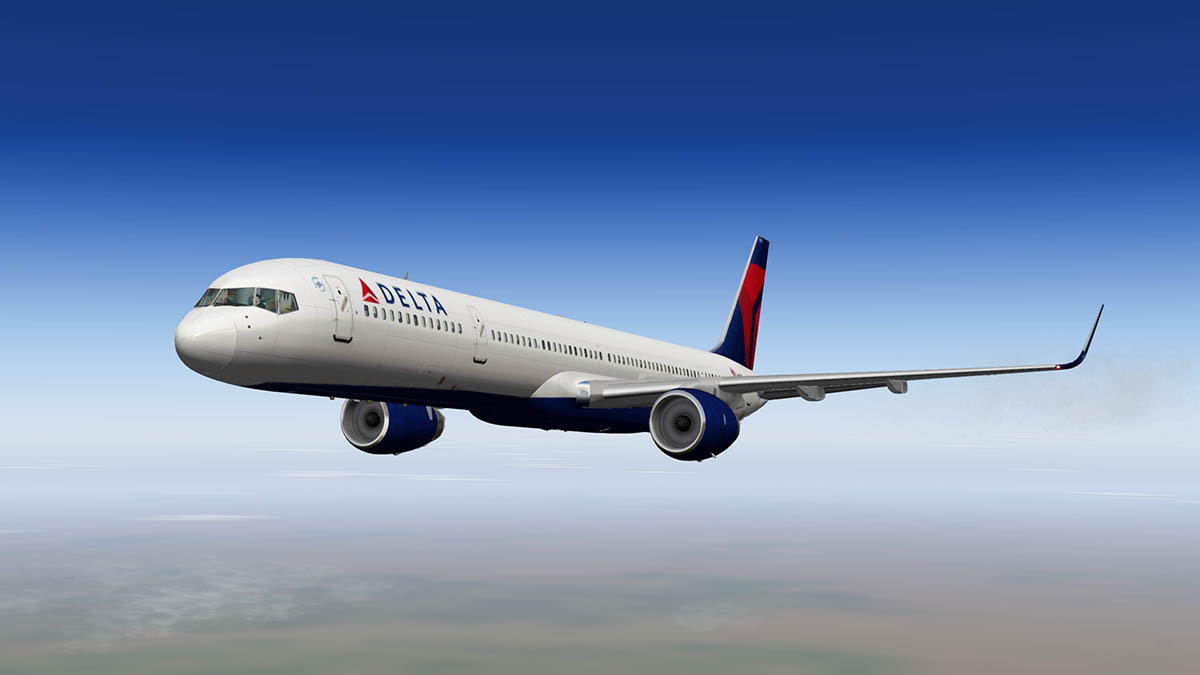
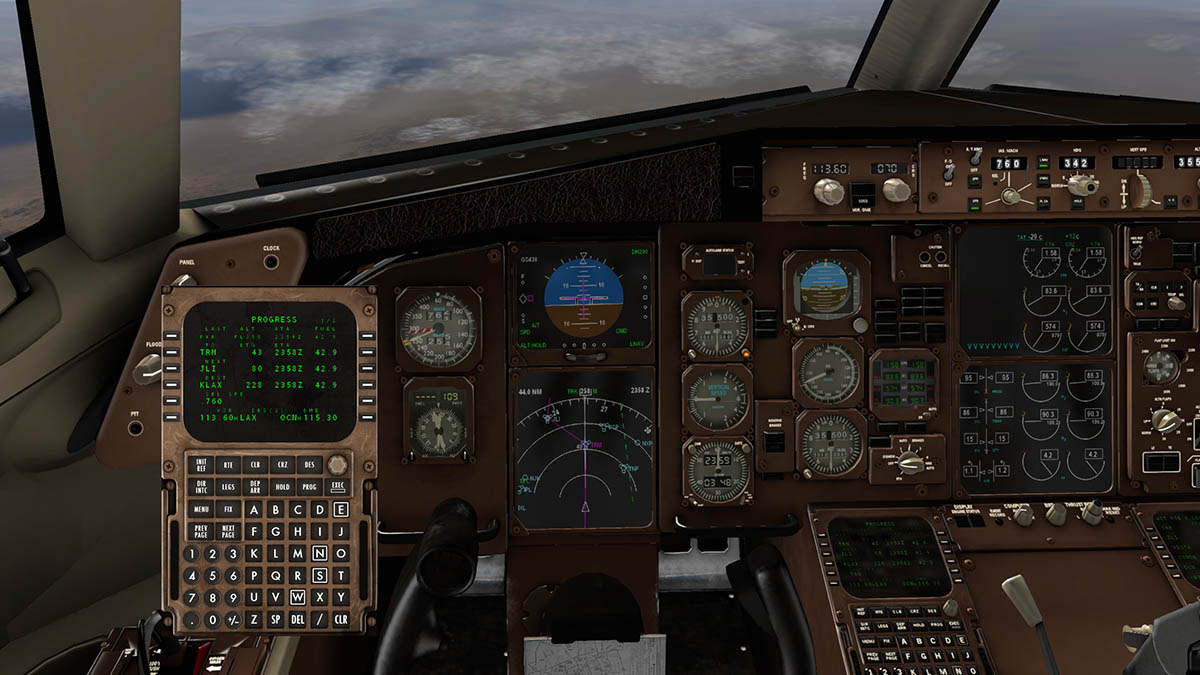
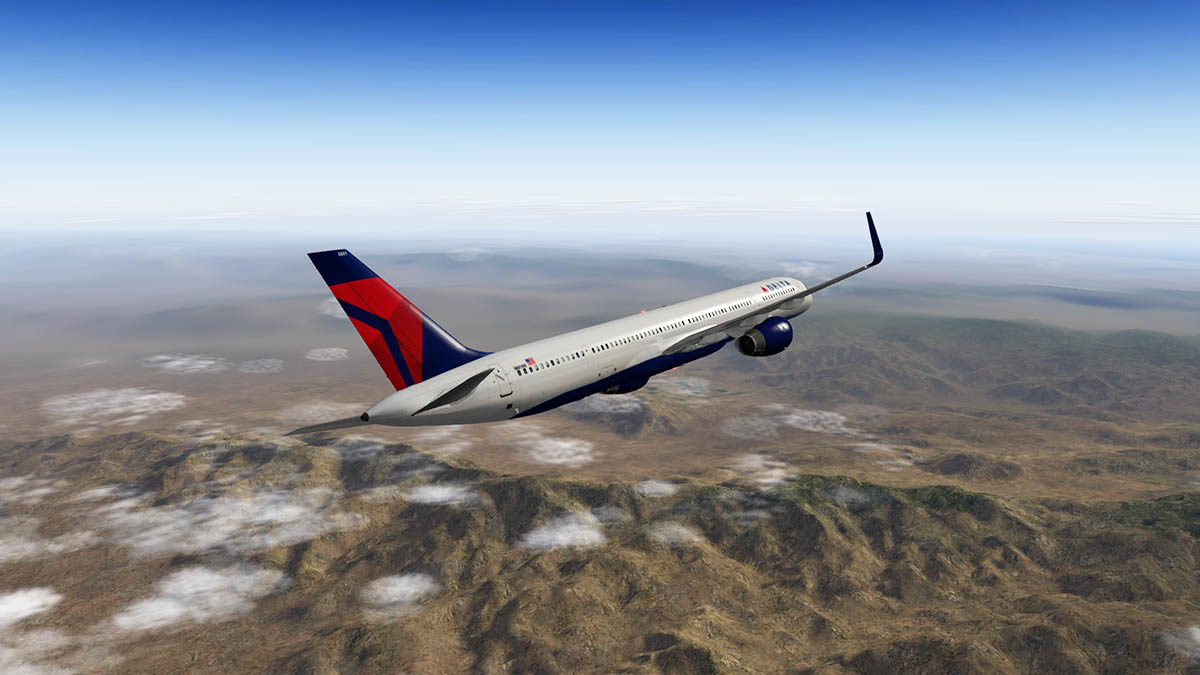
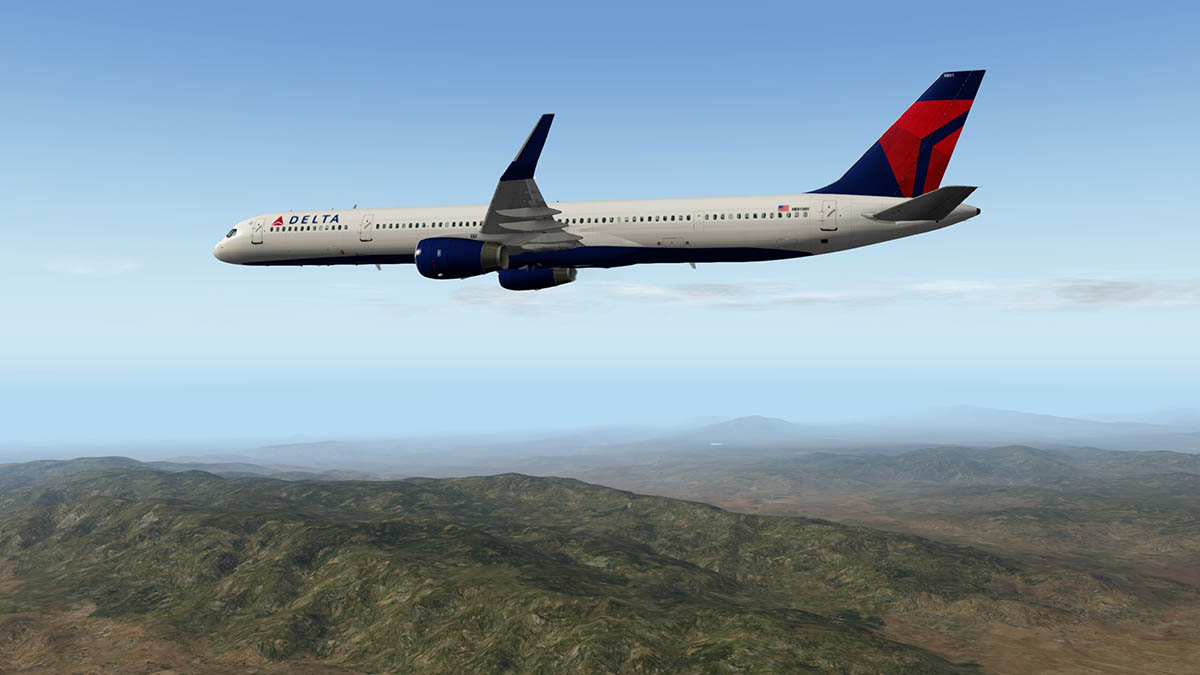
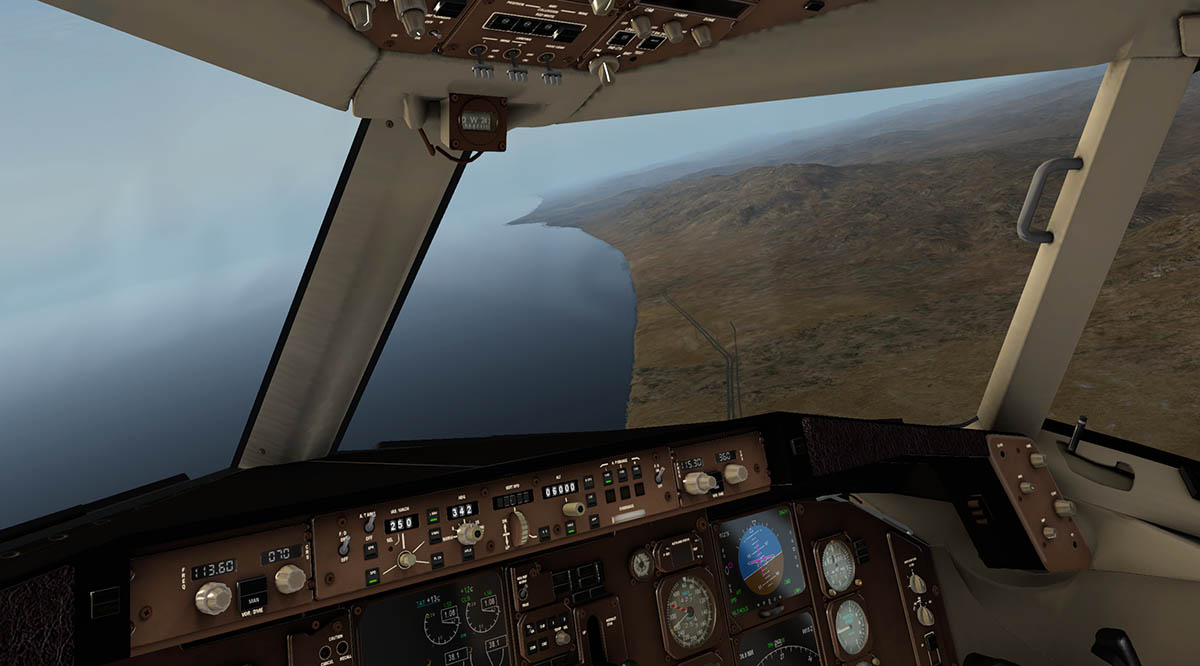
Aircraft Review : Airbus A330-243 by JARDesign JARDesign is well known for their excellent (if slightly misnamed) A320neo as it should be the A320ceo (current engine option). When the aircraft was first released in December 2012 it created new ground in detailing and features that pushed X-Plane to the next level in flying immersion and systems, it was without doubt a new yardstick in design. At that time it was also slightly buggy, certainly in its flight modeling and profiles. But over the years the aircraft has become one of the very best in simulation and that has been mostly by the constant improvements and new features that has kept this aircraft ahead of the pack and created now one of the best experiences in X-Plane. The announcement that JARDesign's second aircraft would be the A330-243, is by and large a natural extension of the A320neo and a perfect fit in every respect. Only the thought of a good A332 with the quality of the original A320neo and its features would certainly make you want to start your savings and adding up your pennies (or nickles) for the release of this aircraft. The nature of this review is to find if the aircraft can live up to or even surpass the sort of hype and expectations that is leveled upon the aircraft in relation to its forebear's success. First point to be made is that the A332 from JARDesign is a complex and deep simulation. If you already have the A320neo you already know what I mean by that, so to those users this A332 will be actually quite easy to translate over too, which in the Airbus philosophy of the way they design their aircraft as well. But if you are new to these sort of simulation designs then the aircraft is demanding of your skills and requires a learning curve (or study) to get the very best out of the aircraft, anyone can certainly fly this aircraft, but it is also demanding to a level that requires time and practise to extract that complete performance and make that perfection of commercial flight in a simulator. In most cases here it is in the area of setting the aircraft up correctly and then flying the A330 in its profile of flight dynamics that is the demanding skill, both of course only come after practise and time. So you will need to invest your energies in those areas to feel the full power of the simulation. To a point it is that like in the real world, pilots usually spend their time on one aircraft for periods of time to be a professional on that airframe, and to a point simulation in X-Plane is now requiring users to invest time and the skills to get to the same proficiency to get to the same level of skill and knowledge to get the return on your investment. JARDesign A330-243 First view of the A330 is certainly not going to disappoint even the hardest critics. The aircraft is simply superbly modeled, simply first rate. This aircraft is fitted with the Rolls-Royce Trent 7000 engines 772.B-60 and creates 71,100 lbf (316 kN) of thrust. Engine design and textures is very well executed, you can almost smell the Jet-A fuel around this aircraft. The huge by-pass blades are perfect and the engine pylon is filled with great detail that is usually over-looked like vents and mesh screens. The wing is very complete as well with perfect spars, and as the hydraulics are powered off the ailerons droop in their loss of power. But if you are wanting the full effect of the detailing of this aircraft then the undercarriage is the place to have a good nosey around. Absolutely perfect design with everything created, as they are a perfect reproduction of the real gear and everything is reproduced here in fine detail. Highlights are the wheel rims and the hydraulic lines, up in the wheel bay is also few items, but the only slight is the connection of the main support link to the airframe, it just rests on a texture image. The whole aircraft glows in the warm sunshine (yes the sun does shine sometimes in the UK) and you want to get on board to see what have inside. But first we will note the menu system. Menu You have a drop-down menu for the A332 in the X-Plane plug-in menu. The menu has three menu selections in Ground Equipment - Doors - Settings Ground Equipment In the Ground Equipment menu there are eight selections.... Ground Equipment Call - Ground Equipment Remove - Open Loadsheet - GPU - Pushback/Towing - Fuel/Weight - Catering - Stairway Not all of them are relevant at this point in time, and so we will focus on the outside items. First is Ground Equipment Call and Ground Equipment Remove. One of the outstanding main features of the original A320neo was the great ground vehicles and animations, and here you have the same excellent feature. You can call all your Ground Equipment by selecting the first menu (Ground Equipment Call) or remove them all the same way (Ground Equipment Remove). When activated all the ground equipment will appear and then move into their respective positions around the aircraft, then the doors or hatches will open to accommodate them. Not only is the animation first rate, but the actual vehicle design and quality is excellent as well. It take a short while for the equipment to place themselves and animate the dropping of the stands and lift their catering boxes or the stairs into the correct positions, and each set of equipment can be selected to work separately in the Fuel/Weight or Catering and the Stairway from the menu. If the fuel truck is selected the pop-up fuel panel is displayed on the screen. Stairways depending on the weather will either be open or covered... I would personally like a manual choice here as I like the covered version better than the open stairs. You can connect up the GPU (Ground Power Unit) to power the aircraft, again the design of the GPU is excellent. Second menu will open all the doors, Two front, Two mid and Two rear passenger doors, Front and Rear Cargo doors and the smaller BULK cargo door. Detailing is again a highlight, animated latches open/close and even the cargo door catches and locks are detailed... There is a "Close All Doors" one click to do all doors, that is great for a quick aircraft cleanup before departure. Third menu selection in Settings, covers two items in you being able to "disable" the rain effects and a frame-rate warning message on the bottom of your screen... Cabin Inside the aircraft the cabin is well represented in three classes. The quality or the non-fuzzyness of the seating is excellent as there is no short cuts here to save frame-rate by putting in poor textures. So the cabin is a quality cabin right through the aircraft. Moving through the cabins, you realise how big and how much space there is in a modern aircraft today. Views out of the cabin windows is excellent, and you can easily find that perfect viewpoint if you like the replays of takeoffs and landing from the passenger view like I do. Externally looking into the aircraft you have a real realistic view, on the ground or in the air. And that is harder to achieve than it looks, but it works well here. Cockpit Into the office and you won't be disappointed. This cockpit is really beautifully designed. Again JARDesign created the best A320 aircraft cockpit with their original A320neo, and here you now have the best A330 cockpit in X-Plane. Quality seeps from every area, the panels are simply gorgeous beyond belief in their textures. Every knob, switch and lever is perfectly Airbus recreated and useable. The one thing that really strikes you is the sheen on the panel (certainly the Autopilot panel) as it looks so authentic. Nothing can be really singled out because it is all quite perfect. One note is that the cabin door can't be opened?, but you can also move easily into the rear cabin if you set up your X-Plane views, so a quick wizz to your favorite passenger seat view and a second wizz back to the office is easily done... Power It is time to set up the aircraft for flight, so first we need the power to come to life. As with JARDesign's A320neo the aircraft always starts up powered down or cold (It also turns off your X-Plane "Start up flight with engines running" like the A320neo as well) Battery switches (yellow) are mid overhead panel, you do have two choices in either one: Select the GPU from the menu and turn on the EXT A & B buttons for power from the external cart, or two: Start up the on board APU via the two lower switches. You now have to align the three air data inertial reference units (ADIRU) top left of the overhead panel. Now the aircraft is powering up and the display's will come alive. It was a feature of the A320neo to always start up from cold (like the A330 here) and you had to power up, align the ADIRU's, set up all the systems and god knows what more before actually flying the aircraft. Don't get me wrong, I love that sequential process and the feeling of really setting the startup of the aircraft from scratch, but it was also to me its biggest drawback in using the aircraft. I finally refined the process down to 12.32 min/sec (yes I timed it) but that is most times 12.32 secs more than I wanted to go right through the whole process again. In other words I would usually select another A320 aircraft than face all that startup process just to fly a few sectors in a the few hours I had spare to fly or complete a review. The A332 here does need a set up process as well, but there are thankfully here a few quicker routes to get flying quicker than the "going the whole hog, all the time" way. There is now a "HOT START" system on the A332 that will power up the aircraft for you!, this will show on the bottom left of your screen unless you start the startup process yourself... Just press the button and the aircraft will set itself up and be ready and powered for flight. You still have to set the GPS alignment and put in your route or flightplan, but otherwise the aircraft is ready to go, and it saves you a lot of time and waiting... Setting up the MCDU/FMC The Airbus A330 uses the excellent Thales and Smiths Aerospace "Topflight" FMS (Rev2+) FMC (Flight Management Computer) and this is based in the MCDU (Multipurpose Control & Display Unit ) on the upper pedestal. If you have flown the JARDesign Thales then there is nothing new here except the weights and performance of the A330 compared to the lighter A320 aircraft. If you know how to program the Thales system or know the system on the A320neo backwards then you may want to skip the next phase. With the ADIRU switches set to "Nav" you insert your aircraft's GPS position by inserting your route on the INIT page, in this case EGKK/LIRF for London: Gatwick to Rome: Fiumicino, type in on the scratch pad the route and insert it into Key 1 right on the MCDU, this will bring up the "Align IRS ->" and you activate by pressing Key 3 Right. The aircraft will align itself and it will take 7 minutes to do so, in some ways this is still similar to the alignment on the A320neo, but it is quicker in the set up as well. Set up of the rest of the INIT page is your flight-level, cost index and flightnumber. There is no "save" of any routes you create on the FMC, which is annoying, but you can actually make one up and save it to the "Flightplan" folder in the main A330 aircraft folder in the format "EGLL SID DVR UL9 KONAN UL607 KOK STAR EBBR" for EGLL to EBBR. and recover the flightplan by inserting "EGLLEBBR" into the "CO RTE" boxes Key 1 Left (top left). Fuel You can select a "Loadsheet" from the menu to help you configure the aircraft. Here you can insert your passengers, cargo and fuel requirements and select the right weight for the aircraft, it shows you your CoG (Center of Gravity) as well. When ready, you select the Fuel/Weight from the menu to bring the fuel truck to the aircraft and begin loading your fuel for the flight. This can be seen best by selecting the Fuel menu on the SD (Systems Display) center panel and INIT Fuel Prediction page on the MCDU. To access this secondary INIT page you select the right arrow key on the MCDU keypad to access the right page noted by the arrows on the top of the display . It is highly important this Fuel Prediction page is correct and activated as it will afect many other functions of the aircraft in flight. Perf (Performance) You can set up your performance preferences via the "PERF" key. Here in PERF's you can set the TAKE OFF - CLIMB - CRUISE - DESCENT - APPROACH - GO AROUND phases, most items will fill in automatically by pressing the corresponding key, but you need to study the items and set these portions correctly to get the best performance out of the aircraft, wrong numbers here have a significant impact on the performance of the FMS system. Most boxes are required to be filled and not glossed over, and you can set your FLEX modes correctly here also. This is the guts to flying the aircraft precisely. Route The Thales FMC is actually quite easy to program in setting up a route, the version on this A330 is quite simple and very robust with few quirks that seem to riddle these complex systems. Creating a route and installing it is quite easy and quick. Select the F-PLN Key to start your flightplan. Both of your DEP (Departure) and ARR (Arrival) airports are already shown. To start then select your DEP airport (key 1 left) of which in this case is EGKK (Gatwick). Then select your runway which today is RWY26L (a good feature is the noted length of the runway on your RWY selection), Then your SID (Standard Instrument Departure) which is DVR1X (Dover) with NO TRANS. All your selections are listed across of the top of the MCDU display. The end of your SID here is fix DVR (Dover) and then between the DVR and your ARR airport LIRF is --- F-PLAN DISCONTINUITY --- which is to note that the flightplan has a break between different points, in this case between the fix DVR and the ARR - LIRF airport positions. Next is to insert all your fixes (or waypoints) between the end of the SID and the start of the STAR (Standard Terminal Arrival Route) at your ARR airport. You can use Airports, VOR, NDB and Airways as points (fixes) on the flightplan. I use VOR fixes mainly because they are very easy to insert and have distances that can be checked built in. So my first VOR fix after DVR is LEQ (Lesquin) which is inserted. To insert a fix you type in the fix in the scratch box, in this case my next VOR fix is RLP (Rolampont) and to insert it I press the key to overwrite my last Fix of LEQ? (key 3 Left) That may sound odd to replace the last fix, but the system does not do that but actually inserts the fix in the next line below (Some FMC's do insert on the next line below, but not in the Thales). From this point on I just continued to insert all my waypoints to the start of the STAR at LIRF with the last fix of GRO (Grosseto). Now I select my ARR airport of LIRF (Key 5 Left) and select my arrival runway in RWY34L (ILS). Next is to select your STAR approach and I am using TAQ1C and that is inserted via the relevant key and also NO TRANS is inserted on the right side Key, the STAR arrival selections are listed across of the top of the MCDU display. Pressing NOTE: It is significantly important you select the right ARR Runway... In this case ILS34L, if you select say VOR34L it will not lock on to the approach... and there is a few different ones in there to choose from? So always look down the list for the ILS approach. On the main flightplan display you now have to join up the end of the inserted fixes to the STAR Approach, this means deleting the --- F-PLAN DISCONTINUITY --- in between. To do this is simple, just press CLR key to put "CLR" in the scratch box and then delete the --- F-PLAN DISCONTINUITY --- by pressing the relevant key (Key 3 Left) to delete the DISCONTINUITY. Your flightplan is complete, but you now have to activate the plan to the system. To do this you select INSERT (Key 6 Right) to activate the flightplan which will turn green. You have the option here to also CANCEL the flightplan to start again by pressing (Key 6 Left). You can activate the flightplan (Green) at any point during the setting up of the flightplan even if the flightplan is not complete. You can see how the flight plan with the inserted SID and STARS looks like (or to find any wrong issues or fixes) by switching the ND (Navigation Display) mode to PLAN on the EFIS panel on the glare shield. You can see on the ND (Navigation Display) the route and you can move through the route by pressing the arrows (up or down) through all the waypoints on the MCDU key pad. (shown above is both the active SID and STAR routes) If you have already set the Flight Level on the INIT page you will find as you change the weight and Fuel of the aircraft,and then inserted other items and activated the Flightplan... the FL inserted disappears? So you have to go back after activating the flightplan and reinsert the Flight Level (FL) on the INIT Page, and you can now also change your flight level (with the fuel now loaded) to a higher FL than you could when you started... In this case FL335. When you do this, the flightplan will then change to show your running time to your destination and flight altitude profiles on the main flightplan for you to use. As noted, programming the MCDU with a route is actually quite quick to do, and easy as well. In all cases you should be ready at the same point the ADIRU's are aligned and the aircraft with the green activated flightplan is usually ready to go. Aircraft Start Engine starts are very easy on airbus aircraft as the process is mostly automatic. APU (Auxiliary Power Unit) need to be running and "Avail" on the Overhead panel, switch on the APU BLEED button and turn the Bleed switch to OPEN. Beacon lights on to warning the rampers that you are now going to power up the aircraft. The engine ignition switch is below the throttles on the pedestal, and goes to "ON Start"... Only thing to do now is push up the switch of which engine you want to start, in this case engine two. The rest of the engine start up procedure is now automatic, and when both engines are running you switch off the ignition switch and the overhead bleed switch and APU bleed button. Note the excellent DCDU (Datalink Control and Display Unit) that shows DEP and ARR airports Metar weather reports (DEP and ARR Airports must be inserted in the MCDU for this to work). SD (Systems Display) The SD screen centre lower panel is your visual information point for the aircraft called ECAM (Electronic Centralized Aircraft Monitor), you can select the different screens by pressing the control panel buttons on the pedestal below. A great feature is the "Please Wait" intermediate screen, it pauses while transferring you to the relevant screen... very realistic. The JARDesign A330 comes with full working systems that include Air Conditioning, Pressurization, APU, Electrical, Oxygen, Fuel, Hydraulic, Ice and Rain Protection, Indicating Recording Systems, Landing Gear, Pneumatics, Power Plants and every aspect can be observed here, all system items are accessed by the comprehensive overhead panel. Mostly the aircraft is in auto mode, or a clean board. You rarely have to adjust anything ready for flight except for the Cockpit and Cabin temperatures. Pushback/Pull The A330 comes with its built in Pushback/Pull tractor. The Pushback/Pull tractor can be called by the menu. It will take its time to latch on to the front gear of the aircraft, when the tractor is in place it doesn't mean it is ready to pushback. It still animated to open latches and finally grab your front steering gear. You have a remote control outline on the very left of your screen to control the tractor, the button's are ambiguous and not outlined, so you have to sort of guess where they are? push once for one speed and twice to go faster, stop is the button in the middle. It takes a little practise to get the tractor to do what you want it to do, because the time you press the stop button to the point the tractor actually stops usually means the aircraft is out of angle to the taxiway? You get it right... finally after several goes. Click remove and the tractor just "bummmpfs" and is gone! as there is no unlatching animation at the end and drive away from the A330 like at the start? Tractor design is however excellent. Taxi I'm not going flying yet but still to load my passengers at the gate. EGKK is very busy today, so I did most of the preparations and cargo loading at the remote ramp and a quick taxi is required to collect the humans (sorry fare paying passengers). A bit of throttle is needed to get the aircraft moving, but only a slight thrust is needed to keep the momentum. You have "Terr on ND" like on the A320neo, which you can switch between the standard Navigation Display (ND) and the "Terrain" mode and the "taxi" mode, which shows you your position on the local map on the ND screen. Great as it is, it is also a frame-rate user, so keep its use to minimal. Aircraft works fine with the animated airbridges, and soon we are ready to depart... Pushback again and you are soon back into the taxi and heading RWY26L, and Flap 1 Flying the A330-243 At 237300lbs the aircraft is quite heavy and you can feel that weight, certainly once you put up the power and release the brakes. The A332 takes awhile to gather momentum, very slowly, but surely. Vr at rotate is 165+10 knts and the aircraft is very slow to respond into the air, you need to have a full control of the pitch which is required at 15º, but you wrestle the aircraft airborne and try to keep that momentum, selecting "THR CLB" has no effect. The A332 seems to lose a lot of speed at the 15º angle and I'm not completely happy with that, as speed should be constant and you seem to be sliding back and too close to Alpha Floor? This without the FLEX mode set. If you don't get the angle of attack right and the correct speed it is very hard to switch on the Autopilot and not get a quick alert as the AP disconnects again? The AP wants a higher pitch degree, but you can't do that because the speed is too low? so your best bet is to get the speed up then adjust to a higher pitch and then activate the AP. I climbed to 8000ft, and then retracted the flaps to zero. And from that point on the climb to 33,000ft was quite easy with 1800fpm to FL220 and 1000fpm to FL260 and finally 500fpm to FL330, then I then stepped three times at 300fpm up to my final cruise altitude of FL355. Climbing out of EGKK (Gatwick) is exhilarating, and the second officer call outs were very realistic. But you have to watch your speed and adjust the pitch to get the best performance to your climb. Once the takeoff has commenced the UTC time will sync with your local time, and with the flightplan. Which is very useful in the context of distance and time to your destination, but also times to the next fix in the flightplan. You can see the route profile by pressing the "North Ref" button on the panel. Here I am climbing higher than the plan, but I found the profile too shallow at the start and no altitude steps in there, you can of course adjust that, but you would need to work out your best profile for that in advance. But for now a few manual fights would give me the numbers to better adjust the profile later to my liking. TOC (Top of Cruise) is noted on the flightplan and on your Nav display The A330-243 looks magnificent in the air, a simply beautiful aircraft, with the HDR on the aircraft glows. There are two blinds that can be pulled down with one on the front window or side blind on the front side window. The drop down blind is excellent as it can be positioned in just the place you want. Cockpit lighting is first rate, with fully adjustable panel lighting (and drop down), instrument highlight lighting, overhead main cockpit lighting (very real) and four spot lights that are adjustable for brightness. Cabin lighting internally is excellent, very realistic and the external lighting also very good, certainly the view through the cabin windows, but the Logo tail light didn't work with HDR on? As the European Alps drew nearer, you think about how good this aircraft really is, sounds are very good in most instances, from the startup, cockpit, take off and cruise sounds, but the external is a very focused 3d sound and towards the tail, good but feels a little blank everywhere else. But there is a way included to customise soundsets and build your own sound effects for the aircraft. Internal announcements are automatic so you don't need a separate "announcement" menu, I find this way far better as you don't have to do anything and they are highly realistic in the background. Call outs are excellent right across the board (If a little loud). There is "Fault Panel" listed in the MCDU menu, and you can turn it on or off on the menu, and you can also in this menu on the MCDU adjust the sound settings, Turbulence on/off (be careful you don't over do the turbulence with the X-Plane weather settings, because you can easily send the aircraft into a spin?) and the Shake Camera on/off setting (which we will come to on landing). The sound settings is comprehensive, so you can find the volumes that you would easily like. Liveries There is only one livery with the aircraft, the default Airbus "House" livery... However like with the A320neo there is a smorgasboard of liveries available from the JARDesign site or from the X-Plane.Org, and all are free... here is a small selection. Panel The main Flight Display for the PFD (Primary Flight Display) is pure airbus with Normal Law, Alternate Law and Direct Law... Speed tapes and altitude tapes with V/S Vertical Speed pointers are all standard Airbus issue. The Navigation Display (ND) has everything you need with "Rose" functions Standard, VOR and ILS. ARC and PLAN positions are also available and note the detailing of the current timer noted in the ND display. ADF and VOR selections are also available and can be set either via the radio panel or MCDU Radio page (Which is quicker) All instrument displays are complex, adjustable and highly realistic... I will note again that to get the best out of the displays and for the display of information, it is all in the MCDU set up. So it is important to get that right at the start of the flight. You can see the local map view (directly down) on the ND in the air, by pressing the "Terr on ND" button, handy if you want see if you are flying over a certain place or city. A note to set the VOR on the radio. Mostly we use the ARR VOR (OST - OSTIA 114.90) to show our distance and position to the ARR airport. But it is best to set the VOR on the Radio on the pedestal and not the one in the MCDU? You get a lock C-O to note the VOR Freq and it sets the VOR Frequency not on the right, but the left top of the FMC? Just make sure it is locked in to the correct placement point. There is a PROG (Progress) page, but it isn't as good as what you get on the Boeings, just some altitudes and the distance to next waypoint? Time to go down as we are reaching the point on the flight profile of ToC (Top of Cruise) which is shown on the ND and the MCDU display. I followed the flightplan profile down directly but I was not happy with it? It put me too high were I should have been 5000ft lower and slower. I corrected it manually, but be careful if you don't adjust the flightplan and follow it blindly by having faith in it. No doubt these are significant areas for adjustment to your flightplan and flight planning. Rome is visual now, but we are landing to the south of LIRF and the passengers get a closer view of Italy. Now into the STAR we pass RATIR fix and turn out to the coast at a projected 3000ft. On finals and I found I was too fast and needed to adjust the speed manually. You require the LS button active to show the vertical and horizontal ILS alignments on the PFD... Then pressing APP to lock onto ILS34L... note again that you select the right runway from the ARR list selection? Get that wrong and your frustration in a non-lock will totally ruin your landing? Ready for landing, I set my speed to 171knts and arm the "airbrakes". It is just a very small arrow that you push to do the actual arming, so make sure that they are armed by the Warning Display E/WD on the panel. ILS34L capture is on the money and I adjust my speed down to 162knts, Gear down and the rear bogies cantor back. Height call outs are excellent and at 200ft the Auto "Land" takes over and is displayed on the PRD... nice flare and your down. Don't fight the aircraft in the landing sequence, it does a very good job for you, so just go along for the ride. On landing your world starts to shake! And then vibrate madly as it does on a real landing. This is the "Shake Camera" feature, and works... really well. very realistic. Sadly the image does not does do the action justice. Engine thrust reversers are the "open" the doors then throttle up control, throttle down and disconnect and work very well and are highly effective on running off the speed, you get a clap from the passengers if you get it all right... Clean up and taxi nicely to the gate... Engine shutdown and open up the aircraft and cargo doors. How good was that flight... simply brilliant. The Airbus A330 is a medium wide-body twin-engine jet airliner made by Airbus, a division of Airbus Group. Versions of the A330 have a range of 7,400 to 13,430 kilometres (4,000 to 7,250 nmi) and can accommodate up to 335 passengers in a two-class layout or carry 70 tonnes (150,000 lb) of cargo. The A330-300, the first variant, took its maiden flight in November 1992 and entered passenger service with Air Inter in January 1994. Responding to dwindling sales, Airbus followed up with the slightly shorter A330-200 variant in 1998 which is the aircraft here. As of January 2015, A330 orders stand at 1,352, of which 1,159 have been delivered. This A330ceo (current engine option) since 2014) is to be replaced by the A330neo, which includes new engines and other improvements, and on 19 November 2014, Delta Air Lines became the first airline to announce a firm order for the Airbus A330neo by ordering 25 A330-900neo aircraft. Specifications A330-200: Max speed - Mach 0.86 (913 km/h or 493 kn or 567 mph at 11,000 m or 36,000 ft cruise altitude) : Cruise Speed - Mach 0.82 (871 km/h or 470 kn or 541 mph at 11,000 m or 36,000 ft cruise altitude) : Range - 13,400 km (7,200 nmi) : Service Ceiling - 12,527 m (41,100 ft) - Max 13,000 ((42,651 ft)) : MTOW - 242,000 kg (534,000 lb). Summary There is no doubt this Airbus A330-243 from JARDesign is aimed at the upper professional market. That is not saying anyone can fly this aircraft, because they can. But it is a professional aircraft and demands time to get the full rewards and flying profiles to really understand what you have here... Preflight, there is a lot to do and insert in data, and you have to dot all your i's and cross all your t's to see what you want in the simulation. The "Hot Start" feature is hugely welcome and even programming the MCDU is quite easy once you understand the process. But you really have to commit to study of Airbus manuals and flight profiles to understand how the systems all work and set up the correct flight configurations, because mostly everything that a real A330 does is in here as well, so you have to approach the aircraft from that perspective. In features and quality you have a smorgasbord (that word again) and brilliant animations abound, and the quality is outstanding on everything from the extreme detailing of the aircraft to the clever ground equipment and even that "shake" on landing will bring a smile to your face... its brilliant, but very complex so expect a few bugs with the early releases. I actually found and why I made those study notes is because the more you know the aircraft the less things can look like actual issues, like I mentioned time and familiarity with the aircraft does in every case fixes things that can go wrong (or look like they are going wrong) like with the case of a simple thing of selecting the wrong runway selection in the process of building your flightplan. If you understand that point, you understand what I am try to demonstrate about what this A330-200 is all about... "The devil is certainly deep in the details" No doubt the JARDesign A330-243 is one of the best X-Plane investments, you will want nothing else to fly in this category and the aircraft will return years of great simulation flying and a great hangar companion to the JARDesign A320neo, If you loved the A320neo, then the A330-243 will put you into a seventh heaven... Its that good.... a simply superb aircraft.... _____________________________________________________________________________________ The Airbus A330-243 by JARDesign is now available from the X-Plane.Org Store here : Airbus A330-243 and is priced at only US$60.95 It is noted that only a WINDOWS version is available at this time. I am Mac OS and I had very few issues with the aircraft, but one does stand out. I found that if you move the aircraft via the X-Plane Local Map or place the aircraft at a gate via the airports selection it will crash! The issue to me is that the SASL plugin does not restart cleanly when the aircraft is moved within X-Plane? A start up from the desktop (Or clean start as I call it) will give you no issues. Installation : Download is 301.70mb that is unzipped to 467.20mb to your X-Plane - "Heavy Aircraft" Folder. Online key activation and serial number required.(I recommend a full desktop restart to reset the SASL plugin after key activation!) It is advised that you require a for best performance, you need a 3Gb Video Card? I found that frame-rate is very good and performance is on par with the Flight Factor professional aircraft (B777/B757). HDR can be limited, but otherwise I found the aircraft ran perfectly well with my settings and computer specifications with no limitations except the usual scenery and weather pull downs. I found a very good pilot briefing manual for the A330-200 Aircraft... 7.03mb A330_Flight_Deck_and_Systems_Briefing_For_Pilots.pdf Requirements: Windows only at this time! (Mac coming soon) X-Plane 10.35+, with HDR mode ON, CPU: 2,4Ghz Multi-core. Memory: 8 GB RAM. Video Card: 2Gb VRAM. 64 bit OS high-precision joystick, rudder pedals, throttle controller (separate throttle controllers not support now). For best performance, you need a 3Gb Video Card Features Detailed Virtual cockpit Detailed Exterior Ground equipment included: Tow tractor, fuel truck, stairways, catering truck are included in pack and managed from menu. Systems Simulated: Air Conditioning, Pressurization APU , Auto Flight , Communications , Doors , Electrical , Equipment , Flight Controls , Oxygen Fuel , Hydraulic , Ice and Rain Protection , Indicating Recording Systems , Landing Gear , Lights Navigation , Pneumatic , Power Plant. Tested by real Airbus pilots Real Airbus pilots and technicians helped in the development and testing. New 3D-sound engine An easy way to customize soundest and build your own sound effects. Navigation Data The A330 comes with the NavDataPro dataset by Aerosoft. _____________________________________________________________________________________ Developer site : JARDesign Group Review by Stephen Dutton 17th April 2015 Copyright©2015: X-Plane Reviews Review System Specifications: Computer System: - 2.66 Ghz Intel Core i5 iMac 27” - 9 Gb 1067 Mhz DDR3 - ATI Radeon HD 6970M 2048 mb - Seagate 256gb SSD Software: - Mac OS Yosemite 10.10.1 - X-Plane 10 Global ver 10.35 (final) Addons - Saitek x52 Pro system Joystick and Throttle - Bose - Soundlink Mini Scenery - EGKK - Gatwick Airport, United Kingdom by tdg (X-Plane.org) - Free - LIRF - Roma Fiumicino Leonardo Da Vinci Airport 3.01 by Seaman2020 (original work by wehrlipub) (X-Plane.org) - Free
-
Aircraft Review : Beechcraft 1900D HD Series by Carenado
Stephen replied to Stephen's topic in Airliners Reviews
The Apple Store won't know... You will need a tech. Mac are made to accept the highest speed chip? One fits all, so there is no problem with that. And as to damaging the Mac... I'll laugh at that, mine should have broken by now, laughable. Only thing to be aware off is the heat, like noted in that post, adjust the fan speed higher... strange thing is with a faster graphic chip is that the Mac actually runs cooler because the chip is not running so hard. Yes if you can install the chip (even a 1gb) you will see your X-Plane in another totally different world SD -
Aircraft Review : Beechcraft 1900D HD Series by Carenado
Stephen replied to Stephen's topic in Airliners Reviews
Yes, that is the issue I'm afraid Irving? The 1900D just does not perform very well with the 512mb chip? I struggled with it. One trick is to keep the panel lighting off (overhead switches), It helps a lot. HDR is a no, no as well, as your desktop image didn't work? so I can't help with tuning in that area? I actually didn't purchase a new iMac, I upgraded it... for the full details I wrote about the conversion here... You would get the same performance hike, but if money is tight you would still get away with a 1gb graphic card? It makes a huge difference. totally well worth the investment and you can then fly anything SD -
Aircraft Review : Beechcraft 1900D HD Series by Carenado
Stephen replied to Stephen's topic in Airliners Reviews
I would need to see your computer specs, but also the way you have set up your computer rendering options? The 1900D has certain aspects that don't translate like the FF aircraft. -
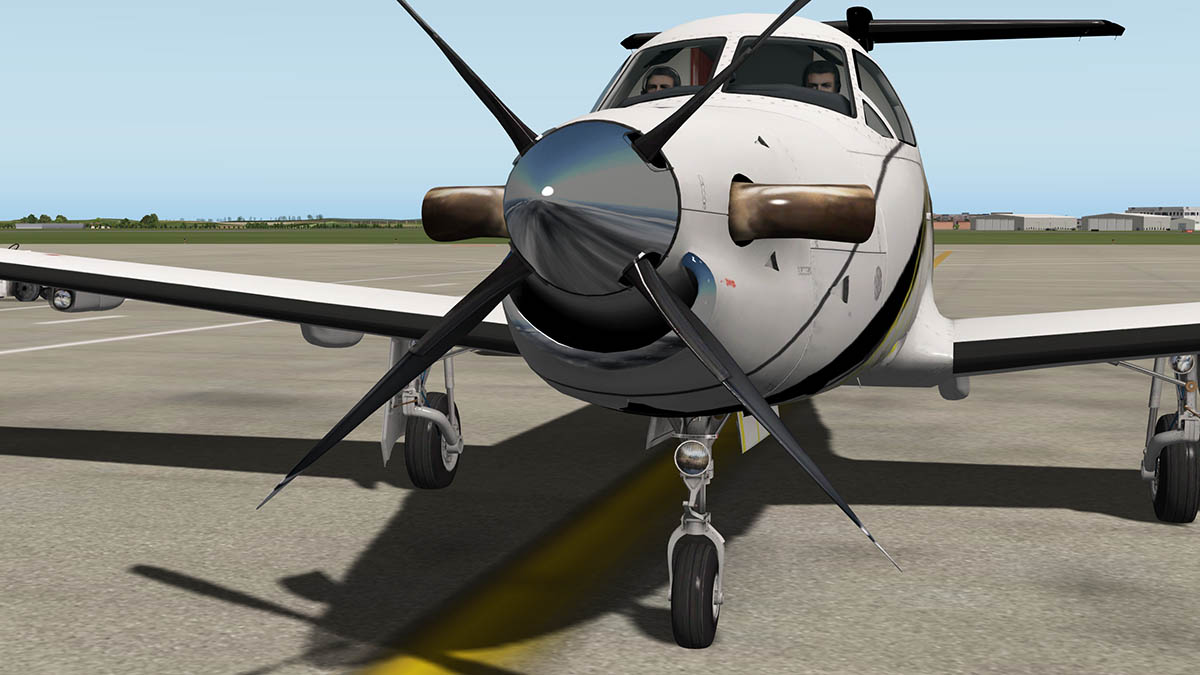
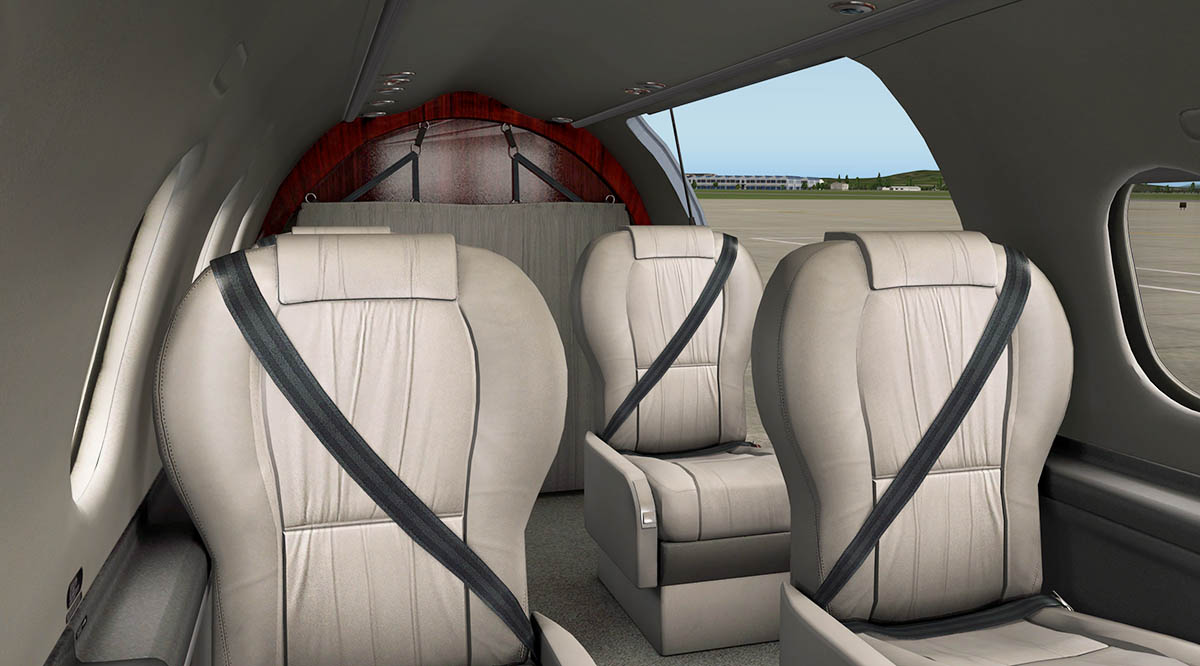
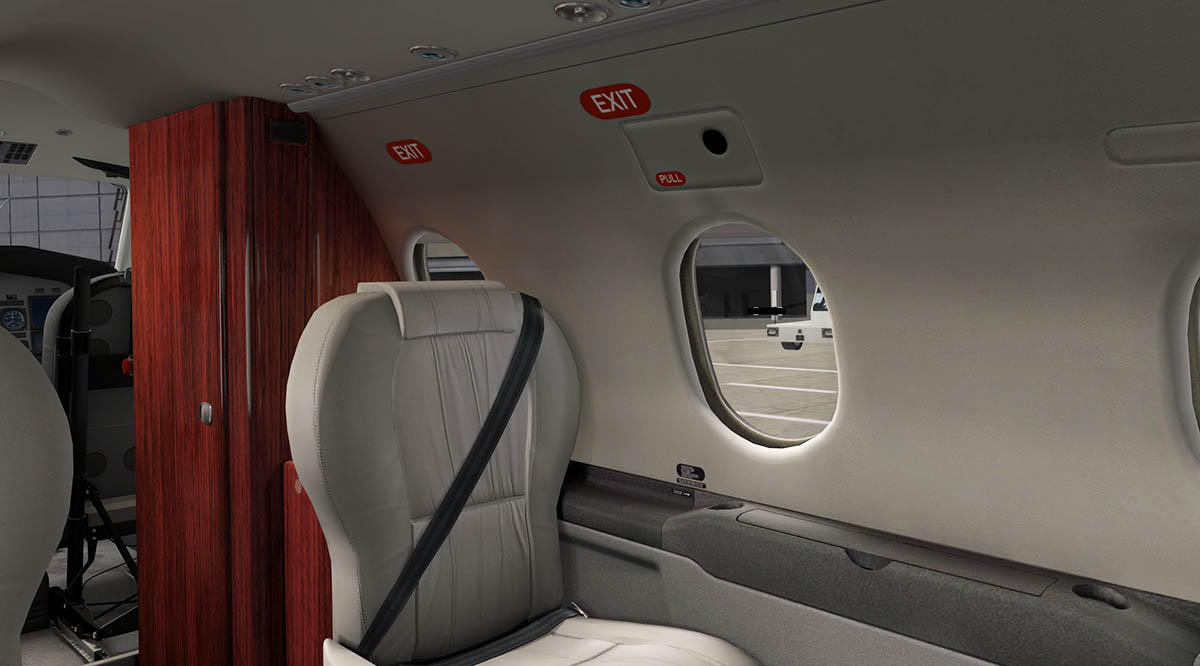
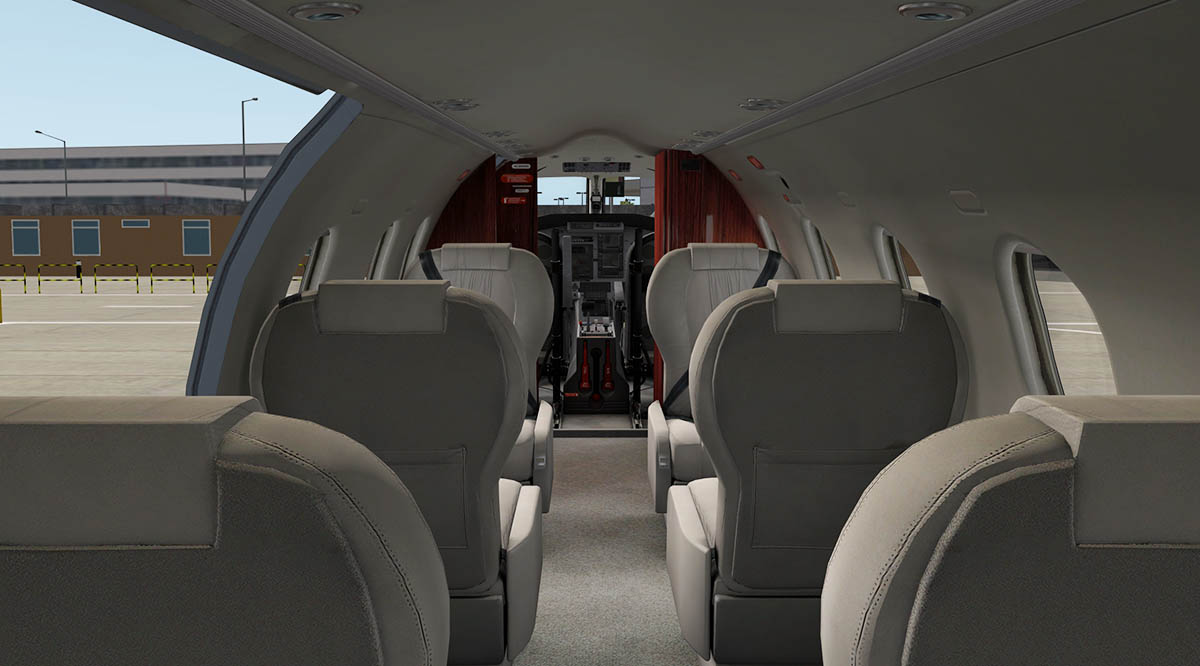
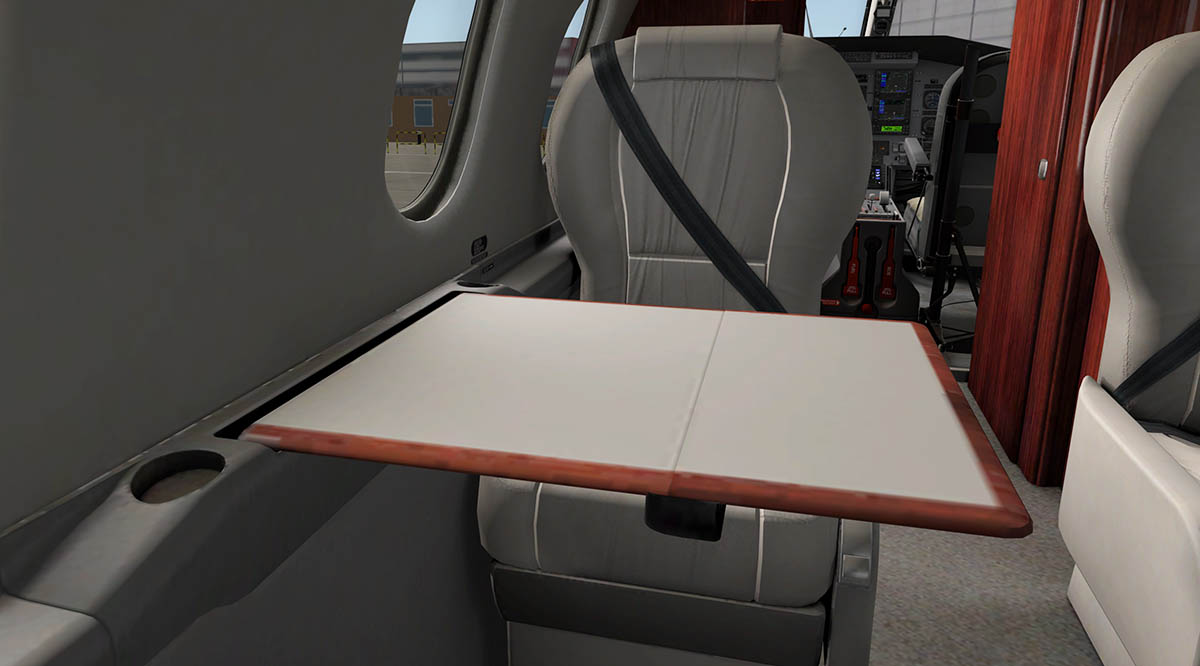
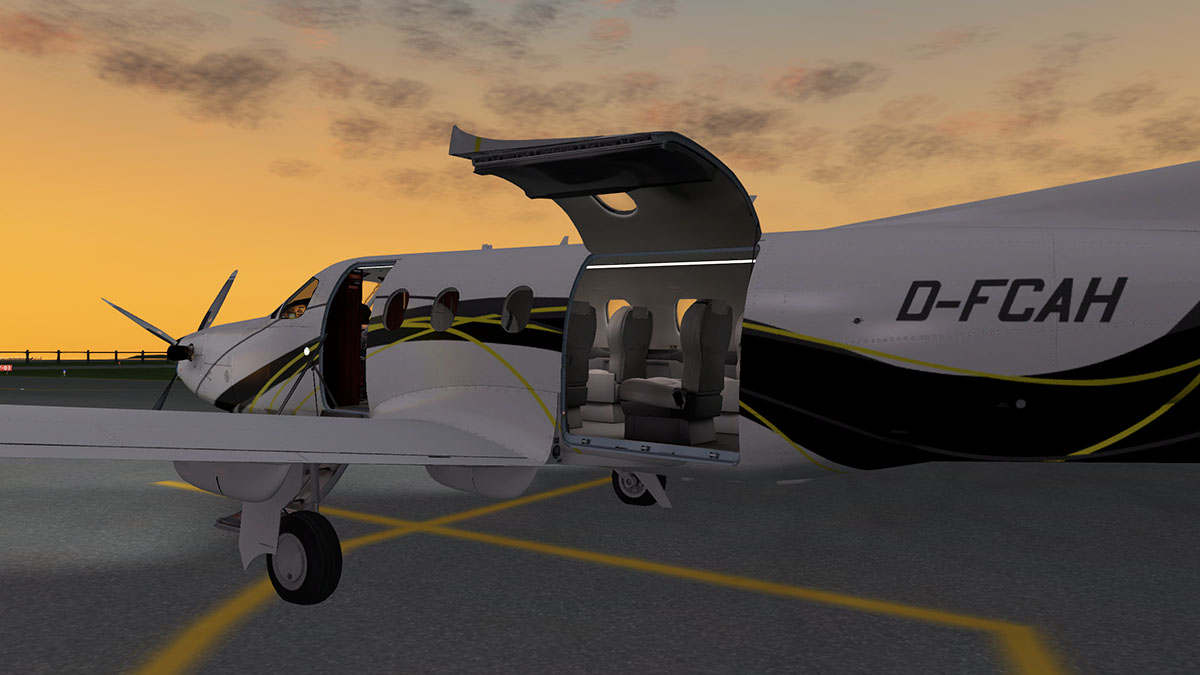
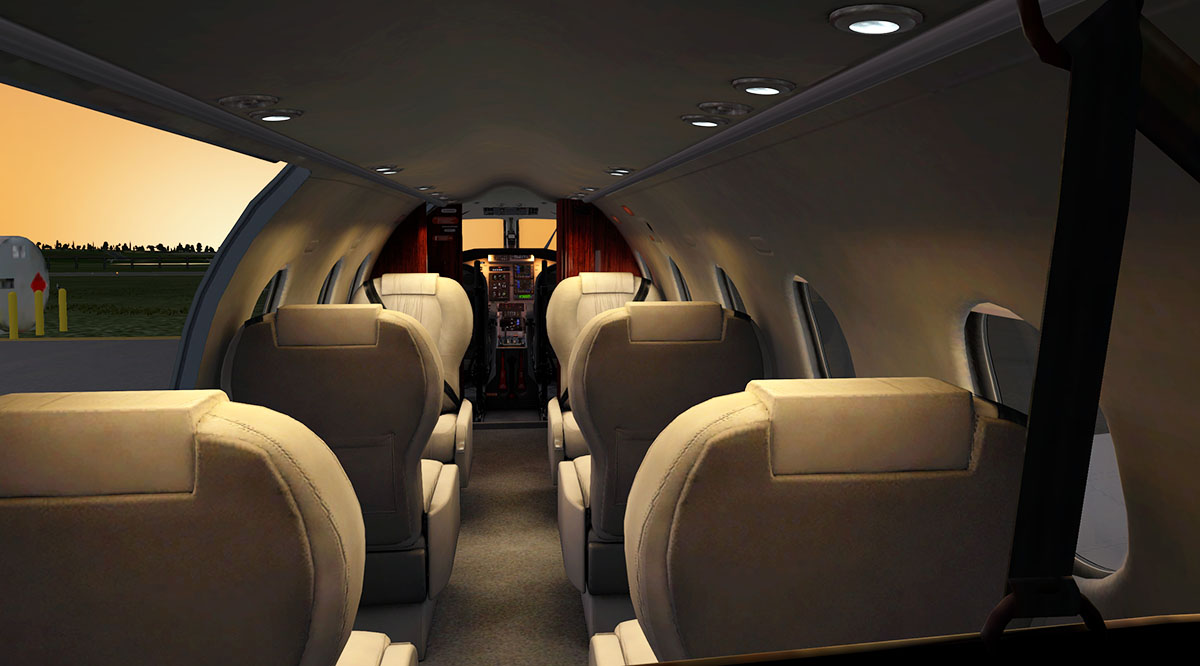
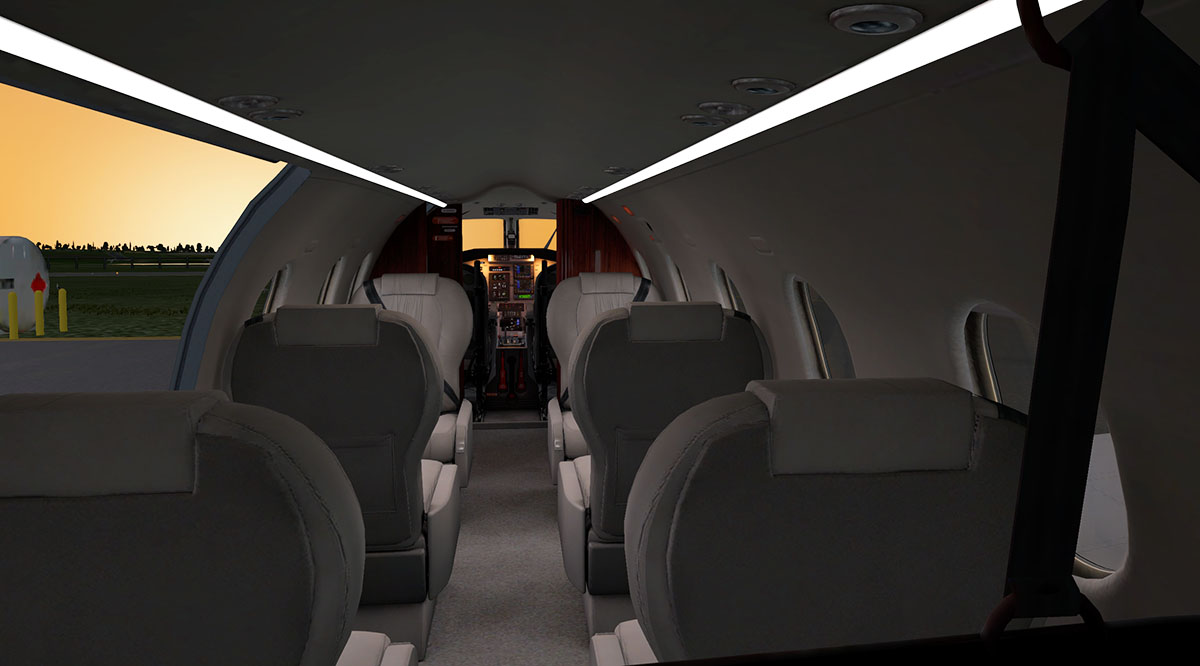
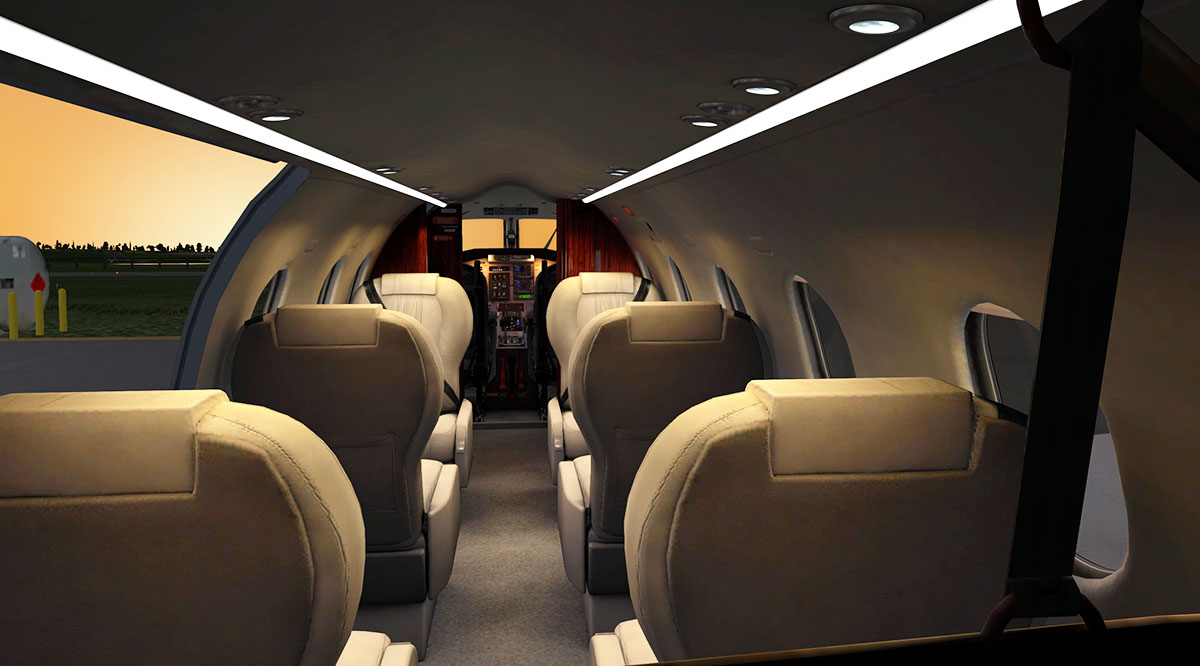
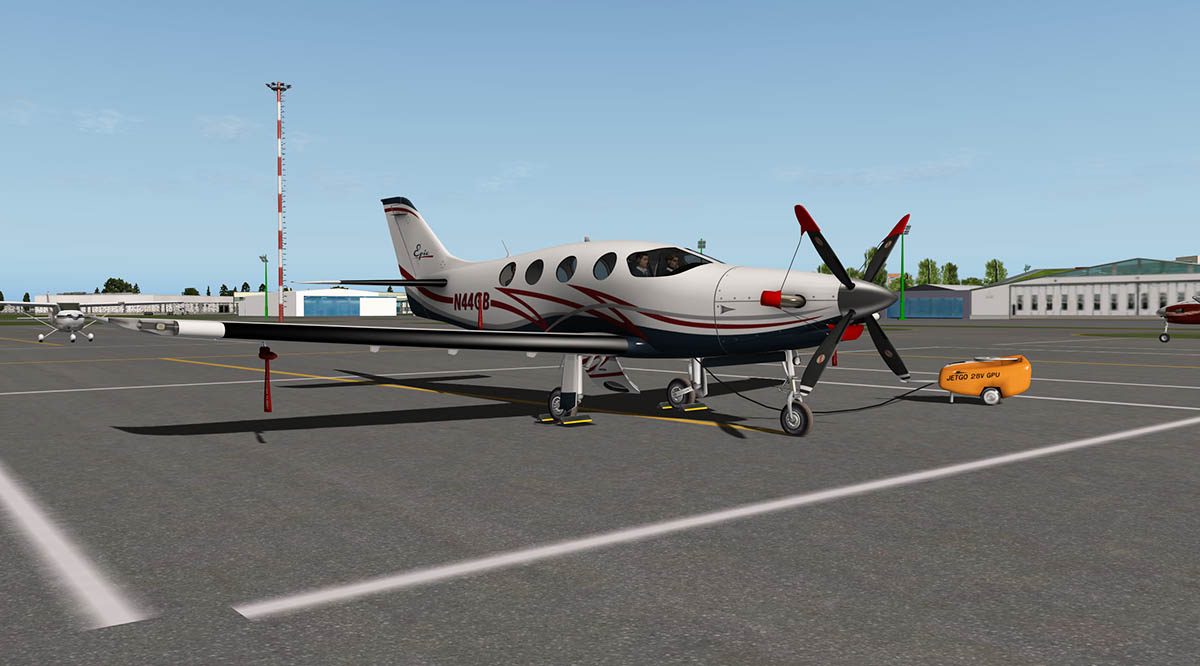
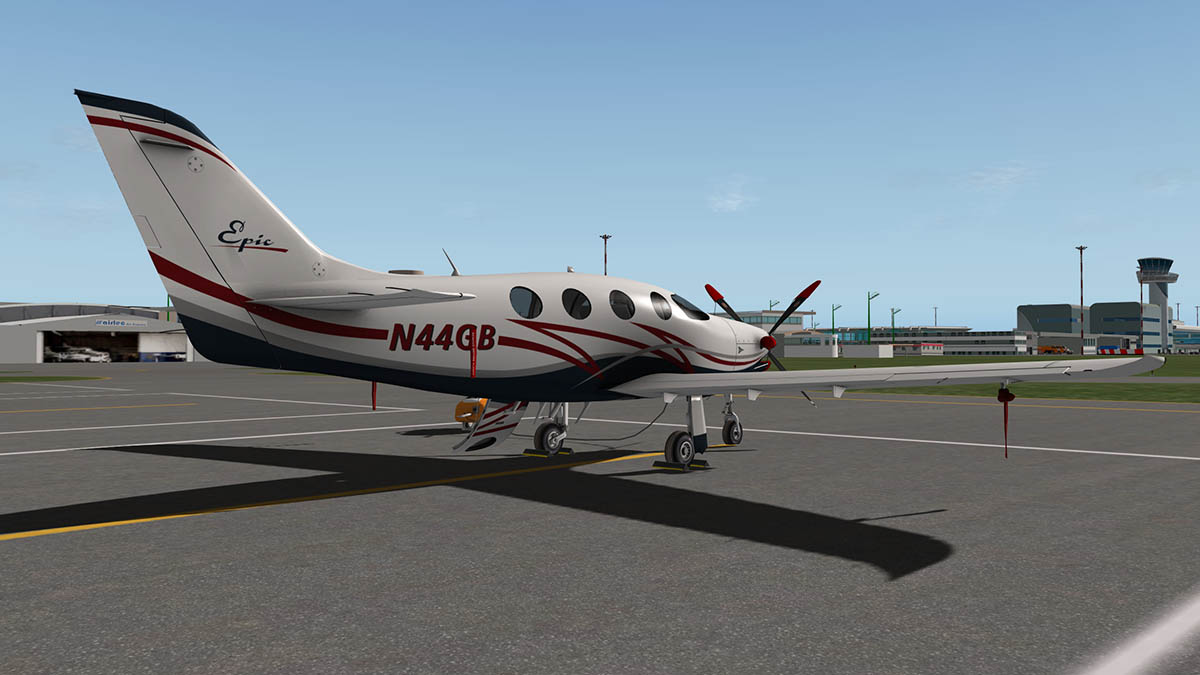
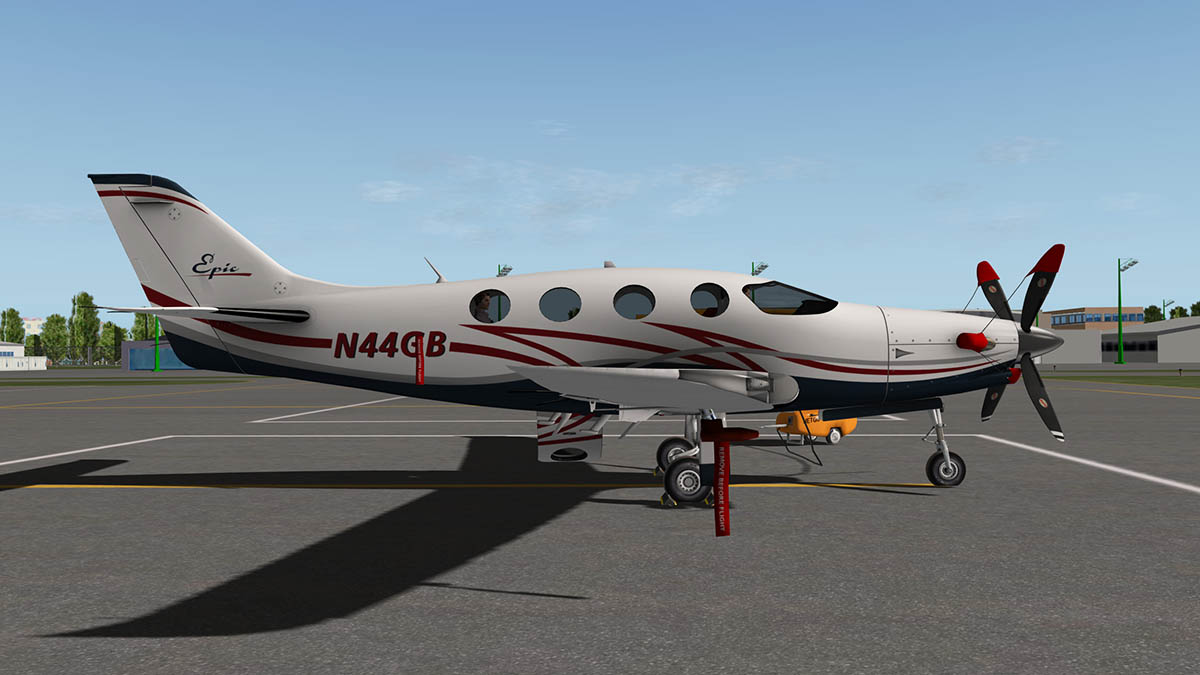
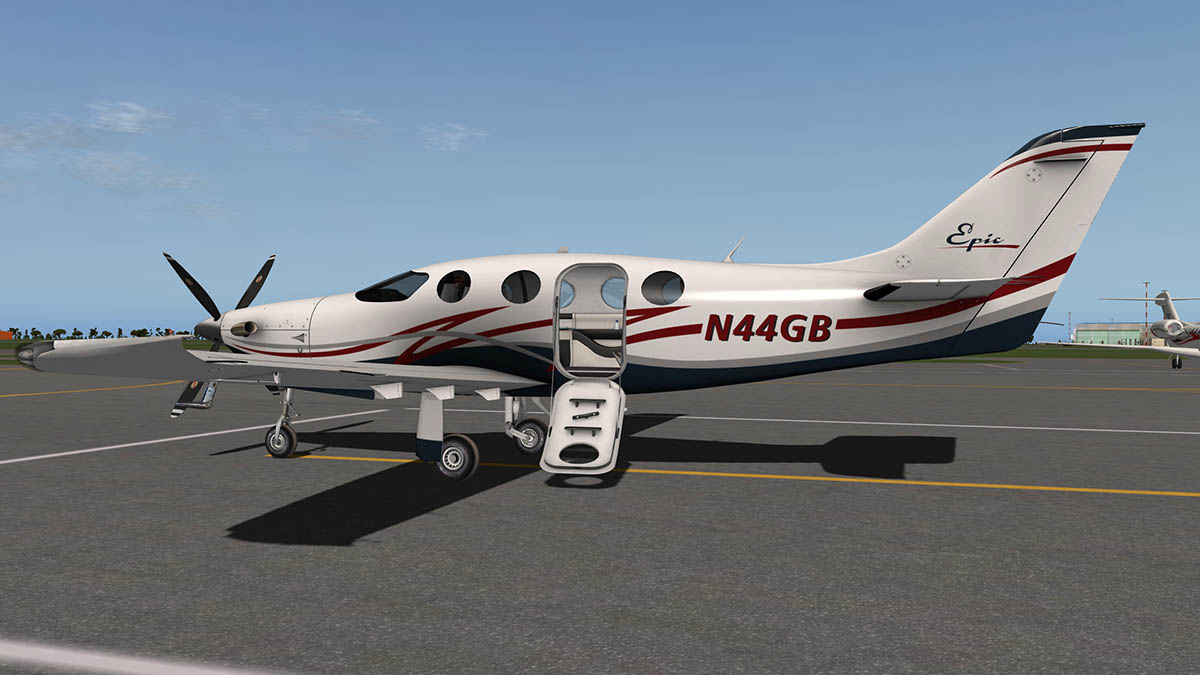
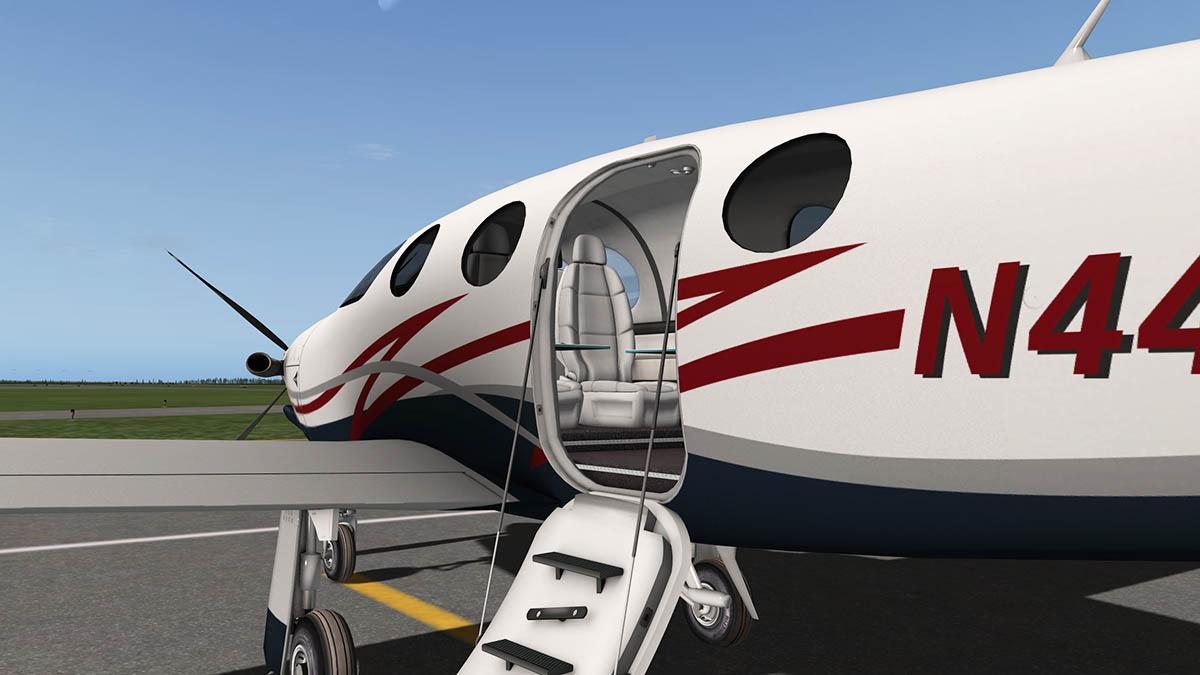
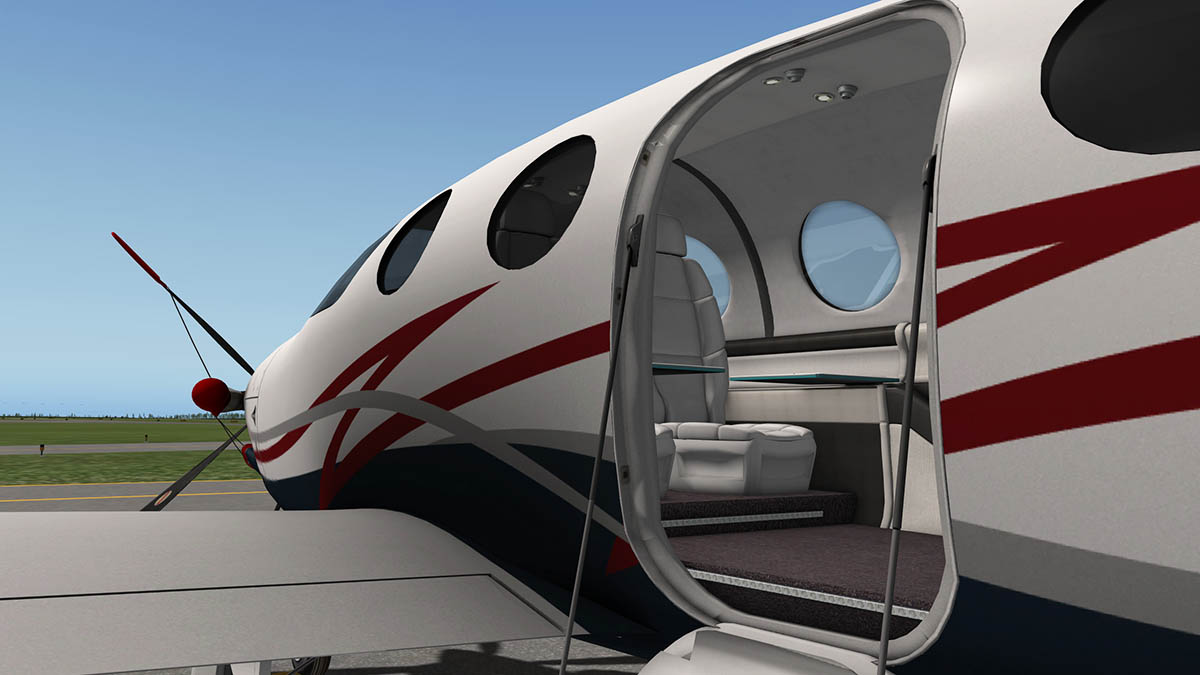
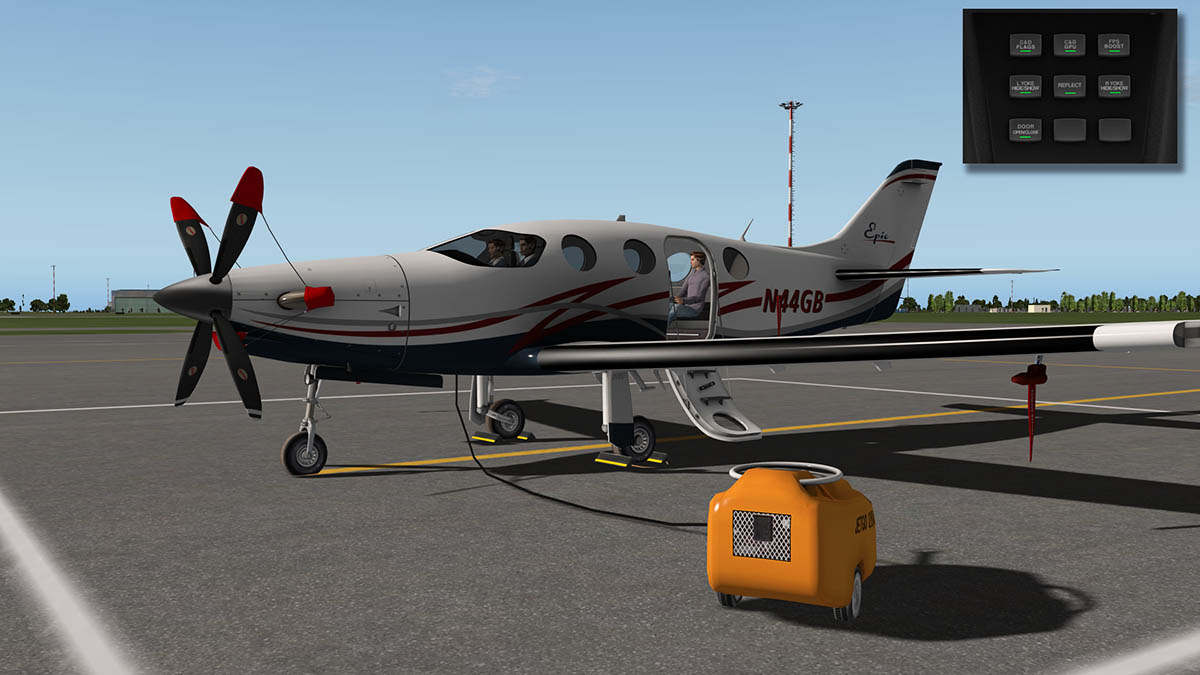
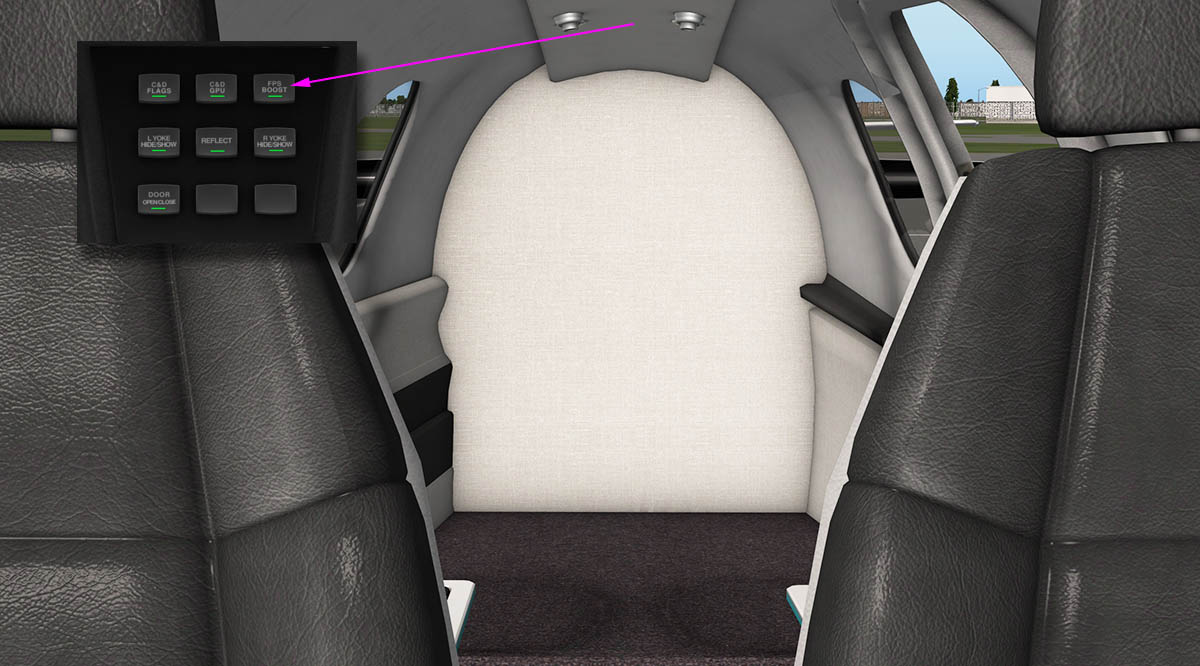
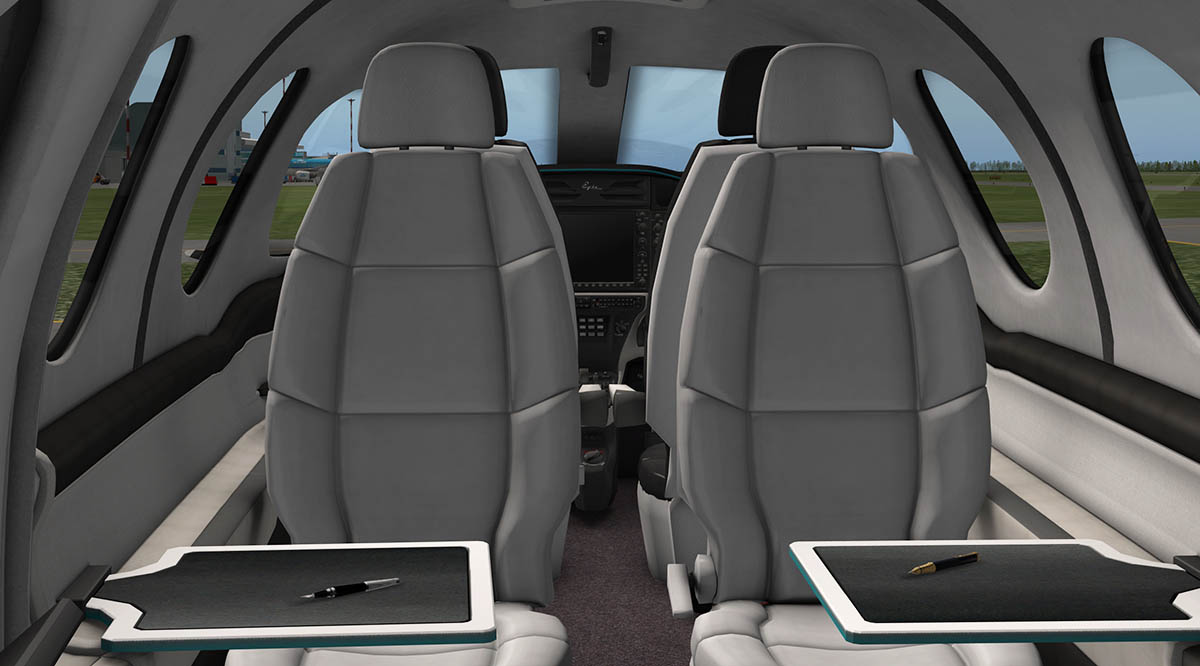
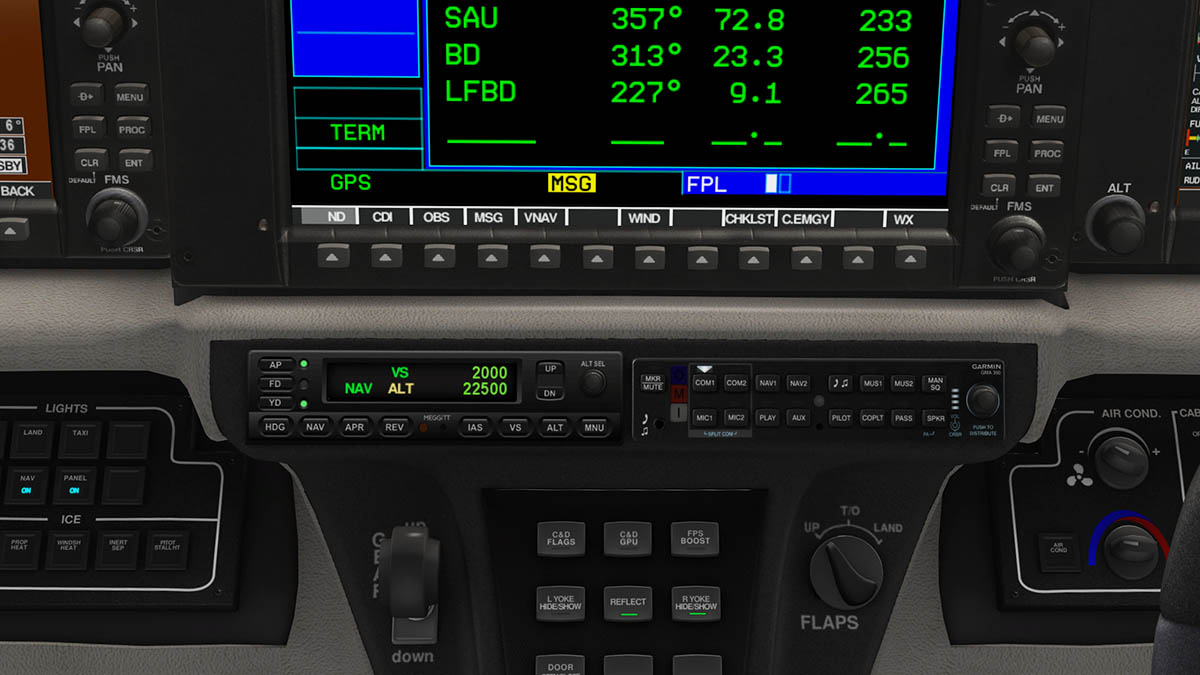
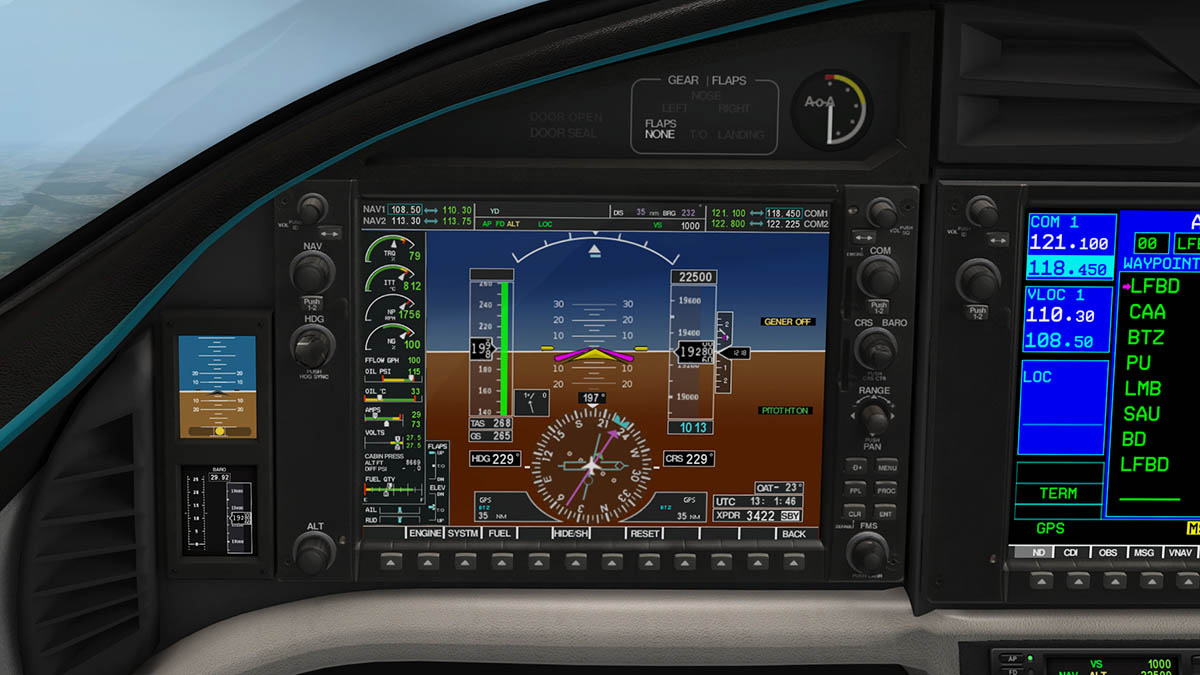
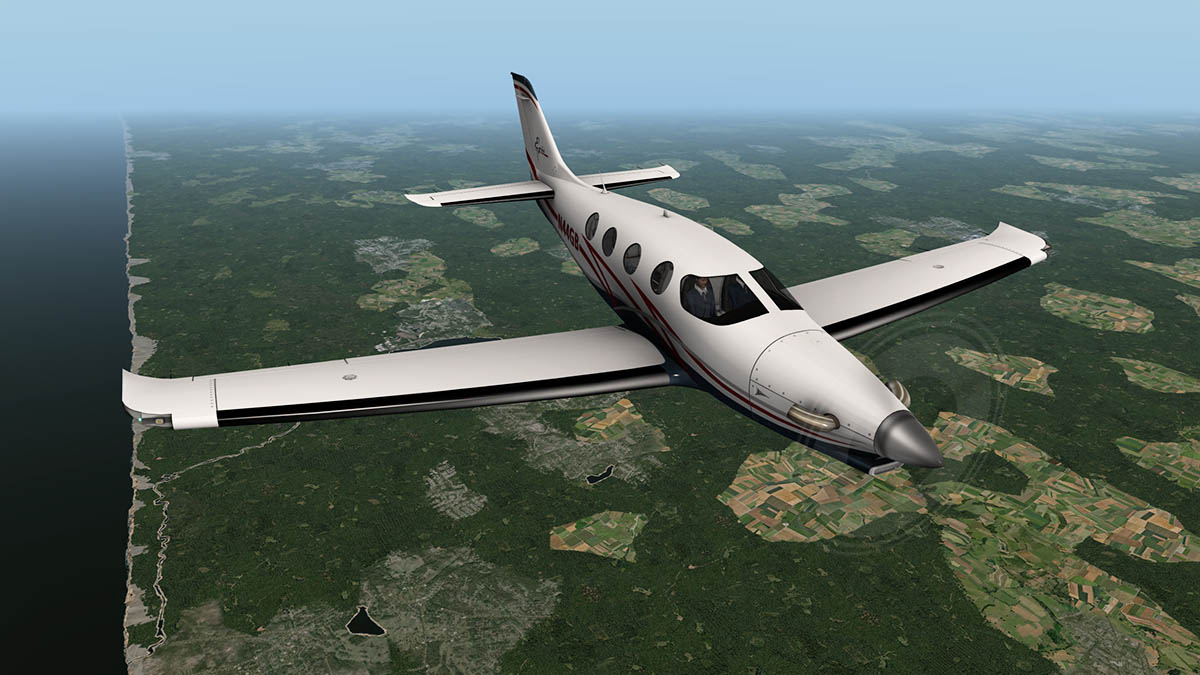
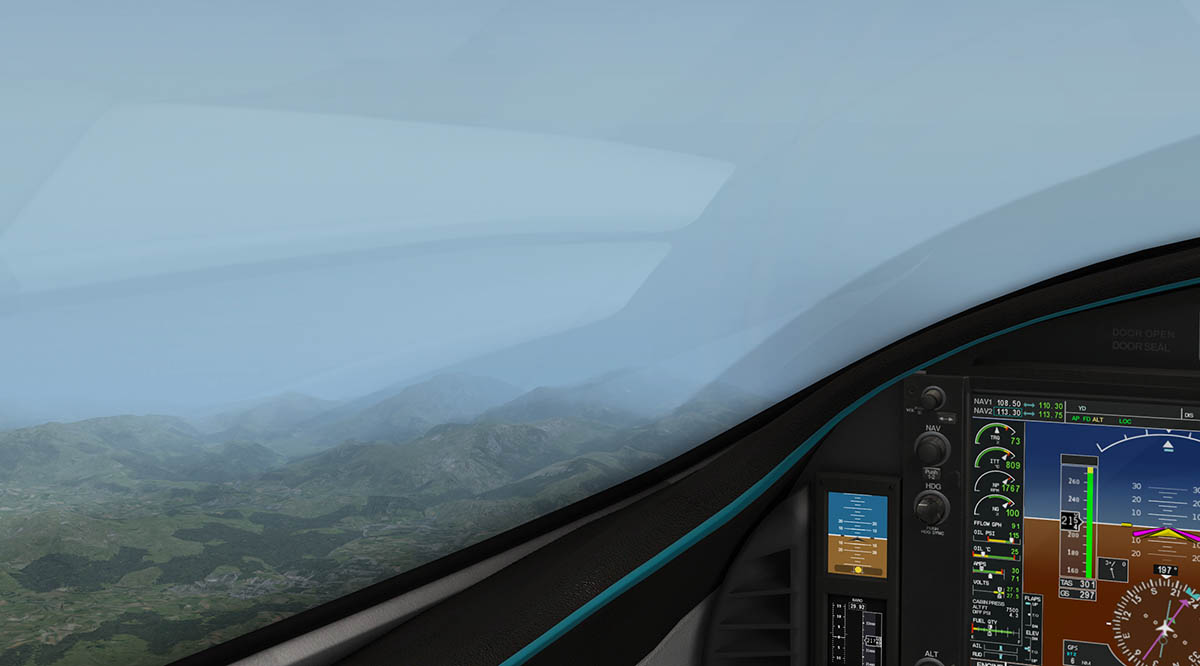
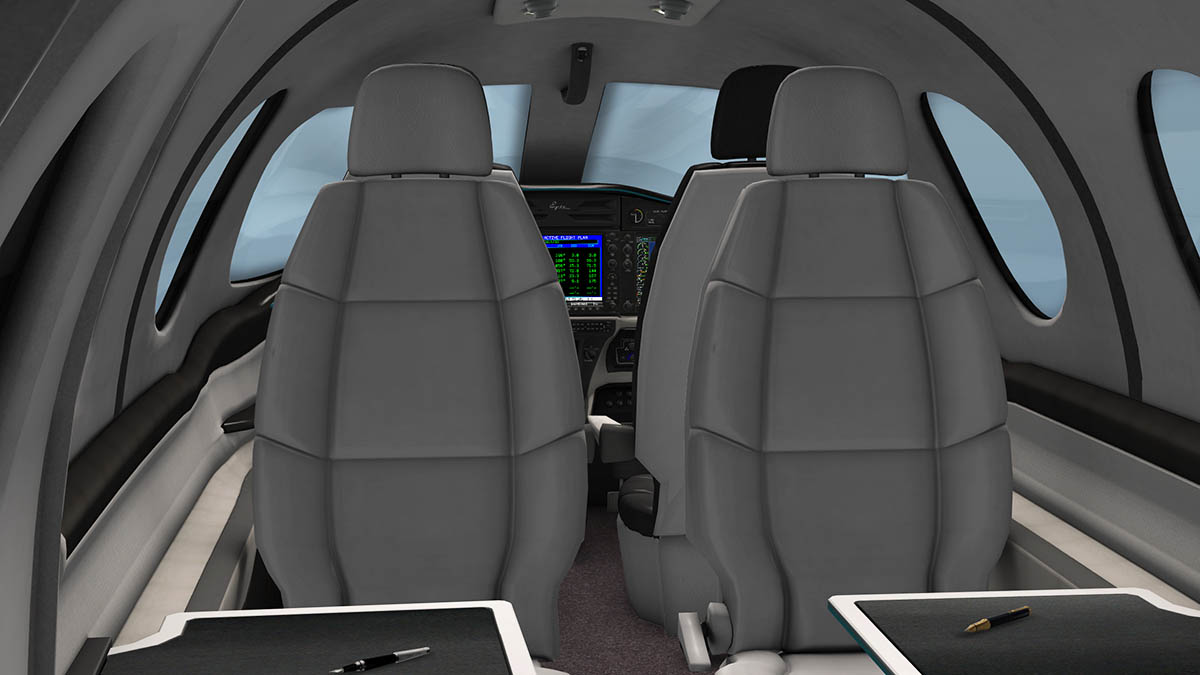
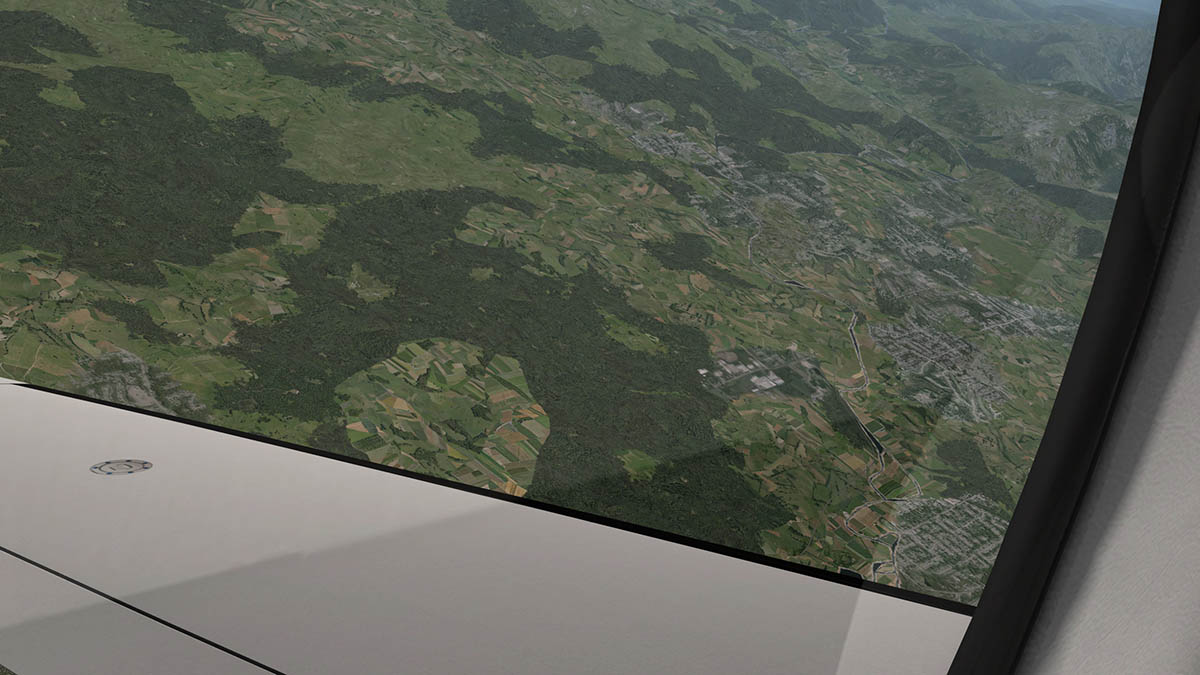
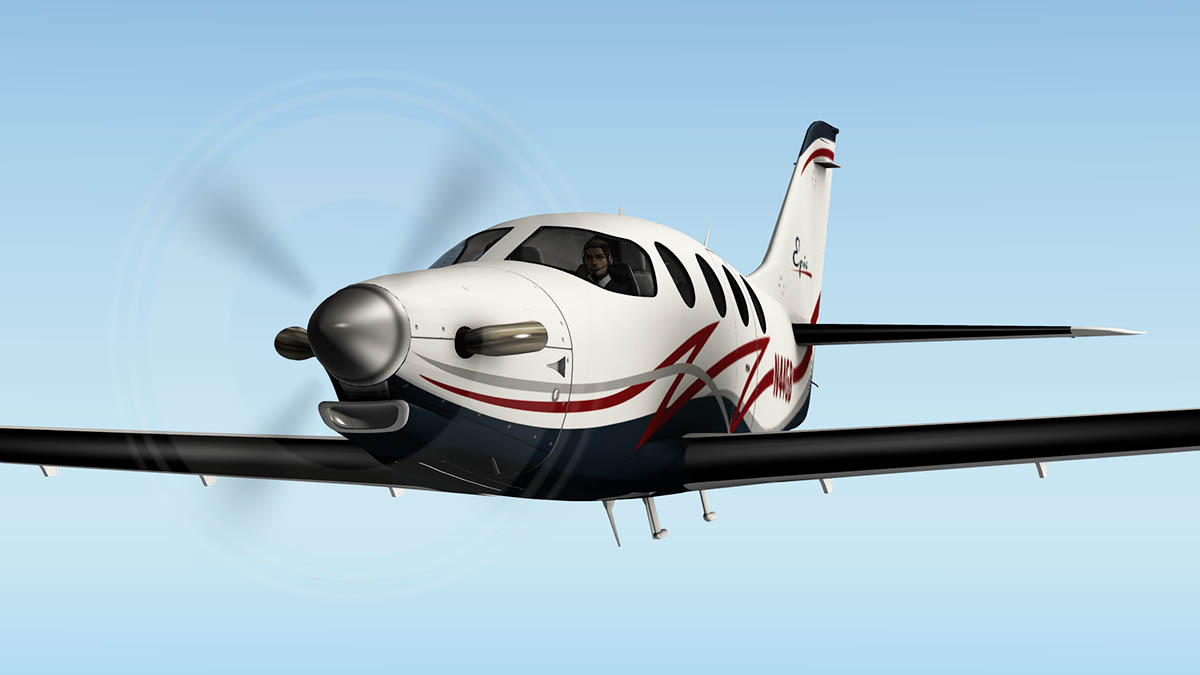
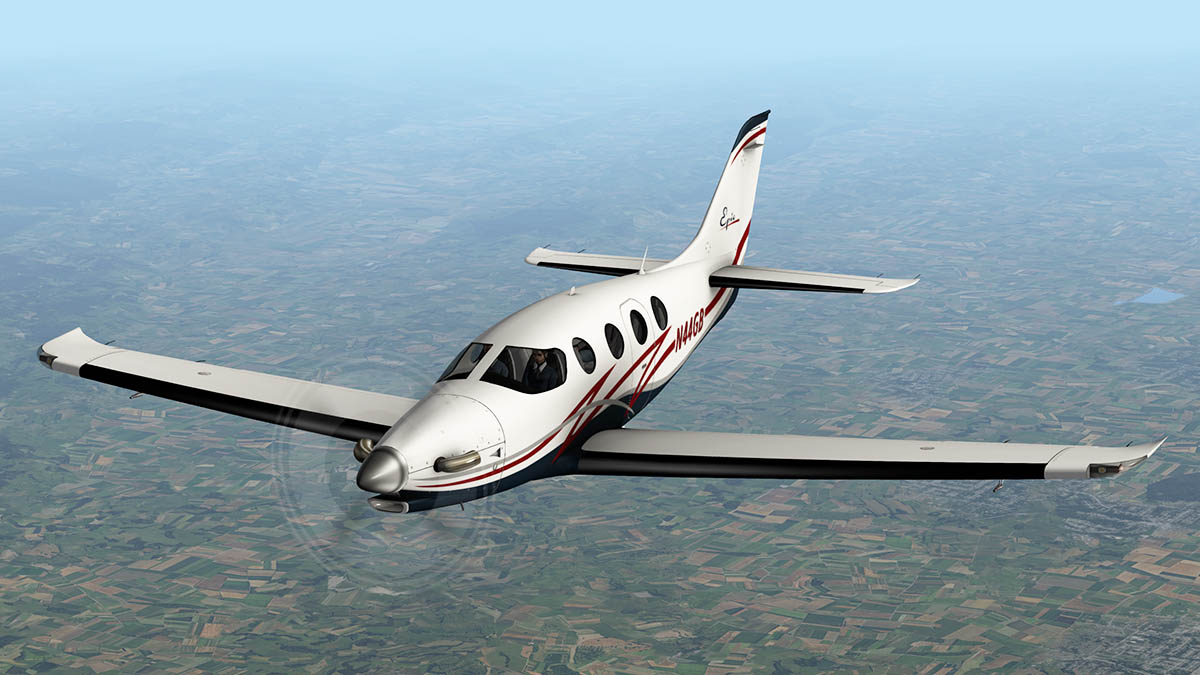
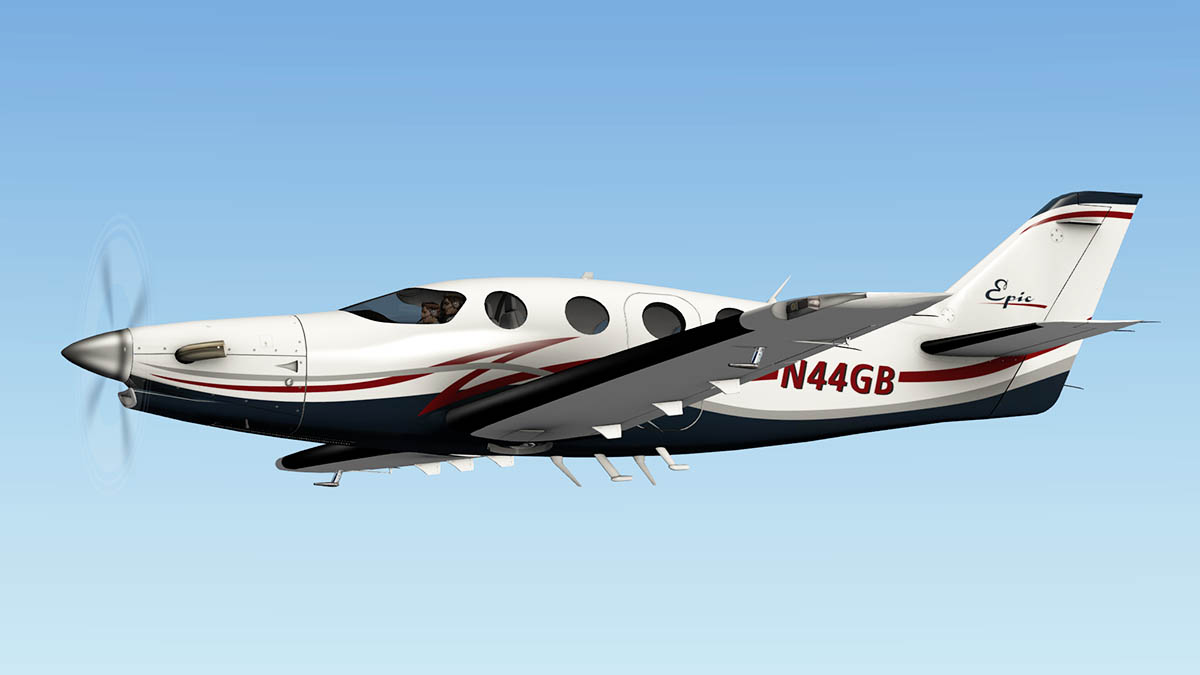
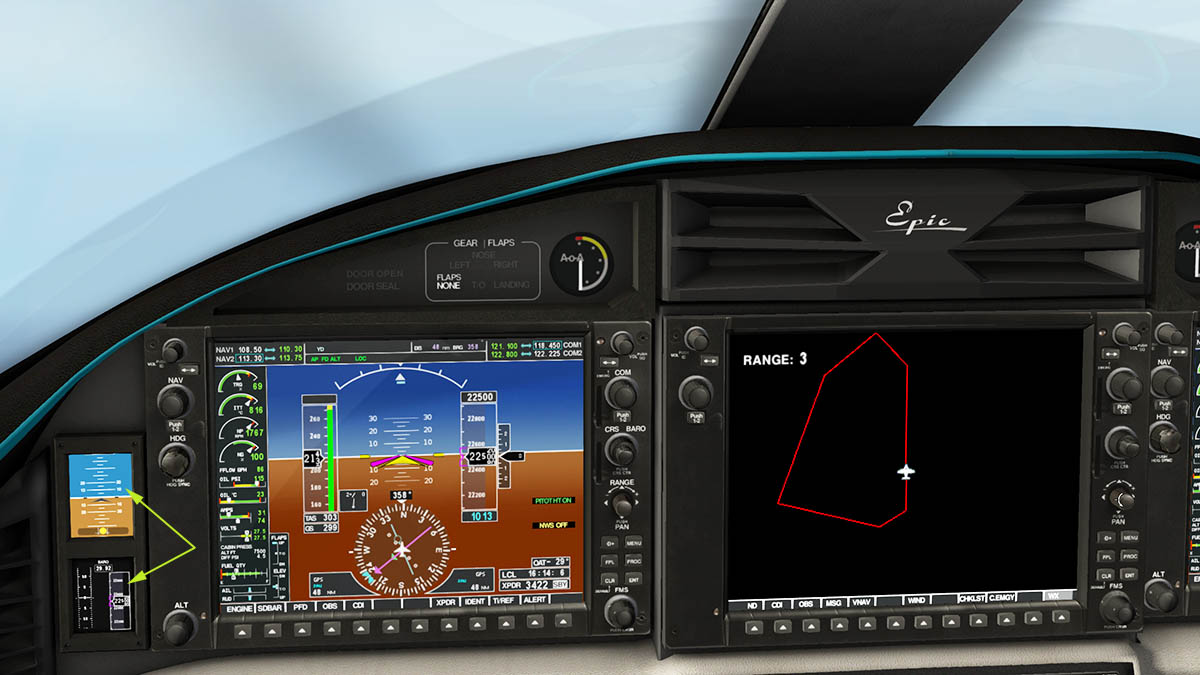
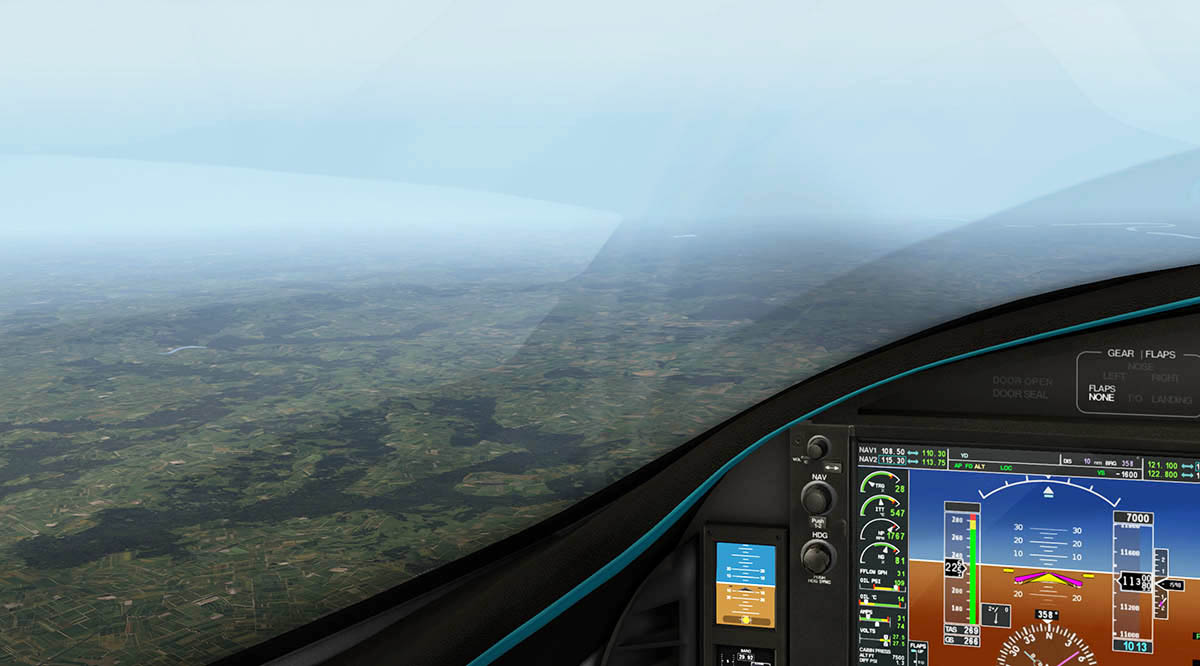
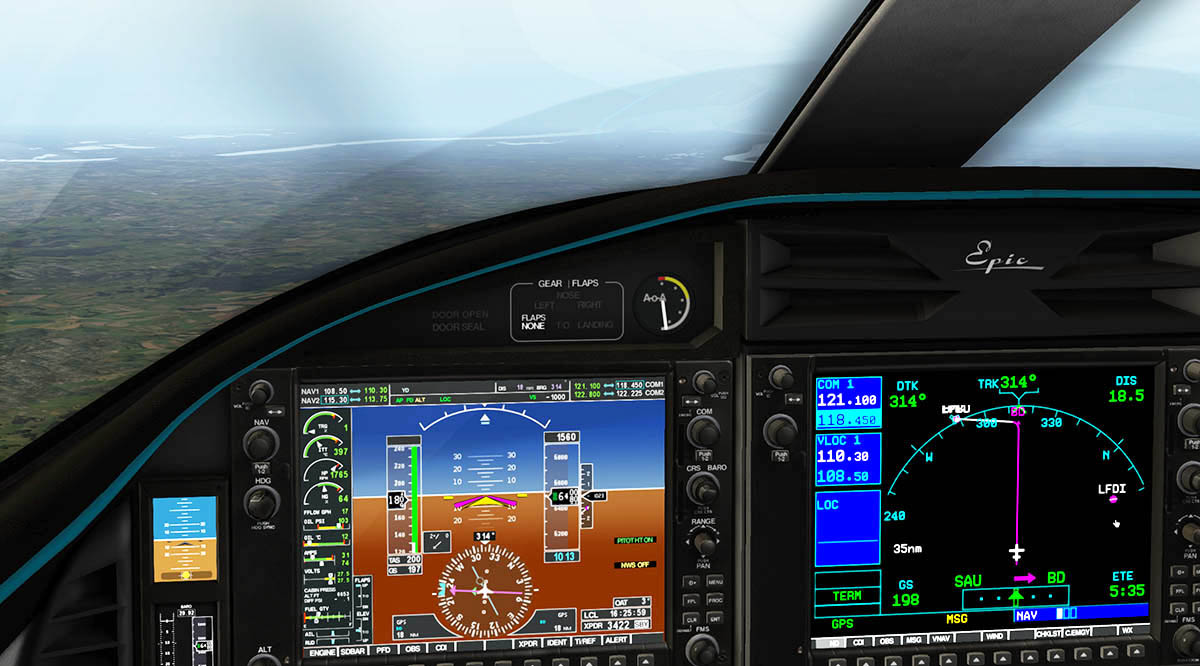
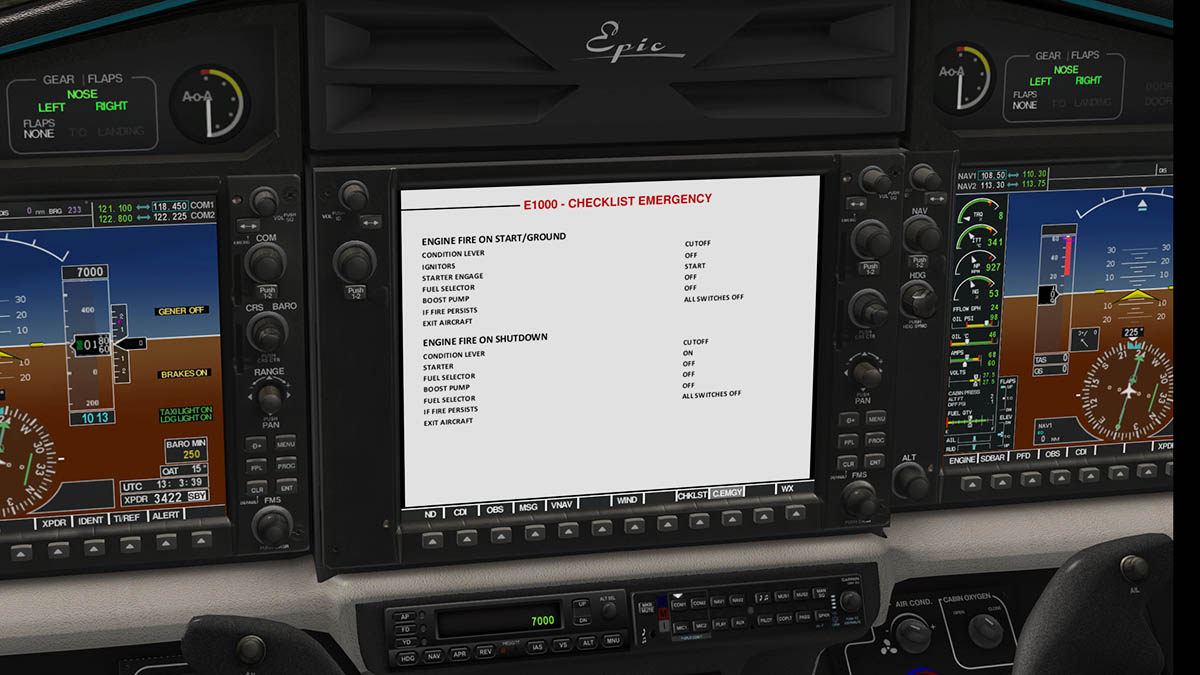
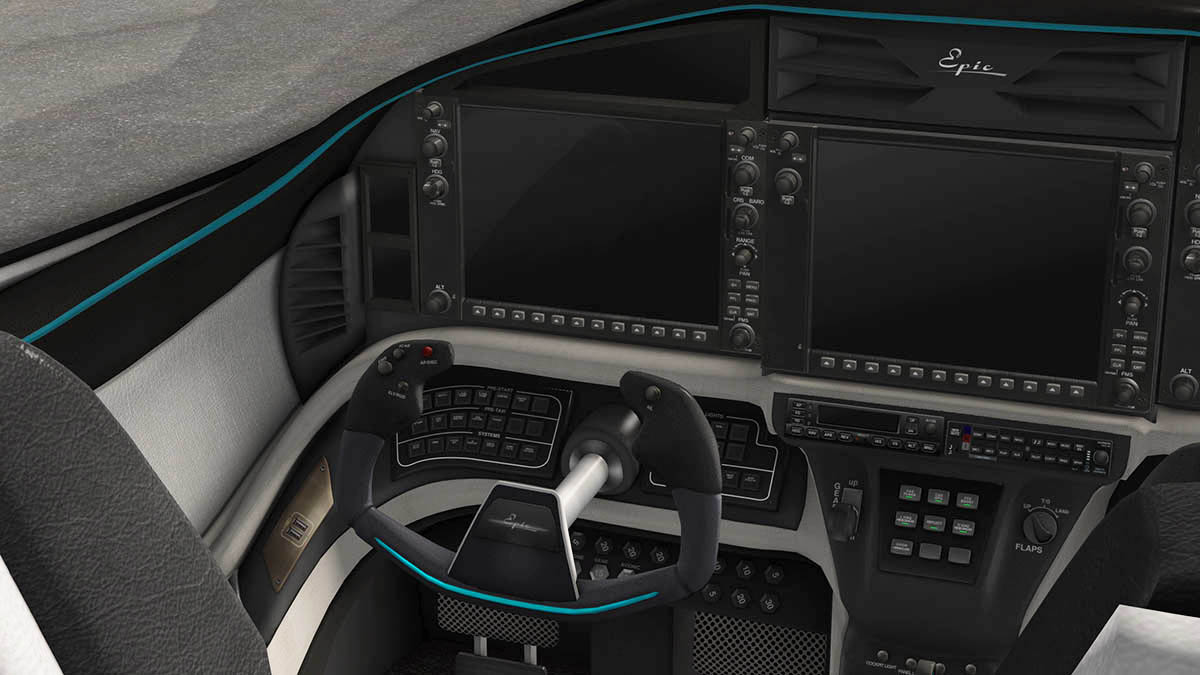
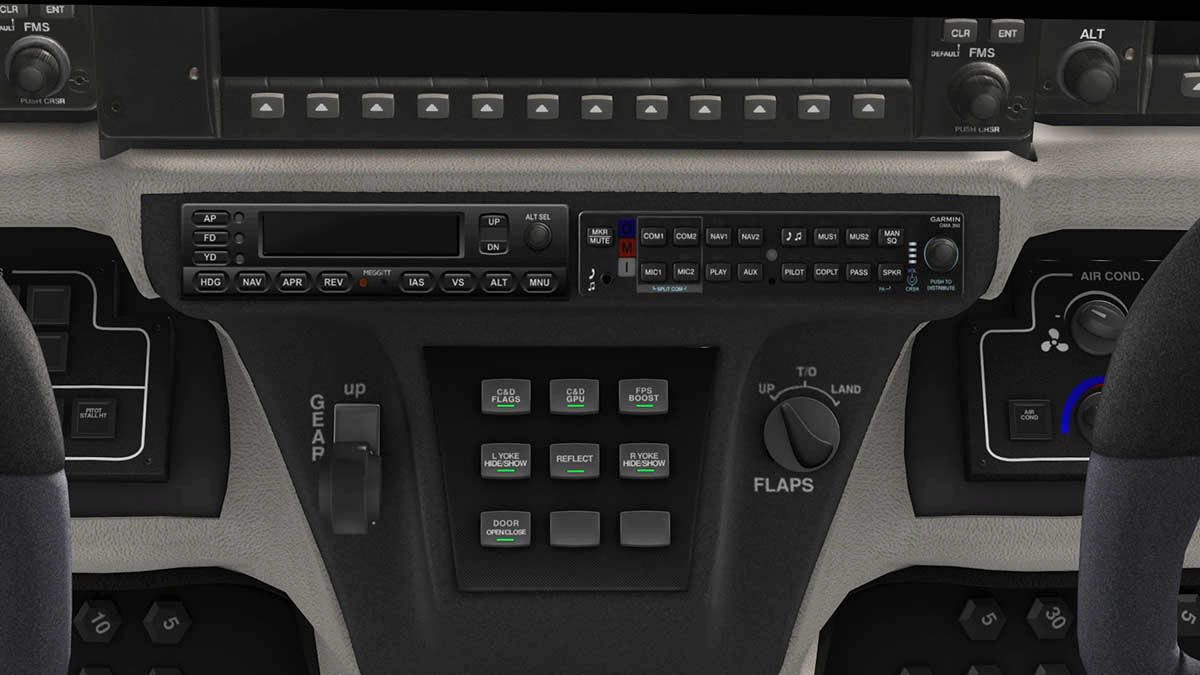
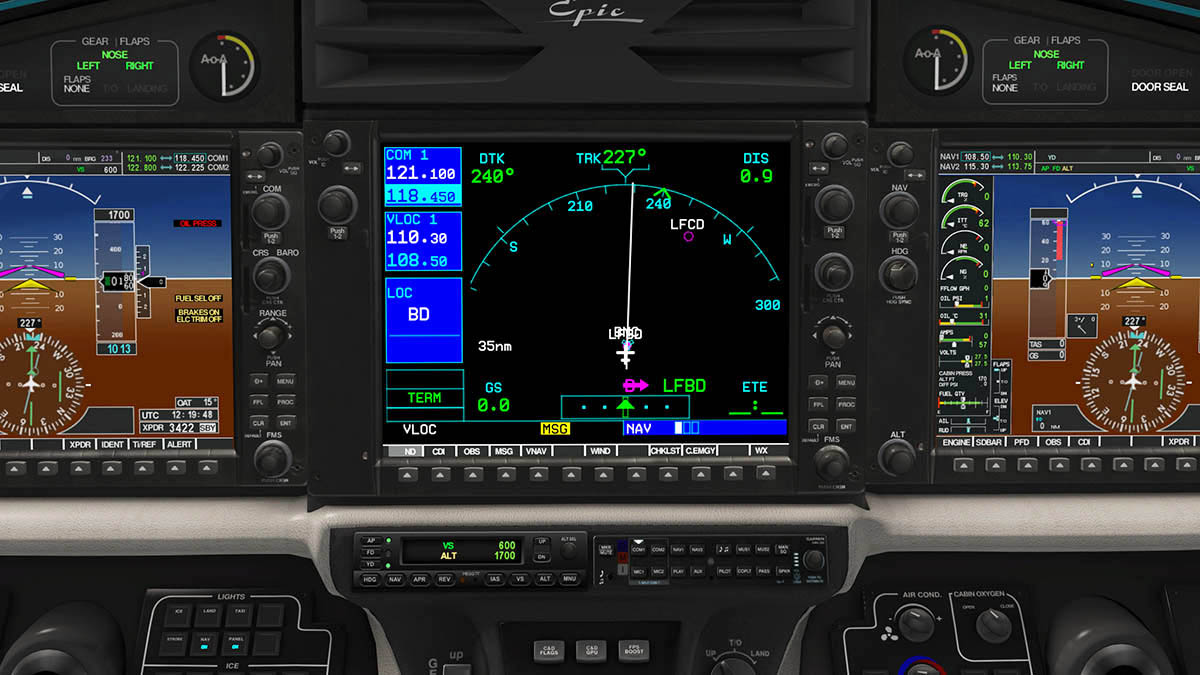
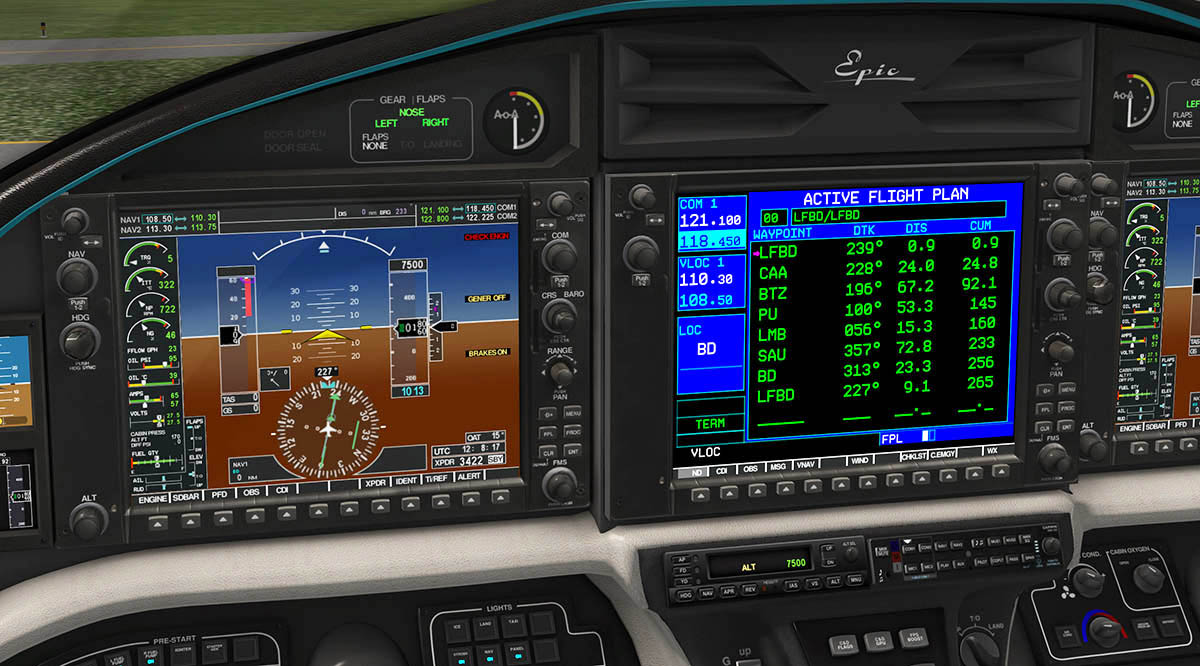
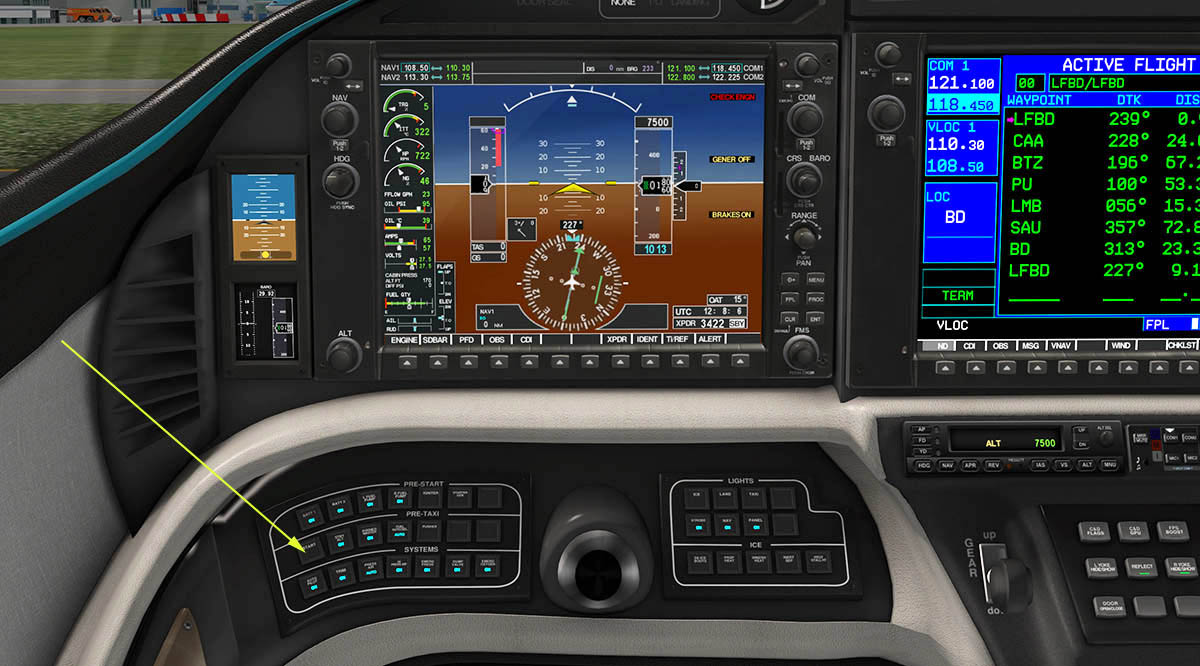
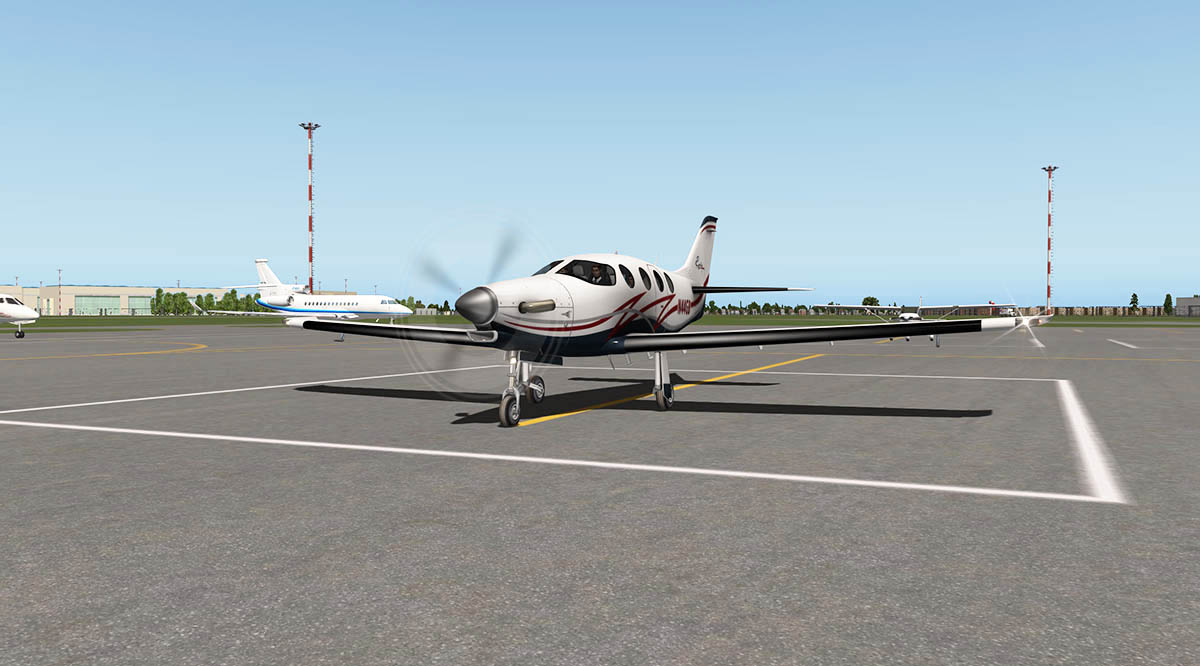
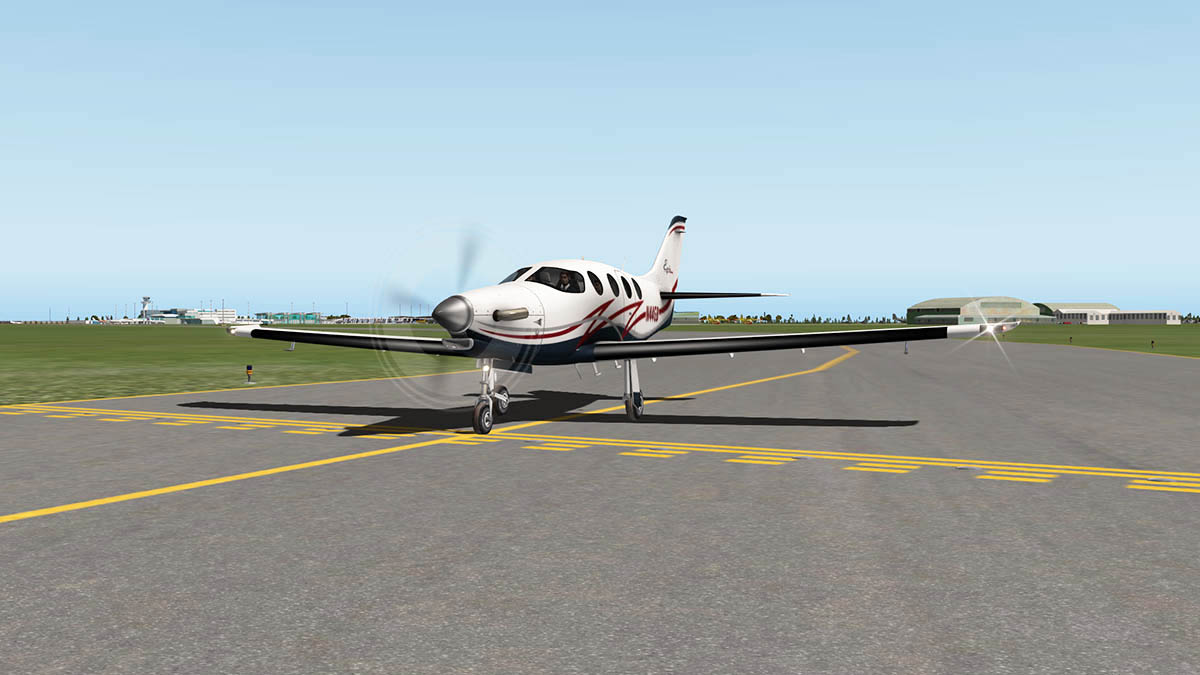
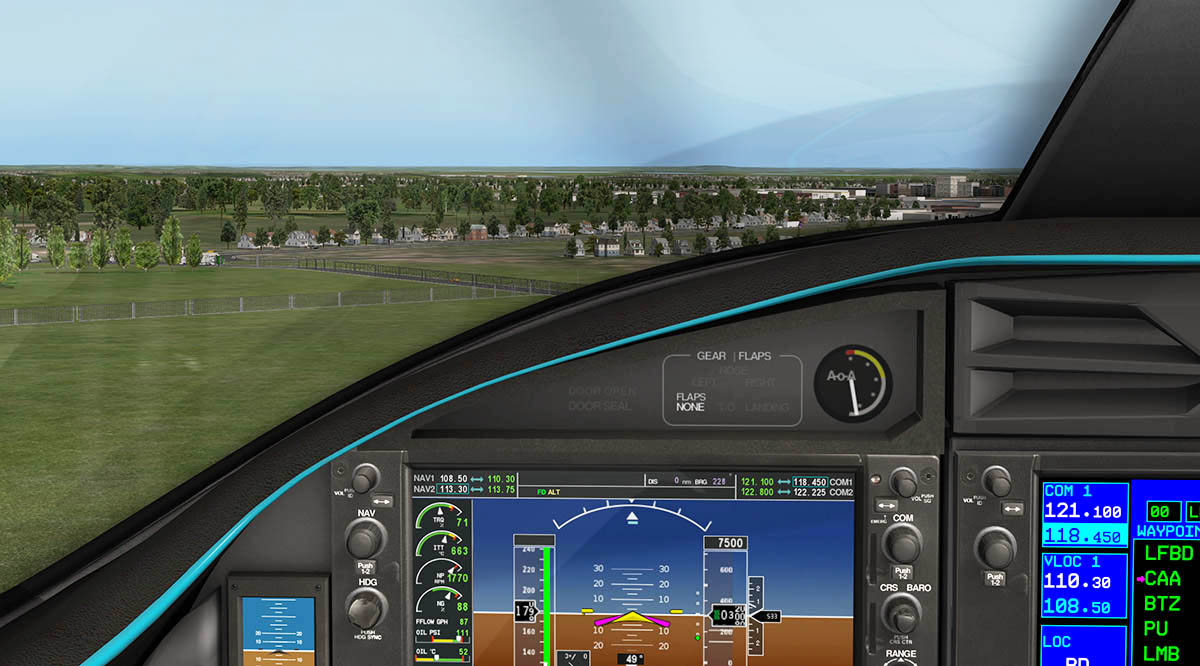
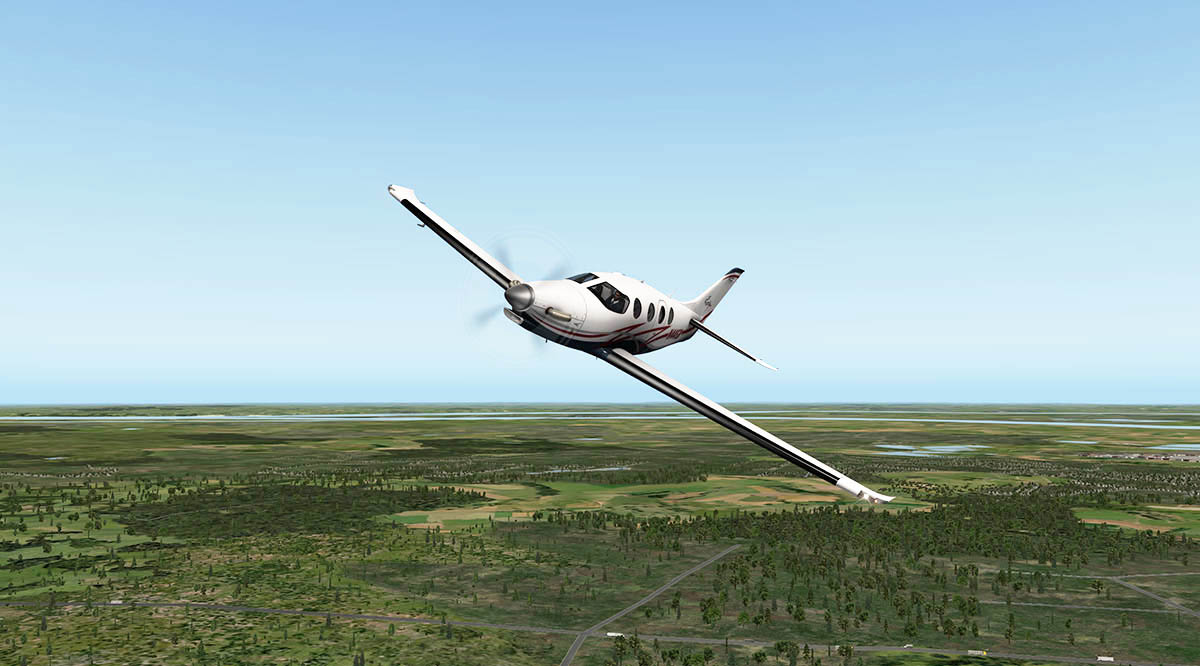
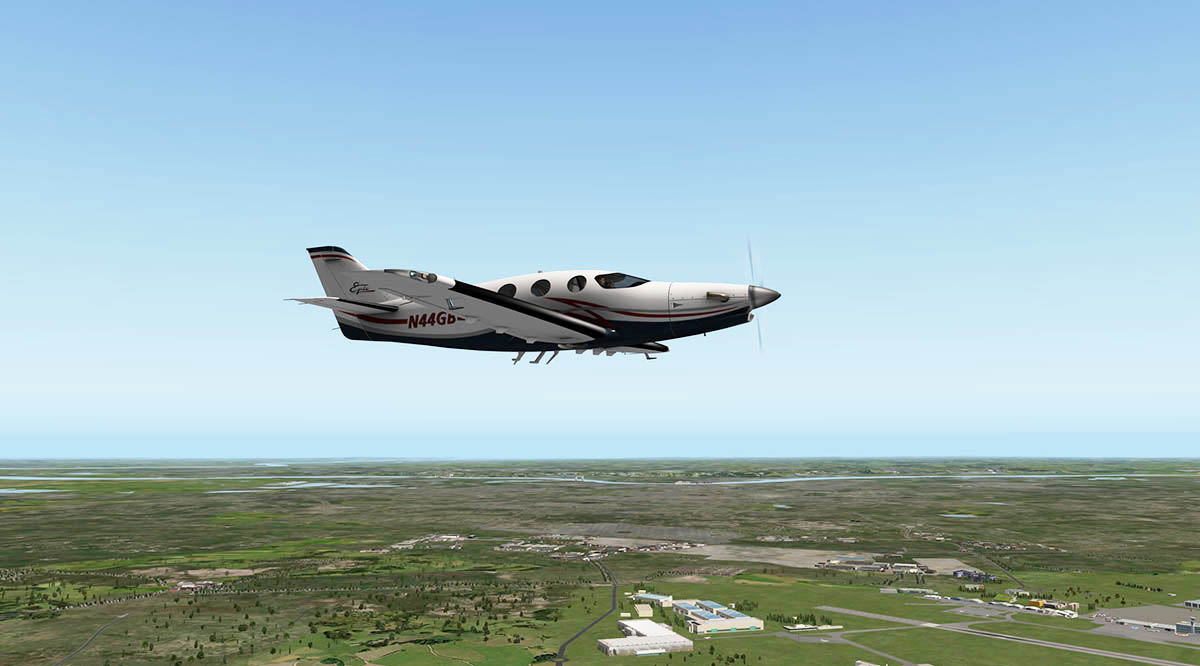
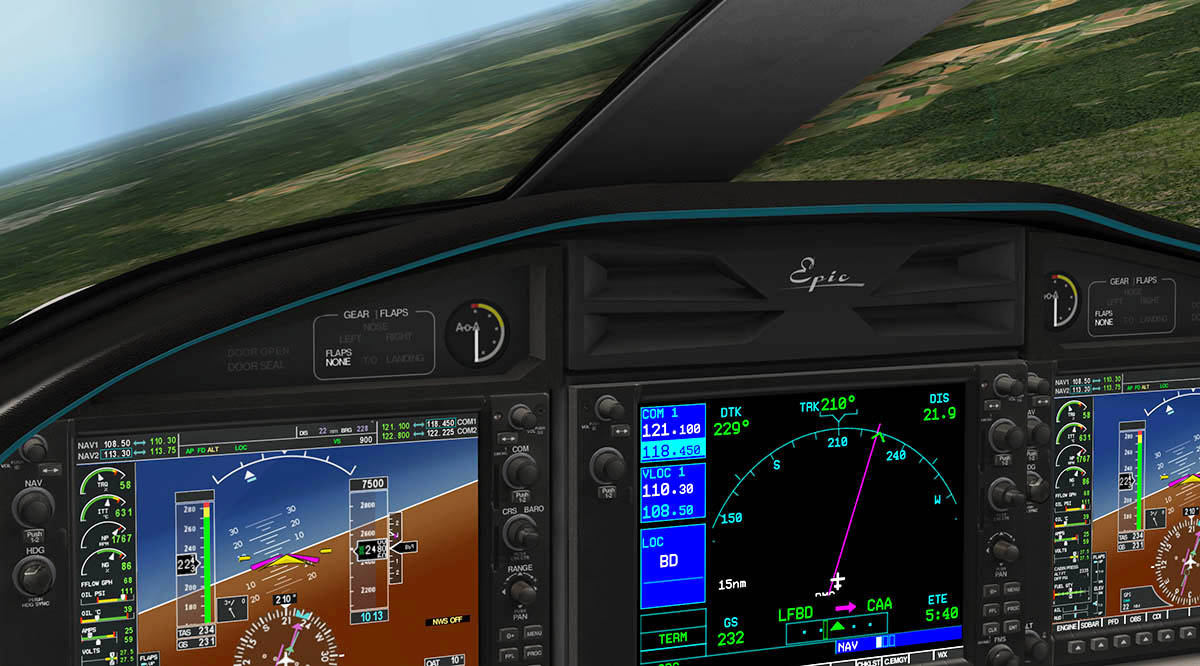
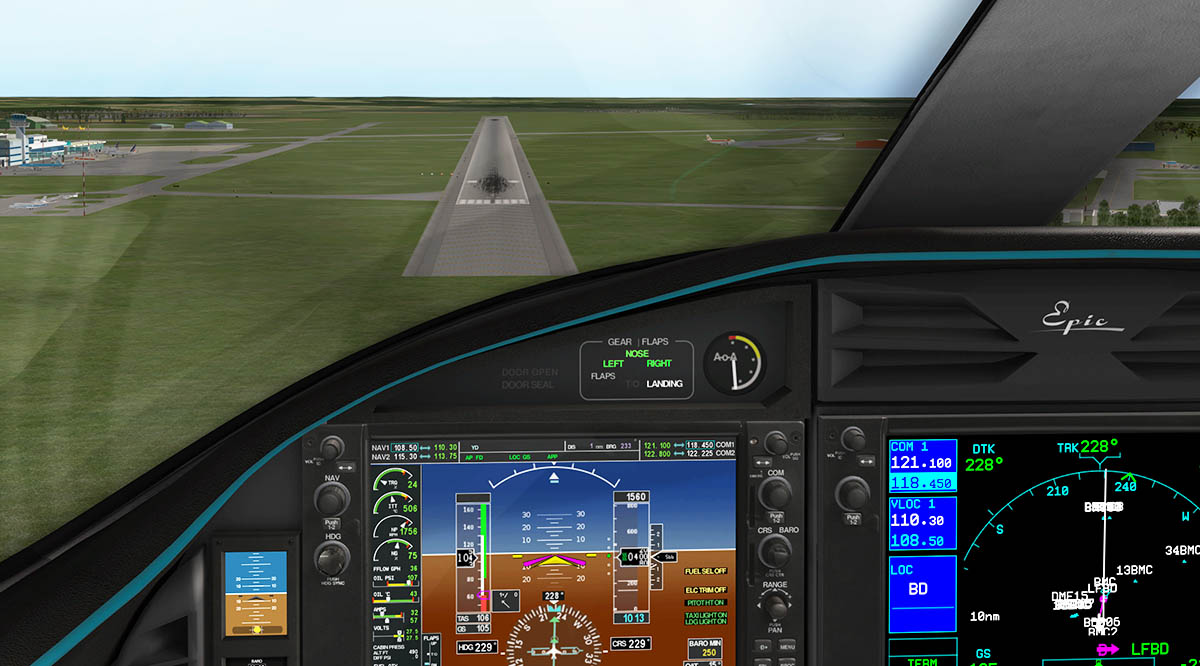
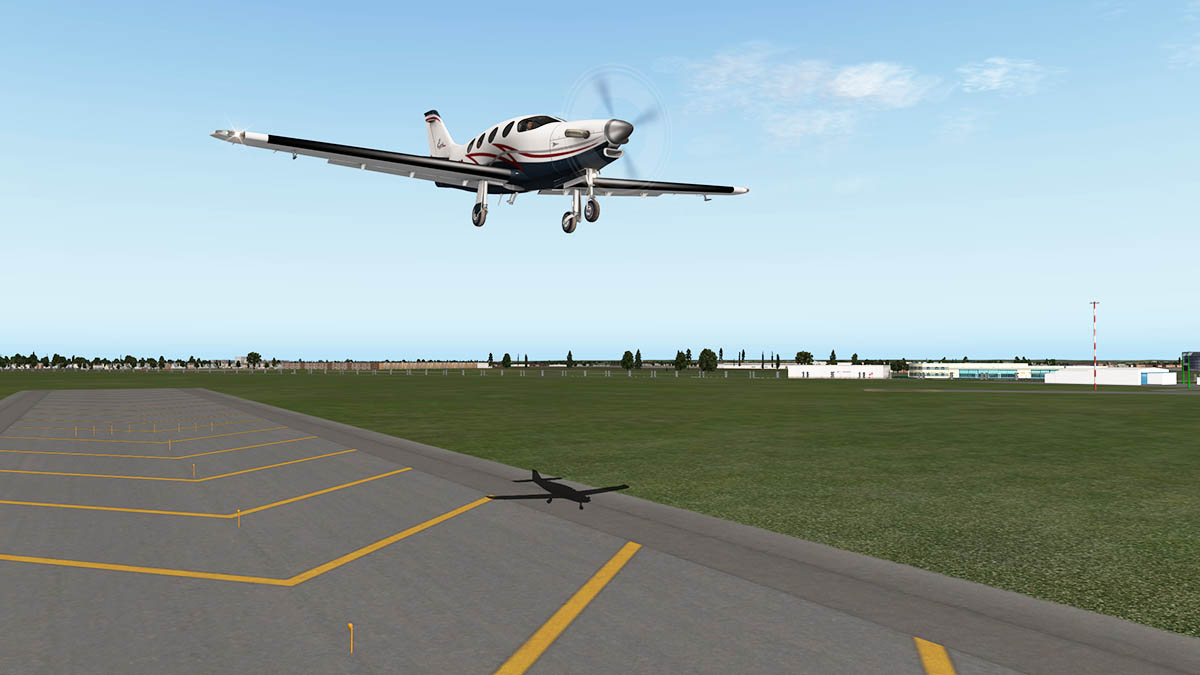
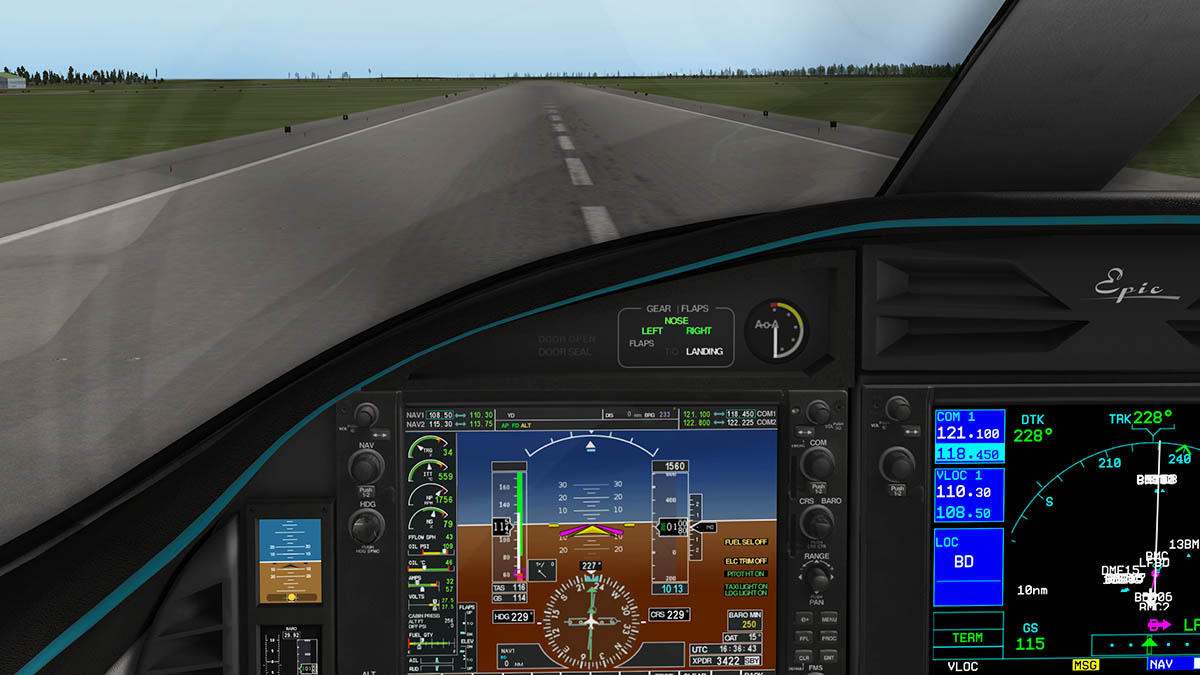
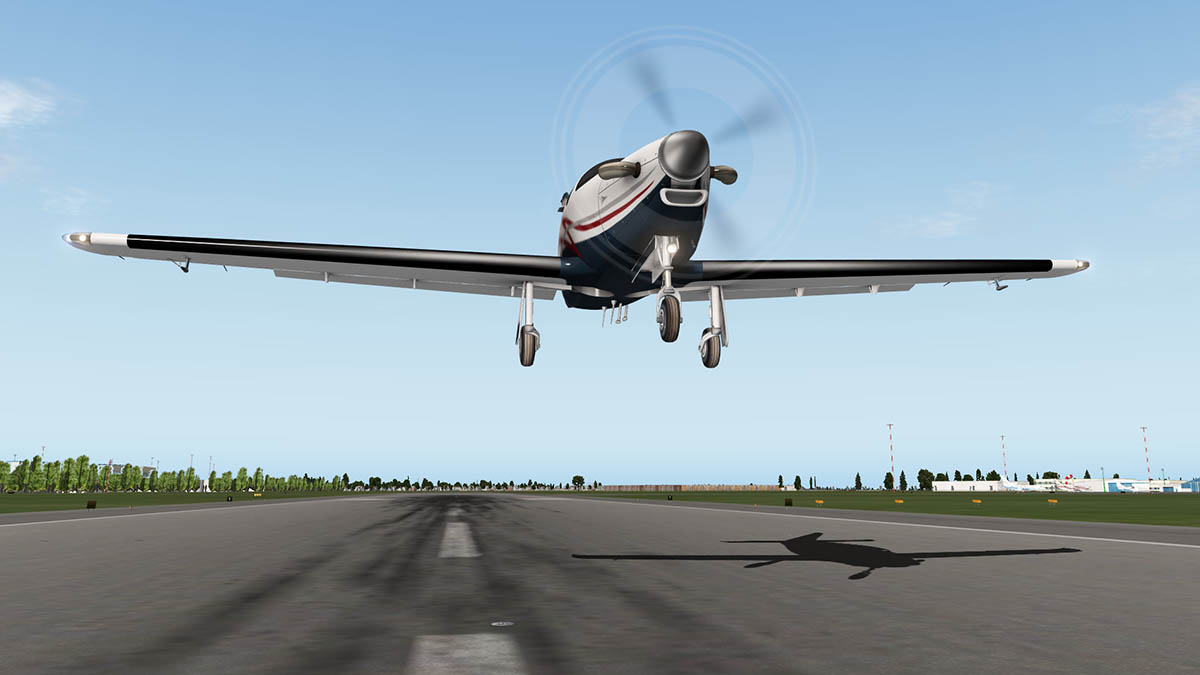
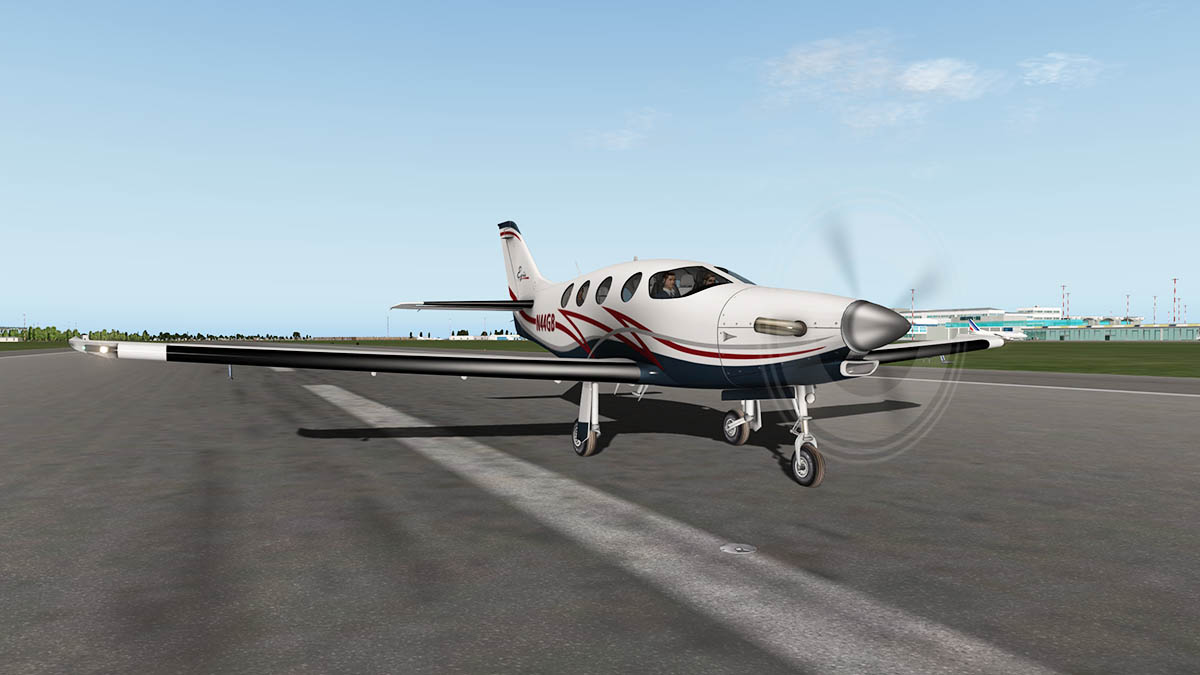
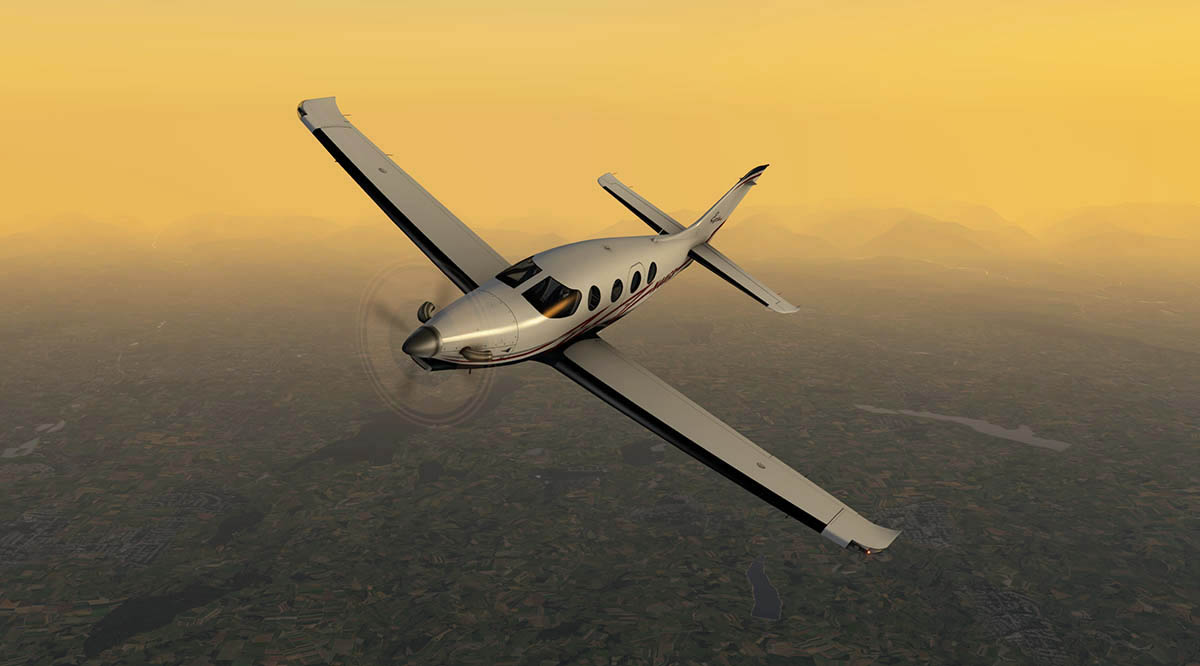
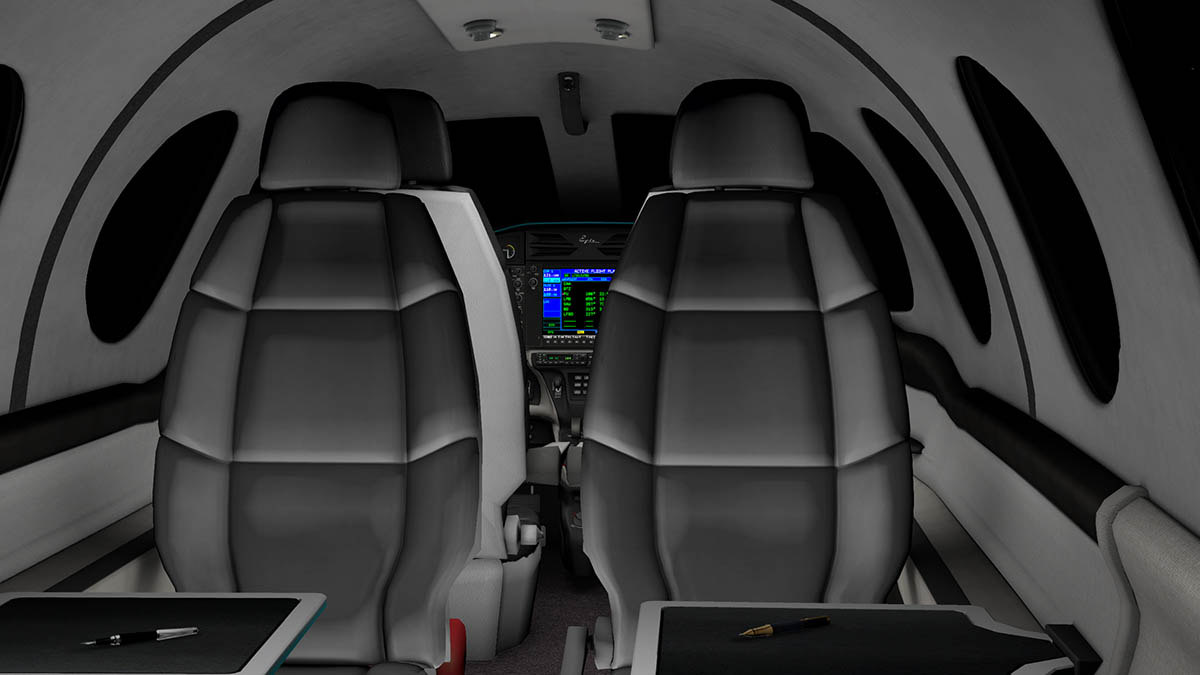
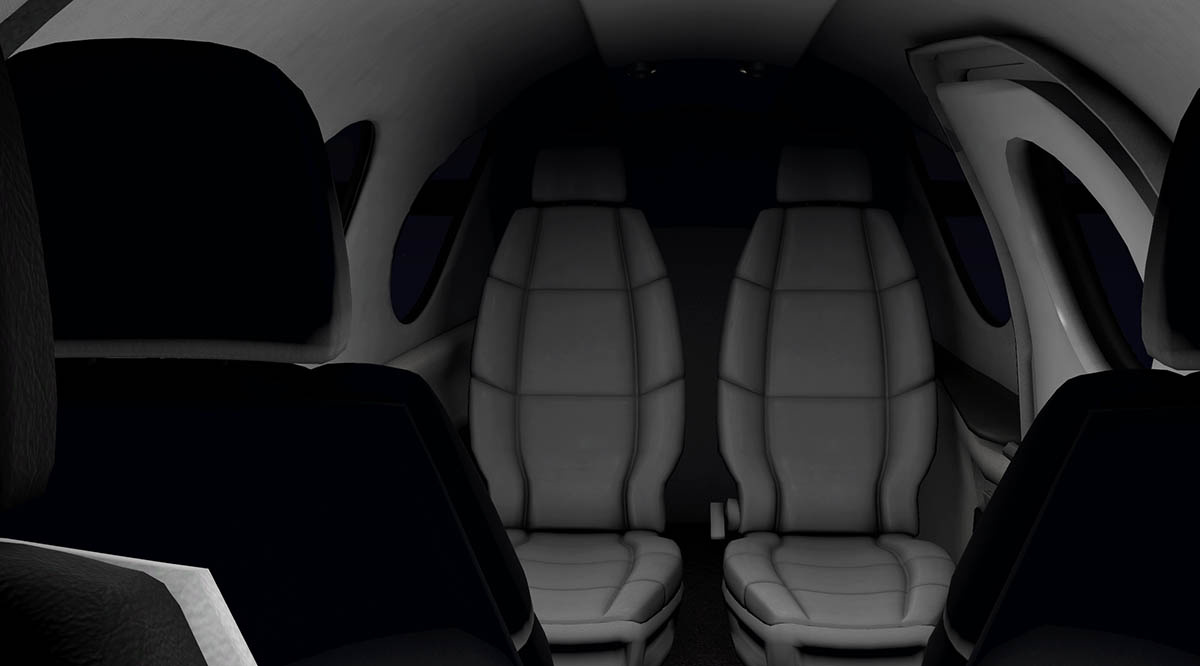
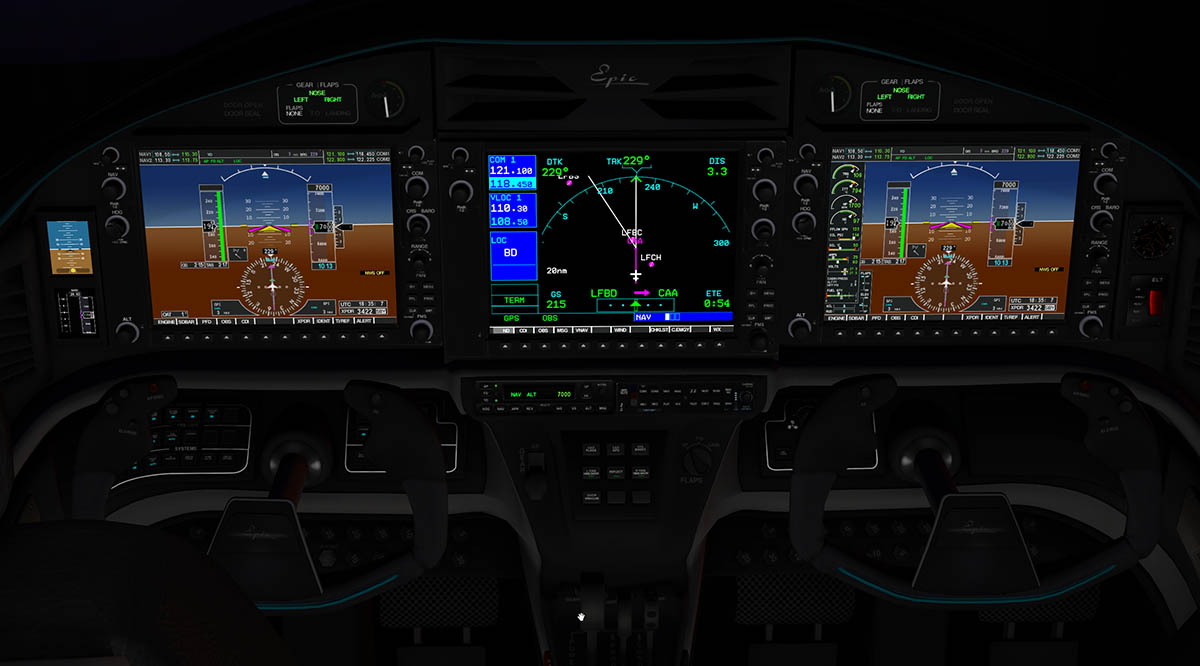
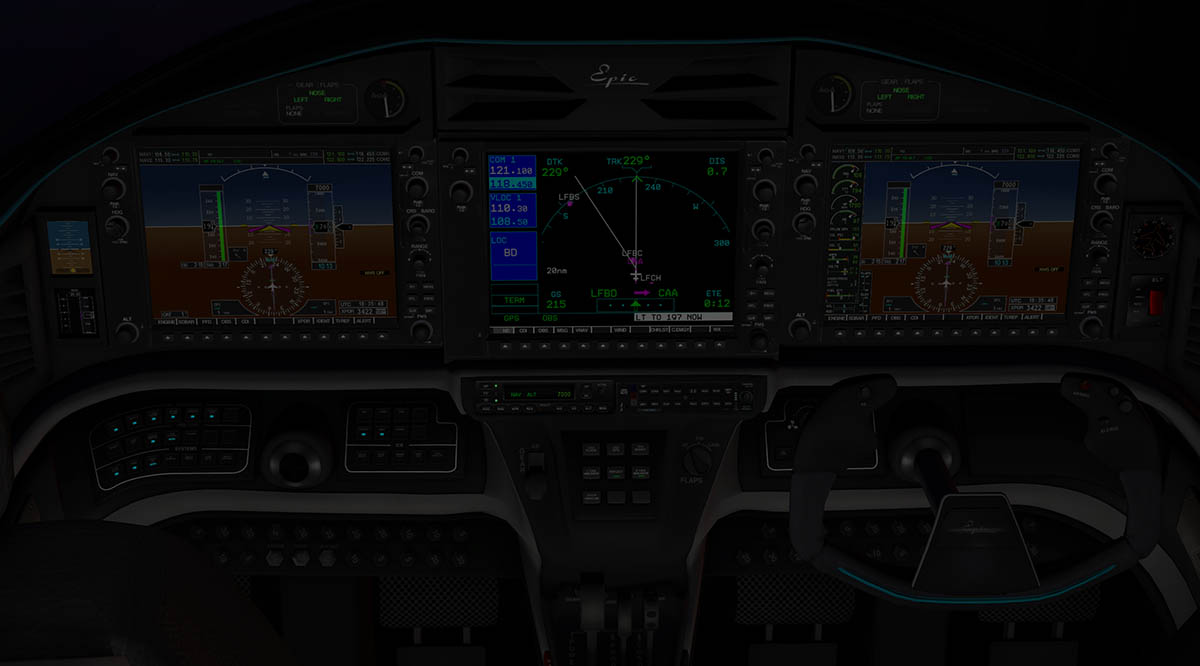
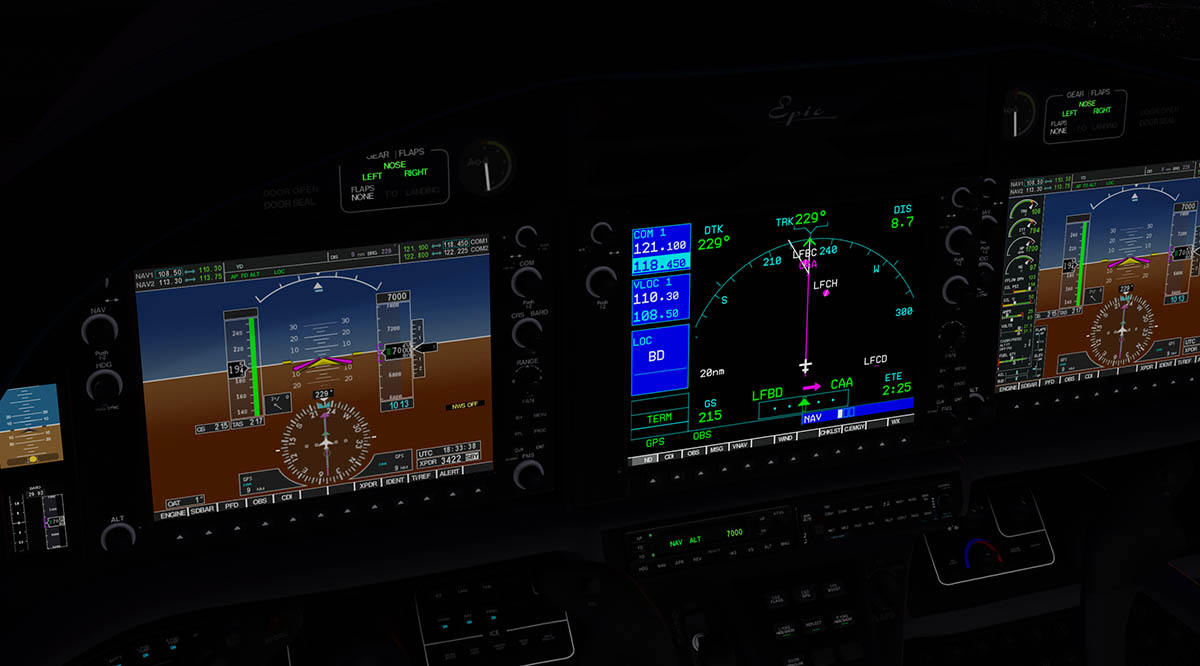
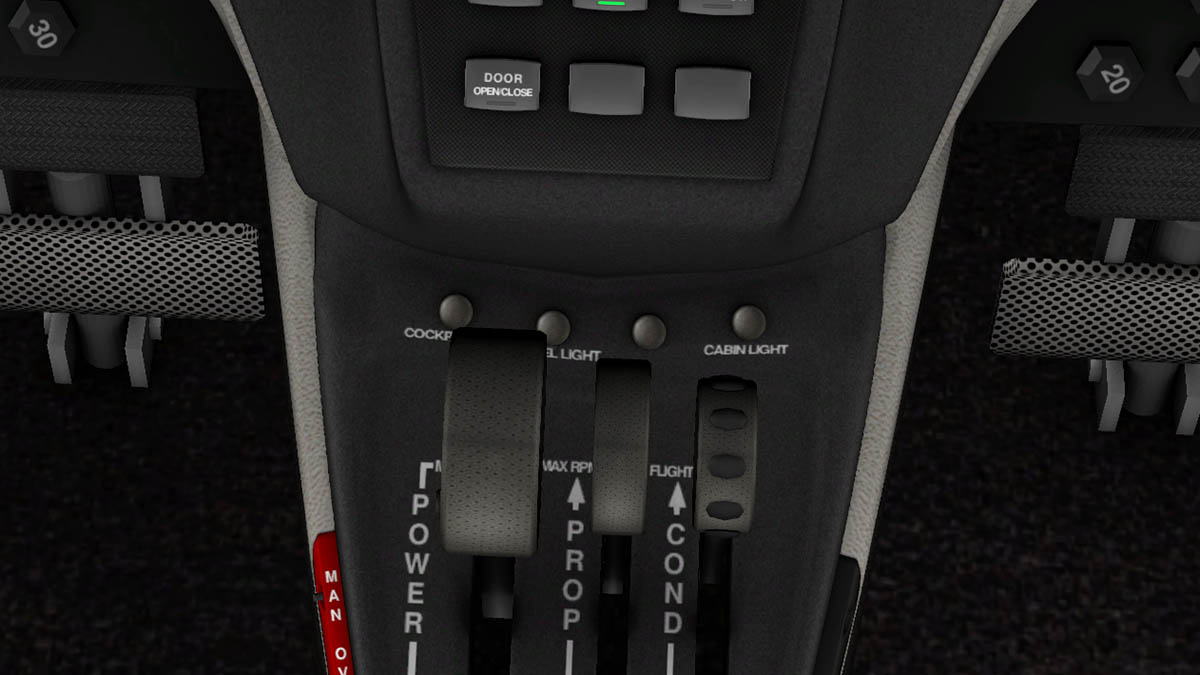
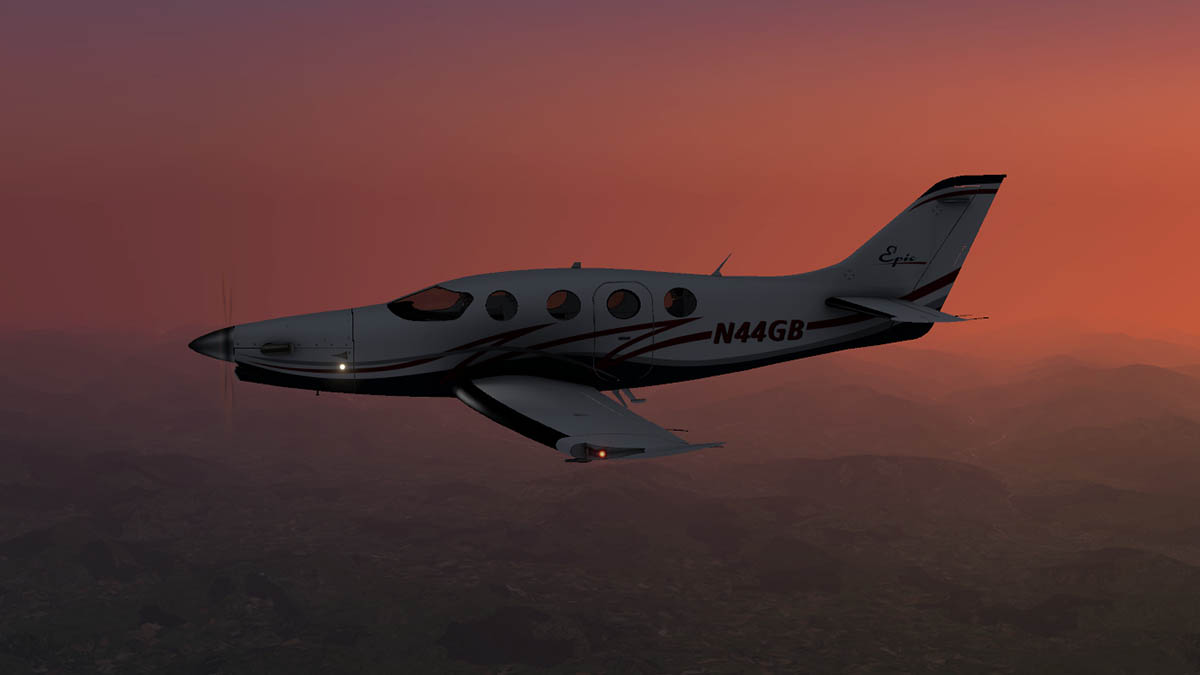
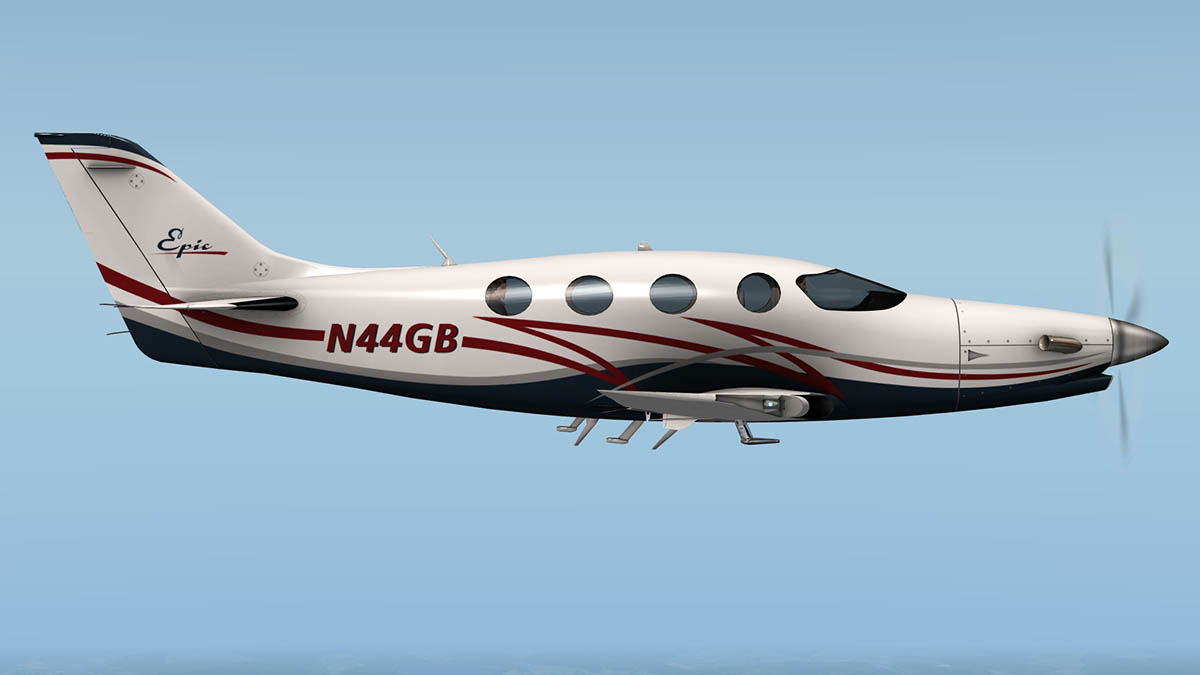
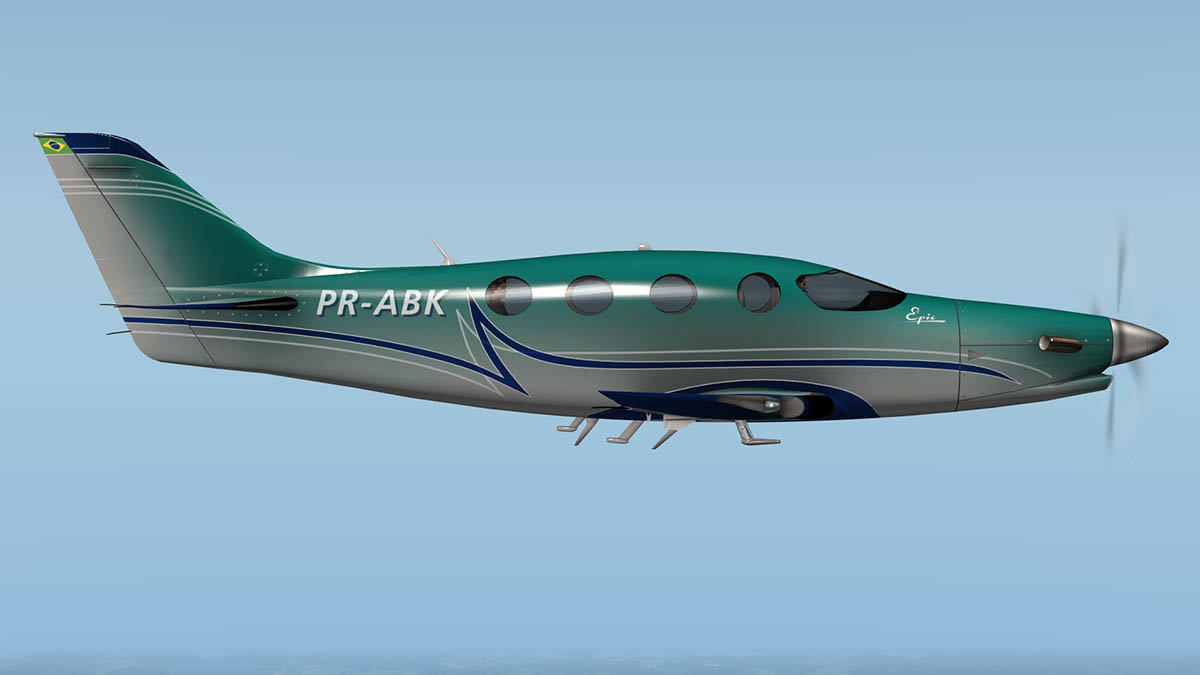
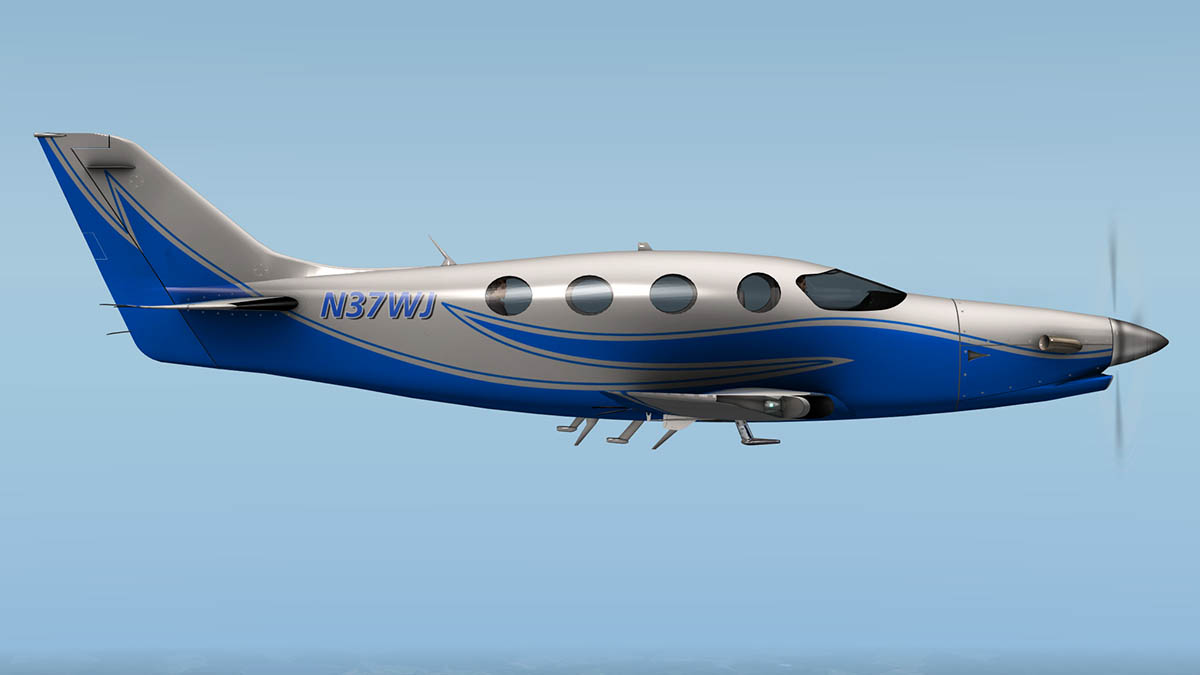
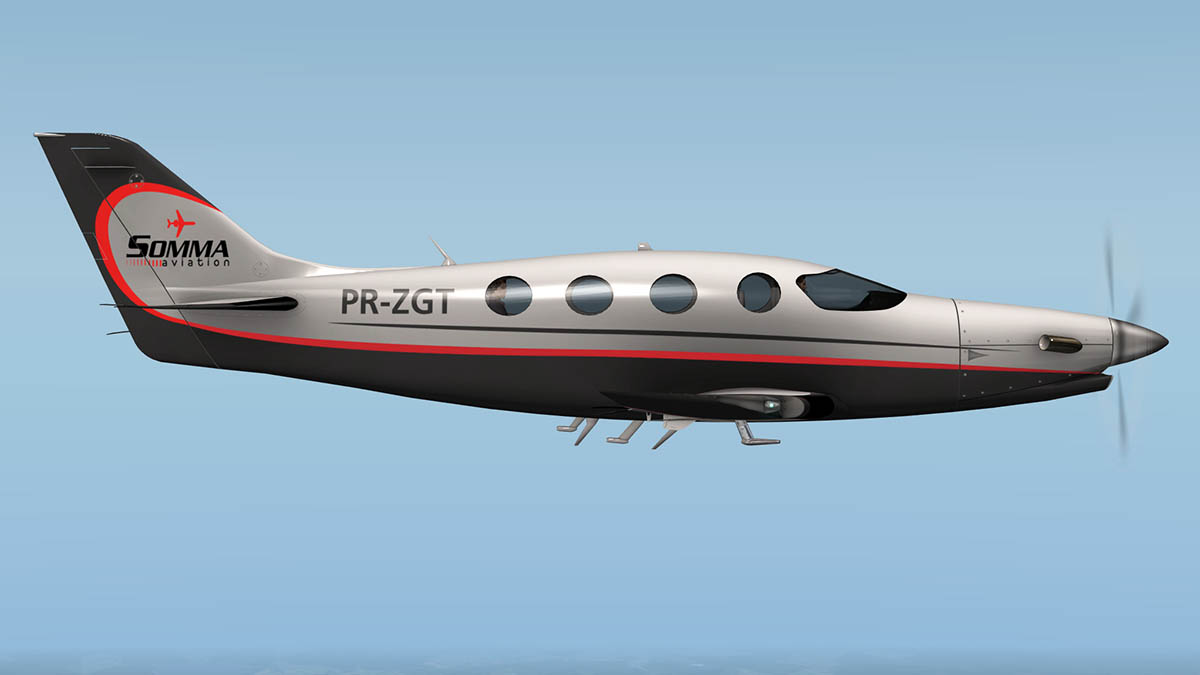
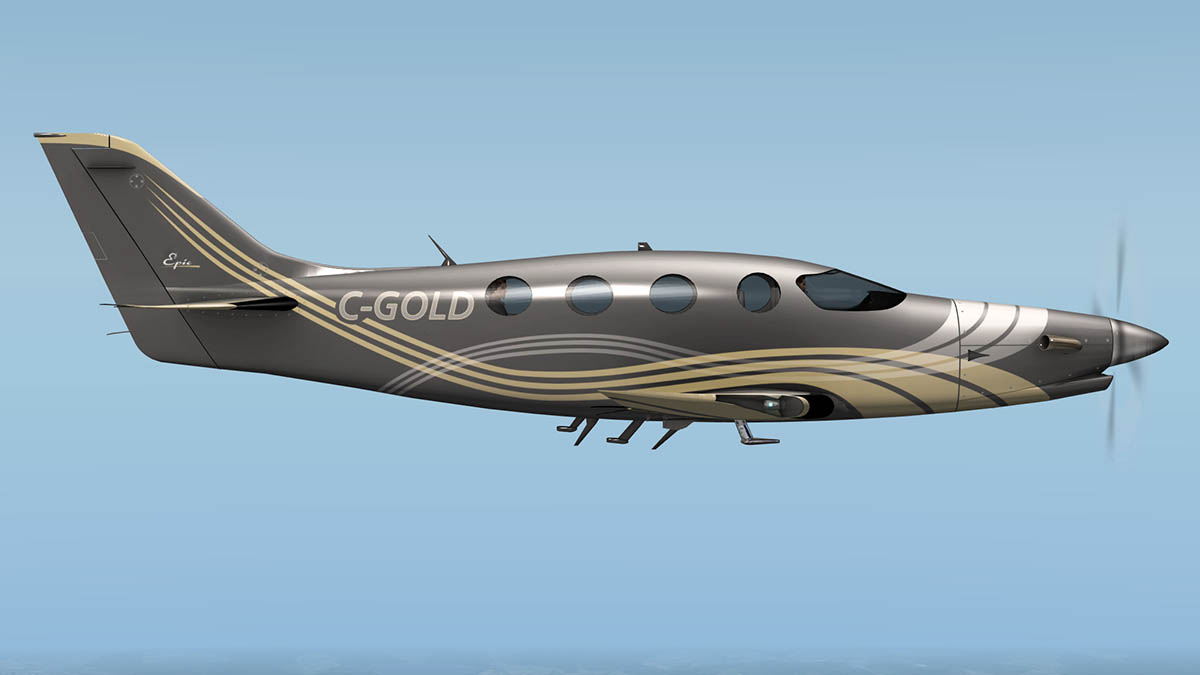
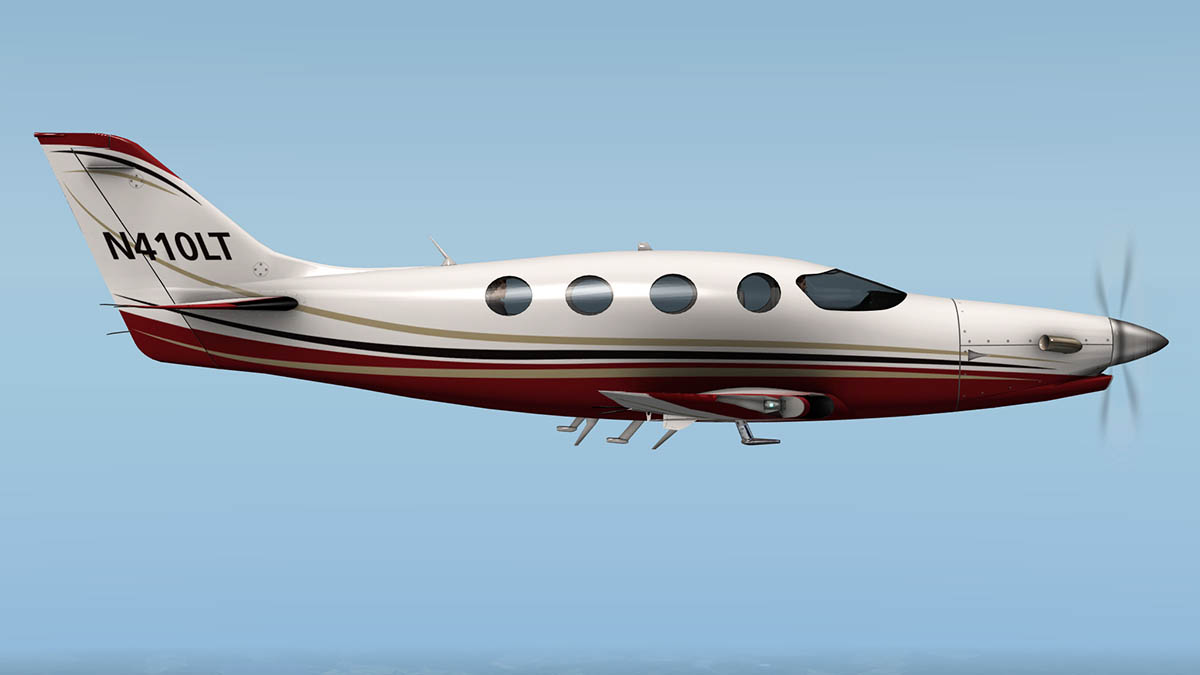
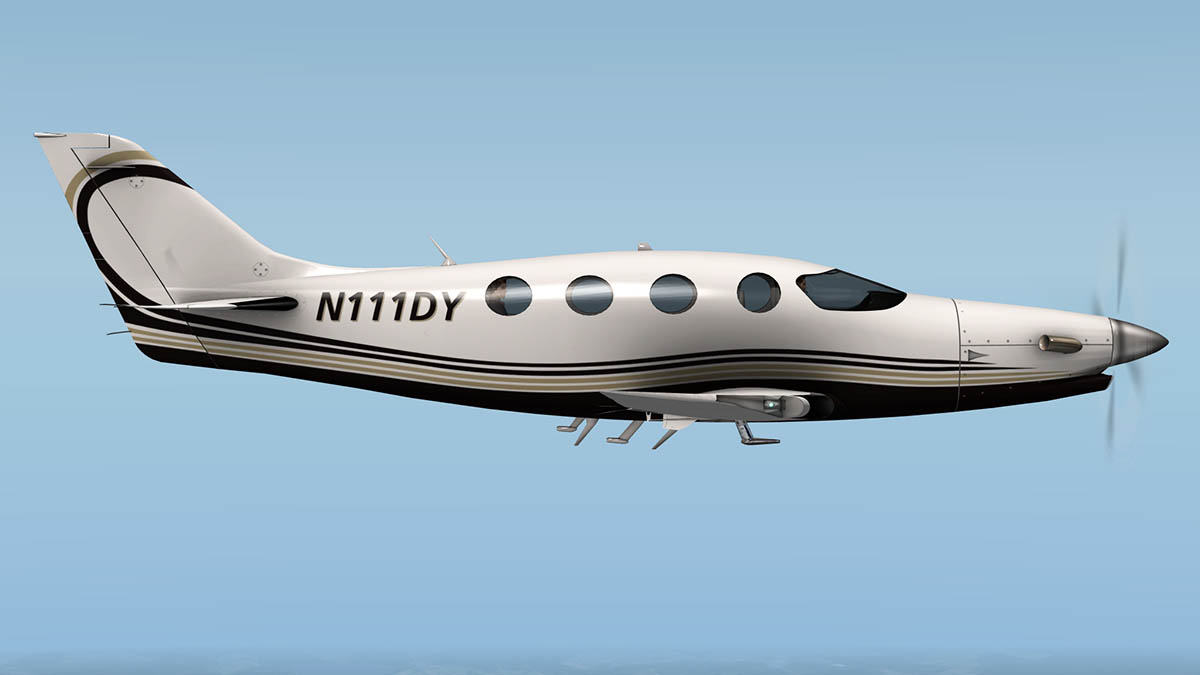
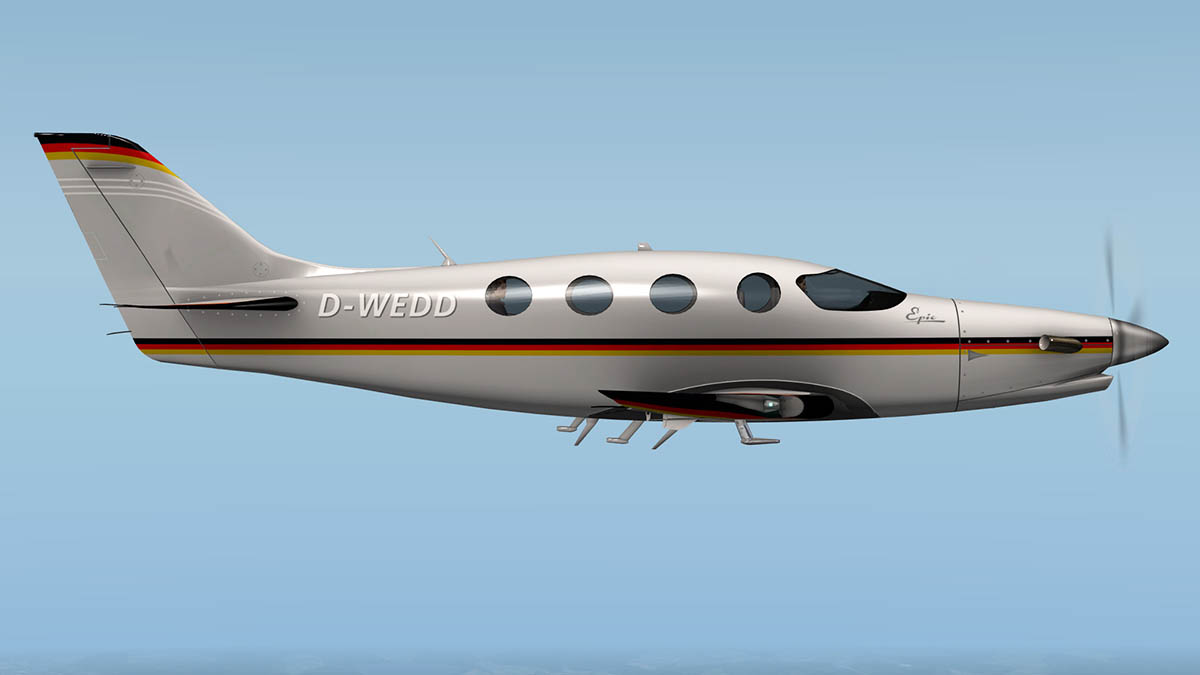
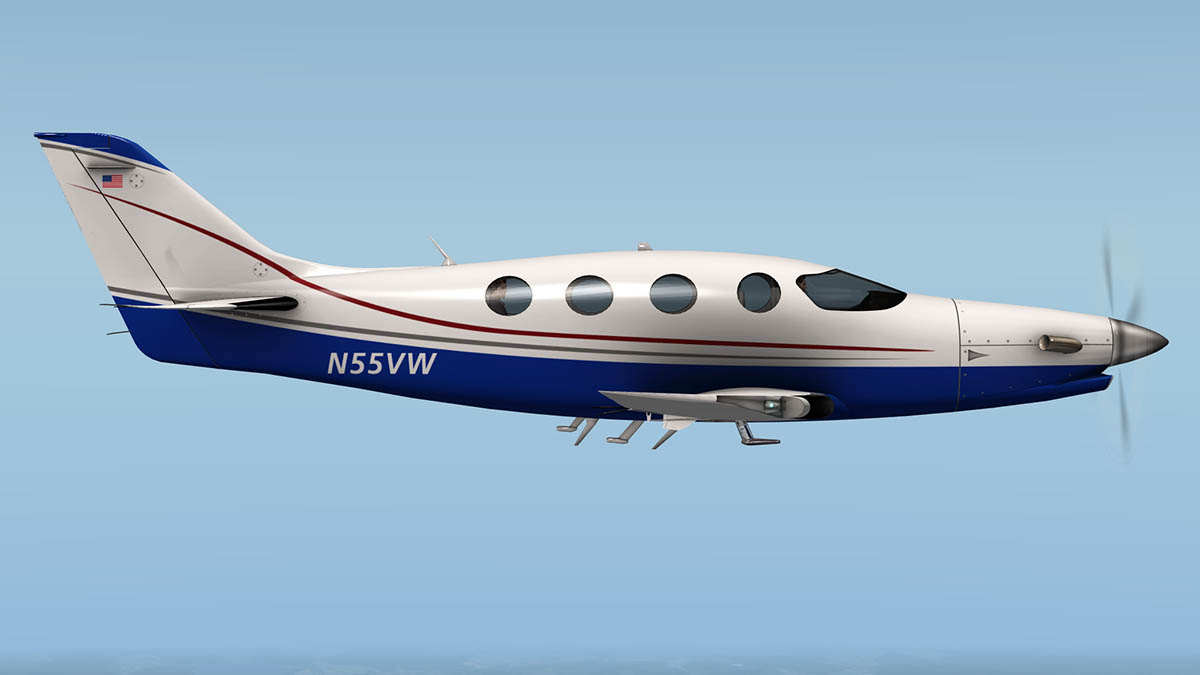
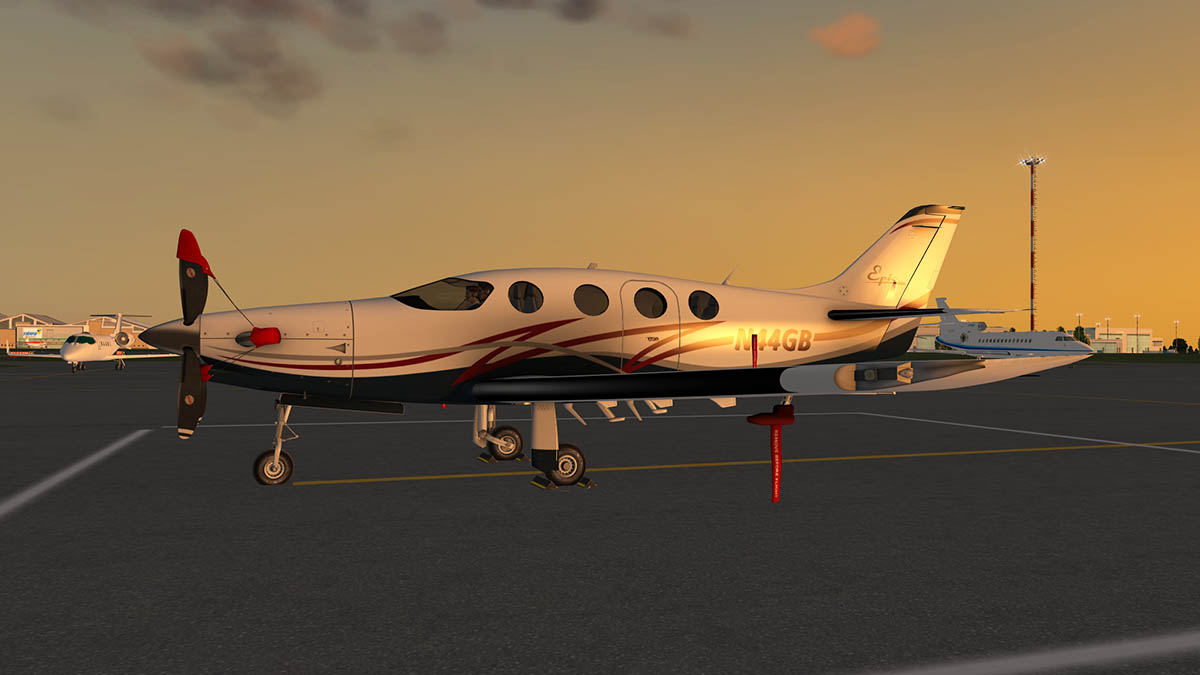
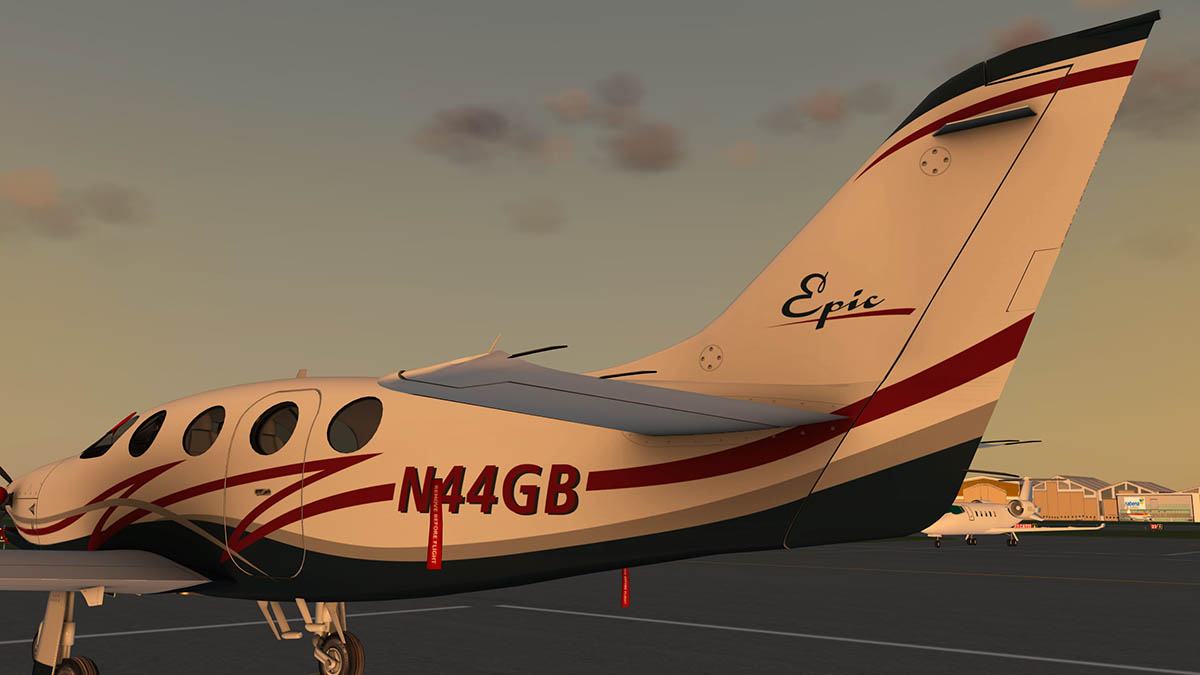
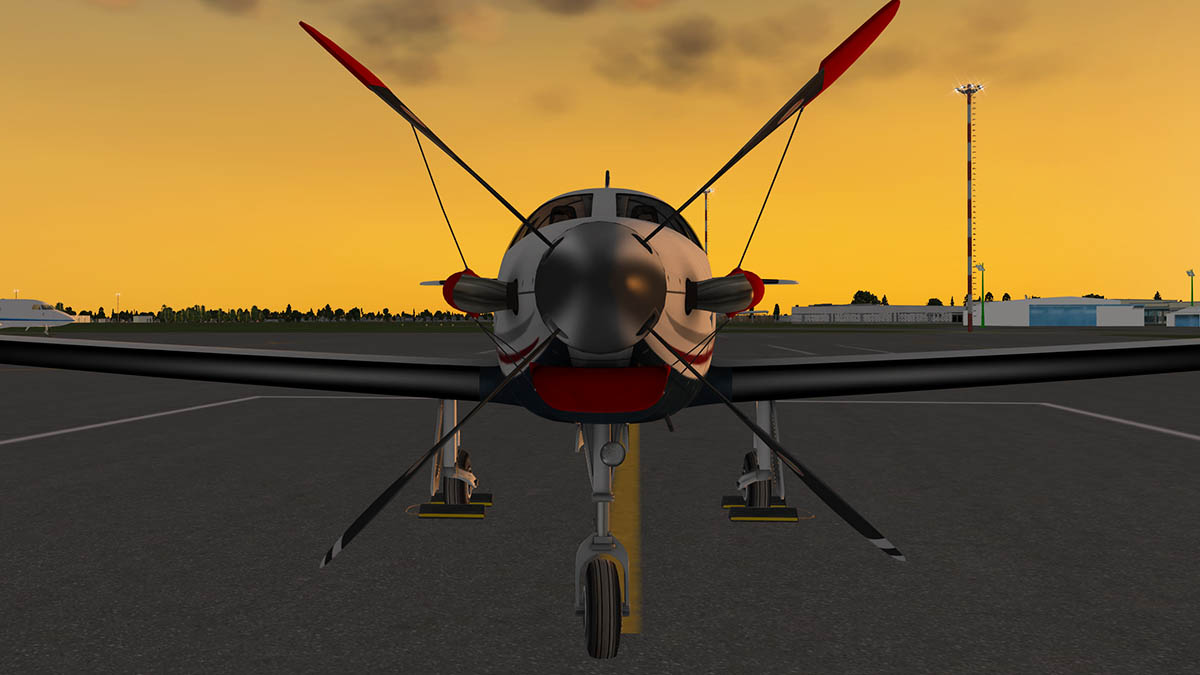
Aircraft Review : Epic E1000 by Aerobask
Stephen replied to Stephen's topic in General Aviation Aircraft Reviews
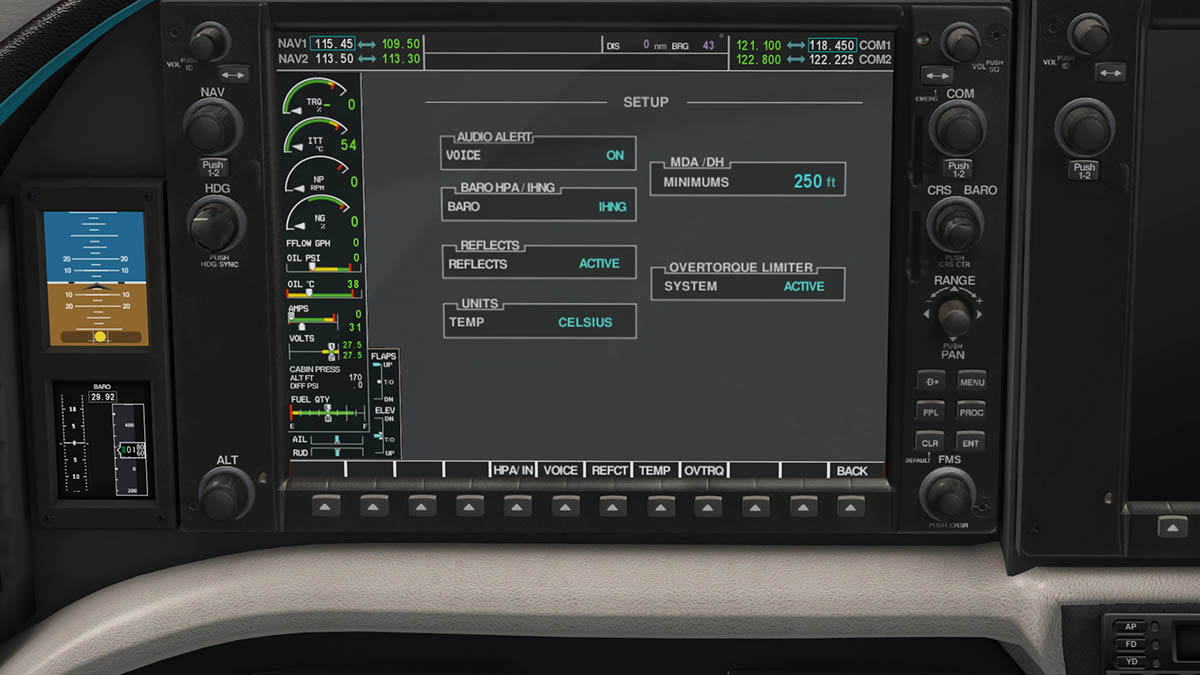
beta mode function is a new feature in X-Plane, some aircraft have it but many don't, it is a slight manual repositioning of the propeller blade angle beyond the normal low pitch stop, which helps the idle. But it has not been significantly explained on how it works in X-Plane, but there is a key selection to turn it on. -
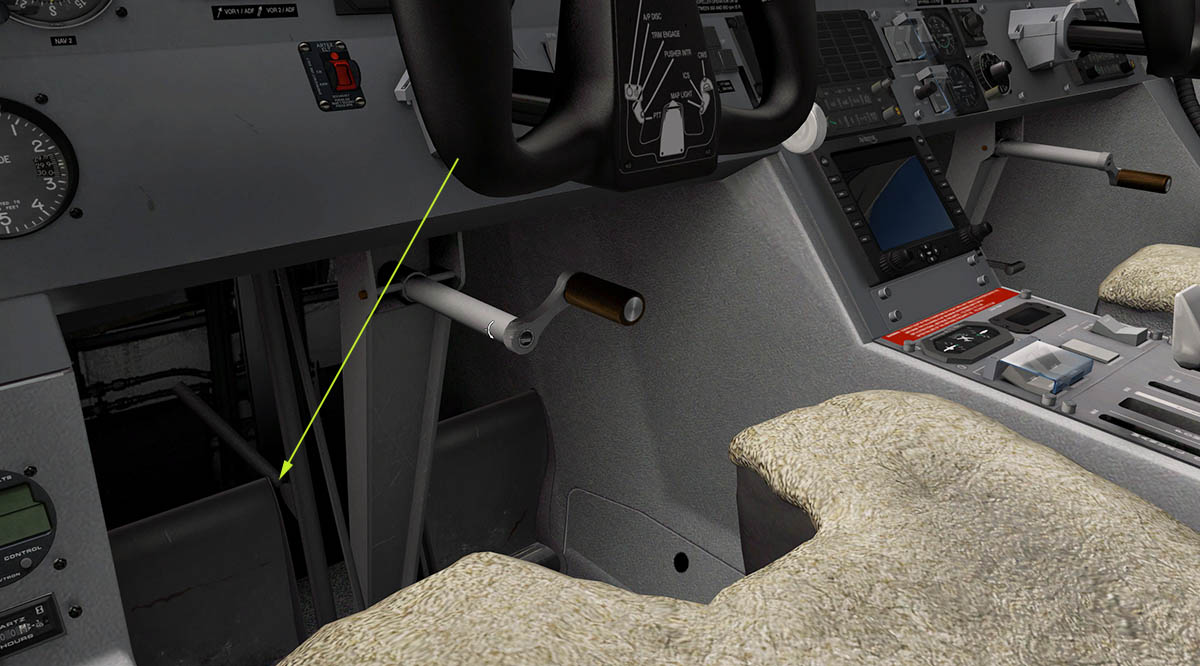
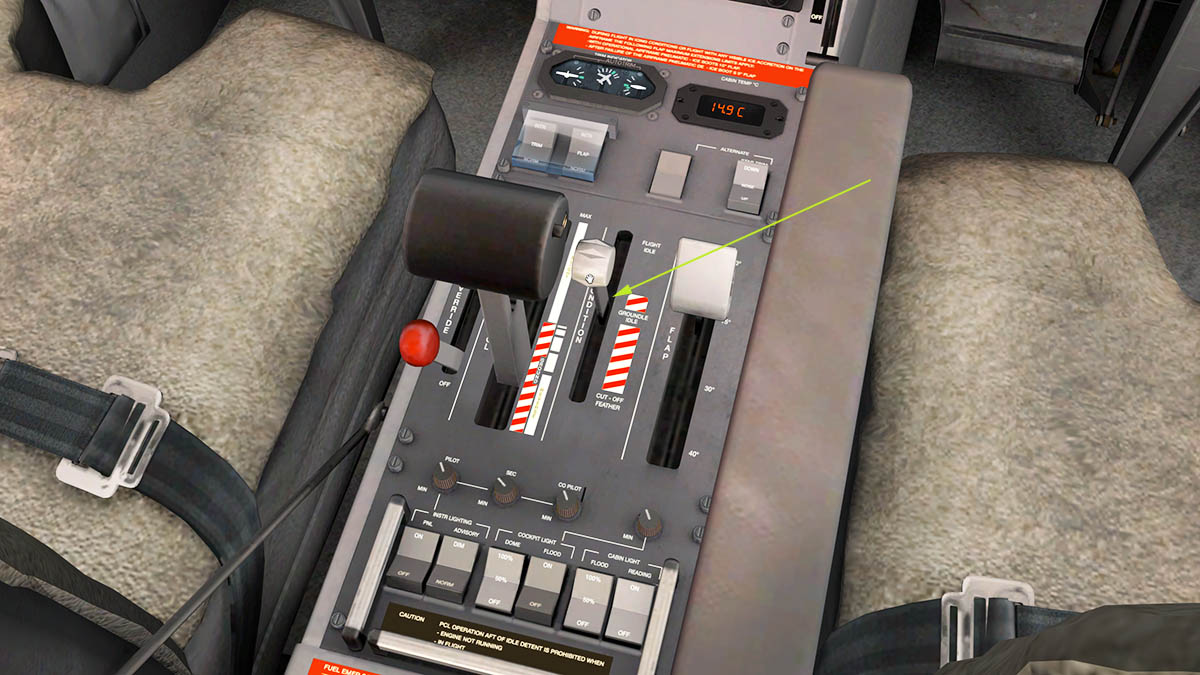
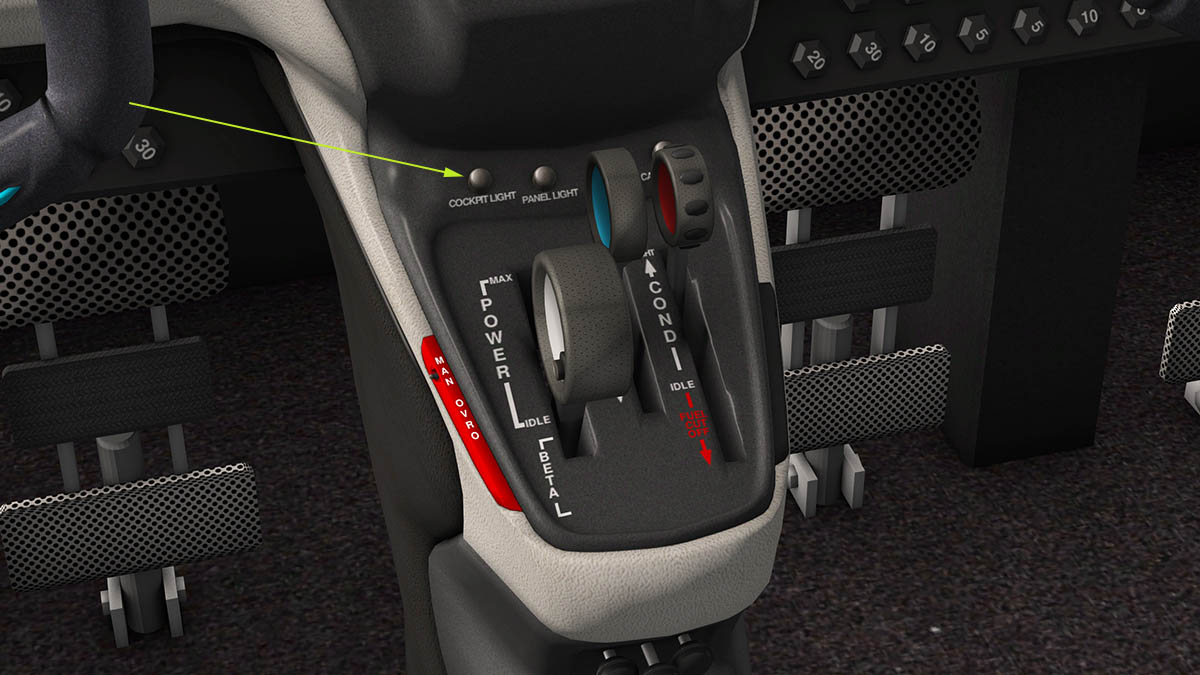
That panel is the air-inlet for the vertical-lift or STOL capablility. In other words you can take-off all most vertically!
-
Aircraft Review : Pilatus PC12 HD Series by Carenado There is already a significant PC12 in X-Plane by Shade Tree Micro Aviation, with their Pilatus PC12/47G. And X-Plane Reviews, reviewed (Aircraft Release : Pilatus PC-12/47G by Shade Tree Micro Aviation) that upgraded aircraft back in January 2015. The STMA version has been around for a few years and has a lot of very devoted followers, as it should have because it is very good aircraft. Now released for X-Plane is the Carenado version, and in reality they are quite different in their approach to the same aircraft, and there is no need really to do a one to one comparison between them, so any notes noted here are really just a summary of the differences. But one area that we have to keep in mind is the price... The STMA PC12 is noted as US$26.95 and the Carenado version is nearly a whole US$8 more at US$34.95. Pilatus announced PC12 in October 1989, and the two prototypes were completed on 1 May 1991, with the first flight taking place on May 31, 1991. A delay in certification in mid-1991 was required as a redesign of the wings with an increase of wing span and addition the of winglets was to ensure the performance guarantees were met. The Swiss certification finally took place on 30 March 1994, and U.S. Federal Aviation Administration approval for the aircraft followed on 15 July 1994. Performance : Cruise speed: 500 km/h (312.5 mph/270 KTAS) : Stall speed: 120 km/h (74.8 mph/ 65 KCAS) : Service ceiling: 9,150 m (30,000 ft) : Rate of climb: 512 m/min at sea level (1,680 ft/min) : Power/mass: 3.7 kg/shp (8.2 lb/shp) : Range 0 passengers: 3,389 km (1,830 nm) - Range 9 passengers: 2,804 km (1,753 mi) (1,513 nm) tdg has been doing some great scenery in Ireland lately, so I wanted to check them out and the PC12 is the perfect machine to do that in. So we start at EINN - Shannon on the west coast of Emerald Isle. The Pilatus PC12 comes in several different fitouts. There is the 9 seater commercial or the six-seat corporate transport. There is also a 4seater/combi version and a medical fitout, but this aircraft is only in the six-seat corporate layout. But I personally wish it had been the 9 seater working machine for tourism/regional network routes. The PC12 is powered by the powerful single Pratt & Whitney Canada PT6 turboprop engine (the PT6A-67B), and the PC12 is certified for single-pilot IFR operations, although a second pilot is usually the normal. For a single-engined aircraft the PC12 is quite large in size with a length of 14.40 m (47 ft 3 in) and a Wingspan of 16.23 m (53 ft 3 in). You are not going to dismiss this aircraft on the ramp, because it has a real presence and it just oozes quality. First thing that takes your eye is the spinner on the nose? Carenado have noted that one of the drawbacks of X-Plane is that the simulator does not show chrome very well? Well they fixed that issue? This spinner is chrome like gorgeous, beautiful in every way. The engine air-inlet behind is also nicely chromed as well, and its not faked either but changes to your point of view... You are wanting in nothing with the details of the aircraft. This is detail overload and everything is done right down to each single rivet around the cockpit windows, oh and the latches on the engine cowls as well. You can spend a significant amount of time just looking at this PC12, admiring it and the design. all the panels are noted and fitted to perfection, and the riveting on the rear fuselage and tail is astoundingly good. Undercarriage is totally perfect, struts, linkages... bolts holding it all together... Let us look at the lighting for instance... Lights out and the detail of the glass and rear internal reflector is realistic, turn on the light and you just don't get that X-Plane dot of a spot lighting but it is a full lit lamp, the wing and taxi lights are both this complete in design. You wonder again how how can you lift that already Carenado excellent quality, but you can and the results are here, the trick is in the really small stuff and not the overall design, it takes time and money to do this sort of incredible design of course, but that is what you pay for in this category. Quality is helped by using HD quality (4096 x 4096) and very detailed 350 pixels / meter sized textures. If you think that they will bring your computer to its knees, then that won't happen either. As all the textures have been totally optimized to not have a big hit on your frame-rate. Menus Menus are standard Carenado. Both tabs on your left lower screen you have the C - Camera and O - Options tabs. Options covers Windscreen and Instrument reflections, Static Elements (handpull tractor, cones and tags), Opening/closing buttons for both the forward passenger door and large rear baggage door (there are excellent animations and great sounds with both actions) and Scroll Highlights (we will note that option later). You now also change your livery on this tab menu as well. Menu C is programmed built in views. With mostly cockpit focused positions, only one external (TailCam) and one cabin view in Passenger L. You can adjust the "Field of View" and the aircraft's sound "volume" as well. Cockpit Climb the stairs inside and you are in another world, and a great one at that. Don't fool yourself, as this is as real as it is going to get. looking into the cockpit you are faced with a realism of great proportions. It is as close to perfect in every sense. You would swear you were in a real cockpit. Get in closer and the detailing is simply totally overwhelming... just look at those glass reflections, absolutely incredible. You just want to touch everything and run your hands down those woolly sheepskin seat covers. You don't have to do anything but sit in here and admire the design work. On detail then how about this... You can adjust the rudder pedals to your liking by twirling the handle? Totally absolutely useless really, but still a great detail. Mouse manipulators have again had another workover. For me I use a single click (Apple) mouse and the last manipulators (as good as they were) just didn't work very well with them? Here it actually shows a mouse in a one or two click mode and excellent the change is. You can still scroll fast and slow in those different directions, but most changes are now the half-mood manipulators that are rock steady. The highlighted scroll items can be turned off on the O - Options menu. Cabin Before we get down to business then we will have a quick look at the cabin. Dden's lovely Challenger 300 has for years held the gong for the best cabin in X-Plane, but now it has serious competition from the PC12 for the title. This is one fully rendered cabin, luxury leather seating and lovely wood grain panels Animated fold-out tables and window screens that you can set anywhere you like, you want home, then here it is... Even with all this the 9 seater still would have been a nice option. It is just the way I want to use the aircraft. Panel Power (battery) is on the overhead panel, there is also an external switch for "External" power, but there is no GPU (Ground Power Unit) outside which is the norm these days... an oversight perhaps? The switching system is clever. First right switch turns the item on and you select the choice by the second switch for two selections. Very easy to get used to and visually great. Power on and the panel looks excellent... very realistic. The panel layout is quite straight forward but is dominated by the EFIS or Electronic Flight Information System, we will get more into the system in flight. The EFIS takes in two of the six standard flight instruments in the Artificial Horizon and the Heading Indicator. The others are the Airspeed, Altitude, Vertical Speed and RMI or automatic direction finder. There is a backup CDI (Course deviation indicator) but that is also built into the EFIS and two other backup instruments in another Artificial Horizon and Altitude dials. Co-Pilot's side is the same EFIS standard six layout without the backup dials. Center panel top under the extensive glareshield is the excellent Benedix/King KFC 327 Digital/Electronic Flight Control System (EFIS) and the autopilot panel pops out. Next to the autopilot is the GARMiN GMA 340 Radio Comms Panel. Your ADF unit is the standard KR 87T50 Bendex/King ADF receiver. Below in another pop out is the engine/fuel display (digital) with large digital readouts for YRQ, ITT and NG and below the RPM, Fuel QTY (analog and digital). GEN 1 and GEN 2 readouts are duplicated from the overhead panel, and you also have the engine oil pressure and temp gauges in digital form. You have a save button and panel alert lighting test button that includes the extensive CAWS (Central Advisory and Warning System) that shows you your alerts and caution items for attention. As standard now are two large GARMiN GNS530 gps units which are fully 10.30 functional and both pop out for ease of use. There are two GARMiN 327 Transponders, with one center panel and one right down behind the co-pilots yoke. Climate controls are on the co-pilots left lower panel and the Oxygen lever is on the pedestal. Stabiliser Trim is electric and the display is on the upper right of the pedestal, but no yaw adjustment. Center lower panel is the fairly useless AvDyne display... pretty but still useless. The armrest hides a lot of the pedestal from the pilot's point of view, almost annoyingly so, so it is a good job it can be retracted back behind the seat. But still the throttle hides the condition/feather lever (in one) which you use a lot, so I had to set out an X-Plane view to get access to it. There are more rocker lighting switches for panel, cockpit and cabin lighting, but the above adjusters don't work which is unusual for Carenado? And in this aircraft that would have been a very nice feature to have. Flap selection lever of 0º - 15º - 30º and 40º of flap, and the indicator is positioned in very top left of the pilots panel. Startup Aircraft closed up and condition lever set to idle, and you are ready to press the "Start" button on the overhead panel. One click and you don't have to hold it down and the engine start sequence begins. Flick the "Flood" lighting switch and the panel changes colour... Personally I didn't like this look of the panel at first? It would have been nice to tone it down a little or have some adjustment? And it is bright, but I did (eventually) get used to it... The problem is you need it on to highlight the EFIS panel controls. Aircraft lighting switches are on the overhead panel for Taxi, Landing, Nav, Wing (ice), Strobe and Beacon. It is not the given thing but leave the passenger door open when starting the aircraft... then close it. You get a clever change in volume sound as the door bumps closed and clicks, which is a great aural soundscape. Sadly the small window on the pilots side does not open to the same effect? The engine sound brilliant in the start up and when running, great 3d sounds are recorded from a real PC12 and they are very realistic. The sweet spot is for the "Conditioner" lever is just above the idle position. Full up position will see the aircraft power off the ramp and into the scenery. But you need it set here for any taxiing and a moderate movement. The PC12 requires a little push of power to get it moving, and certainly if you are going straight into a turn around, but quickly get your throttle back into the full idle position for the straight taxi speed. You get Stab trim and GEN 2 alerts (a lot) on the taxi to the runway, but ignore both, as the GEN 2 switch is actually on? The second generator kicks in later than the main one. Flaps are set to 15º. Adjust the "COND" (condition) lever back to full power for takeoff from idle... and listen to the change in engine pitch as the changes show on the engine display. It take a fair while to adjust, but you have glorious sounds in the process. Flying the PC12 I'm flying from EINN - Shannon to EIDL - Donagal (not to be confused with Donegal itself as it is 71km to the south) which is a "lovely part of the world" The airport is "as the crow flies" 146nm north of Shannon, Western Ireland. The PC12 is a very powerful single propeller aircraft and that will mean a lot of asymmetrical thrust pushing you to the left, the aircraft is quite jiggly at very slow speeds so you need to be on your toes and ready for the machine to behave quite savagely at the start of the run position. I build the speed as I control the straight line down the runway, and it takes a little practise to get it just right... but it can be done with skill. Once you are out of the white band and around 130knts you can rotate and climb easily above 2000fpm. In the aircraft is amazingly good under the yoke and pedals, and a smooth climb and turn will give you a nice big smile on your face. Flaps in and UI settle into my head of which I set almost dead north on the ADF dial ENNIS (352 - ENS) as my first waypoint in the flightplan. My altitude is set at 10,500ft, and is set on the ALT/Vertical Mode control panel (also known as the Altitude Preselector). If you are happy with the pitch and climb speed then click on both the ENG and ARM on the Altitude Preselector and the aircraft will hold that pitch for you... the Autopilot (A/P) does not have to be activated. You can adjust the pitch by pressing the center of the knob for either the altitude or the V/S vertical speed. click either side of the knob to change - or + or scroll. Once ready I activated the A/P and locked in the GNS 530 flightplan. No doubt this aircraft is powerful, The PC12 will climb all the way to heaven if you want it to, to the 9,150 m (30,000 ft) service ceiling, you can't of course keep that V/S all the way up, a sweet spot is around 1,500fpm and the offical Rate of climb is 512 m/min at sea level (1,680 ft/min). The Electronic Flight Control System (EFIS) is a nice system, if you have flown any of Carenado's KingAir's you would be already familiar with it as the installation is the same here. Only difference is that the central positioned EFIS Control Panel does not pop out (There is a second panel down on the right of the co-pilot's yoke) and that is slightly annoying as you have scroll the screen down every time you want to make a change to the heading or switch your ADF and VOR pointers. (it is not a pop out on the image above) It is a slightly complicated system that is controlled between the Autopilot and the lower EFIS Control Panel with the Altitude Preselector, but it covers almost every area you need and everything is shown on the two main displays in the Electronic Attitude Director Indicator (EADI) as the top display and the lower Electronic Horizontal Situation Indicator (EHSI) display. EADI includes angle of attack, rate of turn, flight director, artificial horizon, marker beacons, lateral deviation Indicator (LDI), decision height and altitude. EHSI includes heading, course indicators, wind vectors and speed, nav source and built in CDI (Course deviation indicator). Both all NDB (1 and 2) and VOR (1 and 2) selections can be set on two pointer needles, that helps with heading decisions. The Autopilot settings are noted at the top of the EADI and you can have both "ARC" or "Rose" headings in the EHSI (I prefer the rose for 180º heading changes). Carenado provide a 7 page manual for the EFIS, if you have not used it before then I recommend to get familiar with the system before really flying the aircraft seriously. Stick Shaker The aircraft comes with a new feature of a "Stick Shaker"! Stick Shakers are a warning device on the yokes to warn you of an aircraft stall. There are several way ways to seriously stall an aircraft, low speed in either landing, wing slip or climbing. Here I tried it out by the climbing the aircraft because you have more altitude to recover. Just under a 4000ft per minute climb and down goes your speed into a serious stall. And yes the yokes "shake, and "rattle, hard! So yes a great feature, I found that on another landing I let the speed drop too low and in came the "shake, and it works as advertised. Cruising speed is around 240knts and the engine sounds are excellent internally, Externally they are a lighter more buzzy sound that doesn't quite translate for this deeper rumble of the PT6 turboprop engine. But that does not takeaway on how good this aircraft looks in the air, you admire those beautifully sculptured wingtips and this modern if few decades old design. The weather radar on the port wing is lovely in the softer light. The two Carenado pilots do a good job as well, even if they do give you filthy looks now and again. Timer/Clock and Hobb's meter are buried down to the pilots left, and the flightplan looks on target. Moveable blinds are excellent but not very deep to cover the side windows more effectively and you have to be careful with the EFIS control panel, because if you set the VOR to active it will disconnect the flightplan from GPS to Vlock, and may not notice it until you are well off the your planned route... I did that twice! My flightplan only goes as far as EIDL itself, but I have to be going slightly more north to return to land on runway 21, So I slip into a circuit at 1400ft... ... If there is an ILS freq you can check your distance from the runway on the EHSI lower display. At around 12nm I do nearly a 180º degree turn back towards the airport, just make sure you have turned off the half-bank function on the A/P. Flaps down (40º) to a 100knts gives you a good approach speed. The RWY20 ILS (IFN 110.30) is only a horizontal alignment? It will center the aircraft on the runway but it won't grab you and lower your altitude to the threshold. The Autopilot however has an excellent pitch adjustment. It is very easy to set an minus-300ft descent angle and correctly reduce your height as you would on the beam. It is very fine in adjustment as well, so it is again very easy to fine tune your pitch correctly in the approach phase. 100knts on approach and I turned off the A/P about 200ft from the runway. The aircraft is very steady, lovely at this flare phase, but you have to watch the PC12 doesn't float. Reduce the throttle lightly and your on the runway. You have a powerful reverse thrust, and that is problem... it is very powerful and when you release it back to the normal direction the aircraft at a slowing speed the aircraft can be very jittery in your hand's so you have to be really ready for it. Taxi and park position and you want to again open the passenger door early to hear that lovely engine wind down, and easy with the options menu. Lighting Overall the lighting is simply excellent... Externally you have a great landing light spread with four lights across both wings and the taxi central light filling in the middle, so it is about perfect. The ice wing light by the door is a handy light for passenger embarking or disembarking the aircraft. In the cabin you have brilliant strip lighting for on the ground, then reading/spot lighting when in flight... both are simply perfect, and you don't really need them both on at the same time. differential lighting tones are excellent. I found I turned them both off for a night landing as there is no door to stop the reflections. Four rocker switches on the rear pedestal panel turns on your lighting in the cockpit. From left to right. First is PNL (Panel) that turns on the basic instrument lighting. Second switch is ADVISORY for highlights around important areas of functions. Third rocker switch is the overhead dome lighting that gives you full cockpit lighting. And finally the FLOOD lighting that lights up the panel and switch gear. As noted this effect is quite bright and on all and especially on the FLOOD you wish for adjustment? Mostly I found the dome lighting switch to be off and the rest on... the last two far right rocker switches are for the cabin strip and reading lights. Rain Effects The PC12 comes with great rain and ice effects, the rain dribbles down the windows, but looks just as effective from the outside as well as the inside of the aircraft. Liveries One default white livery and five design liveries. The registration number of the aircraft changes on the panel as you select the livery of your choice. All liveries are certainly very high quality but missing any real design variations or corporate based user interaction designs like RFDS (Royal Flying Doctor Service) which has 31 PC12's Summary The Carendo Pilatus PC12 is a great aircraft to fly manually, lovely under the yoke and pedals. But the aircraft also demands time and hours on the airframe to fly the aircraft really well. The EFIS system is slightly complicated and you need time to really become one with it. I have flown this aircraft a lot over the last few weeks and it is so rewarding, but also so demanding to get your skills tuned into the aircraft... overall that again is what simulation at this level is all about, but if any aircraft demands a though pilots manual, this is it. Negatives are small, but the adjustment of internal lighting is top of the list? That panel is a "I like it" or "hate it" moment, you get used to it... but you wish you could just tone it down just a little. A GPU is certainly an oversight here, it looks odd with power switched on without it, and you need that EFIS control panel at your fingertips in a pop out window. External sounds are not up to par with the internal, this engine has a gorgeous sound and you want to hear it. You do in most cases in starting up and pitch changes and the great thrum inside, but not where you want to. Frame-rate was fine considering the complexity of the aircraft and quality of the textures, it looks heavy... but it isn't really with no issues except at least a 1gb graphic card. Features work well, with the great "Stick Shaker" working (and scaring you) when you get it wrong. The new manipulators are a great step forward as well than the older versions... certainly for my one clicker... clicker. Carenado aircraft are noted for their design and quality (that word again), but they always deliver, and the PC12 again raises the bar. This is without doubt simulation at its best for X-Plane, but demanding simulation at that. The bar is certainly set high to say this is the best aircraft in this category. In design, features and its overwhelming quality, the Carendo Pilatus PC12 is certainly jaw dropping "oh my god" so good. certainly the most life-like aircraft I have seen up to date in design and that cockpit and cabin is to die for. So value to quality is really a none issue... it actually blows it out of the water and even at that high price. You get what you pay for, and you get certainly a lot of aircraft here. The best in class, yes I think so, but for how long... the next Carenado! ________________________________ The Pilatus PC12 by Carenado is now available from the X-Plane.Org Store here : PC12 HD Series and is priced at only US$34.95 Installation : Download is 433.10mb that is unzipped to 515.30mb to your X-Plane - "General Aviation" Folder. (I use my regional aviation folder) Documents :Performance tables and references (which are Airspeed Limitations), Emergency Procedures (checklists) and Normal Procedures (Checklist) and a guide on how the EFIS - Electronic Flight Information System works Requirements: Windows XP - Vista - 7 -8 (32 or 64 bit) or MAC OS 10.8 (or higher) or Linux X-Plane10.30 (or higher) 2.5 GHz processor - 8GB RAM - 1GB VRAM 570MB available hard disk space Current version: 1.3 (last updated March 31st 2015) Special Features: Only for X-Plane 10.30 or higher. 64 bit compatible. Original PC12 Electronic flight instrument system (EFIS) Working stick shaker and pusher installed New and improved multi-function scroll support Volumetric side view prop effect. Two X-Plane GNS530. Features: Original EFIS with EADI and EHSI installed Two GNS530 installed Original autopilot installed HD quality textures (4096 x 4096) 350 pixels / meter textures Smooth animation button logic with custom audio 3D gauges Original HQ digital stereo sounds recorded directly from the real aircraft 3D stereo effects, such as outside sounds entering open windows. Customizable panel for controlling window transparency, instrument reflections and static elements such as wheel chocks and turbine inlet/exhaust covers. Realistic behavior compared to the real airplane. Realistic weight and balance. Tested by real pilots. Realistic 3D night lights effects on panel and cockpit. Individual passenger 3D reading lights and numerous HDR lighting effects. Dynamic loading/unloading of 3D parts and plugin logic for FPS optimization. Ice and Rain effect ________________________________ Developer site : Carenado Review by Stephen Dutton 3rd April 2015 Copyright©2015: X-Plane Reviews Review System Specifications: Computer System: - 2.66 Ghz Intel Core i5 iMac 27” - 9 Gb 1067 Mhz DDR3 - ATI Radeon HD 6970M 2048 mb - Seagate 256gb SSD Software: - Mac OS Yosemite 10.10.1 - X-Plane 10 Global ver 10.35 (final) Addons - Saitek x52 Pro system Joystick and Throttle - Bose - Soundlink Mini Scenery - EINN - Shannon Airport Ireland by tdg (X-Plane.org) - Free - EIDL - Donegal Ireland by tdg (X-Plane.org) - Free
-
Aircraft Review : DHC-6 Twin Otter - 300 Series by RWDesigns
Stephen replied to Stephen's topic in Airliners Reviews
Well I am not faking the images? What detail you see in the review is what I see? and the panel was very good in this aircraft. Check your texture resolution is at least "high", or if you can "very high" and put your anti-alias as high as you can as well. If you are running HDR then minimum should be FXAA but you need 2x SSAA + FXAA for good anti-aliasing. -
Aircraft Review : Epic E1000 by Aerobask
Stephen posted a topic in General Aviation Aircraft Reviews
Aircraft Review : Epic E1000 by Aerobask Welcome to the latest aircraft from Aerobask. This is the Epic E1000 and the largest composite aircraft done by this developer. With the aircraft is still undergoing development and certification expected in late (4Q) 2015. This is a powerful and currently the fastest single-engine turboprop yet built. It uses the 1200 HP Pratt & Whitney PT6A-67A engine installed on a very modern composite aerodynamic airframe to deliver true ‘jet-class’ performance for the price (US$2.75M) of an advanced turboprop. And performance is what this aircraft is all about. The Epic can do a cruise speed of 325 kn (374 mph; 602 km/h), climb at 4,000 ft/min (20 m/s), has a range of 1,650nmi (1,899 mi; 3,056 km) (1385 nmi at maximum cruise speed) and fly at an unbelievable ceiling altitude at 34,000 ft (10,000 m). If you want to go up there with a Boeing 737-800 maxing out behind you then "hey" be my guest... but you have to admit those specifications are very impressive. So X-Plane Reviews headed out to the West Coast of France to Bordeaux–Mérignac Airport to look the aircraft over and see if that performance is real, and can this aircraft really fly alongside the light jets. Epic E1000 by Aerobask Many users are now very familiar with Aerobask's design philosophy. Aircraft like the Twin Star DA-42, Pipistrel Panthera and the Lancair Legacy FG are all very composite designs and significant new generation aircraft. And the Epic E1000 certainly follows on in that vein, the only slight difference is this is not a light spec aircraft here, but a more larger General Aviation/Executive design. And for molding those smooth sleek almost dolphin shaped designs you won't find any one who can do this better. The Epic is one nice looking aircraft. These aircraft are very hard to dissect, because they are not built around a frame or modules, but are formed as a one piece moldings with the smaller components making up the whole. So they can be unnaturally smooth and very hard to make interesting. Aerobask is one developer however who can bring these aircraft to some distinction, so the design here is excellent. The aircraft its on a tri-cycle landing gear and they are quite tall and sits the aircraft well off the ground, the rear wheels are a trailing design and very well designed here. Externally the aircraft is excellent and comes in High-Res textures of 4K. There is no window tab menus, but a menu panel in the center of the panel that gives you various options internally and externally. Top row is the static elements (tags, chocks and covers) and a portable GPU (Ground Power Unit) which is very nice. Third button along is the "FPS Boost" which helps in your framerate if you are marginal by removing the seats and other various no-essential item. I found the aircraft very framerate friendly, overly so... So your computer would have to be pretty average to have to use this. Second row of buttons covers the panel in left and right yokes removal and the excellent window and panel reflections, bottom row single button is to open or close the single rear passenger door. The panel is dominated by two left and right Garmin G900 Primary Flight Display (PFD) displays, the center display (MFD) is another on the surface an G900 display but here it is a modified X-Plane GNS530 unit instead. Note these G900's are only an accurate representation of a real G900, and not an exact replica of the instrument but they are very good never the less for that. Lower panels include the main switch gear on the right (yoke removed) center is an excellent MEGGiTT autopilot and Garmin GMA350 radio unit, with below a small pedestal unit with a throttle, propeller (feather) and condition levers (throttle has power "Max/Idle" settings and a "Beta" reverse thrust setting). The cockpit, panel and rear cabin lighting adjustment knobs? are very small and hard to see behind the levers. Left lower panel is just the climate and oxygen controls. The aircraft has a unique way of switching on the various systems... the three rows of buttons are set out to be used at the various points of getting the aircraft ready for flight and in order. Top row is the "Pre-Start" Second row is the "Pre-Taxi" and the lower row is the "Systems". The Pre-Start includes the batteries, fuel pumps and igniter and starter gen settings. This will power up the G900 screens, but not the central display. For that you need to switch on the avionics master on the second row... and on the right "Lighting" panel the "Panel" button. Other "lighting" panel items include Ice (wing light) Land and Taxi lights, strobe and Navigation lights. Another lower button panel is your "Ice" buttons for de-icing boots, the propeller heat, the window heat, the inertial separator, and the pitot heat. Modern flight displays are quite complex and menu driven. And you have a lot going on in this display, and there is no doubt this is the best G900/G1000 style display in X-Plane at the moment. There is a side panel Engine Information System (EIS) on the left within the display, and this can be switched off to give you more visual space to the main flight instruments that are all artificial horizon, speed and altitude tapes, bank roll scale and roll pointer and HSI (horizontal situation indicator) or heading pointer all in one. You have also a "setup" menu to do more finer settings under the "PFD" menu button. Here you can set your "Audio Alert" in a women's voice that you are doing something wrong. Baro HPA/IHNG setting, Reflections (screens), TEMP units in ºC or ºF, Decision Height and a Overtorque limiter which is simulated. You can test all the systems by pressing TEST under "alerts" and in the sidebar there are the main ENGINE displays of Torque (TRQ), Temperature (ITT), Propeller RPM (NP), power (NG), fuel flow (FF), and oil pressure & temperature and cabin pressure, and a fuel quantity overview. Pressing SYSTM information about electrical amps & volts (generator, battery, bus 1 and 2) and the FUEL for fuel pressure, fuel quantity, fuel remaining, fuel used, estimated endurance and estimated range. Radio VOR1/VOR2 and COMM tuning is set out at the top of the display and the tuning is done via the side knobs and switching them over via the Push 1-2 button. Transponder XPDR is set via the menu buttons on the XPDR page. The standard GNS530 feels a big large expanded for its central role and even the pop out screen is smaller than the installed one? The knobs and buttons are slightly different as well and so if you want to save time the pop out is sometimes quicker to use. But you do have all that great GPS functionality available to you. You also have a built in to the GNS GPS both the Checklist and Emergency Checklist as well, for... Emergencies. Flying the Epic E1000 My flight was a loop around the southern western areas of France. In leaving Bordeaux to Biarritz then skirting the Pyrenees in going inland to Pau and then looping back again to Bordeaux.... A 265nm flight to nowhere! Flightplan in and booked (sorry activated) and your ready to start the engine... Propeller and condition levers up (no propeller pitch change?) Press the button, hold and wait and soon the engine whines up and into action. Set your ALT (alternator), Fuel (auto) and if required the manual tank selection is on the floor under the pedestal. and lower SYSTM's on in Auto-Pilot, Trim, Air Pressure, Hi (Air Pressure), EMER (Air Pressure). Sounds in starting, start with the starter click and the power start whine and then running gives you a great rumble. Great sounds if you have a very good sound system hooked up to your simulator (yes I do). The engine soon settles into its warm up pattern and your ready to go so the whole startup process is simulated. The propeller when running is just a flat disk which is disappointing, but looks very good from the cockpit. You need to pull the COND lever back to idle to taxi or if not your will take out a bit of the scenery, as the aircraft will shoot off the line. Even then I found the idle position still a bit too fast when taxiing. Turn tight and the front wheel does not turn enough into the radius either?. When lined up on the runway don't forget to put the COND lever back into Flight mode and then power up... This is a very powerful single engined aircraft and so the asymmetrical thrust is really quite strong so you need to be prepared for the power. Departure is via RWY05 which is the wrong way to my flightplan, but the wind direction changed so I will have to circuit LFBD before I pick up my plan on the western side. At 130kts I do a slight rotate and then a full pitch to 2000fpm to climb away from the airfield... and yes this aircraft can climb. You tend to feel into the aircraft and find its balance which is very good and let the speed rise, gear up which is very well animated by Aerobask and I'm in the turn to find the circuit. I'm going to 7500ft at first to let the aircraft settle down and build more speed for the climb to 22,500ft. The MEGGiTT autopilot is highly impressive. Easy to use and to set, in you just select your altitude and then press the UP or DN buttons to select your rate of climb. The aircraft will easily handle 2000fpm, but watch your speed because the aircraft can't keep that pace up all the way, so I came back to 12000fpm and then 900fpm and then 500fpm to keep the speed moving in a positive direction. And watch your air pressure is working as if not it will tell you that you need to pressurize the aircraft. And soon you are getting mighty high for a small aircraft like this... and you can get a lot further up than this. The aircraft is nice and fast in the air, but I wouldn't call it jet like, as it is too noisy for that... The sounds however are amazingly good, I turned my speakers up and just loved that turbine running hard in front of me. You can use the GPS to check your route and position, and note the excellent on the far left of the pilot's display the back-up altimeter and artificial horizon. Great vertical display and routing information is well built into the GPS unit. I will profess though that I never found the pilots position really comfortable? the distance between the seats and the display panels is quite small in viewing terms, and those panels are very large when you are this close-up to them. On the X-Plane "Rendering Settings" Menu I set the lateral view to 075.00 degrees to give me more of a better viewing angle, although Aerobask noted that 65º is better but I really needed more than that... And to a point this worked quite well, but move even slightly back and the seat quickly covered the view. Many would like this small cocoon of an area to work in but I found it a little restricting, and the high sloping center glare shield meant the view forward was quite small as well and you had to lift yourself higher to look over the panel, I found the best view out was left and down which was far better and good for approaches. You are not used to coming down from a high altitude with a lighter aircraft like this, so you have plan your descent point at a far longer position than usual when flying small aircraft. In this case the Epic is like a light jet in descent and speed points. Note the reflections which are excellent for realism. Your speed control is very good, you can easily match (with the throttle) the right speed you need (even slow). I could easily balance the aircraft very nicely at 160knt and then down to 140knts when the descent was completed to start the circuit for the approach, and the aircraft gives you confidence, the power on tap allows the two stage flaps (noted as TO - Takeoff and LANDING - Landing) is a little simplistic but effective in operation. On this flight I used the ILS approach system and tuned the airspeed back to around 100knts for landing, this is great but watch out for the drop as X-Plane cuts you off the beam, you are still quite high and so you are suddenly free and the aircraft will slightly wobble. you need to give the speed a little nudge upwards to keep that descent clean, flare is good, but this stick undercarriage does not have as enough give as you would like, but get the flare right and it is not a problem. The aircraft uses the "Beta" toggle function to reverse the propeller pitch for reverse thrust. This means you get throttle control by using the "toggle" reverse and not the "full reverse" selection. In other words, hit the toggle key or button (like you do to open the reverser doors on the heavy jets) and the aircraft goes into beta mode and throttle up the reverse thrust you require, when done throttle back to idle and re-click your toggle to resume normal throttle control. It works here very well, as the rev thrust power is powerful. Don't forget to set your COND lever back to ground idle even if the women's alert voice is complaining about your engine's condition... Lighting I flew the Epic E1000 again to see what it was like in the twilight... but first some nice pretty pictures! The aircraft inside and out looks very nice in the softer light, It is very nice to fly and look at these points of a time and a place. The idea is to make these large displays workable in a dark cockpit, you can certainly adjust the display brightness via those small knobs behind the throttle lever, or even for a quicker solution click the "panel" lighting "off" on the lighting panel. The lighting is not focus, focused in the sense of being very spot like, but just an overall light darker or lighter. It is very adjustable in that way. And you can have the cockpit really bright if you want to. HDR off HDR on When HDR is on the lighting is more slightly focused than with HDR off, In fact the differences are not that overall significant to switch over to HDR if you don't require the need. External lighting is fine but not anything overwhelming. You have a left wing light to check for ice, and the standard beacon, nav and nice strobe lights. The landing lights are good but very spread out on each wing tip, so there is slight dullness between them and the central taxi light, but overall they are all you need. In the cabin there is the modern touch of great LED strip lighting. Liveries There are nine liveries in a few real aircraft, a few fictional and a commercial in Somma Aviation. Default is N44GB which is available in hi-res and low-res. All the liveries are design by a quality artist in XFlyer. Two more are available for download from Aerobask's site.. Summary If you liked any other Aerobask aircraft (and who doesn't) then the Epic E1000 will fit very nicely in your hangar. This is another very fine aircraft and brilliantly done in all context by this very forward looking developer. Design wise and execution it is very good. Sounds are glorious and detailed if you have a great sound system, they certainly add to the overall experience. It is certainaly a nice aircraft to fly and the greatest feat is that you can for a GA/Executive aircraft fly over a high mountain range like the European Alps than around them. It is not a light jet or a jet in that capacity, as good as it is, but it is an outstanding small fast point to point light aircraft. Very modern and totally up to date. Negatives, not many really. I'm not crazy about the propeller in flight from the side, as it has no pitch adjustment and is razor thin, inside though it is very realistic so visually it is a tradeoff. It is tight in there in the control seat but the real aircraft could be the same? no baggage door either, but it looks like the real aircraft does not have one either, suitcases on your laps I suppose. The replacement center display with the GNS530 is very clever and very well intergrated and highly functional, but feels quite large and over-sized in your view point. Frame-rate is very good, it never caused me any problems, but if you have your texture resolution set (very high) then the numbers are above 1000gb or a 1gb of your graphic cards ability so you would need a 1gb card or higher. HDR on was no issues. Overall at that price the aircraft is a great investment, well done and a very much larger sized aircraft than before from Aerobask, like I noted if you like Aerobask's other aircraft you will really like this one... It is the best yet from Aerobask. ____________________________ The Epic E1000 by Aerobask is now available from the X-Plane.Org Store here : EPIC E1000 priced at only US$23.95 Installation : Download is 384.20mb that is unzipped to 454.40mb (all liveries) to your X-Plane - "General Aviation" Folder. Documents : Great detailed manual and tutorial with excellent information on how to use the aircraft. Performance tables and checklists. A real detailed instruction sheet of the PT6A Engine. There are camera presets, but I found they interfered with the X-Plane default. Requirements: Windows, MAC or Linux X-Plane 10.35 or higher - 32 and 64 bit compatible. (X-Plane 9 not supported) 1.5 GB VRAM Video Card Recommended Version 1.1.5 (9th April 2015) Version 1.1.5 There has been a slight upgrade to the E1000 to version 1.1.5 New sounds : rolling runway, touchdown & skid dry. Fix minor PFD bug (position). Fix knob CRS-BARO : CDI course setting is more accurate now. Fix turn bank indicator. Updated manuals & checklist Go to the X-plane.OrgStore for the 1.1.5 update and to your account to download, but if you just want the updated manuals and checklist them go to Aerobask's site Features High quality 3D model with High-Res texture 4K, specular and normal mapping. Fully functional Virtual 3D cockpit. EFIS including the new GNS (by Laminar Research), checklists (Normal/Emergency), Weather radar, TCAS, setup page and vocal alerts. EIS, including 3 pages : Engine, System and Fuel Fully animated : door, flight controls, canopy, gear, all levers Panoramic windshield with reflections Many custom sounds : engine, gear, flaps, door, vocal alert, callout Liveries : more 8 different paint schemes designed by XFlyer Ice effects (windshield and wings) Propeller disc effect Ground Power Unit, flags and wheel chocks Toggle yoke visibility left and right Simulated systems Start procedure - fuel system (automatic balance) - taxiing with beta mode - anti ice system - Pusher - Autopilot - Pressurization - Overtorque limiter Support forum for the Epic E1000 Review by Stephen Dutton 11th April 2015 (updated) Copyright©2015: X-Plane Reviews Review System Specifications: Computer System: - 2.66 Ghz Intel Core i5 iMac 27” - 9 Gb 1067 Mhz DDR3 - ATI Radeon HD 6970M 2048 mb - Seagate 256gb SSD Software: - Mac OS Yosemite 10.10.1 - X-Plane 10 Global ver 10.35 (final) Addons - Saitek x52 Pro system Joystick and Throttle - Bose - Soundlink Mini Scenery - LFBD - Bordeaux-Merignac (France) - by XPFR : Scenery for X-Plane (XPFR : Scenery) Free
-
Airport Review : SBDN - Presidente Prudente Airport by Richard G Nunes SBDN - Presidente Prudente Airport is the first scenery to be released as payware by Richard Nunes. This is a welcoming X-Plane scenery from South America, which is very under represented in the simulator. There are a few good sceneries in the north around Venezuela, but except for a couple in Sao Paulo the rest of Brazil is pretty barren? You can however try FSBrazil for a few airports. Distance from Sao Paulo (SBGR-Guarulhos Airport) to Presidente Prudente is just over 500knm (511km) or 276nm, in most cases flying time is around 55min (GOL) depending if you fly in a big jet or regional 1h.30min (Azul). Our flight is by the ATR 72-500 so we are flying the route in the slower way and in at a slightly lower altitude (18,500ft), departure was via RWY27. First Impressions Flying to Presidente Prudente from Sao Paulo is a flat experience, not the flight... but just the land. The Brazilian landscape is just stretches away every which way you look from the aircraft and is broken up by the odd river and lake systems. And SBDN is just a speck in this pattern of squares. On the map Presidente Prudente is a big sized area out here but it doesn't really register in X-Plane because the OSM (OpenStreetMap) data probably is not very extensive in this area, so the area is mostly like a small forest with a lot of trees. Richard Nunes does give you a few options here and the details are in the manual (in English and Portuguese). You can do two downloads. One (Brasil OSM 25-02) which is the more recent OSM (OpenStreetMap) data for Brazil, so that will fill in the roads and building data for you. Another add-on is a ortho (image overlay) of Presidente Prudente city (SBDN - City Pres. Prudente), with a few Rus_Scenery buildings added in there to make the area more of an impact in the urban areas. The images are very tightly packed in to give you great detail, but the ortho imagery square is highly defined in the scenery, the airport scenery (arrowed) is in the top of the picture. This approach depends on if you like this sort of graphic scenery? For me it was a no to the idea, not just because I don't like this sort of panel layering, but the main reason was the tightly grouped high quality images totally destroyed my framerate? So you would need a good machine to run all this scenery together. Which is quite weird in an area that is so empty? Details on how to download the ortho scenery and the updated Brazilian OSM can be found in "Installation" below. It would have been an interesting exercise if the green portions of the ortho scenery was removed and only the brick urban textures where left in, so the urban areas blended in better than the hard square effect and you would have had a more interesting and natural version of the city. Images shown here are a compromise of the "Brasil OSM 25-02" download, and the "SBDN - City Pres. Prudente" scenery but with the ortho images removed, but the buildings left in the scenery. This was done to recover my frame-rate. There are no ILS aids at SBDN so only a manual visual (VFR) approach is required. I was to land on RWY12 and from the west, and with that I passed the airport at 4000ft (note the elevation at SBDN is 1403ft ASL, so make allowances for that as my real height was in fact approx 2300ft). The airport is very well blended into surrounding scenery so it is difficult to spot, You do have a VOR (PRR -113.50) and a NDB (225 PRR) to guide you but it is still tricky as the wide taxiway to the right can make the airport look like it has two runways and not just the main one on the left when landing from the west. Overflying the scenery you do get from some angles a jagged effect of where it blends into the surrounding default textures, It is not too bad and only really noticeable from a slight distance and it doesn't really damage the visual effect. There are some good OSM scenery around the airport and on the left of the runway on approach. This OSM scenery is not there unless you have the Brazilian data installed. The main runway 12/30 is long at nearly 7000ft (6937ft) so if you are landing from the west, then you will be placed closer on landing to the terminal area which is situated on the far eastern boundary, that means then the RWY30 approach or takeoff will require a long taxi from the terminal area to the start of RWY30. Long lines of sweeps of grass cover the airport grass areas and it is an excellent effect and you feel the need to get the mower out and cut it down a little, the runway and taxiway textures are also excellent and are reproduced according to the Brazilian asphalt specifications (or look), and this creates a very well reproduced tarmac effect. The only issue is the outer runway white lineage tends to roll out in front of you and disappear again behind you (arrowed) and you tend to focus on this rolling out of movement in front of you when landing? Overall the lineage and markings are excellent. The main terminal ramp is central to two GA ramps of which the first one which is more to the east is the larger area. It is full of GA aircraft not only on the ramp, but you have full hangars as well, the areas are well fitted out with static aircraft including a GOL Boeing 737 in a turnaround service. There are plenty of people figures, ramp cargo and equipment, and so visually it is an excellent entrance to the airport and the central ramps area. On gate turn in there is a marshaller waiting for you, but he won't flap his arms or show you were to stop. Animations are first rate with all sorts of vehicles going about there business including a tractor... Twice a day the runway is inspected by an official car at 10am and 8pm local time, so watch your arrival point. There are walking people around the airport and quite a lot of them. The animation is good, but they seem to move more like the "Walking Dead" than the more fluid designs that Butnaru has mastered... So you feel a Zombie alert coming on. Airport 11/29 2,100 (6,890ft) Asphalt Elevation AMSL 450 m / 1,477 ft Presidente Prudente State Airport codes are IATA: PPB, ICAO: SBDN, and he airport is located 5 km (3 mi) south from downtown Presidente Prudente in Southern Brazil. From above the design of SBDN is very good, and as noted it blends in very well, and that makes it highly realistic on the ground. The intimate ground feeling is great, as the airport looks very good from the runways and the ramps. The central terminal and attached control tower are excellent... first rate and both are modeled and designed very well. Excellent detail and with moving flags. The control tower is also perfect but has a floating animated observer that hovers in mid-air above the railings? But overall airside is first rate. Arrival side is very complex and very well laid out. I'm not crazy about the average trees and shrubbery as they feel very sort of a decade old and are usually in converted FS scenery from 2004. There is better foliage available today in X-Plane than this, ditto the signs which are very jaggy and average in design, both which spoil a good well laid out layout with those excellent shaped sails over the carpark and central Shell service station. Standard OSM Brazilian OSM Differences with the OSM is significant with the Brazilian data installed. The standard is version is quite out of whack with the layout, were as the new data makes it work perfectly. The Brazilan OSM does make a difference. Other good buildings are buried within the cardboard trees, and it all feels a little FS in taste and look, but it is still very good in context. There are some excellent hangars on the east side of the ramp and mostly for GA and private jet parking, one huge box like hangar is closed but most are open with statics inside. Note the helicopter that is animated, I usually don't like these hovering items as they become a visual distraction, but this helicopter works because it takes off, and then actually flies away and does a wide circuit of the scenery before coming back... so here it works quite well. One static aircraft here also has a spinning prop? Western ramp area has two large well designed hangars in one for the Brazilian Aeroclube, and one called Hangar Nil which has a great poster on the wall. Down the taxiway is a fire station that has again a bit of FS handiwork, but is also very good. Lighting The lighting overall is excellent on the scenery. Runway and taxiway lighting is very good, but little directional signage, but the airport is easy to get around any way. There is plenty of different lighting designs for different areas so the whole visual look is very good. Ramps are very well lit with a long throw and the ramp lighting poles are excellent. Down and spot lighting has been used to great effect here and the Shell service station is the stand out in the carparking areas and the tennis pitch and (what I think is a swimming pool?) is great as well visually. The control tower has a green tint, but it works again in a strange way. Services Not much out here as you would expect, but you can certainly set up a route structure with other Brazilian destinations. Azul Brazilian Airlines - Campinas, Londrina, Maringá, Porto Seguro, Recife Gol Airlines - São Paulo-Congonhas Summary Overall SBDN - Presidente Prudente Airport by Richard Nunes is interesting but requires a little bit of setting up to get the very best out of it, as noted it is good scenery and a worthwhile investment at this sub-US$10 cost... any higher than that my guess is it would not be worth the price-point. Not because of the actual scenery but because of the position. But that does not say that South America is not a great place to fly... In fact the opposite is true as the continent is well under-represented in most simulator flying and I found when I was last down here (Brazilian Grand Prix) I found it a really great area to explore, so the continent certainly deserves far more attention. As scenery I liked it a lot, with just a few old FS (Flight Simulator) ism's that we have moved well on from now, but the grass textures are very well done and realistic. Buildings and design is very good, but I am in two minds if there is too much animation, but I would come down on the point that SBDN is just this side of gimmicky and that includes the zombi ground staff. Lighting is excellent, but if you like the big jets you don't have the landing nav-aids to help you out, on the other hand it is good for heavy VFR landings. Certainly SBDN - Presidente Prudente Airport is a great addition to your X-Plane network and good value as well... SBDN - Presidente Prudente Airport by Richard G Nunes is now available from the New X-Plane.Org Store here : SBDN- Presidente Prudente Airport and is priced at only US$9.95 Installation : Download is 122.90mb that is unzipped in to 373.60 into your Custom Scenery folder. the GroundTraffic plugin from Marginal for the airport traffic animations is built into the scenery, but you need X-Plane10 for it to work. You need to download the Brasil OSM 25-02.rar from "http://www.4shared.com/rar/WUBt05dmce/Brasil_OSM_25-02.html" and install it in your "Custom Scenery" Folder. (I recommend to put zzz_ before the file to make sure it lists correctly in the ini) it is a 228.30mb download - and you will need to join 4Share to get the actual download or suffer a lot of bad media player downloads. Second download is the same 4Share site for SBDN - City Pres. Prudente" ortho scenery. "http://www.4shared.com/rar/XSrT4qG8ce/SBDN_-_City_Pres_Prudente__Fre.html" which is another 190.20mb download which is also placed in the "Custom Scenery" Folder, but note it is very frame-rate heavy... I deleted the ortho images in WED which is quite easy to do. Both VOR (PRR -113.50) and a NDB (225 PRR) Nav-Aids positions for SBDN are incorrect in X-Plane, and Richard has provided the correct position data to be corrected by the "edit" on the local map. Documents There are two manuals in in English and Portuguese and you need to read them for the above installation information. There is one airport chart and one SID departure chart, and three arrival charts provided. Features: Accurate replica of the real SBDN fully rendered with ambient occlusion. Runways and taxiways modeled according to the Brazilian asphalt. Many Animated objects, vehicles, people, aircraft Many statics objects and aircraft. 3D grass based of the type of the Royal Airport lawn. Land meshes published in the Airport area with elevations of the runway 12/30. Many custom and high-definition 3D objects Day and night lightning- HDR effects. Orthophoto of the airport area Just like in real life, the runway is inspected by an official car twice per day: 10am and 8pm Requirements: X-Plane 10.30+ Windows, Mac or Linux 1Gb+ to 2gb VRAM Video Card which is recommended with the ortho textures. Review by Stephen Dutton 25th March 2015 Copyright©2015: X-Plane Reviews Review System Specifications: Computer System: - 2.66 Ghz Intel Core i5 iMac 27” - 9 Gb 1067 Mhz DDR3 - ATI Radeon HD 6970M 2048 mb - Seagate 256gb SSD Software: - Mac OS Yosemite 10.10.1 - X-Plane 10 Global ver 10.35 (final) Addons - Saitek x52 Pro system Joystick and Throttle - Bose - Soundlink Mini Aircraft - ATR 72-500 Aerosoft (X-Plane.OrgStore) US$32.05 Scenery - SBGR - São Paulo - Guarulhos International Airport - v. 1.1 by junky (X-Plane.org) Free
-
Aircraft Review : Airbus A320 VC package by Peters Aircraft
Stephen replied to Stephen's topic in Airliners Reviews
Yes of course, but I would have the approach frequencies already set in there ready as the time setting them up might just make you a little short... A trick I use is to set the opposite runway ILS and fly in the circuit past and turn 180 degrees back to land on that runway? These big jets are fast and you need the time to set and slow the speed, sort the flaps and even the altitude. Arm the air brakes, ping the passengers, and set the auto brakes, it is a lot to do in 10nm and you rarely can get through the list, so try the trick to get you more time and even more distance to make a better landing. SD -
Behind the screen : Thoughts and Computers X-Plane 2015 X-Plane Reviews does reviews, but we are usually focused on the review and the details that are important to that aircraft, scenery or add-on that is important for your information and getting the best out of the simulator. But "behind the screen" is what we are journeying through the year and what we like flying or and more personal views of what we are enjoying ourselves with or not. So every now and then these posts will pop up for a different view or angle on how the year is going from our point of view in X-Plane. Yes it is almost Easter 2015 and another holiday period is almost here, Already three months of 2015 have almost gone by and it has been hectic in busy, busy... busy. X-Plane is now almost a constant flurry of activity, mostly you expect a lot of activity in certain periods of the year but the simulator has outgrown that size and you are now usually looking straight at deadline after deadline. Don't get me wrong I love the constant movement and the experience of something very new and something different every week and thankfully you are not wanting to find anything to post. The quality of the reviews are simply spellbinding today. When you think it could not get any better than that, it does and you are left more open-jawed than ever. But these aircraft and many sceneries are simply now very complex. A quick review is just not possible anymore, as the systems and feature list grows year after year. You also want to include every aspect of the aircraft or scenery but that is now simply impossible, so the angle is to find the features and show you how to get the very best out of the aircraft or scenery. My usual philosophy is "I love it...." and I want you to love it as much as I do. Nothing is perfect, in fact some of the most imperfect aircraft or sceneries are what endear us the most. But it is hard to escape how very good X-Plane as a simulator is today, not perfect but very good. Computer trials I wanted to write a post like this for awhile, mostly to pass on some information of my experiences with my computer. I run a 27" iMac, a late 2009 or if you are a Apple geek 11.1 version. It was the very first 27" iMacs and is known as the "Unibody iMac" and it is a brilliant machine and I have had a few Macs, I even still have an original 128K Mac, yes the very first "insanely great" computer... Does it still work? "Absolutely no idea" but it is there in the other room... waiting to blow up again? (they had very weak and very expensive power boards). The current iMac was fine up until very late 2013. It had a ATI Radeon HD 4850 with 512 MB of GDDR3 SDRAM graphic chip, but as update after update of X-Plane came out I hit the line and then was under it. It still ran X-Plane quite well in most conditions but it just started to feel the pressure, and the frame-rate was going now south as each upgrade lifted the game. So you get squeezed on both sides? On the simulator side it is mostly textures and heavier HD scenery meshes. and on the other side are the more complex aircraft with again HD textures and systems. The 512mb in graphic capability soon reached its limits. You can get very creative in getting your computer to run what you want it to do (but it comes at a cost as you will see), but HDR rendering and any weather is off the fun list. But my first bit of advice is any graphic chip under 1gb, just does not cut it anymore in X-Plane, it is just that simple. As the 2014 wore on I became more and more compromised, I was faced with a real need to update the Mac, but my car needs a new clutch as well and both are expensive as each other as they are both an important need to life. Loans and depreciation where computers are concerned don't go well together. After years of losing huge amounts of money I won't buy a computer unless it is for cash, even buying new is throwing money away by the buckets full. As a note I bought the current iMac for almost half its purchase price (AUS$1200) at only six months old? What is different about it... nothing. But no doubt that I was now seeing a problem. To upgrade I would have to sell my current machine and still add $1500 to get a performer that could do the job. But events changed all that.... In early December 2014 I saw very odd things happening on the screen when doing a post? small at first but still very noticeable... then it blew. The graphic chip went south just a few days before Christmas and the computer was useless? No doubt I had rendered the chip one poor frame-rate push too far to get some HDR shots for a review. Now I had to upgrade, so I had no choices anymore. Problem was the broken computer was worth absolutely nothing broken except for parts? so I couldn't sell it to upgrade, it was worthless? So I had to fix it first? I found a great repair service centre that repaired Mac's and a new 512mb chip was going to cost me AUS$296 in real terms... but that means I would be right back were I was in the first place? I looked at my versions specs and realised it would accept a AMD Radeon HD 6970M with 2 Gb GDDR5 SDRAM... 2gb, cost was only AUS$200 more than the 512mb? Problem is they are really scarce, almost impossible to source, worse at a Christmas/New Year holiday time. But early in the new year the repair guys found me one, and in it went... Another brave thought was to upgrade to a SSD drive (256mb) to run solely X-Plane. And Mavericks was out and Yosemite was in as well. Well not quite? The setup was that the old 1tb storage drive was left in there and the SSD drive replaced the annoying optical drive that wouldn't eject the disks again when after they first went in. I decided against doing a fusion drive on the basis of cost to put the SSD drive and the slower 1tb drive together, but mostly I wanted X-Plane to completely only access the SSD drive for speed and virtual memory (yes I know they can fail! but I do have everything backed up). So here was the completed deal... upgraded to a 2gb Graphic chip, SSD drive and Yosemite 10.10.2. I also have Mavericks on there if I want to change OS systems over so my old desktop is still in there as a completed form. I later added in another 4gb of memory to my already 6gb of memory (but it works out to 9gb as I had to take out the 1gb to install the the 4gb) and another 3gb will go in soon as well (another item impossible to source here at the moment?) I can use a total of 16gb. The point of all this article is to note how you can update your Mac without A... throwing out an already good computer and B... what performance you can get out of it for the most minimum cost. The main interesting thing that guys in the repair shop explained, was that when you reached your maximum limit on your (in my case) 512mb graphic chip the extra performance required is then sent over to the main processors (I'm not going to get into deep discussions about internal buses and computer data allocations) but this effect doubles down your performance two fold so the limit then becomes a wall, so you get a double whammy of pain. It was important to get both the faster 2gb chip, but also the SSD drive. One or the other would have a big benefit, but both together they both have a huge benefit and lift in performance. So what was the results. Fast, in fact extremely fast performance and a lot of headroom for X-Plane to work well beyond anything I could run before. It has also taken a fair while to find that tuning sweet spot that I can call my base line in X-Plane settings, two months on and I still think I can fine tune it even more yet. From the first day of restarting the upgraded machine it does not feel or perform anything like the same computer I had a few months ago. It feels fresh and very fast. I go into my local Apple store and check out the new macs, (not the retina) and I can't tell the difference? certainly the new machines are better, but this is now over a five year old machine and It feels brand new and not very much different than a new one? Startup is impossibly quick and in seconds, around just under a minute and not the long minutes that Mavericks takes (It starts up still on the old 1tb drive). And so to X-Plane. X-Plane startup is certainly quicker but not "Quick, quick..." so a slight disappointment there, so the X-Plane startup process is still very slow, even with a SSD drive. But changes once X-Plane is loaded and it is significantly faster. I have the livery selection set on my joystick keys to (Saitek X52) in that I can flip through liveries very quickly (up or down) and this can be set by a X-plane key setting "load previous livery"/"load next livery". The selection is extremely fast now (depending on livery file size) but you can see the speed in performance. X-Plane tile load speed from the SSD drive is excellent, and the bump (or stall) that you got when the computer went to load in the next set of tiles has disappeared. File loading in aircraft and scenery is certainly faster, again depending on file size, a huge 2gb of scenery is still going to take time to load? But the real important difference and the aspect that surprised me the most was the extra size of the graphic chip had on the simulator. No doubt every user wants the biggest graphic chip they can buy in their machine, but a really large chip does not translate to more speed? Apple's are very hard to upgrade as well, almost impossible. but the important bit is that if the graphic chip does take more of the load then your main processors are far more effective. When you have a bigger sized graphic chip you get what I call is the "absorption" factor. I got very good in tuning my computer to accept the best compromise between speed and visual capability. I want the most eye candy and goodies running that I can have within that 25 frame to 19 frame line. But the compromises with the 512mb limitations were far higher than I expected. HDR running was very rare, clouds were not usually an option either, texture resolution was usually set in the "high" setting and rarely above that, in reality the simulator was running at a very basic level... Worse was any aircraft (mostly payware) that was on the limit or over that 512mb limitation. You can get around it, but not effectively. Peter's Aircraft A320 Series was a great example. In no form could I run this aircraft (with the installed 3d cockpit) except with a return of 6-8 frames, from my point of view it was totally unflyable... and frustrating. It also made the aircraft look like it was a far more frame-rate hungry than what it actually was, so sadly for Peter Hager, I couldn't give him a fair and objective review so I didn't. With the upgrade to the 2gb graphic chip, things changed dramatically. Your going to say "well of course it will with a bigger chip in there" but they changed in a way I didn't expect? We will go back to that "absorption" factor because it is important. My actual graphic usage didn't really skyrocket like I expected it to? I very rarely now go over 1gb in memory or usage and the average is usually only 500mb? I expected with a heavy scenery and a heavy aircraft file to use 1.5gb or more and even the whole 2gb, but I rarely go over the 1gb zone? It is nice to have the headroom, but I rarely use it. The strange issue is Peter's A320 series in that it does not absorb that much more in actual mb, but it now flies well within the capabilities of X-Plane and the 3d cockpit is more than easily usable... If the A320 had used say 1.7gb in graphic memory then I could go "ahhh ha!" there you go. but it doesn't go anywhere near that and is only around that 500mb of usage, that is actually under the 512mb limitation of before, so you work that out... I can only put it down to the "absorption" factor or how much graphic work in 512mb guise was pushed over to the main processors? And that maybe the key, with a larger graphic chip you are keeping all the graphic work just in one area making the system more efficient or X-Plane can use my four cores to their full potential. Carenado KingAirs (all of them) were also another strange fish? They flew very well, but once you turned on the overhead panel lighting my frame-rate was reduced to dust? Every KingAir did that and the 1900D was simply impossible to fly? but now there is no effect from any lighting effects at all... and the graphic limit is well under or around 1gb of usage? In fact no aircraft I review or use is now effected by the graphic memory limitations, and very rarely goes over 1gb and the highest I have seen is usage of 1.2 gb of memory? (I will note I have not yet used any HD scenery, so that is not part of this assessment) The biggest surprise is more of that "absorption" into the graphic chip. I can easily run HDR, and night flying is now a joy and not a pain. Trees can be on (another no no before) and clouds are also on all the time now, but still major limits with the very dark compressed clouds that still send my frame-rate south, no doubt is that clouds still need far more refinement and work from Laminar Research and are still really the biggest frame-rate killer in the simulator. So the end result was that I found that the graphic chip absorbed far more than I expected, and my headroom is now very good... Any disappointments? Large scenery loads even with a lot more memory installed seems to have a slightly larger hit on frame-rate, so that strangely has gone the other way? and I can't seem to adjust that out either by my usual texture resolution settings? And my jaggies are worse even with the anti-aliasing right up at the maximum setting? But the benefits are huge, huge gains and a very efficient computer by its old standards. So the point is you don't need to spend a lot of money to upgrade a Mac. Check your specifications to see if it will take a larger graphic graphic chip, but still a 1gb size will get you out of trouble. The SSD drive is a significant investment, I'm going to go up to a 500mb as soon as I have saved up for one. Another item that needs to be changed is the Mac fan control smcFanControl is great to get maximum performance, these aluminum backs can get seriously hot and ruin your innards. I recommend to use different settings for different work which you can set, full on is best for any X-Plane running, but a 70% setting will save your fans when not. Apple Mac's or Apple laptops with X-Plane are always going to be a compromise. A new Apple is very nice, but Apple products are expensive. I was in a difficult situation, but the upgrade gave me a few more years of headroom and it has certainly given me a far better simulator experience... for a lot less money. Flying With the added capabilities of the remaxed out computer any aircraft is now my oyster. The one I have spent the most time flying between and sometimes as part of a review is Peter's Aircraft A320 Series. There is a a few areas that the JARDesign A320neo is actually better, okay many areas... but the PA A320 is very easy to set up and fly unlike the JARDesign version and the Airbus flight laws are better in the simulation as well. I still haven't moved on from it and that is a sign of a good investment. The Airliner Update Review: Boeing 757 Professional "Extended" Series v1.2 by VMAX was upgraded with the -300 version. And I spent a lot of hours on the aircraft. You can't get pass this aircraft as a simulation, but you do have to go the whole way in full flight planning and following every procedure by the letter... It will be great if Laminar Research do get the ATC system more workable to add that extra layer on top an already heavy cockpit workload, but as an experience it is certainly top notch. On The Ground Most of early 2015 has been dominated by 10.30 updates and there was a few updates to get through (losing the computer for 4 weeks didn't help either), but otherwise there was a lot of really excellent scenery to bed in and enjoy. Airport Review : EGHI - Southampton 1.2 by Pilot Plus by Pilot-Plus was the first but late to review, but worth the effort. EGHI is a first release by Pilot-Plus is a great entrance to the complex world of scenery design. EGGD-Bristol is coming next and I can't wait to land there. But I found myself really getting a lot of use out of airports that I wouldn't really use and a little off the well worn routes. Airport Review : LYBE - Belgrade “Nikola Tesla” Airport v1 by MB Sceneries is far better than it looks but you need to fix the over-bright textures of which I did. But once done I really love the destination and it has been on rotation more than most and in-out night-flying here is excellent (From Italy, Munich or Vienna). Scenery Review : LEVC - Valencia Manises by DAI-Media is another gem that I use constantly and love the animations and now animated boarding gates (LEVC has been updated here... LEVC - Valecia update 2015 ), but this airport has been on my routes since I installed it in Jan 2014... a great investment. Moscow UUEE was released late 2014, but I didn't get around to getting it sorted and actually working till just a few weeks ago. Airport Review : UUEE Sheremetyevo Airport XP by Drzewiecki Design surprised me on how good it really is for a FS crossover. To me if a scenery beckons you back and even keeps you up very late for a few hours filling in static aircraft then it must have something good going on. I fixed the over-saturated night textures and put a few extra gate equipment items to fill it out. Drzewiecki Design have noted that they are going to do an upgrade to UUEE and even add in some winter textures for the coming 10.40 seasons feature. But if I thought that planning routes through Moscow was high on my list a year ago it was a bit of a stretch then it shows how much I like and use this Russian scenery. Well worth the investment. Butnaru released his KATL ( Airport Review : KATL - Hartsfield–Jackson Atlanta Intl Airport by Butnaru) and it didn't disappoint... I had a few issues with the Gateway "Global Airports" popping up regularly that drove me daft (LEVC was another victim) and here it really screwed up the review... and ruined a day's flying fixing. But over all I was very impressed with KATL and was still there while doing the FF/VMAX Boeing 757 update. Butnaru does do great sceneries, but he is a little sparse on the details outer fringes to make his work exceptional. The walking animations however and certainly at KATL are simple excellent... I found myself fixing a lot of payware ortho scenery to match the surrounding default X-Plane textures... I complained loudly a lot about it as well. In most cases the designers are simply lazy in matching these textures up, and photoshop users can auto-mate actions that can wizz through them in minutes... but why should you have to do them at all? Just plain lazy... Rose tinted glasses It has become simply unbearable to click onto "Rotate" site to look at his MD-80. I just can't go there anymore... painful.. "agghhh". Over the years for some reason the DC-9/MD series has become my real favorite aircraft (The Vickers VC10 is my overall love, but what chance of that as a payware?... zero) anyway the DC-9/MD has become an obsession. I have flown a lot on the aircraft over the decades and is saving up to go on a Qantas B717 (A sort of modern relation) that still route around Australia. But to fly one? We have that unfinished XPFP MD-82 beta. But a full design of the aircraft is a gut buster. Watch a few MD-80 series cockpit YouTube's and tell me you don't want this aircraft... if you don't you are lying. "oh the pain...." Finally signs the IXEG Boeing 737 Classic might actually land on your runway this year, it is as good as it looks (no I haven't actually flown it yet) but how long can a beta program go? And JARDesigns A330 in final beta as well, and PMDG... well they are finally coming soon as well... The second quarter of 2015 is going to be a blockbuster if you need to start saving now. Carenado have released their PC-12 and it looks great... So keep an eye out for the review that is coming soon. Stephen Dutton 21st March 2015 Copyright©2015: X-Plane Reviews
-
Aircraft Release - Pilatus PC-12 by Carenado Carenado have released their next aircraft for X-Plane in the Pilatus PC-12. There was some rumors going around that the aircraft has a few new interesting features? And the rumors have proved correct in how about a "StickShaker and Pusher", I don't think that feature has been in X-Plane before? A new and improved multi-function scroll support and two Garmin GNS530 GPS's to feast over. Special Features: Original PC12 Electronic flight instrument system (EFIS) Working stick shaker and pusher installed New and improved multi-function scroll support Volumetric side view prop effect. Two default X-Plane GNS530 GPS. Features Original EFIS with EADI and EHSI installed Two GNS530 installed Original autopilot installed HD quality textures (4096 x 4096) 350 pixels / meter textures Smooth animation button logic with custom audio 3D gauges Original HQ digital stereo sounds recorded directly from the real aircraft 3D stereo effects, such as outside sounds entering open windows. Customizable panel for controlling window transparency, instrument reflections and static elements such as wheel chocks and turbine inlet/exhaust covers. Realistic behavior compared to the real airplane. Realistic weight and balance. Tested by real pilots. Realistic 3D night lights effects on panel and cockpit. Individual passenger 3D reading lights and numerous HDR lighting effects. Dynamic loading/unloading of 3D parts and plugin logic for FPS optimization. Ice and Rain effect Features are impressive, and the aircraft looks the part. Technical Requirements Windows XP - Vista - 7 (32 or 64 bits) or MAC OS 10.8 (or higher) or Linux X-Plane10.30 (or higher) 2.5 GHz processor - 8GB RAM - 1GB VRAM 570MB available hard disk space Price of the PC12 HD Series is US$34.95 Developer site : Carenado Stephen Dutton 20th March 2015 Copyright©2015 : X-Plane Reviews All images are courtesy of Carenado
-
Aircraft Review : Airbus A350 XWB Advanced by FlightFactor
Stephen replied to Stephen's topic in Airliners Reviews
The reverse thrust system has been changed on X-Plane... you now have to just open the REV doors, and then put the throttle up. I have a key (or in my case the joystick trigger) set to the key "reverse thrust toggle" and that will open the doors for you and click it again after you bring the throttle back to idle then to close the doors again. Note this system does not work on reverse thrust on prop aircraft? SD -
Airliner Update Review: Boeing 757 Professional "Extended" Series v1.2 by VMAX FlightFactor/VMAX have released and updated their Boeing 757 Professional Series to version 1.2. And with this update the Boeing 757 series changes into the same packaging as the FF/VMAX Boeing 777 Series in having the basic "Professional" pack of the B757-200 series, and the new "Extended" package of all three types packaged together which includes three aircraft in the -200, -200SF (cargo) which come with both engine choices of Rolls Royce Engines - RB211-535E4 or the Pratt and Whitney Engines - PW2037 and also now included is the new long stretch version of the Boeing 757-300 which is RR powered. The "Expansion" pack of the -200SF cargo version has now been deleted and is only available in the "Extended" package. If you already own the standard package you can simply get an upgrade code (send an email to [email protected] here) of US$20 for the three variants, just like with the B777 "Extended" Pack. If already have both the Pro and the SP cargo packs then the upgrade code is only US$10 to the full "Extended" package. (Extended Package) The highlight of this release is certainly the 757-300... So is this the best Boeing 757 variant yet? To find out I flew the -300 variant from KATL (Atlanta) to KLAX (Los Angeles) in a 5h 20min flight of Delta service. First view of the -300 version is how looooong it really is? The aircraft is a full 23.4-foot (7.13 m) stretch of the standard 757-200 and at 178.7 feet (54.5 m) the type is the longest single-aisle twinjet ever built. It has a higher MTOW of 272,500 pounds (124,000 kg) is specified and the fuel capacity remains unchanged; as a result the -300 stretched variant offers a maximum range of 3,395 nautical miles (6,290 km). If you select an old -200 livery you can see the plugs in the airframe. Boeing thought it was on to a good thing in stretching an already popular -200 version, but Boeing had targeted the 757-300 as a potential 767-200 replacement for two of its largest customers, American Airlines and United Airlines, but neither were in a financial position to commit to new aircraft. So only 55 aircraft were ever built. The first 757-300 was rolled out on May 31, 1998, and completed its maiden flight on August 2, 1998. Following the regulatory certification in January 1999, the type entered service with Condor on March 19, 1999. The 757-300 has been operated by mainline carriers Continental Airlines (now part of United Airlines), Northwest Airlines (now part of Delta Air Lines), and Icelandair; other operators have included American Trans Air (the first North American operator), Arkia Israel Airlines, along with charter carriers Condor and Thomas Cook Airlines. All the original production aircraft are still in service in as of July 2014. I personally like the look of this long and thin version. The Boeing 757 has always been a slightly odd looking aircraft anyway, in being tall but thin against its mortal twin the Boeing 767 twin aisle version. The -300 version make the Boeing 757 more of a statement and say "hey brother, I can play your big games as well" The aircraft is become very hard to replace as well, as until the recent release of the Airbus 321LR (Long Range) NEO option it has been unrivaled in many single-aisle markets and very popular on the North Atlantic routes. FlightFactor/VMAX Boeing B757 version 1.2 This update as noted includes the new variant the -300. The update log (listed at the bottom of the post) is actually quite small? just really a nip and tuck here and there. Any highlighted changes I will note in the update review as we head to KLAX. Two things to note, in that the aircraft after loading takes a fair while to orient itself and get all the functions of the systems up to running order, so you have to be patient and wait for it to finish what it is doing. Another note is that it doesn't like to be moved via the location map or airport gate position. you find the plugin will mis-behave if you do, a clean runway start and a long and boring taxi ride to the gate you want to use is more favourable than the issues that keep cropping up if you move the B757 around quickly. The "office" is still warm as the aircraft has just arrived from San Francisco, and we are the new crew heading back to LAX, so we don't have to completely restart the aircraft from cold. Looking into the cockpit, you can't go past the detailing of this B757 Series from FF/VMAX. It is simply jawdropping in complexity and design, this notes that these high standard aircraft do require either (a) a few hours in X-Plane on heavy aircraft and the need to know at least the basics on how these complex machines fly, a novice would get through, but be aware these aircraft are a very deep immersion simulations, and this B757 Series is very deep indeed. (b ) they need patience and even a bit of homework in the manuals to get the very best out of the simulation, and you have to prepare this aircraft in charts and tables and routing to fly it. Which means an hour on ground before you actually fly if you are not prepared. The CDU (Control and Display Unit) pops out for ease of use for programming, but if you have an iPad (which i do) then this is supported as well, and this is one of the best features on the aircraft and for ease of use in setting out those SID/STAR bookends with the route. The dual and completely separate for the captain and first officer positions CDU's are positioned high on the pedestal, but can be sometimes hard to read in strong daylight. To highlight this is the FMC (Flight Management Computer) in that it is a complete reproduction of the real 757 FMC? no default X-Plane flightplans can be used in here. You have to program the system yourself (you can thankfully "save" the completed flightplan), but still you have to program in your departure and arrival preferences, weights, fuel and GPS position. In v1.2 the 757 will now also load the navdata from the Custom Data/GNS430/navdata/ folder of X-Plane. So by installing usual the navdata update for X-Plane, you automatically now have the latest data available in the 757 FMC. The menu's under the X-Plane/Plugin menus are highly extensive (and have been covered in the original B757 review) But here we will highlight the loading of the aircraft with fuel and passengers, note you need the "fuel truck' and "bus" ticked to allow the loading menu to work but you can now change the external fuel before actual engine start which you couldn't do before. It takes time as well to go about its business (this process has been refined even more), and cleverly also up dates the FMC with the correct fuel load and aircraft weight parameters. The cabin announcements are a menu highlight as well, you can enjoy the ramblings going on the background and even through there are already lists of announcements you want even more to press, it is a bit of a lot of mouse movement to get them every-time from the X-Plane menu... you want a slightly simpler way of just clicking the next one? The cabin requests still keep on donging all the time on the overhead, you either like or hate this feature. But like me you should listen to the requests and comply and they will soon go away. There is a new feature in being able to use the "scroll" wheel function in v1.2 with three options in... mouse wheel, - click and + click, if you don't have a wheel mouse like me you can turn it off on the menu. Another 1.2 feature is a "Throttle block" which is request for users that have large complex surround multi-screen cockpits and added throttle protection for "autothrottle disengagment". Around the aircraft the menu supplies a lot of ground equipment and support for getting the aircraft ready for flight, all the doors open but the lower cargo ones are fixed shut. Which is shame as it is the only negative in the ground turnaround system. Aircraft loaded and clearance given, it is time to start the engines. You can use the on board APU (Auxiliary Power Unit) that makes great sounds when running or in my case use both the GPU (Ground Power Unit) and Starter Unit. Also on the menu is a really good pushback truck that you not only control the speed (forward in pull and pushback) but also can manoeuvre and steer the aircraft directly to where you want it... perfect. There was a bug with the tow-tractor that created a double version, but that has been fixed in v1.2. The immersion of the simulation with the Boeing 757 is total in most aspects. You are really in there in every aspect of getting the aircraft ready and then delivering it to the runway. The FF/VMAX Boeing 757 Series has had many accolades and you can't deny it with its place as one of the very best simulations in X-Plane. The level of immersion now is totally overwhelming, and select the right scenery to go with the aircraft and you can't deny yourself this experience if you love flying aircraft or dreamed about wanting to be the pilot in the front of the aircraft... its here if you want it and are willing to involve yourself in the complexity of the simulation. The -300 version feels different, certainly with nearly a full passenger load and tanked up fuel tanks. It is quite heavy (256,000lbs) and you need a fair bit of power to get the aircraft moving, it is long as well. You have to be very aware of how well far back from you that tail and central bogie gear really is, and to make the large allowances when turning around the taxiways, if you treat the -300 like the -200 version you will "come a right cropper". Departure is via RNAV SID "JOGOR FOUR", And as I am departing by KATL runway 9L I take the southern route towards "GRITZ", then via HYZMN, ZALLE to JOGOR, If you depart via the northern 8L and 8R you have to take the northern departure route to JOGOR and the SID ends at "GUNDE", departure is strictly 10,000ft and 250knts. Rotate is at v2 +15 and a positive climb of 10º is soon slightly a more lower pitch 7º when I switch on the AP (Autopilot). The FMC requires you use 15º flap for takeoff, which is fine but comes with a lot of drag once in the air, so you need to retract you flaps and gain speed as soon as you can. The power of this aircraft is there and it will climb easily at 3000fpm, but keep the B757 a more shallower ptich. A small warning is again that on -300 long tail... at rotation we don't want a long nasty scratch along the underside of the rear fuselage which is very easy to do, if you are a little heavy on the pull-back on the yoke. I really like the target vertical speed marker, it allows you to set your altitude to the correct point in the flightplan (just before a bank or waypoint) it is great for the correct positioning the aircraft during the climb. In most cases the FMC is doing all the work, but you are still quite busy adjusting the correct vertical speed to adjust the overall speed of the aircraft. You get a better perspective of the aircraft in the air. You would think it would look too long and too thin like the DC-8 Super 60 series, but actually it looks very nice, to me even better than the -200 version. The B757 is known for its super powerful lifting speed and powerful it feel. You ned to use that power as if you keep the speed too low and not get up there towards the max cruising speed the aircraft will fly at 5º pitch which is quite an uncomfortable angle, with a .80 mach you can reduce that to about 2º. And I was never really comfortable with that cruising profile. With the sharper light at being at altitude you had to admire the quality of the cockpit design, it is entirely realistic. There was a few noticeable 3D holes in the cockpit? but they have been addressed in v1.2. Internal detailing is superb, you can almost see every flock if wool on the sheepskin seat covers, and in the back the cabin is long and you can see why airlines simply love this human cargo filling aircraft... The -300 is well used for charter flights and the "pack'em in" carriers as there is plenty of seating to go around for everyone. Views out of the windows are tinted, and those pesky window blinds can spoil your view... A trick I found gets around the X-Plane key views that only work in the cockpit. If you unlock the cockpit door (on the overhead panel) and just move your view outside the cockpit area it will then work if you press your (quicklook) set key to the window view you want... In an aircraft this long it is scrolling lifesaver. Quality of the FF/VMAX Boeing 757 is outstanding in X-Plane10. Tracking takes us over the lower states if the U.S.A with Texas sliding by under. You can follow your progress by using the excellent "Prog" page on the FMC, full details on the next waypoints and distance remaining to KLAX. I have tuned both left and right VOR's to KLAX (LAX - 113.60) and OCEANSIDE (OCN - 115.30) to see our distance and position. STAR arrival is by "Ocean Two" with the entrance point at VOR-JULIAN (JLI - 114.00), This is the southern approach into Los Angeles that brings you down to the Californian coast just north of San Diego. It is a more of a smoother descent approach which goes around the lower part of the series mountain chains that surround Los Angeles. You track over the Salton Sea, before descending to JULIAN. entrance height is 7000ft, but I had permission to go directly to "OCEANSIDE" at 6000ft. The track is 272º, but you feel you are going right out to sea. However you are not but just hugging the coastline, and soon Long Beach is off to your starboard side. At SHILY waypoint you do a hard left turn to put your position more out to sea for the approach, so you go left, right at DOYLE and right again at EXERT to the direct heading of Runway 07L at LAX. As the flaps go down to "Full" and once in the ILS beam I could set the landing speed at 175Knts. You can set the Airbrakes to "auto" by touching the top of the lever, but the B757 has a built in auto wing brake system anyway. Gear down and you get that wonderful rushing of air in the cockpit like you do on FF/VMAX's excellent Boeing 777 Series. KLAX's runways look a little confusing on approach, until a certain point I thought I was going land on a taxiway? But then 07L became more clearer. Over the fence and the touchdown was a good light touch, and once the front tyres touched it full reverse thrust. I have my REV thrust set out with a trigger on my joystick to open the engine doors, and then full throttle up for the thrust. Closing up is slightly harder? You have to make completely sure the throttle is completely back in the idle detent before re-triggering the doors to close... and this can take a few moments as the engine displays turn yellow before noting the green closed doors position. You have to get your low speed right because if you too close to your exit taxiway, you may put up the throttle too early and trigger another REV function, or slow to a complete stop because the slow closing REV thrust door process is not complete. There has been added now in the upgrade a throttle protection for autothrottle disengagement, but either way you have time it just right to get the re-applied power right to keep the process of the aircraft moving to the right speed you require on the side taxiway... FlightFactor/VMAX have done a bit of fine-tuning in the tire grip in cross wind taxi/takeoff/landing situations in v1.2, this also applies with improved course guidance in "autoland" with cross winds (before in certain conditions strange things happened in the final landing sequence), and in both cases here the aircraft seems more stable under the ILS and better for taxiing around the airports, you feel the weight just a little bit better when manoeuvring around airports, but note significant difference between a light aircraft and a very on the limit Gross Weight machine. The -300 version is quite more heavier than the -200 at high weights, and you feel that and it is significant in the taxi mode. After the intensity of the landing you can now relax and enjoy a few more cabin announcements? go on you know you really want to press that announcement again... Unlike Atlanta, LAX feels much more tighter with the longer -300, you feel like you are in a big heavy situation (A340, B747, B777) but you have to actually access areas that are set out for the smaller single-aisle aircraft (A320, B737) and the gates are certainly tighter. You taxi/turning skills have to be absolutely exact to get the right point to swing the aircraft around into the gate position, those rear bogies are a long way behind you and it is not very easy to get it right, but with a little practise it can be done... Okay you really need a lot of practise as it is very tight.. The default aircraft packages come with the standard four liveries per aircraft, and the -300 has the Boeing House, British Airways, Lufthansa and Air France. You can also for the -300 purchase sets of ten liveries in packages for US$10 per-package and they include... North American Livery Packs#1 and #2 - Europe Livery Packs#1, #2 and #3 - Middle East/Africa Pack - Russian Livery Pack. Obviously you can't show all the liveries here, but here is a good selection of what is available... Livery quality is excellent, standouts are the Delta I used for the upgrade review, Dutchbird, Icelandair, NWA-Northwest Airlines, Mexicana. There is a very nice new American Airlines livery but not the older version. If you have collected all of the liveries for all of the variants, then your livery folder will be bulging with just under 200 (192) liveries to choose from... that is a lot of choice. Summary The basics of the v1.2 upgrade is just a fine-tuning of the already well refined Boeing 757 package from FF/VMAX, just really a nip and tuck here. But the differences count where you need them. The FMC is already one of the very best in X-Plane, and a few small refinements have been done here as well in fixing the oscillating FMS-commanded speed in step climb, TFC indication to ND, enter PBD/PBPB waypoints on the RTE page, CTD fixes for blanks in "waypoint on legs" and "direct-to function" on legs pages. All small stuff but the FMC is the complete package, quality is evident in that when a "route" is completed and saved, it can be recalled as perfectly after it was saved as it was when you completed it the first time. The satisfaction of knowing that you can start up the aircraft and load in a flightplan perfectly, and just only then to set your "prefs" and you are ready to go is a huge timesaver and gives you back maximum enjoyment of the aircraft, Too many FMC's out there are still far to messy after reloading a fightplan and need as much time resetting them, that it is actually easier to just do the whole flightplan again from scratch... you don't get that here, you load, you set and you go! The Boeing 757-300 variant now included in the package is another highlight, and I love it far more than the -200 version. It makes the B757 a more exciting aircraft not only to look at but also to fly. This v1.2 upgrade also refines all the variants of the aircraft to the current X-Plane 10.30+ requirements. Any novice reading this update review could think they are totally out of their depth with this aircraft. There is no doubting the depth of systems and the skills required to fly this machine to its full capabilities. But any aircraft basics make them able to fly and that is still the case here, and their are quick start modes to get the aircraft ready to fly built in to get you around the complexity. Any negatives? very few, but I found the aircraft always a little too pitch up for me, It was hard to dial out that 4-5 degree pitch up out of the flying, lots of speed and being close to high mach numbers helps but it still was always there. And no opening cargo doors leaves you just one step away from perfect at the gate. Accolades are thrown about a lot of the FlightFactor/VMAX Boeing 757 Series as being the very best simulation in X-Plane it is also officially licensed by the Boeing © Corporation, and no doubt it is in the very top tier of quality and standards that come with these aircraft. Different aircraft can mean different things to many different users, so a complete outright winner is never going to happen in simulation. But now with the added bonus of the stretched -300 variant as part of the line up, it is now as formidable a package as ever and now so refined and complete, No doubt the Boeing 757 Series is excellent and even now the best in this category. The Boeing 757 Professional "Extended" Series v1.2 by VMAX package is now available from the New X-Plane.Org Store here : Boeing 757 Professional Extended and is priced at only US$79.95 Includes: Boeing 757-200 Boeing 757-200F Cargo version 757-200/200F with Rolls Royce Engines - RB211-535E4 757-200/200F with Pratt and Whitney Engines - PW2037 Boeing 757-300 757-300 with Rolls Royce Engines - RB211-535E4 The Boeing 757 Professional Series v1.2 by VMAX is available from the New X-Plane.Org Store here : Boeing 757 Professional and is priced at only US$59.95 (you can upgrade to the above "extended" package at any time for $20) Includes: Boeing 757-200 757-200/200F with Rolls Royce Engines - RB211-535E4 757-200/200F with Pratt and Whitney Engines - PW2037 For more information of this aircraft: The original release X-Plane Review's review of the For more information on the variant release FlightFactor/VMAX 757-200SF - Freighter: See here X-Plane Review's review of the Boeing 757 livery packages are available here: Boeing 757-200 and Boeing 757-300 and are priced at US$10 per package. Installation : Download for the "Extended" package is 560.20mb that is unzipped to 856.90mb to your X-Plane "Aircraft" Folder (full package with all liveries is a whopping 3.23gb!) A serial key activation is required for installation (I recommend a full desktop restart to reset the SASL plugin after key activation!) Note Important! it was found that window PC users require the Microsoft C++ Redistributable 2013 64bit update to be download and installed before activation. Developer Site: facebook Dev Thread : X-Plane.org Requirements: Important: Microsoft C++ Redistributable 2013 64bit is required! 64bit X-Plane 10 and OS are required. Windows Vista/7/8 64bit or Mac OSX 10.7/10.8/10.9 or Linux Ubuntu 14.04LTS or compatible (older versions are not supported) X-Plane 10 fully updated. 64 bit mode. (X-Plane 9 not supported. x). 1GB VRAM (2GB VRAM Recommended). Current version : 1.2 (last updated March 14th, 2015) Features Include: Fully Functional Professional FMS and EFIS System Custom designed Flight Management Computer, integrated with other plane systems Custom programmed LNAV logic for terminal procedures from updatable database VNAV-managed climbs and descends Optimum cruise performance and step climb calculation Two independent analogue instrument sets for captain and first officer Two independently simulated EFIS (EADI/EHSI configuration) for captain and first officer Dual-FMS with two independently working CDUs Working instrument comparators Triple IRS and triple symbol generator systems with realistic instrument source switching Dual air-data computers with custom failure modes and source switching Three independent nav/ils receivers Realistic inertial and radio position updating - this plane has no GPS ,so you can see the individual inaccuracies of those systems Triple-channel autopilot with realistic dependencies Fail operational and fail passive auto land with mode degradations based on system failures Load company routes generated by Professional FlightPlanner X (or other compatible programs) directly into the FMC FMC can be used on external touchscreen or tablet, optimized for the Retina iPad Advanced 3D modeling and features On-screen Menus Accurate dimensions based on drawings provided by Boeing Very detailed exterior modelling with extensive use of normal maps Super high resolution 3D cockpit with every switch functional Multilayer dynamic reflections on all glass objects Spatial rain simulation with lots of details Very detailed passenger cabin graphics, including galleys and lavatories Real working oxygen masks both in cockpit and cabin, dynamic window shaders Custom programmed particle system to visualize failures: generates smoke, fire and sparks Detailed and deep simulation of almost every system in the real aircraft Custom air and pressure system Electrical system with all AC and DC busses modelled Multistage custom failure system - over 150 more failures than X-Plane Ability to fix failure by following proper procedure 200 Mb of custom sounds - In-cockpit custom sounds -3D stereo engine sounds Review by Stephen Dutton 16th March 2015 Copyright©2015: X-Plane Reviews Review System Specifications: Computer System: - 2.66 Ghz Intel Core i5 iMac 27” - 6 Gb 1067 Mhz DDR3 - ATI Radeon HD 6970M 2048 mb - Seagate 256gb SSD Software: - Mac OS Yosemite 10.10.1 - X-Plane 10 Global ver 10.35 (final) Addons - Saitek x52 Pro system Joystick and Throttle - Bose - Soundlink Mini Scenery - KATL - Hartsfield–Jackson Atlanta Intl Airport by Butnaru (X-Plane.OrgStore) $23.95 - KLAX - Los Angeles International 1.01 by MisterX6 (X-Plane.org) Free v1.2 Change log: -added the 757-300RR model (available only in extended package) -optimized the 3D model for 10.30 and above -fixed a bug with real/AT throttle competition while in EPR mode (full control is given to AT) -added mouse wheel control for knobs with 3 options. -fixed incorrect eng anti-ice EICAS messages -fixed a bug with tug double use -fixed some 3D holes in the cockpit -added throttle protection for autothrottle disengagement -added TFC indication to ND -fixed a bug with inability maintain to FMS-commanded cruise speed lower than 310 bellow 10000 feet -fixed a bug oscillating FMS-commanded speed in step climb -fixed CTD when using direct-to without active leg -corrected ref speed dependence on flap settings -fixed the mysterious ILS excursions on some autolands -removed the need to use "external radio" option (works automatically) -external fuel change is possible before engine start (e.g. FSA refuel compatible) -implemented the ability to enter PBD/PBPB waypoints on the RTE page -fixed CTD during entering waypoint on legs page when it is "blank" -fixed CTD during use of direct-to function on legs page when it is "blank" -the 757 will now load the navdata from the Custom Data/GNS430/navdata/ folder of X-Plane. So by installing the navdata update for X-Plane, you automatically have the latest data in the 757 also -fixed CTD when pushing an empty LLSK with empty scratchpad on legs page
-
The exclusion fix has to come from the developer... If you re-read the review the fix details are listed under "installation". SD
-
Aircraft Review : Cessna 207 Skywagon by Alabeo It is released as an Alabeo aircraft, but in all but name this C207 Skywagon is really a Carenado aircraft right down to its high 20 dollar price. You will remember the Alabeo aircraft as very niche and quirky, in fact quite basic but fun machines. But as Carenado has gone up market to the larger twins and small jets, Alabeo is the new old and represents now the middle ground of very good general Aviation aircraft. The Cessna series 205, 206, and 207, are known variously as the Super Skywagon, Skywagon, Stationair, and Super Skylane which are a family of single-engined, general aviation aircraft with fixed landing gear. The 205 version was a six-seat aircraft that was essentially a Cessna 210 with fixed landing gear and with changes to the crew and passenger door arrangement, being officially designated by Cessna as a "Model 210-5". The 205 retained the early 210’s engine cowling bulge, originally where the 210 stowed its nosewheel on retraction. This distinctive cowling was made more streamlined on the later Cessna 206. History The Model 207 was another further development of the 206 in being a seven and later eight-seater aircraft, which was achieved by stretching the design further by 45 inches (114 cm) to allow space for more seats. The nose section was also extended 18 inches (46 cm) by adding a constant-section nose baggage compartment between the passenger compartment and the engine firewall; the aft section was extended by 27 inches (69 cm) by inserting a constant-area section in the fuselage area just aft of the aft wing attach point. The propeller's ground clearance was thankfully unaffected by the change (the nosewheel had moved forward the same distance as the propeller), but the tail has been moved aft relative to the mainwheel position, which made landing (without striking the tailskid on the runway) a greater challenge. The move gave that airplane a larger turning radius, since the distance between mainwheels and nosewheel increased by 18 inches (46 cm) but the nosewheel's maximum allowed deflection was not increased. The 207 was introduced as a 1969 model featuring a Continental IO-520-F engine of 300 hp (224 kW). A turbocharged version was equipped with a TSIO-520-G of the same output. At the beginning of production in 31 December 1968 the model was called a Cessna 207 “Skywagon”, but in 1977 the name was changed to “Stationair 7”. (X-Plane Reviews, has already reviewed the excellent CT206H Turbo Stationair HD Series by Carenado so check it out) Performance : Maximum speed: 174 mph (150 knots, 280 km/h) at sea level : Cruise speed: 163 mph (143 knots, 263 km/h) at 6,200 ft (1,890 m) : Stall speed: 63 mph (59 knots, 100 km/h dirty) : Range: 704.2 mi (612 nmi, 1,133.42 km) : Service ceiling: 13,300 ft (4,053.84 m) : Rate of climb: 810 ft/min (5.0 m/s) C207 by Alabeo The C207 does have that distinctive1960's Cessna feel, but it looks a little longer and more flatter (It is the same height of course as the rest of the series) by the stretch (or plugs) in the airframe. Although the C207 was built and flown in the later part of the sixties, It again feels more early sixties than later in its design and functionality. Maybe it is its close relationship of the 206 series family which was built in 1962 that gives you that impression, to my eyes anyway it looks like an older earlier Cessna more than a later one. Design wise though by Alabeo this a real quality aircraft. Overwhelmingly good in a perfect realistic reproduction of the real C207. Get close and the textures and highlighting aspects of the panels are simply first-rate. You sometimes have to step back and shake your head at the realism of these mature miniature aircraft. The detailing is simply phenomenal and overwhelmingly good. Look close and you will see a worn aircraft and a working aircraft. The panel work is spot on with every ridge and separate panel visible. close detailing includes the aerials and wing/tail static wicks are very realistic and flow correctly in the airstream (in other words they flutter). Menus The menus are standard Carenado fare. Two menus are tabbed on the lower left side of your screen with C for "Views" and O for "Options". Options include the opening and closing of the doors in "Pilots", "Copliots" and double "Passenger" actions. You have the choice of being able to toggle the reflections of the instruments and windows as well and the "Static Elements" in wheel chocks and cones are excellent. extra features include the option to have open wheels or fairings, which are so good I left them on. You can now also select your livery from the menu as well, which is a great speedy way of getting the right livery quickly. There is also the option to change the tyres from standard size to the larger bush versions. You can select ten different types of views in the upper menu, which is very handy in moving inside or outside of the aircraft. Other adjustments here include your "Point of View" and sound "Volume". Internal Approaching the aircraft you notice the high level of detailing, looking inside you can see were your money goes to get and aircraft of this high quality. The cabin feels spacious compared to most GA's of this size, but that is the extra length and low passenger seats showing here. Texture detailing on the roof headlining and seats shows the aircraft its age, slightly worn but not damaged or torn, seat textures are excellent and you can almost feel every ridge and padding of the classic design. Panel & Internal fittings The moldings of the panel are exceptionally good. As you fly your eyes will be caught by the different textures and details as the light changes and then reveals more different shapes and flecks of molding on these sort of late 60's one piece panels, gorgeous is one word, sublime is another. There is nice plank of wood along the base of the panel that gives the panel a quality look and the yoke is thick and chunky, you can almost feel that grip under your fingers. The roof lining is again molded in beautifully, like all the internal fittings from the padded side panels to the roof lining it is worn but all gives you that sitting in a real aircraft feeling... it is all so real you want to touch it all and run your fingers along the textures. Great blinds and window compass above with below you a central molding that houses the trim wheels and fuel tank switchgear. look above the crafted Cessna rudder pedals and and you can even see the wire and pulley system and airvent piping.... details, and more detailing. It is also great to actually see this sort of detailing at all? Early Alabeo aircraft were darker than your average African Jungle down below the panel, good to see they have lightened things up a bit. Flying the C207 My usual C208 Caravan was in with a service, so the C207 was a great filler in to take a few (4) passengers to our other office at Miami-Opa Locka Executive Airport (KOPF) from Lakeland Linder (KLAL). Our business make a fortune out of passengers leaving Walt Disney World in Orlando and driving the wrong way home? They turn up here lost and are soon dumping their rental cars and leaving it to us to get them back to Miami. All in and with the power on and the mixture, propeller knobs right in we turn on the single key switch to start the engine... You have to hold it for quite awhile till the churning engine catches and then some more. When it finally fires the sounds are glorious if you have a great sound setup on your computer, 3d and putter, putter perfect. A bit of throttle is needed to move the aircraft and it is quite nice to taxi and to keep to the center line. Propeller torque is not that pronounced and taxi speed can easily be regulated. Even when putting on the power the torque is not the "yank the yoke" to counteract the hash forces type, I do usually with these light machines is get the rolling straight and then push in the power required gradually, than the full up (or push in throttle) power to go forward "out of the blocks" type. I found these aircraft are more easily controlled by being gentle than macho with them. At just over 100knts I pulled back on the yoke and the aircraft lifted clean and I was easily able to climb at over 1000ft per minute, The actual climb rate limit is 800fpm, but I found for the short climb to just past 500ft and then a level off to the required 800fpm didn't create any loss of power. There is virtually no wind on the downloaded METAR's so the aircraft didn't need much correction either and the C207 felt very nice straight and then into a slight right bank to head to Miami. You do notice the extra fuselage length, the aircraft is slightly heavier and more direct than the other C210. but very nice to fly if a little sedate. Sounds do change as the power goes on, they are very good but a little more buzzy in the straight cruise externally. The longer cabin and nose is certainly noticeable in the air, "Skywagon" is the perfect name, like in car terminology between the sedan and wagon variants the Cessna lives up to the same point of reference of a longer heavier bulkier rear. Closer in detailing is more revealing as you can see under the aircraft at the minor details. Perfect undercarriage design and If you run your replay in fast forward mode you will notice the wheels spin naturally (slowly) in the slipstream. The suspension animation is so clever and perfect, you really don't take notice of these sort of actions, but they are there working for you. The two standard Carenado pilots get on with the job of flying the aircraft for you... again the great head movement and animations will still get your attention. Instruments The panel is a standard instrument panel from the 60's period. There is nothing here that will warrant a dive into an instruction manual. standard six instruments with VOR OBS and NDB dials, clock, suction gauge and fuel monitor gauge. lower rocker switches on the pilots side are for the lighting (basic), power, extra fuel pumps and turn start key. The co-pilot doesn't even get the standard six instruments, but from the top the R/L fuel gauges separated by the AMP gauge, which is great to watch in perfect operation, turn on any lights and the power amperage shows. Lower row of dials is the Cylinder Head and Oil Temperature gauges and Oil Pressure. The big instrument here is the fuel flow and pressure dial which is great to keep an eye on in flight, it works very realistically. RPM dial with built in Hobbs meter is too far away for the pilot to keep track of as is the smaller ETG (Exhaust Temperature Gauge) Gauge. Flaps... Up - 10º - 20º - FULL lever is lower left. This is well done and not really new in context in that when you drop the flap lever the small white plastic indicator will move as the correct position of the flaps, simple but authentic touch. Equipment stack is very general as well but still well kitted out with a GARMEN GMA 340 Audio Panel, GARMEN GNS 530 GPS unit with pop out panel (still so brilliant), KR 87T50 Bendex/King ADF, the older GARMEN GTX 320 transponder and the good KFC225 Bendix King autopilot. This piece of equipment comes with Heading, Altitude (by Pitch or by V/S) with ARM, NAV (Nav1), APP (Approach) YD (Yaw Damper) and it is a unit that is as good as it looks. I am still not crazy about the "scroll" feature that comes with all Carenado and Alabeo aircraft, it works well but touchy will my one touch apple mouser. i prefer something more direct in changing the lighting and heading. Overall the panel is very functional and nice to live with. looks nice in the air as well with great instrument reflections and that old lovely worn wood grain. The roof blinds are fully functional and work very well in blocking out the direct sunlight... all small but great details. Liveries The aircraft comes with a standard default blank white livery and five registered ones in Red, Blue, Green, Orange Brown and Red, Blue and white. All liveries are HD quality and are all very good in design (Carenado liveries have been getting boring lately) and these are a return to form. A feature is that when you change the livery the registration number on the panel changes as well... clever (but watch if you do any new repaints to only name the registration number on the livery folder?) Aircraft lighting Lighting is basic but effective. The panel has instrument back-lighting and an overhead red cockpit set of lights... extremely good at night. In the cabin there is only two spot lights and they are both non-adjustable, unlike the ones on the Carenado's. External lighting is basic with a Landing/taxi lights as one switch, standard strobe, navigation and single tail beacon. Miami I cruised actually quite high at just under the ceiling at 12,500ft as it was a clear day, but at 800fpm it takes a while to get up there and the average 135knts in speed will make the time pass slowly. But the C207 is a nice aircraft to spend time with and the high views kept the passengers happy. I usually go directly out to the eastern Florida coast and then track down the coastline till level to Opa Locka Exec and then track directly inland to the runway. But today I was going more direct and didn't go out to coast as much as I usually do. With KOPF's tower an easy visual directional point I flew a totally manual approach that is easy because you use the channel waterway as a guide to RWY27. Dropping the flaps to reduce the speed only gives a slight lift if you get the speed correct. The aircraft is still very much on track and easy on the yoke and rudder and little correction is needed in nice smooth turns or alignment with the new heading, this makes the aircraft very nimble in your hands but not nervous. in other words easy to manoeuvre and track with not much effort but a nice flow. 92knts approach speed felt about right, and the descent was a very slight 10º. Over the fence and you can easily set the aircraft down where you want to... but you have to be aware of the wide tri-cycle gear. The rear wheels are well spaced out apart and if you are not perfectly level it is very easy to land on one wheel first instead of the rear two at the same time. My approach was quite shallow so I carried a little speed after touching down but the aircraft soon rubbed off the the flying speed to a taxi speed without using the brakes until you were quite slow. A taxi to the office and our passengers were soon heading to their hotel rooms... After the aircraft was shut down and secured we had a few moments to reflect on the C207 Skywagon. Summary When ever you approach another aircraft from Carenado and in this case Alabeo, your first thoughts are "well I have flown quite a few now, it would be the same I suppose" But strangely they are not. They all are in their various ways like their real world counterparts, in being the same but slightly different. There is always the feel that you are in one type of aircraft and they are not all the same. That is significantly hard to do with the same process and design thoughout this now big X-Plane General Aviation range. What is hard it to get your thoughts around is that this C207 is an Alabeo and not a Carenado aircraft? In every department except for a very few small loss of features (adjustable lighting anyone) it is totally the same aircraft... and that includes the higher price range which also smack in middle of Carenado territory. In the past Alabeo's were certainly different in every area than any of Carenado's, but here it is a wafer thin argument. As that higher price range reflects. The quality and design is simply excellent, in parts overwhelmingly so in detail. Nice to fly as well, easy to manoeuvre the only aspect is that the C207 is slightly slow in speed and in its climbing abilities, but your not wanting to go anywhere very fast anyway if you like flying aircraft like this. So overall this is a very nice and capable aircraft, slightly expensive but still full of value for a Alabeo, but just don't call the C207 Skywagon a... Carenado! ________________________________________ The Cessna 207 Skywagon by Alabeo is now available from the New X-Plane.Org Store here : C207 Skywagon and is priced at only US$29.95 Installation : Download is 259.80mb that is unzipped to 318.90mb to your X-Plane - "General Aviation" Folder. Documents : Quite a bag full, but no radio equipment manuals... excellent original performance tables included. Requirements: Windows, Mac or Linux X-Plane 10.30 + 32 and 64 bit compatible 1Gb VRAM (last updated March 2015) New advanced features X-Plane 10 GNS530 FPS-optimized model. Scroll wheel support High-Resolution model HD Textures Volumetric side view prop effect High quality 3D model and textures. Blank texture for creating your own designs. Accurately reproduced flight characteristics 64-bit compatible. Plugin-enhanced ________________________________________ Review by Stephen Dutton 11th March 2015 Copyright©2015: X-Plane Reviews (Disclaimer. All images and text in this review are the work and property of X-PlaneReviews, no sharing or copy of the content is allowed without consent from the author as per copyright conditions) Review System Specifications: Computer System: - 2.66 Ghz Intel Core i5 iMac 27” - 6 Gb 1067 Mhz DDR3 - ATI Radeon HD 6970M 2048 mb - Seagate 256gb SSD Software: - Mac OS Yosemite 10.10.1 - X-Plane 10 Global ver 10.35 (final) Addons - Saitek x52 Pro system Joystick and Throttle - Bose - Soundlink Mini Scenery - KOPF - Opa-Locka Executive Airport 1.0 by Drankum (X-Plane.org) Free - KLAL - Lakeland Linder Regional Airport 2.01 by Drankum (X-Plane.org) Free
-
Fixed!
-
I thought it was not right? I did clear out my custom scenery of duplicates? so here is the culprit! Again... this is getting annoying! Fixing now.