Leaderboard
Popular Content
Showing content with the highest reputation on 10/20/23 in all areas
-
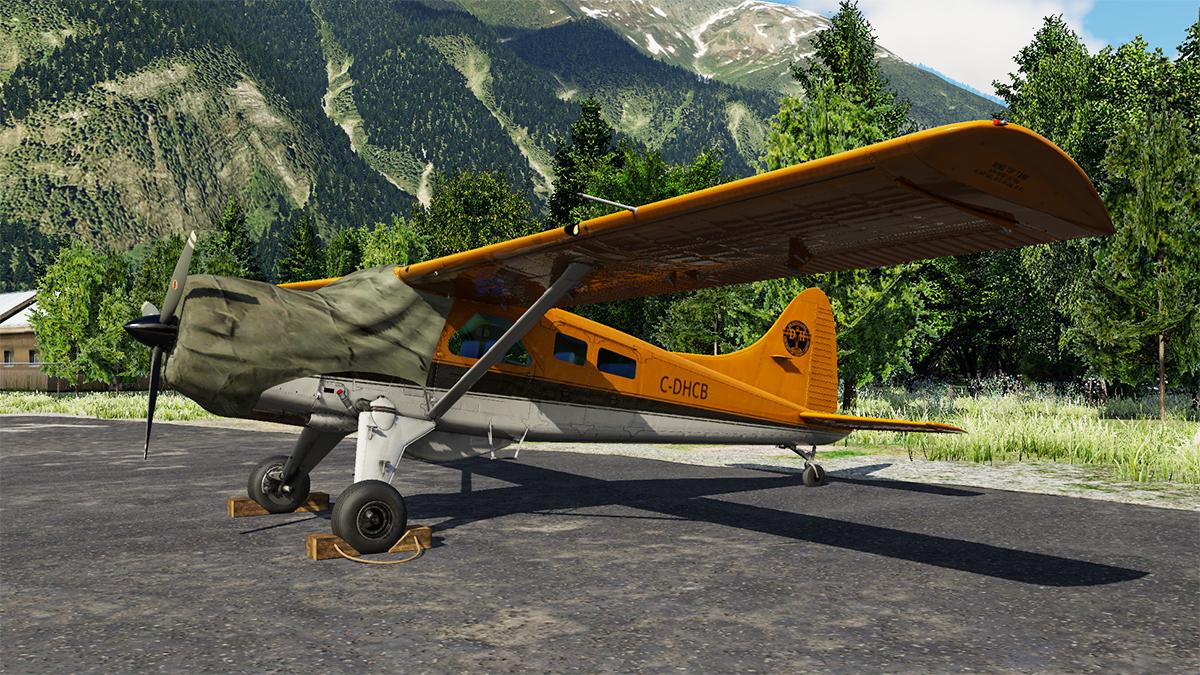
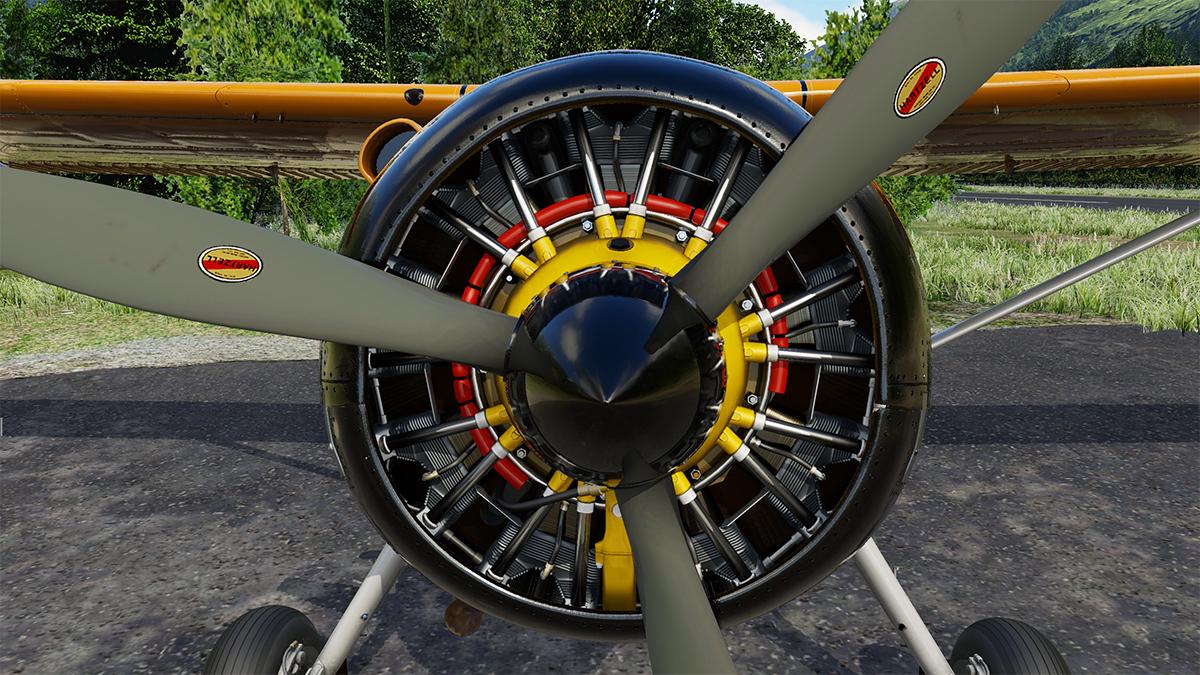
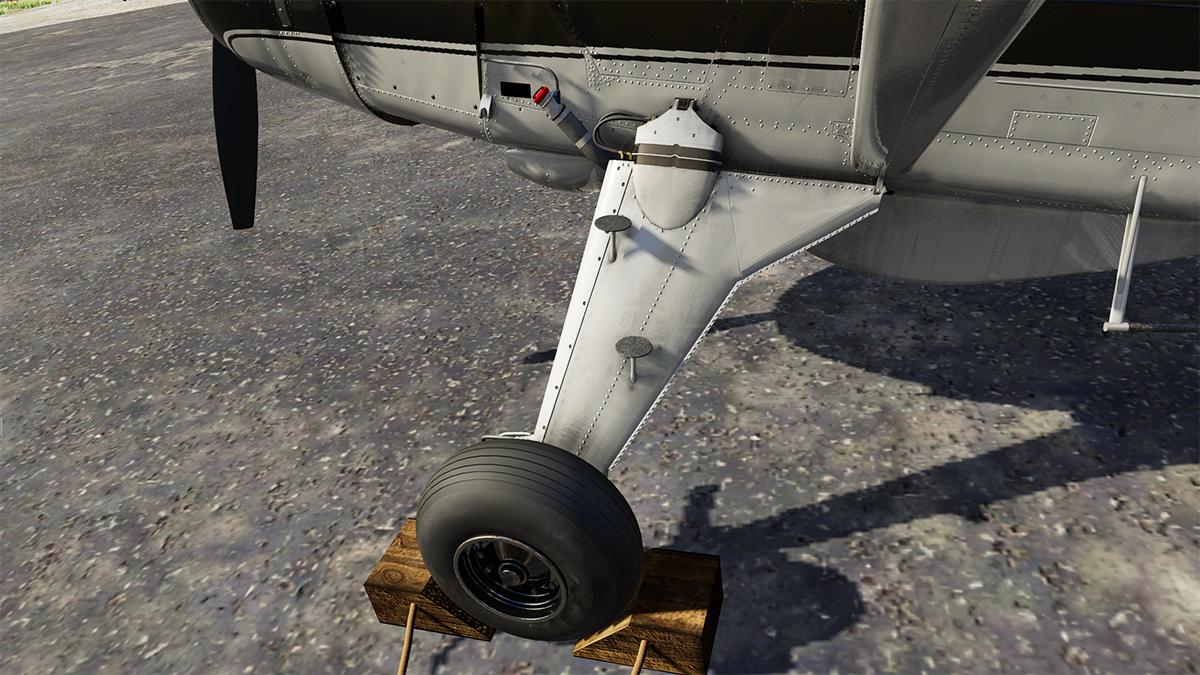
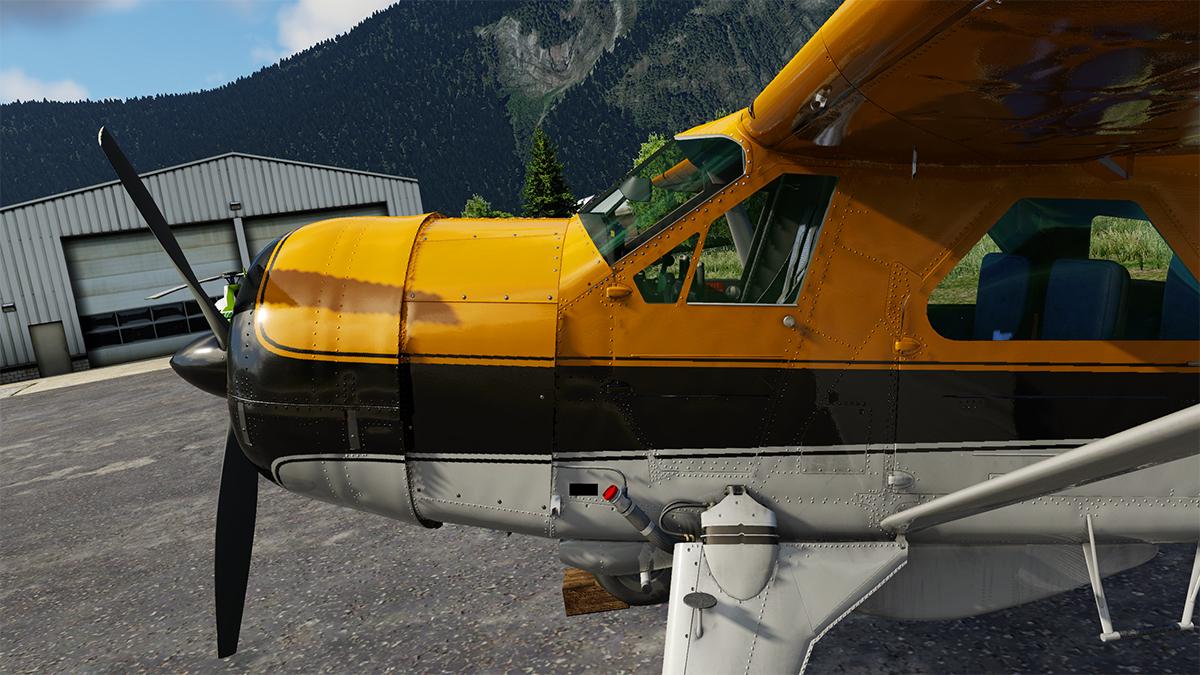
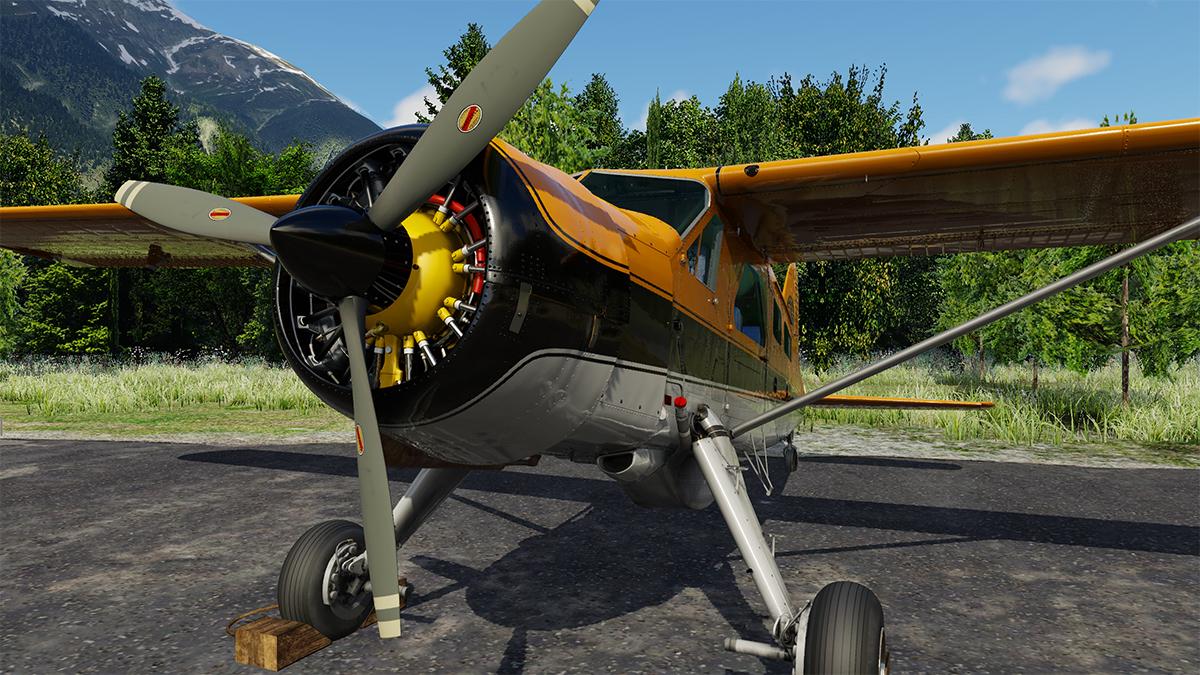
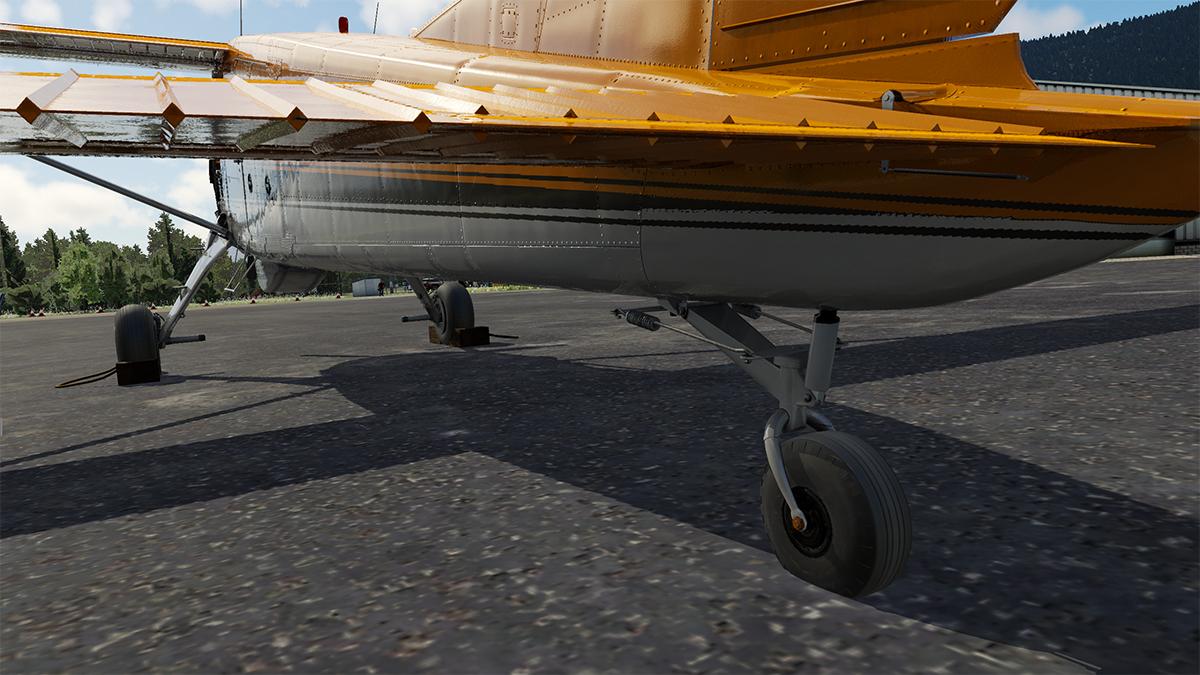
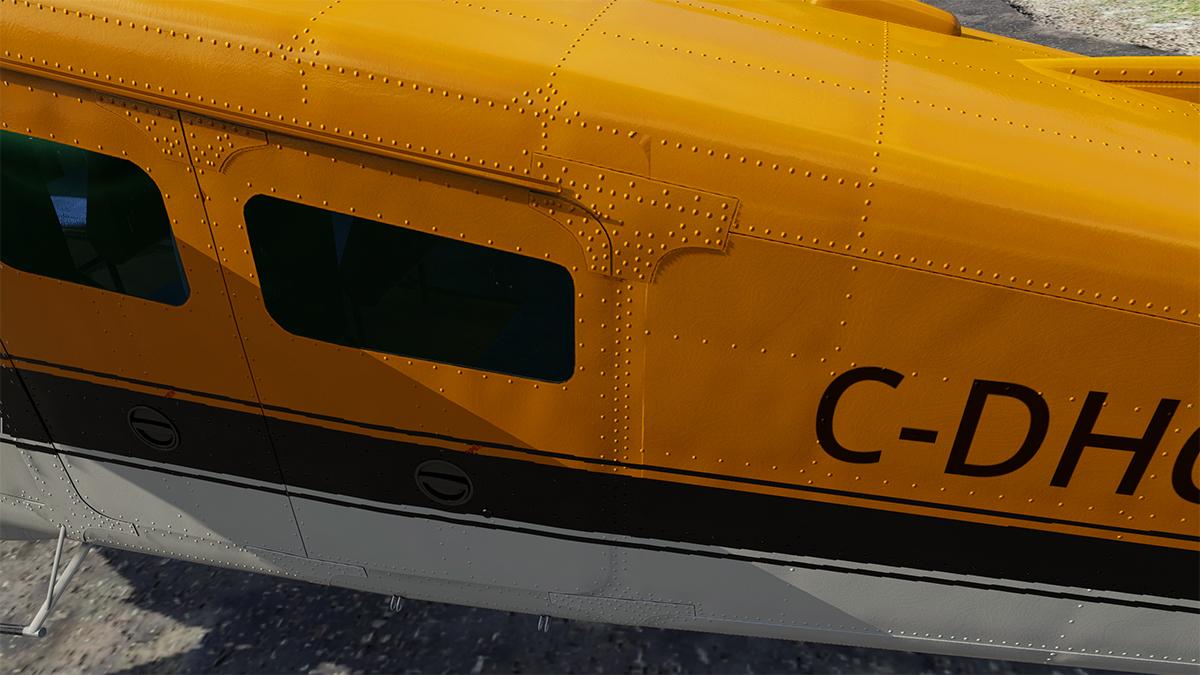
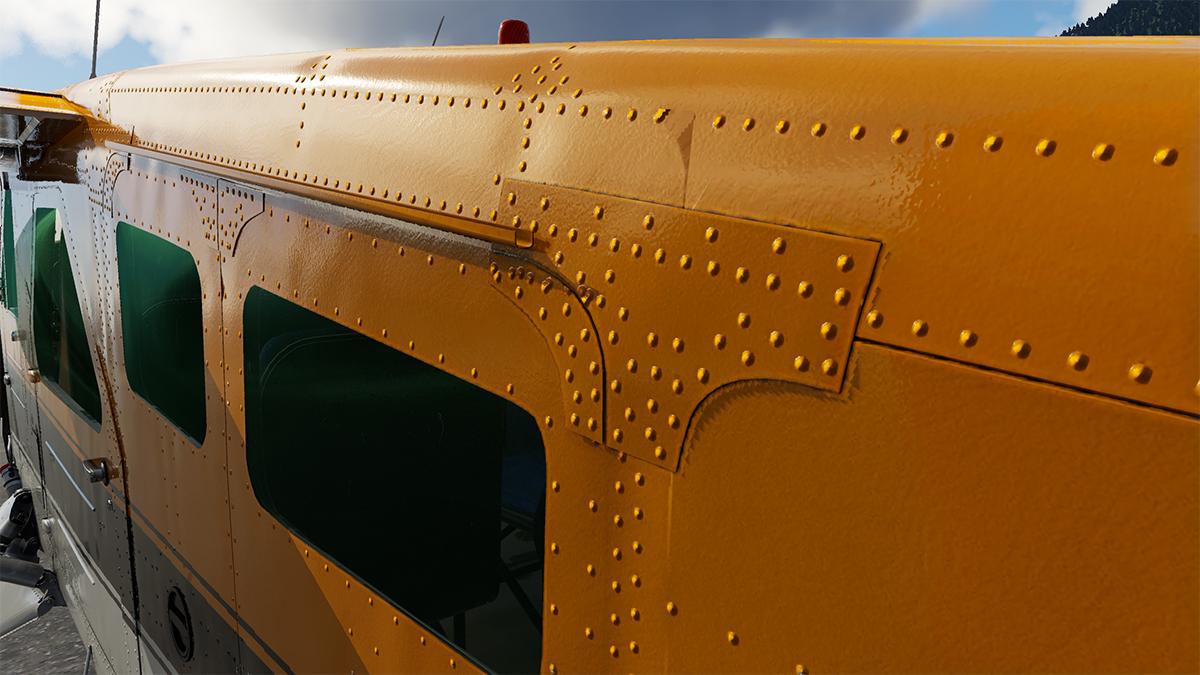
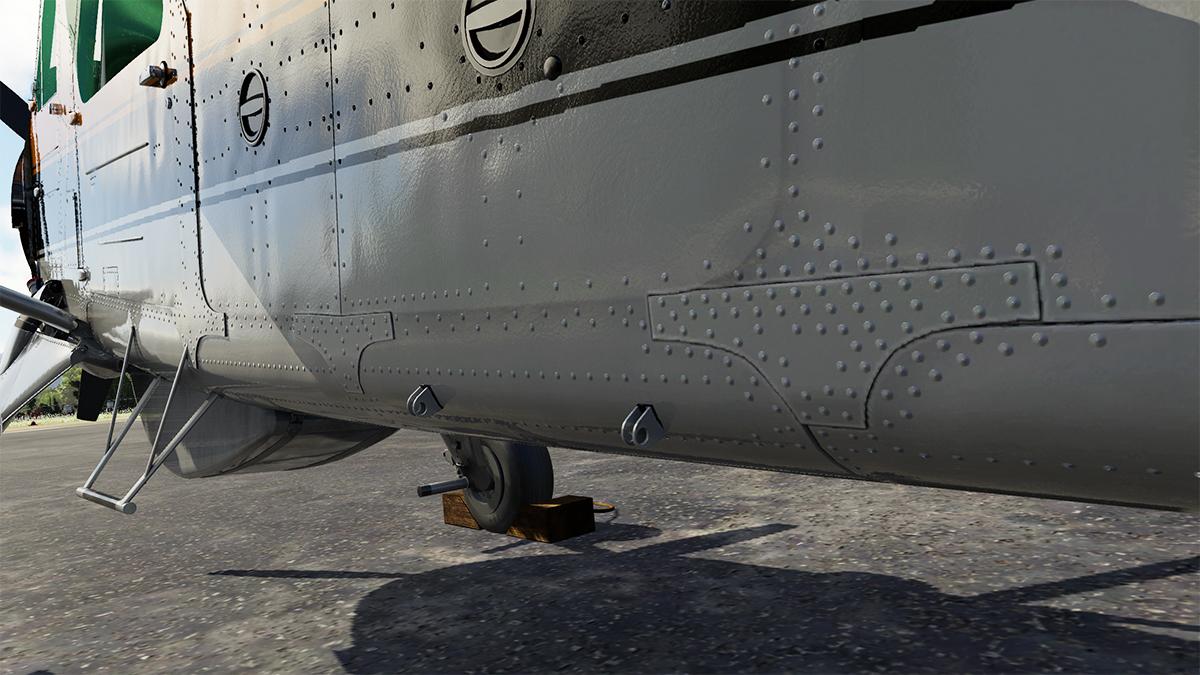
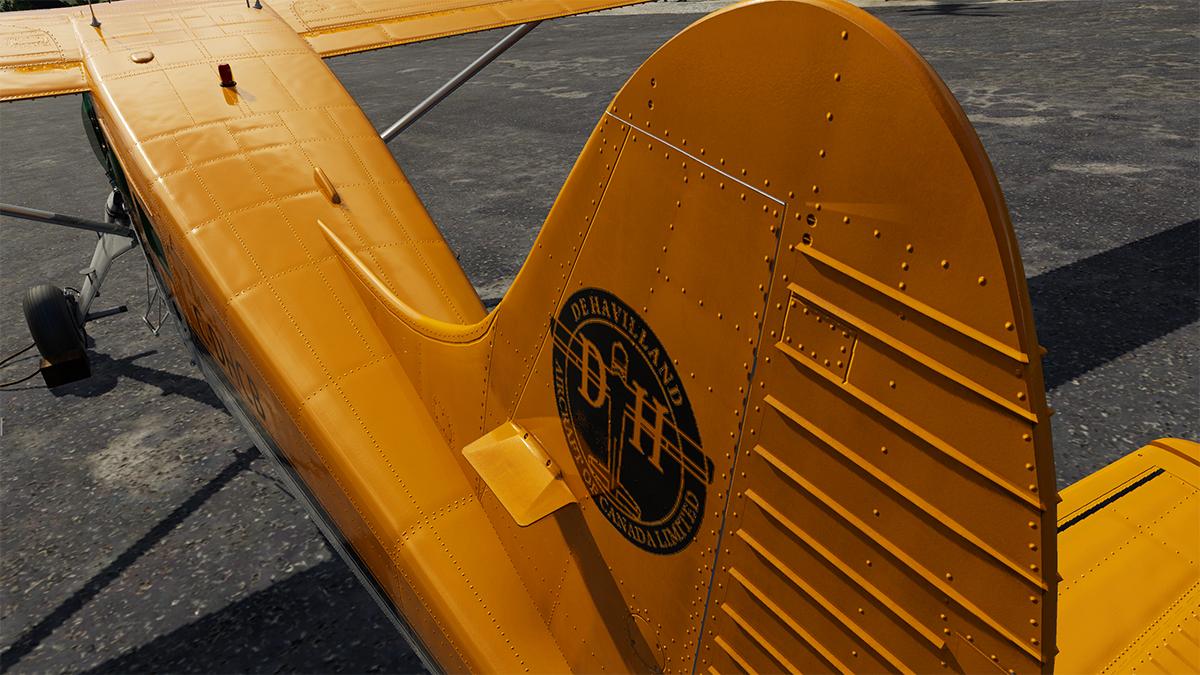
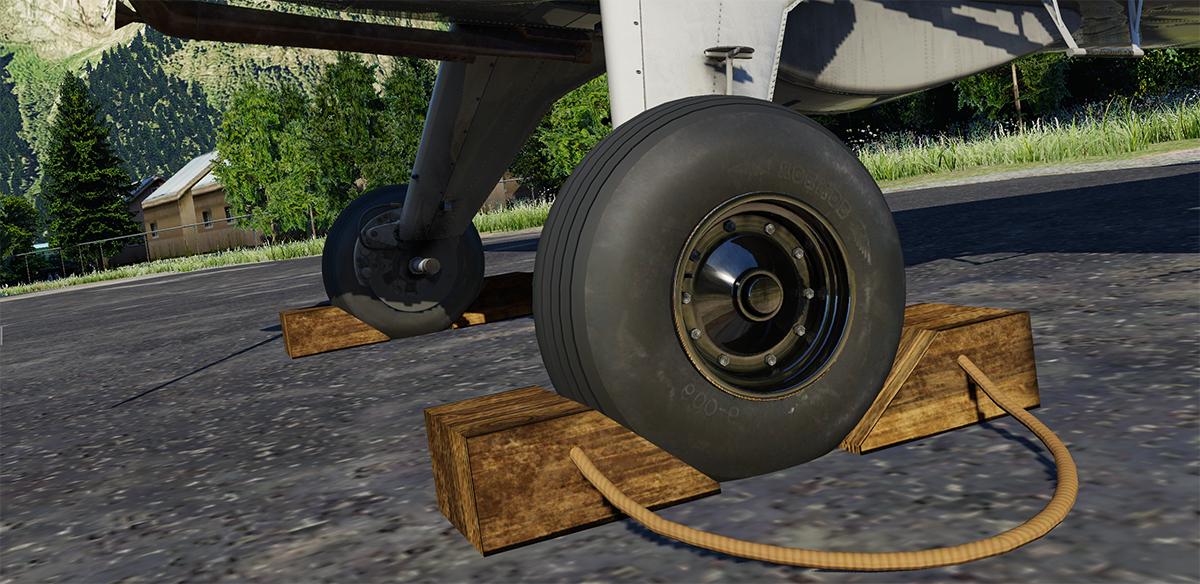
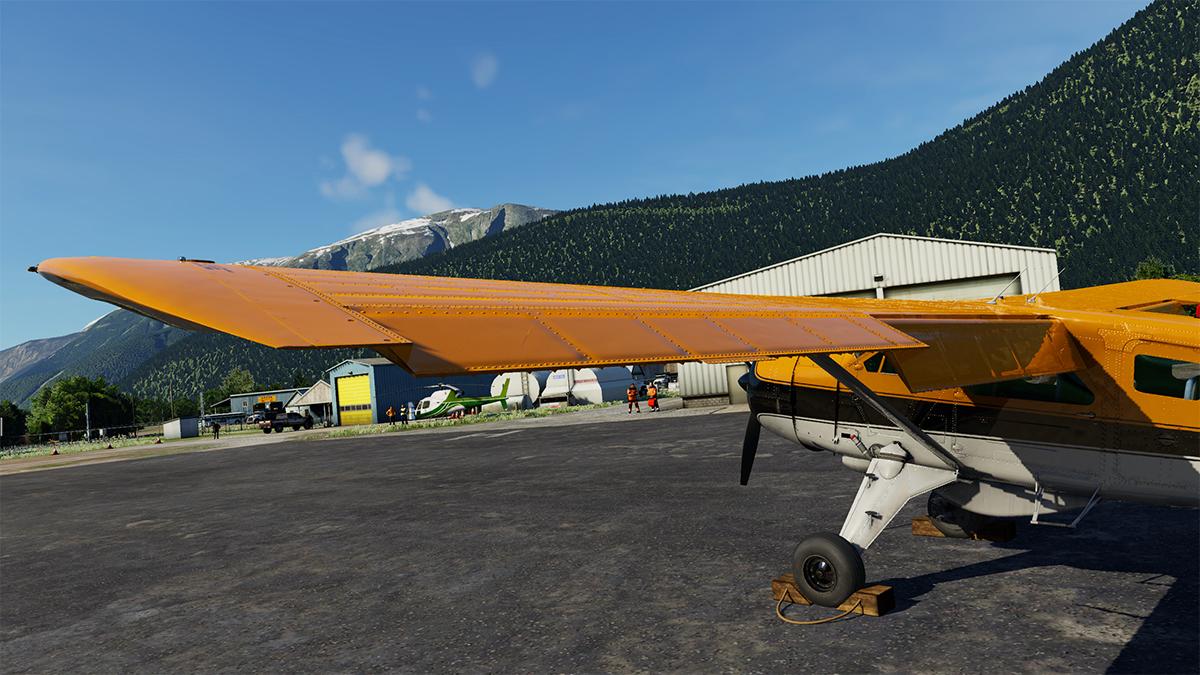
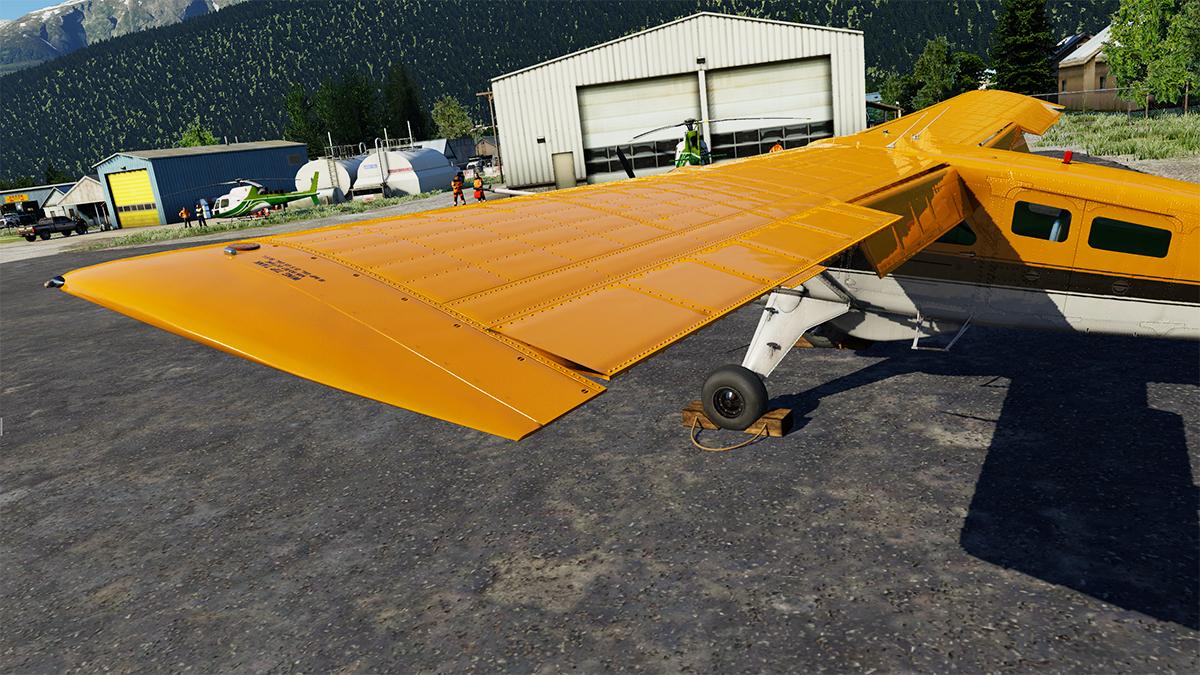
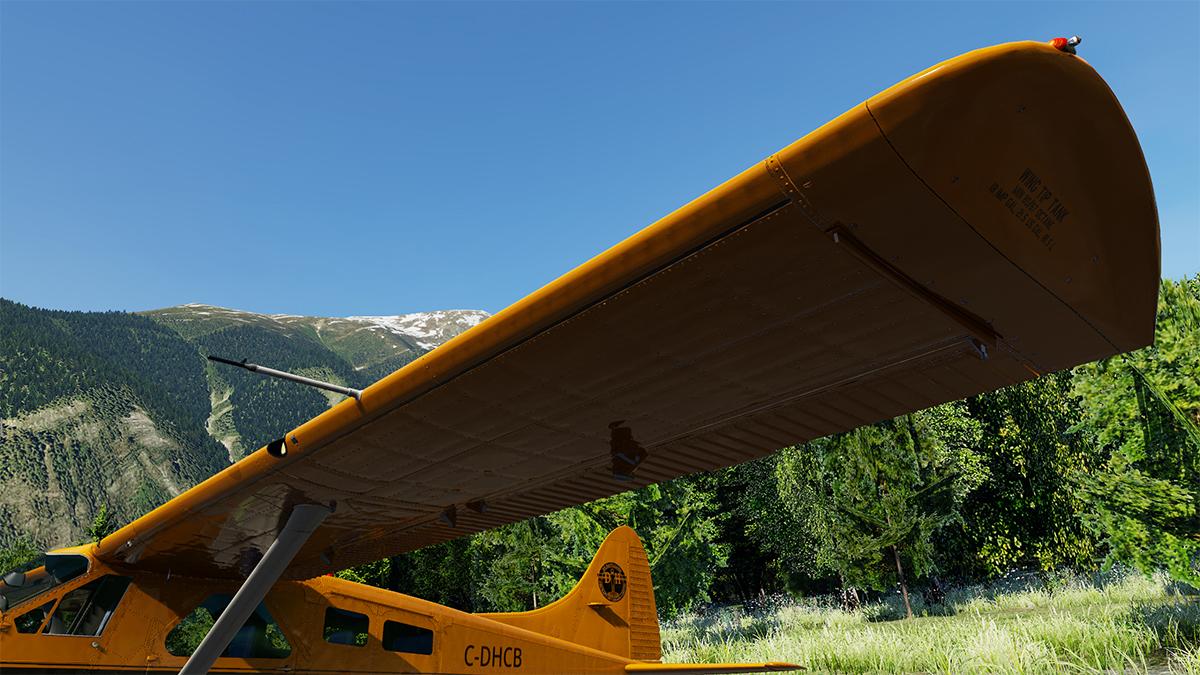
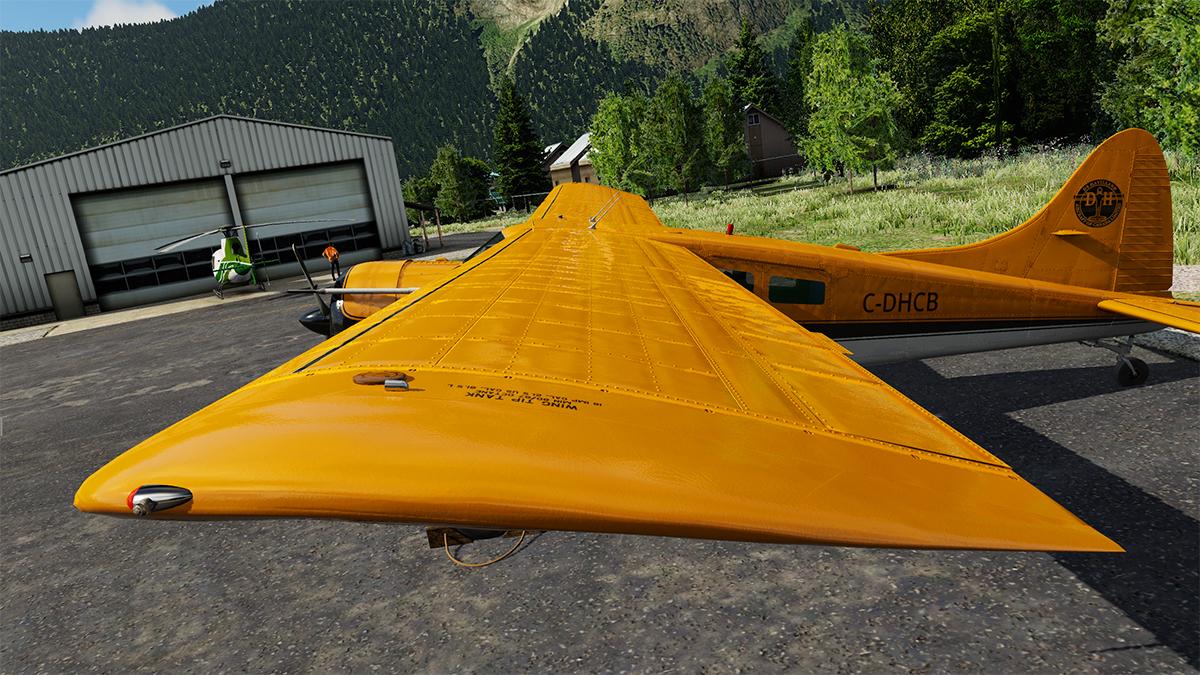
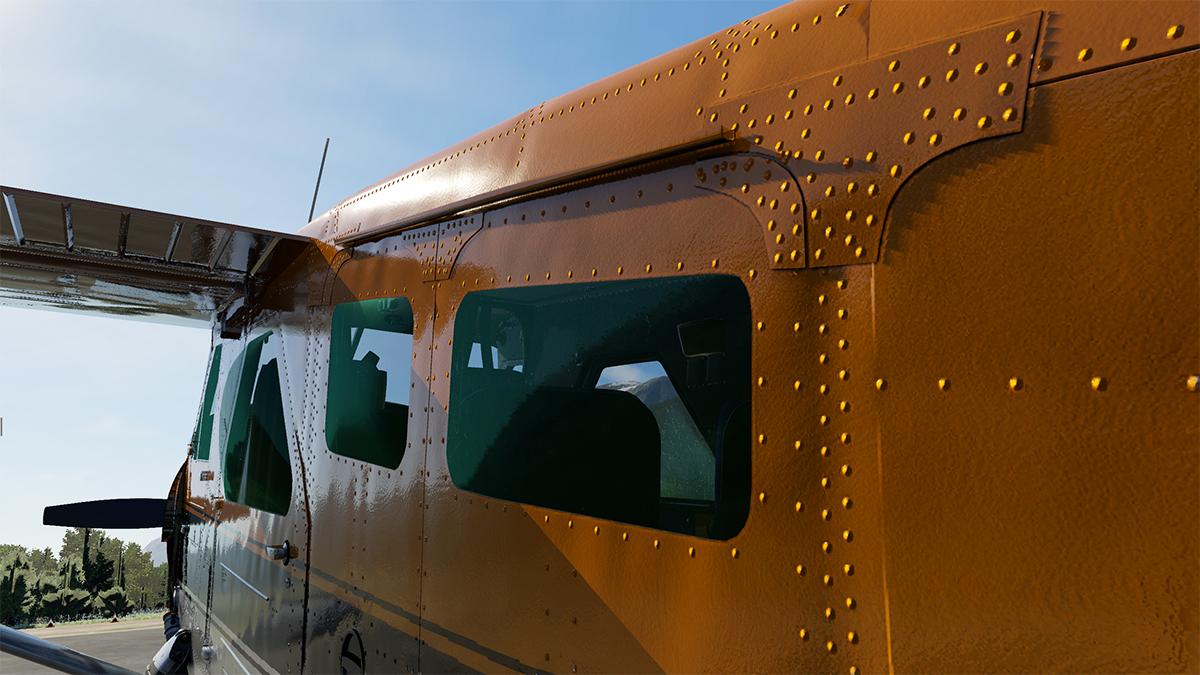
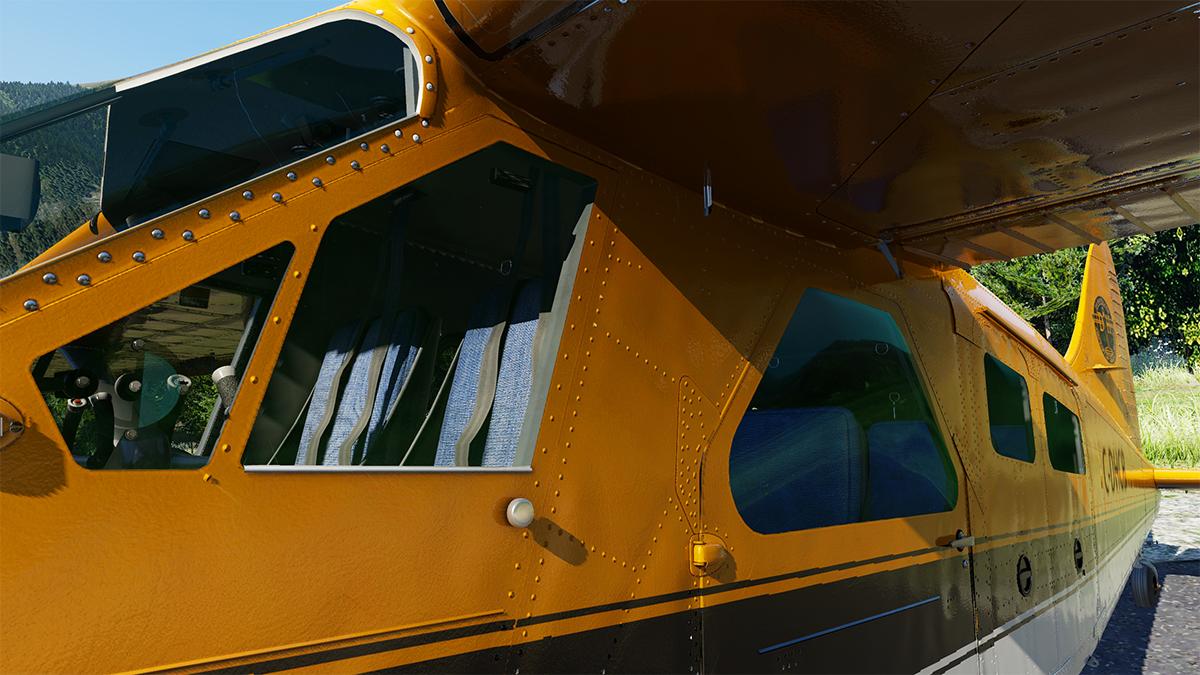
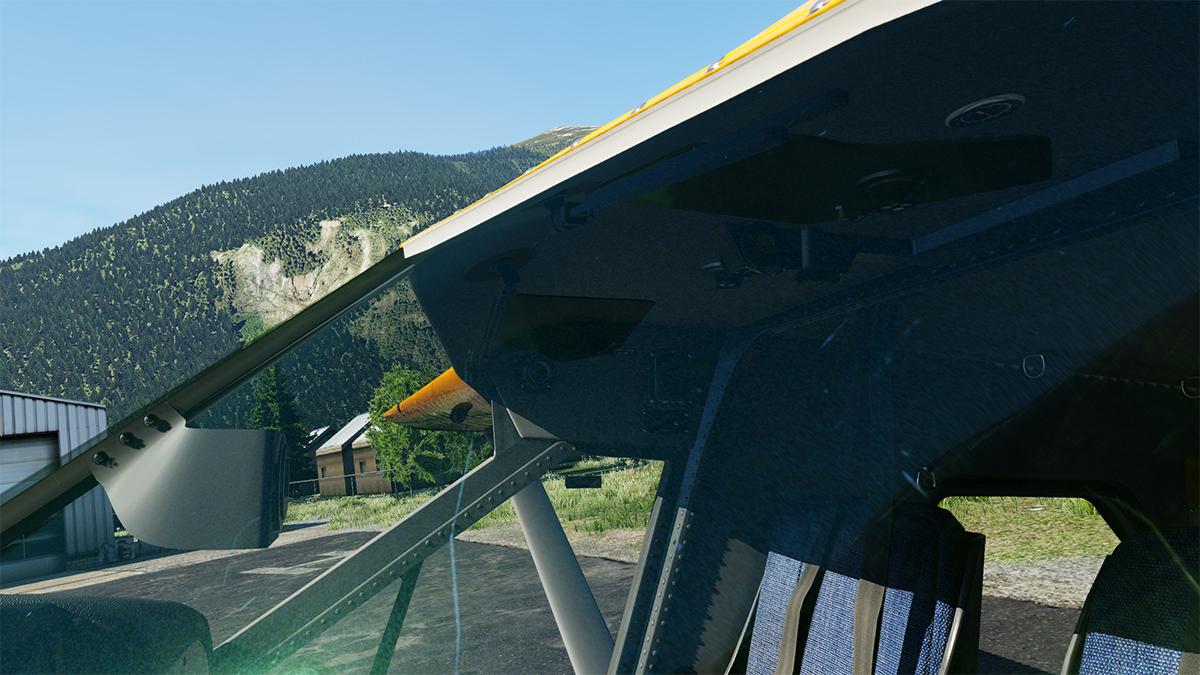
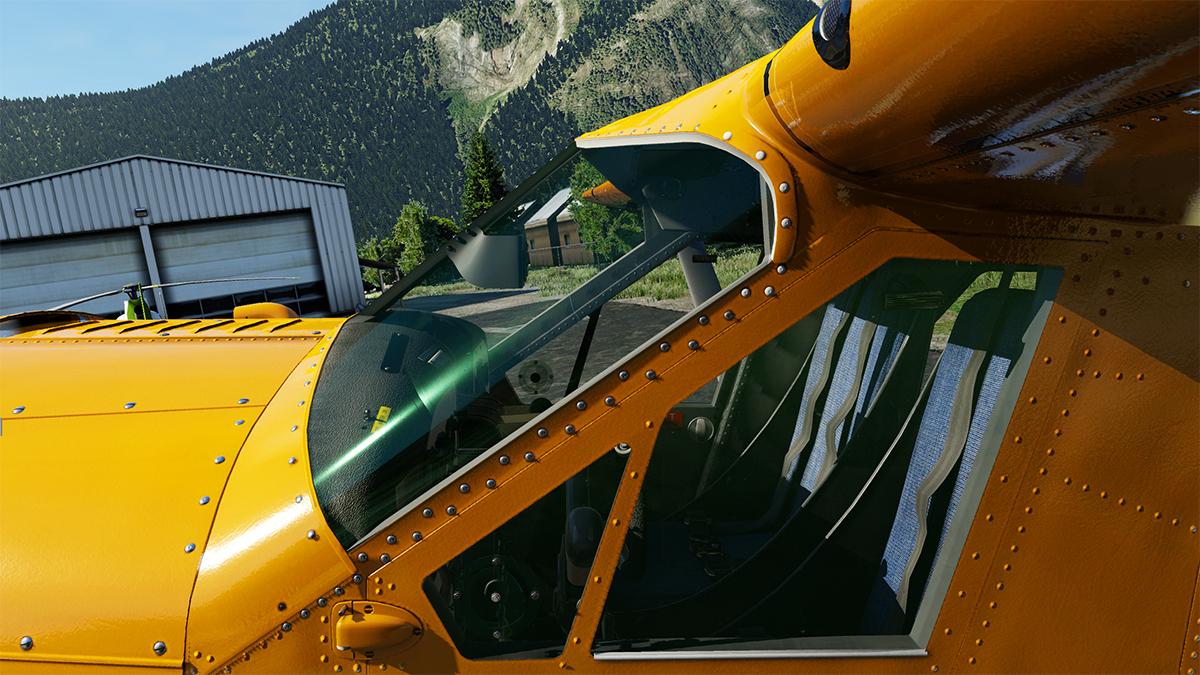
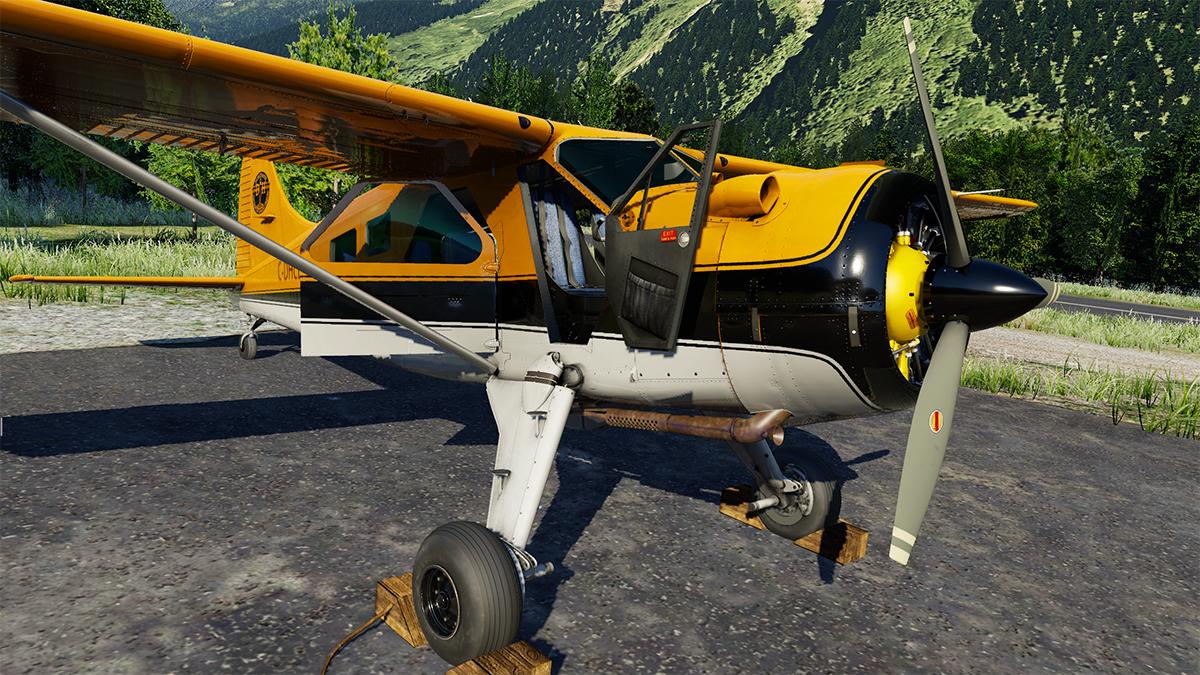
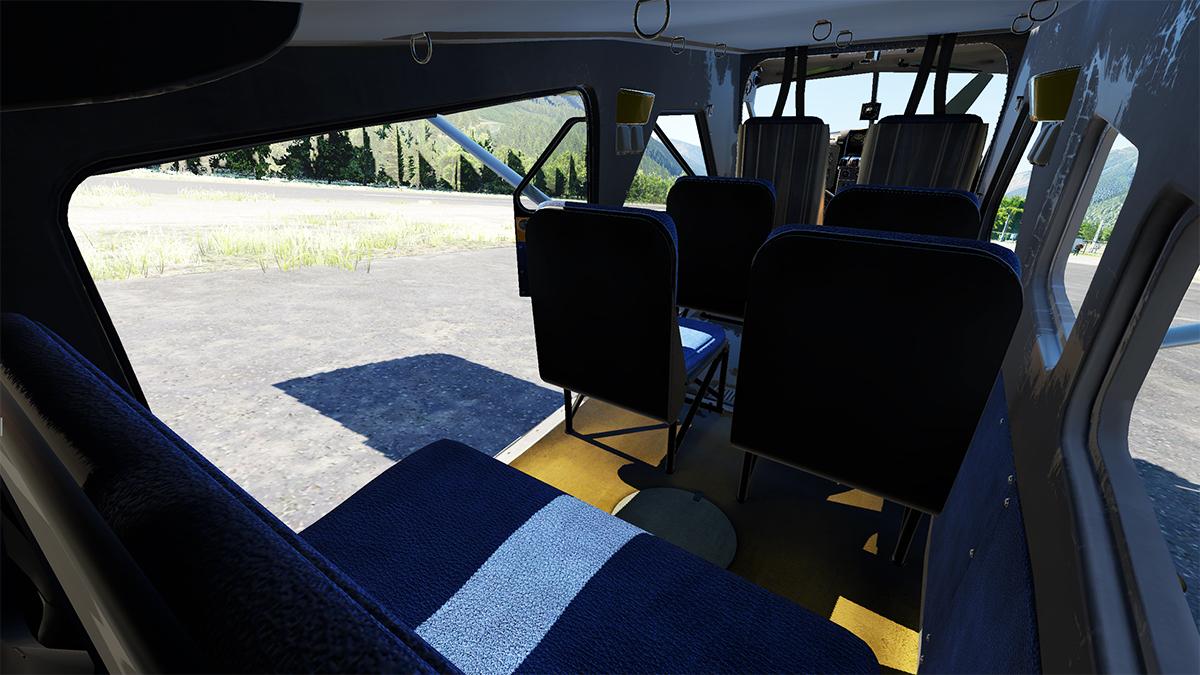
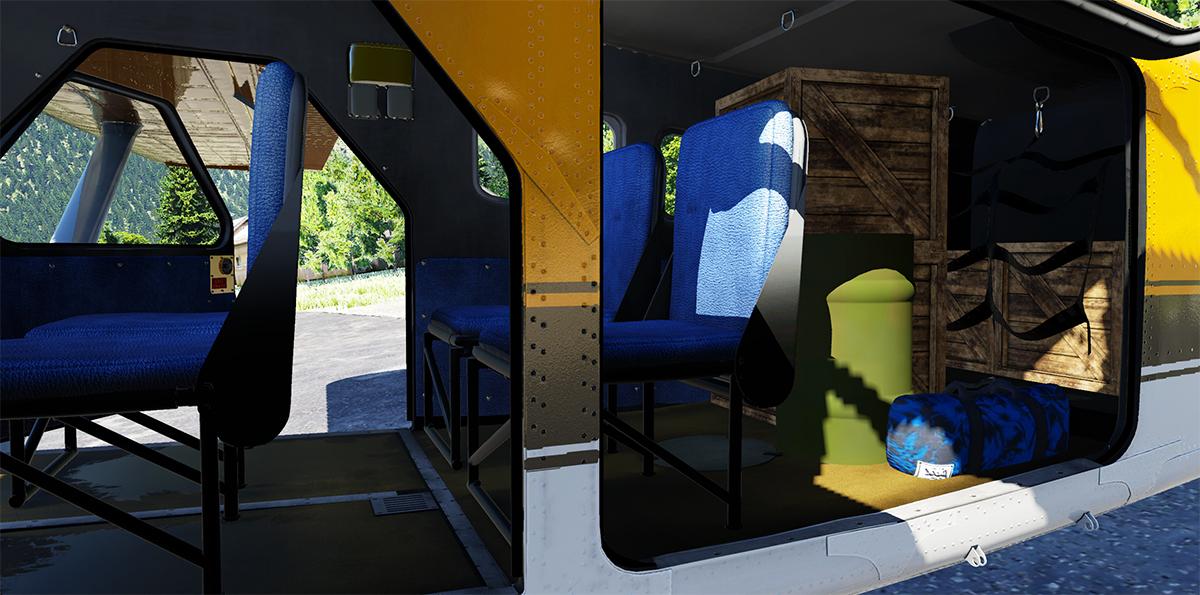
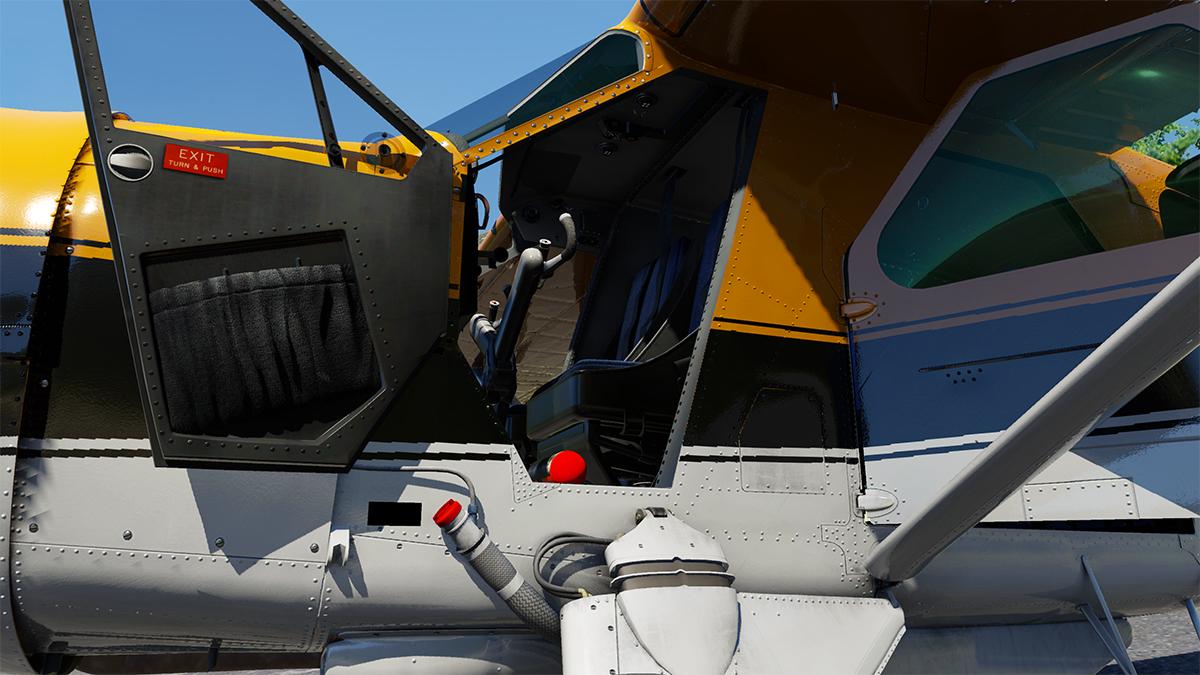
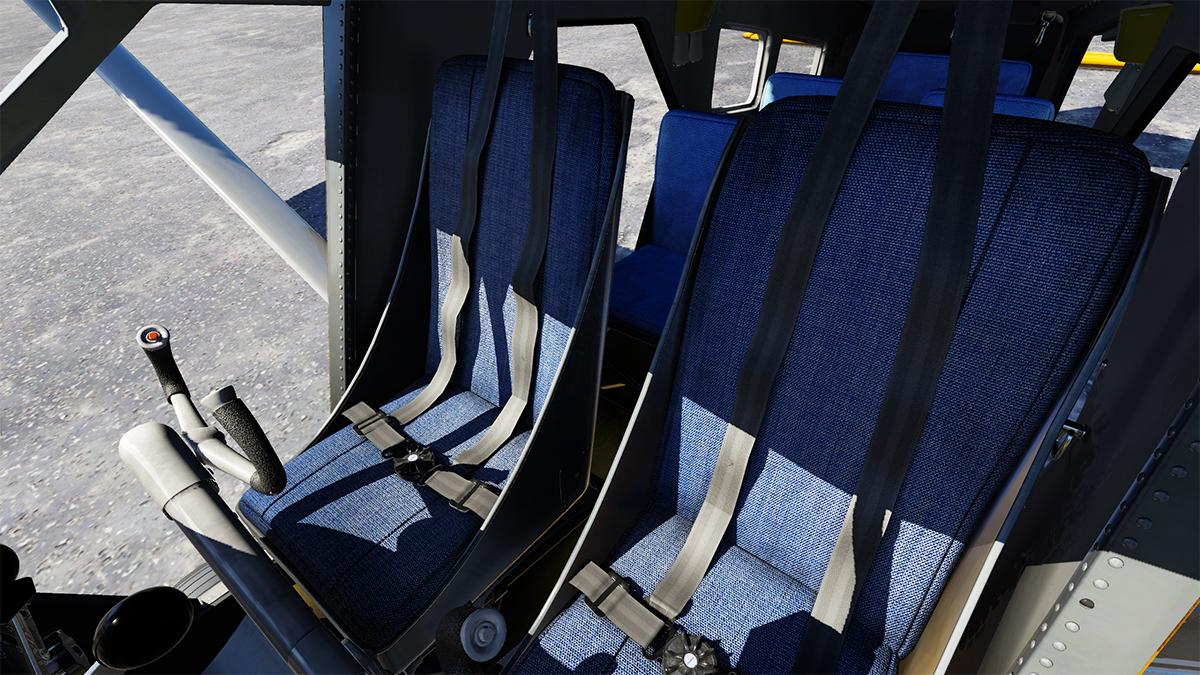
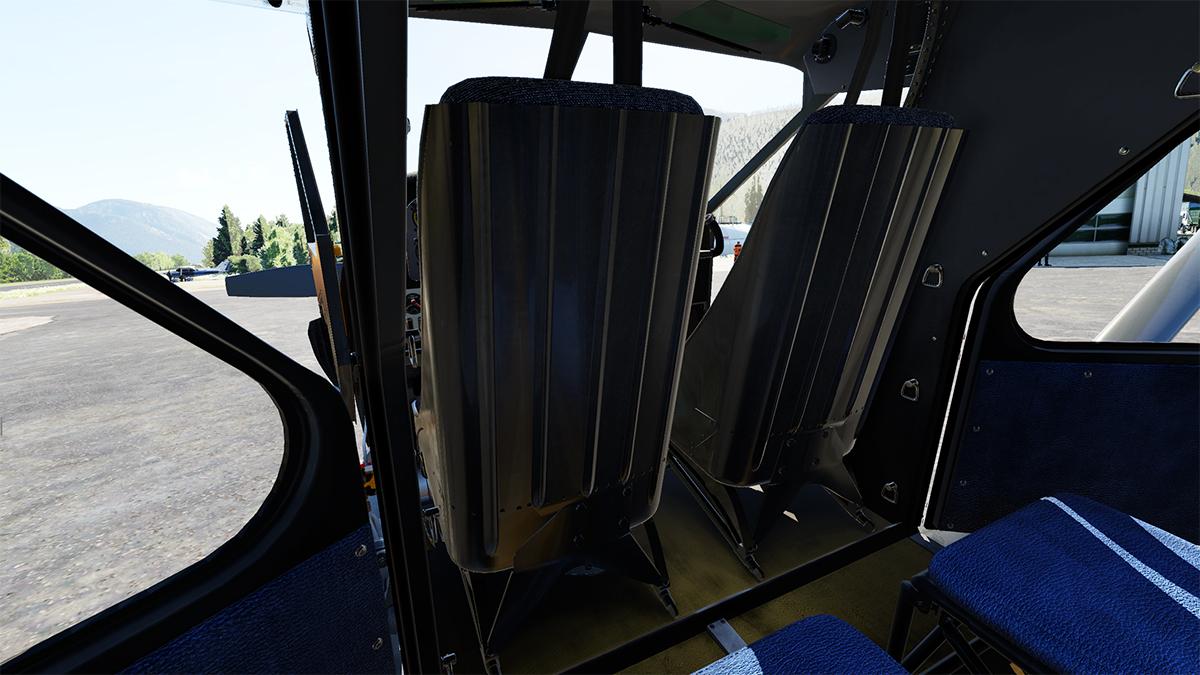
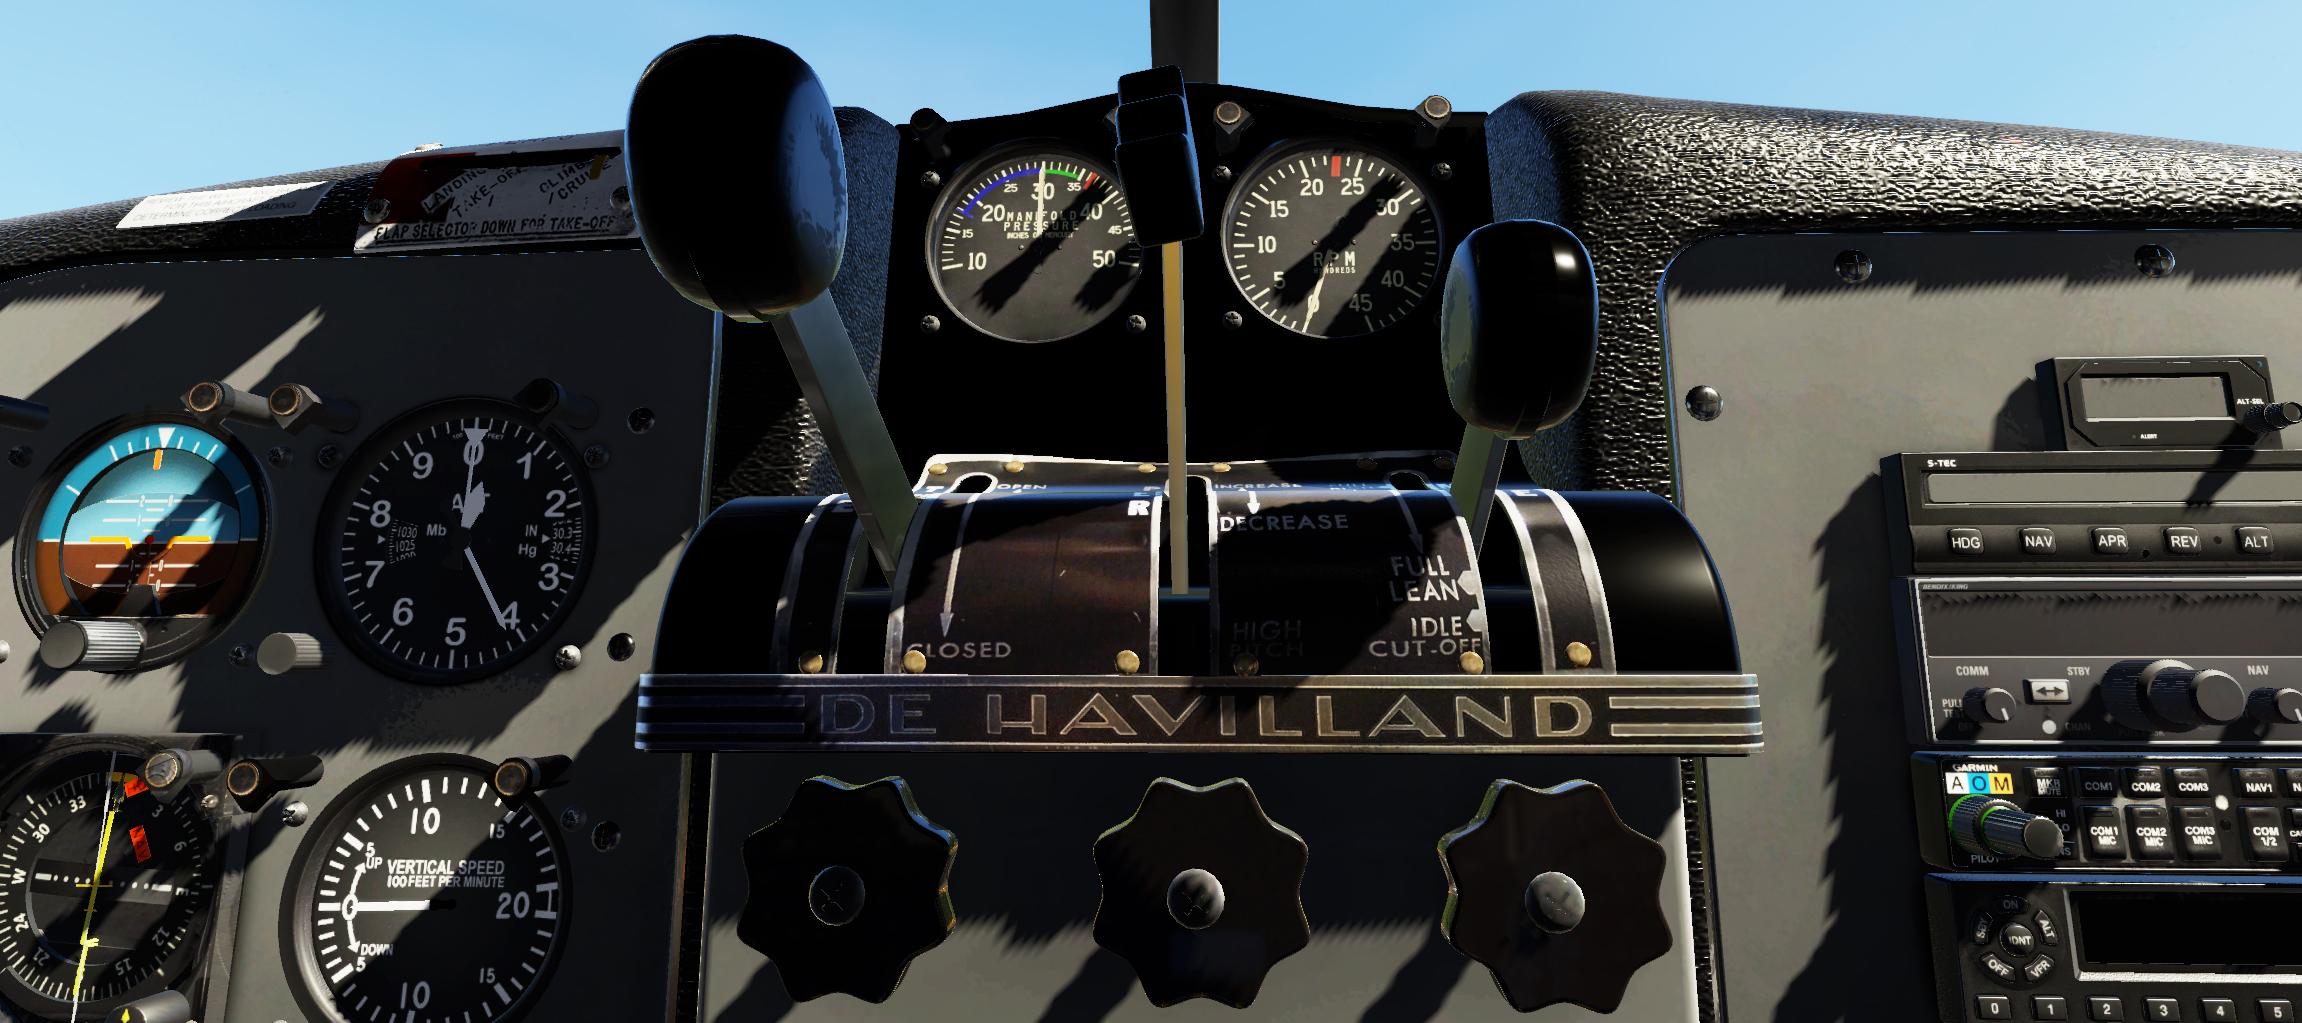
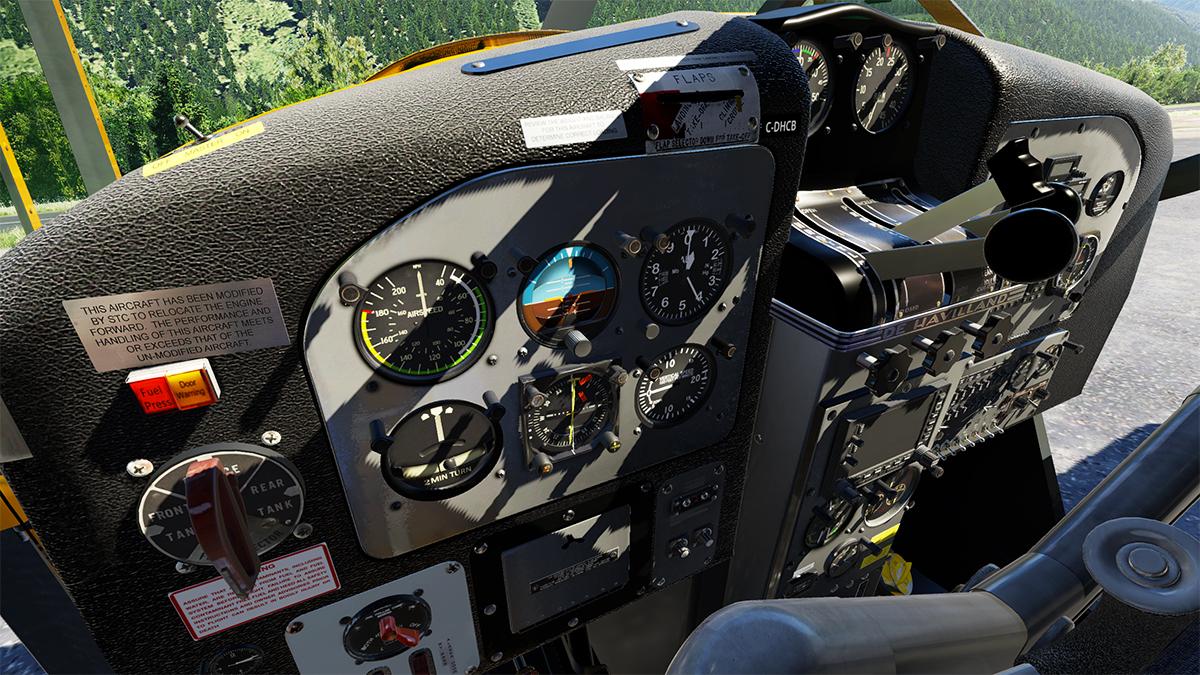
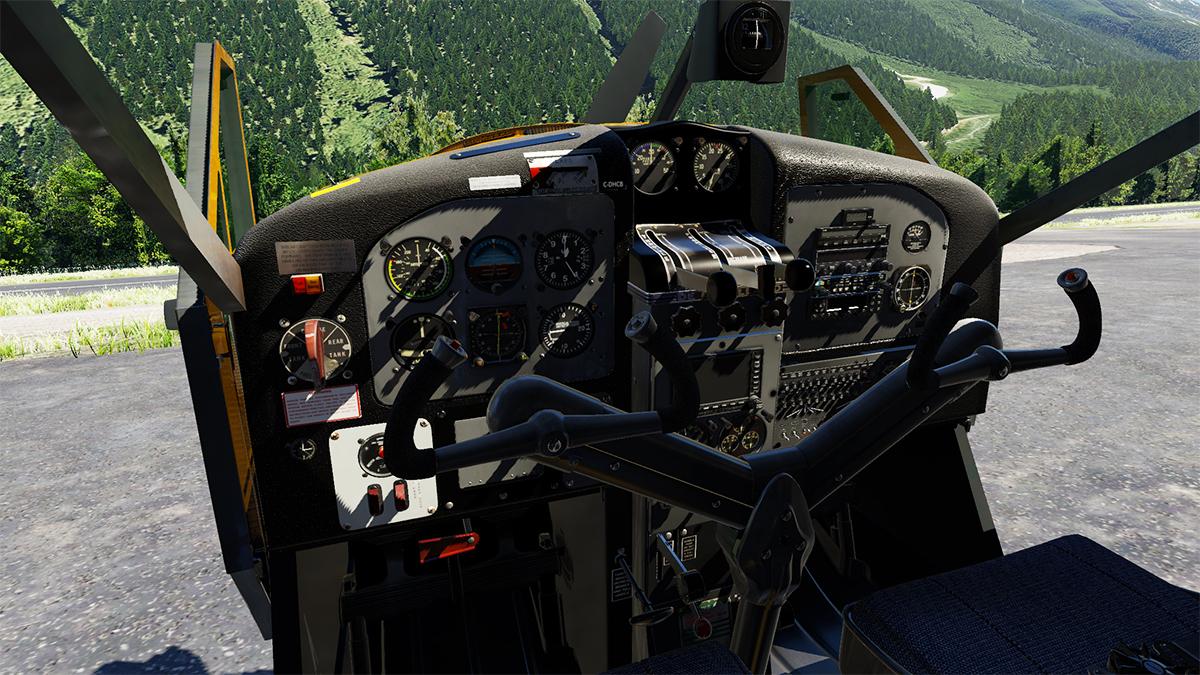
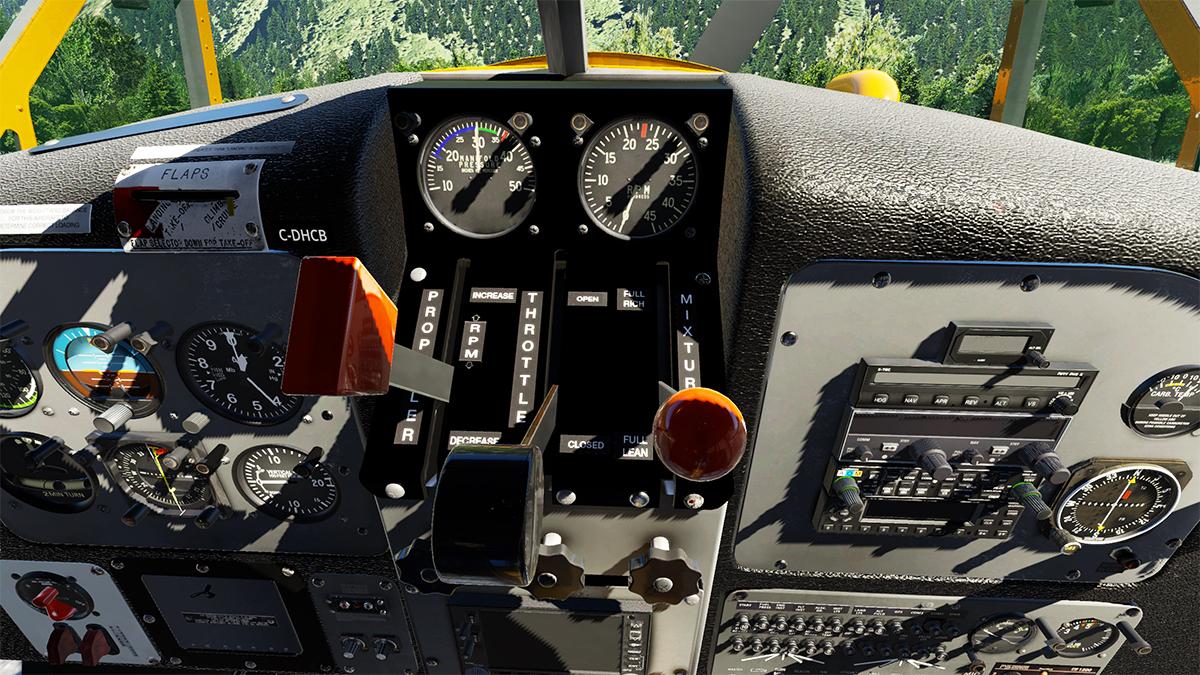
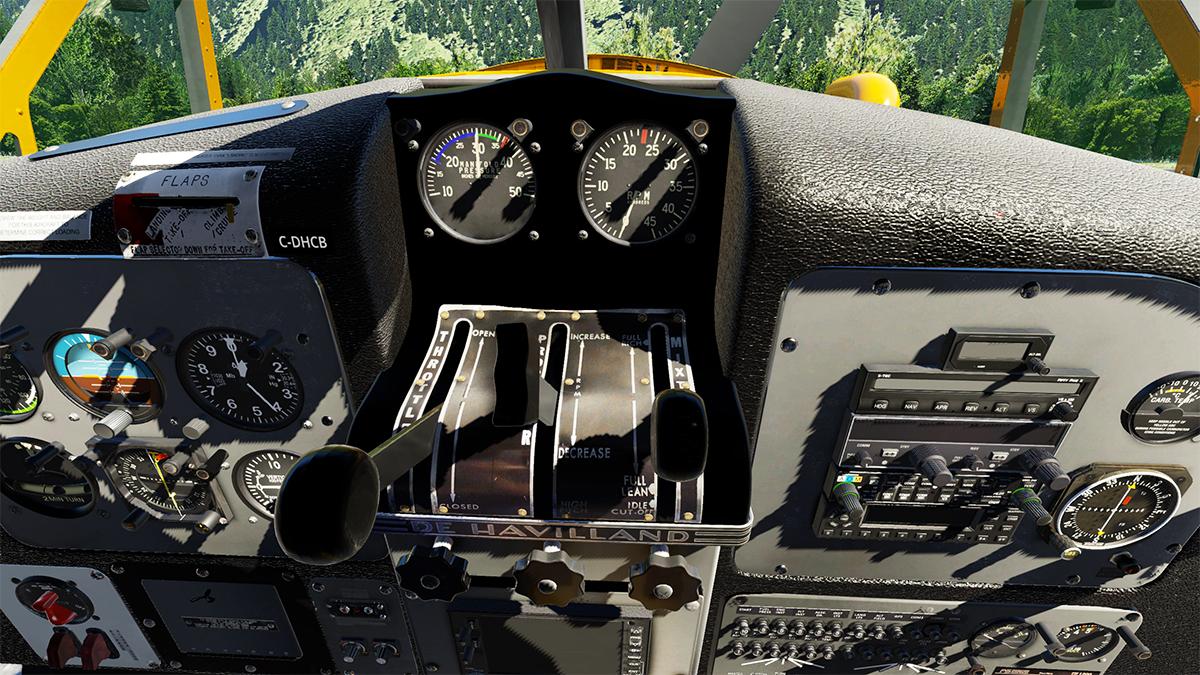
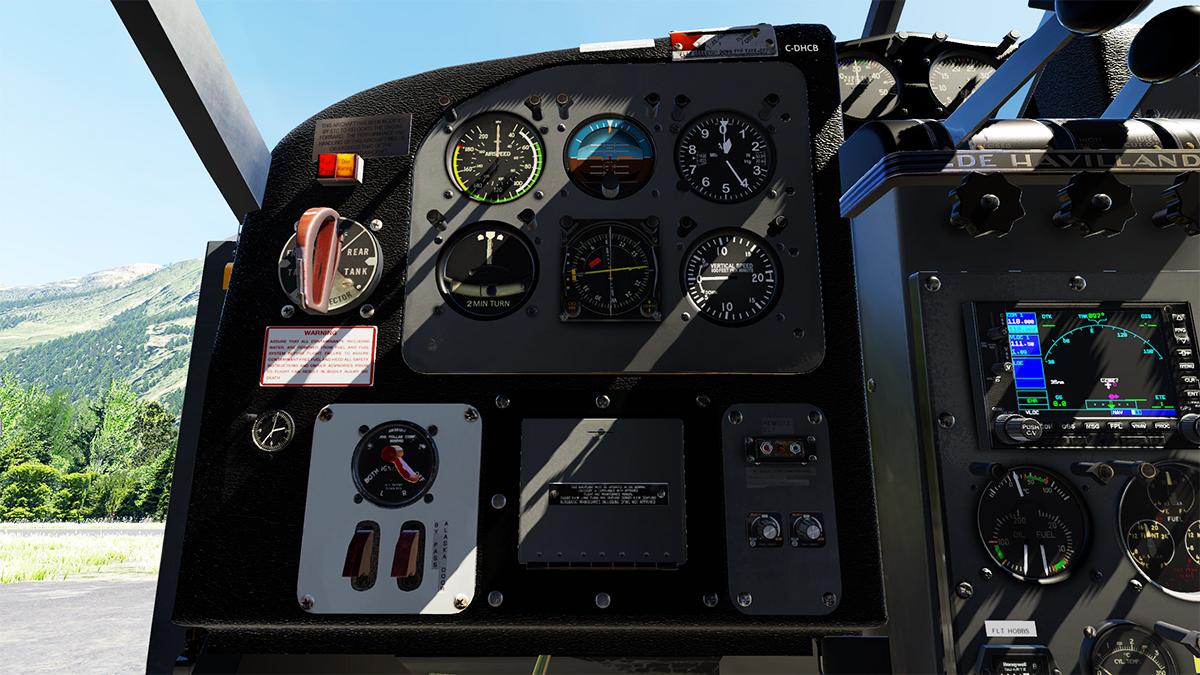
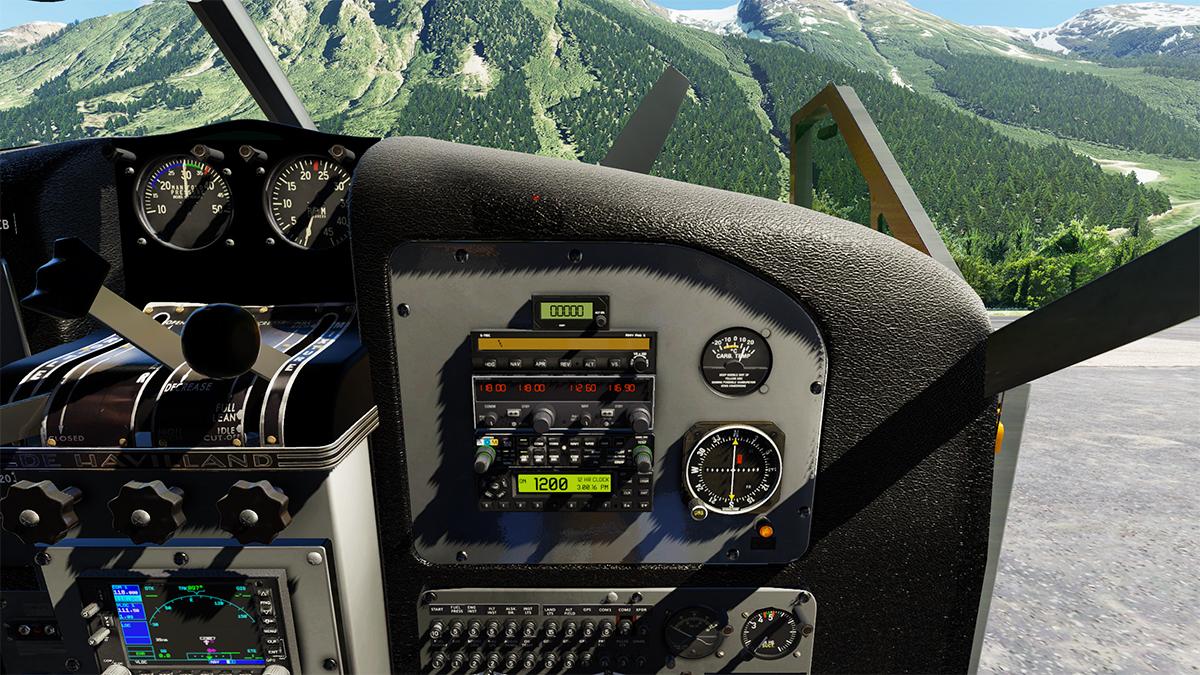
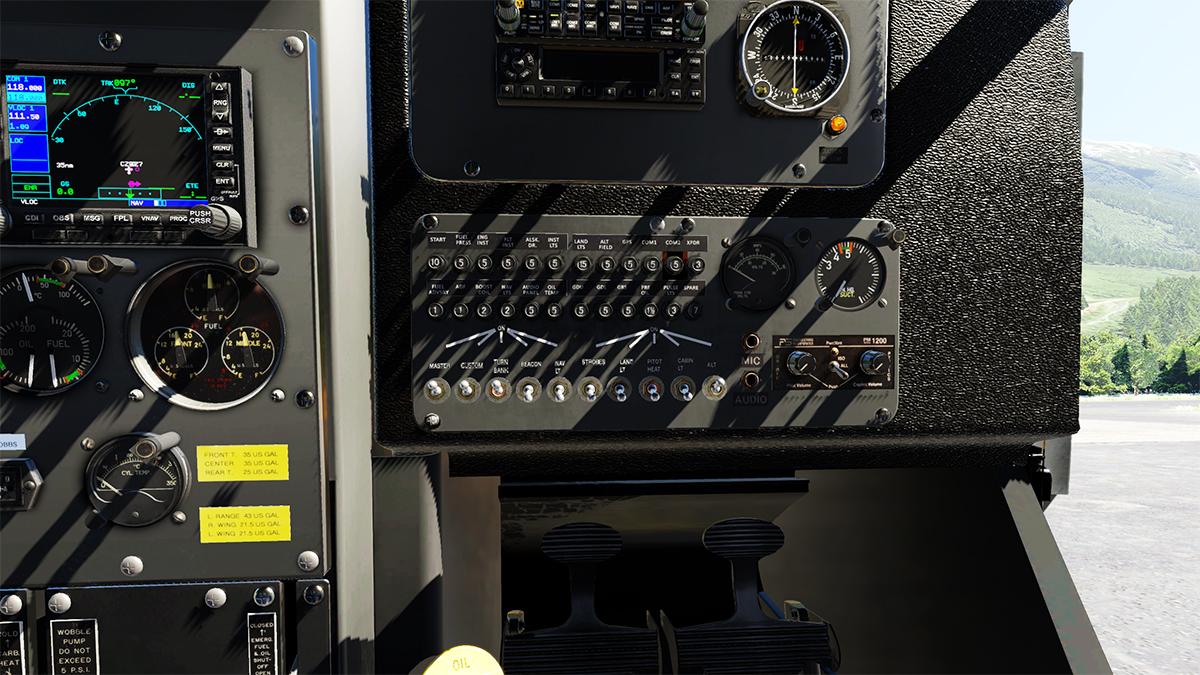
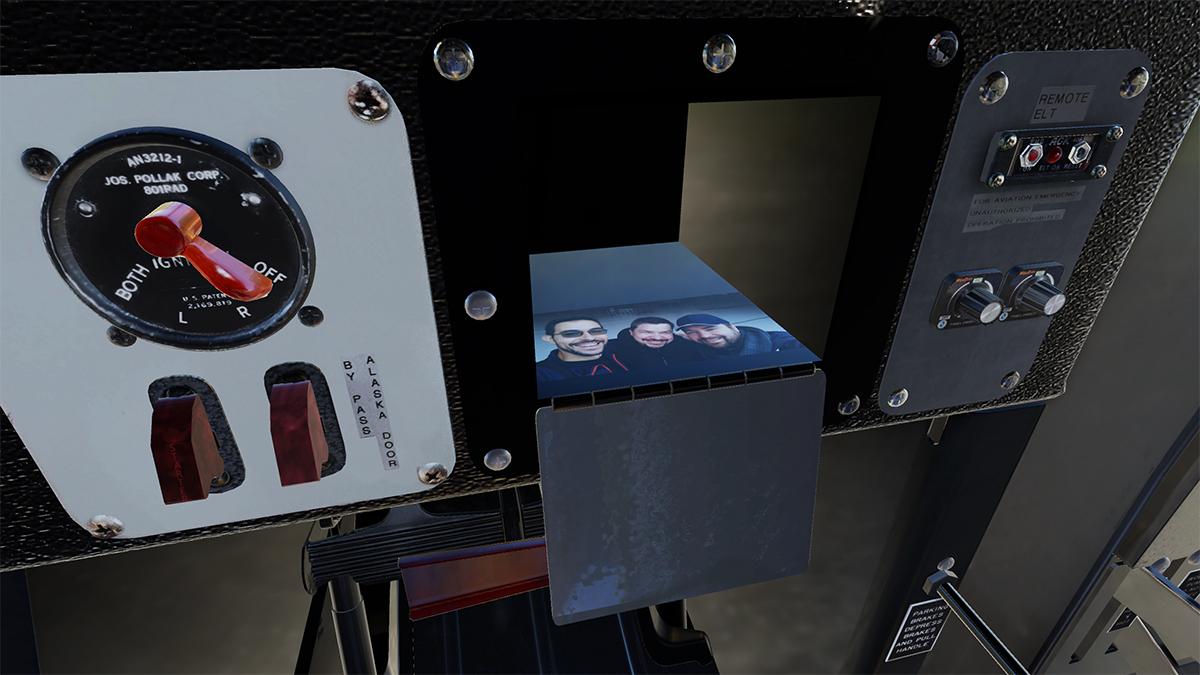
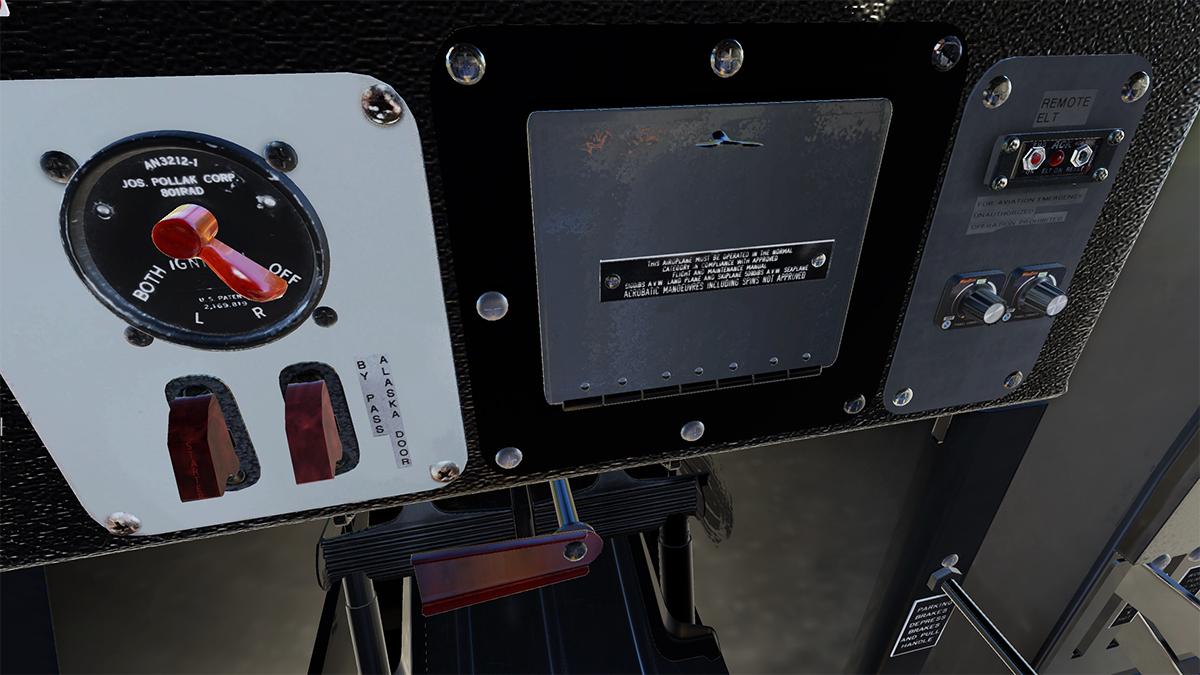
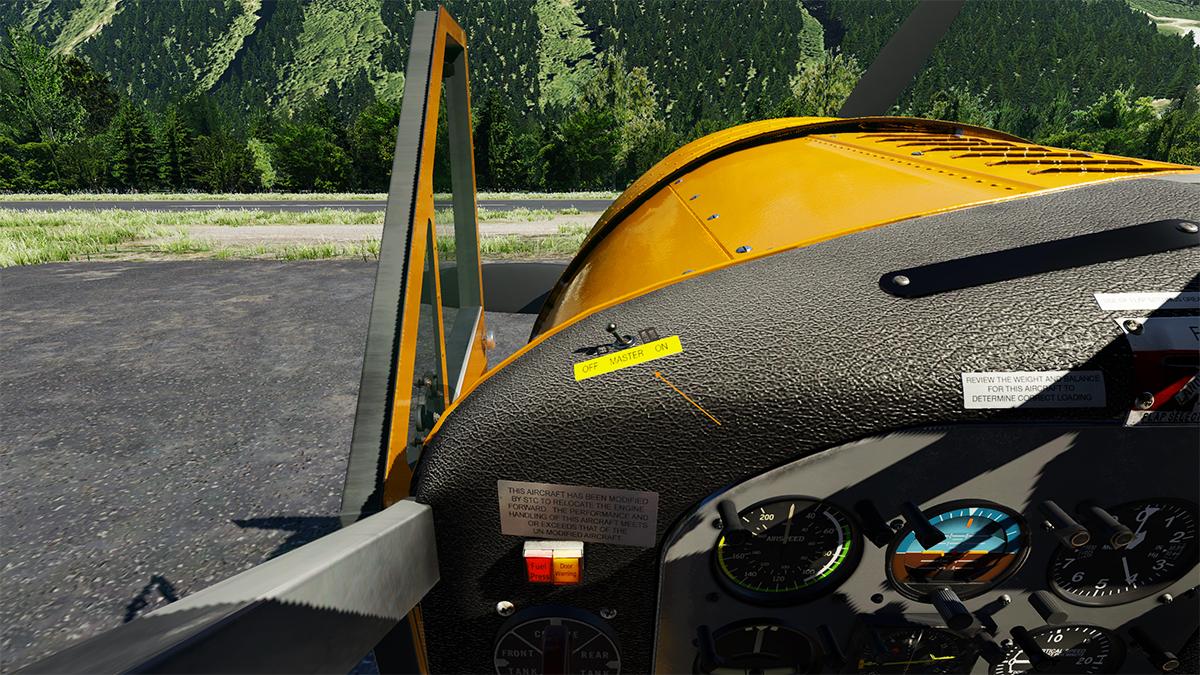
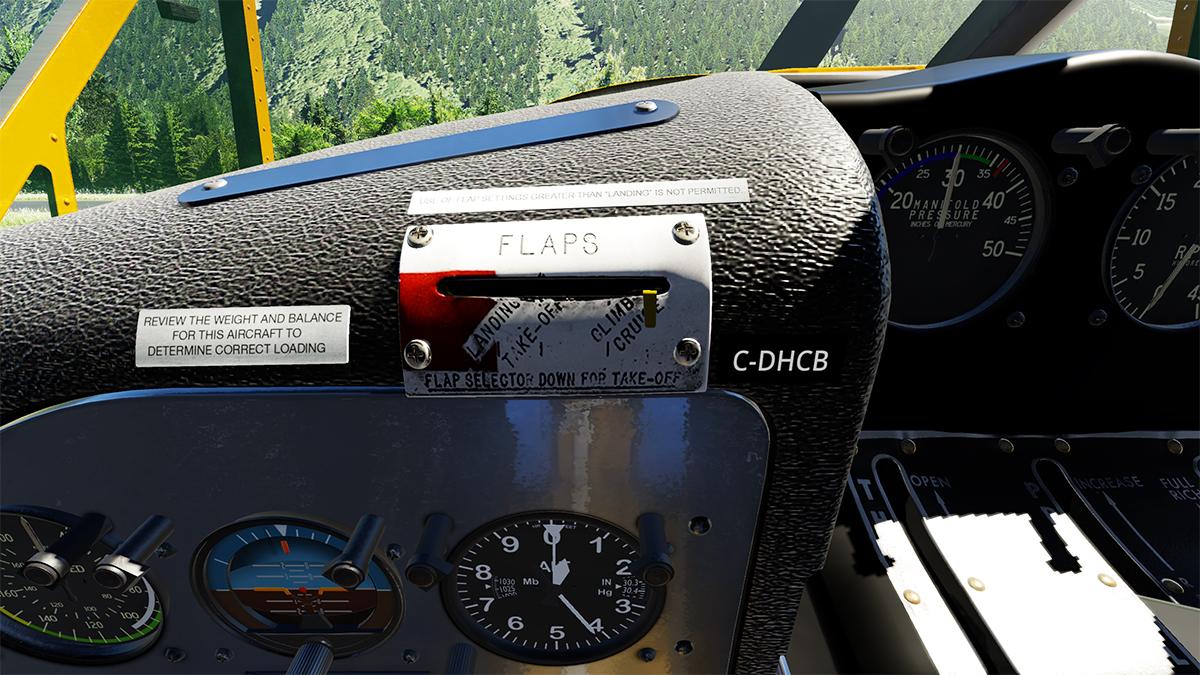
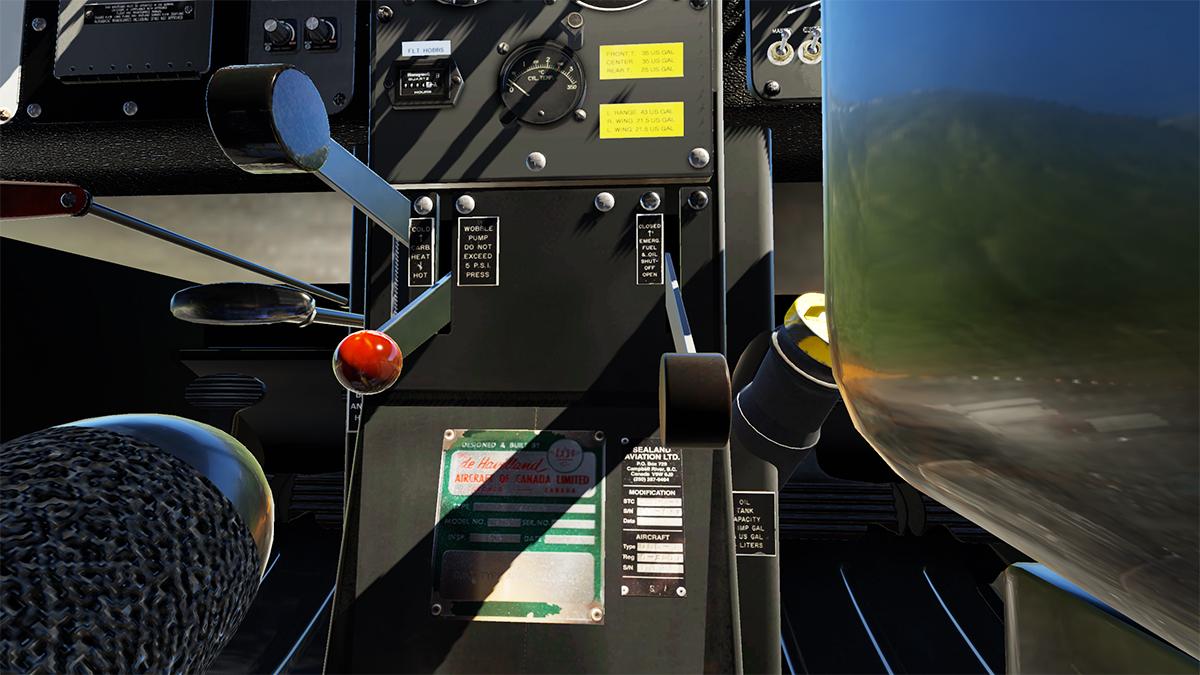
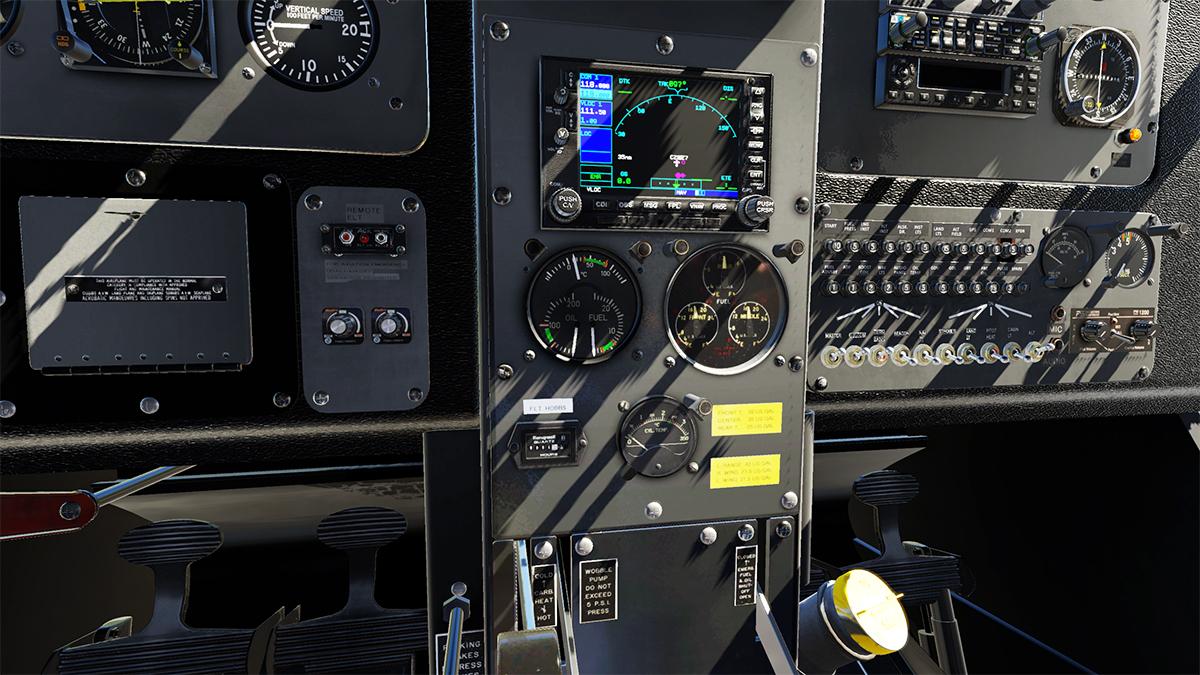
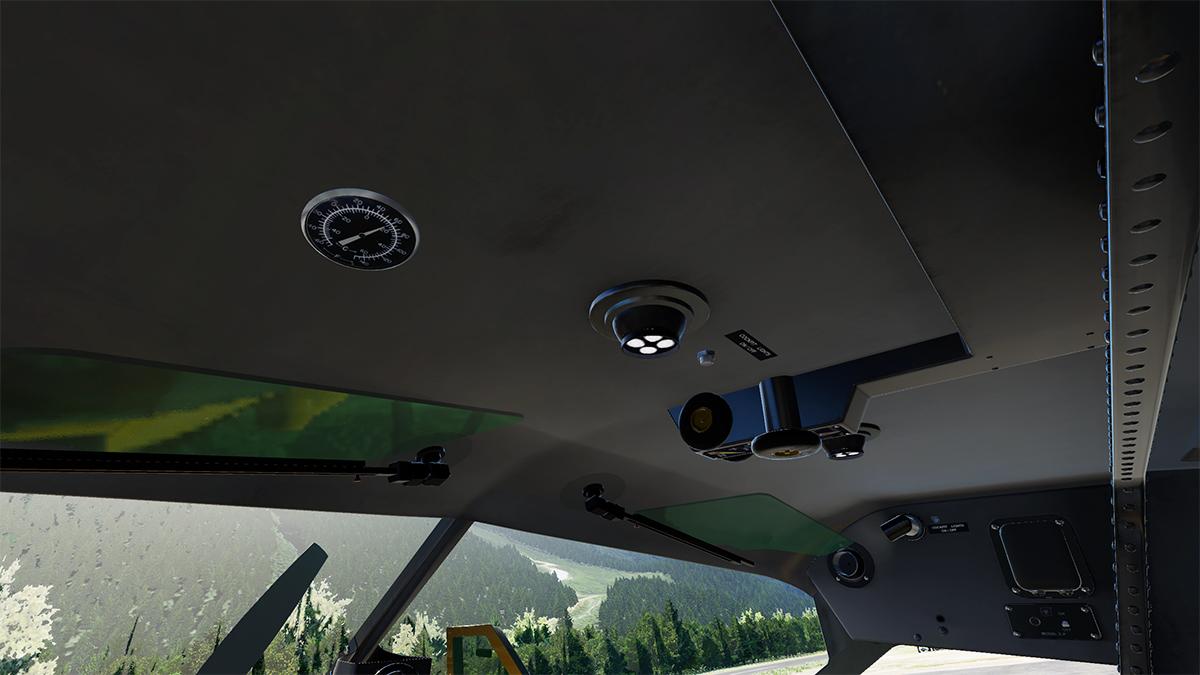
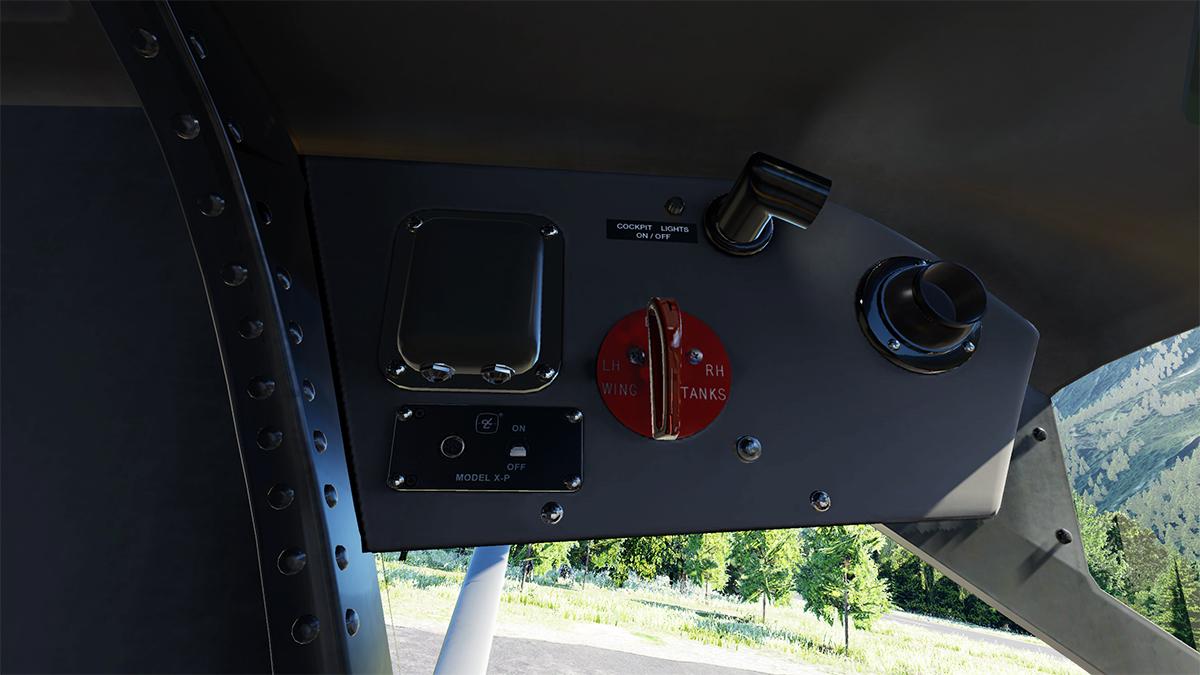
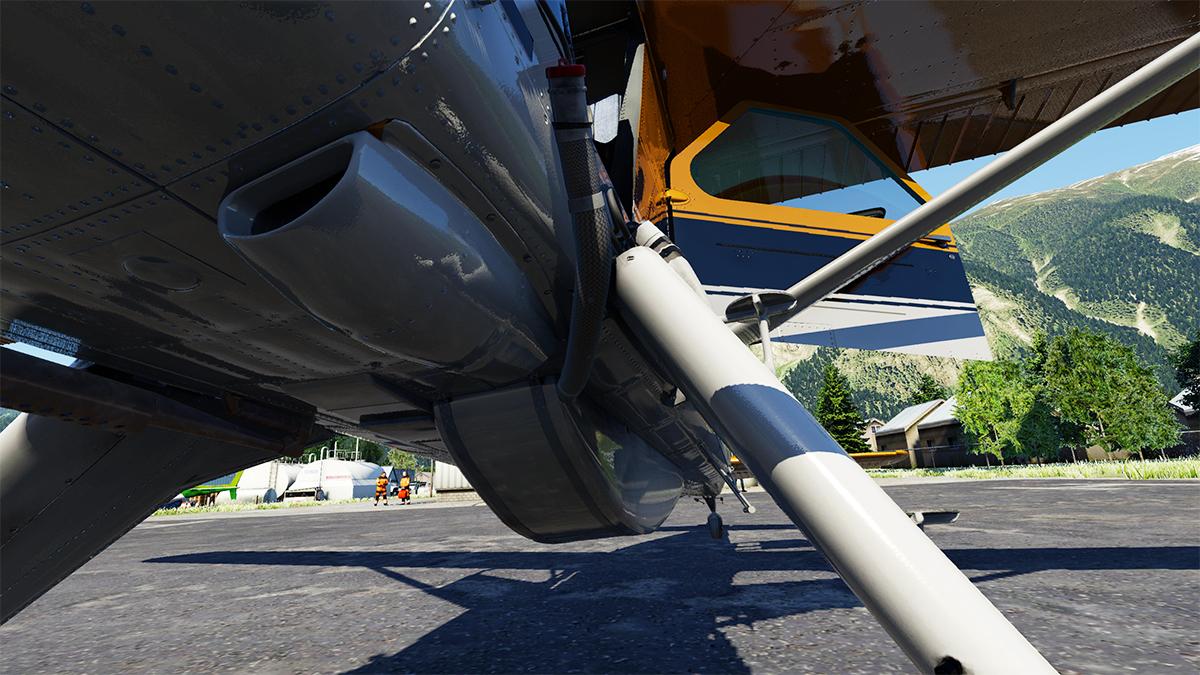
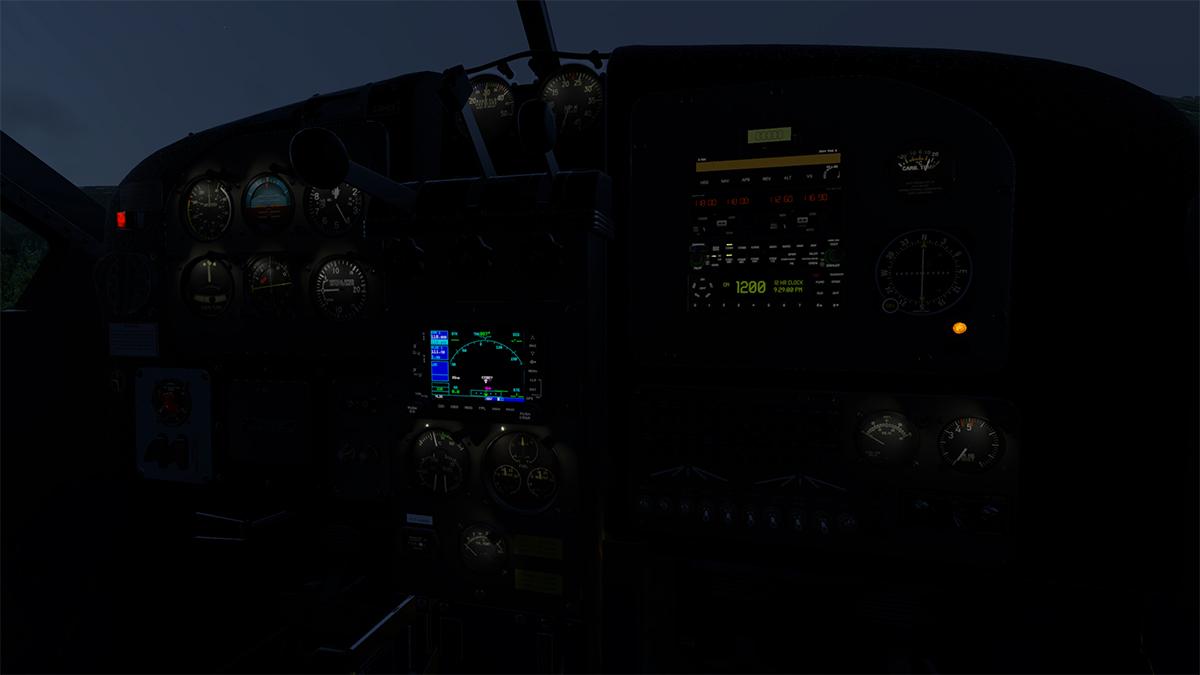
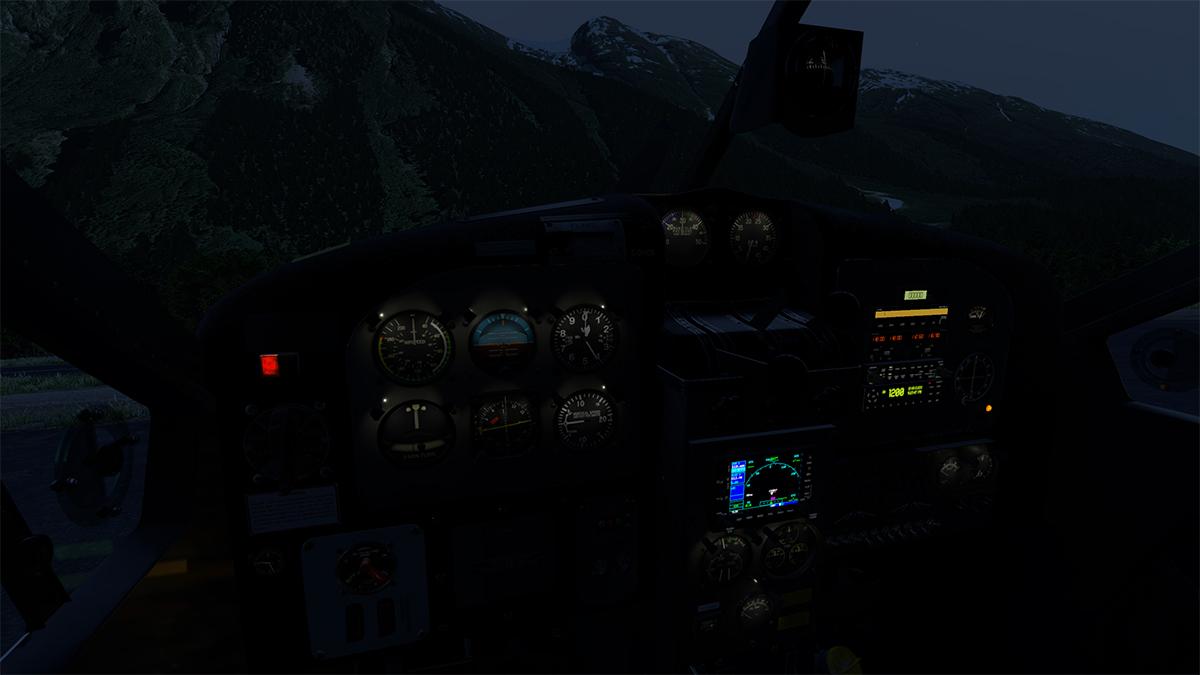
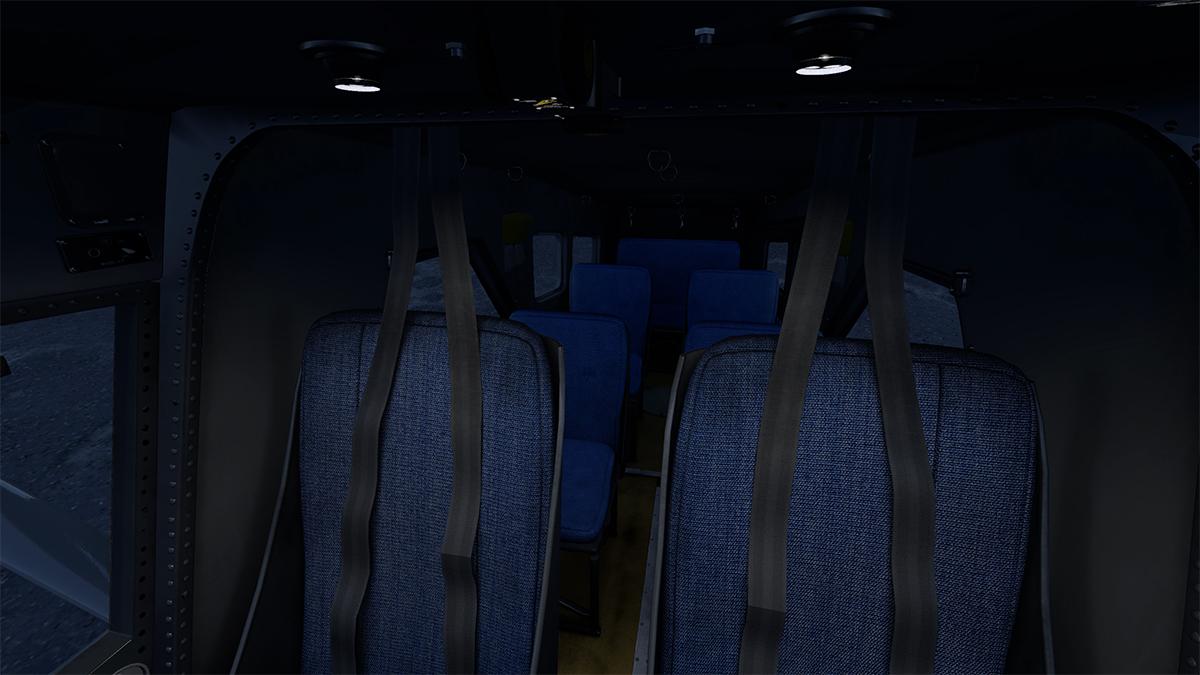
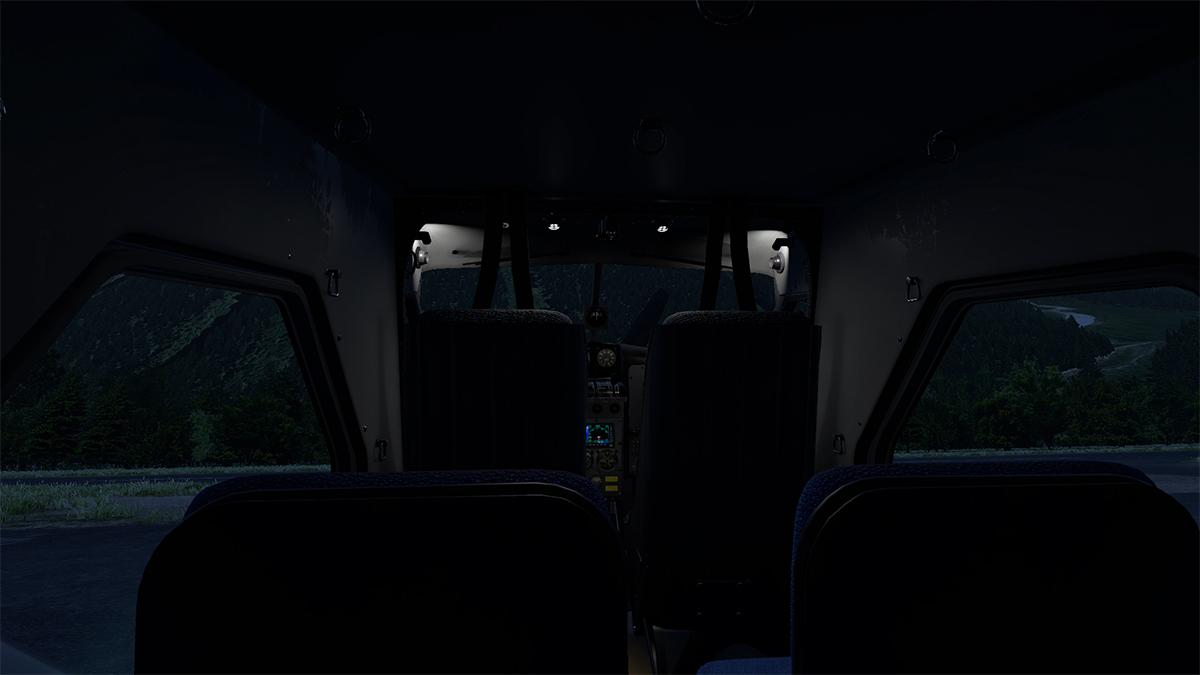
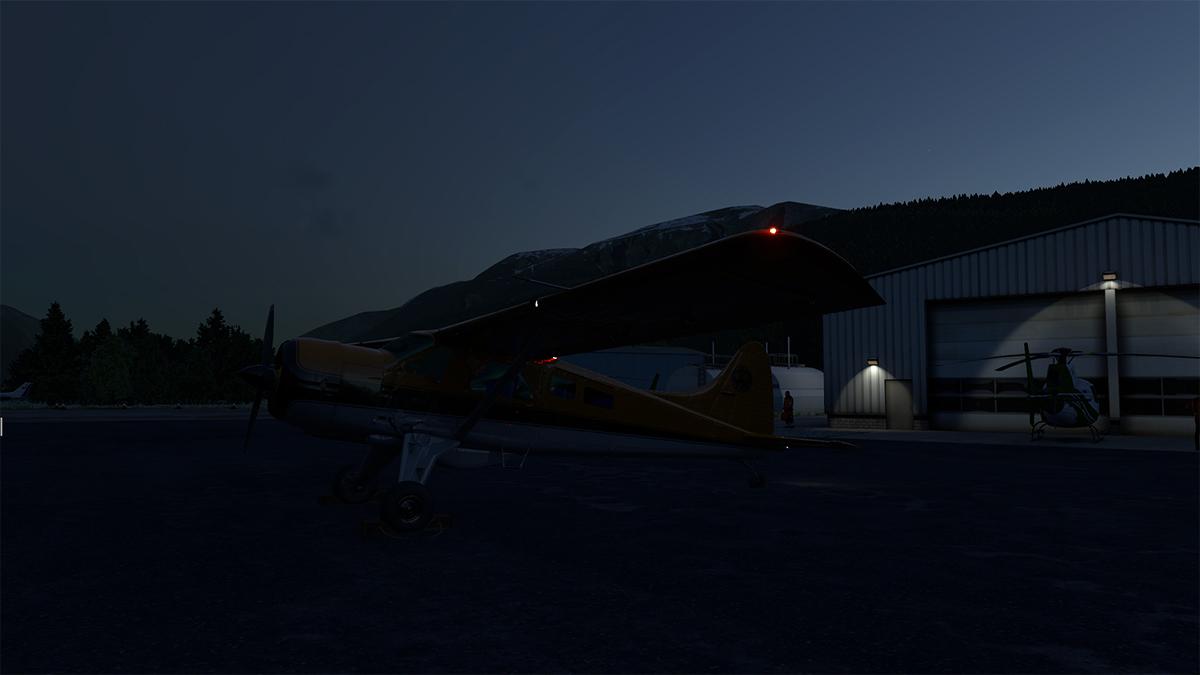
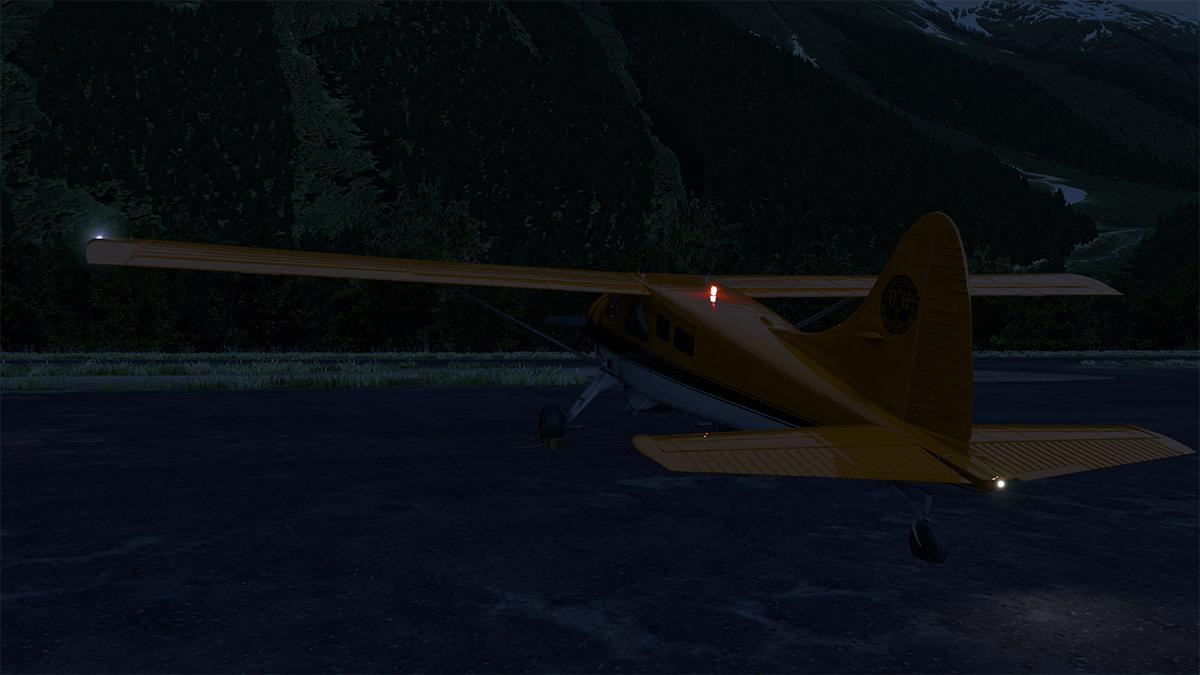
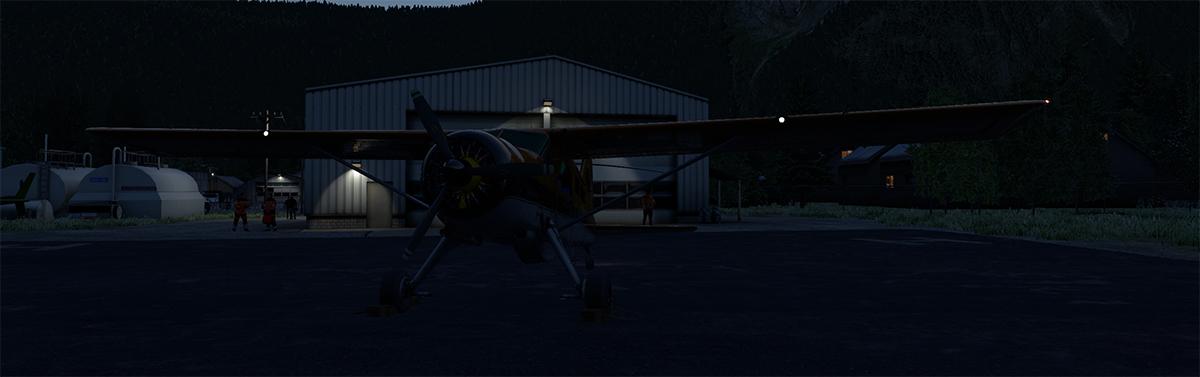
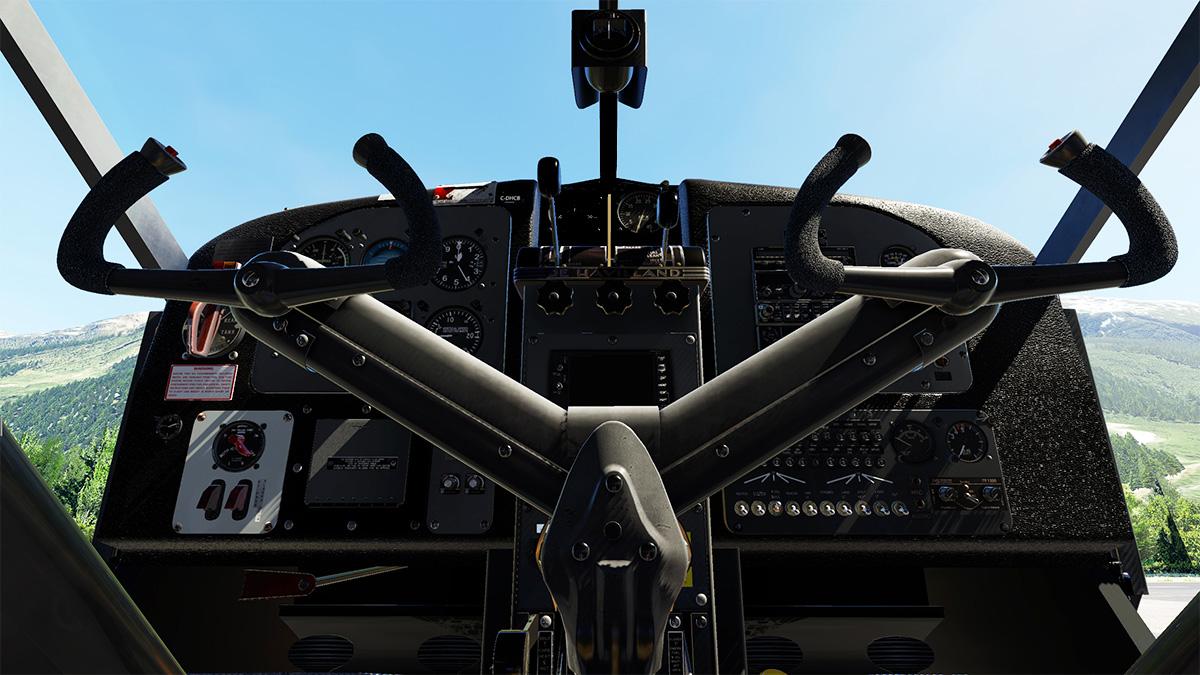
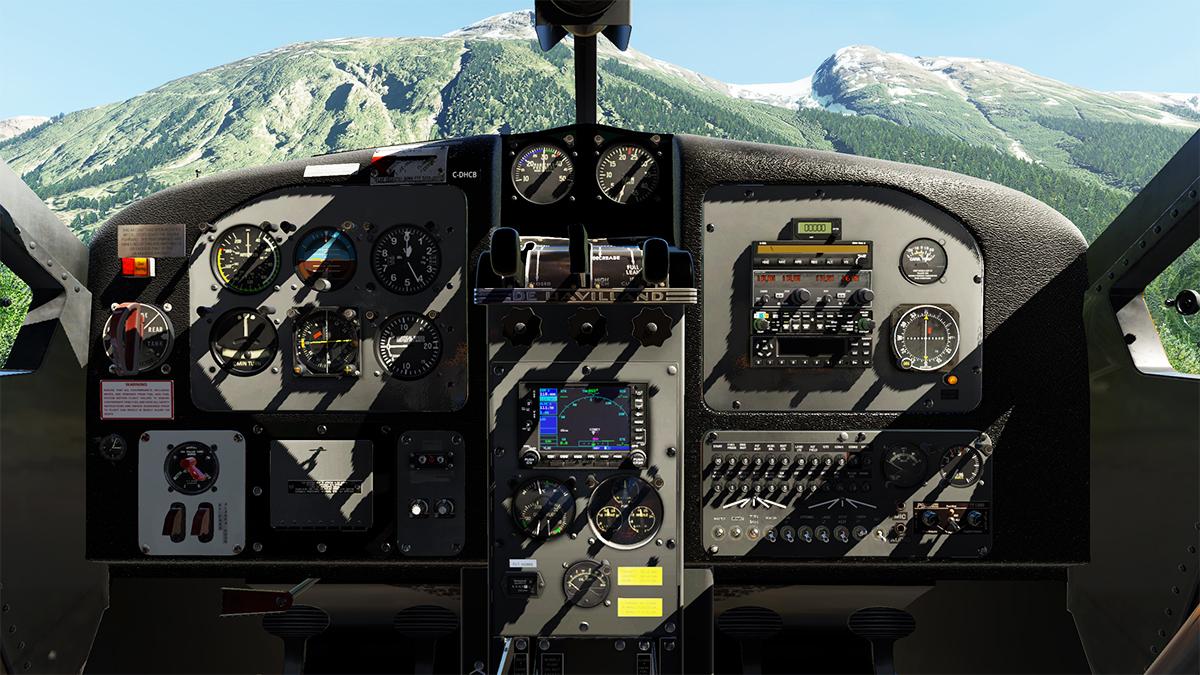
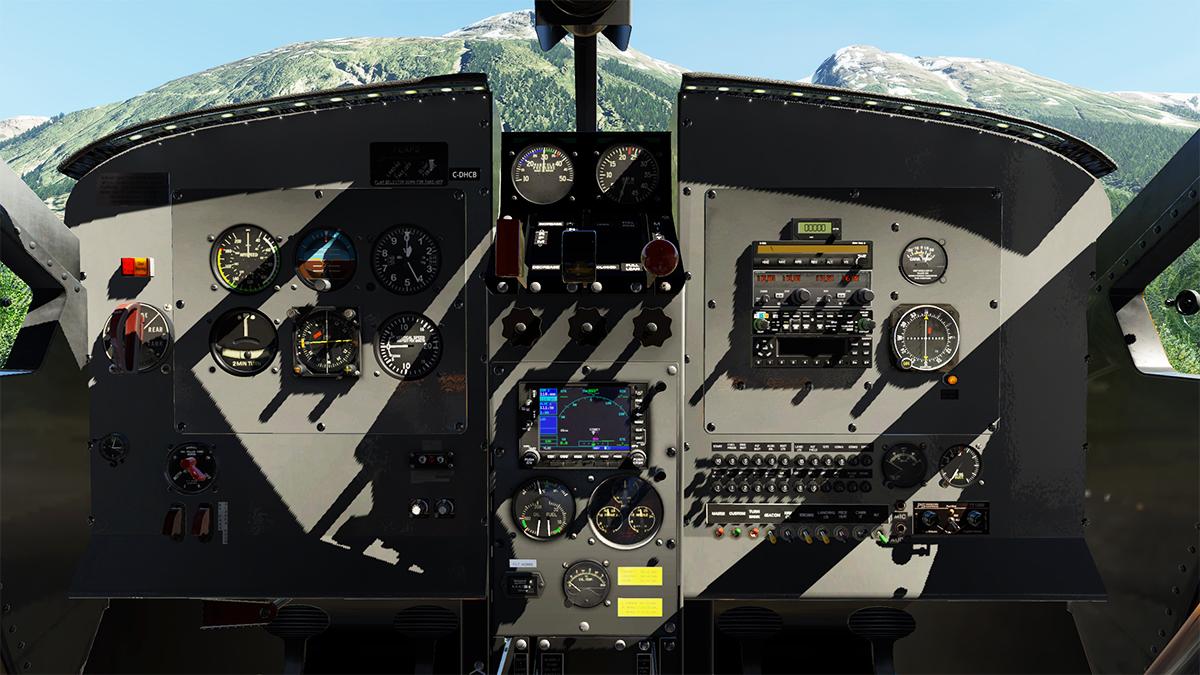
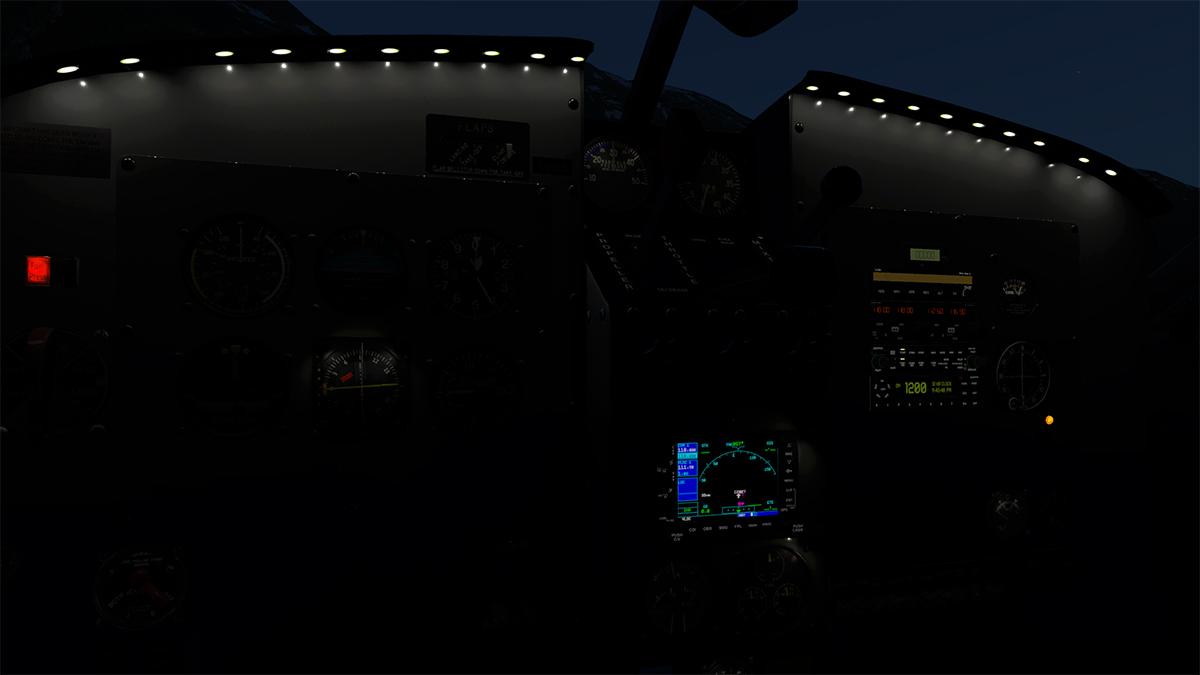
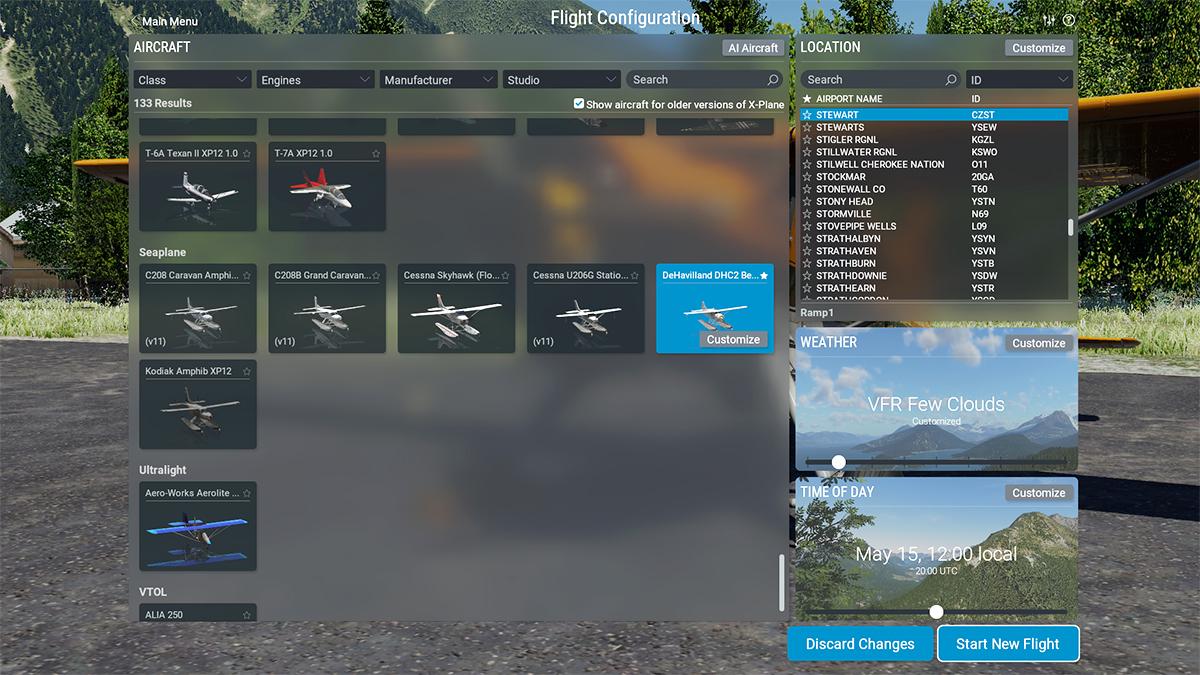
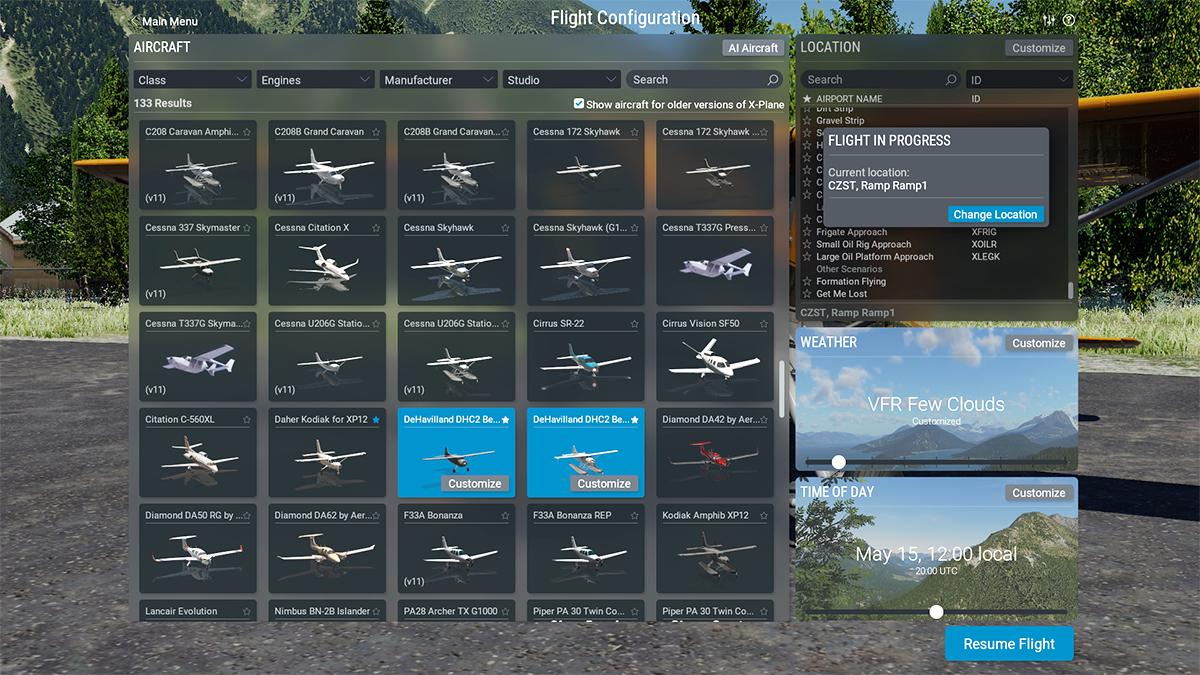
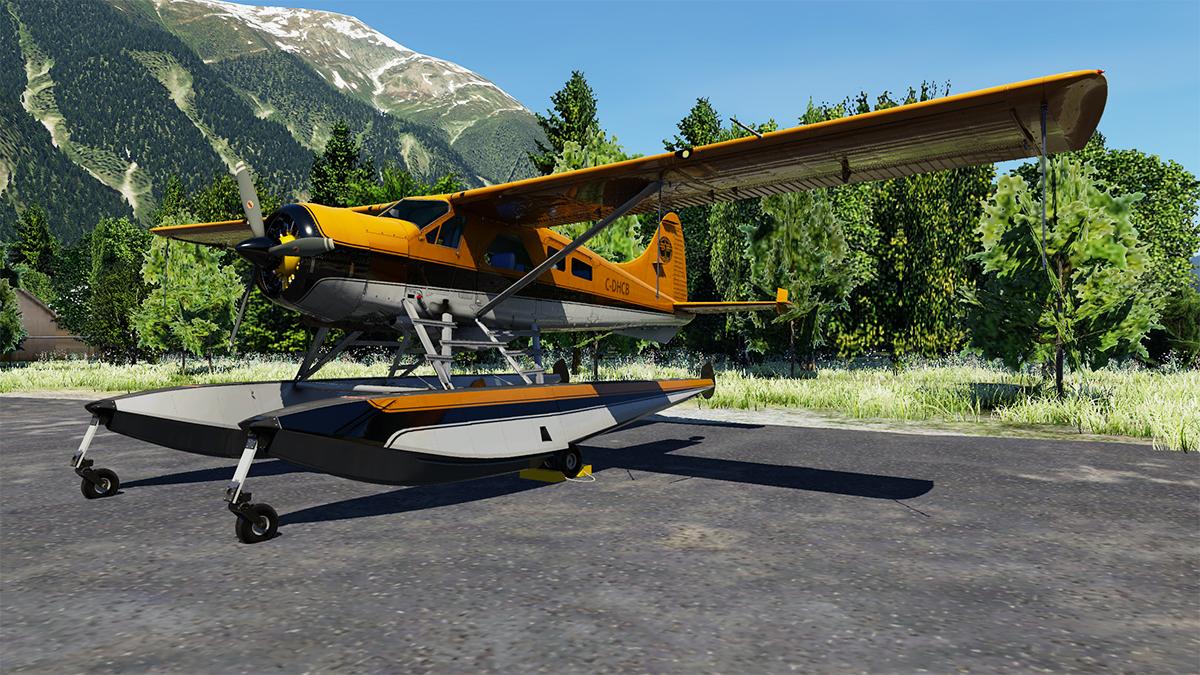
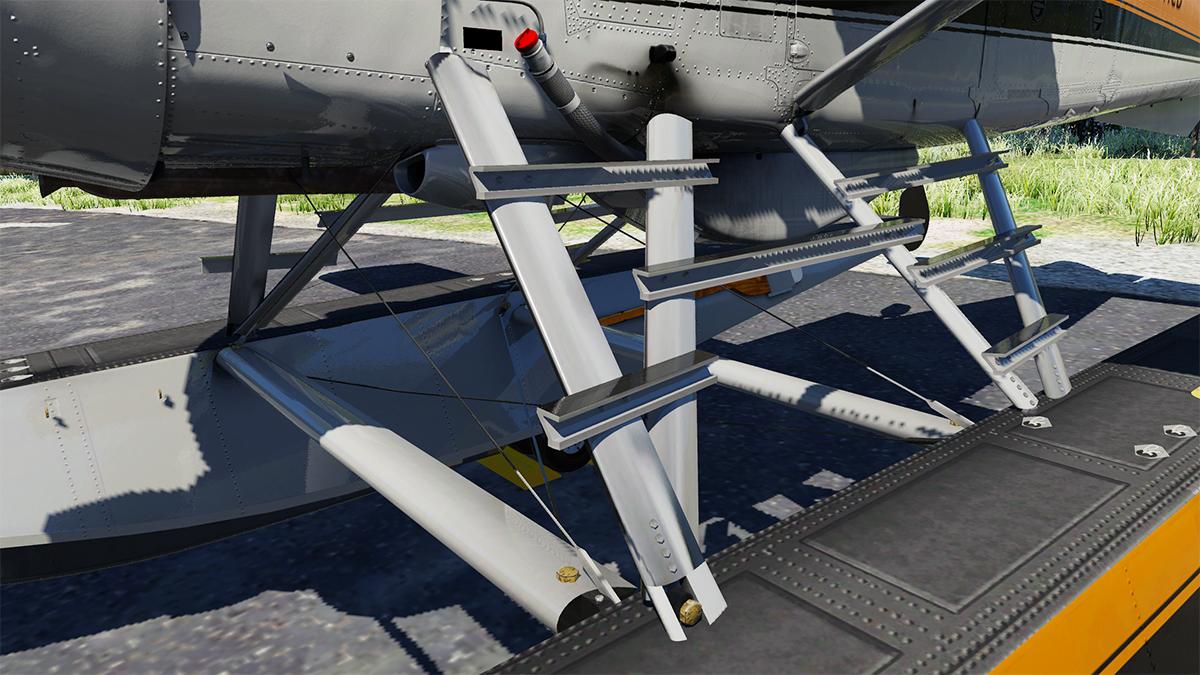
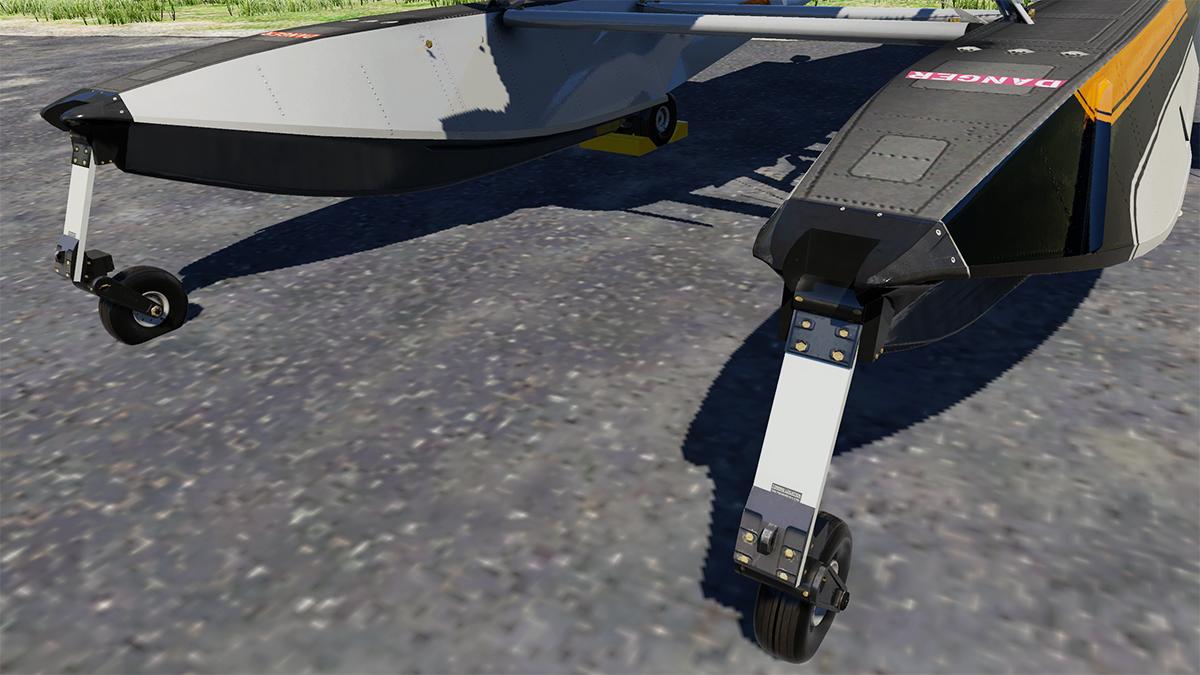
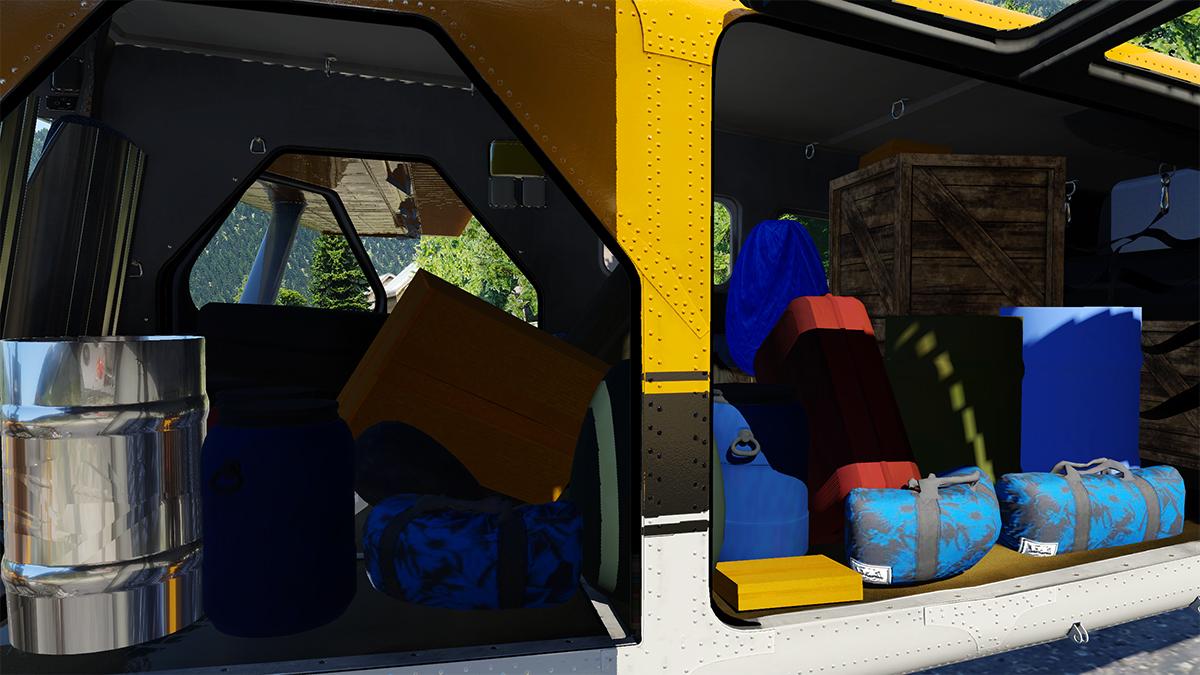
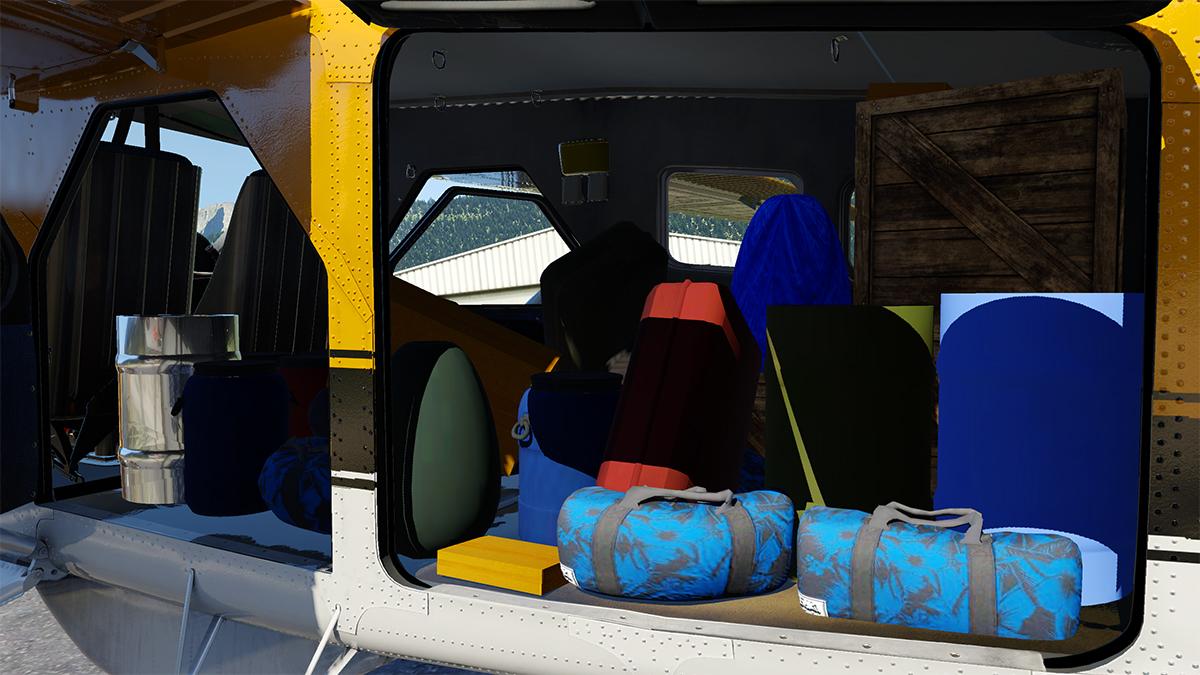
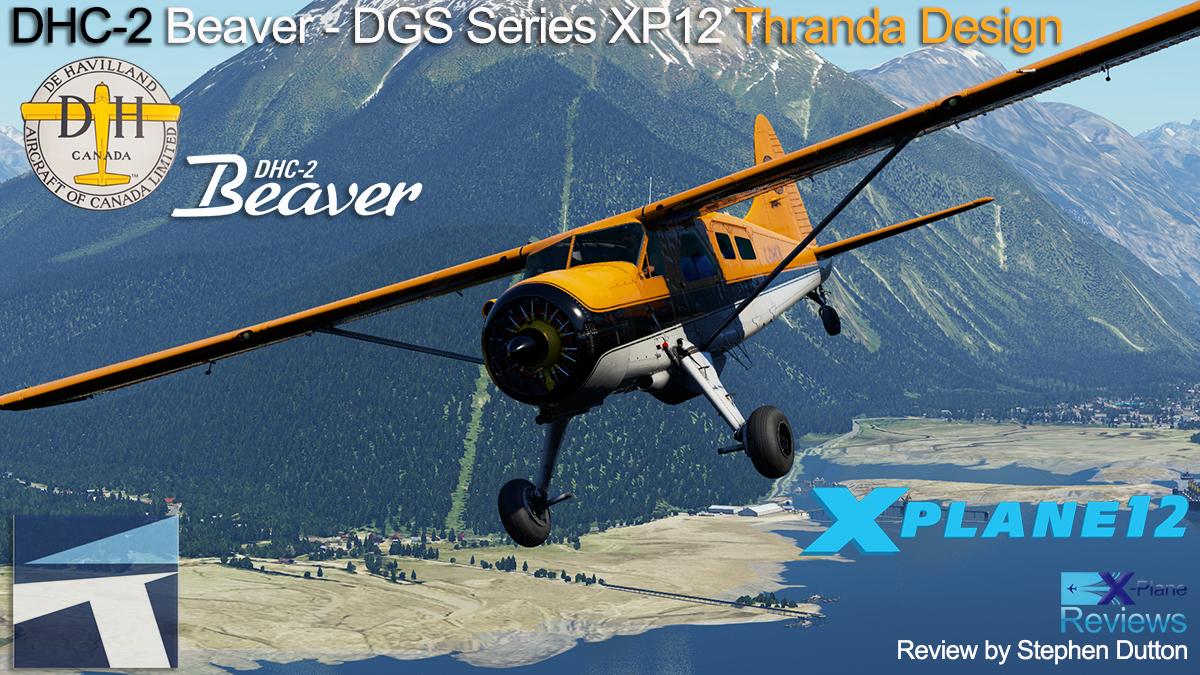
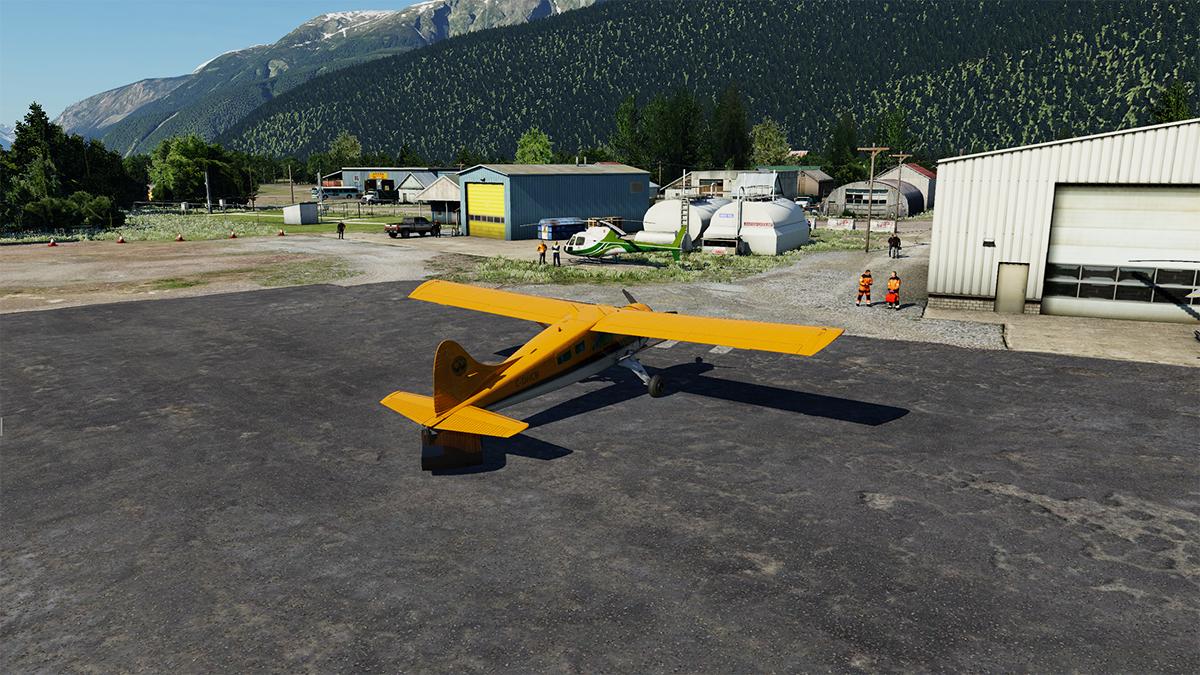
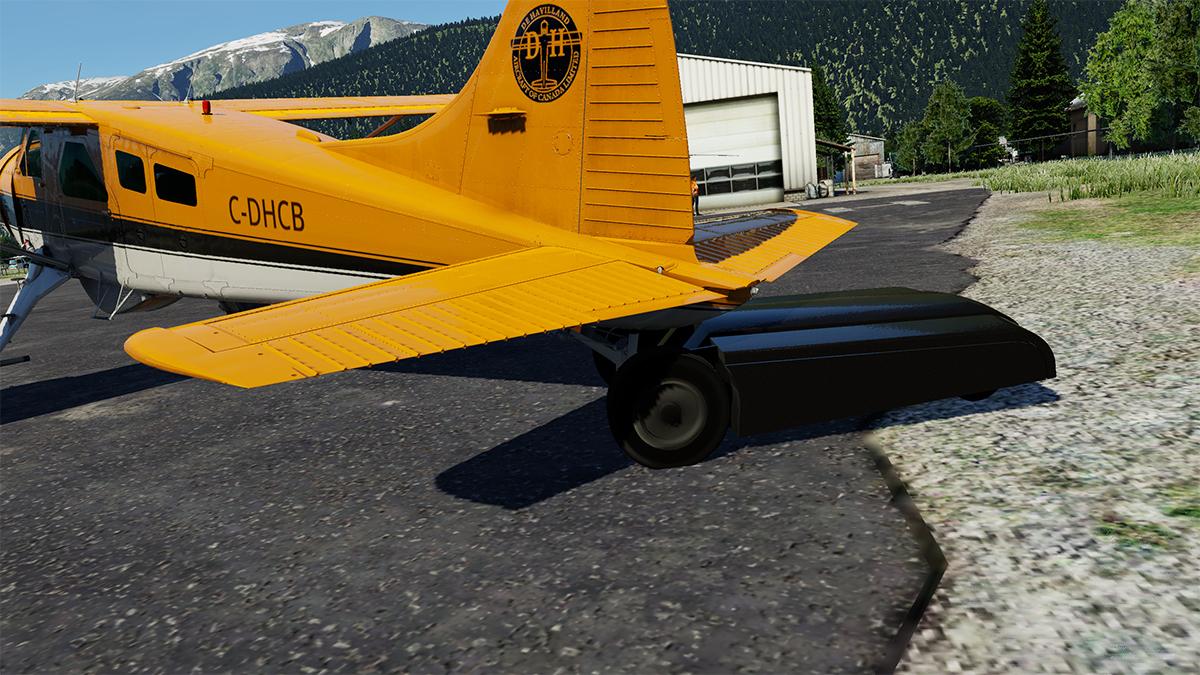
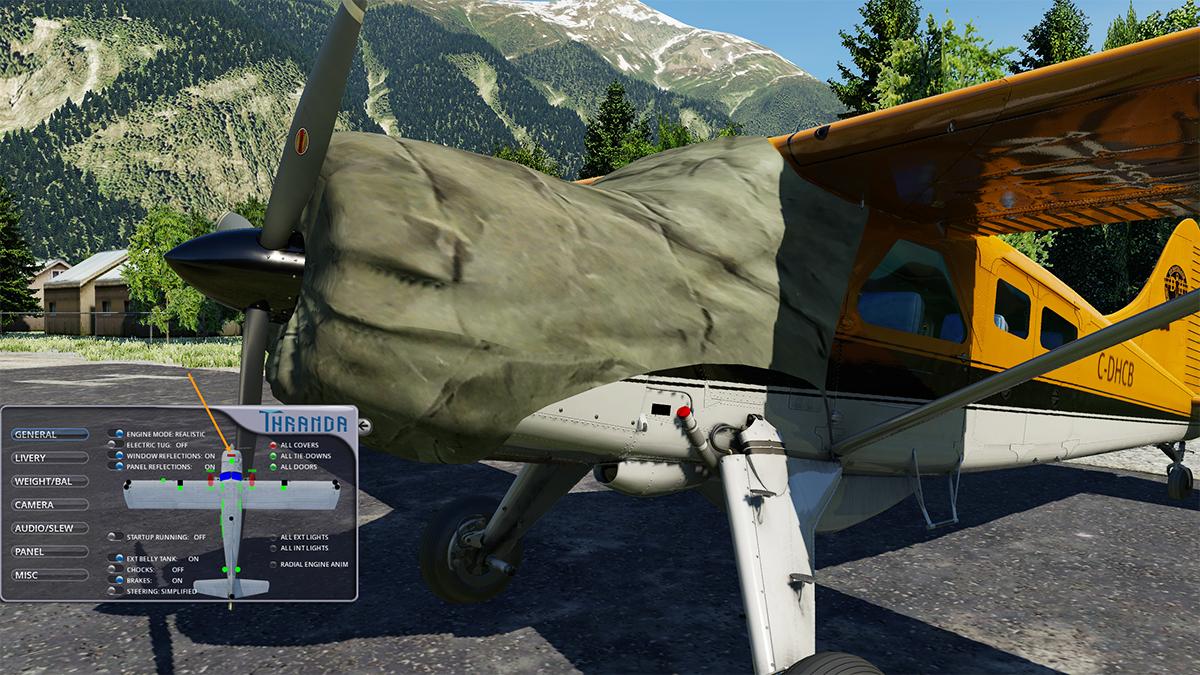
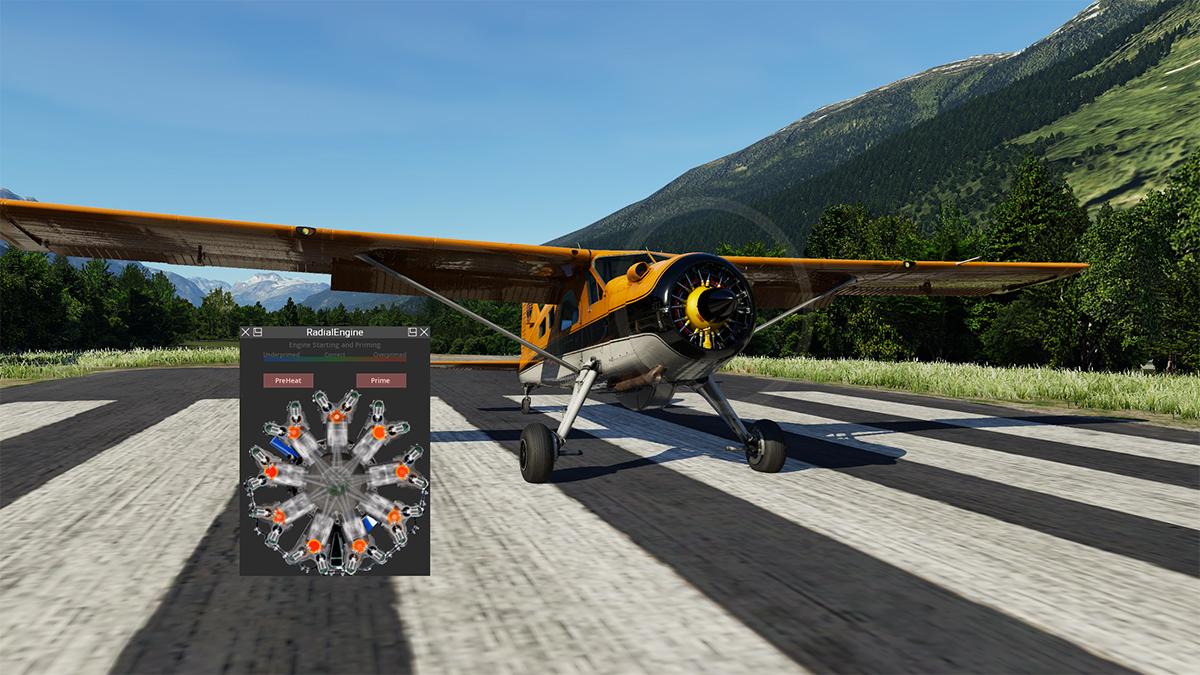
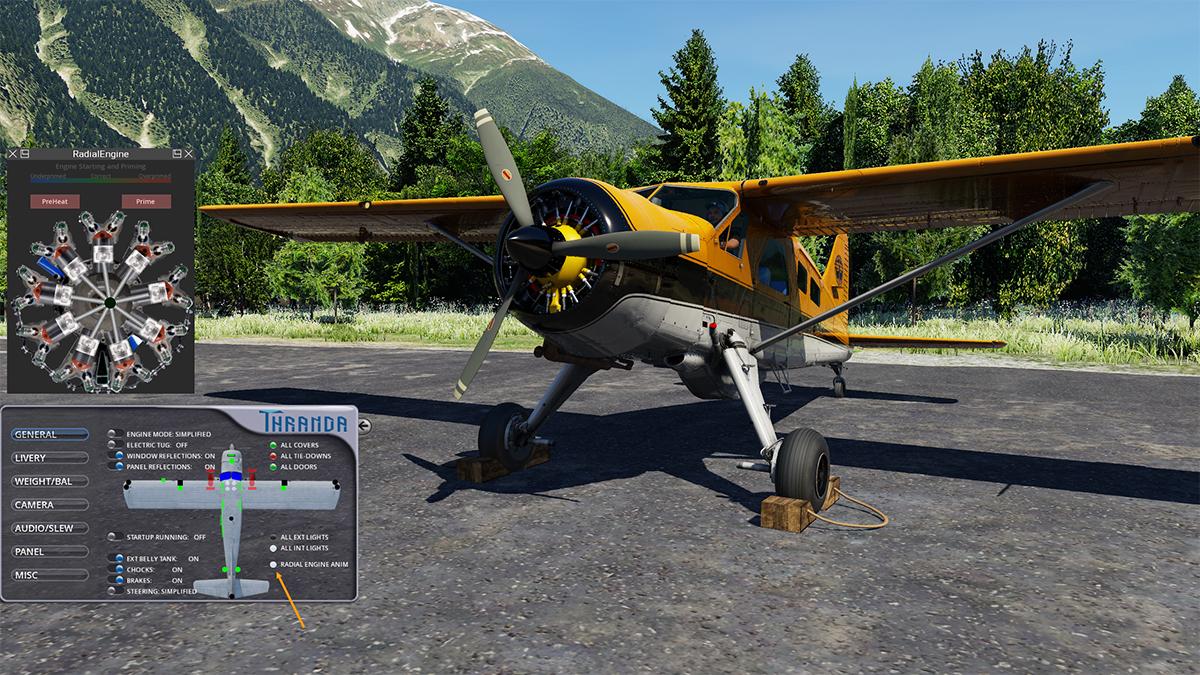
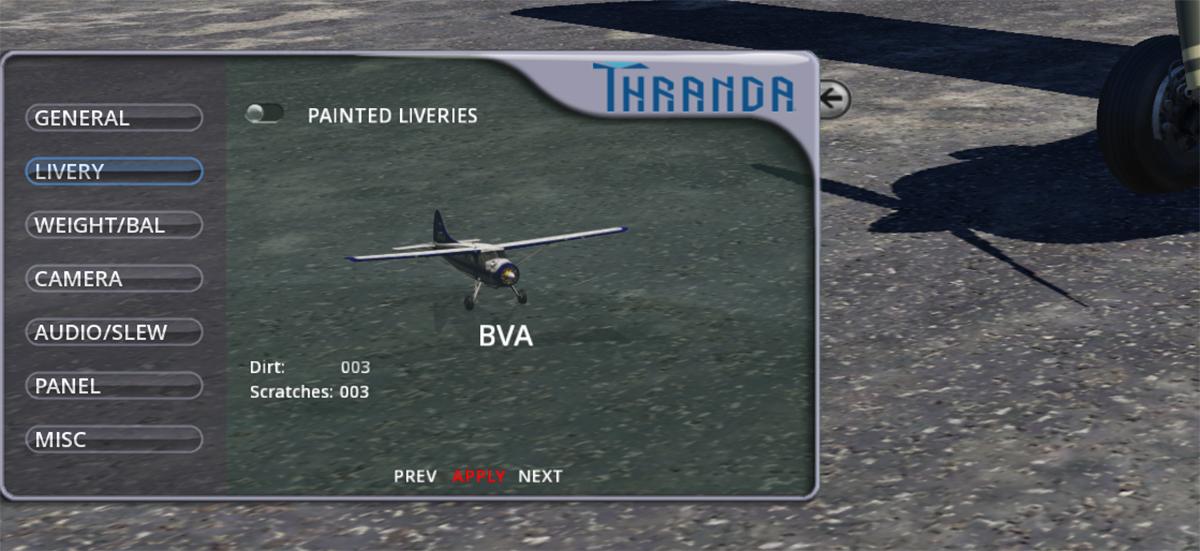
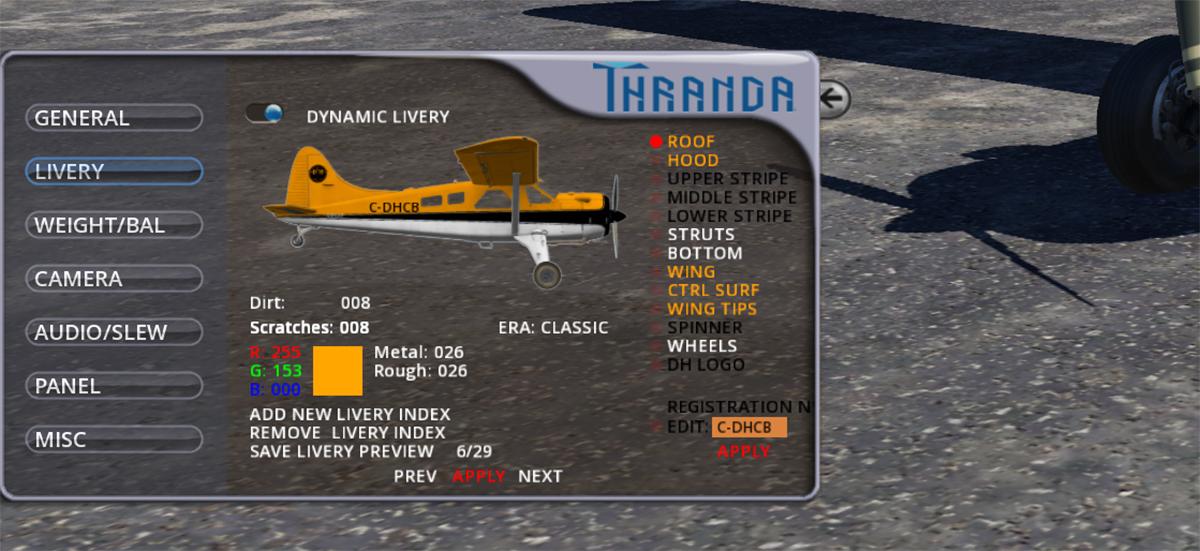
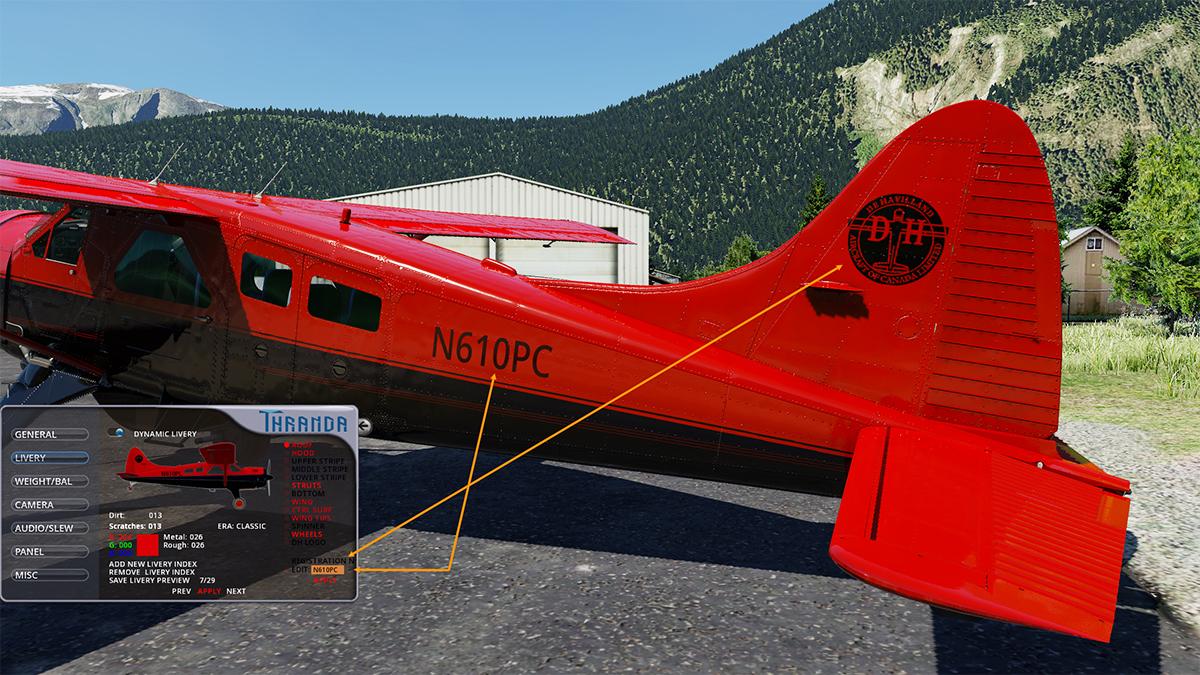
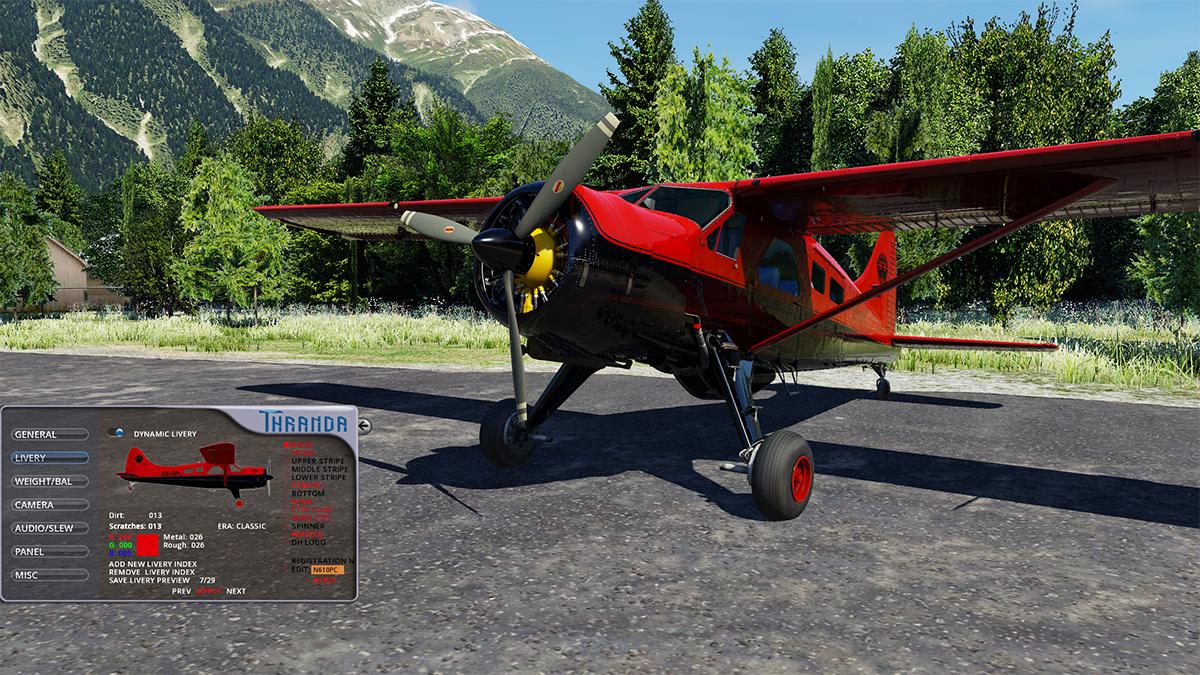
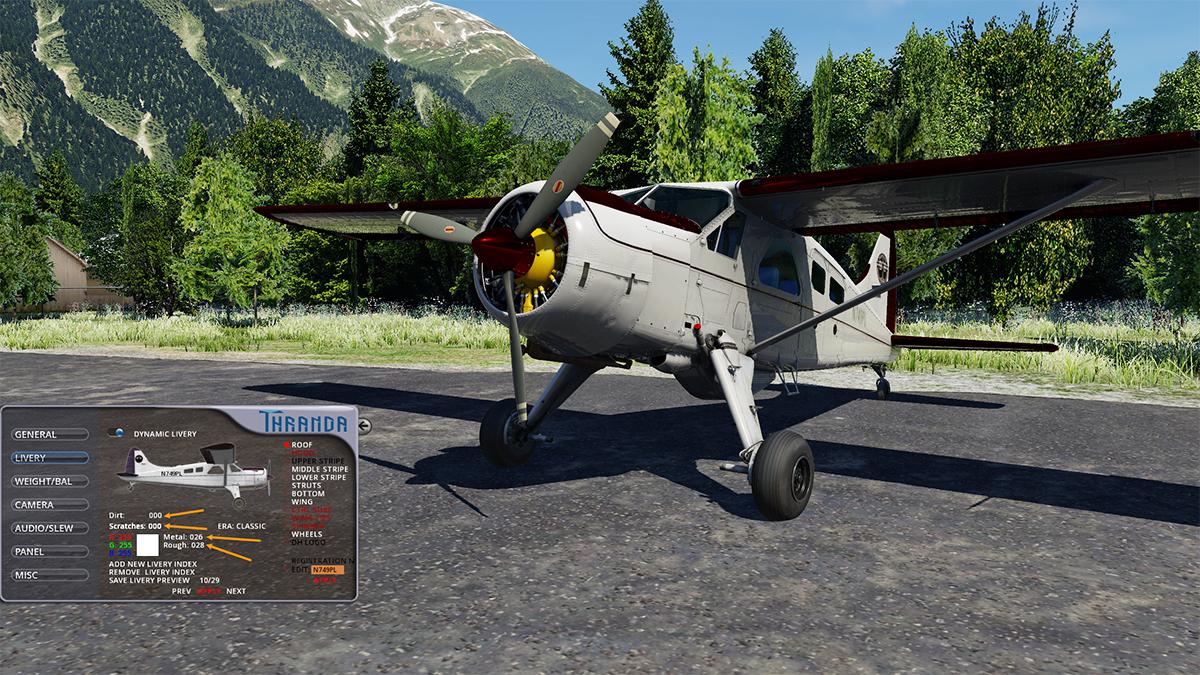
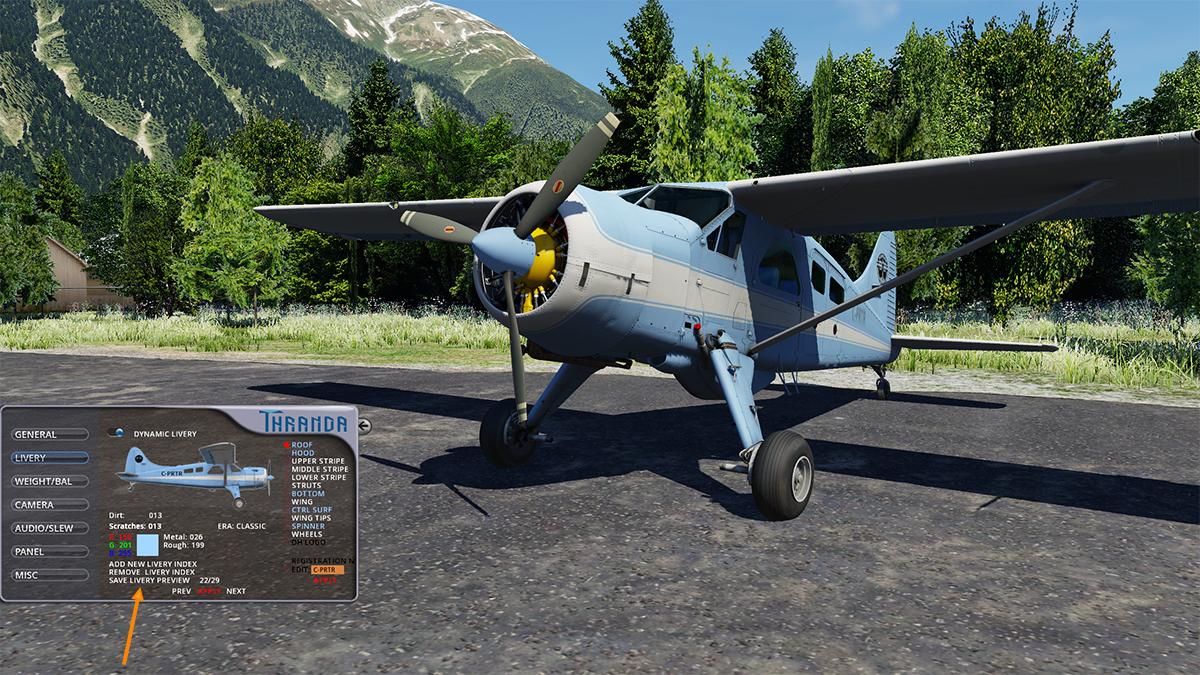
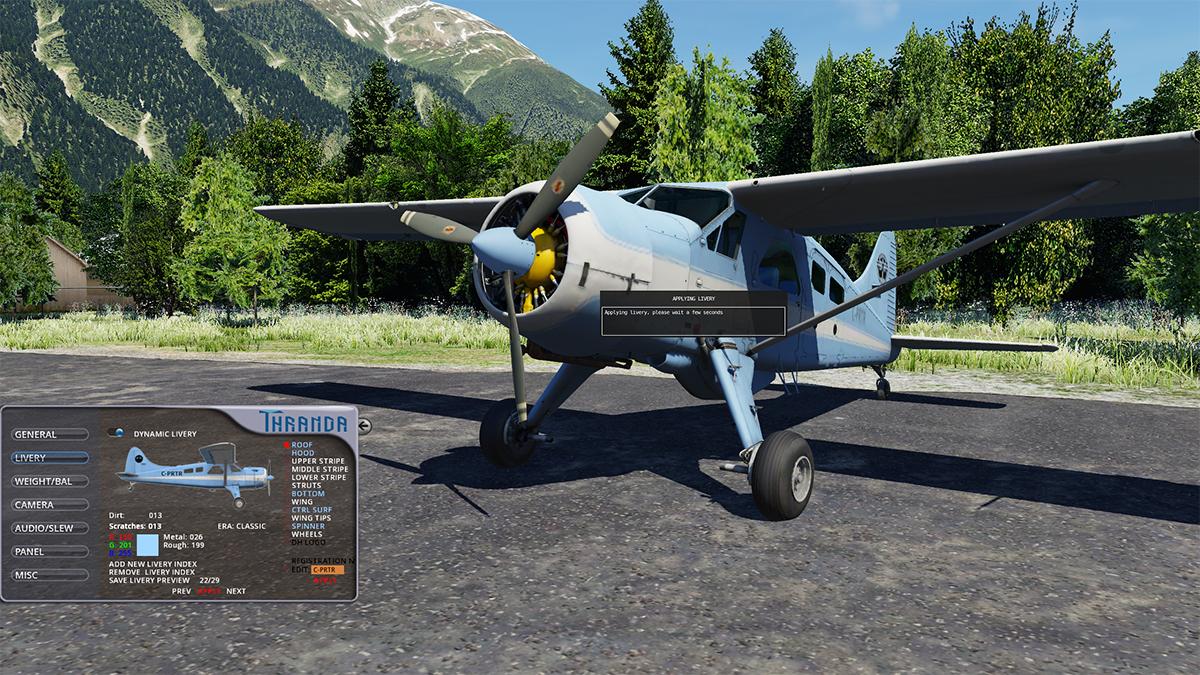
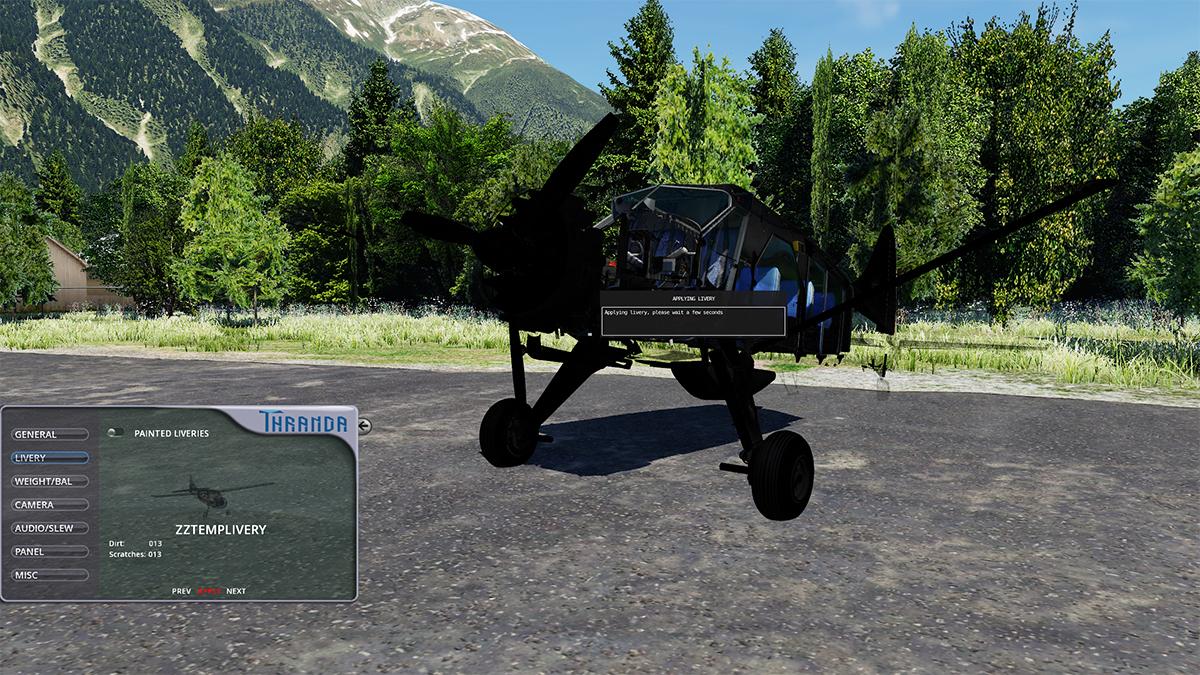
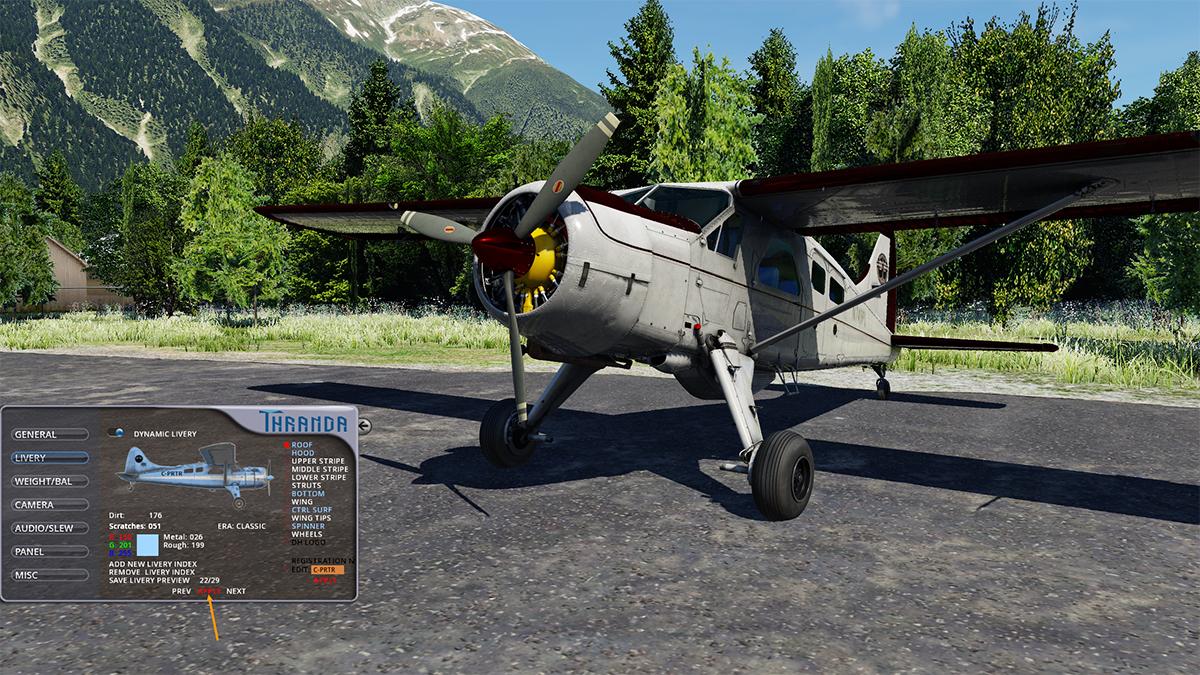
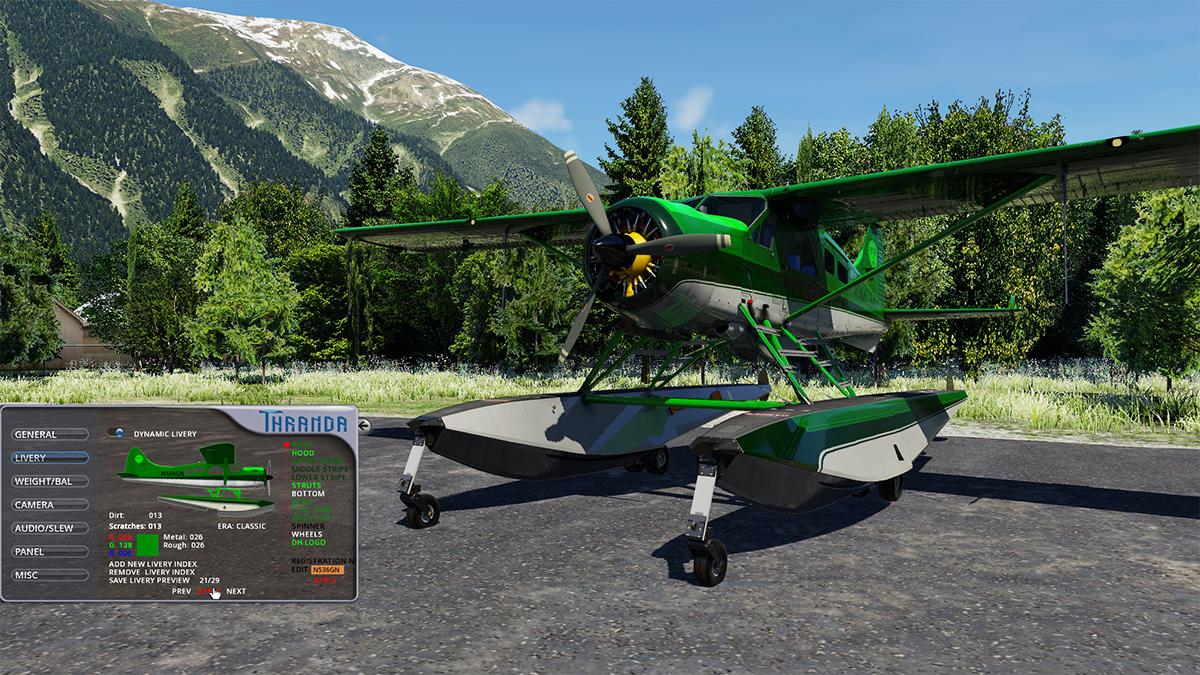
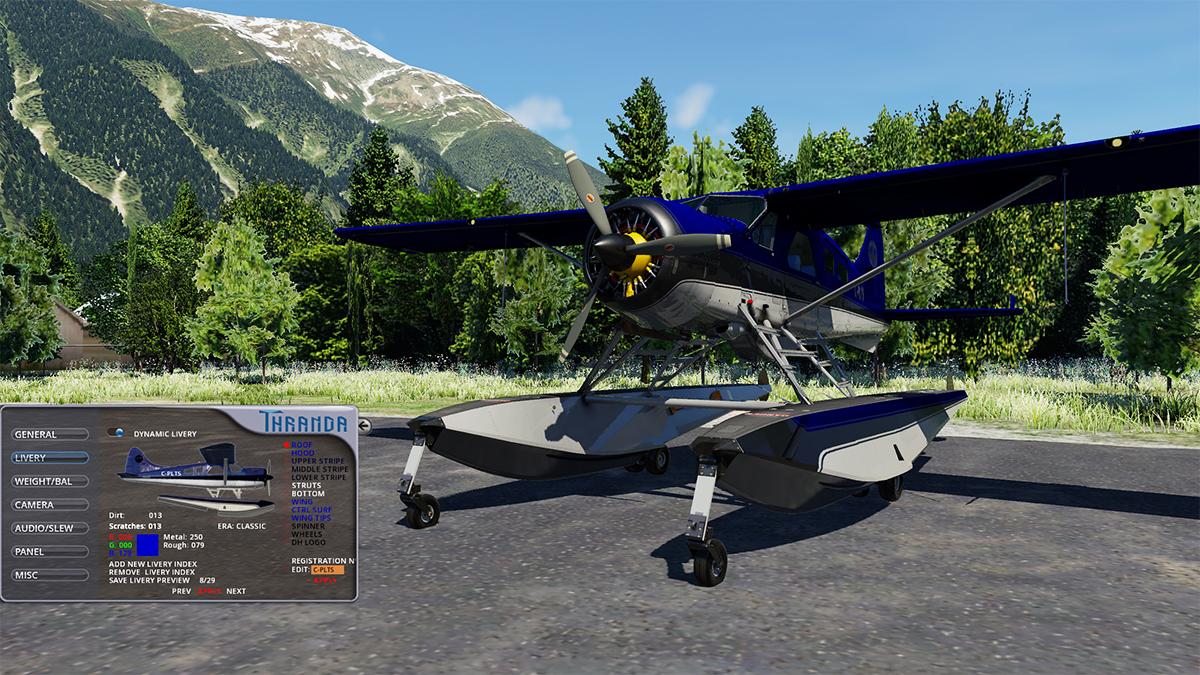
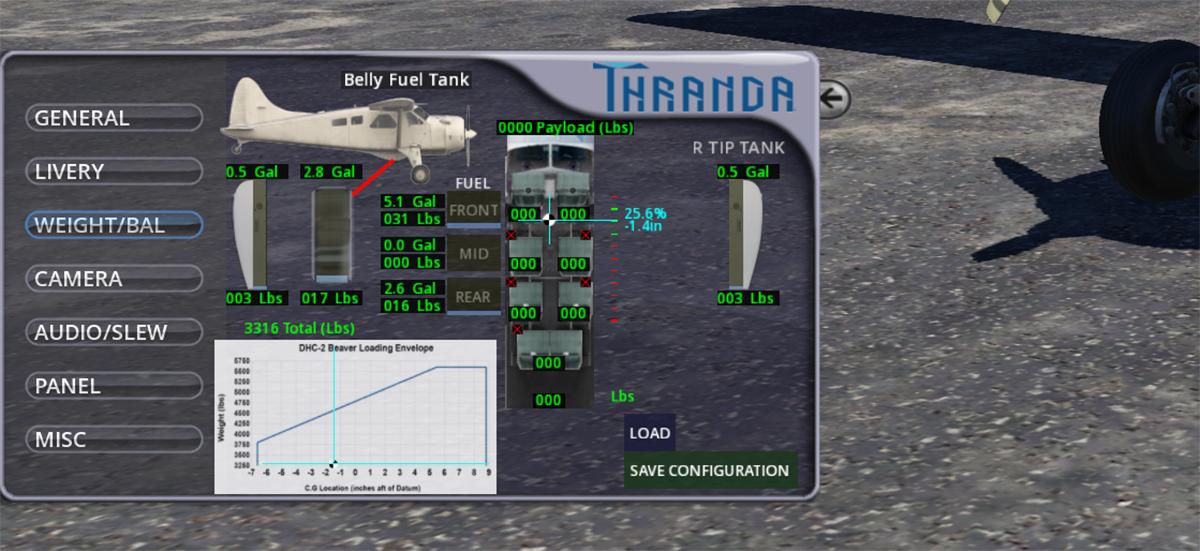
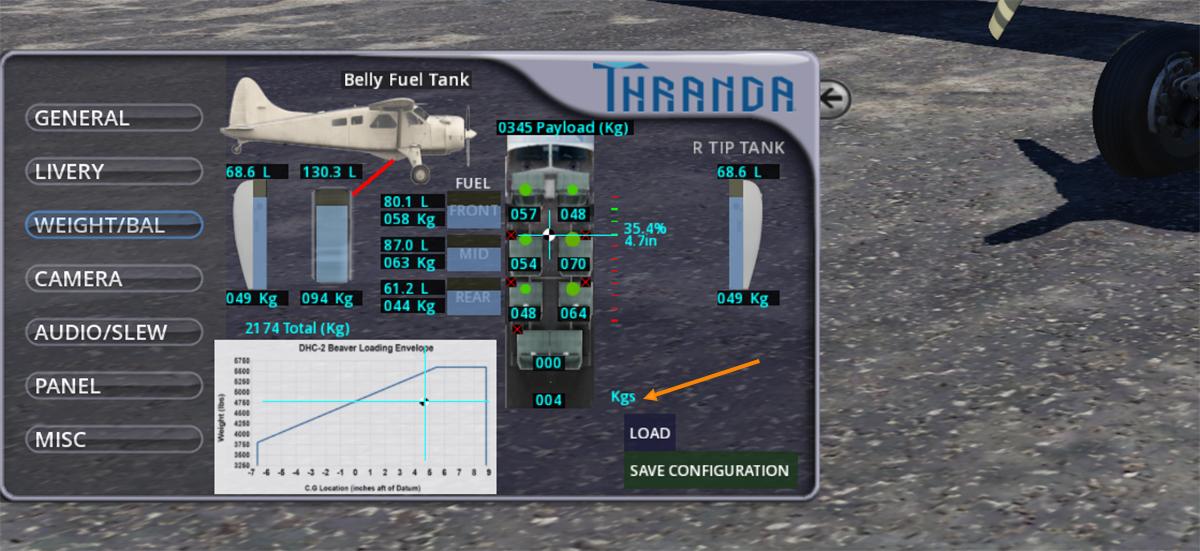
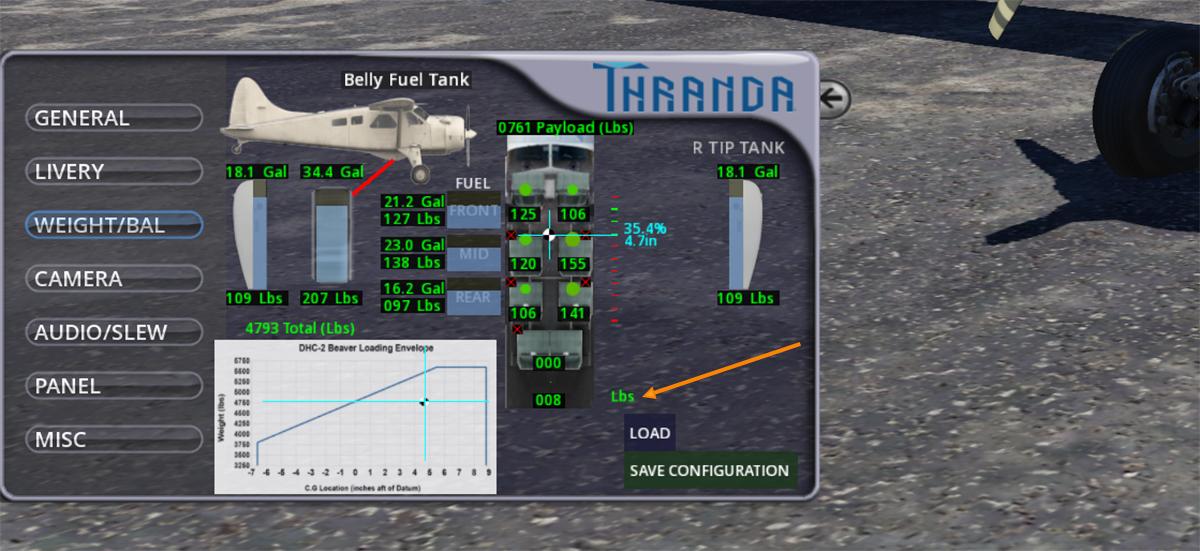
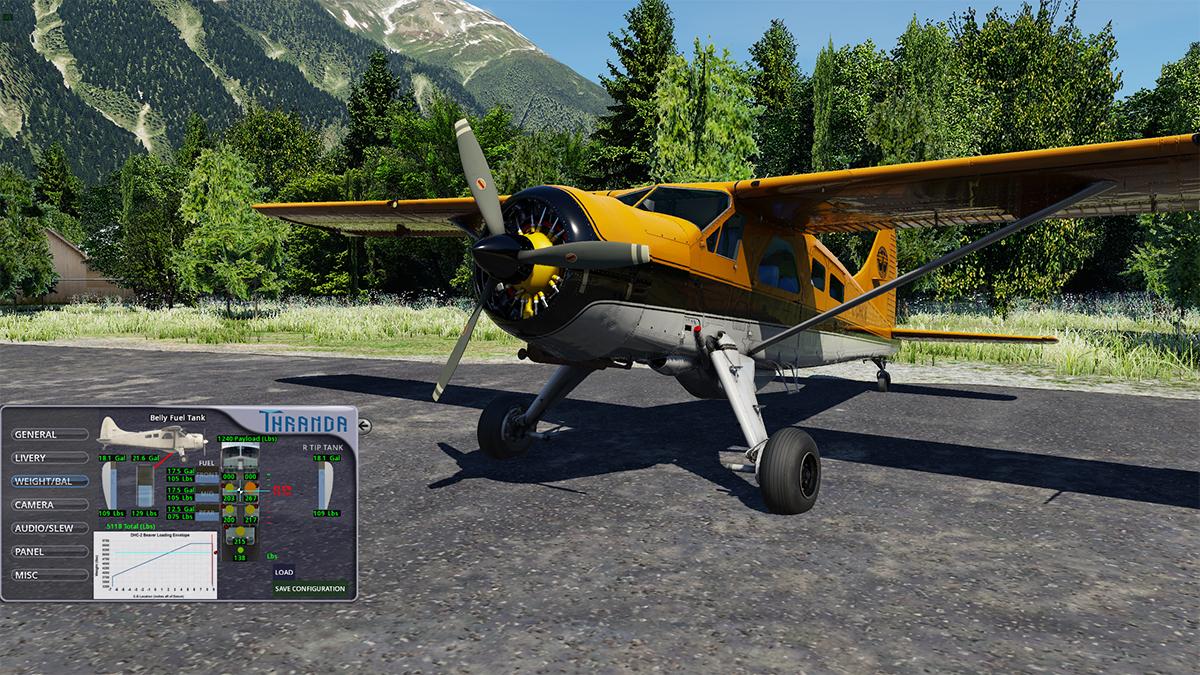
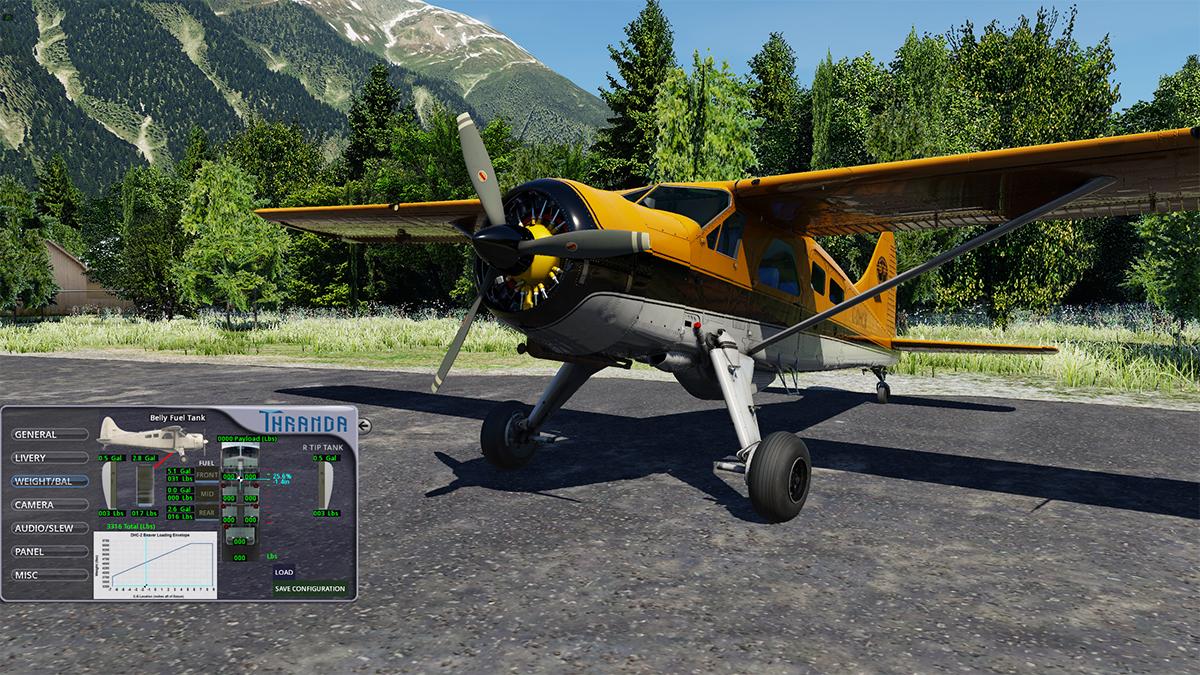
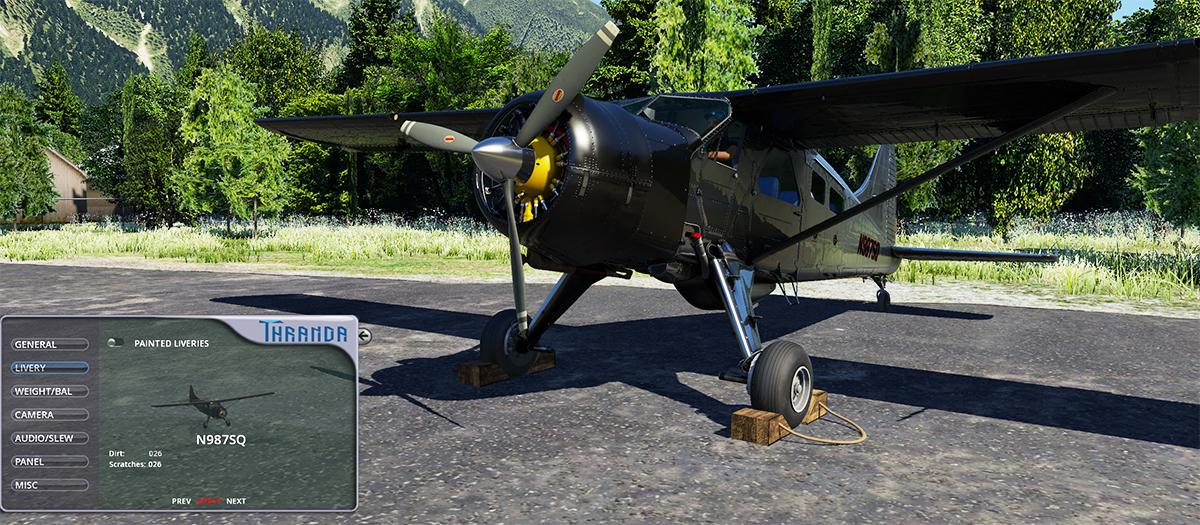
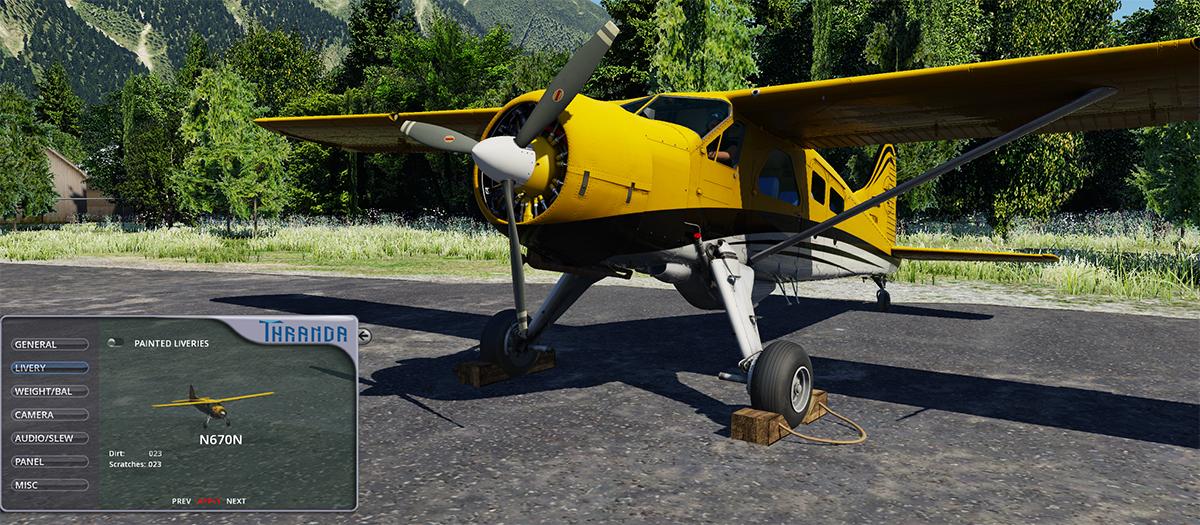
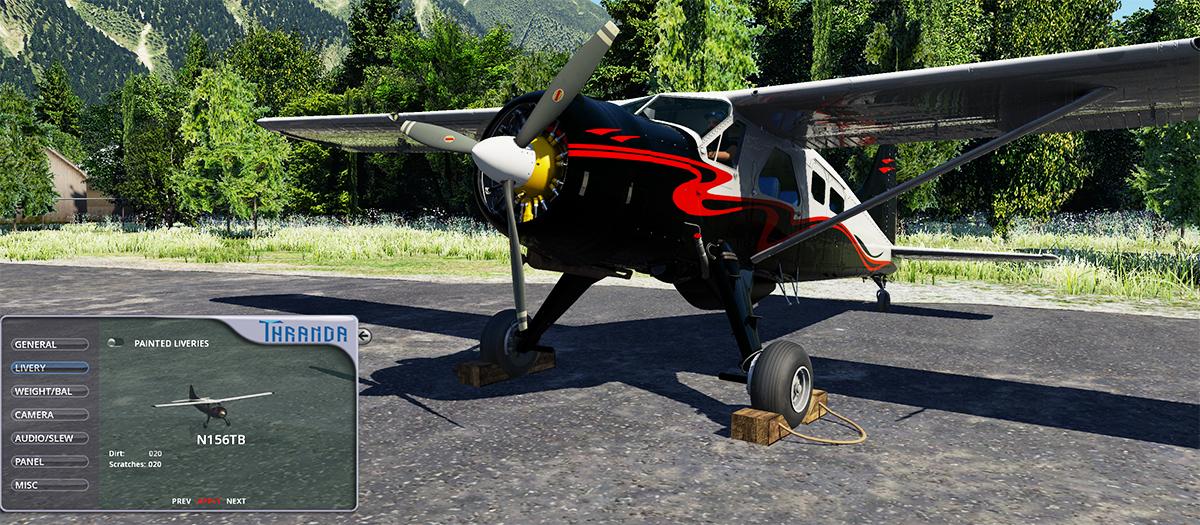
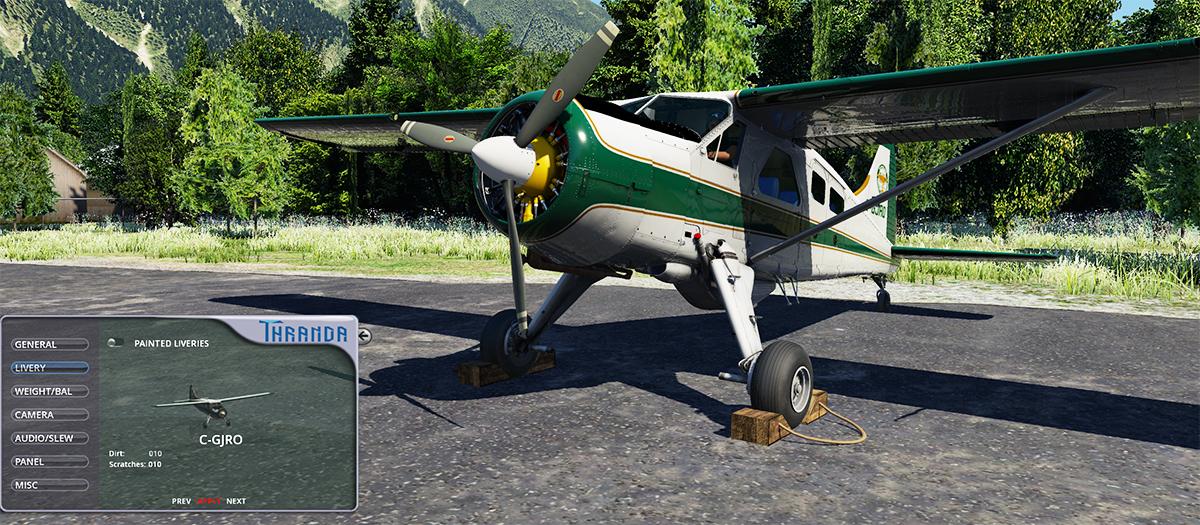
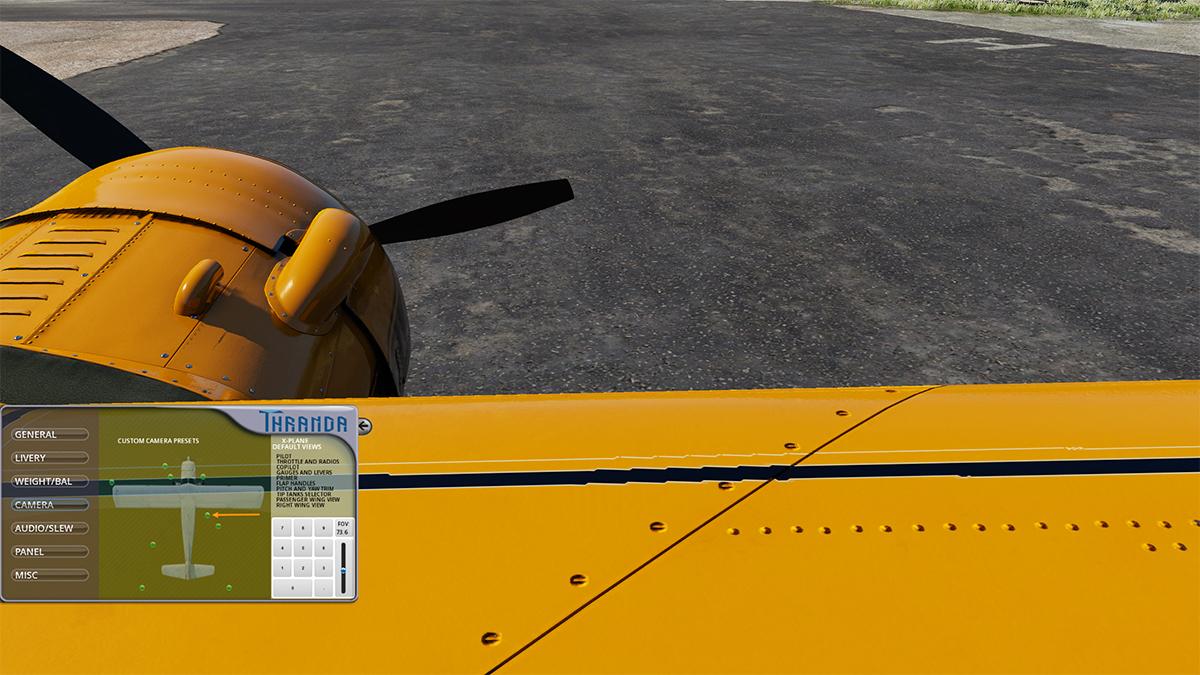
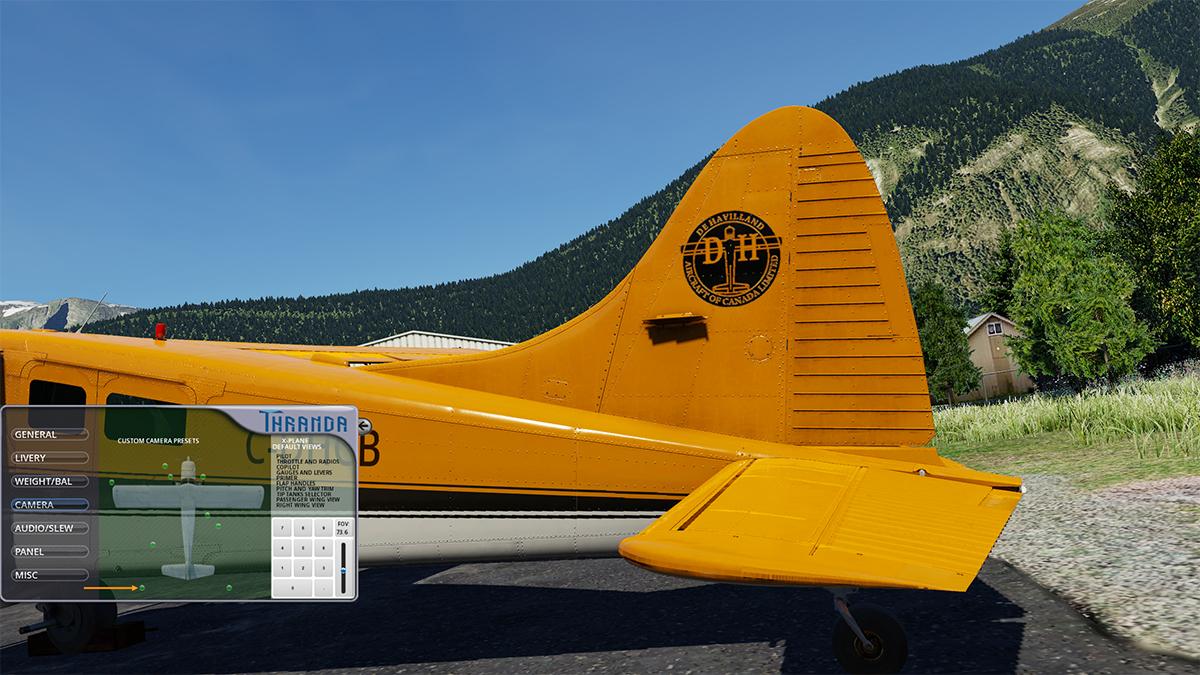
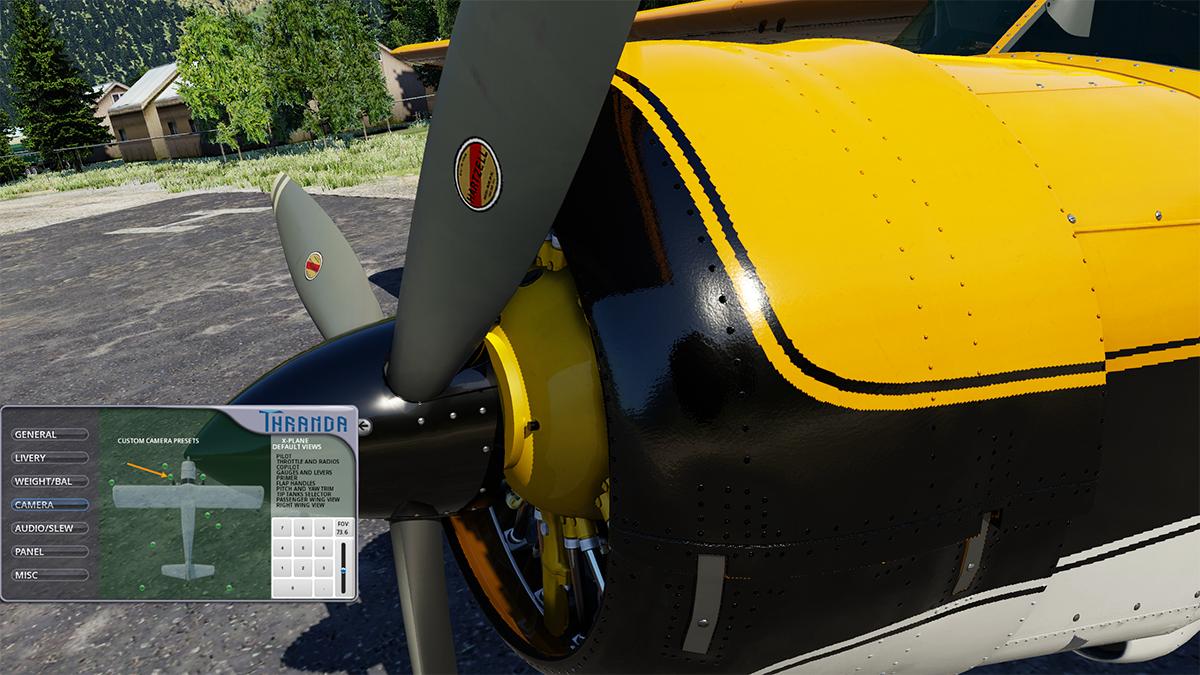
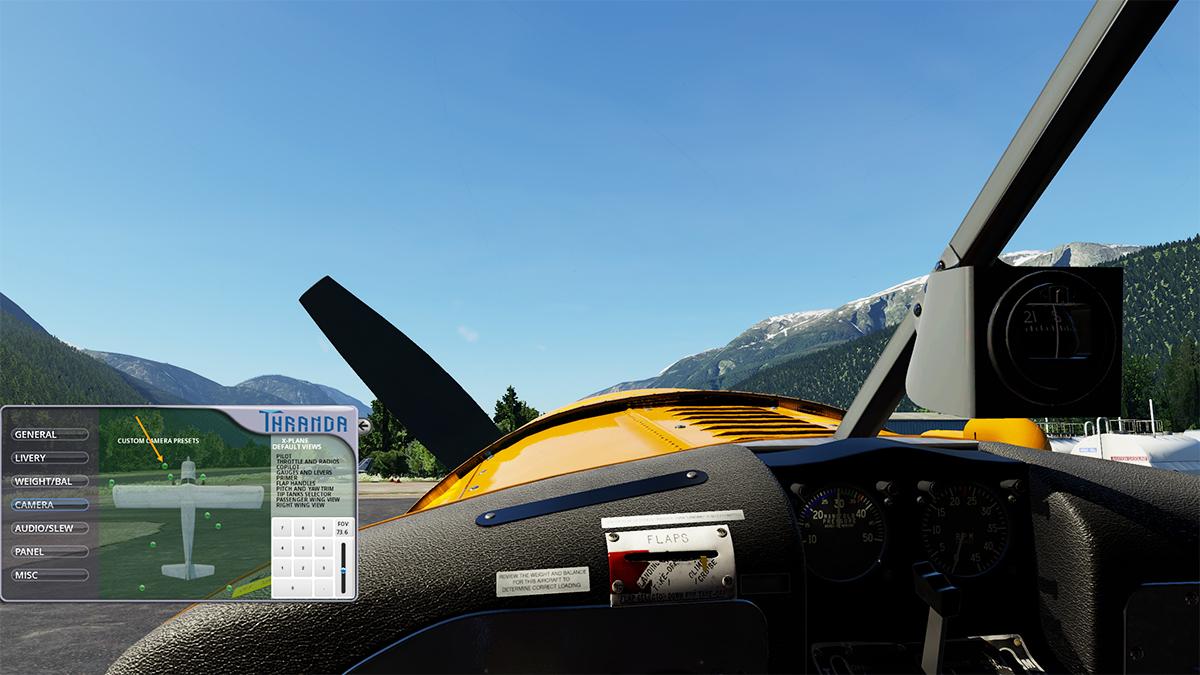
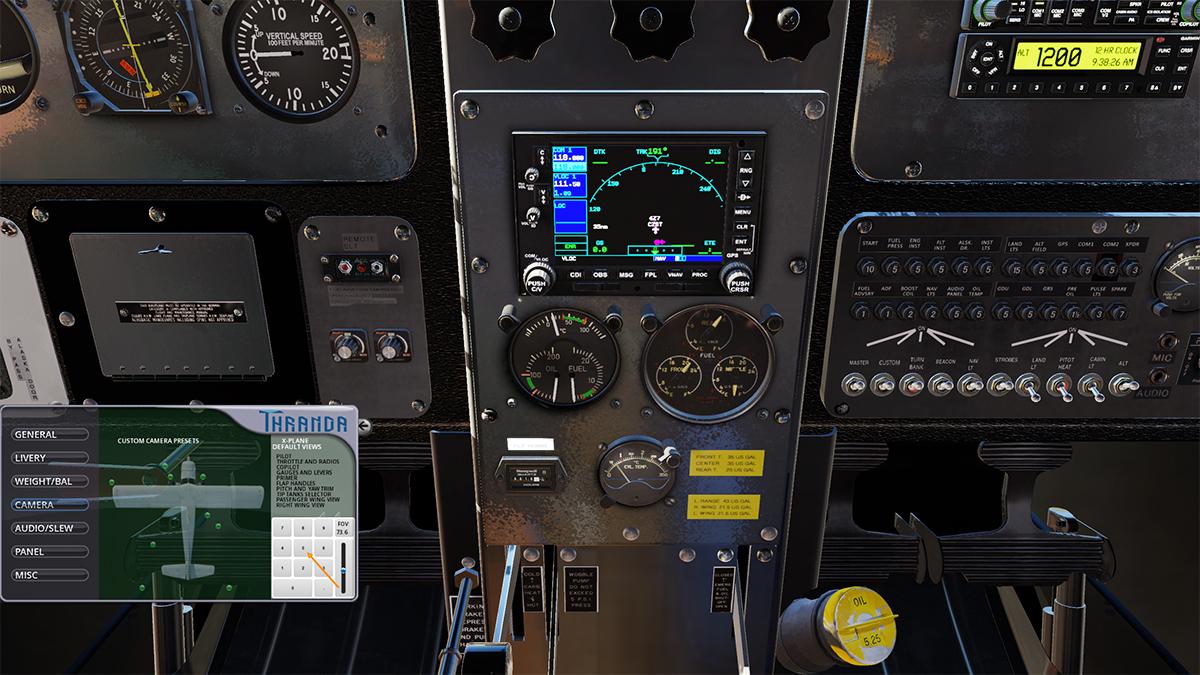
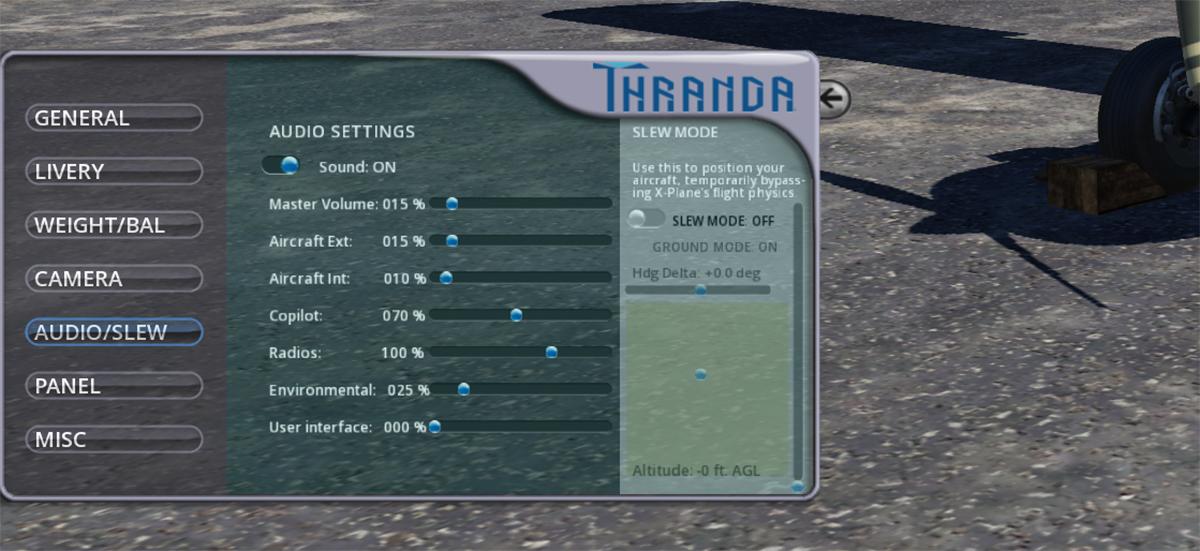
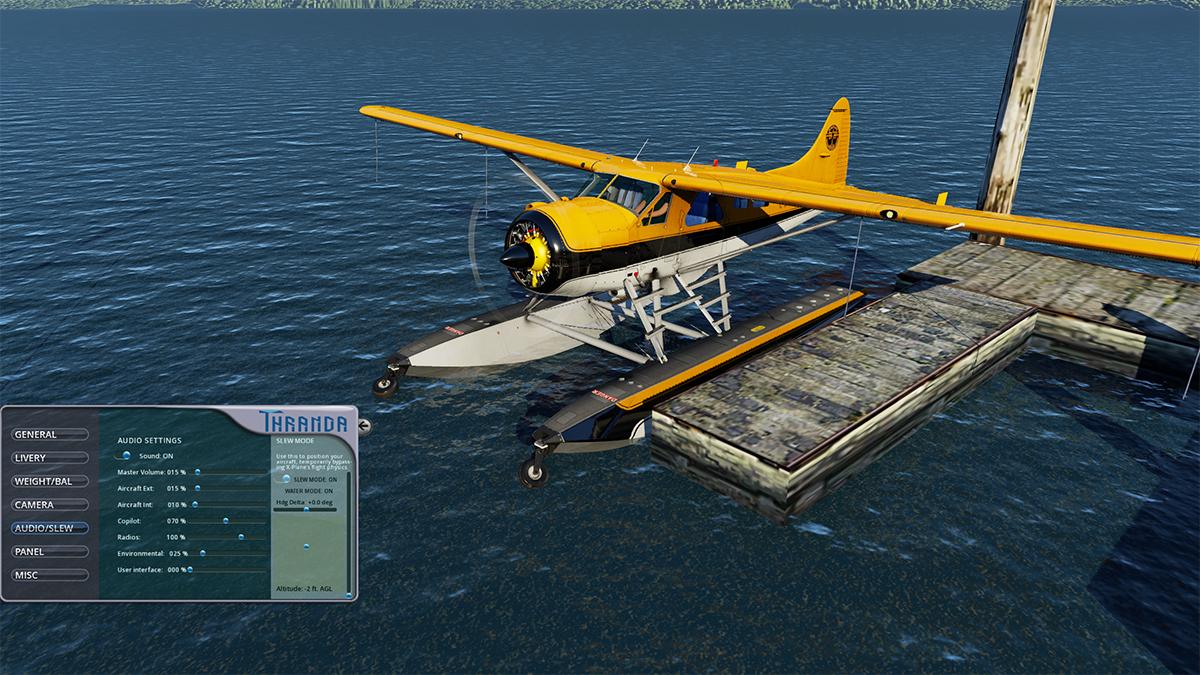
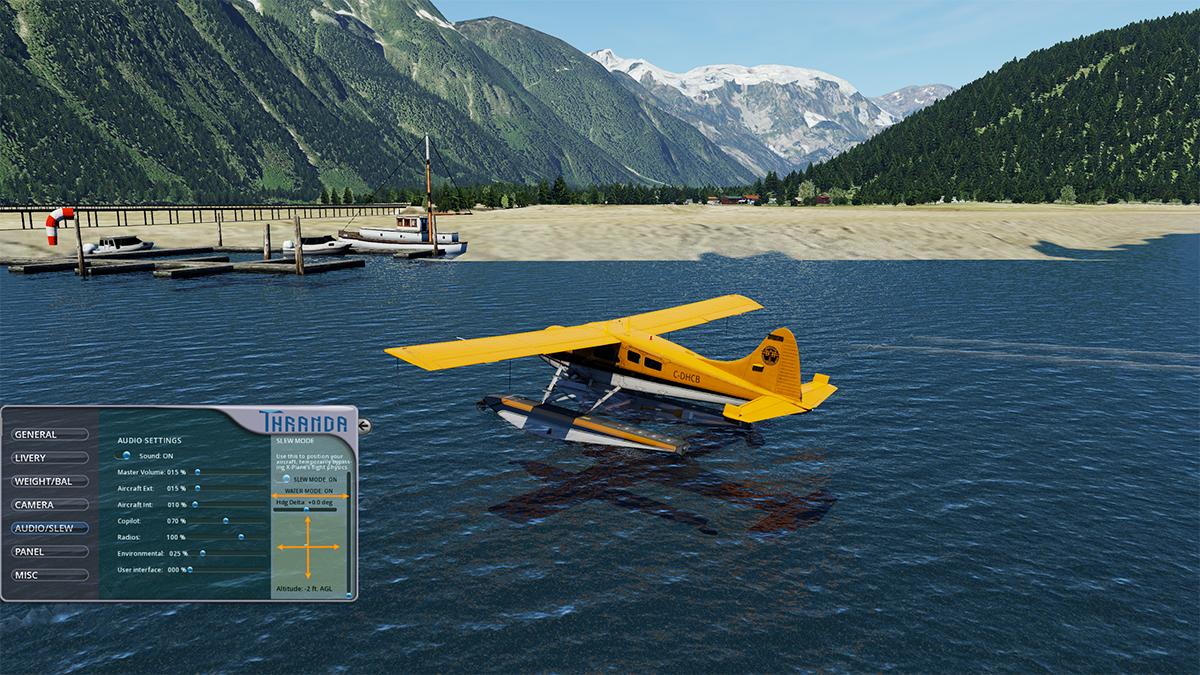
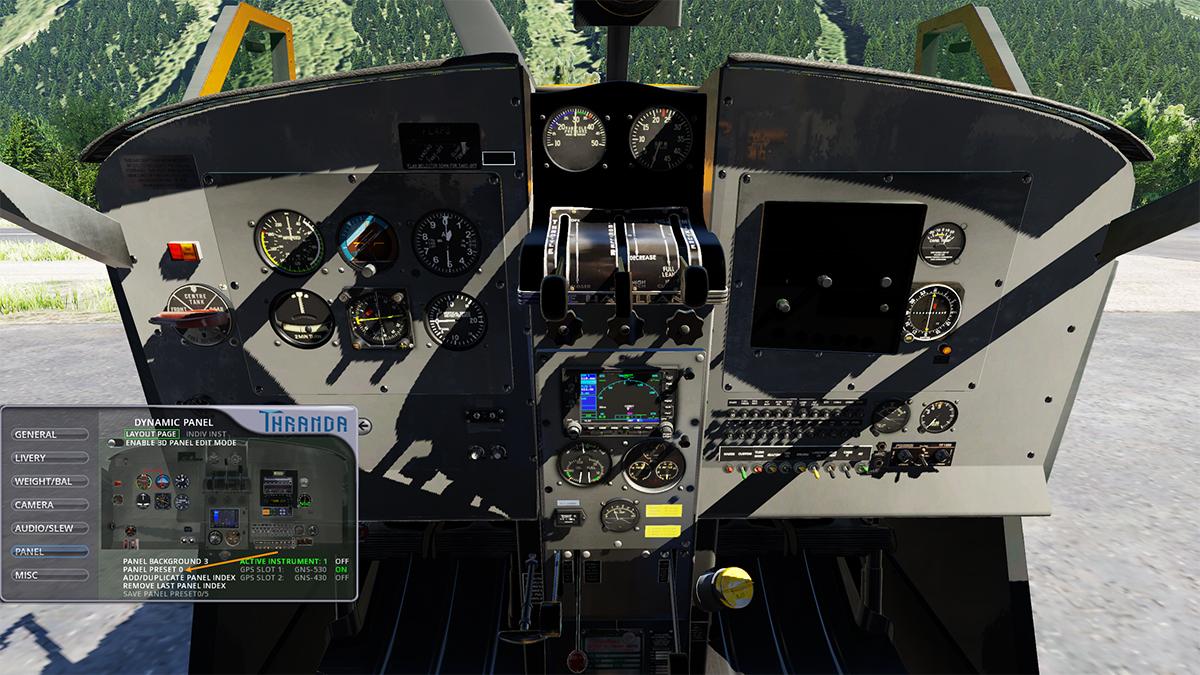
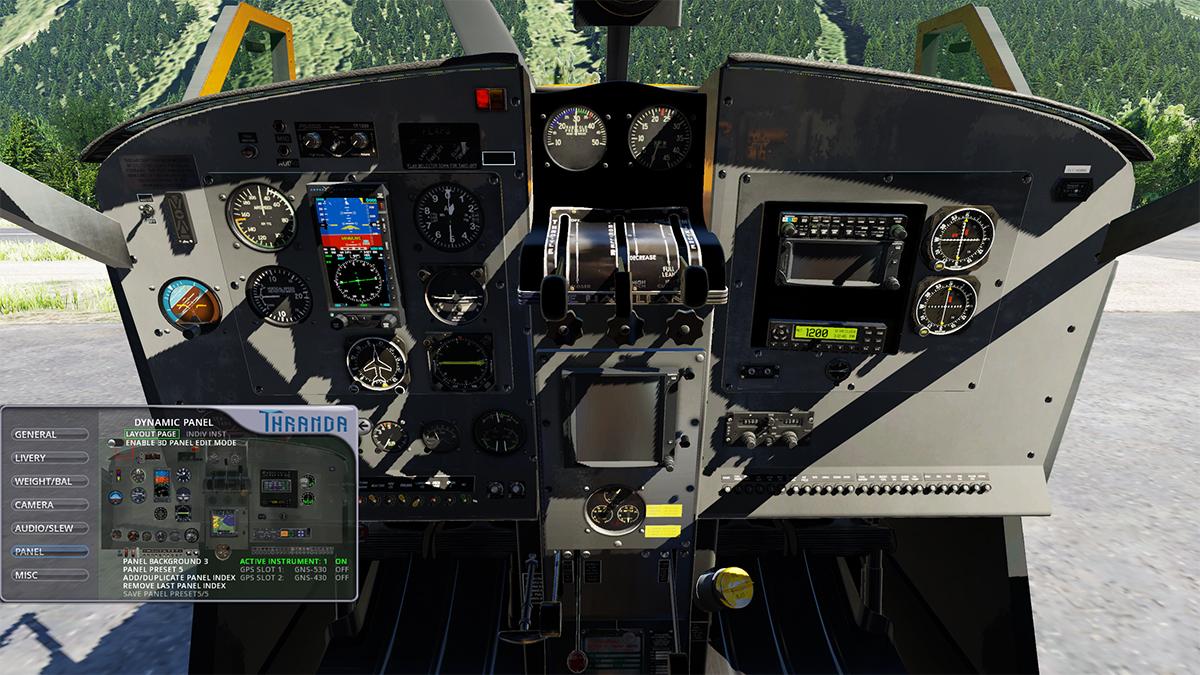
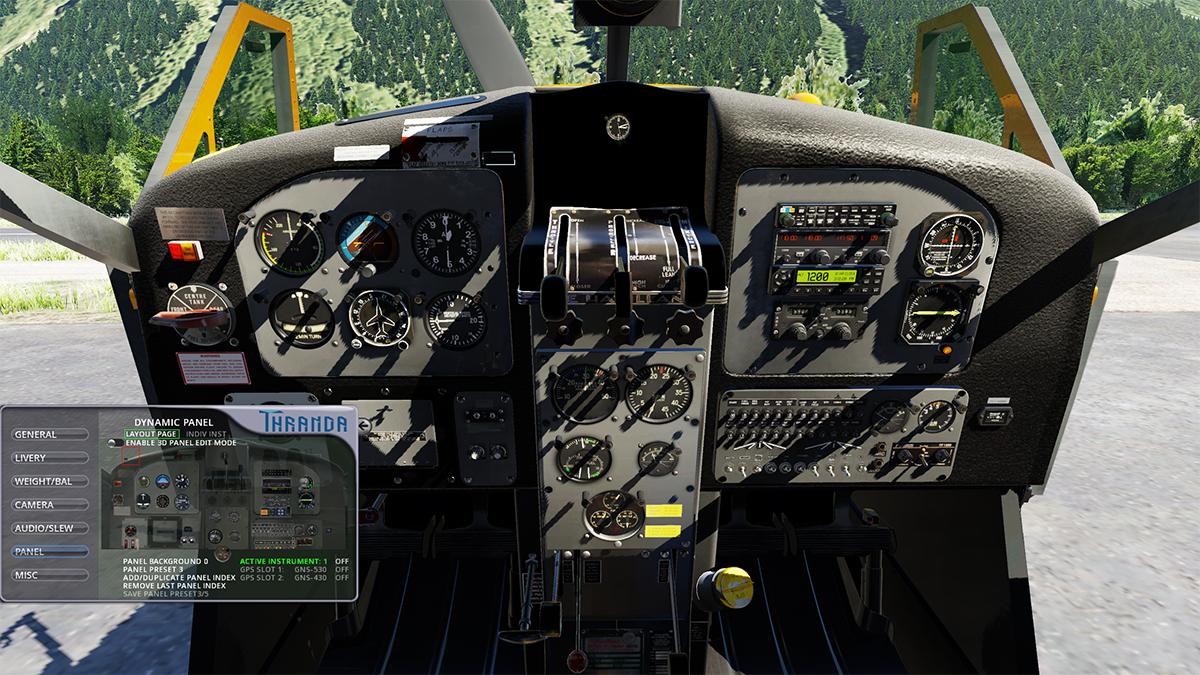
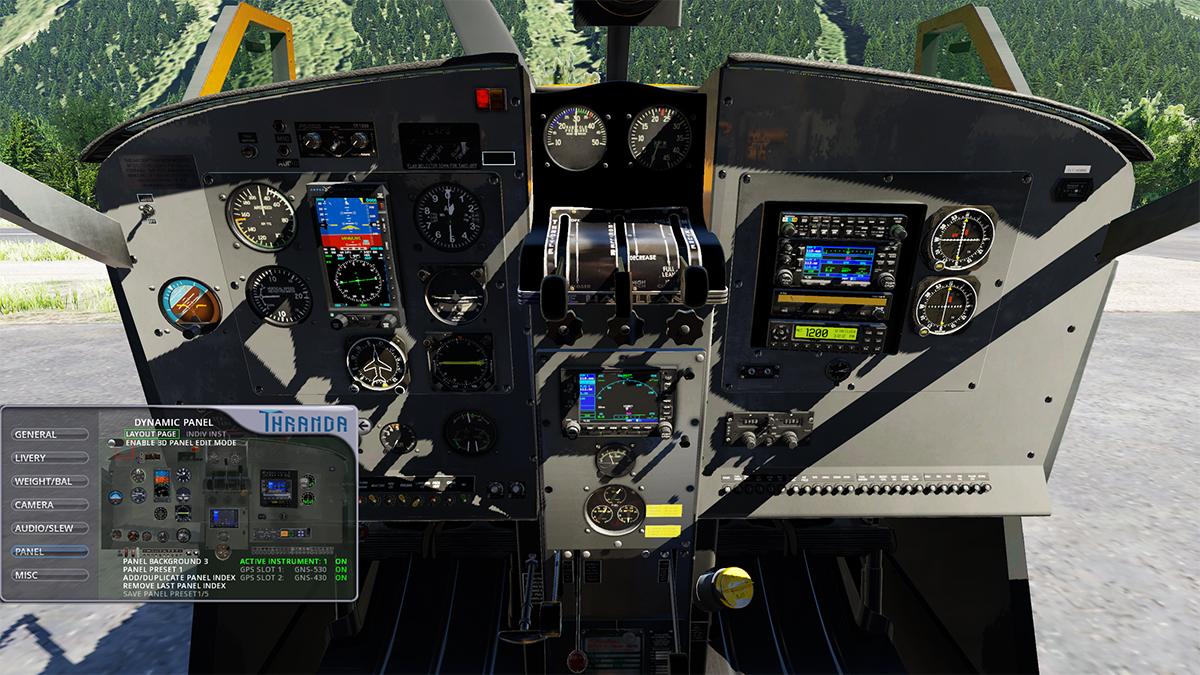
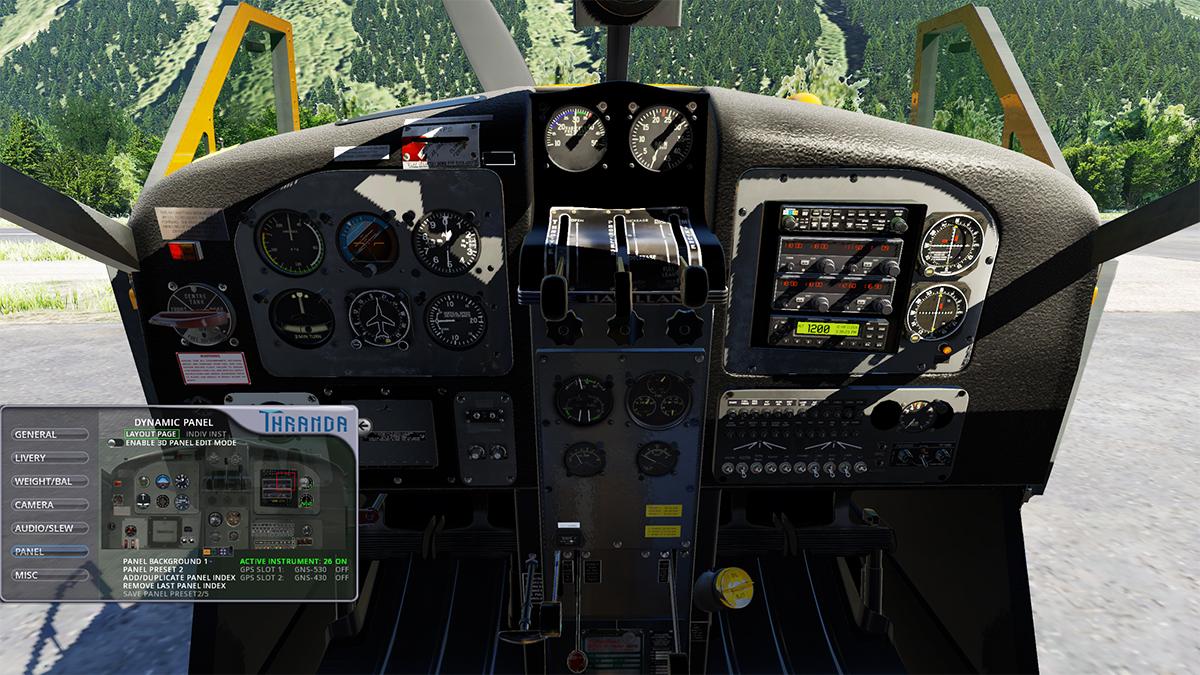
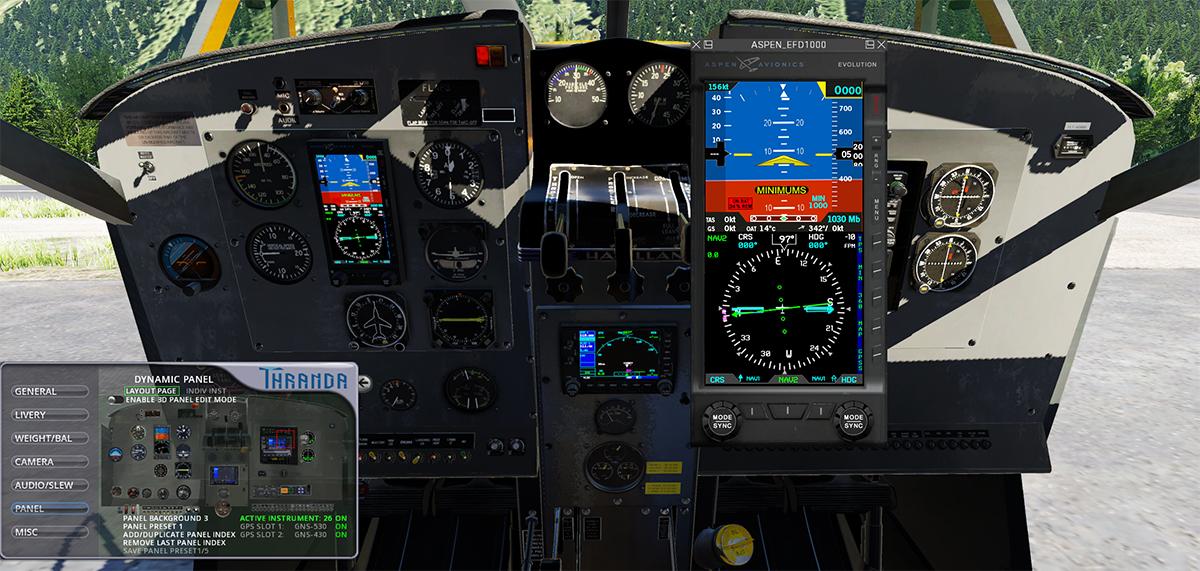
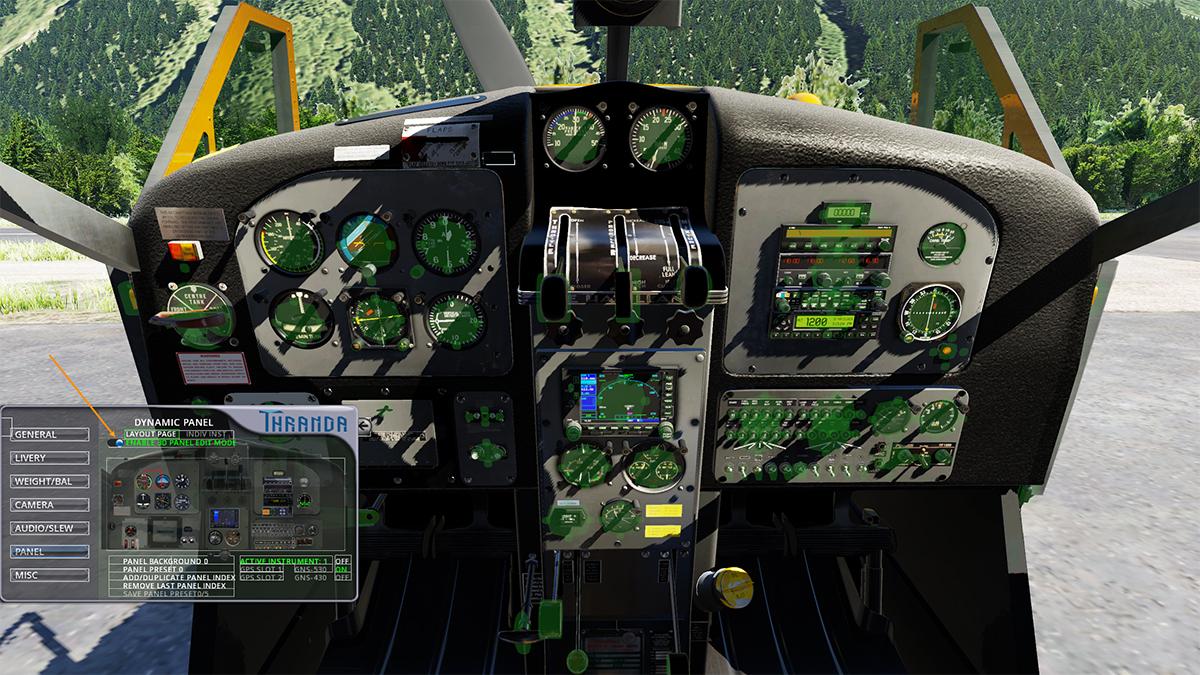
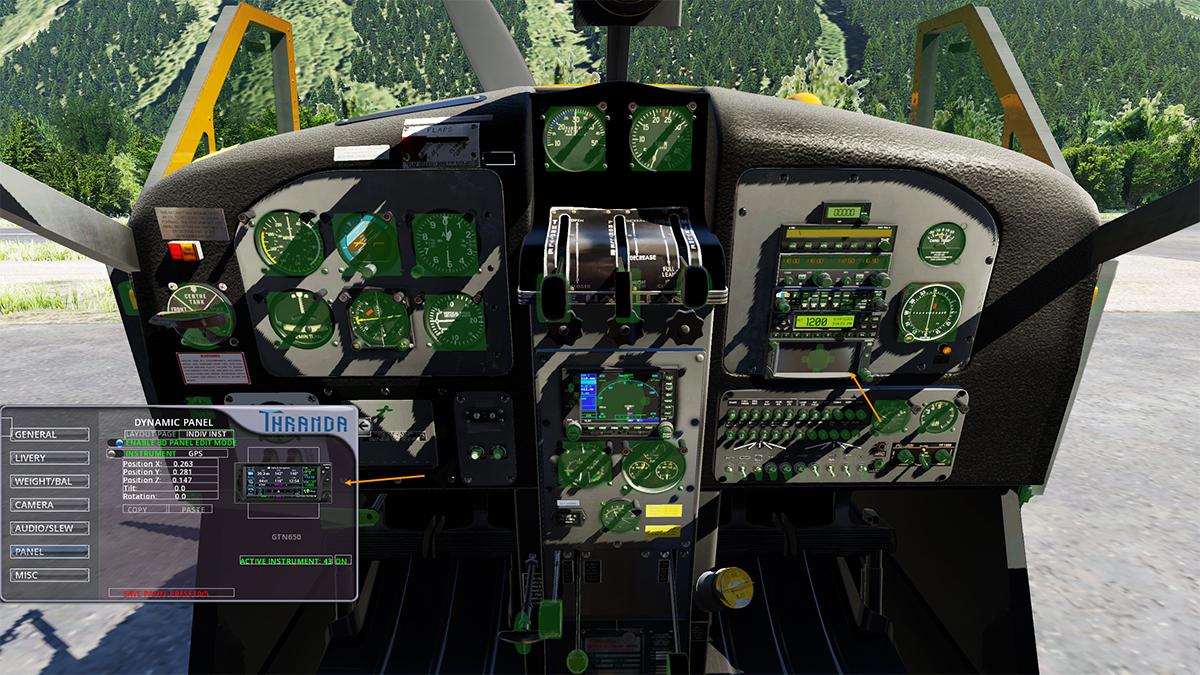
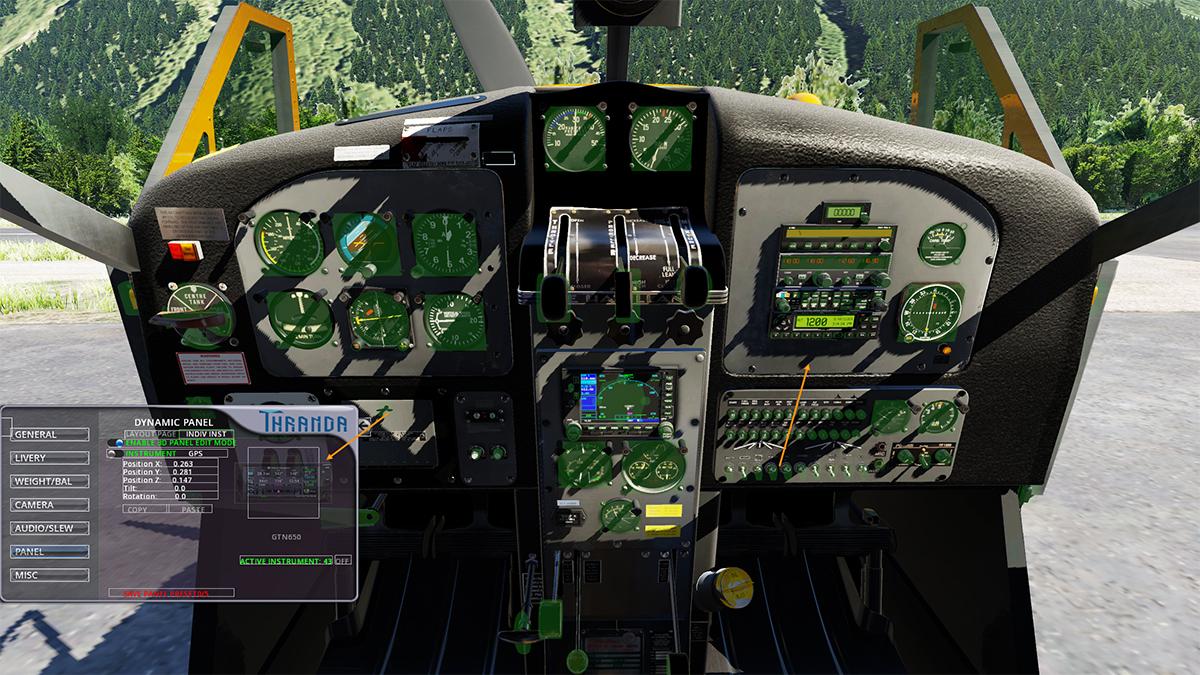
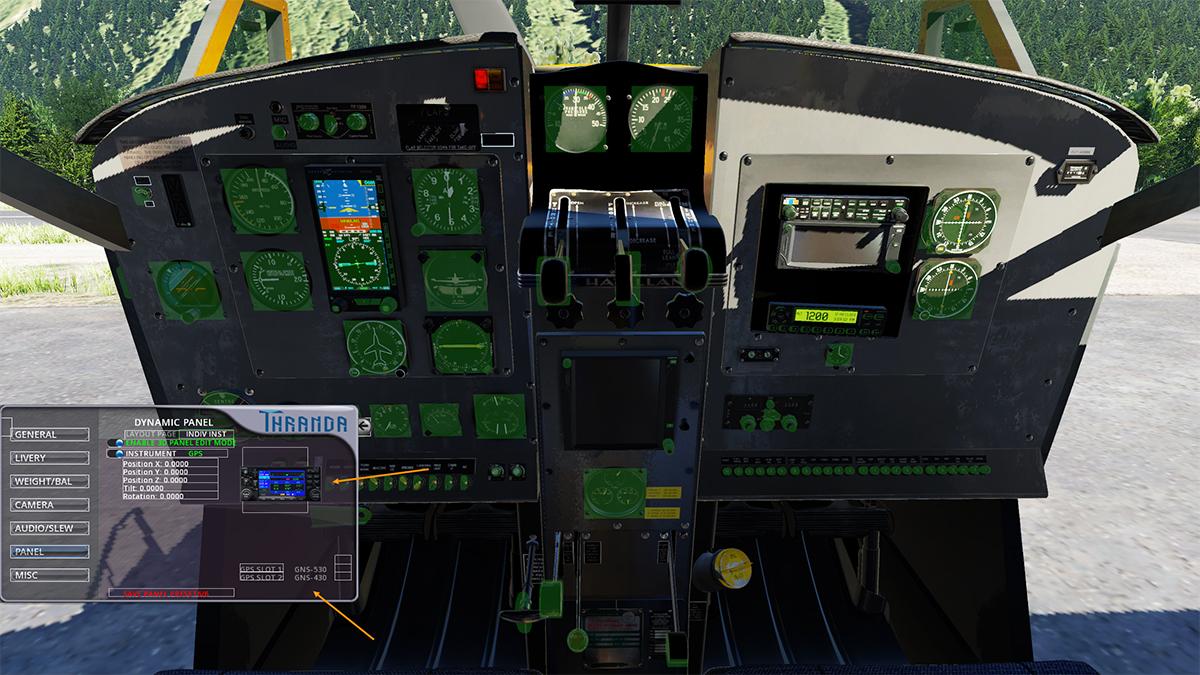
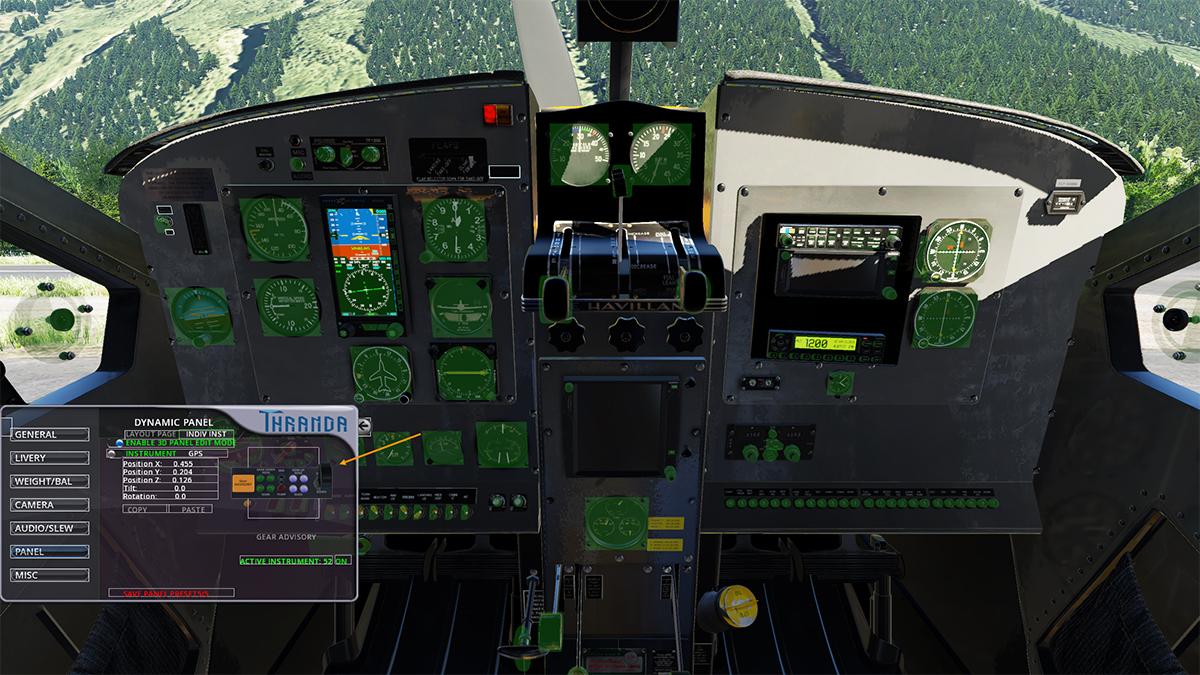
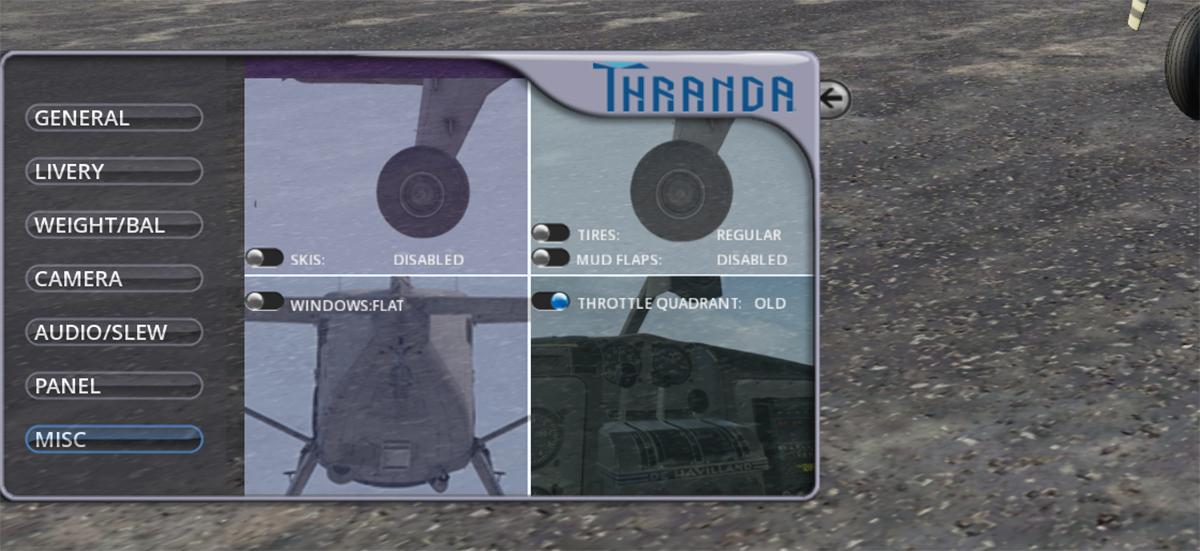
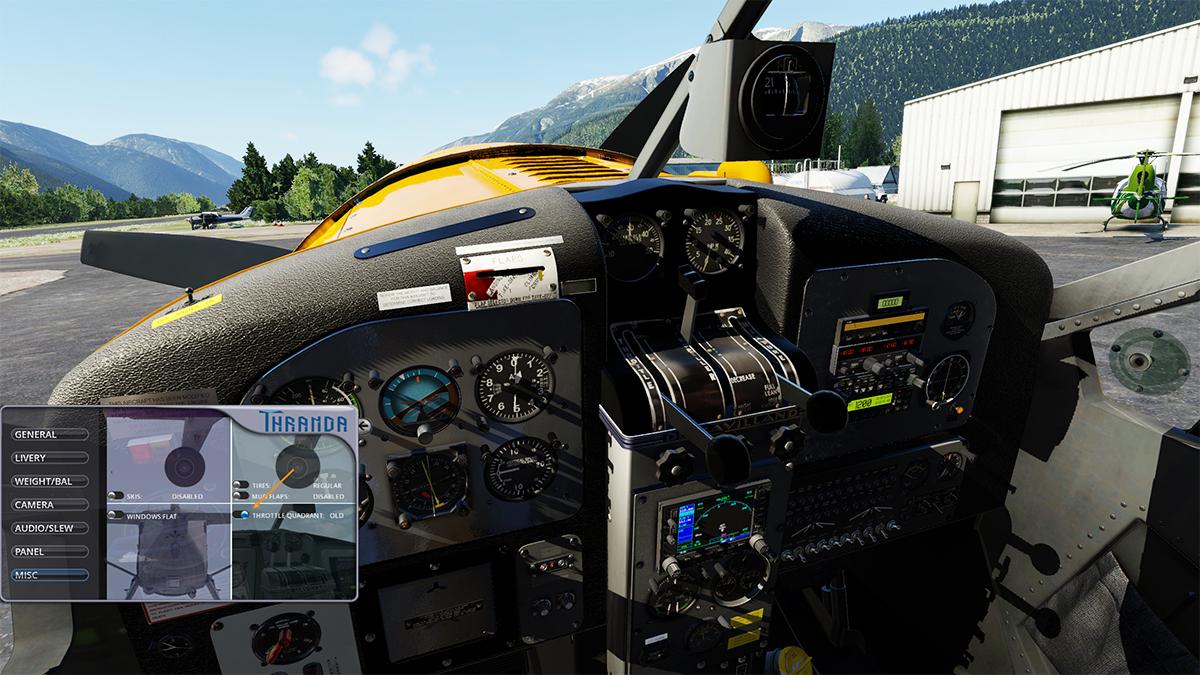
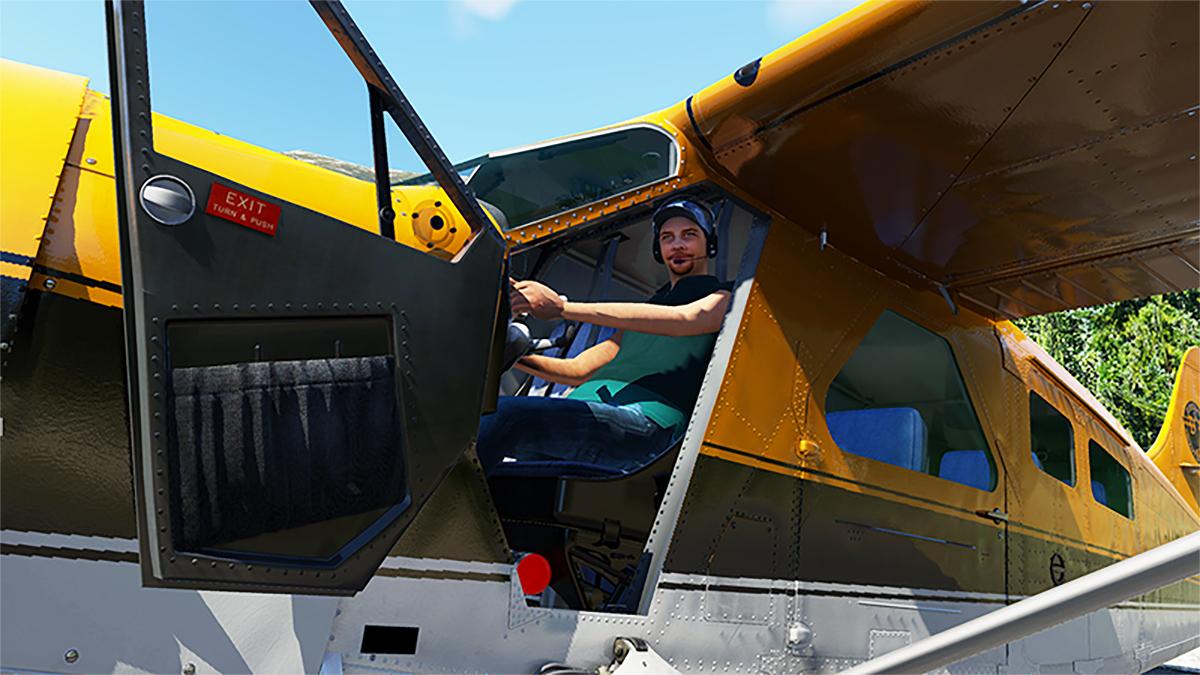
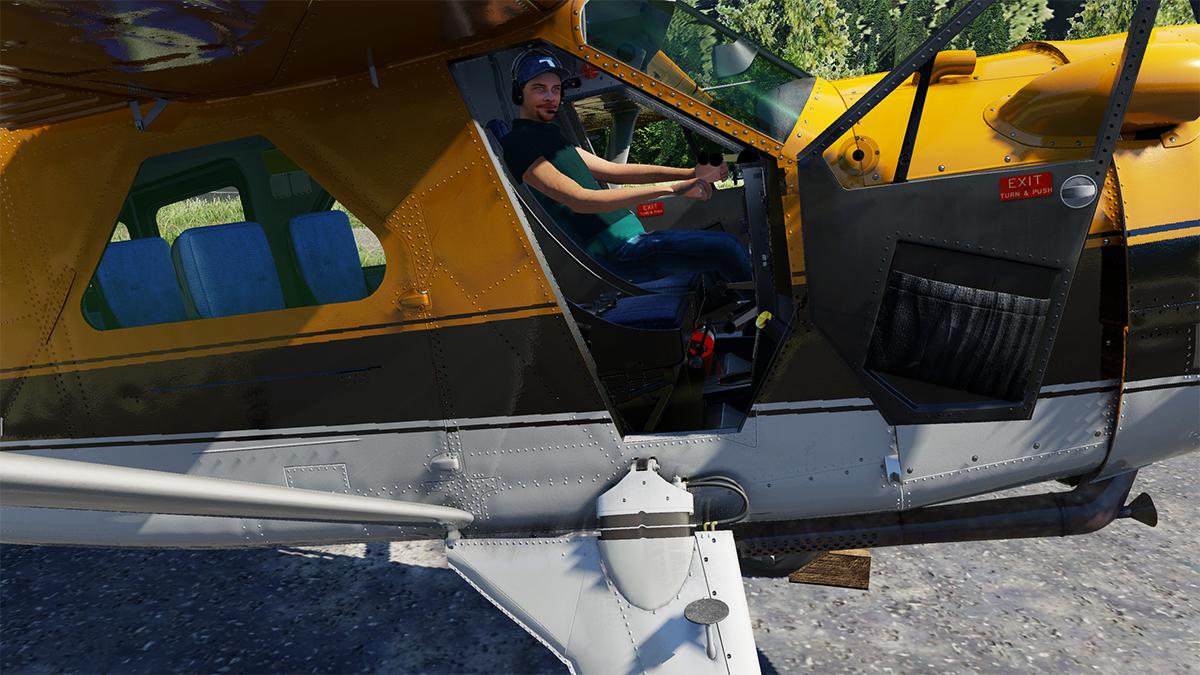
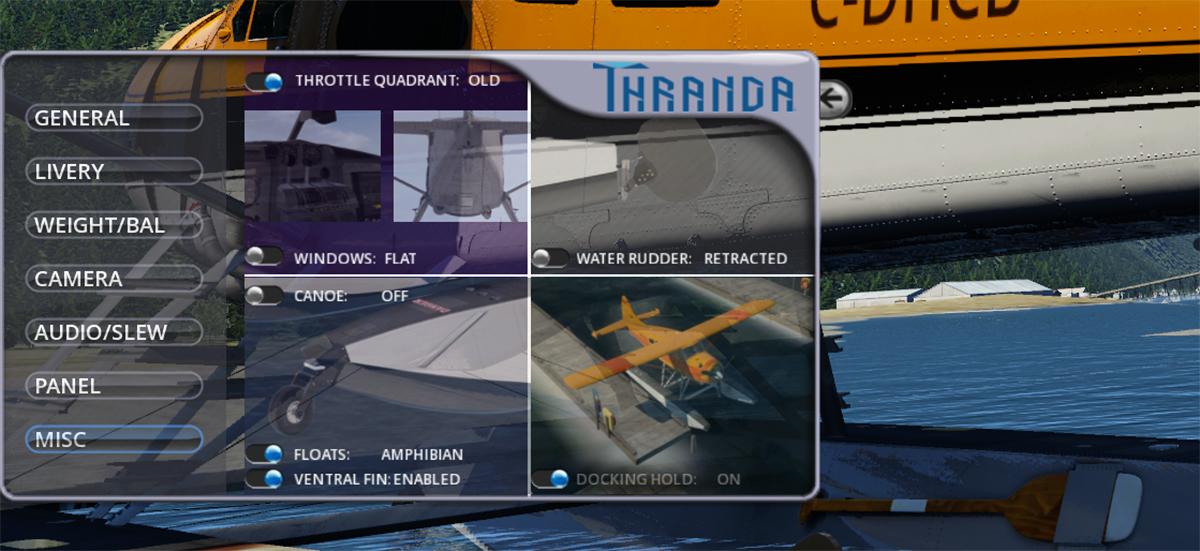
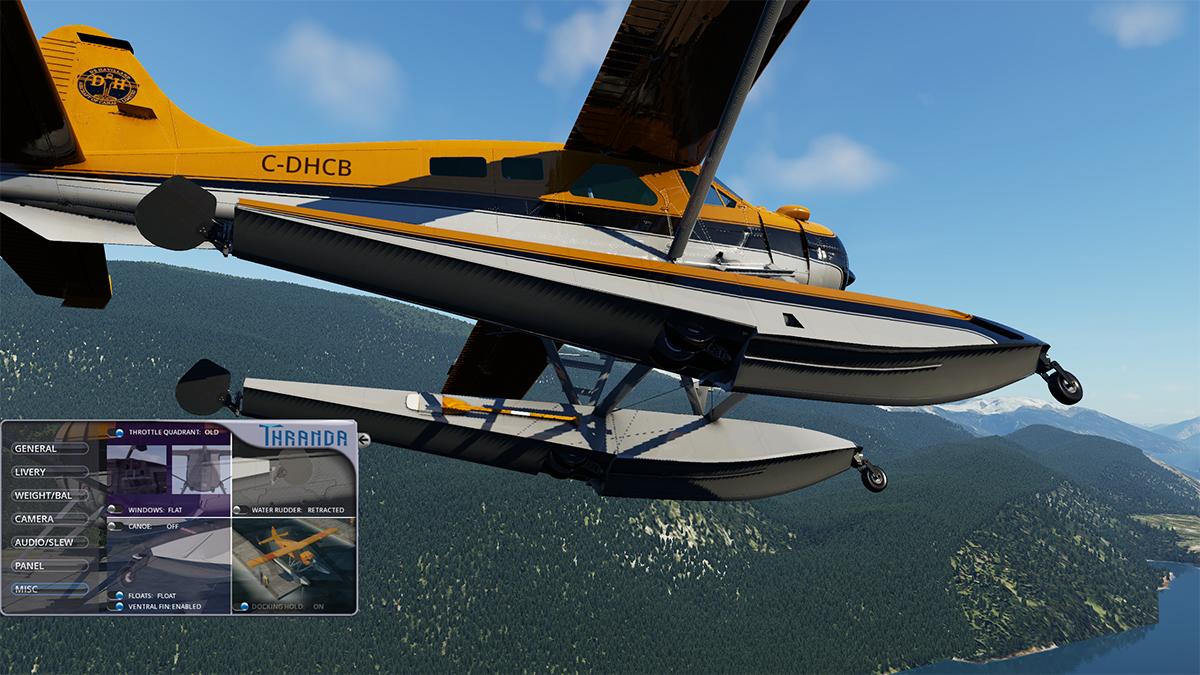
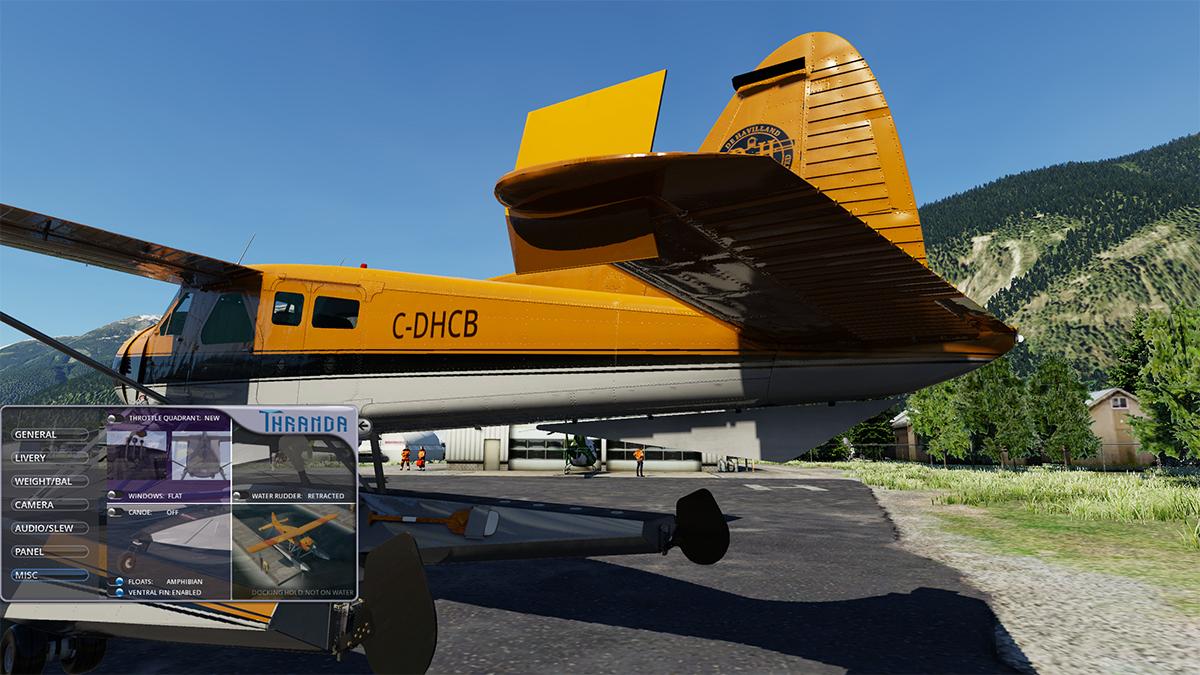
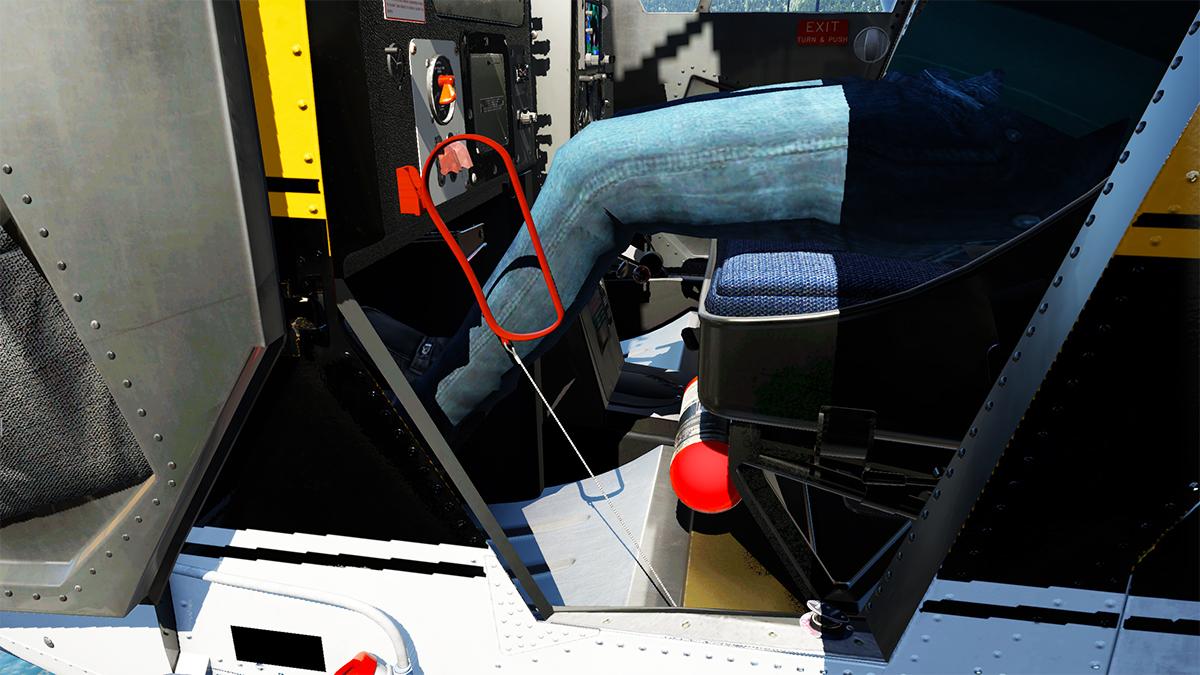
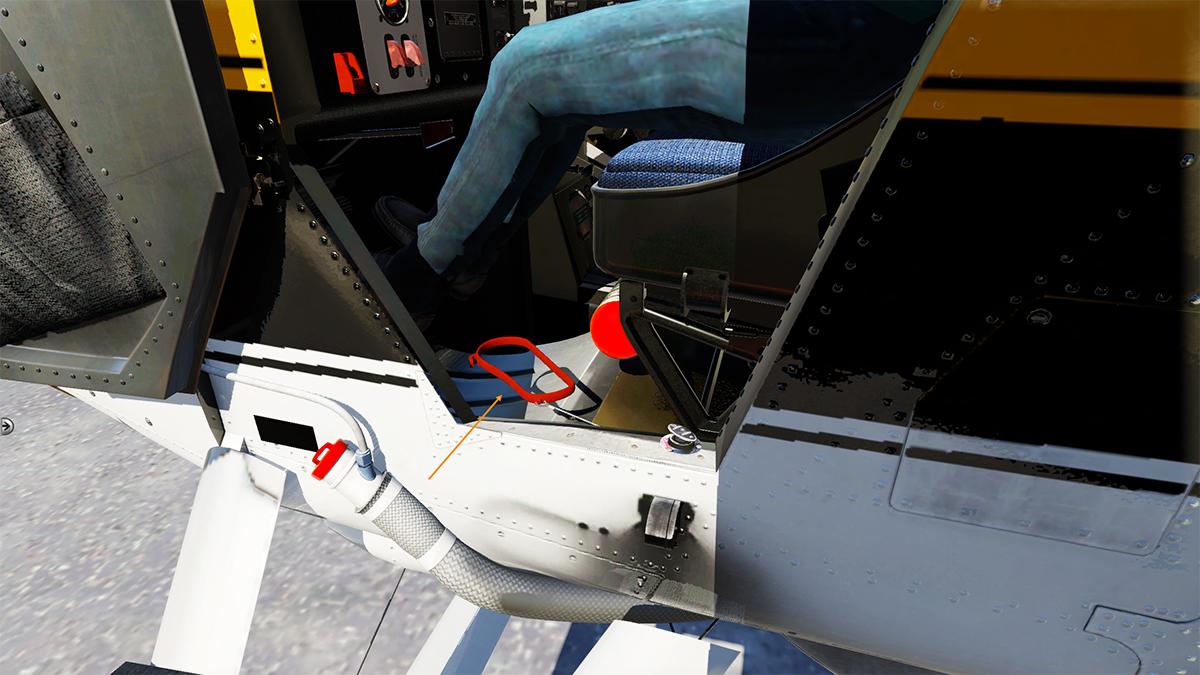
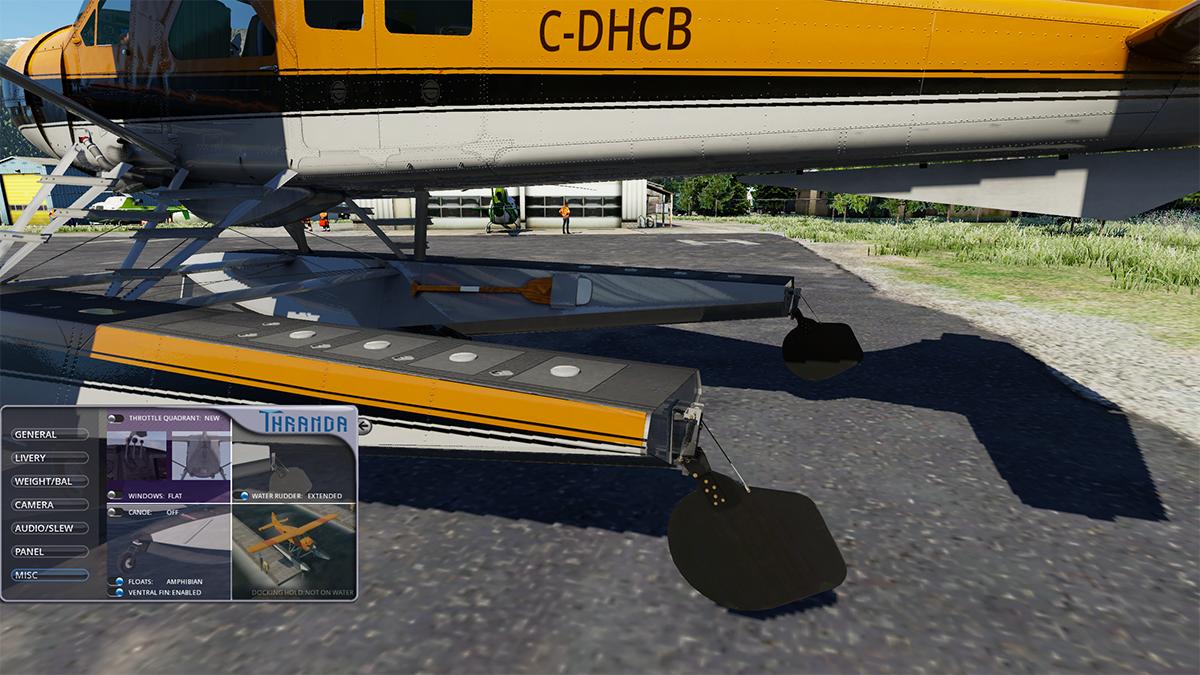
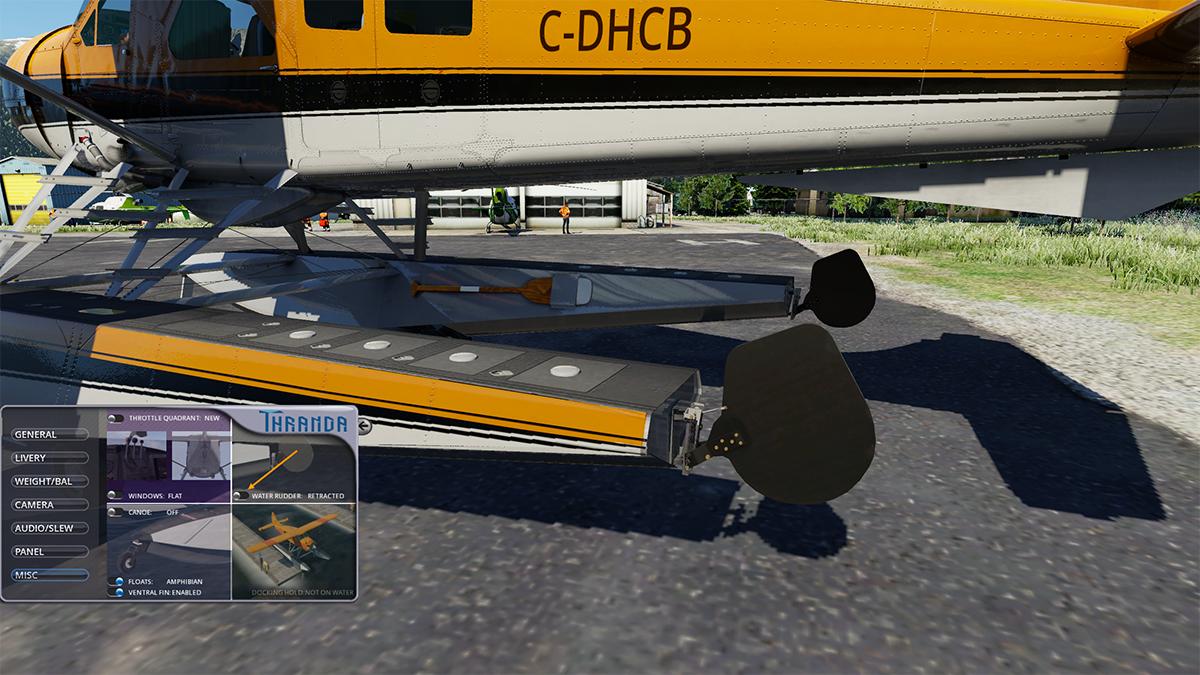
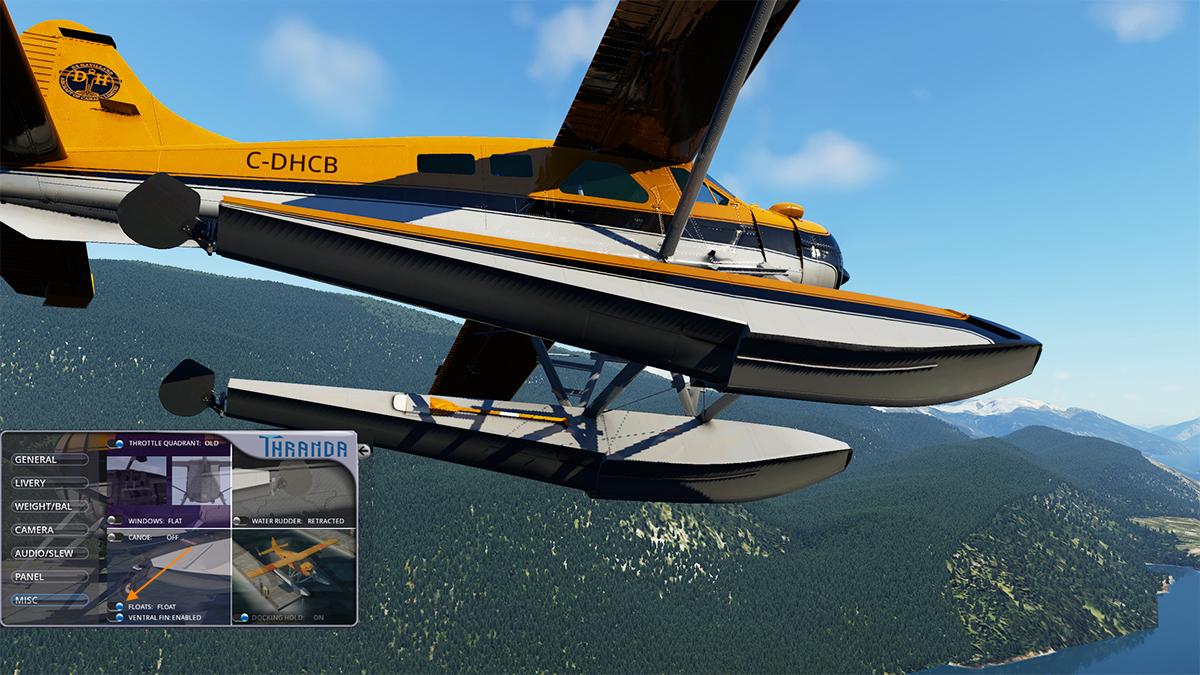
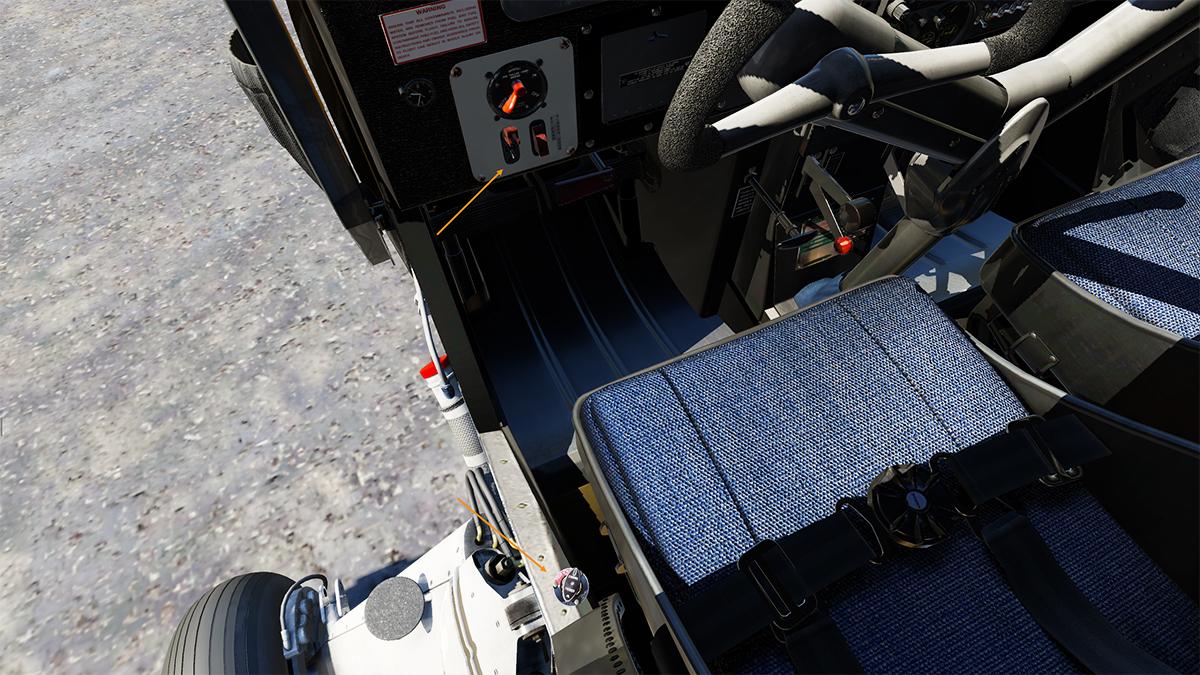
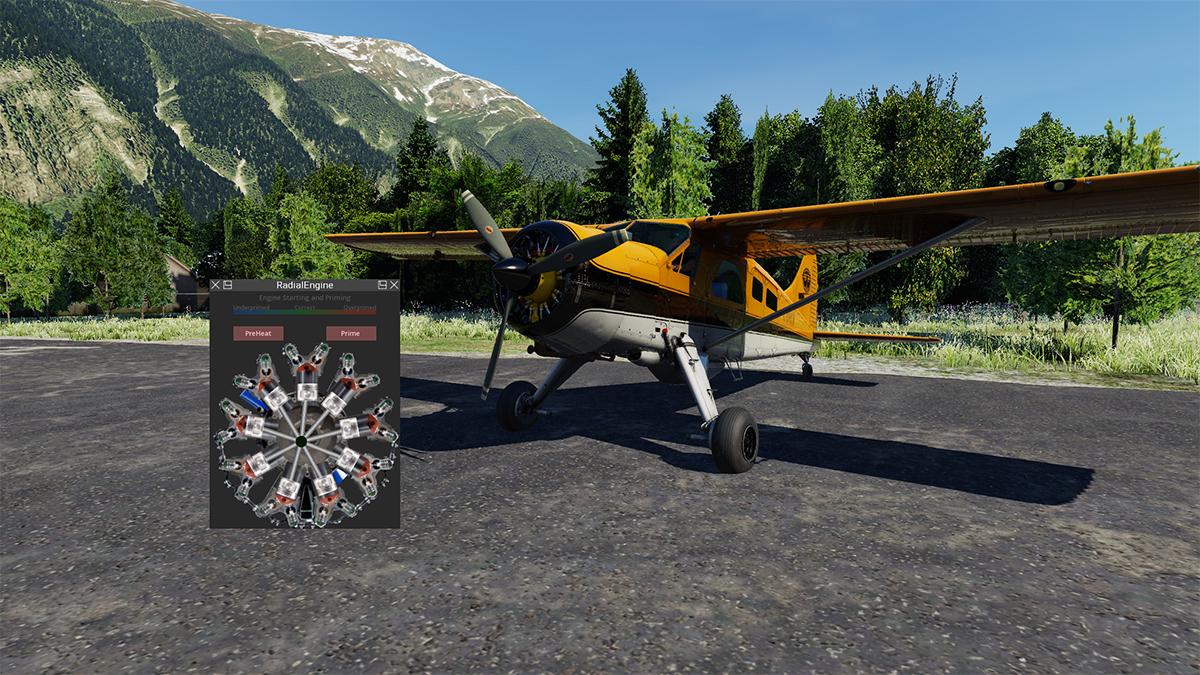
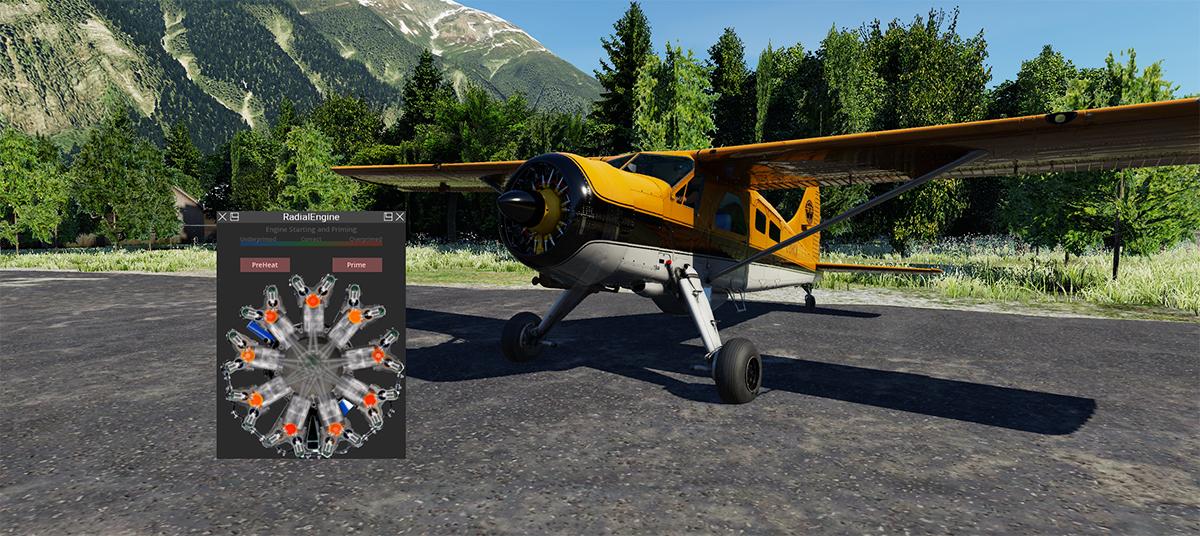
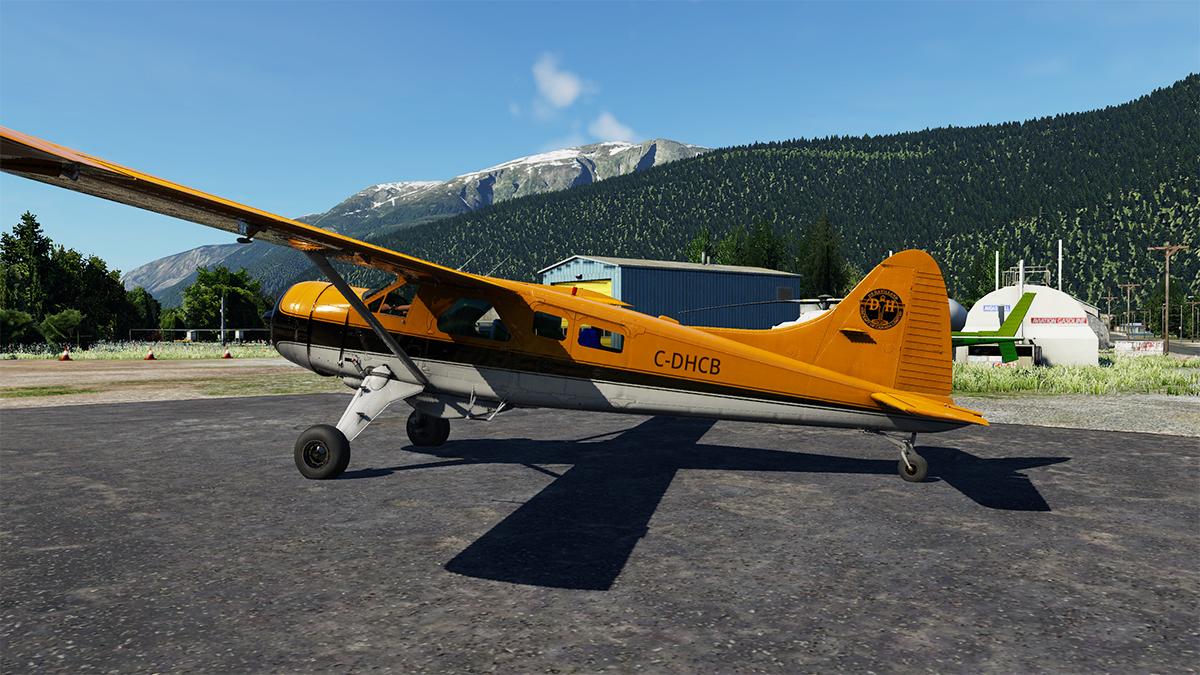
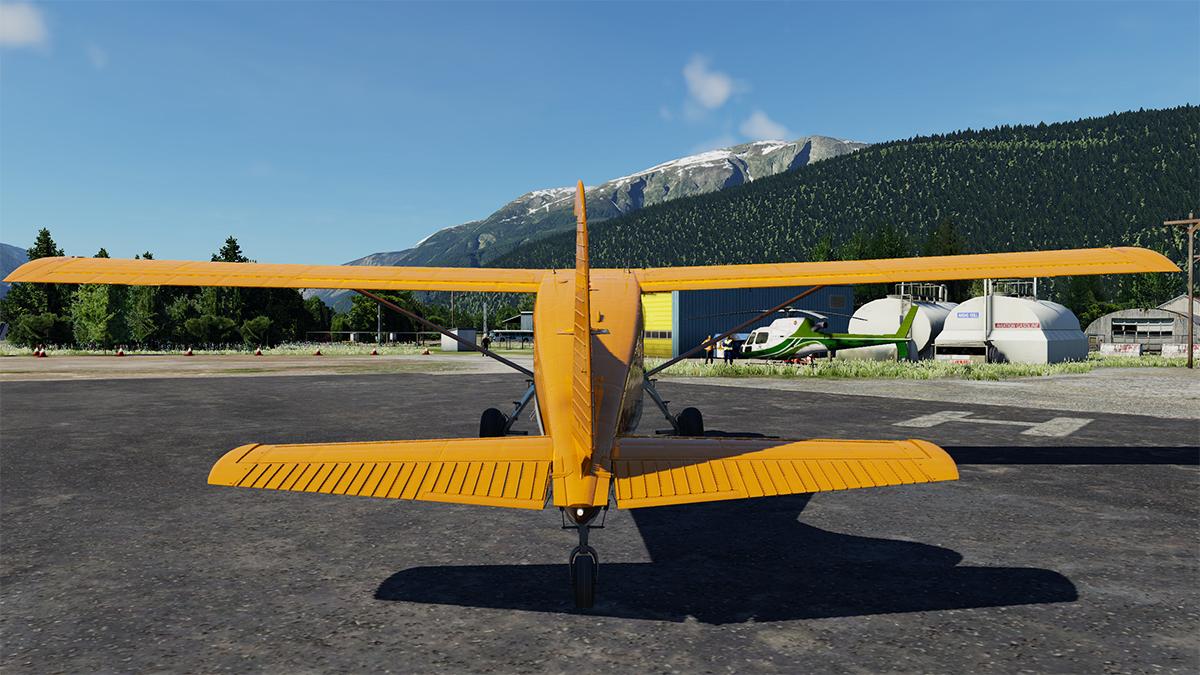
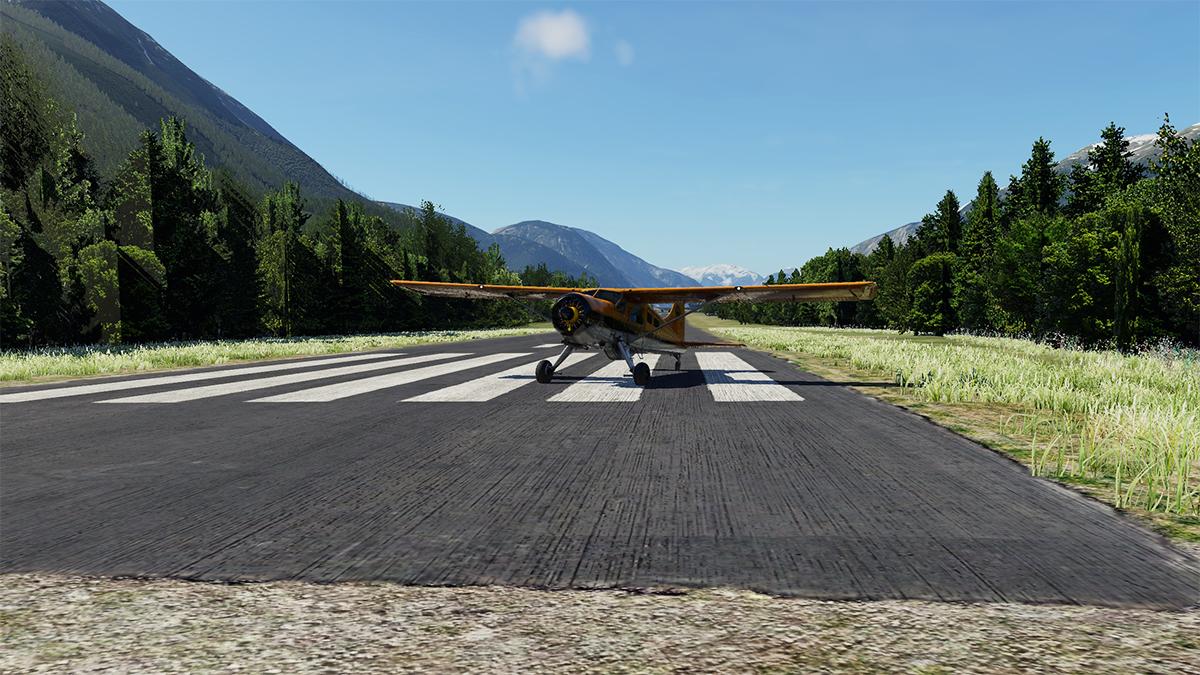
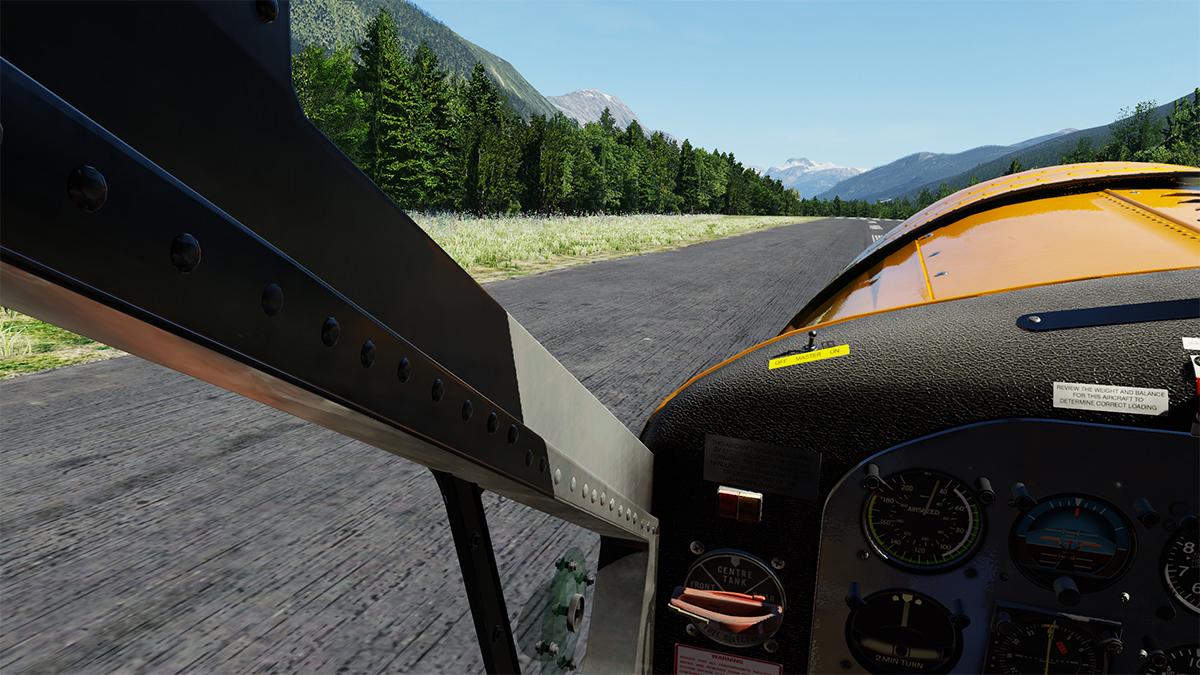
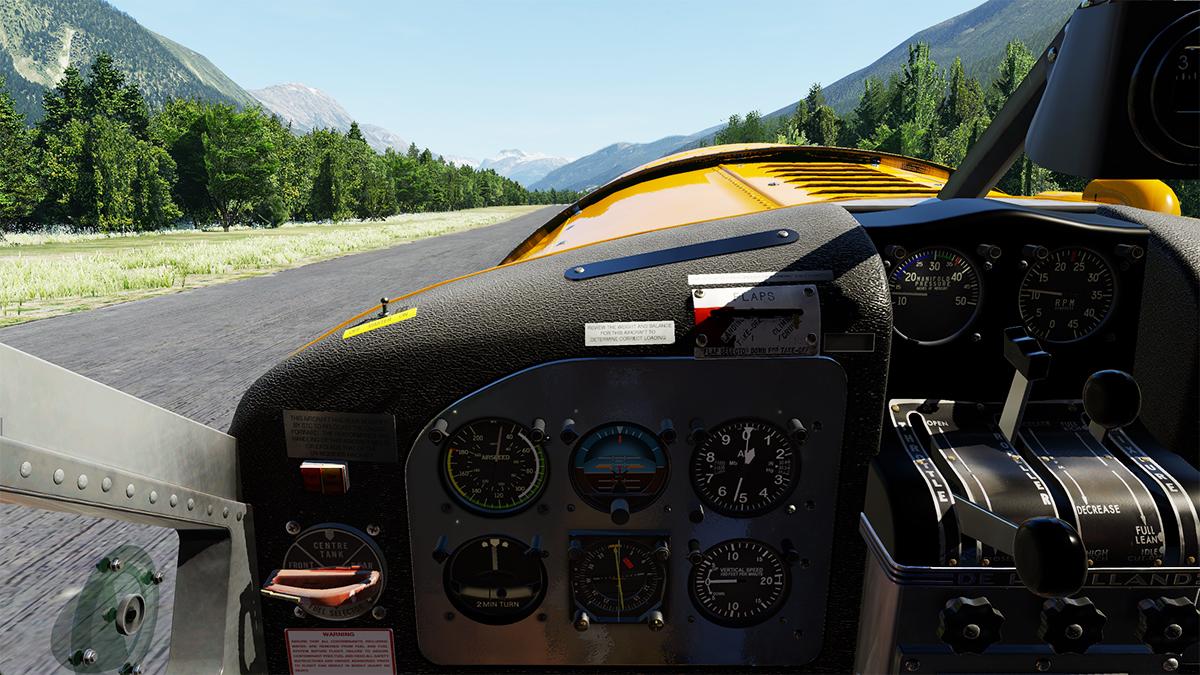
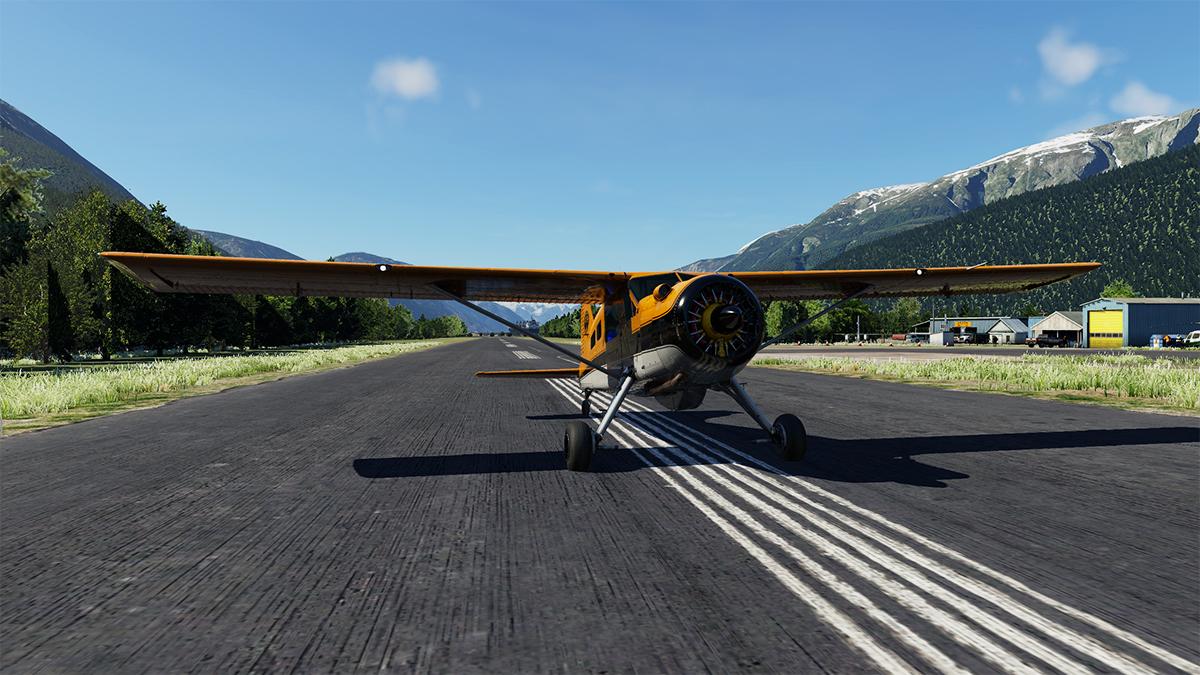
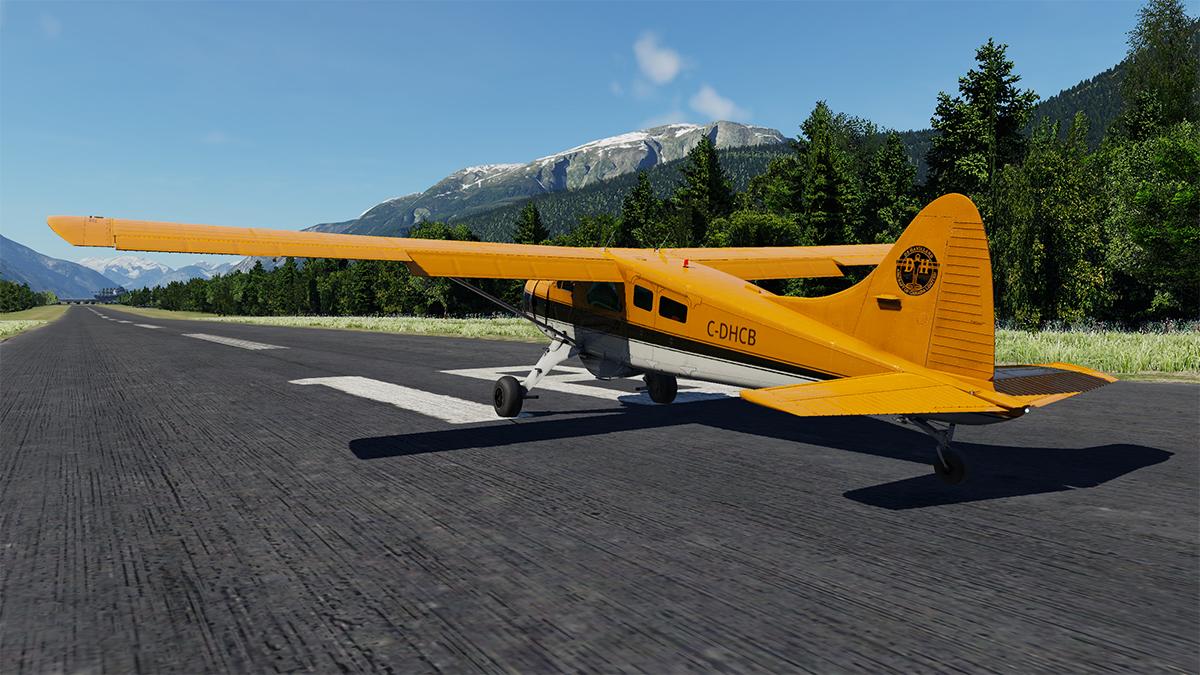
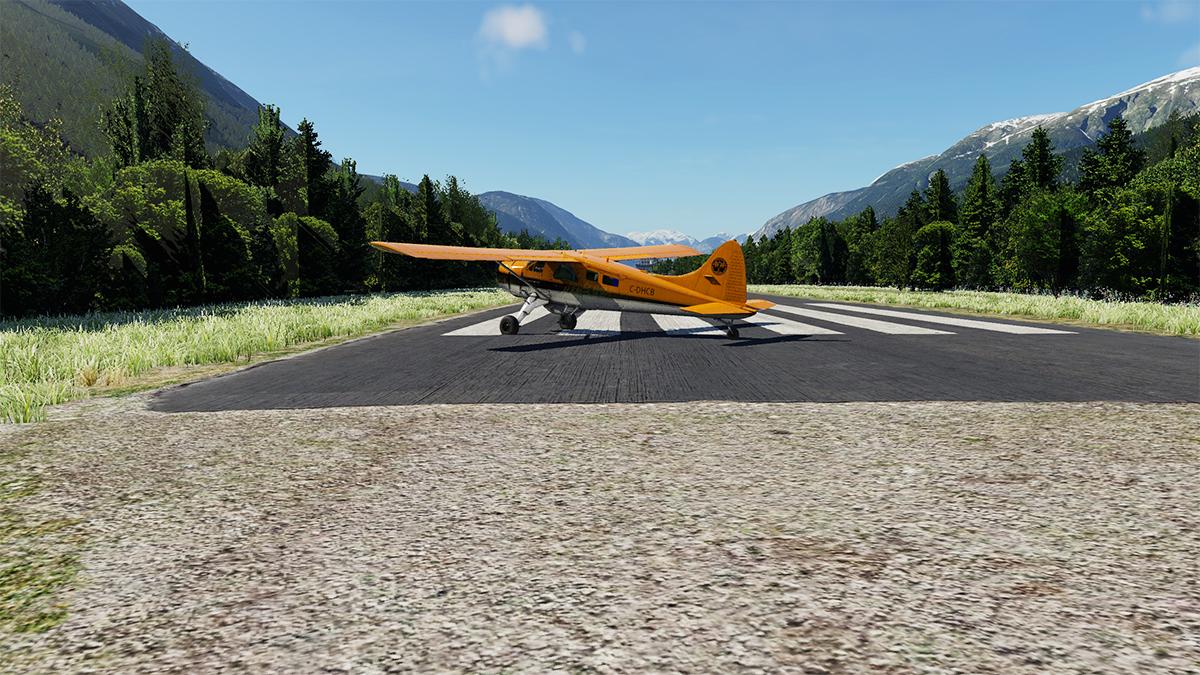
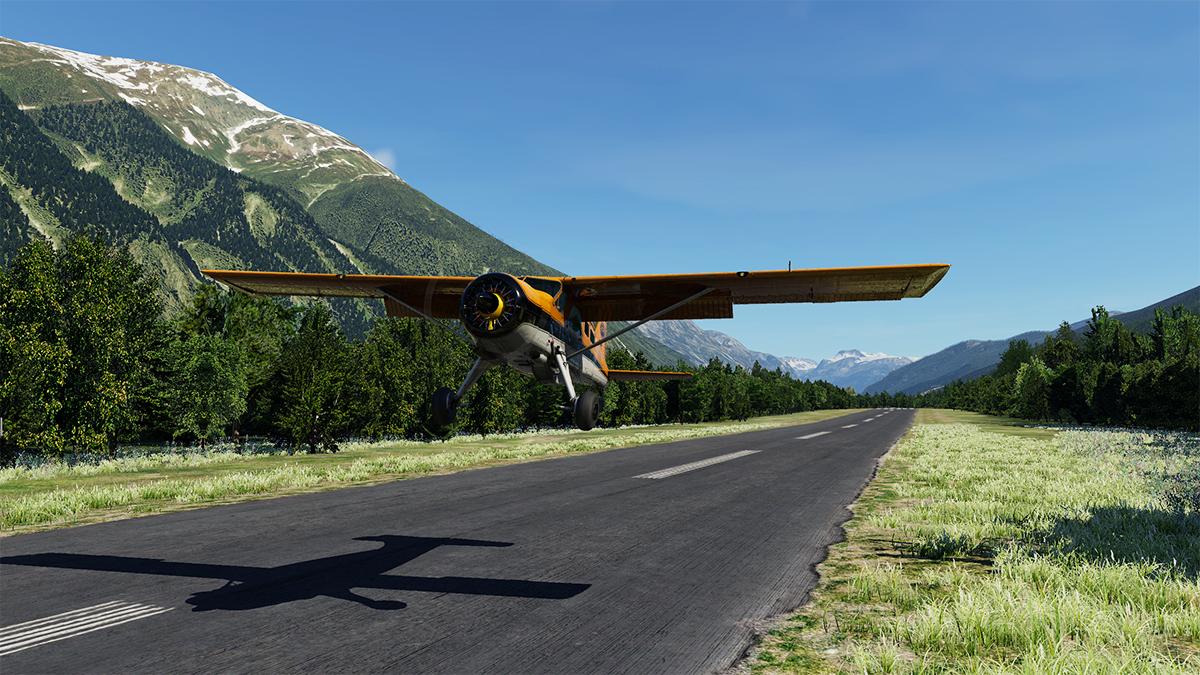
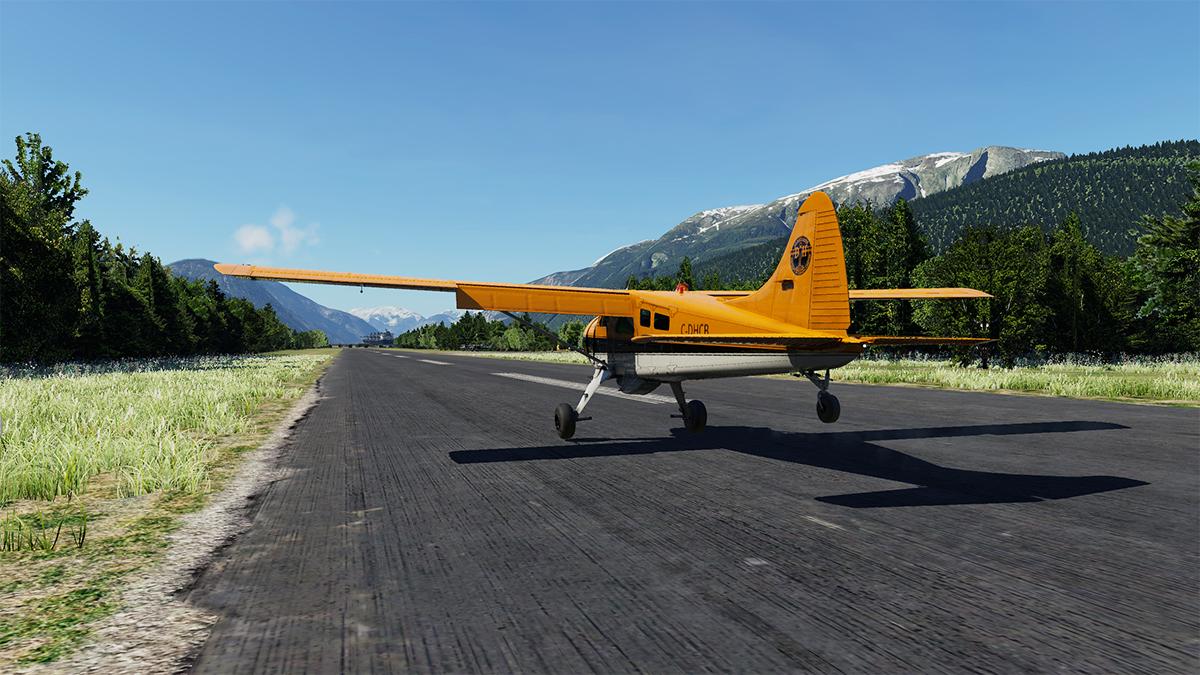
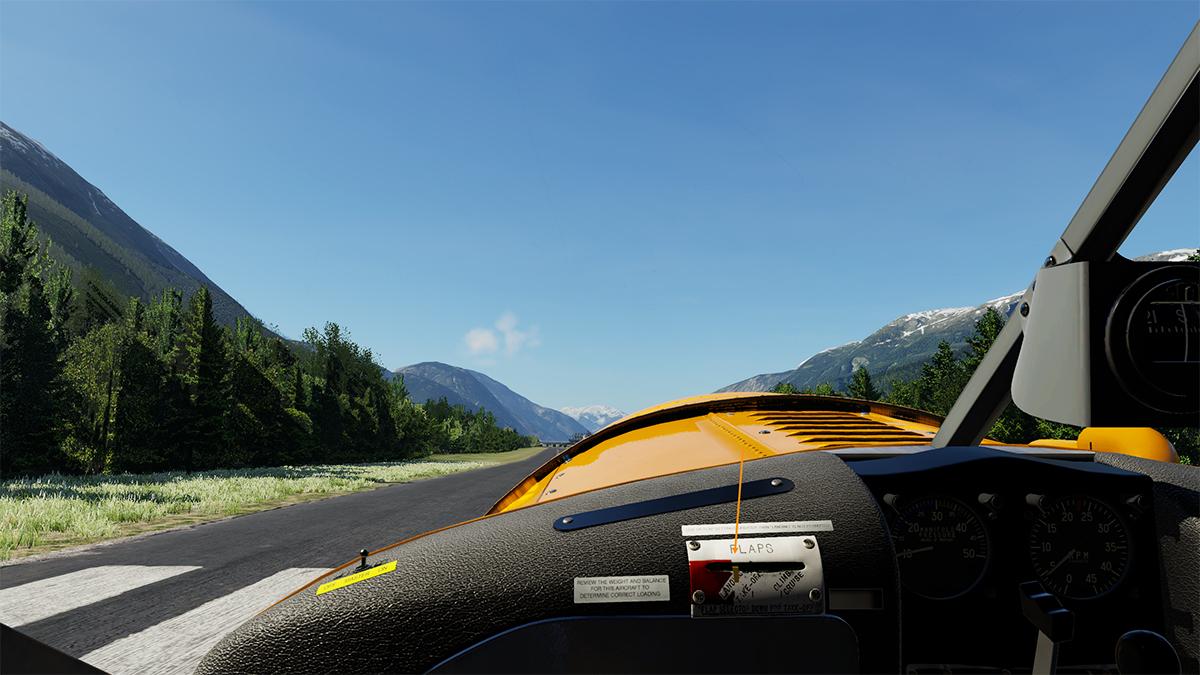
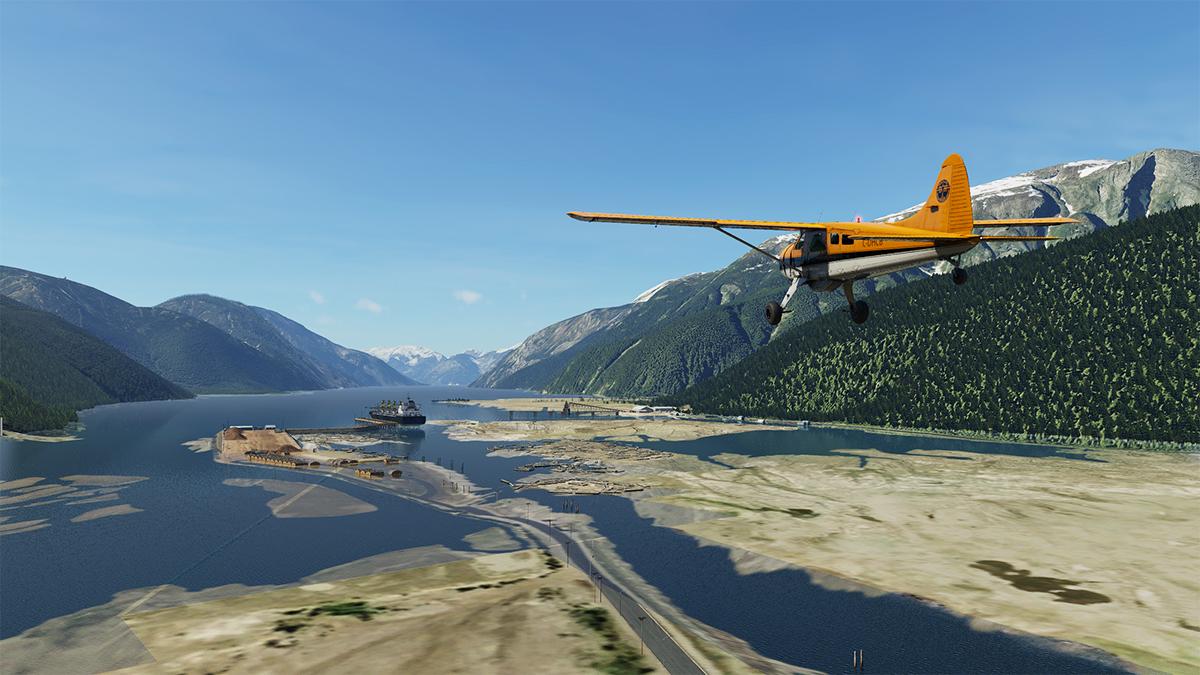
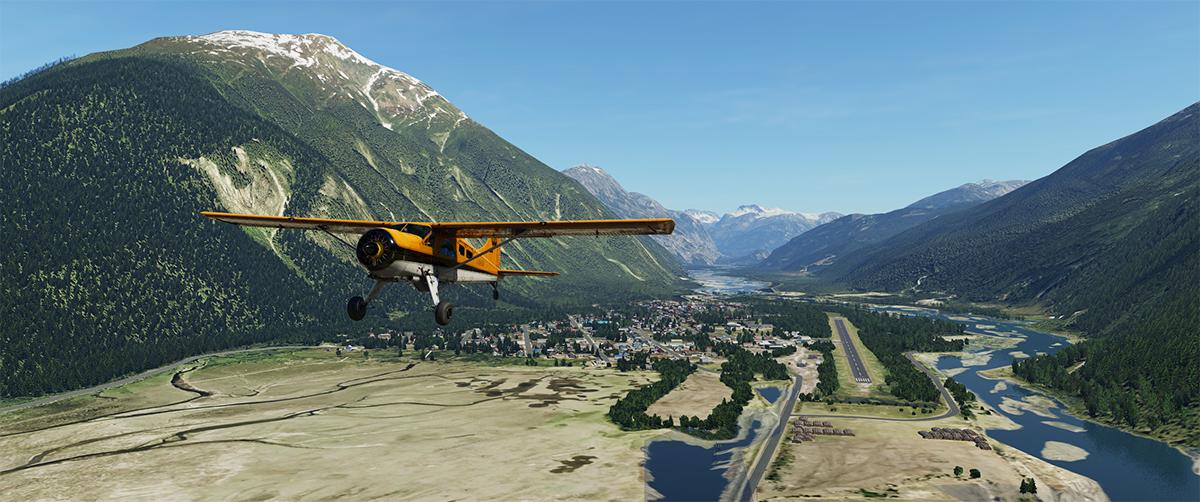
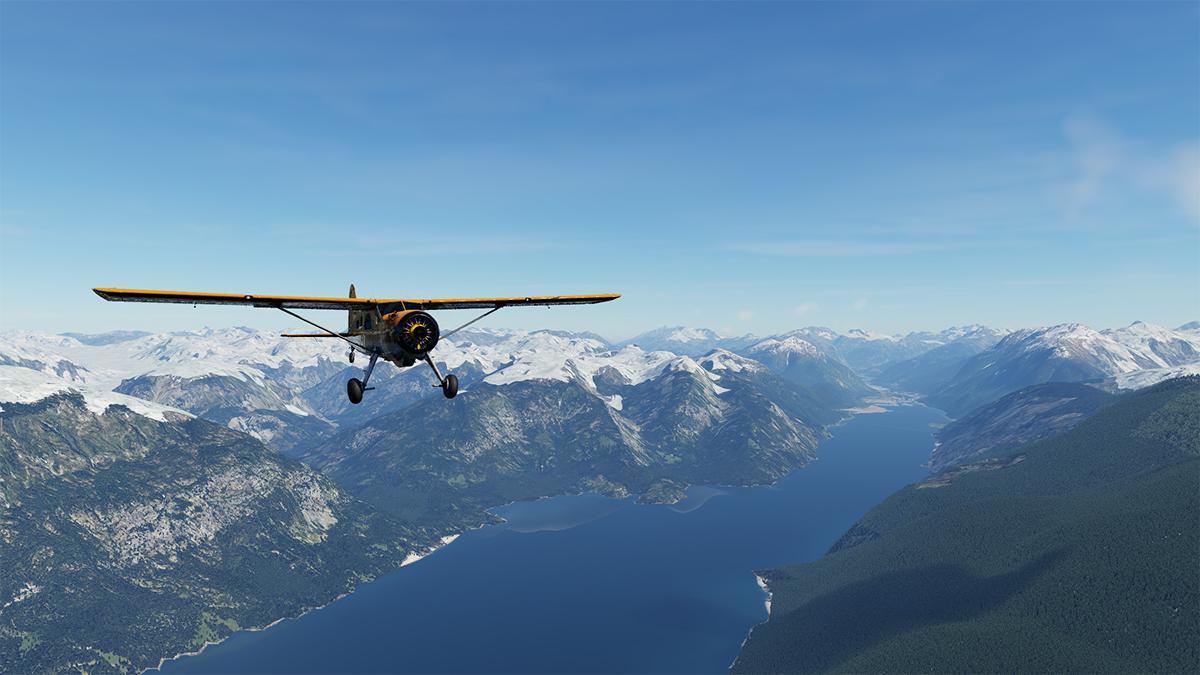
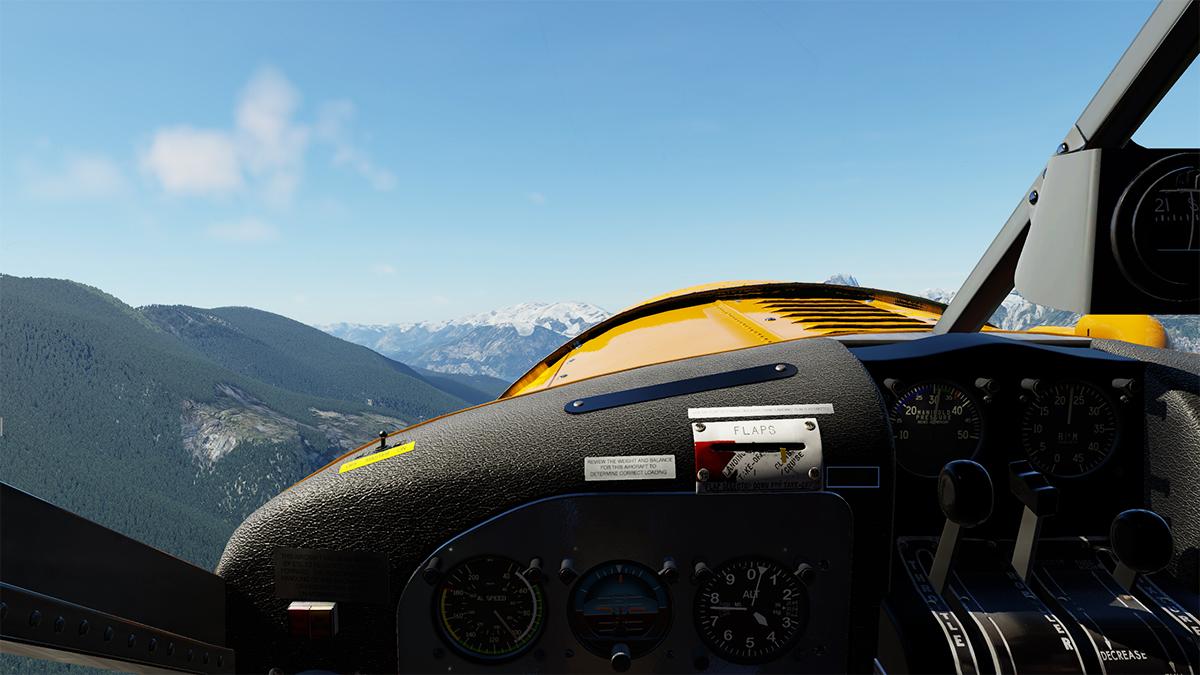
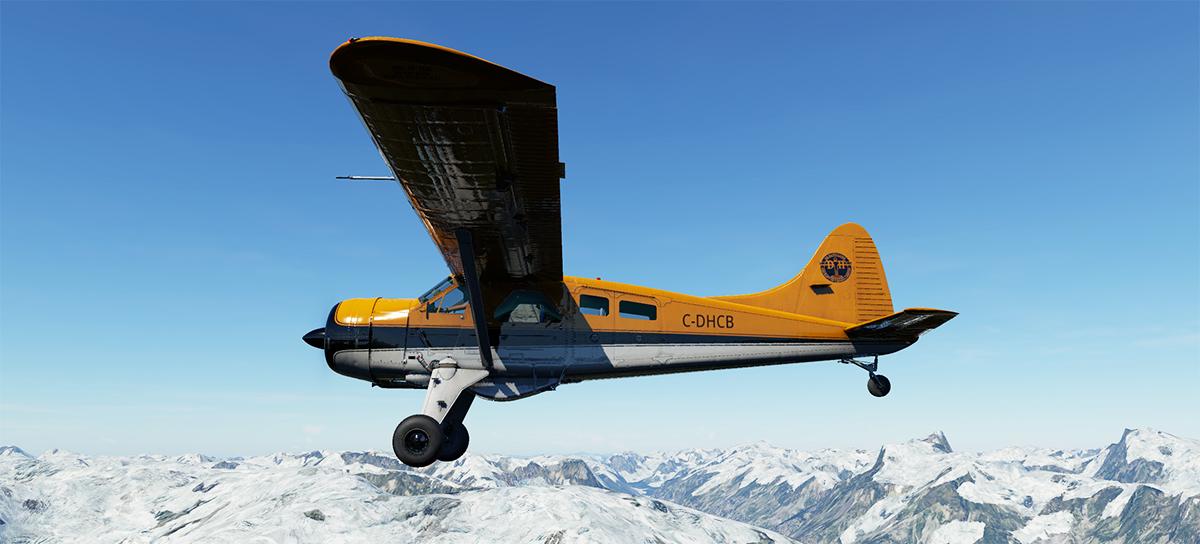
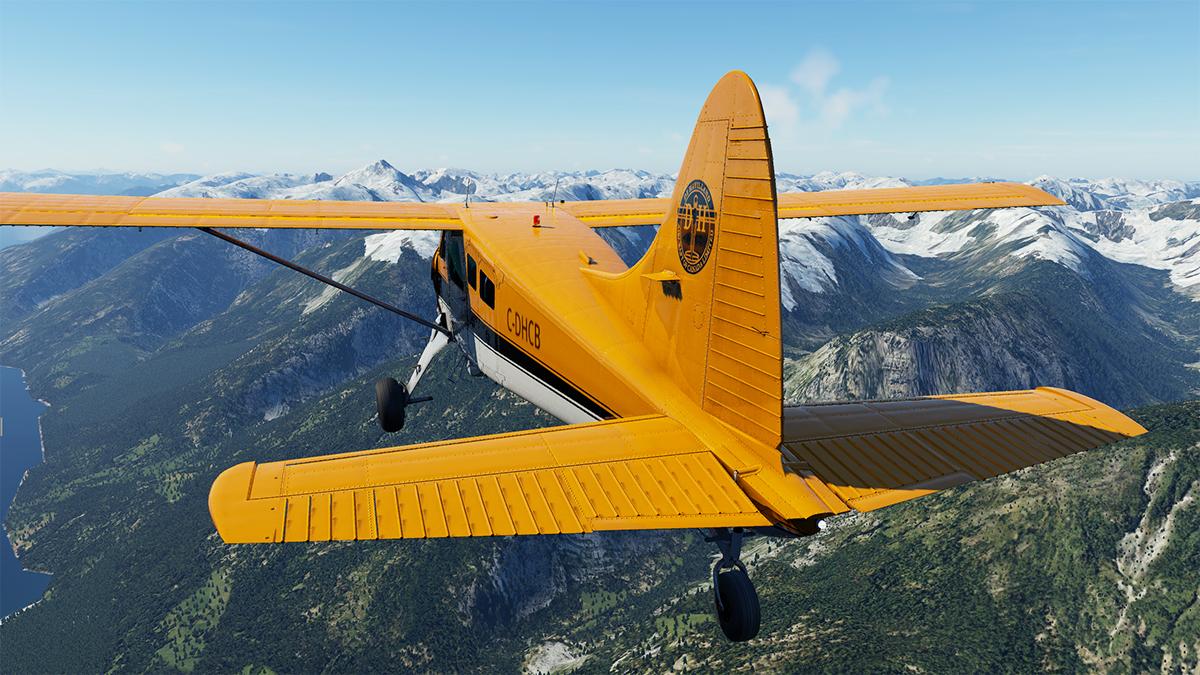
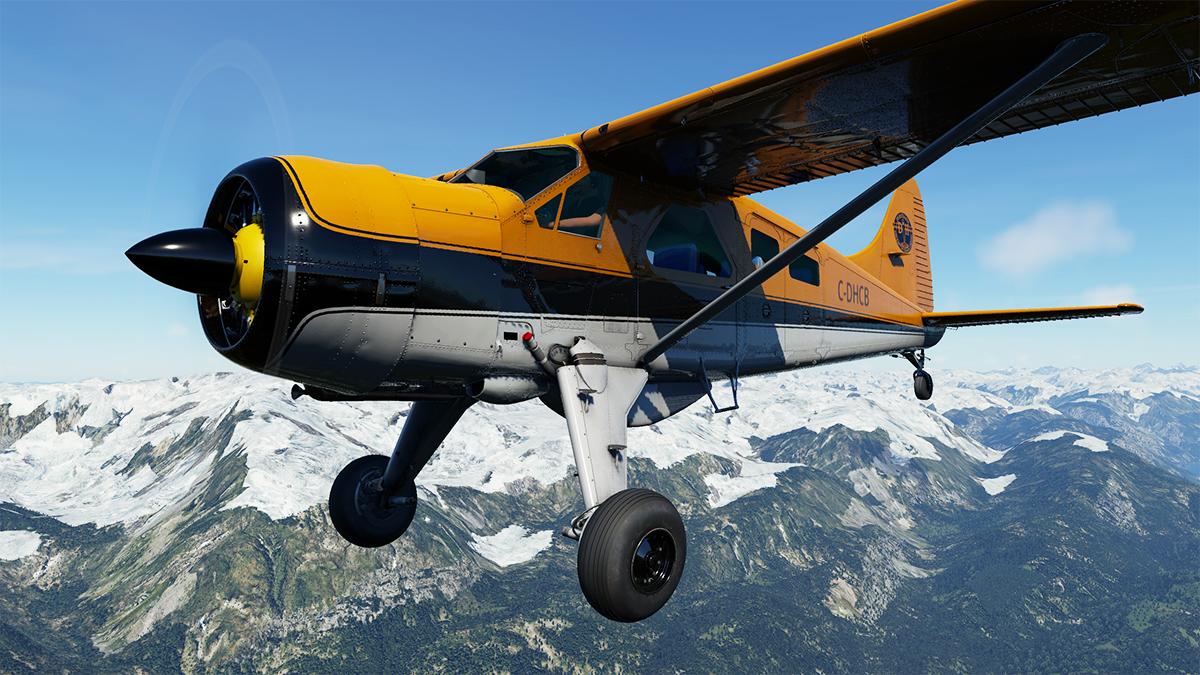
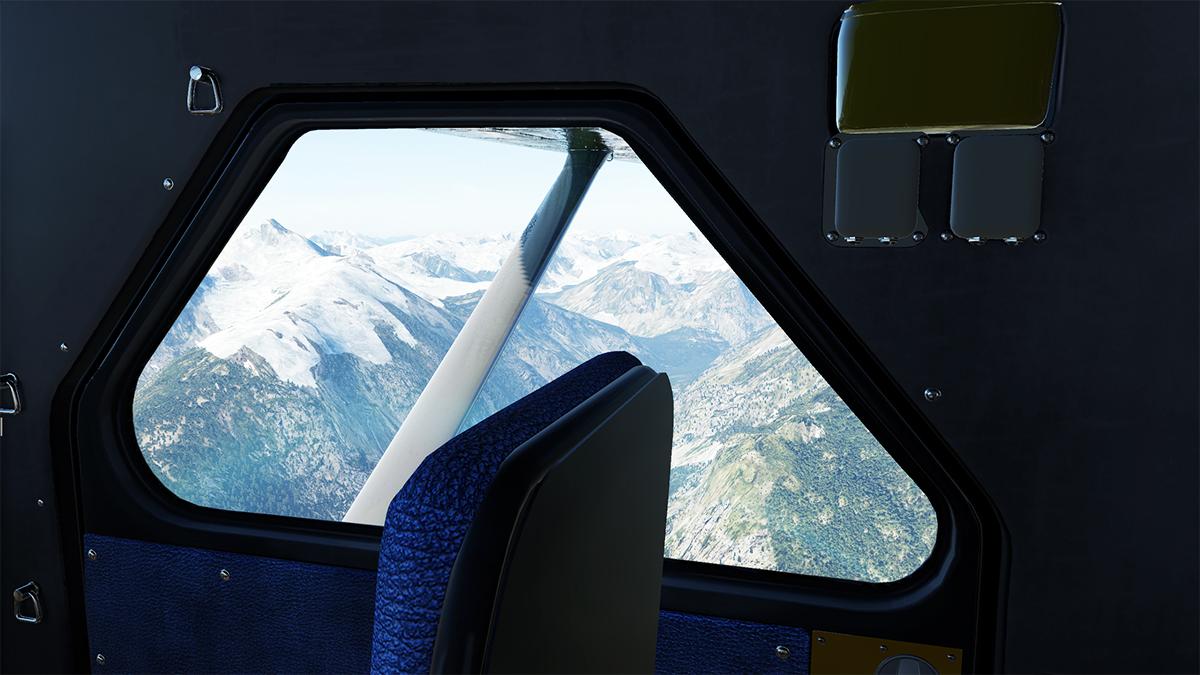
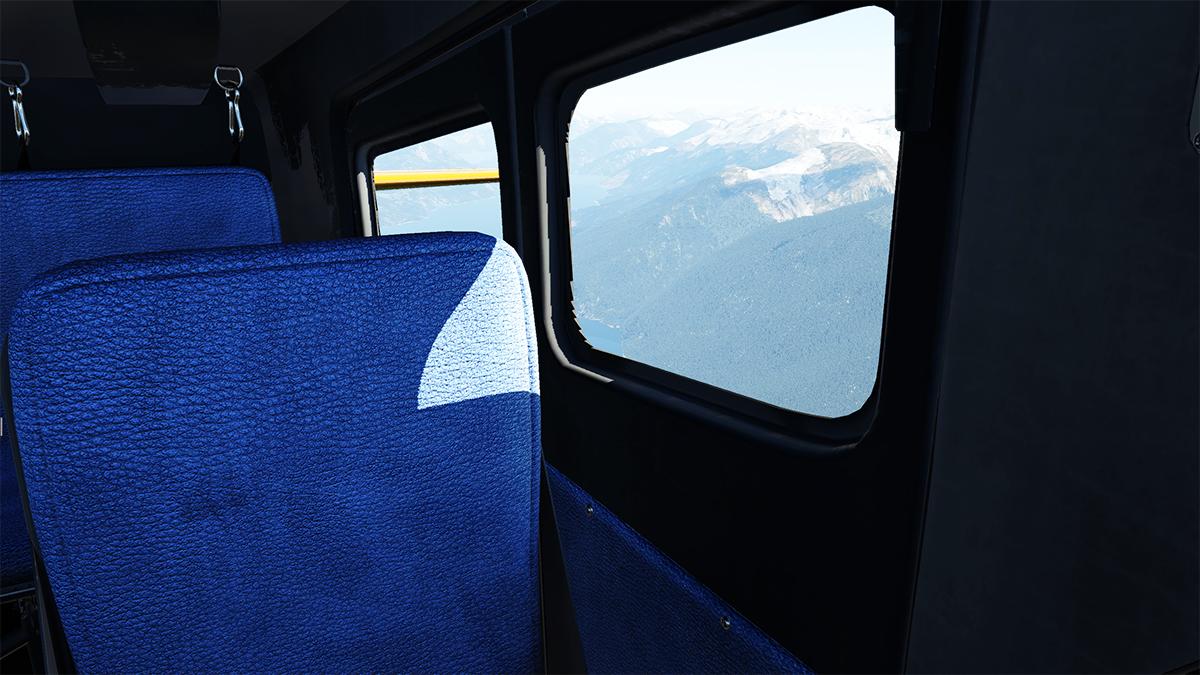
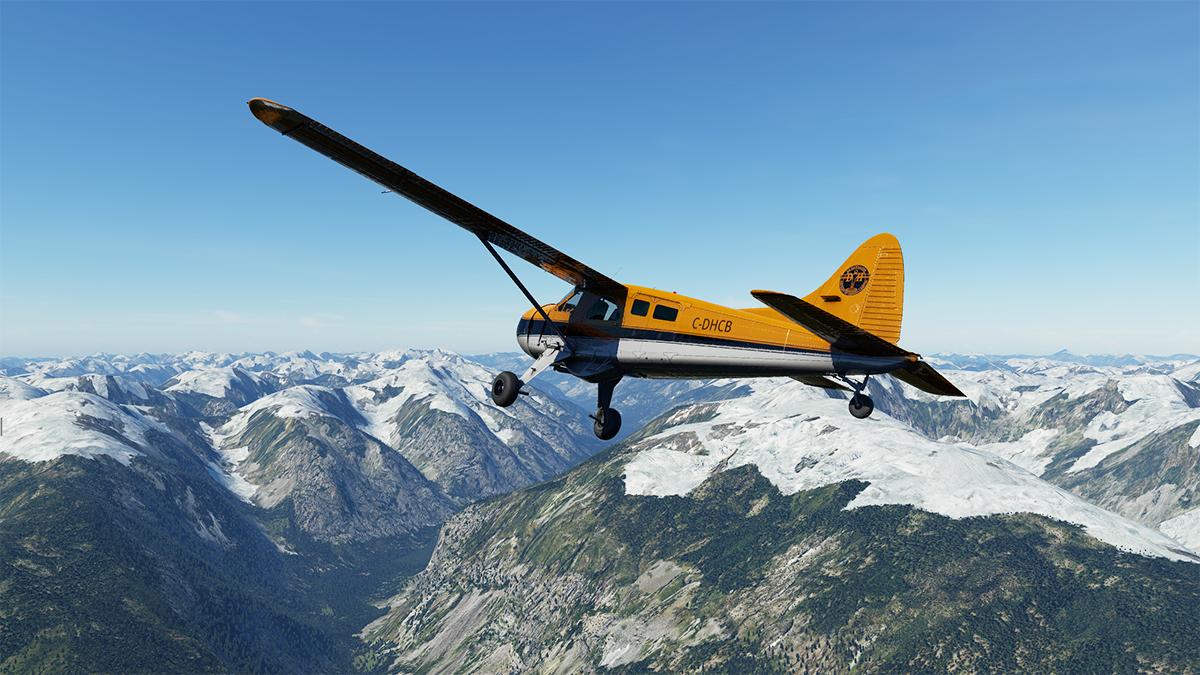
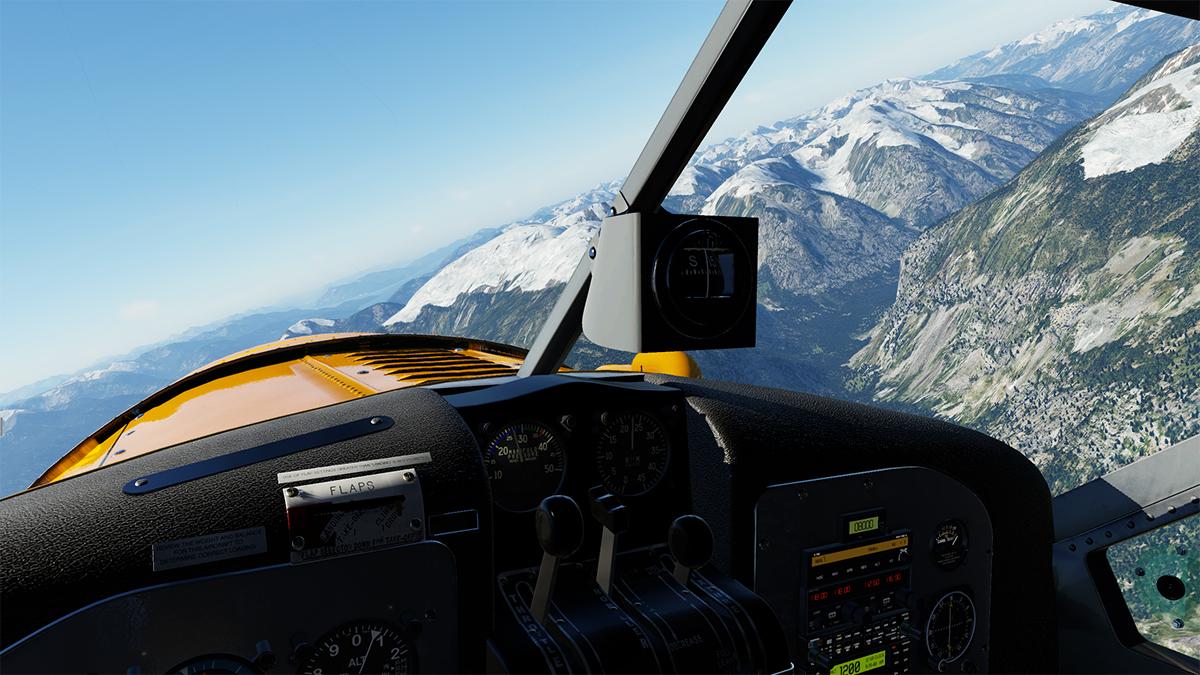
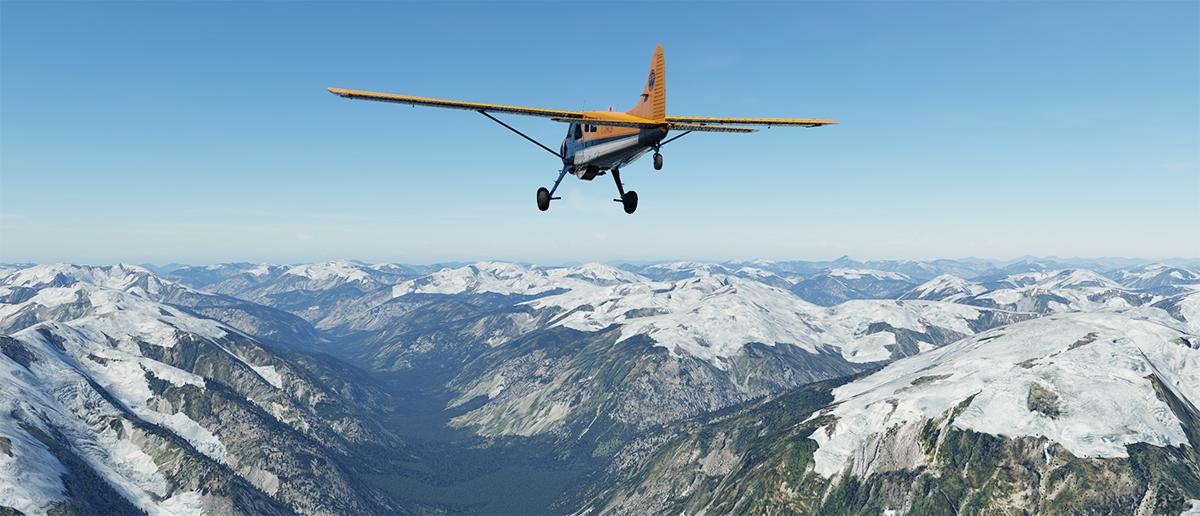
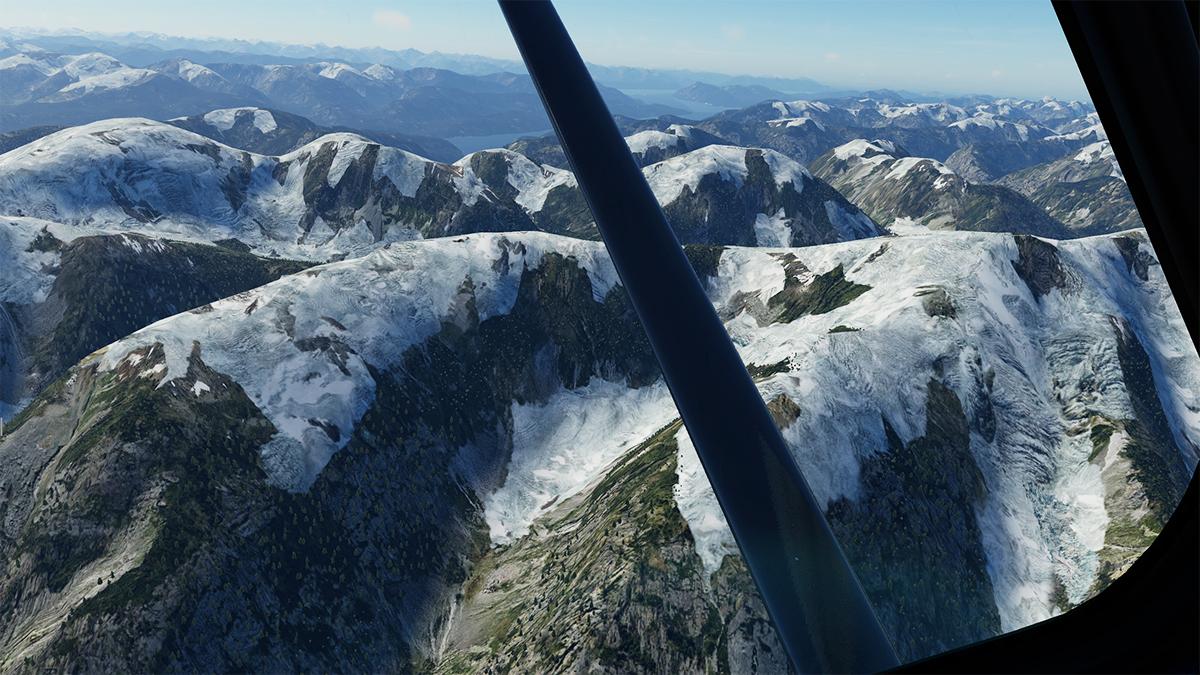
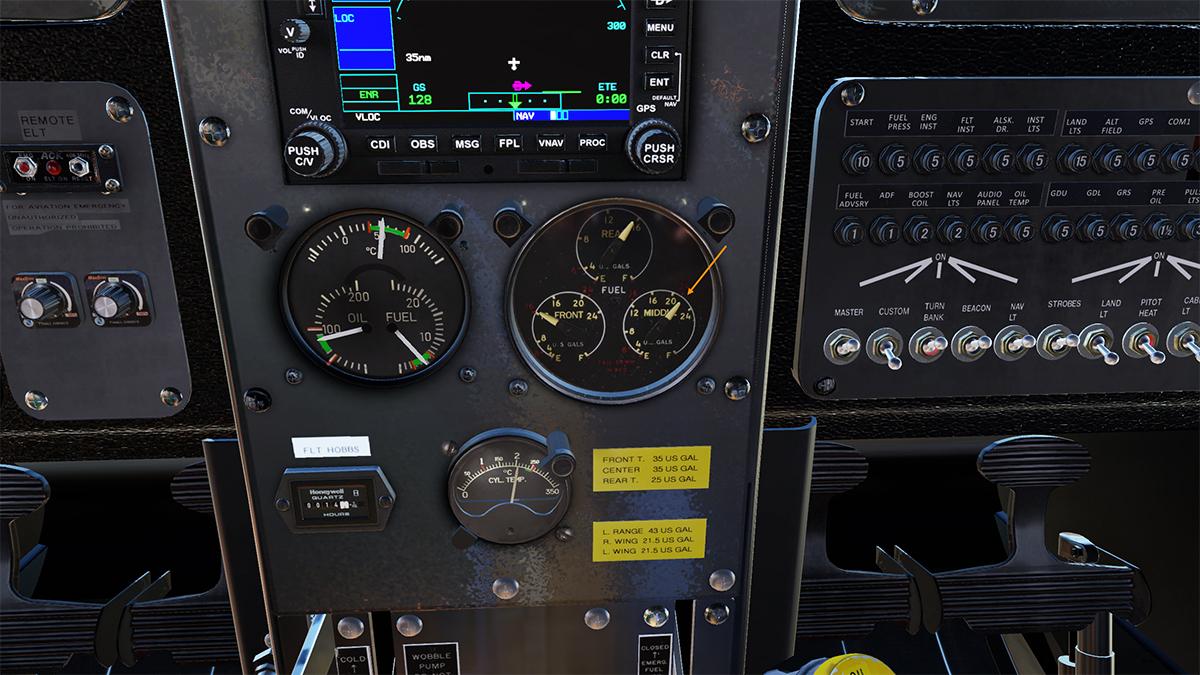
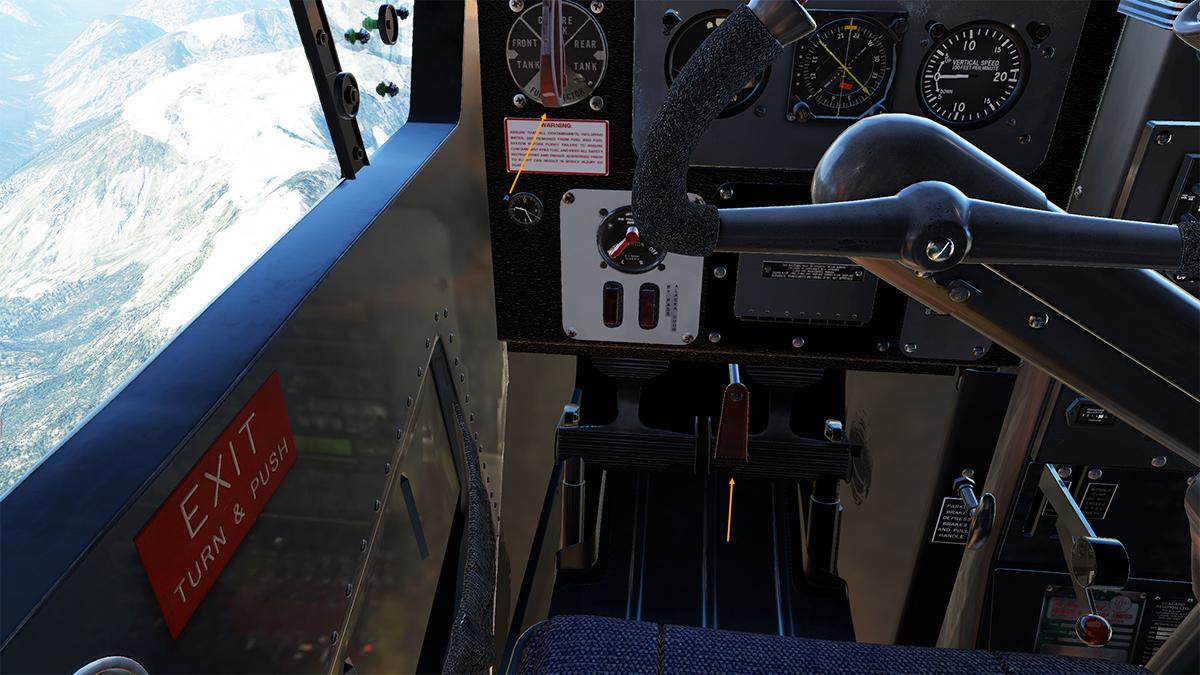
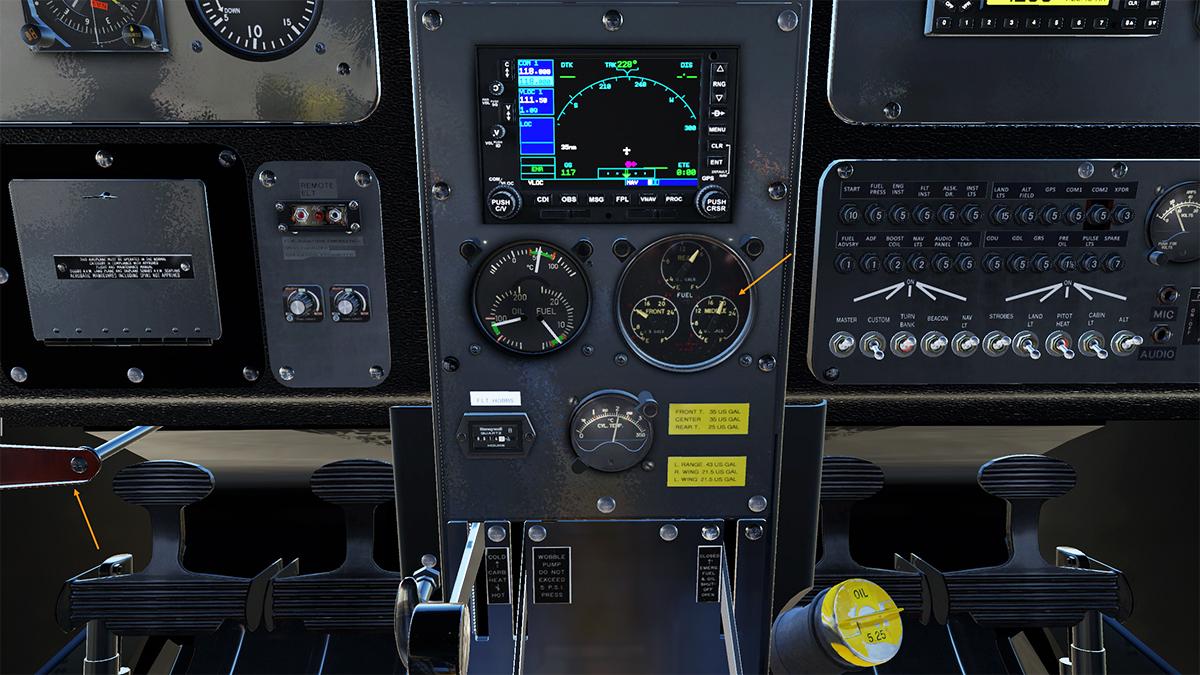
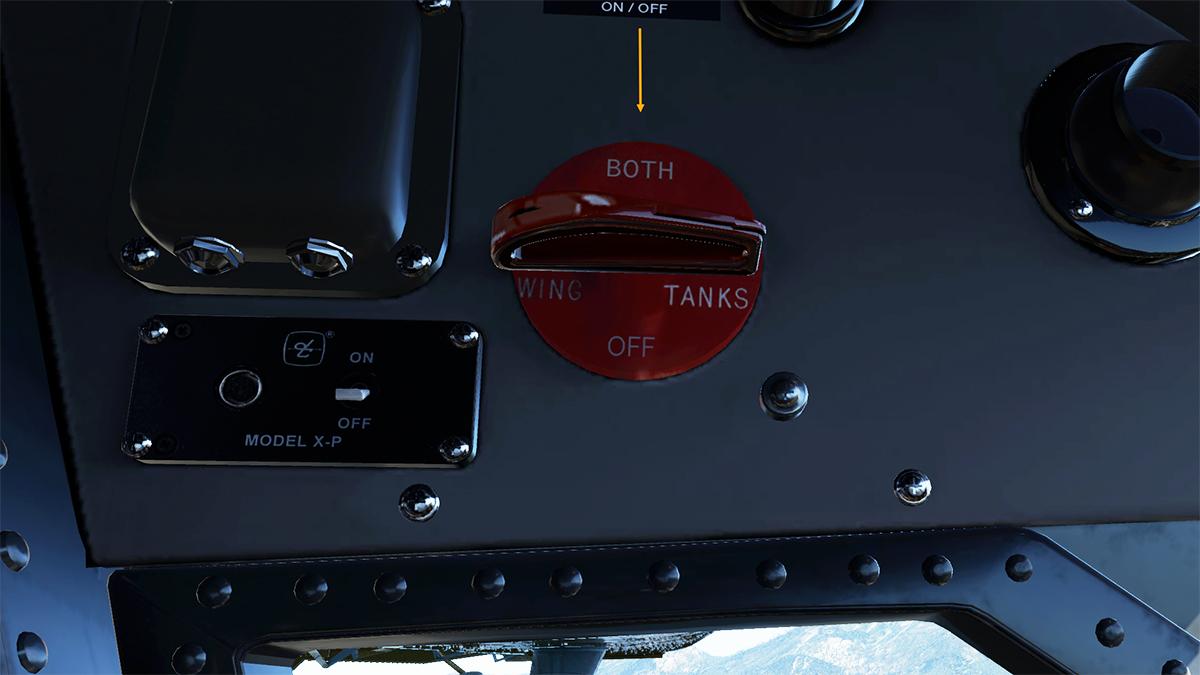
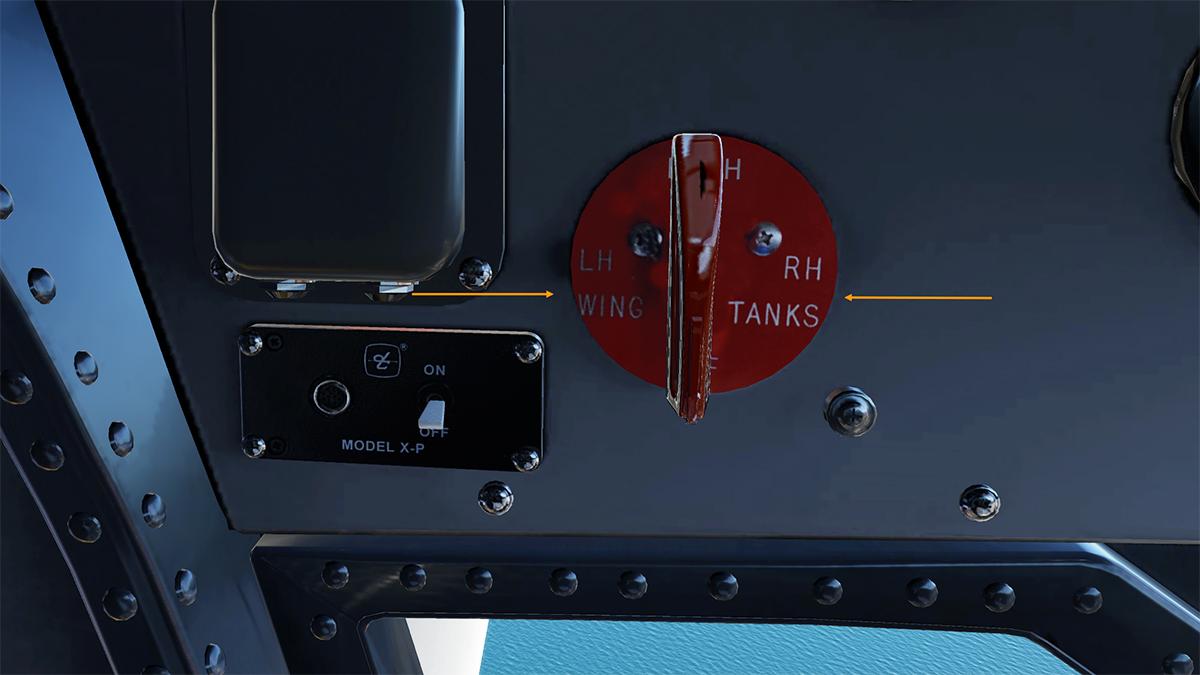
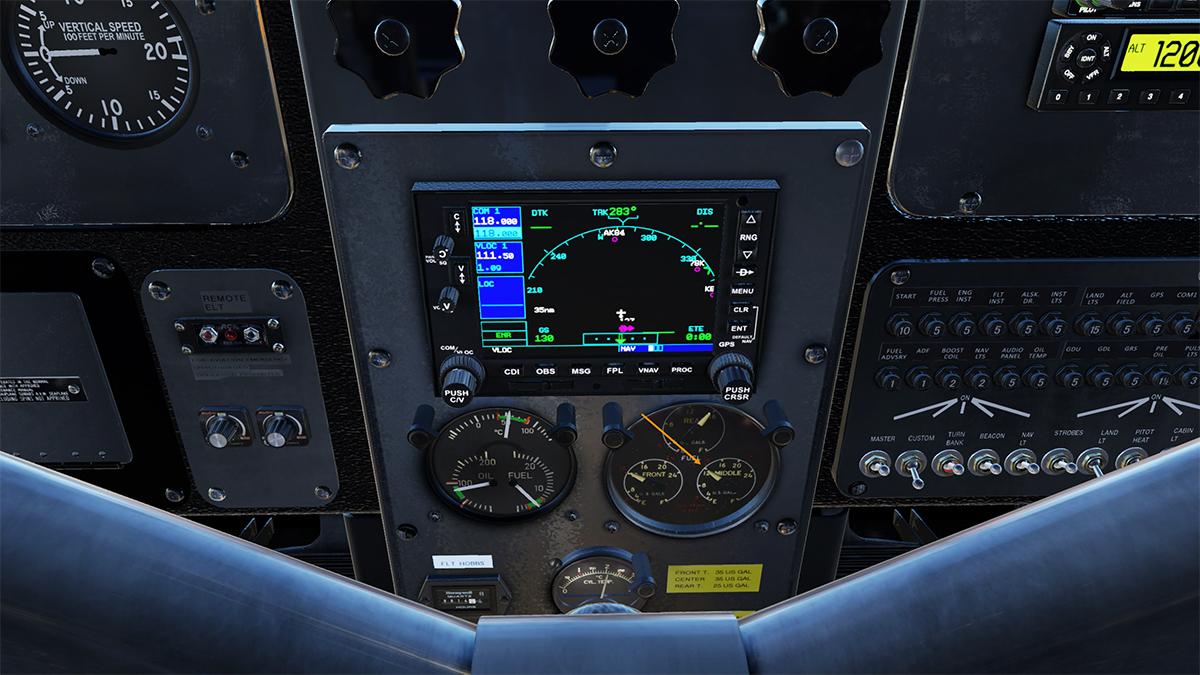
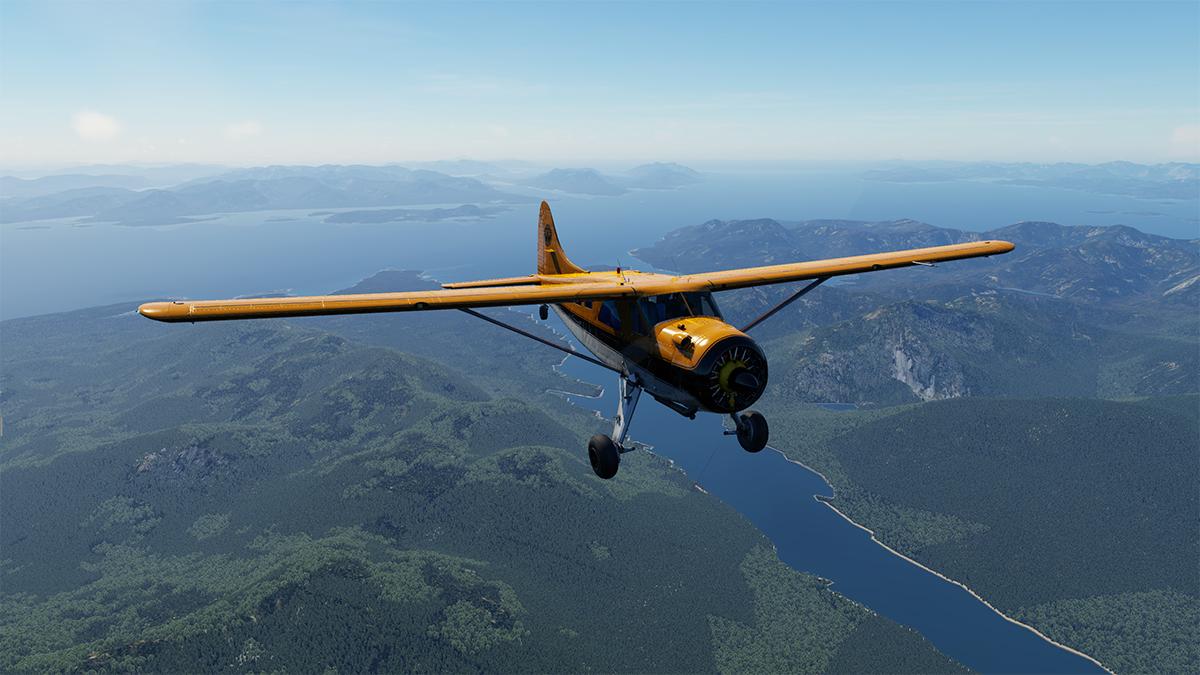
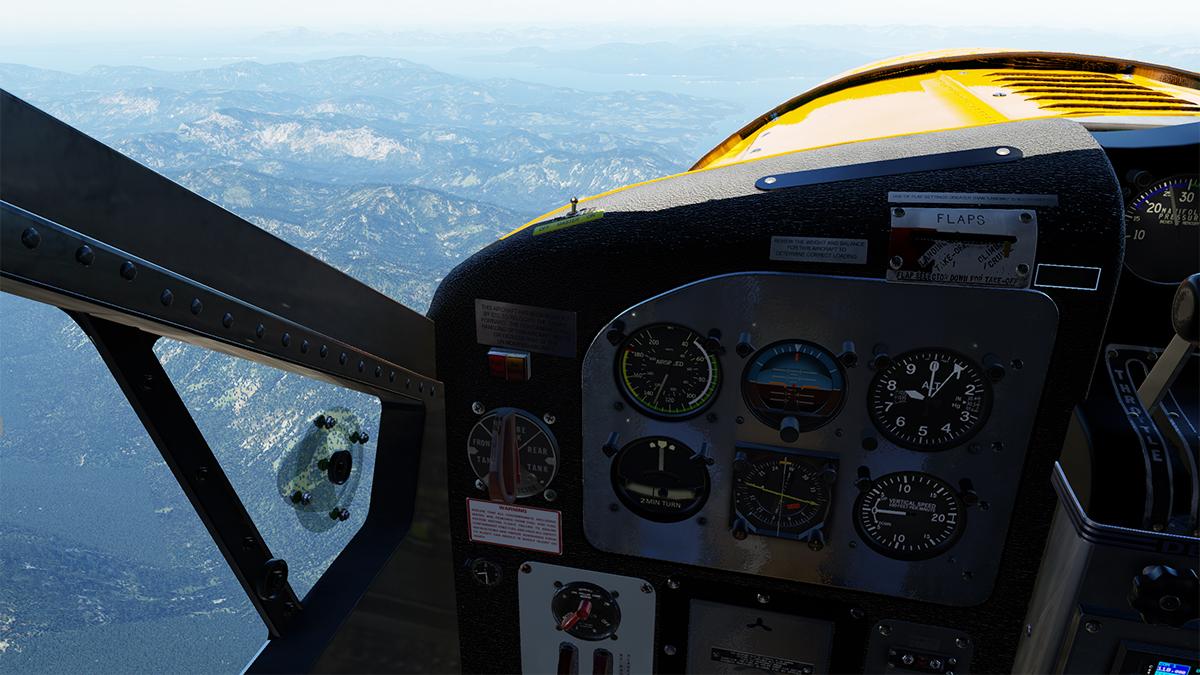
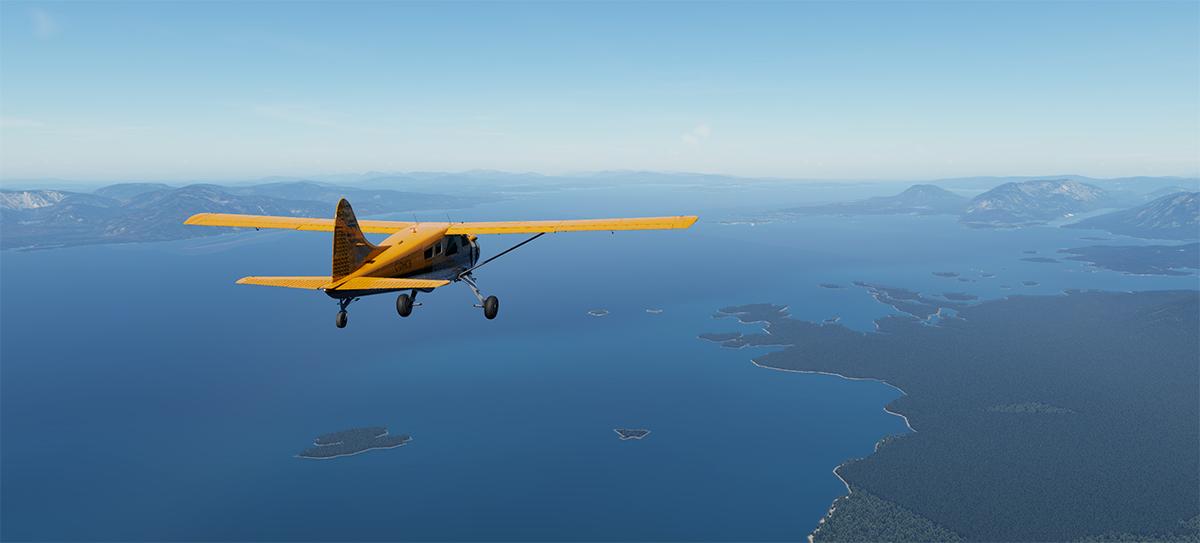
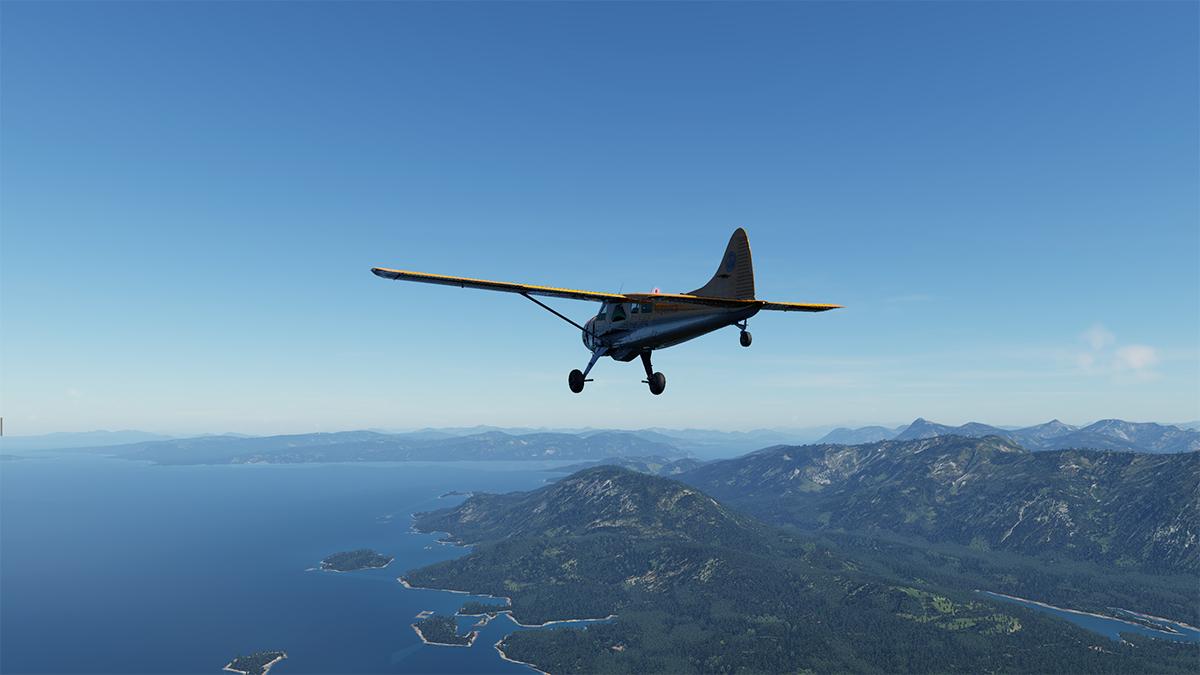
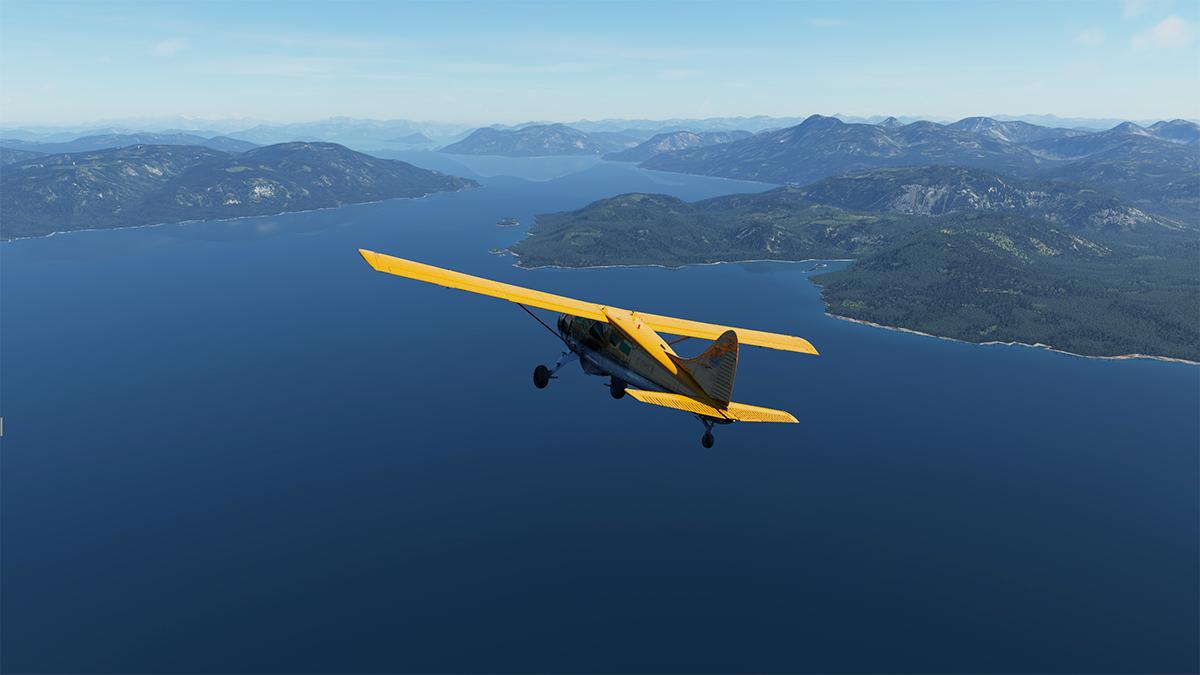
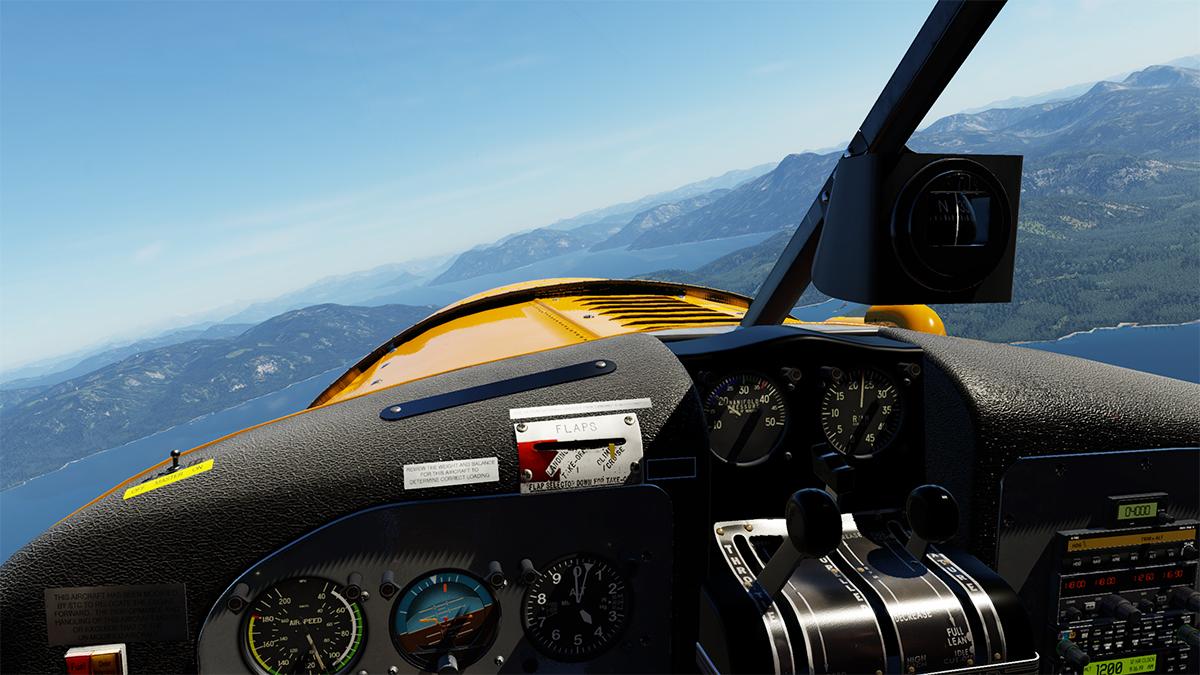
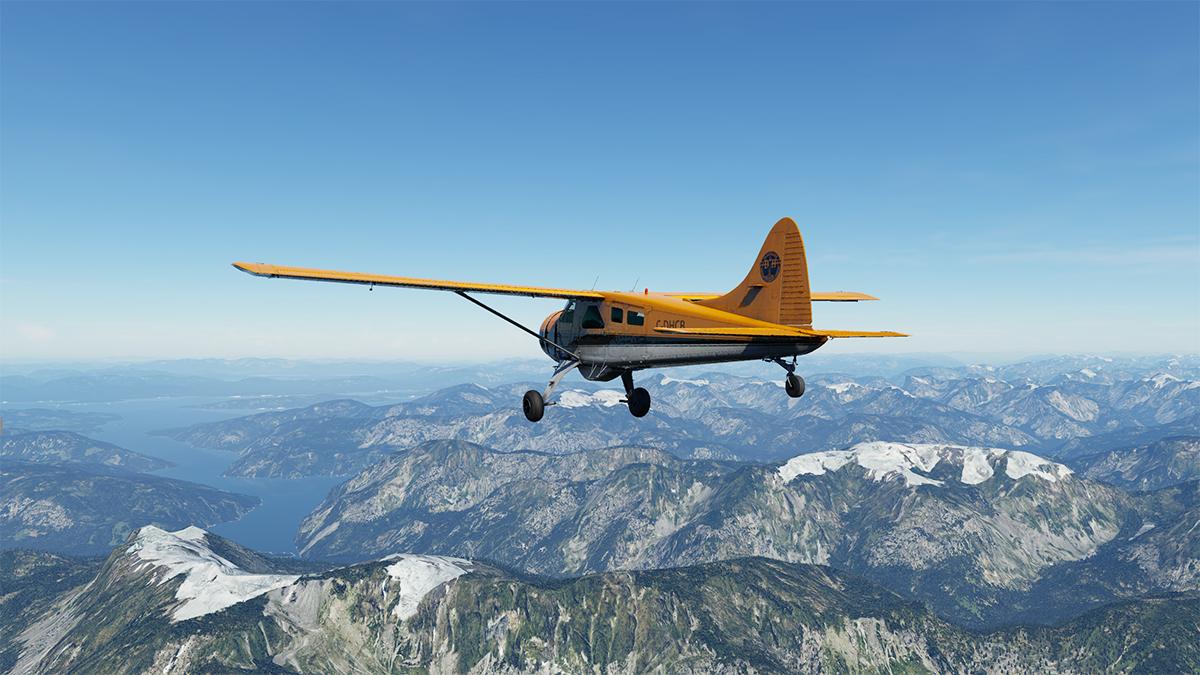
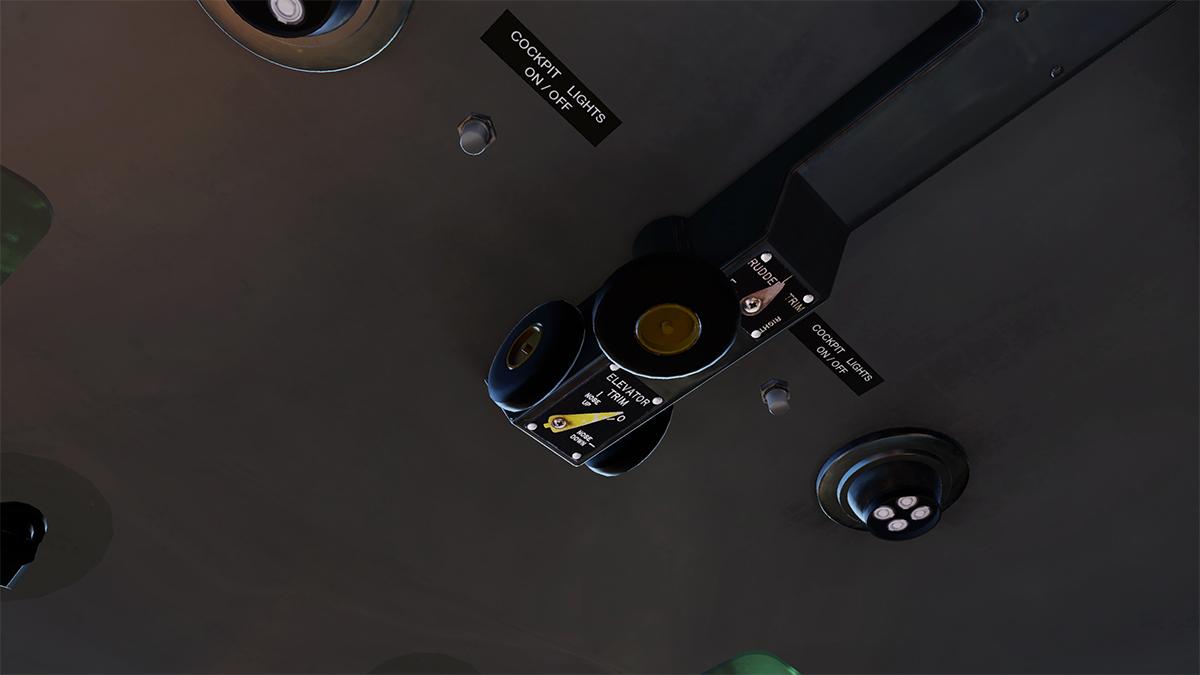
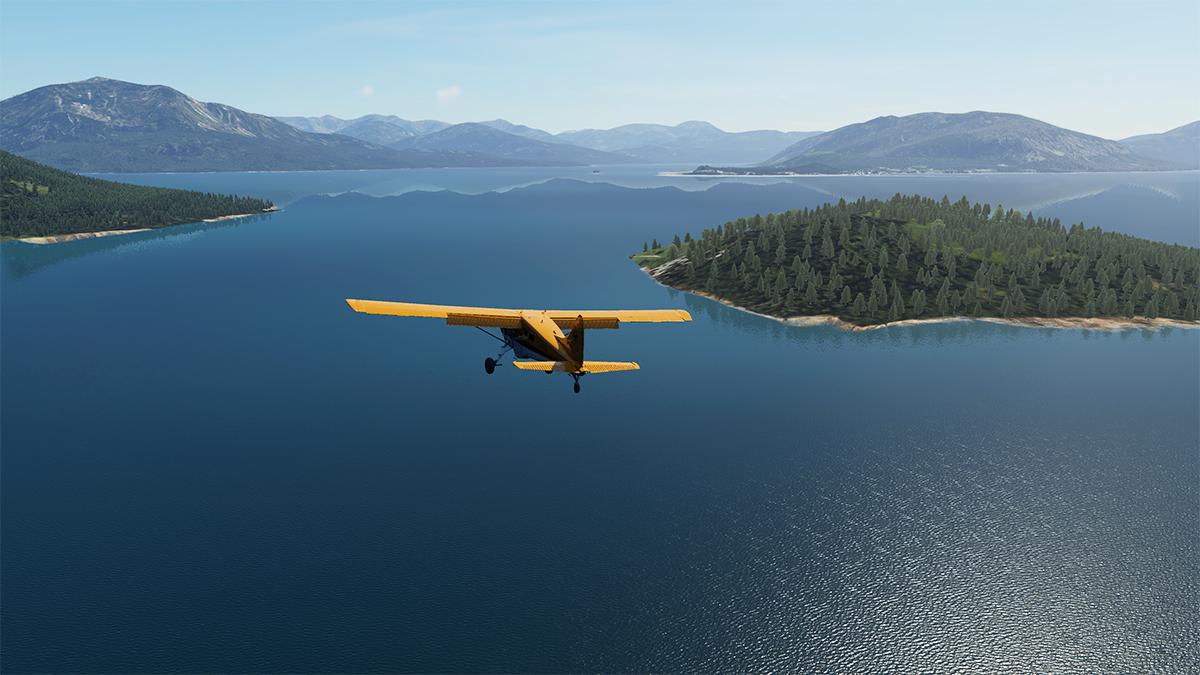
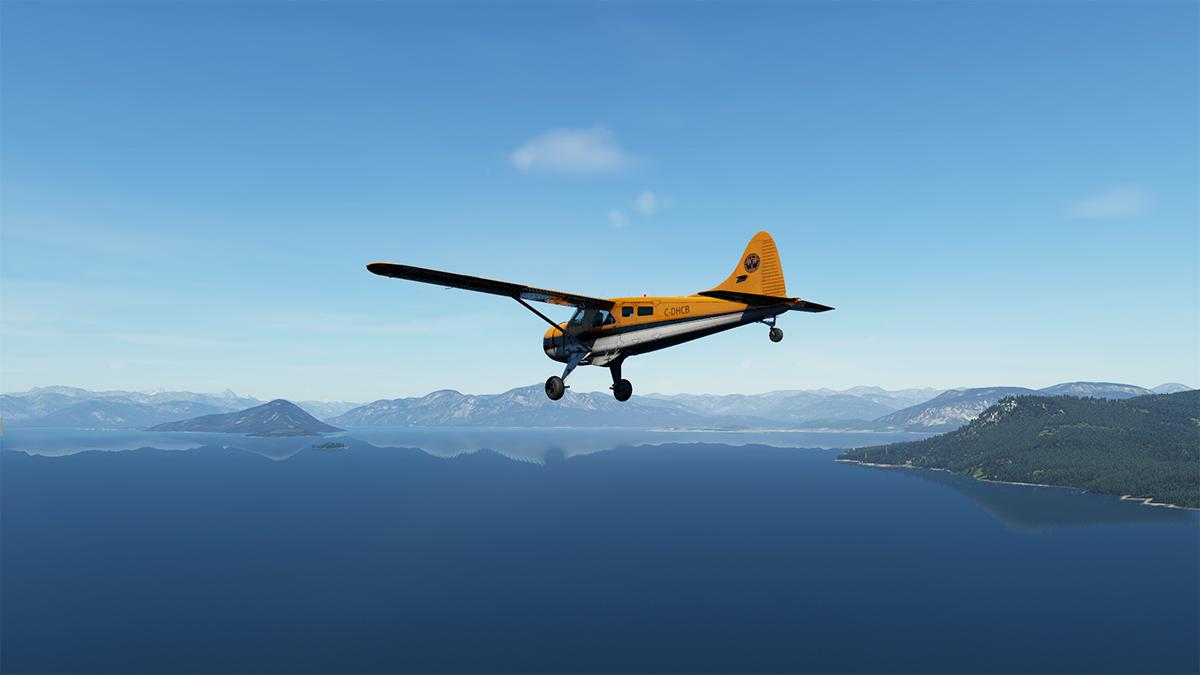
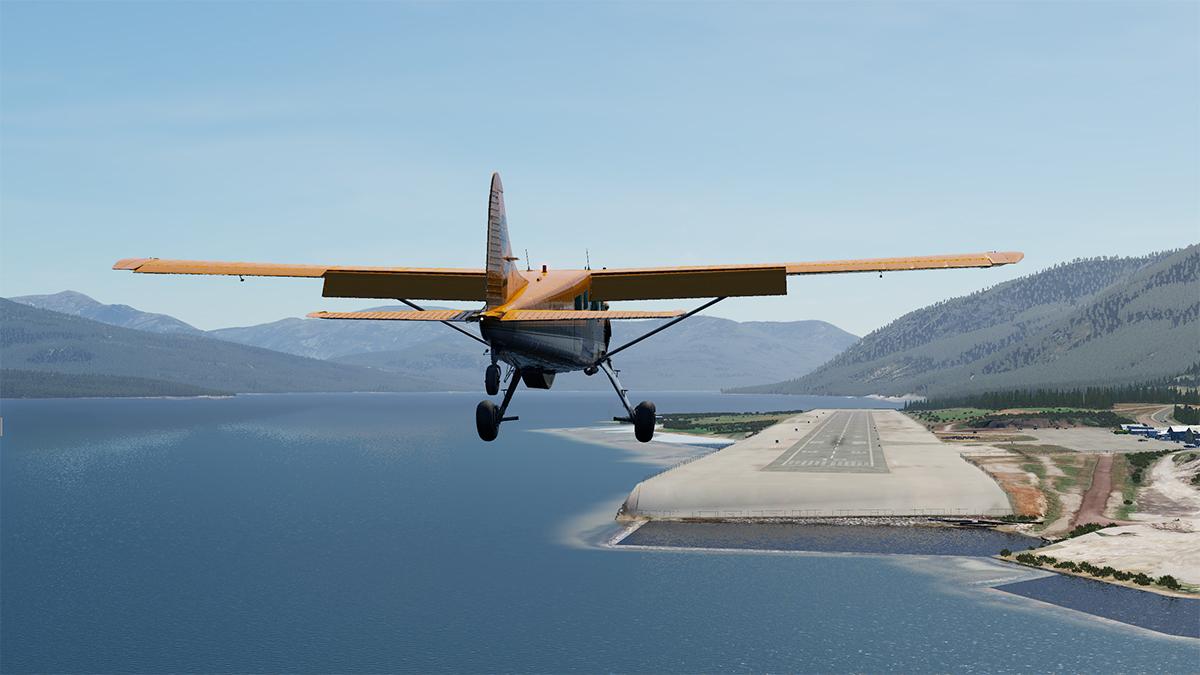
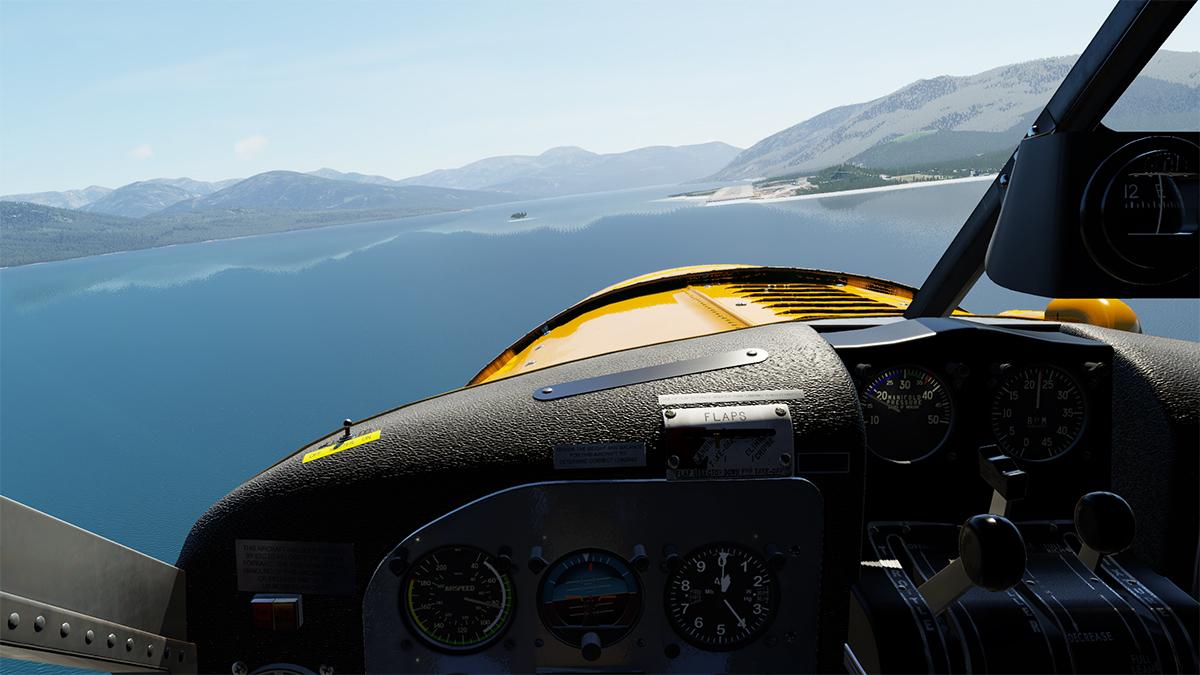
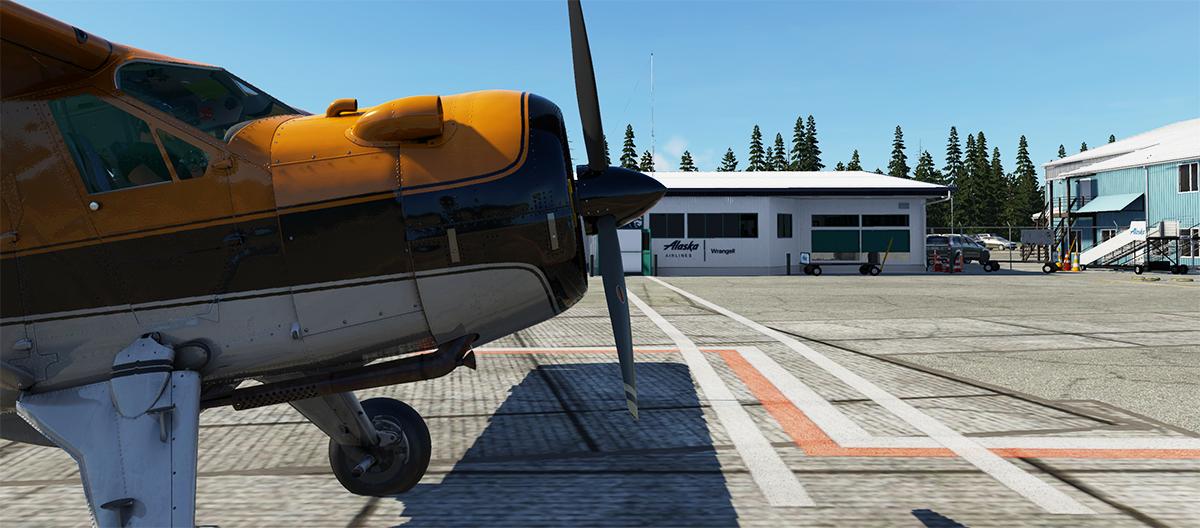
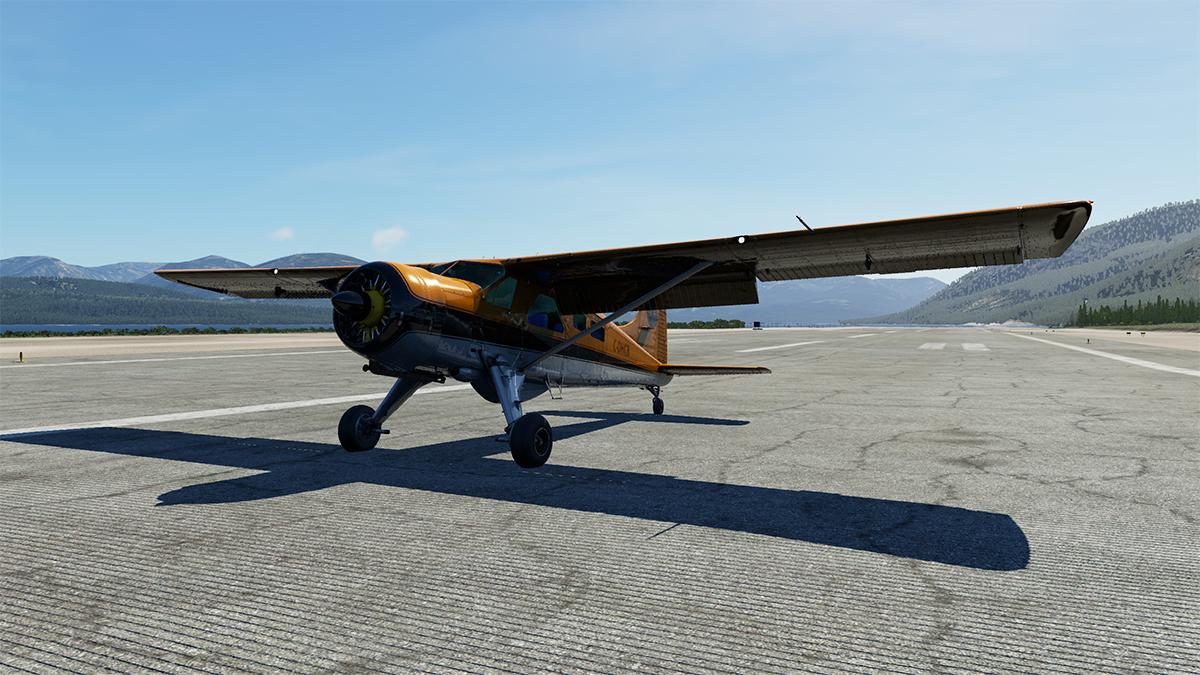
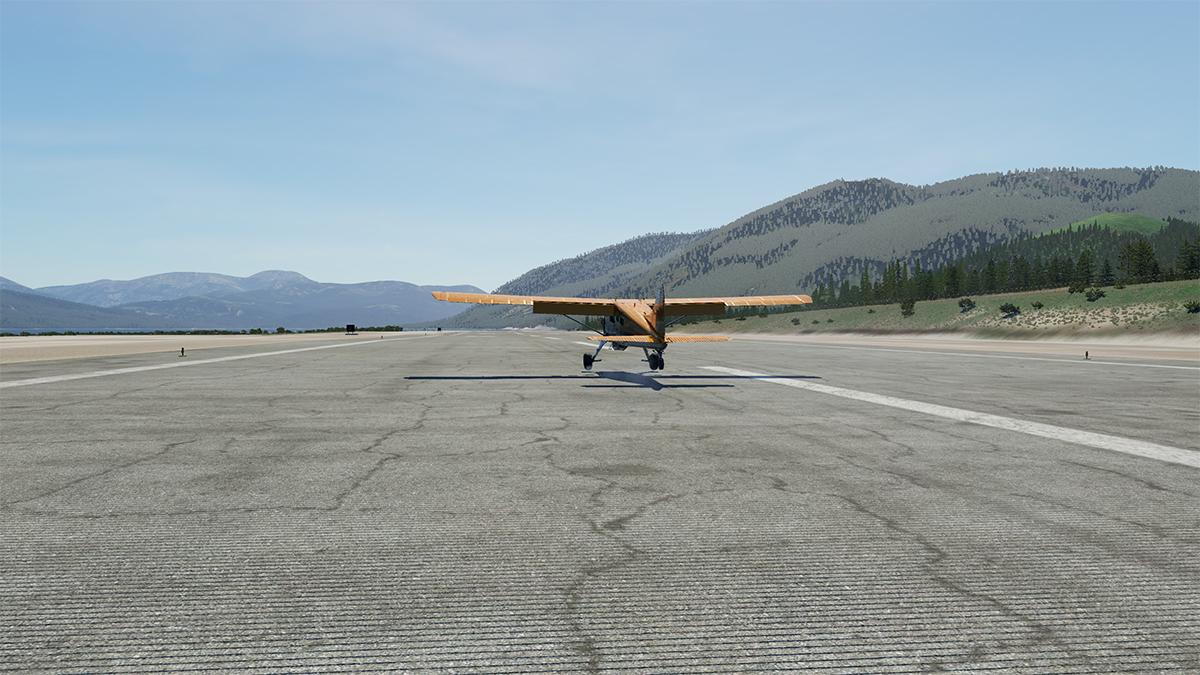
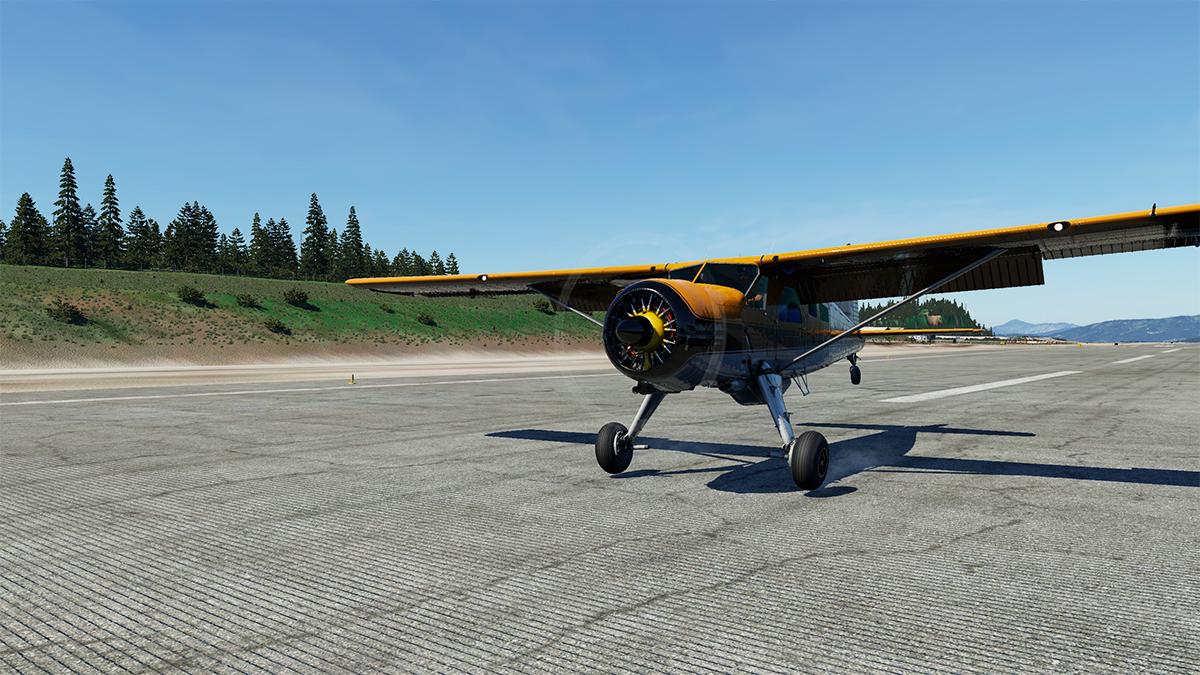
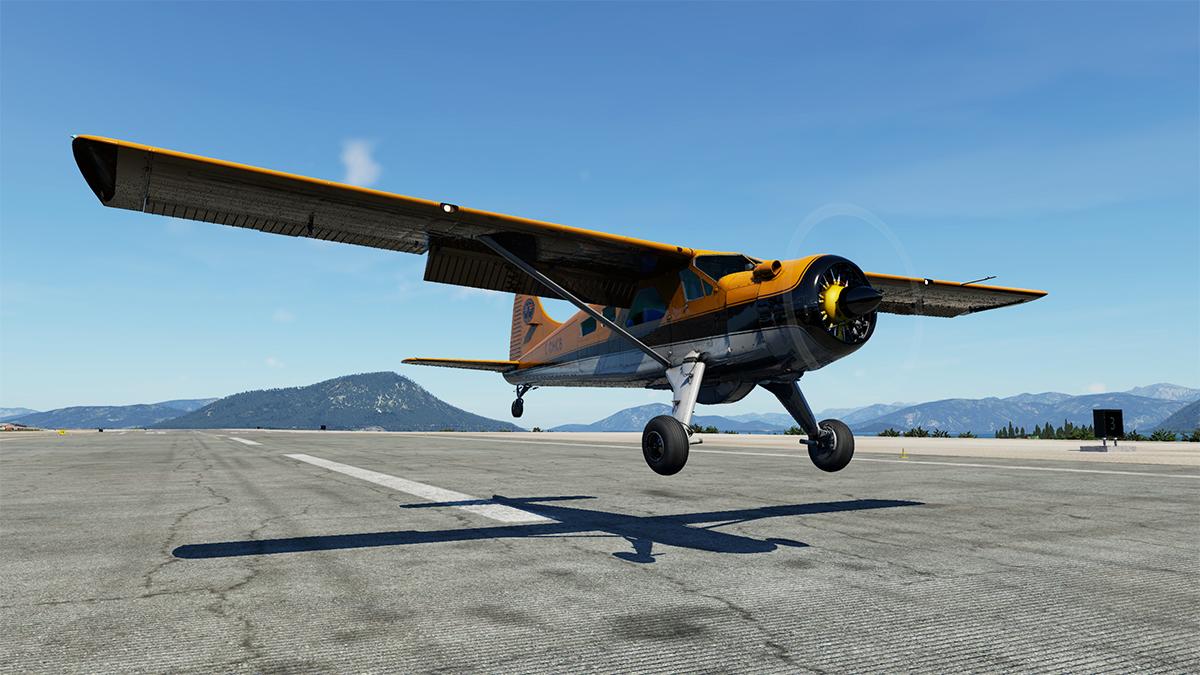
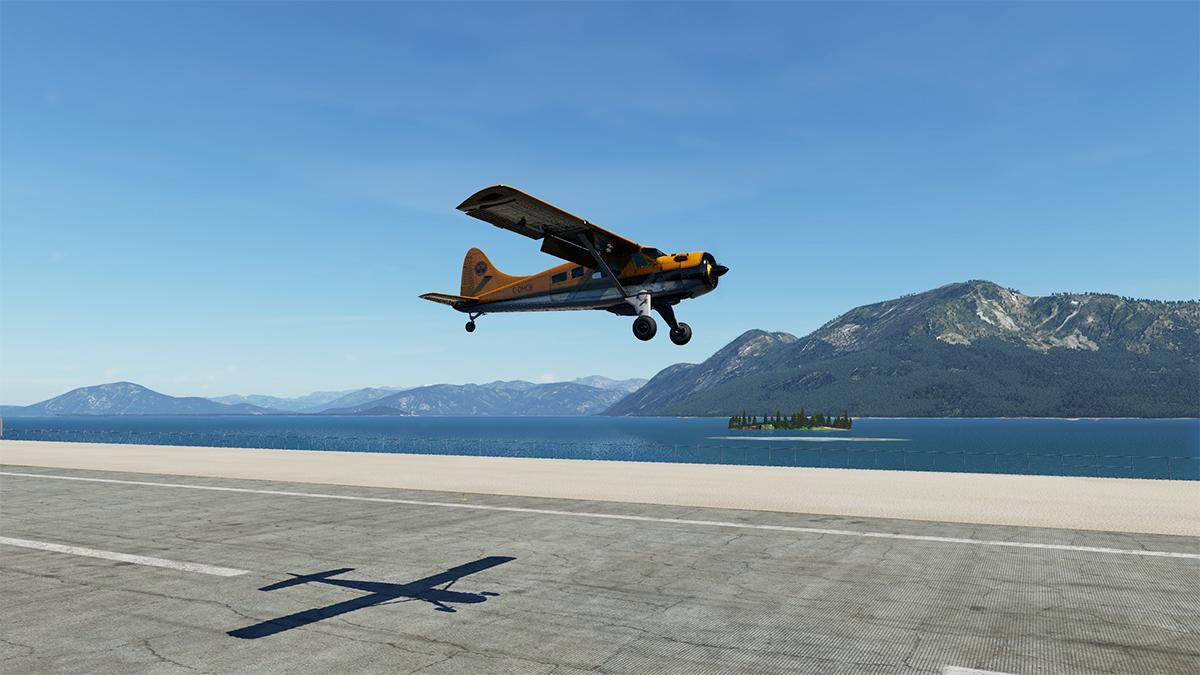
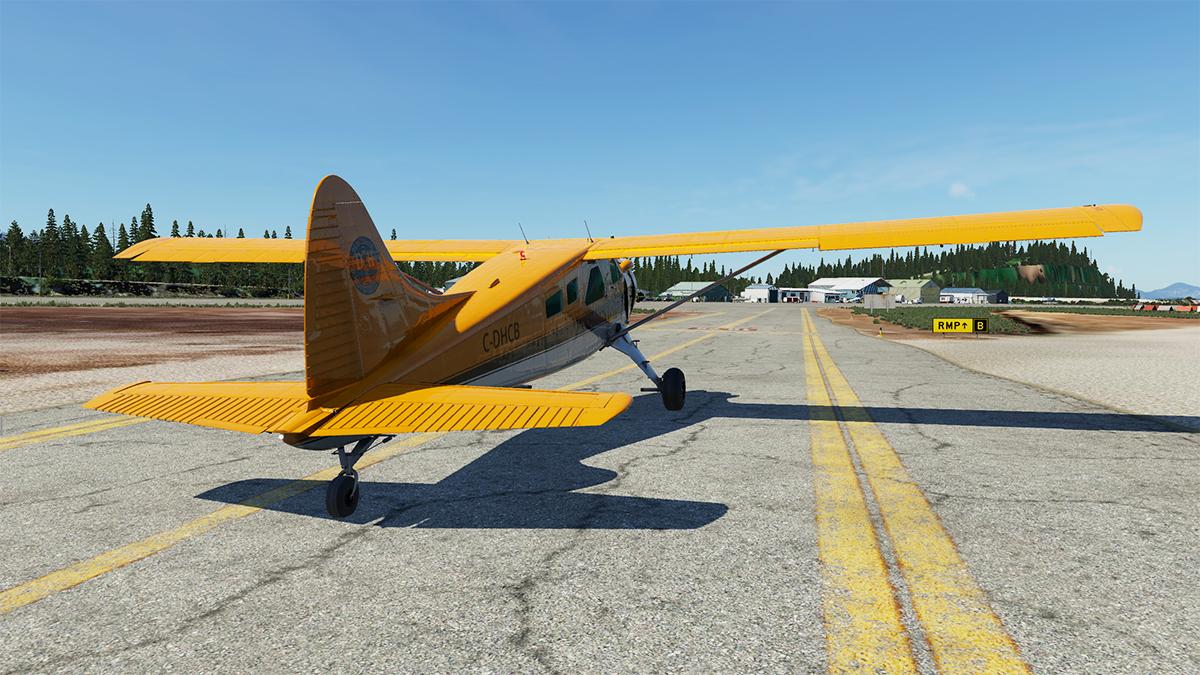
Aircraft Release Review : DHC-2 Beaver DGS Series XP12 by Thranda Design In aviation folklore, there are machines that have created an impact by their design alone, but a few have gone even higher into a sort of immortal status, Say Spitfire or DC-3, Concorde and even the Boeing 707. One other aircraft can also join this upper echelons of achievement, and that is the de Havilland Canada Type 2... also known as the "Beaver". Often referred to as the “best bush plane ever built”, the DHC-2 has been instrumental in developing and servicing far-reaching frontiers since it was first introduced in 1947. The DHC-2 Beaver is a single-engined, high-wing, propeller-driven, STOL aircraft that was developed by de Havilland Canada in 1946, and is known as a bush plane, in fact one of the most highly regarded bush aircraft ever created. There was 1,657 Beavers built between 1947–1967 and half are actually still flying and working hard. In fact you can currently buy a zero-time frame and just rebuild your current aircraft and keep the machine flying as long as you can service the radial engine and afford the new airframes... History de Havilland Canada hired Punch Dickins, a famous bush pilot, as Director of Sales who began an extensive program of collecting requests from other pilots and to understand what they needed in a new type of aircraft. Almost without variation, the pilots asked for tremendous extra power and STOL performance, in a design that could be easily fitted with wheels, skis or floats. When de Havilland engineers noted that this would result in poor cruise performance, one pilot replied "You only have to be faster than a dog sled". Other suggestions that seemingly sound mundane but important in the bush plane world; full-sized doors were installed on both sides of the aircraft so it could be easily loaded no matter which side of a dock it tied up on. The large doors (known as Alaska doors) were also made wide enough to allow for a 45 Imperial gallon drum to be rolled directly up and into the aircraft. On September 17, 1946, de Havilland officially put together a design team consisting of Fred Buller, Dick Hiscocks, Jim Houston and W. Jakimiuk, led by Phil Garratt. The new aircraft was designed to be all-metal in using "steel from the engine to the firewall, heavy aluminum truss frames with panels and doors throughout the front seat area, lighter trusses toward the rear and all monocoque construction aft". At the time de Havilland Canada was still a British-owned company and there were plans to fit the evolving design with a British engine. This limited power, so the wing area was greatly increased in order to maintain STOL performance. When Pratt & Whitney Canada offered to supply war-surplus 450 hp (340 kW) Wasp Jr engines at a low price, the aircraft ended up with extra power as well as the original long wing. The result was unbeatable STOL performance for an aircraft of its size. it was decided that the new bush plane was much like the hard-working beaver and so as many aircraft at the time were named after animals, the aircraft was designated after this industrious animal. The first flight of the DHC-2 Beaver was in Downsview, Ontario by Second World War flying ace Russell Bannock on August 16, 1947. The first production aircraft was delivered to the Ontario Department of Lands and Forests, a design partner, in April 1948. The Beaver was designed for flight in rugged and remote areas of the world. Its short takeoff and landing capability made it ideal for areas normally only accessible only by canoe or foot. Because it often flies to remote locations, often in cold climates, its oil reservoir filler is located in the cockpit and the oil can be filled in flight. A series of upgrades to the basic design were incorporated. One major customer introduced the use of flat steps replacing the earlier tubes, a feature that is now almost universal. In 1987, the Canadian Engineering Centennial Board named the DHC-2 one of the top ten Canadian engineering achievements of the 20th century. The current ownership of the certificates and tooling gives Viking Air of Victoria, Canada the exclusive right to manufacture new Beavers. Viking now sells a remanufactured and rebuilt DHC-2T Turbo Beaver upgraded with a Pratt & Whitney Canada PT6A-34 680 hp (507 kW) turboprop engine. With a maximum gross takeoff weight increased to 6,000 lb (2,700 kg) it can carry 2,450 lb (1,110 kg) of freight. However, Viking Turbo Beavers are only rebuilt from existing air frames, and are not new-builds, unlike Viking's own DHC-6 Series 400 Twin Otter, which is manufactured from a completely new airframe. (wikipeida) Performance - Maximum speed: 158 mph (255 km/h) - Cruise speed: 143 mph (230 km/h) - Range: 455 miles (732 km) - Service ceiling: 18,000 ft (5,486 m) - Rate of climb: 1,020 ft/min (5.2 m/s) Thranda Design This is the second Beaver for X-Plane by Thranda Design, their first release was the X-Plane 11 version released in November 2020, and this is the totally revised aircraft for X-Plane 12. Current users of the earlier Thranda XP11 Beaver can also get 30% off this new XP12 version of the DHC-2 Beaver. The older XP11 version is still also currently available, if you want to fly the aircraft in X-Plane 11 This version is the Beaver that incorporates the "Holmes Extended Engine Mount", which moves the 917lbs engine forward by almost 10 inches. This modification then moves the center of gravity of the plane forward, and in then allowing additional loads to be carried in the back without exceeding the aft CG limit. First impressions are quite impressive. This is now also X-Plane 12, so you also get that huge photographic realism from the aircraft as well with the X-Plane 12 lighting and effects. In features and detail, there is is not that much difference outward between the two XP12 and XP11 versions, on the surface they are quite the same aircraft package. It is in the hidden areas, like textures (more soon), lighting, aircraft dynamics, aircraft performance, aircraft flight models is in were they differ. One significant difference is that the extra Floats and Amphibious floats variant is already included in this XP12 package, were as with the original version release they came a short few months awhile after, you also get a canoe as well! Thranda quality is extreme in detail and fittings. As noted the new XP12 Beaver comes with 8K textures, a huge pixel area 7680 x 4320. Just because it is 8K doesn't mean that you need a 8Gb Graphic Card to run them. 4 Gb VRAM is still recommended as Minimum. And 8 Gb+ VRAM is however recommended as normal. But like with the earlier Thranda releases, they had more than one 4K texture size, sometimes two 4K textures to fill in the same 8K area. So in reality you are only using the 8K to fill the same gap of the two 4K set of textures before. So Graphic Card size is not the issue, if you can run your current Thranda aircraft with your current graphic card size, then the DHC-2 will be exactly the same, in fact even a bit more efficient in that it only has to load in only the one texture sheet, rather than the load of old 2(K)or 4(K) texture sheets. As a classic Beaver, you won't get any better in modeling and design than this one, there was the original X-Plane Beaver from SoulMade Simulations DHC-2 version a few years back, that aircraft is a pure DHC-2, but without any updates, certainly no upgrade to X-Plane 12, the SMS DHC-2 is now quite dated and in the past. The detailing is exceptional, the mapping of the precision of the rivets are simply excellent, and I love the gap in the cowling, actually done twice with the Holmes extended engine mount if you look closely. The Pratt & Whitney R-985 Wasp Junior engine, is rated at 450 BHP at sea level. This is an air-cooled, carburetted, 9-Cylinder radial engine, incorporating dual magnetos and an engine-driven single-stage supercharger. And the engine detail really jumps out at you with the coloured inner components, that aspect should not work on such an old aircraft, but it simply looks brilliant here... Undercarriage is basic, but again very well done in total authentic detail, the DHC-2 is a taildragger, so there is only a small loose swivel wheel at the rear. Notable in the detail are the excellent double metal plate reinforce plates, they are all over the fuselage and they all make the aircraft very authentic. They are beautifully done, and shows the high craftmanship of the aircraft. Rear Rudder, Elevator control surfaces reinforce work is also top notch. Wing shape and camber is perfect, again you have a highly realistic wing, realistically modeled and designed with all the correct rivets. Oddly the aileron goes only about 3º up, but 8º down, note the full barn door flap deflection of 58º, mostly used for slow water landings. There is the debate if X-Plane 12 surfaces are too "shiny, shiny". The X-Plane 11 surfaces were certainly in the opposite of being very flat, but it also bought out the intimate detail, here, or for all current Thranda Aircraft, is that every surface is shiny, reflective.... I'm not sure if I am a total fan of this look. In one aspect aircraft certainly looks realistic in X-Plane 12, but in other ways they just don't, as the shininess can hide a lot of the wear detail that presented well on the older XP11 version of Thranda's Beaver. Glass is superb, thick where it counts (windscreen), with a mottled/scratch wear in the glass. All glass is a heavy green tint, and "Bubble" windows is an option on the passenger doors. Reflections can also be turned off. There are four forward doors, Two for the pilots, and two behind for the front row passengers (note the right side door has no external handle, and can only be opened outside via a hotspot). Rear are two separate large upward opening "Alaska" doors. Space inside was created to be wide enough to allow for a 44 Imperial gallon drum to be rolled up into the aircraft. There are four passenger seats, and one large rear bench seat in the rear, all seats are beautifully done in blue canvas, with metal legs and rear plate supports. All of the five Passenger seats backs can be folded forward. You can take one or all five seats out, to create a huge cargo space. This space can then be filled with cargo, including cases, crates and (small oil drums), cargo is also put in the small baggage area behind the restriction net (bench seat if installed). You can of course also mix the passengers with cargo... Cockpit You sit up there very high at the front of the machine... Both the pilot seats are amazing, with their metal clamshell bucket rear design, and hardwearing blue patterned levi Jean look cushions. Both pilots windows can be opened, or positioned in any place, up or down... you can play with the small window air-vent as well. The Thranda Beaver cockpit is not like the antique cream version like on the SoulMade Solutions DHC-2, that is very much beloved by me as to it's reference to an early Beaver. But this version is very much a more relative version to most of the working Beavers out there and it is extremely well done. The SMS version had a single left side Yoke, but here you get the TwinBar Y double version that disappears if you press the base. The logo we all admire... all in it's chrome and black plate glory "De Havilland" and in the right lighting conditions it just glows and shines like it has just been lovingly and newly polished. The cosmetic detail here is excellent, and you simply can't believe the intimate authentic detail all around you here. There are two choices of the famous throttle quadrant, the older original classic version with the Throttle Lever left, with in order Propeller lever and Mixture right... or the more modern squared off version with the Throttle now centre, Prop left and Mixture right. Centre top are the magnificently large DHC-2 iconic Manifold Pressure and RPM gauges, and the mid-screen mounted whiskey compass. The pilot gets all the flying instruments in the form of the six standard flight instruments in the Airspeed, Artificial Horizon, Altitude, Turn/Slip Indicator, Heading Indicator and the Vertical Speed, left is the main fuel tank selector It has positions of OFF, FRONT, CENTRE, REAR. Top panel is the (very) hard too find "Avionics" switch, and the metal plate flaps indicator is a work of art. There is a sensational JOS. POLLACK CORP Ignition switch, ELT and the logo plated MaxDim panel lighting knobs lower left panel, the metal plate storage box opens as well, to revel the three faces of the Thranda Design team. Right side panel has the avionics and electrical panel... There is an altitude selector top, then an S-Tec Fifty-Five x Autopilot, KX 155 NAV/COMM Radio (NAV 1/COM 1), Garmin GMA 340 Comm radio, and a Garmin GTX 325 Transponder lower... it is to be noted that these items are the default set of avionics, but as we shall see, you can use more different units if you want to. To the far right is an OBS Course Deviation Indicator (CDI) - VOR NAV 2. Lower right panel is a fully active (Fuse) Circuit Breaker panel, with the relevant electrical switches set below for power and lighting (Avionics power switch is as noted is high up on the left side panel facia). Next to the Fuses is the AMP's gauge, and Suction Gauge, and below is a lovely PS radio volume panel. Like with the XP11 Thranda Beaver there are still the two basic panel selections, the iconic version we know so well, but also a flat metal grey facia version, with the fancy LED lights under the glareshield. Centre panel is a default X-Plane GNS 530, but it can be replaced with a Reality XP GTN 750 if you own the extra feature. Mid-Panel are the engine gauges, with the Oil temperature shown on the top of the gauge, oil pressure on the left, and fuel pressure on the right. Next right is the sublime gauges to indicate the quantity of fuel remaining in the three primary internal fuel tanks. From left to right these gauges indicate the Front tank, Rear tank, and Middle tank, and below is a CYL. (Cylinder) Temperature gauge, with a Hobbs hour meter. Three lower levers cover (LtoR) the carburetor heat control lever, the famous Fuel Wobble Pump Lever and the Fuel and Oil Emergency Shutoff Lever. To the right is the internal Oil filler (yellow cap). Detail again comes to the fore with the Manufacture's and Aircraft registration plates. The authenticity is simply mind-blowing and it keeps on coming with the ratcheting carb heat lever, the manually pumped flap system (with direction valve), and the primer system that are all faithfully modeled for maximum immersion. The fuel system is complicated, with three internal tanks Front (35 GAL/132 Lts), Centre (35 GAL/132 lts) and Rear (25 GAL/95 lts), two wing tanks (21.6 GAL/85 Lts each) and an optional Belly Fuel Tank (43.1 GAL/163 Lts)... for a total of 181 GAL/685 Lts of fuel. The main internal tanks are controlled via the red switch upper left panel, the wing tip tanks via a red switch upper door left, and the belly tank via a handle under the instrument panel (Vacuum air pressure is required). On the roof are the manual Rudder and Elevator trim wheels and indicators. Lighting is two side spot lights and ceiling LED lights, note the roof mounted temperature gauge, both (green) blinds twist and turn into place. There are loads of pumps and levers on the Beaver, one is the pump handle for the flaps, down right of the pilot's seat and another is the engine primer pump on the left of the pilot's seat, the actions of both are really well done and authentic. You are probably now thinking "This Beaver is exactly the same as the X-Plane 11 version?". It is, nothing at all is different in here except for the Thranda team image in the storage box. But there is a difference though... in the look and feel. Oddly it feels different in here with the X-Plane 12 lighting, far more grey and dark metal. The centre quadrant(s) are now all black, not the steel metal grey of before, so the aircraft feels more modern now than aged, it has also lost something from the organic feel of a Traditional Beaver in the process. Cabin Lighting You still get the post style instrument lighting, but the brightness (even when adjusted to full), is nothing as bright as the X-Plane 11 panel lighting? And the Avionics are too bright for the main instruments, thankfully you can tone them down a little. The grey metal panel facia, has those lovely LED lights, but the instrument lighting can barely be seen? A switch on the lighting panel (arrowed) will turn on all four forward cabin overhead lights... ... oddly there is STILL no lighting in the cabin? But you can turn the roof LEDs right backwards to give some illumination, but a few rear lights in the cabin would be nice. Overall the lighting although the same, is actually worse? External lighting is also worse than in X-Plane 11. Basic lights and the landing lights have no flare or floor shine? Beacon on the roof and tail light. Navigation and a very bright strobe on the wings. Floats and Amphibious floats In the X-Plane 12 package, the earlier extra Floats and Amphibious floats version are now included. Both variants can be found in the X-Plane "Configuration Menu", The Seaplane version is shown twice, under "General Aviation" and "Seaplane". Both the land (Amphibious) and standard Float design is excellent, all the usual Thranda Design quality detail, both the forward wheels, and rear rudder system, the four float supports are well intergrated into the Beaver fuselage, detail is first rate as well. Both Amphibious and Standard Floats are really well shaped and perform nicely on the water, and with the right amount of drag in the air. The wheeled floats do create more drag than the cleaner "Float", and it is noticeable (slightly) from the cockpit. Menu Thranda's Menus are very feature rich and highly detailed. There is a popout TAB under the arrow, that can be (mouse) scrolled to hide it, that is if you don't like these sort of items crowding your screen (I don't). The Menu system includes the "Dynamic Generation Series" or DGS, a Thranda speciality feature that takes full advantage of X-Plane's flexibility for in-sim, real-time modifications. As noted the "Menu" Tab (arrow) is far left middle of your screen, this will activate the Pop-Out Menu... The Menu has seven menu tabs in; GENERAL, LIVERY, WEIGHT/BAL, CAMERA, AUDIO/SLEW, PANEL and MISC (Miscellaneous). Basically it is the standard Thranda default menu. Menu - General The menu "General" sections covers quite a lot of options, the layout is highly detailed and very comprehensive. General menu selections cover; Engine Mode (Simplified/Realistic), Electric Tug, Window and Instrument Panel Reflections on/off, Startup Running on/off (sets aircraft to full running mode), External Belly Tank, Chocks and Brakes on/off, Steering (Simplified/Realistic). Three selections placed right cover group items, but any one item can be also accessed via "Click Spots" and can be individually selected or hidden via the aircraft graphic. "ALL COVERS" will select engine inlet/outlet covers and pitot covers, "ALL TIE-DOWNS" for rear fuselage and wing tie-downs and "ALL DOORS" for both the cockpit doors and the right side luggage door. All EXT - External Lights can be switched on and off as can the ALL INT - Internal lights. And finally "Radial Engine Animation". Static Items include Wheel chocks, wing pitot cover and that rugged heavy duty engine cover over the nose. The Engine cover can only be seen/hidden via the forward selection on the General-Menu page (arrowed). Engine Mode - Toggles the engine realism between "Realistic" and "Simplified". When this is set to "Realistic", the engine will require the correct amount of priming for it to start, depending on the engine's temperature. When the Engine Mode is set to "Simplified", it makes starting easier. Electric Tug can be used to move the aircraft around on the ground via your Throttle (Forwards/Backwards) and Rudder Yaw (Left/Right), brakes can be used as well. Startup Running on/off this switch will re-load the plane either cold and dark or with the engine running. EXT Belly Tank is really well done (note the filler pipe), too much weight? then remove it, but I like the extra range it adds. Steering Toggles between "Realistic" and "Simplified". In Simplified mode the tail wheel steers directly with the rudder, through a range of +- 30 degrees. In Realistic mode it functions as in the real aircraft, becoming free-castoring past +- 25 degrees of deflection. There is an exciting separate animated pop-up window that shows details of the Beaver's engine in operation. At the top of this pop-up is a graph that indicates whether the engine is properly primed for starting. A small indicator line moves horizontally along the bottom of the graph to indicate the current conditions. This graph is only active if the Engine Mode is set to Realistic. There are no pop-up checklists for the Beaver, usually set on the General page, but there is a basic set of checklists in the provided POH Documents. Menu - Liveries Second Menu option is "Liveries", there are two options here with the first being "PAINTED LIVERIES". There are altogether 10 liveries and one blank (DynamicLiveryResource) overall Eleven designs, and all the liveries are of extremely high quality and have creative flare with the package. I will note that seven liveries only loaded after I ran the Skunkscrafts Updater to v1.0.1. The X-Plane 11 Beaver is supplied with fourteen liveries, but there is now only eleven on the XP12 aircraft? with the DynamicLiveryResources being the currently selected "Dynamic" livery. Dynamic Liveries Not happy with any of those designs, then why not create your own! With their earlier release of their Kodiak then Thranda also introduced a clever feature to design your own livery.This is done by switching from PAINTED LIVERIES to DYNAMIC LIVERIES top. I created this orange, black and grey for this review... You have a menu to select on the right that can colour a certain part of the aircraft, like the Roof, Wing, Tail or Wing tips. Select which one you want, and then adjust the RGB colours for that area, it looks hard but you can easily design a very nice livery in about twenty minutes... You can also change the aircraft's registration number, or have original de Havilland logo on the tail. There are also four effects you can apply. The said "Dirt" and "Scratches", and also "Metal" and "Rough(ness)" this gives the aircraft a dirty rough appearance. So applying these Dirt and scratches on the airplane will make the surfaces rougher, this is giving you the full PBR control in creating stunning metallic liveries, or matte, sand-blasted look, and these aspects will also slightly affect the Beaver's drag, and therefore it's cruise speeds. With full dirt and scratches you can expect a loss of 2 to 3 mph of cruise speed. Cleaning the plane by setting both values back to 0 will give you a smoother and slightly faster plane. ... when done you can then "APPLY" it to the aircraft. It was all quite easy to do. Then the aircraft goes through a sort of transmogrifying process that takes around a minute and a half.... ... you can "SAVE" the livery, in that then the custom livery becomes the "DynamicLiveryResources" livery in the "Painted Liveries" selection. Altogether there are 29 optional Dynamic Liveries to change or use. New to the Dynamic Livery application is ERA options in "Modern' or "Classic".... and of course personal taste is optional! In the Float/Amphibian menu, you can also colour in the float design to your own preferences, or to match the floats in with the same aircraft fuselage design, all the same livery options (29) are available here also. Menu - Weight/Bal The Beaver also has a great Weight and Balance menu. Lbs and Kgs which can be selected and changed via the toggle... Lbs In Green, and Kgs in Blue. There is the weight selection of all the seats. The X option on each seat will toggle the seat off/on, or go from a Passenger to Cargo layout. Fuel (including the EXT Tank) can be added in and the amounts are then shown and are adjustable as well in the menu (above)... pilot, passengers and cargo can all be set for individual weights and all are selected via a scrollwheel... and then all of the CofG (Centre of Gravity) parameters are all shown on two graphs, go too far or too heavy and the CofG goes red. When done you can Save the Configuration and then later re-load it, or press Load to add back in the set weights. Working out that right CofG balance here is critical, setting just inside the parameters is just not really good enough, as you need for the aircraft to be balanced in it's fuel and load weights, or you will have difficulty in flying the aircraft. So put too much (cargo) weight aft and you are tail heavy and unbalanced in the TakeOff, and in Flight. Menu - Camera There is a camera feature under the menu "Camera" selection. The left side of the panel is the "Walkaround" views, just pick the dot for the external viewpoint you want to see to rotate around the aircraft. To the right is the default views can be selected via a menu, or press the keypad to select the internal viewpoints. The FoV or "Field of View" is adjustable via a slider. Menu - Audio/Slew Sound can be adjusted via the Audio menu. There are seven slider selections with: Master, Aircraft External, Aircraft Internal, CoPilot, Radios, Environmental and User Interface. One other sound setting is on the Flap panel... As noted, on the right and left of the panel you get the audio simulation of an active noise canceling headset, which is seen as wearing a headset. Sound quality is beyond excellent as it is a built in audio mixer, so you can individually control the audio channels in real-time and you can adjust the volumes while hearing them play. Slew mode allows you to manually move the aircraft around in a disconnected X-Plane space. It functions by temporarily overriding the various aerodynamic and physical forces on the X-Plane settings, it is to allow the user to reposition the plane as desired. This feature is however highly touchy and it is used mostly only really with the Amphibian/Floats option in docking the aircraft to say a pier or marina. Menu - PANEL The sixth "PANEL" Tab option allows you to adjust or change the instruments and dials. Scroll the "PANEL BACKGROUND" number to see all the four background preset layouts. Scroll the "Panel Preset" number to see all the five preset layouts. The layouts can include both GNS 430/530 and the Aspen EFD. Even the The Reality XP GTN 750/650 Touch can also be installed if you have that external option, as the 3d bezels are provided. Aspen EFD is a self-contained multifunction digital display that is divided into a Primary Flight Display (PFD) in the top half, and an Electric Horizontal Situation Indicator (EHSI) in the lower half. As EDF 1000 systems go it is not as highly featured with the GPSS, MAP, 360 and Menu functions all not simulated... all the lower NAV1/NAV2/GPS selections are however available, as is the TPS (Tapes) see/hide option with the MIN (Minimums) selectable as well. and the PFD can be reversed with the EHSI. The EFD 1000 PFD pops-out for convenience. Customising the panel to your own personal layout is just as easy. Just select the "3D EDIT PANEL MODE" (arrowed) that gives you access to all of the 54 individual instruments and avionic units... There some great options including the Aspen EFD 1000, S-TEC 55x Autopilot, Angle of Attack gauge and so on... For those that find instruments are not to their liking, in say, "I wish I could move that altitude meter just a bit more to the left", then here you can simply adjust and move that particular instrument, or even swap the instruments around the panel to your liking. Here I have added in a Reality XP GTN 650 Touch instrument on the right lower panel... You can even adjust the brightness of the instrument. When you can "ADD" (or Duplicate) in a new "Preset", and then "SAVE" that new layout Preset (Preset /6). So basically you can start off with a completely blank instrument panel and then create your own unique or personal instrument layout if you have the time and patience... and you can have up to or save 14 different instrument layouts. It is however very important to restart X-Plane to lock in the new instrumentation layout before flying. Panel features include; S-Tec Fifty Five autopilot and the noted Aspen EFD 1000, KR 87 ADF Radio, Garmin GMA 340, Garmin GTX325 Mode C Transponder and the usual GNS 430/530 PS/Nav/Comm units. Both GNS units also require their own installation area. Note that the "Gear Advisory" Panel for the Amphibious/Float version can also be added to the custom panel. The DGS system is certainly very clever and versatile, but a small annoyance is that to get your custom livery or panel, you have to reset everything, every time you fly? Yes the custom SAVES are all there ready for you, but not when you start/load the aircraft. Menu - MISC The Misc (Miscellaneous) page has four panels that cover External; Skis, Wheels; Tires and Mud Flaps. Internal; Windows options and Throttle Quadrant options. Notably missing here is the usual "DynaFeel" Feature. High quality designed "Skis" are available for the Beaver... Tyres can be changed from "Regular" size, to the larger "Tundra" style. The larger tundra tyres however won't work with the skis... On the rear you can have "Mud Flaps", and here they work with either the regular or tundra tyre options. Rear Door windows can be "Flat" or "Bubble"... Throttle Quadrant options include; OLD (classic) or NEW... On most Thranda Design aircraft they have a "Pilot" option in that the pilots can be changed around from Male to Female. There is no Female pilot with the Beaver, but only the Male "Beaver Dan"... he is also fully animated in the arms, legs and head movements. The Float/Amphibian MISC Menu is different. You still have the earlier Throttle Quadrant (Old/New)/Window options (Flat/Bubble). Yes, you get a canoe! Amphibian or Float option... There is a Ventral Fin, that is an option under the tail... You can Retract or Extend the rudders from the MISC Panel There are another two options to raise and lower the rudders, One is a handle and cord in the cockpit, left floor... another (the most simple) is to use the Keyboard command "Toggle Water Rudder". ________________________ Flying the DHC-2 Beaver There are two options to starting the DHC-2, the (very) easy way via the Simplified "Engine Mode" option in the Menu/General panel... and the long winded "Realistic" way. With the full engine start up procedure as is explained in the manual. Did you always want to look actually inside your engine? Well now you can and the idea is to see how the engine is primed to start... here Dan Klaue's genius strikes again! There is the option via a menu selection "Radial Engine Animation" that brings up an animated Wasp Radial engine, you can also "PreHeat" and "Prime" your Wasp ready for start, but you have to be careful not to "OverPrime" the Cylinders. You can also prime the engine via the hand pump, deep left of the pilot's seat, switch the large ignition switch on (Fuel on as well of course)... setting the Mixture to almost full RICH lever and a slight 5th throttle... then flick the left switch under the red cover to start the Wasp.... get the procedure right and the Beaver's prop will rotate then fire into action... and also the Radial Engine Animation" will erupt into activity. On the Animation the pistons are exploding, and the animation is amazing beyond belief, adjust the throttle for a some serious movement, but the animation will also react to the adjustment of not only the throttle inputs, but with the fuel mixture from "Rich" to 'Lean" adjustments as well. Just move the mixture lever (not fully back) and see changes and the weakness in the sparks. These movements and the running of the DHC-2 also compliment the amazing sound range as well, there is a consistent adjustment of the excellent engine sounds to the condition of the running of the engine, that is the "Ugh, Ugh" of low lean to the high power "roar" of the full throttle. Also no two starts will sound alike, as there is coughing, sputtering, and the clanking of valves that all contribute the full aural experience, it's clever and highly realistic as well. The sounds actually also give you clues as to what's happening under the hood as is for the shear band of extensive sound patterns available here that show no gaps or the same patterns that just gets you all tinkly down your back... it is highly, highly aurally realistic... well like a full throated real 450 hp Wasp Jr engine sounds like. As noted you can have a freewheeling rear or locked to the rudder yaw, You really need a set of rudder pedals for the Thranda Beaver with built in toe brakes to use the freewheeling option, that aspect takes a little skill to get right. Taildraggers are a feel thing, and thankfully the Beaver is one of the better taildraggers. Of course experiment with the load and trim until you get that feeling the DHC-2 is rightly balanced. Thankfully the DHC-2 Beaver is one of the easiest taildraggers to taxi, keeping the right speed though is important, otherwise it's just easy to track straight. Thank God, because you can't see anything (sh**) with the nose high profile of the aircraft, so a slight hunch up out of the seat left is needed to follow the runway. I have also become quite adept at twisting the Beaver 180º to takeoff, right speed, then a touch more throttle, and then the full yaw tight turn, then quickly off the throttle again... You sit high, and the view out is quite good for a taildragger, but a slight glance to the left will align you up with the runway... flaps are set to "Takeoff" which feels extreme here, in a very high degree setting. But the Beaver has a very wide flight dynamic in that the flaps can be set to extreme positions, but still be well within the aircraft's STOL (Short TakeOff and Landing) performance envelope. Speed builds gradually then suddenly the tail unstick's, and you need a kick of full of right rudder to maintain the straight ahead line... ... another tool is to lightly touch the right toe-brake slightly to maintain the correct aligned course, between the two movements you can keep the Beaver straight. Takeoff is usually around 90 knts, but you don't need to pull back the stick as the Beaver just glides into the air on lift alone (the heavy set flaps), and to climb, it then only requires a little pitch to meet the 600 fpm climb-out you need. You can climb-out to the extreme of 1,000 fpm, but the 600 fpm angle is perfect, the one thing that should be highly noted is the aircraft's weight and feel, it is excellent. Now a slight adjustment to 800 fpm, which is perfect with still no loss of speed, also the Flaps are now at the "Climb" marker, as I need to climb up to 6,000 ft... high? not really as the Beaver can do a ceiling of 18,000 ft (5,486 m)... impressive. Unlike other aircraft you can consistently use the flaps and even in level flight, most aircraft need the flaps in and clean as soon as possible, but not the Beaver, as if you have a slightly uneven balance (front to rear) in the aircraft you can use the flaps to even out the balance without touching the trim, it is a tool every Beaver pilot's use. Stewart River is a 533-kilometre tributary of Yukon River. And heading up river towards Hecate Strait. But I am also not going all the way to the Strait either, just far enough to climb up high to turn west, but with the high mountains surrounding me, it means a climb of at least 6,000 ft, maybe more. Obviously you don't go very fast... 158 mph (255 km/h) or 140 knts is max and your cruise speed is only 143 mph (230 km/h) or 125 knts, but you don't really care about that factor, as this DHC aircraft is an absolute dream to fly. You can see why tourists love this lower Alaskan part of the world, the views are amazing, even X-Plane 12 amazing... I'm now at 6,000 ft, but it's still not enough, so another 2,000 ft to go up to 8,000 ft. Now higher I finally see a gap in the mountains and head west... Trimming the DHC-2 out is easy, the trims are set up up on the roof (But I use keyboard commands), and the Beaver trims out the pitch beautifully, now just small stick and rudder inputs keeps DHC straight, but better still yet is if you trim out the rudder as well, and now you can take both hands and feet off the controls and the Beaver will still fly like a dream straight and level.... this is one amazing simulation of a real aircraft. Fuel management is critical... Six tanks altogether, but basically you switch between three, Front - Middle - Rear, via the big knob, far left panel. The three tanks are shown on the lower console. The Wing tanks are selected via another large knob on the left side above the door. Select Left or Right Tanks or BOTH, and all selections feed to the Front main tank, usually you would leave it on BOTH, for an even balance... The EXT (external) Tank also feeds into another tank, the Middle one. There is a lever under the pilot's instrument panel to turn on the EXT tank flow, this then moves the ancillary fuel into the Middle tank, obviously it is good idea to select the middle tank to use all the extra fuel in there... The EXT tank lever is moved vertical (down) to access the fuel, when done then shut it off by moving the lever left. it will fill up the Middle tank quite quickly. I know why I love the Beaver, as you just purr along doing the job. The Beaver is like a light truck of the aircraft world, it shifts people and cargo with a ruggedness into a wilderness. Your sitting up there high, in charge, master of your own little universe, just shuttling along... heaven is a Beaver in flight, you can easily see why any pilot loves the DHC-2 so much. Ketchikan is rear to my left, Clarence Strait is to my immediate left... ... soon the Stikine Strait comes into view on my right, a glance down and I'm horrified on how much fuel, including the extra top up amount has been used from the middle tank, I switch again to the rear tank, supping more fuel from that one instead, the whole trip distance is only 177 nm, but I'm also using a lot of fuel with that powerful Wasp. Time to turn into the Strait... I have already lost 4,000 ft as I enter, but it was a slow descent. At first the Beaver dropped altitude, then crawled to a stop? the only way to continue the descent was to pull half back on the throttle, then you were moving downwards again. As we already know, the Beaver is known as a "flap-happy" aircraft and you can see and feel that aspect of why here... That is the "Landing" setting, but you can go even slower if you go deeper with more flap and into the red zone to the full 58º degrees... Usually you would never use 58º, that aspect just gives you too much drag, but it is useful for the water landings, as it gives you a far lower speed and more lift at those almost static water approaches. Wrangell pops up now on my right. I'm down to 800 ft, and ready for the approach into PAWG Rwy 10 (6000 ft). Approach speed is around 70 knts, here your altitude is controlled only via your throttle, more power to go up and less power to go down, but even the mixture adjustments can even have an effect, so be aware if you are leaning out the engine more while reducing power. One note I will say is that the touchdown speed is still around 70 knts, dropping to 60 knts on the runway, and that feels a tad fast at full flap? but the speed does still give you full aerodynamic control on the landing and you can finely follow the centreline as good as when you took off... The landing bit is quite easy, the tricky bit is lowering the tail and keeping tracking directly straight, master that and you master the DHC-2. Part of the trick is to use the toe-brakes, but lightly and the rudder (stabs) and find that straight line... I'm not saying it is easy because it isn't, but it comes to you with practise. But let us be thankful, this is an amazing experience of an aircraft, and now the Beaver is available to fly in X-Plane 12. Summary Often referred to as the “best bush plane ever built”, the DHC-2 has been instrumental in developing and servicing far-reaching frontiers since it was first introduced in 1947. The DHC-2 Beaver is a single-engined, high-wing, propeller-driven, STOL aircraft that was developed by de Havilland Canada. This version has the "Holmes Extended Engine Mount", which moves the 917lbs Wasp Jr engine forward by almost 10 inches for a better rear load balance (Centre of Gravity). Any aircraft coming from Thranda Design is usually full of amazing features and outstanding quality design, and certainly you are not disappointed here. In the design aspect the aircraft is extremely the best yet from Thranda, the quality is overwhelming to the point of ridiculous... the DHC has full hi-res PBR realistic effects, featuring true-to-life plate deformation and to-the-rivet precision, not to mention the high quality materials internally and externally. Detailing and the modeling is absolutely first rate, this is an outstanding Beaver. Not only is the instrument Panel one of the best yet in X-Plane, it is also fully customised via the "Dynamic Generation Series" in not only giving you your own control over the way the instruments are laid out, but to swap and change other instruments as well including; Aspen EFD 1000, S-Tec 55x autopilot, RealityXP GTN 750 (these are optional addons) and a Collins 614-12 ADF. Eleven liveries are provided, but also again you can create and design your own liveries with the DGS system. Options include, Skis, mud flaps, Old and New quadrants and bubble windows, and the Amphibious/Float version is now part of the X-Plane 12 package. Sounds are outstanding, with High fidelity, multi-track sounds with smooth transitions and amazing atmospheric effects, 3D audio effects, including "blade slapping" sound when view is perpendicular to propeller, start up and engine mixture variance is also highly realistic. Menus are also extensive, with sound adjustments, weight and balance manager with visual chart, lighting, doors, views, reflections and an amazing radial engine visualisation in a pop-up window, which showcases the inner workings of the engine. Yes a lot in this review is very much like the X-Plane 11 original version, as most in the design features and menus are the same, but a lot of the hidden areas, including the flight dynamics and performance related to X-Plane 12 have all been revised. Also the textures all now 8K, up from two 4K textures for better fidelity, the Skunkcrafts Updater is also now used for direct updates. All earlier purchasers of the Thranda X-Plane 11 DHC-2 can upgrade for 30% off with the new XP12 model. This aircraft is X-Plane 12 only, but the XP11 version is available. But a few things have been affected in the transition with the Beaver. Debatable is the "Shiny, shiny feel" of XP12, although overall the aircraft looks extremely better than XP11. Lighting has lost a lot of it's shine (pun intended) Instruments are hard to read and external lighting is virtually not visible, but to note a lot of X-Plane 12 aircraft are like this, we feel that lighting needs a lot more adjustment from Laminar Research. Thranda Aircraft also extremely dark, hard to see inside and use, but that also may improve over the X-Plane 12 changes. This is the iconic de Havilland Canada Beaver as in depth simulation, with as much quality and it comes with the sheer force of ideas available here, and in reality isn't that is what simulation is really all about, brilliant aircraft with exceptional quality and flying dynamics and a huge feature list. So really want the very best then here it is.... Highly, Hugely Recommended. _______________________________ Yes! the DHC-2 Beaver DGS Series XP12 by Thranda Design is NOW! available from the X-Plane.Org Store here : DHC-2 Beaver DGS Series XP12 Price is US$34.95 Requirements X-Plane 12 (not for XP11) Windows, Mac or Linux 8 GB VRAM Minimum. Download Size: 1.2 GB Current version 1.0.1 (October 16th 2023) The plane comes with the Skunkcraft auto-updater Owners of the Thranda DHC-2 XP11 can get this new XP12 model for 30% off. Please find the coupon code in your original DHC-2 XP11 Invoice. ________________ Installation and documents: Download is 1.66Gb and the aircraft is deposited in the "General Aviation" X-Plane folder. Installation key is required on start up and is supplied with the purchased download file. Full installation is 3.27GB Documents supplied are: Changelog.txt Thranda Beaver Documentation XP12 v1.0.pdf X-Plane G430 Manual.pdf X-Plane G530 Manual.pdf Checklists and loads of Performance graphs are provided in the extensive manual. Review System Specifications Windows - 12th Gen IS1700 Core i7 12700K 12 Core 3.60 GHz CPU - 64bit -32 Gb single 1067 Mhz DDR4 2133 - PNY GeForce RTX 3080 10GB XLR8 - Samsung 970 EVO+ 2TB SSD Software: - Windows 11 Pro - X-Plane 12.07r1 (This is a release candidate review). Plugins: Traffic Global - JustFlight-Traffic (X-Plane.OrgStore) US$52.99 : Global SFD plugin US$30.00 : Skunkcrafts Updater Scenery or Aircraft - CZST - Stewart - XPORG (formally Beti-x) (X-Plane.OrgStore) - US$25.00 - PAWG - Wrangell Airport, Alaska by NorthernSky Studios (X-Plane.OrgStore) - US$16.95 ___________________________ News by Stephen Dutton 20th October 2023 Copyright©2023: X-Plane Reviews (Disclaimer. All images and text in this review are the work and property of X-PlaneReviews, no sharing or copy of the content is allowed without consent from the author as per copyright conditions) All Rights Reserved
 1 point
 -

Scenery Review: VQPR Paro International Airport XP12 by Cami De Bellis
Cami De Bellis reacted to Dominic Smith for a topic
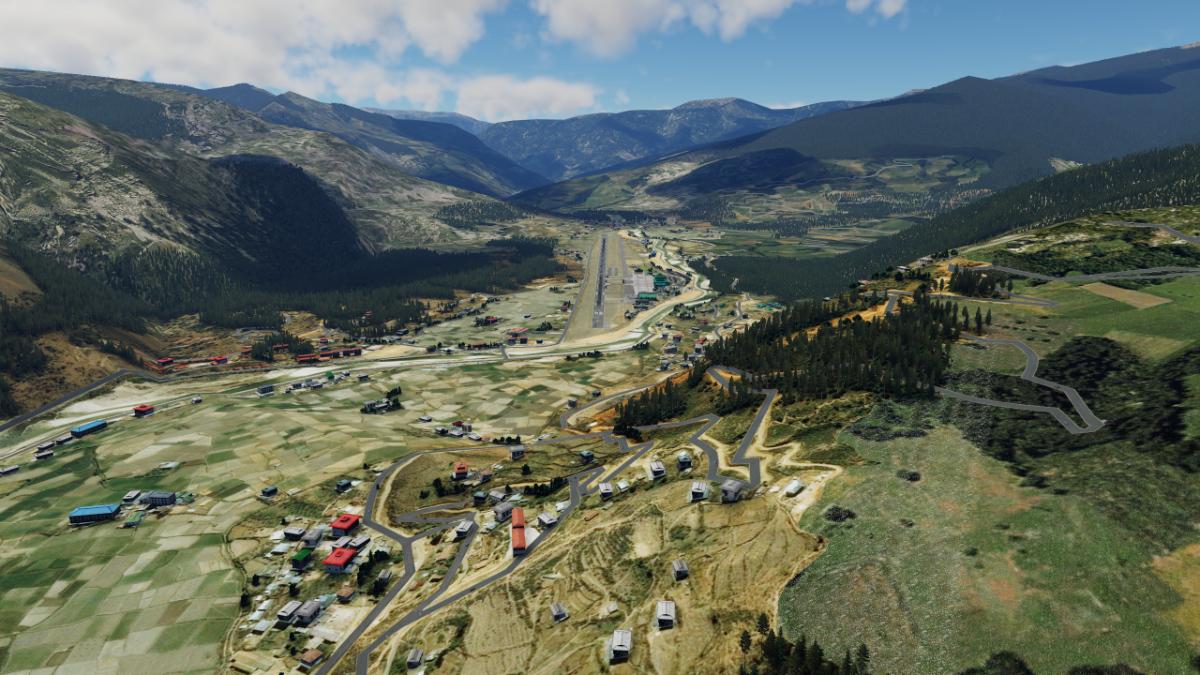
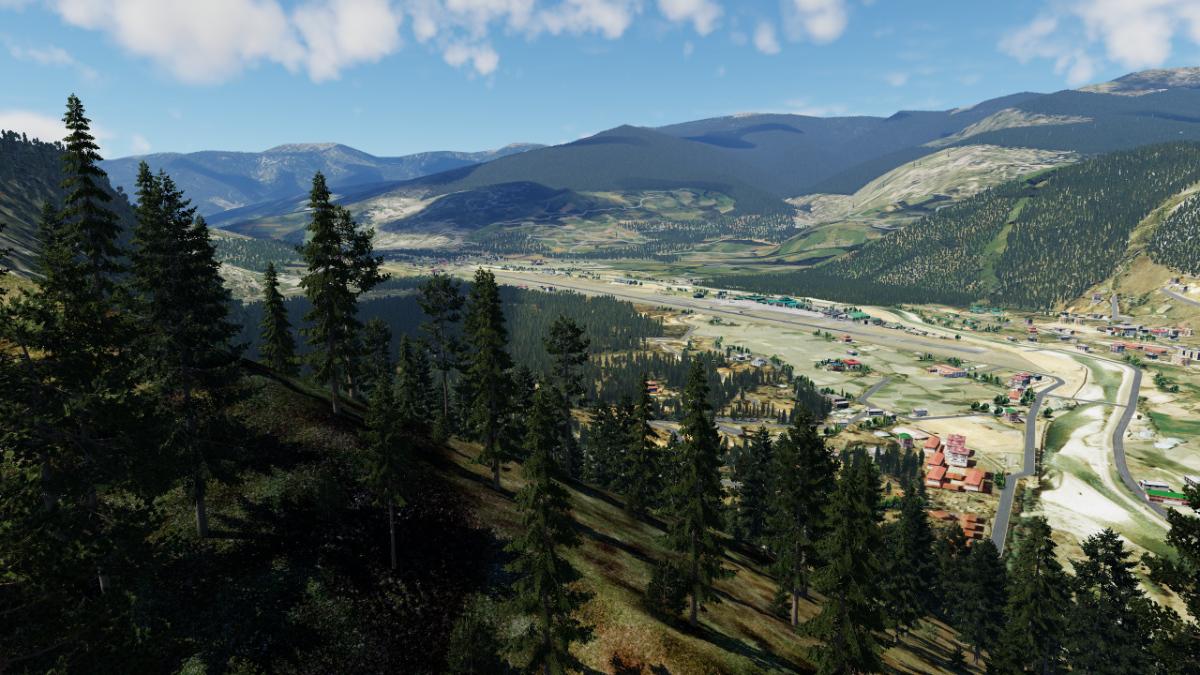
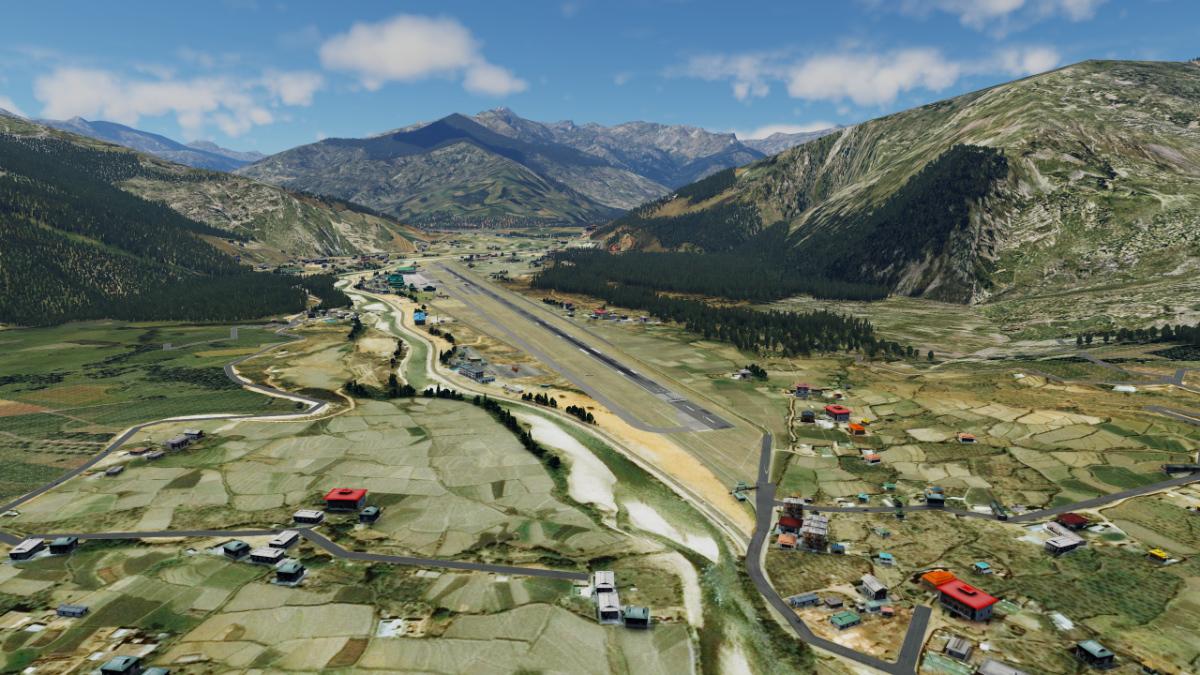
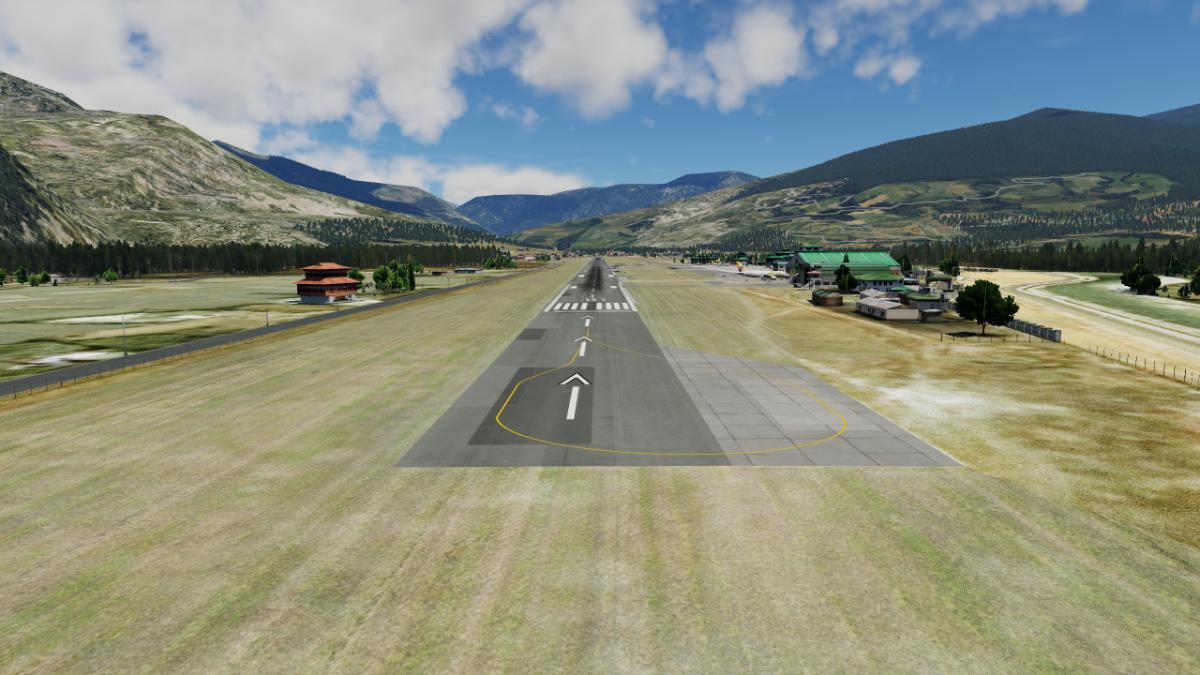
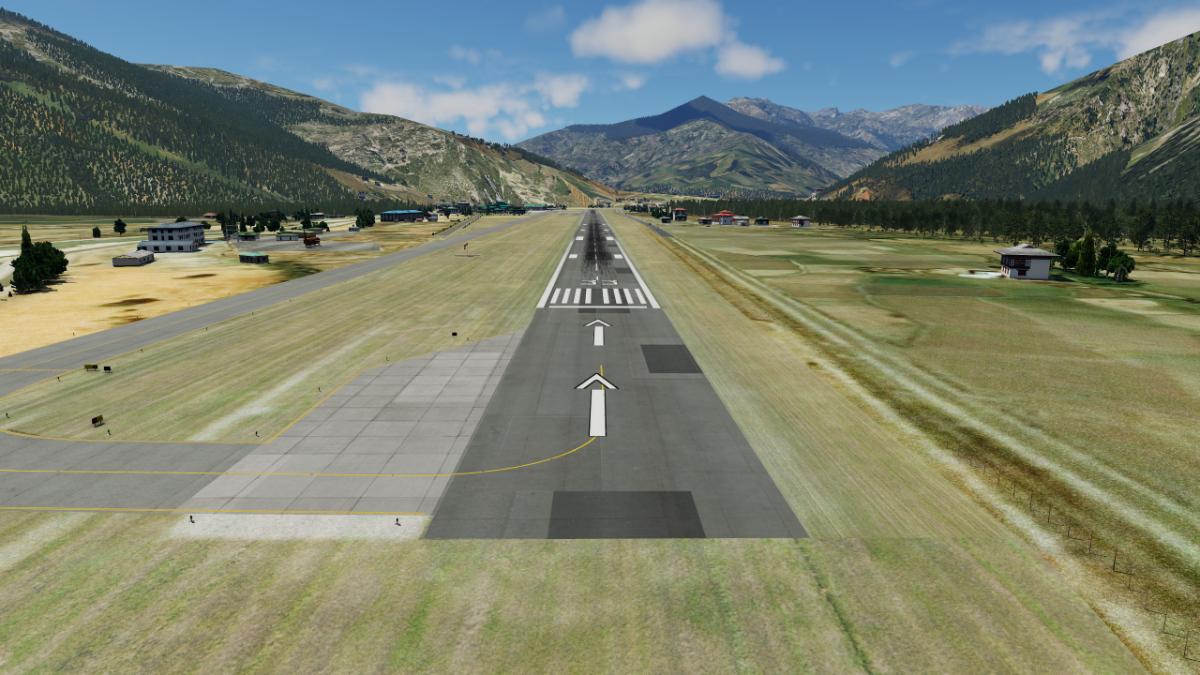
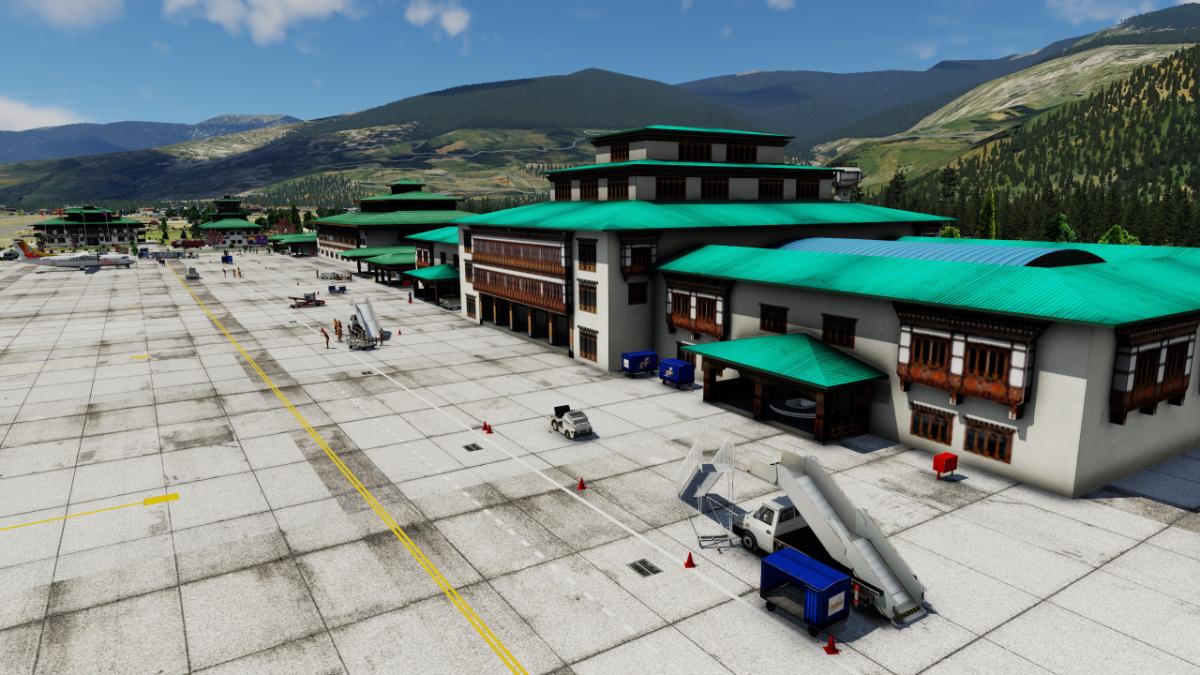
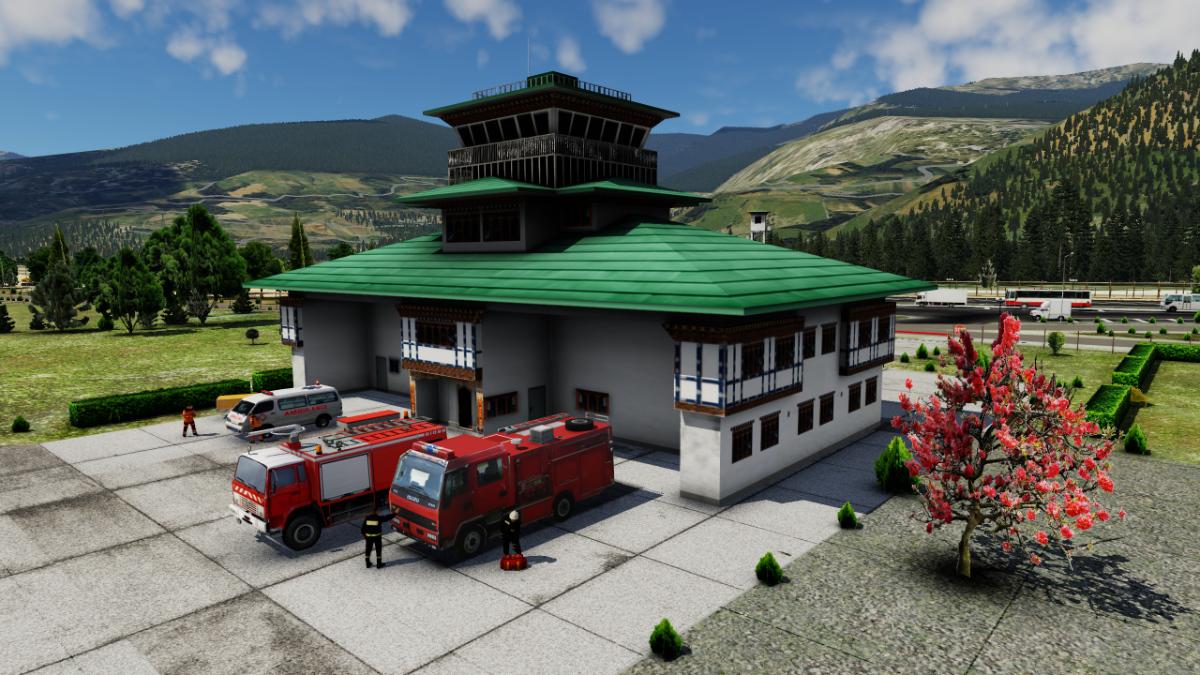
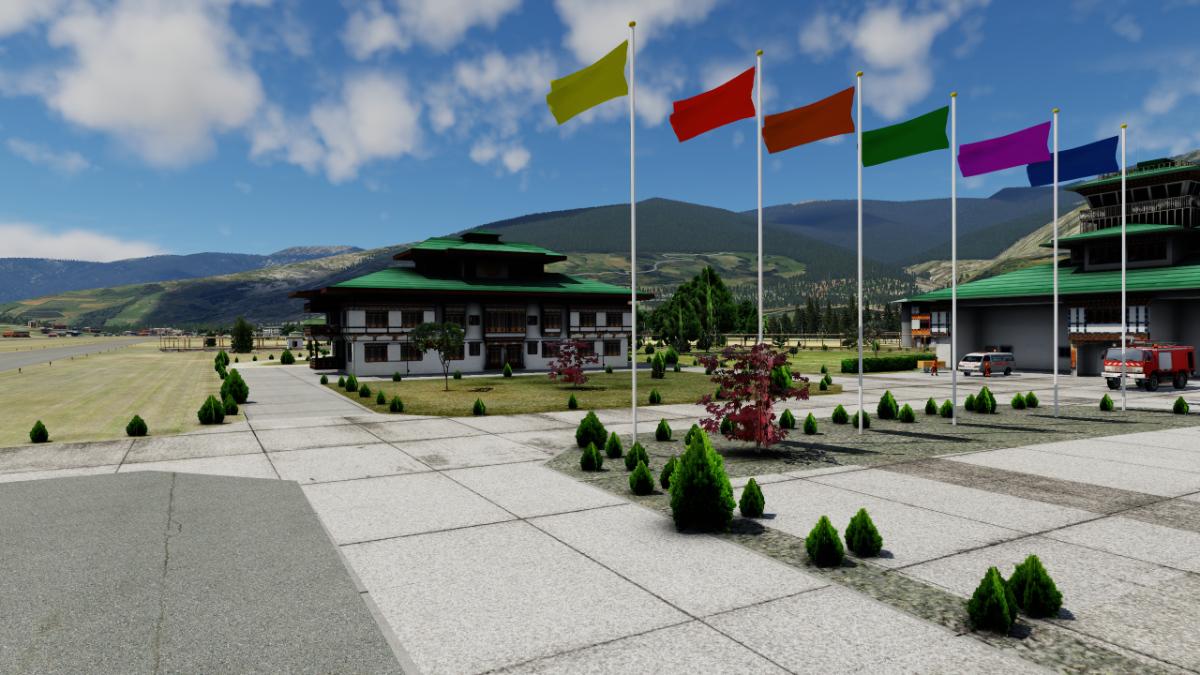
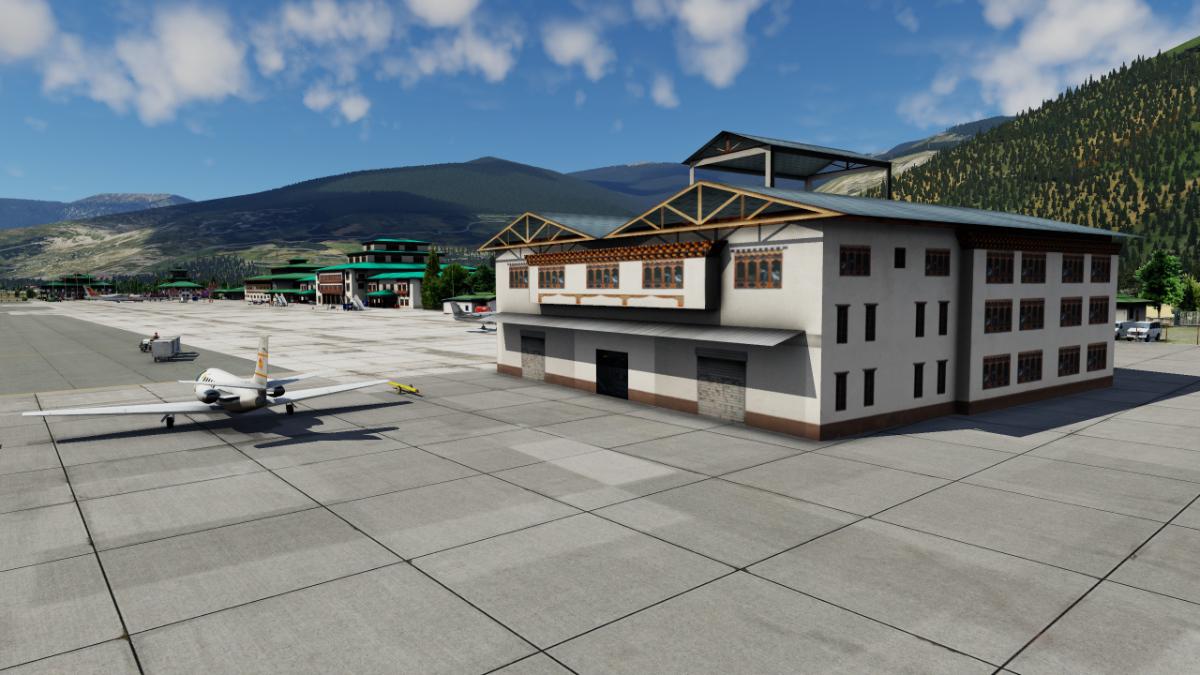
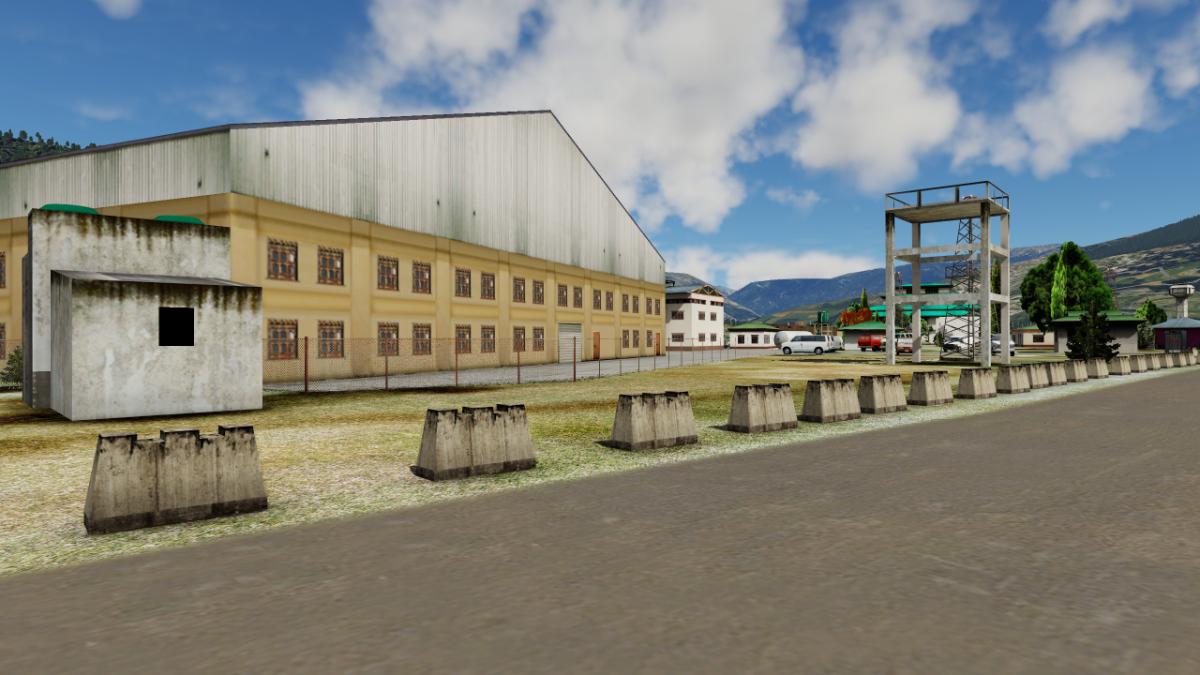
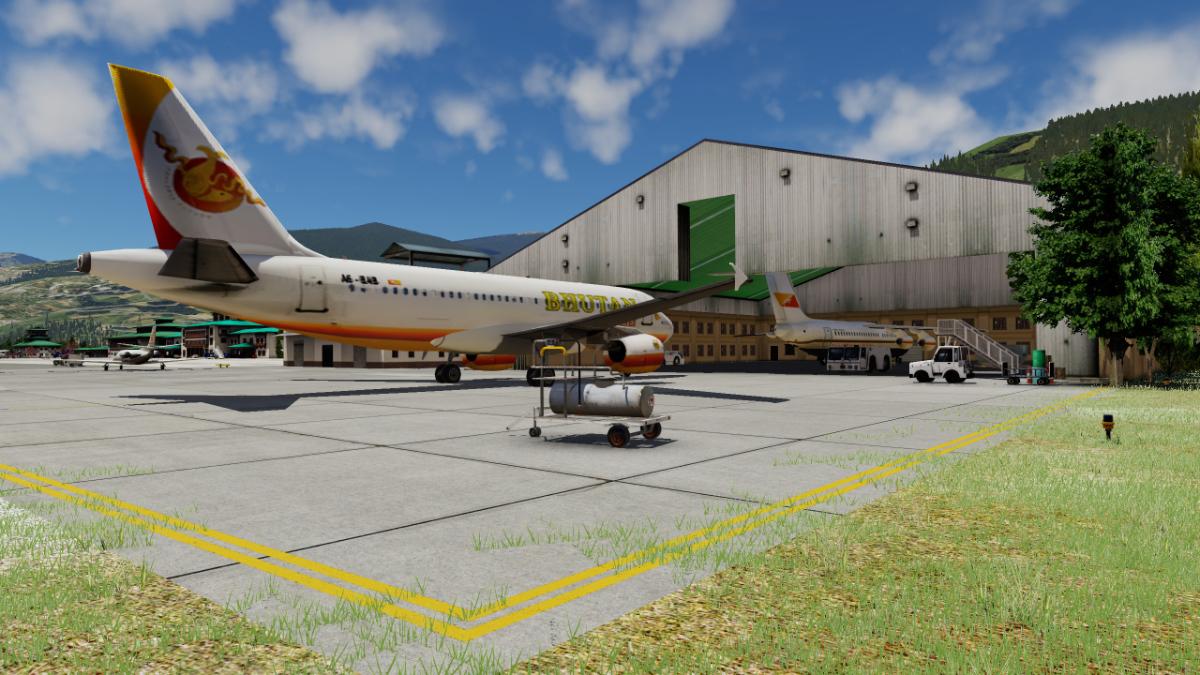
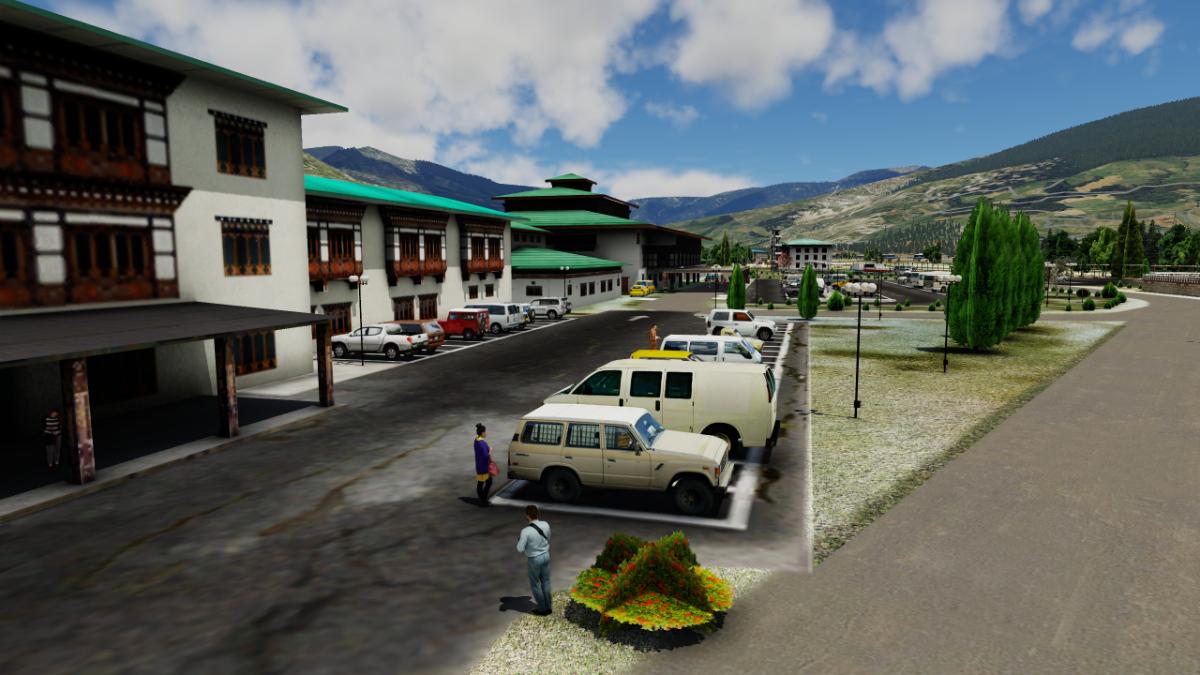
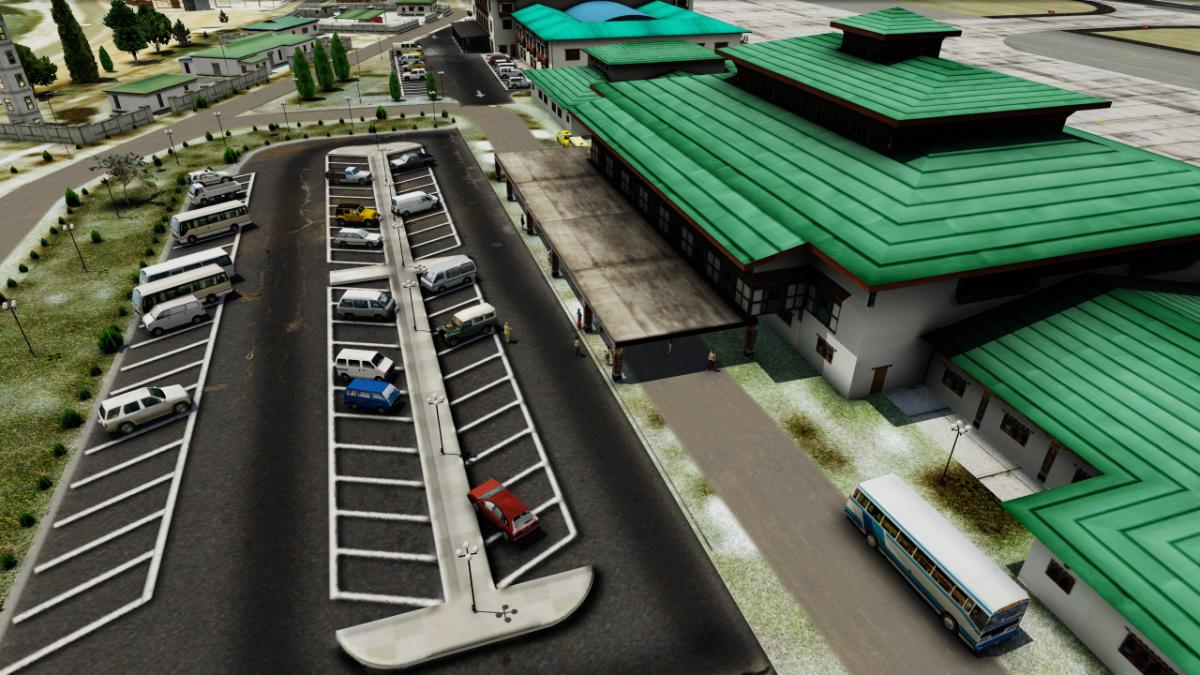
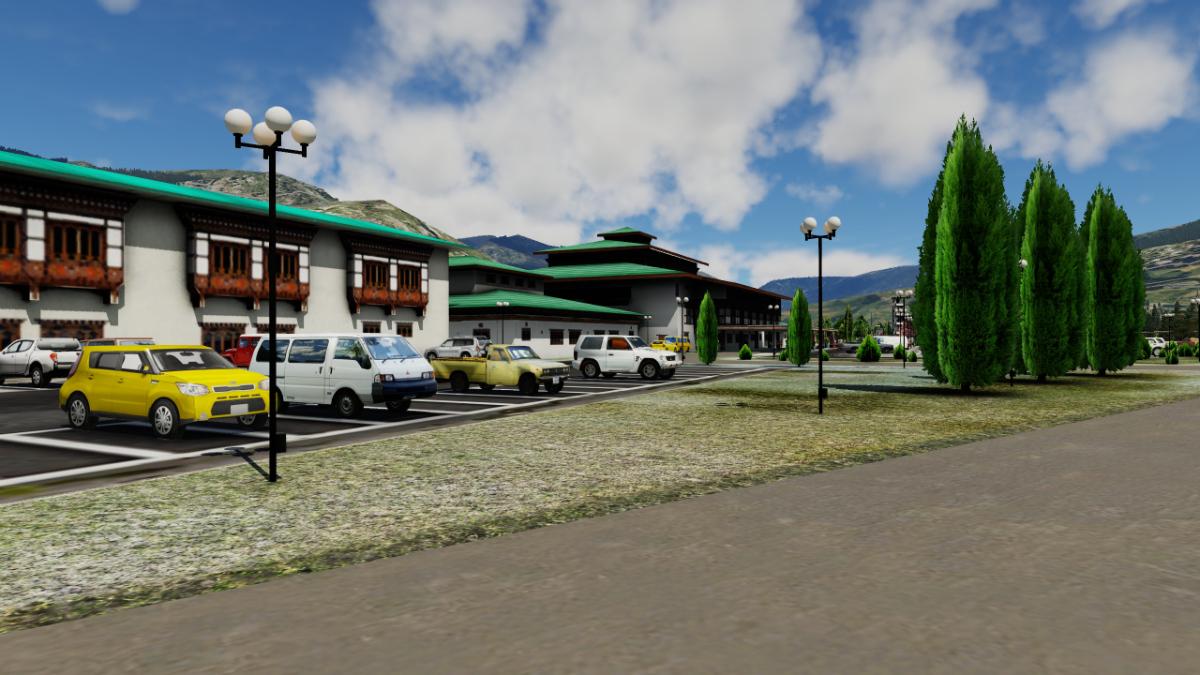
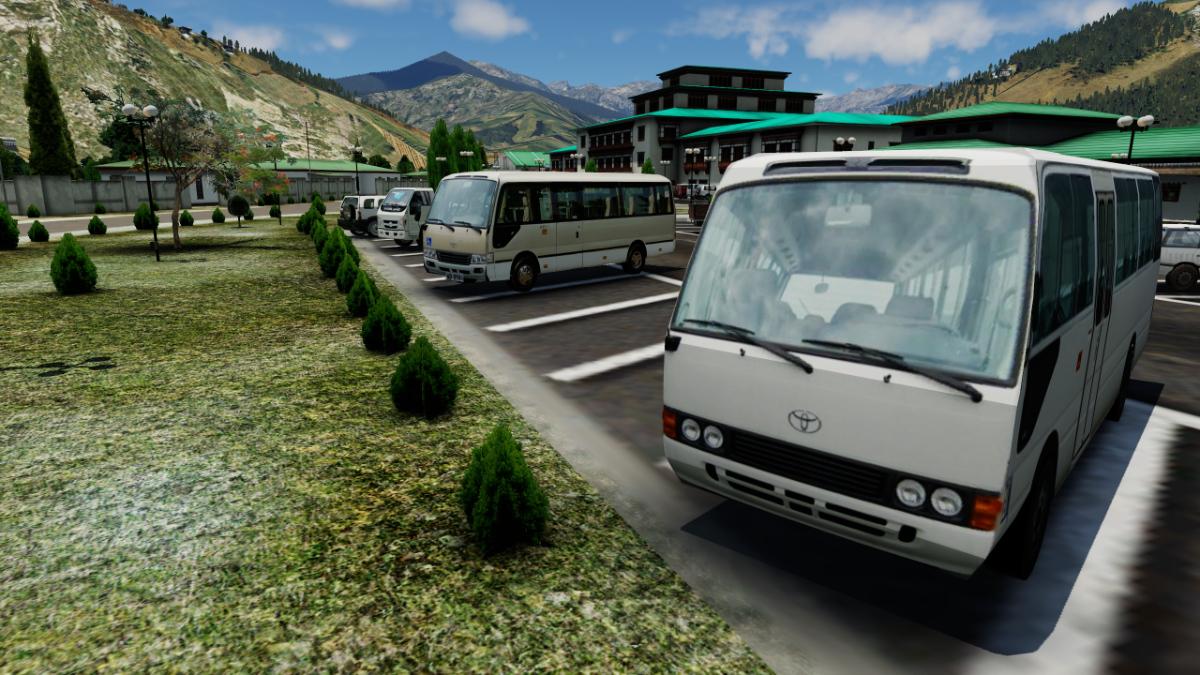
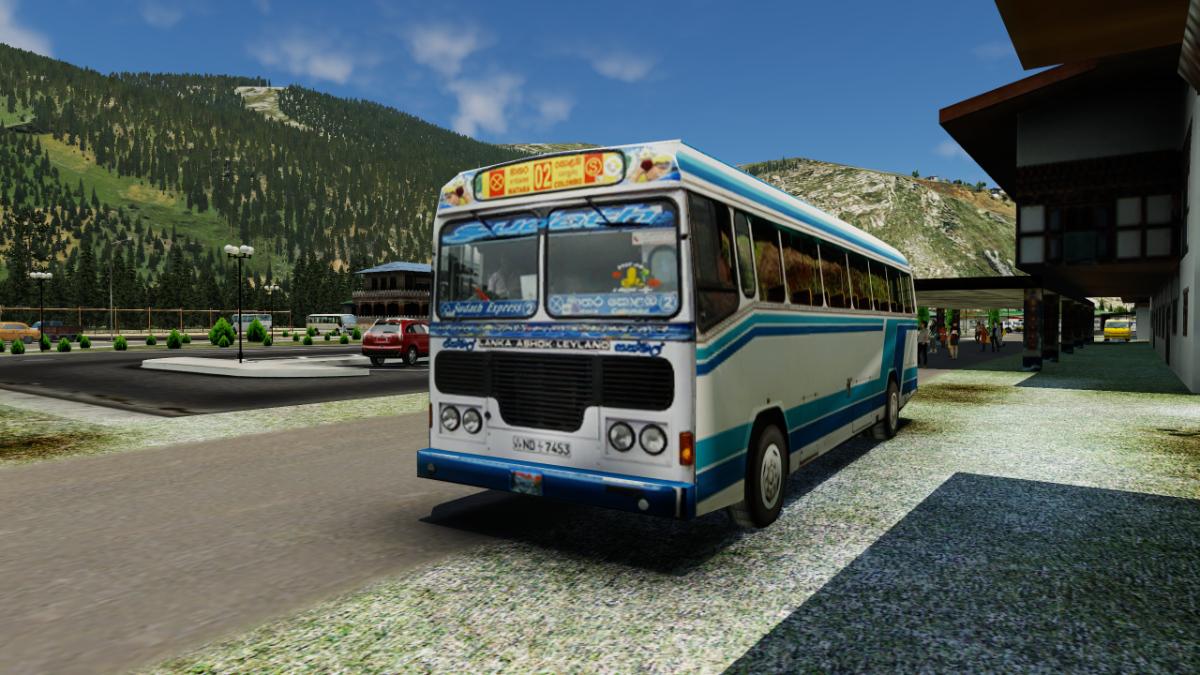
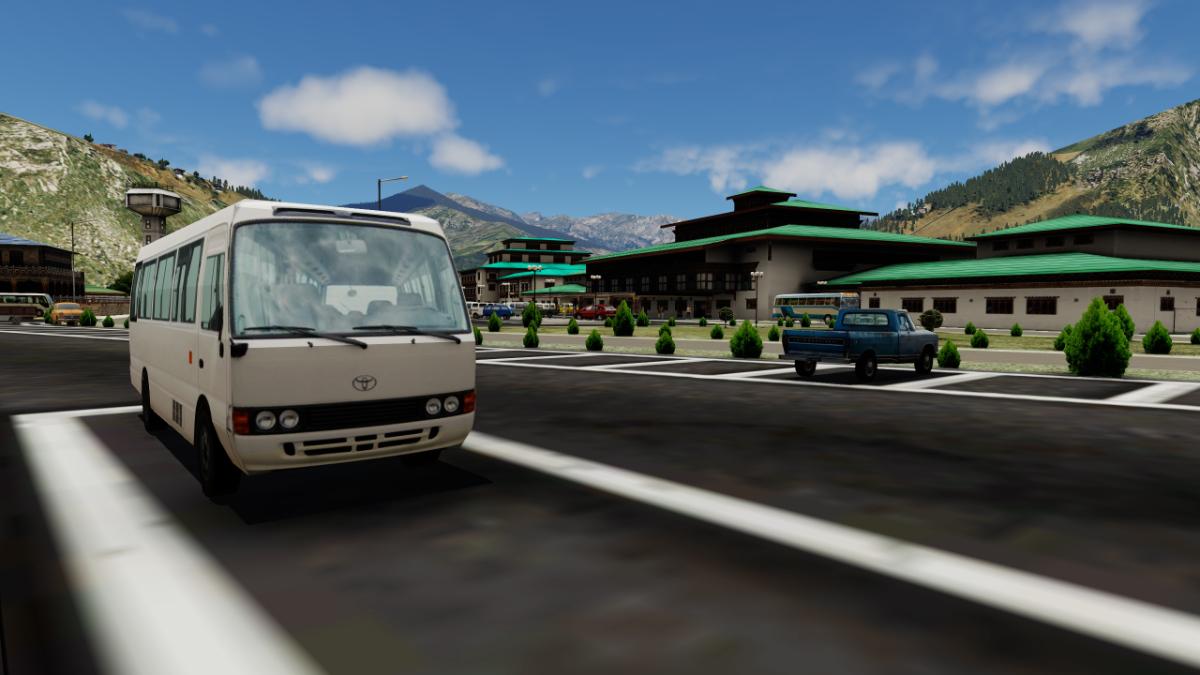
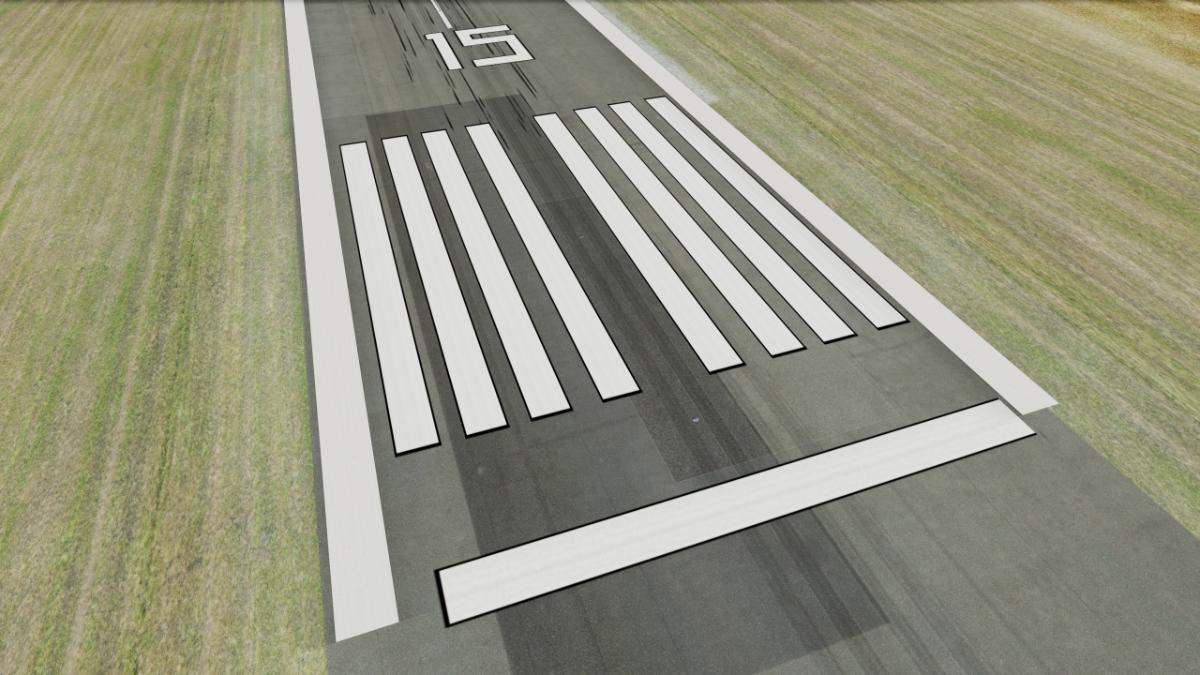
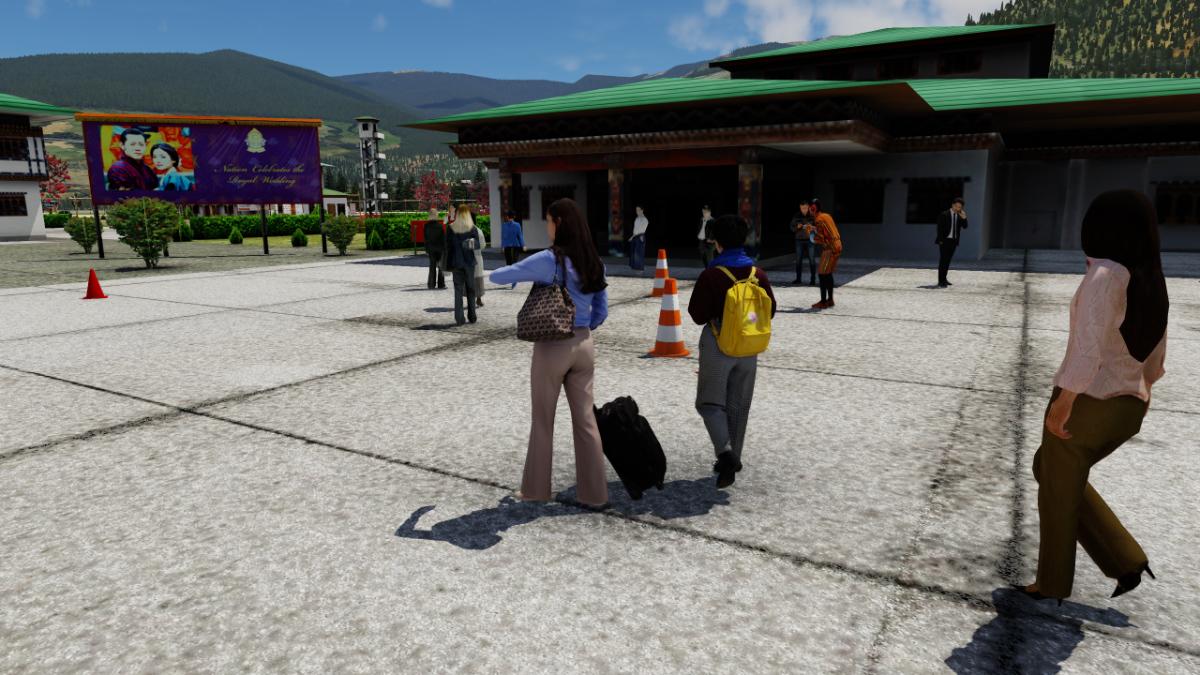
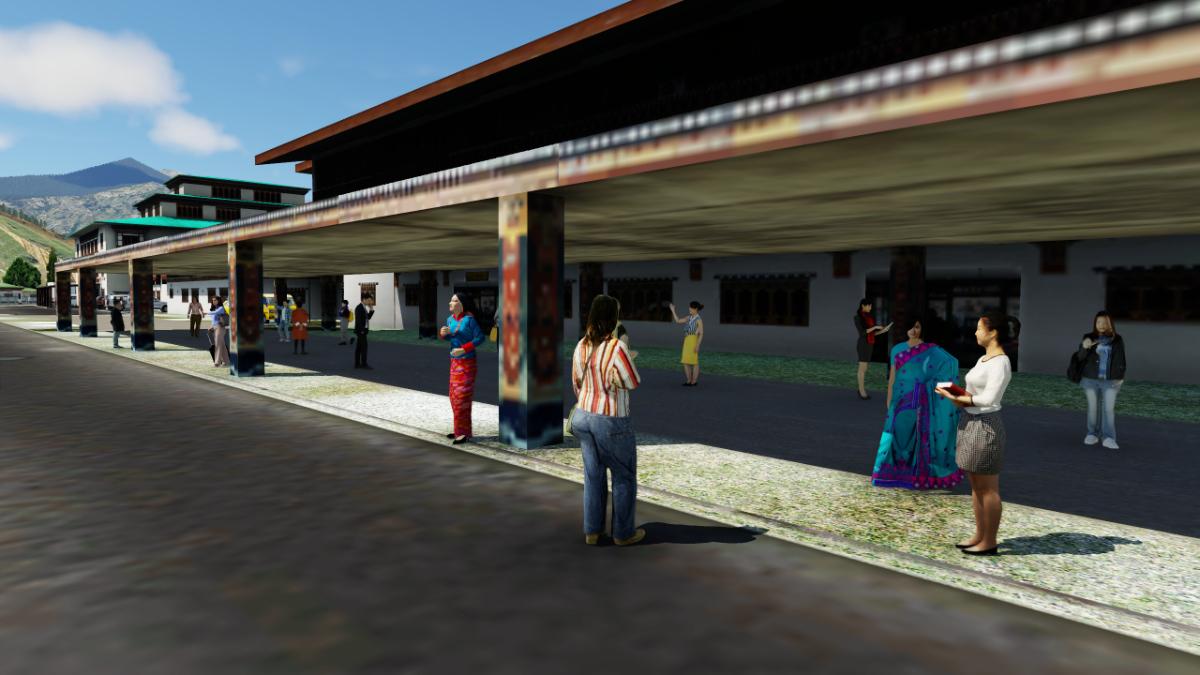
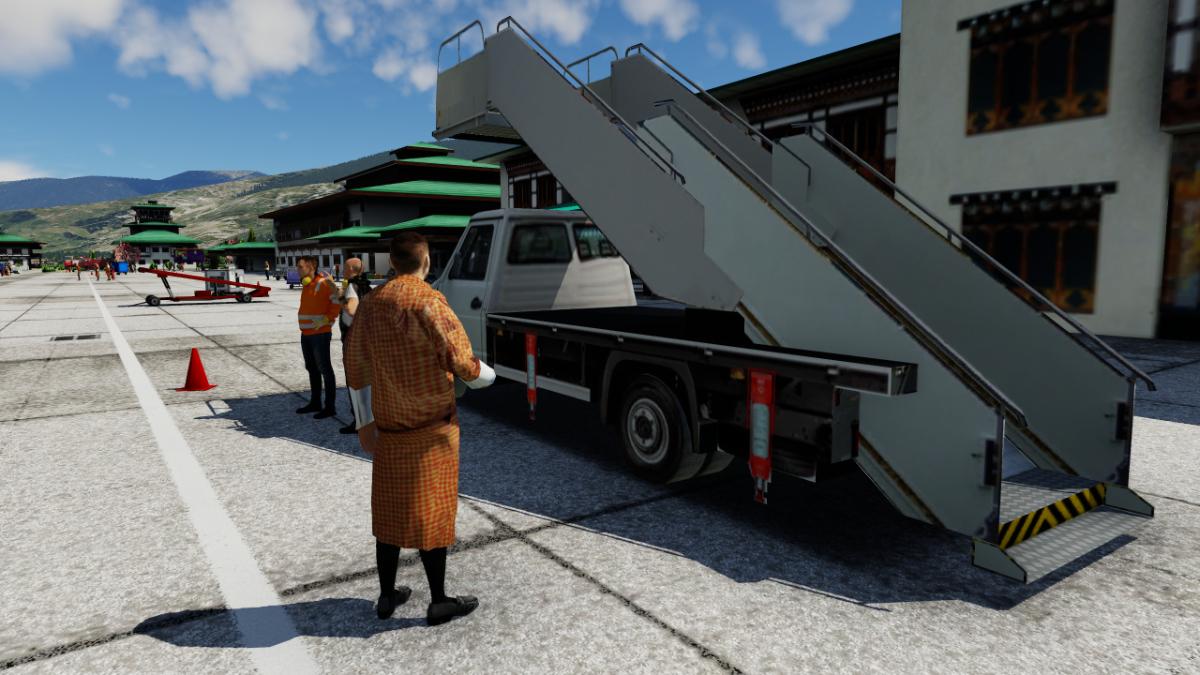
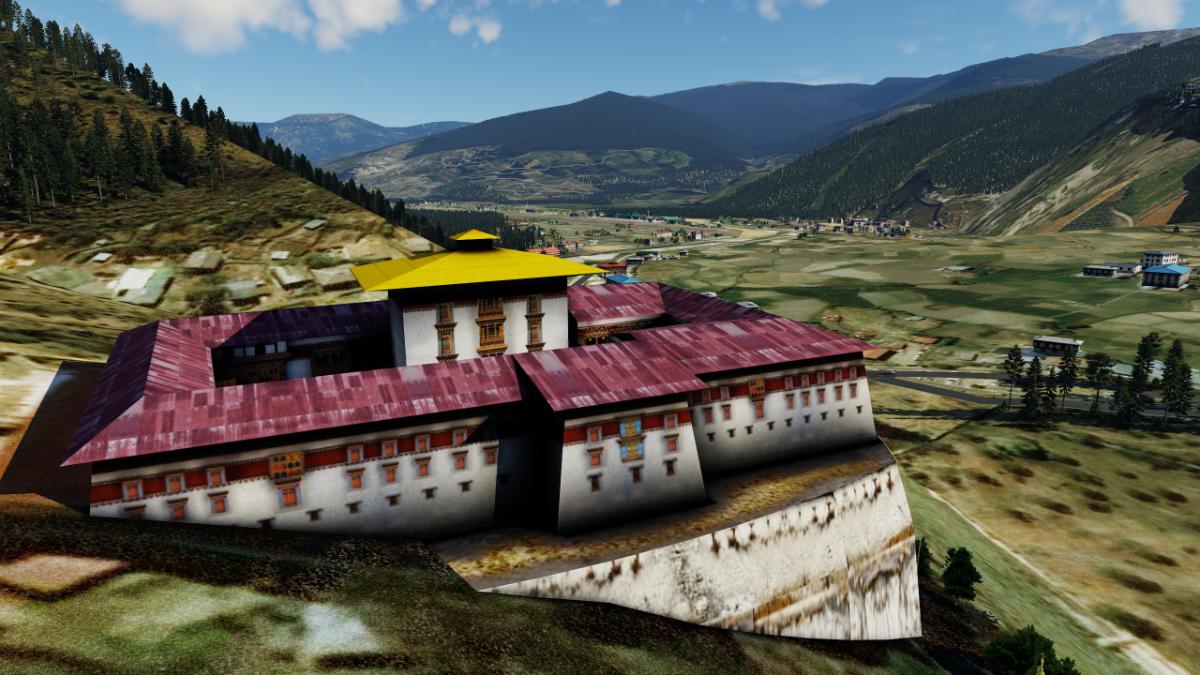
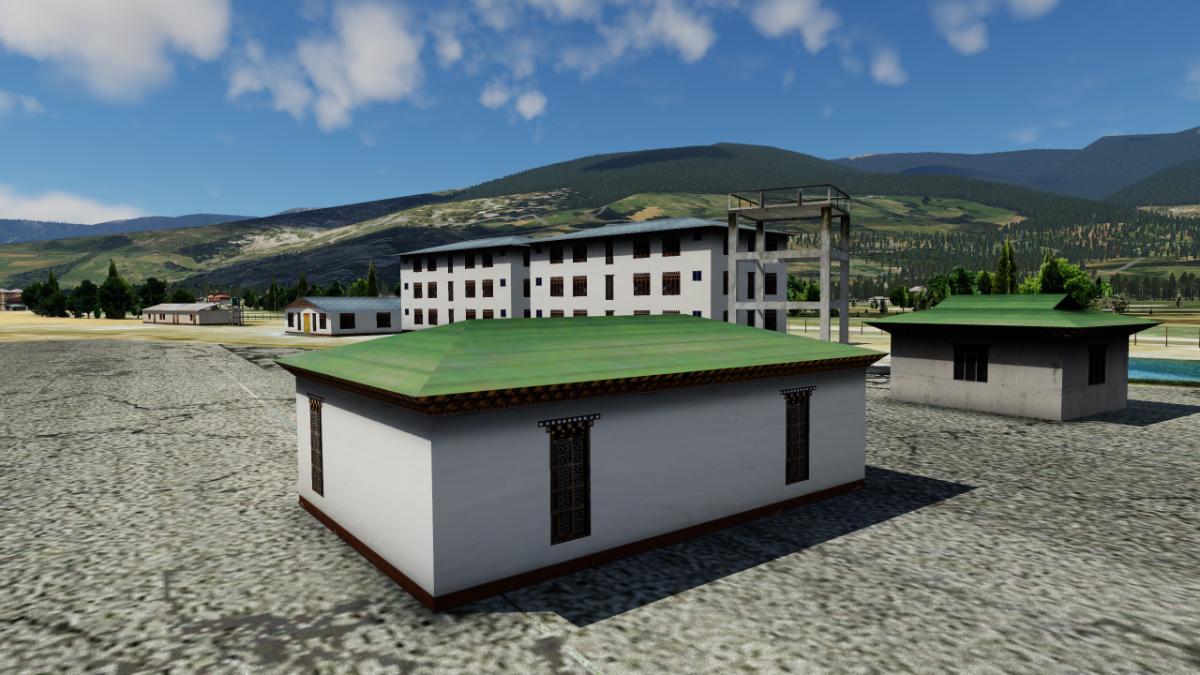
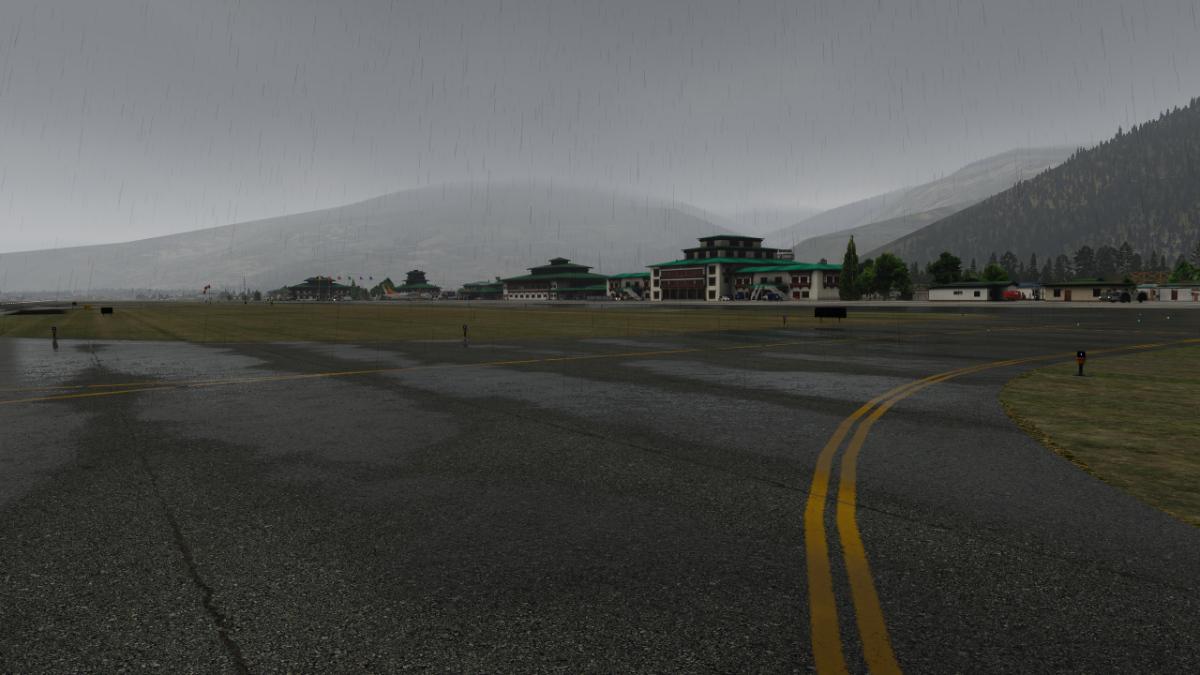
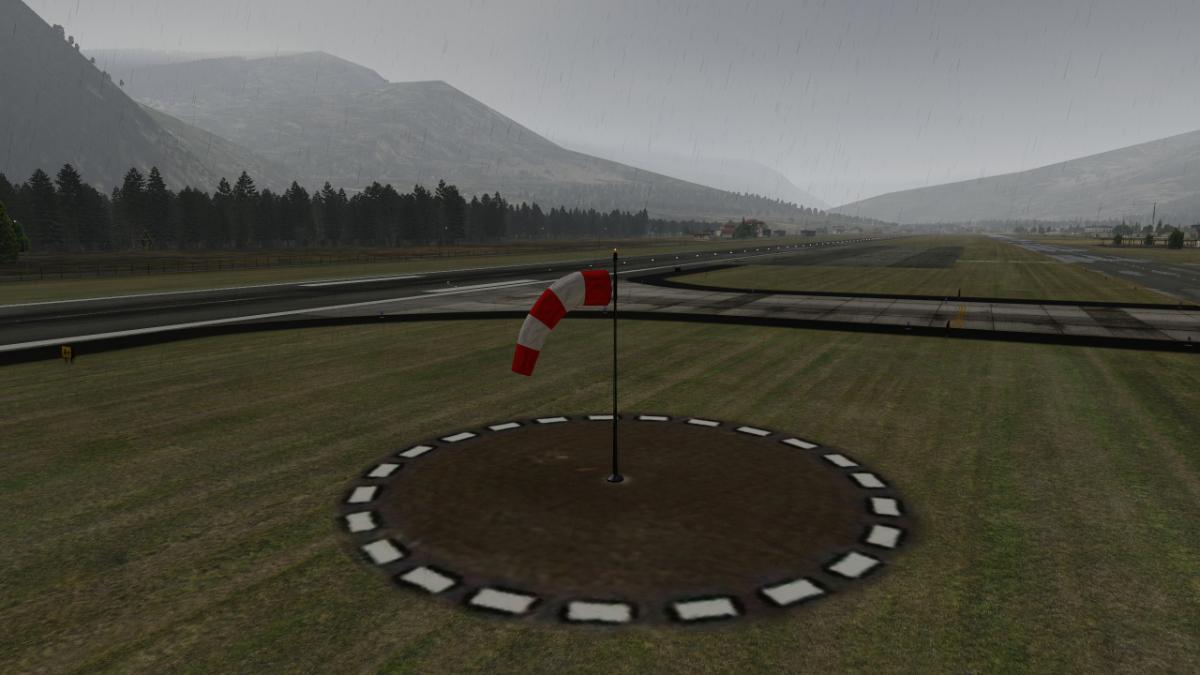
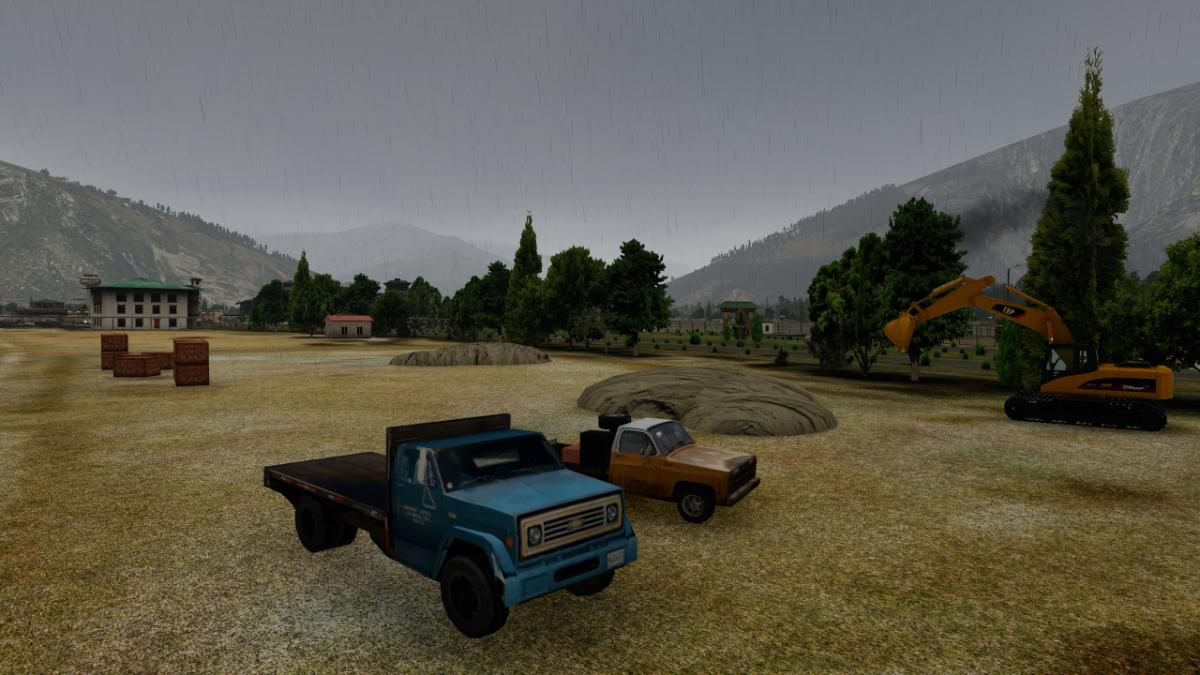
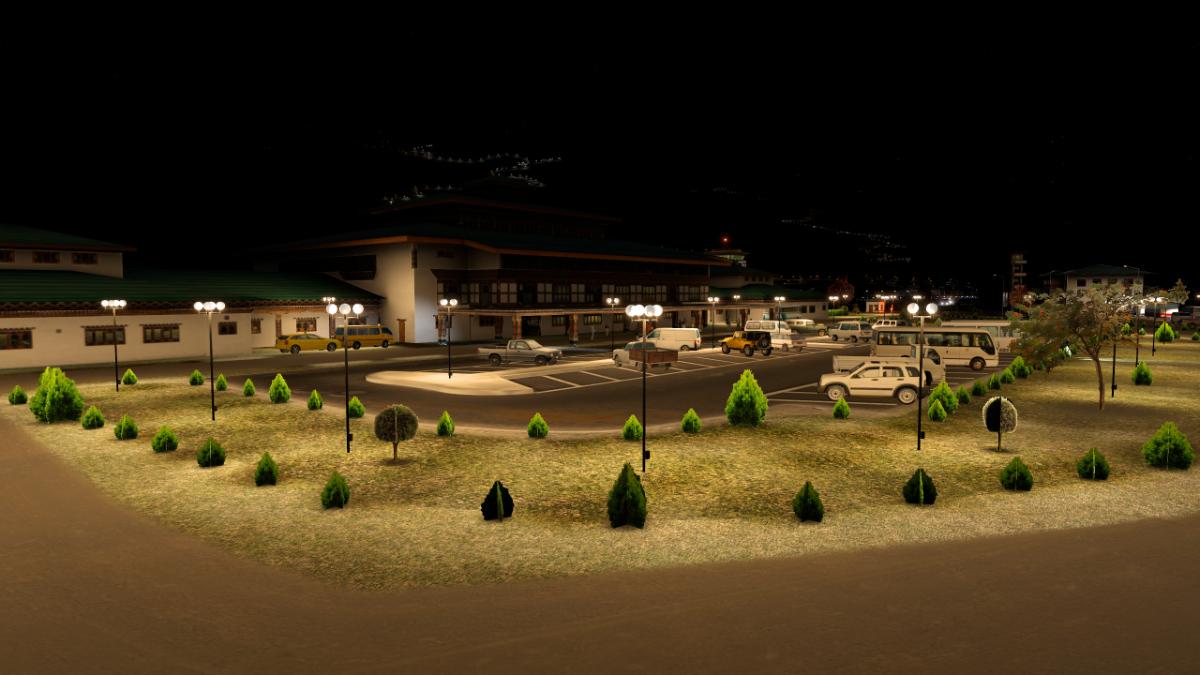
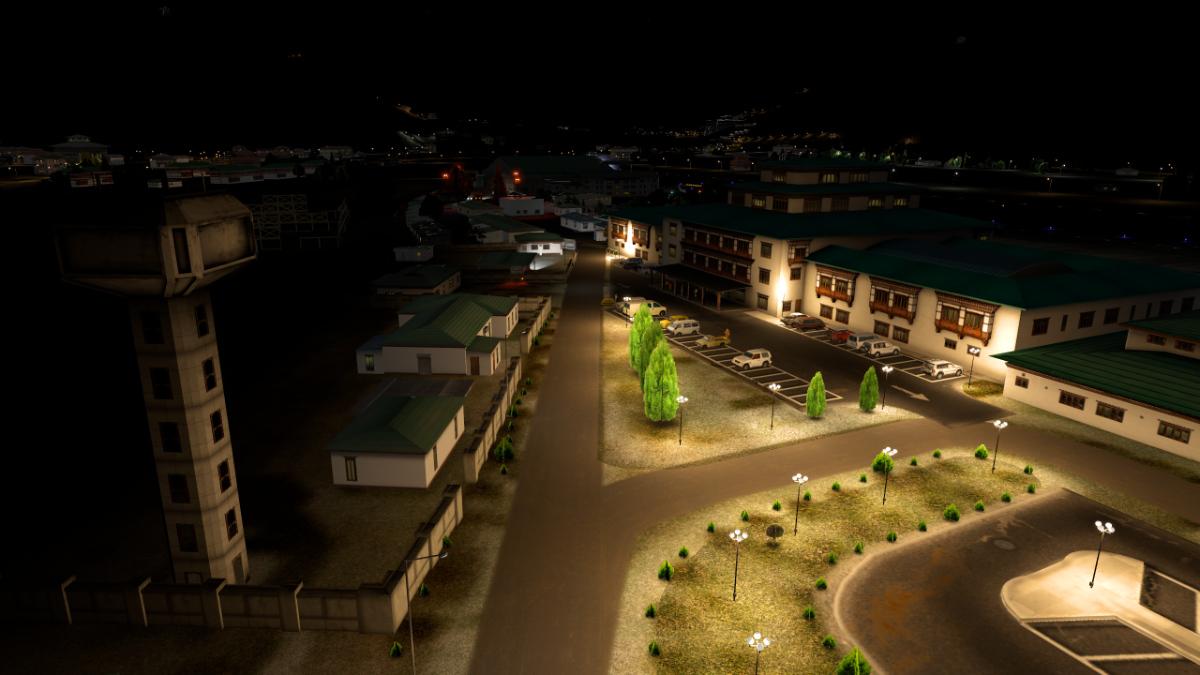
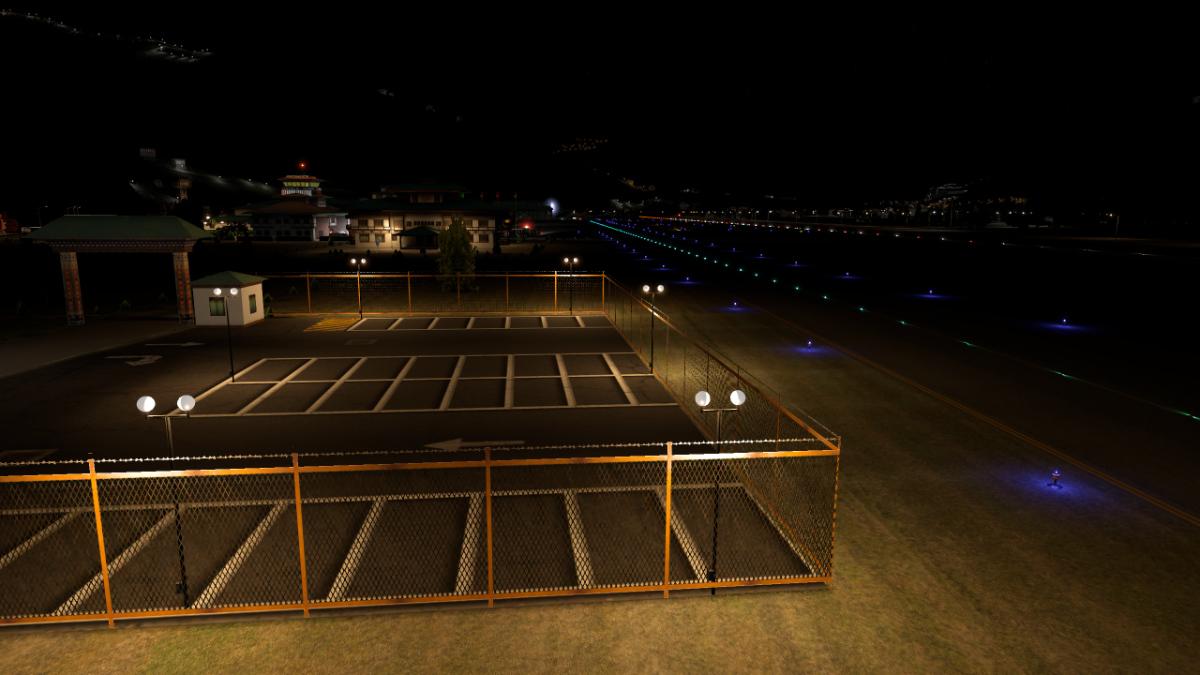
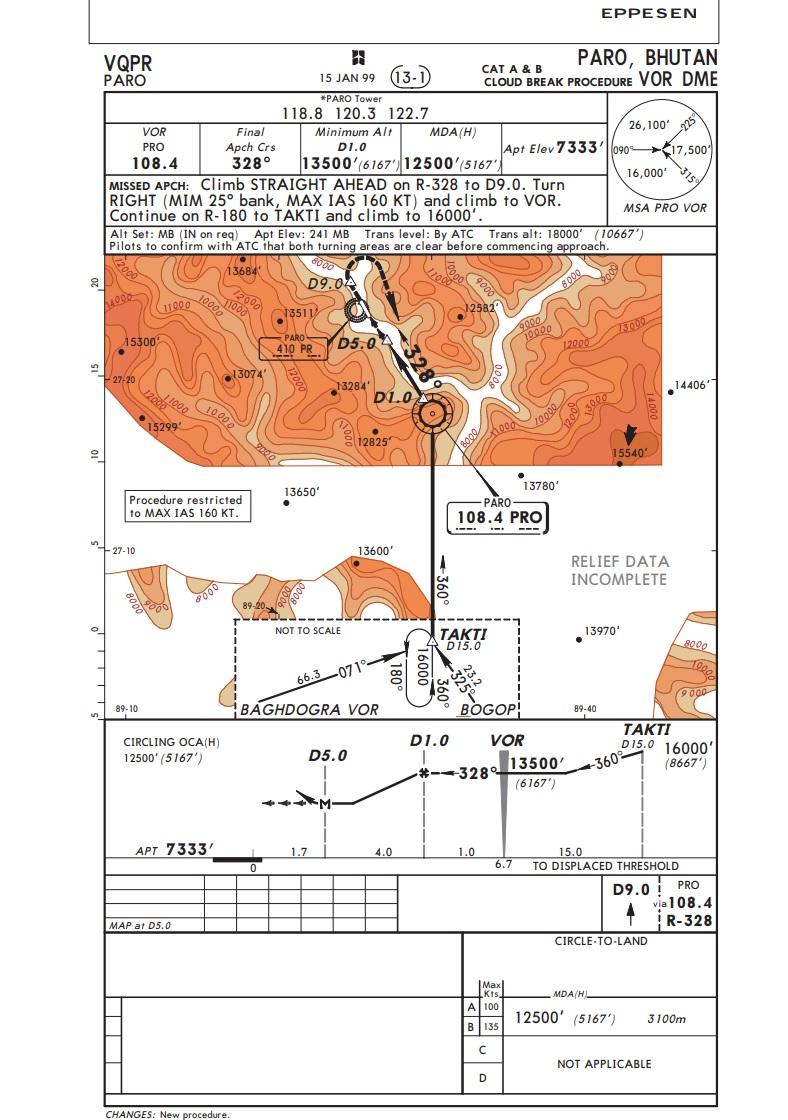
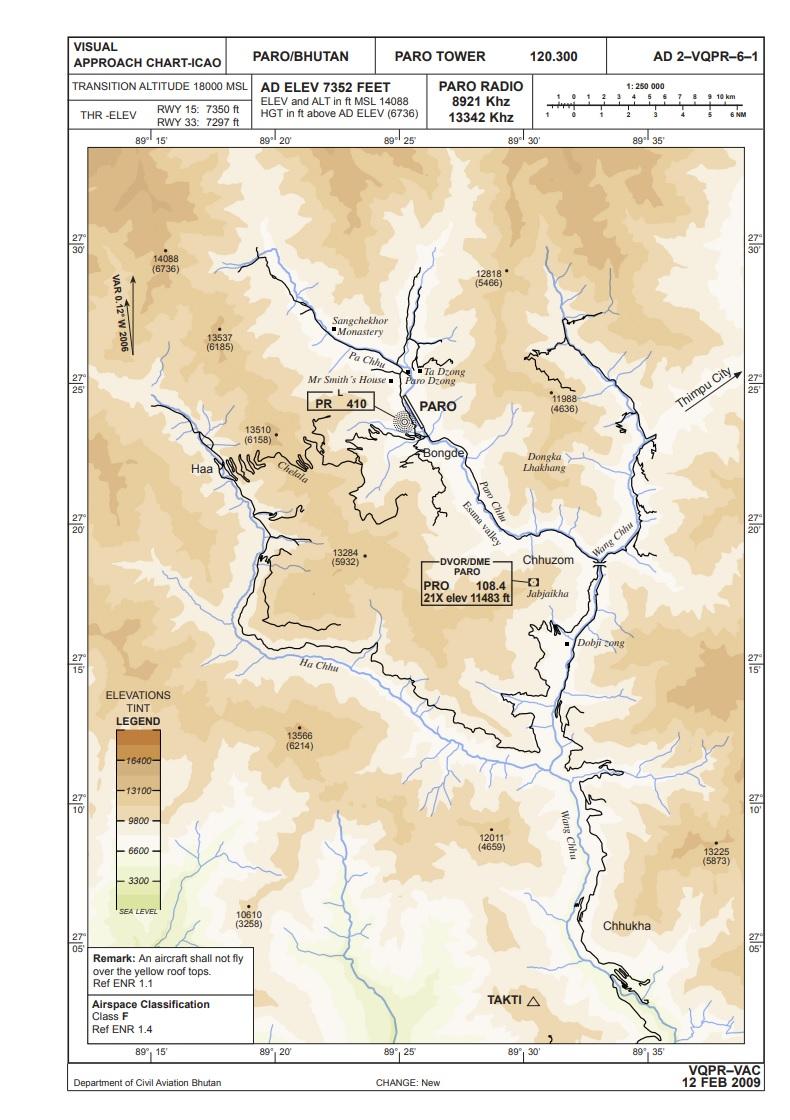
Scenery Review: VQPR Paro International Airport XP12 by Cami De Bellis By Nick Garlick Introduction Every virtual pilot has that one destination, a place that beckons with the allure of adventure and the thrill of the unknown. For many, it's the quest for their personal Shangri-La, a utopia hidden amidst the digital landscapes of X-Plane. Shangri-La, a term immortalised by James Hilton in his 1933 novel “Lost Horizon”, speaks of an earthly Eden, untouched by time and far removed from the chaos of modern life. But what if such a place existed not just in literature but within the very confines of your flight sim world? Enter Bhutan, a landlocked gem nestled in the eastern Himalayas. A realm where the concept of time feels abstract, as if you're miles away from yesterday and yet, just a step shy of tomorrow. Bhutan, with its monasteries perched on cliff edges and valleys echoing with ancient folklore, feels like a page straight out of Hilton's masterpiece. And at the heart of this enigmatic nation lies our destination: VQPR Paro International Airport. An airport that promises not just a flying challenge but a journey into a world that celebrates serenity, culture, and nature's unbridled beauty. Cami De Bellis of CDB Sceneries has been a beacon in the X-Plane community since 2008. Her dedication to creating realistic and immersive sceneries shines through in this rendition of VQPR. This airport, initially released around six years ago, has undergone several updates. The most recent one, as of June 2023, brought further refinements, including corrections to certain objects and the addition of more dynamic elements like ground traffic vehicles and vegetation. So, fasten your seat belts as we embark on this virtual adventure, exploring the nuances, challenges, and charms of VQPR Paro International Airport for X-Plane 12. Install & Documentation Stepping into the world of VQPR Paro International Airport starts with a straightforward installation process. Once you've extracted the contents from the zip file, it's as simple as copying the folder named 'VQPR_Paro_Bhutan V3' and pasting it into your XP12 custom scenery directory. However, a crucial point to note is the dependency on Cami’s CDB Library V2.6. While the scenery package is more compact without this library, it's essential for the full experience. For ease of access, the accompanying manual provides a direct hyperlink to this library found at the Org. If you're new to this wonderful community, creating an account might be necessary to access this file. Documentation comes in the form of an easy-to-follow single PDF, and whilst it primarily offers installation instructions, it also provides guidance on how to get the most out of the scenery. Though brief, it covers all the essential points and is well worth reading. Main Airport - VQPR Paro International Nestled amongst the rugged contours of the Paro Valley, VQPR Paro International Airport is a beacon of modernity set against a backdrop of ancient mountains. The airport's location presents not just visual allure but an undeniable challenge to pilots. Its reputation as one of the world's most demanding airports is well-deserved, as the approach into VQPR is fraught with challenges, made even more intense by the sudden gusts of wind that can veer an aircraft off its course. Only a handful of real-world pilots boast the qualification to land here. Their number is so limited that they could be counted on one's fingers, perhaps with a toe or two to spare. The airport's altitude, sitting almost as high above sea level as its runways are long, adds another layer to its complexity. With a runway length of 6,500ft and an altitude of 7,300ft, even a cursory glance at the airport charts underscores the challenges posed. X-Plane's default mesh does a reasonable job at recreating the intimidating terrain that envelops the Paro valley. This serves as more than just a picturesque backdrop; it's a constant reminder of the flying challenge that awaits would-be pilots. Ground Markings The runway textures at the airport, whilst of decent quality, come off as slightly too pristine. While they feature the expected rubber marks from landings, a touch more weathering could have added to their realism, given the wear and tear runways typically experience. In contrast, the taxiways do exhibit weathering, enhancing their authentic appearance, as does the apron and the surrounding areas close to the maintenance buildings. Main Terminal and Adjacent Structures The main terminal of Paro International Airport is a blend of modern functionality and traditional Bhutanese architecture. Intricately carved wooden cornices, vibrant patterns, white walls, and a multi-coloured sloped roof reminiscent of Bhutan's fortresses (Dzongs) set the terminal apart. Directly in front of the terminal is a car park, catering to both short-term and long-term parking needs. A frequent sight here are the local buses, waiting to ferry passengers to nearby towns and landmarks, all faithfully reproduced to enhance realism. Bustling Environment Cami's trademark use of 3D characters is prominently showcased in this scenery. From locals in traditional attire to bustling passengers and diligent airport staff, the variety is commendable. Together, these diverse figures, albeit static, breathe life into the scenery, replicating the vibrant atmosphere typically associated with international airports. The inclusion of such details not only adds depth to the environment but also enhances the immersion for virtual pilots. Surrounding Area The allure of VQPR Paro International Airport doesn't end at its runways; it extends to the rich tapestry of landscapes and landmarks that envelop it. Unfortunately, X-Plane’s dated ground textures fail to do this part of the scenery justice, so I highly recommend using Ortho4XP or AutoOrtho to increase the realism. While the scenery captures the essence of Bhutan's beauty, it's important to note that certain iconic structures close to the airport, like the Paro Taktsang monastery, also known as Tiger’s Nest, are not part of this rendition, as the coverage does not extend that far. However, the Rinpung Dzong or 'Fortress of Heap of Jewels is included in the package and is beautifully represented. Improvements While the scenery largely succeeds in capturing Bhutan's unique allure, there are a few distinct areas that could benefit from further refinement. Firstly, while the landscape mostly blends seamlessly with X-Plane's default mesh, some inconsistencies are evident, especially in the surrounding hills and slopes. Secondly, expanding the ortho-photo coverage would lessen the jarring contrast between X-Plane's somewhat dated default ground textures and Cami's finely modelled structures. Lastly, incorporating X-Plane 12's advanced capabilities, such as its new 3D trees and vegetation, could elevate the level of immersion and authenticity, although this would understandably require additional development effort. Night Lighting As evening settles over VQPR Paro International Airport, Cami's attention to lighting comes to the forefront. The aprons, taxiways, and runways are well-lit, making after-dark operations straightforward. While the airport's windows rely on baked lit textures rather than dynamic lighting, the effect is still convincing. It adds a layer of realism that enhances the overall atmosphere, especially in low light conditions. Conclusion Exploring the vast horizons of the X-Plane universe reveals many hidden gems, and Cami's rendition of VQPR Paro International Airport in Bhutan undoubtedly shines among them. This scenery captures the very essence of Bhutan, a country synonymous with tranquillity, spiritual richness, and breathtaking landscapes. While many sceneries boast of high-resolution textures and an overload of pixel-perfect details, Cami's work stands out for its balance. The focus isn't on mere visual spectacle but on creating a genuine, immersive experience. VQPR is a delightful blend of simplicity and authenticity, emphasizing the serene charm of Bhutan while leveraging some of X-Plane 12's advanced features. However, just like any other scenery, there's always potential for growth. Whilst the custom buildings and landmarks mostly work well with X-Plane's default terrain, enhancing this integration could resolve some glaring inconsistencies, especially on uneven terrain like hills and slopes. Furthermore, the scenery's authenticity could be elevated by the addition of higher-resolution ortho-photos or even the use of photo-realistic textures. In the same vein, tapping into the advanced capabilities of X-Plane 12, such as its new 3D trees and vegetation, could offer an even more refined and immersive experience. But these suggestions don't overshadow the undeniable allure of this scenery. Cami's VQPR offers virtual pilots not just a landing challenge but an invitation to explore a country that celebrates happiness as a state policy. It's a journey into a world where the modern meets the ancient, where nature's raw beauty intertwines with rich cultural heritage. For those seeking a serene escape coupled with a flying challenge, VQPR Paro International Airport is an unmissable destination. As we await more such adventures from the talented Cami De Bellis, this rendition of VQPR stands as a testament to her dedication to the X-Plane community. So, until the next virtual adventure beckons, it's a heartfelt 'Pip, Pip, Tally Ho!' from me. ________________________ VQPR Paro Intl Airport, Bhutan, XP12 by Cami De Bellis is now available from the X-Plane.Org Store here: VQPR Paro Intl Airport, Bhutan, XP12 Priced at $19.95 Features Exact reproduction 3D of the airport buildings, houses, hangars, Dzong, Pagodas and others Detailed textures and custom objects Reproduction of staff and local people 3D Hand placed 3D trees Volumetric grass Complete reconstruction of the airport's lighting equipment Detailed ground markings Custom night lighting Many Animations in and around airport Very detailed 3D Models covering the whole airport Ground Traffic by Marginal Requirements X-Plane 12 Windows, Mac, or Linux 4 Gb VRAM Minimum. 8 Gb+ VRAM Recommended CDB-Library is required Current version 3.0 (June 15th, 2023) Review System Specifications Windows 10, Intel 4790K liquid-cooled, overclock to 5GHz, 32GB DDR3 1600MHz RAM, Nvidia GTX 1070ti, Titanium HD Audio Card. __________________________________ Scenery Review by Nick Garlick 19th October 2023 Copyright©2023: X-Plane Reviews (Disclaimer. All images and text in this review are the work and property of X-PlaneReviews, no sharing or copying of the content is allowed without consent from the author as per copyright conditions).
1 point