Stephen
-
Posts
2728 -
Joined
-
Last visited
-
Days Won
353
Content Type
Profiles
Forums
Articles
Everything posted by Stephen
-
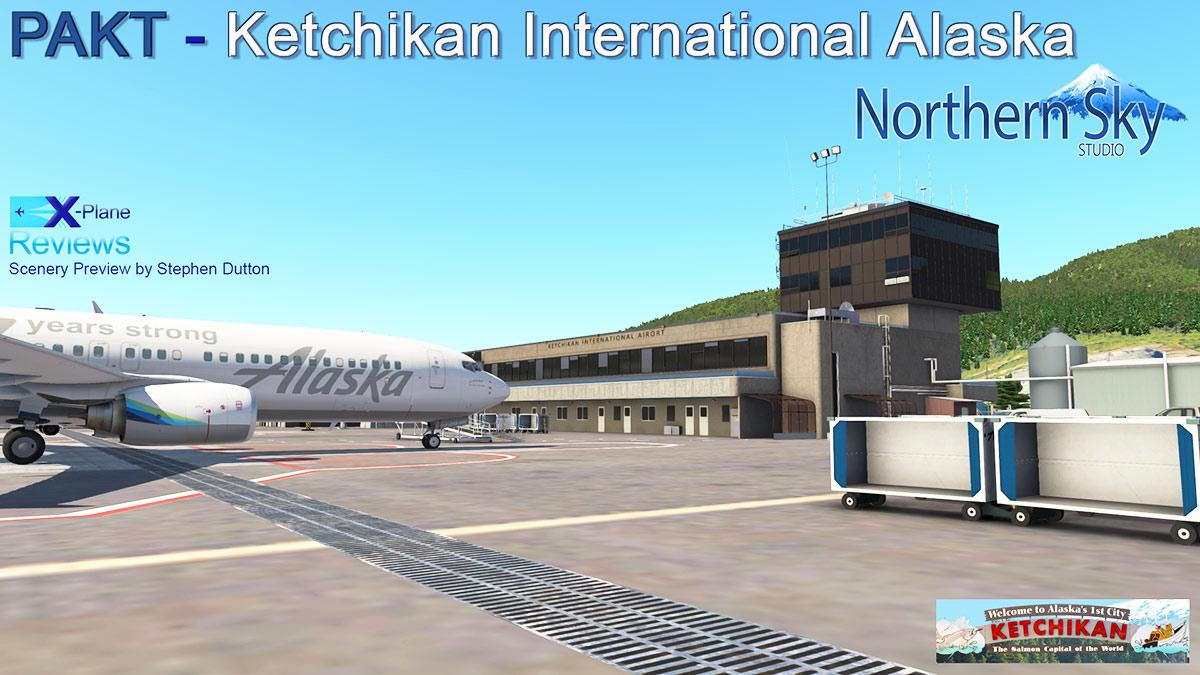
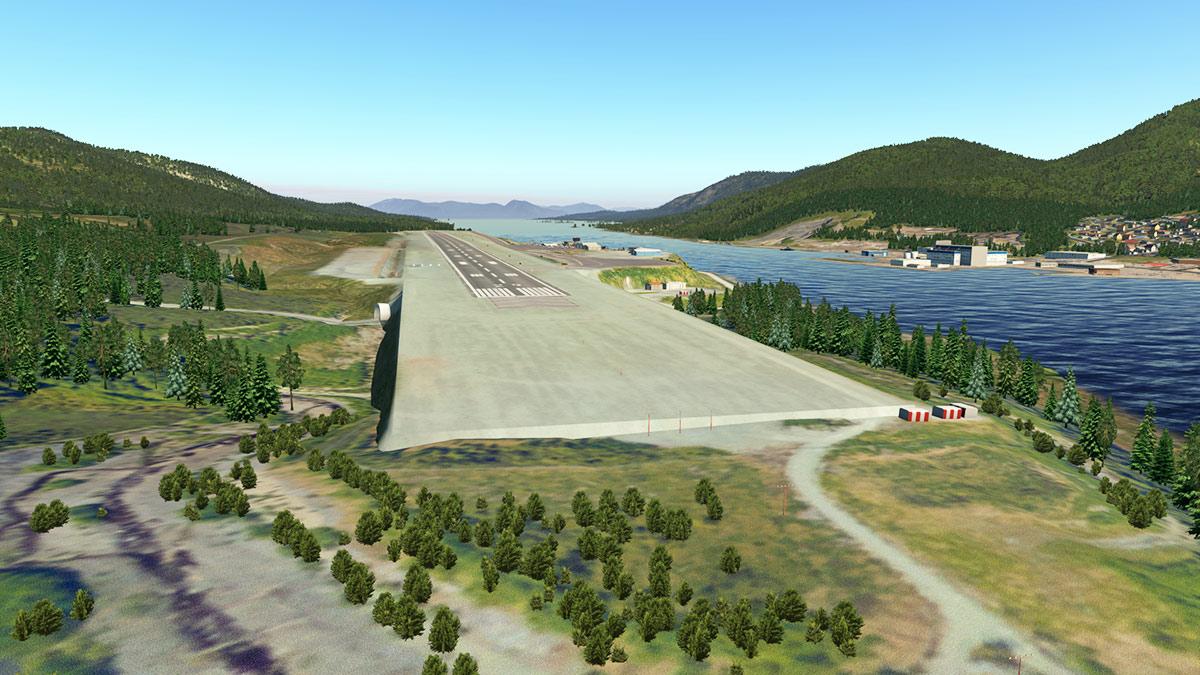
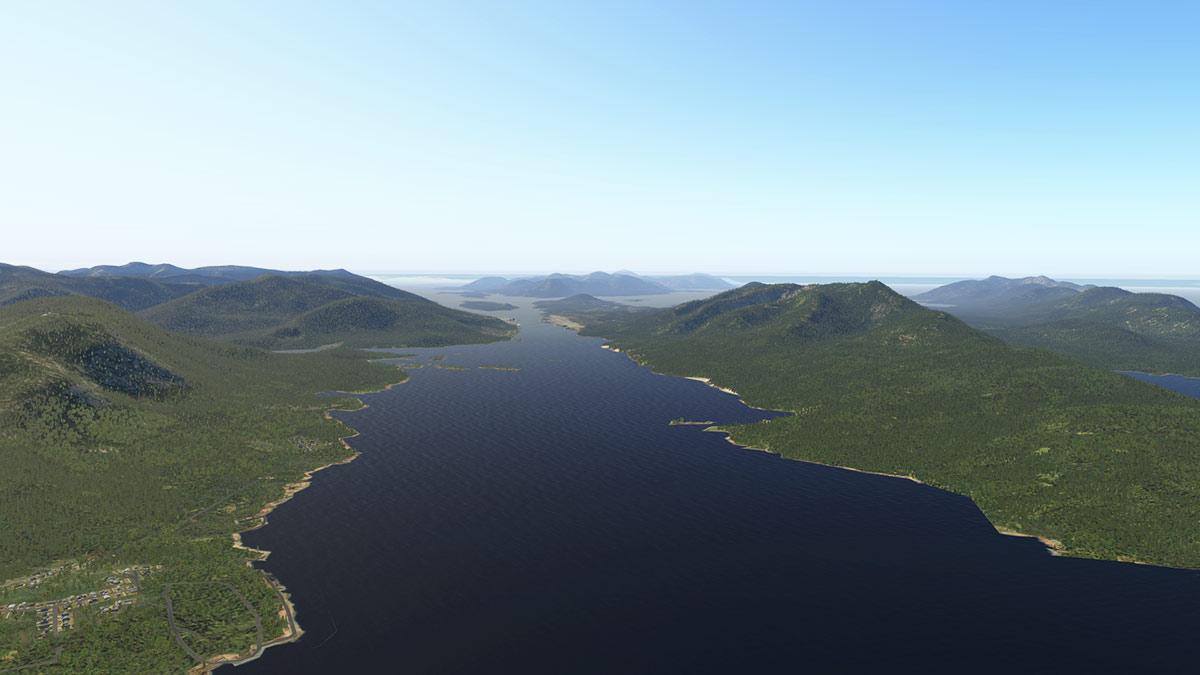
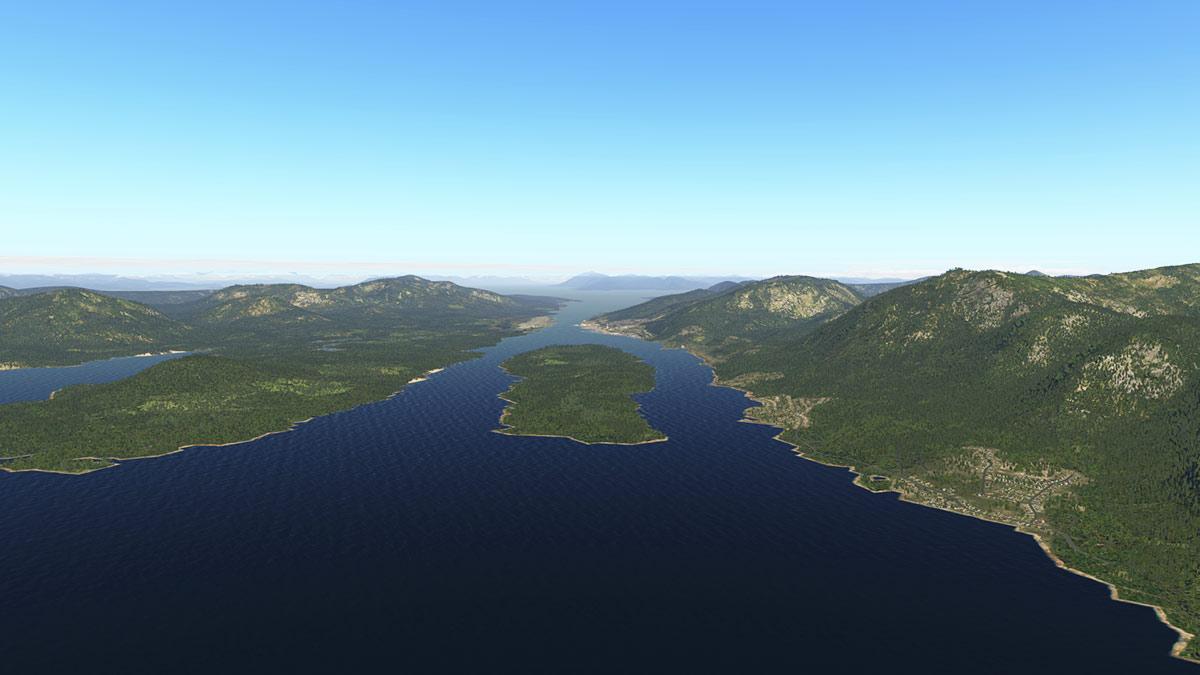
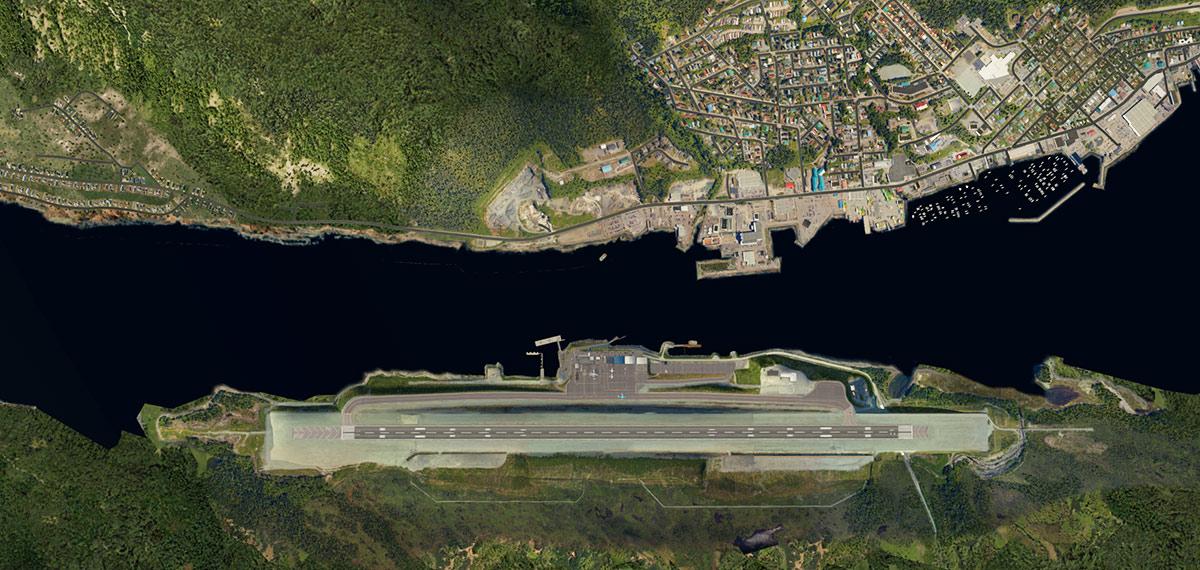
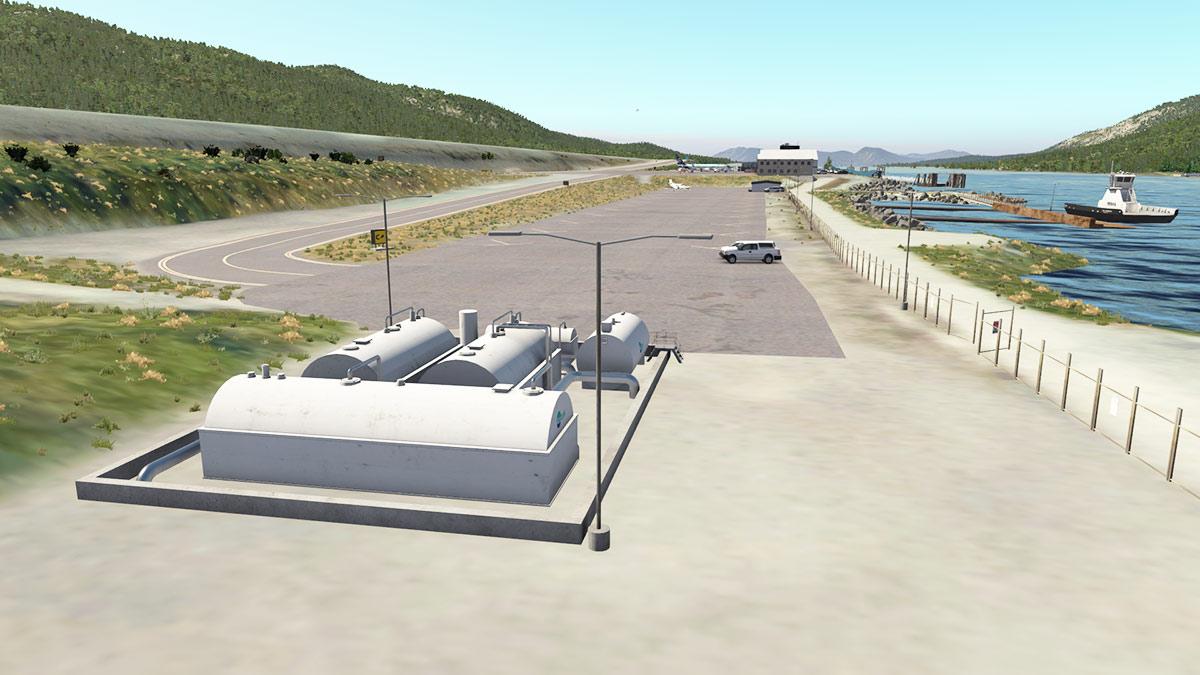
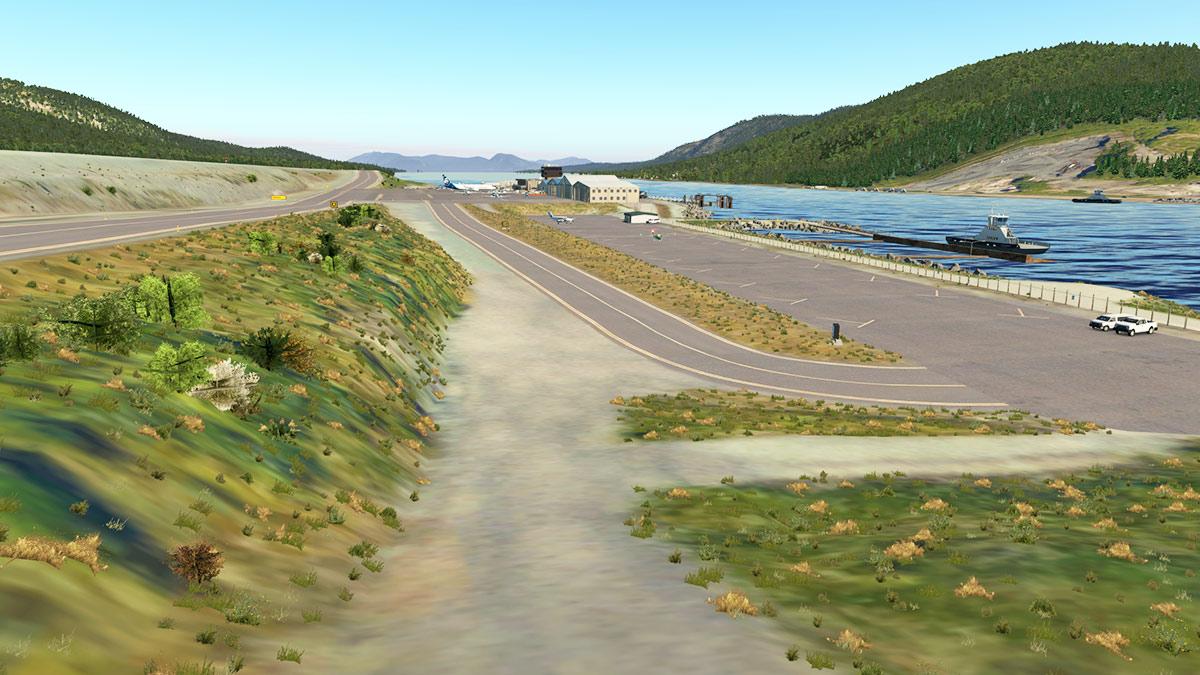
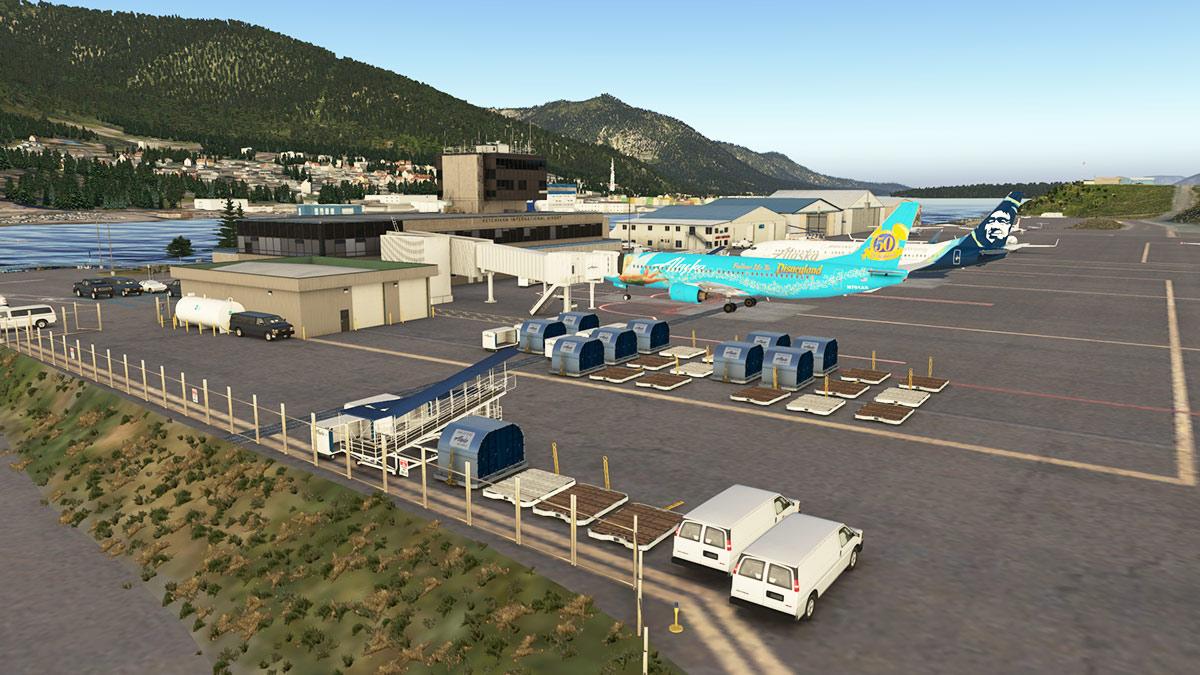
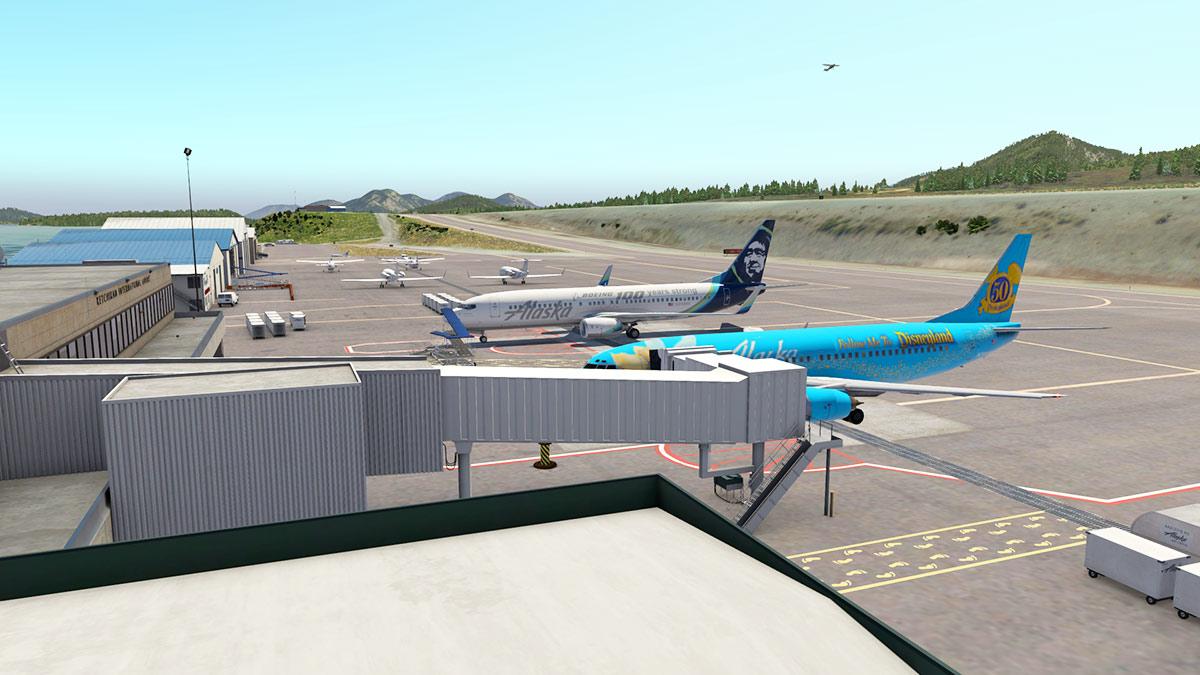
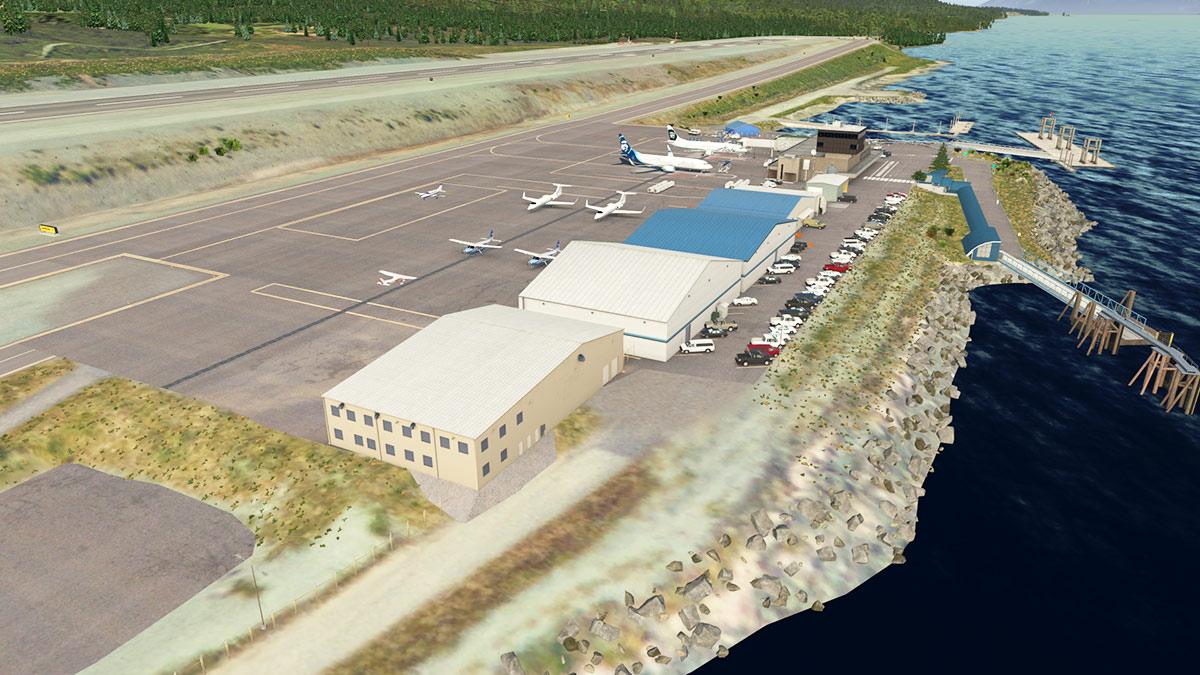
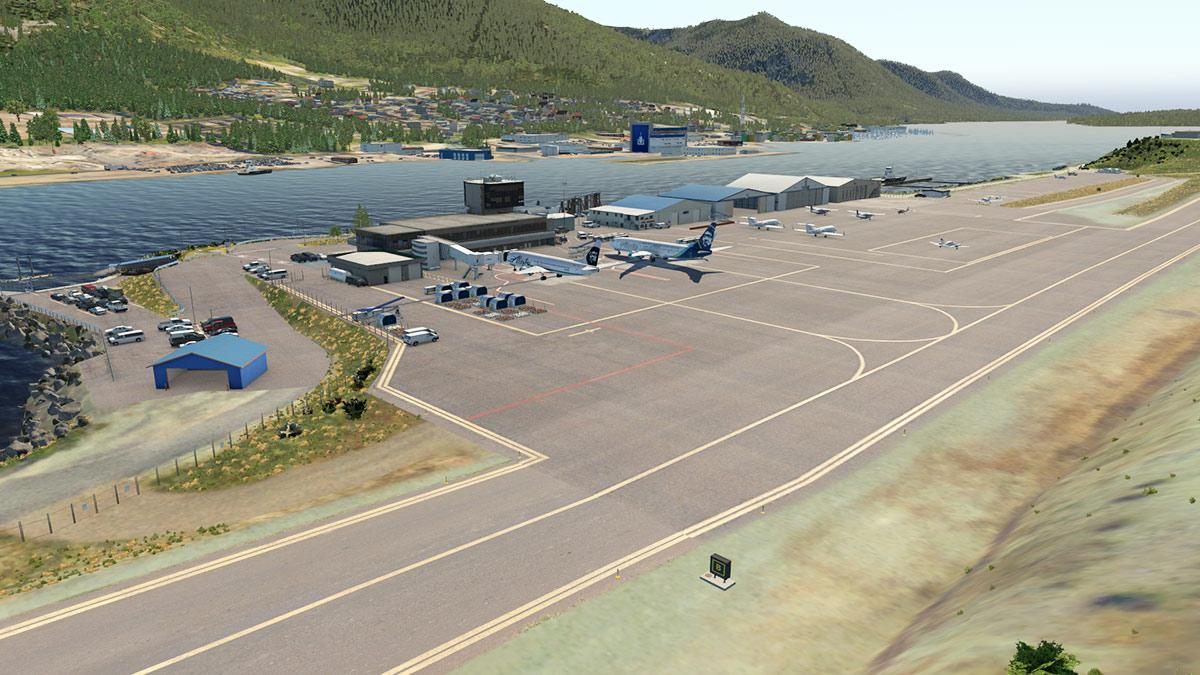
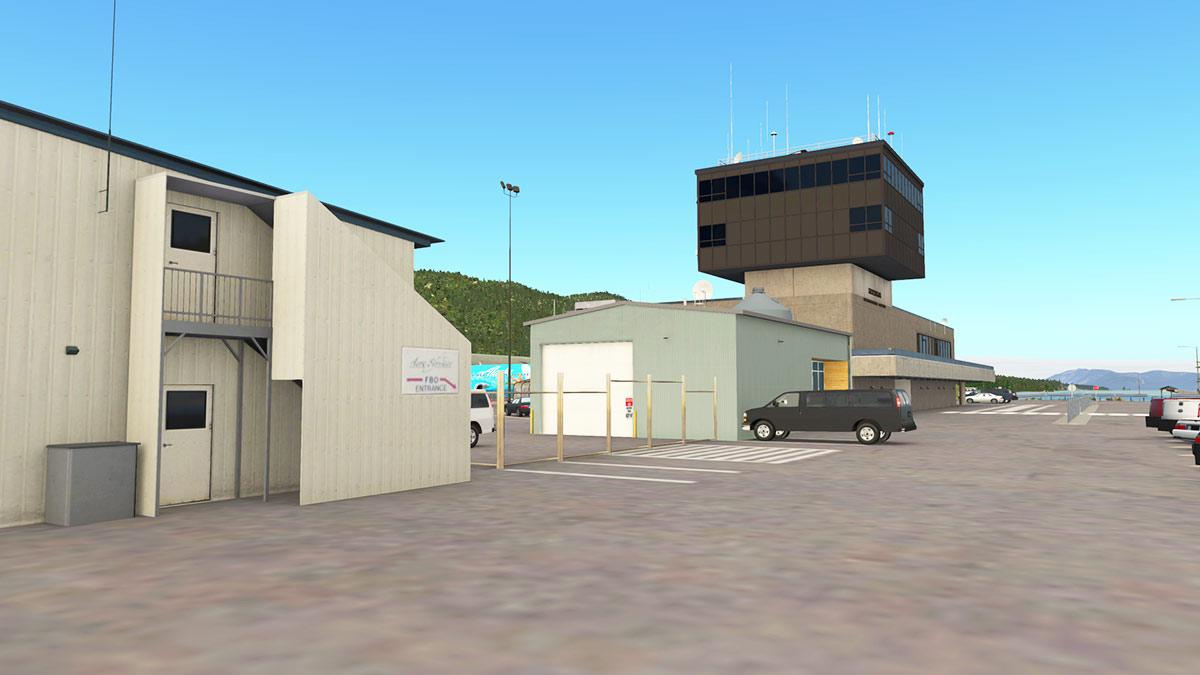
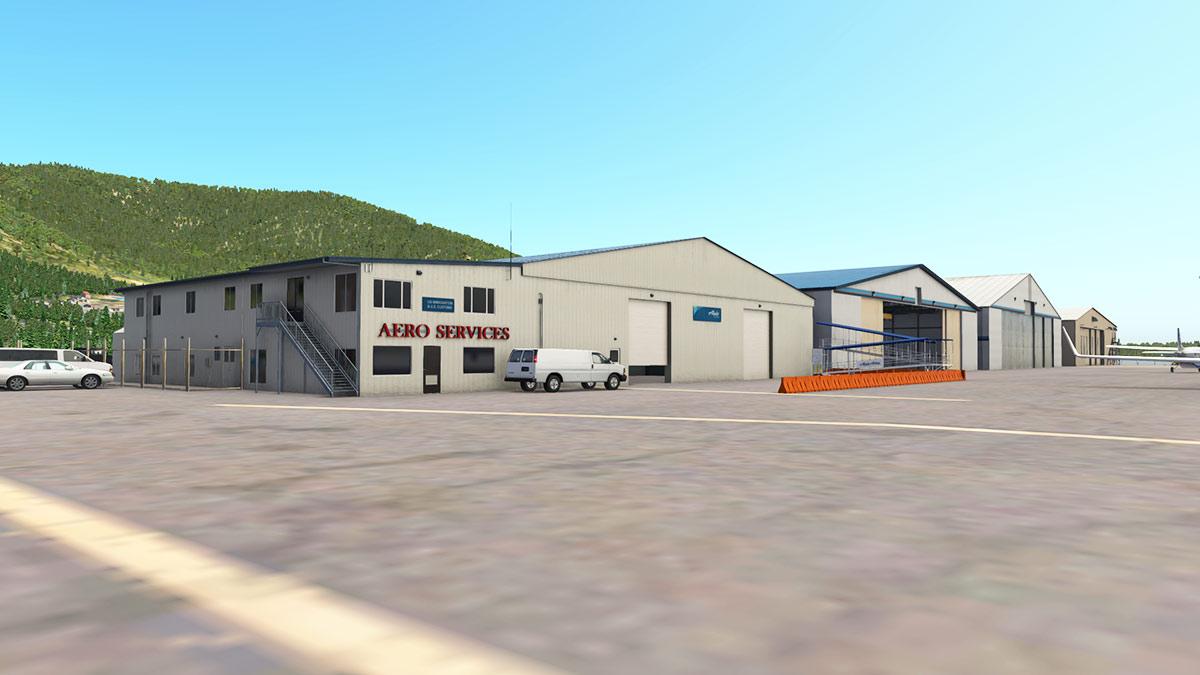
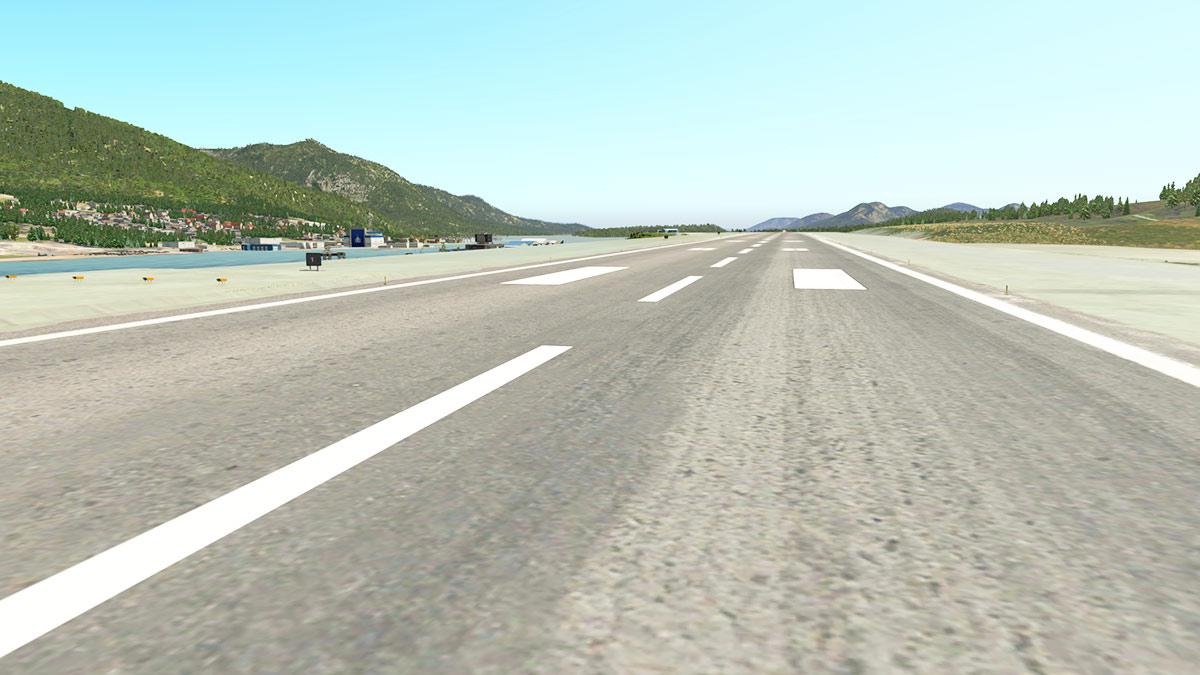
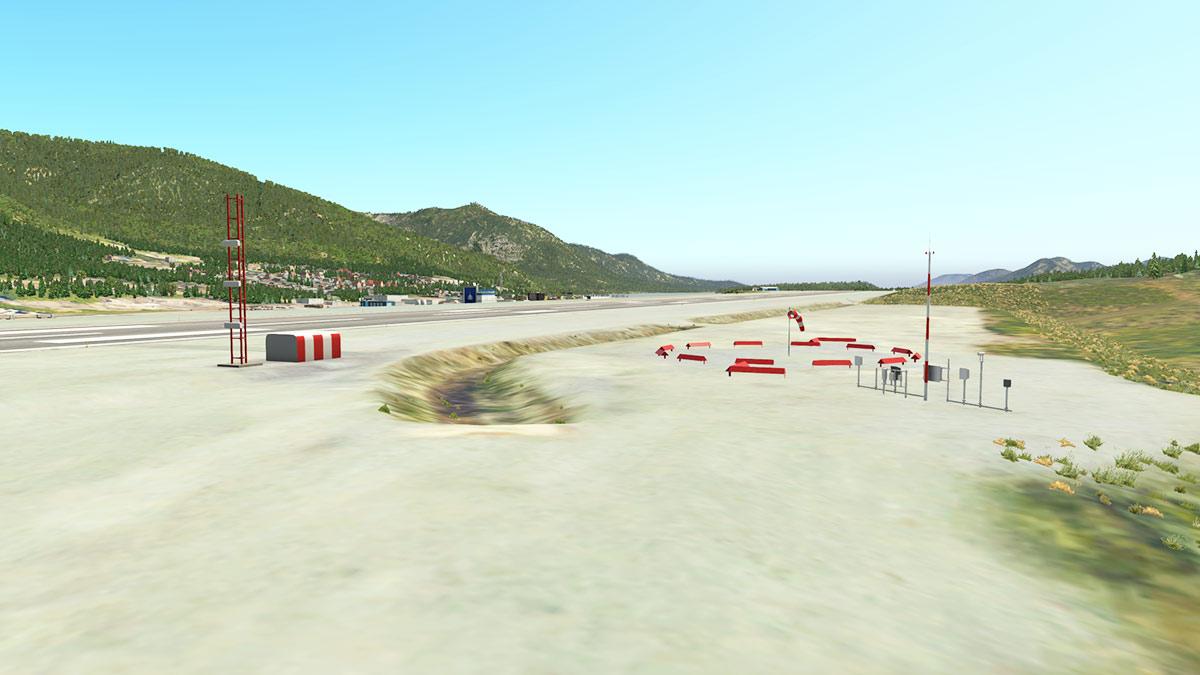
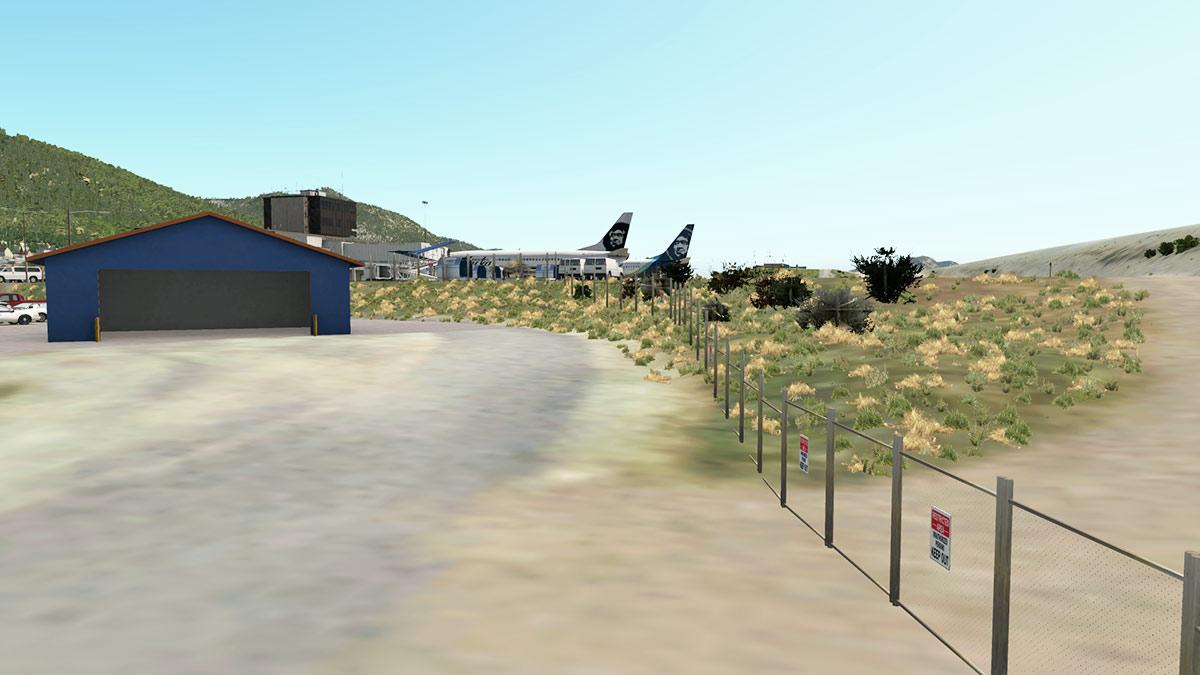
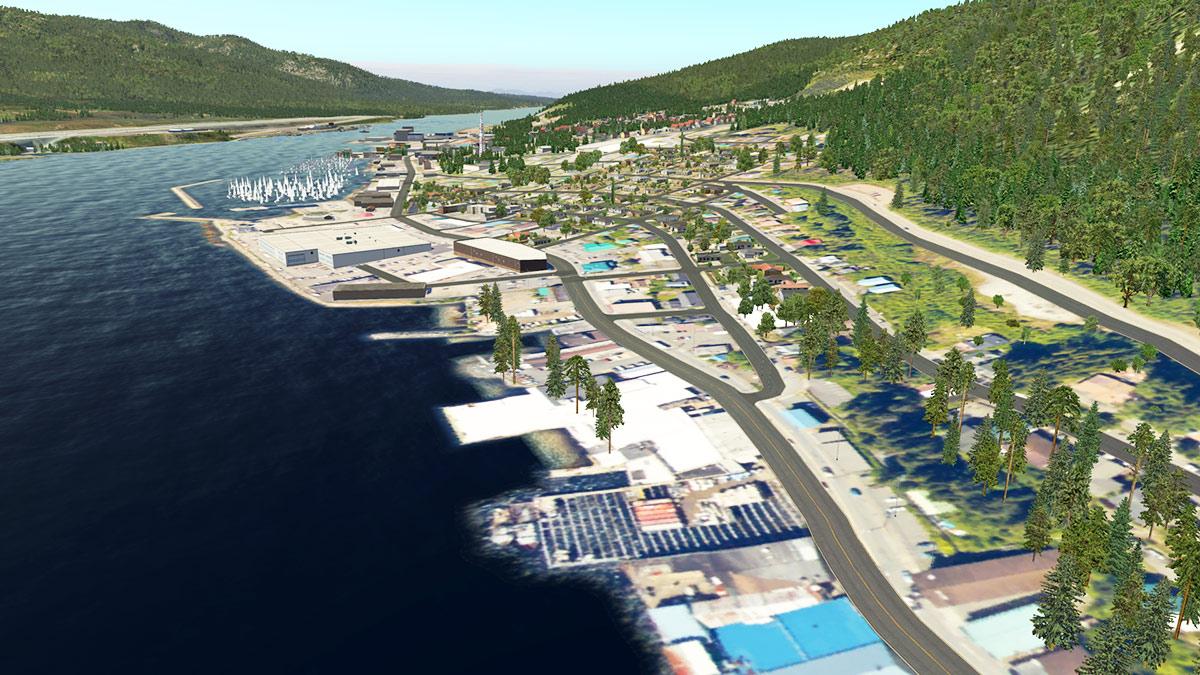
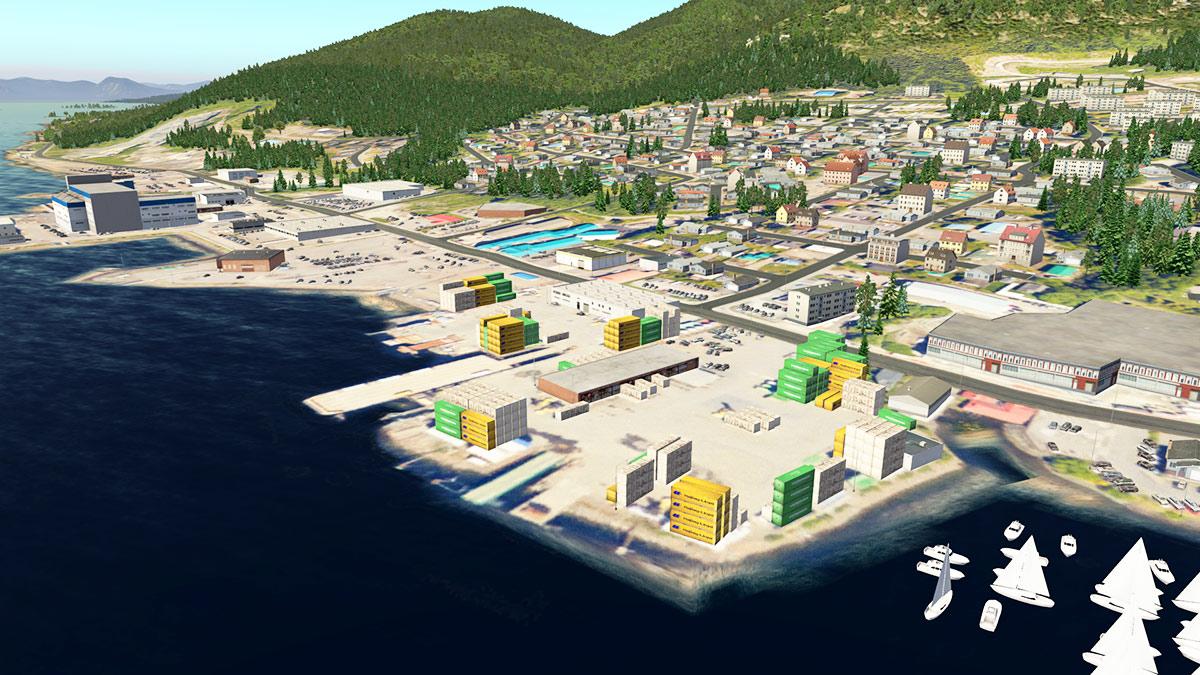
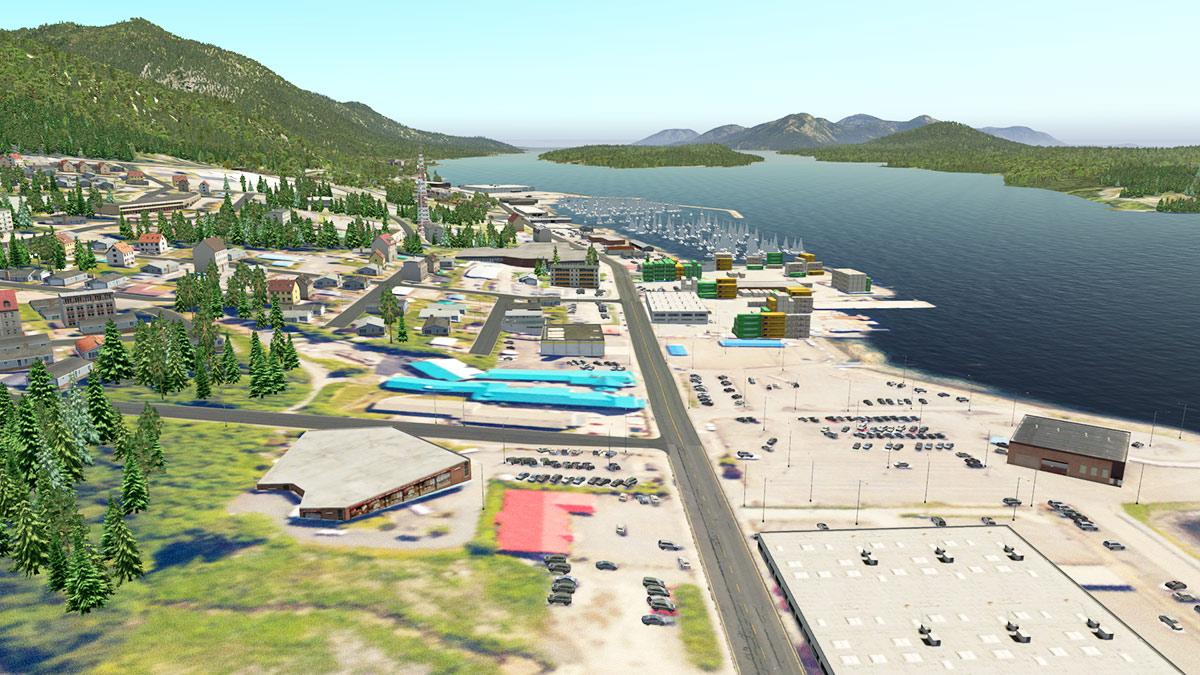
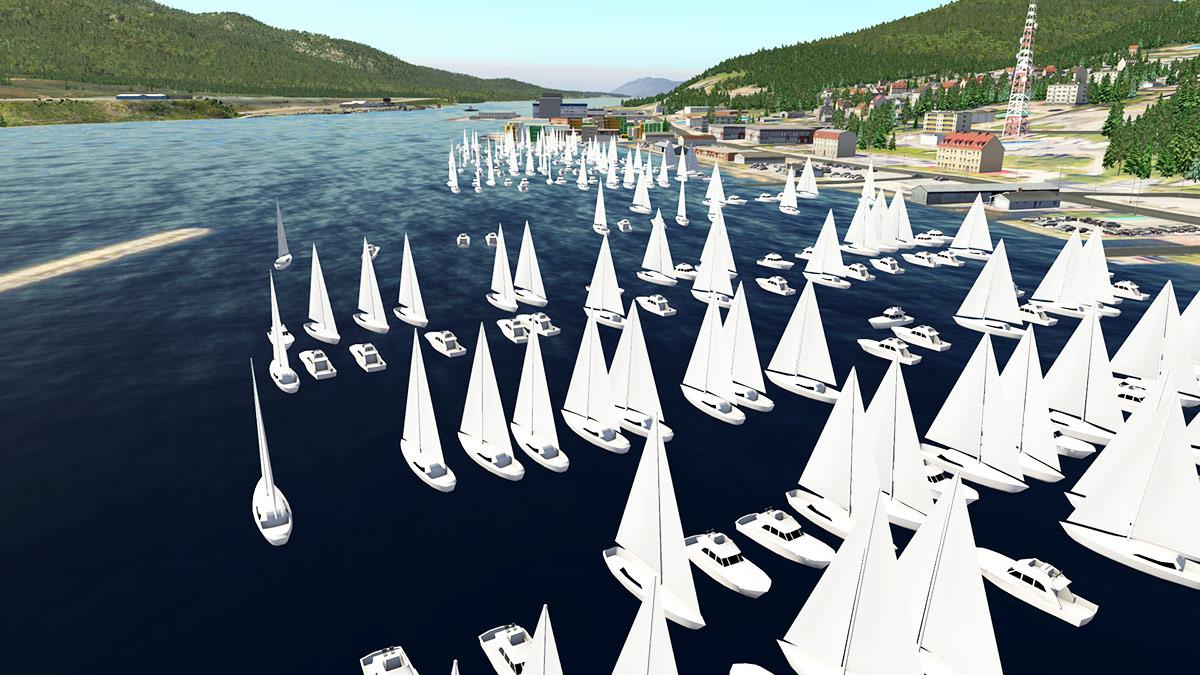
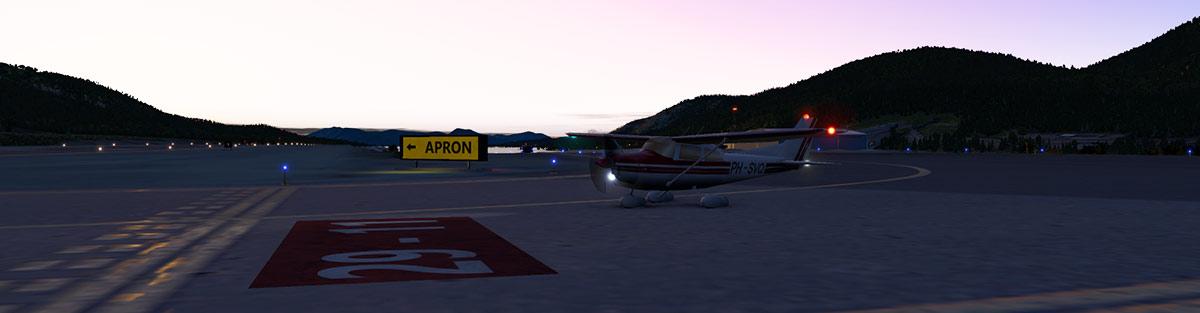
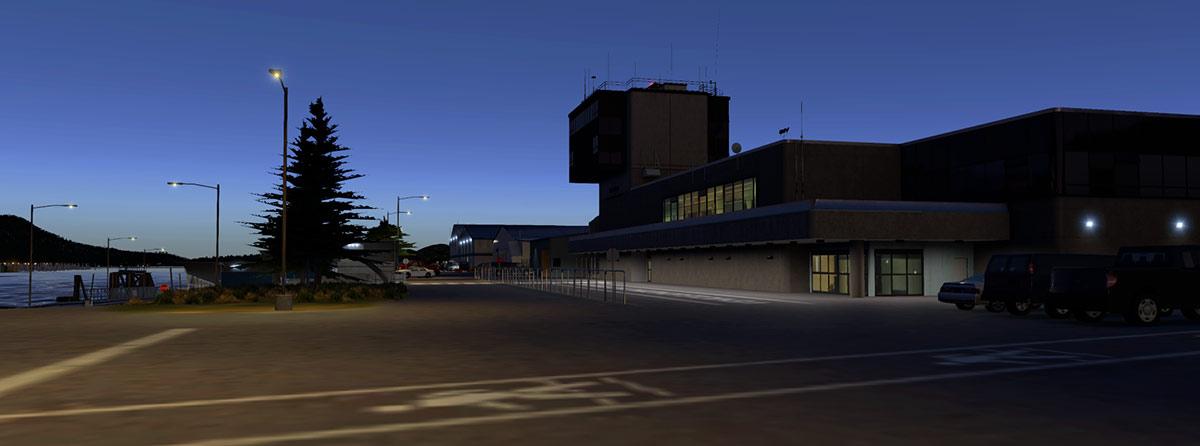
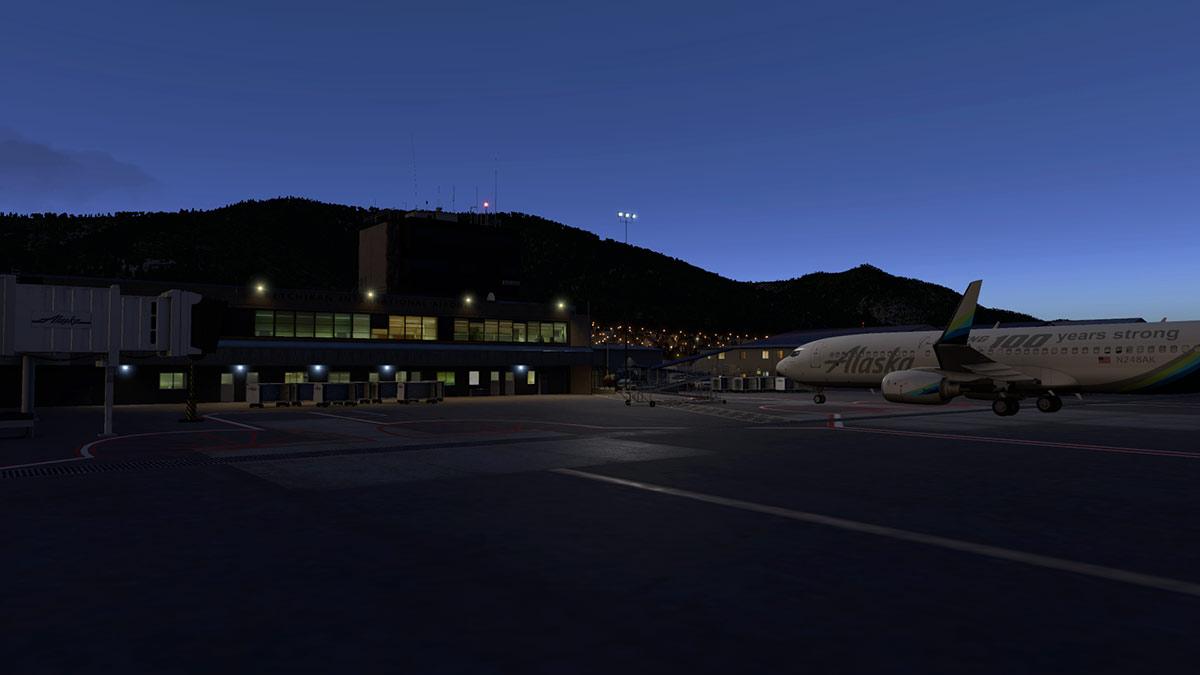
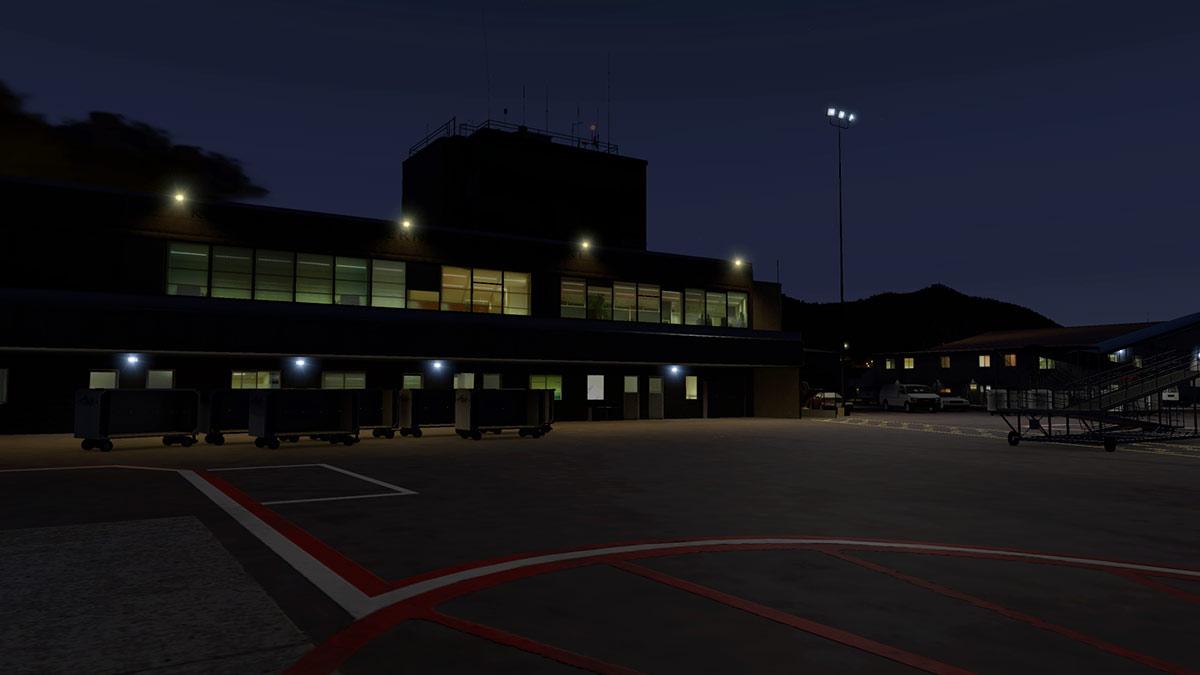
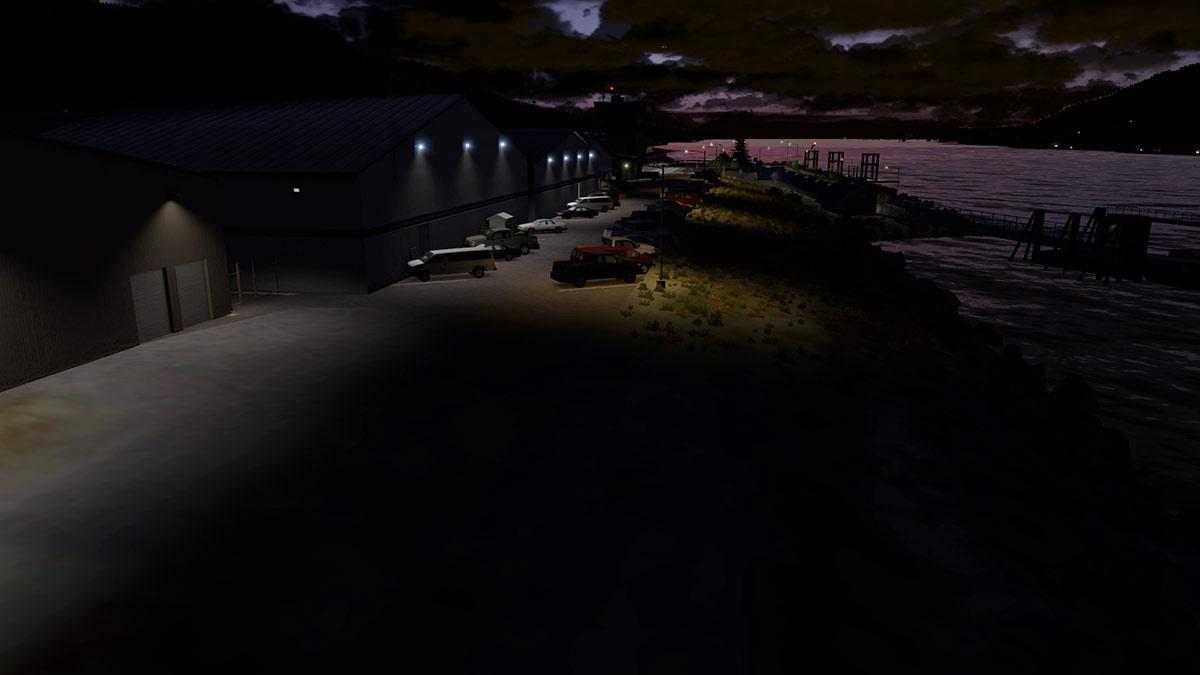
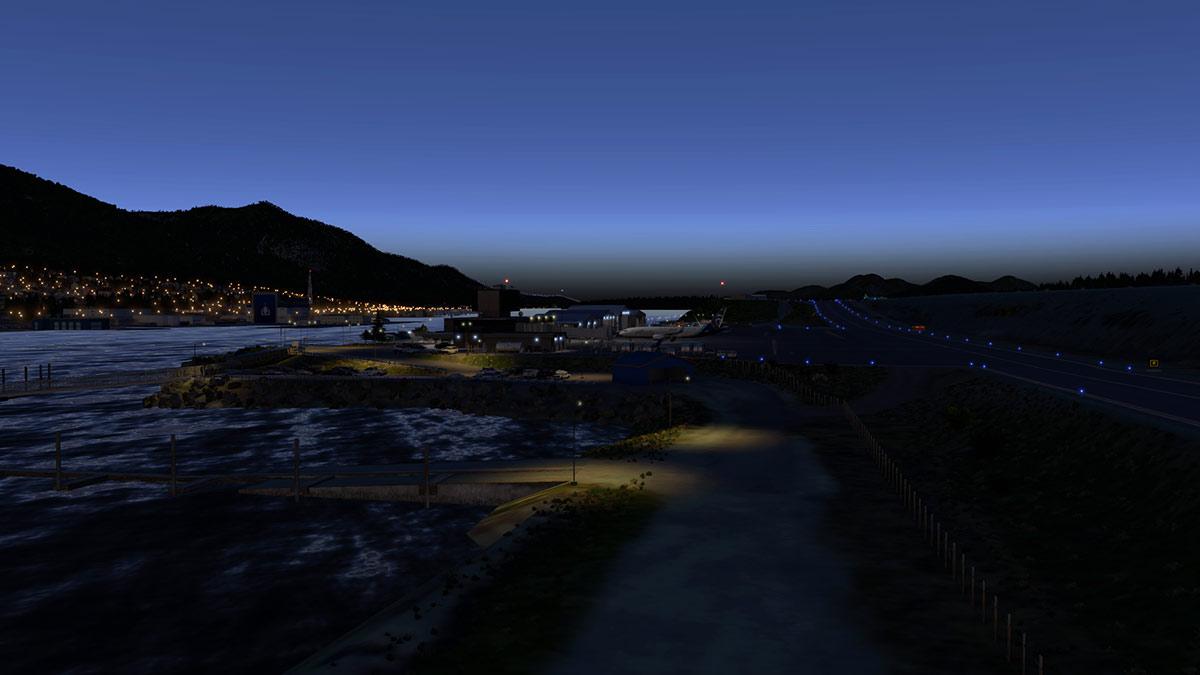
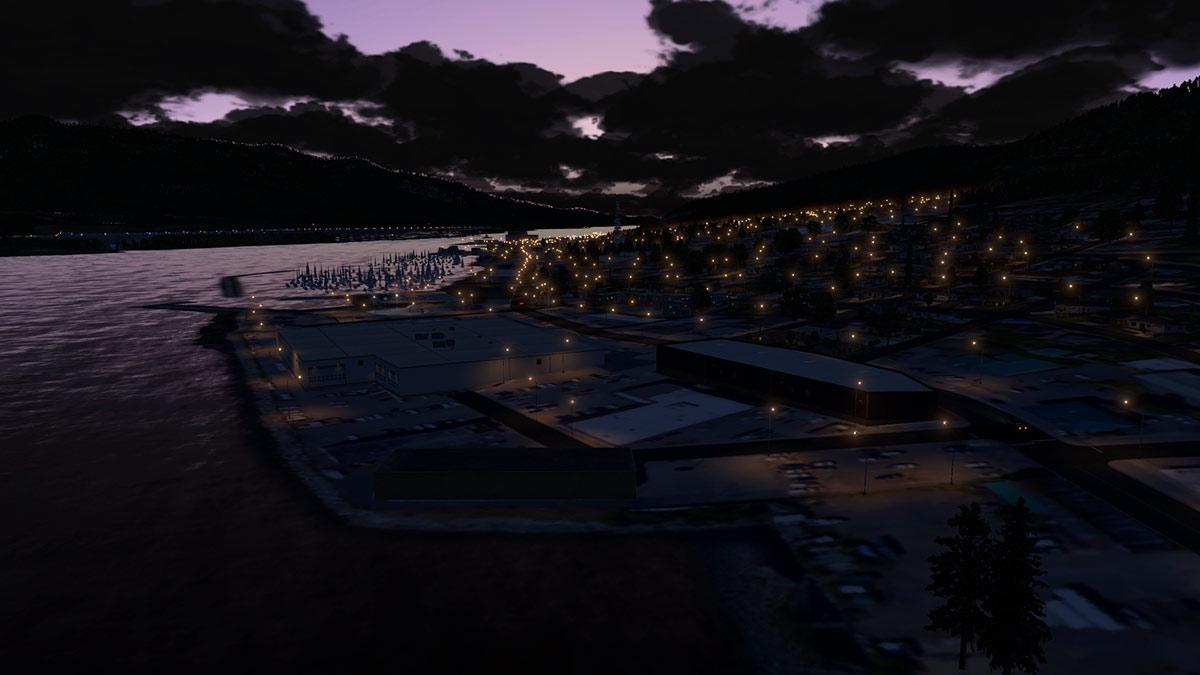
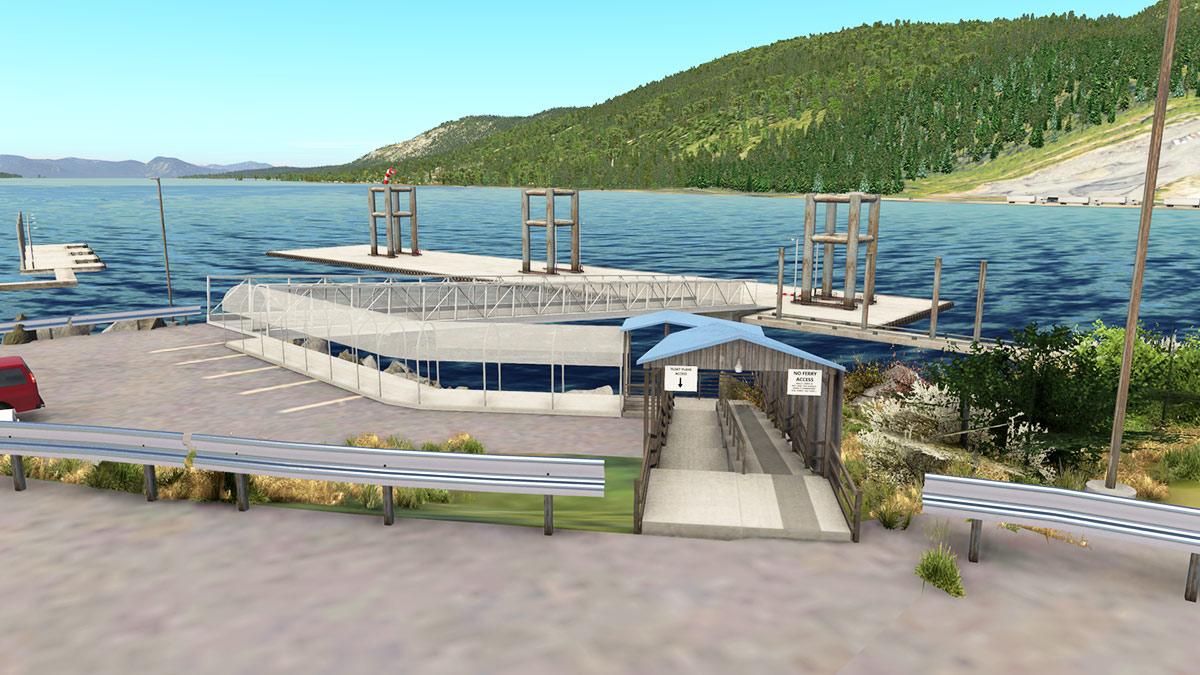
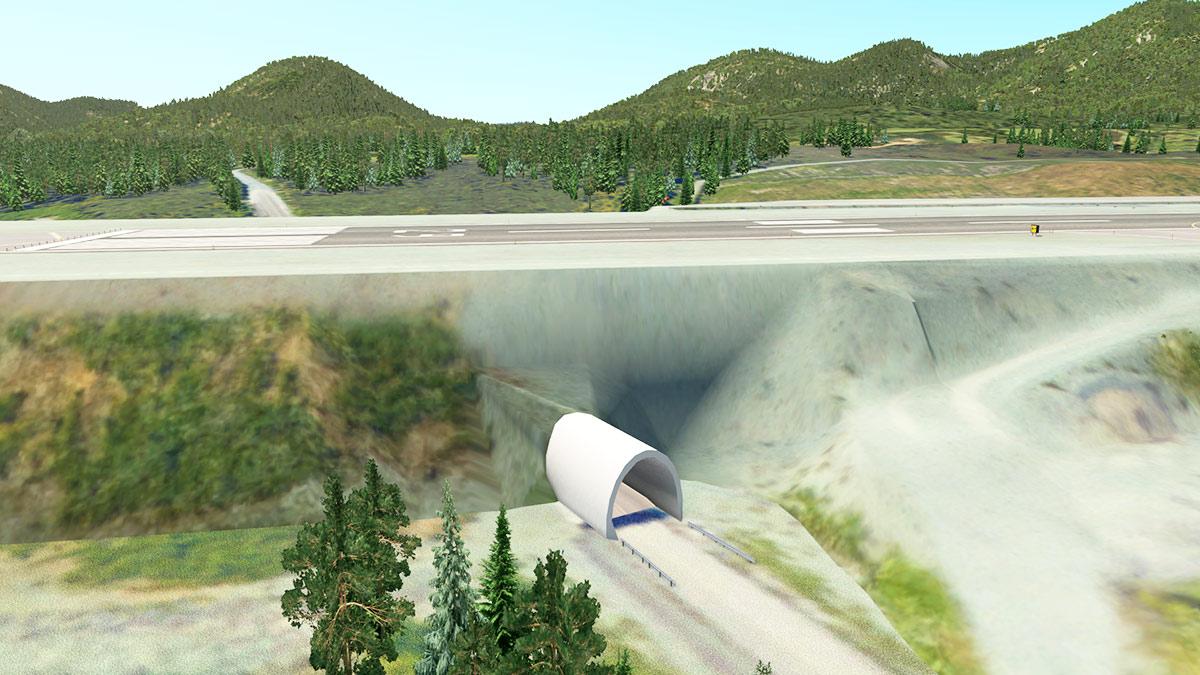
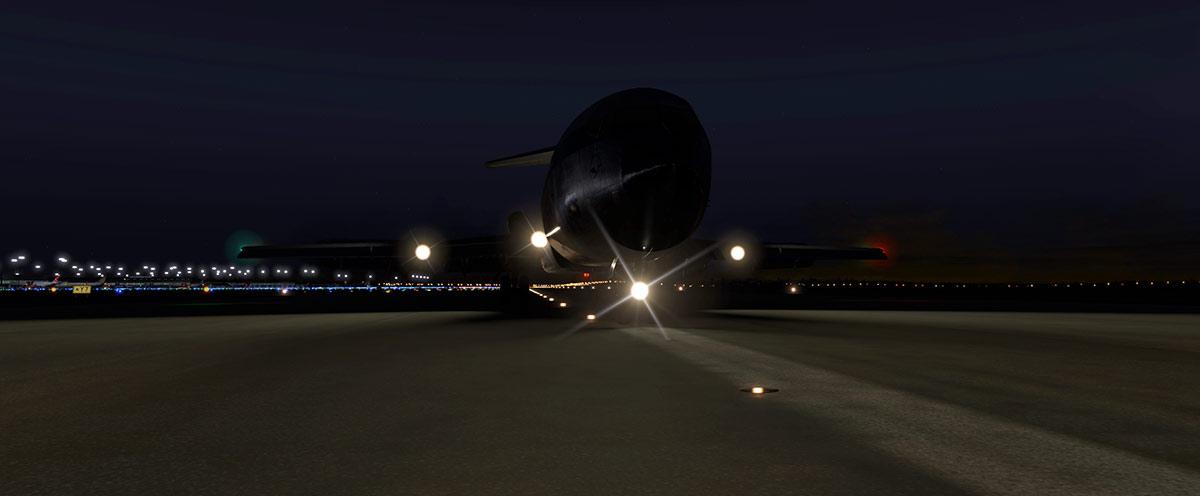
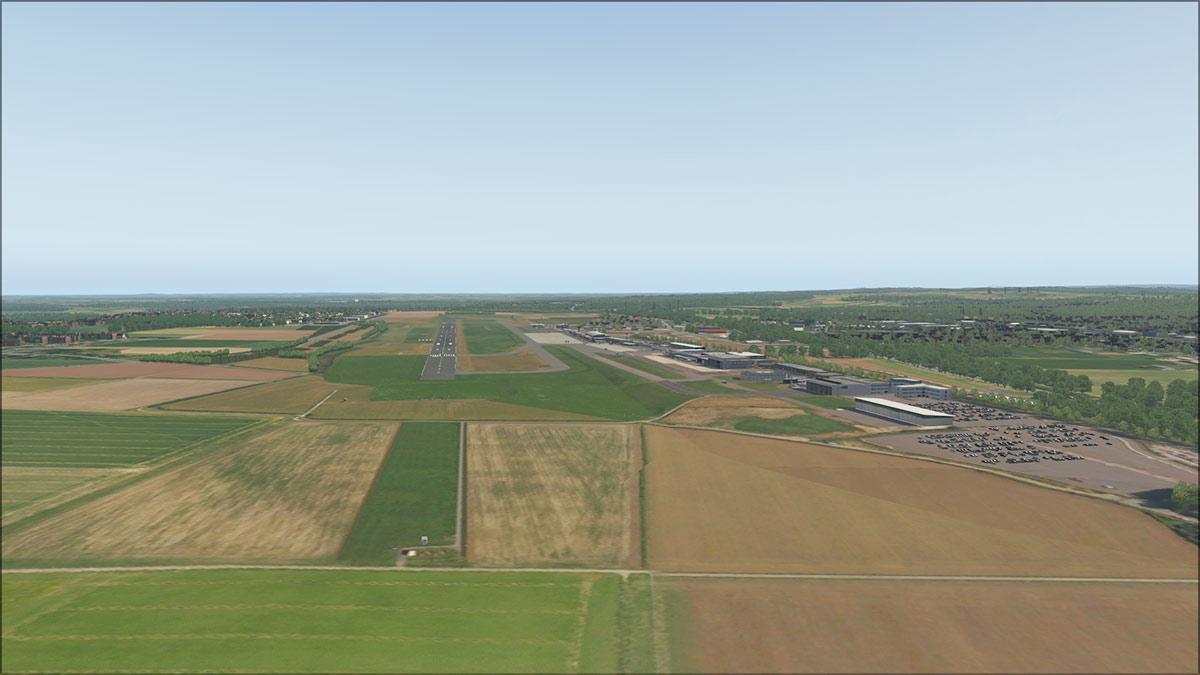
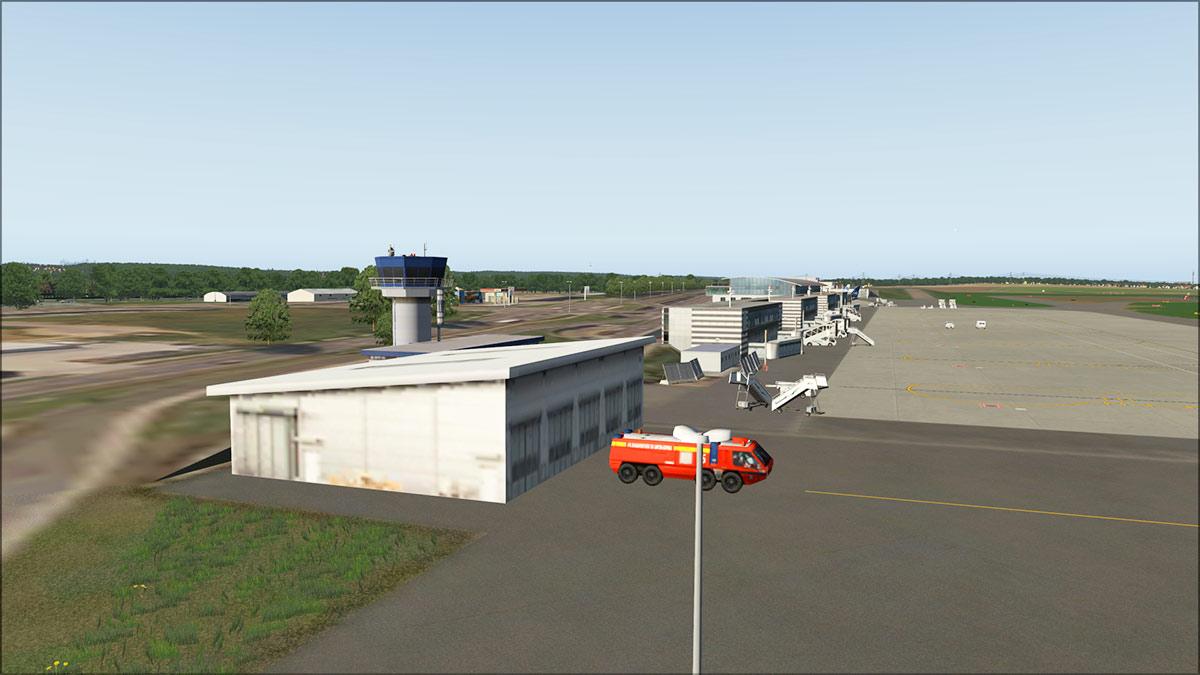
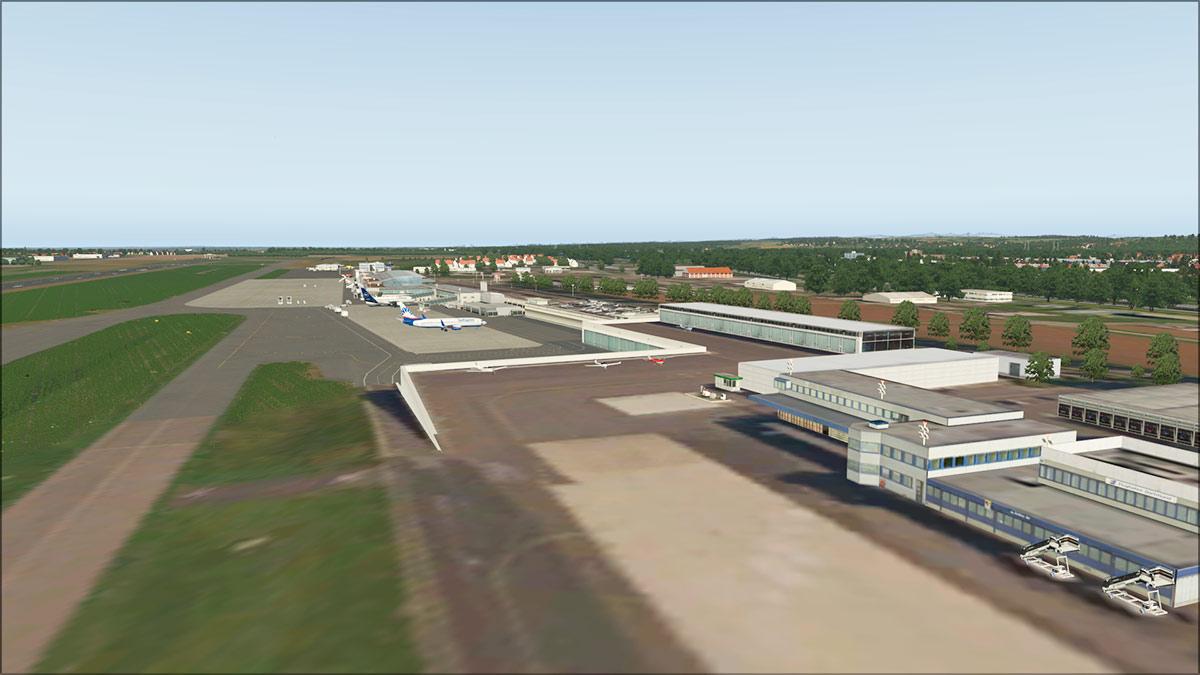
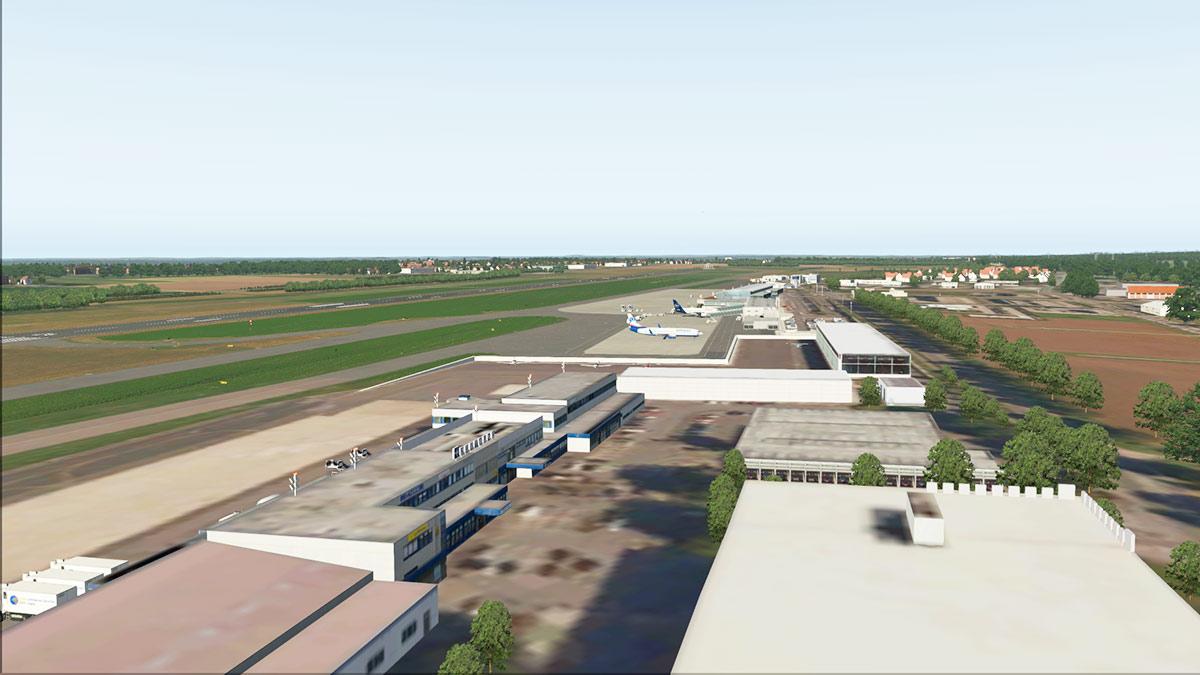
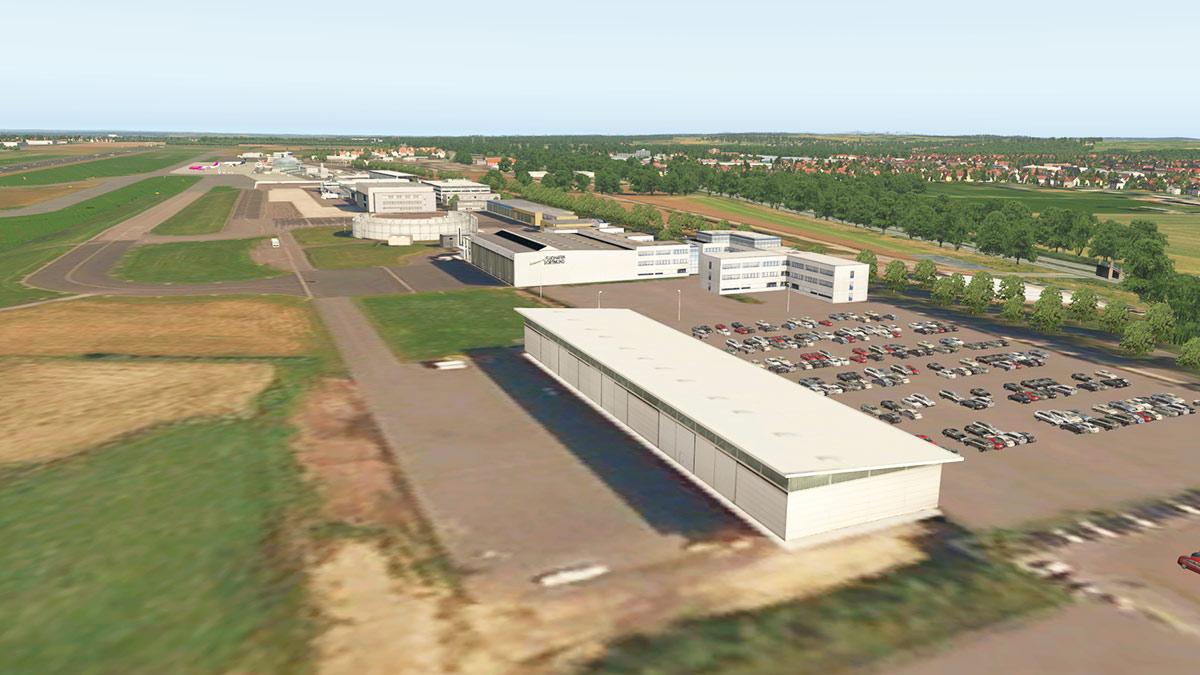
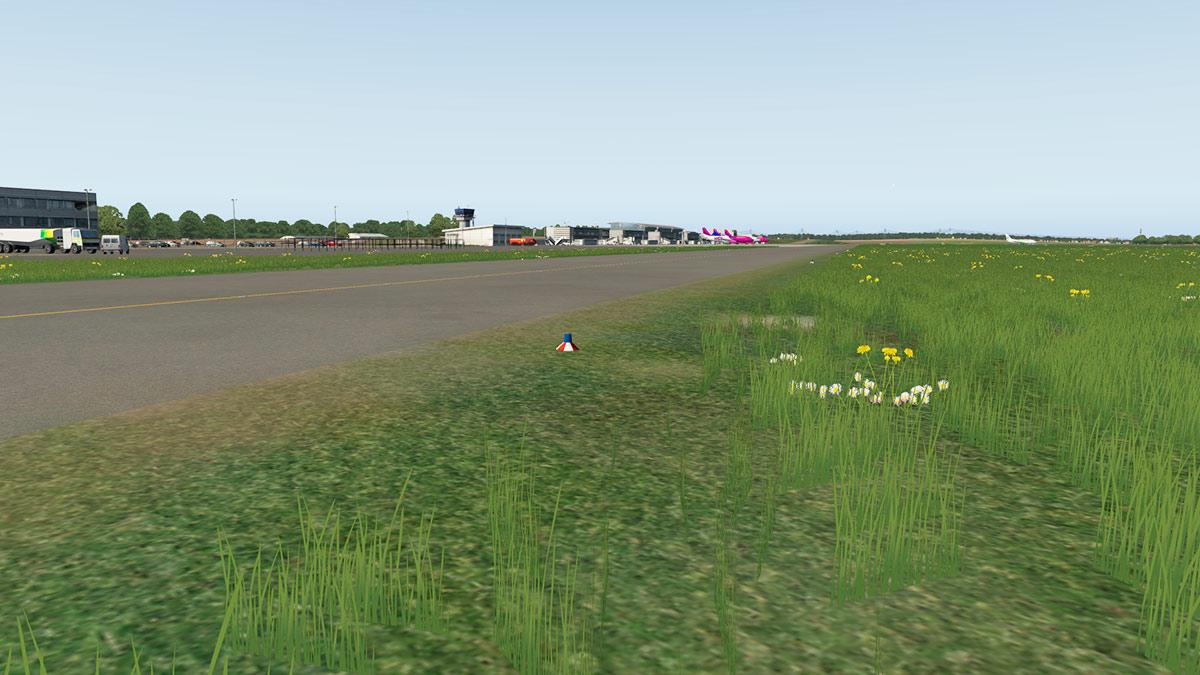
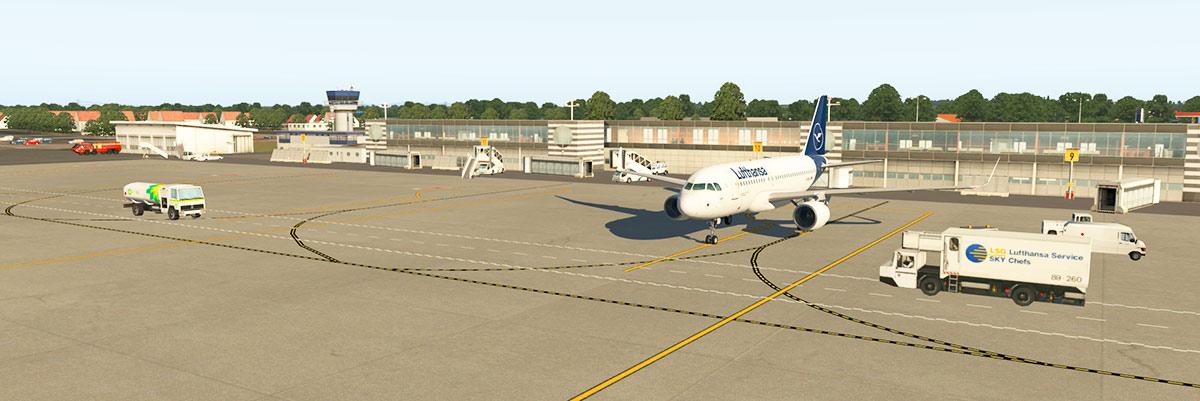
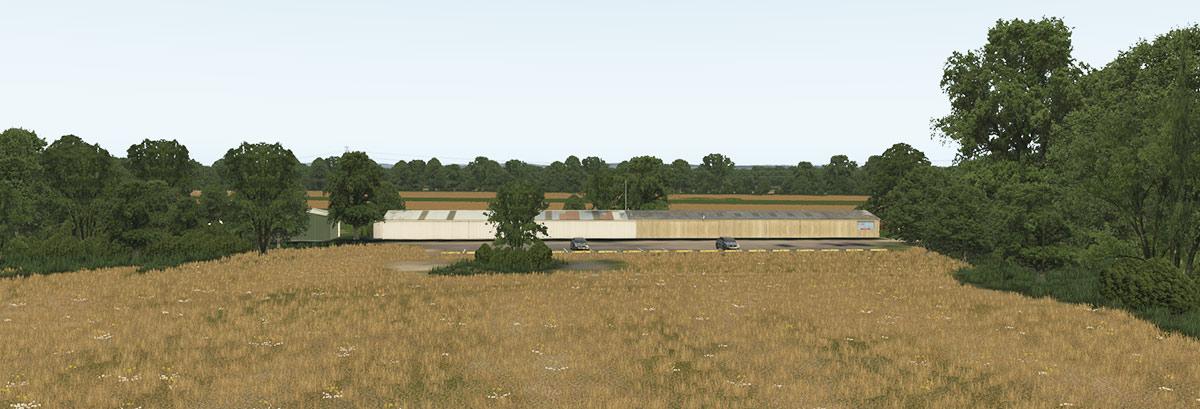
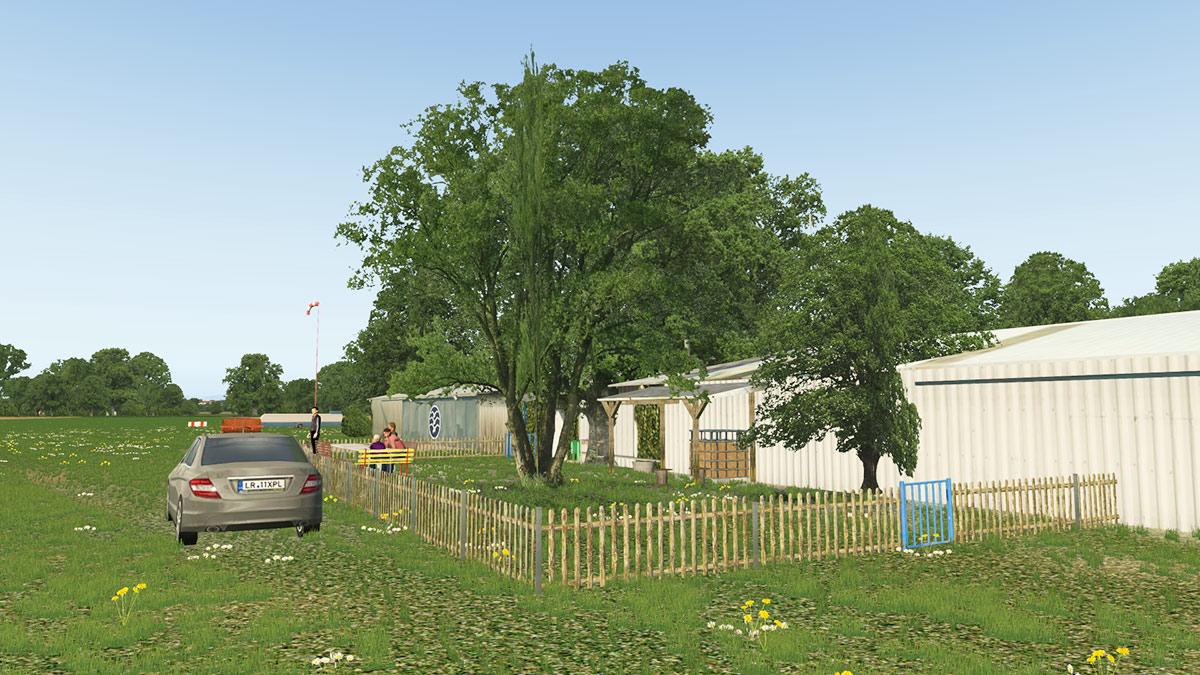
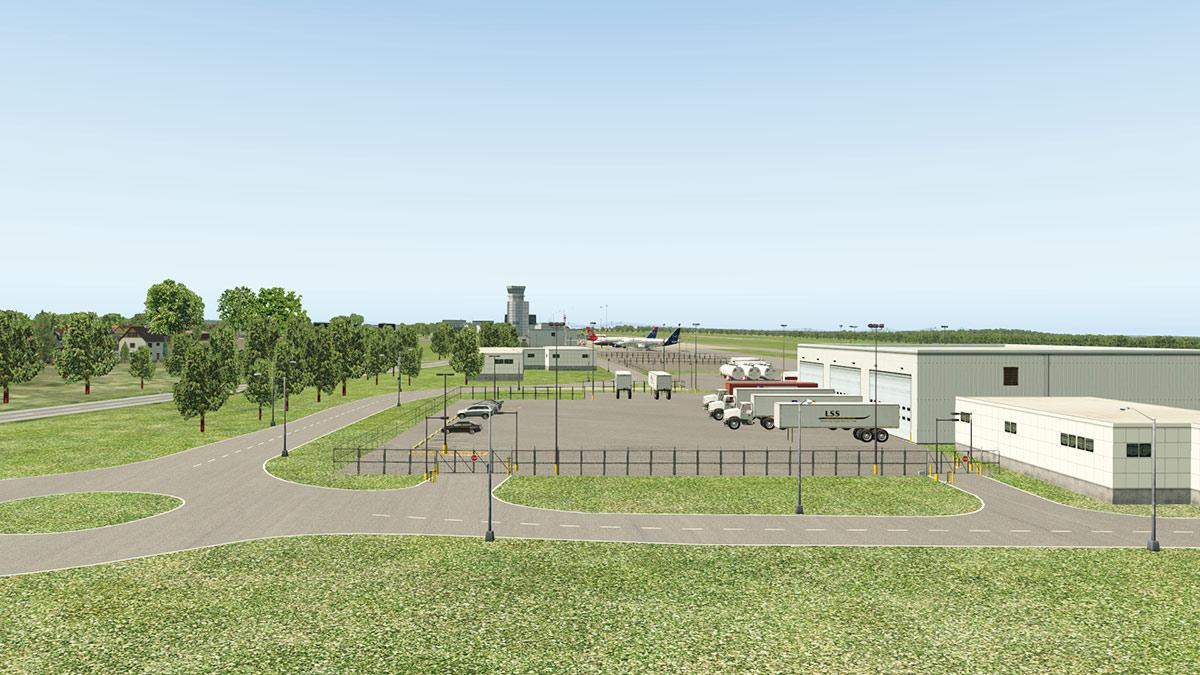
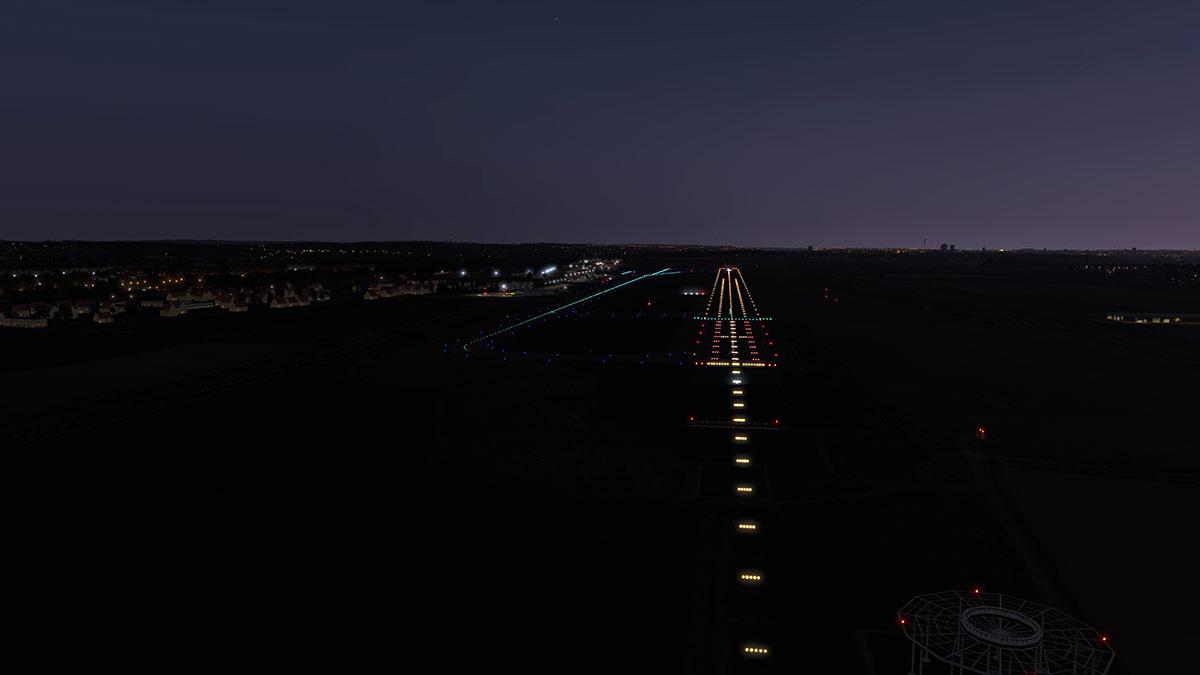
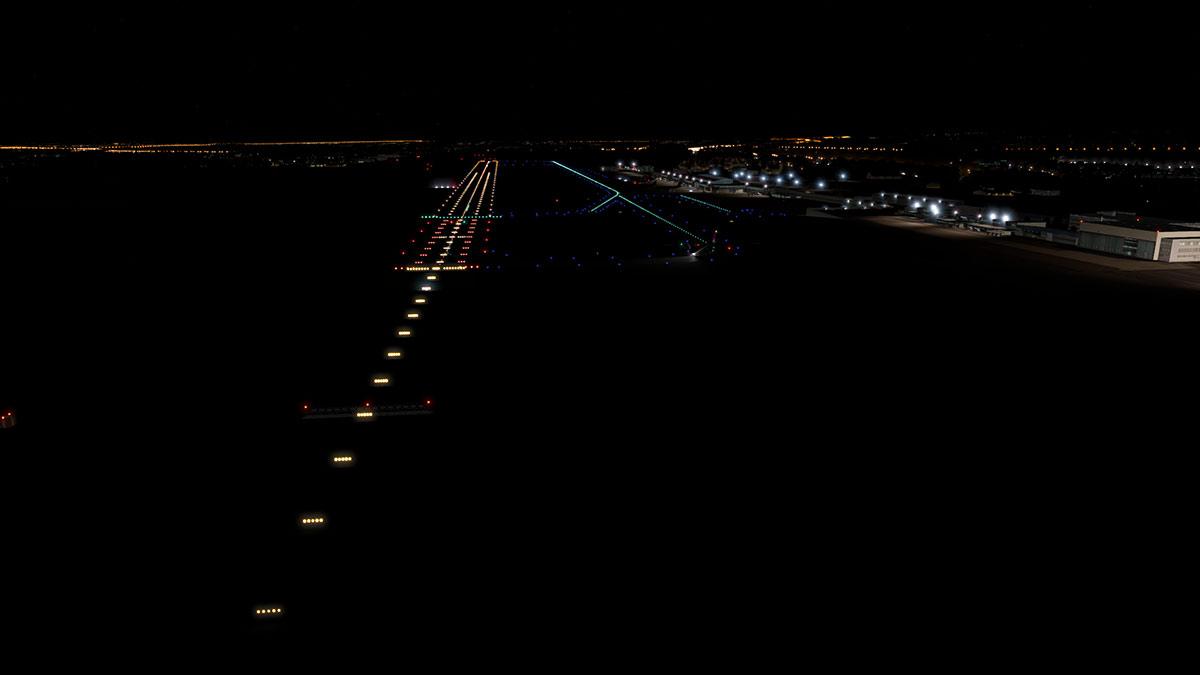
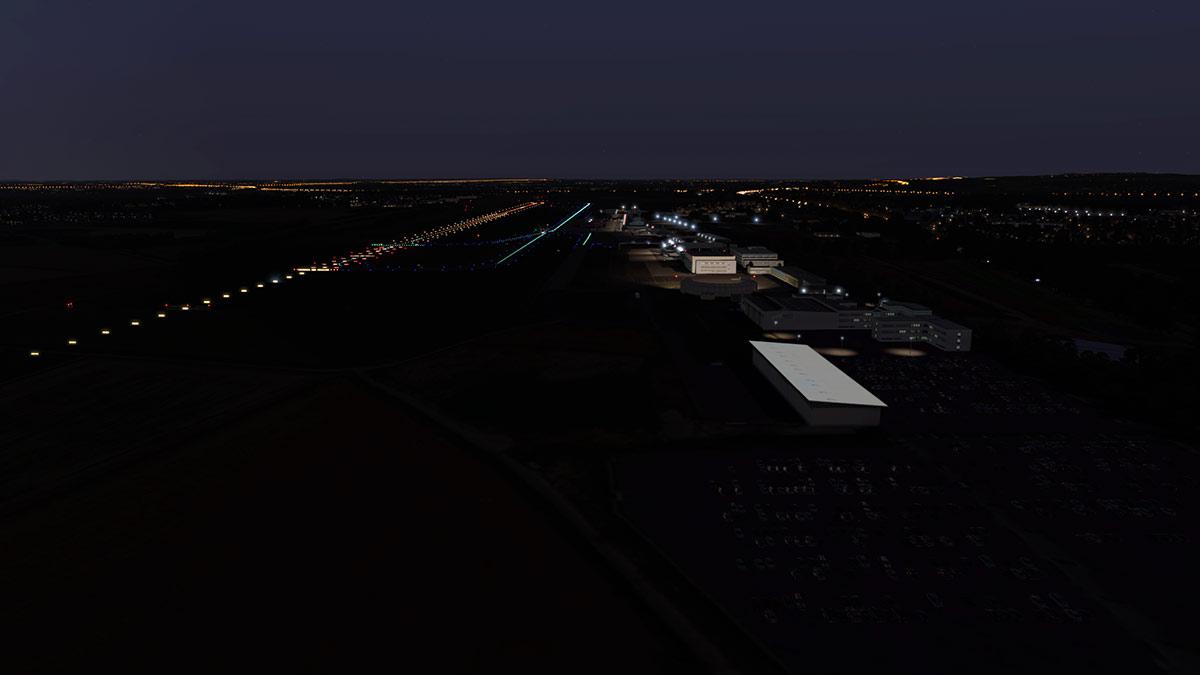
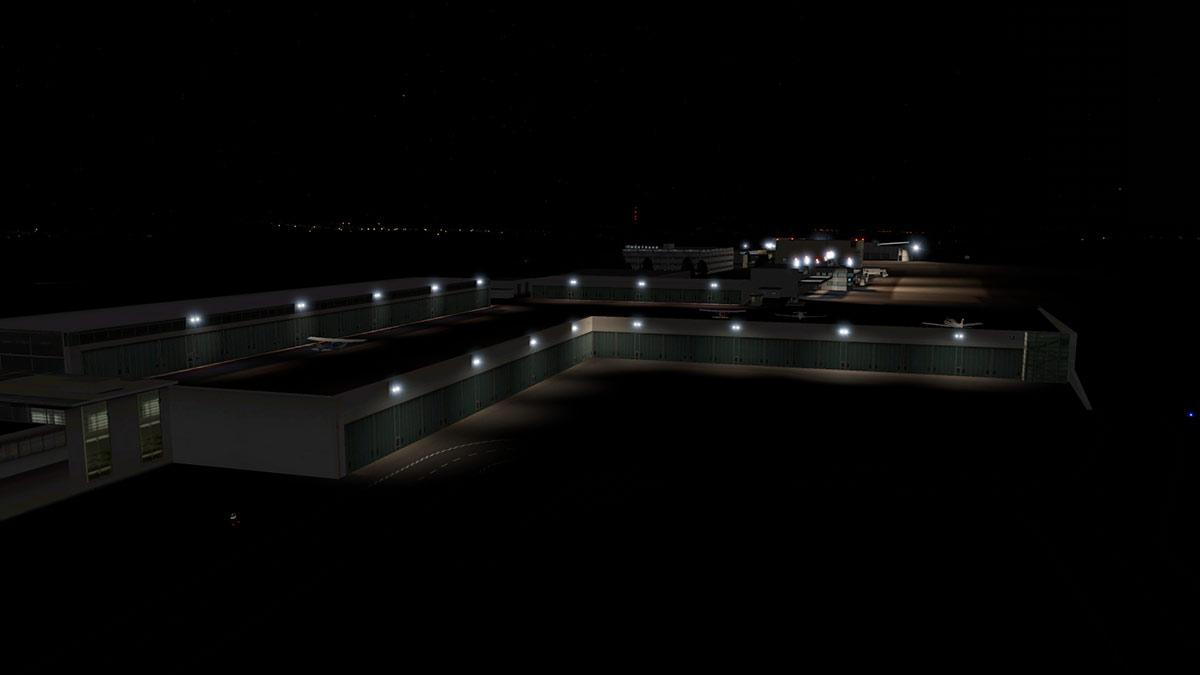
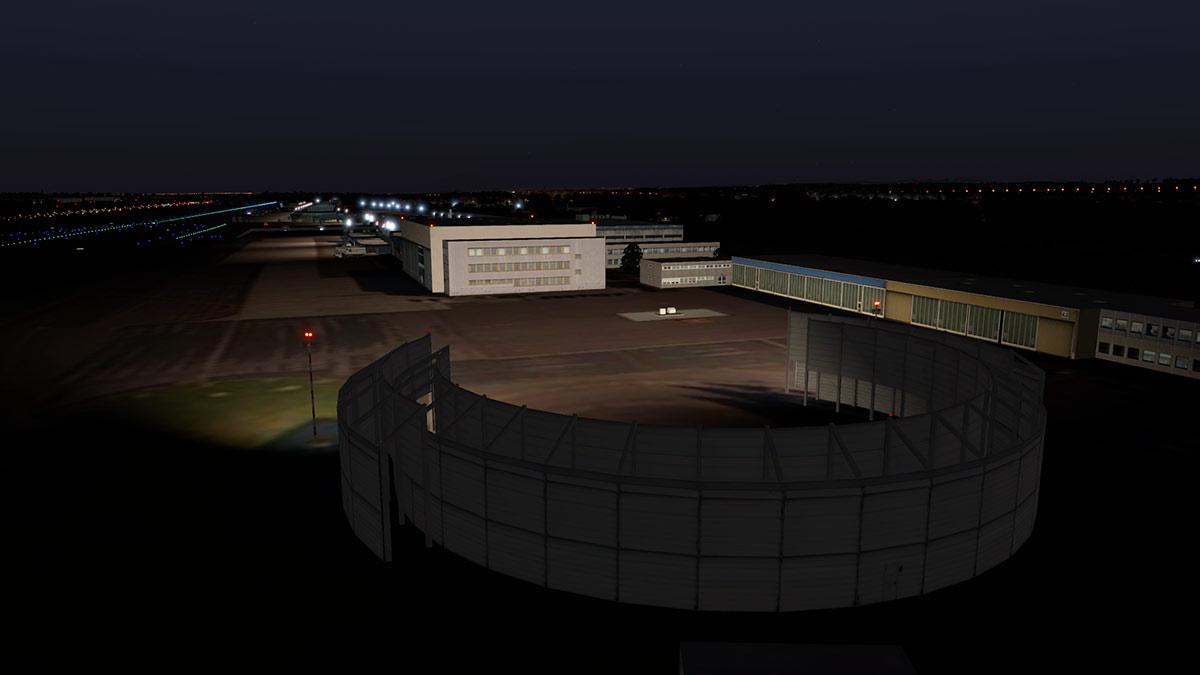
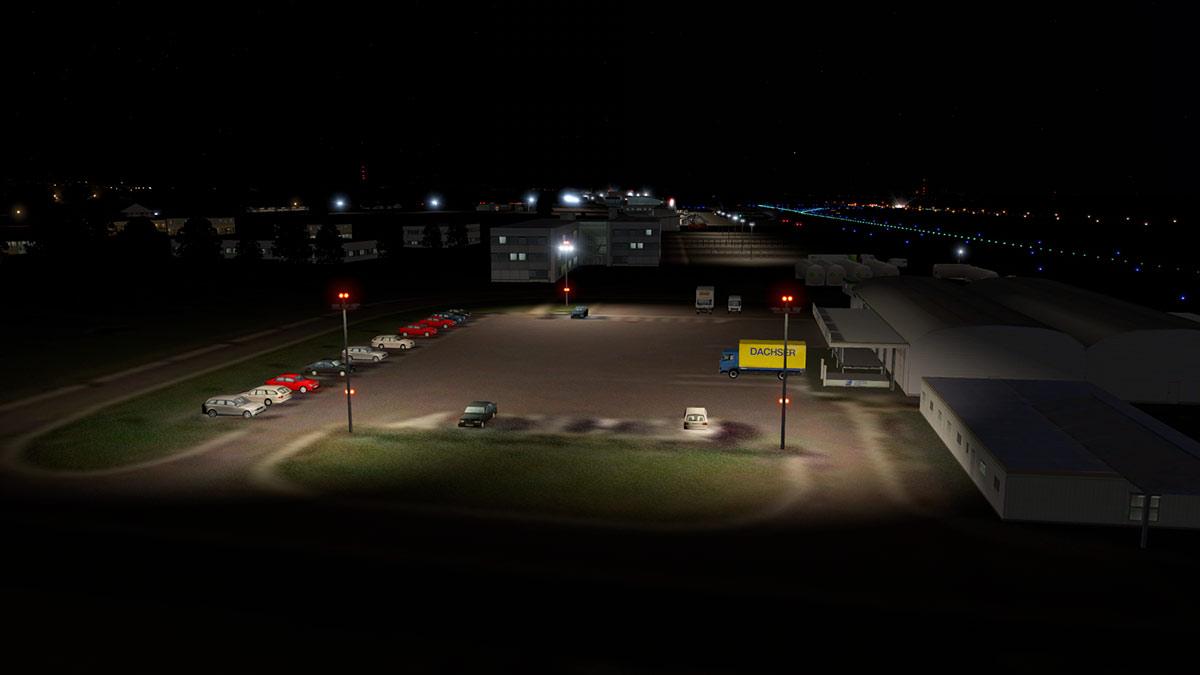
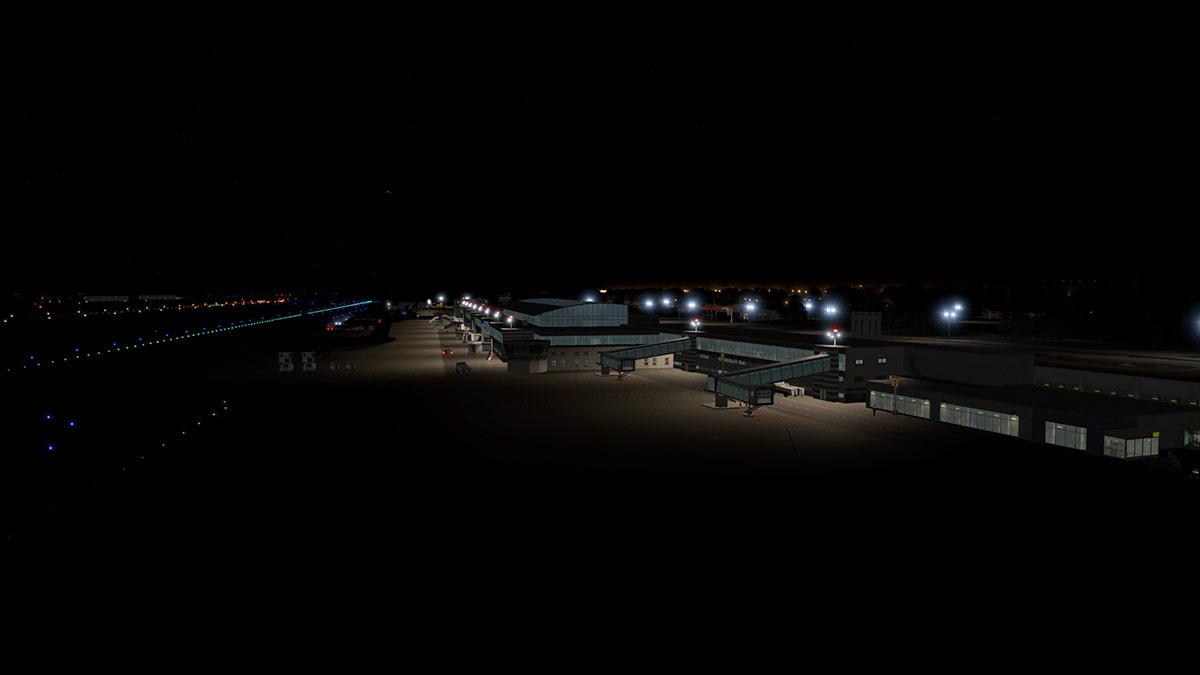
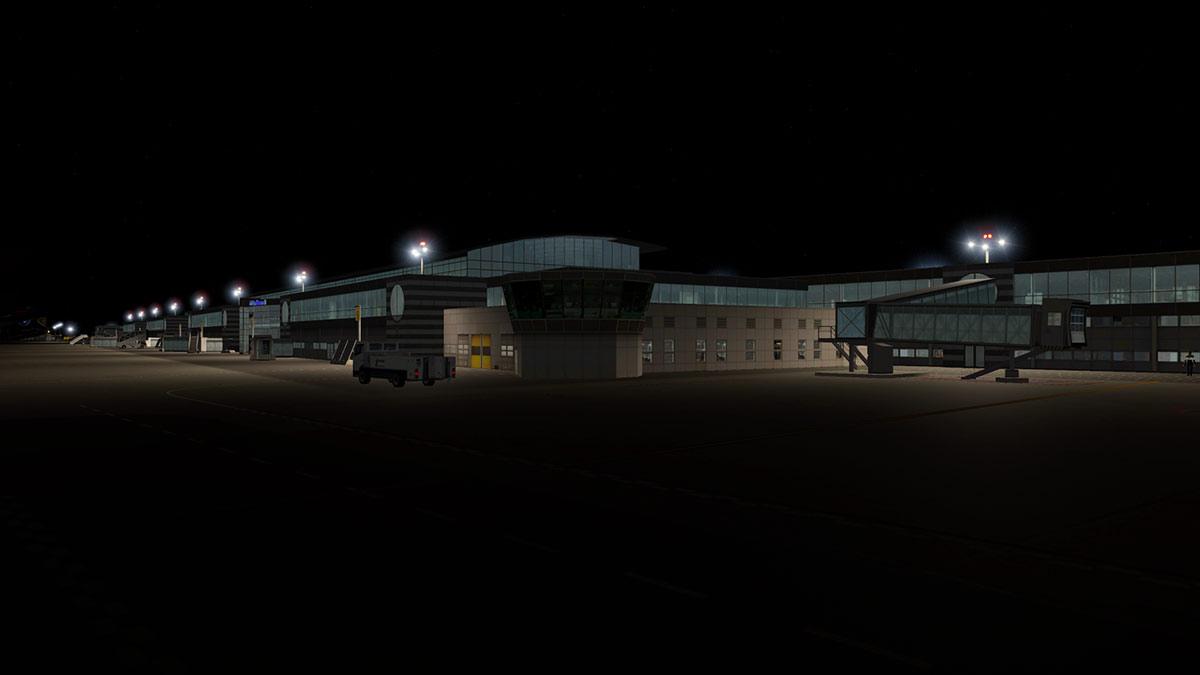
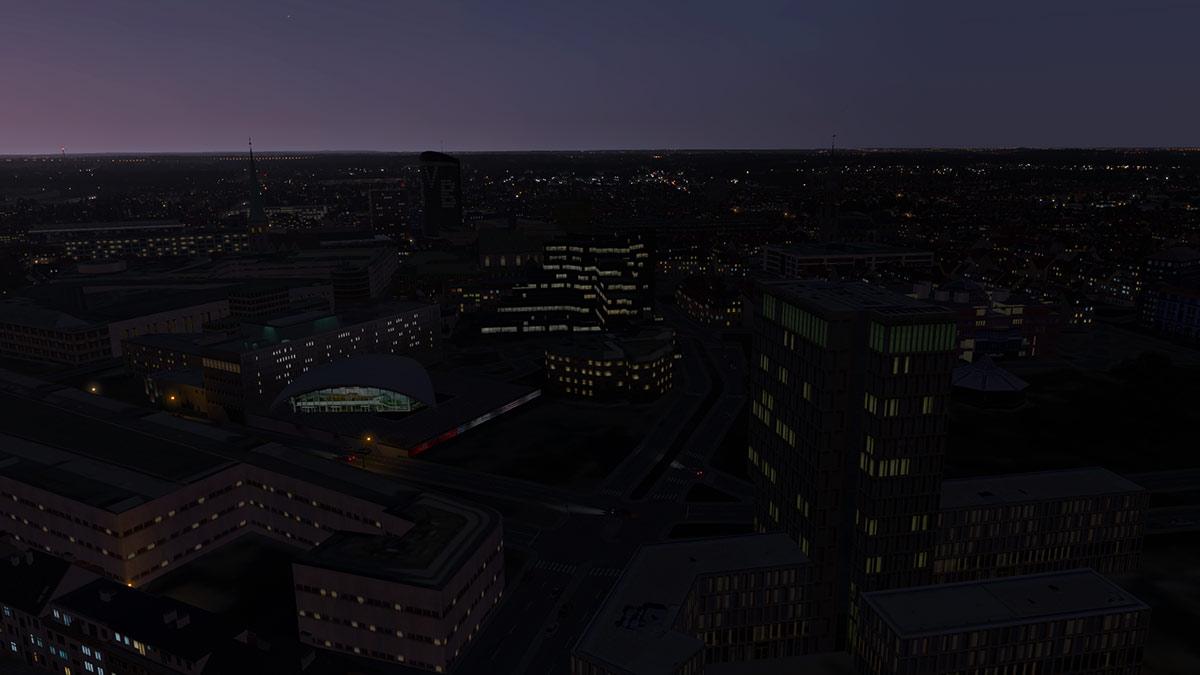
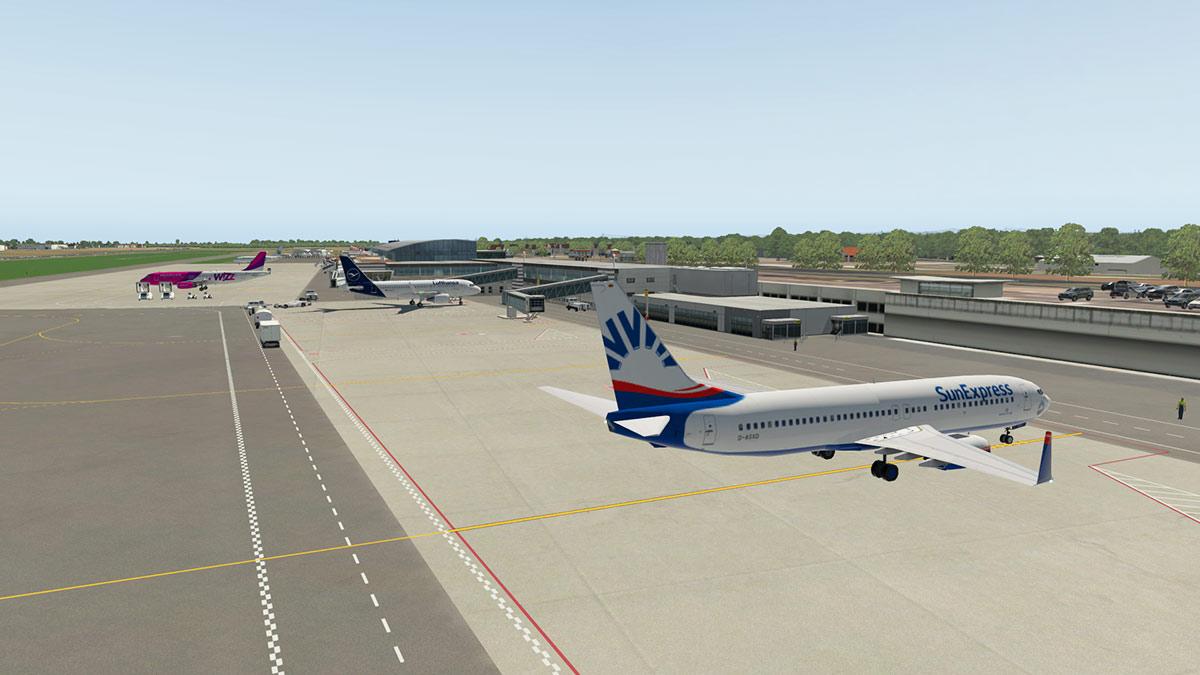
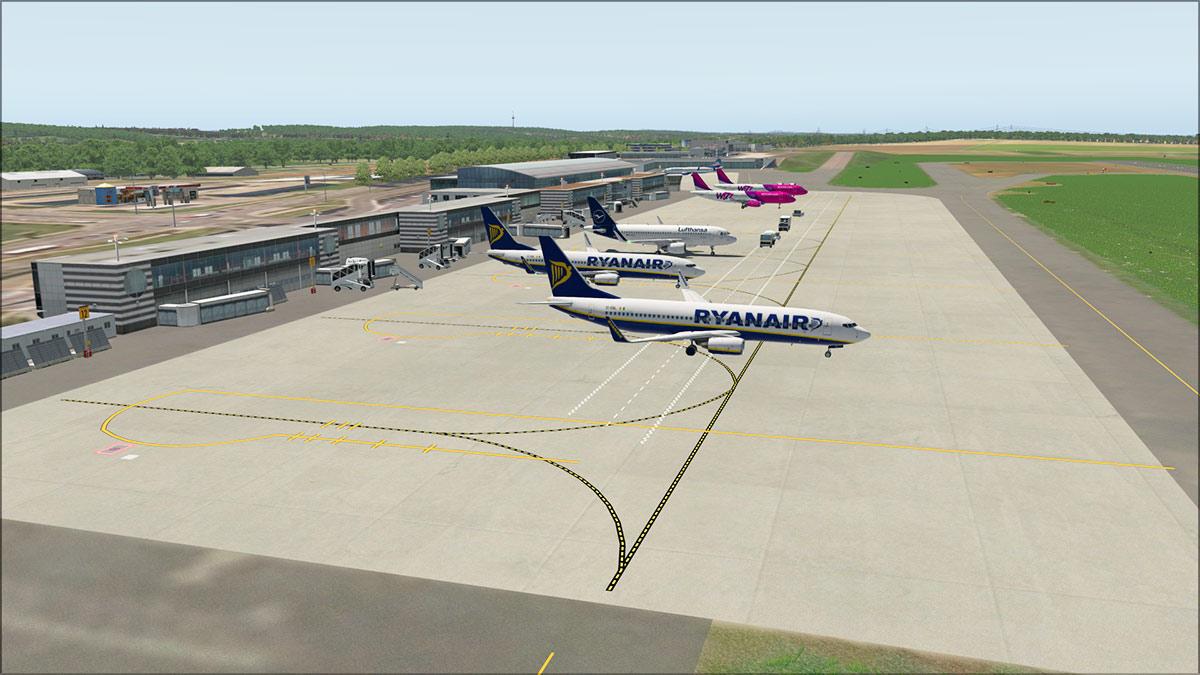
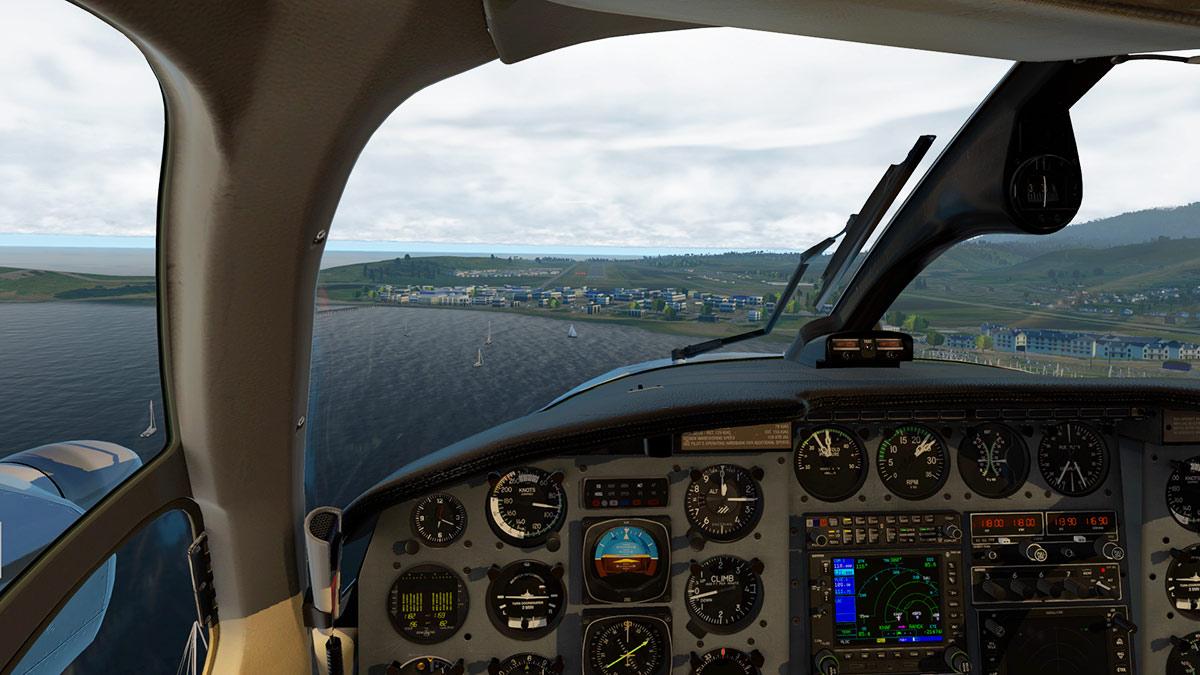
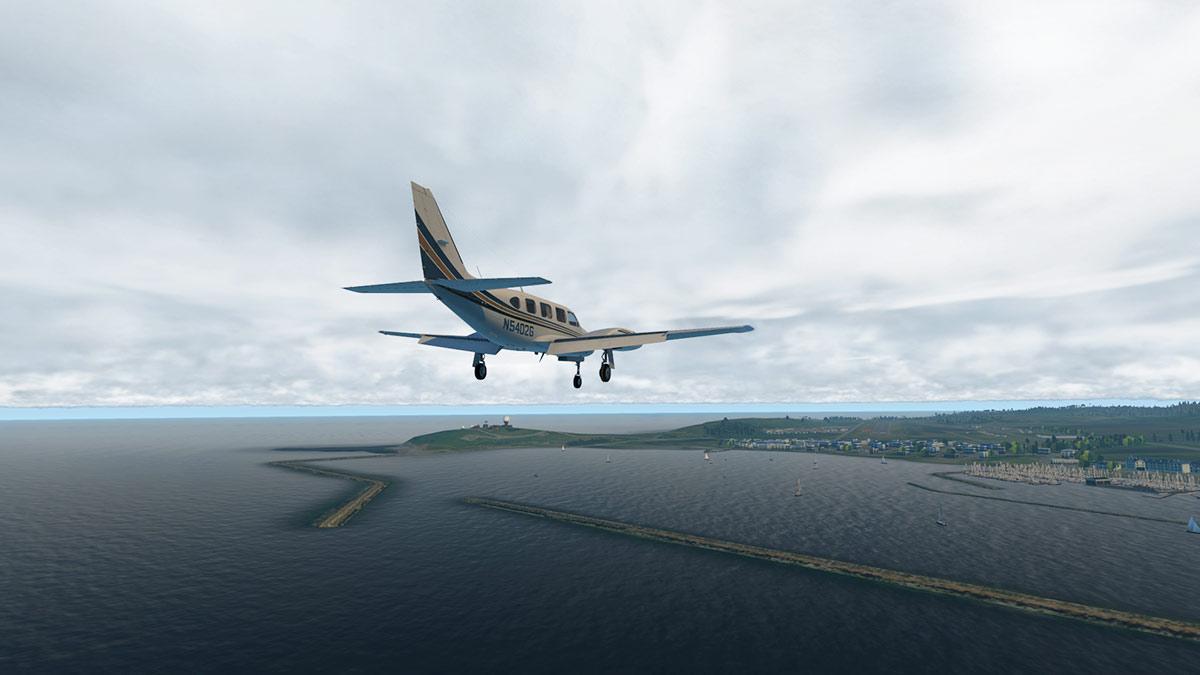
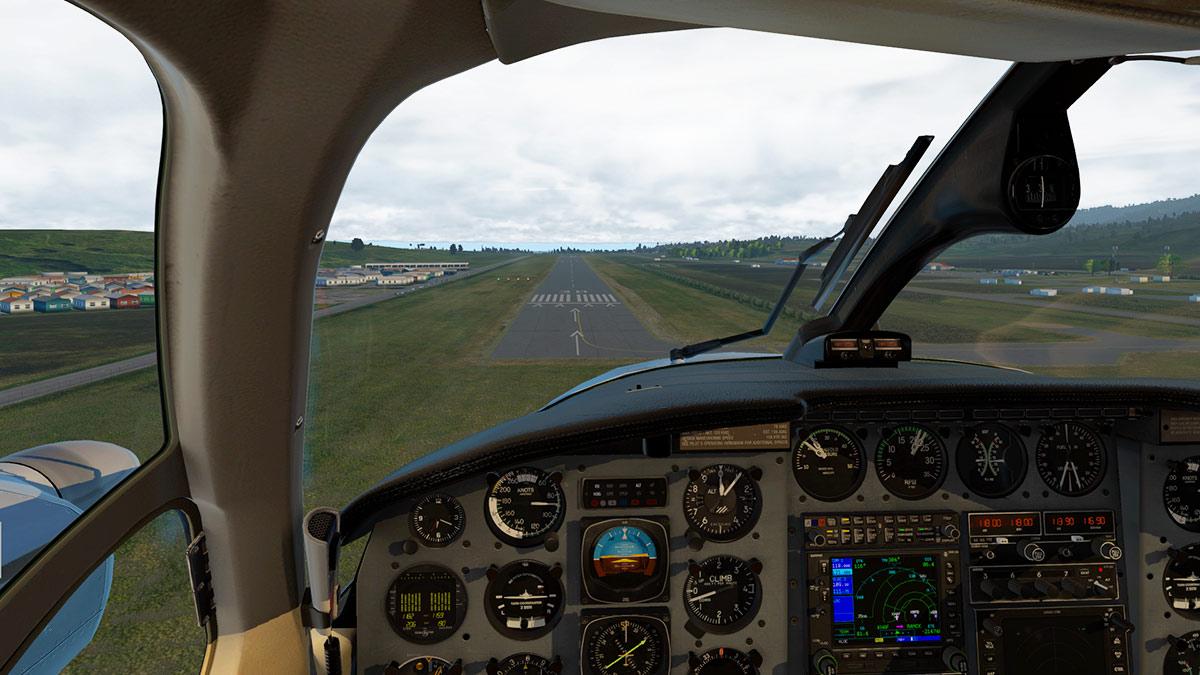
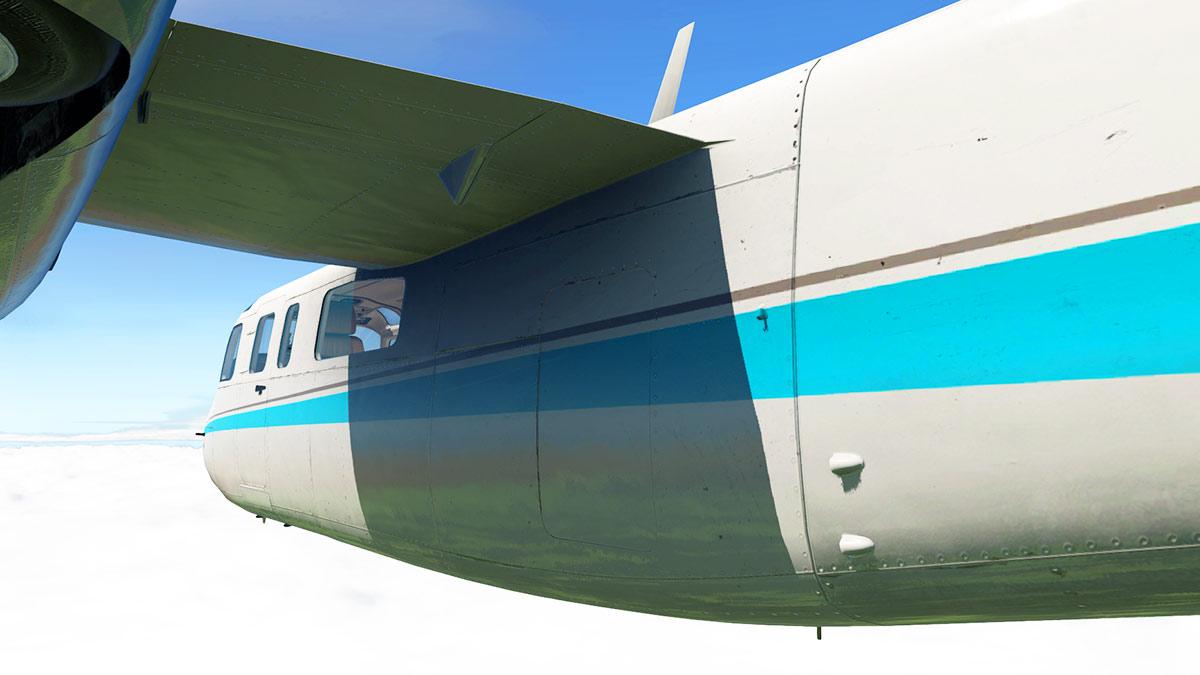
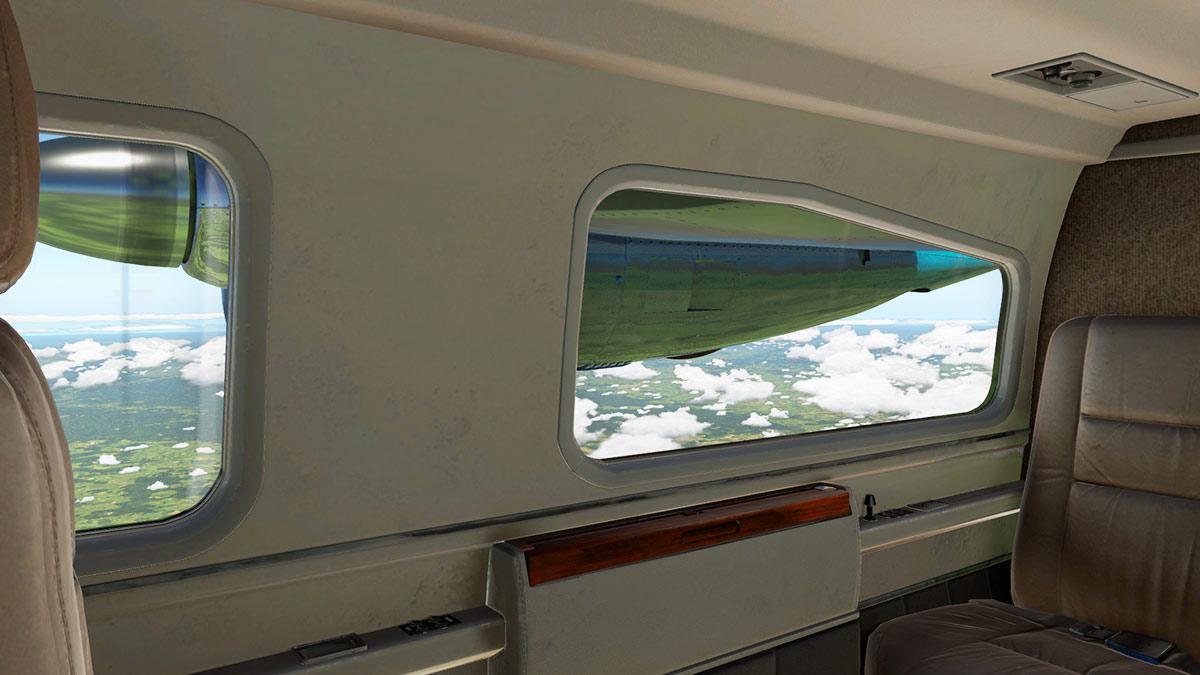
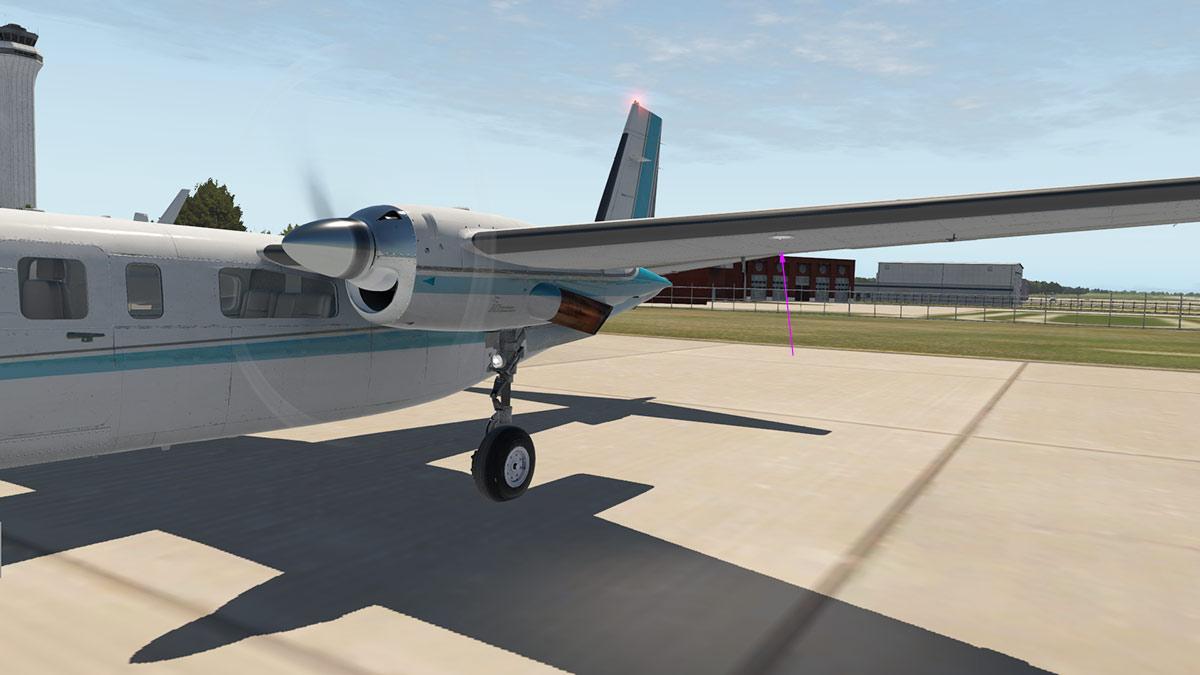
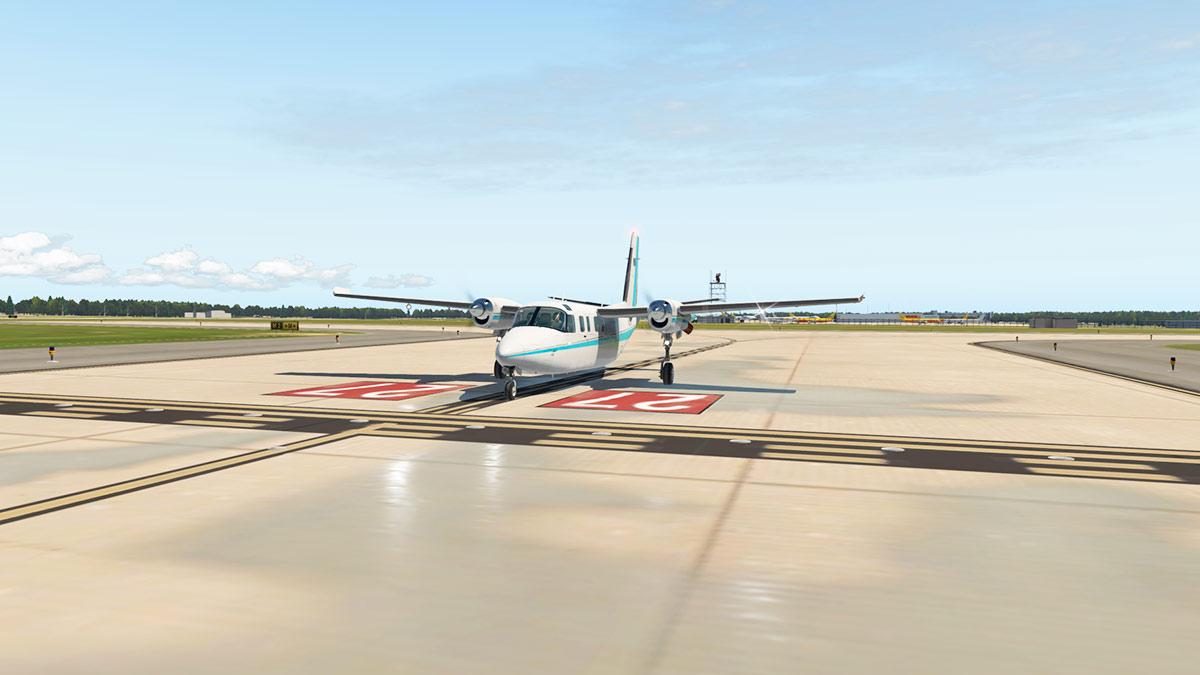
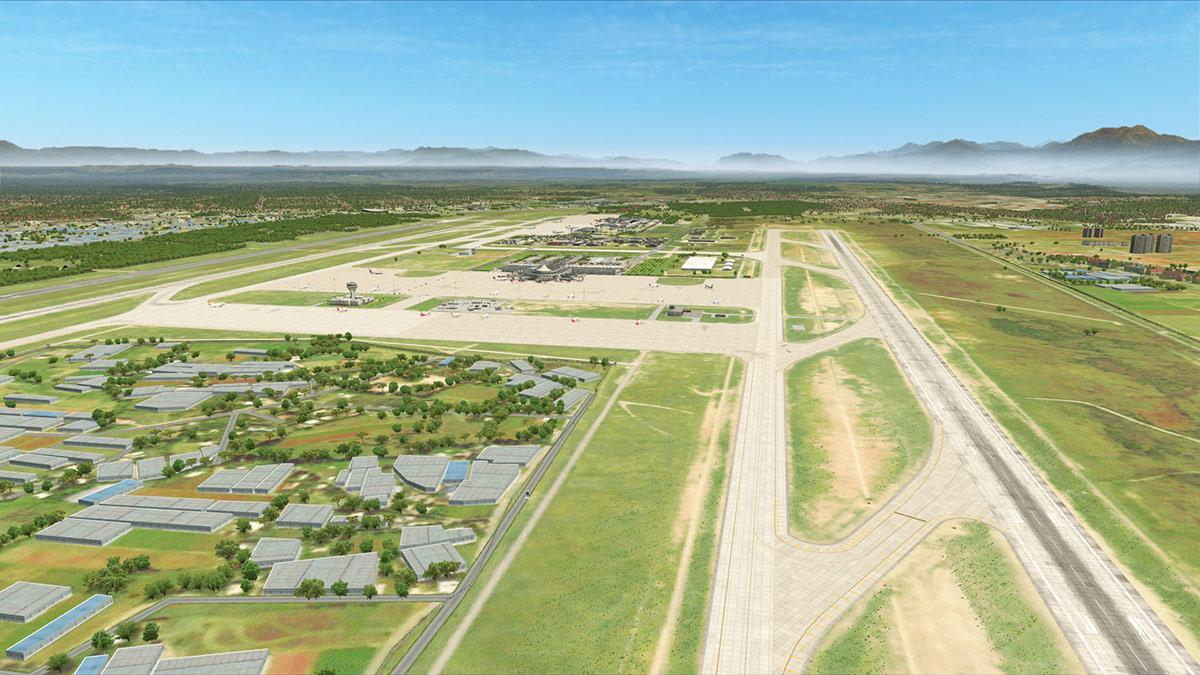
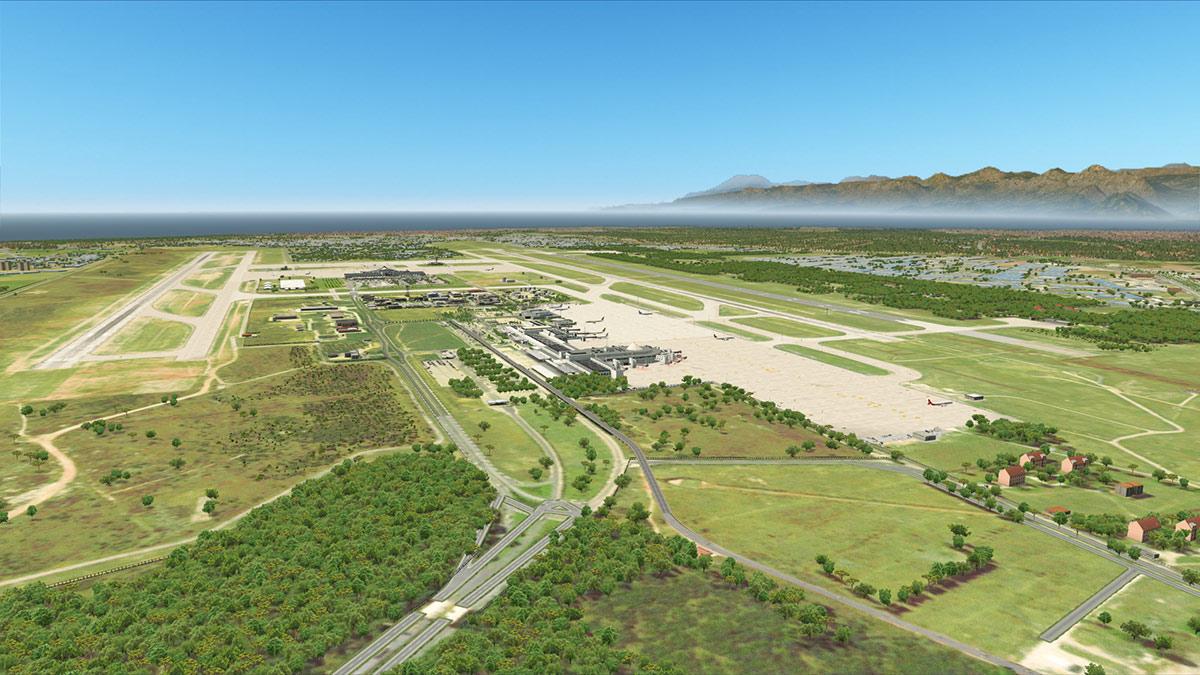
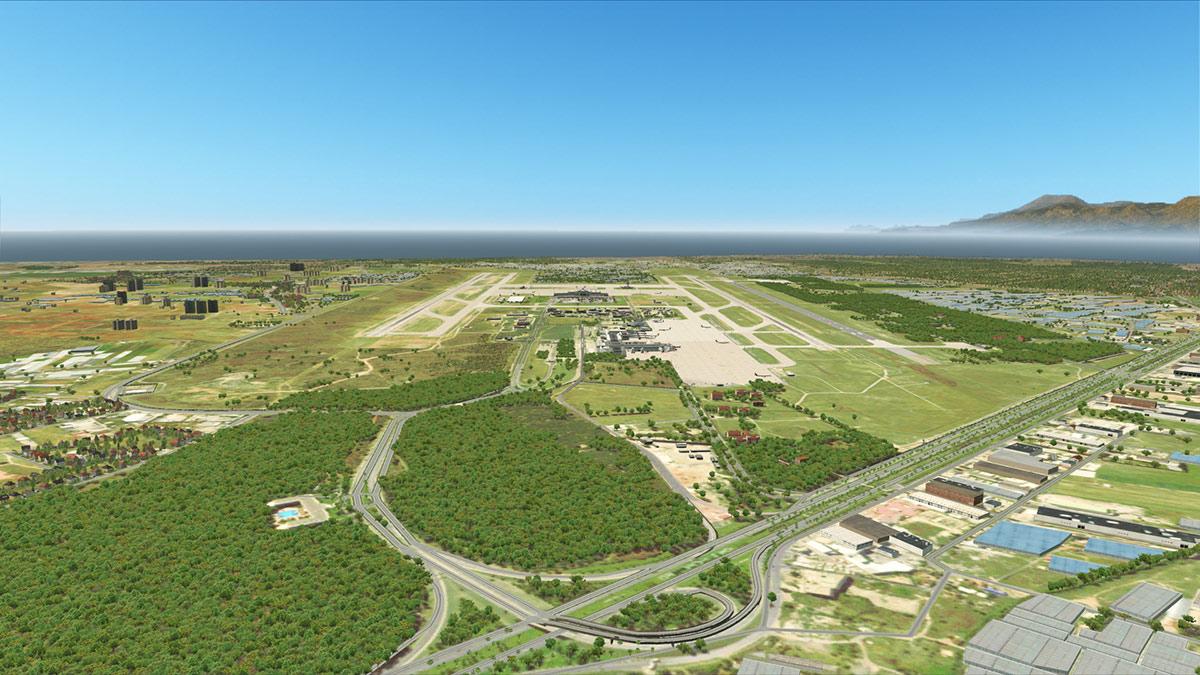
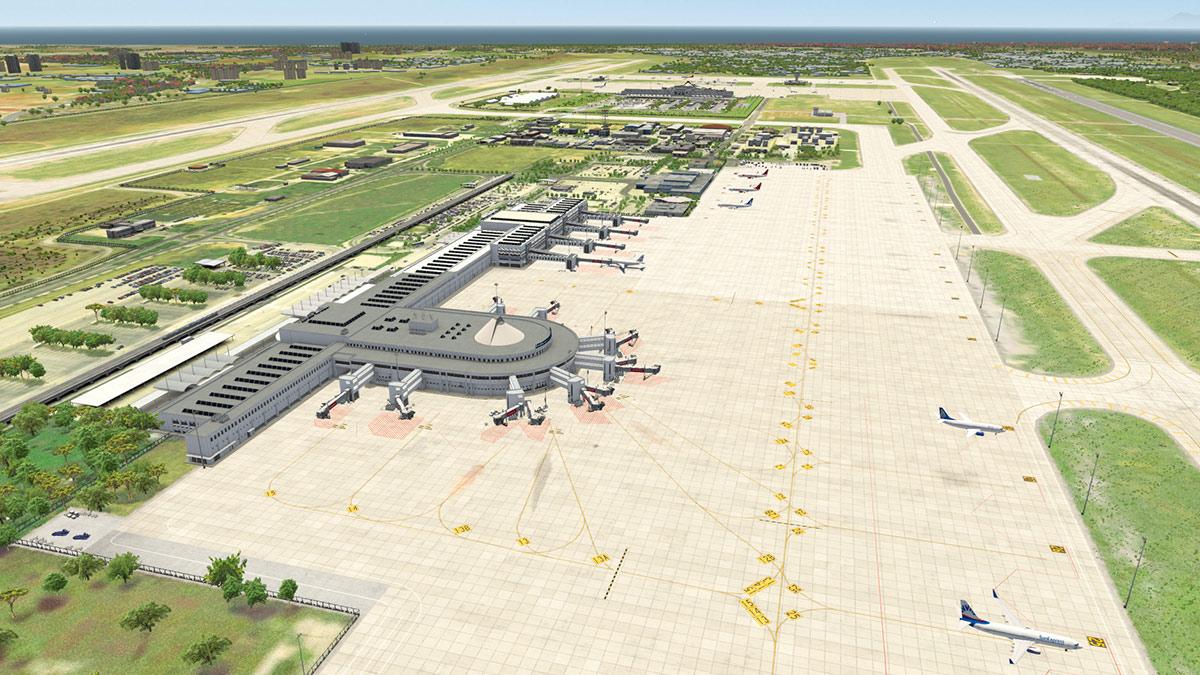
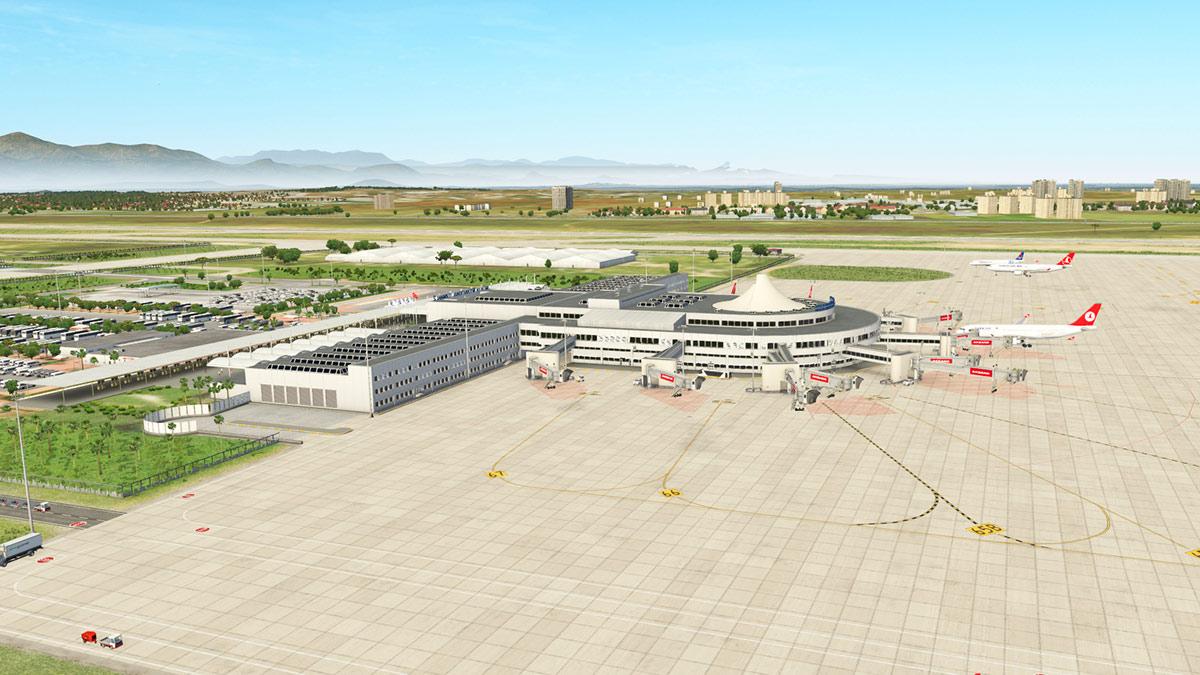
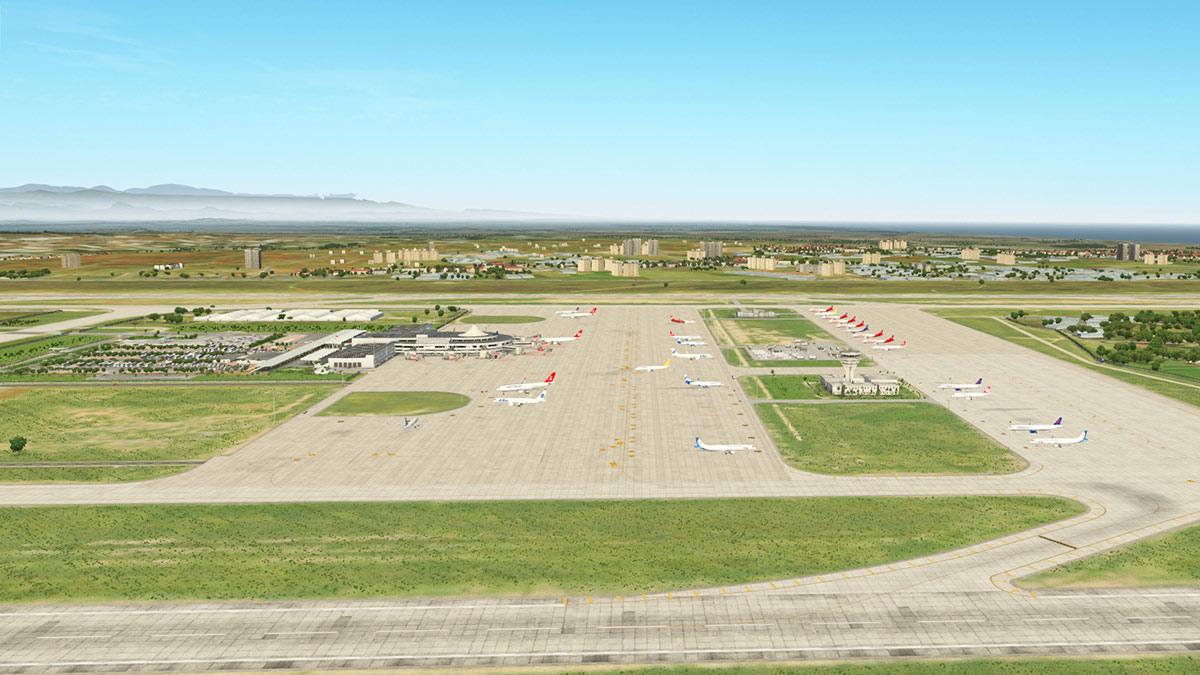
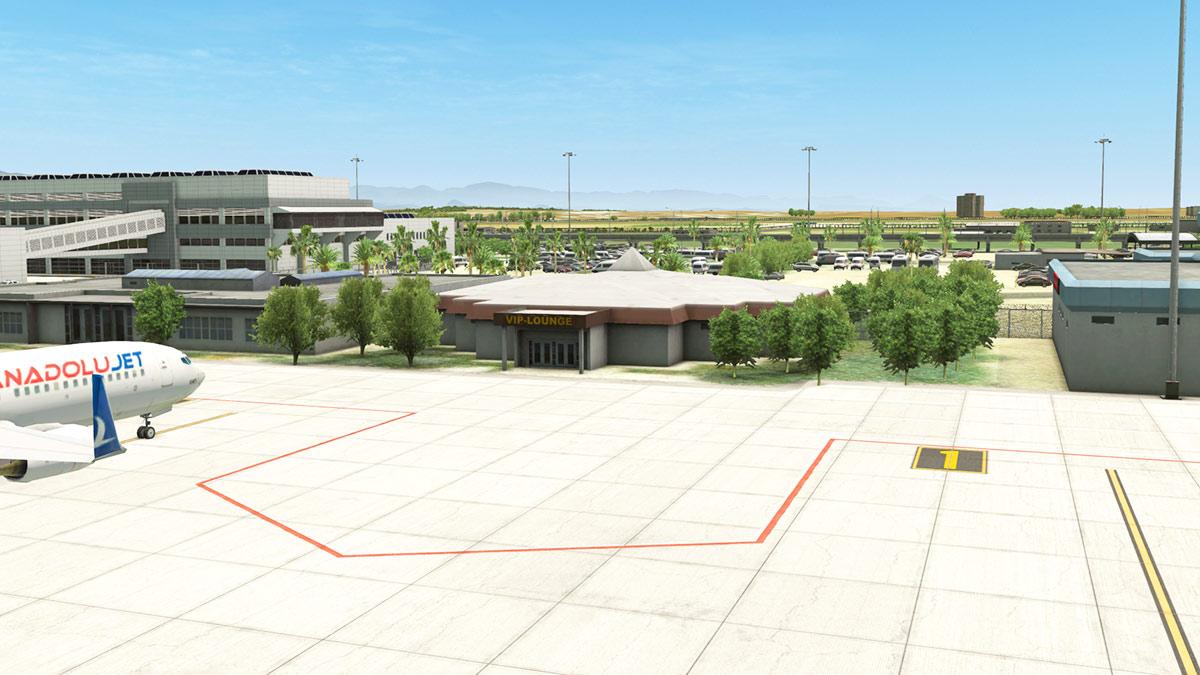
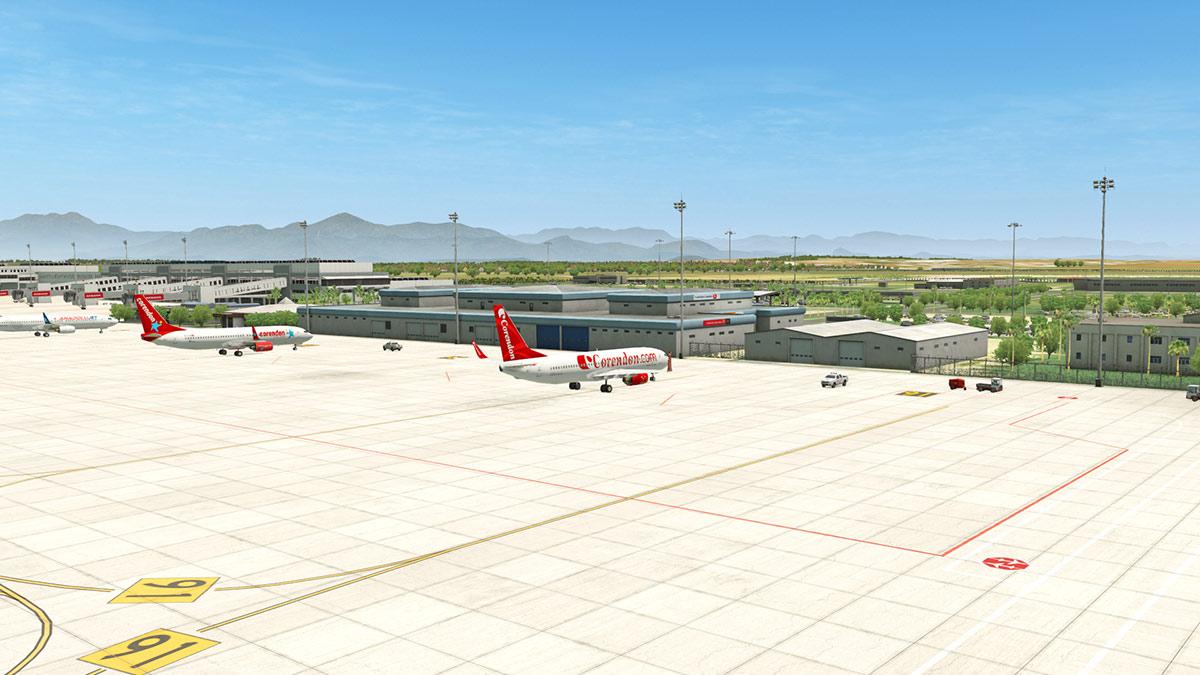
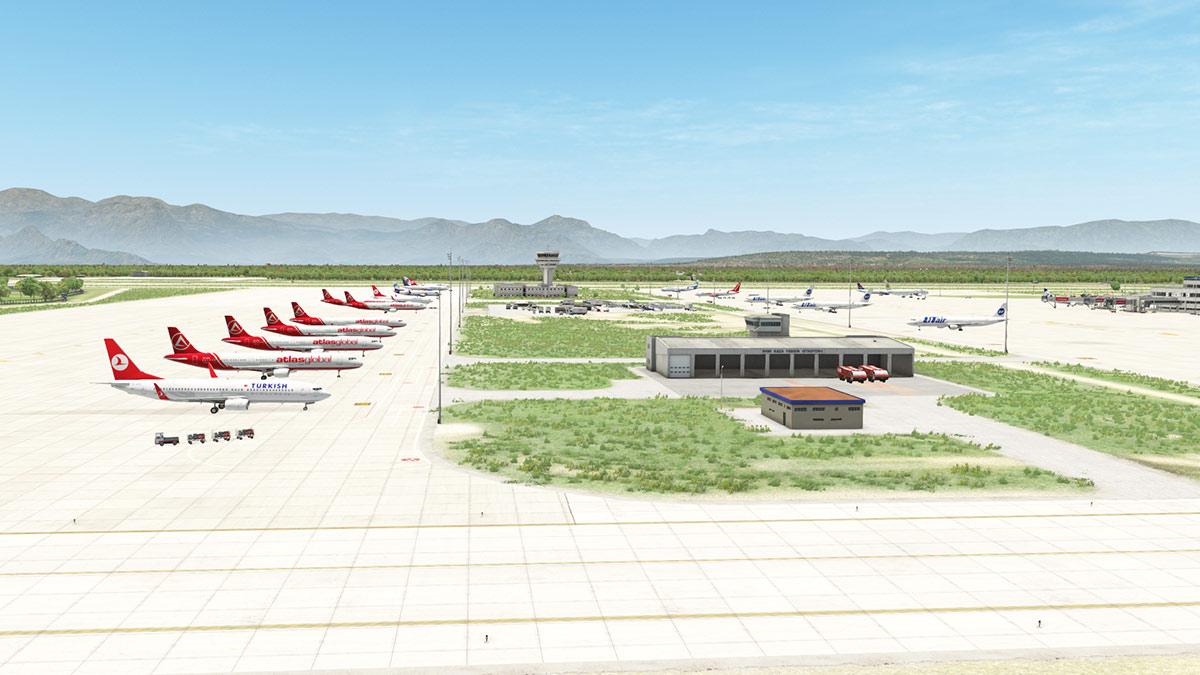
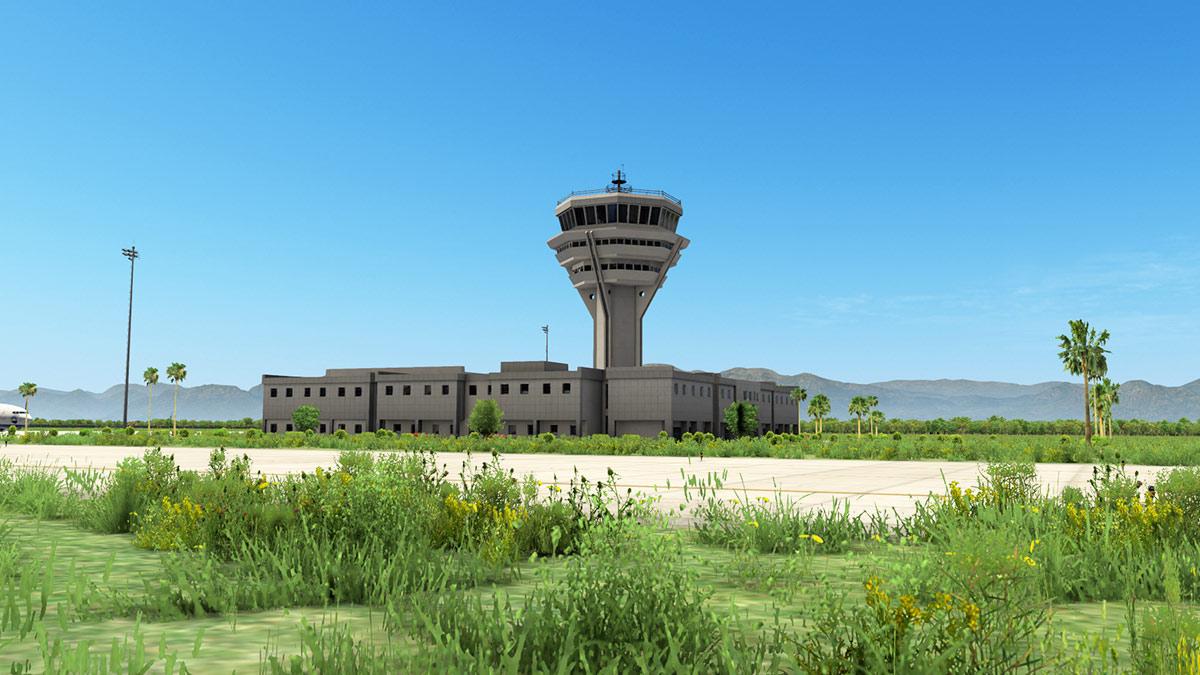
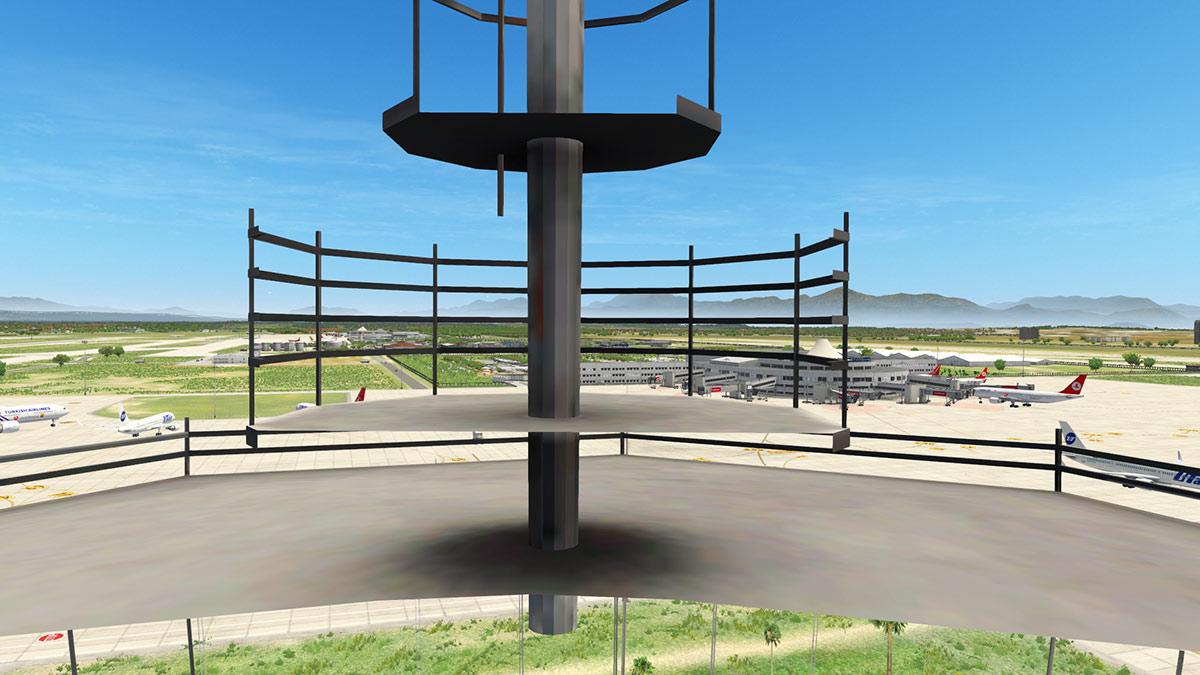
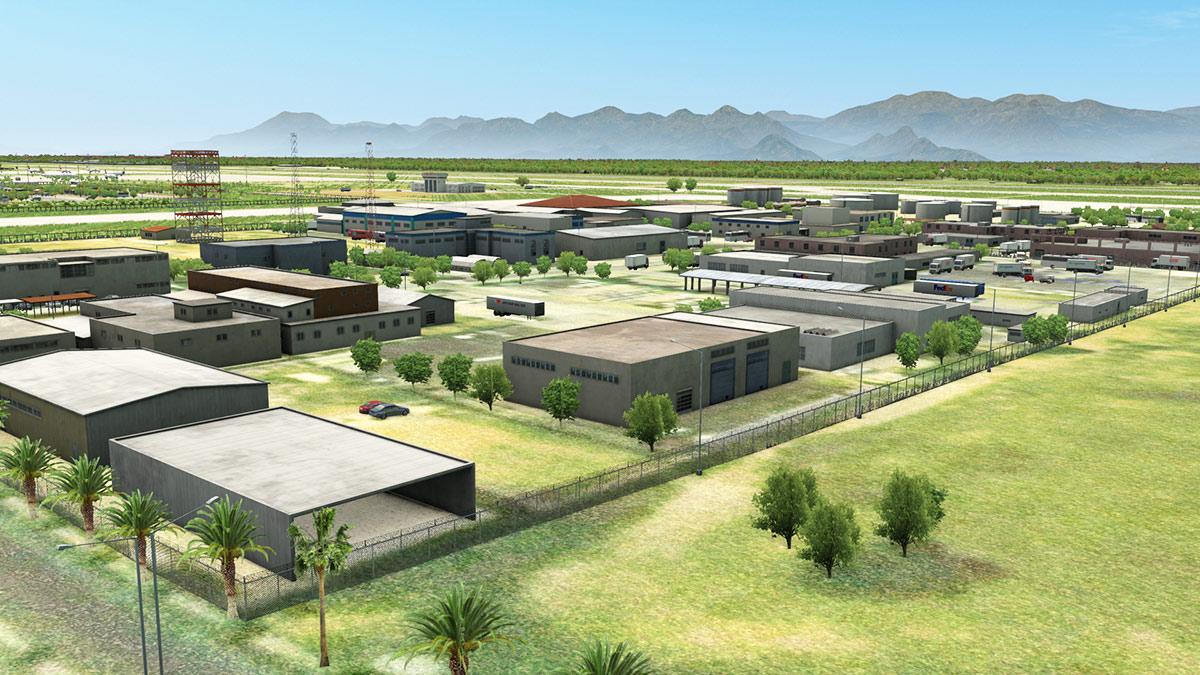
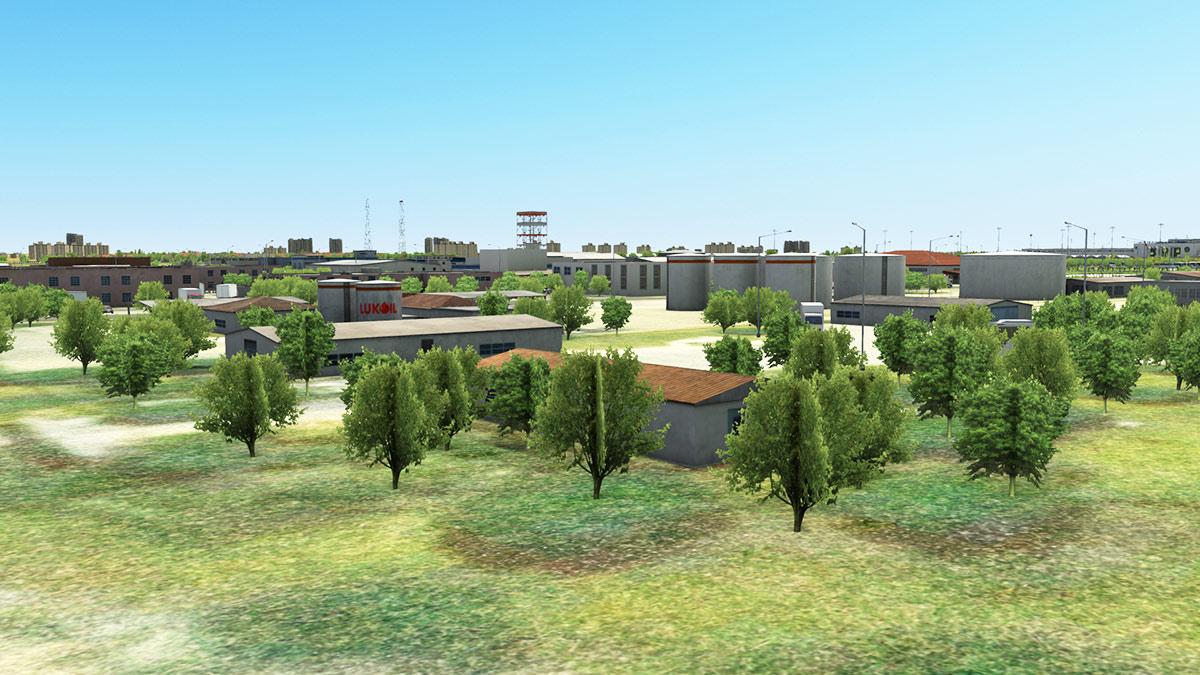
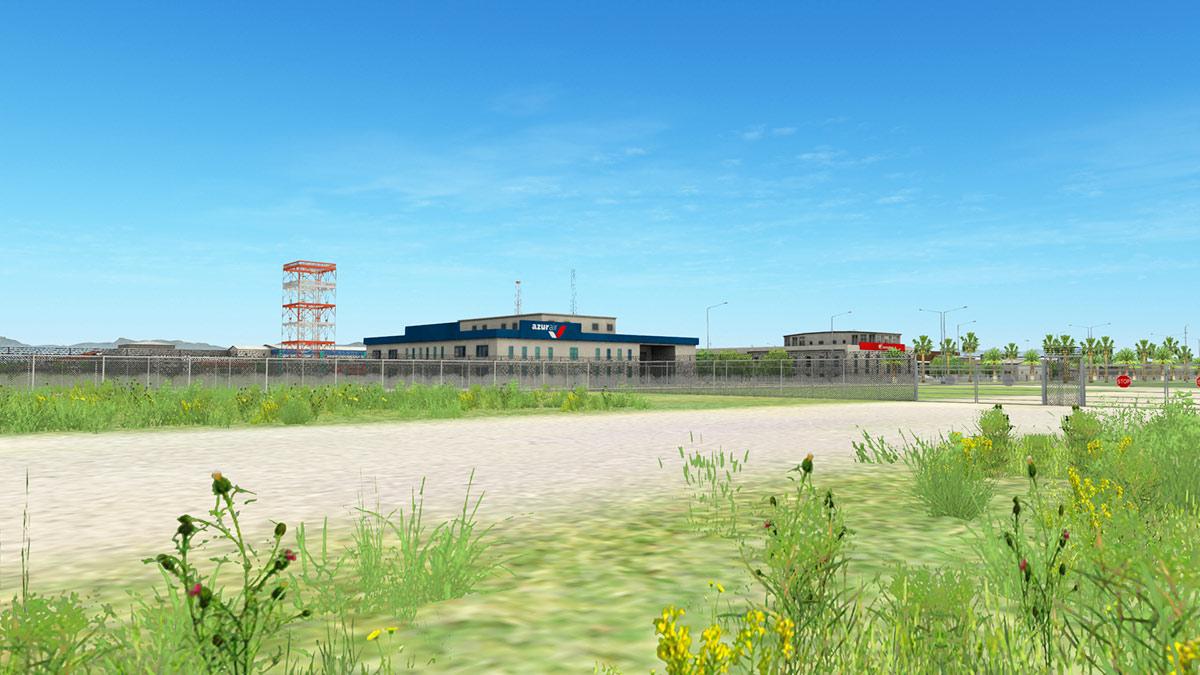
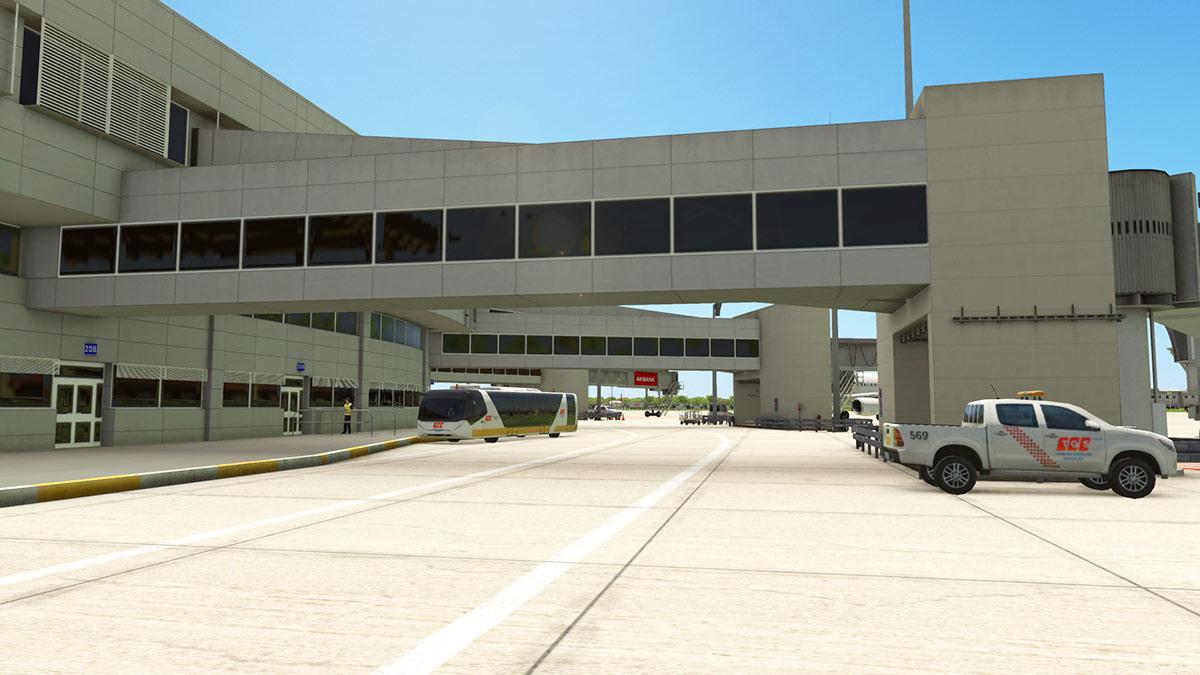
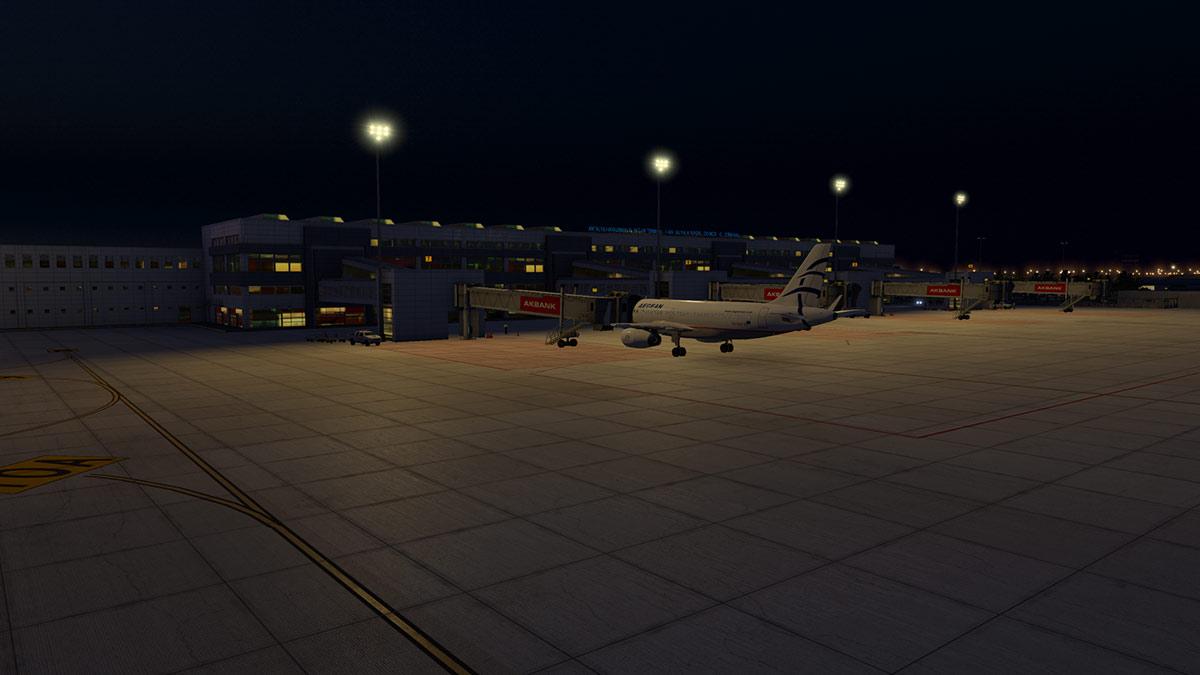
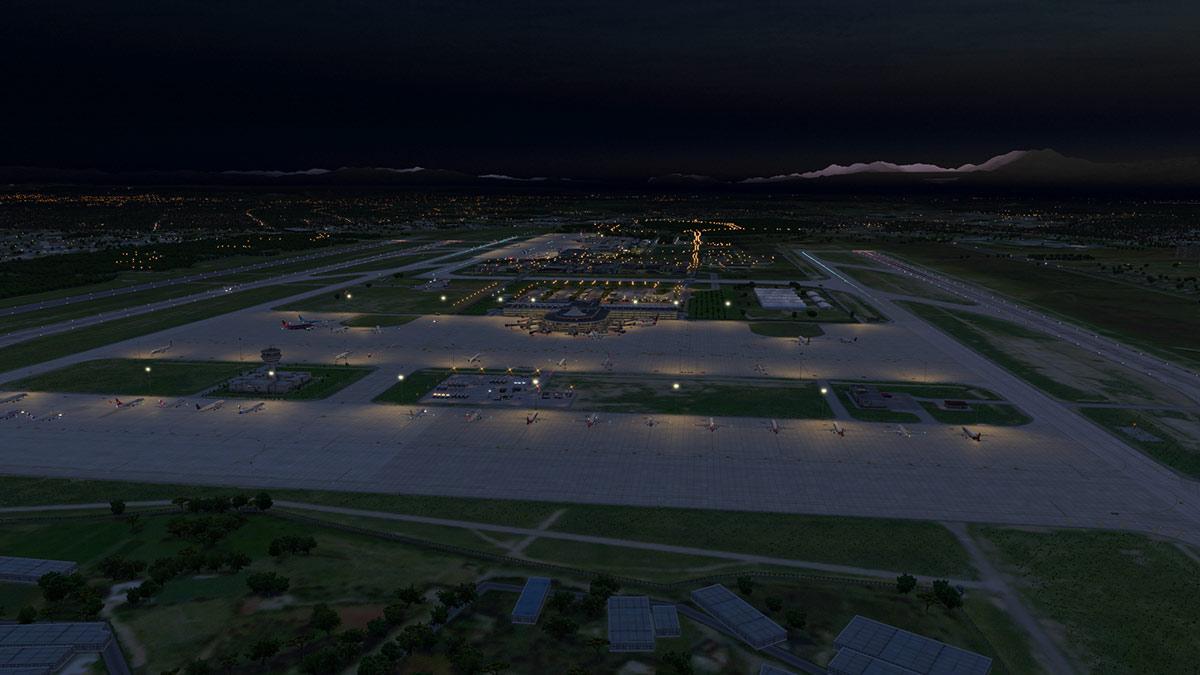
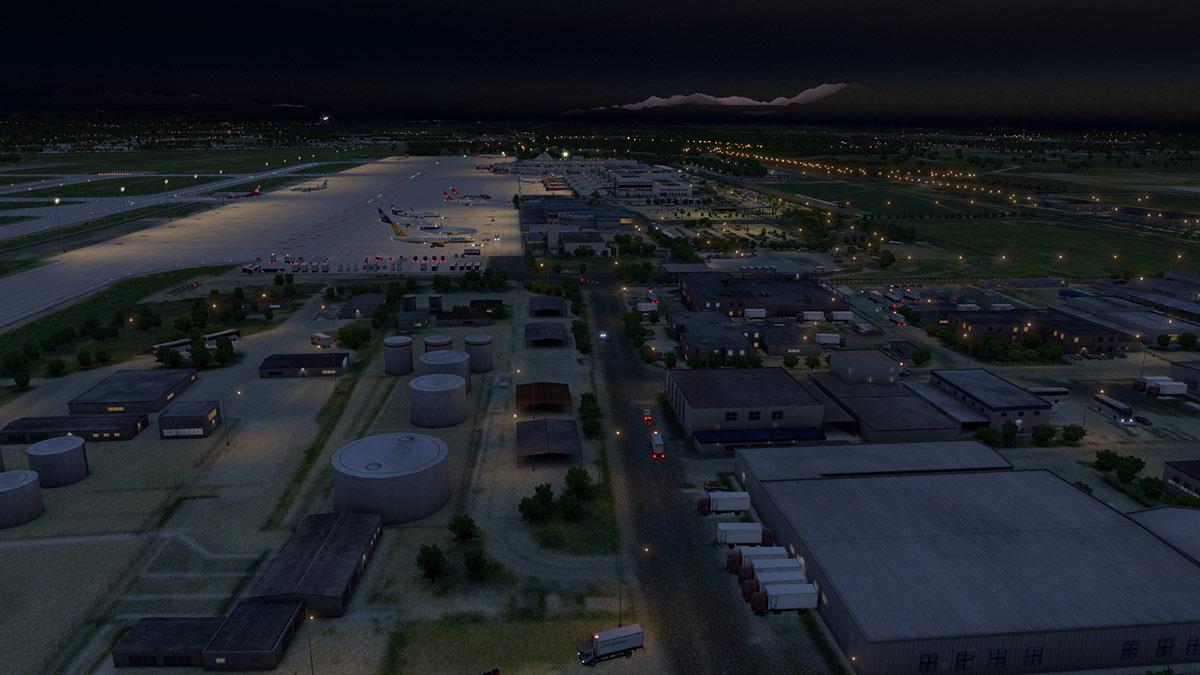
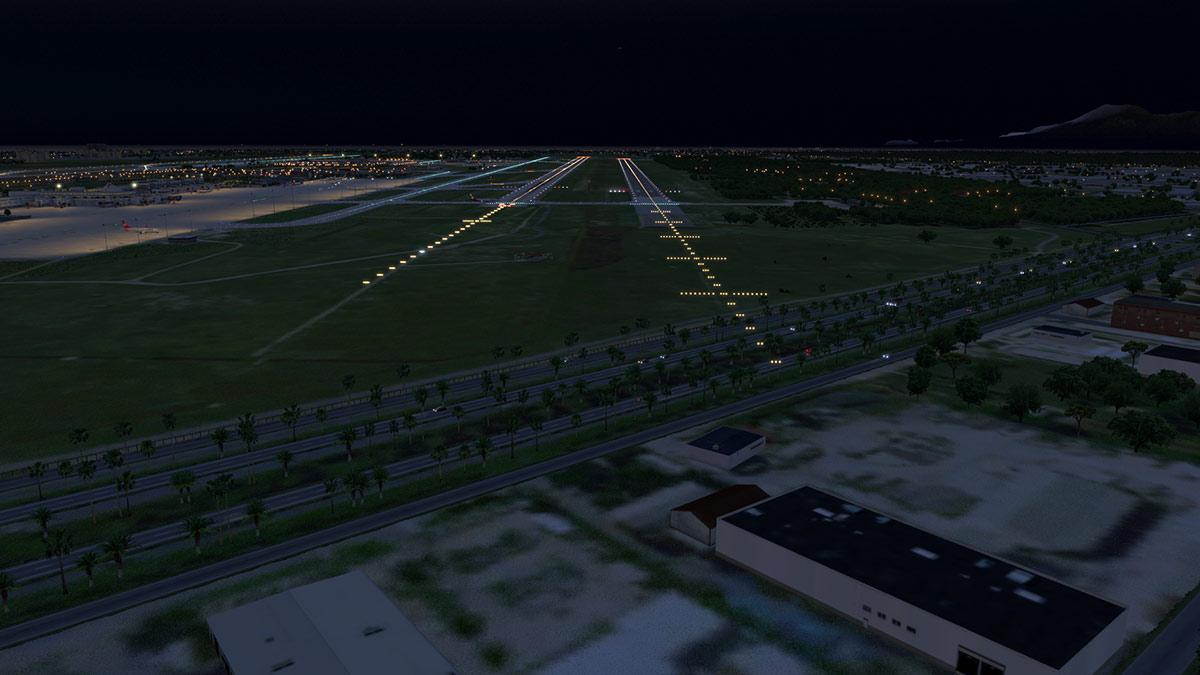
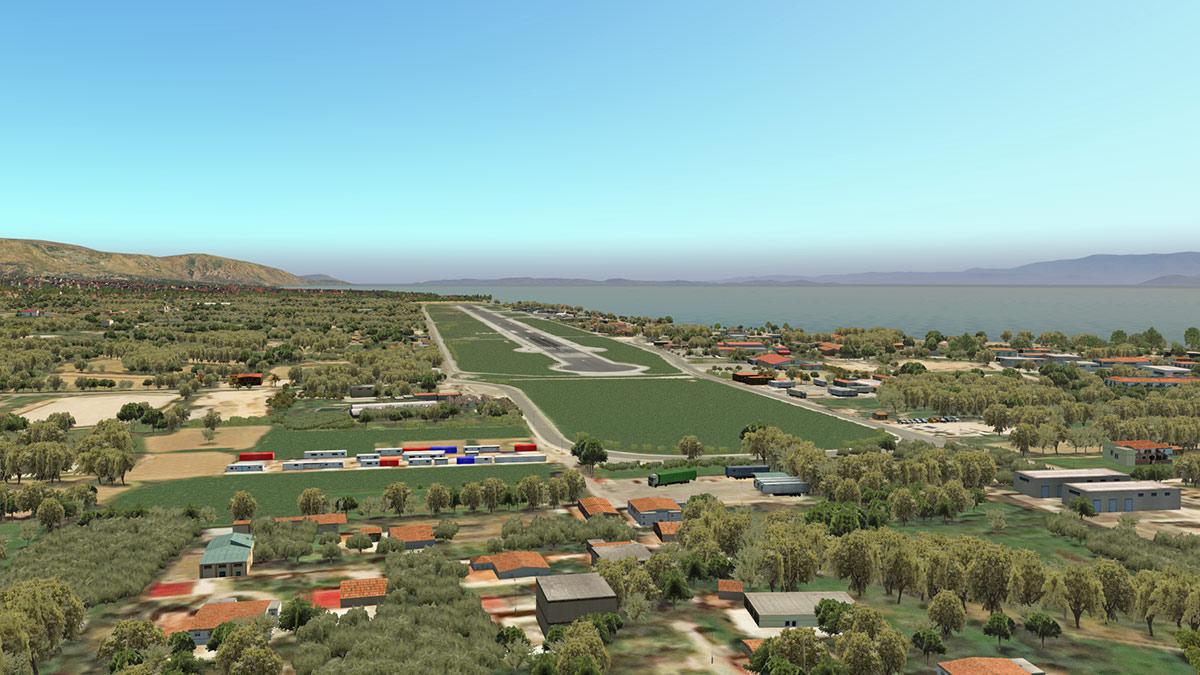
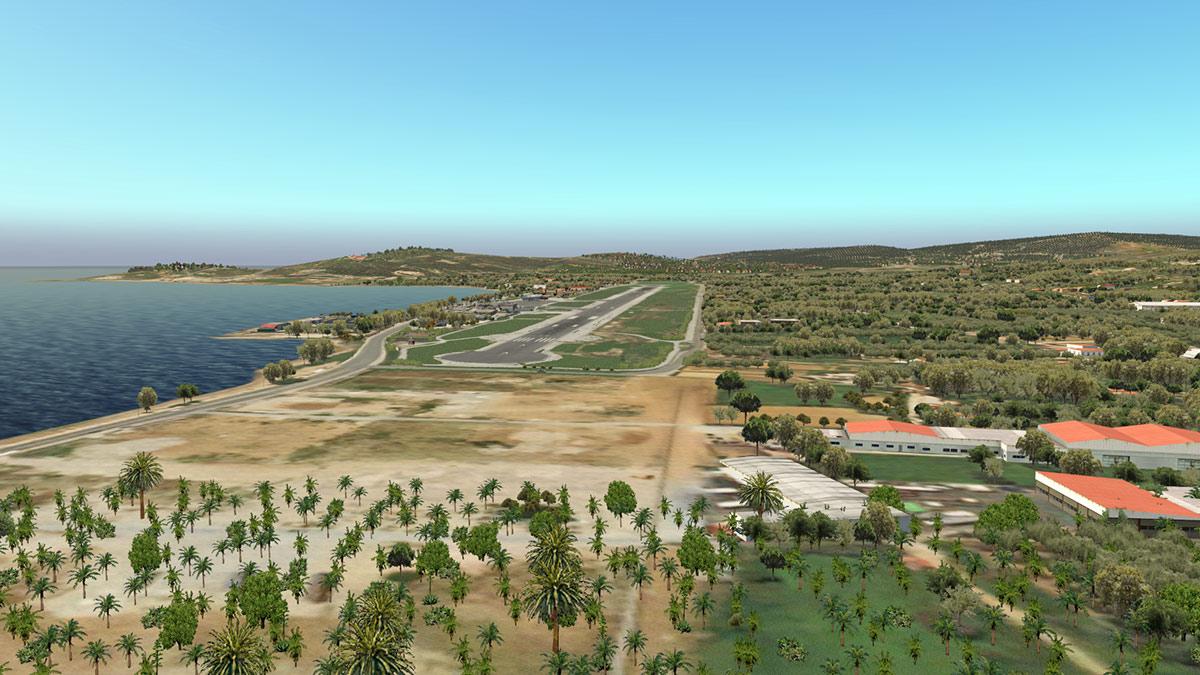
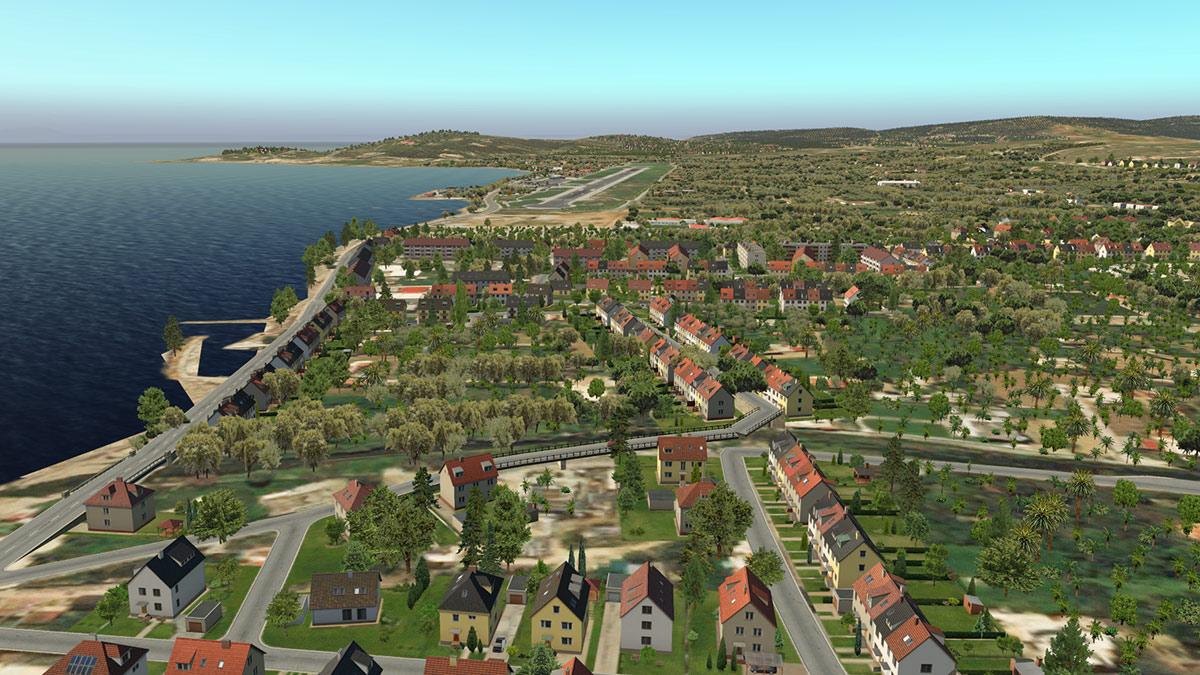
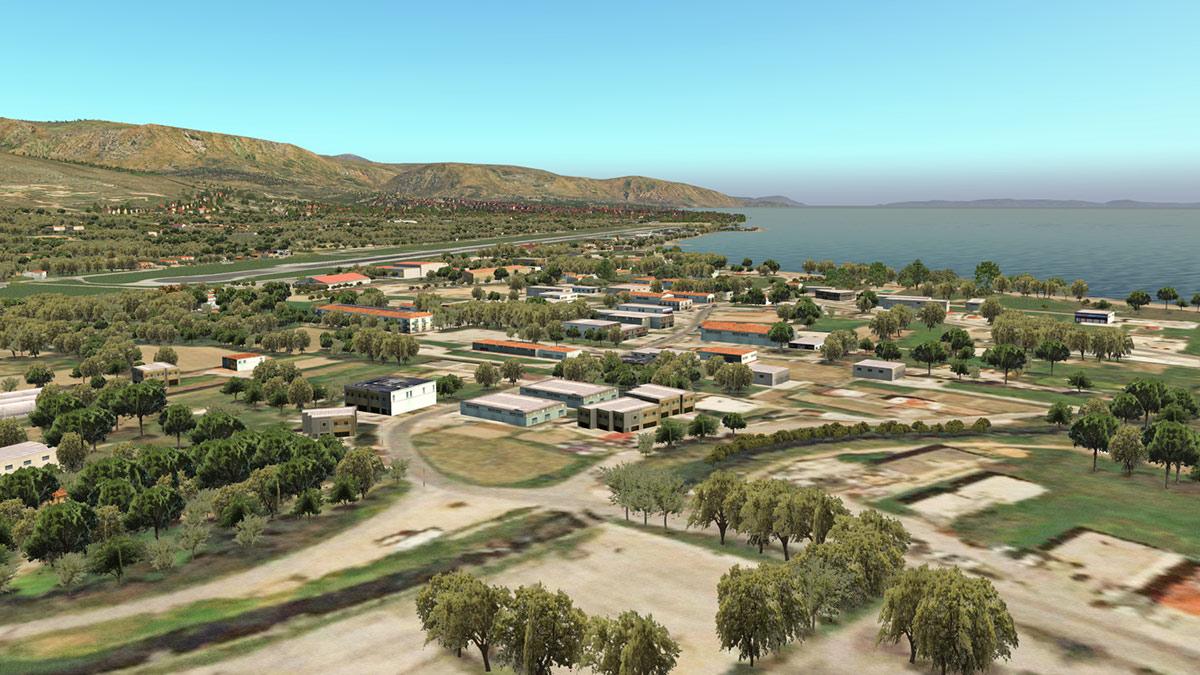
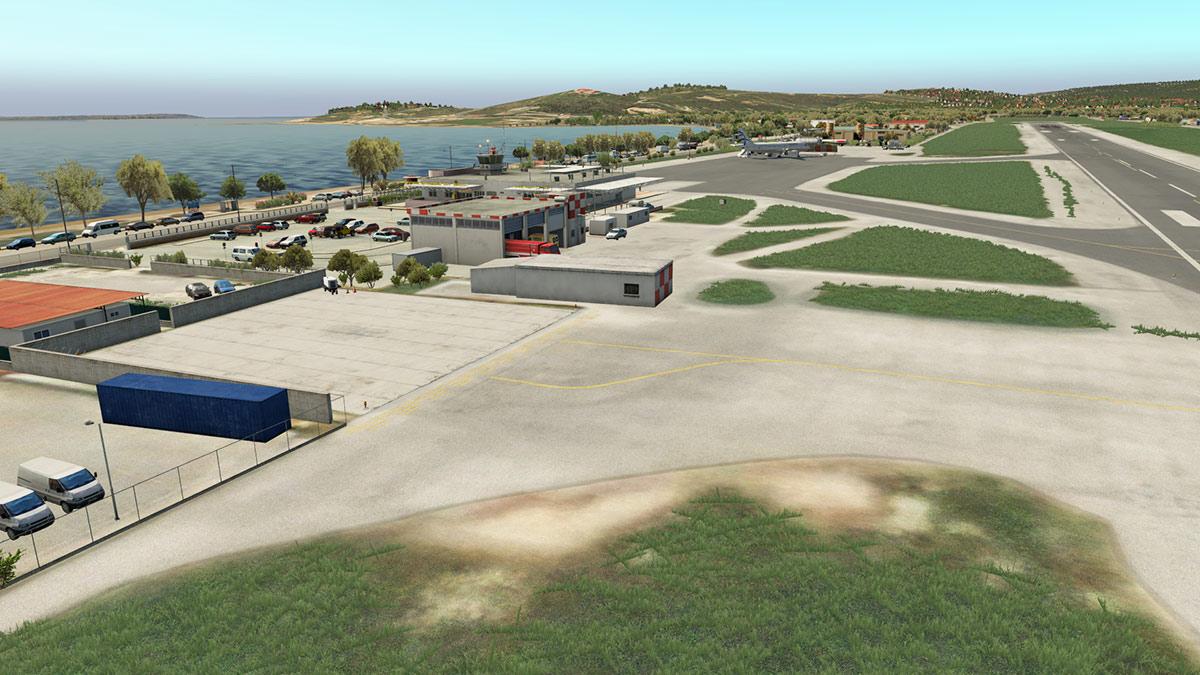
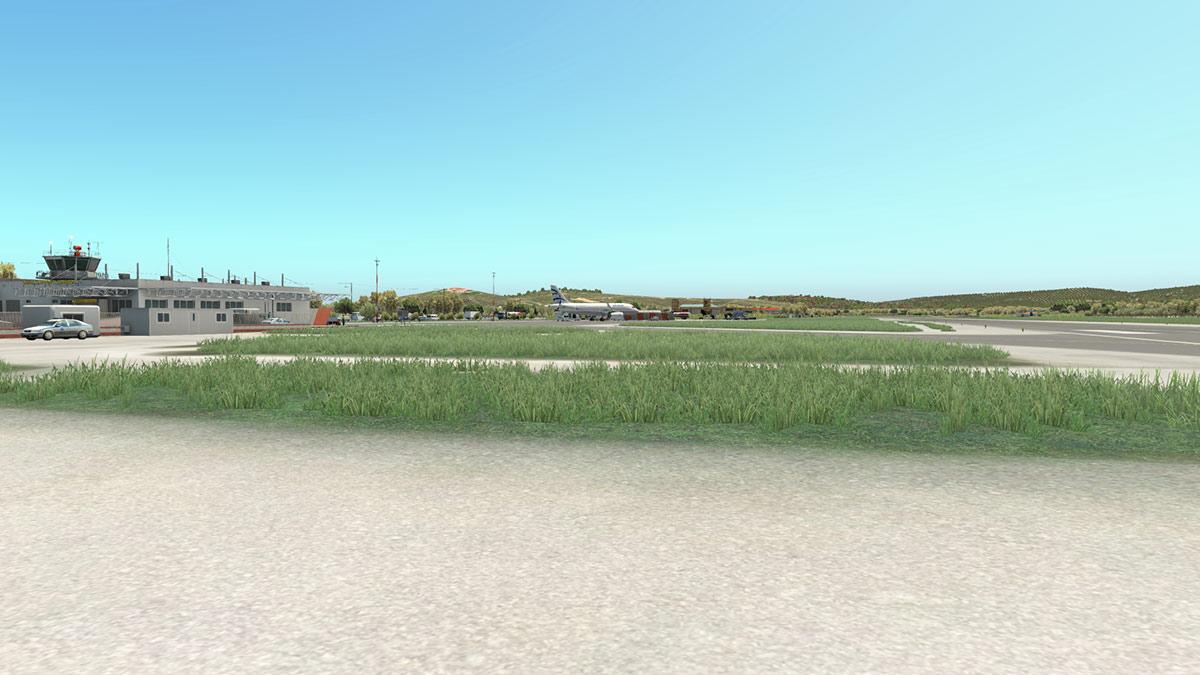
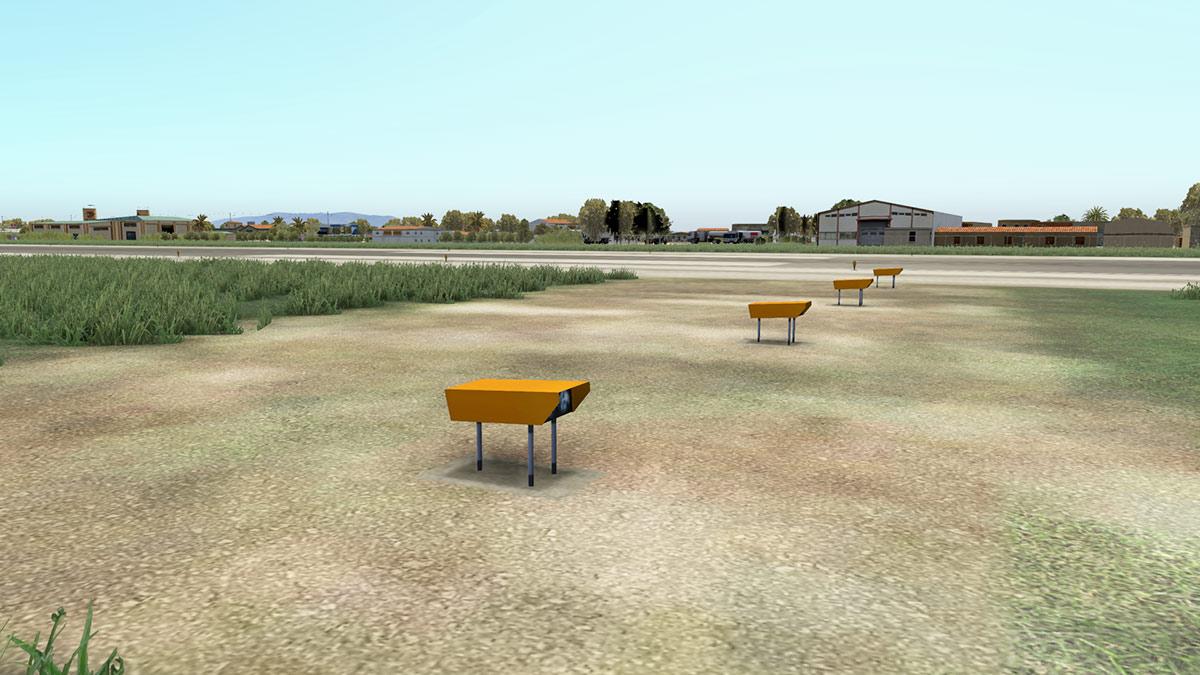
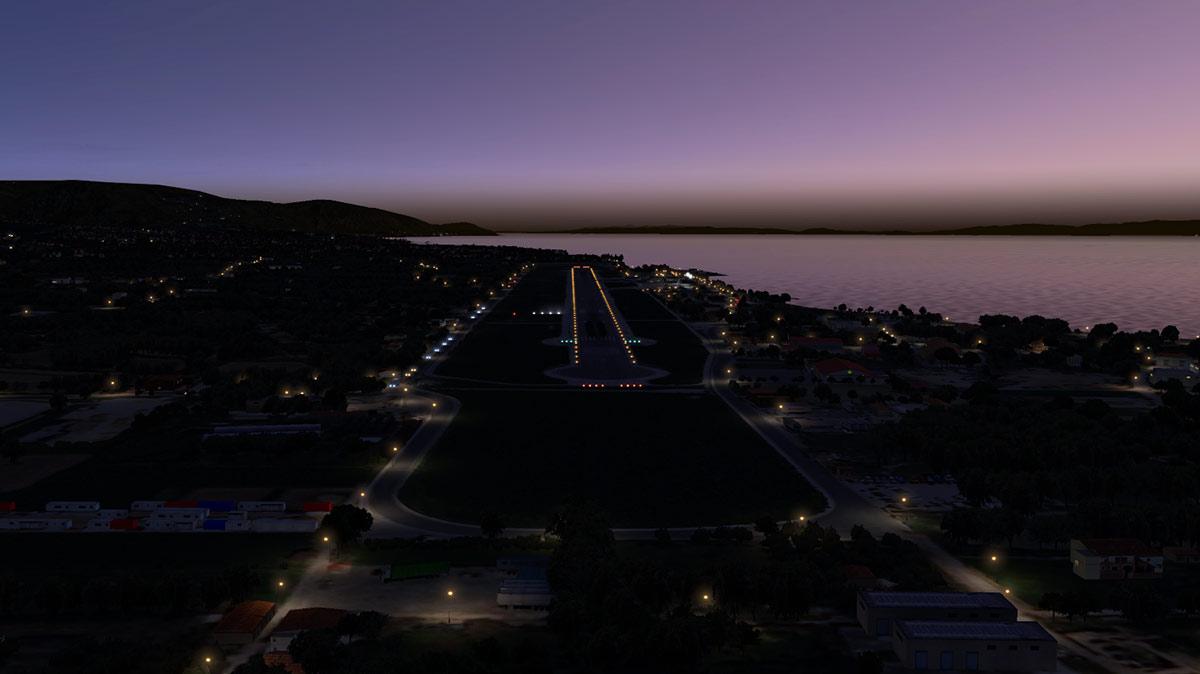
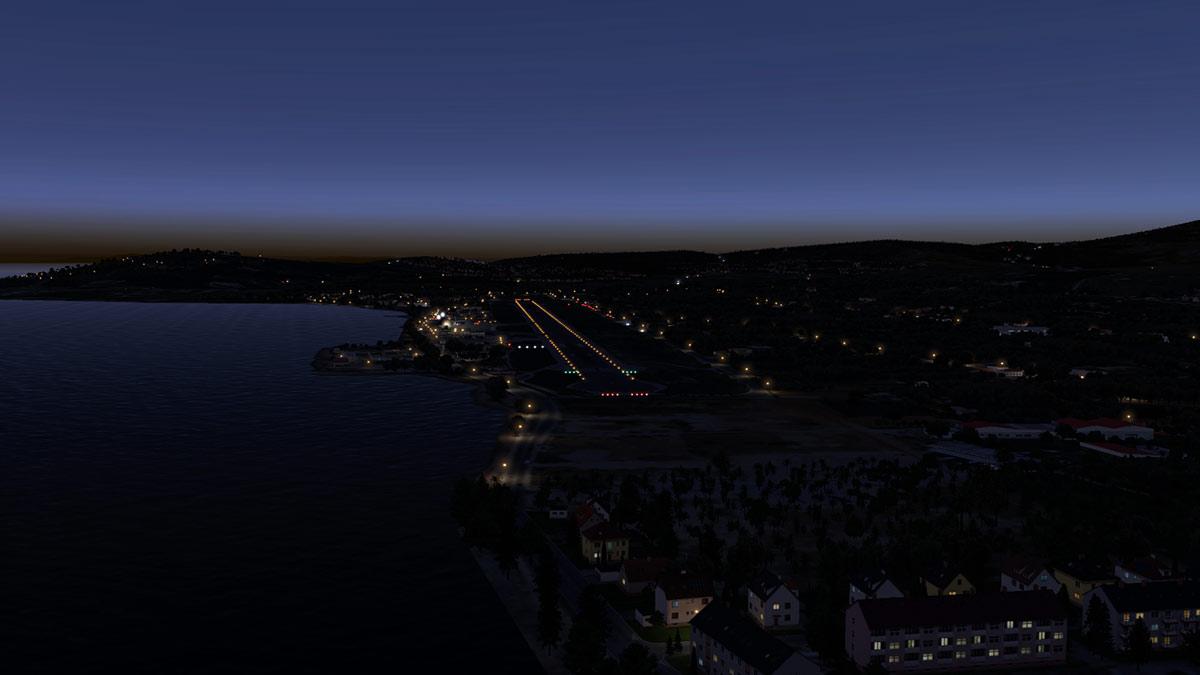
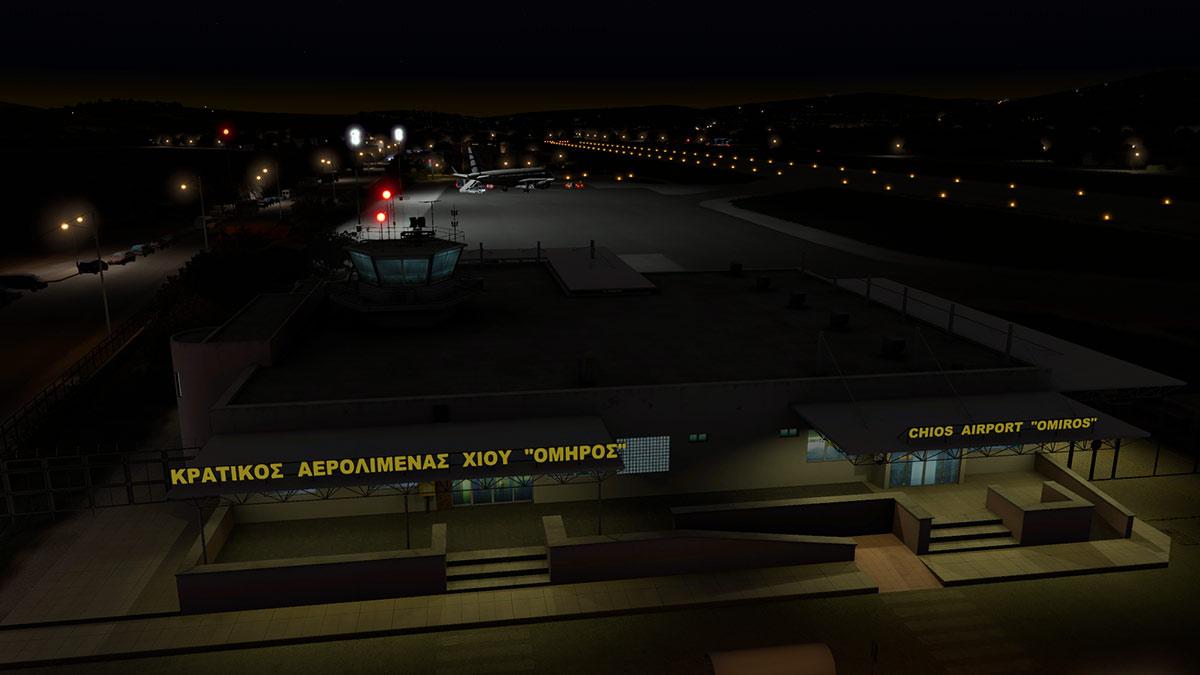
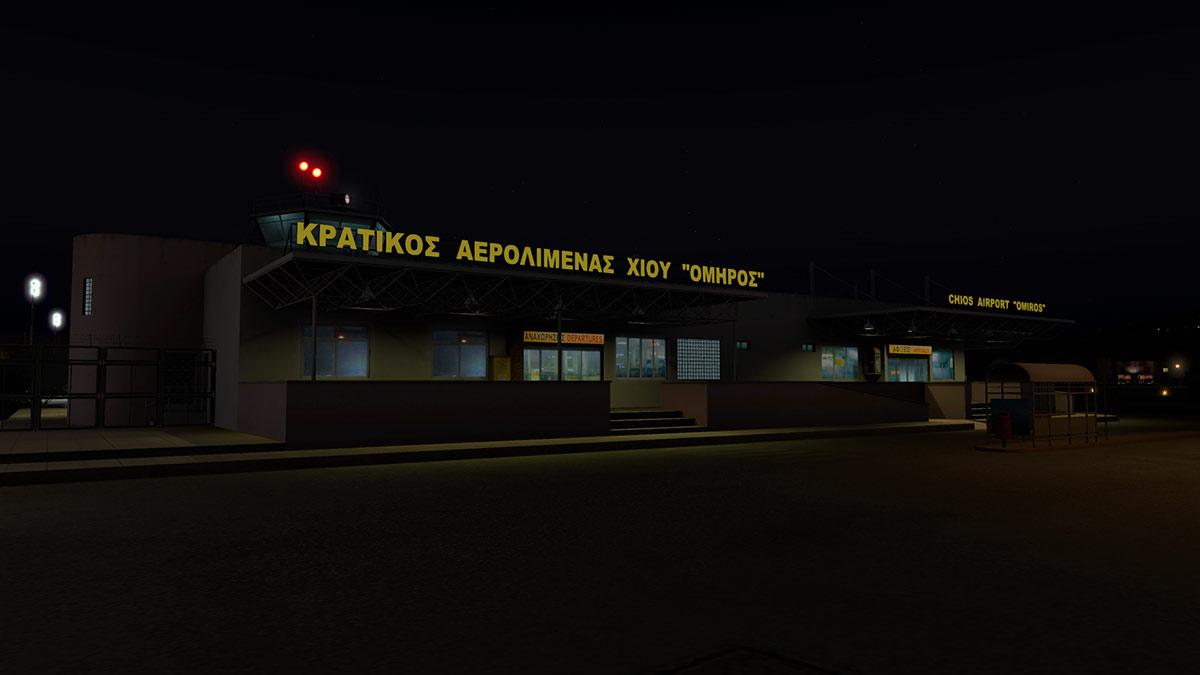
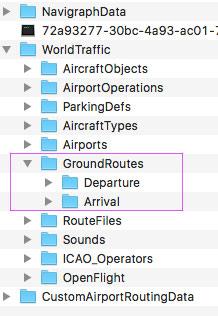
 Scenery Preview : PAKT - Ketchikan International Alaska by NorthernSkyStudio If your brief was to create an International airport with limited space and on the side of a steep hill, then certainly PAKT - Ketchikan International Airport, Alaska would be the result. Unique as well with this position is as the airport is located on Gravina Island, just west of Ketchikan itself on the other side of the Tongass Narrows, and passengers must take a seven-minute ferry ride across the water to get to the airport from the town. Around the World War II era until the early 1970s, longer range land plane air service to Ketchikan including flights to Seattle were operated via an old military airfield located approximately 20 air miles to the south on Annette Island. Aircraft operated into the Annette Island Airport (ANN) for flights in the local southeast Alaska area included the Grumman Goose and Catalina PBY with these amphibian aircraft being utilized to link the airport with the Ketchikan Harbor Seaplane Base. The current airport PAKT was opened on August 4, 1973 and was dedicated on the following day. The airport opening was the culmination of an effort by local residents, a 1965 study by the Alaska State Division of Aviation, another study in 1967 choosing the current site on Gravina Island, and land clearing in 1969. One of the first airlines to serve the new airport was Alaska Airlines which inaugurated the first jet service from Seattle to Ketchikan International Airport on August 4, 1973 with a Boeing 720 jetliner. Alaska Air primarily operated Boeing 727-100, 727-200 and 737-200 jetliners (including 737 passenger/cargo Combi aircraft) into the airport before switching to later model Boeing 737 jets. (edited wikipedia). NorthernSkyStudio The first release in scenery for X-Plane by NorthernSkyStudio, was in Hawaii with their Molokai and Kalaupapa airport package. This was a well done package, but quite a small release that would be a great addition to anyone that need's a very good Hawaiian scenery. So here is their next release with the very complex PAKT - Ketchikan International in southern Alaska. My main connection with PAKT - Ketchikan is that is a superb supply airport for CZST Stewart, and the excellent Beti-x scenery that is positioned close by there. So I have over the years toodled back and too to Stewart in mostly Bush, 208 Caravan and the odd GA aircraft from Ketchikan. But that is not using this scenery to anything but it's full potential. The airport is of course positioned central on the famous "Inside Passage" that consists of thousands of islands that are stretched right up the upper west North American continent from Seattle to Glacier Bay, and it is noted as one as THE very best flying areas in the world, for bush pilot and regional flying services. Ketchiken is also on the famous "Milk Run”. The Milk Run are routes that are run daily by Alaska Airlines and Flight 65, starts in Seattle and stops in Ketchikan, Wrangell, Petersburg and Juneau before flying on and landing in Anchorage. The opposite route flight, Flight 66, starts in Anchorage and stops in Cordova, Yakutat and Juneau before flying on to Seattle. There used to be B737 Combi aircraft flying on the route, but the last run was completed last year, and the combi's have now all been replaced by three dedicated 737-700 freighters. Ketchikan International Airport IATA: KTN - ICAO: PAKT - FAA LID: KTN 11/29 - 7,500ft (2,286m) Asphalt Elevation AMSL 92 ft / 28 m The airport does have a very unique layout with the main runway of which is located about 30 feet (9.1 m) higher than the apron further on up the hillside, and is connected between the two areas by two sloping taxiways in Taxiway A - RWY 29 and Taxiway B - Rwy 11 for departures. From an X-Plane modeling point of view this multi-elevation layout is extremely hard to get right as you can't rely on the initial mesh layouts, so everything has to be modeled to fit. Get it right, like here at this PAKT and it makes for one of the best arrival experiences in X-Plane. To fit aircraft parking areas on a hillside, it requires different parking zones and there are two (another zone looks like a parking area on TWY A but it is large turning or holding area.). The lower, lower zone (above) accessed by TWY C is for all General Aviation parking and it is quite a large area. The upper apron in front of the terminal is the main commercial zone. If International in the broad sense is the general idea, then PAKT is not in the same capability as say like KDEN - Denver or KLAX - Los Angeles. To put that into context it is to say international here is going from the USA into Canada, not to Japan or Europe. So in that context you have one (yes only one) airbridge and only one large stand or two large (B737/A320) parking slots. The (small) international terminal and it's very striking offset control tower is excellent, really well done with even the local carving set out around the building for authenticity, all the areas around the terminal are also very authentic and highly realistic... .... including the ferry connection ramp system landside, which is highly detailed. The Ferry itself "Ken Eichner -2" is also animated and docks on both sides of the Tongass Narrows waterway. On the airport side it perfectly fits into the wharf. Only comment is that the single airbridge is static and not animated, which is a shame as that would have been a big feature for the scenery. Next to the main apron is a commercial apron for local services, in i.e. charter, sightseeing flights, and island hopping. On the apron are four large hangars of which the first "Aero Services" of who is the cargo handler for the airport. All four hangars have been faithfully reconstructed and are simply excellent. Note the excellent grass and foliage, that is done all around here very well. Ground clutter is again excellent, with correctly branded and shaped custom cargo pallets (called cargo Igloos!), ramp aircraft boarding stands and branded baggage trolleys. Static aircraft are also provided with 208 Caravans and Lear Jets and are all also correctly locally branded. Detail is also really well done. With all the correct fencing and airport aids (including the ILS System). Seaplane base is also highly detailed, beautifully done. There is also a tunnel under the runway, a small thing but again great detail. Textures and surfaces are good, but feel a little light in colour and especially with the runway and taxiway A, which both needed to be both slightly darker, and note the excellent steel drainage grids. The odd looking light green colour surrounding the runway and taxiway areas is actually correct, and not a faded poor texture as it must be a coloured concrete mix (I checked). Port of Ketchikan Where as the airport island scenery is excellent, the port area on the other side of the narrows is a mixed bag. The area looks fine from the airport view point, but I feel the issue here is the underlay ortho textures in being far too light (washed out) in colour. The textures are flat around the wharf edges and level with the water and that creates a non-realistic feel? Worse there are a few important buildings missing that in their distinctive style and roof colour looked poor in being flat, and are as well front and centre visually... overall there is that "okay we will stop there, why bother doing any more" sort of feeling. And missing is all the shipping at both here at the port zone and in downtown Ketchikan (cruise shipping) as well and because they would be noticed from the airport on arrival or departure it makes it all look again rather more empty than it needs to be ... ... there is a huge slipway building, but I can't find the same on any maps? but it looks visually very good. The sailboats don't work either? They are all a bit bright and samey... I'm not expecting every one to be different, but a few changed styles would have made it that all the more realistic. Lighting The lighting overall at PAKT is excellent... Approach lighting is fine. The signage though looks totally out of scale... ... the sign looks as big as a Cessna 152? The colour brightness reflection is far to strong as well and not realistic. A shame because the terminal building and ramp lighting is absolutely first rate. So many developers get night lighting textures so wrong? but here they are perfect and highly realistic. Detail lighting including the excellent down lights are very well done... Ketchikan Port side is more simplistic, but fine and still includes nice lighting window textures, so the lighting is very good all over the scenery. WT3: WorldTraffic GroundRoutes are provided with the scenery, and over all they work very well including the hard situation of a taxi and turnaround on the end of RWY 29. But don't expect a lot of traffic here at PAKT as it is pretty quiet operations wise. Preview Notes I was actually pretty surprised by this PAKT - Ketchikan International Alaska by NorthernSkyStudio as it is really very good, even excellent. Quality and detail is very through and there is a lot in this scenery to consider it's worth. And plus Ketchikan as in it's position is a pretty important airport for not only recreating the "Milk Run", but for a base to cover and explore this excellent "Inside Passage" area, as it is a bush pilot, and regional service supreme flying area. There is a lot of excellent work in here, and to say that NorthernSkyStudio is a developer to watch in delivering quality scenery, but there is the odd fumble in here that needs to be watched, but overall from them this is an excellent release. Positives: Great modeling with a very difficult X-Plane terrain (mesh) to recreate. All airport scenery is absolutely top notch, and night lighting is first rate, detail is excellent with the terminal and ferry ramp and ground clutter is branded and well recreated in detail. Negatives: Ketchikan Port feels like a bit of a left over from the main airport scenery, and feels a little half finished, no shipping is a big visual emptiness that shouldn't be? Signage is out of scale to the airport, looks odd at night and the single airbridge is only static. ____________________________________________________________________ Yes!... PAKT - Ketchikan International Alaska by NorthernSkyStudio is Available from the X-Plane.Org Store here : PAKT - Ketchikan International Alaska Price is US$25.00 Requirements : X-Plane 11 Windows, Mac or Linux 2Gb VRAM Minimum - 4Gb+ VRAM Recommended Current Review version : 1.0 (August 6th 2018) Download Size: 1gb : Install Size 2.29gb Installation is the airport folder must be set above the "terrain" mesh in the .INI order PAKT_Northern_Sky_Studio (2.25gb) PAKT_Terrain_Northern_Sky_Studio (35.80mb) There is optional 2K textures if you run a lower powered computer, but to be honest they are not really needed as there is really nothing around PAKT to overuse your processors, running 4K textures my framerate was well within the 40's to 50's Extras and Documents: Manual in txt PAKT Installation manual ______________________________________________________________________ Preview by Stephen Dutton 13th August 2018 Copyright©2018 : X-Plane Reviews (Disclaimer. All images and text in this preview are the work and property of X-PlaneReviews, no sharing or copy of the content is allowed without consent from the author as per copyright conditions) Review System Specifications: Computer System: Windows - Intel Core i7 6700K CPU 4.00GHz / 64bit - 16 Gb single 1067 Mhz DDR4 2133 - ASUS GeForce GTX 1080 8Gb - Samsung Evo 512gb SSD Software: - Windows 10 - X-Plane 11.25r2 Addons: Saitek x56 Rhino Pro system Joystick and Throttle : Sound - Bose Soundlink Mini Plugins: Environment Engine by xEnviro US$69.90 : WorldTraffic 3.0 Plugin - US$29.95 : BetterPushBack - Free Scenery or Aircraft - Boeing 737-800 - Default X-plane by Laminar Research
-
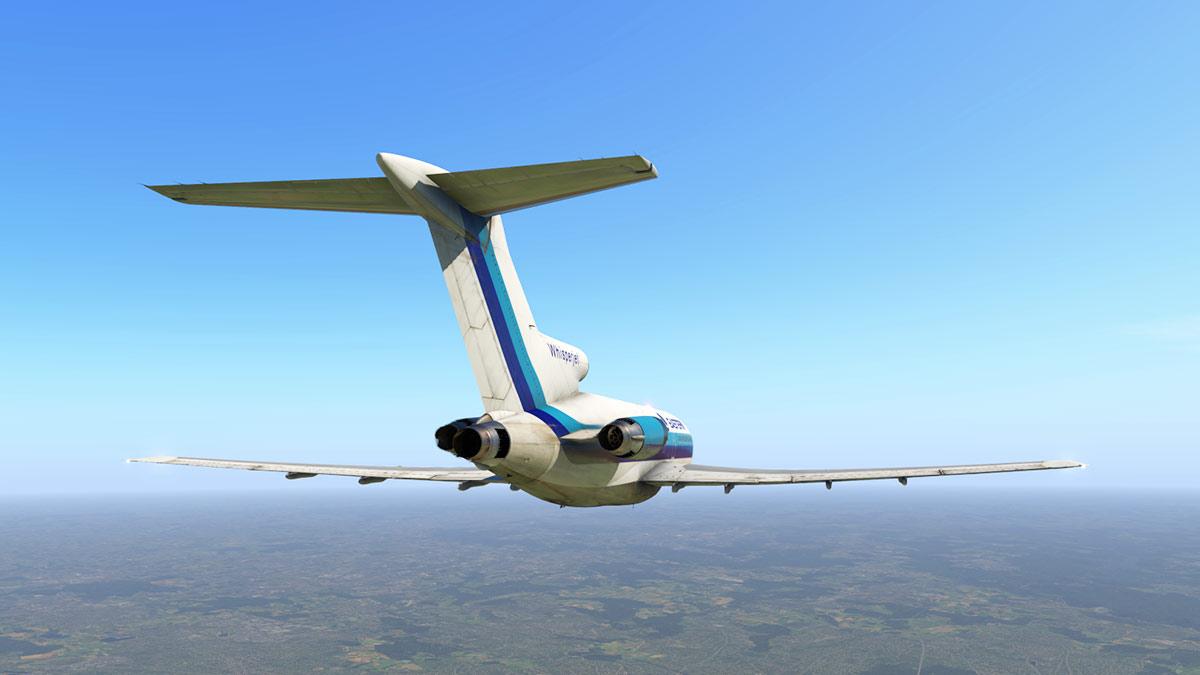
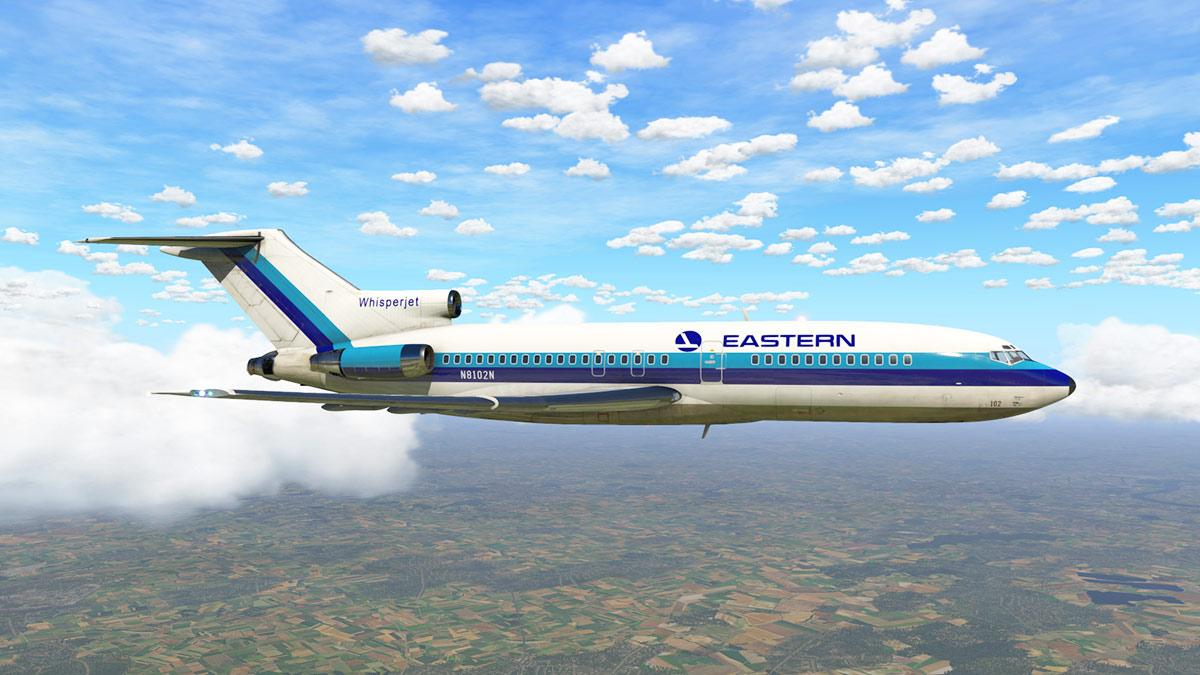
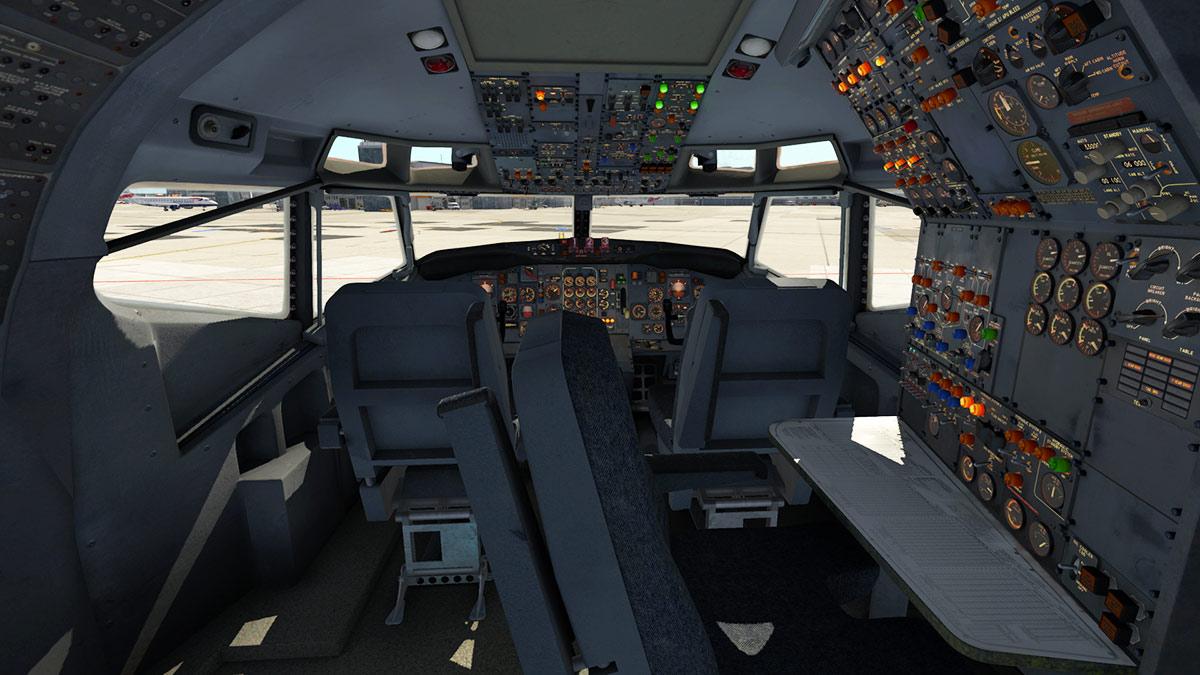
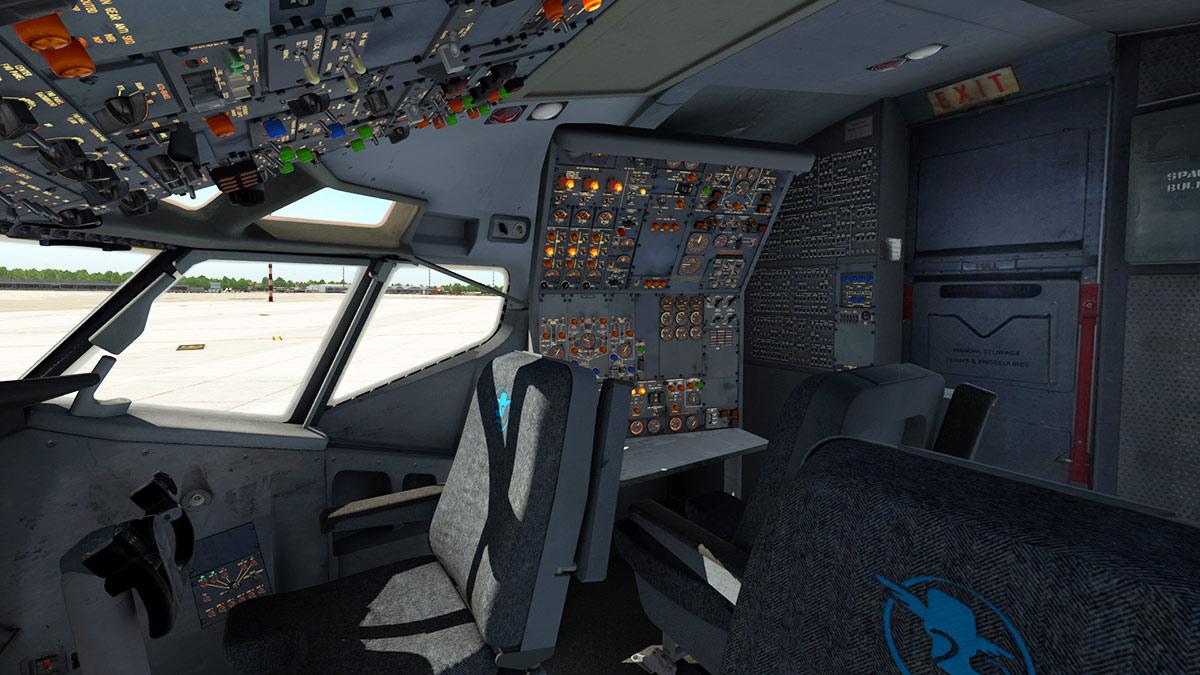
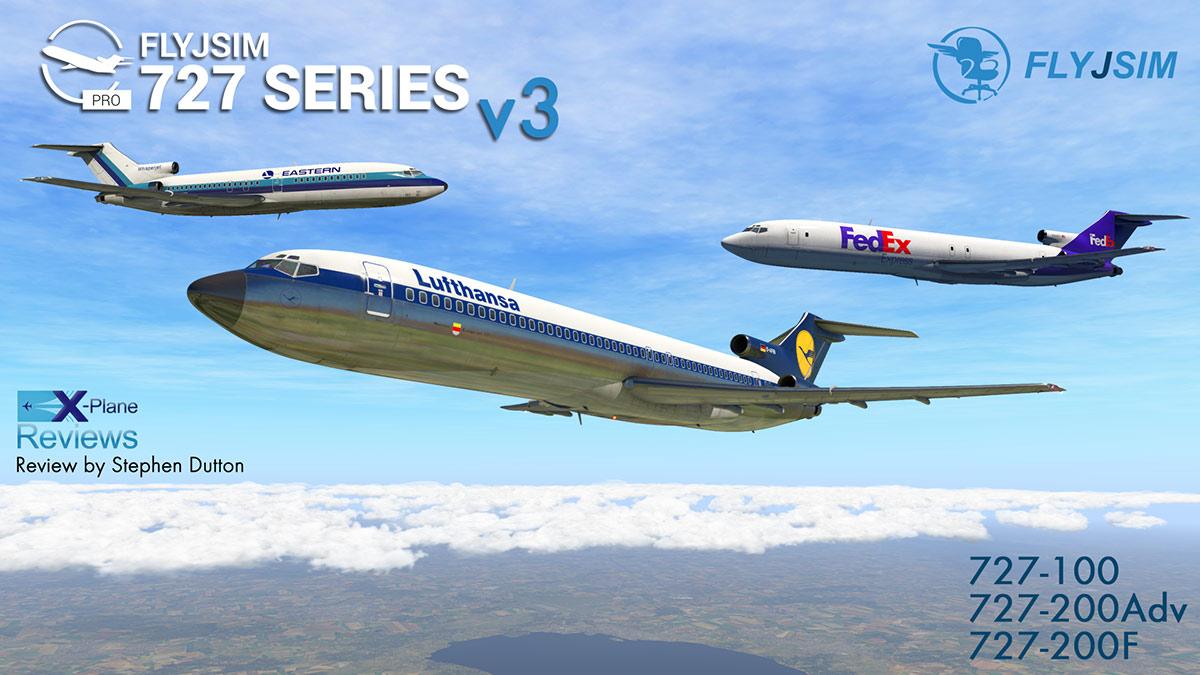
Aircraft Review : 727 Series Pro V3 by FlyJSim
Stephen replied to Stephen's topic in Airliners Reviews
Yes I'm with you all the way on this, I am really, really disappointed there is no internal cargo option... 😢 -
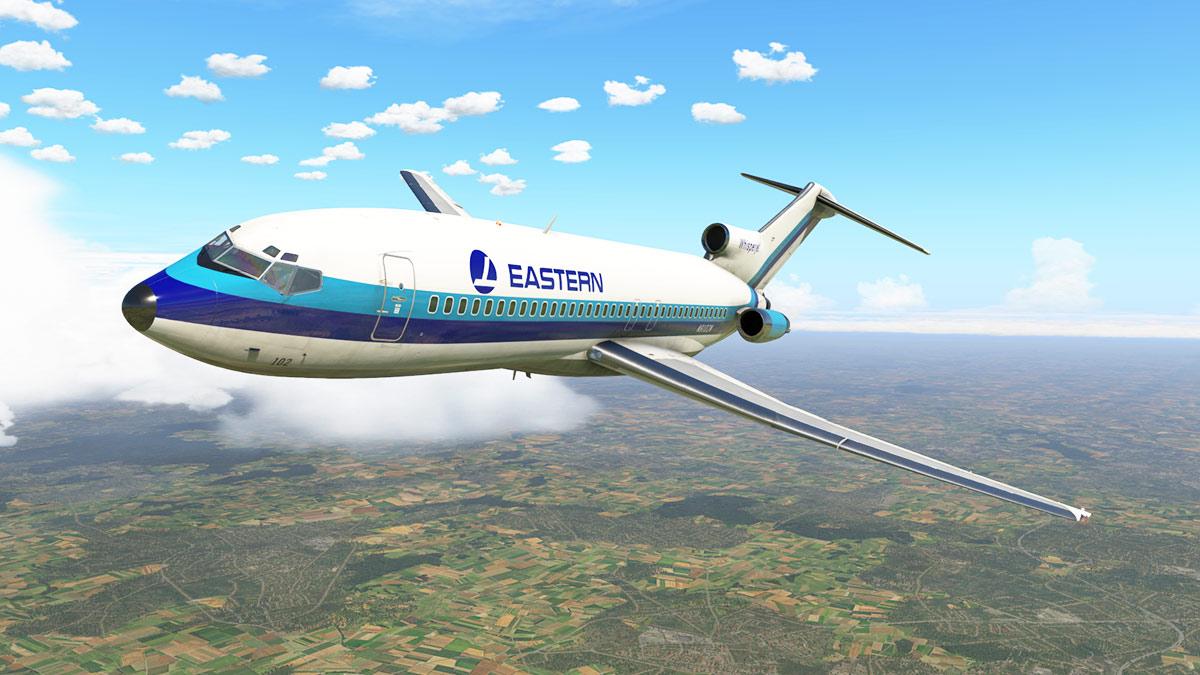
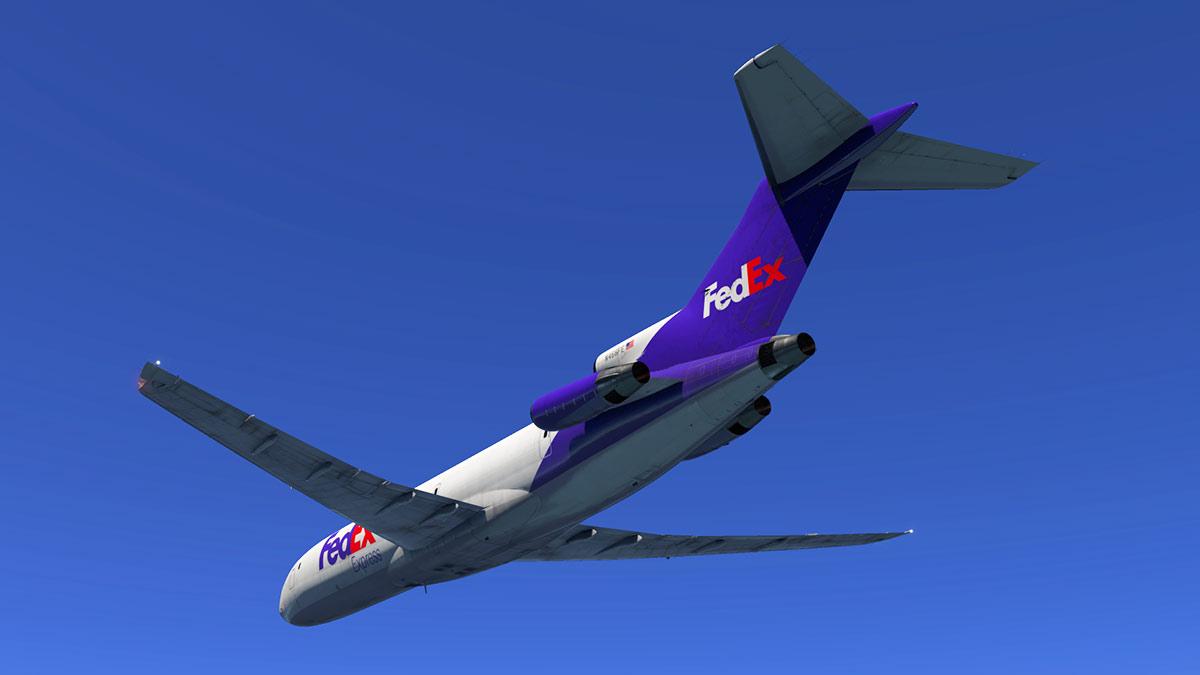
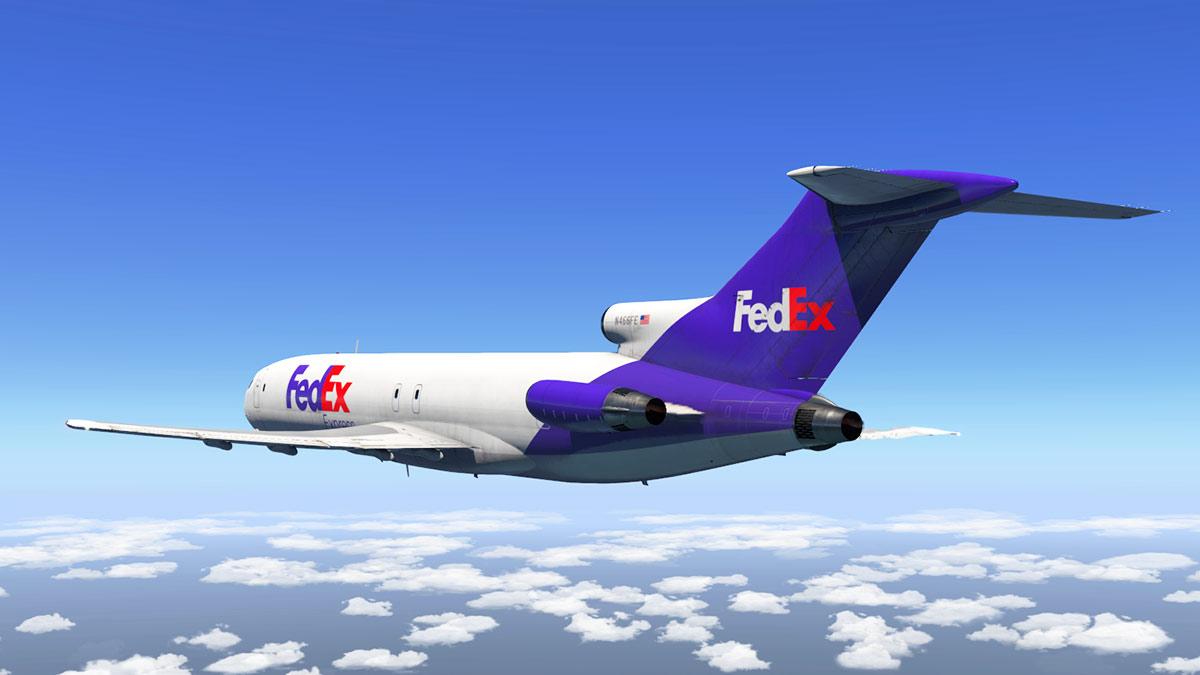
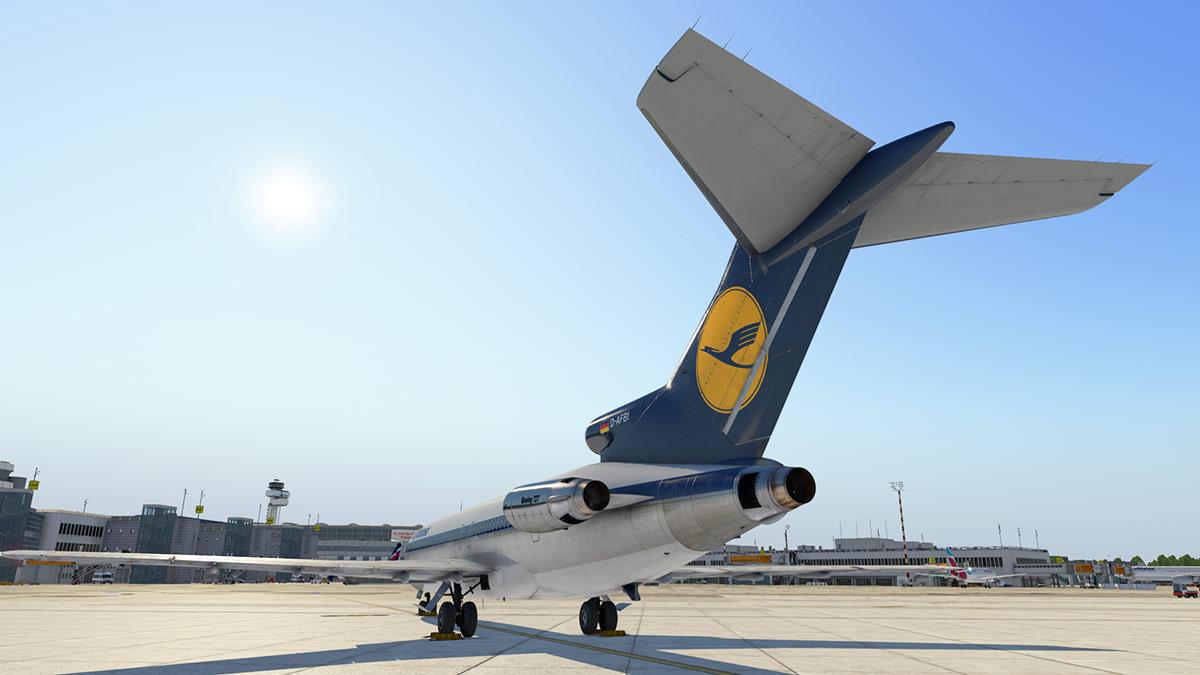
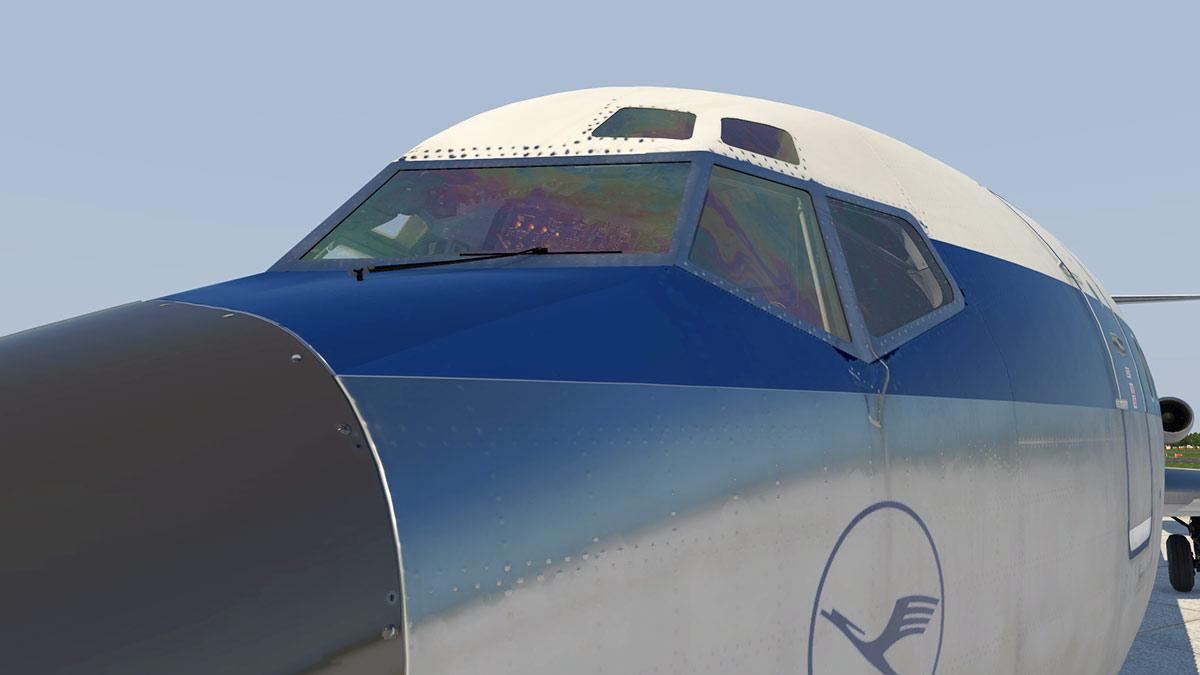
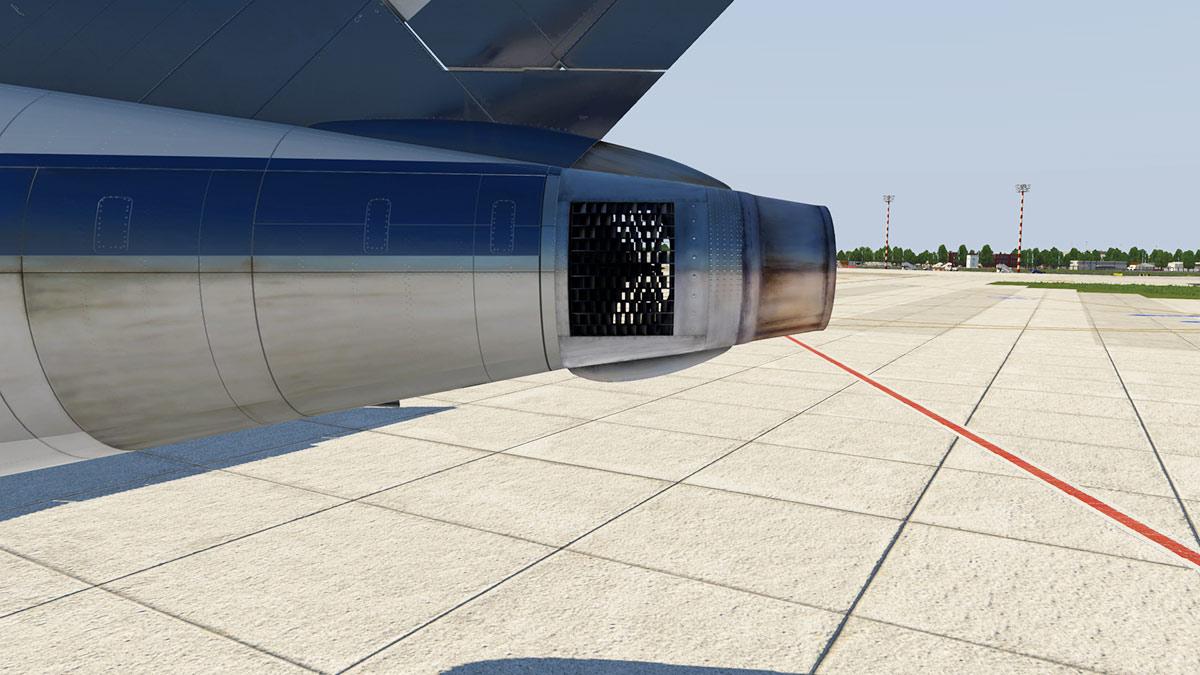
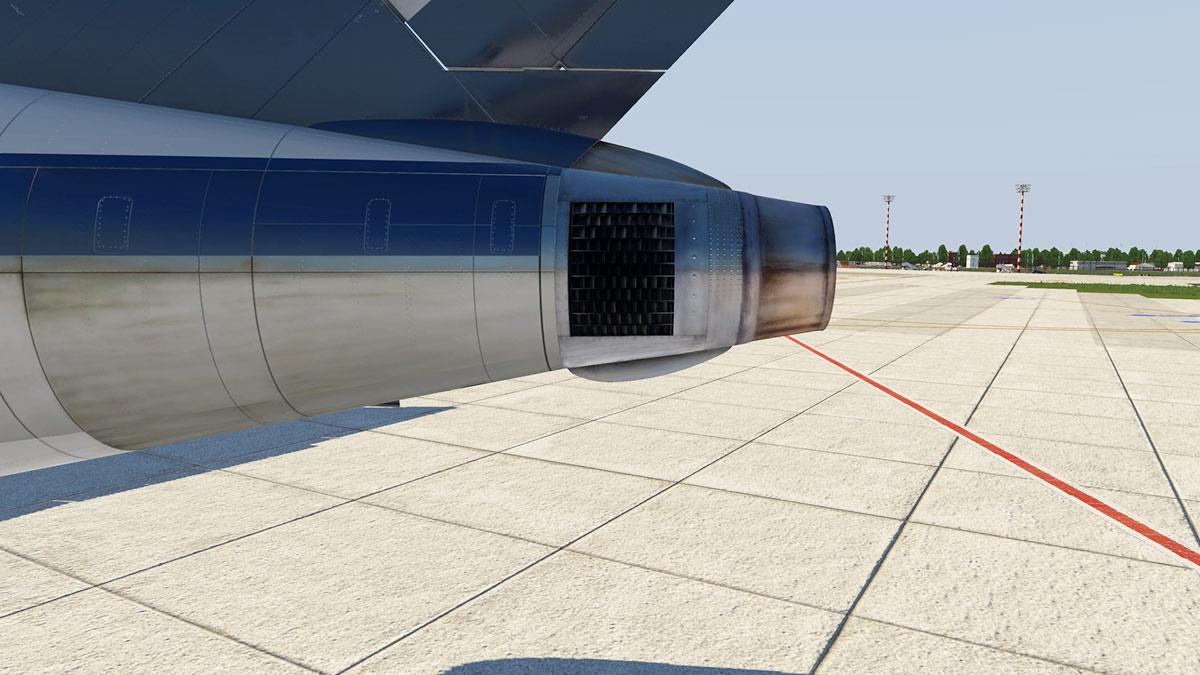
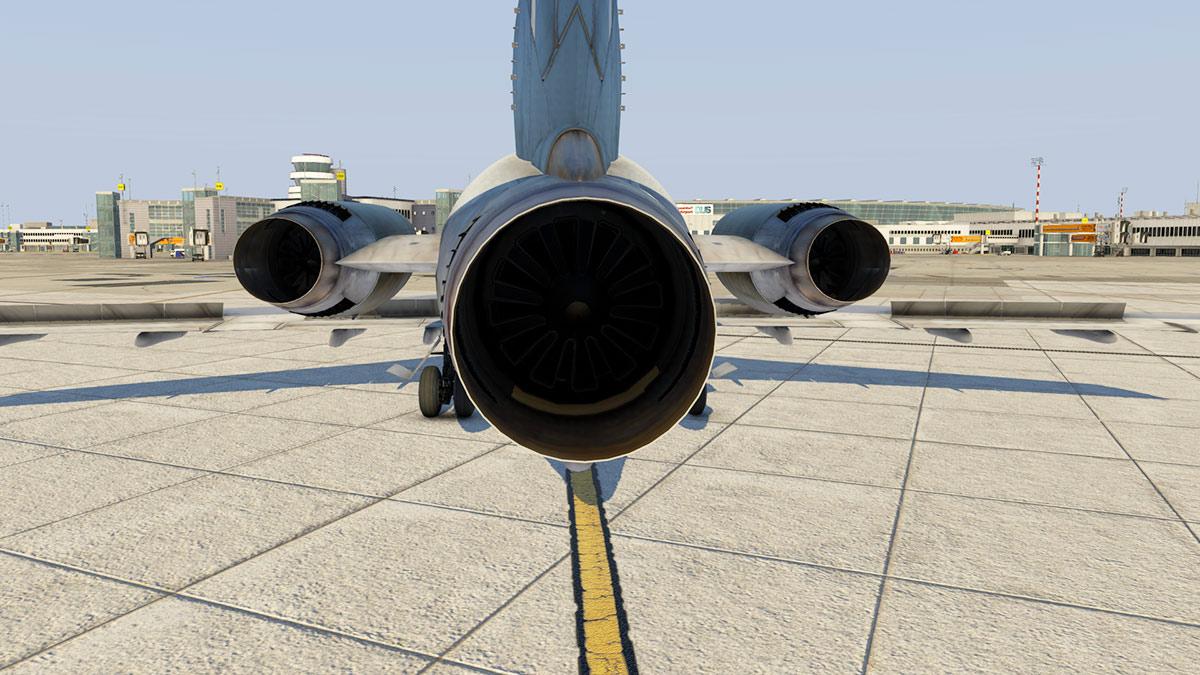
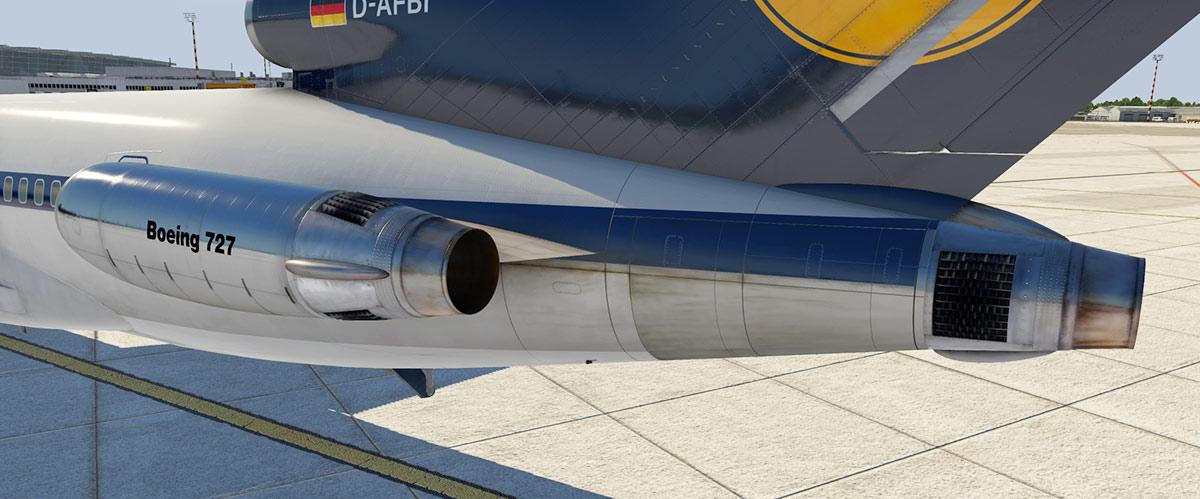
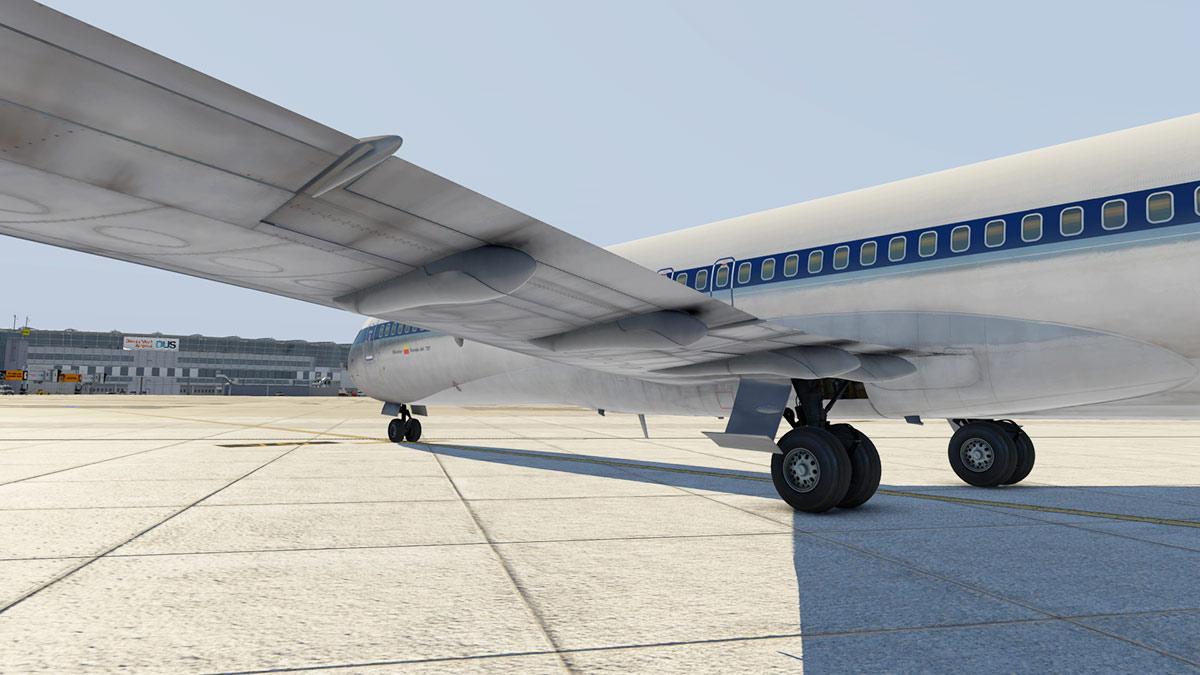
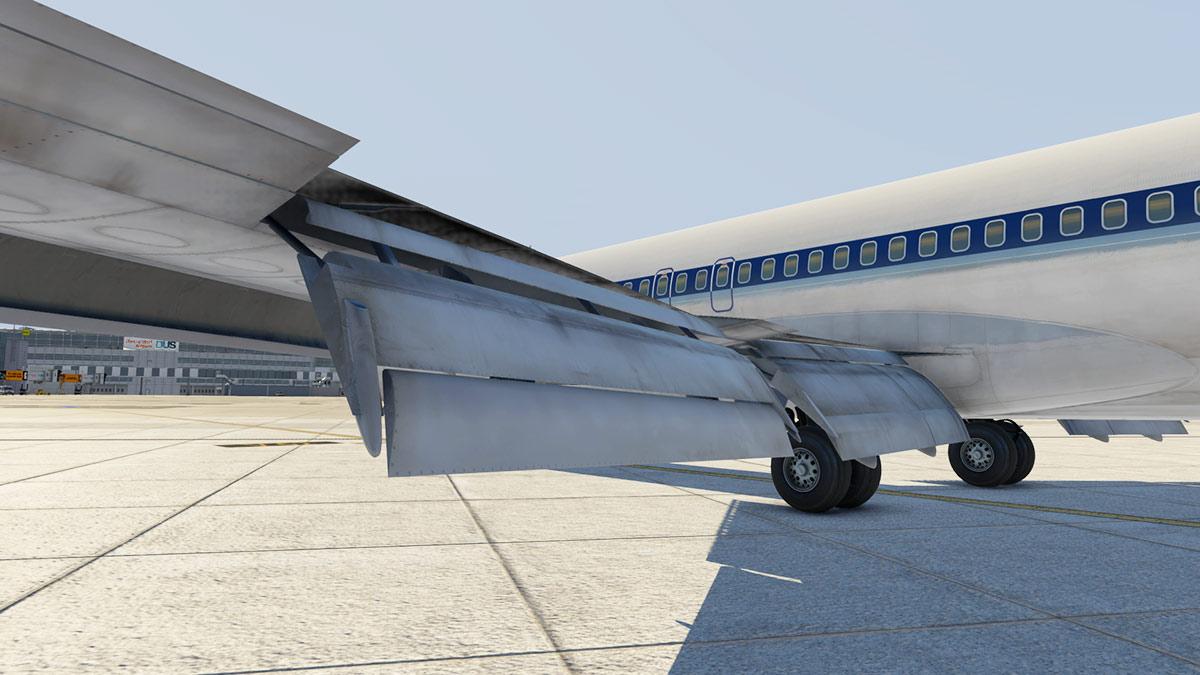
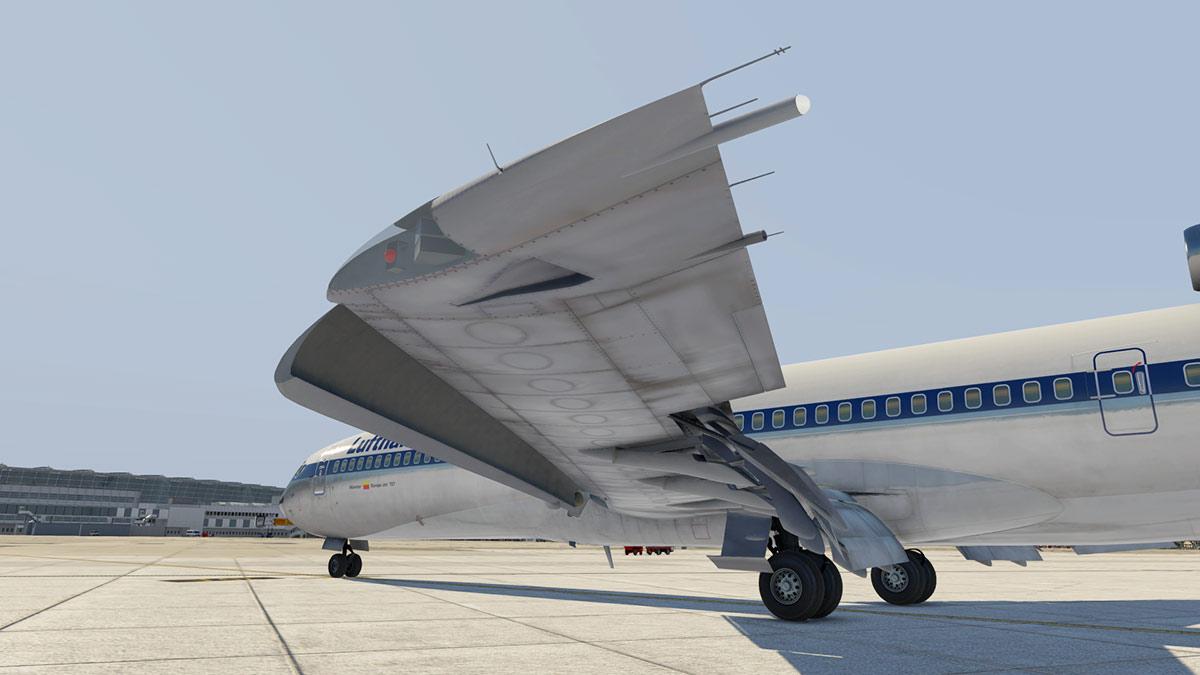
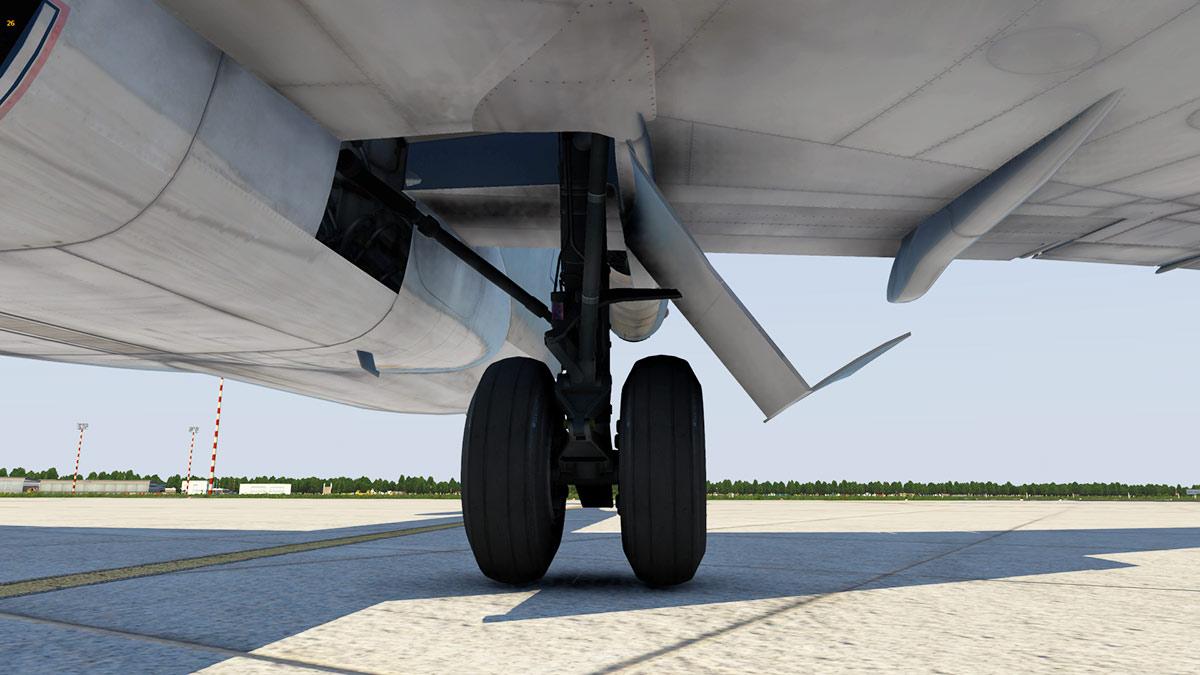
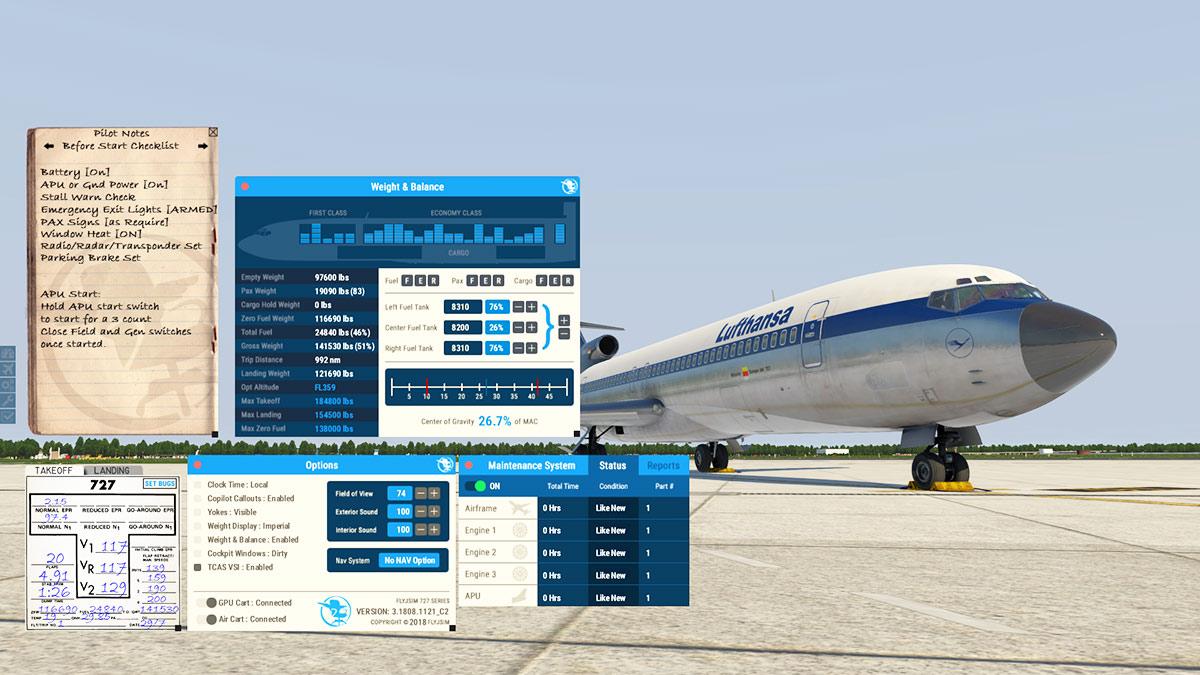
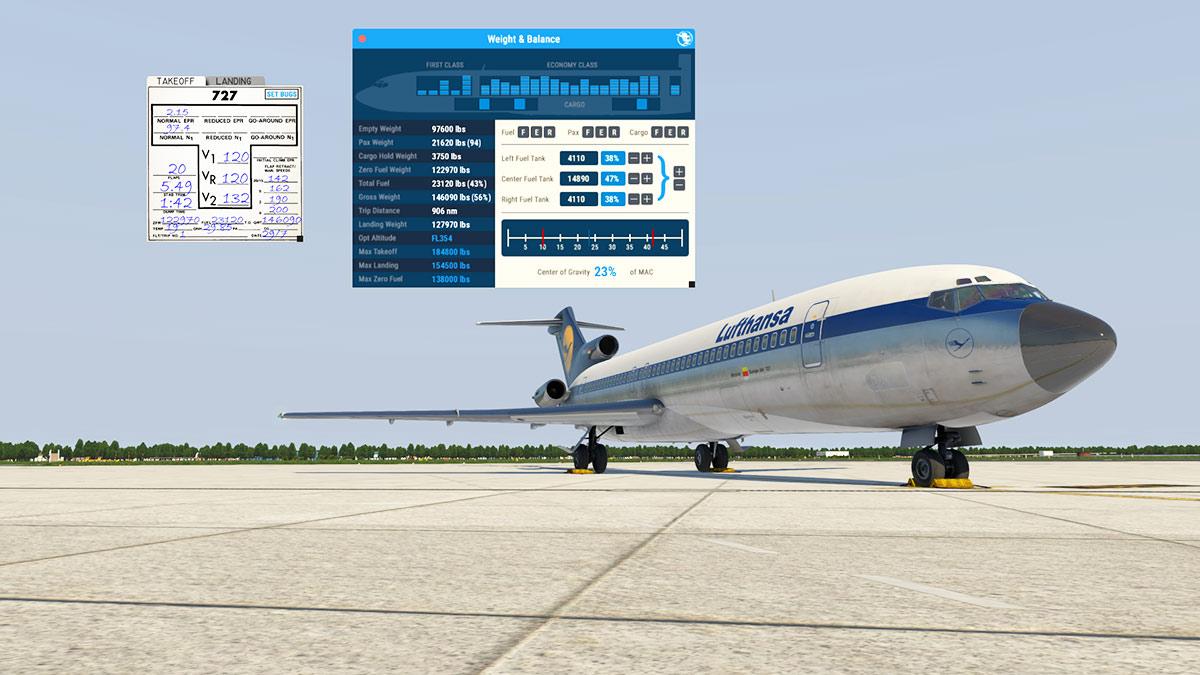
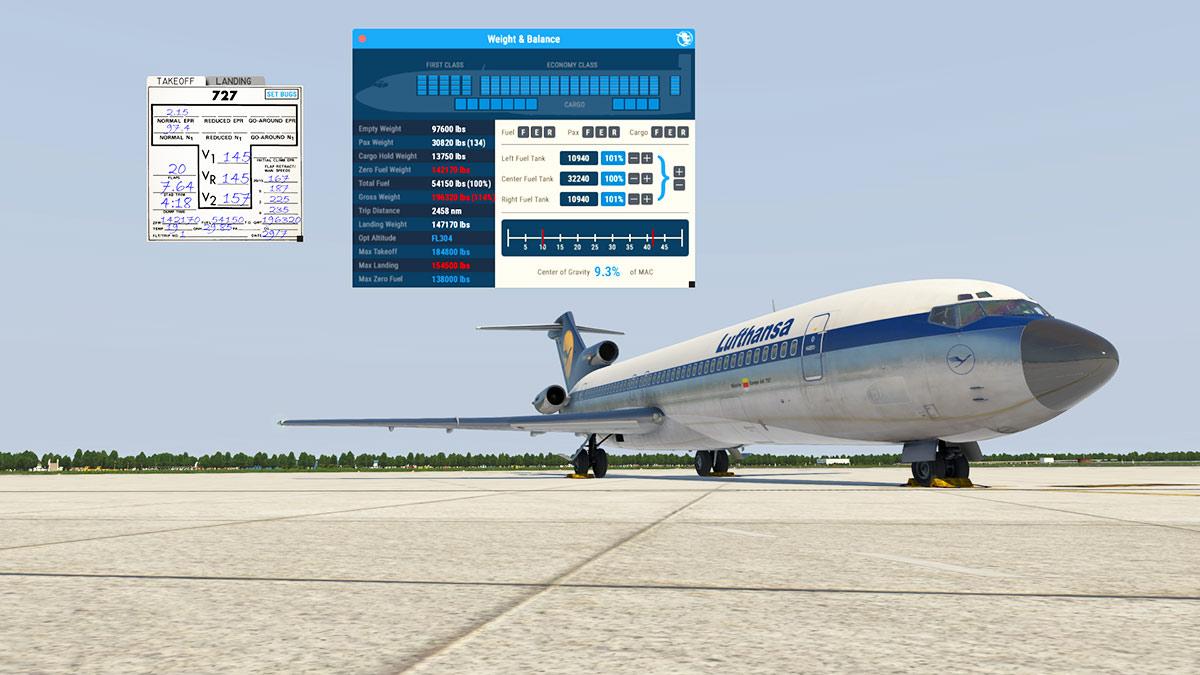
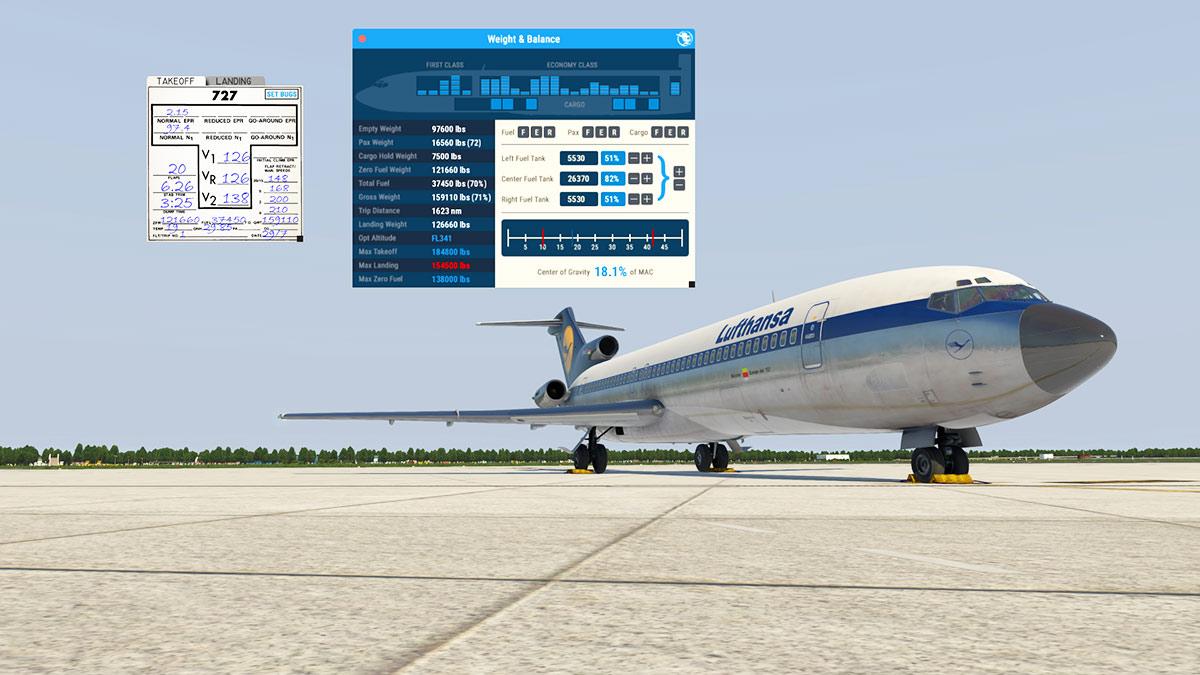
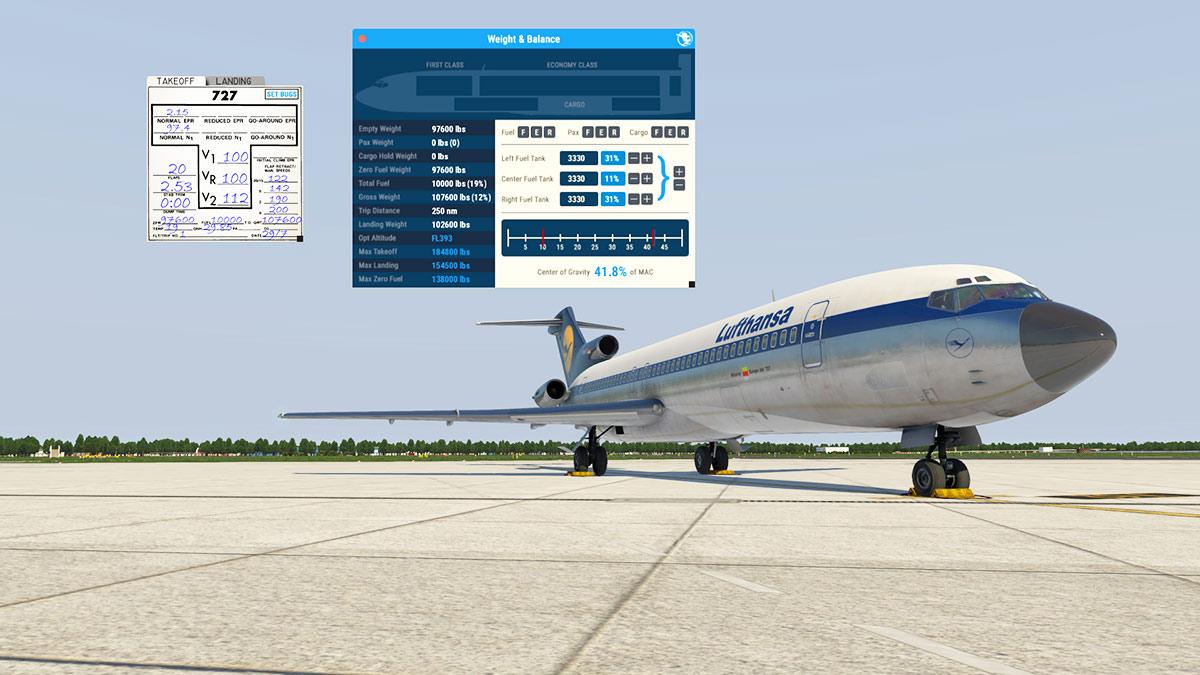
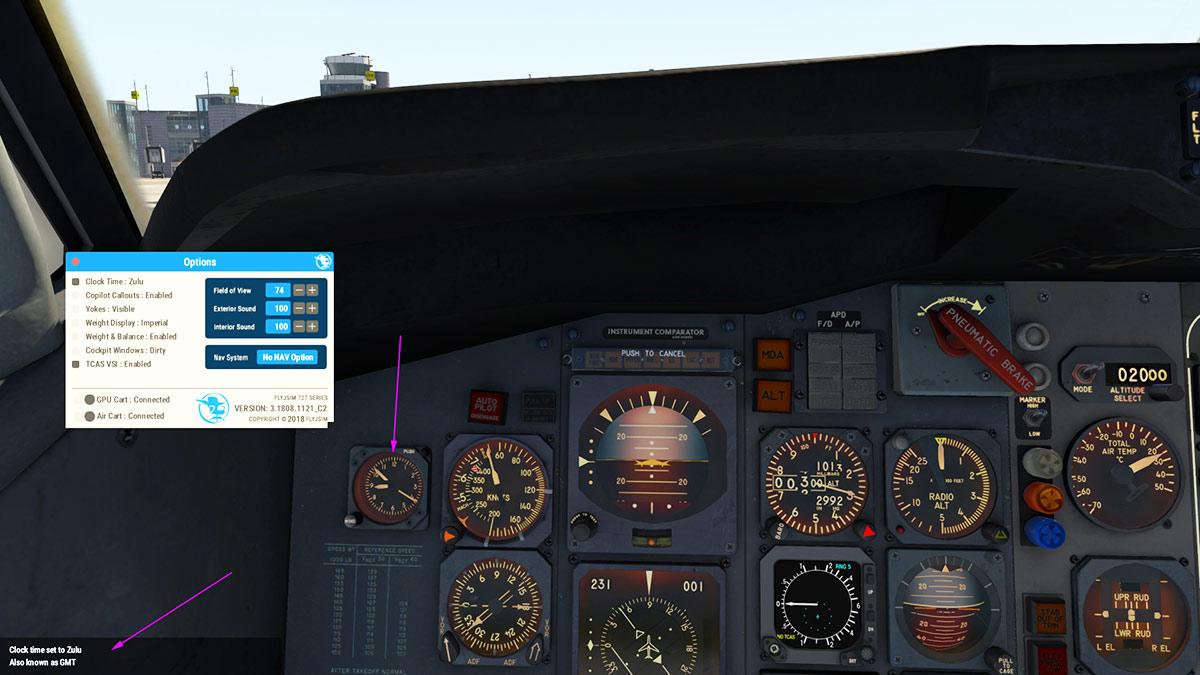
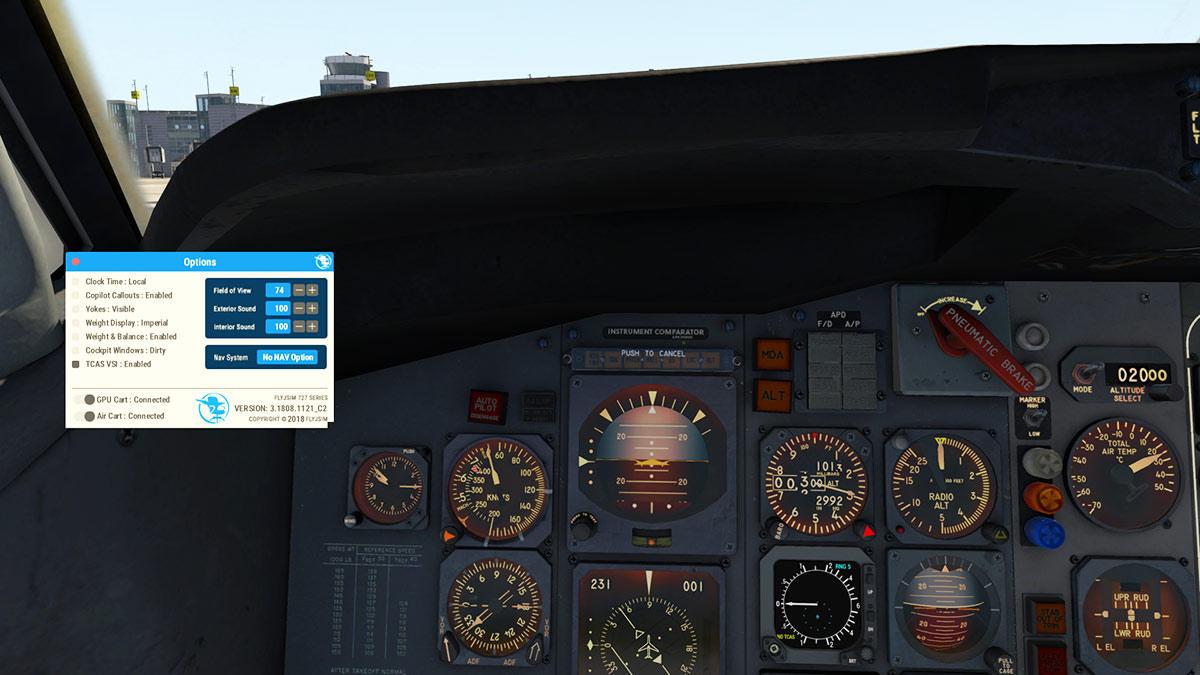
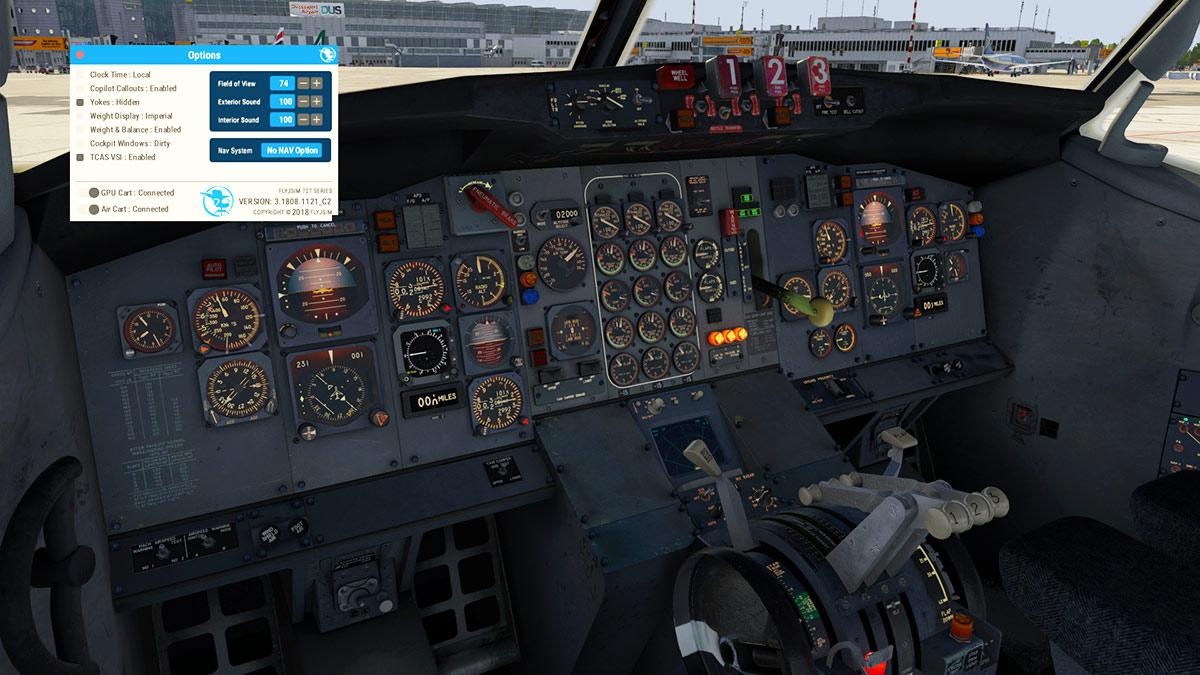
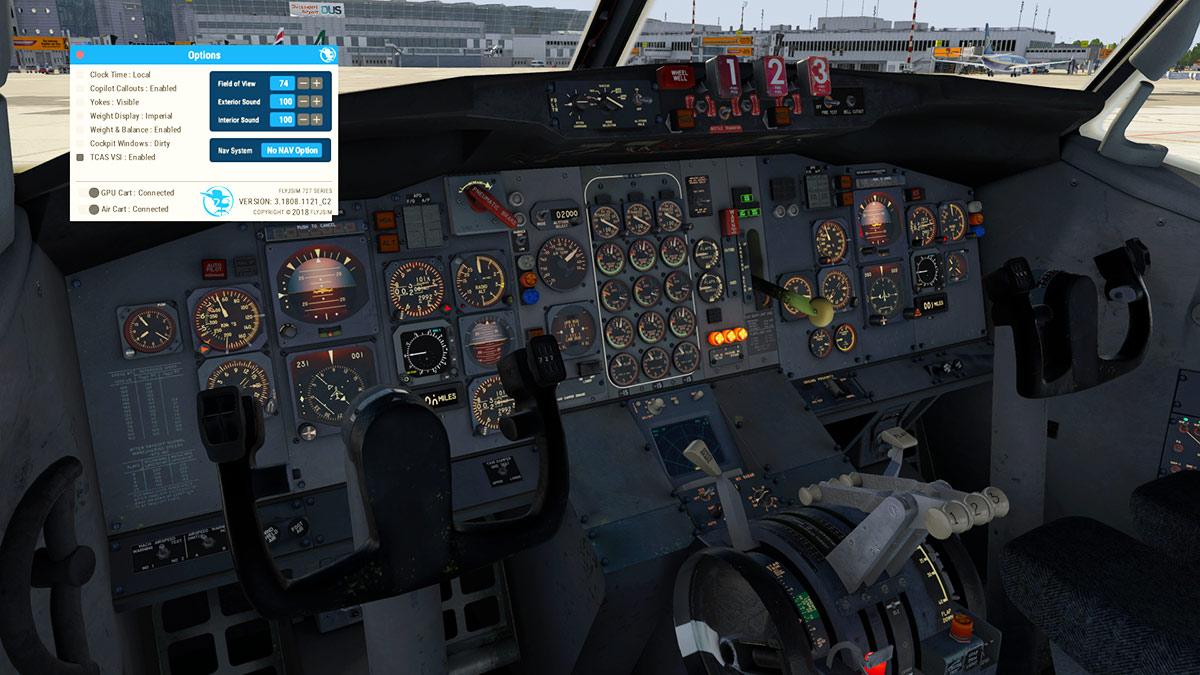
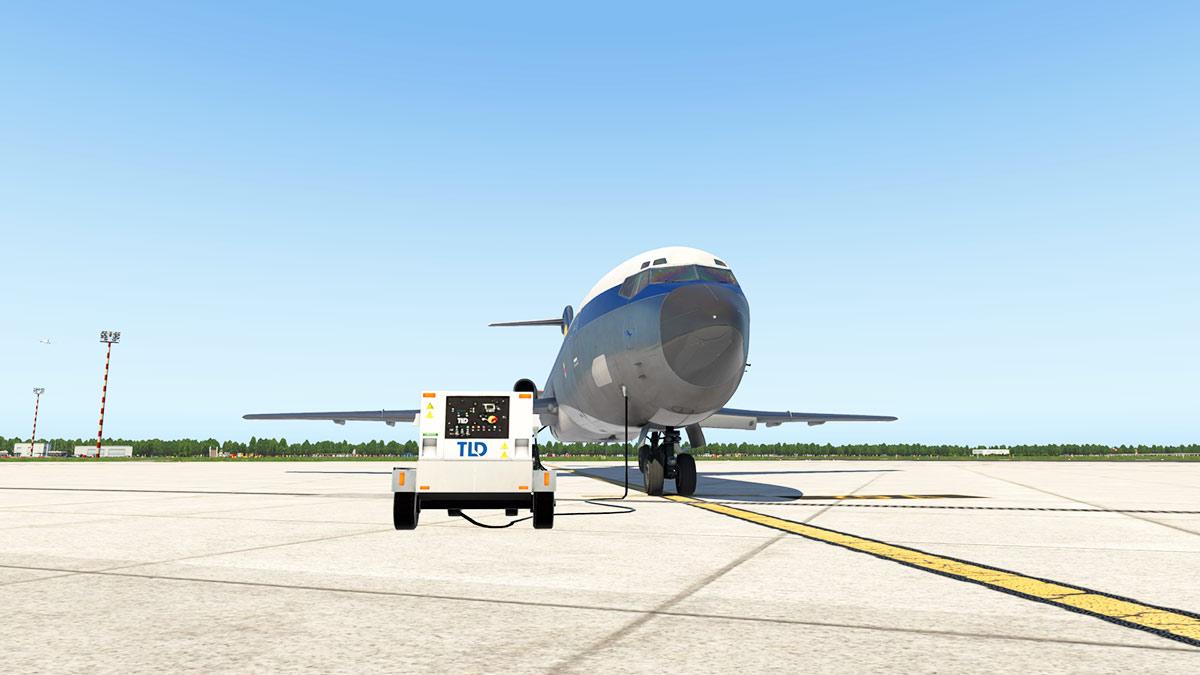
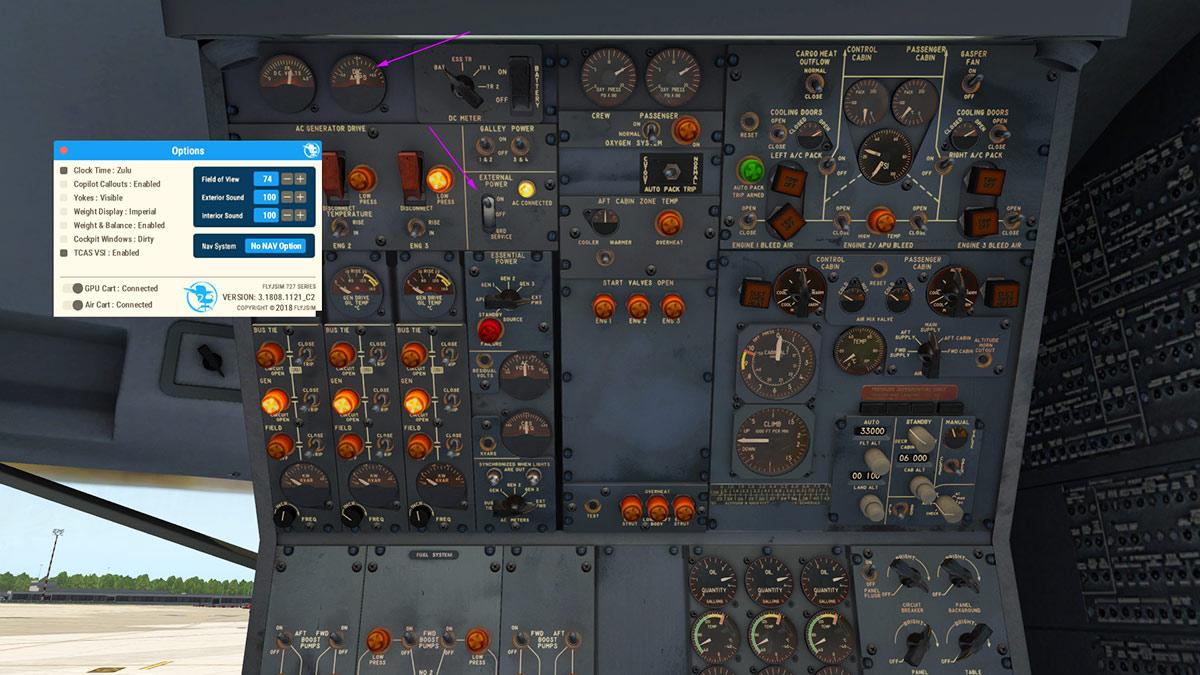
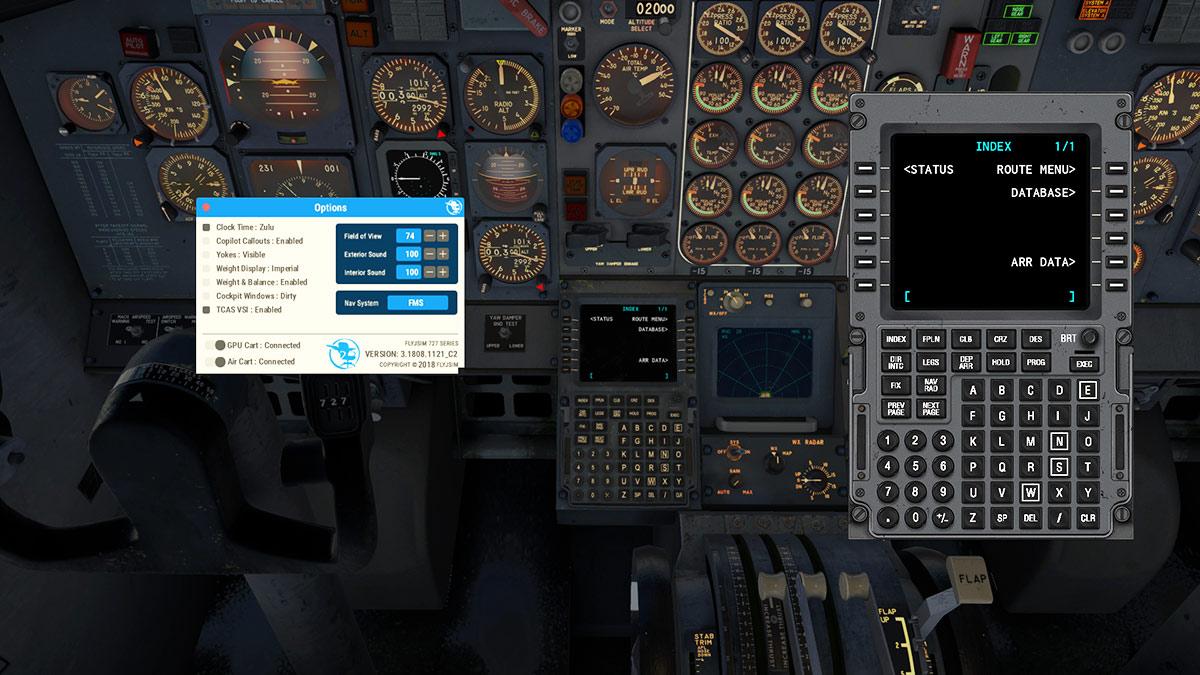
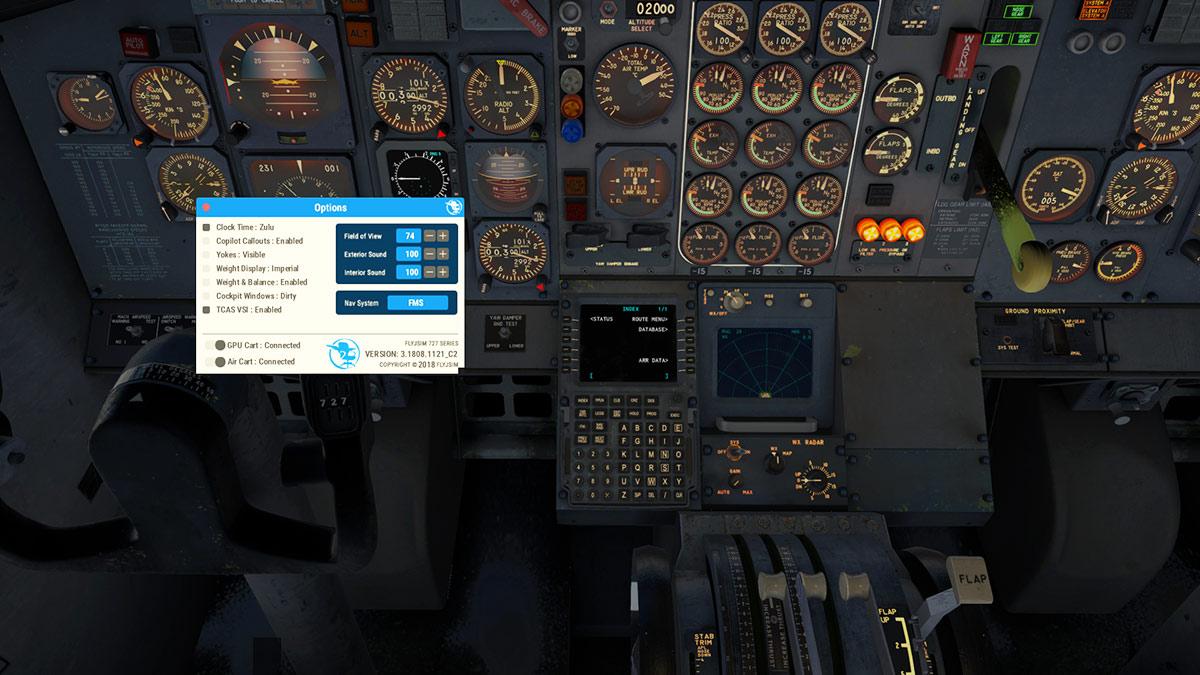
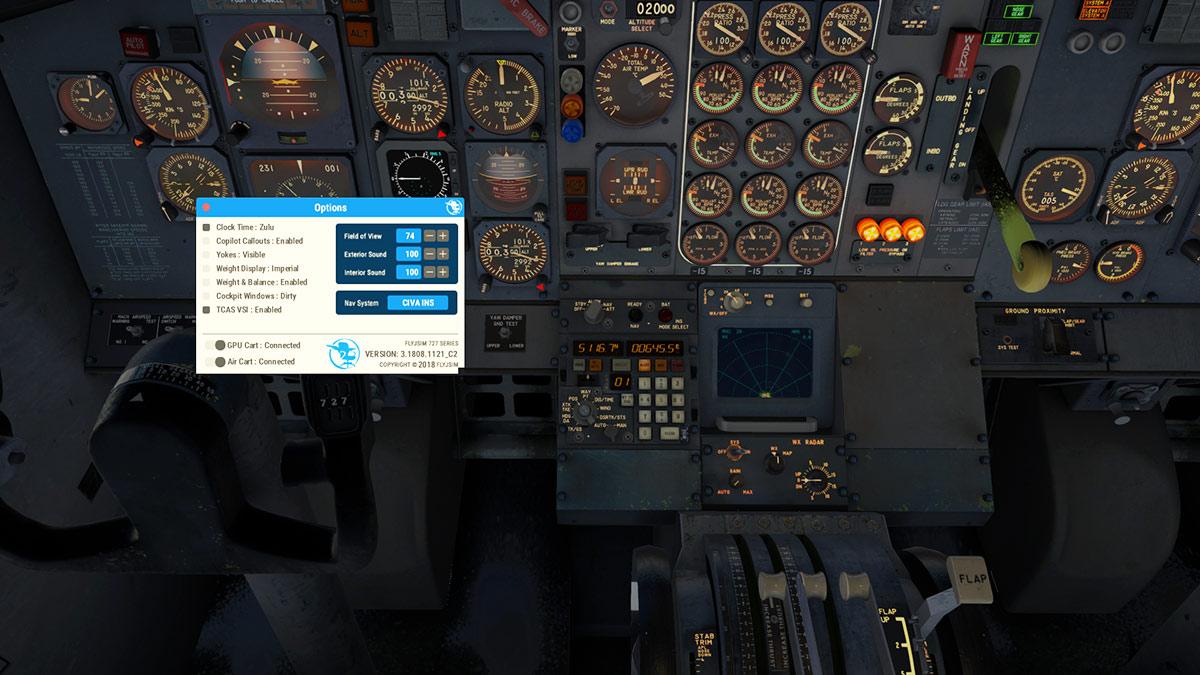
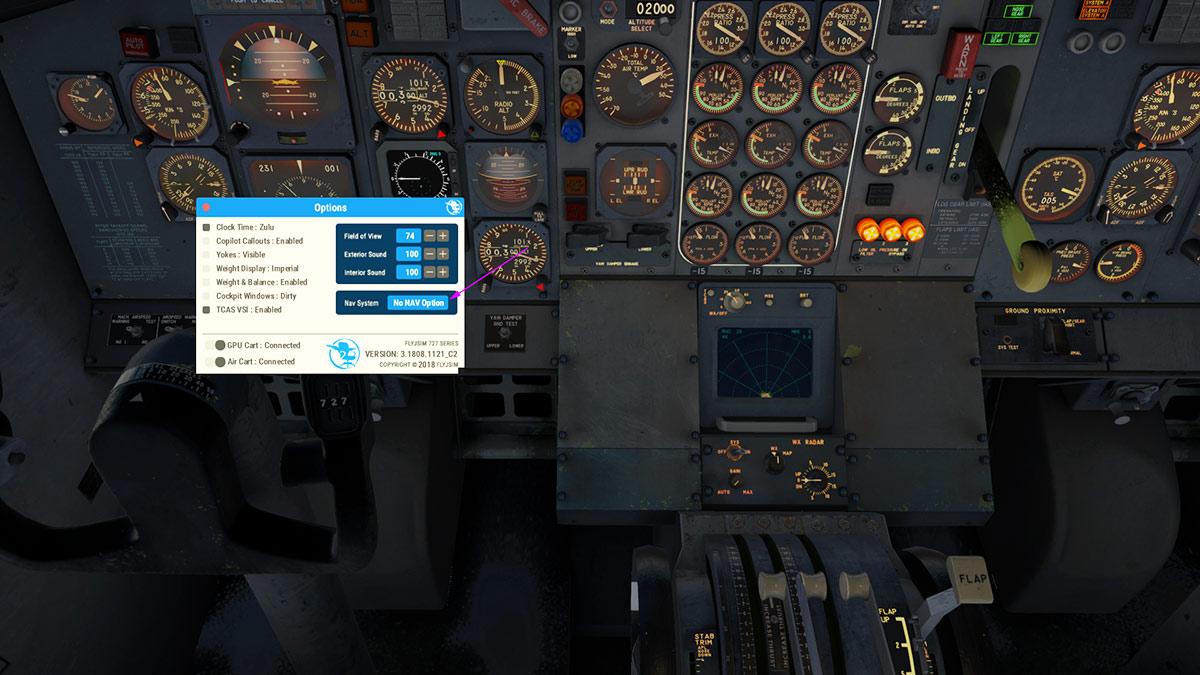
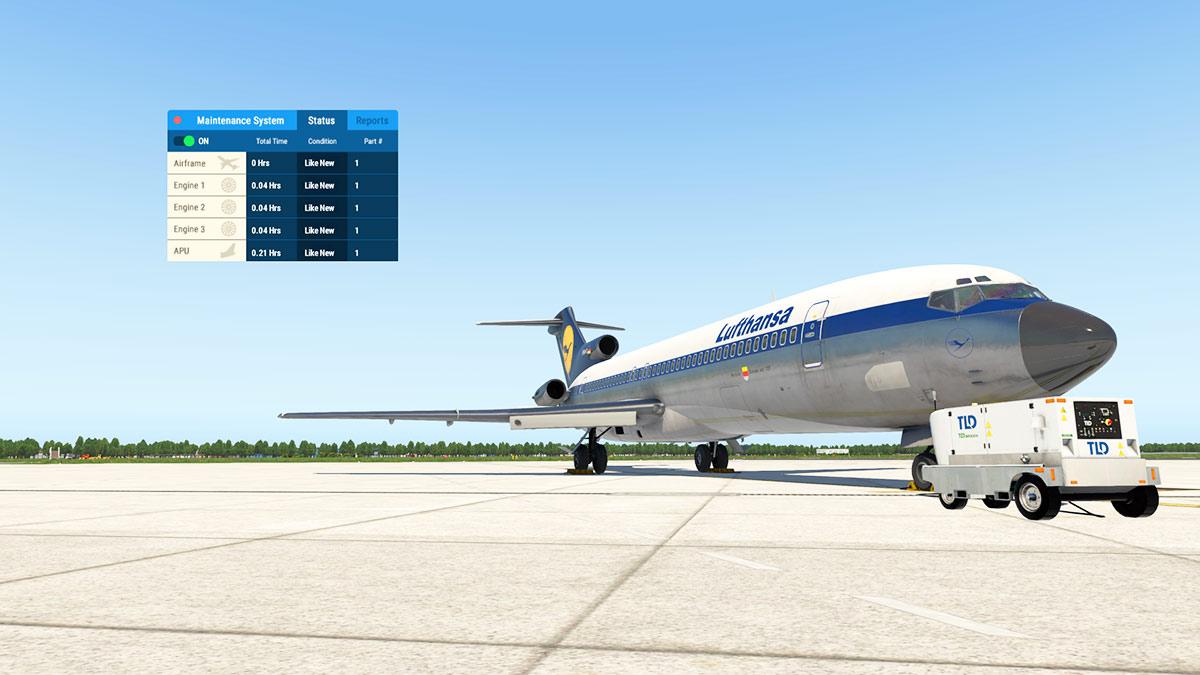
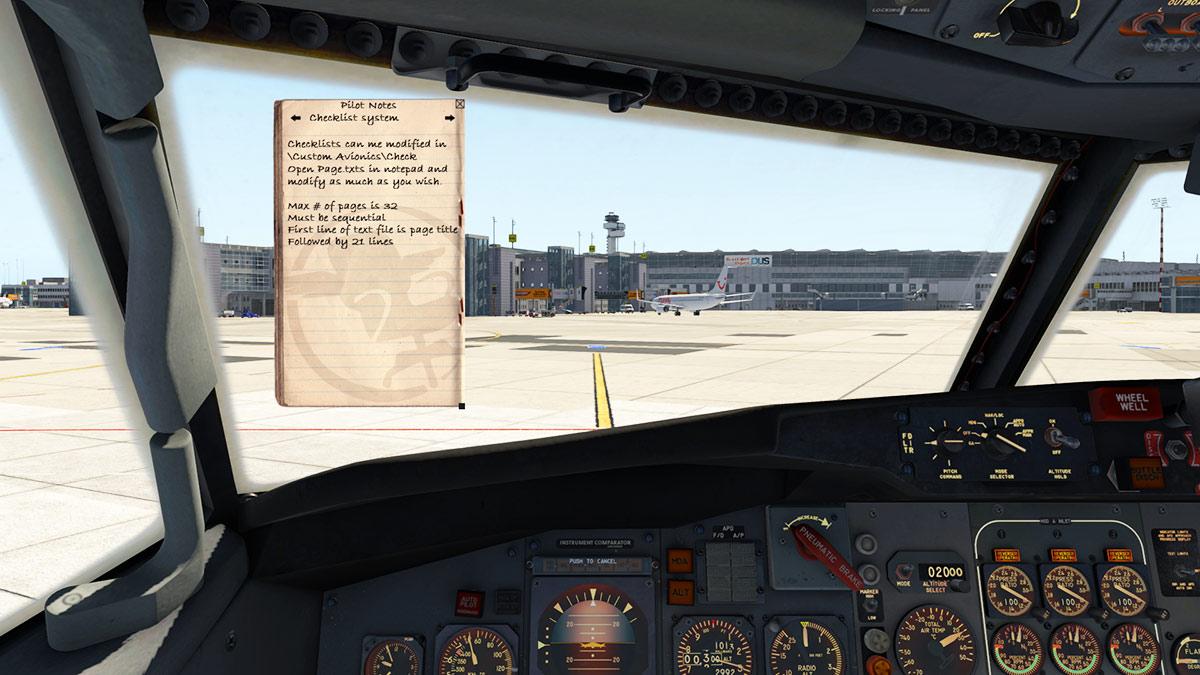
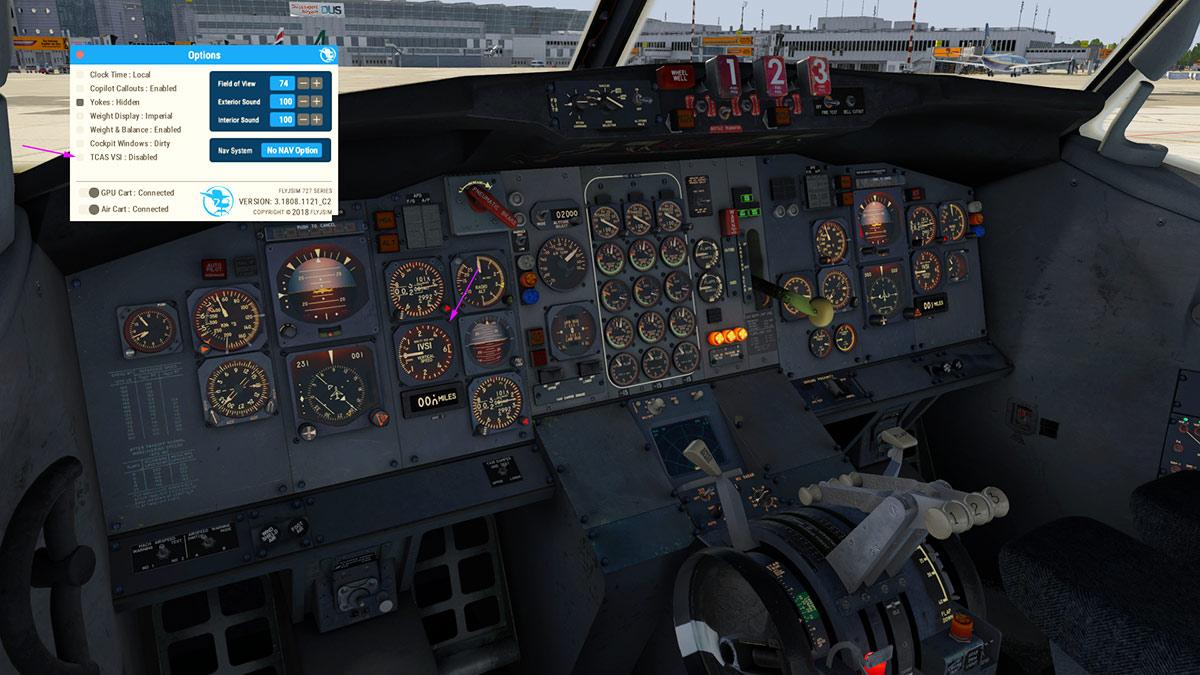
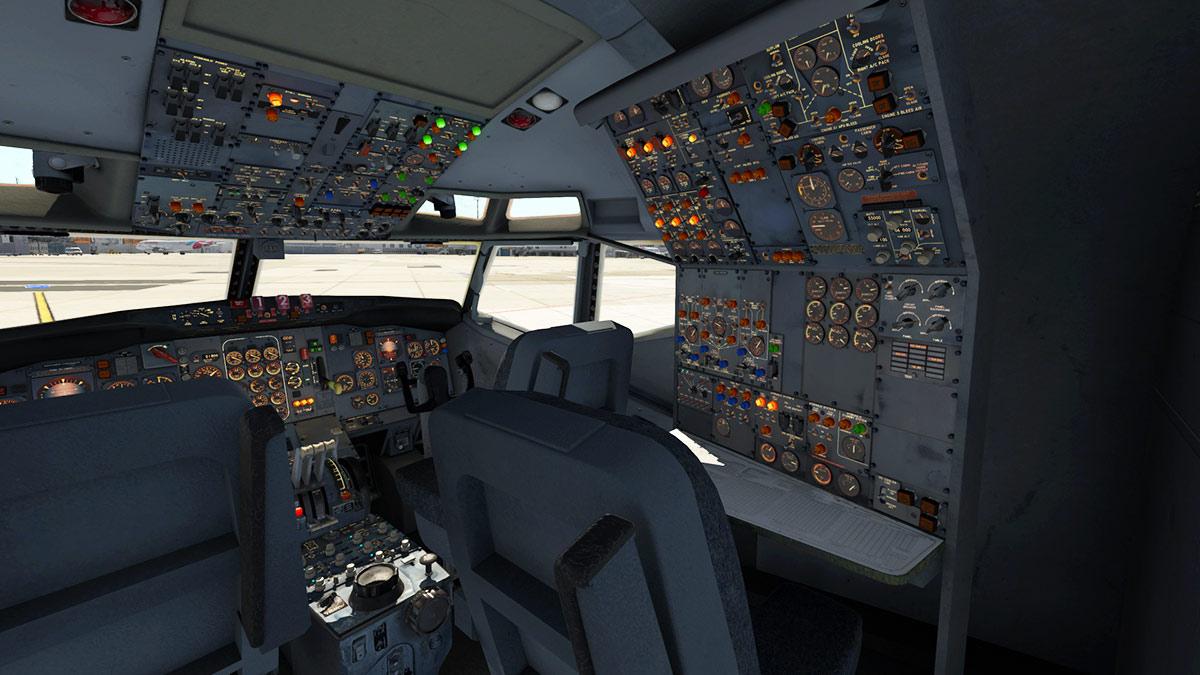
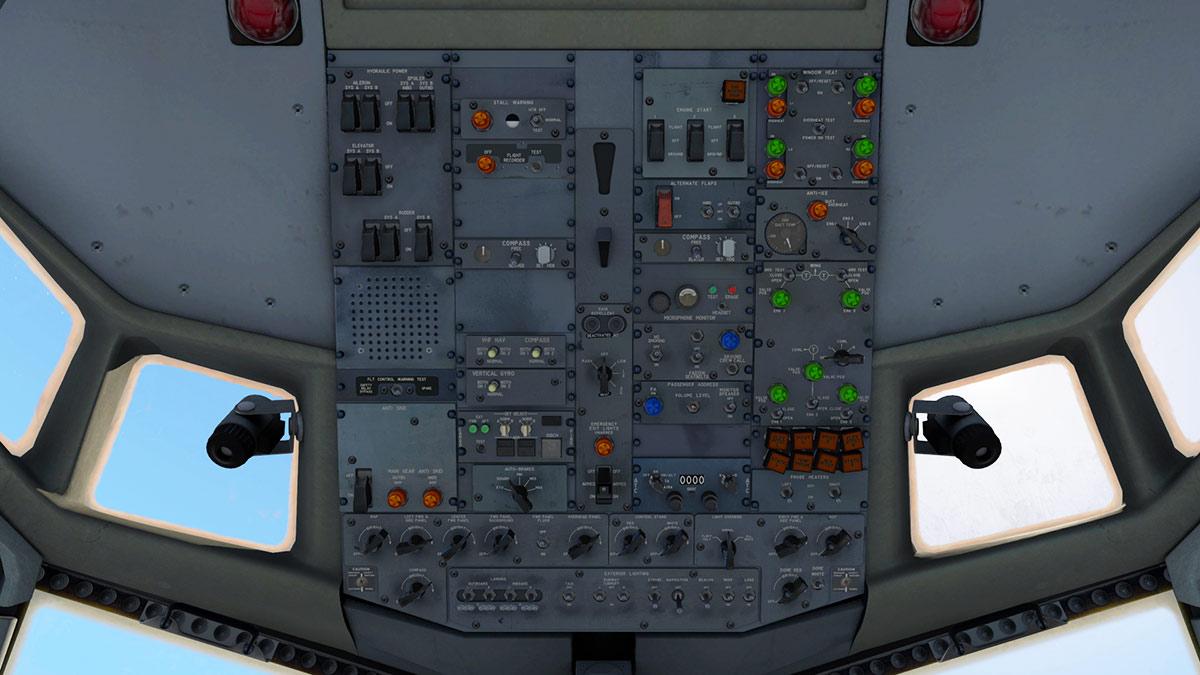
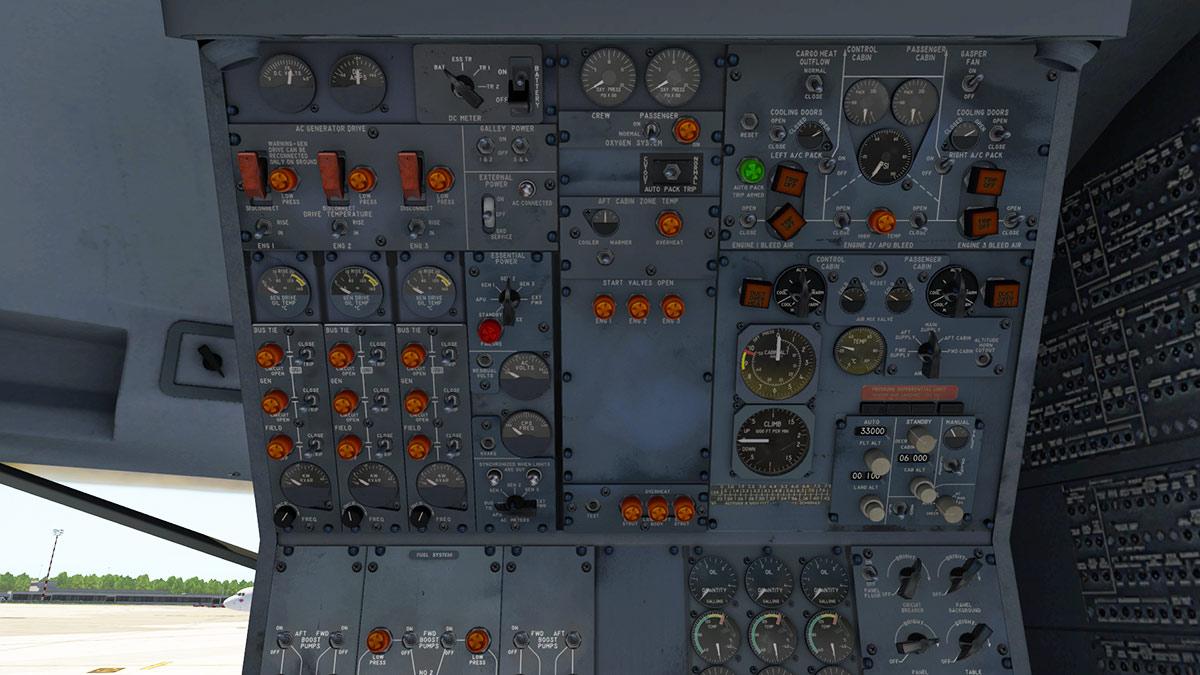
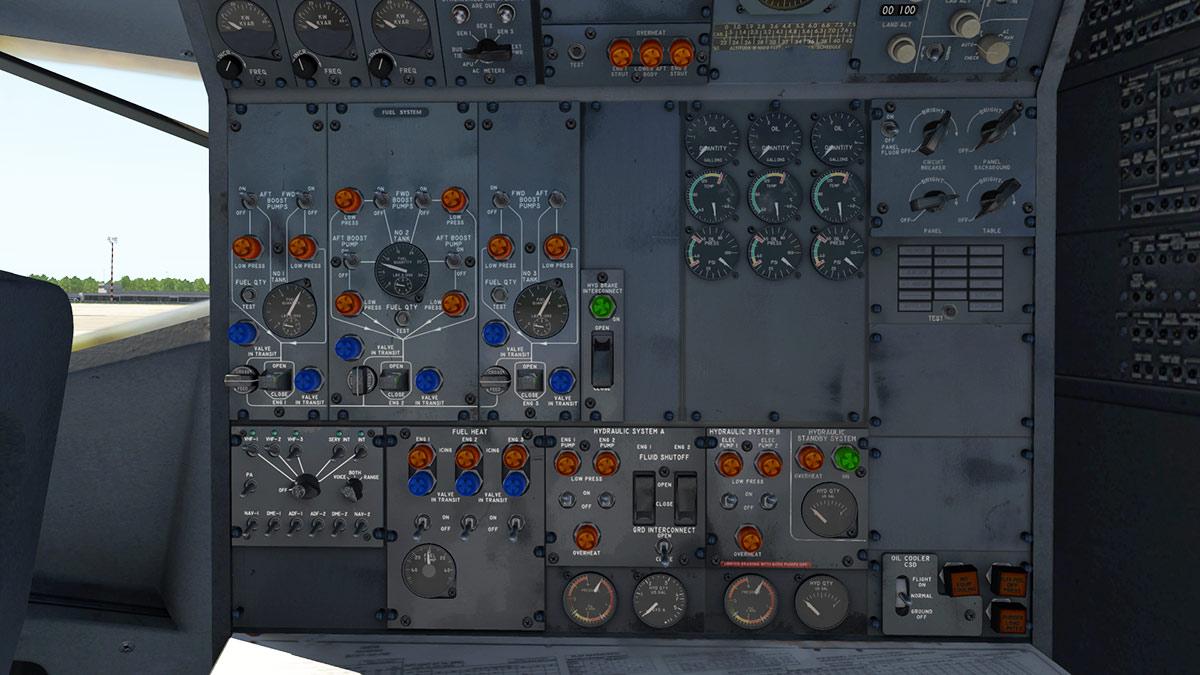
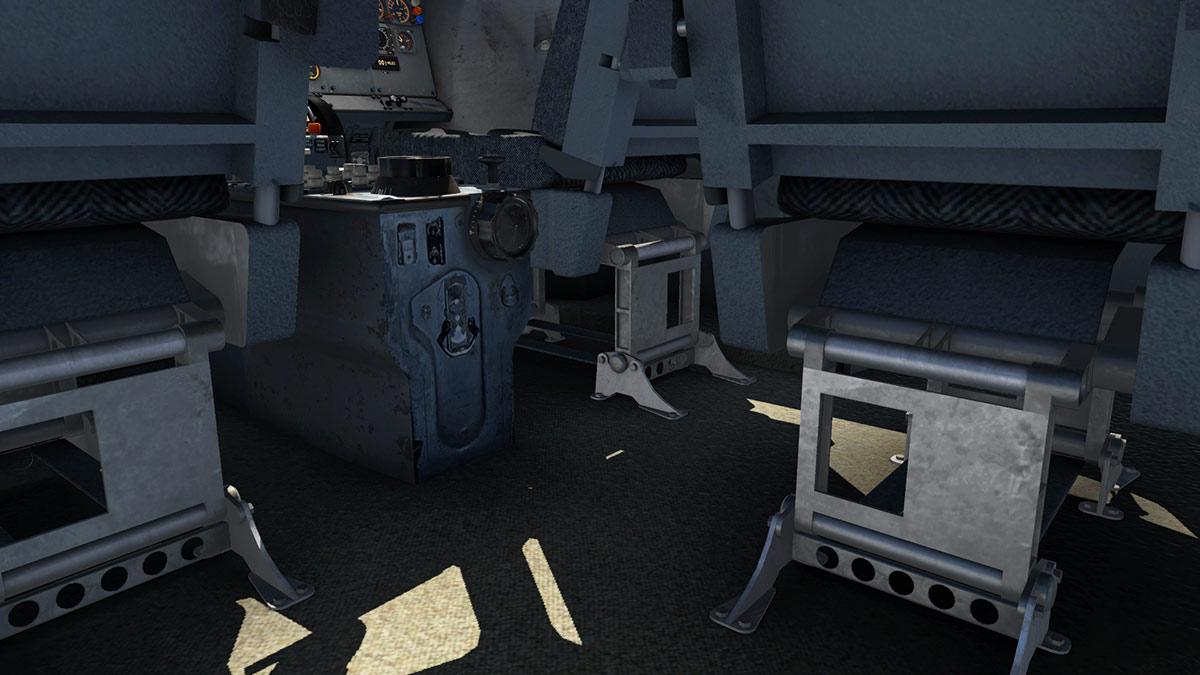
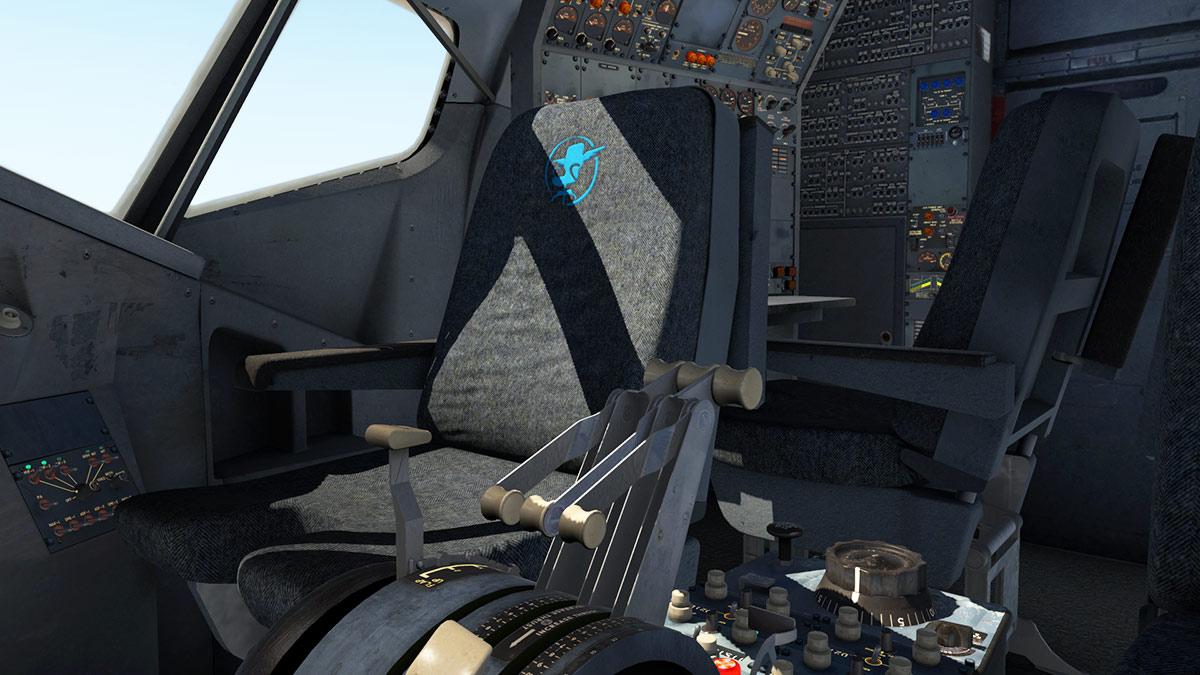
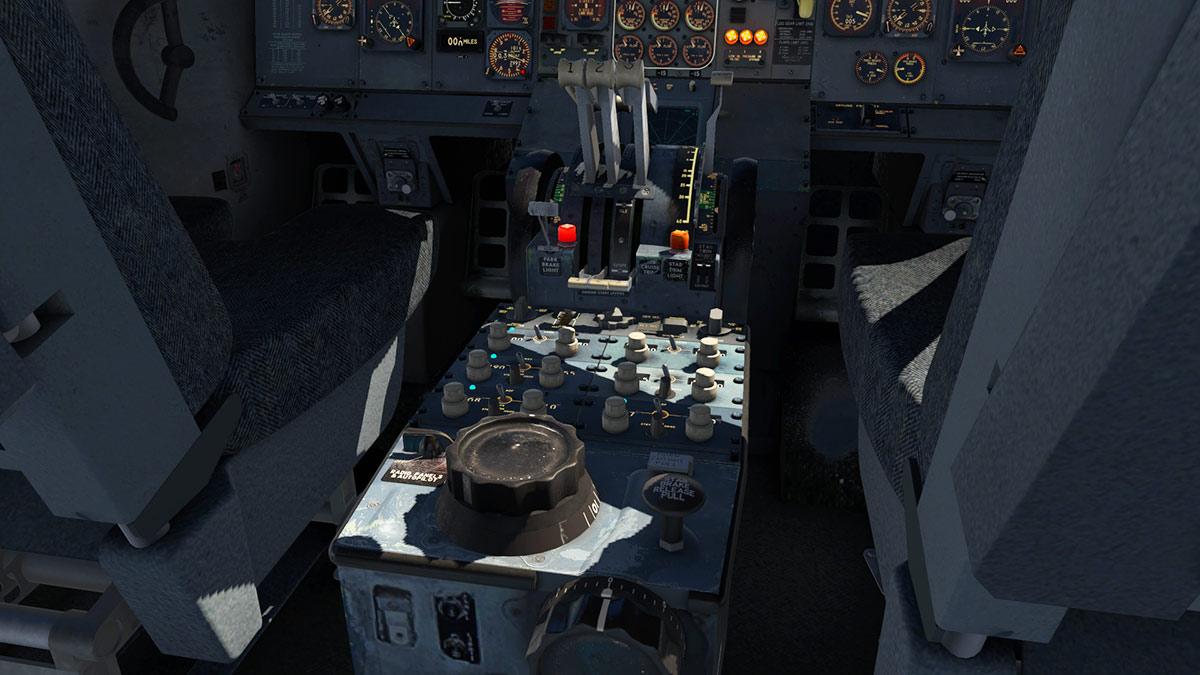
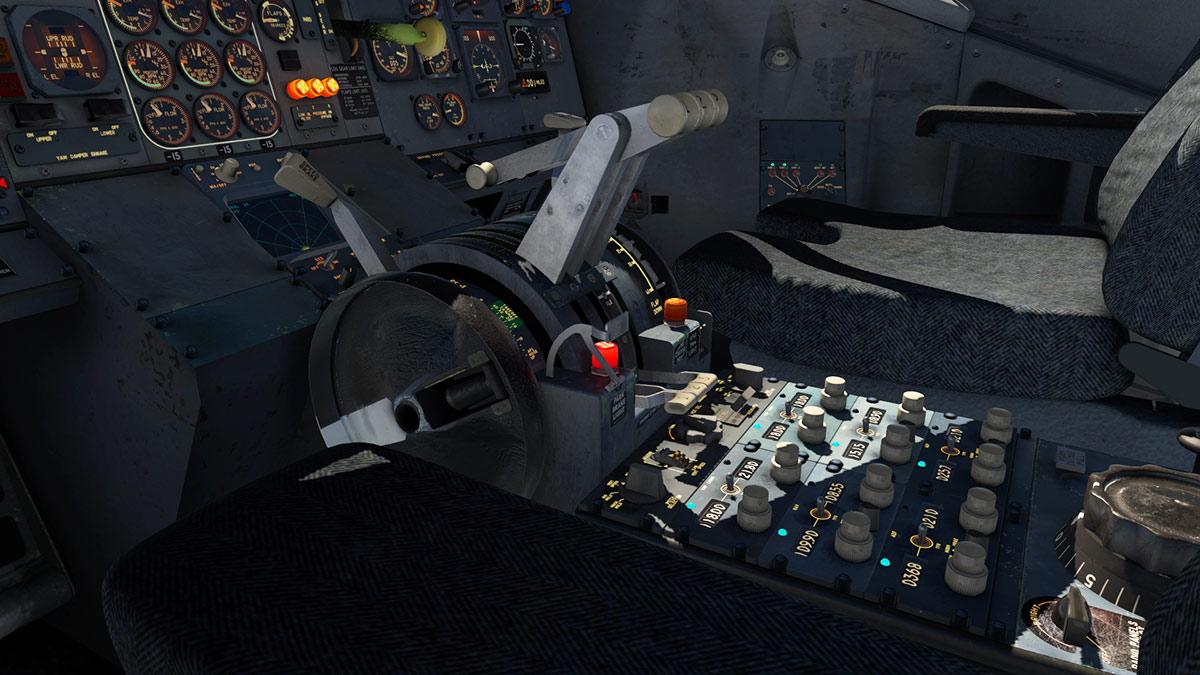
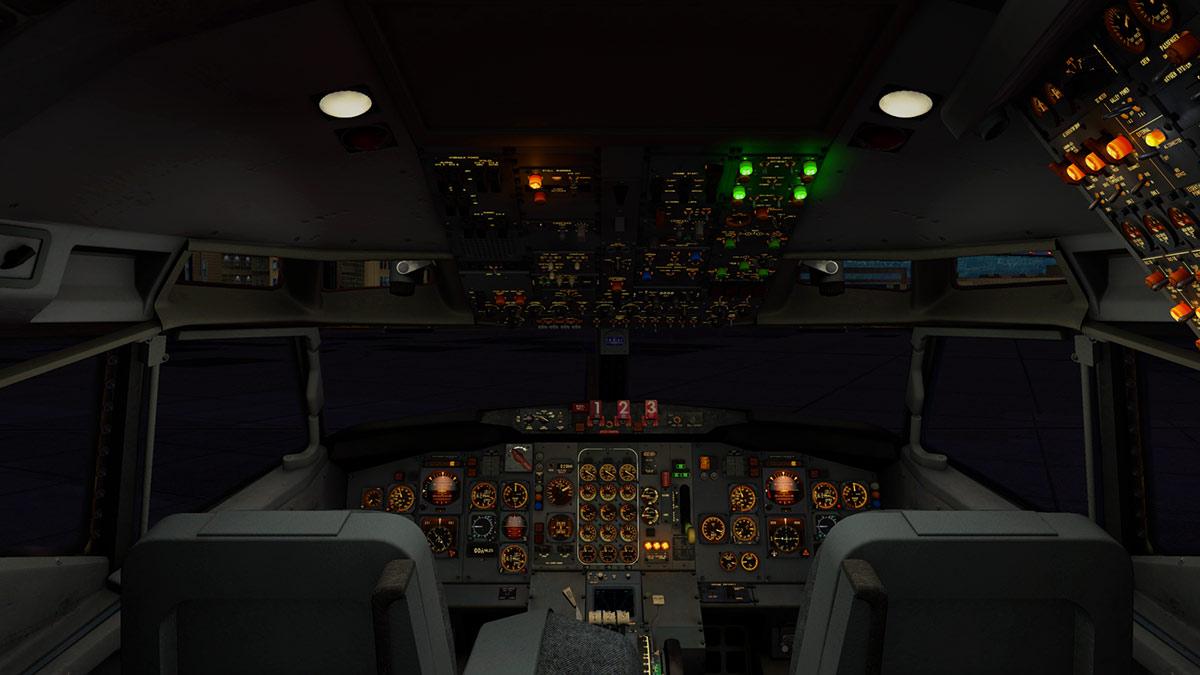
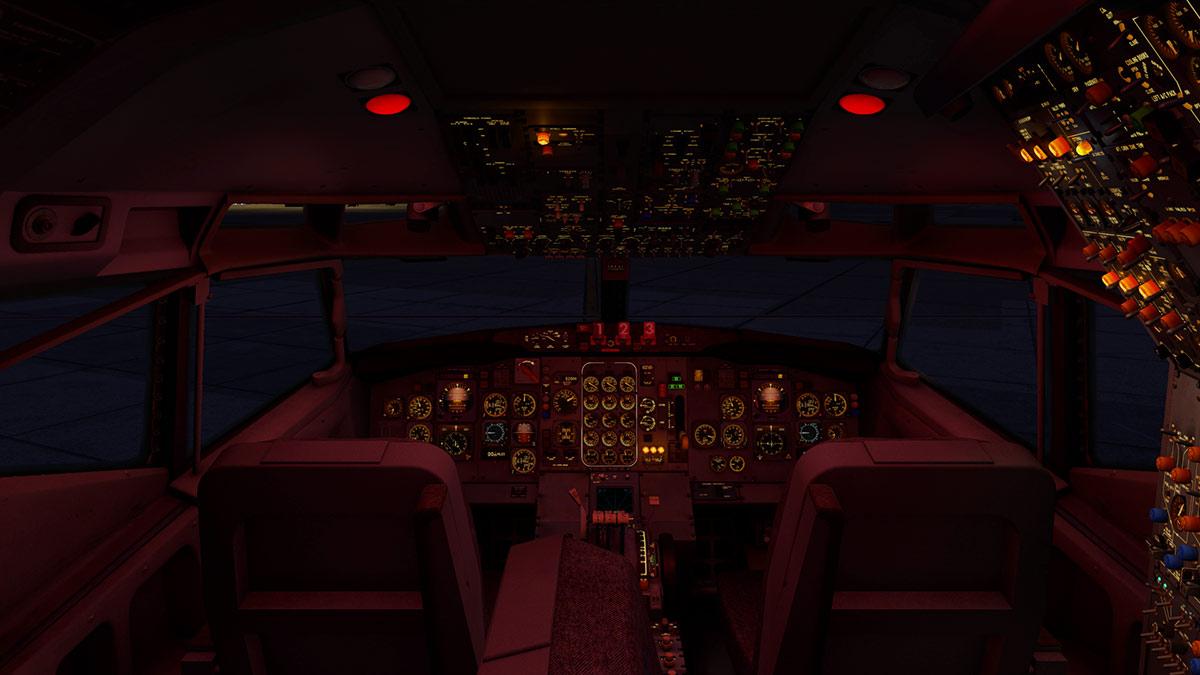
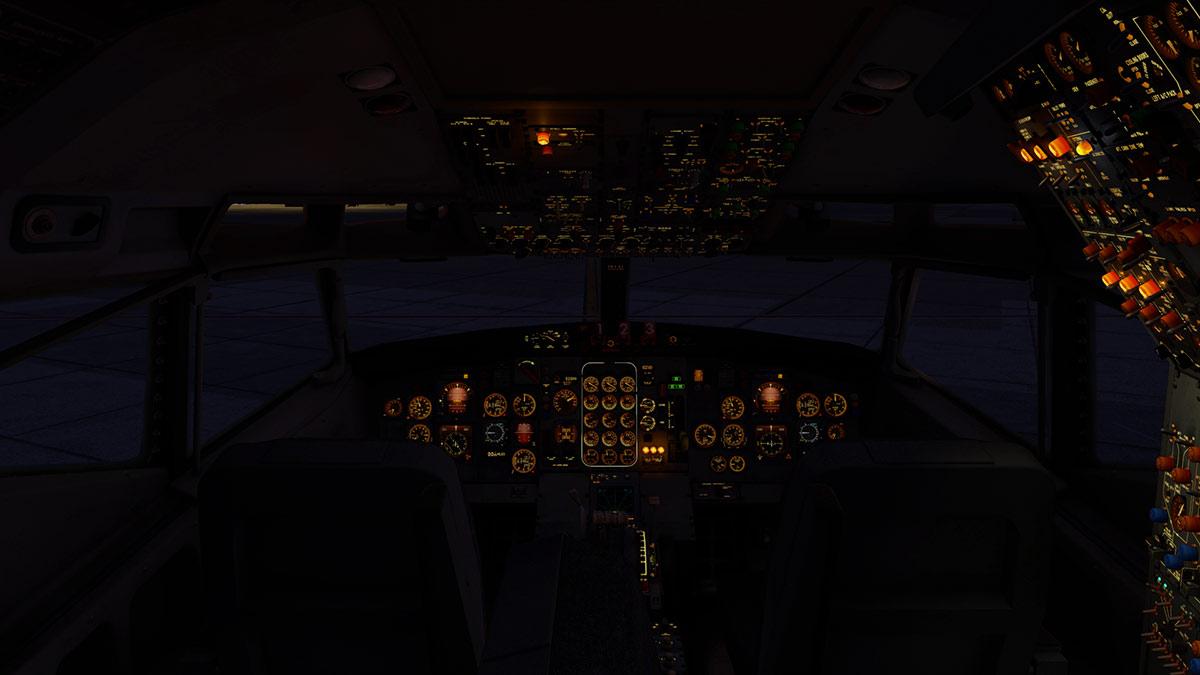
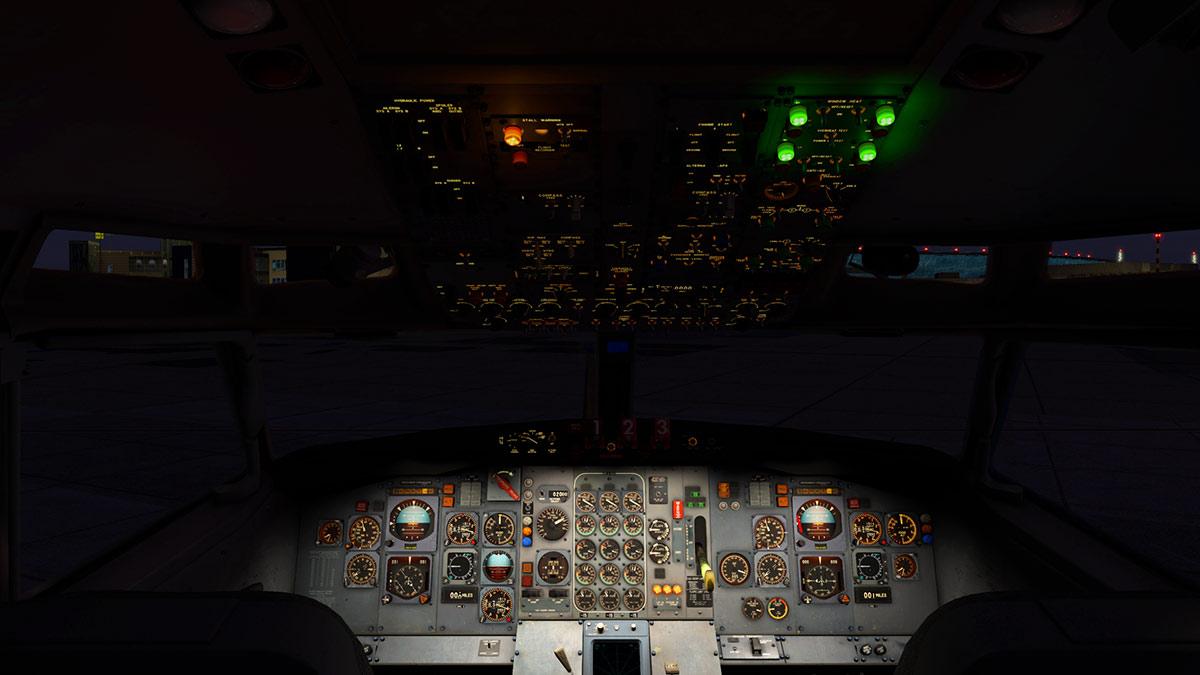
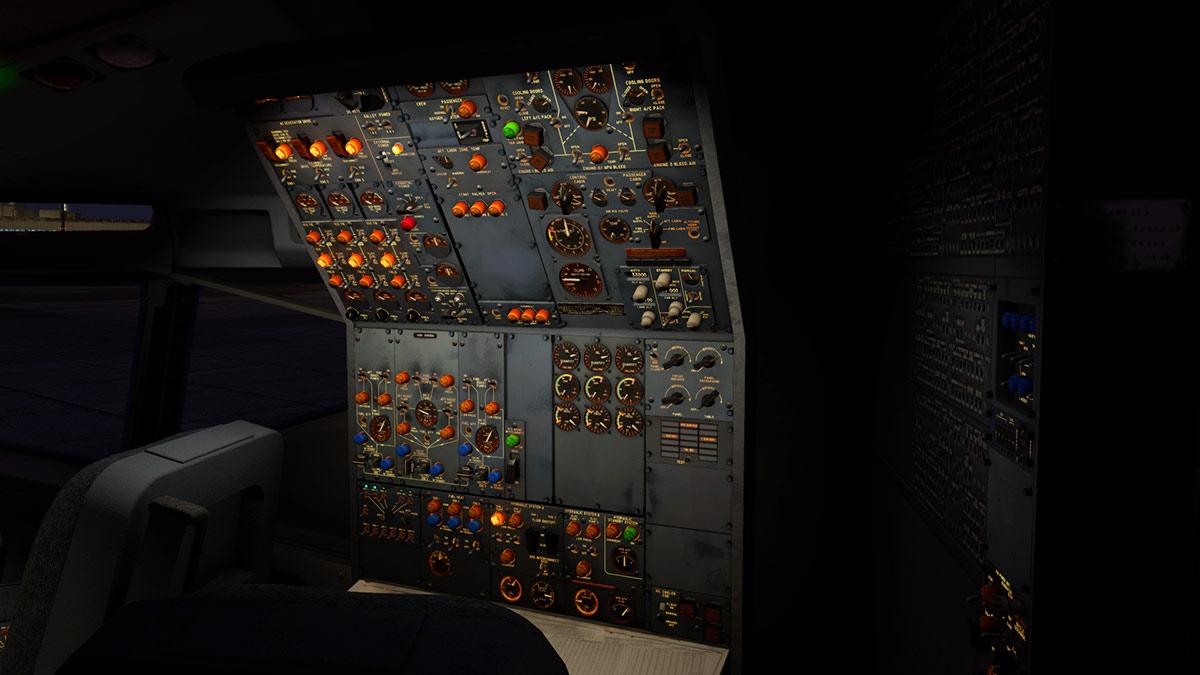
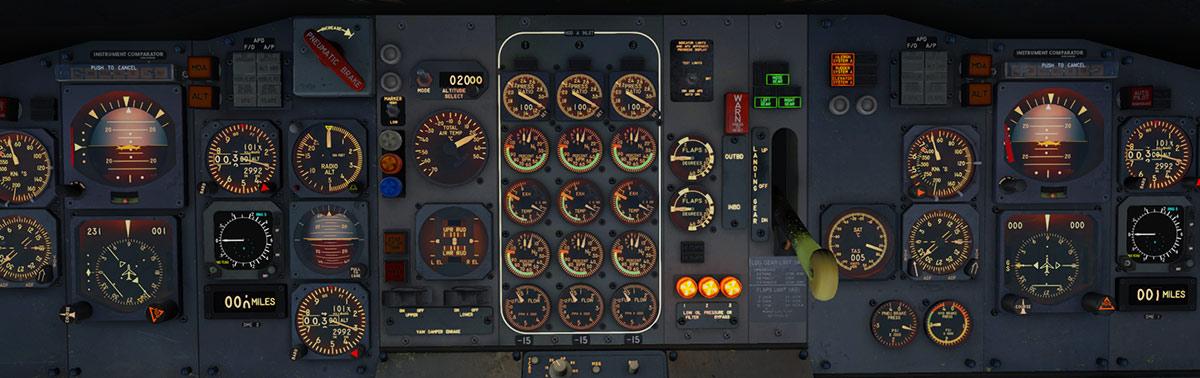
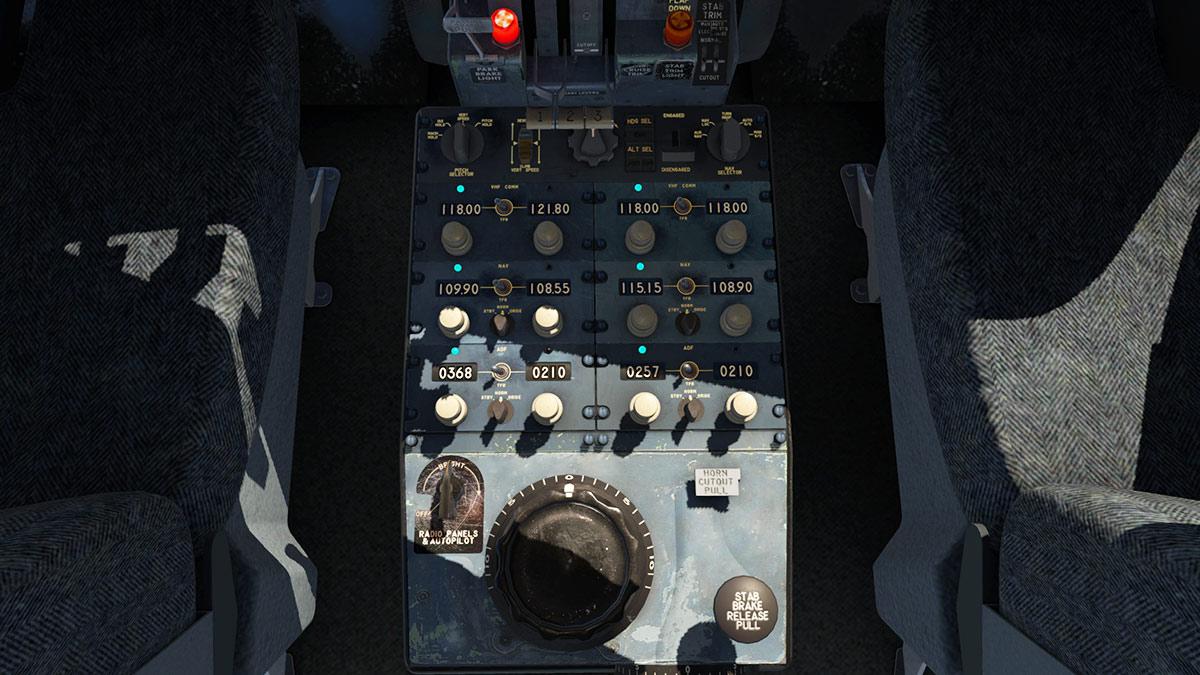
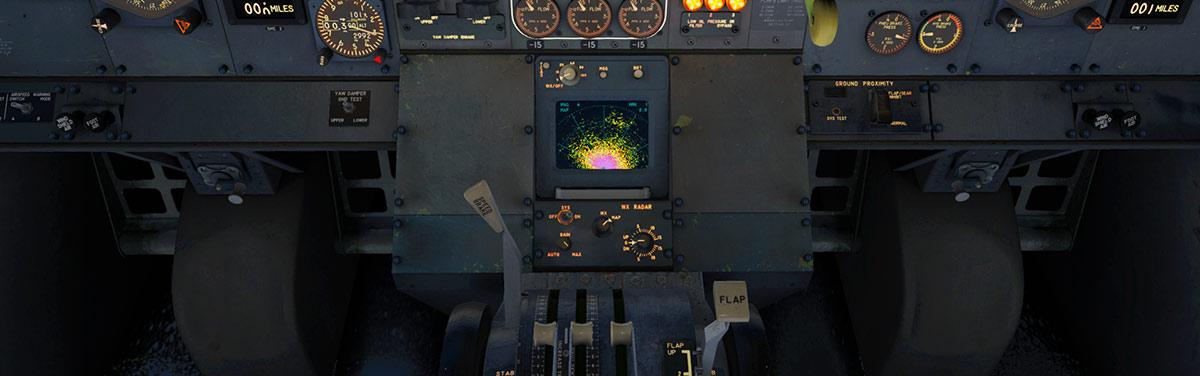
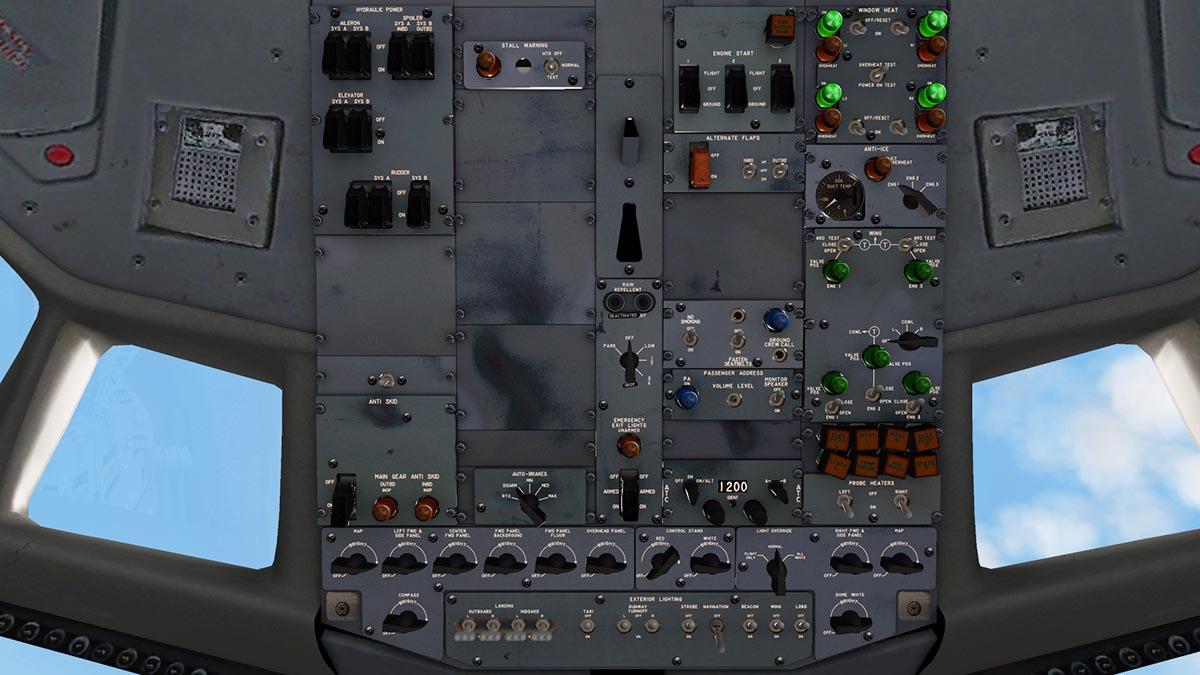
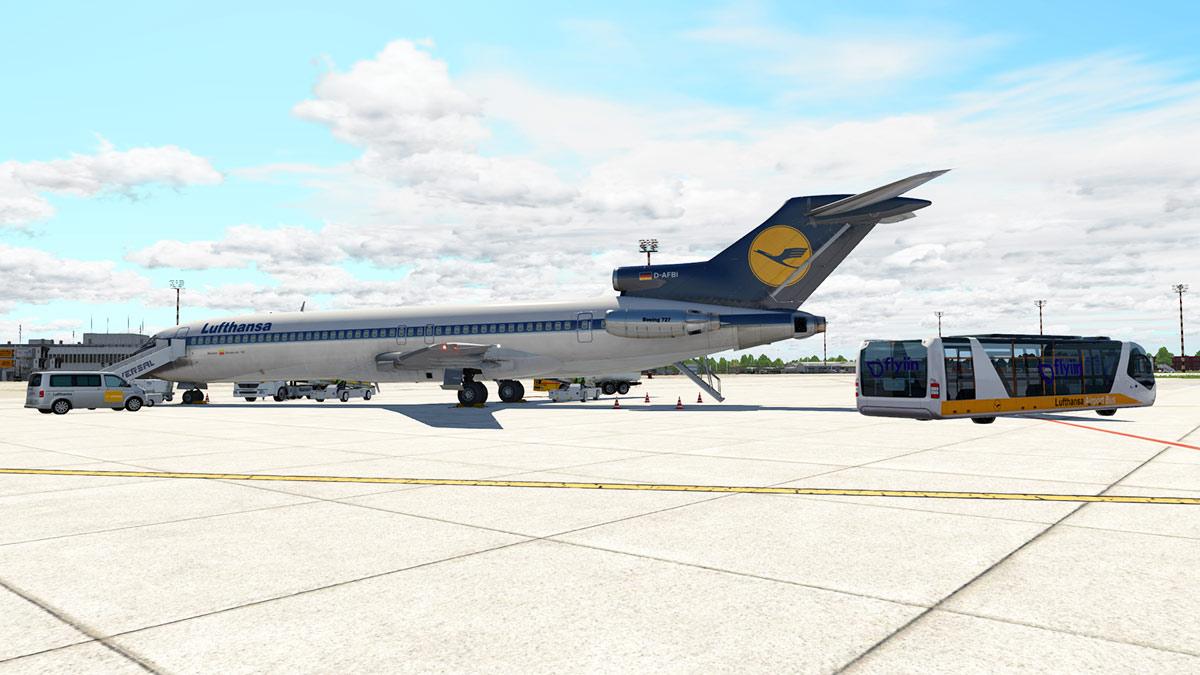
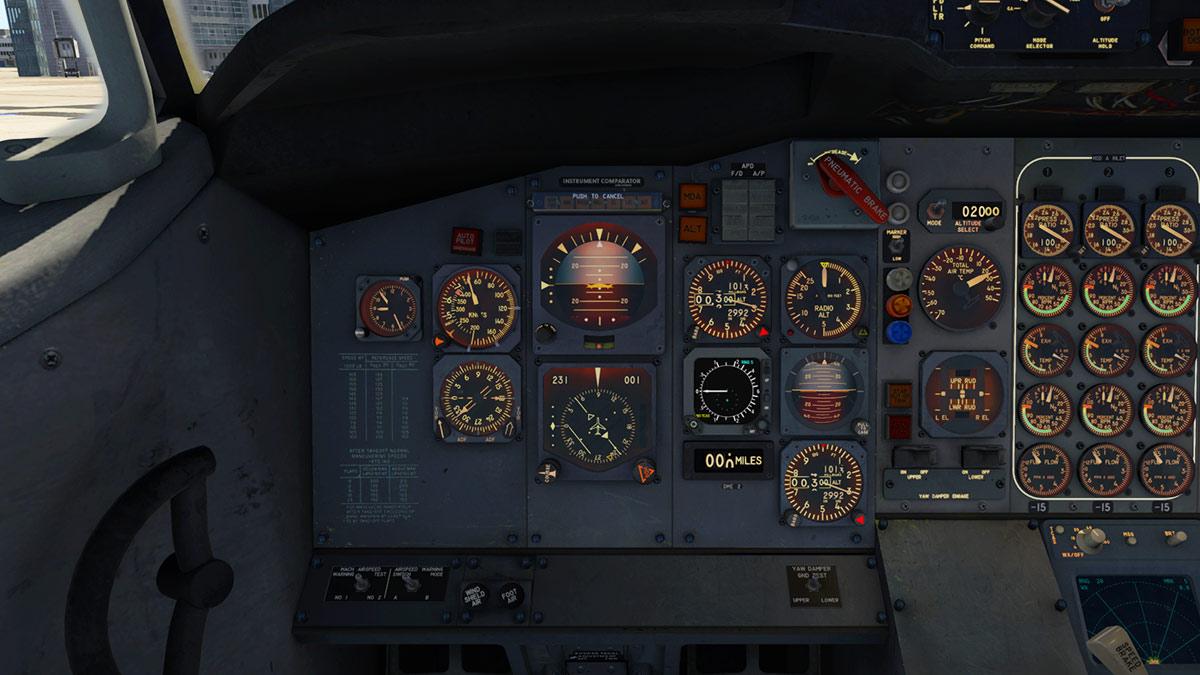
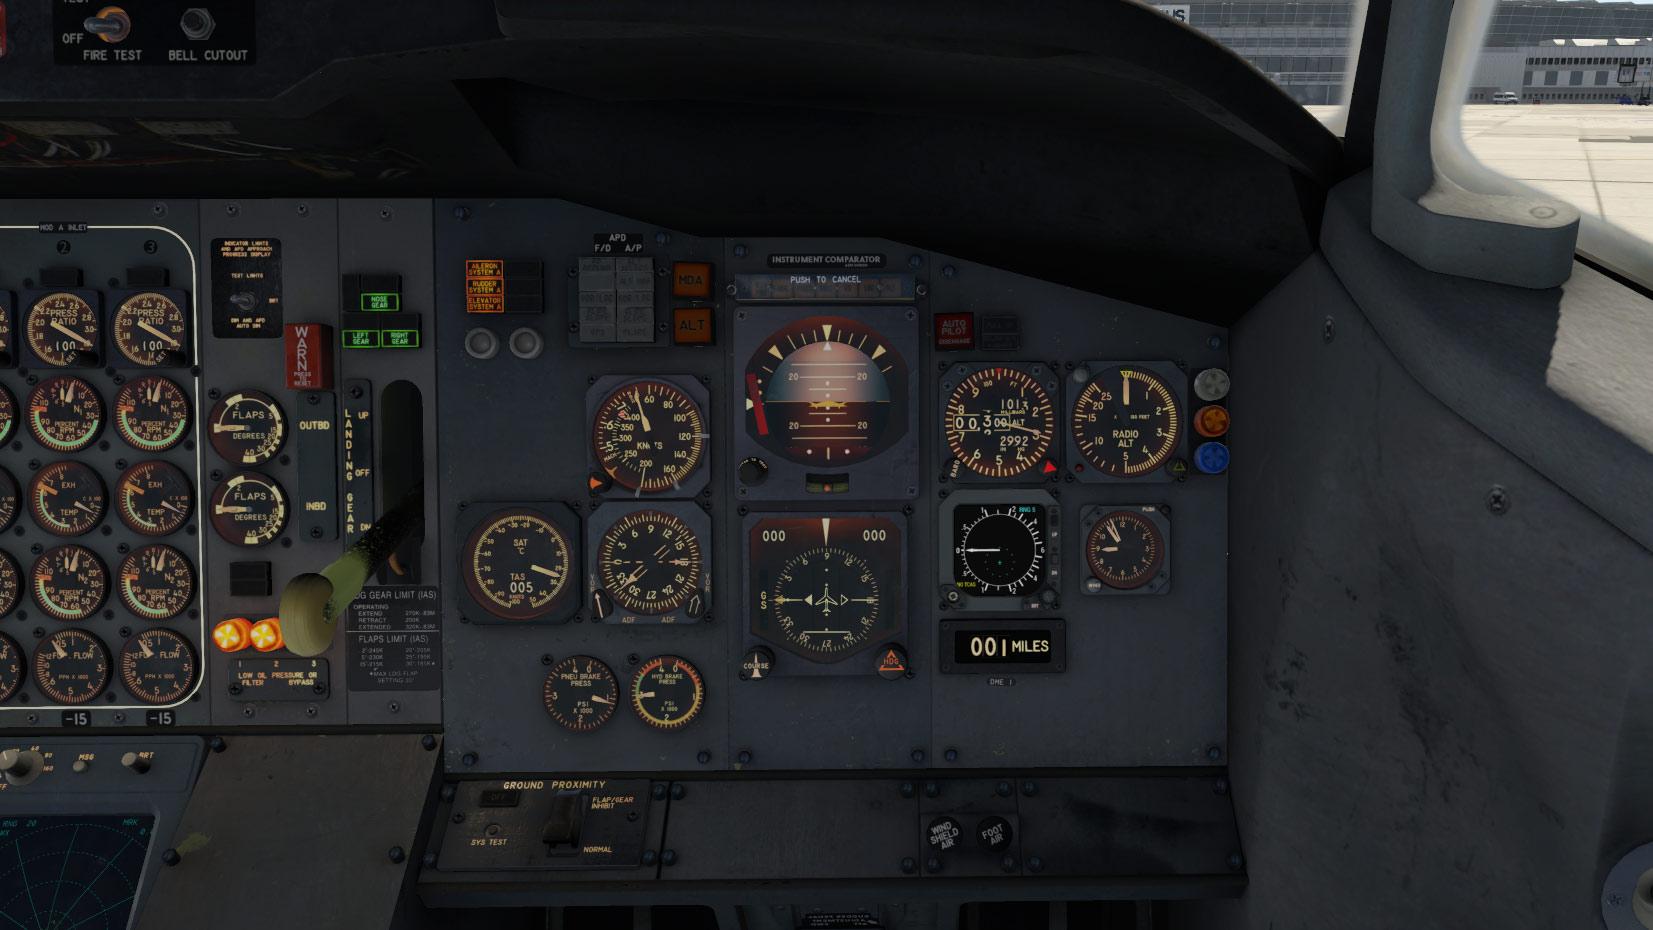
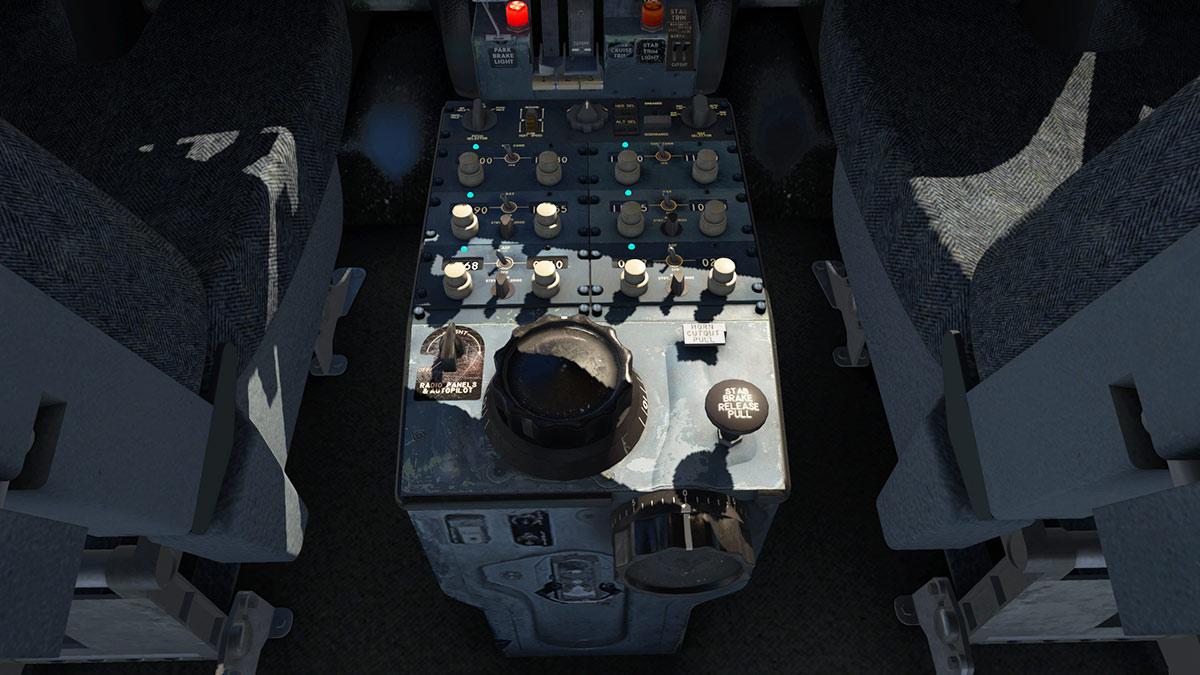
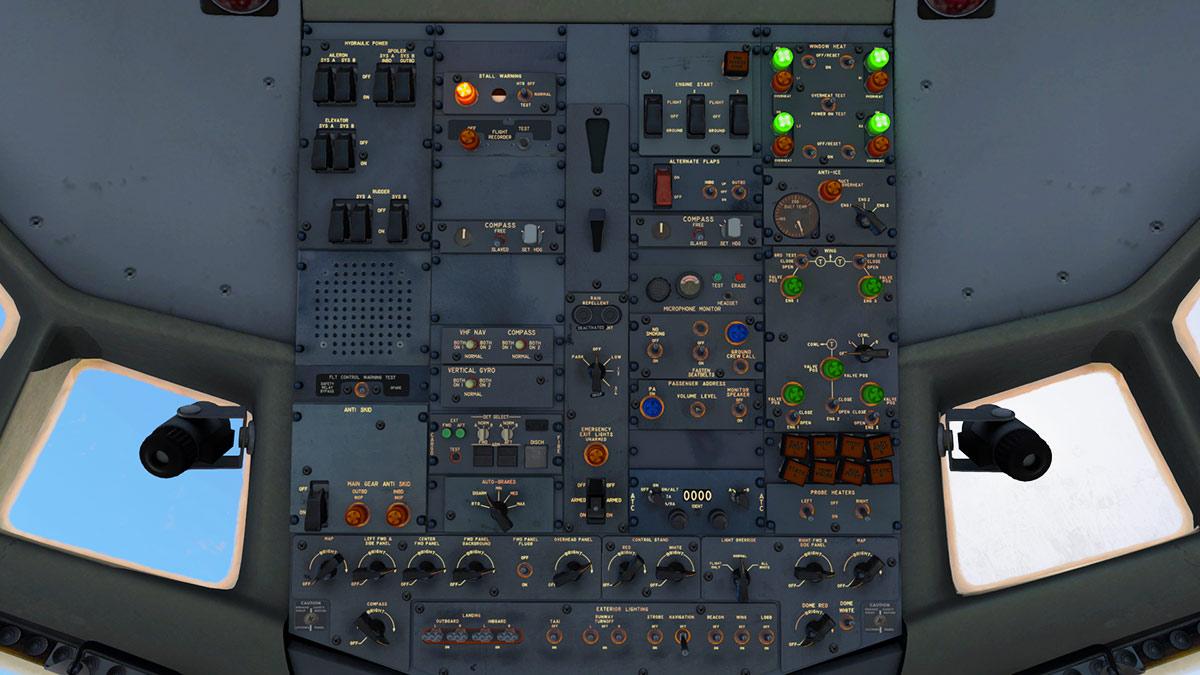
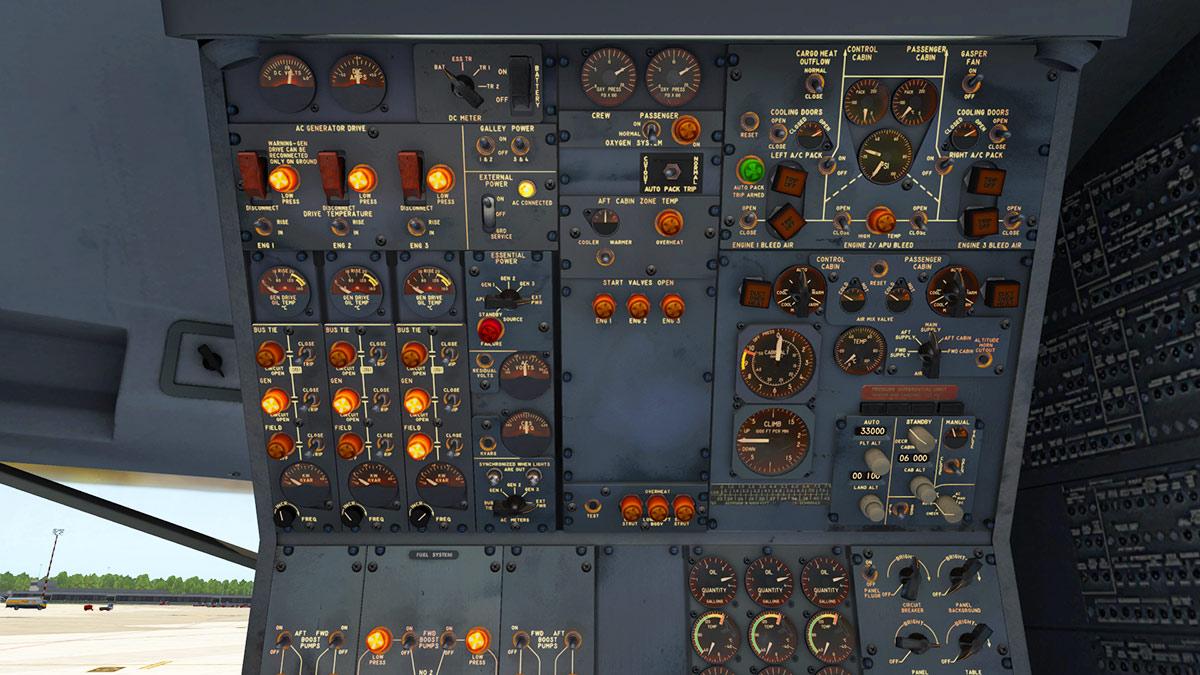
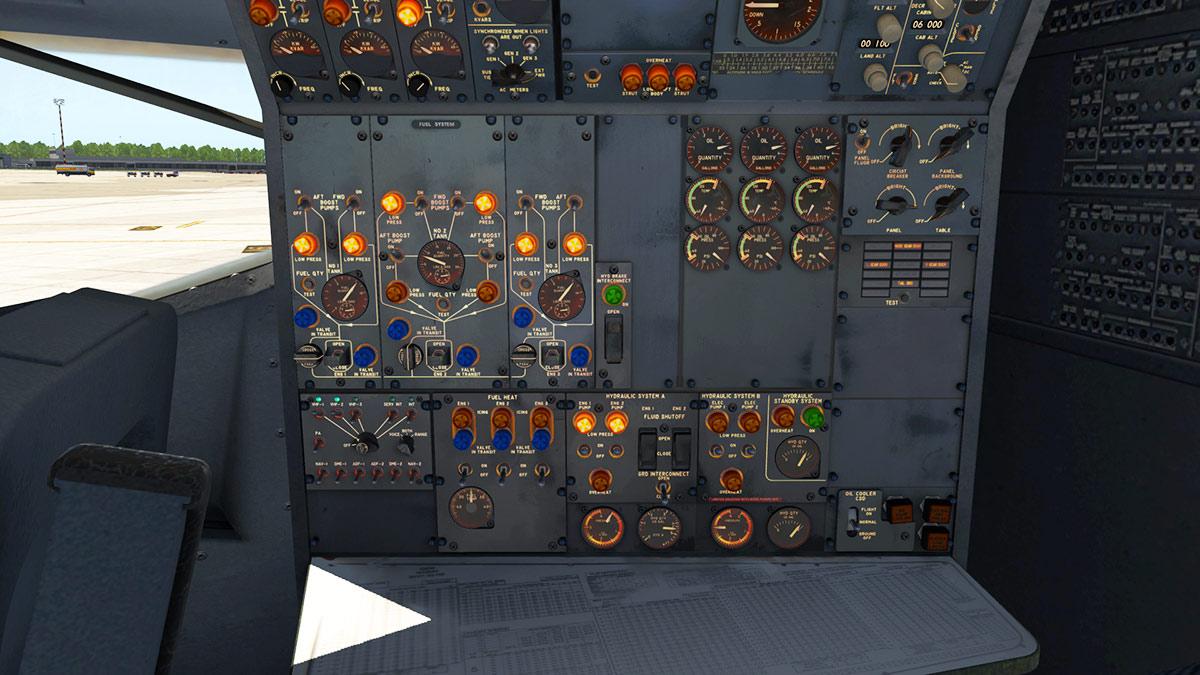
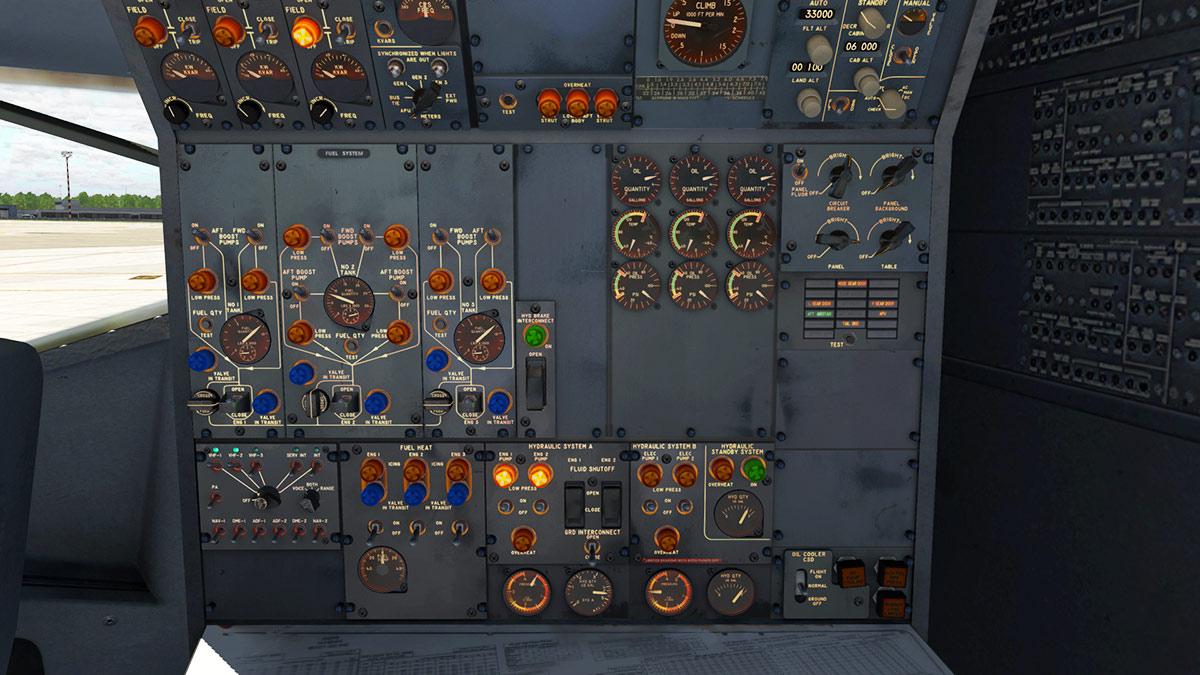
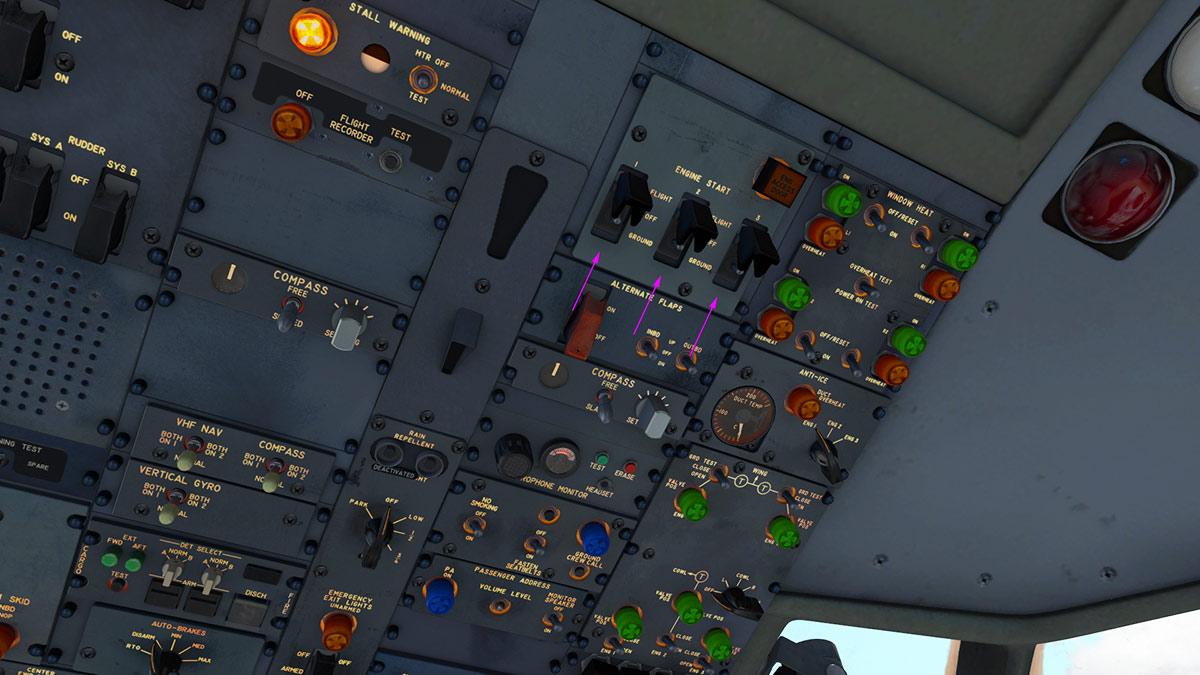
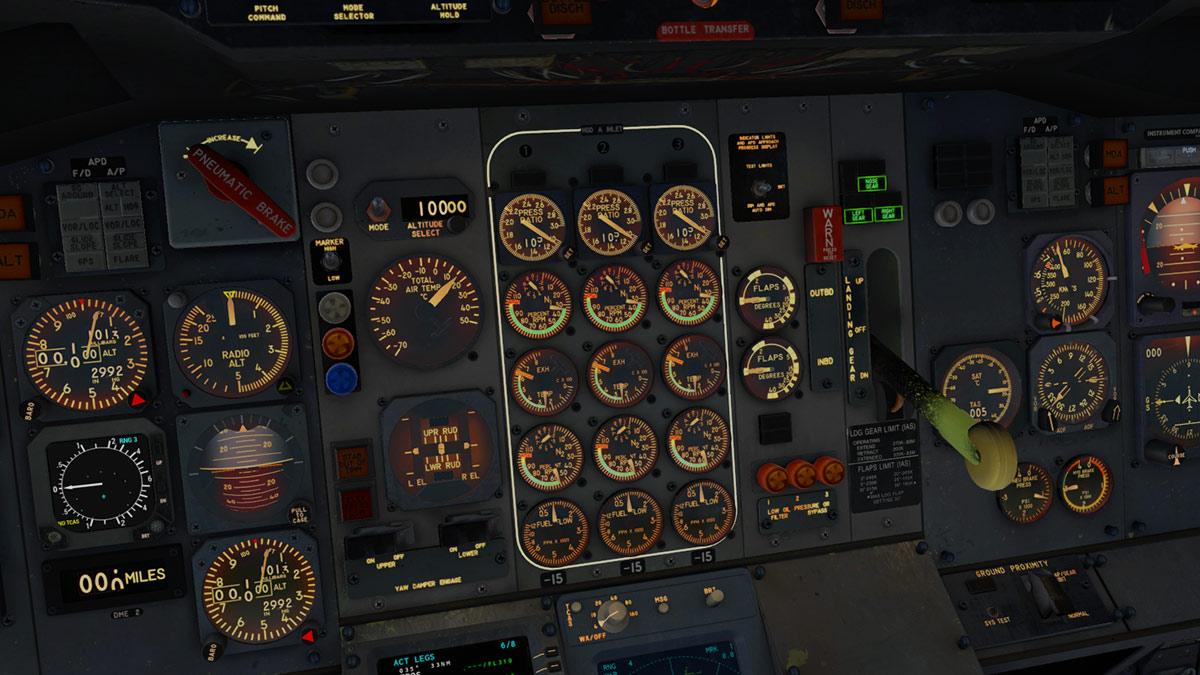
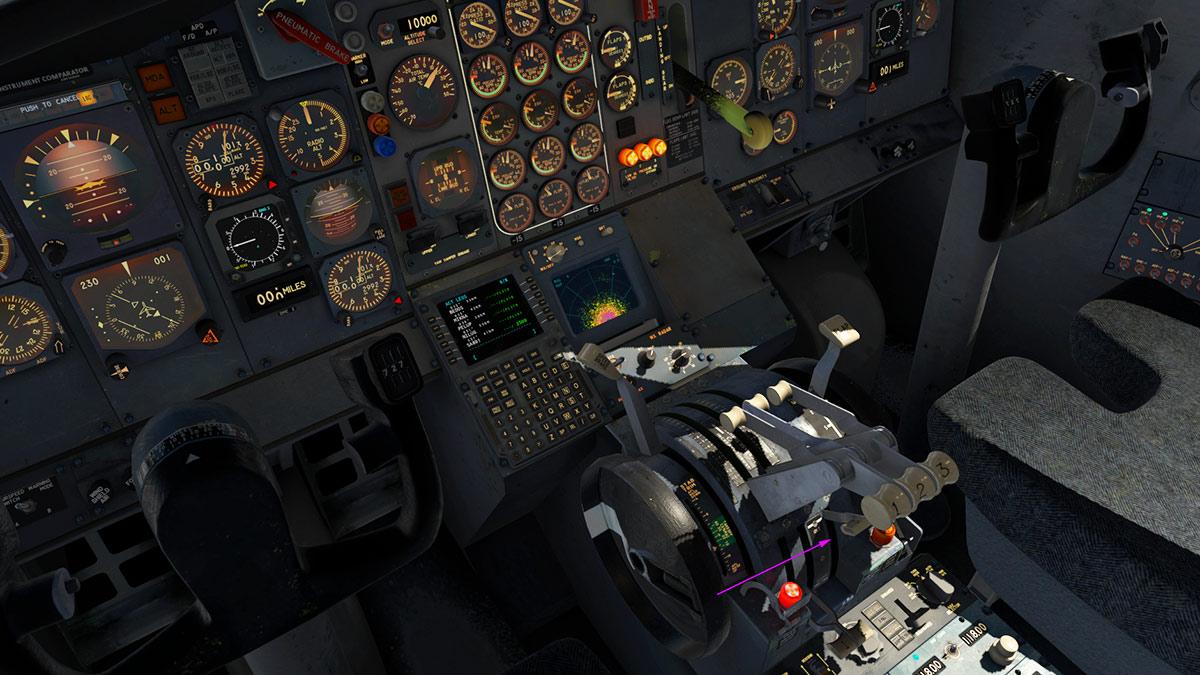
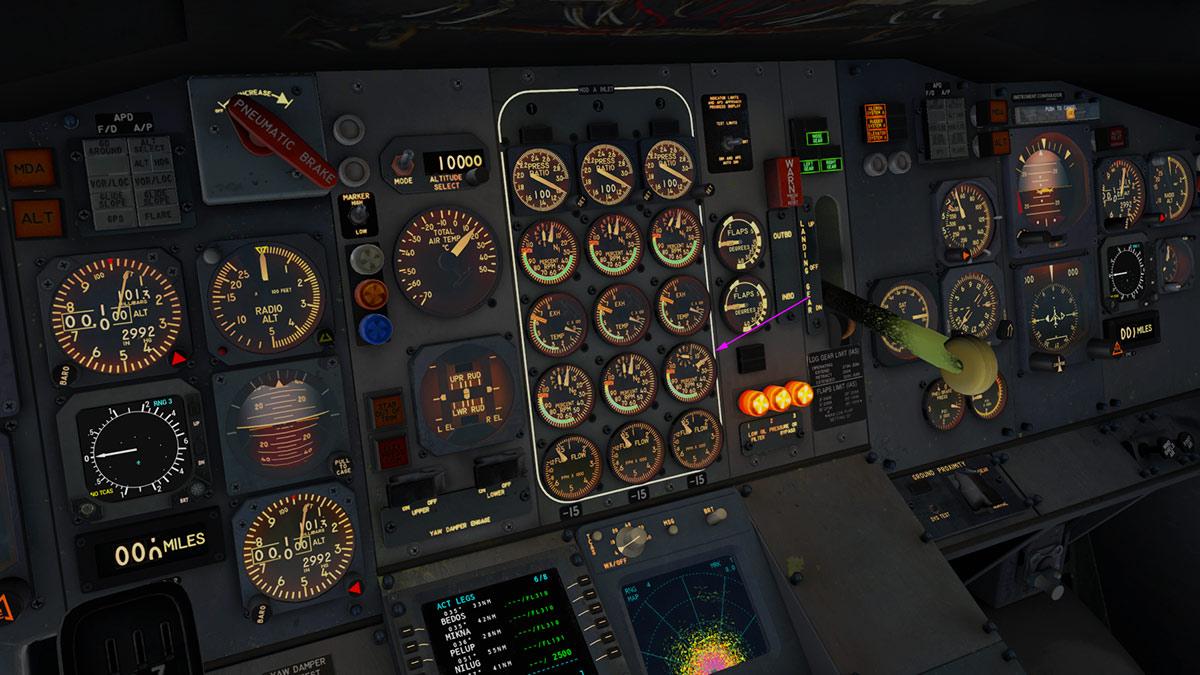
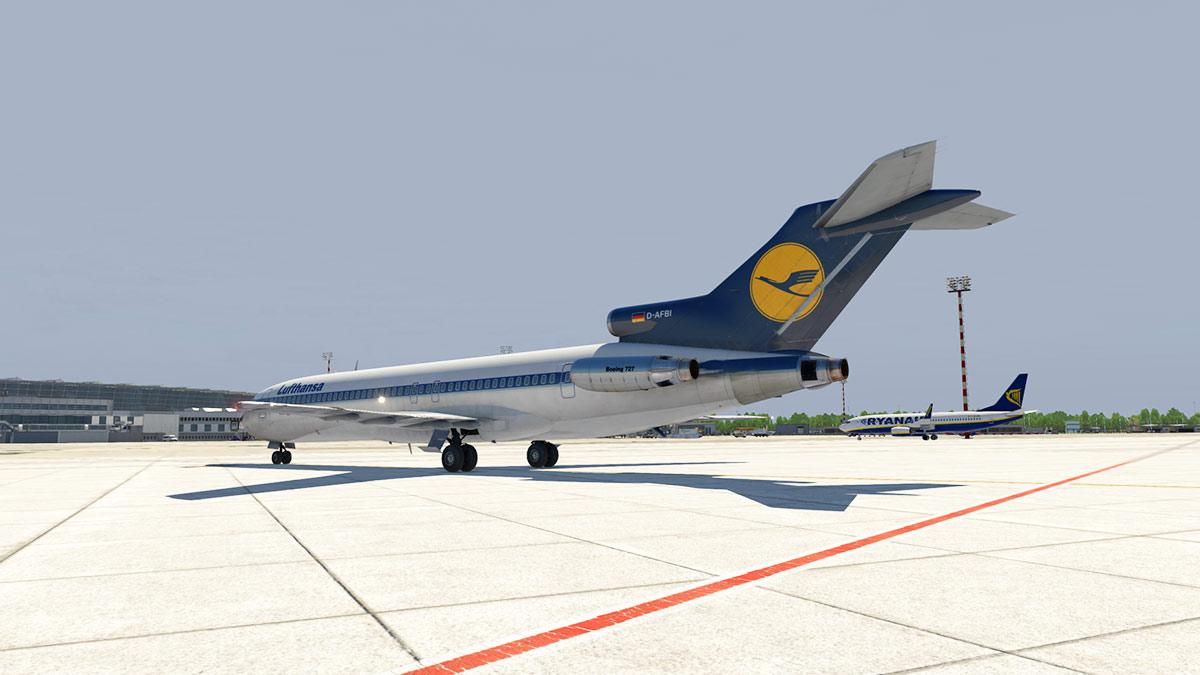
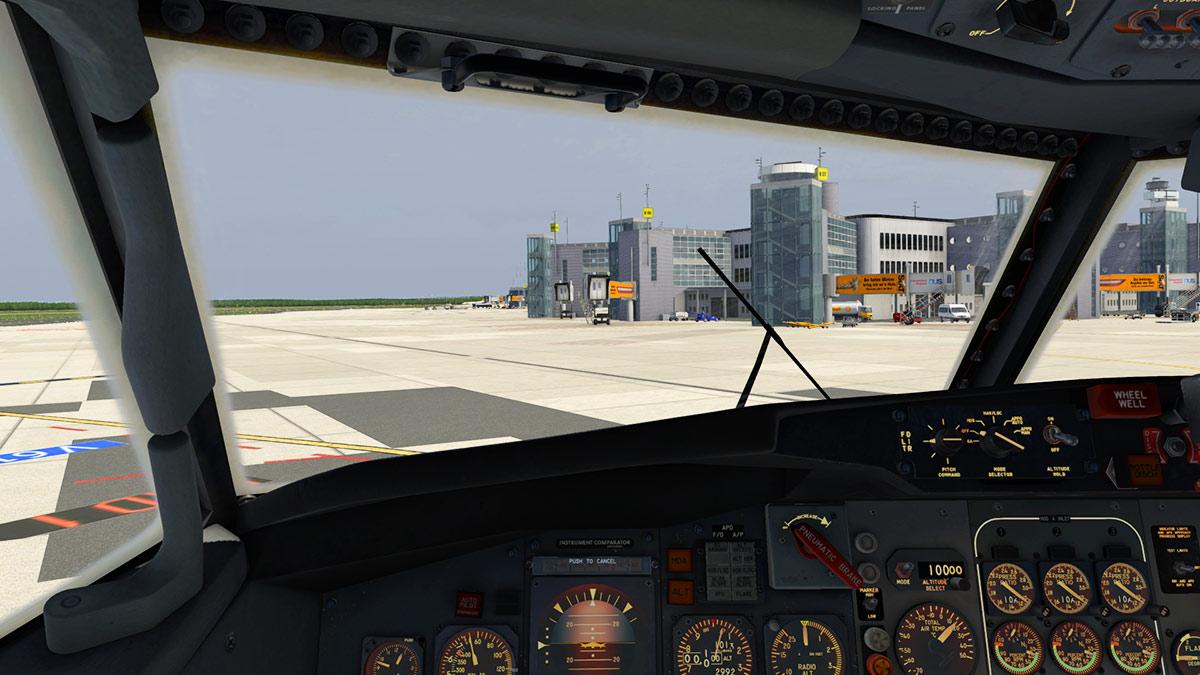
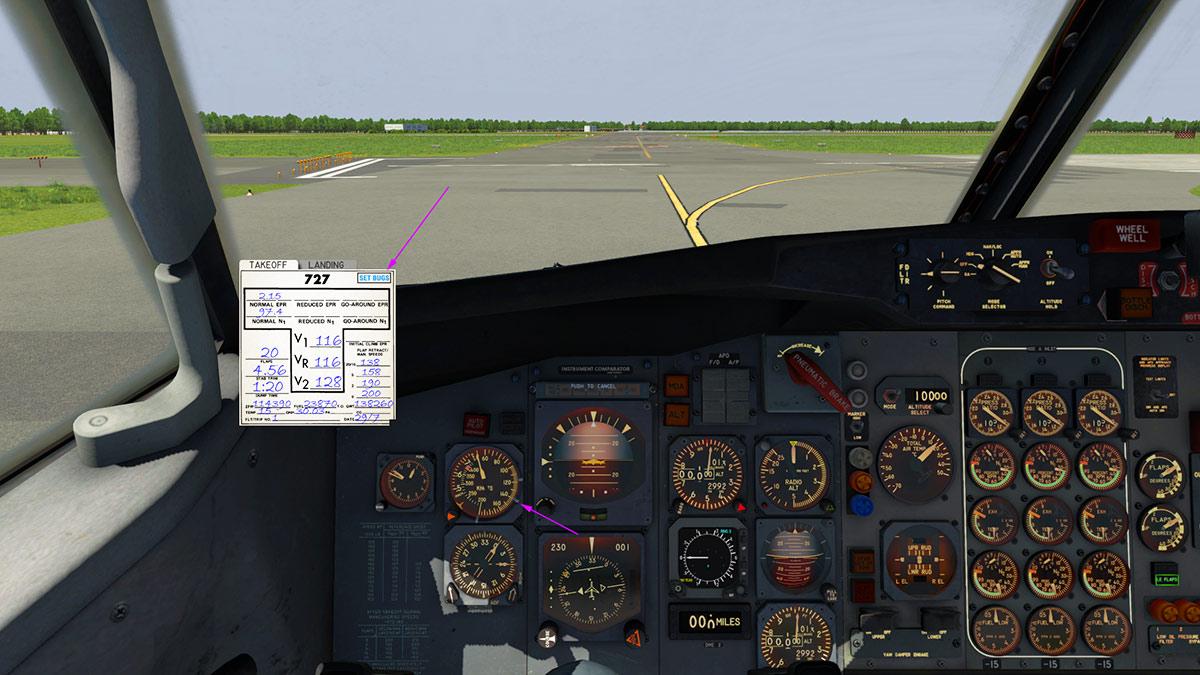
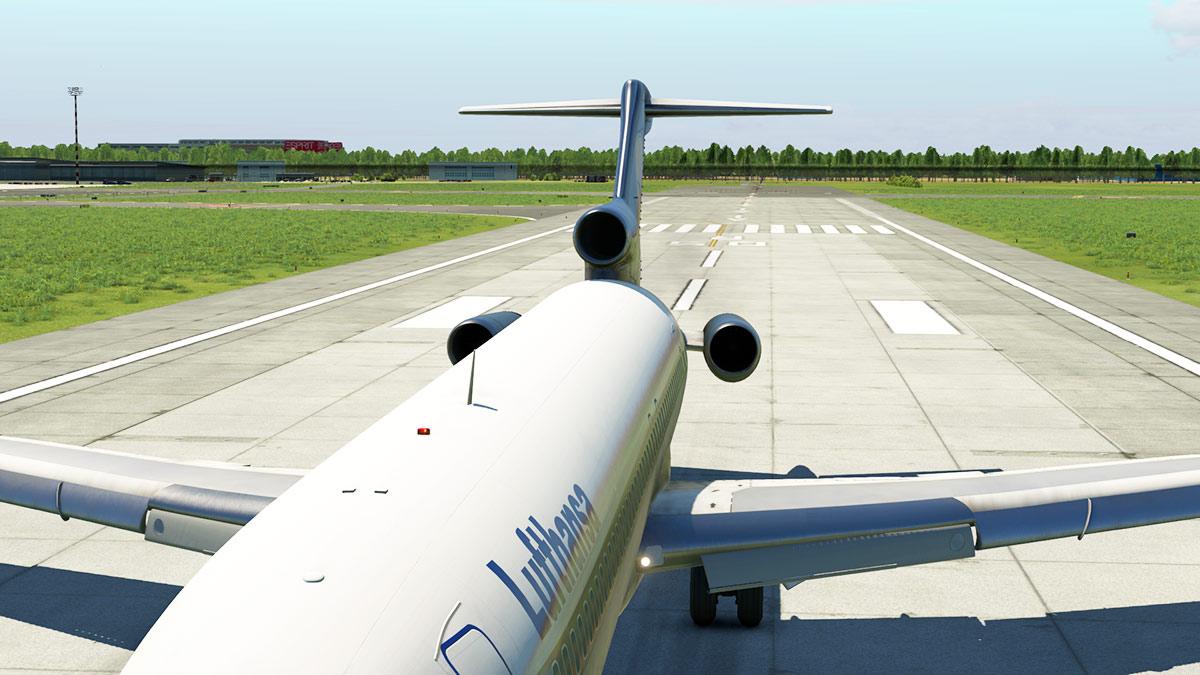
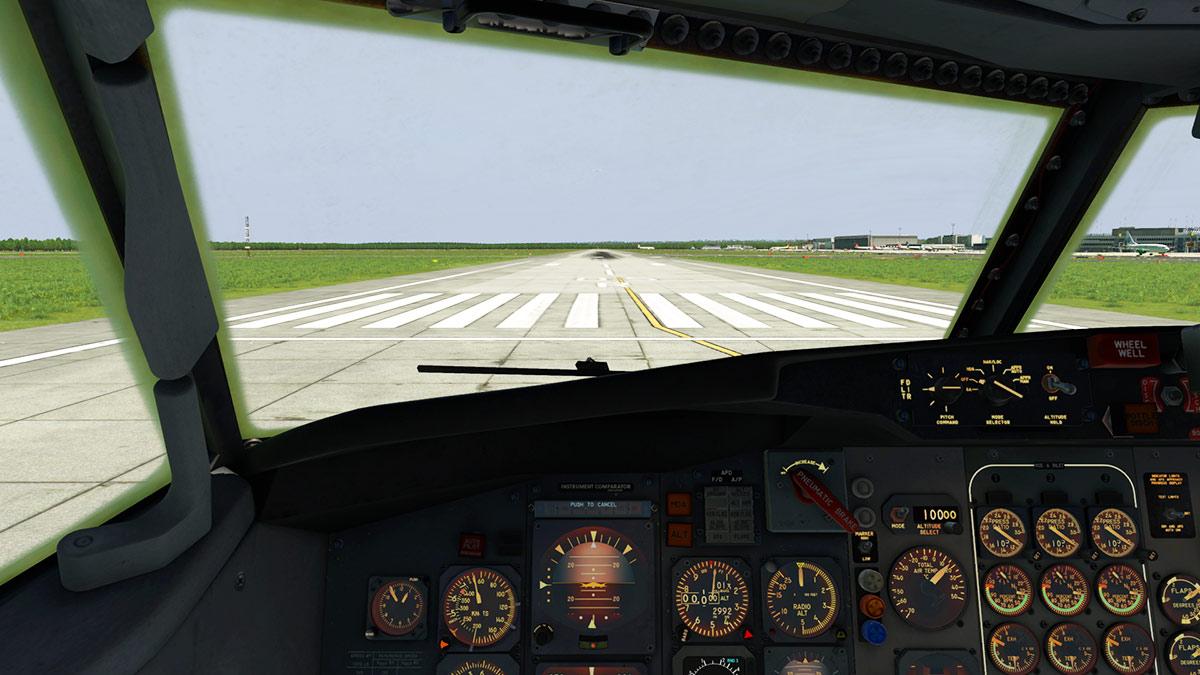
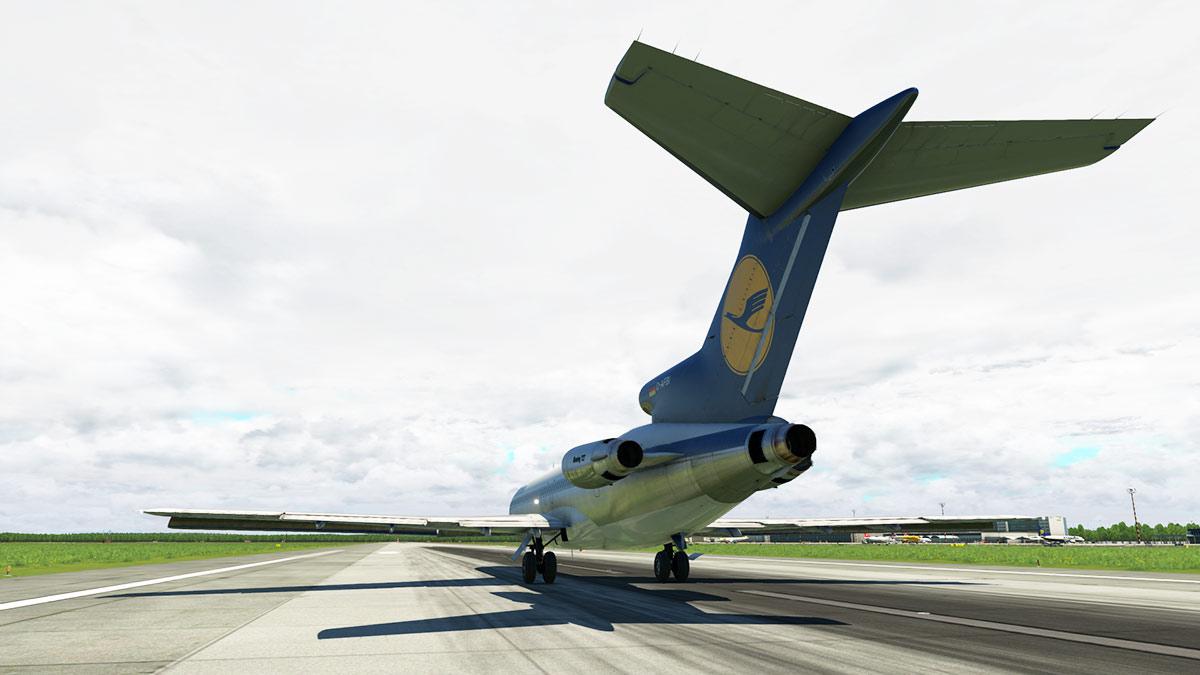
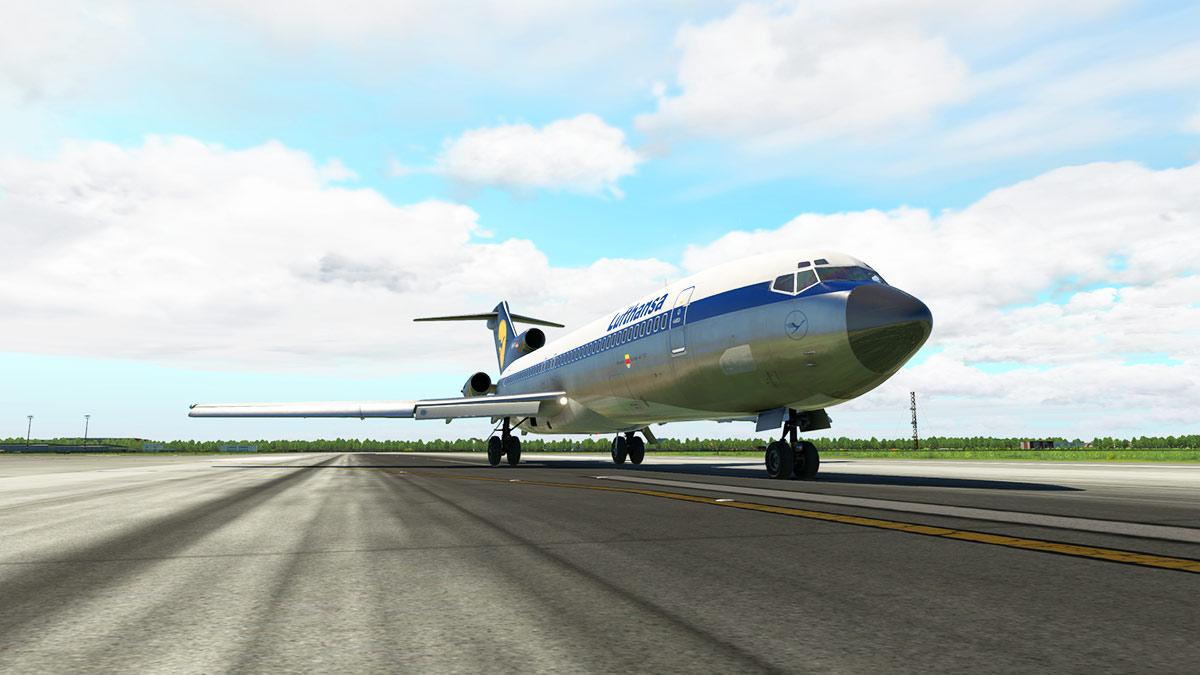
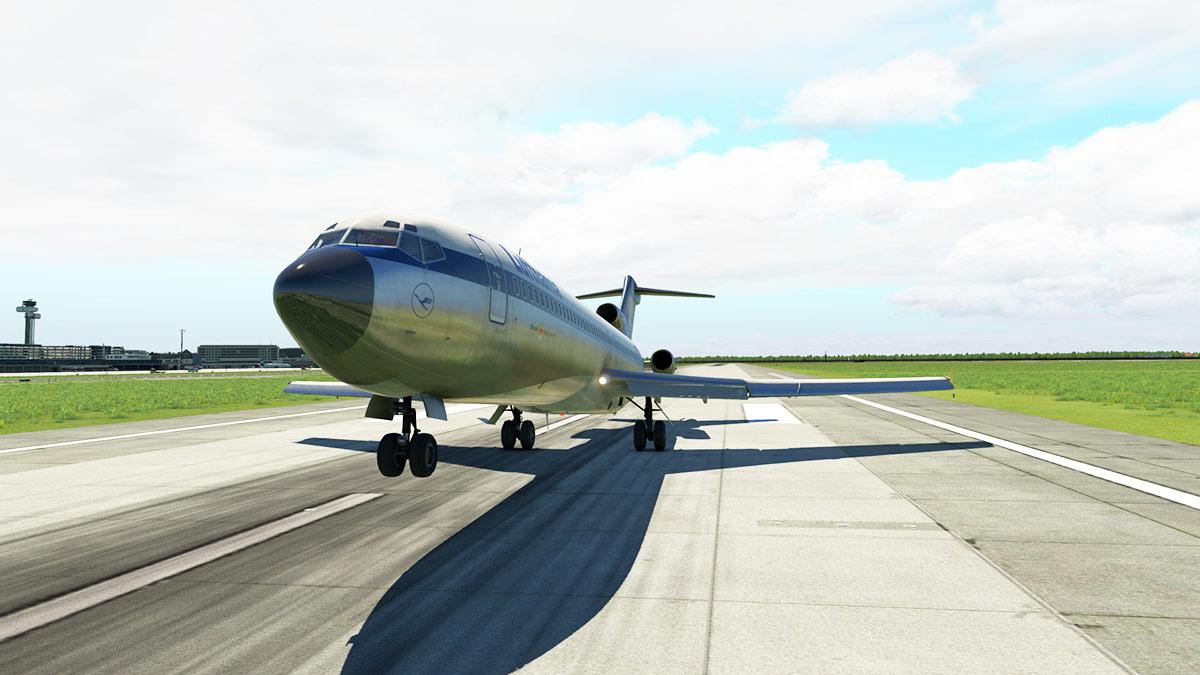
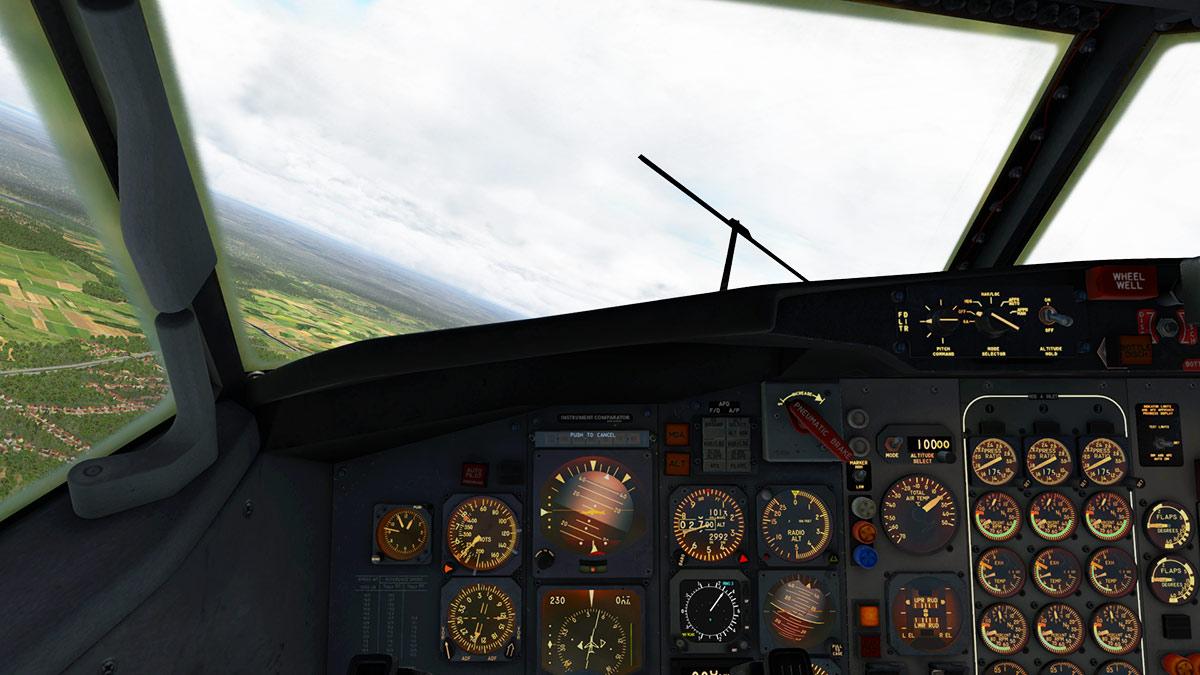
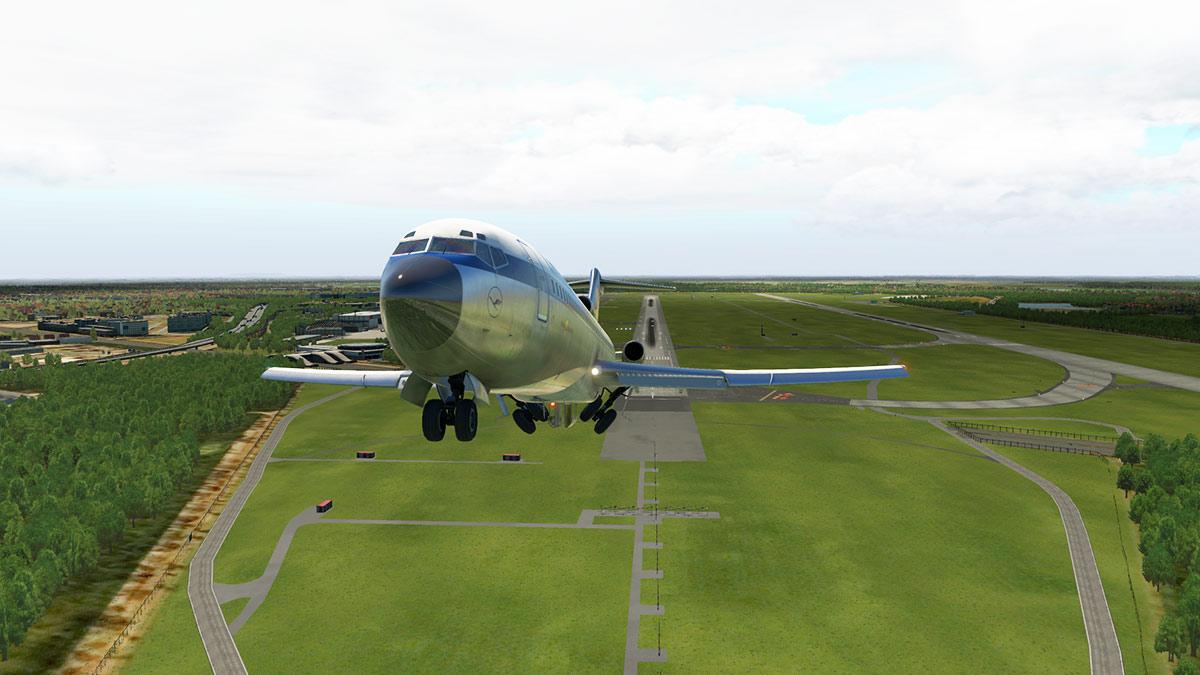
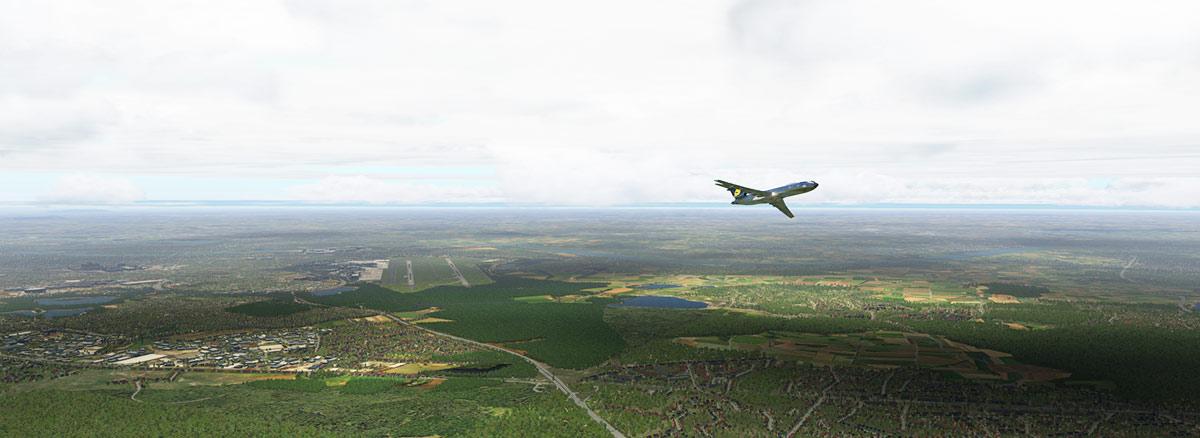
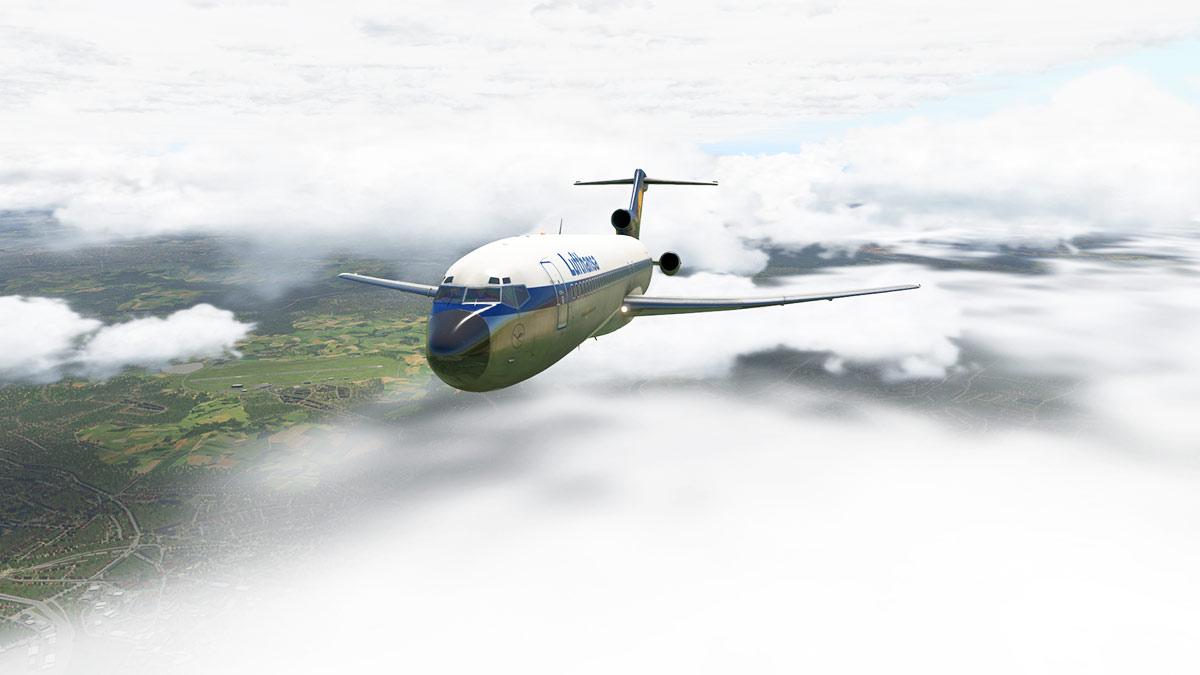
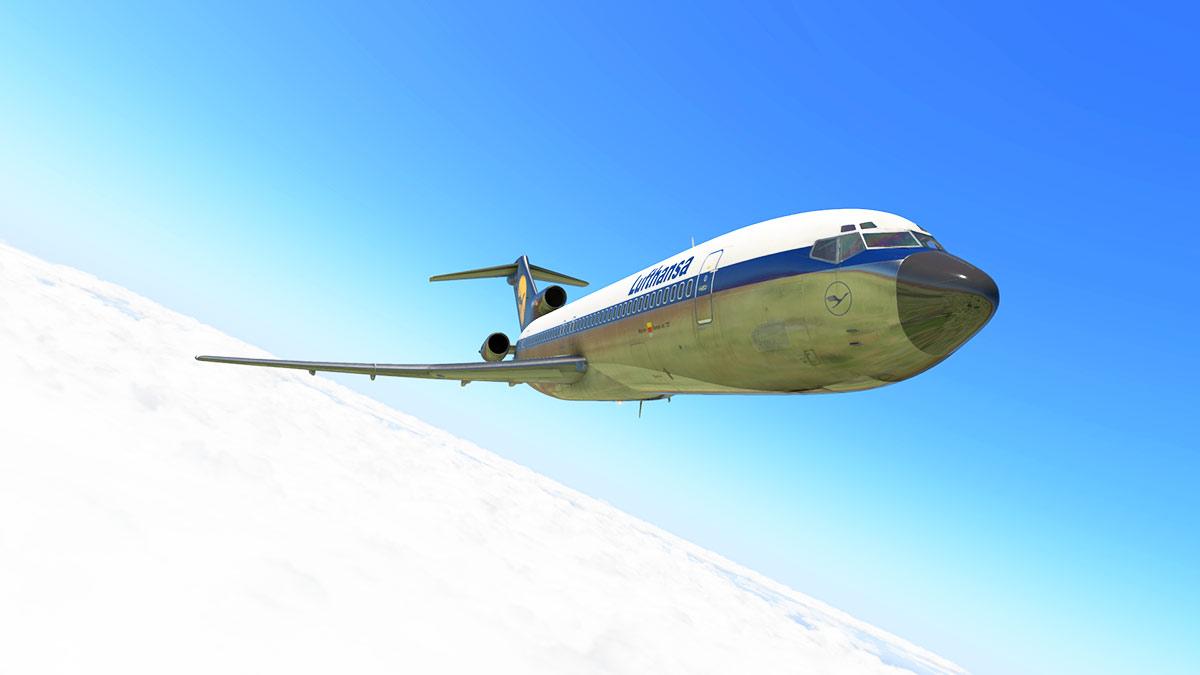
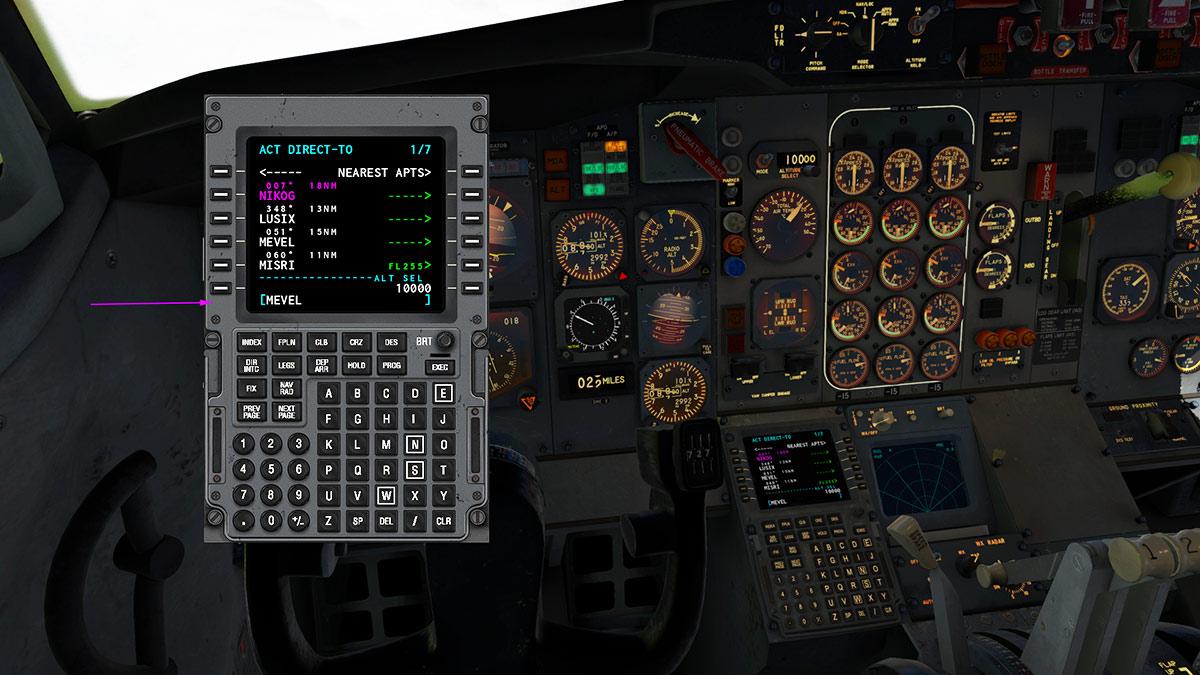
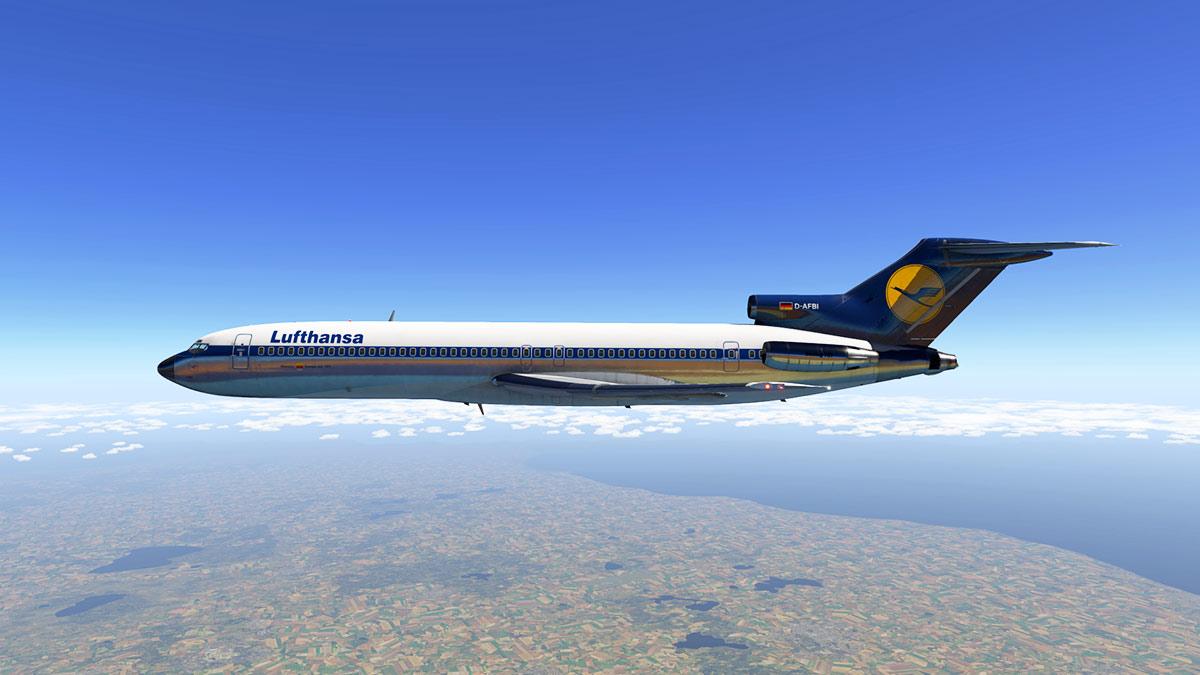
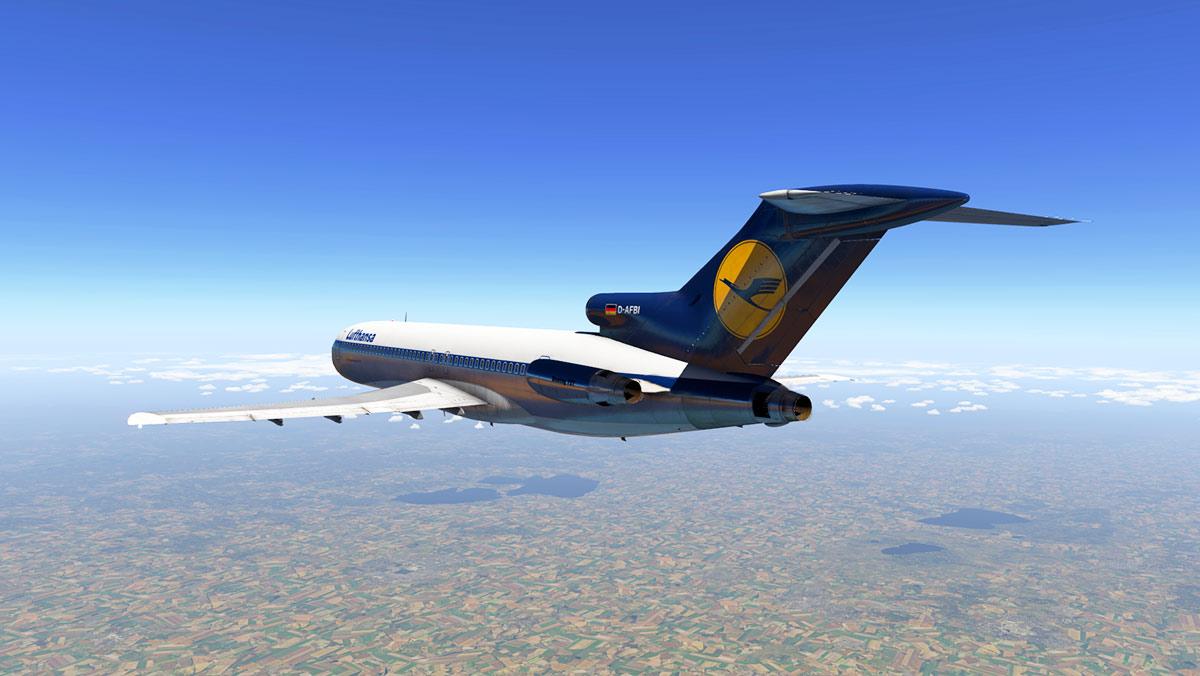
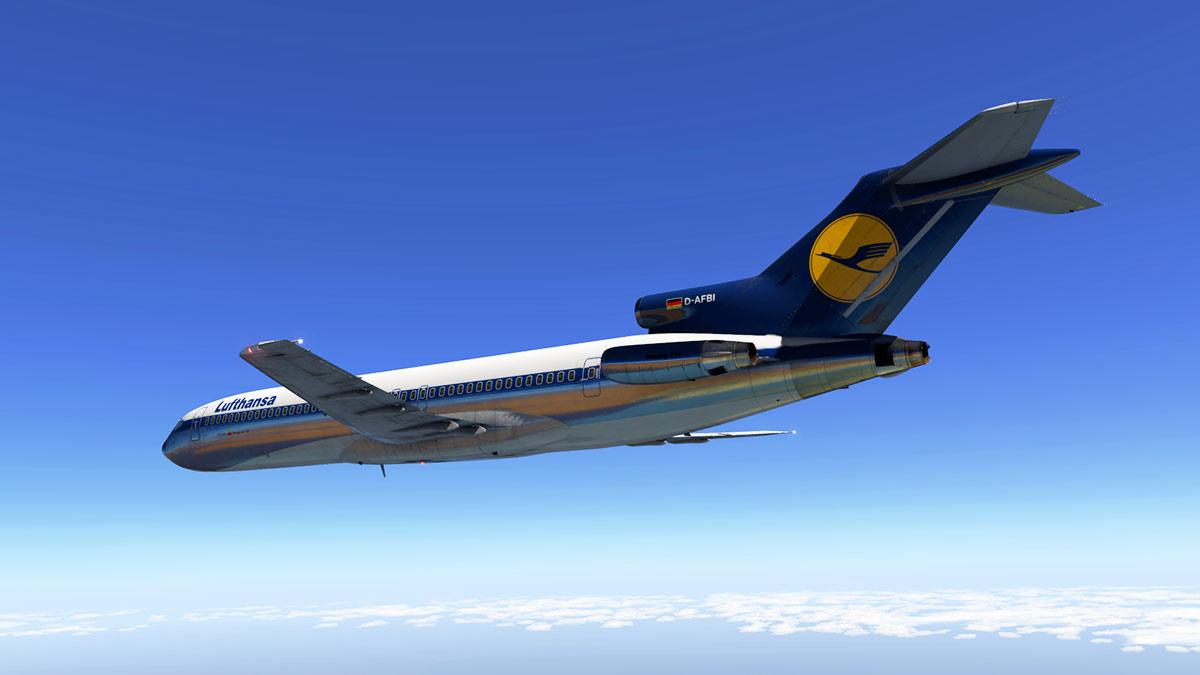
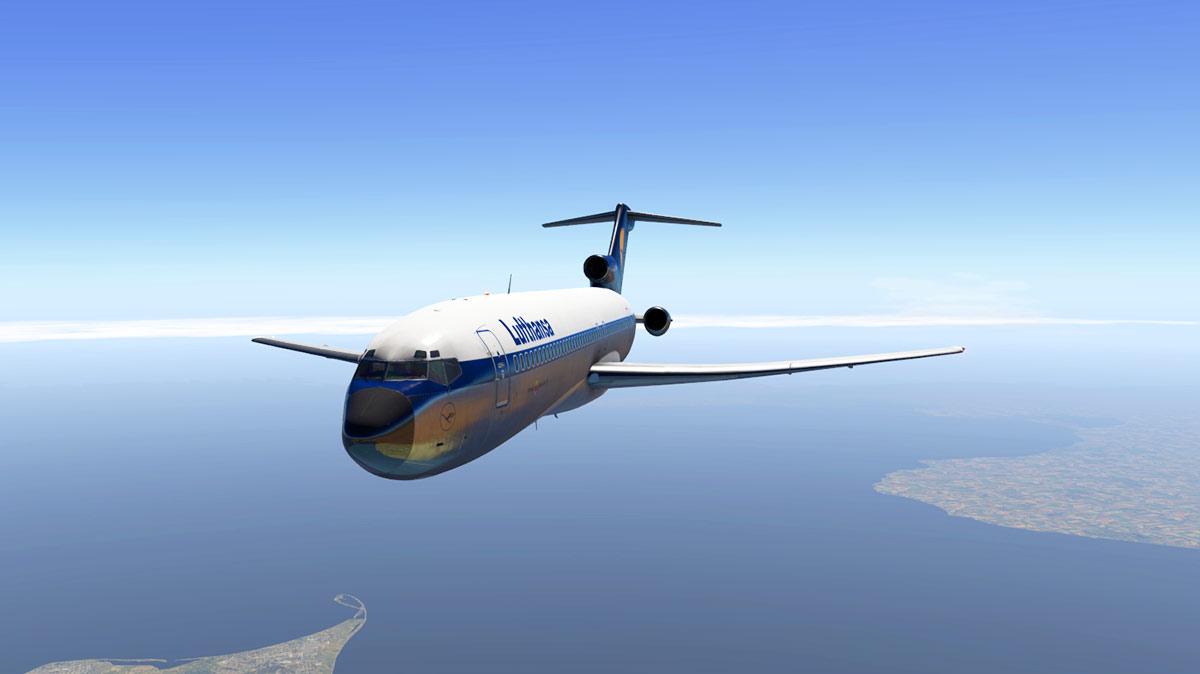
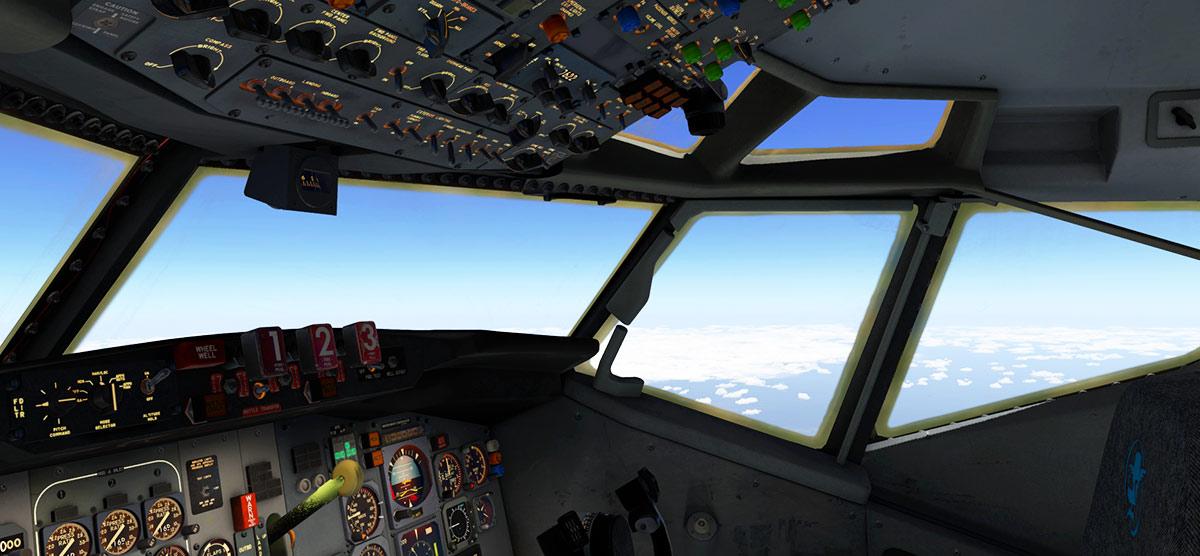
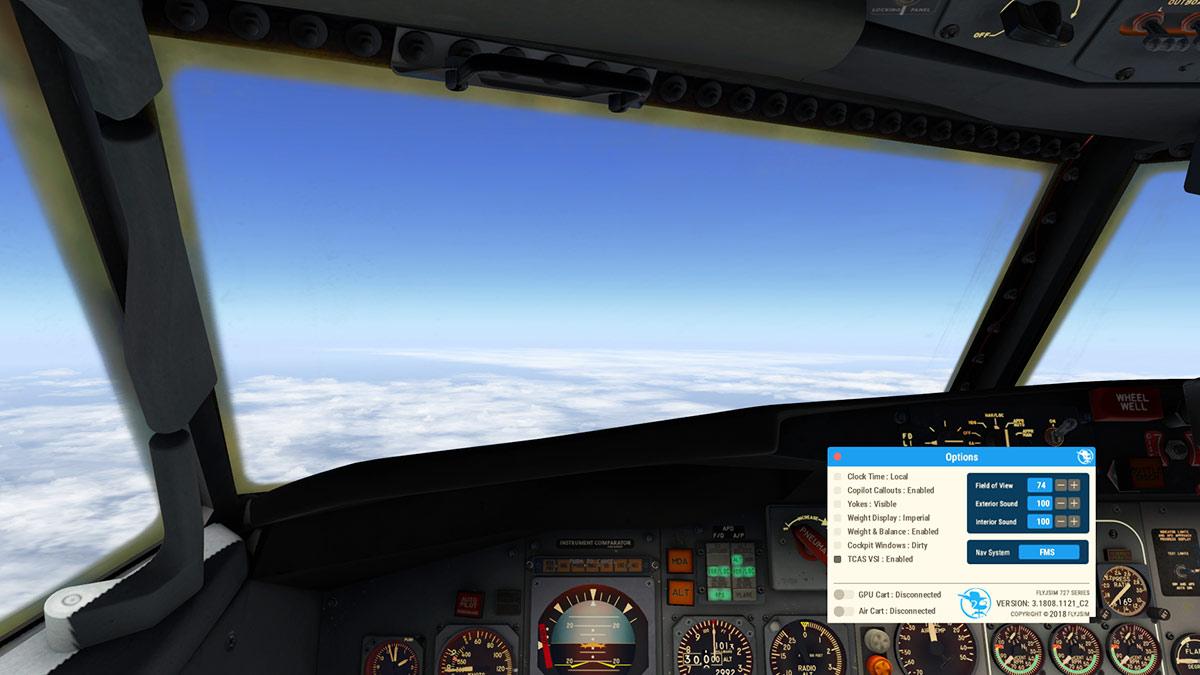
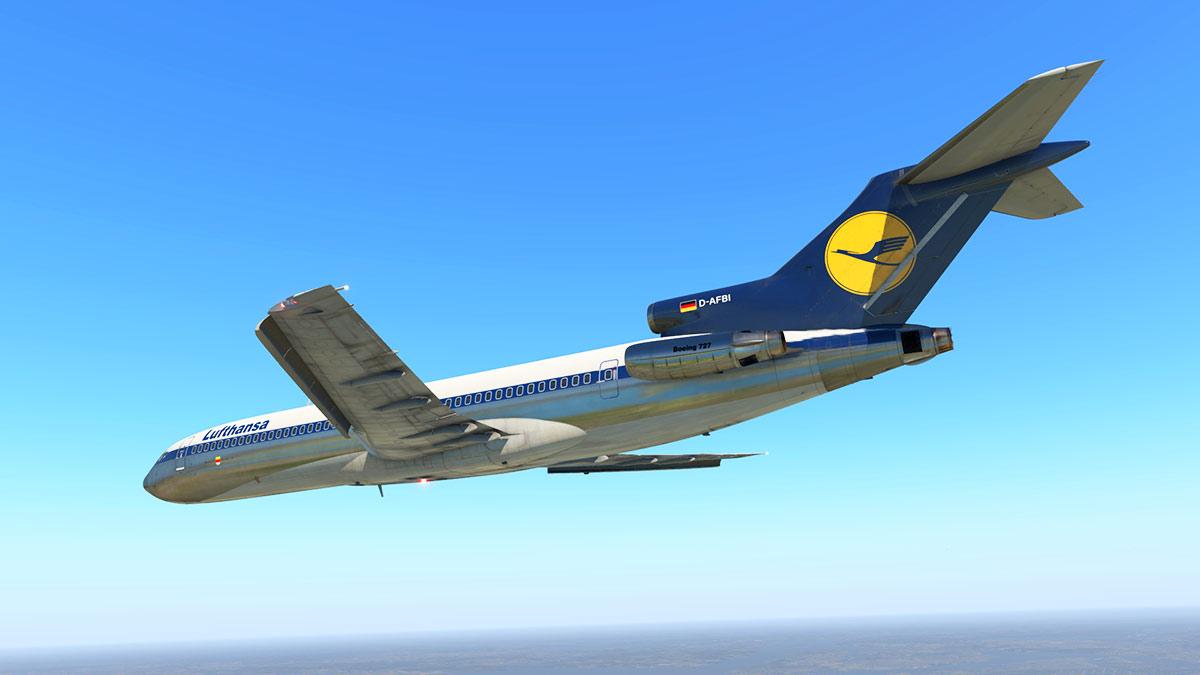
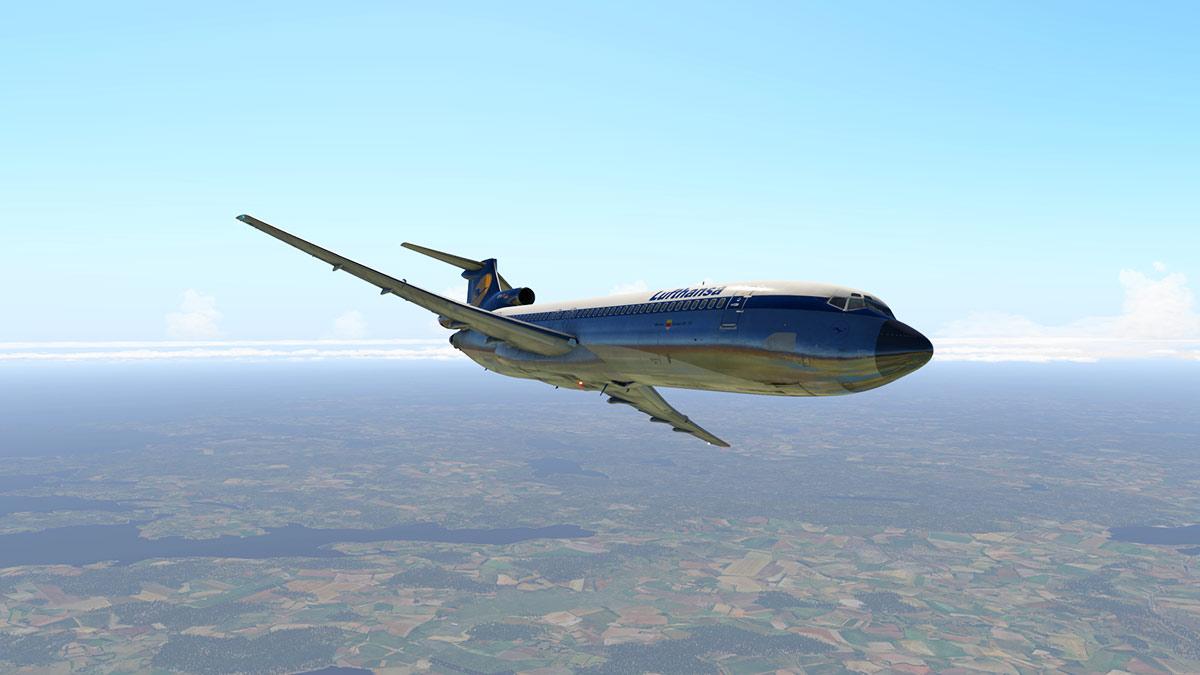
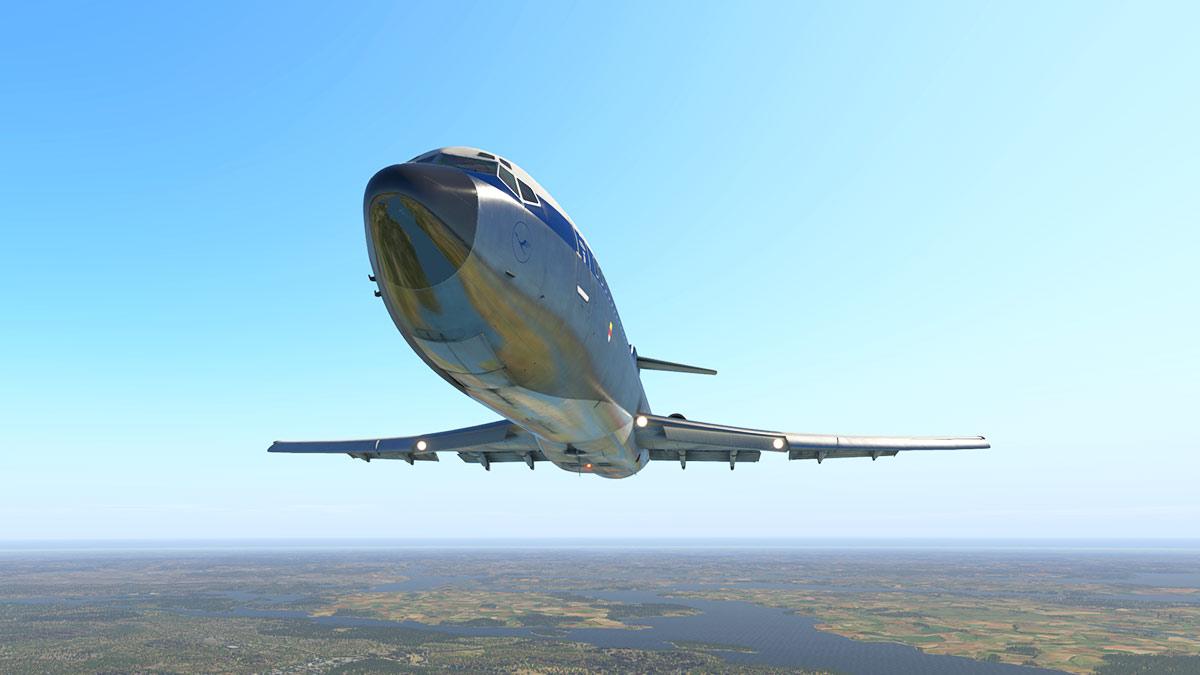
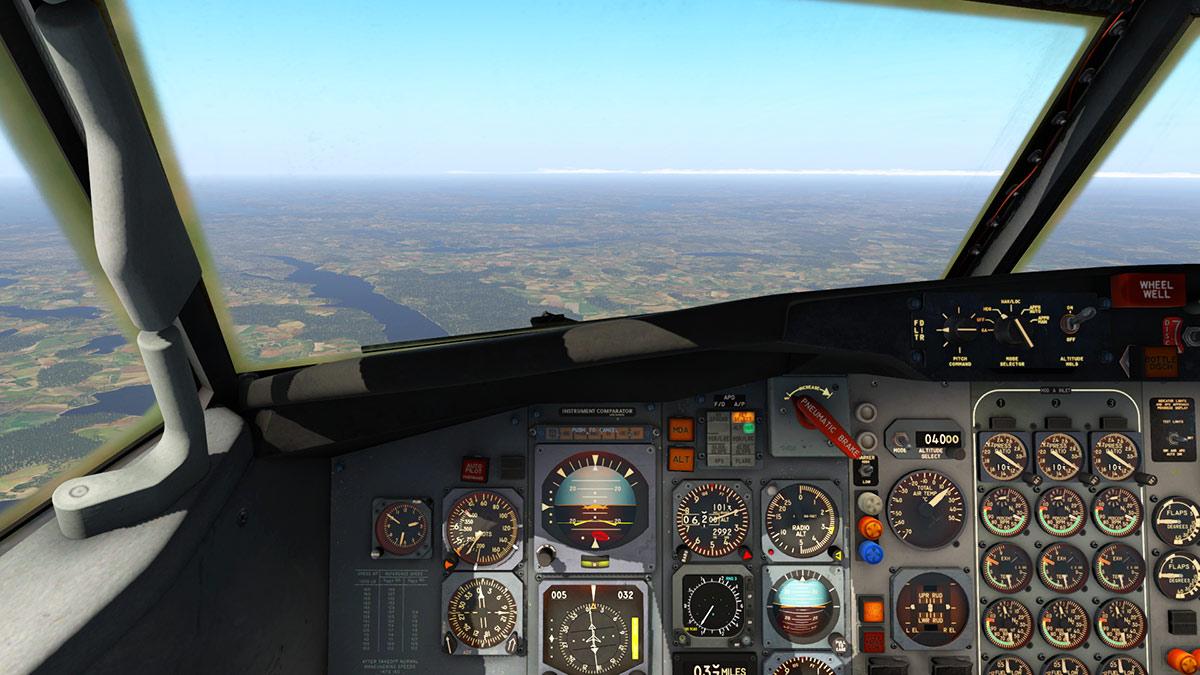
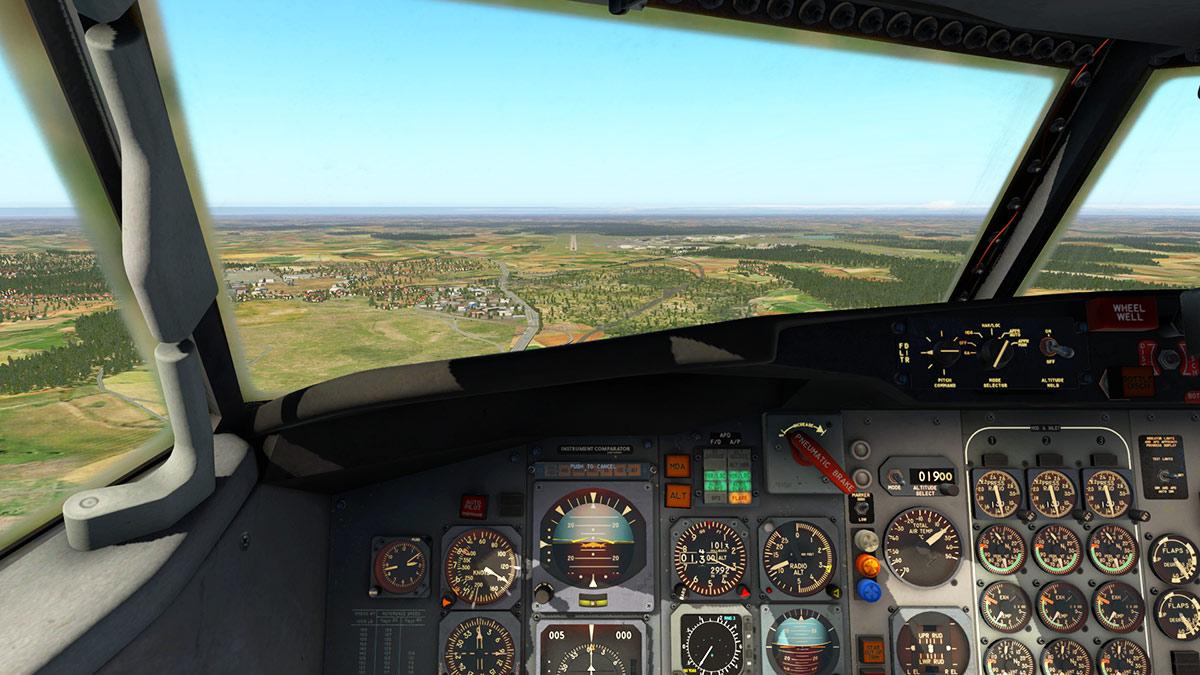
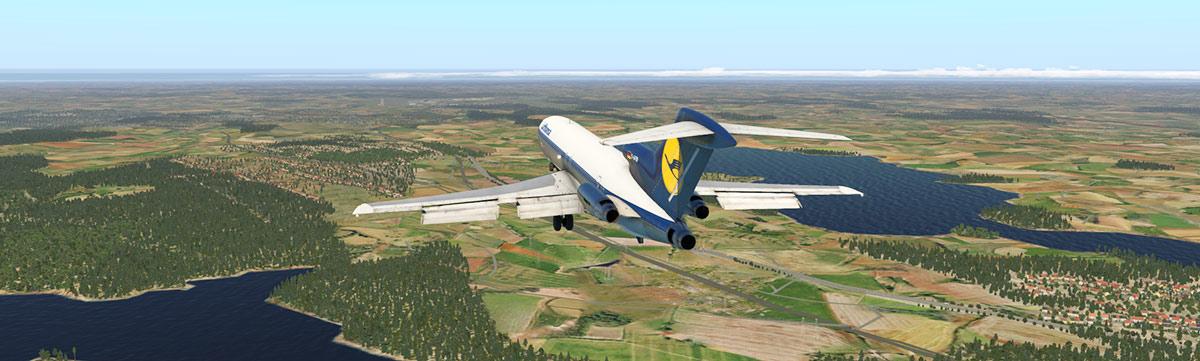
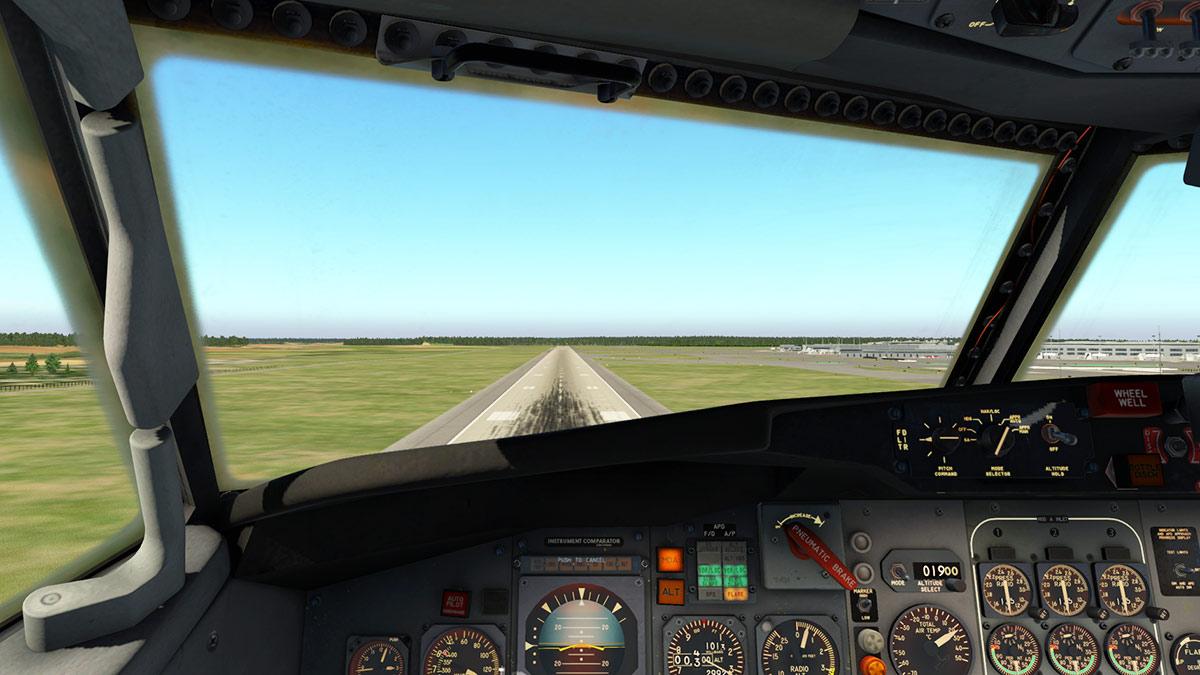
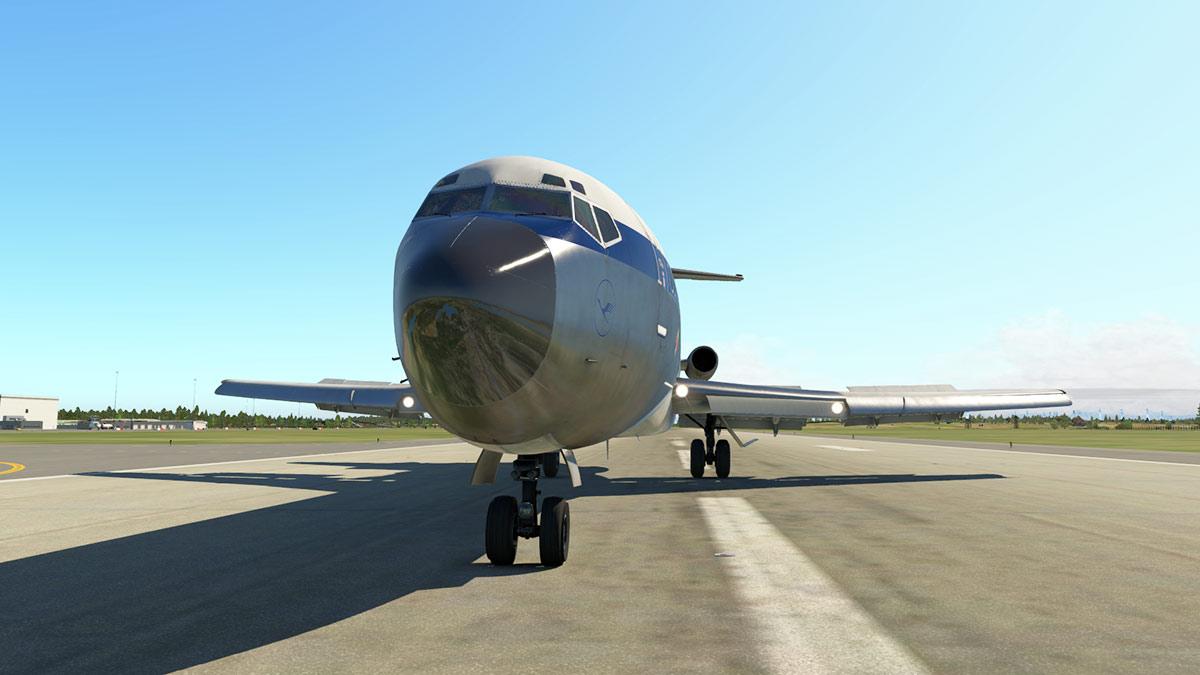
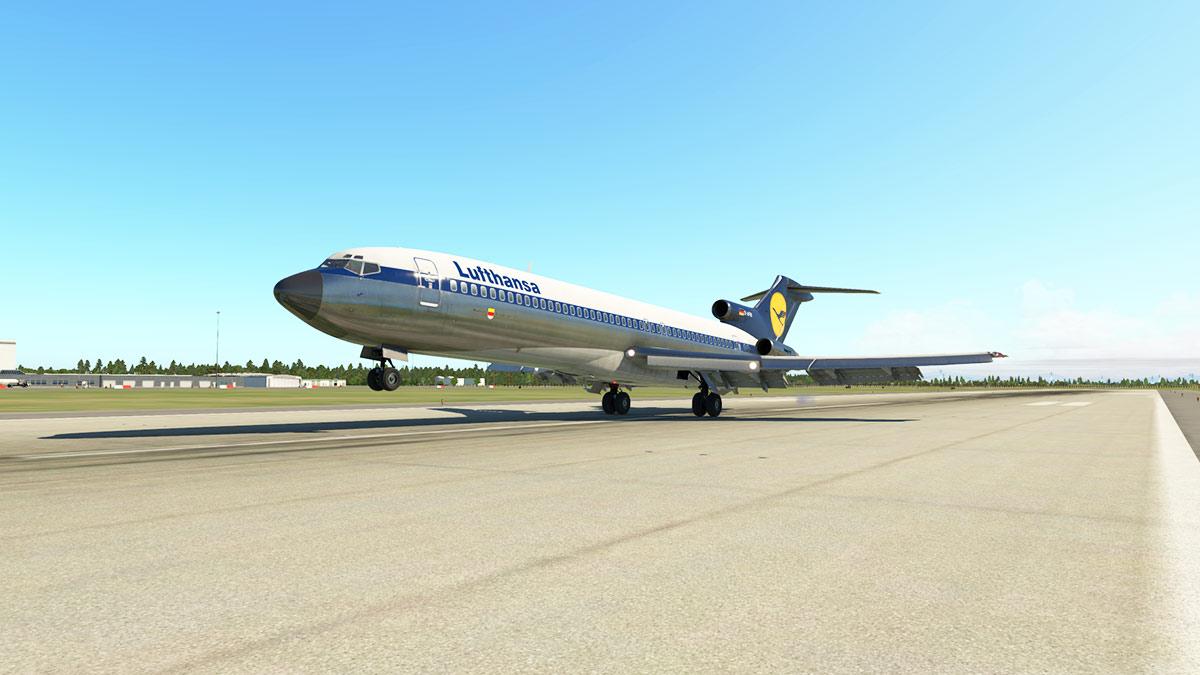
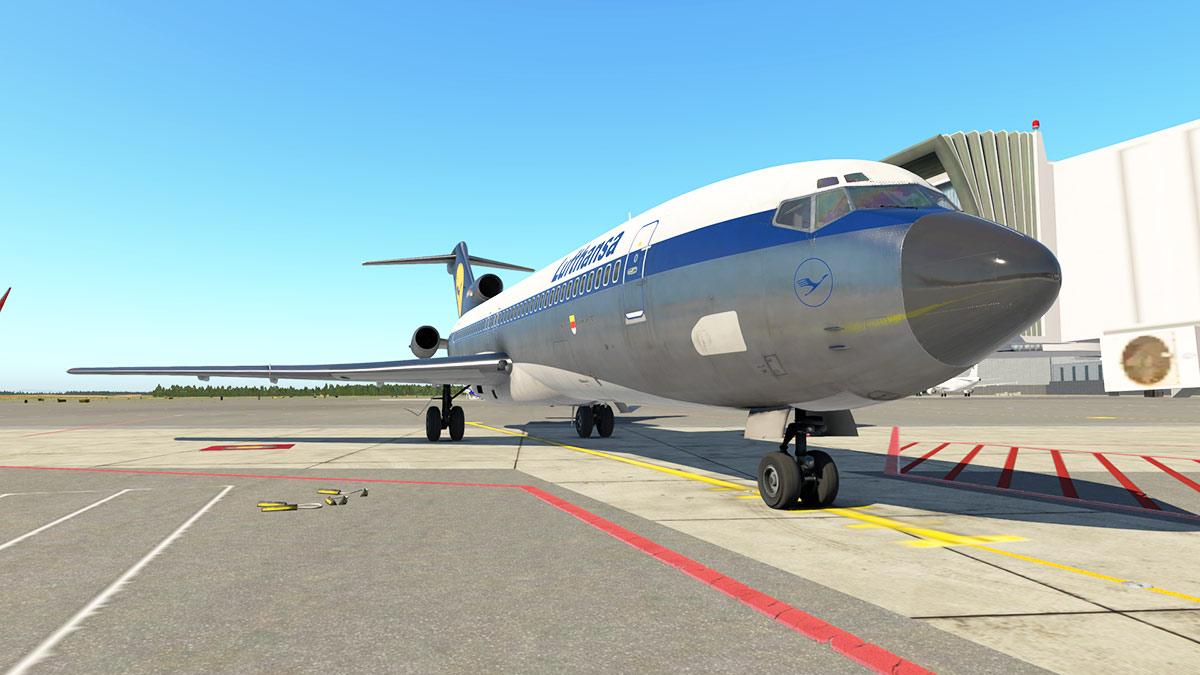
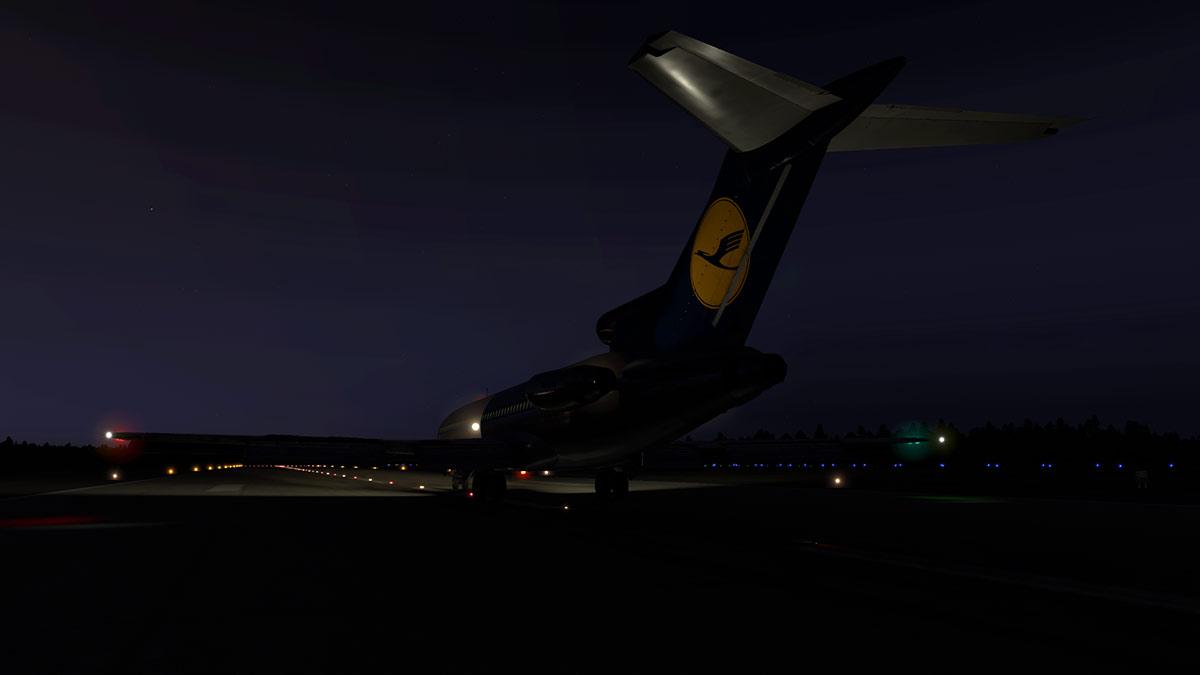
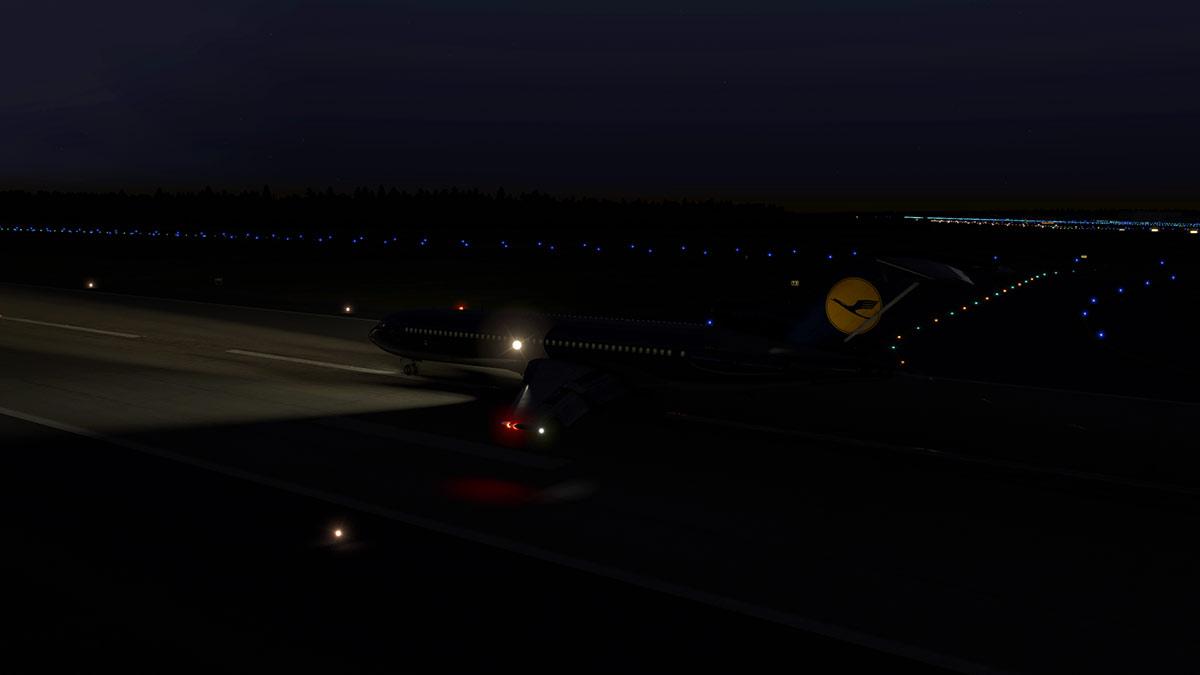
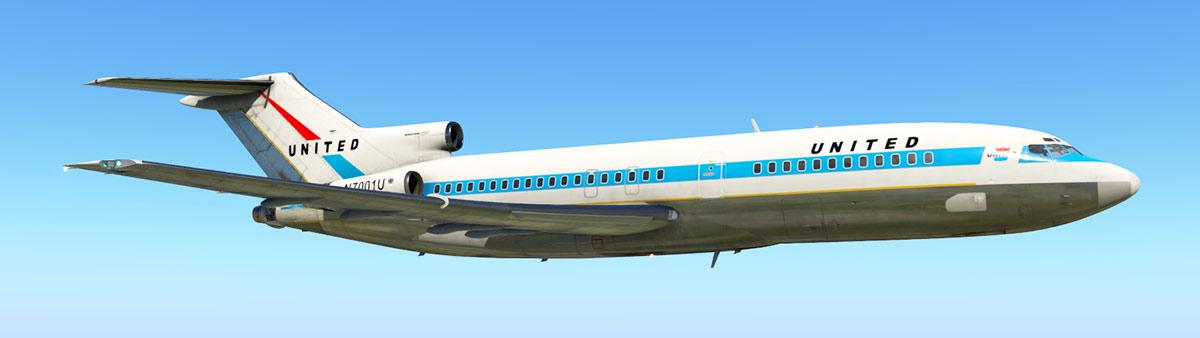
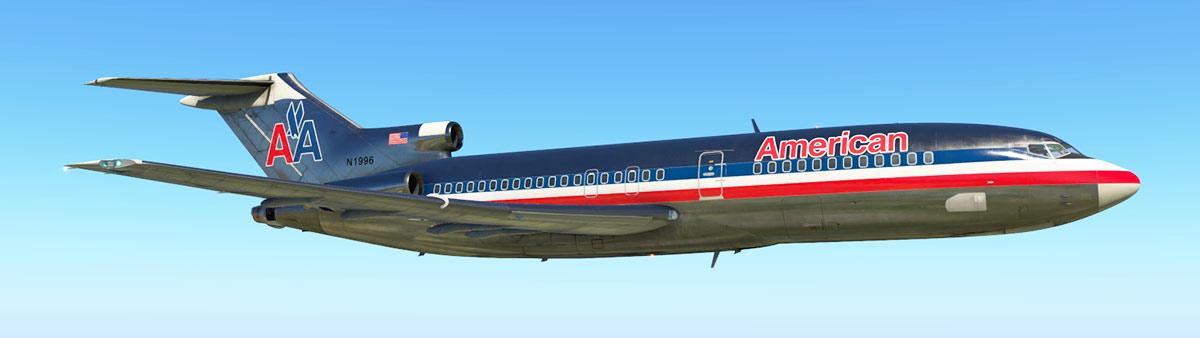
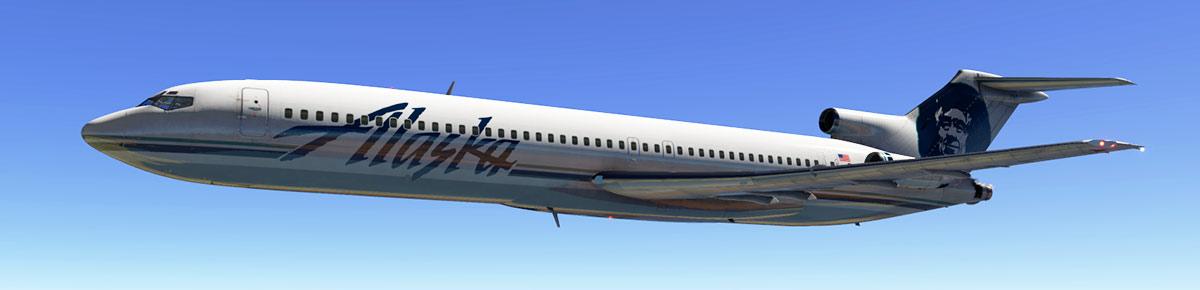
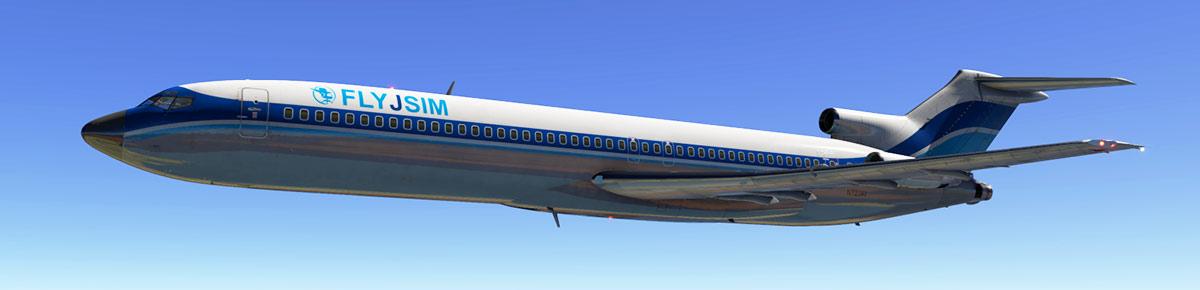
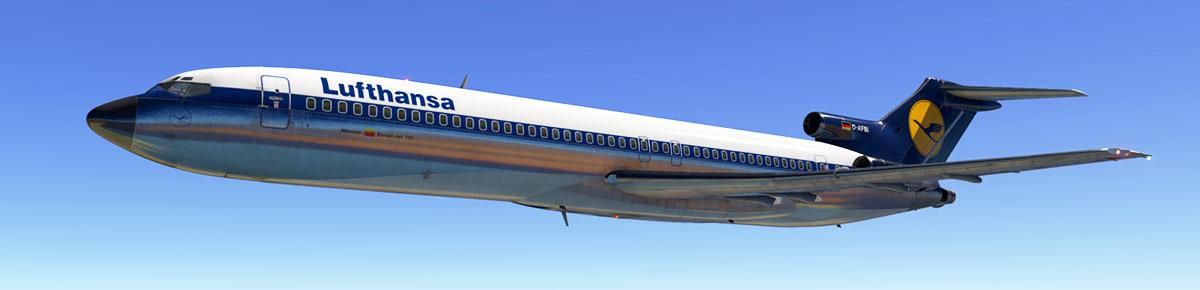
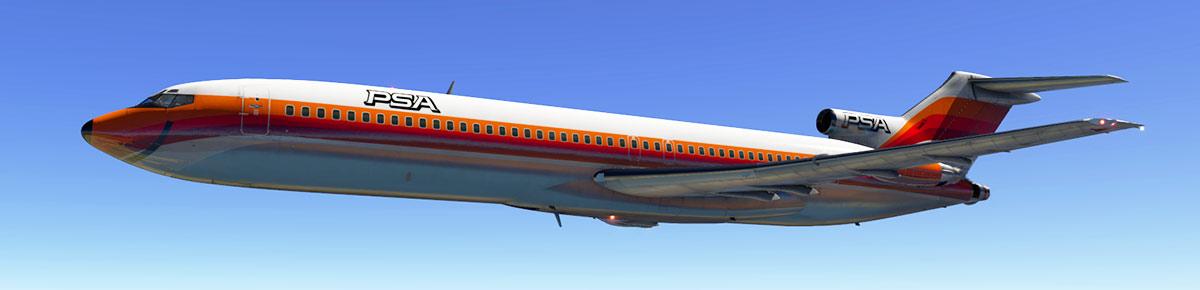
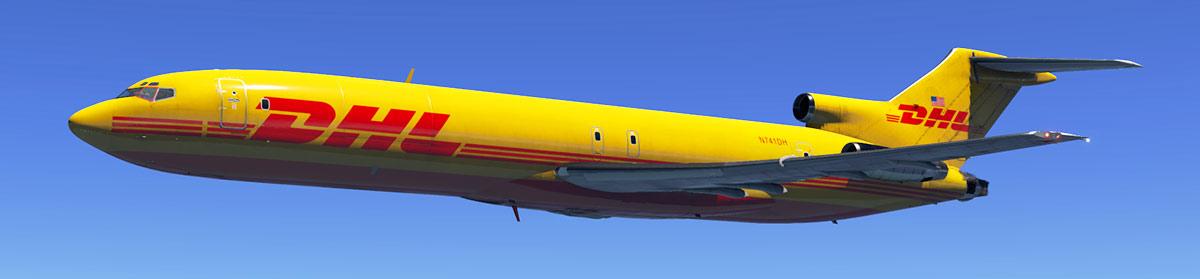
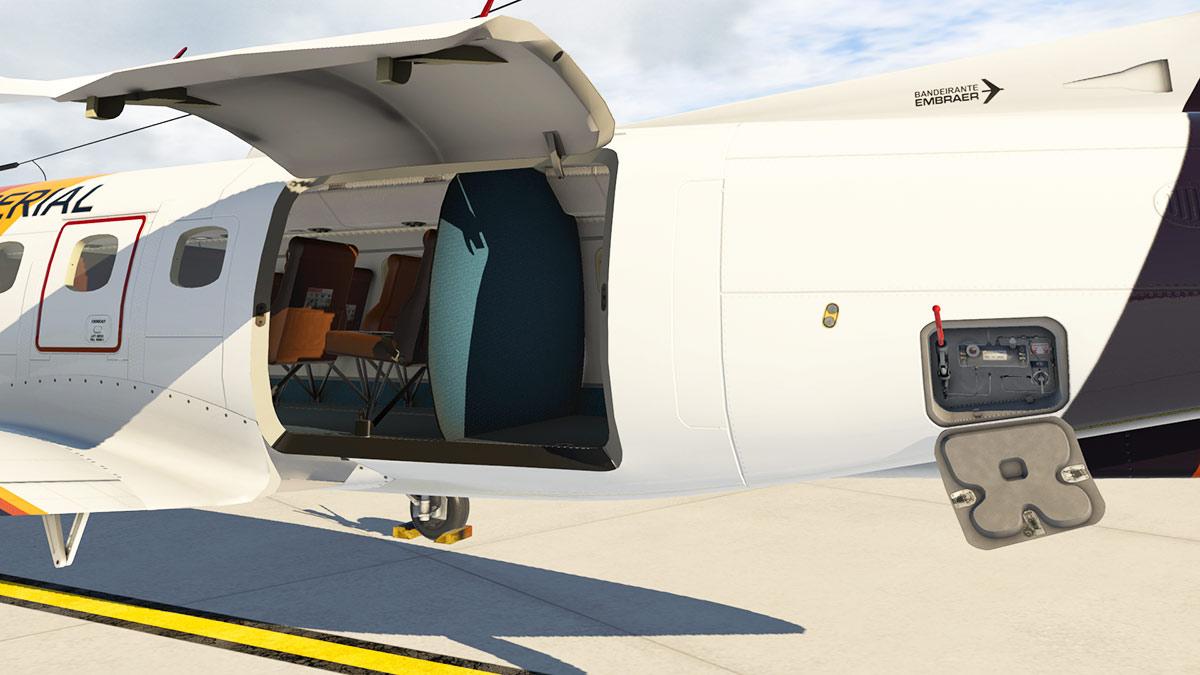
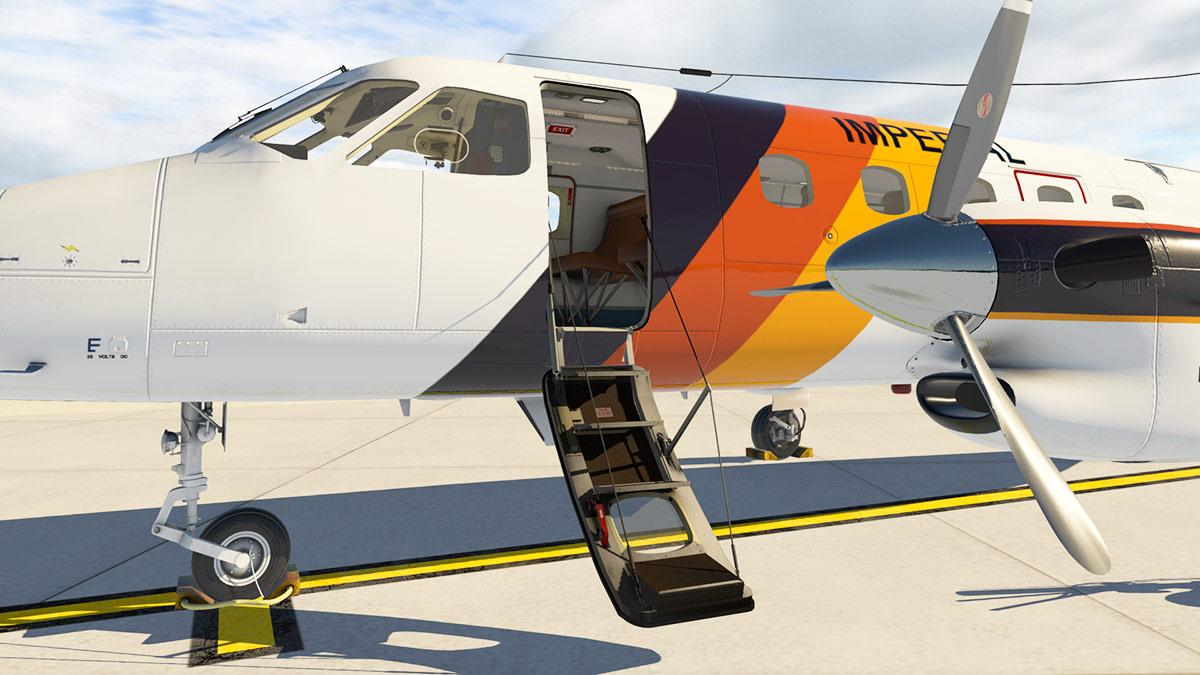
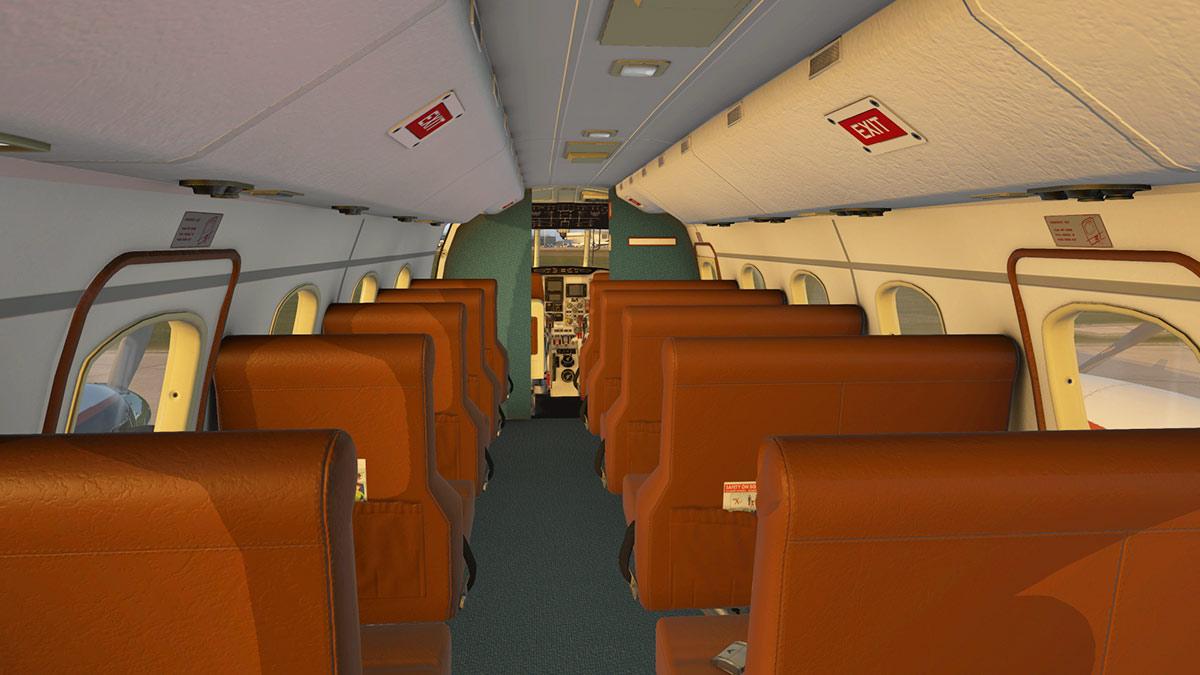
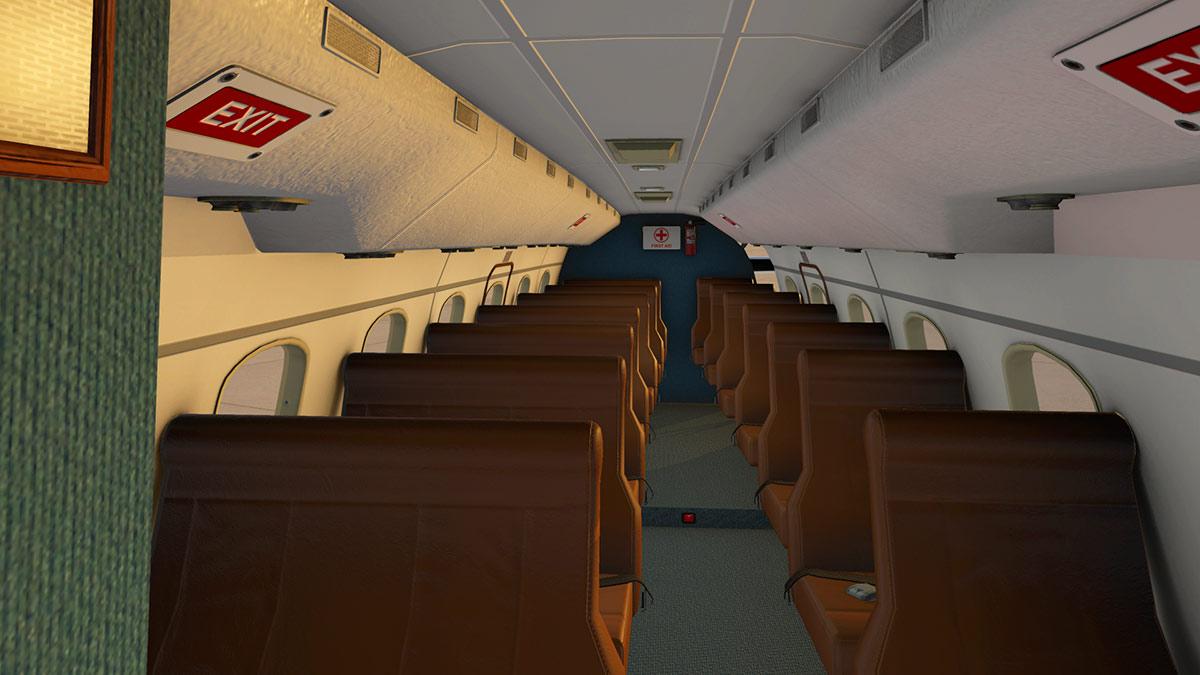
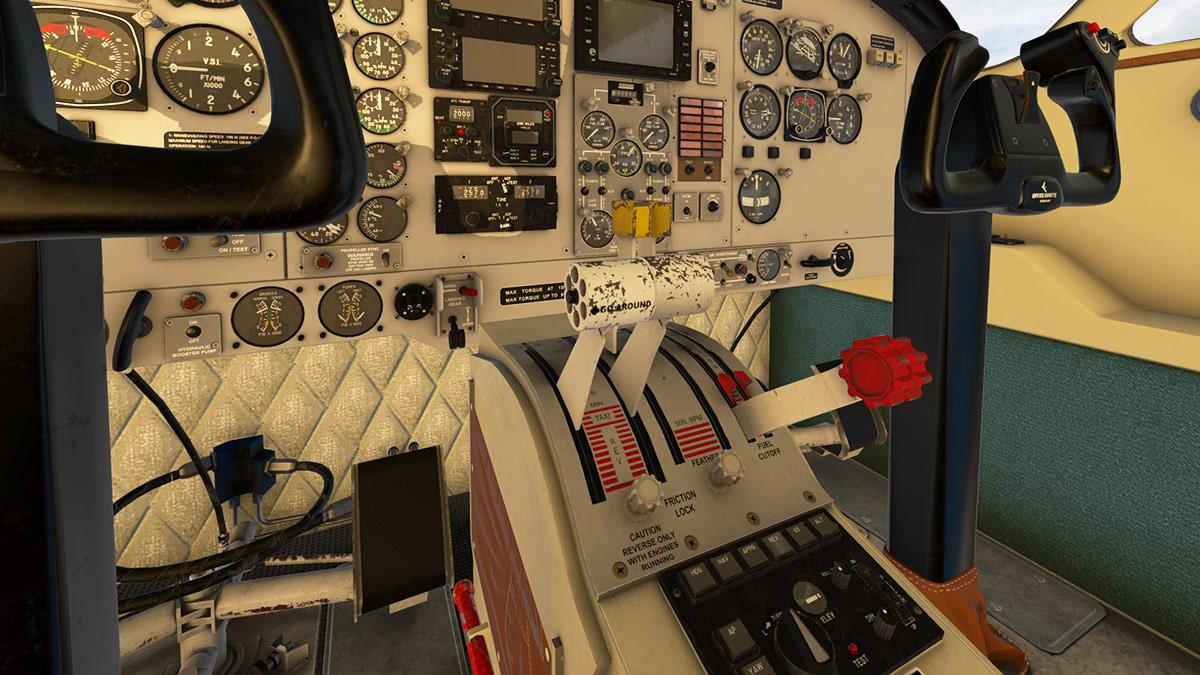
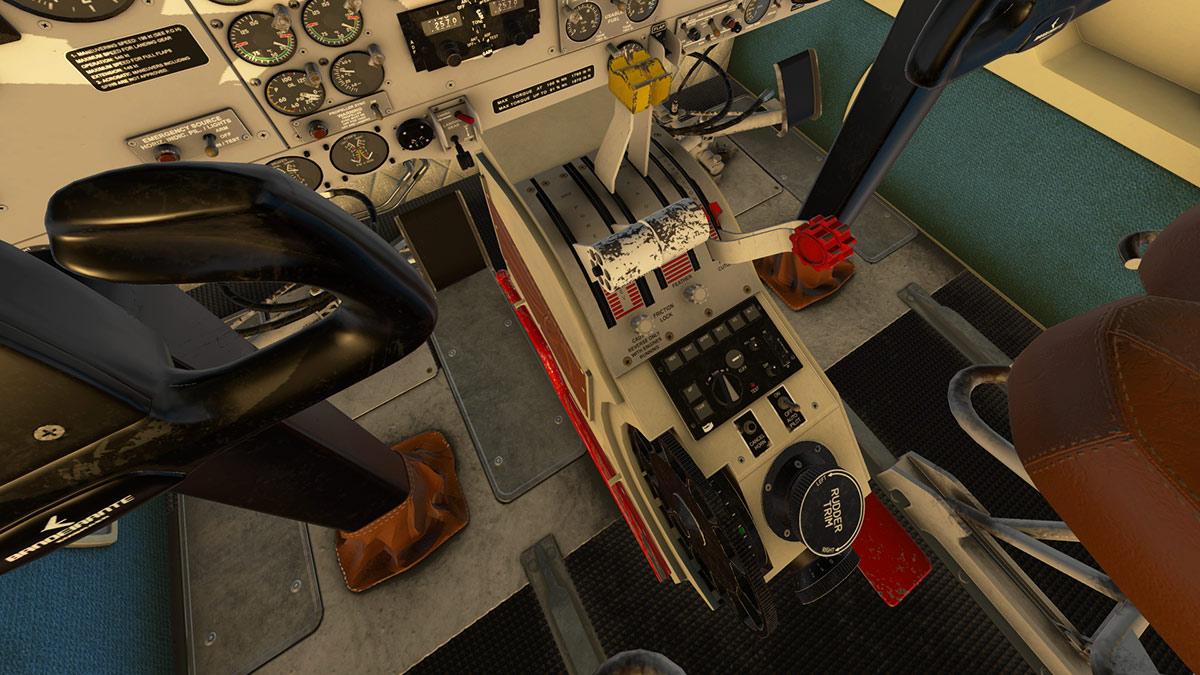
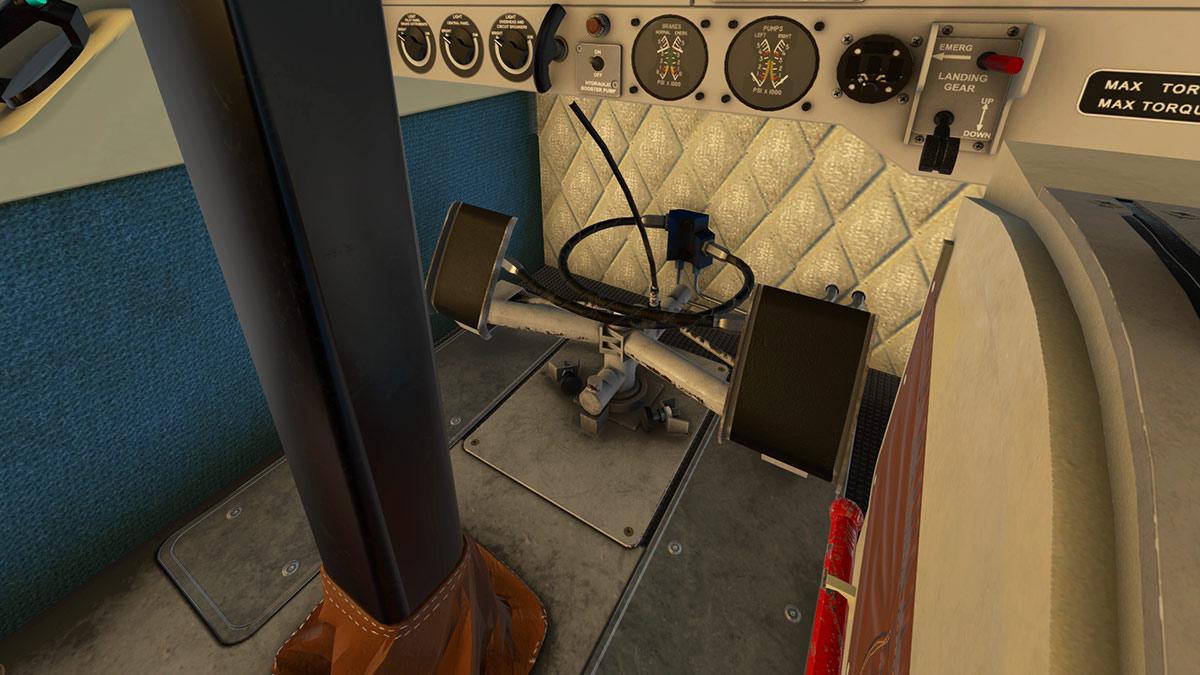
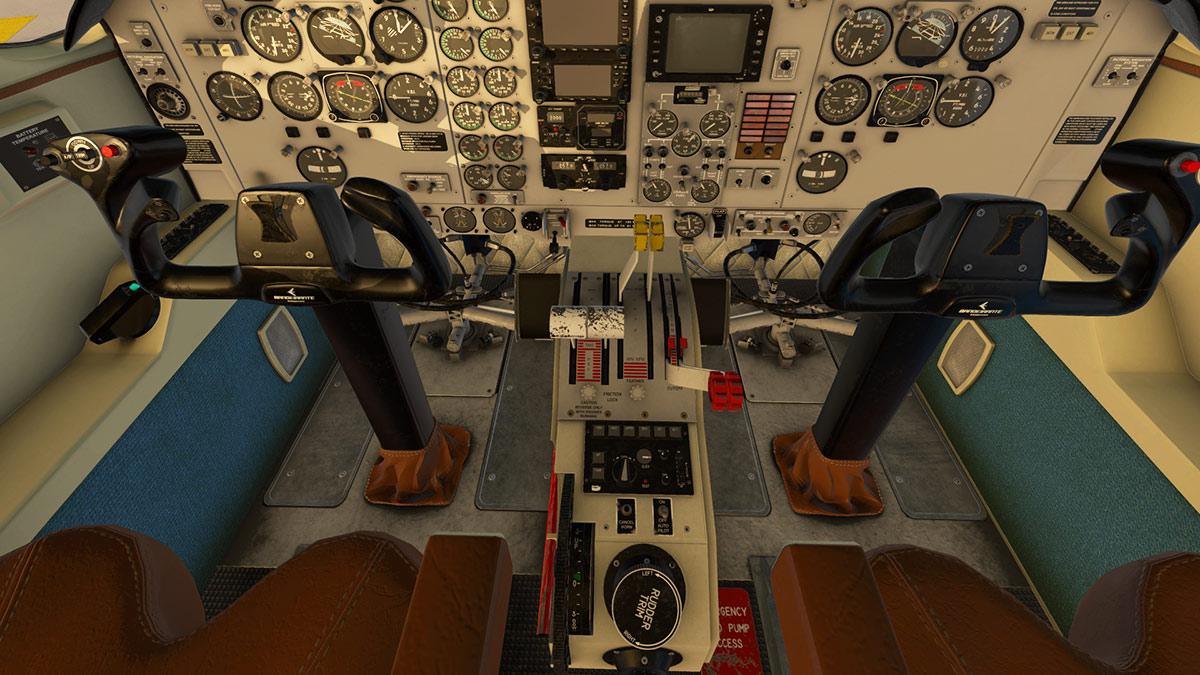
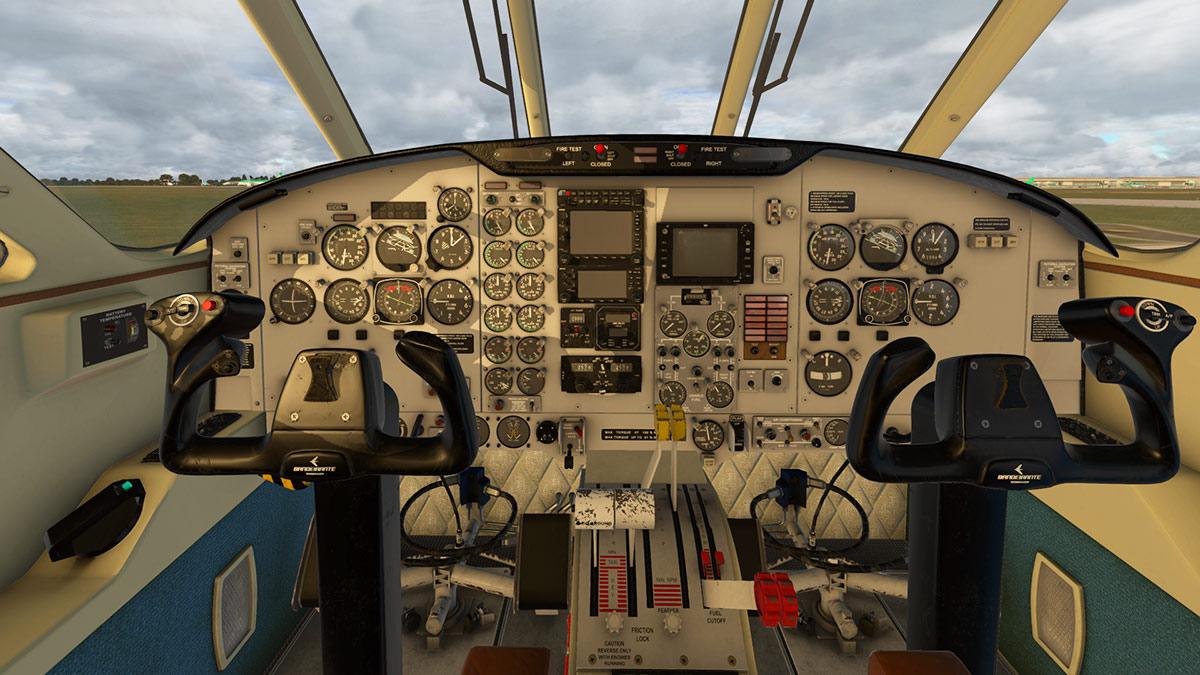
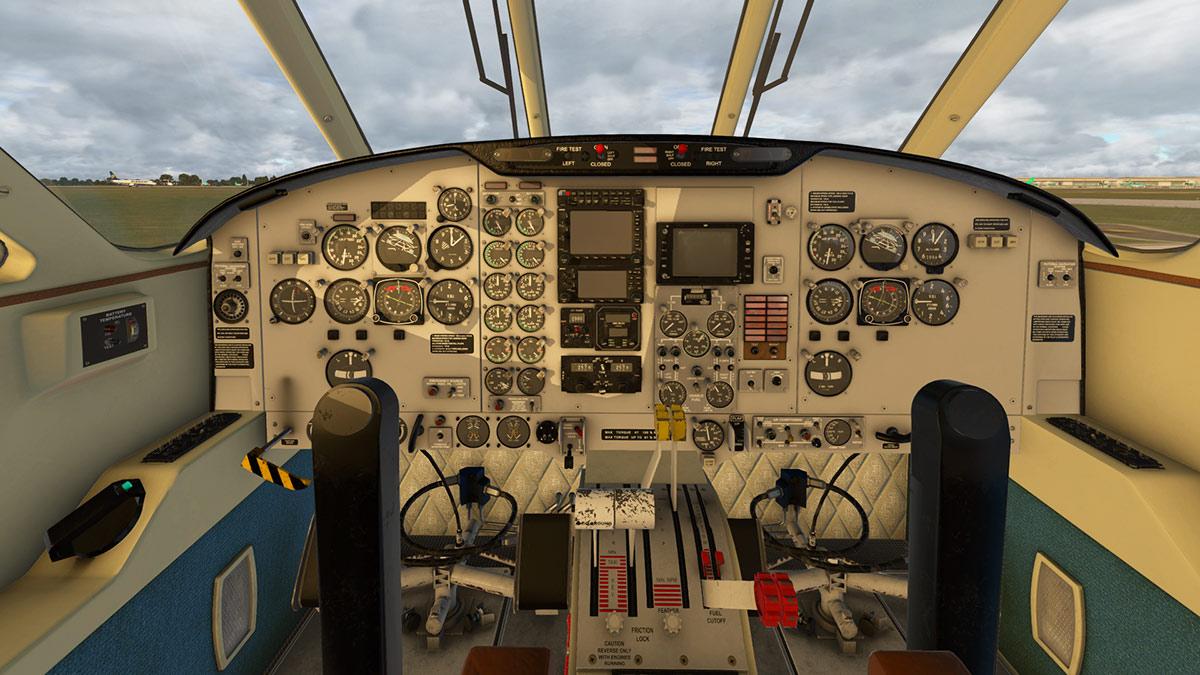
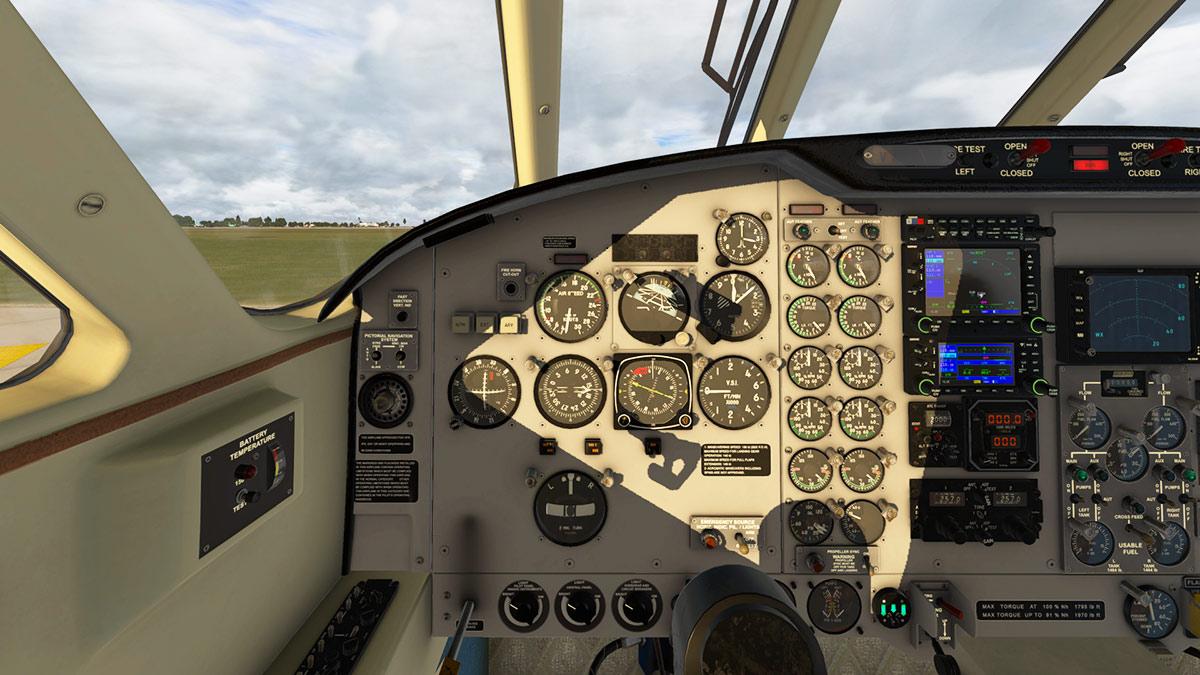
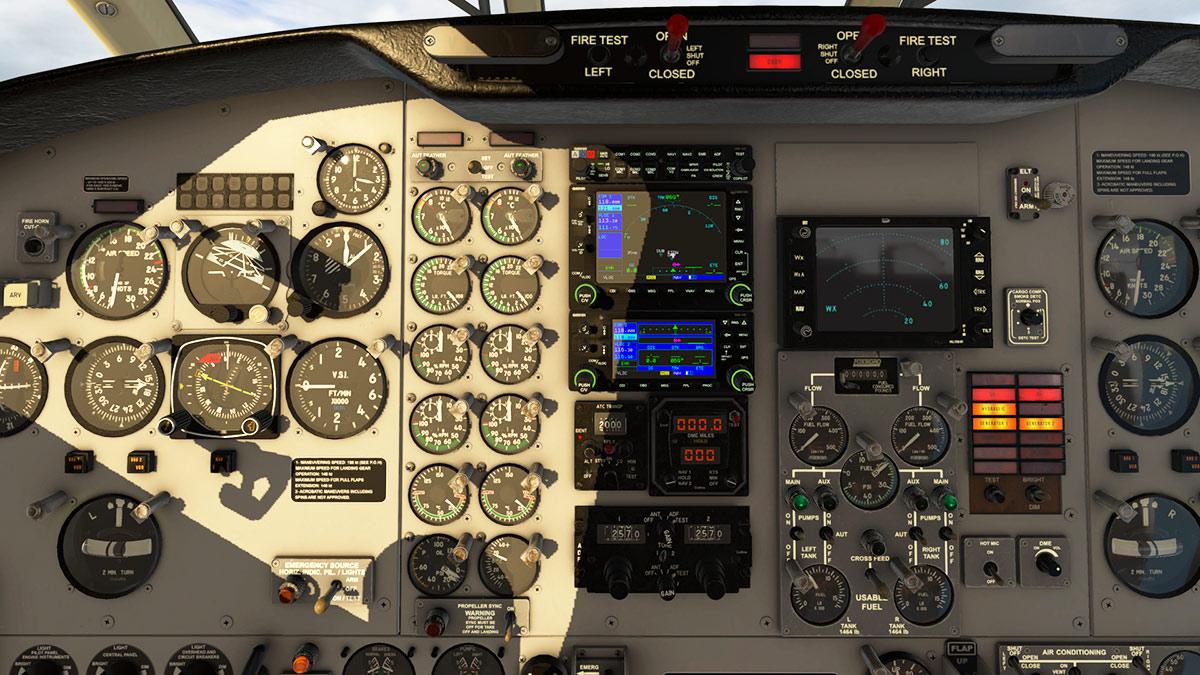
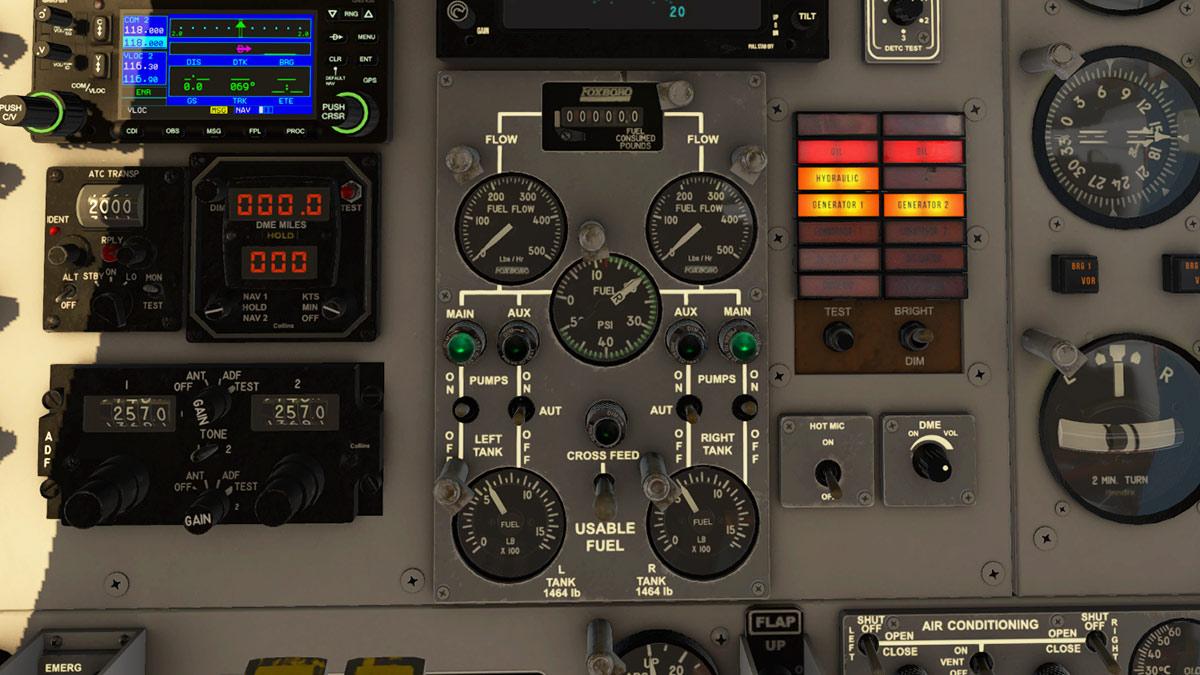
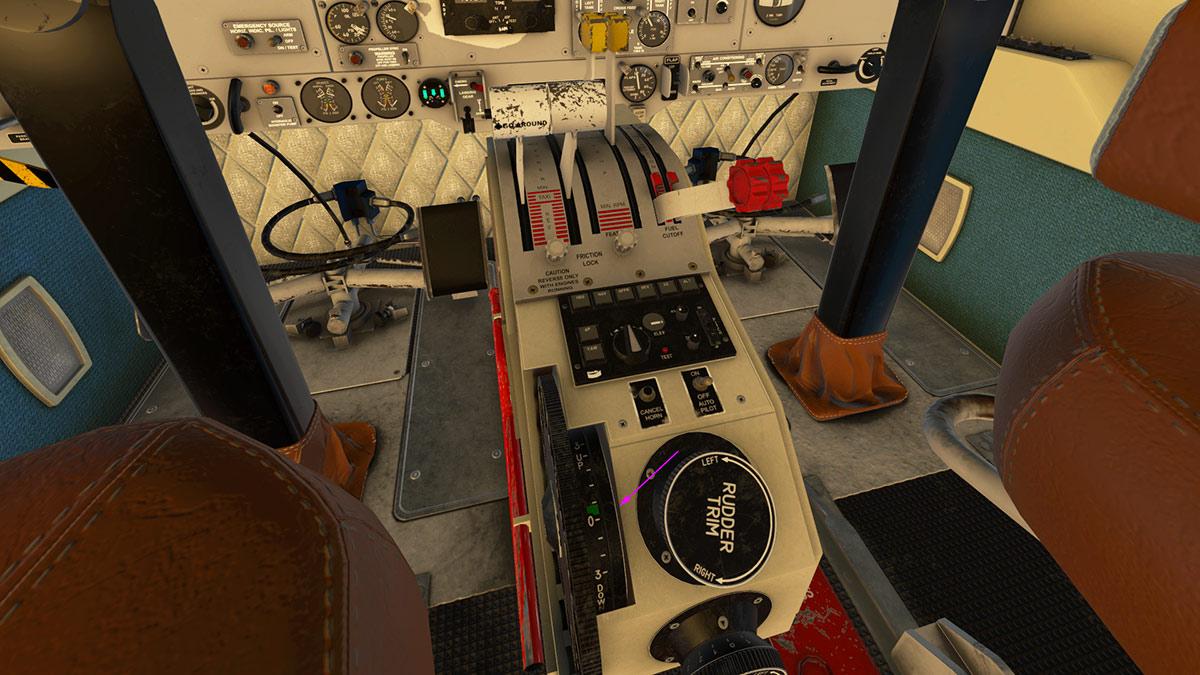
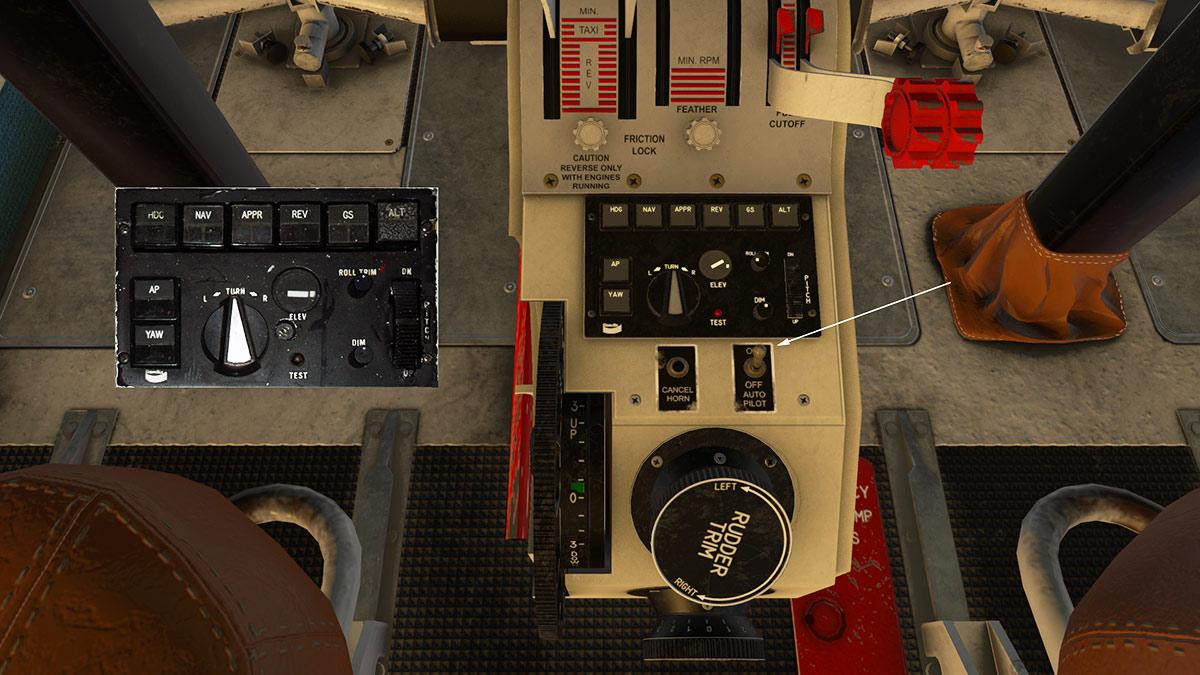
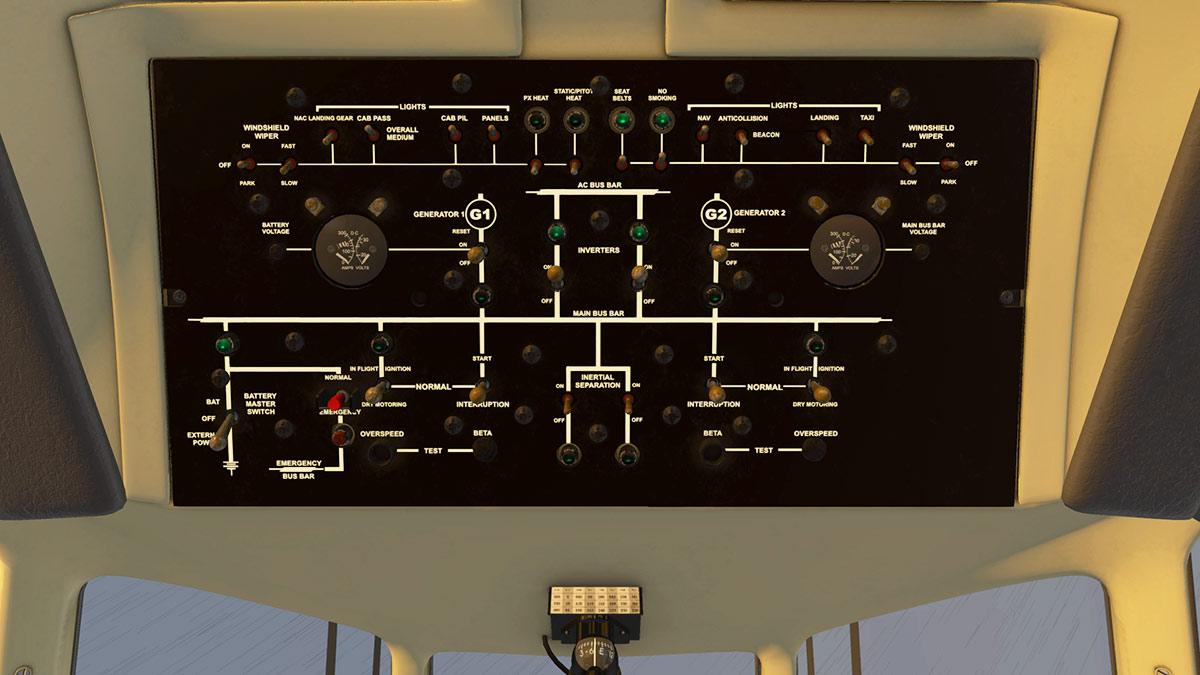
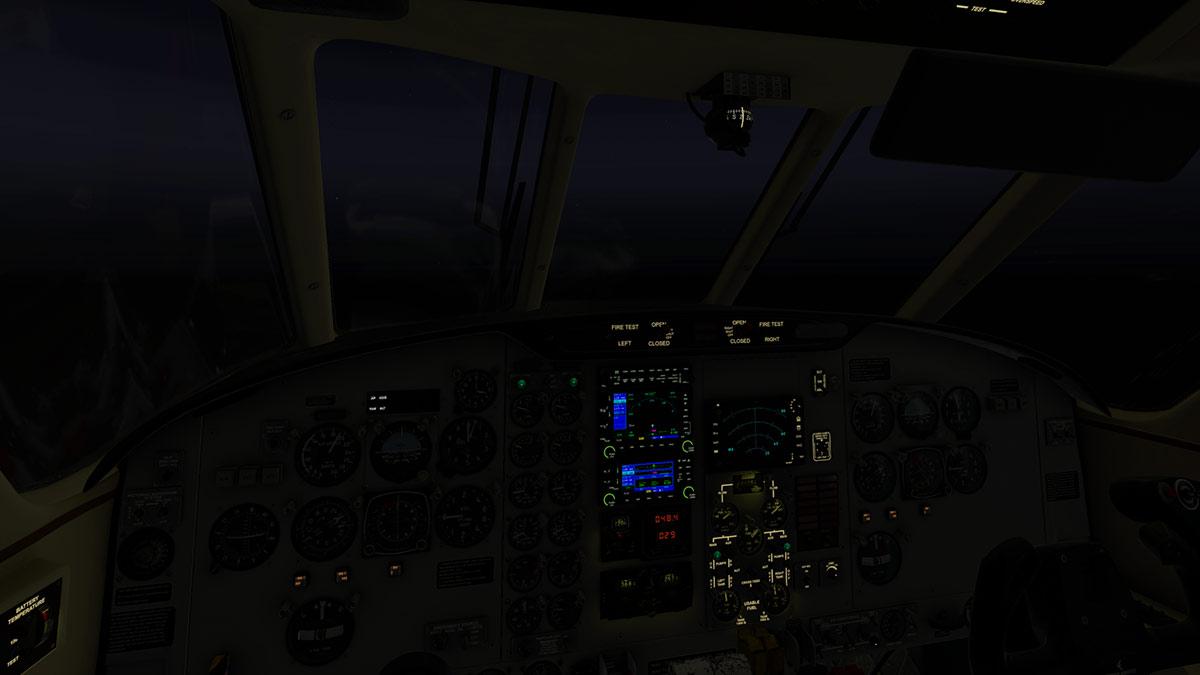
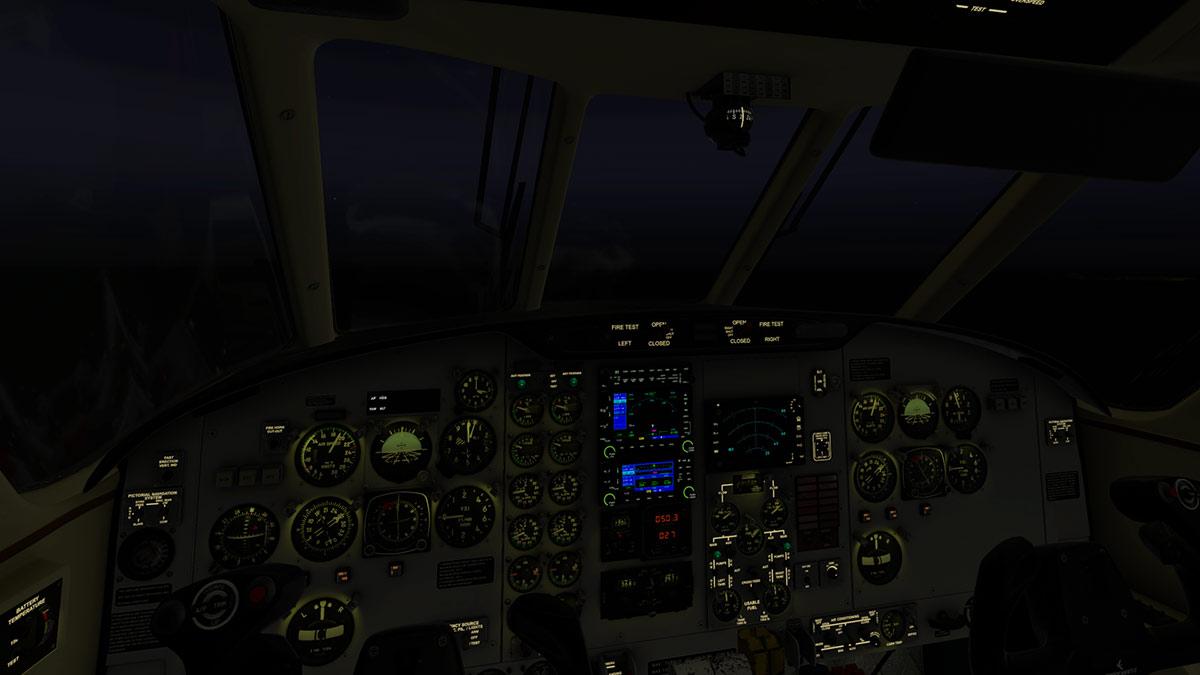
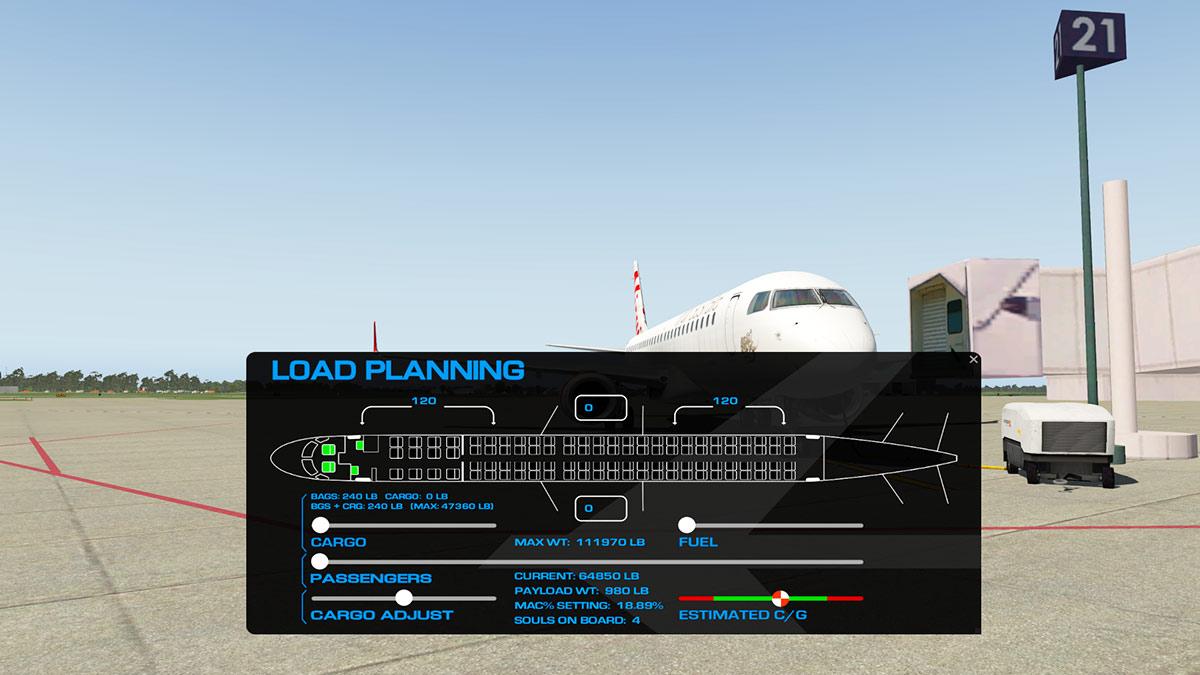
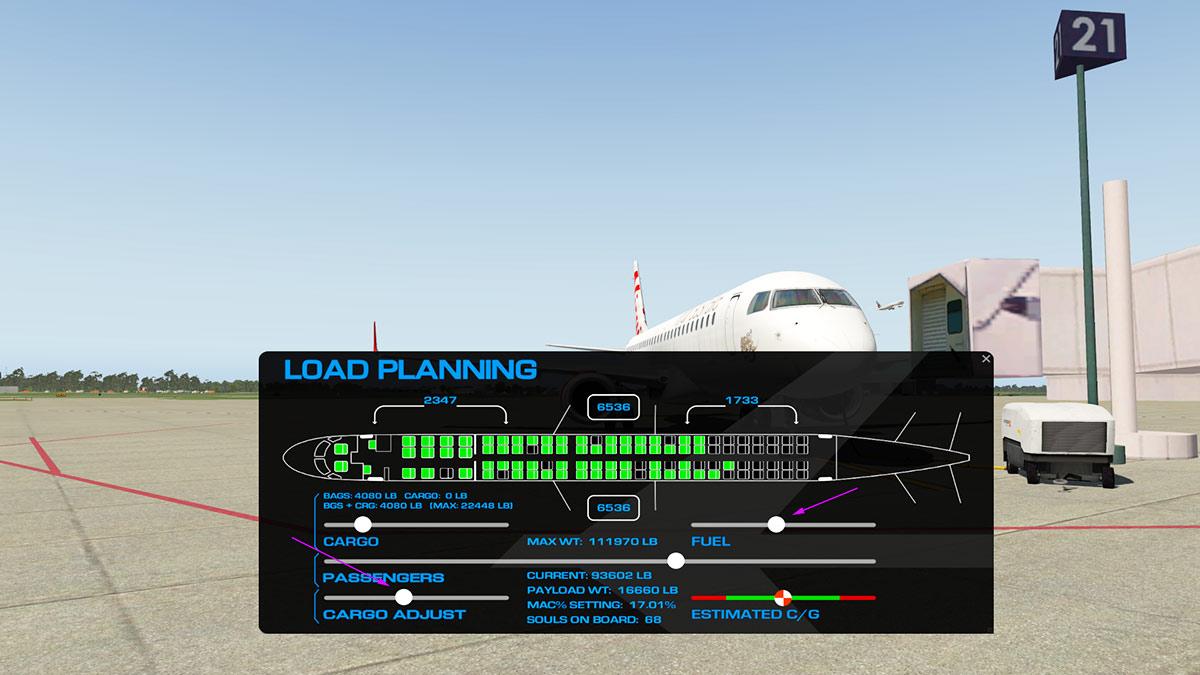
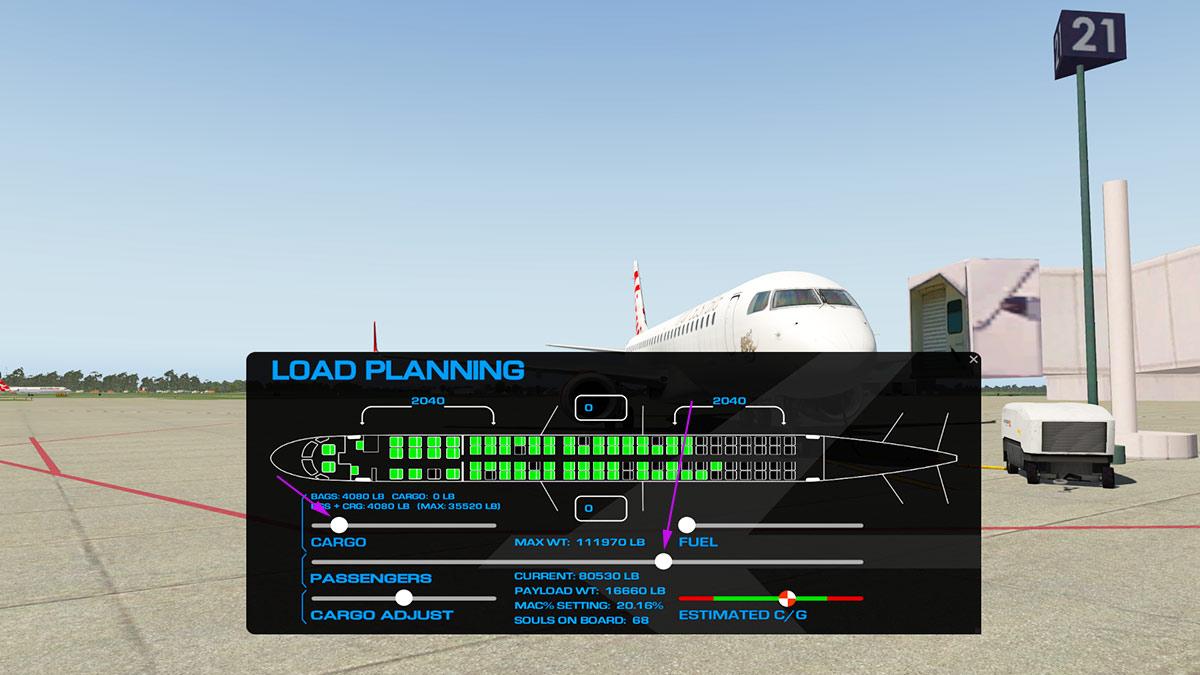
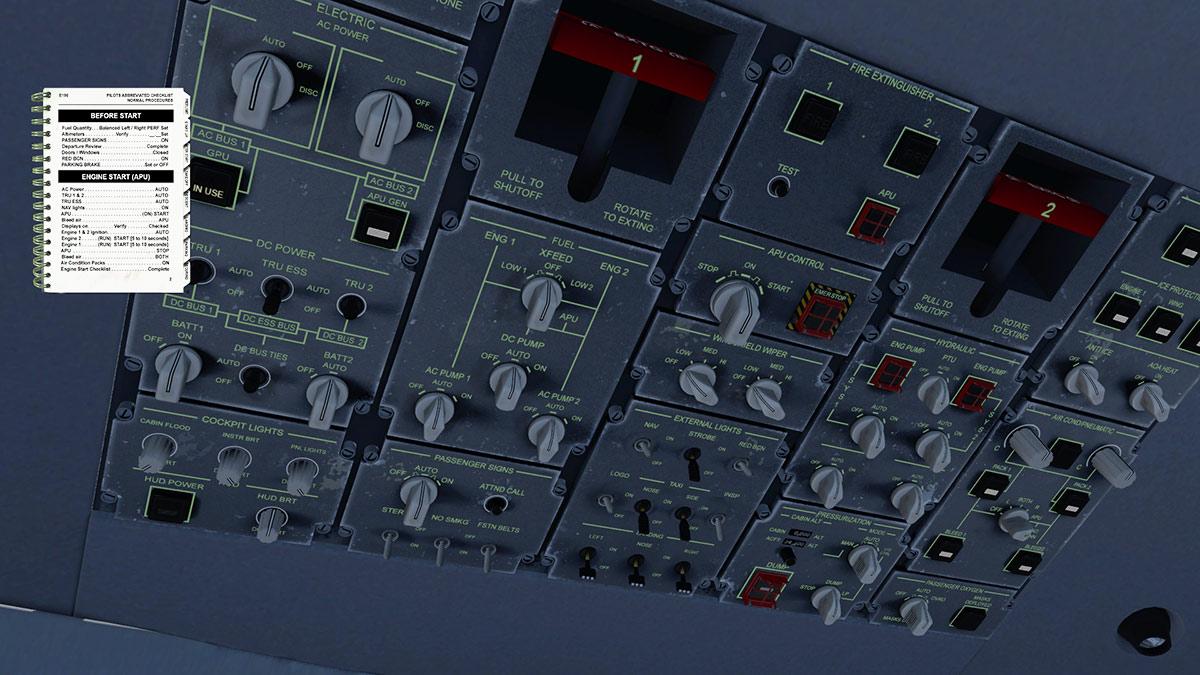
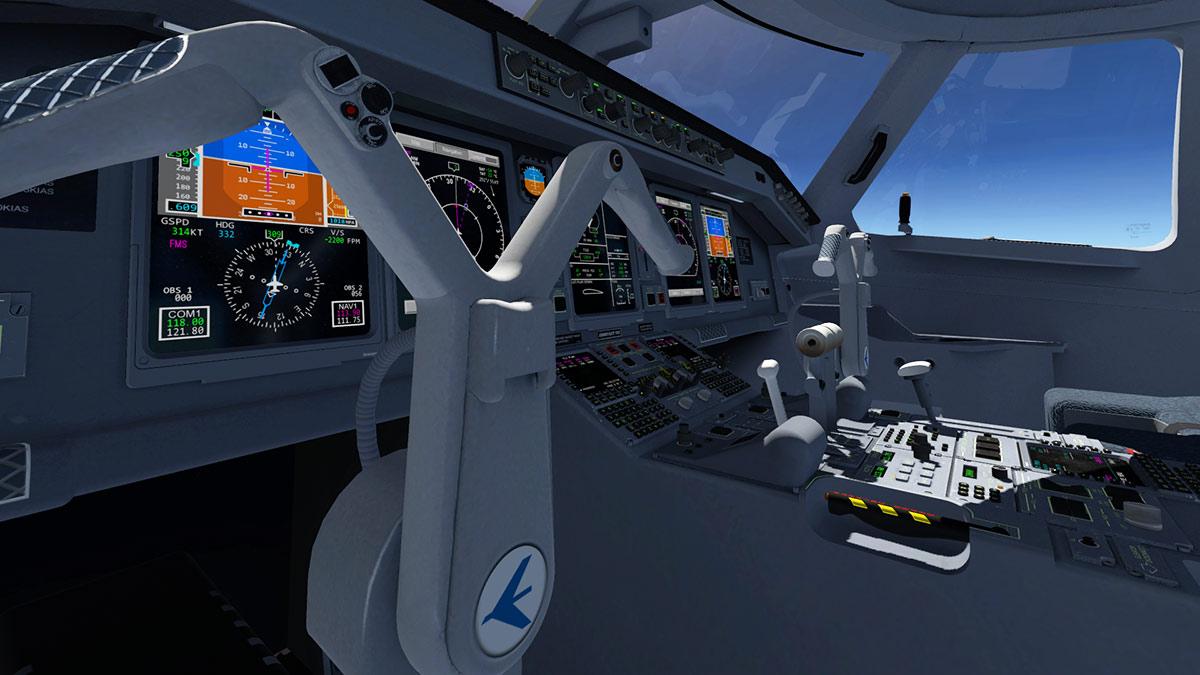
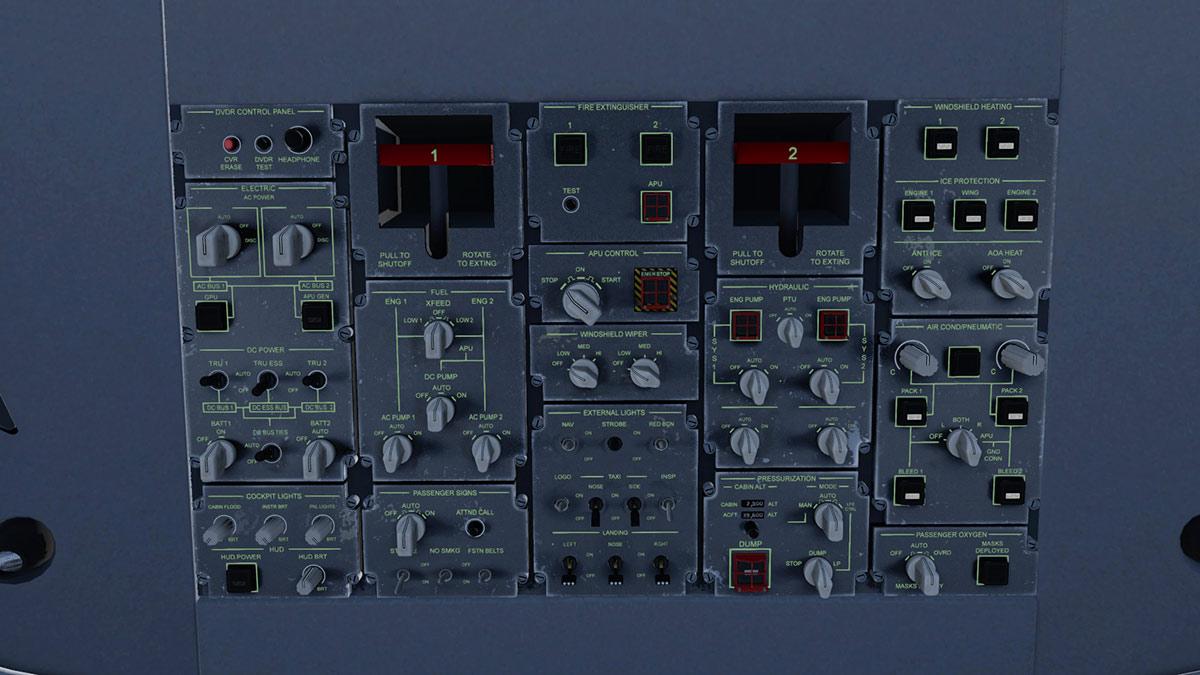
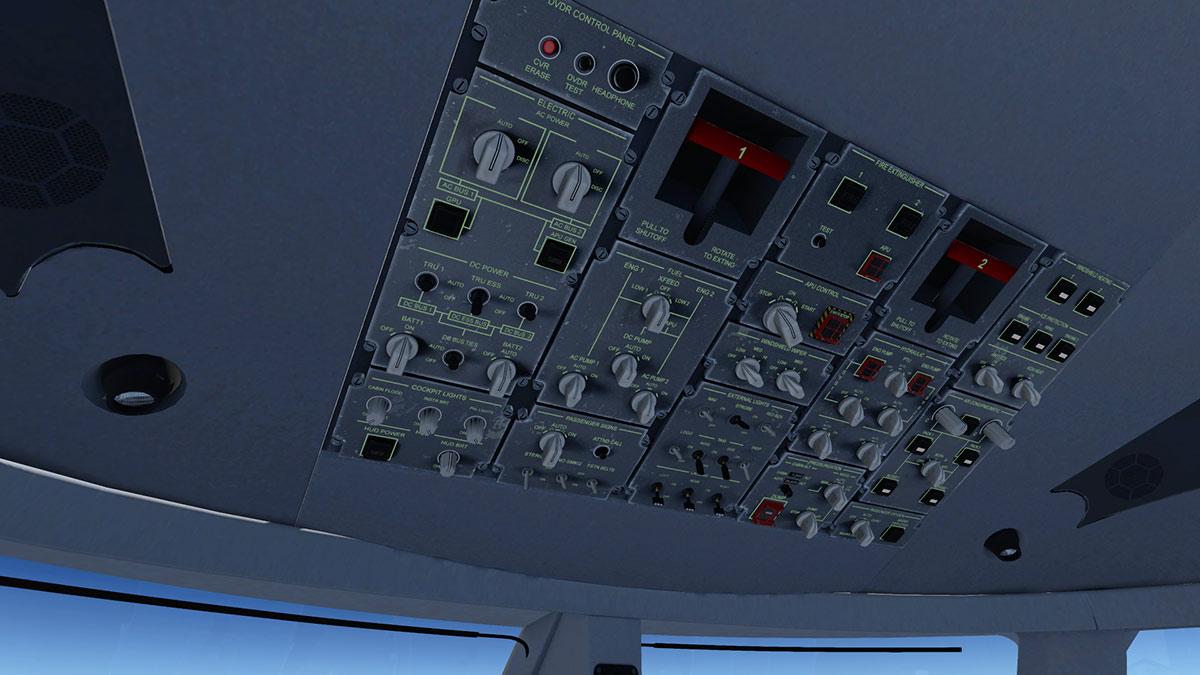
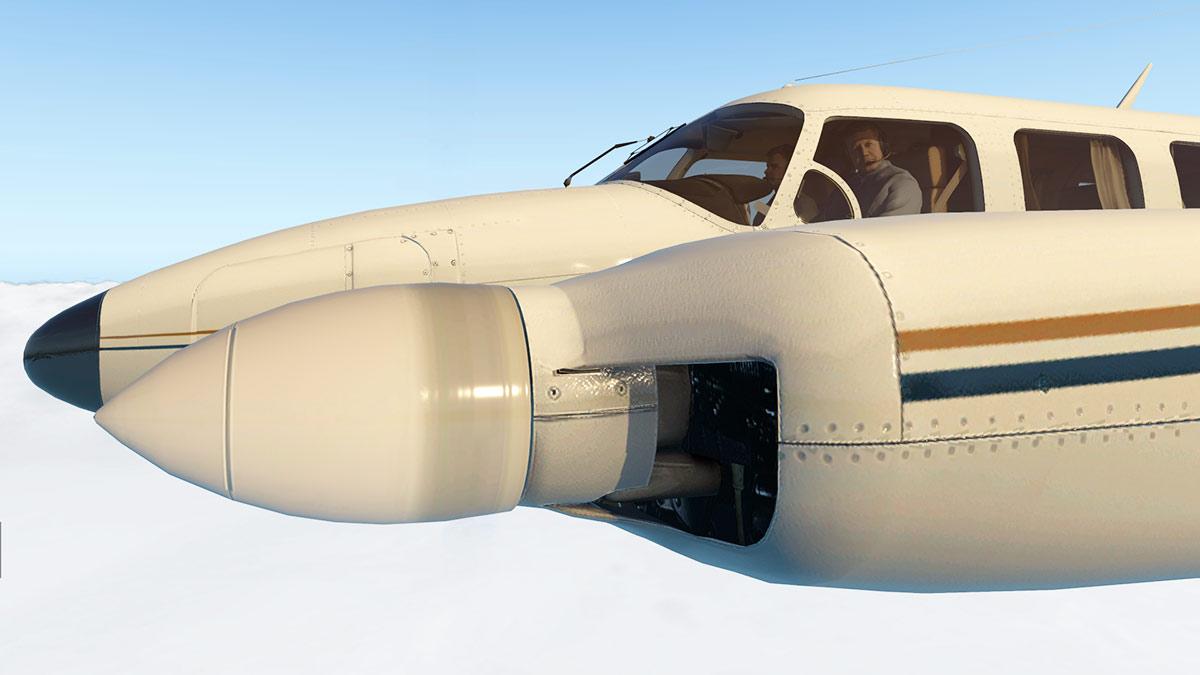
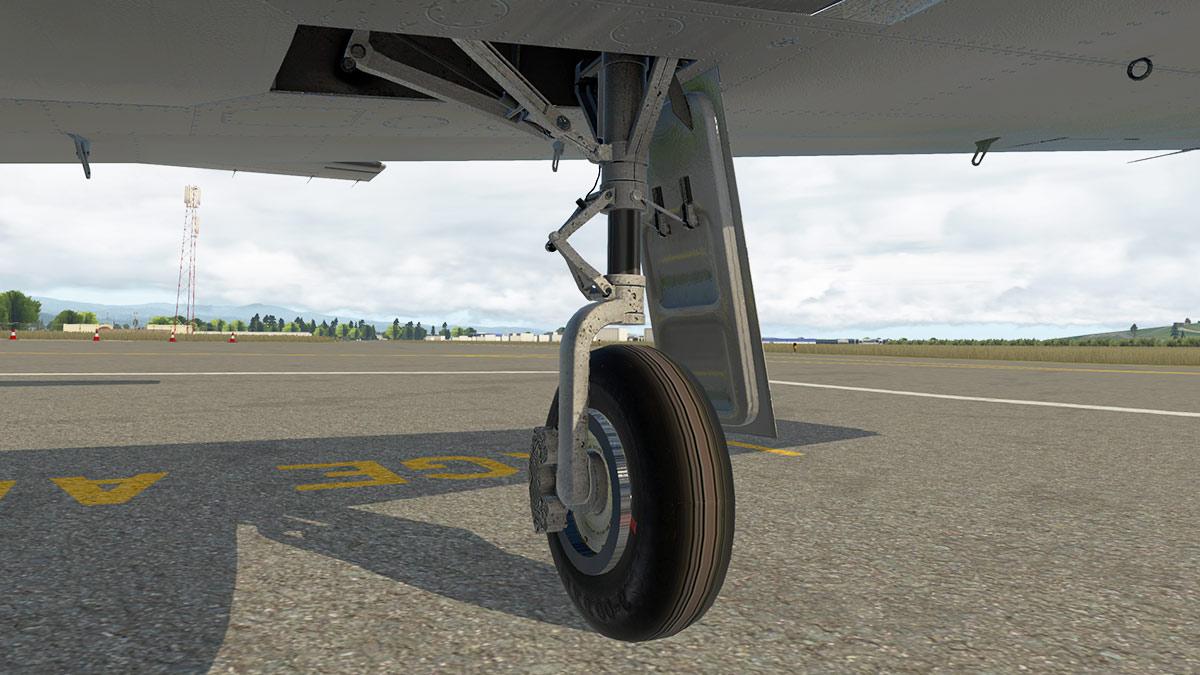
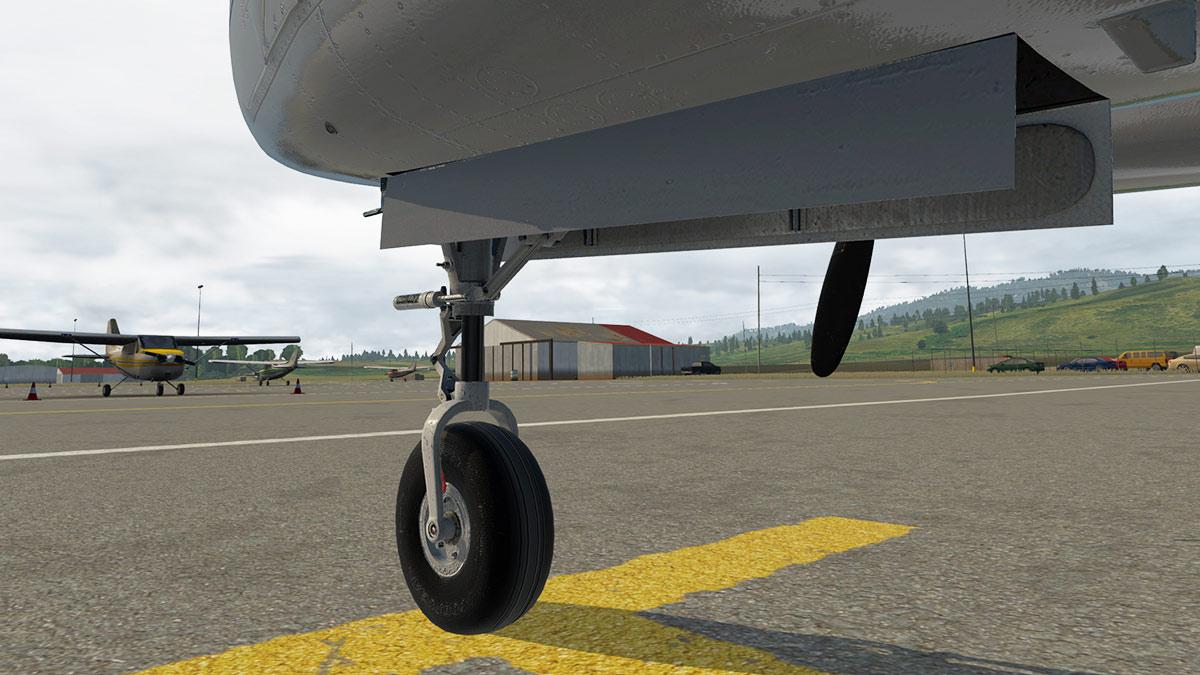
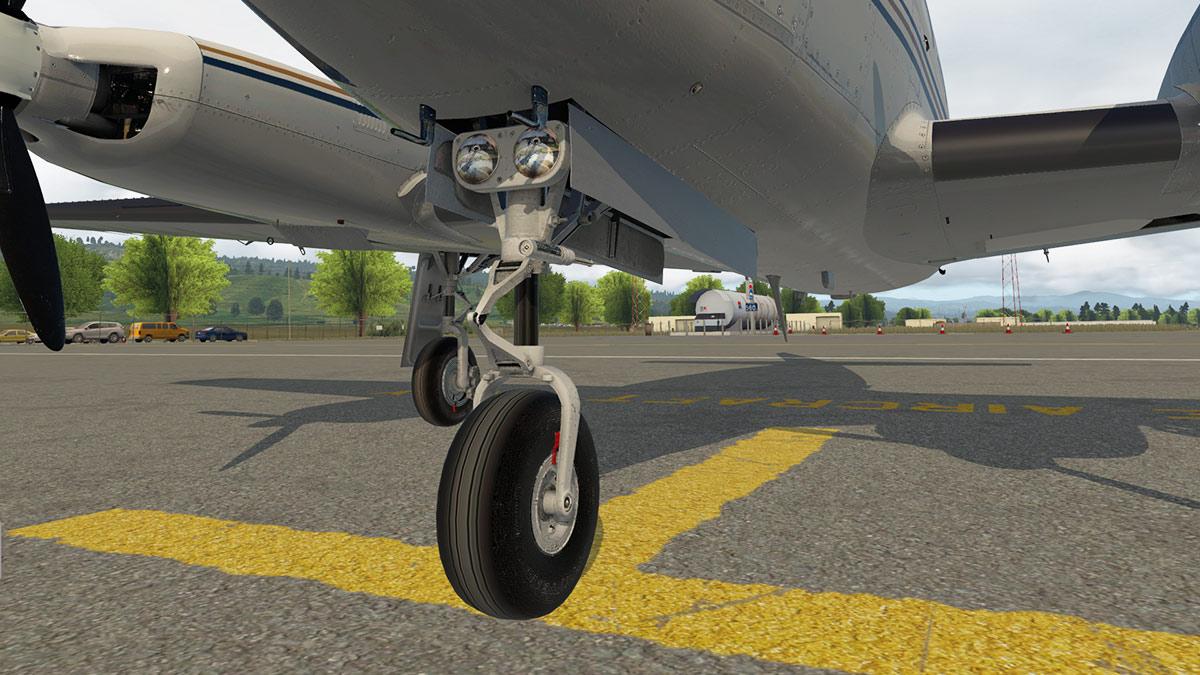
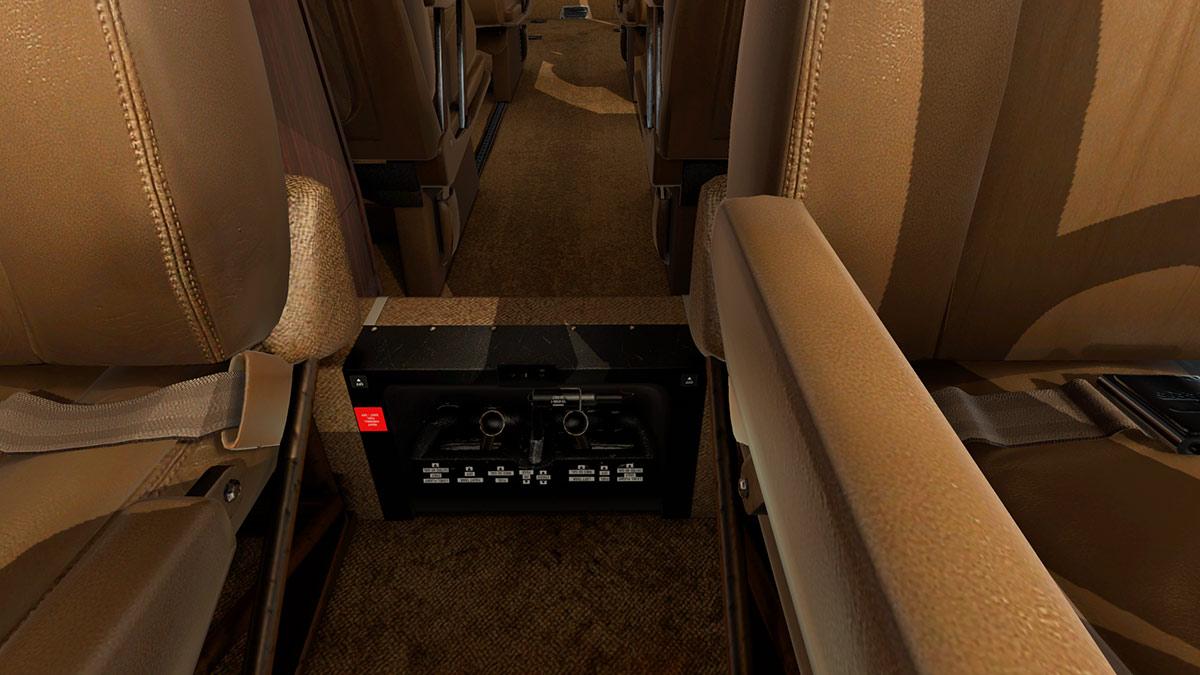
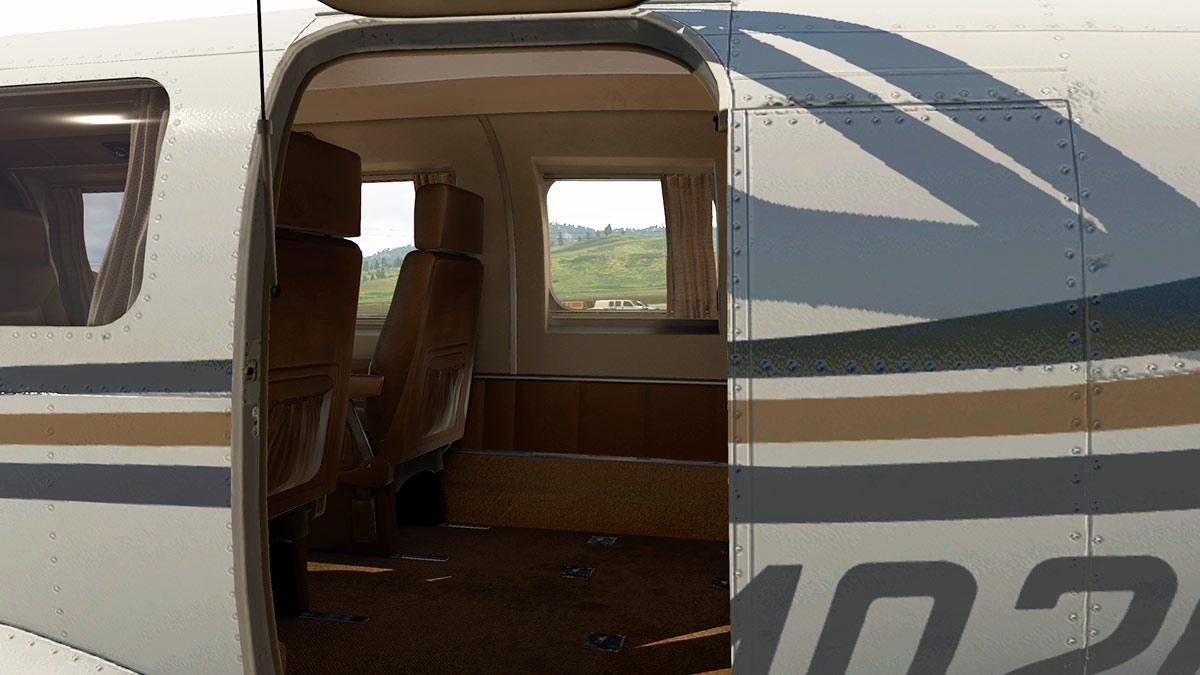
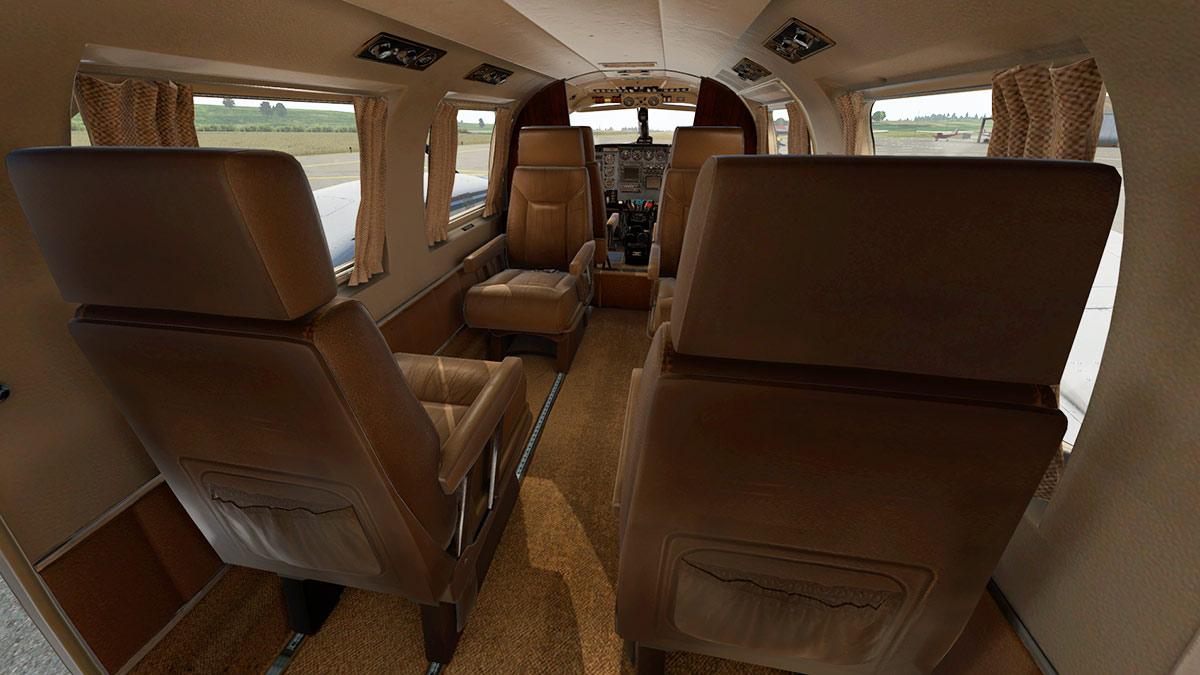
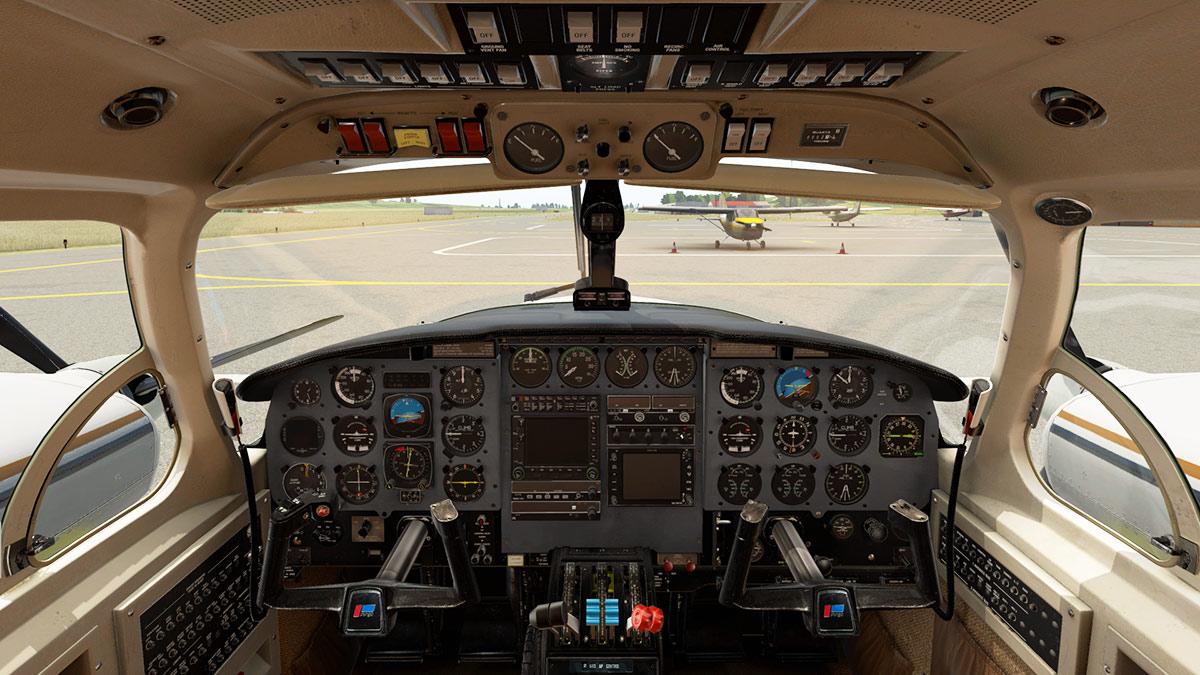
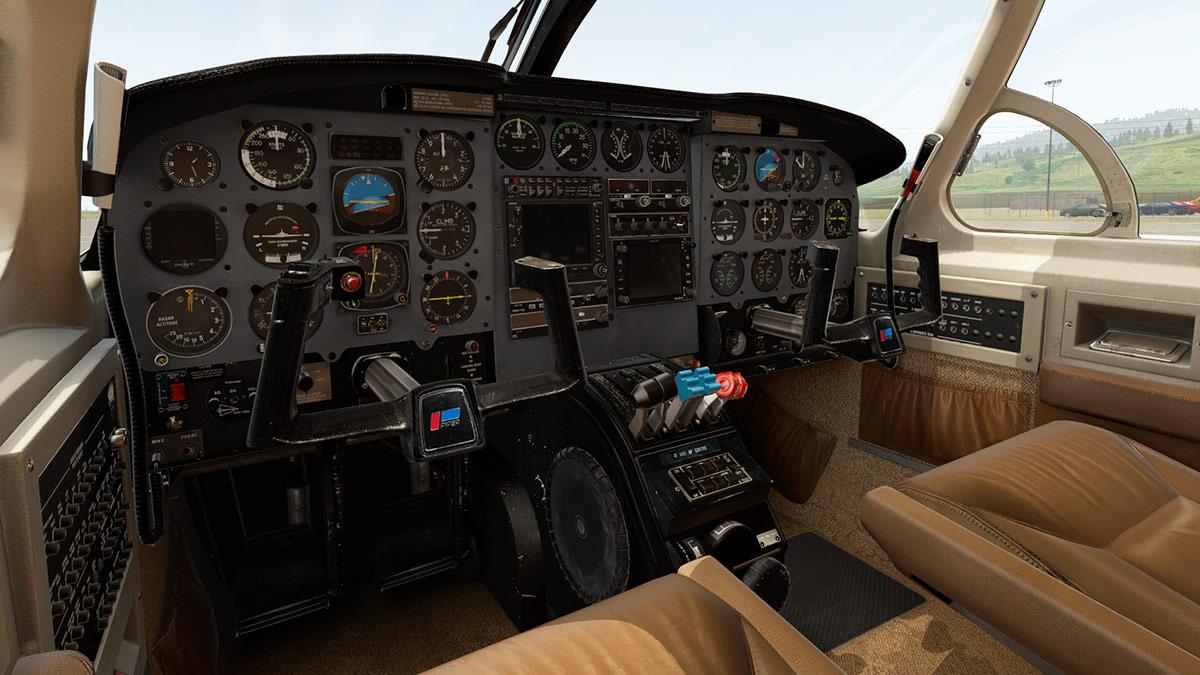
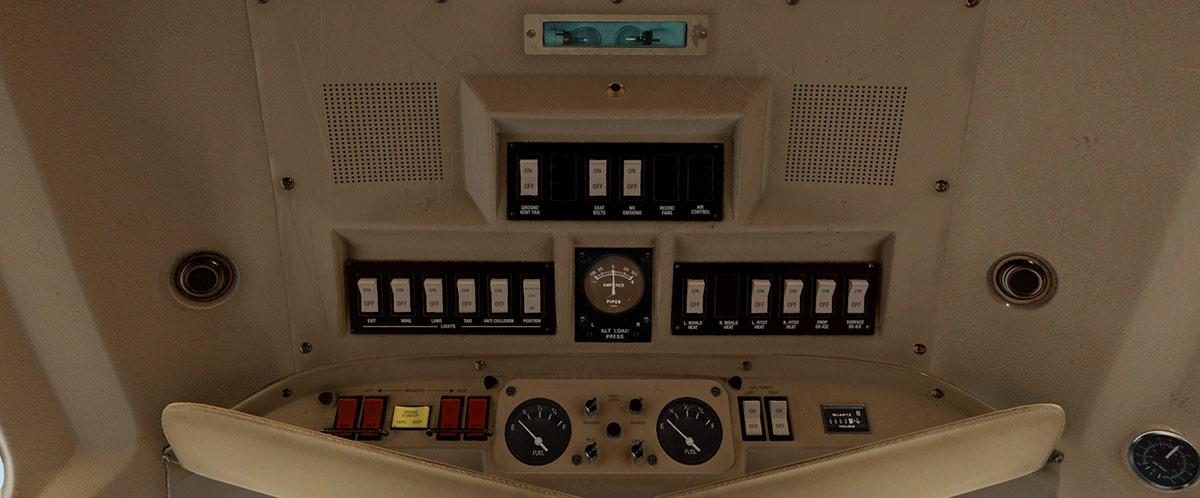
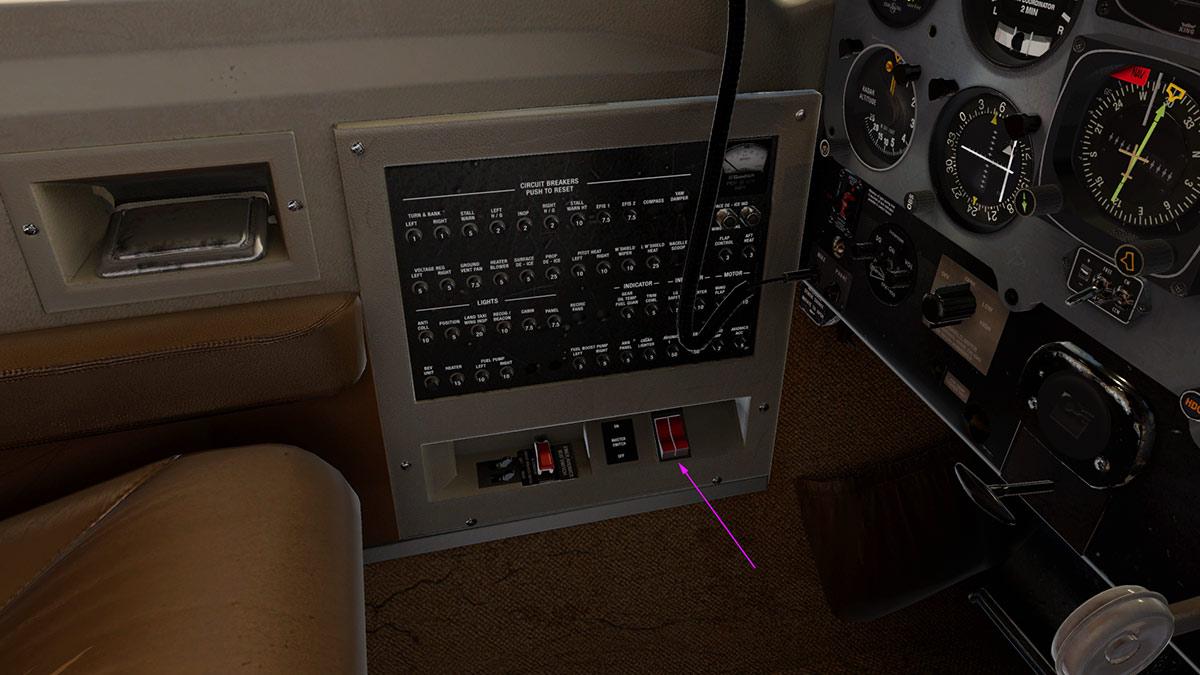
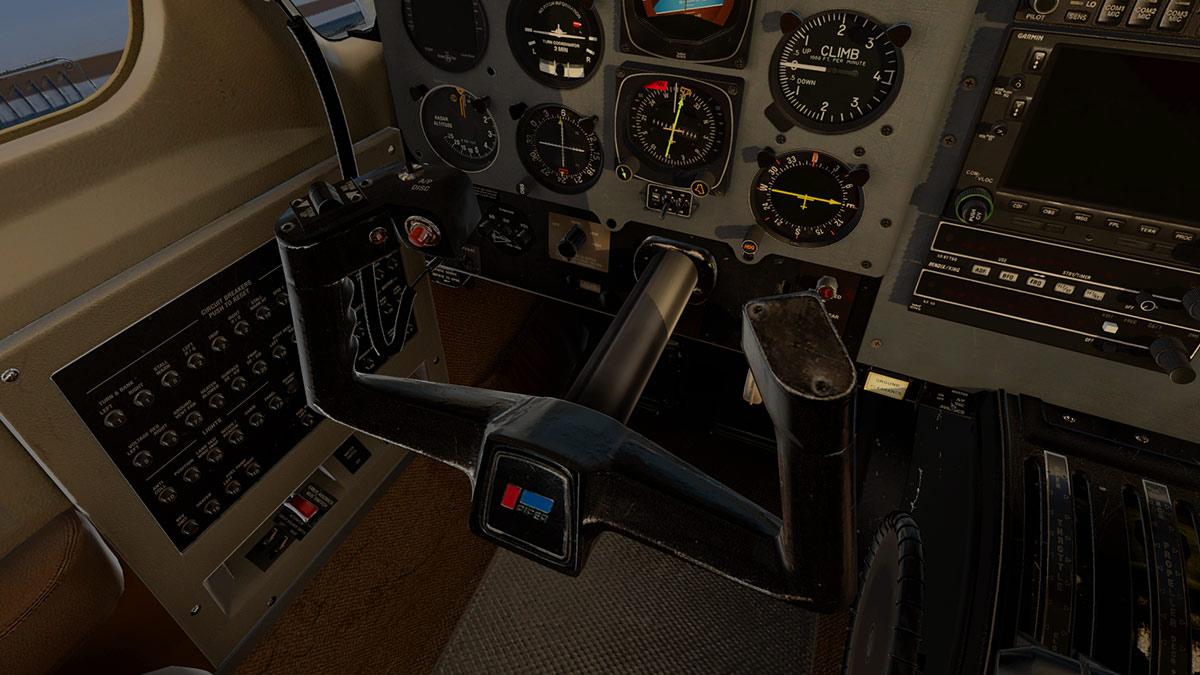
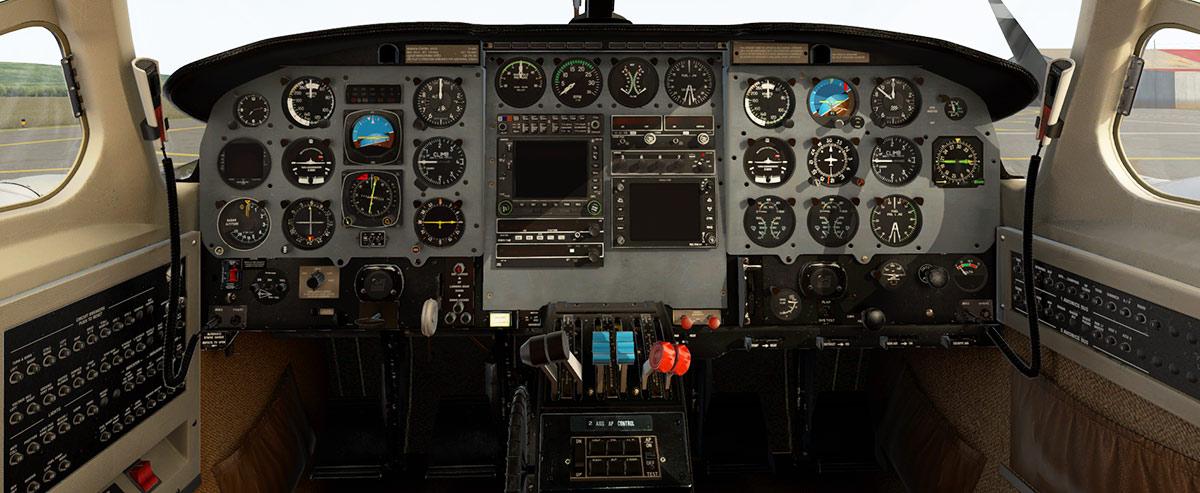
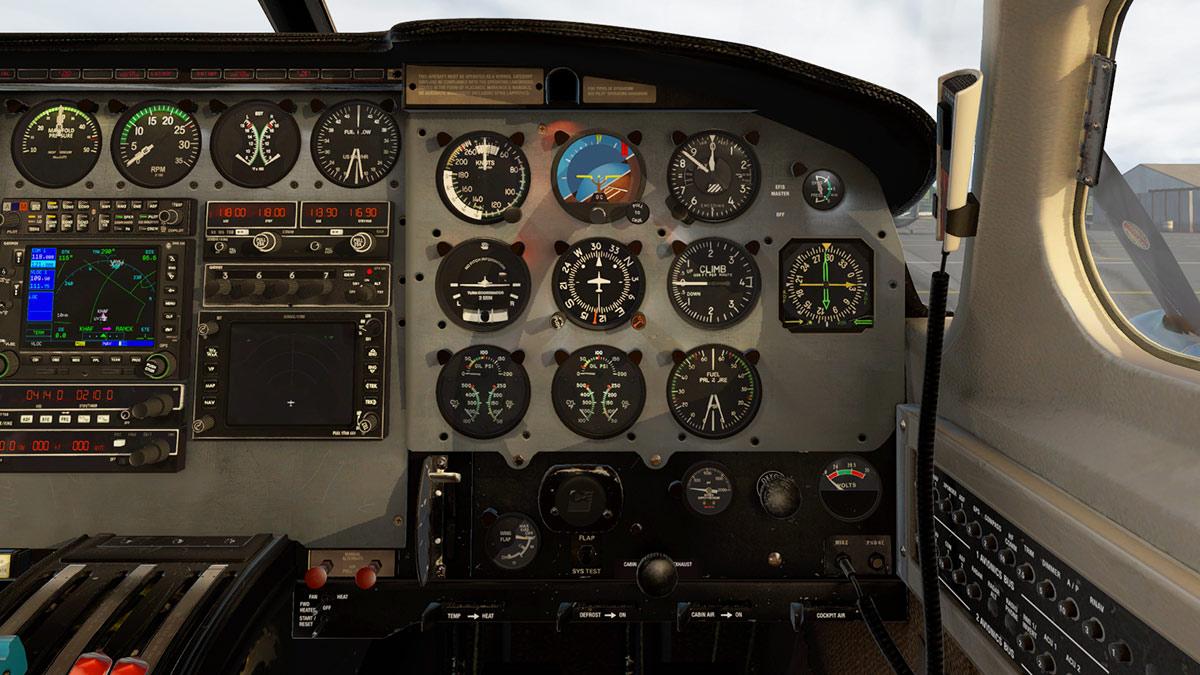
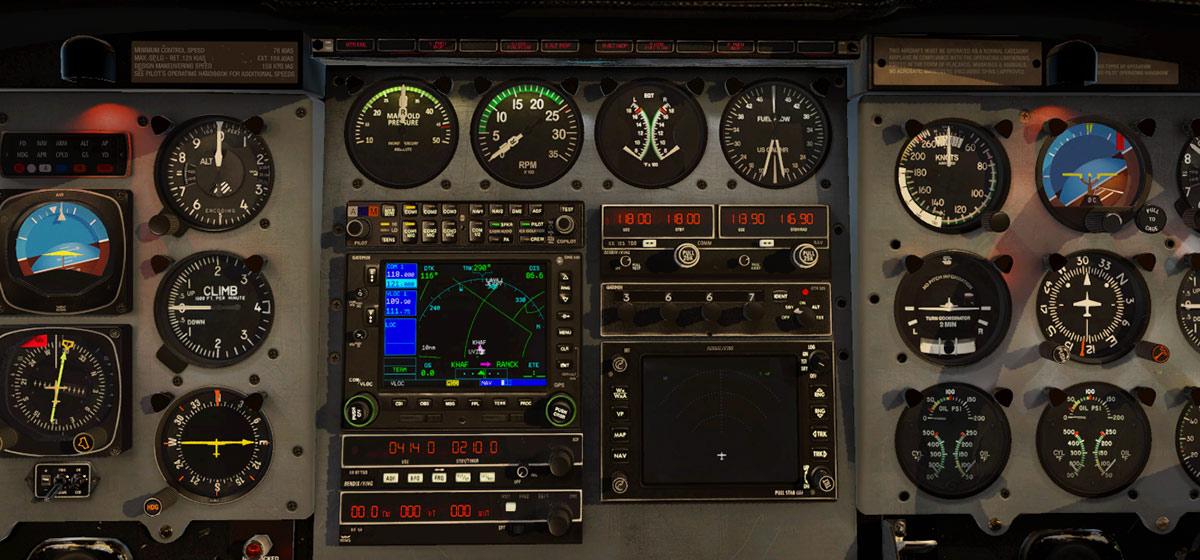
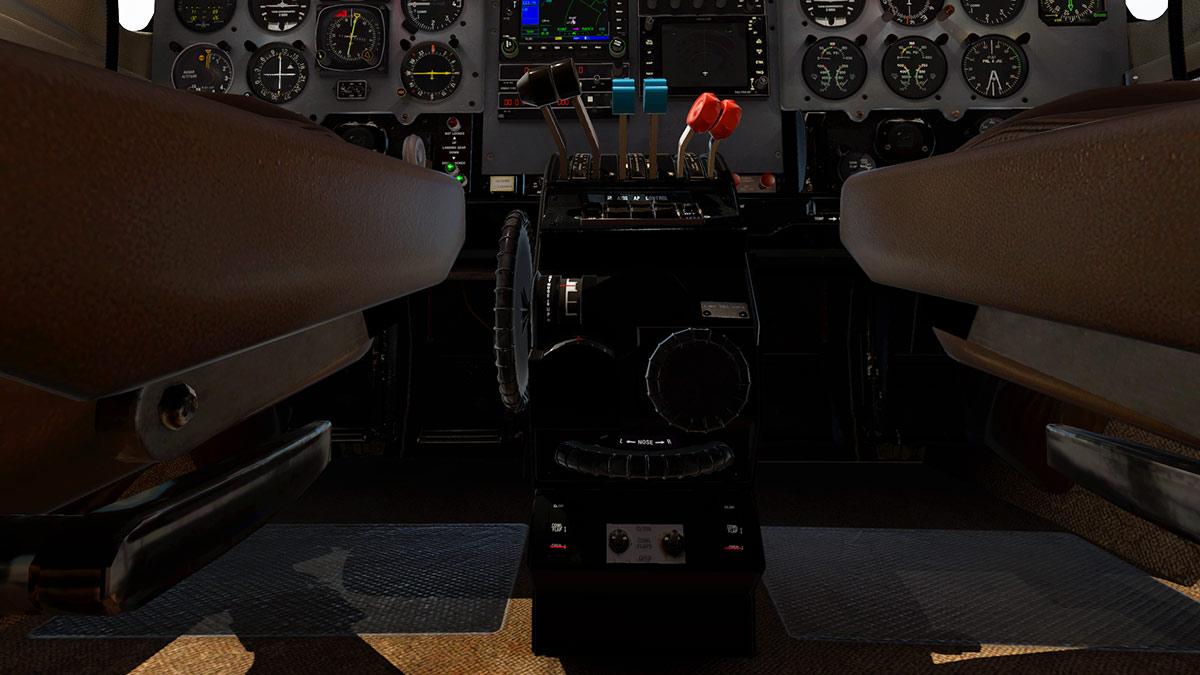
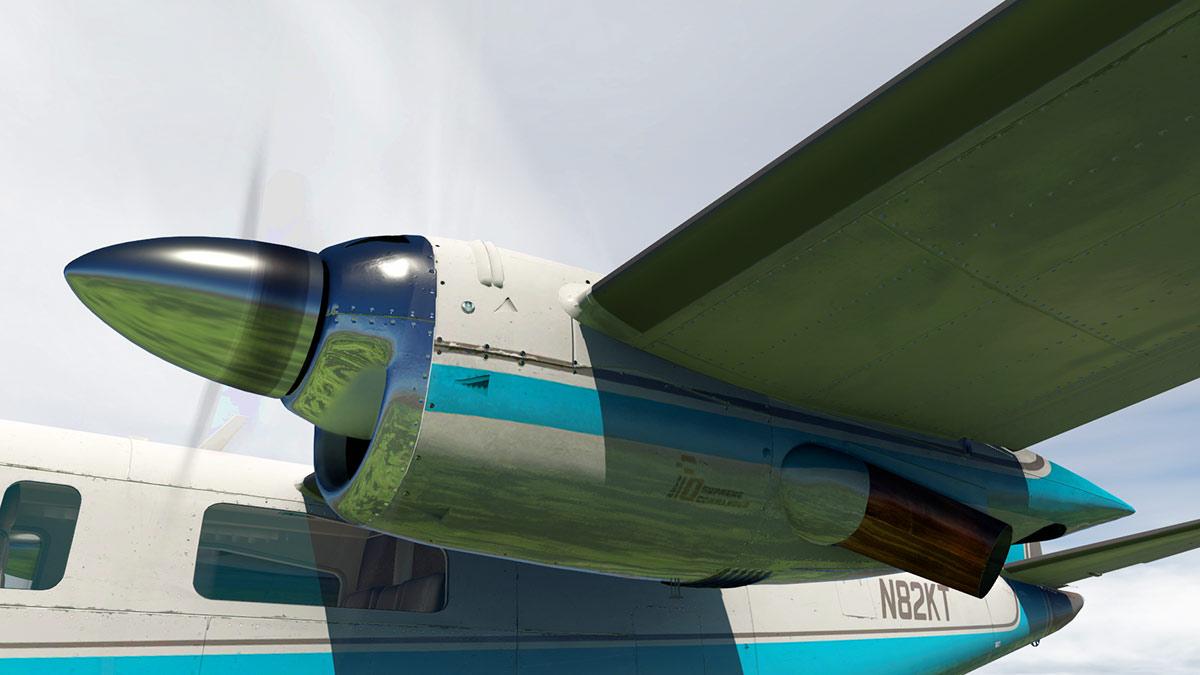
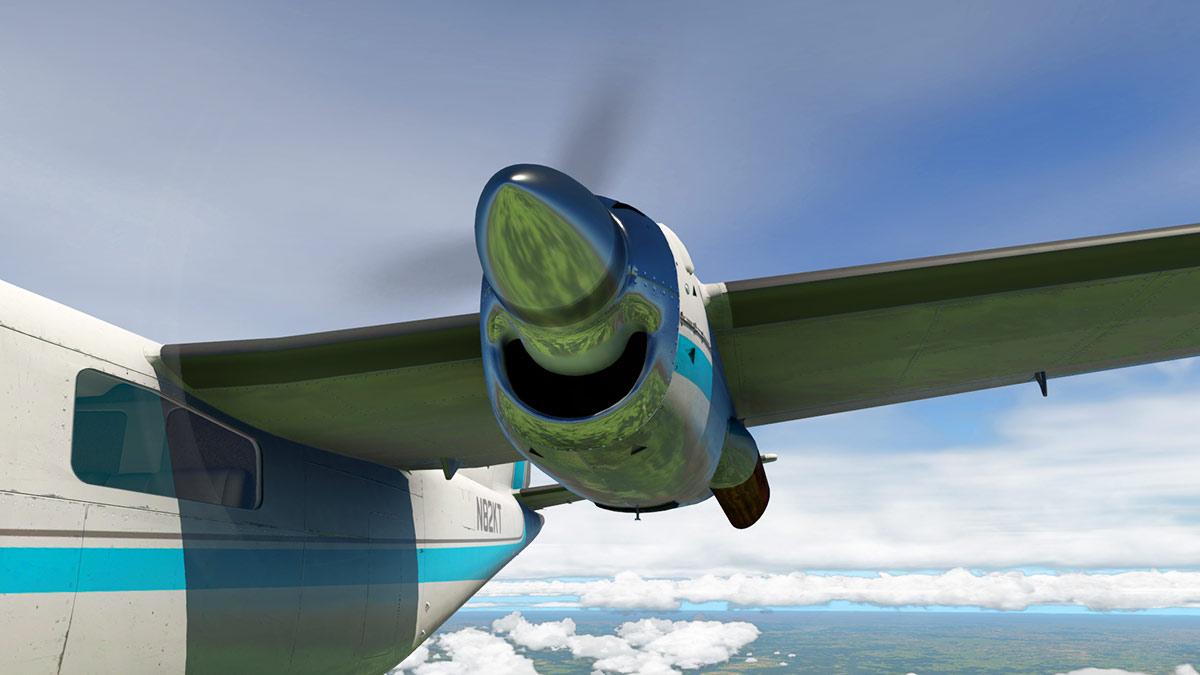
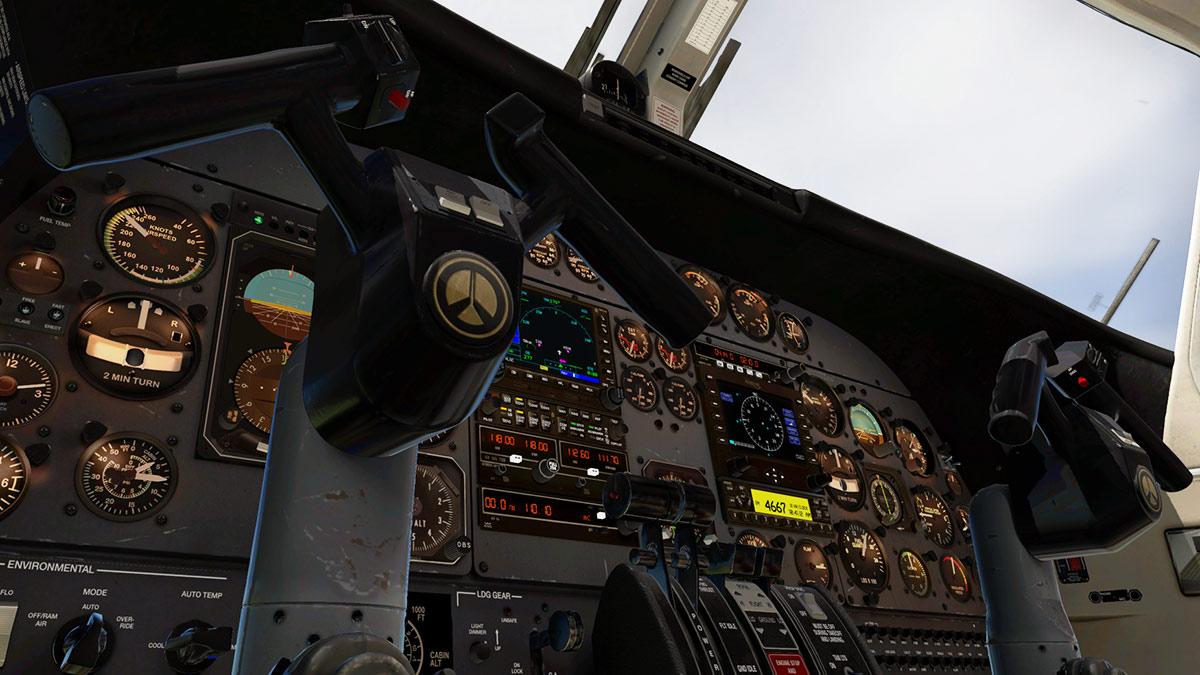
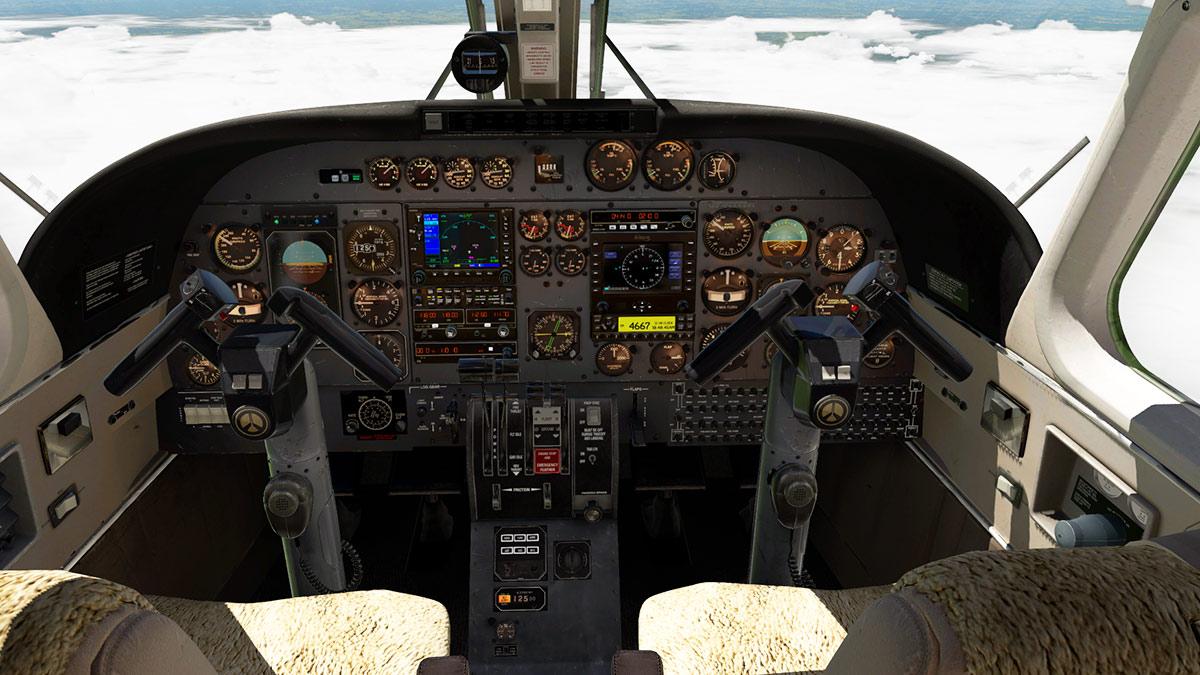
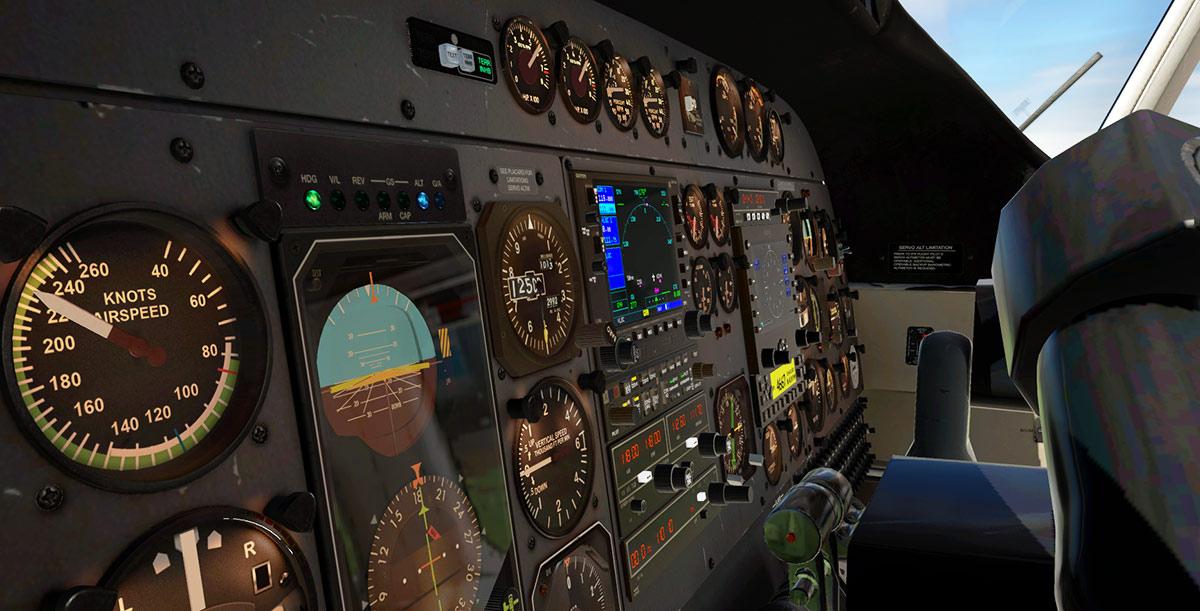
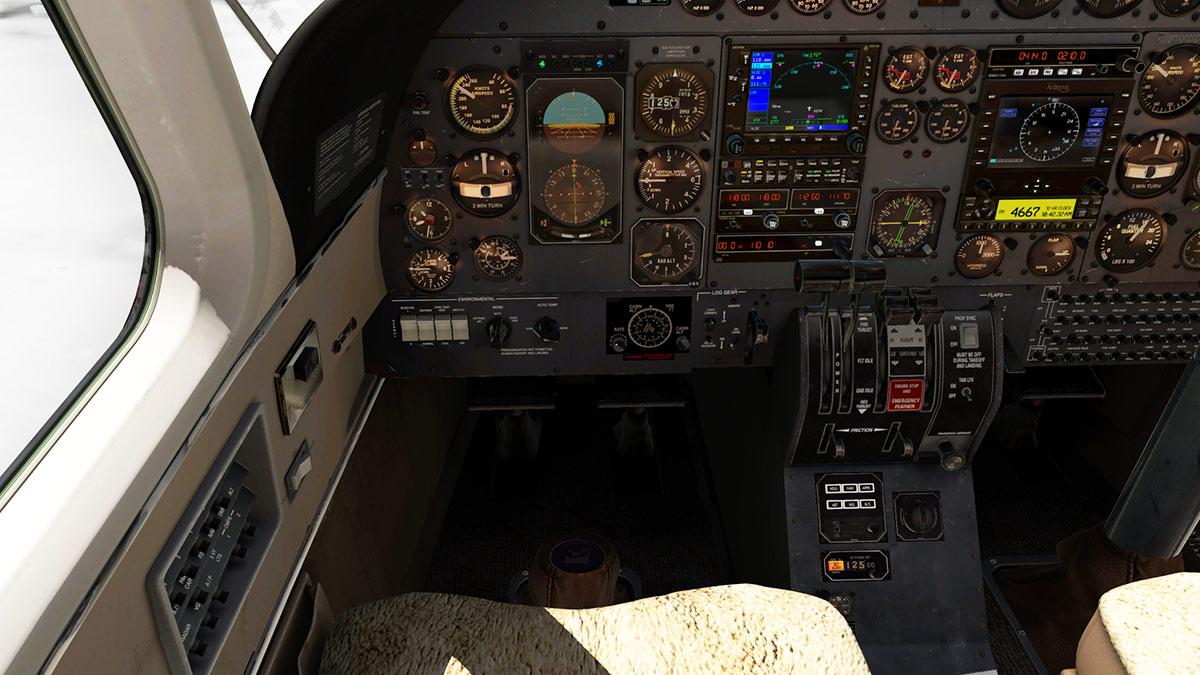
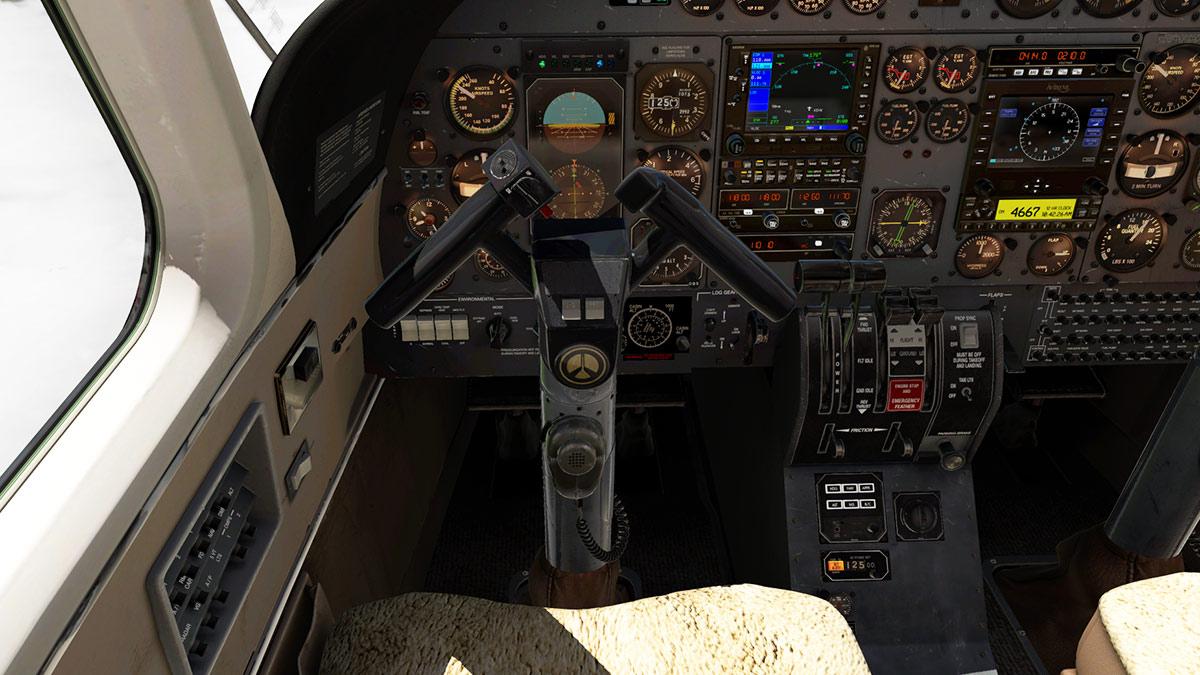
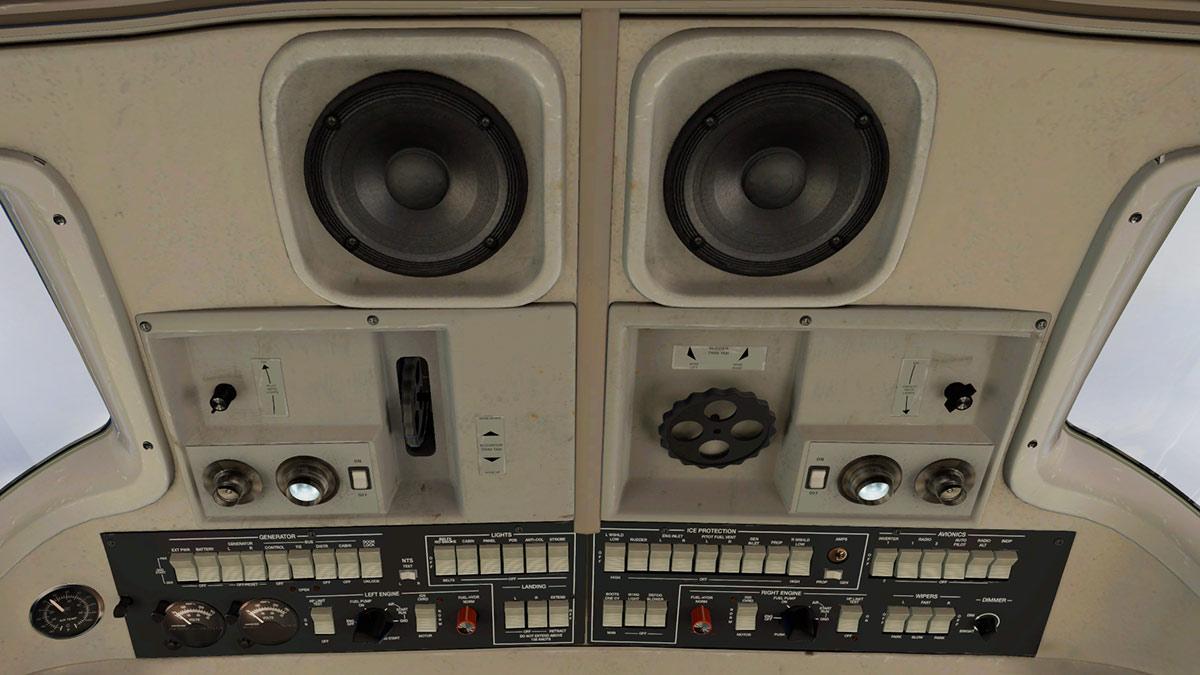
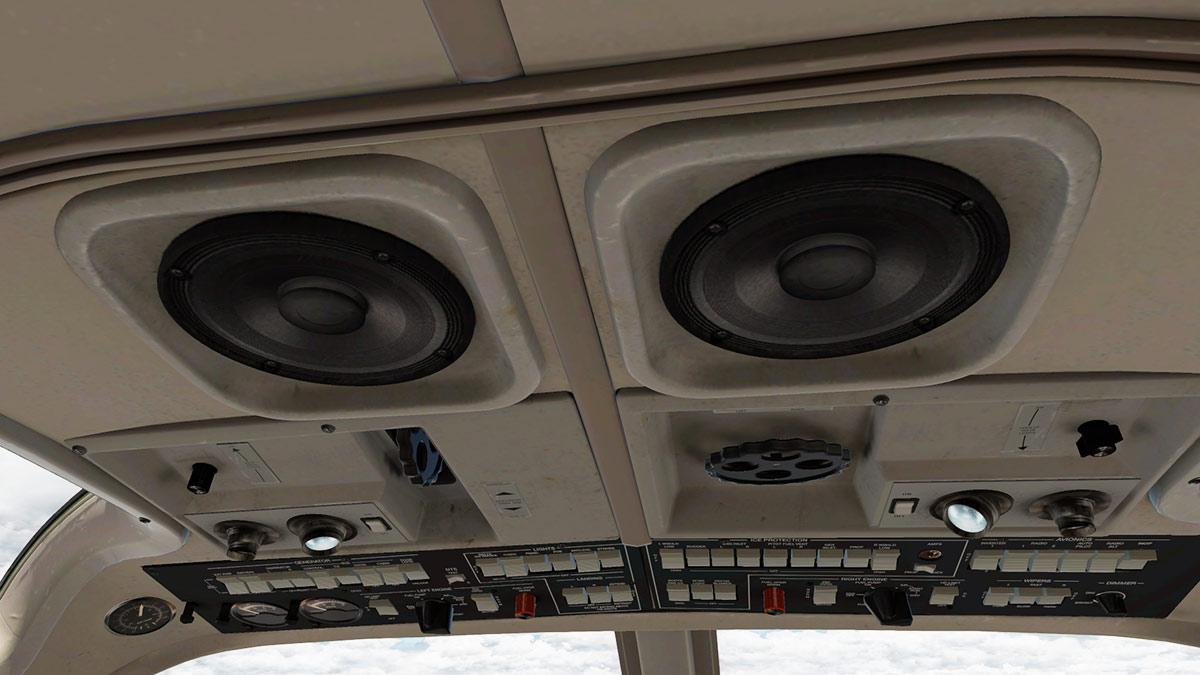
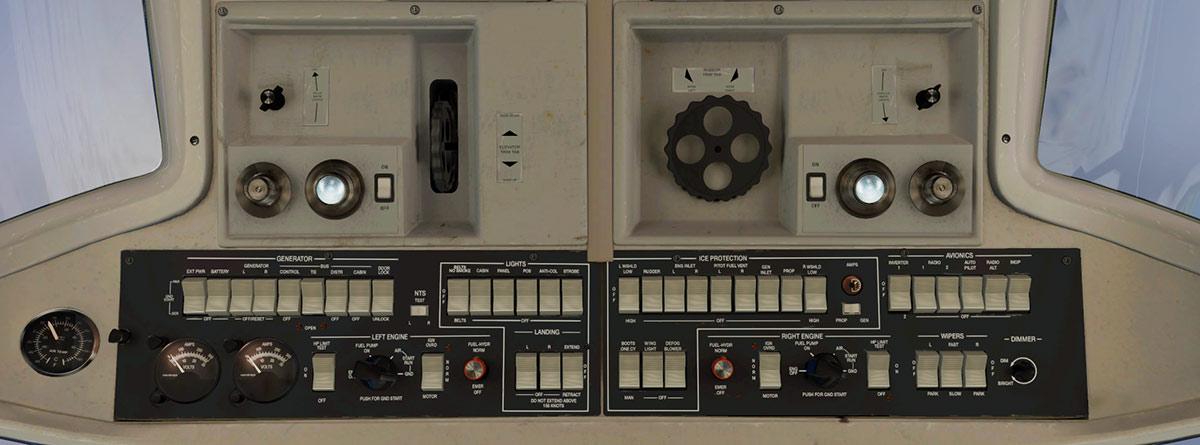
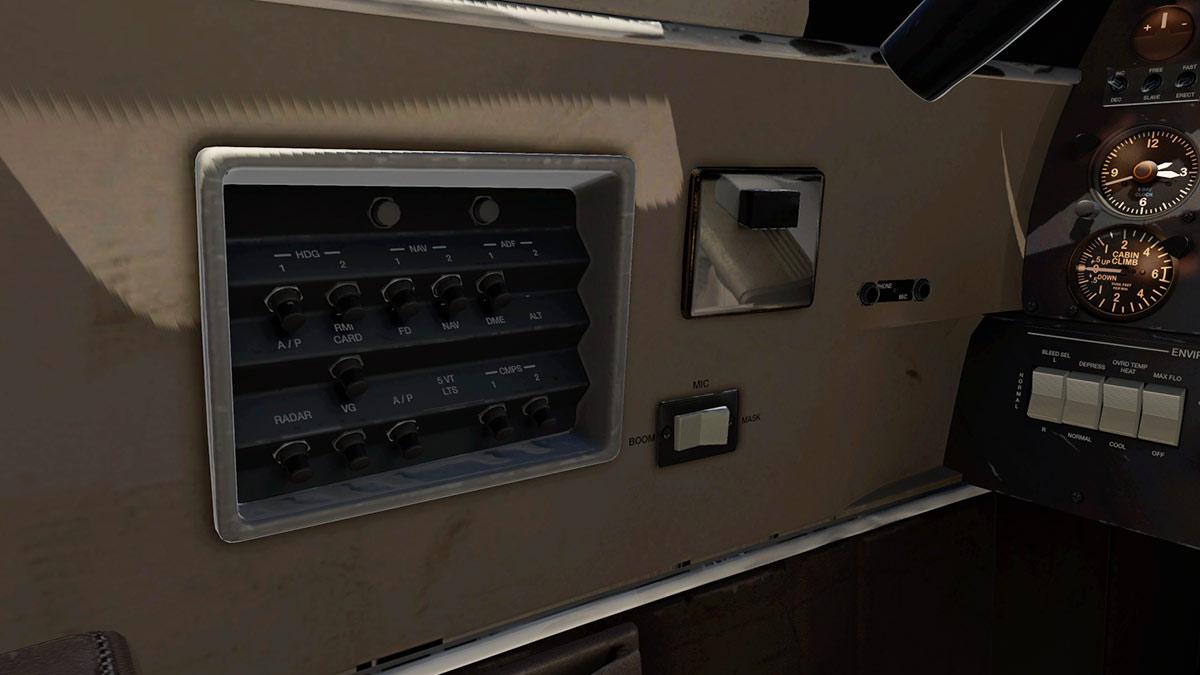
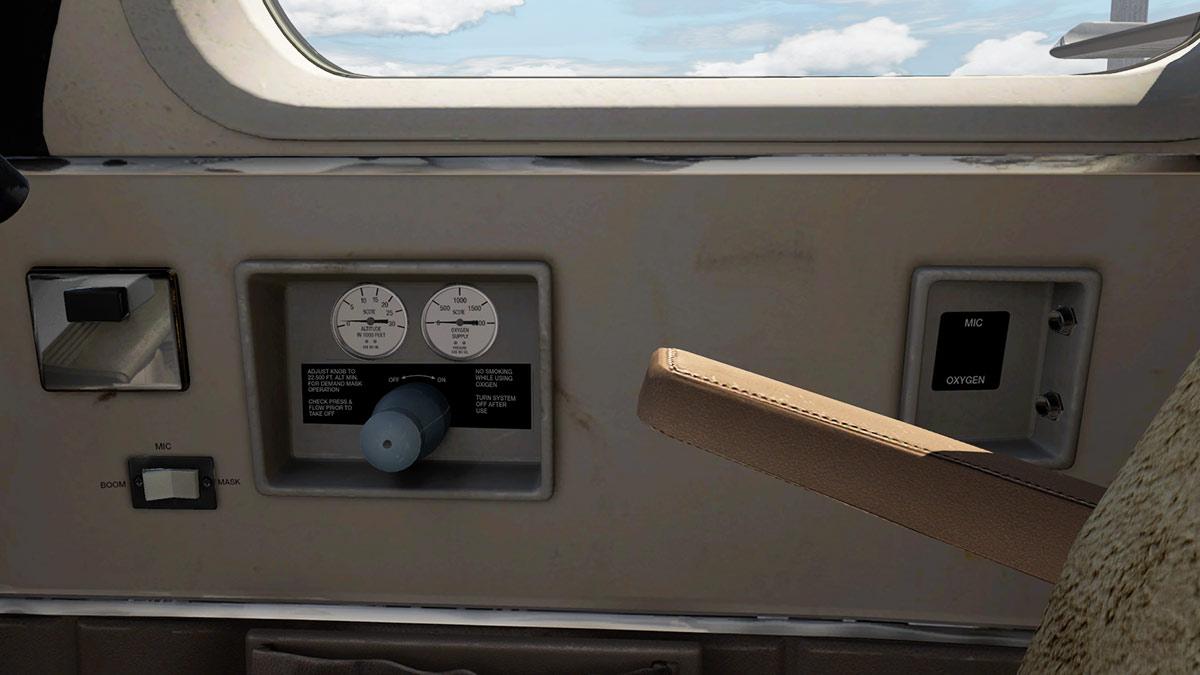
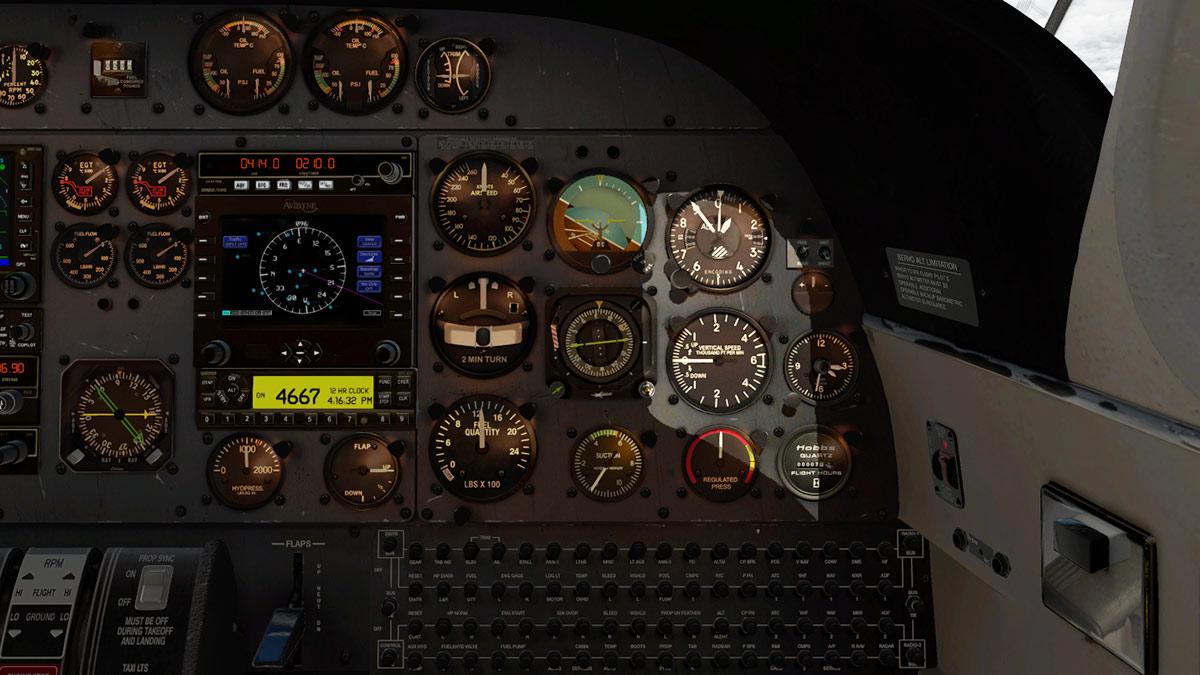
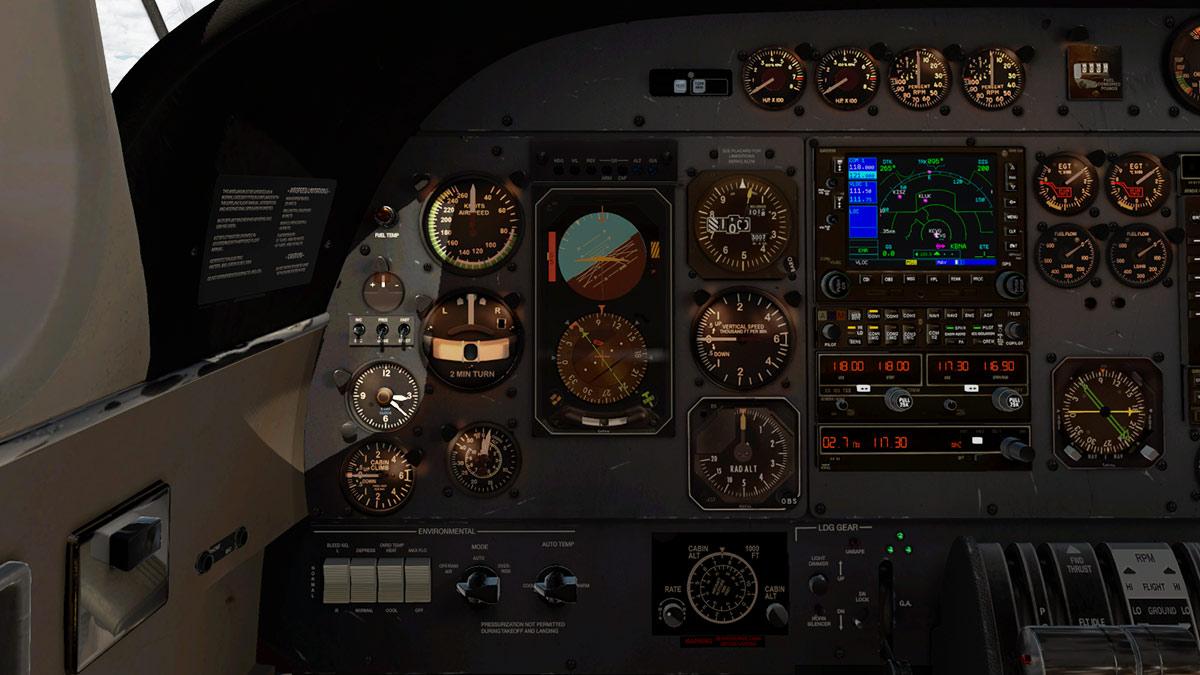
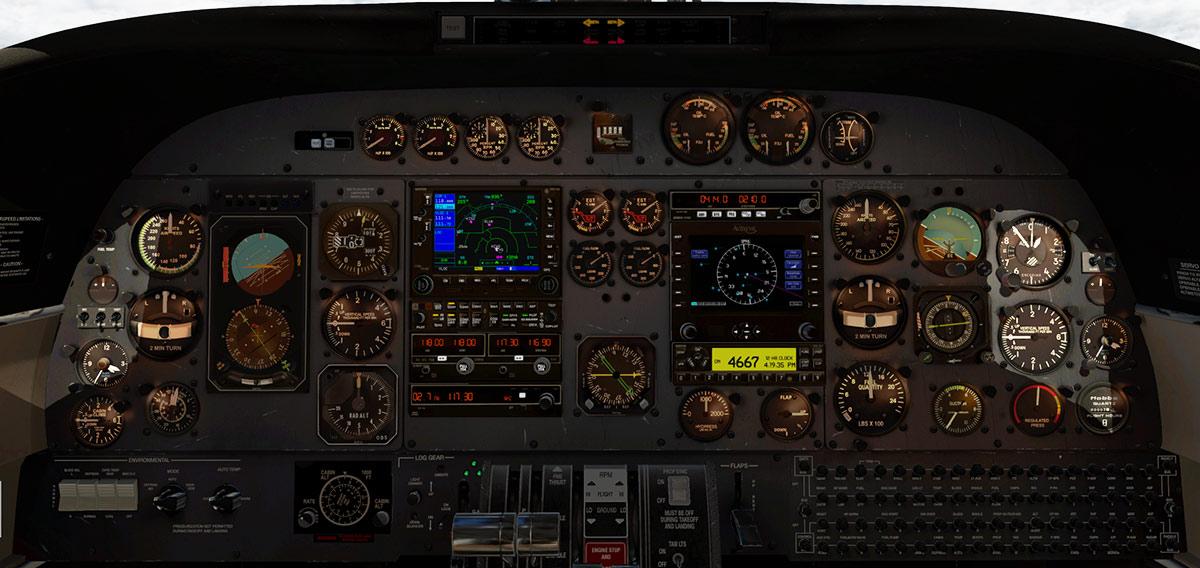
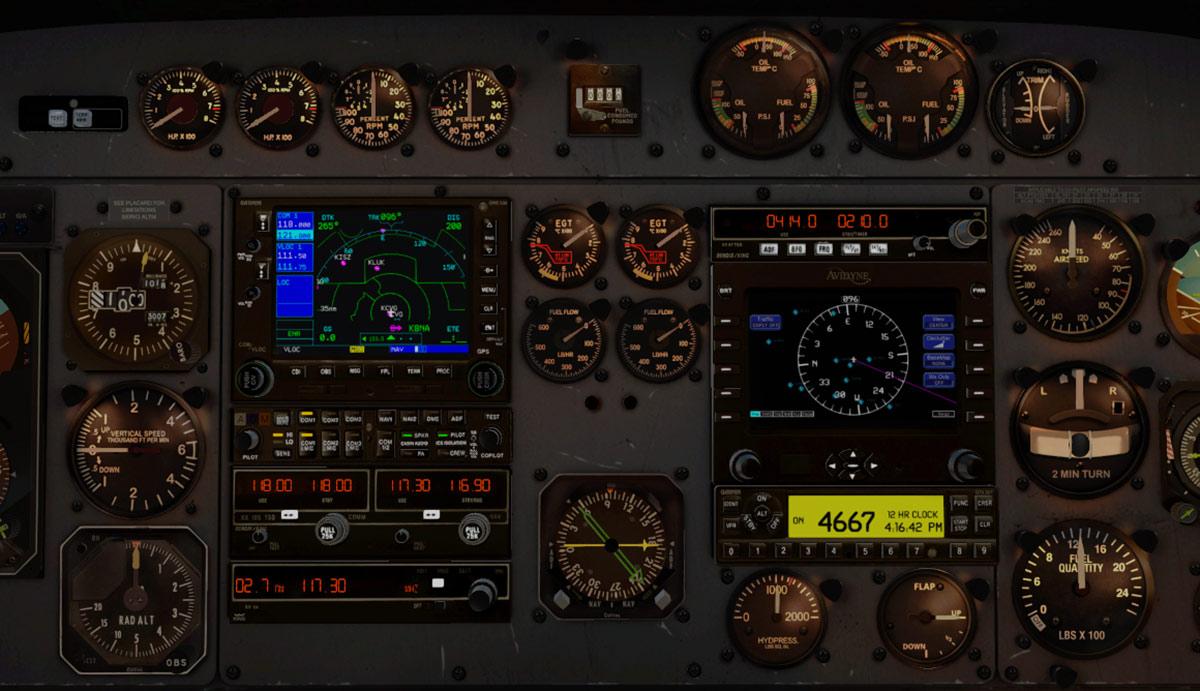
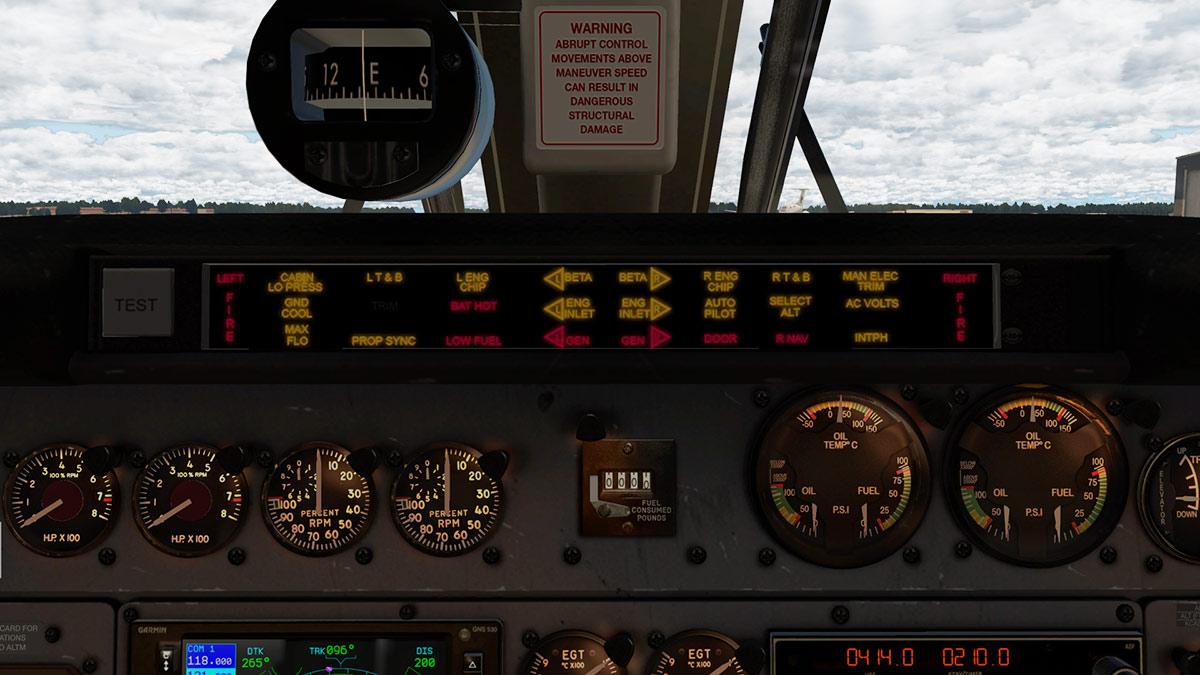
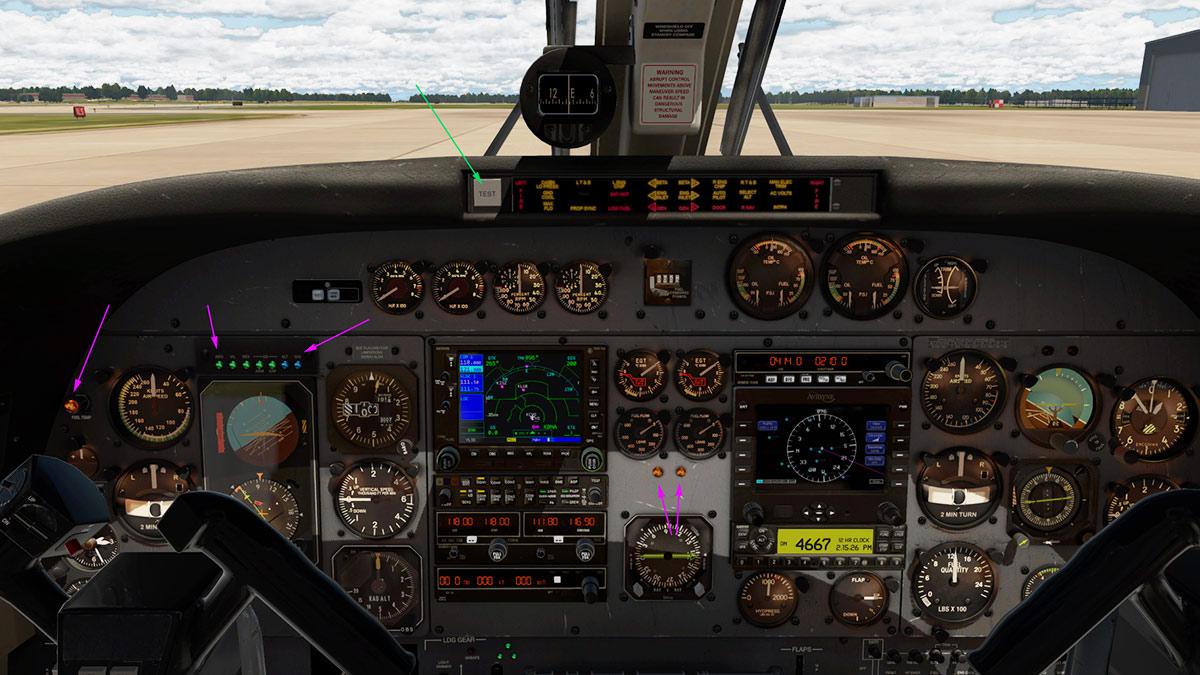
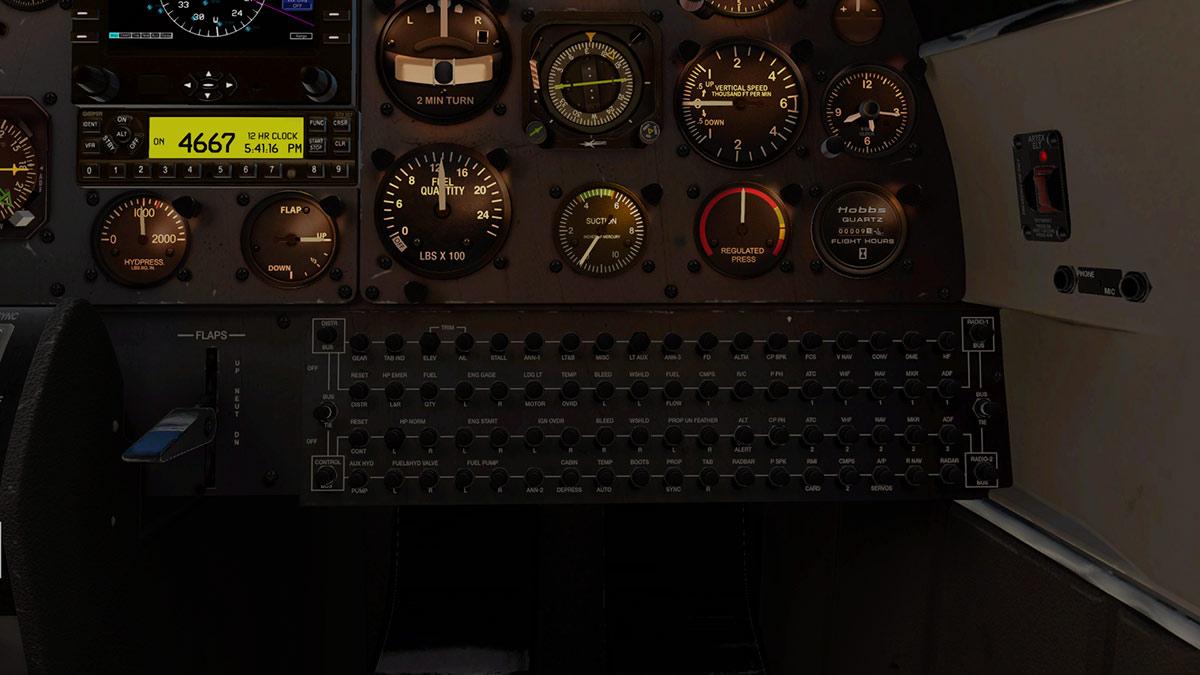
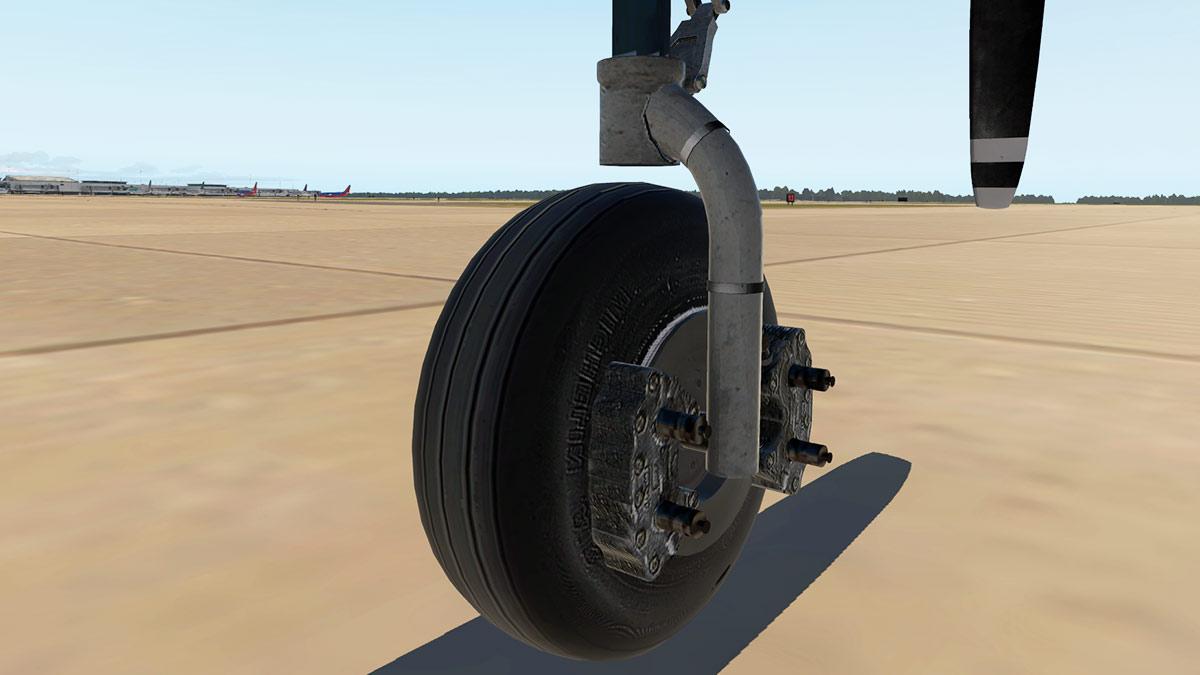
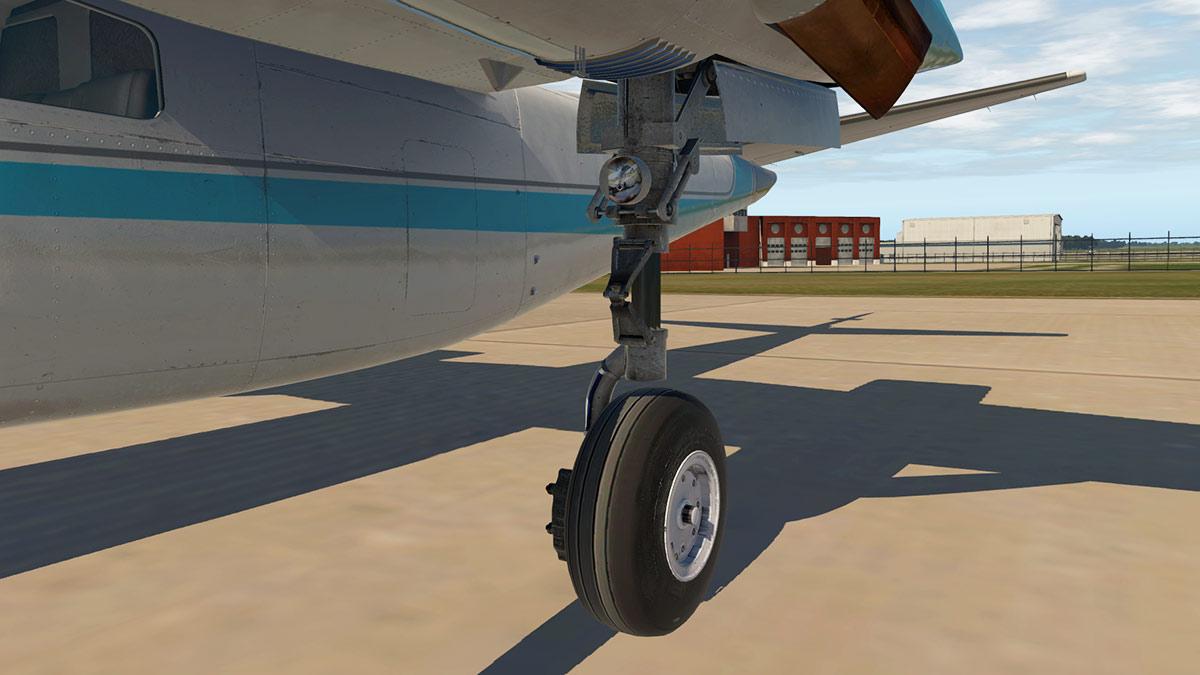
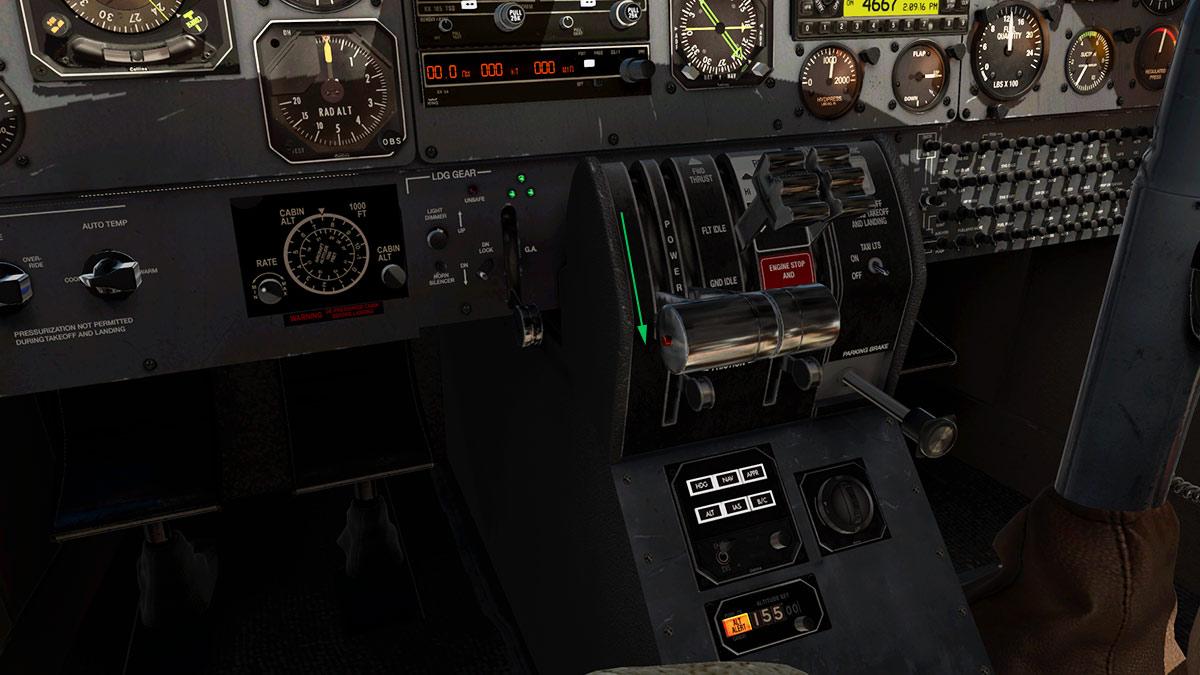
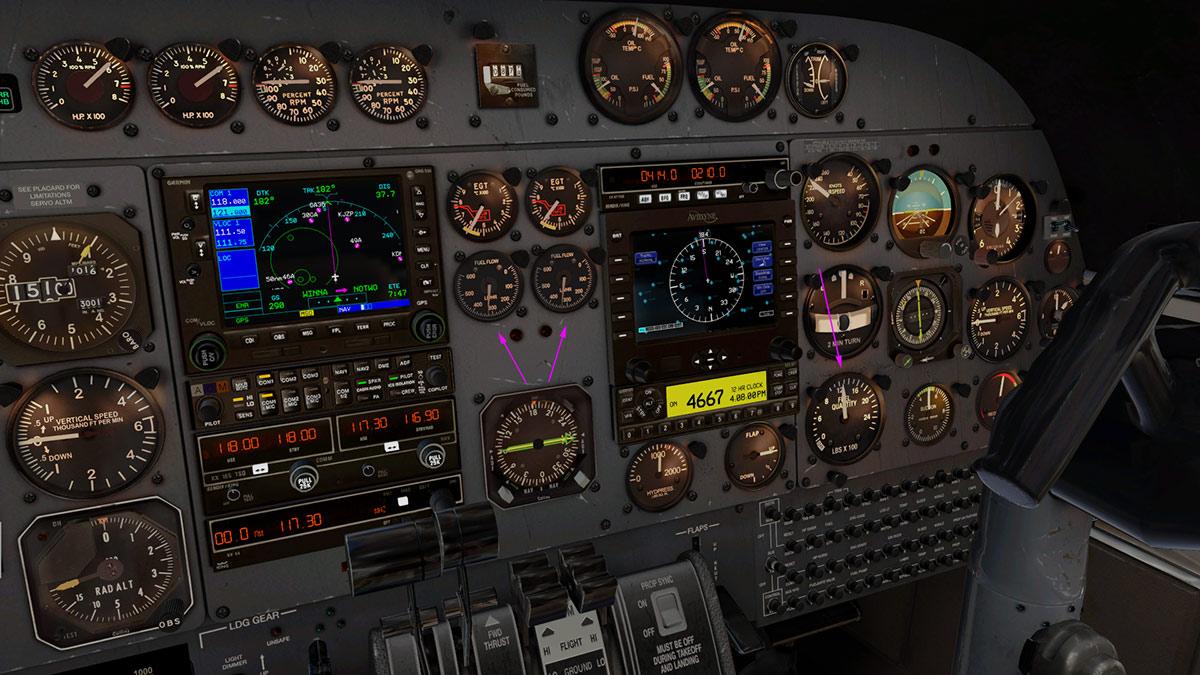
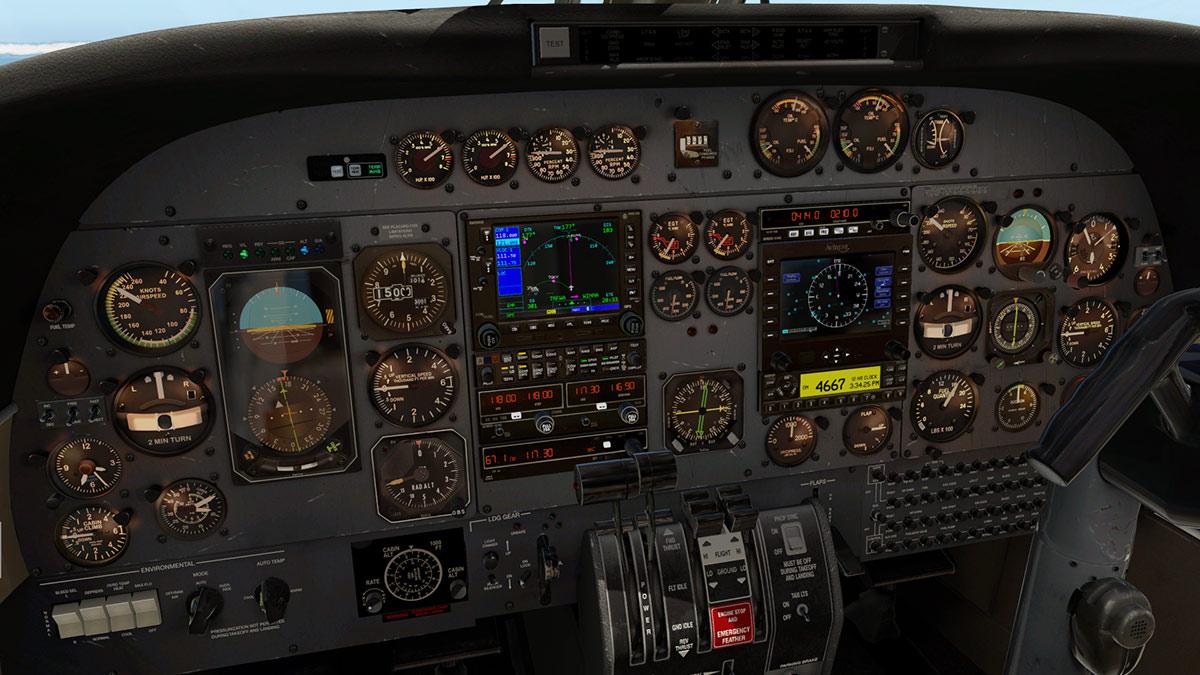
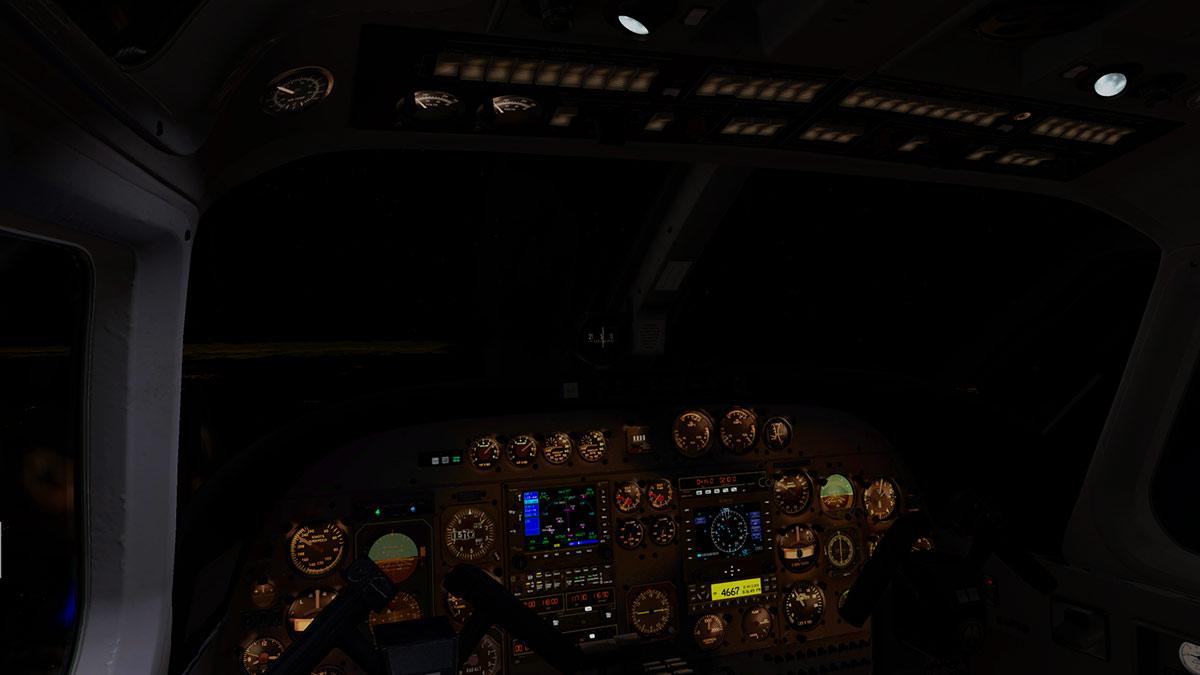
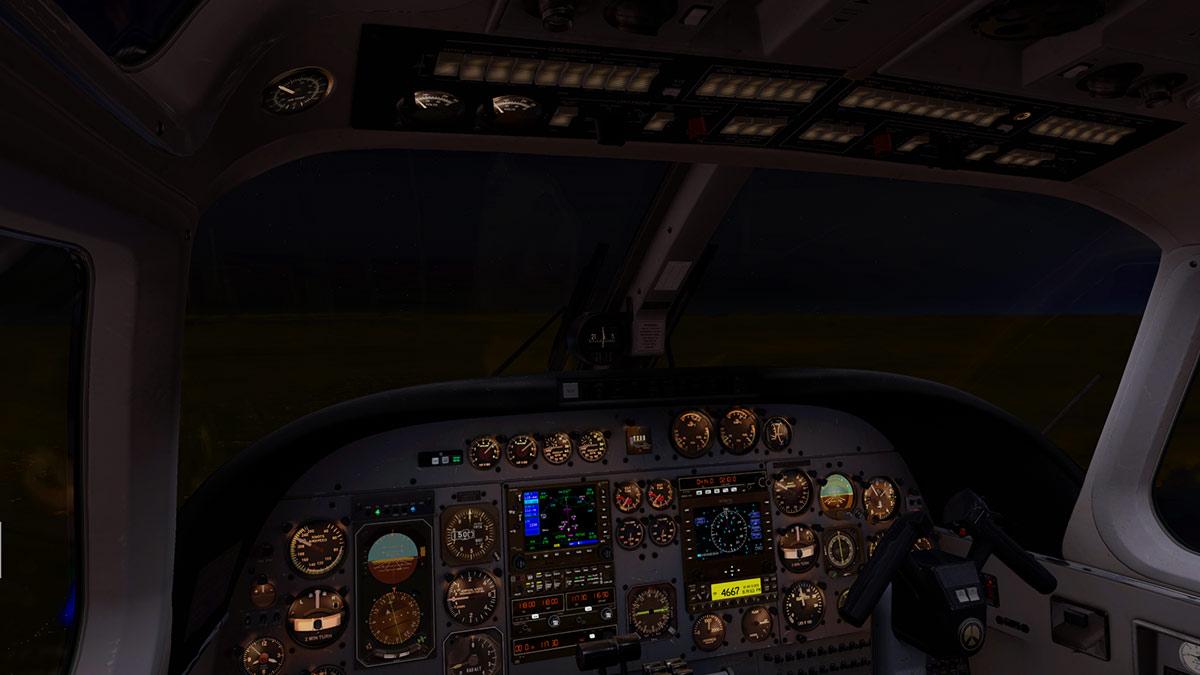
Aircraft Review : 727 Series Pro V3 by FlyJSim The release of FlyJSim's Boeing 737 TwinJet v3 Pro earlier this year was a landmark moment for X-Plane11. This outstanding aircraft was really the very first large scale aircraft to really use all the full features and elements of the X-Plane11 simulator. You would note that there was already aircraft in X-Plane to take note and use the XP11 features, but the FlyJSim B732 TwinJet was really the first to do so from the ground up and not be converted across to or from one simulator version to another, and that difference was very apparent. The original aircraft here for X-Plane is not actually new, as FlyJSim released their initial Boeing 727 Series just days before Christmas back in 2012, that is now nearly eight years ago. So it was for it's time a very advanced and certainly in it's modeling it was a very high quality aircraft. In the mean time to date the aircraft has had numerous upgrades, including collecting the status of being a "Study" style aircraft and in that the B727 was then designated as a "Professional" or "Pro" Series in the v2 upgrade. The last upgrade was just to allow you to fly the B727 Series in X-Plane11 was just last in March 2017, it was fine, sort of... but in reality it was just a few performance tweaks to make the aircraft behave correctly with the very different X-Plane11 dynamics. I flew the aircraft a lot, but you felt it was not quite, quite there, then the B732 TwinJet X-Plane11 comparison then made the point that the Tri-Jet was now feeling it's age a little. So to here is now the full (and it flies only in the) X-plane11 upgrade that is designated as v3 (Version 3). First of all let us get one major point across early. This Boeing 727 Pro v3 Series does not have a cabin installed like the B737 TwinJet did... that item was noted very early on by FlyJSim and they have re-enforced the position that no cabin is forthcoming, well not in the anytime near or distant future. I personally found that item a bit of a head scratcher, because the Boeing 727 has the same barrel size (Fuselage) as the already completed B737? So a conversion, in details like the internal barrel, panels, doors, galley and seating are all in all exactly the same and just needed to be a little bit longer to fit the longer fuselage of the B727 compared to the B737? But I do acknowledge that it would have taken time to do all three versions to cover the full series here which includes the original B727-100 (short fuselage), B727-200 (most popular) and the B727-200 F (Freighter). As all are different and all would require three different internal layouts... and that is a lot of work. Boeing 727 Series v3 Pro From the very start there was these three versions of the Tri-Jet in the B727-100, B727-200 and the B727-200 F, and in the v3 Pro Series all those same three aircraft variants are still part of this v3 package, but are now not sold as separate aircraft. B727-100 Airliner short version The 727 followed the 707 quad-jet airliner of with the same upper fuselage cross-section. The 727's fuselage has an outer diameter of 148 inches (3.8 m). This allows six-abreast seating (three per side) and a single aisle when 18 inches (46 cm) wide coach-class seats are installed. And could carry 149 passengers in one-class or 131 passengers in two-classes. B727-200 Adv Airliner Long version The stretched version of the 727-100 became the 727-200, which is 20 feet (6.1m) longer than the −100. A ten-foot (3-meter) fuselage section ("plug") was added in front of the wings and another ten-foot fuselage section was added behind them. The wing span and height remain the same on both the −100 and −200 (108 feet (33 m) and 34 feet (10m), respectively). The original 727-200 had the same max gross weight as the 727-100. The MTW became 184,800 lb (83,800 kg) but the range was decreased to 1,700 nmi (3,100 km). At that short range the aircraft then evolved quickly as a series of higher gross weights and more powerful engines was introduced along with other improvements, and then from line number 881 727-200s where then dubbed −200 Advanced (Adv). The aircraft gross weight eventually increased from 169,000 to 209,500 pounds (76,700 to 95,000 kg) for the latest versions. The range increased slightly to 1,900 nmi (3,500 km) (Standard) but if you loaded the aircraft carefully you could get 2,600 nmi (4,800 km) (Optional) range with 189 passengers (one-class) and 145 passengers (two-class) with a higher Cargo capacity which was the same for the standard -200 version. Ceiling was increased to 42,000 ft (13,000 m). The first 727-200 flew on July 27, 1967 and received FAA certification on November 30, 1967. The first delivery was made on December 14, 1967 to Northeast Airlines. A total of 310 727-200s were delivered before giving way to the 727-200Adv in 1972. B727-200F Freighter A freighter version of the 727-200 Advanced became available in 1981 was designated the Series -200F Advanced and was powered by the Pratt & Whitney JT8D-17A engines. The F (Freighter) version featured a strengthened fuselage structure, with an 11 ft 2 inch by 7 ft 2 inch forward main deck freight door and a windowless cabin. This was the last production variant of the 727 to be developed by Boeing and 15 aircraft were built, and all for Federal Express. The last 727 aircraft to be completed by Boeing was the Series 200F Advanced for Federal Express in 1984. In all the total Boeing 727's built was 1,832. Although only fifteen Freighters were actually built. Many Series -200Adv passenger versions were converted to -200F's. The 727 is one of the noisiest commercial jetliners in service and was categorized as Stage 2 by the U.S. Noise Control Act of 1972, which mandated the gradual introduction of quieter Stage 3 aircraft. Current regulations require that a 727 in commercial service must be retrofitted with a hush kit to reduce engine noise to Stage 3 levels. All current flying -200F's are stage 3 except for some flying in parts of Africa. Other versions of the B727 were C's for convertible - passenger/cargo version. The C had an additional freight door and strengthened floor and floor beams, with three alternate fits: 94 mixed-class passengers 52 mixed-class passengers and four cargo pallets (22,700 lb, 10,297 kg) Eight cargo pallets (38,000 lb, 17,237 kg) Detail Even the earlier converted X-Plane10/11 727 version looked great in X-Plane11, but that version still used the original textures and older lighting dynamics. The new 727 v3 textures and developed X-Plane11 dynamics are a world away from the older versions, for one the scale is far bigger at 4096x4096, and printed out together in their real size they would cover the wall like with a large Beastie Boy poster. So certainly with that large a scale you are going to get really excellent detail and quality, but they also going to tax out your graphic power as well. I found I had to drop my texture resolution a notch to "High" to accommodate them, but the scale is so large that you lose nothing in the quality of the detail (you might lose slight detail with your airport scenery or A.I. traffic), but these big scale textures are the normal now. As with the earlier FJS B732 TwinJet the quality is now just astounding, jaw dropping... as metal (in aluminium) is perfect with highly realistic reflections and are bringing in a realism that you could have only dreamed of when this aircraft was originally released, don't get me wrong the FJS B727 was always good in this area, but now it is levels again higher. Certainly the X-Plane11 dynamics do a lot of the work, but the right grading of metalness also now brings out the shear realism. Boeing standard rivets are perfect and would pass the inspection. Engine inlets and external details of the T8D-15A engines are excellent. Exhaust outlets are highly realistic and detailed, and inner Cam-Shell thrust reversers work as required, and it is superb detailing. The series comes with different engines for different variants as with the JT8D-9 for the 727-100, JT8D-15 for the 727-200 and the JT8D-17 for the 727-200F. Cockpit glass is excellent with that rainbow effect that shows off the depth and strength of the glass. Side cabin glass is fake, and it is noticeable compared to the excellent B732 TwinJet cabin windows, as you lose all those reflections, the depth and the inner cabin detail. Wing detail is better with the higher grade textures, but overall all the detail here is all carried over from the original version. The animations of the complex systems are still one of the best in X-Plane, as the Boeing 727 flap system it is very complicated to allow the aircraft to land at very low speeds (130knts!). There are leading-edge devices (Krueger, or hinged, flaps on the inner wing and the extendable leading edge slats out to the wingtip) and trailing-edge lift enhancement equipment (triple-slotted, aft-moving flaps) are in a 0º, 2º, 5º, 15º, 20º, 25º, 30º and 40º selections, but the 40º is rarely used. They also create a lot of if a huge amount of drag. Landing gear is also carried over, but it was excellent in the first place, again the higher graded textures bring out more of the detailing, and in flight the animations of retraction and extraction are again first rate. It is surprising on how low actually the Boeing 727 sits close to the ground. 8 FlyJSim was always one of the best modelers in X-Plane, and the aircraft has lost none of that experience and quality in the upgrade, in fact everything is and feels more highly evolved, and in most areas have been touched upon and the quality has been enhanced. Menus The menu arrangement is upgraded to the same layout and system as on the Boeing 737 v3 TwinJet... the only difference is the missing "Doors" panel. FlyJSim pioneered originally some of the best menu ideas in X-Plane like with their Vcard, Weights & Balance menus. This layout is now the new standard throughout all of FJS aircraft and replaces the older layout. There are five panels accessed by the pop-up tabs on the left side of your screen. The five panels consist of : Vcard, Weights & Balance, Options, Maintenance System and Pilot notes (Checklist) Vcard and Weights & Balance The Vcard works in association with the Weights & Balance manager and so we will look at them together. The Vcard is your Vspeeds for takeoff and landing. These selections are reflected in the way you load the aircraft via the Weights & Balance panel. The Weights & Balance is powerful but a very easy way to set up the aircraft with fuel, passengers and cargo and it notes the aircraft CoG (centre of Gravity) of MAC (Mean Aerodynamic Chord). Most functions given are to load the aircraft in three options with F - Full. E - Empty and R - Random, of course you can add or subtract passengers and cargo via the blue containers or set the exact fuel required. The Red items denotes aircraft over weight or warnings. The aim is of course to create the best balance on the aircraft to make it fly easier, the wrong settings on this aircraft can make it a very big handful of trouble. Options The options panel allows you to select certain general options for the aircraft. On the panel you can : Select the aircraft's time to be local or zulu... the note system (arrowed) on the bottom of your screen will also tell you the various operations and tips for using the aircraft Have the Co-Pilot call out vSpeed's for you or not. Yokes (below) can be visible or not. Weights can be in Pounds or Kilograms Weights & Balance, Enabled or Disabled - This will disconnect the Weights & Balance system for the use of FSE compatibility Cockpit Windows can be Dirty or Clean (can be seen later in the review) TCAS VSI A new feature in the v3 is the TCAS VSI (Vertical Speed Instrument). This instrument is a dual digital instrument that combines the TCAS (Traffic Collision Avoidance System) display and the Vertical Speed Instrument. This option allows you to have the new instrument or switch back to the older original VSI. The TCAS has full integration into the VSI including full TA/RA. There is the option to turn on the Ground Power Cart and Engine Start cart. The power can be selected on the upper Engineer's Panel and is registered power on, on the DC Dials... ... but there are no physical carts sitting outside the aircraft, which is disappointing considering the overall detail and quality of the aircraft? To get around the missing items I use the JARDesign Ground Handling Deluxe (GHD) plugin (US$14.95) that will provide the power cart and other aircraft service vehicles as shown above. Field of View, Exterior and Interior Sounds can all be adjusted. You can have three settings of options for the FMC (Flight Management Computer) and first is the clear empty blank panel... Second option is the for the Delco Carousel IV-A Inertial Navigation System. Nicknamed "CIVA", CIVA Navigation System which is purchased as an add-on for $US10.00 and it is a basic navigation system that can give automatic navigation of up to 9 waypoints. (you can load X-Plane .fms plans) and it can also be used in the FlyJSim B737 as well as any other other aircraft of that 60's/70's era. It is well worth the additional cost. (note the CIVA plugin is loaded into the "Aircraft's" Plugin folder and not the X-Plane/Resources/Plugin folder... and you need to load it separately into each aircraft variant). NOTE. To use the CIVA in X-Plane11.20 or higher you will need to use the recently updated version v1.31, any earlier X-Plane version or X-Plane10 will still require the v1.20. Third option is the native X-Plane FMC. The X-FMC option has been dropped, which I think is disappointing as the X-FMC is far more powerful than the native basic version as was in the earlier v2 Boeing 727 which I find a little bland and not as versatile. At least you get the pop-out feature. Maintenance System The aircraft comes with a built in Maintenance System that covers the Airframe, both engines and the APU. If you have used the FJS Maintenance System before you will know it is quite unforgiving and all repairs can only be done on the ground, but it is highly realistic. But if you can't handle the surprises then turn the system off. Pilot Notes This is in reference a checklist... or setup helper in both ways to get through the myriad of switches and systems. Easy to use and scalable... You can also create your own notes and then add them into the book... it comes with a max of 32 pages, which is very helpful and professional. Cockpit Overview It is hard to imagine that this cockpit design is now six years or more old. So brilliant it was in the first place. But that is only really half the story, as yet over the years the cockpit has also changed quite significantly with more and more active systems being added in and more design items have also been included, as the original OverHead Panel (OHP) if you remember was actually quite blanked out and very empty compared to the comprehensive OHP version in this Boeing 727. One of the very best cockpits in X-Plane? as that point is always debatable, but certainly in a clockwork environment then the answer here is yes. As noted the aircraft went to a "Study" level in v2, but I felt compared to other study level aircraft this B727 just finely and slightly missed the mark, but here and now in this v3 then does this B727 now come up certainly to that required level of Pro skill. And so the question is to be put forth in the point "is the FJS B727 now a full Professional aircraft" The title notes that "Pro" moniker of course, but sometimes that title can be shall we say exaggerated a little bit to create sales. But not here, the one thing that really strikes you with this v3 B727 like the with the companion FJS B732 TwinJet is the true completeness of the aircraft, a single whole in feel, as systems wise this B727 was always a complicated aircraft, as it should be to reflect the 60's era design. But "Study" is now the point in question, remember you are doing the flying in this aircraft for three people?, The Pilot, First Officer and the Flight Engineer on the rear right panel, and that is a lot of workload, and a lot of systems to understand, so yes now the "Study" aspect is heightened certainly more to the fore than ever. The cockpit could be called "simple - complicated" in that the era required a simple design but it looks complicated to the untrained eye. All these flight panels are completely active, every switch, knob and dial all work and are connected to the realistic systems to fly the aircraft. Only a few panels on the rear bulkhead are active, like the APU (Auxiliary Power Unit) panel and the fuel transfer panel, the rest are just perfectly matched images. Setting the texture quality to the lower setting of "high" does make the images a little if slightly blurry, but not enough to make them a visible annoyance. Detail is beyond glorious, and now with the X-Plane11 dynamic PBR effects to highlight more the pure 60's feel and environment. You pay for quality and that uber detail.... well certainly you get your money's worth here, and more. Just the best of the best. Cockpit Lighting Cockpit lighting was improved in v2. And it was extremely good before, but is even more outstandingly brilliant now. You have that great collection of eleven dials and switches (four more dials and a dome switch are on the engineers station). Left and right flying instrument and centre engine instrument panels are all fully adjustable as is the OHP and the central throttle quadrant. There is the choice of red or white cockpit illumination. This feature was on the v2, but just as a hidden colour, now in v3 you have the actual lighting domes on the ceiling for both the red and white illumination, the difference they make is excellent in lighting and also as a visual representation. Add in two fully animated reading spotlights and your life in the dark does not get any better than this. Another v3 new lighting feature is the amazing fluorescent lighting, there is one light over the main instrument panel (below right)... ... and the other fluorescent light is over the Engineers Station, turn either on and they flicker realistically and noisily as they illuminate, just brilliant and perfection. You can change (or play?) around with the huge range of various lighting conditions that can satisfy even the most dissenting pilot for low lighting judgement conditions, but remember to fly the aircraft as you can become seriously distracted with all this extensive lighting knob tuning. Main Panel & Instruments The 727 cockpit is very different in that it is all gauges and dials (known as a "Clockwork Cockpit). There are no glass screens or menu driven tabs in here. There is also a third person to help you handle out with the aircraft systems as well with the Flight Engineer (FE) who is situated sitting rotated 90º behind the First Officer. His panel is bigger than the main panel and in today's modern aircraft as then most of his systems have been transferred over to the Overhead Panel (OHP). The instruments are all the basics that are required for flying. The Standard Six - Artificial Horizon (sometimes known as the attitude indicator) with built in turn indicator, Heading, Compass, Vertical Speed (both versions), Altimeter and Speed (in knots and Mach speed, added to the SS is the back up instruments of Artificial Horizon, Altitude, Radio Altitude, Clock and (outside) air-temperature, the DME 2 - NAV 2 (distance - in Miles) are also situated lower down. The First Officer's set of instruments is very similar except they have a TAS (True AirSpeed) dial and DME 1 - NAV 1 (distance - in Miles). The landing gear lever is also on the right side of the panel. The Flap indicators are here as well for Outbound and Inbound flaps (0º, 2º, 5º, 15º, 20º, 25º, 30º and 40º settings) dials. Lower down are the dials for Pneumatic Brake Pressure and hydraulic Brake Pressure. The center of the panel is dominated by the sets of three engine dials covering "Pressure Ratio (RPM), N1, EXH (Exhaust) Temp, N2 (RPM) and Fuel flow to each engine. To the left is the there items of the Altitude select panel, Total Air Pressure and upper and lower rudder trim pointers. The detailing of these dials is breathtaking and simply eye-widening in operation and in fact the whole panel is exquisite in detail and great design from FlyJSim. I doubt you will never get a better 60's cockpit like this. Step out of a General Aviation aircraft and into this B727 and you would feel more at home than a current line pilot would in the way you interact with the instruments. The three red fire handles are on the top of the glare shield that twist and fire for each engine and the fire system can be tested. Left is the Flight Director (FD). The full flight director system is worked together with the authentic Sperry SP-150 Block V autopilot that is situated in the middle of the throttle pedestal. The autopilot system is quite basic, and it does not pop-up either, so you have to set a point of view that where you can see the autopilot and the vertical speed Instrument at the same time, it is slightly awkward but you do get used to it. For a large airliner it is quite rudimentary. In fact your GA has probably a far more powerful AP than the Boeing 727. The AP may be rudimentary, but it is still highly effective in its simplicity. Radio Panel is also very authentic to the period. The frequency is set and then you just flip a switch over to activate the frequency that you require in all settings from COMM, VOR 1 and 2 and NDB (ADF or Automatic Direction Finder here). Below the radio are the large Rudder and Aileron "Trim" knobs. New to v3 is a fully operating WRX weather radar. which has accurate cloud reflectivity, full simulation of energy dissipation and signal attenuation and simulation or radar returns and terrain interference. You can also tune the gain and tilt to scan through the cloud layers appropriately for your position in fight. The differences with the Overhead Panel are highlighted here with the original (left) and the v3 (right). One thing to note is that the aircraft's manipulators are new and clever. They come in two forms in half-moon for each side movement and a circle to drag (and turn) in the centre, and the ease that you can adjust knobs and switchgear is excellent and fast. There is a full Anti-Ice panel and Window heat, engine start and full external and internal lighting switchgear that are all now active on the OHP. One feature has however been deleted from the last version and now the same as the FJS B732 TwinJet is the is the pushback truck. FJS recommends now to use the BetterPushBack Truck as the alternative. The aircraft has been tuned so the BetterPushback works perfectly with the B727, and the same feature is also available in that if you press on the OHP the "Ground Call Button" on the OHP the BetterPushBack truck will answer your call.... great. Flight Engineer's station is quite simply perfection... ... and it is quite complicated to use as all the major systems in : Electrical, Pressurization, Air-Conditioning, Oxygen, Air-Bleed, Heating, Fuel system, Hydraulics are all active in use and operation, yes you need to study the systems in depth to understand them all and the provided manual is a good place to start in explaining the systems, but in not confounding you in too much jargon... it is called a "study" aircraft for a reason. Flying the Tri-Jet v3 The flight today is from EDDL (Düsseldorf) to ESSA (Stockholm - Arlanda). I set my passenger and cargo loads to a ZFW of 126030lbs and a fuel load of 25710lbs for a total of 151740lbs GW, and I selected the native X-Plane FMC and I used the standard .fms file but adjusted the Departure (RWY 05R-Meve3T) and Arrival (RWY 01L - NiLU1J) routes to match the SimBrief routing. The rear stairs do work (sort of) but the view inside is quite weird with no internals? use the (shift) F1 key to raise or lower the stairs. You can start the aircraft with the provided GPU and Engine Start cart, but I started up the APU on board to make my departure quicker. It takes about a minute to power up and settle. The checklist is quite comprehensive and there is a lot of items to check off and test. The passengers are boarded and we are ready to start the engines. So first it is... Window Heat "on" (OHP) and Beacons "on" (OHP). On the FE Panel right down low you turn on the hydraulics and then the eight boost fuel pump switches on the fuel panel. High right is the Air-Conditioning panel, but right now we are only concerned with the "APU Bleed" switches (magenta arrows) to start the engines. So the Air-Con (A/C) packs (green arrows) must be off and with the bleed switches open and then the PSI will show on the dial. As noted you know the APU is pushing power to the aircraft by the AC (centre) dials (It will show the same power output on the APU panel as well). The three engine start switches are on the very top position on the OHP and are covered by black covers, flip each one open and the inner switch can go into two settings "Flight" and "Ground". Here we are starting on the ground so you would use "Ground" selection as the other setting is for restarting the engine in the air (Flight). Clicking the switch down on number 3 engine (Start sequence is 3, 2 (center) and 1) and the dial will start to move in the n2 gauge, when it reaches 17-20% you introduce the fuel by flipping up the "flow/cutoff valve" up. From here on the engine will power up to full idle and you can now start the other engines in sequence. The start up sequence still has that "oh wow" factor even after all this time, watching the dials turn and work, then settle down is highly realistic. When done you can switch on the electrical power from all the three engines and close down the APU (before flight). In it is now not requiring the "Bleed" function, then you can set your Air-Con A/C packs to provide bleed to the aircraft's pressure and cooling systems. Easy to do? yes after a few run throughs it does actually get easier. In knowing what dial or switch does what easily helps you find your way around. The trick is understanding the bleed and A/C packs and that the required pressure is correct in starting the engines. The sound of a Boeing 727 in idle is that loud whining squealing noise that was so familiar only a few years ago. The FlyJSim sounds are extremely good... Noisy, but good. And they get better. But I have a AC generator failure on Engine no.3... damn? It shows if I turn the switch to Gen 3 and the low power is shown on the no 3 Bus Tie. So I now have two choices, fly with the fault (yes you can) or fix it now by shutting down almost every thing including the GPU and doing the required maintenance. I choose the latter, fix it now and so you don't have to worry about a broken generator all the way to Sweden. All restarted and we are finally ready to go.... As I am sitting on a remote stand, and so I don't need the BetterPushBack option. The B727 needs a bit of thrust to get moving but once it does, then you can pull the thrust back a bit... At the RWY 05R hold point there a few items to checklist... Flaps at 5º, Getting the right flap setting is crucial between lift and drag... There is a hidden active area (arrowed) in the green area to set your current takeoff trim, this is one action you must not miss... unless you want to end up a crash statistic. Use the Vcard to your Vspeeds (bugs) for takeoff, i also usually note them down and add 10+ to the v2 rotate. Power up and keep the power around 90% rpm, no need to go to absolute full throttle, and if you do you will regret it. Takeoff roll start is slow, but you build speed very quickly and you need some forward yoke to keep the nosewheel on the ground until the rotate point. Rotate at v2 is here around 150knts. The B727 may look dramatic, but in reality you have to fly it with skill. On rotate you keep the pitch at around only 5º-8º until the aircraft actually drags itself into the air and then has some space under the wheels before then gaining pitch to a more 15º or 2000fpm. You have a rear skid under the rear in case you mess it up, but that would be a sign of a poor pilot if you scratched it?... The aircraft handles very smoothly under the climb and you can hold the pitch perfectly. The aircraft does have pitch hold system if you require it. The aircraft is very hands on, you are working very hard in there and you have to be very disciplined in your actions, and procedures. Aircraft handling is very, very good. FlyJSim were always the masters of getting a lot of feel into their aircraft... but now there is the added dimension of the X-Plane11 dynamics and performance. Compared to the v2 the B727 it does feel different, depending on your overall weight. So your focus is on really flying the aircraft via throttle control and with the balance of the controls, and to be honest your whole focus at this stage of the flight is just on doing all that, and even a simple thing like turning off the wing lighting and the passenger signs are usually left far later than you would usually do... Flap retraction for 5º is 189 knts, 2º 190 knts and all in just below 200 knts. You have to maintain your vigilance and focus on your "Press (pressure) Ratio". Go above the marker at 19 and nasty things can start to happen. The B727 does not have any engine management systems, so you (the pilots) are responsible in keeping the engines within their operating limits. push those JT8D engines too far and they will burn out... or you will be pulling fire handles. You work with "aims". I set up to aim for a certain speed and altitude and more importantly aim for a certain position... or waypoint. Once there you can activate the Sperry Autopilot to take over a lot of the workload, but have to know or set every thing up in advance to make sure you know in what direction you have to go (with the course needle), where you need to be when you get there. So following a set of headings to the flight-plan markers will help... ... as you simply you don't have any helpers in here, as there is no Navigation/Map display? the WRX says map, but it is only for the weather aspect, so you have absolutely no idea of where you are unless you plan it out before hand... a bigger trick is locking into your FMS flightplan, because you can't see it or even know where it actually is? the earlier X-FMC option had a built in route map pop-up, but you now don't have that feature available in here. Most departure SID's usually have a VOR point as their exit from the controlled airspace zone. Here in my case it is MEVEL, on track to the OSNABRUCK (114.30 OSN) VOR dial, so I set my VOR pointer to lock into and fly that radial that will take me to OSN via MEVEL, once close to MEVEL I do a "Direct-To" to lock in the flightplan and activate the waypoint as my next position on the flightplan... as you can guess you have to work all this out before departure, so the procedure goes as smoothly as you can execute it, so you will need your charts, heading numbers and distances to make it all work, or you can cheat and use the built in X-Plane local map, but you don't do that... do you? These 60's jets are fast, really fast... the B727 will cruise easily at m8.5 or if you want to even at m8.6, so you have to keep a sharp eye on the speed and adjust the throttles to keep the aircraft from going over it's limiter (warning), as at the same time to adjust the throttles for the lighter fuel load as you cover the ground speed rather quickly. There is not of a lot of automation in the B727 cockpit, so you have to take the notes and do the adjustments. range in the -200 adv is quite limited at 1,900 nmi (3,500 km), both the -100 and the Freighter have far more range at 2,250 nmi (4,170 km). Of course there is also the differences again with the different versions of the JT8D engines installed in each variant with each individual performance tuned to that type of engine. Now and again you can look out of the windows at that incredible view. There is the option to clean the aircraft's windows, but the "clean" option is that the window surrounds are darker than with the "dirty" option? The exceptional original wide range of sounds are still here, but the DreamEngine that has been on the aircraft since 2012 has been removed for the now standard native FMOD engine... like I noted, nothing really has been lost and in fact I found a more sonic change in moving around the cockpit (more realism) and the full 180º range around the external aircraft as well, and even down to the detail of the buzz of the fluorescent lights, and the APU is quite loud. Arlanda The trickiest part is getting the B727 down into the lower speed zones, the different markings on the Speed dial do show you where you can use which flap setting and when. But getting the aircraft down under the initial 200knt zone without putting your nose high is a bit of a skill, worse is that the initial 2º are just the forward edge flaps and not the nose leveling rear, so you need to get your speed down to the 15º flap to have that flap speed control, and it is not as easy as it looks. I have got to know the aircraft very well over the years, but the X-Plane11 dynamics have created a whole new ball game in the way the aircraft flies and you are having to relearn a lot of the differences between the new and the old, like I have already mentioned in that the FJS aircraft are very finely tuned, and this newer XP11 version now lift's your game again into that higher skill range. The Sperry Autopilot is very accurately modeled including the manual glideslope with intercept mode and altitude capture, which is available here with mode interlocks. Again even in auto mode or with your manual flying the pure thrust throttle control is highlighted on your approach slope... you can see why older pilot's enjoy the purity of this era's aircraft, as your flying skills are highlighted. One bonus is that your approach speed can be quite low, almost GA speeds. This was to help with landing at remote airstrips that isn't done with aircraft this size anymore. So 140knts and 25º flap can be used on arrival, and this gives you a great steady platform to get your landing correct. But the thrust is high compared to the speed to overcome the huge flap drag. Final approach and 130 knts with 30º flap is about perfect, and it is a total feel thing... speed, thrust and handling, as it should be. The aircraft does have both Autobraking and Flare, but you don't really need either, as for one your approach speed is quite low and you sorta automatically use your throttle and lower the speed once you are over the threshold and create your own perfect flair as the speed rubs off. Like all rear-engined aircraft (MD-88) you need to watch the nosewheel doesn't get too high, it needs a firm hand to keep it under control and also keep tracking the aircraft directly. If you watch any videos of aircraft flying and landing like this you usually see some pretty violent yoke movements at these points to keep the aircraft steady. Even though the engines are a fair way back from the cockpit... the huge roar of the reverse-thrust is still highly noticeable, and it is brilliant if seen and heard externally... a note is that these era aircraft Autopilot and Flight Director don't disengage on landing, you have to switch them both off manually. Cleaning up the aircraft and taxiing to bay 38 is a doodle after all that, you certainly get a serious workout with these older aircraft. The B727 is fully VR (Virtual Reality) compatible for the very best immersive experience. External Lighting All external lighting is excellent. There are four landing lights, but the outer lights are covered by the forward leading-edge flaps if the flaps are retracted, front wheel strut taxi (moves), runway turnoff, wing/ice, navigation, strobe and beacons are all covered as is the logo light on the tail. All lighting reflects on the ground including the strobes. Liveries All the original liveries are available, but that huge B727 collection that you built up over the years is now useless, as the paintkit has been changed to accommodate the larger scale files and quality. The painkit is already available for use, and so it won't be long before they will start reappearing again... FlyJSim have also created a site for these liveries to be hosted and can be downloaded here... FlyJSim Liveries the Painkit (1.04GB) is on the same page. Provided liveries are: 727-100 American (N1996), United (N7001U), Eastern Airlines (N8102N) 727-200 Alaska Airlines (N294AS), FlyJSim v3 House Colours (N727FJ), Lufthansa (D-AFBI), Pan Am (N4737), PSA (N533PS) 727-200F DHL (N741DH), FedEx (N466FE),Kelowna Flightcraft (C-GWKF) Summary To a point this review is preaching to the converted as this Boeing 727 Series from FlyJSim has been around since late 2012. Some of the basics are still here of that initial aircraft, but in reality this is a very different aircraft from that earlier aircraft in almost every way. Earlier updates mostly focused on systems including Electrical, Pressurization, Air-Conditioning, Oxygen, Air-Bleed, Heating, Fuel system, Hydraulics, Anti-Ice, and then the layout for both the FD-108 flight director that is fully independent from the Sperry SP-150 autopilot to bring it into the full "Study" paradigm. Even taken into account of the era of the aircraft it is at it's heart still very highly technical, if old school flying machine. This v3 upgrade is more than simply making the B727 X-Plane11 compatible, as it has been totally revised in many areas, the details covered here are huge if only intimate in changes, it may not look so from the surface, but you know the difference when you fly it. Dynamically in texture quality and performance it is levels above the previous version and this is certainly in every way THE X-Plane11 version and delivers the overwhelming features that X-Plane11 has to offer, but that is also noticeable on your computer in the effect it has on your graphic power, a step up in all the sheer detail available here, this also means another step down in the way you have to absorb it. New v3 features include the custom weather radar modeling that simulates realistic cloud reflectivity, radar scanning, energy attenuation, and interference. and the full TCAS integration into a VSI instrument, including full TA/RA. A few changes from the v2 with the removed X-FMC, which was better than the native FMC, and the older livery collection does not now work and the menu system is improved. The release of FlyJSim's Boeing 737 TwinJet set the bar very, very high, to the point it could be even be one of the very best aircraft ever created for X-Plane. The Boeing 727 is overall a far more dramatic aircraft than the B737, and so the B727 Series should be even better again, but as the B737 was a totally complete airliner, then the B727 doesn't have it's cabin and rear internal features, including opening doors. But to compensate for that you do get in almost every area better and bigger systems and the best cockpit in X-Plane, but also the three different variants of the same aircraft. FlyJSim is an exceptional developer, now not one but two of their aircraft with the release of the Boeing 727's v3 after the earlier Boeing 737 v3 TwinJet as they both sit at the top of the list or pile in their sheer dynamics and quality, both give you an extraordinary experience, but also come with the requirement that you have to study and fly them like a Pro or with the professional approach they both require, but at least you know you are getting your money's worth back with all that work you have to put in, and know in the knowledge that you have mastered and is flying the very best of the best old school airliners... Highly Recommended _____________________________________________________________________________________ The 727 Series Pro V3 by FlyJSim is NOW available! from the X-Plane.Org Store here : 727 Series Professional V3 Your Price: $59.95 Currently the package is now for all three variants, the aircraft are now not sold separately. The v3 upgrade is however not free but it is an pay upgrade and the deal is for those who bought the complete earlier 727 Series package can get this new aircraft package at 50% off the purchase price - Find your coupon code in your original 727 order. Optional : The plugin for the CIVA Navigation System addon that costs US$10 is here: CIVA Navigation System Features Study Level Systems and Dynamics Designed with input and testing by former 727-200 pilots and mechanics. FD-108 flight director that is fully independent from the autopilot. All modes accurately modeled and with accurate mode interlocks and animation. SP-150 autopilot accurately modeled including MAN G/S intercept mode and altitude capture. Accurate mode interlocks and animation. Altitude alert system acquisition and deviation modes and flaps 30/40 cutout modeled. Autobrake system modeled to match real world data Fully custom weather radar modeling. We now simulate realistic cloud reflectivity, radar scanning, energy attenuation, and interference. Full TCAS integration into a VSI instrument, including full TA/RA. Compatible with the Pilotedge network. Accurate simulation of an APU, ground power, generator paralleling and sync lights system. Every annunciator light is push to test. Bulbs burn out, so be sure to spot the burnt out bulbs during preflight! Independent and functional navigation and communication systems, including separate nav radios, adf radios, VHF radios and more. Bleed systems and performance physically modeled, and respond to temperature, altitude, wear, and humidity. Pressurization and environmental cabin control systems faithfully modeled. Get the packs on before loading passengers on a hot day, and watch the cabin temp cool as the sun sets. Auto, Standby, AC and DC manual modes all faithfully modeled. Aft cabin zone heating system is modeled. Duct overheats and pack trips and resets are modeled. FMC and CIVA units realistically coupled to pilot HSI for improved situational awareness Fully custom hydraulic systems and electrical busses Instrument Comparator GPWS including test functionality Warning systems Fire protection systems Weather radar Extraordinary Exterior Incredible textures. Revamped textures show every rivet, crease, dent and oil stain on the exterior of our aircraft. Watch as light realistically reflects and reacts with every corner of this aircraft Detailed animations. All exterior control surfaces animated accurately to real world behavior and smoothly driven even in replay using our enhanced custom replay system. Accurately animated control surfaces, landing gear, flap deflections, and wing flex all help immerse you when piloting the aircraft. Detailed lighting. Lighting is based off real 727 data. Landing, taxi, taxi turnoff, strobe, beacon, navigation lights, wing and even logo lights have been faithfully modeled using the real angles and dimensions from real 727 documentation. Sound They called it the whisperjet… but the sounds are anything but quiet. Continuing from the success of the 732 Twinjet, FlyJSim has developed an accurate and immersive FMOD sound pack, which provides a fully 3D positional experience. Experience the realistic screech of a 727 JT8D engine at full power. You will hear every engine, switch, and greased trim wheel. Definitely an experience you will want to keep the headphones on for! Comprehensive Menu System Redesigned and unobtrusive menu that dynamically appears only when moused over Weight and Balance Manager provides detailed loading of passengers, cargo and fuel to accurately and dynamically shift the aircraft’s center of gravity (CG) V-card popup provides dynamic V-speeds for landing and takeoff including improved flap schedule calculations for user selected takeoff and landing flap config Additional customizable options menu to configure the plane and navigation systems Checklist and notes provided in sime with a 32-page fully customizable window that includes checklists and an overview of the aircraft. Have something you need to reference in the flight? Add it into the notes page! Our menu system is now 4K ready and can be easily scaled and moved to best suit your screen resolution X-Plane VR compatible For anyone who is as excited as we are for the technology, the FlyJSim 727 Series Professional is now fully compatible with X-Plane’s VR system. Now with custom and interactive manipulators, teleport hotspots and magnetic surfaces. Requirements: X-Plane 11.20+ Windows, Mac or Linux 4Gb+ VRAM Video card Current review version: 3.0 (August 10th 2018) Installation : Download file size is 1.4gb and is inserted into your X-Plane - Aircraft Folder. All Installed file sizes are 2.31gb 727_Series_Pro_V3_-200Adv_C2 (847.40mb) 727_Series_Pro_V3_-100_C2 (931mb) 727_Series_Pro_V3_-200F_C2 (708.20mb) Documents : Four documents that cover almost everything you will need to fly the Boeing 727 Pro. The procedures manual is really well done. 1. FJS 727 Series Manual.pdf 2. FJS 727 Series Procedures.pdf 3. FJS 727 Series Manoeuvres.pdf 4. FJS 727 Series Systems.pdf FJS - 727 Series - Support forum FJS - 727 Series - Developer Site _____________________________________________________________________________________ Review by Stephen Dutton 10th August 2018 Copyright©2018: X-PlaneReviews (Disclaimer. All images and text in this review are the work and property of X-PlaneReviews, no sharing or copy of the content is allowed without consent from the author as per copyright conditions) Review System Specifications: Computer System: Windows - Intel Core i7 6700K CPU 4.00GHz / 64bit - 16 Gb single 1067 Mhz DDR4 2133 - ASUS GeForce GTX 1080 8Gb - Samsung Evo 512gb SSD Software: - Windows 10 - X-Plane 11.25 Addons: Saitek x56 Rhino Pro system Joystick and Throttle : Sound - Bose Soundlink Mini Plugins: Environment Engine by xEnviro v1.07 US$69.90 : XPRealistic Pro v1.0.9 effects US$19.95 : WorldTraffic 3.0 Plugin - US$29.95 : BetterPushBack - Free Scenery or Aircraft -EDDL- Airport Dusseldorf by Aerosoft (X-Plane.OrgStore) - US$27.53 -ESSA- Stockholm Arlanda by tdg (X-Plane.org) - free
-
Yes and yes... odd isn't it that most users don't fly it that often, including myself. It will be interesting with the far better X-Plane11 improvements on performance if that changes anything, it is a far different aircraft in that respect than it was before. SD
-
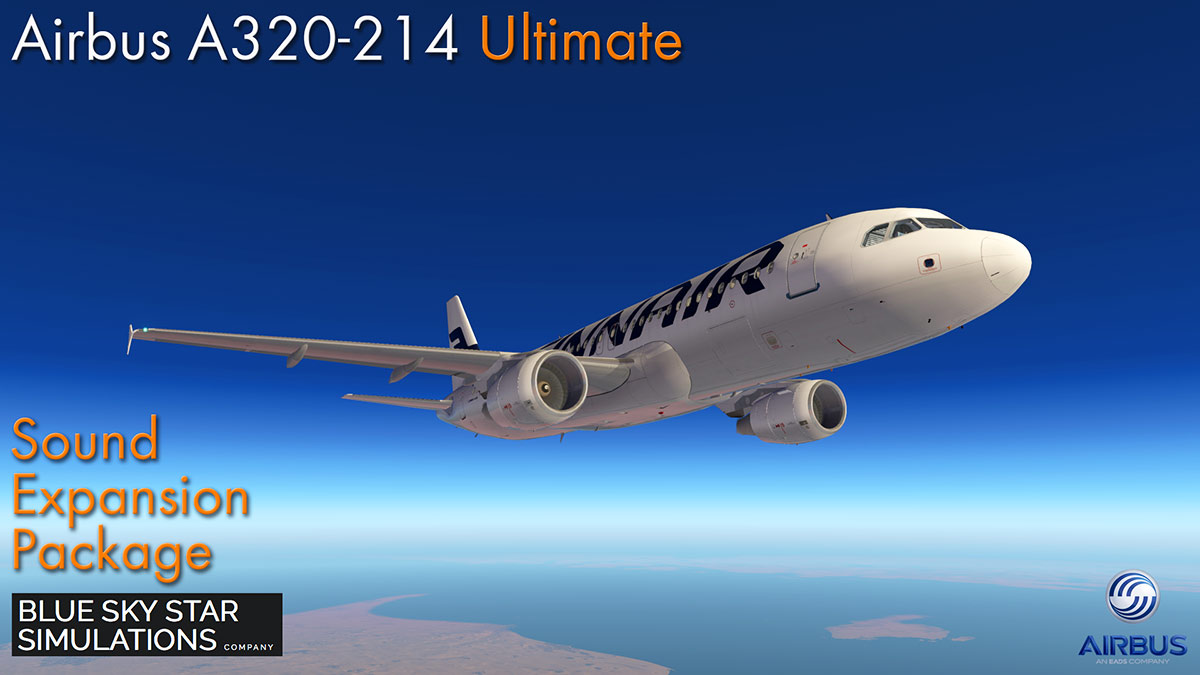
News! - Updated - BSS Flight Factor A320 Ultimate Sound Pack Blue Star Simulations have updated their sound pack for the FlightFactor A320 Ultimate to v0.8.176-2139 (August 2nd 2018). This soundpack is still noted as a "Beta", which is quite strange really? Yes the A320 Ultimate is still an ongoing project, but a rather slow one these days compared to say around Feb/Mar and the aircraft is now pretty well configured. Secondly is that the JARDesign A320's soundpack is far more comprehensive and I should point out I was a little disappointed initially with the FF A320 Ultimate version compared to the comprehensive JAR pack... That engine is a CFM International CFM56-5 series were as this CFM56-5B4 engine is the one that powers the FlightFactor A320, and so well what is the difference, well not much really? so why are the packs so different, or need to be.... you ask me? Anyway the updates keep on rolling out... Version 0.8.176-2139 (August 2nd 2018) ENGINE SOUNDS ROLL SOUNDS GEAR WIND SOUNDS GENERAL VOLUMES GENERAL DISTANCES Version 0.8.162-2125 (July 2nd 2018) ENGINE SOUNDS TONES AND VOLUMES (WHINE AND SAW) ENGINE BASS DURING SPOOL IS LESS STARTED ON OUTSIDE ENGINE SOUNDS (70% COMPLETE) NEW TOUCHDOWN SOUNDS DEPENDING ON SOFT/HARD TOUCH Version 0.8.95-2058 (May 5th 2018) Engines Internal 360 degrees cockpit and cabin - 100% Switching (everything that you can press pull or switch) - 30% Electrical - 90% Hydraulic -91% Ventillation - 50% Air conditioning - 90% Passengers - 5% (temporary fix) Environment - 0% Wind and airflow - 85% Surfaces drag - 85% Gear ground roll - 80% Vibration - 50% APU - 50% Airport - 0% Ground Vehicles - 0% Gear doors - 100% So from the initial release the soundpack has had significant changes and additions, and obviously now sound far much better. So you could say the soundpackage is finally getting there, but this is not yet the total comprehensive package compared to the JAR version, and so overall should Blue Star Simulations have waited and released a far more completed package, or this one? ______________________________________________________________________ Yes! the Blue Sky Star Simulation Sound Packages is now available from the X-Plane.Org Store here : BSS Flight Factor A320 Ultimate Sound Pack Price is US$19.98 (Yes! you do need the FlightFactor A320 Ultimate aircraft and it is Required for the use of this sound pack US$89.95) Go to your X-Plane.OrgStore account to update to the current v0.8.176-2139 (August 2nd 2018) version if you have already purchased the package. ______________________________________________________________________ Blue Sky Star Developer Site : Blue Sky Star Simulations News by Stephen Dutton 7th August 2018 Copyright©2018: X-Plane Reviews (Disclaimer. All images and text in this review are the work and property of X-PlaneReviews, no sharing or copy of the content is allowed without consent from the author as per copyright conditions)
-
Soon... vFlyteAir are aiming for the end of August.
-
Aircraft Review : Embraer EMB 110 Bandeirante XP11 by Dreamfoil Creations One of the great delights in reviewing aircraft are the ones that come from nowhere and then simply blow you away, the addictive ones, the aircraft that you simply can't shake off and just want to fly them over and over again because they are just that good, and that they are so involving and reinforces the whole complete reason you are in this X-Plane flying simulator thingy in the first place. One such aircraft was the Embraer EMB 110 Bandeirante or "Bandit" from Dreamfoil Creations and that it is already an odd start in that as developers and then Dreamfoil are more renowned for their helicopters than fixed-wing aircraft, but like a comedian that does a straight role, they are usually better than the developers or the actors that are the fixed-wing or drama specialists in the first place. In a coincidence, I flew the EMB 110 in its X-Plane10 version only a few weeks ago, and obviously my first thought's were, then this aircraft would be even better in X-Plane11, well I now not need or wait any longer anymore because here it is in it's newly polished X-Plane11 PBR shine, the Embraer EMB 110 Bandeirante XP11. It was always a simply amazing aircraft to fly, but also very challenging... but that was also part of it's immense appeal as noted in my review: Aircraft Review - Embraer EMB -110 Bandeirante by Dreamfoil Creations. Embraer EMB 110 Bandeirante XP11 The original EMB 110 was a very high quality aircraft and was also very feature rich. So in X-Plane11 then those areas have not changed at all, in fact the PBR effects have completely enhanced that quality to a whole new level again, in other words the "bandit" looks excellent. Dreamfoil are really great developers, and the detail here is simply excellent, these are nice aircraft, realistic and really well put together. So every nut, bolt, rivet, panel, RF antenna, pitot tube, NACA vent, door handle, screw, cable, hydraulic line, brake assembly and every item that makes this airliner is all done here with precision and perfection. The HF Antenna between the upper tail and forward fuselage can be hidden in the menu. All these areas have been recalibrated for the maximum effect, in quality and with the newer X-Plane11 dynamics, so the MB 110 looks simply amazing. But to note the older liveries now don't work? Which is a shame as I lost my lovely Air New Zealand livery, but the new XP11 paintkit has been posted to redo the liveries for this XP11 version. Gear detailing is perfection and first rate. Glass also delivers high standards in design and reflections. One great Dreamfoil feature (on their choppers) was that you could open doors and activate items externally... With the front passenger door it can still be tricky to see the activation arrows from certain angles on the center of the door? but it is really great to open the aircraft externally.... you open also the large rear cargo door via the separate smaller panel to the right. Internally the cabin looks different? It is the same, but the colour of the seats have gone from a drab grey to brown leather, and the carpet is now also blue from the same greyness as before, so overall the cabin feels more colourful and it is far better and to the good for that. Cockpit The view of the cockpit is in that "I can't believe in how good and realistic this all is" observation... We are used to very high quality cockpits in X-Plane, but this is still one of the very best. Because of the sheer realism available in this cockpit, you love being in here, in control, enjoying the moment. Every single detail is covered and the levers are worn, tired whatever, and yes those amazing rudder pedals not only work but you can adjust them as well. The seats four armrests are also animated and retract. Yokes can be hidden, but only the very top yoke handles, so the yoke column still covers some lower panel switchgear. Instrument Panel The panel is a lovely clockwork design, very regional in layout and a bit like a KingAir panel. At first glance it can look both easily very complicated and complex. But when you break them down they are usually quite easy to fly and understand. Left to right across the panel, we will start with the pilots station. As for the flying instruments placed they are quite basic. The standard six: Altimeter, Speed, Heading Indicator or RMI, V/S (Vertical/Speed) and Horizontal Horizon are all well represented with the ADF and VOR directional points in the heading indicator and a CDI "Course deviation indicator". The rate of turn indicator is also set out below, all these main seven flying instruments are duplicated on the Co-Pilot's panel station. There is a bigger CDI on the far left of the pilot's panel and analog clock at the top. Brake and pump pressure (PSI) are noted low down. Undercarriage and Flap indicator is central lower and hard to see and use and Cabin Temperature is on the Co-Pilot's lower panel. The central panel is divided up into sections. Left are the twin sets of engine dials and gauges, from the top is: Engine Temp ºC, Torque(lb-ft), RPM% (Nh), RPM% (Ng), Oil Temp ºC, Oil Pressure PSI and ºC. Top is an extensive and fully working Fire panel with pull handles and test buttons. Set centre is the biggest change from the earlier XP10 EMB 110... gone are the older (but very authentic) three Collins sets and are now replaced by the more modern avionics as from the top there a Garmin GMA 340 receiver, Garmin GNS 530 and and the smaller Garmin 430 below (All X-Plane native gps units) as these were changed over in the v2.2 update. ATC Transponder, VOR 2 directional radio and ADF radio. In the middle of the stack is a basic but lovely Trimble Navigation TNL 2100 GPS. Right centre panel is a Benedix/King WX weather radar set (tube style) which is also a great unit, with an excellent warning annunciator panel below. The aircraft comes with a full Air Conditioner simulation system that is very effective and usable with the Air-Con panel situated down left of the Co-Pilot on the lower side panel. Highlight is the comprehensive fuel panel which is a thing of beauty all by itself!, gorgeous in design with gauges for fuel flow (top), Fuel Pressure PSI, and usable fuel lbs x 2 below. Main, Aux tank switches and crossfeed. There is a "Foxbaro" fuel used (reset) counter at the top that can reset to zero on startup, so you know the perfect quantity of fuel consumed... The pedestal is quite basic, but beautifully crafted. Main twin-levers for throttle, Prop and Condition. Three trim knobs are good and easy to use... but the setting marker on the pitch is very hard to see? I would have put a blob of white paint on it... and also on the central pedestal is the Autopilot (A/P) panel. The A/P is quite basic in mostly hold modes and a dial for turns and thumb wheel for pitch. In the earlier version it was very difficult to use the autopilot because of it's buried position... in this XP11 version you now have a pop-up A/P panel (hooray!) that is activated by pressing the autopilot FD/AP repeater panel (action lights). A common mistake is that users think that the A/P doesn't work... but you have to first switch it on (arrowed) before you can use the autopilot panel (it lights up when activated). Overhead Panel (OHP) is quite complicated, it covers the electrical buses, aircraft lighting (Internal/external), wipers and engine start switches. You really have to study it to fully understand the bus flows and the way it is laid out for use. The "Deicing" panel is high right above the Co-Pilot on the roof, and you have all the full deicing options for the propellers, windshield, engine inlets and all wing pneumatic wing boots. Again very complex and well done, but requires study... a lovely AMP gauge is the highlight of the panel. So the cockpit looks and is complex, but it is in reality quite easy to use, the main point is the way you interact with the aircraft, and that is in a wonderful way. Switches are big, functional and the all the switch lighting is also large (usually green) and they all glow beautifully in the faded light or dark.... this EMB 110 is a great place to be in. Menu Anyone who has flown any of Dreamfoil's other aircraft will be very familiar with this circular disc selection system called Smartmenu. On the XP10 version the Smartmenu was activated by pressing on the centre of the glareshield, but it has now been moved to the panel warning sticker next to the FD/AP repeater panel (arrowed), and that it is a far better place to access it. Items available in the menu when going counterclockwise and from the top is first the "SmartLivery" selection. Here you can rotate through all the liveries and easily select the one you require, and the livery is shown in the centre of the disk... Next is the set Views that includes positions of the: Pilot, Co-Pilot, Console, Overhead, Passengers, PostCam, Passenger 1, Passenger 2, Baggage Compartment and Tail Cam... all are excellent. Volume... the aircraft comes with Dreamfoil's excellent sound DreamEngine which includes over +50 sounds, Doppler Effect and Atmospheric Attenuation, realistic turboprop sounds with real-time propeller dynamic and relative sustain effect for startup and shutdown. You can adjust the volumes here on the menu disk to your specific liking. FOV allows you to change the "Field of View"... ... and the Checklist is excellent, it is very well done and you can move the pop-up binder around the screen and also scale the binder to fit smaller spaces. Stability allows you to change the percentages % of Yaw, Roll and pitch to your liking. You can customise changes in three items; Tail-Plane (change to 10º dihedral), HF_Antenna and activate (system) Failures. Exterior; This menu item can be accessed both on the internal menu and externally by pressing the circle on the nose of the aircraft. Your GPU (external power) can be selected here (You can also use the lower point on the battery switch on the "Overhead" panel), the GPU has changed colour as well from yellow to white, personally I preferred the yellow version. External options include the GPU, Wheel Blockers? (Chocks), Pitot caps, Engine caps, Tail Support and Safety Cones. One other selection item is for loading the fuel... you press a pump handle on each wing centre cap to bring up a % dial of the amount of fuel in each wing tank, and you can then adjust the fuel amounts to your liking. Flying the EMB 110 XP11 Start up is Beacon and Nav lights on, fuel pumps on... and I have set 2,139.50lbs of fuel on board to make the distance to Cork (EICK) from EIDW (Dublin) Ireland. On the OHP I set the AC BUS Bar switches on, Inertial Separation switches to on (condition levers to up) and to start is a simple switch up of the "Start" switch. The turbo-whine starts up outside of one of the Pratt & Whitney PT6A-34 turboprop engines (Same as in the King Airs, PC12 and Twin-Otters) and each engine gives you 783 eshp and 750 shp. Throw another switch and you get another whine from the second engine and the start-up procedure is fully automatic. The Ng RPM will settle down at idle around 52%, and the excellent as mentioned DreamEngine sounds will give you the full voice from whine startup to idle revolution power. If you are connected up to a good sound system (like I am with a bose) then be fully prepared to feel all that turbo power that raises all the hairs on the back of your neck. It is simply great stuff. Once the engines are running you can then switch down both "Start" switches to "Interruption" and turn on both G1 and G2 engine generators, Then close down the external GPU... As expected the performance dynamics of X-Plane11 and they are all very different from the original, once you have idled the engines you need to pull back on the mixture (once the engines have warmed up) for a more leaner idle to taxi. Wipers are on, and as it is raining hard in Dublin the "thunk, thuck" to each side of the window is created with a great realism... I noticed the panel lighting is a lot, lot less brighter than on the earlier versions, and it makes the panel look quite blander, you would think that XP11 lighting would be better here and not worse? Flaps 25%, brakes off and throttle up... The Bandeirante will track the runway very well, but when you lift off around 135knts with that 1500shp power pulling you upwards but with the thrust going slightly sideways the aircraft will very quickly roll right, if you are not prepared for that slip to the right you are very quickly going off the departing runway centre line. So you are working the rudder and yoke to keep the aircraft in a nice straight line while holding a 5º-7º pitch. The first time the slip will easily catch you out but after a few runs to adjust to it and love the feel of this lively machine in your hands. Rolling to a new heading needs a firm hand but it is easier than you think it would be, and you need flaps quickly up (or 0º) before you are out of the slow (white zone) at 148knts. Speed is then set at 91% Nh. Climb at fpm is around 1000ft and official Rate of Climb is noted around 8.3 m/s (1,640 ft/min), but I found the 1000fpm setting was a better feel and climb without losing power and speed. One thing that threw me was that the undercarriage didn't retract on my Saitek switch command (set to the X-Plane key settings), this gear has a manual gear drop feature which is very clever via a red lever, but it also cancels out the native command as well, you can then only raise and lower the gear via the panel switch... The Embraer certainly feels different from the earlier versions, and certainly more to my liking as it feels more complete and refined. I broke though to low cast heavy cloud cover at around 3000ft, and felt freeee... If you don't want unwarranted issues then make sure you turn off the "Failures" on the menu, I had a "Fire" in my left engine because I held the power up too high on a takeoff and a "Landing gear" failure, all very exciting and authentic if you like your flying that way, but I just want to fly today. One area I was keen to check out in this new version was the heading change and a hard bank... In the original aircraft my impressions of the Bandeirante were not that great in the turn or the bank, as I found the aircraft just badly pitched up and down and sometimes as much as a thousand ft per minute and in some cases as it did the banking manoeuvre, and it was all quite hard to control and cancel out this heavy wave effect... ... after a few rolls under both the A/P and manually rolling under the stick and rudder, I can confirm that this nasty issue thankfully has now gone away, in fact the aircraft is really lovely under any change of heading, but you have to keep the inputs quite smooth and small as the aircraft is still quite delicate under the stick, but it is now far, far better to fly, and so that is a big plus to X-Plane11 dynamics there. It is a hell of a nice place to be in up here... ... the cockpit uses the X-Plane PBR effects to the limit, it is highly realistic and livable. The only thing I noticed was that it was easy to confuse the A/P pop-up panel for the Menu pop-up, or you got even both if you got confused by the selection zones as they are located quite close together. I found earlier approaches very tricky in the X-Plane10 version, it was hard to keep lift and fly at the same time with a very tight speed zone between them, so here I go again in the X-Plane11 version and was expecting the worst. Note the inverted nose illusion effect has been fixed as well. But the early approach signs were very good. I found that I could find a nice balance of speed around 120knts and with the flaps set at 60º and you could fly as steady as a rock here... all day. Flaps down to FULL or 100º and no sudden lift or painful loss of height... very nice, and with the speed slowing now to around 105knts it is again about perfect. Flap and undercarriage design and animation is excellent, great detail and beautifully created. The main gear track is quite wide so you have to make sure your landings are quite level, or if not the aircraft will bounce on one wheel (tip the wing up) and then bounce to the other before both wheels settle down. Mighty, mighty impressed, this is far better than before... over the fence. A nice little flare at around 100knts as stall speed is around 87 knots, and you do a perfect landing, but again be sure to be perfectly level as the rear wheels touch. In the earlier version there was some confusion in using the "beta" mode of the throttle, currently the setting "hold thrust reverse at max" which I have set on my joystick trigger works fine to reverse the props, but the aircraft became a little bit of a handful under the beta reverse mode, a Laminar ground effect issue or an aircraft issue, but I may have to practise that more in the future but I would blame the former. Cork, and that was certainly a very different feel and difference between the old and new versions on slow approaches, I was actually very impressed and the newer X-Plane dynamics have done simply wonders to the aircraft, as the EMB 110 feels very different and certainly it is far more flyable. Lighting Overall the lighting is excellent, as noted the panel feels far more dimmer than before. Cockpit lighting is controlled by four rotary dials, three on the pilot's side and one on the Co-Pilot's. It is excellent at night, fully adjustable and you can turn off the overhead lighting on the OHP. So no doubt the EMB 110 is a very nice place to work in. There are map reading lights each side, but they still don't work? The rotary dials cover both flying instrument lighting, Overhead Panel and the Avionics, and other switches cover the main cockpit lighting and rear cabin lighting with three settings of: OFF - MEDIUM - OVERALL or half lighting or full cabin lighting. There are some EXIT signs but I couldn't get them to work, which is a shame. External lighting is again excellent... with Navigation, top and bottom Beacons, strobes and tail light. All lighting including the strobes reflect on the ground and are about perfect. There is a Landing light in each wing and a single taxi light positioned on the front gear strut. Other lighting features are gear well lights, great ice/wing lights and when the door is open an overhead entrance light. Liveries There is one blank/white livery and four brand liveries that all strangely don't have any registration numbers? Quality is however very high, and come with 4k textures and detailing. Summary First point to make here is the price? Which is US$29.95... that is simply a crazy price for an aircraft like this, nuts!, this is worth US$35 minimum for the quality, detailing and the huge amount of features you get with this aircraft and this certainly a highly immersive aircraft that is easily in high Carenado price territory, better still if you already have the earlier X-Plane10 version you can also upgrade to this new exceptional X-Plane11 release for only $19.95. Dreamfoil Creations were always one of the very best developers for X-Plane, as noted mostly for their exceptional helicopters, but their only fixed-wing aircraft (to date) is this Embraer EMB 110 Bandeirante. But their same exceptional quality is here for you as well and that includes all the usual Dreamfoil Creations features in clever menus, brilliant sounds, loads of features and pretty well almost everything that includes the kitchen sink as well... almost. The upgrade also fixes up all of of the small issues that came with the original aircraft, and they are mostly in the flying dynamics, in banking and slow speed lift and feel. In fact it is about perfect in all areas now and simply a great aircraft to fly. The hard to get to and use autopilot now has a pop-up and scaling panel as well, which had been another if slight annoyance... but a few things have also gone slightly backwards. The indirect panel lighting is not as effective as before and it is far more dimmer which takes a lot of the wow factor out of the instrument panel, Undercarriage does not work via key input and the yokes only semi-disappear. There are still some missing lighting items like the side spots and EXIT signs, but all these are mere niggles compared to what you get overall. So overall it is again that sensational price, and everything noted above in this review is what you get for your money... but above all else this Bandeirante is an excellent aircraft and delivers on every single level in what you would expect as one of the best small regional twin-props you can get today and now the aircraft is also available in a X-Plane11 cofiguration and uses the dynamics and features of X-Plane11 very well as well, so what more could you really wish for... Highly recommended. _____________________________________________________________________ The Dreamfoil Creations Embraer EMB -110 Bandeirante XP11 is available from the X-Plane.Org Store here : Embraer EMB-110 Bandeirante XP11 And is priced at only US$29.95 Owners of the EMB 110 XP10 can get this new version for only $19.95. Please find the coupon code in the your original EMB110 invoice at the store Features: Revamped and Optimized for X-Plane 11 Improved Flight Model for XP11 New PBR textures on both Interior and Exterior Many new features VR Compatible New Ultra-High quality 3D model Realistic 3D night lights effects on panel , cockpit and passenger cabin Realistic behavior compared to the real airplane. Tested by real pilots. All Systems simulation Realistic simulation of all switches Caps for turbine inlet, outlet and pitot GPU (Ground Power Unit) available New exterior objects Air Conditioner simulation, including a nice sound that react to vent directions Prop Disc effects feature 3D holographic side view, which changes depending on prop settings Fully articulated and animated sun visors Wx radar simulation Failures simulation (Engine Fire, Over Torque, Electrical Failures, Landing Gear, etc) Original Autopilot installed and realistic behavior Pop-up menus for Autopilot and Checklist Manual landing gear actuator Laminar’s GNS430/530 SmartMenu Technology Clickable external areas for increased interactivity. Refuel the aircraft by clicking on the fuel inlet, a pie slider make it very easy Open cargo compartment and Passenger Door from exterior A menu on the nose for inserting or removing motor covers, wheel block, pitot cover, safety cones, GPU and support in the tail. These items can be inserted or removed also by clicking on them. A customization menu allow to set few equipment like (HF-Antenna, Tail-plane with 10º dihedral and enable/disable Failures) all in real-time with no need to restart the sim. DreamEngine sounds Over +50 sounds included 3D directional sounds - Compatible with Rapture3D plugin (same used by codemasters) Custom sounds for switches, buttons and circuit breakers Realistic exterior and interior sounds - Simulation of all the Horns Requirements: X-Plane 11.20+ Windows, MAC, Linux 2Gb VRAM Minimum. 4Gb+ VRAM Recommended for VR Current review version: 3.0 (August 2nd 2018) Installation : Download file size is 636.20mb and is inserted into your X-Plane - Aircraft Folder. Installed file size is 3.49gb Documents : Four documents that cover a main Pilot's manual (23 pages), real Embraer performance tables and normal, emergency procedures Manual EMB-110.pdf normal_procedures.pdf emergency_procedures.pdf Manual EMB 110.pdf Developer Support Site : Embraer 110 by Dreamfoil Creations .Org Support _____________________________________________________________________________________ Review by Stephen Dutton 3rd August 2018 Copyright©2018: X-PlaneReviews (Disclaimer. All images and text in this review are the work and property of X-PlaneReviews, no sharing or copy of the content is allowed without consent from the author as per copyright conditions) Review System Specifications: Computer System: Windows - Intel Core i7 6700K CPU 4.00GHz / 64bit - 16 Gb single 1067 Mhz DDR4 2133 - ASUS GeForce GTX 1080 8Gb - Samsung Evo 512gb SSD Software: - Windows 10 - X-Plane 11.25 Addons: Saitek x56 Rhino Pro system Joystick and Throttle : Sound - Bose Soundlink Mini Plugins: Environment Engine by xEnviro v1.07 US$69.90 : XPRealistic Pro v1.0.9 effects US$19.95 : WorldTraffic 3.0 Plugin - US$29.95 Scenery or Aircraft - EIDW - Airport Dublin V2 by Aerosoft (X-Plane.OrgStore) - US$24.95 - EICK - Cork Airport Ultimate & Business Park XP10/11 1.4 by Ciano35 (X-Plane.org) - Free - credit goes to Cormac Shaw at www.xpih.net for the original custom EICK
-
Aircraft Update : E-175/E-195 v2.4 by X-Crafts It is an interesting journey in when reviewing developers progress and certainly with the twin versions of E-Jets from SSG and X-Crafts. Looking at this new X-Crafts v2.4 after the recent update to SSG's twins E-170/E-195 Evolutions in June, they have both (or all) have come a very significant way since their 2014 debut. In reality both are now nothing like their original predecessors, if certainly in the modeling, systems and quality, but the prices have changed also to match their higher quality status, as was the original X-Crafts E-195 was only US$20 dollars, and which was an absolute steal at the time. But remember there was no FMC or nowhere the quality or the features of the aircraft you have in flying the same aircraft today. But the journey also shows on how to do this simulation do,da game right, start with a basic idea with quality modeling and just keep on improving the aircraft, add in the best of the current features and keep the aircraft bang up to date (in this constantly if ever changing X-Plane environment) with updates. The users (or purchasers) will feel safe in knowing that their investment is going up and have the security that their E-Jet is current with the latest changes all done and dusted. It is a simple coda really, but you would be surprised how many developers are quite average at this, that also adds in to the fact that once you do fall behind in the changes it gets harder and harder to catch up again and the investors are going to be picky as well because your past track record is going to say "not very reliable", in other words you can't count on them... but then there is that word "Investment" because that is what a sale is. Most upgrades fall into three areas, a fix for (usually major) for new simulator changes or for new features. A lot are however in the third batch of a few new features and a general tidy up of bugs and small issues, this E-175/E-195 v2.4 update falls firmly in to this latter category. E-175/E-195 v2.4 update Externally the original X-Crafts modeling has not changed over the years, because it really didn't need to. It was brilliant from the very start and was why the aircraft in a modeling sense was well ahead of its time. Certainly the textures and details have been updated to the reflect the changes to the better X-Plane11 dynamics, but overall it is still the same... but E-Jet still looks as brilliant as ever. The notes here are related to the E-195, but the E-175 is almost identical. The major change with this update is the addition feature of a "Load Planner" or as other developers call them a "Weights & Balance" panels. As every developer does their own interpretation of the same idea and now here is the X-Crafts version. The menu is a pop-out of now four tabs on the left lower part of you screen. They cover: Menu, Pushback, WGT & BAL and Checklist. Menu: The main menu tab opens all the doors (both pass and cargo), connects a GPU (Ground Power Unit) and requests pushback. Ground Equipment static items include chocks (front nosegear), cones and tag covers Pushback: The tab won't work unless you have "requested" the pushback truck on the menu page. Then it it will be active. It is however a quality pushback setup with a nice tractor supplied and it is a set distance and pivot system that was good. Now everyone (like I do) use the BetterPushBack plugin, so this pushback system is a little bit of a non-starter now, but X-Crafts have tuned both their E-Jets for perfect use of the BetterPushBack plugin version as well. WGT & BAL: The third tab is the new feature of a "Weights & Balance" panel. The new Load Planner is a very good one, easy to use and the loading is very quick. The panel can be not only be moved around the screen, but also scaled to fit... excellent. There are some very clever ideas going on in here... scroll the passenger loading bar and the cargo adjusts to the corresponding passengers baggage weights as well! The loading is also from the front to the rear to balance the aircraft, and so the Centre of Gravity MAC number also adjusts as well... ... You have to set the fuel load via the top slider before adjusting the "cargo adjust" or the general cargo slider to balance out the C/G, simple! All your weights are then shown including Max Weight, ZFW (Zero Fuel Weight), Payload Weight, MAC% setting and the crew and passengers loaded on board. So the set up and the loading is super quick and efficient... impressive. Checklist: Final lower tab is a pop-up checklist in a binder, again really well set out and easy to use. Again you can move the binder around the screen and also scale it to fit to your panel views, just simply brilliant. TEKTON FMS The major difference between the SSG E-Jets and the X-Crafts aircraft are the FMS (Flight Management System) Systems. The SSG uses Javier Cortes FJCC model were as the X-Crafts uses Steve Wilson's Tekton model. The differences are built around the fact that the SSG uses custom plugins to run the systems, were as the Tekton version runs on top of the X-Plane native FMS system. The Tekton uses a different idea to set up the Departure (SID) - Route - Arrival (STAR) into three different settings and then combines them together when you activate the route. So you start by loading in your departure airport, RWY and SID details. Then you input your route and AIRWAYS are supported. Then your arrival Airport, RWY and STAR details... it is highly recommended to do any edits of any of the three segments BEFORE you activate them, as they can be really hard to change any details after loading... here I am removing CORAL waypoint to stop a backtrack to the next connecting waypoint. Then you INIT the plan and finally EXEC to combine and load the flightplan into the FMS on the PROGRESS page. The combined complete flightplan is then shown on the FLIGHTPLAN page. There has been a huge amount of improvements to the system over the years, and once you find your way around it and understand how it works it is very good, but like I said it is hard to edit, once the three segements are set up in there. The system can be inputted by both your mouse or pad, or by direct keyboard input for speed. You can import and save routes, but I always prefer to do the full route directly from APT start to APT finish with this particular system. Changes to the Tekton FMS in v2.4 include: Added airspeed values to all legs, along with pre-calculation of climb and descent values Revised use of PERF 2 so that airspeed and cruise altitude parameters can be entered more easily prior to entering procedures and the planned route Revised warning messages to be yellow in color, signifying caution, instead of a critical warning in red Fuel calculations fixed for flight plans that do not include route waypoints Added current AIRAC information to the STATUS panel Enhanced font textures used for highlighting row data when scrolling Various bugs fixed including the somewhat infamous airways loading crash Note in the fact the AIRAC Data is now updated to the current cycle 1808, and is supplied by Aerosoft. Other notes I found the panel and the the displays far, far more easier to read in this version... ... earlier displays based on the X-Plane native (PlaneMaker) layouts were of a quite poor resolution, mostly unreadable, but more so looked out of place in a quality instrument panel layout. But these are very good, not perfect as some numbering in the MFD are still quite small in the text size, and it is quite hard to read the minute sizes on critical points like on my approach to Rocky YBRK. but overall a major improvement. Another oddity is that the MFD and MAP/NAV displays for the First Officer are set the wrong way around on startup, and you have to switch them back every time before departure via the switches right panel? The cockpit itself is very good, nice detailing and better reflections (this version seems to be better overall in these texture details, but they are not noted in the notes detail) the Side menu graphics are noted for better resolution and the audio panel has been revised so that COM, NAV and ADF radios can be turned on and off with an LED in the button to indicate current status, but besides the fixing of the various minor graphics glitches it is the same as the previous version. FMOD Sound The sounds were updated to FMOD in v2.2 and they were a mixed bag, some good, but a few not so much. Here in v2.4 they have been updated to more FMOD selections, but still mostly as announcements including: Boarding: Triggered by turning ON the fasten seatbelt sign when on the ground. Gate Departure: Triggered by CLOSING the main cabin door. Safety Briefing: Triggered by moving BACKWARDS faster than 3 knots during pushback Accent: Triggered by CLIMBING past 11,000 feet. Descent: Triggered by DESCENDING past 10,000 feet Landing: Triggered by LOWERING the landing gear Arrival: Triggered by CLOSING the reverse-thrust Overall the sounds were certainly far better than I remember earlier, but the cockpit levels are quite low (The SSG is also very similar) but even in flight the volume is lower that I would like compared to the external sounds, and although good they are quite loud. So the problem is you can't actually hear the new announcements as the volume is set too low? (so you should be able to hear the announcements if not the engines). Maybe we need some sort of sound adjustment panel? Liveries are unchanged, but are still updated to XP11 standard... There are fifteen liveries including: White/blank, Lufthansa Regional (default), Air Canada, Air Dolomiti, American Airways, Augsburg Airway, Austrian, Austrian (Star Alliance), Azul, Flybe and Virgin Australia. And the four great variations on the JetBlue livery in - Stripes, Mosaic, Blueberries and Barcode. Summary Another few new features and a few touch-ups and some bug fixing pretty well sums up this v2.4 update for the E-Jet twins from X-Crafts. The new Weights & Balance menu panel is of course being the major highlight here and it is one of the best in ease of use and speed in getting the load done and sorting the out and getting the aircraft ready to fly. So full marks on that feature. The FMS has had its usual adjustments and bug fixing, but overall it works pretty well now, sounds in new announcements are new, but the (very) low cockpit volume makes them hard to hear, but they are very good. This v2.4 update keeps the E-Jets up to date and flying along quite nicely, but overall these E-Jets just feels a bit more complete, more finished and the flying displays certainly look and feel better than they did before... note this aircraft is now X-Plane11 only. ______________________________________________________________________ Yes! the Embraer E175/E195 v2.4 by X-Crafts is NOW available from the X-Plane.Org Store here : Embraer E-175 v2.4 Price is US$39.95 Embraer E-195 v2.4 Price is US$39.95 Twin Embraer E-175 and E-195 v2.4 Set is also available for US$59.95 Embraer E-175 and E-195 Package X-Crafts E-175 v2.2 review is here: Aircraft Review : Embraer E-175 v2.2 by X-Crafts FEATURES: NEW: Load Manager NEW: Fully integrated 3D sound system! Accurate dimensions based on drawings and documentation provided by Embraer © Windows, Mac and Linux compatible Custom TEKTON FMS© by Steve Wilson Custom pushback plugin with animated tug On-screen checklist plugin Plugin menu for door control, ground objects or GPU Tested by a real Embraer E175 pilot Suitable for beginners - Just load and fly within seconds! Great for advanced users -Enjoy the complexity of the Custom FMS! Requirements: X-Plane 11 (not compatible with xp10) Windows, MAC or Linux - 64 bit Operating System required 8Gb RAM - 2Gb VRAM Minimum. 3Gb+ VRAM Recommended Current version: 2.4 (last updated July 31st 2018) X-Crafts Support Forum : Support forum for the E-195 ______________________________________________________________________ Update log - Version 2.4 (July 31st 2018) New Load Planner adds the ability to simulate a random passenger load and baggage/cargo calculation along with CG management. Very useful to have realistic data available to add in the FMS PERF 1 page Fixed various minor graphics glitches Audio panel revised so that COM, NAV and ADF radios can be turned on and off with an LED in the button to indicate current status Side menu graphics improved, checklists now in higher resolution and resizable. Revised side tabs' visibility trigger so that the activity selections are now presented only when the mouse cursor has moved to within 50px of the left side of the monitor Updated both the aircraft and FMS manuals to conform to the current state of the add-on Tekton FMS Improvements: Added airspeed values to all legs, along with pre-calculation of climb and descent values Revised use of PERF 2 so that airspeed and cruise altitude parameters can be entered more easily prior to entering procedures and the planned route Revised warning messages to be yellow in color, signifying caution, instead of a critical warning in red Fuel calculations fixed for flight plans that do not include route waypoints Added current AIRAC information to the STATUS panel Enhanced font textures used for highlighting row data when scrolling Various bugs fixed including the somewhat infamous airways loading crash Revised and improved the accuracy of the FMOD sound experience, including new announcement clips during certain portions of flight: Boarding: Triggered by turning ON the fasten seatbelt sign when on the ground. Gate Departure: Triggered by CLOSING the main cabin door. Safety Briefing: Triggered by moving BACKWARDS faster than 3 knots during pushback Accent: Triggered by CLIMBING past 11,000 feet. Descent: Triggered by DESCENDING past 10,000 feet Landing: Triggered by LOWERING the landing gear Arrival: Triggered by CLOSING the reverse-thrust (Requires the NO SMOKING sign to be ON) ______________________________________________________________________ Release notes by Stephen Dutton 2nd August 2018 Copyright©2018: X-Plane Reviews (Disclaimer. All images and text in this review are the work and property of X-PlaneReviews, no sharing or copy of the content is allowed without consent from the author as per copyright conditions)
-
Behind the Screen : July 2018 - X-PlaneReviews 5th Anniversary
Stephen replied to Stephen's topic in Behind The Screen
The actual store (Checkout) is not actually connected to the orgStore, In fact most are not, they just pick the third party system that suit's their needs. 😊 SD -
Behind the Screen : July 2018 - X-PlaneReviews 5th Anniversary This edition of "Behind the Screen" coincides with X-PlaneReviews fifth year Anniversary. A big deal, well in any industry to survive is foremost the general idea, but in this very modern fast moving world as many others can come and disappear in simply a blink of an eye, as usually (mostly around the New Year) up a new site pop's and it is totally full of enthusiasm and to be honest you do get overwhelmingly overwhelmed by the sheer output they are able to quickly generate, so you keep your head down and do the best you can, keep the faith (family motto) and plug on ahead. Then usually they start to falter, and within months they have either collapsed and mostly disappeared, or then finally the odd old post then pops up now and again, but mostly the dragon storm has run it's course and blown itself out. Personally I don't mind these sites as any new viewpoints in X-Plane can always be welcomed, you can always learn something new as well or see a different approach to what you are doing. But the worry is when in the unbridled enthusiasm of the getting so much attention in that the actual facts get well... a bit lost in the message or with the messenger, as this is of course the age of instant news, or "fake (internet) news" and then every email, message or text is taken as gospel when it is actually isn't and then then the post is out there, and the damage is done, and sometimes mostly the damage is irreparable. X-PlaneReviews is a bit, well shall we say old school... more city newspaper than instant TMZ, but the one thing we do is check is our facts, and so we know what is really going on in the industry (even if sometimes we can't tell you about it), that goes for our reviews, yes the reviews are a few days and even sometimes a few weeks older than the release date, but we would have flown the real aircraft, landed at the real scenery and tested those plugins. No heresay, no passed on information, we have checked it out and verified the product is what it is. Like most work, then what you see is only the top of the iceberg, a lot of what we do is behind the scenes, working with developers and helping with ideas, testing... a lot of testing, helping users, the list goes on, and the pop up sites then very quickly realise, that to run a site like this requires a lot of hours of work, the idea of just posting, posts is actually very different from reality, spend a few days away and the landscape has already changed, the funny thing about running websites is that you actually work far harder and a lot longer than you did with manual work and it takes up a vast amount of your time, this is the one area that the budding bloggers also don't see, but they soon quickly find those facts out. So what has changed in X-Plane in those five years, well a lot, but a lot is still the same. In detail then X-Plane is way and above and beyond with what what had back then, in fact most aircraft and sceneries from back then would simply be laughable today, but that is not to say they weren't good, they were what they were for the time and the computer power, and to think back then we really had only one virtual cockpit (a nice B757), as all the panels were only 2d... all 2d, and just think about that. The quality in design in X-Plane11 is now jaw-dropping, you think it couldn't get any more realistic, and then it does some more, but in also being far more efficient as well with the latest tools. We certainly loved our aircraft five years ago, as we do today, but the range we have to choose from now is getting overwhelming, but from a FlightSim point of view of X-Plane that would seem laughable, but the choice is now there for every taste. So the change in reviewing has grown substantially as well. Overall we still do the same in detailing the aircraft or scenery, flying the aircraft or testing out the scenery (mostly for framerate efficiency)... but it is in the depth of the aircraft and to a point in the scenery in detail, that is where we have had the biggest changes. I was able to review five years ago, because basically the aircraft were quite simple... but that is certainly not the case today. The hardest challenge in reviewing is simply making the same feel different, and saying the same facts over and over about the same thing in 1200+ reviews, and even making it entertaining. The main point of the five years of the journey of this X-PlaneReview site is the extensive work of learning. and even more so in the last few years. The skills required are now high, and I would say even real world capable. You could say I was getting above myself, even a so called "big shot know it all". But I disagree. Five years of constantly flying and practically in pretty well everything from hang-gliders to A380's, and I mostly fly when doing with reviews 2hr to 4hrs a day that is converted to 28 to 30 hours per week, yes a day and even if I averaged that out with sceneries. The one area I have had less time to do is long haul which is my favorite form of flying, because I constantly need the computer for the reviews, but I will sneak one in now and again. Mostly when doing reviews the flying computer is usually still running, flying or testing or like it is right now with a new aircraft to review doing a 350 nm flight. And then is the actual physical study with manuals and a lot of Googling for the areas that are not covered in manuals or specific instrument items, lingo or just plain aircraft information. The last year instead of the study becoming less with time, it has actually stepped up significantly with far more heavily detailed study aircraft now coming into X-Plane, this year has been an Airbus year with the deep systems ToLiSS319 and FlightFactor's A320 Ultimate, then there was the extensive depth of the Boeing twins of FlightFactor's B757/B767 and FJS B732, I mean even a real pilot learns and flies only one airframe at a time... for god's sake! ... and worse I want to keep everything as real or as close to the real world as possible. Then comes X-Plane itself. I started with X-Plane9, with X-Plane10 changing the environmental aspects of the simulator, the focus there was in taking the basics of X-Plane9 and then making the world around the fundamentals of just flying an aircraft, and to making a far more realistic world to actually fly the aircraft in, and the change to 64bit was a very important step as well. At the time X-Plane11 didn't seem to be the huge step in simulation that X-Plane10 was, but looking back from this position today then X-Plane11 has changed the simulator more than X-Plane9 and X-Plane10 put together. Many of you would disagree with that statement, but I believe that X-Plane11 has more depth now globally than any other simulator out there (and yes many will also totally argue that case) but here are the facts. PBR or Physically Based Rendering has totally and absolutely changed the way we see and feel all the areas in simulation, PBR makes the simulation world realistic, and you only have to compare the X-Plane10 version of an aircraft to a X-Plane11 version, in other words... dull or alive. X-Plane was known for it's highly realistic aircraft performance and handling, that is nothing new. But since X-Plane11 was released the basics of the flying have also again fundamentally changed, You however need the tools to access this area, as a throttle system is now invaluable. In reviewing the biggest challenge now is simply landing an aircraft. Every single aircraft has a totally different feel and performance, before X-Plane11 there was a sort of barometer between most categories of aircraft and it was quite easy to adapt between them, but that is simply not the case now in X-Plane11. The simulator now is very much more fine tuned to the aircraft's performance and the challenge of finding that absolutely correct timing and throttle adjustment that separates lift from stall has become crucial, and every aircraft is now very different in this area, and it is very highly challenging to get it right, and then do it again. The point is the skills required are now also seriously high, challenging as much as it is in the real world, and in fact the real world is actually probably a little easier as you have real metal around you with a real feel from the machine, just like when driving a car compared to a car racing game. Of all the areas over the last five years this one has been the most difficult, the most demanding area of all, because I simply can't get it wrong as the review counts on these factors. I do admit that in reviews (mostly with GA aircraft) I do put a lot of emphasis on this area in X-Plane11. As noted the basics of X-Plane haven't really changed but everything else has. I would have never dreamed of the gate to gate experience I can achieve now with say the ToLiSS319 and a few quality addon sceneries and that I was so aghast that so many users in X-Plane are not taking advantage of the quality of the aircraft and scenery now available to them to make their flying as authentic as it can actually be. Most changes over the years have been incremental, but the simulator has changed fundamentally, but two areas have made the biggest differences, in Laminar Research's change it was the switch to 64bit, as that allowed the explosion of space to expand out the simulator and make it more relevant. In addons it was the release of Classic Jet Simulation's World Traffic, that filled up your airports and made X-Plane a far more dynamic world around you, and for all the clever ideas over the years X-Plane still doesn't come close to choice of addons that the FlightSim users have available. And weather is a great example, with the still bulky native weather system, the SkyMaxx series and xEnviro, all have positives, but none really absolutely covers the workable system X-Plane requires and what that FlightSim has had for years, and the less said about X-Plane's ATC the better. No one bores quickly than me, and I don't have time in my life to waste it around on trivia, so what has held my attention for nine years by keeping me here in computer simulation. That huge learning curve for one, there is always something to learn, practise or do better, or try that again, aiming for perfection and to be as good as the real guys. The development of the simulator, in ideas, genius moments and seeing developers up their game with every release, pushing the boundaries, seeing the dream come true in front of you of flying almost the real aircraft, landing at an almost real airport, the development cycle simply never stops and I have a slogan in "X-Plane - Building the world around you at one airport at a time". I actually gave myself four months in X-Plane before the so called then "fad" wore off, but here I am almost eight years later and still enjoying it, loving it actually and knowing on how much more there is still to come, and X-Plane leads in online communities, users and people all over the world from every nationality that all have the same goals, aspirations and share their same love for online simulation, there are no barriers here, not race, not age, not gender... stupidity maybe, but then that is universal, but overall we share and do the same together, learn, dream and push X-Plane forward, we get a lot of things right that most humans on the planet get wrong. I have made a few speculations this year, but one thing that is very apparent is that these next few years are going to the most significant for the simulator, where and in what direction will it go, good or even bad... but we are still growing, still adding in the numbers, but X-Plane is still at a very critical point in its history... and even I couldn't forecast the future right now, but like in the real world it is not X-Plane itself per se that is the question, but the events outside and surrounding it that will bring the questions and the changes, the problem with every business is that people and things change, many like myself who have been in simulation for years will move on, and new people and business's will replace them with their own agendas, change happens... for the good or for the bad,and if I am here in another five years time in will be interesting of where we will be then as now... if the changes are as big and as significant as they have been in the last five years, then that will certainly be interesting and exciting time. Payware Clutter Earlier this month came the "cease and desist" notice to a developer, in this case it was Rim&Company that produced the scenery "Ayers Rock" and "Ushuaia Malvinas Airport". If you look you will see that both sceneries have been pulled from sale. The issue is that the developer used clutter or objects taken from other sceneries without their permission, most notably here is Cami De Belis and Richard G. Nunes our South American specialist, and at least in that context Rim&Co had their pick of quality objects. But this is a no, no in X-Plane or any simulation platform, as if you use items or objects you must have permission if it is a payware product, mostly just as a notice to the ownership and copyright of the original material or work, some developers will ask for a small fee, but most will allow for free in respect to where the original items came from. Some rumors even stated that Rim&Co actually doctored the objects to claim them as their own (copyright), which if true is even worse than just stealing them in the first place. Personally I thought something was wrong while reviewing Rim&Co's "Ayers Rock" as there was extensive over clutter that I mentioned in the review, and believe me there is nothing like that much in quality detail anywhere in Central Australia... In context though it is hard for Payware developers, but not enough to actually steal items. If you are a freeware developer you have a very wide selection of libraries, hence the output of say tdg, and a lot of these libraries are very high quality ones at that, like the misterX library. For the payware developer they have to create every single custom item from scratch to build up their own library selection, and in context is that not actually fair. The bonus of this is that the library is all custom and can be used as a feature to sell the scenery, but a lot of clutter is just that in basic airport clutter, and if another quality scenery developer has some really excellent items that is perfect for your scenery and also give X-Plane itself a sort overall consistency then should that option be actually available to them? In my reviewing in scenery, then still most developers are still single dev's and they are still not in the larger teams or groups like you find with aircraft development, although this scenario is currently changing. The problem is that with a single developer although in many areas they are very good in creating the actual scenery, that in some areas they can also be quite average or not even that bothered to create high quality clutter objects. And so in far too many sceneries I have seen many an excellent work ruined by really average baggage carts, aircraft stairs and other clutter that look like they have been created in the 1990's era of 3d modeling. So even then the very best developers can have their weak spots in a single developer scenario unlike were as in a team, in that if one developer can then compensate for the other developer's weaknesses. But is it fair that for someone trying to build a business creating custom payware scenery to have freeware quality clutter at a far higher and in far more abundance than with their own work? I asked mister6X this and he noted it up to the developer to create his own high quality custom scenery, and again as a feature for users to purchase that custom high quality scenery, and for all of that it makes it a reason to highlight the quality of Payware over Freeware, but the issue here becomes more confused in the fact that mister6X also has an extensive high quality library available for freeware developers as well? The overall point here is that if X-Plane is trying to build a business model to attract talented developers to create scenery for the simulator, the first point is "why bother", because the freeware market is just going to ruin any chance of the developer actually making any cash out of it, never mind a living. The X-Plane mindset is already "its free!" so why pay for the same thing, and for one the freeware developers have all the advantages and even sometimes a donation button on their work as well, this is why X-Plane is lagging behind in this area, with the chance of the payware scenery business even collapsing completely altogether. It is also being seen that even high quality scenery can very quickly go on to the "Sale" market and priced well below it's worth just to sell the scenery to cover costs, again the user will get into that "sale" mindset and will know that soon any scenery release they will be able to pick it up at a very low cost, again why would you do it, and why spend months of work just to give it away at below cost... it is a model that just can't survive. So the debate is should developers have access to their own high quality clutter libraries, for a fee? It works both ways... the developer can save months of work in just creating clutter objects that come with a high quality already built in and give X-Plane a consistency of design. And the developers can also make money off the fees for their developed libraries so that is another income stream for their business, plus it gives the developers far more options in the way they can fill out their scenery as they would now skimp on those areas because filling them out is going to take a lot of time for no real return. One way or the other, the current business model for payware scenery has to change and quickly, and so does the altitude towards such practices. So would have Rim&Co paid a fee for those objects instead of stealing from Cami and Richard, probably not... but at least the option would have been there for them to do so. Preview In July X-PlaneREviews introduced a new category called "Preview". Full reviews can take time to cover all the very varied aspects of a scenery or even an aircraft, like the KLAXv2 by ShortFinal as the scenery took nearly four days to review and then there was an extra added on segment for changes. Problem is there are now as many as 4 to 5 new scenery releases a week, and in that I realised I was simply falling behind. Users want facts and usually want them quickly when they want to purchase products, so I could see it was getting to be a problem if even becoming very stressful in just covering every aspect of every releases. So "Preview" was created to give you a comprehensive overview of a release, if the release is significant to X-Plane then of course the full review will still be completed. But "Preview" will allow us to cover the product far more quickly without still missing out on the main important details that are made up in purchase decisions. Again I thank... The site is as always reliant of the many other people to function. First thanks goes out to all the developers that give out such outstanding work, they all have created this amazing intimate world with their creativity. I spend a lot of time with many of them, and although they wonder why I am there suddenly 100% then disappear only to reappear again later and it is that because there are so many projects ongoing, and I try to follow all of them, but time is of course limited. Overall I try to see for the benefits of X-Plane on how the work is going forward. Laminar Research is always a foundation we constantly complain about, but in reality they have really delivered and again this year. It is a far more professional business today than certainly when I entered X-Plane. Give them a another round of applause I think they have deserved it. The X-Plane.Org and the X-Plane.OrgStore is the centre of our X-Plane universe, take both out of the equation and would X-Plane be where it is today, and would this site even exist? I would doubt it. A lot of users note it is a monolith, but I see it as a steady hand in allowing the simulator to thrive as passionate people give a lot of their free time to help and give service to so many others, both Laminar Research and the X-Plane.Org are two binary stars orbiting each other that keeps that balance and the X-Plane engine running, surviving, so it is important that we support both. I have no problem in saying X-PlaneReviews supports the X-Plane.OrgStore because they do supply a lot of the releases for reviews, it allows us to cover a far larger area than most review sites, but my real reason for supporting the X-Plane.OrgStore is because it supports X-Plane in the best way it can in service, and developers trust it and the users do as well, in other words it is a sound and solid foundation you can rely on time and time again and that is a rare thing in this day and age. See you all next month in our sixth year in X-Plane Stephen Dutton 1st August 2018 Copyright©2018: X-Plane Reviews
-
Scenery Preview - EDLW - Dortmund XP by Aerosoft Set in the center of the Ruhr region in Germany is Dortmund and Aerosoft has released a scenery for the city's airport EDLW for X-Plane11. It is a companion airport for EDDL - Düsseldorf Flughafen which is only 70 km (43 mi) to the southwest, which also a very good Aerosoft scenery and a highly favored airport that I use in reviews. So certainly EDLW is an overflow airport for EDDL. This scenery is an update of Aerosoft's FlightSim version included in their German Airports 2 package, but converted and enhanced for the X-Plane11 platform. The main addition includes 280 km2 of surrounding orthoscenery at a DOP60 / 60 cm resolution and intergrated into the native X-Plane (German) autogen. Closer airport detail includes DOP30 / 30 cm resolution at both the main EDLW and the added on grass runway airport of Hengsen-Opherdicke to the south. A city skyline and Dortmund iconic buildings are also included EDLW - Dortmund Airport Dortmund Airport Flughafen Dortmund IATA: DTM - ICAO: EDLW 06/24 - 2,000m (6,562ft) Asphalt Elevation AMSL130 m / 427 ft First view of EDLW is that it is a fair way from the city centre of Dortmund at 10 km (6.2 mi) to the southeasst, so it is very countryside bound, but there is a huge amount of X-Plane autogen surrounding the airport and as this is Germany then the German (European) housing style fits right in. A side note is that as we are now using X-Plane v11.25 with the autogen upgrade noted in the Expo 2018, then the added urban (factory) autogen is now highly newly visible here as well and very good it is. So the combination of the extensive surrounding orthoscenery and a high object setting creates a very good and if extensive visual panorama of this Ruhr area. The buildings are of course the direct same versions and textures as the FlightSim version, and that scenery was created in 2013, so they look a little outdated and noticeable in quality... ... unless you have to have your texture quality setting at "maximum" (no compression) were as I prefer to keep the setting at "high" for maximum object (autogen) performance, and with that lower texture setting it shows here in that the textures are noticeably more blurry. If you can get away with the standard "maximum" setting it is not too bad, as overall the modeling is quite good. Your eyes certainly can't ignore the large flat empty expanse of landside behind the main airport buildings, it awful, flat and isolates the modeling. This is highlighted more by the Global airport version of EDLW (below left). This landside area is automatically filled in and feels more realistic even if the terminals are not? No fencing between the landside and airside just also highlight's the issues even more with the Global version above and the Aerosoft version below, so the all important intimate clutter detailing is missing.... ... The airbridges are solid, and are not active? and the difference to the latest X-Plane native airbridges are now also highly noticeable in detail, but you do have marshals to guide you in. Elevation changes to the southwest are very well done, and on the elevated area is the GAT or General Aviation Terminal. There is a catering company here and also a large maintenance hangar... far west is the airport administration building and Star Wing's hangar. Highlight here is the well done and detailed engine test bay. Ground textures are very good as well as the around runway detail, Linage and surfaces are varied and well done. Highlight is again the Aerosoft grass, here the textures come in the various different types and feel. There is animated ground traffic, but they have a habit of queuing up and not moving at all and are usually queued around your aircraft, no matter where you park the aircraft. There is a little ramp clutter, and branding in areas, but it would be in the minimum 3 setting more than the 10 mister6X maximum zone Hengsen-Opherdicke The grass strips of Hengsen-Opherdicke is a lovely place. A glider's heaven and earth, there is not much here, but it is very authentic and visually very good. The airfield is run by the Air Sports Club Unna-Schwerte eV Gliding area Hengsen-Opherdicke 7.25 850 m × 60 m grass 7.25 580 m × 30 m grass Elev 125 m (410 ft) Above MSL Great small detail and every area covered, you sort of scratch your head to wonder "is this the same scenery package"? Dortmund The city of Dortmund has recreated buildings to reflect the city centre and the city's skyline and in a visual aspect in arrival or departure from RWY 06 or from the airport itself. All the main buildings and Churches are covered in the package including: ADAC, Altes Hafenamt, Alte Post, Big Tipi, Brackel Kirche, Continen- tale, DOGEWO21 skyscraper, Dortmunder U, Dreier Werk, Ellipson, radio tower Florian, Gasometer Hoesch, Portal cranes at the harbour, Raiffeisen, Rhenus Logistics, Harenberg City Center, main station, Helmut-Körning-Halle, Hörder Castle, Stadt. Immobilienwirtschaft, coal- red power station Kneppler, Kronenburg (prev. Kronenbrauerei), Stadt- und Landesbibliothek, NH Hotel, Petri church, Probsteihof, town hall, Reinoldi church, RWE of ce building, RWE Tower, Siemens of ce building, Hauptsparkasse, Stadtgarten subway, Stadthaus & Berswordthalle, Südbad, Telekom building, City theatre, Deutsche Bahn-Verwaltungsgebäude, old water tower „Lanstroper Ei“, old water tower at Southern Station, old water tower at the Deutschen Bahn factory garage, 6 wayposts, Westfalen halls 1-8, Westfalen stadium, Westfalentower, wind farms, Zeche Gnei- senau, Zeche Minister Stein, DFB Museum, Volkswohlbund of ce building The Hospital Dortmund North (clinic centre Nord) has a Helipad for use (XEDZ1) and the wind-turbines are well done but don't actually work? they are noted as animated, but mine were always static? and as there is a lot of wind-turbines this static element is noticeable? Overall for VFR flying this Dortmund scenery is very good to excellent, with the right visual elements all in place to navigate your way around the area, or if you are passing over the area, say i.e. from the EDDL - Düsseldorf Flughafen Interesting for this package and any other X-Plane scenery is the new commercial autogen released in v11.25... with the more high-definition orthoscenery and your object count set high the new urban commercial building really fill out the area, the buildings are a very high quality and gives you an excellent surrounding clutter fill bar none. The effect is more pronounced here as the Euro style buildings fit in extremely well with this Germanic scenery. But to note they work better with custom ortho textures than the standard X-Plane mesh, but a nice if unexpected bonus with this scenery for Aerosoft. lighting Runway lighting is first rate here at Dortmund, it is custom for the airport and very authentic, so all the runway and taxiway lighting is as per spec at EDLW. The airside areas in lighting are a real mixed bag? It is well lit... ... but the Brackel hangar's roof is a distracting bright white and not very realistic, and in other areas in the cargo and on the engine test bay apron the lighting is also over bright. The Terminal lighting is not tooo bad, but the night textures are certainly showing their age here. Dortmund city lighting is pure FlightSim, but it is better than he usual bland greys and blues, although there is still a lot of that in here. Again the city vistas are enhanced immensely by the new commercial native autogen, of which the night textures are extraordinarily good. A night view in a city sense is now excellent, when you combine the custom buildings with the autogen correctly, Dortmund is this context is simply brilliant. WT3: No WorldTraffic GroundRoutes are provided, but the airport will generate GroundRoutes. Overall the airport functions fine, but with EDDL not that far away then most traffic is attracted to that larger airport than coming to EDLW, so mostly the traffic is here of the LCC catergory. Parking here is split between nose in at the airbridge gates and nose out on the main apron... ... as the aircraft arrive they turn into the right parking position, but stop more parked forward? so a bit of editing is really required here to fine tune the ground routes. But overall WT3 works fine. Preview Notes When I started in X-Plane and the simulator was void of any real decent scenery, and back then Aerosoft was the benchmark of what X-Plane wanted to give it the credibility and also the visual sense of realism. Even now years after Aerosoft has released their products in X-plane they still sort of blow hot or cold. The good ones even if (still) lacking many X-Plane features are still very good and even excellent as is the local here EDDL - Düsseldorf or LSZH - Zurich v2 which are both favorites that I use mostly for German and Swiss operations. So the events of releasing the so called "Back Catalogue" of Aerosoft sceneries you would think then it would be a major addition to the X-Plane simulator environment, but it is not actually turning out that way? There is for one that very varied quality in that many are being excellent and too many being in being just passable, and sadly this EDLW - Dortmund is way into the latter category. I really don't think you can now take older (or old) sceneries and just simply put them into another simulator and even with more updated and better ortho set out underneath the objects, and at least do not do something to up date the textures or to use clutter to make the scenery at least workable, and again sadly both or any ideas have not been implemented here... and it shows. Global (meaning free) airports are leaving scenery like this way behind in quality clutter, this is 2018 and not 2013 when this scenery original was released. So if you want a Dortmund airport and the surrounding VFR scenery then it is available here and in many areas better than the free version in more authentic buildings, but overall EDLW - Dortmund and X-Plane needed the better of this scenery makeover that it deserves. Features: Detailed rendition of the airport and its surroundings, incl. landmark objects Photo realistic ground textures based on aerial images (50cm/px) All airport buildings and facilities True-to-original navigation aids (ILS, VOR/DME, NDB, ATIS) Excellent night effects True-to-original runway and taxiway lighting Detailed 3D city model of Dortmund incl. colour-corrected 60cm/px aerial image covering the entire city area Authentic rendition of the airfield Hengsen-Opherdicke incl. colour-corrected 30cm/px aerial image The aerial images for Hengsen-Opherdicke can be turned off Autogen covering the area of the aerial image, corrected by hand Animated wind objects: wind turbines and windsocks specific to Hengsen-Opherdicke as well as the helipad the Hospital Centre North Ship traffic at the Dortmund-Ems Canal when using the Seatraffic plug-in by Marginal/Jonathan Harris Volumetric grass, toggleable PBR-based reflecting water surfaces Backup library – runs without add-ons Positives: Large area and high quality ortho textures, and good airport ground textures, Nice grass, many varied and authentic city objects with VFR references, Hengsen-Opherdicke glider field is excellent. Negatives: Poor old texture quality and requires a "Maximum" setting, poor detailing landside and clutter detail is very poor in minute areas like fences, gates, signage and road detail, scenery relies heavily on autogen to create fill and atmosphere. Animations don't work correctly and lighting is below average, heavy install and download with a messy folder installation... ouch! ____________________________________________________________________ Yes!... EDLW - Dortmund XP by Aerosoft is Available from the X-Plane.Org Store here : Dortmund XP Price is US$22.95 Requirements : X-Plane 11 Windows, Mac or Linux 2Gb VRAM Minimum - 4Gb+ VRAM Recommended Download Size: 2.2gb : Install Size 6.33gb Installation is messy, with one major airport folder and six minor folders that should have been grouped together. Aerosoft - EDLW Dortmund (196.40mb) Bahrometrix_Dortmund_v100_99_Extras (247.50mb) Bahrometrix_Dortmund_v100_05_Ortho (6.04gb) Bahrometrix_Dortmund_v100_04_Scenery (228.90mb) Bahrometrix_Dortmund_v100_03_Autogen_Fixes (26mb) Bahrometrix_Dortmund_v100_02_Forests (47.30mb) Bahrometrix_Dortmund_v100_01_Vegetation (8.5mb) Extras and Documents: Manual in German and English (24 pages) - Manual_Dortmund_XP11_de-en_web ______________________________________________________________________ Preview by Stephen Dutton 31st July 2018 Copyright©2018 : X-Plane Reviews (Disclaimer. All images and text in this preview are the work and property of X-PlaneReviews, no sharing or copy of the content is allowed without consent from the author as per copyright conditions) Review System Specifications: Computer System: Windows - Intel Core i7 6700K CPU 4.00GHz / 64bit - 16 Gb single 1067 Mhz DDR4 2133 - ASUS GeForce GTX 1080 8Gb - Samsung Evo 512gb SSD Software: - Windows 10 - X-Plane 11.25r2 Addons: Saitek x56 Rhino Pro system Joystick and Throttle : Sound - Bose Soundlink Mini Plugins: Environment Engine by xEnviro US$69.90 : WorldTraffic 3.0 Plugin - US$29.95 : BetterPushBack - Free Scenery or Aircraft - ToLiSS319 (A319) by ToLiSS (X-Plane.OrgStore) - US$69.00
-
Obviously the guy has a pretty though Twin-Otter set up, so has very intimate details about the aircraft. In most cases the developer will go for a certain version, and will then fine tune the aircraft to a far more detailed version based on details like this provided here. Be interesting to see any update.
-
Aircraft Review : PA-31 Navajo XP11 HD Series by Carenado When the PA-31 Navajo from Carenado came out two years ago for X-Plane 10 it was an instant love affair. Love or feel at first sight, but we stargazed at each other with mutual admiration. I loved this medium-twin and the aircraft gave me all the love back by letting me fly it as it should be flown, with feel and embrace. That love has never faded, even with all the excellent releases since that first mutual moment in time. So anytime if I needed a fast medium-twin for a range of 1,011nmi (1,875 km) and a ceiling of 26,300 ft (8,015 m). Then also available is the Navajo's top speed of 227 knts (420 km/h) at 15,000 ft (4,600 m) and the Cruise speed is also around 207 knts (383 km/h) with an econ cruise that is best at 20,000 ft (6,100 m) then this was always the aircraft I used or flew, and numbers aside it was an excellent distance crusher. So here is the new upgraded X-Plane11 version of the same aircraft. The PA-31 Navajo did have a quick update to fly the aircraft in X-Plane11, but here we get the full XP11 conversion and treatment. As this is an upgrade and not an update, and so then this version is now also the full new purchase price aircraft, and then with that you also get the free updates throughout the X-Plane11 run. At first sight the PA-31 does not look that much different, and that is until you go back to the earlier version... then you realise it is very different from the almost bland, flat aircraft you flew before. X-Plane11 comes in with the Full PBR or Physically Based Rendering for the superb material shines and reflections, although the detailing is the same, the PBR now brings out that extraordinary detail and realism. You see things you never saw before... yes they were there before, but the minor detail is certainly far more highly visible and even touchable to the point if you had Virtual Reality "feelarama" in X-Plane then you could run your fingers over the aircraft and feel every join, panel and rivet. The glass was and always good, but the reflections are even again better and now comes with more reflection in realism. Still love the single wiper. The Piper Navajo has two 310 hp (231 kW) Lycoming TIO-540-A turbocharged engines in the so-called "tiger shark" cowlings each turning three metal bladed, fully feathering, Hartzell propellers, and you certainly feel the power, the pull, as you cruise along. Note the great cooling vent detail and wing light. This Navajo here is the basic variant and is officially called the PA-31-310, and the later PA-31P was the pressurized Navajo, going up to the PA-31-350 which was the stretched version of the Navajo with the more powerful 350-hp (261-kW) counter-rotating engines and that version was called the Chieftain. Undercarriage detailing is also first-rate, yes it is the same as the earlier gear assemblies, but you feel the grease, wear and tear now far more. All wheel animations have been redone for more authentic movement and reactions... perfection. The aircraft has only two forward lights on the nose strut, in a landing left and taxi right, and they are both in the newer style lighting. Obviously they can only be used when the gear is down. Menus Carenado provides you with their usual three tabbed menus on the left lower screen. A ) is for the pop-up Autopilot panel. This is a 2 Axis Autopilot panel which can be scaled for size. C ) Is the standard Carenado ten preselected Views, Field of View and Volume panel. And O ) is the Options panel. Options include Window and Instrument reflections. The Static elements provided here are still quite basic with only two cones, wheel chocks and front flag pitot covers and the twin highly realistic (and new) pilots disappear when you activate the static elements. Doors opening include rear passenger door and separate Baggage door left rear which I really like in this arrangement and a front nose locker baggage door, and there is also the choice of changing the liveries without going to the main X-Plane menu. Internal Cabin Cabin style is early to mid 80's in a four seat club arrangement, very luxurious and a two-tone light brown/tan and cream colour scheme with wood highlights. This is the exactly same cabin, but it does feel different and it is. X-Plane11's dynamics create a different feel and lighting in the aircraft and it is enhanced by all the textures or materials that have all been redone to create that maximum lighting and reflection effects. Jump back into the X-Plane10 version and it all looks... well a bit bland and flat. Pilot's and Co-Pilot (passenger) seats have animated armrests, and the fuel tank switches are on the floor and are upside down? It is hard to see, but easy to use with only two knobs to worry about for switching each tank. Instrument Panel Cockpit is home from home for me, very familiar to me now, but still really well done in design and layout. The roof rocker switchgear is great. Upper panel has, ground fan, seatbelt and no smoking switches. left panel has lighting switches and right panel has pitot/windshield heating and anti-icing equipment switchgear is also provided, including working boots with the large main Amp gauge central. Lower left are four magneto switches and engine left/right starter switch. Lower right are two left/right fuel pump switches and the Hobbs meter. Center lower are the two fuel tank gauges and four rotary knobs for the panel and overhead lighting. A note is that at night the switch gear is mostly not illuminated and can be hard to use, so the in built X-Plane torch feature is the only way to use them... Main power switches though are not up here... they are on the fuse panel lower left of the pilot (arrowed). Both Yokes disappear, but have operational electric trim switches and Autopilot (A/P) disconnect. The instrument layout on the Navajo is a little haphazard and can be confusing if you swap over piloting positions. Yes both stations have the standard six layout instruments. but even these are not set out in the same order in both flying areas. Airspeed Indicator and the Attitude Indicator are both in the same position top left and right with the Turn Coordinator and Vertical Speed Indicators set directly below. But the Artificial Horizon and Heading Dials are different instruments with the pilot's set centre of the panel and the co-pilot's set more correctly in the standard six layout. The co-pilots Artificial Horizon is adjustable but the pilot's is not. The pilot's Heading Dial has a built in Course Deviation Bar (CDI) and can be set to the course angle and heading change knob. but the co-pilot's only has a rotary heading adjustment. And that is the odd commonality between the panels. On the pilot's side there are also instruments for radar height, localizer indicator and ADF pointer. There is a very nice EDM 760 digital readout for dual channel Lean Assist and an analogue clock. On the co-pilot's panel besides the standard six you get only one instrument in the VOR/ADF pointers. Very nice but in the wrong place for me as I use the VOR/ADF pointers a lot for airport or runway alignment, and being right over the other side of the aircraft's panel for me makes it useless... unless I fly in the right hand seat and I still hate this pointer position and I never got used to it, I really wish I could swap their places. Centre panel has at the top a very nice set of annunciators that can be tested and below are four dials that covers both engine outputs in Manifold Pressure, RPM, EGT (Exhaust Gas Temperature) and Engine Fuel Flow (FF). Equipment stack is very good. Standard issue Garmin 347 audio panel is top left with the X-Plane Garmin GN350 GPS system below. Then there are a set of three Bendix/King units in one KR87 TSO ADF unit that is hard to adjust, and two KR 64 VOR/DME speed and range sets. The RealityXP's GTN750 can also be used if you have that option. Right stack includes a Bendix/King KX 165 TSO Comm/Nav (VOR2) tuner and a Garmin GTX 320 transponder. The weather radar is a Bendix/King and comes with a manual that notes you can adjust the range and radar angle, but I couldn't do any adjustments accept to turn it on, test and adjust the brightness and you would think by now that Laminar or someone would have this unit updated, it still looks and feels like the dead weight it is. Lower panel switchgear left is minimal except for the landing gear lever and position display as most switchgear items are on the roof. The wiper switch is great with a three way action in park (which is actually intermittent) slow and fast. Side panels are excellent with nice fuse panels, there is (Goodrich) Prop-Ice amp gauge that works when you turn on the de-icing... a nice touch. The rest of the right side panel are for the Flap position in 0º - 158 - 15º - 127 - DN, and the numbers 158 and 127 are the speed zones in knts for those flap positions... then gauges for pressures in gyro, fuel, oil and cylinder head/oil temperatures and the oxygen supply knob is set out below. Centre pedestal is excellent. All twin-engine levers are well done for Throttles, Propeller (feather) and Mixture... as are all the three lower trim wheels and knob that have great position marks that are easily noted, set and seen. Built in Autopilot is mostly used with the pop-up, but down here on the pedestal panel it is not to hard to use either if you want to. The "Cowl Flap" switches are set very low down (one each under the engines), but the position indicators are great to use. Reflying the PA-31 Navajo XP11 Developers had to go back to basics with the newer X-Plane11 dynamics. They are significantly very different than the earlier dynamics of X-Plane9 and X-Plane10. This is more highly noticeable on these medium or light twin-engine aircraft. Power from each engine is now far more and highly felt, if not only through "your seat of your pants", but more so if you have a twin lever throttle system in the way you use your throttles to fly the aircraft. If you have already felt this effect, more so on the slightly more larger twins like the 690B Turbo Commander and the Dornier Do 228 100 then the same dynamic changes are in evidence here as well on the PA-31. The earlier version was an exceptional aircraft to fly, you loved it the moment you flew it and knew it was something special. The newer version is slightly different in this aspect, it is more finer in the feel, or more agile under the yoke, so you have to be more smoother with your inputs. But the biggest change is in the throttle feel. We all know that the current X-Plane11 ground effects are not perfect, but if you are willing to learn and practise you can sorta overcome the major issues of just keeping the aircraft straight on the centre line. More so here as you can use your throttle thrust to balance out the negative effects. It is not easy at first but with practise you can do it, but overall it shows the XP11 dynamics and how you can use them for your own use and rather than allowing them to control you. The PA-31 Navajo was not an easy aircraft to takeoff... in fact that is a bit of it's personality as this 310 version has the standard twin clockwise rotation propeller setup, the later Chieftain was created to fix this aspect with an opposite-rotation LTIO-540 installed on the right-hand wing to use the more counter-rotating thrust aspect of finding a more easier way of making the aircraft's thrust more balanced in takeoff and smoother in flight. So the awareness is of that the pull of not one but two very powerful engines in wanting to take you right and then flinging you into the scenery, then this creates the need to find the right throttle positions to balance out the effects of the same rotation thrust direction. It actually is not that hard to do, but does require a little practise to get it right, but the point is the better XP11 dynamics allow you to do this to a finer point and in making such power adjustments realistic. Once felt, it becomes a second nature thing in the future, so feel is important. But it is very realistic and adds into a lot of the aspects of the aircraft that brings out more of the skills in yourself to master. Obviously a lot of X-Plane11 aircraft are the same, but the effects are more highlighted here because of the iconic nature of this aircraft. It will be interesting when the XP11 version of the Chieftain from Alabeo (Carenado?) comes out to compare the two aircraft. You can rotate at around 110 knts, but watch your vertical speed and keep it under the 1000 fpm line to keep the acceleration moving forward until you need to adjust out the speed around white band cutoff of around 180 knts, official rate of climb is 1,445 ft/min (7.3 m/s), but you can use more if you are light and still not rub off or lose speed. It also highly important you do set all those three trim positions to neutral before takeoff, obviously any pilot will do so anyway, but if you have used the A/P on the last flight and then that can seriously put those positions into a very different set of settings that makes the Navajo quite a handful if the aircraft is not rebalanced, get that neutral trim set and the aircraft is far more easier to point and control as you want it to. As noted smooooth input are the best way to get the thrill out of the PA-31 and to fly the aircraft as a pro, control in bank angle and watching the V/S indicator to hold them both tight takes a bit of skill, but highly rewarding as this aircraft does deliver that sort of feedback so well. Carenado do have real world pilots to check that these feedback and that the handling aspects of the Navajo are correct, so yes the XP10 Navajo was very good, then this XP11 version is much, much better... but you also have to understand it more and to go deeper to get those certain results that the aircraft can deliver. I am going to debate the sounds a little. They are the same high quality original Navajo sounds that are now repackaged in a FMOD container, so yes they are very good with excellent 180º doppler effects, and certainly from the internal perspective and the switchgear clicks and thunks like they all should. But externally the engines feel at higher revolutions more higher buzzy, buzz, buzz than the feeling of a 310 hp engine should be, lower speeds are great and no doubt the sounds are correct, but I think more bass would have helped to make them feel a bit more realistic when higher up the range, overall I'm not over crazy on the external sounds at cruise speeds. Another change is the older tree based custom manipulators have gone. Carenado tried to do something different in the way you scrolled knobs, but it was a very fiddly way of doing simple adjustments, personally I never really took to the idea, as to scroll this way, the adjustment usually went in the other direction... now (on all Carenado/Alabeo) aircraft we are moving back to the more improved native X-Plane manipulators, and they are certainly far easier to use. This was highlighted by checking out the older version in the last version, "yes, I just found them just as awkward to use again" and was very glad to back in this XP11 aircraft and again using the newer if basic manipulators. Fine tuning the mixture to the digital lean assist, can get you a better fuel flow (FF) without the loss of speed and more range, something to play around with when having different aircraft payload weights and fuel loads, so you want and can get the best refining you can deliver for your dollar. Memories... they come back with a jolt, and with a hit in the back! As the Navajo can still be a bit of a handful in a crosswind, so you need to keep your nerve and skill. Full 15º flap and your approach speed target is 90 knts, and the aircraft feels nice in this zone, and that all that is to take care of any quick yaws that need to be addressed from the sudden wind bursts. Note the different throttle positions on both the Manifold Pressure and RPM, with more power to the left engine than the right to keep the runway alignment straight... ... here use the pitch to lower your height while holding the same 90 knt throttle speed, not the other way around, until you are almost close to the runway, then lower or phase the throttles down to around 80 knts in a nice last minute high flare.... .... still to remember as you reduce the power to keep the same throttle position margin in the left having more power than the right, the better you do this the better the landing will be. Tricky yes, but that is what flying is all about in controlling your machine in the right settings and conditions that brings out the best outcome... in this case a perfect and smooth landing. The Navajo will track the centreline better as well, even after the speed has ran off and only then you close up the throttles. So is the PA-31 Navajo the most sensitive twin out there? It is an interesting question, and it certainly requires a bit more concentration and skill, but it is rewarding as well if you understand the aircraft's performance and quirks, that is also highlights the X-Plane11's unique differences from the earlier versions. Lighting The Navajo's lit panel is simply beautiful, one of the best in X-Plane? well that is always debatable, but it is still a very nice one to look at and use. The overhead panel is nice as well, but more focused in the lighting. The four adjustment knobs are here as well for the overhead lighting itself, avionics and left and right pilot and co-pilot lighting of the main instrument panels (above right). There are two lovely switchable blue overhead lights, one above the cockpit and one above the entrance door. Note when the blue overhead light is on, then the Amperes gauge goes brighter... nice. There are four switchable animated spot lights above each passenger seat, so you can shine the light on any area. External lighting is a little basic, but an interesting featurefor a GA in that the wingtip navigation is two way with the standard nav red/green and also the option of noted "Recog" lights which are bright white lights for recognition on as well. Landing left and taxi right lights are as noted, tail beacon and the new brighter strobes are all new XP11. Liveries One blank and six liveries are provided and are all the original XP10 versions... One mustard with yellow, red and black stripes, then five white base liveries with Blue Stripes, Blue/Gold, Red and Stripes, Blue/Gold Stripes and Green Stripes. All are 4K HD high-quality (4096 x 4096) 350 pixel/meter texture liveries but updated and refined for X-Plane11 PBR and reflections... Summary The X-Plane11 version of the PA-31 Navajo from Carenado looks outwardly the same as the X-Plane10 version, but it is in many areas quite different. You could say it is the X-Plane11 take on the X-Plane10 version. But dig a little deeper and this is now a more all round aircraft, and certainly highly updated and in all the right areas. Visually it is also very different to the earlier now blander looking Navajo, as the Physically Based Rendering effects certainly brings out all the hidden detail, the better glass and the all round polish on the aircraft. And that is both externally and also with the high quality internal cabin and cockpit design that reflects its early-mid 80's feel. The aircraft's manipulators have been updated, but not the average if dull (even useless) Bendix/King weather radar, sounds are now FMOD, but sound more higher buzzy at high throttle settings, but overall the sounds are excellent and the aircraft is VR compatible as well with the new manifest.json feature (personal fine tuning). It is in the areas of performance is that I think it is were we have had the biggest gains. There is far more feel and variation between the two engines that you need to tune into or dial into the way this aircraft is now flown, certainly having an addon twin-throttle arrangement will give you a far more better experience and control, and yes you could even steer this aircraft left and right by the throttle inputs alone, but we won't go there. but the effects of correct trimming, and throttle control as Pipers are known for being hard to trim and keep trimmed at speed, and that is very evident here and it all adds into the more higher experience of flying a really good medium-twin engined aircraft, in other words the PA-31 is far better using X-Plane11 performance than the original aircraft was in the past and is in the use and in the overall handling of the machine. The is a huge choice in these types of aircraft now in X-Plane, certainly in the Twin-Engine category, and we all have our favorites. But there is and always was something a bit different but very special about this Navajo, it is in its class it could be the very best in X-Planef or VFR and moderate IFR conditions and to note the Piper Twin Comanche PA30 by vFlyteAir which is also extremely good, but the Navajo would always be my personal choice, and now it is even better... Highly Recommended. _____________________________________________________________________________________ The PA-31 Piper Navajo XP11 HD Series is a new release for X-Plane11 and is available here at the X-Plane.OrgStore PA31 Navajo HD Series XP11 Price is US$32.95 The aircraft is directly available from Carenado as well. Special Features Version 1.0 Only for X-Plane 11 State-of-the-art configurable FPS-friendly logic system. Fully VR compatible Full PBR (Superb material shines and reflections) Features Specially designed engine dynamics for XP11 Support for RealityXP's GTN750* (integrated into 3D cockpit, when available). Flight physics optimized for XP11 standards. Ground handling adapted for XP11 ground physics. Physically Based Rendering materials and textures throughout. PBR materials authored with industry-standard software used by the film and gaming industries. X-Plane GNS530 (FPS friendly) Goodway Compatible. Realistic behavior compared to the real airplane. Realistic weight and balance. Tested by several pilots for maximum accuracy. Requirements: Windows XP - Vista - 7 -10 or MAC OS 10.10 (or higher) or Linux X-Plane 11 CPU: Intel Core i5 6600K at 3.5 ghz or faster. Memory: 16-24 GB RAM or more. Video Card: a DirectX 12-capable video card from NVIDIA, AMD or Intel with at least 4 GB VRAM (GeForce GTX 1070 or better or similar from AMD) 500MB available hard disk space _____________________________________________________________________________________ Installation: Download for the PA31 Navajo HD XP11 Series is 453.30mb and the unzipped file is deposited in the "General Aviation" X-Plane folder at 521.80mb. Key authorisation and a restart is required. Documents: There is Normal and Emergency procedures (checklists), excellent sets of reference and performance tables. But no full manual. Copyrights.pdf Credits.pdf PA31-310 Emergency.pdf PA31-310 Normal procedures.pdf PA31-310 Performance tables.pdf PA31-310 Reference.pdf Recommended settings XP11.pdf _____________________________________________________________________________________ Review by Stephen Dutton 24th July 2018 Copyright©2018: X-PlaneReviews (Disclaimer. All images and text in this review are the work and property of X-PlaneReviews, no sharing or copy of the content is allowed without consent from the author as per copyright conditions) Review System Specifications: Computer System: Windows - Intel Core i7 6700K CPU 4.00GHz / 64bit - 16 Gb single 1067 Mhz DDR4 2133 - ASUS GeForce GTX 1080 8Gb - Samsung Evo 512gb SSD Software: - Windows 10 - X-Plane 11.25 Addons: Saitek x56 Rhino Pro system Joystick and Throttle : Sound - Bose Soundlink Mini Plugins: Environment Engine by xEnviro v1.07 US$69.90 : XPRealistic Pro v1.0.9 effects US$19.95 Scenery or Aircraft - KHAF - Half Moon Bay by Rising Dawn Studios (X-Plane.OrgStore) - US$19.00
-
News! - Now Released! - XP11 Aircraft Upgrade for Carenado PA-31 Piper Navajo HD Series When I reviewed the X-Plane10 release of Carenado's PA-31 Piper Navajo HD Series, I was totally taken with the aircraft in an instant, it was just an amazing aircraft to fly, I simply just absolutely loved the thing. Since that point my mind on the aircraft didn't change either and it is one of my very favorite twins to fly. The Navajo was updated to v1.1 that allowed you to fly the aircraft in X-Plane11, but now Carenado have upgraded the aircraft to the XP11 Version. Note this is an upgrade and not an update, so a full purchase is now required for the full X-Plane11 run of updates. The upgrade is the standard but extensive changes for the X-Plane11 version, features and changes are mostly all X-Plane exclusive... Special Features Only for X-Plane 11 State-of-the-art configurable FPS-friendly logic system. Fully VR compatible Full PBR (Superb material shines and reflections) Features Specially designed engine dynamics for XP11 Support for RealityXP's GTN750* (integrated into 3D cockpit, when available). Flight physics optimized for XP11 standards. Ground handling adapted for XP11 ground physics. Physically Based Rendering materials and textures throughout. PBR materials authored with industry-standard software used by the film and gaming industries. X-Plane GNS530 (FPS friendly) Goodway Compatible. Realistic behavior compared to the real airplane. Realistic weight and balance. Tested by several pilots for maximum accuracy The original XP10 Navajo was already exceptional in the quality area, so now you will go levels higher again with this PBR and even higher, higher definition textures. It won't be me your trying to convince to buy it... I'm already sold. Recommended System Requirements Windows XP - Vista - 7 -10 or MAC OS 10.10 (or higher) or Linux X-Plane 11 CPU: Intel Core i5 6600K at 3.5 ghz or faster. Memory: 16-24 GB RAM or more. Video Card: a DirectX 12-capable video card from NVIDIA, AMD or Intel with at least 4 GB VRAM (GeForce GTX 1070 or better or similar from AMD) 500MB available hard disk space The PA-31 Piper Navajo XP11 HD Series is a new release for X-Plane11 and is available here from Carenado: Piper Navajo XP11 HD Series Price is US$32.95 The aircraft should be released on the X-Plane.OrgStore real soon. Images are courtesy of Carenado ________________________________________ News by Stephen Dutton 20th July 2018 Copyright©2018: X-Plane Reviews
-
Pure aircraft dynamics... you need air to keep your aircraft airborne? I checked it out anyway... The PA28 -161feels and flew fine to me? 60 knts on approach full flap, plenty of lift. 55 knts to 50 knts on landing... all at 1500rpm or just under? I say just under, and not a lot under? So can't answer your question, only answer is are your flaps actually at full? as they are awkward to see and to set or are you not into the wind? as I noted in the review the stall around below 55 knts is then severe so you need a lot of skill around then area... SD
-
Aircraft Review : 690B Turbo Commander by Carenado The Aero Commander series is one of the great aircraft designs that came out of the early 50's. Like the recently reviewed Aerostar 601P, the Aero Commander is large twin and is also originally a Ted R. Smith creation. First thing to note is that this 690B Turbo Commander is not an upgrade of another Carenado Aero Commander which is the Shrike 500s of which is in fact a very different aircraft. The 690B has in differencal a new wing centre section and a completely different engine configuration with the twin Garrett AiResearch TPE331-5-251K turboprops engines moved further outboard, a changed flightdeck layout and the pressurisation system is upgraded for an altitude ceiling of 31,000ft. External Design Those Garrett's are very impressive, and very finely modeled here, they look and sound spectacular. Note the extravagant huge booming exhausts. The same high quality of Carenado design very is evident from the nose to tail of the this Commander, for some reason they just seem to get better and even more highly realistic, the trick is in the minor detail, here is it very extensive, almost every panel and rivet is accounted for with wear and the tear is also very well realised. This is because Carenado have used Physically Based Rendering materials and textures throughout and the PBR materials are authored with the same industry-standard software used by the film and gaming industries. For any new time developer wanting into the X-Plane game, the stakes now are certainly high and as with this sort of perfection you are up now up against such detailing in realism. Glass is also perfection, and all the surfaces have excellent reflection properties. Upper roof hatch style windows are heavenly, but they look even better from the inside, note the lovely window surround detail... You can of course spend ages noting every single aspect of this exterior, but it is almost perfect and again this is another new slightly higher level of quality through and through. Internal Design The cabin is just as highly detailed, but more to the earlier Carenado style than their latest aircraft, in other words it is a more very heavier look for the leather seating and trim. Detailing is in the "Oh wow!" territory, with a very custom style perfection. Layout is set out in a executive club seating arrangement, with a jump seat side right, and exit door side left, and internally it is certainly luxurious. You feel the internal thick cladding of the design, as the 690B had the extra soundproofing over the 690A. Animated tables pop-out from the side of the cabin enclosure for the each single side seating arrangement.... ... and the unusual window layout of a small, then the huge panoramic long window is amazing for the backseat fliers, and looking outside it comes with those huge powerful turbine Garrett's filling out your view, note the really beautiful reflective chrome on the spinners. This is an aircraft you want to spend a lot of time of inside, as the rear is as brilliant as the office up front. Cockpit Flightdeck instrumentation and systems are comprehensive, at first glance the layout looks very complex, and more a regional airliner setup than a large executive twin. Instrument panel is far, far more different than the 500s, the only points that are the same between the aircraft are only the position of the standard six flying instruments and again that is only on the co-pilot's panel. Yokes can be hidden, which is great as the ram style yoke covers a lot of the lower panels, but they are better for flying with in smaller spaces. Switches for map light and Ident actually do work as does the A/P disconnect (red button) Centre console is complex with just a set of throttle levers and combined propeller/mixture levers noted as RPM, note the throttle lever friction levers... ... Prop sync, taxi light switches are here with the park brake. Collins 106/107 Autopilot (A/P) is down low centre console, thankfully there is a pop-up in the menu. Overhead Panel (OHP) is just simply amazing in detail and use. Both Elevator and Rudder trim wheels are very authentic and to note those huge speakers, gotta be a great when just ferrying the aircraft, "Rock and Roll". All spot lighting in the aircraft are separately switchable and animated to focus the light, instrument brightness is separate for both pilots. Many rocker switches are three way with a clever arrow up and down and a hand finger to set the middle position. OHP switchgear is comprehensive, and even complicated as well. Areas include: Generator, Lights (Ext/Int) Ice Protection, Avionics, right and left engine starter panels, Landing lights and wipers. Ice Protection is again comprehensive and highly detailed with authentic amp switching, and there is full information on how to use the system in the provided "Systems reference guide". A note is warranted in the fact that all these sort of systems are currently being overhauled in X-Plane (see - FlightSimExpo 2018). So there is a good chance that these systems will become even more realistic and functional in the future, but this system installed here is still very well done. Personal mask oxygen panel is on the co-pilot side and as is the circuit breaker panel pilot's side, note the armrests are all animated for use. Instrument panel Flying instruments are a different setup on each side of the instrument panel. The pilot's side has the Collins semi-glass vertical mounted Artificial Horizon top and the Heading Dial lower. The co-pilot's layout is the same AH top and HD bottom, but they are standard instruments and that the Course and Heading knobs are opposite on each setup, and you sort of don't get used to the heading knob being on the left on the pilot's side. Airspeed Indicator and Turn Coordinator are left of the centre instruments and the Attitude Indicator and the Vertical Speed Indicators are on the right, both sides, but the Attitude Indicator is a different type style on each side. On the pilot's side the other dials covers a Clock, Cabin Climb Pressure and Cabin Altitude (pressure) in 100ft/1000ft, there is also a Radar Altimeter. Co-Pilot's side is again a Clock, main Fuel Quantity (all fuel tank is made up 22 individual fuel cells in the wings and fuselage that are interconnected to form a single tank of a total capacity of 384 U.S. gallons, (about 2,573 pounds of Jet-A). Suction and Reg Pressure dials and a Hobb's meter is lower center to the right. The centre of the panel with the avionics is a bit of a ergonomic design mess, so you have to note which instrument is which to find them, but there is a sort of system at work here. Top row and centre has an engine readout in a two - two arrangement, from left to right are the twin High-Pressure RPM dials then the Percent RPM 10-100 with an insert clock dial 0-9. Centre is a Fuel consumed counter (resettable in lbs) then the two large dials that covers both engines Oil temperature and Oil/Fuel Pressures. Far right is the Elevator and Rudder position indicators. Centre are the twin dials to cover engine EGT (Exhaust Gas Temperature) gauges, then lower the engine Fuel Flow (LB/HR) dials. Lower centre panel is an ADF/VOR2 pointer, far lower right are two instruments to cover Hydraulic Pressure and Flap position in Up- 1/2 - Down with markings for 1/4 and 3/4. Avionics consists left of a standard pop-up Garmin GNS 530 top, GARMEN GMA 340 Audio Panel, Bendix/King KX 165 VOR2/NAV2 radio and NAV2 Bendix/King KX 64 DME receiver stacked below. Right panel avionics are a Bendix/King KX 87 ADF unit top, Avidyne radar (functional) centre and a Garmin GTX 327 Transponder/Clock bottom. The RealityXP's GTN750 can be used as an option replacing the GNS 530. Glareshield annunciator panel is first rate, but also again a little confusing to work out at first. Warning items are mostly concerning the turbine engine warnings and lever positions. Pressing the "Test" button on the left will illuminate the panel, but there are also other warning lights around the panel including: Fuel Temperature far left, A/P settings on/off and Fuel Flow centre. Lower panels cover left... Environmental (Oxygen Pressure) and Landing gear, Left Flap lever and circuit breakers right... ... I am surprised that by now Carenado still don't do active circuits, as they would do them very well. The systems here though are all very active and covered in the said "Systems reference guide", included are the: Electrical System with buses, Ice Protection, Fuel System and HP Limiter. So there is the need in this aircraft to study the systems and understand how they work to get the very best out of the aircraft. But there is the point to be made that developers are advancing to the very limits now of X-Plane's default built in systems, as to make a lot of the systems work, there are and certainly in this 690B compromises to the X-Plane system basics, and to a point Laminar Research have not done a lot of changes in these areas for years, hopefully with Phillipp Ringler now moving into the systems areas and more as X-Plane's avionics are now pretty well complete, we will now see far more attention on these system areas in the future. Ground Details and Menu On the ground the undercarriage is a work of art, and very well animated. Struts and links are all recreated with incredible detail, internal gear bay is just as detailed. Taxi lighting is on the strut, and only comes on if the gear is lowered. I'm not sure of the crack on the upper gear support? a detail, or wear and tear... anyway I wouldn't be flying this aircraft in real life with that there! Gear animation is simply first rate, and you can watch all the twist and turning action from the cabin windows, the link between the upper support strut and wheel assembly is again very well animated, here it is at full stretch holding the the two assemblies together Menus are the standard three menu tabs lower left of your screen and all are the usual standard Carenado A, C and O menu staples. A is the Collins 106/107 autopilot pop-up panel. C is ten "Views" with "Field of View" adjustment and two sound adjustments. O is for "Options" including opening Pilot (passenger) door and a Baggage door left rear. Static elements provided are basic with, two cones and engine inlets front and rear/flag, pitot covers and there is also Window and Instrument reflections and the choice of changing the liveries without going to the main X-Plane menu. The twin pilots disappear when you activate the static elements. There is an option for the "External Power" but Carenado don't show a cart outside the aircraft, surely it can't be hard to feature a power cart? Note the lovely drop-down step, which is fully animated and detailed. The Collins 106/107 Autopilot panel is scalable (thankfully as it is rather large)... but the adjustment triangle is very small and hard to see, obviously to not having it stand out alone right in your view, but it can also be hard to find against a bright background. Flying the 690B Turbo Commander! As with understanding the aircraft's systems, then flying the 690B also requires a bit of skill and knowledge, flying the actual machine per se is not the issue here but it is a quirky aircraft that is quite deep in the way you use and fly it. I flew from KCVG - Cincinnati to KMCO - Orlando... and then just kept flying on again to KRSW - South Florida, and what was just my usual routine of understanding and dissecting the aircraft for a review, then in this case the flying just went on and on and to the point of flying this long route until it then took out a complete full day. Now that is very unusual for myself, unless it is usually an heavy grade "Study" aircraft with a zillion systems or features. But that also shows how much time and effort it required to really fully come to terms with this aircraft. The startup of the 690B is a little complicated, more so by the setup of the "beta" range. The beta range on the throttle levers is the lower part of the throttle range that puts the propellers into a reverse pitch for reverse thrust. But in X-Plane in trying to replicate the beta range zone on the throttle slider has really just messed it up, the worst instance is in the FJS Dash8 where it just doesn't work at all, or then or even when it does or doesn't work in flight or on landing. The problem is X-Plane doesn't really know if it supposed to activate the beta mode or not, so sometimes you get the action, and sometimes you don't, it's confused and so are you. This is more pronounced if you use a throttle system like I do with the Saitek x56. So if you set the throttles in the 690B like you should do in the "GND IDLE" position and above the beta zone, then the thrust is too high, so to get idle you have to set your throttles at the bottom of the range and in the reverse beta zone? To make the beta reverse thrust work then set a key or in my case the joystick trigger to the key setting "Hold thrust reverse at max" and this simulates the "beta" range reverse action. So if you set your throttle levers correctly then they won't work... but set them in the wrong position and they do? and this also causes the annunciator for the beta warnings to also always show? This is first of all highlighted at engine start up as the 690B has a propeller "Startlock" that holds the propellers in a flat pitch, to unlock you need to hold them in a reverse pitch? above 60% RPM, and the same again to lock them at engine shutdown. Starting the TPE331-5-251K turboprops is automatic, but you do have to do it a sequence. Main switch is first to fuel pump ON, and the IGN OVRD switch has to be ON (Fuel/Hydr on as well). There are two engine start positions with the AIR and GND, with the AIR position you can start the engines only in flight as the aircraft uses the forward motion of air against the propellers to start the engine, on the GND start position it uses a Garrett air turbine starter to start the engine, so it is air turbine turning a turbine to do the starting. The whine will start and then the engine will power up on setting the GND position. At above the 60% RPM point then you use the "Hold thrust reverse at max" trigger to unlock the propeller startlock, just slight hold and you feel it change. Then start the other engine with the same process, turn off the IGN OVRD once the engine is at the correct RPM at around 78%. Taxi lights are on the gear strut, but the landing lights are inserted into the wing? You have to flip a switch to "Extend" them, so make sure you remember to do that, and to retract the lights again after takeoff. There are wing (Ice) lights built into the engine cowling. Before flight or in the climb phase you have to set your cabin pressure... this is done via the "Cabin Alt" knob and the settings are noted by the internal dial that is in altitude feet, I am flying up to 15,000ft so I set this to the inner-ring, and the cabin pressure will be shown and set on the outer-ring at 2,400ft, mode to "AUTO" so it will do the pressure changes for you in flight. With the throttles full back set the RPM levers to just below LO GROUND setting, but don't forget to put them to HI FLIGHT position before takeoff. It took me a fair while to get the sweet spot for taxiing speed, as if not there is too much power and far too much speed and you are consistently on the brakes and makes for a pretty unrealistic taxi if even infuriating in trying to rub off too much of speed all the time. Even then you use minimal throttle to move forward, once moving I pull one throttle lever back and use the other engine to control the speed, it takes a little practise to get comfortable, but once you do it right makes the Turbo Commander behave as it should. Even with a slight push up of the throttles the 690B takes off like a bucking bronco, it easily quickly passes 100 knts and with rotate is around 140 kts with a slight single setting of the flaps. Your holding on more than flying this aircraft so strength, precision and control is required as you take flight and is vital... Once clear of the field I level off around 4000ft, initial handling feel is very good, but the aircraft is powerful so you have to one make sure the throttles are kept close together as the power will side slip or yaw you, and that is until you switch on the Prop-sync. Overall in the flying I love the aircraft's handling, but it is quite different from a usual twin-engined aircraft like say a KingAir. The big -twin will climb at a max of 2849fpm, so an initial 2000fpm is fine and then after 10,000ft drop it to around 1,000fpm, that max climb rate is very different to an earlier Aero Commanders as 1,800fpm was about max. Setting the V/S (Vertical Speed) is a bit tricky, as the ALT (and panel light) has to be off to adjust the V/S, you do this via the wheel DN or UP, but you don't need a lot of movement to adjust, a few clicks will get you climbing up (or down) quite fast, so it is not very precise, keep the RPM slightly under the red and 70% on the climb. If the pressurization is working then the "Cabin Altitude dial" will show you the pressures, the long needle shows your cabin altitude and the short needle is the DIFF Pressure, which can go quite high. Sounds are in the "extremely good" category, as all are FMOD and 180º soundscapes and are simply really great, start up sequence is very and highly realistic, and through the throttle range to cruise you get all round excellent sound, and to me good sound is not boring or repetitively annoying, and you don't get either here. One thing I did notice is that the 390B simply devours fuel at an high rate... Official range is 820 nm, but I loaded in 17,000lbs and was on fumes at Orlando after 550 nm, you can max the range out to 1100 nm but that would be an aircraft empty of passengers and cargo and not pushing the higher speeds at all, and trying or aiming for the 280lbs per hour goal... so watch those gauges! Ice protection is again quite extensive, L and R windshields are heatable, rudder heating element, Engine inlet de-icing, pitot heating for tubes and vents, prop ice protection and de-icing boots that work. Lighting The lighting layout is very good, but mostly done by movable (animated) spot lighting with eight spot lights, in two over the cockpit, two with one over the door entrance and one over the jump seat... four spot lights cover the rear seats and tables. Cockpit instrument lighting has adjustment each side of the panel and those twin overhead spots. External is the already noted wing and gear taxi lighting, wing ice. A beacon on the tail, new bright strobe lighting and small navigation lights. KMCO - Orlando Awareness of the NAV2 settings between the Bendix/King KX 165 VOR2/NAV2 radio and the NAV2 Bendix/King KX 64 DME receiver in that the NAV2 frequency has to be done manually on the DME unit, even the X-Plane frequency insert will not put it on the same DME frequency? On approach to Orlando's RWY 17L and it is tricky to get the speed correct, if the gear is still up then you get a warning if you go below 140 knts, but you want to drop the flaps? so to go slower you have no choice but to extend the undercarriage, the RPM lever needs to come back into the LO position to again (to try to) lower the speed... ... your aiming for an approach speed of around 100 knts full flap, which is not a notched flap setting, but a hold down the lever to do a continuous flap movement either up or down, so with the flap indicator in a very buried position, it can be a bit of a hit and miss and even to a gut feeling of the actual flap position? And make sure the Prop Sync is also off before landing. If your cabin altitude is to zero and the cabin pressure is also low, then press the DEPRESS button to depressurize the cabin. And note the outstanding view out of the cabin windows. If you have got everything right in the balance of the speed which on finals is essential, Stall speed is 59 knots, (109 km/h) flaps, so 60 knts is your marker.. ... so your flare speed is around 85 knts. A nice flare and then reduce the power... ... once tracking correctly on the runway and with the levers in idle then trigger that reverse thrust... and the job is done. Well not quite? remember to re-trigger (reverse) the propeller startlock's on the engine wind down... and "holy hell" is there only THAT much fuel left in the tank? Liveries One blank and five US registrations and one Belgium registration covers the livery choice, all are however very high HD 4K quality. Summary This 690B Turbo Commander is a very technical aircraft, it has a lot of areas and systems that you really need to understand and in flying the aircraft really well also demand's a bit of skill and experience, so this is an aircraft that is certainly not for new flyers or for anyone that doesn't have a fair bit of simulation experience. For the pro-pilot, then it is smorgasbord of features and systems that include, a comprehensive pressurization system, Manifest.json (custom aircraft configurations), Fuel system, Ice Protection System, Electrical System with buses and HP Limiter system and there is support for both the native X-Plane GNS 530 and RealityXP's GTN750* The instrument panel is comprehensive and very authentic, but also confusing and comes with a heavy workload, beta range is catered for but tricky to use, and requires a bit of skill in using the throttle and RPM modes to their full advantages, so this is an aircraft that requires time and even study and mostly even a lot of flying to get it really if perfectly right, it took even myself three days to really get the full perspective of the full range of all the aspects of the aircraft. From a modeling and detailing perspective, then this 690B is in that upper niche area of being at the top of the top of the class, it is a quality act, with exceptional glass and chrome. Undercarriage design, detail and animations are excellent and the lighting is very good with the sounds in range and 3d spatial awareness are again top notch. You are however starting to feel the limitations of the underlying X-Plane framework with this aircraft, as developers are now out pacing the inner X-Plane systems setups, obviously Laminar Research will catch up, but it shows how far we have come in these heady days with aircraft that are as great and as excellent as this Turbo Commander, the aircraft is not for the faint-hearted either but then the rewards of this 690B are also very high and it is highly addictive and already a very popular aircraft... highly recommended. ______________________________________________________________________ Yes! the 690B Turbo Commander by Carenado is NOW available from the X-Plane.Org Store here : 690B Turbo Commander Price is US$37.95 Special Features The latest technology in X-Plane Optimized for X-Plane 11 State-of-the-art configurable FPS-friendly logic system.(details here) Fully VR compatible Full PBR (Superb material shines and reflections) Features Specially designed engine dynamics for X-Plane 11 Flight physics optimized for XP11 standards Ground handling adapted for XP11 ground physics Physically Based Rendering materials and textures throughout PBR materials authored with industry-standard software used by the film and gaming industries. X-Plane GNS530 (FPS friendly) Support for RealityXP's GTN750* (integrated into 3D cockpit, when available) Goodway Compatible Realistic behavior compared to the real airplane. Realistic weight and balance. Tested by several pilots for maximum accuracy Requirements: X-Plane 11 Windows, Mac or Linux 4Gb+ VRAM Recommanded Current version : 1.0 (July 3rd 2018) Download size: 450Mb Installation Download of the 690B Turbo Commander is 428.60mb and it is installed in your General Aviation Folder as a 518mb folder. Documents Extensive, but no actual aircraft manual as per Carenado, and in this case you really needed a detailed manual. The 690B Systems Reference Guide does cover however many of the featured systems. Recommended Settings XP11 .pdf 690B Systems Reference Guide.pdf Carenado 690B_Turbo_Commader Performance tables.pdf Carenado 690B_Turbo_Commander Emergency Procedures.pdf Carenado 690B_Turbo_Commander Normal checklist.pdf Carenado 690B_Turbo_Commander References.pdf Copyrights.pdf Credits.pdf _____________________________________________________________________________________ Review by Stephen Dutton 18th July 2018 Copyright©2018: X-PlaneReviews (Disclaimer. All images and text in this review are the work and property of X-PlaneReviews, no sharing or copy of the content is allowed without consent from the author as per copyright conditions) Review System Specifications: Computer System: Windows - Intel Core i7 6700K CPU 4.00GHz / 64bit - 16 Gb single 1067 Mhz DDR4 2133 - ASUS GeForce GTX 1080 8Gb - Samsung Evo 512gb SSD Software: - Windows 10 - X-Plane 11.25 Addons: Saitek x56 Rhino Pro system Joystick and Throttle : Sound - Bose Soundlink Mini Plugins: Environment Engine by xEnviro v1.07 US$69.90 : XPRealistic Pro v1.0.9 effects US$19.95 : WorldTraffic 3.0 Plugin - US$29.95 Scenery or Aircraft - KCVG - Cincinnati International Airport by Skyline Simulations (X-Plane.OrgStore) - US$27.00 - KMCO- Orlando International Airport by Nimbus Simulations (X-Plane.OrgStore) - US$24.95
-
"Runways follow terrain contours" is off? set on the general menu.
-
Preview: LTAI - Antalya International Airport by JustSim Turkey was always off the aviation radar, mostly because the country was the join between east and west, but also because it was very political, and it still is. But Turkey is quickly in this second decade of the 2000's becoming a very major player in world aviation, as the investment in Istanbul's new mega airport called ironically enough "Istanbul New Airport" is of a scale of that the country means business and is due to open late 2018. And the growth of Turkish Airlines is staggering as well with mostly the expansion of the international fleet to go for more one-stop journeys between the USA and hard-to-reach destinations in Africa, the Middle East, and India. But the real purpose of all this expansion is to take on the Middle-East carriers and their east-west world connections, in a few years that route through currently Dubai or Abu Dhabi will be also running through Istanbul with connections to any ongoing destination in Europe, Africa but more importantly the opening up of the central markets of far west Asia. But Turkey as a holiday destination in itself is also becoming a large market as well, as seasoned packaged holiday companies have now moved on past Spain and Greece to newer markets and the south coast of Turkey is now becoming a well known choice for UK package operators and European holidaymakers wanting something different and exciting but still cheap. And so here is one of those really big tourism resort cities in southern Turkey of Antalya on the north-eastern side of the Mediterranean. From the X-Plane perspective then this area of the world has had a lot of attention lately as well, mostly around Greece with FlyTampa's excellent Corfu, The Chios Island scenery that has just been released a few days earlier, a great Athens freeware by tdg and from JustSim themselves with their earlier underrated Larnaca, Cypress and now this Turkish destination of LTAI - Antalya International Airport in Antalya. Anyone who reads X-PlaneReviews then would know I rate JustSim's sceneries very highly, for the details, features to value perspective they are one of the best current developers in X-Plane. LTAI - Antalya International Airport Antalya Airport Antalya Havalimanı IATA: AYT - ICAO: LTAI 8L/36R - 3,400m (11,154ft) Concrete 18C/36C - 3,400m (11,154ft) Concrete 18R/36L - 2,990m (9,809ft) Asphalt Elevation AMSL177 ft / 54 m The first impression of LTAI Airport is simply the size of it... this is a huge airport. There are two major international terminals in 1 and 2, a Domestic, VIP building and Terminal C for Cargo. The airport is positioned 13 km (8.1 mi) northeast of the city center of Antalya, Turkey. If you have your object slider set to maximum then there is significant amount of autogen to fill out the scenery. JustSim always provide a lot of custom scenery to match in to the perspective, and that is the same case here also, but it is a slight mis-match in that the custom is a load of blocky low-rise buildings, more OpenStreetMap than custom buildings, so they clash with the German autogen, or does it? On Google Maps the same layouts are also evident as are the odd flat grey shaped industrial buildings are in fact the same in real life. International Terminal 1 - Domestic - VIP International Terminal 1, Domestic and the small VIP terminal is all one long complex. Modeling is excellent with some very well done web style entrance frames, signage and branding is very good as well, and overall the full complex is very impressive. Oddly this Terminal 1 is operated by Fraport AG and has just had a full refurbishment were as the newer Terminal 2 is operated by the company Celebi All airbridges are active with the plugin by Marginal and have the newer movable hoods, branding again is very good. But it is quite sparse down here on the ramp, there is a little clutter created around the gate, but it feels quite empty and inactive overall, very unlike JustSim in the past. Terminal 1 are stands 7 to 22 and Domestic are stands 1 to 7. Cargo Terminal is small by this airport's size, and a nice VIP center is ready for your personal arrival. Terminal 2 The design of Terminal 2 is very similar to T1, but it is a far larger building. Landside arrival detail is exemplary, as terminal modeling is first rate with reflective glass and has again great detailing and brandings, realistic people are well done here for the ultimate realism. Note the checkin counters, outside the terminal... Airside quality is very good as well with the clutter custom made, but like at Terminal 1 not a lot of ramp clutter again makes it feel a little vacant, But overall the terminal layout is excellent. Mid-Field Mid-Field separates the two terminal complexes (only taxi's are available here between the two terminals and that drives interconnecting passengers mad). The area is mostly airport services related and has situated here the large fuel depot. The area is very well filled in and is highly realistic to the eye as small building detail and branding is as good if not better than the terminals. Control Tower - Apron 3 Centre area with the airport's Control Tower and the Fire Station separates Apron 2 (Terminal 2 - stands 40 -72) and Apron 3 for remote stand parking (301 - 315) Complex tower design is very well recreated and is authentic to the real version, with lots of nice detail set out around the building. Tower View however is a bit crappy, it is set too low and so you get a lot of visual obstructions. Runway and taxiway textures are very good as JustSim always do excellent ground textures... 3d grass is also considerable throughout the whole airport and very if highly realistic when taxiing around and to or from the runways. Runway 18C/36C looks a far more worn, tired concrete runway compared to the newer asphalt 18L/36L, and from the air in the distance it can look actually abandoned. Lighting Arrival at Antalya at night is fantastic. The airport has really good and a high abundance of different lighting. Approach lighting is even exciting in realism. Terminal areas are very well lit, but slightly duller than you would like, but it still looks and works fine for night time stand operations. Terminal and building lit textures are very realistic and look great when arriving. Signage and branding lighting is also really well done as is the carpark lighting coverage and the drop down spot lighting on buildings. Preview Notes: JustSim always deliver, and again here at LTAI - Antalya you get a the same. That statement however is to be taken into context, because this scenery like all JustSim sceneries are not an ultra high detailed scenery, but you do get the latest X-Plane dynamic features (like reflective glass), great lighting, lots of animated items like active gates, ground traffic and wet surfaces and the modeling is usually of a very high quality... and you get all of this at an excellent value price and usually under US$20. I will always recommend a JustSim scenery, and this one also comes highly recommended as well. Features noted are: Detailed airport objects and vehicles Custom textured taxiways, runways and apron Custom surroundings Custom airport lights Compatible with X-Plane 11 features Animated ground vehicles (X-Plane 11 only) Shading and occlusion (texture baking) effects on terminal and other airport buildings High resolution ground textures / Custom runway textures High resolution building textures Excellent night effects Realistic reflections on glass Optimized for excellent performance Fully Animated Airport World Traffic 3.0 compatible X-Life traffic compatible Animated Jetways (plugin by Marginal) WT3: No WorldTraffic GroundRoutes are provided, but the airport will generate a GroundRoutes. Overall the airport functions fine, but WT3 is a bit sparse in giving you that full airport and full busy look? Even with the settings at full capacity... custom corrected WT3 routes and operations would have made a difference here, but overall WT3 works fine. Positives: Mostly everything Negatives: More gate and stand clutter would have been nice, it feels strangely vacant when parked up at the gate. Custom WT3 routes. Tower View is not really usable... but overall LTAI strangely feels a little soulless and not that buzzy, busy airport you expect. ____________________________________________________________________ Yes!... LTAI - Antalya International Airport by JustSimis Available from the X-Plane.Org Store here : LTAI - Antalya International Airport Price is US$19.80 Requirements : X-Plane 11 Windows, Mac or Linux 4Gb+ VRAM recommanded Current version: 1.0 (July 13th 2018) Download Size: 602mb : Install Size 1.71gb Extras and Documents: - None ______________________________________________________________________ Preview by Stephen Dutton 13th July 2018 Copyright©2018 : X-Plane Reviews (Disclaimer. All images and text in this preview are the work and property of X-PlaneReviews, no sharing or copy of the content is allowed without consent from the author as per copyright conditions) Review System Specifications: Computer System: Windows - Intel Core i7 6700K CPU 4.00GHz / 64bit - 16 Gb single 1067 Mhz DDR4 2133 - ASUS GeForce GTX 1080 8Gb - Samsung Evo 512gb SSD Software: - Windows 10 - X-Plane 11.25 Addons: Saitek x56 Rhino Pro system Joystick and Throttle : Sound - Bose Soundlink Mini Plugins: Environment Engine by xEnviro US$69.90 : WorldTraffic 3.0 Plugin - US$29.95 : BetterPushBack - Free Scenery or Aircraft - ToLiSS319 (A319) by ToLiSS (X-Plane.OrgStore) - US$69.00
-
No Problems ?
-
Airbusalitalia - hello guys .... start by saying thank you for accepting me in this very beautiful forum. I wanted to ask a question, in fact, a kindly advice. the A319 Toliss would like to buy it, could someone tell me if it is worth buying it? thank you - Note - Moved to correct forum.
-
Preview: Chios Island National Airport by Descent2View Simulations Chios Island is the fifth largest of the Greek islands, and is situated in the Aegean Sea, it is located 7 kilometres (4.3 mi) off the Anatolian coast. The island is separated from Turkey by the Chios Strait. So the island is positioned far closer to Turkey than most of Greece. This Chios Island scenery is by a newcomer developer to X-Plane called Descent2View Simulations, and is by an large a small scenery but is an excellent walkaround scenery because of the high-detail that has a short-ish runway, some terrain, and a fun 90 degree intercept to the final approach on the traditional instrument approach and no ILS guidance... so what more would you want? Chios International Airport "Omiros" Κρατικός Αερολιμένας Χίου «Όμηρος» 01/19 1,511m (4,957ft) Asphalt Elevation AMSL 15 ft / 5 m The scenery is very well intergrated into the native X-Plane mesh and the custom mesh scale is very large, so the overall view is highly realistic. There are 800 noted custom objects located in the scenery and represent the Greek style, but also the default German autogen is quite significant as well and situated to the north of the airport. Main street scenes that are set close to the airport are excellent, certainly a very realistic walkaround vista to explore. Detail is exceptional in both clutter, branding and modeling. LGHI - Airport The ramp area is small with a noted three parking positions, but only two of the available parking positions can be used by a B737/A320 size aircraft. There are also two helicopter pads at either end of the ramp. At the northern end there is a none X-Plane location noted position cargo stand for a small freighter (above right). Terminal design and detail is excellent, with super high quality framework and reflective glass, this is a very highly realistic first design from Descent2View. Ground clutter is again excellent, not too much but enough for realism when on the ramps or surrounding airport areas. Tower view is perfect for both approaches. Fire Station detail is very good to the Greek feel (below). Area and ground textures are very good, but runway textures feel a little flat, but are still very well detailed. 3d grass is really well done and in abundance all over the airfield. Small navigation items like the visual approach slope indicators (VASI) lighting is excellent. Lighting Overall the lighting at LGHI - Omiros is highly impressive, first rate. There are no runway approach lighting, except for the VASI lighting system, so it in a medium-heavy aircraft it is quite a technical approach at night, and as noted there is no ILS here either. Terminal, surrounds and ramp lighting is highly impressive, great quality and detail... again first rate. Greek Street lighting is well... very late night Greek, with a lot of tourism restaurants and services in that bright semi-darkness vista, lighting detail is very good, like this Greek branded petrol station. Preview Notes: This new scenery from a new developer Descent2View Simulations is an excellent debut into X-Plane scenery. The scenery is highly walkable from a ground level and flying in and out of this island airport is technically challenging, but highly rewarding. Scenery detailing and modeling is first rate as is the excellent night lighting, so overall as a first impression it is very, very good and I enjoyed the experience a lot. So very good value. Features noted are: Over 800 custom objects Custom animated car traffic Custom ground textures in 20 pixels per centimeter, resolution 3D night lighting Custom taxiways and runways with full PBR material Custom runway lights WT3: No WorldTraffic GroundRoutes are provided, but the airport will generate a few groundroutes, but in reality the airport and the few stands here are too small for traffic operations. Positives: Mostly everything Negatives: Odd Geman default autogen housing when custom objects are available to give the correct full Greek feel is a bit of a head-scratcher, some buildings float. ____________________________________________________________________ Yes!... LGHI - Chios Island National Airport by Descent2View Simulations is Available from the X-Plane.Org Store here : LGHI - Chios Island National Airport Price is US$29.95 Requirements : X-Plane 11 Windows, Mac or Linux 4Gb+ VRAM recommanded Current version: 1.0 (July 2nd 2018) Download Size: 2Gb : Install Size 2.44gb Extras and Documents: - None ______________________________________________________________________ Preview by Stephen Dutton 12th July 2018 Copyright©2018 : X-Plane Reviews (Disclaimer. All images and text in this preview are the work and property of X-PlaneReviews, no sharing or copy of the content is allowed without consent from the author as per copyright conditions) Review System Specifications: Computer System: Windows - Intel Core i7 6700K CPU 4.00GHz / 64bit - 16 Gb single 1067 Mhz DDR4 2133 - ASUS GeForce GTX 1080 8Gb - Samsung Evo 512gb SSD Software: - Windows 10 - X-Plane 11.25 Addons: Saitek x56 Rhino Pro system Joystick and Throttle : Sound - Bose Soundlink Mini Plugins: Environment Engine by xEnviro US$69.90 : WorldTraffic 3.0 Plugin - US$29.95 : BetterPushBack - Free Scenery or Aircraft - ToLiSS319 (A319) by ToLiSS (X-Plane.OrgStore) - US$69.00
-
Yes I think we are getting there... uncheck the Auto-gen flights and military flights, and if you can set up the keys like I did in the review its makes WT3 easier to use, never seen those red dots? but at least the aircraft are now running... SD
-
Aircraft Update : Boeing 748i/8F Adv v1.9.1By SSG
Stephen replied to Stephen's topic in Airliners Reviews
The problem with the FF B777 is that yes it is old now compared to the B757/767 Series, and a complete upgrade to v2 was promised but then everything went quiet? Does that mean v2 is coming or not? Personally I think so as both the B757/B767 twins are up to date and the FF A350 is still waiting on the FMS upgrade... so the FF B777 is the only one standing out there. The last upgrade v1.9.12 made it X-Plane11 compatible and no it is not THAT bad either, but the earlier version was unflyable, so the question to ask is "if I buy can I get an upgrade to the v2" It is only fair that you don't pay twice, but only an upgrade fee, or do you wait? One point is FF do usually announce in August (for release October), if anything is coming. But if you did buy the B777 you wouldn't be very disappointed either, it is still a great aircraft in X-Plane. -
I have never had the situation where it deletes that many aircraft? or routes. Lets check some basics... You checked the resources/plugin install is correct as per the image? Now check the GroundRoutes folder includes both the arrival and departure folders? Under the RouteFiles should be the AFRE_Route traffic folder? Both the Arrival and Departure Folders should include the ground routes like this... Now there is one extra thing to do with the AFRE files, under the WT3 menu there is the "Enable/Disable Regions" now make sure the AFRE is enabled! or active. Cargo is part of the same AFRE data, so it shouldn't make any difference. My Flight setup is for KLAX is like this (click on image to enlarge) If all correct now click on "Create Flights" Try that.
-
The three ground route files? The Arrival and Departure folders have to be "inside" the GroundRoutes folder? Is there a load of items in the resources/plugins worldtraffic app?, if so take them out or reload the original clean version... it should look only like this. Try that... SD