Stephen
-
Posts
2731 -
Joined
-
Last visited
-
Days Won
354
Content Type
Profiles
Forums
Articles
Everything posted by Stephen
-
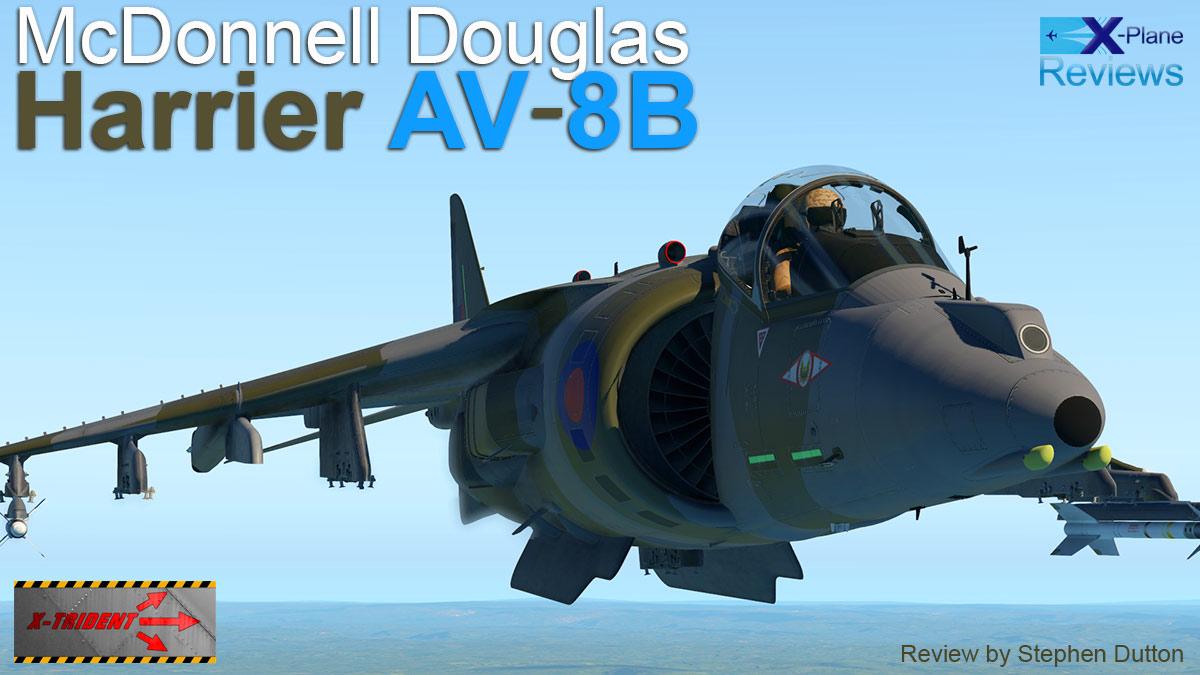
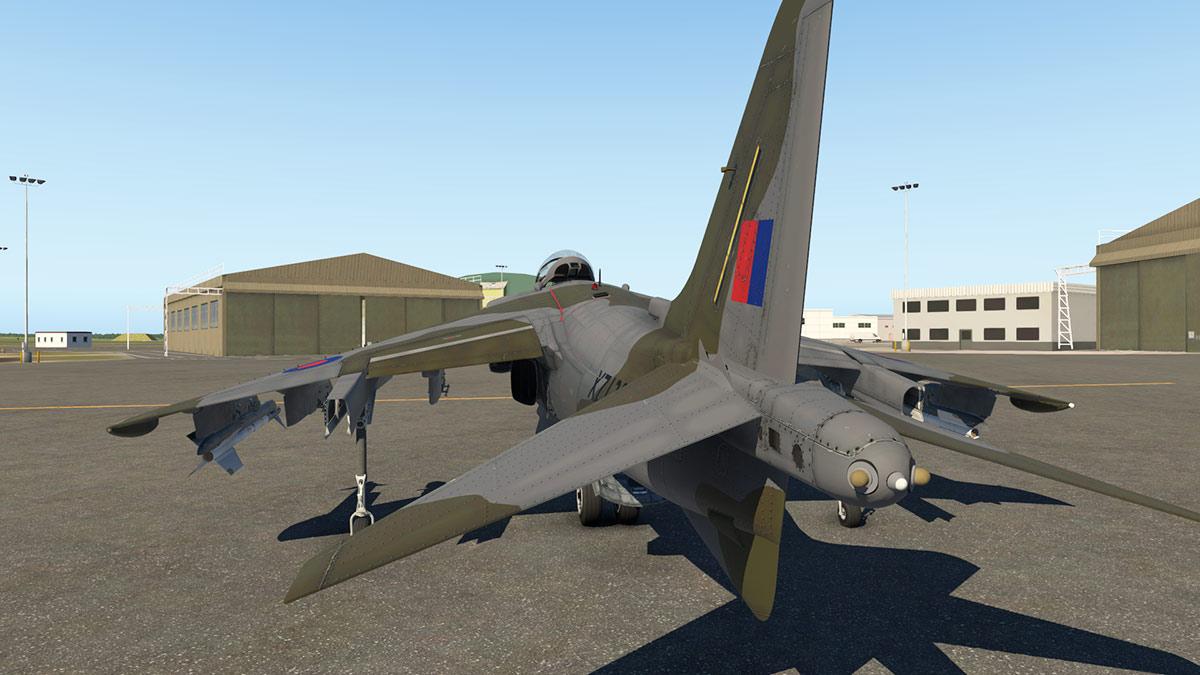
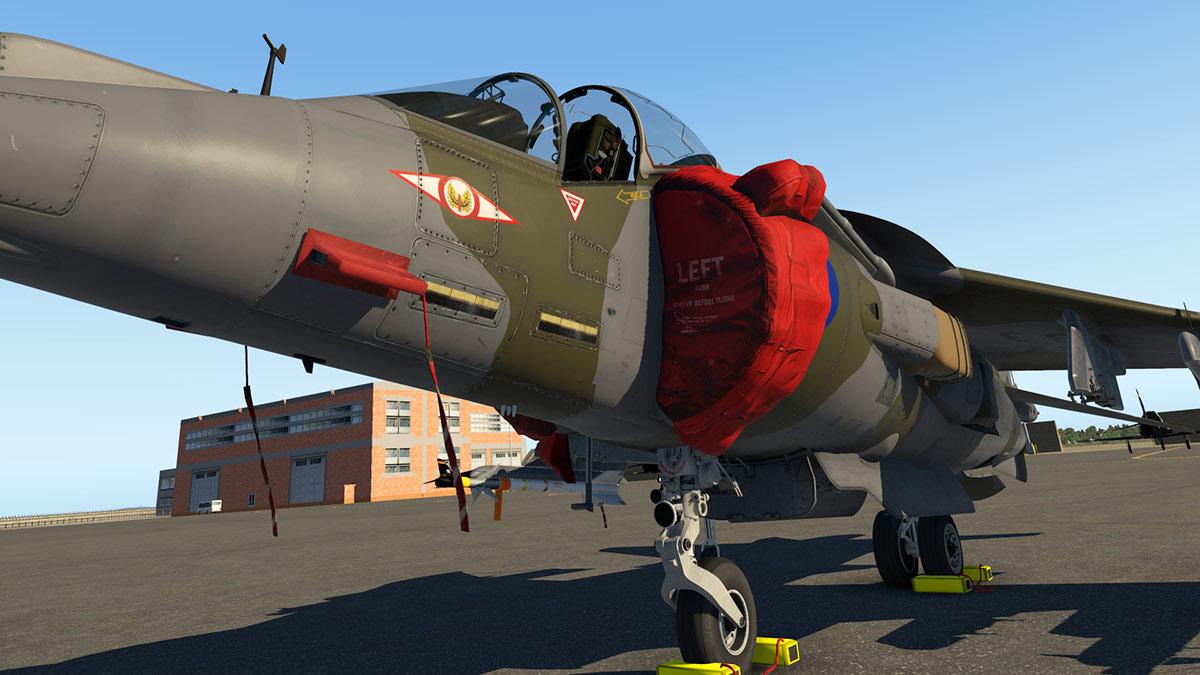
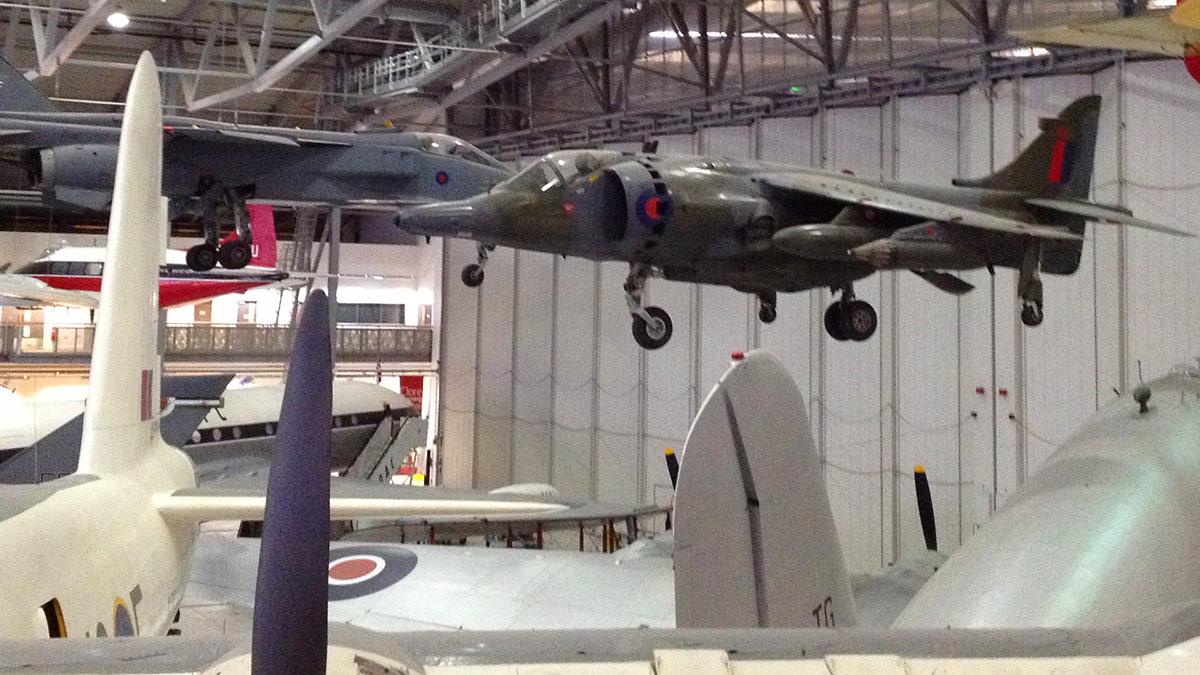
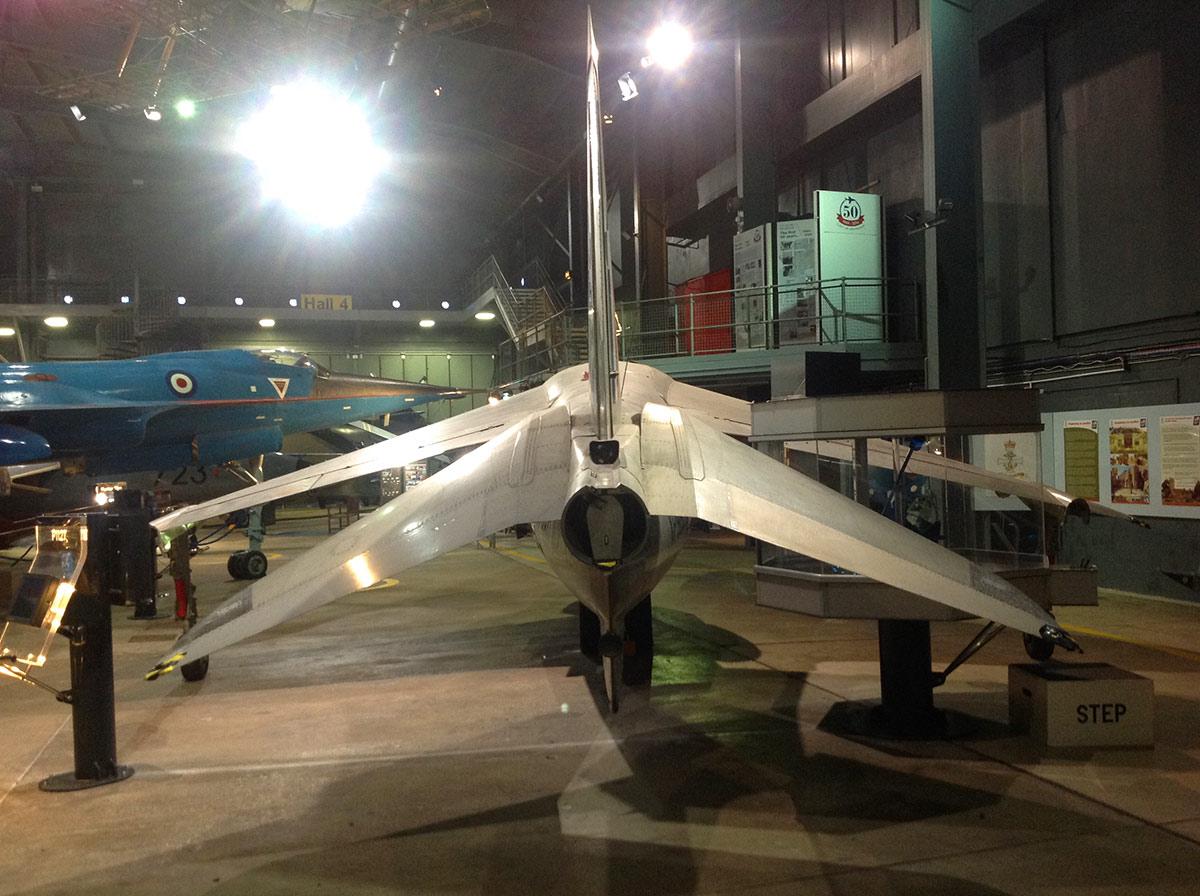
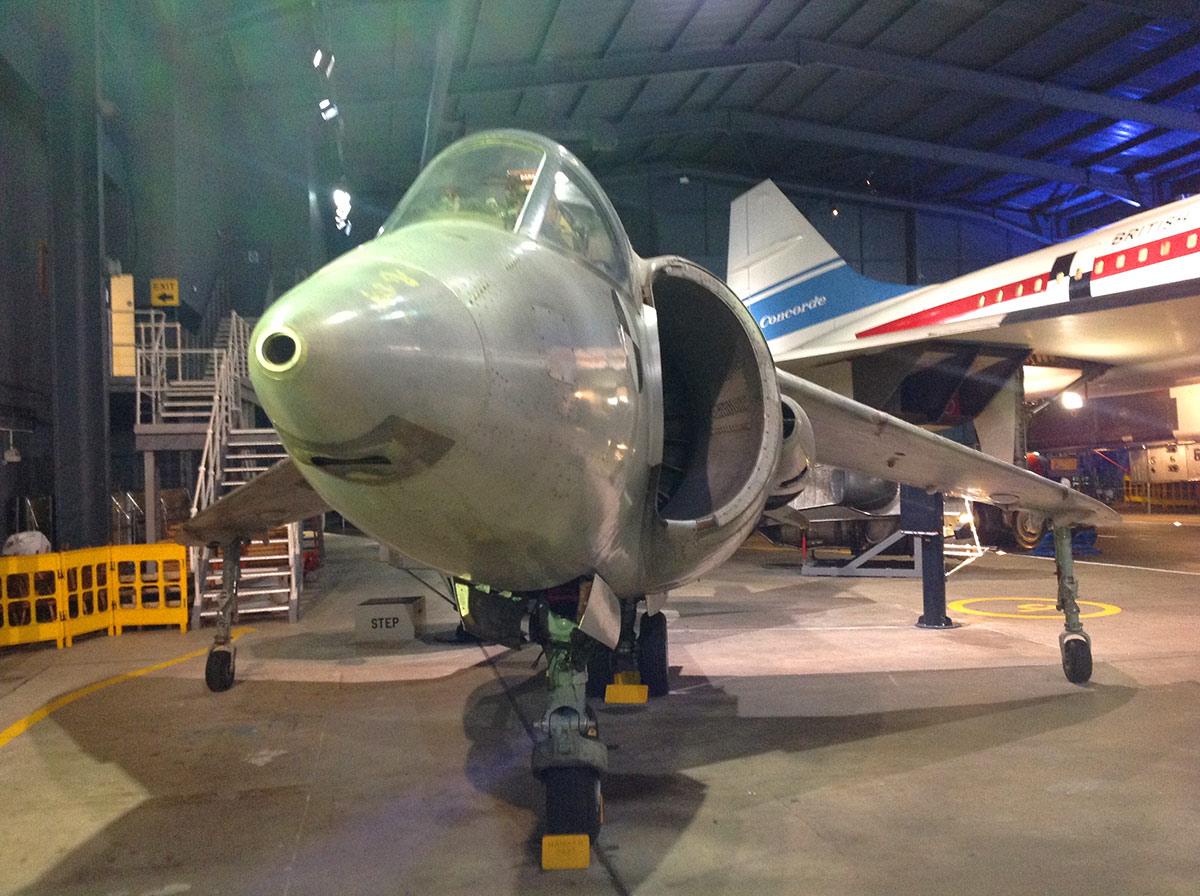
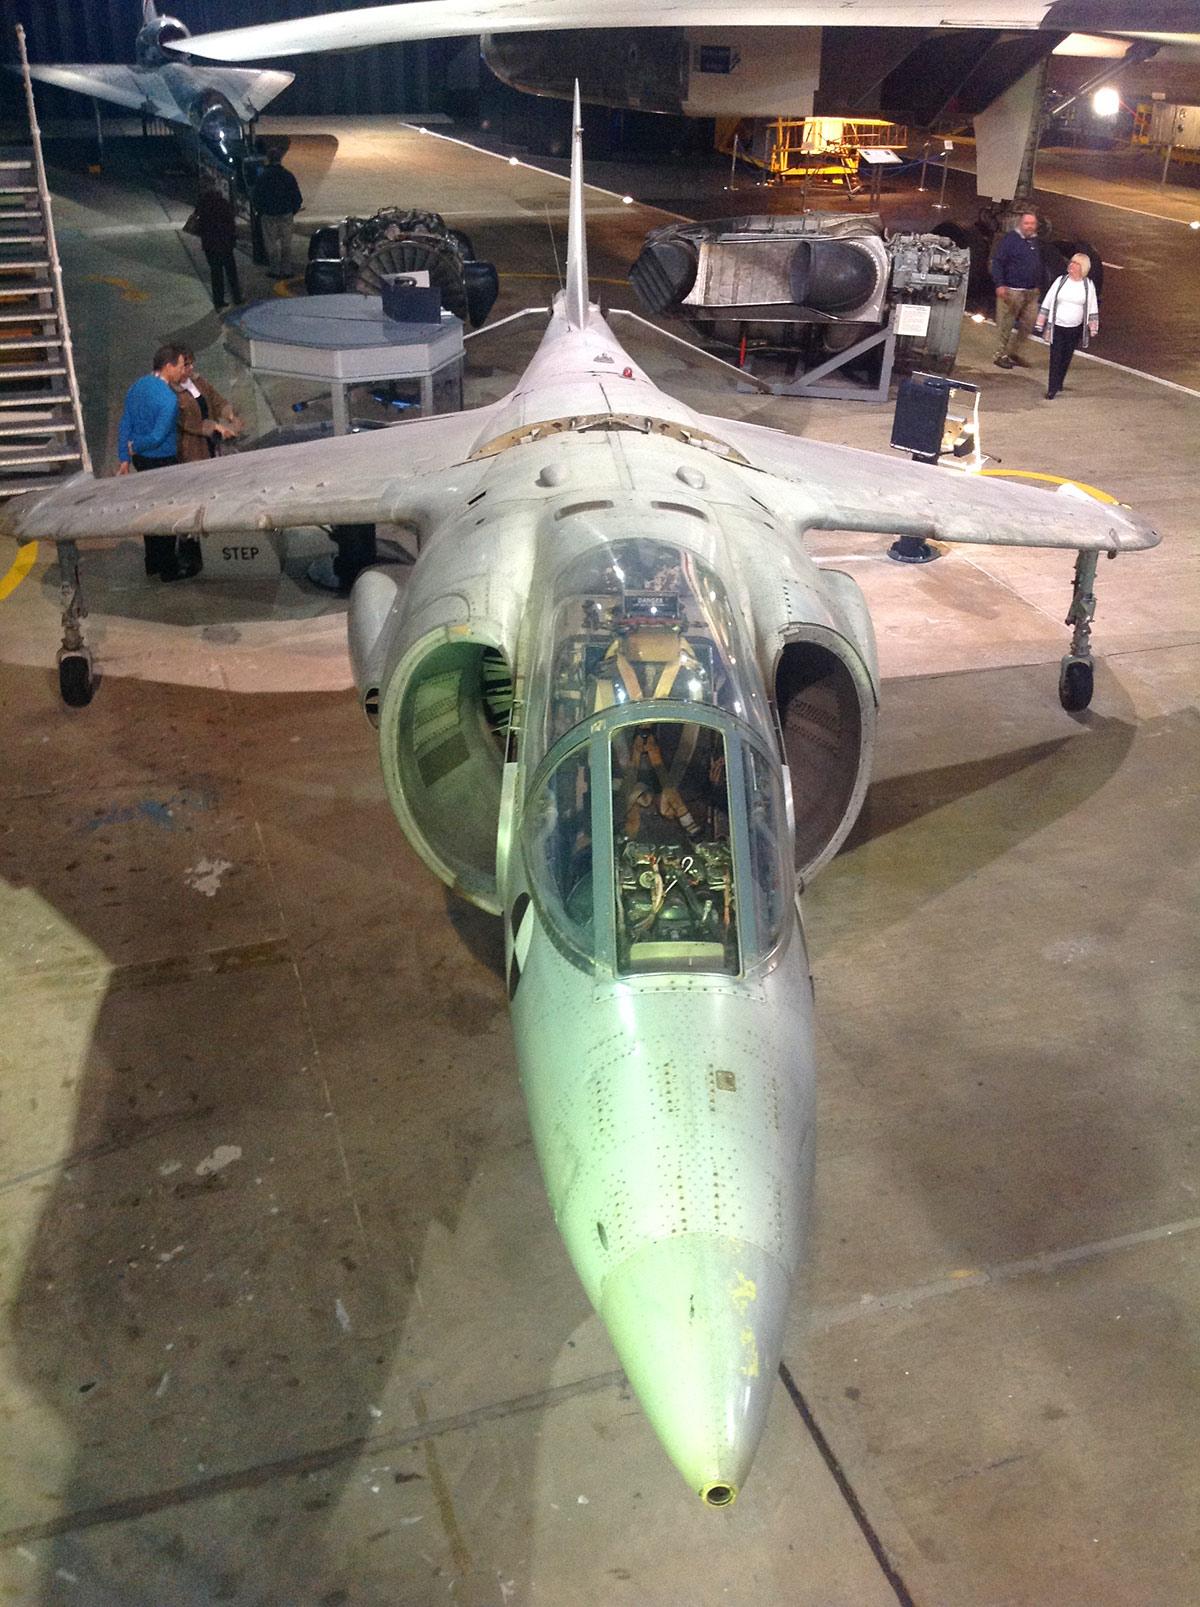
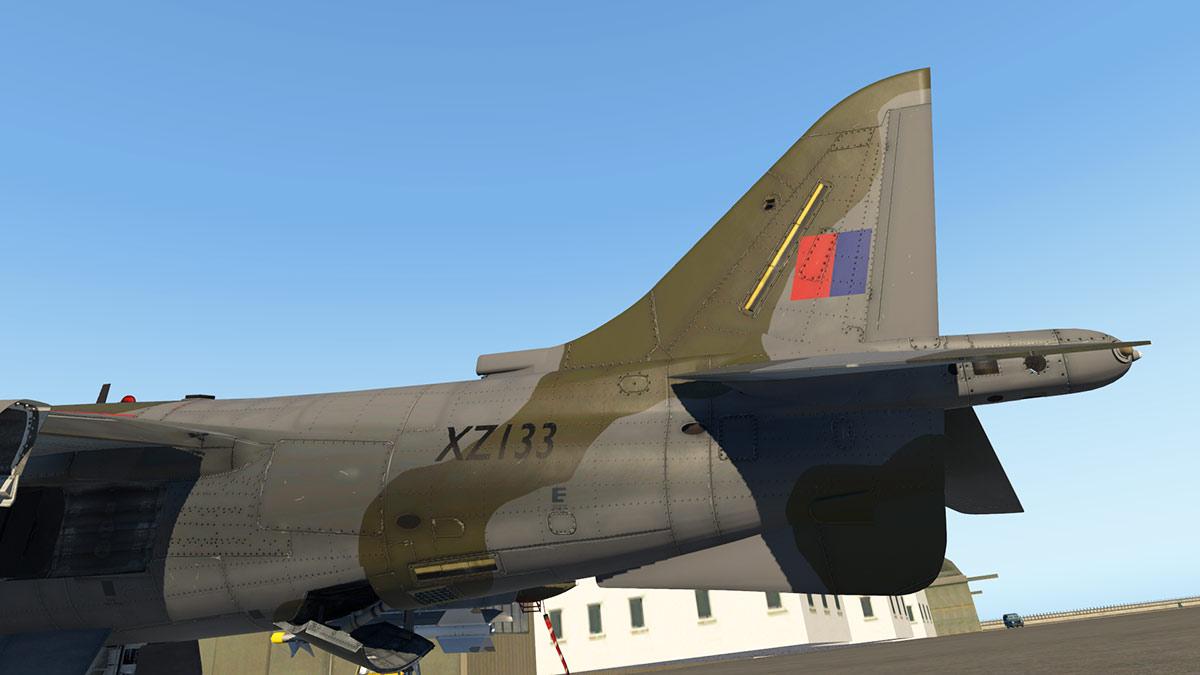
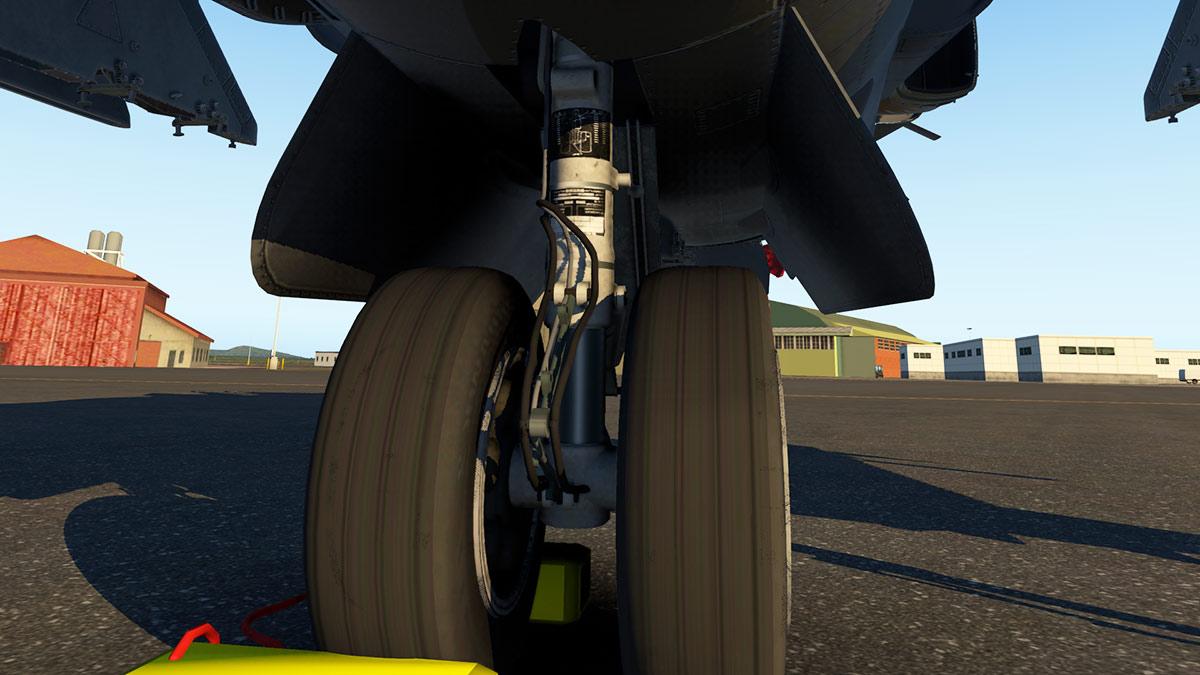
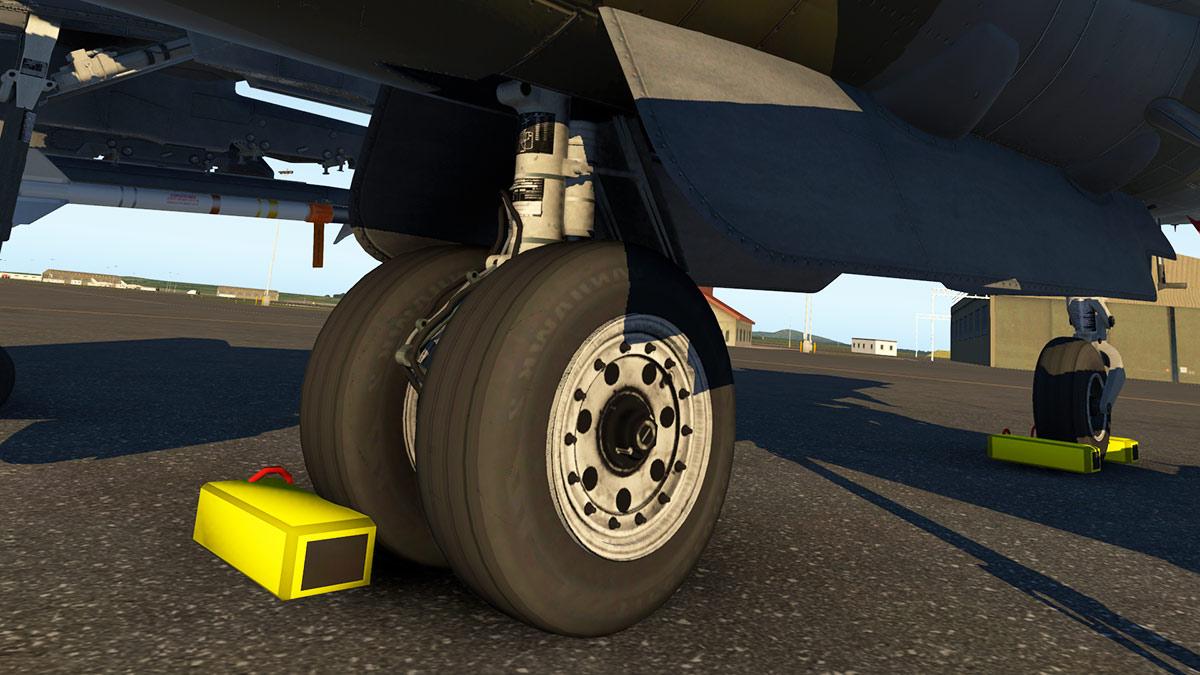
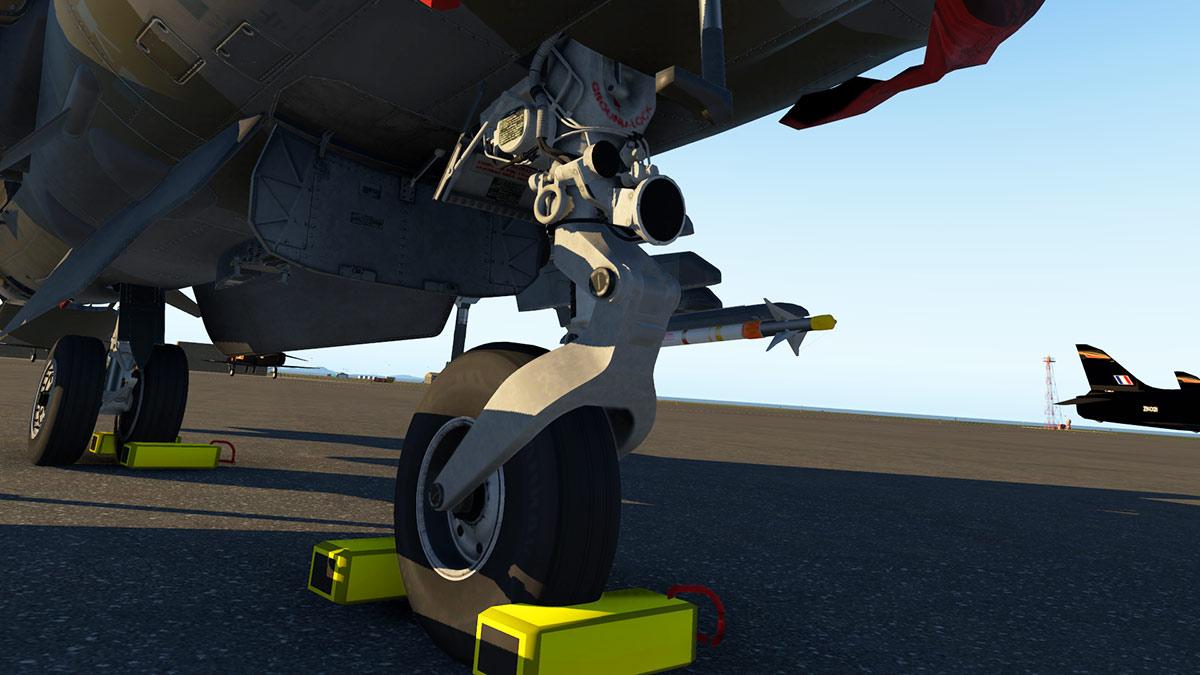
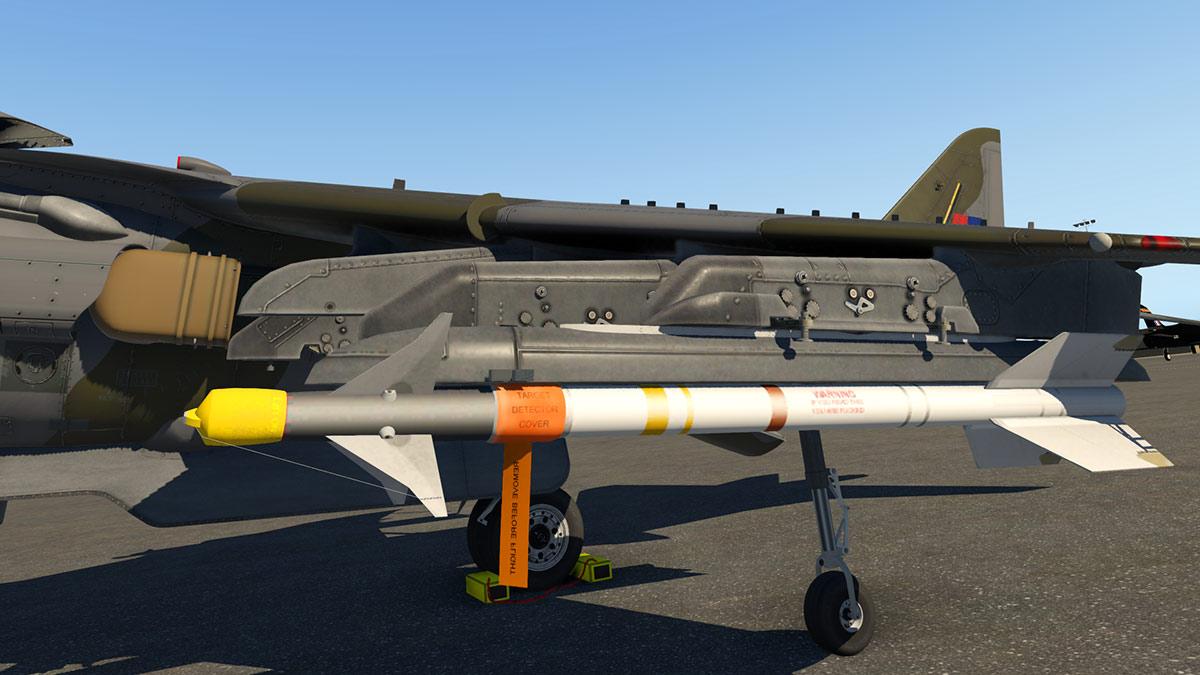
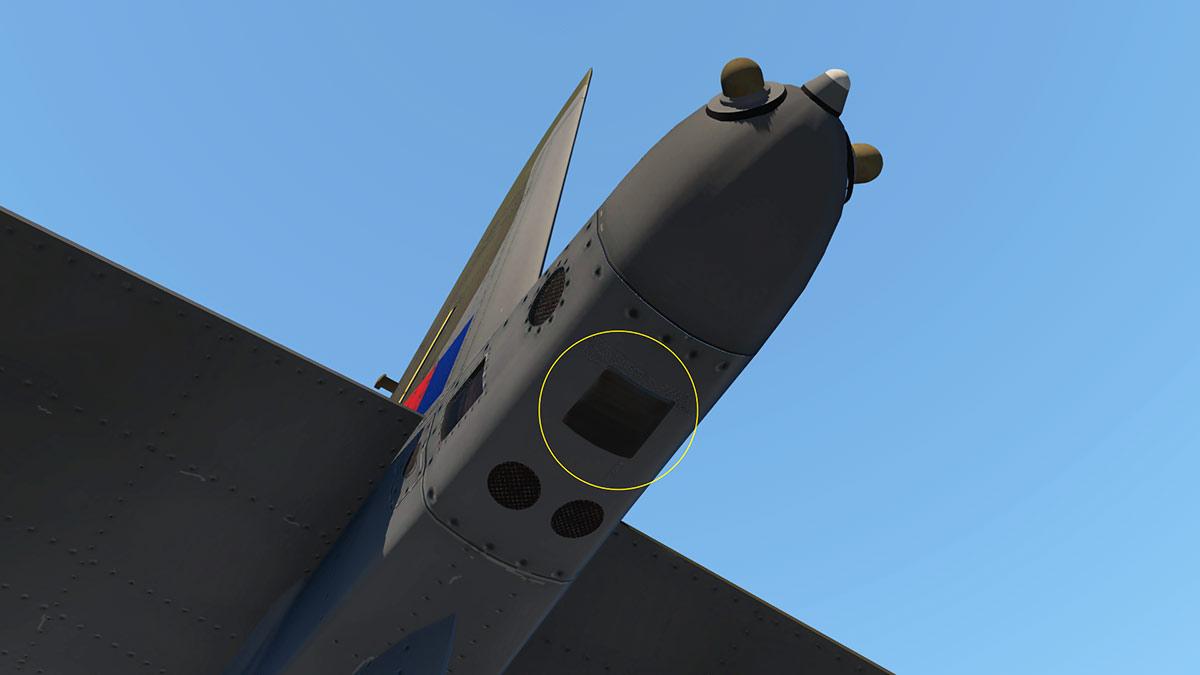
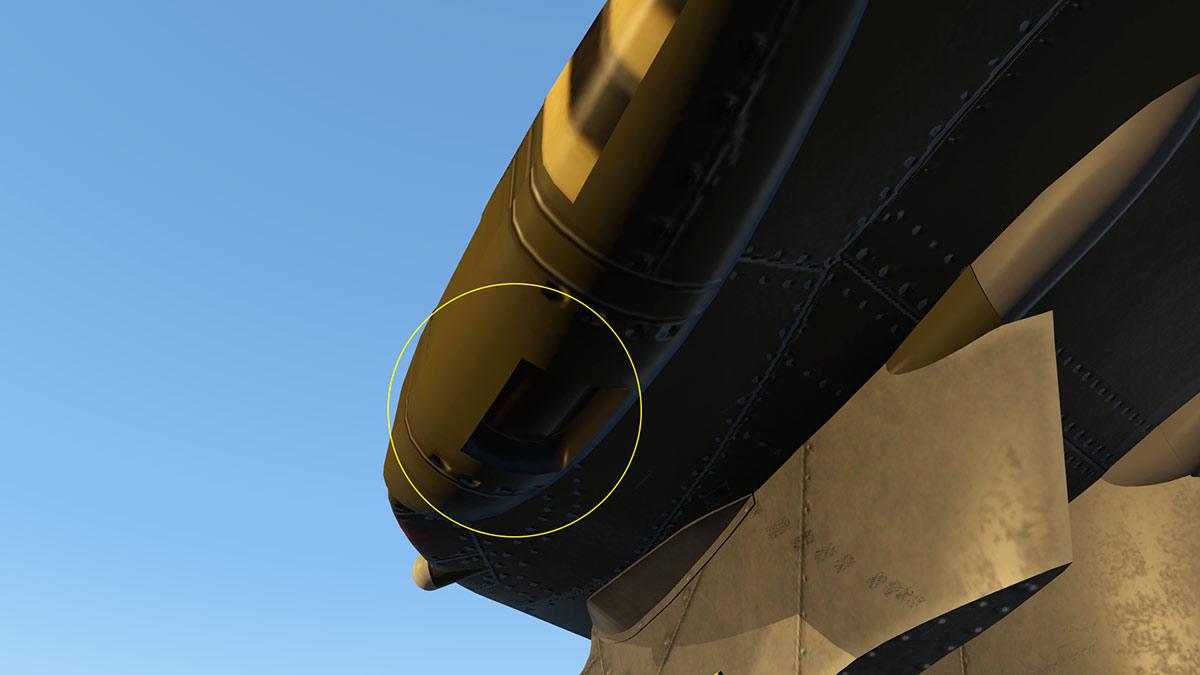
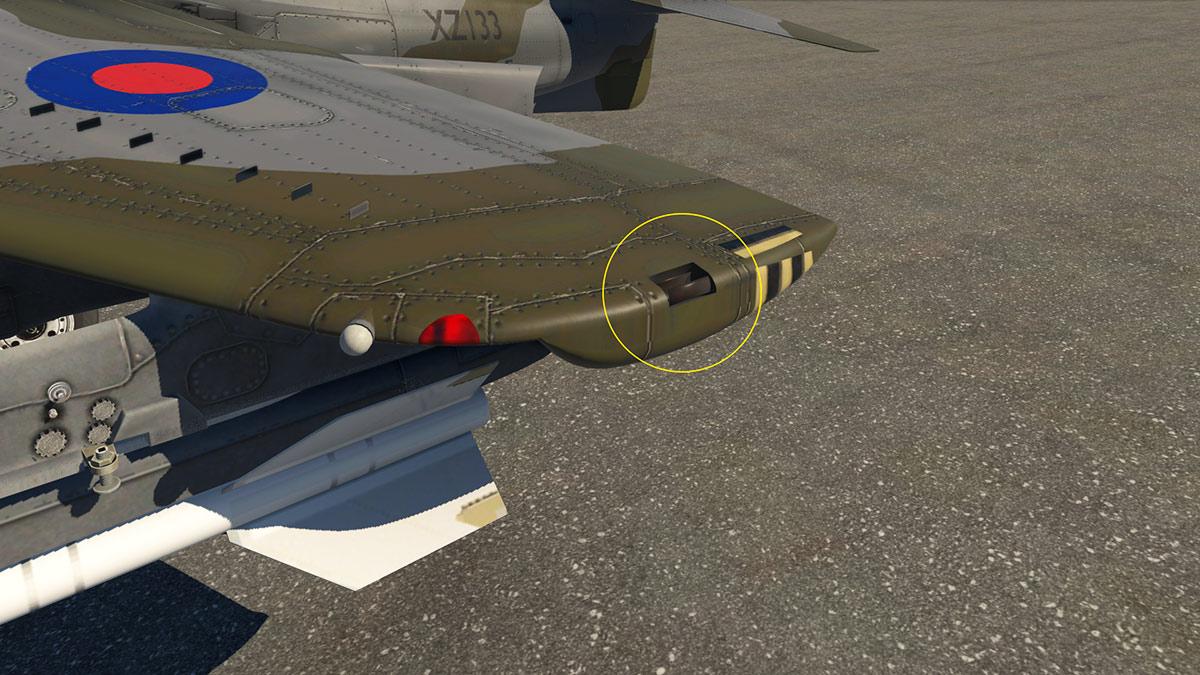
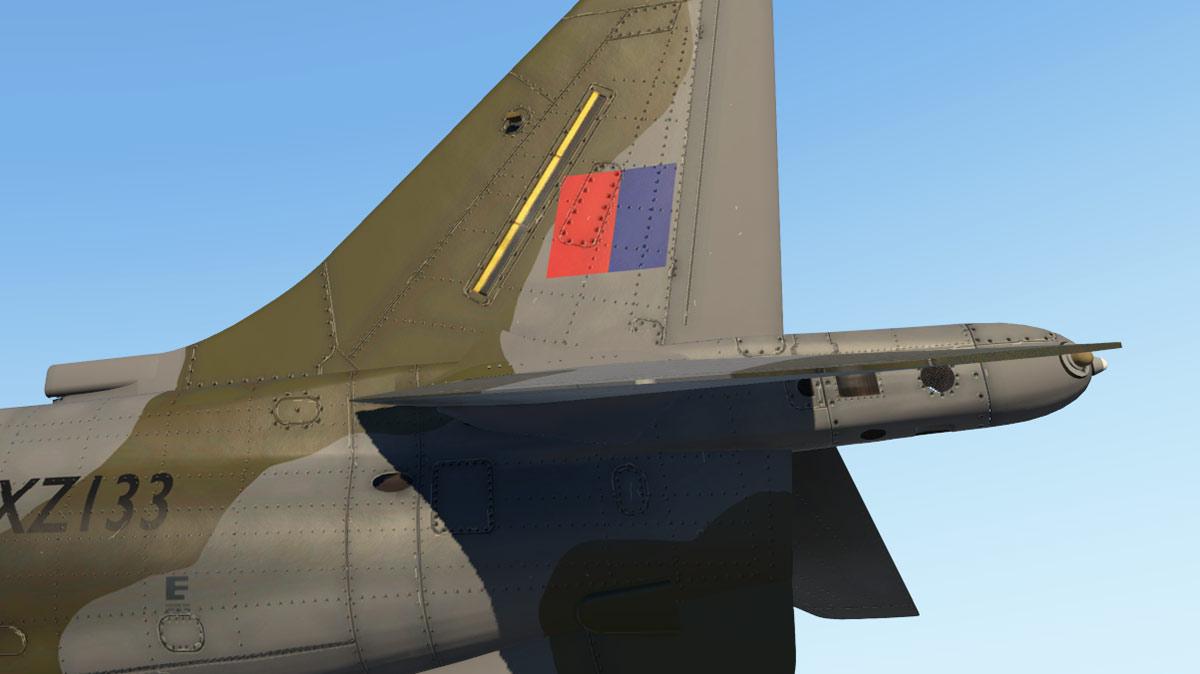
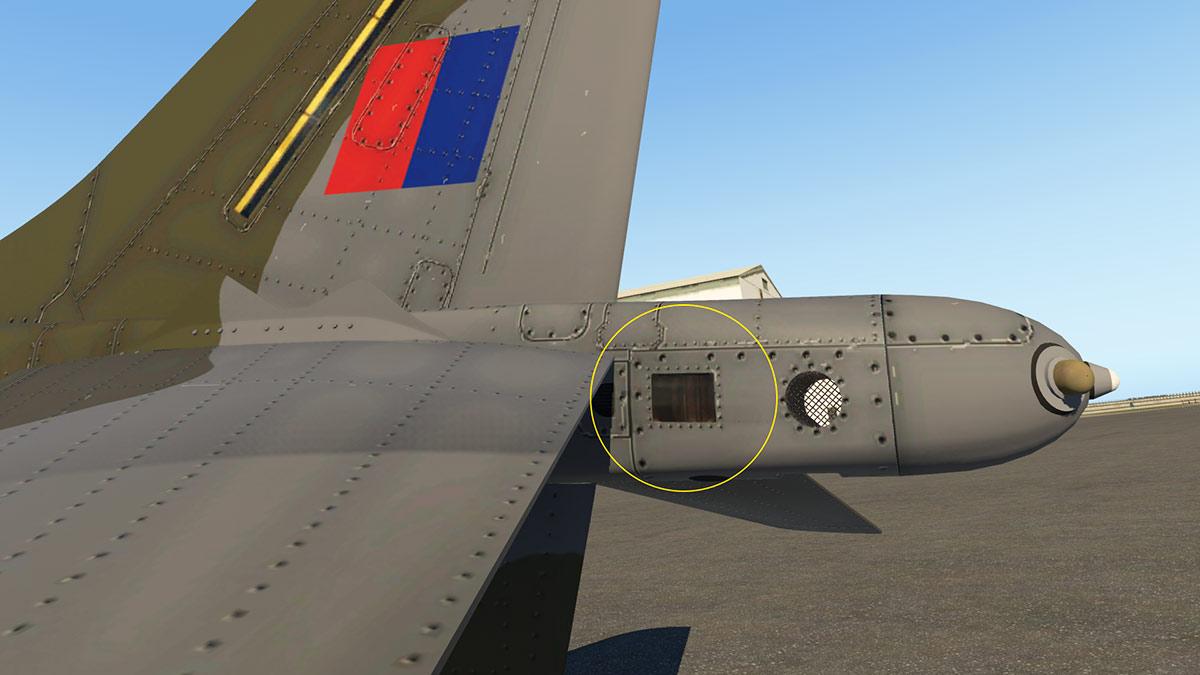
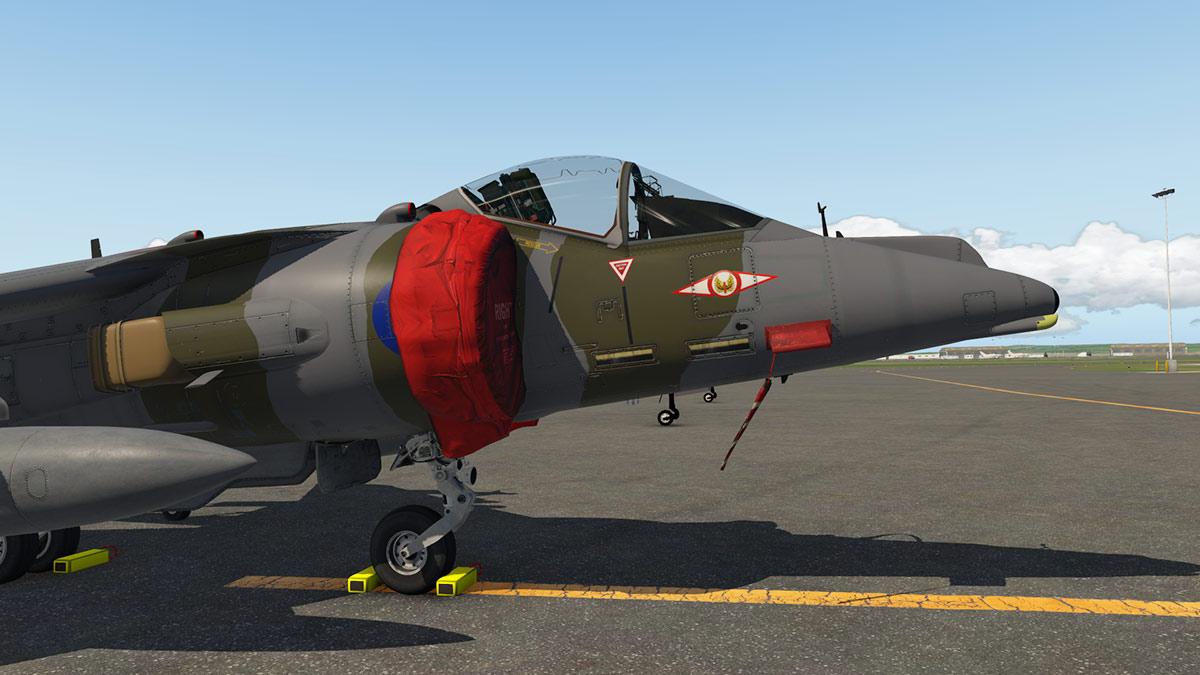
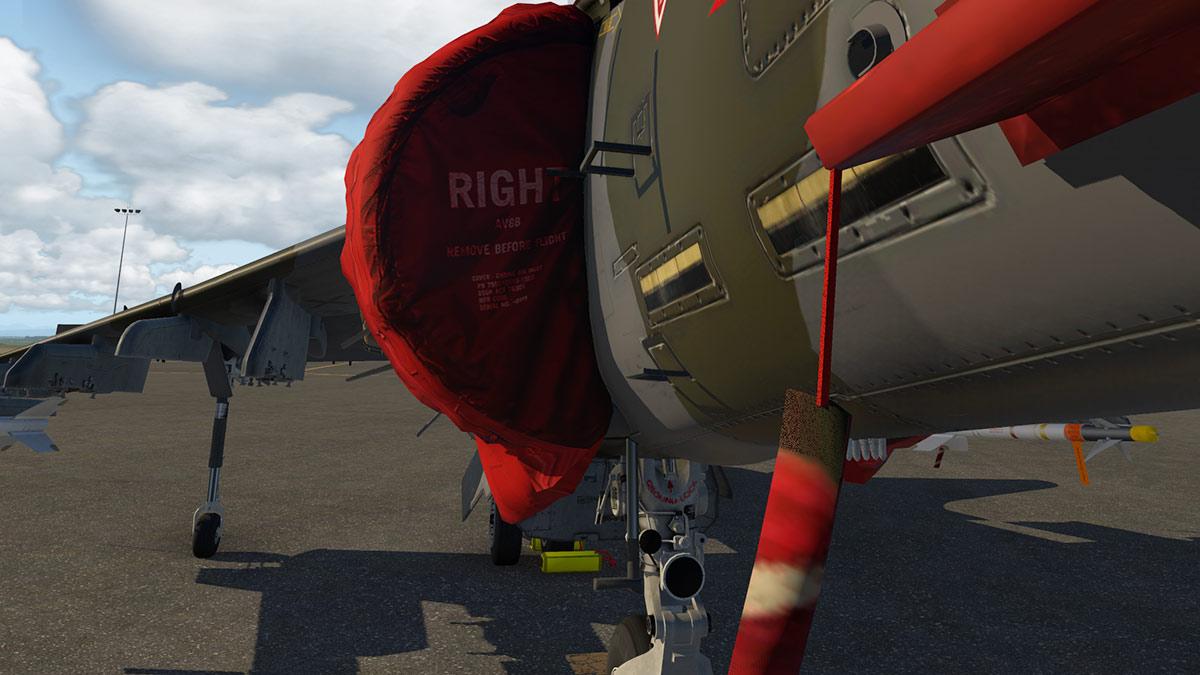
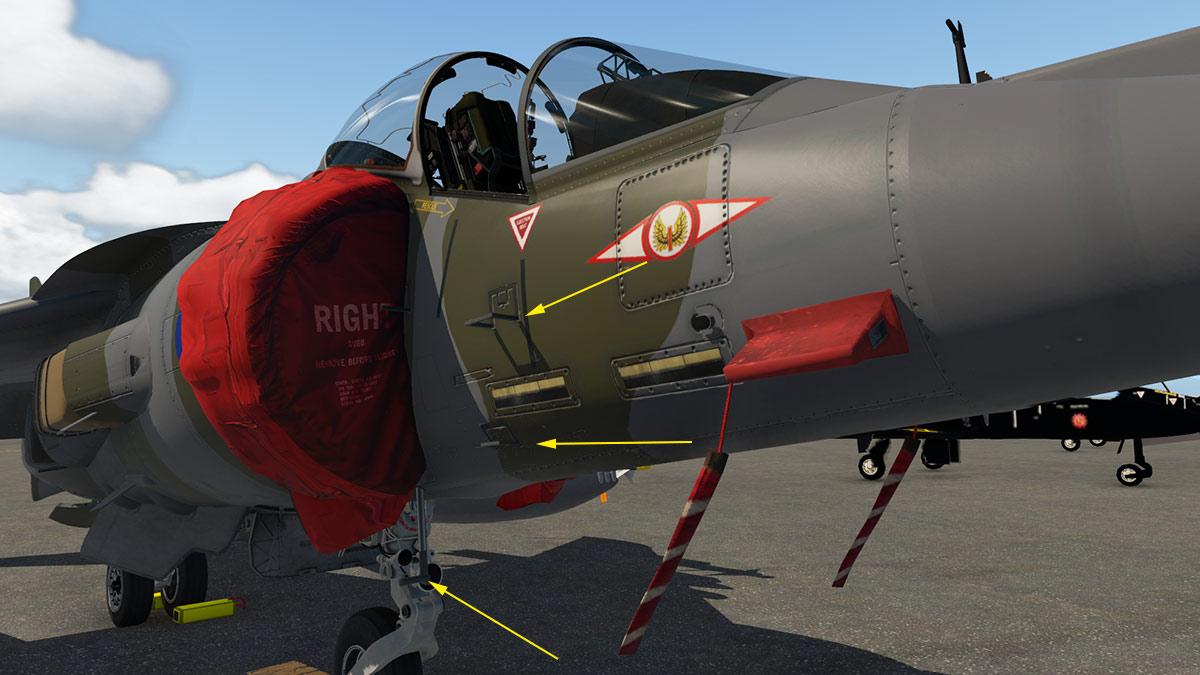
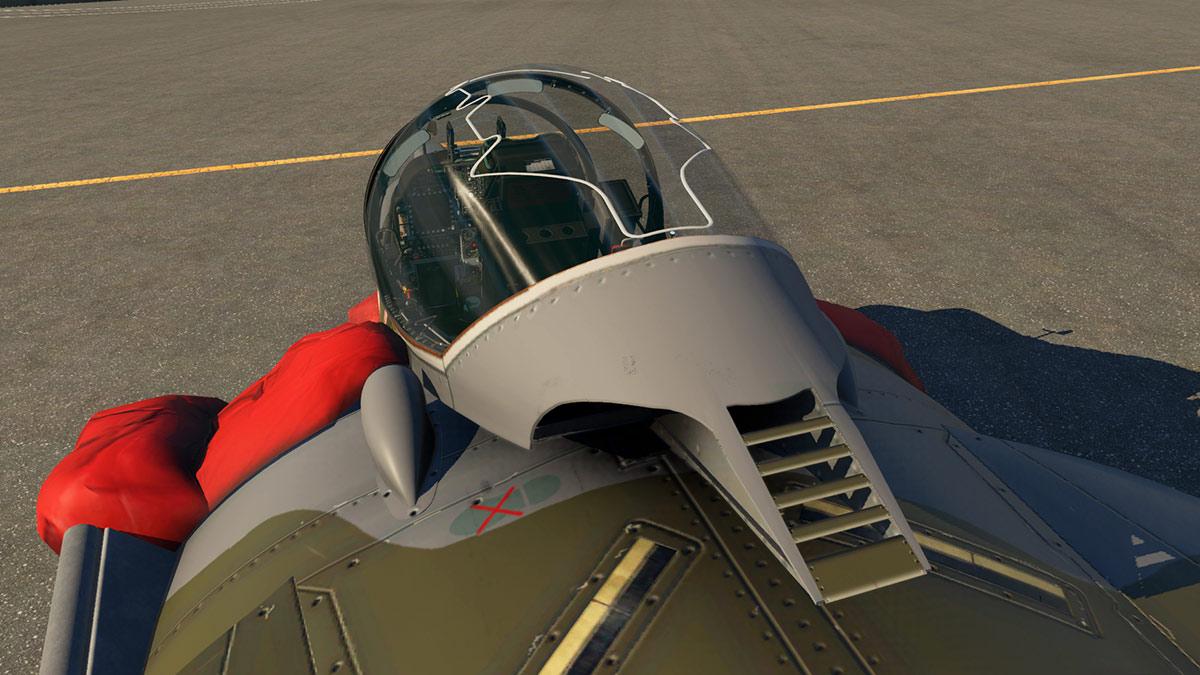
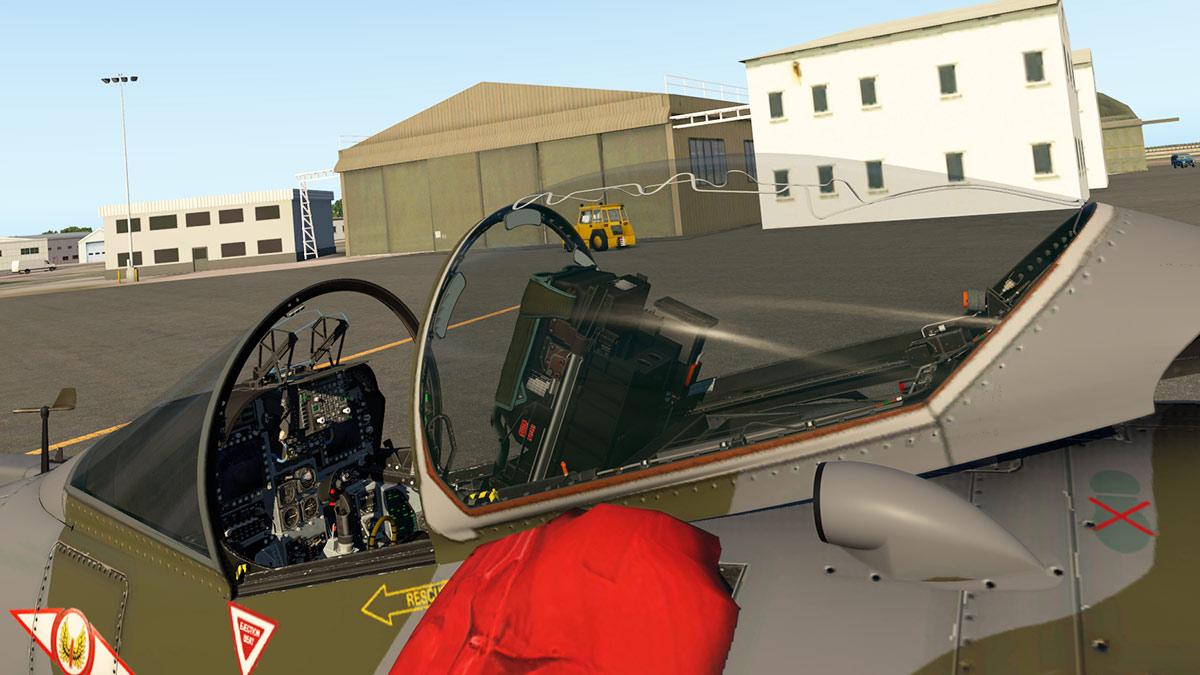
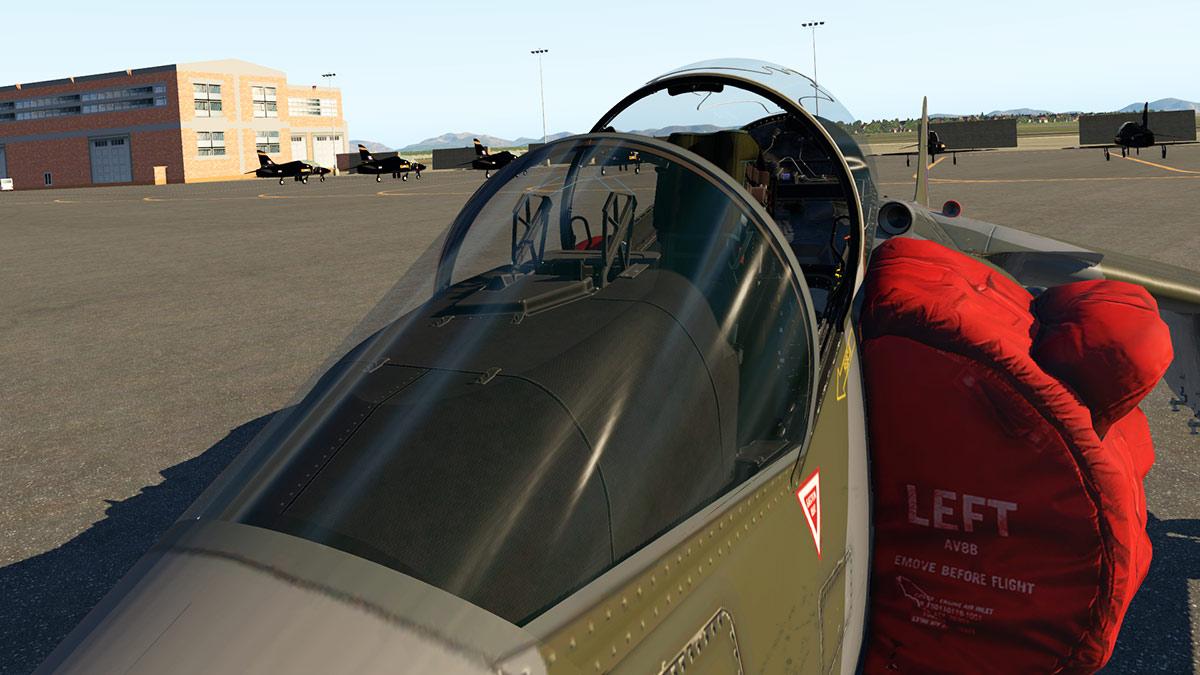
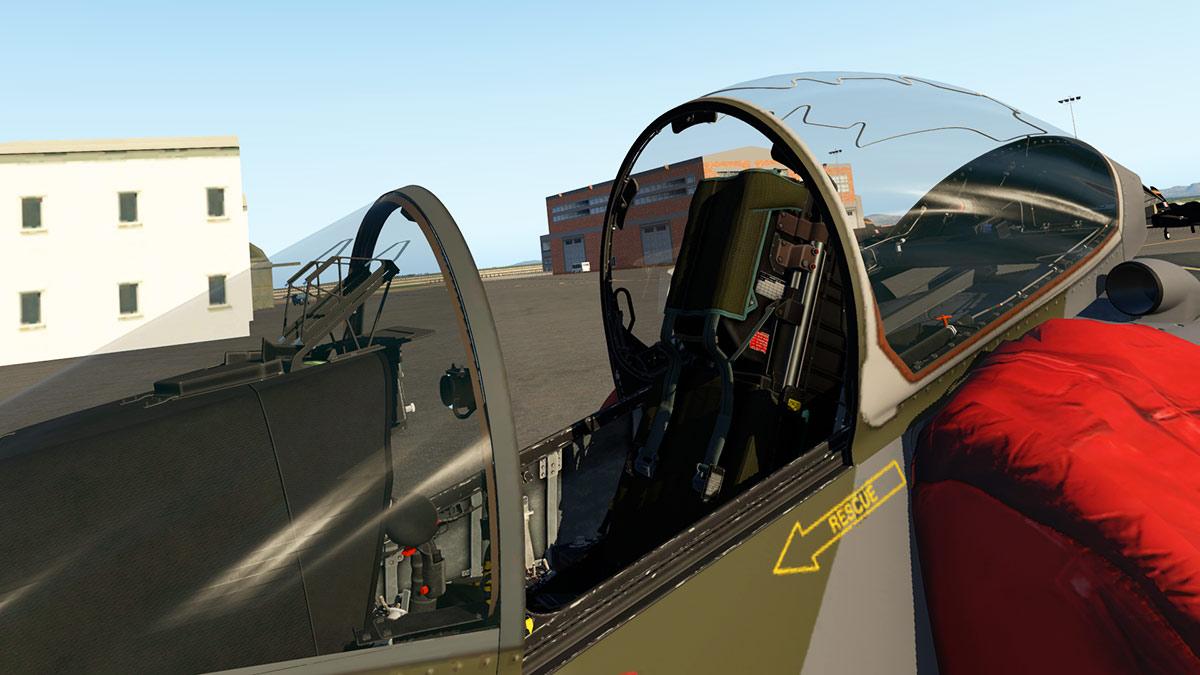
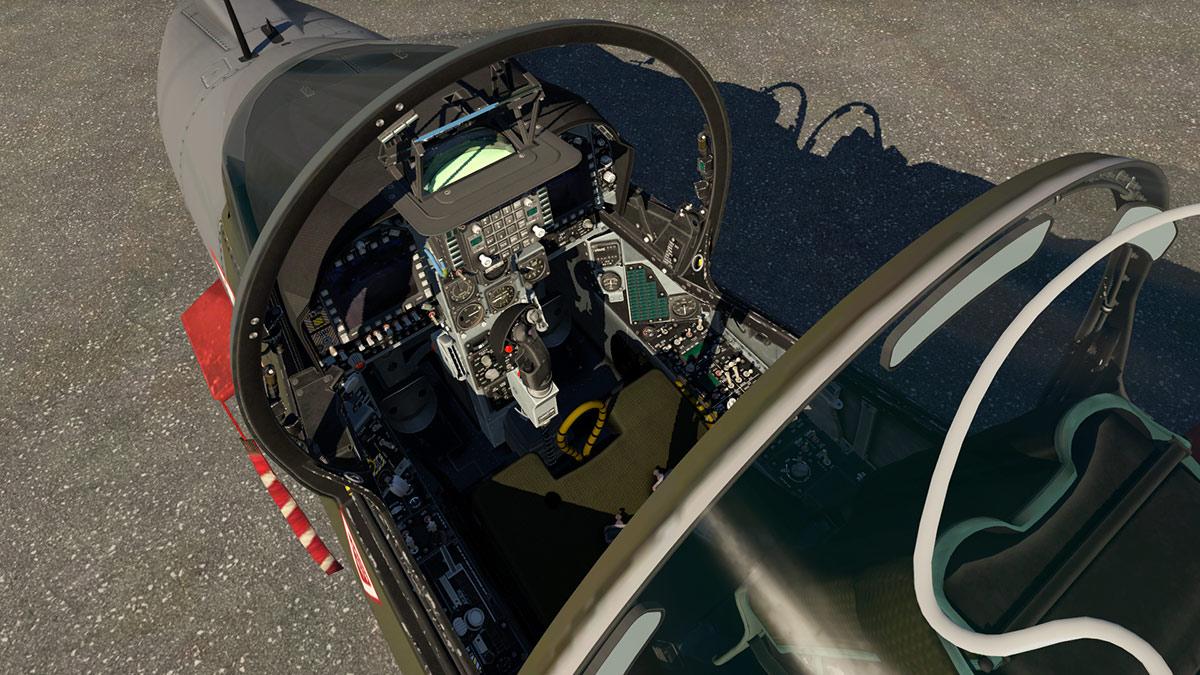
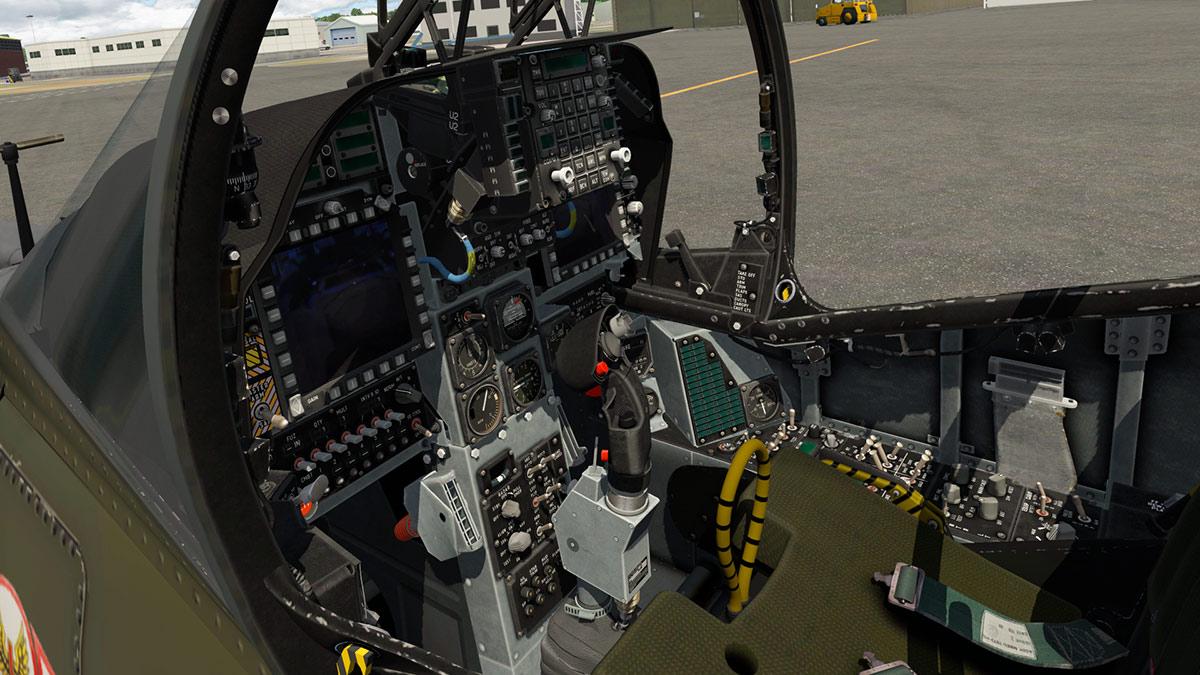
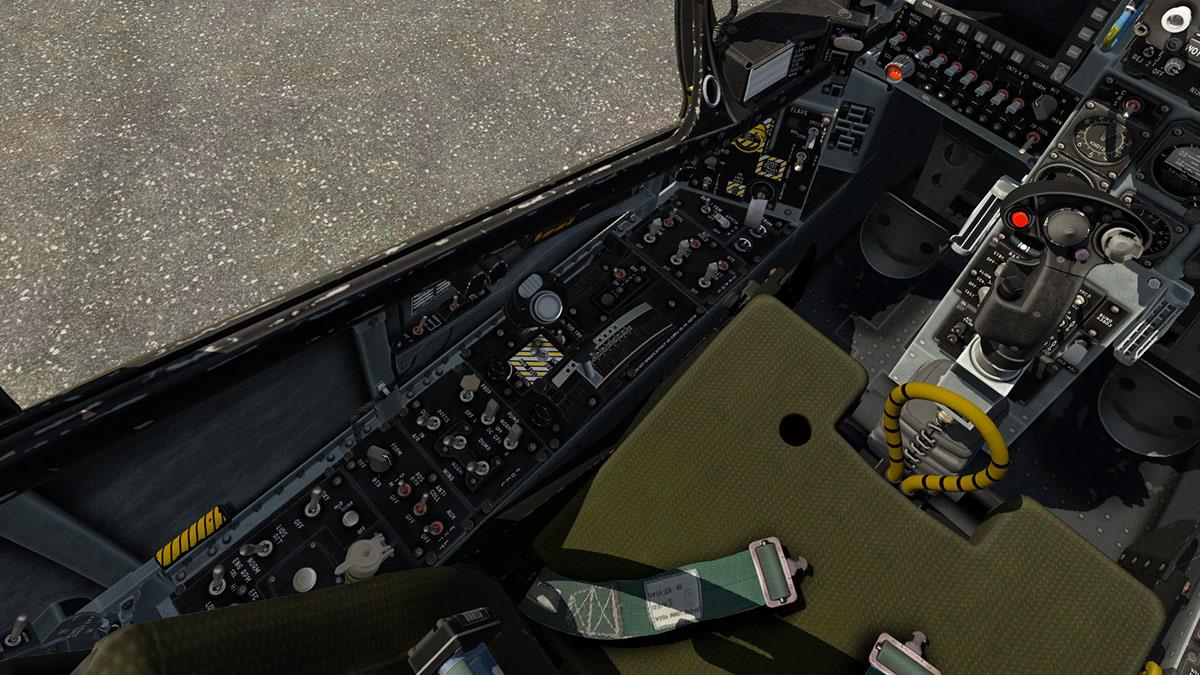
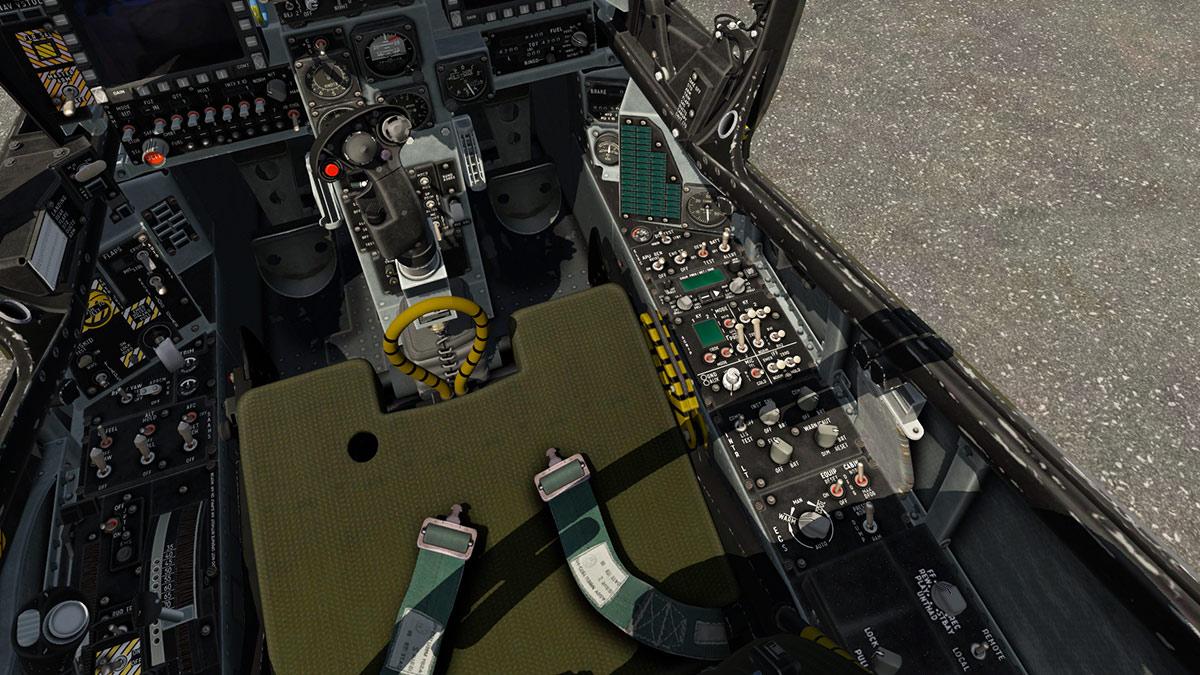
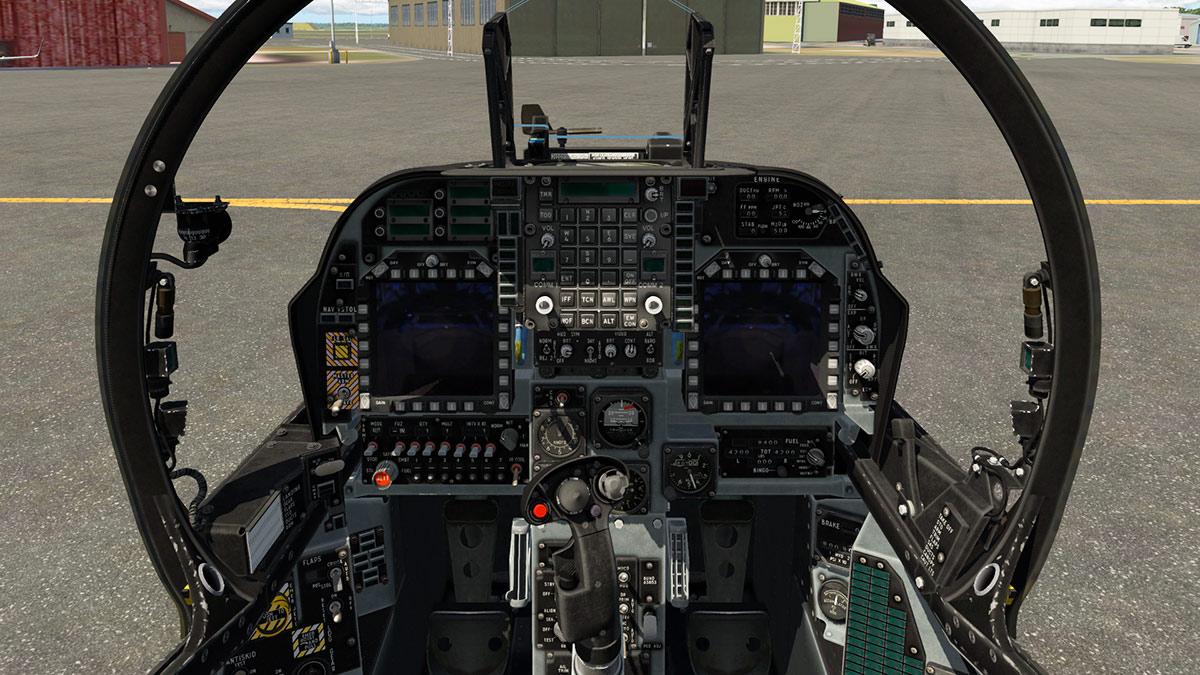
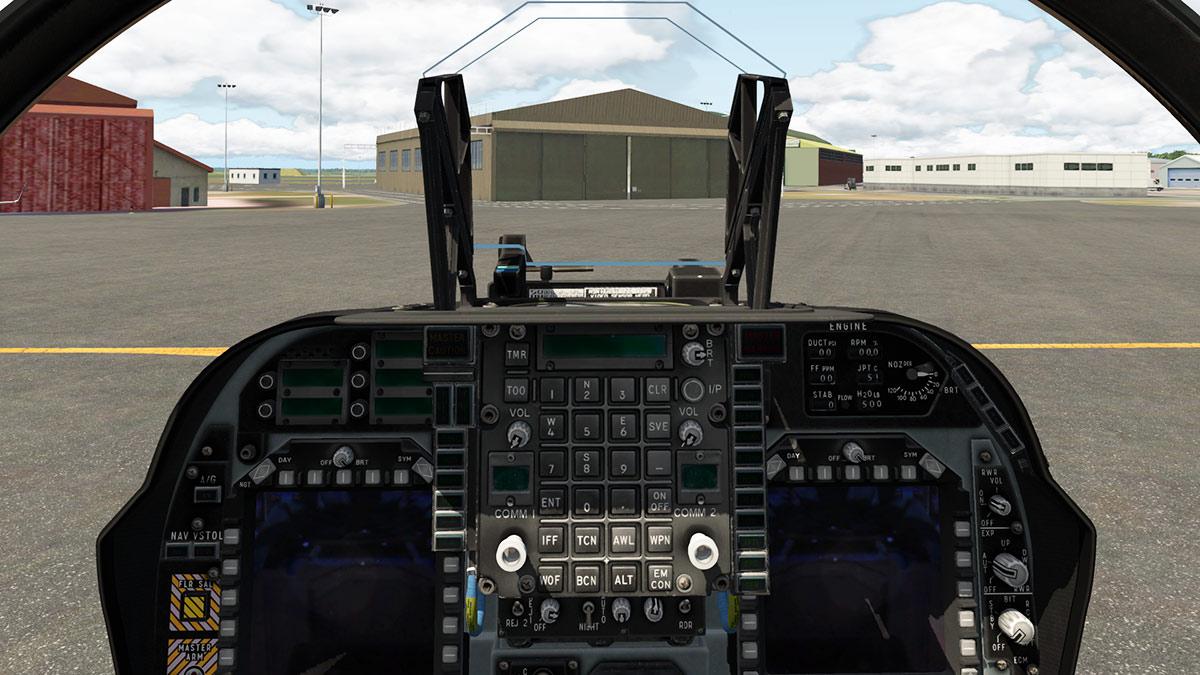
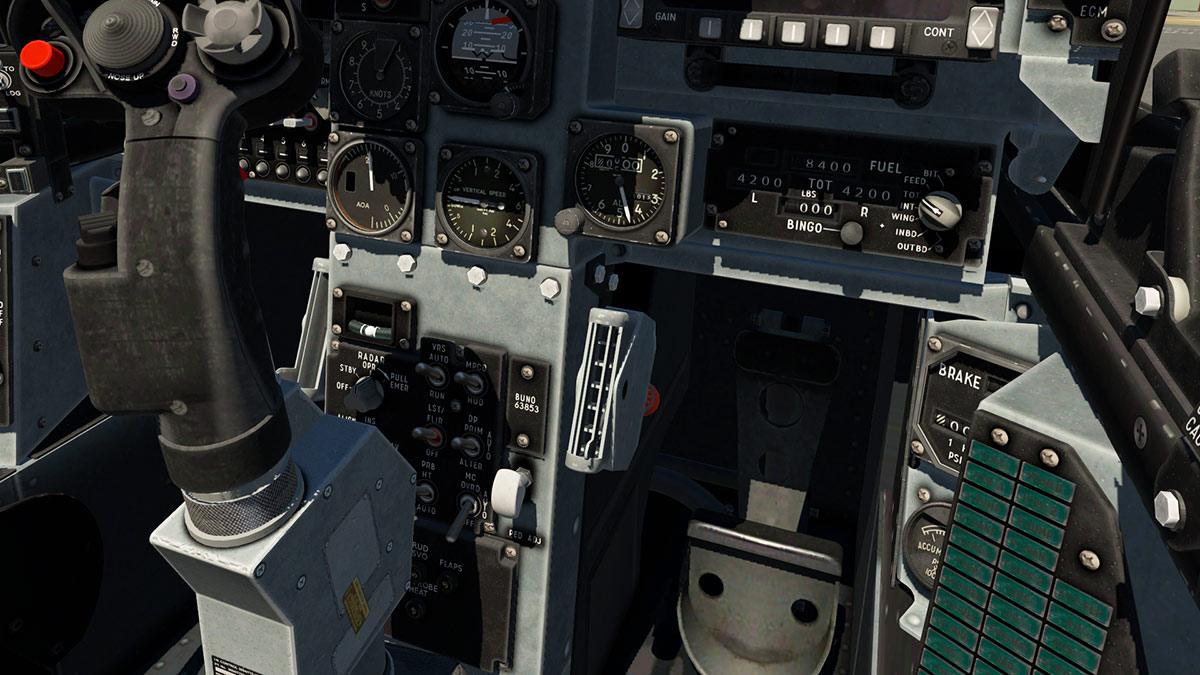
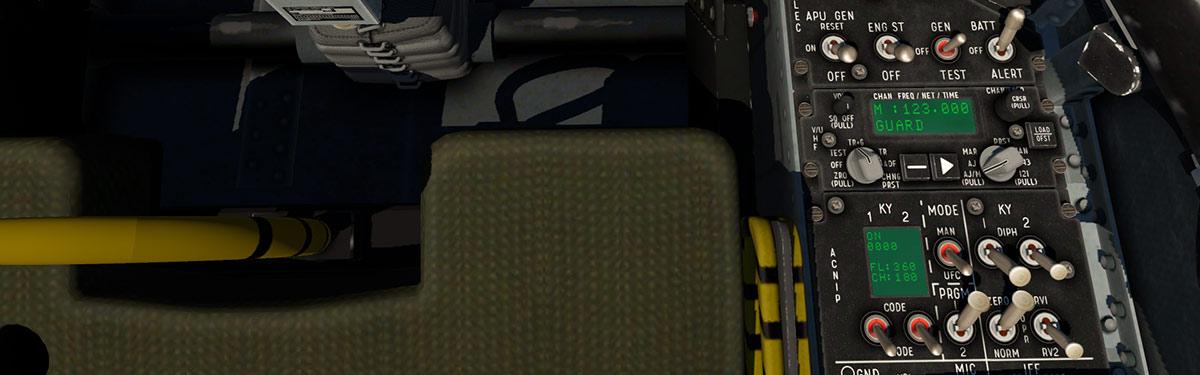
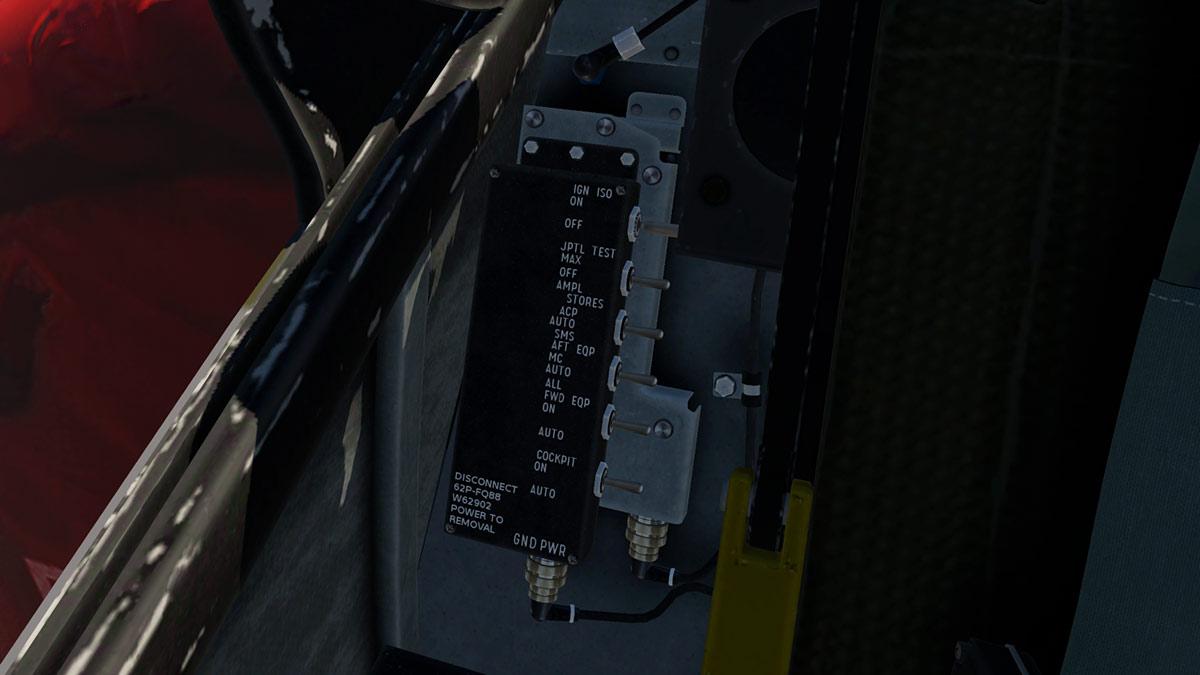
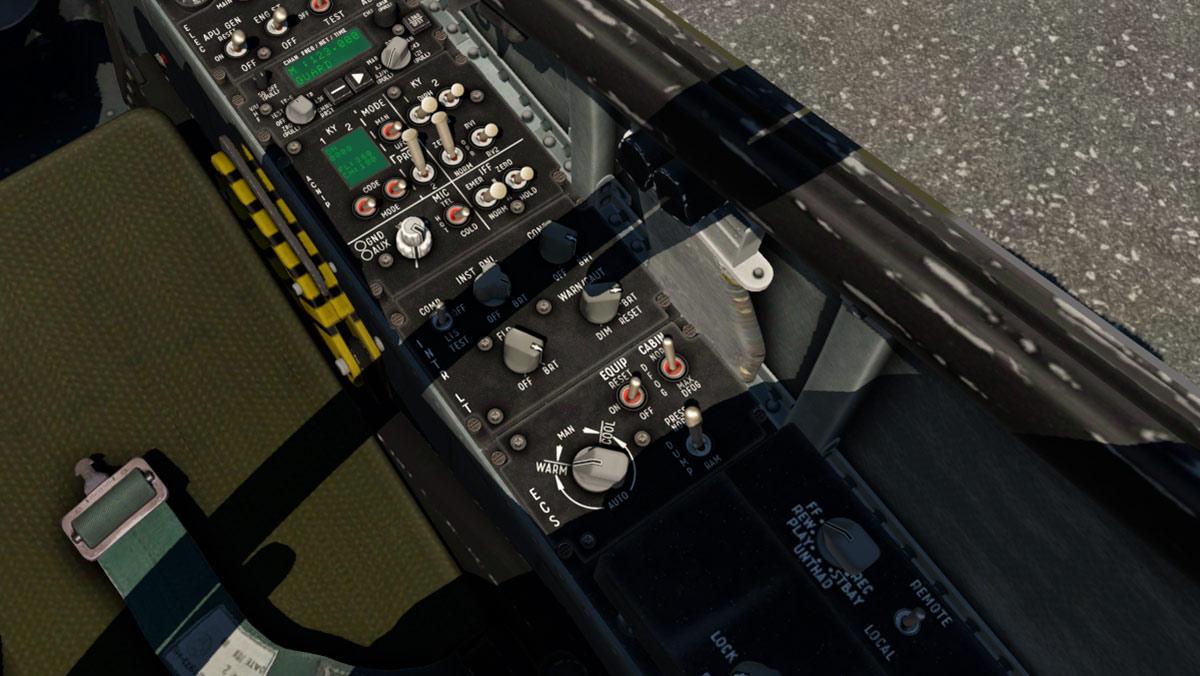
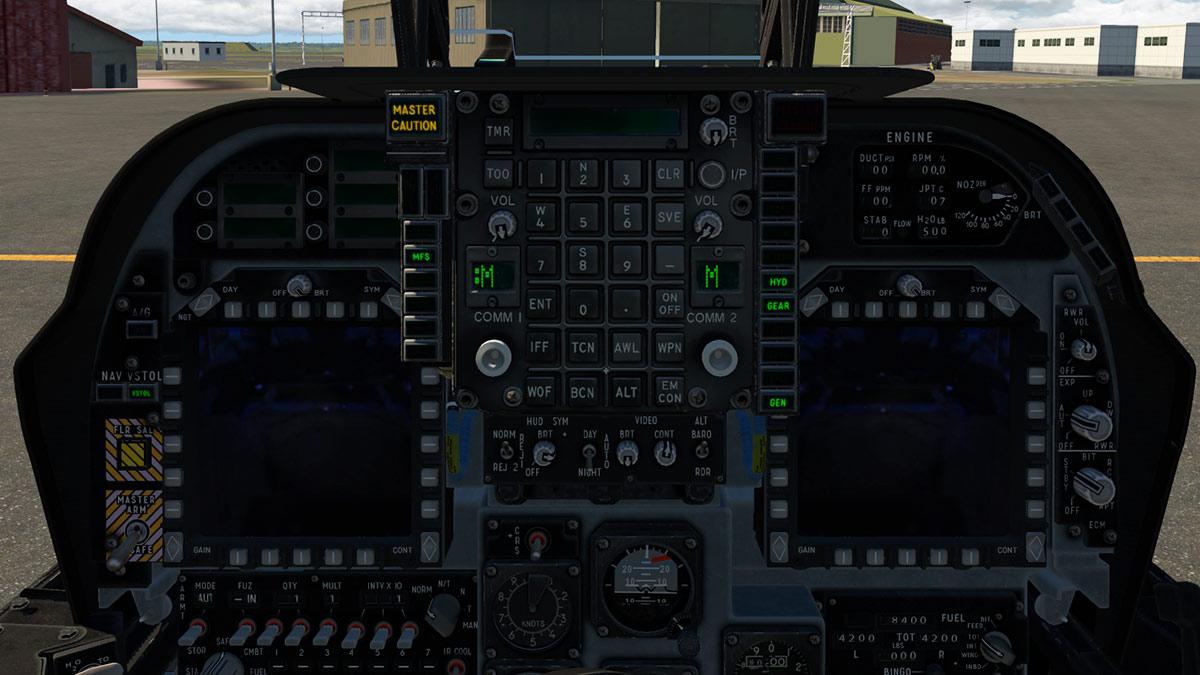
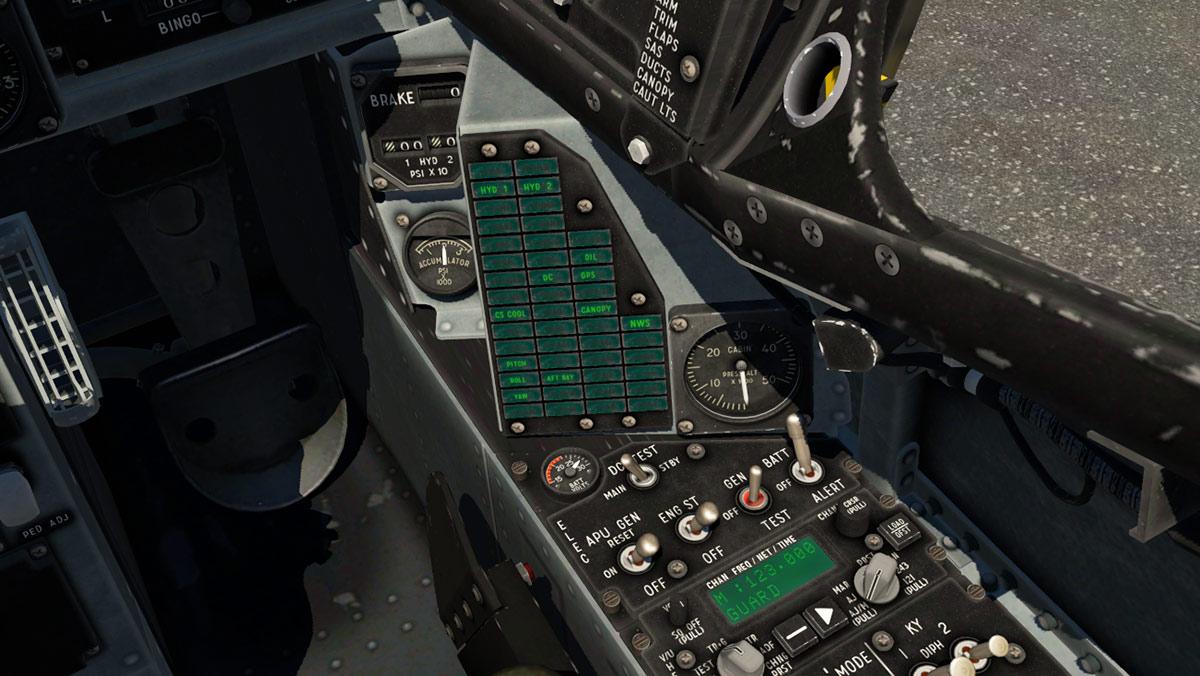
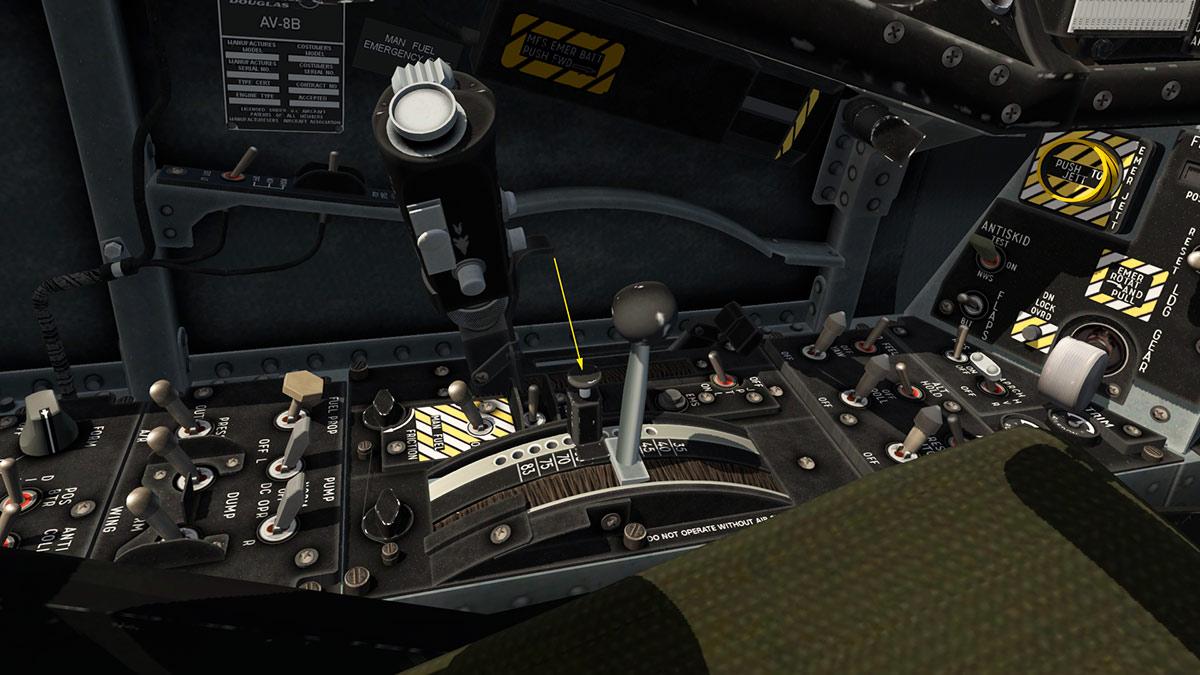
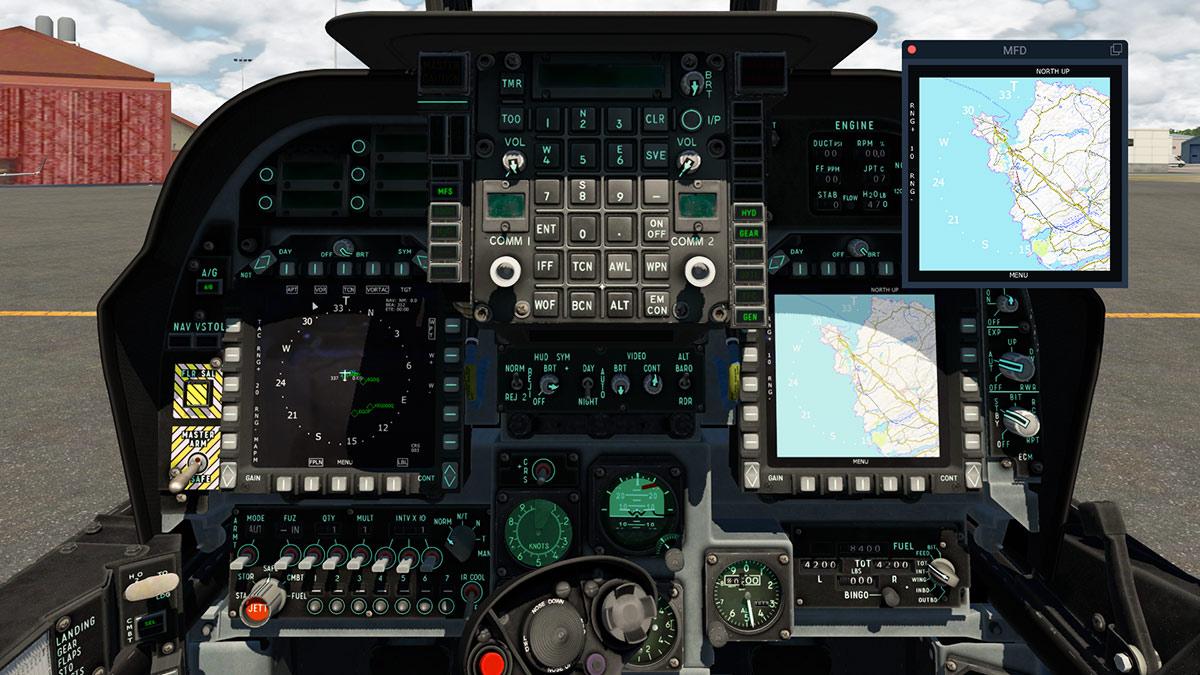
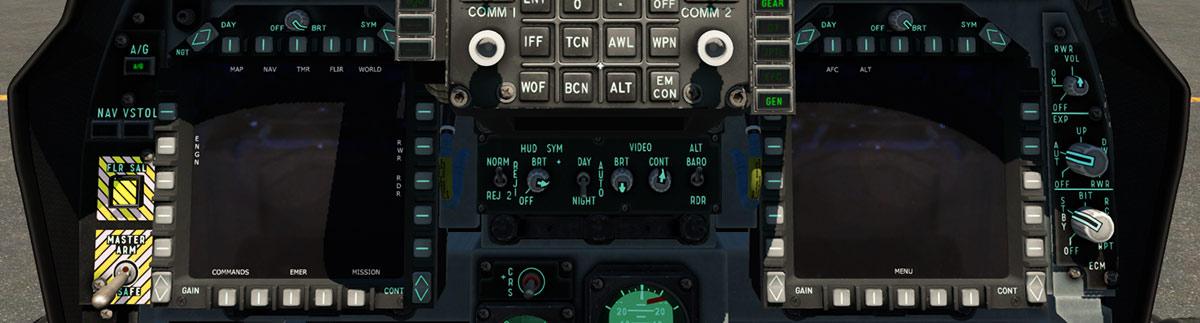
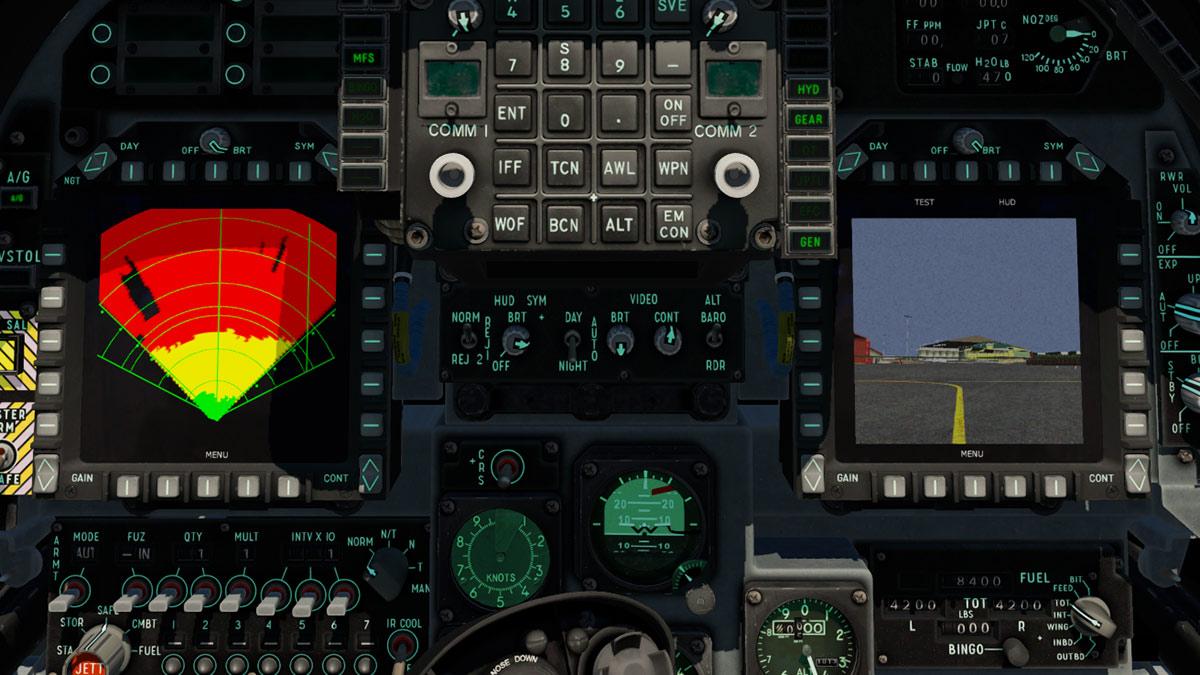
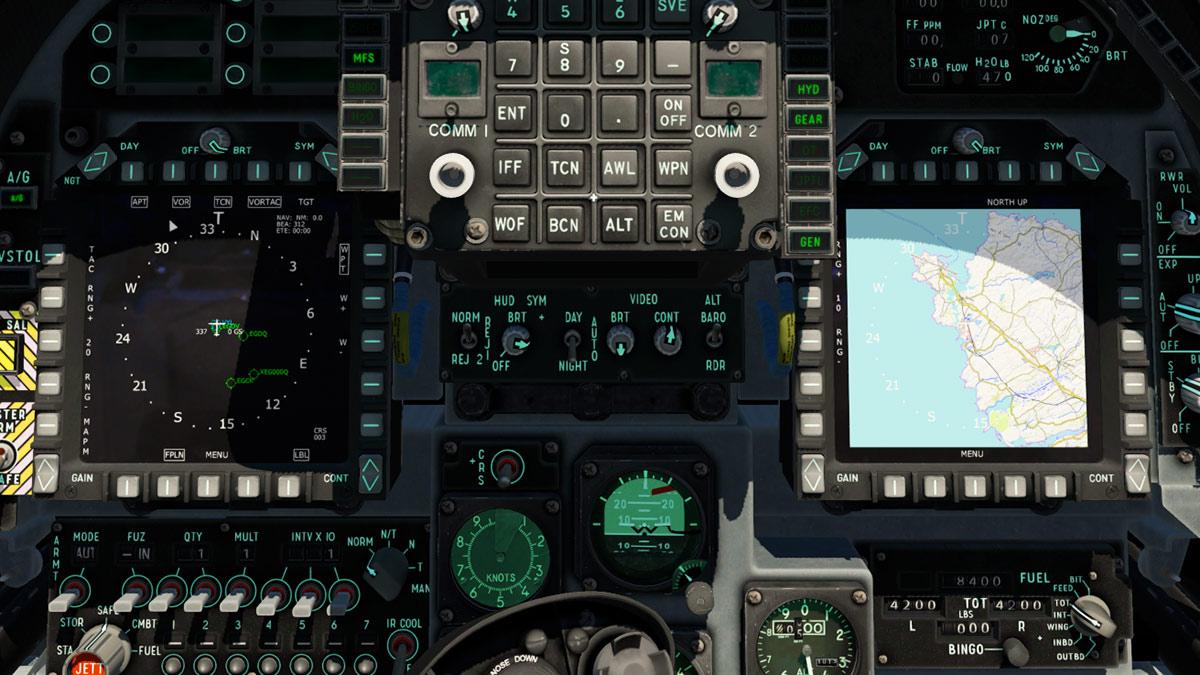
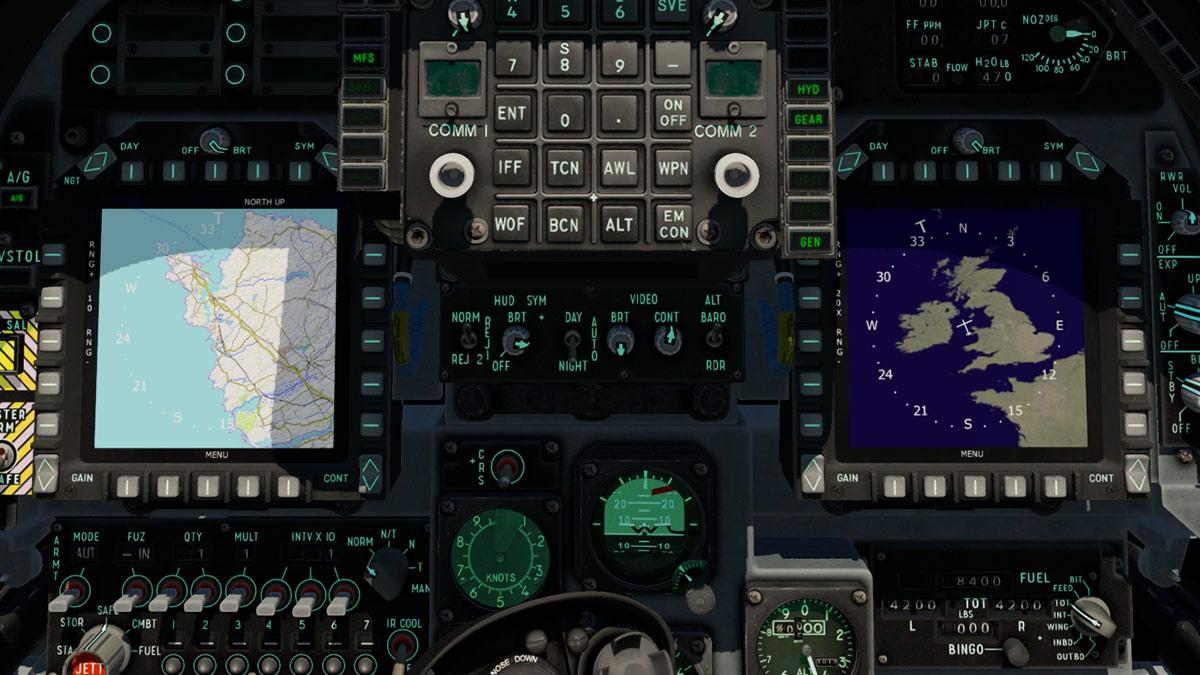
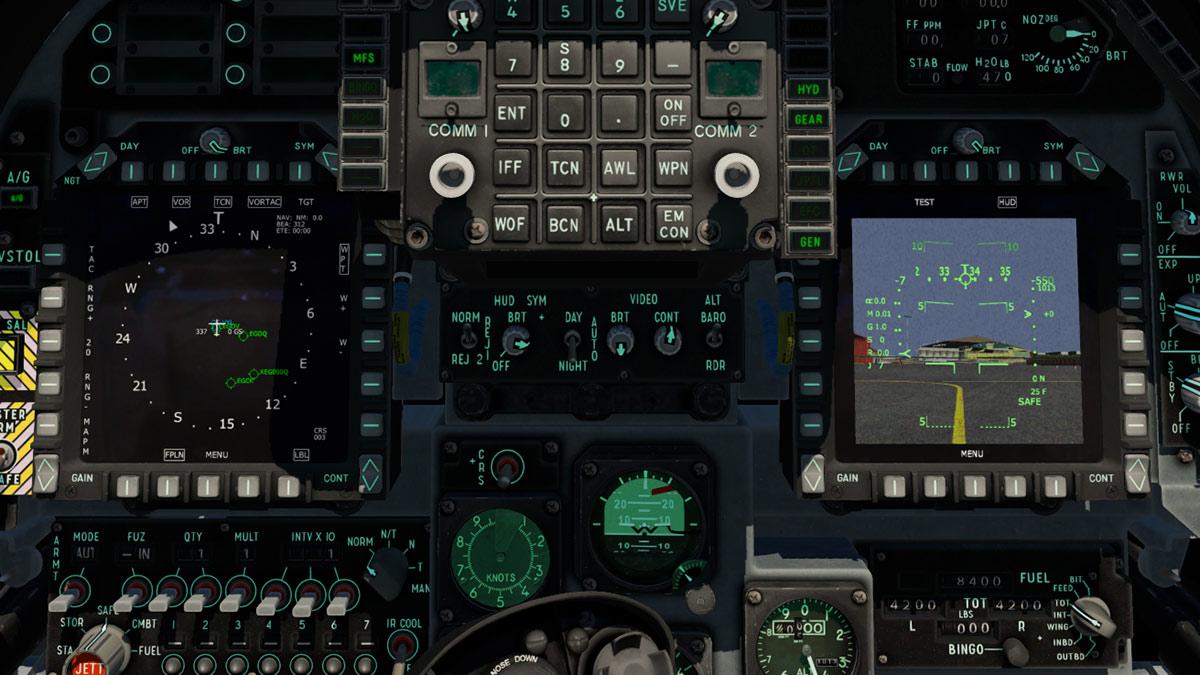
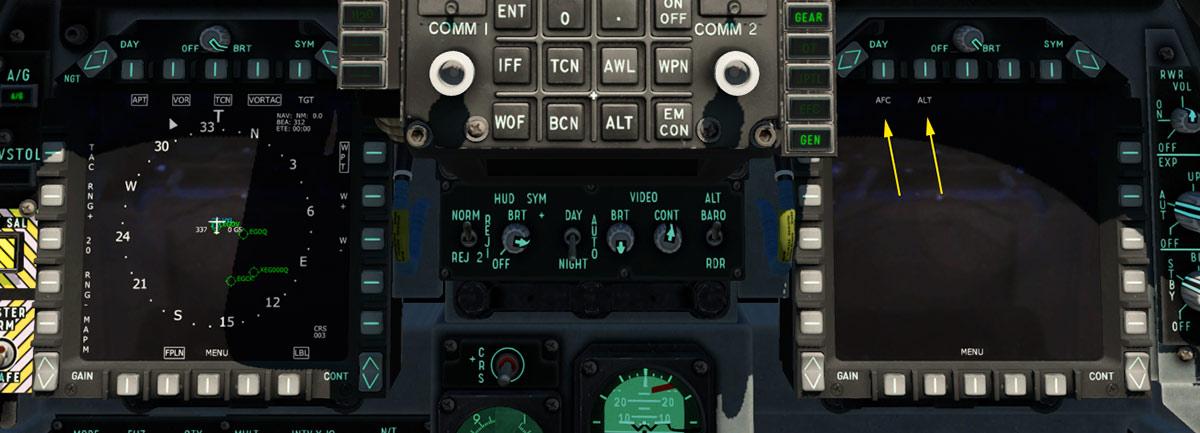
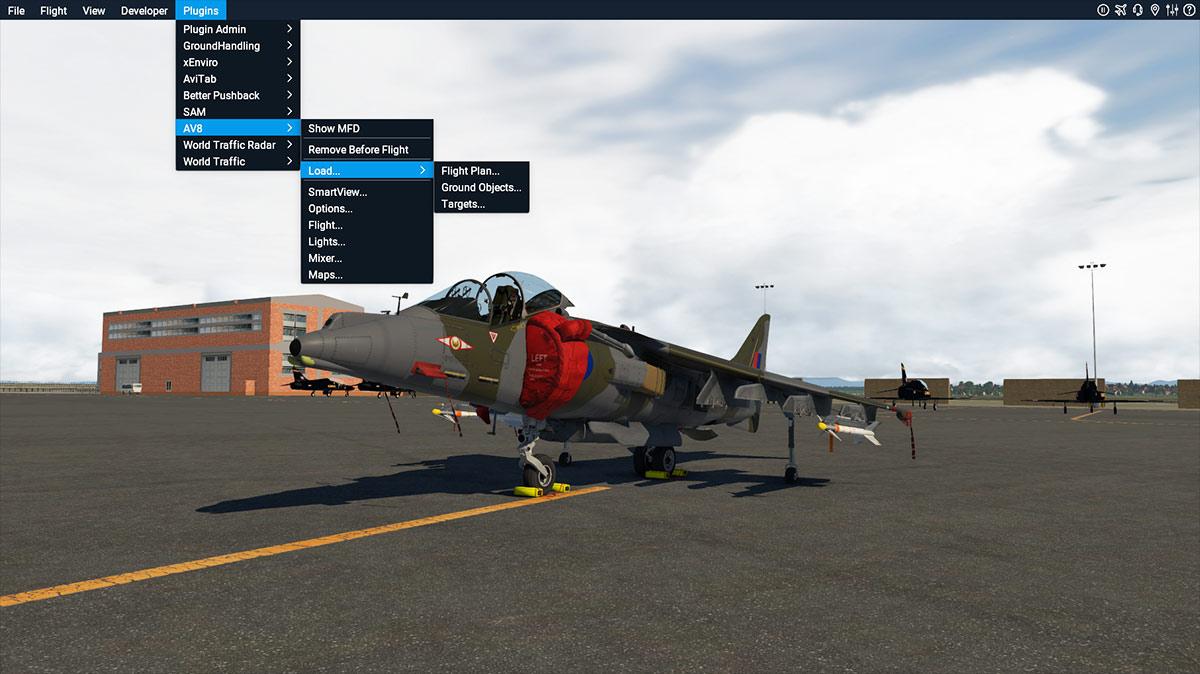
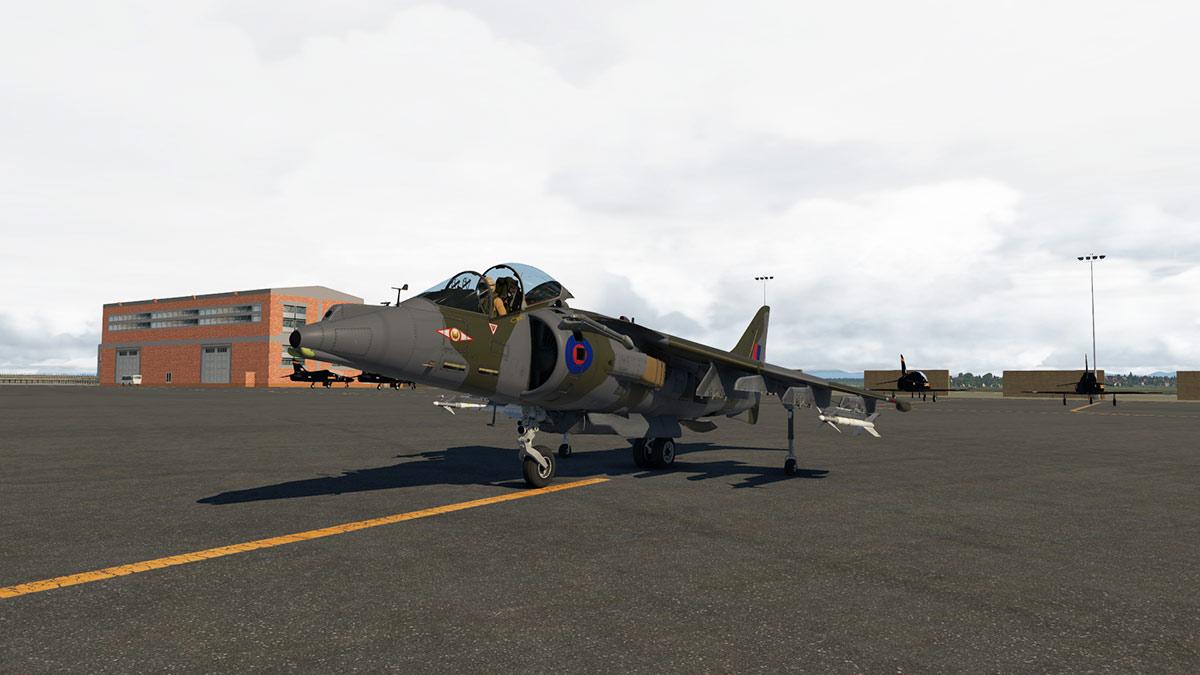
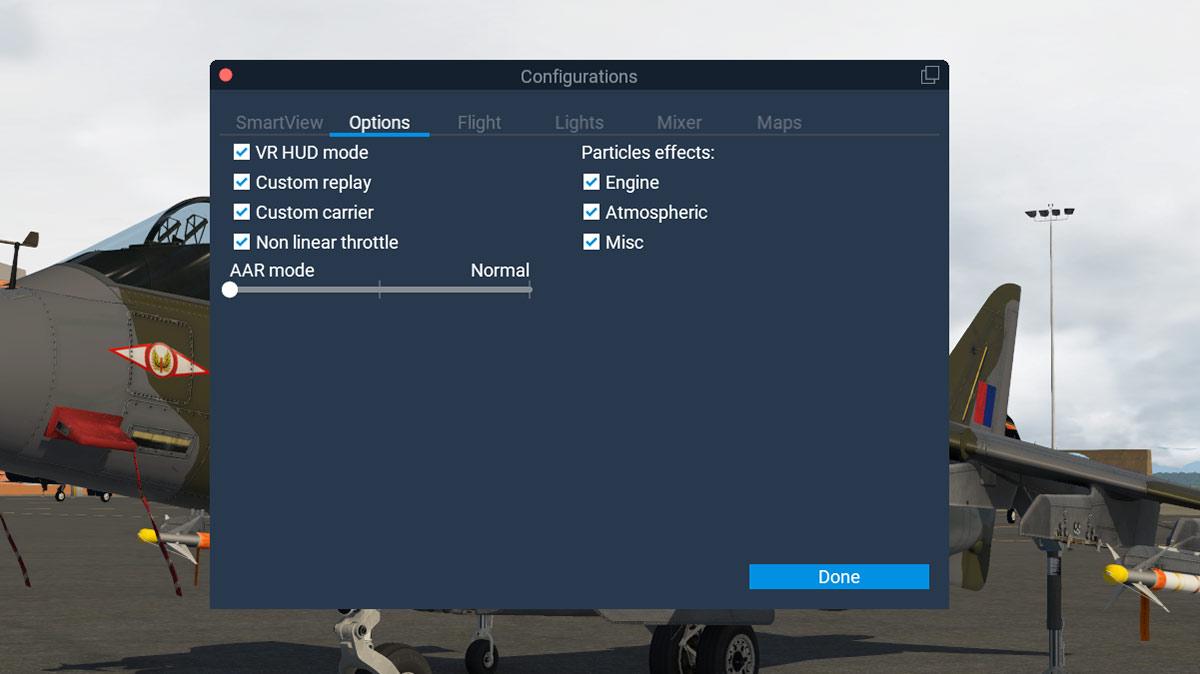
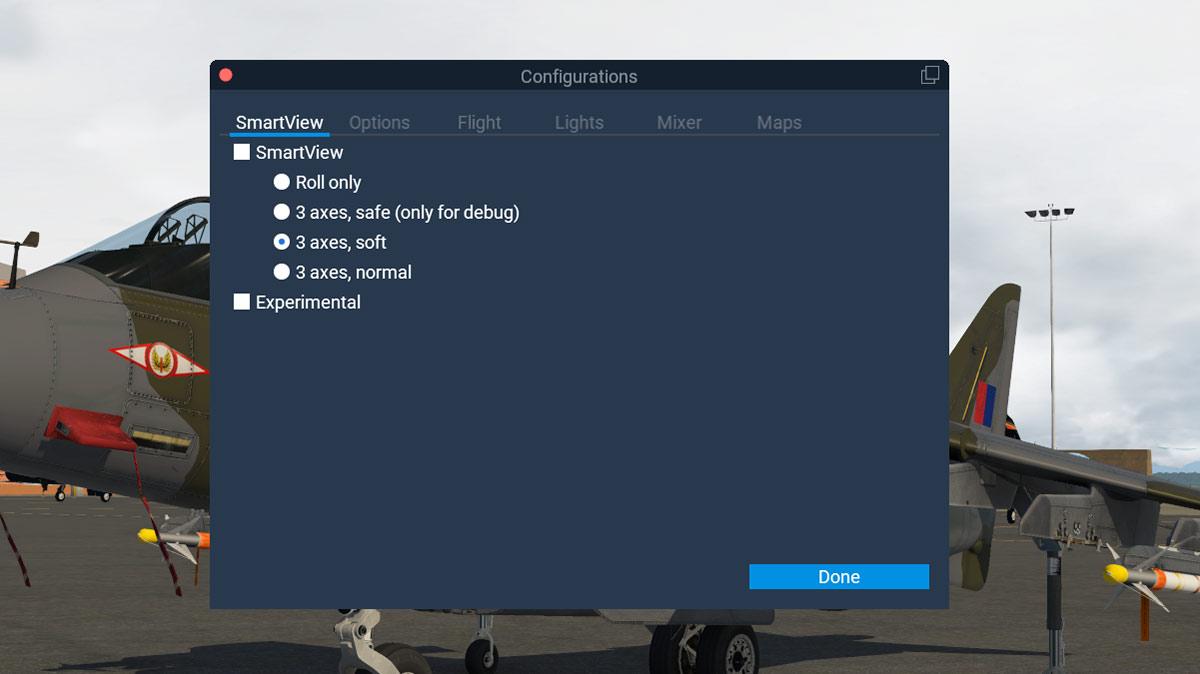
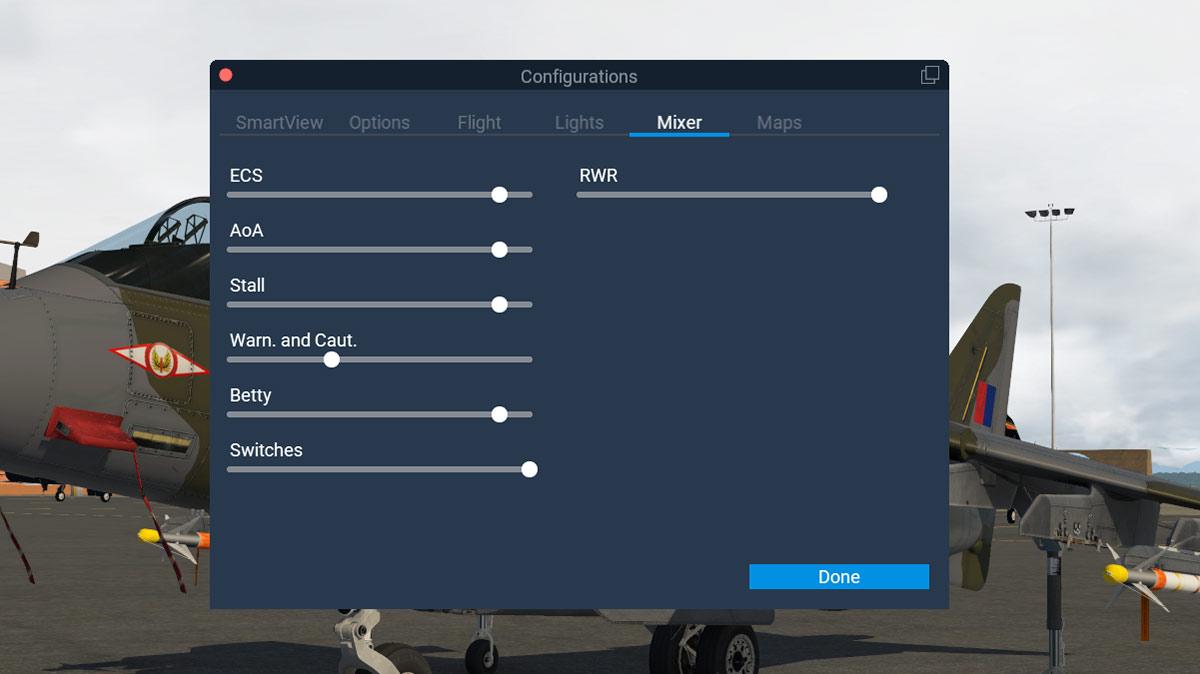
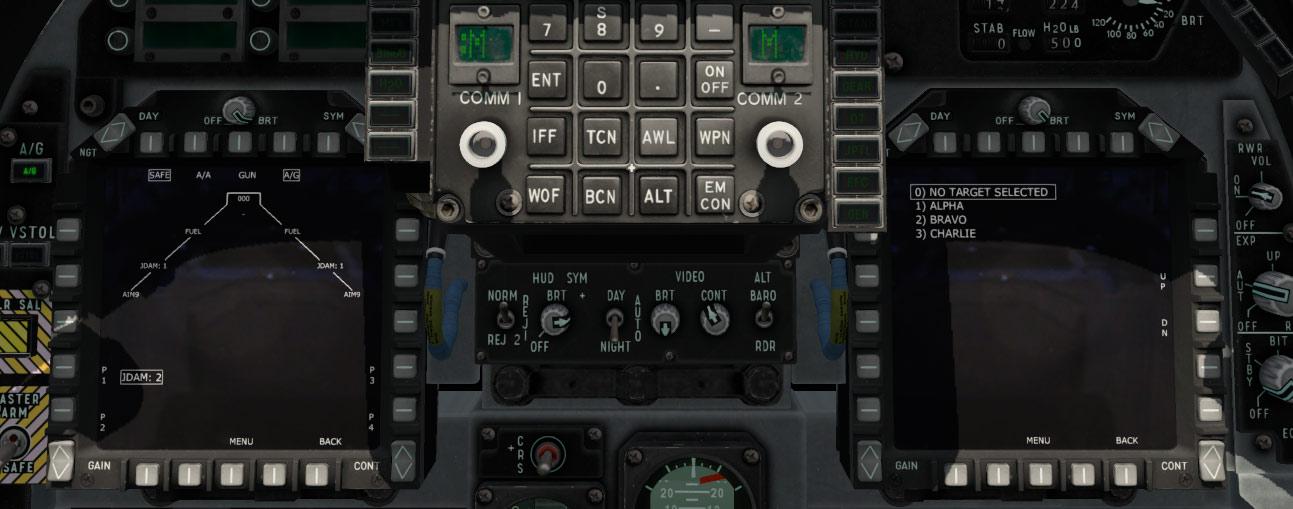
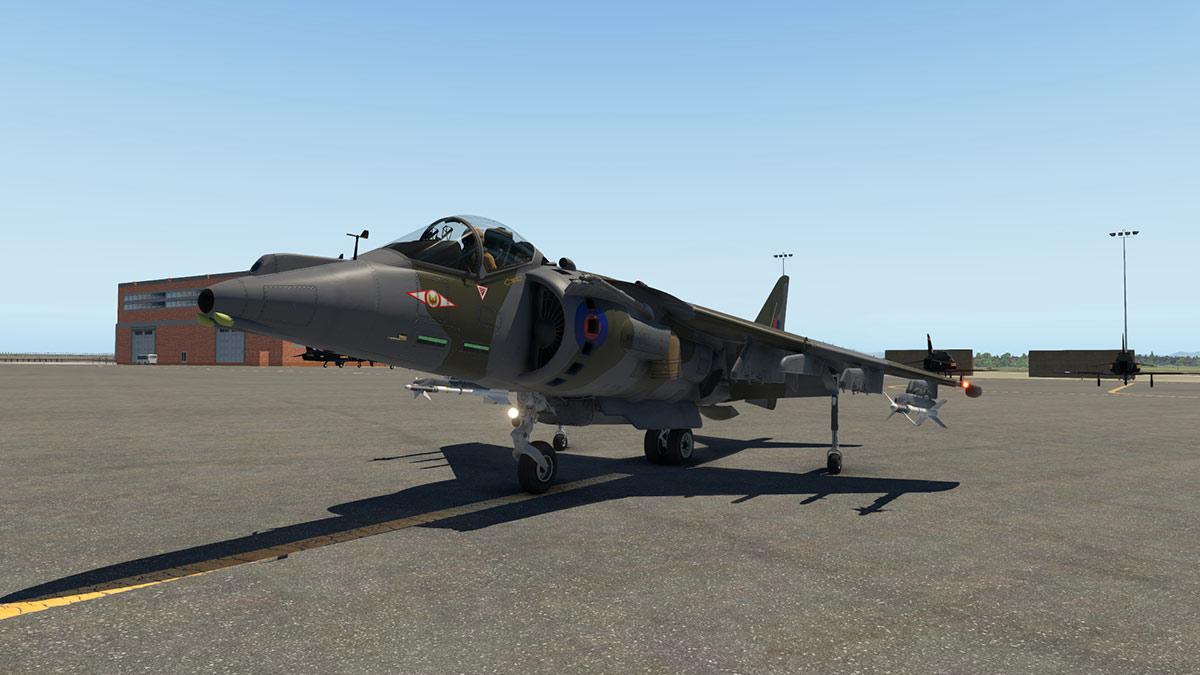
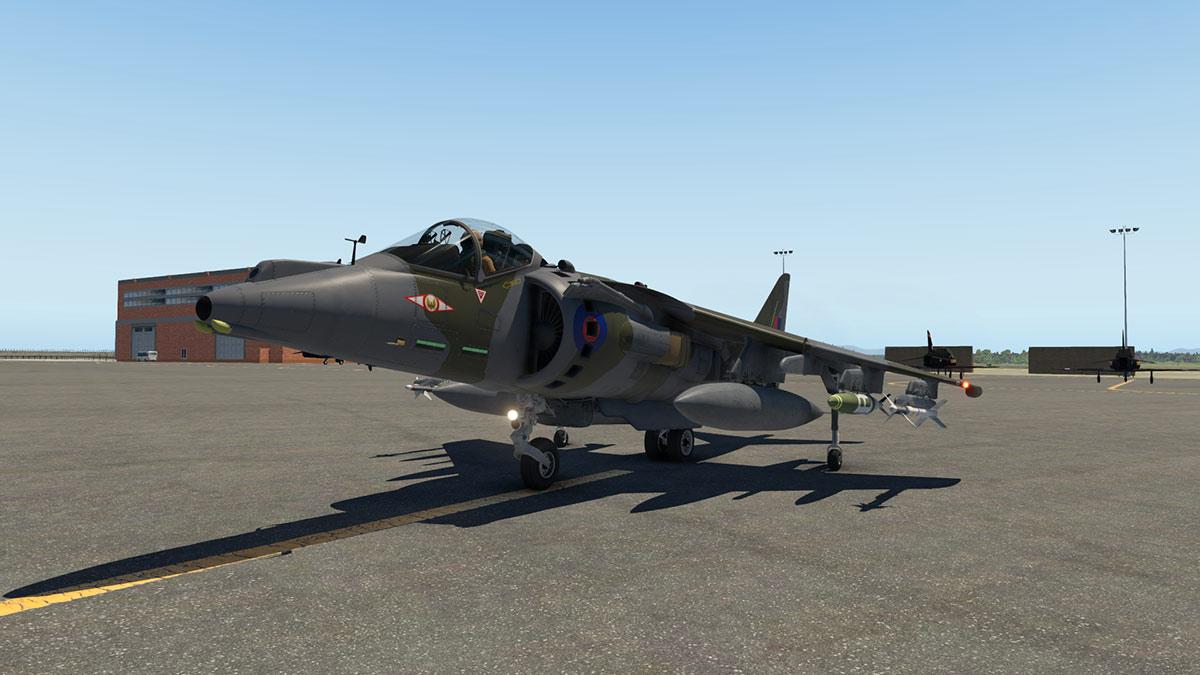
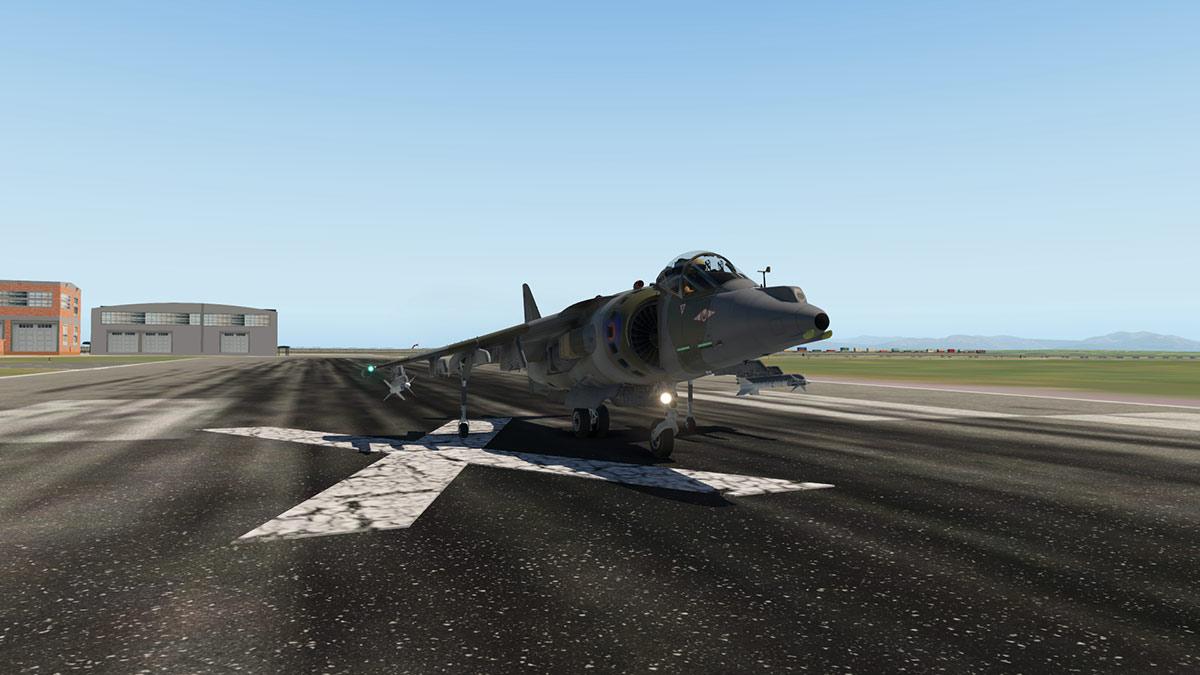
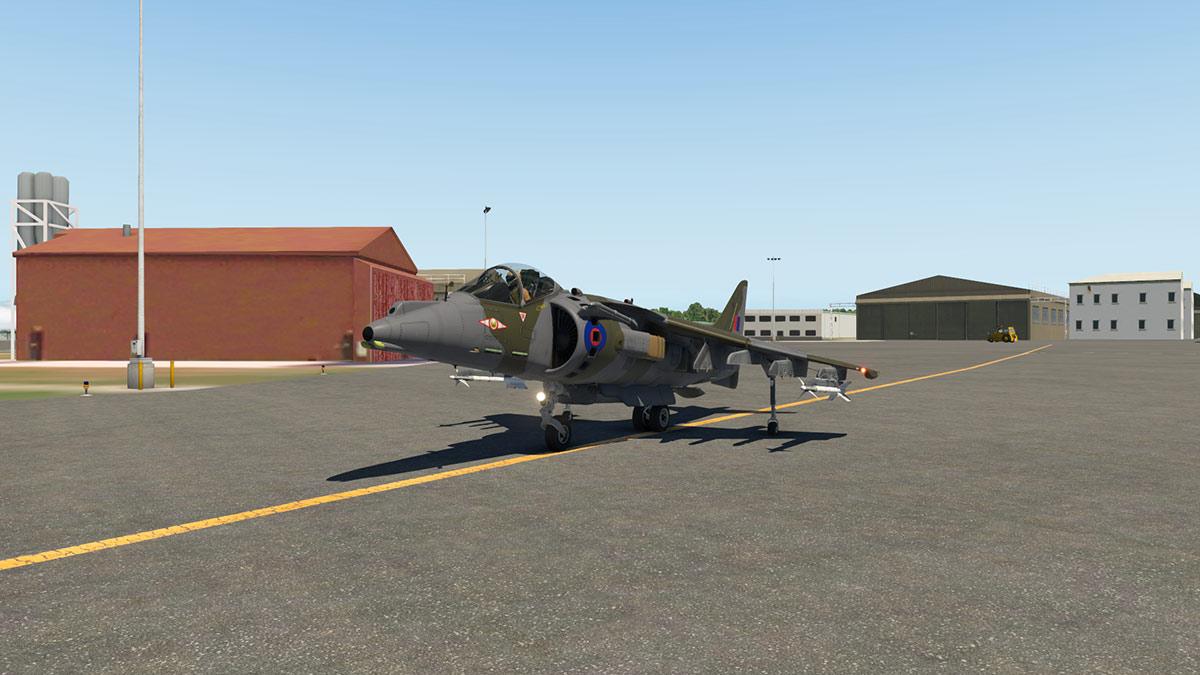
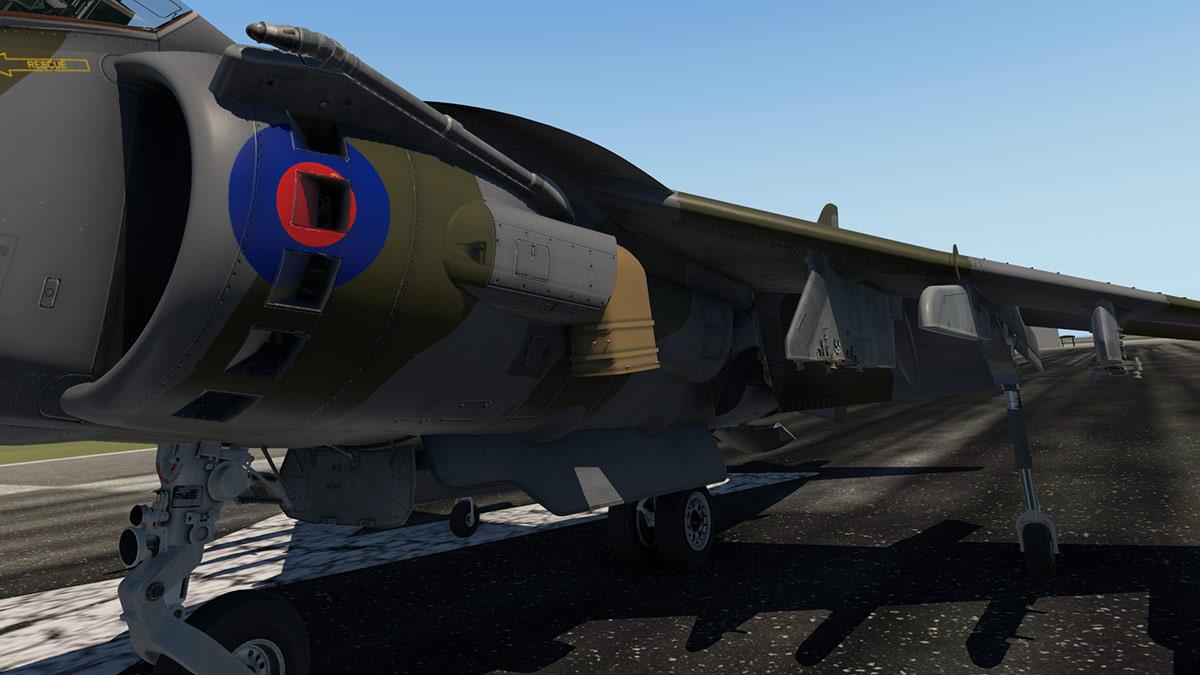
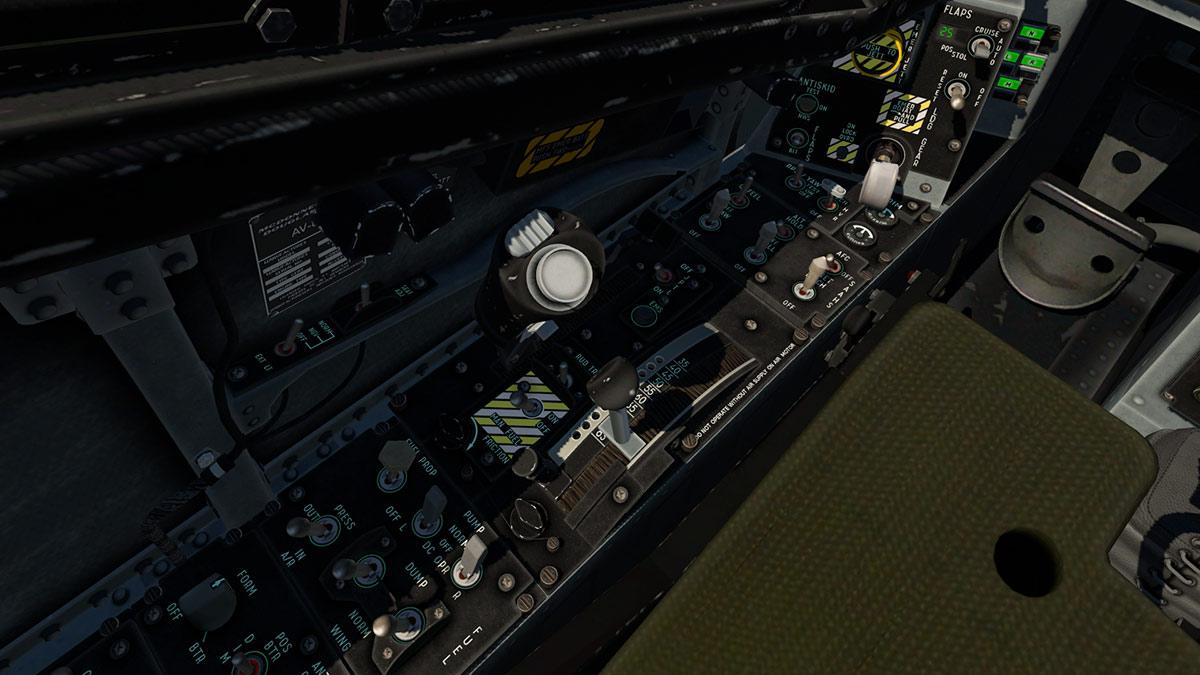
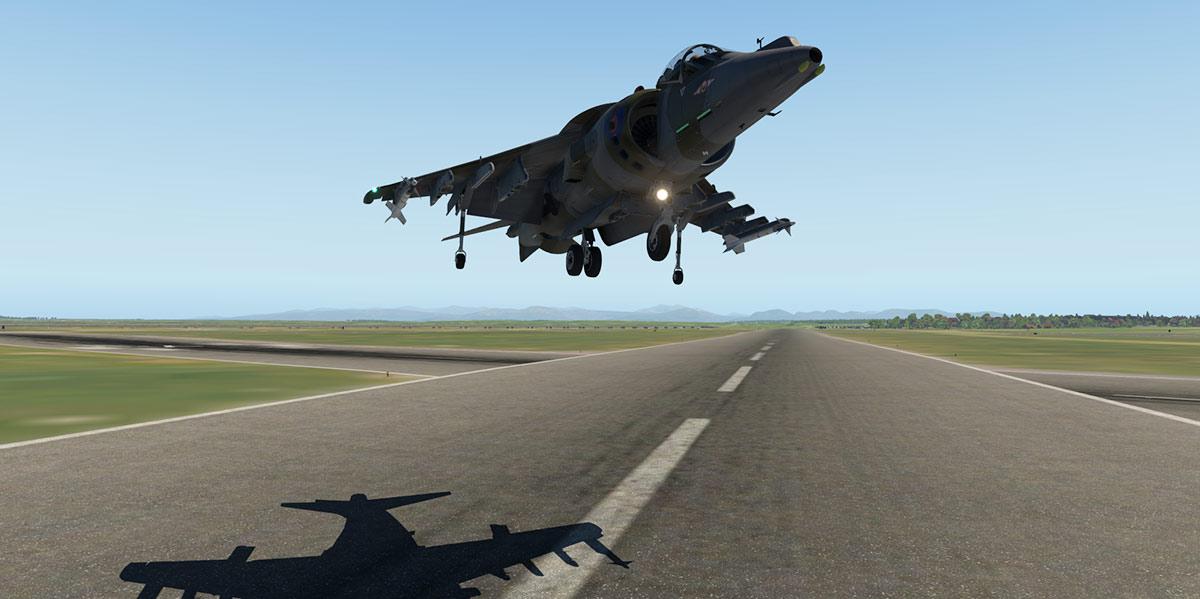
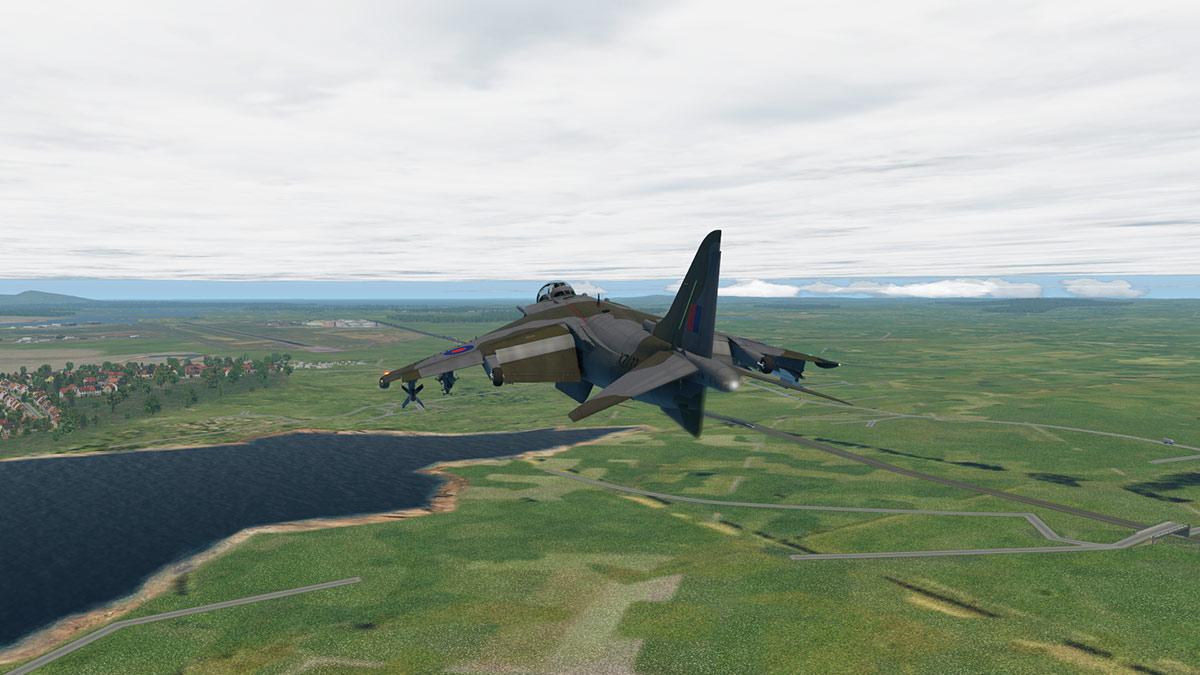
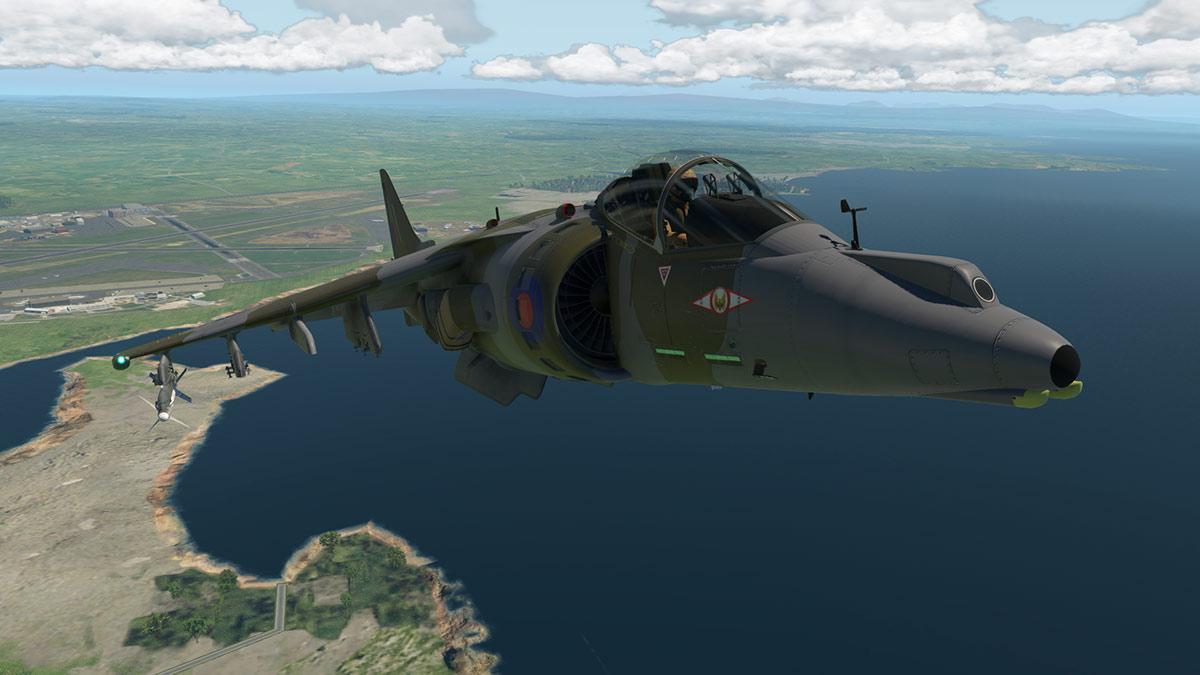
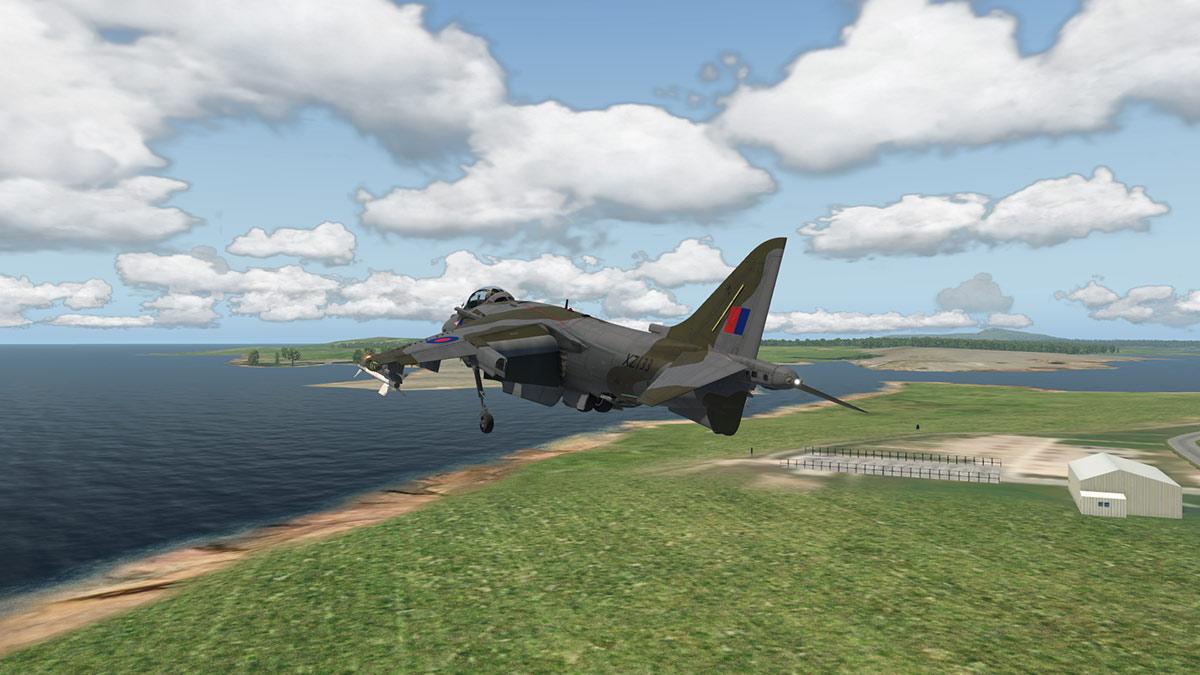
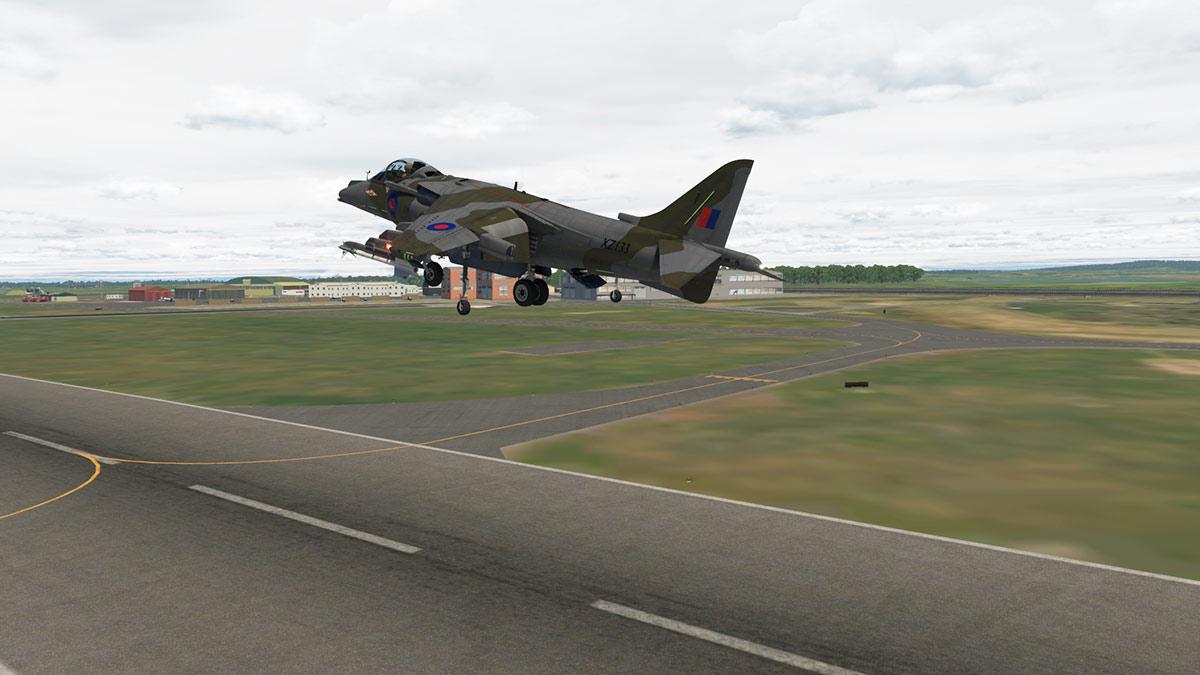
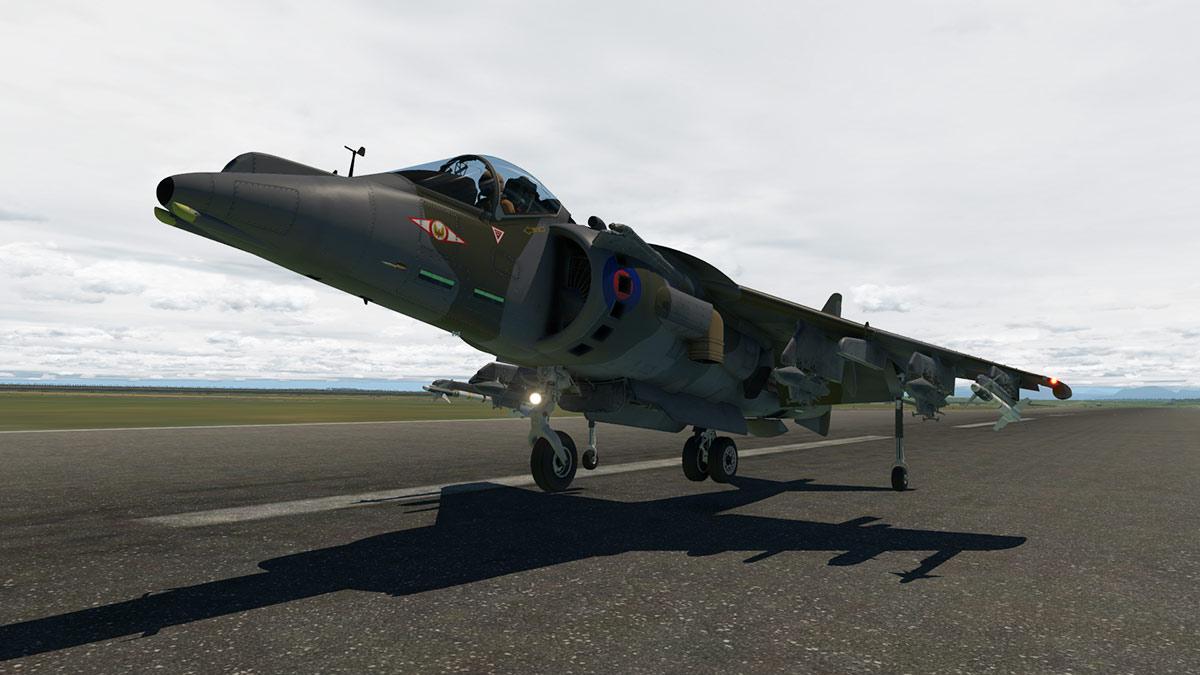
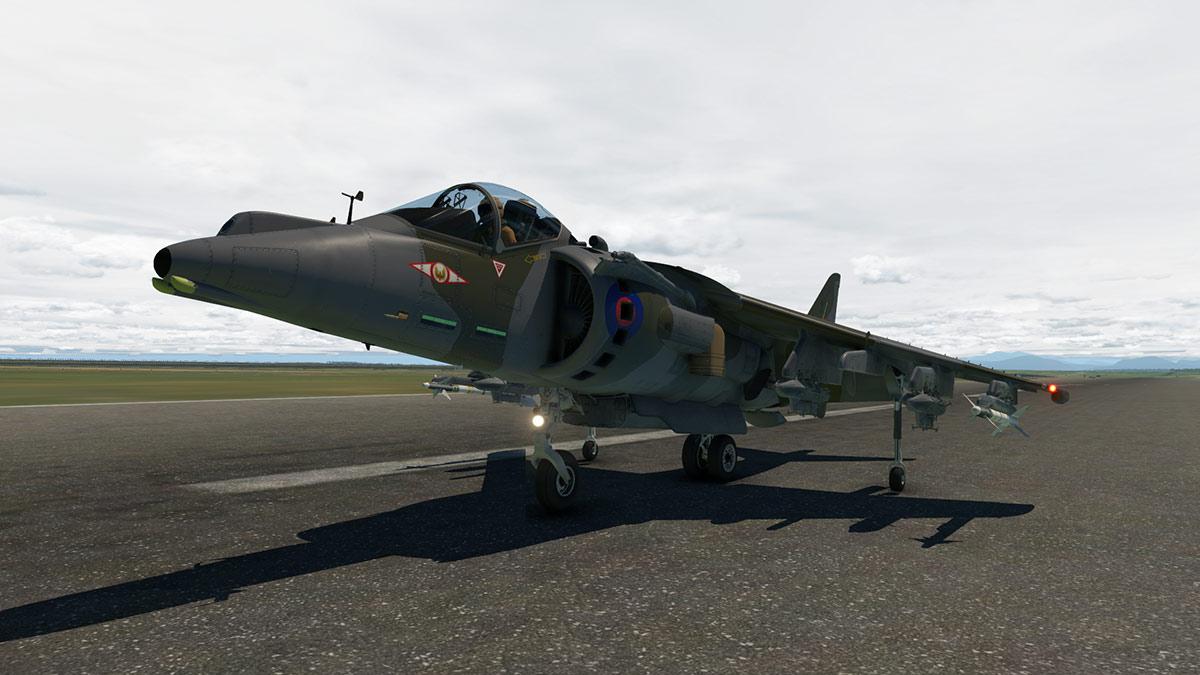
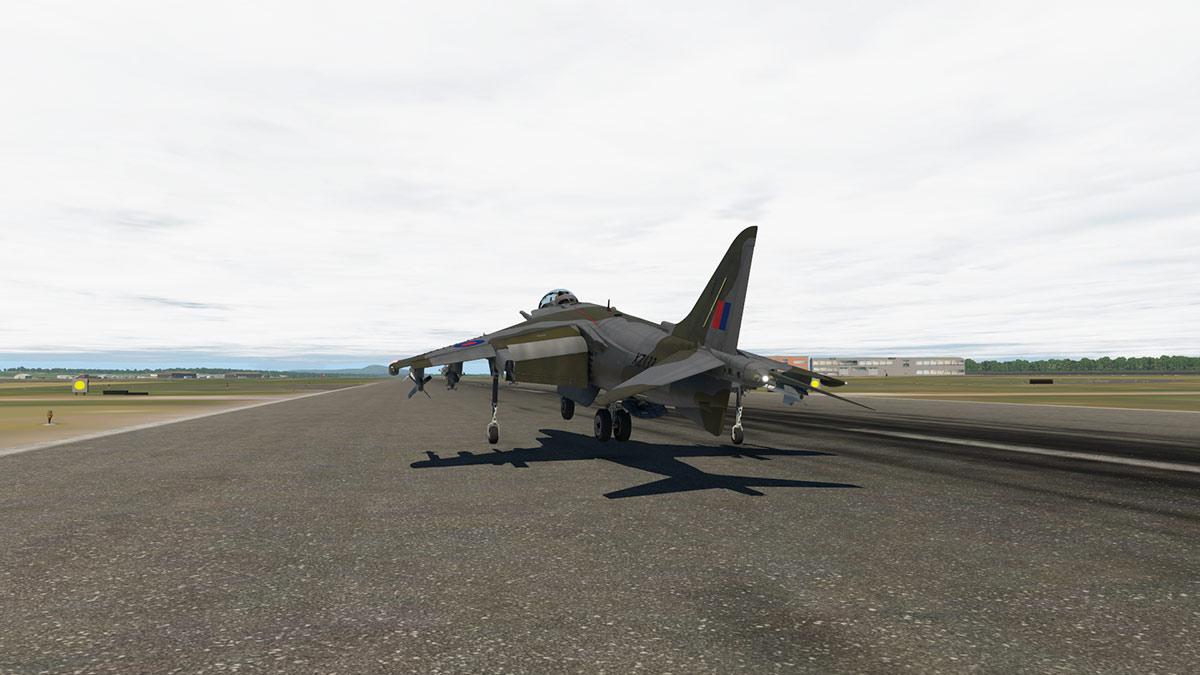
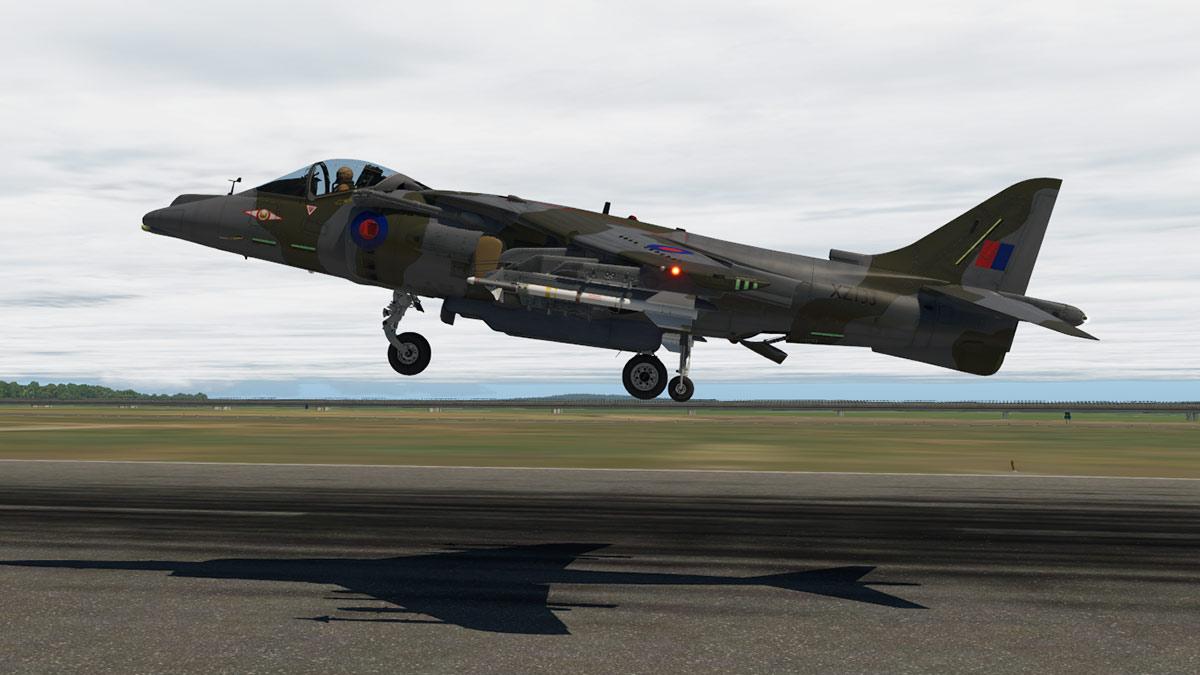
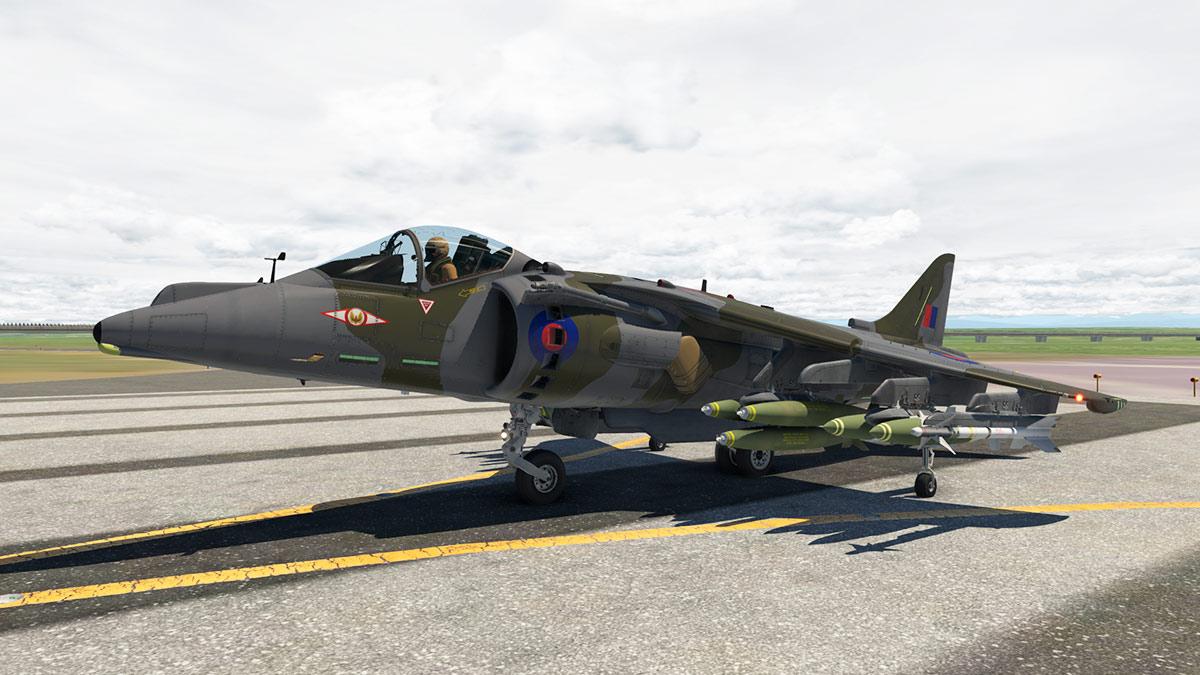
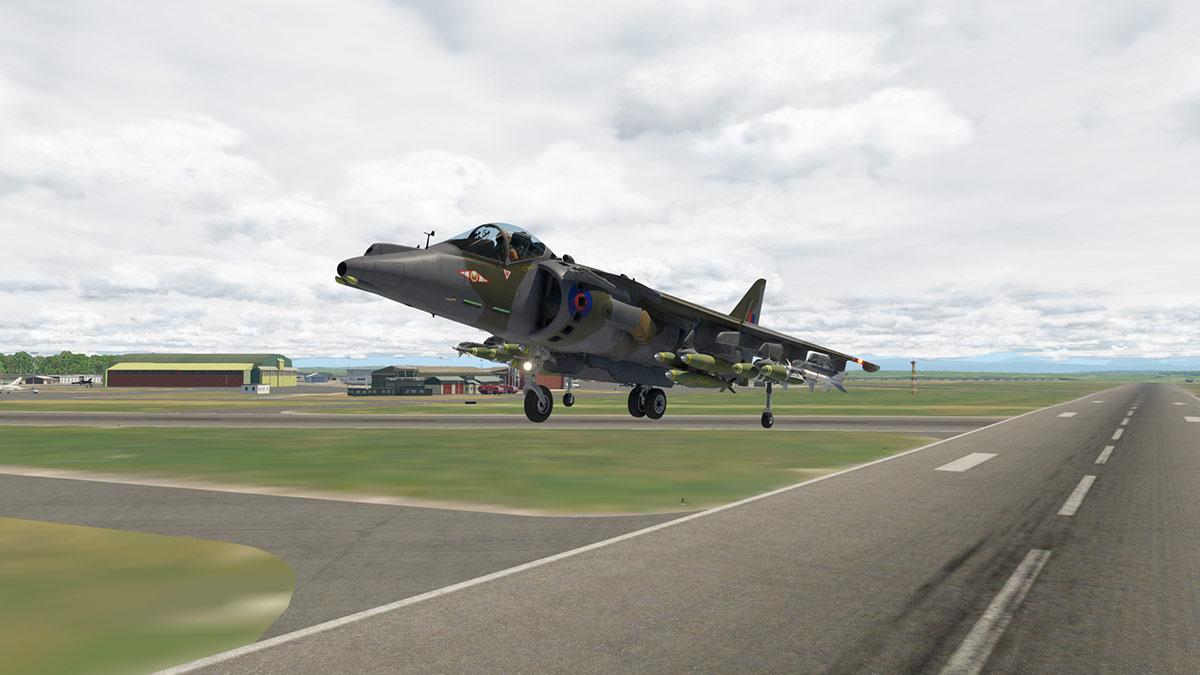
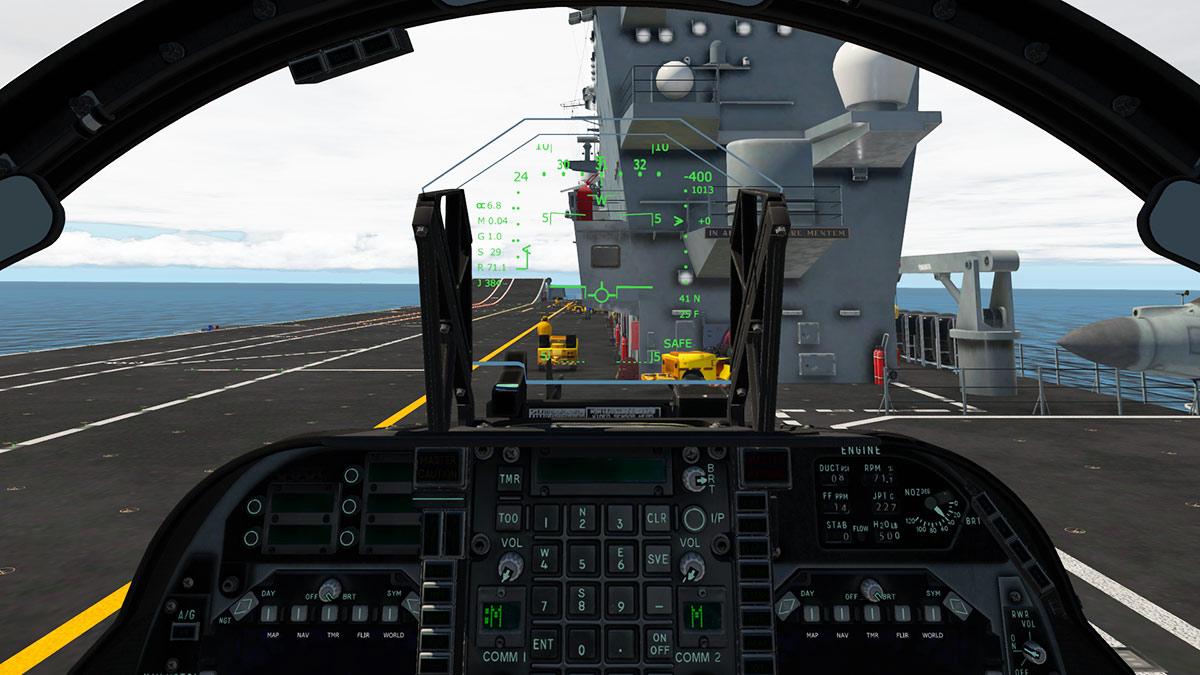
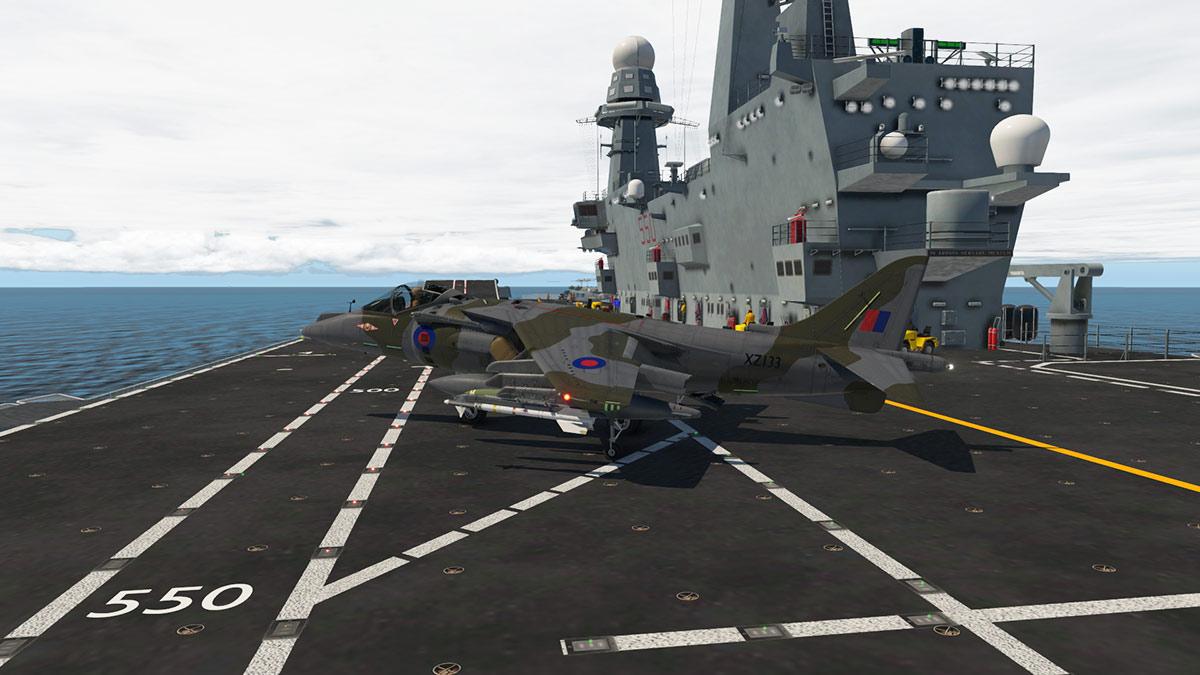
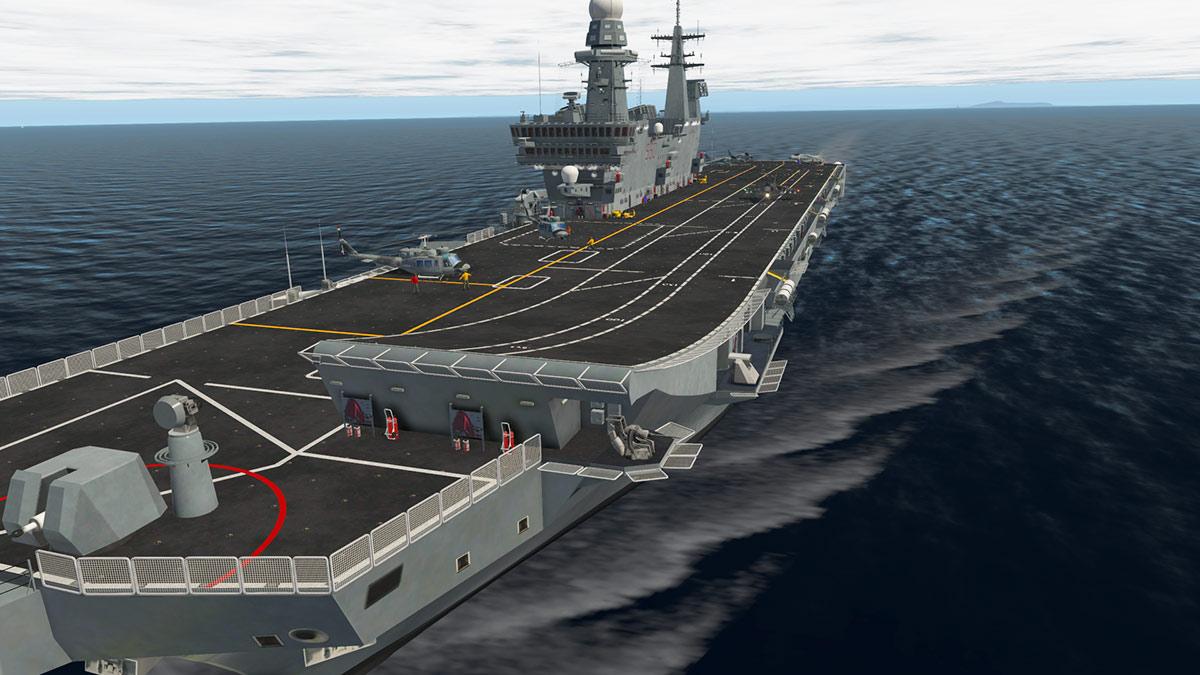
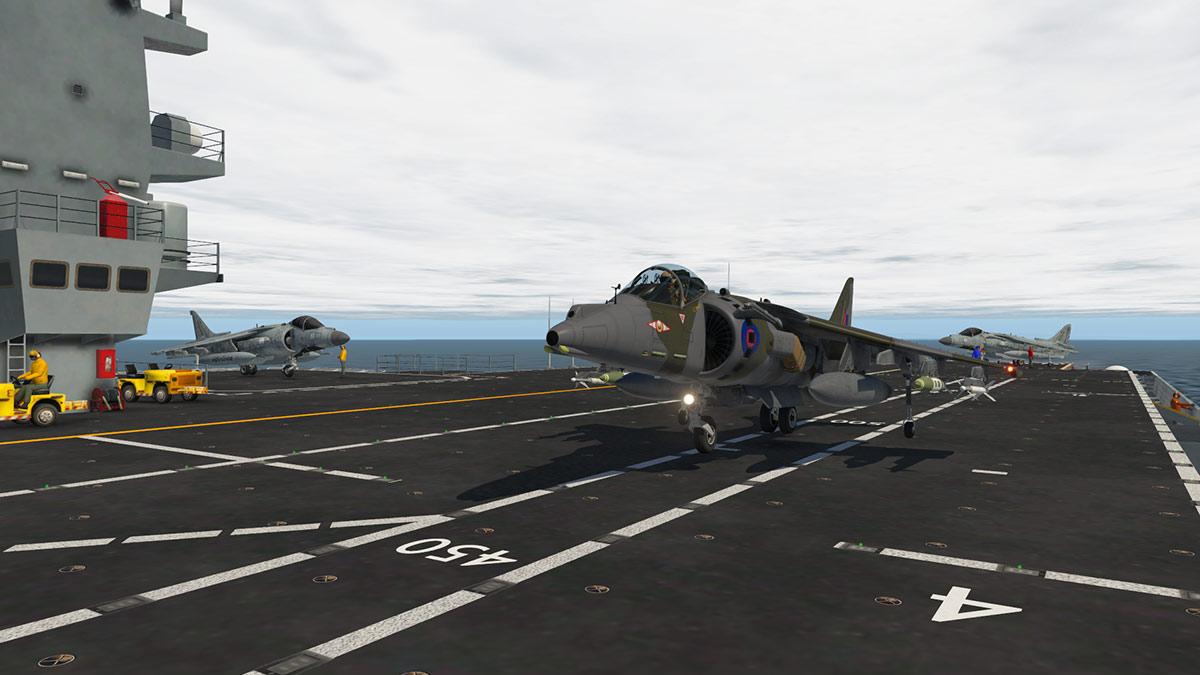
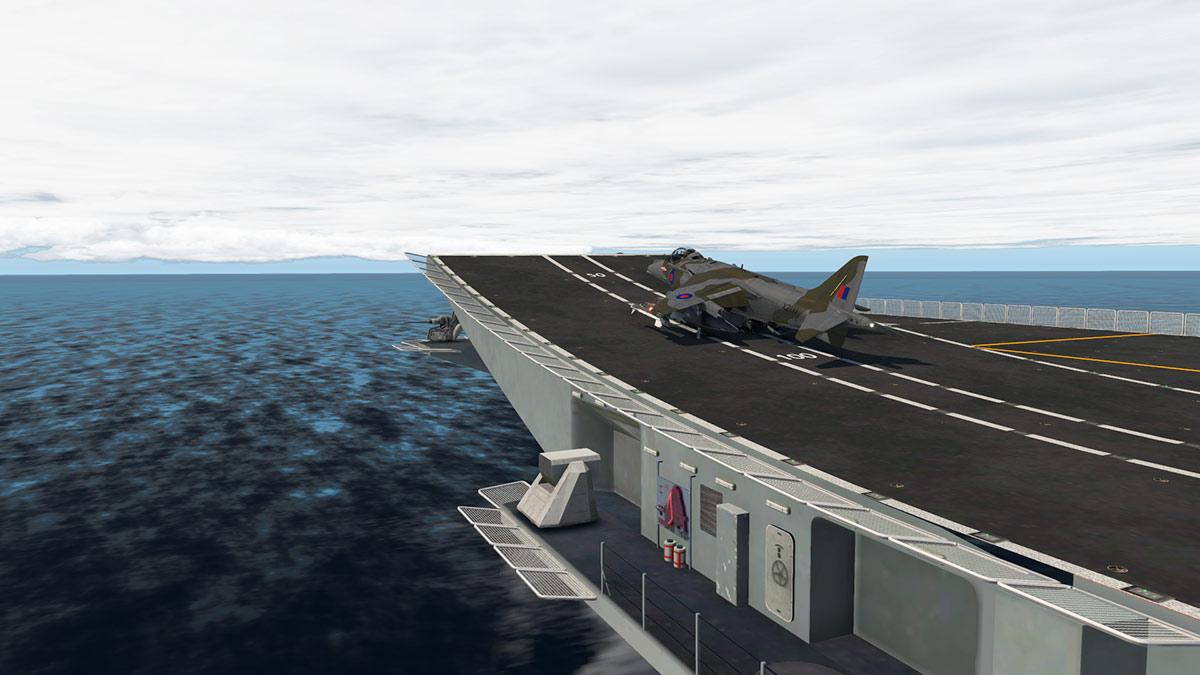
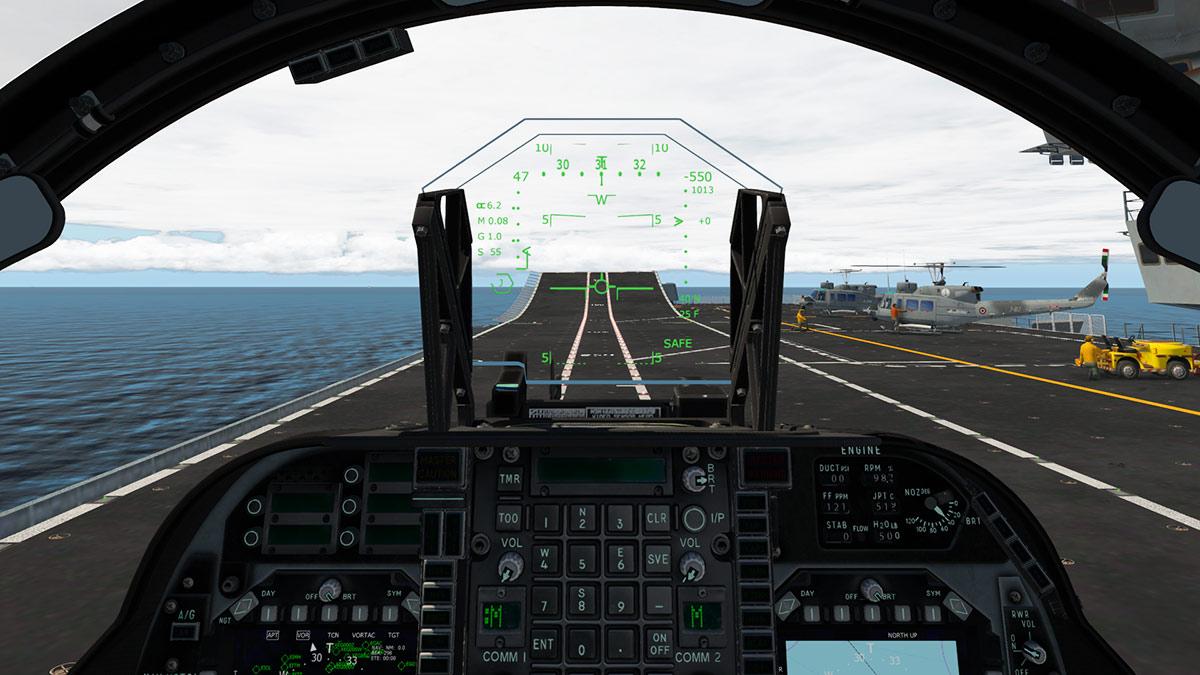
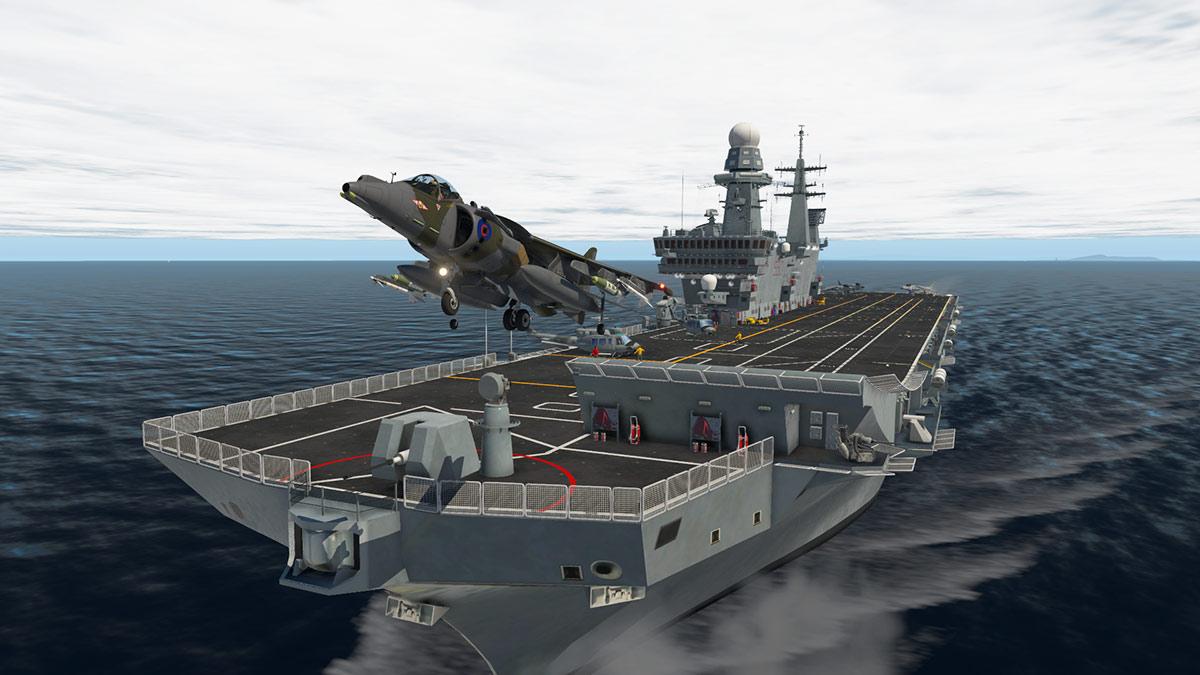
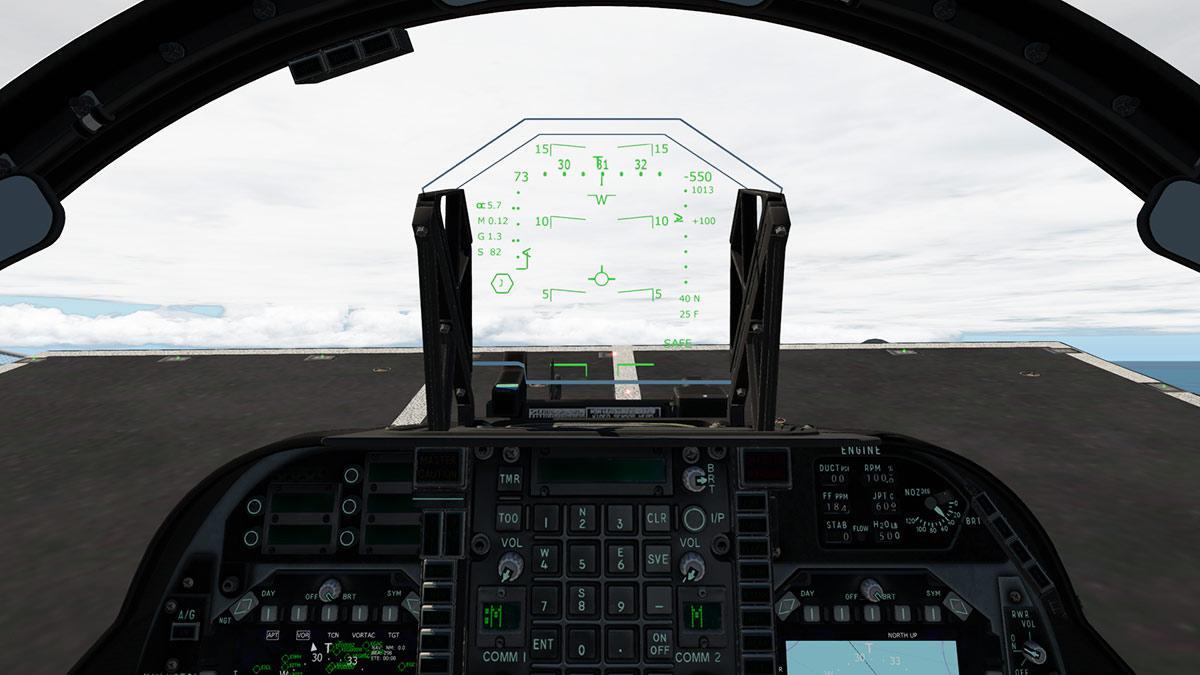
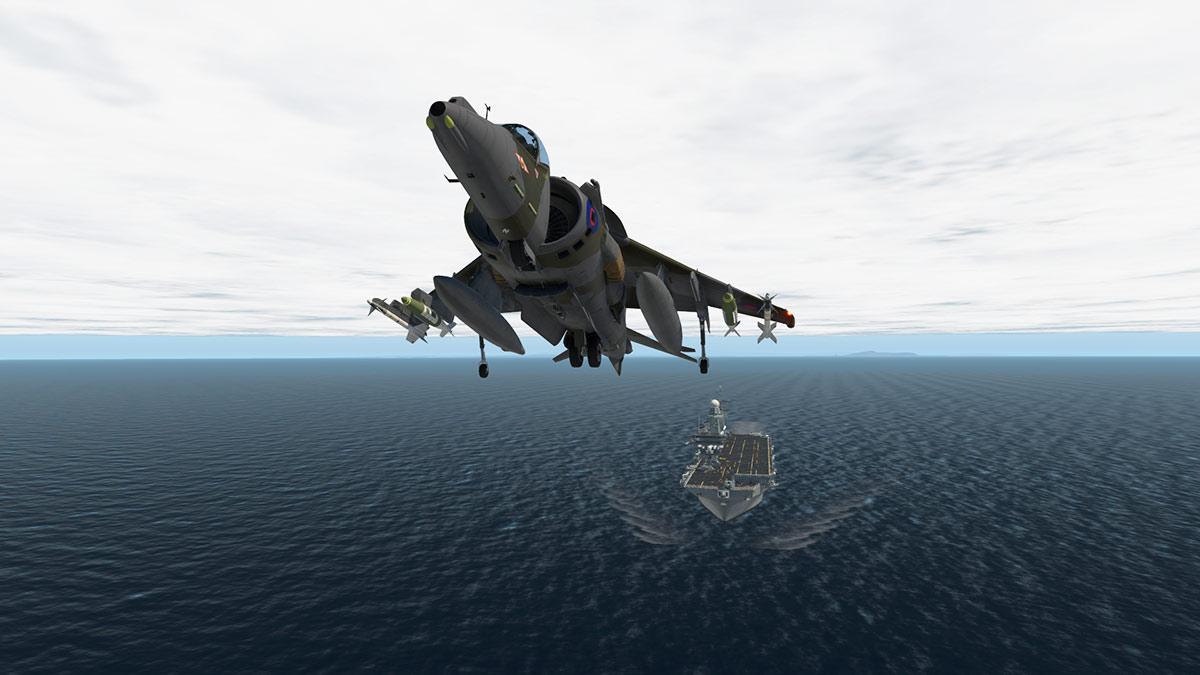
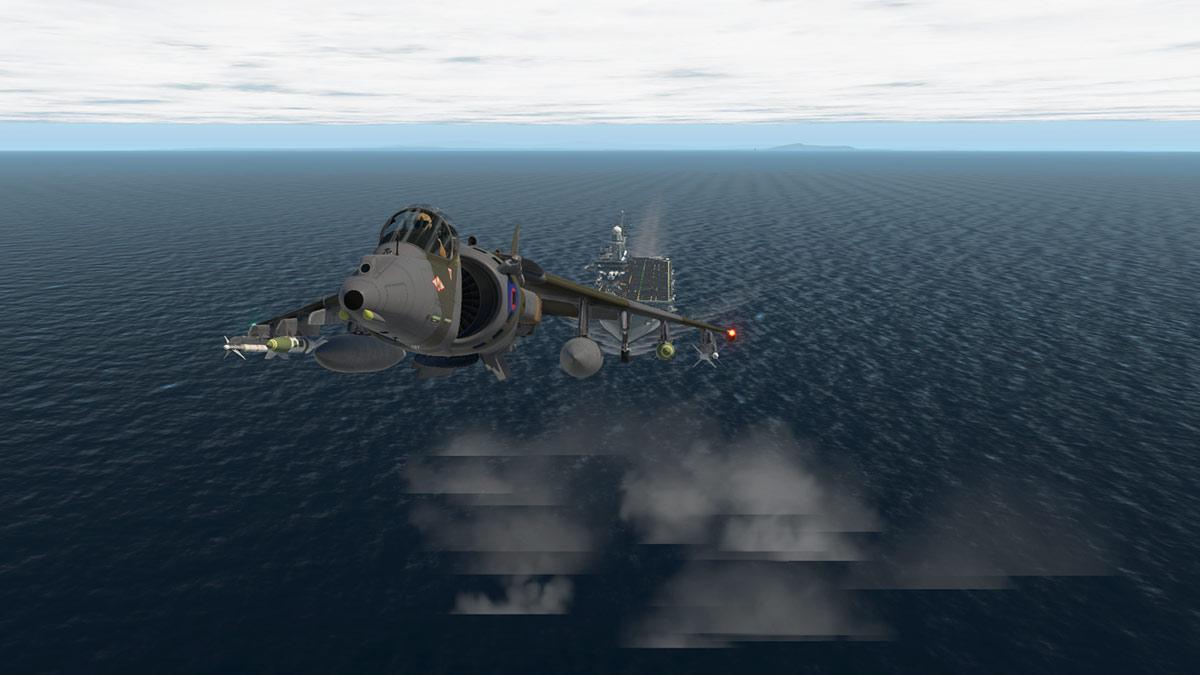
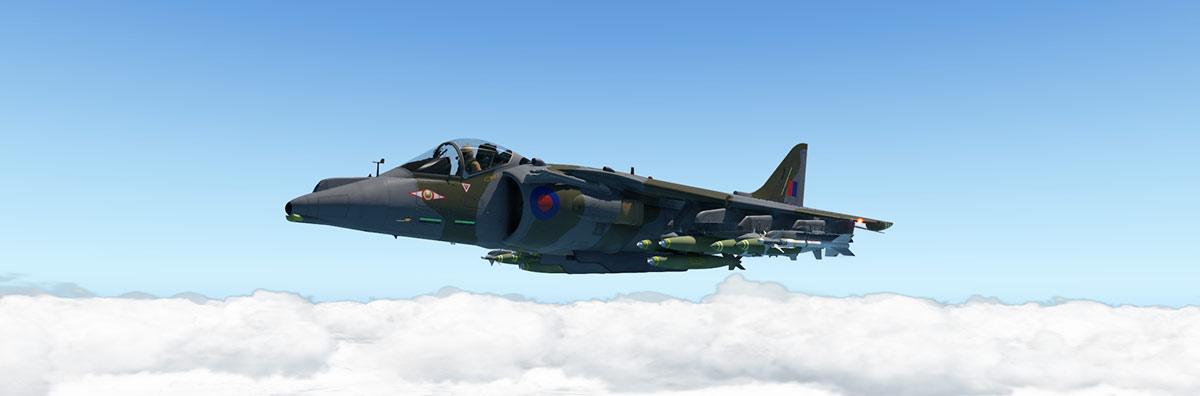
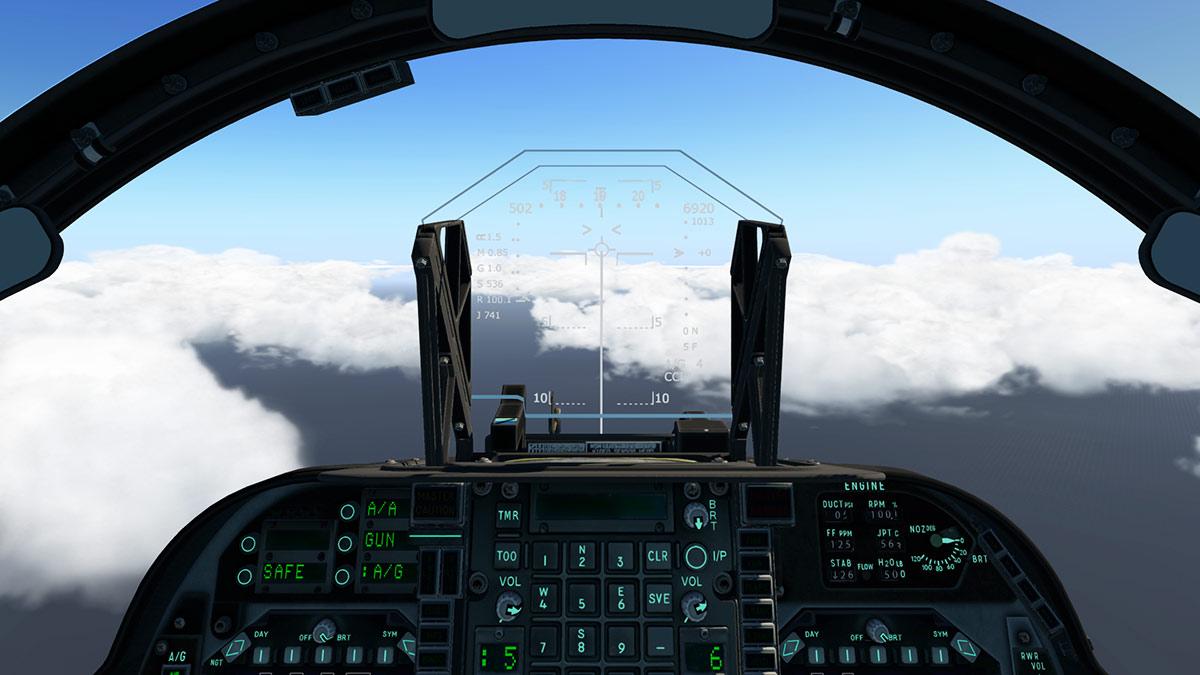
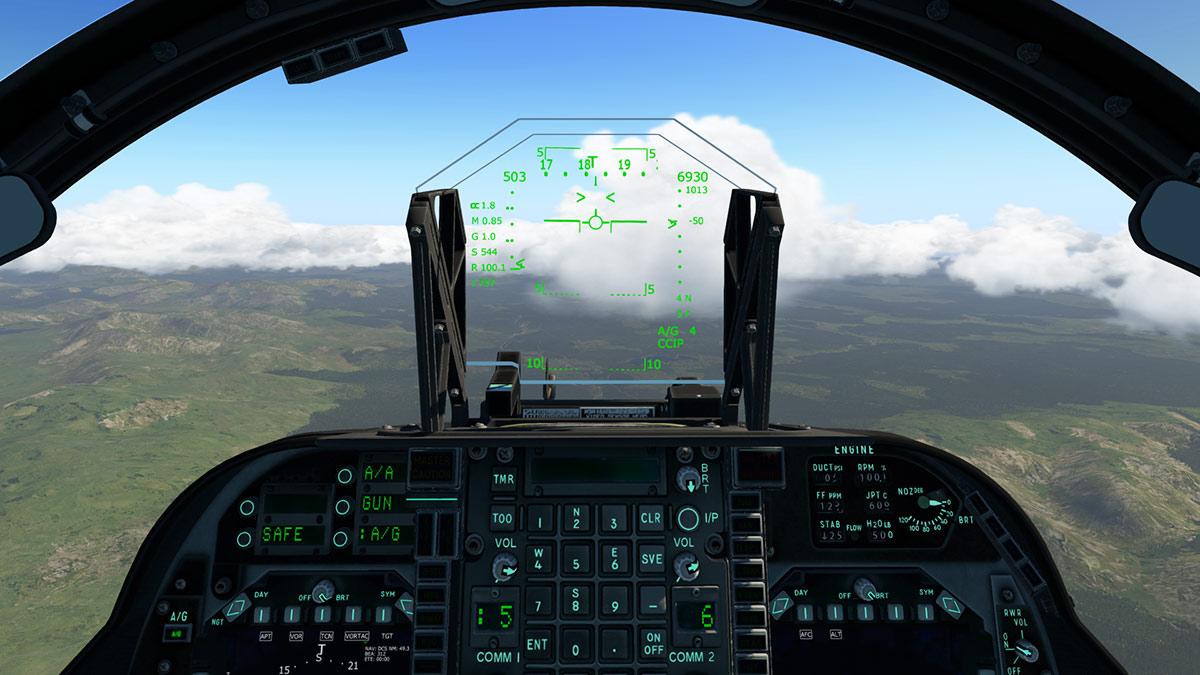
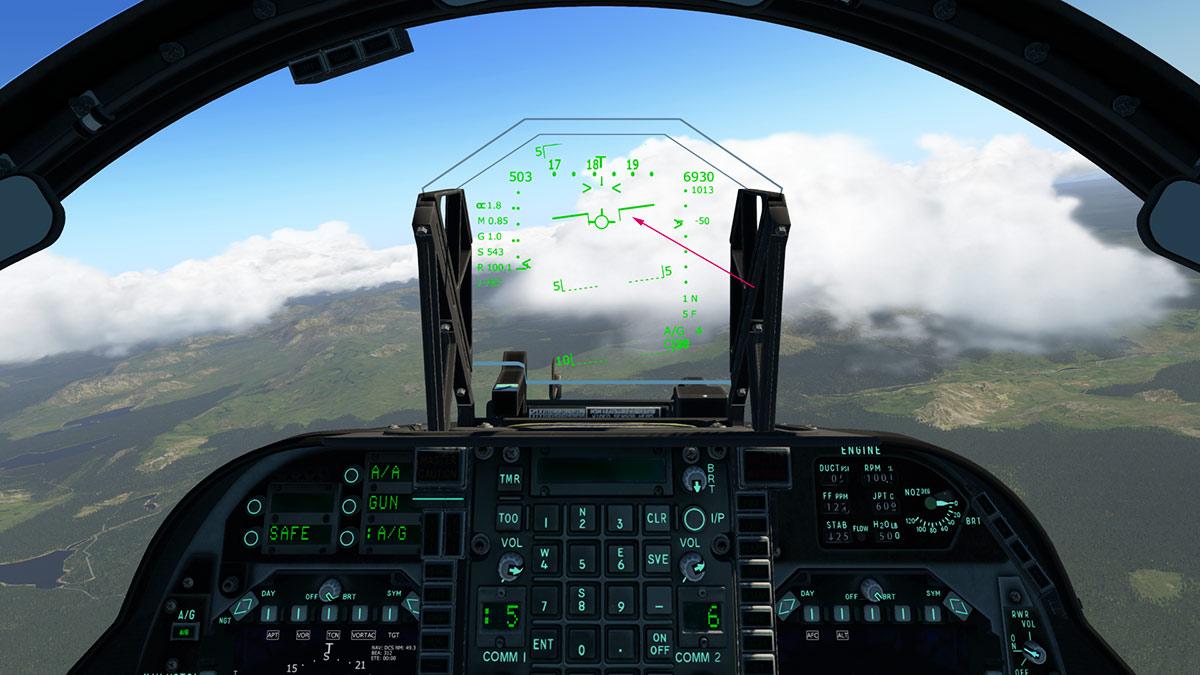
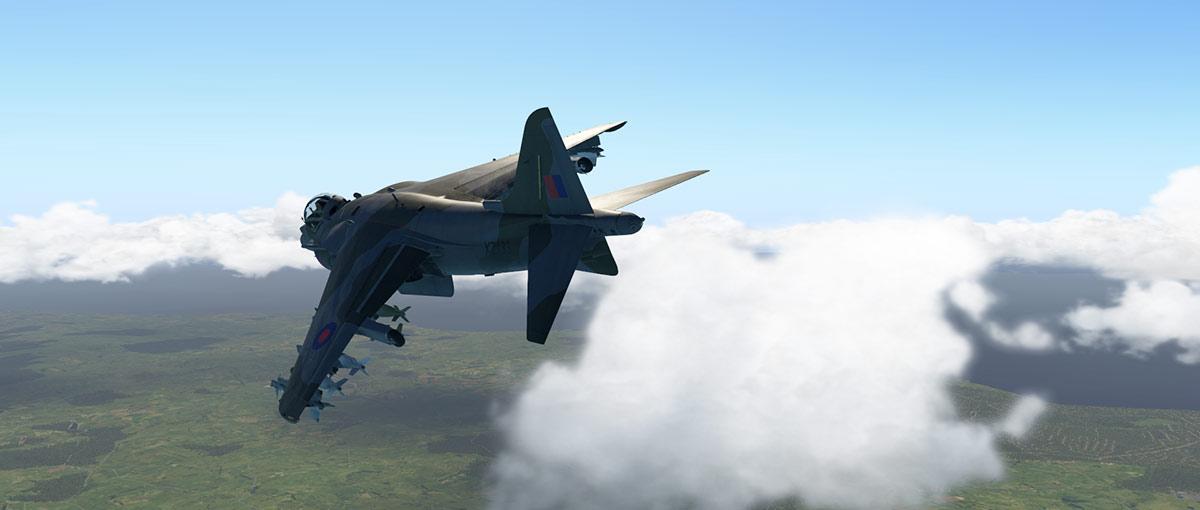
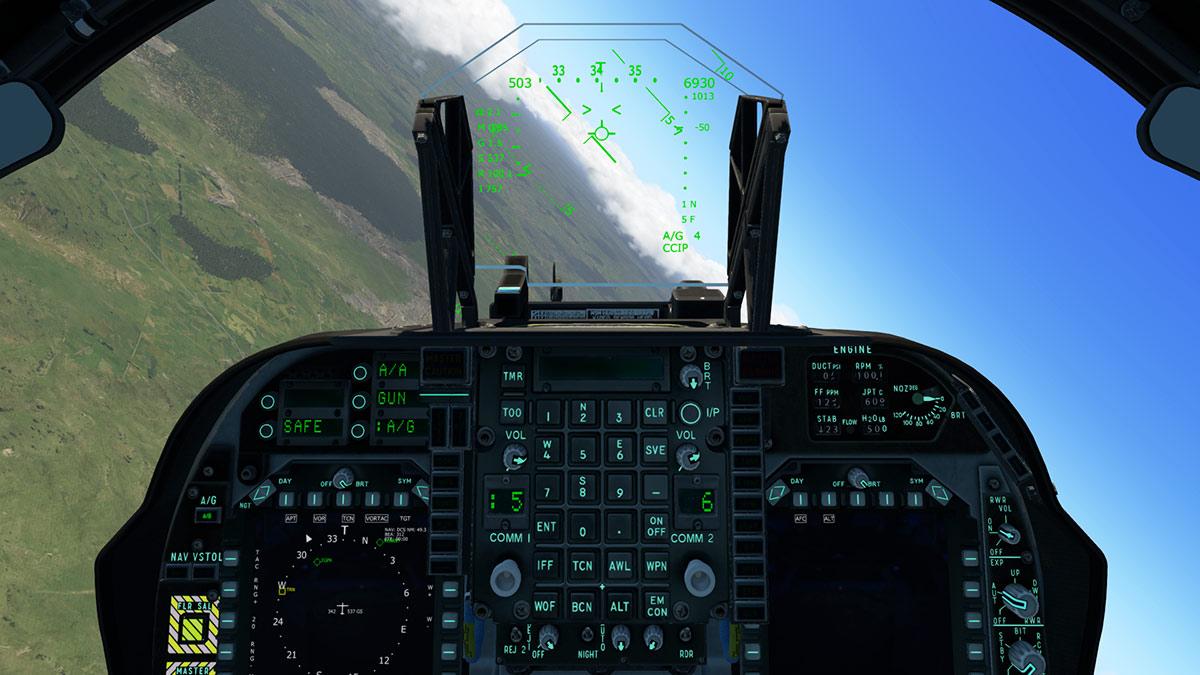
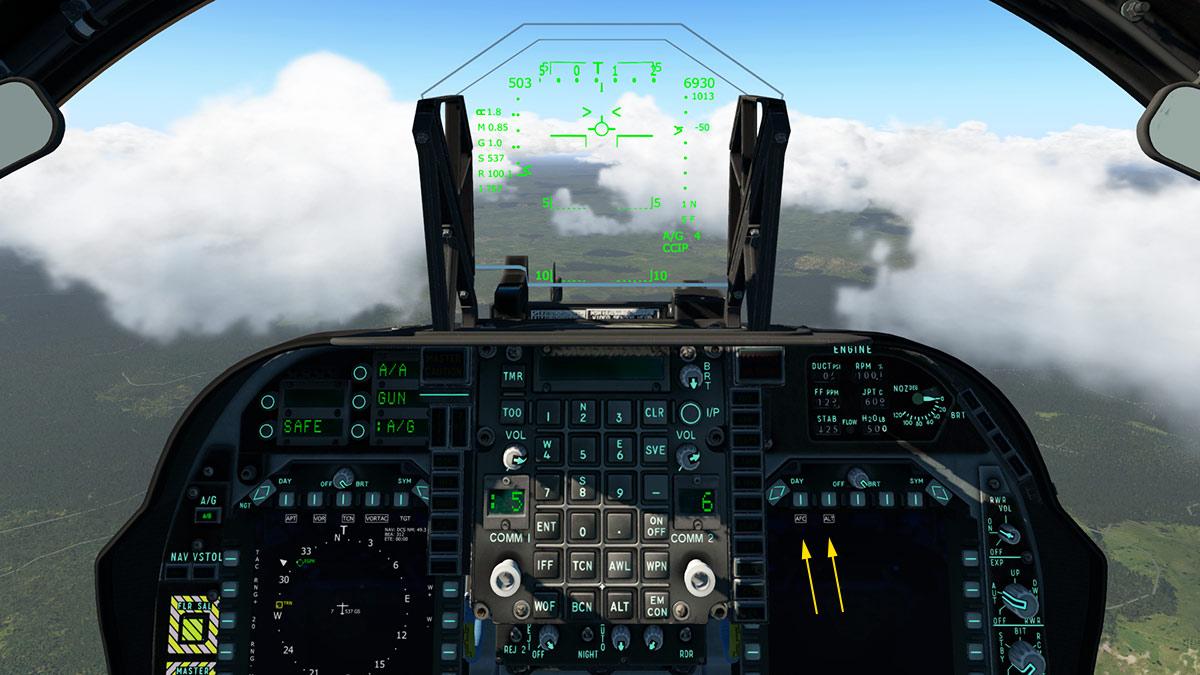
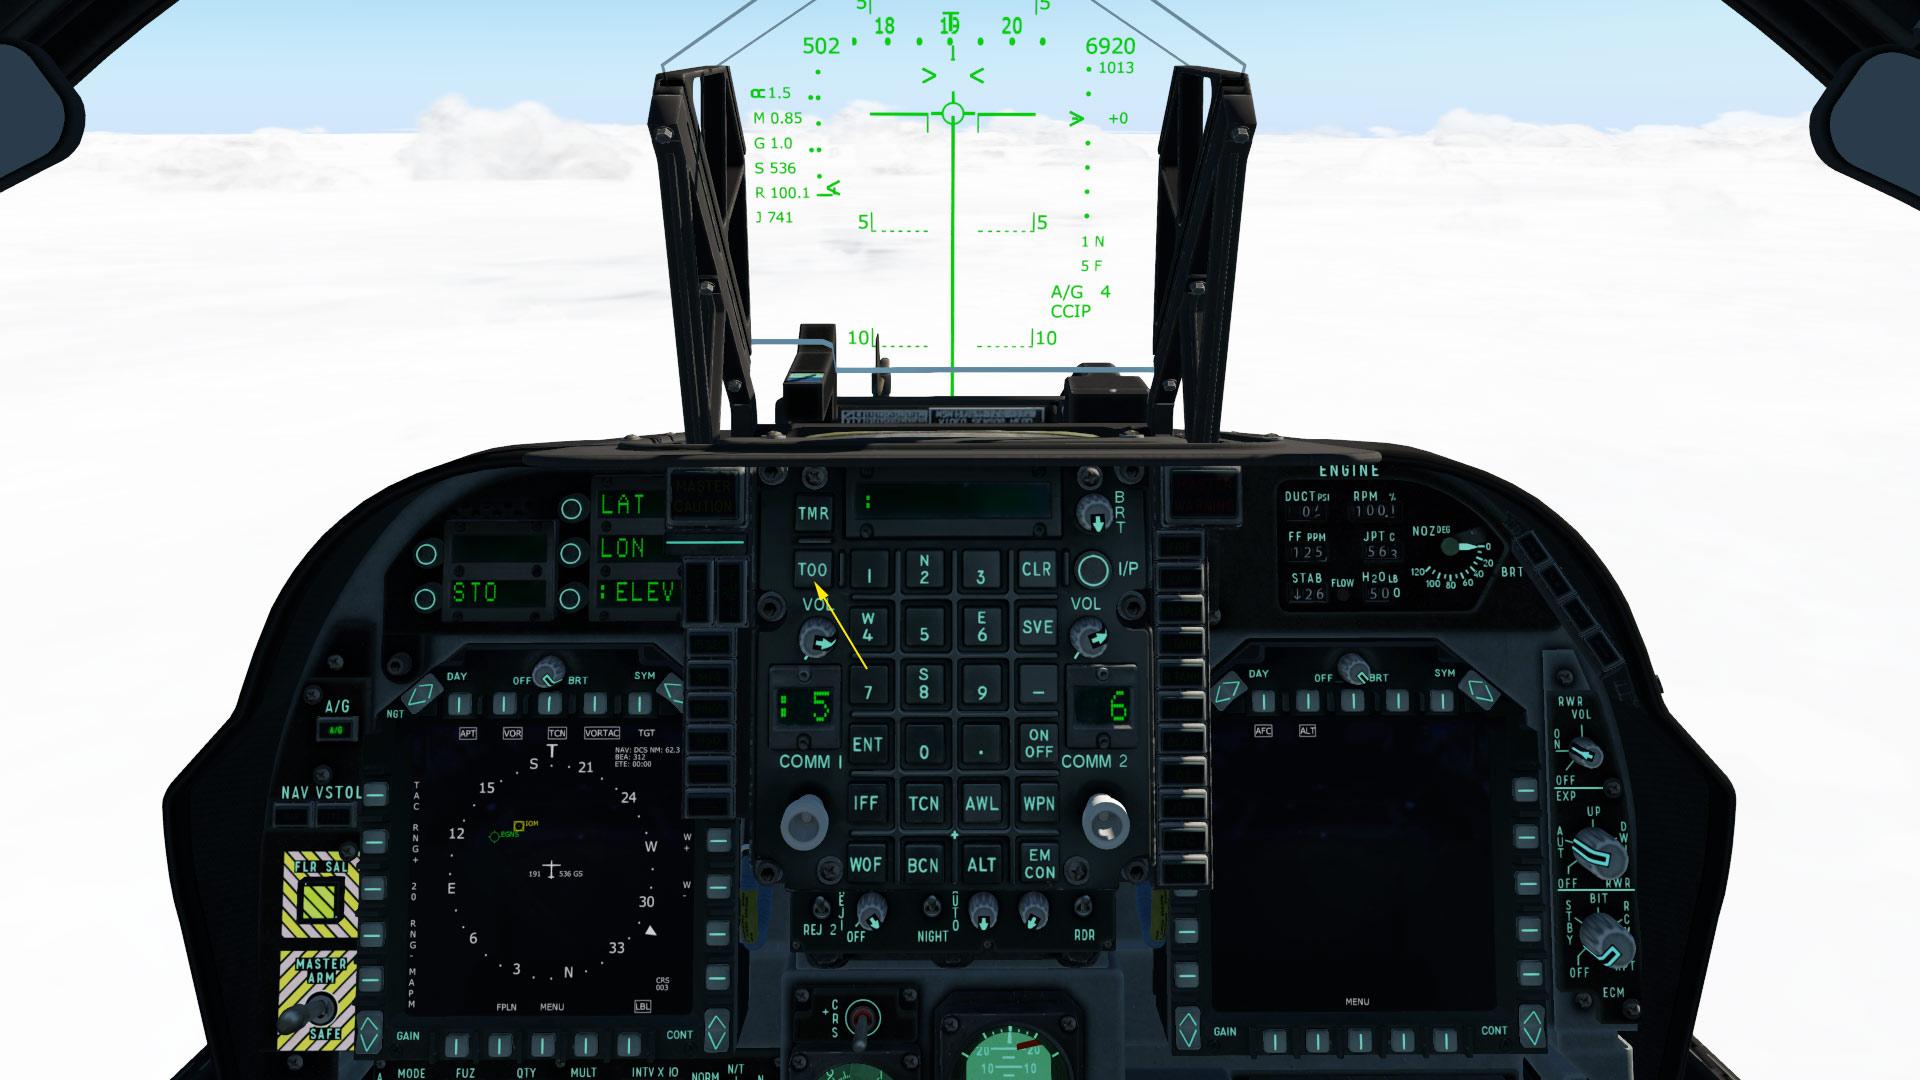
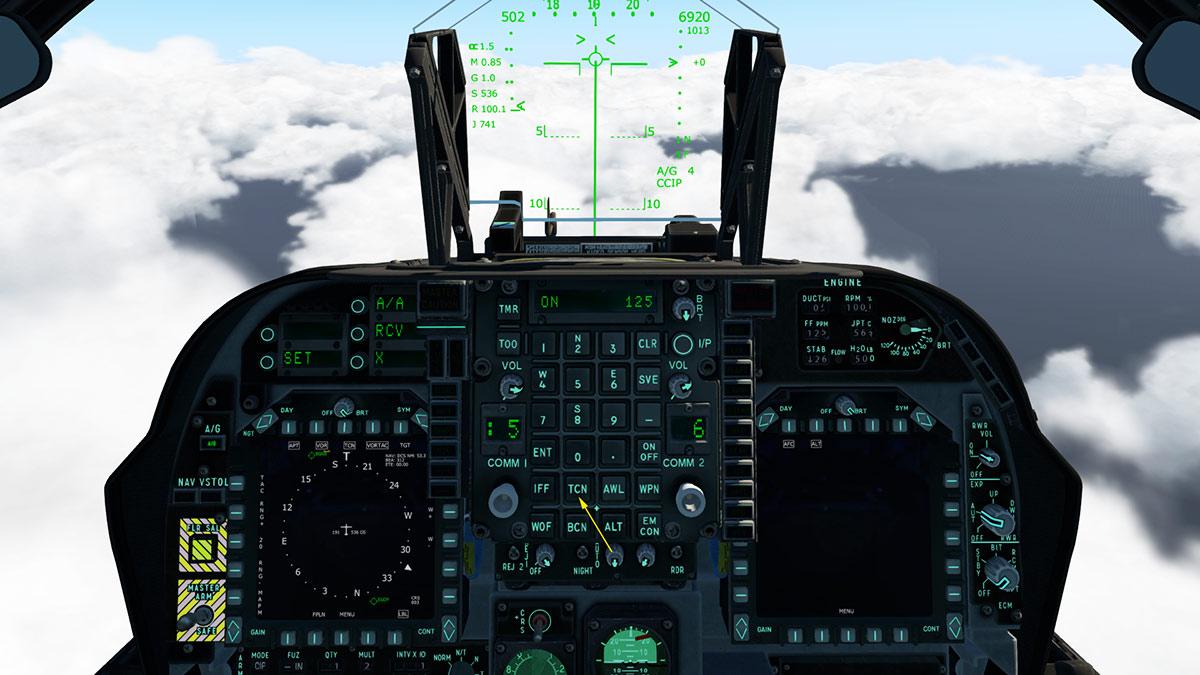
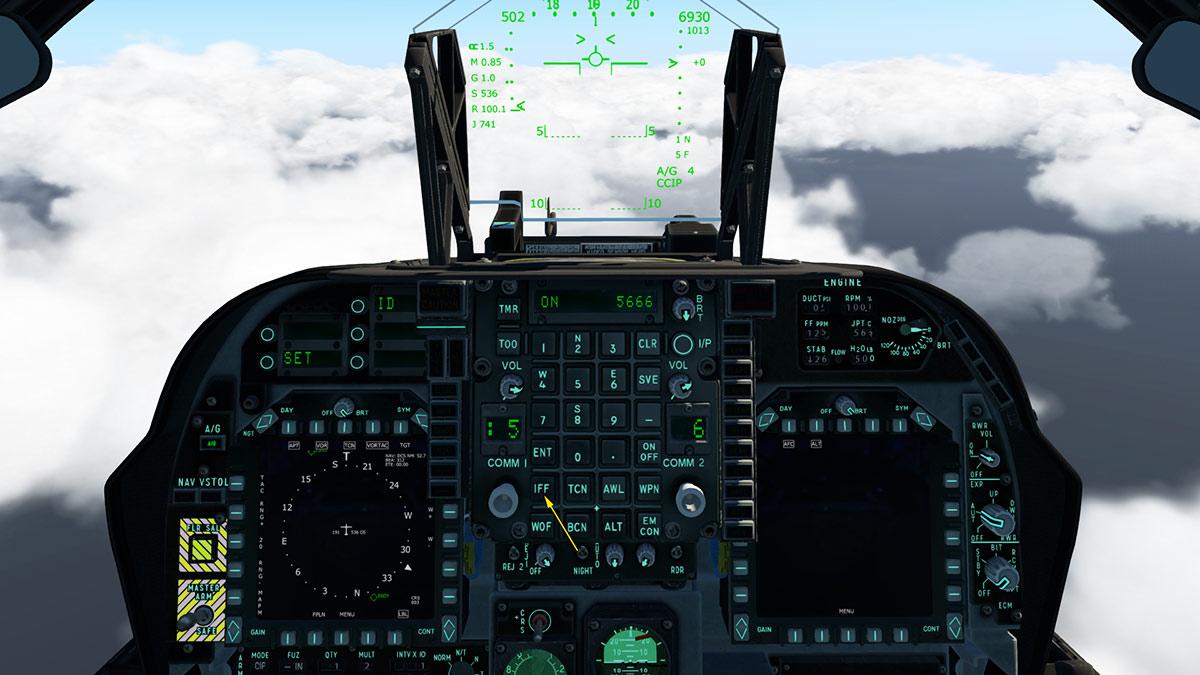
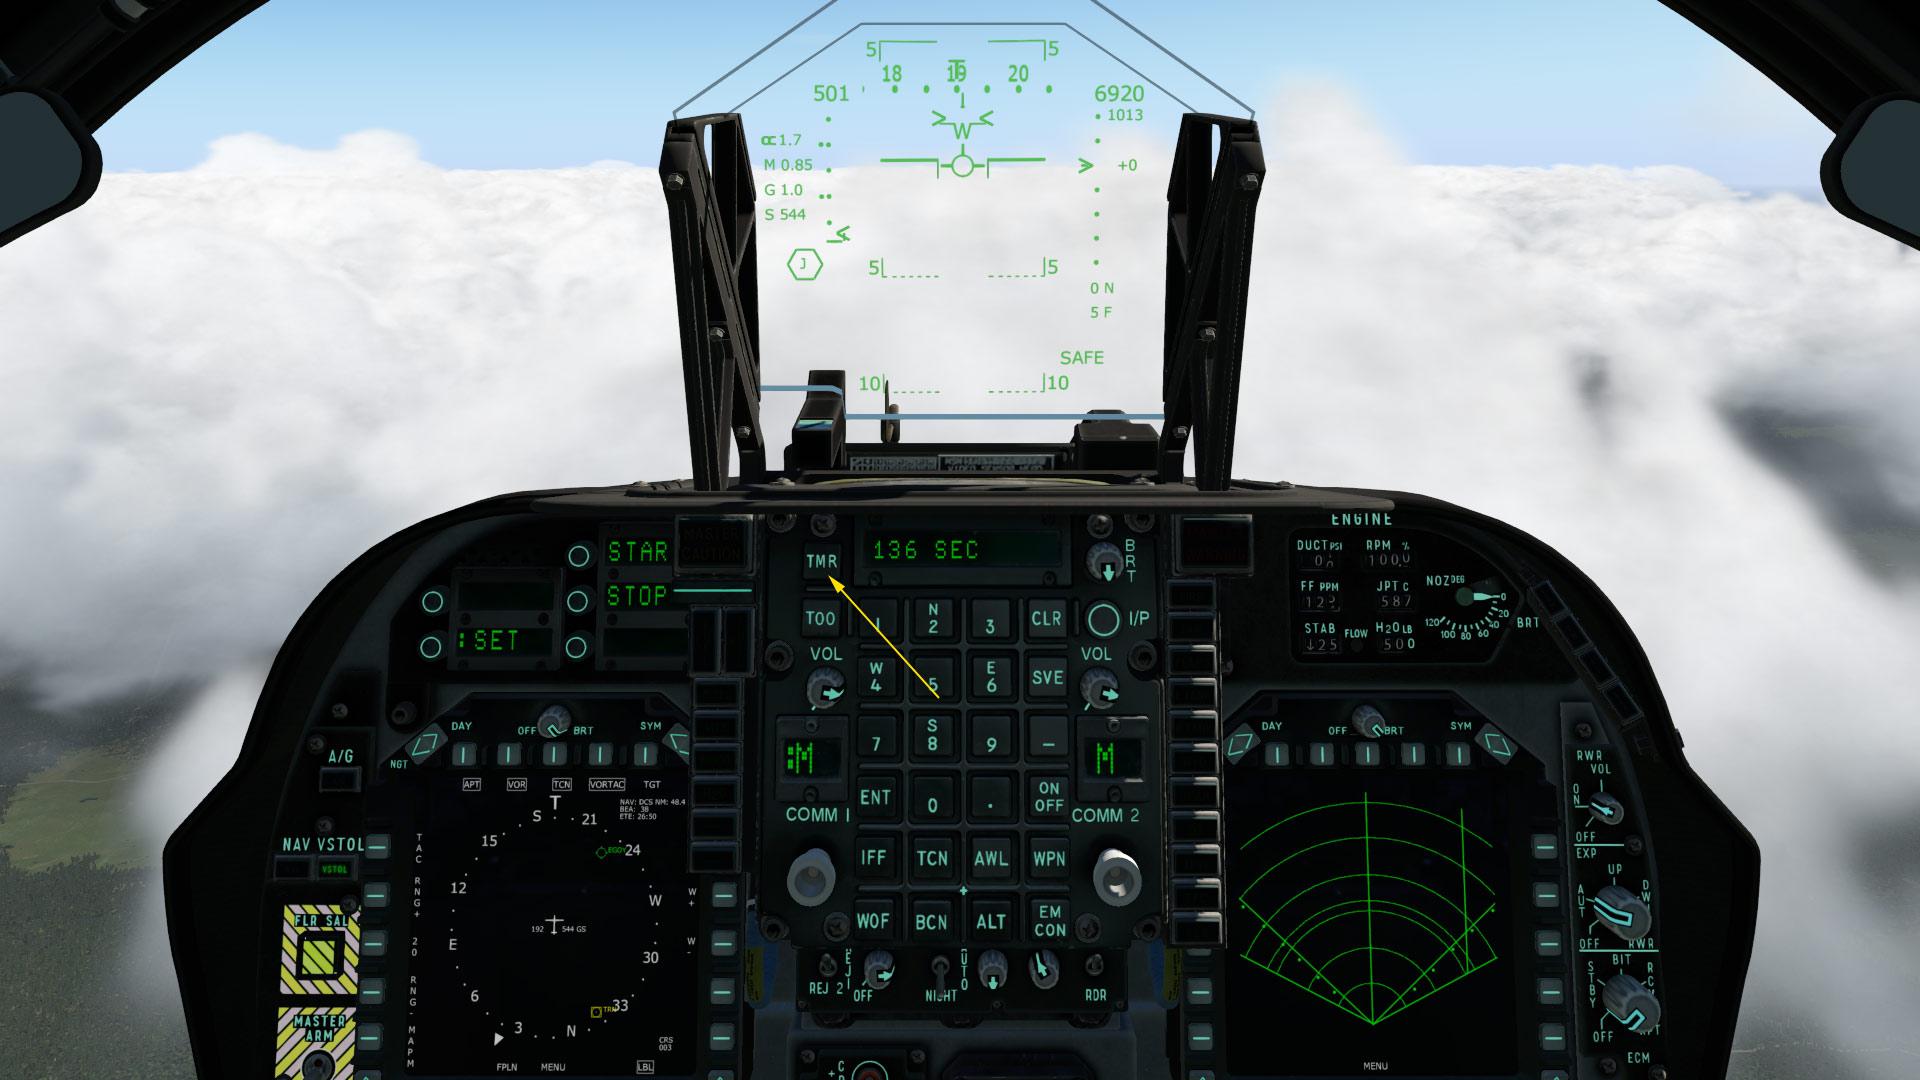
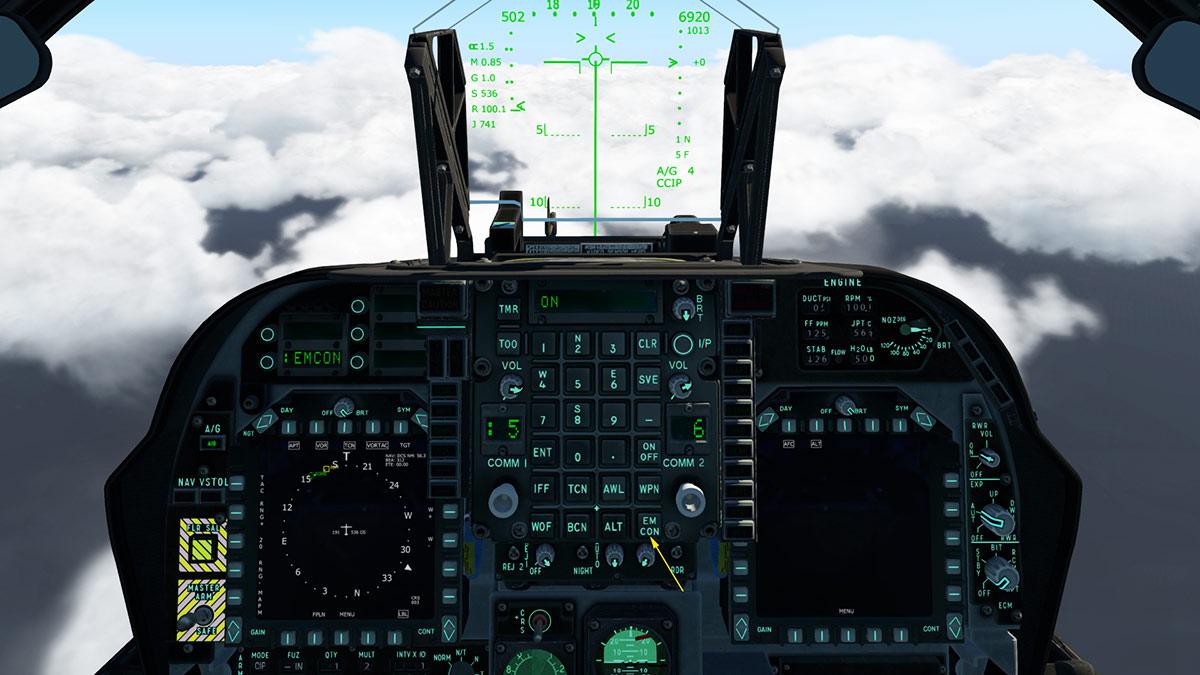
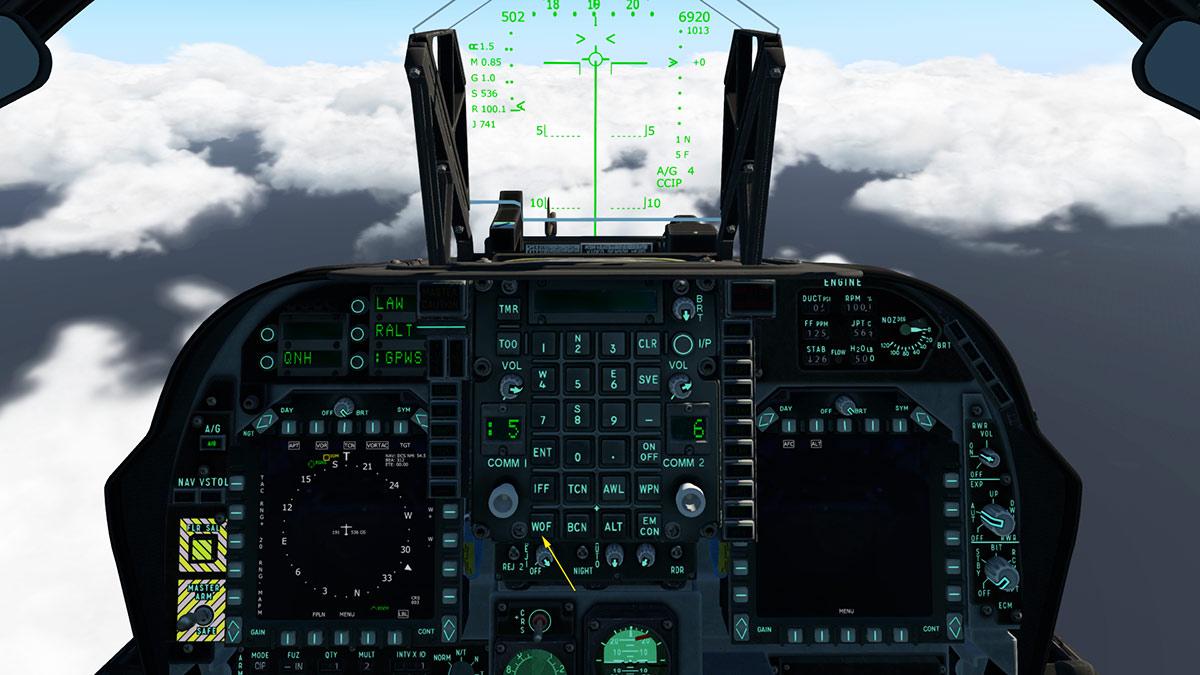
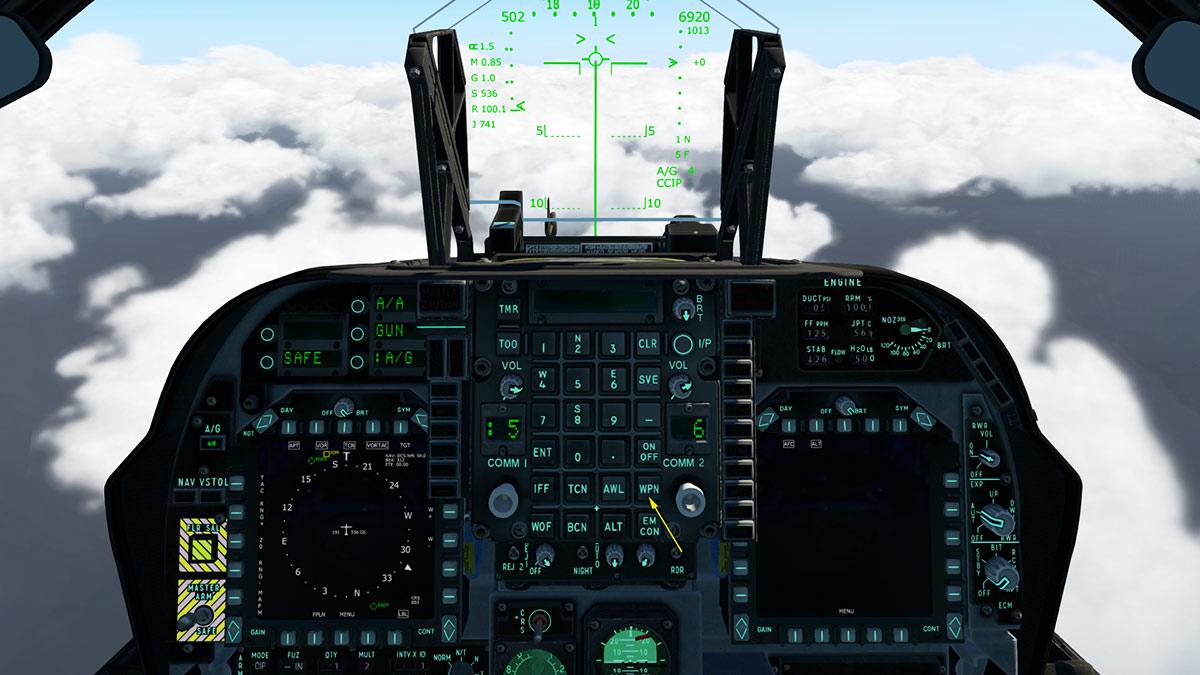
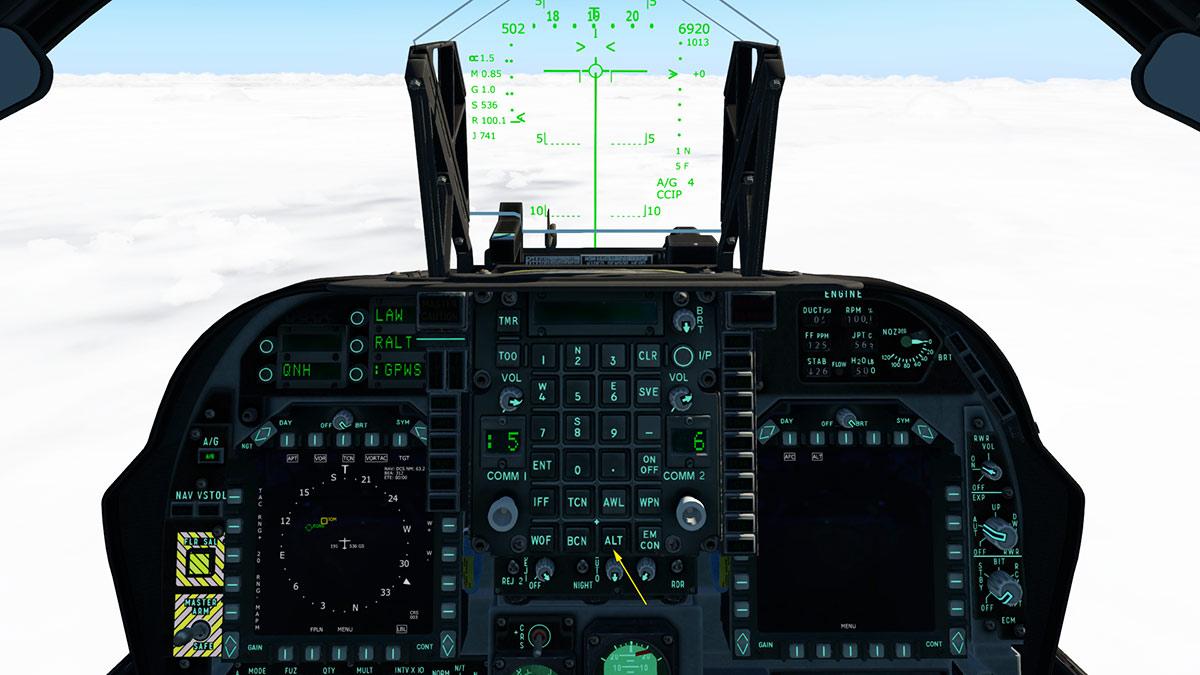
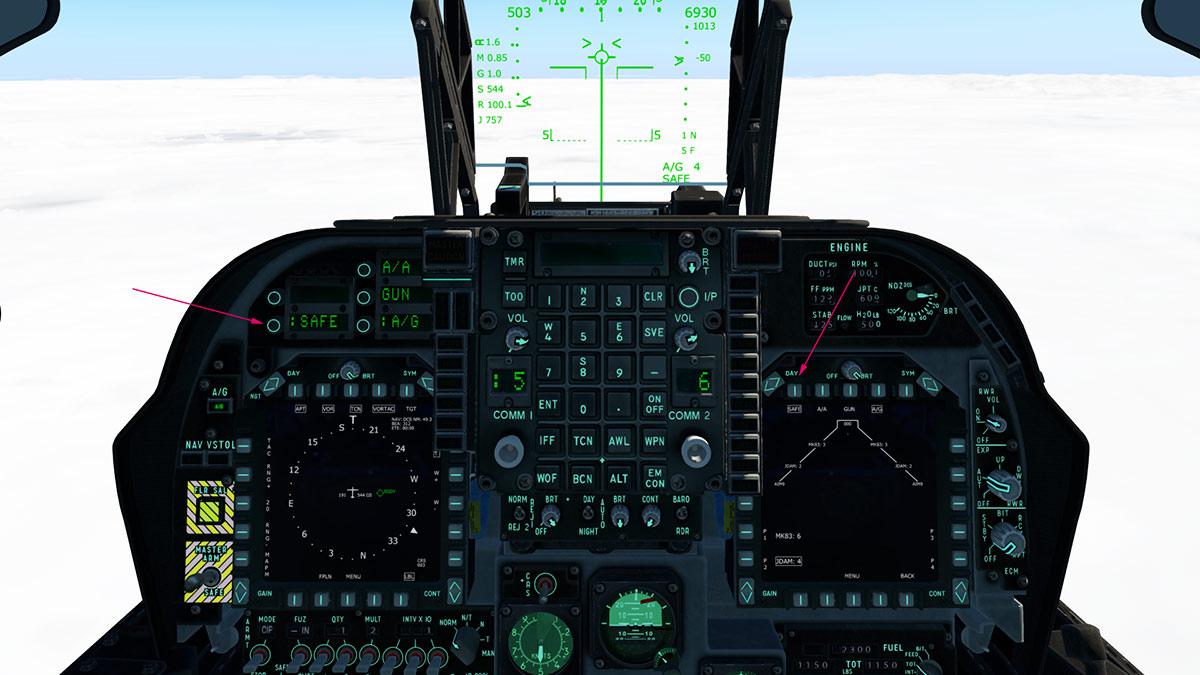
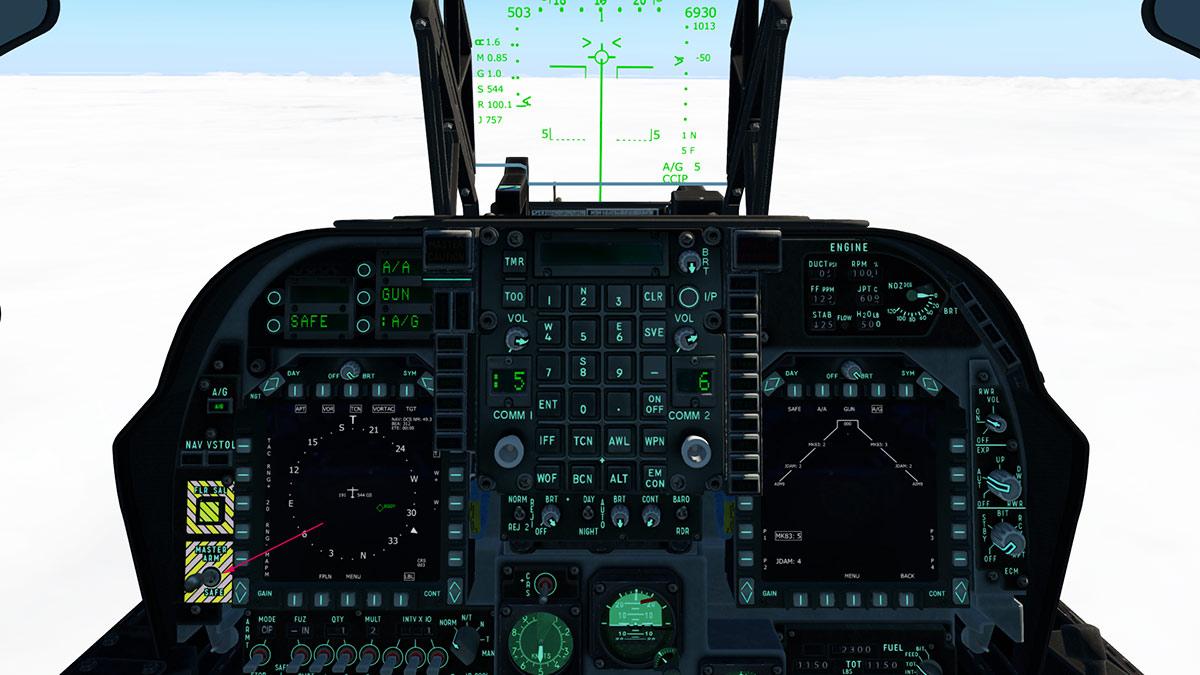
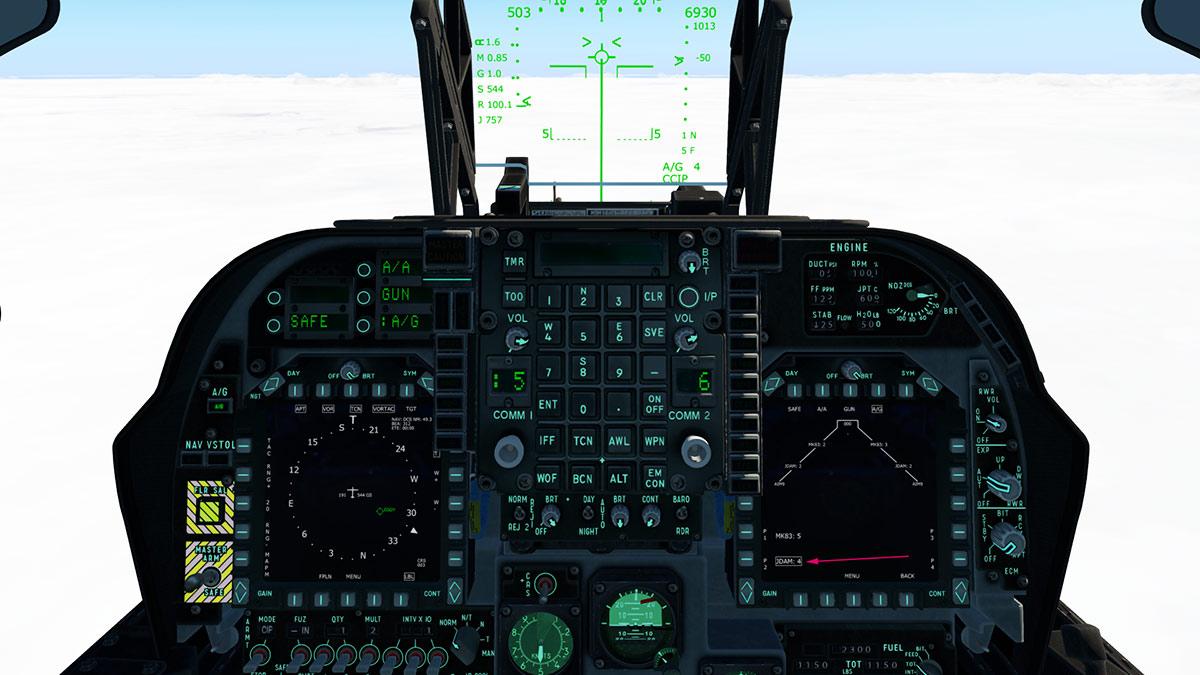
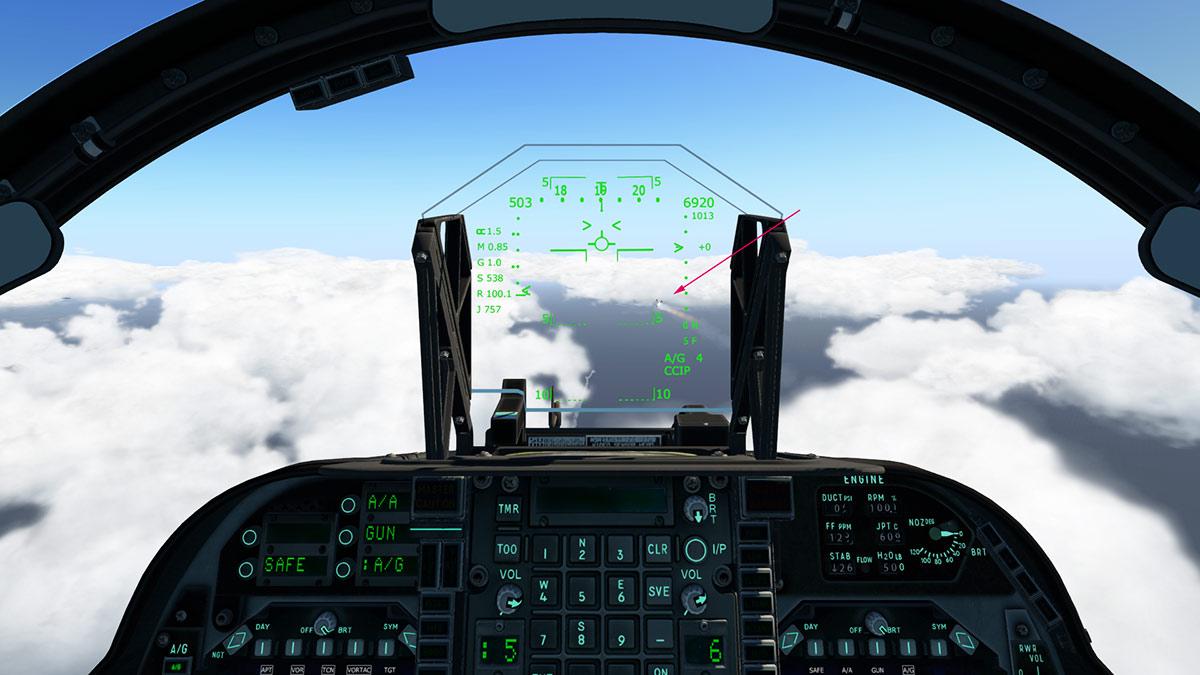
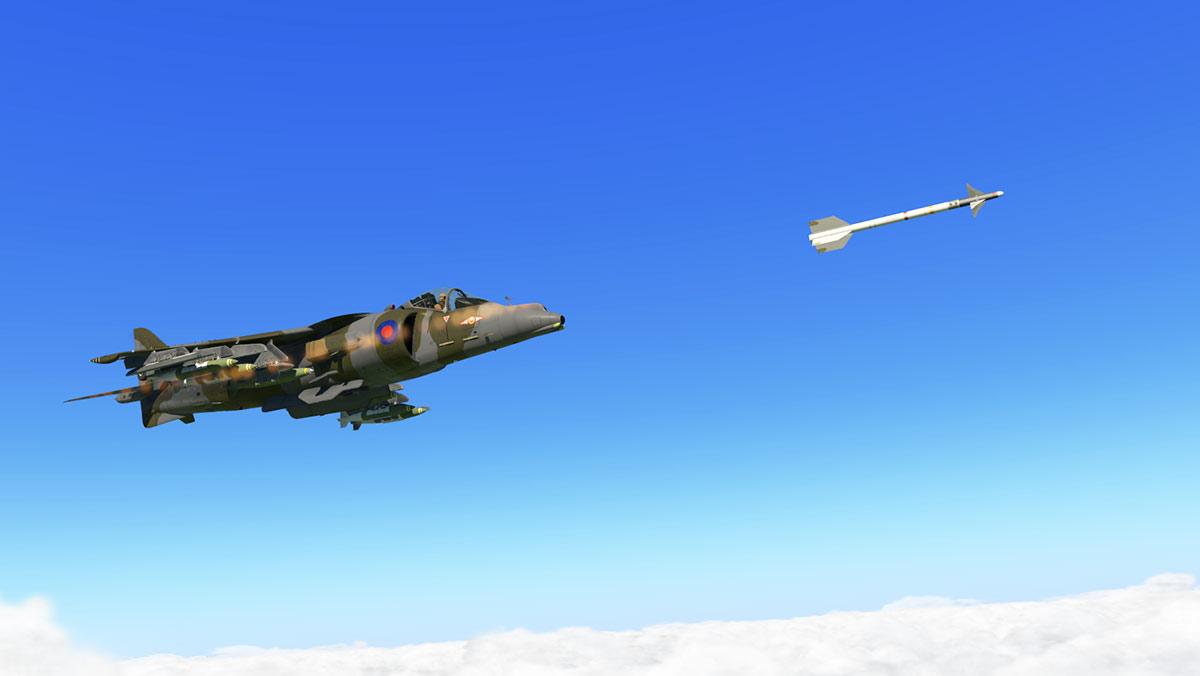
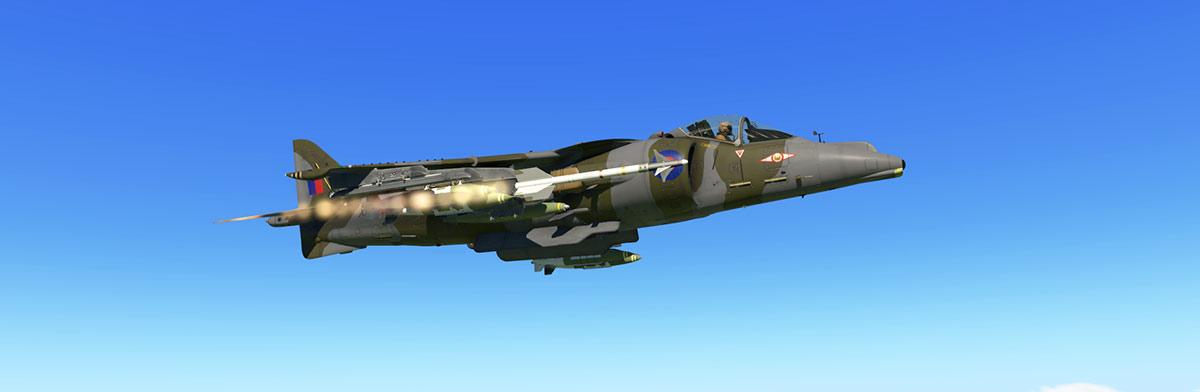
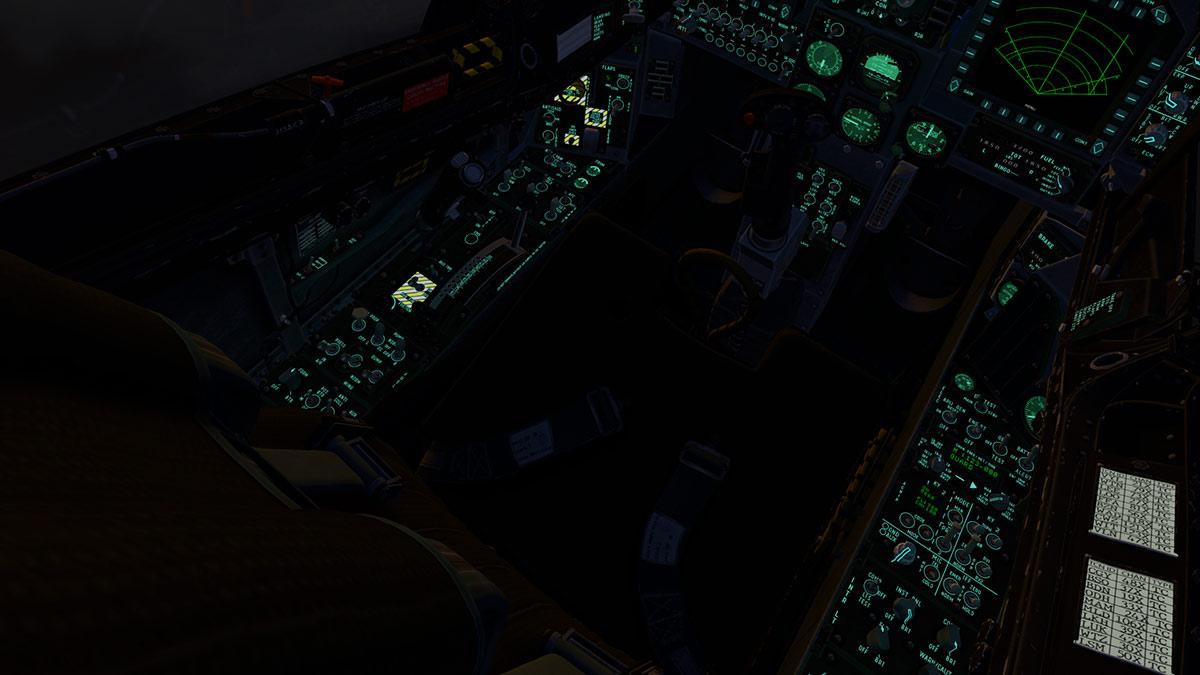
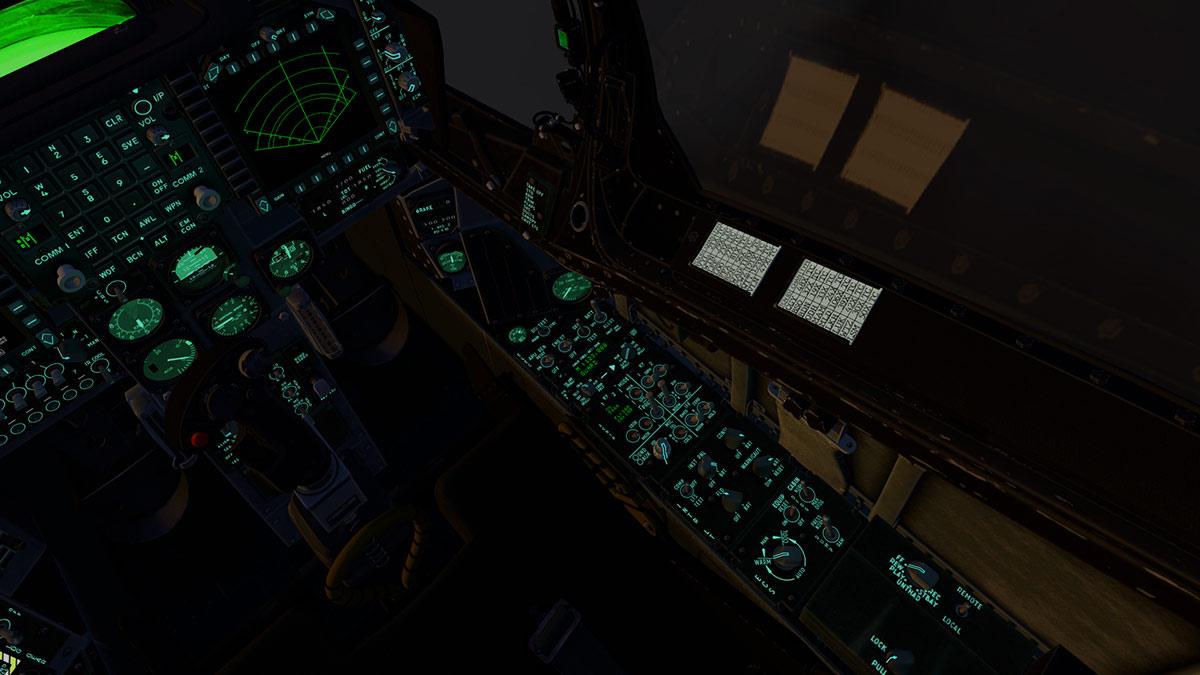
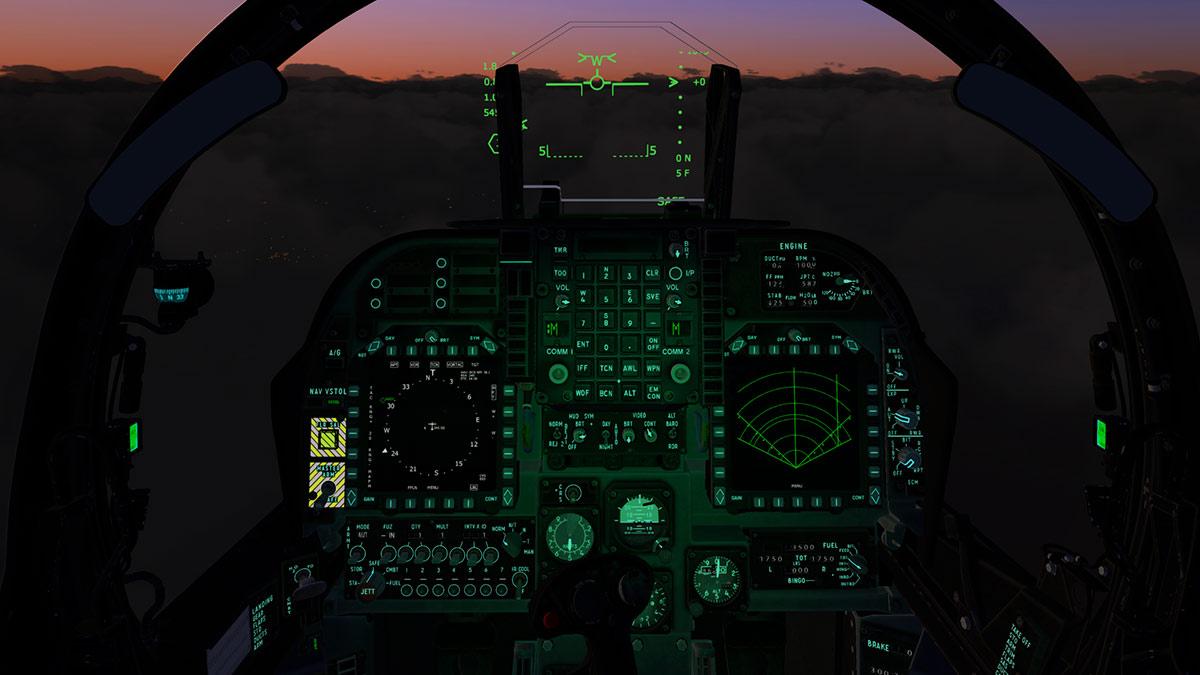
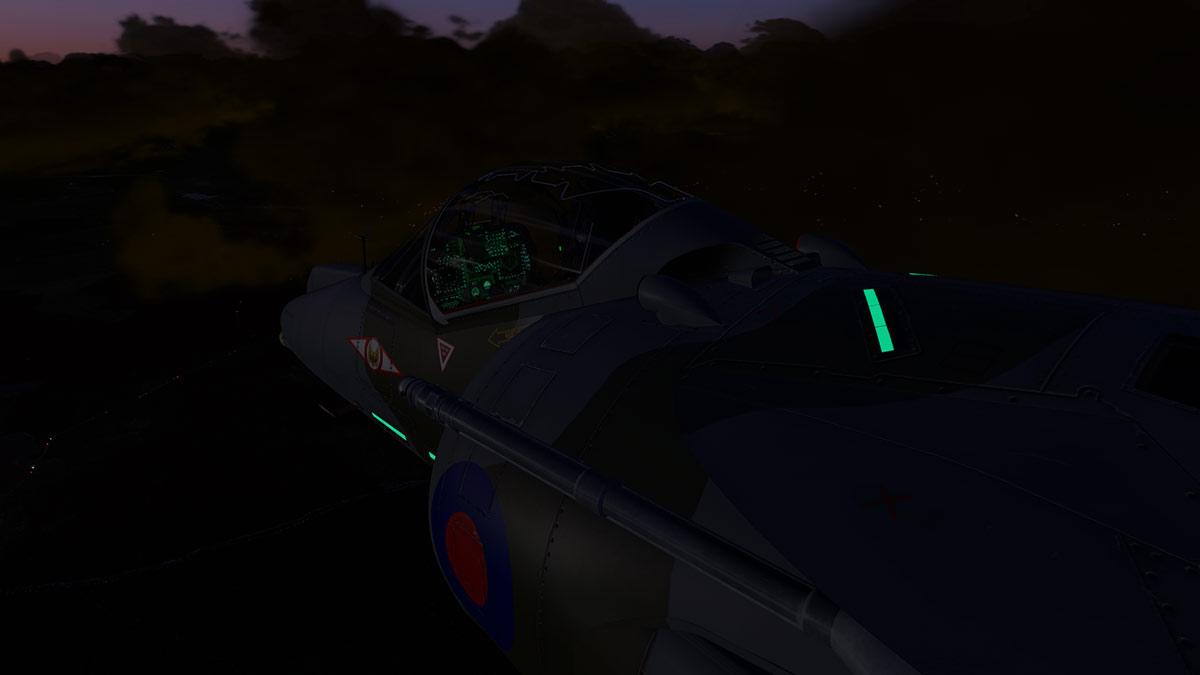
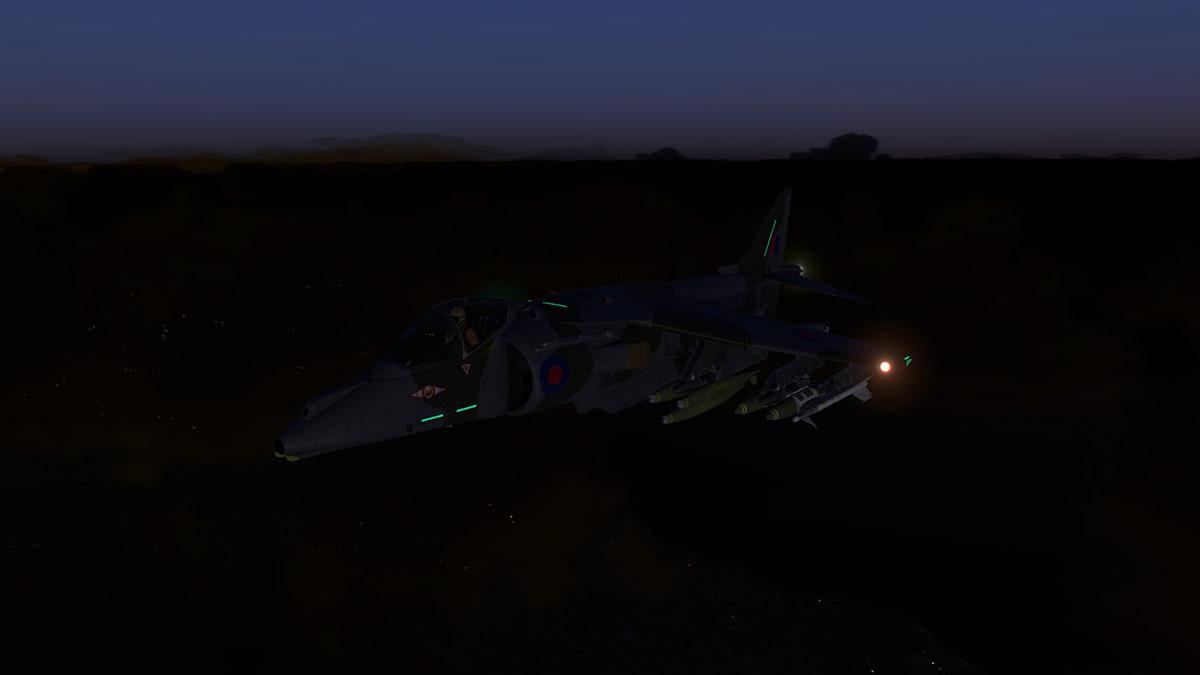
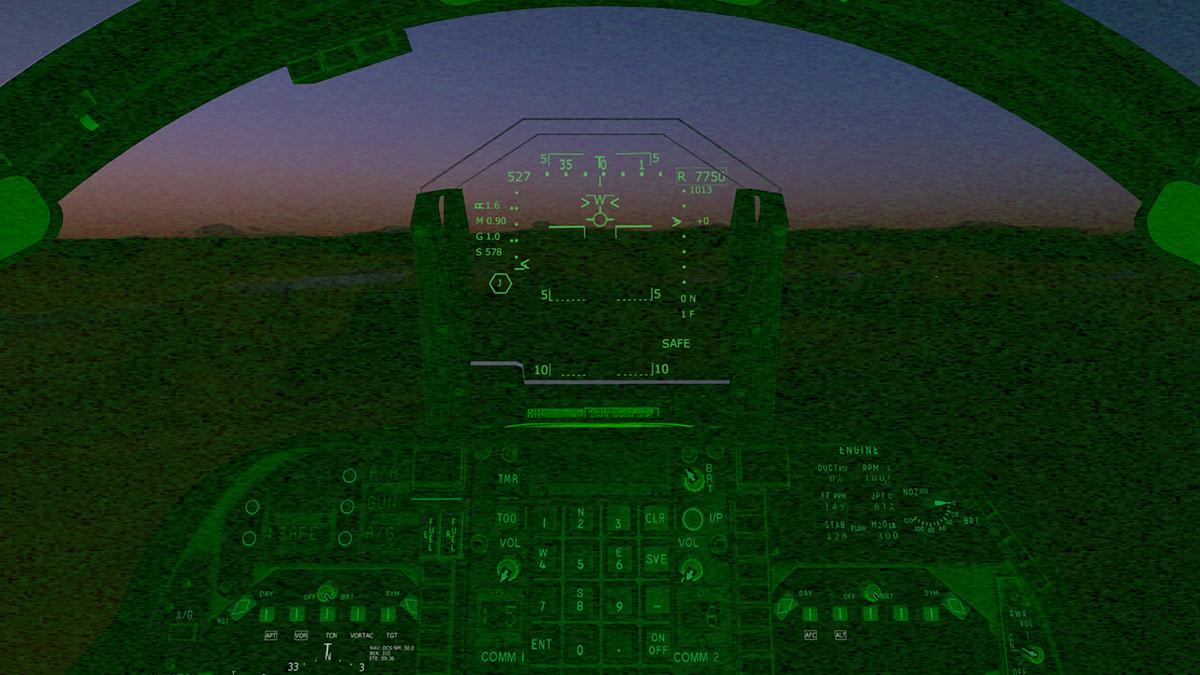
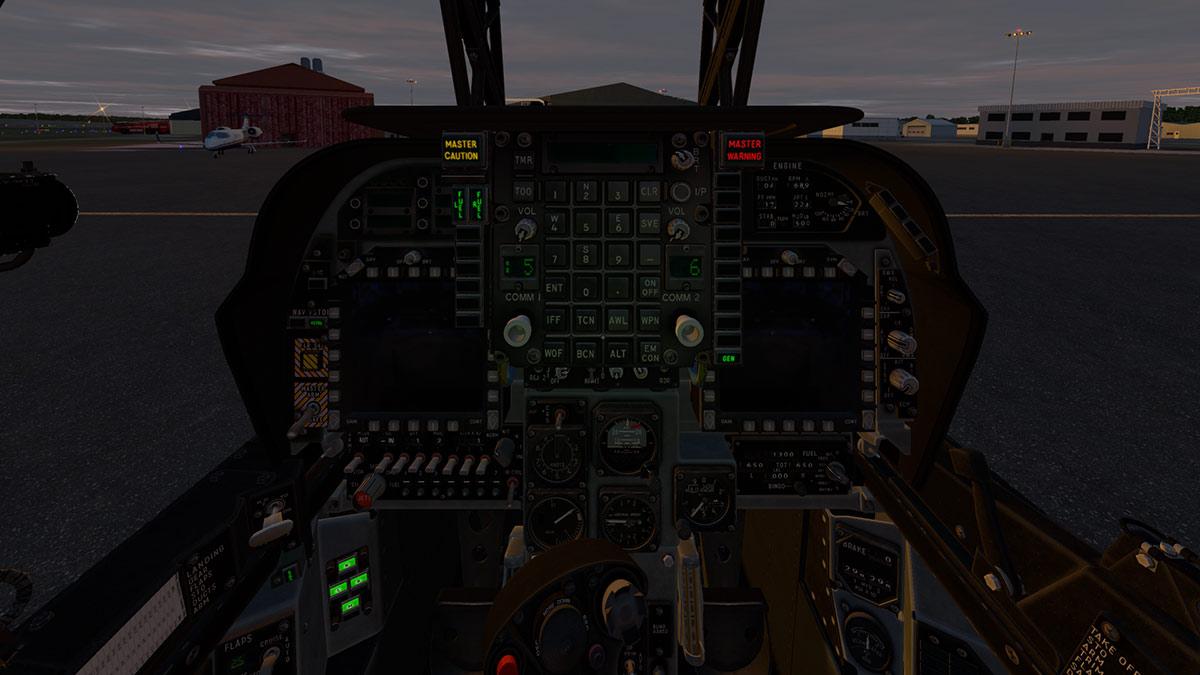
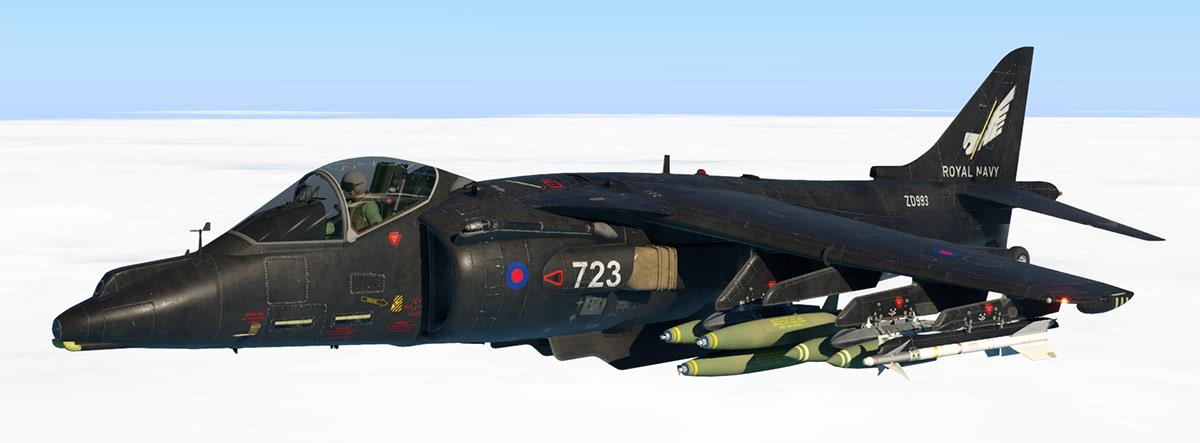
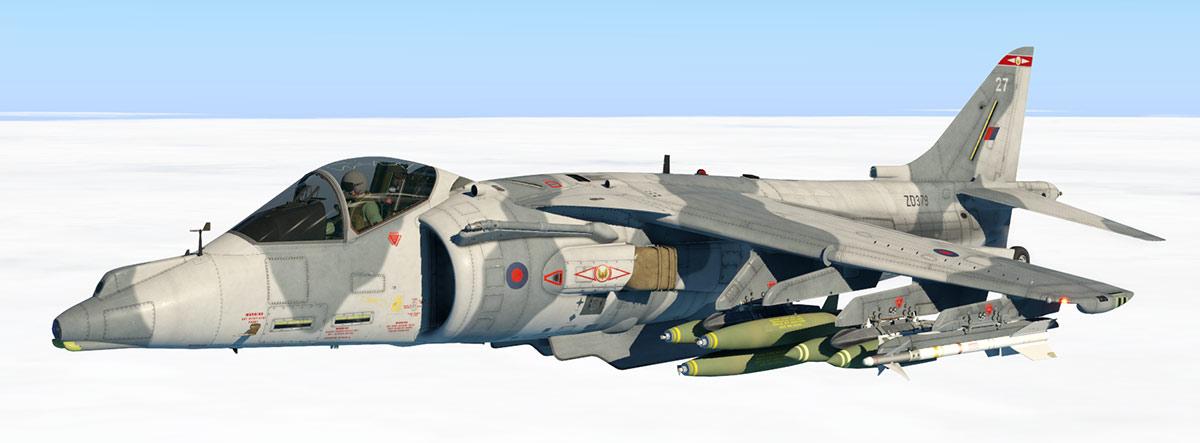
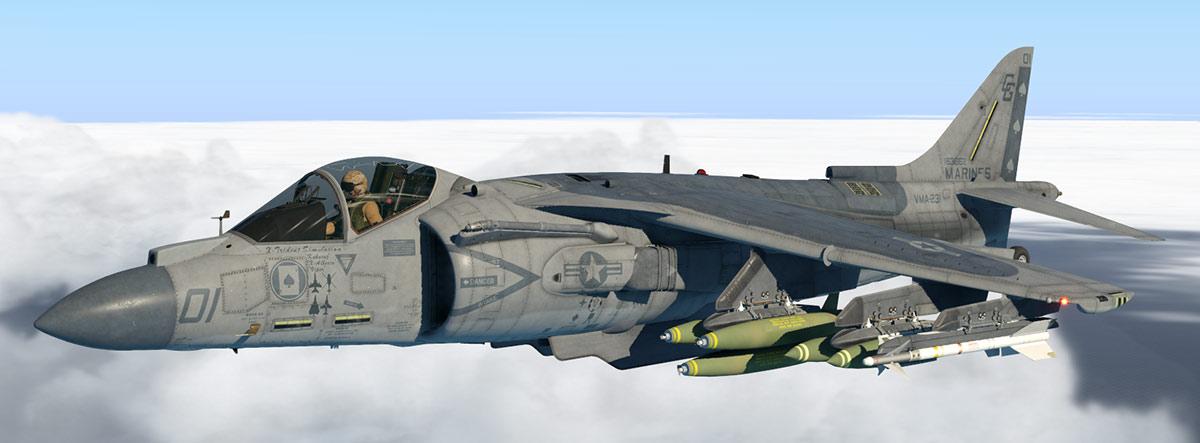
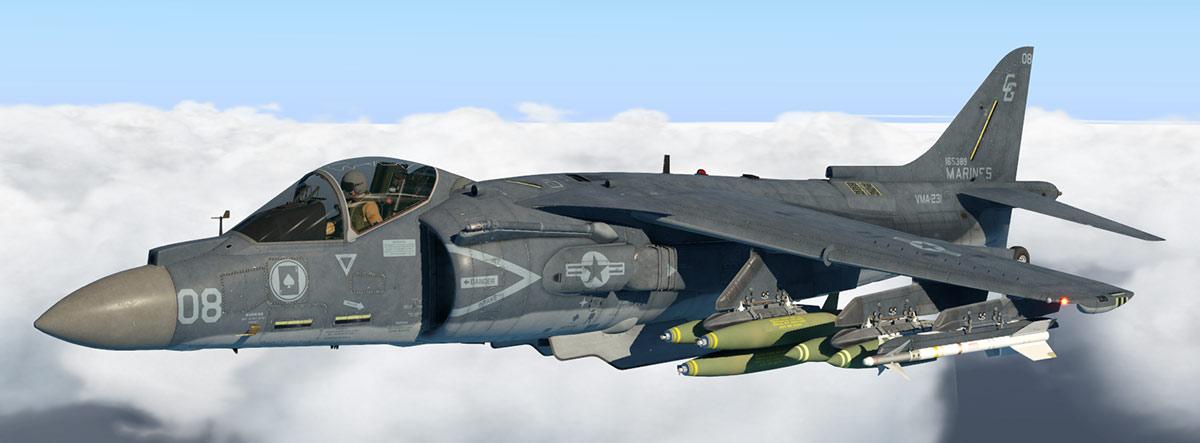
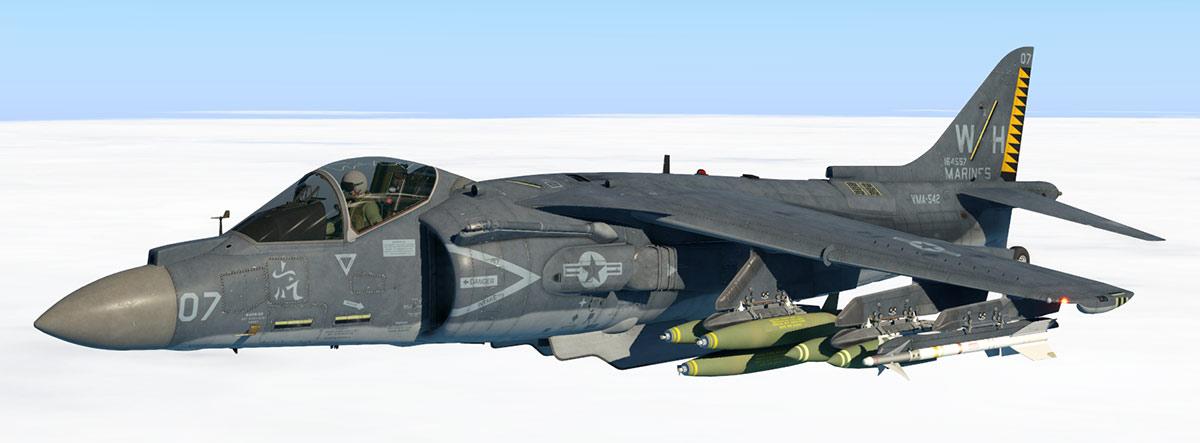
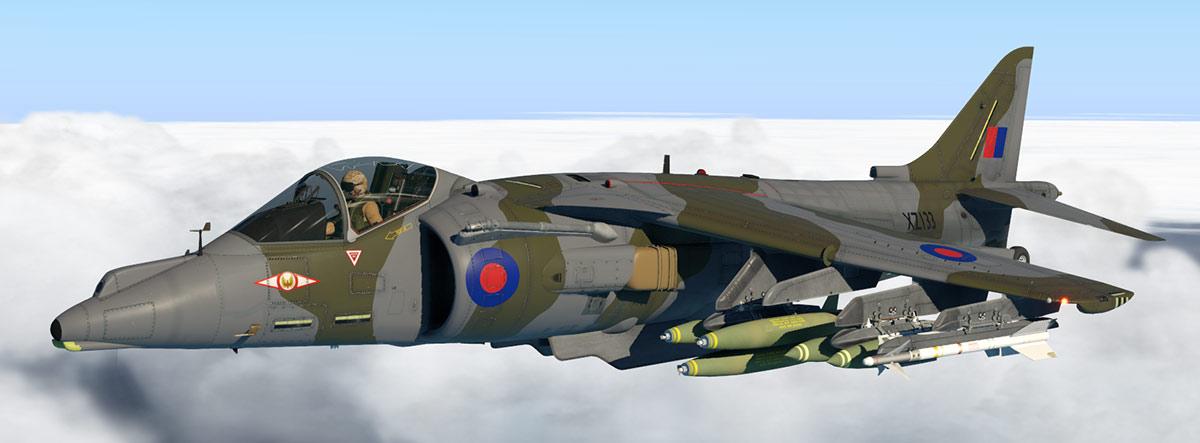
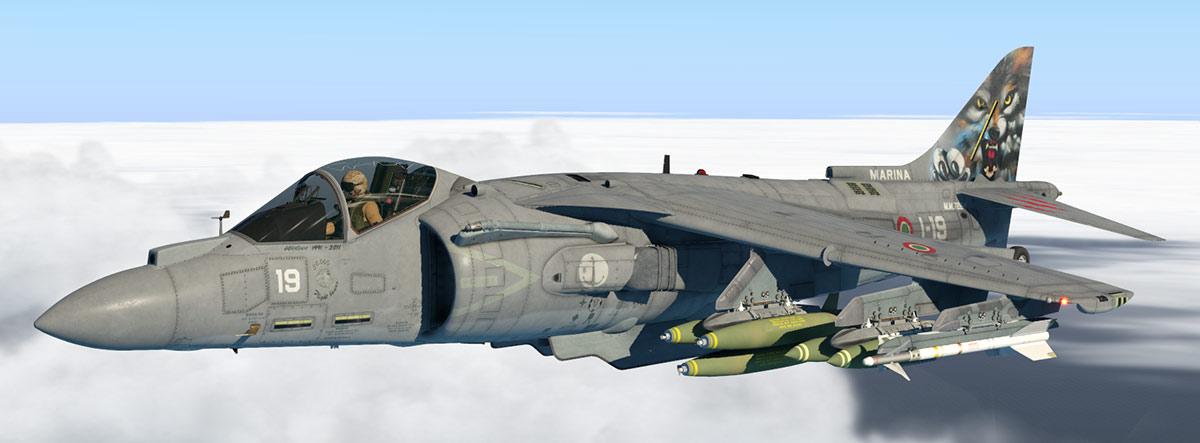
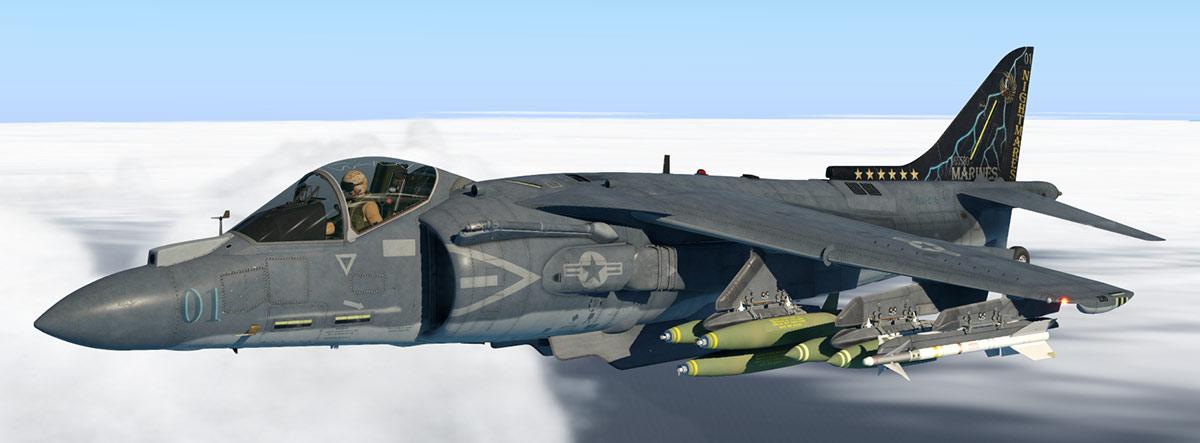
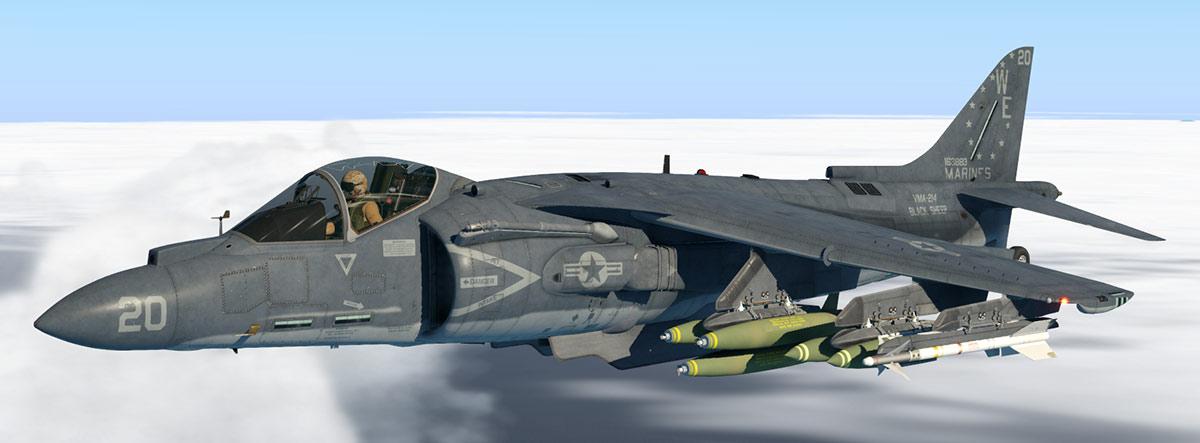
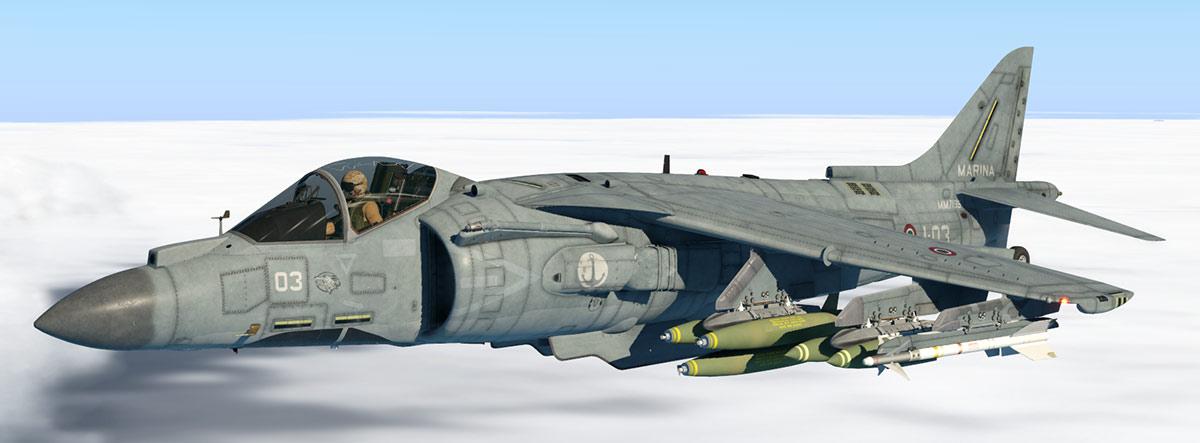
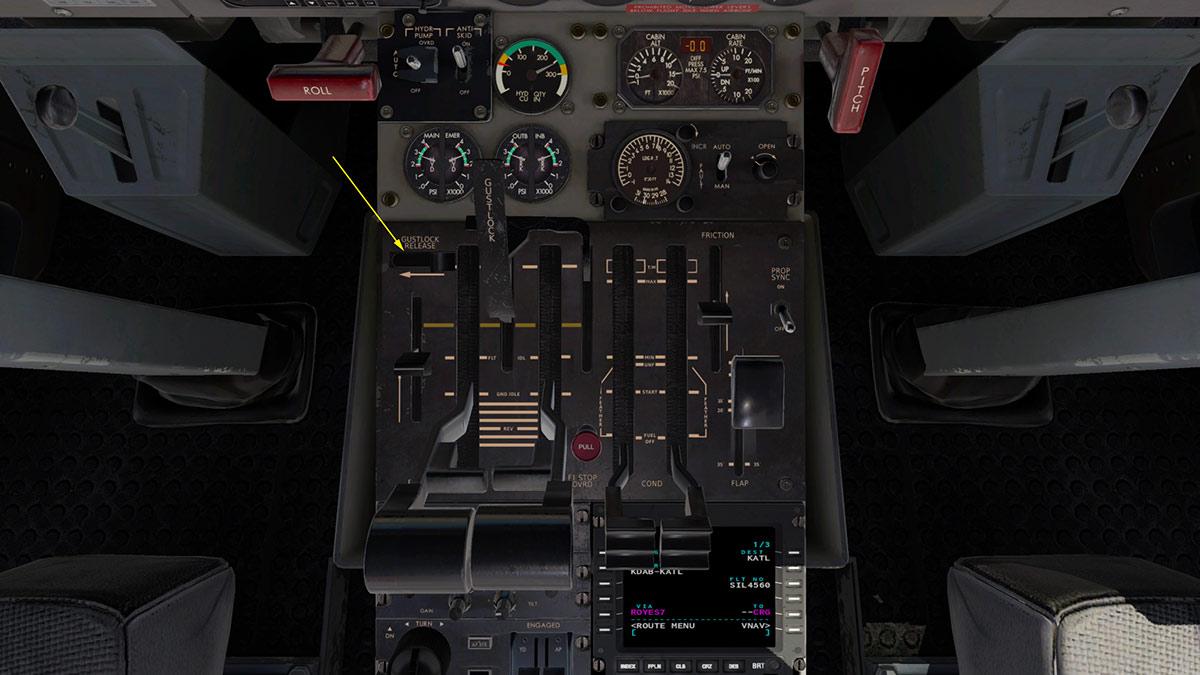
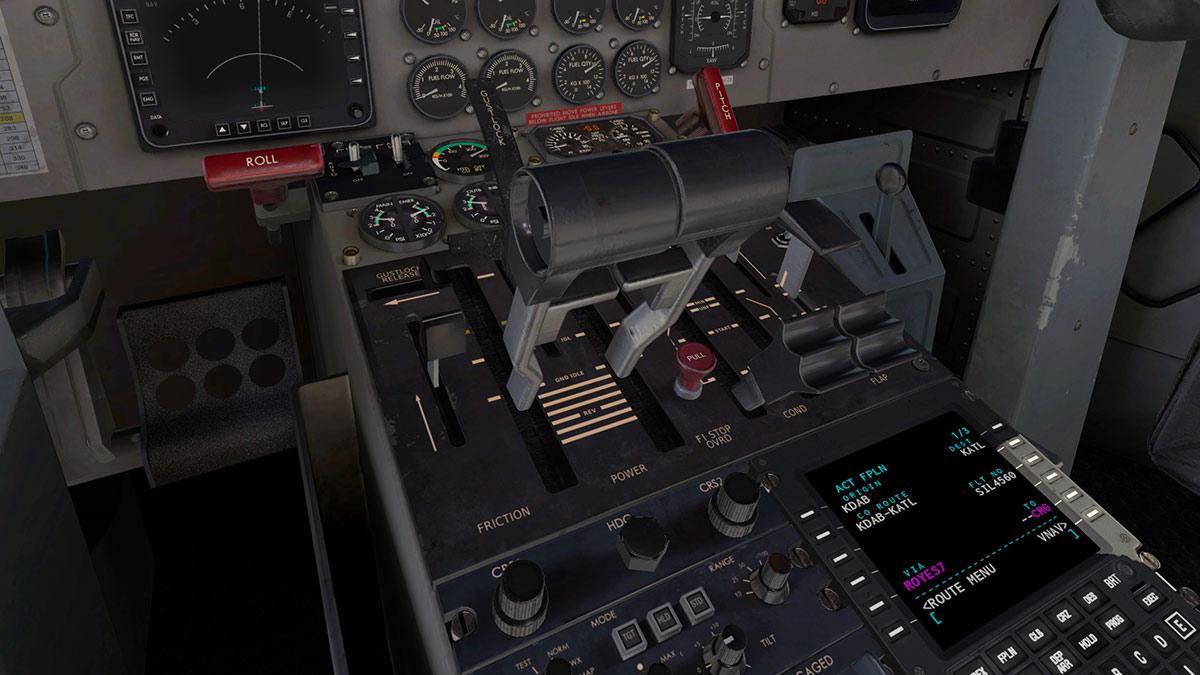
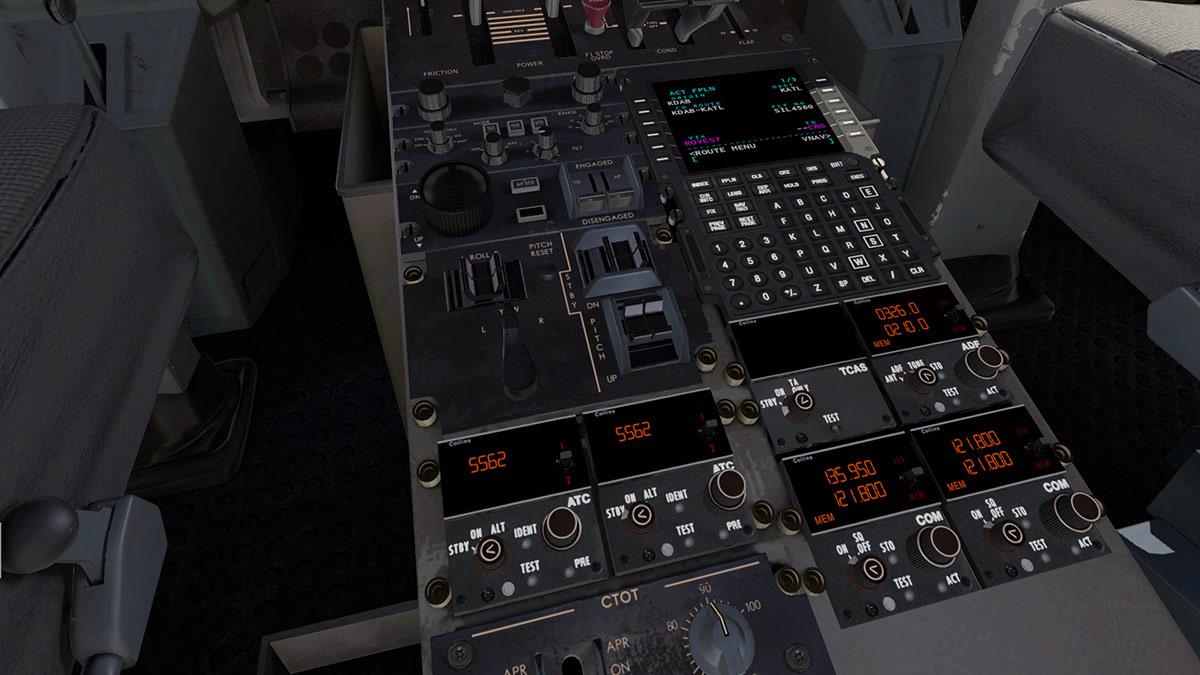
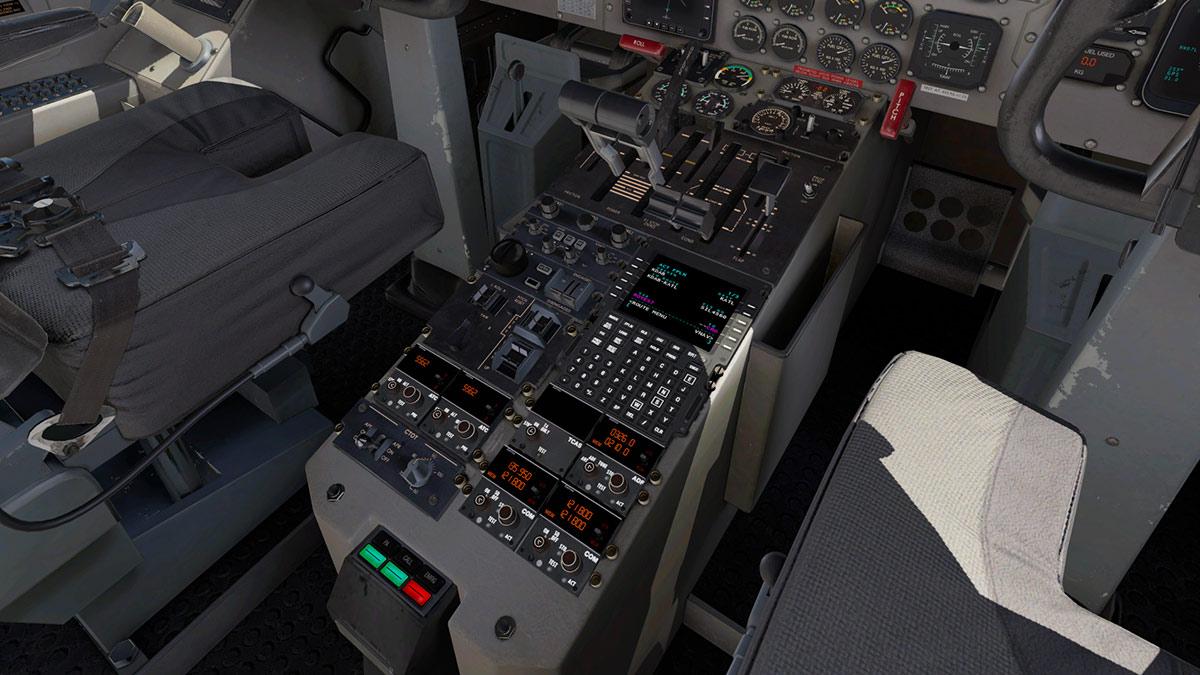
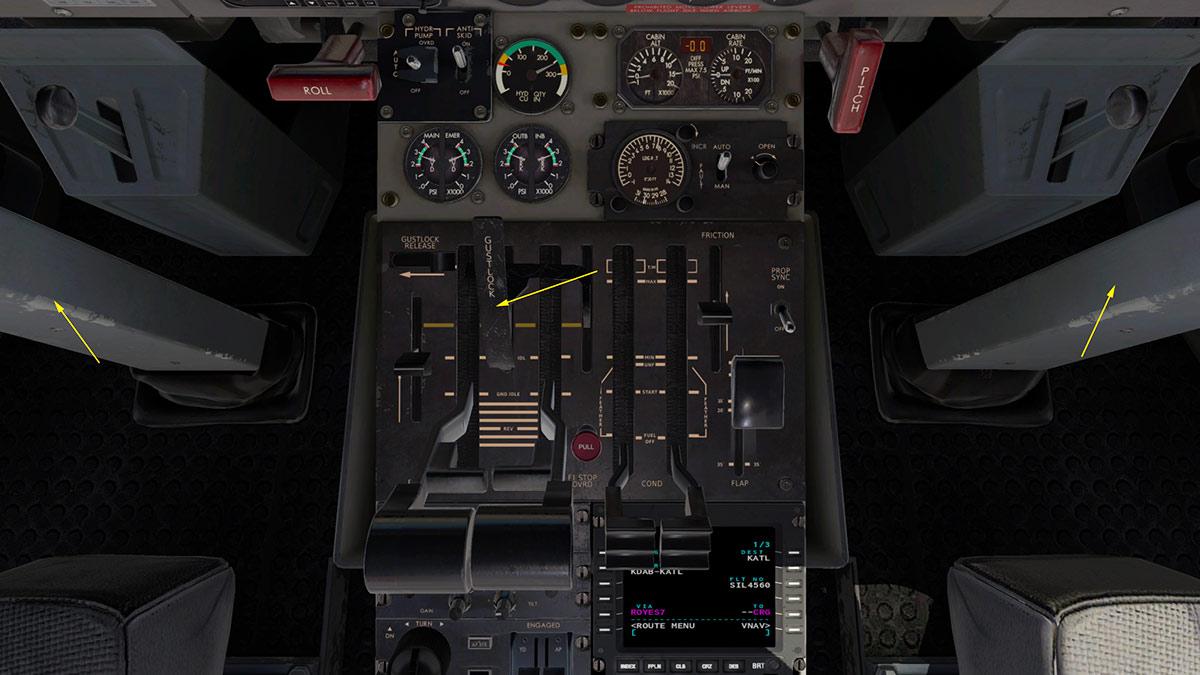
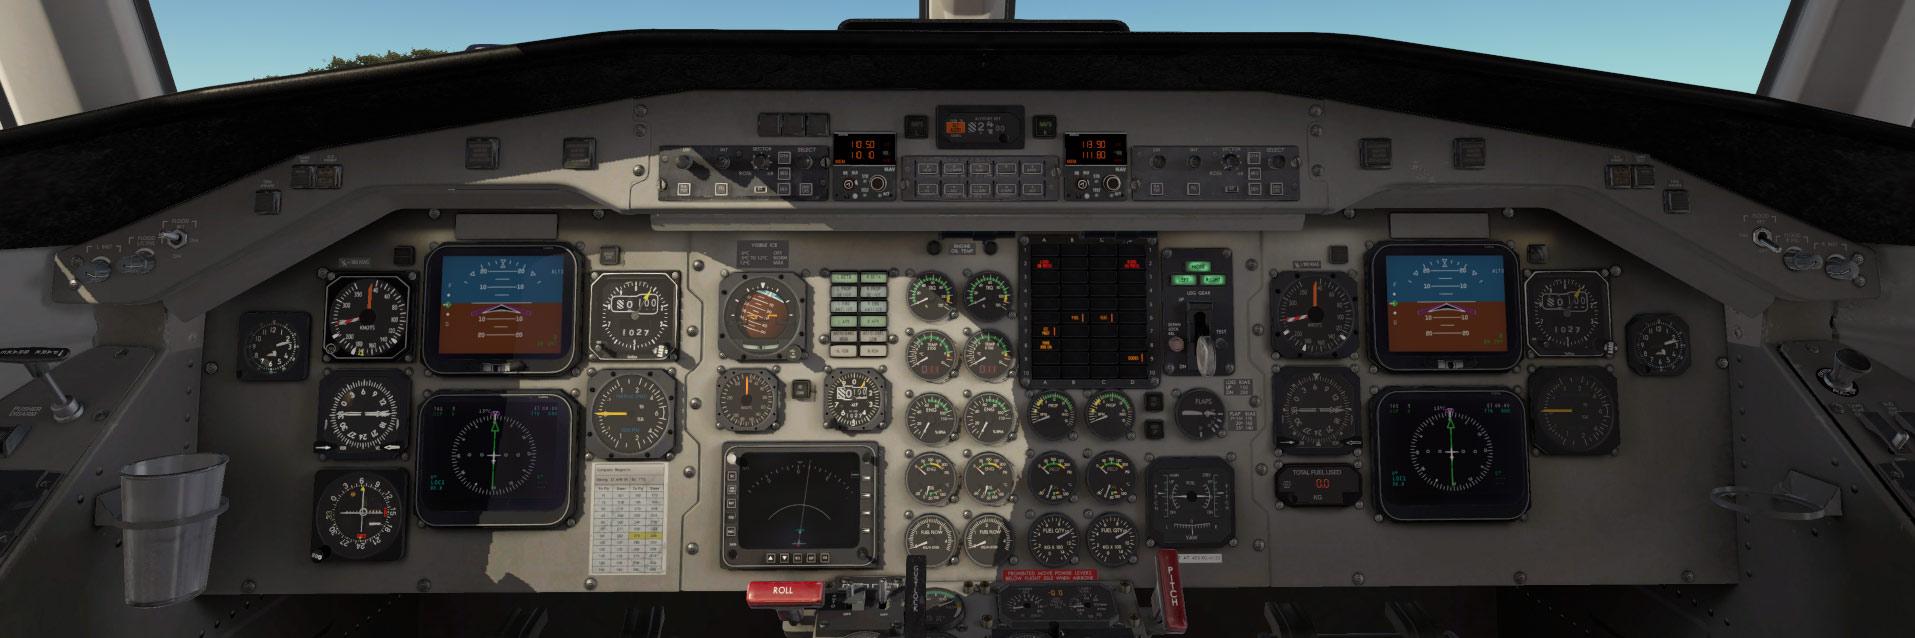
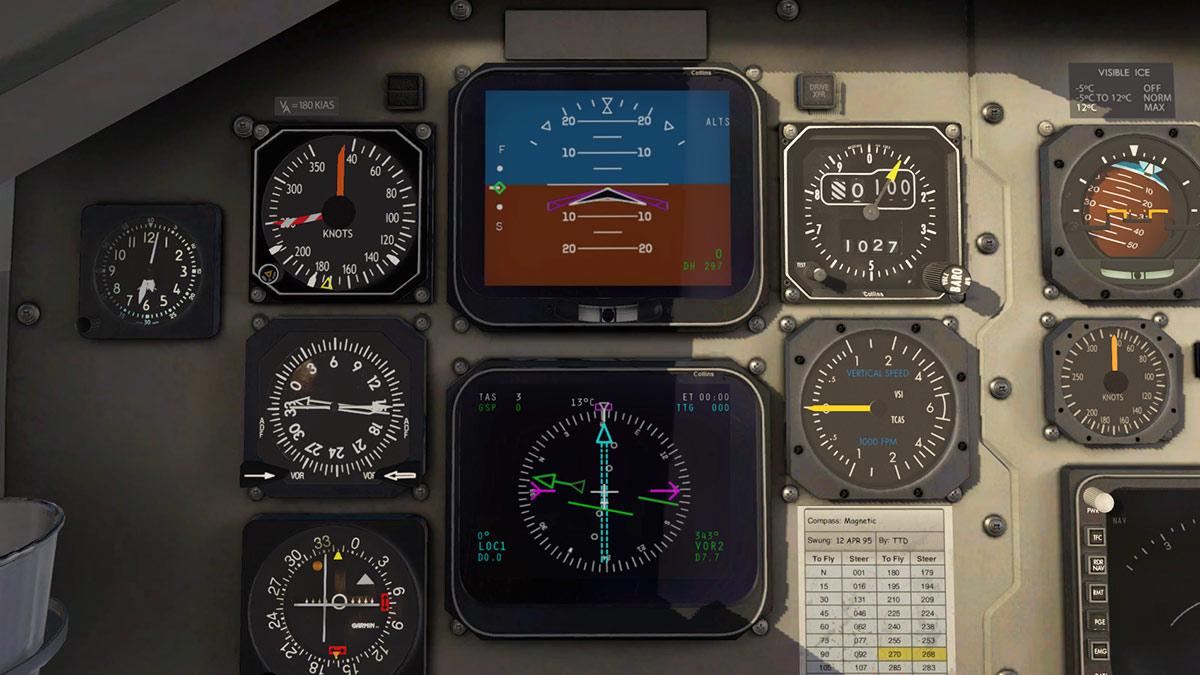
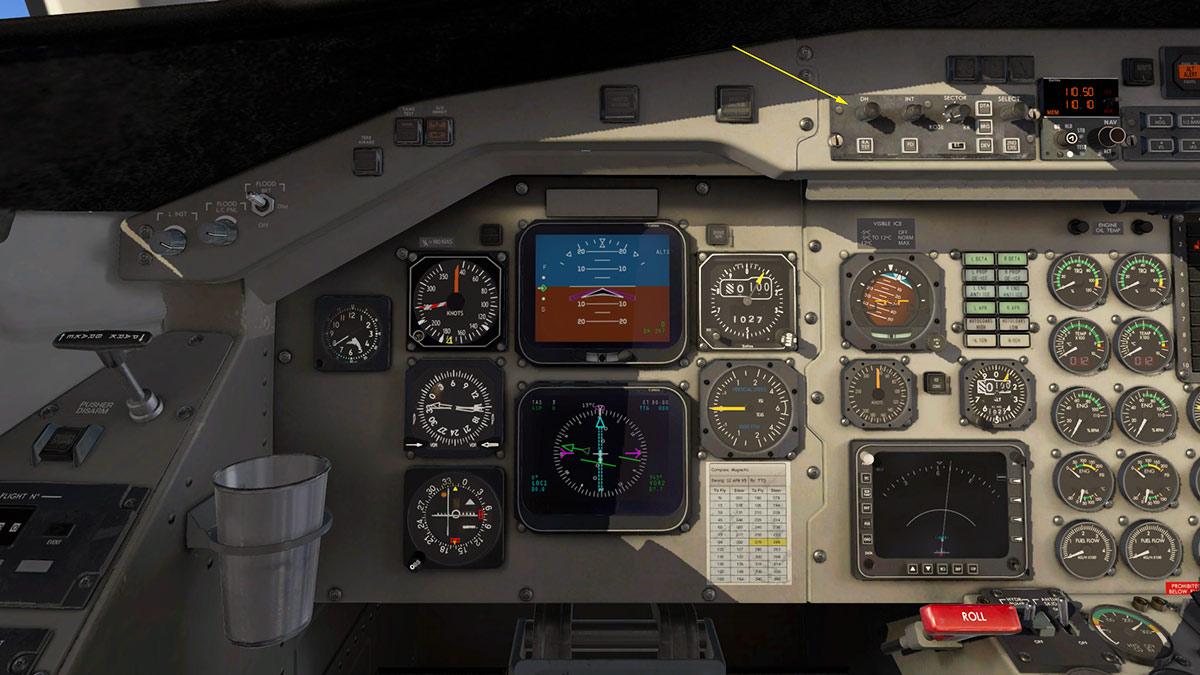
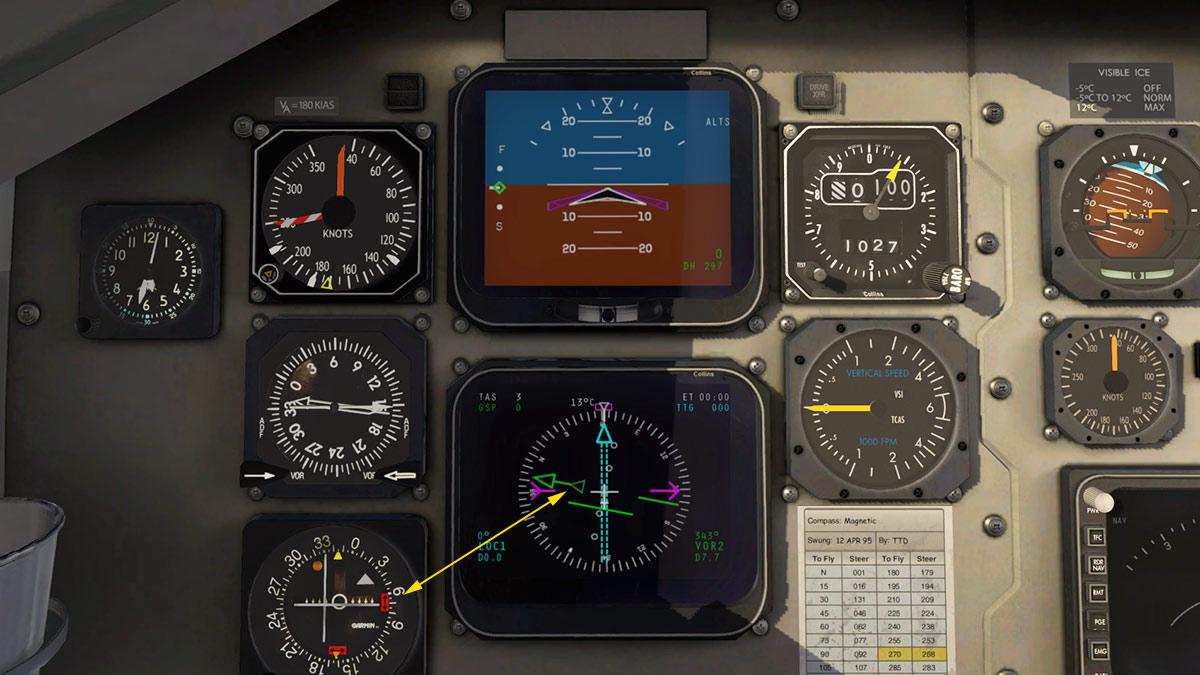
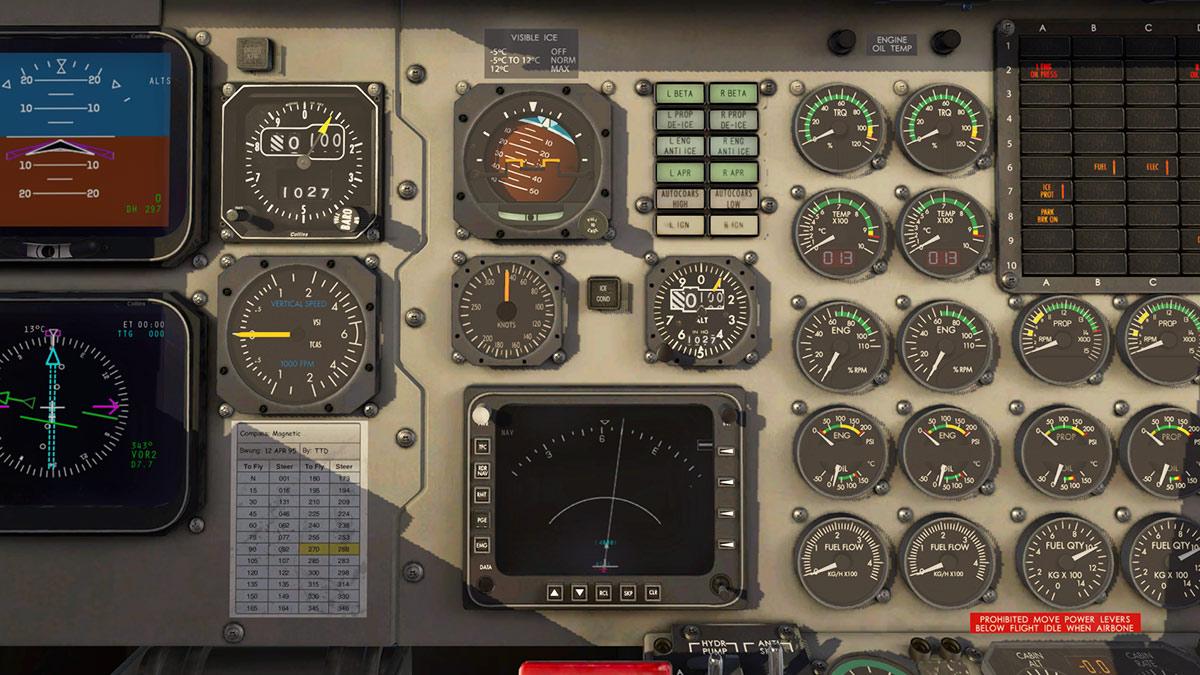
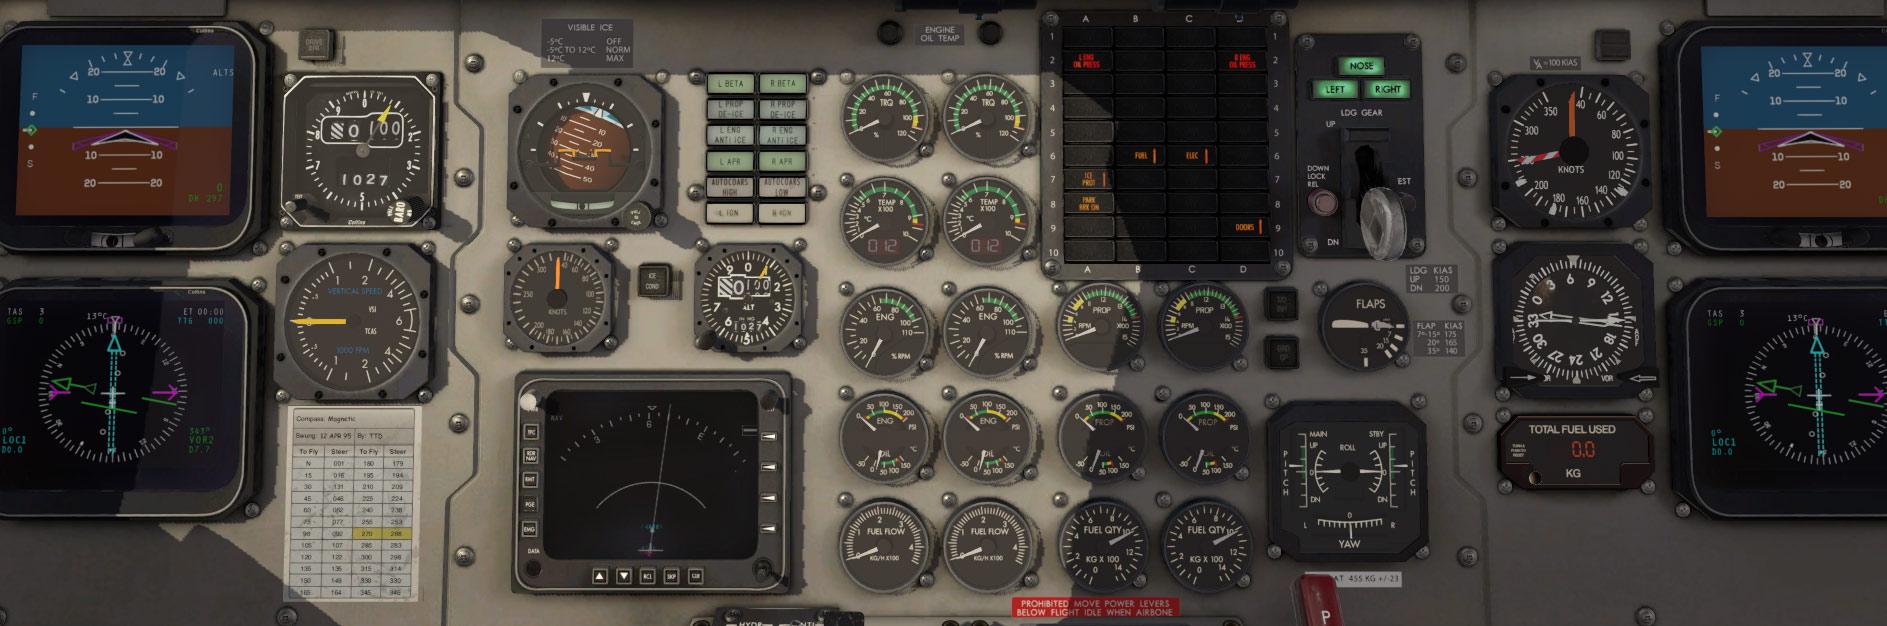
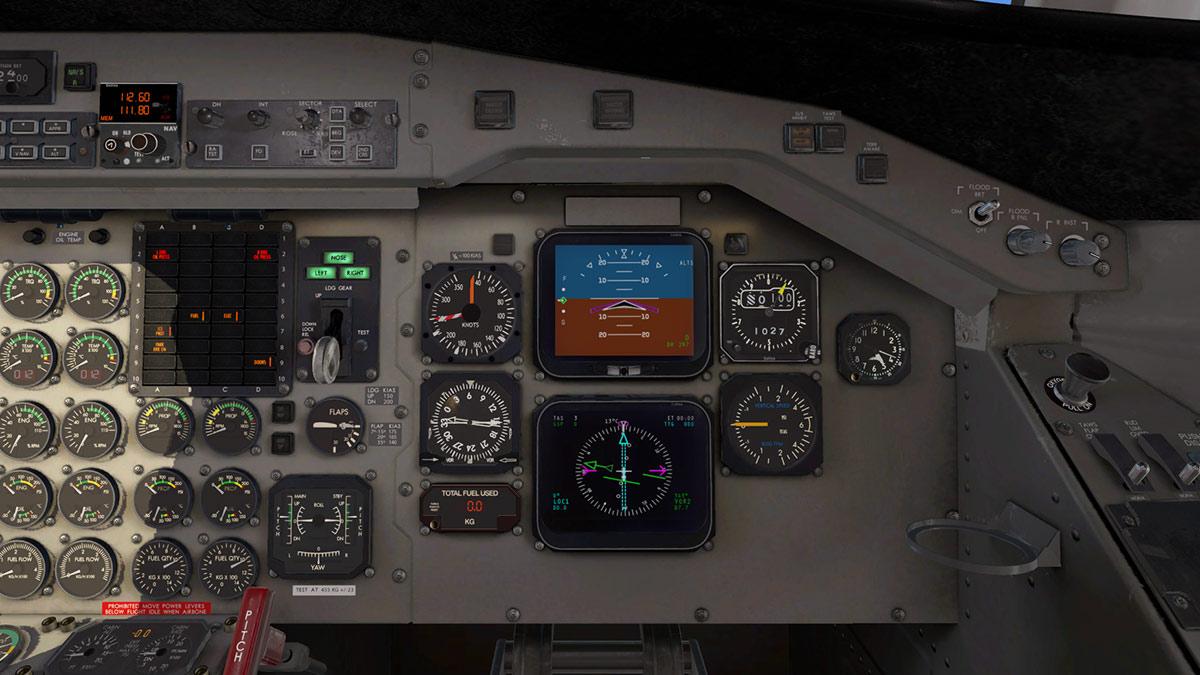
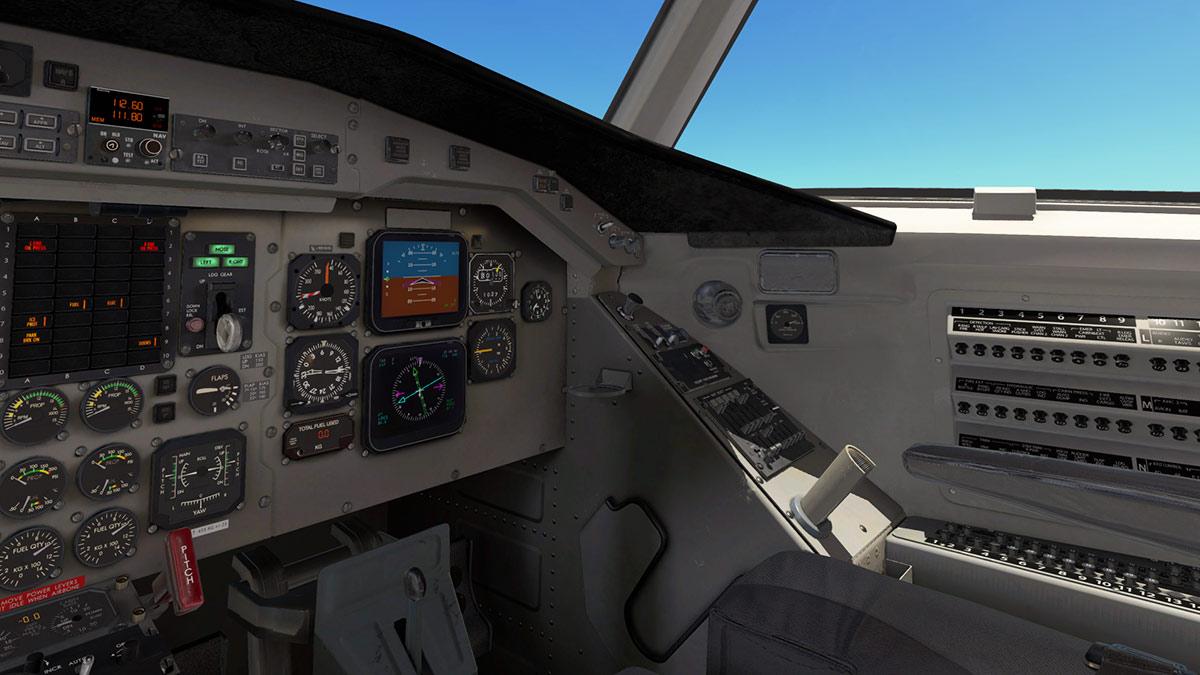
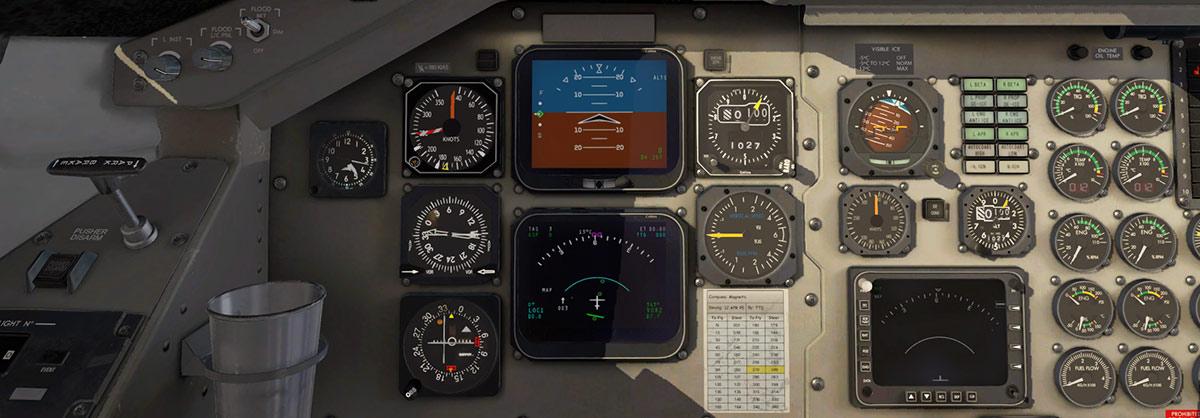
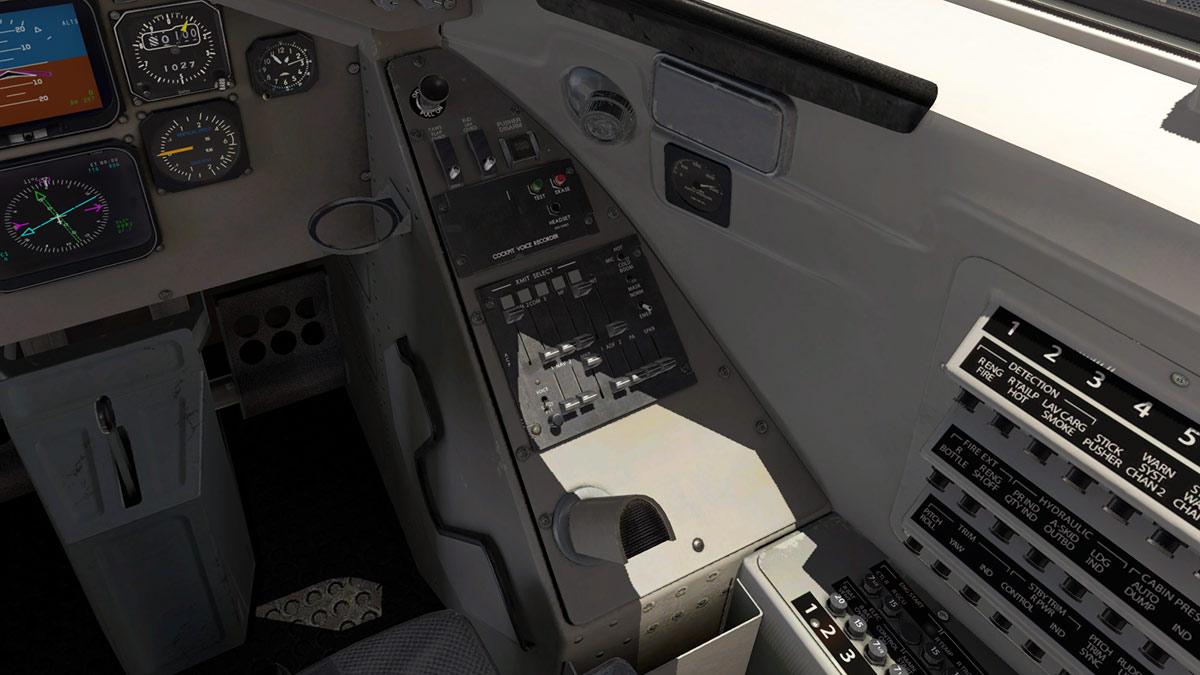
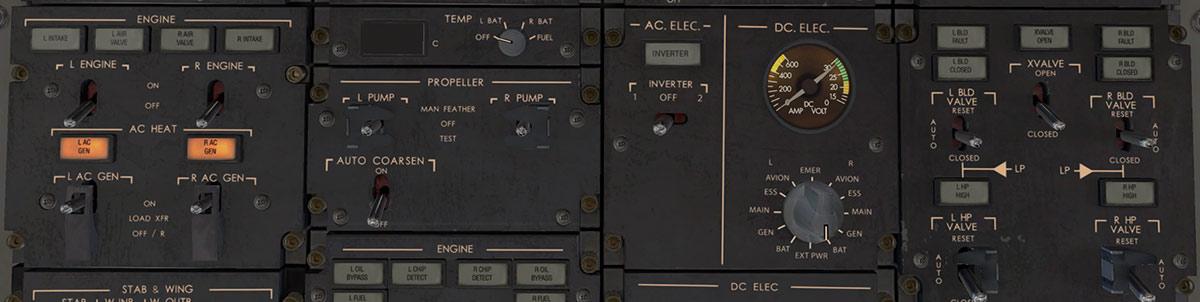
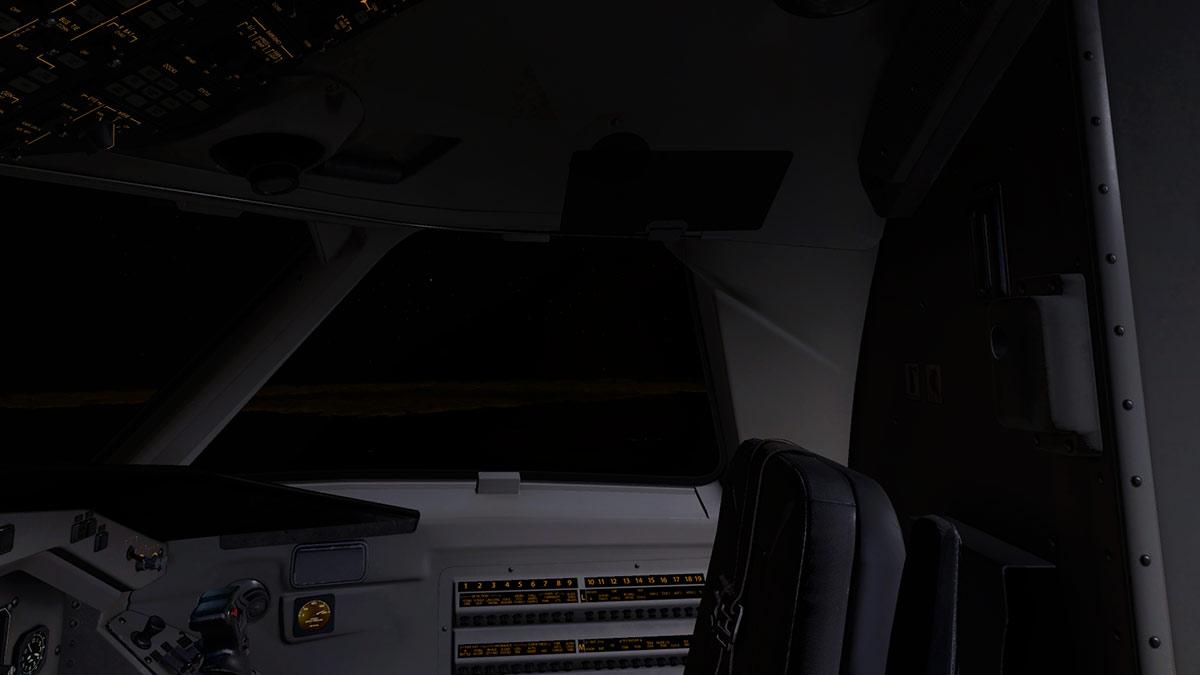
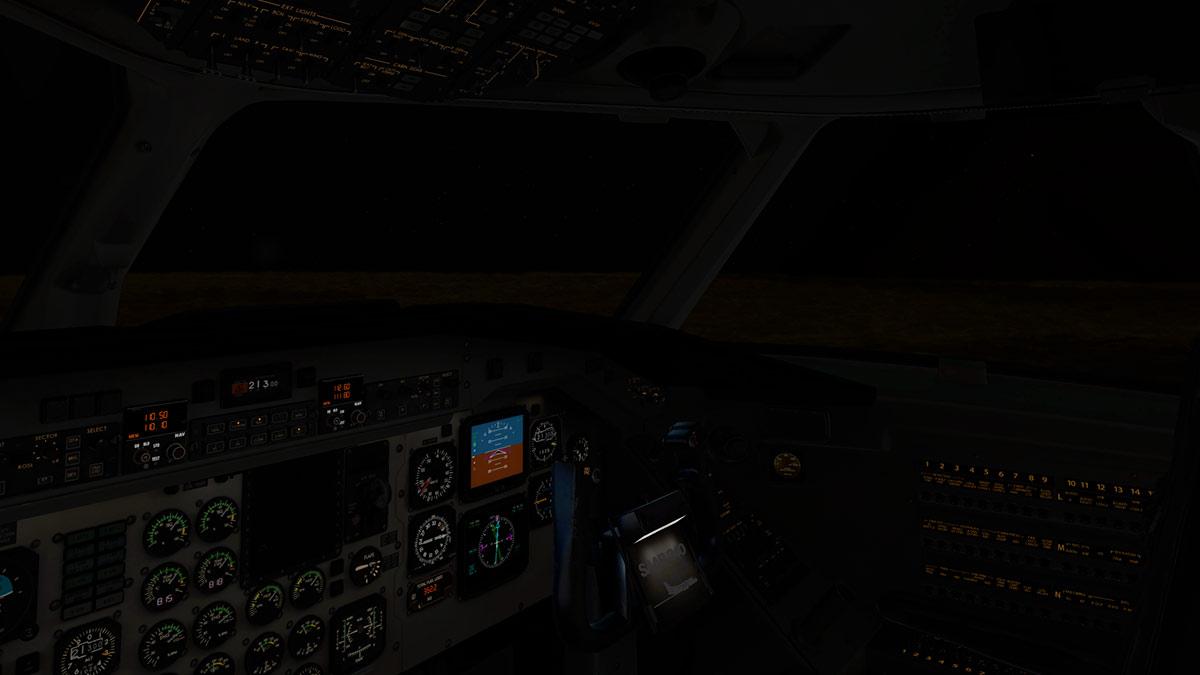
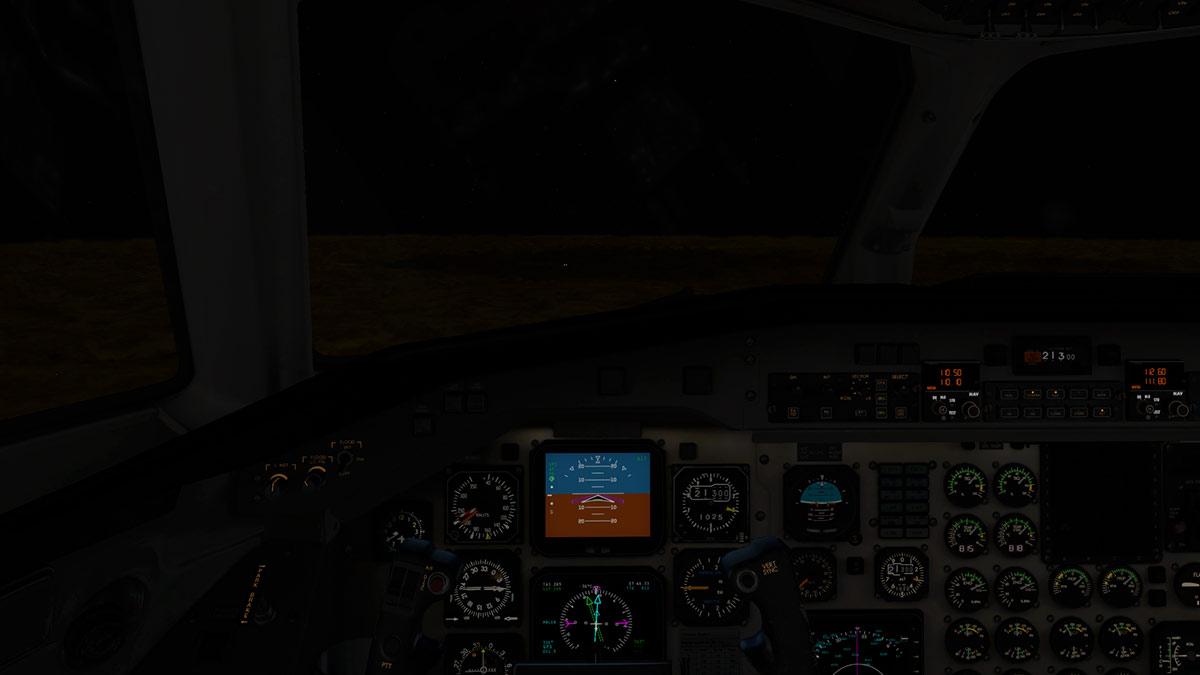
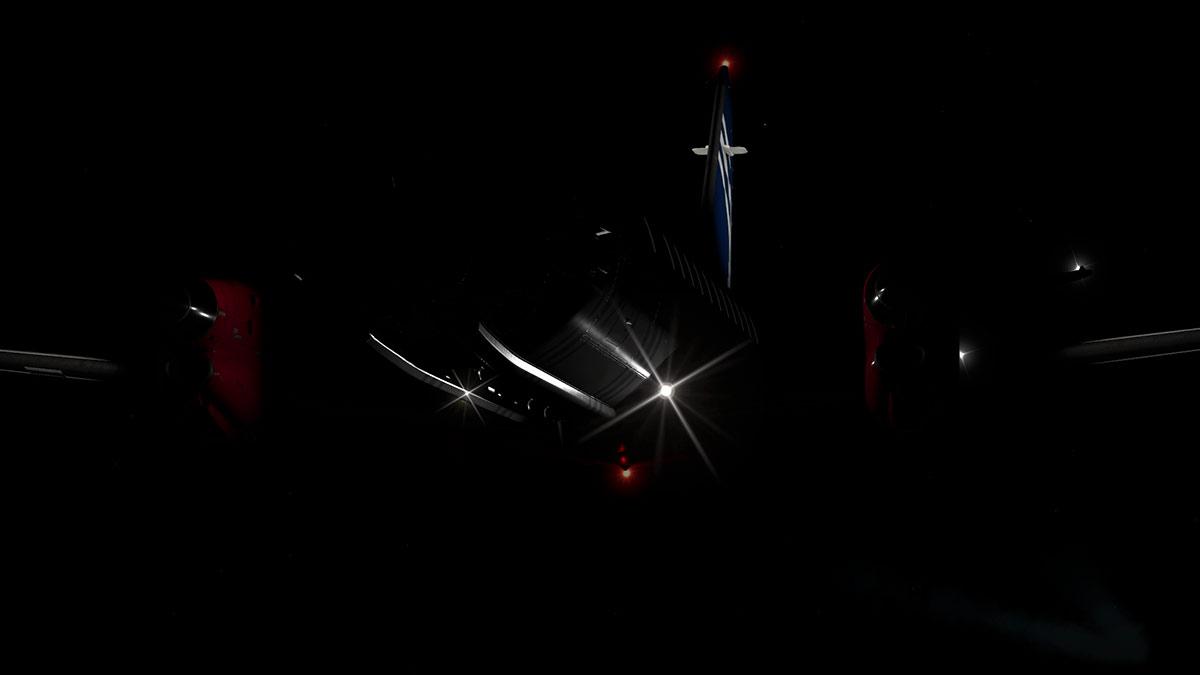
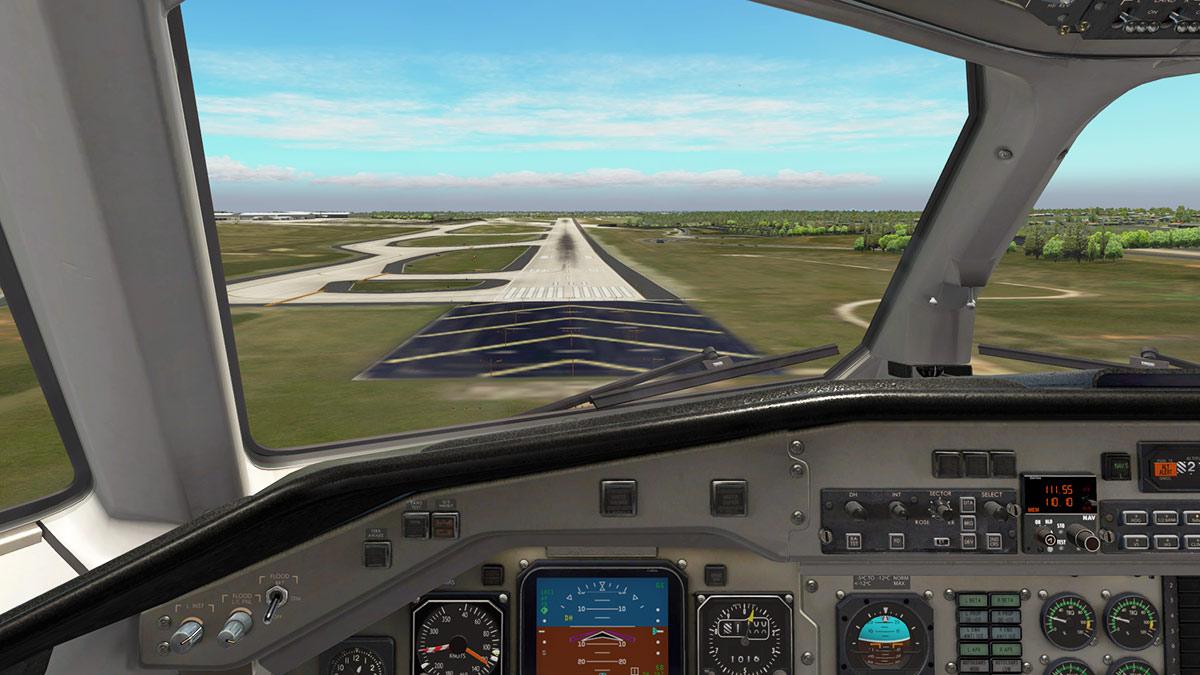
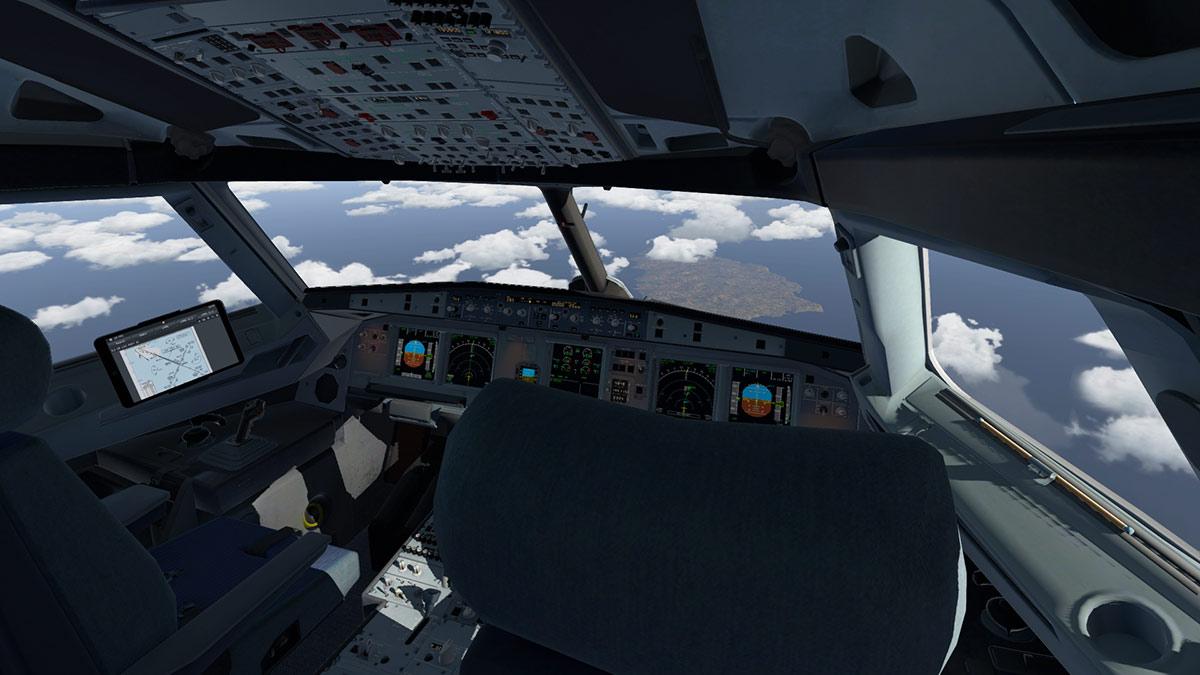
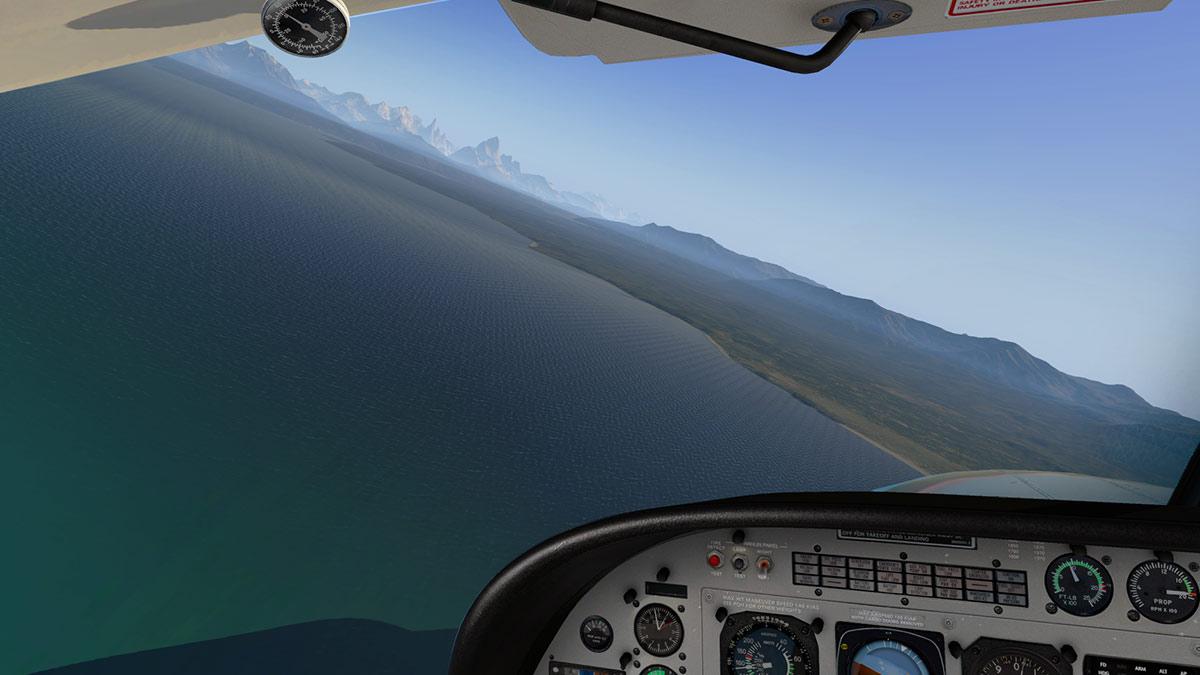
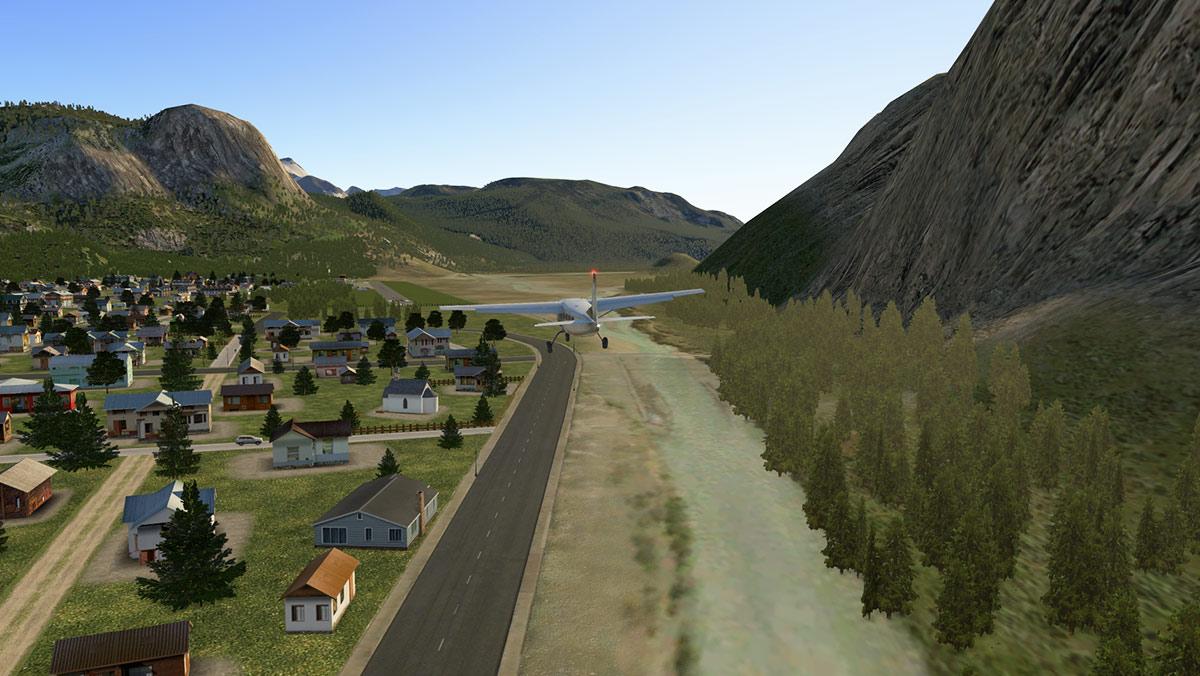
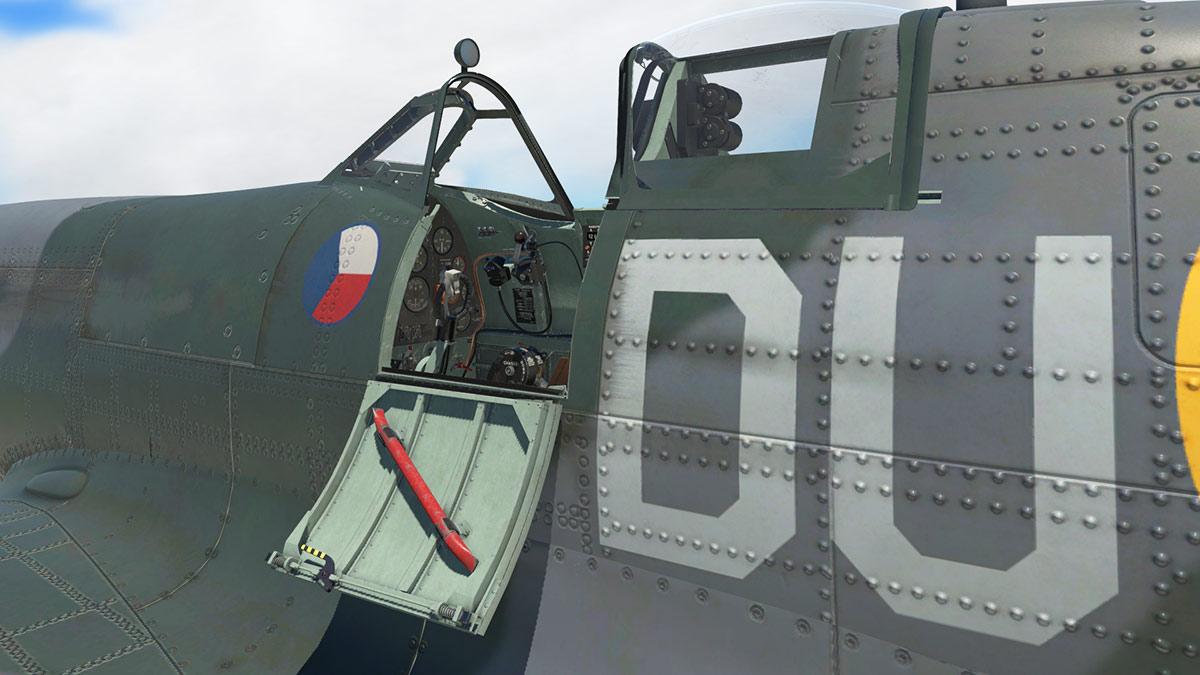
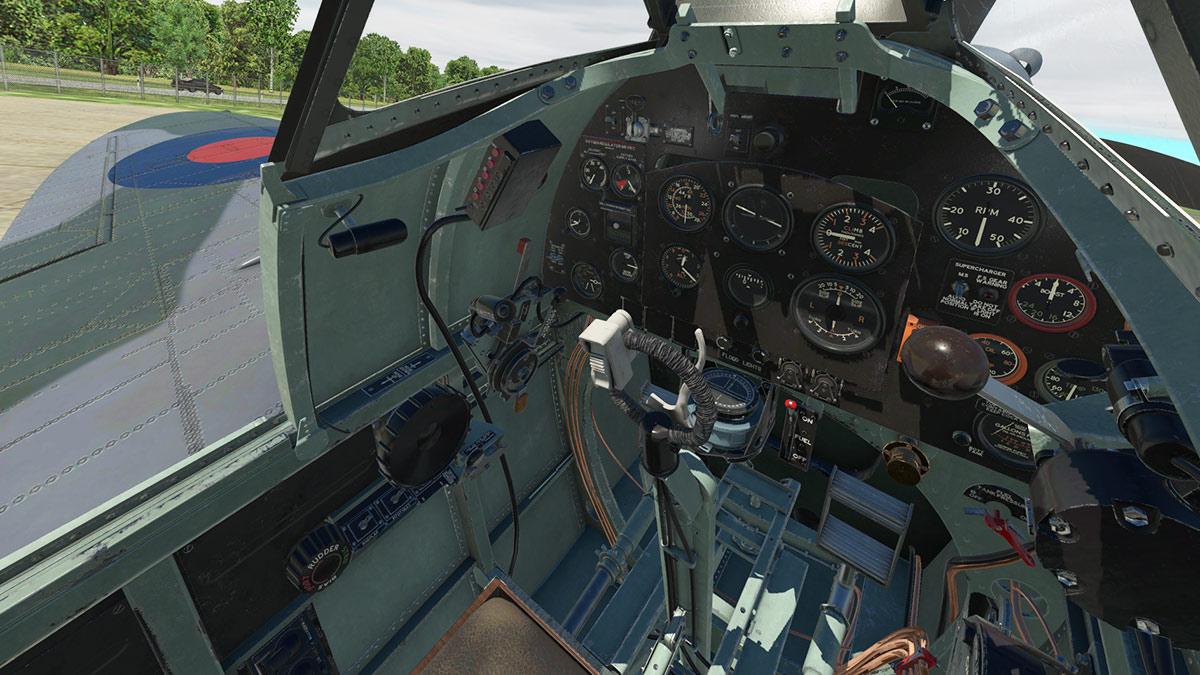
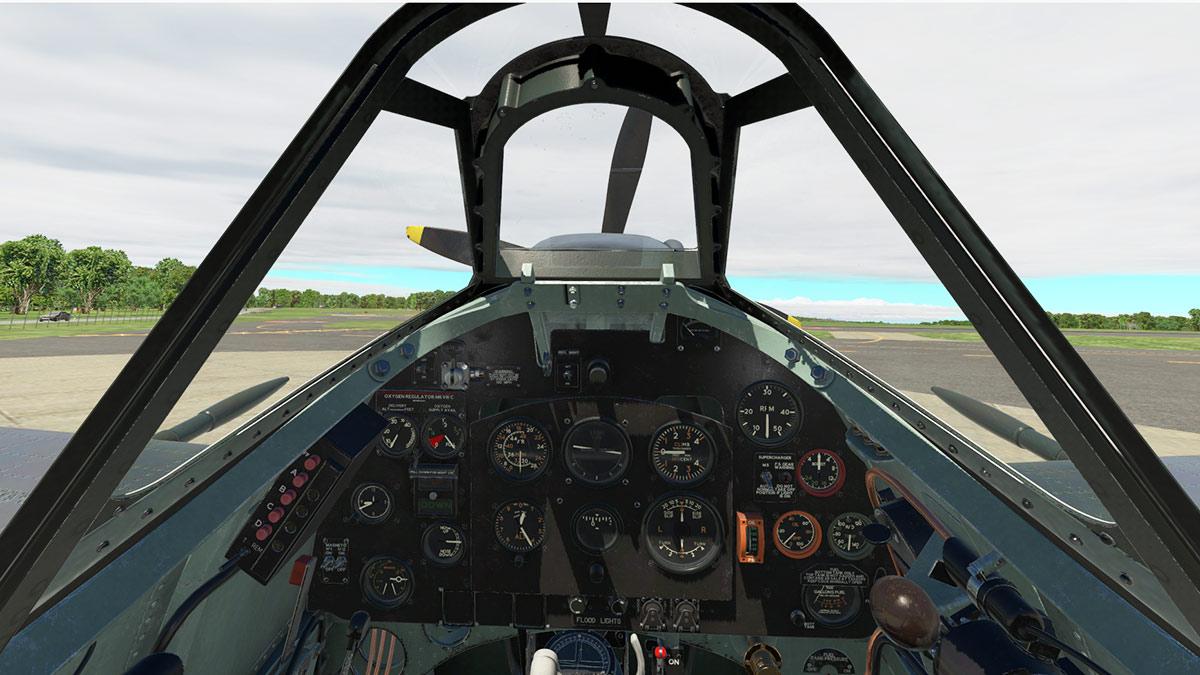
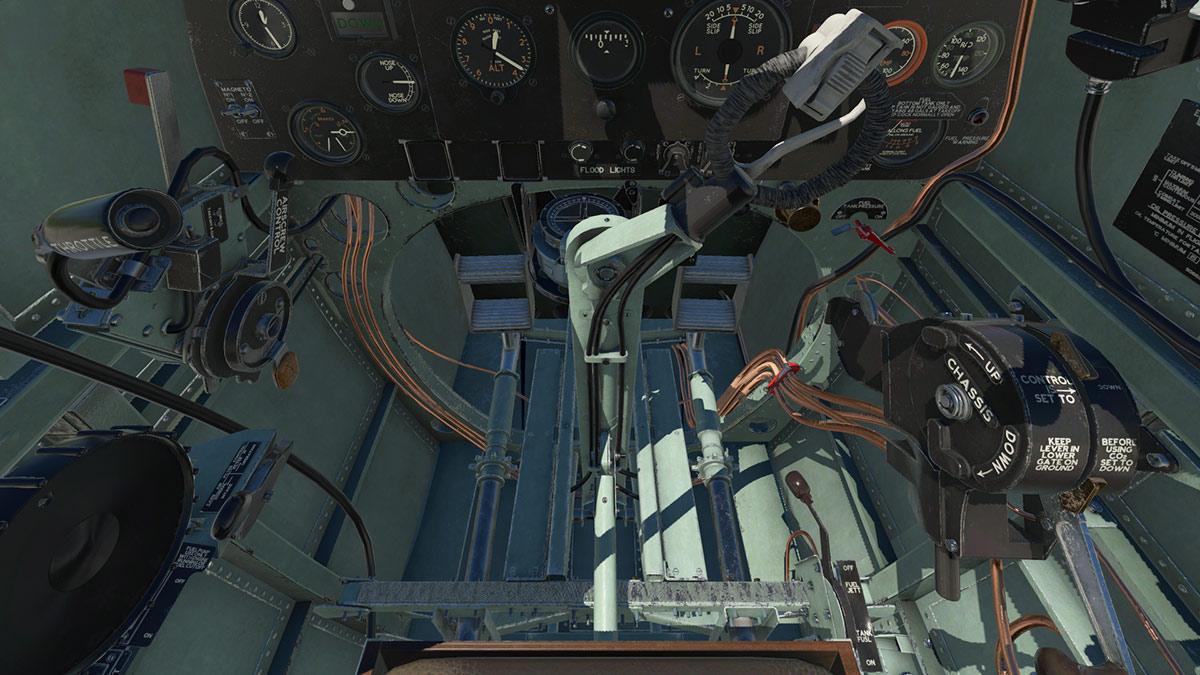
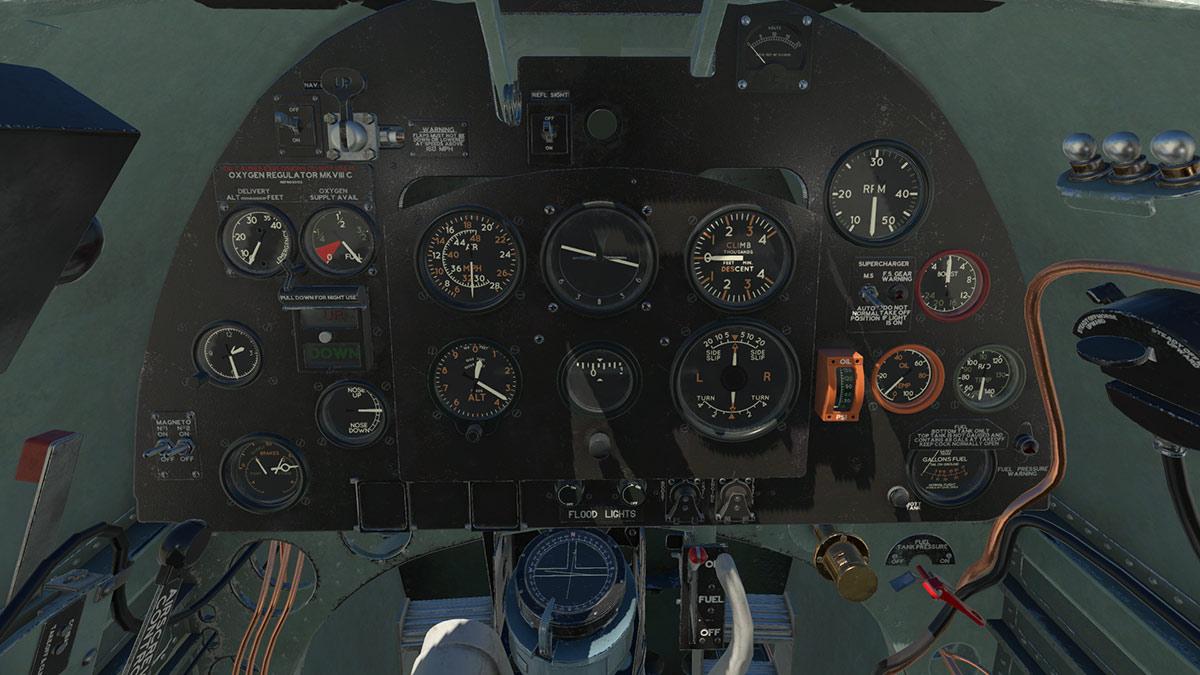
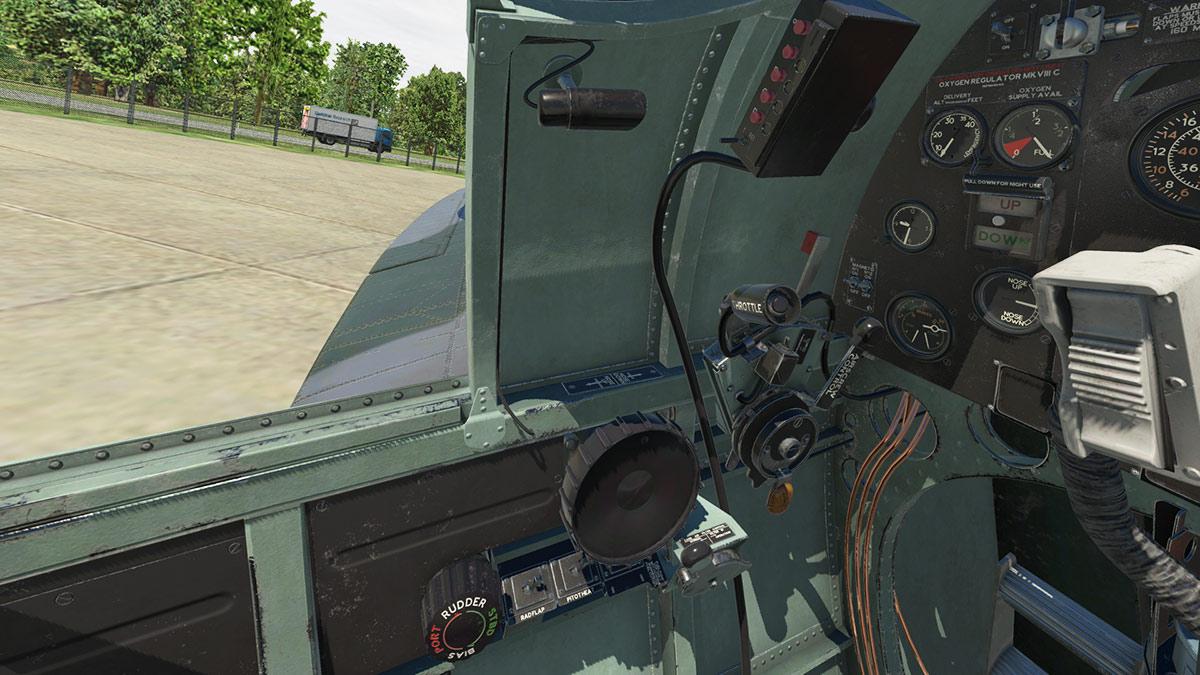
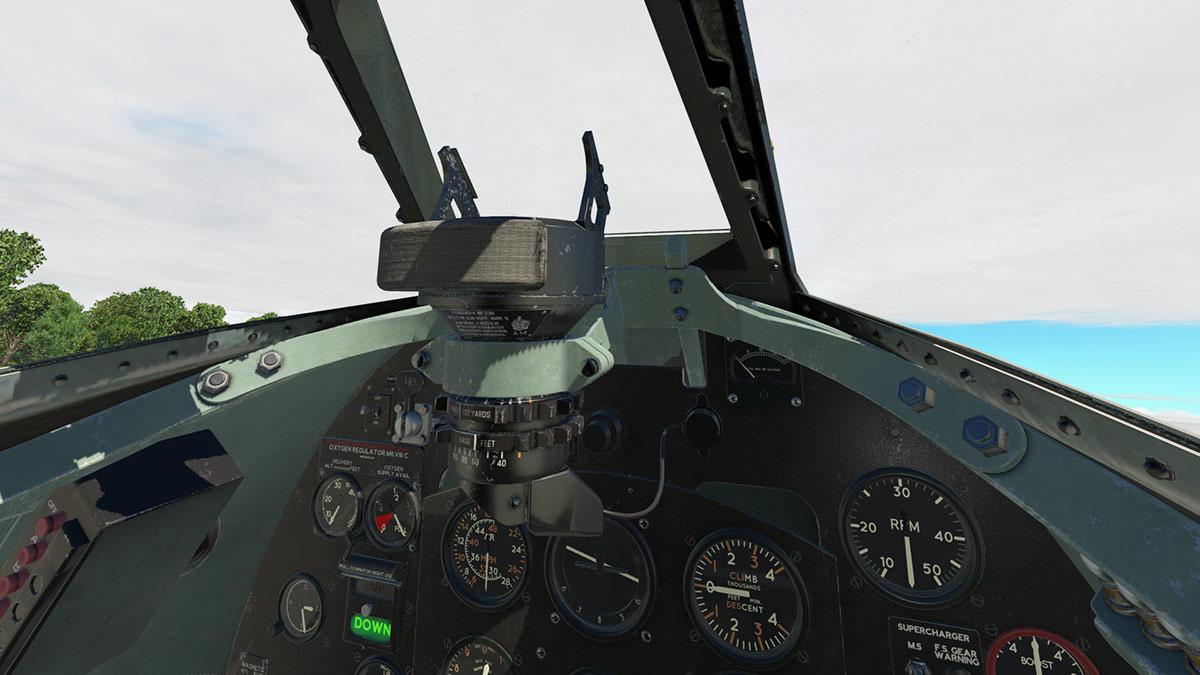
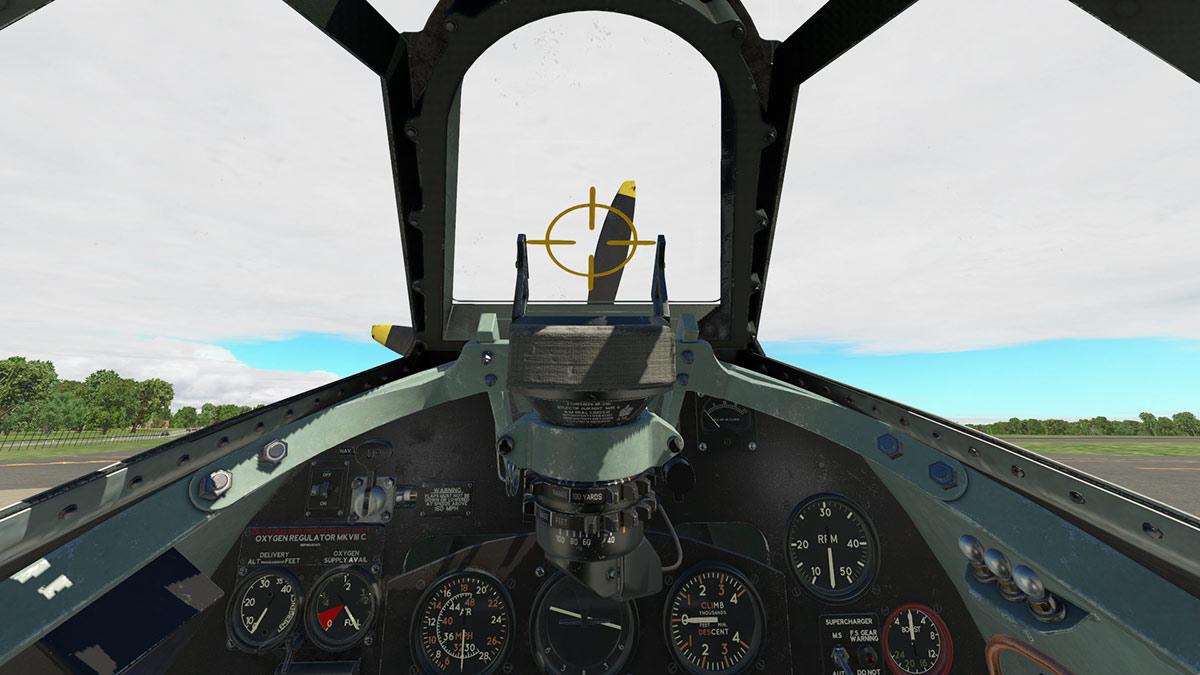
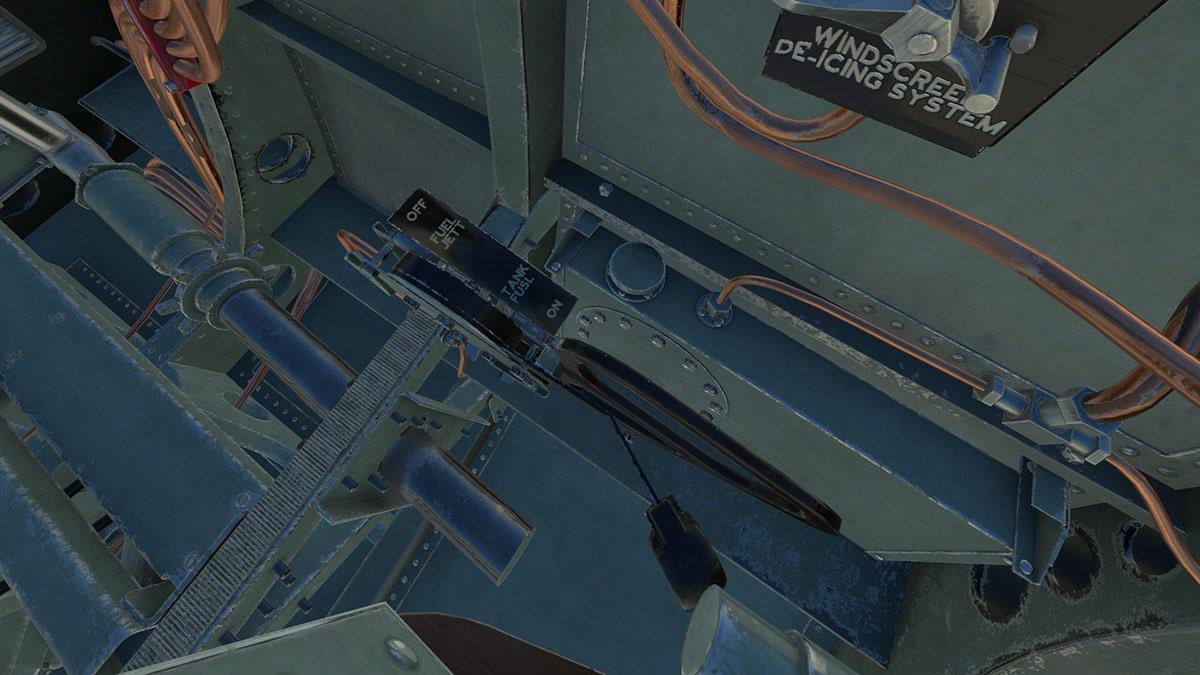
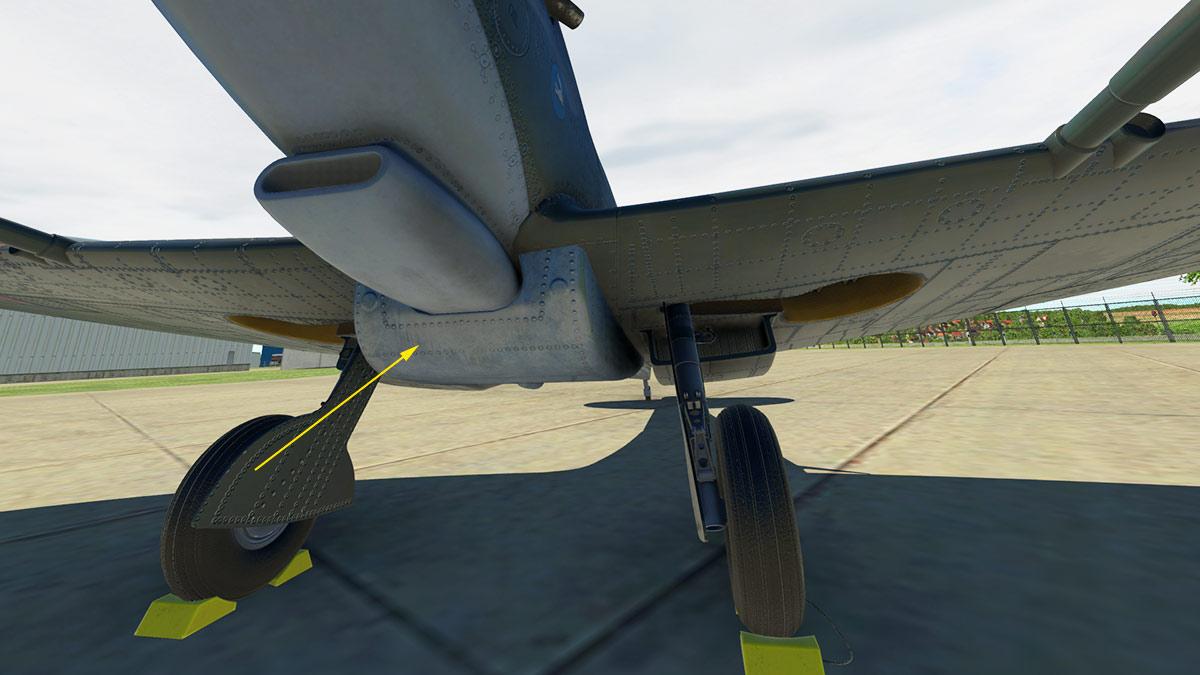
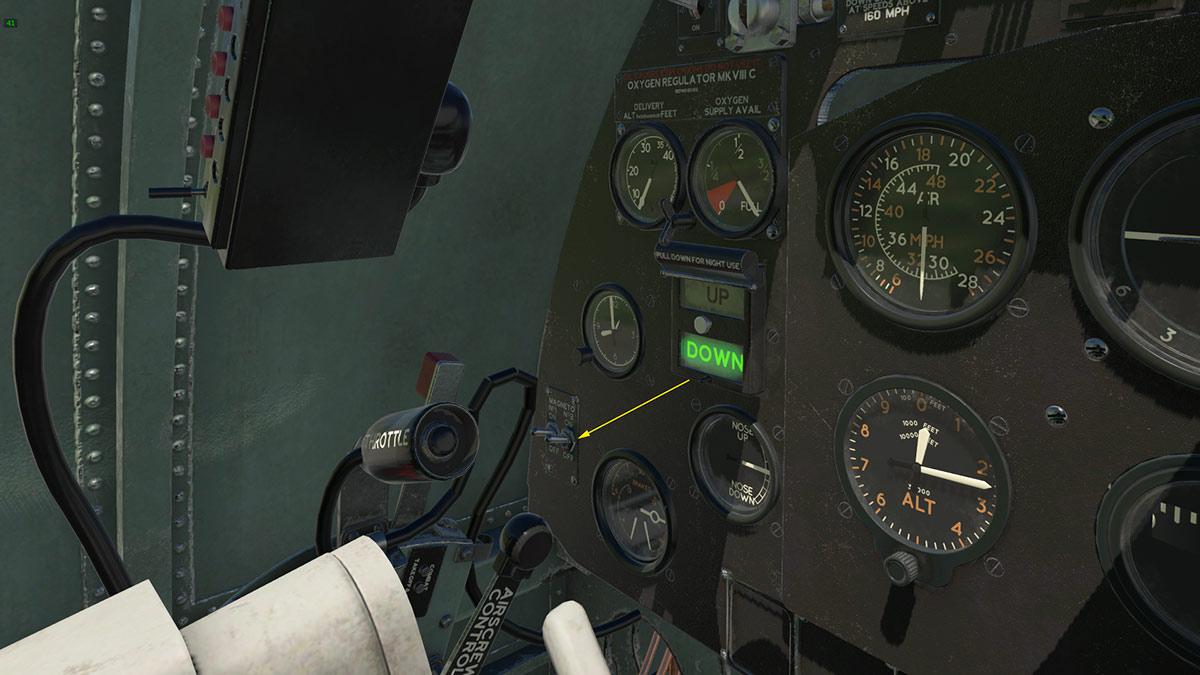
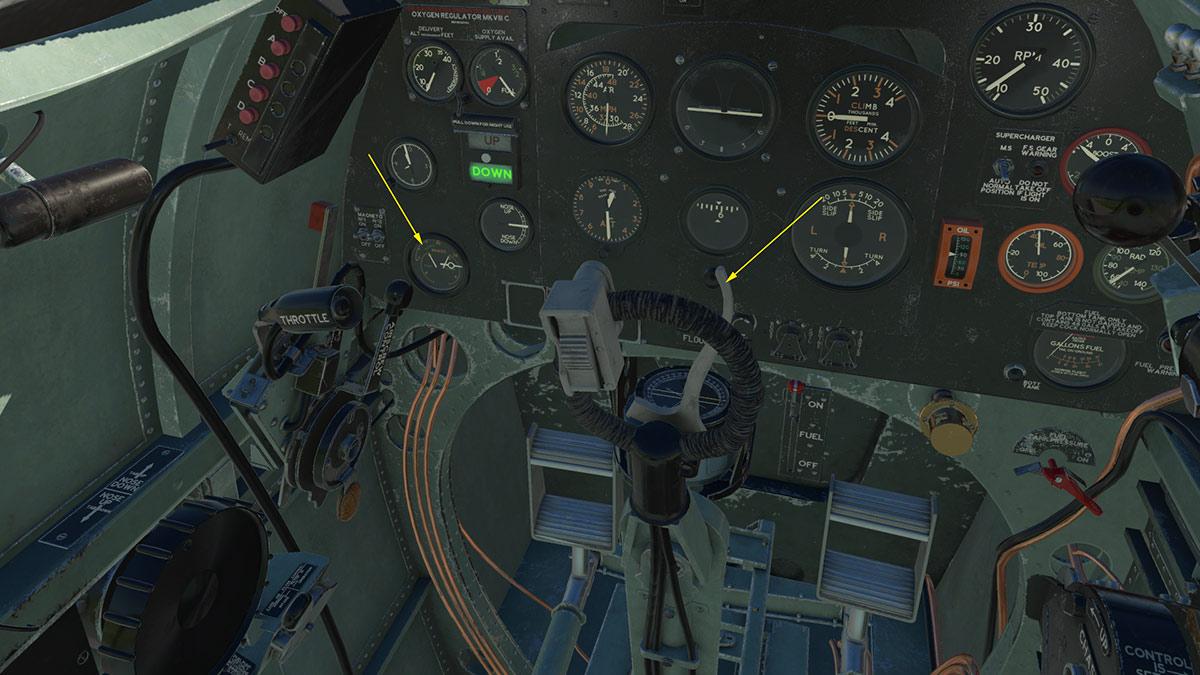
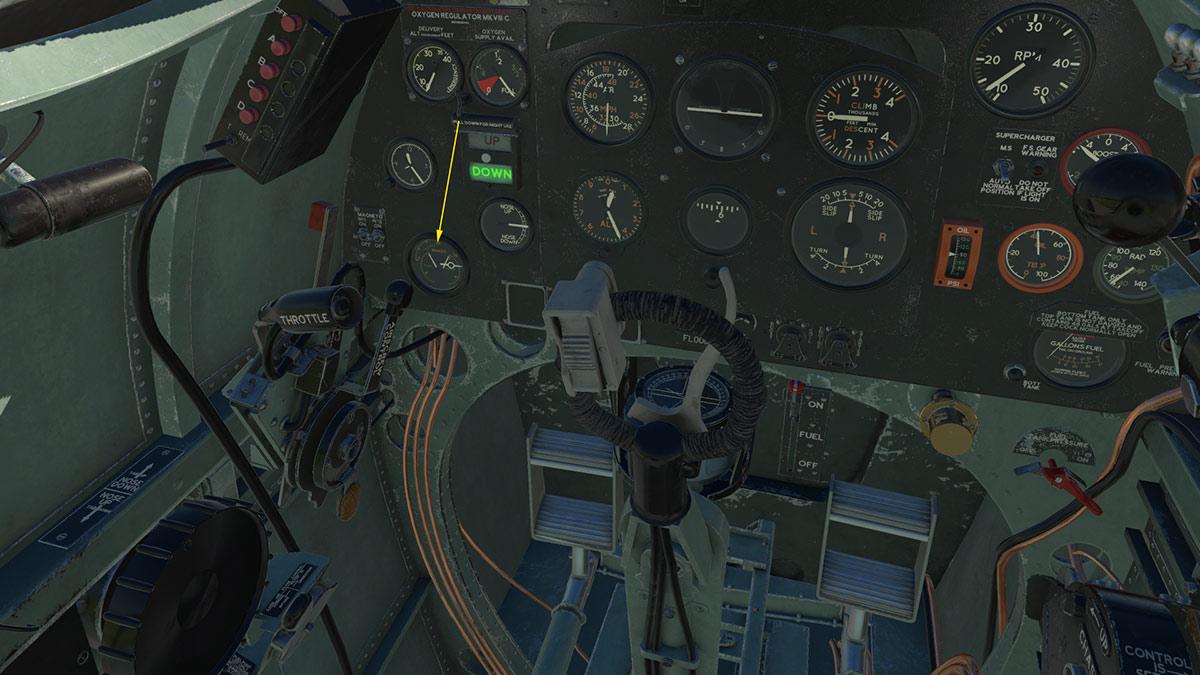
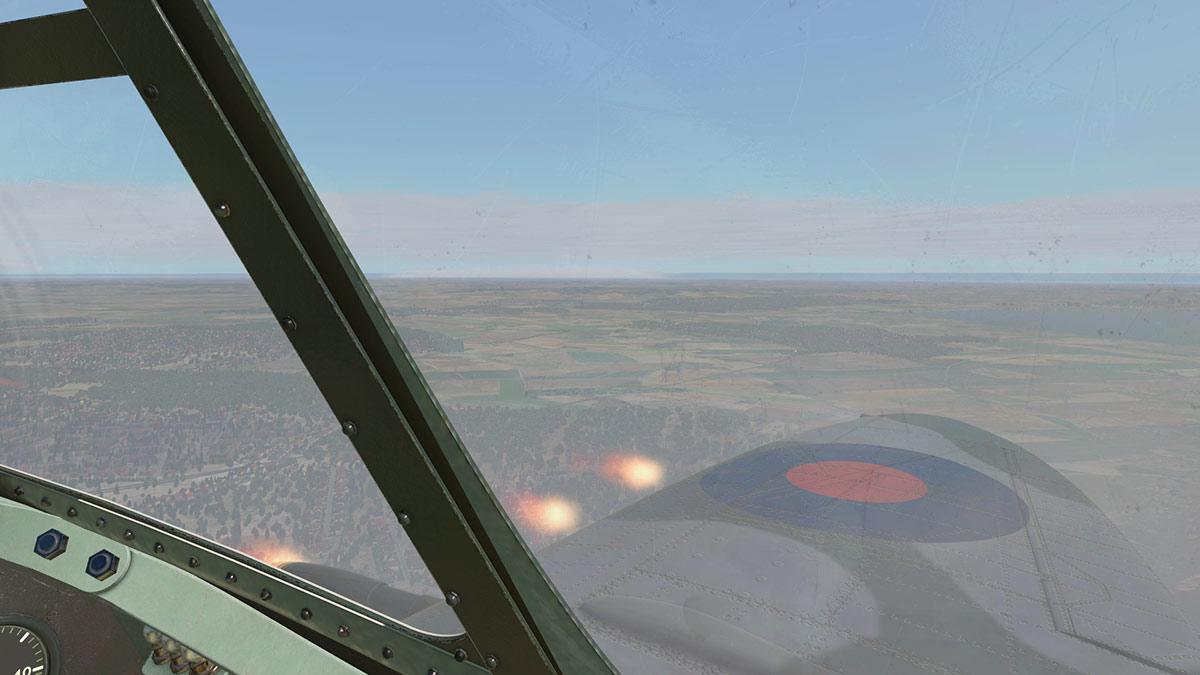
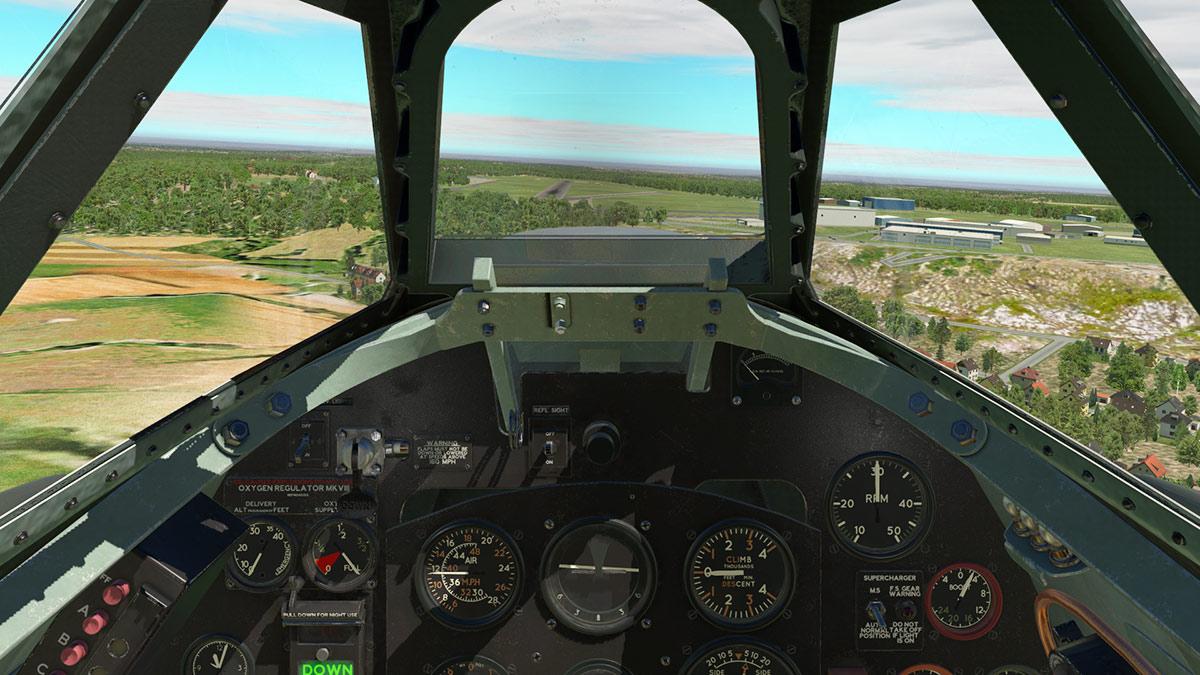
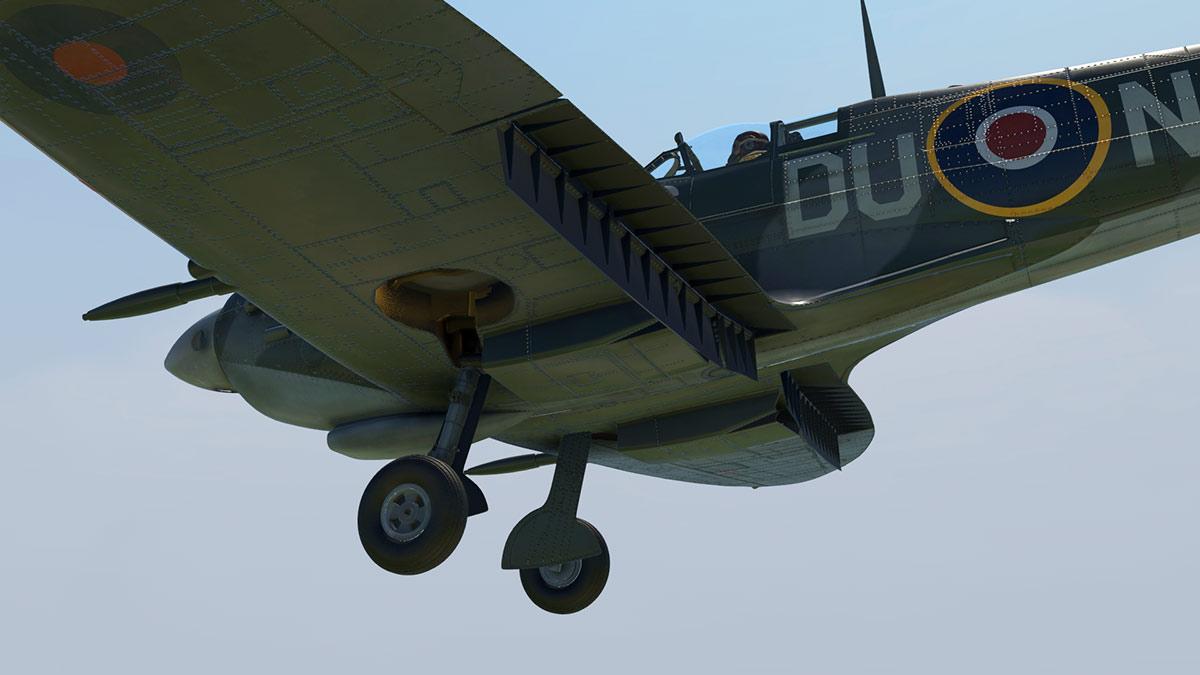
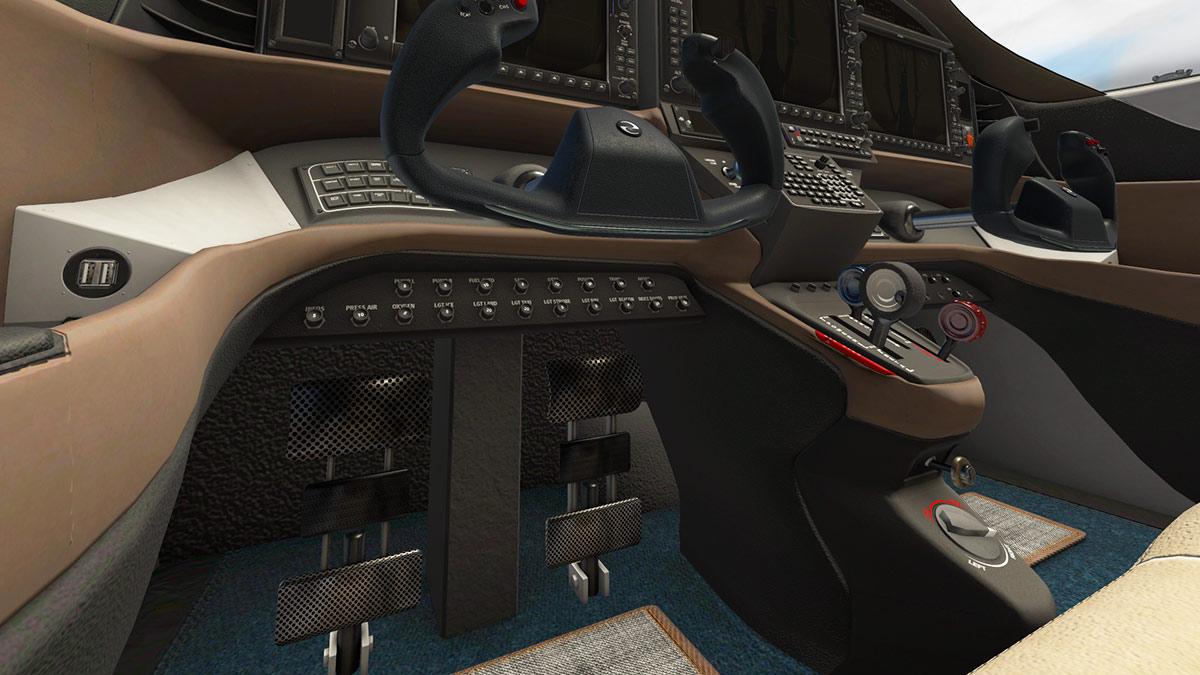
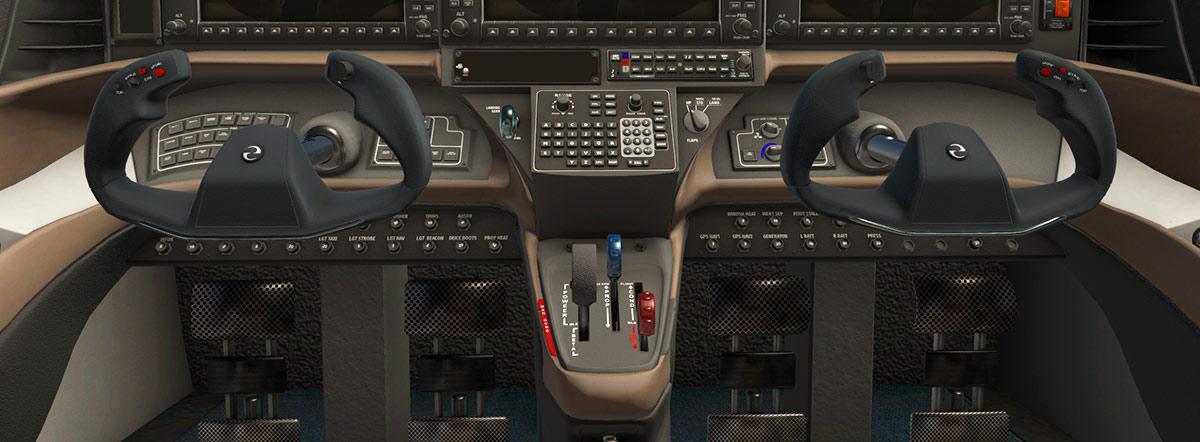
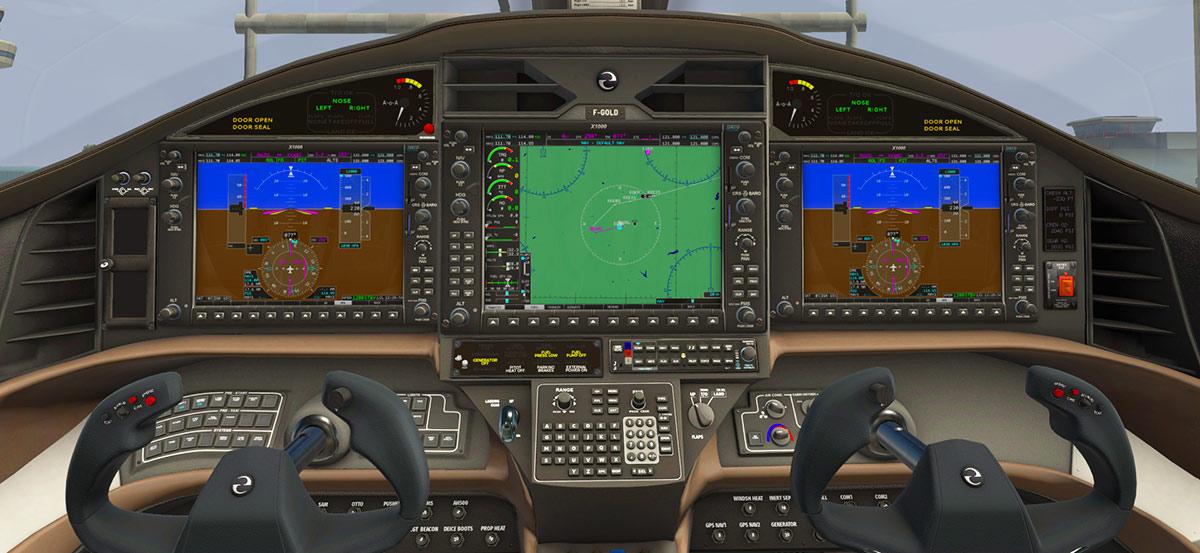
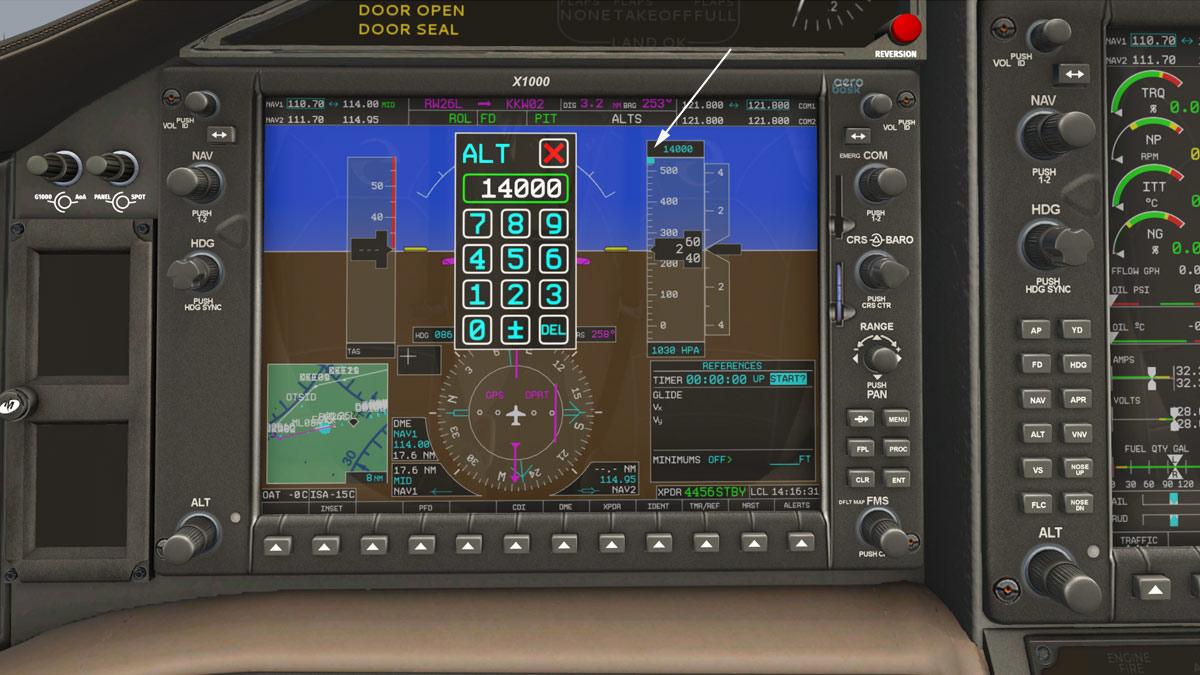
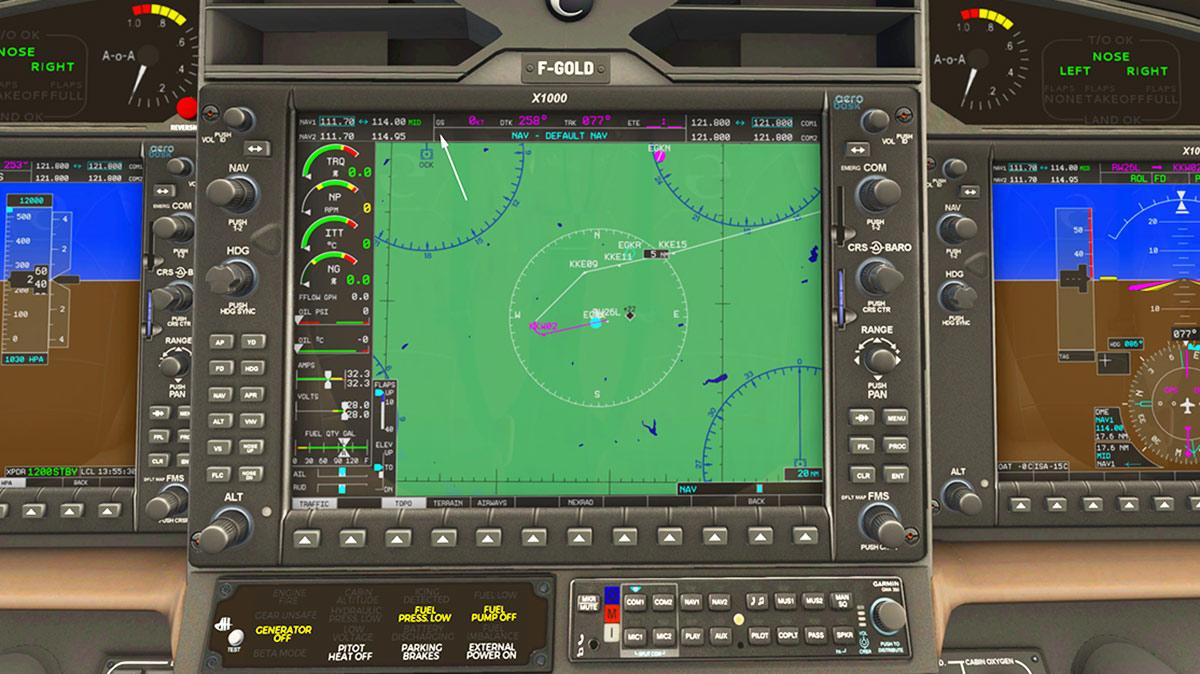
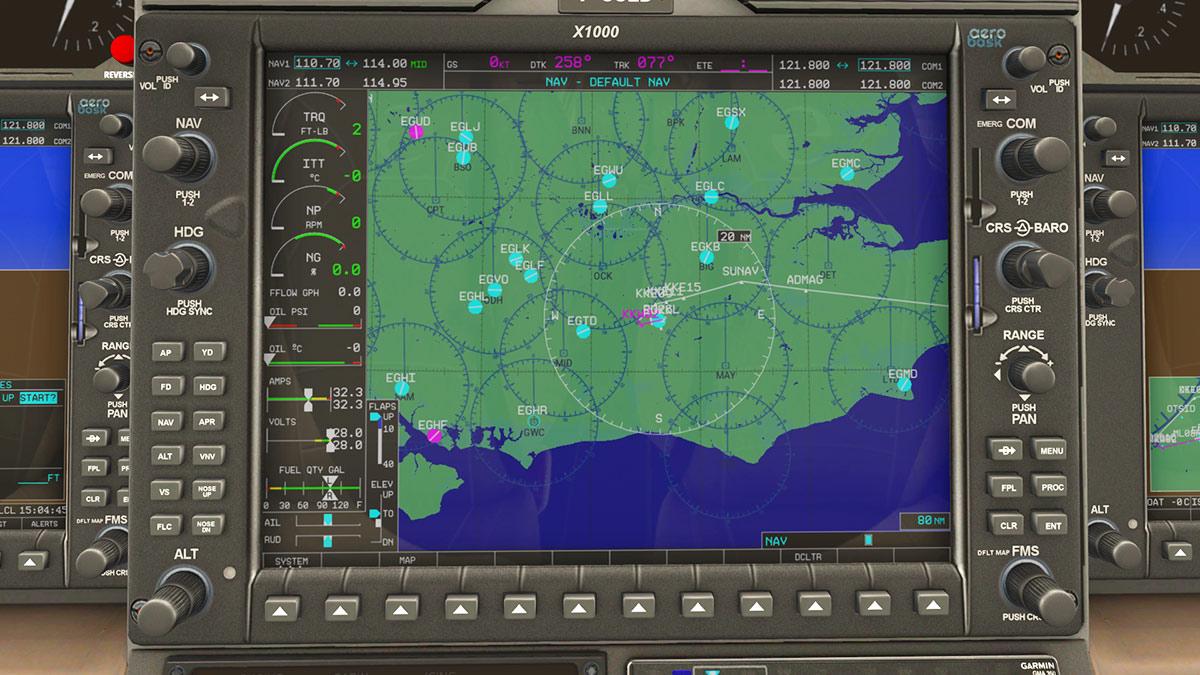
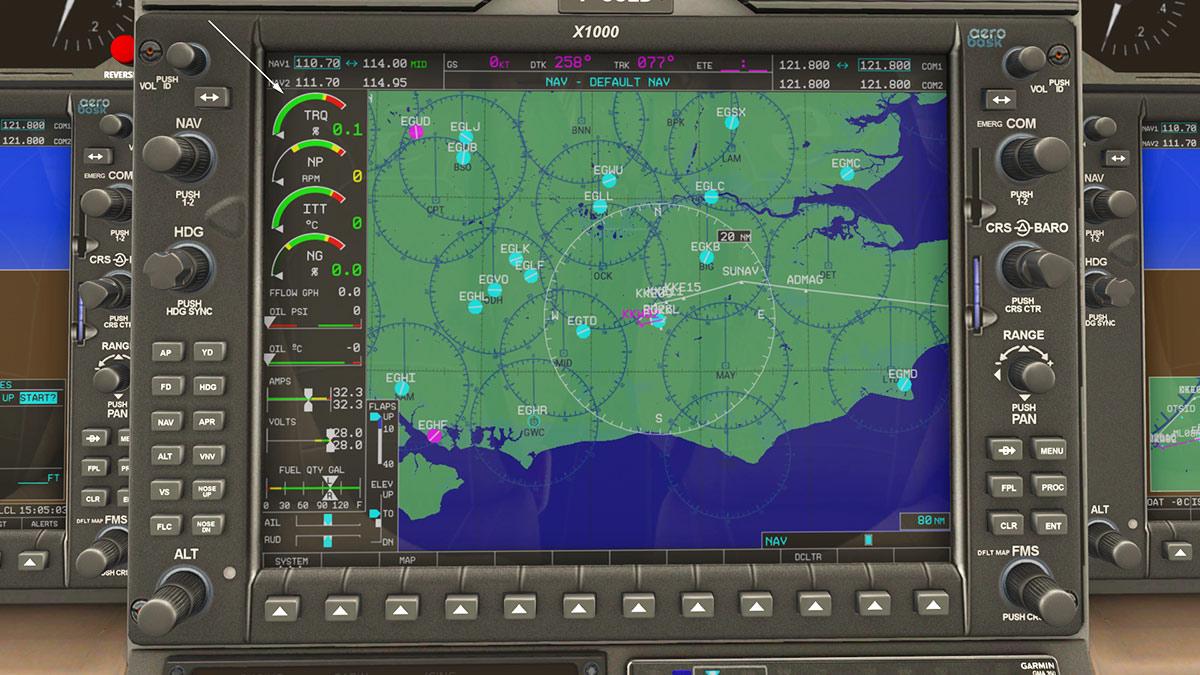
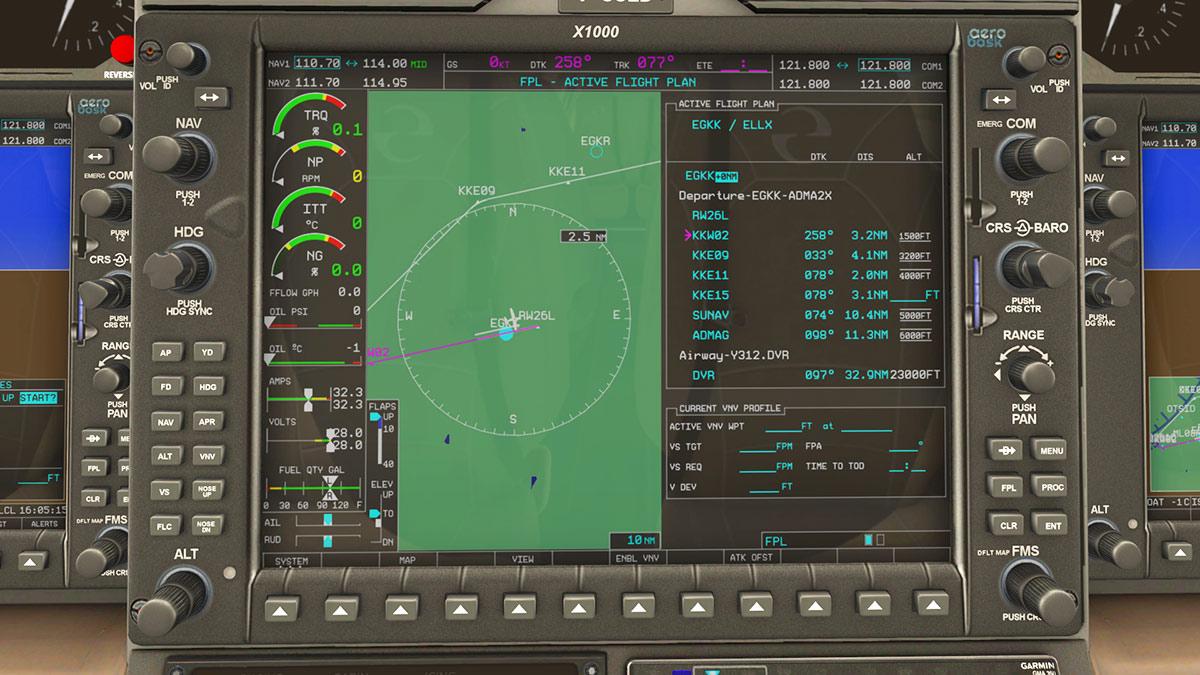
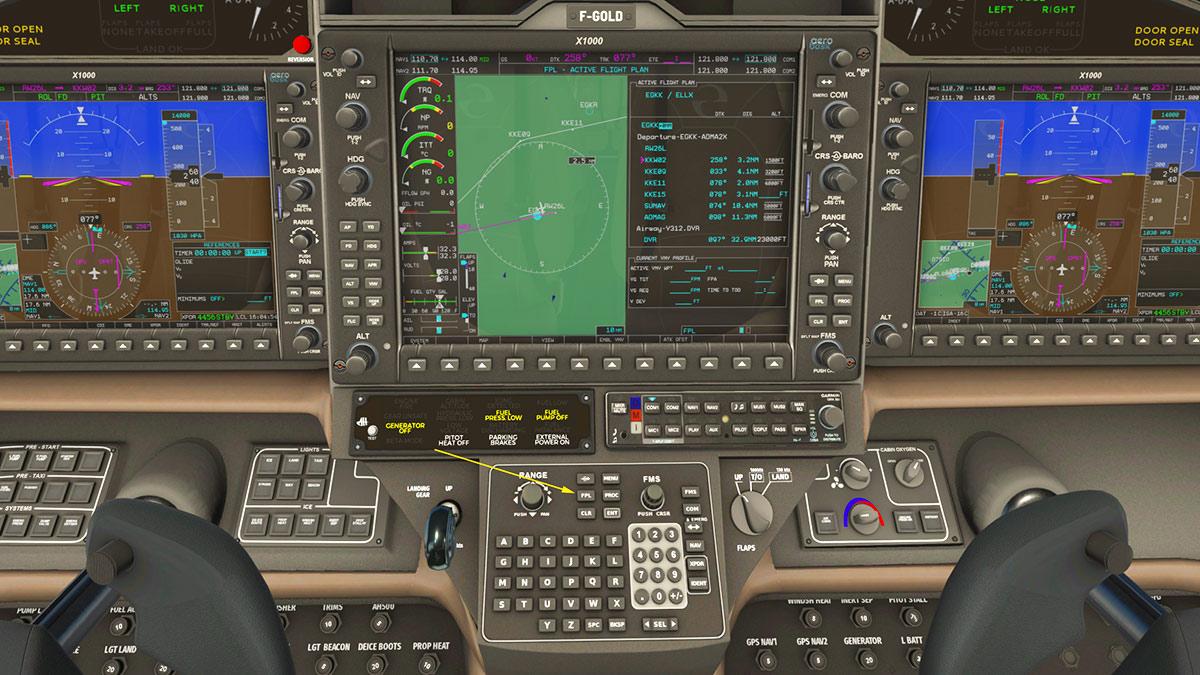
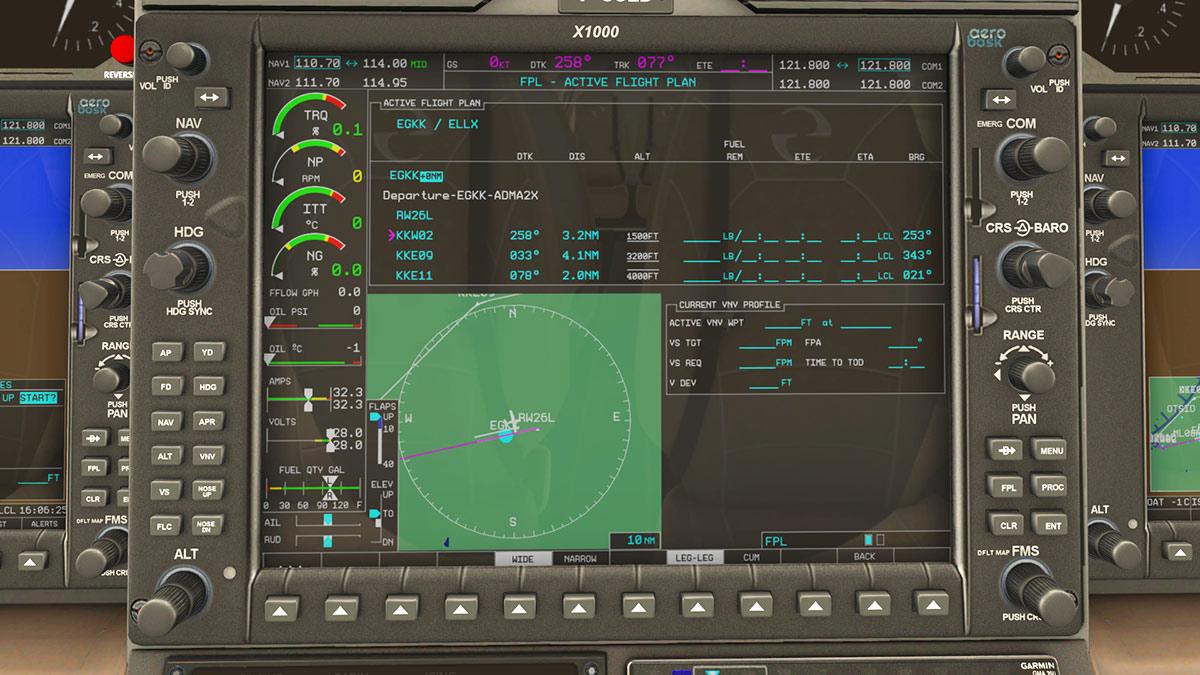
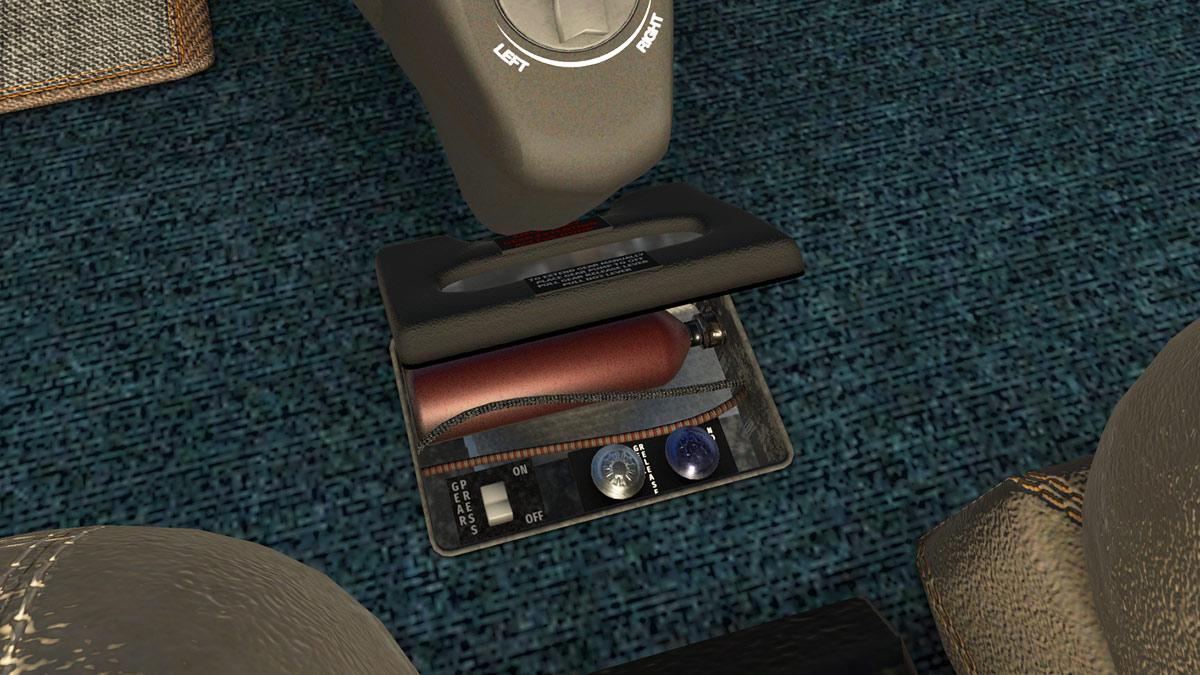
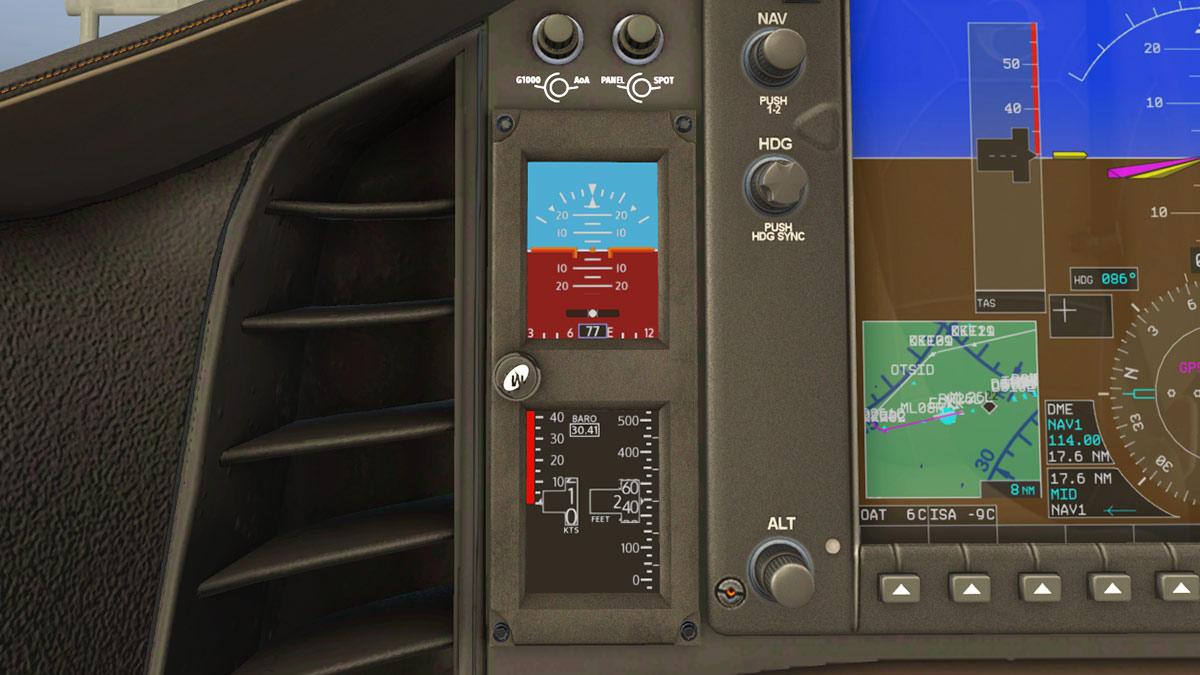
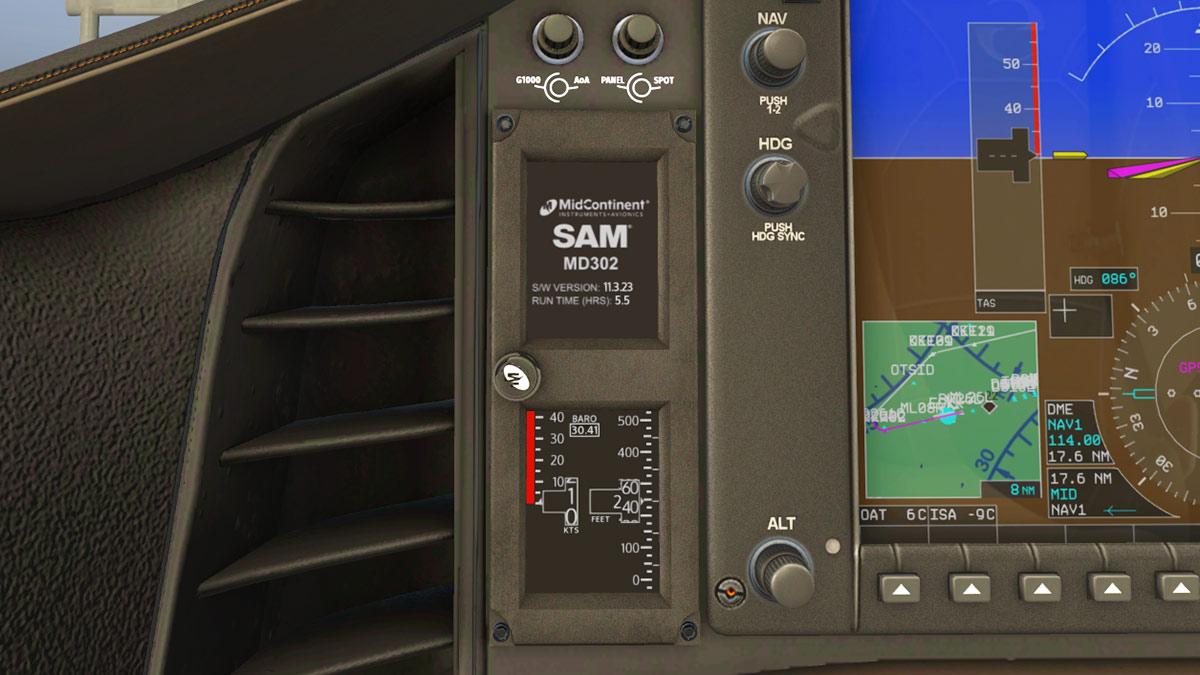
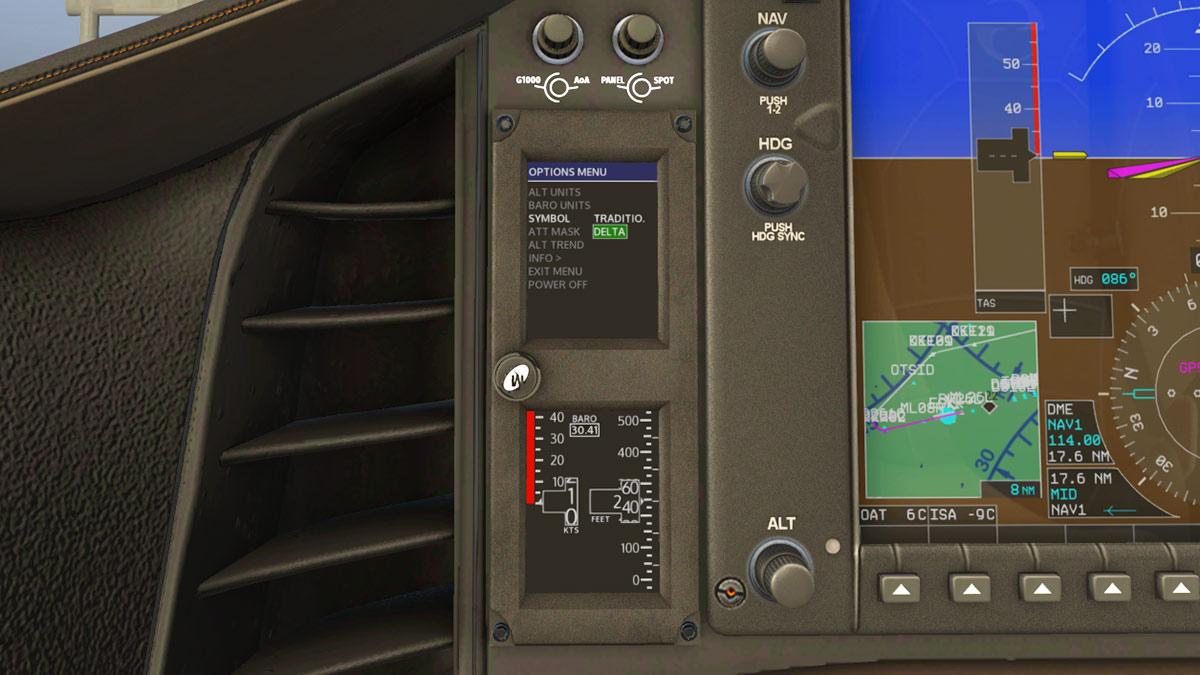
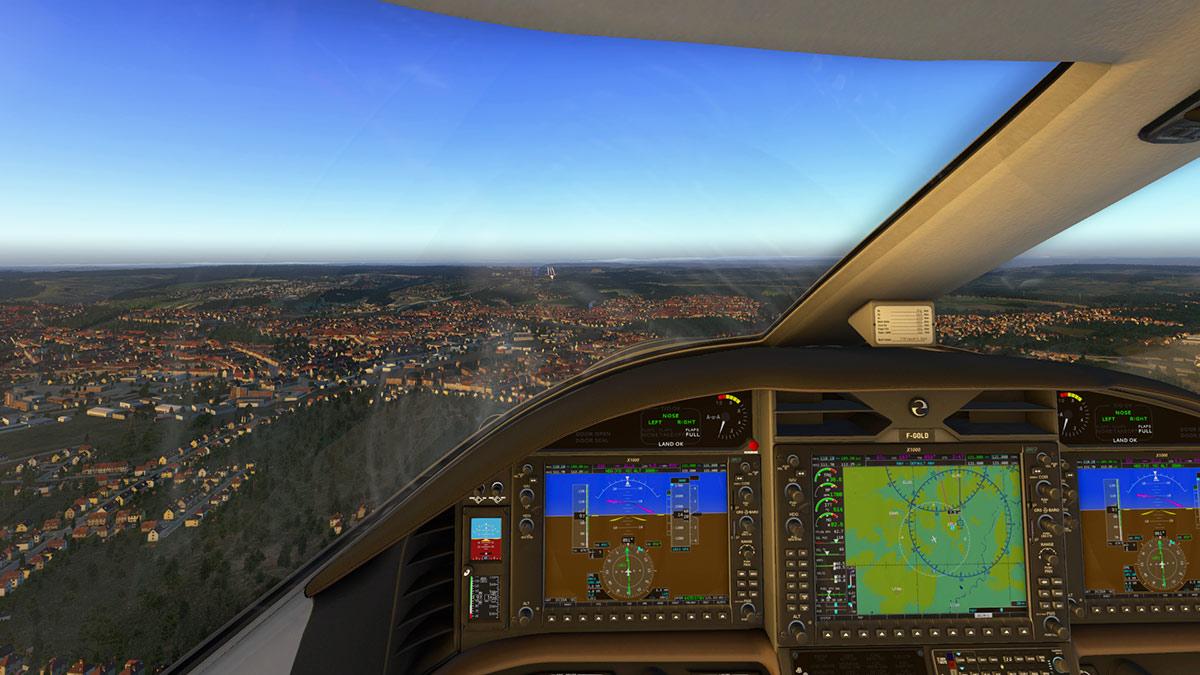
 Aircraft Review : McDonnell Douglas Harrier AV-8B by X-Trident The AV-8A/B version of the Harrier is in essence a version Mk ll of the famous and highly versatile British Hawker Siddeley "Jump Jet". The Jump Jet story starts with the Hawker P.1127 and the Hawker Siddeley Kestrel FGA.1. Both are the experimental and development aircraft that led to the Hawker Siddeley Harrier, the first vertical and/or short take-off and landing (V/STOL) jet fighter-bomber. The P.1127 development began in 1957, in taking advantage of the Bristol Engine Company's choice to invest in the creation of the Rolls Royce Pegasus vectored-thrust engine. Tethered testing began in July 1960 and by the end of the year the aircraft had achieved both vertical take-off and horizontal flight. It was not an easy program with the first three aircraft crashed during testing, and one aircraft was lost at the 1963 Paris Air Show. From the start most Air Forces didn't want the slow sub-sonic Jump Jet. Their eyes and money was always on the fast jets or supersonic target delivery. The Hawker Siddeley team created the P.1154 for the supersonic requirement as the design used a single Bristol Siddeley BS100 engine with four swivelling nozzles, but the NATO requirement was cancelled shortly after in 1965, along with that other great British hope the BAC-TSR-2. RAF however began considering a simple upgrade of the existing subsonic Kestrel and issued Requirement ASR 384 for a V/STOL ground attack jet. Hawker Siddeley received an order for six pre-production aircraft in 1965, designated P.1127 (RAF), of which the first made its maiden flight on 31 August 1966. An order for 60 production aircraft, designated as Harrier GR.1 was received in early 1967. The aircraft was named after the Harrier, a small bird of prey. The Harrier GR.1 made its first flight on 28 December 1967. It officially entered service with the RAF on 18 April 1969. Almost immediately into service the RAF Harrier made the headlines! The aircraft won the The Daily Mail Trans-Atlantic Air Race which was a race between London, UK and New York City, USA to commemorate the 50th Anniversary of the first trans-atlantic crossing by John Alcock and Arthur Brown. The race was held between 4 and 11 May 1969. The 50th anniversary of the race is right now. The race was actually a race of individuals between the Post Office Tower in London to the Empire State Building in New York. Each of the individuals or "Runners" had to use some form of air transport. With a number of different categories a total of 21 prizes could be won. A number of point-to-point world records for aircraft were broken. The shortest overall time between London and New York was by Squadron Leader Tom Lecky-Thompson flying a Royal Air Force Hawker Siddeley Harrier in 6 hours 11 minutes . The Harrier used a coal yard next to St Pancras station in London and landed on the quayside of the Bristol Basin in New York. the GR1 aircraft was refuelled 11 times in flight to achieve the record. A great video of the event and the restoration of the aircraft XV471is here: Forces Network. A variant for the UK Royal Navy (RN) was the Sea Harrier, but the aircraft was not capable of taking off with a full armament and fuel load from the ship's deck vertically, the solution was the Ski-Ramp that allowed the Harrier to achieve almost forward flight and with a big payload as well. The flexibility of the Harrier led to a long-term heavy deployment in West Germany as a conventional deterrent and potential strike weapon against Soviet aggression; flown from camouflaged rough bases the aircraft's ability to just appear and disappear but still deliver a capable strike was very effective. Every aircraft is known for a certain theatre of war, for the Harrier it was the Falklands War in 1982. The South Atlantic distance of the conflict rendered the supersonic prime force to be almost grounded, until an airfield on the Islands could be secured, in fact the Harrier's exceptional low speed capablites were far more effective even against the Mirage lll than the usual theatre tactics with shoot over the horizon armaments, Both Sea Harriers FRS.1 and GR3's were both active in the war. Further exercises trained pilots to use the vectoring-in-forward-flight (VIFF) capability to out-manoeuvre their opponents and showed that the Harriers could act as effective air-to-air fighters at close range and against far faster aircraft. The AV-8A was really a duplicate of the RAF version GR1/3, but the U.S. Marine Corps wanted a bigger and faster version of the aircraft. As the British government refused any more financial commitment, then McDonnell Douglas with an order of 12 originally then a full order of 324 aircraft decided to do the upgrade program themselves. The new AV-8B Harrier ll had new wings, revised intakes, redesigned exhaust nozzles, and other aerodynamic changes with a supercritical wing, hands-on-throttle-and-stick (HOTAS) control principle, and increased engineered lateral stability make the aircraft fundamentally easier to fly. Hawker Siddeley or BAe Systems worked with McDonnell Douglas on the development of the Mk ll upgraded aircraft. The modified forward fuselage and cockpit found on all subsequent aircraft were not incorporated on these earlier prototypes which were designated YAV-8B, the first converted AV-8B aircraft flew on 9 November 1978, the British Government then reversed their original commitment to build the RAF version of the AV-8B with the GR5 which was the RAF's first second-generation Harrier. The GR5 differed from the USMC AV-8B in avionics fit, weapons and countermeasures, and forty one GR5s were built and saw action in Bosnia, Iraq, and Afghanistan. The Harrier was also flown by the Spanish Navy, Thai Navy, Royal Air Force, and U.S. Marine Corps. X-Trident Harrier AV-8B This aircraft for X-Plane11 was originally released late December 2018, but was noted as "still in development". X-PlaneReviews obviously looked at the aircraft and development, and decided that it was all very nice but overall the aircraft still required some significant development to be noted as a release version. X-Trident noted that the development would be finished early in 2019. But the reality was (and we knew this) was that the 11.30 beta from X-Plane was going to take far longer than expected. Only by early March 2019 was the full complete release version was issued as v1.1 and is as reviewed here. X-Trident are no stranger to military jets as their last project was the excellent aircraft Panavia Tornado GR4 of which X-PlaneReviews really liked. So much was expected here. Note on the Pavavia Tornado GR4 in that X-Trident have also updated the aircraft to the current same 11.30 specifications (v3.0). The Tornado was released over two and a half years ago, so the Harrier has had a long development process, X-Plane itself as a simulator has also had a few reincarnations since then as well. So you are really expecting a lot, and on a first view you are not certainly disappointed. I have lived with Harriers my whole life, from my childhood to their retirement in March 2011, the AV-8B is still however in US Marine service, but will soon be replaced by the F35. There are a few Harriers in Museums, I saw a few at Duxford UK, where it was quite hard to see into the aircraft (GR.3 XZ133) as it is suspended? but the Pegasus engine is very accessible. There is another GR.3 XZ997 at RAF Museum, Hendon. The Tribute XZ133 livery of the Duxford aircraft is used in this review. There is also a rare P.1127 XP980 (fitted with a Harrier GR.1 wing) which is on display at the Fleet Air Arm Museum, Yeovilton, England. Detail on the Tornado was exceptional, but it feels now slightly dated in a sort of X-Plane10 way, externally it still delivers, but the cockpit in areas shows it's age. Not so with the Harrier... as this aircraft is simply the top gun of the current game, and the opposition is also very strong like with the Just Flight Hawk T.1. The thing is with the JF Hawk is that it lifted the notch up not only a few bars but a lot of bars in the fighter category, so this Harrier design is a worthy comparision.... ... but the Harrier here does easily match the Hawk in most and even every area. Undercarriage detail is excellent and all is highly animated, this factor is more important here as the aircraft is a vertical takeoff/landing machine, so the gear extension and retraction not in only in stowage, but the physical vertical movements has to be correct. Intimate detail is of course exceptional with lovely hydraulic cabling/piping and even the gear notices that are all perfect. More highlights includes the weapon tracks, which are highly detail, and not just a texture image... under fuselage airbrake and so are the numerous of opening air vents that are required for the vertical flight. For me the significant area was the flight "puffer" small reaction nozzles that are the most important and the most ingenious aspect of the Harrier. It is actually quite easy to support any aircraft on a downward thrust of gases, and even here with the clever engine mounted vector nozzles... the real trick was in actually controlling the aircraft in the air. The Harrier has a unique system of engine bleed that directs air to the various reaction nozzles... .... two with one under the nose and one under the appendage at the rear controls "Pitch". There are two outlets on the wingtip (that is why the support wheels are inboard) with one outlet on the the top and another below the wing edge... ... these two outlets control "Roll" and the final two outlets are again on the rear appendage but this time on the sides... .... and these outlets control "Yaw". The development not of the thrust factor, but in controlling the nozzle aspect was the really big headache of the time (besides the early underpowered Pegesus engines), but once sorted the system created a landmark in aviation controllable flight. This is all powered by the later Rolls-Royce Pegasus F402-RR-408 (Mk 107) vectored-thrust turbofan at 23,500 lbf (105 kN). I always loved the "Snout" look of the Harrier, certainly not the look of fast jet, but the Harrier a more workman like aircraft... ... open the canopy and you can look inside. Missing are the usual external stairs that give access to the cockpit, the Harrier has a built in set of legups and steps with a drop down foot hook and two drop out foot handles that fall out of the side of the forward fuselage (arrowed) ... they are all animated with the sliding of the canopy. Canopy detailing is of course excellent, with great glass depth feel and reflections... ... note the explosive trace for in flight ejection. Cockpit looks extremely authentic, looking also at the Tornado it is also a few levels higher in detail and quality... certainly more work has gone into this design, and it is the most impressive work from X-Trident yet. Cockpit Detail Sitting in the Harrier is a claustrophobic experience, that is mostly created by the extended UFC (Upfront Control Panel) upper-panel that contains the scratch pad display and keyboard, function selecting buttons and Radio Repeater controls. Either side of the UFC are two MFD's (Multi-Function Display) that we will get to in a moment. Centre is the front panel that is the analog backup (BU) instruments of Speed indicator, Artifical Horizon, AOA (Angle of Attack), Vertical Speed and sticking out the Altimeter. The lower BU instruments can't be seen as the joystick hides them, the stick is non-hideable as well. Top right are the engine readouts. Left top is the ODU (Option Display Unit), that works with the UFC. HUD (HeadUp Display) is top glareshield. Also lower behind the joystick is the Auxiliary Controls panel that is not usually required in flight. Left lower panel is the ACP (Armament Control Panel) which allows you to select the ordnance quantity to be released or permits you to perform an external stores "Selective Jettison". The Flap control is here as well on the side-front console, but the flaps are also part of the Stability Augmentation System (SAS) to transition to the hover mode, so you don't actually need to use the flaps in the Harrier manually as mostly as it is an automatic setting called "Aileron Droop". the Landing Gear Lever and anti-skid is located here as well. Right Lower panel is the Fuel Quantity Indicator with the Fuel transfer, in-flight Refuel and Fuel Dump which are controlled through the left rear side console Fuel Panel. Brake Pressure (excellent) and Accumilator are on the right side-front console. Canopy latch is above. Fuel Quantity Indicator has three displays that indicate the quantity of available fuel, other fuel selection choices include FEED, TOT (Total), INT (Internal), WING, INBD (Inboard) and OUTBD (Outboard). Full left side console is top to bottom with Trim the main aspect. Below is the SAAHS ((Stability Augmentation and Attitude Hold System) which is basically a sort of autopilot, (which we will show in action later). The throttle and nozzle vector lever (see below), Fuel (Pump and Dump), EXT (External) Lighting panel and rear the Oxygen panel, far rear is the Fuel "Shut Off" lever... Full left side console is top to bottom is first the ELEC (Electrical Panel) including the APU start. VHF Radio is pure military. There are two radios which can independently be used in Manual mode, Pre-Set mode or Guard Mode. Radios are usually called COMM1 and COMM2 and are managed through the radio panel and UFC. Set below the Radio is the ACNIP (Auxiliary communication, navigation, identification panel). The ACNIP panel allows to monitor and control some navigation and communication functions. Included is the IFF status, Emergency Code, IFF ZERO, IDENT Squawk Ident and FL and CH display respectively the amount of Flares and Chaffs still available. Rear right console is the INTR (Internal) Lighting, ECS (Cockpit Environmental Control System) on the rear wall (right of the ejector seat) is a nice isolation box, it doesn't actually work, but it is very nice detail. There are Warning, Caution and Advisory lights that illuminate to warn about a failure or a dangerous situation. Main panel is right lower and "WARNING" / "CAUTION" lights around the UFC panel. All are highly effective and come with the aural alerts that will make you simply jump out of your flying suit. Throttle is totally authentic with two gate locks, one is for the engine CUT-OFF lock and the other is for IDLE lock. The Harrier has another control lever for Vectoring the Nozzles, the settings are 0º for full forward flight to 83º for full downward thrust, 100º can give you a slight rearward thrust. You can use a locking pin to set the full 83º or any other degree positions to protect you from changing the angle to the wrong degree position, and it works extremely well in an eyes forward situation. One area I had issues with on the pre-release of the X-Trident Harrier was using my Saitek X-56 throttle twin throttle as both the main throttle (left lever) and the Vectoring lever (right lever), as there was no actual X-Plane setting you could use for the vectoring? That is changed in the v1.1 release version with the use of the X-Plane command "Thrust Vector" and it now works perfectly. You can of course still use the key commands "Vector or Sweep Aft" and "Vector or Sweep forward" to move the vector lever forwards or backwards. MFD (Multi-Function Display) There are two MFD's (Multi-Function Display). and both can be set for a certain display function. There is a pop-out window, but only one, so you can't have both MFD's popped out at the same time... which is odd and no help for self made cockpit users. Pressing MENU on either screen will bring up the main menu. The commands are set across the top for the main types of screens and aircraft commands are on the bottom. Top row commands are MAP, NAV, TMR, FLIR and WORLD, lower commands are COMMANDS, EMER and MISSION. My main flight/mission setup is the NAV on the right and the MAP on the left. TMR (left-right image)) is the "Terrain Mapping Radar" which generates a synthetic image of the ground in front of the Aircraft; Radar antenna is tilted 0.15° down to display also obstacles slightly below the flight level. NAV selections include: APT, VOR, TCN, VORTAC and TGT (Target) of which you can set by putting in an "Ground Objects" of which you can set three targets. FLIR - FLIR camera returns a synthetic image generated by Infrared Camera, and the HUD symbology can be superimposed by selecting the HUD option. With the NAV on the right MFD then the FLIR with HUD option on, it is a very effective heads down flying situation. Using both MAPS and WORLD you get two perspectives of your position in local and global positions. You can insert your own mapping images in an "MAP_FOLDER" but you are also required to set out the map format (syntax) so it is animated in the MFD, image sizes are 4098x2632 px. COMMANDS are used to set the SAAHS (AFC) on/off, so you can turn the SAAHS on to create a controlled flight (autopilot) or use the ALT to hold an altitude... ... again an easier heads up solution to switching on/off the autopilot, and I used it all the time as the switches left lower console are hard to see, never mind use when the throttle/vector lever is forward. MISSION has two settings in "WEAPONS" and "TARGETS" Selecting WEAPONS gives you the current armament/fuel load on the aircraft, you can then select the weapon of your choice or SAFE the weapons. TARGETS allows you to select the target you require, and the ones that you have set up with the static objects. RWR (Radar Warning Receiver) returns a synthtic depiction of other Radars pointing at the Aircraft. The color of the Spike shows the kind of Radar emitter, indicating whether it is recognized as Friendly, Hostile or Neutral There is a setup feature than can give you the platform configuration that you require. There are twelve CONFIGURATIONS that you can use, but you need to set up the platform before you use the aircraft, because you have to change the actual AV8B.acf file for the configuration you require... 12 choices include: 2 x AIM120 GUN 2 x JDAM - 2 x MK83 - 2 x AIM9, 2 x JDAM - 2 x TANK - 2 x AIM9 2 x TANK - 2 x AIM120 GUN 4 x GBU12 - 2 x TANK LITENING - 2 x AIM9 4 x JDAM - 2 x TANK LITENING - 2 x AIM9 4 x JDAM - 4 x GBU LITENING - 2 x AIM9 4 x TANK - 2 x AIM120 GUN 6 x MK83 2 x TANK - 2 x AIM9 6 x MK83 - 4 x JDAM - 2 x AIM9 12 x MK83 - 2 x AIM9 GUN CLEAN AV-8B Menu The AV-8B menu is located in the "Plugins Menu" on the X-Plane banner menu. The menu is in four selections: Show MFD (pop-up), Remove Before Flight (Static Elements), Load (Flight Plan, Ground Objects and Targets) and the Configurations panel. Remove Before Flight (Static Elements) has engine inlet covers (excellent!), wheel chocks, pitot covers, refueling probe cover, pilot hide, tags and weapon "safe" tags... all are excellent, but you can only use them all or nothing? I always like the option of using just wheel chocks and safe tags without the full monty of everything, so the static elements are a bit limited in their use. The "Configurations" Panel has six selections with: SmartView, Options, Flight, Lights, Mixer (Sound) and Maps. Configurations/SmartView: Smart View is an X-Trident option which controls the POV (Point of View) on all axis to recreate the movements of the pilot’s head and gaze when maneuvering. When Smart View is active, cockpit view is no longer controllable by mouse or buttons. Configurations/Options: VRHUD - Focuses HUD to infinite, option can be left on also without VR. Custom Replay - Toggle the recording of some custom variables for replay Particles Effects - Particles Effects may considerably reduce the Frame Rate, so you can turn them off if you wish Custom Carrier - A custom “NAVE CAVOUR” carrier is supplied with the package (we will look at the carrier later). Nonlinear throttle - Activates a “nonlinear” throttle response, as in real AV-8, in order to have an accurate control of RPM and Thrust above 85% RPM. AAR mode - Allows to select to levels of assisted "Air To Air Refuel"... there are three selections: Normal - Easy - AUTO Configurations/Flight: H20 - Shows available water for Engine Water Injection System Flight options include a few selections that are also selectable in other areas. Remove Before Flight - is the same as the other Menu selection Canopy - opens and closes the canopy and drops the leg-up and drop out foot handles Vector Limiter - Adjusts the vector locking pin to a degree Park Brake - ON/OFF Quick Set Carrier- Sets the AV-8B onto the nearest Carrier Quickset VTOL - Sets the AV-8B ready for VTOL flight including the correct fuel load (weight), external armaments and sets nozzles for vertical takeoff Fuel - Set fuel quantity with also available external tanks Active COM - A list of Stored Frequencies and relative channels is displayed 833 Khz radios - Online flights, as the real world, require a 005 KHz frequency spacing instead of 025 KHz Configurations/Lights: Sets the lighting settings in internal selections: Console, Inst.Panel, Flood, Warn (Warning), HUD (Brightness) HUD (Contrast). External Selctions: Formation, Pos.(Position), Antic (Anticollision), Ldg. (landing), Taxi, Ext (Navigation). Configurations/Mixer Sets the sound volume for : ECS (Nozzles), AoA (Warning), Stall (Warning), Warn & Caut (Alarms), Betty (Warning Voice), Switches (Clicking) and RWR (Radar Warning Receiver) Configurations/Maps Shows and allows selection of Maps available for display in the MFD. ___________________________ Flying the Harrier In most circumstances taking off in an aircraft from an airport is to taxi to a runway and takeoff... but the Harrier is no normal aircraft, as It gives you choices with V/STOL capability. But also restrictions as you can't takeoff vertically unless the aircraft is quite light, a few sidewinders and a low fuel requirement is the the only go... the VTOL selection in the Flight/Menu will do that for you. When you taxi you can go to any point on the runway and not the usual start, or really anywhere you have a wide flat hard space, and yes you could even use a heli pad, but your skill level would have to be quite high. The vector setting is noted at 83º, but it is more sensitive than that, as the line between going forwards, backwards or into the straight up hover is very fine... you don't have to look down at the nozzle lever as there is a nozzle angle guide on the left of the top of the instrument panel (it is noted in the HUD as well), mostly you use only two settings in 83º and 50º for runway takeoffs. ... one way to gauge the thrust direction correctly is by the blast dust. The X-Plane11.30 particle effects are excellent here as you can see the direction of the thrust by the dust, it is easy to see the rearward or forward thrust directions, and there is also a sweet spot in the middle. Bring in (up) the throttle and the AV-8B will start to lift, and in your throttle movements you have to be fine, slow and precise. But yes you are now sitting in the hover... .... so the Harrier is like flying a helicopter, well yes... and no. You have sort of the same feel and adding more throttle is like more collective on a chopper... ... the trick in flying the Harrier is in the finer aspects, with the small vector nozzles. One they can be slow to react, so you have to ahead of their adjustment, but they will (in time) adjust to your stick movements, slight rolls can correct sideways movement, but the pitch is not as effective, and the yaw is also slow to react.... another aspect is the heavy upwash when you go down closer to the ground again, this can re-lift the Harrier upwards, so your natural reaction is to lower the throttle, but as in most cases if you over do that then the aircraft will simply fall out of the air as most learners do. The trick is to find that upwash barrier point and fly through it without the uplift and still be in the hover control... that aspect needs practise, but it is there... Move slightly rear the vector nozzles and you move quickly forward, the AV-8B is quite different from a normal aircraft as the thrust is angled and you still don't have a lot of aerodynamic control, but as the speed builds then adjust the nozzles to full rear thrust... again with the thrust angle the aircraft will always climb like a banshee so you need to control the height via the throttle as much as the forward speed, the transition is not hard, but you need total control from the hover flight to normal aerodynamic flight... ... returning to the field and the transition from aerodynamic flight back to hover flight is not as hard as you think it is, and slowing down is quite easy with those huge barn door flaps doing all the work for you. The hard point is later when you feel the transfer of the heavy aircraft weight back onto the downward air thrust, helicopters have of course the same sort of weight transfer, but it is far more evident here, even excessively so. You can use the rearward thrust to slow you down... but the thrust differences between forward, hover (more heavy) to the rearward movement (less weight thrust) can upset your approach and make you lose height, so you use it sparingly, find that up-lift barrier and control the forward and descent movement and you can rest the aircraft easily. The nozzles can also be slow moving to a new position angle so the effects are not instantaneous, again you have to anticipate the thrust change and move the nozzles before you want to do a certain manoeuvre and be almost in front the aircraft. The easiest approach is a slight forward movement touch down... the aircraft's comfort zone is nose up about 7º and it is when you drop that pitch angle lower to land vertically that it all gets a bit loose and messy... ... so if you keep that nose up angle and come in slightly moving forward the landing is usually very relatively easy and smoother, you just slightly bump the ground and move forward a few feet until you touch the brakes, but it is far more less stressful and a noticeably smoother landing.... you will notice on the videos that most runway landings are done in this way. Taking off full loaded then you will need both the aerodynamic lift and downward thrust. You still put the nozzles about 50º and you are surprised on how much thrust (power) you have available, you do feel the push forward, but with the slightly downward thrust as well, takeoff is around 180knts depending on the weight, but it requires skill as the Harrier is balanced centrally with only out-riggers for balance. Don't move the nozzles into the 0º rearward position straight away and let the aircraft climb well clear before then slowly adjusting the angle of the thrust back to the rearward position. Marina Militare Italiana “NAVE CAVOUR” Aircraft Carrier The takeoff from the custom provided aircraft carrier is much the same as a full loaded takeoff, but with a difference! The provided carrier is to be first in replacing the X-Plane "Nimitz" carrier and the files have to be switched over for it to work. You can use the Nimitz of course, but it doesn't have a built-in ski-ramp of which the "NAVE CAVOUR" does... Use the "Carrier" button in the "Menu/Flight" to position you on the carrier. You find the first position will actually throw you burning over the side of the ship!, but do it again and you will this time stay on the deck.... the position is in an odd place just behind the ship's island, so you have to carefully move the aircraft almost directly to the left to get to the ship's runway, you can't loop around the deck either or go backwards, so it is a tight manoeuvre , but you can now sort of sit on the 500 marker. Again use the 50º nozzle angle and hold the aircraft on the brakes. Your first thought would be to hammer the throttle full blast to get you airborne, but in fact that is the wrong thing to do? as you will hit the ramp too fast and you sort of compress the front gear into the deck and you will then bang your way upwards and go unwieldy into the air or usually over the front of the ship. 60º throttle, but let the thrust build before letting go of the brakes, if you get the speed right the Harrier will find the slope and you will be launched into the air, even a low 85 knts is enough to get you airborne, and once clear then bring in more throttle to maintain your climb rate, again don't move the nozzles aft until you have enough aerodynamic lift and speed... ... climb out cleanly and start the mission. Landing back on the CAVOUR is slightly easier because the ship is moving forward, so it helps that high pitch angle approach. Most approaches are to the left of the deck at around 100ft then roll slow over the carrier deck and then reduce slowly your height, easy... well not at first, again if you want quick landing then come in slow over the stern and with a forward moving to stop landing on the deck is a still far easier approach. Once at speed you will need to switch the "Flaps" to "Cruise" (don't forget to switch them back to auto) to bring them up to the full 5º flight setting, you will feel the extra drag and lift, unless you do this. The HUD (Head-Up Display) is excellent, with a lot of detail that combines both Navigation and Weaponing data, Barometric Altitude or measured Radar Altimeter Altitude are both indicated as is the important Heading, Speed, Artificial Horizon, Horizon Reference, Weapons Status, Nozzle Flap position, Pitch Flight Director and Flight/Engine data. You can adjust the brightness from green to white. The AFC (Automatic Flight Control) is very easy to use. Level the aircraft on the heading and altitude you require, then in the MFD select MENU/COMMAND and then select both AFC and ALT... Want to change heading then just hold the stick on the direction you want to go.... when at the new heading just centre the stick... ... the Harrier will then realign to the heading exactly, mostly going in the opposite direction slightly and then centering the aircraft, to change altitude you just switch off the ALT and pitch up or down and reset at the new altitude. UFC (Upfront Control Panel) The in your face UFC (Upfront Control Panel) is easy to use once you have worked out what all the different actions are.... TMR (Timer), TOO (Target of Opportunity) are top left.... IFF (Identification Friend or Foe), TCN (Tacan), AWL (All weather Landing System), WPN (Weapons), ALT(Altimeters) and EMCON(EmissionControl). I/P, WOF (and no it isn't "What the F*ok") and BCN don't work at this point. And all the selected choices are shown in the top left ODU (Option Display Unit). The UFC scratch pad top is used to input the data and ENT to enter the data. Weapons Laminar Research have upgraded the "Weapon" feature in X-Plane over the last few years, but the 11.30 version gave with the particle effects the real "Wow" factor. Main "MASTER ARM" is to your left... a layout of your armaments is shown on the MFD - MENU/MISSION/WEAPONS and also on the HUD lower right.... if you select the WPN on the ODU you can select which WPN selection you want to use in Air to Air, Air to Ground or use the Gun. There is a SAFE(ty) on both the ODU or the MFD to unlock the weapon. The lower MFD display buttons L or R selects the type of armament you want to use When you have all your selecting done, then when ready just "Fire!" (X-Plane key or joystick command required). It is pretty spectacular... You can of course dump any armaments or long range fuel tanks in flight. All these areas of systems use and all the complex symbology is all explained in the excellent in depth "Flight Manual", it will take some time to know everything, its complex, but that complexity comes with the realism, and to a point that is why we fly these aircraft... for the absolute if complicated realism. In performance the AV-8B has a maximum speed of Mach 0.9 (585 knots, 673 mph, 1,083 km/h) an on-station range of 1,200 nmi (1,400 mi, 2,200 km), combat radius of 300 nmi (350 mi, 556 km) and a ferry range of 1,800 nmi (2,100 mi, 3,300 km). The rate of Rate of climb is an enormous 14,700 ft/min (75 m/s) and the stall speed is zero (0)... Service ceiling is 50,000 ft (15,170 m); Lighting There is really only two sets of illumination, with one the main panel and side consoles lighting, and all are adjustable. The second is the Overhead/Flood light that actually illuminates from the canopy sides, all are excellent. Externally there are FORM (Formation) lights and they are knob adjustable, POS (Position), ANTI COLL (Collision), AUX (Auxiliary - Taxi Light) and single landing light on the front strut. Various lighting modes allow full or dim position lights... there is also a NVG setting that turns off all the external lights and are then replaced by LED infra-red lights. (see in X-Plane's "Night-Vision" feature). Liveries The bulk of the liveries are leaned towards the AV-8B operators, both with the US Marine Corps, Italian and Spanish airforces... the RAF does get a few versions put in there, but they are the more the odd ones than the earlier GR.3 or GR.5 liveries, the RN livery is not the main "Falklands" version either... note the different nose configurations with certain liveries. There are twelve hi-quality liveries as part of the package and a paint kit is available. This is the "Harrier AV-8B GR3 XZ133 1982 Tribute 1.0" by Domhenry and was active in the Falklands, first from the HMS Hermes and then from Port Stanley. The aircraft is currently (hanging) at RAF Duxford... image noted above. Summary The AV-8B is the second generation (discounting the prototypes) of the British Hawker Siddeley Harrier "Jump Jet", upgraded by McDonnell Douglas with a bigger engine, bigger wing and more armament attachment points and raised canopy, as it was eventually also used in the RAF as the GR.5. An outstanding versatile V/STOL aircraft, the Harriers capablities gave the aircraft a wide range of theatre roles and was the dominant force in the "Falklands War" in 1982. It was known as a "difficult" aircraft to fly, for the obvious reasons and the US Marine Corps have wreaked nearly 110 aircraft that have been damaged beyond repair since the type entered USMC service in 1985. This not the first Harrier for X-Plane, but certainly the first in depth quality design from X-Trident, and was a follow on project from their earlier also excellent Pavavia Tornado GR4. System depth including weapon systems with both CCIP and CCRP bombing modes, MFDs with click-to-lock A/A targets, UFC and CDU, highly detailed HUD with master modes and navigation with GPS (with moving maps, in scale with NAVAIDS) and TACAN (A/G and A/A). Fully detailed and authentic VTOL rotating nozzle and vectored-thrust control systems are really well designed and comes with performance and vertical flight controlability, sounds are also exceptional, and all through the full range of vectored thrust. Added details includes 12 different armament configurations, custom Italiana “NAVE CAVOUR” Aircraft Carrier, in-flight refueling and placeable target ground objects. Negatives, not much, if anything... one click static elements restricts a lot versatile options on the ground and some external lighting could be more refined, the non-hideable stick hides instruments and a animated pilot would also be nice. Mostly in this area you need to note that the Harrier is not the easiest aircraft to fly, and the systems are quite complex to learn and use (there is an excellent manual) so the Harrier is not for the unskilled or first time timers. Even if you are highly skilled the aircraft is still a challenge because this is an V/STOL unorthodox flying machine and not even your every day fighter aircraft, but authentic to the Jump Jet it is. Overall X-Trident have done an exceptional job in recreating a classic revolutionary aircraft design, and highly challenging one at that. The quality in this fighter clas is now getting very high as is all of X-Plane aircraft of this detail and systems, but this AV-8B certainly delivers in all aspects of what you would want in flying the Harrier Jump Jet... Highly Recommended, but be aware as this is not your usual flying machine. _____________________________________________________________________________________ The McDonnell Douglas Harrier AV-8B by X-Trident is a new release for X-Plane11 and NOW available here at the X-Plane.OrgStore Harrier AV-8B Price is US$38.95 This aircraft is a noted aircraft for X-Plane11 only and version v1.1 is required Features: Weapons AIM9 (Infrared guidance) AIM120 (Radar guidance) JDAM (GPS guidance) GRAVITY SNAKEEYE GUN (with computated aim) Weapon systems CCIP bombing mode CCRP bombing mode Weapon control panel Selective jettison Navigation GPS (with moving maps, in scale with NAVAIDS) TACAN (A/G and A/A) VOR/ILS Radar Air to air, with radar lock on targets Terrain mapping radar RWR Systems MFDs (plus one "floating" MFD - it is possible to click-to-lock A/A targets) UFC and CDU Detailed HUD with master modes (VR friendly/collimated) Radios Autopilot and selective SAS Miscellaneous Ground target objects that can be damaged by bombs Animated ejection sequence Smartview (automatically adjusts the point of view based on flight path and speed) FMOD Sounds (3D), aural warnings, custom mixer Detailed control panel Support for Tiled and Overlayed maps Particle systems effects (with opt out possibility) Paint kit Requirements: X-Plane 11.30+ (not compatible with XP10) Windows, Mac or Linux 2Gb VRAM Minimum - 4Gb+ VRAM Recommended Download Size: 665 Mb Current and reviwe version: 1.1 (March 6th 2019) _____________________________________________________________________________________ Installation: Download for the Harrier AV-8B is 740.40mb and the unzipped file is deposited in the "Fighters" X-Plane folder at 1.58gb Installation of the Militare Italiana “NAVE CAVOUR” Aircraft Carrier is required for use, you replace the X-Plane default carrier Nimitz. Weapon configurations are required before starting the X-Plane simulator and any custom targets have to be placed for use. Documents: Highly detailed manual covers installation and all instrument notes, systems details, panel and Quick Start sheets AV-8 Flight Manual_1.2.pdf CHECK_LIST.pdf Quick Start details include: x-trident AV8-B AP and Flight Plan 1.0.pdf x-trident AV8-B COM Radios 1.0.pdf x-trident AV8-B NAV Radio and ILS 1.0.pdf x-trident AV8-B Quick Start guide 1.0.pdf ____________________________________________________________________________________ Review by Stephen Dutton 29th March 2019 Copyright©2019: X-PlaneReviews (Disclaimer. All images and text in this review are the work and property of X-PlaneReviews, no sharing or copy of the content is allowed without consent from the author as per copyright conditions) Review System Specifications: Computer System: Windows - Intel Core i7 6700K CPU 4.00GHz / 64bit - 16 Gb single 1067 Mhz DDR4 2133 - ASUS GeForce GTX 1080 8Gb - Samsung Evo 512gb SSD Software: - Windows 10 - X-Plane 11.25 Addons: Saitek x56 Rhino Pro system Joystick and Throttle : Sound - Bose Soundlink Mini Environment Engine by xEnviro v1.07 US$69.90 : XPRealistic Pro v1.0.9 effects US$19.95 Scenery or Aircraft- EGOV - RAF Valley for X-Plane 11 1.0.0 by RCMarple (X-Plane.Org) - Free!
-
News! - In Development : FlyJSim Dash Q400 - Q4XP Images FlyJSim have released some more development images and notes of their forth coming new version of the Dash Q400. Anticipated around the last quarter of 2019, then this regional prop liner has a lot to live up to with the current detail and quality required for X-Plane11 lately. But as FlYJSim won my best overall for the year in 2018 with their excellent Boeing 737 TwinJet then there is everything to lose and not to gain. FlyJSim's notes are as followed: "This month we’re going to be presenting some early work of the modelling and texturing. We’ve set a high bar for ourselves following on from the modelling of the FlyJSim 732 Twinjet V3. For the Q4XP, we’re making sure that the external visuals are carefully crafted to accurately represent the aircraft. We stress the following images are early work-in-progress and are subject to change, but hopefully will serve as a tease as to what is to come. The following images are also taken directly in X-Plane 11." "Here we have one of the main gear struts for the Q4XP, one of our most detailed external areas. With the help of our Q4XP experts and technical data, we have near millimeter accuracy on every wheel, strut, screw and pipe. It’s just a fraction of the amount of detail X-Plane can actually handle. The texture work here is done by Valdudes. His PBR workflow has captured the subtle roughness of the tires, and the mattness of the brake dust across the gear to create a Q400 which feels worn out and abused." "That detail extends to the Turboprop housing. We’ve split our model over multiple texture maps, ensuring that we can cram as much detail as possible. Every screw and dirt streak will be visible from close proximity. We can’t wait wait to see how painters utilize our HQ textures. We also cannot wait to see our YouTube pilots fly some interesting approaches, and replay their landings with the gears and engine in view." "And finally, a preview of the rear APU outlet and tail/stabilizer. Take particular attention to the discoloration of the APU exhaust outlet. Observe the linkages in the tail, or the dirt around the APU door housing. Everything represented is handcrafted modelling and texturing to invoke the spirit of the Q400. As we transition into the interior model, you’ll slowly see parts of the cockpit and cabin come alive, and we hope to bring you a truly stunning rendition of the aircraft." FlyJSim also note that the development of their current aircraft of theBoeing 732 TwinJet and the Boeing 727 Series and note... "There should be an upcoming “quality of life” patch to these aircraft that is going to lightly refresh the 727 and 732 with some small new features and aircraft performance/flight model tuned for X-Plane 11.30. What new features exactly? Well, you will have to wait and see…" As the FlightSim Expo is coming up on the 5th-7th June and FlyJSIm are due to appear their, then expect not only the updated B737/B727 to be updated and present, but even maybe a few views and an earlier beta of the Q4XP. Images and text are courtesy of FlyJSim ________________________________________ News by Stephen Dutton 25th March 2019 Copyright©2019: X-Plane Reviews
-
News! - ToliSS319 goes officially licensed Airbus Did you wonder in the fact the ToLiSS319 was spelt that way? it is an Airbus A319-112, so why not call it an Airbus A319? In the world of licensing it is a complicated business, and getting the authorisation it is even more complicated. The original Airbus licensing was to be in place for the original release of the aircraft last year 2018, but things sort of... we got complicated. But now the ToLiSS A319 is officially a licensed product (under the home entertainment license) and not for professional market, that does not mean to say any budding Airbus pilot couldn't learn a thing or to on this study grade aircraft. Notably is the point that from now on ToLiSS may have access to real Airbus documentation in future aircraft upgrades and changes... the official stuff. There are benefits for Airbus here as well, access to study grade aircraft is a great way to promote your products, certainly if they are of a higher grade, as not everyone has access to a multi-million dollar simulator, don't write off desktop simulators... they are pretty good nowadays. The last update for the ToLiSS A319 was only a few weeks ago: Aircraft Update : ToLiSS319 v1.3 by ToLiSS The aircraft is now very good, if not excellent.... ______________________________________________________________________ Yes! the ToLiSS319 (A319-122) v1.3.1 by ToLiSS is available from the X-Plane.Org Store here : ToLiss A319 Price is US$69.00 (currently on sale for US$62.00) Also available is the internal IAE Sound Pack that can be purchased here: IAE Sound Pack for Toliss A319 Price is US$9.95 Features: Highlights: FMGS with SID/STAR, Airways alternate flight plans, performance prediction, etc. Out of the box with TSS (Turbine Sound Studios) custom sounds for the CFM engine Realistic FBW with Alternate and Direct law reversions Fault injection interface with support for roughly 90 different failures and probability-based random failure injection Choice of CFM and IAE engine, and wingtip fences or sharklets. Choices affect aircraft performance and FMGS predictions. Detailed list of features: FMGS: Support of SID/STAR, including all leg types (Arc, course or heading to intercept, Radius to Fix, Holdings, etc.) Temporary and alternate flight plans Full VNAV guidance with TOC, TOD, Deceleration point, speed limits, fuel prediction, etc. Altitude and speed constraints as the real aircraft deals with them Ability to change the selected STAR while already in the STAR Support for go-arounds and diversions Step altitudes Airway support 2 independent MCDUs and autopilots Top-notch aircraft systems ToLiss uses the QPAC Fly-by-wire and autopilot module, augmented to support Alternate and Direct Law Unique feature: Control Surface hinge moment modelling allows the surfaces to float to the appropriate position after loss of all actuators on a surface. Fault injection interface allowing to inject custom selected failures, or randomly selected failure based on fault probabilities. Custom TCAS with resolution advisory function. Terrain on ND and Weather radar available (WX radar works with default X-plane weather engine) Brake temperature model based on the detailled physics of heat transfer between the individual brake components Hydraulics model in which the pressure is dependent on usage. This is most notable when dropping to RAT mode Detailed model of each ADIRU including alignment, small pressure sensor differences between the units, switching of sources for PFDs Custom air conditioning model supporting high altitude operations at airports like Cusco in Peru or La Paz in Bolivia without spurious warnings Flight warning system with ECAM actions supporting numerous system failure scenarios, e.g. engine failures, generator failures, hydraulic failures. Eye- and ear-candy Detailed 3D cockpit 3d exterior model with CFM and IAE engine Choice between classic wingtip fences or modern sharklets (controlled via livery names) Custom sounds from Turbine Sound Studios (TSS) included for the CFM engine. IAE engine soundpack available as addon for a small fee. Usability features Situation loading and saving. It is possible to save the flight at any point in time and resume it another day. This can also be used, e.g., to save the position just before approach and practice just the approach many times. Autosaving allows recovering where you left off, should the X-Plane session end unexpectedly. Jumping waypoint-to-waypoint through the cruise phase: Shorten your flight to focus on the more interesting parts as you like. Integrated takeoff performance calculator supporting the use of flex temperature. ______________________________________________________________________ News by Stephen Dutton 25th March 2019 Copyright©2019 : X-Plane Reviews (Disclaimer. All images and text in this review are the work and property of X-PlaneReviews, no sharing or copy of the content is allowed without consent from the author as per copyright conditions)
-
Your load order in the Custom scenery .INI is the wrong way around. Put the main KATL folder at the top of the list above the Global Airports... SD
-
X-PlaneReviews : Announcement - Site issues Currently the X-PlaneReviews site is experiencing issues that is beyond our control. The site had an (automatic) upgrade from the IPB Invision board that has buggered up all our layouts and settings, worse we can't use the editor to create reviews (text is fine) but no layouts can be currently created (this has happened in the past but the editor was still working correctly, so we worked around it)... but this time around we are royally stuffed. We hope normal review conditions will resume as soon as possible... Thank you for your continuing support and patronage to the site... Stephen Dutton
-
Aircraft Review : Cessna Citation ll S550 by Carenado
Stephen replied to Stephen's topic in General Aviation Aircraft Reviews
I still don't agree with you? I have covered a vast set of aircraft from Carenado, and the instrument layouts are vastly different with different instruments, the GTN 750 is available from Realistic for intergration with the XP Citation, that is why there is no default version, The FlightSim versions are very different from XP, from different suppliers so you can't compare the two platforms, performances are governed currently in aircraft that have been converted to XP11.30 dynamics and those that have not... the Citation is still a pre-11.30 aircraft and has not been yet currently updated to 11.30 performance. -
Aircraft Release : Airbus A320-214 Ultimate by FlightFactor Aero
Stephen replied to Stephen's topic in Airliners Reviews
Your guess is about as good as mine at the moment, FlightFactor are not forthcoming with any details, I do know the updates and testing has been going on since the start of the year and there is a public beta.. but to a formal release we are all in the dark? -
Aircraft Review : Cessna Citation ll S550 by Carenado
Stephen replied to Stephen's topic in General Aviation Aircraft Reviews
Are we flying the same aircraft? I don't think so! I respect opinions but Carenado are currently leading the pack and not following, In areas yes they could improve like with their still 2D menus, but on the flight performance areas they are class leaders... -
Aircraft Released : ICON A5 by VSkyLabs - Test Pilot VskyLabs have released their next project for their "Test pilot" series in the ICON-A5, which is a LightSport amphibious aircraft. The A5 seats two people in an enclosed 46-inch-wide (116.8 cm) cockpit and is powered by a single 100 hp (75 kW) Rotax 912iS engine driving a three-bladed pusher propeller. Dornier-style sponsons provide hydrodynamic stability, housing the retracted main landing gear, and also act as a step for crew and passenger. The wings can also be folded aft for ground transport and storage. To date (January 2019) 90 A5's have been produced with orders set currently at 1,850 aircraft. The Vskylab philosophy is that you purchase an ongoing project, so any aircraft you purchase is not fully completed and 100%, that is the deal you sign up for to get access to the aircraft, but this Icon-A5 is certainly a far more a completed aircraft than most of the releases than from VskyLabs in the past. Detail is finished certainly to a far higher grade than in the past, with some nice noted features.... Highly detailed, fully animated aircraft exterior and interior 3D model. Fully functional, authentic A5 Angle of Attack display system. Unique and authentic iconography, embedded into the display systems in the cockpit. CAP system (Ballistic Parachute system) modeled along with automatic gear retraction upon activation. Bilge water build-up and purge system are modeled. Removable cockpit windows. The A5's unique custom designed, authentic Landing and Taxi lights. Custom built PFD Companion and a fully functional Autopilot system included. High quality, animated pilot figure for highly immersive experience in 2D/VR modes. Built-in Avitab Plugin compatibility (AviTab plugin is not included). FMOD Sounds. The project is under constant maintenance and development, updates are free. VR (Virtual Reality) compatibility is very good and a focus on the design here... The A5 is surprisingly easy to fly, even to land on water. I found myself very at ease from the start and in control of the aircraft, as the A5 has a very nice flow to it. Water takeoffs and landings are quite easy as well, without resorting to tricks to get airbourne, but wave height is obviously important with such a small craft, 004 metre wave height is about the limit, 1m will crash you around. Particle effects are well done, as the heat outlet from the Rotax is part of the propeller housing you get a nicely blurred propeller feel as part of the effect. Only issue was the very dark instruments on the centre upper console and radio frequencies, full lighting adjustment in place they are all still extremely hard to read or use? But VskyLabs usually fix issues like this quickly. Requirements are: X-Plane 11.30+ Windows, Mac or Linux 2Gb VRAM Minimum - 4Gb+ VRAM Recommended - 8Gb+ VRAM for VR And the Download Size is 195Mb The VskyLabs Icon-A5 is now avaliable from the X-Plane.OrgStore, details are set out below... The ICON A5 by VSkyLabs - Test Pilot is now available! from the X-Plane.Org Store here : VSKYLABS Test-Pilot: ICON-A5 Price is US$32.95 ______________________________________________________________________ vSkyLabs Aerospace Simulations has a full extensive website on all projects for updates and information including aircraft manuals available here: www vSkyLabs.com All VskyLabs projects are also available for purchase from the X-Plane.OrgStore here: VSKYLABS _____________________________________________________________________________________ Release notes by Stephen Dutton 16th March 2019 Copyright©2019: X-PlaneReviews (Disclaimer. All images and text in this review are the work and property of X-PlaneReviews, no sharing or copy of the content is allowed without consent from the author as per copyright conditions)
-
Scenery Review : Berlin-Brandenburg XP by Aerosoft In the history of monumental stuffups and total ineptitude then the saga of Berlin's Brandenburg Airport "Willy Brandt Airport" is at the top of any infrastructure category list. In that this new airport is the focus of a main European capitol city is even more astounding and that it is also a high performing precision focused country like Germany then the whole idea turns simply into disbelief. But that is exactly what has happened with this new airport for Berlin. Brandenburg was originally It was originally intended to replace both Schönefeld and Berlin Tegel Airport and become the single commercial airport serving Berlin and the surrounding state of Brandenburg (The glorious Tempelhof Airport had already been closed). In reality it was a simple idea, extend outwards the runway and Schönefeld facilities and then close down the older airfield. Start date was in 2006 and the opening of the new "Willy Brandt Airport" was planned in October 2011. Poor construction planning, execution, management, and corruption created a debacle or even a complete fiasco that deems the airport is still not opening until at this point until sometime in 2020 or 2021. The most significant cause for the continuing delays has been the fire protection and alarm system that did not adhere to the construction permit and failed all the mandatory acceptance tests, more delays are encountered in that all the original information screens are all now in need of replacement because they are already out of date, and not one passenger has ever even used them to review their flight details... and that the current airport head is both simultaneously earning a monthly wage and a retirement pension as a former state secretary of the state of Berlin, so there is a situation that is now described as a "scandal" and even potentially illegal shows the deeper ongoing issues. Berlin-Brandenburg XP by Aerosoft The heading says Aerosoft, but in reality this is a LimeSim scenery with some development (SAM) by Stairport Sceneries. You get with the scenery two options... one use the Schönefeld setup were as Brandenburg is just a sealed of construction site (the real view currently) or use Brandenburg and have a side airport of Schönefeld available. In reality there are two airports as part of the package, both the same quality and both are situated in the scenery. However the switching (manual details) are very ambiguous and confusing on how you switch them over (create a ACTIVATE BER folder and insert the nav-data) but the actual ACTIVATE BER folder already exists with the included nav-data? the default is the Schönefeld setup, so that is the review setup here (can't this airport get anything right?)... anyway I like reality over hypothetical, If you want to use the BER version then you copy the nav-data in the ACTIVATE BER folder and replace it with the nav-data in the main "Earth nav data" folder, and vice-versa if you want to use the SFX version (my guess this is what the manual is actually trying to say?). If using WT3 then it gets a little more messy. In reality you have to generate two sets of ground routes from each location, and then swap them over to the required nav-data of which layout you want to use. The new Brandenburg - BER and Schönefeld - SFX are almost diametrically opposed with SFX slightly to the north, and they both share the older runway 07L/25R Asphalt runway (the darker one) to the newer unused 07R/25L which is concrete. From above the layouts of both airports are very distinct. Earlier and closed in 2007 SFX had another (Northern) runway also called 07L/25R, a few remaining sections can still be seen in the scenery. EDDB - Schönefeld - SFX Before the Berlin wall came down then Schönefeld was the main East German/Berlin airport (Tegal was on the Western side) so Eastern bloc airlines were once a regular visitor and user of the facilities. Schönefeld Airport consists of the four terminals A, B, C, and D. All terminals are located next to each other but have separate landside areas; however they are all connected through a joint airside concourse. Terminal C has no check-in facilities, it is used exclusively for passengers clearing security checks to enter the airside boarding gates. Terminal D was opened in December 2005 due to the rapidly growing passenger numbers. Being nearly identical to Terminal C at Berlin Tegel Airport, it features check-in counters D40–D57, which are mainly used by Ryanair, Condor, Germania, and Norwegian Air Shuttle. It does not feature jet bridges but several walk-boarding stands. In November 2016, the new 4,500 square metres (48,000 sq ft) large arrivals area D2 opened right next to Terminal D but it is noticeable as the newest part on the complex. There are only three airbidges, so mostly at SFX it is stand parking and a lot of the stands are remote. The large Apron 3 is directly in front of the terminals for stands 50-59, and Apron 3a is in front of terminal A for stands 61-65... stands 31-36 & 60 are remote with stands 40-43 far foreground. ... Stands 28, 29 & 30 are just west of the main Apron 3 on Apron 2A. The larger Apron 2 stands 19 -27 is further away off Apron 2A. Directly across the runway on what was the old Schönefeld field layout, but now part of BER is Apron 4 with a large maintenance hangar for Lufthansa Technik.... this area is now designated the "General Aviation" area. Aprons A, D and E are positioned in front and around the new BER terminal complex, but they are only remote storage stands and not currently passenger stands, we will see these when we look at BER. Terminals are noted by their letter, and the large central original is Ter A, with Ter C slightly to the right and Ter D the larger low set building (centre left), Ter B is the corner extension (centre right). All modeling is very good with nice textures, but all the objects are situated on a different scale photo underlay (Usual Aerosoft standard) so the detail is very smudged at ground level and the detail is lost, so there is that object on a flat surface look in most areas... and like that with the carparks and rental parking areas in that they are not defined. Apron fencing is also missing (poor quality anyway) in critical areas which shows a lack of attention to detail... so there is not great airside security here? Apron detail however (thankfully) is very good, as is the glasswork and finer terminal details. The highlight here are the three airbridges, design is excellent with lovely glass. All airbridges are SAM (Scenery Animation Manager) powered (both BER and SFX) and it is extremely well done by Stairport Sceneries. The bridges are well branded and have custom Safedock T2-24 VDGS guidance, if not in use they show the current time. There are a few apron animations (traffic) scurrying about, but nothing really to write home about. Other SFX airport infrastructure is to the west of the aprons, here there is a secondary apron used for cargo (very small) and the older original airport built in 1934 when construction began to build three 800 metres (2,600 ft) long runways to serve the Henschel aircraft plant in Schönefeld. There are two control towers (three including the new one over by Brandenburg), Fire Station and various catering facilities like for GateGourmet and SkyChefs. There are a lot of good custom buildings and a train station outside the actual airport environs, but the poor grainy ground textures defeat any real detail... ... signage is good, and the surrounding German Autogen creates a very viable landscape, as on approach and departure point of views. If in the SFX layout there are some nice bollards that show non-access areas, both around SFX and of course all around the BER terminal, 3D grass is also very good and plentiful. EDDB - Brandenberg - BER In the SFX layout the BER area is deserted and looks very authentic as a newly built but closed airport... ... the full glass BER terminal is excellent, with great detail and great tinted glass, inside the terminal internals are seen, but there is not much detail like seating or shop fronts. SAM detail and branding is again excellent. Gate B15 has a strange ball display set out over the gate access? Must be a reason? The terminal central and detail is very good, with the set out carparks and parking zones... but set in the BER layout is is still the same situation, with no fill internally with 3D vehicles or any items to say the areas are operational, so in both SFX and BER layouts you get the same emptiness feeling. BER infrastructure is good with custom buildings including the twisted observation tower and stand out BAYER sign, again the further out you go the more it is an object on the ground textures than detail, and the maintenance areas are all a little empty. The Waltersdorf shopping complex is to the south-east of EDDB, and it can be seen on both 25R and 25L approaches, it includes an IKEA and Hoffner stores... well done but no detail in say 3D vehicles renders it all a little bland. The autobahn 113 that crosses the same approaches does add in a lot of activity to the airport. BER Control Tower is well done and the default tower view... nice detail includes external stairs and the complex box construction arrangement. Either side of the tower there are two large aprons, with Apron D the main apron for BER terminal parking, the remote Apron E is to the west and both aprons are used currently for aircraft storage parking... ... far further west is a maintenance area with two large maintenance hangars for (now defunct) Air Berlin and Lufthansa Technik, The Lufthansa Technik doors open courtesy of the SAM plugin. Runway and taxiway textures are good, but not over high quality and detailed, yes the newer BER section may not have any use to date, but the runways have still been out in the weather elements for ten years or so, overall they just all a little too clean.... there is also some runway PBR effects for rain or shine in wet conditions. The darker 07L/25R Asphalt runway is a nice contrast to the newer 07R/25L concrete with the joins well done, there is a some nice island detailing as well. The charts (Navigraph) only cover the Schönefeld EDDB areas of the airfield and approach, departure and stand info, so there is none for operation with the BER area if you are using the BER choice of layout. Overall there is not really a lot of difference by switching between the two sections SFX and BER, and I think this is where to a point the scenery needs more development. The biggest issue is if you use WorldTraffic 3 to make sceneries active... currently there are no custom WT3 ground routes, so you have to generate your own and for each section... in the SFX generation it is really quite good, as it works around the Schönefeld takeoff and landing operations, with a bit of static parking over at BER, the AGRE routes work fine as well with LCC carriers EasyJet and RyanAir as the main players. The BER generation is a bit of a mess.... for one it doesn't generate the arrival ground routes, and the population parking is extremely low. Admittedly there are no AGRE routes for BER, but even with the Auto-Gen it still doesn't work... it makes the airport look empty, at least fully occupied working WT3 aircraft on BER would have made some inroads to making the BER layout work and active, so it fails. Lighting The two separate layouts have two different lighting layouts as well.... with SFX active then runway 07L/25R is active, with 07R/25L and taxiways in darkness. With the BER layout then both runways and taxiways are active. SFX BER SFX Terminals There are two different light sources with SFX being bright white and BER being a yellow shade. Schönefeld is very nicely lit and with some great working areas under the lights, and the terminals look good as well... .... The landside is not too bad as the terminals stand out, but you notice the blank bland carparks which are heightened under the lights. An oddity is that apron 3A is under yellow lighting and not the usual white, so it makes the area in front of Terminal B look darker (above)... BER Terminals The emptiness is heightened under the lights of the empty terminal. No doubt great for an arrival effect of the new airports position in the scenery.... .... The contrast to the whiter interior to the yellowish ramps looks great and effective, but the airport looks and feels empty.... very empty. Two highlights are the nicely lit observation tower and Control Tower detailing, but the missing street lighting is a major head scratcher, even if the street lighting effect is present. Summary When you review sceneries then most fit into a category... totally brilliant, excellent, very good, passable and simply crap. But now and again a few come along that you can't fit into a category, because even though they should fit one, in reality they should be totally in another.... and Aerosoft's/LimeSim Berlin - Brandenburg XP certainly fits that category. So what is causing that confusion? All the elements are all here and correct in this scenery to make it an excellent if outstanding scenery, but it falls far short. The modelling and detail is very good and even in parts even excellent, glass and textures are all very good as well and so is the layout, most of the lighting is also very good as well, SAM (Scenery Animation Manager) intergration is first rate, so where does it all fall apart... on the smaller details. We have to live sometimes with very grainy ground textures because they look good from the air, but if you do use them then on the ground then you have to cover them with detail, and that is what is missing here, all the small stuff. Carparks are awful, not detailed, no security fencing, no road side lighting, no 3D vehicles, no airport landside furniture or clutter were they are required and so the emptiness and I am not talking just about the BER area, but overall is very apparent. Switch to the BER from the SFX and the differences are very small, if not worse where WT3 is concerned, in reality with the airport open or not, then switching over should be a transforming event, but instead it is a dud, and not much different than before. The only difference is that you just get another runway and taxiway system to use and not a full working airport... that is if you can work out how to change the airports over in the first place (it is easy when you know how). So how do you approach this scenery. Currently just use SFX Schönefeld because it is very good, and WT3 works fine. If that was the developers intentions then they have achieved it, but what a waste it is in not using BER... to its full capacity. Overall most niggles here can easily be fixed with an extensive update, but in the immediate period then just some decent custom WT3 routes for the BER section would get you out trouble... overall very good, but it could have been totally brilliant. ______________________________________________________________________ Yes! Berlin-Brandenburg XP by Aerosoft is now Available from the X-Plane.Org Store here : Berlin-Brandenburg XP Price Is US$29.99 Features Highly detailed rendition of Berlin Brandenburg International Airport "Willy Brandt" (BER) Includes the older Schönefeld (SXF) airport (north of BER) with the same level of detail Includes two configs to switch between SXF and BER operation Custom animated approach lights (SAM Plugin required) All jetways animated (SAM Plugin required) Numerous dynamic objects like apron vehicles High resolution day and night textures Extensive coverage of over 100 km² with high resolution aerial imagery (0.2-0.4 m/px) Realistic 3D grass and vegetation Ground Layout: End of 2018 Compatible with default AI-Traffic and World Traffic 3 Requirements: X-Plane 11 Windows, Mac or Linux 4Gb VRAM Minimu - 8Gb+ VRAM Recommended Download Size: 3Gb Current and Review Version : 1.0 (March 5th 2019) Installation Download scenery file size is download 2.91Gb and with the full installation installed in your custom scenery folder at a huge 7.29Gb Choice is required on if to use either SFX Schönefeld only (BER is there but not active) or the BER - Brandenburg. Change of the provided nav-data is required for the version you want to use. Limesim - EDDB Berlin Brandenburg Documents One manual with notes in English and German Manual_Airport_Berlin-Brandenburg_XP11_de-en_web.pdf ______________________________________________________________________ Review by Stephen Dutton 14th March 2019 Copyright©2019 : X-Plane Reviews (Disclaimer. All images and text in this review are the work and property of X-PlaneReviews, no sharing or copy of the content is allowed without consent from the author as per copyright conditions) Review System Specifications: Computer System: Windows - Intel Core i7 6700K CPU 4.00GHz / 64bit - 16 Gb single 1067 Mhz DDR4 2133 - ASUS GeForce GTX 1080 8Gb - Samsung Evo 512gb SSD Software: - Windows 10 - X-Plane 11.31 Addons: Saitek x52 Pro system Joystick and Throttle : Sound - Bose Soundlink Mini Plugins: Environment Engine by xEnviro US$69.90 : JARDesign Ground Handling Deluxe plugin : US$19.95 : WorldTraffic 3.0 Plugin - US$29.95 : BetterPushBack - Free : SAM Plugin - Free Scenery or Aircraft ToLiSS319 (A319) by ToLiSS (X-Plane.OrgStore) - US$69.00
-
News! - Announcement : Aerobask Announce Falcon 8X Aerobask have announced their next project and it is the Dassault Aviation Falcon 8X and the design is in association with the manufacturer Dassault Aviation themselves in a collaboration and even under the supervision of the Dassault Aviation manufacturer themselves, with step-by-step validation of the aircraft and according to their specifications with provided real documentation of the aircraft from Dassault (The aircraft is officially licensed). This is an interesting project for more ways than one for X-Plane and to a point for Aerobask as well. A move to this scale of aircraft for Aerobask breaks their past composite specialisation of designs (although the Falcon would still have a lot of composite construction). It is also an aircraft of a far larger scale for Aerobask, but we all do not doubt they will deliver on the project... and that is what makes it all very exciting. X-plane is also in dire need of intercontinental private business aircraft as well. The success of Careando's epic Citation S550 shows that when Business jets are done very well they will be highly received by the users. But considering the zero range of intercontinental aircraft now available, it is surprising that X-Plane is so dire in this area, and an area of greater focus in the future. Early images show great quality, but the Falcon 8X will not be released to well into the last part of the 2019 year. Features noted.... Flight Model Precise flight model built and tweaked by Cameron Garner (X-Aerodynamics), complemented by custom-coded FBW and protections, all validated by certified Falcon 8X pilot and in compliance with expected performance. 3D Modeling Exact model based on original blueprints provided by Dassault Aviation, with high resolution PBR textures (Physically Based Rendering). Fully functional cockpit with smoothly animated buttons and switches. External animations include passenger and cargo doors, RAT (Ram Air Turbine) and GPU socket, in addition to all moving surfaces, and including wingflex. Cabin modeled according to Dassault Aviation standard configuration, with optional very high resolution model for static display purposes*. Official house livery from Dassault Aviation, with plans for some extra fictional liveries. Cockpit and Systems High resolution EASy III avionics (without options) with pop-up screens. Simulated PFDs and MFDs with reversion*, custom FMS, at or close to study-level simulation of electrical, hydraulic and pneumatic systems and synoptics. Custom failures are planed for a post-release update. Sounds Precise sound modeling and effects by Daniela Rodríguez Careri, based on samples taken from real aircraft, courtesy Dassault Aviation. No doubt the Falcon 8X will be highly detailed and Aerobask are very well known for their exclusively detailed interiors, a custom FMS is also a nice addition than the usual filler X-Plane default FMS.... yes Aerobask/Dassault Falcon 8X will be well worth waiting for. Images and text are courtesy of Aerobask ________________________________________ News by Stephen Dutton 13th March 2019 Copyright©2019: X-Plane Reviews
-
I think this is were the PA140 is an important aircraft, to revisit special times even when you can't now physically do so... it fills a need in it's worn state to be an aircraft to understand why we fly. Yes the Twin Comanche would make an excellent upgrade to XP11, I would expect it this year.
-
Aircraft Review : SAAB 340 XP11 by Carenado As a design studio then Carenado was always categorised very firmly into the General Aviation category. And even when they released their medium twin-engined six to ten seaters like the Dornier Do 228 it was still very much positioned in the large general aviation division rather than into the small regional airliner category. There was still this boundary you thought Carenado would not really ever not pass over, and the reason was that to go up into the next category required a major shift away from the way Carenado designed aircraft. Small airliners required a very different kind of application, because they push into the study grade territory and and with that comes all the required in depth features and systems. Certainly Carenado's GA aircraft had a lot of depth in systems and in fact the design studio was usually on the forward edge of those detail and systems. But a regional airliner is a totally different ball game, it has to deliver a much higher depth of intergration... So in reality there was always the thought that Carenado would always stick to designing what they excelled at and leave the next level of highly complex aircraft designs to other the studios that were better catered to designing these more highly detailed machines. But over the last few years Carenado have moved upmarket so to speak, as many of the lower GA aircraft once the domain of Carenado are now supplied by Alabeo, so the earlier noted Carenado's are now in the same quality and bracket in Alabeo disguise as Carenado moves upwards on to the more complex and larger aircraft territory, but airliners still felt like a level too far... That all changed with the release of the SAAB 340 for FlightSim (FSX/P3D), but for X-Plane that was still a dream too big to realise. The S340 was followed up by the F27 Fokker Friendship and the Shorts 360 (boxcar) so we knew that Carenado was serious about their future market... X-Plane however was still a maybe. But here is the X-Plane11 version of the SAAB 340... and with all that next level in intergration, and could Carenado really fly with the specialist airliner developers... it is a big question and the core of this review.... in one area though X-Plane's users knew straight off the line was that the SAAB would look brilliant in the better dynamics of the 11.30 simulator and in that thought they were certainly not wrong there. The point to make is that the development of the Carenado SAAB is very much up to date, with modern tools to create the very best detailing and getting the most efficiency out of the design... so yes the detail is very detailed and highly refined. Texture mapping is first rate in that shows every panel and rivet that holds the airliner together, but the real mapping detail is in the strengthened areas of fuselage that gives it body and realism... every area of detail is well covered and to highlight this is the small laminar flow airfoils on the tail and rear elevators. Panel design detail is first rate, but the PBR effects give you also a very realistic feel to the aircraft in their perfect shines and reflections, as noted Carenado use only the very best tools to get these dynamic reflections, realistic metal and dielectric material effects perfect... and it shows. Obviously there will be a lot of comparisons the the Leading Edge (LES) Saab 340, that has been around X-Plane as long as I can remember, always updated, but still dated by design. The debates will go on forever and as I don't have or use the LES Saab 340 then I can't compare it to the Carenado version either. But what I do know is that this SAAB 340 from Carenado is "State of the art" in X-Plane and to all the current 11.30 dynamics and effects. Undercarriage detail on larger aircraft are often the make or break of detailing (the correct animations are important as well). In this area the SAAB is outstanding, highly detailed, but the highlight is if you poke your head under and into the front gear bay. Crafted assembles of major components are excellent and highly detailed. Chrome features are exceptional and the distinctive SAAB ribbing on the fuselage is also very authentic... note the lovely landing light housings. To a point this sort of high quality detail was not going to be a surprise from Carenado, as they have produced some of the best quality for years now, but it is also very nice to see and feel it anyway. Carenado Menus One of the limitations Carenado faces is that it's menu system is still the same as it was from day one, three tabs in the left side down corner... there are two now known issues, space for items and VR support. Here even with a far larger aircraft that demands a lot of feature choices, it is all really just still the same. The three tabs are noted as: A ) is for the lovely authentic Collins Aerospace APS-85 pop-up Autopilot panel, that can be moved and scaled to size. C ) Is the standard Carenado ten preselected Views, Field of View, livery Selector and Volume panel. And O ) is the Options panel. Options include Window and Instrument reflections. The static elements provided here are still very basic with only two cones, wheel chocks and flag/pitot covers and some nice "SAAB 340" engine outlet and inlet covers, but you can only have all or nothing. The highly realistic pilot and co-pilot (and new) animated pilots in flight uniforms do disappear when you activate the static elements. Other menu items include opening the rear baggage door... .... opening internal cockpit door and the selection of a nice "HOBART" GPU (Ground Power Unit). The GPU is important here as the SAAB 340 has no internal APU (Auxiliary Power Unit) to provide power or pressure to start the engines, if you shut down the engines you are then only on short span battery power, so the GPU is usually required to be operating before you shut down to continue the aircraft's power supply, same with starting the engines and the GPU cart is required until the running engine provides power to the systems... Once one engine is supplying power you can then disconnect the GPU and start the second engine from the first. SAAB's are noted to go dark inside if there is no GPU available on landing. There are two selections to first open the Passenger door.... then another section to fold out the built-in air-stairs Both detail and animations are first rate, very authentic. Finally on the options menu is the selection of liveries that can be changed from the menu. Cabin The SAAB cabin is a huge surprise.... first though is that you can open and close the passenger door manually and also manually extended or retract the air-stairs. Pressing a point on the left part of the crew headrest will animate the stairs down or up... the retracted air-stair is certainly well crafted here Opening the main passenger is easy by touching the door lever, but it is a bit hard to close it again if you are not in the right position to move the lever with it hidden... you aim for a spot on the wall, but in your own position you have to be close to the door and turned before the active area works, in most cases the menu selection is far easier. The cabin looks really, really well done... love the nice shape and detail of the seating... ... but use the cabin lighting panel left of the doorway, and the "wow", then becomes "WOW" astounding! Window drop lighting, overhead strip lighting, seat number row lighting, galley lighting and illuminated "EXIT" signs all create a cabin to die for. You jaw is down, but now it will now hit the floor with a thump.... The overhead passenger drop lights are all individually switchable, so is calling the Flight Attendant, and the blinds can also be moved down (or up)... ... seatback meal trays can be lowered, armrests moved and so can the seatbacks to a reclining position... ohhh heaven! Only one word of warning... ... now if you spend in flight a considerable amount of time making the passengers very comfortable, dropping shades, switching on the overhead lights, lowering meal trays, slipping back the seats and adjusting all the armrests, then be aware that there are no global settings to get the cabin back ready for landing, and every single former adjustment will have have to be totally redone. So yes do so and certainly make the paying punters happy, but not for every seat and every light. Best airliner cabin now in X-Plane, yes certainly, but only just a whisker past FJS's B732 Twin-Jet v3. Cockpit Open the cockpit door and the distinctive SAAB lighter tone cockpit is all there. Detail is excellent, fine detail is excellent... ... Carenado can sometimes go to a darker more overwhelming set of beige tones and contrast in many of their aircraft, but that aspect is certainly not present in here, as they get it all perfectly right. Yes you can detail very well a C172SP (which Carenado also do very well), but this is on totally another scale The level of quality and realism is always going forward, but once you see almost no areas that "could" be created by a 3d tool, then you have the ultimate realism... the reality of the cockpit just takes over. Detail can be interesting areas, take the rear cockpit air-vents and the lovely overhead lighting... ... all beautifully crafted and created, and nice touch is when the cockpit door is closed you can drop down the jump seat, the pilot's and first officer's armrests are also animated. Seat detail is astounding, with chrome lifters and the knob lever to raise or lower the seating position in detail. Nice yokes can be hidden, also have built in AP disconnect and working trim switches. The overhead panel (OHP) is surprisingly large for the size of the aircraft, but all the different system areas and switchgear work. The pedestal is also very comprehensive and well detailed. Lets power up. OHP panel colourful Annunciator lights can be set to BRIGHT or DIM, both look authentic, but both settings look brilliant at night... Pedestal is excellent, but the standard X-Plane default FMS is a bit glaring. The real S340 uses the UNS-1K Flight Management System, which is a lovely bit of kit, so this FMS is a bit of a compromise as the XP default FMS is a compromise anyway, it looks not very professional and a bit gaudy as well... the RealityXP GTN750 can also be fitted and if you can afford the high price then that would be my option... but still the Universal original would still be my overriding preference. The Collins Aerospace APS-85 pop-up Autopilot panel is part of an extensive system set out all around the instrument panel, the (A) menu pop-out panel is a good way to see all the system in one location, but at least it is totally authentic. Note the older style radio frequency Collins digital units... the lovely throttle levers and mixture levers are all excellently reproduced here. There is "GUSTLOCK" on the throttles that is released by a switch in to use the lever to lock the yokes forward... when in operation the rear elevators are also locked down. Environmental controls are all mostly automatic, but well replicated here.... Flaps settings are UP - 15º - 20º - 35º. There are two friction levers for the levers that affects the pressure on the throttle movement, try them out at different points to get the best feel results, but as I use a Saitek throttle it affects the speed of the throttle movement... the full friction setting can seen to give quite a slow reaction to the movement. Instrument Panel The full instrument panel looks complicated at first glance but it is not, but there are a lot of small areas and switches that you need to study and know of their operations. The SAAB 340 is not an easy aircraft to jump into and expect to fly without first some study. These are mostly related to warnings and small actions to certain operations. The SAAB has the dual Electronic Attitude Indicator (EADI), and the Electronic Horizontal Situation Indicator (EHSI) instrument system (NAV) as it's primary flying instruments. Many would call it an early glass cockpit layout. Most selections to adjust either display is on the DCP selection panel above right (arrowed). EADI has the Artificial Horizon, Rate of Turn, Turn Coordinator, Pitch and Flight Director operations. ILS and Fast/Slow indicators and AP modes are also displayed. All instruments are Collins instruments inscribed. The EHSI NAV covers heading, Nav1/Nav2 and GPS functions, with VOR1 and VOR2, ADF pointers... the aircraft has two Course pointers with the second pointer connected to the secondary OBS VOR2/ILS dial below left (arrowed). A secondary VOR/ADF pointer instrument is left centre. IAS speed (knts) is top left and Attitude Indicator, Vertical Speed Indicator is right... A clock is far left. Center panel left are the backup instruments for Artificial Horizon, Speed and Altitude. The MFD85 Weather/MAP screen is bottom, but it is basic. There are two sets of Annunciator panels, left the L&R Engine and the larger grid Annunciators. With so many warning lights it does get confusing, certainly as the Master "Warning" and Caution" lights are always going off and pointing to something somewhere, so study and even printouts are required to use all the different annunciators correctly. Engine dial readouts are comprehensive... Engine - Torque, Temp, RPM %, Pressure, Oil Temp and Fuel flows... Middle four dials cover "PROP" RPM, and Prop Pressure and Oil Temp. Both lower dials cover the twin Fuel Quantity. The SAAB has Four Fuel tanks (two either side of each engine), but the are counted as one each side of 2,803 lbs capacity with a 5,606 lbs total capacity. Each half has an XFEED valve to level those two sets of tanks, to level each side there is a CONN Valve that balances the twin sets of tanks across the aircraft. Top right centre is the gear lever with a manual release and lock, Flap indicator and lower a very nice control position indicator. Second Officer position is quite simple, with just the same EADI and EHSI and other main flying instruments in the same arrangement. The only difference is that the pilot's OBS VOR2/ILS dial is replaced by a nice "Fuel Used" counter that can be reset. Autopilot panel glareshield is standard, with the main AP sections centre, with the VOR 1 and VOR 2 frequency radios on either side... Each end is the EHSI NAV DCP panel to set the various functions for each pilot and second officer, it is again a bit complicated and study is required to understand all the complex choices that you have. You have both Rose and ARC heading (below) modes available... Altitude selector is middle top. Side panels are excellent. Pilot's side panel has the Park Brake top, Then a "Flight Recorder" number that can be set, lower is a nice XMIT radio panel that is adjustable by sliders... Tiller Wheel/Knob is set bottom. There are extensive circuit breaker panels but Carenado don't still do active circuit breakers. Second officer's side panel has Oxygen pull top (Oxygen supply pressure gauge is on the upper panel side), TAWS Flap and Rudder Overrides, Pusher disarm... then the "Cockpit Voice Recorder" panel, lower is the same XMIT Radio selection panel. Systems The working aircraft systems on the S340 is comprehensive... From the top of the OHP and left to right is first the "ICE PROTECTION" Then "FUEL" with the noted XFEED and CONN valve switching and the main AIR COND (Conditioning) panel. Lower are the Fire pull handles and Extinguishers. Centre OHP is "ENGINE" covering AC Heat and AC Gen switching, "PROPELLER" (Manual Feathering), AC/DC Electrical Panels and secondary AIR COND Bleed panel (most can be left on "AUTO"). Lower/Front OHP is "STAB & WING", Engine START and the main DC ELEC (Electrical) Panel and main Electrical switchgear, including the EXT PWR and Generator selectors. Far right is another nice set of Annunciators to cover the aircraft's current situation, like open doors and status... Far front OHP is all the 'EXT LIGHTS" lighting, and CABIN switchgear and individual wiper switches. INT (Internal) LIGHTING panel is mid lower panel. Almost every system, switch or selection works as real... there is no doubt this is the most comprehensive Carenado aircraft ever created for X-Plane. If your eyes are not yet glazed over by the sheer amount of system detail you have to absorb, you can now see where the study factor comes in. In a rare publication (for) Carenado they have created a "Systems" manual for this S340, it is not as deep as a formal manual, but it will get you out of trouble and you can download the manual here : Carenado Saab 340B for XP 11 Systems Manuals.pdf and there is also a Carenado Saab 340B for XP 11 Flight Tutorial v1.0 tutorial as well. Provided also is a manual for the X-Plane FMS, and a layout of the DCP Panels. The Librain rain effect plugin is also on the aircraft. It was on the S340 that I first saw the librain plugin in action, and it looked a bit underdeveloped. But Carenado by version v1.1 (release) have done some more refinement and it is very good now. It is also featured on both the cockpit and cabin windows. There are however still a few quirks, one is that the bathroom window rain effects show hanging in the rear of the cockpit, that would be even scary in VR. Second is looking into the cockpit from the cabin you can see all of the rain effects of both of the forward windows? As development does go forward you can expect both areas to be addressed. Flying the Carenado SAAB 340 Spoke and Hub operations today takes us from Daytona, Florida to Atlanta, Georgia. This route is typical of the sort of services the S340 covers, with a maximum 34 passengers and crew. Ground distance is 357 NM and fuel load in lbs is 3692 lbs for a total weight of 27,995 lbs of a max weight of 29,300 lbs. (SimBrief routing). No APU means no hydraulic pressure either, so you have to set the pumps to work manually before removing the chocks, battery power is fine, but you are better on GPU power... Passengers in and loaded... don't forget you still need the GPU cart to start ("NO BAT START" will be extinquished). There is no PROP lever to set the Feather as it is automatic, and the feather position is noted on the Mixture lever gate... so set all throttle and mixture levers to start. Select the IGN switch to on (No 2 engine), press START R and wait for the whine... it comes and boy it is good, this is a brilliant startup procedure aural experience. With an engine providing power and the generator switched on you can now remove the GPU and start No 1 engine the same way as you start No 2... .... you can easily see the startup of the engine from the cockpit, which is rare mostly. Once both engines are settled and warm you are ready to go. Again the running and system sounds just waiting for the engines to come up to operating temperature is really realistic, the aircraft hums with the urge to go. Back in the cabin the experience is awesome and highly realistic from our usual passenger position (note all the seatbelt and EXIT signs), a look out of the window is also extremely real. The real S340 has a HOTEL mode or the engine is running but the gearbox can be disconnected and the prop braked and feathered… usually used for taxiing, as most passengers then freak out that only one propeller is turning while taxiing (most Prop regionals do this fuel saving trick anyway). But you can't brake the Prop here, so the best you can do is switch one Prop to manual and keep it totally feathered. You adjust the mixture on one engine to give the prop bite, but the point of contact is very on/off in too much power or nothing... You can find that sweet spot with one engine at full idle (feathered) and one engine doing the taxiing work and get a nice slowish taxi speed, but personally I would like far more adjustment at the PROP feather stage to stop the surge of power even from one engine. It is just far too full on or off for me, but there was that sweet spot (still a fraction too fast) to control the taxi speed. You can't even advance the mixture to full (MAX) until you are lined up ready to go, it is just too much thrust. I usually set the mixture levers at the hold point, but I couldn't here unless I wanted to visit the scenery. I did try in only starting one engine until I was approaching the taxiway hold point of the runway, then starting the other on the taxi, the effect was quite good, but on part of the engine start as the other engine's generator kicked in you lost your power to the instruments.... but I liked the idea. Note that all three altimeters (including the standby) have to have their pressures adjusted... With Flaps set at 15º, then press T/O INH button by the flap dial... there is the option to use the CTOT - Constant Torque on Takeoff; CTOT is a fancy system to meter fuel during takeoff and during an Auto Coarsen (optimized blade angle of 55 1/2 degrees) event. Turboprops can be finicky about setting takeoff power due to "torque bloom" as the aircraft accelerates, 90% is the recommended position but you can set 100% if the runway is short, the panel is located lower left on the pedestal, and the Auto Coarsen switch is MID-OHP. Speed bugs are adjustable on the IAS Speed dial, but there is a selectable bug as well for speed control in the EADI, which is great for setting both first your rotate speed and then your desired climb speeds. Carenado provides extensive performance tables for takeoff speeds and their weights, highly recommended and worth printing out. As you advance the throttles the range of the engine tones in change are simply amazing, the best I think I have ever heard. You get a different sound for a different engine condition, you really do feel the power and movement in the sounds. Pitch back around 100 +10 knts, and you clear the runway easily, but you have be really aware of right climb pitch and hold it tightly as the flaps are retracted and the speed builds, you need to really concentrate on your flying as the aircraft demands that to keep it all smooth and correct. As the gear goes up you get a very quick peak into the gear bay, and yes it is all very good in there. Feel and control is Amazzzzing, as there is so much feedback as you bank left to clear the airport... rate of climb is 10.2 m/s (2,000 ft/min), which really is a bit tight for a small airliner, you would expect around 3,000 fpm or even more... so you don't climb up as fast as you would think you do so, 1,800 fpm is the line before losing power. You will now need to turn off the CTOT, it is a bit tricky in increasing your power to a slightly higher level, then turning the CTOT off and then resetting the power back to 95% torque. It needs a little practice to get perfect and not lose power when you disconnect the CTOT. It is so easy to go onto the FMS route and wing it, but I want to Fly this aircraft, so I banked left (with permission) than go right to the flightplan.... I want manual control here for as long as I can have it, and it is short cutting the flightplan as well. Even in the cockpit the roar of those General Electric CT7-9B turboprops, 1,305 kW (1,750 shp) is very real, you feel the power as you climb. The S340 has been completely refined to the new 11.30 performance features and details, so power reflections and numbers are exactly correct to the real aircraft. The engine exhausts are poring out the burnt carbons courtesy of 11.30 particle effects, and yes they are very good and realistic. My jollies over I have to get back to and on to the flightplan... the Collins APS-85 pop-up panel is huge and it can easily fill the largest of screens, but thankfully it can be scaled right down to a workable size... Carenado note the APS-85 system as 2-axis, but the official system is actually 3-axis, it looks like a 3-axis system as well in the way you use it. The MFD85 map (weather) screen is positioned very low in the instrument panel, but you can pop it out and even resize it to use both the AP panel and the Map screen in one view (FMS screen as well)... certainly the pro users will scoff and do everything per the normal cockpit routines, but the simulation tools are there if you want them. The autopilot I named "Colin" was now doing all the flying... the A340's service ceiling is 7,620 m (25,000 ft), which again is a surprise but the same as the Dash, the Q400 version can go slightly higher to 27,000ft. Range is 1732 km (935 nmi, 1076 mi) and cruise speed is 467 km/h (252 knots, 290 mph) at 7,620 m (25,000 ft) (range cruise) - Max speed is 502 km/h (271 knots, 312 mph) (VMO) (IAS), 0.5 Mach MMO. Time to finally sit back and revel in the safe purr of the twin CT7-9B engines, all with the range of sounds that still astounds me... it is nice up here. Lighting As expected the lighting system in Carenado's S340 is complex, but exceptional.... Panel drop down lighting is adjustable as is the panel instrument lighting. Main cockpit lighting is via two overhead lights, both on via the "Dome" OHP switch, but either side can be switched on via either pilots side switches... Adjustable Yoke document holder lighting is absolutely gorgeous, it also highlights the yokes other text items. Two directly click on/off forward overhead spots are powerful and can be moved to shine on to the areas required. OHP is in flight mostly just an outline of the systems... note the battery temp, and the temp display can switch to three positions; L Bat/R Bat and Fuel temp. It is not what you want to see in-flight, but the annunciator warning lighting is very impressive. As expected the cabin lighting is extraordinary... ... as the realism factor is overwhelming. You can spend hours trying out the different lighting conditions in by the way you use the overhead seating lighting, the various window and overhead lighting selections to get the effect you want. I did however find an odd situation in that the rear of the cockpit was constantly lit... I wanted a fully dark cockpit and the adjusted instrument lighting for night takeoffs and landings, but no matter how many adjustments I made in the cockpit I made it was just always too bright? The worst was either side rear (below) and on the rear of the pedestal... I was about to give up and then I found the offending lighting... it was a lot of bleed from the galley light and it was coming into the rear of the cockpit, turn off the galley light and the cockpit finally went dark. I doubt Carenado can actually fix this bleed, but at least with the galley light turned off I can set up the instrument lighting perfectly for the night time operations (below). External lighting is very good as well. Beacon, Navigation and Strobe lighting which is all excellent as well as the engine positioned wing (Ice) lighting... logo tail lighting is really well done with the lights shaded outward..... ... highlight is the inner wing landing lights that illuminate the underside of the aircraft and give a brilliant view of the engines out of the cabin windows, a lot of users get very excited about these sort of features, but in this aspect you can't blame them. There is a single taxi light on the front gear strut. In flight Your aim is for a dull instrument and OHP. No warning lights or anything flashing will make you happy, but with so many different systems and switch positions it is harder to achieve nirvana than what you think it is. I personally would like more brightness on the EADI/EHSI displays, they certainly look good, but can be a little dull in some lighting conditions... you don't need a lot but something, and overall they look dull in context with the rest of the instrument panel. ET time on your EHSI is really your block to block timer and not to destination, very nice though and selected on the DCP panel. Blinds are animated and move to any position... handy. Arrival at KATL now had a wind and runway change, so my initial 27R was changed to RWY 10, so the flightplan was abandoned for a circuit approach to RWY 10. Final to KATL RWY 10 (IOMO) One speed bug can be set to control your speed in too fast or too slow on the EADI, the other bugs are set to your flap position speeds as required. 160 knts is flaps to 7º, and the approach speed of 140 knts is 15º flaps... gear down. You actually hear the hydraulic pumps working and thump.. thump as the gear locks into place. ... final speed bug sets the speed at around 118 knts and flaps at 35º, you can go straight from 15º flap to 35º without any due course. Speed control is tricky, but experience will help in getting the right numbers, my worries are always the full mixture speeds on landing, any adjustment lower and that on/off power causes issues and you stop, the other setting is far too much power and the aircraft is hard to slow down. Stall speed dirty (flaps down) in landing configuration is 82 knots. Control on finals is excellent, but you really have to work the yoke to keep the S340 straight, not big movements but tight small ones. BETA mode works well, set the X-Plane "Full Reverse Thrust" key/trigger to activate the BETA mode, the top blue annunciator lights note the reverse thrust is activated. Finding that idle/taxi speed was again a distraction, I sorta found something, but you needed the throttle set quite high to move and KATL has a lot of angled taxiiways that saps the speed... At the gate, remember to switch on the GPU before shutting down the engines... Liveries Carenado supply one blank livery for the S340 and nine branded, all of course are excellent and highly detailed... but two of the liveries in the airlines supplied have already gone bust? SAAB favorites are well represented, with excellent Loganair (Scotland), Flybe, Silver, Nextjet and REX Australia. 459 S340's were built between 1983 and 1999, but still 210 S340s are still in service with 34 operators around the world. So there is a lot of choice of brands to choose from. And the current fleet average is at 35,277 h and 39,446 cycles – a mean 0.89h per flight, less than halfway of its remaining life. SAAB has also extended the airframe life from 45,000 to 80,000 flight hours and 90,000 cycles and so the Saab 340 should remain in service for at least another 30 years. As the FSX/P3D Carenado version has been already released a few years, there is already a huge crossover of liveries ready available and with loads more coming to the X-Plane.Org near you... currently here are a few already released... with Norwegian, Westjet, American Eagle, Delta, Crossair (launch airline) and Air Rotatonga. Summary 2019 will be a banner year in X-Plane if you love regional aircraft. FJS are redoing their Dash Q400 to a high standard, SSG have their CRJ-700, X-Craft's has the ERJ-145, The JROLLON CRJ-200 is supposed to be also in redevelopment... but the first of the year's batch is now released in this fabulous SAAB 340 from Carenado, yes the Carenado version is not the first S340 in X-Plane as that title goes to the Leading Edge version, but this is the brand new and up to date 11.30 version were as the LES is an highly updated early XP10 version. This S340 version also certainly gives all the other regional aircraft a major high starting level to compete with as this S340 is already a class leader. The questions were out there in the fact that would a segment dominating developer house with general aviation would then be able to move into another far more higher and technical (study) grade category or just deliver their usual but in a far bigger size. That question is now without doubt here, as this S340 is an outstanding aircraft and I would note it as "Study" grade as the systems and details delivered are also very highly developed, but only a user with the full understanding of the aircraft's systems and quirks would only ultimately be able to answer the "Study" question. But make no doubt, in that this Carenado aircraft DOES require a lot of study to understand how it operates, it is highly complex and you will require a lot of time to really get everything worked out and operational, even in the few weeks of doing this review there was a lot of ground to cover and a lot to learn, so the aircraft is certainly not for the novice or users that have not had much experience in high level complex aircraft. In the design and details, the the S340 really does deliver and again in many areas it even sets the new higher standard. Quality here is simply outstanding a level above, but I always look to the side points and not the focus areas to see if the detail is covered and how well those areas are done. So the points of like hidden under the pilot's seat are as detailed as the artificial horizon instrument, and that is so why cabins are always and usually the benchmark. Why because they are really an add on factor and not the focus of the actual aircraft, if the developer has devoted as much resources to these side areas you can be fully aware the rest of the aircraft is going to be just as good. In the S340 this cabin is outstanding, and maybe now even the best airliner cabin in X-Plane, as the detail is excellent, but so also are all the amazing features, if this area can reach such a high standard the rest is simply a no-brainer. The attitude to a highly developed cabin is always going to be controversial, from my perspective they bring a whole concept to the simulator, a whole compete airline that adds in a different dimension... and yes I am a huge fan when they are so right as it is here.. Sounds are exceptionally good as well, and aircraft were you feel and hear sounds that reflect and adjust to the realism of the real world aircraft and you actually "believe" you are in that aircraft then the developer has delivered exceptional sounds, both the important areas in the cockpit to the cabin are all well covered as is the feel and noise of those lovely CT7-9B turboprops, the sounds and effects totally deliver here end of story. So are there any negatives? All the issues are really nit-picking rather than the glaring variety. Carenado sometimes delivers aircraft that have a poor range in the idle/taxi mode, and that is also the case here, as in this S340 it is very hard to find the sweet spot in a controllable taxi speed, so in most cases you are being pulled fast towards the scenery with heavy braking, as it is all very on/off and with no middle range to find the right taxi speed and the aircraft on landing finds it hard to translate down to a decent taxi speed with the engines either roaring or feeble in their power response, it takes the edge out of the full total entertainment factor. Light bleed into the cockpit from the galley is work-aroundable, but annoying and the now older Carenado menu system is 2D (No good for VR) and limited for an aircraft of this scale. The rest is pure perfection. Reading this extensive review and you will understand the depth and quality delivered here by Carenado with their S340, but even after all that in the sheer overwhelming detail and features presented here there is another one big final surprise... the price. US$39.95, and that is not a sale or reduced price either... it is the actual price. So the value is as outstanding as much as the aircraft delivered, my price on this aircraft with what you see delivered would be US$59.95, so it is priced US$20 below what in my case thinks is it's actual value. Big review and a lot ground covered with the Carenado SAAB 340, but it certainly delivered on all levels, certainly this an aircraft to savour and totally enjoy, but requires a lot of study and skill.... the highlight of 2019 by this date.... Highly Recommended. _______________________________ The SAAB 340 XP11 by Carenado is NOW available! from the X-Plane.Org Store here : SAAB 340 XP11 Priced at US$39.95 Features : Latest X-Plane 11 enhancements: Engine design optimized for XP11 new turboprop model Flight dynamics optimized for latest improvements in XP11 Ultra-High resolution Model High-end 4k PBR (Physically-based Rendering) graphics throughout, with ultra-realistic materials rendition (Dynamic reflections, realistic metal and dielectric materials, etc.) Includes 9 highly detailed liveries Extensive HDR lighting with gimballed 3D lights and dynamically illuminated tail logo and ice lights for amazing night lighting effects Extensive VR support with snap points in every passenger seat (All knobs, buttons, dials, handles, etc. also optimized for VR usage) Functional stewardess control panel Visible and functional Ground Power Unit All passenger seats support seat backs, table trays, arm rests, HDR reading lights, stewardess call buttons. Main door has optional retractable passenger stairs. Extensive Custom Systems Functional gust lock system Custom electrical system Custom Starter Logic Custom Fuel System Custom prop logic Custom Bleed Air System Custom Avionics busses Custom Hydraulic Logic (Requires, among other things, pressurizing brake lines prior to chock removal) Custom Electrical Temperature system Custom de-ice logic Custom independent windshield wiper logic (with functional off and park positions) Airspeed Indicator with "Barber Pole" and functional test sequence Support for "librain" plugin, including wiper support (Requires separate plugin install) Librain support also includes visual ice effects on windows. Ground steering (tiller) system Includes air conditioning, pressurization, and oxygen system Custom EHSI and EADI instruments and custom MFD85 with moving map, all featuring detachable pop-up windows Features reversionary logic for EHSI and EADI. Custom APS85 Autopilot with detachable pop-up window Integrated FMS with detachable pop-up window (Laminar default) Other features End-user customizable via Manifest.json file. Runs latest SASL 3.5.1 plugin software (optimized, improved features, and latest fixes) Goodway compatible RealityXP GTN750 support (with 3D panel display support High-end 4k PBR (Physically-based Rendering) graphics throughout, with ultra-realistic materials rendition (Dynamic reflections, realistic metal and dielectric materials, etc.) Fully customized in-depth annunciator logic Fully customized in-depth aural warning logic Fully customized in-depth throttle logic, with friction control, gate, flight idle and flight idle override. Fully customized Custom Torque on Take-Off (CTOT) system Fully customized pusher (anti-stall) logic In-depth FMOD sound design implementation, including distance effects, realistic prop reversal effects, etc Requirements X-Plane 11 Windows, Mac or Linux 4Gb VRAM Minimun - 8Gb+ VRAM Recommended Download Size: 582Mb Current version and Review Version 1.1 (March 5th 2019) Installation and documents: Download for the SAAB 340 XP11 is 569.20 Mb and the unzipped file is deposited in the aircraft "Regional Aircraft" X-Plane folder at 805 mb. (there is no "Regional Aircraft" folder in the X-Plane aircraft folder, so just make one... you will need it anyway) Both the LIbrain rain effects is required to use the new feature. Documentation: Huge amount of documentation, with Laminar FMS manual, Performance and reference tables. Carenado_SF34_Version History.rtf Copyrights.pdf Credits.pdf DCP.pdf Recommended settings XP11.pdf S340 Emergency Procedures.pdf S340 Normal Procedures.pdf S340 Overhead Panel Layout.pdf S340 Performance Tables.pdf S340 Reference.pdf X-Plane FMS Manual.pdf Thranda also provide for download for the Carenado S340 a Flight Tutorial v1.0 tutorial and a S340B for XP 11 Systems Manual Carenado Saab 340B for XP 11 Flight Tutorial v1.0s.pdf Carenado Saab 340B for XP 11 Systems Manuals.pdf ______________________________________________________________________ Aircraft Review by Stephen Dutton 11th March 2019 Copyright©2019 : X-Plane Reviews (Disclaimer. All images and text in this preview are the work and property of X-PlaneReviews, no sharing or copy of the content is allowed without consent from the author as per copyright conditions) Review System Specifications: Computer System: Windows - Intel Core i7 6700K CPU 4.00GHz / 64bit - 16 Gb single 1067 Mhz DDR4 2133 - ASUS GeForce GTX 1080 8Gb - Samsung Evo 512gb SSD Software: - Windows 10 - X-Plane 11.31 (v11.30 is required for this aircraft) Addons: Saitek x56 Rhino Pro system Joystick and Throttle : Sound - Bose Soundlink Mini Plugins: Environment Engine by xEnviro US$69.90 : WorldTraffic 3.0 Plugin - US$29.95 : LIbrain rain effects - Free Scenery or Aircraft - KDAB - Daytona Beach by Aerosoft / Stairport Sceneries (X-Plane.OrgStore) - US$28.99 - KATL - Atlanta International by Nimbus Simulation (X-Plane.OrgStore) US$23.95
-
Aircraft Update : Cherokee PA140C Original v3 by vFlyteAir When we reviewed the release of vFlyteAir's Piper Cherokee 140 back in 2016, it was an unusual journey, not unusual in a negative sense but an odd sense of something very different. As noted in that review, is that at the first glance that this PA140 looked on the page just like every other general aviation aircraft we reviewed around that period, even vFlyteAir was as a developer still developing forward and were not yet at the level of a pure developer studio... and yet it was this same PA140 that was the start of the sort of excellence that we now expect vFlyteAir to deliver. From this position now looking back with the X-Plane11 or v3 of the Cherokee 140, it is easier to understand why this Cherokee was so significant, not only for vFlyteAir, but also for the X-Plane simulator itself. In reality the PA140 was the first real Uber general aviation X-Plane simulation design for the simulator. So how do you define "Uber". It is the level above or even several levels above the normal. Yes with this early release in X-Plane10, there was not the PBR effects, or the performance details we now have with X-Plane11.30, but there was still with this PA140 an extreme quality about it, not only in the design, but more so in the way you interacted with the aircraft and the fundamental way you had to fly it. Those aspects are certainly more the normal today as just think of any Carenado or Just Flight GA aircraft, but not back then three years ago. A big clue in why this little tiddler of an aircraft loomed so large at the time was that it's origins are pure. The aircraft was created around a real donor aircraft N3466K, and was actually flown by the team that make up vFlyteAir. Yes there has been personal aircraft developed before for X-Plane, but this Piper was just not a copy, but almost a pure complete replication of the real PA140, and right down to the last scratch and the wear and tear. Yes it was a labour of love, but it also is something else in that in the transition, vFlyteAir broke a lot of boundaries and fourth walls in creating such a pure simulation. Even in my first flight it was an astounding realistic handling aircraft (It still is), you feel the ownership and the wanting to actually own the aircraft rather than just fly it in a simulator.... and all because it was so personal and realistic. vFlyteAir Cherokee PA140C Original v3 For X-Plane11 then vFlyteAir have completely remodeled the same PA140. So your first reaction is going to be in "Why would they want to do that?" Well because the newer X-Plane11 requirements are far more extensive than the XP10 ones. For one you need high and better quality textures and of course the layering of the PBR (Physical Based Rendering) effects. All textures now have extremely high quality, but are also more efficient than the ones they replaced... they give the aircraft that "wow" factor as well as creating an even more realistic real world look and feel to the aircraft. So the first notes on the updated PA140 is that it does certainly look far more dynamic and realistic, but thankfully the aircraft still retains it's original feel, this factor is the same throughout the whole change process here, far better... but still retains the original character and feel that made the first vFlyAir PA140 so realistic and wanted. Yes I am not going to discount that this extensive detail was not on the original, as it all most certainly was but the aircraft looked dull and it was the period's simulator's dynamics that created that dullish feel and look, and not the developers... but the higher quality and far sharper detail now means all that time-consuming patient work was not wasted, and now also very highly enhanced here... this v3 version is now the aircraft we all deserved, it also shows the forward progression of detail and the dynamics of the improvement of the X-Plane simulator in the convening years. it is now at the full realism factor... now multiplied double or tripled, or about as real as it gets. You could say the PA140 now has the look and feel it always deserved to match it's original hands on performance. The glass before felt slightly dull, but no more... now all glass is perfect as well with PBR effects doing the magic. Every detail from the donor N3466K aircraft is replicated here... and I mean everything. So the aircraft is about as real as it gets to being a recreation of real flying aircraft, and there is documented proof in the manual of all the elements that were recreated in this X-Plane version Internally as this aircraft was built back in 1963, it is old, tired and even buggered. And the detailing reflects the aircraft's current state with worn ripped seating and faded materials... a nice touch is that at some stage the pilot's seat has been reupholstered as the material is slightly more new and brighter but still fairly used. A lot of the rest is cracked, rusted and even downright dirty... ... if you can revel in all this disgusting wear and tear you will absolutely love the realism of it all. The instrument panel is extremely authentic as well, or tired with years of use. Highlight is the falling apart but still working right yoke assembly.... it is so broken it is almost art. Custom switchgear that has been added over the years, or renamed with Dymo tape lettering makes for a chaotic but highly realistic instrument panel... the "INOP" tape feature is also still here, and with now added notes of which instrument to use when the noted one is not usable. You would not certainly fly a real aircraft in this situation, but it is there to allow training pilots to practice skills with a “Partial Panel” flight . Most internal fittings are animated, like the nice roof airvent, door airvents and airflow knobs. Internal lighting is authentic to the original. There are several changes to this "Original" version from the earlier one. In the past the original was only in the format of being exactly like N3466K. But in this new XP11 version you now also have the option of the (Original) VFR avionics panel, or the IFR full avionics suite... you can switch via the labels on the centre panel. The "Classic" IFR was in the past another separate version of the PA140, but now they are combined, gone with the transformation is also that ghastly grey instrument panel, now both avionics share the same darker layout. Both VFR and IFR avionic layouts are exceptional. In the VFR layout you have top a PS Engineering PAR200A radio with bluetooth, below is a TKM MX300 Com panel with Comm 2 and VOR/Nav 2 frequency adjustment that is slaved for use with the OBS (usually VOR 2). You have finally on the bottom a lovely RC RT-359A 300 XPDR Aircraft Transponder, and all perfectly antiquated and authentic. On the IFR panel top is a Bendix/King KMA 20 radio, Garmin GNS 430 is below... the RealityXP® GTN650 plugin can also be installed and configured as Unit #1, and then the GTN650 instrument will automatically appear. If you select or use the RealityXP GNS430 plugin and configure as Unit #1, then the RXP GNS430 will replace the default GNS430. The TKM MX300 Com panel is the same as the VFR version for Comm2/VOR/Nav2 functions. The Avidyne AXP 340 transponder which has six different functions; Pressure Altitude display, automatic flight timer, stop watch, Flight ID display (tail number), altitude monitor, and ADS-B OUT position display.... classy. Bottom is the highly featured Bendix/King KAP 140 autopilot with all the functioning functions as per the real unit. It is a very complex unit to use, and a study of the manual is required before takeoff, selections are multimode, but clever when you work it all out. Full instructions and diagrams are provided in the manual. The instrument panel is fully active, with that mentioned custom switchgear and all working circuit breakers and everything is totally interactive, including the ashtray. A note in using the controls... The really lovely roof mounted trim winder is also extremely hard to use in X-Plane, so there is a requirement to have your trim set on keyboard (note - use the "mechanical" setting and not the "servo" trim settings) to use and set the trim effectively... the trim setting is set top left instrument panel (arrowed). VR Menu Two new features in this XP11 PA140 are related to VR (Virtual Reality).... One is the menu is now a pop-up kneeboard set in the left door pocket, click to use. The 2D cog menu is gone. You can use the "Options" menu to select/de-select the co-pilot, add/remove fuel, change panel options, turn on/off ground elements (wheel chocks, cowl plugs and pitot tube cover), hide internal glass, hide the copilot in internal cockpit views, and turn on/off the nose gear steering. You can also select the amount of fuel (36 gal) to load into the aircraft via sliders for the left and right tanks, and choose if you want to use the streamlined wheel covers on the exposed wheels in then cutting drag and speed... ... there are no weight or balance numbers or CoG graph which is now common and odd since vFlyteAir was one of the pioneers of these features, and if you add in the optional co-pilot/passenger the aircraft adds in an extra 72 kgs to cover his weight. The pilot however just sits there and can't be hidden, which he can get annoyingly in the way sometimes if you move the wrong way in the pilot's seat... or around the cabin. AviTab There is also now the option and again for VR of using the Avitab pdf viewer plugin via a VR iPad. The iPad can be moved around, but your point of view aspect is important... a larger number like 95% is fine, but your usual 73% it can be a bit large in your face, but it can be put well to one side out of the way. The window AviTab viewer window version is now also available. The STMA plugin updater is now also supplied with the aircraft, great for a quick update, but seriously annoying on screen all the time if you like to move your cursor around... not a big fan. Flying the Cherokee PA140 I'm flying in the IFR role to use the extra gizmos that comes with the avionic stack. First difference starts right from the moment you turn the starter key. FMOD sounds and well done new dynamic sounds are a welcome feature. Yes they are brilliant and brings the sound package into the modern X-Plane age... I thought they were good before, but as they say "nothing stands still in X-Plan"e and so you easily notice the difference and the huge progress in sound. All aspects of the performance ranges of the tiddler PA140 have been updated to the latest X-Plane v11.30 dynamics, the developer notes however to leave the X-Plane 11.30 “experimental flight model” checkbox off and in that selection it does feel slightly different from the original, but now also feels and sounds even more realistic again, and more advanced from it's original great to now brilliant flying feel that was there in the first place. So here all the dynamics on the ground and in the air have been revised, but with that revision also comes a few variations from the original.... Original. Taxiing has turned into a bit of an art. Throttle up and pull away, but when you turn you will soon grind to a stop... There is a trick in using the power to move and turn the aircraft at the same time on the ground. And you will a need fair bit of power to do so, more harder is when you straighten up at almost full power and you have to quickly control the forward speed. You do adjust to this real world ground movement dynamic, but it does need a fair bit of practise to get it all right. Sitting In the pilot's seat it is realism 101, get feedback and huge clatter from the just above idle power of the noisy 150 horsepower (112 kW) Lycoming O-320-E2A engine (the 140 moniker does note a 140hp engine, but after the upgrade to150hp, they didn't change the model number). Runway tracking is now a far more a required skill, even difficult until you tune into the feel at a growing speed.... not only with the asymmetric blade effect which with only 150hp is feeble anyway, but the ground effect tracking... once the air starts to work around those “Hershey Bar Wings”, because they look a bit like an (American) Hershey chocolate bar. Then you have some to complete control. You pull back around 80 knts clean, 60 knts dirty... You are actually surprised by the power and quick climb speed, certainly this is no Aerostar, but the PA140 does move quite fast for it's performance specifics... official numbers are 85 mph (73 knts) 660 ft/minute (fpm), but you feel like you are going faster as I was touching 100 mph at the end of the runway... a 500 fpm climb is about perfect. And once you have fine tuned out the trim, you can pretty well stay up here all day with little effort. These early Cherokee's are mostly trainers by nature, so ease of use and an easy balance platform of the aircraft are essential. But so is aircraft feedback, and like the earlier PA140 Original the feel and control is excellent, it was the best in it's class three years ago, and still certainly easily still a leader with all the current crop, and some at double it's price. Top Speed is noted at around 130knts and the official cruise speed of 112-115knts which is sloooow but I cruised easily at around 120 knts (mixture leaned correctly), and the Range is 455nm with a full fuel capacity of 36gal. A note from the earlier PA140 review "There is a trick you can on do the Original aircraft as well. Real-world pilots of the Cherokee 140 jam a small object under the flaps lever during cruise flight? Why would they do this? Well -- this way the flaps deploy by about 1°. To compensate for the small extra lift generated by the flaps, the pilots trim down the aircraft a bit, and this results in a slightly increased cruise speed (2 to 4 knots). You can do the same as the aircraft offers you a pilot's log book in the cockpit which you can click to put it under the lever. Then trim down a bit and you are a little bit faster without touching the throttle. Just don't tell the NTSB". 11.30 Particle effects... well yes and they are very good. The little well worn Lycoming O-320 chunks out carbon dioxide that would put certainly not be in accordance of any Paris agreement, its dirty... dirty if you know what I mean. But very well done here. I loved the propeller effects as well, to show the moving aspect, and not just the usual looking like moving disk, the rain and ice effects are good as well, but they are not the new "Librain" rain effects but the original ones, still very good though. The KAP 140 autopilot is tricky to use with all the multi-functions, but also authentic and very realistic.... When you first activate the KAP 140 it goes into a "Roll"mode that sets up to central the aircraft in pitch and roll, then press the button twice to get access to the autopilot functions, so if prepared you soon get the hang of it and for such a small trainer of an aircraft it is a big avionic tool. It does not however pop-out for ease of use. The Cherokee is not an aircraft to throw around the sky, in fact there are restrictions on the types of manoeuvring or the types of turns you can do... but that does not stop you from doing lovely banks and control movements to satisfy your ego... this was and still a really lovely aircraft to fly. Because of the slow speeds then approach and landing are the time to show off your skills on how precise you can fly the aeroplane... it will respond nicely, but don't push the PA140's boundaries... thankfully this aspect has not changed either from the earlier original version. Flaps are four position in "Up - 1/3 - 2/3 - DN" and once fully down a 80 knt approach speed is ideal.... ... slightly reduce the speed and your altitude drops with the power output, all very controllable and you are also in control. 70 knts gives you the best descent rate, and you almost glide over the threshold.... A slight flair will do the final touchdown... but have to get it right as the PA140 will bounce if you land awkwardly... secondly the tracking like on takeoff can be severe, the Piper grips, almost too hard, so you have to skillfully control the rollout to a taxi speed, and then watch that turning aspect with the required power off the runway. For me it took a few practice landings to get it all right and understand the feel and control. If you remember I had to do the same few practice landings in the original review, this handing is sharp but highly authentic on the ground. A small note that is not noted anywhere is that when you shut down the PA140 the aircraft will stay (or save) itself in it's current situation, so when you reload the Cherokee it is in the same condition as you left it. Lighting Overall the lighting is pretty basic as this is a 1963 aircraft design... but that is not to say it is not great either. The instrument panel is a one switch affair for rear instrument lighting and another switch for the avionics, but it looks brilliant at night and far better than the quite dull original version... .... switch on the large single overhead light to illuminate the cockpit and cabin, again is very effective. External lighting is the basics, with a single landing light in the nose and a huge red beacon on the top of the tail. All lights are “parameterized” (spill lights, directional lights and spot lights) to provide more reality including the beacon with a custom flash sequence... Navigation are the red, green and white rear tail. Liveries There are eleven liveries and a blank white... all varied, but a few are a bit on the gaudy side... the donor PA140 N3466K is in there as well. __________________________________ Summary Even at the time of the original release of the vFlyteAir Cherokee PA140, you knew it was something very special, but not really how progressive and excellent it really was at that time. It did set the coming standard for handling and ultra realistic design that is quite the normal now. The very things that did made you go past or passover the aircraft as noted at the time is that even though it was very highly detailed, as it looked a drab or bland. Now with the 11.30 dynamics and PBR effects that aspect has been well and truly buried as the new PA140 is now all large glossy and full HD. So it was all there in the first place anyway, it was just the period it was set in. This is the X-Plane11.30 brand new version of the aircraft, so you do now have all the aspects of what the current X-Plane delivers and the aircraft is in many ways even far more enhanced with those new simulator features. So performance, full FMOD sound and the noted PBR effects are all present, including the new particle effects. VR in Virtual Reality is also now well catered for with 3D kneeboard menu, and AviTab intergration. On the performance front the Cherokee is about as good as it gets, but the ground effects maybe very authentic, but are also quite onerous and demanding more skill from the pilot. There are two avionics pack no included in this version, with the old original VFR minimum pack, and the very comprehensive IFR pack with some top notch fully featured units including the Avidyne AXP 340 transponder and the Bendix/King KAP 140... on both aircraft is the classic looking TKM MX300 Com panel... and either VFR or IFR package can be changed even in mid-flight. Features are very good, with a lot of ideas in here, but there are a few oddities. Missing aircraft weight and balance numbers are a head scratcher as vFlyteAir are usually very good at those areas. The set but animated pilot can keep getting in way if you move the wrong way, and the on screen STMA updater is just plain annoying. The original idea to replicate a real aircraft in X-Plane is even now more realised, and in that aspect it is as real as flying the 63 Cherokee in all its worn out glory as you could possibly get, it is a highly dynamic and a very involving aircraft and more a personal investment than just a flying machine... and once flown, the Cherokee becomes really part of the family and now in it's full X-Plane11 form, you can guarantee it will be in the family for a very long time to come, and finally at that price and almost half the price for the same dynamic involvement as other general aviation aircraft in the same level and category, it is an absolute bargain in the process as well... Highly Recommended. _____________________________________________________________________________________ The Piper Cherokee PA140C Original v3 by VFlyteAir is NOW available! from the X-Plane.Org Store here : Piper Cherokee PA140 Original Priced at US$24.95 If you already own the original Cherokee PA140 then you can update to this v3 X-Plane11 version for free, just go to your X-Plane.OrgStore account Requirements: X-Plane 11.30+ Windows, Mac or Linmux 4Gb VRAM Minimum. 8Gb+ VRAM Recommended Release and review version 3.0 (Feb 25th 2019) X-Plane11.32 is required to fly this aircraft. It will not certainly work in XP10 Features Virtual Reality ready FMOD sounds New pop-out Kneeboard with Options menu "Save State" Preferences, - switch settings, options and preferences are saved each time you fly, and are reloaded the next time you fly New interior PBR textures Improved animations using new X-Plane datarefs, including new push-button animations "INOP" placards now include hints for secondary gauges Automatic and integrated support for RealityXP(tm) GTN 650 and GNS 430 plugins (must be configured as Unit #1) Integrated support for AviTab plugin Flight model and ground handling improvements Now has the STMA Autoupdate plugin included - keeps your copy up to date automatically each time you load the airplane Avionics – Panel Option 1 – VFR Panel PS Engineering PAR200 combination audio panel/COM1 radio w simulated 'Bluetooth' music feature and 8.33Khz tuning TKM MX300 COM2/NAV1 radio (25 Khz tuning) ARC RT-359A transponder Omni-Bearing Selector (OBS) slaved to NAV2 radio with localizer and glideslope indicator needles Magnetic Compass Directional Gyro Compass Vertical Velocity Indicator (VVI) Altimeter/Barometer Airspeed Indicator with True Airspeed indicator Clock with Elapsed Timer Hour and Minutes hands and Time-of-Day adjustment feature Artificial Horizon Hobbs Meter Engine Gauges (Left Fuel Qty, Right Fuel Qty, Ammeter, Oil Pressure, Fuel Pressure, Oil Temperature, Suction) Avionics – Panel Option 2 – IFR Panel KMA20 Audio Panel G430 GPS (Laminar Research default) MX300 COM2/NAV2 Radio Avidyne AXP 340 Transponder with Pressure Altitude, Flight Timer, Stop Watch, Flight ID, Pressure Altitude Monitor, and ADS-B OUT functions KAP 140 dual-axis autopilot with Altitude Preselect function Other gauges and instruments same as the Panel Option 1 above Special Features Beta Tested by Three Real-World Cherokee 140 Pilots New FMOD Sounds Pop-out Kneeboard with Options Menu Click on the kneeboard stowed in the pocket near the pilot’s left knee to pop out the kneeboard. Select your preferences from the menu, add or remove ground elements, copilot and fuel Simulated Bluetooth Music The PS Engineering PAR 200 radio/audio instrument has Bluetooth features. We have simulated Bluetooth music in the model. Simulated Radio Squelch Noise If you turn OFF ASQ button on the PAR200 audio panel/radio, you will hear a simulated radio static noise over the normal radio audio. Fuses are Operational You can fail any of the fuses and/or circuit breakers on the panel to practice emergency procedures. Exterior HDR Custom Parameterized Lighting All exterior lights are created using X-Plane custom parameterized lighting system with plug-in control. To enjoy the lighting effects to their fullest, HDR Rendering must be ON in your settings. However, the lights will still work with HDR off, they just won't look as nice. Wheel Fairings can be Removed using Menu If you remove the wheel fairings, the drag co-efficient will be increased by approximately 3% Vibration Effects The exhaust pipe, ignition key, ailerons and stabilator are animated to appear to shake/vibrate when the engine is running. As you increase engine RPM, the shaking smooths out. Spinning Wheels Blur Effect When the wheels are spinning at faster than 20 KTS, the textures are replaced with a radial-blur effect to add more realism. Rain and Ice Texture for Windows When X-Plane indicates that there is precipitation on the windshield, or ice on the airframe, the window glass textures will be replaced with rain or ice effect textures. Original N3446K livery plus 11 more liveries provided (including a Plain White livery) Super Hi-resolution textures up to 4K textures Fully animated model. If it looks like it should move in real life, it is animated! Installation and documents: Download for the Piper Cherokee PA140C Original is 426.30mb and the unzipped file is deposited in the aircraft "General Aviation" X-Plane folder at 1.32 Gb. Documentation: Excellent vFlyteAir full manual and software agreement. Manual shows documentation and images of the real N3466K that was the basis of the X-Plane version. vFlyteAir_Cherokee140_Original_Manual_v3_0.pdf vFlyteAir_LimitedUseSoftwareAgreement.pdf ______________________________________________________________________ Aircraft review by Stephen Dutton 6th March 2019 Copyright©2019 : X-Plane Reviews (Disclaimer. All images and text in this preview are the work and property of X-PlaneReviews, no sharing or copy of the content is allowed without consent from the author as per copyright conditions) Review System Specifications: Computer System: Windows - Intel Core i7 6700K CPU 4.00GHz / 64bit - 16 Gb single 1067 Mhz DDR4 2133 - ASUS GeForce GTX 1080 8Gb - Samsung Evo 512gb SSD Software: - Windows 10 - X-Plane 11.31 (v11.30 is required for this aircraft) Addons: Saitek x56 Rhino Pro system Joystick and Throttle : Sound - Bose Soundlink Mini Plugins: Environment Engine by xEnviro US$69.90 : WorldTraffic 3.0 Plugin - US$29.95 : Avitab pdf viewer - Free Scenery or Aircraft - KHAF - Half Moon Bay by Rising Dawn Studios (X-Plane.OrgStore) - US$19.00
-
News! - Announcement : Duchess Model 76 by Just Flight - Thranda Just Flight/Thranda have announced their next release as the Twin-Engined Duchess Model 76. This is the first twin released for X-Plane by Just Flight. The aircraft is replicated from two real-life Duchess aircraft, G-BZRT and G-GCCL, and every past released of Just Flight aircrat have been very highly featured and detailed... that is reflected in the price as well, but at least they deliver for the money and there is not one Just Flight aircraft that has been released yet for X-Plane that has disappointed me or has been undervalued. Full details and features are: Accurately modelled Duchess Model 76, built using real-world aircraft plans and comprehensive photography of the real aircraft Numerous animations including multi-animation passenger doors that, when open, respond to G-forces and air resistance, baggage door, cockpit window and sun visors Ground equipment including chocks and tie-downs HD textures are used to produce the highest possible texture clarity PBR (Physically Based Rendering) materials with real-time environment reflections for superb quality and realism Detailed normal mapping for down-to-the-rivet precision of aircraft features COCKPIT A truly 3D virtual cockpit right down to accurately modelled seat belts and screw heads - every instrument is constructed fully in 3D with smooth animations Cockpit textures feature wear and tear based on reference photos taken in the real aircraft to produce an authentic environment Interactive engine start checklist that responds to user inputs and sim variables Interactive checklists for every stage of flight Aircraft configuration system that will allow you to choose between 'cold & dark' or 'ready for take-off' (if aircraft is stationary on the ground) Fully functional and comprehensive IFR capable avionics fit including: - KMA 28 audio selector - Fully featured X-Plane-native GNS430 (supports procedures out of the box, and supports Navigraph and Aerosoft custom NAV databases) - KX 155 COM/NAV 2 radio - KR 87 ADF receiver - KT 76A transponder unit - WX-8 Stormscope - Century IV autopilot - HSI and ADF gauges - Support for Reality GTN750 (sold separately, Windows only) Interactive logbook panel for logging your flight details (X-Plane native) Flight computer panel with useful information such as fuel burn, endurance, speed and wind speed/direction GoodWay compatible Ability to change barometric units from inHg to MB in altimeter adjustment Option to activate flashlight from within pop-up window, to aid in those pitch-black cold and dark starts at night Pop-up autopilot window Option to remove window and instrument reflection effects Animated toe brakes Radio knob animations routed through plugin logic, for optimum movement fidelity and sound synchronisation AIRCRAFT SYSTEMS Custom-coded fuel system with crossfeed Custom-coded electrical system with functional circuit breakers and avionics power circuit. Circuit breaker logic is linked to X-Plane's internal failure logic, so if the plane is set to fail a certain electrical component after a certain number of hours, the circuit breaker for that element will pop out. Realistic landing gear with emergency extension, slow/fast tyre rotation animation (blurry when rotating fast), precise shock absorber animation and wheel chocks and tie-downs Functioning carburettor, cowl flap and primer controls Dedicated interactive engine pop-up window displaying values such as fuel tank weights and imbalance, fuel pressure, oil pressure, oil temperature, battery charge (with quick charge option), and information about spark plug fouling and vapour lock condition Simulated vapour lock condition, with warning pop-up and suggested actions Simulated spark plug fouling condition, with indication of percentage of fouling Lighting system includes separate lighting control for gauges (via rheostat) Functional electric trim control on yoke Simulated fan and vent system with realistic blower sounds (linked to circuit breaker logic and electrical system for realism) Custom external light logic with custom strobe light pattern and custom light halos for added realism LIVERIES The Duchess comes with eleven paint schemes: G-BZRT (UK) G-GCCL (UK) G-BNYO (UK) G-WACJ (UK) N671R (USA) D-GIGY (Germany) F-GCLJ (France) C-GTYG (Canada) VH-HKI (Australia) EC-INC (Spain) ZK-JED (New Zealand) OTHER FEATURES Realistic and accurate flight dynamics based on real-world performance and handling data, and input from Duchess pilots Authentic sound set, generated using X-Plane's state-of-the-art FMOD sound system Custom sounds for switches, doors, warnings and more, featuring accurate location placement of sounds in the stereo spectrum, 3D audio effects, atmospheric effects, adaptive Doppler, exterior sounds spill in when window or door(s) are opened, different sound characteristics depending on viewing angle etc. Comprehensive manual with panel guide and performance data PSD Paint Kit included so you can create your own paint schemes Dedicated pop-up window for sound mixing, allowing for individual adjustment of the volume of exterior sounds, in-cockpit sounds and various effects Custom weight and balance manager window Most past release announcements from Just Flight means the release is imminent, maybe later this week or even next week as at the moment it is noted as "In development" price is also not noted, but most Just Flight aircraft are usually in the low to mid-forties in US dollar terms... JustFlight are here: JustFlight Should be also on the X-Plane.OrgStore very soon after the official release... Images and text are courtesy of Just Flight ________________________________________ News by Stephen Dutton 4th March 2019 Copyright©2019: X-Plane Reviews
-
Aircraft Update : ToLiSS319 v1.3 by ToLiSS "Happy Birthday to you, Happy Birthday to you.... Happy Birthday ToliSS319... Happy Birthday to youuuu" Yes ToliSS are celebrating the first anniversary of the release of the ToliSS319 and with guess what? Yes another update... this is version v1.3 or the X-Plane11.30 version of the chubby little airbus. The developer admitted on release that it was not completed but to say 85% of what the aircraft's roadmap was supposed to be. For most of us with developers this would be groan street, in that you knew it would be a fair (to a long) while before any sort of completion or update was going to be forthcoming. Not so with the ToLiss though, as throughtout the year in 2018 the updates came thick and fast and all were brilliant in marking up the aircraft to it's full compatibility. Are we completely there yet? well close but no cigar, but close in this aircraft as it is already far ahead of most of the others.... the ToliSS A319 is one of X-Plane's real benchmark for small passenger jets. Many will note the excellent FlightFactor A320 Ultimate, and yes it is as good in study detail, but the A319 is the best automated manual flying jet aircraft in X-Plane, if that statement sorta makes sense... in when you turn off the excellent automation, the baby bus will fly (actually still sort of automated in Airbus's "Flight Control Laws" Fly by wire (FBW)) in a manual control sense... does that still make any sense. Notable is that the aircraft feels like manual control in the way you fly the aircraft. (this is Direct law which is the lowest level of computer flight control laws and occurs with certain multiple failures). Note since posting this update review ToLiSS has issued a new update in build 10006 - v1.3.1... the changes are now noted within the review. Update v1.3 As updates go this release is not a long list of changes. Most of the detail changes are hidden in the switch to the X-Plane v11.30 performance and new features. The developer notes however to leave the X-Plane 11.30 “experimental flight model” checkbox off as it is not required here. Engine performance (both engine variants) now adheres to the new engine dynamics of twin-spool tracking of the n1 and n2 engine outputs. So the readouts are now far more authentic, and so is the actual output performance. Many complained that in a lot of aircraft the performance details were not accurate, but the fact was the actual X-Plane turbine engine performance was not accurate either? 11.30 has gone a long way into fixing this issue. There is a mixture of fixes and new features in the systems, some relating to 11.30, but most are not. ECAM action items now include "ADR DISAGREE" ECAM caution, and also added is the ECAM "SPD BRK STILL OUT" caution. MCDU PROG page now supports airport/runway for the Distance/Bearing function. ECAM ALL button now works for all repetitive pushes. activating the fire extinguish bottles, the DISCH light will now comes up at the right time. The FMS now also parses Custom Scenery/Global Airports/Earth Nav data/earth_nav.dat to get the best ILS placement. (in other words checks the two datas are correct but selects the correct one for a more aligned ILS). As 11.30 redid the Oxygen systems in X-Plane, then now the "Cabin pressure and whether you are wearing the oxygen mask now ties into the pilot felt altitude" dataref... so that means the enabled hypoxia selection in X-Plane setting now works for maximum realism. And the FBW system drops to "alternate mode" when in EMER ELEC configuration. Pulling the SPD knob, the speed target now synchronizes to the current speed (a yes from me) and the GEN 1 Line push button is now functional. Finally the 2D Cockpit is back in because too many users complained about it being taken out, I can't actually remember the last time I used a 2D cockpit? All these system items are nips and tucks but they are all worthwhile. VR has had some attention with better manipulators for the sidestick and tiller (v1.3.1) that has been changed again from the v1.3 release. Visual features now included are the 11.30 particle effects... ... contrails are glorious, but the engine output effects are the best I have seen yet (the Carenado Citation was very good), as they seem more well refined and realistic on takeoff and when the power is applied, note the APU effect output, it is hard to see but it is very effective... "I wonder if X-Plane is now contributing more to the planet's carbon output? with these new effects" In v1.3.1 the heat blur with the thrust reversers have been changed to a more realistic blur length, and engine hear blur. Two new additions are first with the LIbrain rain effects... ... the watery effects look really good in here, but I still think the water drops are too large, however the cabin windows don't use the rain effect? which makes it all feel a bit odd in that it looks really wet and in the cockpit, but you are looking out of the cabin at a completely different weather system, and in the v1.3.1 update if you are in the cabin, the effects are not seen now in the cockpit? Personally I would rather have them the other way around and have the choice of the rain on all the windows, but as ToLiSS notes the effects on the cabin windows had too much a negative effect on the framerate, but overall the Librain effect plugin still needs work and refining. Second new addition is the use of the Avitab pdf viewer plugin... This AviTab has become an essential tool for X-Plane, but I wish there was a "Portrait" mode as most charts are in that layout. Navigraph charts are also now in there if you have an account with Navigraph and they are intergrated really well for functionality here. There is a window popup... .... in case you don't want the bulky iPad sitting there while flying... the iPad can be hidden via the TISCS menu panel (Audio-Visual Tab). The external lighting has had refinement, with great results. Gone are the blobby lights and have been replaced with sharper more realistic lighting... .... navigation lights, taxi and turnoff lighting is now excellent... the huge past blobby wing lights now look really good (surprising how many developers get the wing lighting installation wrong) and the landing lights are also excellent, and all lighting now has different tones to reflect the different types of lighting. A quick hop (is three hour flight a quick hop?) from EGKK (Gatwick) to LMML (Malta) showed off the bus to it's very best, and the new features felt really well intergrated and the A319 now feels really well sorted at it's offical first birthday. I still find the HDR effect a little to dramatic in being too dark unless there is some indirect light coming into the cockpit, and the instrument panel lighting nowhere effective in the daylight. So aircraft set up sometimes requires a torch to find anything. There was some more texture work done in this update, but the lighting is still well below par. I was very impressed by the performance. The Baby Bus followed the performance and fuel burn numbers on the SimBrief flightplan almost to the number, and the the cross reference during the flight to the brief was faultless, which makes flightplanning a very exact affair and all with very satisfactory results, the engine performance readouts were notably far better with the new 11.30 performance adjustments. It will be interesting to compare the FF A320 U performance when their 11.30 version is released. All ECAM (Electronic Centralized Aircraft Monitor) readout pages are now excellent (note the brake heat warning), but also now look totally authentic and realistic. I will note the excessive braking was caused by an X-Plane joystick input "Hold Brakes Regular" which if held too long now will also park brake as well? Overall the new v1.3 of the ToLiSS319 was very impressive. Summary Not a big update for this new version of the ToLiSS319, and mostly to adjust to the performance and effects of the X-Plane 11.30 release. Engine performance is now hugely improved twin-spool tracking of the n1 and n2 engine outputs, and the numbers are now mostly absolutely perfect. Particle effects, Rain effects (via the Librain plugin) and AviTab have also been added, with the external lighting also having some nice refinement. The rest of the update includes some system refinements and a few bugs sorted or fixed, overall a very nice update that lifts the aircraft to a nice if almost complete level of simulation. It has been twelve months since the ToLiSS319 burst into X-Plane, everyone noted including the developer that there was some work still to do, but a year on it is a quite now an all round sorted aircraft, with more added new features (not fixes) still only to come. My only gripe is the dark cockpit and average adjustable cockpit lighting in the daytime. From the release this Airbus A310 from ToLiSS was always destined to be an X-Plane classic, if you don't fly it then you are doing yourself a big disservice of how good X-Plane aircraft in today's form really are, and it is not just in the actual study detail that makes this aircraft such a brilliant simulation, it is in the perfection of flying big jets like this that you get a real reflection of the real world aircraft... a classic. ______________________________________________________________________ Yes! the ToLiSS319 (A319-122) v1.3.1 by ToLiSS is available from the X-Plane.Org Store here : ToLiss A319 Price is US$69.00 (currently on sale for US$62.00) Note make sure you have v1.3.1 when downloading, All previous purchasers can now update via your X-Plane.OrgStore Account Both the LIbrain rain effects and Avitab pdf viewer plugins are required to use the new features. Also available is the internal IAE Sound Pack that can be purchased here: IAE Sound Pack for Toliss A319 Price is US$9.95 TSS IAE Sound Pack is activated by inserting the key activation code in the "ADDON" tab on the ToLiSS Interactive Simulation Control System panel Full v1.3 Changelog Changes for build 981 (V1.2.2) to build 1003 (V1.3) Major new features: - Rain effects (Thanks to Saso Kiselkov) - experimental for now - Created custom XP11.30 particle effects - Engine performance adaptation to new XP11.30 engine dynamics model - VR manipulator support - Avitab support is integrated now. Minor new features: - Added bulb dynamics to the integrated lights. (On/Off is not instantaneous anymore.) - Added ECAM action items to ADR DISAGREE ECAM caution, added ECAM caution SPD BRK STILL OUT - GEN 1 Line push button is now functional - MCDU PROG page now supports airport/runway for the Distance/Bearing function - The FMS now also parses Custom Scenery/Global Airports/Earth Nav data/earth_nav.dat to get the best ILS placement. - Cabin pressure and whether you are wearing the oxygen mask now ties into the "pilot felt altitude" dataref. Enable hypoxia in Xplane setting for maximum realism - Texture rework from Matthew Bug fixes: - When using the fire extingushing bottles, the DISCH light now comes up at the right time. - Fixed an issue with import of altitude and speed constraints in newer CFIP files. - After entering the TO/FROM ICAO codes, the ALTN airport now shows "NONE" rather than red boxes - When Pulling the SPD knob, the speed target synchronizes to the current speed. - Fixed a bug to make sure that FBW system drops to alternate mode when in EMER ELEC configuration - Fixed behaviour of the ECAM ALL button for repetitive pushes. - Fixed EIS switching behaviour when all screens are available. - Fixed airplane symbol location in PLAN mode - Upon go-around the AP reverts now to HDG/VS mode (if it was in TRK/FPA before) - Made the pitch down notion when approaching stall in alternate mode more noticeable - Improved flap/slat extension times and Normal law compensation of flap movement - Allowed the activation of managed Descent during the Cruise phase now. (at -1000fpm) - Fixed a bug that could lead to loss of correct ILS data on approach, if the flight plan asks for tuning an ILS DME in VOR1. Changes from build 1003 (V1.3) to build 1006 (V1.3.1) Minor new features: - Added sidestick and tiller to the VR manipulators Bug fixes: - Fixed the unintended reset of FCU and GPS during power transients - Fixed an issue with the transponder/TCAS when using 19 AI aircraft leading to quite weird random behaviour - Fixed engine heat blur: More realistic length of the heat blur, heat blur now also present when thrust is reversed - Removed cockpit rain effects when in the cabin. - Fixed a bug in the FMGS that could lead to crashes/hangups, if an alternate plan exists and transition altitude at departure and destination are not the same ______________________________________________________________________ Update by Stephen Dutton 4th March 2019 Copyright©2019 : X-Plane Reviews (Disclaimer. All images and text in this review are the work and property of X-PlaneReviews, no sharing or copy of the content is allowed without consent from the author as per copyright conditions)
-
Behind The Screen : February 2019 The question is always going to be asked in why some products are reviewed on this site and not others and why does some very obvious releases don't get the exposure. The first point is that X-Plane is always very fast moving in this day and age, with a lot of products being released simultaneously, and sometimes even three to four releases a week. In the past years you could drop one this week and pick it up again in the next to cover the release period. but mostly you would still cover most if not all of them. But in those high release periods in say the noted start of the year, holiday periods of say Easter and the American Thanksgiving points then the releases can overwhelm even the best of us. So you have to pick and choose of which reviews you would want to read and want the information from to see if you want to purchase the aircraft or scenery (which is the reason why review sites like this exist), or in parlance say "check it out and it's features". Overall most of the significant releases are always covered. Reviews can take time as well because you have to check all those features and research the aircraft or the airport, if it is a plugin or an add-on, you also have to work it all out and make sure it works correctly and break it down so both pro and novice readers can see how it works or explain the certain features in detail. I see this site as a sort of translator in helping most users to use the aircraft, plugin or scenery to their uttermost highest level. An example of what I mean by that is say the starting procedure on the Supermarine Spitfire. Yes the procedures were noted in the manual, but the many items required in the starting procedure were also not totally defined or completed in the manual... for a novice or even an experienced reviewer like myself you have to work it all out... and that takes time, sometimes for the hours that you don't really have in completing the review. But it is a necessity as well, in that when the procedure is defined and can then be followed by users in a step by step basis and it is that can then get them past that blank area (saves you the hours of time) were they struggle to just get the aircraft to fly and enjoy the simulation. In other words it is a short cut, but that short cut took hours and hours to do and relate to the review, so I took all the pain out of the procedure and that aspect is not transferred on to you when you purchase the product. So hints and tips cut a long story short and a full flight should convey the reality of the simulation of the product. So if a plugin or product hits the download, your faced with a choice. Spend hours or even days trying to work it all out, and for most or a lot of cases you will pass because you don't have days and days to assemble the layout or set up and spend days working through manuals or talking to the developers on how it all works, so in a look over if the plugin is not a completely defined product (or messy in my parlance) then you are going to have the same issues and nightmares using it. Don't get me wrong, in that anything significant to simulator will not get a pass and the time will be spent in making the new idea or feature work as it should and the information then passed as quickly on to you. These gamechangers are important and X-PlaneReviews will cover them. But any products still have to be well set up or have the documentation to allow you set up correctly and use the product without pulling your hair out or screaming at the computer screen.. what works easily for the developer that assembled the idea and product, does not mean it translates easily to a new user in the same capacity.... or worse it is a github code in code to insert into your simulator. But most plugins fall into a really odd area. X-Plane is experimental by nature, we love to try great ideas and create brilliant new features... but plugins really are a world of their own, and many of these external tools can have some of the biggest impact on the simulator. But in this area I am extremely conservative and within good reason. Many plugins are by nature created from the same code as the core code of X-Plane and code in one plugin can affect another. So the result is what we call "Plugin conflict". In most cases the developer can resolve those conflicts, but there are many cases when the code has to live side by side and not affect the other in the conflict scenario. Certainly a really good coder can fix most if not all the conflicts, and when the plugin reaches that stage then it is noted as "clean" or safe to use consistently without it being a notable source of crashes or conflicts with the other plugins or even the X-Plane simulator itself. FlywithLua is a great example of this, on it's own it is quite brilliant, very clever and adaptable. But it was a plugin that was in and out of my plugin folder with more conflicts than any other plugin I can remember. The main reason is that the lua in Flywithlua is the also the main aircraft and now scenery code as well, as most payware aircraft fly or use the Lua code in their plugins (SASL). In the end the out of my plugin folder became final, even though I loved the XPRealistic plugin that used it... and FWL was just all too much of a headache and was costing me far too much fixing time to worth the insertion... Gizmo has legendary status in ruining most users lives, but to note it has been far milder since it's last full rewrite, but I avoid it like a plague. X-PlaneReviews usually also ignore plugins that are the current rage. Take the latest craze with the librain plugin. This is a plugin that creates rain effects on the windows of aircraft, and yes it is very good, but also no where near good enough to be noted as "clean" or "sorted" or even finished close enough to be a usable tool, as currently you can look around your cockpit to see raindrops running down your instrument displays, rear panels, windows you don't have visually and even suspended in mid-air around you and scaring you half to death... what it must be like in VR would amuse even Jamie Lee Curtis. librain is created by the same person that created the brilliant betterpushback,(BPB) which was a brilliant better push back that changed the way you departed the gate, so most certainly librain will also get to the same position of being as brilliant as the BPB tool. I promote BPB with a vengeance, but if you remember it didn't appear in the reviews until it was finally sorted and was an efficient clean plugin for your use. librain will get the same attention, I will test it regularly and use it regularly, but it won't be promoted or shown until I feel it is worthy of your attention (or the bad bugs has been addressed). I not being arrogant or restricting your use of the tool as you can download it anytime, but it has to reach a certain standard (mostly in the crashing of the simulator) to be useful to your overall simulation experience. I personally don't like compromises in my simulation flying as many will put up with waterfalls on their instruments, but that to me that is simply not realistic... and a lot of plugins will be binned for that very reason, even if they do bring a certain new idea or tool to the simulator, it still has to fit in and work cleanly and be fully authentic to the full simulation environment. In most cases users will bin it as well in time if it is buggy or not practical enough.... I usually do that within a hour if it does not fit in with my overall vision of the what the simulator can be. And yes your choices maybe quite different to mine, but I have a saying in that "the best always rise to the top and only use them", if they are consistent and bug free then the chances are they will quickly gain global acceptance. So in reality we at X-PlaneReviews only promote the tried and tested plugins that will not crash or conflict with the simulator and so in that case their appearance can be months or even longer before they appear regularly in the reviews or in the simulator, and yes they are simply months out of date by the "new great feature" factor, but at least they are sorted and safe to use. Some which work straight out of the box like the excellent WebFMC plugin went straight into a review, because it was a pro plugin, and it worked brilliantly and it was a huge advantage to you users. Another is the new SAM - Scenery Animation Manager plugin that is also very clean and now a major feature to any new scenery... if it is good it will be reviewed and promoted. Most usually end up the trash bin, a few crashes is all it takes to throw it out, and even if it contains the even the best ideas and if you can see down the line if the plugin is not going to reach any sort of reliability then it goes, gone. Another area X-PlaneReviews have noted consistently is any plugins or uses changes that affect the basic X-Plane (items and code) simulator itself. Not only for the overwriting every time X-Plane is updated, but also messing around in the central engine is just simply asking for trouble. You just don't need to, and then complain loudly when your framerate goes south. Other point on the choices of doing reviews is when a developer releases an aircraft and notes "this is a pre-release version', and the aircraft will be finished in a few updates. Yes great for you to get your mitts on to this great new product, but you can't review an aircraft that is only 85% finished? And in reality you are all being used as lab rats to fix up the issues that should have been completed on release. Yes I admit that with the wide variety of computer systems and operating systems then there will be bugs and issues to be refined... but the reality is the product is not "actually" finished, and in that case we also can't make a good assessment about it for you. So after four weeks or a month or so then the aircraft is noted as a "Final" current release. But by then in reviewland we are all looking at another or in the middle of a series of releases that is of a more current interest to the users, and that pre-release is now very old news. So the review is then put on hold of until a point of finding a break in the schedule to fit it in, and mostly we will wait until the next update is then issued to then finally review it. The X-Trident Harrier is a good example of this, as it is still on the ever growing list, as it was released as a "Pre-Release" around Christmas 2018 but when can we get actually around now to doing a review.... with a full release the review would have been done at that time of the release period as it was well worth of the attention for both the review site and the users wanting the release information and critical assessment. Personally I don't even know if the X-Trident Harrier is actually completed? or even in a full release situation, so these pre-release ideas do also muddle the waters in situ of what or where the real full release situation actually lies while sandwiched between lots of fixing updates, so if I don't know then how can the developer expect the user base and customers to know either, and is that overall a good business sense. That point also comes to developers that love to do multiple small updates. A four line feature update is not going to get an update review, the feature list is just too small to fly the aircraft and check out the small list of changes, especially if we know in a another week or so that another set of updates will also be quickly coming along. What we tend to do in these cases is to combine three or four small releases into one review and then covering those updated versions all in one go. This works well in the idea of getting a lot of combined information together in one update review and have a worthwhile look at the current release situation of the aircraft or product. Yes we love constant updates fixing our issues and it looks good for the developer, but unless it is a required major fix (like an update to a final of an X-Plane version) or a major feature that needs to be sorted or released quickly, then a lot of these updates can be bundled together to make a more significant update. But this aspect works very hard against very talented developers like VskyLabs that does loads of multiple quick updates, but also loads of releases of various different and new aircraft designs, we simply just can't cover that wide a spread of changes that these developers in their own working system on their weird patterns of release schedules, you would simply do or get lost in all the multiple version numbers of what version is which, and even we get confused on the current status of the developments and versions as we did with VskyLabs, so you will have no chance. This is not of course to be confused with the stream of updates that come out after a major release, in most cases when doing the review we will see the issues and mostly if the developer is already aware of them and that update is coming within days, the point is that the actual aircraft is complete in a sense to warrant the review. If there is a ghastly area that needs to be highlighted and to a point make a strong statement to the developer to fix it, then it will be included within the review... as some developers just won't simply budge on some really dumb or obvious ideas or even major mistakes. In most cases the forums will usually vocal the same point of view, but it can take a fair bit of persuading sometimes for the developer to see the shining light of the er er absolutely er "you know" obvious. You have to also pick through what is known as commonly "vaperware". Many review sites grab the news and megaphone that "this is sensational" or "wow" for the project to as quickly disappear as quickly as it appeared, there are the obvious signs, but in most cases the so called developer has zero talent to match their lorded ambitions. Developing is hard work, and mostly in the areas you don't see in the coding and animation... go and count the half finished 3D hulls of aircraft the X-Plane.Org Aircraft development forums to see the huge Games of Thrones CastleBlack giant ice wall of the problems building when confronted with the complex coding aspects of the aircraft. The coming Rotate MD11 is a classic case of the sheer detail and the hours and hours of work that goes into the detail and serious depth of the systems to be recreated and have it all to be perfectly realised to be authentic. But then again that is what you pay for. So what you see in the glittering news bursts will not be mostly what you will get in reality, many a really tempting idea or scenery is quite average when you are finally faced with the final product, and that can be a real letdown after months of bits of development leaked and some times from dubious sources. The gushing needs sometimes to be tampered with a bit of reality, but more than anyone I also love in being totally surprised... in say the extended development of the Zibo mod Boeing 738, and Magknight's amazing Boeing 787 and both projects started off in a very basic and underrated way to the major talent behind both aircraft. So overall we have to edit, filter and assess the new aircraft, scenery or any new addition to the simulator in it's own credibility factor, and that means not shouting banshee from rooftops until the project actually has some credibility and then usually vanish into vaperware, and that is why there is not the volume of announcements on this site that are lorded around on most of the others and in most cases we don't get too far from the truth... and don't get me wrong as when something really insanely great comes along you will still see it in here first, because our core mantra of this site is still that "If I really love this, then you will also" and I want you to enjoy simulation par excellence, that is and always was the main objective of this X-Plane site. See you all next month Stephen Dutton 1st March 2019 Copyright©2019: X-Plane Reviews
-
Scenery Review : 3D Cerro Torre "Los Glaciares" National Park by Frank Dainese & Fabio Bellini It was not long ago a fabled land, a sort of "Lost World" a mythical story that few human western eyes had seen, but they brought back words of soaring mountains and seas of glaciers, this was a forgotten place at the end of the world. Today even with the current global unchallenging travel the words of Patagonia is still held in some sort of travel reverence that was once once held for Machu Picchu or Indiana Jones. But you can now get there or sort of in or out of the area, and with the courtesy of modern trekking methods... the aircraft. The area of Los Glaciares is heritage protected area in Santa Cruz Province, Argentina on the west coast and adjacent to Chile in the (disputed) border runs through the centre of the park in South America. The name means " Giant ice cap in the Andes" Los Glaciares National Park, of which 30% is covered by ice, can be divided in two parts, each corresponding with one of the two elongated big lakes partially contained by the park. Lake Argentino, 1,466 km2 (566 sq mi) is to the south and the largest lake in Argentina, while Lake Viedma, 1,100 km2 (420 sq mi), is in the north. Both lakes feed the Santa Cruz River that flows down to the lower part Puerto Santa Cruz on the Atlantic. Between the two halves is a non-touristic zone without lakes called Zona Centro. The northern half consists of part of Viedma Lake, the Viedma Glacier and a few minor glaciers, and a number of mountains very popular among fans of climbing and trekking, including Mount Fitz Roy and Cerro Torre... and it is this area is the focus of the scenery by Frank Dainese & Fabio Bellini The main access for the (tourist) range El Calafate (SAWC) on the southern side of Lake Argentino and access to the actual resort zone is El Chalten which is on the Argentine side and just up the valley from the Cerro Torre mountain and other significant peaks. The odd thing compared to most of these significant mountaineering areas is that it is a plain on one side of the mountain range, so there is actual very little elevation climbing to be done to get to the El Chalten zone, so most transport into the area is via buses. This scenery provides a "Fictional" airport called SACH at El Chalten and obviously modeled on VNLK - Lukla airport in the Himalayas, it is a short STOL runway with a few obstacles thrown in for good measure to make it all a bit of a challenge. Frank Dainese & Fabio Bellini are the specialists of areas of mountainous regions for X-Plane. First there was the "Dolomiti 3D" Scenery, then there was the excellent Matterhorn Park 3D and the superb Everest Park 3D scenery of late last year to top them all out. This 3D Cerro Torre is a smaller scenery than Everest, but the price reflects that as well, but that doesn't say it isn't as spectacular... as this area is one of the most spectacular visual places on Planet Earth. Los Glaciares National Park first Impression Like most travellers I am going to depart from SAWC - El Calafate International Airport. There is no payware SAWC (hint) and the only X-Plane version is an old converted FlightSim modeled airport. I added in a few more objects to make it more usable as a base in the area, but the basics are good enough for what I wanted. SAWC is positioned well away from the actual mesh of the 3d Cerro Torre zone and so that is why the airport was not included with the payware scenery, so the mesh surrounding the airport is also then standard X-Plane mesh. A note that this region is in the weather a very changeable conditions by the minute place as we shall see. 80% of the time the area is covered in cloud or mist and if you use a real time environmental weather plugin the chances are you won't get a clear day, but I got lucky on my fourth day... that is not to say it is not visually stunning with the low cloud conditions, in fact it is the opposite in the surreal vistas it creates... but it makes the flying extremely hazardous as well. My equipment is the Carenado 208B Caravan, it is perfect for this sort of touristy operation. So why start so far away from the scenery. The best of Cerro Torre viewpoints are at 10,000ft and higher, so you have to climb up there, and that takes time and distance. I will note the 10,000ft altitude is the safest minimum requirement, even 8,000ft can put you eyeball to rock faces or peaks. The long lake in Lake Argentino gives you the room to complete the climb to altitude and also with complete safety. There are loads of large lakes set out around the area, and they are great safe areas to descend through low dense cloud without hitting anything, once under the low ceiling you are back in visual control again... today it is clear with a long visiblity, but as I mentioned these conditions are more rare than the usual. Once at the 10,000 altitude and at the western end of Lake Argentino you turn north and head directly towards one of the largest glaciers in the world with the Upsala Glacier... if you continue west you will find more famous glaciers like the (falling ice into the sea) Perito Moreno Glacier and Spegazzini Glacier. The views are already spectacular, with the "top of the world" or "on another planet" sort of feeling. The actual 3D Cerro Torre mesh starts about here and covers the full Cerro Torre group range and the main significant iconic mountains are situated about in the middle. You could say this is the rear of Cerro Torre, but the huge Monte Fitz Roy (also known as Cerro Chaltén) is bigger in size at 3,405 m (11,171 ft), Cerro Torre is 3,128 m (10,262 ft)... but it is in it's unusual almost spiky shape that it is renowned for by climbers. The aircraft views are out of this world.... The high quality 3D Cerro Torre range modeling is according to the DEM data (digital elevation model) which are are further elaborated with many structural details. Many textures are like with all Dainese and Bellini sceneries based on 4K (4096x4096) extreme quality images. Yes the Cerro Torre and the Fitz Roy are the centre point of the scenery, but the rest of the range is just as impressive. Turning east shows the huge scale of the Upsala Glacier, only one glacier in Greenland is bigger (discounting Antarctica). In the confines of the 208B you feel the scale and the beauty of it all... vistas like these expand X-Plane to to travel to other worlds and the best most picturesque places are available on your desktop, so you can explore but also understand the earth we live on in a sort of 3D visual way. On the eastern side is the valley of the Rio de las Vueltas, with El Chaltén the main settlement... but your eyes are for the moment is too the west. These are granite shaft towers and other peaks including the Torre Egger 9,350 feet (2,689 meters), Punta Herron 9,022 feet (ca. 2,750 meters) and Aguja Standhart 8,858 feet (ca. 2,700 meters) stand next to with the other two iconic mountains. For a moment the Fitz Roy blocks out everything, then finally all the peaks are revealed... The Cerro Terro is the first shaft peak on the left, the summit looks like a phillips screwdriver head but it is actually a mushroom of rime ice. Cesare Maestri claimed in 1959 that he and Toni Egger had reached the summit and that Egger had been swept to his death by an avalanche while they were descending. Maestri declared that Egger had been lost with the camera containing all the pictures of the summit. (dubious). Maestri went back to Cerro Torre in 1970 with Ezio Alimonta, Daniele Angeli, Claudio Baldessarri, Carlo Claus and Pietro Vidi, trying a new route on the southeast face. With the aid of a gas-powered compressor drill, Maestri equipped 350 metres (1,150 ft) of rock with bolts and got to the end of the rocky part of the mountain, just below the ice mushroom.(even more dubious)... but still no summit. The route Maestri followed is now known as the Compressor route and was climbed to the summit in 1979 by Jim Bridwell and Steve Brewer. Most parties consider the ascent complete only if they summit the often-difficult ice-rime mushroom.The first undisputed ascent was made in 1974 by the "Ragni di Lecco" climbers Daniele Chiappa, Mario Conti, Casimiro Ferrari, and Pino Negri. (wikipedia) Once past the formation it is time to descend down to SACH at El Chalten. The safest way down as I mentioned is again to use the lake, in this case Viedma Lake which is to your left. Almost all the flying around this area is totally VFR, the navigation map on any aircraft is useless with absolutely no markers or waypoints or any significant points of reference for flightplans or flightpaths. So it is all eyeballs or nothing... oh and skill helps. Once you are down to an altitude (for me 3,000ft) it was time to do a 180º turn straight back up Viedma Lake... .... obviously if you are flying out from SACH at El Chalten then you can climb up to altitude on Viedma Lake in reverse. El Chalten Your focus is now on looking for the Rio de las Vueltas estuary on the left, and the entrance to El Chalten. It is quite easy to see. The Cerro Torre group peaks are spectacular in the distance. El Chalten (SACH) does not exist, so don't go looking for charts or anything, and the one runway is 13/31 and is at 1322 ft (MSL). ILS... in your dreams. Once you find the estuary you just follow the eastern side of it, and the line of the las Vueltas river is your line directly into El Chalten... the gap you are looking for is small (arrowed). You have to watch your height because as you get closer then the terrain does step slightly upwards, and if are too low, then you will find your height will very quickly diminish, but you can't come in too high either as we shall see. As you fly through the gap there is a bluff to the right, and SACH is a bit farther to the right just beyond the bluff (arrowed). So you going to have to fly an S curve to line up to RWY 31 correctly. Height, speed and position is crucial in getting the best approach line into RWY 31... it is far harder than it looks. Getting you final approach height is as noted is crucial in getting down correctly, the runway at 755 meters does give you room, but you don't have any space options if you get it wrong, the only way out is a hard climb-out. This is a STOL airport and the right aircraft can make the difference here, The 208B struggles a little, as you seem to come in too high and fast, even just above the stall speed of 61 knts (the 208B is XP11 but not yet XP11.30)... but it can be done. It is extremely challenging, I never attempted RWY 13, as it looks just too challenging for a clean approach, but give it a go... There is that VNLK - Lukla feel at SACH without the extreme slope, but as a creation (fabrication?) it is really good. There is two taxi lines into five parking stands (A helicopter pad is located here as well- HCTN), the single stand is very nice, but the clover leaf parking design is a bit misleading in that if you follow the yellow parking line it actually creates the box, and not with you within it? There are two other helipads; HCTS - El Chalten Heliport-South and HCBCT - El Chalten Heliport-South Base Camp Cerro Torre. As an experience then the flight from SAWC - El Calafate and landing at El Chalten (SACH) is excellent and very challenging... "experience" is the the right word in more ways than one, as it requires great flying skills as well. Before we look at the details of the El Chalten area, this flight was done in clear weather, but mostly the weather around here is like this... It is spectacular, but also extremely dangerous... the low cloud density is thick and heavy, and you hope there is nothing hidden in there to fly in to... ... but this flying is also extremely realistic, but you will have to study your flying profile and maps to make sure the flight path is inch perfect, and all VFR.... as noted the lakes are a great leveler. Flying conditions around these regions are very combustible, downdrafts, up drafts, gusty winds are the norm not the exception, I found an odd area just on the approach to RWY 31 at SACH that did really strange things to the Caravan, the trick is too survive them... it is all in the fun, well at times no! SACH - El Chalten It is strip... or a small runway or access to a tourist resort... The SACH airport is not detailed, detailed per se, because there is no real replication of the facilities here... The idea is actually very well done, if they wanted to insert an airfield into El Chalten then this arrangement would be a good layout, but I wonder if the 13 approach would pass the regulation requirements? I think the boundaries could have been made a bit more realistic, and better blended into the mesh as the lines are a bit to harsh, the fence helps the illusion. Main stand area are the noted four stands with the front in line single parking behind, the Helipad (HTCN) is mid-field rear. One big factor is that the feel on the ground works, it does feel and look real from that perspective, and that is the most important aspect of any scenery. There is a lot of 3D people and airport objects to give the airport a working feel... but slightly more realistic textures linage to show no go zones and such would have lifted it from the normal. Runway textures are standard. Terminal is basic with a built in rooftop control tower, but the textures are well thought out for local area character. Three hangars include one custom and two semi-military style designs, they all look good with nice detail and not just easy to place default hangars. Microwave and communication towers add in realism. Welcome sign adds a little local flavour... El Chalten The El Chalten township has been nicely recreated, and with more care than the recent Zermatt layout... ... is the township walkable... well it is and a very nice walk you will get exploring it... but there is limited moving traffic. All custom homes, churches and industrial holdings are all not from the "A few objects and replicated" mantra, but you really get a lot of diversity here and some nice designs, even if most textures are flat on a box variety. All the electrical and phone lines are set out and so overall it is really well done with some lovely detailing. The famous yellow "Rancho Grande Hostel" is fully replicated here and as well done as is the extravagantly named "Destino Sur Hotel & Spa de Montaña, Restaurante" is situated next door. Just outside the actual township is the famous "Chorillo waterfalls" and they have been replicated here to the north, and is a great addition to fill the scenic vista of the area... ... also featured is the "Estancia la Quinta" resort to the south, with the YPF gas distributor at the entrance to the valley. Lighting The El Chalten nightlighting is very good as well... all buildings are well lit and the township doesn't have that total dark village in a remote area feel. There is a lot of little lit details like the Total Service Station and church signs, and the streets are nice lit by lamps. Airport lighting is not at all bad. The terminal is nicely lit, but mostly it is all downlighting.... .... ramp areas are nicely lit, and feel good on the ground at night. But a few area lighting towers are a bit dubiously positioned that close to a working runway. Cerro Torre Group The famous Cerro Torre Group range from the ground view is just up the valley (or valleys) to the west of 4. All the iconic National Geographic angles are shown here, just add in your own selfie to complete the trek. You can here admire the rockface detail up close and how excellent the work from Frank Dainese & Fabio Bellini really is, they are the masters of this sort of mountain range creation and authenticity of the formations. I have added in my local map route so you can follow the route in the images, and the return leg back to SWAC - El Calafate of which I took the route back down the northern Lago San Martin lake system... there are certainly far quicker ways back to SWAC, but not as a nice visual route to relax by. Here are a few images of the nice return trip to SWAC images, note the weather. On takeoff from RWY 31 just don't forget to kink left to miss the bluff! Summary This "3D Cerro Torre' is the fourth mountain range scenery from Frank Dainese & Fabio Bellini of which they are specialists in creating perfectly recreated famous mountain range vistas. Not in scale or as large as their past sceneries it is not however not missing any of the spectacular elements that you expect from flying in these sorts of incredible areas. This area is the famed (or fabled) Patagonia area of South America on the border of both Chile and Argentina. Words like "Spectacular" and "Experience" are all of the package, but even though all the visual vistas are outstanding it is in the other elements like flying conditions and the weather that can test your skills to high level as well. The tourist hub of El Chalten for the Cerro Torre range is also well recreated here, with a even a walkabout simulation available and a "Fictional" airport (SACH) is also well positioned to test out you flying skill levels and give you a flying in-out aspect of using El Chalten as a flying hub. This is not an over detailed airport scenery, but certainly a realistic and well thought out one. The quality of the Cerro Torre range at a high density modified mesh is very accurate, and recreating the dimensions and the main morphological terrain features of the mountains. But the Cerro Torre (3128 meters 10262 ft) also the Fitz Roy (3405 meters 11171 ft.) mountains are the focal point of the scenery, and they really both deliver in the huge sense of scale and realism. But the whole area and vistas including the massive Upsala Glacier... and Perito Moreno Glacier and Spegazzini Glacier creates a significant area just waiting to be explored and marvelled at. What are the elements of great simulation flying. Certainly great viewpoints and areas to be explored outside of your normal environs, but also to deliver challenging flying conditions and also fine tune your flying skills to a higher level, and this "Cerro Torre" is a scenery you will never be bored with because it delivers those aspects very highly on the scale of both of those crucial simulation elements. The "Los Glaciares National Park" is a glorious place to fly around and enjoy, and this 3D Cerro Torre scenery delivers the full Patagonian experience to you to enjoy... Highly Recommended! ______________________________________________________________________ Yes! Cerro Torre Los Glaciares 3D National Park by Frank Dainese & Fabio Bellini is now Available from the X-Plane.Org Store here : Cerro Torre Los Glaciares 3D National Park Price Is US$22.95 Features 3D Cerro Torre includes a territory about 500 square kilometers located in the Patagonia South, on border between Argentina and Chile, but in Argentine territory. In addition to Cerro Torre (3128 meters 10262 ft) also the Fitz Roy (3405 meters 11171 ft.). Airport and Heliports The virtual El Chalten airport has a runway of about 800 meters. and an Apron area with 4 parking sites. Equipped with hangar and control tower, it is located in the east area of El Chalten, on the edge and near the Rio de las Vueltas. For those who want the approach to landing 3-10 miles, I recommend using the runway start on 31, from the south. The approach from North is much more complicated. Heliports some landing pads have been inserted in the most important points of the scenery, normally located in residential areas, and in the area the Base Camp at Cerro Torre. El Chalten has been completely rebuilt with 3D buildings models, and although they are simplified, they are well recognizable. Some of these have been faithfully reproduced based on photos. The 2 main mountains of area have been reconstructed with 3D models. DEM data was used and further corrected with 3D graphics programs. Later the textures were applied, mostly HD, taken from high definition pictures. The positioning on the modified mesh was very accurate, respecting the dimensions and the main morphological terrain features. The Cerro Torre (3128 meters, 10 262 ft.) Has been practically rebuilt from scratch, using the many pictures and descriptions available, in fact the basic meshes, even the most detailed ones are practically blank on the vertical walls. WT3: Your joking of course! no, you are on your own here. Requirements X-Plane 11 Windows, Mac or Linux 4Gb VRAM Minimu - 8Gb+ VRAM Recommended Release and Review version 1.0 (1st March 2019) Installation Download scenery file size is download 413.70mb and with the full installation installed in your custom scenery folder as there are four install folders in order (INI File included): trees_lib (41mb) Mesh_Cerro_Torre (147.80mb) EL_Chalten_Scenery (416mb) 3D_Cerro_Torre (81.40mb) Total scenery installation : 686.30mb The developers note you need to adjust the X-Plane "scenery_packs.INI" so the loading order is correct... and that the "LMML_JustSim_2_v1.0 (Mesh)" is below the Airport and overlay files, but above the Global Airport folder. Documents One manual with notes ______________________________________________________________________ Review by Stephen Dutton 1st March 2019 Copyright©2019 : X-Plane Reviews (Disclaimer. All images and text in this review are the work and property of X-PlaneReviews, no sharing or copy of the content is allowed without consent from the author as per copyright conditions) Review System Specifications: Computer System: Windows - Intel Core i7 6700K CPU 4.00GHz / 64bit - 16 Gb single 1067 Mhz DDR4 2133 - ASUS GeForce GTX 1080 8Gb - Samsung Evo 512gb SSD Software: - Windows 10 - X-Plane 11.31 Addons: Saitek x52 Pro system Joystick and Throttle : Sound - Bose Soundlink Mini Plugins: Environment Engine by xEnviro US$69.90 : US$19.95 Scenery or Aircraft - 208B Grand Caravan HD Series XP11 by Careando (X-Plane.OrgStore) - US$34.95 - SAWC - El Calafate Intl Airport by awall86 (X-Plane.Org) - Free (note this scenery was updated with objects for the review by the author)
-
In reality there is not really much between any of the JF PA28's. You pick the version really that suit's your needs than in features or best of... in saying that the Archer lll is a more modern set of instrument and avionics version so in current form it is more relatable machine, so I was surprised how well I related to the aircraft.
-
Aircraft Review : Carenado C340 II HD Series
Stephen replied to Stephen's topic in General Aviation Aircraft Reviews
Do you have this really old out of date version or the newer one? you don't note what version of aircraft or X-Plane version you are referring to, however If the newer one you might be able to adjust it in the .Manifest in the main C340 ll aircraft folder, if you are flying old aircraft in XP11 then of cousre the performance will be totally out of date? SD -
Classic Aircraft Review : Supermarine Spitfire Mk IXc by FlyingIron "Never in the field of human conflict was so much owed by so many to so few" The quote is from a wartime speech made by the British prime minister Winston Churchill on 20 August 1940. It is an iconic quote and usually accompanied by the usual iconic image of a Spitfire, the fighter machine that was flown by the few that we owe so much to. In reality it was the numbers of the cheaper Hawker Hurricane that was the backbone of the RAF in 1939/1940 and in the Battle of Britain in that fateful summer. But the Supermarine Spitfire was a class aircraft on it's own, only problem was we couldn't build them fast enough. The Spitfire aircraft also had an achilles heel in that it was a carburettor design on its powerful Rolls Royce Merlin (PV-12) V-12 piston aero-engine of 27-litres (1,650 cu in) capacity. Take the aircraft into the wrong G - force or steep dive and the power spluttered, but it was a miracle in manoeuvrability and could out-turn almost anything, but mostly Bf-109's. Although mostly related to the earlier World War ll battles the Spitfire was actually more effective later in the war with the later Mk IX's over the most built V's (6,487) and it was by then a far more formidable weapon and more so as high-speed photo-reconnaissance aircraft. But it was still that higher victory-to-loss ratio in the Battle of Britain that sealed the aircraft's legendary status. This is the second aircraft from Flying Iron after their after the Republic P-47N Thunderbolt, which in my eyes was the most ugliest aircraft to ever fly. This Spitfire is also the second Spitfire for X-Plane after the RW Design's version but that was a Mark l and released three years ago for X-Plane10. X-Plane design and detail has come a long way in three years. And FlyingIron are a very highly skilled development studio. I have seen enough Spitfires in my time to know when it is detailed correctly (yes I have sat in one as well). And the FlyingIron version is very good. The newer X-Plane PBR effects certainly help, but the NML files are really well done (NML is the effect of raising areas of the modeling or bumps, say here the rivets) and the rivets and ribs are done with precision and so are the construction panels of the aircraft... ... the modeling of the surfaces are also excellent, the wings and tailplane shapes are perfect as is the ribbed rudder construction. Glass is the deal breaker, but glass today is usually now always very good. But still getting it right can be the difference between good and really great... Thankfully here is it is perfect. The undercarriage on the Spitfire is quite basic, Early models (prior to the 175th production aircraft) actually had no hydraulic gear extension system, and were pumped up with a lever, later versions had a pump driven by the engine. So don't expect huge detail here, but it is still good, with the correct in wheel housing wing ribs showing, as is the protruding oil cooler and the supercharger-intercooler radiators (the radiators on both wings note it is a later version). The bubble acrylic canopy that was a new material at the start of WW2 replaced the earlier heavier glass canopies, but acrylic was perfect for a fighter. There are a few scratches on the top of the bubble for realism, but the great detail is the finger/hand marks on the rear left window, that you touch to get into the aircraft is a nice touch of detail. The bubble's convex is perfect upwards and outwards for realism, the new rain effects (librain) work on the glass surfaces also... ... the front hardened glass is well done as well, with the clearer gunsight area laid out in the box centre, which is a nice detail. Open the canopy and drop the little left door to see inside, and this is what I call the "classic airshow view", you can look in to the cockpit but don't touch... ... I have as mentioned sat in a Spit, so the view and detail is very authentic here, it is quite tight and confined when in there. The first thoughts on the detail is the excellent use of the brass and copper piping within the cockpit... a clever detail, because for one it shows you the age of the aircraft, but also gives the cockpit a very authentic feel than the usual painted piping. The detail of the pipe routing is excellent and mostly here for the gear, with the correct clips and holders to place the piping perfectly. The "Emergency" red lever is a powered CO2 cylinder backup for the undercarriage. Wiring is really well done and flexible where required (move the throttle to see great movement). The famous Spitfire stick is also well done in detail. (Note again the wiring to the trigger button) and here it is not the usual red button, but a realistic push trigger. Stick animation is excellent, and highly realistic... you can see it was created for the confines of the cockpit and to bend around the pilot's legs. Instrument panel Close up the instrument layout is actually quite basic. The Standard six are centre mounted on a separate plate on or above the main panel. These instrument include L to R top row; IAS Gauge (MPH) - Artificial Horizon - Climb (Descent) Rate, Lower row; Barometric Altitude - Magnetic Compass - Turn & Slip Indicator (The slip and turn indicators are really well recreated and is RAF period authentic) Left panel top to bottom is : Nav Light switch, and Flap control (up or down), Oxygen Regulator Control Valve + Oxygen Gauges, Clock, Magnetos, Elevator Trim Gauge, Pneumatic Pressure Gauge (brakes). Magneto switches are far left. Right panel top to bottom is : Voltmeter, Engine RPM, Engine Boost Gauge, Supercharger Control & FS Indicator Light, Oil & Radiator Temperature Gauges, Fuel Quantity Gauge... Main Fuel Tank ON/OFF Control is lower central by the large Primary Compass Left (Port) panel levers and controls cover top (the box) Radio System, Mixture Control Lever (red handle), Throttle, AirScrew Control (Propeller). Rear... Elevator Trim Wheel and Rudder Trim bias, Radflap (Radiator Control), Pitot Heat, Fuel Booster Pump and the Carburettor air filter control (Shut lever to keep out the dust on the ground). Right (Starboard) panel top has the famous Wobble Pump for priming the Engine, Undercarriage Control Lever, Oxygen Flow Control Valve and the already mentioned CO2 cylinder for the gear release. There is also a windscreen De-Icing system. Like most cockpit layouts it looks initially complicated, but by using the instruments and knobs and levers it soon becomes familiar as it is quite a simply layout. Menu Touch the right side mid-panel and you get a pop-up menu panel. Created for VR (Virtual Reality) in mind it is really well intergrated into the feel of the aircraft... it is called the "VR/GUI box", fancy! The main radio set is set out here to dial in the frequencies, the A,B,C,D buttons are the set choices and you can switch to these frequencies via the "Radio" box on the left side of the instrument panel in the same A,B,C,D selection. Volume knob is below. Other menu selections cover (Most are toggle switches): Static Elements (Chocks and Tiedown) and a period Ground Power Unit (GPU). GPS (Garmin 530) can be used set under the panel, the default pop-out can be seen, but I had window within window issues in keeping it on screen? You have the option of having the RAF Reflector Sight attached or not... Beautifully recreated this is the standard Mk IID Gyro reflector gunsight. Gunsight switch and brightness knob is below left under the gunsight... .... fully adjustable, FlyingIron notes the gunsight still needs more development in the cross-hair areas. There is an external fuel tank (90 Gallons) but not set out under the wings but directly under the belly of the aircraft... ... the tank switch is buried on the floor right of the pilot's seat. Other items include Batteries (note the real Spitfire has no battery or electrical controls in the cockpit - as in real life the batteries were connected to the terminal on the ground by the ground-crew). Optional Landing Light for Night-Operations. And a Toggle AP that sets the aircraft straight and wings level... in other words you fly in a straight line and at the same altitude for as long as you would want to... or until the fuel runs out. You can switch between the Merlin 66 & Merlin 70 Engine (essentially converting your Spitfire from a LF - Low altitude fighter to a HF - High altitude fighter version series engine with two-stage, two-speed superchargers and vice versa). And the difference of a two-stage, two-speed supercharger is actively simulated here when selected. One button is still in development with the Radio for the Transponder. The Spitfire comes in four versions... the standard above in both Merlin 66 and 70 versions and the clipped wing versions of Merlin 66 and 70. There are actually five different Spitfire wing types in, Type A, B, C, D and E wings but mostly it was to accommodate the different in wing armament designs, the "clipped" version was created to take on the speed of the Bf-109 as part of the the above LF (low altitude) package, so sometimes they are called "LF's". At 10,000ft the clipped-wing Spitfire proved the faster by a small margin of about 5 mph. But above 15.000ft the speeds were about the same, however at all level speed runs the clipped-wing Spitfire accelerated faster than the standard Spitfire. Flying the Spitfire First is to note that the Flying Iron Spitfire uses a lot of custom commands, and mostly on your keyboard, so you will have to set them all up and save them as customized for the aircraft. So a lot of your standard X-Plane default commands don't work or will be replaced with the custom versions. I personally don't like this because my keyboard is set up a certain way for continuity, and changing things around to suit the developer can cause confusion of where is set where. I also took me ages (before the manual was updated) to even release the parking brakes, even now they are hard to use but workable. They are set up for the rudder pedal toe pressures. And there is two custom commands in one (the main one) "Wheel Brakes" and the other is the "Parking Brake" in the custom setting and you do not use the default X-Plane braking setting. It works like this... Press the "Parking Brake" key to release the brakes (it is the handle behind the grip on the stick) and then use the "Wheel Brakes" key to brake the aircraft, to reapply the parking brake then use the "Wheel Brakes" keys to get to full brake hold... and then press the "Parking Brake" again to hold it parked (or lock it). Set up correctly on the joystick made it easier to use, than the keyboard. and a lot of the custom commands are like this. Another X-Plane command is essential and that is the "Toggle_Tailwheel Lock", into lock off or the release of the tailwheel. Only the real Pro's can taxi a taildragger like this, for the rest of us we have to sort of cheat. Starting the Spit This is a cantankerous pre-WW2 aircraft, so starting it can be easy if your luck holds or drive you insane. Reading the manual (printing it out helps) in the start sequence. But it goes like this: First turn the Battery/GPU . (power) on, both are on the VR/GUI... Then you move the throttle until the Indicator switch comes on, the red "Fuel Pressure" light right panel and the "DOWN" light also illuminates, then Prop Control full-forward (Below the throttle). Then the mixture lever to full idle (the red topped lever). Then the "Carb Air Filter" lever to closed (Forward, arrowed below left). Fuel Tanks and Fuel Cock to ON lower panel.... as there is no electrical circuits the fuel gauge doesn't actually work, to see your fuel capacity then press the button by the gauge (upper red arrow). Throttle to ½ open position, then press the "Booster Pump" switch under the Trim Wheel (FlyingIron recommend to use a key input for the booster switch)... you can use the "wobble" pump if you want to have your jollies, and either will prime the fuel until the red "Fuel Pressure" light goes out. Primer is hard to find as it is not noted in the manual or looks like the usual pull out knob, but it is a large turn knob right panel (arrowed above) turns required are noted in the manual for the various conditions. Flip up the two Starter Coil/Booster Coil Safety Covers to expose the "Booster Coil and Starter Coil" buttons... Mixture now to full forward (the red top lever by the throttle) and finally turn on the two magneto switches far, far left panel. To start you have to press the two Booster Coil/Starter Coil buttons together, which is impossible with a single mouse input, so your only option is to a set a key input on the booster coil button via the key selections then press both buttons both via the mouse and key at the same time... And whammo! the Merlin should then fire into life!... Note the excellent particle effects coming out of the engine exhausts, they do however get quite flaming bright in flight. If the engine flames out then that effect is simulated. Clean up the aircraft by hiding the GPU (Starter) and controlling the warm up of the engine to finding a good idle without stalling the hard won power. Taxiing Using the brakes is first letting off the parking brake via your set "Parking Brake" custom key, then reapplying brake pressure via your other "Wheel Brakes" custom key or in my case the park trigger button on my joystick... you know the brakes are released by the loss of pressure on the left lower panel pressure gauge. If you have it set right when you press your "Wheel Brakes" key/trigger the brake pressure should go up again, to lock (or park) then as noted you press the "Parking Brake" key again... got it. Taxiing is an art in the Spitfire like all taildraggers, a bit of flipping the (toggling) caster wheel on the tail to stiff (set on my joystick pinky lever) and holding the brakes in a way to control direction with the rudder, you learn to use the throttle with the brakes on to turn in mostly to the left, then another throttle position to swing to the right, again while holding or releasing the brakes... and to hold your position to go straight you toggle the tailwheel stiff straight and hard right or left rudder to keep it fine tune straight.. tricky yes but doable with practise. The hard part is slowing down... hit the wheels or brakes too hard and you go nose over? Flying A well known trick for taking off in the Spitfire is to give the trim a bit of nose down, you have to find out the best setting for this trim to get the balance right as you lose the tailwheel off the ground and then get the airflow over the aerodynamic surfaces as it levels out the aircraft in pitch. Brakes off and power on, but feed in the throttle very slowly to keep a straight line (tailwheel locked) and use the rudder for small corrections... .... once the tail rises you can see forward, but the view sideways does help in keeping the line straighter. Use your rudder to control, and feel the airflow as it strengthens to keep it aligned straight. Spitfires love to bump or bounce on the ground when they reach flying speed, so a slight pull back on the stick when this movement starts with around 100 knts or 60 MPH and your finally flying... a Spitfire! The Spitfire will easily climb out at 2000 fpm while gaining speed, max climb is 2,150 ft/min at 10,000 ft (3,000 m), even so you feel 2000 fpm is no sweat or drag on the aircraft. Bang up the gear lever and hear the pressured air working away in the background. Climbing or building speed is not over using the throttle, just gradually move it forward until the aircraft feels happy, the throttle hard to the wall does not apply here. Supercharger control is all automatic, unless to turn it to manual, which isn't really needed, and move the throttle to see the supercharger working, the power rises... then the POWER rises as it kicks in (note the two-stage, two-speed kick), but don't over do it on the full on power setting unless you want serious engine troubles. Pilot is animated, but only to head turns, but the Tom Hardy looks good if you want to do a Dunkirk. Guns have to be armed (Master Arm Toggle), which is again another key setting, but your joystick standard "Fire" trigger will do the firing. This aircraft must use the drum-fed Hispano HS.404 cannons in each wing, as the installation here has the required large blisters on the wing to cover the 60-round drums. You can carry bombs as well and the Mk 82 series unguided bombs is the required armament specified by FlyingIron. The Spitfire has a top speed of 370 mph (322 kts 595 km/h), and a combat radius of 410 nmi (470 mi (756 km)). With the external tank the ferry range or the photo-reconnaissance version could cover 991 nmi (1,135 mi (1,827 km)). The RR Merlin 66 puts out 1,720 hp (1,283 kW) at 5,790 ft (1,765 m) using +18 psi boost and the RR Merlin 70 was 1,233 hp (920 kW) at 35,000 ft (10,668 m);and fitted with the noted two-speed, two-stage supercharger and a Bendix-Stromberg carburettor. Trim the Spitfire up and it will sit there all day on a pedestal, lovely to fly (It is one of the most renowned aircraft to fly) in balance and feel, turns are majestic, but watch you don't rub off altitude, so any banks need to be focused and controlled, with using the throttle with turns can smooth out the pitches. When aligned in balance then turn on the AP via the VR/GUI box (you can set another key input)... Sounds are all FMOD Sound Design with 50+ custom Sounds and you notice the dynamic multi-sounds that increase immersion and avoid that recognisable repetition chanting. The odd thing about the sounds in the Spit is that they are just so good, as you just feel them in the background than go searching for them, they blend more than stand out... perfect. The Spitfire will then stay perfectly aligned and level as long as you want it to, move the stick left or right and the aircraft will turn and bank cleanly for ease of flying and direction changing... then when ready centre the stick and the aircraft will simply resume its perfect straight course. Remember to re-trim if you disconnect the AP back to manual flying. Lighting The lighting is pretty basic, but this a WW2 fighter, not an airbus flightdeck. Two adjustable side mounted lights light up the panel... and quite nicely too. Externally FlyingIron provide a single landing light to compliment the red, green and single rear light navigation lights. Overall though you could see yourself flying home late at night from a Photo-Recon mission with your head down in the cockpit with the lighting. These wartime fighter aircraft are extremely hard to land like the Mustang and the Thunderbolt, and I expected the Spitfire to be another sweaty, tense, focused, grip the joystick death like sort of approach and landing. In fact the Spit was quite good, even nice to control and land. FlyingIron recommend to pitch up to lose speed and not to drop off the speed by keeping the throttle in a power band place. I agree with that, but it is easy to balance the Spitfire around the 100 MPH - 120 MPH band. FlyingIron recommend to drop the flap (Only full flap - barn door effect) on the final approach, but I found I could slow the Spitfire to just under 100 MPH and the slow to 80 MPH with ease, and the aircraft was very stable and easy to fly, with just the throttle inputs to keep the aircraft under control. A nice detail was when the flaps are down you get a small flap open on the top of the wing with the flap arms showing to note visually they are in the extended position.... Nice and authentic So the approach even with a gusty cross-wind was quite nice and easy.. so I loosened my grip a little and relaxed... The wind was creating a little full rudder sometimes (a known Spitfire quirk as it had a weak rudder), but the Spit was falling down to the runway with ease... slightly slower... ... slightly off the throttle and I was down. I'm not saying it was easy, easy as it all still required skills to control the aircraft keep it aligned, but it certainly was not that heart in your mouth and fear effect that usually comes with these fighters on landing. Stall is 74 MPH (65 kts) with the flaps extended and 87 MPH with the flaps up Certainly don't touch the brakes until the speed is quite slow unless you want to roll nose over nose and destroy the propeller and engine, certainly a grass landing would be better for running off the excess speed than the hard runway. Like any aircraft of this era and being a taildragger, the more you practice and the more you sort of set up the aircraft around you, then the experience will rise and the enjoyment escalates. There is a certain amount of dedication and skill required to fly these aircraft as they are not a jump in fly cessna or piper GA. Liveries There are ten liveries from the World War era and many are for forces internationally. You expected more than two to represent the RAF (DU-N and Dorothy) as there was some very famous squadrons, RAF Memorial Flight and Burma campaign squadron, but otherwise they are all well done. Summary The Supermarine Spitfire is one of the most iconic, most instantly recognisable aircraft in the history of aviation. Historic and beloved by everyone the aircraft is always a worthy addition to any simulator... I mean who does not want to fly a Spitfire, to know what it was like to be one of the few and see and feel the aircraft from the inside out. So does the FlyingIron Spitfire version live up to the aircraft's distinguished career and iconic status. Well yes it does and does it very well. It is beautifully modeled and designed aircraft and it is full of lovely touches that bring the aircraft above the normal in what you would expect in authenticity of the era and the aircraft. I really liked the brass and copper piping and the glass and all fine detailing is excellent. Mod-cons include a GPS and basic Autopilot, but you don't have to use them if you don't want to. four variants include both 66 and 70 RR Merlin engines and standard and clipped wing versions, sounds are also first rate and very immersive. The Spitfire flies nicely as well, and it feels like the experience that you would expect from a WW ll aircraft, without the extremes of handling and the sheer terror that sometimes you get with these old fighters, that is not to say it is fighter-lite to fly, in fact it is the opposite as skill is certainly required to understand and fly the aircraft and taxiing is a still an art to do correctly, remember the Spitfire was a great aircraft to fly in reality. The aircraft is created around VR (Virtual Reality) and so is the nicely done VR menu box, so the VR experience would be excellent. Most niggles here are not actually related to the aircraft. There are a few areas still not completed like with the transponder and a few other areas were not covered on release (Skunkcraft updater is included), the manual was not completed on release and this review was held back weeks after the release to find (wait) for the details required, there are still large blanks in the manual (Primer pump knob?) and manuals are essential for these era aircraft and novice flyers. What is there however is very good (another release before ready syndrome). There are a lot of custom settings that will ruin any set defined keyboard arrangement, and then try to remember where you set them all in the moving simulation? I lost track... I understand why the braking system was done the way it is, but it is tricky to set up... I now have to put my normal keyboard commands all back to right again and reset everything. The last of the "Few" died only a few months ago, so they are all now gone into history with their bravery. I personally think if any of them had flown this FlyingIron version of their machine, I think they would have been quite overjoyed at the recreation of their past, even highly related to the aircraft and I don't think any accolade could be higher than that... it is a worthy simulation of a very distinguished part of our history. Highly Recommended. _______________________________ The Supermarine Spitfire Mk IXc by FlyingIron is NOW available! from the X-Plane.Org Store here : Spitfire Mk IX Priced at US$34.95 Features : Spitfire Mk IX comes with 4 variants: Spitfire LF Mk IX (Merlin 66) Spitfire LF Mk IX with clipped wings (Merlin 66) Spitfire HF Mk IX (Merlin 70) Spitfire HF Mk IX with clipped wings (Merlin 70) Art & Sound Ultra-realistic 3D Cockpit Model that is used for SimPit recreations of the Spitfire (provided by Heritage Flight Simulations) Incredibly detailed modelling & texturing, both in and out of the cockpit FMOD Sound Design with 50+ Custom Sounds Dynamic multi-sounds to increase immersion & avoid repetition 10 Liveries included Animated 3D Pilot Flight Model Highly detailed & realistic simulation of the Spitfire Mk IX, performance matched to be within a few % of real-world data in all aspects of flight Custom simulation of the differential braking system & ground handling Tested by a team of real-world pilots to ensure accuracy & realism Simulation of unique Spitfire quirks, such as the need for nose-down trim on take-off and many, many more. Realistic spin & stall behavior for aerobatic flying Complex Engine Simulation Code-enhanced simulation of both the Merlin 66 & Merlin 70 engines, with the ability to switch between the two in-cockpit Complete custom simulation of the 2-stage supercharger of the Merlin engines Realistic operating limits, enforced by dynamic failures Systems Modelling Complete fuel systems simulation Realistic navigation systems simulation Emergency systems modeled Simulation of the original preset-radio system, as well as an optional cockpit-integrated modern radio system Complete oxygen systems modelling External Tank systems realistically modeled Particle FX Engine exhaust flash/flame FX Engine over-prime flameout FX Heat-Blur FX Dynamic Smoke FX Ultra-realistic canopy rain FX (powered by Skiselkov’s Rain Library) VR/GUI Box GUI Panel is VR-ready & integrated into the cockpit for maximum immersion (optional – can be hidden) Ability to switch between engine types, toggle ground elements and optional cockpit elements. Autopilot feature for long-distance flights Extra Features Static Elements modeled (Chocks, Tie-downs & GPU) Functional & adjustable RAF Reflector Gunsight (optional) Optional cockpit-integrated 3D GPS (Garmin 530) Functional weapons & controls (Guns & Bombs) Optional landing light Requirements X-Plane 11.30+ Windows, Mac or Linux 4Gb VRAM Minimum - 8Gb+ VRAM Recommended Current version and review version : 1.3 (1st February 2019) Download Size: 1.3 Gb Installation and documents: Download for the Supermarine Spitfire Mk IXc is 1.24 Gb and the unzipped file is deposited in the aircraft "Fighters" X-Plane folder at 1.28 Gb. Documentation:Manual is accessed currently on line : FlyingIron Spitfire LF Mk IX Pilot Handbook (Google Docs) Documentation is still in WIP progress at the time of the review... but it is getting there and will be good when or if finished ______________________________________________________________________ Aircraft review by Stephen Dutton 23rd February 2019 Copyright©2019 : X-Plane Reviews (Disclaimer. All images and text in this preview are the work and property of X-PlaneReviews, no sharing or copy of the content is allowed without consent from the author as per copyright conditions) Review System Specifications: Computer System: Windows - Intel Core i7 6700K CPU 4.00GHz / 64bit - 16 Gb single 1067 Mhz DDR4 2133 - ASUS GeForce GTX 1080 8Gb - Samsung Evo 512gb SSD Software: - Windows 10 - X-Plane 11.31 (v11.30 is required for this aircraft) Addons: Saitek x56 Rhino Pro system Joystick and Throttle : Sound - Bose Soundlink Mini Plugins: Environment Engine by xEnviro US$69.90 : WorldTraffic 3.0 Plugin - US$29.95 : Librain (Rain) - Free Scenery or Aircraft - EGKK - London Gatwick Airport v2 by Pilot+Plus (X-Plane.OrgStore) - US$21.00 - EGKB - Biggin Hill (XP10) 1.3 by Chars (X-Plane.Org) - Free
-
News! - Aircraft Released! : Saab 340 by Carenado Carenado have released the Saab 340 for X-Plane11. Carenado was originally mostly always associated with the general aviation market. But a few years ago Carenado changed their direction upwards, with first to the big twin-engined six to ten seaters like the Dornier Do 228, but a true airliner, even a regional one, was not really an aircraft you would associate with Carenado. This SAAB 340 was the the first true airliner for Carenado when released for the FlightSim community a few years back, but for X-Plane it was not really on the table as a release (my guess is because of X-Plane11 and its very changeable performance and dynamics). But with the release of X-Plane11.30 then the situation has of course changed. The Saab 340 is no stranger to X-Plane as for the Leading Edge version has been available for years, Although well updated.... it is still an old X-Plane design. A quick first look at the Careando S340 says, this is a very nice aircraft. Cockpit is pure SAAB, but also very Carenado... if there is such a feel? The feature list is huge : High-end 4k PBR (Physically-based Rendering) graphics throughout, with ultra-realistic materials rendition (Dynamic reflections, realistic metal and dielectric materials, etc.) Fully customized in-depth annunciator logic/aural warning logic/throttle logic, with friction control, gate, flight idle and flight idle override. Custom EHSI and EADI instruments and custom MFD85 with moving map, all featuring detachable pop-up windows Integrated FMS with detachable pop-up window (Laminar default) Custom APS85 Autopilot with detachable pop-up window Fully customized Custom Torque on Take-Off (CTOT) system Fully customized pusher (anti-stall) logic In-depth FMOD sound design implementation, including distance effects, realistic prop reversal effects, etc. Functional gust lock system Custom electrical system/Starter Logic/Fuel System/prop logic/Bleed Air System/Avionics busses/Hydraulic Logic (Requires, among other things, pressurizing brake lines prior to chock removal)/Electrical Temperature system/de-ice logic Custom independent windshield wiper logic (with functional off and park positions) Airspeed Indicator with “Barber Pole” and functional test sequence RealityXP GTN750 support (with 3D panel display support) Extensive VR support with snap points in every passenger seat (All knobs, buttons, dials, handles, etc. also optimized for VR usage) Extensive HDR lighting with gimballed 3D lights and dynamically illuminated tail logo and ice lights for amazing night lighting effects Ground steering (tiller) system Includes air conditioning, pressurization, and oxygen system Features reversionary logic for EHSI and EADI. All passenger seats support seat backs, table trays, arm rests, HDR reading lights, stewardess call buttons. Main door has optional retractable passenger stairs. Functional stewardess control panel Visible and functional Ground Power Unit End-user customizable via Manifest.json file. Goodway compatible Engine design optimized for XP11.30’s new turboprop model Flight dynamics optimized for latest improvements in XP11.30. Support for “librain” plugin, including wiper support (Requires separate plugin install) Librain support also includes visual ice effects on windows. One of the huge features here is the highly dynamic cabin... Moving seatbacks, moving shades, custom overhead seat lighting, full individual cabin lighting and panel, call buttons and even moveable armrests and drop down seat table trays. Breathtaking! Included is : 9 HD liveries. 1 HD Blank livery S340 Emergency Procedure PDF S340 Normal Procedures PDF S340 Performance Tables PDF S340 Reference PDF S340 Overhead Panel Layout PDF DCP PDF X-Plane FMS PDF Recommended Settings XP11 PDF Has there been external stairs on a Carenado before? not sure, but there is now... Recommended System Requirements Windows XP – Vista – 7 -10 or MAC OS 10.10 (or higher) or Linux X-Plane 11 CPU: Intel Core i5 6600K at 3.5 ghz or faster. Memory: 16-24 GB RAM or more. Video Card: a DirectX 12-capable video card from NVIDIA, AMD or Intel with at least 4 GB VRAM (GeForce GTX 1070 or better or similar from AMD) 755MB available hard disk space First impressions really count... brilliantly done and that cabin is to die for. Systems and performance are tricky and require a lot of study to work your way around the cockpit, instruments and the autopilot also requires some study.. sounds are incredible, as they are very realistic externally but very good internally and again in the cabin, It will take time to learn and fly correctly, so don't expect that from the first flight, my thoughts are a semi-grade to full study aircraft. Price is noted as ... US$39.95 Now Available from Carenado ________________________________________ News by Stephen Dutton 20th January 2019 Copyright©2019: X-Plane Reviews
-
News! - Simulator Environment : SFD Global by ShortFinal Designs Hot on the heels of ShortFinal Design's extremely successful EDDM - Munich scenery is the announcement of their next scenery... or project. It isn't actually a scenery but a complete reworking of X-Plane's internal terrain textures, autogen regions, and creating HD forest and vegetation textures. That is a really big proposition, but ShortFinal also have the runs on the board for you to know that if anyone can deliver such a big transformation of the simulator it is ShortFinal... and exhibit A, with their excellent Japanese autogen that blows your socks off. Terrain Most of the terrain currently in X-Plane hasn't really changed in years, and mostly because it is already very highly efficient, but detail and quality is not one of it's fortes. In reality it has done a really good job over years, but like everything else in X-Plane there needs to be a HD (High-Definition) feel that currently is just not there... hence the new textures from SFD with more detail and a more quality feel. The most interesting aspect of this is "how much will these textures change the feel of X-Plane". And that is a very good question, because it is the current textures that have been the most consistent look and feel of the simulator since the release of X-Plane10. And textures are the core and soul of the simulator, efficiency is not really an issue, because ShortFinal already do extremely highly efficient sceneries. Autogen Since I started in X-Plane I have had one serious major gripe (global) autogen. It was also seriously worse than what we have now, in just the US style autogen being available wherever you set your wheels down in the world... Africa, Greece, Singapore... all American, hated it all with a passion. The most jarring areas were the Middle-East and southern European countries in Italy and Greece... I mean US housing in Greek Rhodes is simply horrible. The German 11.20 European autogen was a revelation when released, but also showed the serious issue more glaringly as well in how bad the situation really was, and with no foreseable fix on the horizon coming from Laminar Research.... The one change in X-Plane 11.20 that did now allow regions to be now specified within the simulator just begged for a package or packs of specific world autogen... but there was nothing until now. Middle East Italian First three region areas will cover the Mediterranean, Africa & Middle East (as one region) and Southeast Asia. More regions will be announced later during the development. The USA and Europe central will not be available, because the autogen there is already very good, this package is really a filler for the rest of the world. Extra smaller packages will later cover the more remote areas like the Nordic states and Australia, Japan we already have, but it might be tweaked to fit in with the full global package. It will be interesting to see how far this new system will go. But one thing is very evident, it will be very good in quality and range. Trees and vegetation are also in the package, but currently there is not a lot of development in that area, but here is one glimpse... Trees are actually a crucial area of coverage in X-Plane, get it wrong and any scenery looks awful, so it is very important to get this aspect correct. Like with Laminar Research there will some Landmarks as well... Like with here with the Petronas Twin Towers in Kuala Lumpur and the Leaning Tower of Pisa in Italy. Personally I don't see the point of the odd landmarks in a city, as they feel odd without the other aspects that make up a city outline. Dedicated city packages are still a better way to cover these areas and are far better for VFR flying than the odd landmark in a city desert. ShortFinal's forum page is here to keep up with the latest developments... The intended release of SFD Global? well not yet, but around or after Easter is the target. All images are courtesy of ShortFinal Design ________________________________________ (Disclaimer. All images and text in this review are the work and property of X-PlaneReviews, no sharing or copy of the content is allowed without consent from the author as per copyright conditions) News by Stephen Dutton 19th February 2019 Copyright©2019: X-Plane Reviews
-
Aircraft Review : Epic E1000 - G1000 Edition by Aerobask Like a lot of developers, then Aerobask have had to rethink their range of aircraft to migrate to the dynamics of X-Plane11. In the past between the X-Plane versions the changes were large, but in most cases an update or two would cover the conversion and the overall aspect of the design would in someways not really change. But for the migration to X-Plane11 and certainly to X-Plane11.30 then that earlier transfer does not really work.. the differences are just too different and are most aspects of the design, from the modeling, the performance and the PBR effects and also the now minimum requirement of 4K textures and all... and plus on top of all these new elements it is that all have to be far more efficient and computer friendly. This has to a point made the aircraft migration of any developer's past range of aircraft a slow and tedious process and like with the new dynamics of 11.30 as you sort of go suddenly again back to the bottom of the ladder with all these newer updated dynamics. So it is all to the good of course as the product is usually far more dynamic and sensational, but the process means that even now in the two or so years since the release of X-Plane11, then it is that most developers are still ticking of their past aircraft, and spending time more so doing this than in creating new aircraft. But the above process can be used to your advantage as well. As no matter at the time in that even if you have created your best work, there was always something better you could have done, but then couldn't change because it required usually a new design from scratch. So in reality although these aircraft are the same original designs as the pre-X-Plane10, they are also completely new... and from the ground up. And so it is with Aerobask's Epic E1000 which was released originally just under four years ago (E1000 Review), and at the time the aircraft was the state of the XP10 art. This new version is the state of the XP11 art. It was back then so brilliantly created, but the four years in simulation development now shows us how much has really changed within that period, and as a yardstick the differences between the simulations. So this new Epic E1000 from Aerobask is even if it looks the same it is in reality a completely new aircraft from the original, no updates, no adjustments... but a completely brand new design, and so you know that feel straight away as it is all very new and different. The Aerobask developers themselves would admit they alone have come a long way in four years, always very good, always very innovative... you now usually buy on the Aerobask name alone without even looking at the details... and for any developer that is a very high reverence to achieve, but Aerobask do also deliver, again and again to achieve that prominence. And the new E1000 certainly also delivers on that promise. Modeling is now perfection, no bumps or 3d odd angles and that is a certain smoothness of design that captures the difficulty of creating a featureless composite aircraft. It took years to perfect it, and here it all is now in it's glory. Certainly the PBR effects go a very long way in creating the feel and reflections that bring that sleek almost dolphin shaped design to life, and no matter what the visual angle it always looks glorious. Glass and chrome are also now hyper realistic and not faked liked in the past, metal variations of materials are also beautifully represented. X-Plane users have come to expect a lot, and you are even "spoilt" for this short of hyper realism... but the developers deliver it, so why not absorb it and revel in the greatness of it all. The trailing link undercarriage looks standard from a distance, but the detail is evident when close up. Cabin Detail "Careful" and not to trip over the latch on the door while boarding... Internally in the cabin it is an odd layout, just in the rear a four club seating but with a huge space between the seats and then again a space between the passenger and pilot seats in the front... you automatically say "You could easily fit another row in here". Renowned for their cabin fit-outs and materials, then Aerobask don't disappoint in here with the E1000 either. Detailing is excellent, with modern materials and that feel of executively. The attention to detail in here can be overwhelming. The cockpit is almost the same layout, but it is in reality a very different look and feel from the original. The modeling detail is that so much smoother and the materials are light years in difference. You have to also really admire that paneling curvature and molding, and even the trim changes colour to the external livery... It is a very modern cockpit and far removed from the older Beechcrafts and Pipers.... this is all slicks and curves. There are also some significant differences between the two aircraft... the old and this new version. The biggest change is on the stub console. The original version was dominated by the aircraft's menu panel and above the MEGGiTT autopilot and Garmin GMA350 radio unit... .... now there is a "Remote Control Key Pad" for access to the G1000 avionics suite, which is very similar to what you use on the Cirrus aircraft. The MEGGiTT autopilot is also gone and replaced by a annunciator panel, but the Garmin GMA350 radio unit installation is still the same.This GMA 350 is really the only external avionics unit now in the aircraft. Note the extremely different design and feel of the yokes. Laminar Research G1000 As there was no decent G1000 glass system around four years ago. The various developers came up with a wide range of ideas to create in most cases a hybrid avionics system to replicate the Garmin suite. Aerobask tried in someways the hardest to create a functional and realistic system. Aerobask created a Garmin G900 Primary Flight display (PFD) for each pilot, and the center display (MFD) as a modified X-Plane GNS530 unit. And note these G900's were only an accurate representation of a real G900 even then. It worked, but the MFD was a bit of stretch in more ways than one. But at the time it was actually very good. Since that time Laminar Research have created as default a full G1000 avionics suite, and so the "G1000" moniker on the this aircraft reflects the install of that default system on the E1000. But a bonus here is not only is this G1000 more authentic, more powerful... but also adapted for use with the Remote Control Key Pad and also includes the GFC700 autopilot. One thing also becomes very apparent is the install of the three displays. The centre MFD is more pronounced and set more forward than the two PFD displays set either side... and yes it was the same set up on the earlier version (I checked). But here it is far more noticeable if even with a more visually perspective. The earlier version came across as just three displays in a line. It is outstandingly done, as you feel the installation of the displays are very realistic, and it is highly noticeable in flight. Primary Fight Display The Laminar G1000 is now quite extensive, but there are a few differences between this one and the older version, some good and some removed. The display can be opened in a window via pressing the small aircraft symbol in the centre of the heading rose. The main PFD has the the split horizon which is here to the darker even dreary brown and blue of the default look... of which I don't really care for, the older version was the far nicer gradient version, and this bland default background display can be adjusted as Carenado did on their Cessna 172SP G1000. Secondly is the optional Engine Information System (EIS) is only available on this version in the PFD in the Emergency mode (see below). The G1000's PFD main flight instruments that are all correct with the artificial horizon, speed and altitude tapes, bank roll scale and roll pointer and HSI (horizontal situation indicator), course and heading pointer which are all in one. The FD (Flight Director) elements are also shown. Other features include "Inset" map, alerts, REF/TIMER, NRST, XPDR, both VOR 1 and 2 pointers, DME and Wind (3 options) ... top banner includes Radio NAV (left) and COM (right) Autopilot info (centre). A feature is that you can adjust the radio frequencies directly with a mouse scroll wheel while holding the cursor over the frequency you want to adjust. Another pop-out adjuster panel can also be used on like the "Altitude" (press arrowed) and Baro pressure.... press the green band to insert the number. Multi Functional Display The centre MFD is quite different from the hybrid forebear. The pop-out selector is also quite hard to find as it is not the PFD centre aircraft symbol, but a hard to find touch spot hidden in the top banner under the GS (arrowed below left). The side panel Engine Information System (EIS) Engine readout covers TRQ (Torque), NP (low-pressure rotor RPM), ITT (Inter Turbine Temperature), NG (N1 for Turbines). If these readouts look different it is because they are. This is a custom set of engine performance readouts created by Aerobask to be more authentic to the E1000 avionics readouts. If you want the default, then can have that via the menu (below right). Lower EIS shows Fuel Flow GPH (Gal per hour), Oil Pressure and Temperature, Electrical Bus AMPS and Volts, Fuel quantity (GAL) is for both tanks (145.5 Gal per tank) in a scale. More engine readouts can be accessed via the "System" button. Fuel readouts are top with Fuel Flow GPH, Fuel Flow PPH (lbs per Hour), Fuel Pressure (PSI) and quantity left and right tanks (lbs) - Fuel Totalizer shows lbs Remaining and lbs Used. Totalizer amount can be increased, decreased or reset Lower is the Electrical Gen A (amps)and ALT A (amps) and Bus 1 Volts and Bus 2 Volts. On both EIS displays are also the Aileron position marker, Rudder position marker, Elevator position marker and Flap position UP-10º-40º Pressing the RED button upper right on the pilot's PFD will change the displays around for emergency flying and bringing the EIS onto the PFD and moving the PFD to the centre in then replacing the MFD (got that?) Flightplanning The really big advantage is using the "Remote Control Key Pad" to create route planning via the "FPL" key (arrowed). Input is easy via the keyboard even in VR (Virtual Reality) My route is from EGKK (Gatwick) to ELLX (Luxembourg) and you can easily assemble the routing data, however I chose to create the route in SimBrief and then import it directly into the planner. The bonus is that you have the options of adding in easily via the "PROC" button any Departure or Arrival routes (SID/STAR) or a certain approach that you would like. The bonus is that the added on Dep or Arr segments don't mesh up your central route planning either and it all fits in seemlessly together. You can set the display to either "Narrow" or "Wide" orientations. The days of data planning and input frustration are well and truly over. Lower Panel On the left side shoulder panel is the main switchgear. The E1000 aircraft has a unique way of switching on the various systems... the three rows of buttons are set out to be used at the various points of getting the aircraft ready for flight and in switch order. Top row is the "Pre-Start" Second row is the "Pre-Taxi" and the lower row is the "Systems". The layout although arranged by the same rows of buttons as the earlier E1000, but the sequence of activation of the items are actually arranged differently, so you will need to relearn the buttons sequence. Pre-Start includes - Batteries (Batt 1 & Batt 2), Avionics Master, Fuel Pumps (Left & Right) and Starter Gen selections Pre-Taxi Includes - Igniter, Start, Stby Alt, Fuel Autoselect and Pusher Systems Includes - Auto Pilot, Trim, Press Air, Emerg Press, Dump Valve and Emerg Oxygen On the right is the "LIGHTS" panel the lighting panel. Items include Ice (wing light) Land and Taxi lights, Strobe and Navigation lights and a Beacon (a new light). Another lower button panel is your "ICE" buttons for De-Ice Boots, Propeller Heat, Window Heat, Inertial Separator, and the Pitot Heat (Pitot Stall HT). Bottom panel are the circuit breakers and they are all active, pull a breaker and the item stops working. Right side shoulder panel are the cabins Air Cond and Cabin Oxygen controls and more active circuit breakers. Both yokes can be hidden, but only together and not independently. Left side of the Remote Control Key Pad is the gear lever and on the other the flap selector switch. Pedestal is in two layers (beautifully moulded) with the top section holding the Throttle, Propeller (feather) and Condition levers (Throttle has power "Max/Idle" settings and a "Beta" reverse thrust setting). There are four buttons above with "warnings" on them, so you don't touch them, the manual says that you NEVER touch them. Lower section has the lovely crafted Fuel Switch for OFF- LEFT- RIGHT (Tanks). On the floor there is a Manual Gear Extraction feature... and it works. Again amazing detailing and functionality. MD302 SAM The MD 302 Standby Attitude Module (SAM®) made by Mid-Continent Instruments and Avionics and the unit is placed left of the PFD. This is a set of backup instruments, but in reality an avionics suite by itself. Upper panel is an artificial horizon, turn rate and compass heading... lower panel is the Speed and Altitude (Baro centre). The single knob does all the adjusting and selection. Turn the knob to adjust (arrowed) the Baro (note the Baro on the SAM is not connected to the G1000, so you have to adjust the pressure manually here as well). Press the knob and turn to adjust the MD302 brightness. Hold the knob down for a full menu of adjustable settings. Above the MD302 SAM is the instrument and forward spot cockpit lighting knobs. Menus There are four ways to access the E1000 menu. One is from the pull down plugin menu, Two is from the 'a" tab lower left of your screen, Three is the Epic Logo centre panel and Four is via the iPad in the side storage bin. The menu is laid out in the new Laminar XP11 pop-up style and there are four tab selections with : Ground, Options, Sounds and About. Ground : Is both a menu and a basic Weights and Fuel setup in one. Fuel sliders top will set the amount of fuel required in both kgs and Gal and show the fuel weight... A side note here on refueling the E1000. You have to be really careful to balance out the fuel on the E1000, both on the ground and in flight. If you don't then you will get this, yes this is an extreme example, but it also shows how sensitive this aircraft is to the loading of the fuel and weights. Well done though. You can select passengers (pilot is free but he still counts in the aircraft weight). With a Co-Pilot, R&L Passengers, R&L Children, baggage is None, 60kg and 120 kgs... and all weights of loaded Fuel and passengers are shown in detail with full all up weight and Maximum weight allowed. There is no CoG scale or graph. All passengers are shown and the bags are shown on a luggage trolley, but they are not visible internally and only externally, which is a shame as the modeling of the people is very good. Static elements include: Chocks, Engine inlet/outlet covers, pitot covers, towbar and loads of flags... but they are all or nothing. So it makes closing up the aircraft a bit awkward with say the towbar attached or if you just want the chocks after a flight? The Ground Power Unit (GPU) is now a more heavy duty design than on the earlier E1000, it is very nice... but also extremely noisy if the door is open. Button will open the single door or via the internal handle. Options : Are mostly for selections of the G1000 and custom features, like the change of the custom to default G1000 engine display, but a few are still experimental. You can choose to keep the pop-ups inside the screen (VR) and switch on/off the instrument and window reflections. Top of the menu is the reliability of the electrical system via the circuit breakers, or you can reset them all in one push of the button. Sounds : The sound panel is just a carbon copy of the X-Plane11 sounds panel and if you adjust it here, then you adjust it there and vice-versa, with just two added buttons with the "Enable Sounds" and "Enable Speech" selections. About : The final selection is a credit page on who created the aircraft. VR iPad AviTab One of the great features is the iPad and it located in the side storage bin. Obviously created for VR interaction, it is highly useful for the 2d generation as well as It works with the Avitab (Aviators Tablet) plugin. It works quite well in a basic form with mostly for access to stored pdf files and note taking, but internet access would be a nice feature. My use here was with the Navigraph Chart access that is now available (make sure you have AviTab v0.3.14). You login and create access to your Navigraph account, it is all seemless and works extremely well... You can bring up all your charts and airport information to have it all by your fingertips. My only wish is for the tablet to be in both landscape and Portrait modes because most charts are in the portrait orientation. But it is highly usable as you can (in 2d mode) move the tablet out of view (it goes smaller) or keep it in eyesight when taxiing or flying. As noted the aircraft's menu can be accessed on the tablet as well. Flying the Epic E1000-G1000 Starting the 1200 HP Pratt & Whitney PT6A-67A engine is a simple as following the keys in order... Pre Start row done, fuel on, mixture lever to idle... then follow the Pre-Taxi row of buttons until you get to START... easy peasy. Marvel at the propeller as it moves ready from it's feathered position to half way, then that familiar PT6A whine comes in from the forward engine compartment, it does take a fair while to start, run and then settle into that smooth turbine idle speed and sound. The E1000 does come with all the latest fine-tuning from Laminar of this turbine engine, which has been a focus project for most of X-Plane11. This includes the newer 11.30 performance details with separate 2-stage free power turbine and 1-stage gas generator turbine internals now also available on this engine in X-Plane11 (output is now divided between both stages, were as before the output was only one stage). Of course it sounds incredible, looks incredible as the powerful exhaust flows out past and down the side of the aircraft, and courtesy of the particle effects. You wait and let the output numbers settle down, then you are good to go. With the Throttle at idle and the COND at idle, I still needed to put the PROP position half-feather to keep a decent taxi speed, if not the E1000 will run quickly away from you. Flaps have to be set at the takeoff position... ... view out of the cockpit is excellent as there are no obstacle or blind spots in your view point, but the reflections are quite strong. On the original E1000 had the stick like undercarriage that took some getting used to, that version was harder in give (hence the solid stick feel) than the far better set up here as the undercarriage has certainly more give, but it is still tricky until you get used to it... as you still sit still tall and narrow on the wheels. So forward movement needs to build very slowly until really the aerodynamic forces give you more control, then you can give the throttle more power and also still have directional control, and powerful is that PT6A on an aircraft of this size, so use it wisely. Rotate is around 85 knts and the aircraft will climb out easily under full power, 2000fpm is also easy but if you want to really go for it then the official climb rate is around 4,000 ft/min... "wow". This aircraft climbs and goes up like hell even with a fair weight aboard, so you have to be in control of the machine and not the other way around. So instead of being cocky and flying the E1000 like fighter pilot, then try to fly it as a professional and stay well within the boundaries, and there is a reason for this. I have my X-56 joystick quite well set up and refined, so like the spindly undercarriage the aircraft in the air feels the same, a little nervous, any strong wrist action will make the aircraft do sharp movements... so you have to keep everything really very intimate, slow and precise. As it is like an aircraft balanced on top a sharp stick, and it will move to any position very sharply. Like bank and you go down wing very quickly, so you tune into it but do it slowly, but you need focus and use slow movements to guide the E1000 in an easy and thoughtful way. Yes so that is very strong aspect of the flying in the E1000... focus. Just pressing AP (Autopilot) and the NAV on the G1000 MFD left panel won't activate the Autopilot? There is still another button on the "Systems" menu before it will activate... ditto the PRESS AIR that seals the aircraft for the high altitude flying. The environmental cabin controls are on the right side, and yes they really work via the 11.30 Oxygen feature. The G1000 flightplan is very comprehensive and the Laminar G1000 Manual is well worth the download and study. But if you are using the VNV function and importing a flightplan (SimBrief) then make sure ALL the waypoint altitudes are correct and filled in, instead you could get almost a straight up and then straight down climb and descent, you need to control the flightplan profile correctly. Here I am checking and adjusting my descent into ELLX and then seeing the changes in action. The Epic is a turbine propeller alternative to a small four seater private jet, so the numbers have to stack up to compete with the same performance, with cost being the major factor. Maximum speed is 325 kn (374 mph; 602 km/h) Max cruise which seriously fast for a prop aircraft and Cruise speed in Eco mode is 265 kn (305 mph; 491 km/h). Range: is 1,385–1,650 nmi (1,594–1,899 mi; 2,565–3,056 km) at either max cruise - eco cruise with a Fuel Burn of 300 kn (560 km/h), FL340: 40–60 US gal (150–230 l)/per hour and the Service ceiling of 34,000 ft (10,000 m) can be well within the reach of jet transport. Impressive. The window reflections can be quite heavy in certain lighting conditions, but overall they are very realistic. Lighting The lighting is very good to brilliant but limited in the ways you can adjust it. Those big G1000 displays put out a lot of candle power, but you need them bright to read the screens. All in the G1000 displays and switch instrument lighting can be adjusted, but only globally and say focused just on the pilot's side. Cabin is all LED lighting and two forward lights cover the cockpit... ... the cabin overhead LED's are amazing and are all adjustable, but only directly. And floor strips of LED lighting is in front of pairs of seats and the door entrance when open. External lighting is good but the standard layout... Two wing edge LED landing lights and a single nose wheel taxi light. There is a left wing Ice light, belly rear beacon and the navigation and strobe lighting. For all it's high speeds the E1000 is very good at low speeds... you can set the flap to 10º and set your speed at a low 148 knts, which is great for aligning up to a runway and the aircraft is rock solid (180 knts is the 10º max). Want to go even slower and you can, 130 knts is the limit for 40º flap (down) and you can then reduce your approach speed to an amazing 100 knts - 97 knts... not even a Cessna 172 can go that slow? Can it? You can keep this position and speed and control the descent via the throttle and the adjustment of the pitch, it is all very hands on but very controllable. Your aim is to just let the E1000 sink slowly... those stick legs can be quite stiff if you try to go in to fast or down too quickly, yes there is more give in the trailing edge gear, but you mustn't try your luck too much. You don't need a lot of flare either, just let it down via the speed throttle control. 85 knts is the touchdown speed and the stall speed is a low 61 knts. There is a built in BETA reverse, and the best way to access it is to use a key input "Toggle Beta Prop" from the X-Plane menu. It works, but I haven't used it enough to see how really effective it is. Using the brakes is your last option, and if you have runway space then use it to run off the excess speed and keep control. Overall I was very impressed with the low speed approach, it gives you time to adjust and fly the aircraft with time on your side. With most aircraft in this category (mostly price wise here) in that these are very finely tuned aircraft need time and practice to get the very best out of them, certainly brilliant for flying, but they require certain skills and professionalism to extract the full potential from their dynamics. Liveries A wide selection of twelve liveries gives you plenty of choice and use, but mostly based in Europe and USA... they are all high quality and 4K refined with the Metal skin COBALT and the magic N333AK the highlights, N410LT is the default. There is a White (for painters) and Lo-res liveries that are also available through Aerobask website. Summary It is an Aerobask aircraft... many will purchase on the name alone. That is for a quality aircraft, huge features, brilliant ideas, massive internal detail and materials. So does the E1000 - G1000 Edition live up to all that high acclaim... of course it does. This the second version of the Epic 1000 from from Aerobask, but discount the similarities right there, because this is a complete ground up redesign of the aircraft, and for not only X-Plane11 but for X-Plane11.30 as well... it is all in here, and it shows in every dynamic of its PT6A turbine performance and also real world latest certification prototype performance and in it's complete dynamics of the perfect use of PBR in glass, reflections the sheer quality and depth of its design. X-Plane11.30 boots-based wings and stabilizer de-icing system and working oxygen system (11.30 again) and functional breakers are also part of the in-depth systems. Features are clever and well thought out, including the various tools required for Virtual Reality use and even the use of AviTab. Menus are clean and well thought out, but the static elements are all grouped together with limited flexibility. The title says G1000, and that is the main feature of the E1000... the Laminar Research G1000 avionics suite and tools. And very good it is if you are willing to study the manual in depth to get the very best out of the avionics suite. There are no compromises now unlike with the earlier G900 based system, it is good and works well in here. Only point is the dark and bland default PFD Artificial Horizon screens, not a fan, and they spoil the customised side of the aircraft and a surprise they were installed here, and I have seen a better AH on the Laminar G1000. The other avionic features includes the MD302 backup instruments and GFC700 autopilot... nice. Flying dynamics are good to excellent, but the aircraft requires skill to get the really best return out of the aircraft, then the E1000 will return the favor back in full. Sounds are also fully dynamic with full FMOD spatial surround sound. A comprehensive review details a very comprehensive aircraft... that is nothing new for Aerobask, they deliver... they deliver brilliantly - Highly Recommended. _______________________________ The Epic E1000 - G1000 Edition by Aerobask is NOW available! from the X-Plane.Org Store here : Epic E1000 G1000 Edition Priced at US$34.95 Features : Aerobask quality 3D model Completely reworked and re-scaled exterior and interior model New 4K PBR textures 11 stunning liveries out of the box Color-matching interior based on livery White (for painters) and Lo-res liveries available through Aerobask website Smooth and VR-friendly manipulators Professional Flight model New flight model by X-Aerodynamics Tested by actual owner Gianfranco Somma of Somma Aviation Matches latest certification prototype performance High quality sounds full FMOD environment by Daniela Rodriguez Careri samples from real PT-6 engine in-game volume control without pausing the sim Enhanced Laminar G1000 Integrates new XP11.30 GFC700 autopilot Custom MFD PT-6 engine parameters (on PFD in reversion mode) Optional mouse, scrollwheel and dialpad support for easy data input Optional keyboard support for dialpad and flight plan input Custom detachable popups with fixed ratio and all optional features above Note: some of the optional features may need VR-mouse at the moment Deep system emulation Realistic engine startup procedure Implements new XP11.30 boots-based wings and stabilizer de-icing system Implements new XP11.30 oxygen system for emergencies Functional breakers, with configurable reliability Fully simulated MD302 Standby Attitude Module Special effects Rain and windshield icing using librain plugin from Saso Kiselkov Dynamic reflections custom heat blur effect on both sides custom engine twin-contrails Other Avitab tablet, with integrated options panel Detachable and VR-friendly 2D options panel Preferences, fuel and payload saved between flights Requirements X-Plane 11.30+ Windows, MAC or Linux - 64 bit Operating System 4Gb VRAM Minimum - 8Gb+ VRAM Video Card Recommended Current version and Review Version : 3.22 (Feb 12th 2019) Installation and documents: Download for the Epic E1000 - G1000 Edition is 446.70 Mb and the unzipped file is deposited in the aircraft "General Aviation" X-Plane folder at 521.40 mb. Avitab (Aviators Tablet) requires the download of the plugin and for the Navigraph charts you need a Navigraph account. Documentation: Huge amount of documentation, with full manual, (including training flight), Laminar G1000 manual, Performance, checklist and guidelines included. Documents for MD302 and AviTab are also included. A real world document (Get to) "Know your PT6A" is also part of the package. Avitab integration.pdf E1000_2019_manual.pdf Epic E1000 G1000 Edition Checklist Normal.pdf Install Recommended settings.pdf Performance Guidelines Epic E1000 G1000 Edition.pdf Quick-Doc MD302.pdf Know_your_PT6A.pdf ______________________________________________________________________ Aircraft review by Stephen Dutton 16th February 2019 Copyright©2019 : X-Plane Reviews (Disclaimer. All images and text in this preview are the work and property of X-PlaneReviews, no sharing or copy of the content is allowed without consent from the author as per copyright conditions) Review System Specifications: Computer System: Windows - Intel Core i7 6700K CPU 4.00GHz / 64bit - 16 Gb single 1067 Mhz DDR4 2133 - ASUS GeForce GTX 1080 8Gb - Samsung Evo 512gb SSD Software: - Windows 10 - X-Plane 11.31 (v11.30 is required for this aircraft) Addons: Saitek x56 Rhino Pro system Joystick and Throttle : Sound - Bose Soundlink Mini Plugins: Environment Engine by xEnviro US$69.90 : WorldTraffic 3.0 Plugin - US$29.95 : Avitab (Aviators Tablet) - Free Scenery or Aircraft - EGKK - London Gatwick Airport v2 by Pilot+Plus (X-Plane.OrgStore) - US$21.00 - ELLX - Luxembourg Findel Airport XP11 by JustSim (X-Plane.OrgStore) - US$19.80
-
News! - Aircraft Updates : JustFlight updates ALL aircraft to 11.30 JustFlight/Thranda have updated ALL of their aircraft to X-Plane 11.30 specifications... All changes include: Common to all aircraft Support for rain effects (requires free 3rd party "librain" plugin) Improved VR (VR Pop-up support, cleaned up yoke, more supported knobs, etc.) Improved sounds and sound effects Upgraded to SASL 3.5.1, which now includes pop-out window support Revamped RealityXP configuration to bring it to the latest capabilities of the GTN750 Revamped flight dynamics for XP11.30 Broke out checklist to "manifest.json" file, so it's end-user editable now. Moved cockpit.obj file into "objects" folder, for neater top directory. Numerous optimisations and improvements. TB10/TB20 v1.1 New graphics, improved PBR materials, fixed textures. Added VR magnet attach point for XPad Added VR click spot for Just Flight pop-up menu Hawk T1 v1.2 Smoke effects (red, white, blue smoke with smoke pod attachment). Added VR click spot for Just Flight pop-up menu Fixed some texture artefacts Improved rotational inertia around the roll axis Integrated XP11.30's oxygen system Fixed some VR knobs Improved throttle latch logic C152 v1.1 Added VR magnet attach point for XPad Added VR click spot for Just Flight pop-up menu Added RealityXP support (GTN750 now integrated in 3D panel) Closed up compass Improved ground handling Added paint kit Fixed quick-look views Arrow III v1.6, Turbo Arrow III/IV v1.6, Warrior II v1.6 and Archer III v1.1 Added VR magnet attach point for XPad Made spark plug fouling rate and Vapour lock configurable via manifest.json file. Hide Yoke system now responds to X-Plane's default command Optimised performance. Fixed case sensitivity issue for Linux Removed default wing condensation effects. (They're excessive by default). Note the new feature for the Librain (rain effects) plugin on all the aircraft.... see here: librain (rain) library for windshield effects If you have a Just Flight account, then go and click on 'Your Orders', you will be able to re-download the installer(s) for the aircraft you have purchased to get the latest updated version(s). X-Plane.OrgStore updates are available ________________________________________ (Disclaimer. All images and text in this review are the work and property of X-PlaneReviews, no sharing or copy of the content is allowed without consent from the author as per copyright conditions) News by Stephen Dutton 14th February 2019 ♥️ Copyright©2019: X-Plane Reviews