Stephen
-
Posts
2735 -
Joined
-
Last visited
-
Days Won
356
Content Type
Profiles
Forums
Articles
Everything posted by Stephen
-

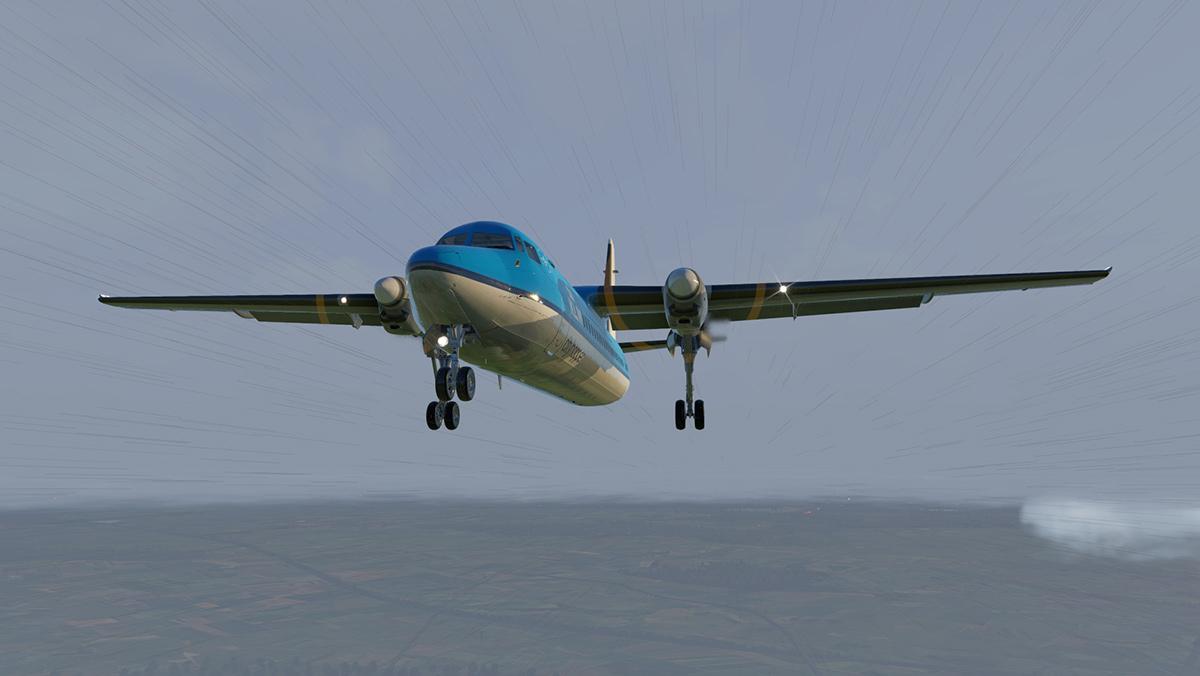
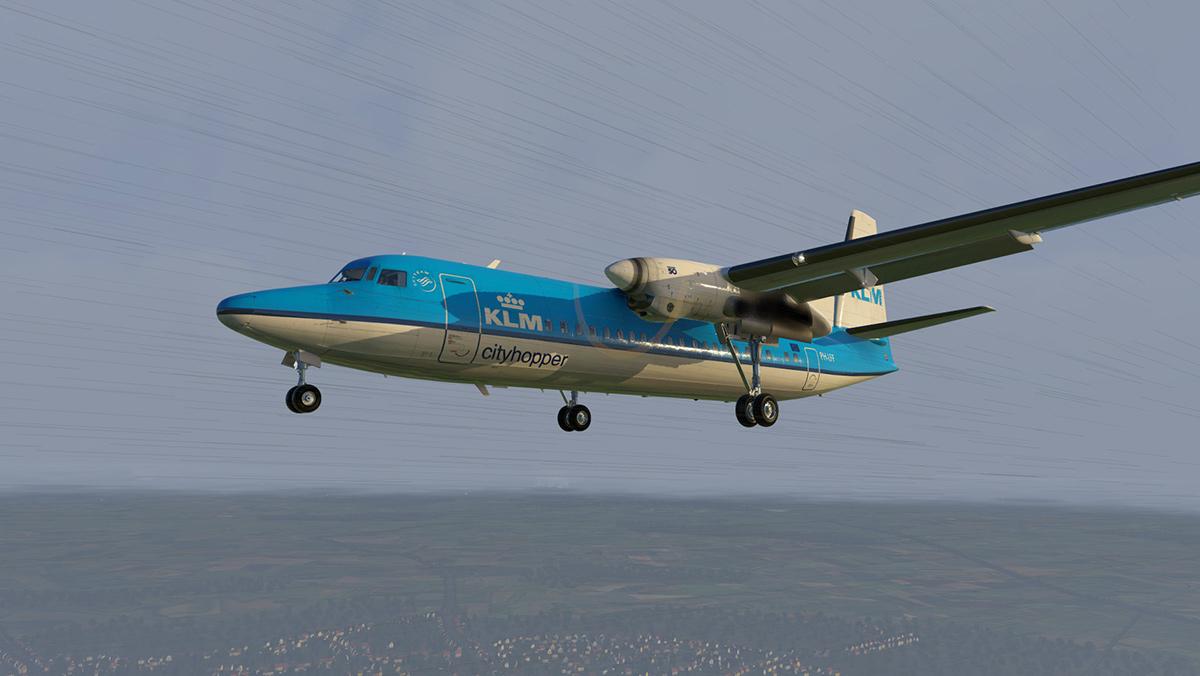
Helicopter Review : Bell UH-1 Iroquois "Huey" by Nimbus Simulations
Stephen replied to Stephen's topic in Helicopter Reviews
Nope! too deep now into X-Plane11 to work in XP10... a conversion would not work. -
Obviously you didn't read the manual? This is early FlightFactor so you will need ALL the Visual C++ Redistributables installed for the B777 to activate...

-
Payment is fine, but I don't understand why FF are continuing with this silliness
-
It is a bit of a joke, why I don't know?... you pay but you get a $979.00 refund?, but it is very odd business for just a $20.00 payment.
-
I heard reports that Mr Wilson was not well or had been in hospital... that's all I know.
-
There isn't one, it was a completely new version v2
-
Very good question? Personally I don't know because I simply don't have the SSD storage to test it, these Orbix files are extremely big in Gb size... but I would like to know the answer as well.
-
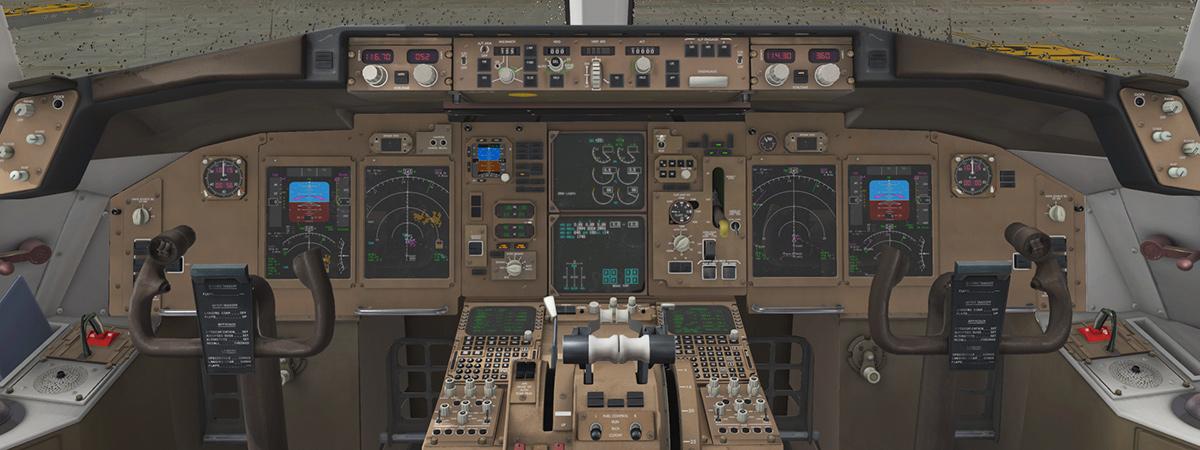
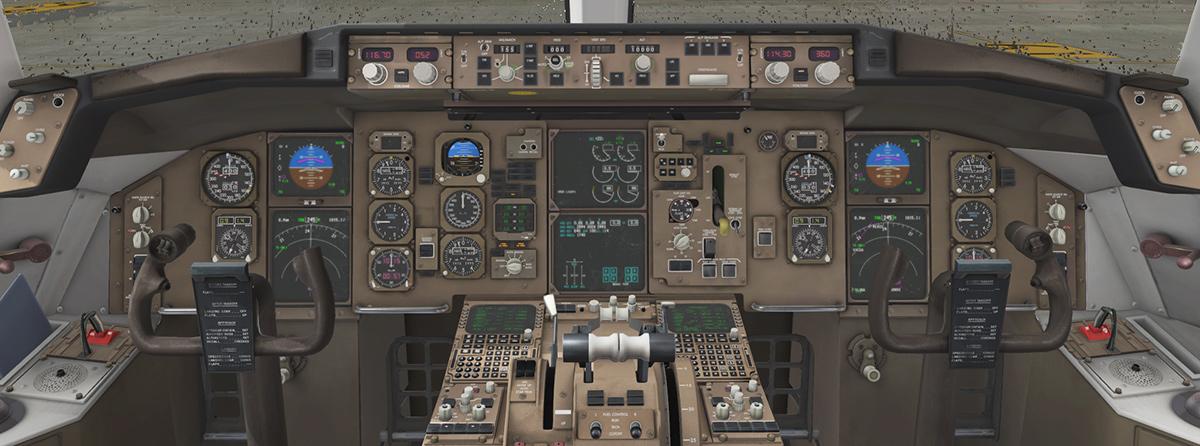
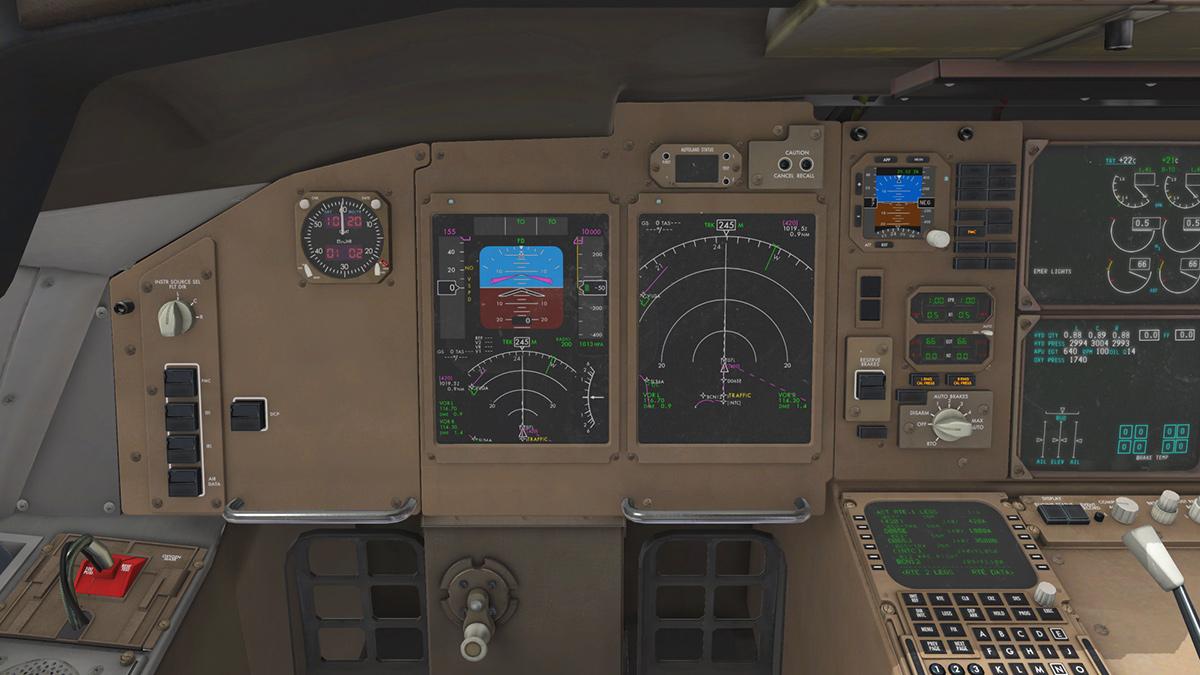
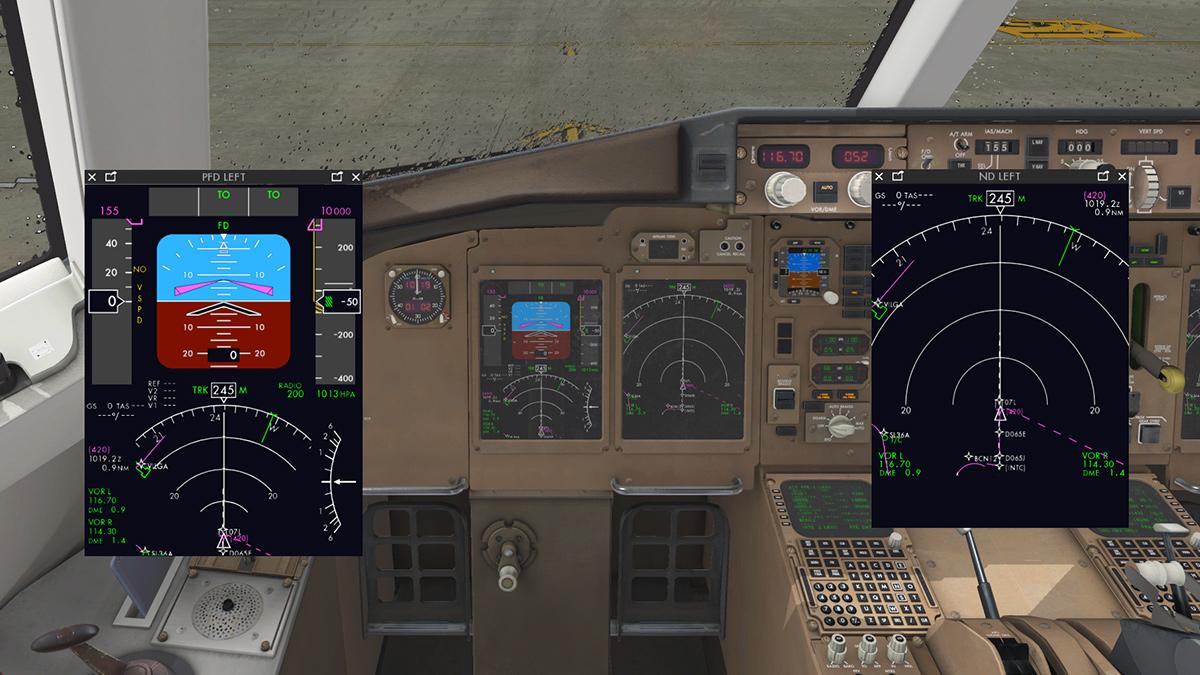
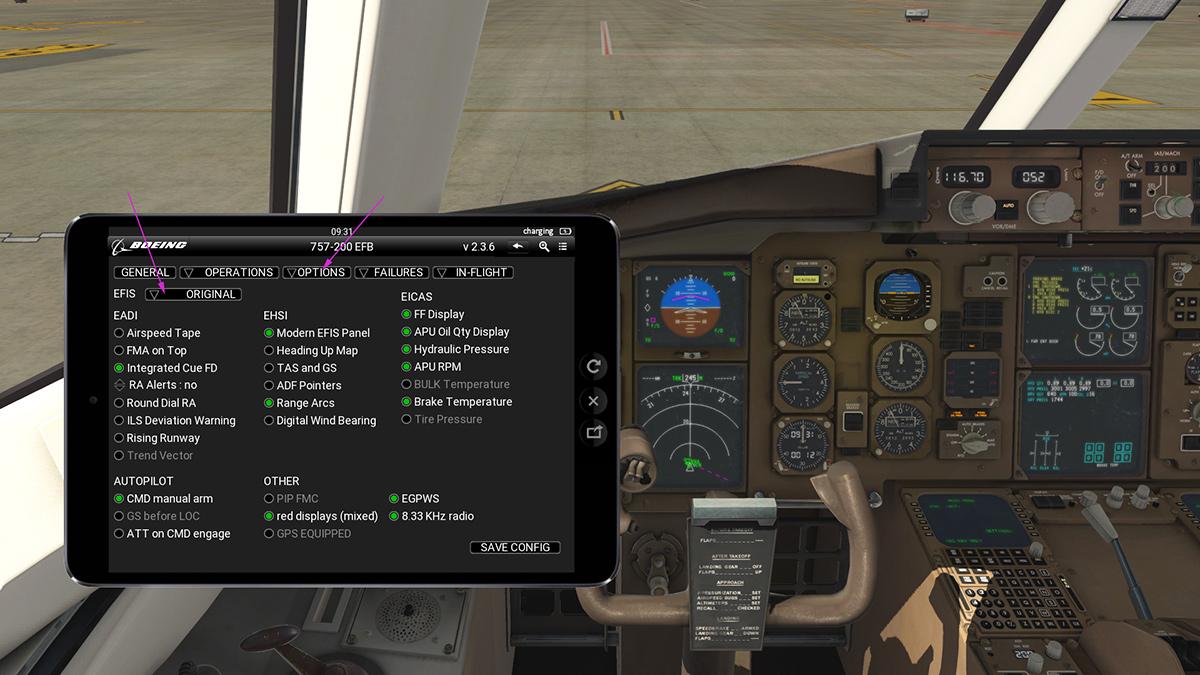
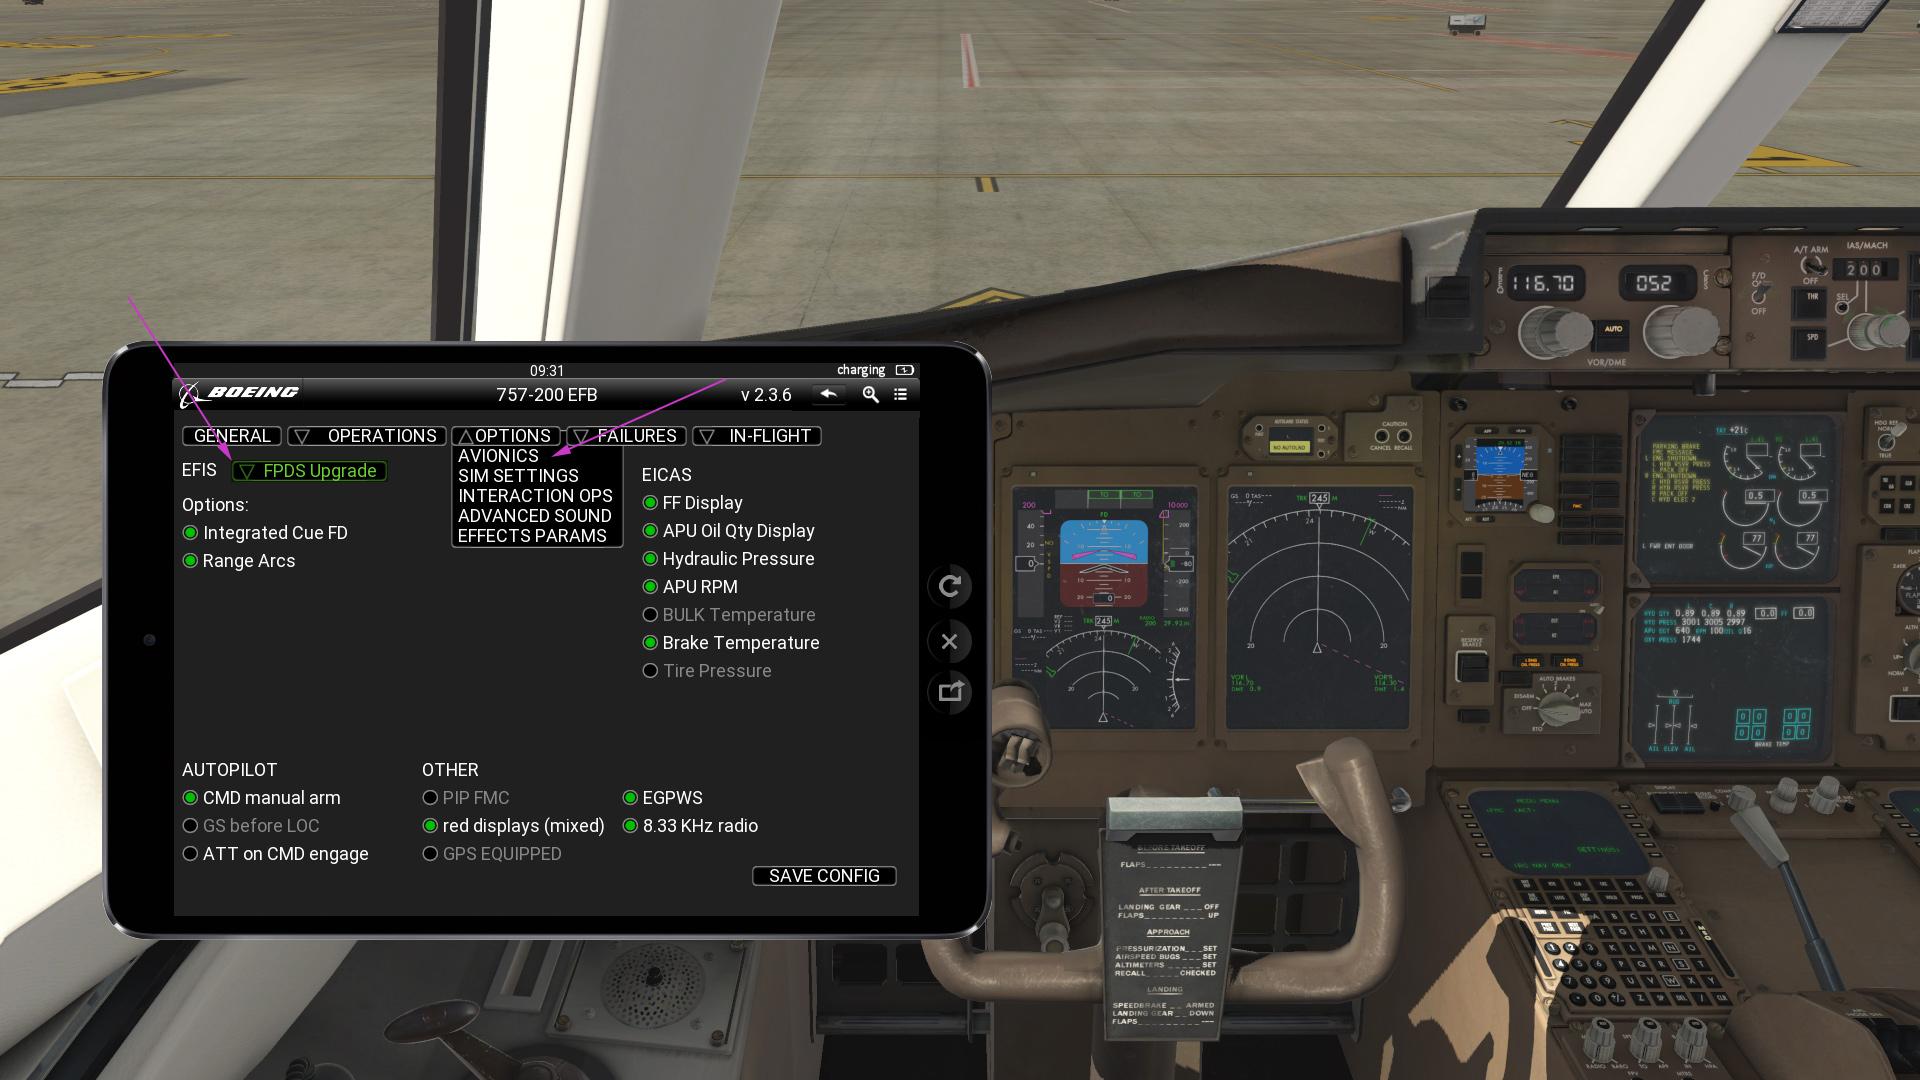
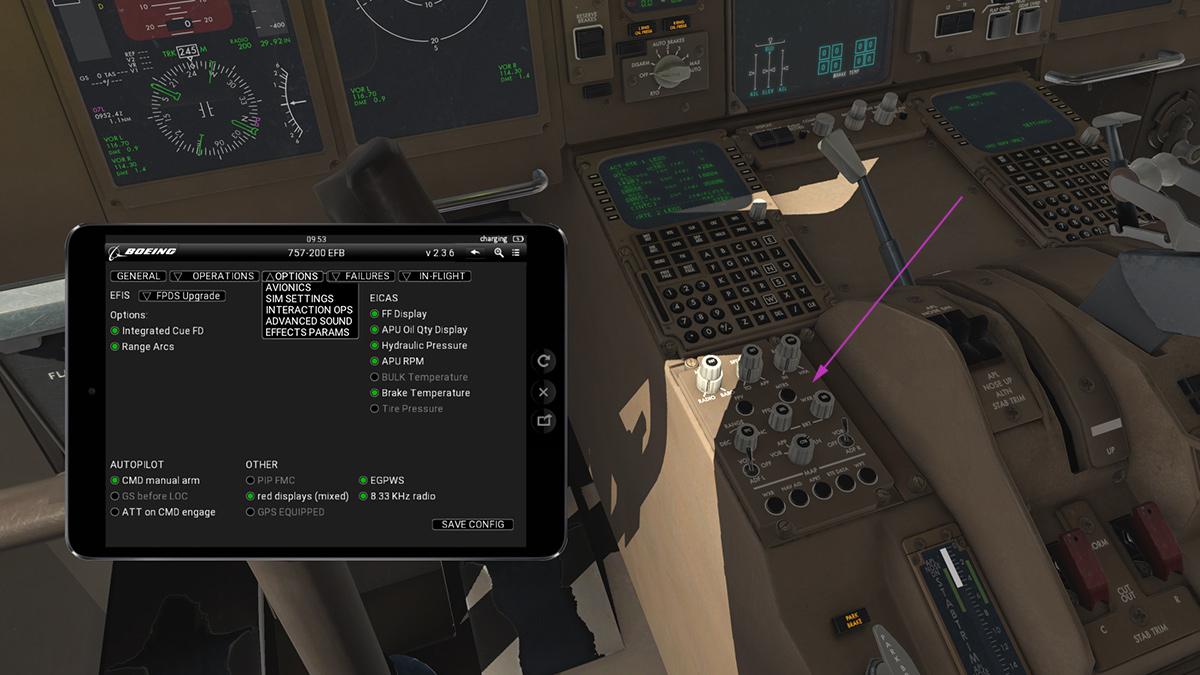
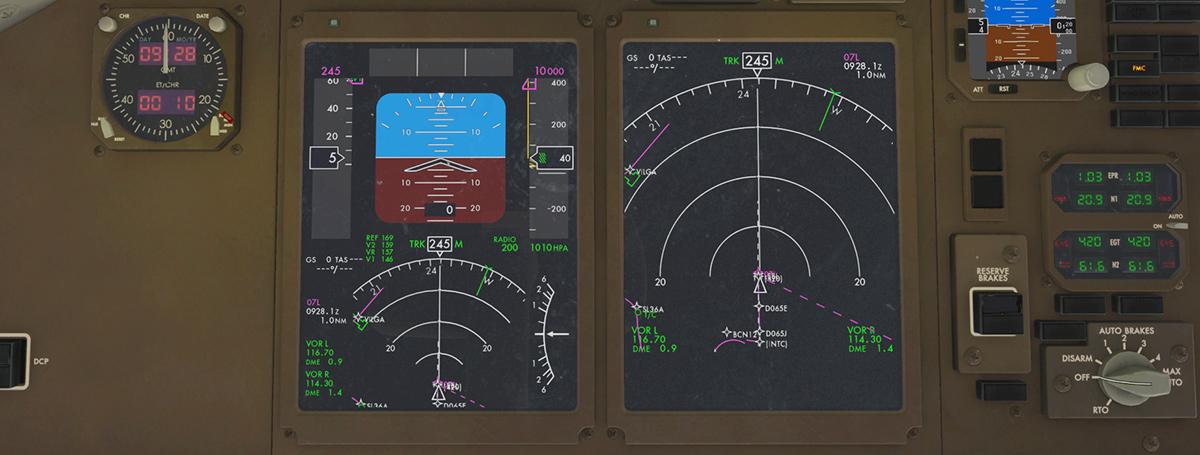
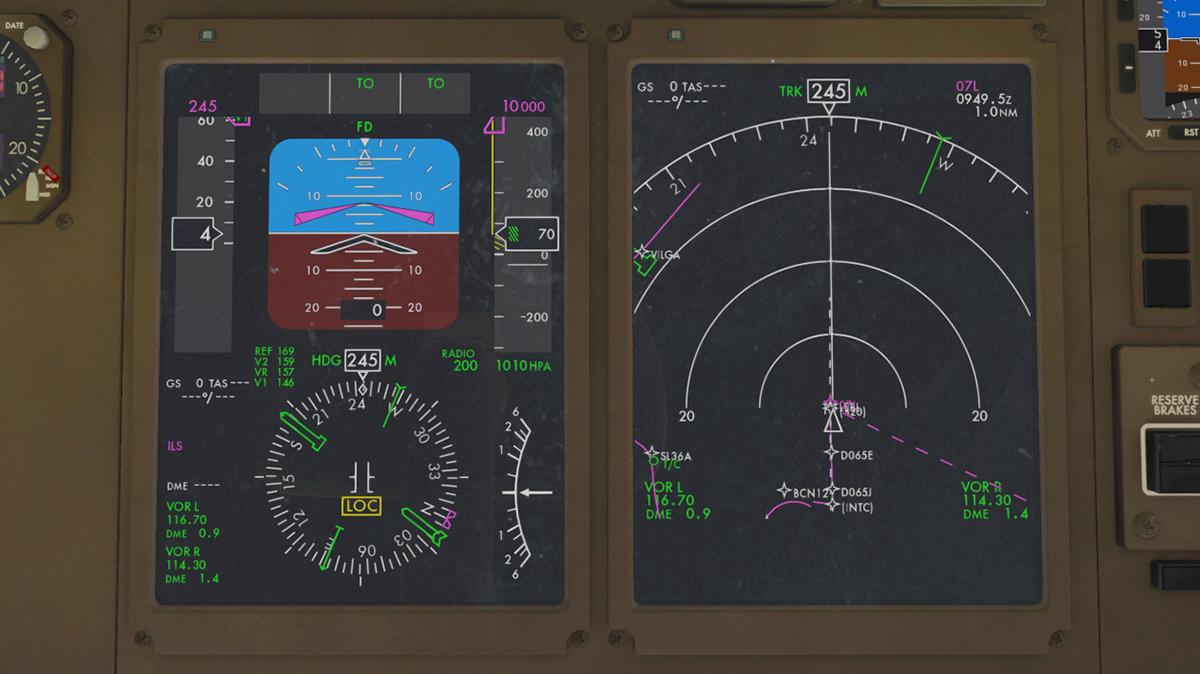
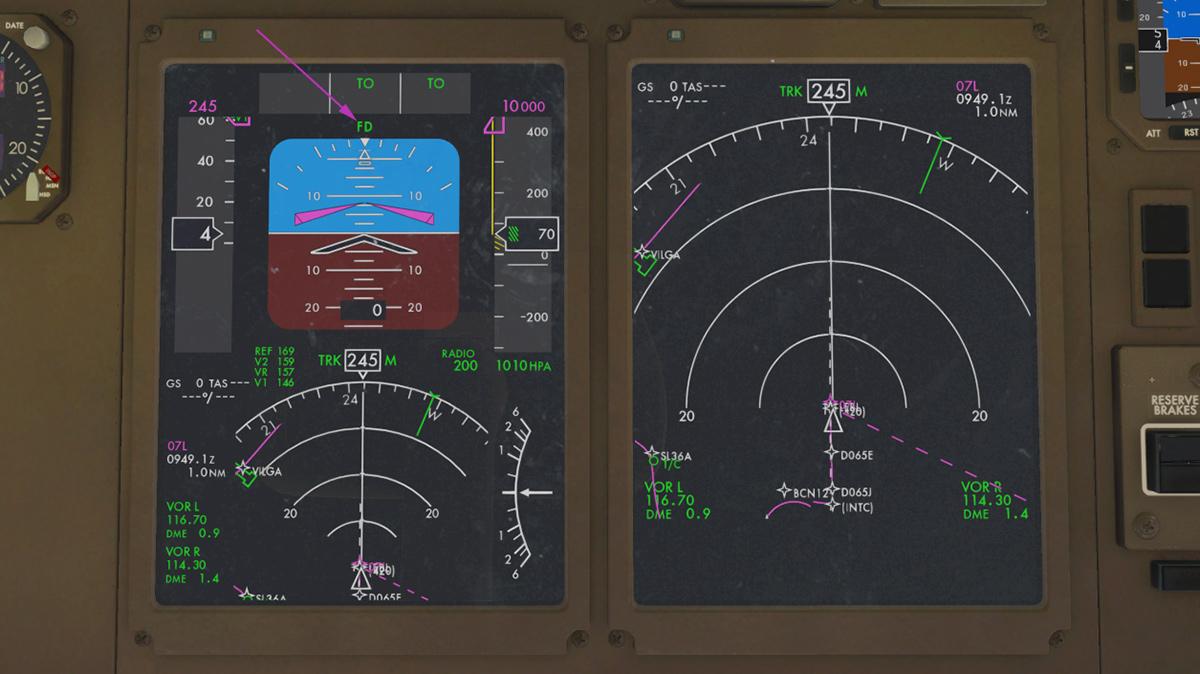
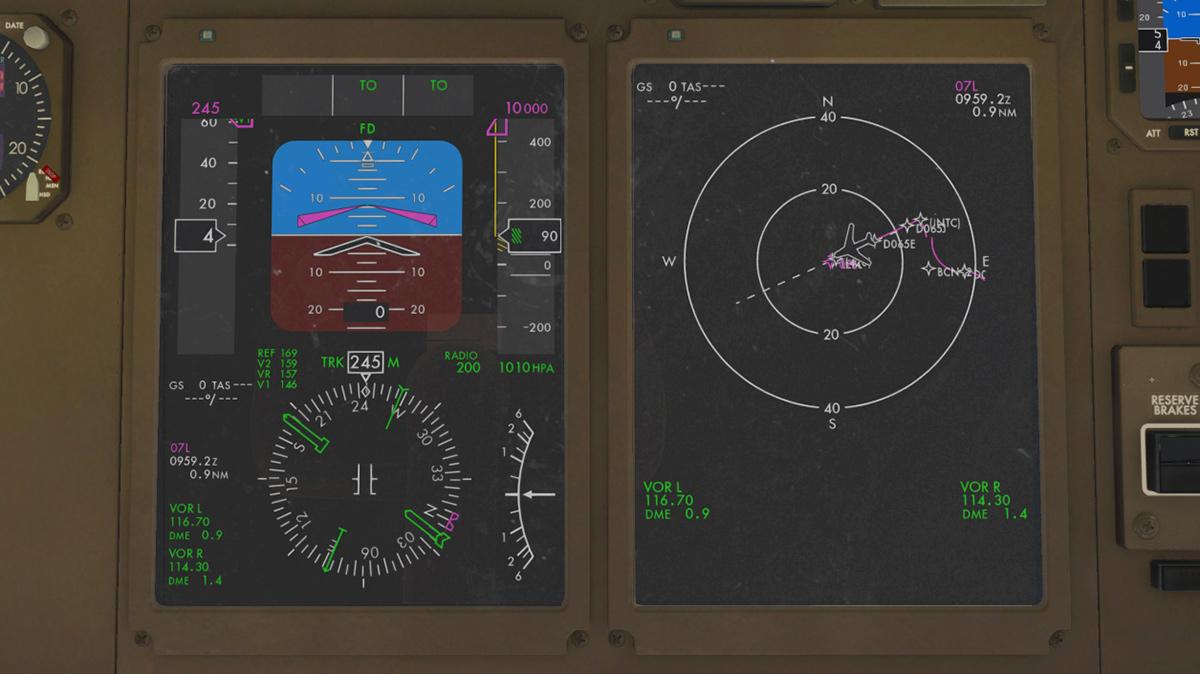
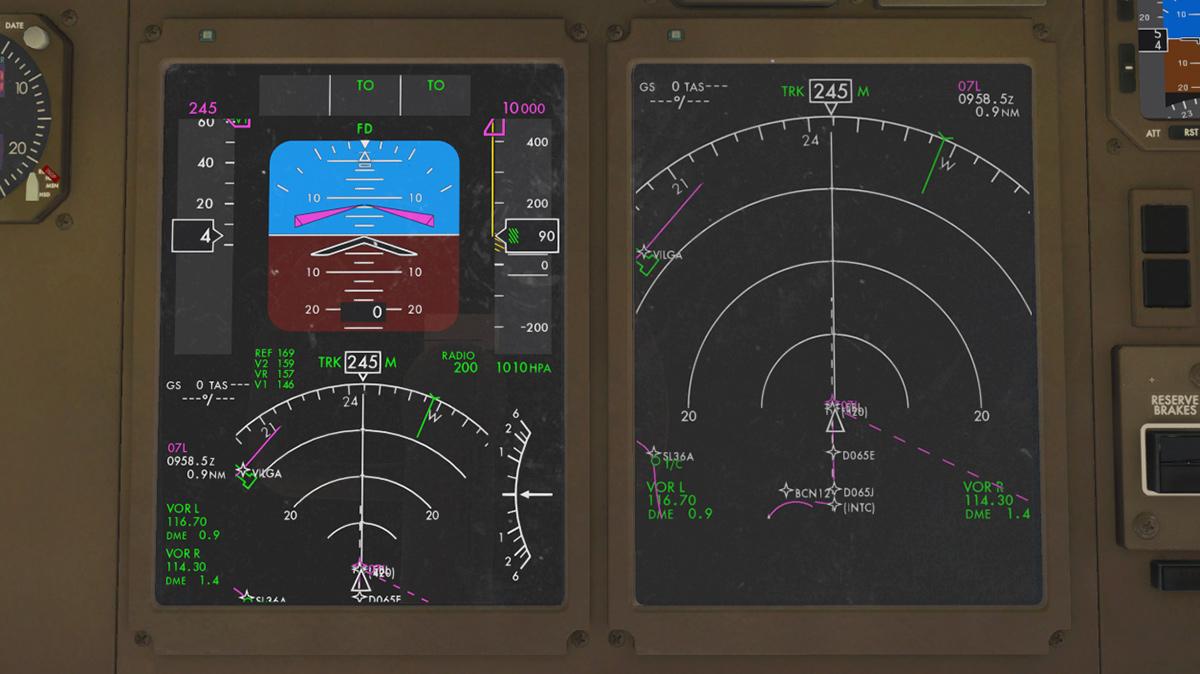
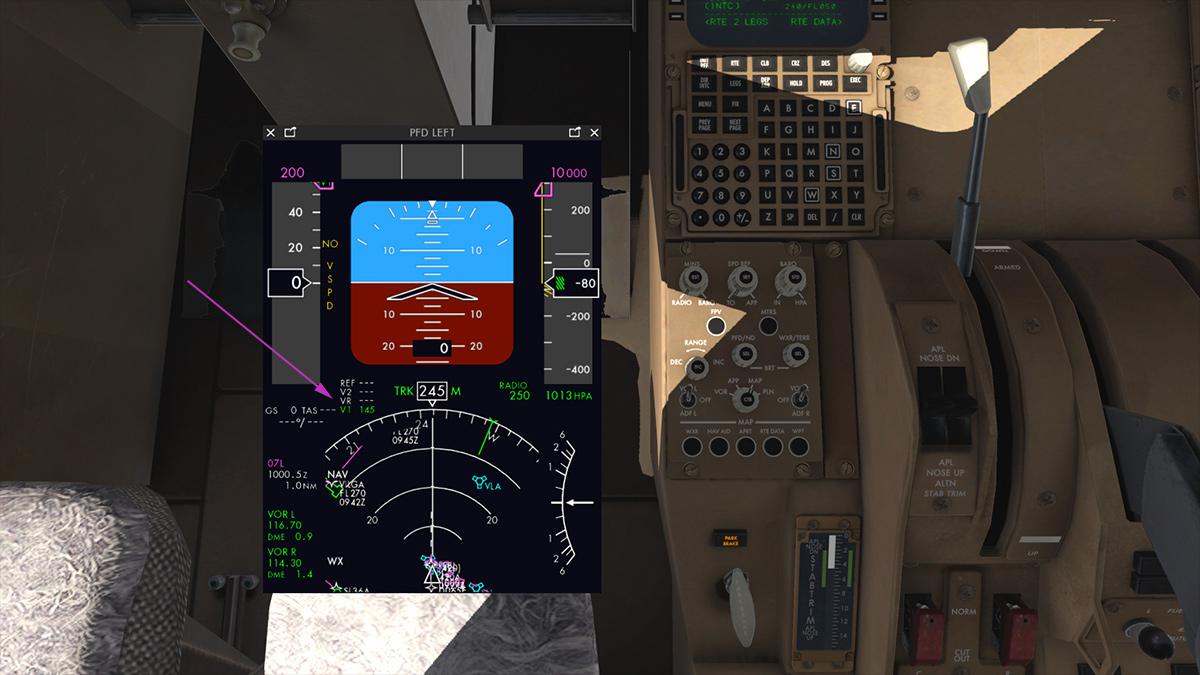
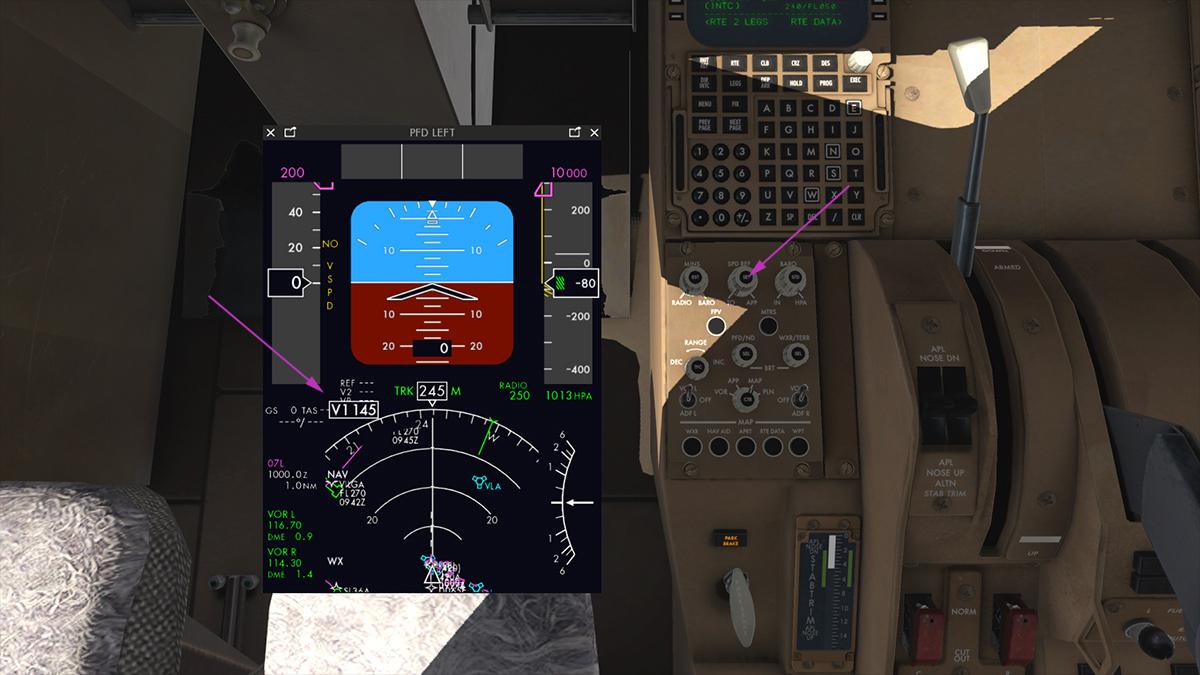
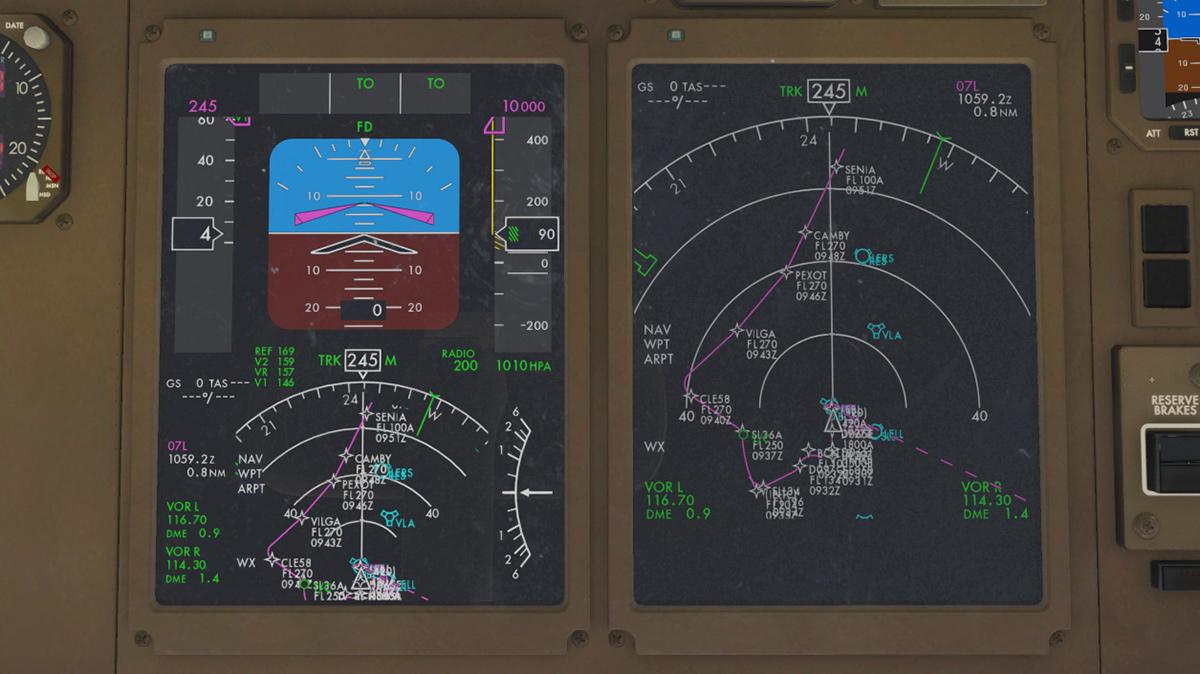
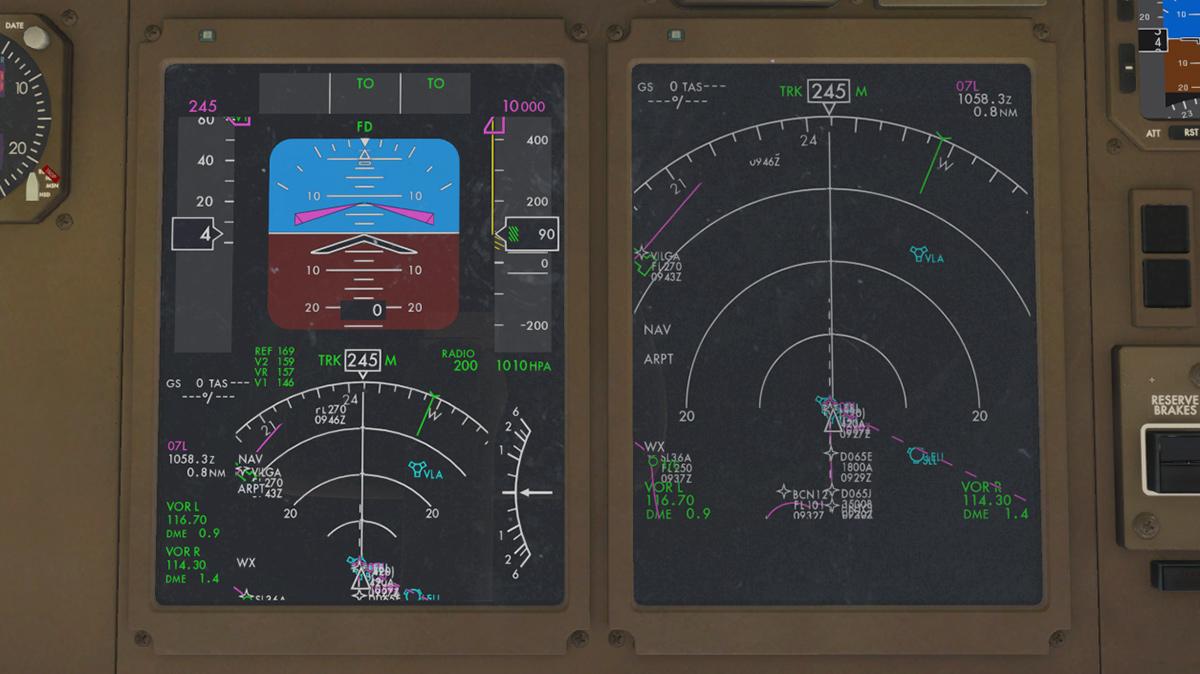
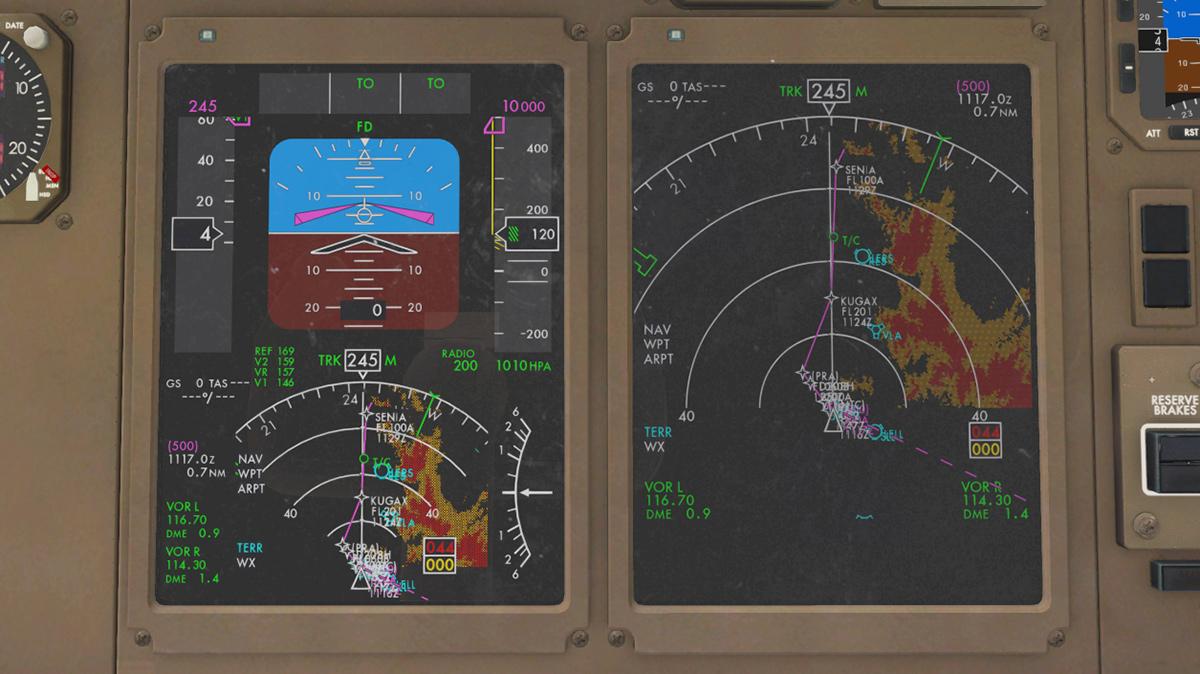
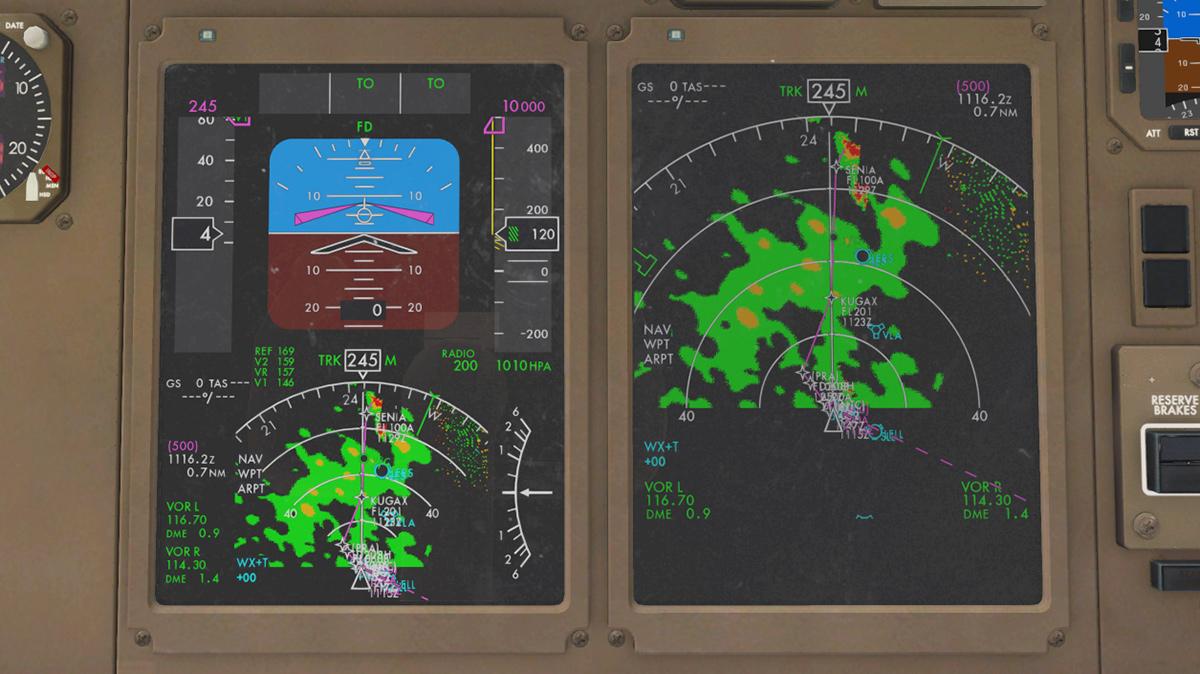
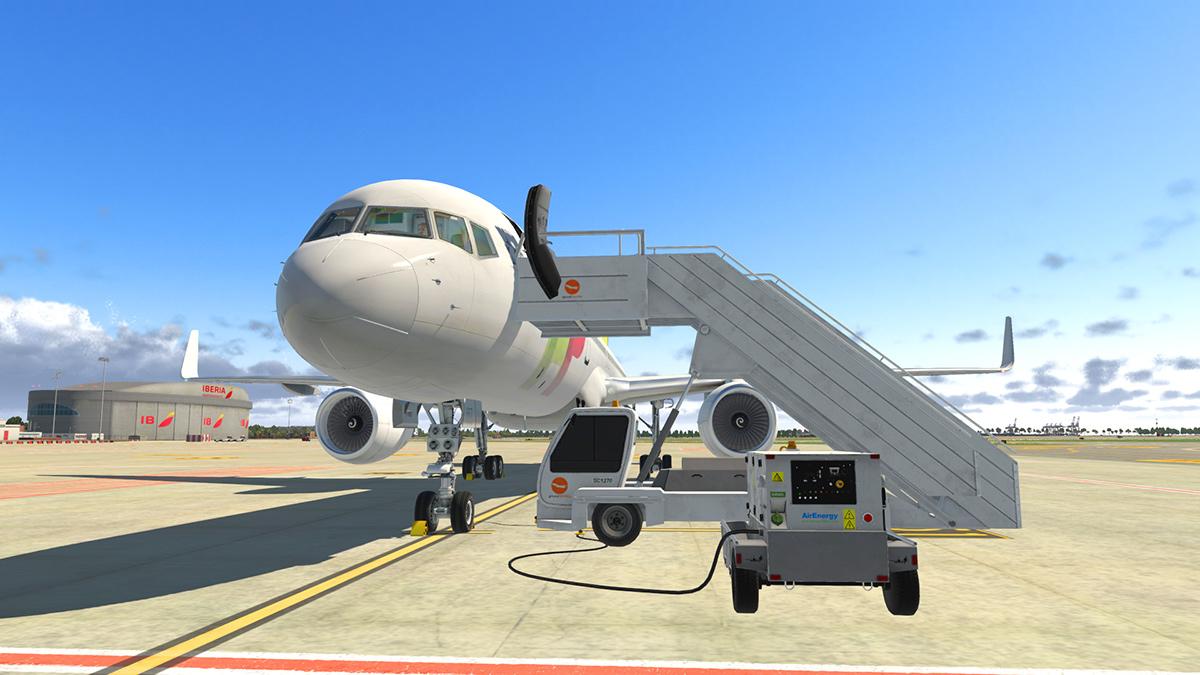
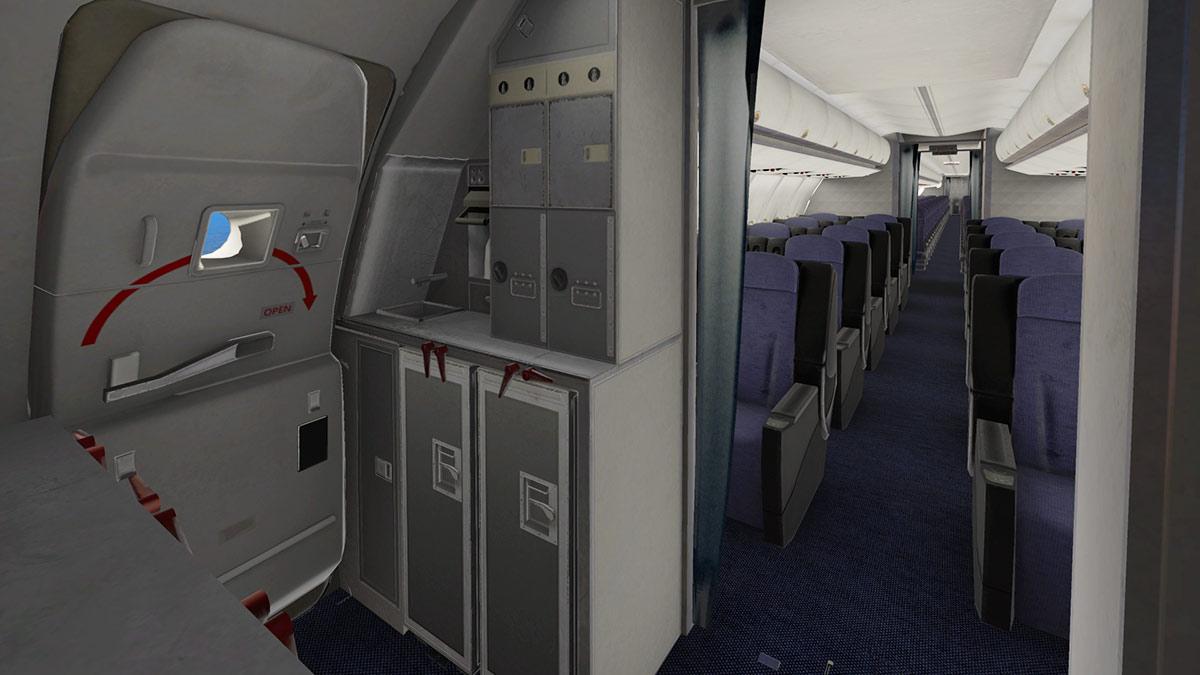
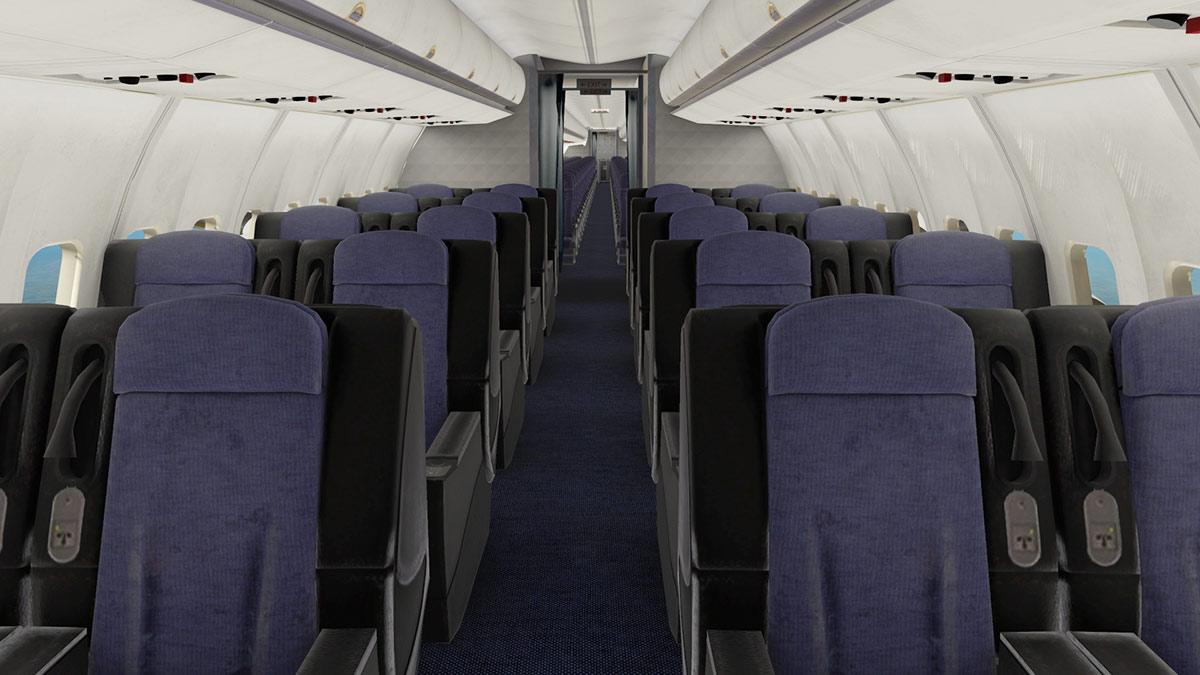
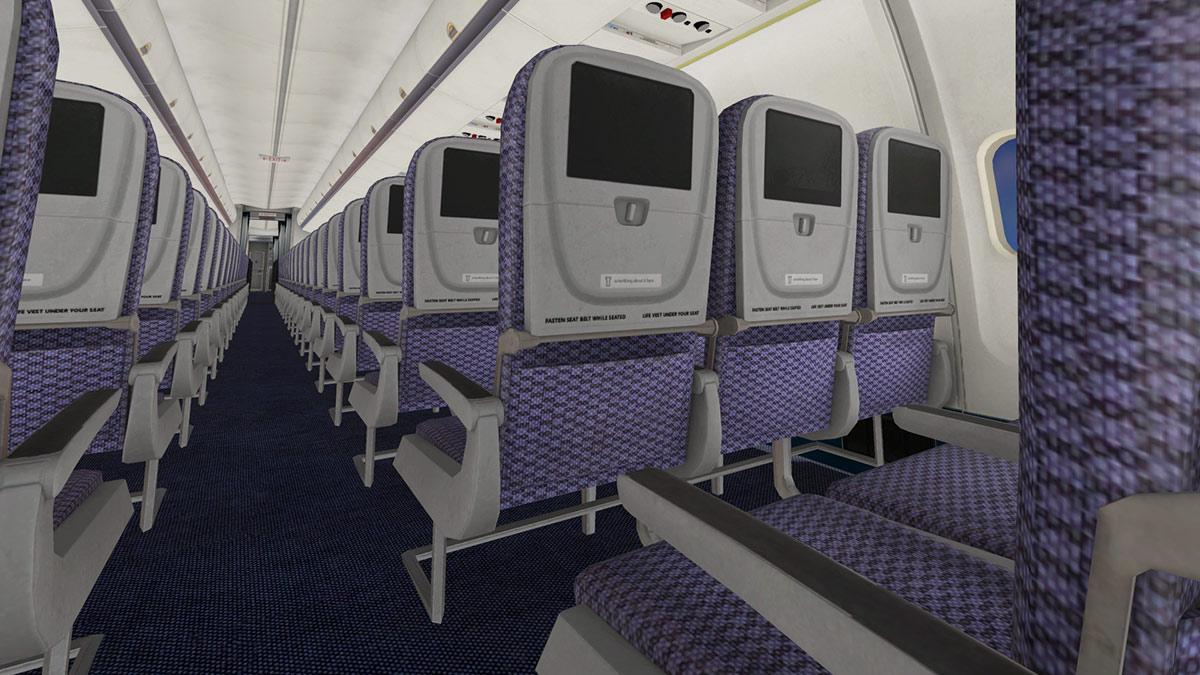
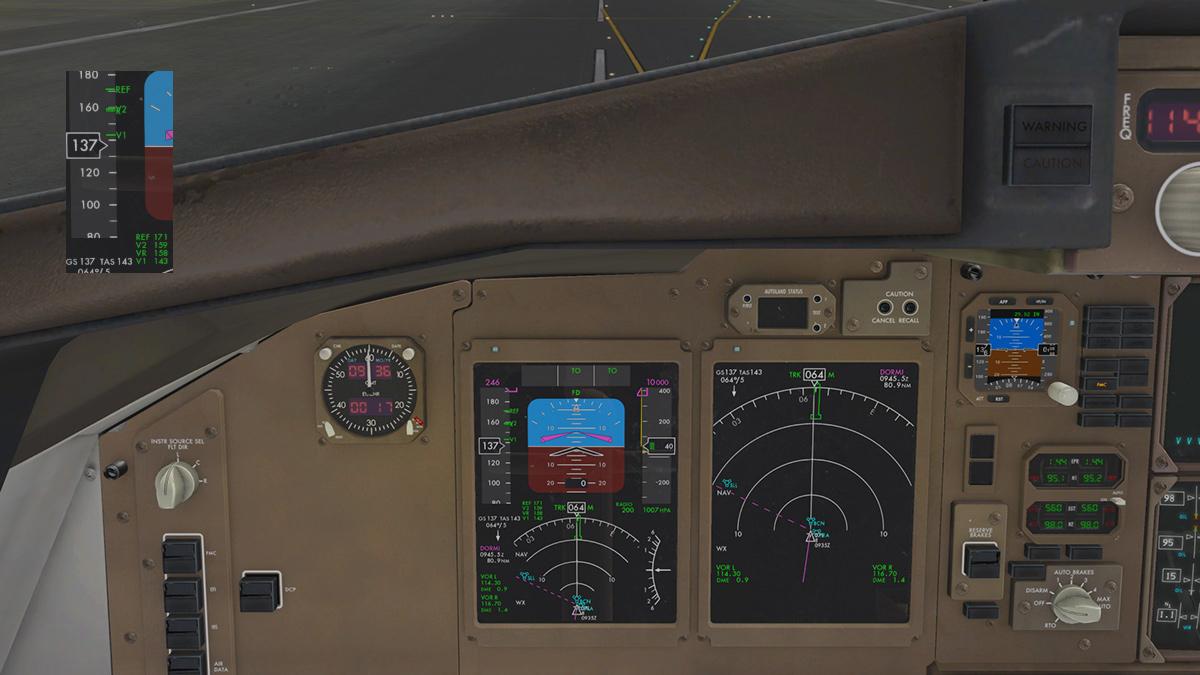
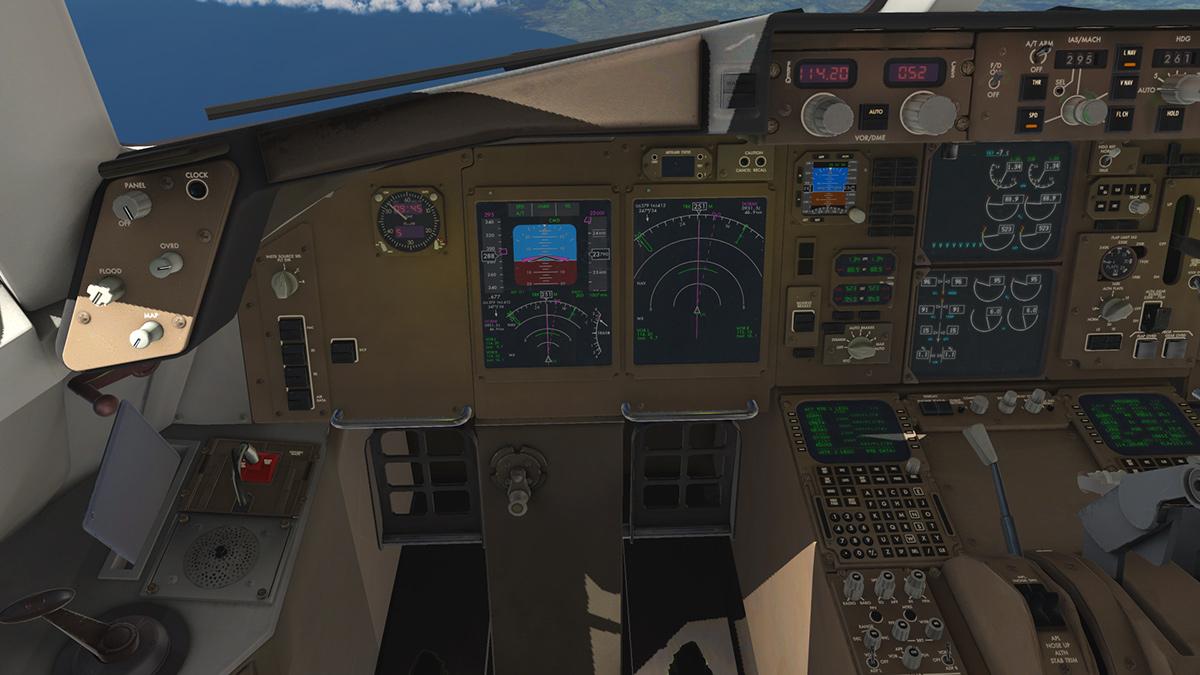
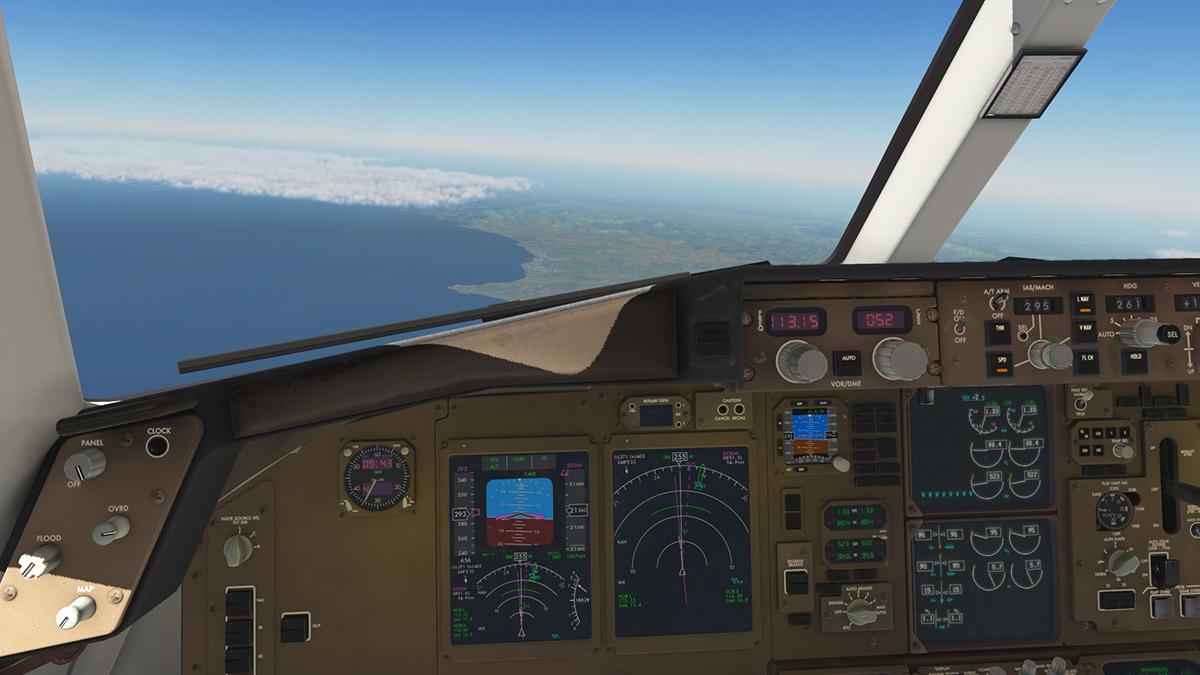
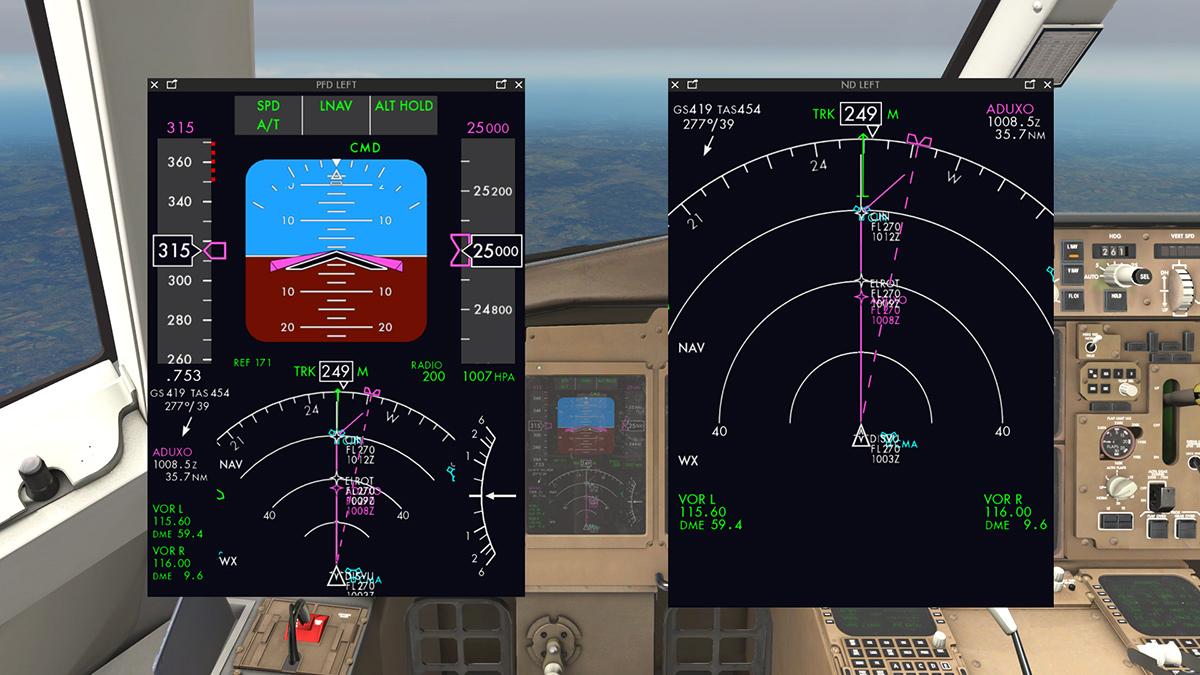
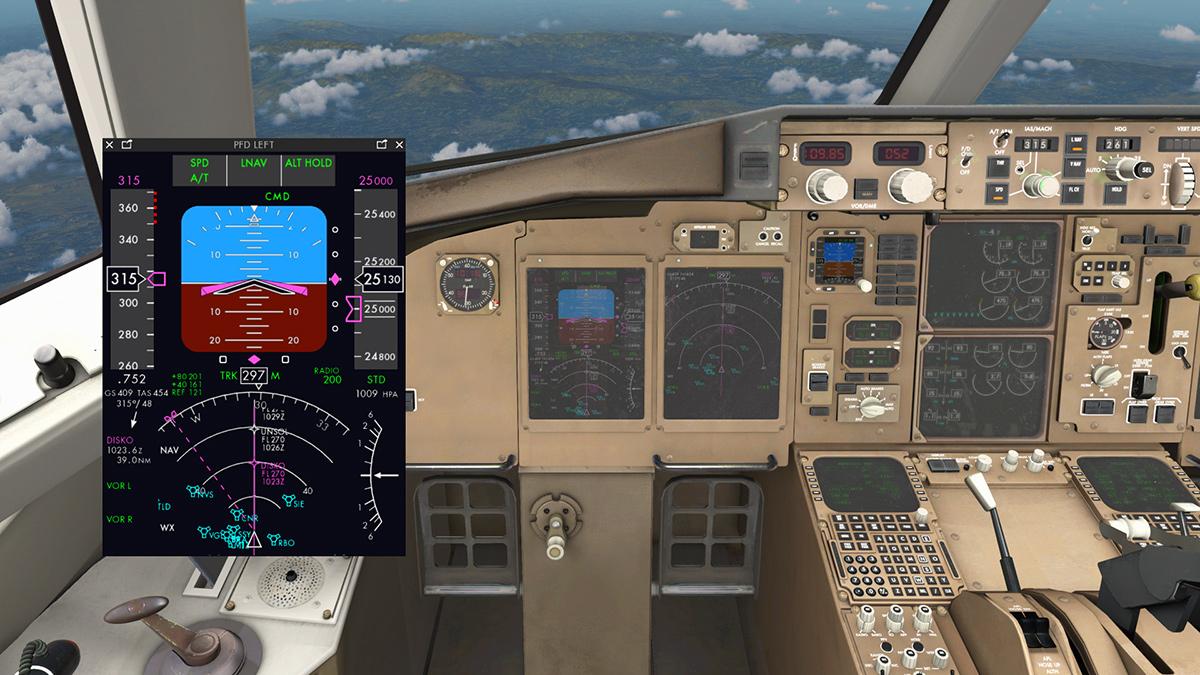
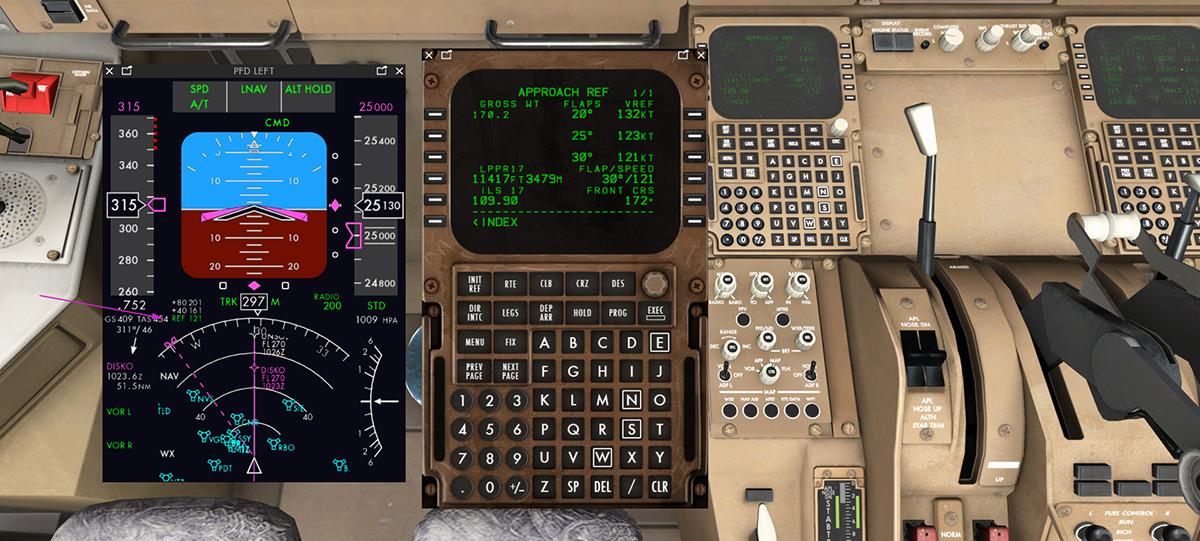
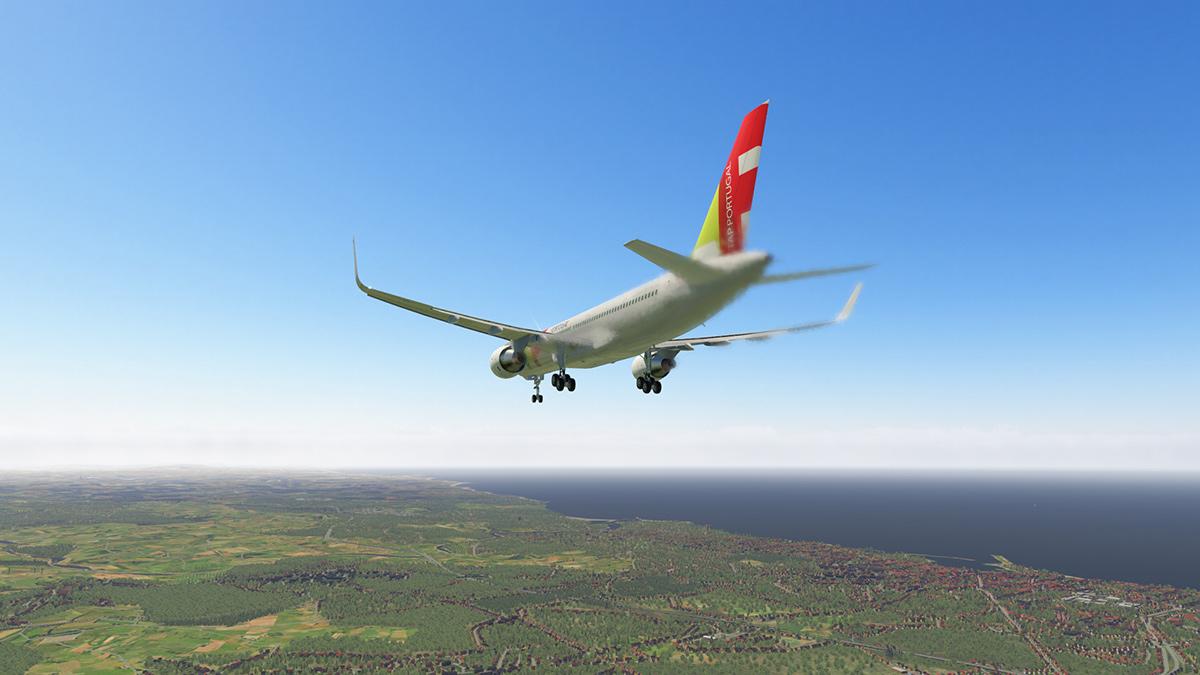
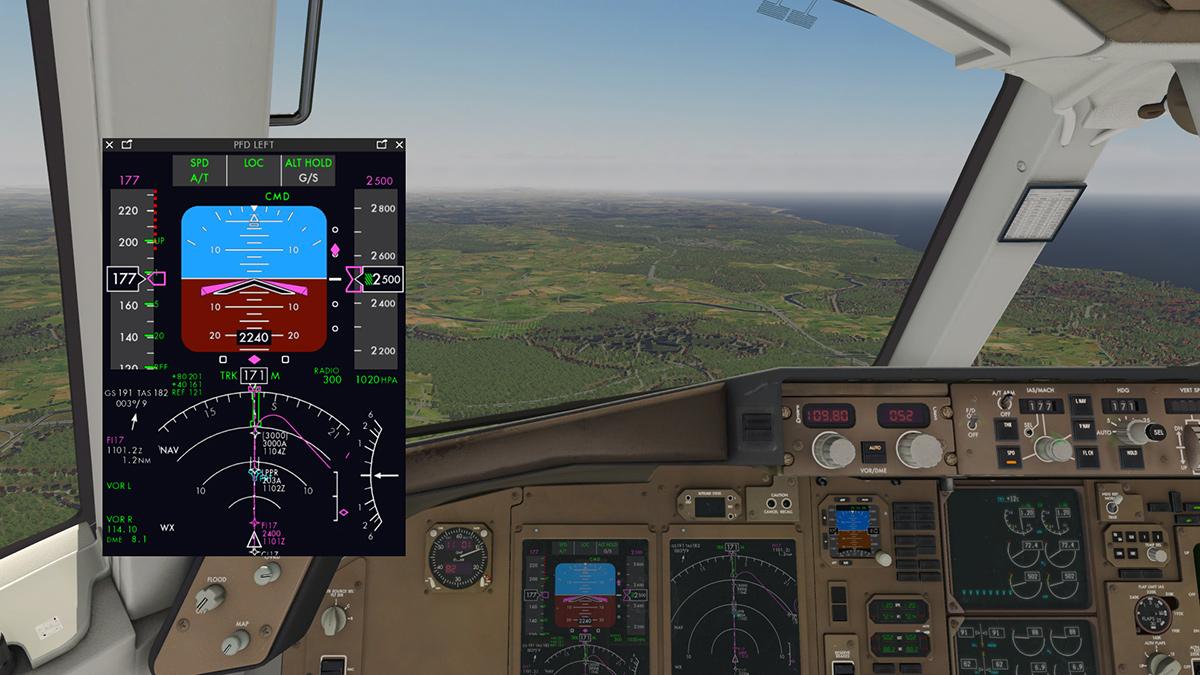
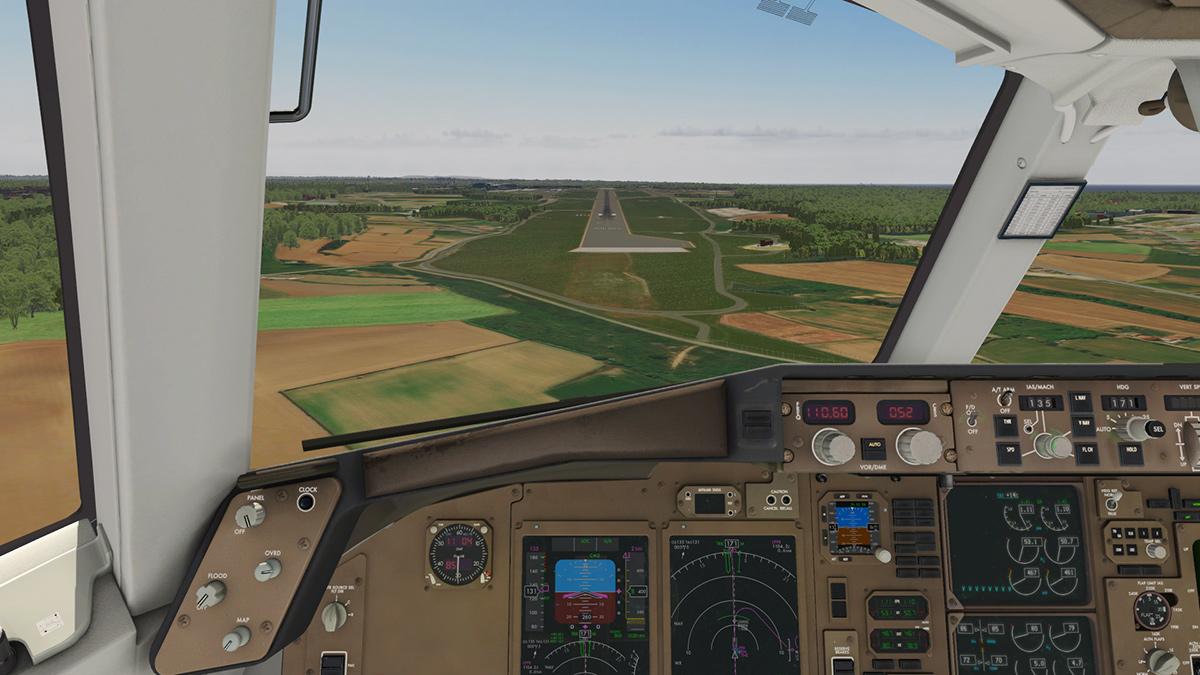
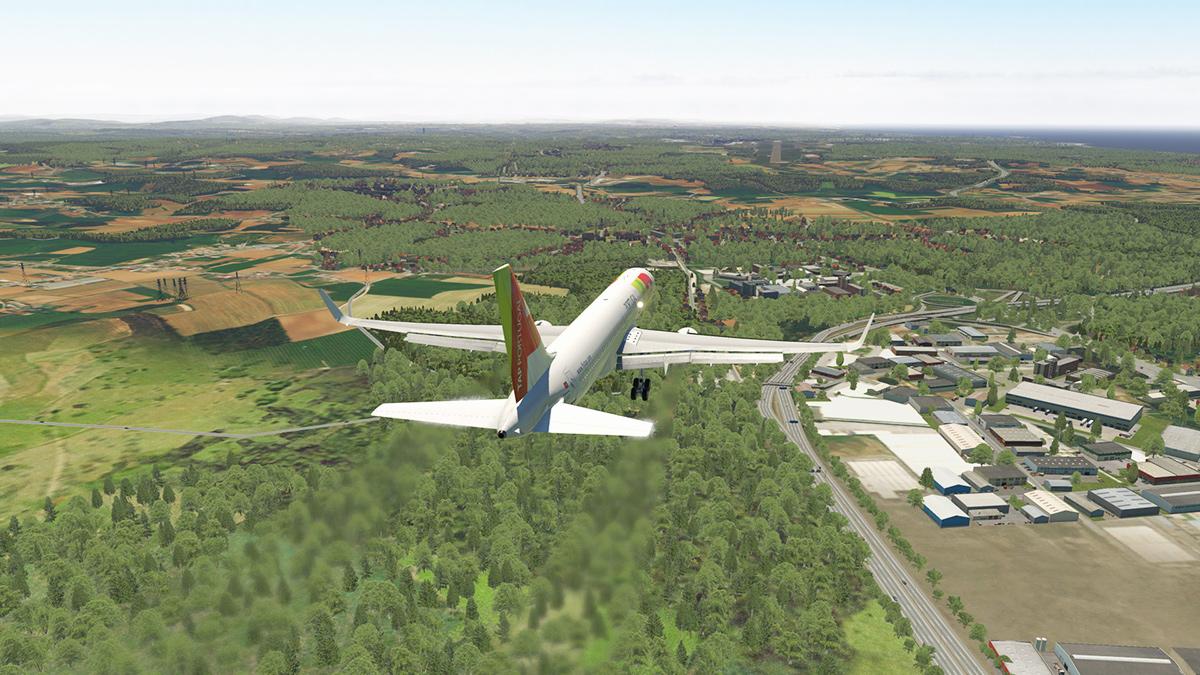
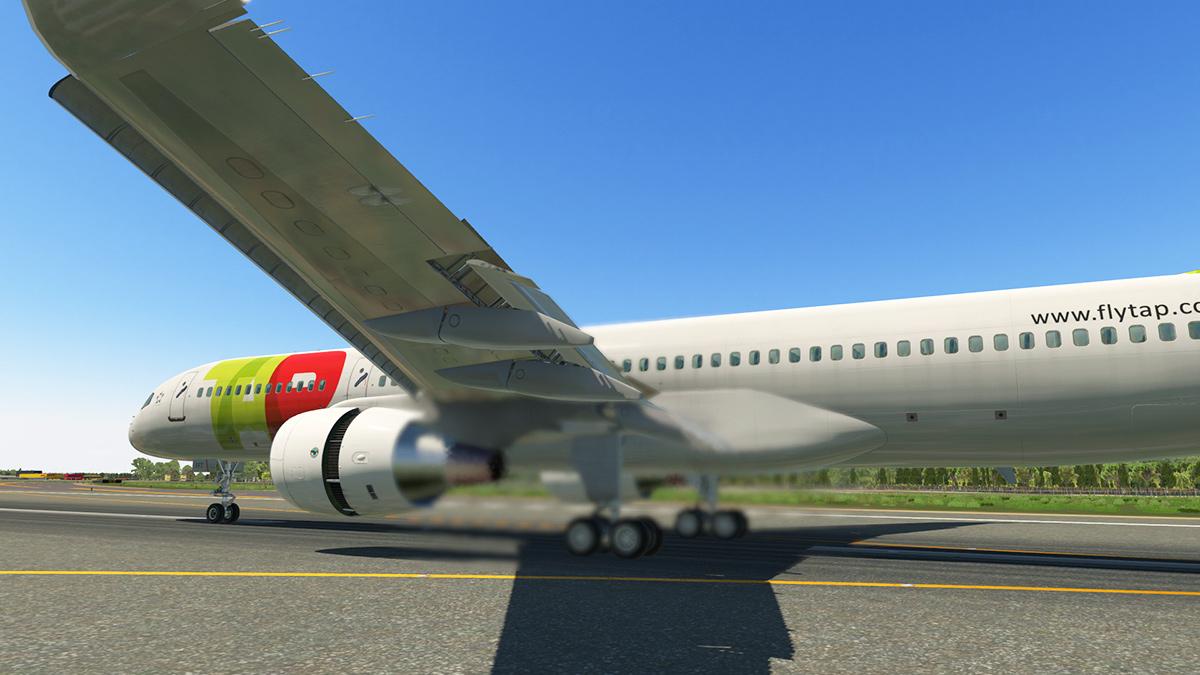
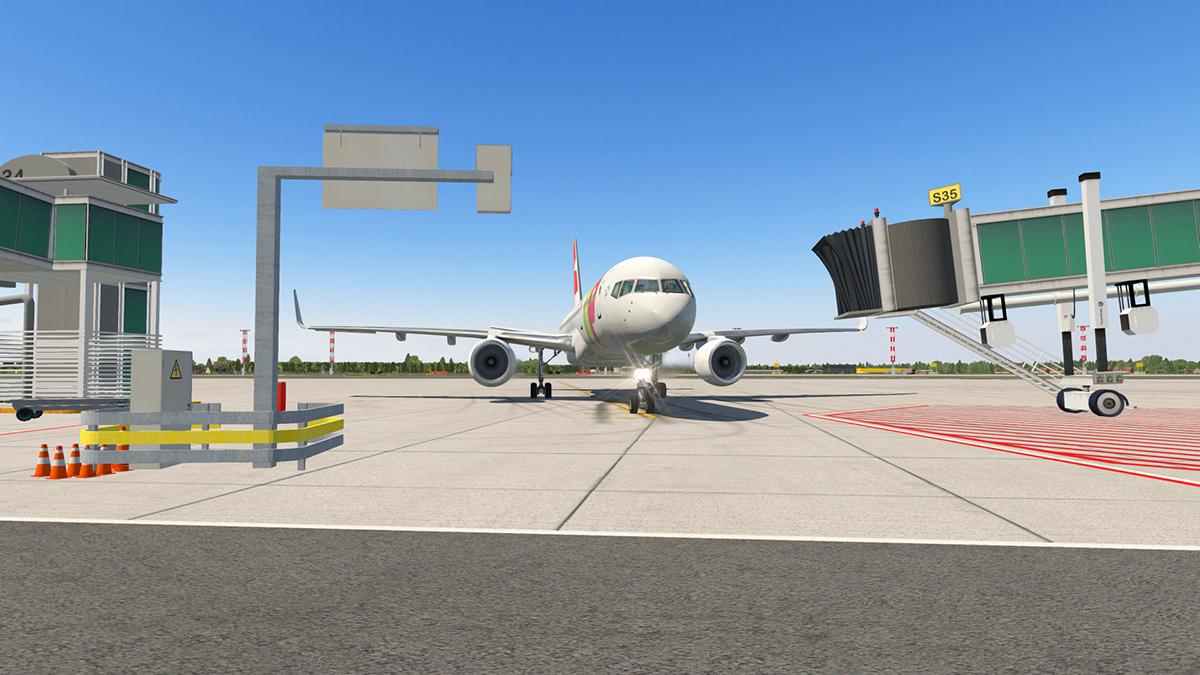
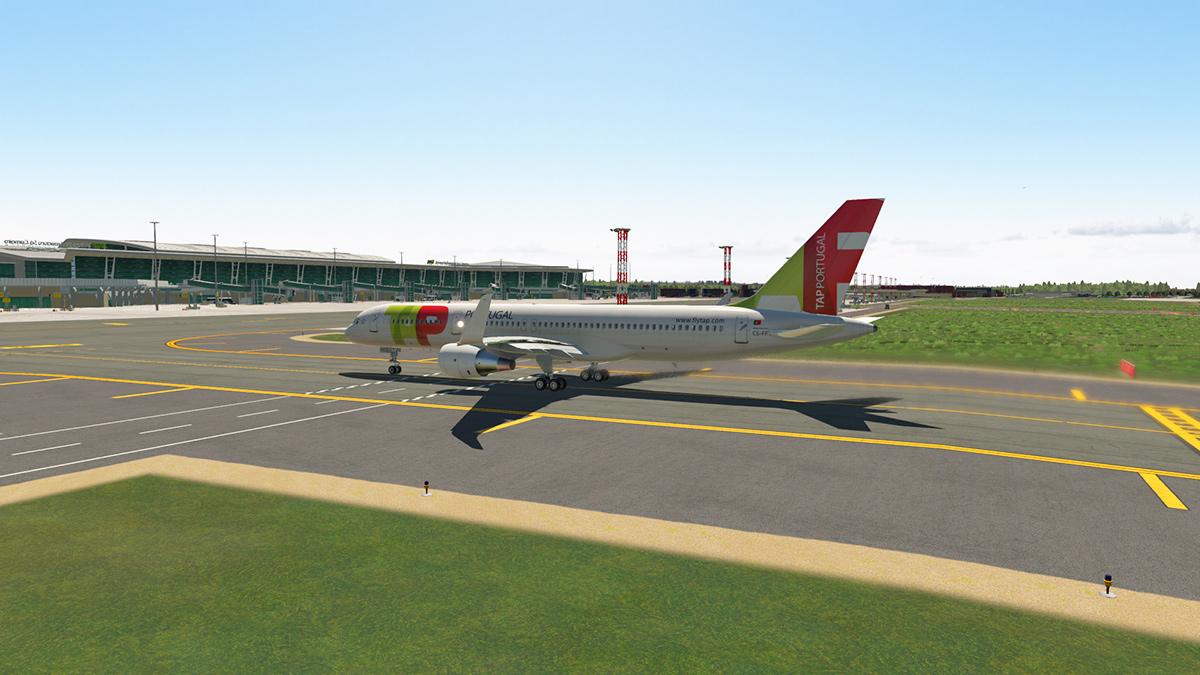
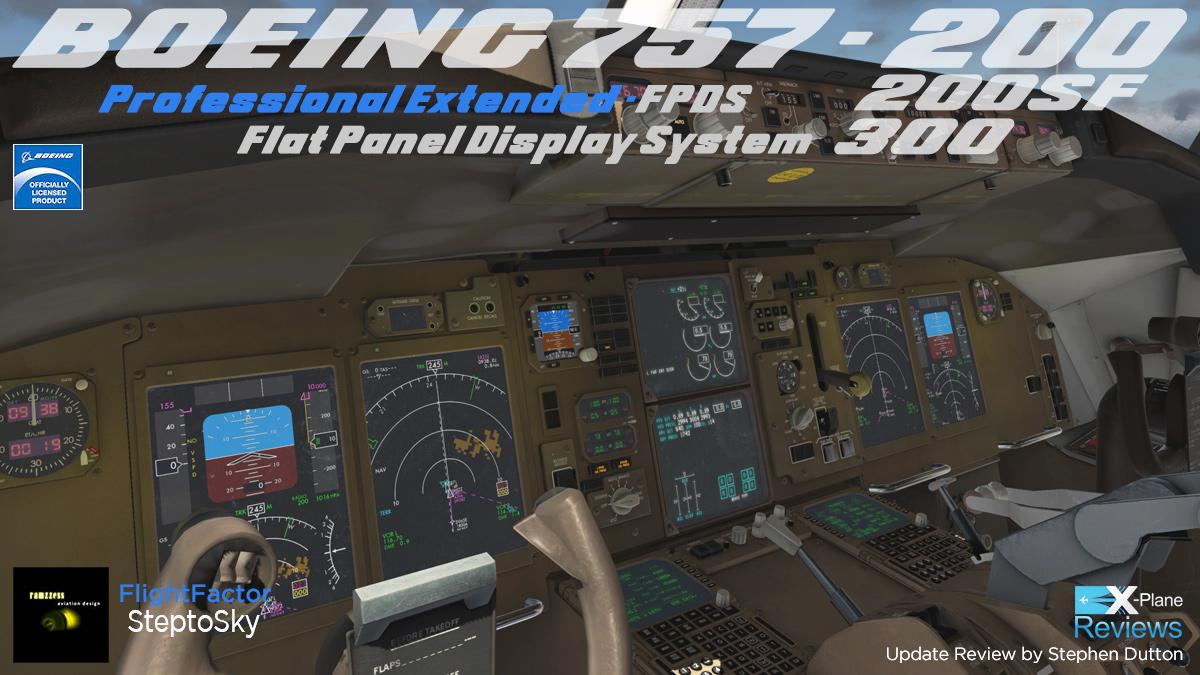
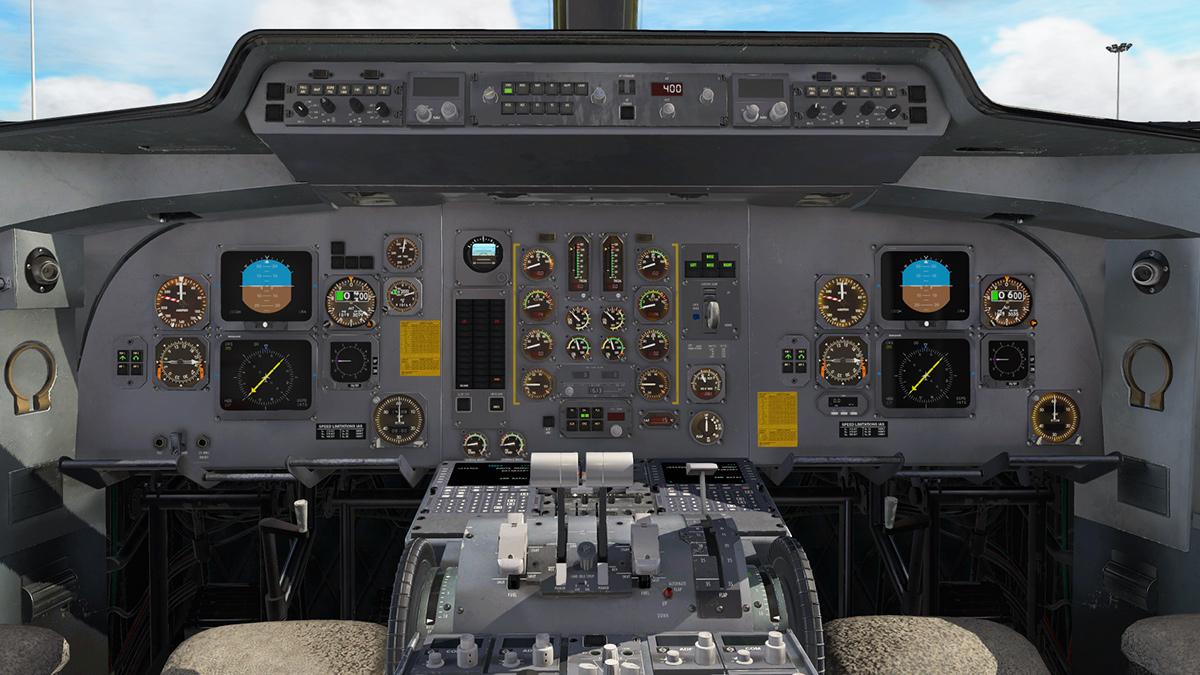
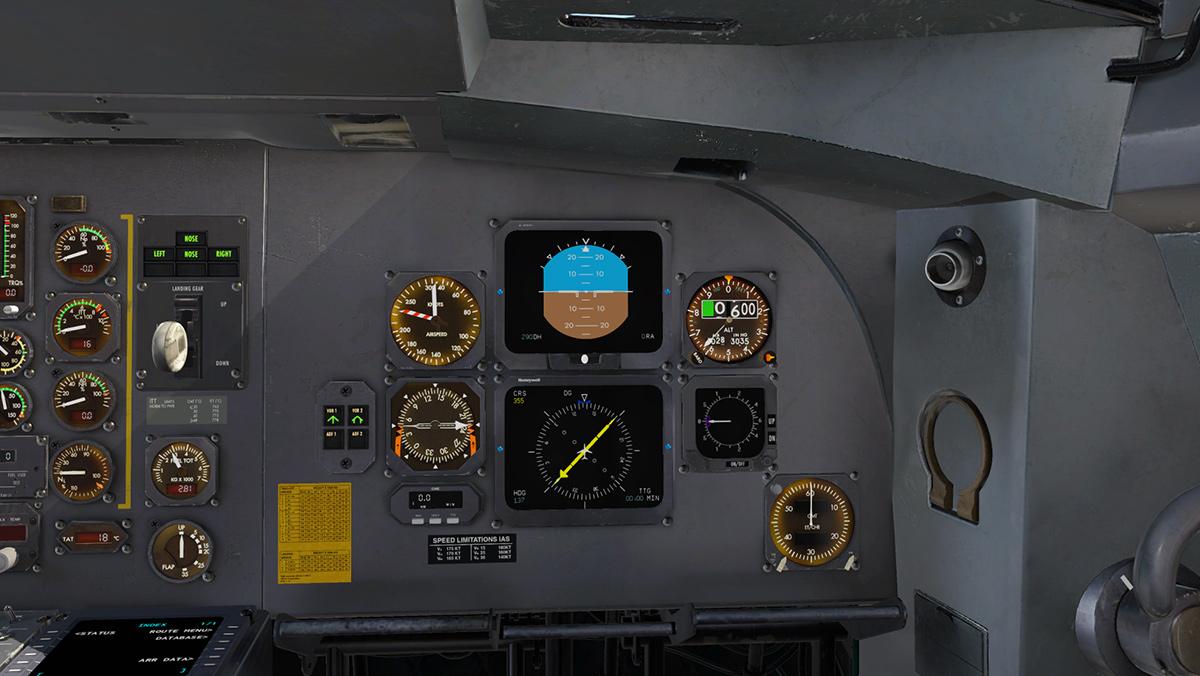
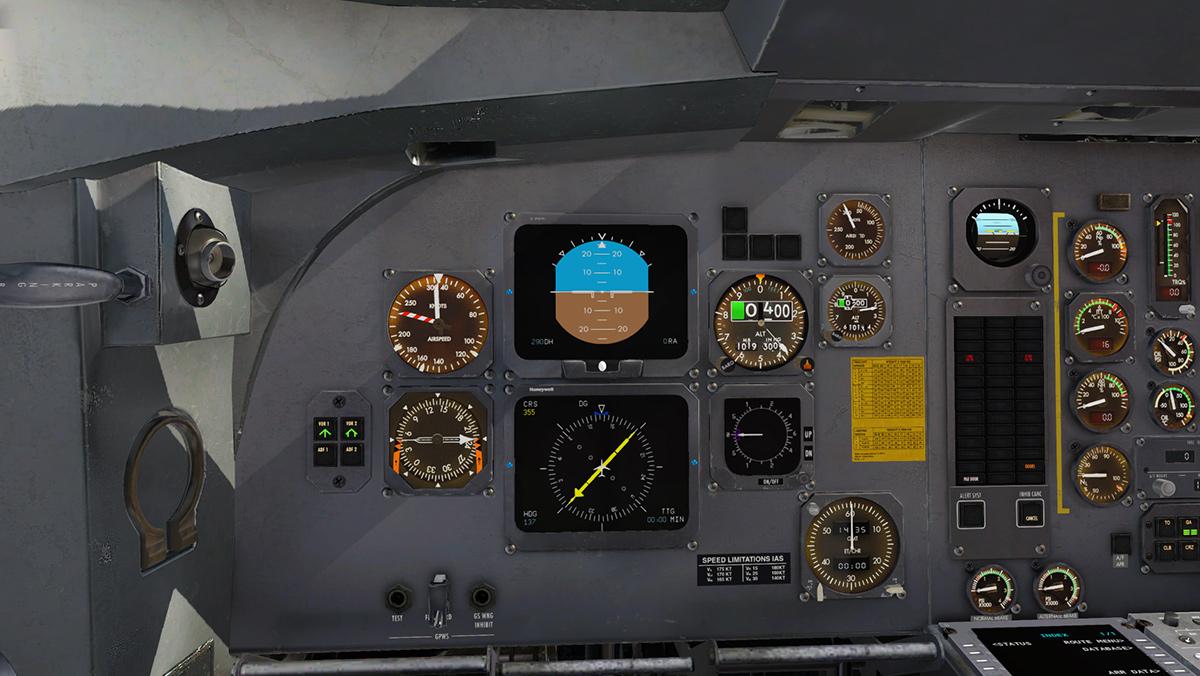
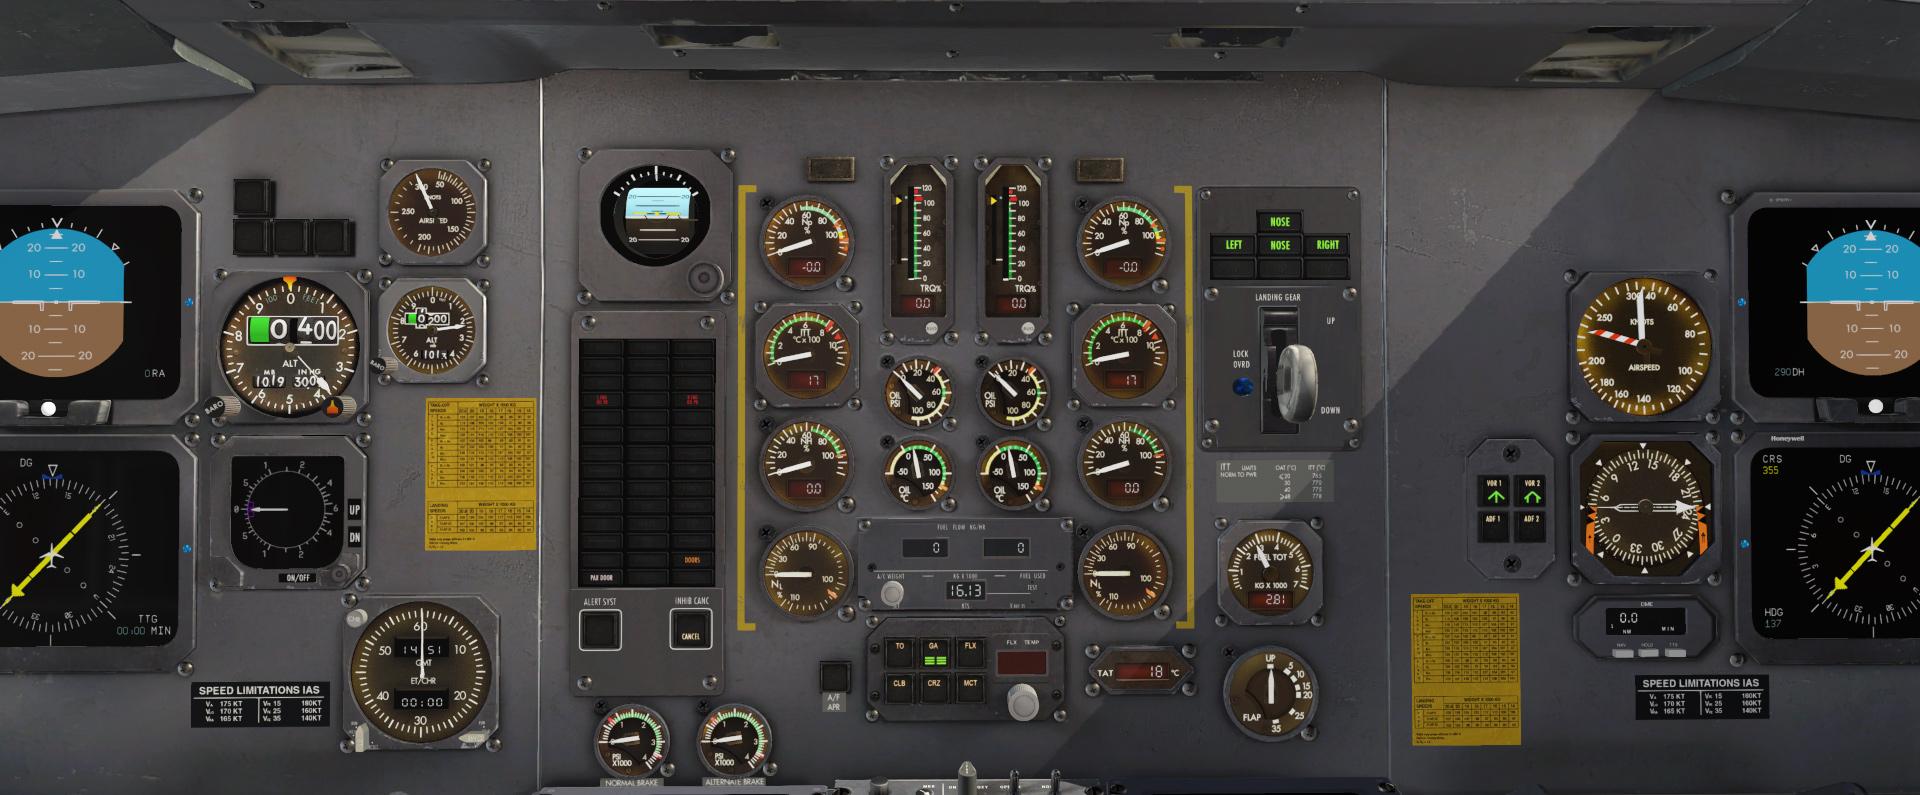
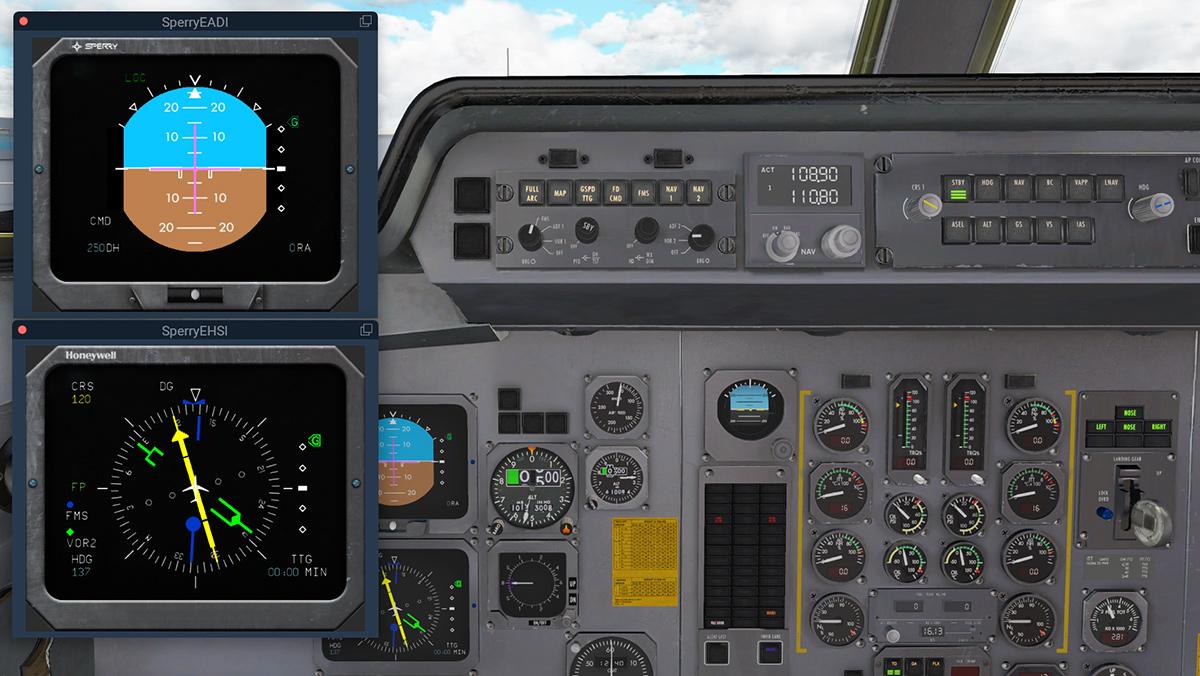
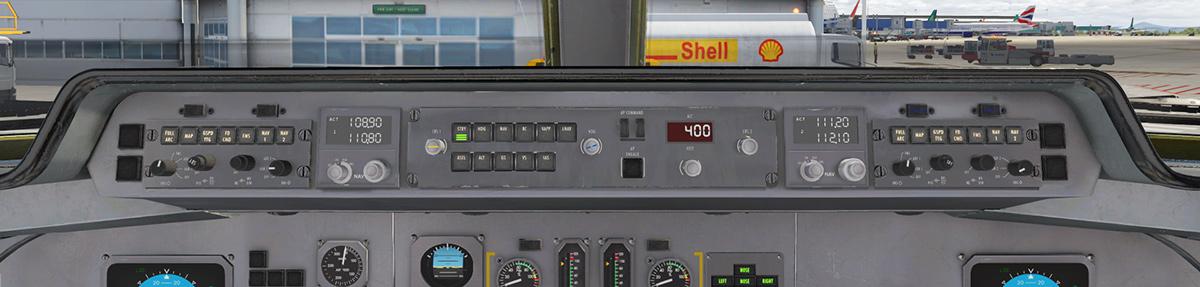
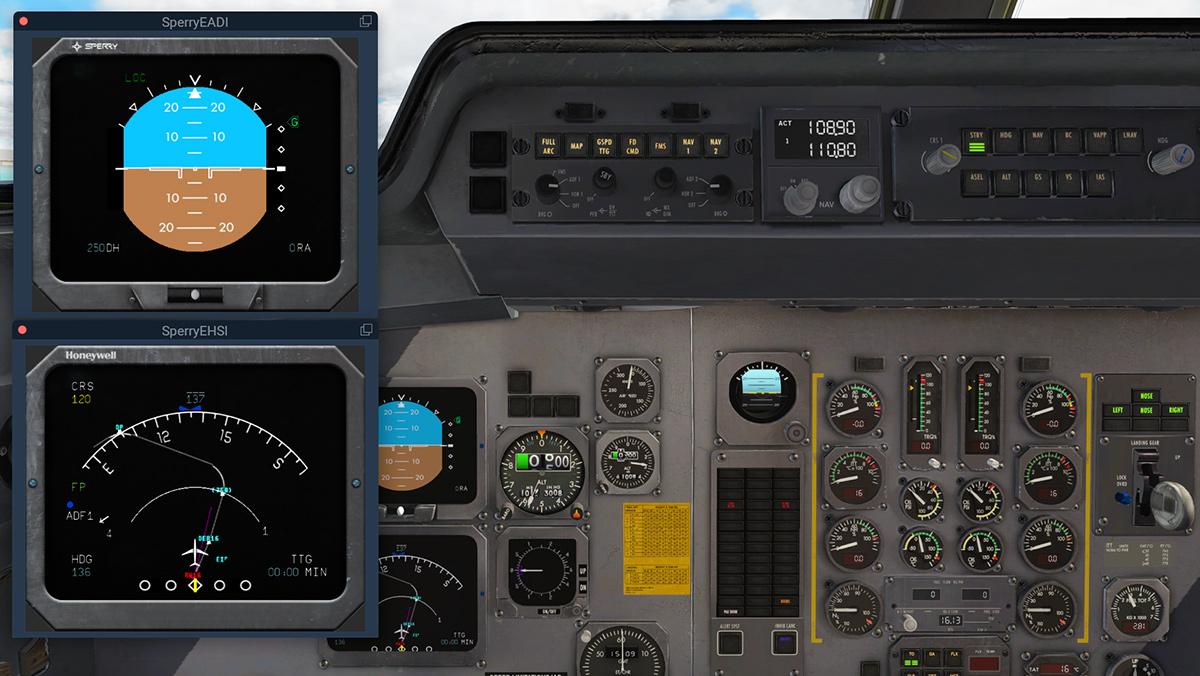
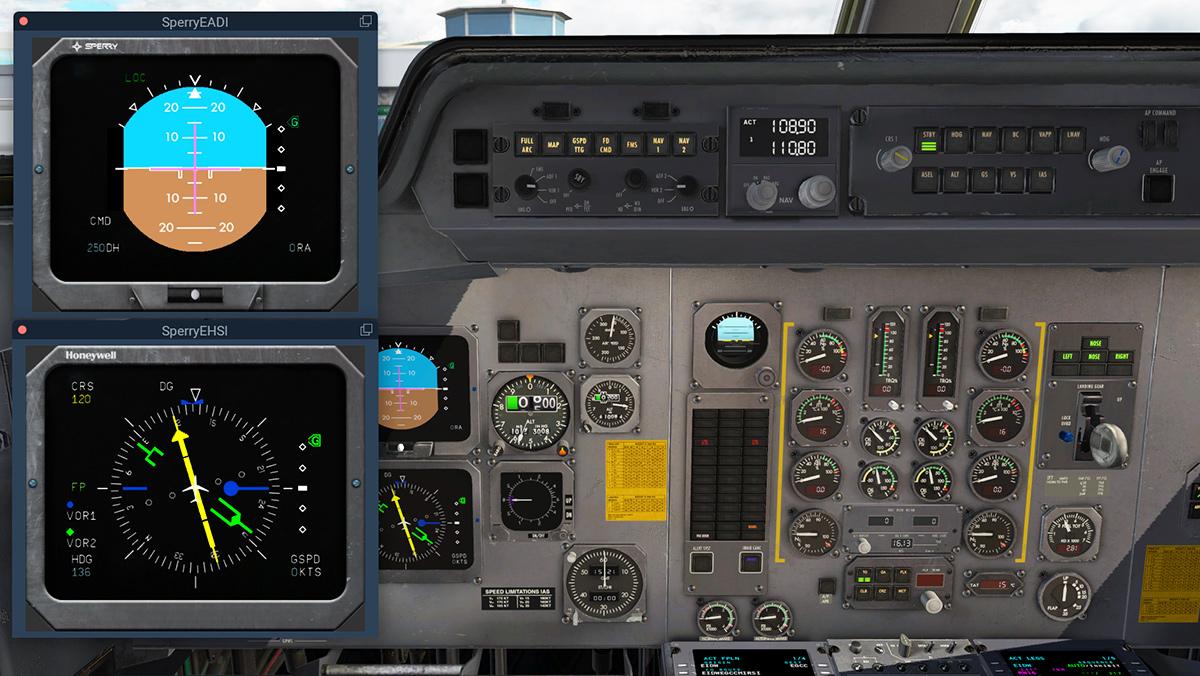
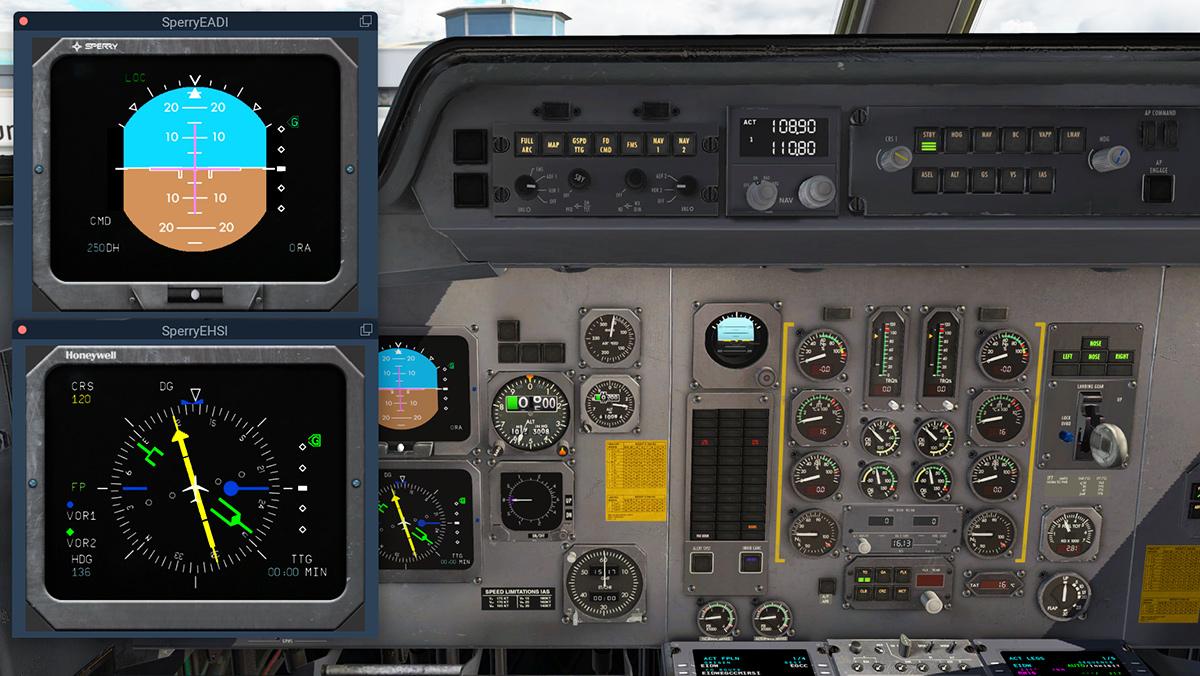
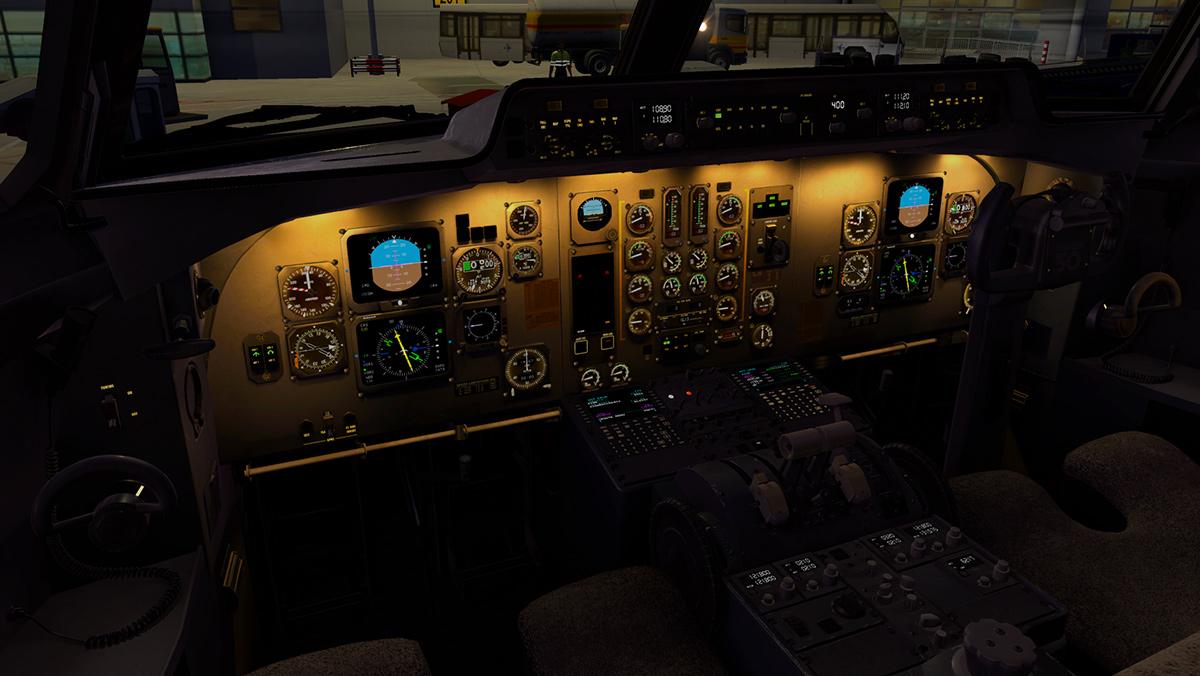
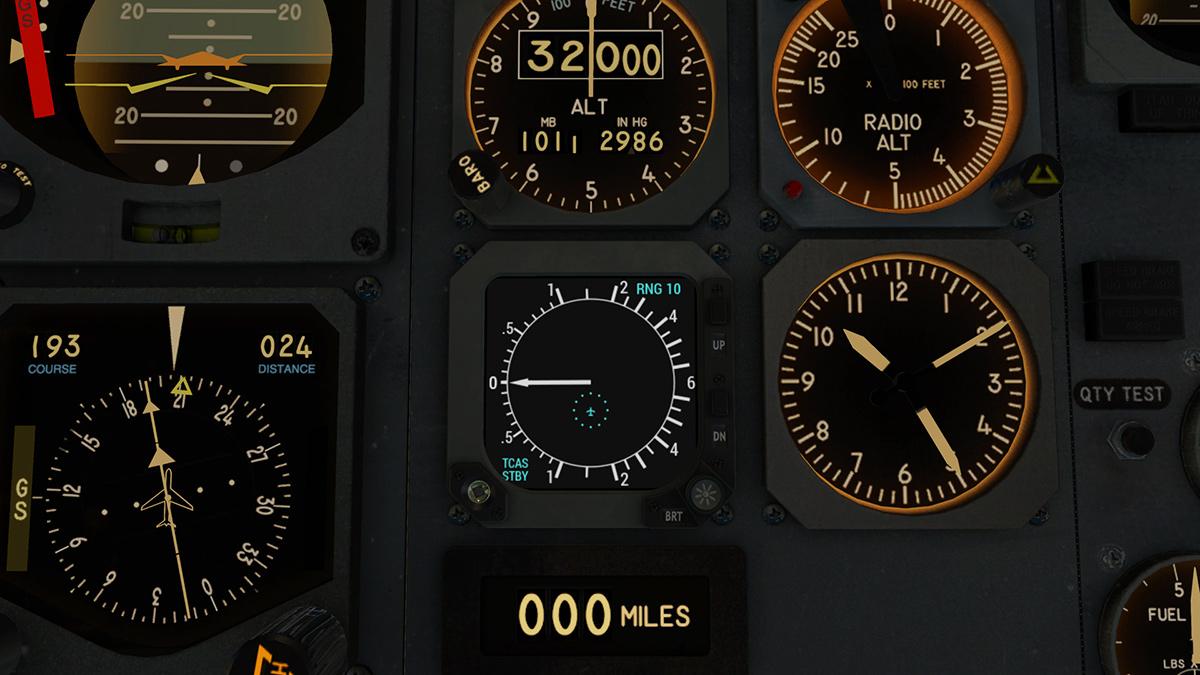
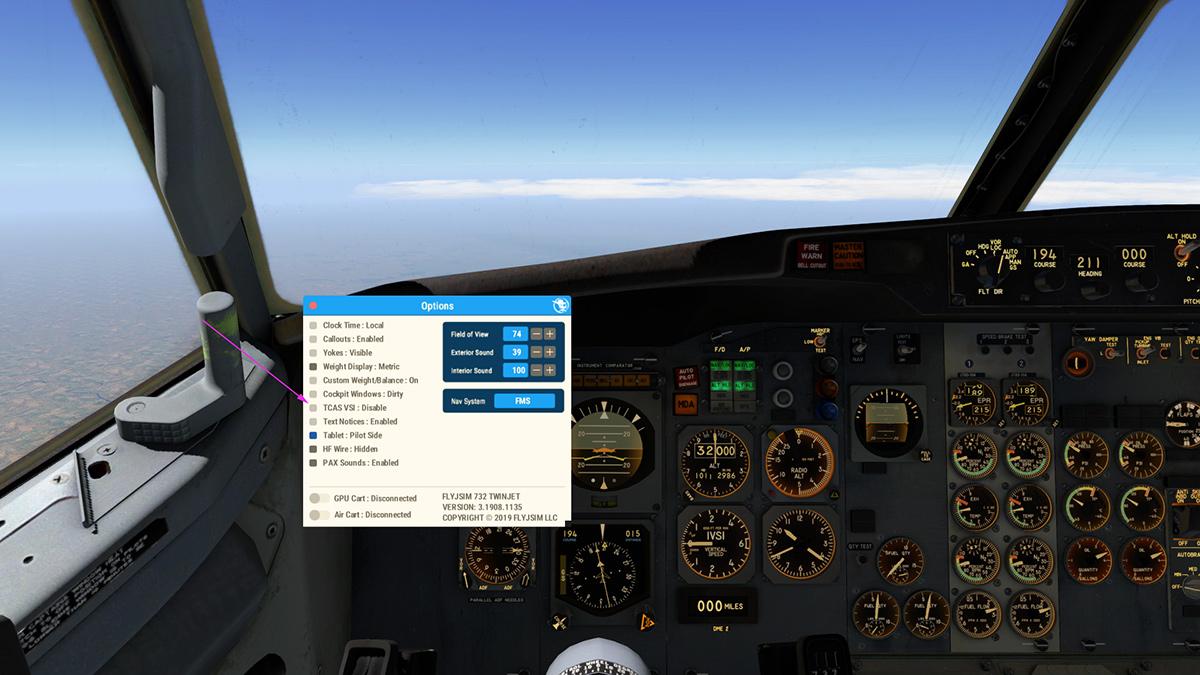
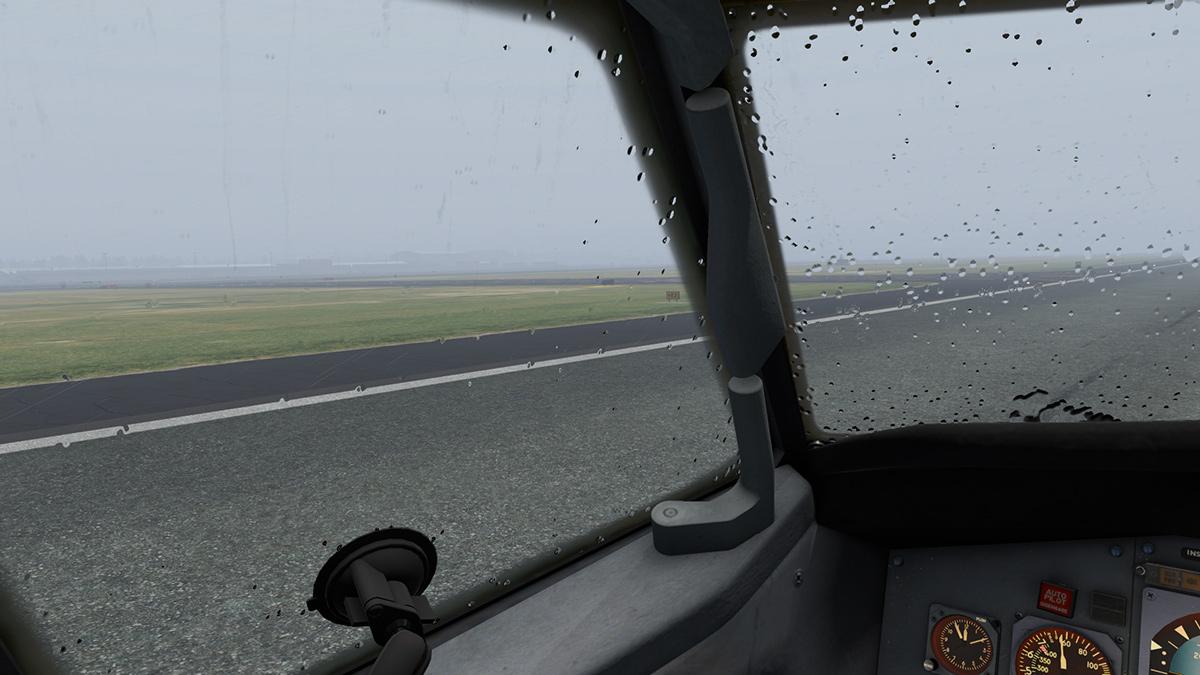
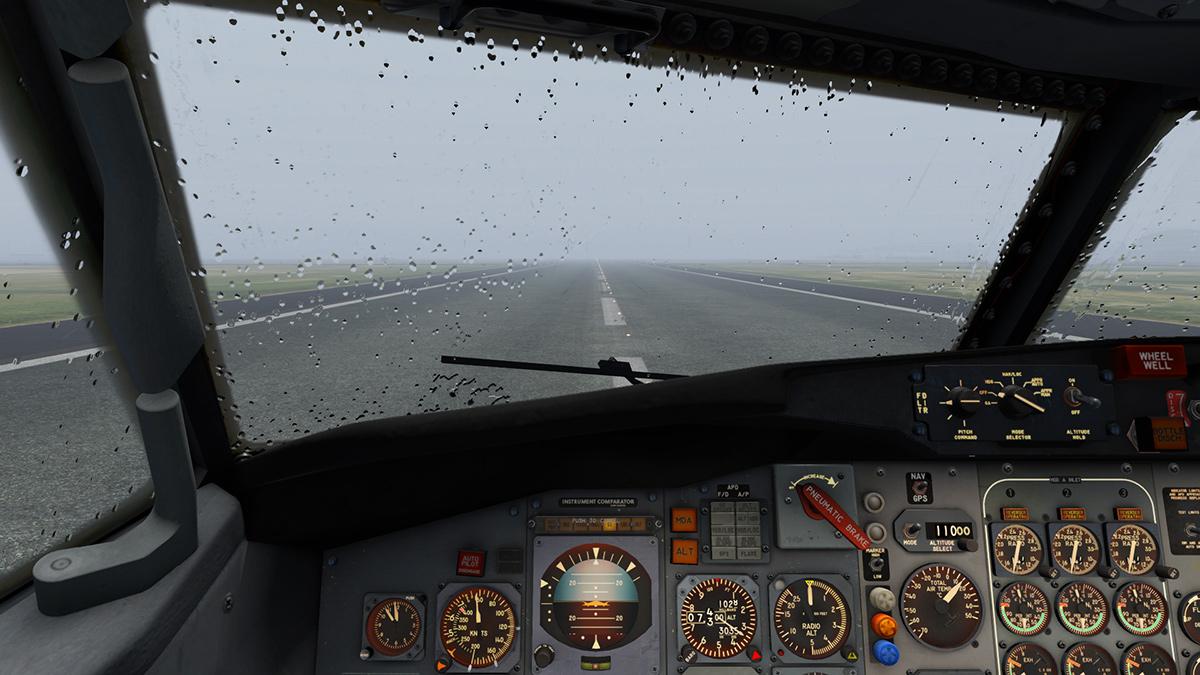
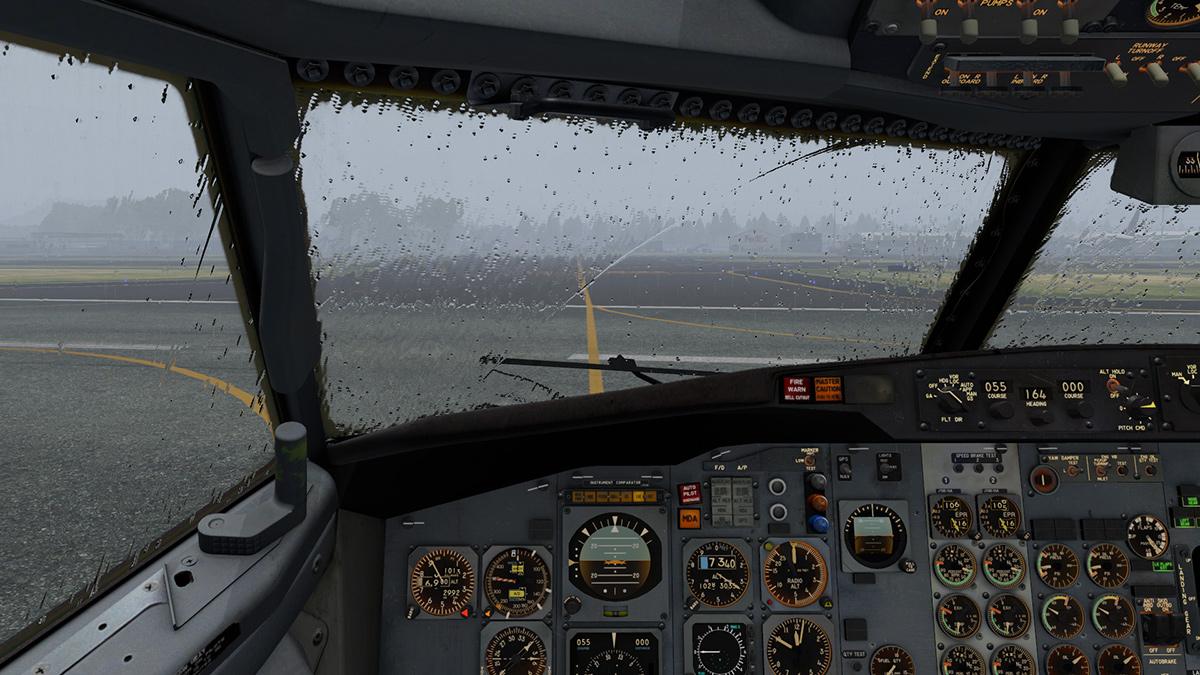
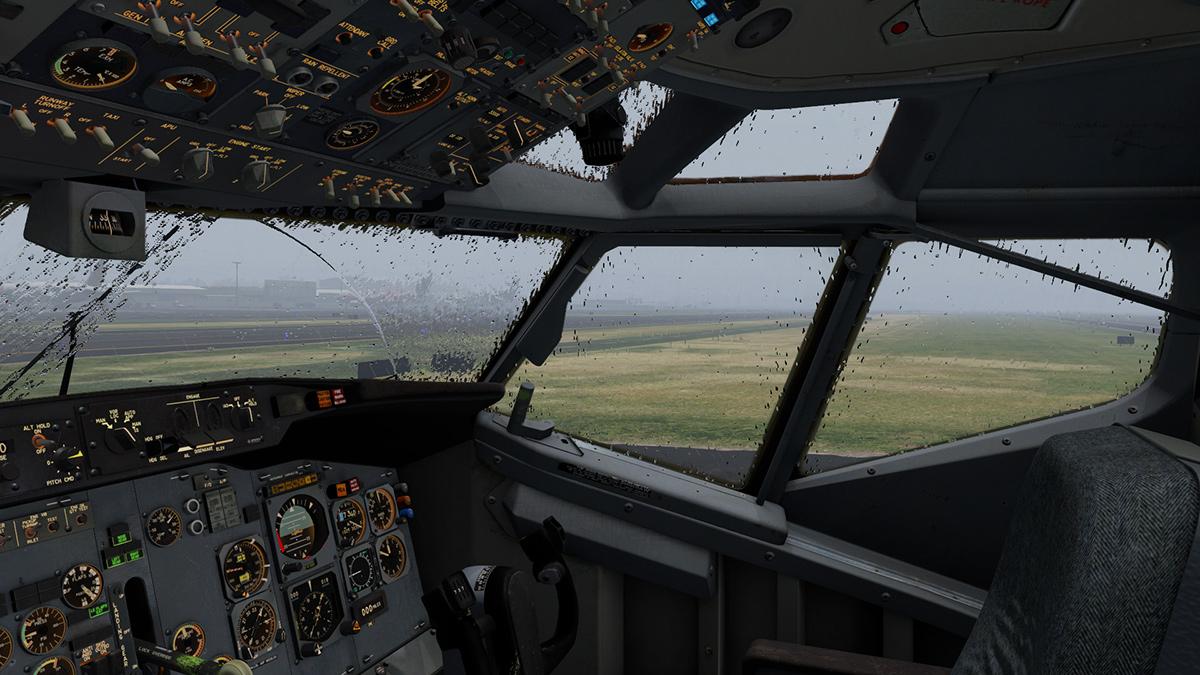
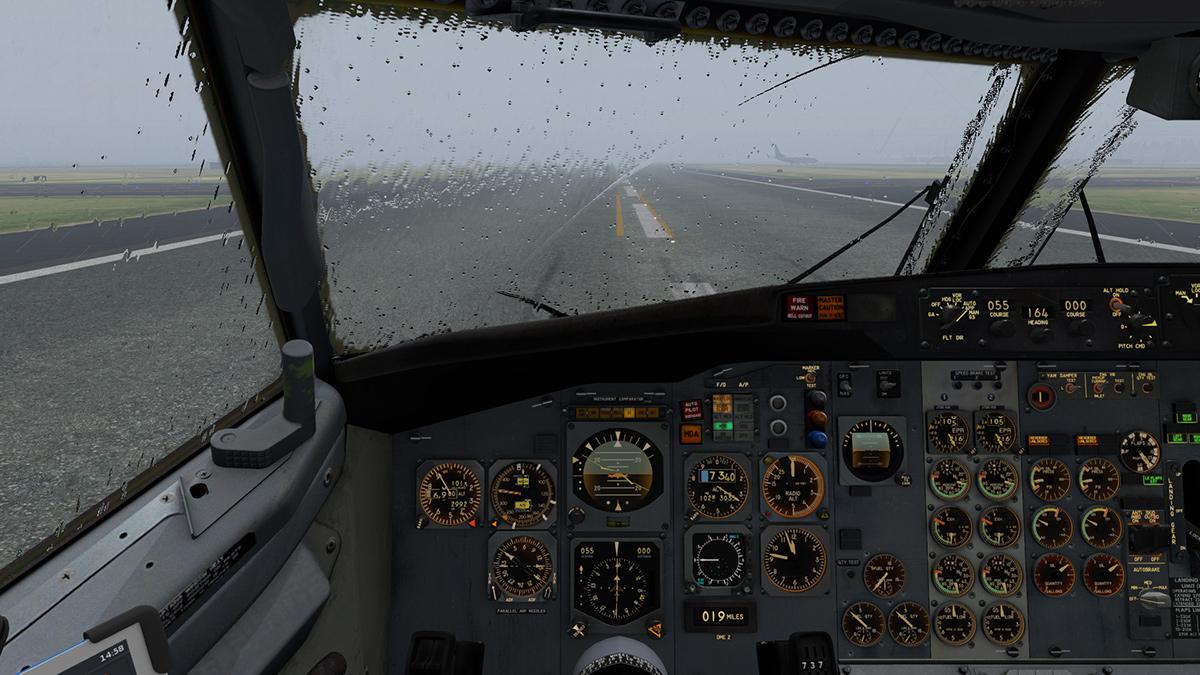
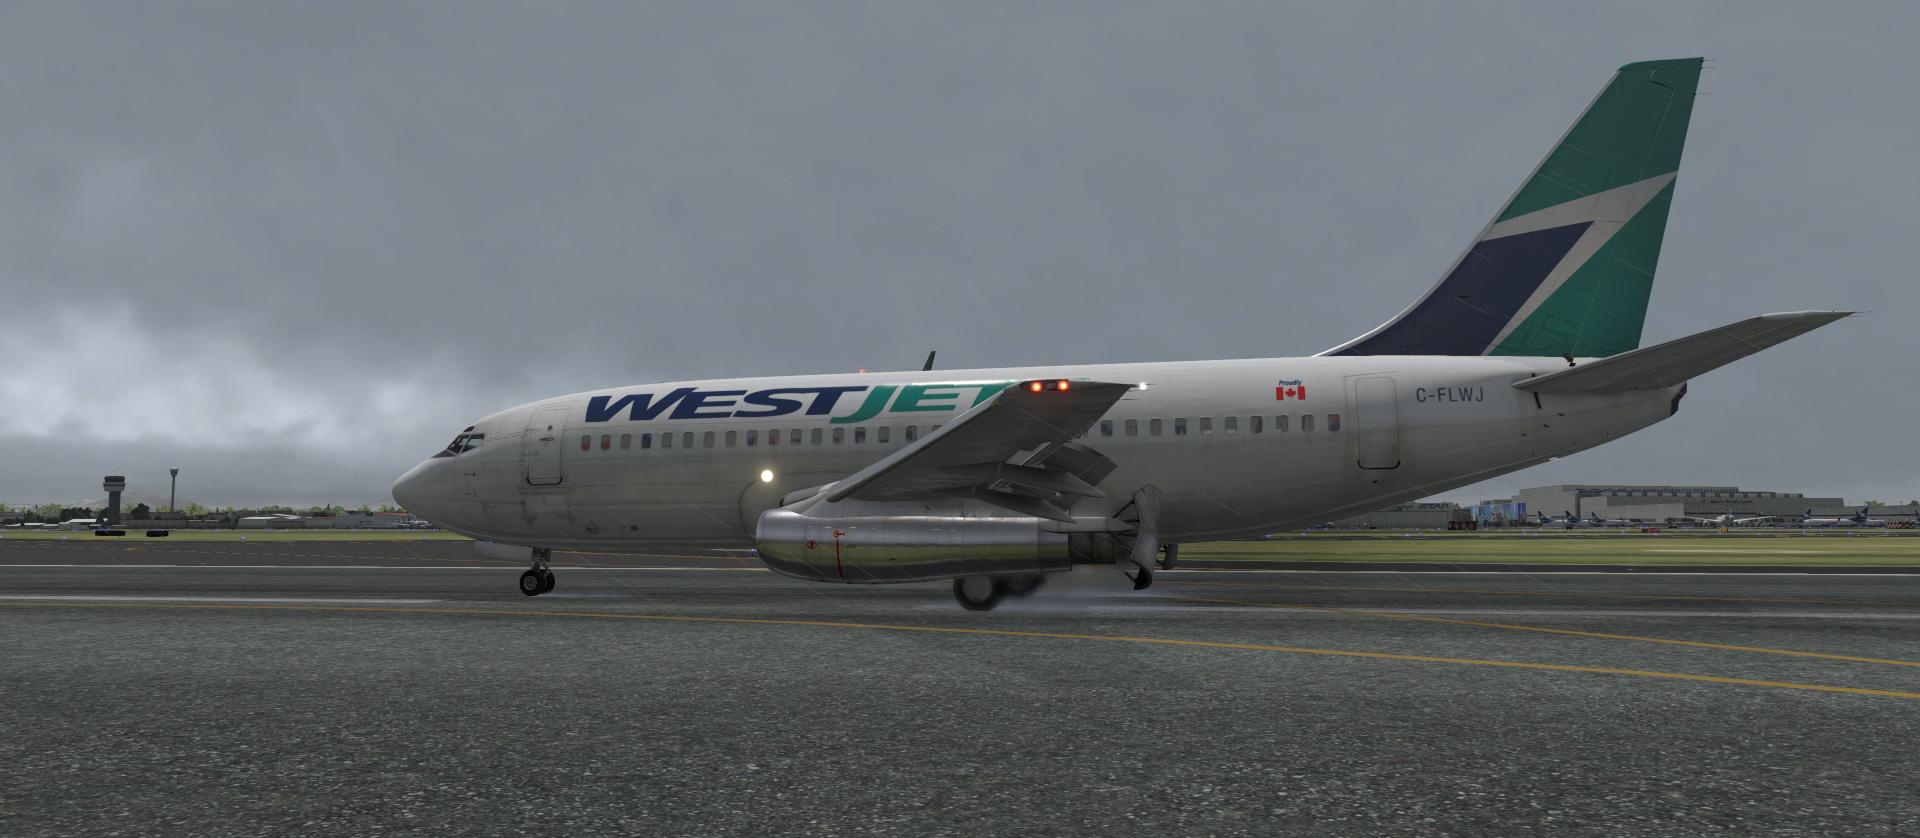
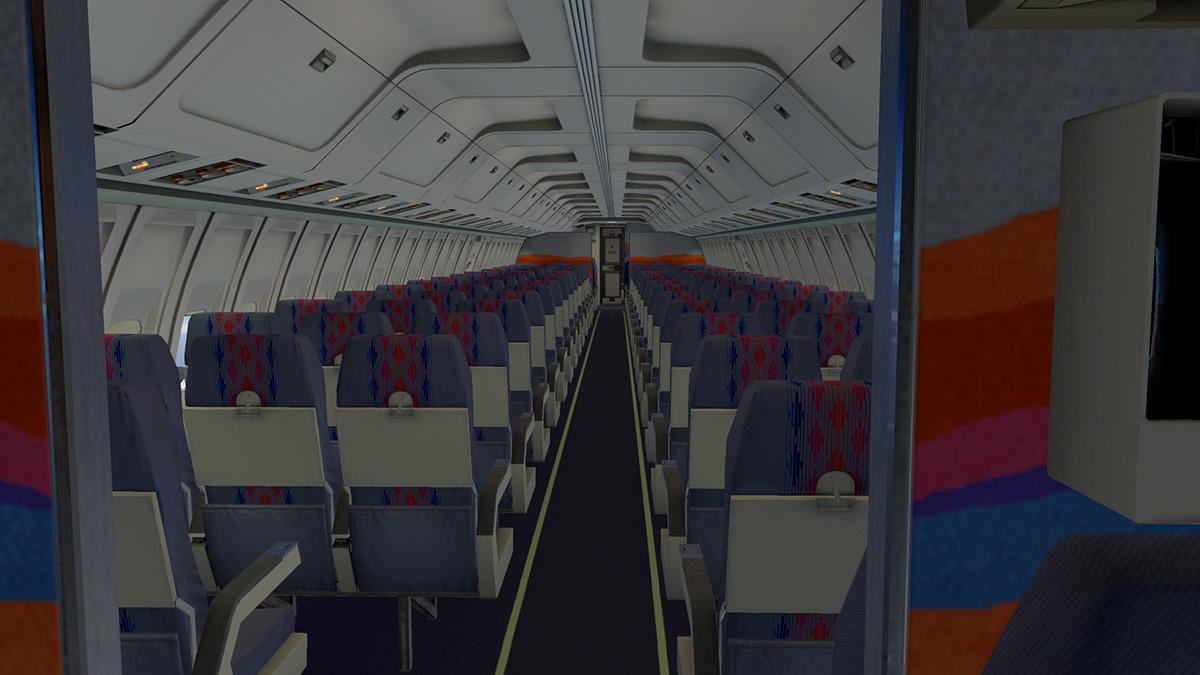
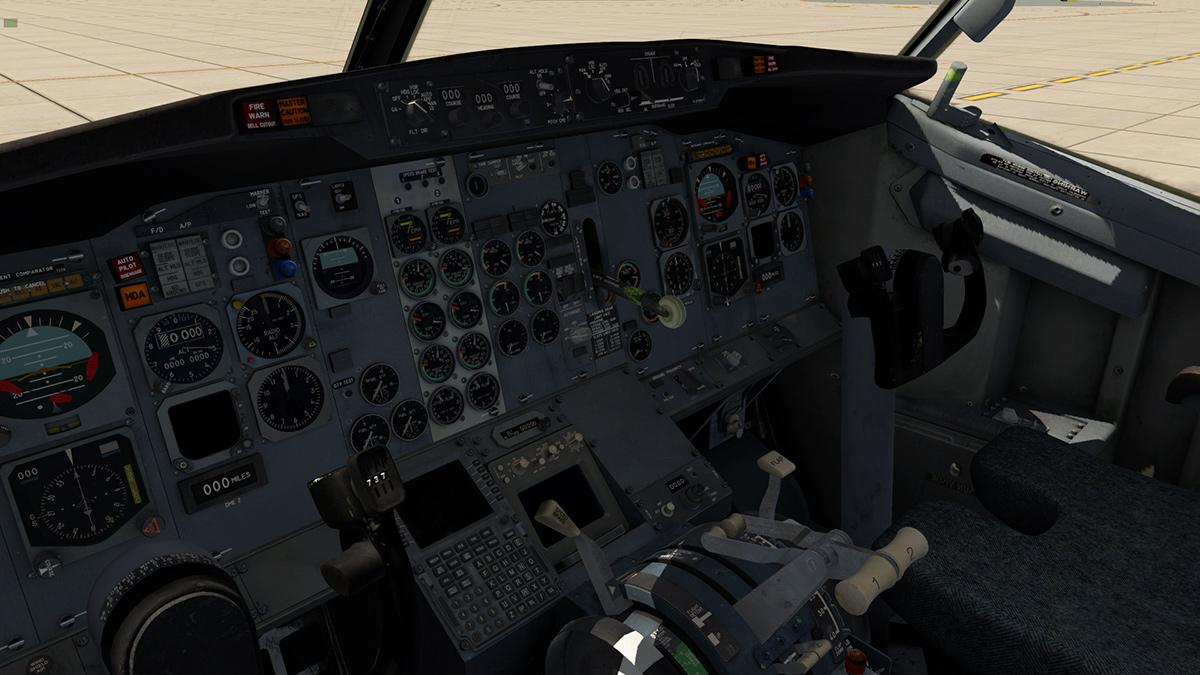
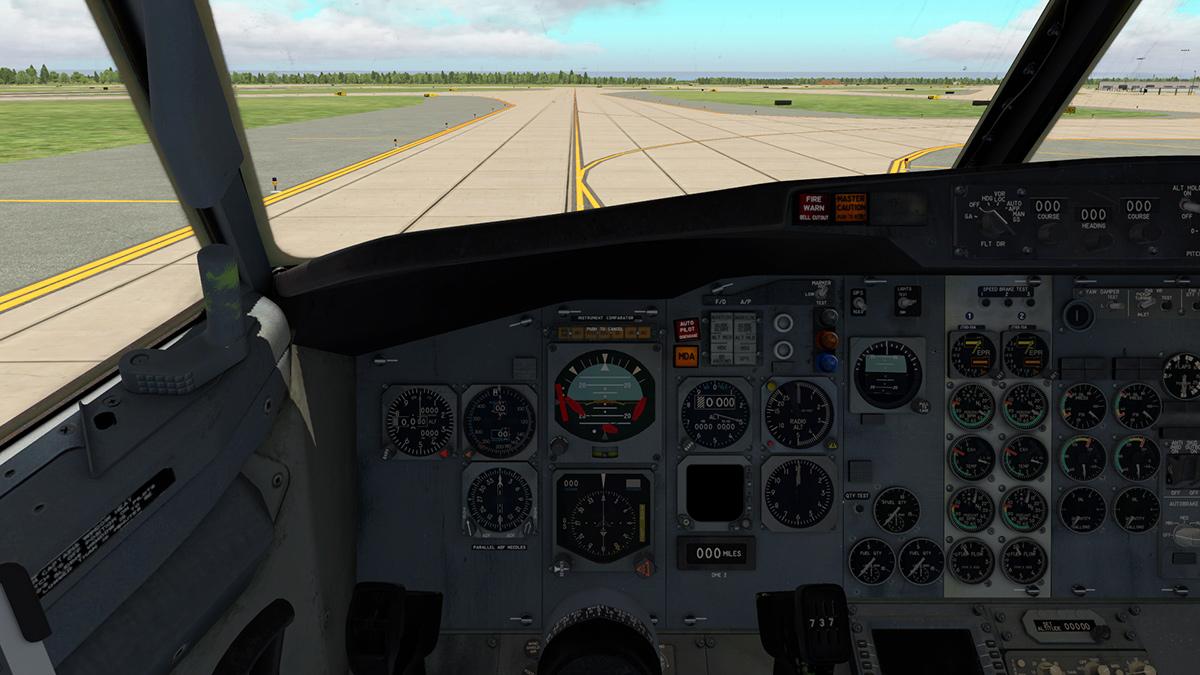
Aircraft Upgrade : Boeing 757 Pro Avionics FPDS by FlightFactor/SteptoSky Although nice in retrospect, the Boeing 757 by FlightFactor/SteptoSky has the older CRT/Clockwork dial cockpit, it does look excellent and it is also certainly a very authentic way to fly the original B757. But in reality most of the surviving Boeing 757's flying out out there on the cargo or passenger route airways have left this older analog world now far behind years ago. Any late built Boeing 757 have usually now however a conversion of the avionics to the IS&S - Innovative Solutions & Support’s display units, this layout is very similar to the ProLine 21 system and the Boeing 737-800 but with four displays covering both pilots PFD and MAP/NAV, and this conversion is called the "FPDS" or "Flat Panel Display System" or commonly known as a glass cockpit conversion. So X-Plane users have been asking, well okay begging FlightFactor for this glass cockpit FPDS for a long time.... and now it is here, for another added on extra price. We will go into the (complex) pricing structure later, but for now this is a great addition to the Boeing 757 cockpit. At this point it is just the B757 Pro and the Extended version and currently not for FlightFactor's other significant aircraft the Boeing 767, but the avionics system in the B767 is almost exactly the same as this IS&S system, and so that conversion should be along not far behind. So here is the original CRT/Analog panel, and below the new FPDS. In reality the original was also a semi-glass instrument system if part CRT (Cathode Ray Tube), but the latter two-display glass unit is far more cleaner and larger with more features. Both the PFD (Primary Flight Display) and the NAV/MAP (Navigation/Map) displays pop-out for ease of use and also for the cockpit builders, the pop-outs can also be scaled and moved around your screen. To switch over the CRT/Analog to the FPDS you go to the iPad menu and select "OPTIONS" then "AVIONICS", the EFIS selection is to the left. A few users have had issues with the new EFIS Option not appearing in the iPad. The trick is to start the aircraft in Cold&Dark Mode and then the new avionics can be selected. Save the CONFIG file. Thereafter it should work when loading aircraft with engines running. This is for only users that are updating and not doing a complete new aircraft download. Not only do the main display panels change on the FPDS selection, but also does the EFIS Control Panel on the pedestal.. IS&S Avionics The PFD is in reality not that much different than the twin unit it replaces, it is in the addition of the large NAV/MAP screen that gives the system it's more substantial and easier workflow. The one thing that really stands out is the sheer details and features we now have in these avionic displays, certainly gone now in X-Plane are the days of showing a sort of a moderated version or simplistic layout. Twin Display EADI and EHSI The primary flight display is highly detailed. Obviously the main items are represented in the upper EADI (Electronic Attitude Direction Indicator) like the Artificial Horizon, Rate of Turn and Pitch guides, Speed and Altitude tapes are also represented... The Flight Director (FD) is also of course represented but it is highly detailed here, and this a point to make, as you are not just getting the basics, but the very highly detailed version with all the finer details as well. It is the lower EDSI (Electronic Horizontal Situation Indicator) section (really the older NAV/MAP) that is the most interesting of the system. The detail is excellent and there is a lot to take in. You can switch from the VOR/APP/MAP in the display which is between the ROSE (APP) and ARC (MAP) modes, but there are a few limitations in that the large secondary NAV/MAP can't be switched to the ROSE mode (I don't think the real version can either) it stays only in the ARC mode unless you use the PLAN mode, so to a point both the displays are not completely independent. Both VOR 1 and ADF 1 frequencies and VOR 2 and ADF 2 Frequencies are shown in both displays, I love the stack version in the PFD, but the frequency layout in the NAV/MAP can also be mixed in with the lower part of the NAV/MAP details, and they can be then very hard to read. I checked that the frequency position is correct, but on the real display there is no layout overlap? PFD also shows the VOR 2 data (next waypoint) and in the NAV/MAP version on the top right. Left lower PFD is the Rate of Climb dial, again really well done Both show GS (Ground Speed) and TAS (True Air Speed)/WindSpeed and Direction, TRK (Heading) Radio height and Baro. The Vrefs are worth looking at. Even if you set the aircraft's Vrefs speeds in the "Takeoff" preferences in the FMC (Flight Management Computer) they don't select the same in the EHSI So you still have to set the Vref Speeds yourself. The SPD REF knob is top centre on the EFIS Control Panel, slightly tricky to use at first but you soon get use to the insert system of adding in the Vref Speeds, if it is grey it can be set (note the yellow "No VSPD" notice)... .... select the speed via the top part of the knob and lock it in with the "SET" button, it will turn green when set, all four settings can be set in V1/VR/V2/REF, You can switch between TO (Takeoff) and APP (Approach) Vspeeds, when set the No VSPD notice disappears. I like this action a lot. VAV/MAP display details cover WXR (Weather), NAV AID, APRT (Airport), RTE DATA (Route Data) and WPT (Waypoint), set them all and you will get a very cluttered screen, certainly with the WPT range set long, personally I never use WPT unless in RNAV mode as they usually clog up to much of the screen. RTE DATA is however very good in fine detail in showing all the complex data of your route. WRX - Weather can be selected and you can adjust the brightness of the weather on the display. TERR - Terrain is also available and FlightFactor was one of the first and it is still the best of this TERR feature. _______________________________ Flying with the FPDS What started out as a nice day in Barcelona, Spain quickly deteriorated later in the day towards departure to Porto - LPPR, Portugal. FlightFactors/VMax Boeing 757 is still a magnificent aircraft, and as we have noted over a few update reviews it now comes with a much more nicer cabin and dynamic details, but you do notice the missing engines behind the blades and the cabin still has some work to be done on the overhead panels. You have to find the right WRX setting, if not it will overwhelm the display, or when it does refresh it can take a moment before resuming. Vref Speeds are excellent and spot on if you have done your homework 159 knts + 10 is perfect at 15º flap... .... no denying that the FF B757 is a great aircraft to fly, but with this level of study flight, one you have to know your stuff and two have to fly the aircraft a lot in sequences over a lot of routes to get the full depth of simulation, get it right and the returns are impressive. I am a big fan of "Range to Selected Altitude" markers, setting climb and descent targets can make or break a good flight, and in here they are excellent on both displays. I find the PBR a bit to bright in certain lighting conditions and light in the B757 cockpit it is, and that shows on the displays as well... but you can't doubt the excellent detail and data you get from this avionics system... Select APP Vref and then fill in the "REF" (you can get this from the FMC/APPROACH REF) and the system will fill in the blank speeds, just okay to green or change them to your own preference. Arriving at the EGI2T STAR into Porto the information provided is really good... and in many ways far better than the older CRT layout. But be aware that there are no backup analog instruments with this FPDS, as all instrumentaion is now all just in the glass displays. Then down the chute into LPPR RWY 17. Note the ILS alignment diamonds, and yes you still set the ILS Freq on the rear of the console and not on the forward EFIS Control Panel, note the excellent VNAV Path Exceedance marker next to the Vertical Speed. ... manual thrust control to the runway, and you have to really like this bird.... it is amazing to fly when you get into the groove. 131 knts on final, and you just let the power off to the flare, the B757 is quite hard to pitch with the nose, but a little nose high is perfect anyway.. ... a very sweet touch down, I am pretty happy with that one, now the reverse thrusters and airbrakes and your quickly down to taxi speed.... .... so the flying experience with the more contemporary IS&S avionics is a certainly a great advance if you are wanting the Boeing 757 to be a current simulation and rather than a nostalgic one. These B757 are mostly now running cargo freight, but many a unreplaceable -200 or -300 versions are still doing great work out there until the newer Airbus A321XLR starts to send them all out to Victorville, for you that is a great omen to keep flying this brilliant aircraft. A last note that the FlightFactor Series in the Boeing 757 and Boeing 767 are both very high study grade machines, so they need a fair amount of devotion and time to learn all of their complex systems and flying habits, and like this B757 FPDS then the Boeing 767 version shouldn't be to far behind. Pricing: FlightFactor have produced a 9.14 min video to explain their pricing structure, which really says it all in that it is getting complex. But basically you can upgrade two ways. One (which I will call the Avionics upgrade) is the Standard Single aircraft PRO that can be upgraded with this FPDS package to Modern Avionics Two (Extended and Global) you can also update to first from the Standard Single Aircraft to the "Extended" version that includes three versions of the B757 in the -200, -300 and the Freighter, and then update again to the GLOBAL version of everything in the Extended and plus the FPDS package. Pricing is best shown like this base B757 US$72.00, Upgrade to Extended US$20.00, Upgrade to Modern Avionics US$20 So all four upgrades can also be purchased as a pack.. Single basic B757 Pro Pack - US$72,00 Modern Avionics Pack - US$ 92.00 Extended Pack - US$92.00 Global Pack - US$112,00 Summary Here is another extension to the FlightFactor/SteptoSky Boeing 757 Pro with the first being the " Extended" version with the optional variants of the -200, -300 and the Freighter. This is the "Avionics" upgrade to the IS&S - Innovative Solutions & Support’s display units called FPDS or Flat Panel Display System. This brings the Boeing 757 into a more contemporary later aircraft currently still flying around the world, as the older version carried the nostalgic CRT semi-glass/analog systems. As a reproduction of the IS&S FPDS it is about the best as you are going to get, but it is however a bit pricey for just an avionics upgrade, and the NAV/MAP display can also interfere with the VOR Frequencies in the lower part of the display, otherwise it is excellent with all the features you will ever need including great Takeoff and Landing Vref interaction. In reality it turns the B757 into the same PFD and NAV/MAP system as on the Boeing 737. Obviously yes this Avionics upgrade is a brilliant addition to the aircraft and expect it to appear soon in the similar Boeing 767, personally I really like this avionic option on the FlightFactor's Boeing 757 Pro Series, and yes it was well worth the wait. ______________________ Other small version and fix updates of this aircraft include: v2.2.13 - added showing plane position on navigraph charts that support such functional - added some docking points for better compatibility with ground services - fixed navigraph charts in VR - fixed resetting navigraph charts page on switching efb mode (horizontal/vertical) - fixed broken sound on some Linux distributions - fixed the case when pop-up screens weren't visible in different multi-monitor setups - returned an ability to toggle keyboard input mode for cdu, now by clicking on cdu screen on pop-up window ______________________________________________________________________ Yes! the Boeing 757-200ER Professional & Extended versions and the EPDS extension by FlightFactor Aero/SteptoSky... ... is NOW! Available from the X-Plane.Org Store here : Boeing 757-200ER v2 Professional Price is US$72.00 Boeing 757-200ER v2 Professional Extended Price is US$92.00 Boeing 757-200ER v2 Professional Extended Upgrade Price is US$72.00 + US$20 Boeing 757-200ER v2 Professional Modern Avionics Price is US$72.00 + US$20 Boeing 757-200ER v2 Professional Global Upgrade Price is US$92.00 + US$20 Boeing 757-200ER v2 Professional Global Price is US$112.00 You must already have purchased and own the current Boeing 757-200 v2 version for any upgrades (Extended/Avionics) to the aircraft Requirements X-Plane 11.36 (X-Plane 10 is NOT supported!) Windows 7+, Mac OS 10.10+ or Linux 14.04 LTS or compatible, 64 bit mode 8Gb RAM / 2Gb VRAM Minimum, 16Gb+ RAM / 4Gb+ VRAM Recommended Current and Review Version: 2.3.6 Free auto-updates for the entire XP11 life-cycle _____________________________________________________________________________________ Upgrade Review by Stephen Dutton 10th September 2019 Copyright©2019: X-PlaneReviews (Disclaimer. All images and text in this review are the work and property of X-PlaneReviews, no sharing or copy of the content is allowed without consent from the author as per copyright conditions) Review System Specifications: Computer System: Windows - Intel Core i7 6700K CPU 4.00GHz / 64bit - 16 Gb single 1067 Mhz DDR4 2133 - ASUS GeForce GTX 1080 8Gb - Samsung Evo 512gb SSD Software: - Windows 10 - X-Plane 11.20 Addons: Saitek x56 Rhino Pro system Joystick and Throttle : Sound - Bose Soundlink Mini Plugins: Environment Engine by xEnviro v1.11 US$69.90 : WorldTraffic 3.0 Plugin - US$29.95 : BetterPushBack - Free : JARDesign Ground Handling Deluxe plugin Scenery or Aircraft - LEBL - Barcelona XP11 by JustSim (X-Plane.OrgStore) US$21.00 (review of LEBL is here : Scenery Upgrade : LEBL - Barcelona XP11 by JustSim - LPPR - Porto Airport UHD, Portugal by Area 77 (X-Plane.OrgStore) US$23.50 (review of LPPR is here : Scenery Review : LPPR - Porto Airport Portugal by Area77 Simulations
-
Aircraft Review : Challenger 300 V2 XP11 Captains Edition by Ddenn
Stephen replied to Stephen's topic in Airliners Reviews
Okay I see your problem... mp3's won't convert to a .wav file because they are a highly compressed file, in other words to make a mp3 and its small size they throw away data to highly compress it, that is why it usually sounds like shit (I loath mp3's and never use them). What your looking for bit rate as a CD which is 44.1 kHz and that is why the sound on a CD is far, far better than an mp3 at 320 kilobits per second (Kbps). So to convert to a .Wav file as It stores the same audio at about 10 MB per minute at a 44.1 kHz sample rate using stereo 16-bit samples. The WAV format is by definition, the highest quality 16-bit audio format. So what you are trying to do is create a quality sound out of a very poor sound. You will have to find a better file source with the higher bit rate...or the same 44.1 khz sample rate to convert to .wav -
Aircraft Review : Challenger 300 V2 XP11 Captains Edition by Ddenn
Stephen replied to Stephen's topic in Airliners Reviews
I'm going to need more information than that? -
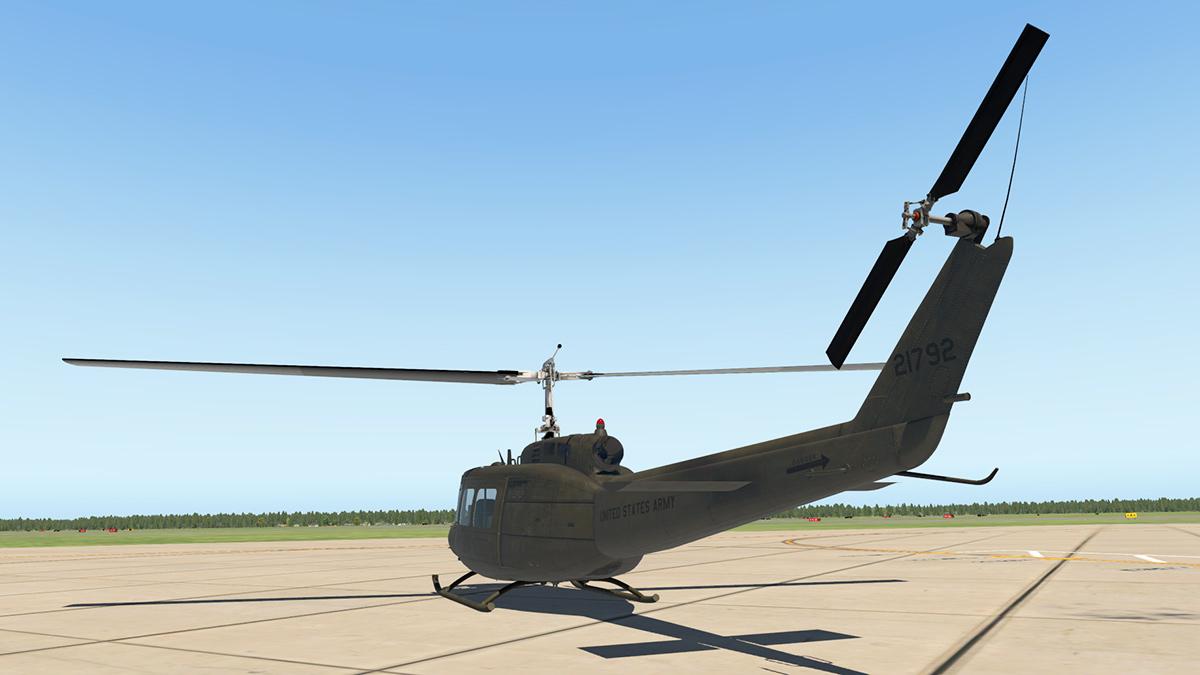
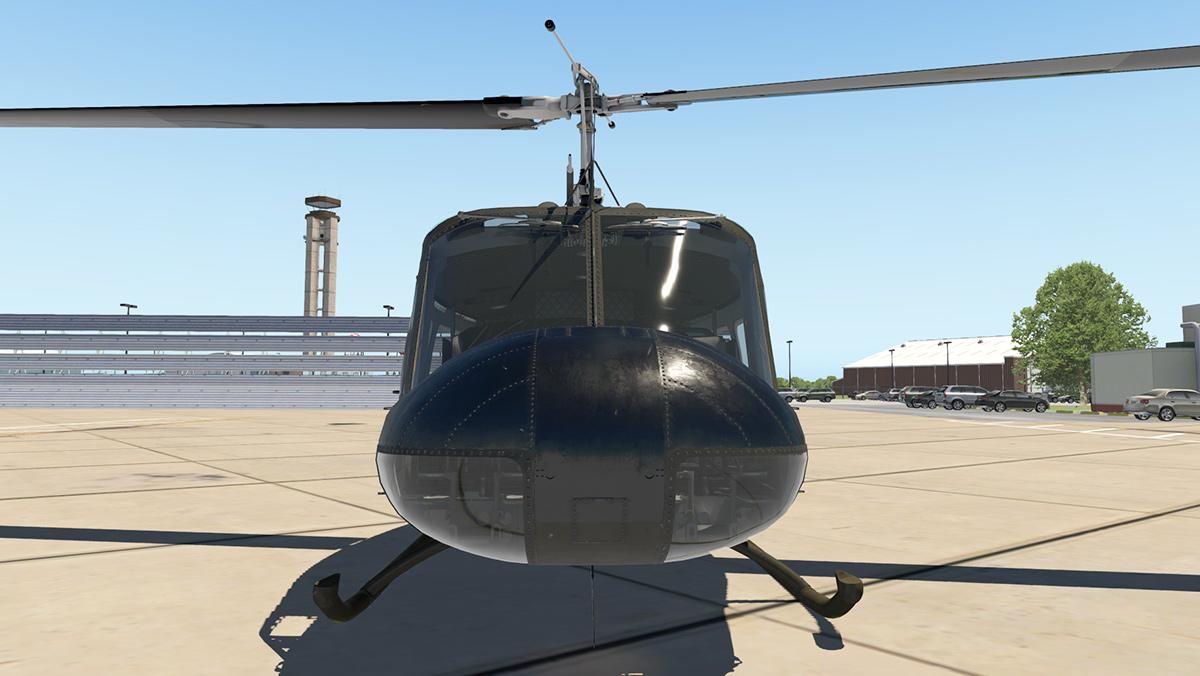
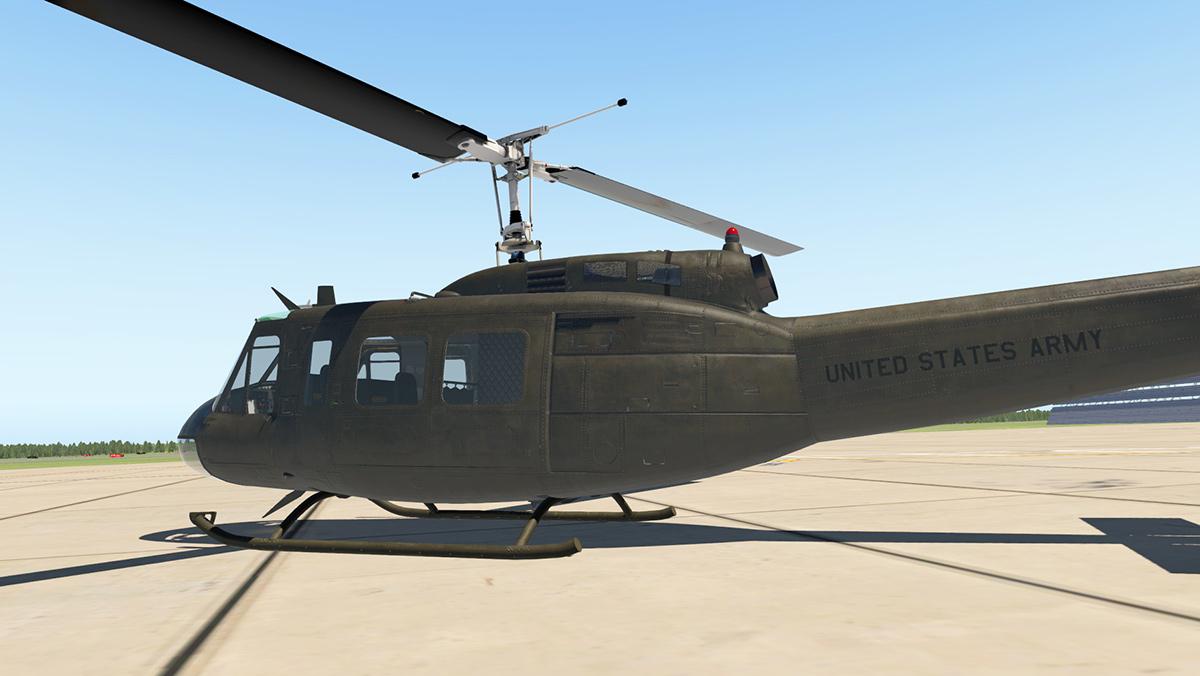
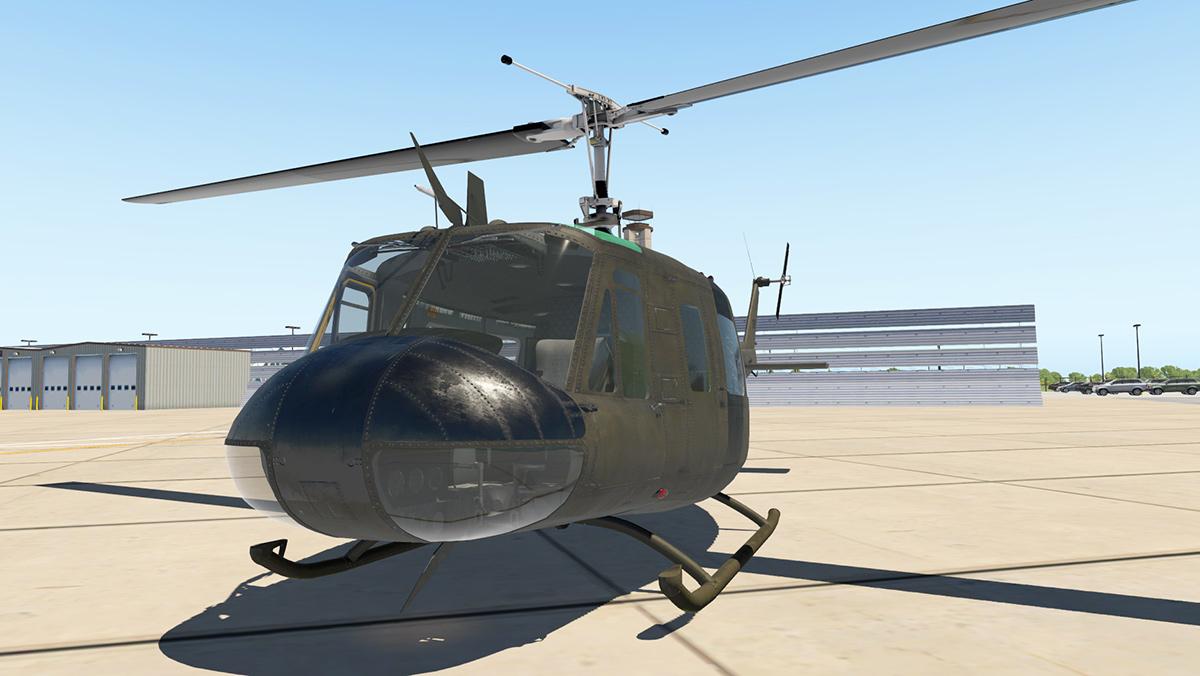
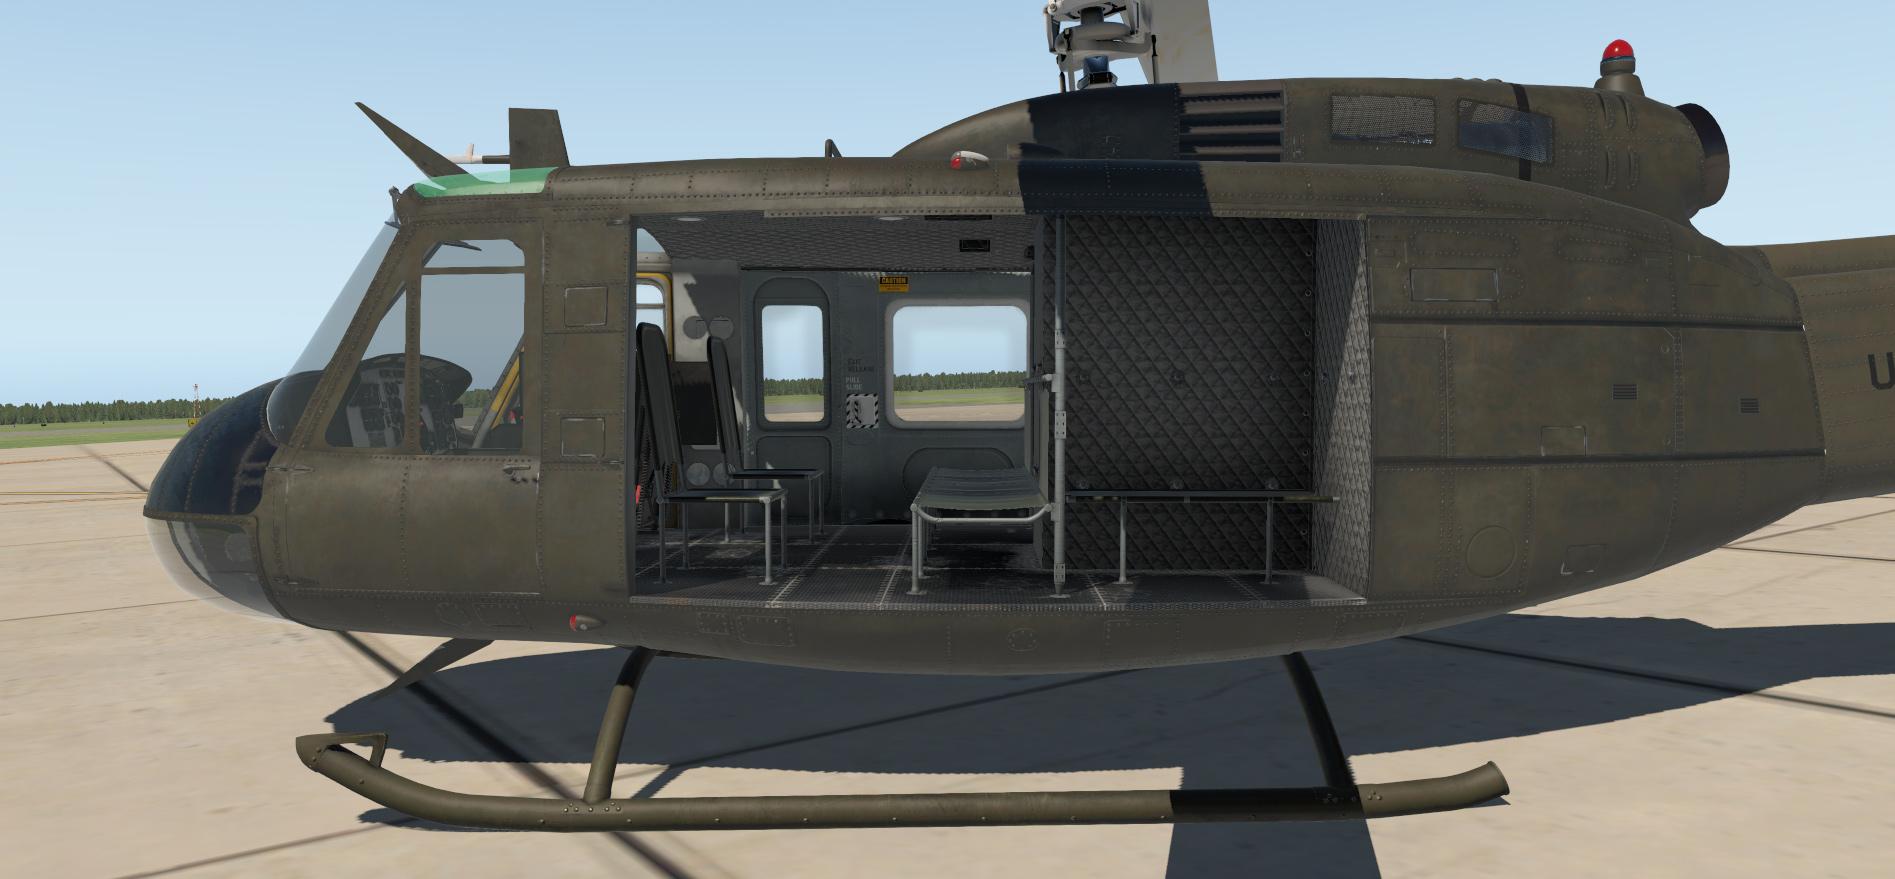
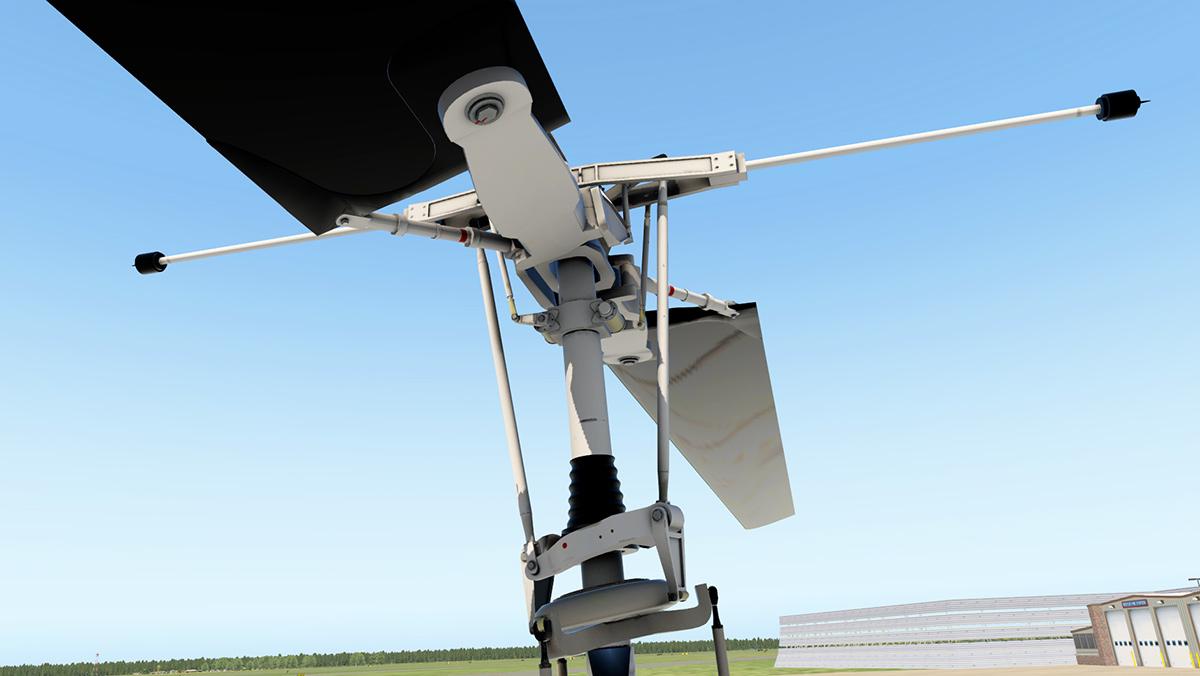
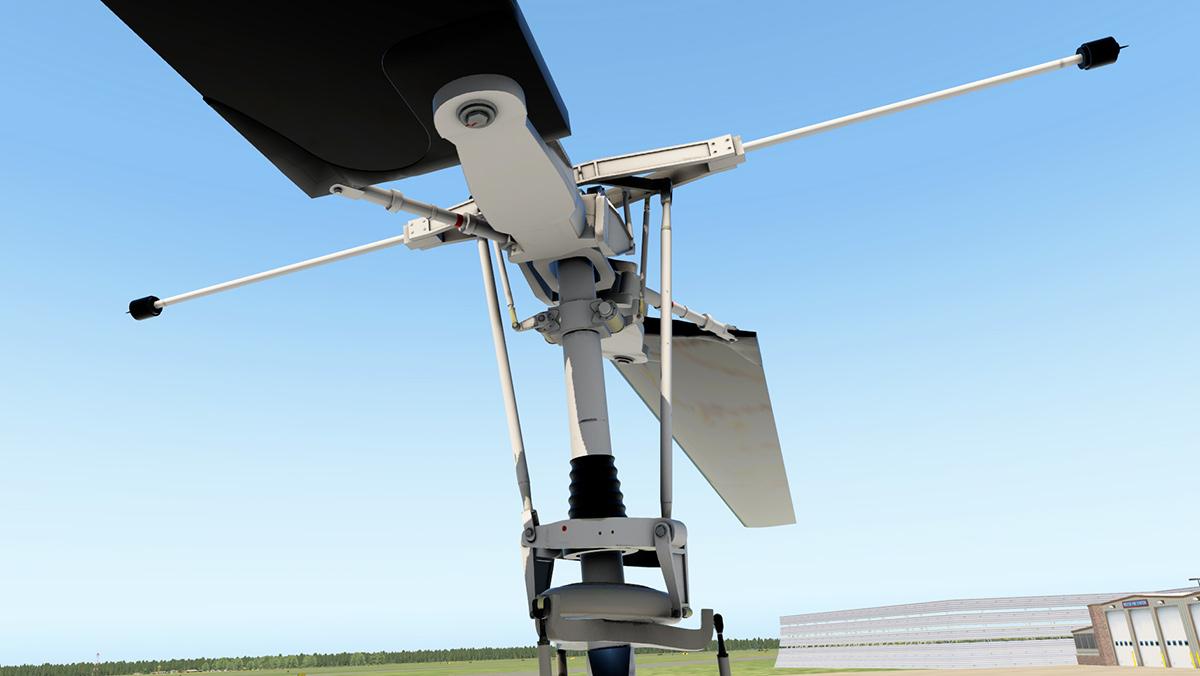
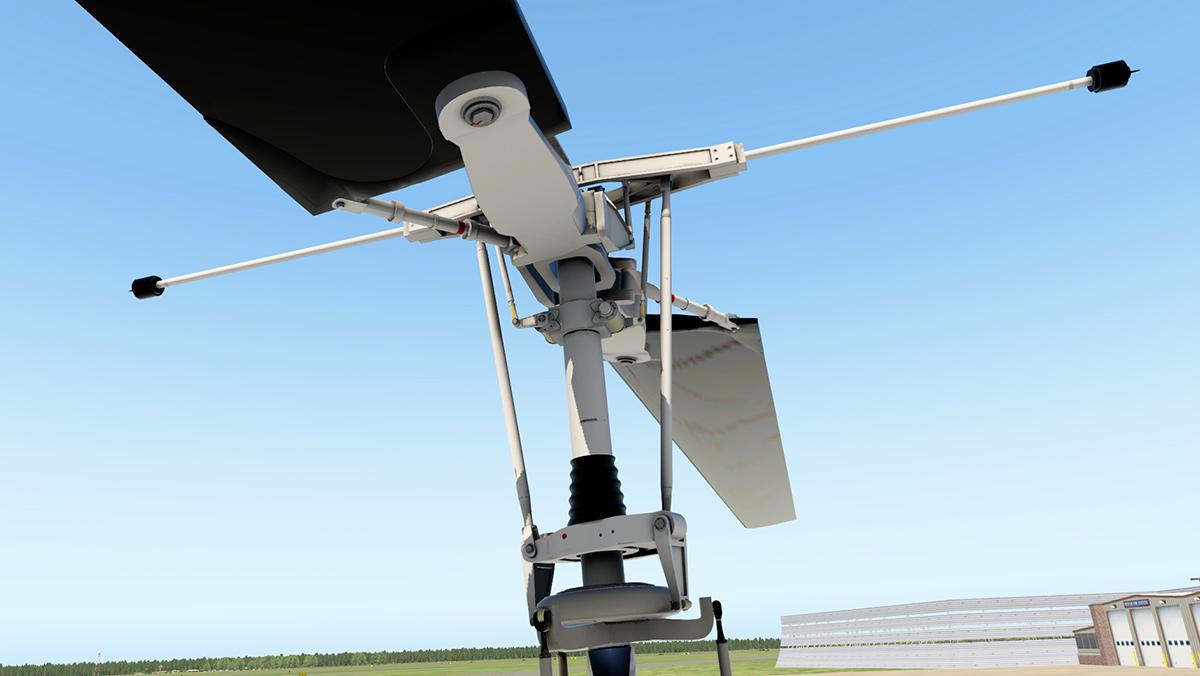
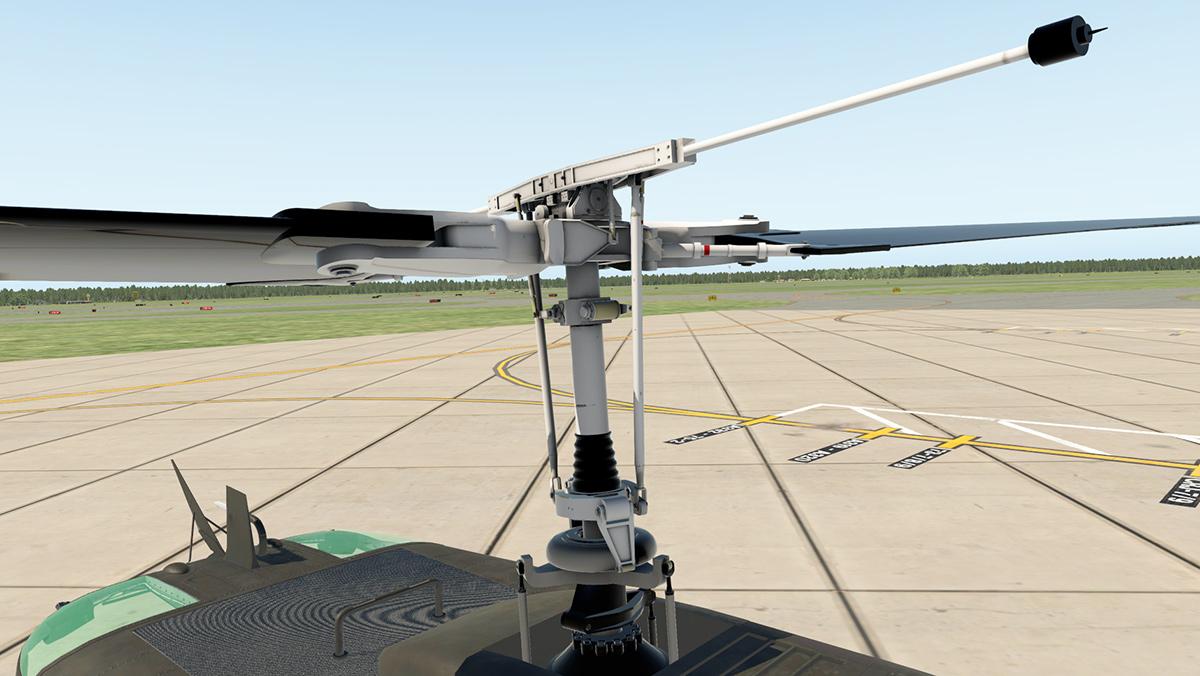
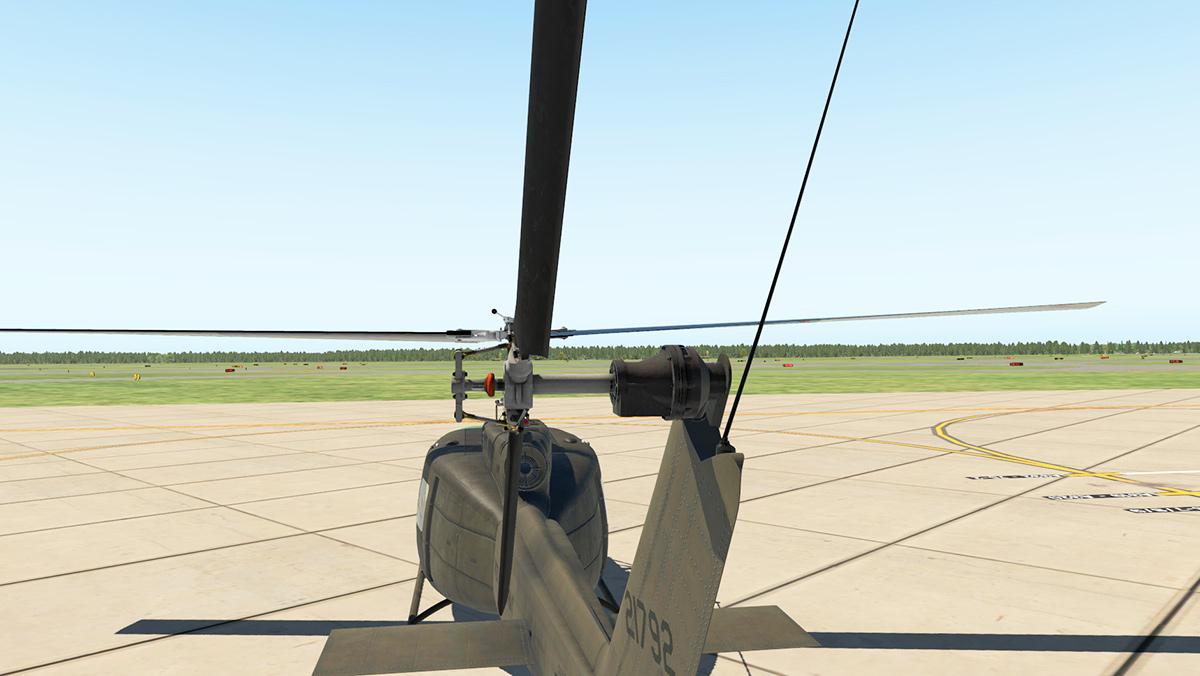
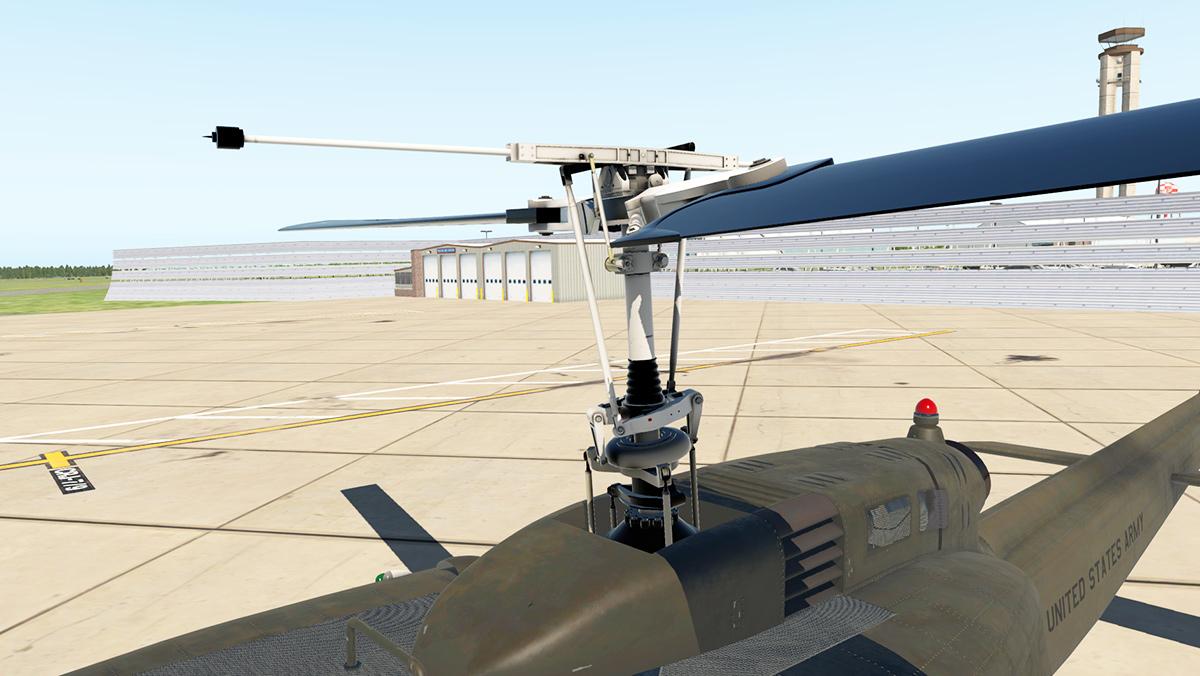
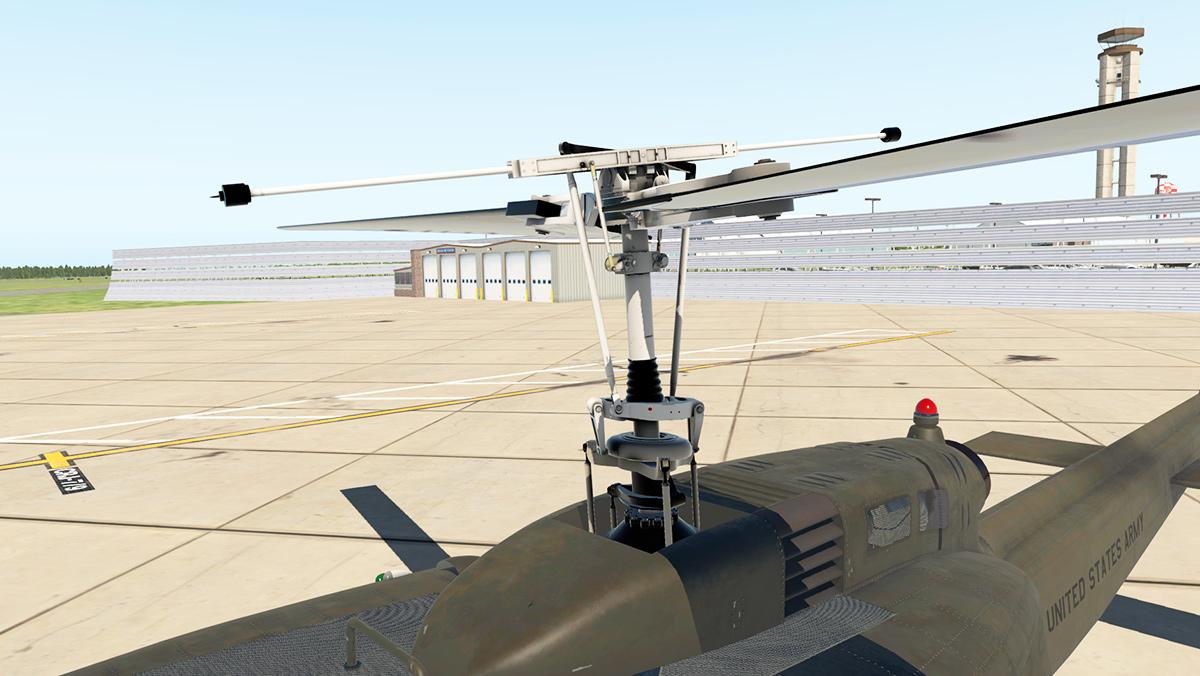
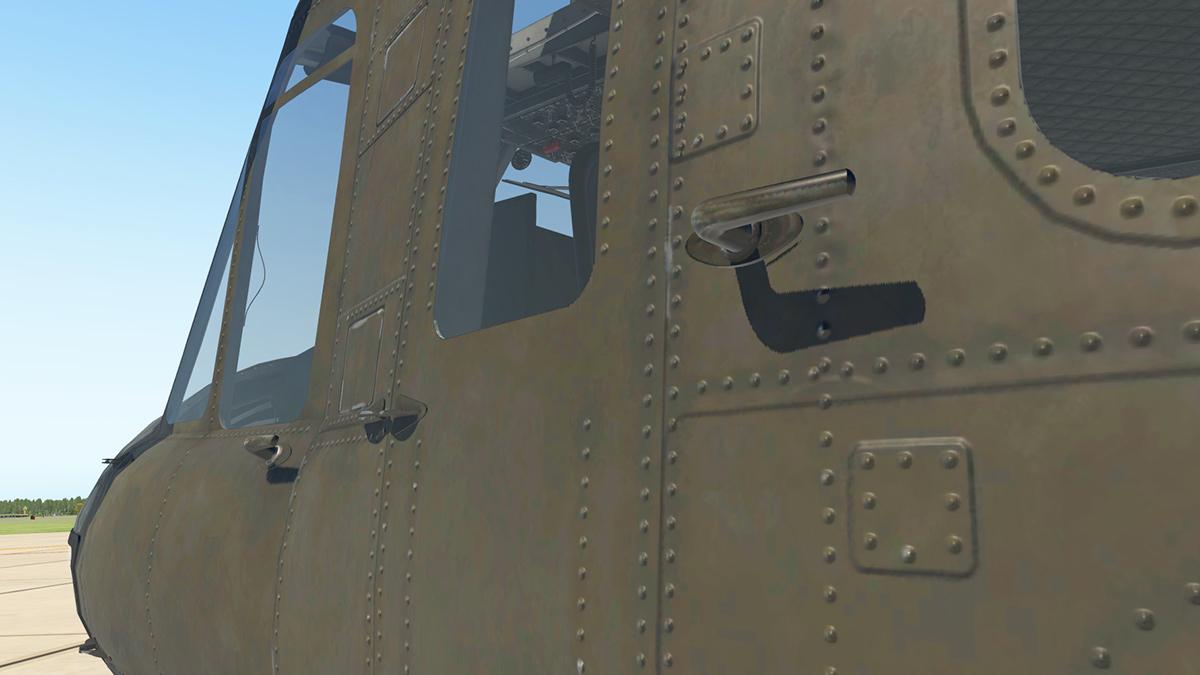
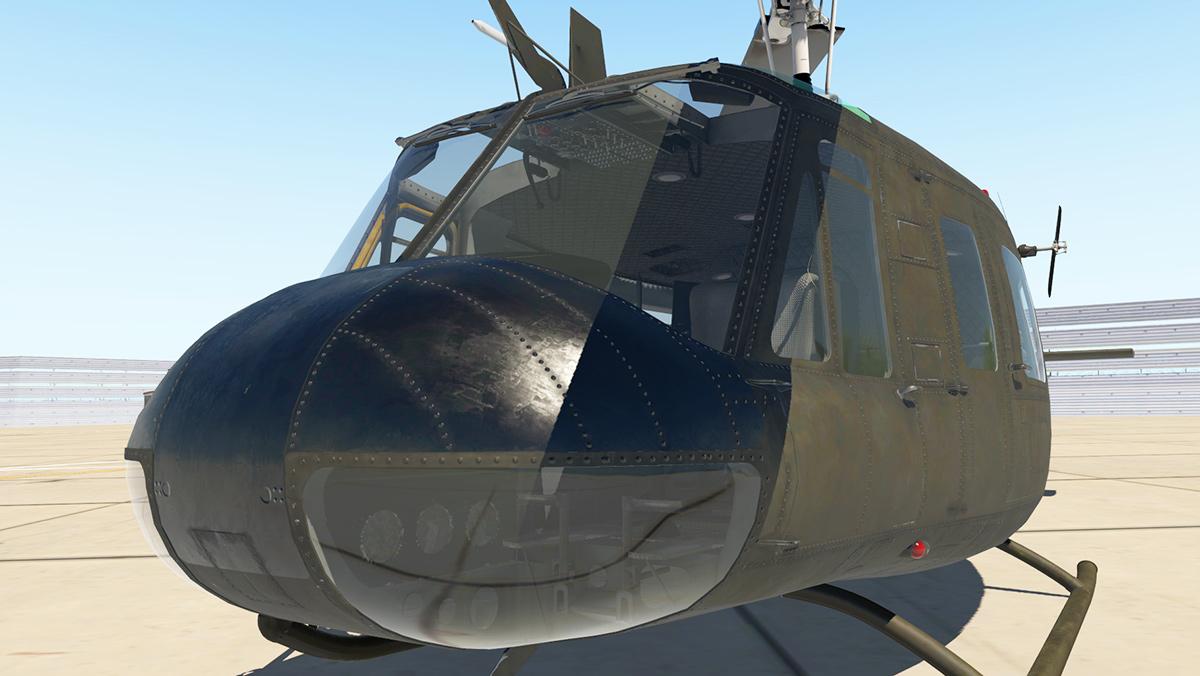
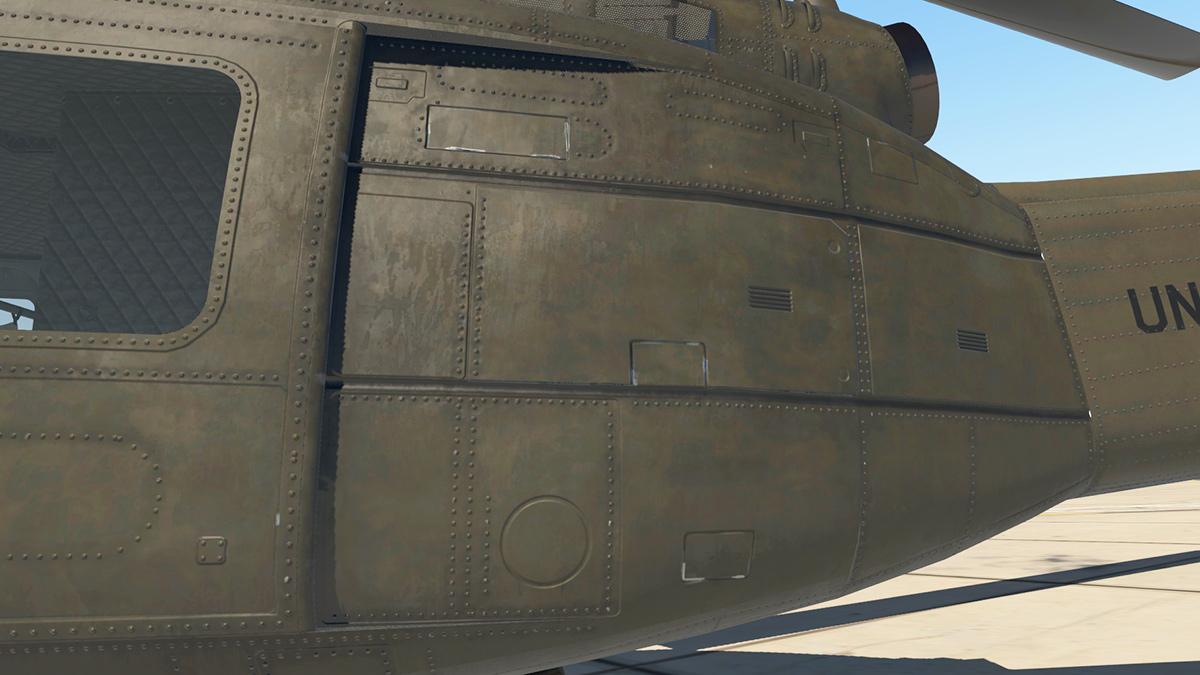
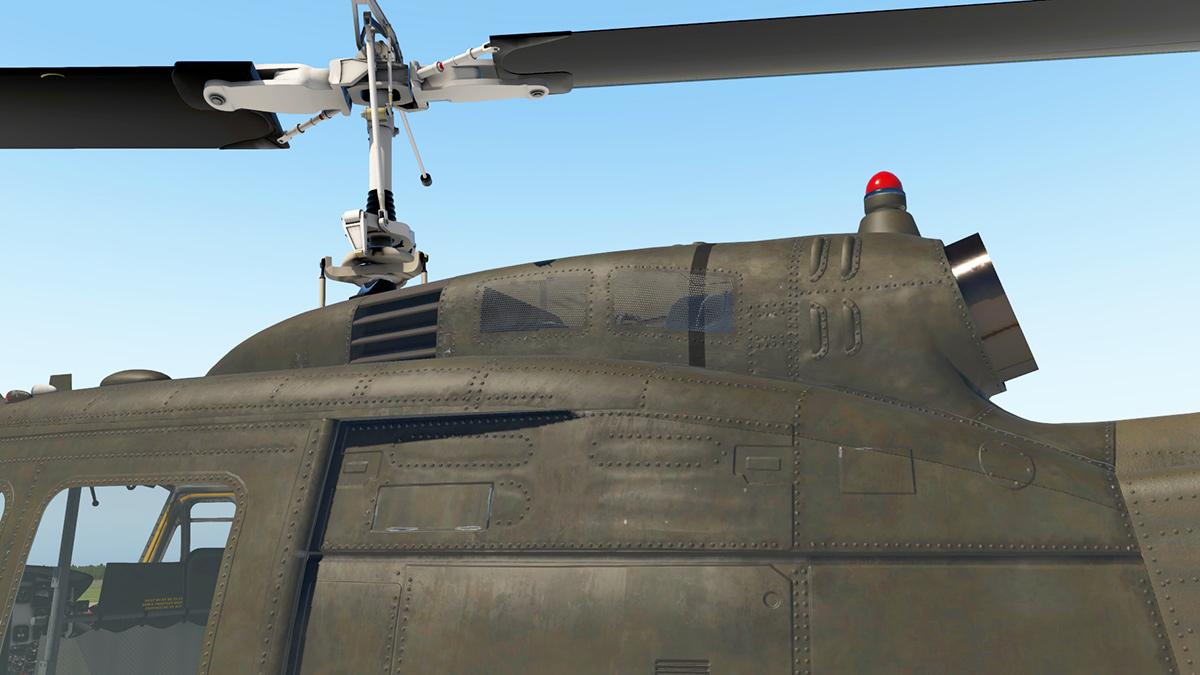
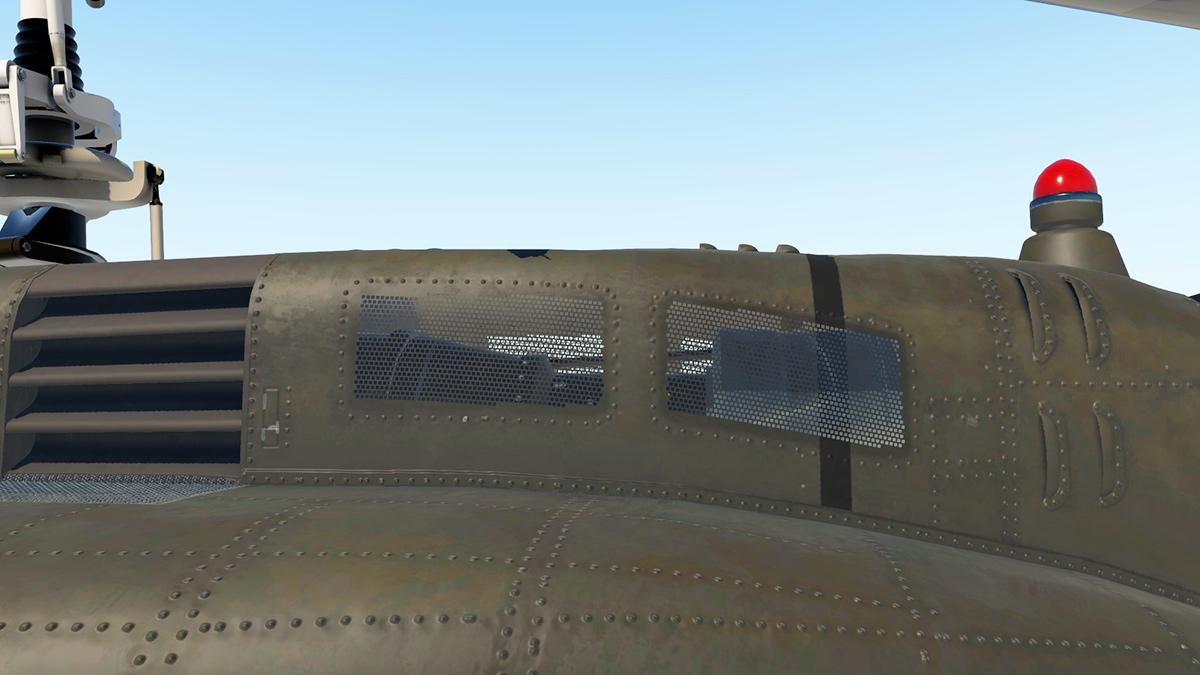
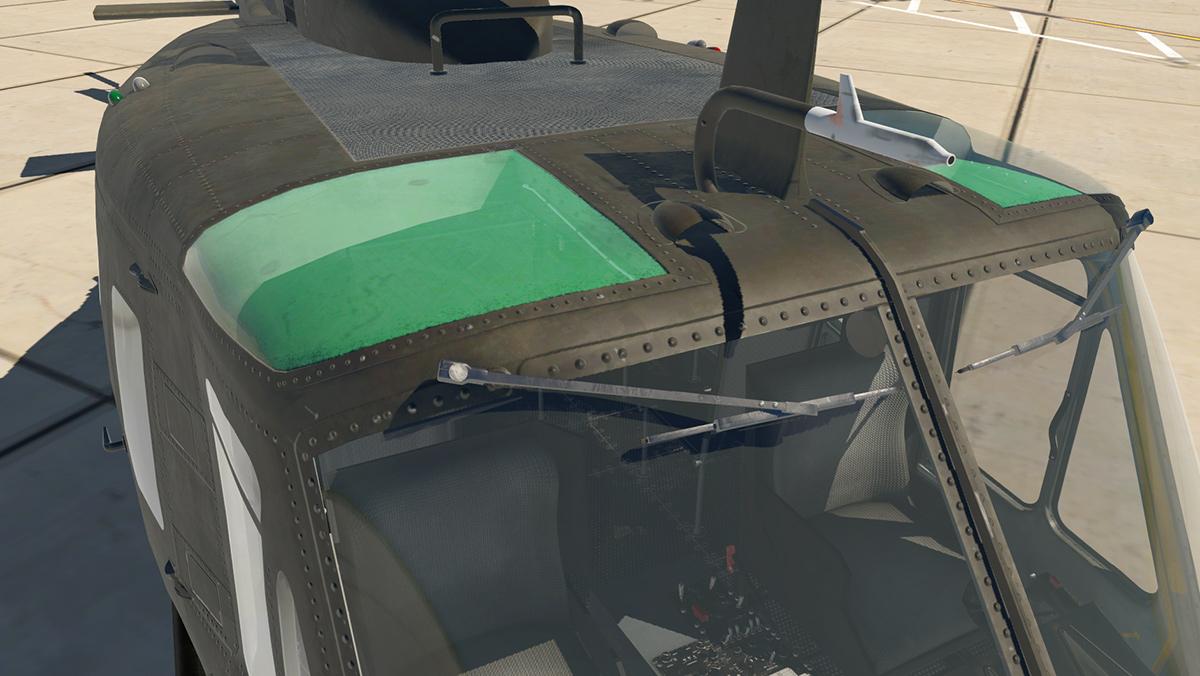
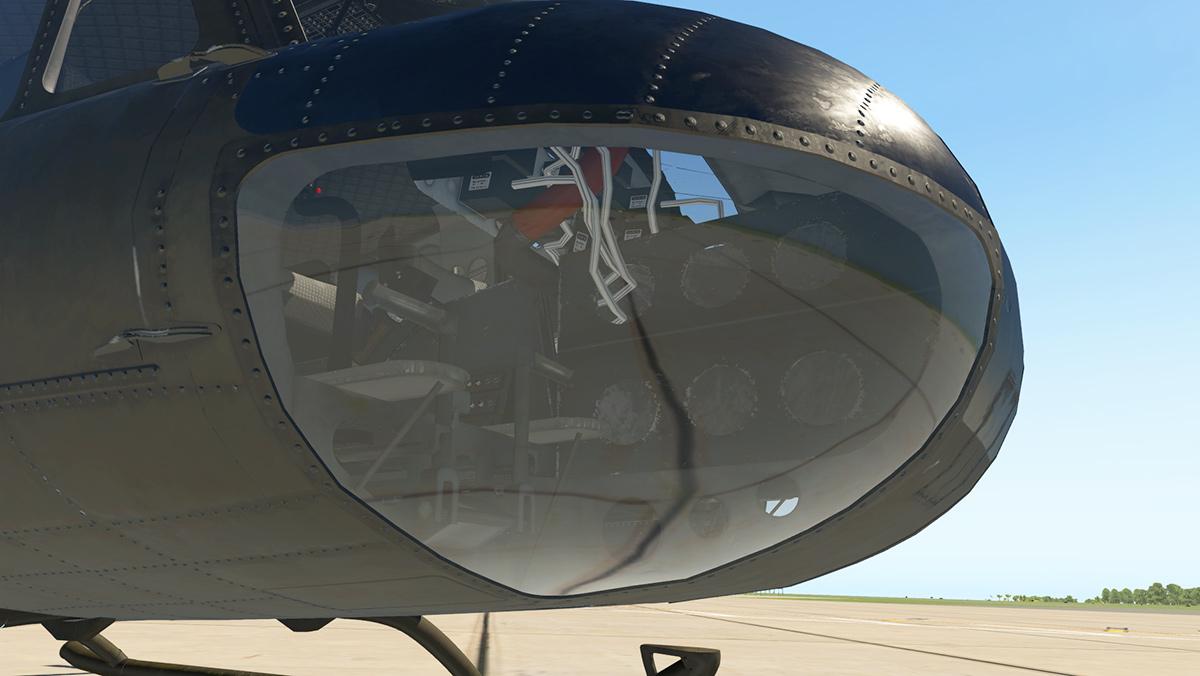
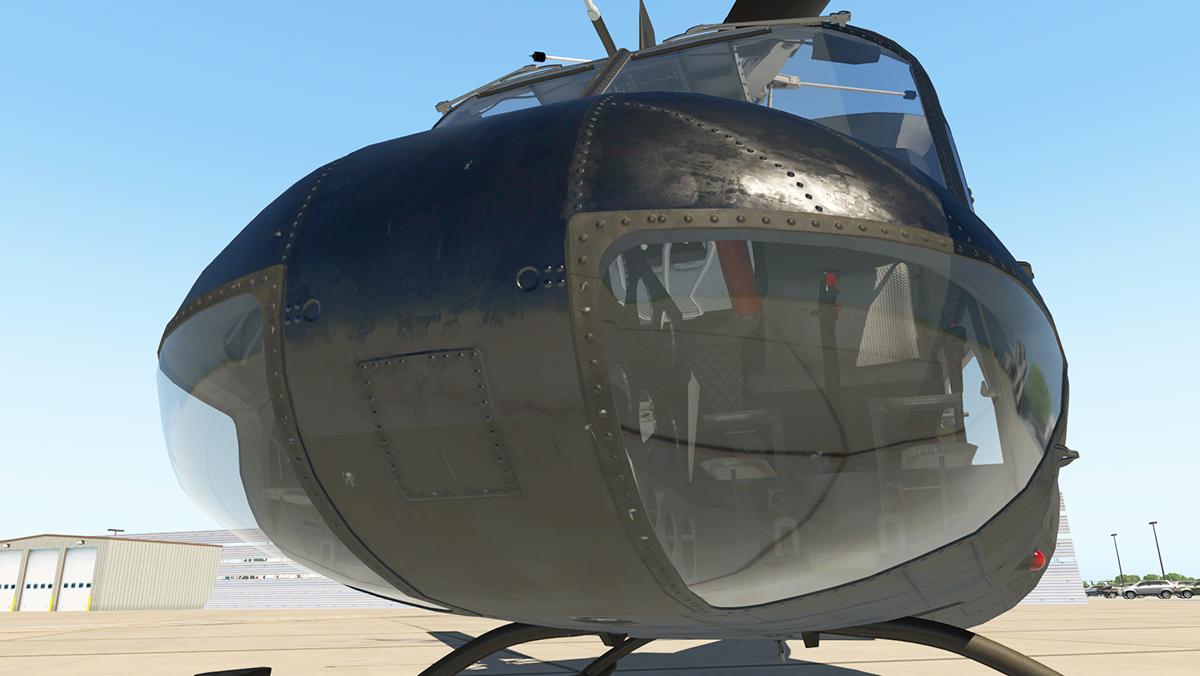
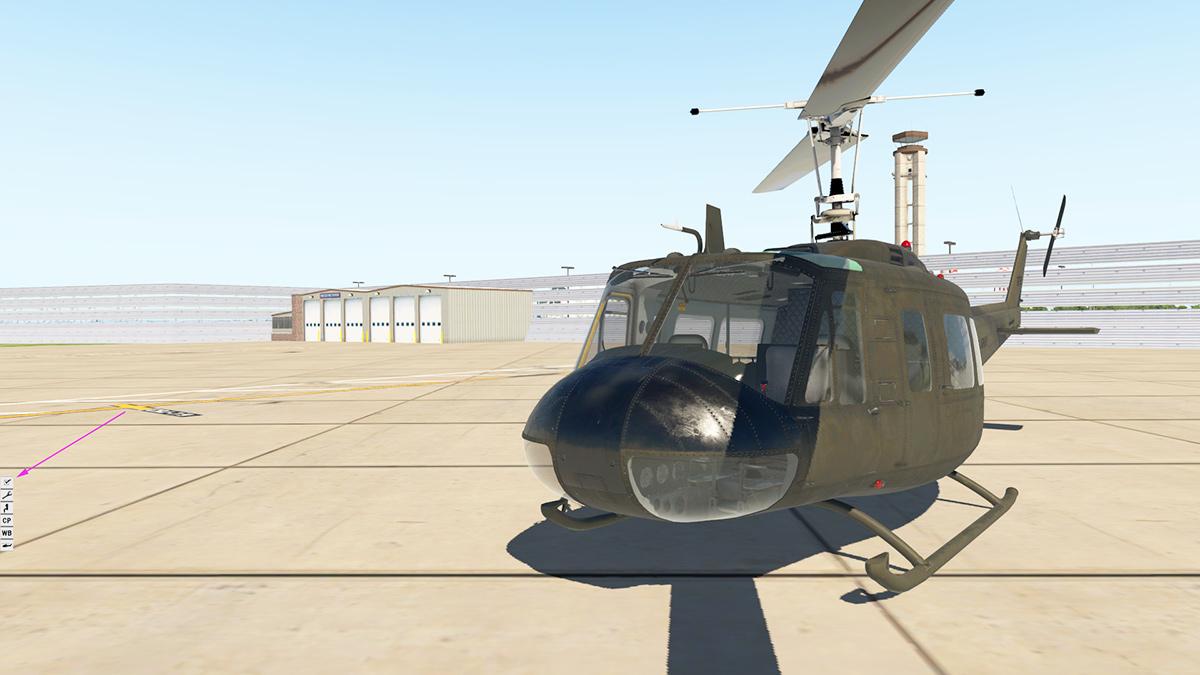
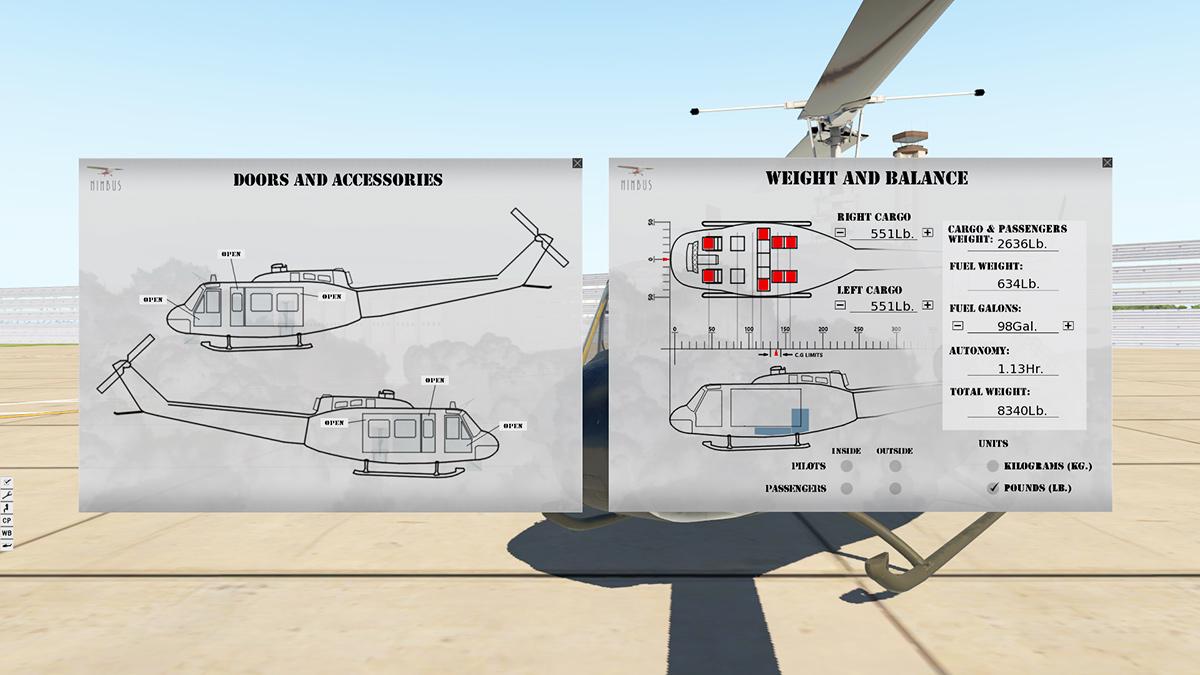
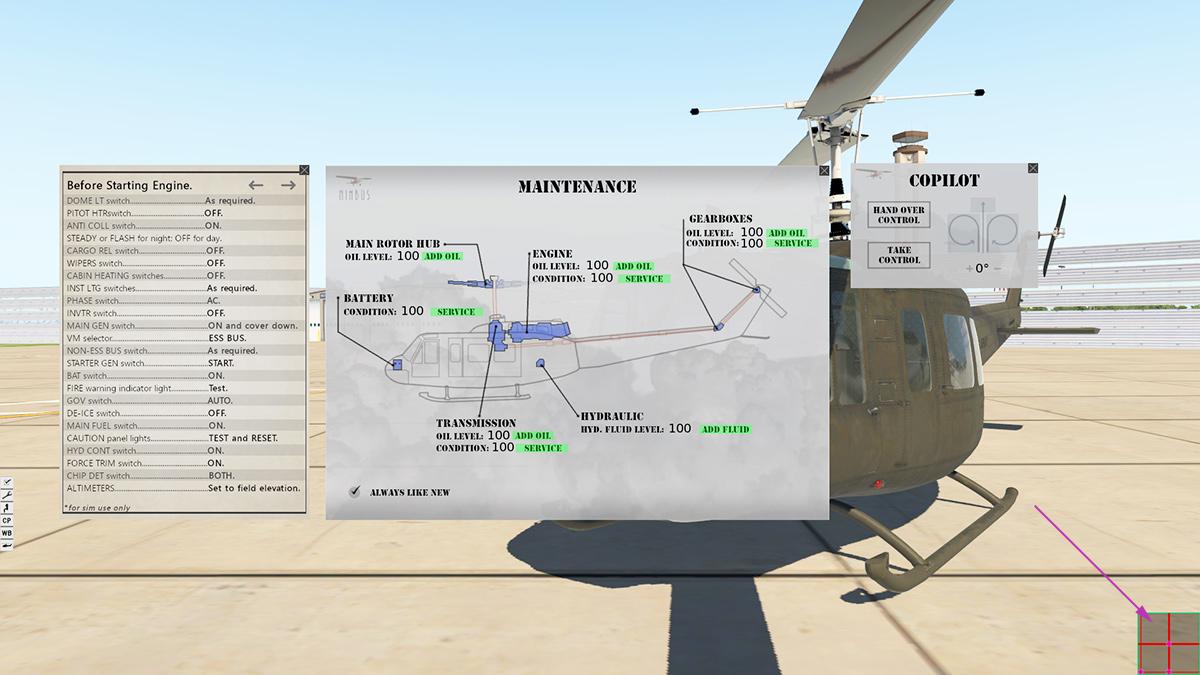
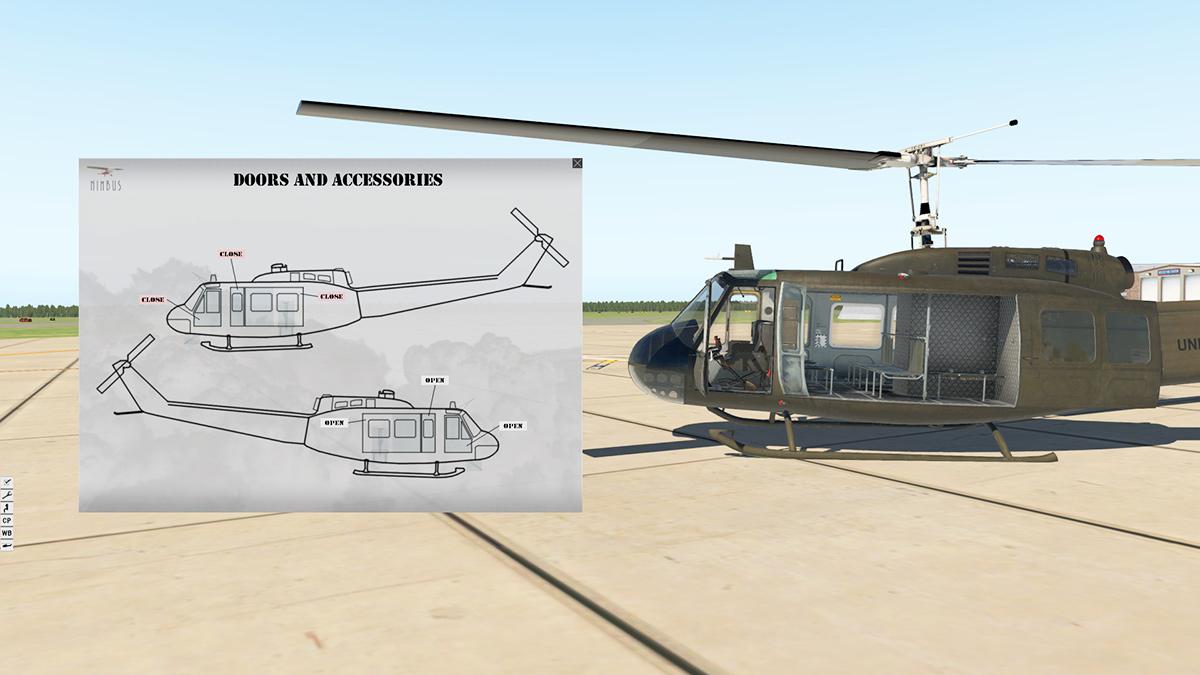
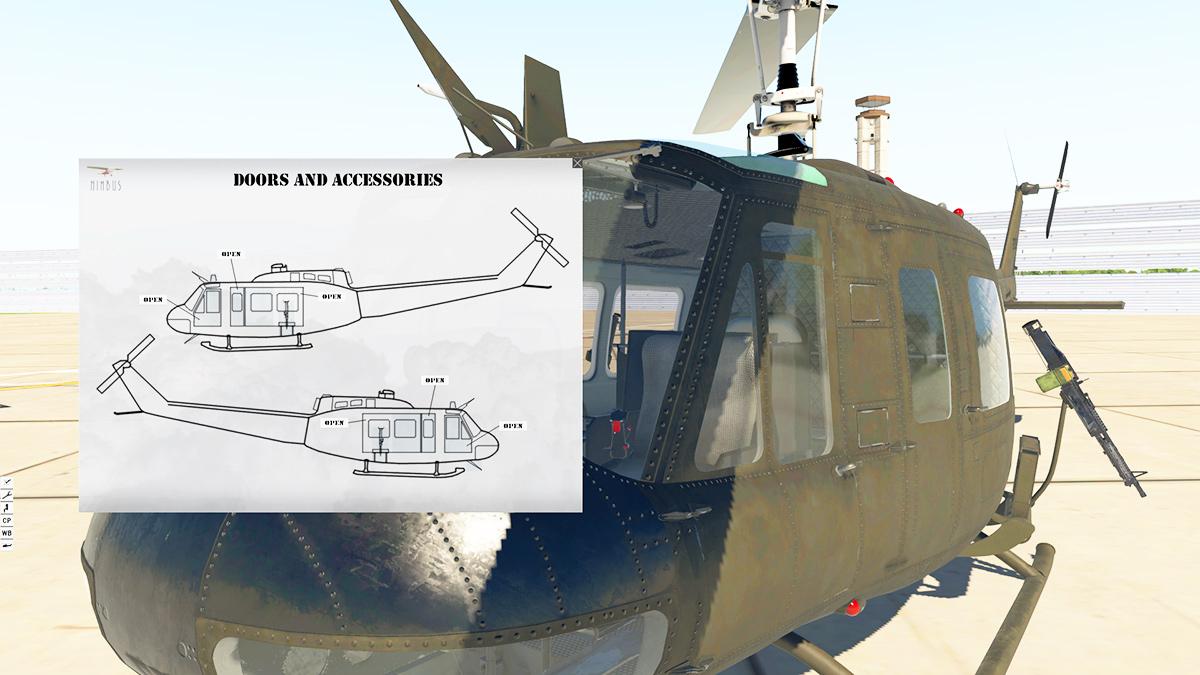
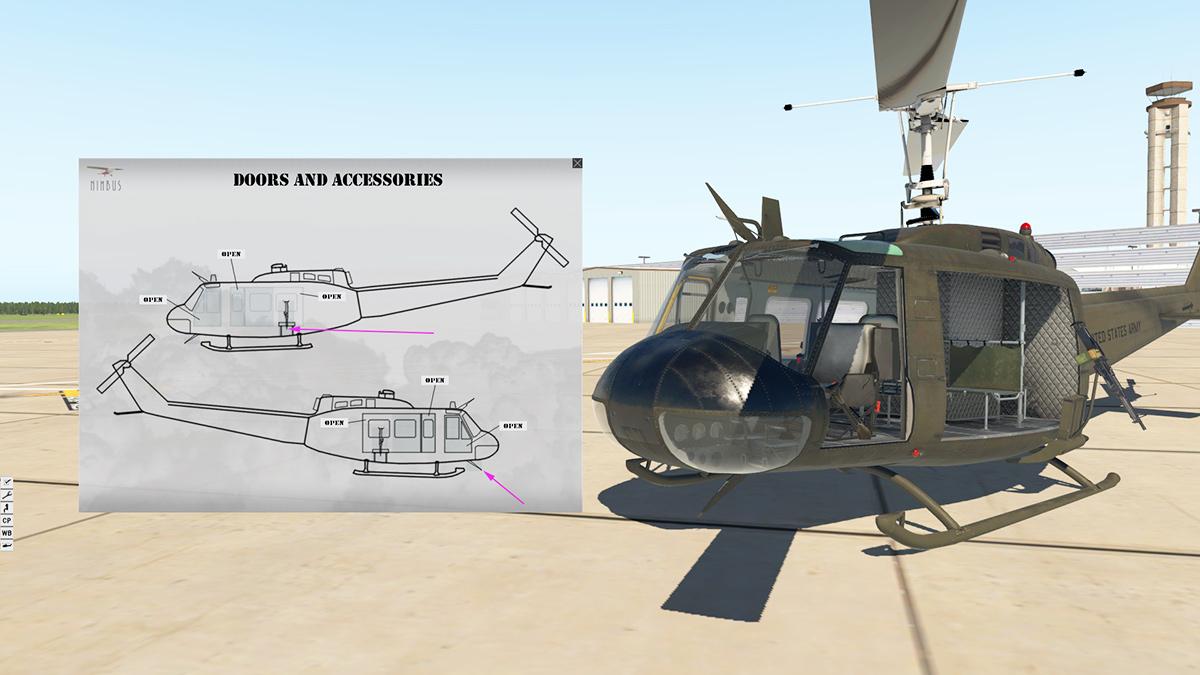
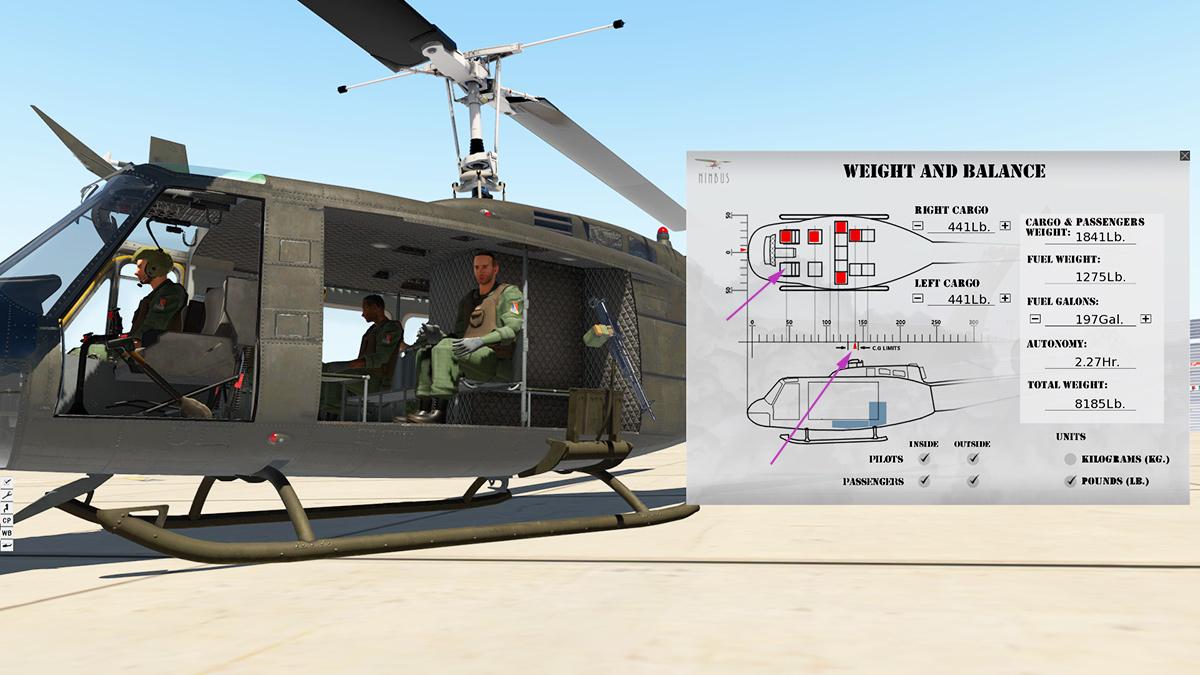
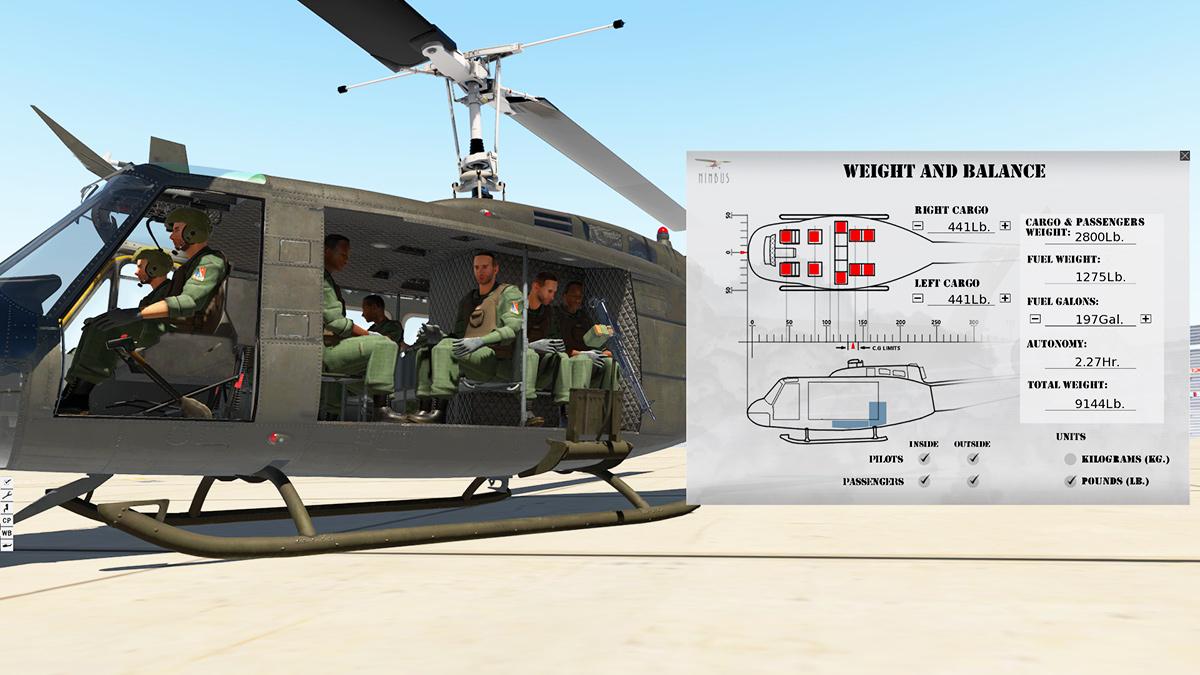
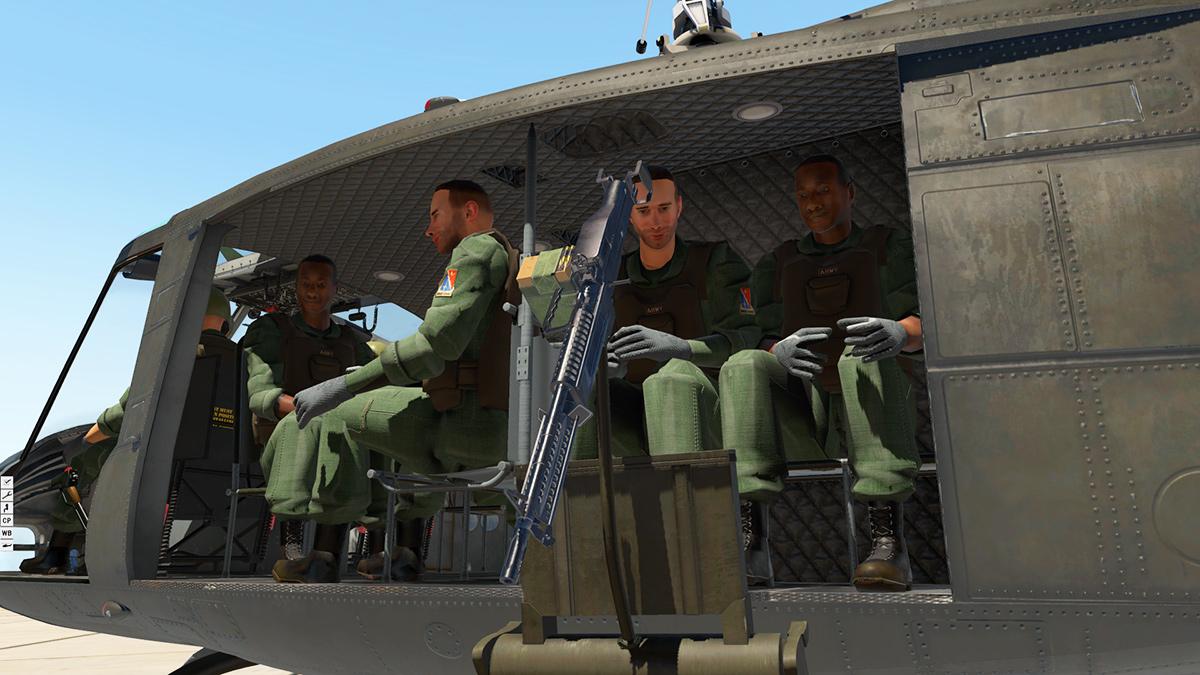
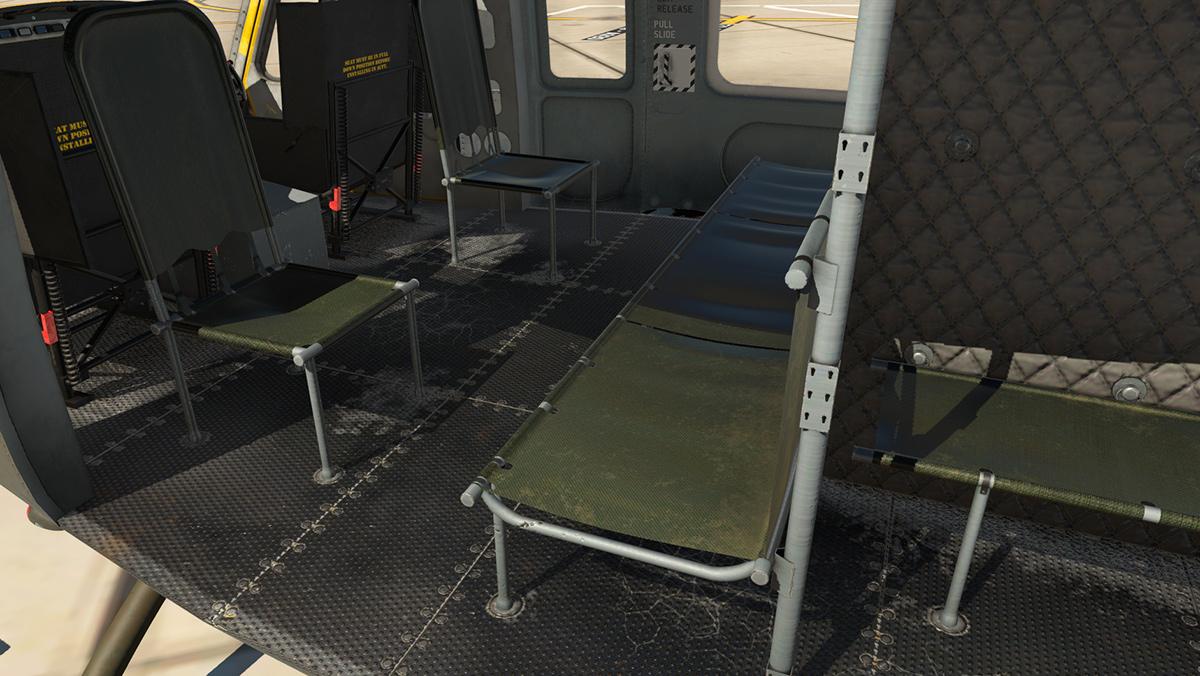
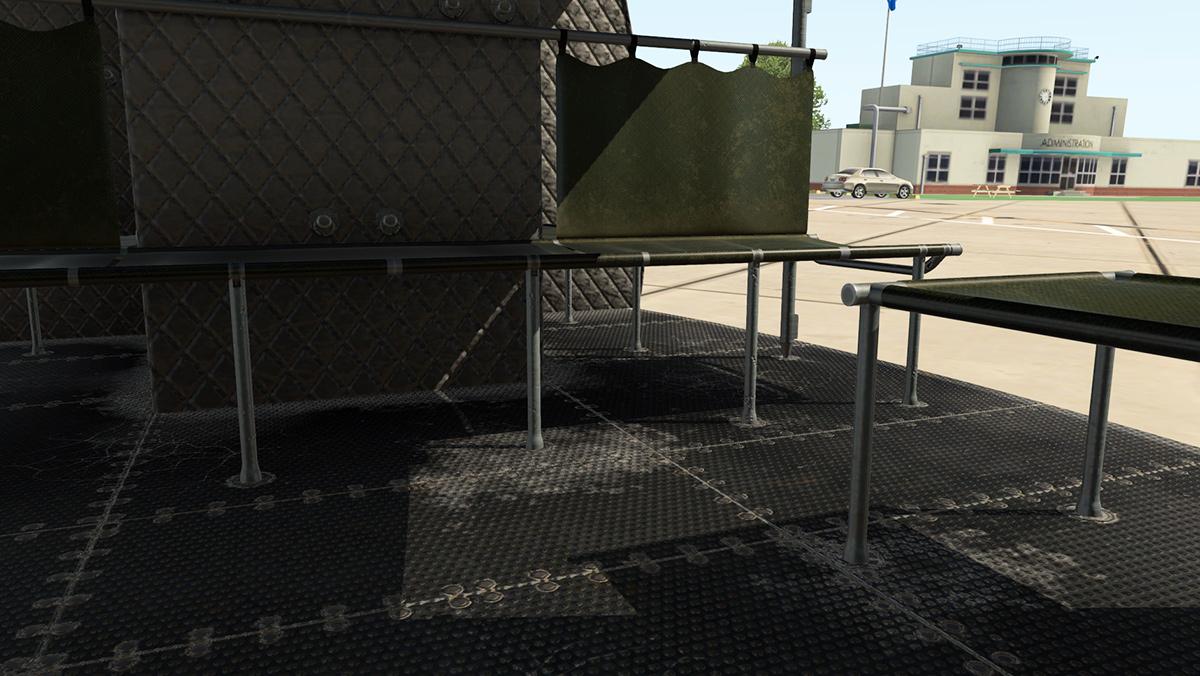
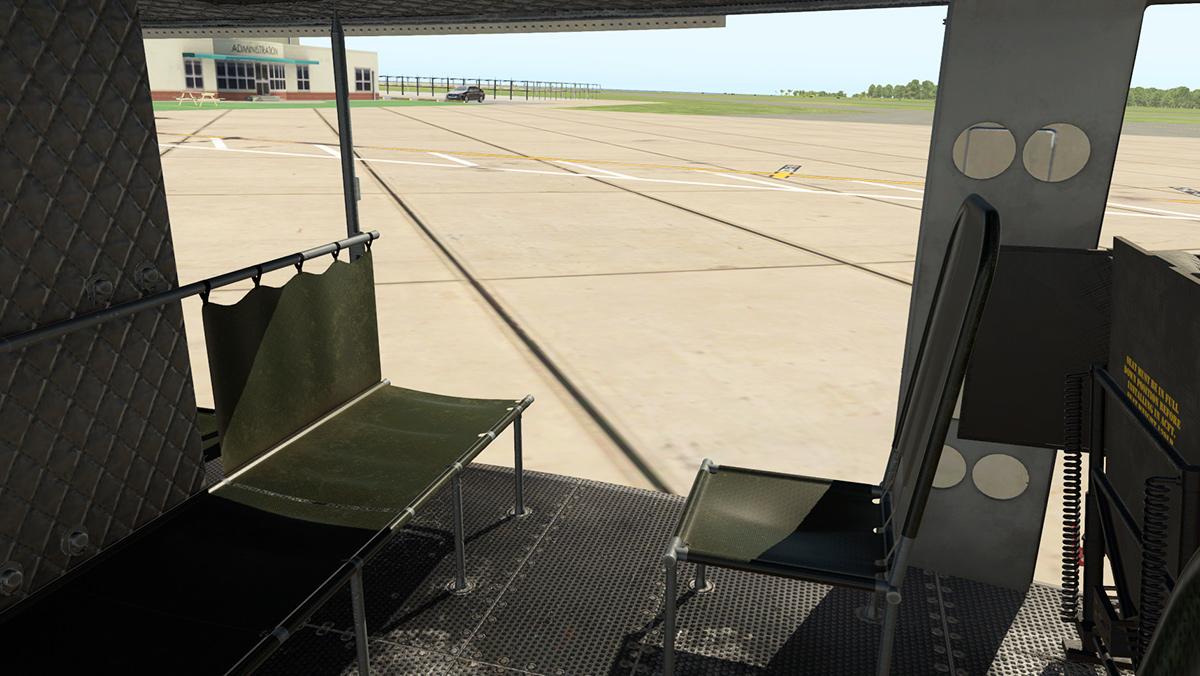
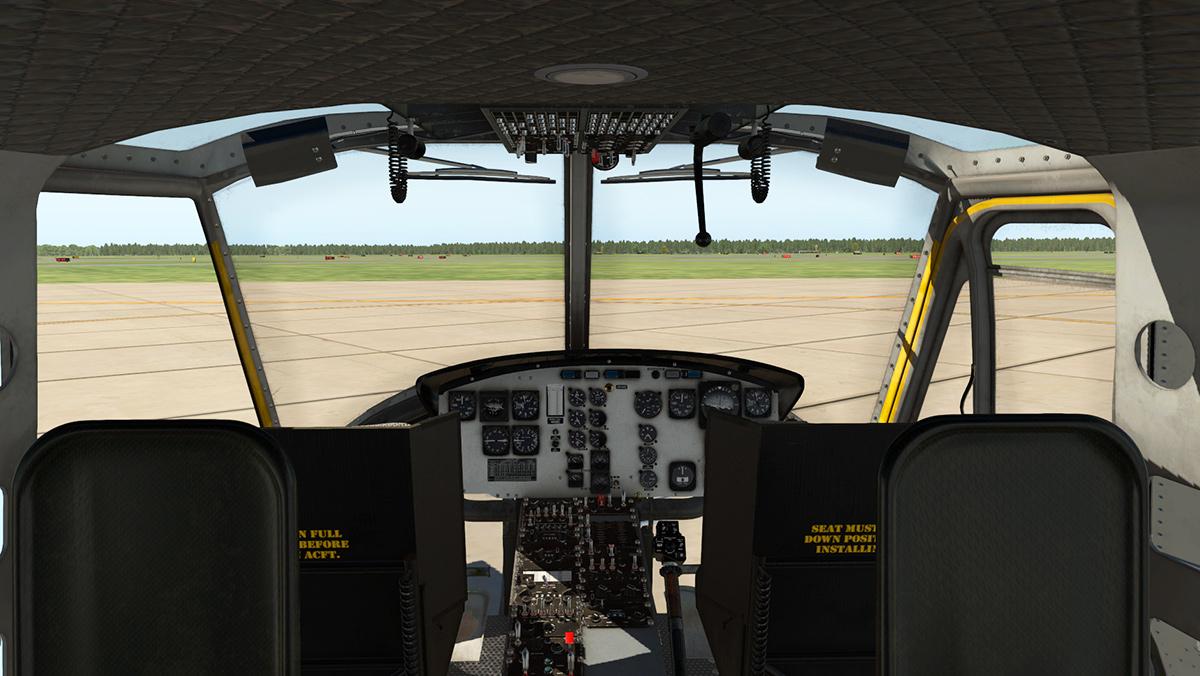
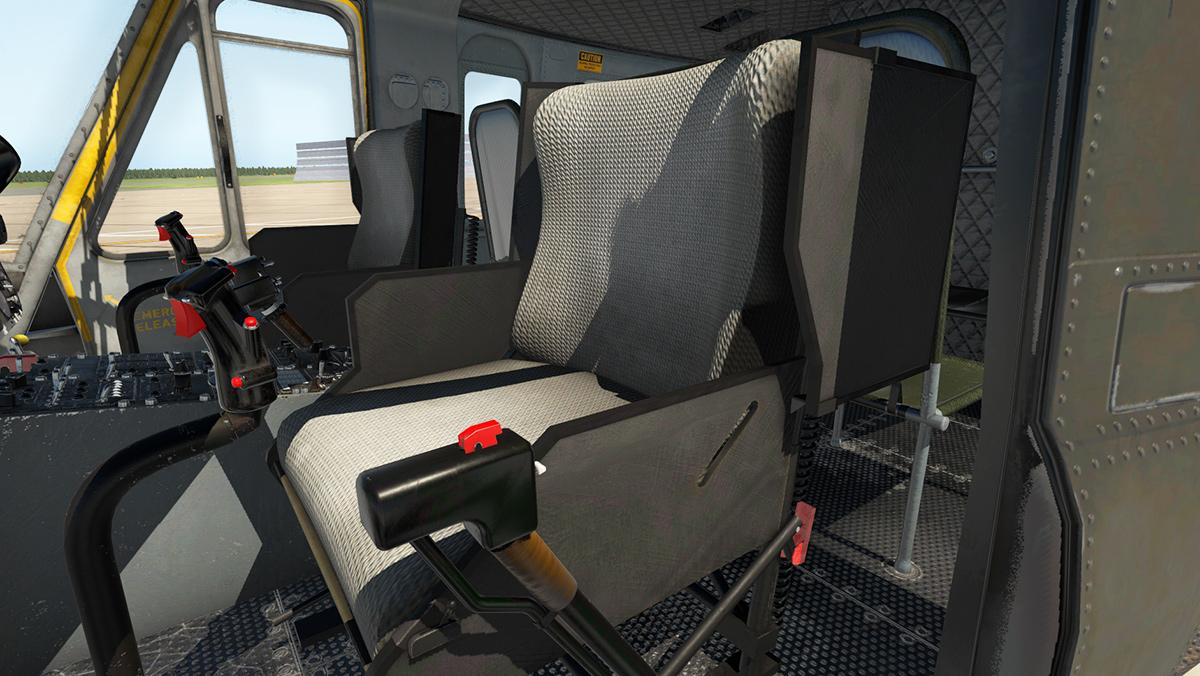
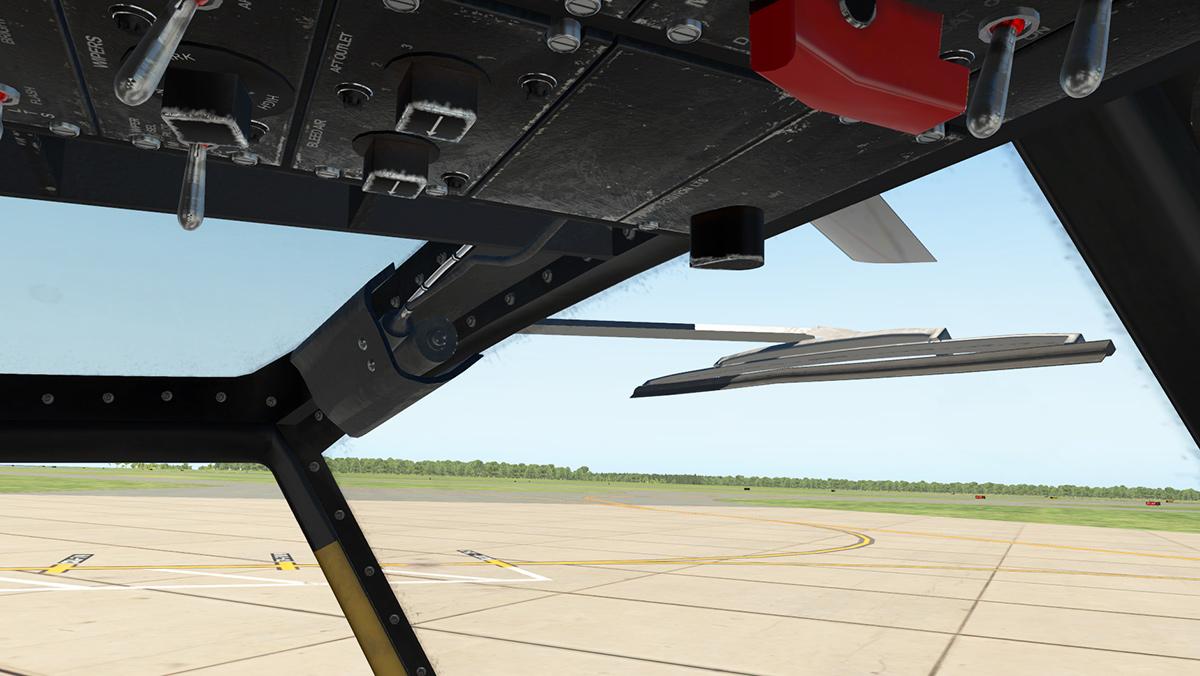
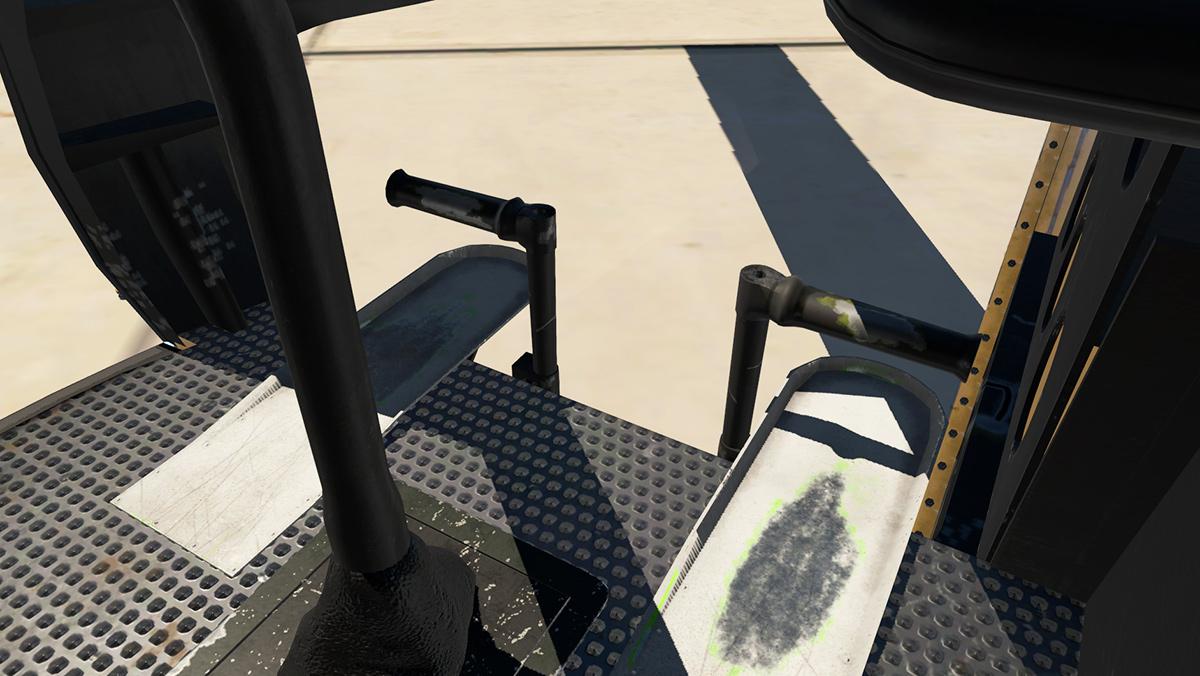
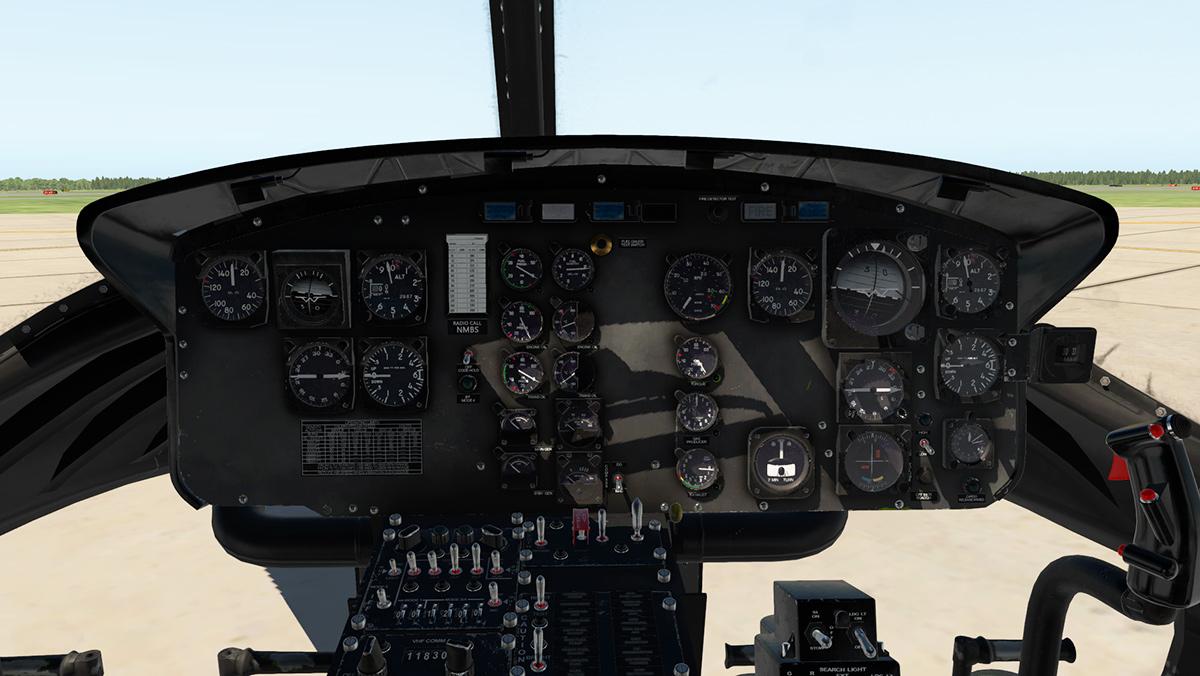
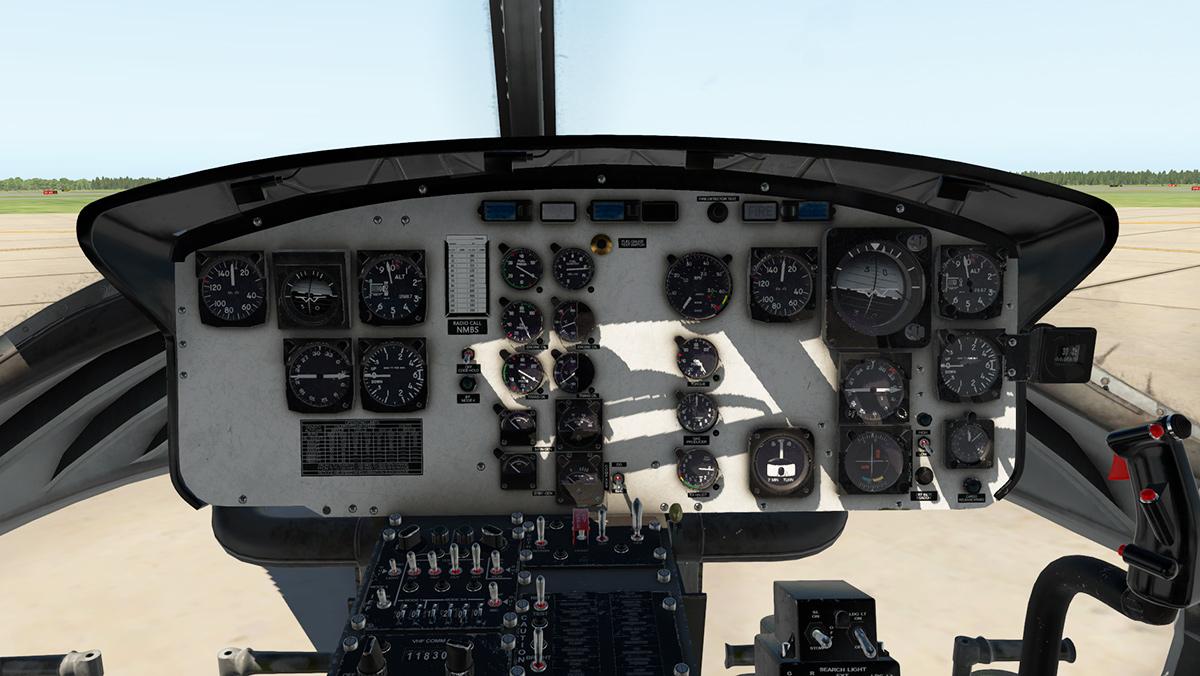
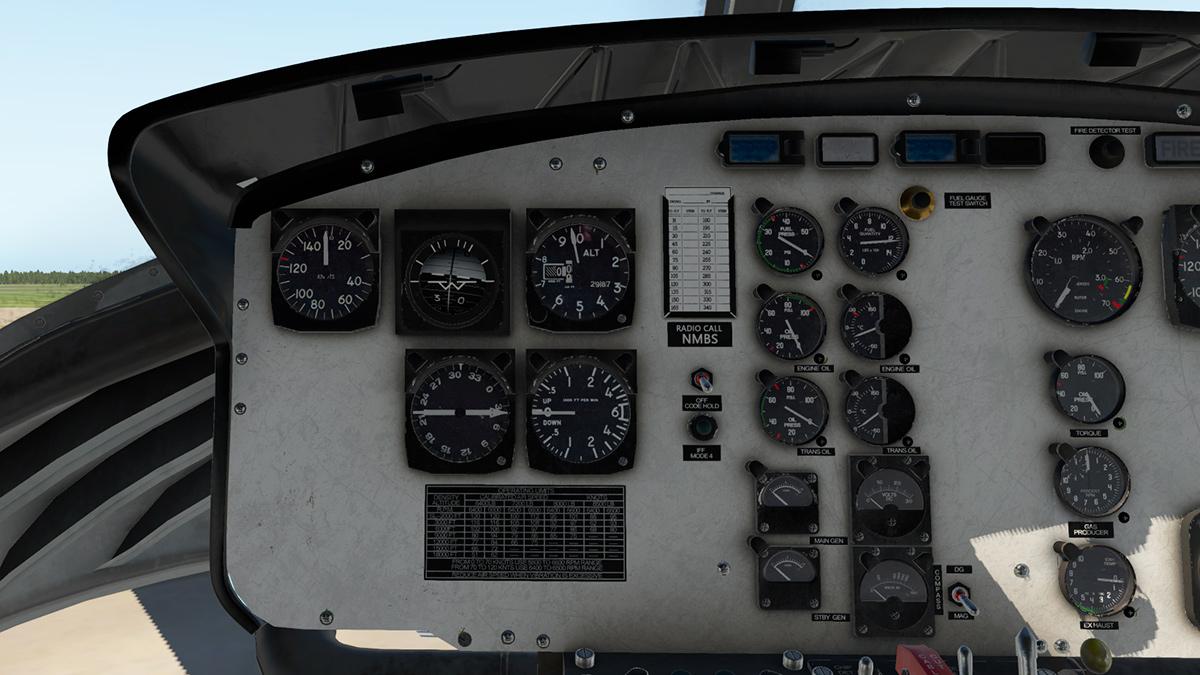
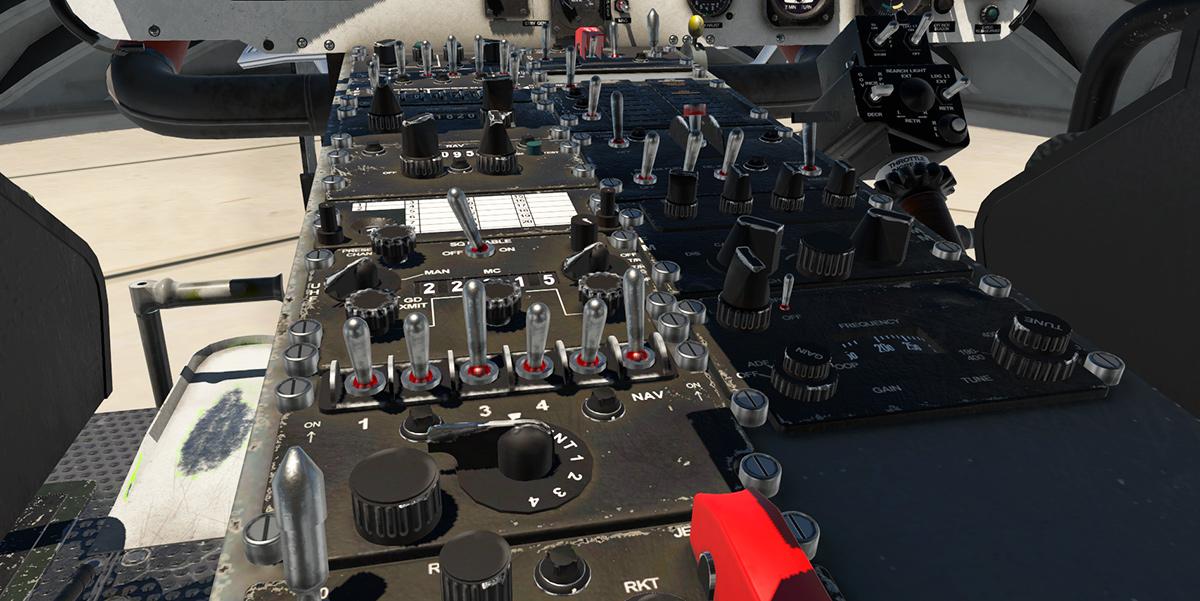
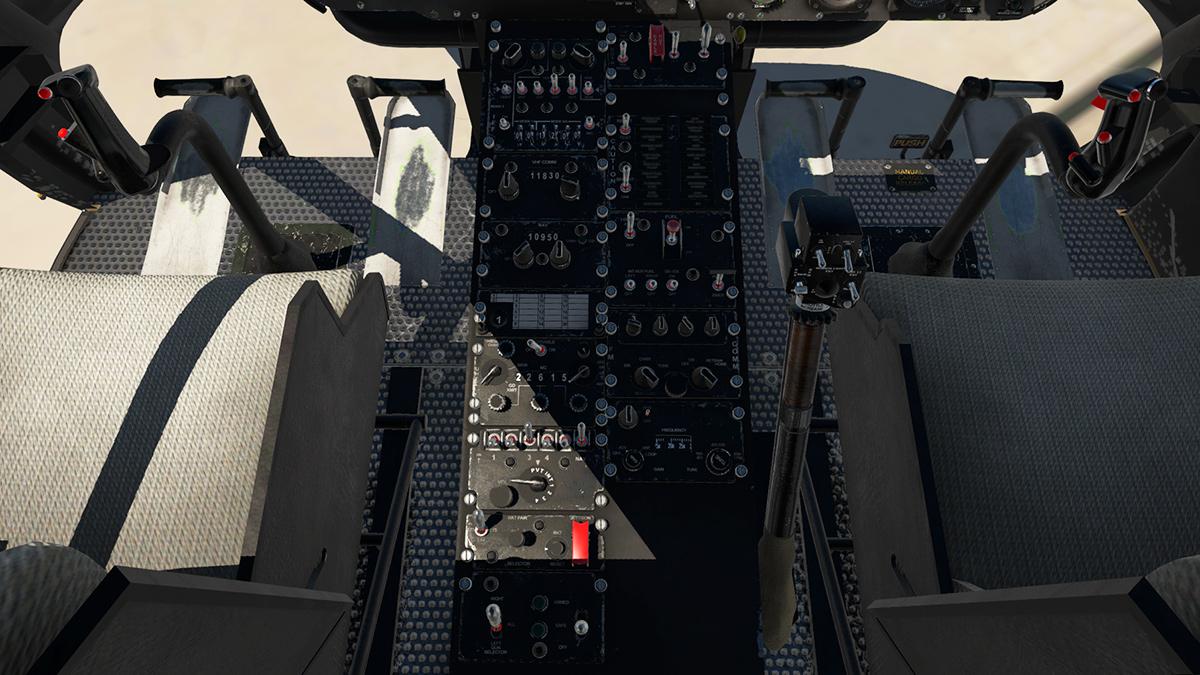
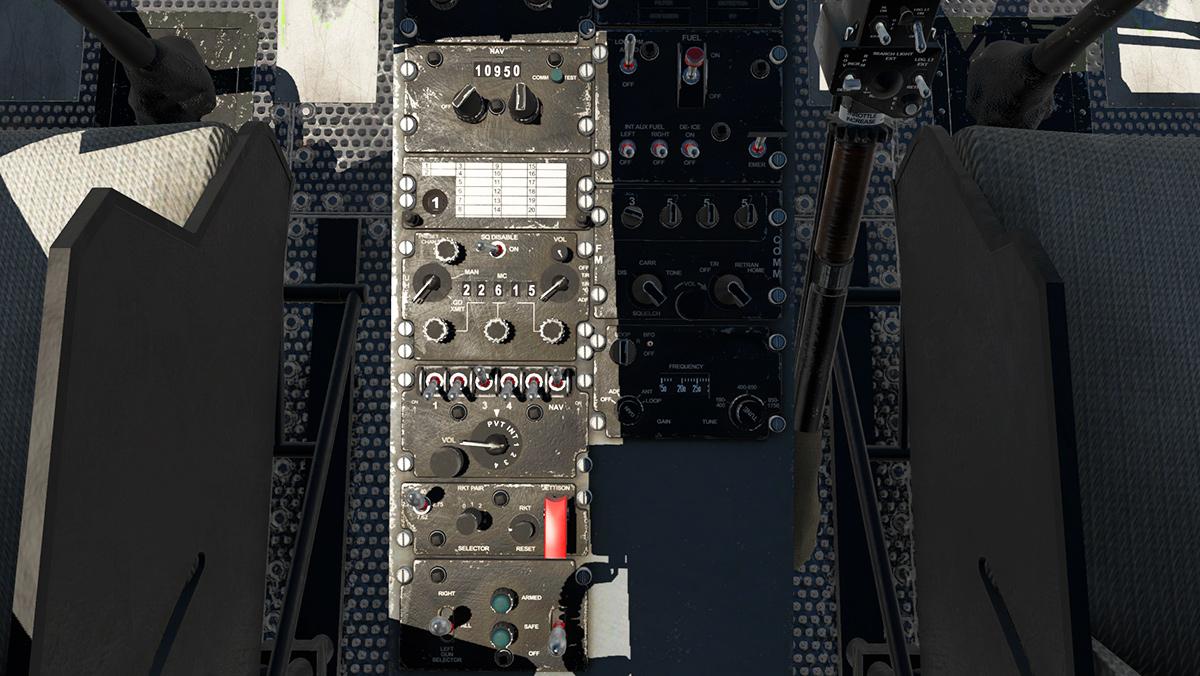
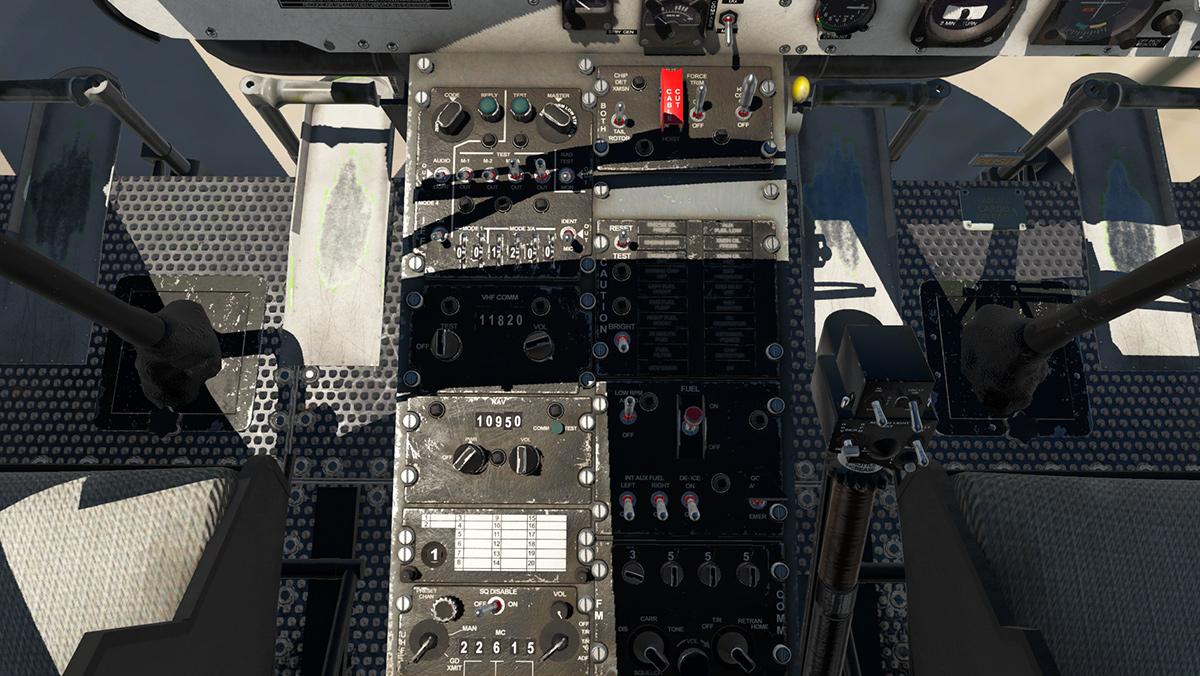
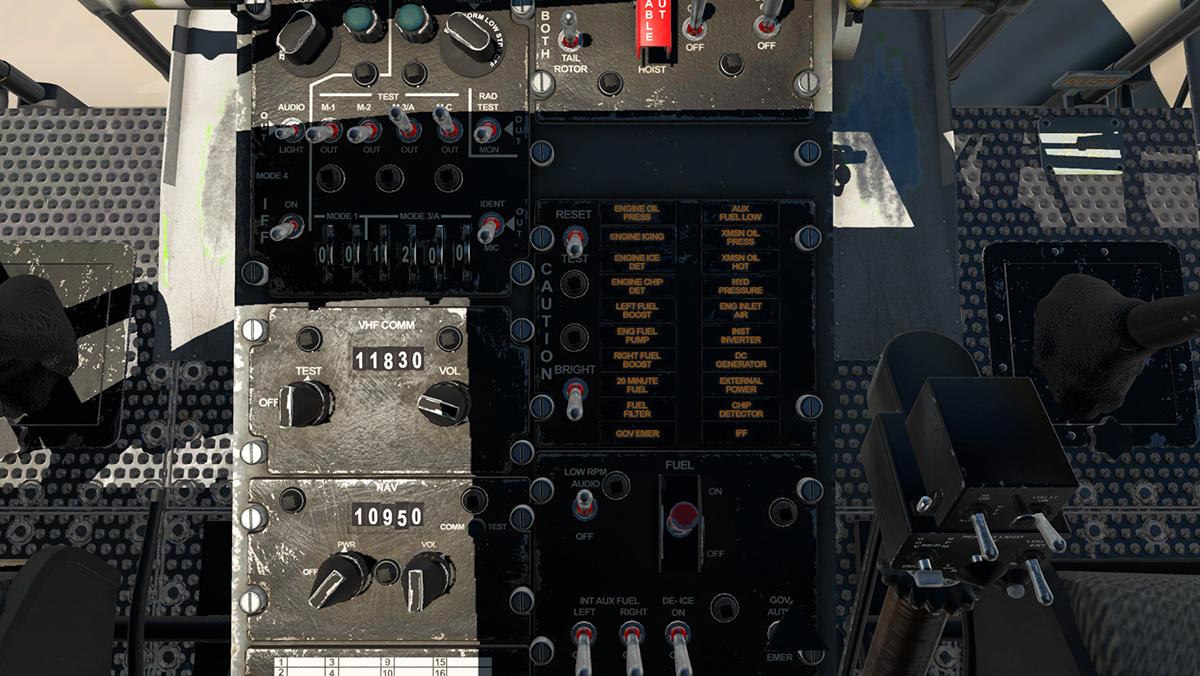
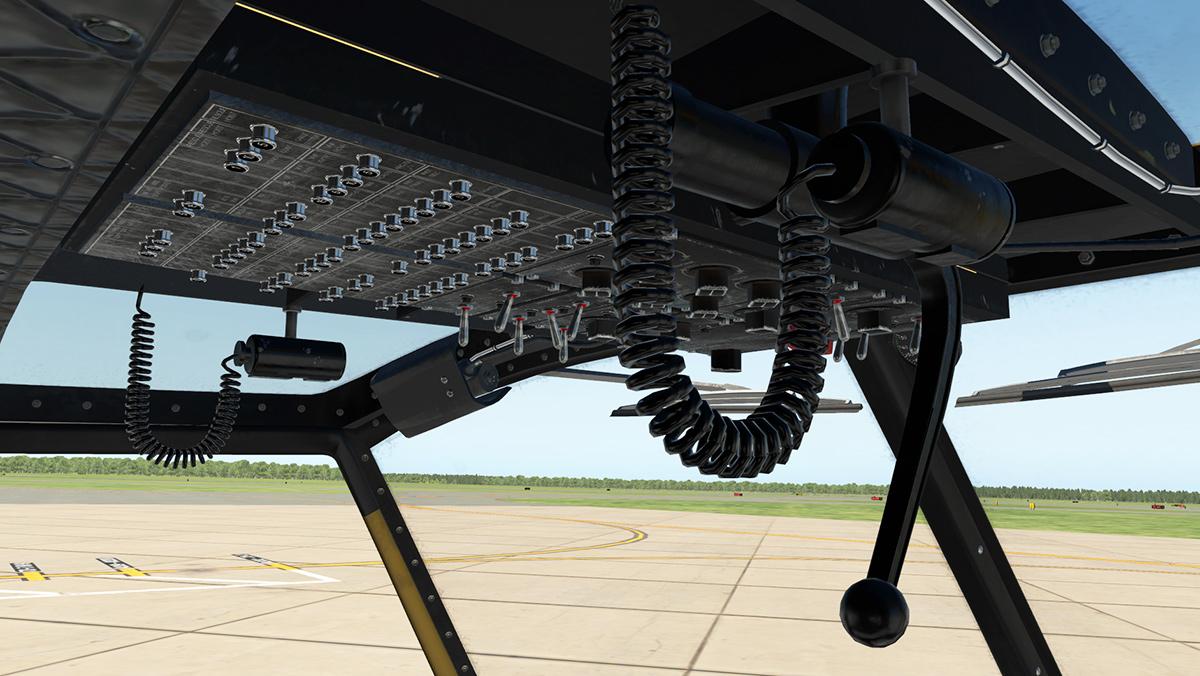
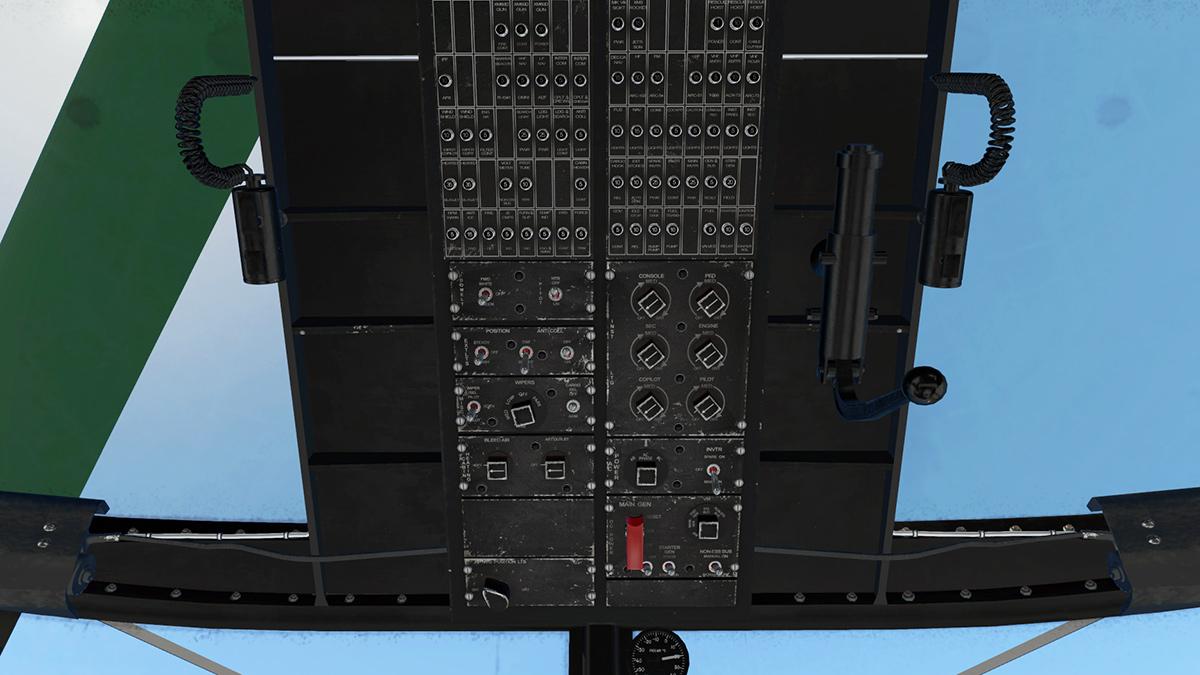
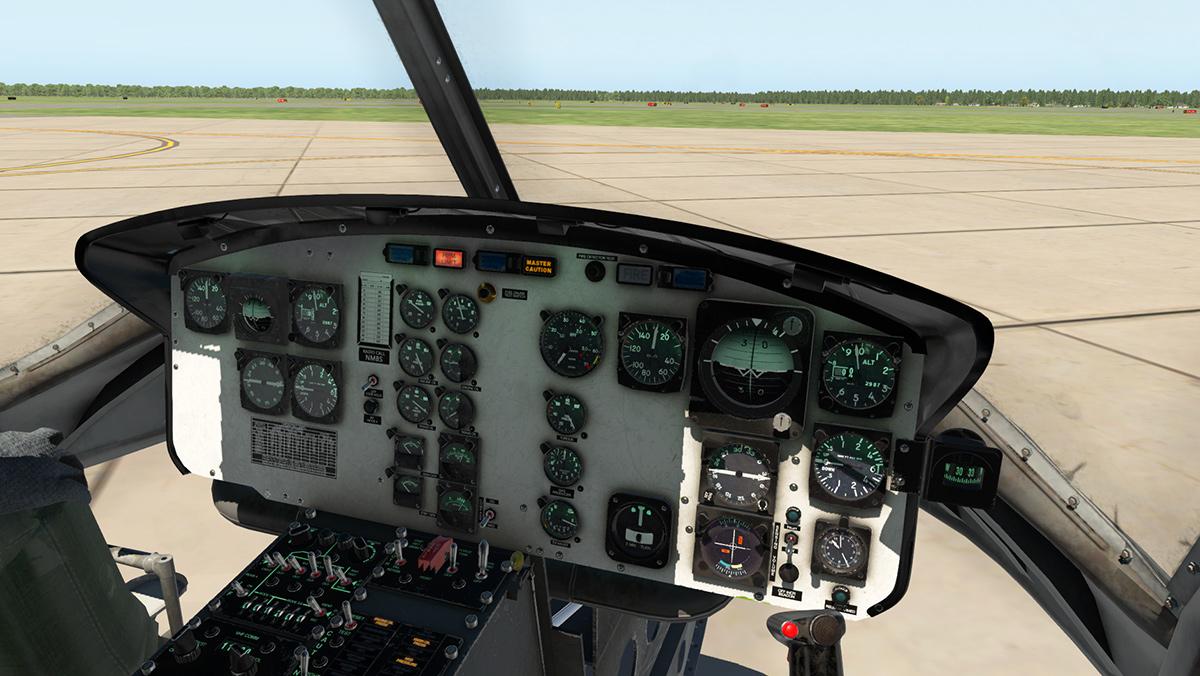
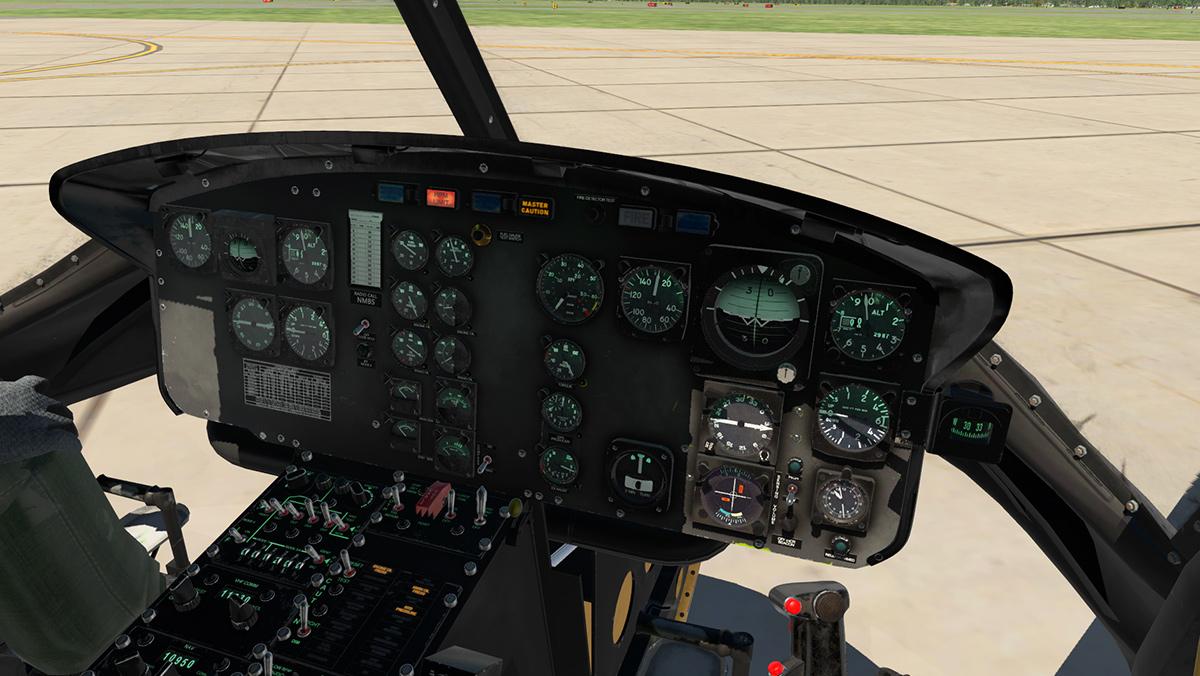
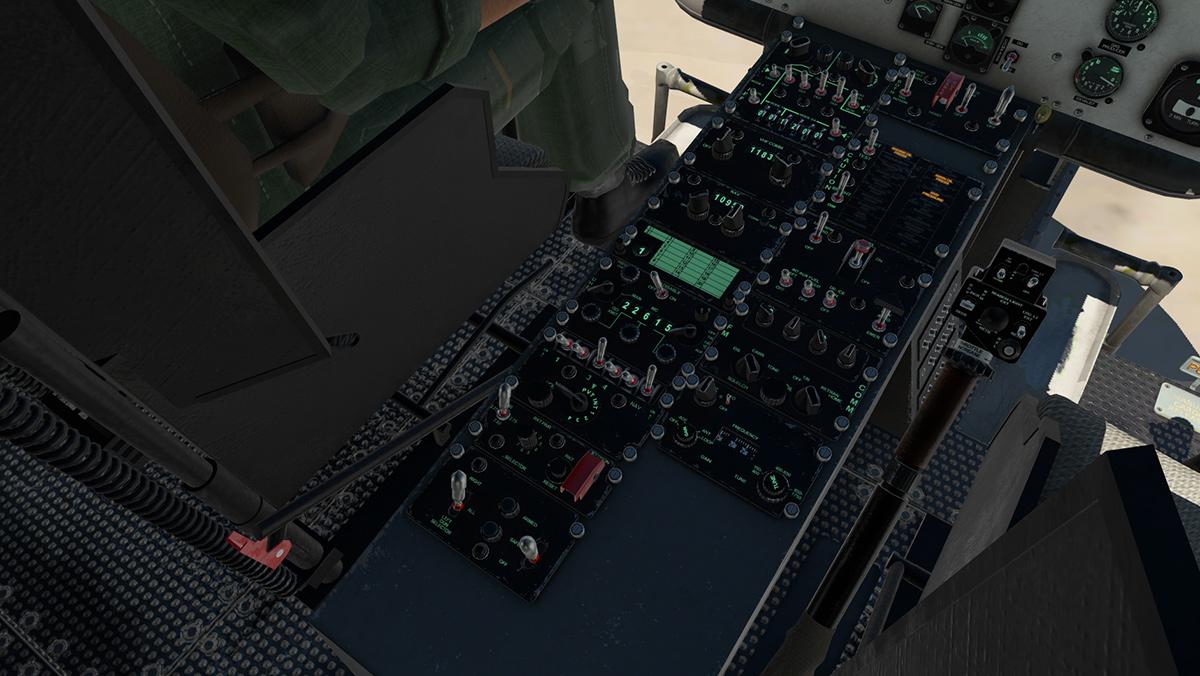
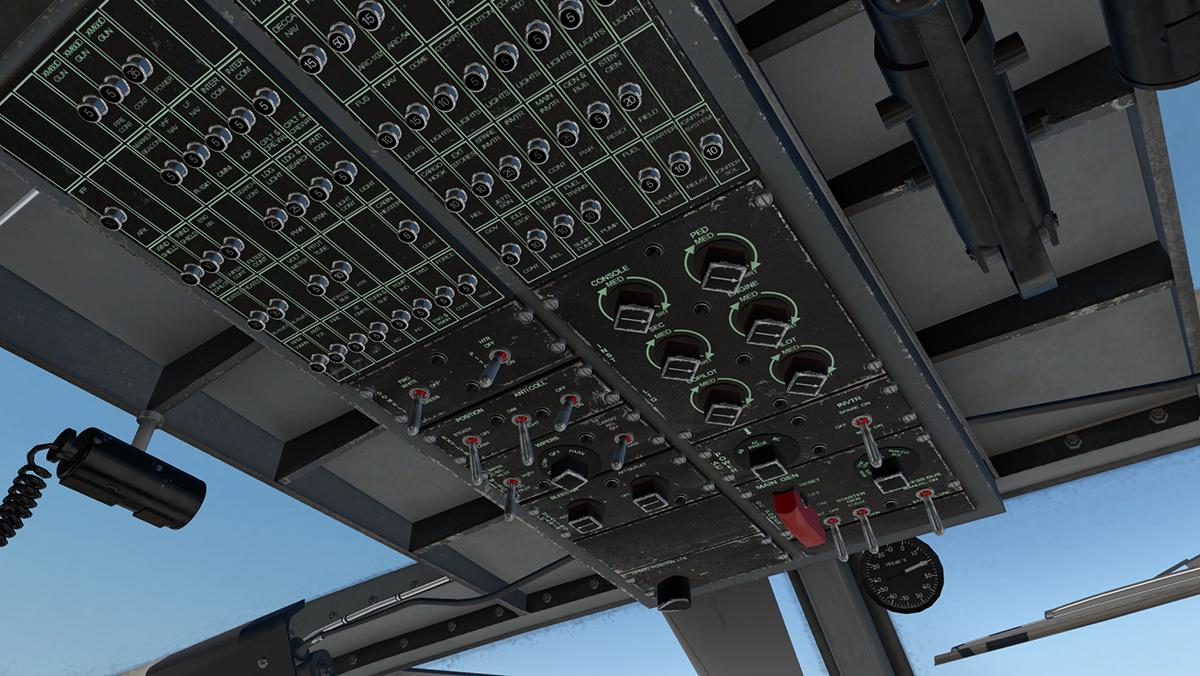
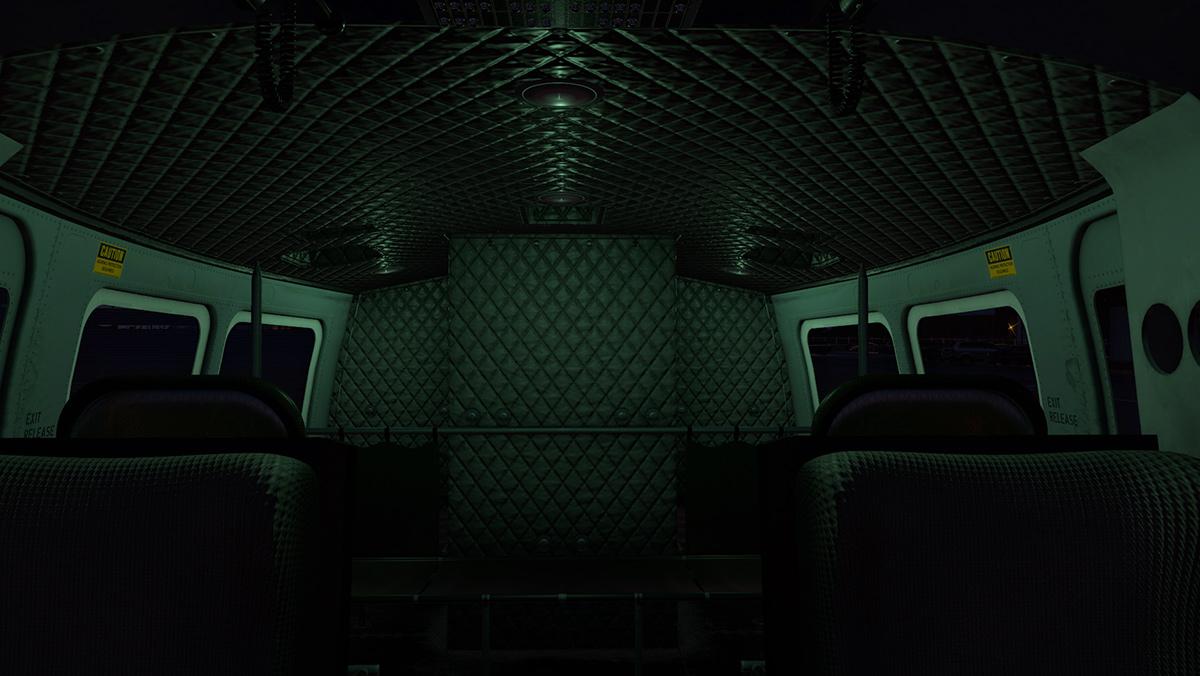
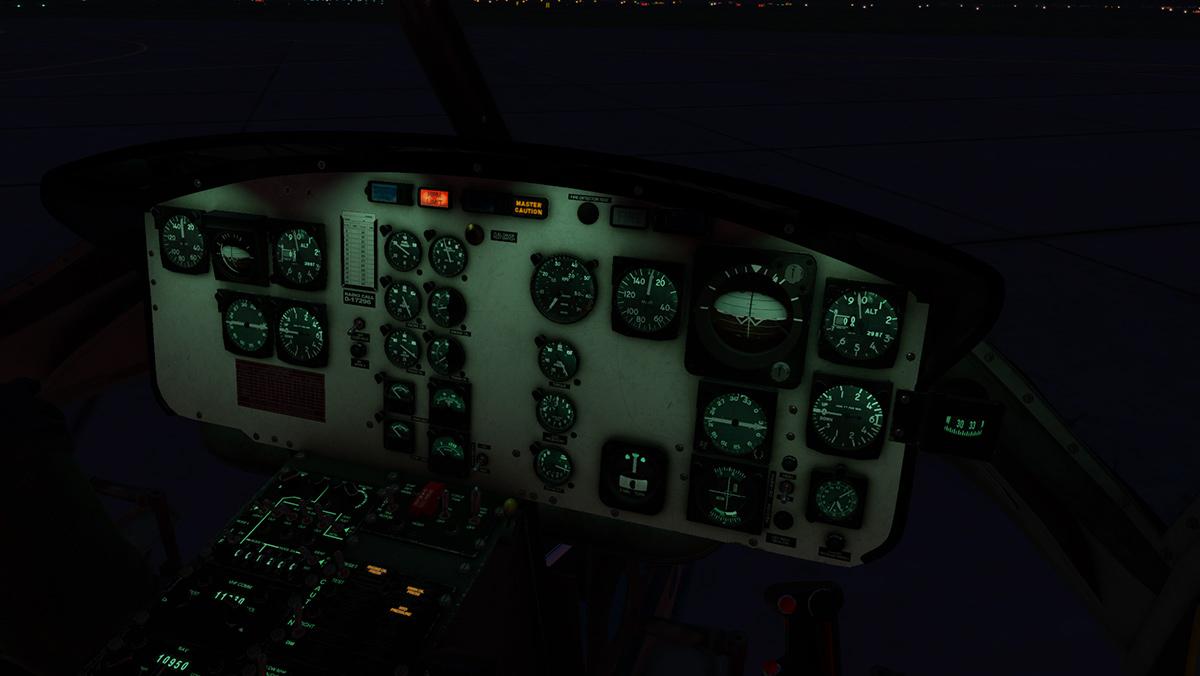
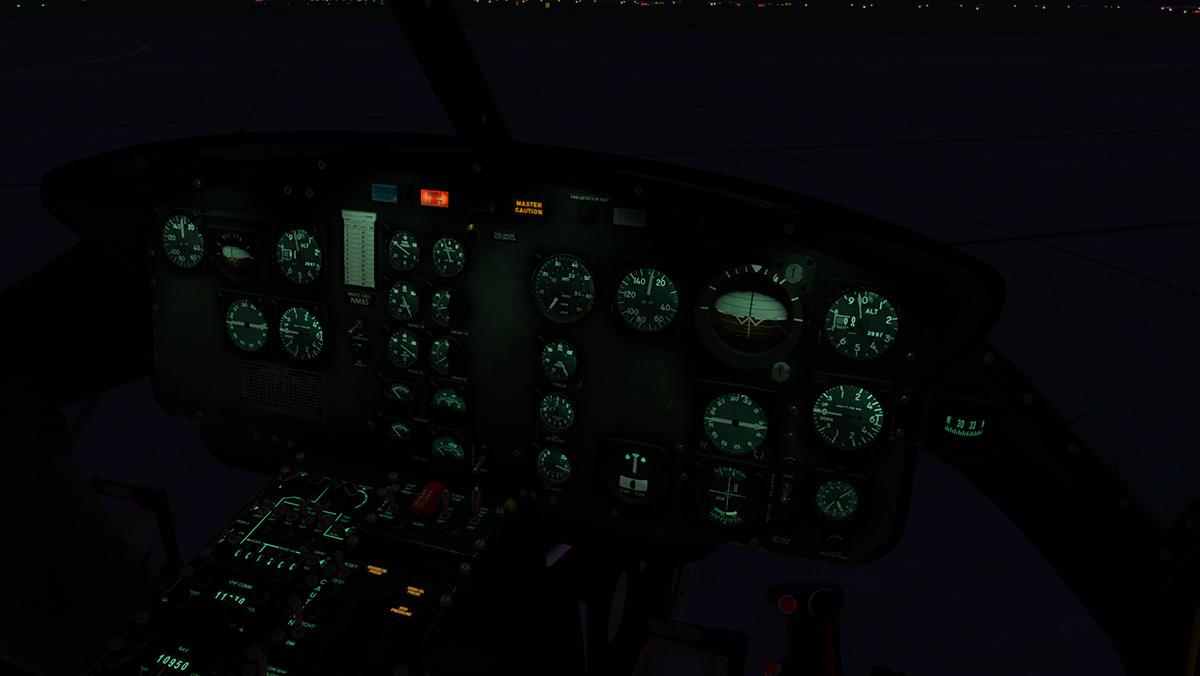
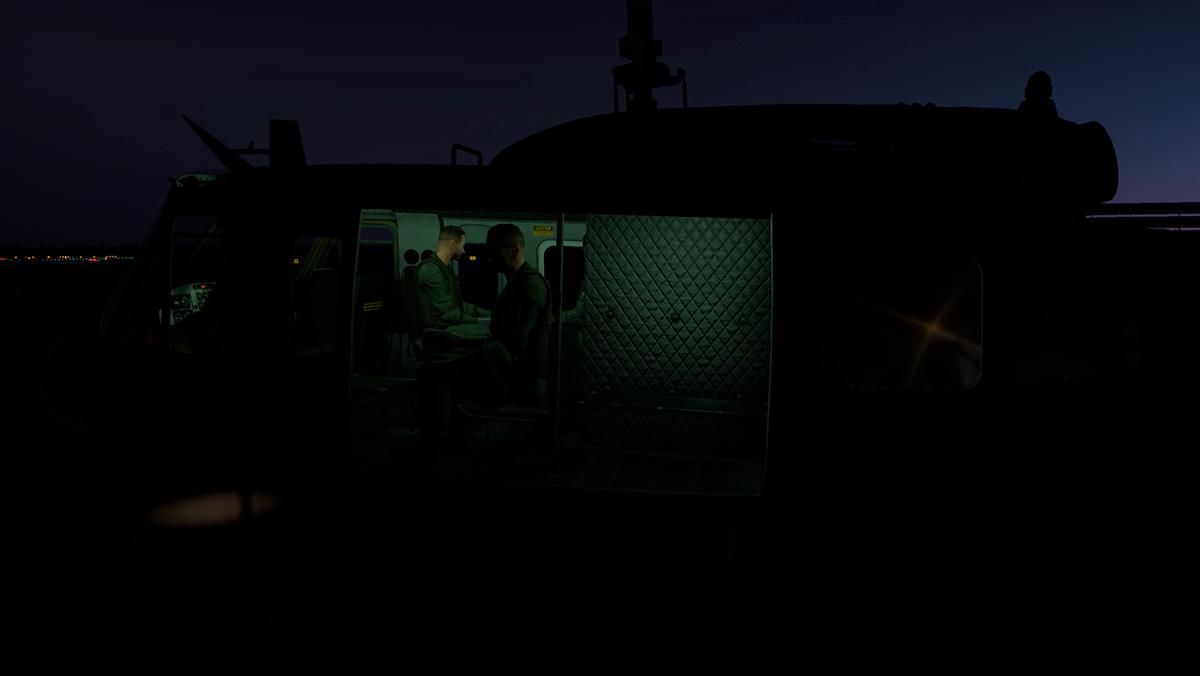
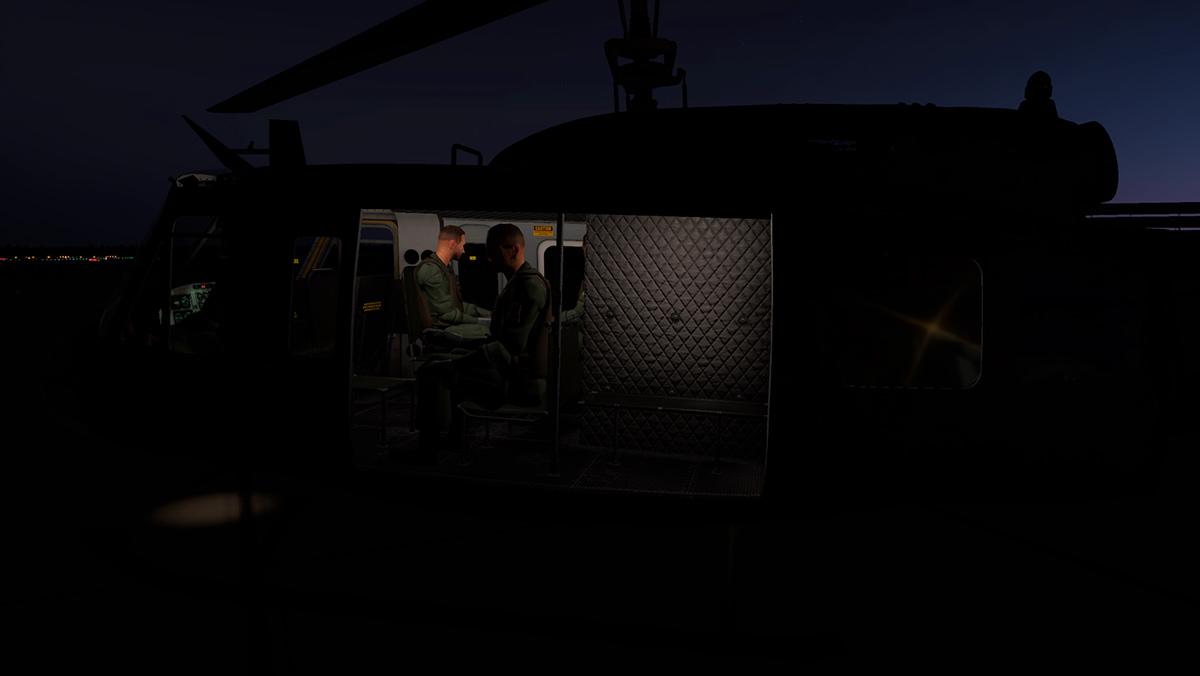
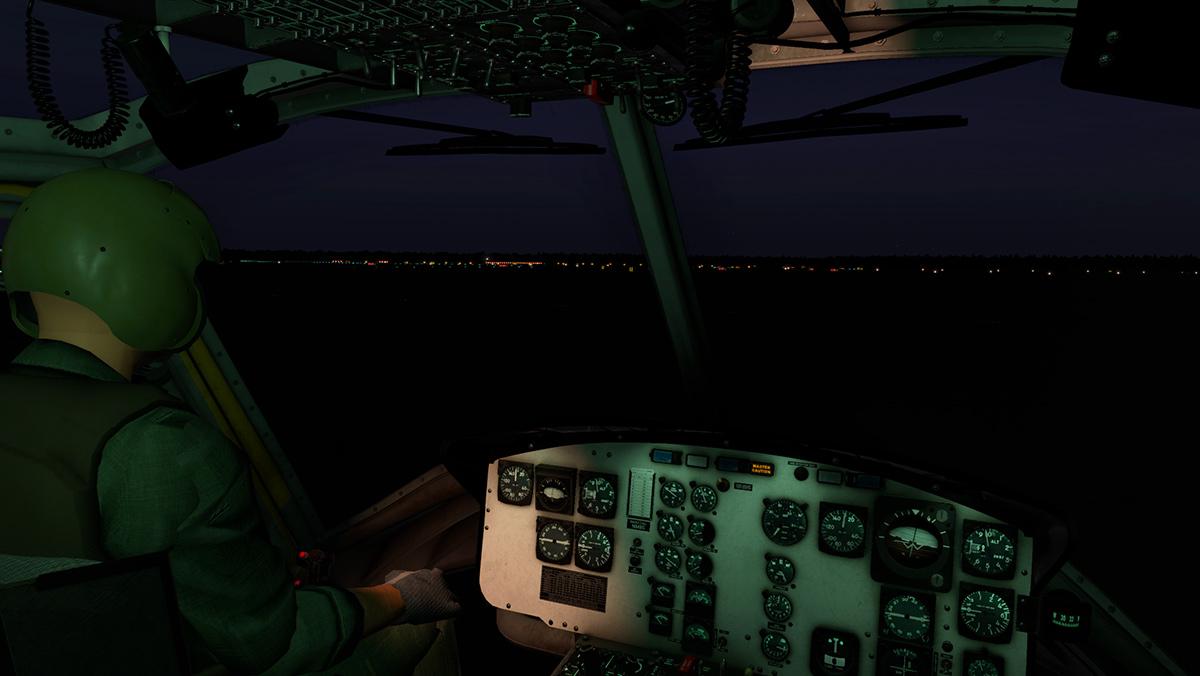
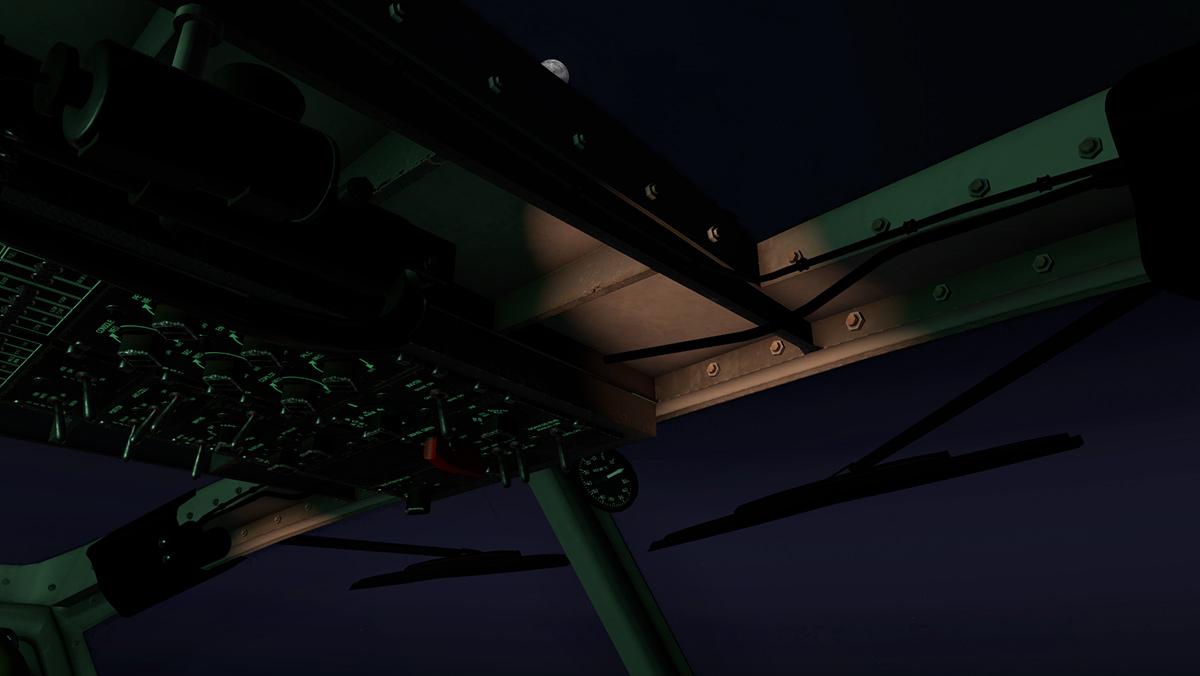
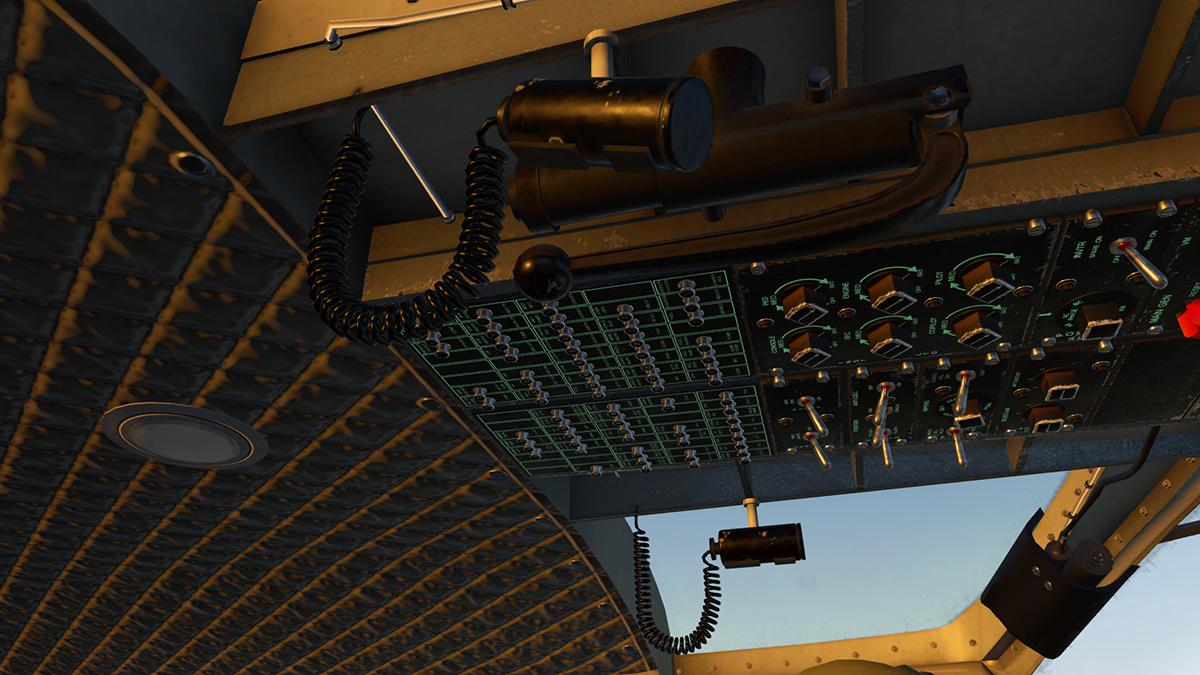
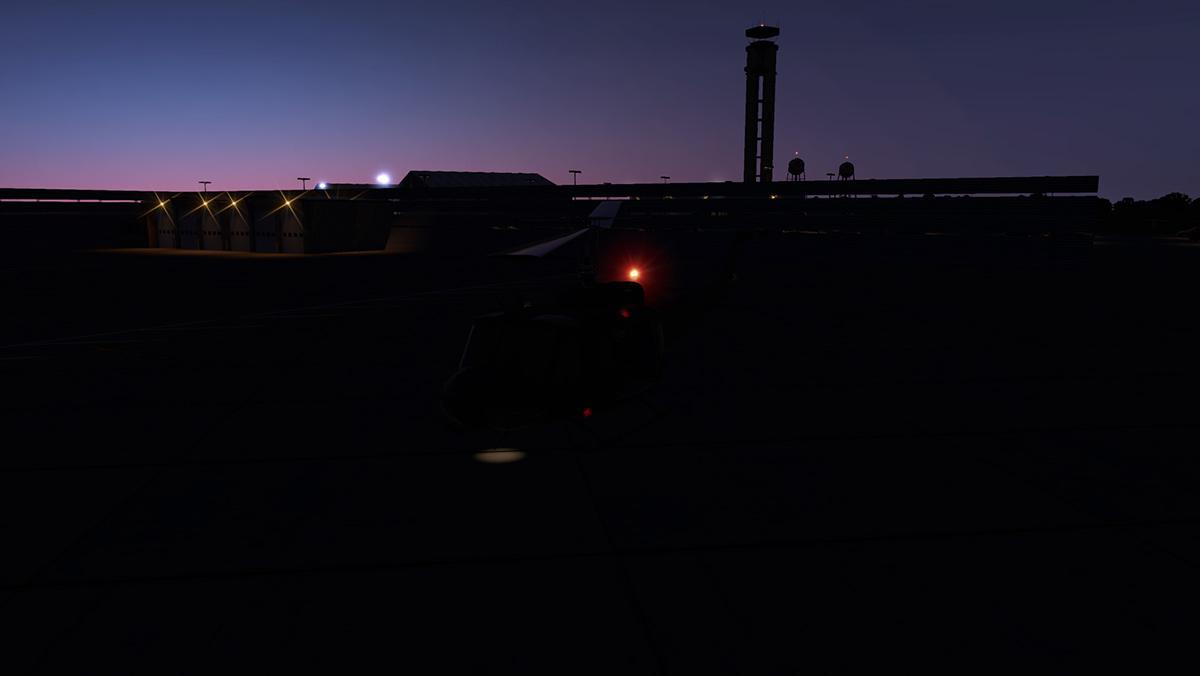
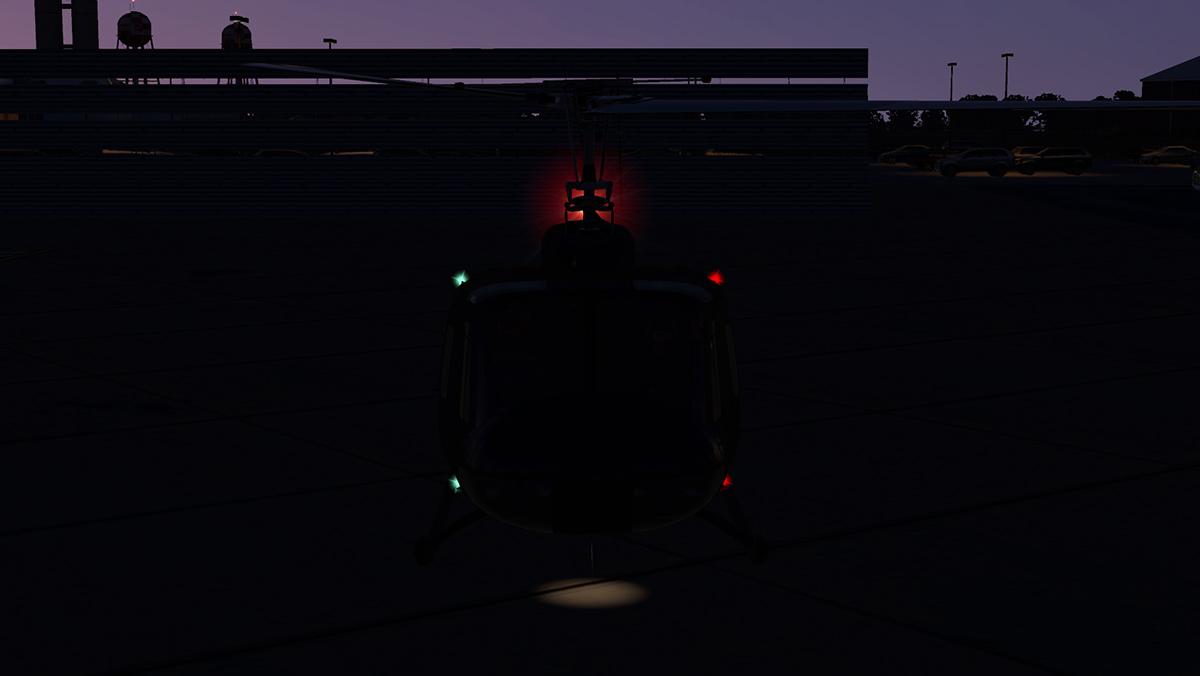
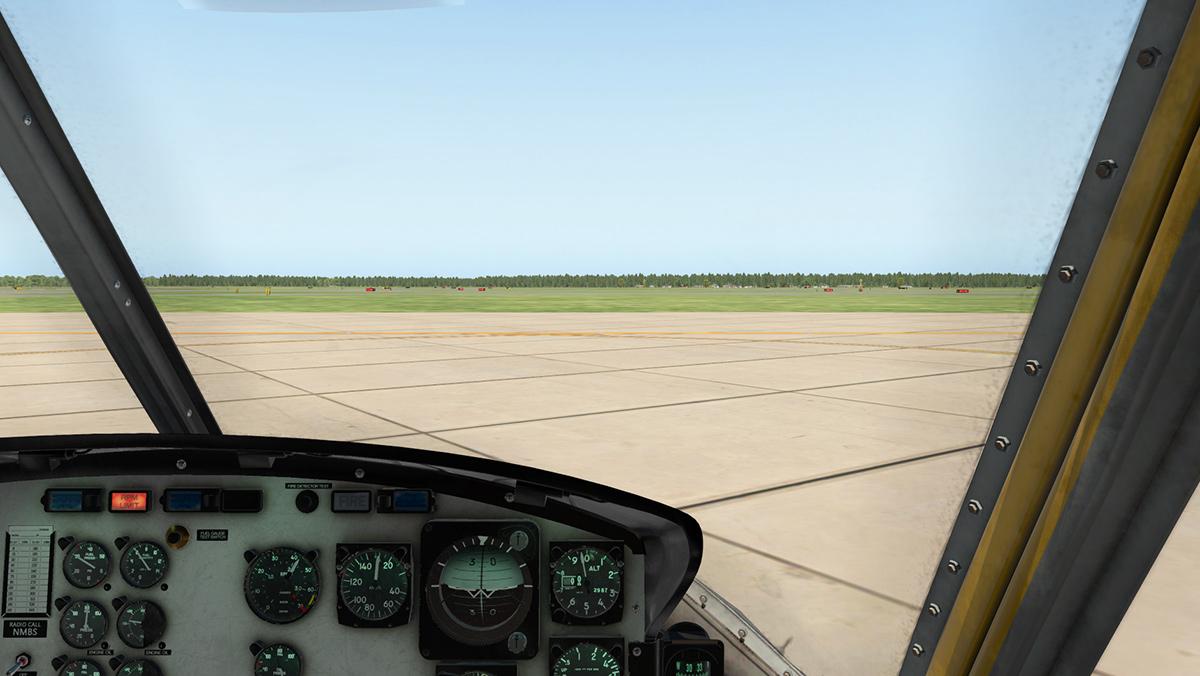
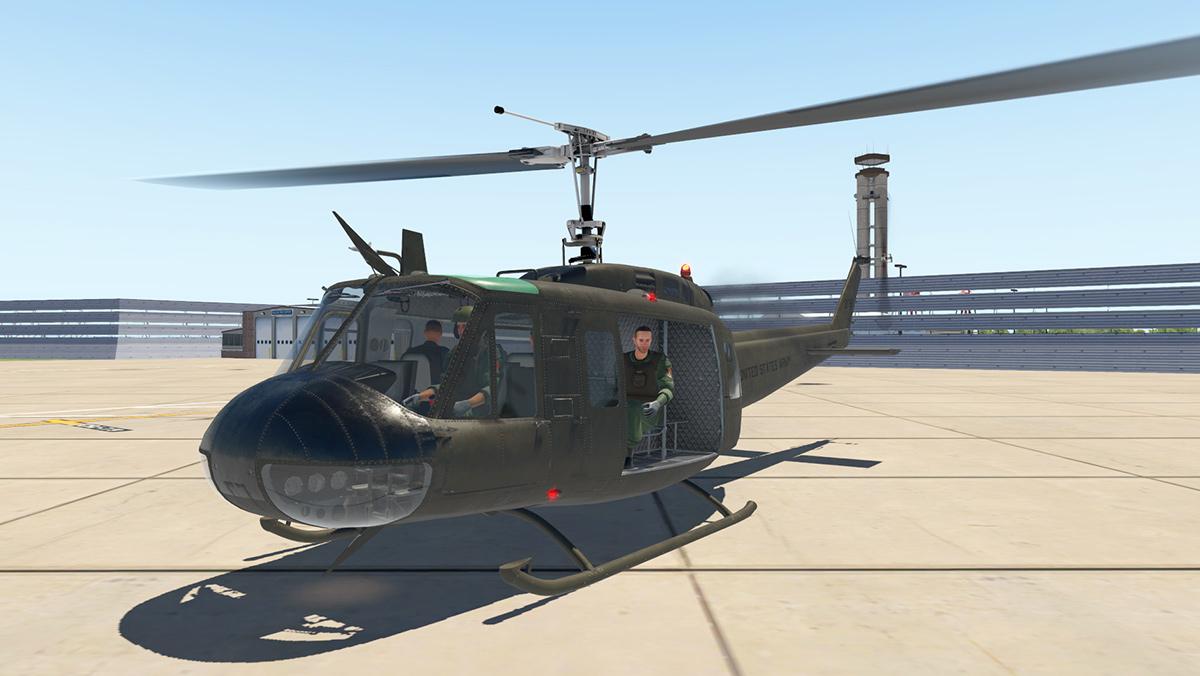
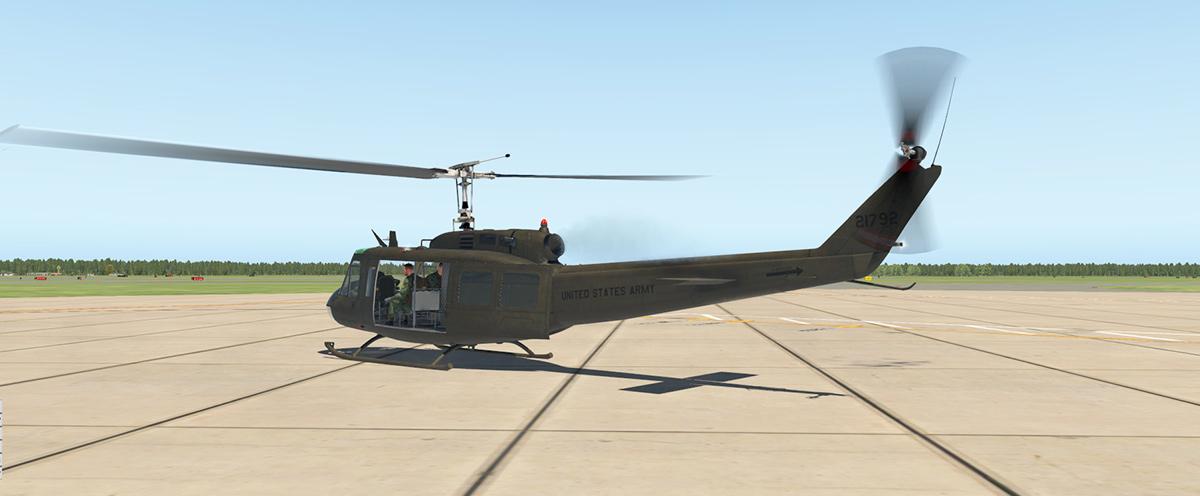
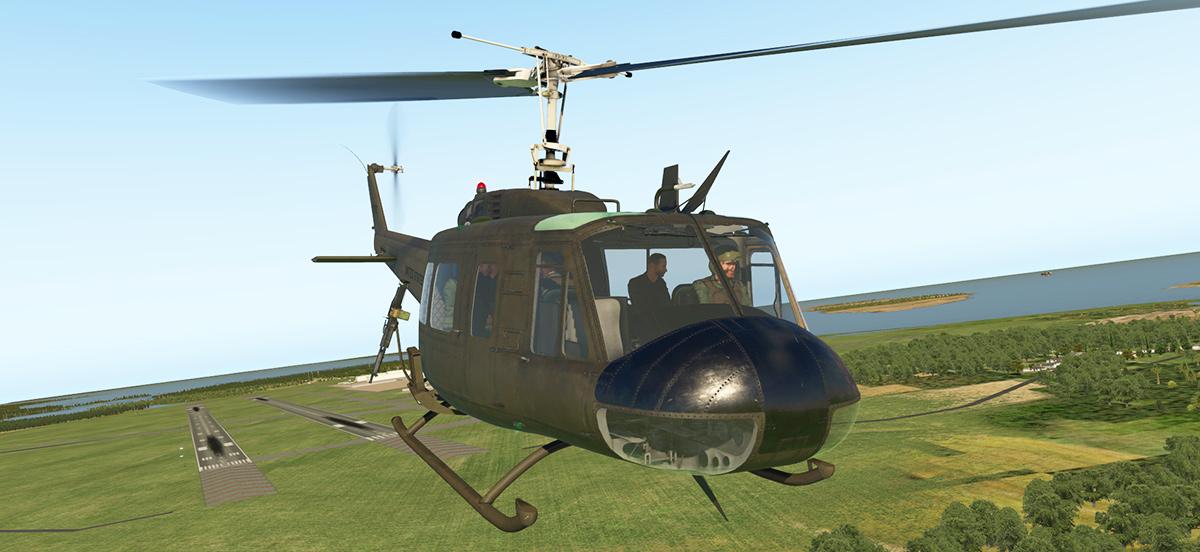
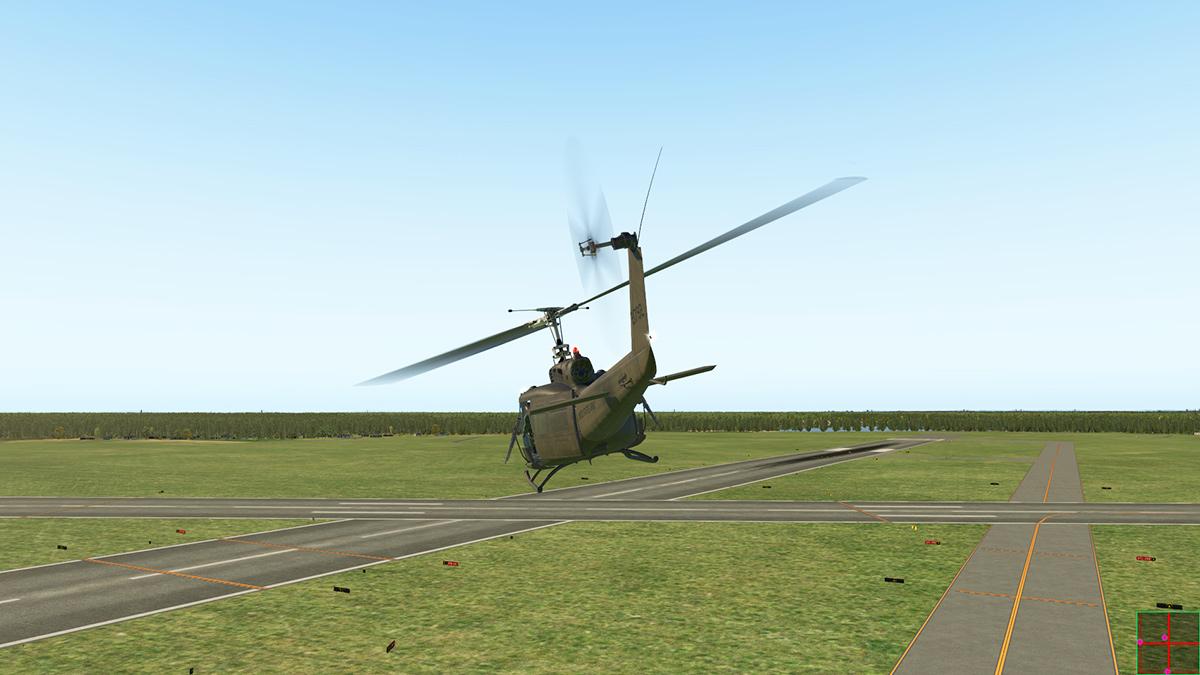
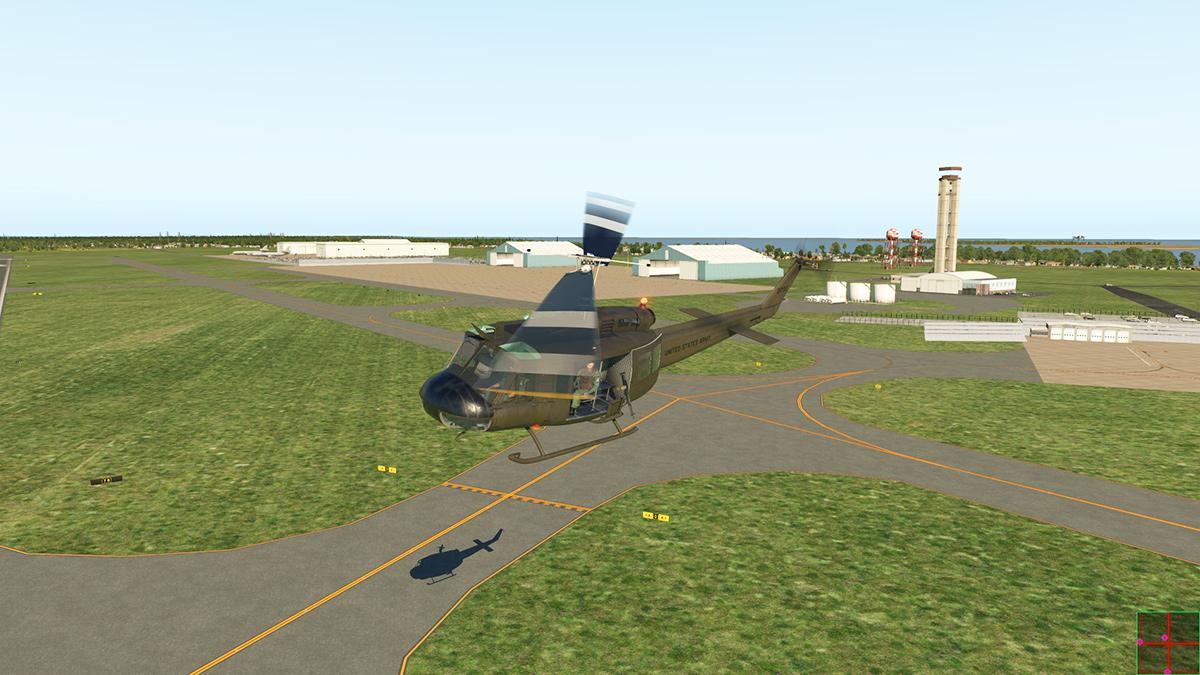
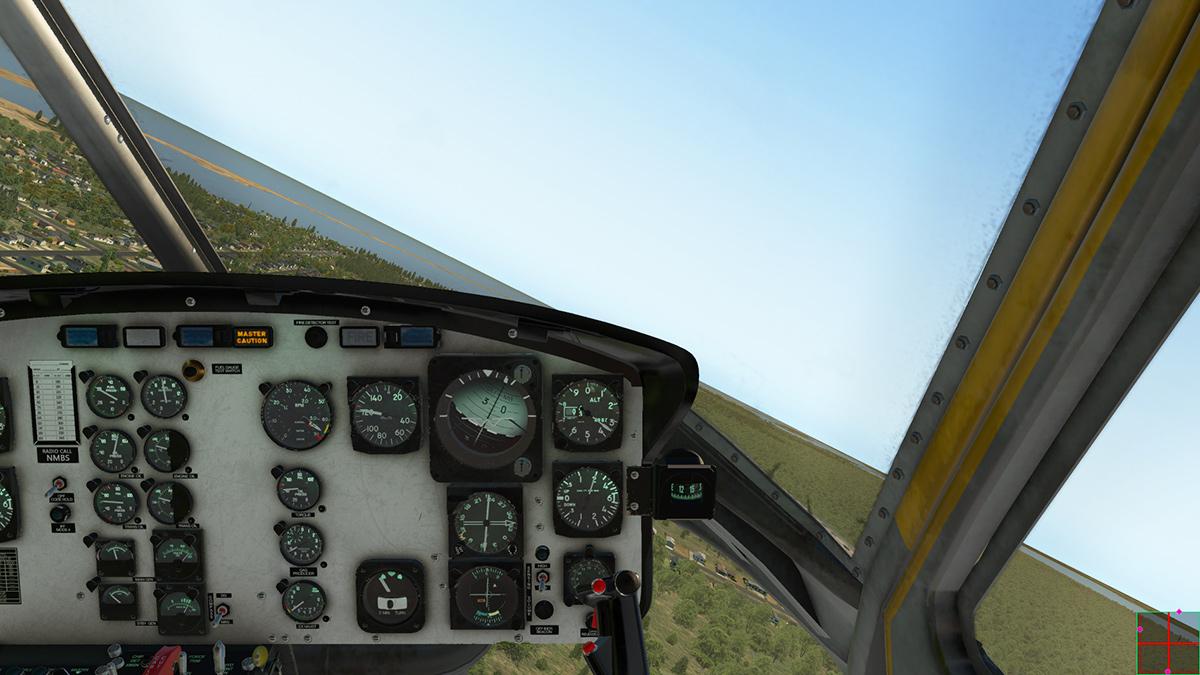
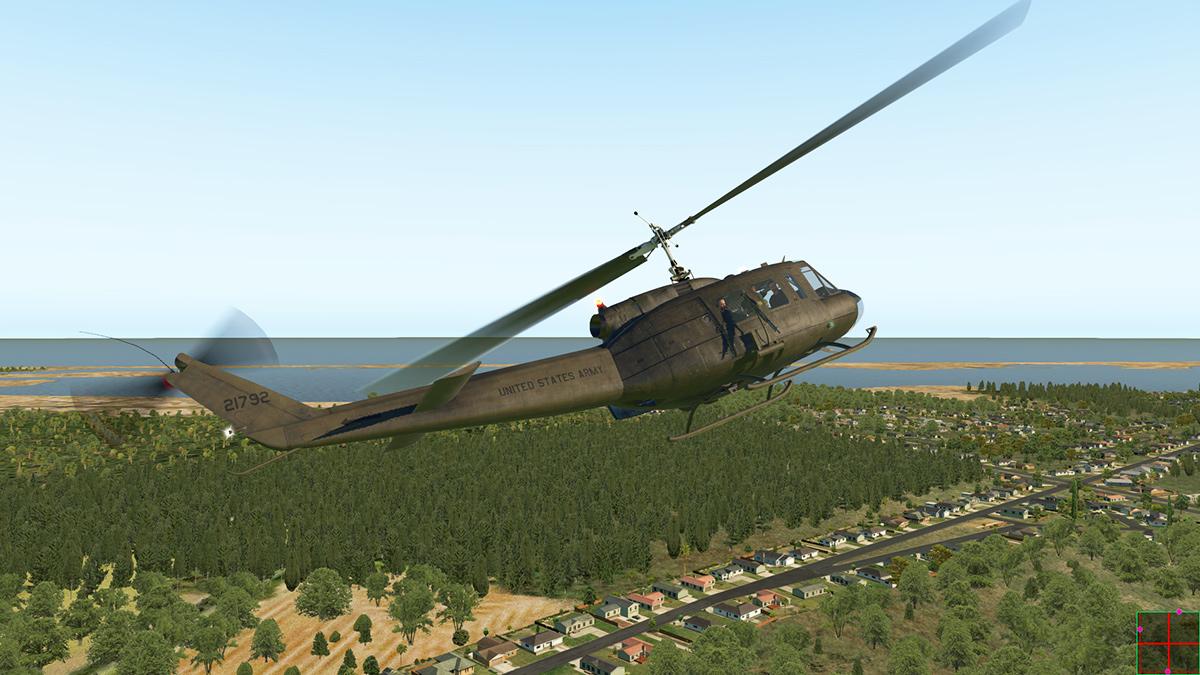
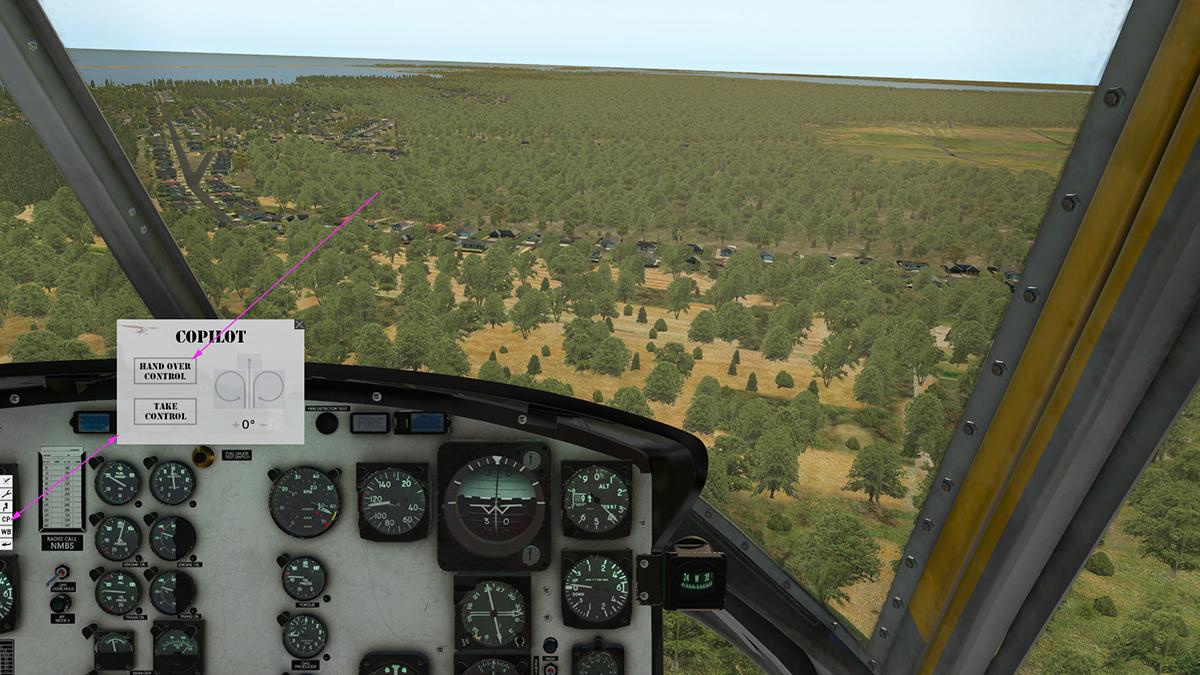
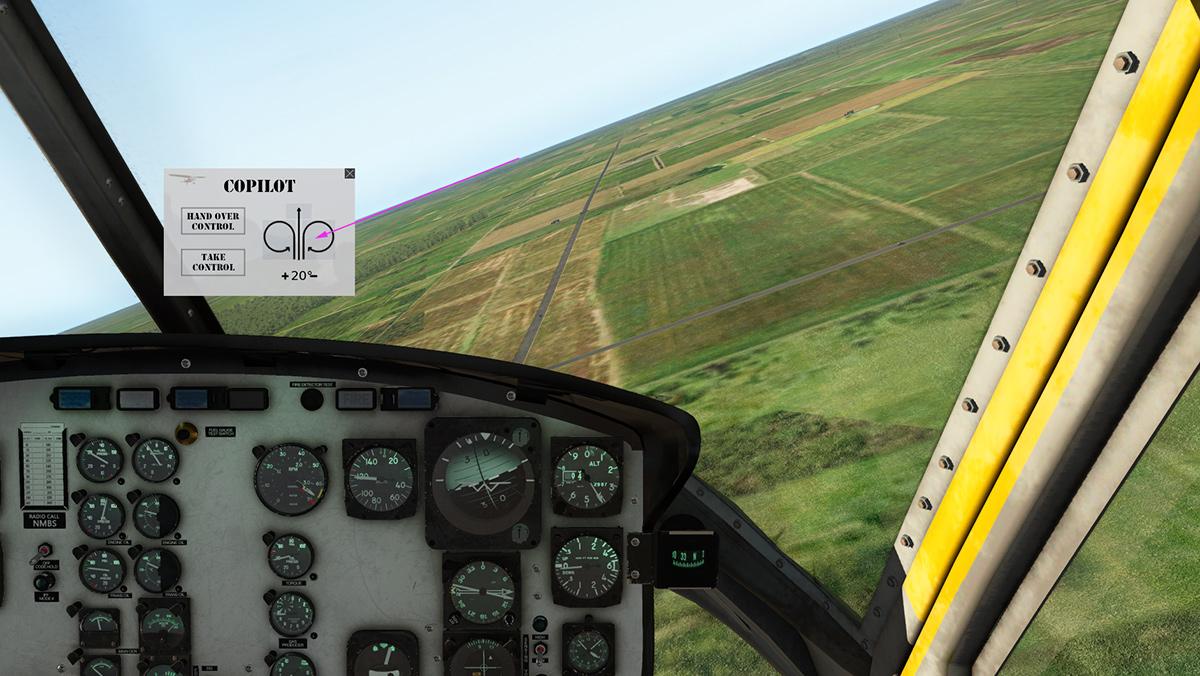
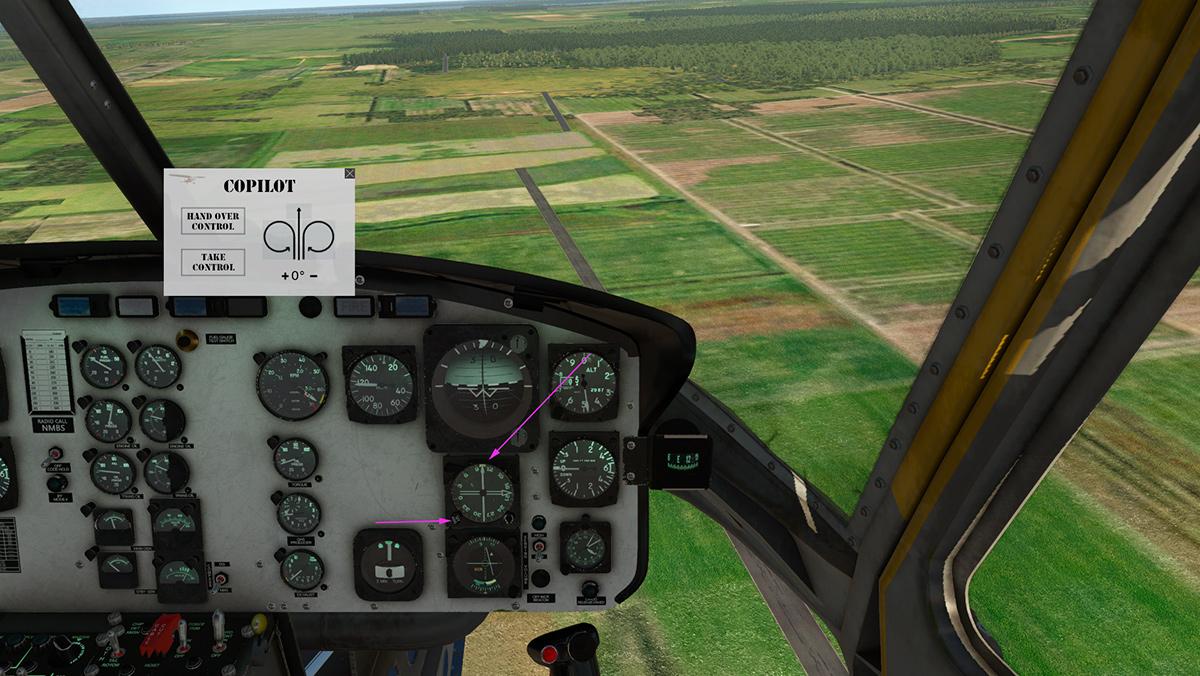
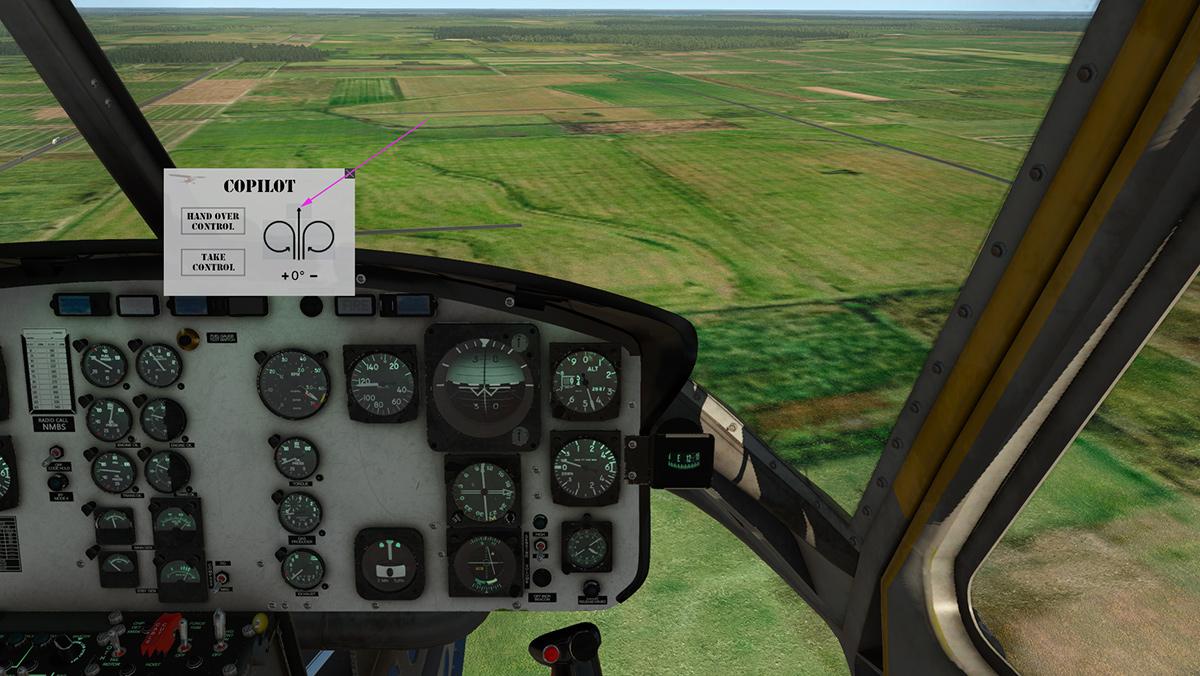
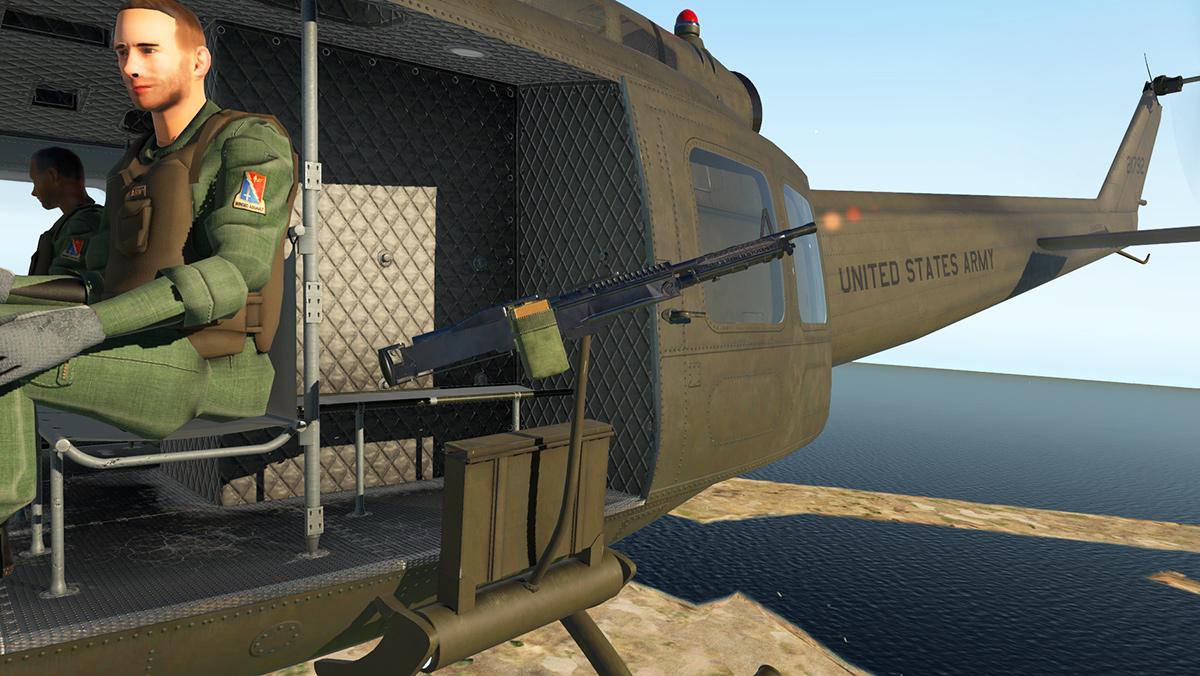
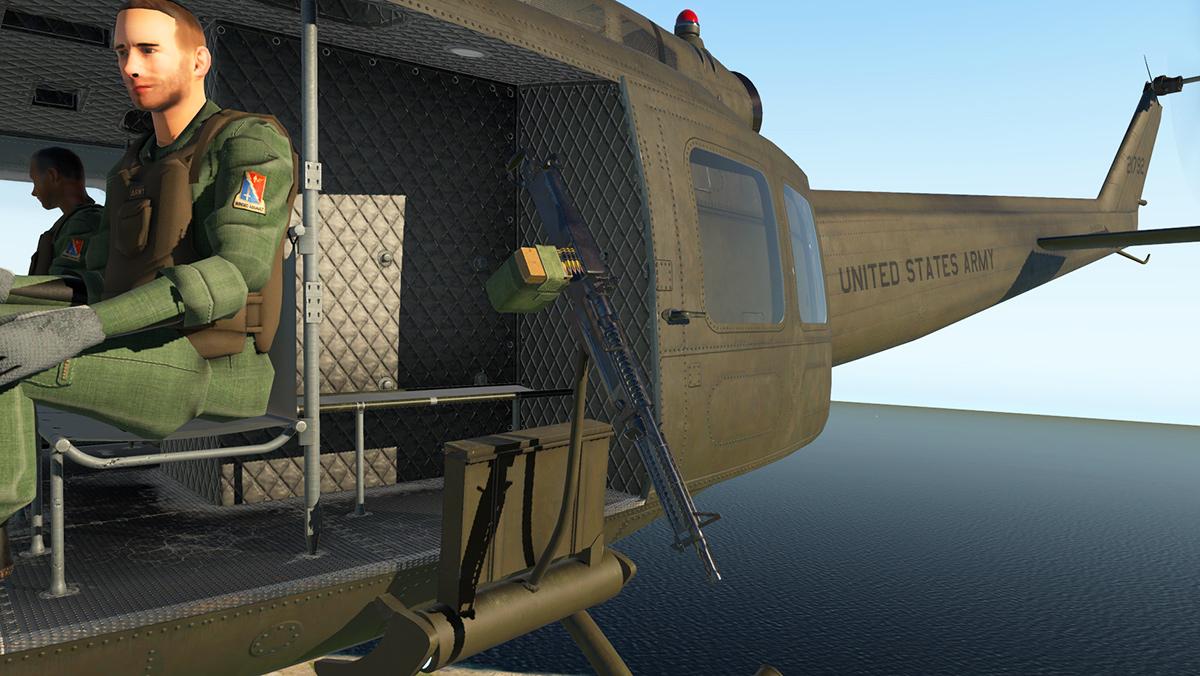
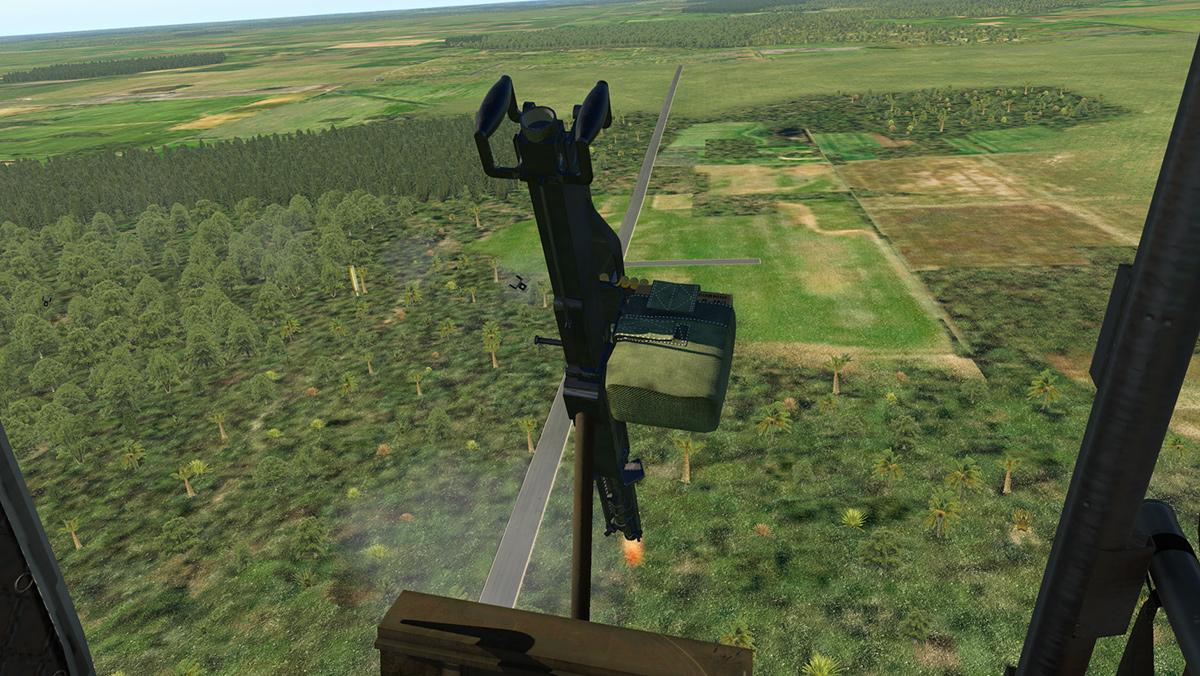
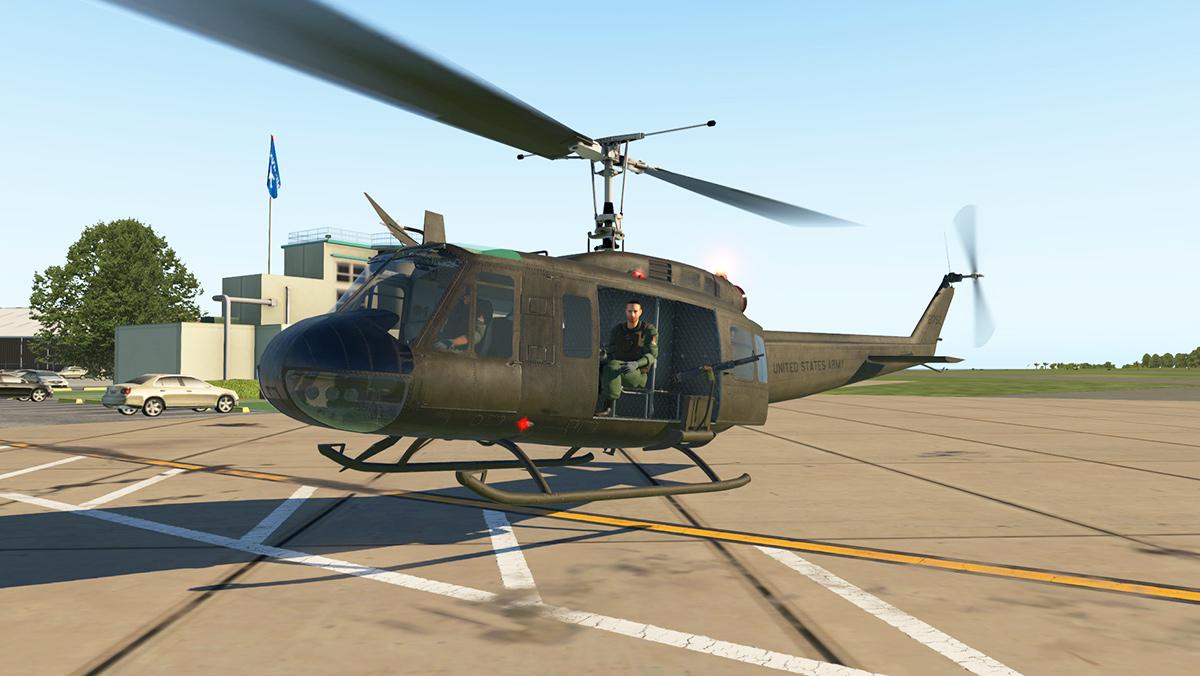
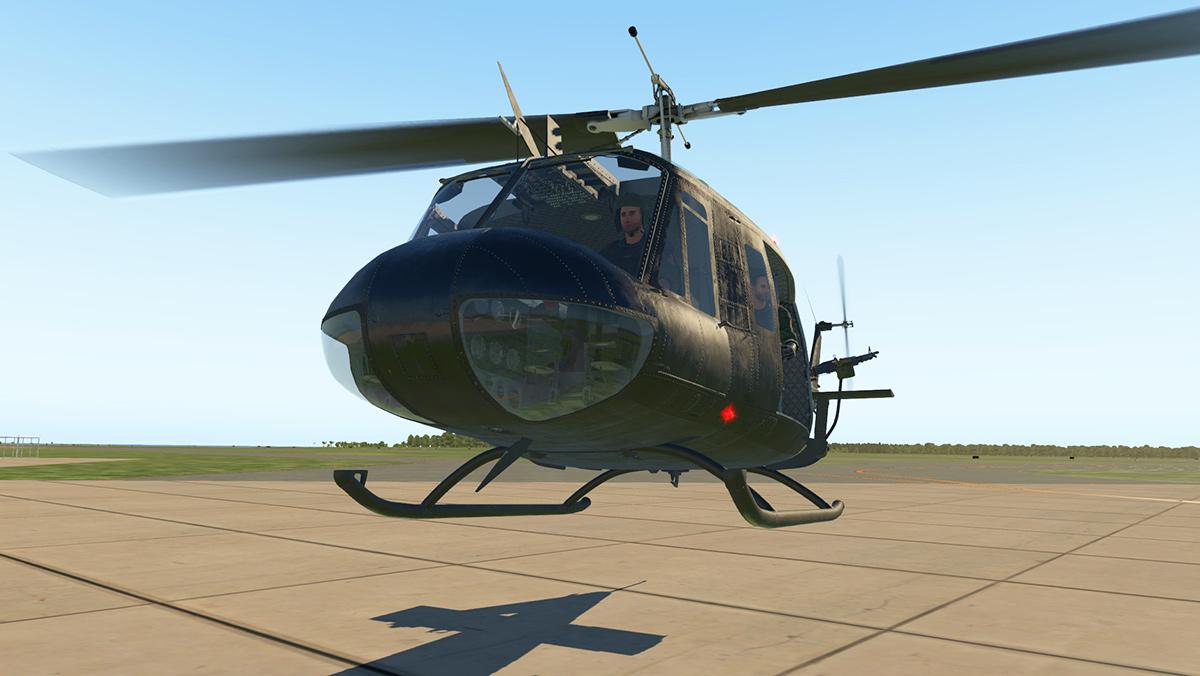
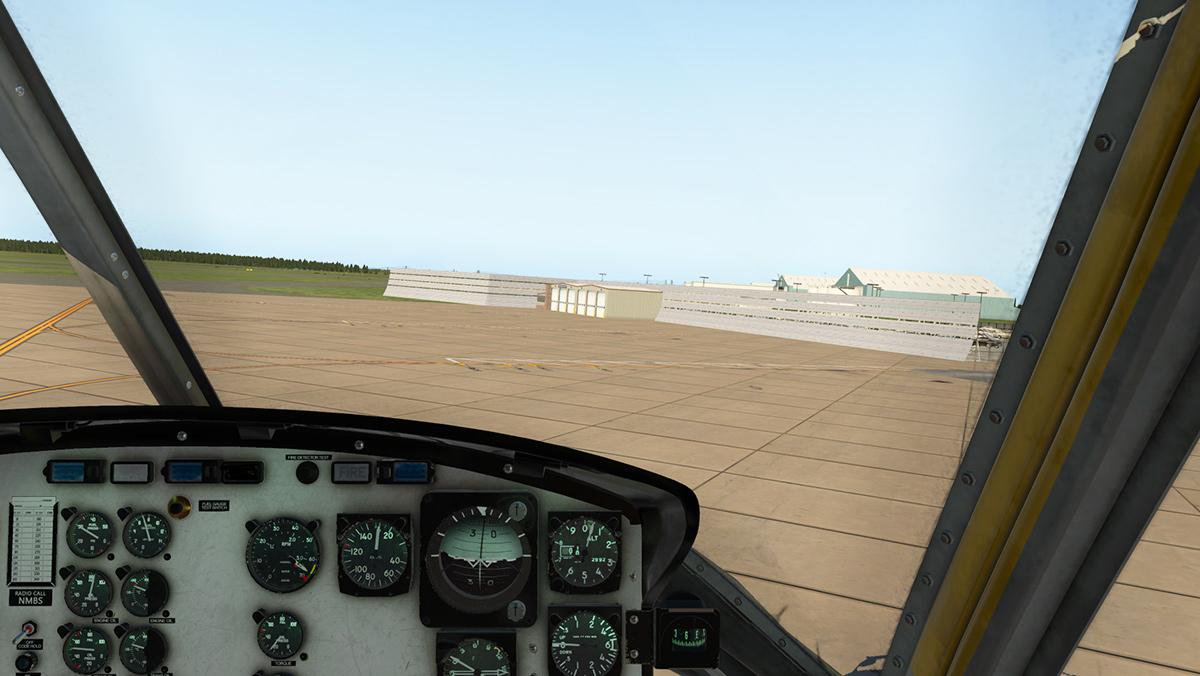
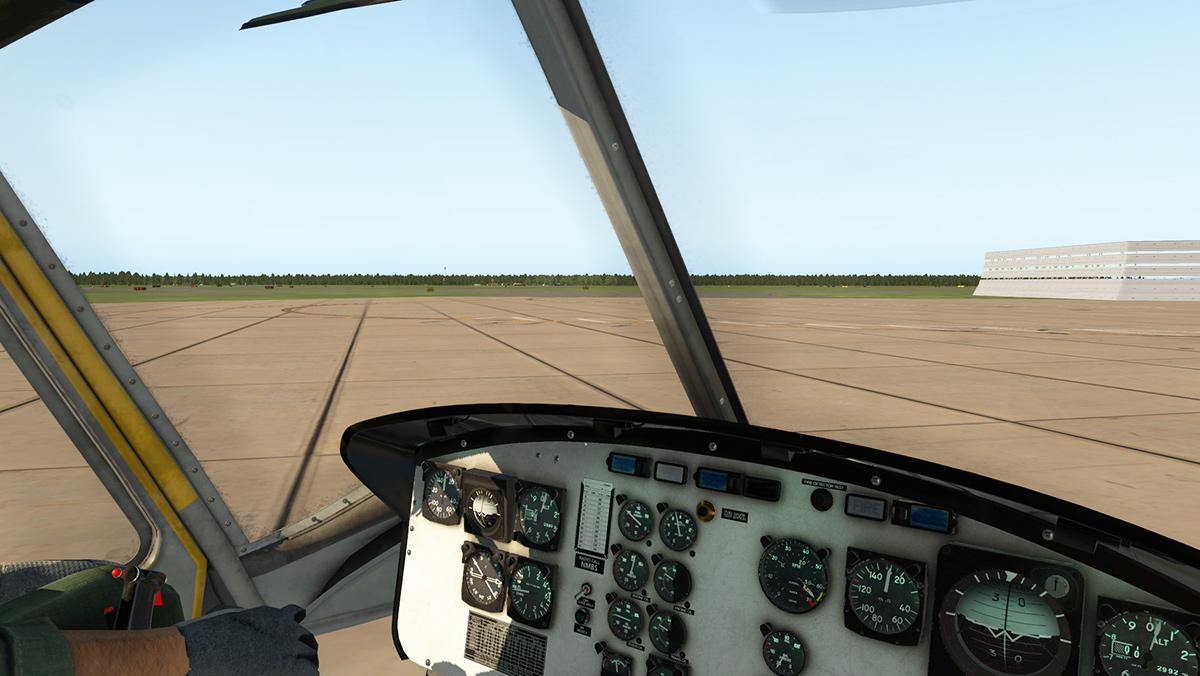
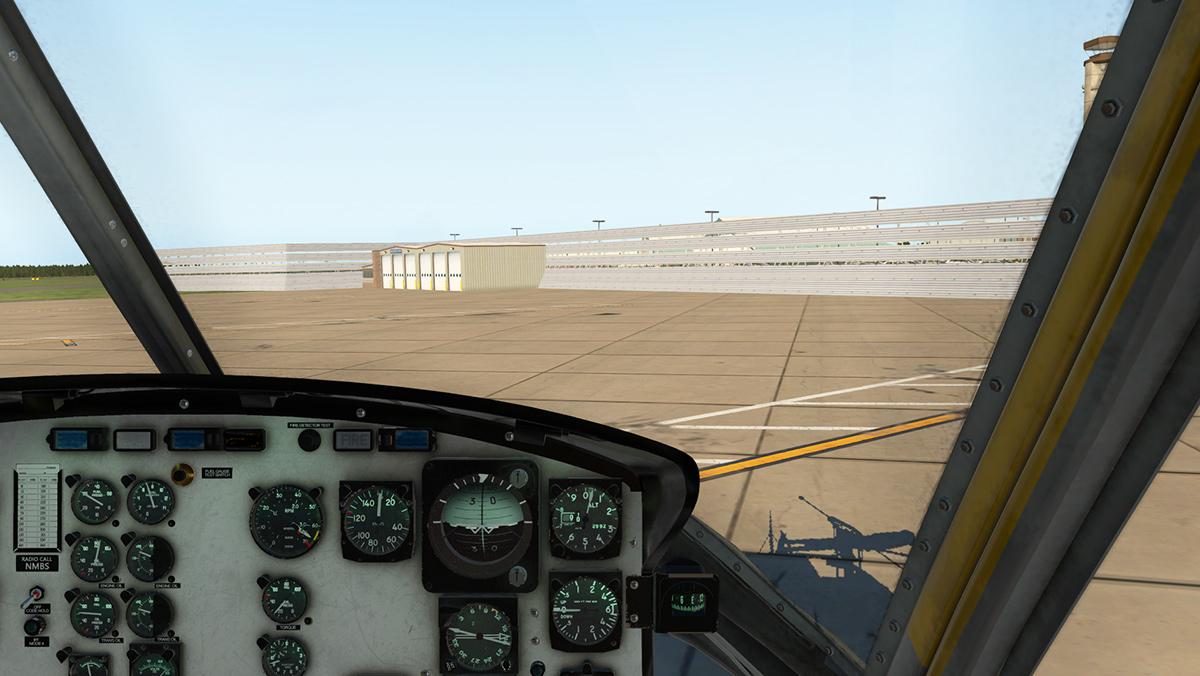
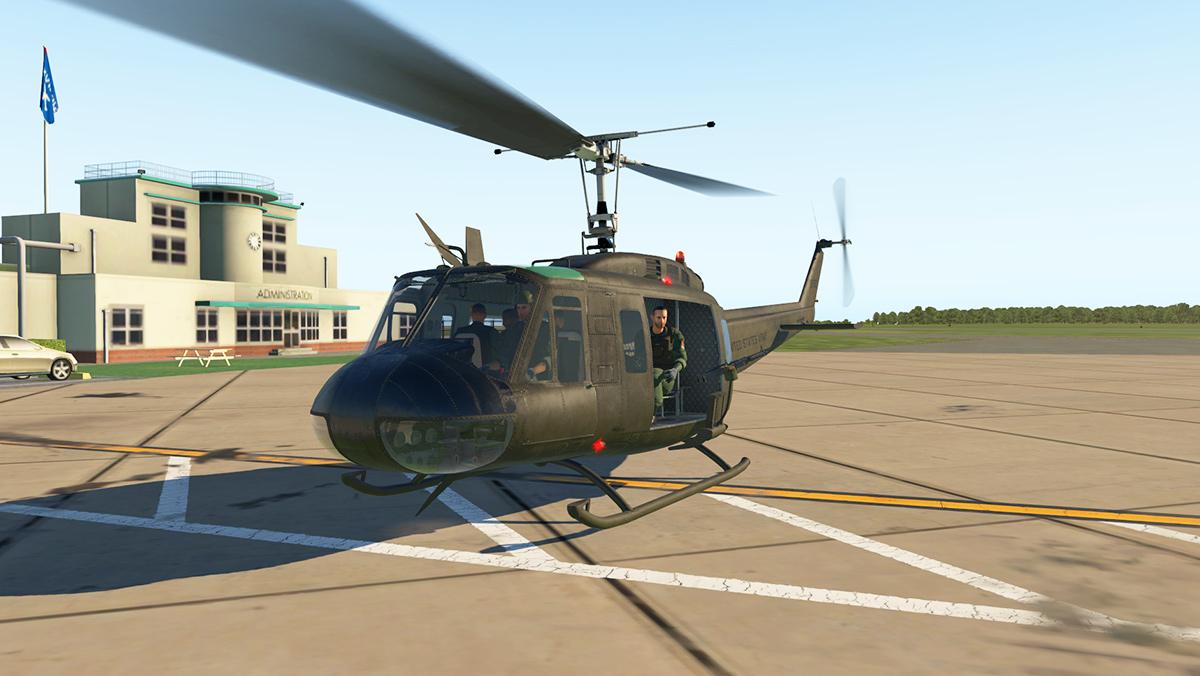
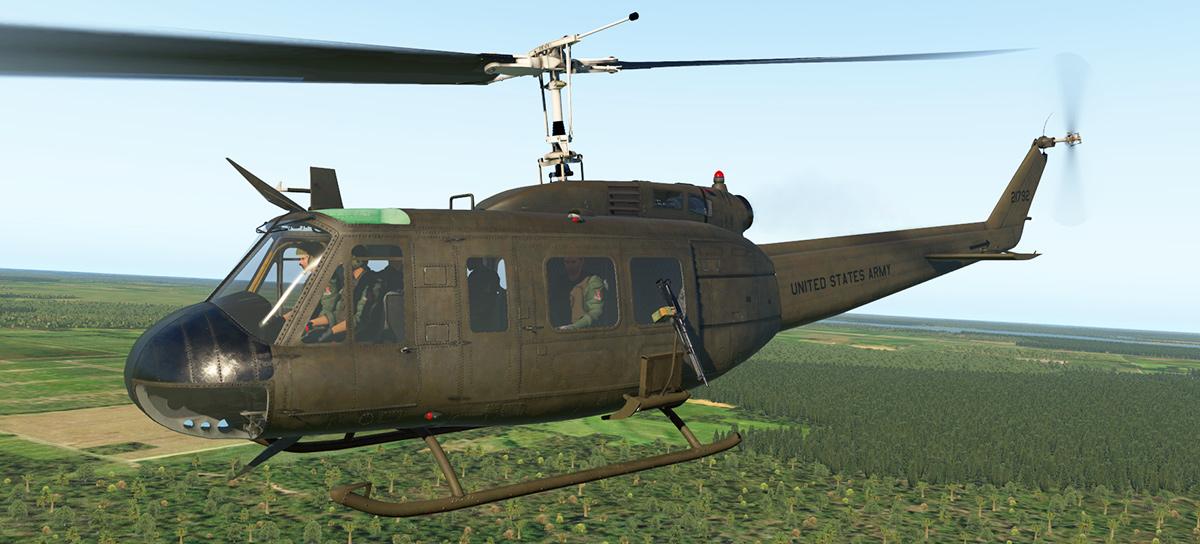
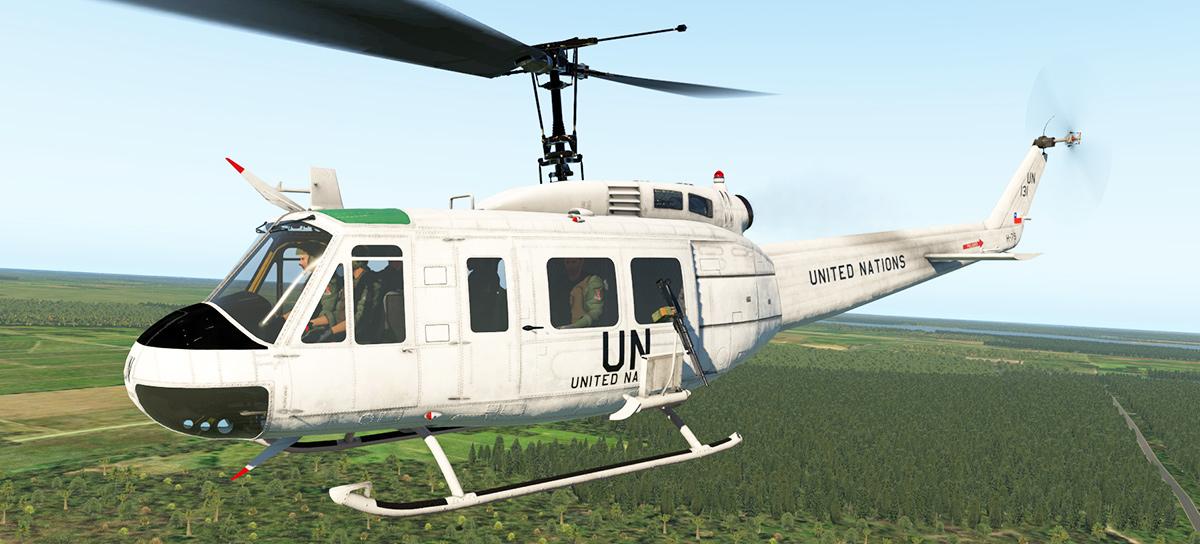
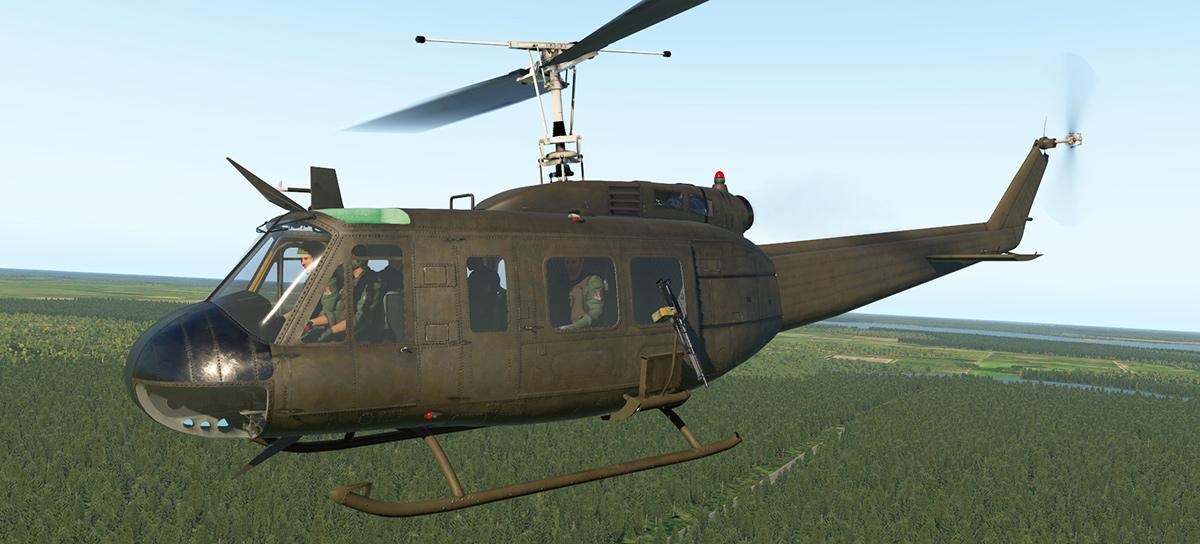
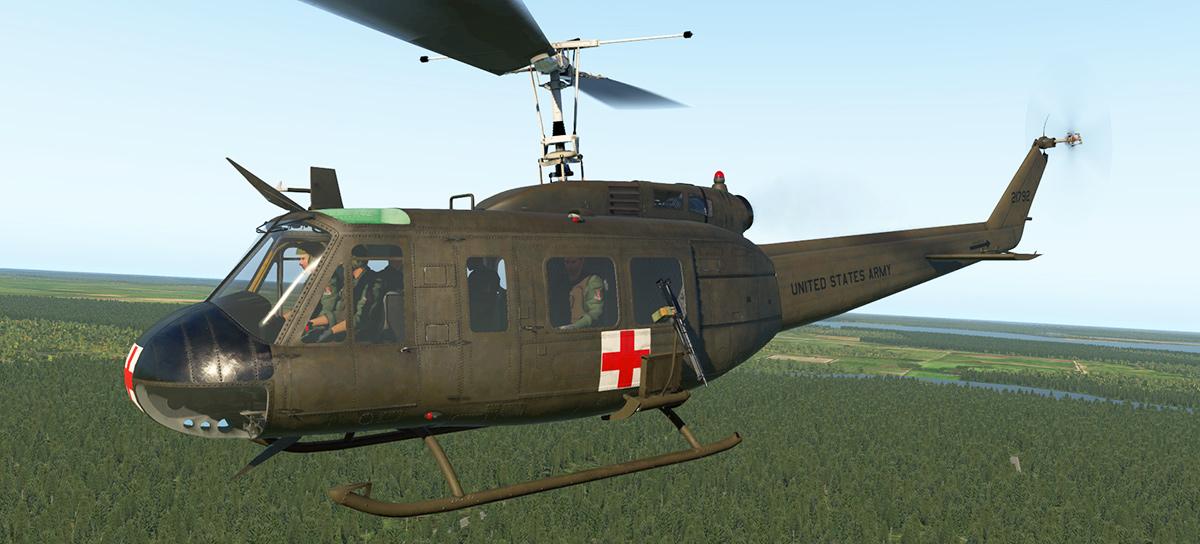
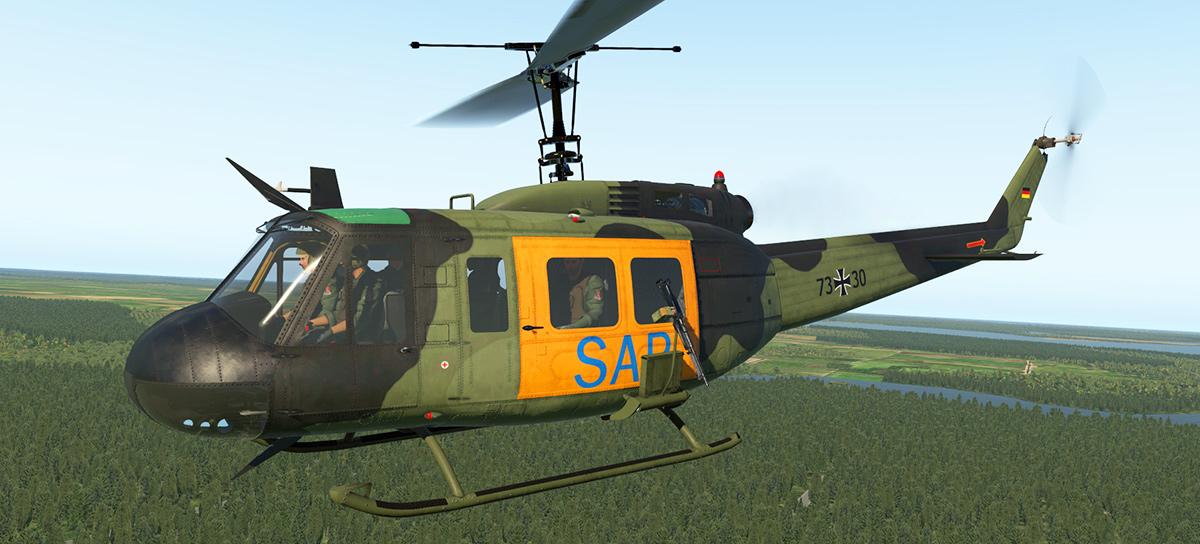
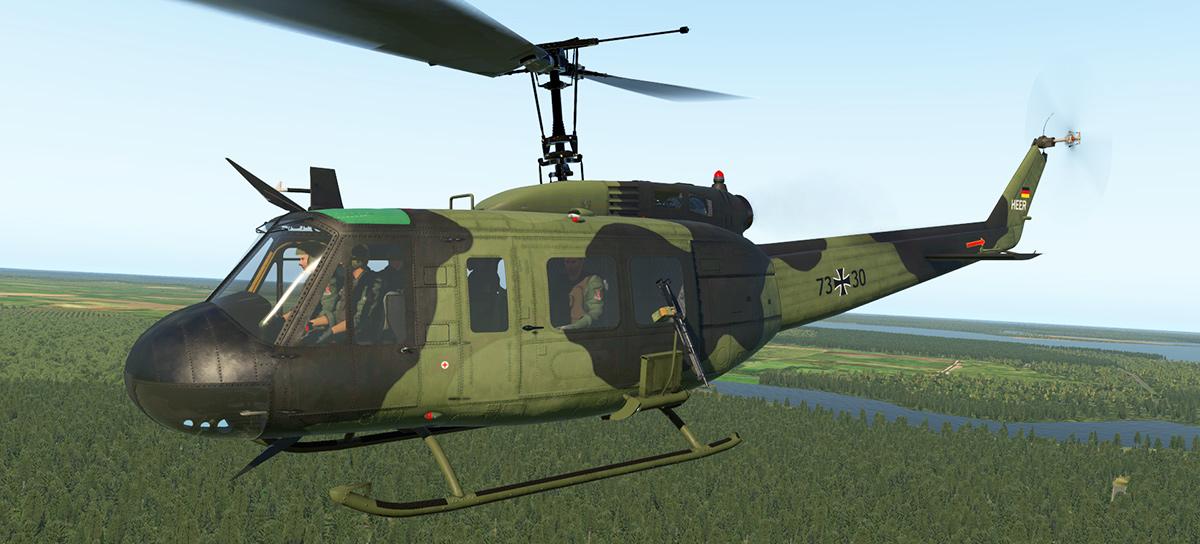
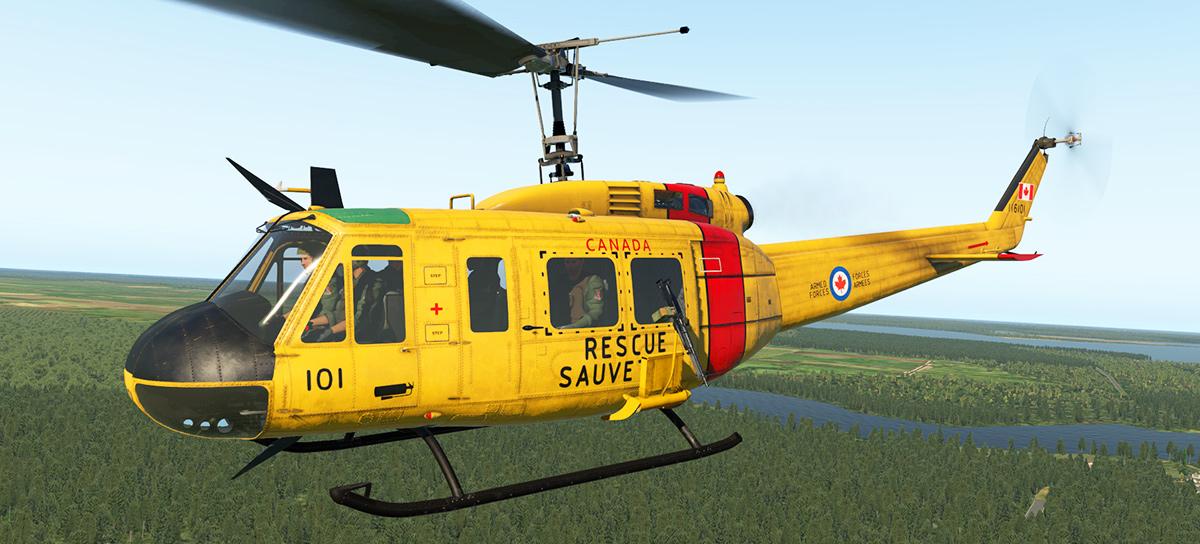
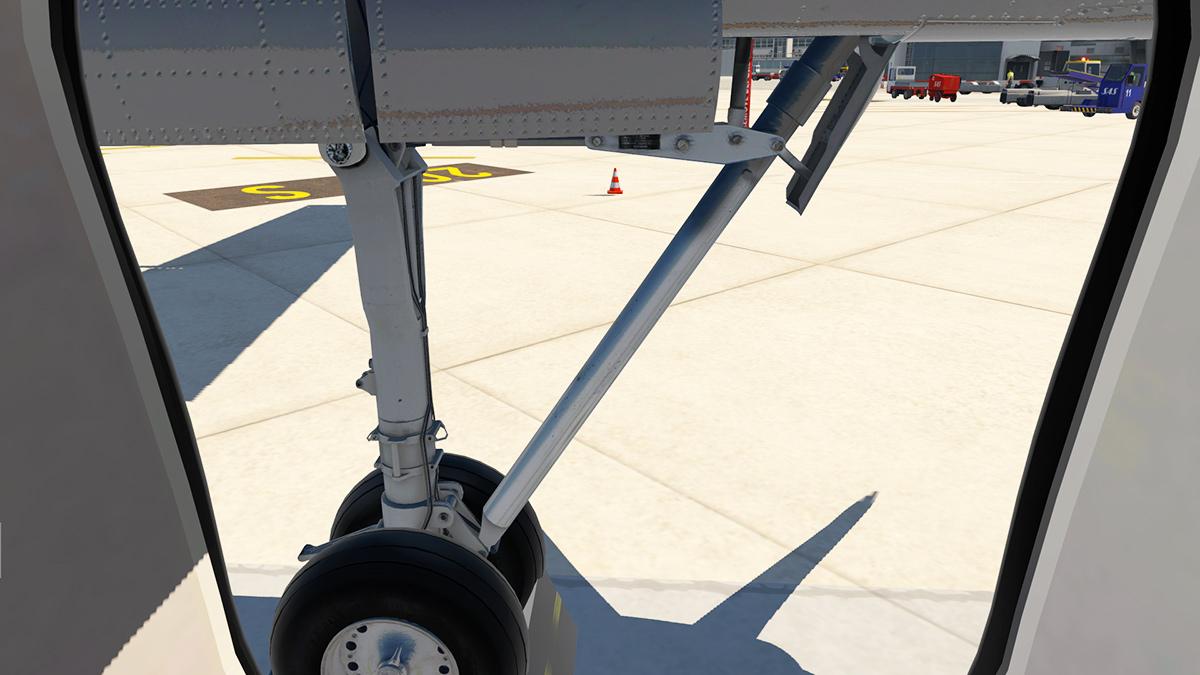
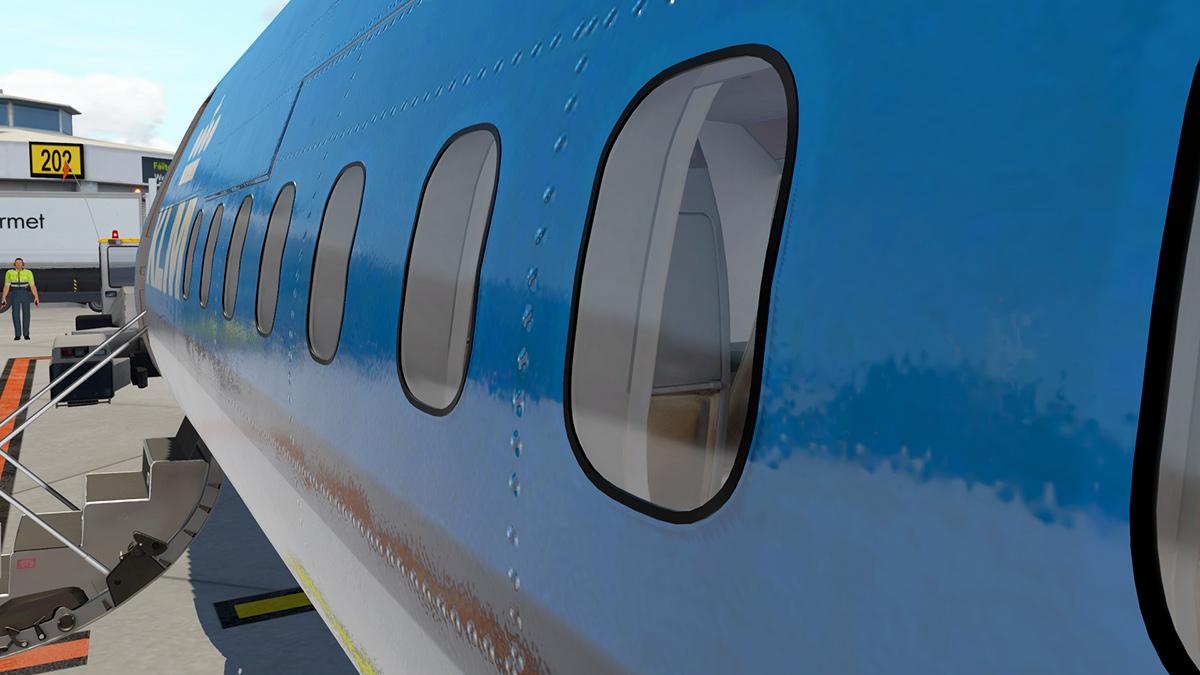
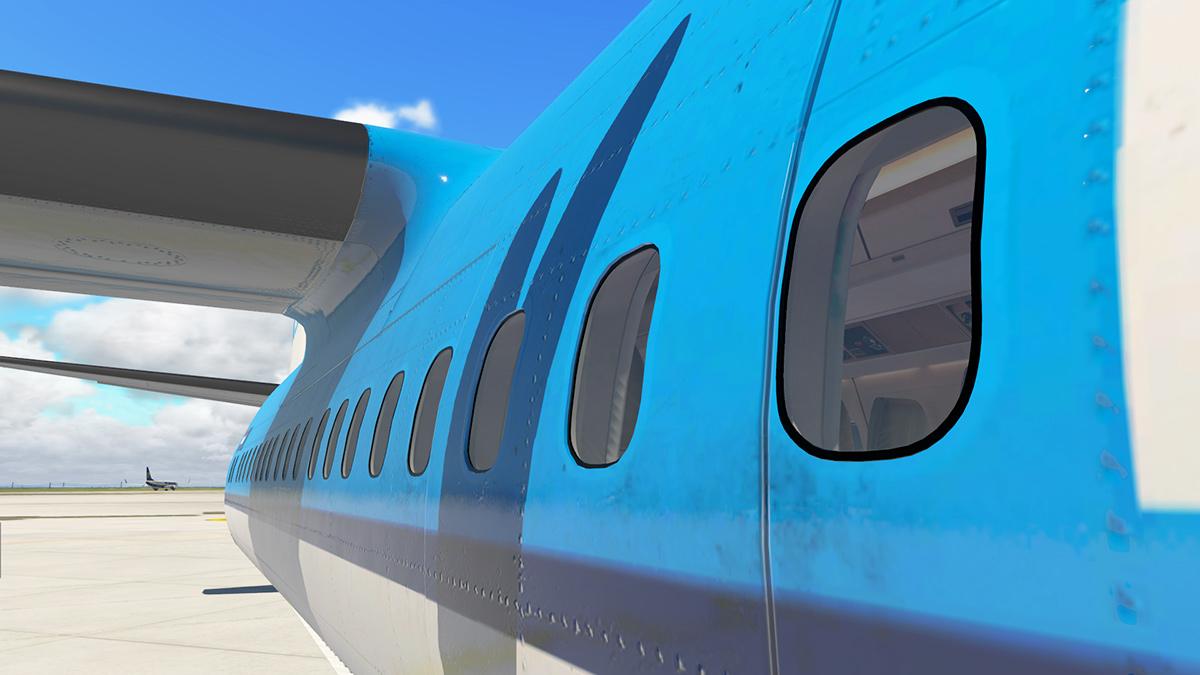
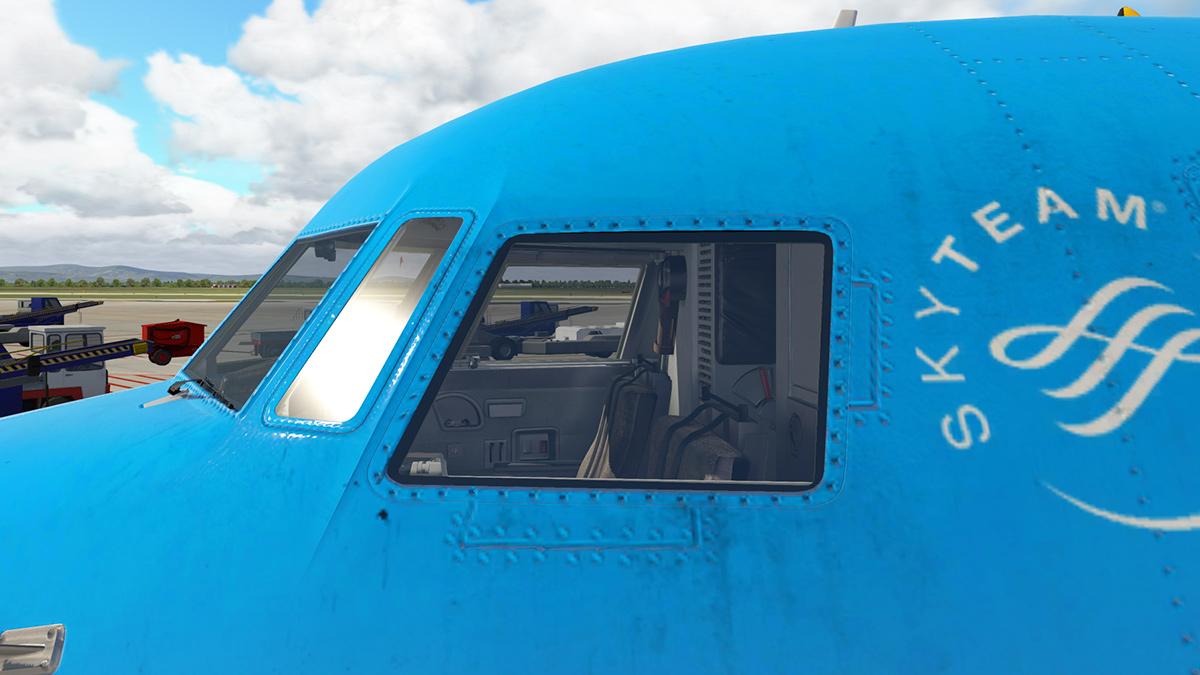
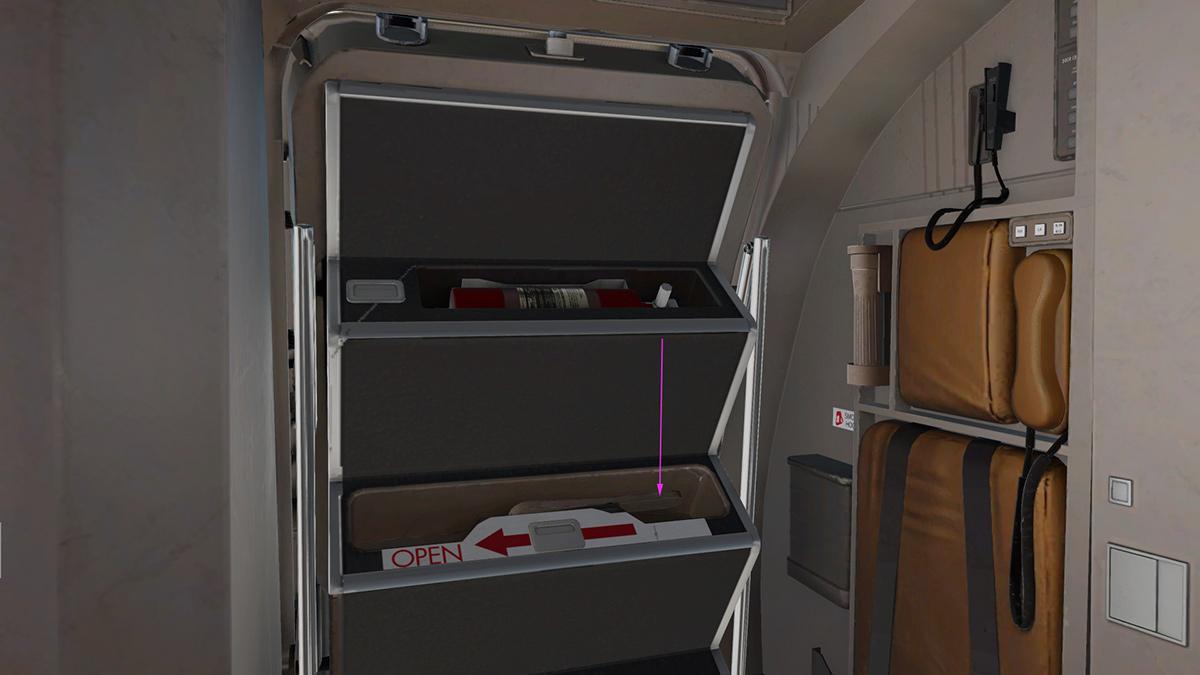
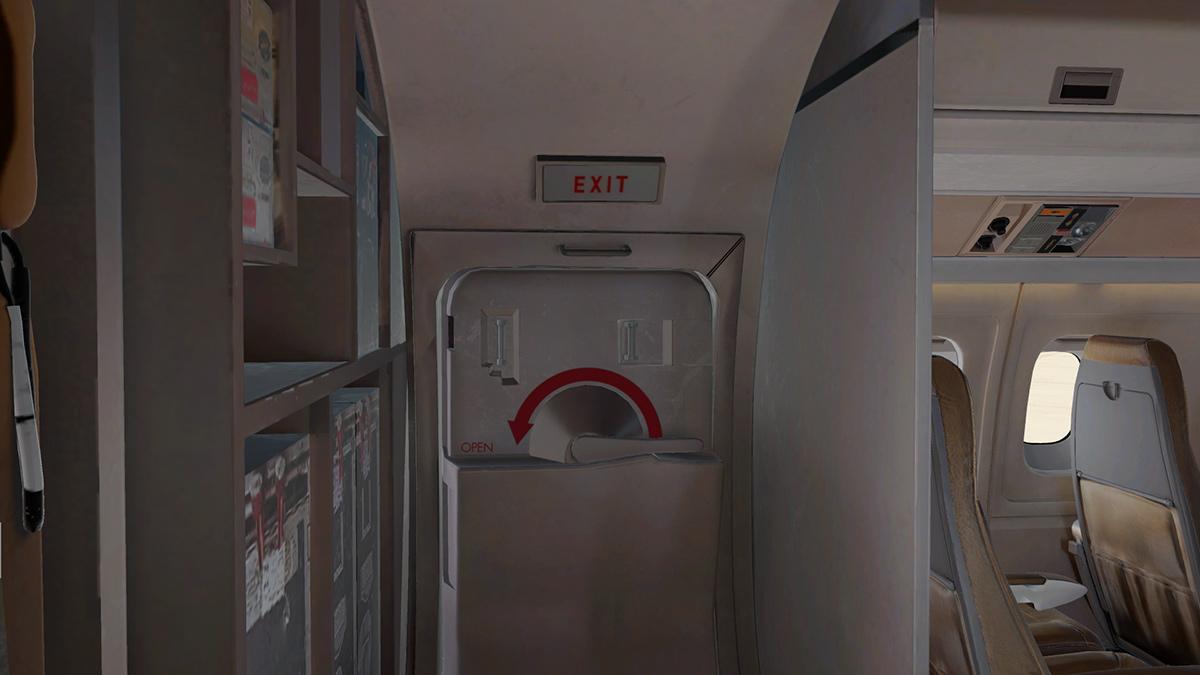
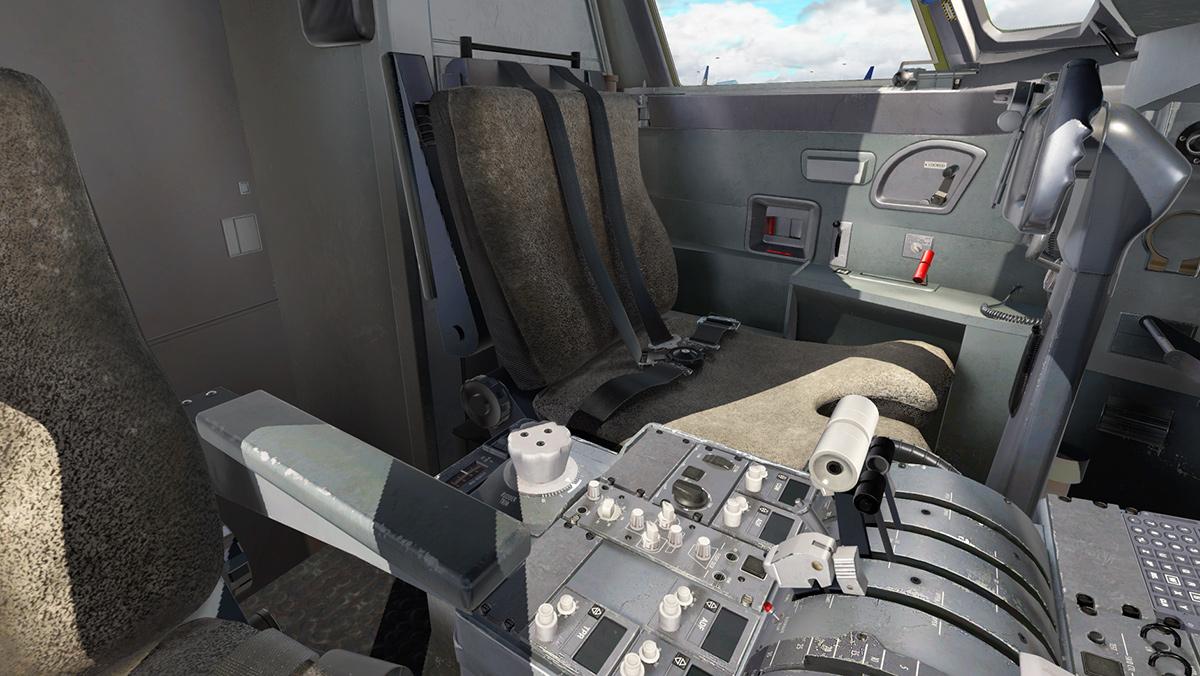
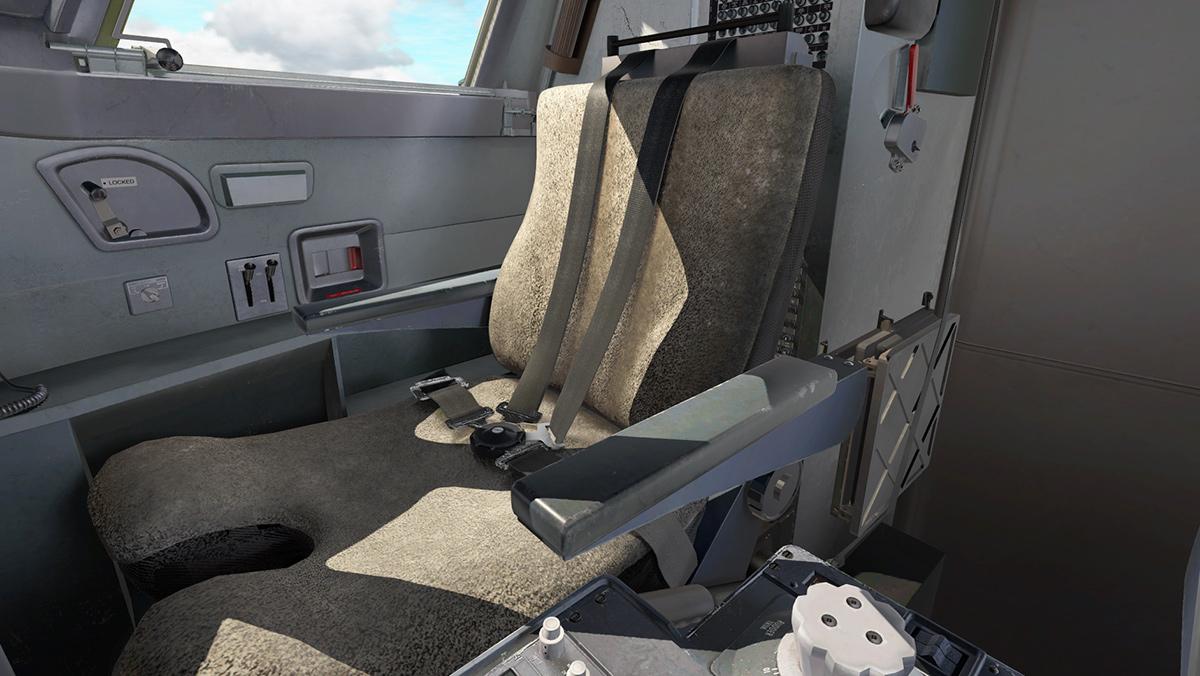
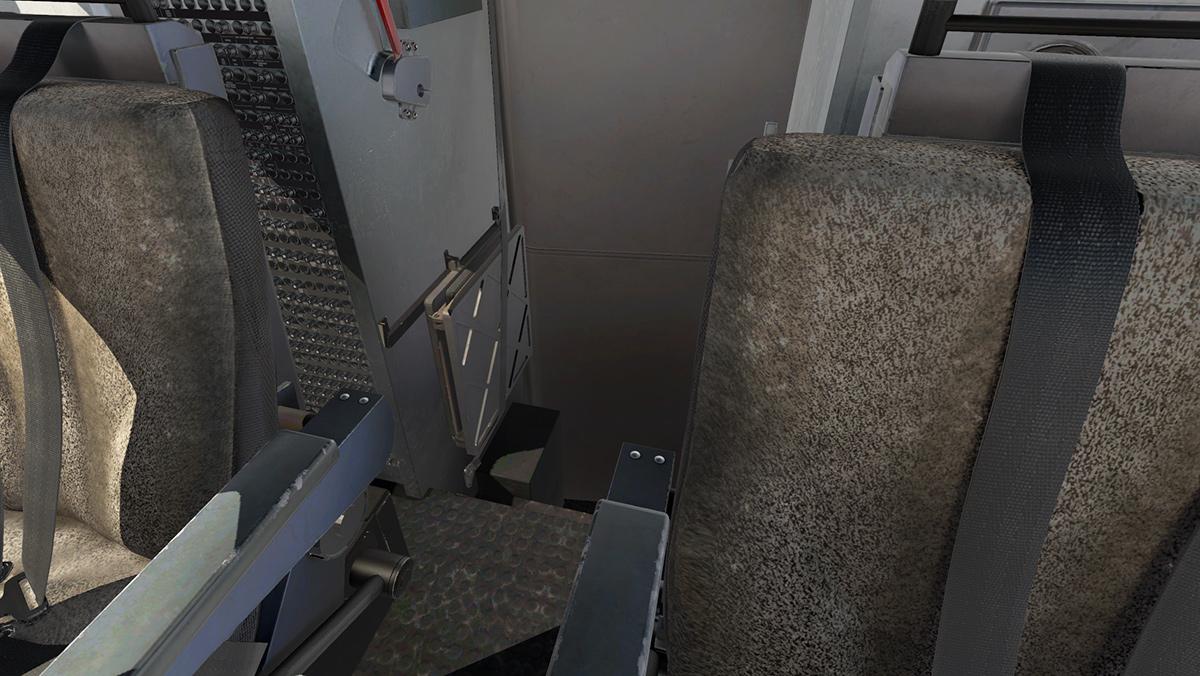
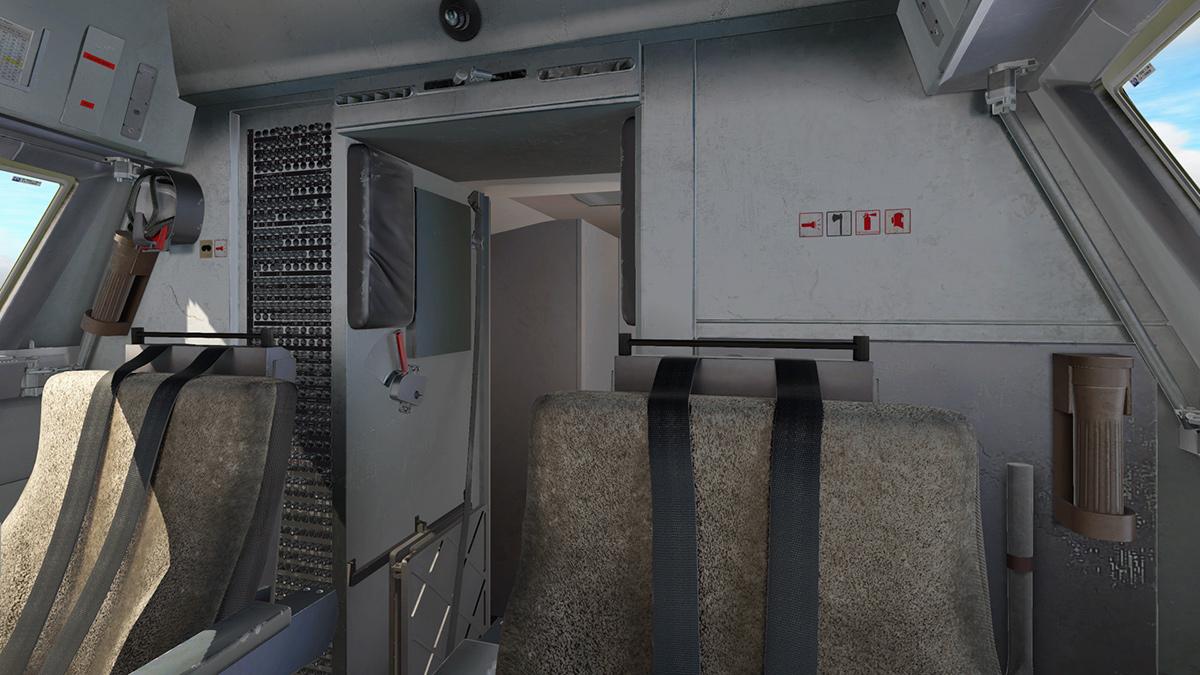
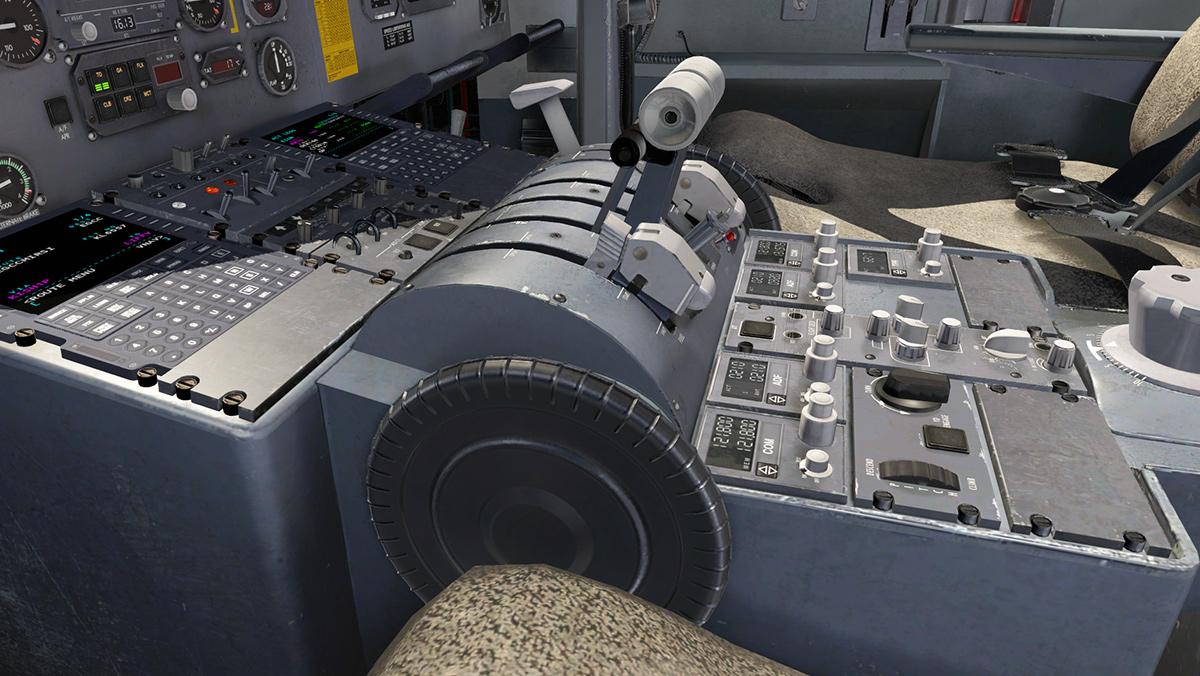
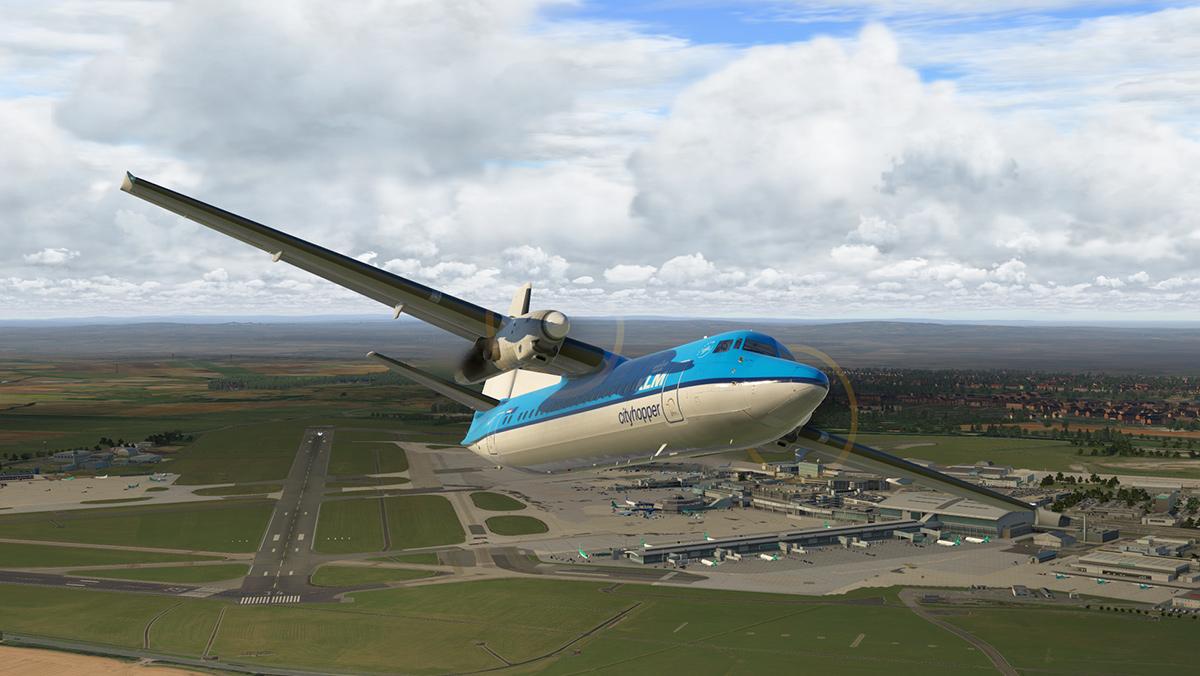
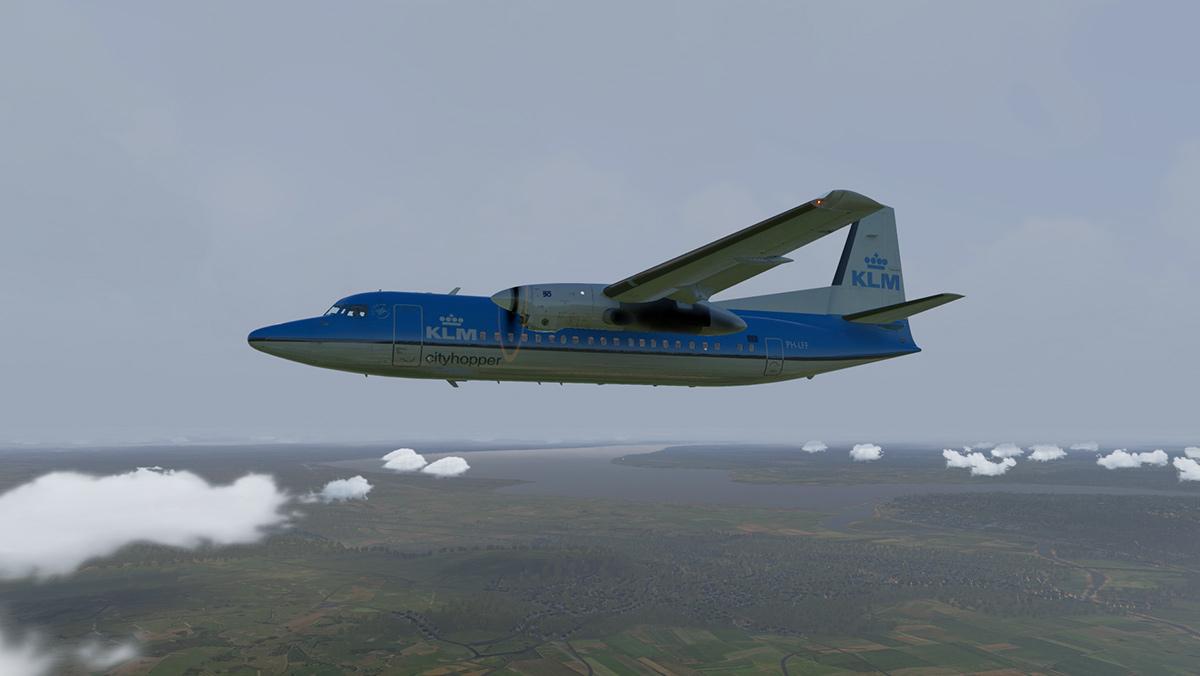
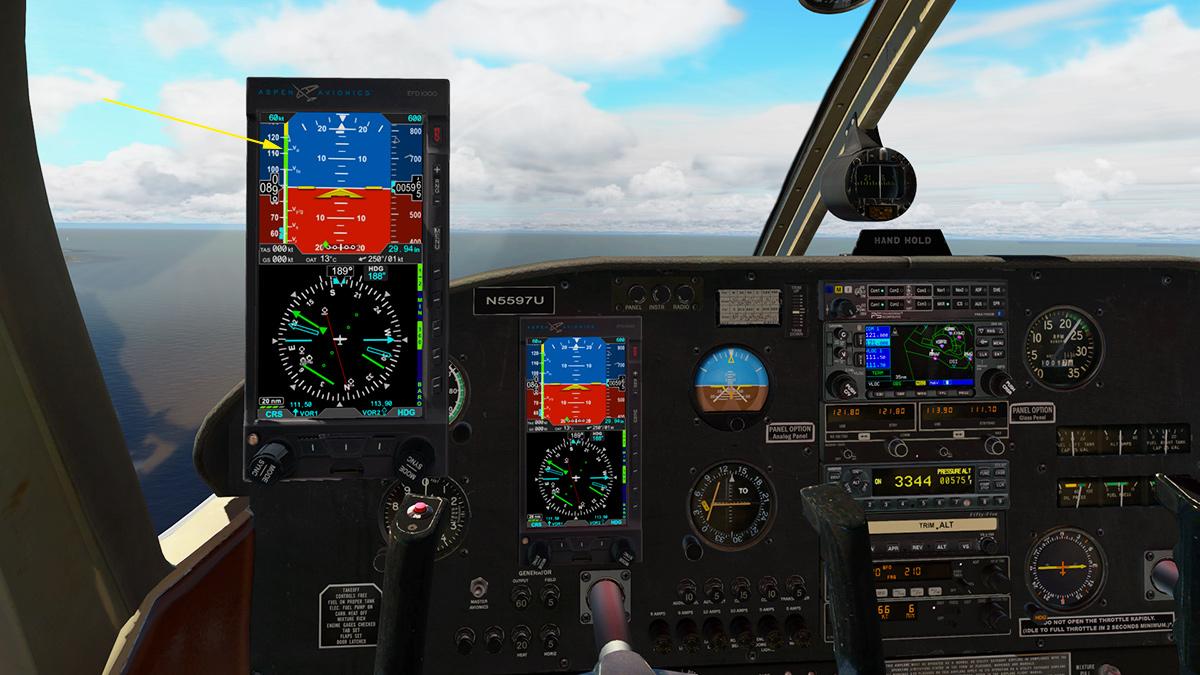
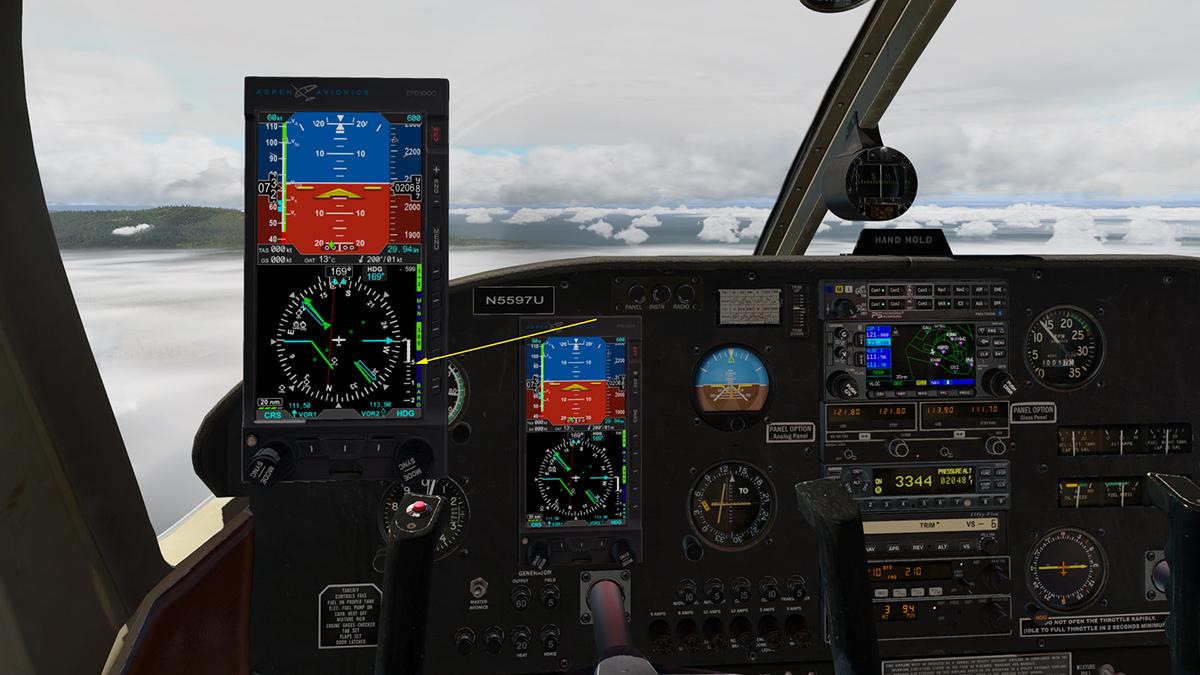
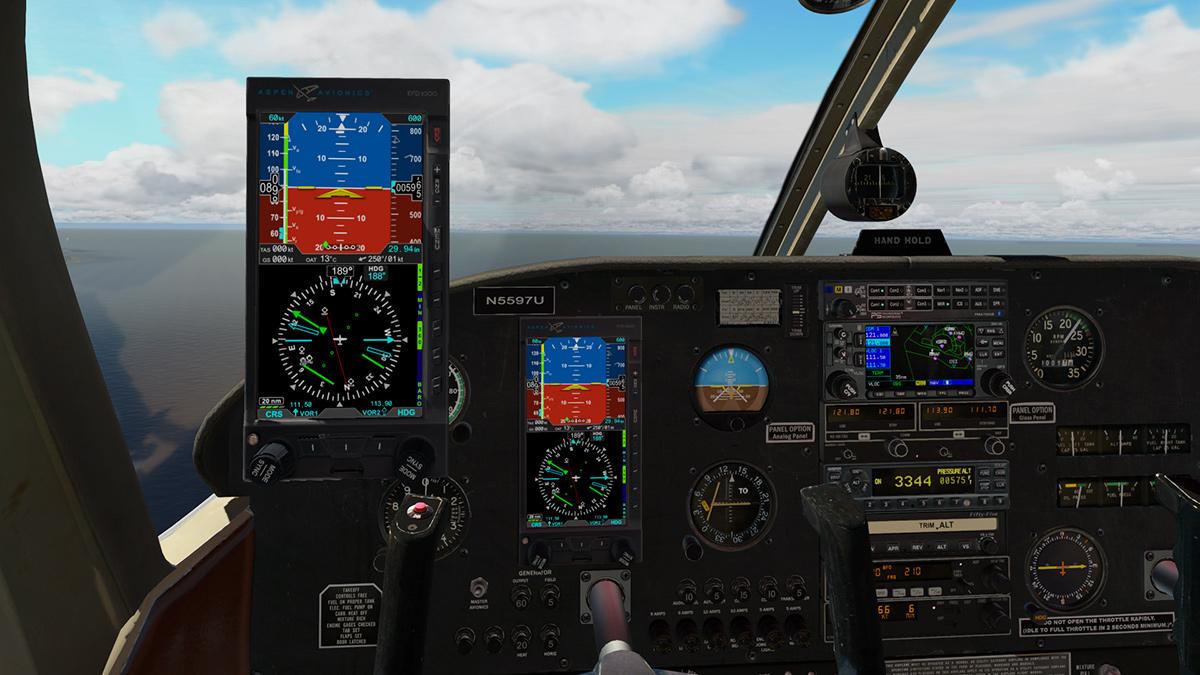
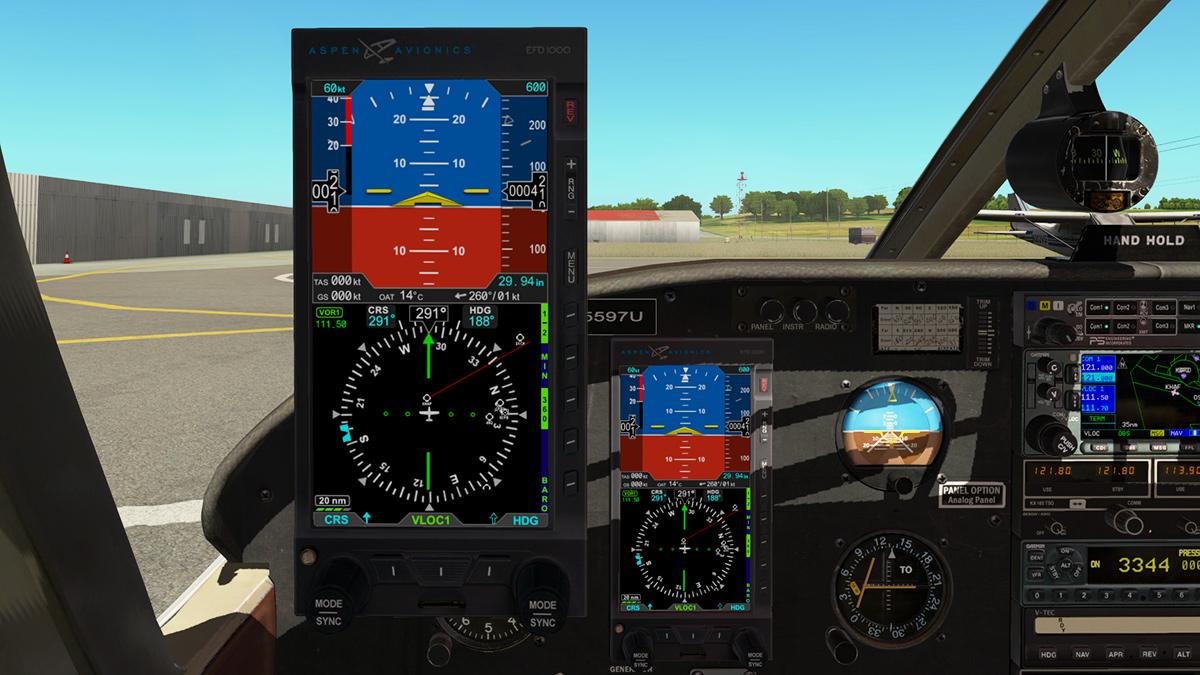
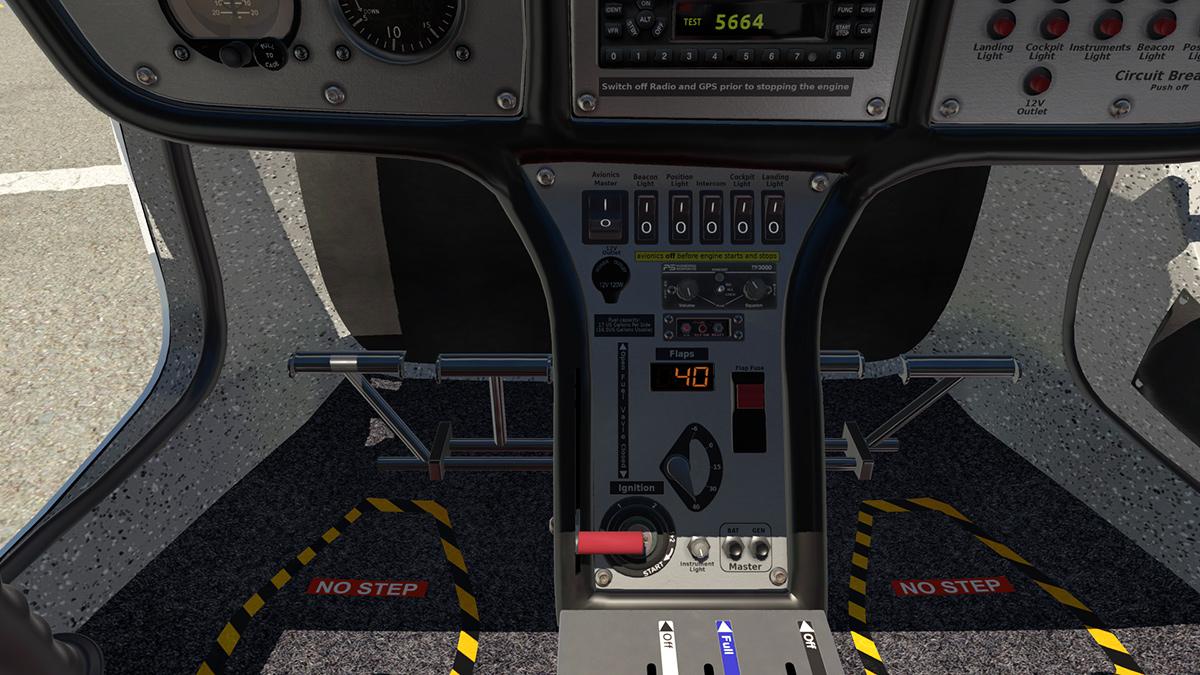
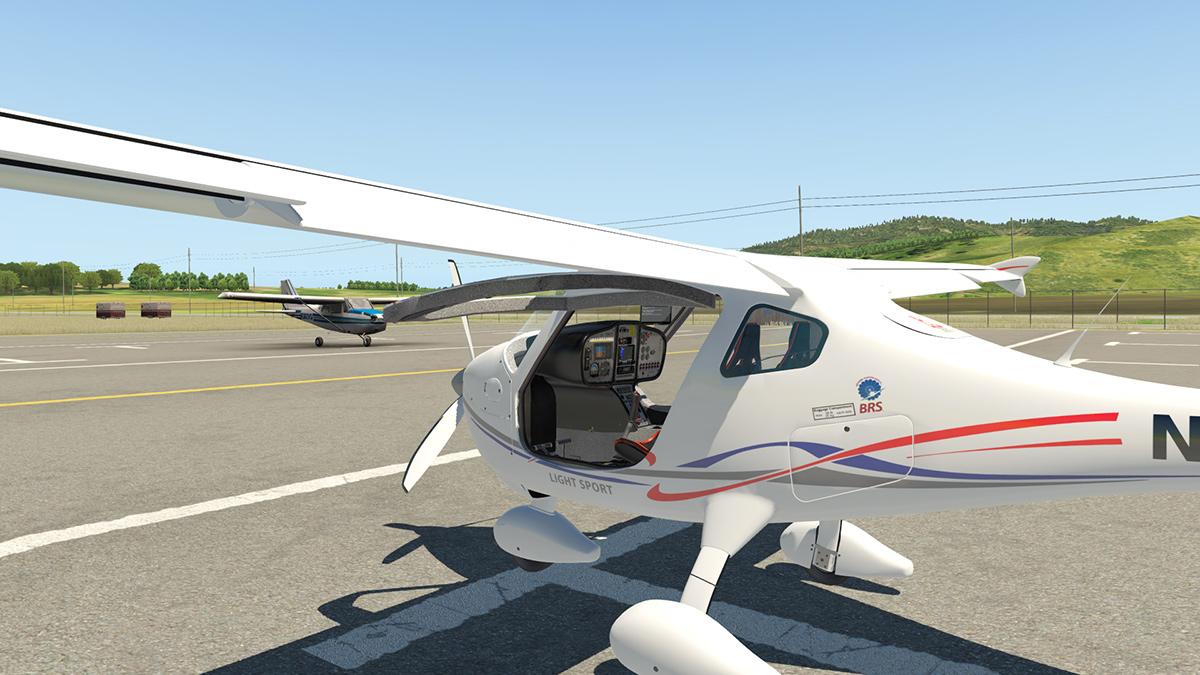
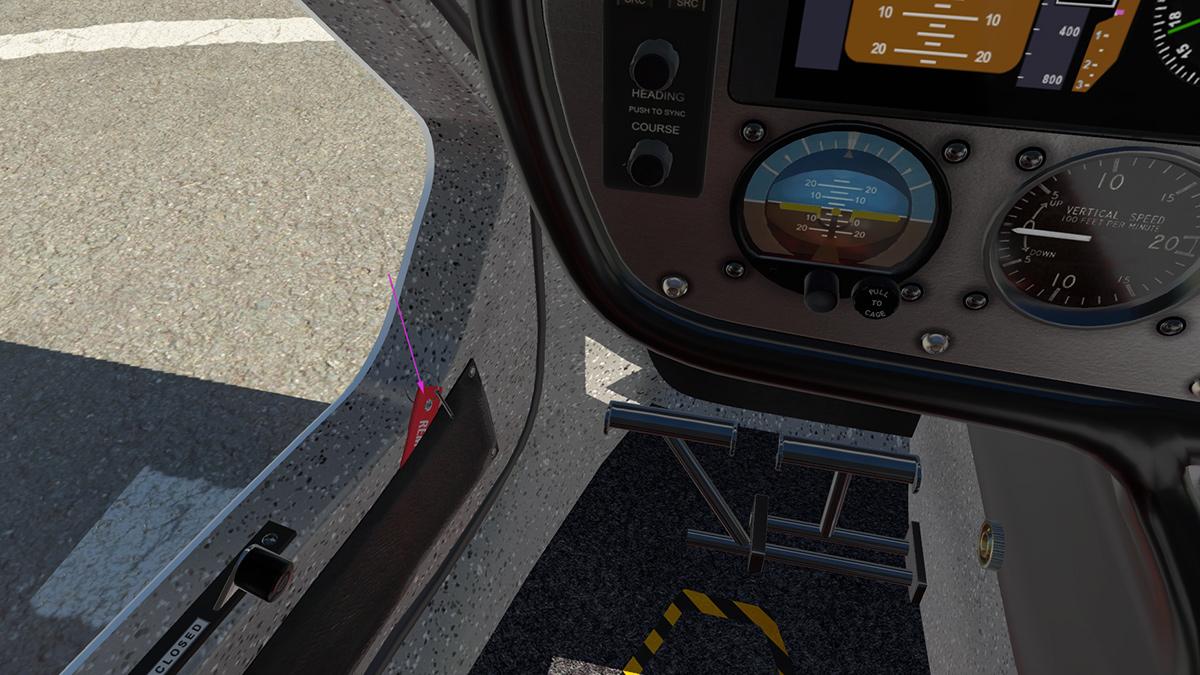
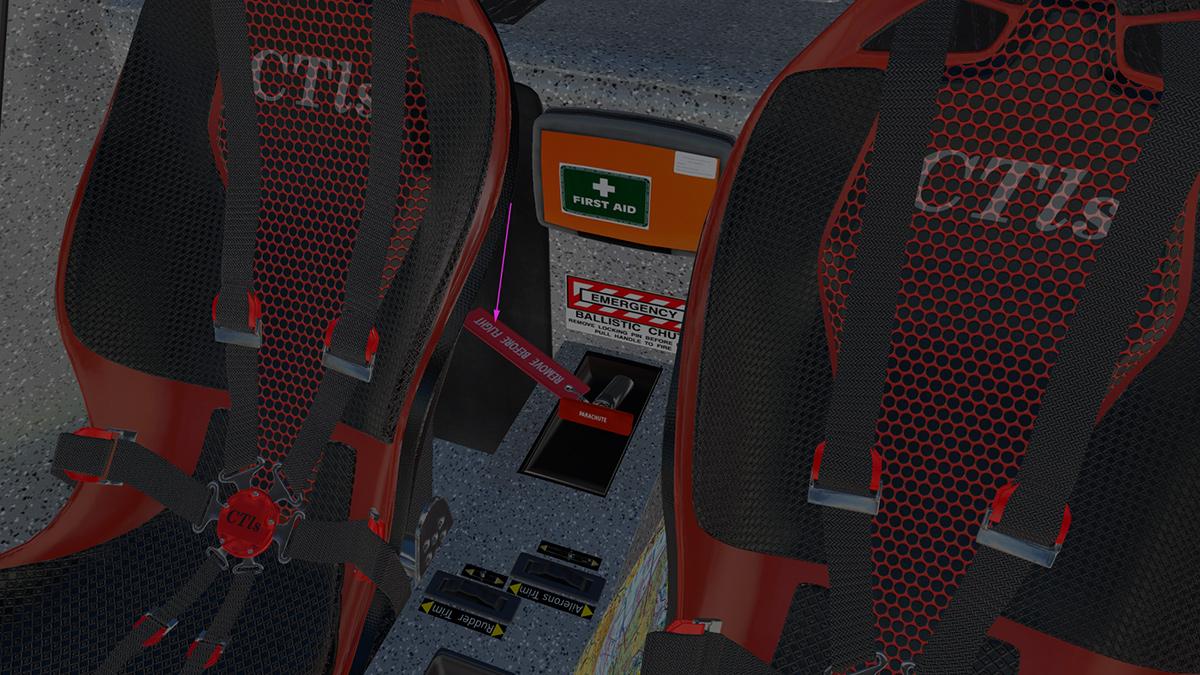
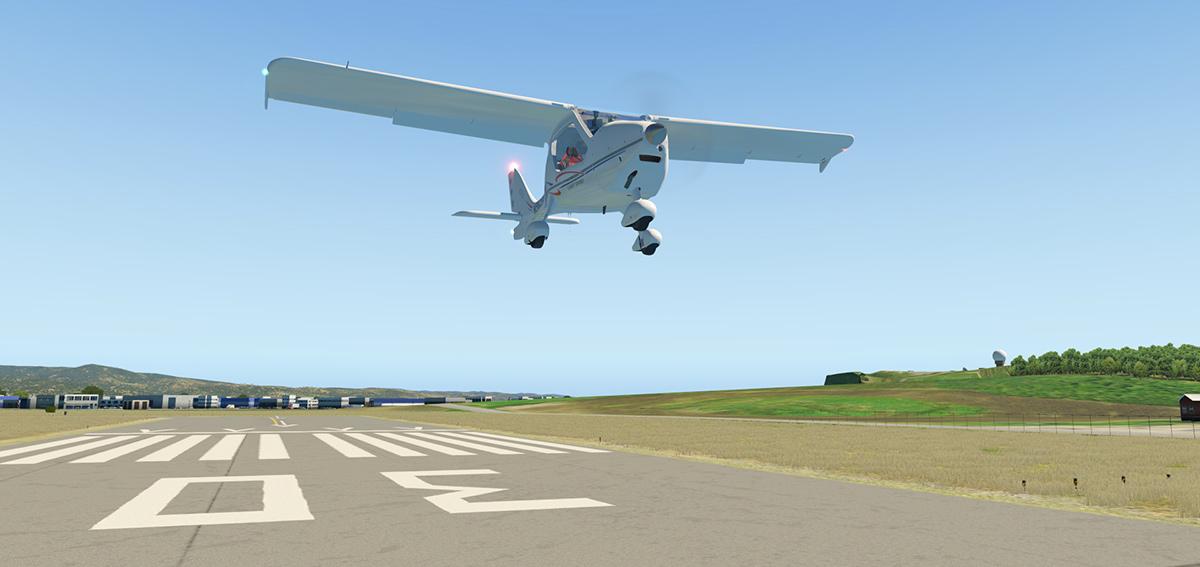
Helicopter Review : Bell UH-1 Iroquois "Huey" by Nimbus Simulations It may be just a simple coincidence that tonight I am going to see another version of Francis Ford Coppola’s "Final Cut" edition of the 1980 seminal film "Apocalypse Now" on the big screen with full dolby surround-sound. A film about the excess of film making, but also about the excesses of the Vietnam War (Ken Burn's "Vietnam War" documentary series is highly recommended viewing). The main star is not the brooding Marlon Brando in semi-darkness, but a machine that signifies the war itself, a helicopter and the Bell UH-1 Iroquois nicknamed the "Huey" and no film shows the magnificence of the Huey in full flight than does Apocalypse Now and certainly in dolby surround sound. I can still hear and remember the "whop", "whop", "whop" start of the film with The Door's "this is the end" transfixing you to screen and created the feeling of the era... if you were there in the 1980's then that is the moment. Of course many of you have far different memories, and of the war itself... and those sounds and feelings are of course are in a totally different context, but the"Huey" will still count as a seriously significant part, to a few veterans here in our own X-Plane world the recreation of the UH-1 is far more than just another aircraft to fly in our collection, it is their life and soul as well... the point is as a simulator you can't just recreate an aircraft, as the "Huey" is much more than in that all it's many contexts. The UH-1 is a utility military helicopter powered by a single Lycoming T53-L-11 turboshaft engine, 1,100 shp (820 kW), with two-blade main and tail rotors. It was the first member of the highly prolific Huey family, it was developed by Bell Helicopter to meet a United States Army's 1952 requirement for a medical evacuation and utility helicopter, and first flew in 1956. As a note the three prototypes were built and equipped with the Lycoming XT-53-L-1 engine of 700 shp (520 kW) and the Bell 204 and 205 are Iroquois versions were developed for the civil market. While earlier "short-body" 204 Hueys were a success, the US Army wanted a larger version that could carry more troops. Bell's solution was to stretch the HU-1B fuselage by 41 in (104 cm) and use the extra space to fit in four seats next to the transmission, facing out. Seating capacity increased to 15, including crew. The enlarged cabin could also accommodate six stretchers and a medic, two more than the earlier models. In place of the earlier model's sliding side doors with a single window, larger doors were fitted which had two windows, plus a small hinged panel with an optional window, providing enhanced access to the cabin. The doors and hinged panels were also quickly removable, allowing the Huey to be flown in a "doors off" configuration. The Model 205 prototype flew on 16 August 1961, and seven pre-production/prototype aircraft was delivered for testing at Edwards Airforce Base starting in March 1961. The 205 was initially equipped with a 44-foot (13.4 m) main rotor and a Lycoming T53-L-9 engine with 1,100 shp (820 kW). The rotor was lengthened to 48 feet (14.6 m) with a chord of 21 in (53 cm). The tail-boom was also lengthened, in order to accommodate the longer rotor blades. Altogether, the modifications resulted in a gross weight capacity of 9,500 lb (4,309 kg). The Army ordered production of the 205 in 1963, produced with a T53-L-11 engine for its multi-fuel capability. The prototypes were designated as YUH-1D and the production aircraft was designated as the UH-1D. UH-1H is the most-produced Huey version, and is the representative of all the various types. This aircraft was the improved UH-1D with the uprated Lycoming T53-L-13 engine of 1,400 shp (1,000 kW) and overall 5435 UH1H's were built. This is not of course the only Bell "Huey" family aircraft in X-Plane as there is also the X-Trident Bell 412 twin-engined version, but this Nimbus version is the first of the original iconic twin-blade aircraft. Iroquois UH-1 "Huey" First impressions are of the iconic stubby nose and long tail configuration of the aircraft. In an odd context the original far shorter bodied 204 version looks really quite odd, were as the longer fuselage 205 aircraft looks almost perfect in proportion. The one thing that keeps coming back to you with this aircraft and most likely it's reason for it's outstanding success is really just the machine's overall simplicity. Many of the ideas built in here into the aircraft are so simple but highly effective in operation... Like with just the basic reinforced roof and floor created a wide open space for an effective aerial platform, the engine is on top and out of the way, with only the complex transmission intruding into the cabin. The number one focus on any reproduction of a helicopter is in the elements of the rotor designs. How helicopters fly is mostly by small movements at joint positions that you can't really see. So to have that perfect replicated animation of the workings of a rotor design in going to show you more than just a load of pretty good 3d design element work, and so it is just not enough in detail that the basic 3d work matches the aircraft perfectly, it also has to move like the real linkage system as well. The heart of the system is the lower swashplate that surrounds the mast that holds the main assembly, there are actually two swashplates in a solid one to hold the control levers and the flexible one that moves the control rods connected to the control horn of which is then connected to the blades. On the main rotor it is the pitch and on the tail rotor it is the yaw. It is fascinating to watch the moments control rod movements as you move the controls, the pitch by a lot of movement to the minimum of the roll. Of course there is the secondary movement of the collective that angles the blades to the air (you could call it bite) in more angle then the more bite of the air for lift... ... to see all these elements working so well together on the main and tail rotor defines how well designed, developed and animated are these components by Nimbus. Modeling is also exceptional, as the Nimbus Huey has been two years in development and the work shows... paneling and rivet work is exceptional and it all comes with very highly crafted normals (NML's are the raised or sunken elements of the modeling, i.e. rivets)... .... the UH-1 shines were it should, and is semi-matt were it should be, and put the right lighting on the aircraft and it looks simply excellent. Nice details of vents, lovely steel exhaust outlet and that excellent mesh detail exposing the inner Lycoming T53 turboshaft engine. One area of detail that does stand out is the exceptional rubber, plastic and other items like cables as we shall see, note the mast joint rubber boots. Glass is overall very good with excellent reflections and shape and they do a great service in seeing the fuselage framework and internal details, but the only area that I wasn't at all particularly taken with was the green overhead cockpit panels... ... for one I feel they are simply too light and don't look very authentic, secondly is that they are not actually green inside either, but clear? You can't have a shade colour set on one side and it be totally clear on the other, it just does not feel or look right... Menu There are six menu tabs lower screen left, they consist of: Checklist, Maintenance, Controls Position, CoPilot, Weight & Balance and Doors & Accessories All pop-up panels are 2d and can be moved around the screen, they cannot however be scaled, and as a few are quite large they can be a bit of a viewing hindrance. The six tabs can't be hidden either, so they will always show up on your screen, which is something I don't like even if they are this small. Checklist: The checklist is small at around one and a half pages, but effective. Maintenance: You can keep your chopper in flying order by watching and either filling up or repairing areas of the machine that are noted with condition and fluid levels. You can turn off the servicing via checking the "Always Like New" checkbox. CoPilot : The Huey has no autopilot, so Nimbus has provided a fake one by using the flying skills of the CoPilot, we will look closer at this feature when we fly the aircraft. Controls Position: There is a small box bottom right of your screen (arrowed) that shows you your position of the cyclic (joystick), collective and pedals. This is a great learning tool to fly the aircraft and some of the settings are spot on for certain manoeuvres like taking off, hovering and landing, and I personally think a learning tutorial with these settings shown would be invaluable to the vertical flight newcomer. Doors & Accessories: I will cover the Doors and Accessories before the W&M. There are two choices with the doors, and first you can open them via the menu with the pink "open" tags, or directly with the door handles. When selecting the actual door or panel and it will disappear, a great and simple system. Wire cutters top and bottom can also be selected... ... and so can dthe oor mounted guns, and the guns are mounted in a way you can fly with the doors shut, which a lot of developers don't do.... the guns work as well! Weight & Balance: The Weight & Balance sheet is excellent. It covers Pilots & Passenger weights, Fuel weight, Cargo weights in Kilograms (kg) or Pounds (lbs), Total weight and Autonomy (flying time at set full weight). All Pilots and passengers can be selected or hidden and their weight either added in or removed from the aircraft's total weight. All crew can be shown internally or just externally as well... ... if you have the pilot flying in view internally then he can be seen in your vision? But you can hide him and keep the rest of the crew if you want, so it all works very well, but be aware you lose the pilot weight from the total, but you could always balance that with say the cargo weight. Finally there is the all important CofG (Centre of Gravity) limits, which are noted on a scale with flying limits marked, and again it is surprising how many developers don't show this vital tool. Both pilot's heads are animated, but a few crew members do have the odd green arms? Internal Cabin and Cockpit As noted the Huey is a basic flying machine, as there is no first class frippery in here. With rubber mats on the floor, metal piping and canvas for seating, this is basic cattle class flying. The detailing in here would even make Hawkeye Pierce cry. It is a worn, battle scarred and a mission heavy conceptualised scene and it is all surrounded by that so familiar diamond soundproofing padding material. I personally love the realistic worn floor detail. Into that very familiar Huey cockpit, and yes it all looks glorious... ... but there are a few glitches that are very quickly and highly noticed? There are to blue sky areas on the front door panel that can be seen from some angles, and the collective has space under the base when at full up position? But just look at those armoured seats! as they are totally brilliant in detail, materials, shape, wear and tear... a real highlight. Rudder pedals are of course basic, but it is overall very well done in detail, ditto the windscreen wiper motor housing and protecting covers Instrument Panel The instrument panel facias come in two versions, with the steel exposed face or the black... I would automatically assumed that the black would have been the default version and it does look the better of the two versions. But the original plain facia would probably really be more authentic when you think about it, I know the Marine version used the black, so the debate will be which is the original? The different facias are set via the different liveries, so if you want to customise your Huey you can change the panel.png file in there. Like everything else on the UH-1 these Viet War machines are incredibly basic in their instrumentation layout. We have to look at the right side panel as the main pilot position as it is on all helicopters.... a huge ball Artificial Horizon dominates the panel, with a heading horizontal instrument with built in VOR1 pointer. Far bottom is a CDI (Course Deviation Indicator). left top is the Airspeed Indicator and bottom is the Turn & Slip Indicator. Right top is the Altimeter, Vertical Speed Indicator and bottom a clock. In a nice touch the magnetic compass is tagged on to the right of the main instrument panel. Left pilot position has only the basic five flying instruments... Airspeed, (small) Artificial Horizon, Altimeter, Vertical Speed Indicator and the same heading horizontal instrument with built in VOR1 pointer. Centre panel right has the single engine dials (top to bottom) RPM, Torque, GPT (Gas Producer Tach), EGT (Exhaust Gas Temp). Six centre left dials cover Fuel Pressure, Fuel Quantity, Oil Pressure, Oil Temp, Transmission Oil Pressure and Transmission Oil Temp. Four dials lower left cover the electrics with... Main Gen (Generator), Standby Gen, Volts - DC and Volts AC. Compass can be switched from DG or Mag and you can test the Fuel Gauge to make sure it is working correctly... There are also a row of warning lights top panel with (LtoR): Master Caution, RPM Warning, and Fire Warning. Pedestal The pedestal is really just a large box set out on the floor with all the instruments set out on the top surface... ... and pedestal detailing is excellent and highly authentic. You really have to love the click, click switchgear in here, it is excellent. From top left you have a AN/APX-72 Transponder, AN/ARN-72 VHF NAV with the AN/ARC-134 VHF COMM Radios both below. Miscellaneous Control panel right with an excellent Caution Lights panel below... There is the noted Engine Control panel, but it is also the main fuel panel right middle. Continuing down the left rear pedestal you have a AN/ARC-51BX UHF Radio, C-1611AIC Signal Distribution panel and bottom the Armament panel. Right rear pedestal is AN/ARC-131 FM Radio and a AN/ARC-83 ADF Radio. Obviously if you want to find your way around these military panels you are going to have to study and use them, they are complicated, but the click setting knobs and dials are very authentic and realism 101. You can use and test the Caution Lights panel in "Bright" or "Dim" modes, again it looks excellent. Both the collective and the cyclic stick are well done, but not very interactive, the important "Force Trim" switch does not work and you can't hide the cyclics either? Overhead Panel The simplicity of use is overwhelming on the Overhead Panel (OHP). Those amazing square lighting knobs are excellent to feel and use in the dark... Panel layout is again quite simple, left top is the rear dome lighting, with Pitot Heating, External Lighting, Wipers, Cabin Heating, and NVG Position lights brightness (I couldn't see these working?). Right OHP are those six Instrument lighting knobs, AC Power panel and DC Power panel. The rest of the OHP is the rows of circuit (non-working) breakers. There is an external Temperature gauge Cº on the top of the windscreen. There is the choice of either or both pilots to use their wipers, but the wipers sadly only work together which is a missed feature, in saying that I still love the selector switch. Lighting Turn up the panel and instrument lighting and you get this lovely green glow from the instruments... again it is more effective on the darker panel. At night the differences in the panel tone can make a difference to your tastes, again the darker is better. In the cabin you have a choice between normal or green lighting. The bulbs don't look very bright, but the effect is very good. Externally the interior lighting looks absolutely excellent... Above you in the cockpit are two movable spot lights, and note the excellent coiled power cable, they are both animated for total shake realism as well.... ... but the spot lighting idea is not fully formed. One you can only have both lit, and not individually, and two they are hard to adjust to the place you want the Illumination to show... there is no light effect in the actual light either but just the dark lamps, and like with the cabin lighting when on the actual lamp brightness needs to be better or even there at all. Navigation lights (position) can be set in STEADY or FLASH, BRIGHT or DIM, there is a nice beacon and a landing light under the nose (a full added on external light would have been nicer) and a white tail navigation light, again the lighting is already very good, but you feel it still needs some refining. Flying the Huey First a few notes is that Nimbus recommend you set your "Flight Models per Frame" (Menu/General) to four (4) and the experimental flight model to "off". Another point you have to have control of the aircraft's "Throttle" on the collective. I have a twin throttle system and so the throttle setting just slipped right in for adjustment, if not you will need control of the throttle slider in the joystick or Key settings? X-Trident used just a manipulator adjustment on the Bell 512 and that work very well and I think the same idea should be added into this version, but if you can use the actual throttle lever, then it gives you more control in flight... a mouse scroll wheel can be used as well. One of the first things that confront you when the Huey is running is that the aircraft shakes like "Bloody Hell", mine was worse because my SimCoder "Headshake" plugin was activated... you can sort of adjust the headshake to match, but for now I would turn it off. It is also debatable if the shake is just too much at idle, yes you only have an unbalanced single twin-blade rotor above you, but it just feels like there is a bit too much movement... One thing that totally grabs you at idle is the "chhhhe", '''chhhhe", "chopp", "chop" that moves into the familiar whop", "whop", "whop" as you increase the RPM. Sounds are taken from a real UH-1 and they sound excellent and are simply highly realistic. You have to add in Wagners' "Ride of the Valkyries" yourself as it will have to added in from another aural source, LOUD of course, very LOUD.... Notice the RPM goes up as you increase the throttle on the collective, if you are game, you can also increase the "governor" switch on the top section of the collective that is now very realistic in operation. Laminar now gives developers more control over governors since the v11.30 update, as before it was most done automatically... now you can adjust it yourself, but like I said only with care and try to not to overload the transmission. Particle effects will now swirl up the dust and power out of the exhaust, and it all works extremely well here, and takeoff on any dusty area and it is very and highly realistic... I am not going to hide the fact that helicopters are hard to fly, because they really are... more so here with the UH-1 as the helio pilot's want them as close to the realistic realm as possible. So that makes them very unforgiving, very touchy in movements and the single twin-blade arrangement makes them also a little more unstable. But practise and master the "Chopper" and the rewards are extremely high... I am pretty good after a lot of right seat flying, but still not a total master of the realm. And so the control position monitor is a great way to check your flying situation, but overwhelmingly chopper flying is totally about feel, and one thing I have learnt is that fine, fine control movements between the cylcic and collective are the secrets to helicopter flying, don't take any notice of the crap you see in the movies or the "wow" dramatic manoeuvres that they show, chopper flying is all about being slow and promoting smooth flying... The one thing you realise is that the UH-1 acts slightly differently is several areas, so you have to be aware of it's performance and boundaries, it is after all a utility machine, and so it is very basic and quite brutal in areas of it's flight envelope, you find them and have to master them to be aware of the limitations, but get it right and the aircraft is actually very nice to fly. One nasty one is if you pass or get near the red line speed 125 knts, the whole machine then shakes quite violently and it can easily throw you into the ground... ... so once the shakes start then lower the speed and keep control as quickly as you can (note.. ignore the "Master Caution" warning as the aircraft is in the replay mode). As we have already noted the Huey has no autopilot, so Nimbus has provided a fake one by using the flying skills of the Co-Pilot called "COPILOT". It is found under the CP tab in the menu. To use just press the "Hand Over Control" selection and the aircraft will just then fly on the current settings... press the top box selection to make the aircraft follow the current heading direction, if you want to turn then press the left or right spiral and you can set the bank angle below in degrees.... .... the panel heading works as well if you prefer that as I do and if you want manual control back, then just press the "Take Control" selection. Overall the feature is excellent, but I found the Huey shook violently under the COPILOT control, and after a while it got annoying, going back into your manual control is as bad as you think it will be, but I have mastered that now with other choppers being even worse in the between the auto and manual joystick positions. The M-60D flexible 7.62 millimeter machine guns are excellent in both the high detail and features... they can also be moved to any firing position and can be set to fire via a key command. The guns shake with vibrations for realism and the gunners door visual position is excellent. The most significant part of flying an helicopter is the transition from forward flight to the hover, it is called the "translational lift", and usually it is around 40 ft to 50 ft above the ground. translational lift can be seriously tricky, but with practise you can get the dynamics pretty smooth. The point here is the Huey is pretty dramatic in two areas in this phase of flight. One is that if you get the transition phase wrong the lift goes away pretty dramatically, in other words you simply stall and fall out of the sky... but again you soon learn where those severe limits are, most pilots use the 30/30 approach of 30 degrees at 30 knots, try it as it works. Secondly is that those twin-blades as one will cause the aircraft too tilt harder to the left than usual (direction of the rotating blades), so you are sort of fighting the aircraft more to keep it level, and you use far more yaw to correct it... ... this is not the very light or small helicopter effect, but the style and type of machine you are flying, so a bit of skill is needed here, yes the Pro's make it look all so easy, but fine movements and staying in front of the machine (anticipating what the aircraft will do next) will put you in good steed. The view down is excellent in gauging the distance and movement to the ground, but again keep total absolute control until you are hard on the ground, if not the Huey will quickly snap back at you. It is all in that fine, fine balance between the collective and stick movements that you find the best control conditions. There is no doubt the real guys (including our own X-Plane Brett Sumper) will absolutely love the flying capabilities of this Huey, and as they should as they have spent months refining the perfect dynamics of the aircraft to a high level of realism 101... the point is you have to match the pro's feel and their skills. I am not saying that is an impossible task, but you have to be aware of the skill required here. I just past the test and can fly this Huey fine, but I do find it very challenging to refine to the higher skills required here. So as a pure simulation of flying a Huey, it is certainly one of the very best and the most challenging to date. Liveries There are ten liveries provided and all are good, with a blank white and base green, but overall you would want far more variety than what is really on offer here, as some like the SAR is pretty basic and an Air America, and for myself a "Death From Above" version would have made me smile... but I suppose it will be the painters that will eventually fill in the blanks. Army Green is the default Summary The Bell UH-1 Iroquois "Huey" is of course one of the most iconic aircraft we know, and certainly with it's association to the 60's Vietnam War. So any simulation of such a significant aircraft has to deliver solidly in many areas. Those important points have certainly been delivered here with exceptional modeling and detailing, it is close but overall it is not yet absolutely totally perfect as we shall see, but it is currently certainly a very solid and highly authentic featured and very aural aircraft. Yes the machine has been recreated with loving care and the "NamViets" will be very if even emotionally thankful. The flying dynamics are also first rate, but they need skill and practise to perfect, so dig deep and the rewards are very high. Points to be made are to be also taken in context of being very marginal fine tuning than issues. The green overhead plastic panels need work? they are too lightly coloured, but also only green on one side and clear transparent on the other, a rethink is certainly required here. Lighting need still more refinement in showing better light sources and separated spot lights in the cockpit, ditto the windscreen wipers, and librain rain effects would be a great addition. And there are a few blue sky gaps in the bodywork and space gaps on the collective. The CoPilot and control position monitor are both good, but more in one less heavily shaking and the other in a more detailed flying tutorial in how to get the best out of this feature. In features there is a lot going for the aircraft here, menus are excellent, but you can't hide them or scale the pop-ups... but I love you have a lot of control over the choices of pilots and crew, weights and the basic aircraft setup. Overall it is what is missing that gets you wanting a little more. A medical version would be very nice and an under the nose light would be lovely as well. More armaments in rockets and cannons would help with the jollies, and a sling load would be fun as well... I personally think all these features will certainly come. A last word on the shaking, in that I found it got better (more realistic shakes) the more I used the aircraft and the effects at the 125 knt limit could mask the heavy shaking issue of the autopilot as well, but I think again a little more refinement on the movements could not help. In stating that the movement effects and the excellent aural sounds are extremely brilliant when working together and when flying the machine. So this Nimbus Simulations UH-1 "Huey" is certainly now the definitive classic machine we have craved for in the X-Plane simulator, yes there is a few refining areas, but overall it is a masterpiece of such an iconic aircraft. And in the film "Apocalypse Now" you see this incredible aircraft in all it's glory... yes the film like this aircraft live up both to their historic legends, for the record seeing the film again (on the big screen) is still an overwhelming event, flying battle forward in those Hueys was still as thrilling as was all those 40 years ago, the flying is supremely majestic, and now you can fly here the same extraordinary machine.... "this the end... my beautiful friend, this is the end, my only friend... the end, of our elaborate plans, the end.... "whop", "whop", "whop" _______________________________ The Bell UH-1 Iroquois "Huey" by Nimbus Simulations is NOW available! from the X-Plane.Org Store Nimbus UH-1 Priced at US$37.95 Features: High quality 3D model PBR textures High quality 4K textures VR ready Black and also white panel and interior Usable side mounted guns Nothing beats the sound of a helicopter sound in real live so we are using High quality professionally recorded sounds to give you a realistic experience, every switch and knob, doors, guns, blade slap, engine and rotor sound is there. Vibrations play a big role on helicopters, the Nimbus UH-1 is full of animations and vibrations. Accurate systems simulation, fuel, electric and hydraulic systems are simulated, all the logic of switches, warnings and annunciators is present. Accurate handling and flight characteristics Accurate performance based on performance charts. Realistic night lightning with custom lights and textures. Particle system. 9 liveries including a military green and a white one for repaints. SASL powered Menu Windows for managing maintenance, weight and balance, doors and accessories, joystick position, copilot and checklists. Maintenance module: if you want a more realistic experience you can choose if you want the helicopter to require maintenance with time and usage, depending on how you fly and engine exceedance the mechanical components will degrade and performance will be affected. Copilot: We created a "copilot" module that will allow you to hand over control and forget about flying so you can move to the back, enjoy the view, the sound or even use the side mounted guns. Weight and balance: A graphic interface gives you the chance to modify the cargo, passengers, fuel and CG, handling of the helicopter will change depending on the CG lateral and longitudinal position. Doors and accessories: Guns, no guns, doors opened or closed, wire cutter or not.....customize it as you want. Checklist: Checklist are easily accessible through the menu on the left, This window will also allow you to see some performance charts. Joystick position indicator: A small window on the right bottom corner will show the position of your controls, it seems simple but is a very good way to refine your flight technique. Requirements X-Plane 11.30+ Windows, Mac or Linux 4GB VRAM Minimim - 8GB VRAM Recommended Download Size: 830MB Current version and Review Version 1.0 (Sep 2nd 2019) Installation and documents: Download for the Bell UH-1 Huey is 1.57 Gb and the unzipped file is deposited in the aircraft "Helicopter" X-Plane folder at 1.67 Gb. Different instrument panel colours can be created in the liveries to suit your preference in either the metal or black. Documentation: One manual that is pretty basic for an aircraft like this, the aircraft requires a tutorial as well... Nimbus UH-1 manual ______________________________________________________________________ Aircraft Review by Stephen Dutton 8th September 2019 Copyright©2019 : X-Plane Reviews (Disclaimer. All images and text in this preview are the work and property of X-PlaneReviews, no sharing or copy of the content is allowed without consent from the author as per copyright conditions) Review System Specifications: Computer System: Windows - Intel Core i7 6700K CPU 4.00GHz / 64bit - 16 Gb single 1067 Mhz DDR4 2133 - ASUS GeForce GTX 1080 8Gb - Samsung Evo 1Tb gb SSD Software: - Windows 10 - X-Plane 11.35 (v11.30 is required for this aircraft) Addons: Saitek x56 Rhino Pro system Joystick and Throttle : Sound - Bose Soundlink Mini Plugins: Environment Engine by xEnviro US$69.9 Scenery or Aircraft - KNPA - Naval Air Station Pensacola - X-Plane Global Airport - Free
-
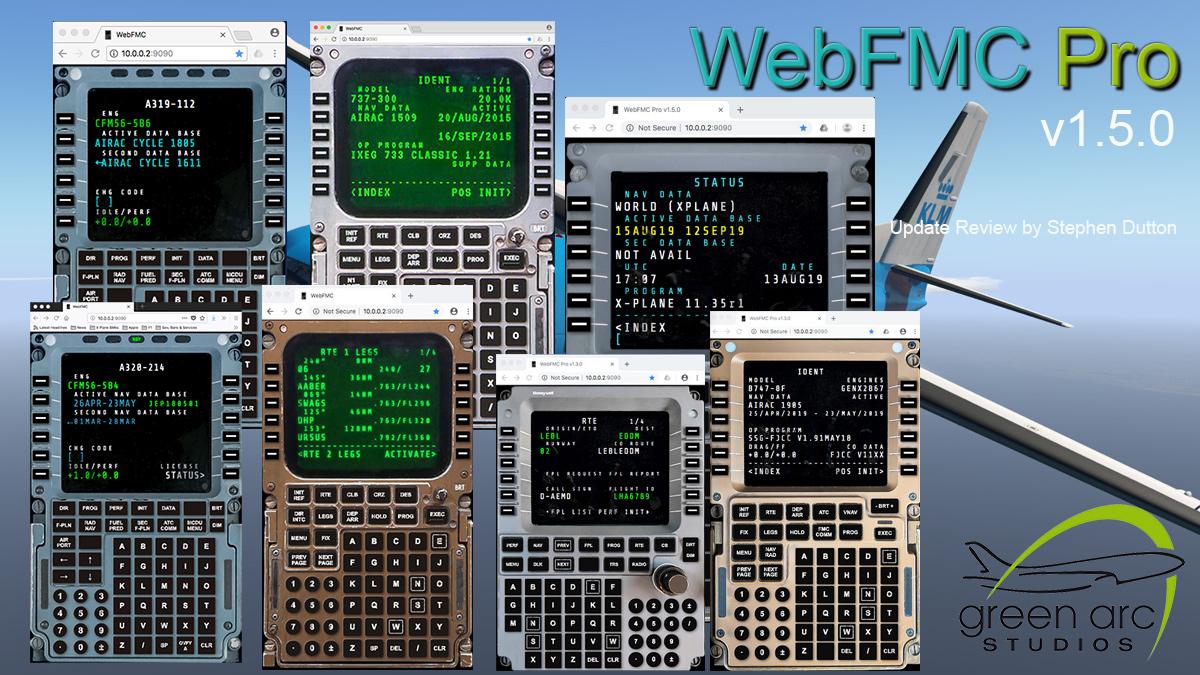
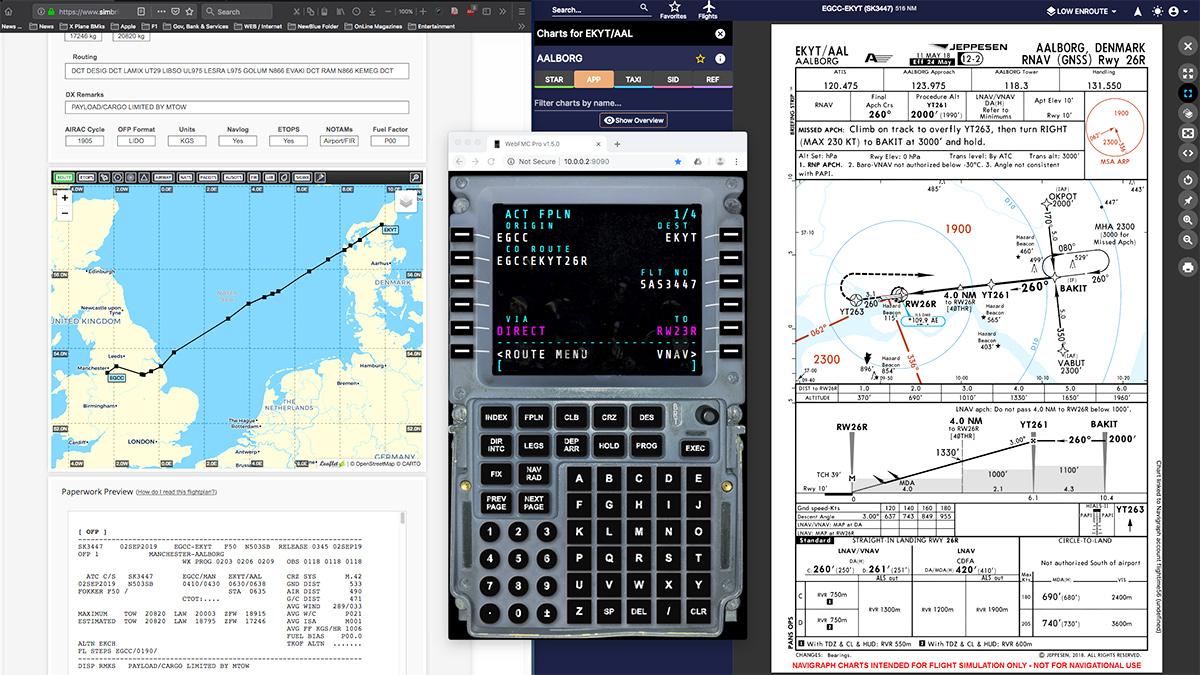
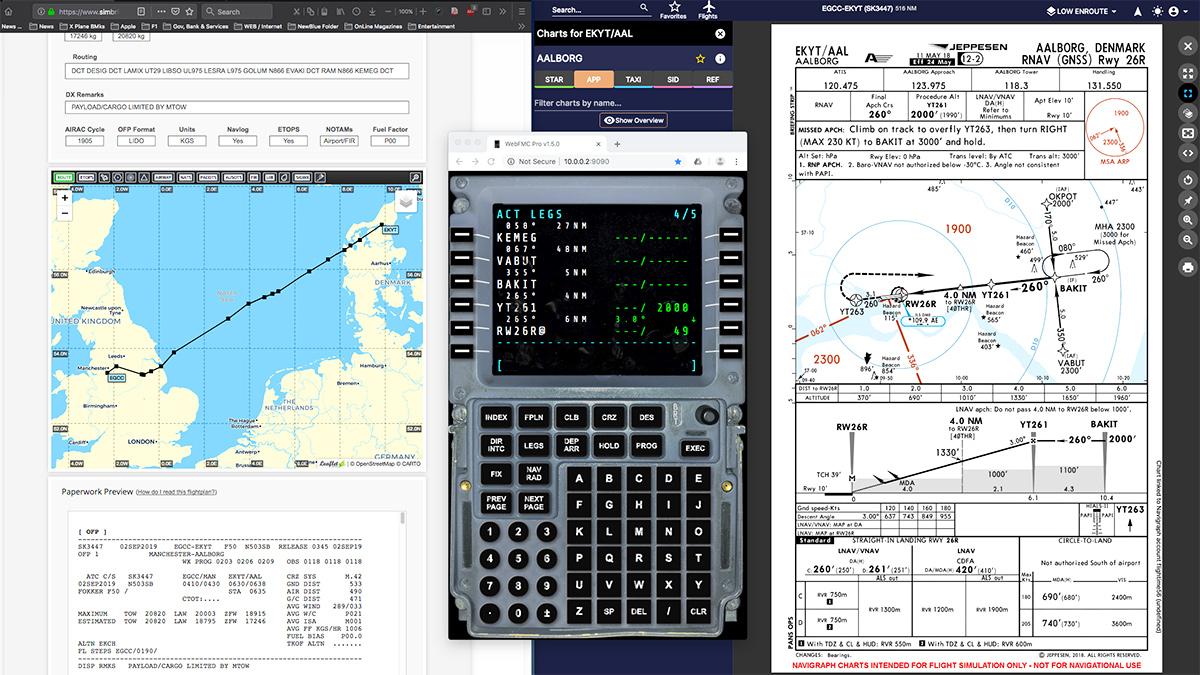
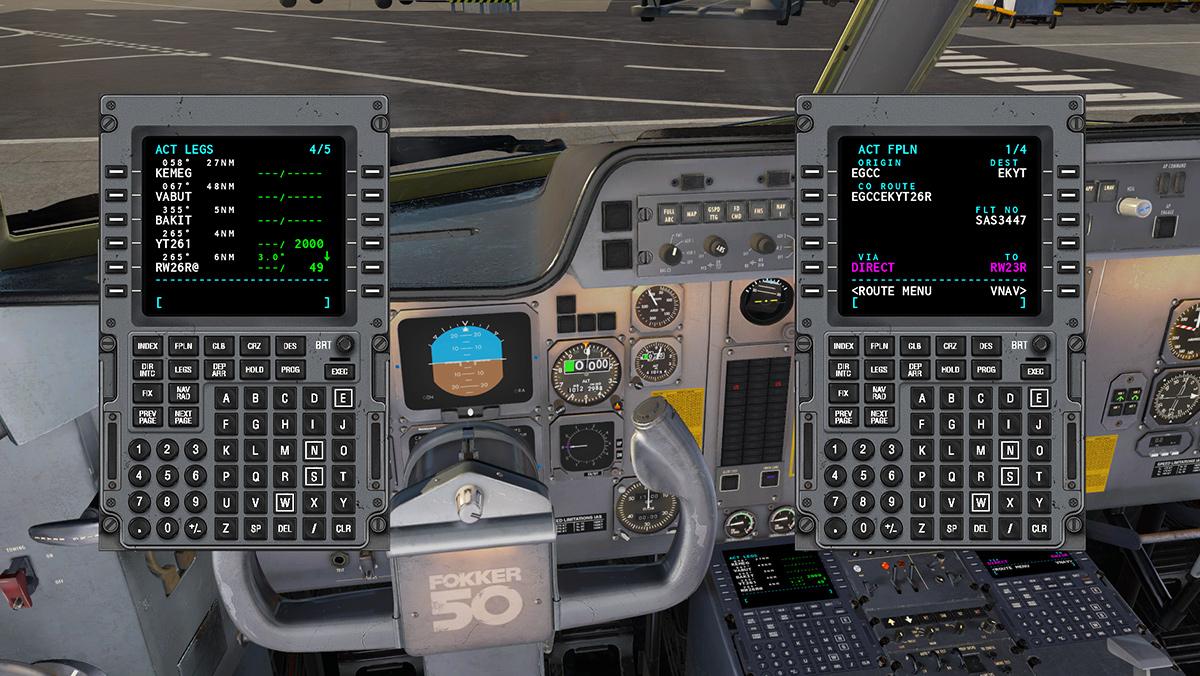
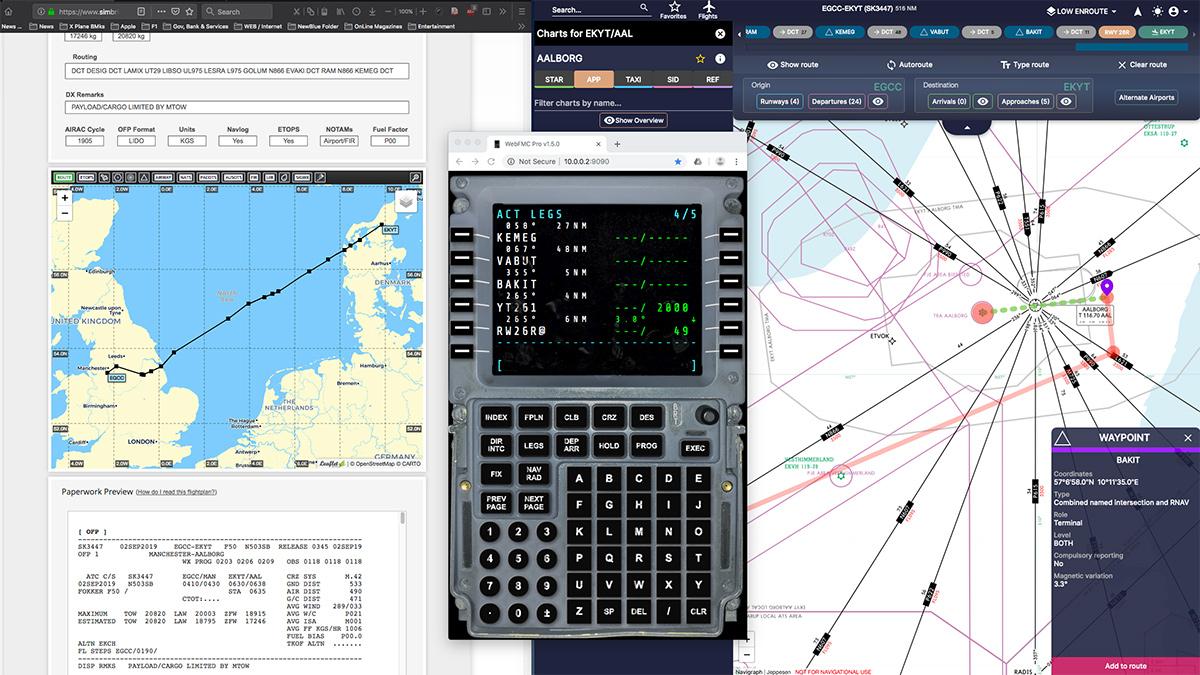
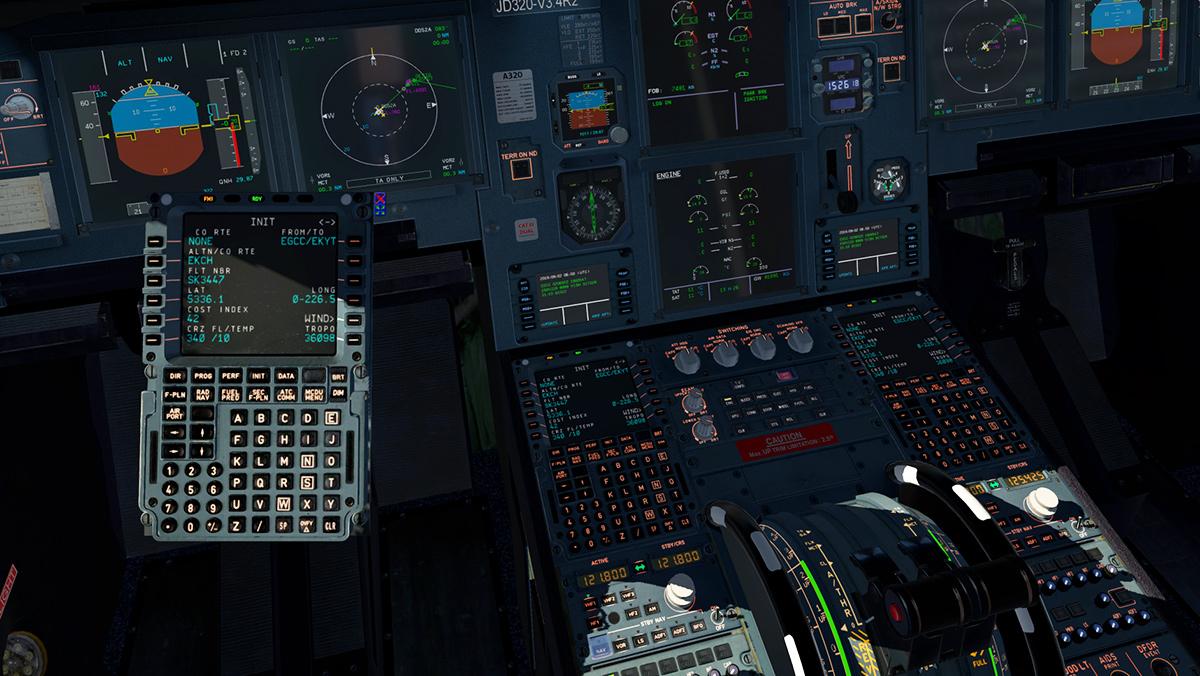
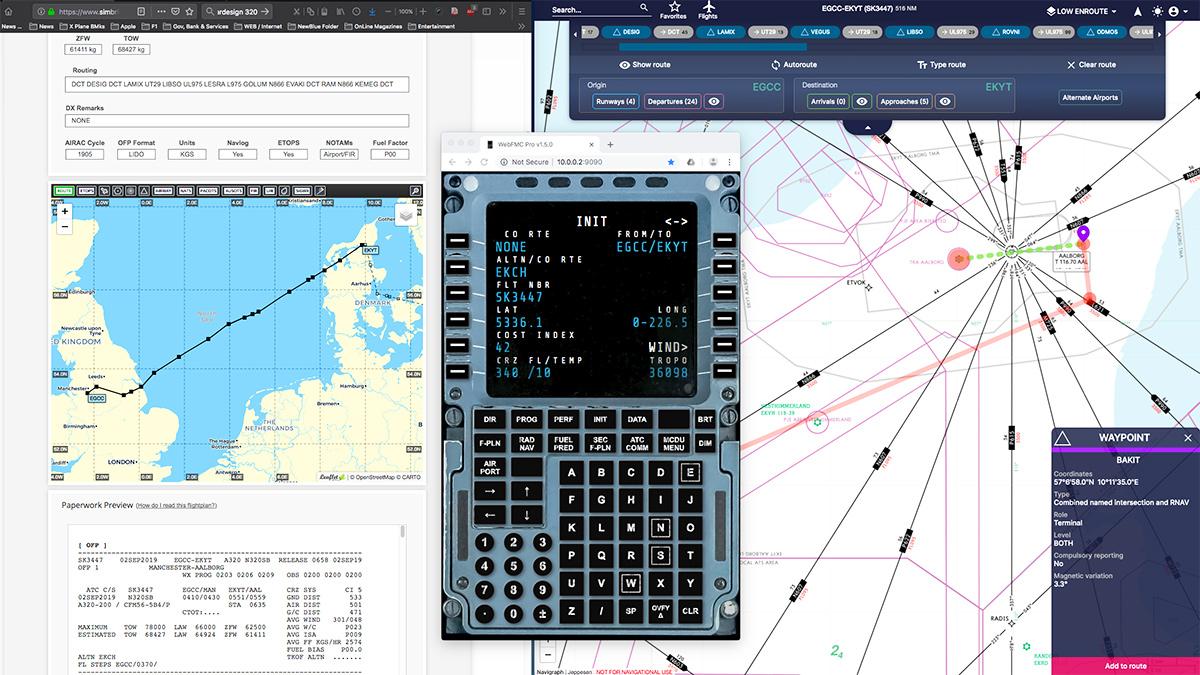
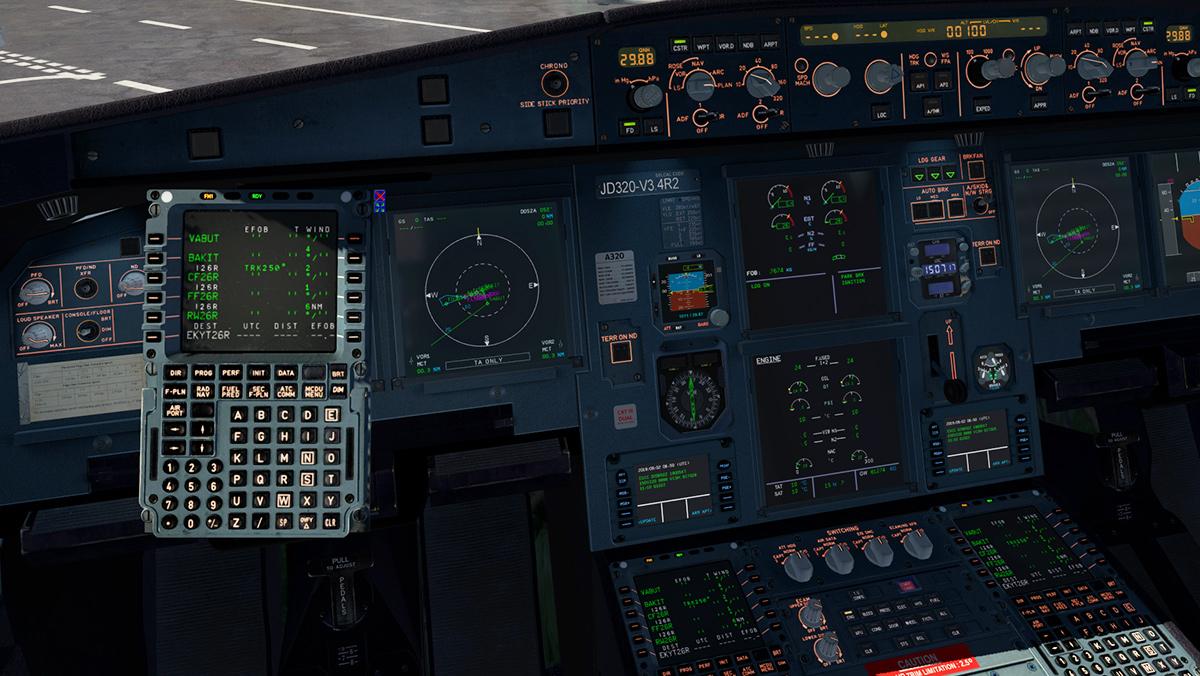
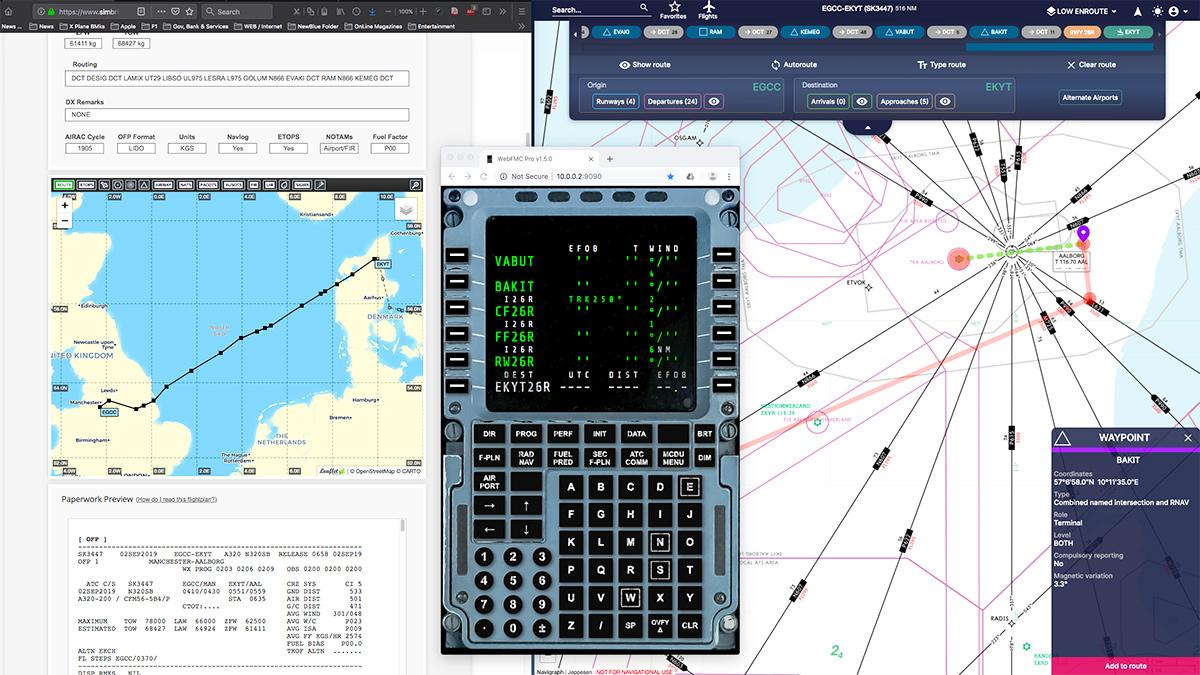
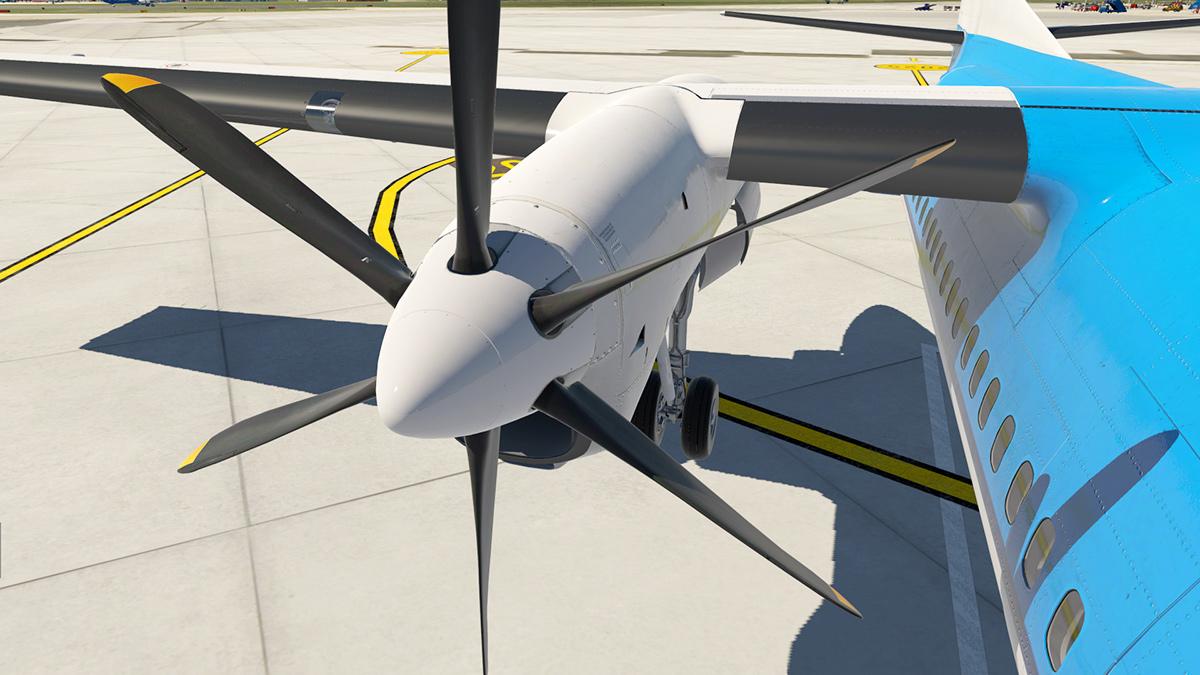
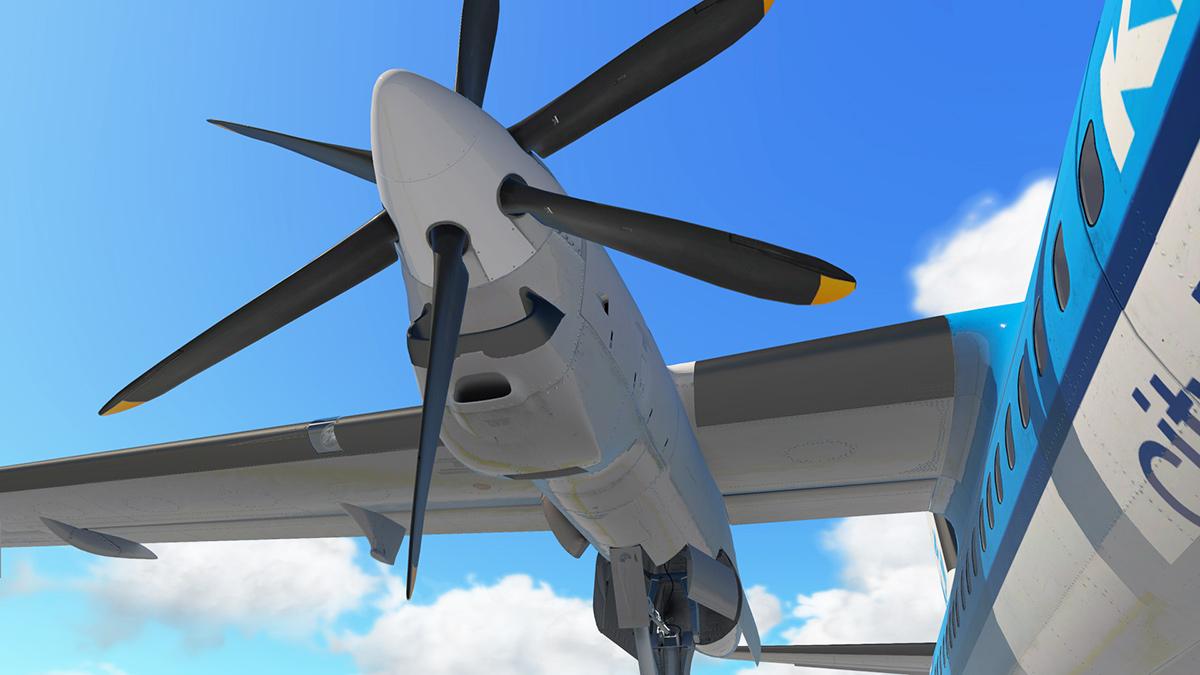
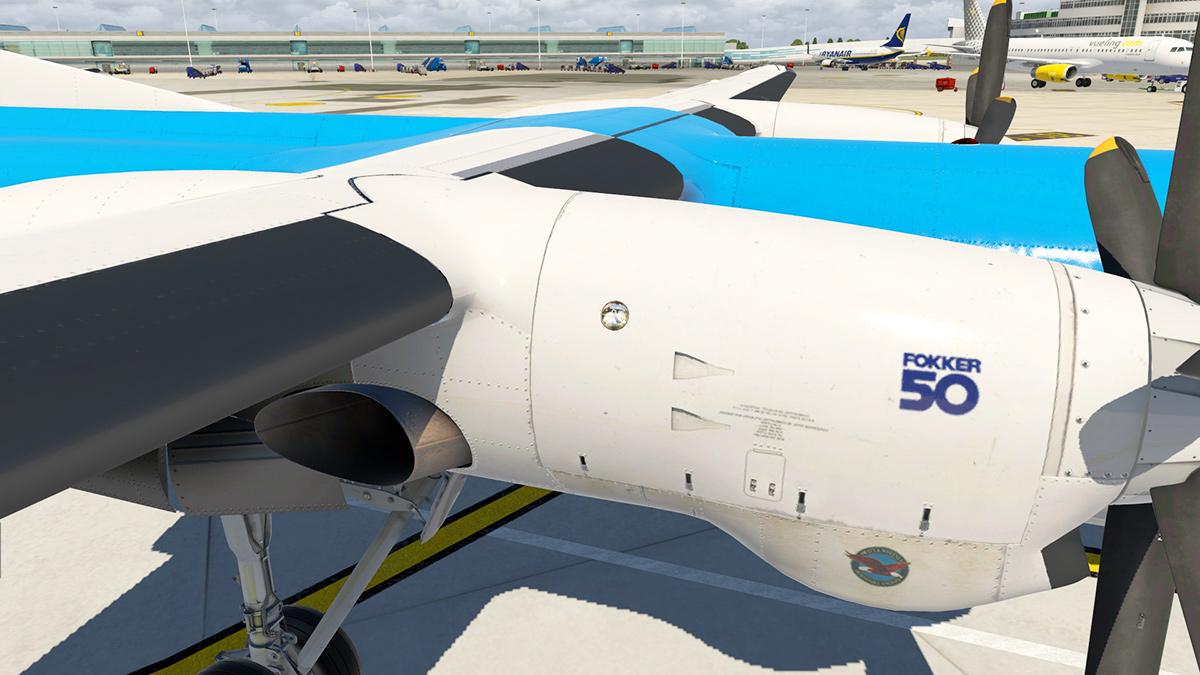
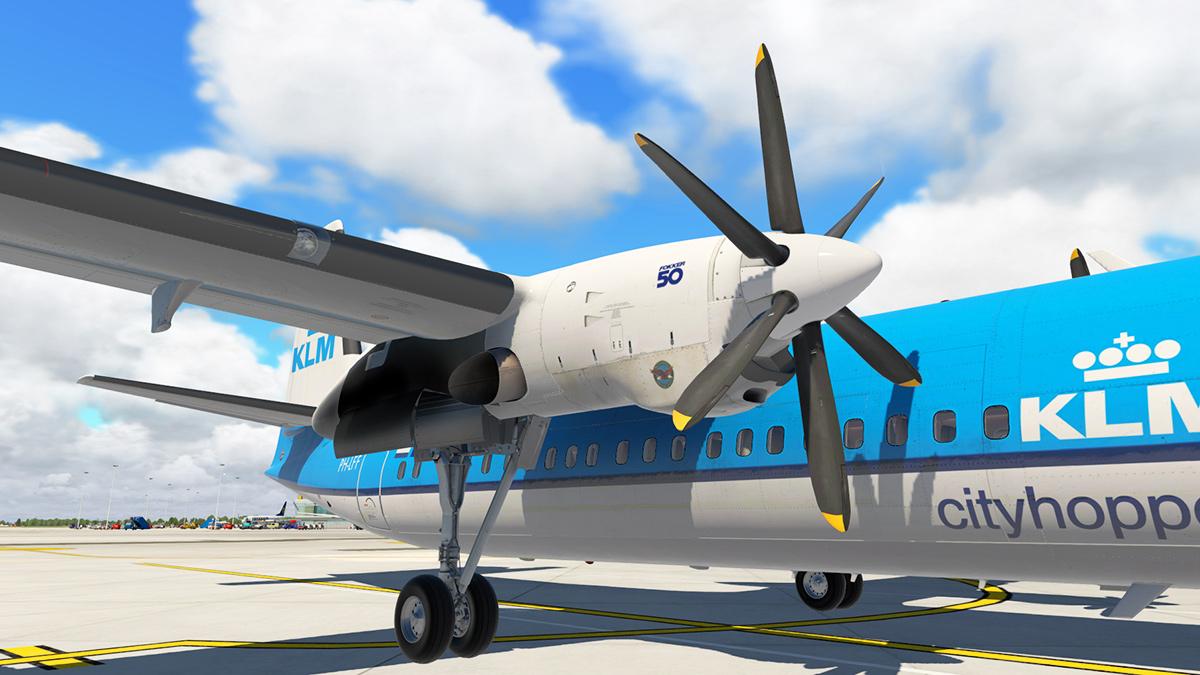
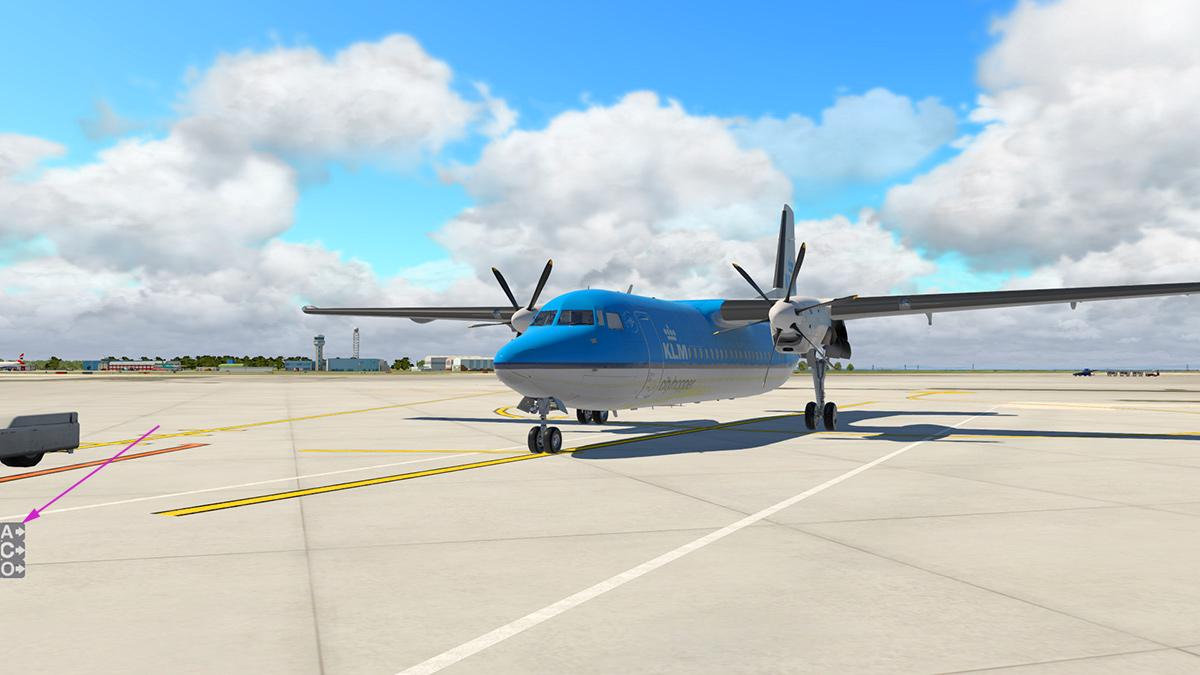
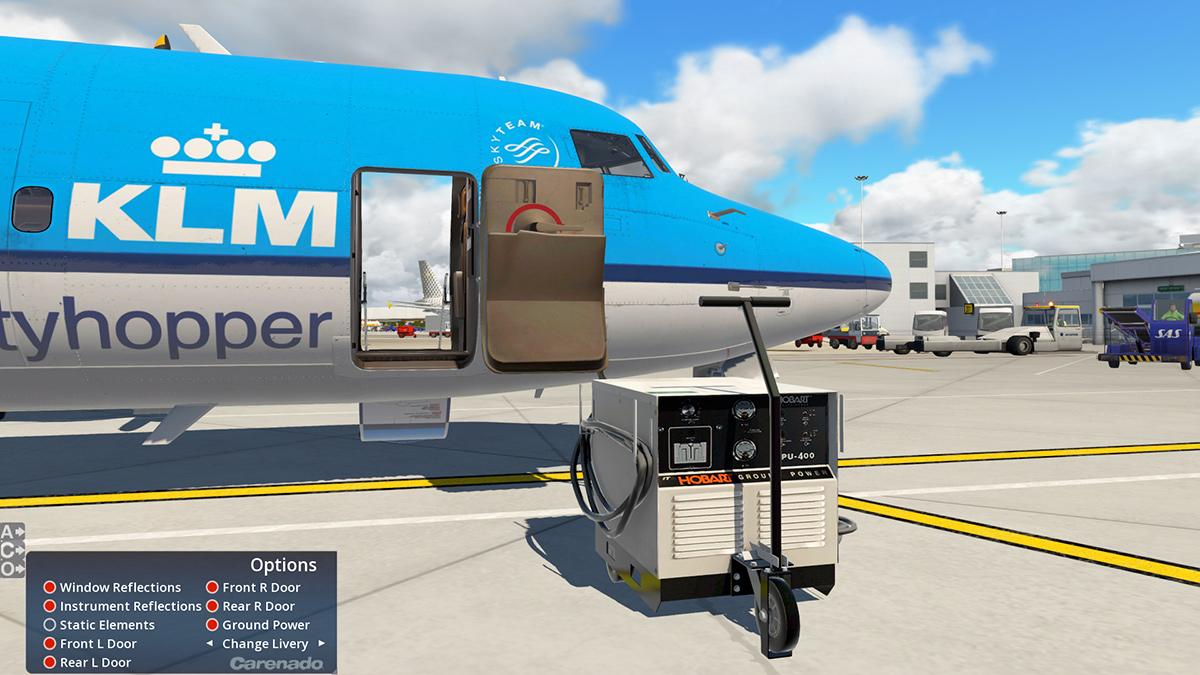
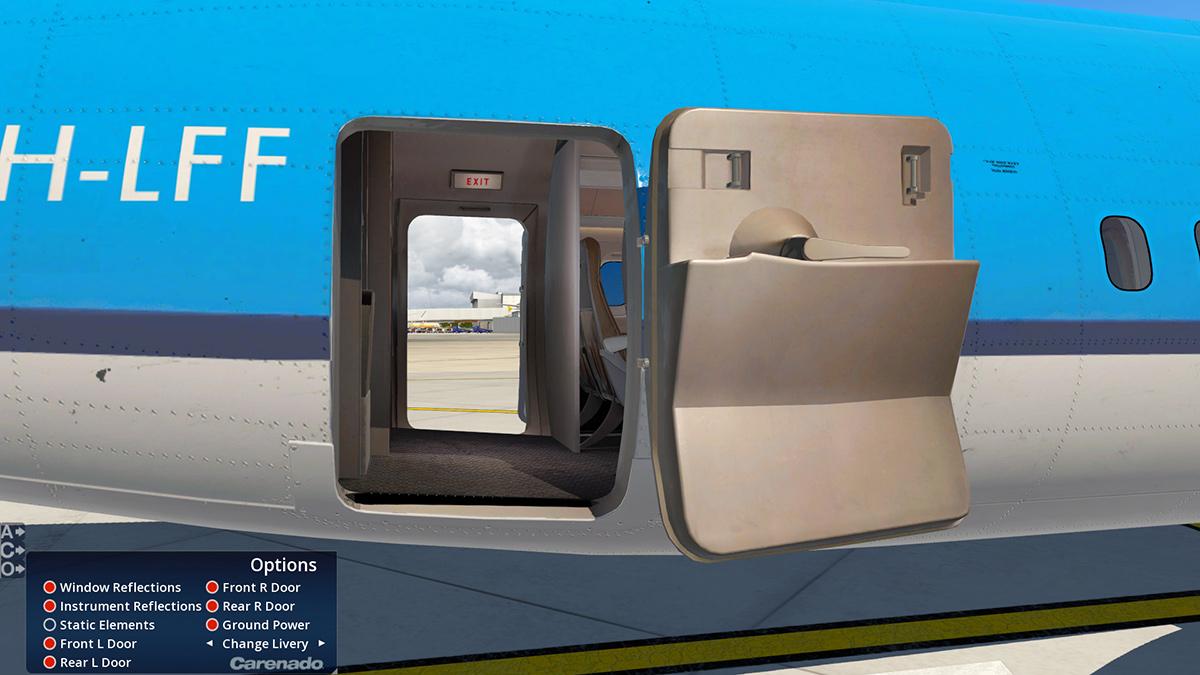
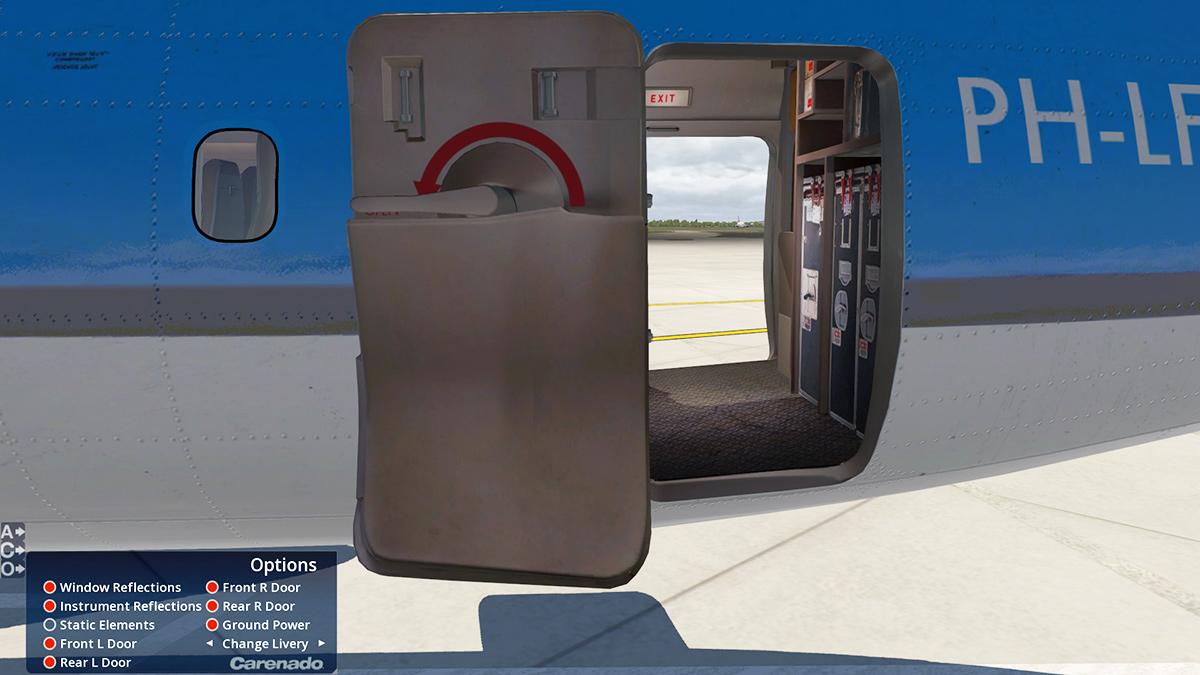
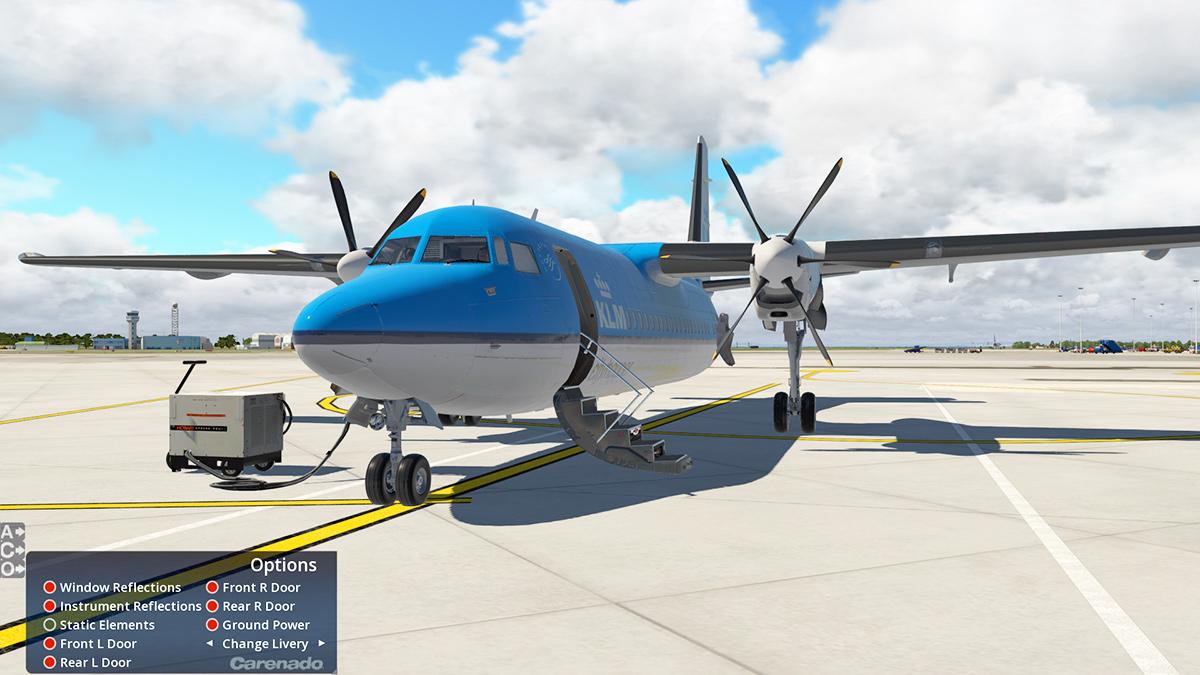
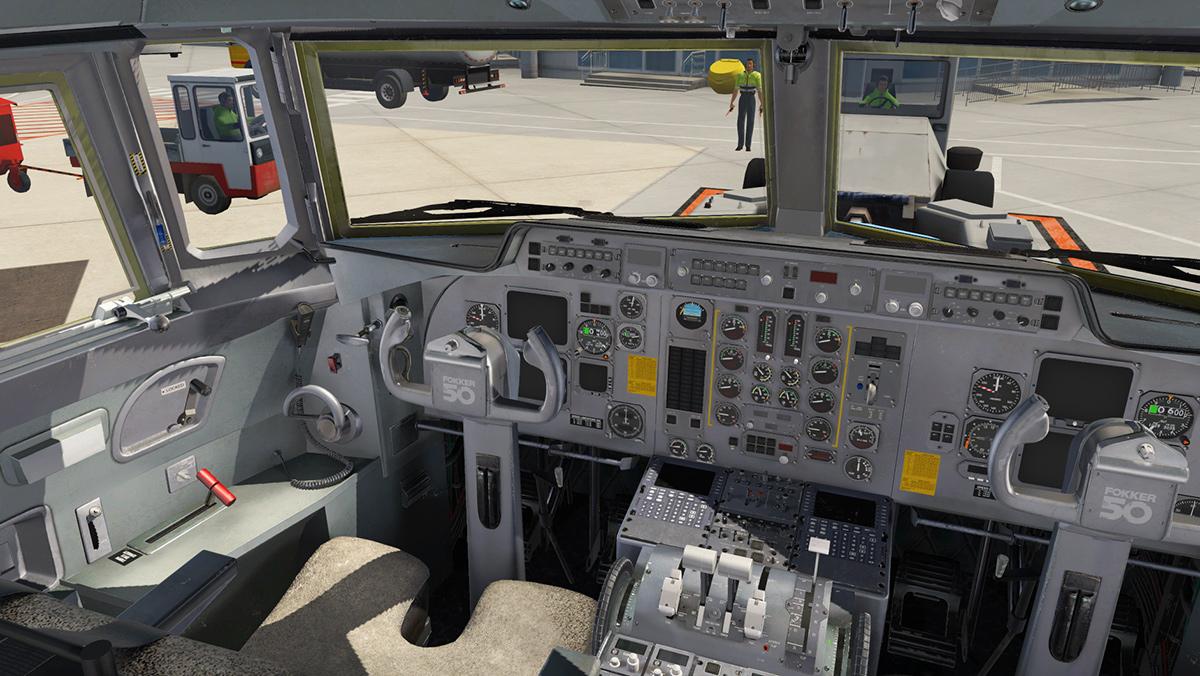
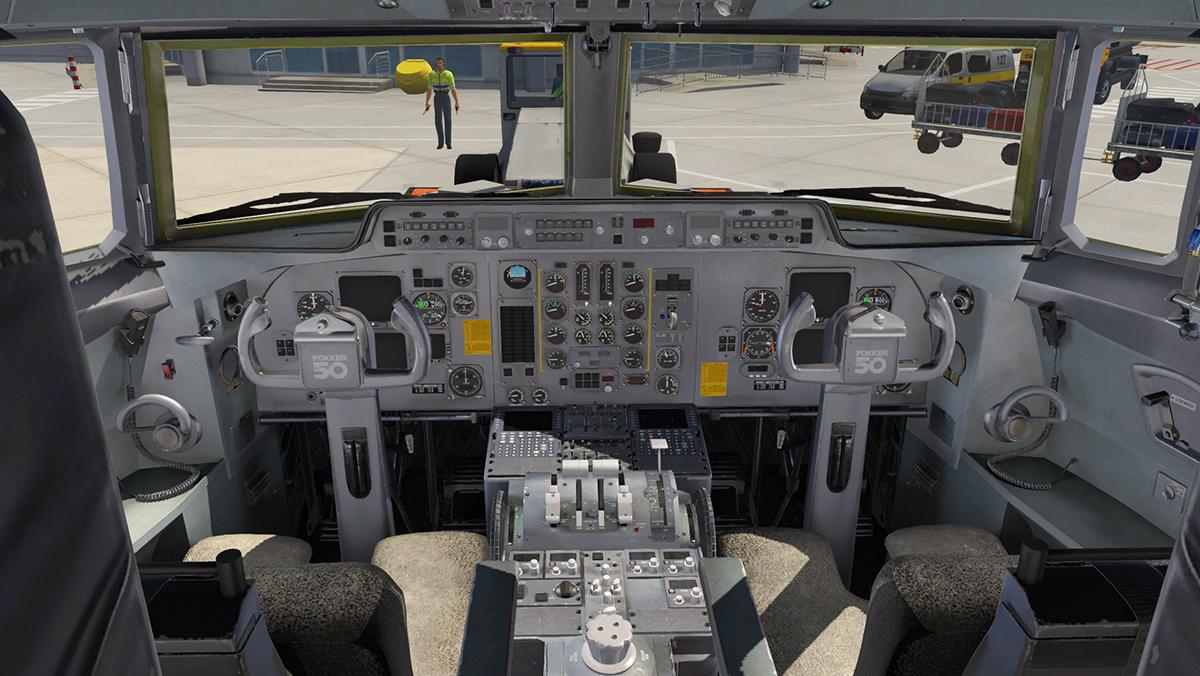
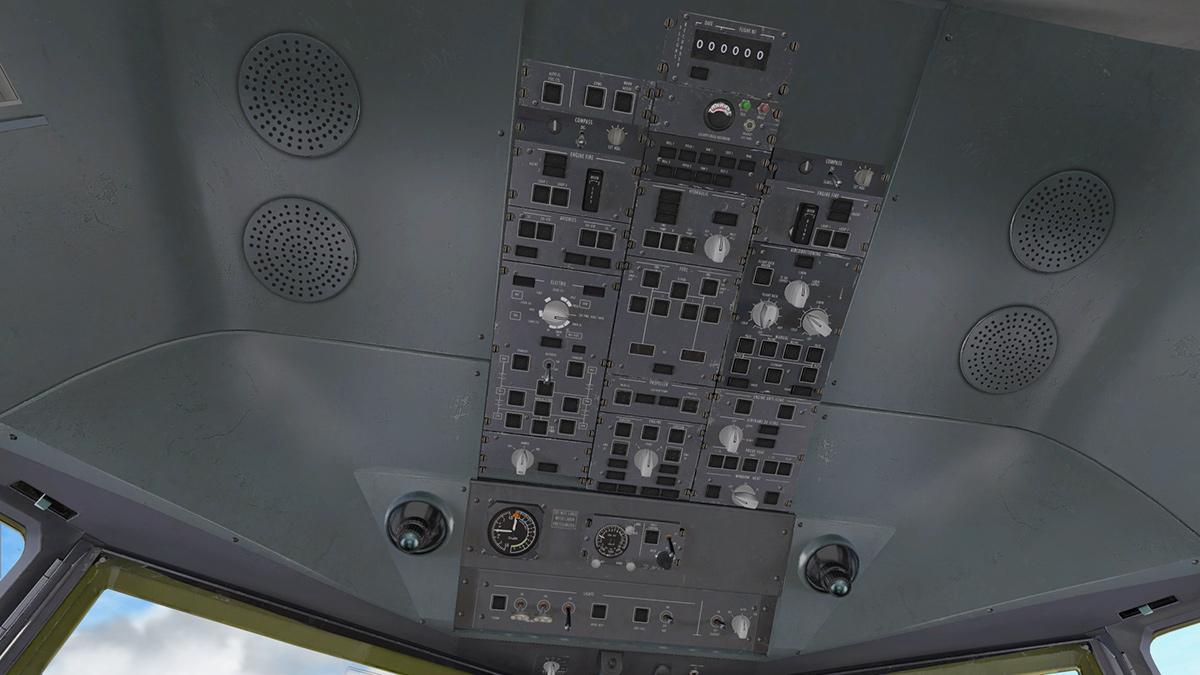
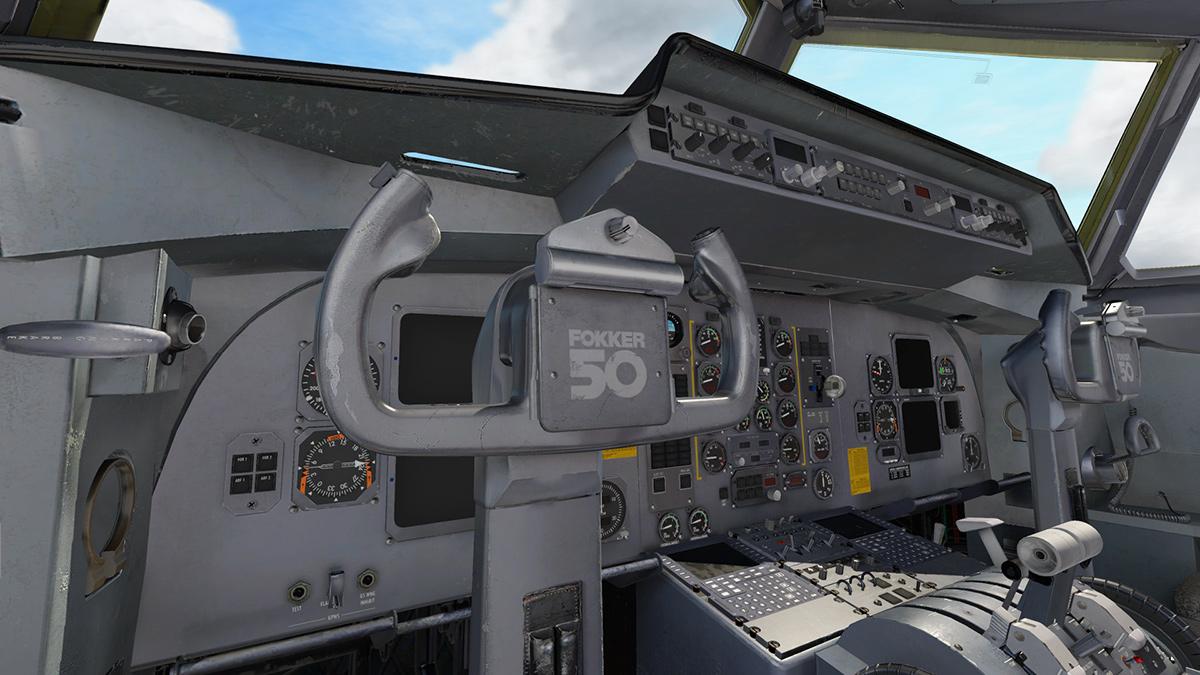
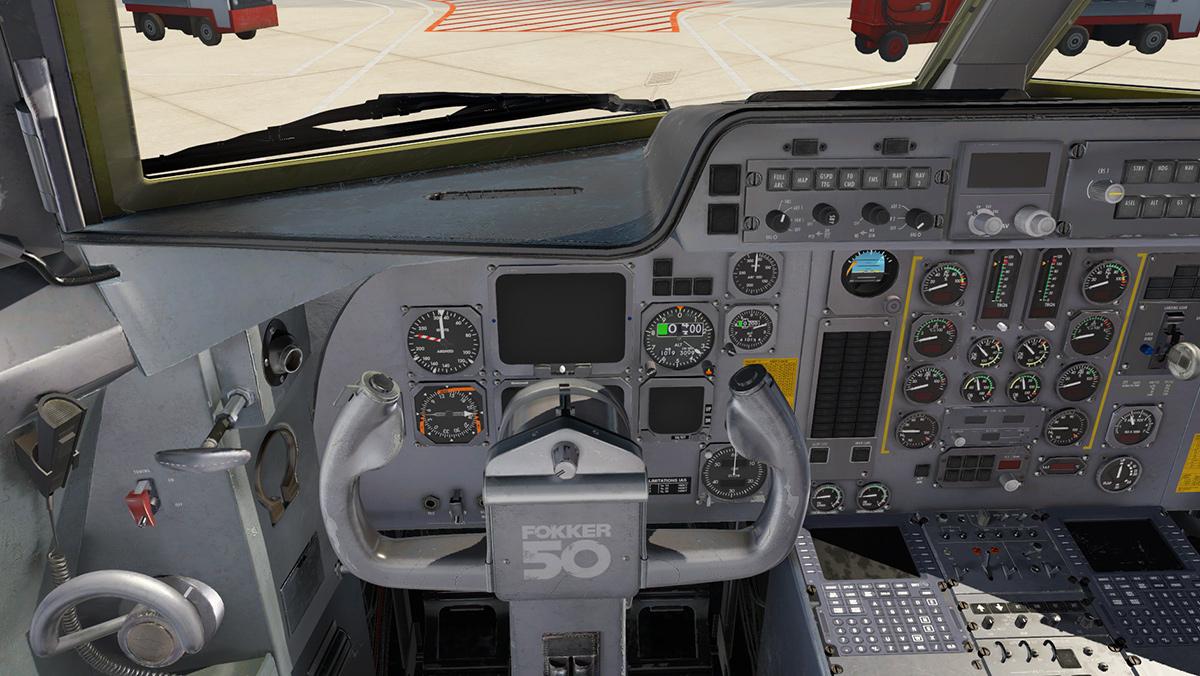
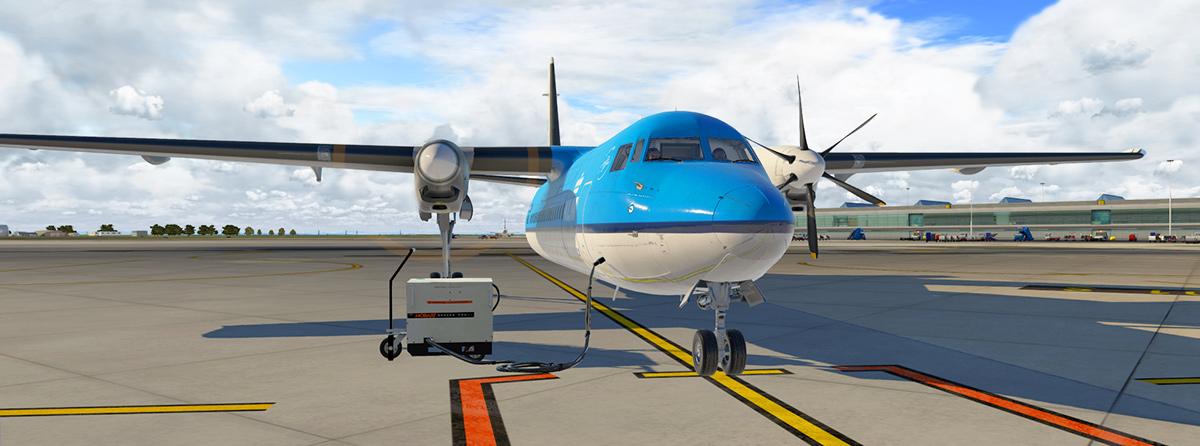
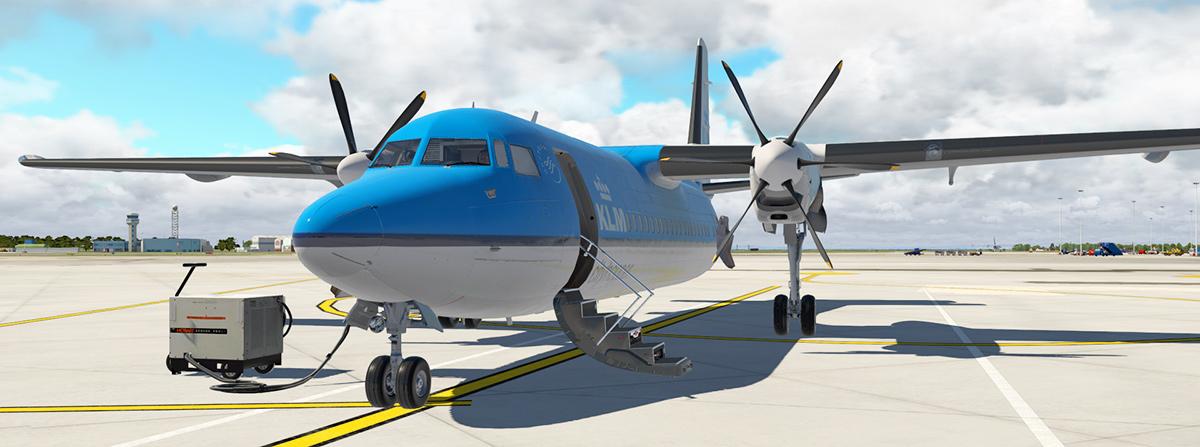
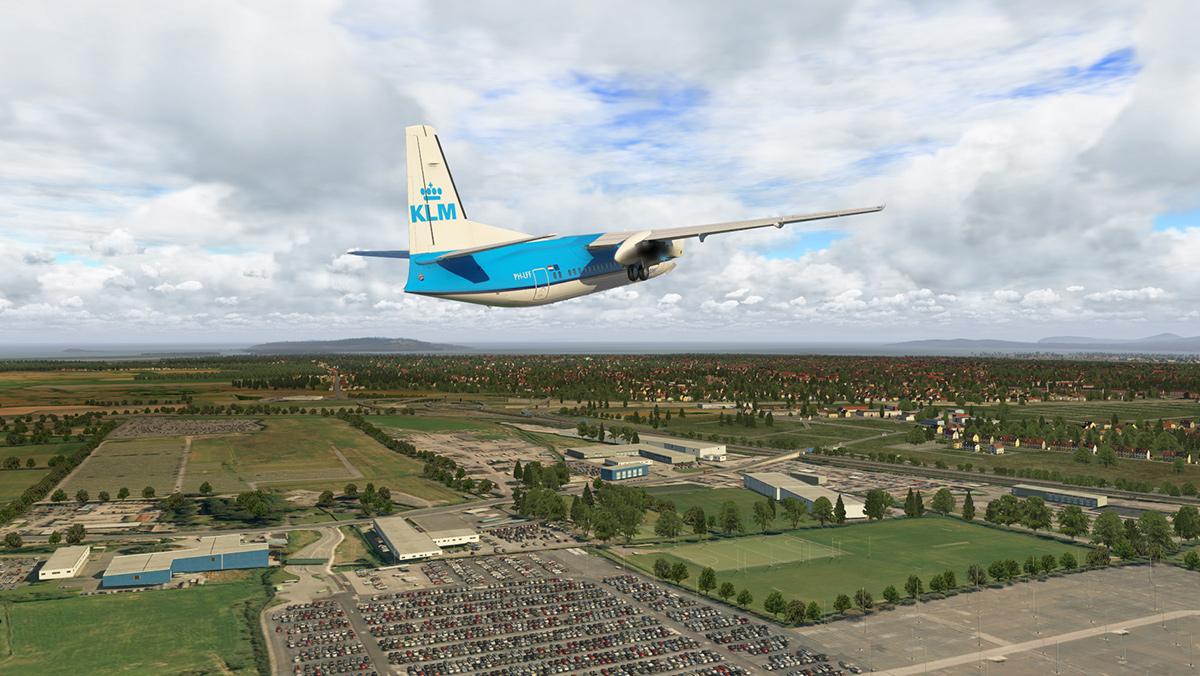
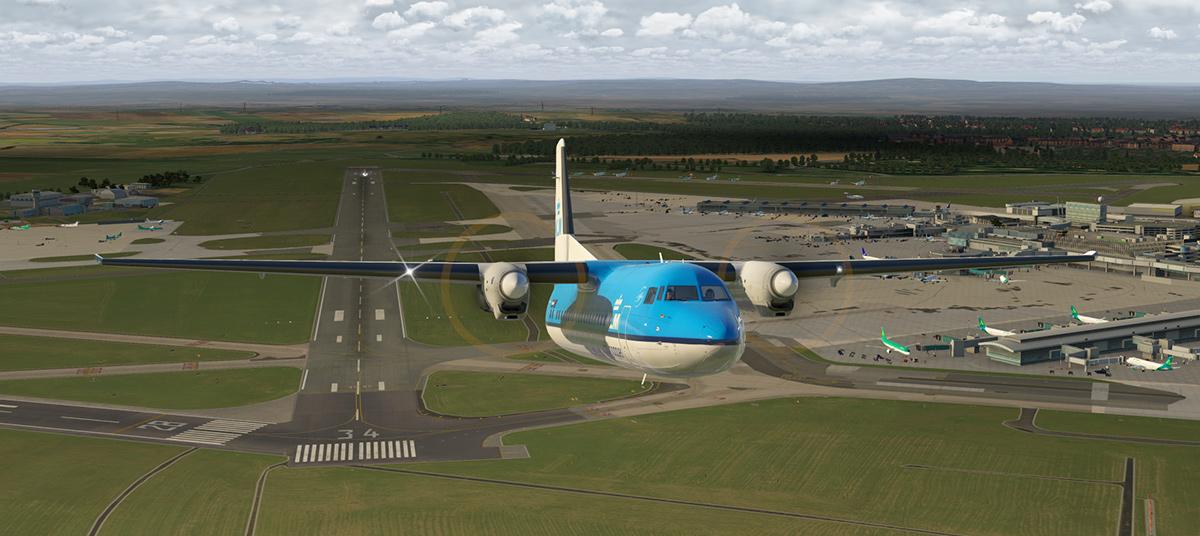
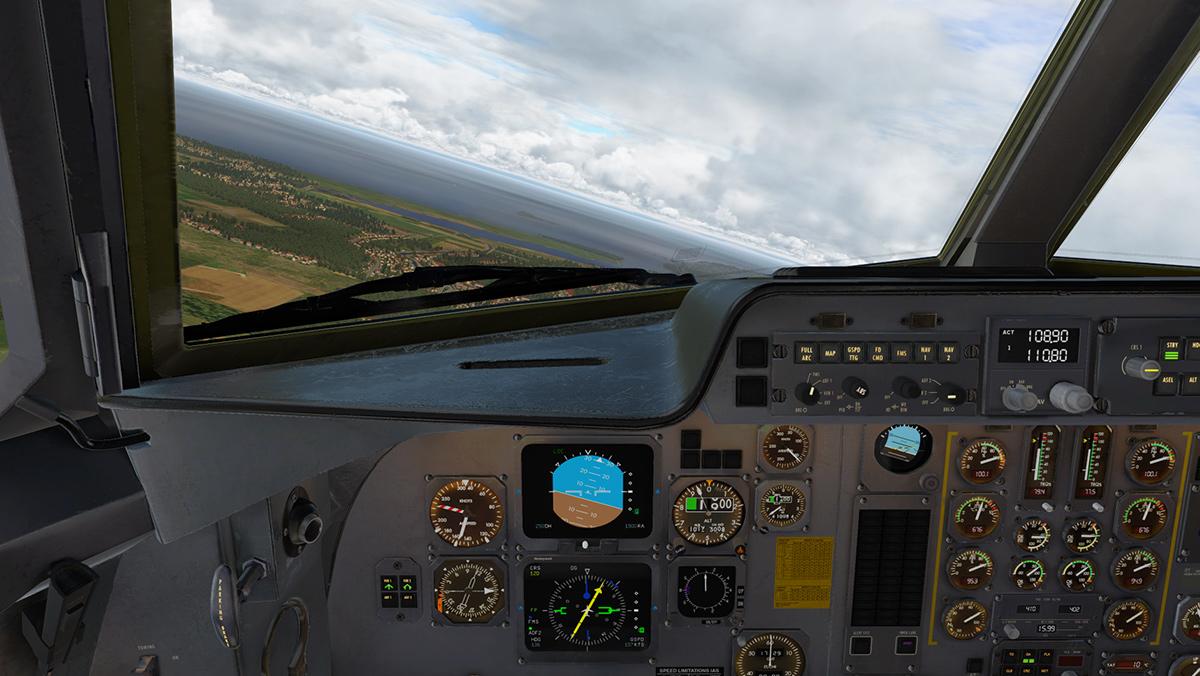
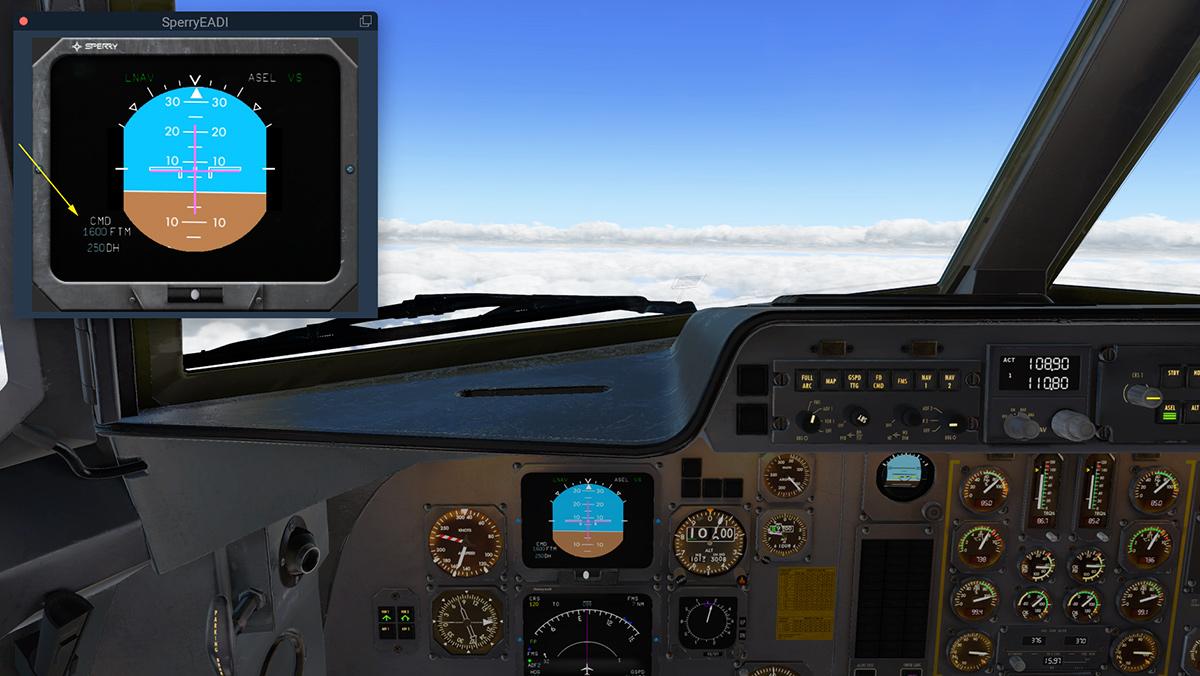
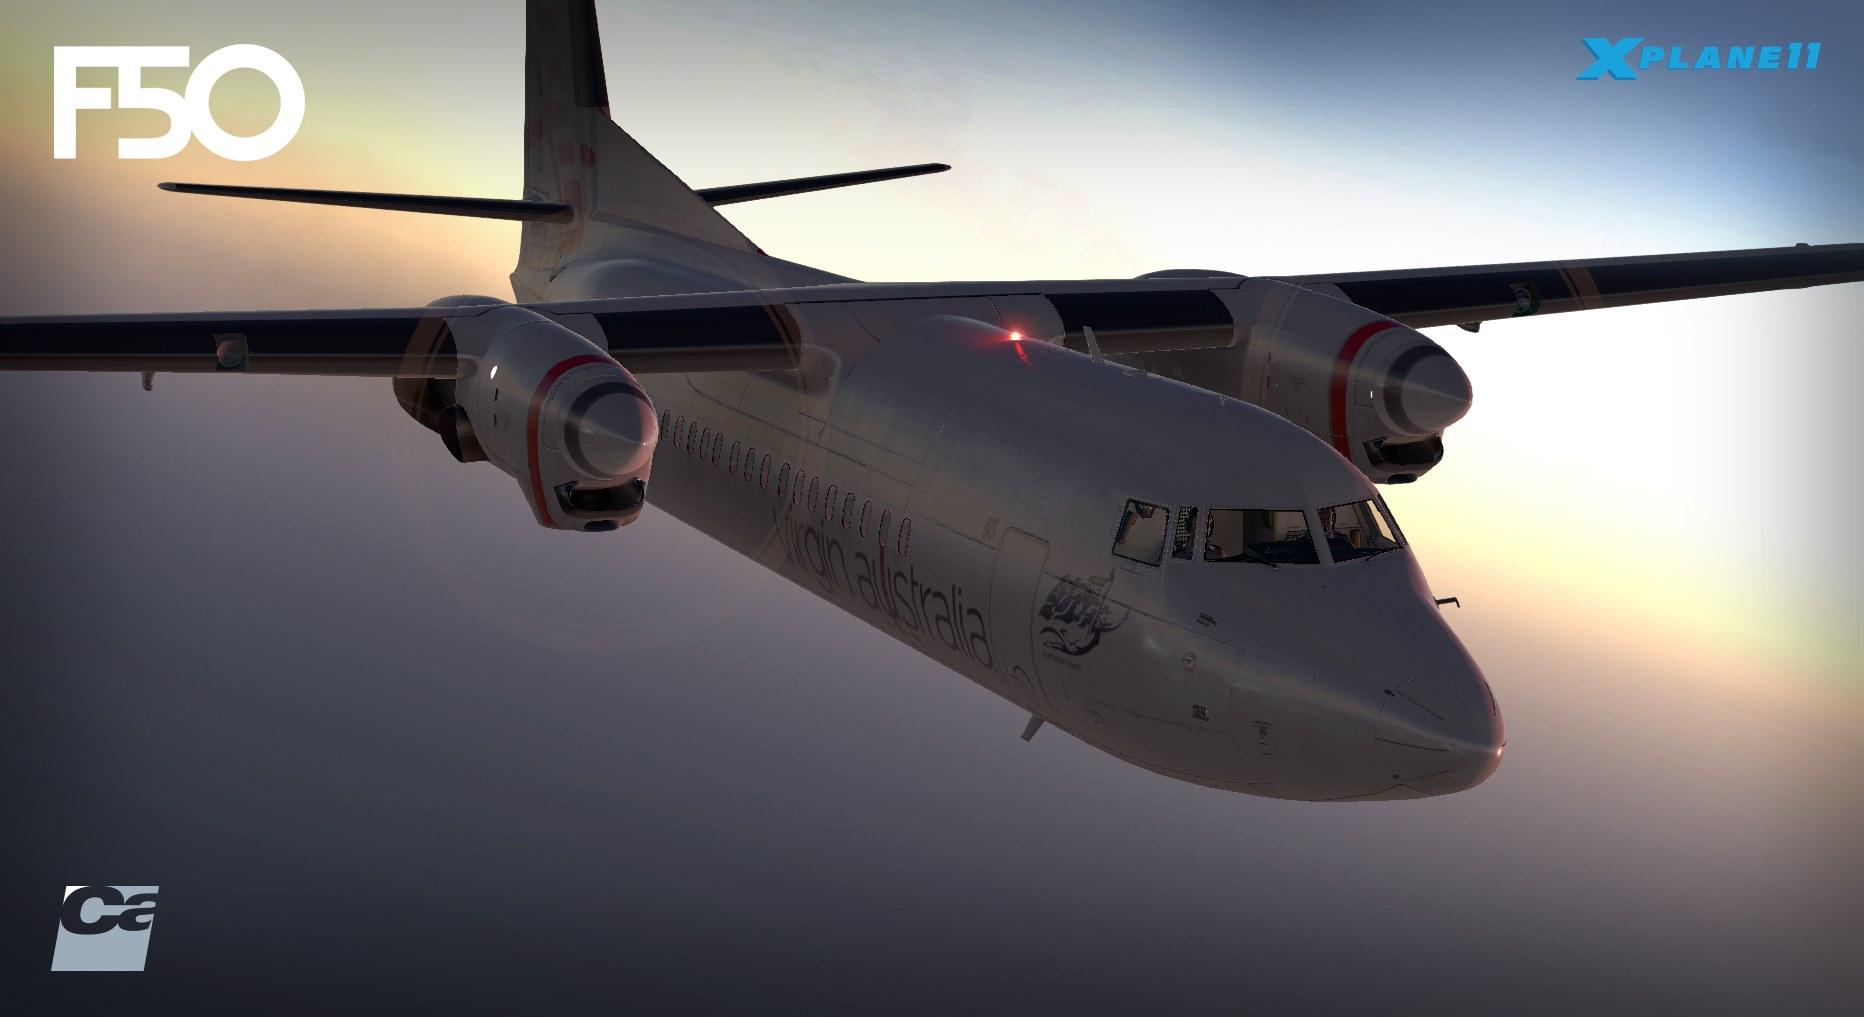
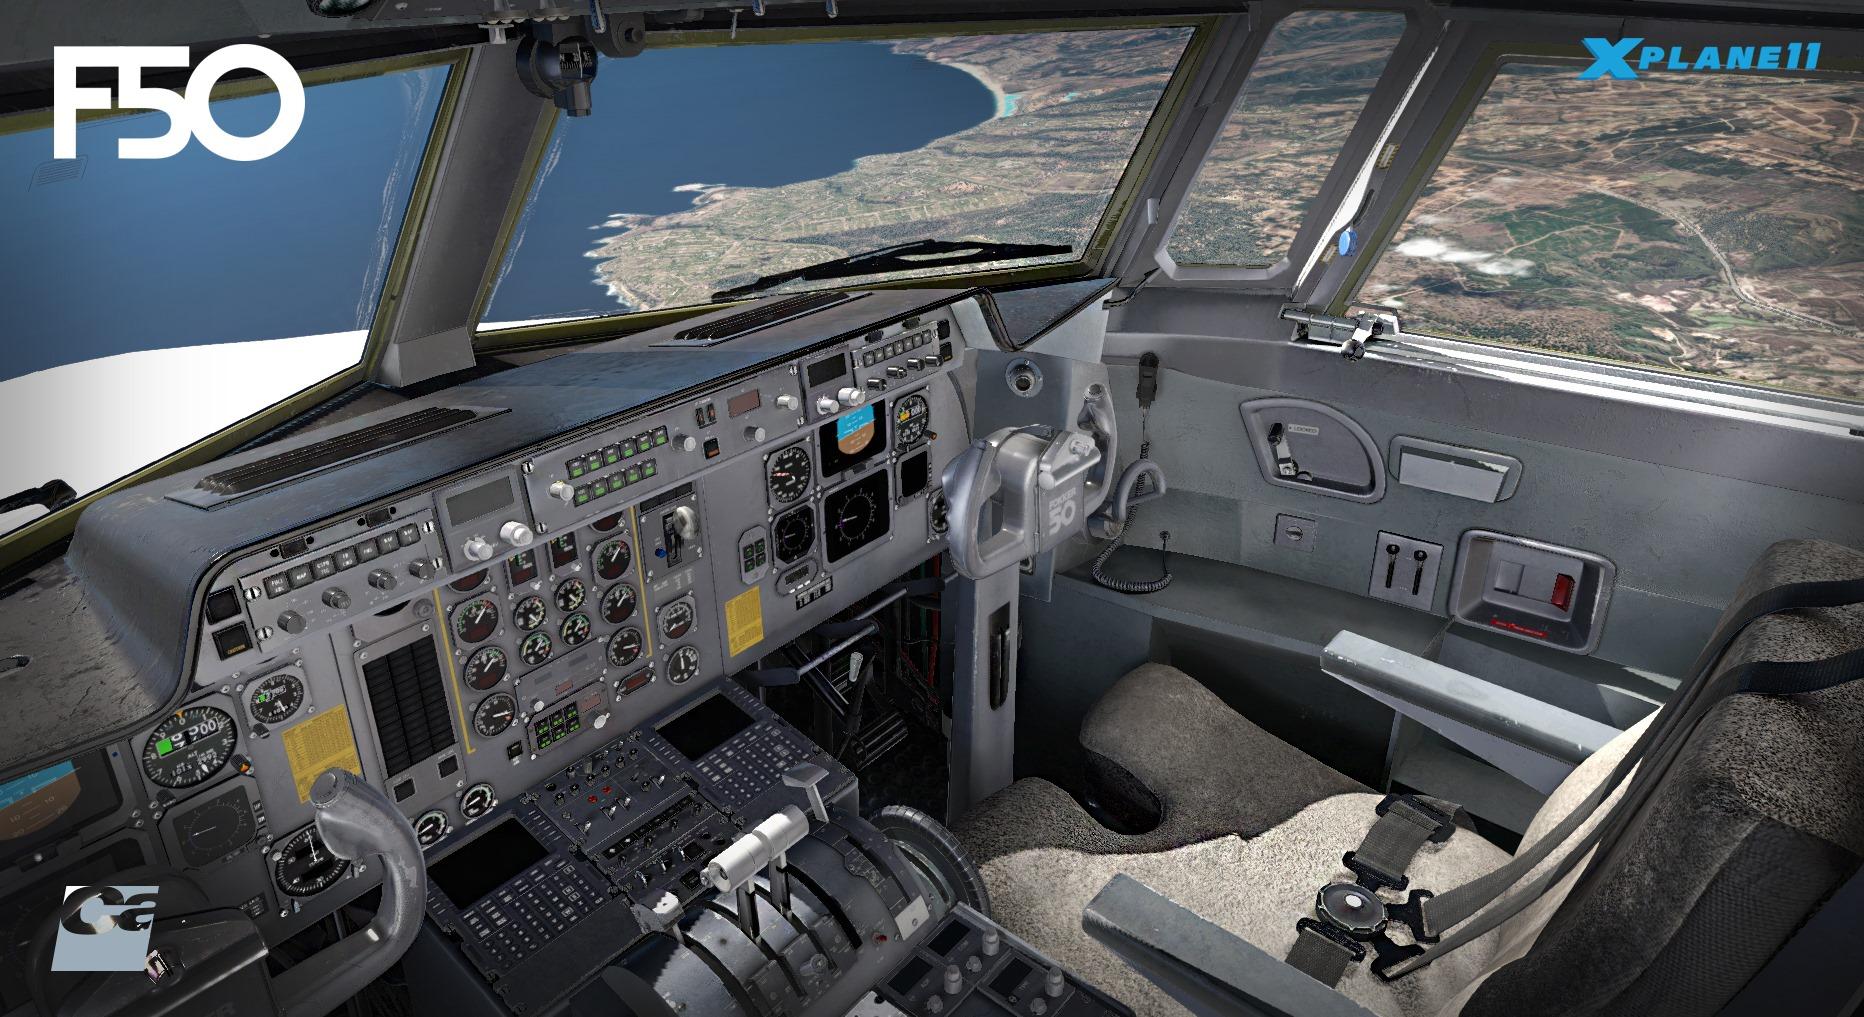
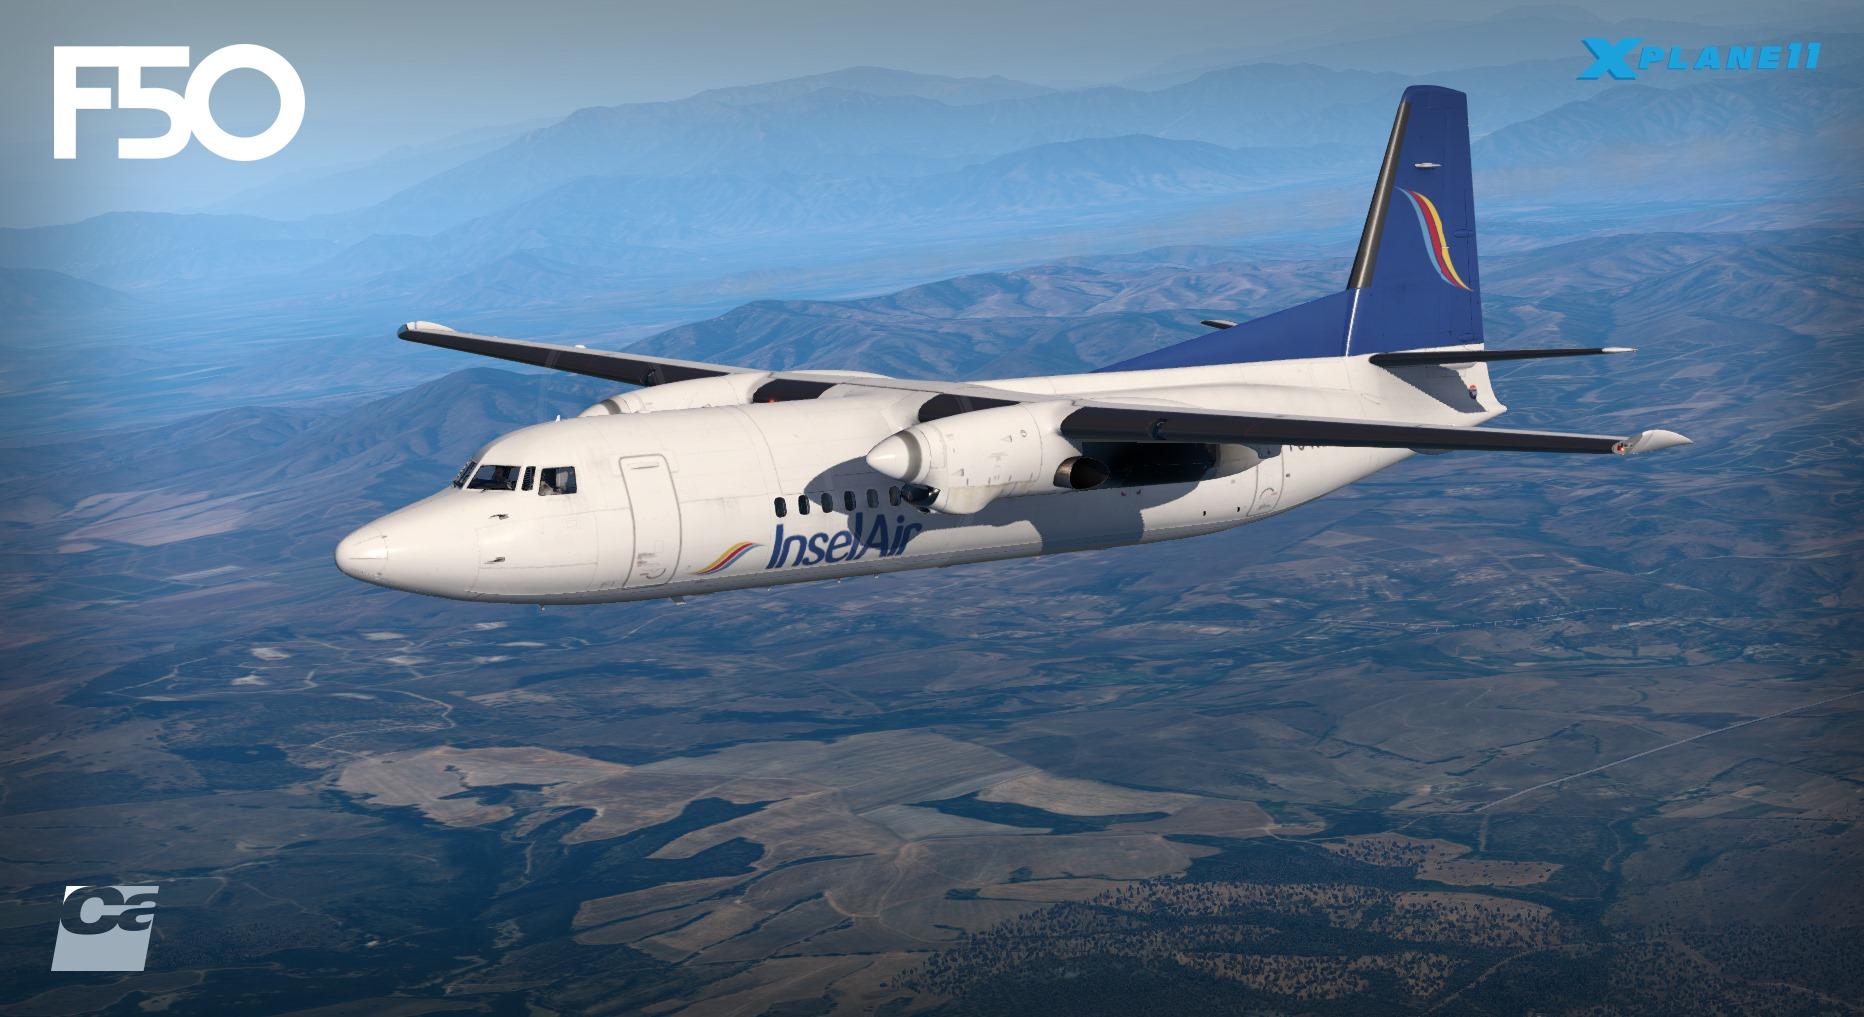
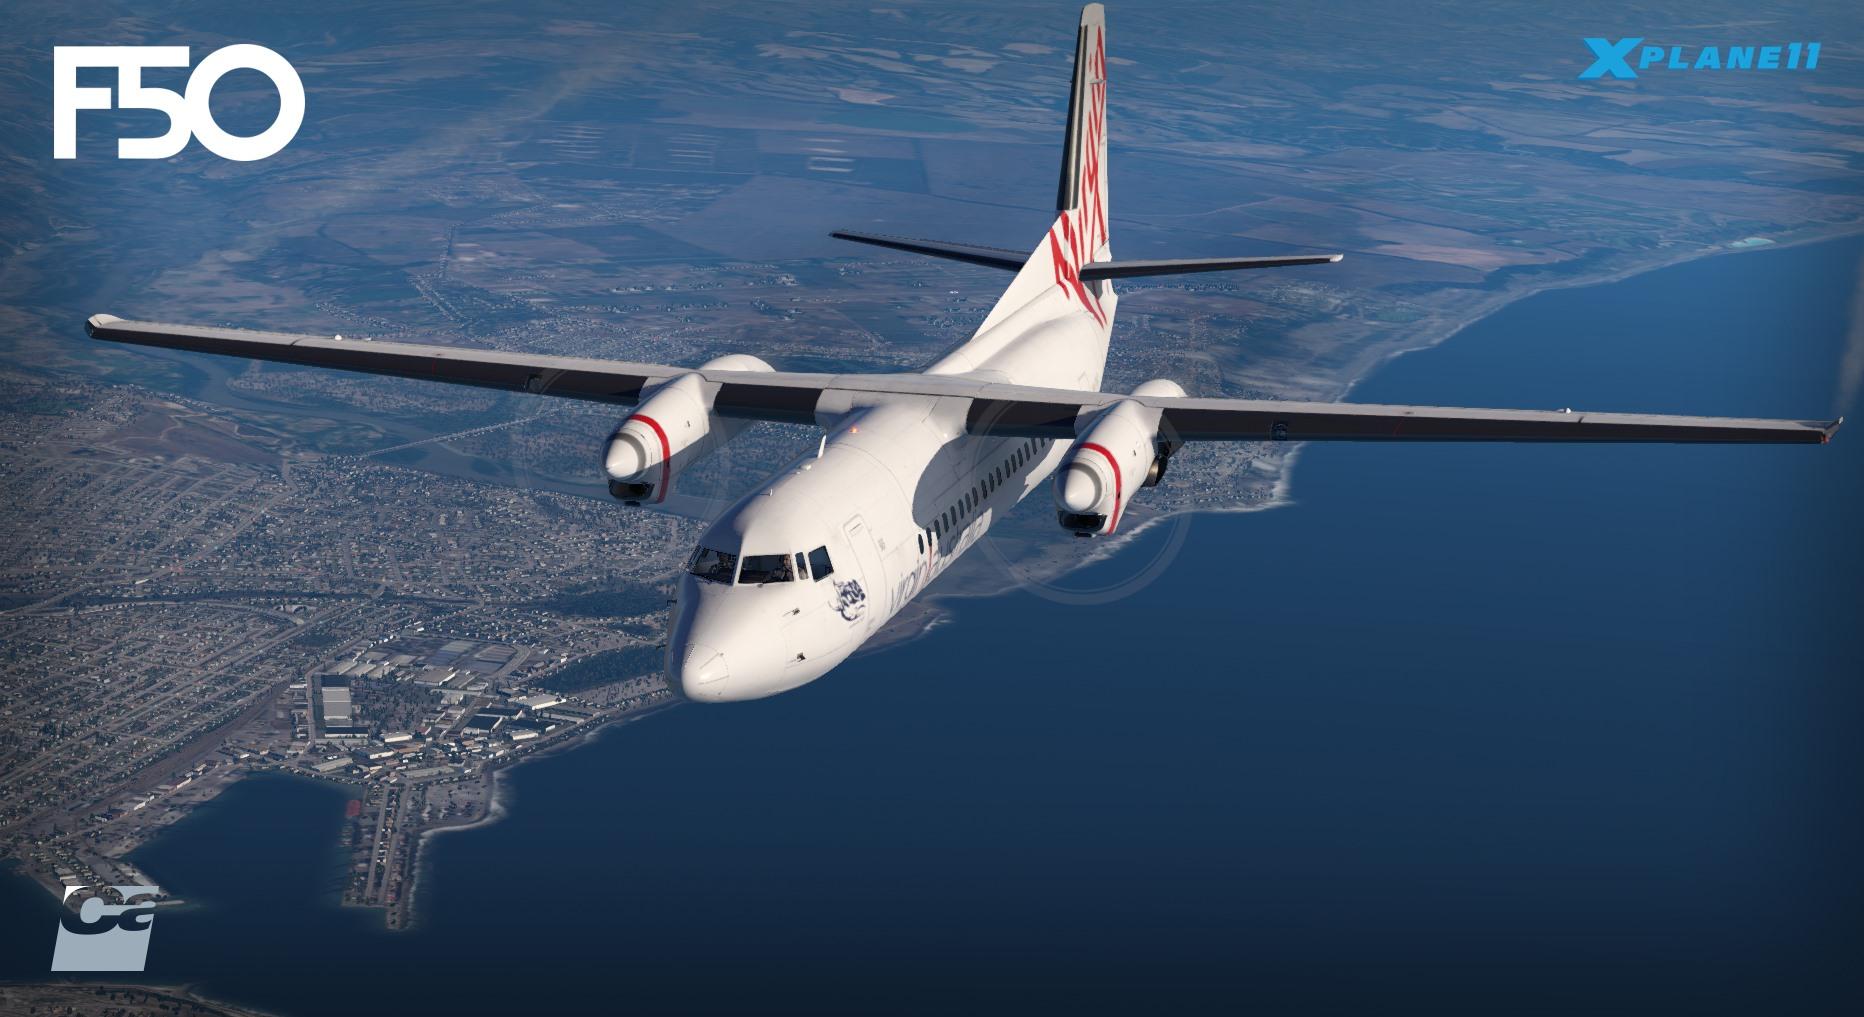
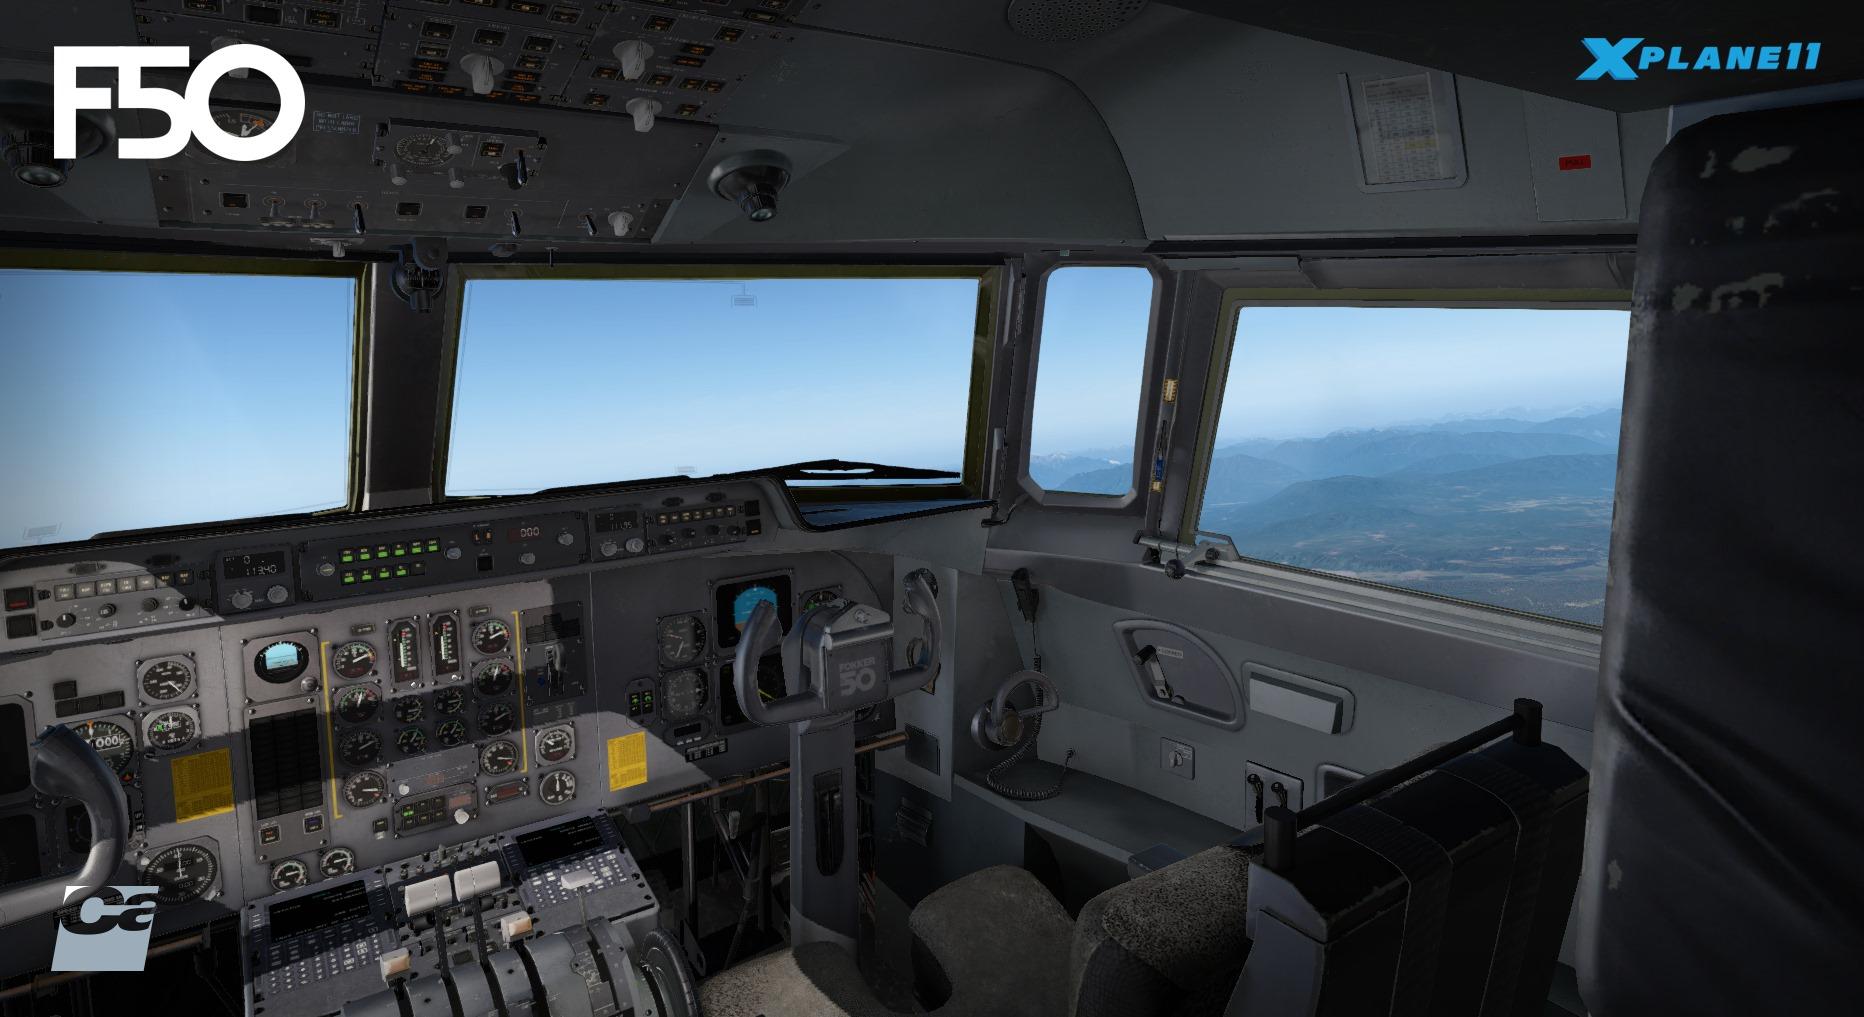
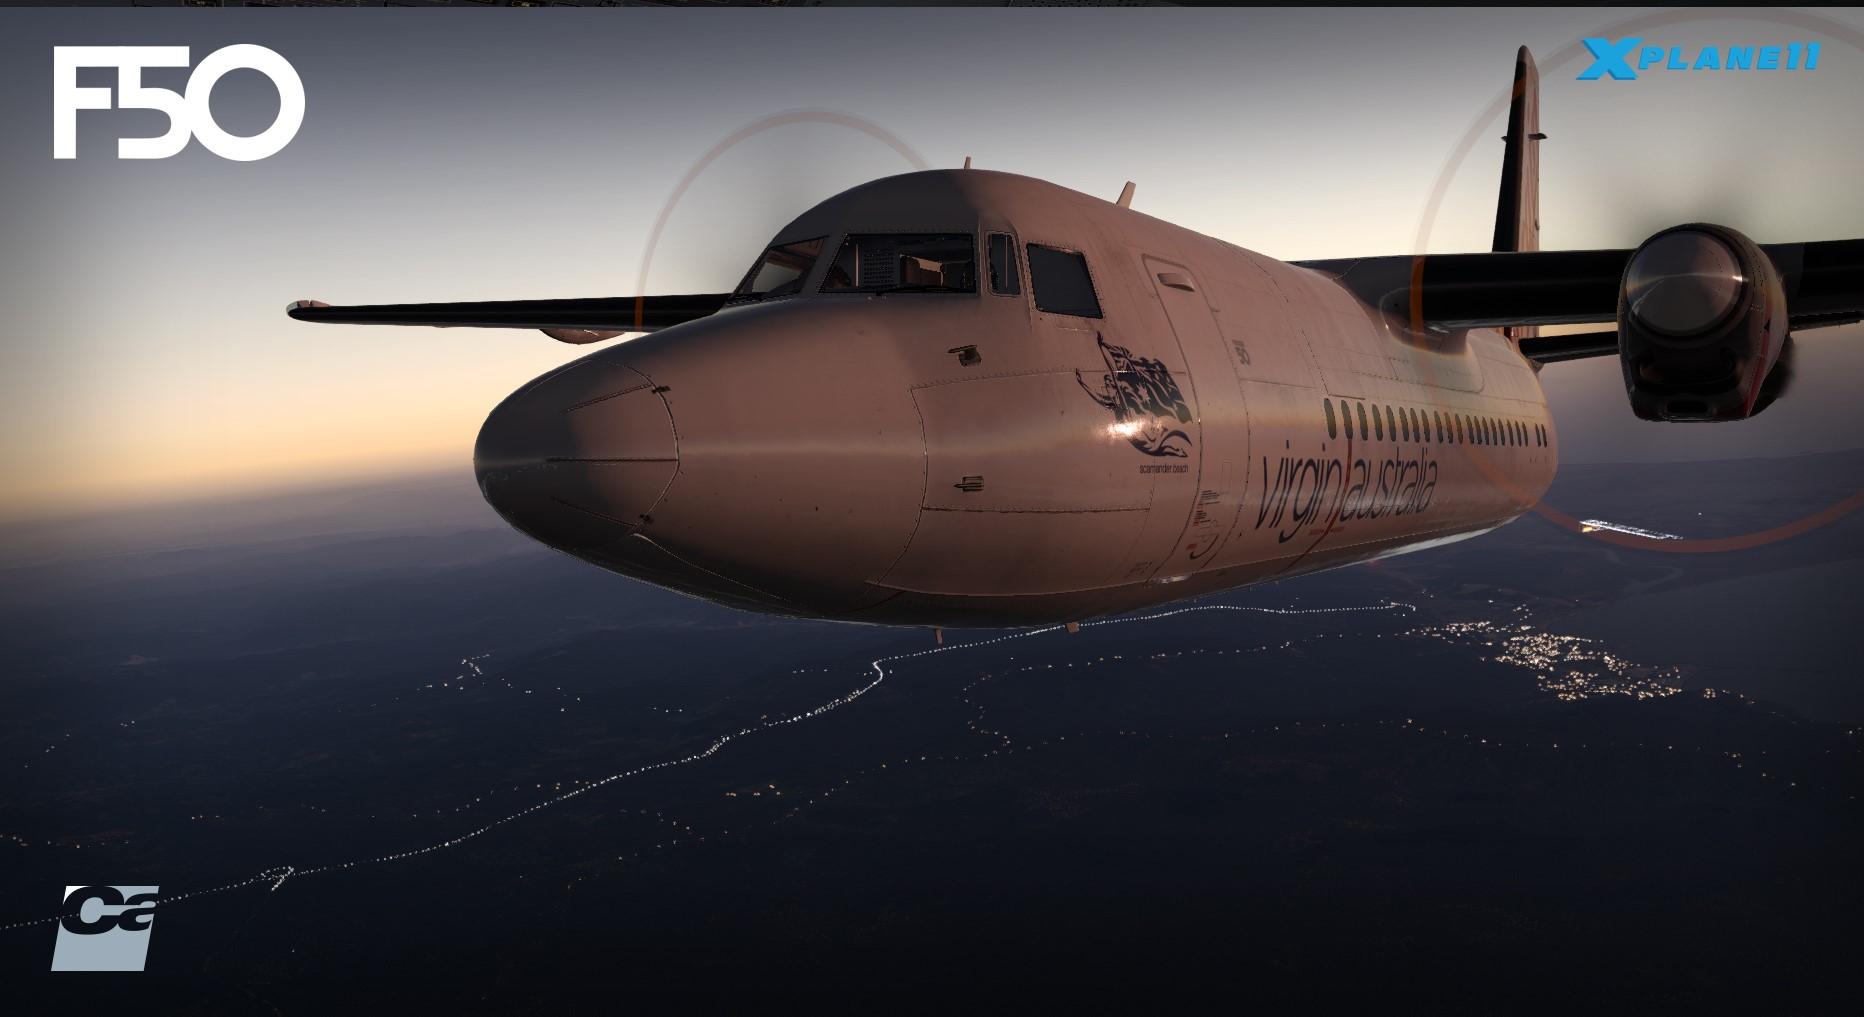
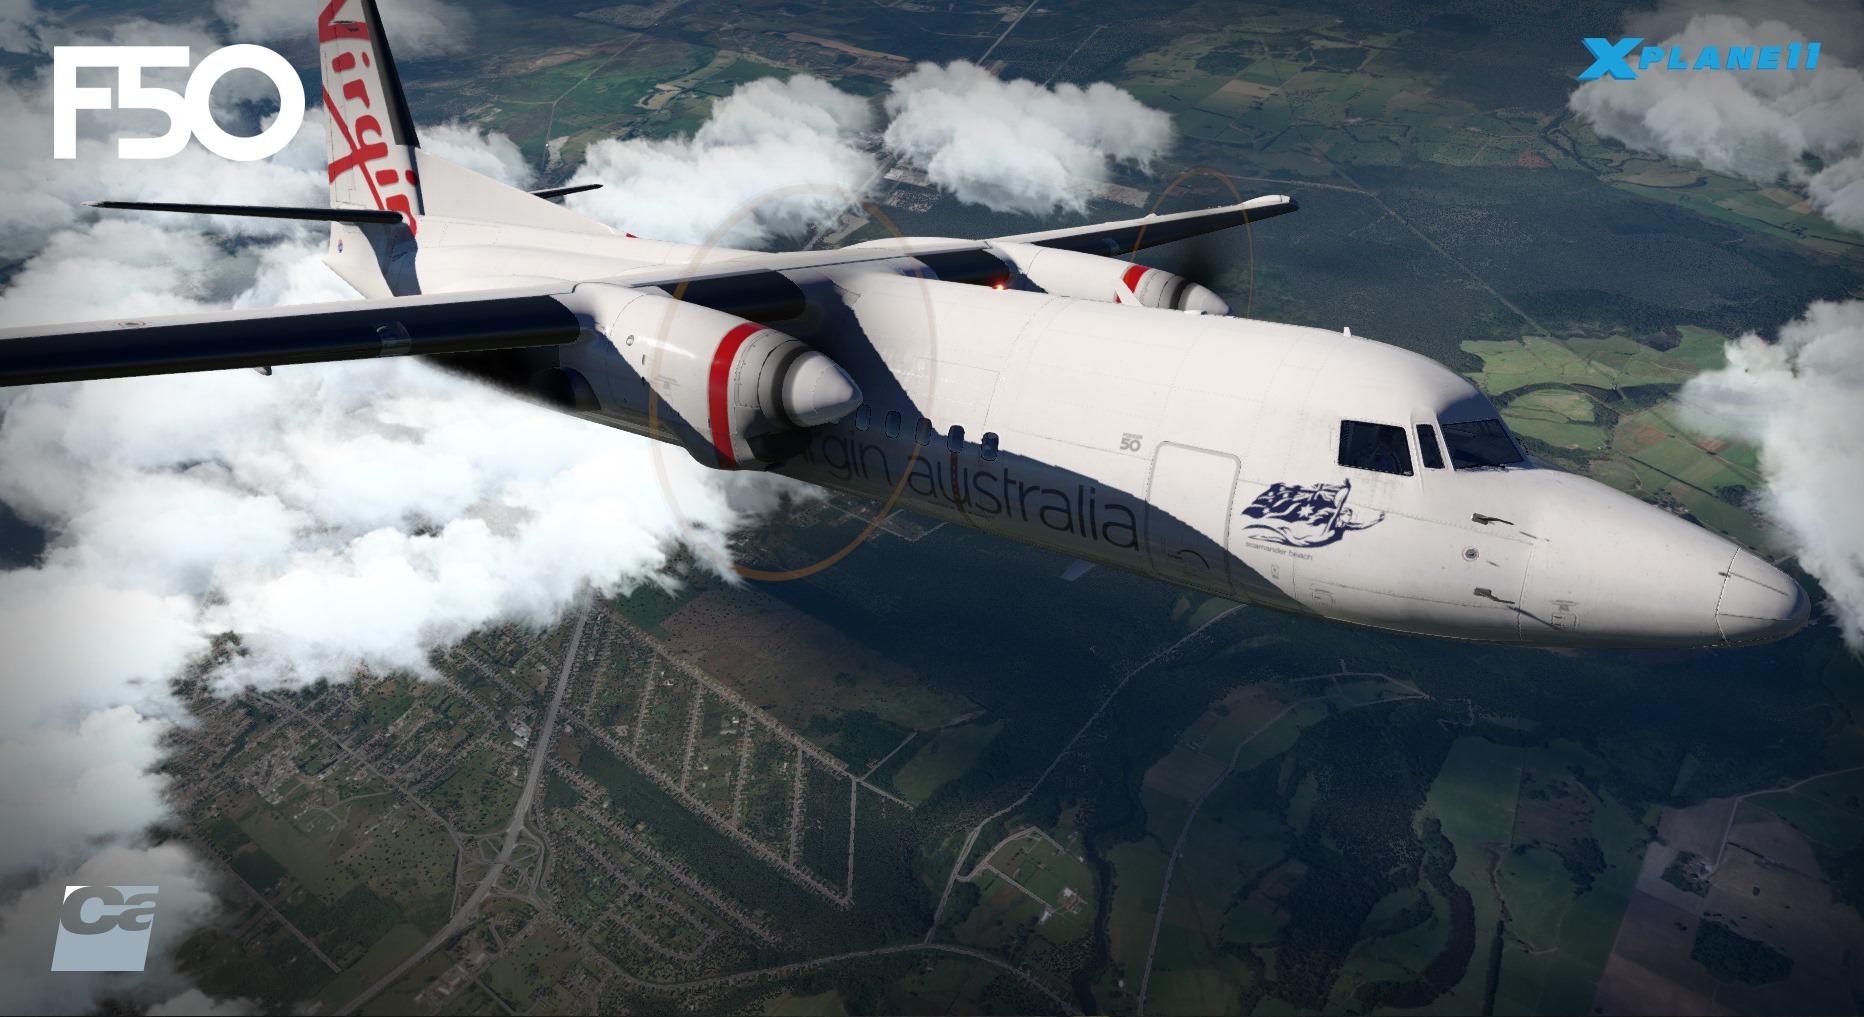
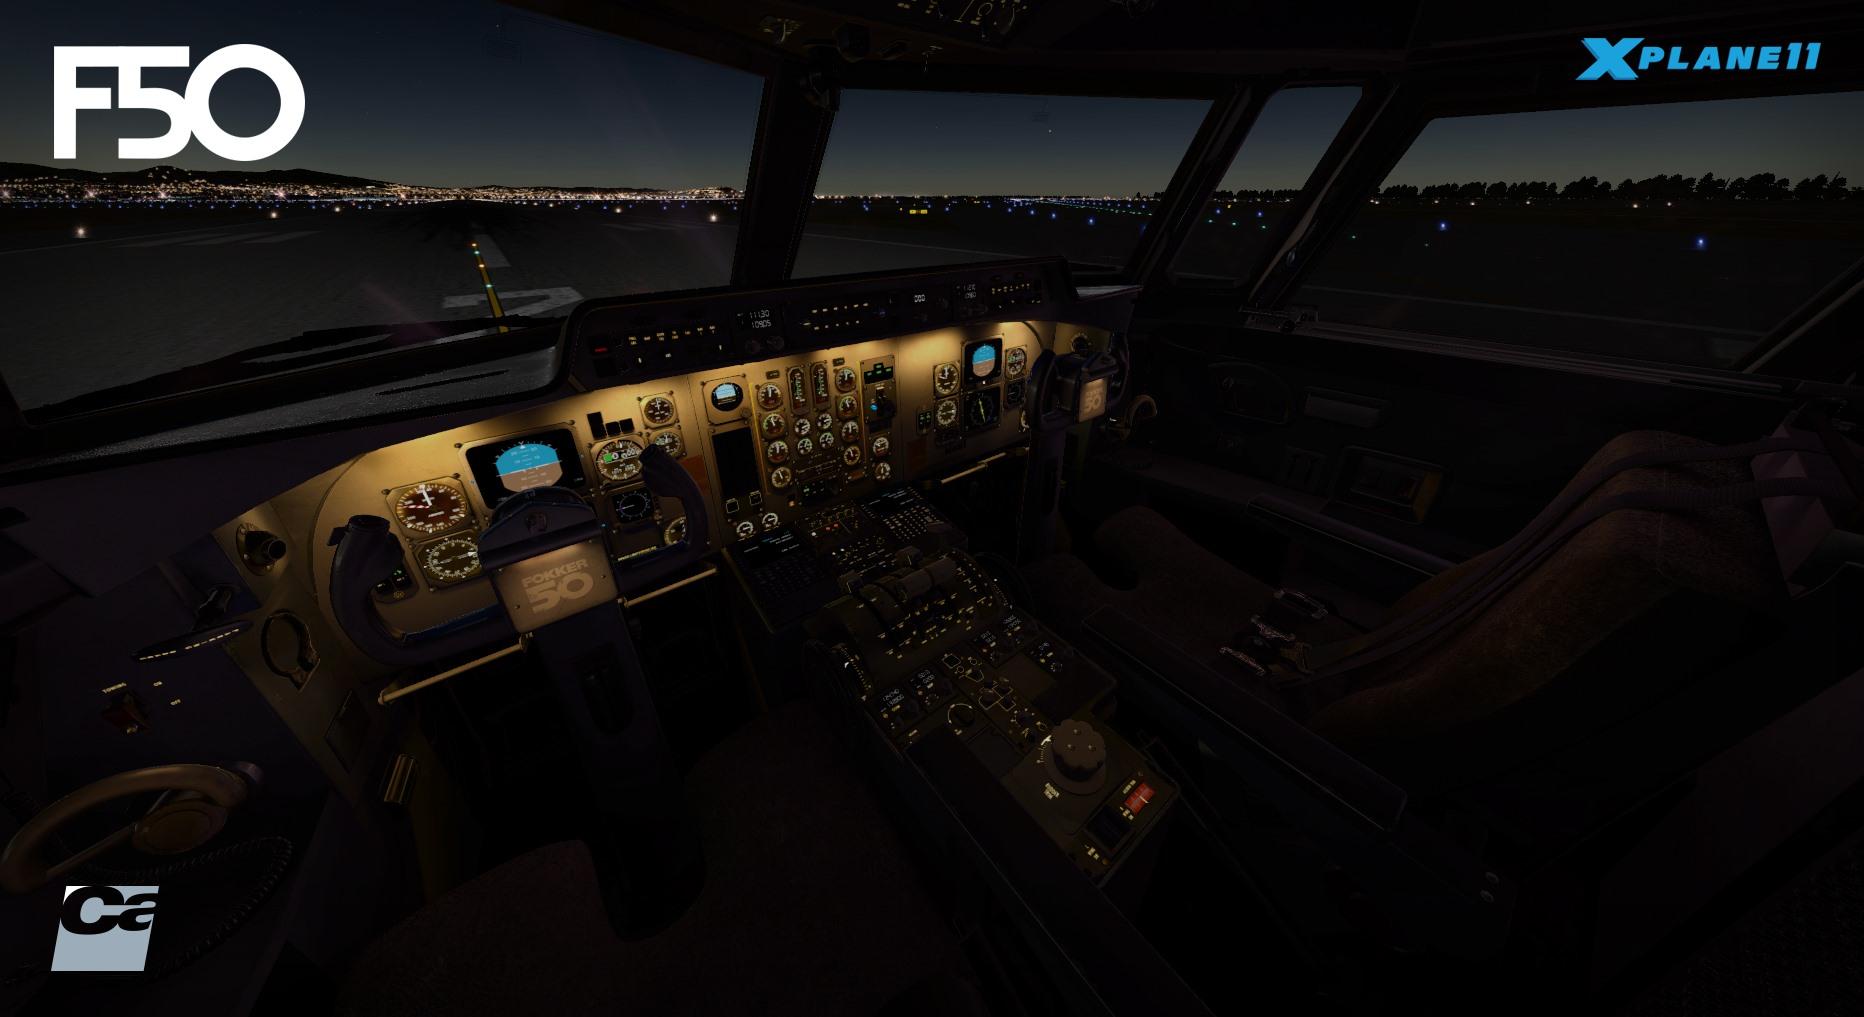
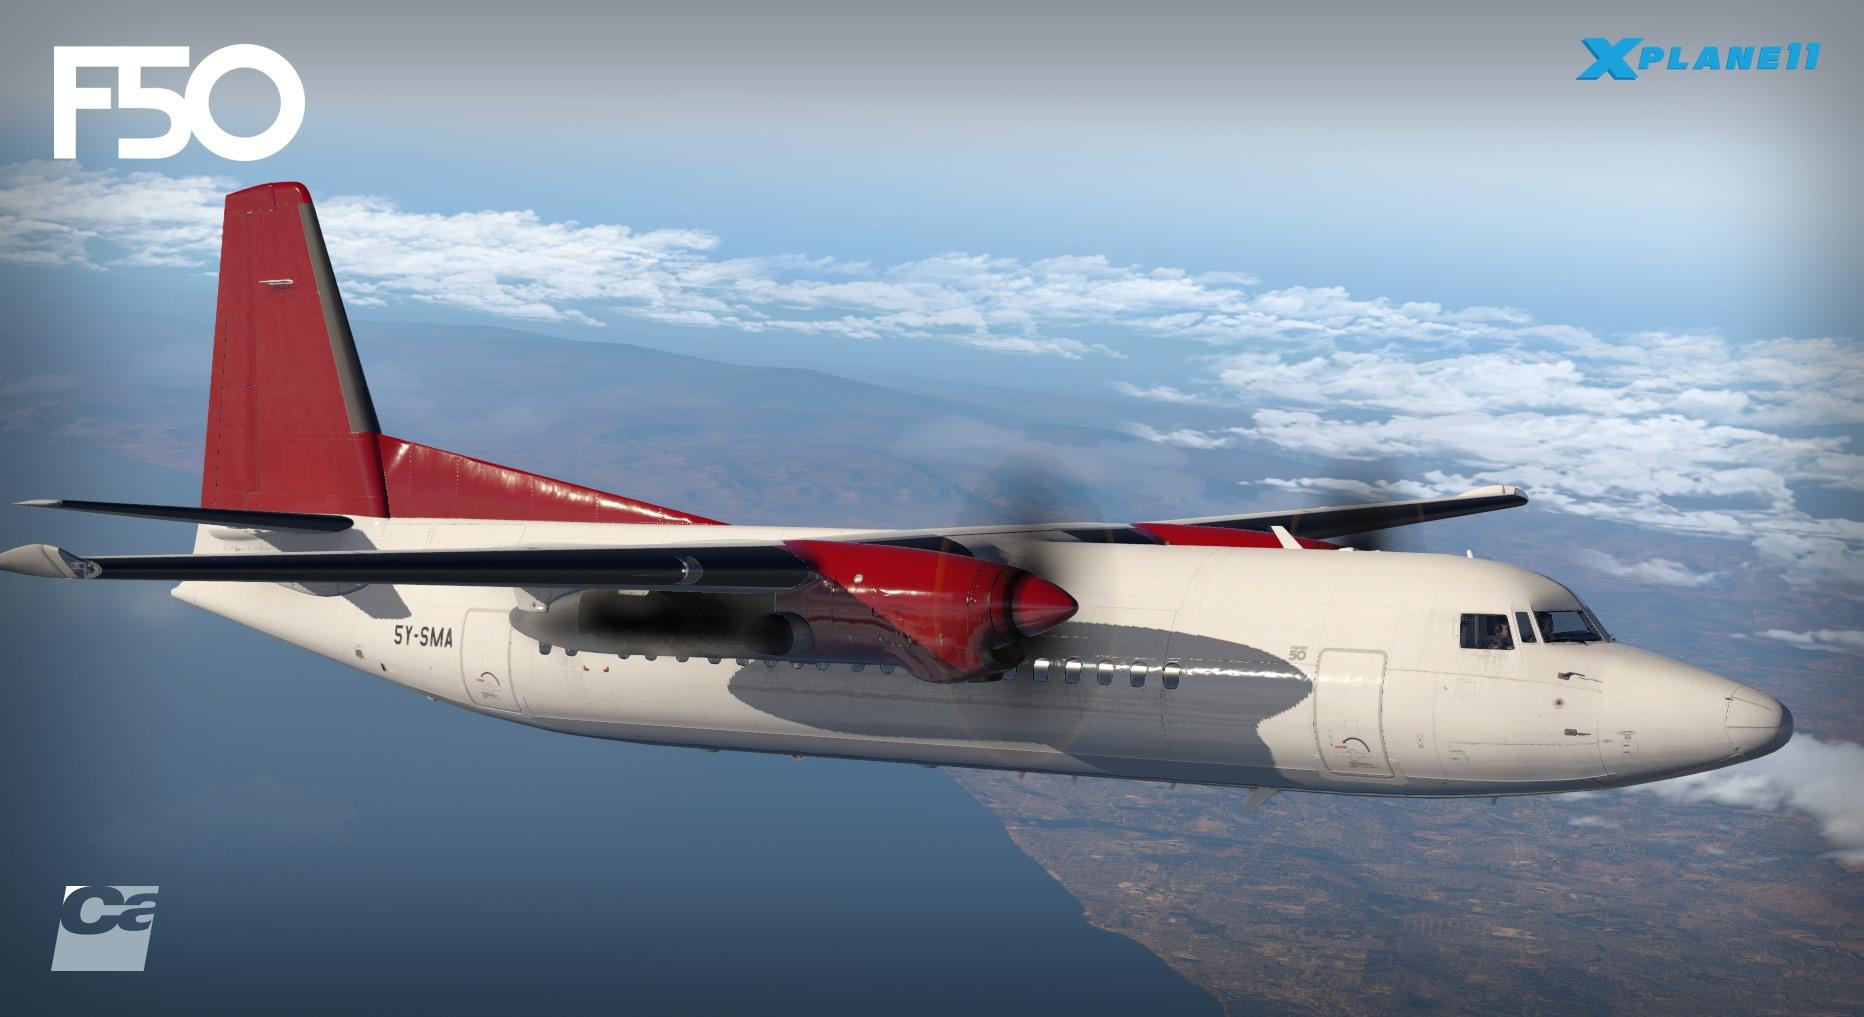
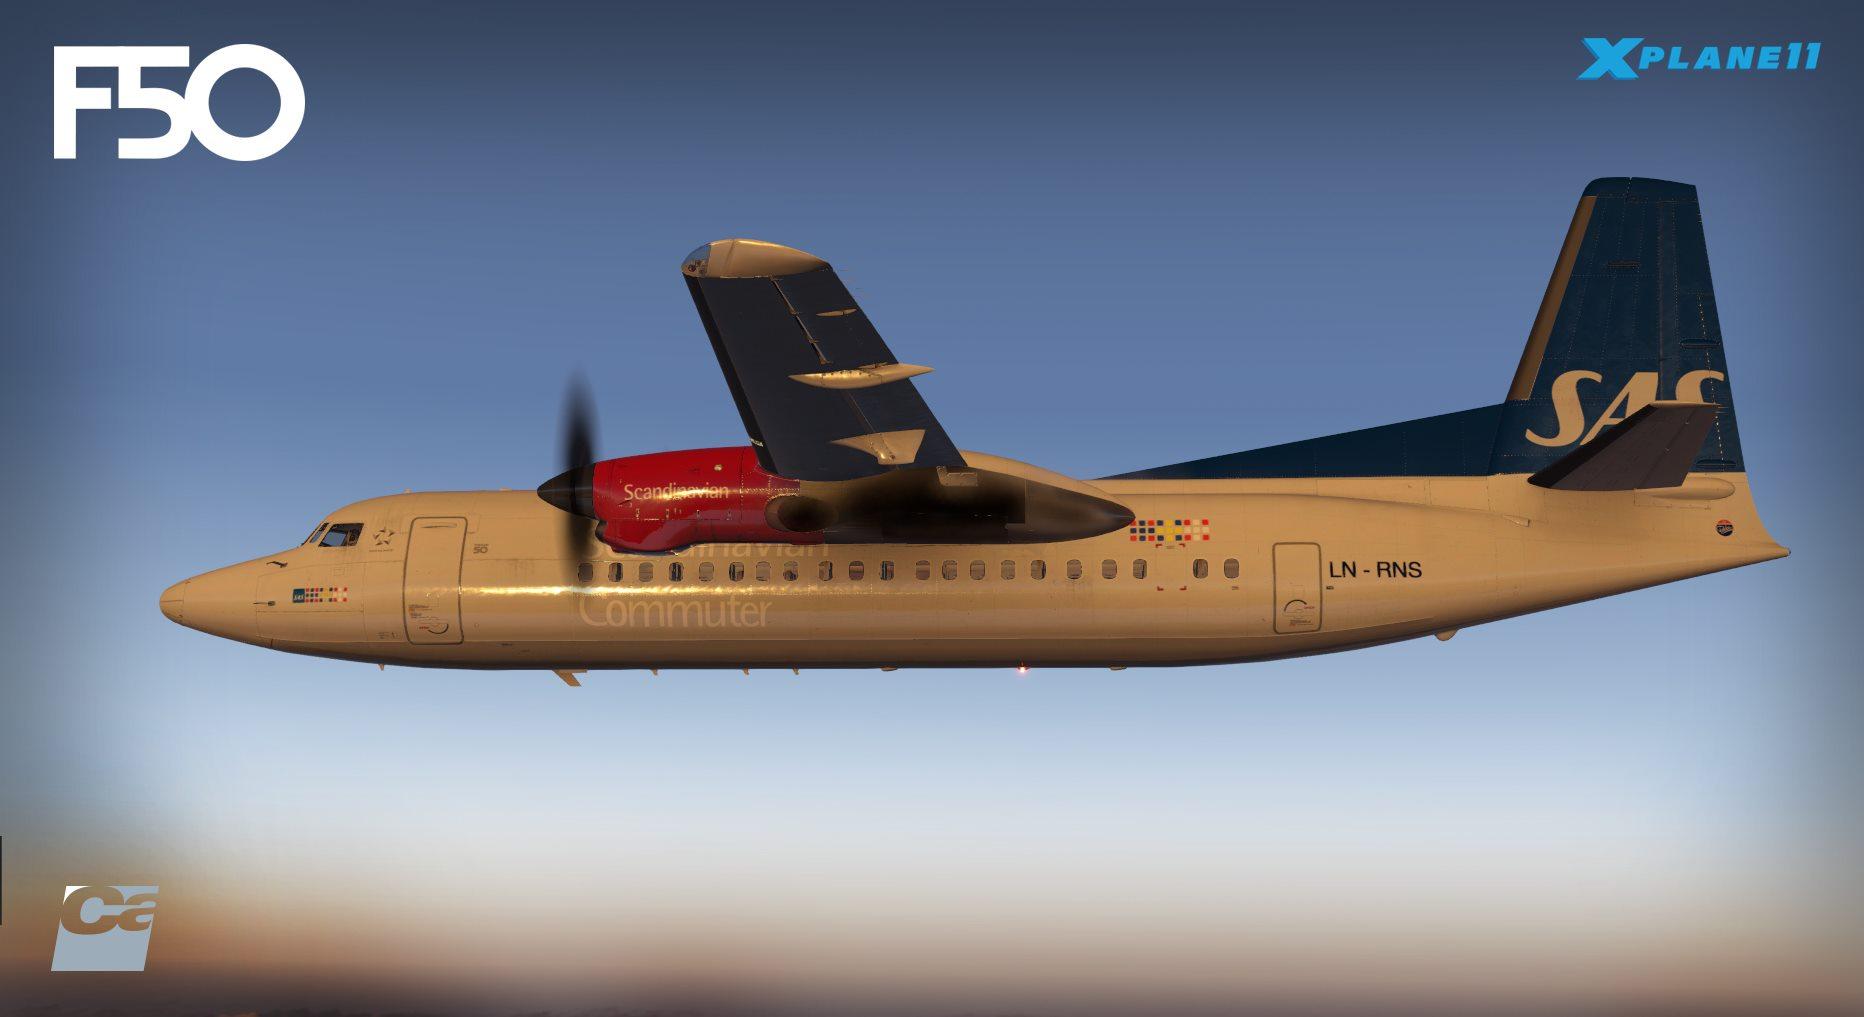
Plugin Update : WebFMC Pro v1.5.0 by Green Arc Studios The latest update to the excellent WebFMC Pro v1.5.0 plugin is not a large one, but it is highly significant. This version adds in the default Laminar FMC to the usable selection of aircraft FMS systems to the user. The WebFMC is a plugin that allows you to use a FMC (Flight Management Computer) on an external screen via a web browser. That is an another computer or tablet. It is a remote tool, but a very beneficial tool and even a powerful one in programming in route and performance data and following the set aircraft route in flight and in mirroring the aircraft's built in FMS (Flight Management System). Added into the functionality is a load of features in the use of the FMC on another screen.... and yes I am a huge fan. Any plugin or tool that you use is highly valuable if you actually use it, if not it is a waste of money. So for me the value of this plugin is that I use it all the time and in fact most times that I have to programme in a route and and aircraft performance and preferences data. There are two versions available and the PRO version is now listed with an impressive 16 aircraft, but three in the list of the Zibo Mod 737-800 and the 737-900ER/700 Ultimate are also available in the Free Demo version. WebFMC Pro v1.5.0 This version is significant because it breaks the boundary in the aircraft already listed into another dimension. Before it was the actual FMC per aircraft, but here in this version has been added in the default Laminar Research FMC... that fact opens up the plugin's scope to cover any aircraft that uses or has installed the default FMC feature. These aircraft include both FlyJSim's Boeing 732 and 727 by FlyJSim, KingAir 350 by Airfoil Labs, Challenger 300 by DDen, many of the aircraft from Carenado and a lot of others - the list now is really open-ended in the use that any developer that adds in the default X-Plane FMC will now be be automatically added to the list. The full current v1.5.0 list is: The complete list of supported aircraft / FMCs with version 1.5.0: Default X-Plane FMC with all aircraft that use it NEW! SSG E-Jets Evolution Series (both variants) SSG 747-8 Series (both variants) FlightFactor A350 XWB Advanced (old style MCDU) JARDesign 330 (requires v3.1r2+) JARDesign 320 (both v3.2x and new v3.4+) ToLiss 319 FlightFactor A320 Ultimate FlightFactor Boeing 757v2 (all variants) FlightFactor Boeing 767 (all variants) Rotate MD-80 IXEG 737-300 EADT x737 (x737FMC required) Zibo Mod 737-800 737-900 Ultimate 737-700 Ultimate Default X-Plane FMC This may not sound great, but I find the current Default X-Plane FMC a bit average? Yes I will admit I have been very overindulged with some very exceptional aircraft FMC's. X-Plane as a simulator and 3rd party addons have come a long way in this area since the first in the JRollon CRJ-200, and still I am slightly flummoxed in that the same developer in Phillipp Ringlar actually programmed both the first and the default FMC's. There is no doubt the Default X-Plane FMS is extremely basic, but that aspect is fine because as there is a wide variety of aircraft it has to cover, it can't do the deeper data for aircraft performance or preferences... and I get that. But my issue is that it is currently quite average in loading in the basic and required SID (Standard instrument departures) and STAR's (Standard Terminal Arrival Route ). I create most of my flightplans in SimBrief of which I wholly recommend and it is free. And you can import the created (Flightplan) route directly into X-Plane and it's FMC. But in most cases the required SID is missing, so the aircraft usually goes direct (DCT) to the first waypoint. Worse are the STAR's in that they are usually again a very basic import with a lot of significant waypoints missing, I will note that a lot of the STAR approaches are just plain weird like at EDDM - Munich so they do require editing. Of course you have to route edit even the very best of FMC systems, that is a given, but the Default FMC is just too basic in even laying out any selected SID or STAR route, yes you can select them, but they usually are nothing like the actual SID and STAR you are loading in, and consistently they send you directly to the runway threshold. An important note at this time is to make sure all your navigation data is collated across the board with both the Simulator Nav Data and the Aircraft Nav Data are the same. Yes it costs a little to do this via either a Navigraph (recommended) account or Aerosoft's NavDataPro data cycle. I found the IXEG B737 Nav data so out of date I was landing in fields far off the runway. If short of funds then only download the data two or three times a year, but it is the collation of all the nav data across all aspects of the simulator that is important, not the age of the nav data (in other words it is all the same). So currently WebFMC Pro is just about invaluable for fixing up these nav data errors in the default FMC... here the plugin is now available in the lovely Fokker F50 by Carenado via both the Default FMC and WebFMC Pro. Style of the FMC is based on a facia of a Boeing like with the Zibo 738. Here we have a route from EGCC - Manchester to EKYT - Aalborg. Departure for MCR is actually DIRECT to DESIG via SID DESIG 1S, so even the default FMC could not get that wrong? But at the other end at Aalborg it was a mess of an arrival route, Problem is that there are no arrival STAR's for EKYT RWY 26R? but there is an RNAV chart via insertion waypoint BAKIT. First bonus of the WebFMC Pro was that I was able to input data via the keyboard directly, which you can't do in the aircraft version and even in the pop-up, second is that the data is fully accessible on your desktop, in this case set out between SimBrief (right) and the Navigraph Charts (left), so no head movements back and too from another another screen of which you would have to constantly do in the aircraft, so it is like a sort of work-desk arrangement. So inputs of the last official route waypoint of KEMEG to VABUT to BAKIT and then DCT to RW 26R, of which gives us a very nice approach route to the EKYT runway. A bigger bonus for me and I accept that you will need the Navigraph Chart Application is that the Carenado F50 has no PLAN mode? This mode allows you to check your route directly out of the FMC on usually the NAV screen of the aircraft. So if you input in the same navigation waypoints into the Navigraph Chart App you can see if you got the routing correct. You can input the full route into Navigraph directly from SimBrief, but your edits can be checked also in the Navigraph App directly. Nothing is worse in not knowing if your arrival route is wrong, and once the route is completed, a save in the default FMC will keep all your edits in place. So I found WebFMC Pro is excellent in working with this basic FMC, it actually adds in functionality, but also makes it easier to use. On the aircraft WebFMC Pro will only adjust the left FMC, the right side unit is not editable. That is the only aircraft(s) addition to WebFMC Pro v1.5.0, but there is another change to note. JARDesign A320neo This aircraft was part of the original release list for WebFMC Pro. But JARDesign have completely redone the aircraft's MCDU or Mulifunction Control Display Unit. This is from version JD320-V3.4R2, or v3.4+. The original MCDU still works, but you can use this WebFMC Pro version with the newer updated MCDU as long as you update to the JARDesign v3.4+ version. Again the advantages on the work-desk setup are excellent... however here you do now have the advantage of the PLAN mode on the MCDU as a guide to double-check the arrival route. The JAR A320 has the larger, newer PW1100G Engines as well, and don't forget this is still one of the most popular payware aircraft in X-Plane. And v1.5.0 also comes with Enhanced FMC key mappings (as an option in the menu) and Improved screen scaling for cockpit builders. Summary This WebFMC Pro is a great plugin tool that can be used in a browser on another computer or a tablet. It is a remote tool, but a very beneficial and even a powerful one in programming in route and performance data and following the set aircraft route in flight in mirroring the aircraft's built in FMS (Flight Management System). This version v1.5.0 adds in the versatility of now using the Laminar Research Default FMC on a remote screen or tablet, other changes is the addition of a new MCDU for the JARDesign A320 neo in the newer v3.4+ version, the older MCDU works as well. And enhanced FMC key mappings with Improved screen scaling for cockpit builders are also noted in this new version. By and large this is not a big update but still a significant one. The option to use your fingers directly on a tablet screen to programme a FMC is not to be underestimated, but my work-desk arrangement is a great setup to layout routes and input data, performance and routing quickly. My biggest choice here is how good it is for editing and creating routes with both the SimBrief and subscription Navigraph Chart applications, all brilliant tools to create the most perfect routes to fly with... Highly Recommended _____________________________________ Yes! WebFMC Pro v1.5.0 by Green Arc Studios is NOW available from the X-Plane.Org Store here : WebFMC Pro Price is US$19.99 The v1.5.0 update is free to previous purchasers of the plugin, go to your X-Plane.OrgStore account for the new version. Access CDU / FMC of select X-Plane 11 airplanes via any modern web browser running on your PC or mobile device over local network. Quick and easy access to the FMC Get easy access to the FMC: quickly edit the flightplan, monitor flight progress, set up your approach and do all the typical work of the pilot without having to move around in the cockpit, even if the plane doesn’t support FMC as a popup natively - on the same PC, or different monitor, tablet or phone - in fact you can use multiple displays at the same time! Make pilot tasks easy and comfortable Enjoy external views during cruise while monitoring flight progress on separate screen or take a quick look at your phone to verify calculated landing speed with just a glimpse of an eye during busy time on approach. Make flying complex SIDs / STARs easy as you can focus on the important flight parameters while having overview of the constraints all the time. Take your mobile to the kitchen as you cook a dinner during a long haul and never miss T/D again! Convenient to use Use physical keyboards on PC with extra keys such as Prev/Next page mapped to keyboard keys for easy access. WebFMC scales dynamically to fit any display or window size and can look as native app on mobiles by using browser's "Add to home screen" feature. Aircraft support WebFMC Pro supports a growing number of 3rd party aircraft starting with New: Default X-Plane FMC (requires X-Plane 11.35+) FlightFactor A320 Ultimate FlightFactor 757v2 FlightFactor 767 ToLiss 319 JarDesign 320 (both now for v3.2x and new v3.4+) Rotate MD-80 IXEG 737-300 EADT x737 (x737FMC required) Zibo Mod 737-800 737-900 Ultimate JARDesign A330 SSG E-Jets Evolution Series SSG Boeing 747-8 Series FlightFactor A350 XWB Advanced (old style MCDU) 737-800 Zibo Mod* 737-900U Ultimate* 737-700U Ultimate* * Available on the free demo WebFMC plugin Requirements: The WebFMC plugin requires X-Plane 11 running 64-bit Windows 7 operating system or newer Mac OS 10.14.x (Mojave) Ubuntu Linux 16.04 LTS or 18.04 LTS (64-bit) Web Client The CDU can be displayed on any modern and up-to-date web browser with JavaScript support. We recommend the latest versions of Google Chrome on PC or Android and Safari on iOS. No internet connection required, remote device needs to be on the same local network as X-Plane PC. Support for WebSockets RFC 6455 standard is required which implies at least iOS version 6. Current and Review version: 1.5.0 (Sept 1st 2019) Not required but highly recommended is SimBrief (Free) and Navigraph Charts (Subscription) ______________________________________________________________________ Plugin Update Review by Stephen Dutton 3rd September 2019 Copyright©2019 : X-Plane Reviews (Disclaimer. All images and text in this review are the work and property of X-PlaneReviews, no sharing or copy of the content is allowed without consent from the author as per copyright conditions) Review System Specifications: Computer System: Windows - Intel Core i7 6700K CPU 4.00GHz / 64bit - 16 Gb single 1067 Mhz DDR4 2133 - ASUS GeForce GTX 1080 8Gb - Samsung Evo 512gb SSD Software: - Windows 10 - X-Plane 11.33 Addons: Saitek x56 Rhino Pro system Joystick and Throttle : Sound - Bose Soundlink Mini : SimBrief (Free) : Navigraph Charts (Subscription) Plugins: Environment Engine by xEnviro v1.07 US$69.90 : WorldTraffic 3.0 Plugin - US$29.95 : JarDesign Ground Handling Deluxe - US$14.95 Scenery or Aircraft - Fokker F50 by Carenado (Carenado) US$39.95 - Airbus A320neo by JARDesign (X-Plane.OrgStore) US$49.95
-
Behind the Screen : August 2019 In reference to the first six months of 2019, August slowed down a little for us to all catch our breath. As the northern summer got hotter, the releases got slower, but that does not mean X-Plane per se is slowing down as we have a huge amount of releases now well into their development and expect a very big September and October for a lot of significant releases, with Carenado's Fokker 50 a great way to kick you up and into the next gear. FlightFactor are about to deliver their Flat Panel Display System avionics package for the FF Boeing 757, with the Boeing 767 version obviously coming soon after and making these the most comprehensive Boeing's yet for X-Plane. But I am going to be honest with these aircraft, sensational as they really are they never return the full satisfaction level I really want from them or what they can really deliver. The biggest boundary in connecting deeper with them is the mostly in the set up areas, and in the loading of the passenger, cargo and weights. Spending a lot of time in setting them up correctly, you mostly find that when you land at your arrival airport is that somewhere from the point of loading on your passengers and cargo to the point of unloading them, you have lost most of them enroute? Consistency are big issues with these aircraft, and it is all in the interface of setting up the aircraft, it is odd, even damn right frustrating to use, worse it keeps on reverting back to the default settings and the weights and preferences conflicting with the settings in the FMC setup and the A320 Ultimate can be the worst offender. In most cases I just give up, which is not the way I really want to do my simulation, because at the loading and at the end of the flight I want to have realistic numbers to reflect upon, okay even gloat that I got a pure realistic simulation out of my flying. So the point is are we in need of a 3rd party plugin driven loading master, a bit like SimBrief for loading aircraft, where as we get first a standard loading pattern that covers all aircraft and all developers, and don't get me wrong a lot of developers have done brilliant Weight & Balance systems, but do we need a standard and to cover a lot of the aircraft that don't have a highly detailed W&B sheet (like most of Laminar's default aircraft), personally I don't need another plugin to maintain like a hole in the head, but this one I would welcome. I had another so called moment mid-August in that I felt the simulator wasn't as healthy as it should be, framerates were dragging and down into the lower twenties, X-Plane ran, but again it didn't feel right, I have also had a lot of moments were I was getting odd wind forces throwing the aircraft around on strange vortices on a perfectly clear calm day, ultimately what it all felt like was that older preferences are getting mixed up with current ones. I have had my suspicions all year on this aspect and it seems to be a creeping in code mismatch. The problem I feel is in the complexity in many different parts or mostly plugins that are using or target the same areas. A weather plugin for say the weather radar is creating it's own data preferences that a weather environment plugin is doing the same, and both are loading in the slightly different data information (METAR) for X-Plane to absorb and remember the weather data can be updated as early as every ten minutes or so. So the simulator is taking the data from both and creating a hybrid situation, worse is that the reread preferences are being rewritten in this hybrid code so you get this sort of flu virus that is changing to it's own RNA (for the unwashed, Flu viruses will replicate badly because of each time they replicate the code is not perfect, so they can change shape because of the damaged replicated elements and that is what makes them so lethal) just waiting for you to reopen the simulator to a strange flying environment. It is also a gradual thing, not simply something that happens overnight but over months as the code get more and more confused. Obviously the fix is to dump those preferences and start with a clean sheet, and that always works, but again there are now a lot of preferences and even now the more dangerous hidden ones you have to cover to reset, each developer to their own is fine, but when you start to add them in all in there together it starts to get seriously complex, this "Data Bleed" as I call it maybe an area to be aware of in the future. I am already heavily juggling plugins that will work together and the ones that don't and my plugin folder is quite bare compared to many of yours out there, but a few aircraft in ToLiSS A319, IXEG B737 Classic and the FF A320 Ultimate will only work/fly cleanly with only certain plugins installed, so you have to swap them around beforehand to fit that required simulation, it is important that you have to make a list and follow the install perfectly to make them available. Messy, well yes but you really don't have any other choice, the worry is that as aircraft get more and more seriously complex, then the problems of complexity and conflict can get far more worse and not better, are you going to soon just get to want to get back to the older X-Plane9 simplicity, in other words... just load it up and fly. And complex it really is getting. The basic X-Plane simulator is fast approaching its 100,000 items to load, up from a 23,000 load items when I started, but that still is the basic system before anything else is added in there, to run X-Plane it is becoming like to keeping twenty spinning plates moving in the air at one time, if you are lucky they all will spin together, but have a bad day, and it can get seriously complicated just to find that odd wobbling plate and get it spinning again, so again like a mantra on these pages, you need to keep it simple to get the best out of the simulator. Microsoft put out their roadmap for the coming new Microsoft FlightSimulator 2020, and you can become an "Insider", and officially the development team expect a beta testing version out soon with "Build Programs" and a lot of "Program Updates" and it is all very professional. So do this and tick-off that... anyone who follows big developments, like our own Laminar development threads will tell you, that hitting project dates and ticking off targets will just be asking for trouble, at least Laminar are extremely open in setting targets, and mostly hitting them, but as they warn repeatably they can also miss targets just as easily as well and beta's can run sometimes a third of the year in bug fixes and changes. Simulators as noted above are extremely complicated bits of code to try to get it all to work seemlessly together. In a box or regional situation that is fine, but once you start adding in the addons and third party plugins then the real problems start. Try weather or environmental effects, has any one really pulled that one off yet in X-Plane, not really, ATC, no again, traffic, well we have a few and WorldTraffic3 is pretty good but complex, but Microsoft are promising all this and far more straight out of the box, I hope they achieve it, that would be golden for simulation, but my gut and head currently says otherwise, as one day Uber promises to make money, and so does Tesla... In the same theme Laminar hit a landmark just only this week. For the first time a 3rd party aircraft flew in the Vulkan API. The significance for the simulator is really like the first flight of a new aircraft design. The aircraft was the ToLiSS Airbus A319, which is a very complex coded aircraft and Laminar's response was "a buttery smooth landing with no stutters", now that is advancing the simulator and a real breakthrough for the rest of us. MilViz was again in the news in August and if you have been following the dramas of the developer and his absurd crowdfunding scheme that failed, the announcement was this time that he has now given up X-Plane as a simulator altogether. Yes we are not going to get anymore aircraft from MilViz. I have detailed and spent already far too much time on the MilViz saga in past Behind The Screen editions, but the full saga is one to be noted on how not to enter a credible market (X-Plane is actually a bad market according to MilViz) but the point is I gave him the benefit of the doubt and checked out his Cessna T310R. Many users love it, but I was underwhelmed, it felt old and in this light twin category you are up against the very best with Carenado, vFlyteAir and Just Flight and even Aerobask, and they are all exceptional developers, more odd is that MilViz actually collaborated with vFlyteAir, so how could it all go so wrong, personally again the old issue is true, you can't mask over old designs against the current X-Plane ultra quality aircraft, maybe it would have been accepted far better back in the X-Plane10 era, but X-Plane11 has now certainly lifted the game to a far higher standard and dynamics. So I think overall it was that like a lot of FlightSim developers, in that they just waited far too long to get into the X-Plane market and by the time they did... we had then significantly moved on. A site note, In the middle two weeks of September and then again in the middle of October the site will be slow with updates and I will be not posting as frequently as I have to move homes, so my attention will be required elsewhere, certainly if something significantly comes out I will make a big effort to cover it, but if I have no broadband or they are extremely slow in reconnecting (which they can be), I won't be able to post, my apologies but you simply can't avoid life. See you all again next month Stephen Dutton 1st September 2019 Copyright©2019: X-Plane Reviews
-
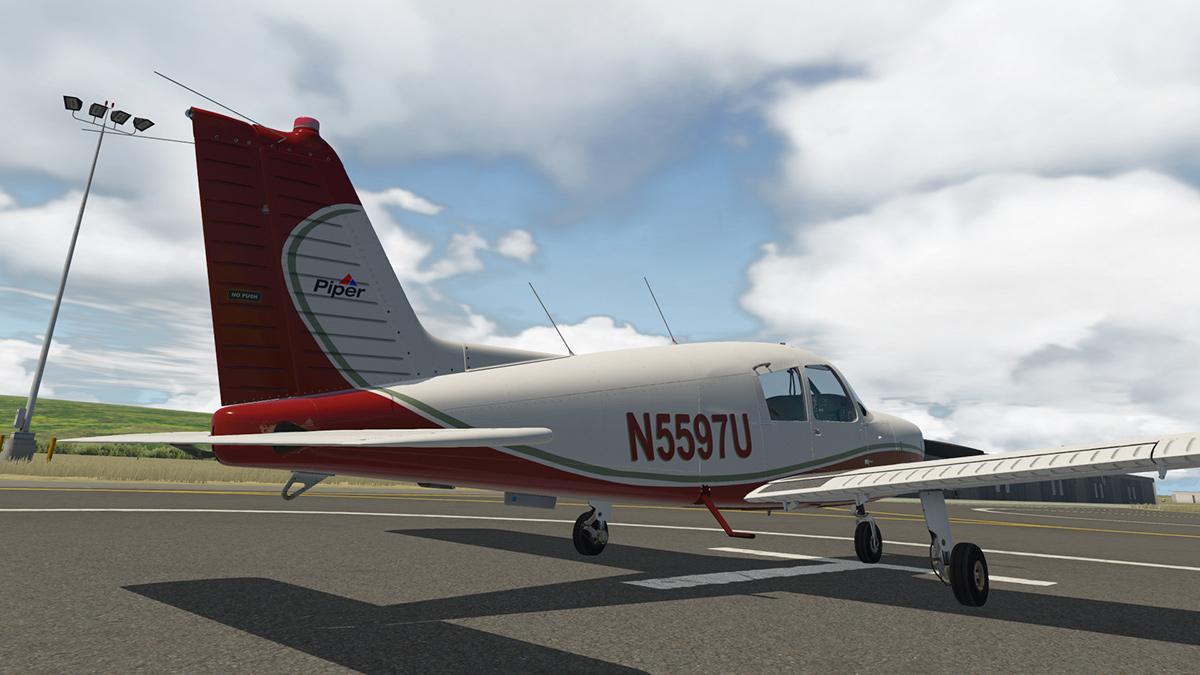
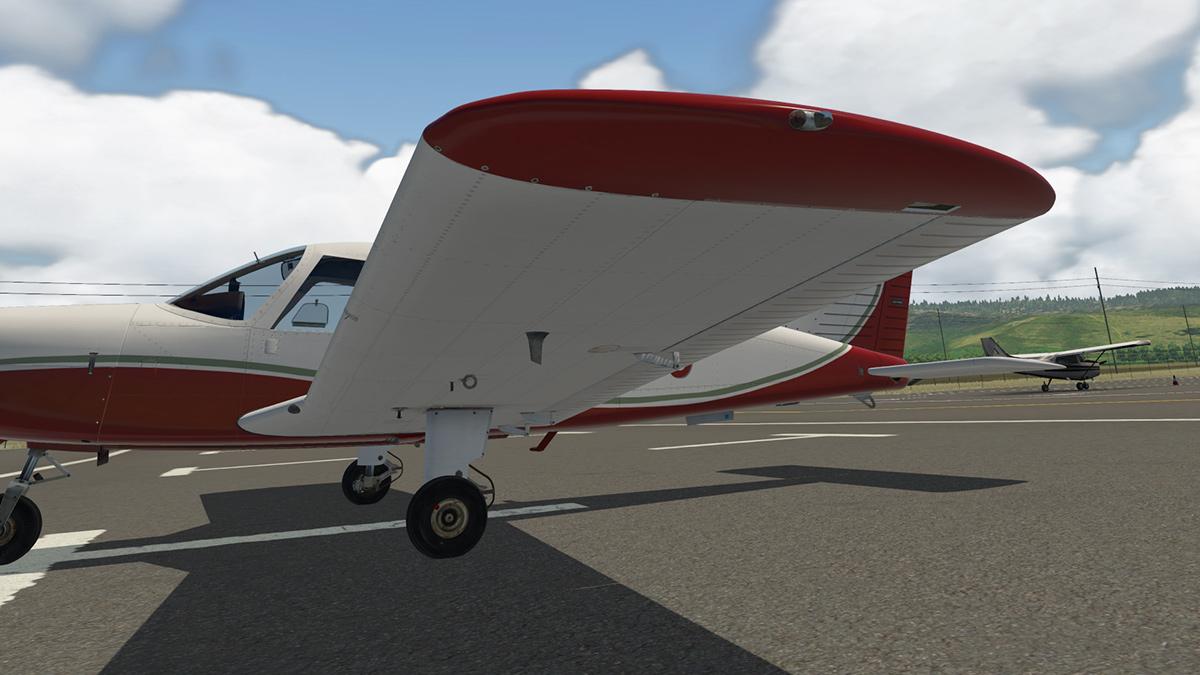
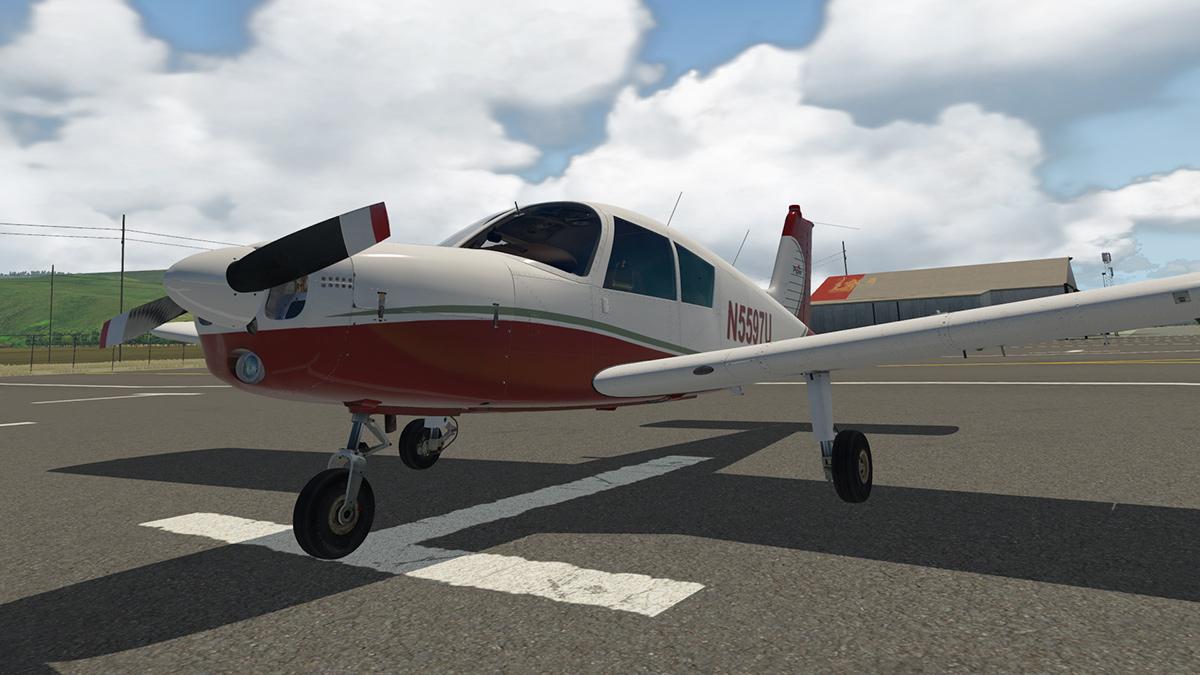
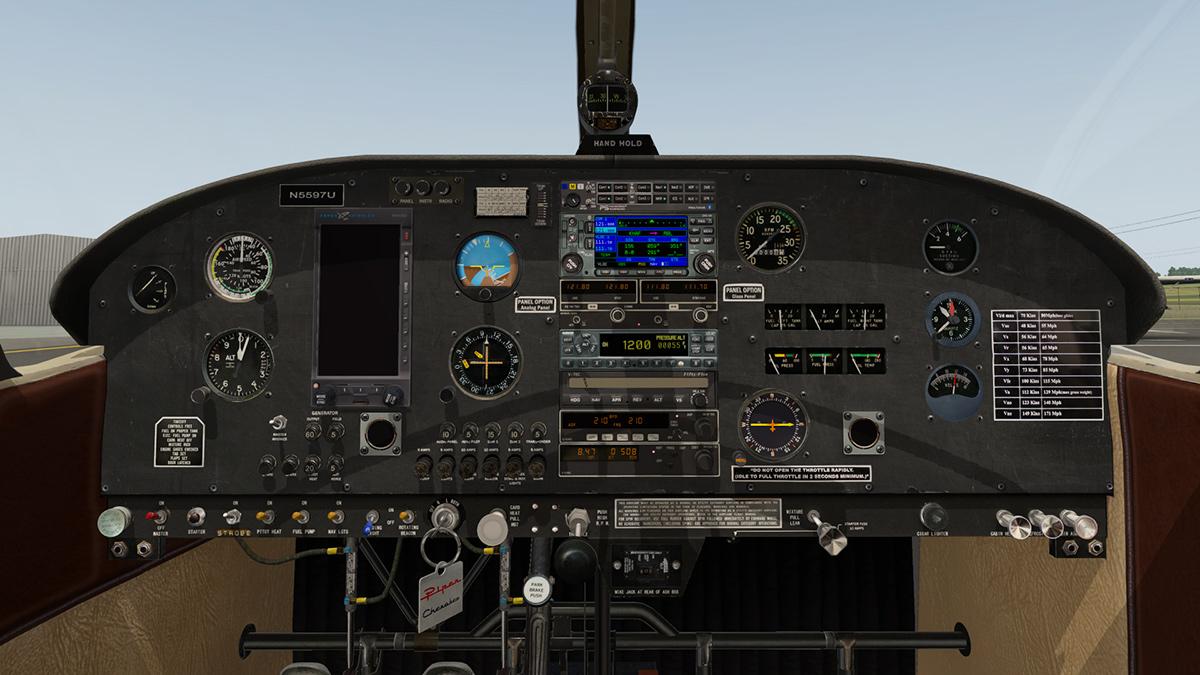
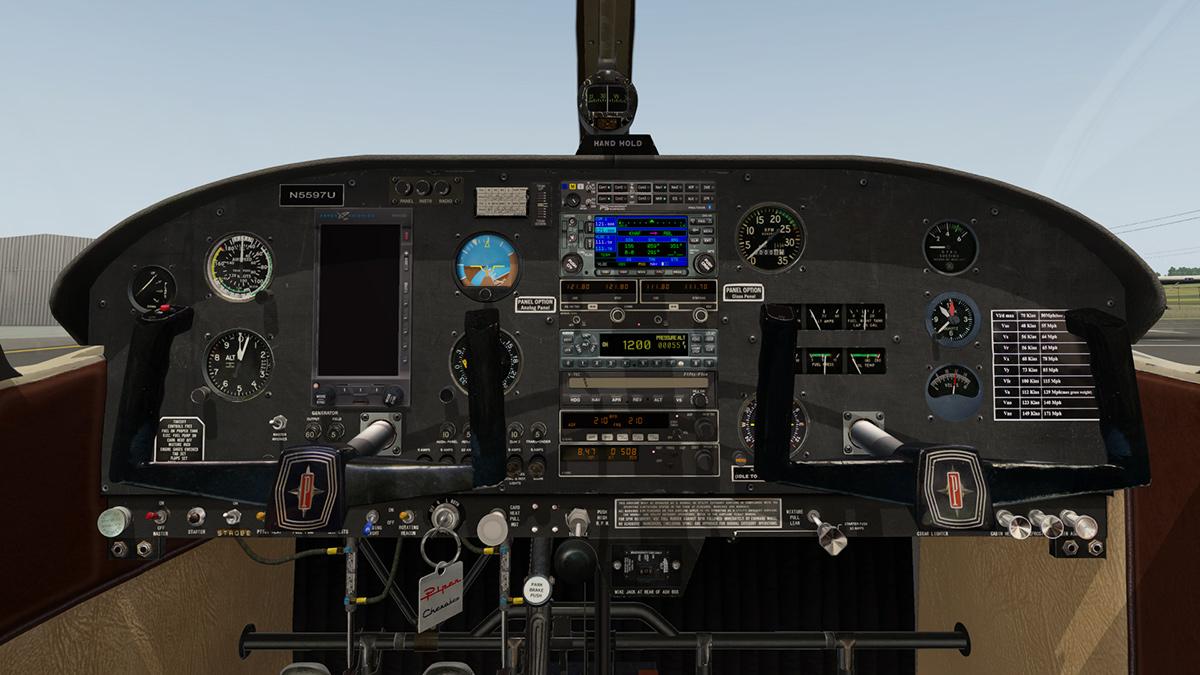
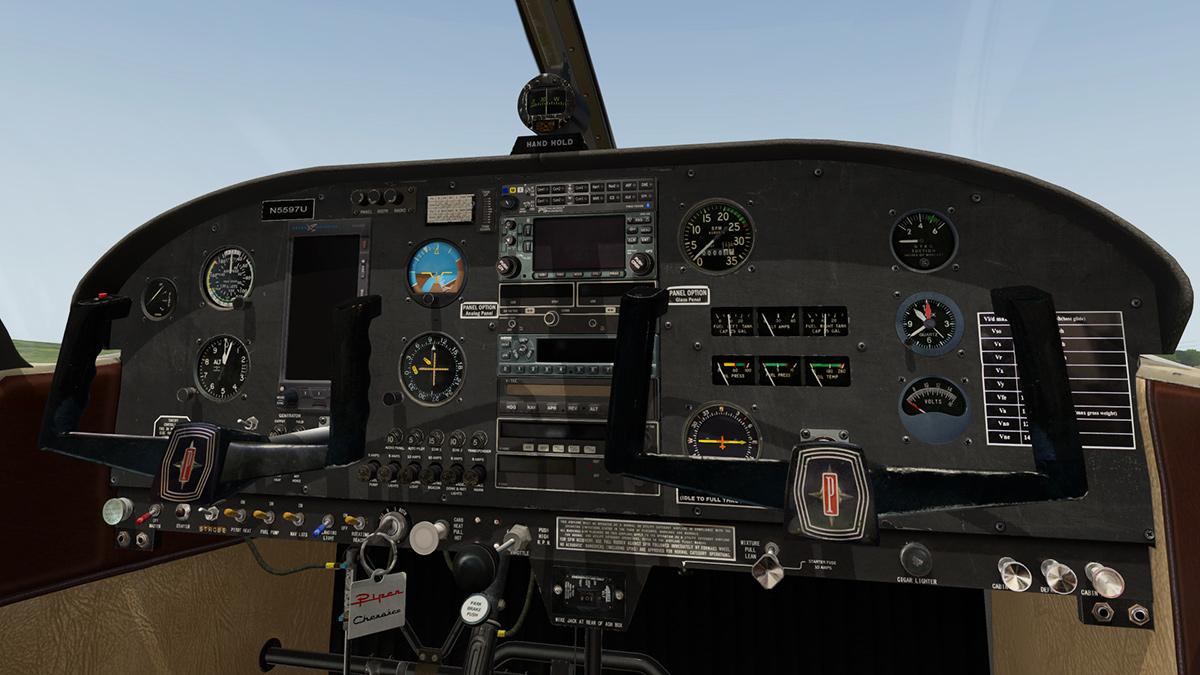
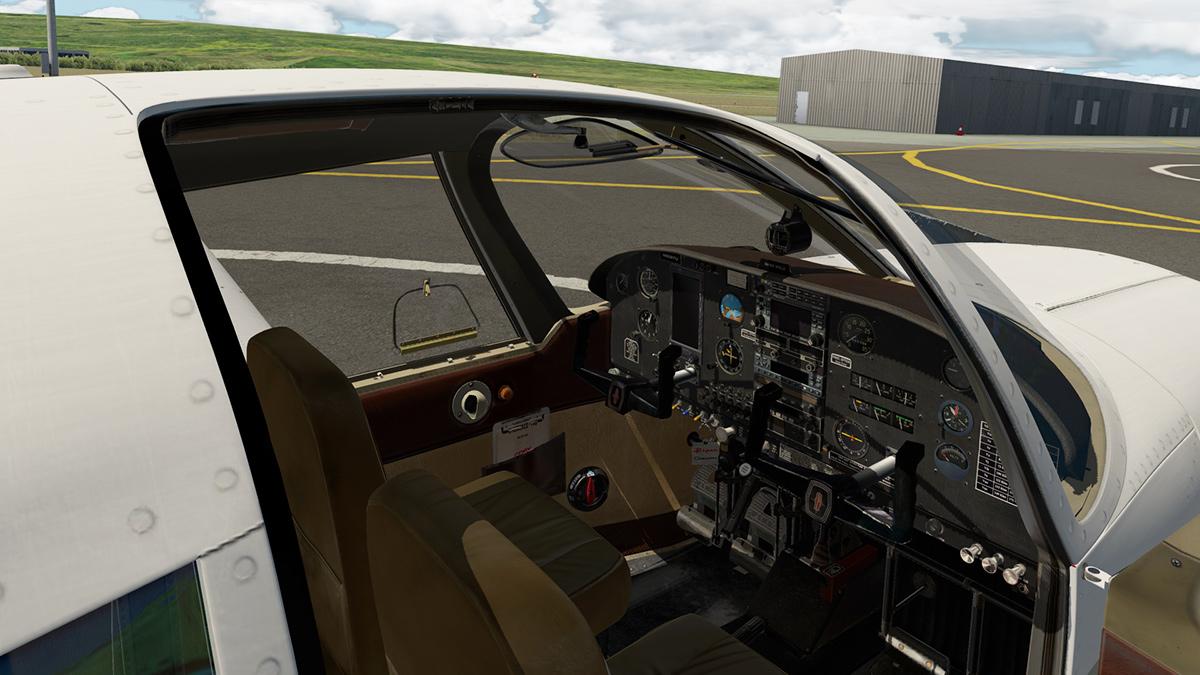
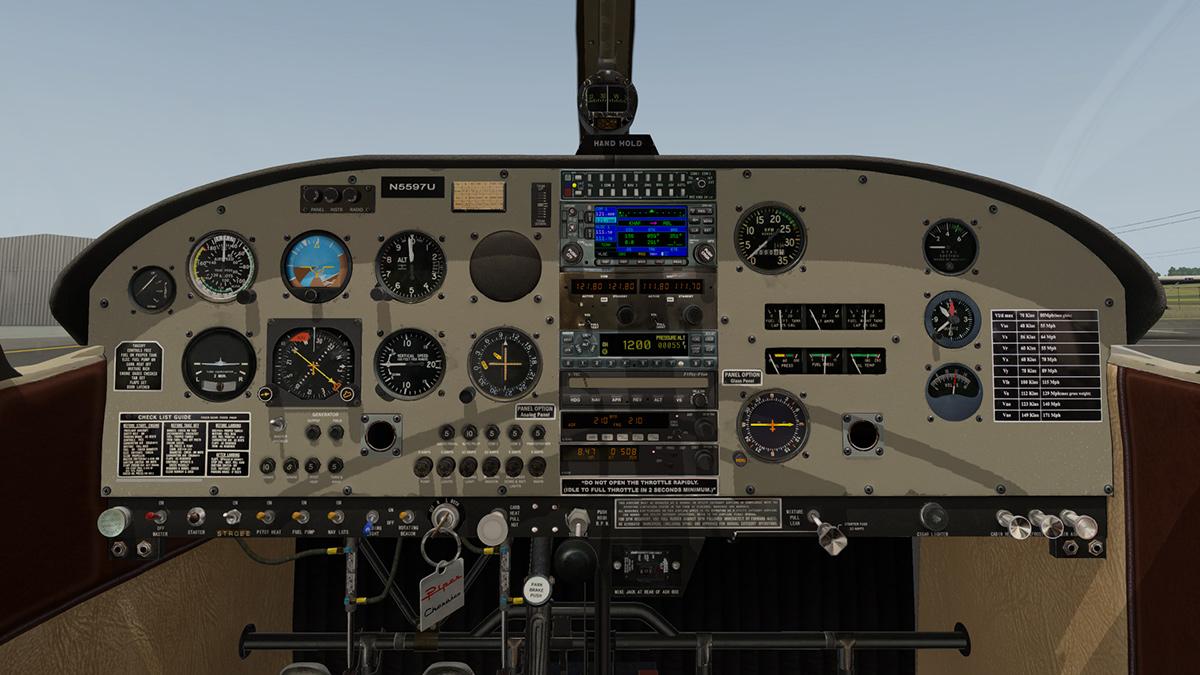
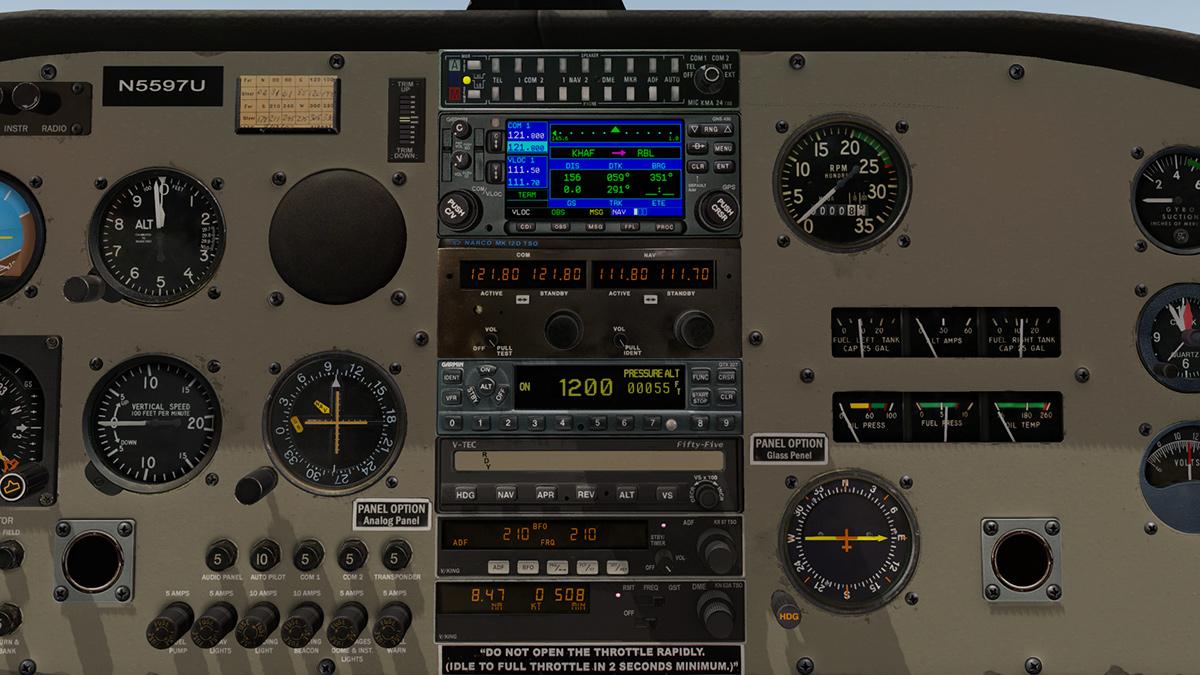
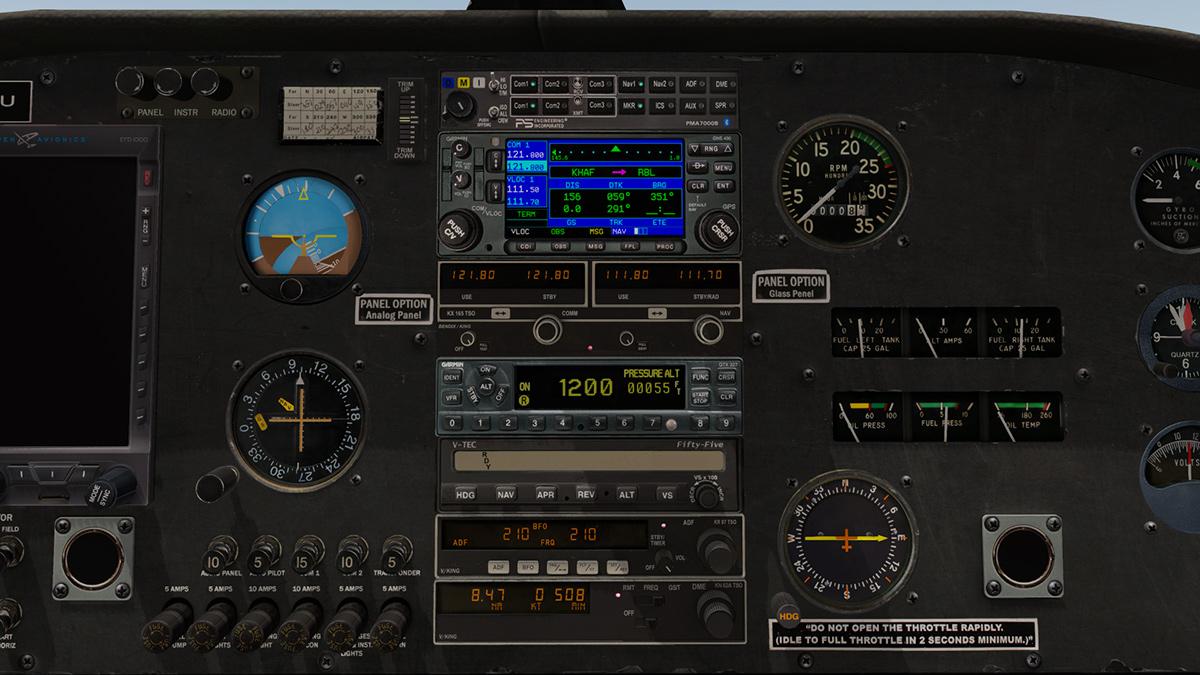
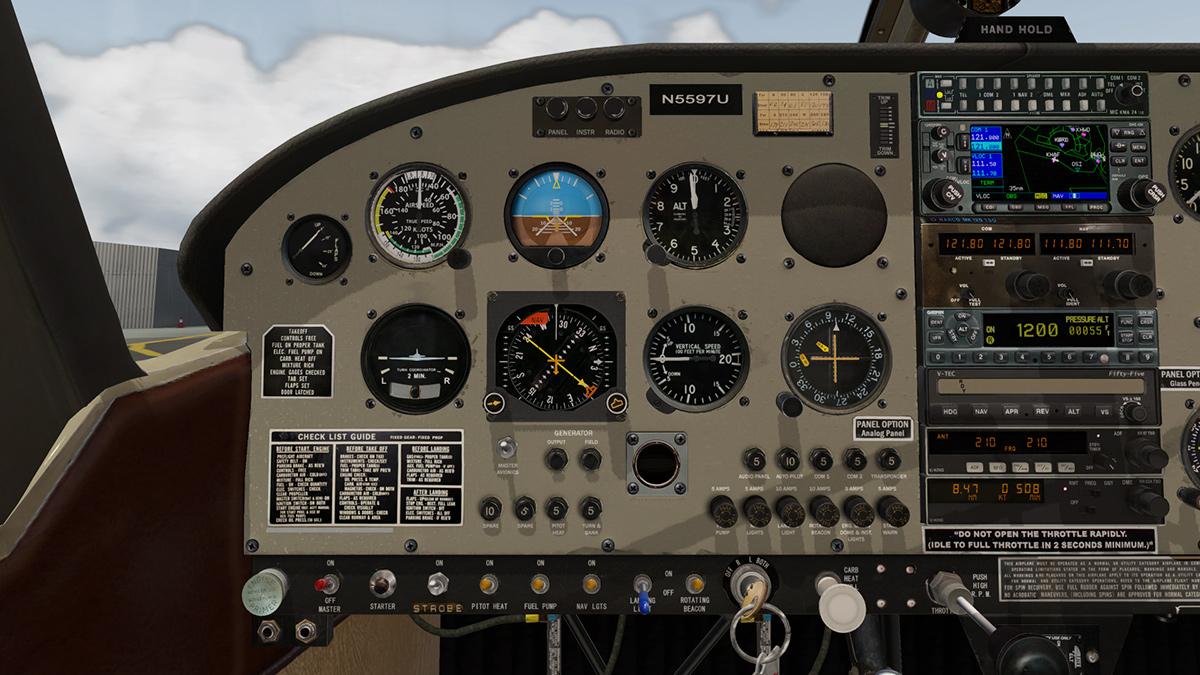
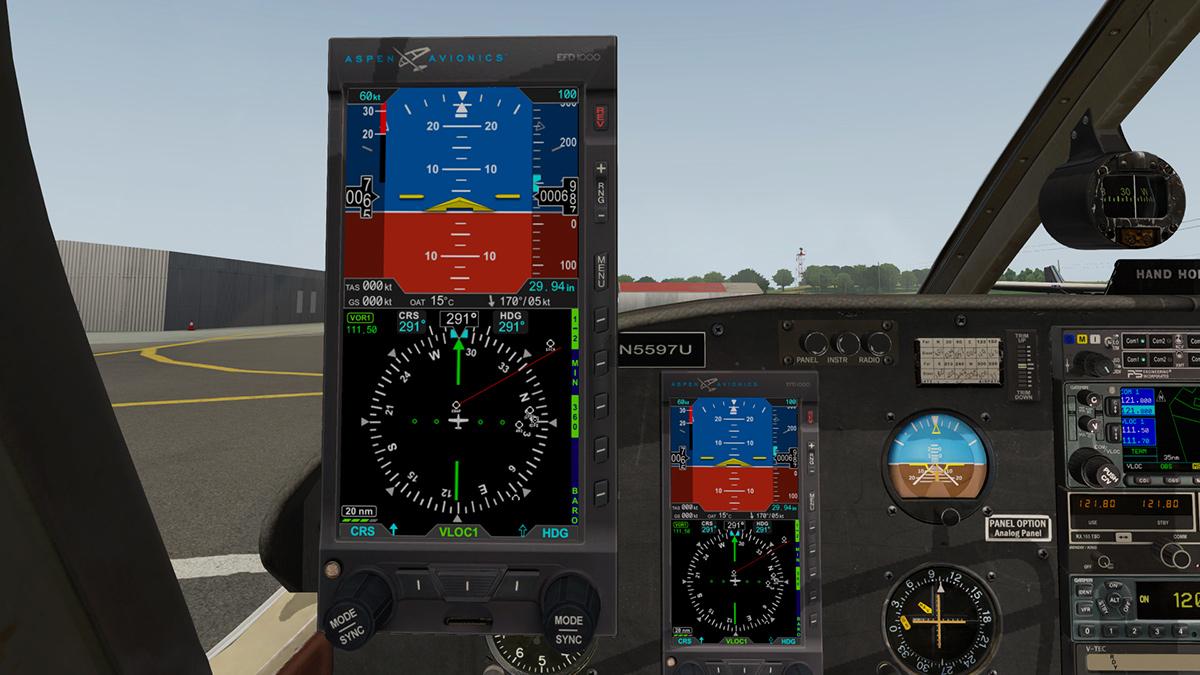
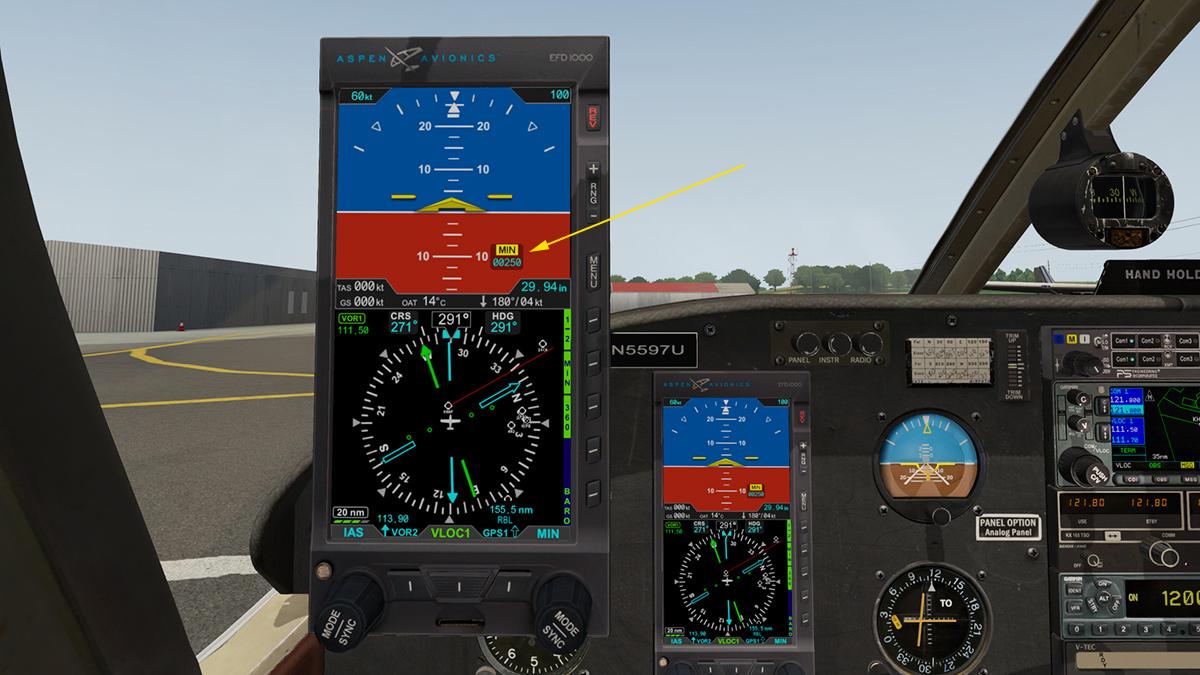
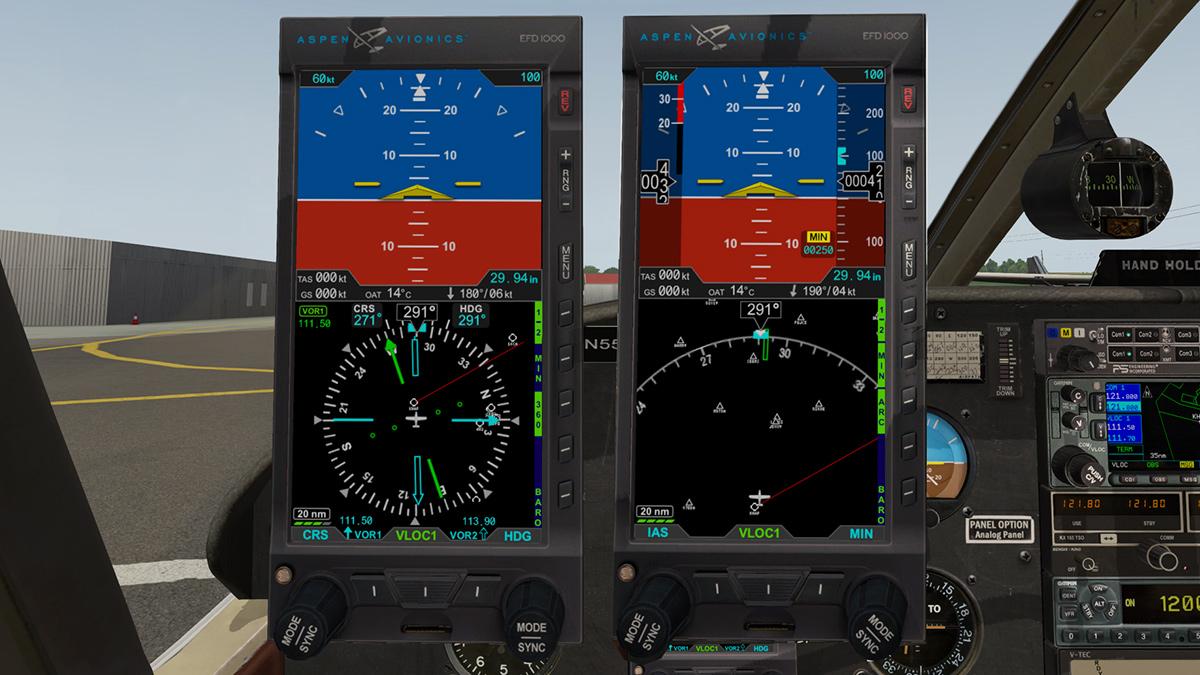
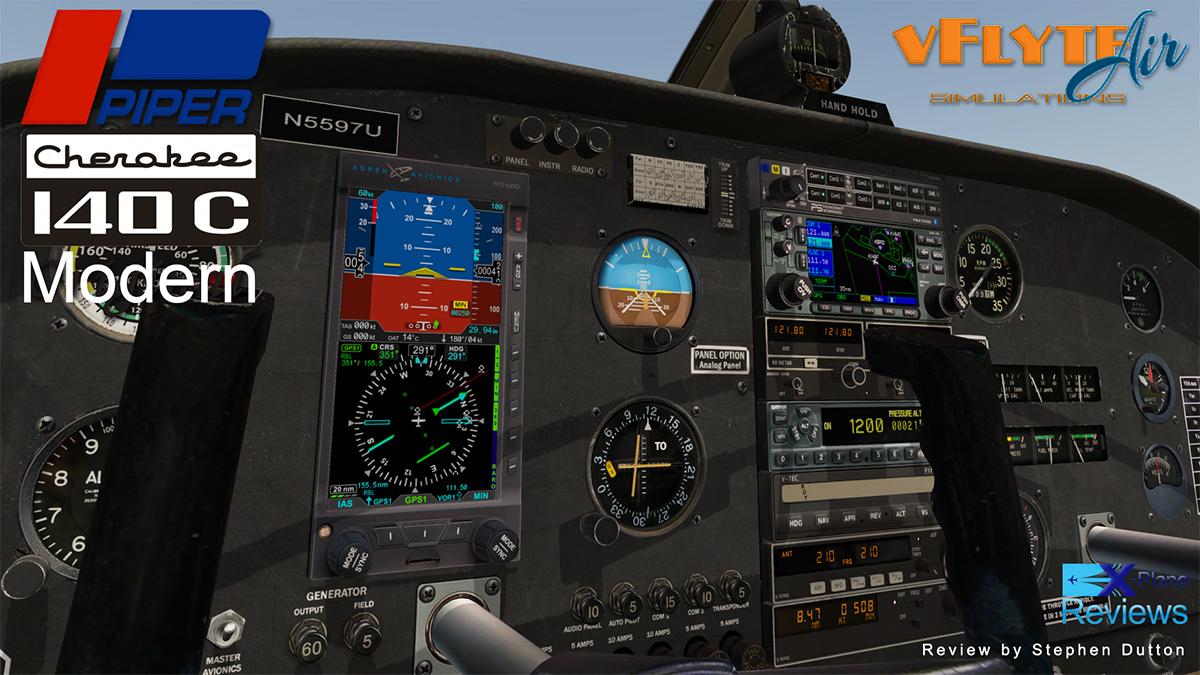
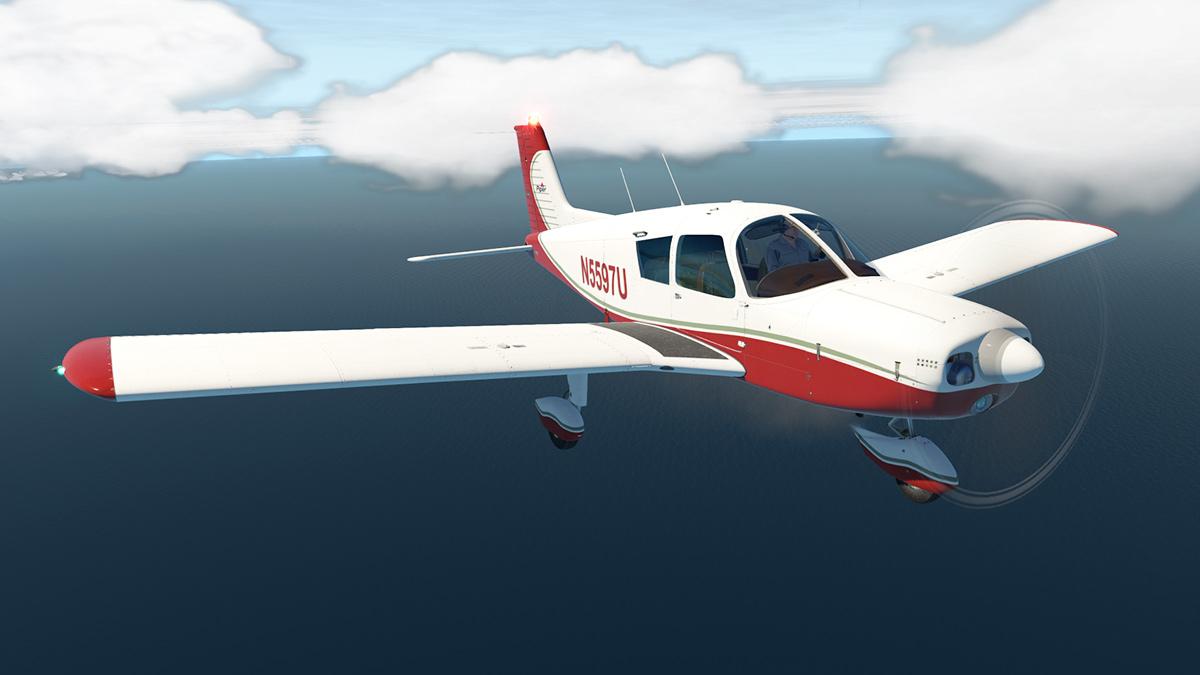
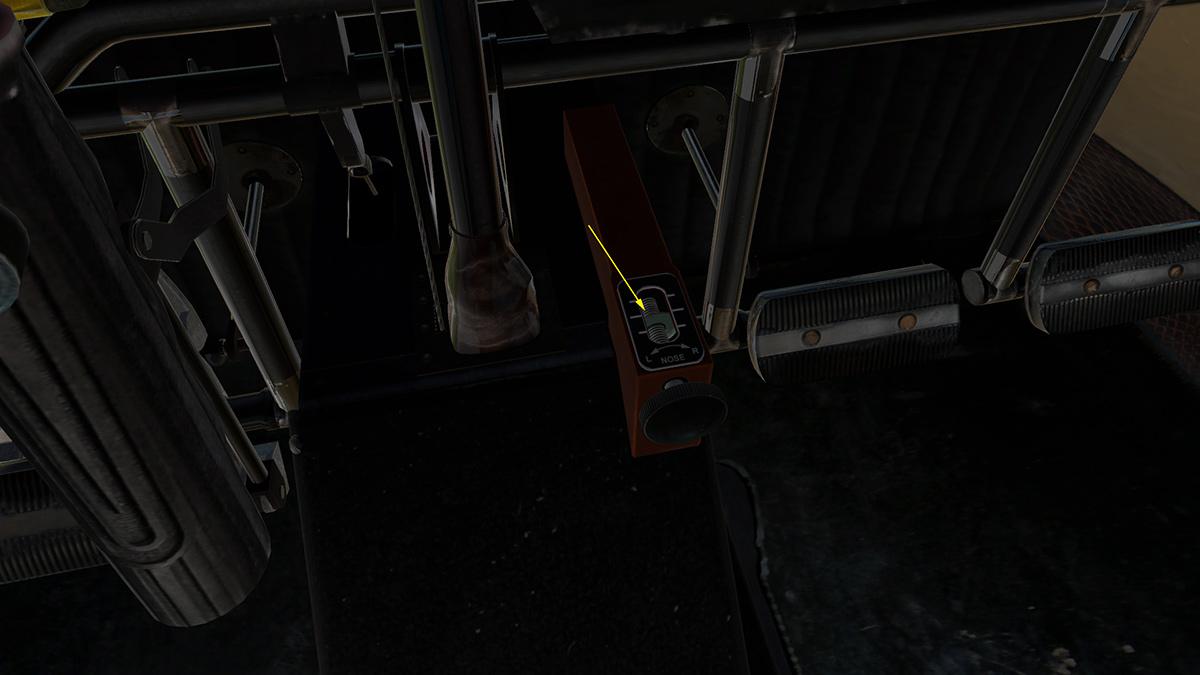
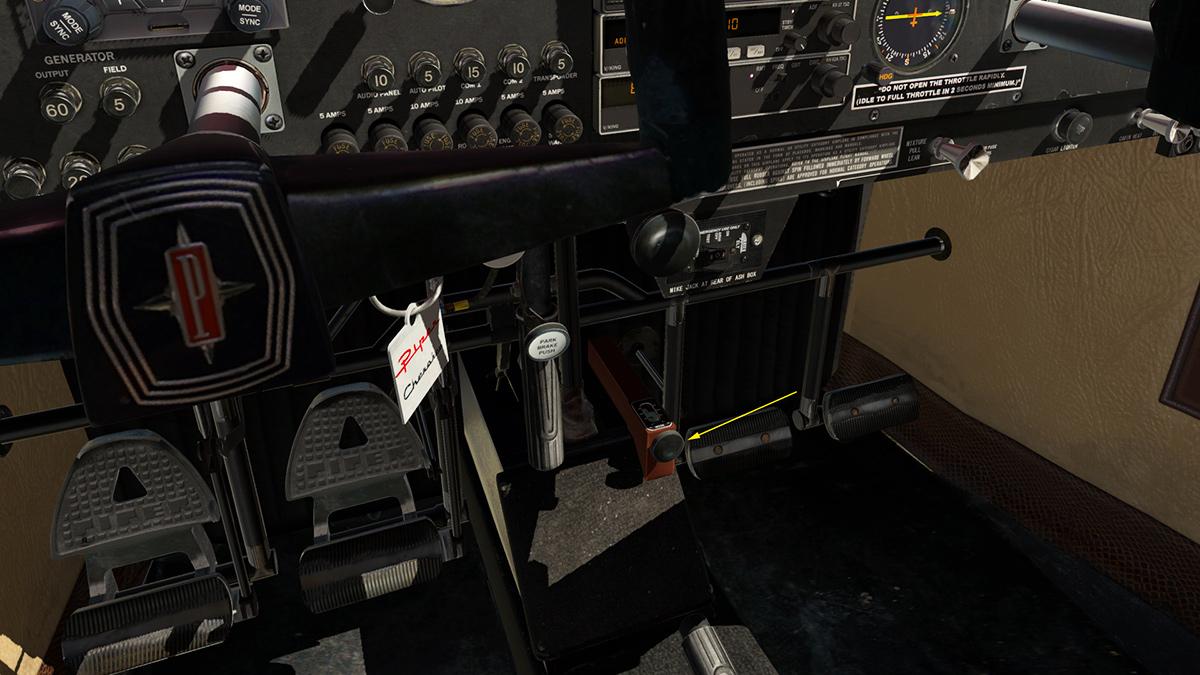
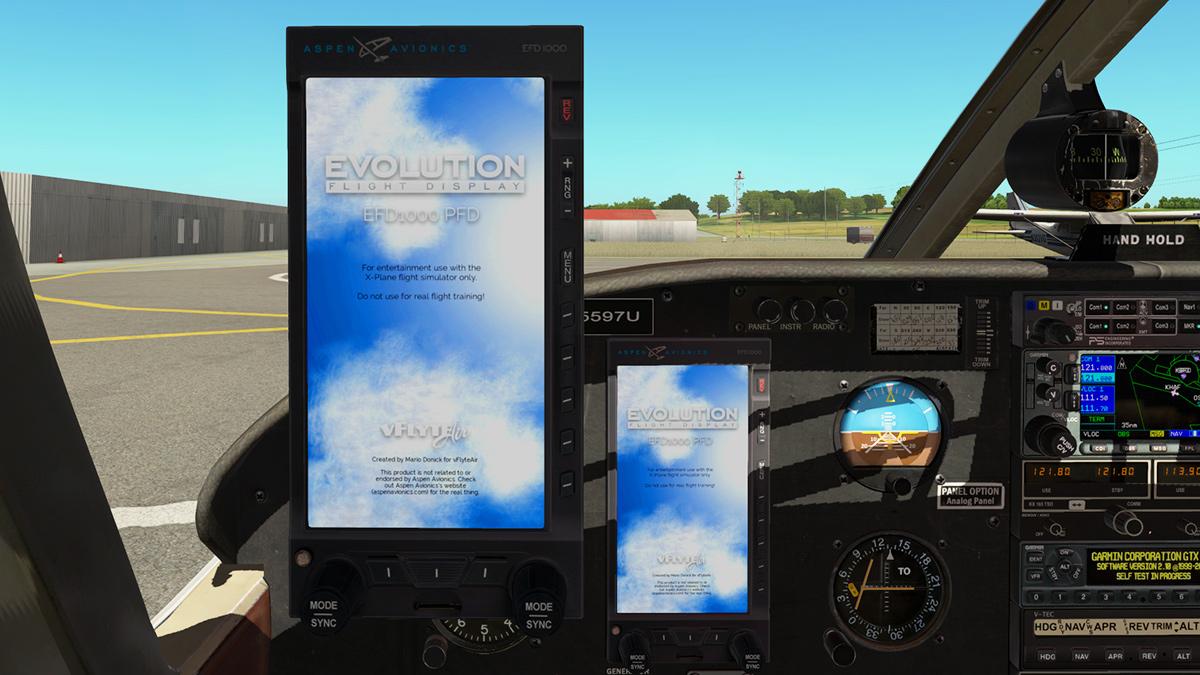
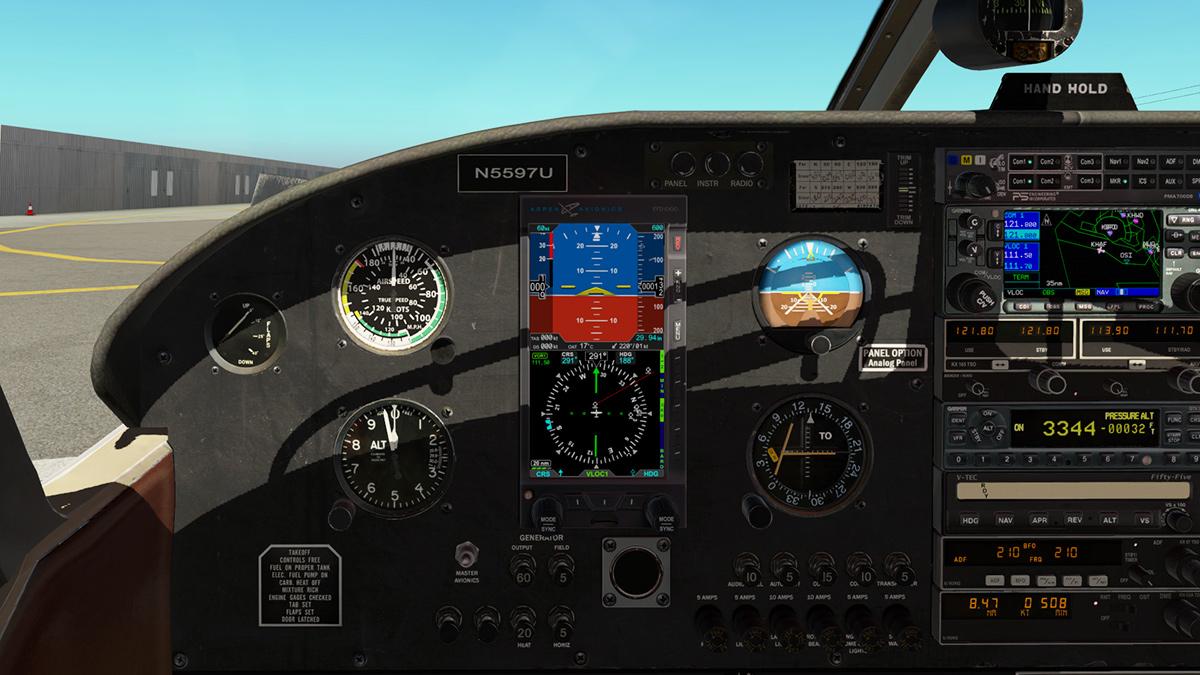
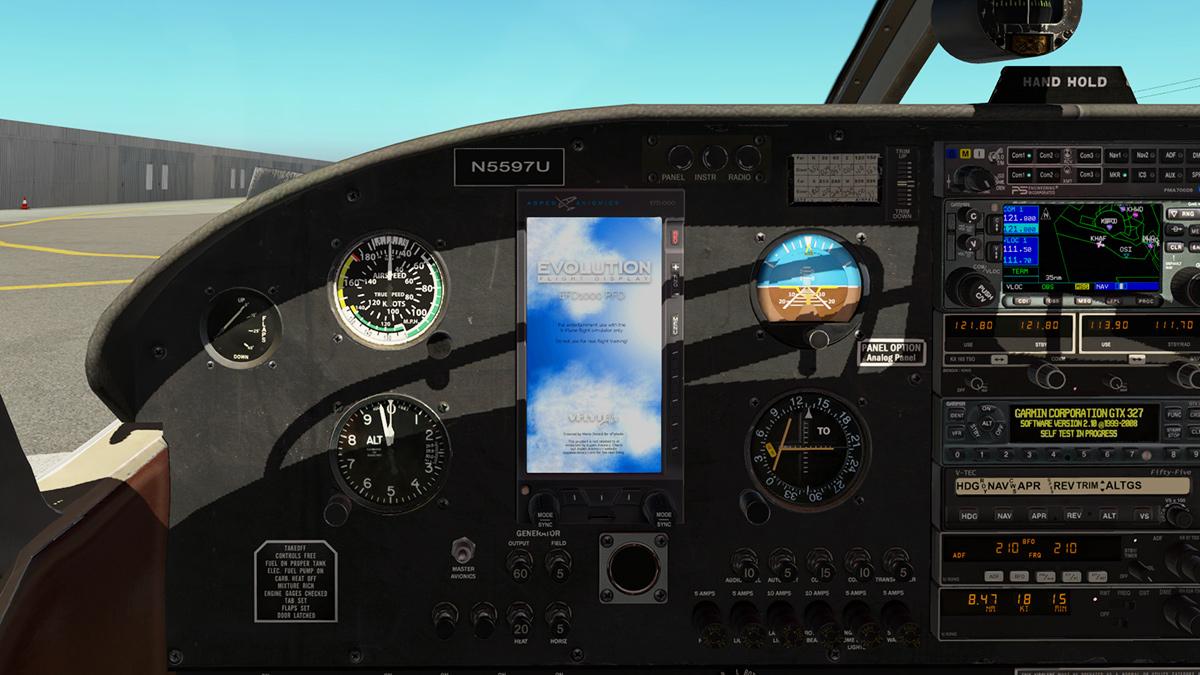
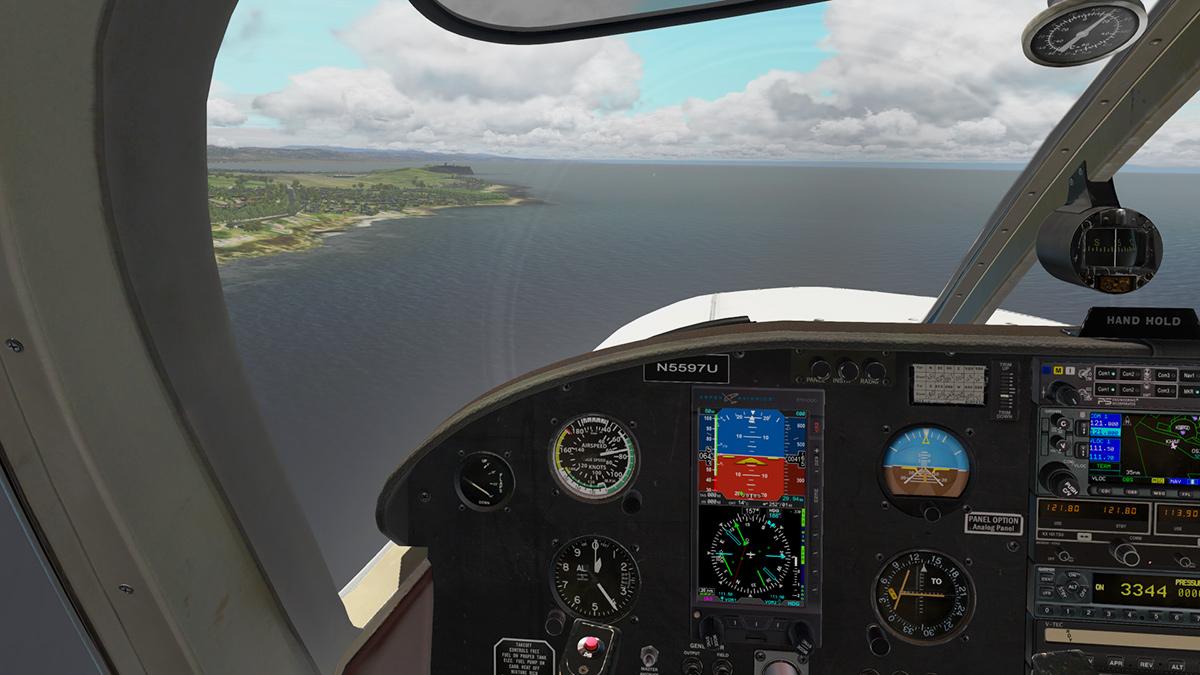
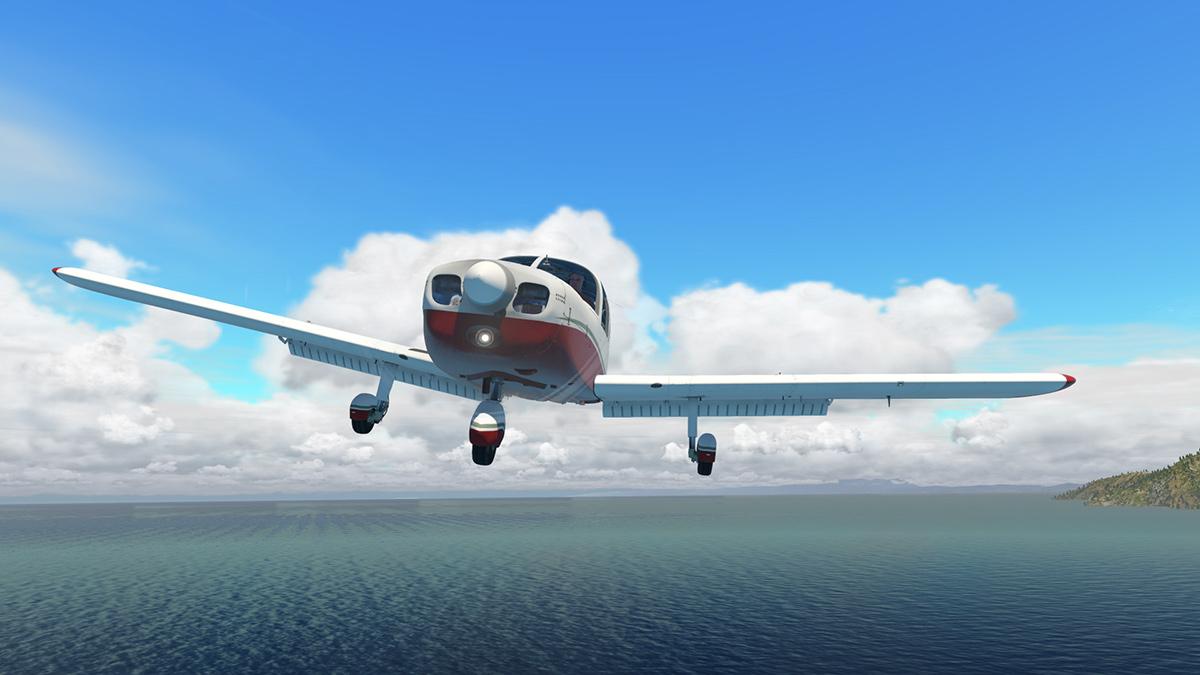
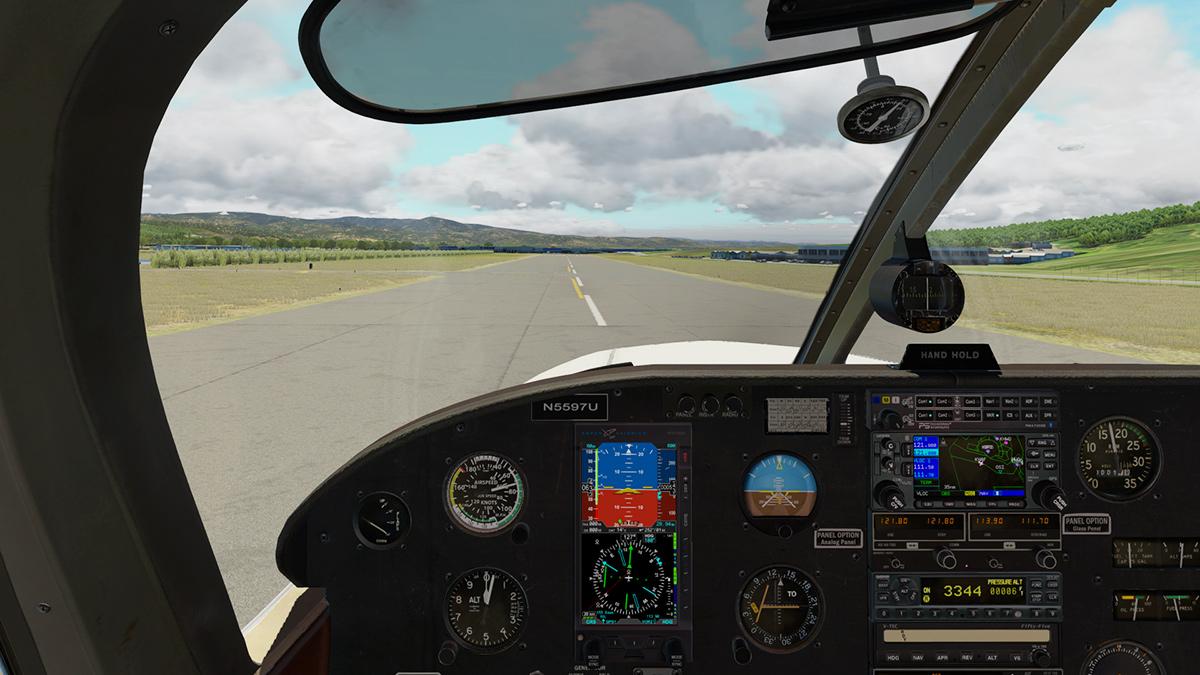
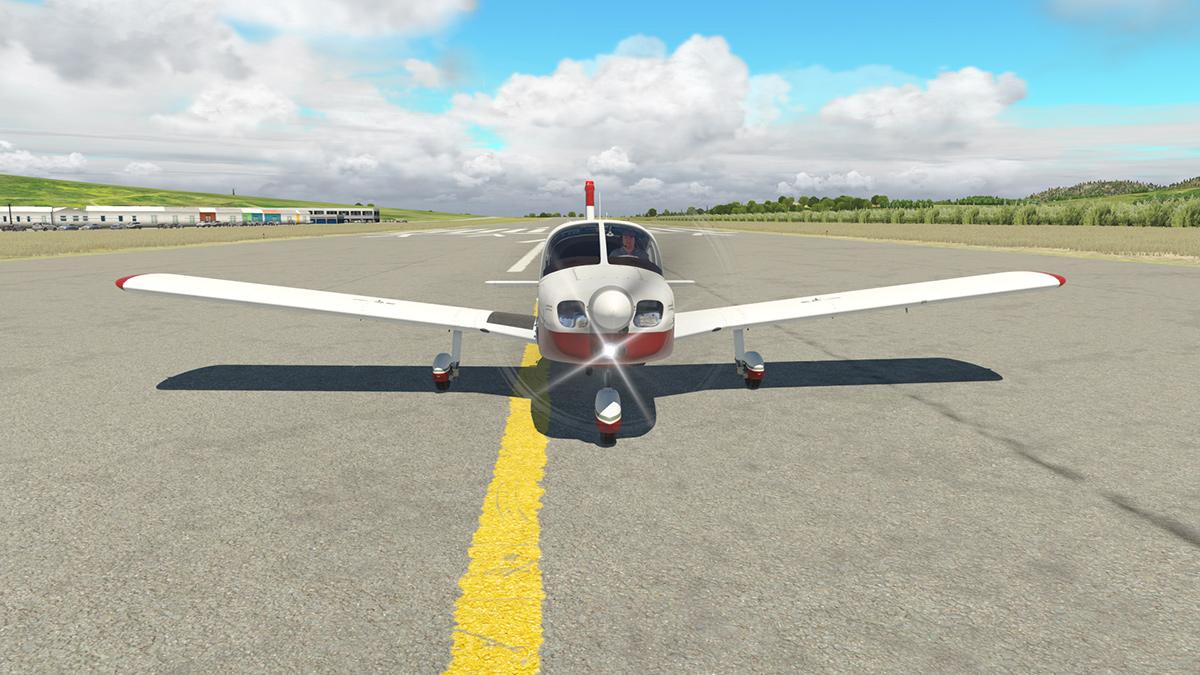
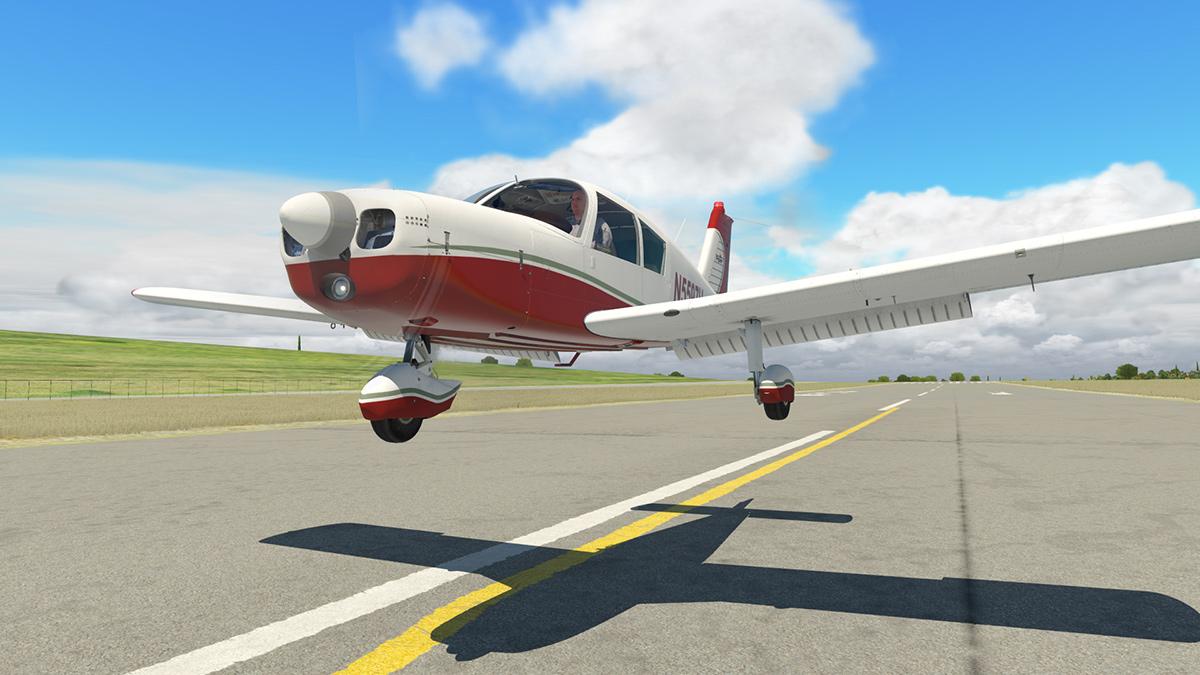
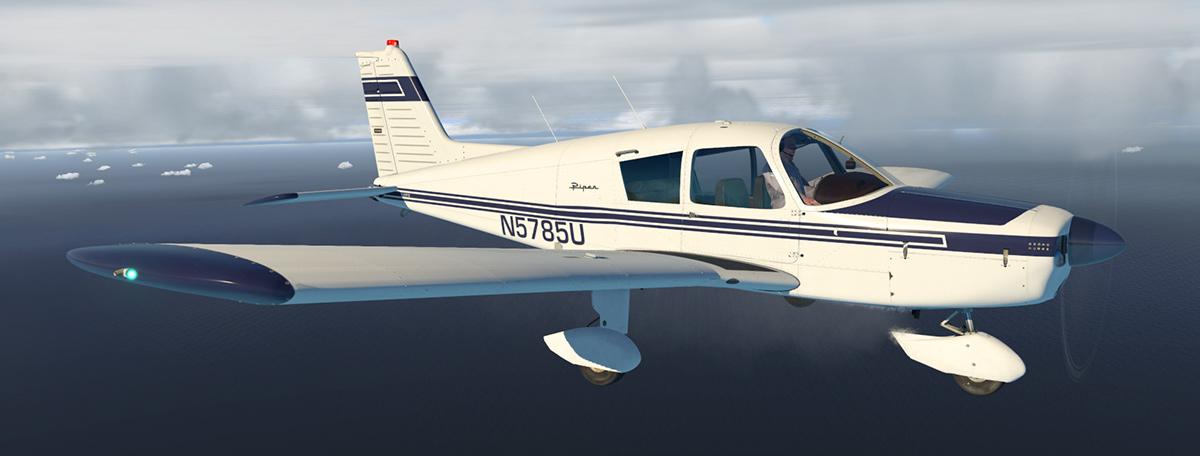
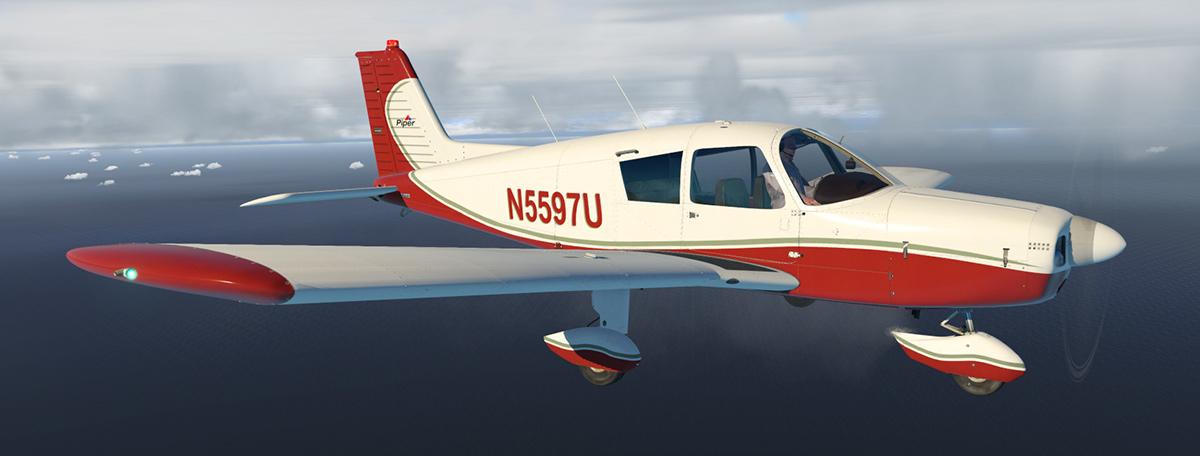
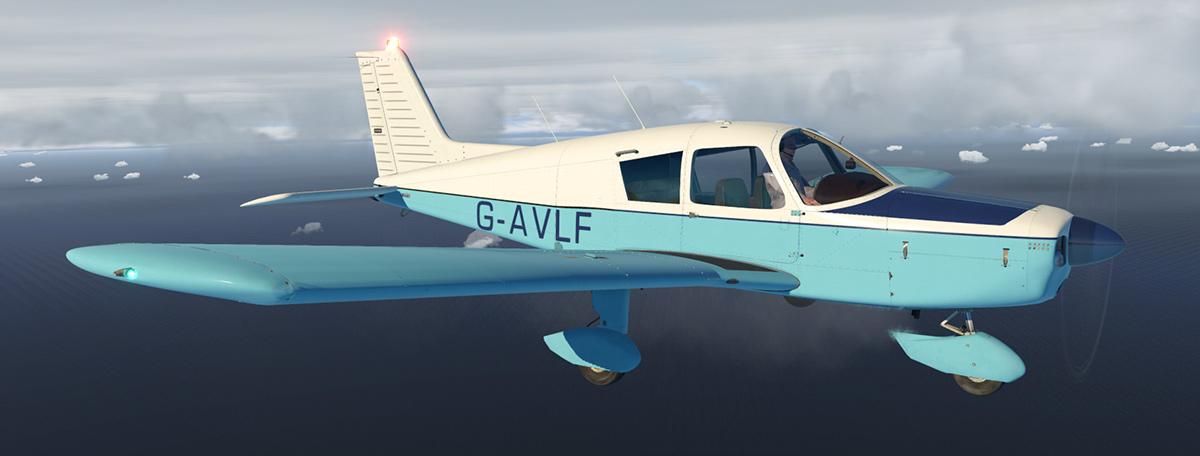
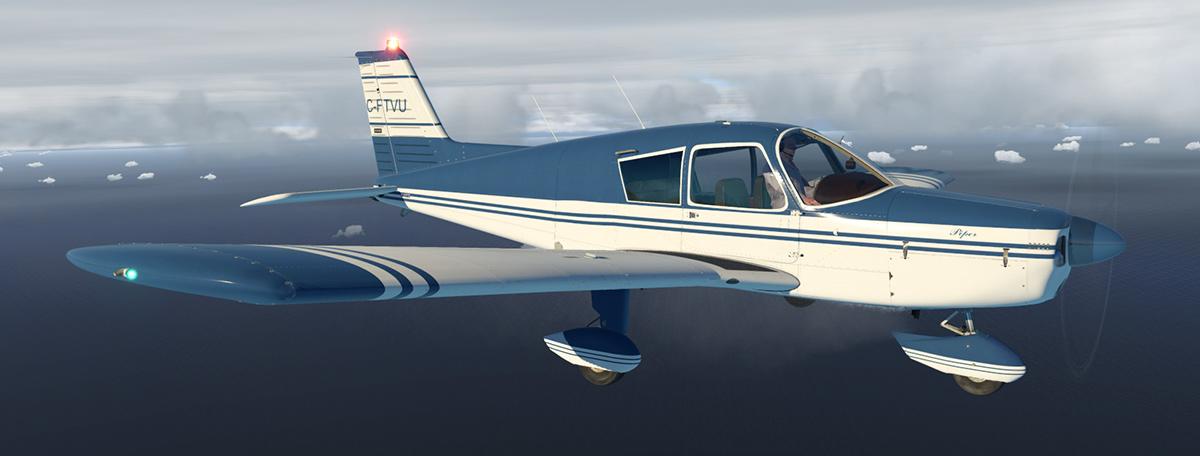
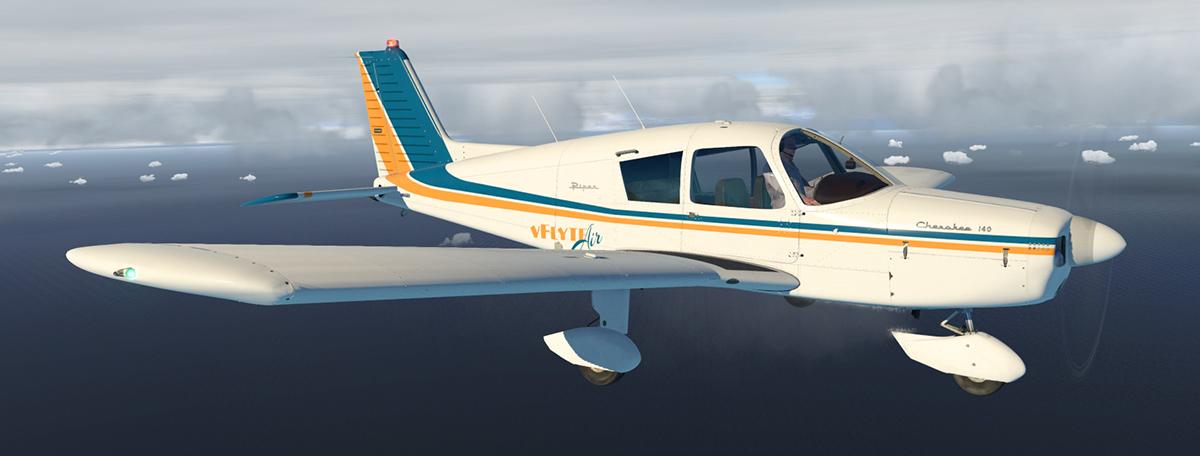
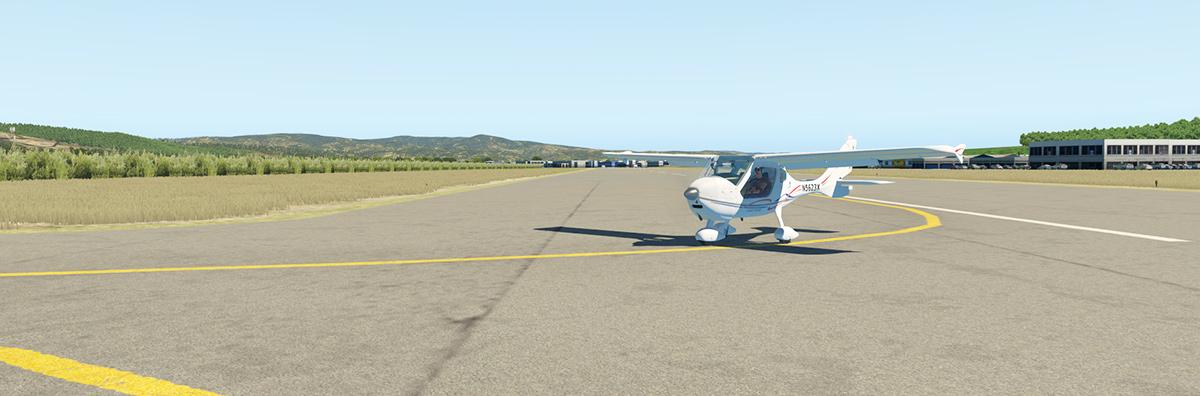
Aircraft review : Cherokee PA140C Modern by vFlyteAir
Stephen replied to Stephen's topic in General Aviation Aircraft Reviews
The Original 140 was taken off the X-Plane.Org Store for some reason, and yes it is available directly from the developer, but I think they both can be supported long term on the Store. -
No, as because every time X-Plane is updated it replaces it... just make sure the JustSim version is above it in the INI order. However if it is persistent you might have to remove it, but my version doesn't do that, however I have a YMML - Melbourne in the global airports that just won't go away, so I have to consistently dig it out and remove it.
-
Aircraft Review : Fokker 50 XPlane 11 by Carenado In the 50 seater commercial aircraft market that is currently dominated by CRJ550 and the Embraer 145 in jets and the Dash 8 and ATR in props, there was before this regional era no other aircraft for decades to compete against the Fokker F27 Friendship, as this was an aircraft that absolutely totally ruled this short but light route market. The F27 was first flown in 1955 and then entered service in 1958 and as nearly 600 Friendships were built the and aircraft was well into production even until 1987. So how do you replace such a legendary aircraft against the newer and jet powered designs. The result was the Fokker 50. Not really a totally brand new aircraft as the Fokker 50 was basically an amalgamation of all various refinements and improvements which had been made to the design of the F27 Friendship over the years. As a result of these modifications, such as the adoption of Pratt & Whitney Canada PW127B turboprop engines (1,864kW (2,500 hp) each over the older Rolls Royce Darts Turboprop (1,678 kW (2,250 hp)), Fokker was then able to progressively reduce the F27's fuel consumption by 30 per cent. Various different propeller designs were also adopted over the same time span of the aircraft's production with the best outcome with the six-bladed Dowty Rotol composite propellers, while an increasing proportion of composite materials were used in the airframe with adjustments to the wing design, and a higher degree of cockpit automation were other areas of major advances of the Fokker 50 over its predecessor. Speeds for the F50 are 565 km (351 mph, 305 kn) with a general cruise speed of 500 km/h (310 mph, 270 kn) which was also slightly faster than the Darts at 460 km (290 mph, 250 kn). the F27's range of 2,600 km (1,600 mi, 1,400 nmi) was also curtailed to meet the market of 1,700 km (1,000 mi, 900 nmi). Takeoff weight 19,773 kg (43,592 lb) was however increased to 20,820 kg (45,900 lb) for the F50. F50 by Carenado Earlier this year Carenado released their version of the SAAB 340, and this was a truly outstanding aircraft, and one that is still in the running for aircraft of the year. So there was no doubt a lot of anticipation for another brilliant short haul regional aircraft and one based on the legendary F27 as well. The SAAB 340 may seem as a direct competitor to the F50, being a twin turboprop, but it only carries 34 passengers compared to the F50's 46 to 56 capacity, as noted speeds are about the same (S340 - 467 km (290 mph, 252 kn) at 7,620 m (25,000 ft), but the F50 is obviously faster point to point, but there would be no doubt they would fly together on the same routes and schedules. Externally the Carenado F50 is excellent, and finally we have a quality F27/F50 in our X-Plane simulator. There is atgcab's F27 (known as Rotate) that was a devil to fly, but it did only have a semi-functional 3d cockpit. We always hoped that atgcab would have done a complete redesign of the aircraft but it never sadly happened and considering his excellent MD88 you could only imagine of what that aircraft could have been like, so is this Carenado F50 a consolation prize, well certainly that is absolutely not the case as the features and quality are as good and even better in many areas. Modeling and design are hallmarks of what you get with Carenado aircraft, and you will certainly not be disappointed with this Fokker. You see all the construction detail with rivets and paneling as per perfection and the slight aerodynamic aides that run along the fuselage that give the aircraft that hull feel. Carenado use pro-gaming soft ware to create high-end 4k PBR (Physically-based Rendering) graphics on the aircraft and it shows. My texture quality settings are only set at "high" and yet I get this excellent quality and it all comes as well with ultra-realistic materials renditions of dynamic reflections, realistic metal and dielectric materials... and all this comes without the framerate penalty either, it is so really impressive. The 1960's F27 Friendship feel is still in here as well with the upright cockpit and high-wing low slung fuselage. The PW127B turboprop engine installation is very good and highly authentic to the aircraft, highlights are the excellent if perfect exhaust outlets... ..... and also the rendition of the six-bladed Dowty Rotol propellers. The original F27 had almost clipped wings for more efficiency, the F50 however has these slightly upturned winglets and the complex shape has been rendered well here with perfect wing-tip glass enclosures. Again the aircraft's design age is shown in the shape of the tail to lower fuselage point, it is a lovely long curve but a very dated one if a nautical design, again the modelling to the navigation light is really well done here. Main gear assemblies are excellent, the point is they have to be exceptional here because most of the gear is so exposed, and so it is the same detail inside the gear housing, and you can spend time to admire it all. It is all lovely cast joints, links and levers and it all can be seen perfectly from inside the cabin, and I particularly like the running grease down the main leg support, a nice touch. Those familiar with the F27's long forward trailing nose gear, will know how tricky it was to taxi with. So on the F50 that arrangement is replaced by a stubby nose gear set. Here the new style gear is well done with the large taxi light dominating the gear, and fine detail down to the labels are perfect. Glass is also excellent and it needs to be here. The F27 design that morphed into the F50 is well preserved and was even iconic in the cockpit window arrangement that hints of post-war Douglas aircraft. The cabin glass and rubber installation is also first rate, and it is all high quality work. Carenado Menus One of the limitations Carenado now faces is that it's menu system is still the same as it was from day one, three tabs in the left side down corner... The three tabs are noted as: A ) is for Autopilot panel and an extensive and huge one at that, and that it can be moved and scaled to size is a very big relief. C ) Is the standard Carenado ten preselected Views, Field of View and Volume panel and O ) is the Options panel. The Tabs can be hidden via the mouse scroll wheel. So how big and how small can the AP panel be adjusted? well from absolutely massive to minute, in fact if you go too small the panel will disappear altogether, so be careful. Nice panel but it is limited in interactivity, with a lot of the areas that are not active. Options include Window and Instrument reflections. The static elements provided here are still very basic with only two cones, rear wheel chocks and flag/pitot covers and the very nice engine outlet and inlet covers, but you can only have all or nothing. The highly realistic pilot and co-pilot animated pilots in flight uniforms do disappear when you activate the static elements. but overall you feel the limitations of the menu design. Four doors open, the left front main stairs, rear left door, rear right door and the front right galley service door... ... the rear right is the cargo door, but where do you put all the bags, as there is no access to the rear baggage area? There is the selection of the "HOBART" GPU (Ground Power Unit) by the right front door, and finally on the tab there is also a livery Selector. F50 Cabin The Carenado Saab 340 created one of the truly great cabins (only the FJS TwinJet is as good) in these regional aircraft categories, so I was expecting another great experience from the F50... that door access is highly inviting. The service door opposite can be opened internally, but the interesting one is the main door. You can open the main door two ways internally, again directly with the handle or by the Internal passenger door control panel high on the bulkhead (arrowed), it works in three positions Up, Down and Stop and yes pressing the "Stop" button will freeze the door in that position. Crew station is really nicely done and the intercom buttons move if you want to play with them. One of the great attractions of the F27/F50 was that huge walk in, walk out tall cabin, and that cabin is well presented here... It is a tight fit past the toilet and storage cabinets, but once inside the cabin is large, it is fitted out with that mid-80's brown vinyl feel and not in the more recent colourful soft fabric upgrade, but it is a nicely presented and very detailed cabin. A small note that the internal lighting is always slightly on, even when the aircraft has no electrical power, which is slightly odd. Rear galley is well done with another crew station, but the detail is only flat graphics and not detailed 3d equipment. Cabin detail is excellent, seat and row numbers are authentic, blinds come down, air vents are moveable, seat back tables work as well, odd though is that one seat insert is brown but the outer insert is grey? Armrests move to the full up position and if you want to annoy your passenger behind then just recline your seat. Amazing cabin lighting is exceptional.... .... invitingly lit doorway has galley illumination and "EXIT" signs switchable from the cockpit. The galley/Entrance and full cabin lighting can be switched from the same bulkhead control panel which is also nicely illuminated... .... working no smoking and seatbelt signs are added in with individual seating spot lights and illuminating attendant call lights. But like the S340 there is no global reset, so switch the lights on, and you have to then go all through the cabin to switch them all off again, but highly effective the lighting is. Cockpit Overview Open the cockpit door and beware of the couple of steps up... a note on the cockpit door as it opens outwards, and the odd thing is you have to close it from outside of the cockpit and not from the inside? try to manipulate the lock through the wall will just open the service door? First view of the cockpit gives you that "It is very sparse in here" feeling as all the instruments and panels are first mostly all grey and you just have only the basics in flying equipment compared with most modern aircraft. Period detail is very well done, and you reaaly feel the clash of the very vintage F27, to the upgraded F50 fittings... ... but that 60's look is the overall dominant feel, so you relate better here to the same feel of FlyJSim and the B727 and B732 more than the later aircraft of say a Q400 Leather worn crash pads, worn rubber floor matting, tired and dirty sheepskin seat covers, are you getting the aged tired feeling of everything... .... seat design is absolutely first rate, and everywhere you look it is ultra realism in detailing, armrests (yes both of them) fold up and away to the rear of the chairs. Rear seat design and highly realistic seatbelts give you that 101 factor. Lovely F50 branded yokes are what you want to get your fingers around, but there are no built in features like electric trim. Glareshield is really nice with authentic heat vents and see through hand holds. OHP (OverHead Panel) is sparse forward but more detailed rearward but still well equipped, ditto is the pedestal in the same layout design. Sit in the pilot's seat and you are very much aware of how the yoke easily covers all of the lower Navigation Display (ND). This is set at the 73º field of view... ... so how did they use this valuable instrument? thankfully we can hide the yokes (both separate) to see the ND display, note the lovely rudder pedal designs. Instrument Panel Look hard and the instrument panel is extremely basic with an early Electronic Attitude Indicator (EADI), and the Electronic Horizontal Situation Indicator (EHSI) instrument system (NAV) and the F50 uses the Sperry SPZ-600 Avionics suite. EADI - PFD has the Artificial Horizon, Rate of Turn, Turn Coordinator, Pitch and Flight Director operations, lower ND has a The EHSI - NAV covers heading, Nav1/Nav2 and GPS functions, with VOR1 and VOR2, ADF1 and ADF 2 pointers. Primary dial instruments are Airspeed and VOR/ADF pointer left, and Altitude and Vertical Speed dials right. Backup Airspeed and Altitude are top right with a clock/timer lower... ... co-pilots instrument layout side is identical, but has the addition of a VOR DME (1&2) readout, with TTS (Time So Station). VOR/ADF pointers are selected via the arrow selectors. Centre panel Engine readouts are clockwork comprehensive that could be described as outer and inner... We will look at the inner first with the dominating twin TRQ -Torque indicators with digital readout, Pressure and Oil Temperatures and lower a nice digital Fuel Flow panel (press Fuel Used to get a minus fuel use) and lower is an engine rating selection with FLEX settings Outer four dials (each engine) cover (top to bottom) NP - Propeller speed, ITT - Inter turbine temperature, NH - HP-spooI speed, NL - LP-spool speed. Both lower left dials cover the Normal and Alternative Brake Pressures with the backup Artificial Horizon top. Right side covers TAT - Temperature, Total Fuel capacity (4,120 kg (9,090 lb) and Flap position UP - 5º - 10º - 15º - 20º - 25º - 35º There is a large annunciator panel that is tested by the "Alert SYS" Overall the engine dial layout is very similar to the S340, but the dials show different readouts so be careful. OHP - OverHead Panel The OHP is again highly comprehensive... the cockpit works on the "Dark Cockpit" system that means if the light is out (Dark) then the system is active External lighting panel is quite sparse lower OHP and cabin Seatbelt and No Smoking switches are to the right. Above is the oxygen panel with cabin pressures. Segments represented lower are Engine (Start), Propeller, Engine Anti-Icing, Airframe De-Icing and Probe Heat Mid - Segments include a large Electrical panel (left) with Avionics above, Fuel (centre), Airconditioning (right). Upper - Segements include Engine Fire L (left), Hydraulic (centre) - Engine Fire R (right). Top - Segments include a nice servo power selection panel with a CVR - Cockpit Voice Recorder, you have to every flight set the recorder log in the "Date" and "Flight Number" which is very authentic. Pedestal The F50 FMS is a bit of a compromise as the XP default FMS is a compromise anyway, it looks not very professional and a bit gaudy as well... the RealityXP GTN750 can also be fitted and if you can afford the high price and then that would be my option. I am becoming increasingly frustrated with the default FMS, as it is so basic. But even at this level it is not loading in the correct SID and STAR Dep and Arr patterns, so it is far quicker to input the nav data directly than try to fix it... Laminar needs to give the FMS some attention. Inputting nav data is harder here because there is no PLAN mode, so you can't check on the NAV display of your route, so I would recommend to build it in another aircraft FMS (with PLAN) and then import it into this F50 FMS. Upper pedestal has a basic Radio panel, then the WX weather Radar panel. This panel requires a little study, but mixed up in here is the "Range" arrows (arrowed) that changes the range on the EHSI... buttons RCT (Rain echo attenuation compensation), STAB (Radar Stabilisation), TGT (Target) and SECT (Section) are represented. Lower-Mid Pedestal are four Collins units with two for COM frequencies and two for ADF frequences, lower is another Collins unit for the TPR - Transponder. Sperry Pitch (wheel) and Turn (knobs) with YD - Yaw Damper switch are left panel and lower Pedestal are the big rudder trim (knob) and Aileron Trim/Indicator. The centre pedestal has both the main Throttle and Fuel levers, with the Flap lever far right. Twin trim wheels are set at each side of the section and in all a basic but professional arrangement. Sperry SPZ-600 Autopilot The glareshield autopilot "Flight Mode" panel (AP) is a nice layout, but a little basic in operation. Centre AP panel has both pilot and co-pilot Course knobs but only the CRS 1 works for both? Heading knob and altitude knob are central with AP engage, AP command buttons are nice to use. Left and right of the AP panel are two Collins NAV1 and NAV2 units, and each end of the panel are two EFIS control panels (arrowed) of which again only the pilot's left side works for both. This panel can be slightly complicated, so you will need to work through the selections before flying the aircraft. Both the EADI and EHSI pop-out for use. FULL ARC switches between ROSE and ARC EHSI selections, and MAP shows the route You can switch on the EADI between TTG (Time To Go) and GSPD (Ground Speed), FD (Flight Director) CMD turns on the FD. DH (Decison Height) and RA (Radar Altitude) are also shown. FMS/NAV1/NAV2 are all EHSI selections Knobs select FMS/ADF1/VOR1 or OFF left and ADF2/VOR2 or OFF right... when in VOR1 you will get the ILS runway alignment guides in both EADI and EHSI. Like I noted you really need to be fully familiar with these EHSI selections before flying, yes they are really just the standard tools, but you need to know how to access them easily. Cockpit Lighting Again the Carenado SAAB 340 created one of the best cockpit lighting dynamics in a regional aircraft, but does the F50 match that quality and versatility, the good news is that the F50 does easily match the S340 in cockpit lighting dynamics. Blackout is thankfully dark... with just the basic instruments illuminated. All adjustments are via the noted "Flightdeck" rear pedestal lighting panel. Instrument illumination is separate for the pilot and co-pilot, but the pilot's adjustment includes the central engine instruments (shown here below left)... Rear F-DR Flood adjusts the lovely under the glareshield lighting (above right). OHP and Pedestal surrounds are both fully adjustable, and Dome light is situated high rear above the cockpit entrance and it can be paired with... .... twin fully adjustable spotlights lower each side of the OHP (click to use). Both Yokes clipboards (as per SAAB) illuminate, and there is also each side a Map reading light switch that has two selections in DIM - BRIGHT. There is a big selection switch centre of the lighting panel for the annunciator panel, with again DIM - BRIGHT - RST, but it doesn't work, if an oversight then so a big one? The compass lighting has to switched on via the OHP which is lovely in the dark.... I very easily found the best lighting conditions without much adjusting, as you know I don't like over bright instrument lighting for night operations, and they are absolutely perfect in here to my sensitive tastes. Flying the F50! Starting up the engines is surprisingly easy... Fuel levers to START, PACKS (OHP) off... then switch on the START P/B (the centre button) then select which IGNITION you want to use, Engine No.2 is preferred. You can start an engine on the batteries, but the GPU is recommended, once one engine is running and supplying power you can then take away the GPU and start the second engine off the first... The PW127B turboprops start very quickly, almost straight start to running, which I feel is a bit too quick... so there isn't that drama of the start sequence you expect, the sounds however are glorious... Route today is just a short hop from EIDW - Dublin to EGCC - Manchester and fuel load is a recommended 2600 Kgs. As they say, a "Dark" OHP is a "good and ready" panel so all the ignition, bleed switches and electrics are set correctly. Unlike the SAAB 340 you can easily find that sweet spot for a good taxi speed, fuel levers set to "OPEN" (don't forget to set to forward later) and positioned there the idle power still allows you stay stationary, and movement is gradually achieved only via throttle power, so there is none of that constantly hitting the brakes or nasty runaway power to worry about, and so taxiing around an airport is a dream. Set at 73º, the field of view tends to make you sit close to the windscreen, so you will need a key input to look down and see the instruments... ... but you easily get used to the forward position. Clearance and throttles up (Flaps 10) and your rolling, the sounds rise as you power down the runway, but the engines are not as loud as you think they would be, but it is a overall great aural experience. You can set your own speed bugs for v1 and v2, and leave the third bug set for you climbing speed, I rotated at around 120 knts, with a set climb speed of 160 knts and if you go below 140 kts the you will get a prop vibration that shakes the the airframe, so to make sure you set the engine rating selection first to TO and then CLB, because as when you switch over the extra power comes in like a turbocharger Climb-out is around 1,700 fpm, there are various notes on the rate of climb for the F50 are from 3,800 to 1,450? but my climb around the said 1,700 fpm to 2,000 fpm felt about right without losing speed and power. Watching the gear retract from the cabin is a very real experience... I will be honest in that my first few flights in the F50 were a bit average, but I was also highly distracted by working out things and finding my feel level, but by the time I reached this phase of three flights I was seriously enjoying this aircraft and now felt very in tune with the machine, so you need to work through to that mature point to where it all comes together... I can see why pilot's love flying these F27's/F50's. Cockpit sounds are perfect with FMOD sound design, you get that lovely movement bass feel drone (yes I said drone) but not in a negative way but a realism of feel that you are flying the aircraft and it is responding around you... With the gear now retracted the view from the cabin is excellent, forward seats will give you a none obstructed view. You just love the way this aircraft catches the light.... spellbounding. You do tend to use the pop-up EADI and EHSI panels a lot because a lot of the detail is quite small and too far away looking downwards, note the rate of climb in the EADI. Ceiling is 25,000ft, but my guess you will fly mostly around the 18,000ft to 20,000 ft altitude, and for short hops like with this Irish Sea crossing is of around 15,000ft. Carenado provide a few performance guides with Takeoff Speeds, ISA Normal Cruise and ISA Long Range Cruise to get the full performance out of the F50. I actually found the AP panel a bit too large, and it is actually easier to use the correct controls, and even the lowly positioned Vertical Speed wheel. Time to descend into Manchester. You have to watch your speed to rate of descent and to keep that speed under control, so anything over 2,000ft fpm is too steep, and you feel the slope as well from the cockpit, so 1,800 fpm would be the max descent I would use. An overcast Manchester makes me light up, "Oh good a wet landing?" Starting finals there is a nice sweet spot of 120 kts (or just slightly above) and Flap 15º and the F50 will sit there all day at that setting with control via the throttles. Throttle control is very sensitive, and you have to work hard to find that correct thrust to drag ratio to keep the aircraft smooth, so you usually finding yourself are making minute and constant adjustments to control the speed, and so don't jump on the throttles too quickly or push them too far as it will cause you dramas, so slow and fine throttle movement is best. The jump between 20º of flap to 25º/30º is quite large, so your speed has to be in the right place, I am usually currently only using 25º on the finals, but you can get down to a really slow approach speed of even minus 80 knts at 35º as stall is a low 64 knts, even at the selected 25º flap your stall is still 67 knts, so here an 80 knts approach speed works well. External lighting is basic, nose-gear light and a single wing light is all the forward illumination. There is a beacon, but they are connected to the strobes (if you like your replays you have to keep your strobes switched off, as in Carenado's they are nasty in the replay). There are twin Ice/Wing lights left and a single Ice/Wing light right, with standard wing and tail navigation lights... but there is no tail light. Extending the main gear is again an event if you can spend the time away from the cockpit to check it out... ... wipers on for the rain. The switch is set the opposite way around with "Fast" first and "Slow" the last position, you have to "Park" them as well, but they are nice to use. The F50 comes with the LIbrain rain effect plugin is which is also on the aircraft. A note the plugin is not supplied so you will have to install it either in the aircraft's plugin folder or X-Plane's Plugin folder... at the first I was disappointed as nothing happened, but the weather here at EGCC could more showery than actual rain. You have to concentrate all your focus on finals, the relationship between flight, flare and a smooth landing is all in the throttle and yoke control, you feel the age of the F27 here, but have the more modern F50 feel... feed off from the 78 knts to the ground and your down with a slight nose pitch as it is very easy to do a three point landing. You have Prop reverse (Beta) which is effective. The trick is landing at the slowest speed you can and getting the nose in the right pitch position. Note the nice Ice/Wing lights, one on the right engine and the same on the left engine, with one lower by the main left door. On landing I finally get a few drops of rain on the screen, I wanted far more than just some spitter, splatter and like more constant rain like I had on the FJS B732, but the weather is not providing the drama. Notable is that the cabin windows also have the Librain rain effects which I really love. Parking up I got more rain effects, nice... but still wanted more, the engine particle effects are very good as well. PW127B engine shutdown is a bit more dramatic than the startup, but there was still the no high drama that you usually get with these turboprop aircraft. Shutdown and done... you just look at the F50 for only one thing, well two actually in, in first how nice it looks in the right light, and when can I fly the Fokker F50 again... again and again. Liveries All ten liveries are excellent quality in detail, but a mixed bag of brands with a white blank livery. But there are a few gems in the mix... The SAS, VLM, InselAir and the review KLM are excellent as is the Baltic. Two local Australian liveries are very welcome, but the Alliance is an insipid livery in real life. But no UK or more European liveries are sadly missing, but the painters have already started to fill in the gaps, so expect a big range in time. Summary Coming off the back of Carenado's earlier 2019 X-Plane11 exceptional release of the SAAB 340, the Fokker F50 had a lot to live up to in detail and features.... yes we waited with bated breath and anticipation. So does the F50 match the SAAB 340 in the same areas. Overall yes they match almost feature to feature, but the SAAB with it's slightly better (more modern) avionics and slightly better sounds (those engines are golden) just makes it slightly better, but the F50 has that nostalgic edge as you are flying an updated 60's iconic machine, can you choose? not really so buy both... as they are both really brilliant. Quality is a Carenado benchmark and you get it here in spades, there so much detail and the dynamic lighting it just pulls on your heart. Features include an excellent cabin with all the gizmos, like moving seats, trays, window blinds, armrests, then we get to the lighting that is excellent in the cabin and mind-blowing in the cockpit. Cockpit is highly detailed with authentic Sperry SPZ-600 avionics and great, great instrument detail, librain rain effects (plugin needed) and the cockpit's dated spartan appeal is actually a great feature. Sounds are excellent and this is a real flying machine, but practise and skill is required to get the very best out of the aircraft... The minus's are small but worth noting. The default FMS is not a great fit, and not that good either compared to other FMS systems so the aircraft deserves better, all avionic adjustments are only on the pilot's side, so flying from the right hand seat is not effective (The SAAB is the same in one change for all, but at least the buttons work on the right side), pop-out AP panel is basic in use. Menus are limiting and no "weight and balance" sheet is now really a requirement of this category. More variety in liveries, what is good is very good, but the rest are average. So now we have a great Fokker F50 for X-Plane and the aircraft was certainly worth the wait, the SAAB 340 was always going to be a huge climb to beat, and the Fokker is so, so close. In time though you will get a lot of flying out of this aircraft, so as an investment and at that really excellent value price you are getting a really great if brilliant deal here. No doubt the F50 will easily become a firm favorite of my flying and with the already brilliant SAAB 340 it will be very hard to choose between them... overall a must, must have aircraft in your collection. _______________________________ The Fokker 50 X-Plane11 by Carenado is NOW available! from the X-Plane.Org Store F50 X-Plane 11 Also from Carenado directly F50 X-Plane11 Priced at US$39.95 Features : High-end 4k PBR (Physically-based Rendering) graphics throughout, with ultra-realistic materials rendition (Dynamic reflections, realistic metal and dielectric materials, etc.) Fully customized in-depth annunciator logic/aural warning logic, throttle logic with functioning reverser gates. Optimized for VR. Integrated FMS with detachable pop-up window (Laminar default) Custom Autopilot with detachable pop-up window Rain effect support* (Librain support also includes visual ice effects on windows). In-depth FMOD sound design implementation, including distance effects, realistic prop blade reversal effects, etc. RealityXP GTN750 support (with 3D panel display support) Custom electrical system/Starter Logic/Fuel System/Bleed Air System/Hydraulic Logic Extensive VR support Extensive HDR lighting with gimballed 3D lights and dynamically illuminated ice lights for amazing night lighting effects. Includes pressurization system. End-user customizable via Manifest.json file. Goodway compatible Engine design optimized for XP11.30’s jet engine model Requirements Windows XP – Vista – 7 -10 or MAC OS 10.10 (or higher) or Linux X-Plane 11 CPU: Intel Core i5 6600K at 3.5 ghz or faster. Memory: 16-24 GB RAM or more. Video Card: a DirectX 12-capable video card from NVIDIA, AMD or Intel with at least 4 GB VRAM (GeForce GTX 1070 or better or similar from AMD) 910MB available hard disk space Current version and Review Version 1.0 (August 25th 2019) Installation and documents: Download for the Fokker F50 XP11 is 685.90 Mb and the unzipped file is deposited in the aircraft "Regional Aircraft" X-Plane folder at 953.70 mb. (there is no "Regional Aircraft" folder in the X-Plane aircraft folder, so just make one... you will need it anyway) Both the LIbrain rain effects is required to use the new feature. manifest.json is included. Documentation: Huge amount of documentation, with Laminar FMS manual, Performance and reference tables, but no actual manual. I did however find a lot of resources for the F50 on the internet and the SMARTCOCKPIT being very good for instrument details and aircraft operation details and well worth studying. Carenado Copyright.pdf Credits.pdf F50 Emergency Procedures.pdf F50 Normal Procedures.pdf F50 Overhead Panel Layout.pdf F50 Performance Tables.pdf F50 References.pdf Recommended settings XP11.pdf X-Plane FMS Manual.pdf ______________________________________________________________________ Aircraft Review by Stephen Dutton 29th August 2019 Copyright©2019 : X-Plane Reviews (Disclaimer. All images and text in this preview are the work and property of X-PlaneReviews, no sharing or copy of the content is allowed without consent from the author as per copyright conditions) Review System Specifications: Computer System: Windows - Intel Core i7 6700K CPU 4.00GHz / 64bit - 16 Gb single 1067 Mhz DDR4 2133 - ASUS GeForce GTX 1080 8Gb - Samsung Evo 1Tb gb SSD Software: - Windows 10 - X-Plane 11.35 (v11.30 is required for this aircraft) Addons: Saitek x56 Rhino Pro system Joystick and Throttle : Sound - Bose Soundlink Mini Plugins: Environment Engine by xEnviro US$69.90 : WorldTraffic 3.0 Plugin - US$29.95 : LIbrain rain effects - Free Scenery or Aircraft - EIDW - Dublin V2 by Aerosoft (X-Plane.OrgStore) US$24.95 - EGCC - Manchester V2 (Not available to purchase as this scenery has been updated to the XP11 version, but the earlier version is better)
-
Aircraft update : Rainman Package for B727 Series, 737 TwinJet by FJS FlyJSim have released an update package for both of their Boeing 727 and 737 packages. Dubbed "Rainman" it covers actually two plugins, first is the Librain water effects plugin and the second is the AviTab (iPad) plugin. Both aircraft had significant V3 updates last year, with the Boeing 737 TwinJet back in February 2018 and the Boeing 727 Series following in August 2018. So this package is really just an annual update to keep everything flying (pun actually intended). Boeing 727 Series Boeing 737 TwinJet Librain Effects The package is noted as "Rainman" for the added librain effects from skiselkov. First a note in that these github effects are still in development, and in areas the rain and ice effects can be still a bit hit and miss, however when they work they are excellent, first the B727. I landed both aircraft at Mexico City MMMX (somehow MMMX can always be counted on for rain, maybe it is the altitude?) and the rain effects work well, and it look all pretty good sitting in the B727 cockpit, however they are not edited to the actual glass so the drops show also on the black glass surrounds as well, so it looks a bit odd... now the B737 TwinJet I really like the way the effects build up on the wiper sweep line, and drip at the bottom, but the wiper coverage area in both aircraft is basically useless, and you will have to adjust your line of sight to see through the small clean areas, no librain effects on the side cabin windows was a serious disappointment, and you have all of that excellent cabin to sit in and no rain to look out from, as it is just a clean window... however the cockpit eyelet windows work well. A final note on librain is that in most cases my global librain plugin (In the X-Plane plugins folder) that works with all librain active aircraft would not work with the FJS versions, so it had to be removed before becoming active. Added OpenWXR for weather radar, and the Issue with ILS frequencies at ends of the spectrum not being recognised has also been fixed. AviTab These vintage Boeings both now have the AviTab feature, and yes I am a big AviTab fan... .... the design and the feel of the installation is excellent and you can select to show either side of the cockpit, but... the position of the tablet is extremely low from your normal pilot viewpoint, so you have to look down, and so the low display is more a long but slim slot view of your charts? to see the tablet full straight on visually you have to get right down and move backwards and to be almost level with the yoke? so yes I loved it, but hated the unworkable position. The 737 TwinJet position is the same... ... try to taxi and use the AviTab chart at the same time is almost impossible, as it is completely out of your viewpoint, I had to use Navigraph on my (real) iPad to do the taxiway navigation. Note a Navigraph account (subscription) is required for the charts seen here in this review. VR Support Of all airliners then these two classic Boeings are just the best for the VR (Virtual Reality) experience, these cockpits are unique in their design and so with this update comes some refinements for VR. Now there is added yoke, throttle, and several other additions, and also enhanced VR manipulators courtesy of SimVRLabs on the B732 TwinJet. X-TCAS In last years B727 update, FlyJSim added in the more modern TCAS VSI (Vertical Speed Instrument). Now that same instrument is available in the B737 TwinJet... .... the TCAS has full integration into the VSI including full TA/RA. You can of course still revert back to the original V/S dial, via the menu. B737 TwinJet FD/AP The custom FD-108 flight director and SP-77 autopilot is now fully modeled and the two systems are now accurately independent It is unusually for an old aircraft in that this system is quite complicated when it shouldn't be as the servos are distinctly for ROLL and PITCH via two large switches, so study is certainly required. However I found odd business in that the "Pitch CMD" didn't work? and only the Yoke hold pitch which was or is tricky to use, was the only way to climb and descend, with the AP (Pitch) turned off the manual trim didn't work either very well, and even hard to set up on the ground before flight while even using the "Trim Quick spot". It needs a lot of practise as do both of these aircraft in their styles of slow thrust changes and the feel of heavy weight, but they are extremely rewarding to fly. Replays Noted is "Custom replay system improvements and bug fixes", but I found the replays a bit of a issue... most of the instruments are blank?, switches flicker very badly and the cabin blinds have a complete bonkers mindset of their own. As I use replays a lot in the reviews, it was practically useless unless viewing externally. Finally the FMOD sounds have been adjusted and GPWS callouts, morse code, and beacon audio are now all audible, so sound is excellent, although I did have to drop the external sound by 50% compared to the internal sound, but in this department the Boeings are both very aurally satisifying. Oddly enough these original Boeing 737-200's aircraft are working hard again, the 32 few that are left airworthy are being put back into service to cover for the grounded 737 MAX, and people are loving the chance to fly on these old geriatrics again, and so would I in a heart beat. The -200's are also still highly in demand in Canada with their dirty runway FOD (foreign object debris) capablities... so long live the -200 Summary FlyJSim have done an annual update to their Boeing 727 Series and Boeing 737 TwinJet. Features added is the wet weather librain effects and the installation of the AviTab (Tablet), plus the addition of the X-TCAS in the TwinJet. The rest is all just nice bug fixing and touchups. But it is an odd update... the AviTab set at a low rear position is in reality useless if you want to use it while taxiing or flying the aircraft, you just want to unsucker the sucker and move it somewhere more usable, to note it can be hidden if you don't want it in view. Librain effects are excellent as they usually are, but no side cabin window effects was a big letdown for me as a cabin window hogger, same with the replays that you can't use them really internally, so admiring my lovely piloting skills can't happen here. Updated FD-108 flight director and SP-77 autopilot should be easy to use but needs a lot of study as it is now also independent, although there are two sets of notes in the comprehensive set of manuals, more of the autopilot operations I think is required, certainly with the separated systems. For the sheer experience of these amazing very hands on flying machines, they are also a very specialised simulation. feedback and flying immersion is bar none out there in the simulator, but you do needs the skills and even a fair bit of study to get the very best out of both of them, but to the diehards they are both exceptional experiences. _____________________________________________________________________________________ Boeing 727 Series Pro V3 by FlyJSim is NOW available! from the X-Plane.Org Store here : 727 Series Professional V3 Your Price: $59.95 Currently the package is now for all three variants, the aircraft are now not sold separately. Optional : The plugin for the CIVA Navigation System addon that costs US$10 is here: CIVA Navigation System Full Release Review : Aircraft Review : 727 Series Pro V3 by FlyJSim ______________________________________________________________________ Boeing 732 TwinJet v3 Professional by FlyJSim is NOW available from the new X-Plane.Org Store here : 732 TwinJet v3 Pro Price is US$69.95 Full Release Review : Aircraft Review : Boeing 732 TwinJet v3 Professional by FlyJSim FJS - 727-737 Series - Support forum FJS - 727-737 Series - Developer Site For current purchasers both aircraft can be updated to the "Rainman Pack" via the Skunkcraft's updater: Updater download page : Skunkcrafts Updater v2.5 _____________________________________________________________________________________ Update Review by Stephen Dutton 24th August 2019 Copyright©2018: X-PlaneReviews (Disclaimer. All images and text in this review are the work and property of X-PlaneReviews, no sharing or copy of the content is allowed without consent from the author as per copyright conditions) Review System Specifications: Computer System: Windows - Intel Core i7 6700K CPU 4.00GHz / 64bit - 16 Gb single 1067 Mhz DDR4 2133 - ASUS GeForce GTX 1080 8Gb - Samsung Evo 1Tb SSD Software: - Windows 10 - X-Plane 11.35 Addons: Saitek x56 Rhino Pro system Joystick and Throttle : Sound - Bose Soundlink Mini Plugins: Environment Engine by xEnviro v1.07 US$69.90 : XPRealistic Pro v1.0.9 effects US$19.95 : WorldTraffic 3.0 Plugin - US$29.95 : BetterPushBack - Free
-
I tested mine and the S.N. so you either not connected to the internet or the S.N. is wrong, go to their site to check and help desk? The aircraft is fine, a brilliant and my absolute favorite GA, BTW where did you buy it from?
-
Aircraft review : Cherokee PA140C Modern by vFlyteAir
Stephen replied to Stephen's topic in General Aviation Aircraft Reviews
Librain is still under development, and has it's quirks, even the best developers find things they can't control (see Saab 340), worse for VR... the next update should fix a lot of the issues, when it happens. -
I really don't think that will happen. The X-Craft's aircraft use a hybrid Custom TEKTON FMS system, that is really hard to duplicate in the plugin application, it would be nice of course, but the setup is just too difficult to convert.
-
Aircraft Review : Cherokee PA140C Modern by vFlyteAir When FlyteAir did an extremely heavy update to their Cherokee PA140C back in early March 2019, there was a some considerable discussion on the forums of a glass version or the Aspen E1000 Evolution avionics system for the Piper PA140C. VflyteAir at the time noted that they were indeed working on a glass version of the aircraft and this noted "Modern" release is that dual analog and glass EFD version. But the story has become a little confusing? The "Original" PA140C had the choice of two types of instrument panels with the very basic VFR avionics panel, or the IFR full avionics suite both supplied in analog form, the aircraft was also a free update. With this "Modern" release the analog basic VFR has been dropped with the choice now of only the Glass and IFR panel, plus this is also a paid upgrade of 50% off for previous purchasers of the original aircraft. The full review of the "Original" version is here: Aircraft Update : Cherokee PA140C Original v3 by vFlyteAir The review is mostly 90% of the same aircraft in details and design, so that review is still valid to the changes that will be noted here, so to read through that review would be a good idea before reading through this version, however (it is confusing) as the Original aircraft is now unavailable to purchase, which is a bit of a strange situation if you still wanted the VFR capabilities of that aircraft, and many of the original authentic panel changes here would also favour using the older machine, I hope both versions can be restored. In this review we will note the differences as well as the changes that have been instigated between the two versions. Cherokee PA140C Modern by vFlyteAir Externally the aircraft is exactly the same as it's predecessor, extreme hi-quality design and detailing, we noted that for VFlyteAir their original Cherokee 140C was a breakthrough aircraft and into that ultra quality design category, for that nothing has changed, this is an extremely well done machine. External choices are still the same with static elements of chocks, engine inlet and pitot covers and the choice of having the wheels exposed or covered, as the 150 horsepower (112 kW) Lycoming O-320-E2A engine (noted as 140) is not exactly the most powerful puller, so the wheel covers shown will give you a little drag. Fully animated pilot and optional female co-pilot replacing the original male are also visible, the choice to have the female visible in the cockpit is an option as well. Looking inside the Modern 140C and the new glass panel installation is now evident... ... and at first glance it is a clash between the vintage with the modern, the PA-28 Cherokee is an aircraft from the early sixties, the blank flat metal instrument panel and almost stick like yokes show the aircraft's build period, but the addition of the Aspen glass system changes the perception. First let us clarify the differences between the instrument panels, you can switch via the selections on the instrument panel on each side of the avionics stack, you can also switch them over in the menu as well. First change is that the analog panel has now gone back again to the old, old beige colour, were as the original VFR and IFR versions were both in dark colours. Gone also is the early seventies molded facia as it is now back to the flat plain metal. Biggest changes besides the obvious insert of the Aspen EFD are around the avionic stacks, I will show both below from the older VFR (left) and the IFR (right)... ... to the new glass (left below) and new IFR (right below). In the changes a lot of the original authentic radio sets have been tossed out and replaced mostly with default avionics. The loss of the VFR version means we lose both that lovely PS Engineering PAR200A radio with bluetooth, and below was an authentic TKM MX300 Com panel, although dated the RC RT-359A 300 XPDR Aircraft Transponder that was lovely to use is gone as well. In the Modern version you have the usual standard KMA 24 com panel, PS Engineering PAR200A radio with bluetooth, Garmin GNS 430 (the RealityXP GTN650 or G430 plugins (purchased separately) can also be inserted here). COM2/NAV2 radio is now a Narco Mk12D, but still original. The rest of the stack is the usual standard Garmin GTX 327 transponder, Fifty-Five S-TEC (noted as V-TEC) autopilot, ADF V-King (sic) KR 87 and bottom a V-King KN 62 DME unit. So you lose also on the IFR the Avidyne AXP 340 transponder which had six different functions and also the highly featured Bendix/King KAP 140 autopilot. The glass version has the less attractive but more functional PS Engineering PAR7000B radio with bluetooth, Garmin GNS 430, standard KX 165 COM2/NAV2 radio, same GTX 327 transponder, same Fifty-Five S-TEC and the same KR 87 ADF and KN 62 DME units. Instruments Like a magician with the ball under a cup trick, the instruments on the original (below left) have been moved around the panel to fit in the Aspen unit... On the right side the clock has been moved to be under the Gyro Suction dial, then below has been added in the Voltmeter. The Datcon Hobbs meter has also been replaced by the ADF pointer. The RPM gauge and the six engine gauges in a block cover left and right fuel tanks, amperage, oil pressure, temperature and fuel pressure are per PA-28 standard. Left pilot side panel... first the VFR, Standard-Six instruments are a more modern standard layout, with Airspeed Indicator, Attitude Indicator or Artificial Horizon, Altimeter, Turn Coordinator, Heading Dial (with course) and Vertical Speed Indicator are all correct and present, VOR OBS (Nav2) dial completes the setup. A flap position indicator is far left and the trim indicator is top right, the instrument and avionic brightness knobs are new on the top as well. The glass version has analog instruments in backup mode, with the Airspeed and Altimeter on the left, and the Artificial Horizon and same VOR OBS on the right of the Aspen display. As with all the 140C's the circuit breakers are all active and the power and external lighting switches are on the lower shelf. Aspen E1000 Evolution Flight Display But what we all came to this aircraft for is the electronic glass primary flight display, this is the Aspen E1000 Evolution by Mario Donick. The unit pops-out as well, and can be moved but only in a 3d context and not in a window scale or movement, so it sorts of bends around you on an axis. So you will need to get the best field of view degree to get the right access. But good and highly detailed the glass instrument is. I am a really big fan of the Apsen E1000 unit EFD, but this Donick version is the most detailed yet. So what is so special about the Aspen EFD1000? It is a very compact but highly functional pro display that is split into three sections with at the very top section is your speed and height in the PFD (Primary Flight Display) and Artificial Horizon with a built in pitch and rate of turn indicator that also comes with both airspeed and altitude tapes (switchable on/off.) In the middle section is your TAS/GS speeds, OAI (Outside Air Pressure), Wind direction/speed and Baro. In the lower section is the Navigation Display with 360°/ARC heading, and we are not finished there either as there is a Map function as well.. Left tuning dial (knob) is for CRS (Course) and IAS (Speed). Right tuning dial (knob) is for HDG Heading, Target Altitude, Baro Pressure adjustment Blue is set and Magenta is for adjusting, the selection is changed by pressing the in centre of the tuning knobs. Minimums (height) can be set also via the right knob and is displayed in the upper section, but like the Baro you have to select it from the side menu that has two 1/2 pages of selections. 1: Page Select, MIN, 360 and Baro. 2: has NXRD (Weather), TFCU (Traffic) and again Baro MENU (Preferences): There is a Menu button to access the menu selections, these include... TPS (Tapes) on/off, VSPEEDS on/off, Baro (in or mB), AUTOCRS (Auto-Course) DECLTR LVL (De-clutter Level). + RNG - (Range) : for the map display - When adjusting the range it is shown by green bars on the far lower left. The centre three selection buttons select (right to left) Single-line Pointer (VOR1, VOR2, GPS1) – CDI source (BLANK, VLOC1, GPS1) – Double-line Pointer (VOR1, VOR2, GPS1). Data displayed is excellent, with all frequencies, distances and waypoint ICAO. The EFD 1000 is excellent clear and thankfully bright, but it comes two oddities, one is the EFD brightness is adjusted by the RADIO brightness knob instead of the PANEL knob, and two the Baro selection only works when the panel is popped out? Flying the Piper Modern vFlyteAir's Piper 140C is one of the very best general aviation simulations you can get in X-Plane11, bar none. The feel, feedback and the sheer dynamics of the aircraft are about as good as you will ever get... ... in an aircraft and right down to its totally authentic real sounds are taken from a real PA-28 donor aircraft N3466K based at Bulverde Airpark, (1T8) San Antonio Texas with a build serial number of 28-209040. The donor aircraft is of course an analog machine, but the performance and dynamics are all the 66K. So what makes the perfect simulation. It is really in the fine details, the way the aircraft handles, the way you can realistically trim the aircraft, the way you interact with the controls, and for instance here is the different power settings and feedback you get from the adjustments of not only the engine's mixture (Rich to Lean) but the effects of those adjustments in power but for the throttle input as well, adjust the mixture and you have to then adjust the throttle to compensate for more or less power, you really have to fly very realistically in this 140C. This aircraft just wants to make you trim it, and that is just for the sheer realism of it all.... pitch adjustments on the panel are reflected on the roof, and the chrome the handle is your adjustment tool, but obviously it is too hard to turn that and fly the aircraft correctly. So trim key input are required. Ditto the rudder trim, which is hidden under the centre of the panel, not too bad to adjust, but very hard to see the washer sized adjustment indicator, but beautifully done it all is. Avitab is available and charts as well if you have a Navigraph account and again in 3d movement. Another feature is using the CWS on the Fifty-Five autopilot... called "Control Wheel Steering" and again a key input is required, it will disconnect the autopilot to allow you to adjust the heading and height, then just reset S-Tec to continue. Disconnecting the AP cannot be done on the unit, the only way to disconnect the servos are with the red button on the left hand yoke handle... ... and in some ways the S-Tec is a slight backward step from the use of the KAP 140, you can't for example disconnect the HDG or ALT (instead use the CWS), that was much easier on the KAP 140 because of its more versatile and accessible setup, the aircraft comes with the S-Tec Laminar manual to however get the best out of the new autopilot. Apsen EFD is however brilliant, with some very good built in features and details, two highlights are the excellent Vertical Speed strips, that display only in use, in either climbing or descending (shown below left), or the vSpeeds on the speed tape. It does wonder in the now restricted setup on the 3d pop-up ckecklist menu, as all the other vFlyteAir aircraft have excellent Weight & Balance sheets, and with the new EFD the 140C just begs for the same with the adjusted vSpeeds shown. EFD is highly intuitive for use, it easily becomes second nature to use all of its excellent tools in flight, and because I think it tries to find the balance between what you need and the excess of too many options like with the G1000 installations, and that smaller sometimes is better as everything is grouped and central focused unlike the analog and G1000 layouts as just one look gives you all the information you need. Flying is so natural, you are really in tune with the machine, with the excellent dynamics and now the EFD it is a great experience. Arrival at KHAF's runway 12, it was a slight bank into the line up with the centreline, working the throttle to maintain height... ... you have to be very aware of your landing speed, officially they note the landing speed around 65 knts and full flap and yes the 140C feels very comfortable there at that speed, stall is around 47 knts... ... but I found the stall higher at around 53 knts, but to land at 65 knts feels very fast, and if you don't get the flare right the PA-28 will easily bounce, and even at 60 knts you were losing height and moving too fast, they do note to however to land directly into the wind, which may help with the drag and the speed. Okay so I had another go, this time I got the speed down to 50 knts on final and as low as 47 knts on touchdown, but it felt far better and I didn't bounce, but that number is awfully close to the stall speed. Did I mention practise, then if not then you will need to refine the skills in the landings to get it perfect which is quite achievable with this aircraft. The 140C is simply awesome to fly, and the feedback in every area delivered is simply superb. Overall that EFD installation is a major plus. Liveries With this Modern version ALL the ten liveries except for the blank and vFlyteAir branded livery are new... the donor N3466K livery has been retired ____________________________________________ Summary The "Modern" Piper Cherokee 140C replaces the earlier "Original" version with the excellent Mario Donick Aspen E1000 Evolution EFD avionics suite, and an outstanding glass instrument it is, with deep features including vSpeeds and Vertical speeds, and all the required menus and flying tools are included. The transition from the Modern from the Original version you do however lose a bit of the "well original" layouts. The VFR version is gone, and the IFR version has also been changed to a flat panel facia and away from the lovely molded version and changed most of those lovely authentic custom avionics to more the default Laminar default versions, personally both versions can easily live side by side for your ultimate four layout choice, so why discard it? I am quite sure many who have already the Original version will quite if happily if vehemently will hang on to it, for the upgrade to this EFD version you will also have to pay 50% more in the swap. In dynamics this amazing Piper PA-28 is one of the very best simulations in X-Plane, if one of the best general aviation aircraft in the simulator, a yoke and throttle system (use the second throttle lever as the mixture lever) to get extreme engine feedback, FMOD sounds are total realism from a donor aircraft, detail and modeling is excellent, but the menu layout is now feeling quite restricted and missing a lot that could elevate the aircraft more, mainly the missing weight & balance sheet and better control of passengers and weights, the pilot still intrudes visually. Yes the vFlyteAir Cherokee 140C is certainly the best flying experience you can get, the added Aspen EFD just adds in far more now into the mix, and the aircraft certainly is well placed in that ultra general aviation category. This a huge favorite aircraft for me and now fitted with my favorite avionic suite I get both experiences in the one aircraft.... hugely recommended but I will keep the original for that odd day VFR flying as well. _____________________________________________________________________________________ The Piper Cherokee PA140C Modern by VFlyteAir is NOW available! from the X-Plane.Org Store here : vFlyteAir Cherokee 140 Modern Priced at US$27.95 If you already own the Original Cherokee PA140 then you can update to this Modern X-Plane11 version for 50% of the cost price, just go to your X-Plane.OrgStore account for the voucher Requirements: X-Plane 11 (XP 11.30+) Windows, Mac or Linux 4GB VRAM Minimum. 8GB+ VRAM Recommended Release and Review Version 1.0 (August 15th 2019) Download Size: 486MB Features - X-Plane 11 Optimized - Animated rain and ice effects courtesy of the librain plugin - Both panel options include audio panel, Garmin GPS, COM2/NAV2 radio, transponder, “VTEC 55” autopilot, DME and ADF - Pop-out kneeboard has Options and re-fueling functionality - Integrated support for RealityXP(tm) GTN650 or G430 plugins (purchased separately) - Integrated support for the AviTab plugin (download from X-Plane.org) - Aspen glass panel option has a pop-out Aspen E1000 for easier viewing in VR - Full support for VR flight - FMOD sounds - Ultra-res PBR textures - 12 liveries included - Fully animated 3D model - 3D volumetric prop effects - Animated copilot and pilot figures - Supports XChecklist - VR optimized Included with the Model: - Fully illustrated User Manual - librain plugin is included - no need to download - 12 liveries including a blank white - STEC 55 Autopilot Manual by Laminar Research Installation and documents: Download for the Piper Cherokee PA140C Modern is 486 mb and the unzipped file is deposited in the aircraft "General Aviation" X-Plane folder at 1.31 Gb. Documentation: Excellent manual including performance and detailed tutorial, S-Tec Laminar manual also included S-TEC Autopilot Manual.pdf vflyteair_cherokee140_modern_manual_v1.0.pdf vFlyteAir_LimitedUseSoftwareAgreement.pdf ______________________________________________________________________ Aircraft review by Stephen Dutton 20th August 2019 Copyright©2019 : X-Plane Reviews (Disclaimer. All images and text in this preview are the work and property of X-PlaneReviews, no sharing or copy of the content is allowed without consent from the author as per copyright conditions) Review System Specifications: Computer System: Windows - Intel Core i7 6700K CPU 4.00GHz / 64bit - 16 Gb single 1067 Mhz DDR4 2133 - ASUS GeForce GTX 1080 8Gb - Samsung Evo 1Tb SSD Software: - Windows 10 - X-Plane 11.35 (v11.30 is required for this aircraft) Addons: Saitek x56 Rhino Pro system Joystick and Throttle : Sound - Bose Soundlink Mini Plugins: Environment Engine by xEnviro US$69.90 : Avitab pdf viewer - Free : Navigraph - Subscription Scenery or Aircraft - KHAF - Half Moon Bay by Rising Dawn Studios (X-Plane.OrgStore) - US$19.00
-
News! - More Images : Fokker 50 by Carenado Ohhhh, it is starting to get now very exciting now as Carenado has put out more images on Carenado's facebook page of their forthcoming Fokker 50 to X-Plane11, and the aircraft is now labeled as "COMING VERY SOON!!" aggghh I can't wait... The original set of released images are also shown below... Still feature details have yet been released, but the FSX/P3D version does have Flight1 GTN 750* integration so I would expect that, price on the FSX/P3D version is US$44.95 and that feels about right for X-Plane. The F50 was the refinement of and the successor to the highly successful Fokker F27 Friendship and 213 aircraft were manufactured between 1985 and 1997.... the aircraft is still in service with a few airlines around the world, and also soon in X-Plane11. Images are courtesy of Carenado Announcement via Carenado's Facebook page ________________________________________ News by Stephen Dutto 19th August 2019 Copyright©2019: X-Plane Reviews
-
I never use the Saitek Tools with my X56 Rhino, why would you anyway as X-Plane provides all the control and key settings you could need, it sounds like the external settings is confusing the simulators settings... my bird works perfectly well... my guess the tools are for FSX/P3D and not for X-Plane in features.
-
It is actully a floor panel, that looks like a small storage bin, but there is no warning around it, but it could be weak.
-
Aircraft Review : Flight Design CTLS Project by VSkyLabs This is the next new project released by VSkyLabs and it is a high-wing, tricycle, two seat light sport/ultralight aircraft and part of the Flight Design CT series family of Germany. But to note first the VSkylab philosophy is that you purchase an ongoing project, so any aircraft you purchase is not fully completed and 100%, that is the deal you sign up for to get access to the aircraft, all updates to the aircraft are free but changes can come infrequently if sometimes slowly. Basically small ultralights or light sport aircraft are aviation's version of Buzz lightyear's set of wings on your back, the fuselage is there just to carry the wings and put an engine in front of you and in the case of the CTLS that is a Rotax 912ULS (Carburated, 100 rated BHP @ 5800 RPM) engine with a Propeller gear reduction of 2.43:1, the rest is a pure plastic body. At first glance the tiddler CTLS feel like one of those packaged toys that you get where you click in the wings, click in the elevator, click on the three wheels and finally put the propeller on the nose to create an aircraft, only in full size. The design is very, very simple with an plastic or composite molded fuselage with the wings and appendages fastened together.... or a pure ultralight design. The look and feel is a bit like a large fish, bulging nose, wide centre to a flappy tail. VSkyLabs detail is very good as their modeling usually is. Plastic composites always come across as plain in simulators, and there are shades of that aspect here, but the modeling's tight lines and curves does eliminate a good part of those areas and making it interesting. Appendages and aerodynamic surfaces are thick, even clunky but perfectly designed here. Tri-cycle gear is all aerodynamic covers and not much in assemblies, but again they are well done. Glass is very realistic and nicely reflective, the doors can't be opened in flight like a lot of these light designs, but the huge panorama windows compensate for that, and again they have been well created. The fixed pitch Neuform CR3-65-47-101.6, 3 blade, composite propeller has also been really well rendered. Open the quite thick side door and there is the well designed instrument console and to the right the highlight of the aircraft with two very modern design sport seats. Both seats are insanely well created in detail, with the hard shell with the rubber body hugging insert is excellent work, the full detail can be observed by just admiring the sheer detail of the six point harness and straps. Note the nice rubber seals around the doors for quality work. Rear shelves have areas for bits and pieces with a rubber string restrainers, both wells are well done here but don't expect to get any sized bag in here. Looking forward the CTLS comes with two instrument panel configurations. One is the standard, basic analog CT VFR + night pack panel (Left) and the other the enhanced panel, which is including the addition of a notebook-based glass PFD (Primary Flight Display) along with a Dynon style AP74 and HS34 avionics package (right). In the review I will use the avionics package version. To change the panel then press the glass PFD (Primary Flight Display) and it changes over to the analog dials. The only difference instrument wise is that the top two instruments in the Airspeed and Altimeter are replaced with an electronic version, lower two instruments are the Artificial Horizon and the Vertical Speed instruments are both represented in either configuration. The overall panel design is very nice, as for the raised chrome nuts that hold the metal panels with the instruments in place is all expertly done with skill, realism 101. The glass arrangement is simple but highly effective for an aircraft of this class, and it feels right up to date. Centre panel has the default Laminar Research GNS 530 but enclosed in a custom housing, pop-out is standard GNS 530. Lower is the GTX-327 transponder. Right panel is top a large RPM dial and alternator warning light, lower are four engine dials that cover CHT (Cylinder Head Temperature), Voltmeter, Oil Temperature and Oil Pressure and right is a Quartz Hobbs meter. Lower are fifteen circuit breakers, and all are active (to note when starting from cold all breakers are out or off, so you have to click in to use). We will look at the Dynon AP74 and HS34 panels in flight. Centre forward console has the lighting and avionics switchgear top (6 Switches). PS Engineering PM3000 4-Place headset Intercom. Below is the ELT panel. The red lever to the left is the fuel valve (cutoff) that covers the start-key when in the lower position. Main Battery and Generator switches are set right, and we will look at the flaps in a moment. Centre console has left the stabilator (stabiliser) trim wheel, then the choke lever... right are the throttle lever and the brake lever, rear is the brake stop switch. Rear console between the seats are both the Rudder and Aileron trim wheels, and the BRS Ballistic Chute handle. Flap selections are interesting, there are five selections with Zero as the main position... dropping flaps are positions 15º, 30º (not shown) and full flap set at 40º... .... the interesting one is a setting in the negative at - 6º or the flap is set upwards, we shall see how this works in flight. There is the feature of a Avitab screen, stuck on the right side window and it is free and available here: AviTab: VR-compatible tablet and a Navigraph account is also required for active charts. This is a nice installation that can be hidden via pressing the suction cup, a lot of these 3d tablets are too large and hard to see around while flying, and if real you would bang your bonce on it if you moved your head around, but this one is about perfect in size and functionality. Window blinds are nice, and the left hand one has the checklist applied on the surface, very nice. The frame mounted compass is nice as well If you are aware then you will be wondering in "Where are the fuel gauges?" There are two left and right, both visual and are both set up in the wing roots, top up the tanks to see the volume of 17 US Gal (65 litres) in each wing. Note the "Carbon Monoxide Detector", but personally what could you do if it went into "Danger", jump out? The whole internal cabin comes in this motley composite texture, it looks good... but you feel it is more like your kitchen bench top than a quality internal aircraft design. As with most of these tiddler aircraft the instrumentation and controls are fairly basic in use and layout, but you get a great balance here. Flying the CTLS Is the CTLS difficult to start? no not really. Lots of circuit breakers to click in, main power BAT (another breaker really) Choke to "On", Throttle to 10% and that big red fuel cutoff lever to up... which exposes the start key and to note the avionics have to be switched off to save power. Then a twist of the key a few times and the Rotex purrs into life. One thing you expect is what you don't get is... movement? These Rotexs shake violently, so you need that visual feel, so I grabbed and installed "Headshake" by SimCoders to add in the shake effect, again I wanted more shake even when set with the plugin's full 100% settings, but some movement was better than nothing and gave you at least some vibration. But before you bombard me with emails on instead in using XPRealistic Pro, I will note I won't use the FlyWithLua plugin as it creates too many conflicts with my system. Another note is that the Experimental Flight Model checkbox on the X-Plane/General menu page has to be selected for this aircraft, a restart is required. Put the Choke in after about 30sec, but keep the revs up until the aircraft's vitals are showing normal, then turn on and set up the avionics. But before you can leave you have to arm the BRS emergency ballistic chute system by removing the pin, it is stored in the left lower pocket. Two things to note, you can adjust your horizon pitch target in the Artificial Horizion and set one and it sets in the glass version as well, secondly is that to set the Baro you can to switch over to the analog version to adjust to inHG or use the "Value" knob on the on the glass version via the right side Dynon HS34 panel for hPa. When warmed up and the throttle at idle you are ready to go, brake safety off and off goes the park brake, the braking has three settings, park and off, but also the standard X-Plane 50% braking action. Sounds are FMOD, and very good, but not highly dynamic in rotation and direction but more than enough for this type of aircraft. Tuning the stabiliser trim needed careful setting to be exact, if not the whale stabiliser will flutter badly, line it up correctly and it will calm it down. Taxiing is very nice with just a slight throttle to get you moving, yes the aircraft needs fine control to taxi, but it is a very short small aircraft and all of these types require that control, ditto going too fast, and if you do there is the feeling you will lose control and flip the aircraft. Power up but gradually and even just over 4000 revs is enough however VSkyLabs say 4800 rpm, but that feels too much for me, max I would do would be 4500 rpm... and almost straight away the nose wheel wants to lift, so for the first few hundred yards you need to keep the stick pressure forward... ... VSkyLabs note you can takeoff with the flaps set at 15º for a short almost handglider of a cliff-face lift off, but even the 0º setting will have you off the ground in a very short time at around 60 knts (official 54 knts) so you don't need to do that. Climb-out is around 500ft per minute and official max climb is 960 ft/min. Finding the right power position is critical, as too much power will rise the aircraft more and making it harder to trim. Trimming is tricky, even hard to get right because if you use keys (like I do) to trim, you have to hold them down to move the trim wheels, just clicking will not change the trim. So holding hard can make you go too far past your trim position, or the other way in in being too low... you work it out, but finding that sweet spot is kinda hard but doable. Once sorted you do have the option of using the flaps now in the -6º position to balance the aircraft better and gain more speed, again it is best to sort this out and manually trim it out before using the autopilot. But the aircraft never seems happy, with constant slight climbs and drops and sometimes as much as 300fpm either way no matter how much you try to flatten out the curve via the stick or manual trim, the CTLS is nice to fly and even very realistic, but not over time and distance a smooth experience. The Dynon Avionics autopilot system is very basic, but quite innovative for an aircraft of this category. The AP74 panel has the main engage selector, HDG (Heading), TRK (Track), NAV (Navigation GPS) and (hold) ALT (Altitude), the value knob does not work but is noted as Multi-Purpose) Left of the glass display is the Dynon HS34 panel that knobs adjusts top Value (Baro), Heading (middle) and Course (Lower) all push to sync. Other selections include NAV-SRC (NAV or GPS), BRG-SRC (just resets pointer). Like with the manual trim the aircraft's Dynon AP struggles also to keep the climbs and drops under control even in 5 knt wind conditions. It is a good little system that will take all on all the flying work from you, and with a 850 nautical mile range a requirement, top speed is 230 km/h (143 mph; 124 knts) but you cruise around 112 knts. Big huge side windows give you a helicopter panorama view... ... and the particle effects are effective on the tinny exhaust. There are no liveries except for the default N5623X VR (Virtual Reality) is a big feature here with designated zones for interaction and is fully operational with the use of mouse manipulators or VR touch controllers. Any manoeuvring for the CTLS has to be under 100 knts, and aerobatics are for the insane... The AP won't let you descend even if you disconnect the ALT button, so the only way to lose height is to disconnect the AP completely and then manually adjust the trim. You can come down quite quickly if you want to but be aware of that nose pitch... ... you also can turn on a dime, so short approaches are easy to do, but running off the little speed you use anyway can be quite hard. The problem is if you lift the nose to slow the aircraft it will then easily gain height, working the throttle helps, but even that action is not always totally effective, dropping the flaps is... but you still have to be well under 80 knts (15º) to do so, so be aware to get your speed down ready for an approach, 35º is 63 knts. You will need to have a few practise landings to find that perfect zone of speed and lift, too fast and you pitch the nose too far down, too slow and of course you lose height, so you tend to favour the former and safety. But the tiddler is very responsive to inputs, even to a point a bit nervous... .... so flying skills are everything here. Final approach is 55 knts and down to 48 knts in flare, and 42 knts is stall, you can land in -6º flap but add on a few more (2-3) knts to the approach speeds. Once those wheels contact then active steering control is everything to keep the CTLS straight until the speed rubs off, if not you will end upside down in the grass. So your first circuit in the CTLS will be a bit of a shocker, but after a few takeoffs and landings you will find your groove and understand the aircraft's limitations. Avitab is very handy (with a Navigraph account) to find your way around airports, then time to put the tiddly machine home to bed, but remember, that before shutting the engine down to switch off the avionics! The BRS emergency ballistic chute system works very well, you get thrown around a lot at first, but then gradually descend to the terra firma. Lighting Instrument lighting is basic, but adjustable. In fact it is quite good with the limitations. Glass and analog are nice to use and there is one overhead light that is not really very bright, but illuminates the glareshield nicely.... External is average with non-refined lighting (landing light is very blobby) and this light can then only be switched on and off via the panel switch and not by a key input, which I have set on me throttle system. Summary You sort of know what sort of aircraft project that comes with a VSkyLabs release. They are well if even extremely well done models with a lot of clever ideas. What you don't have are detailed menus and lots of active features, but this CTLS from Flight Design has more features than most with both glass and analog instrument panels and with the glass version there comes also a very nice if basic Dynon AP74 and HS34 autopilot system. They are clever and extremely dynamic flying aircraft, but I found the CTLS a bit nervous with the trimming and the up and down constant adjustment while in the air, and in both manual and auto trimming selections. It is certainly an aircraft to fine-tune into to get out the maximum rewards that it can deliver, but to note the aircraft is built to Sport/Ultralight rules and is just a step away from being just an upmarket handglider. You do also get great responsive service from VSkyLabs as part of the project, but remember the purchase deal just that, access to a project and not a fully designed and completed aircraft, but to me with only a few refinements needed the CTLS overall feels pretty well completed here. So overall this is another great little VSkyLab project, clever, different and challenging... it is all that and more. The VSKYLABS Flight Design CTLS Project is now available! from the X-Plane.Org Store here : VSKYLABS Flight Design CTLS Project Price is US$27.50 Project Highlights: VSKYLABS 'Test-Pilot' Project: designed for use with X-Plane 11.30+ cutting edge Experimental flight model environment, featuring a superb flight dynamics with authentic performance and flight handling characteristics. Built for VR: development was tailored specifically for VR, and optimized for 2D usage. Engineered and designed as a default X-Plane aircraft (Like all VSKYLABS projects). The VSKYLABS projects are practically show-casing X-Plane, as they are stretching X-Plane default features, systems and flight model to its limits without any dependencies on complementary plugins or software...delivering a very robust simulation model, having maximum compatibility with the ever evolving X-Plane flight simulator. Perfect fit for beginner and expert pilots: The VSL CTLS is featuring the standard, basic CT VFR + night pack panel. The simple and clear analog gauges layout is perfect for beginner pilots. It is also featuring an enhanced panel, which is including the addition of a notebook-based glass PFD along with a Dynon style AP74 and HS34 (these are incorporated with simplified, yet functional features). Built-in Avitab Plugin Compatibility (AviTab plugin is not included). STMA Autoupdater plugin is included - all updates are being pushed smoothly without the need to re-download the entire base package (base package will be updated every once in a while to minimize the gap). Highly responsive VSKYLABS support forums: Professional discussions which results in incorporating users feedback into the on-going scheduled development plan. Real-pilots inputs (as well as sim-pilots feedback) are always welcome, and in practice sets the the VSKYLABS projects within solid, professional margins over time. The project is under constant maintenance and development - updates are free. Requirements: X-Plane 11.30+ Windows, Mac or Linux 2Gb VRAM Minimum - 4Gb+ VRAM Recommended - 8Gb+ VRAM for VR Current and Review version: 1.0 (Aug 8th 2019) Installation and documents: Download for the Flight Design CTLS Project is 189.20 Mb and the unzipped file is deposited in the aircraft "General Aviation" X-Plane folder at 265.30 mb. Download of the"Headshake" by SimCoders effect plugin is highly recommended with this aircraft, Navigraph account also recommended Documentation: Manual included VSKYLABS Flight Design CTLS POH vSkyLabs Aerospace Simulations also has a full extensive website on all projects for updates and information including aircraft manuals available here: www vSkyLabs.com All VskyLabs projects are also available for purchase from the source developer here: VSKYLABS ______________________________________________________________________ Aircraft Review by Stephen Dutton 15th August 2019 Copyright©2019: X-PlaneReviews (Disclaimer. All images and text in this review are the work and property of X-PlaneReviews, no sharing or copy of the content is allowed without consent from the author as per copyright conditions) Review System Specifications: Computer System: Windows - Intel Core i7 6700K CPU 4.00GHz / 64bit - 16 Gb single 1067 Mhz DDR4 2133 - ASUS GeForce GTX 1080 8Gb - Samsung Evo 512gb SSD Software: - Windows 10 - X-Plane 11.31 (v11.30 is required for this aircraft) Addons: Saitek x56 Rhino Pro system Joystick and Throttle : Sound - Bose Soundlink Mini Plugins: Environment Engine by xEnviro v1.07 US$69.90 : Headshake by SimCoders - Free : Navigraph Charts - Subscription Scenery or Aircraft KHAF - Half Moon Bay by Rising Dawn Studios (X-Plane.OrgStore) - US$19.00