Stephen
-
Posts
2733 -
Joined
-
Last visited
-
Days Won
354
Content Type
Profiles
Forums
Articles
Everything posted by Stephen
-

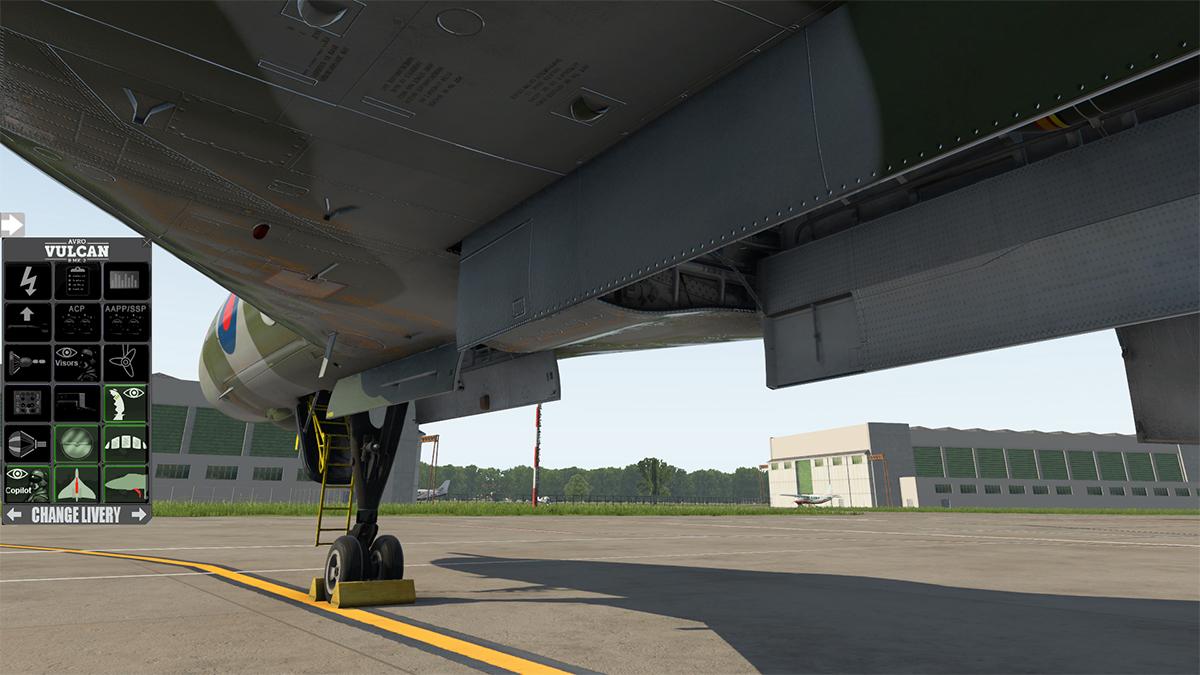
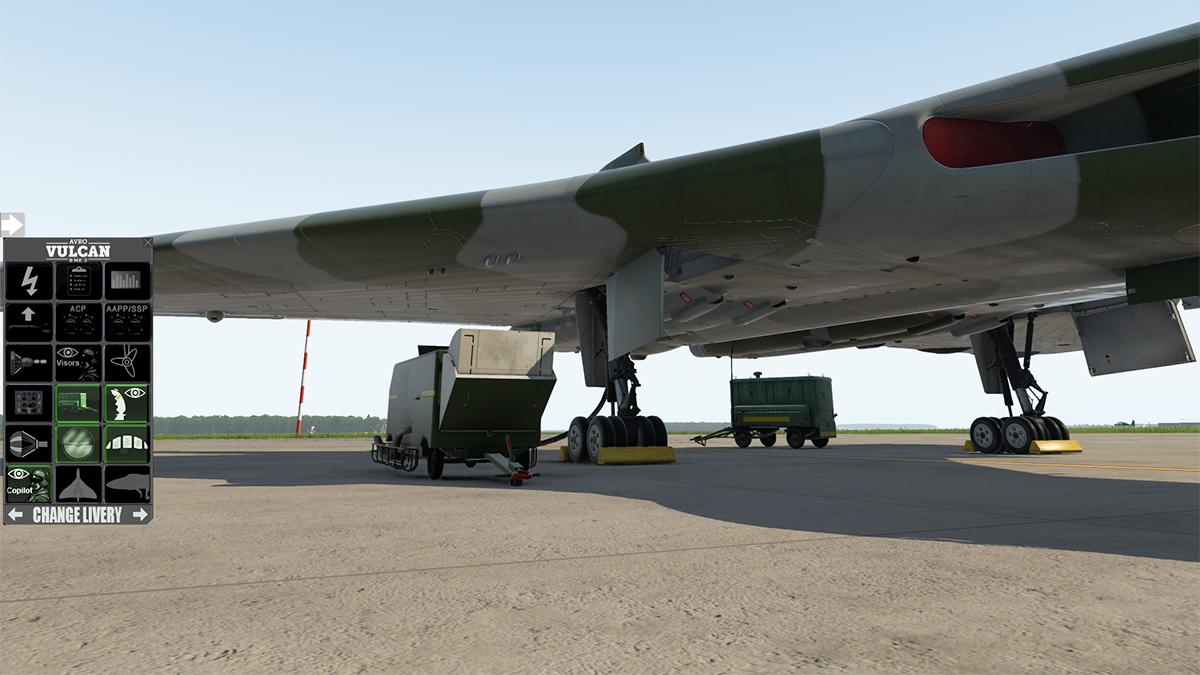
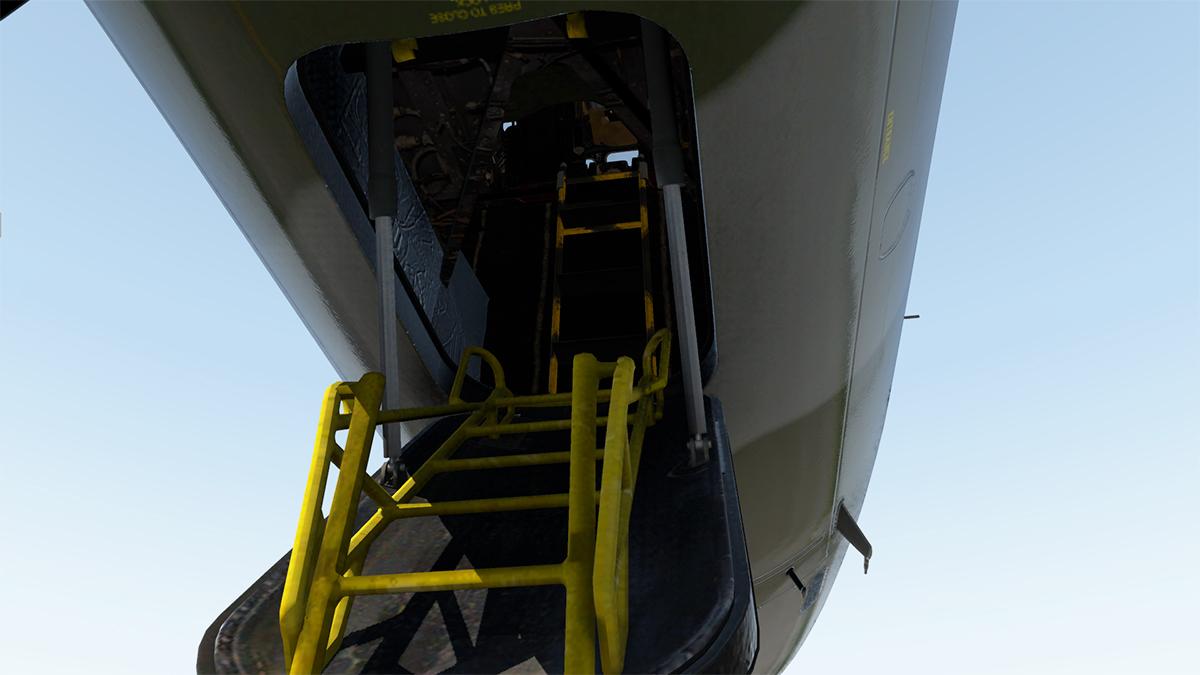
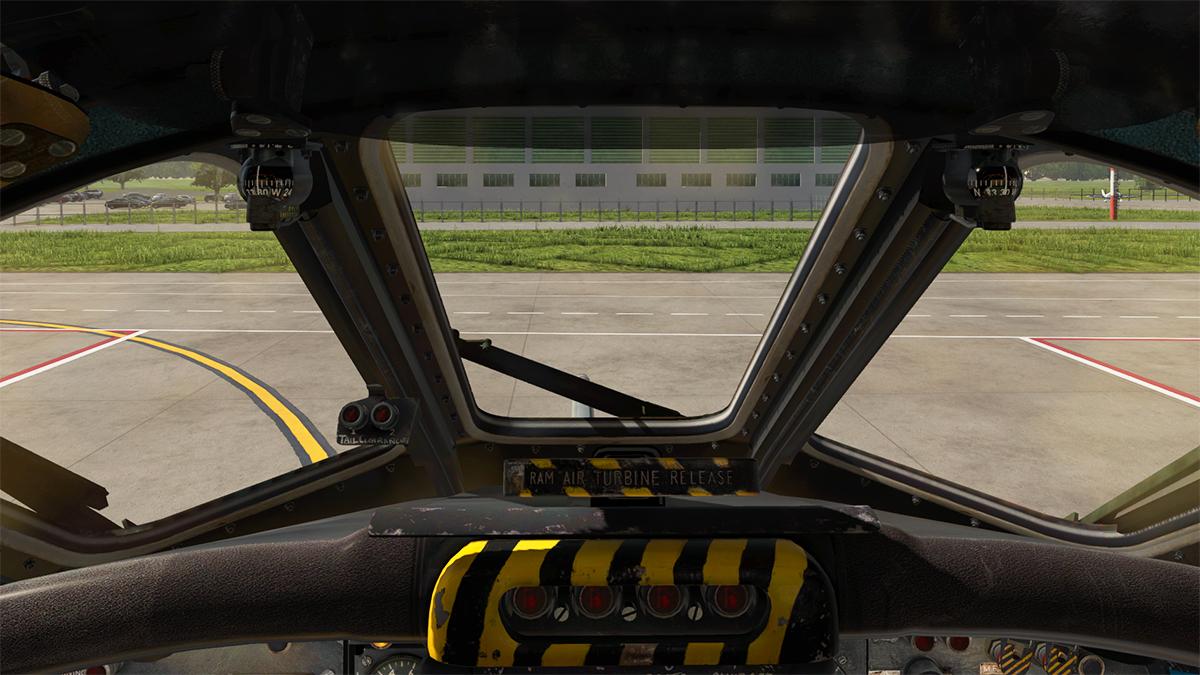
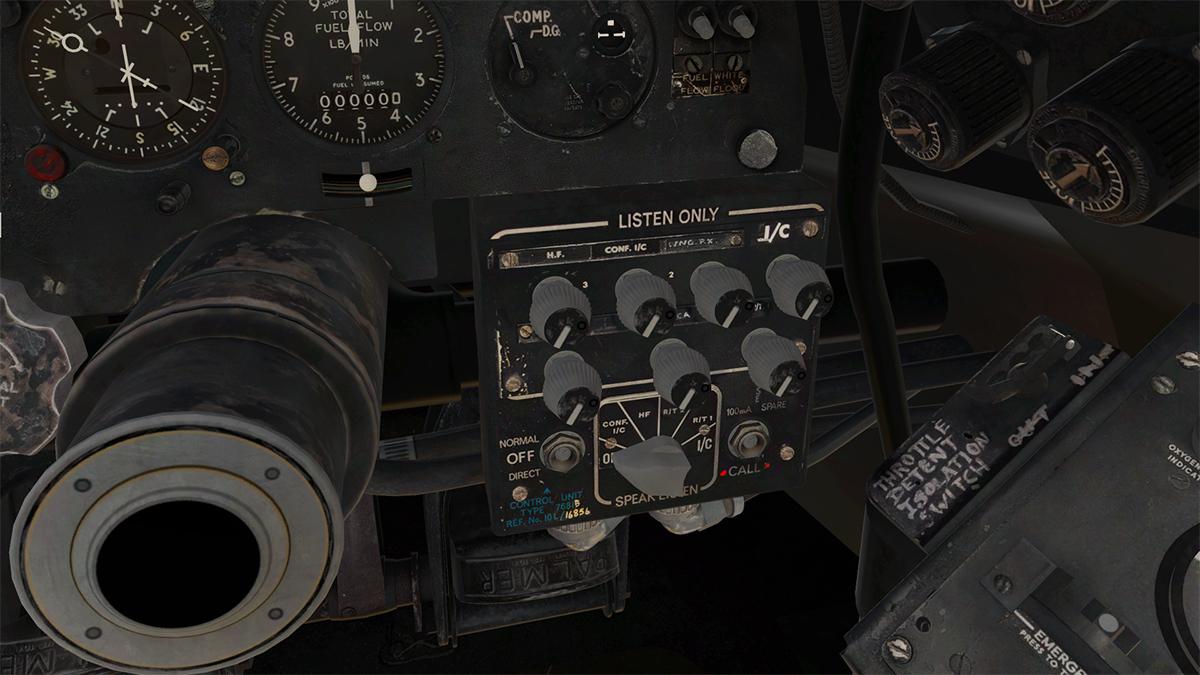
Aircraft Release : Airbus A320-214 Ultimate by FlightFactor Aero
Stephen replied to Stephen's topic in Airliners Reviews
I believe you mean the framerate? -
Oh please!, read the review it is explained how to authorise in the XJet plugin... Aircraft Review : King Air 350 by AirfoilLabs
-
There is more value with the "Extended" pack as you have not only the two extra variants, but the PW/RR engines as well. The Avionics pack is just the FPDS avionics.
-
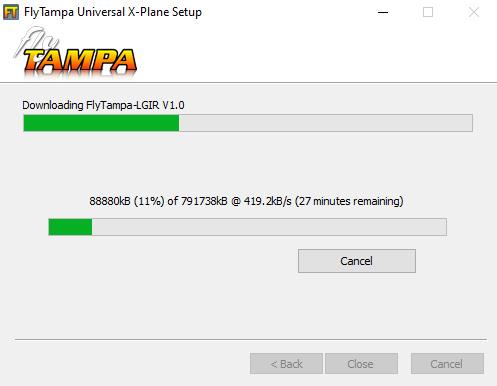
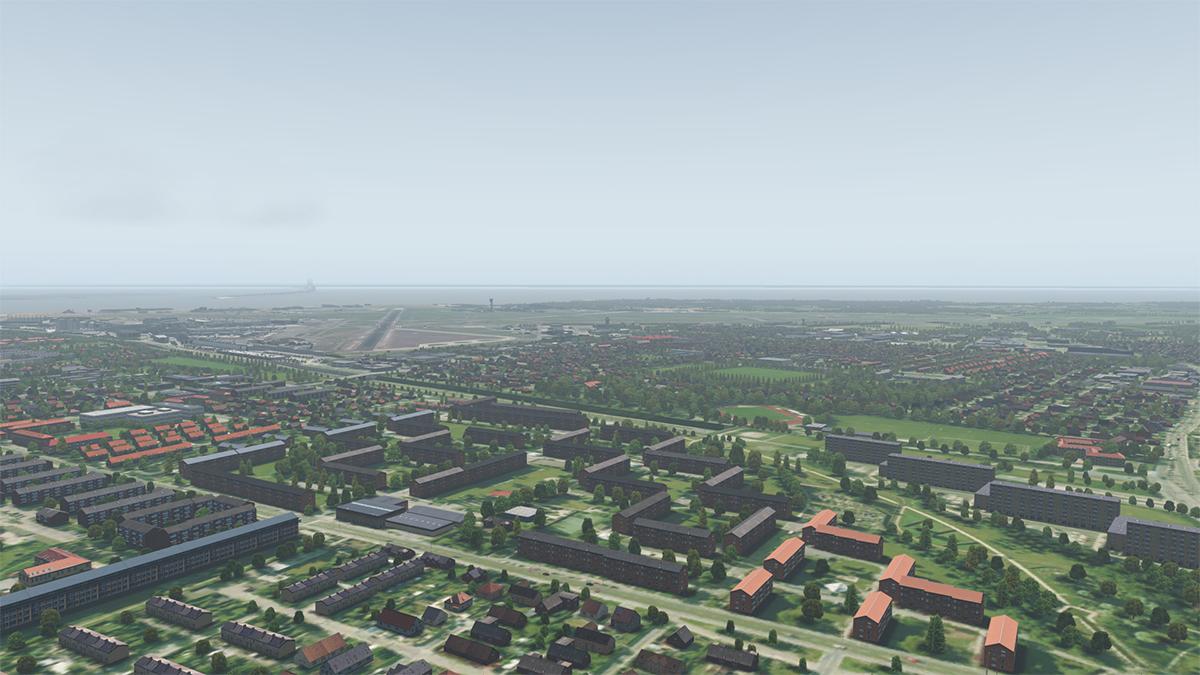
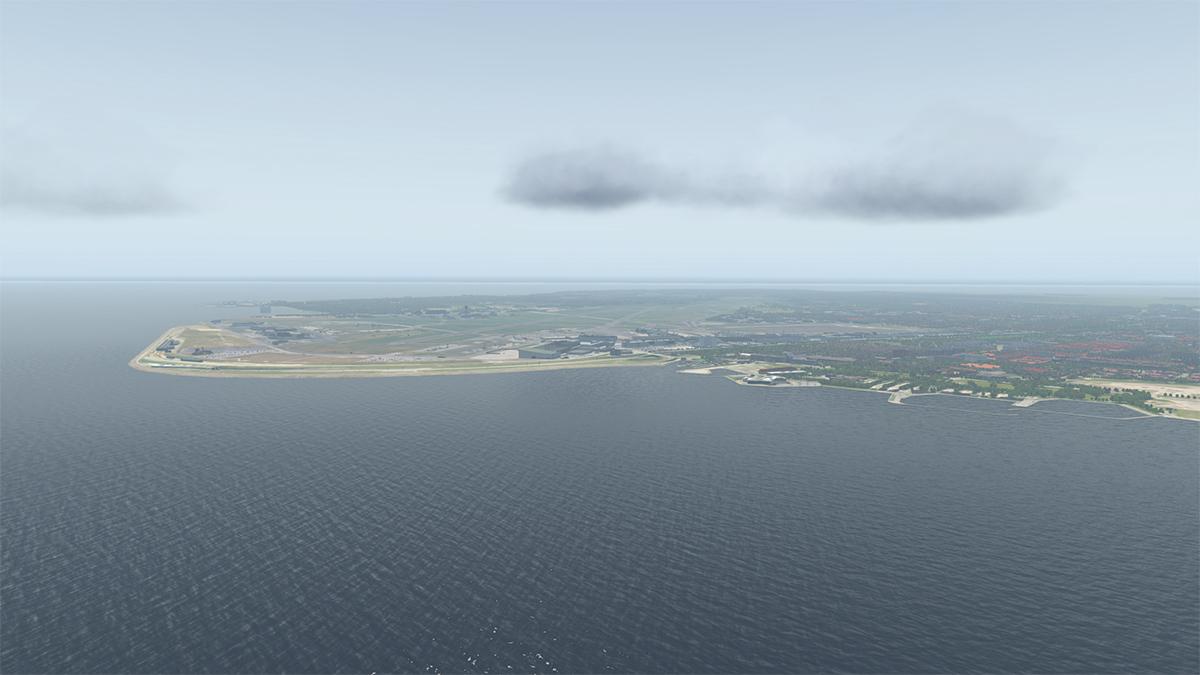
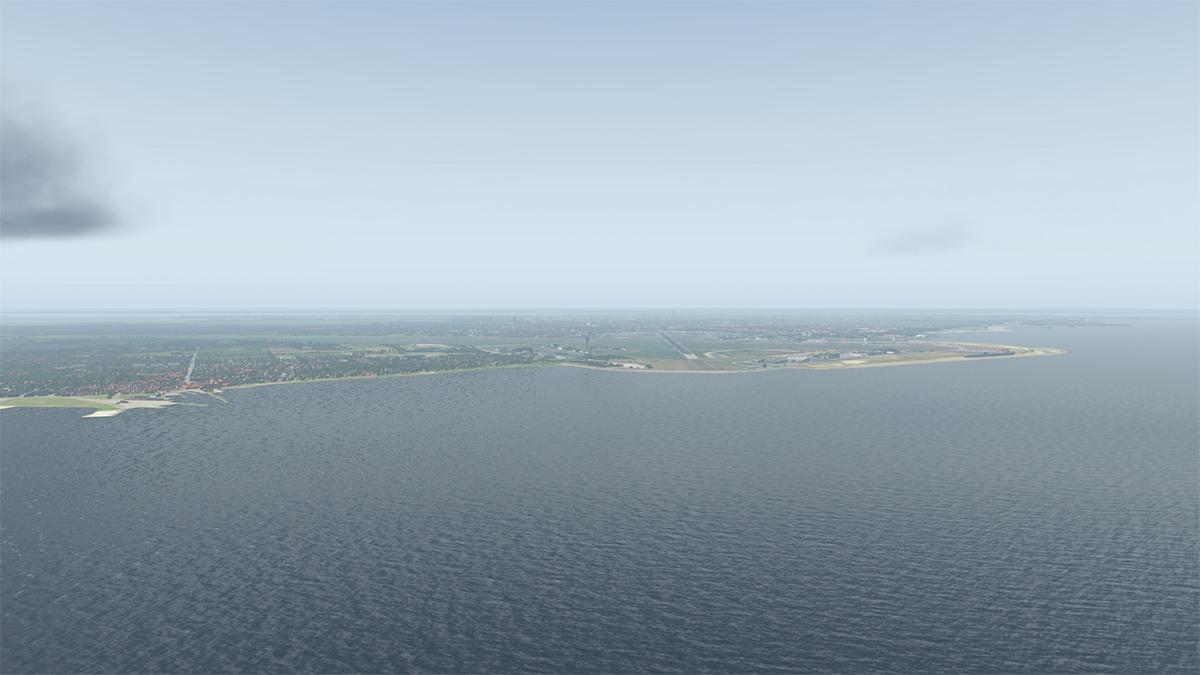
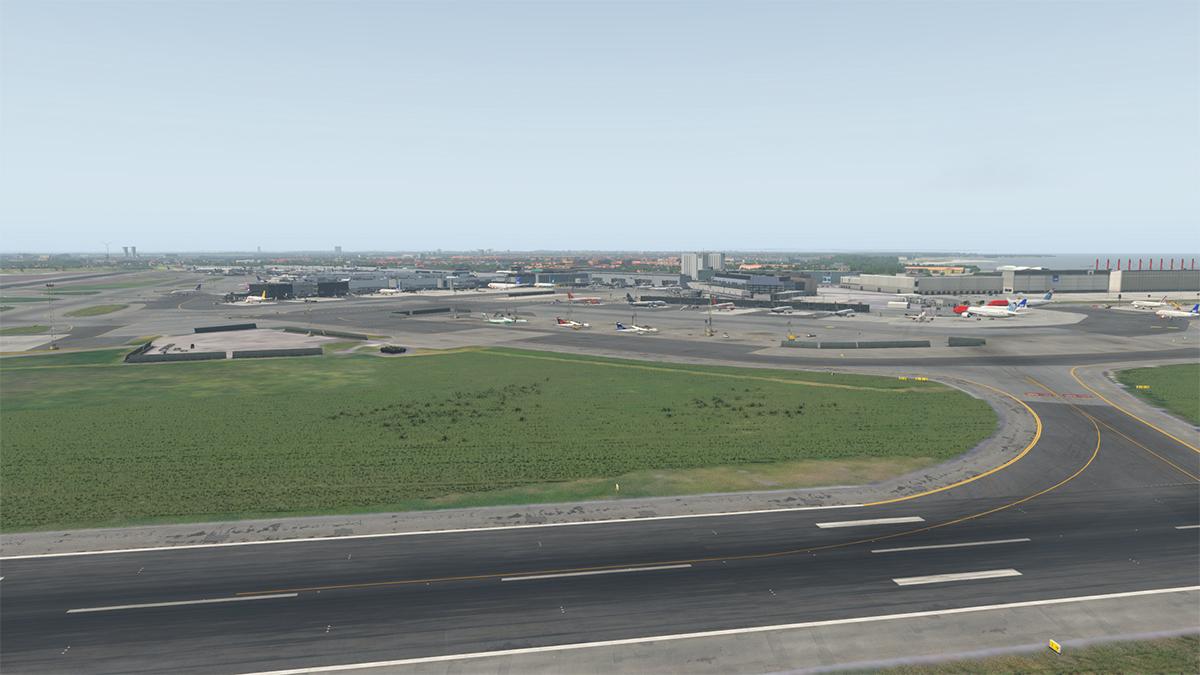
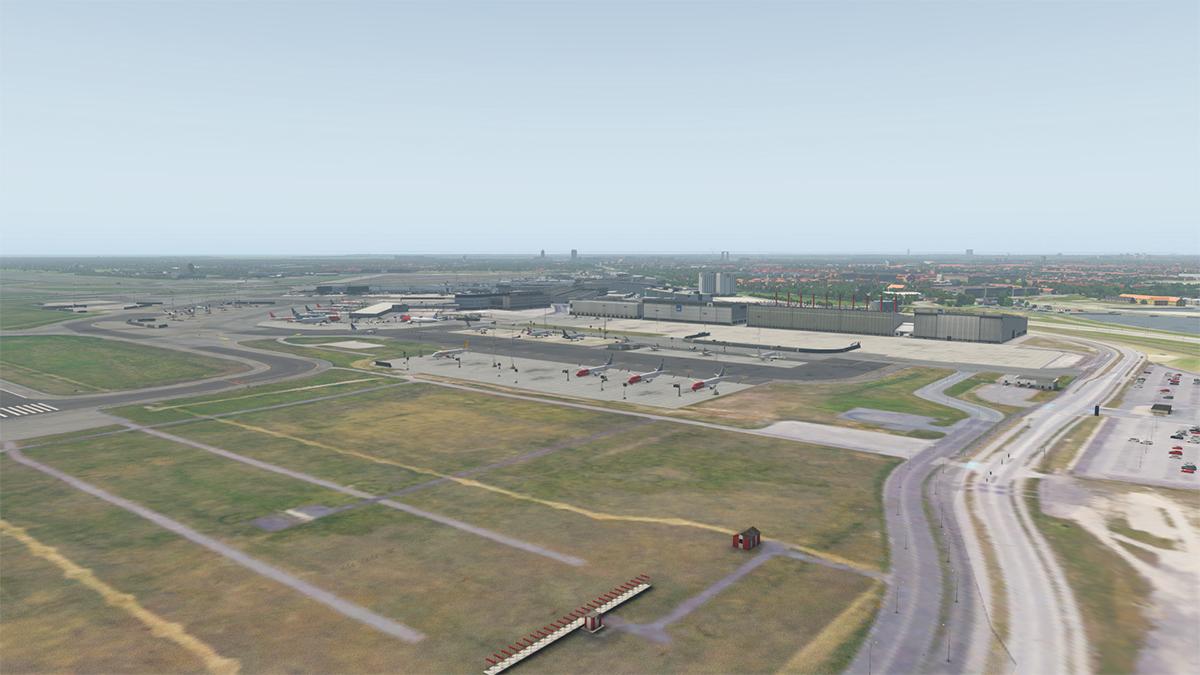
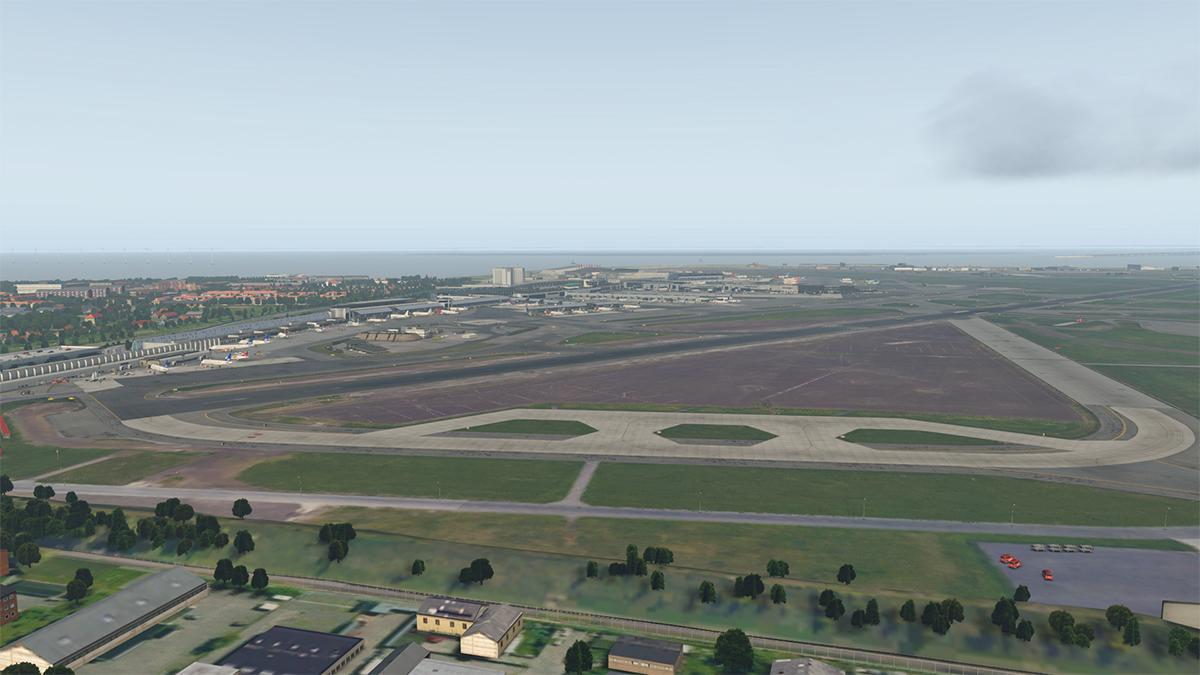
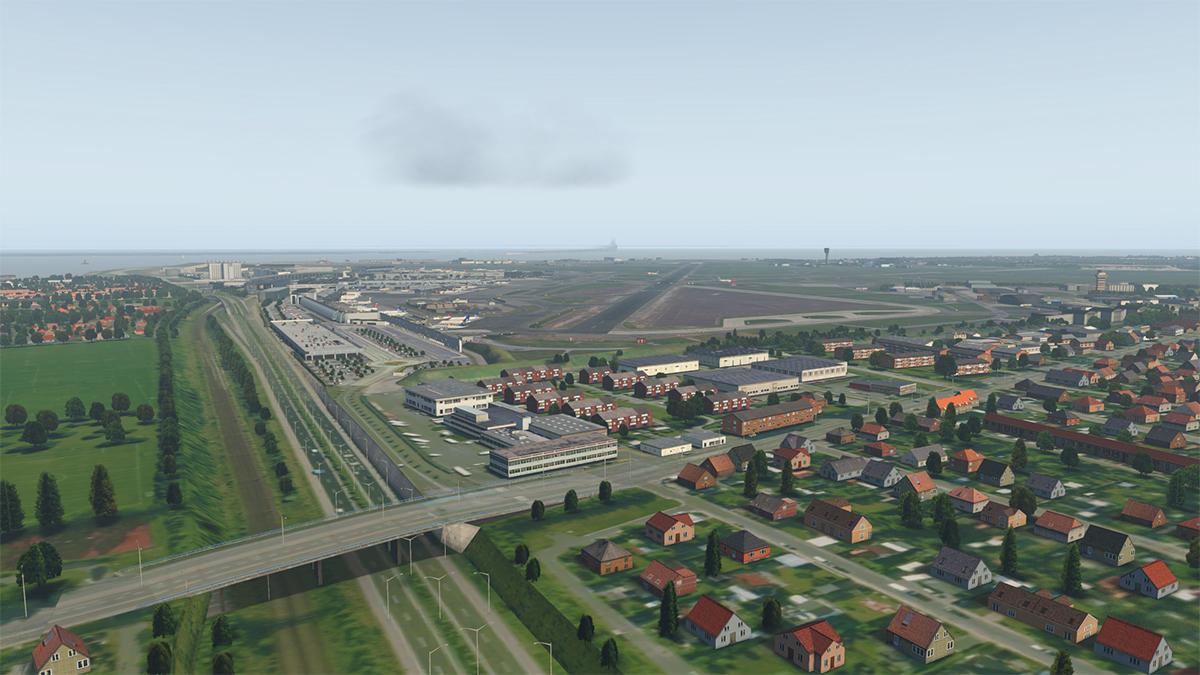
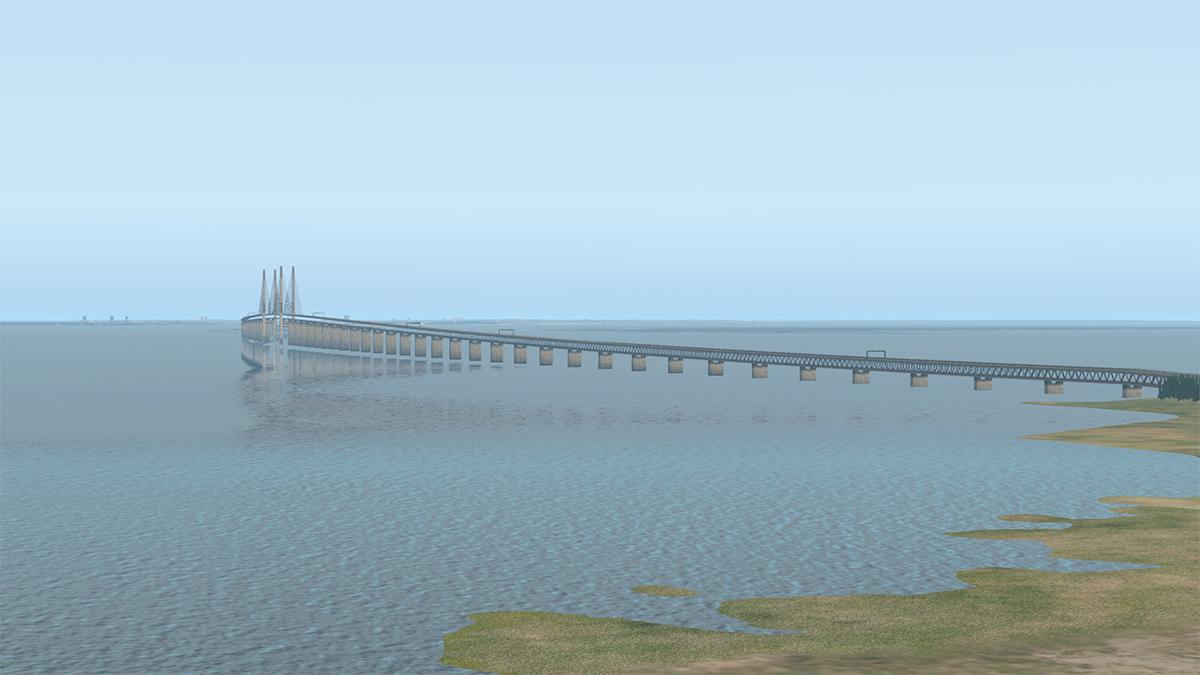
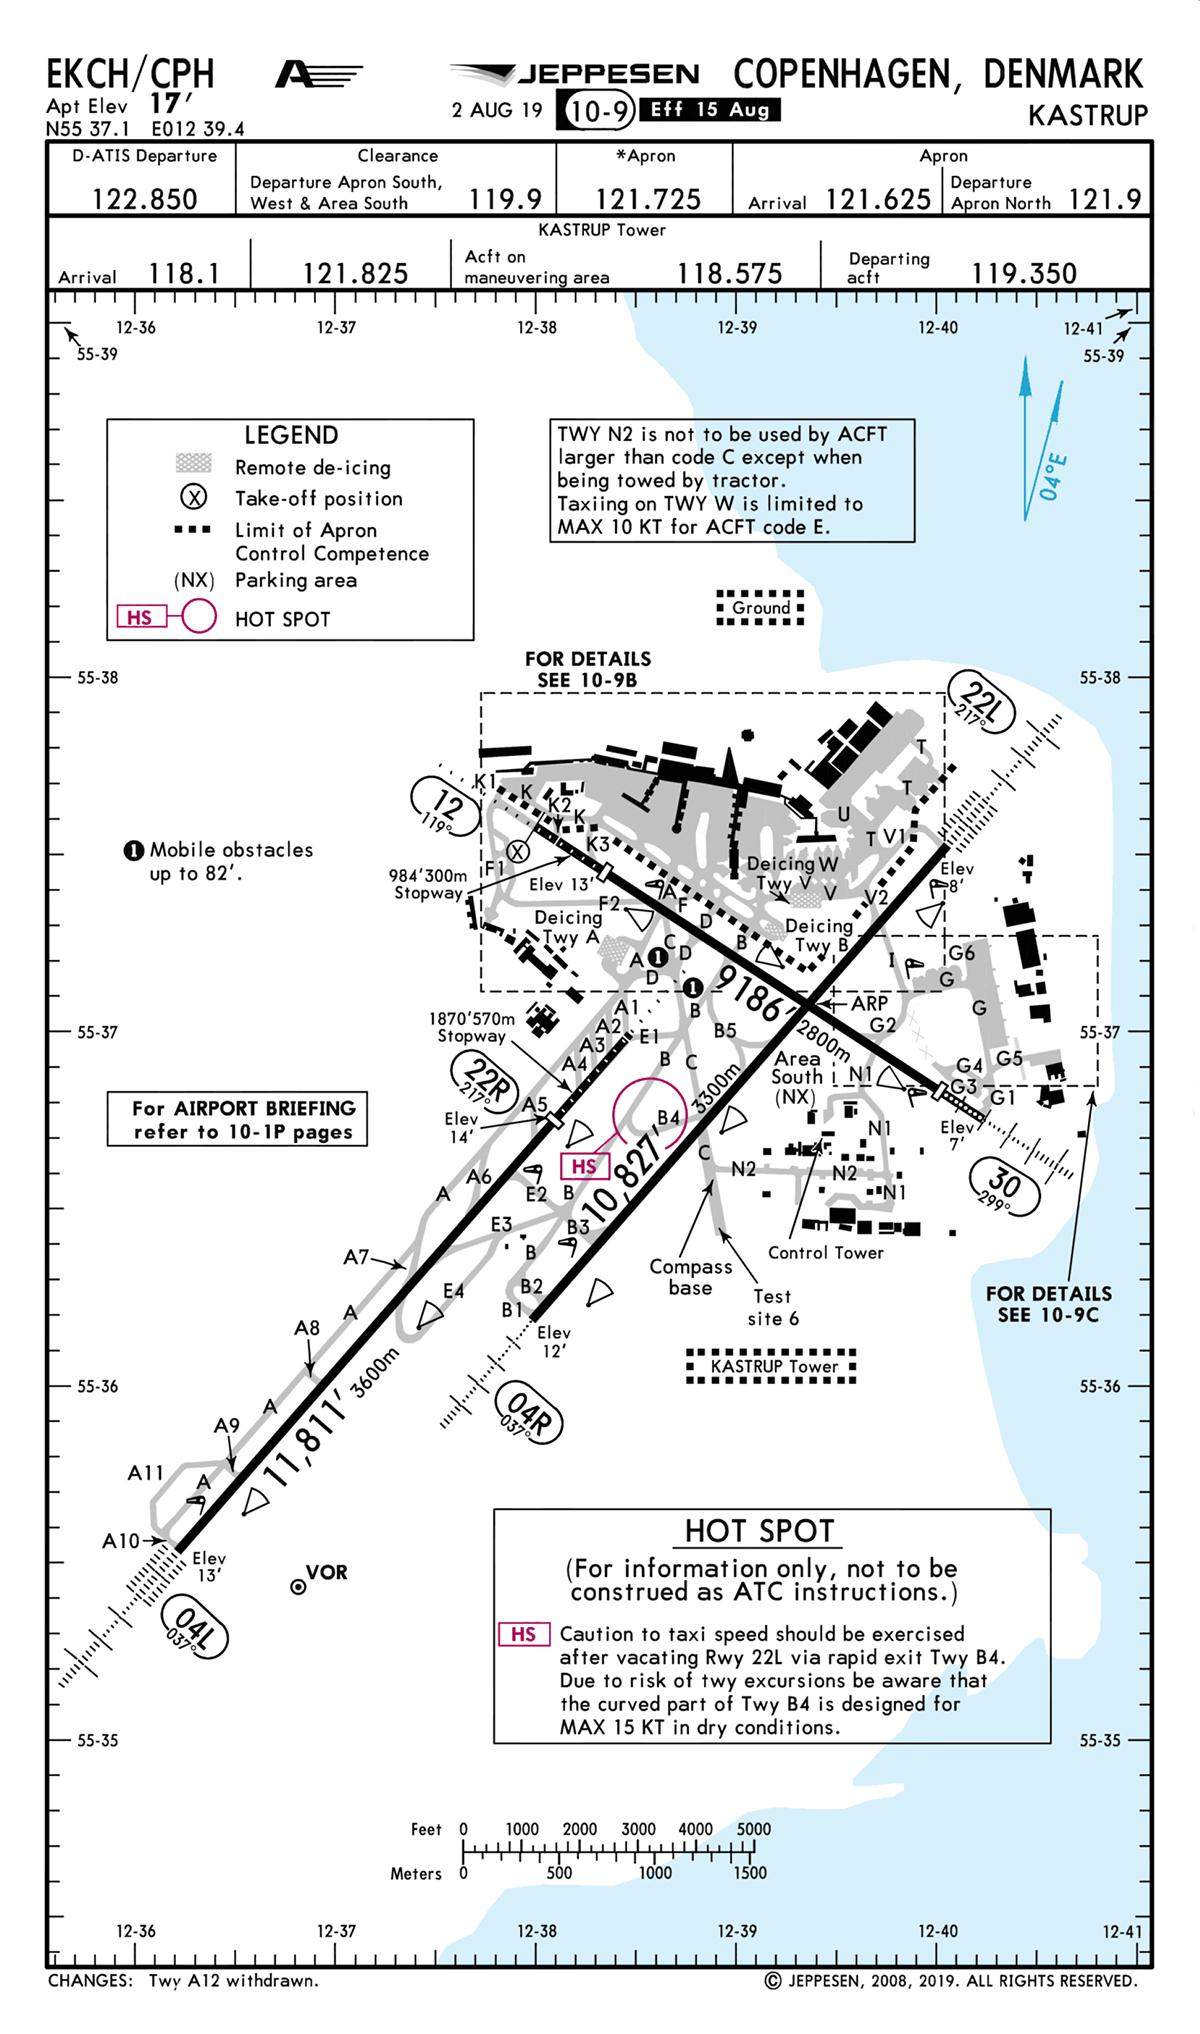
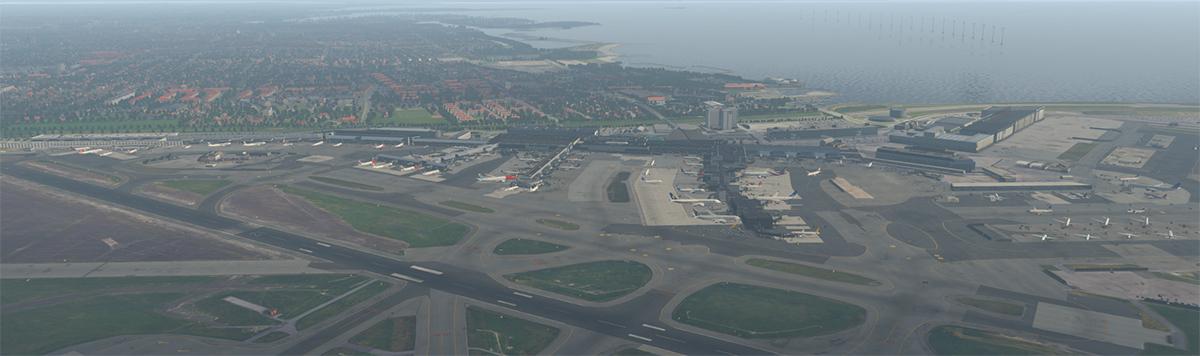
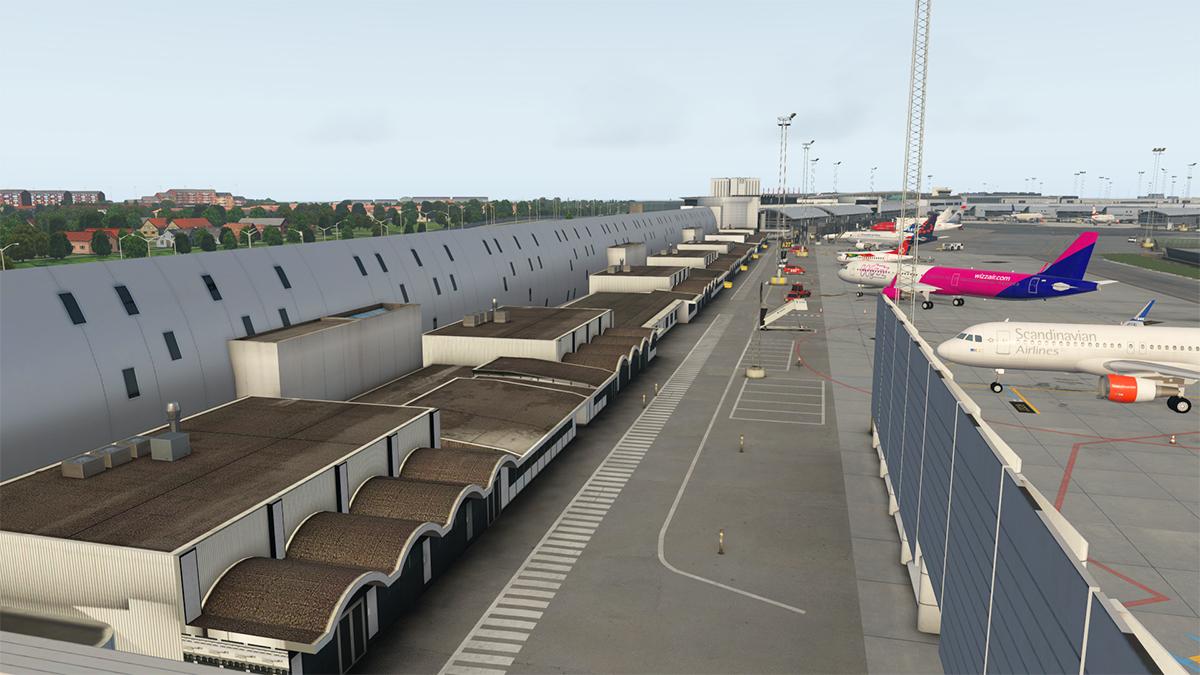
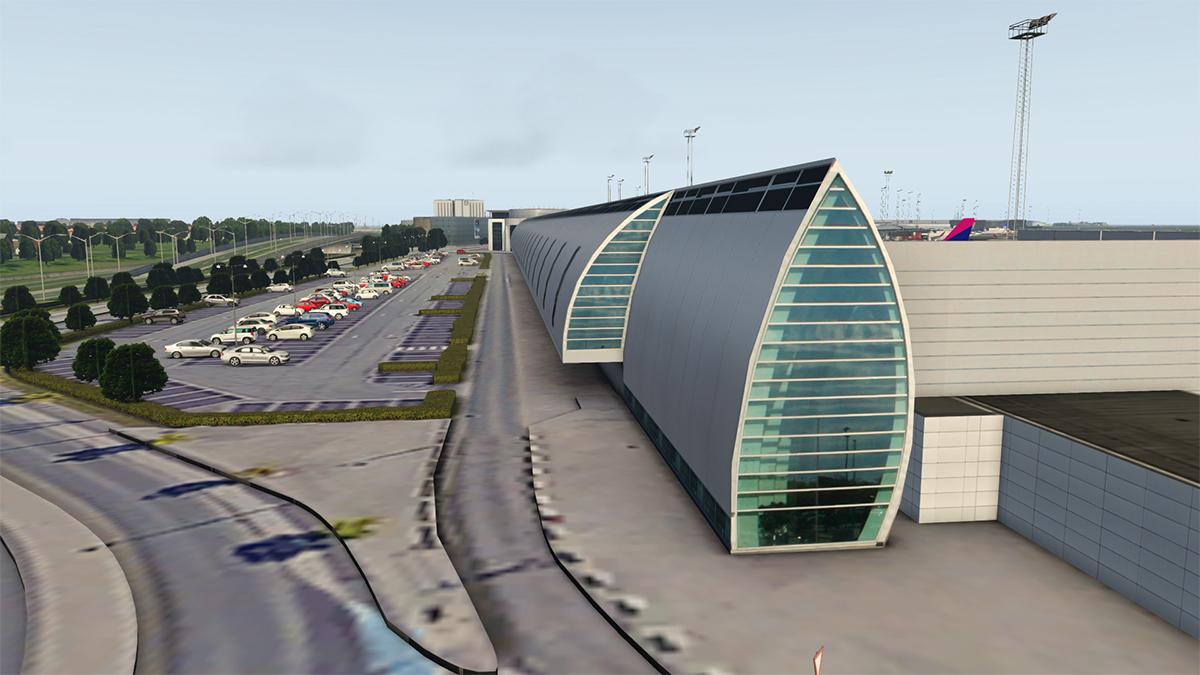
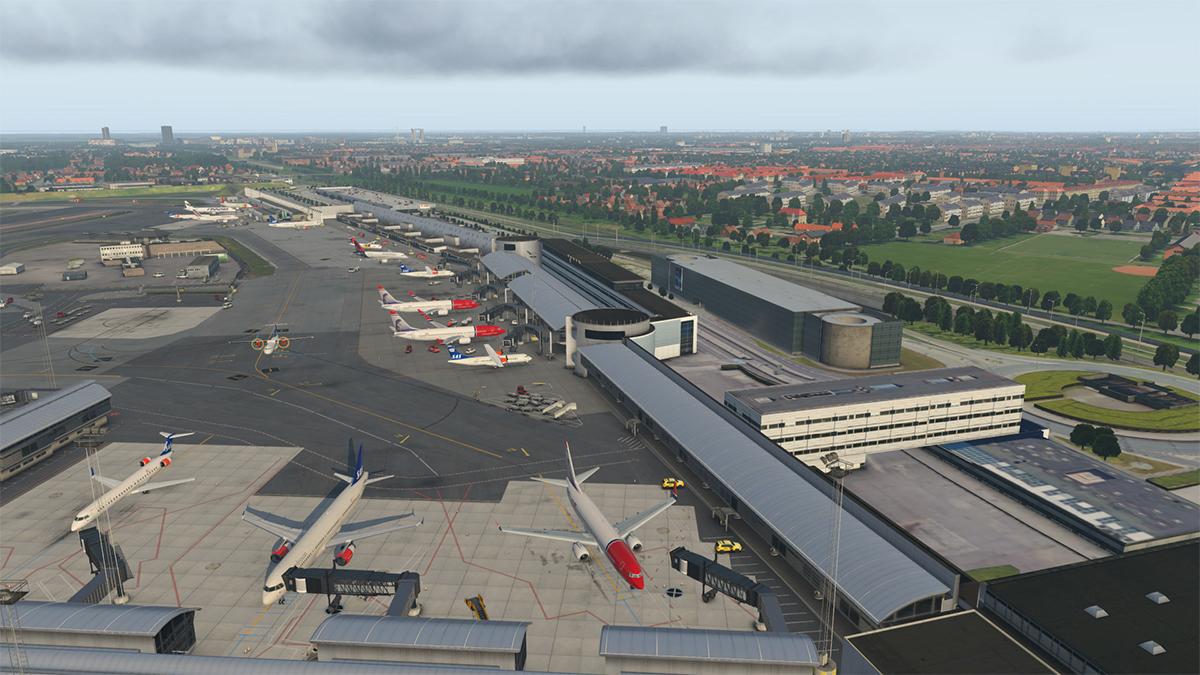
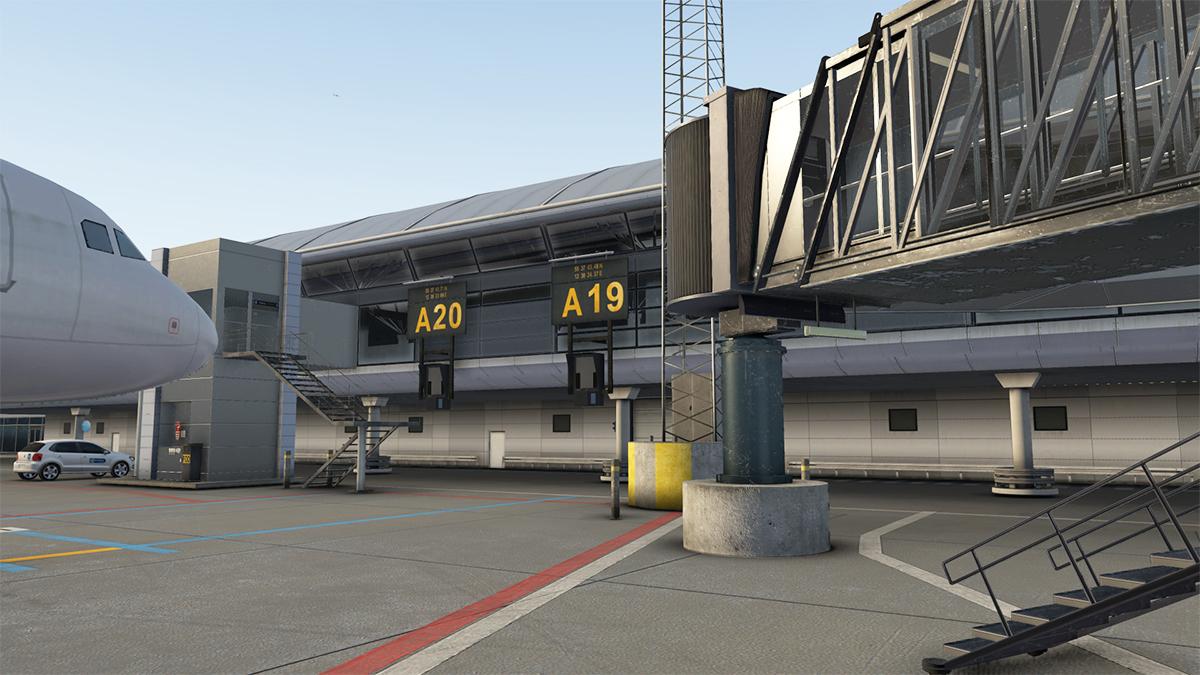
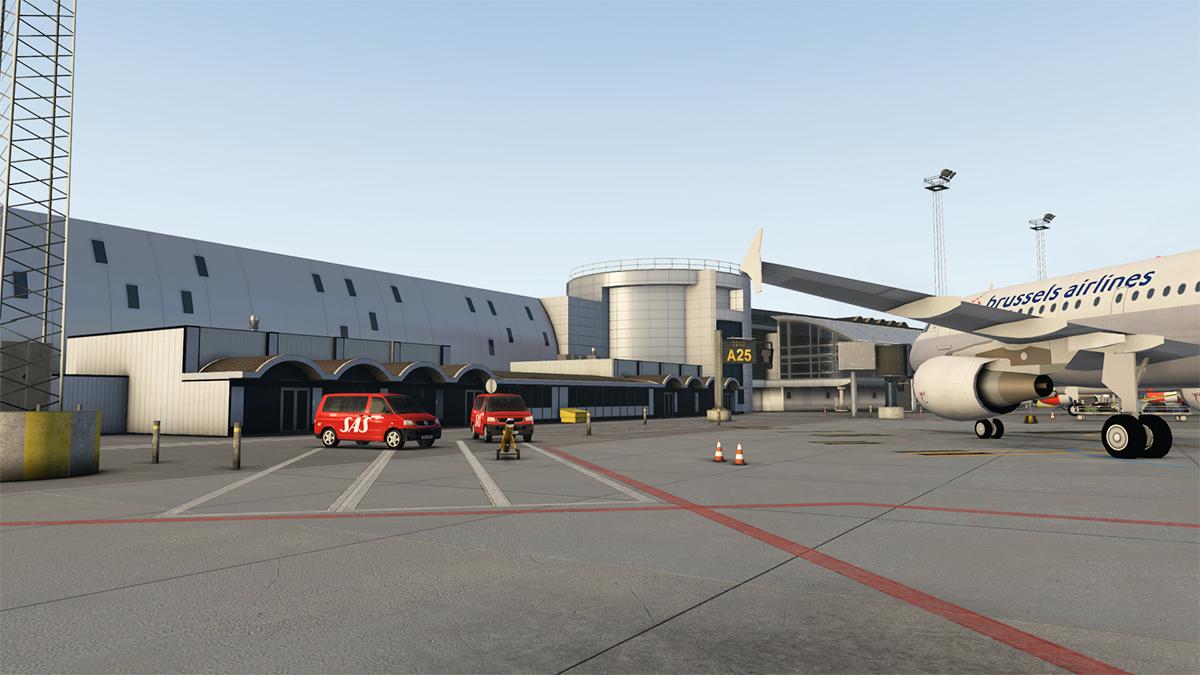
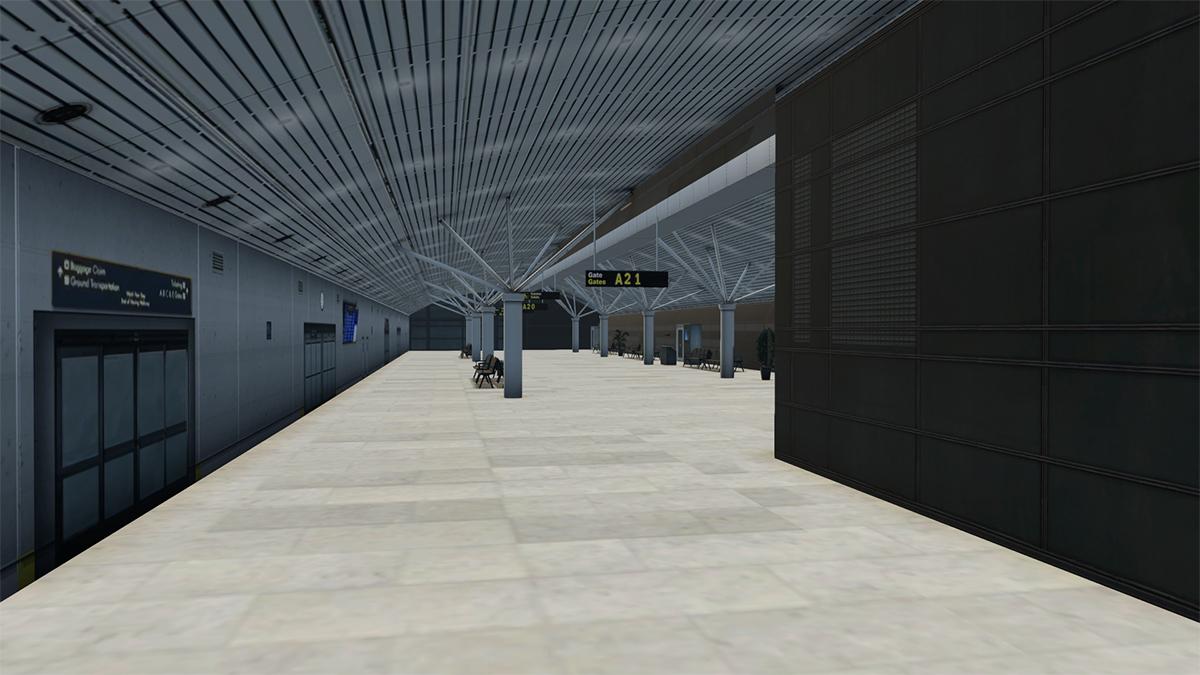
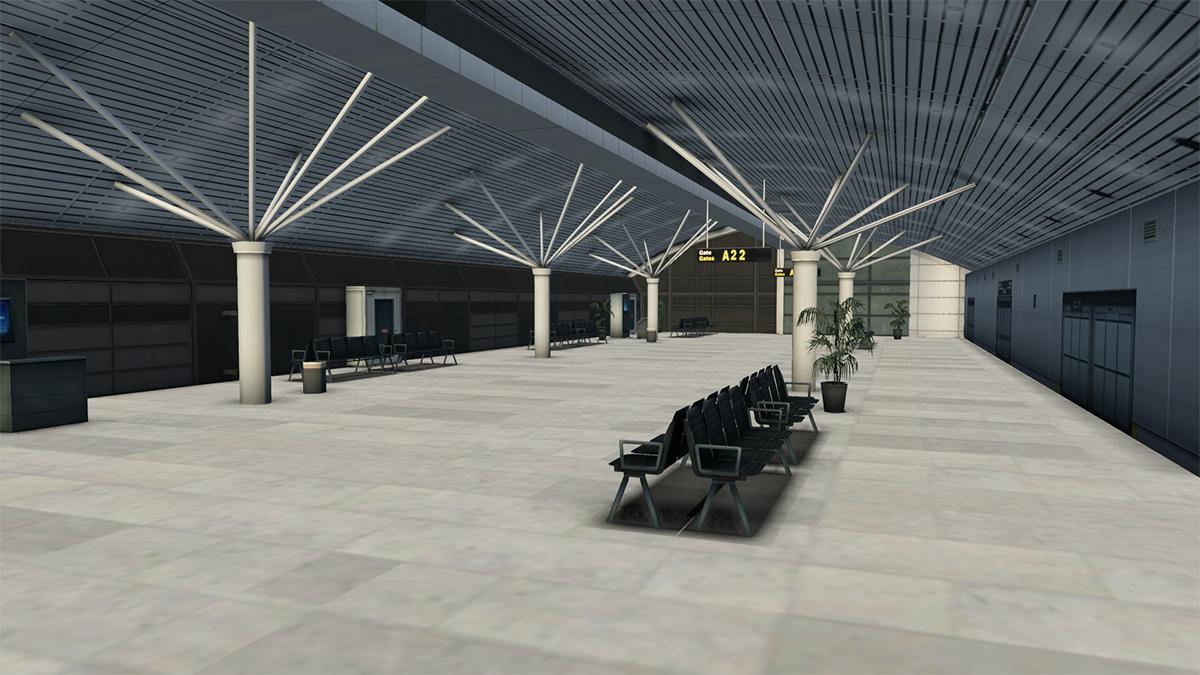
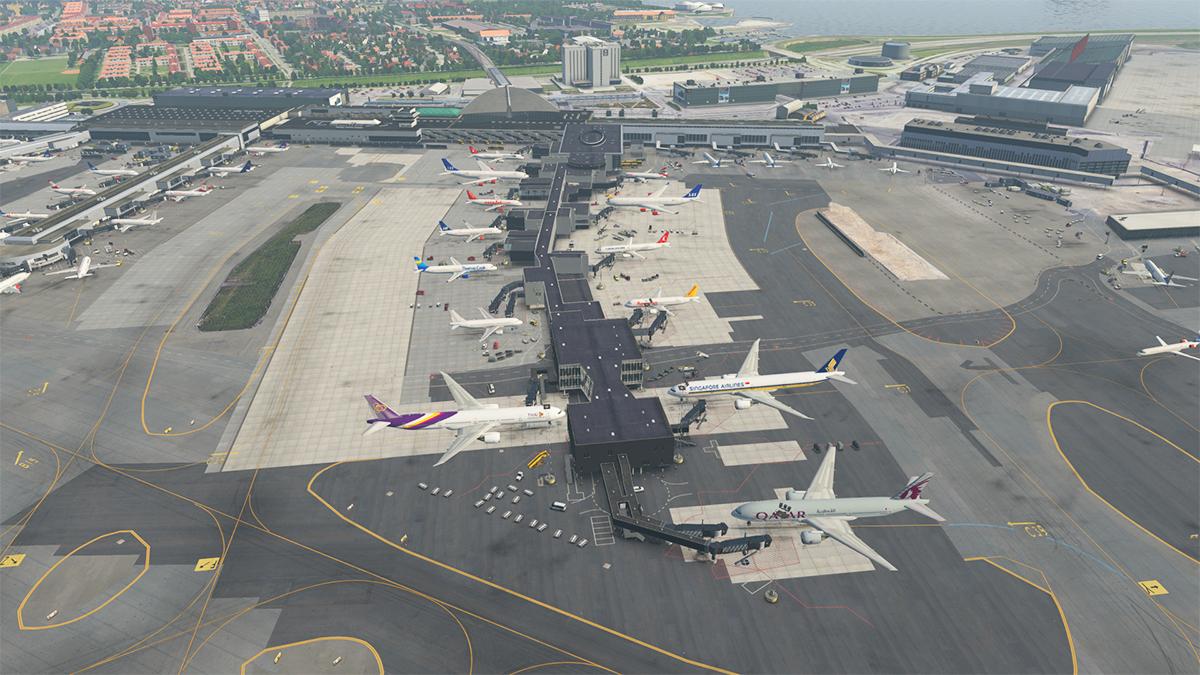
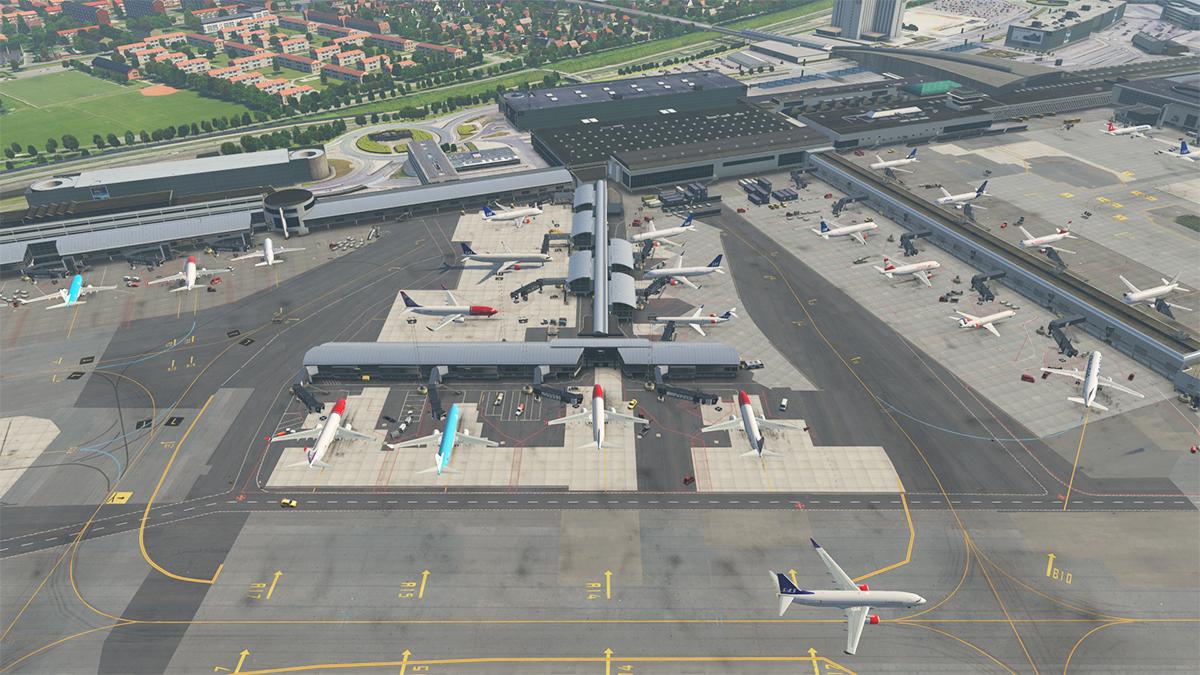
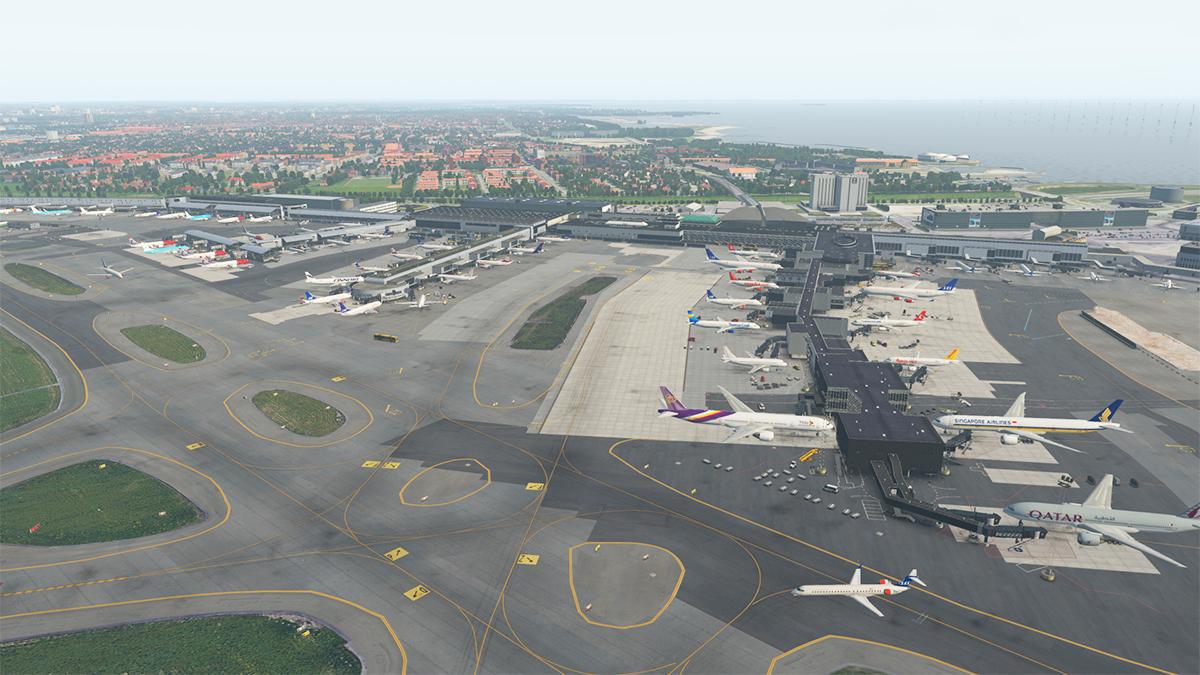
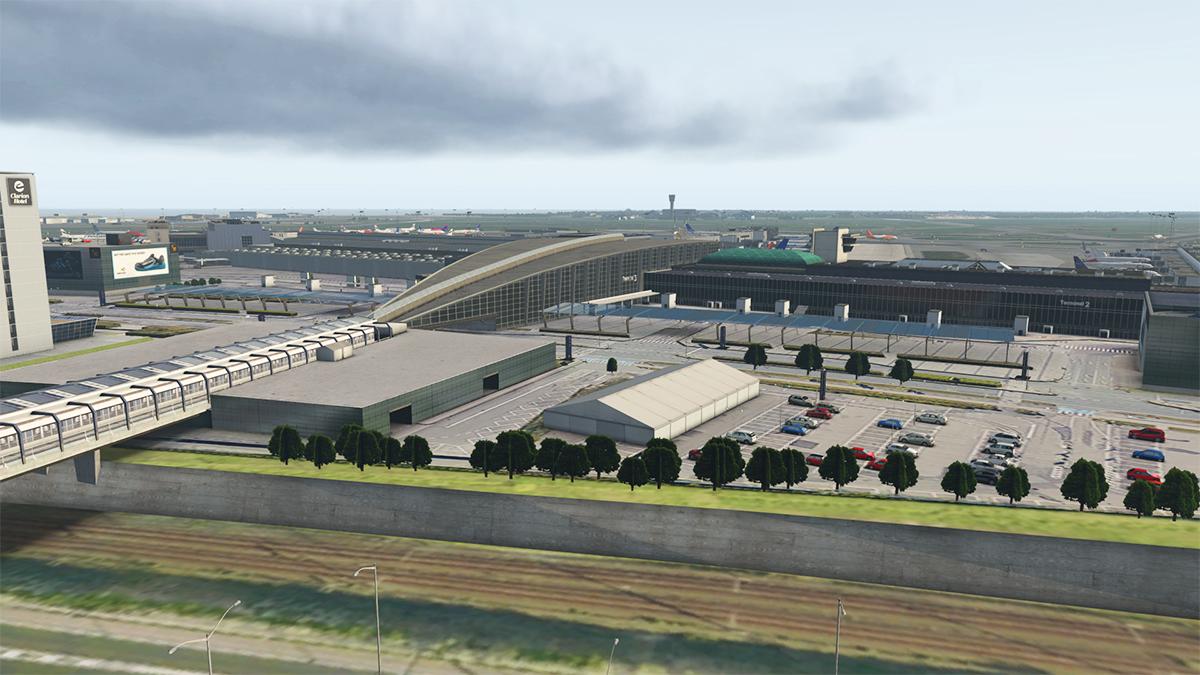
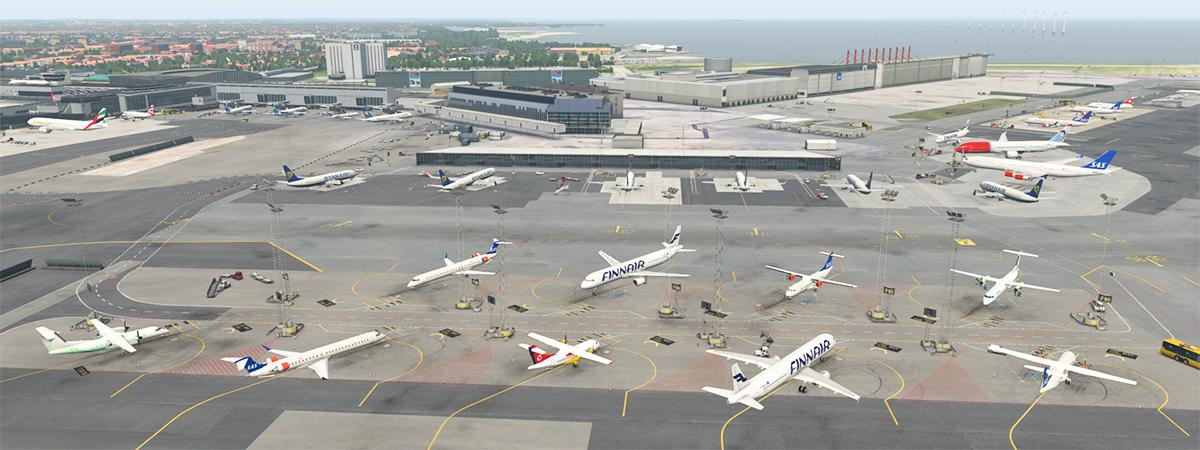
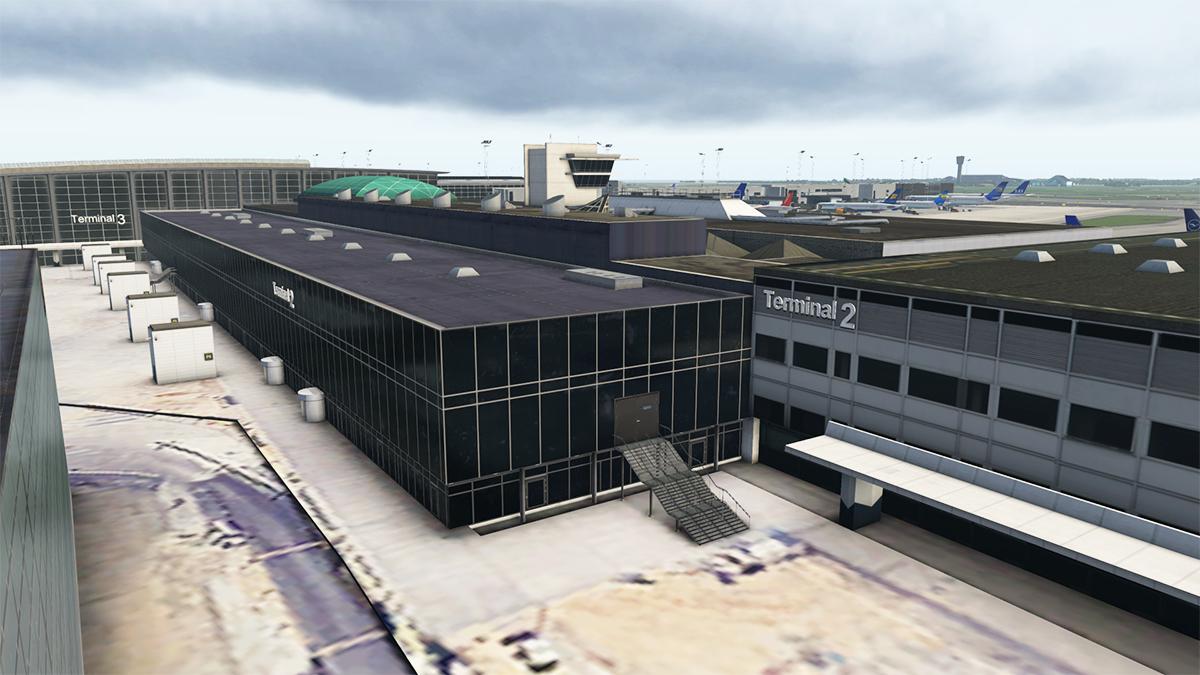
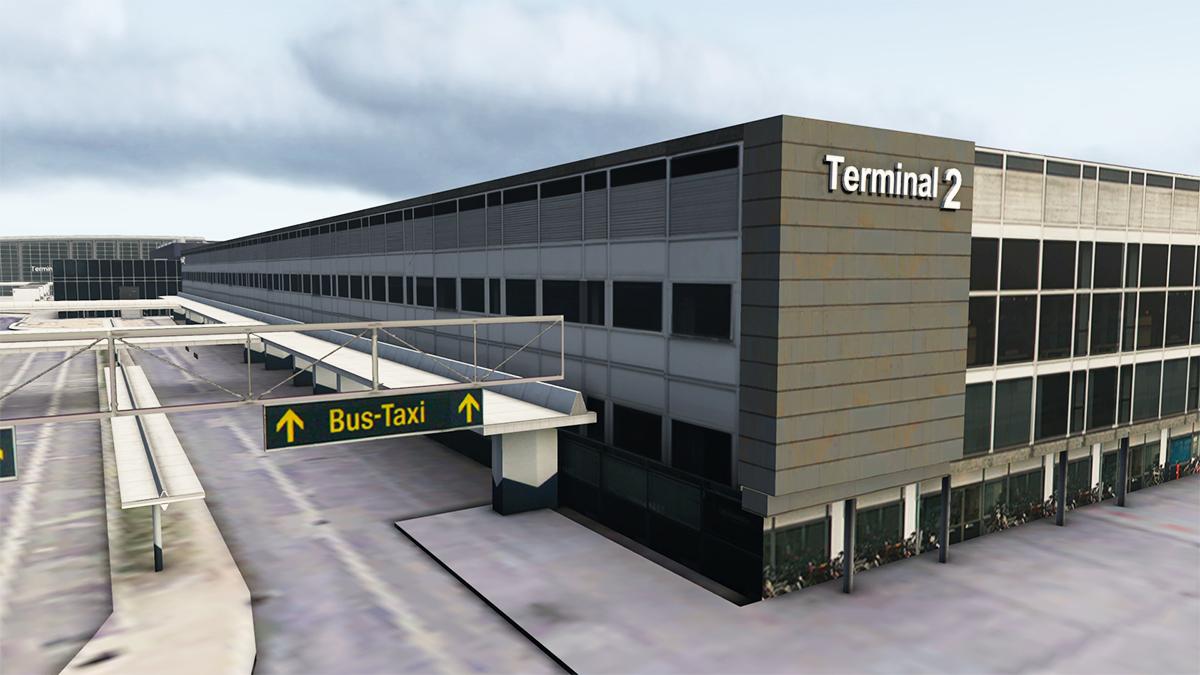
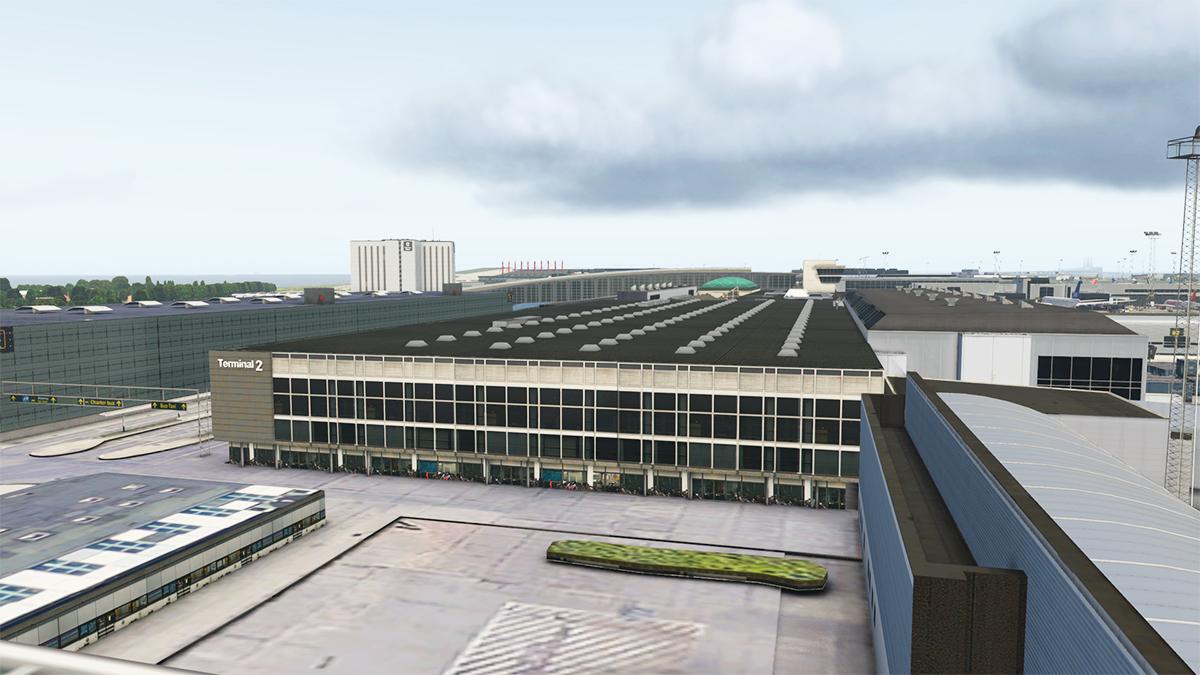
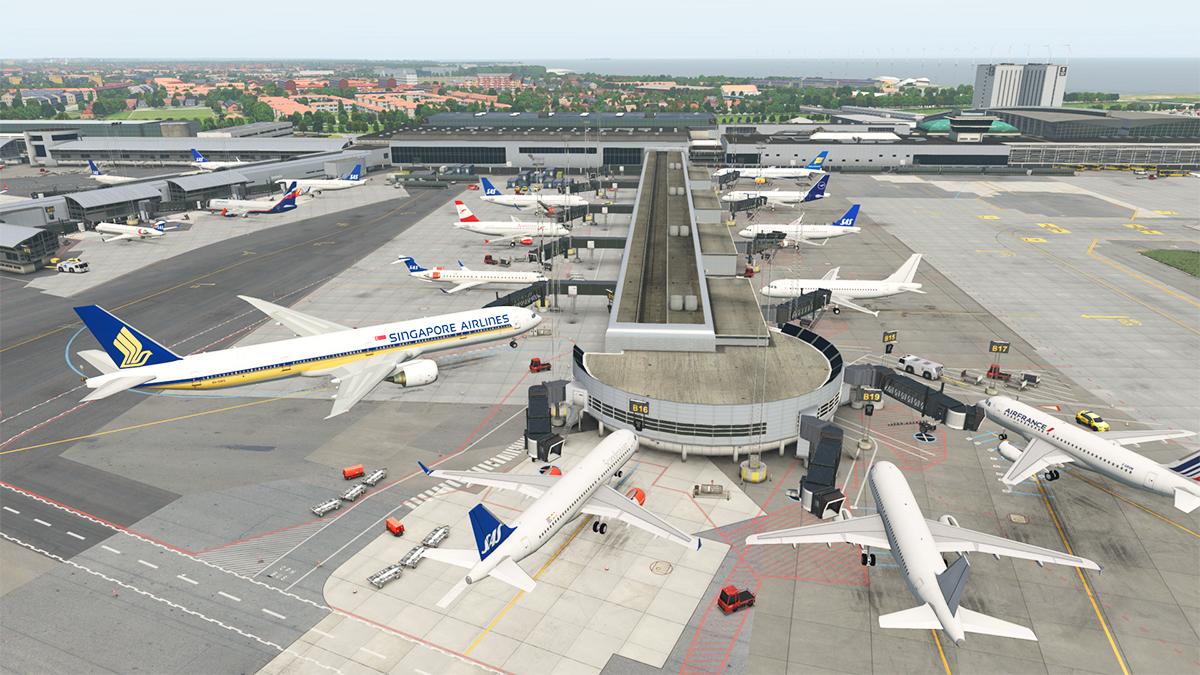
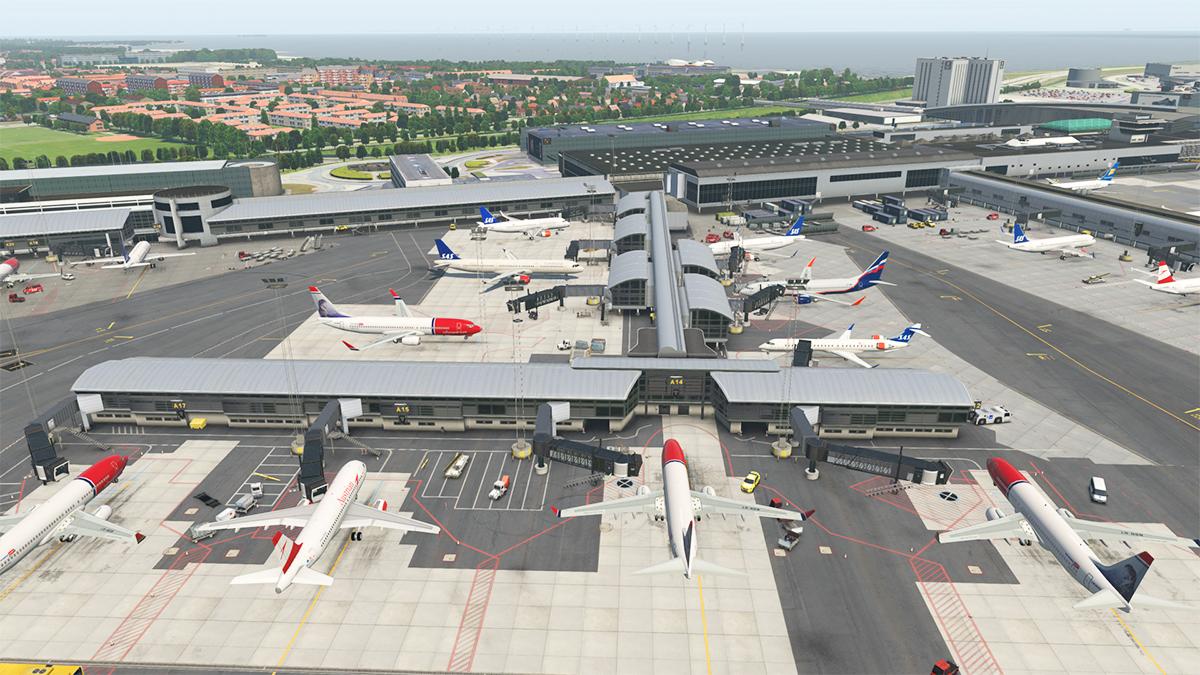
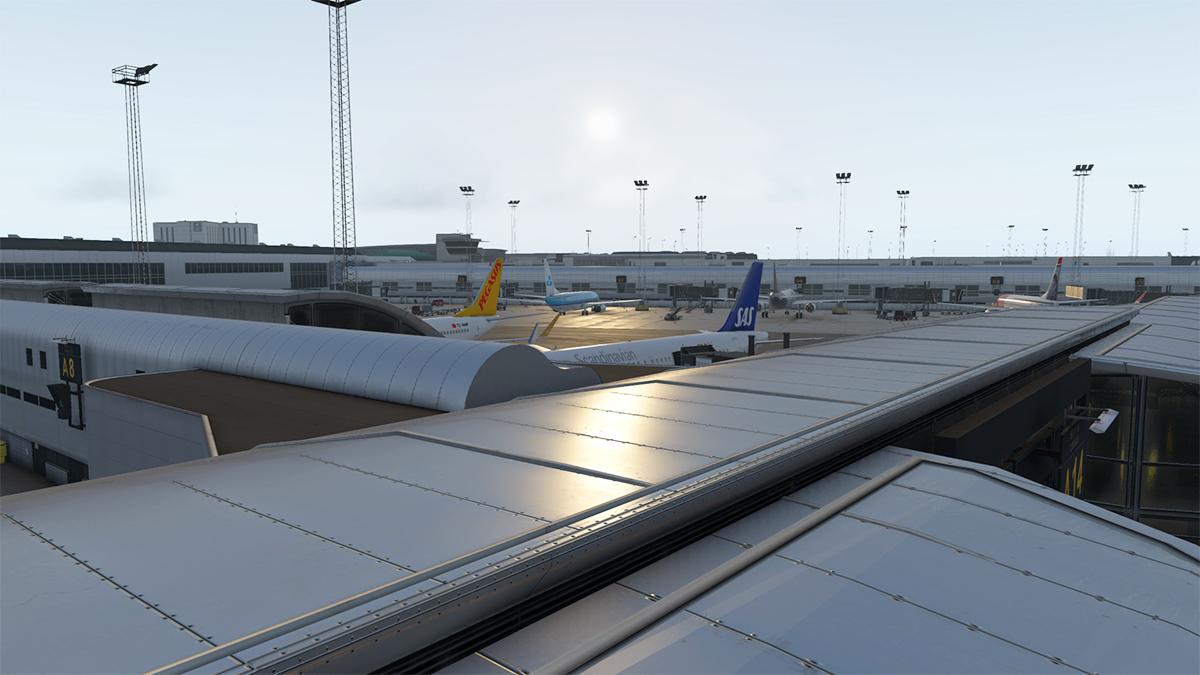
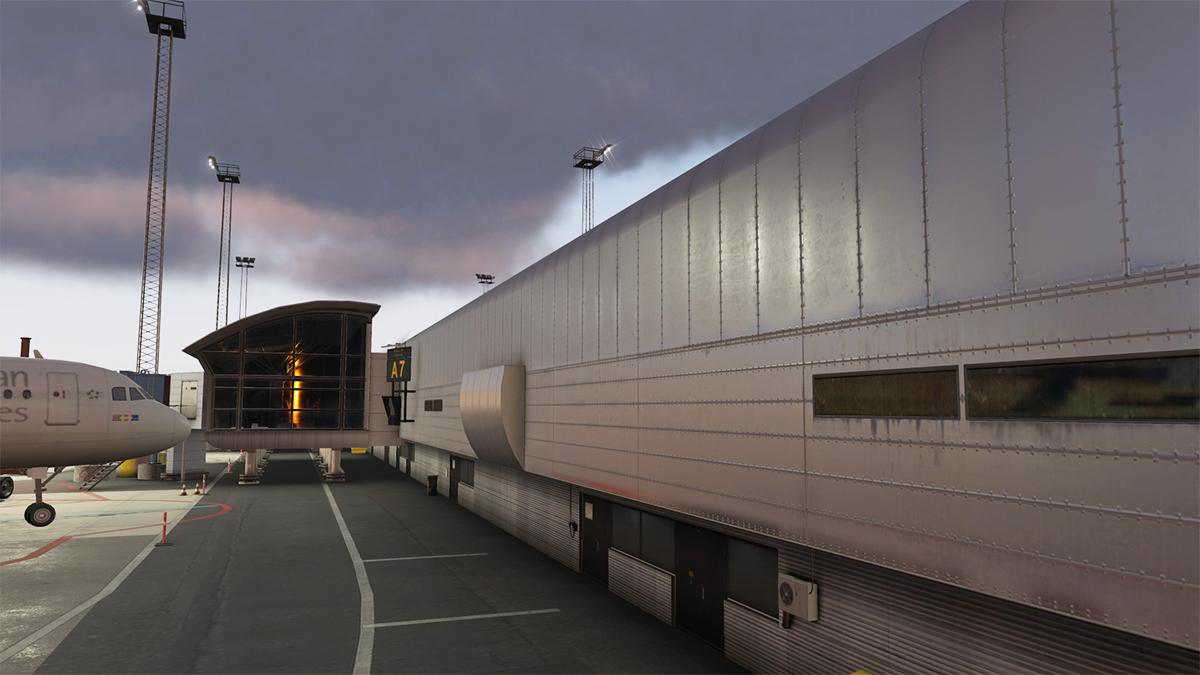
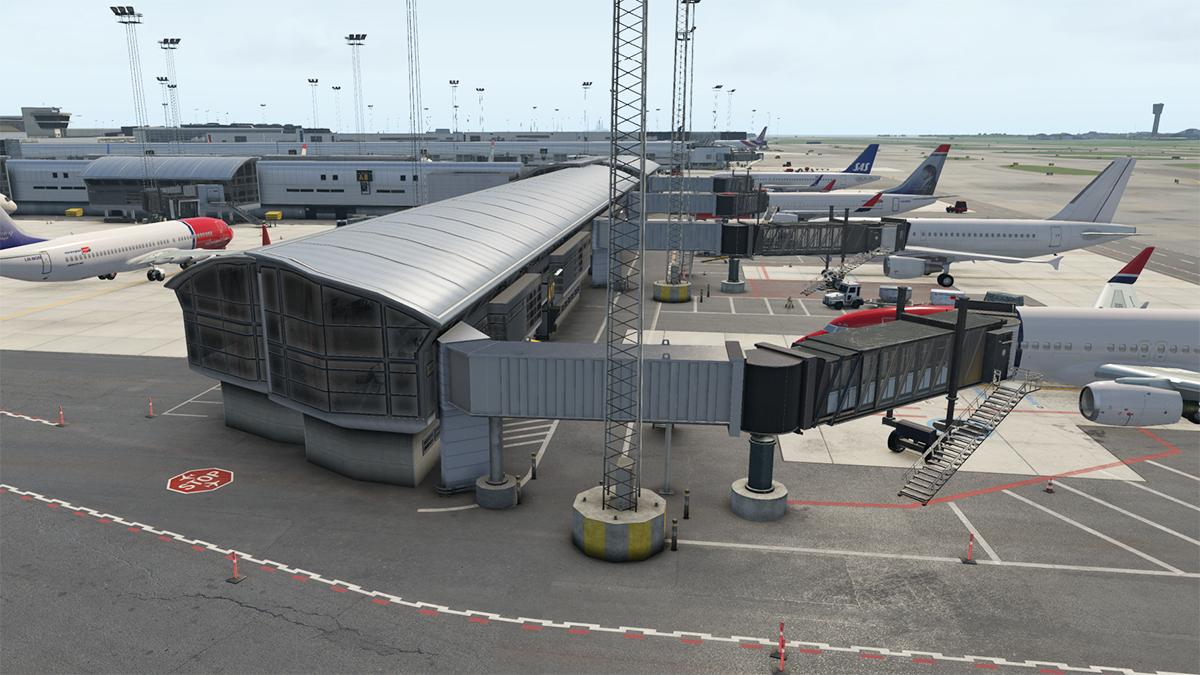
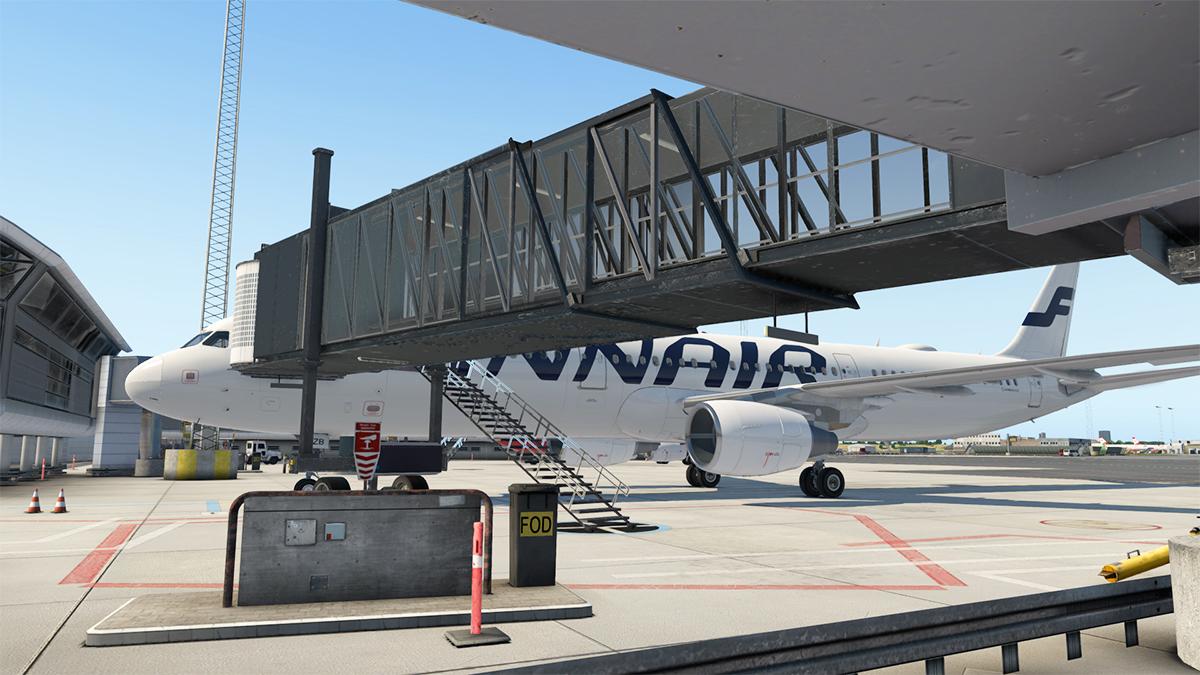
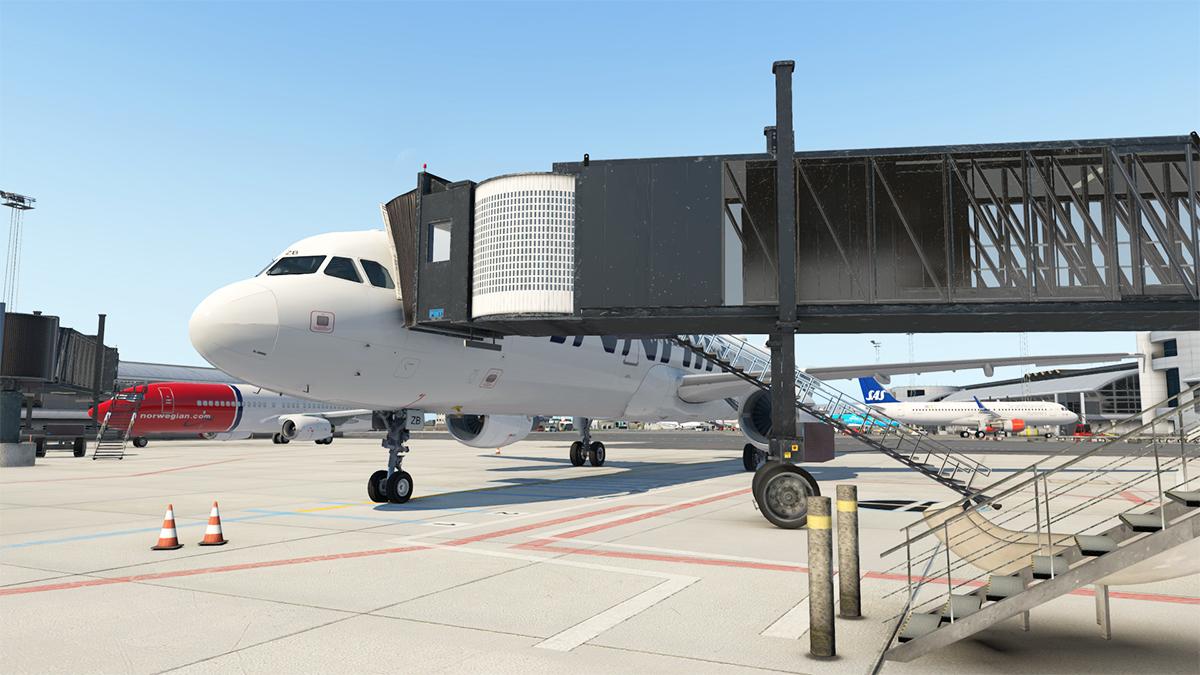
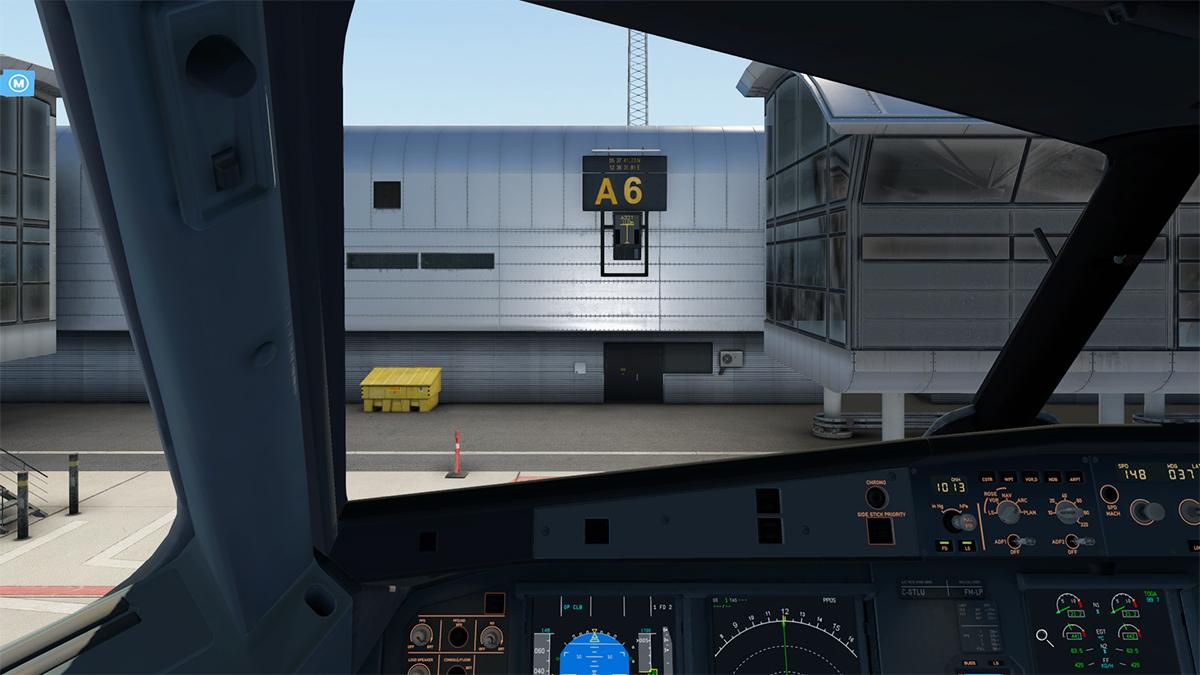
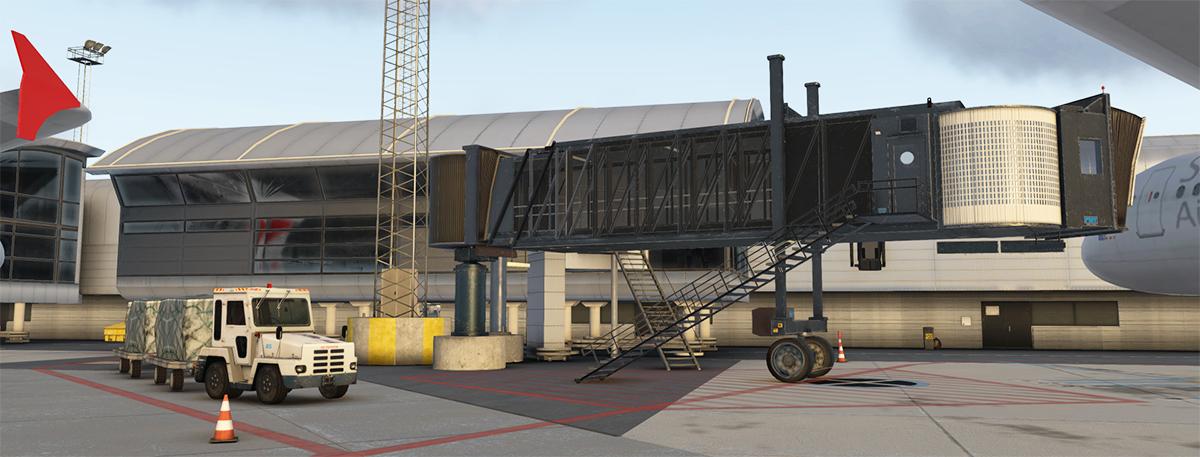
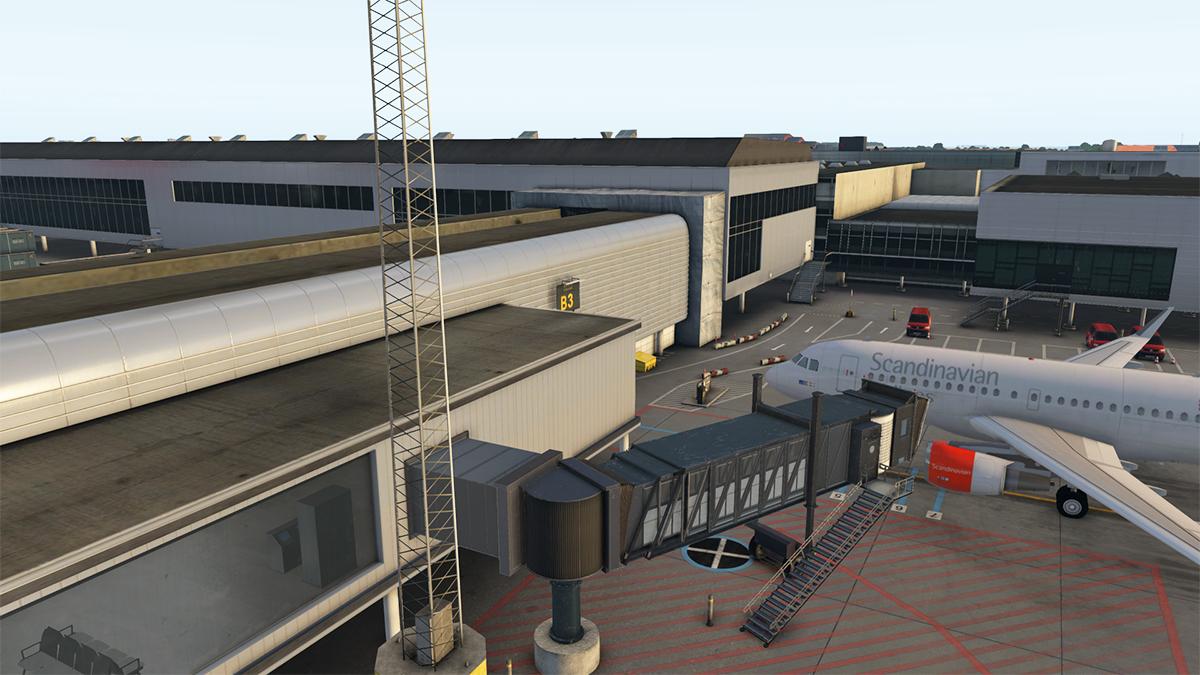
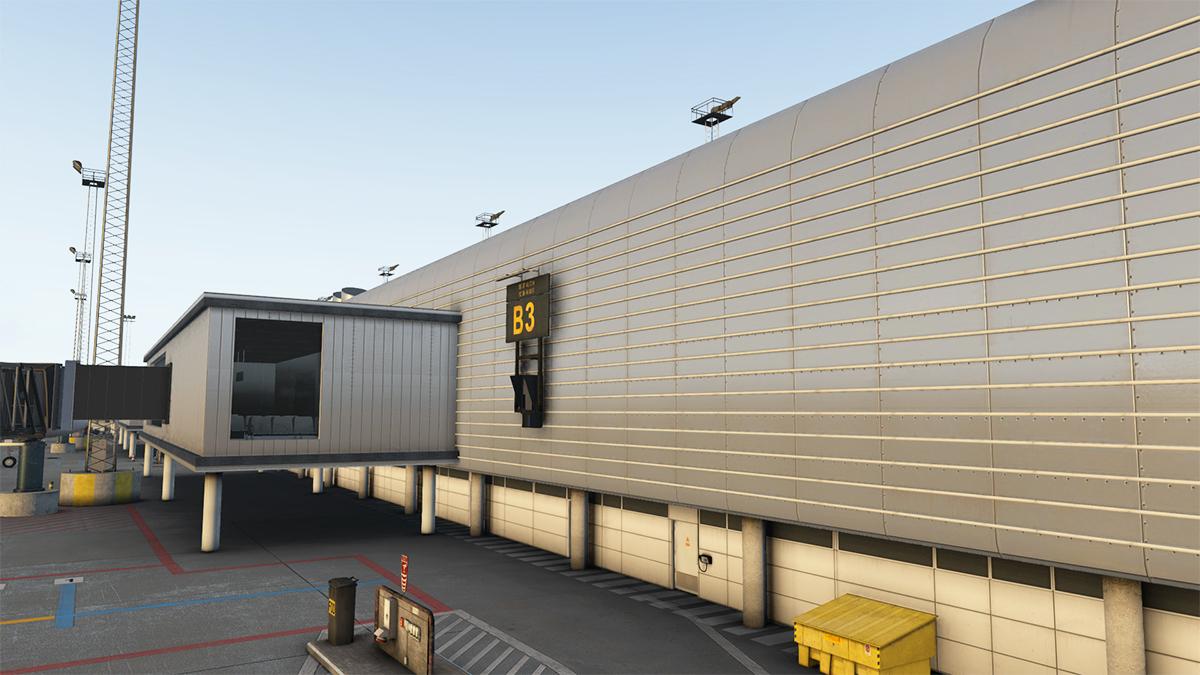
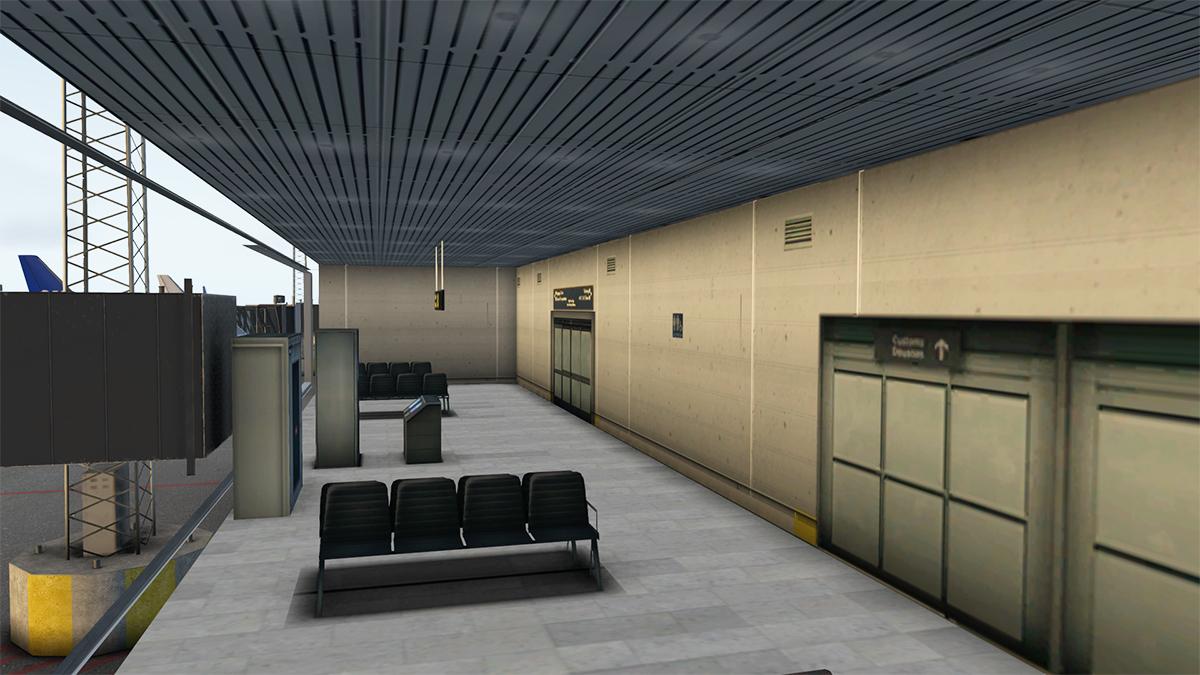
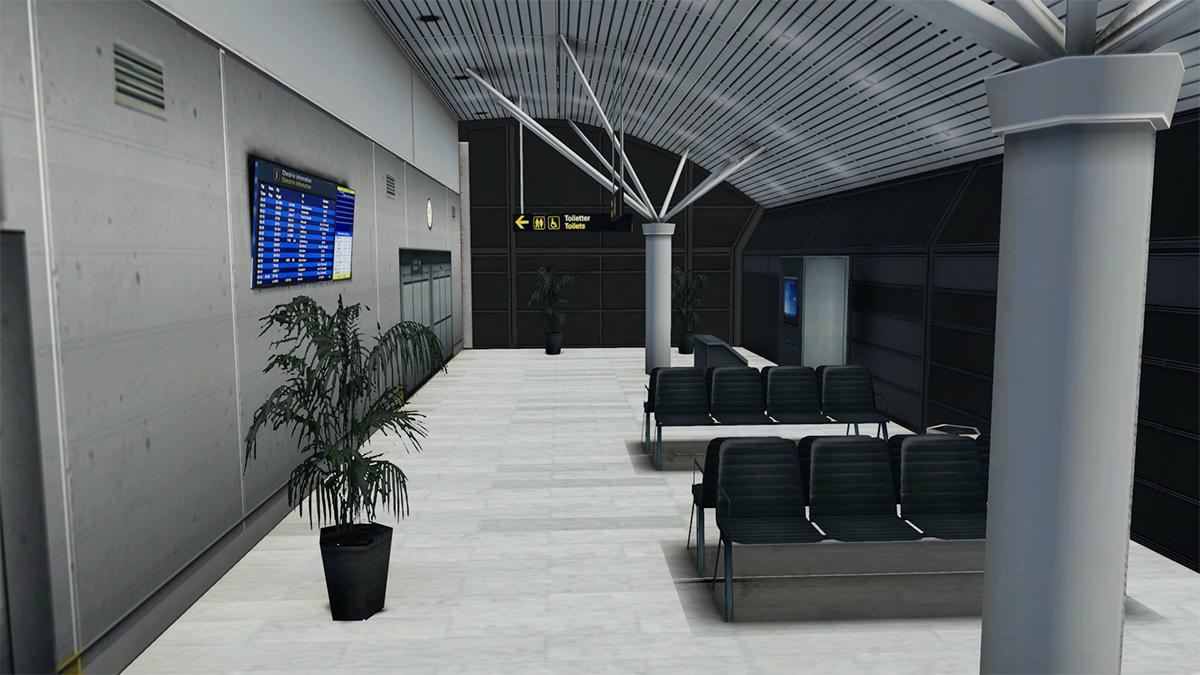
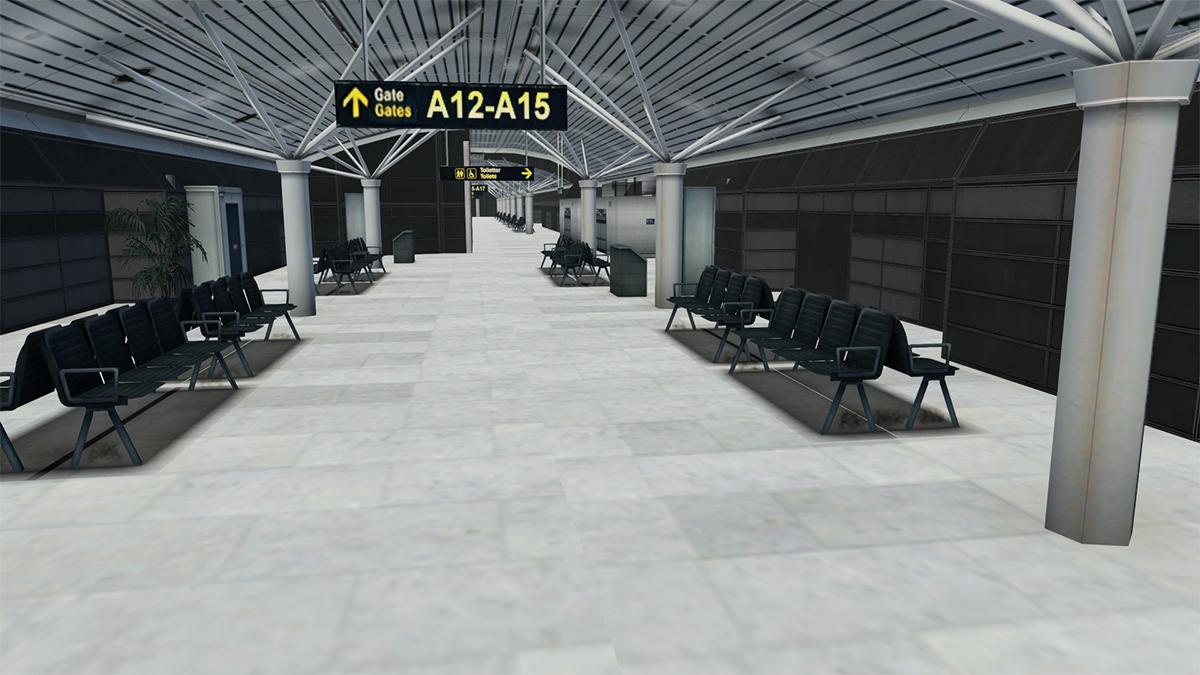
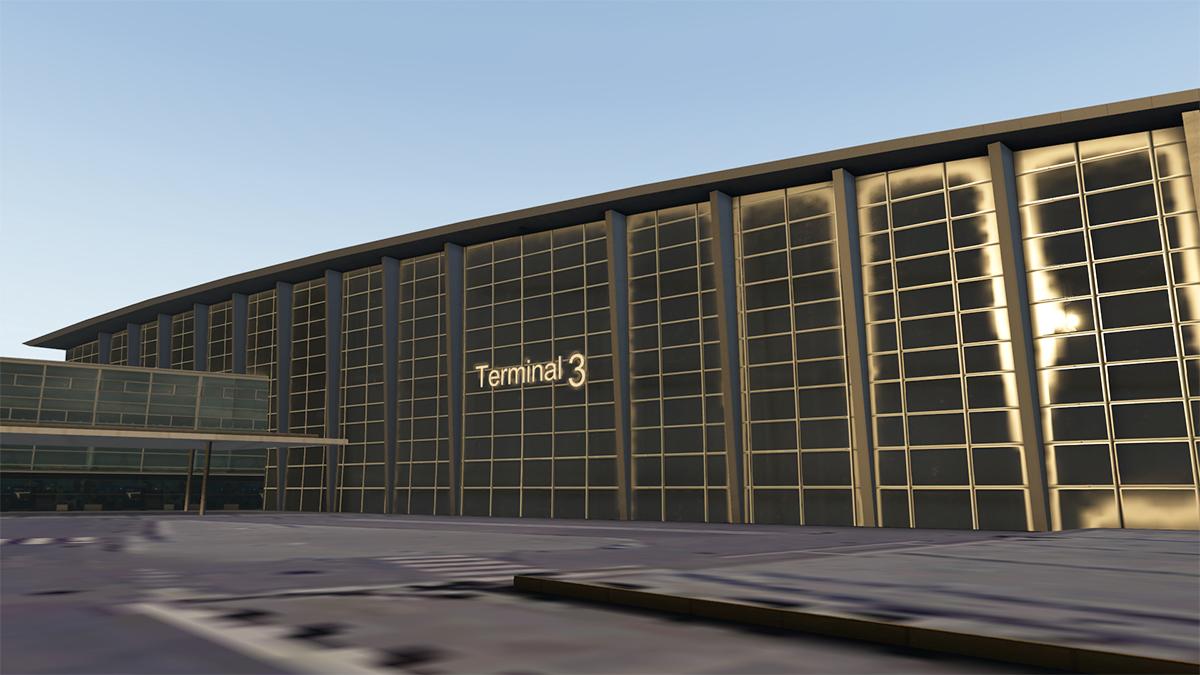
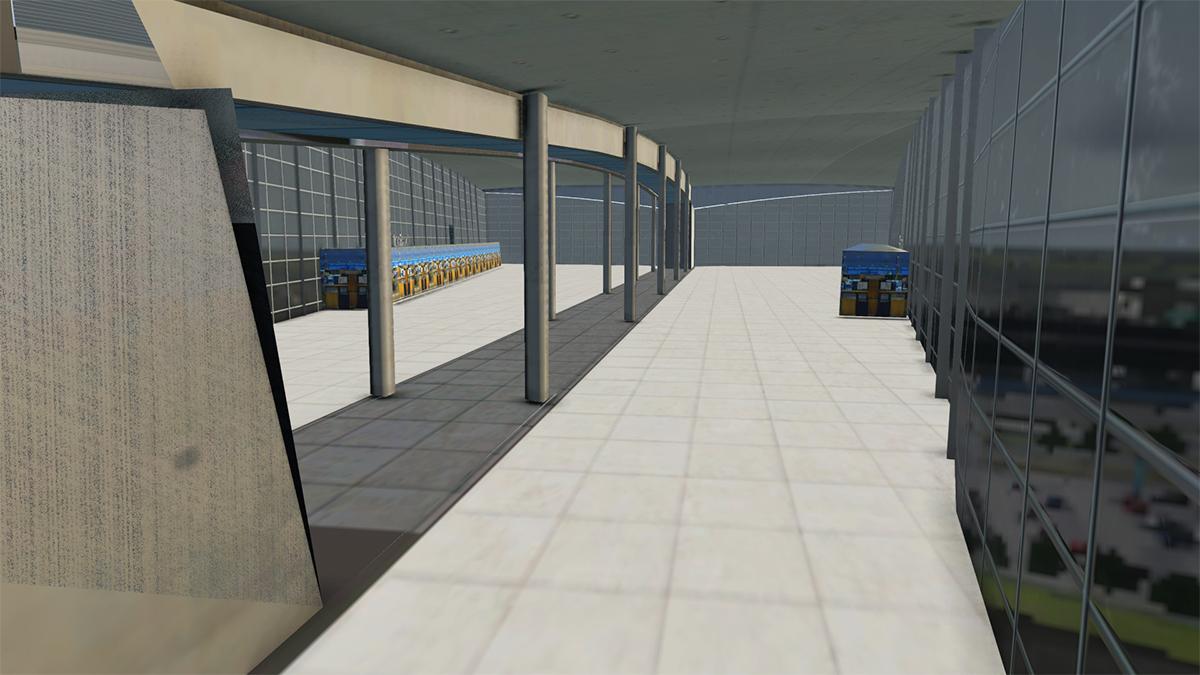
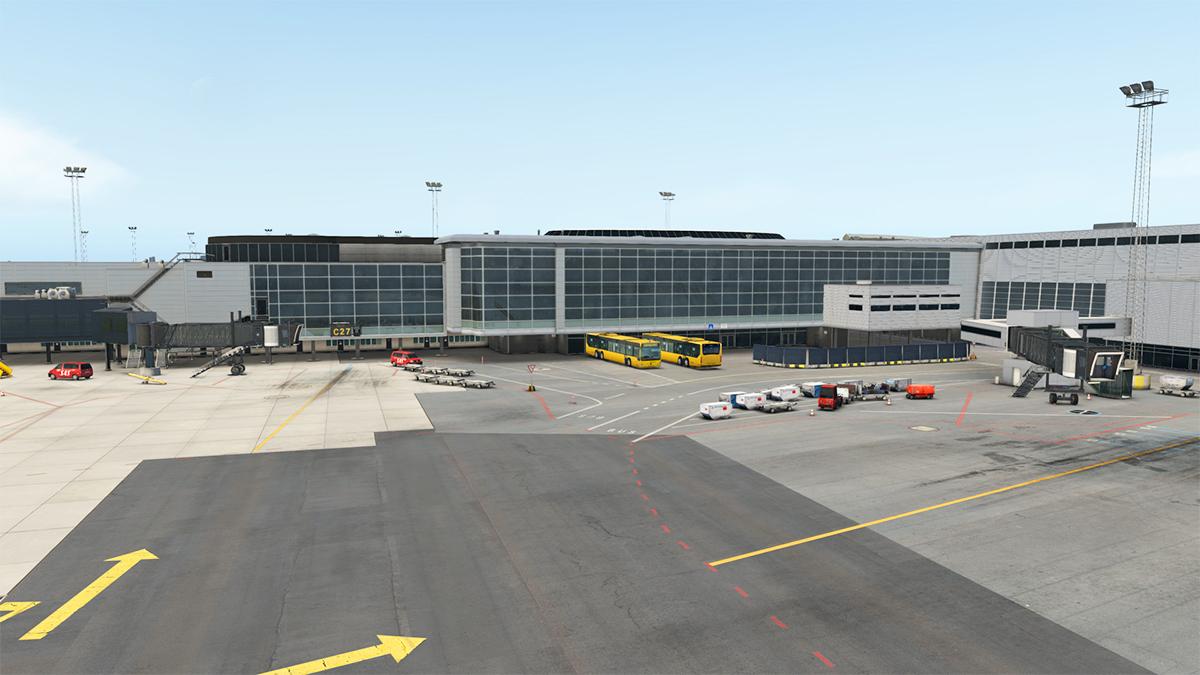
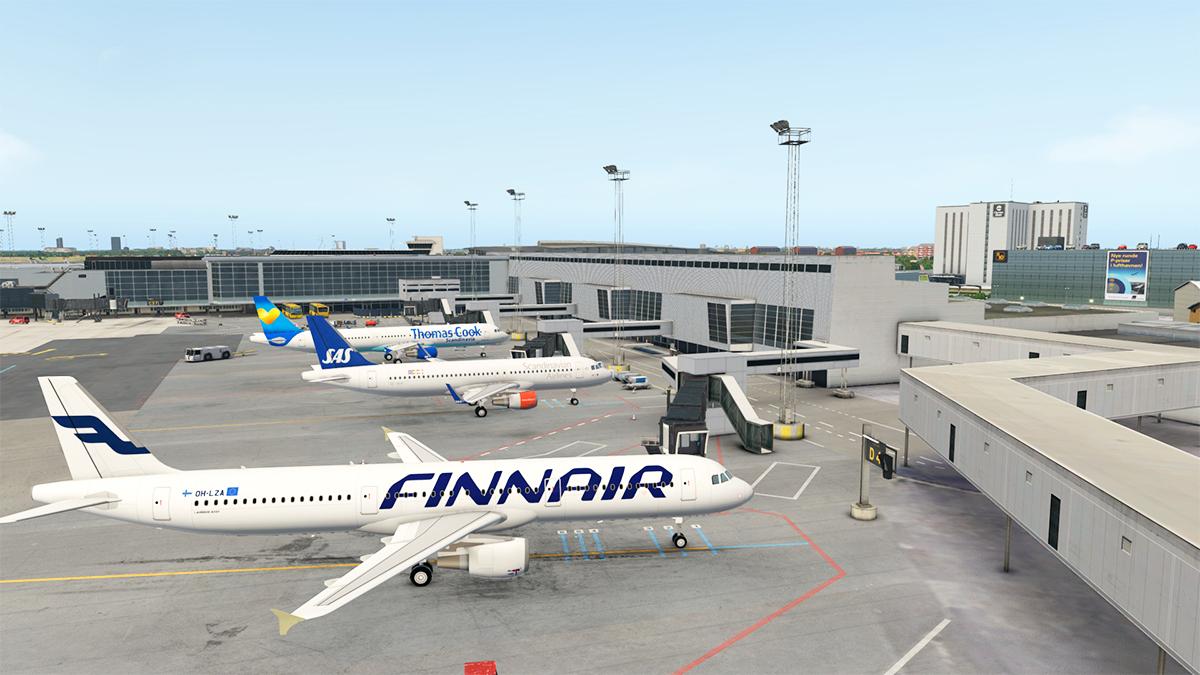
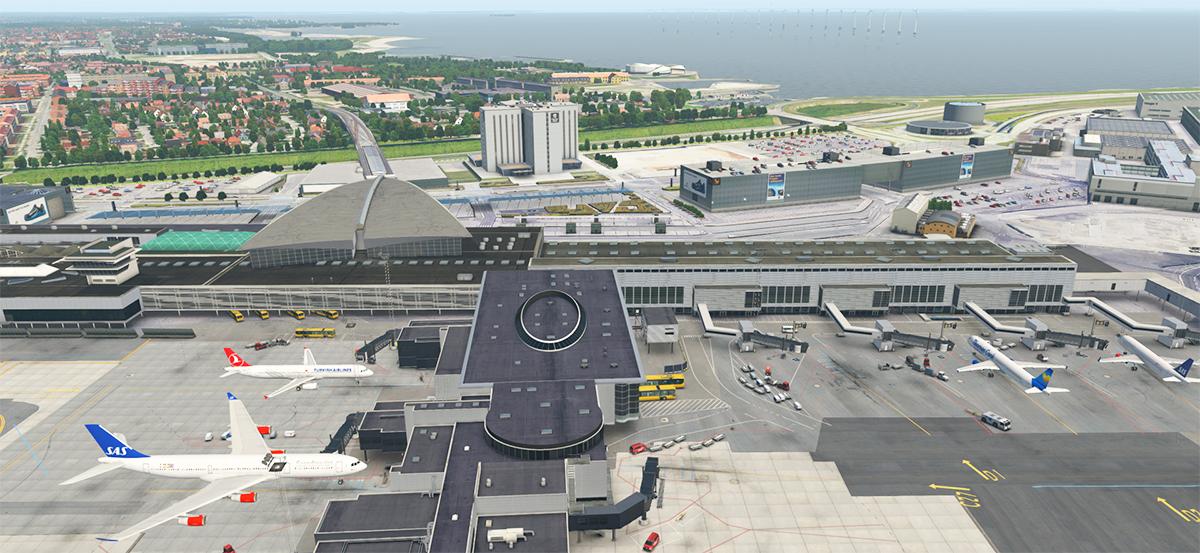
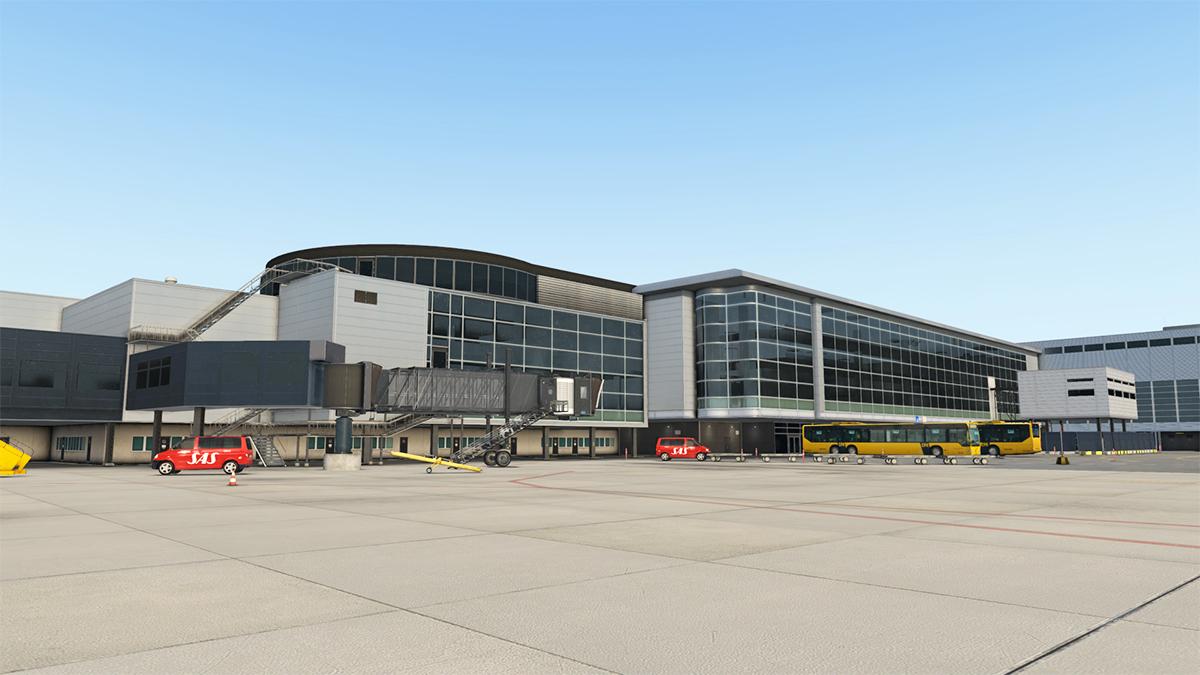
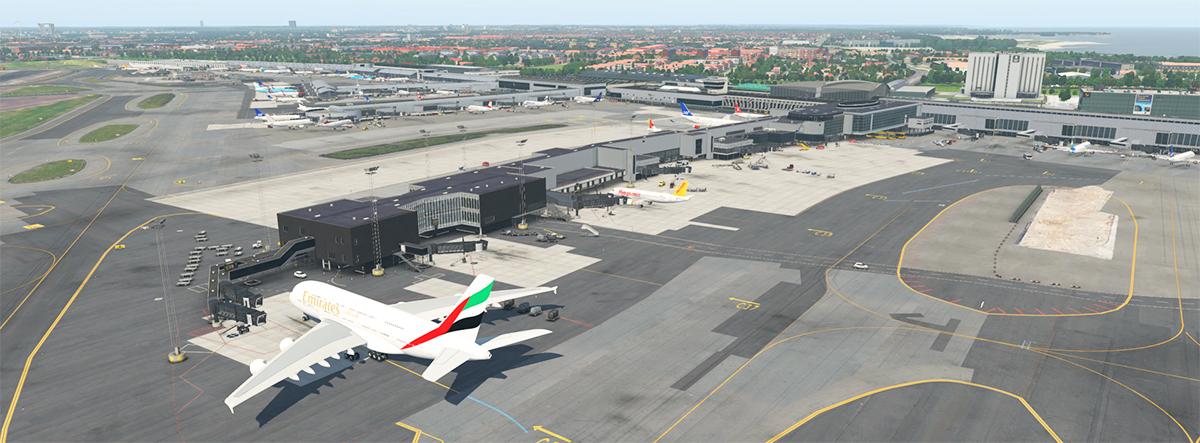
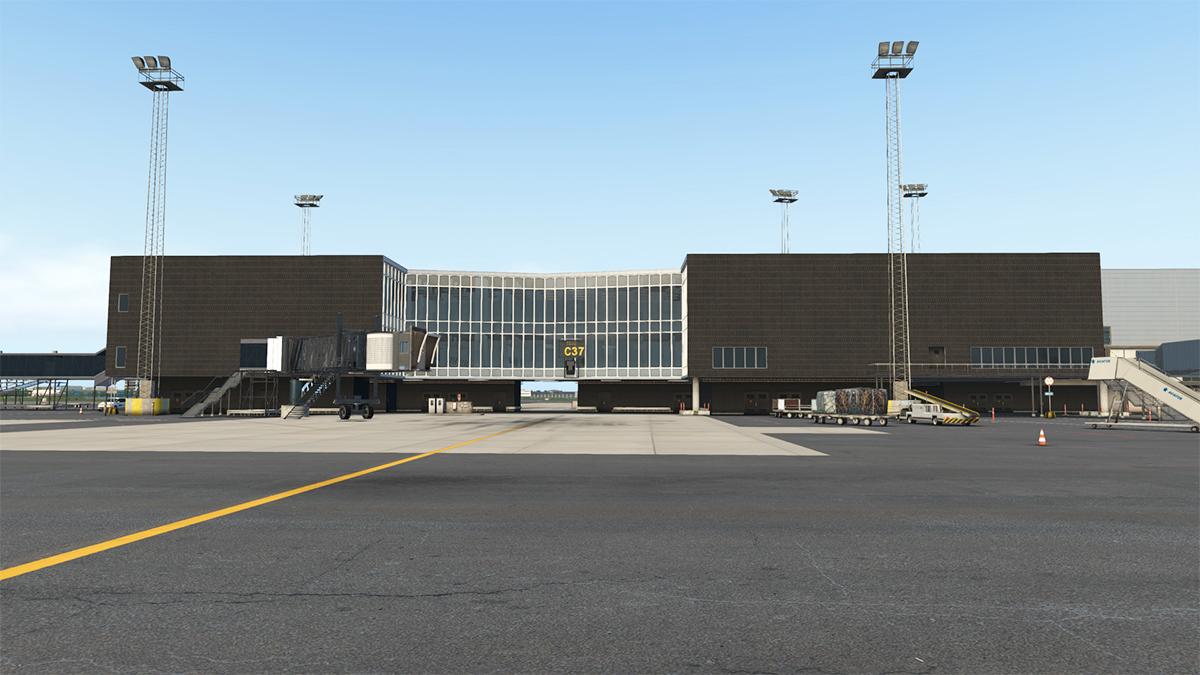
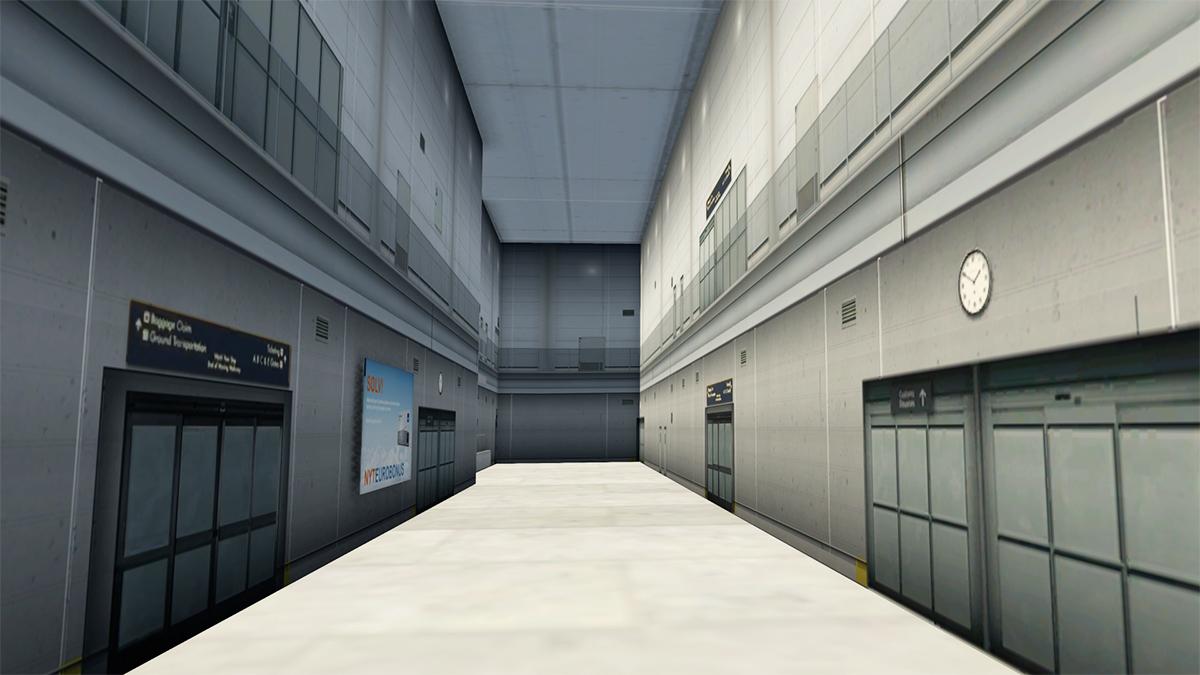
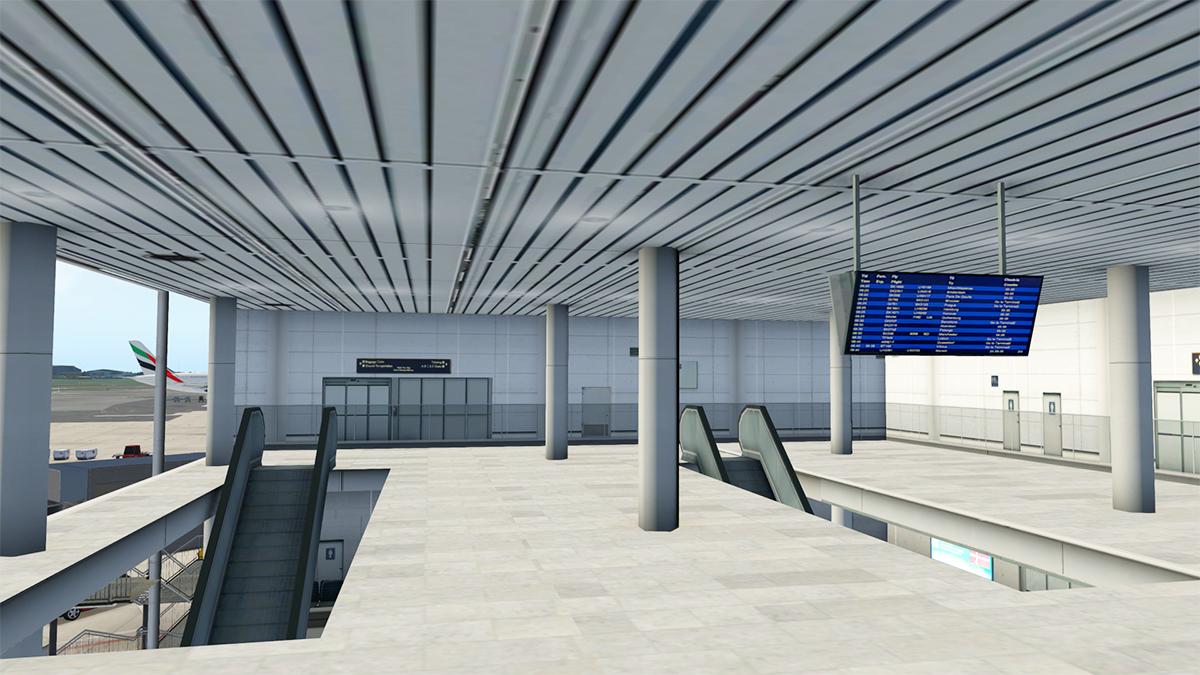
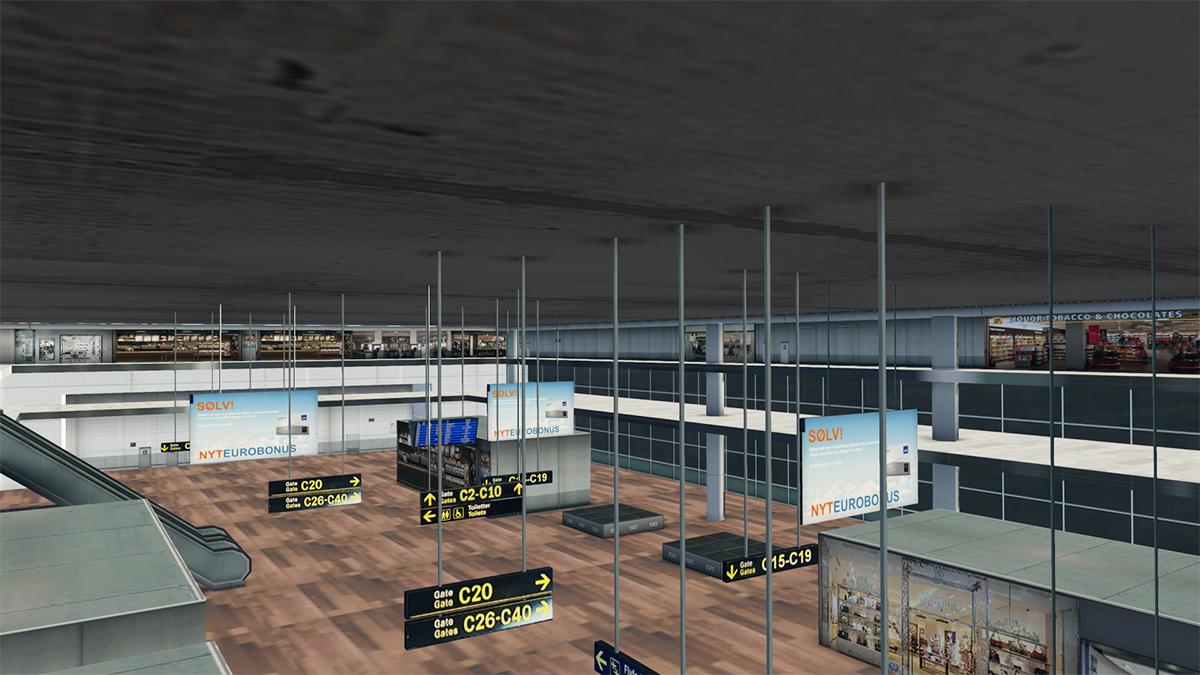
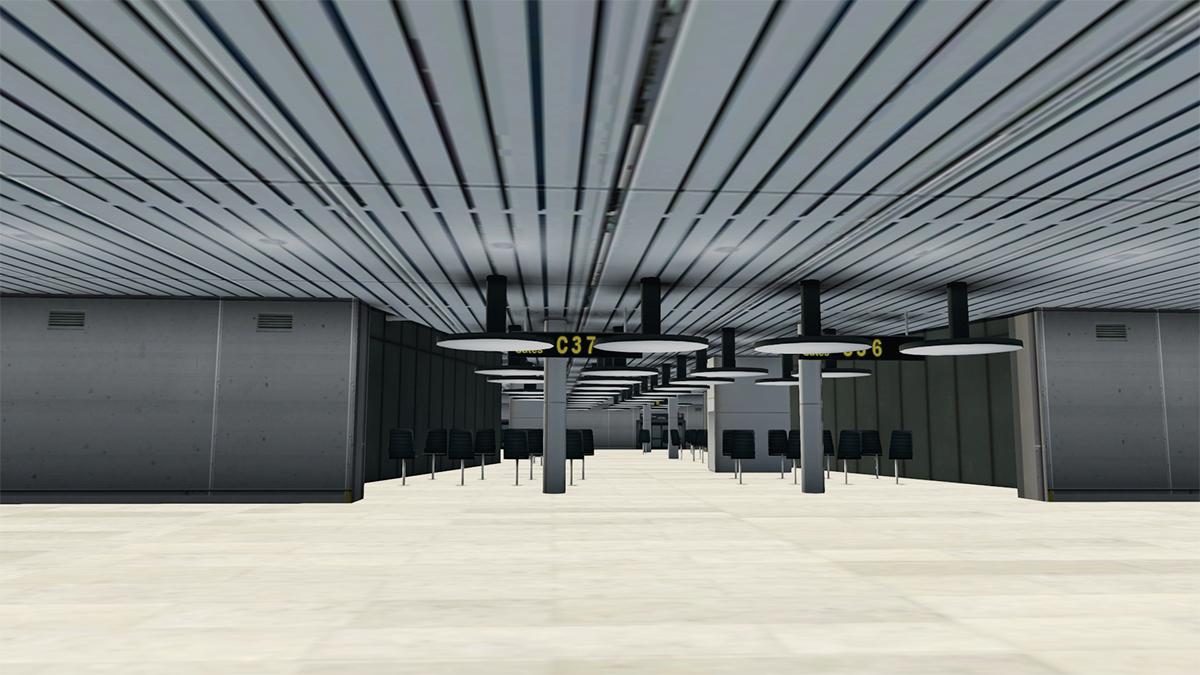
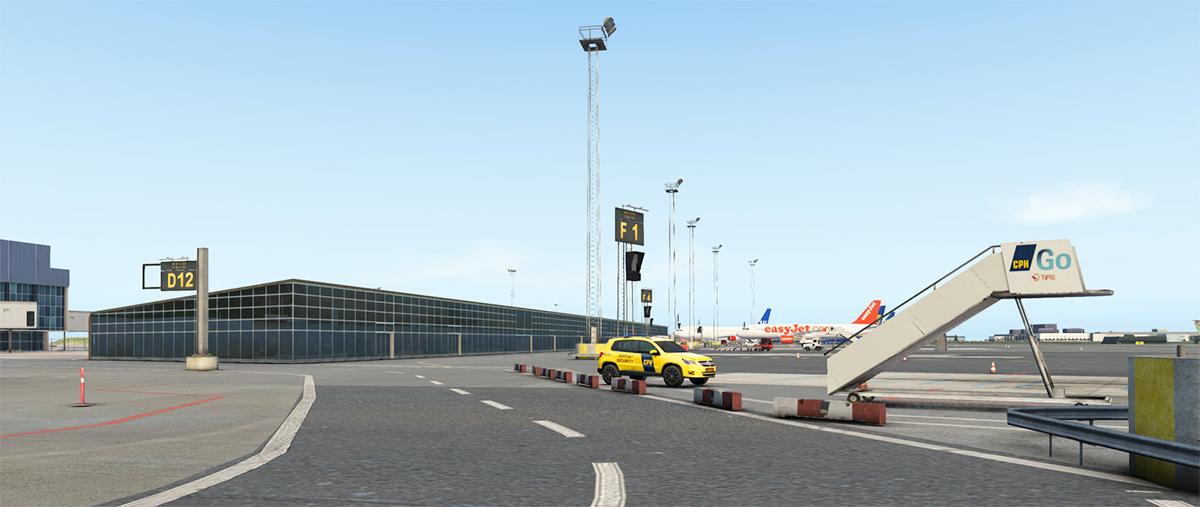
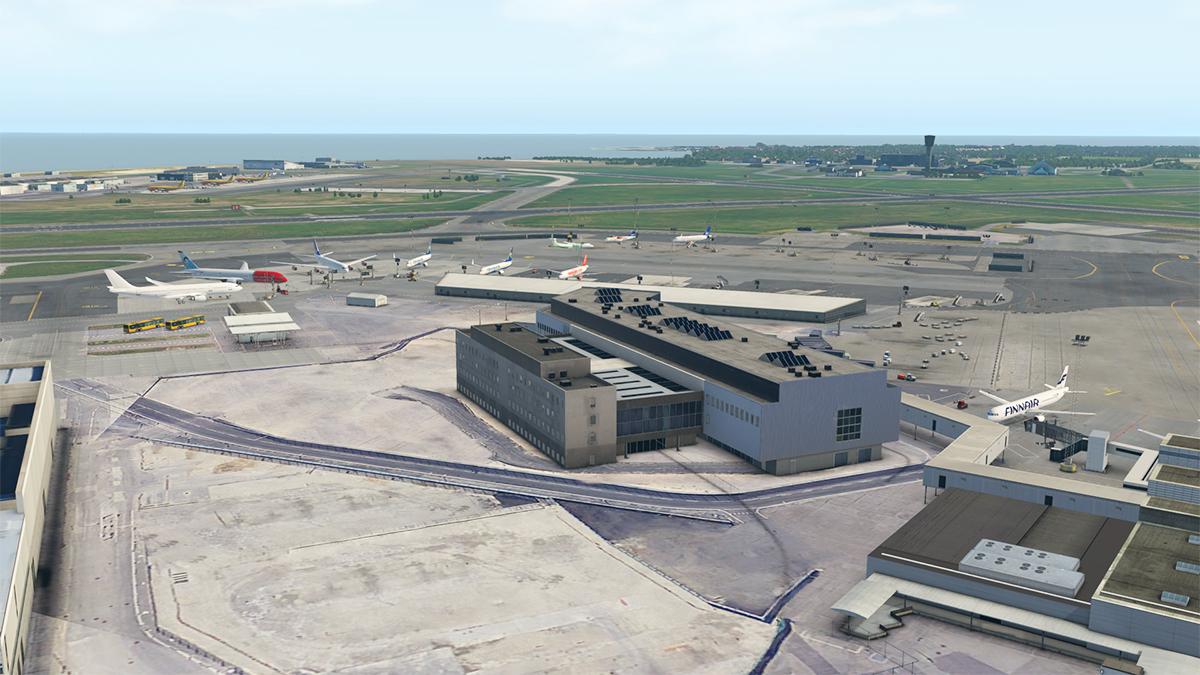
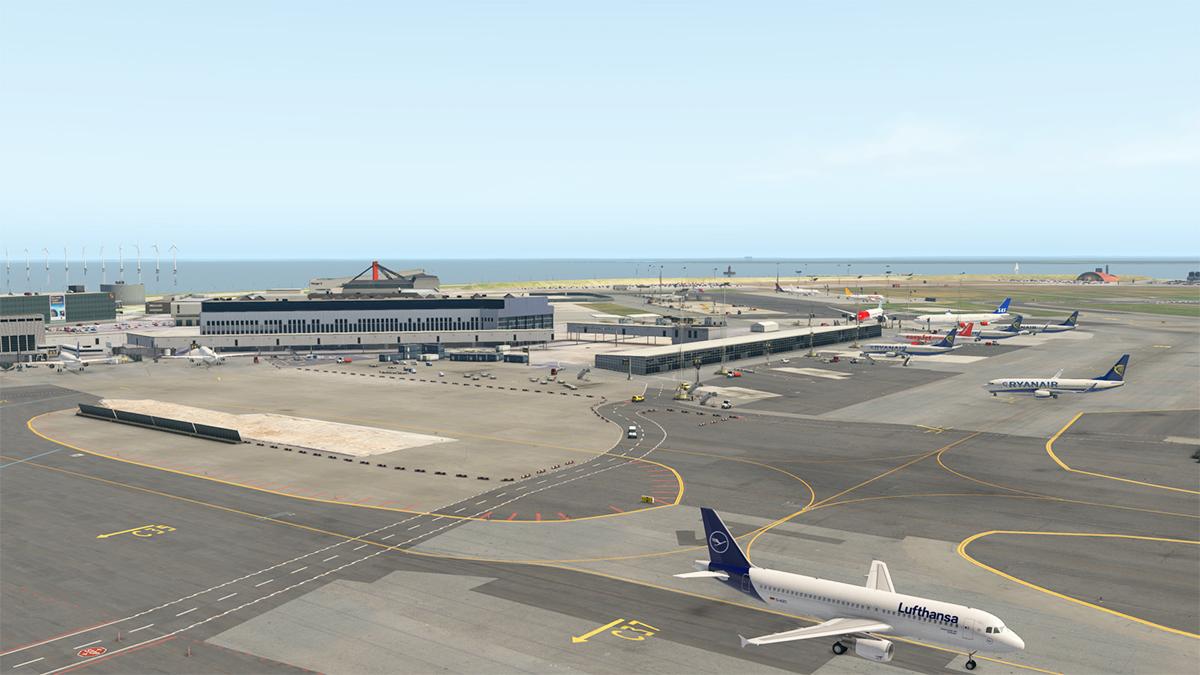
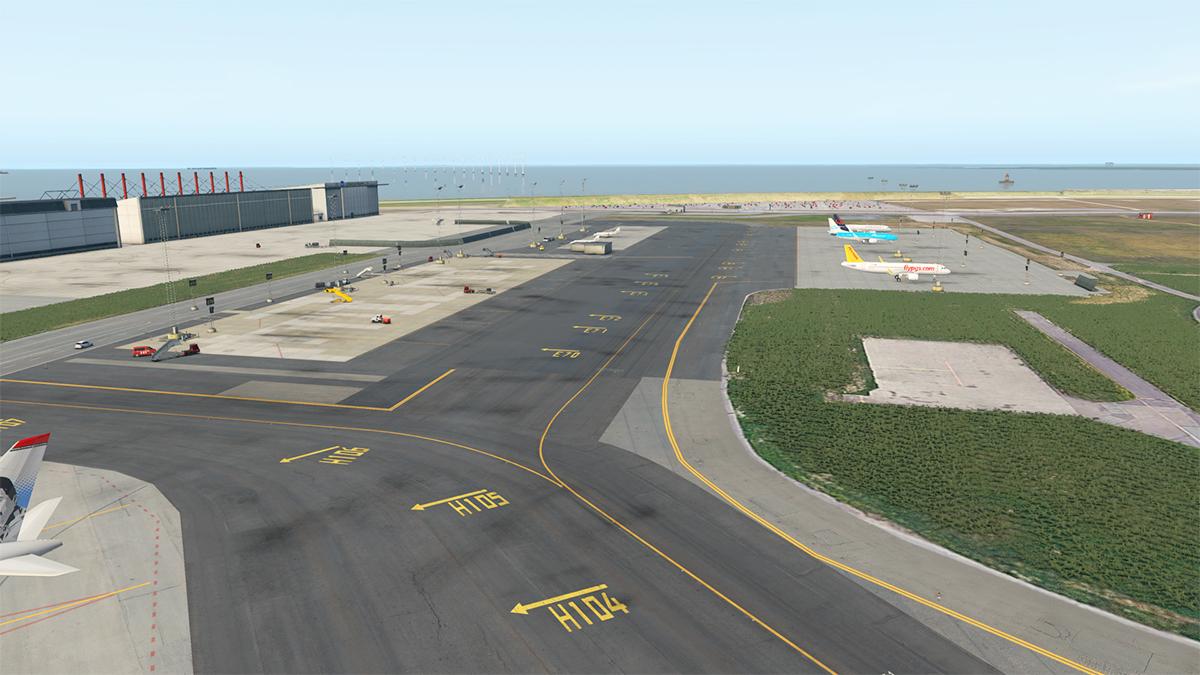
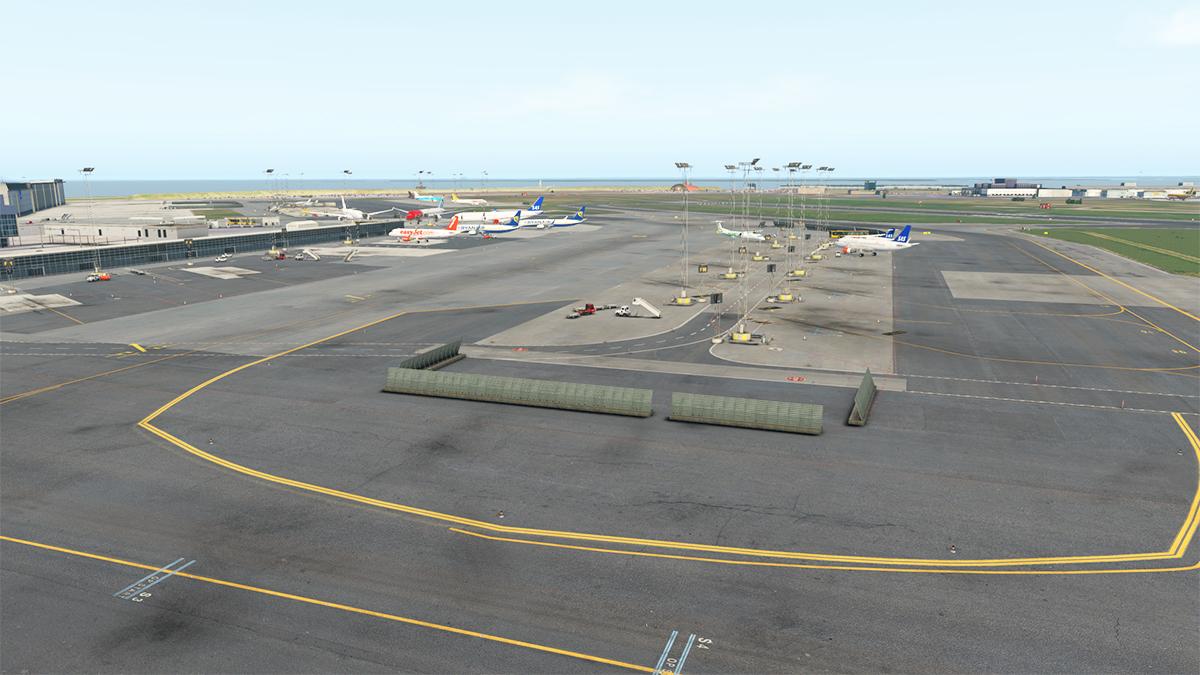
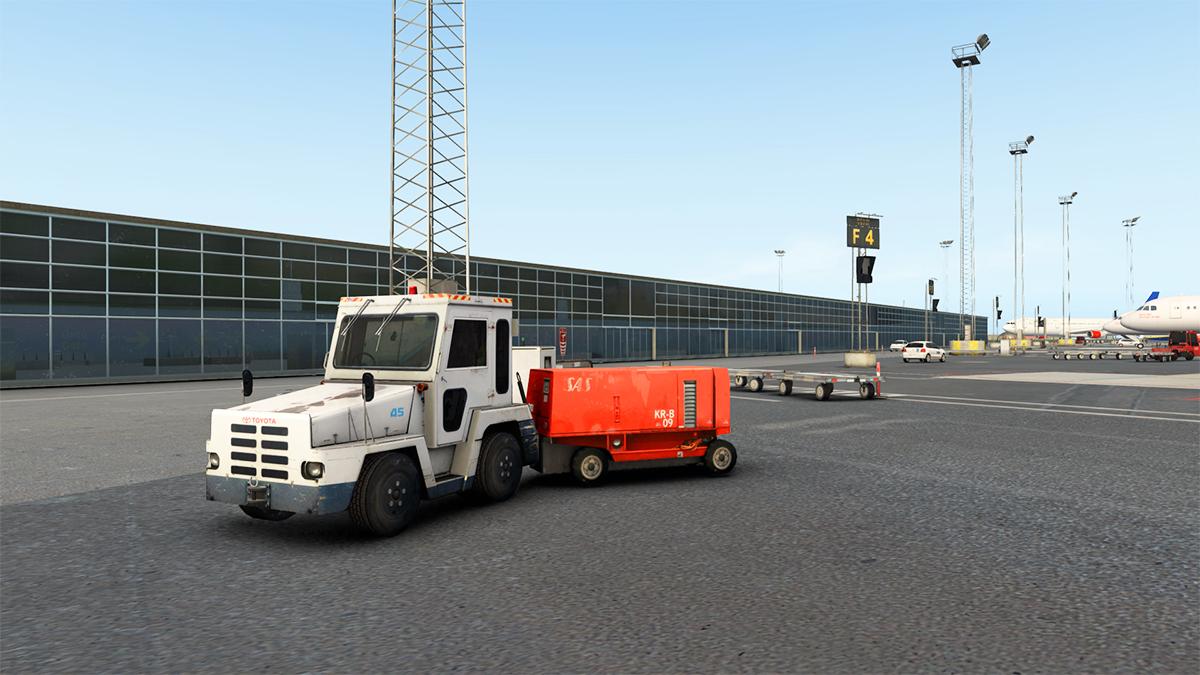
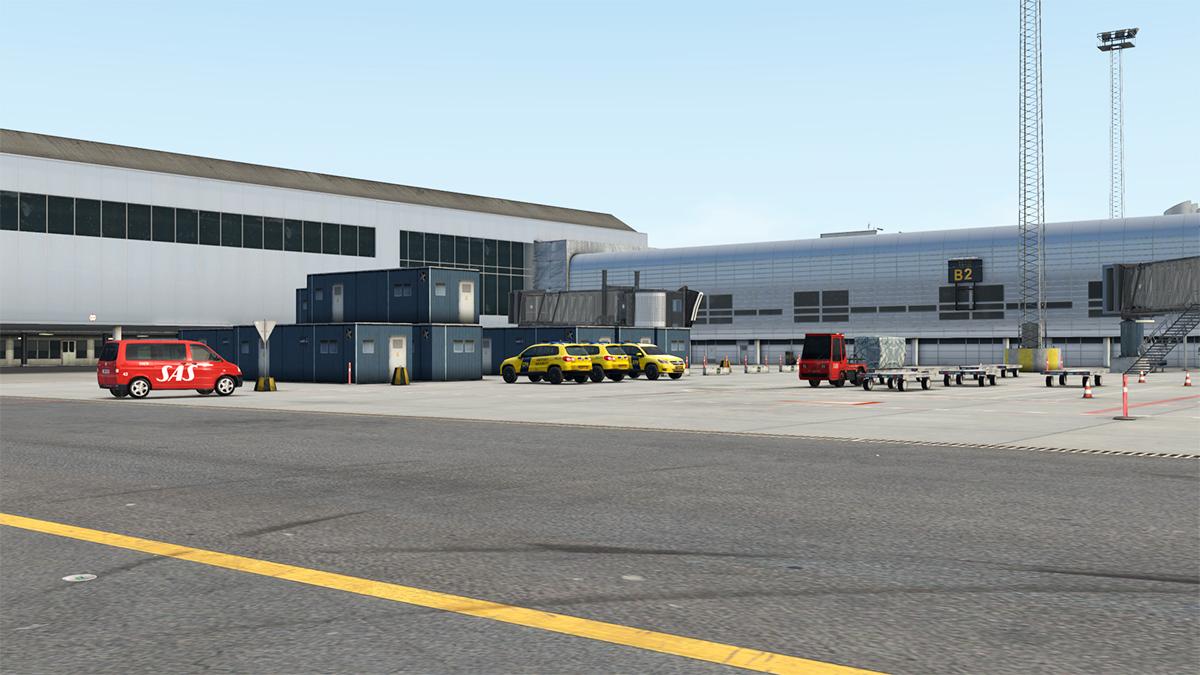
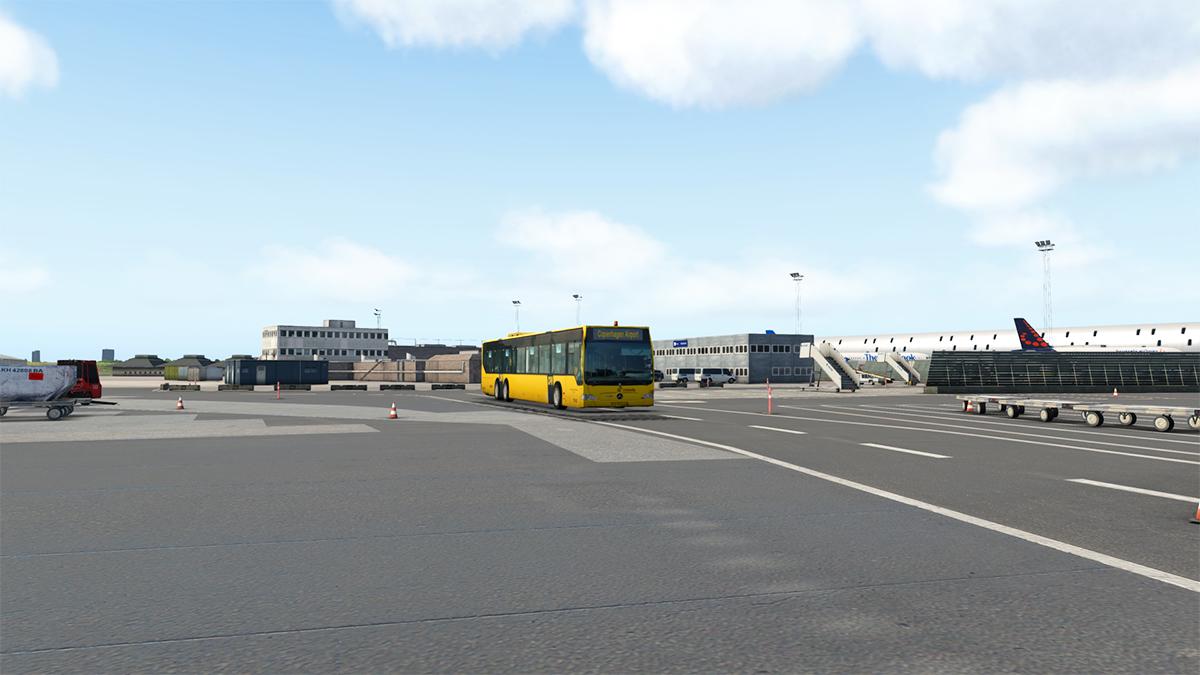
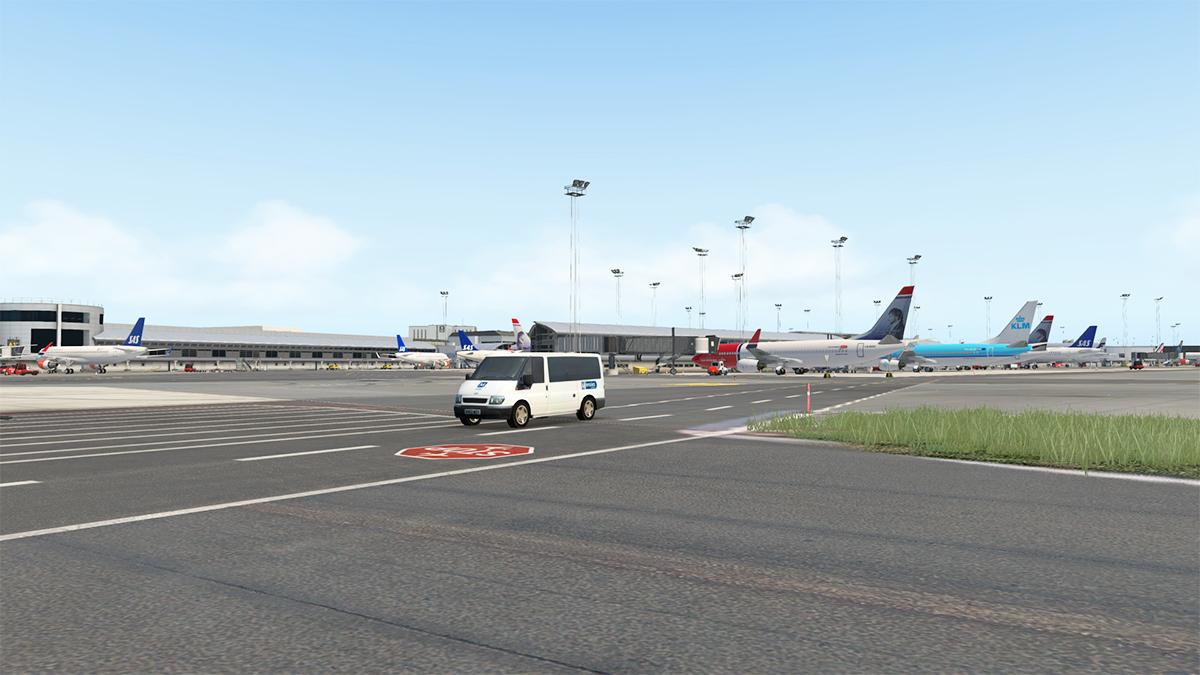
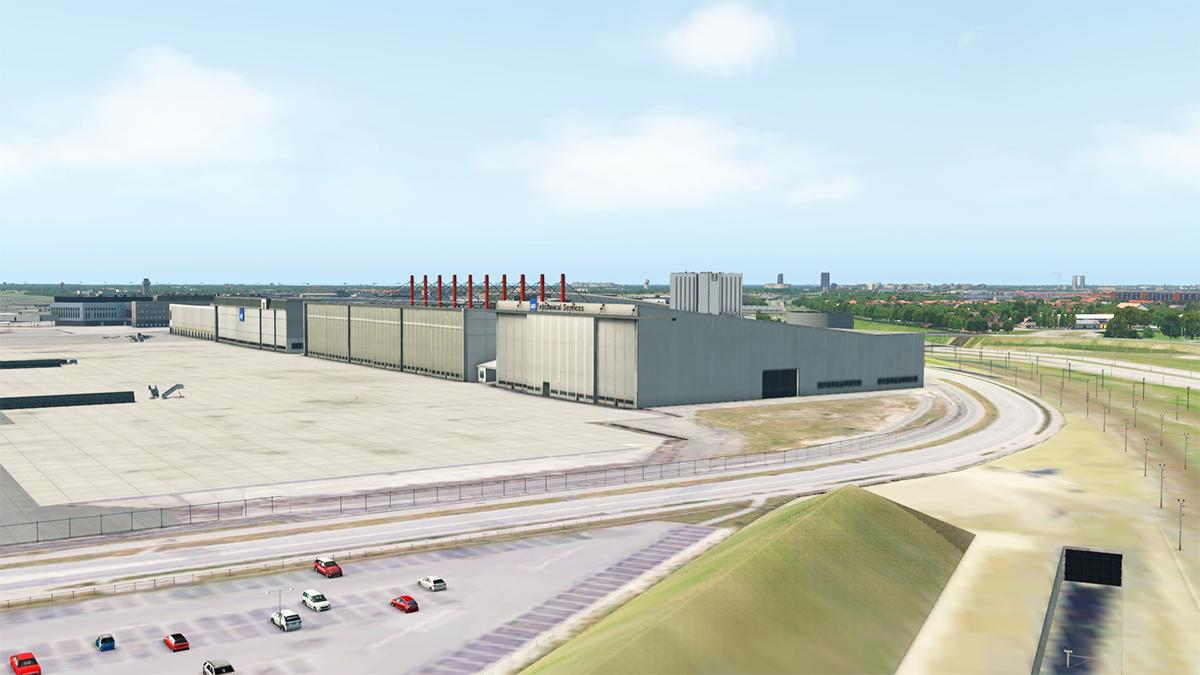
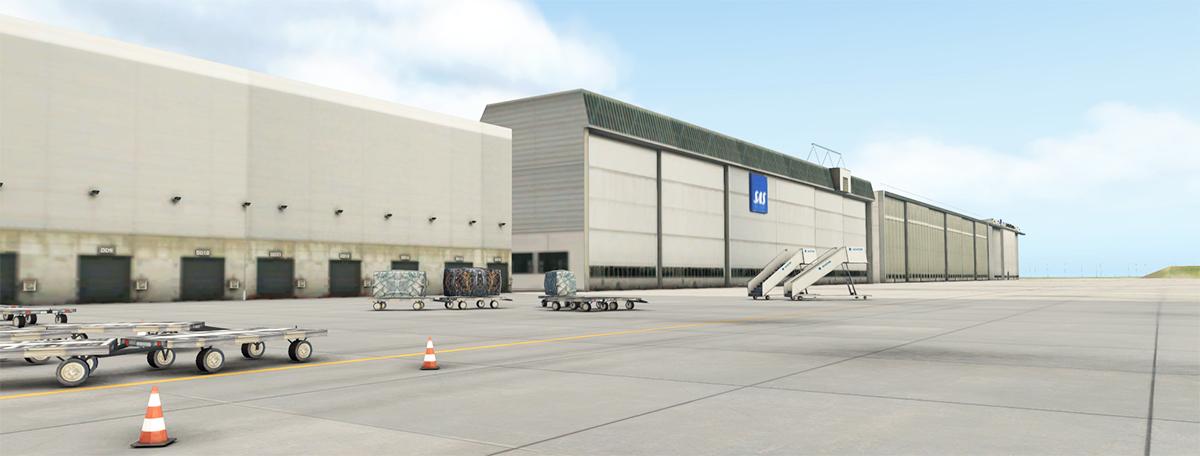
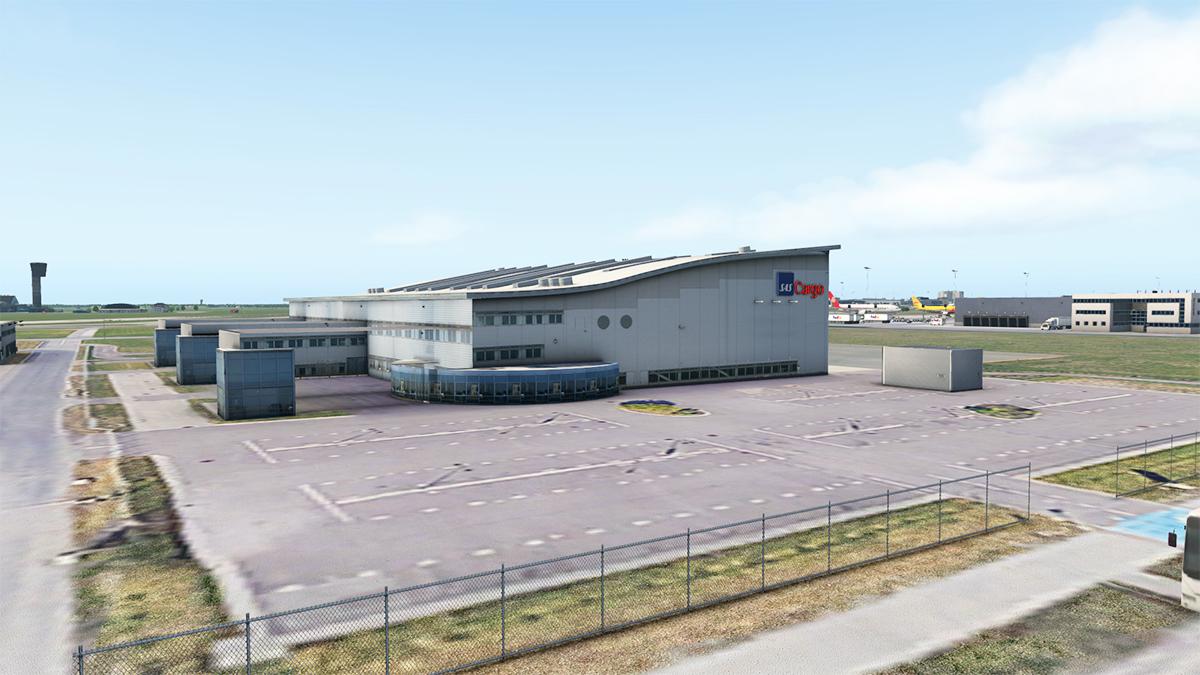
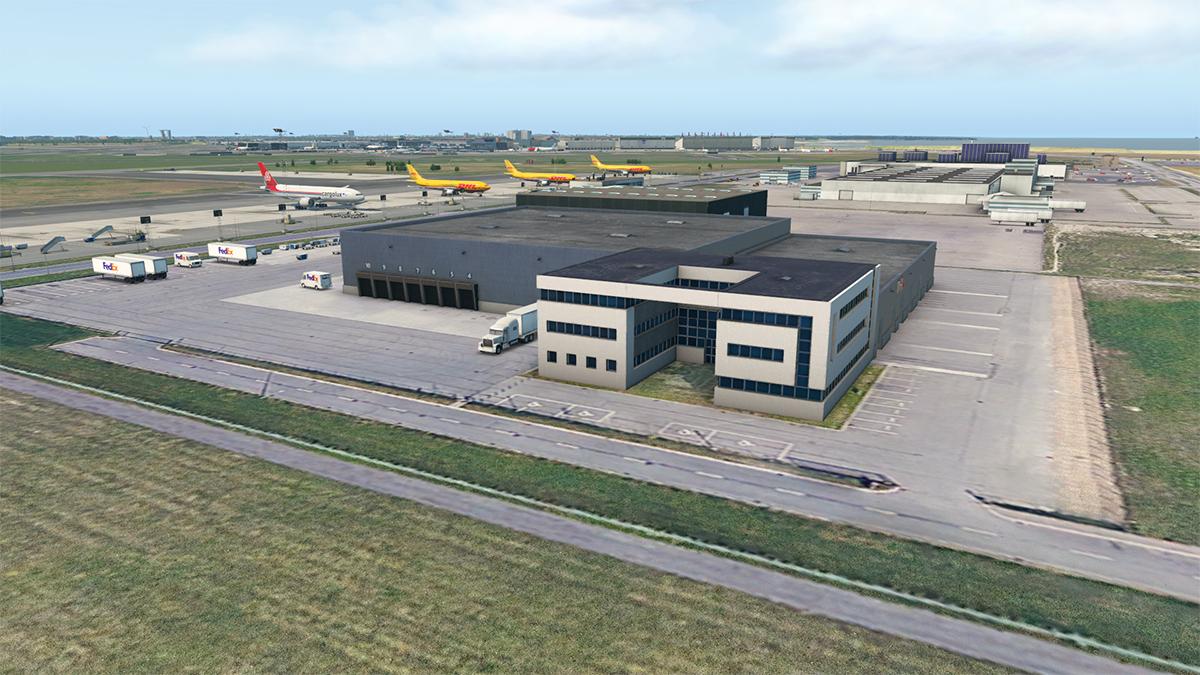
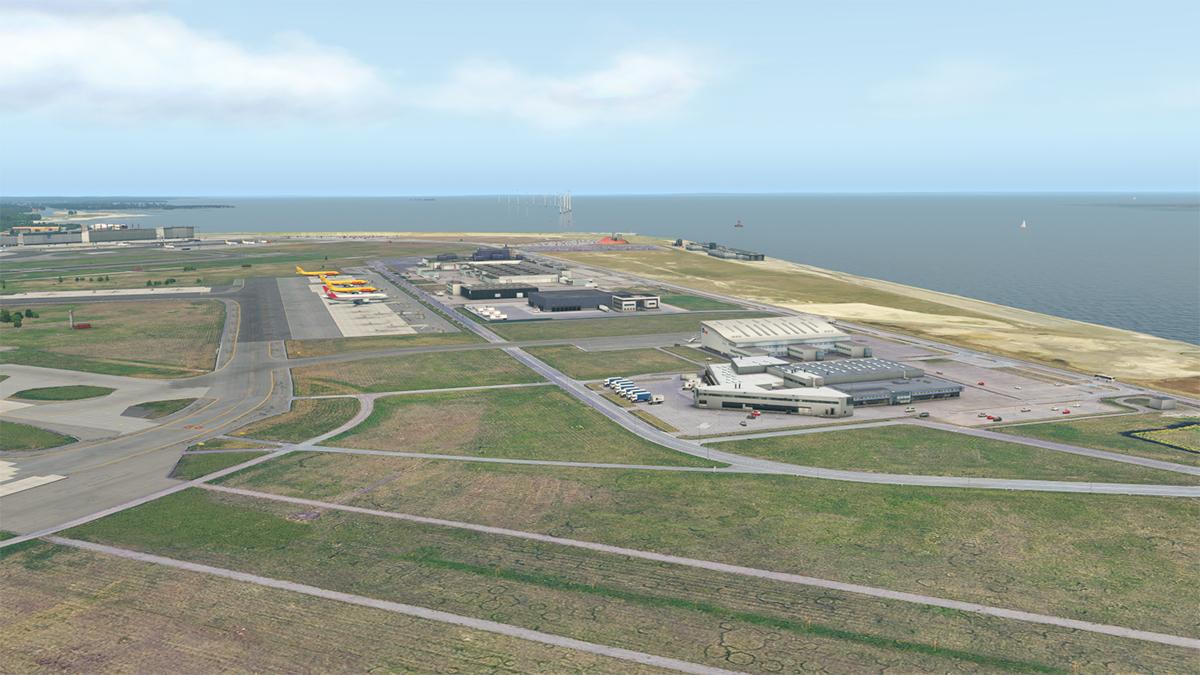
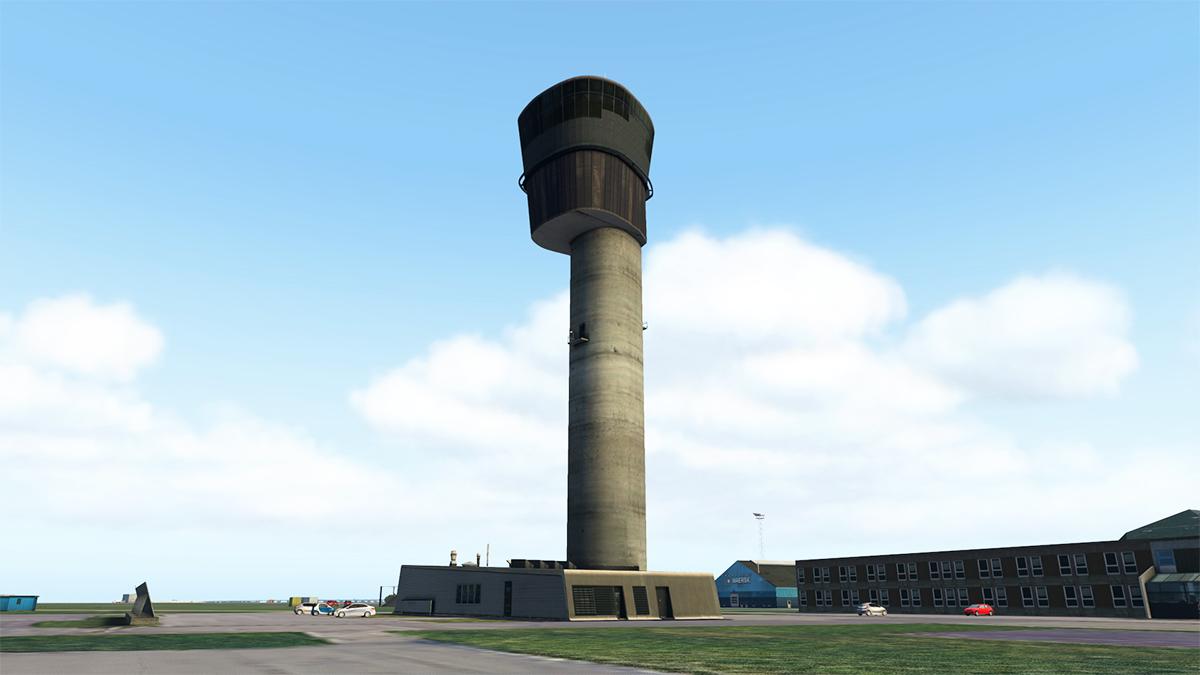
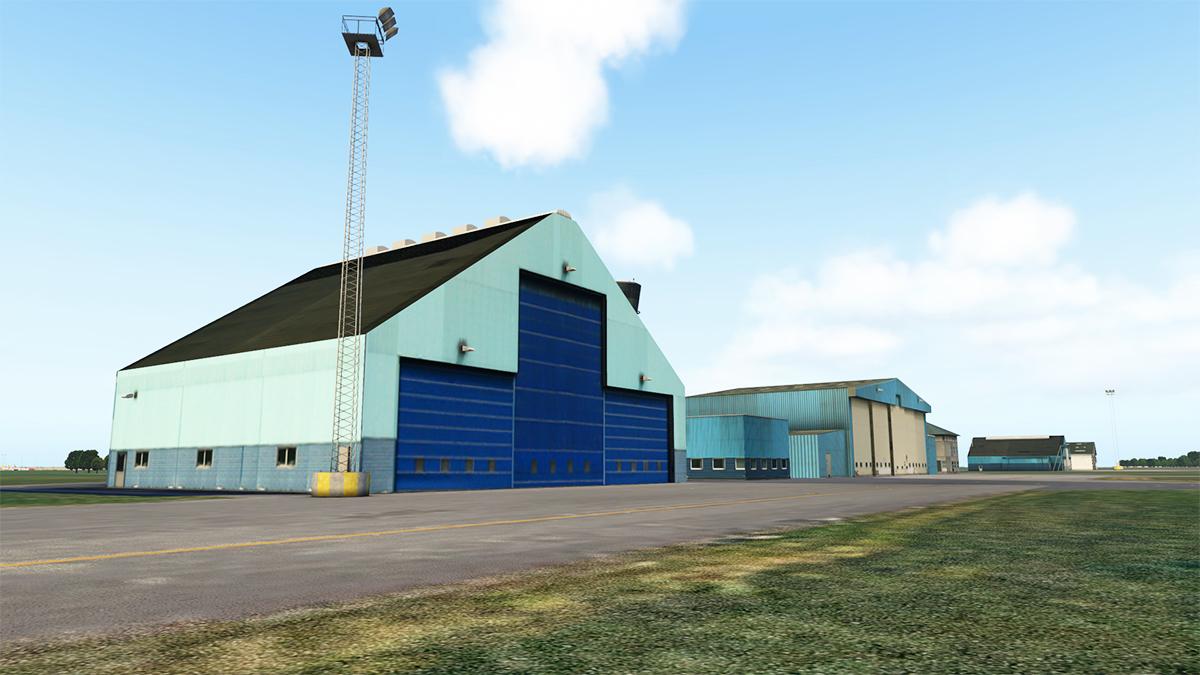
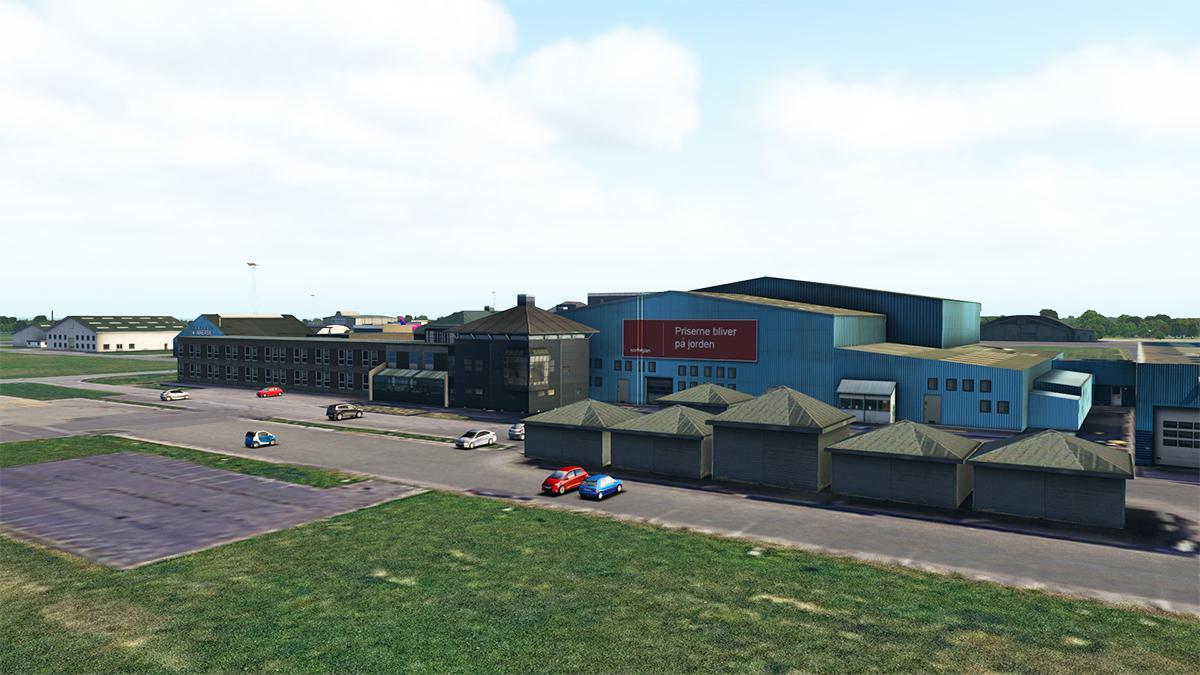
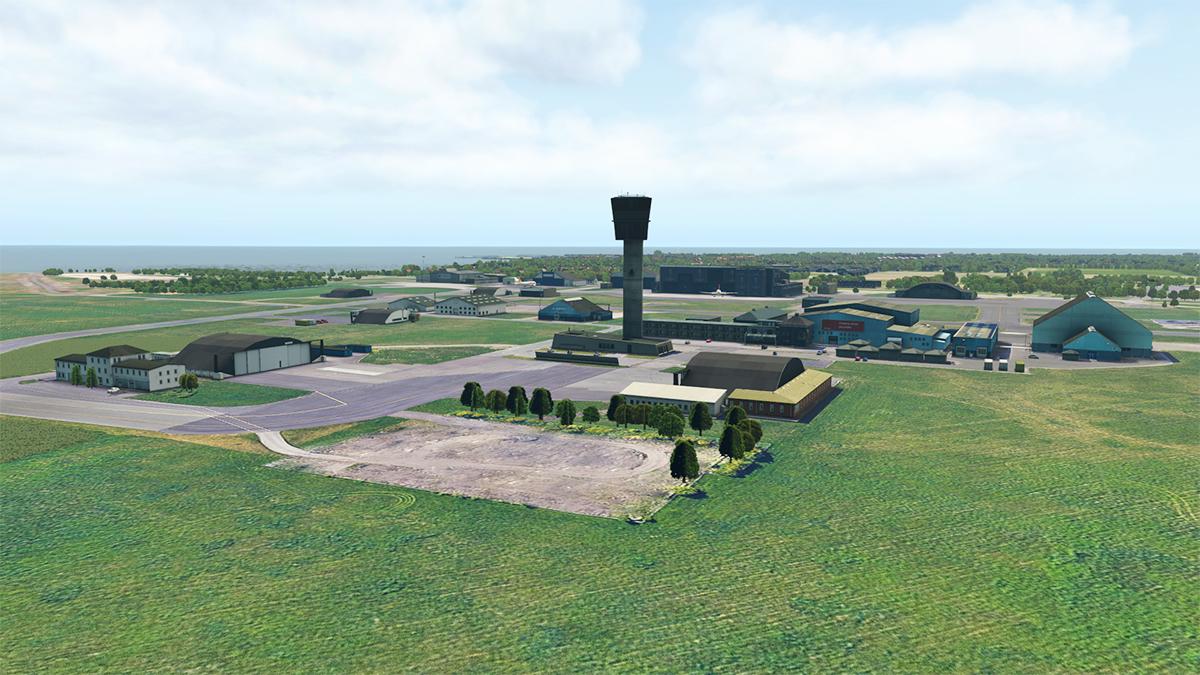
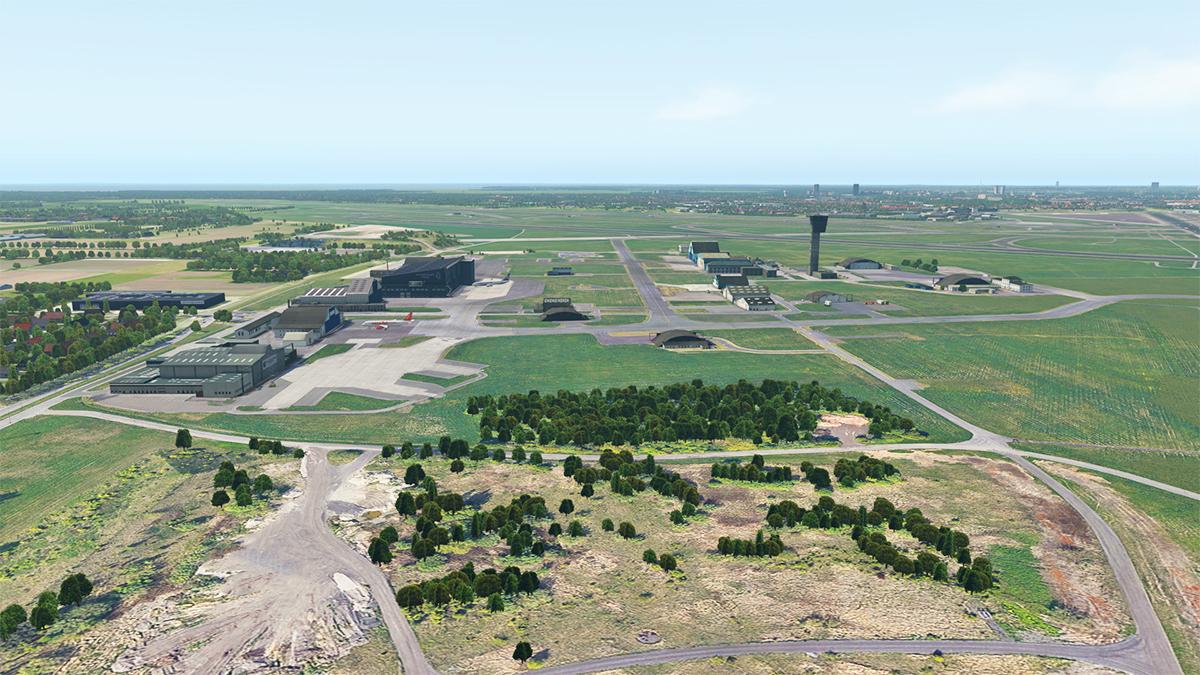
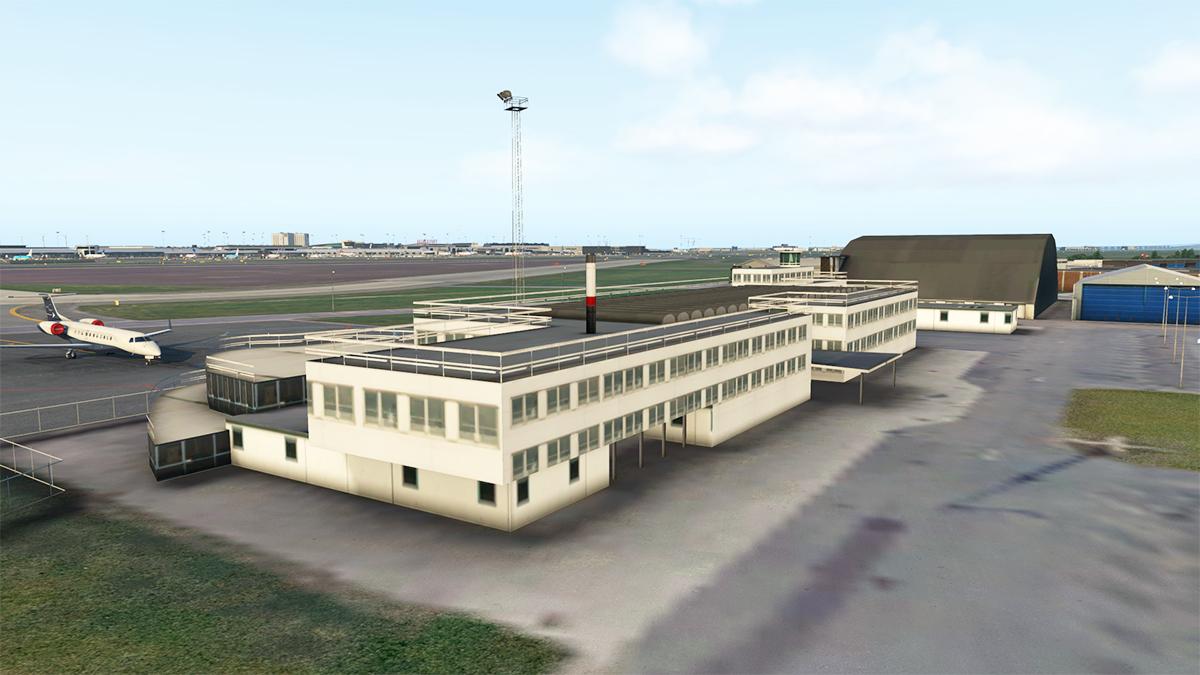
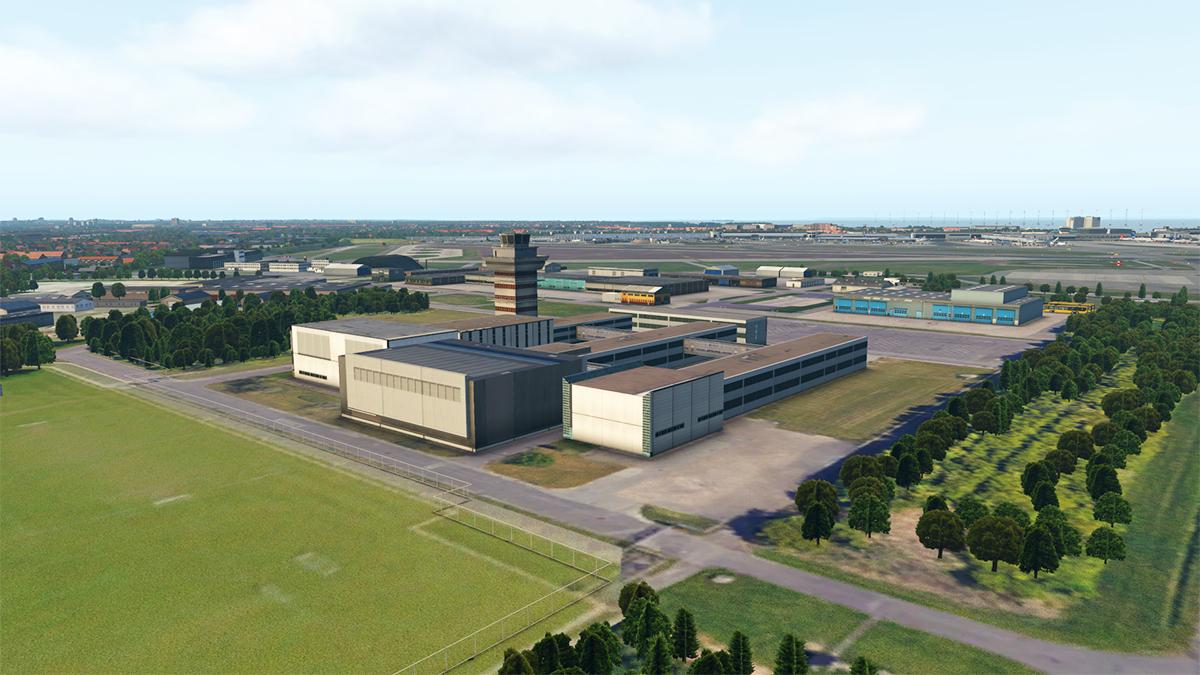
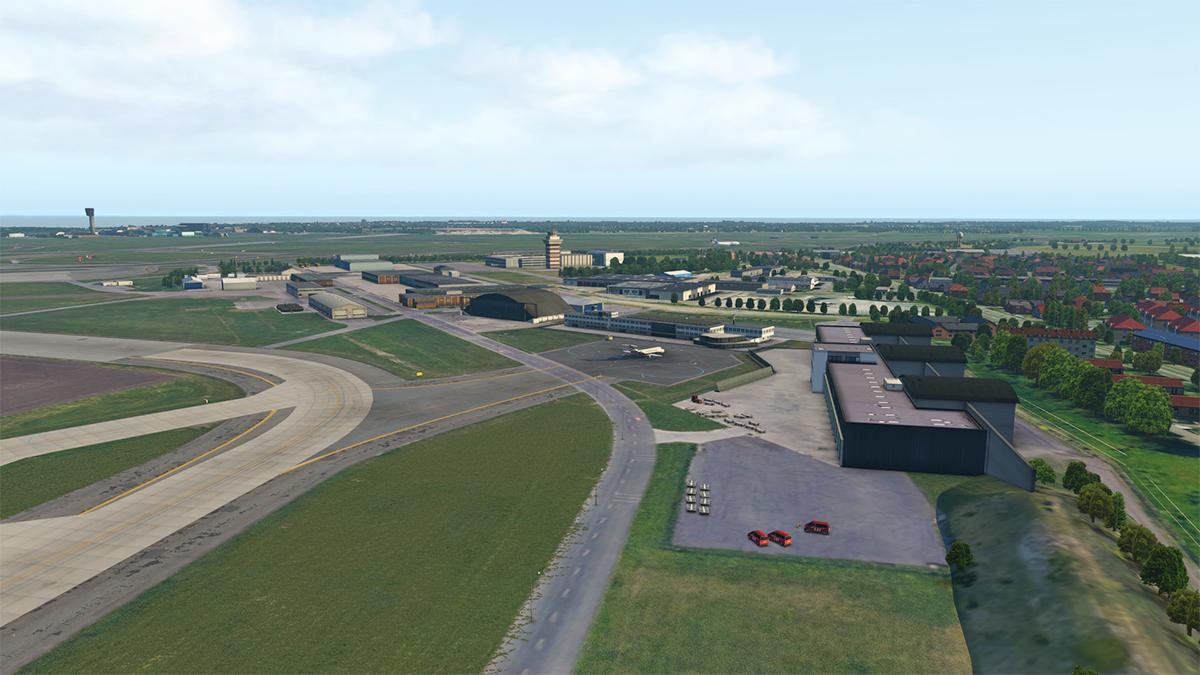
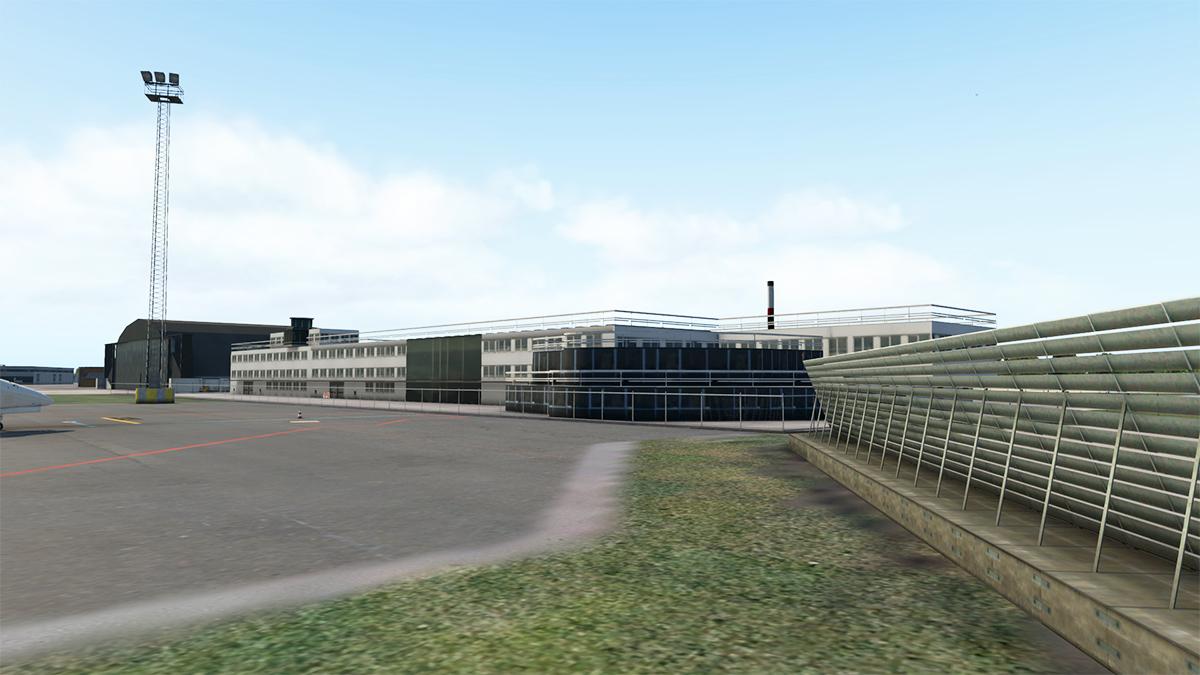
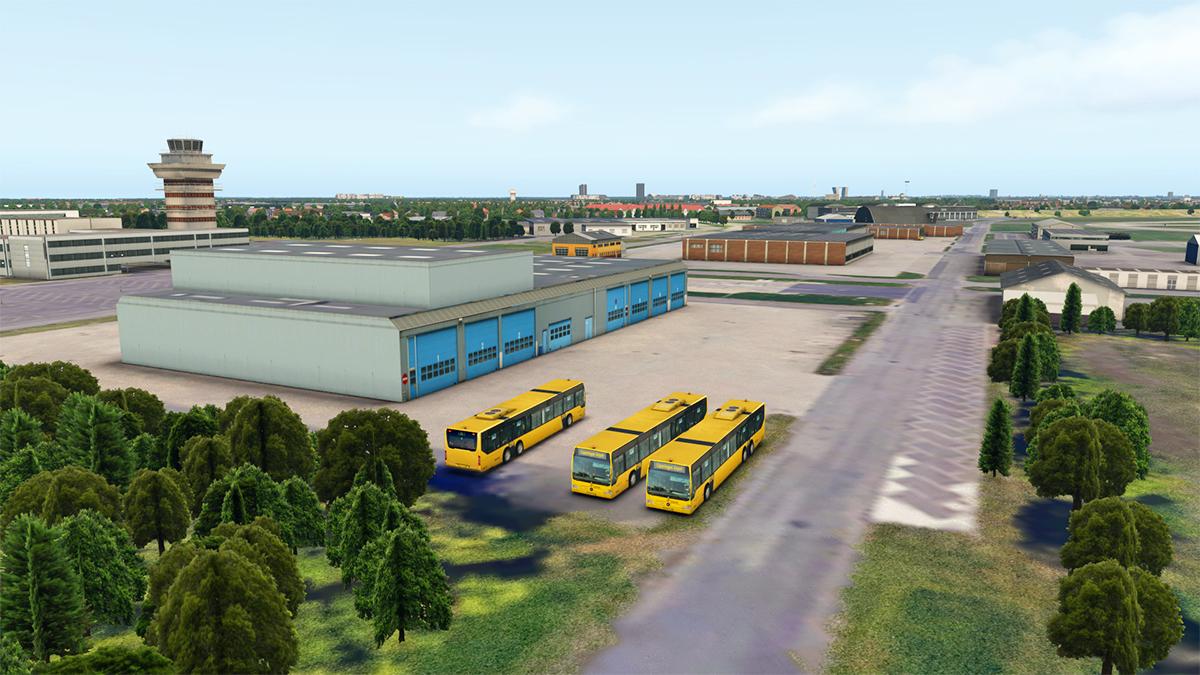
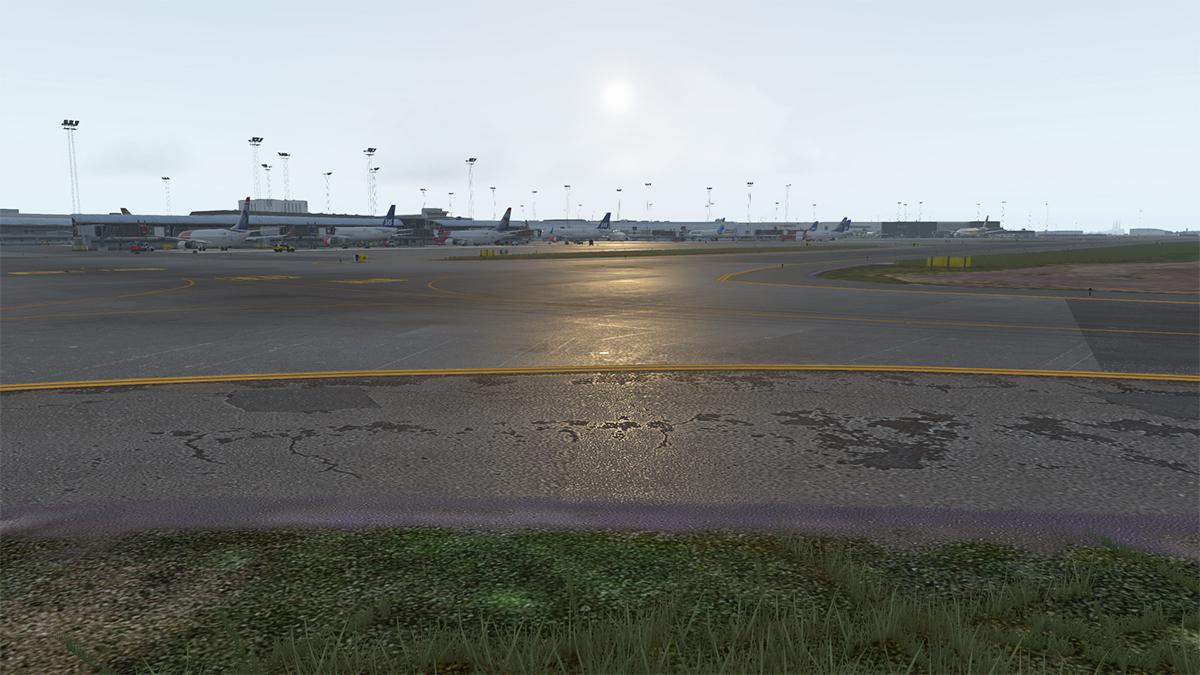
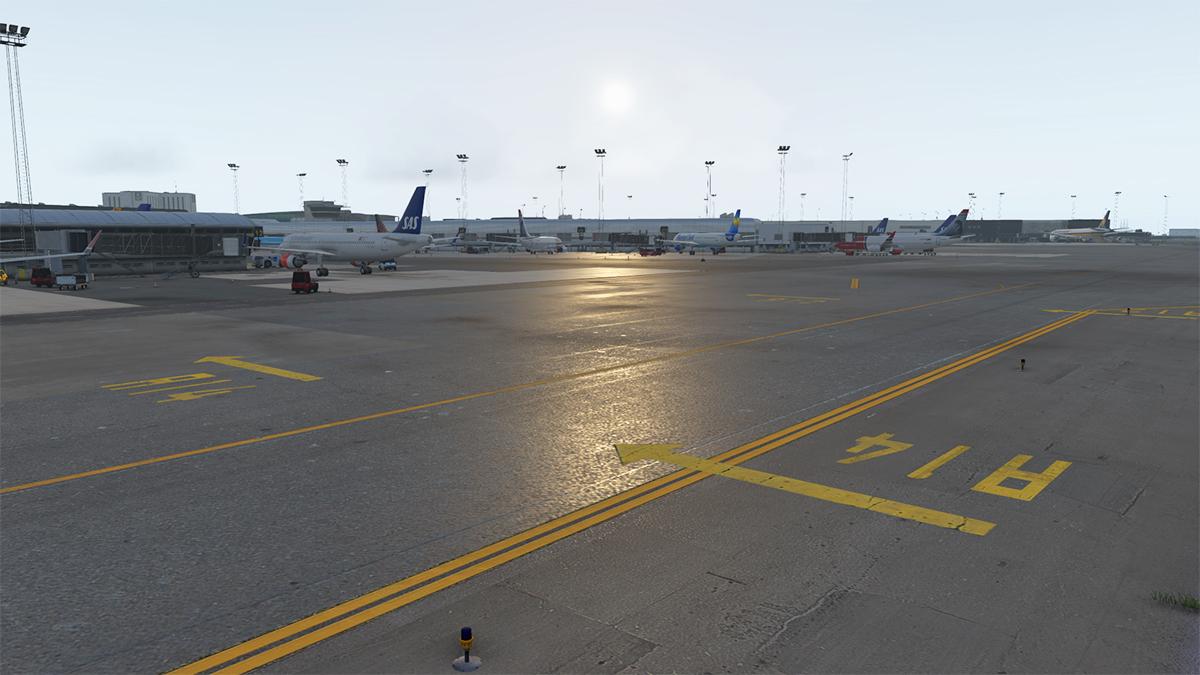
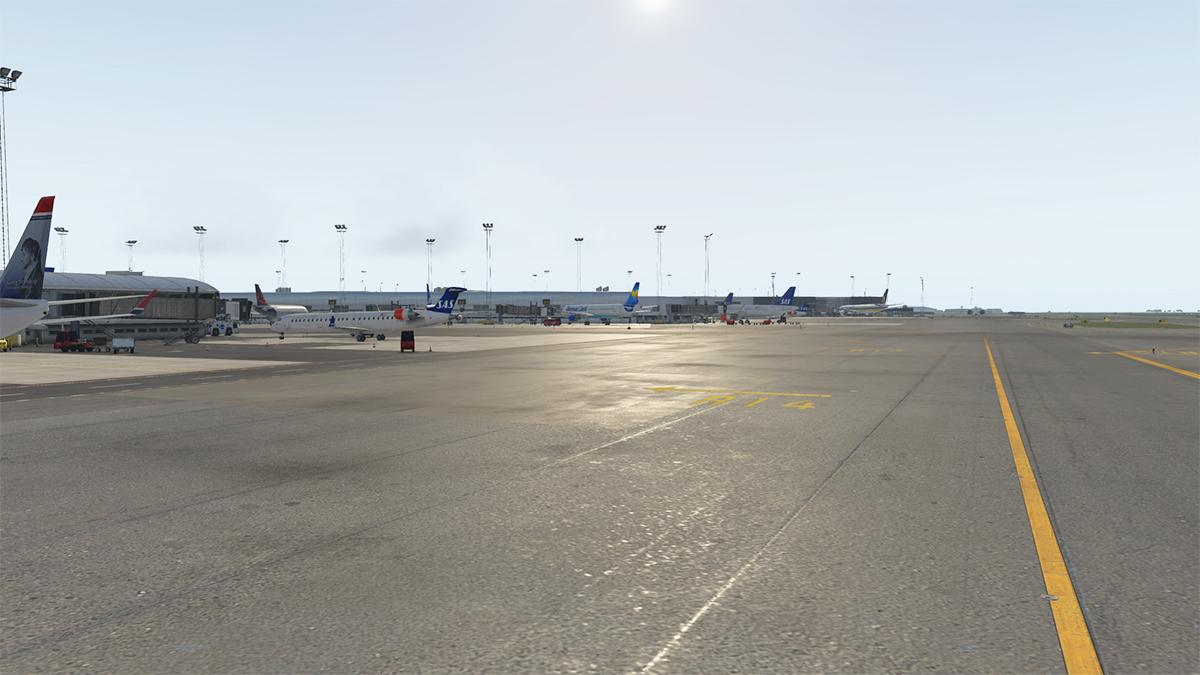
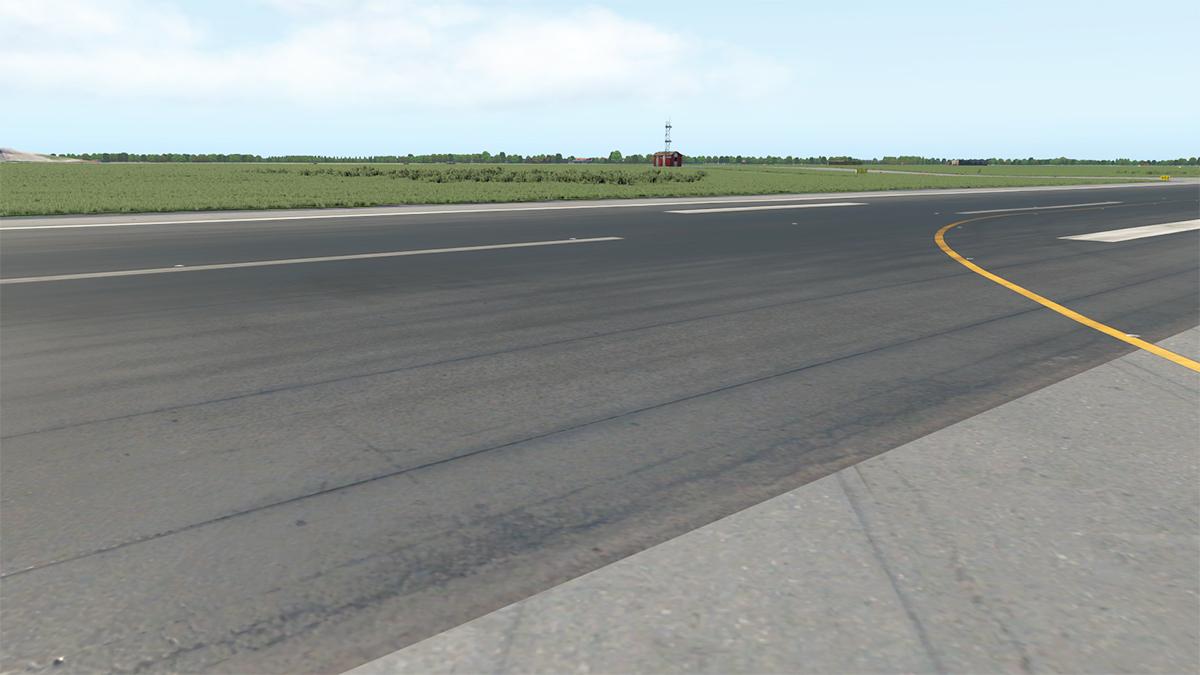
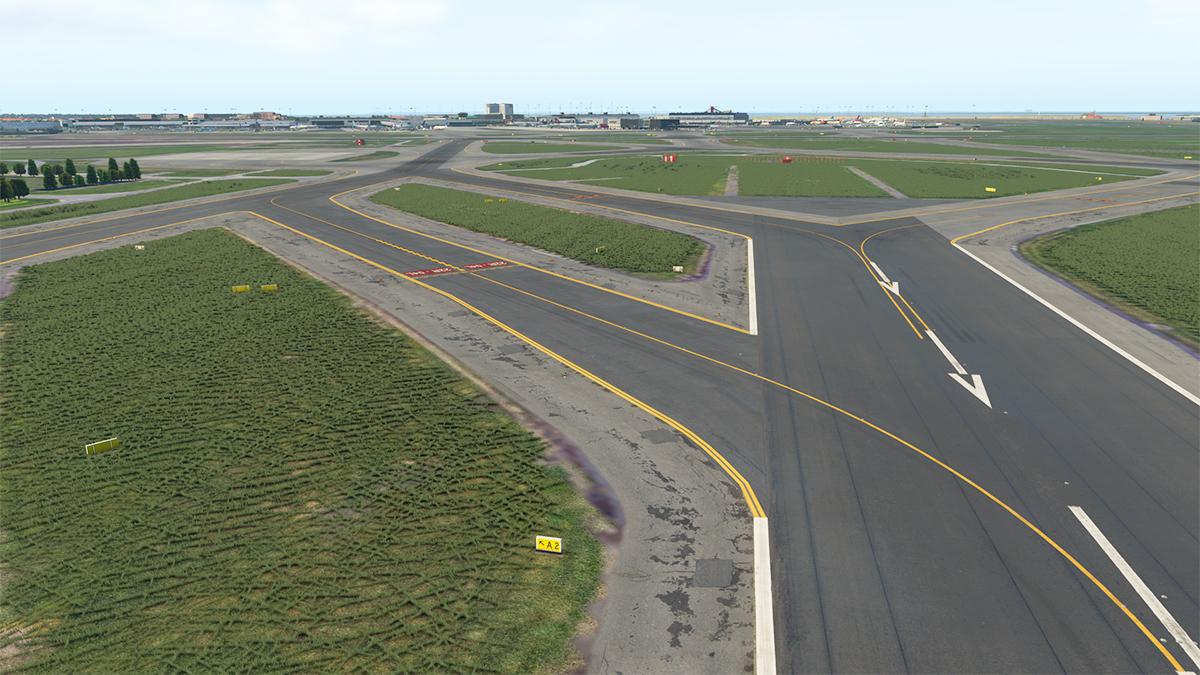
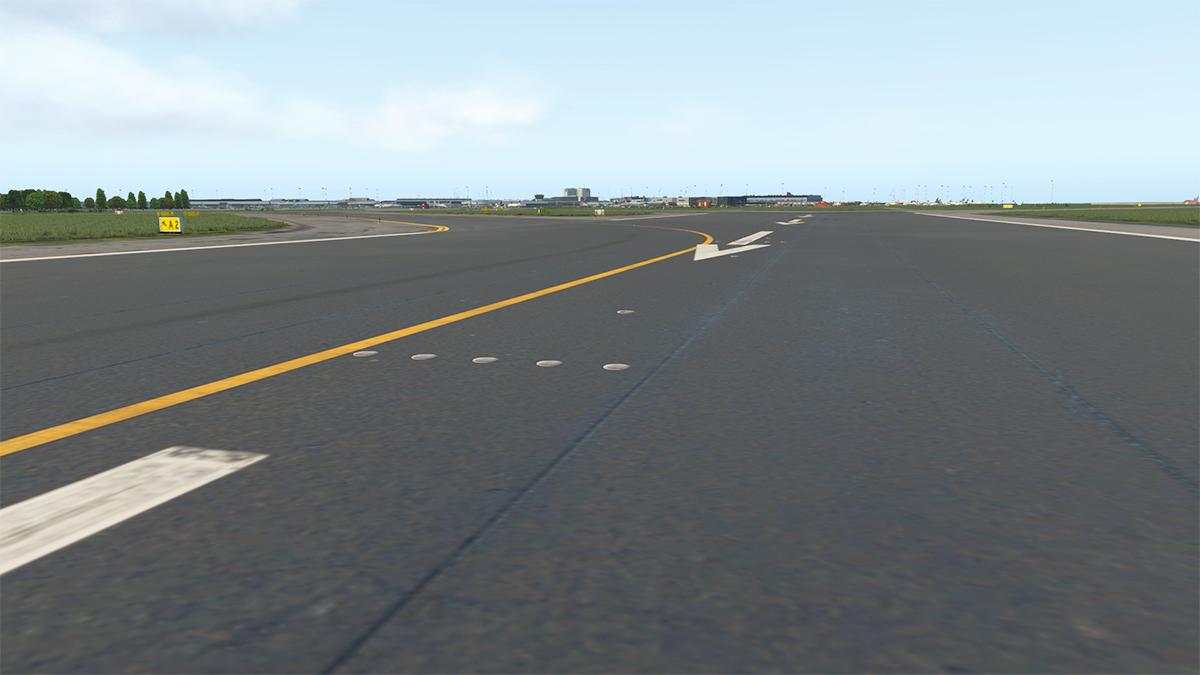
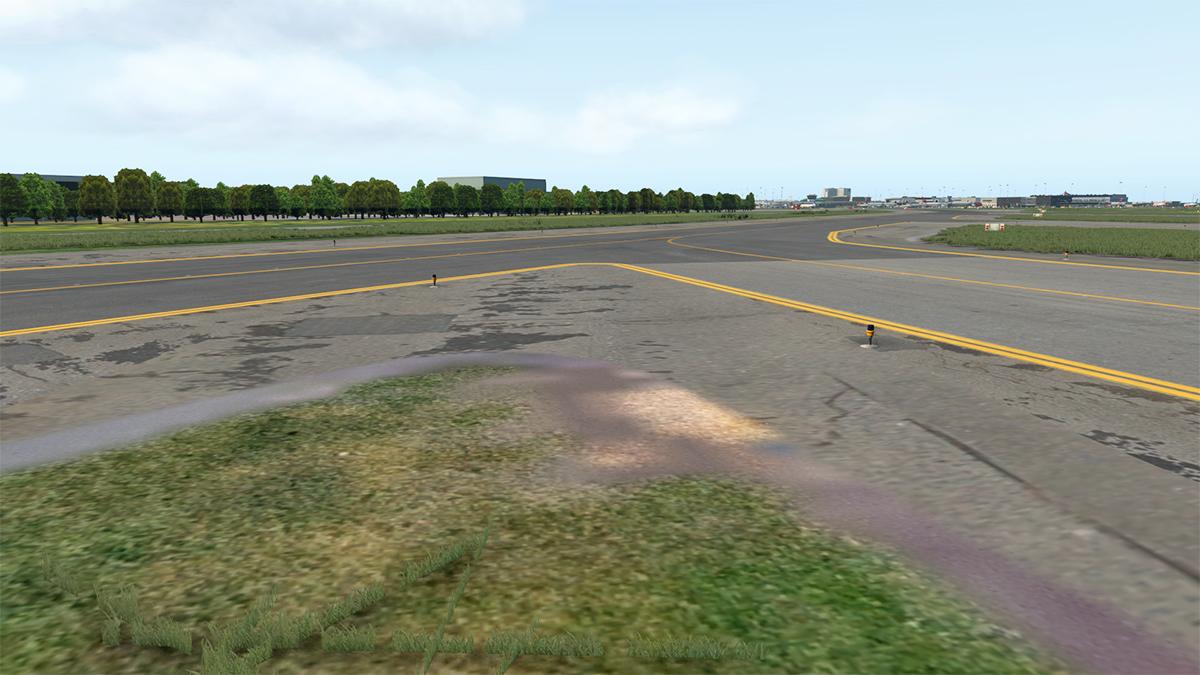
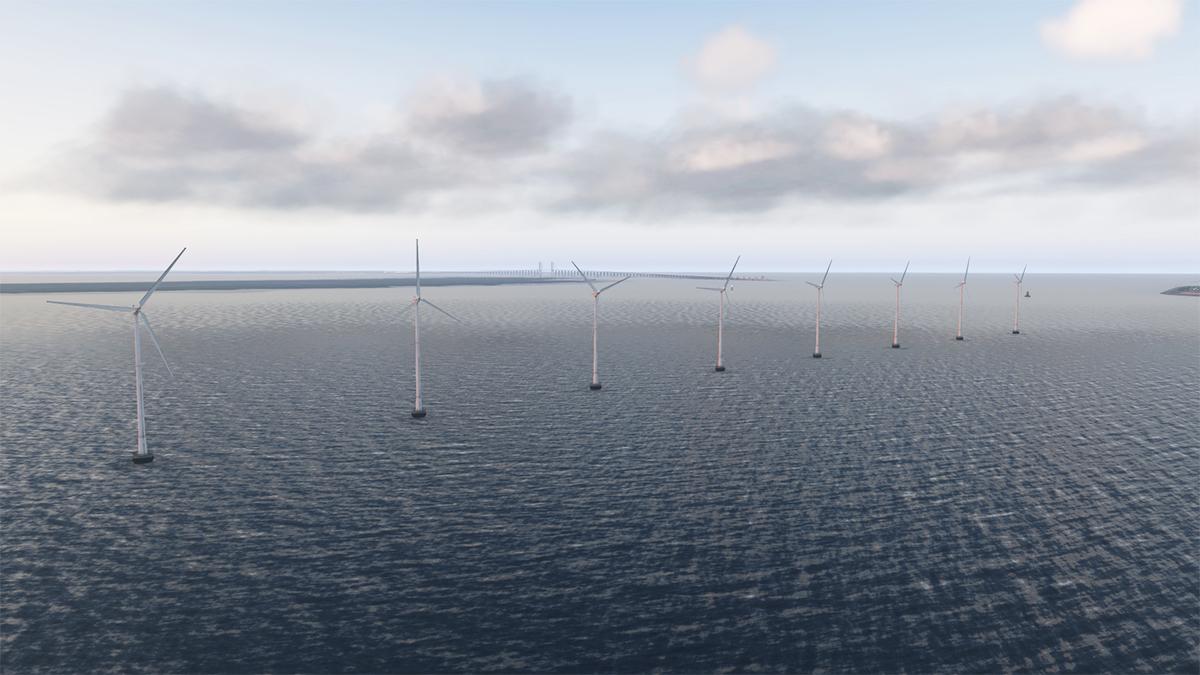
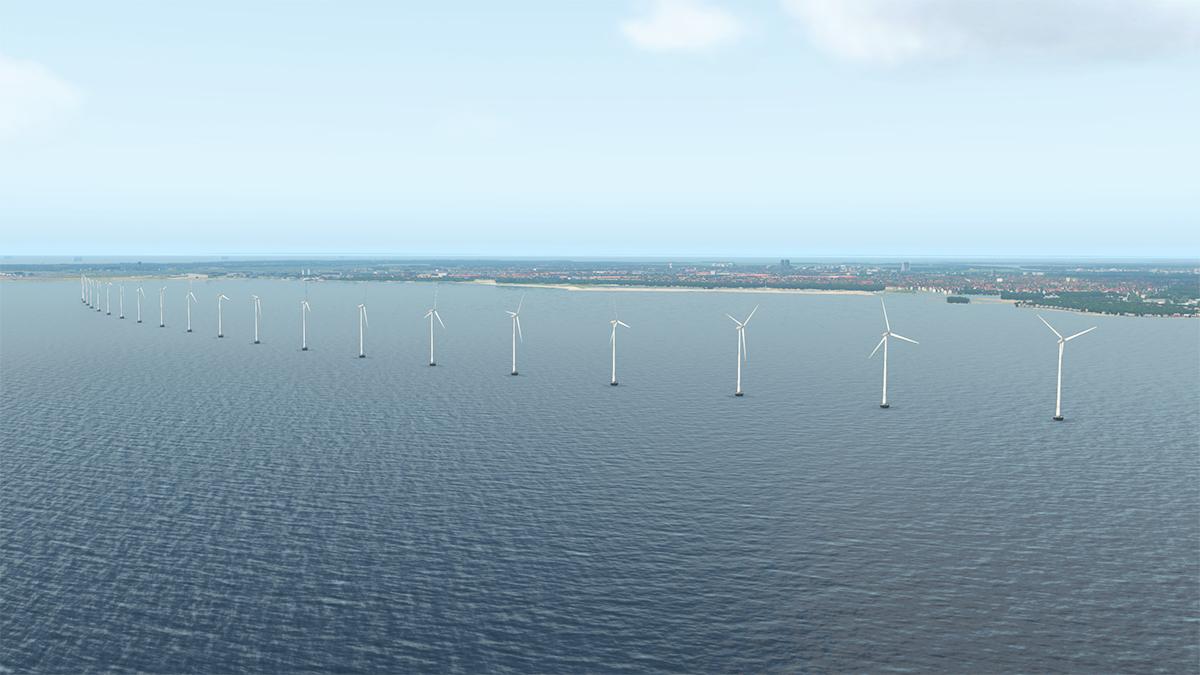
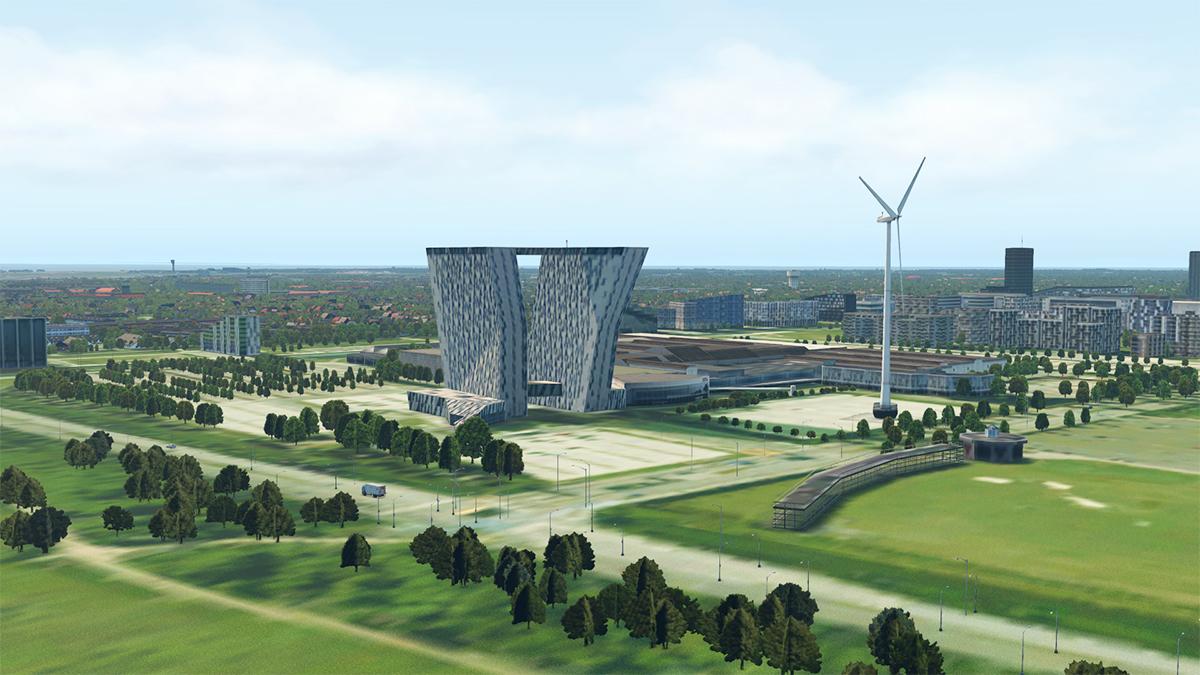
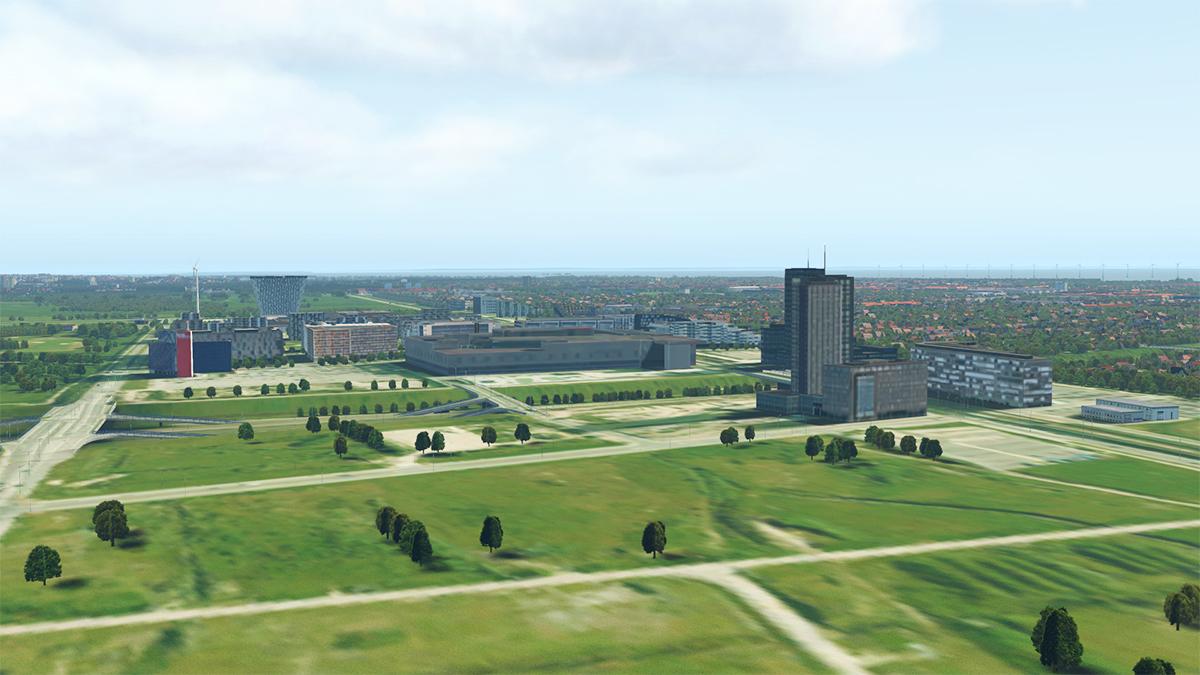
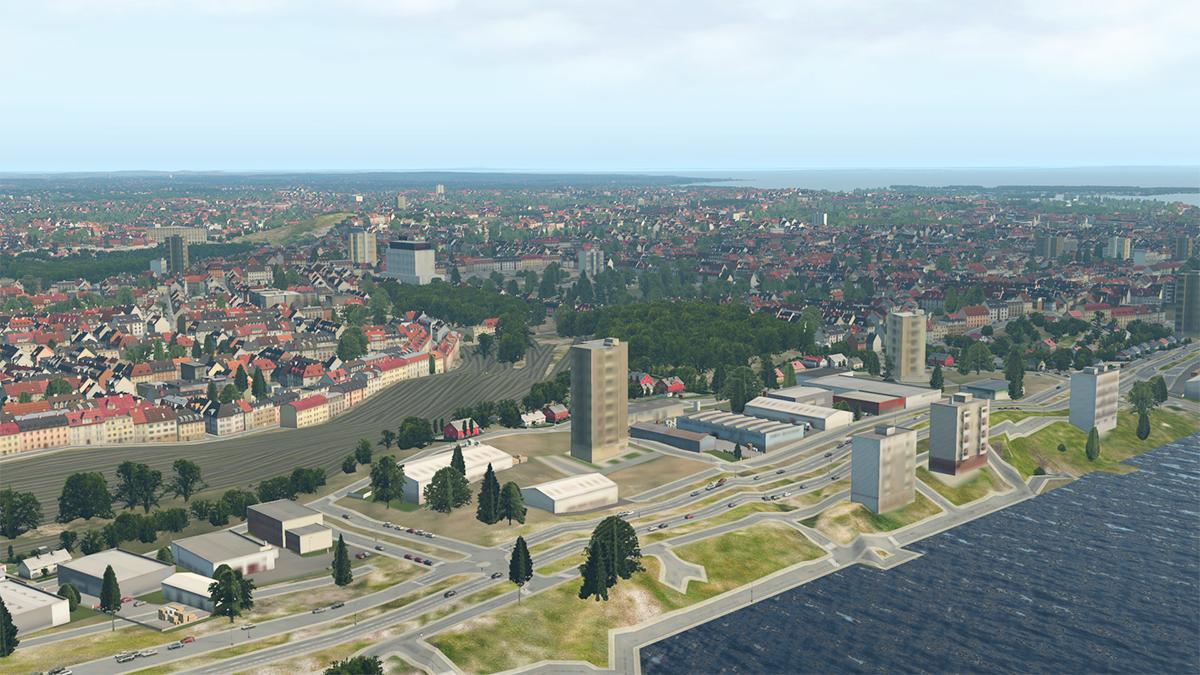
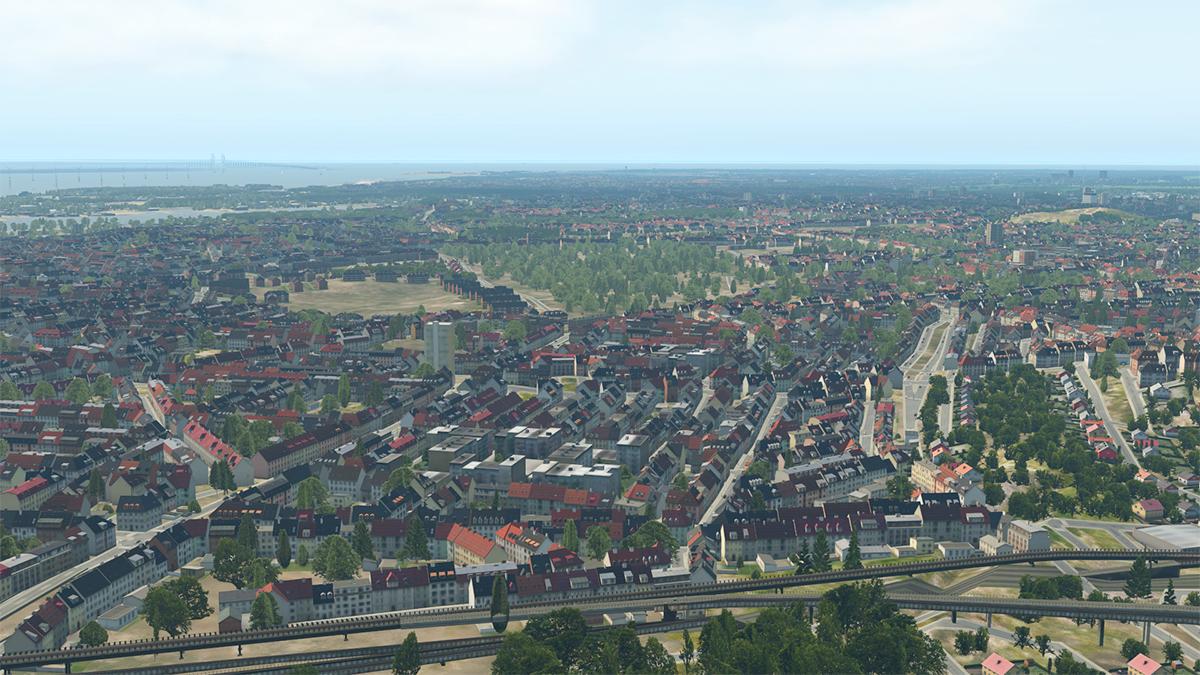
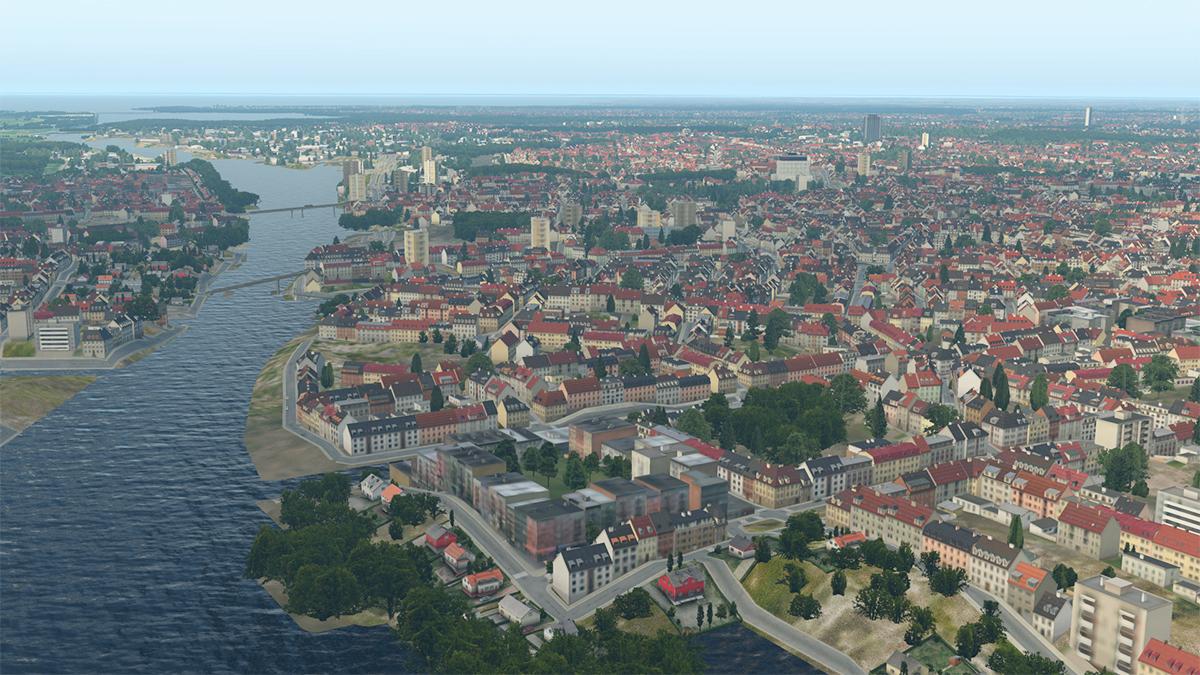
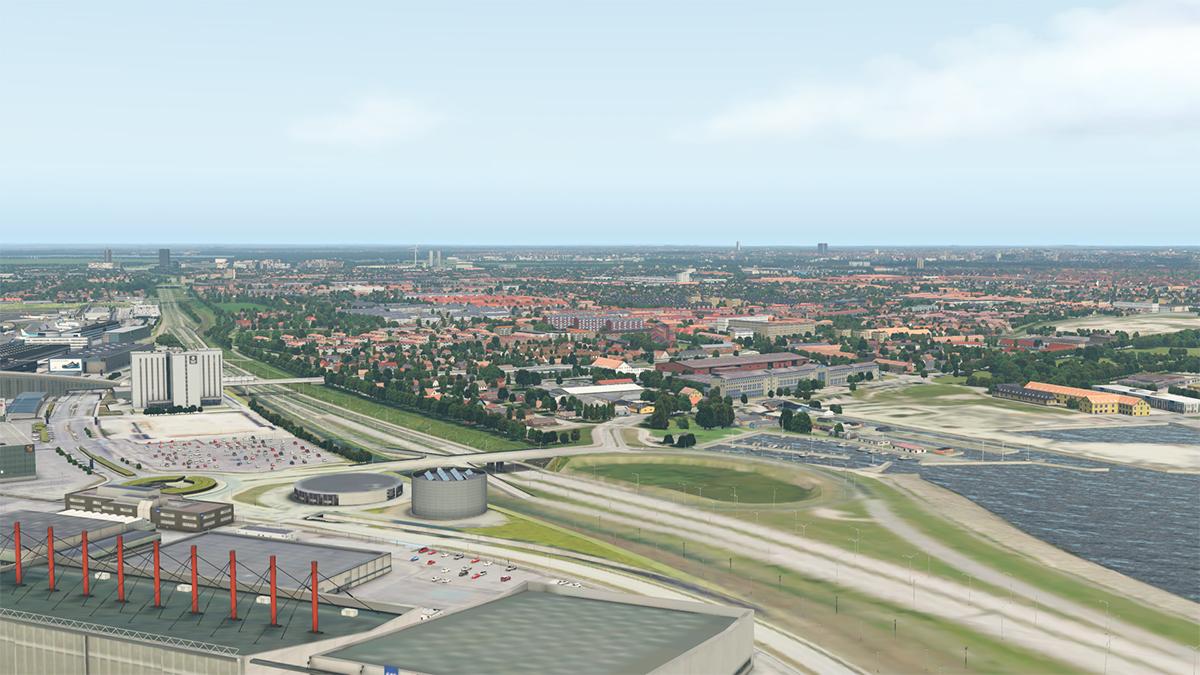
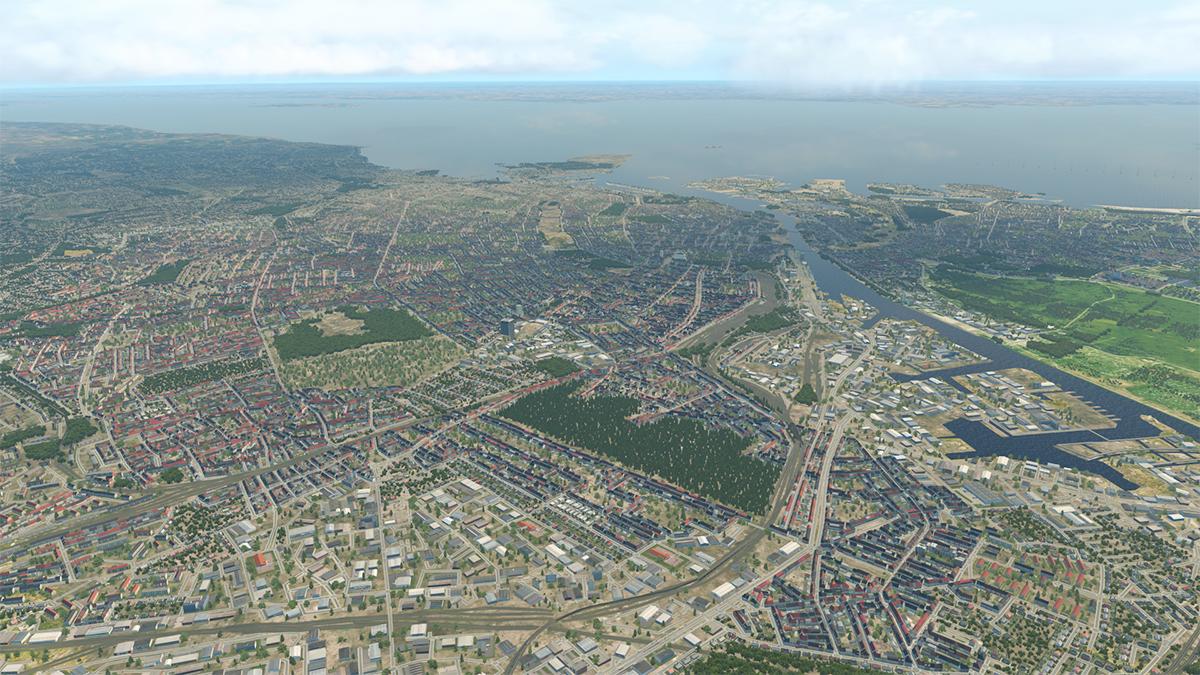
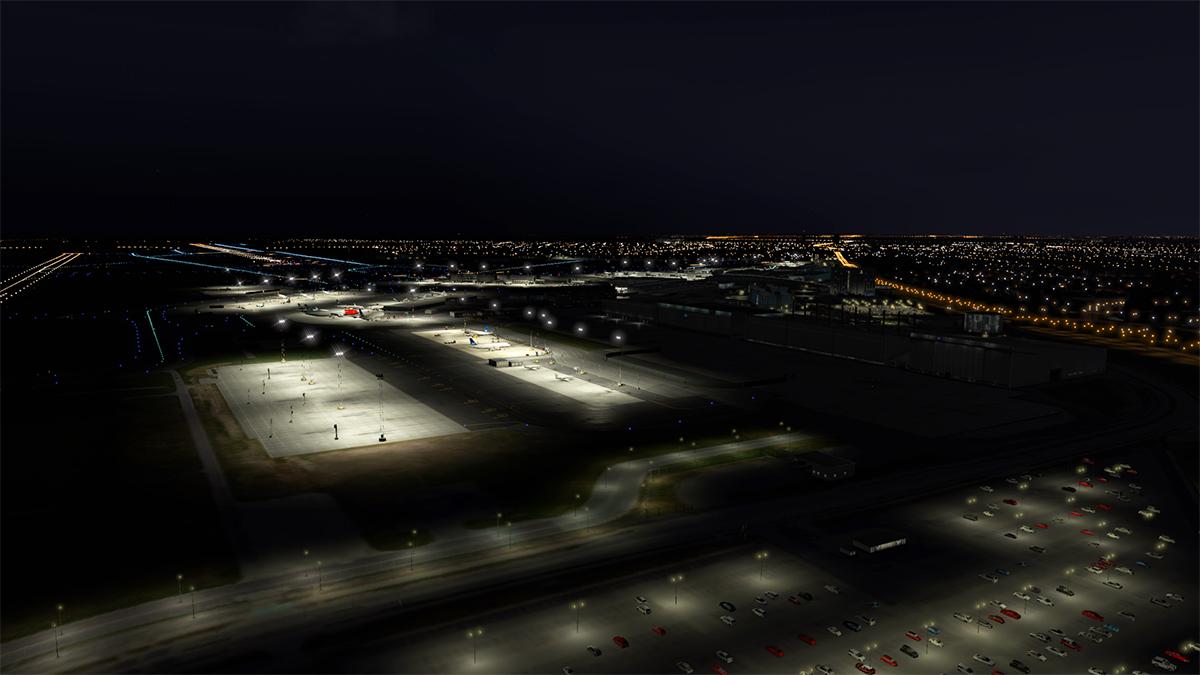
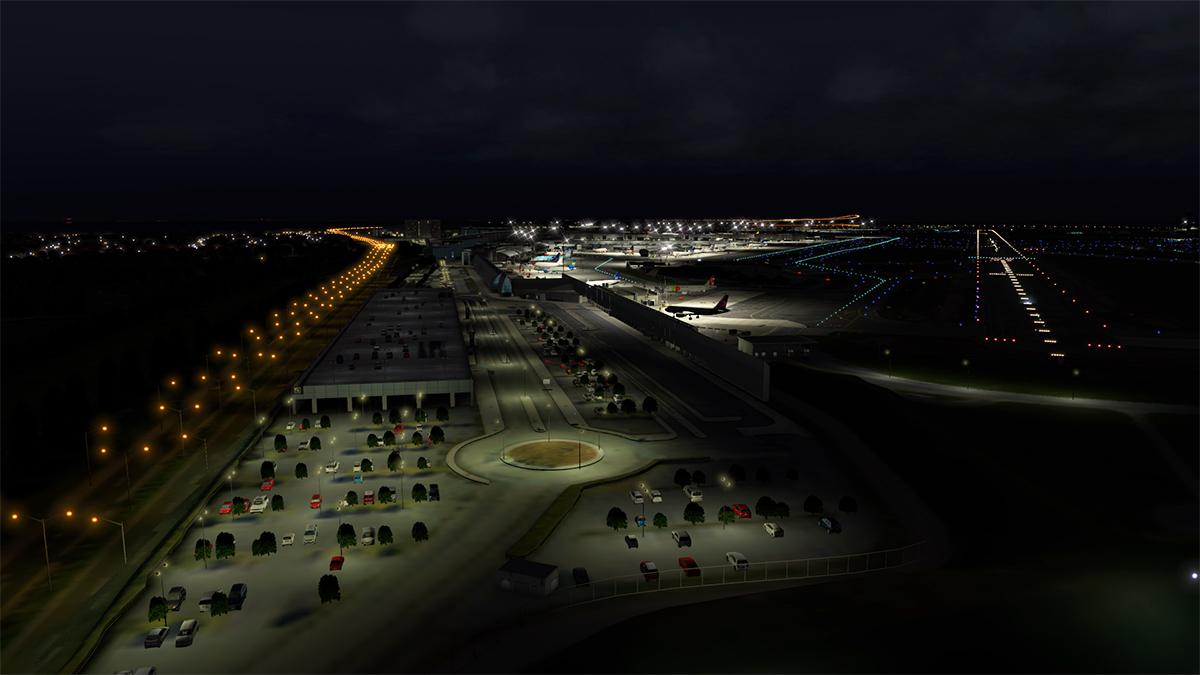
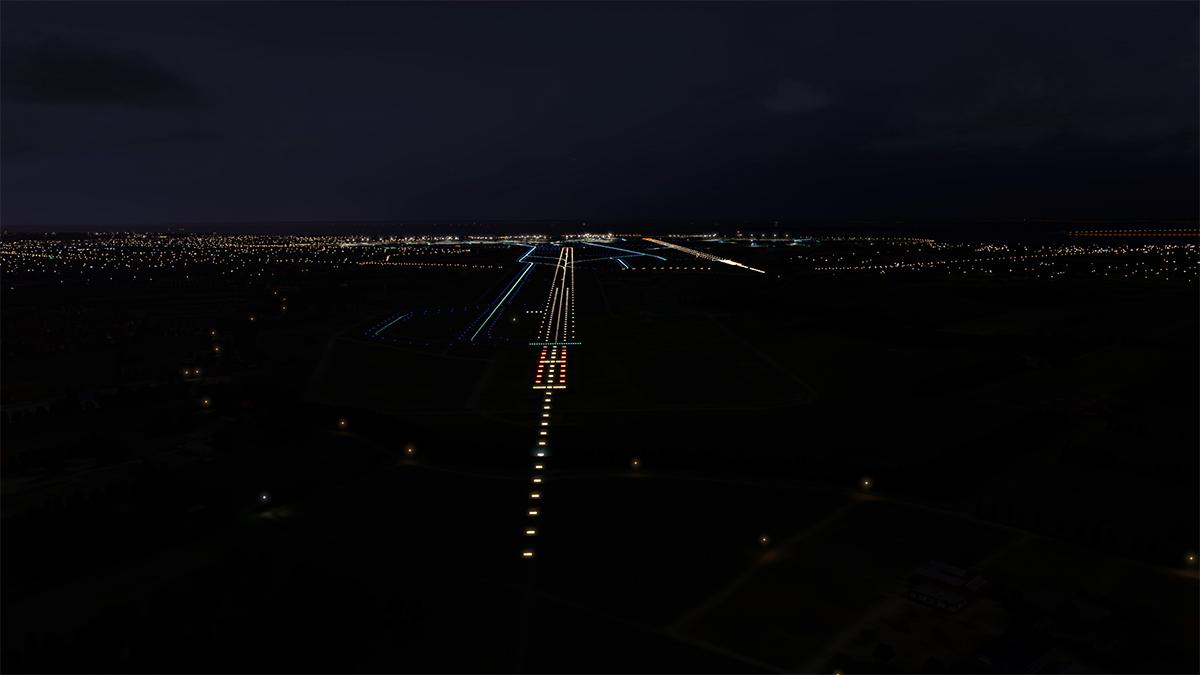
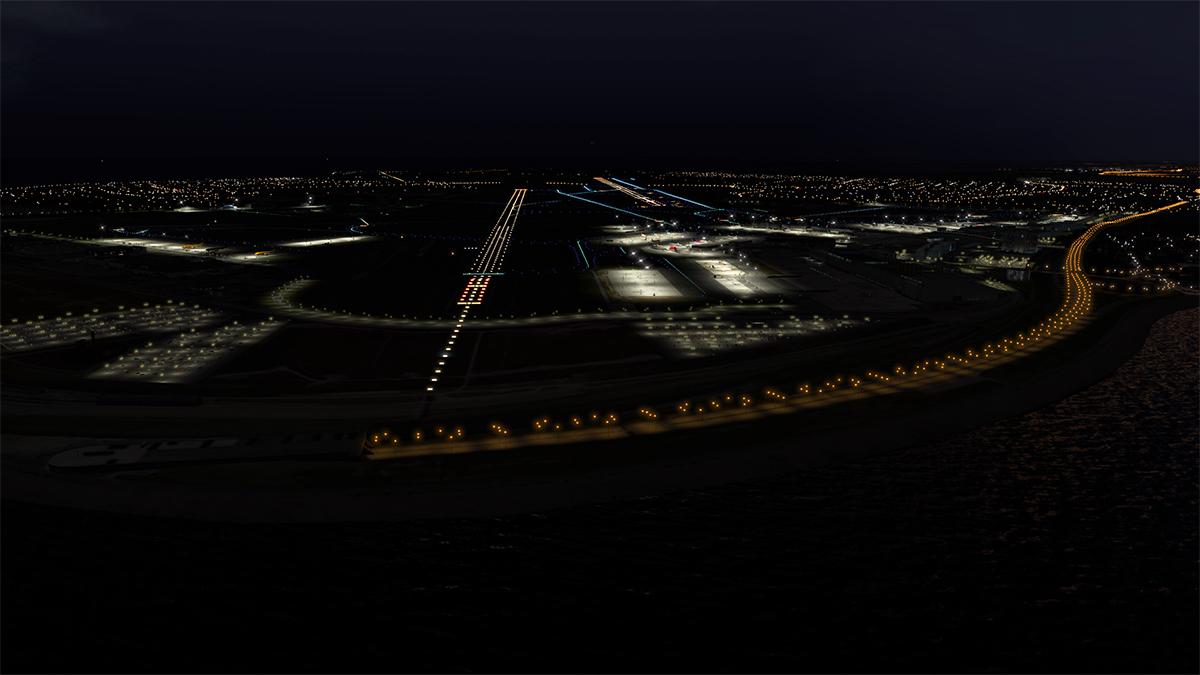
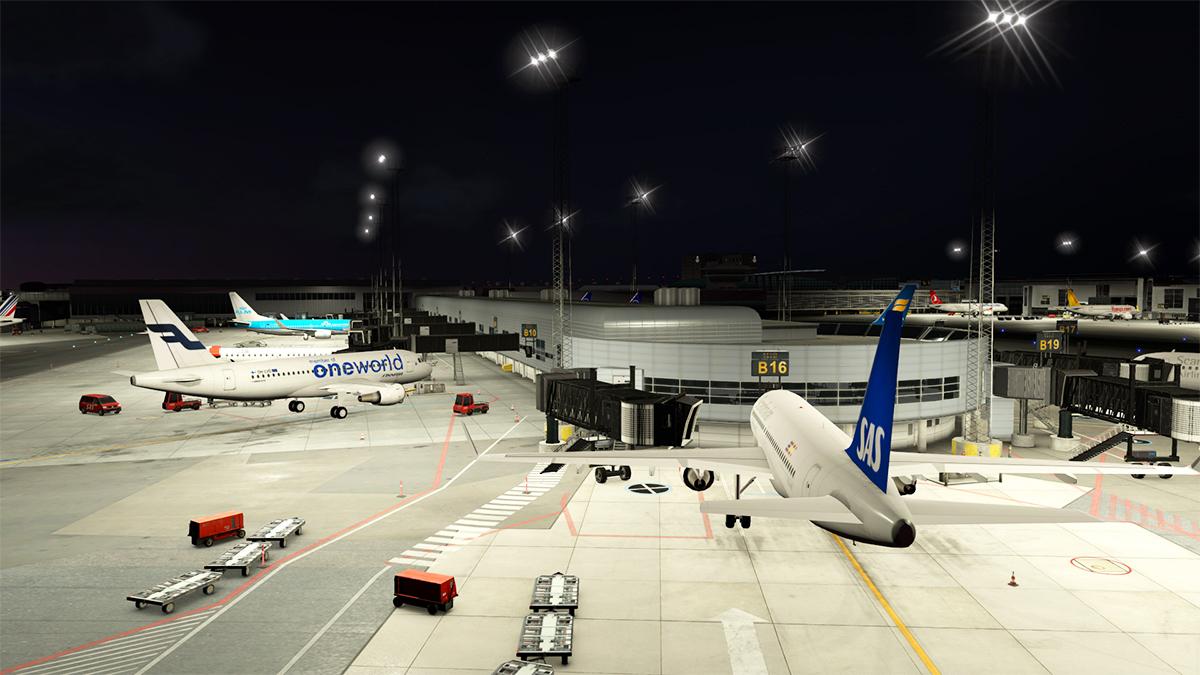
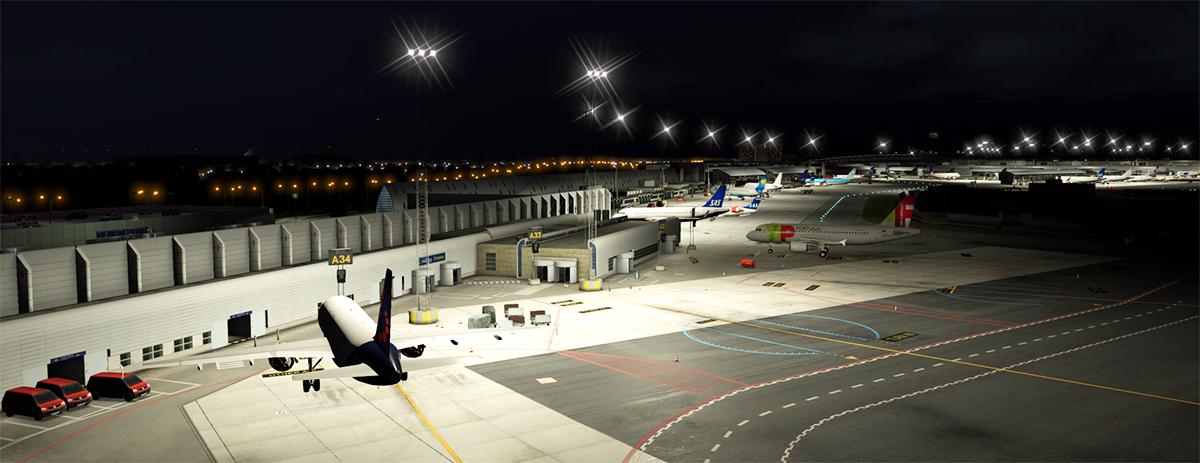
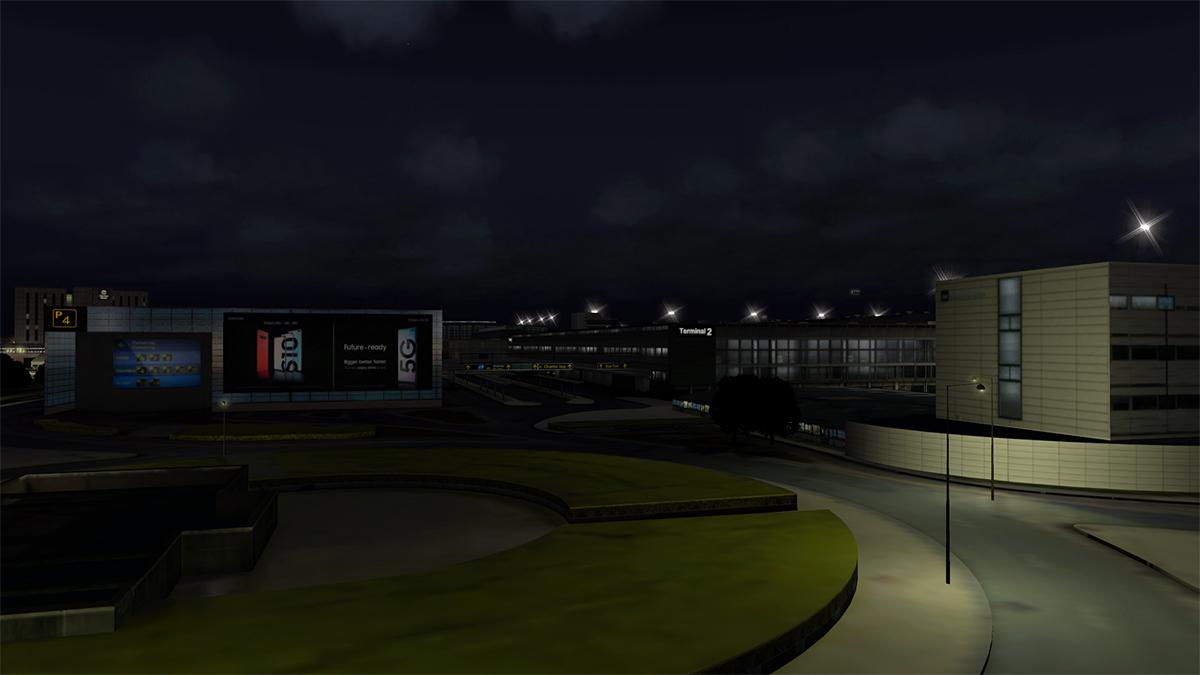
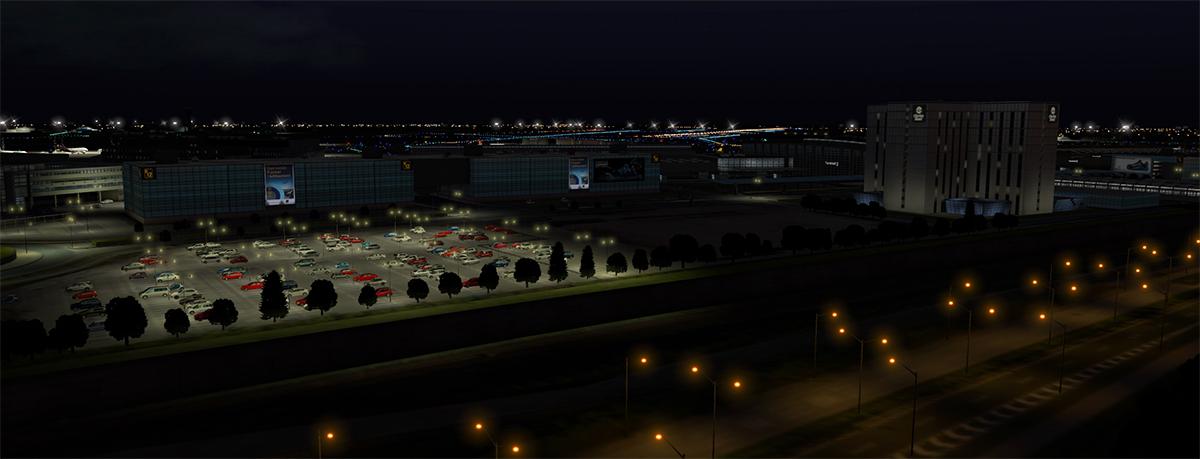
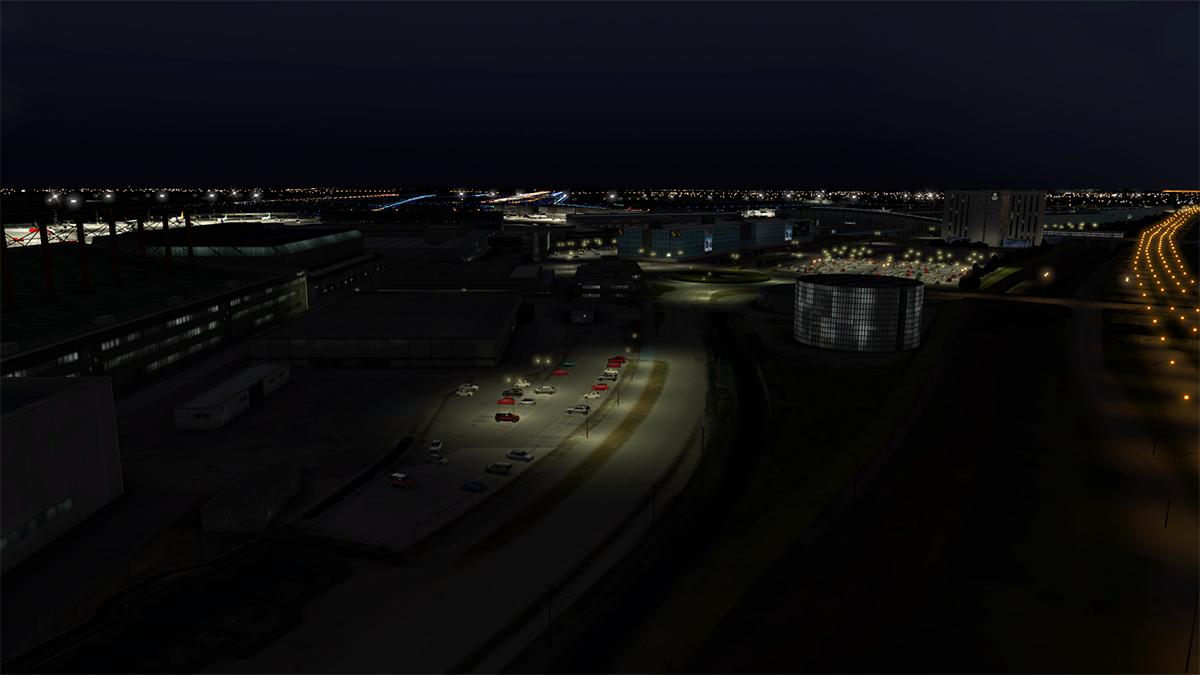
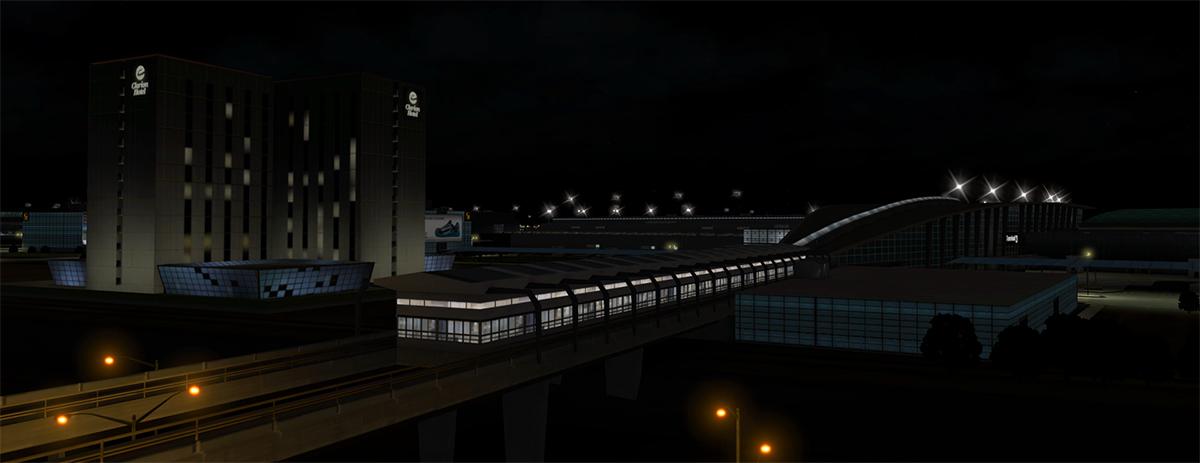
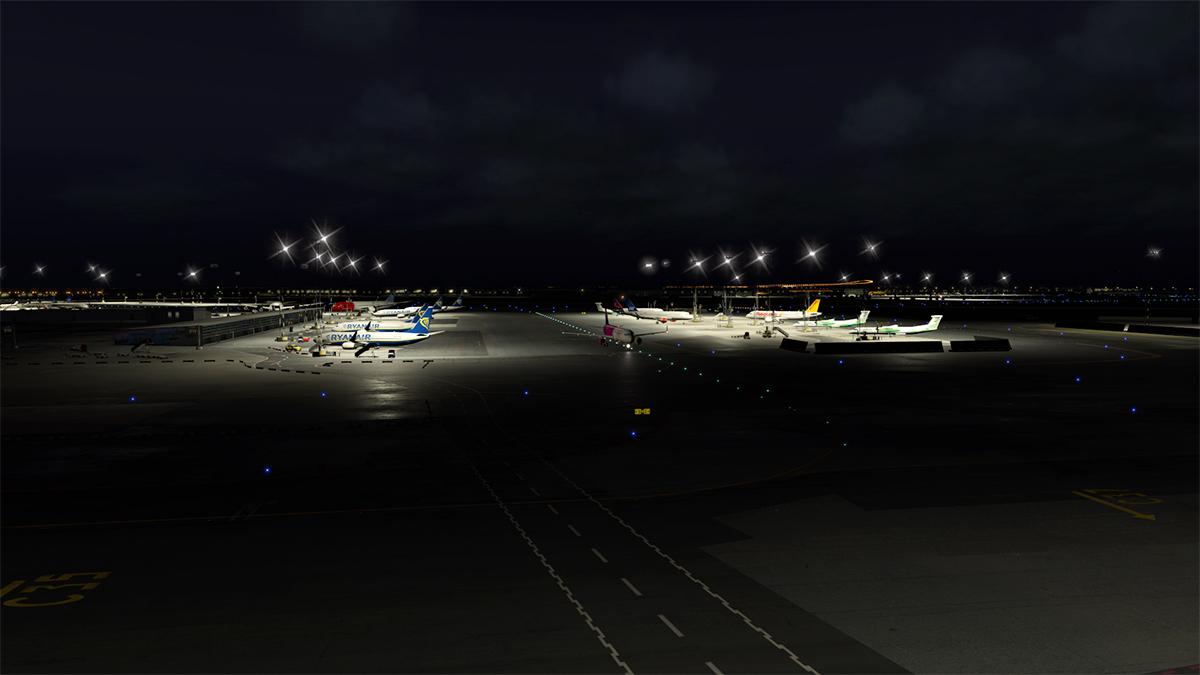
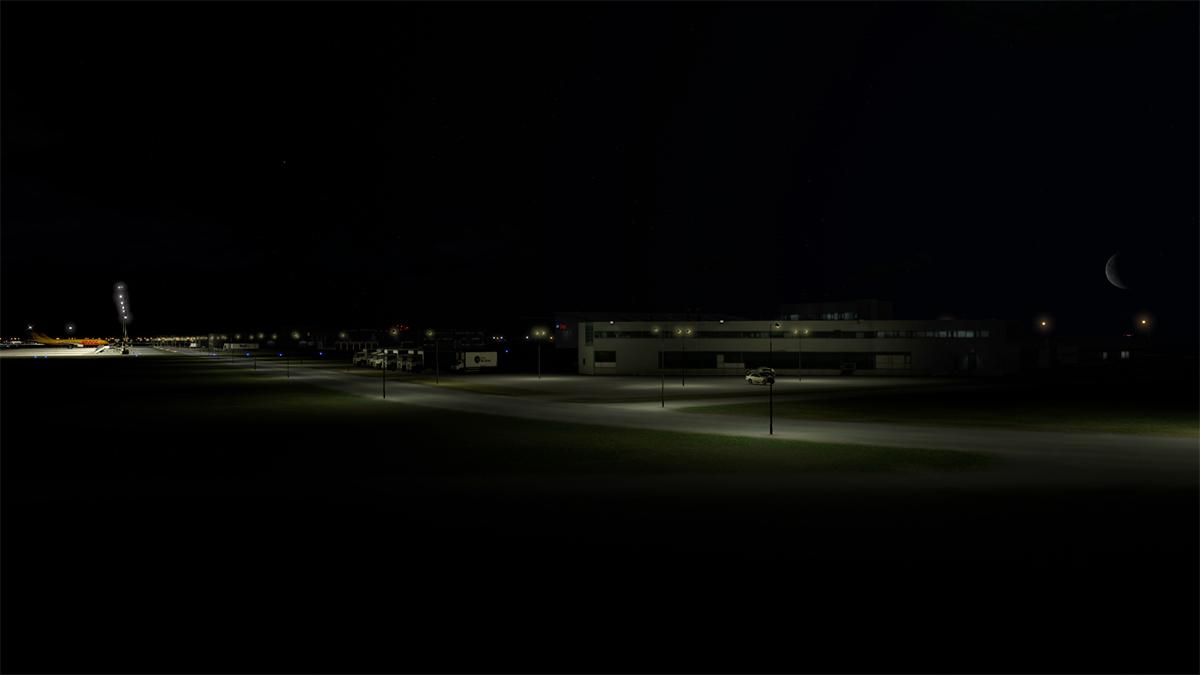
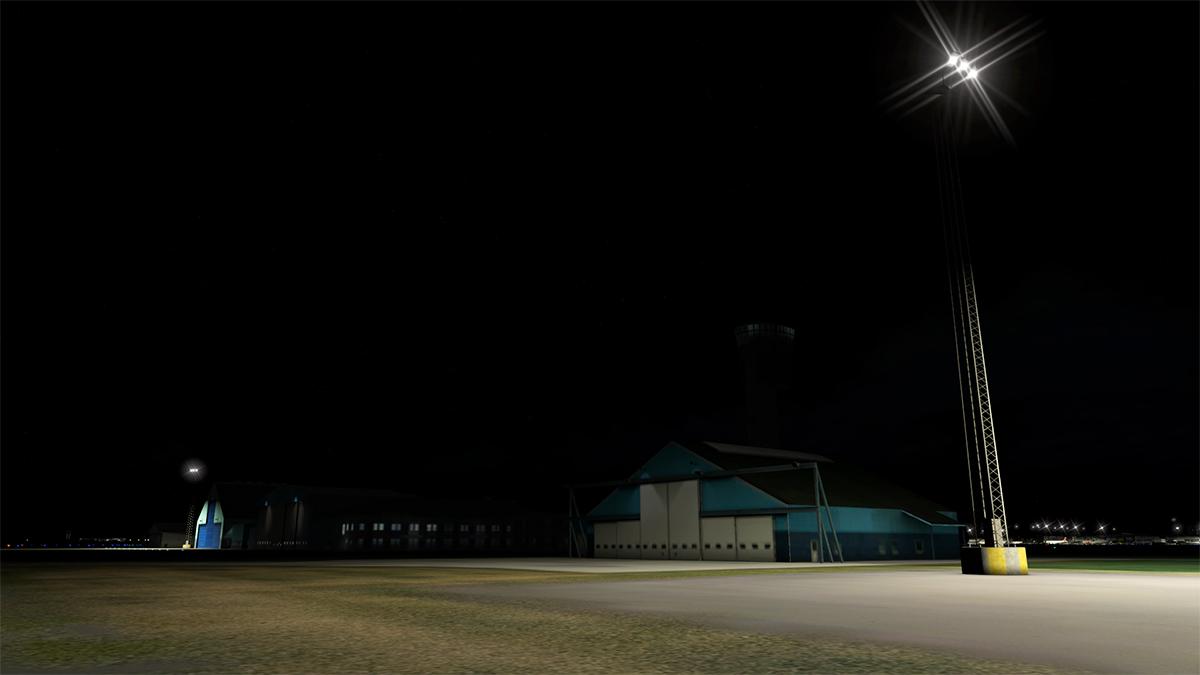
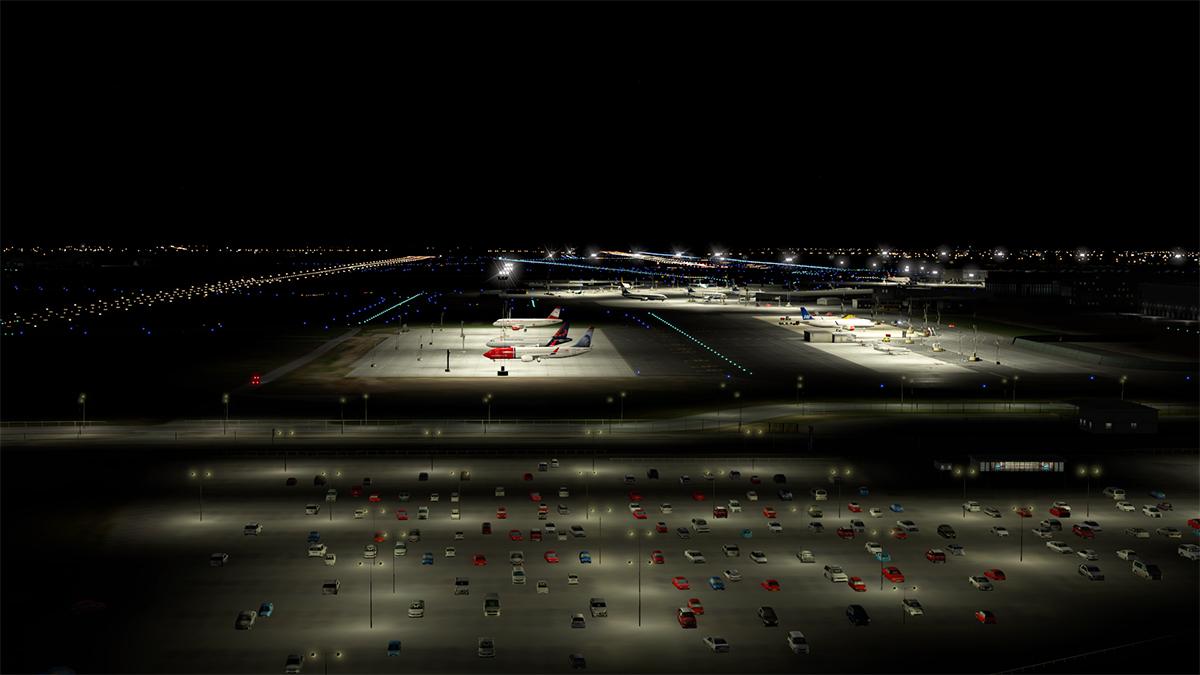
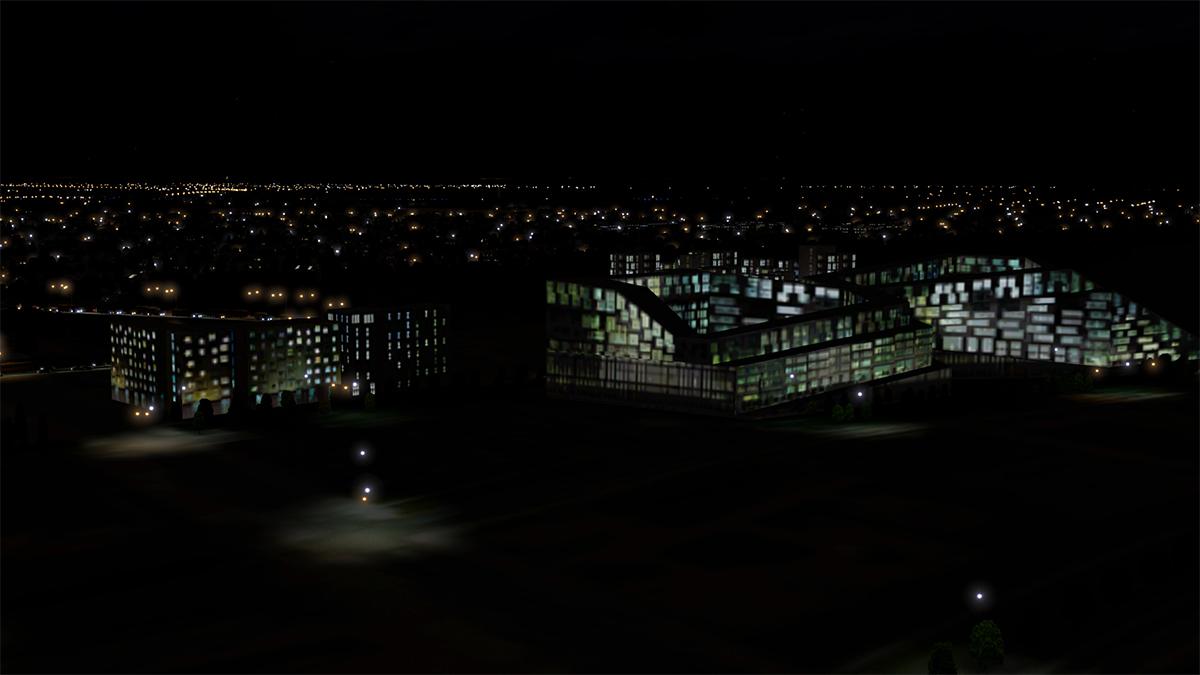
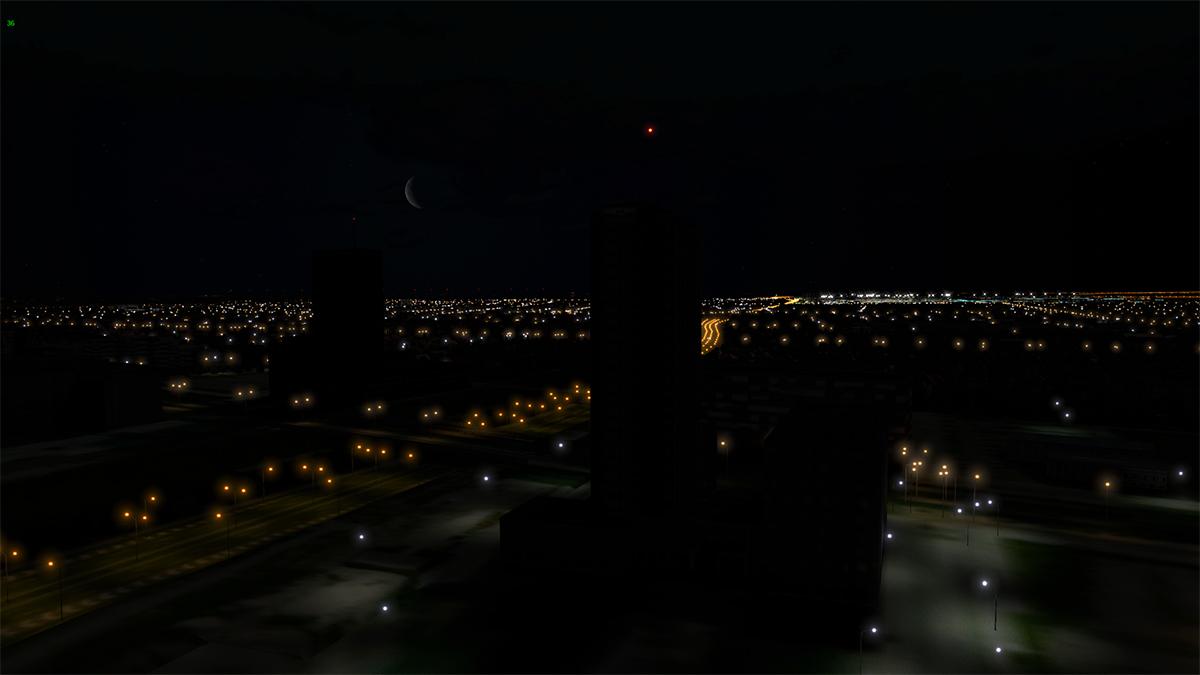
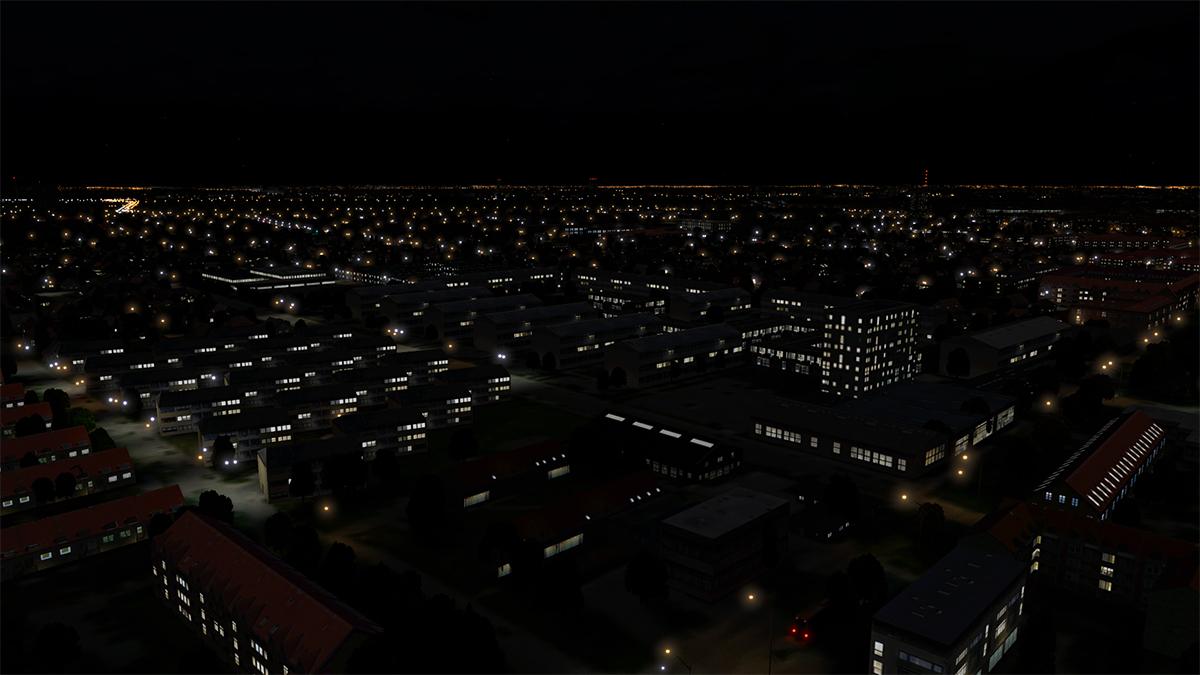
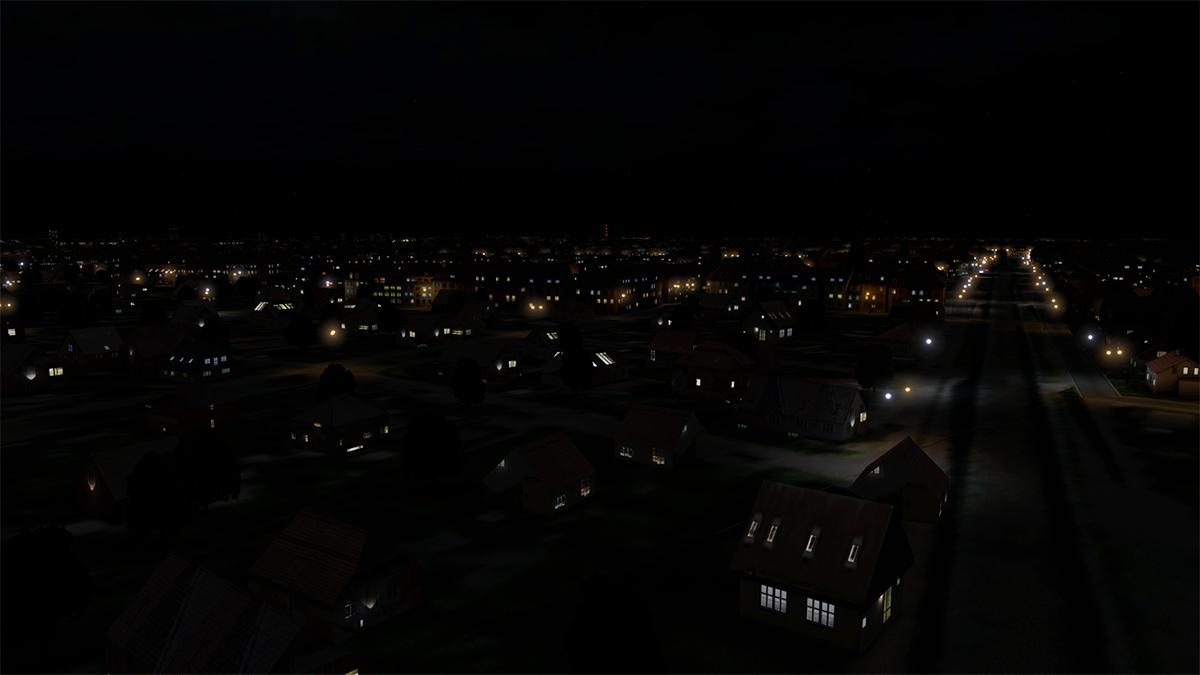
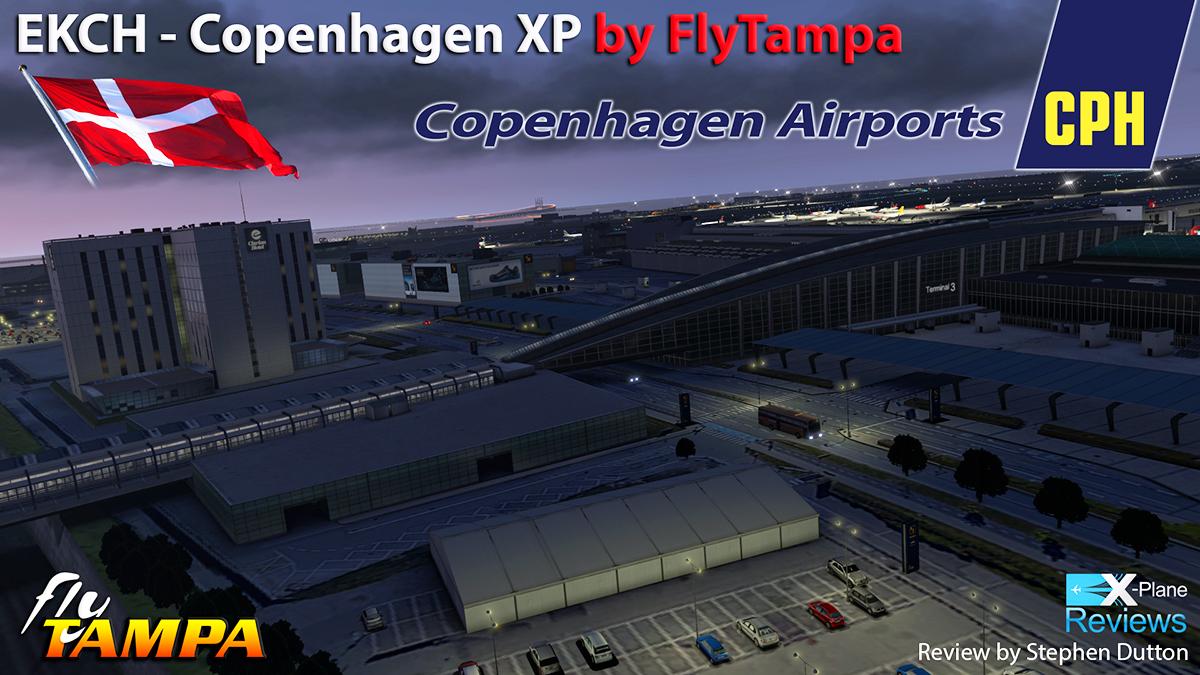
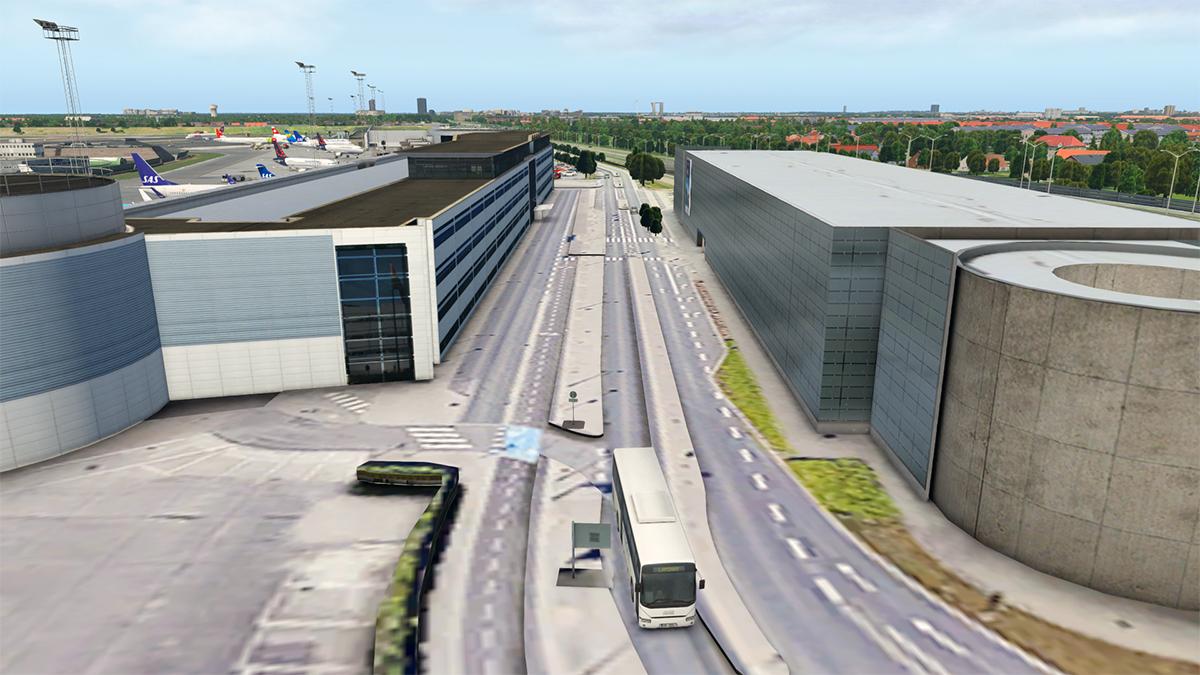
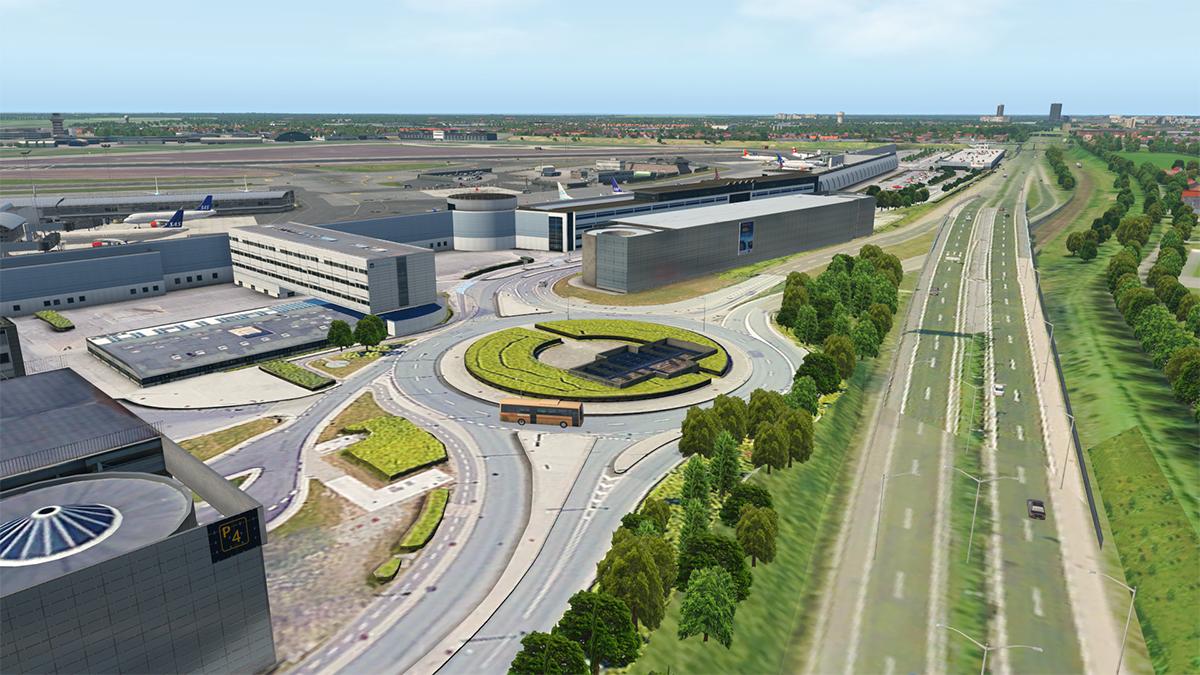
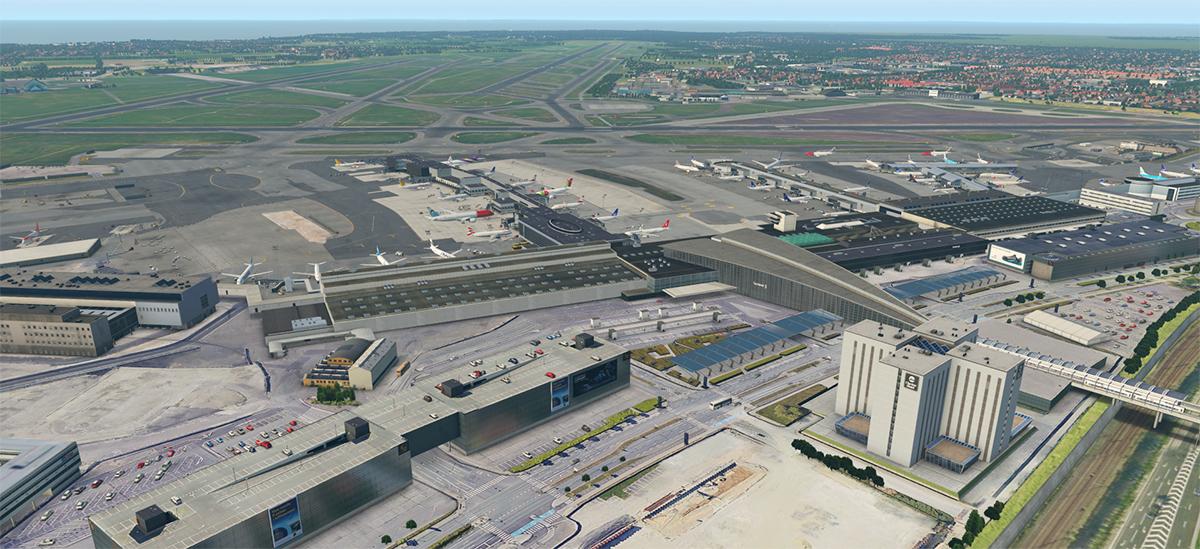
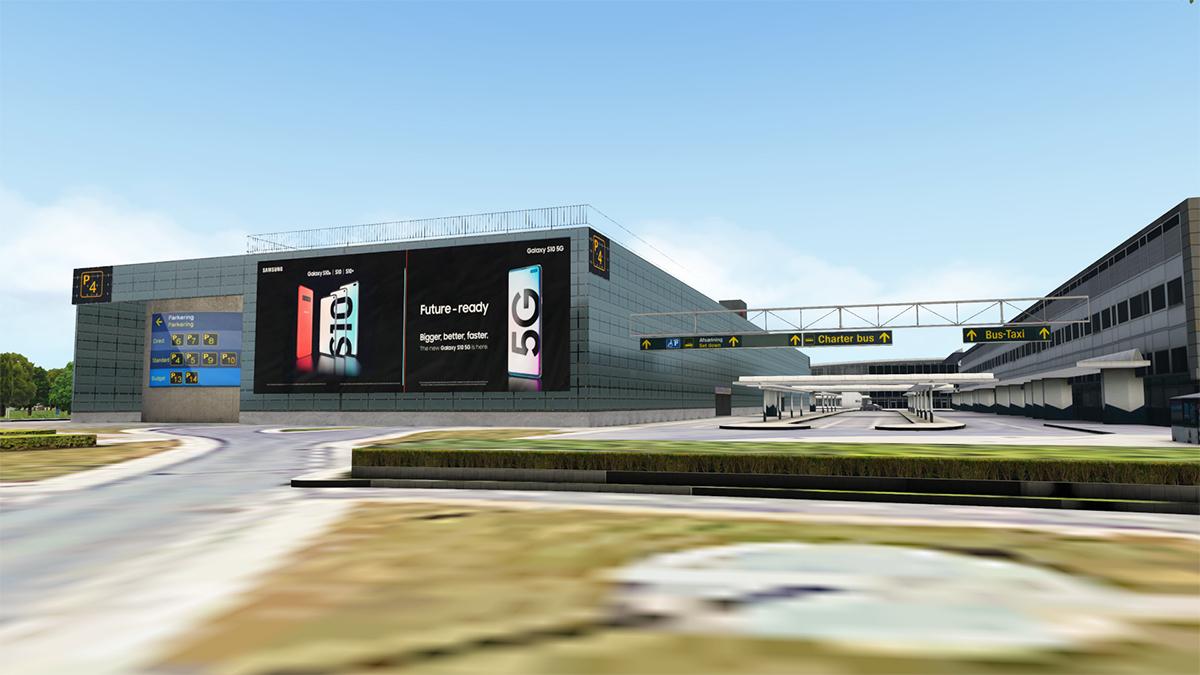
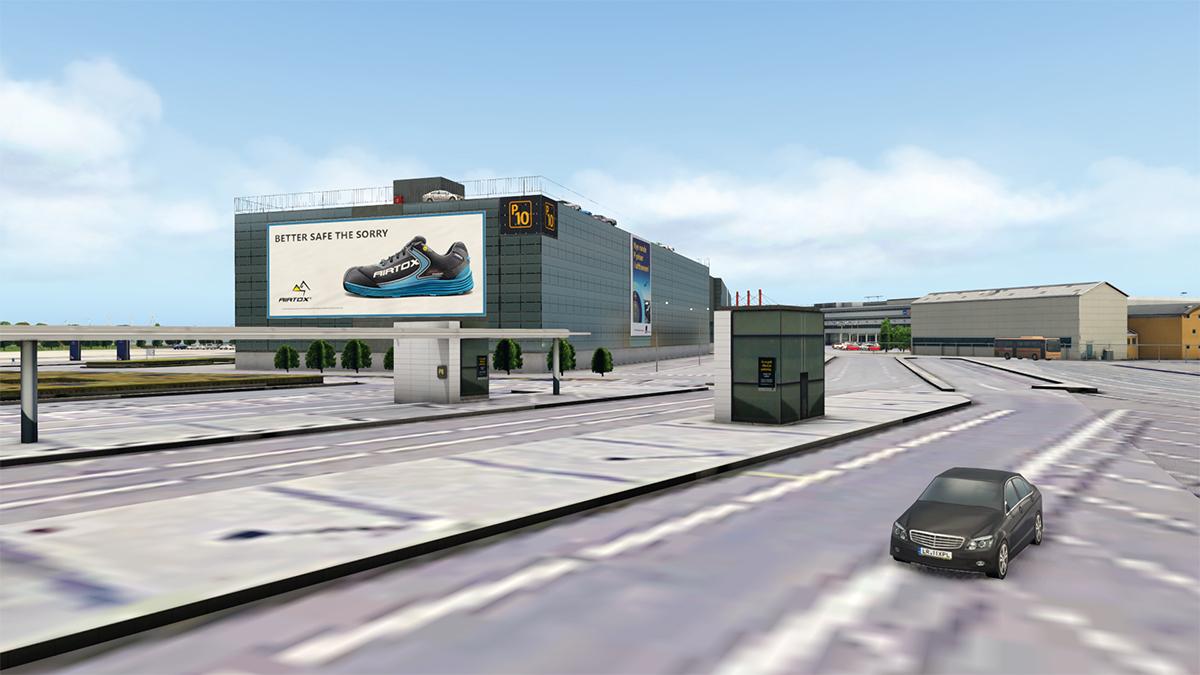
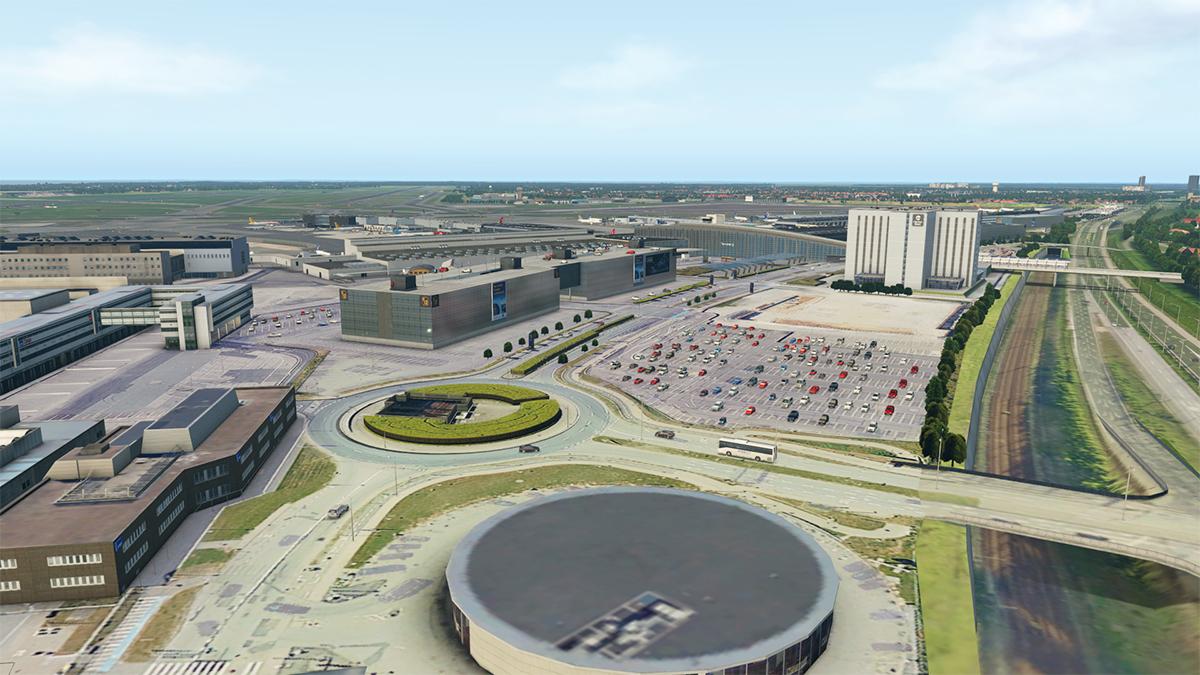
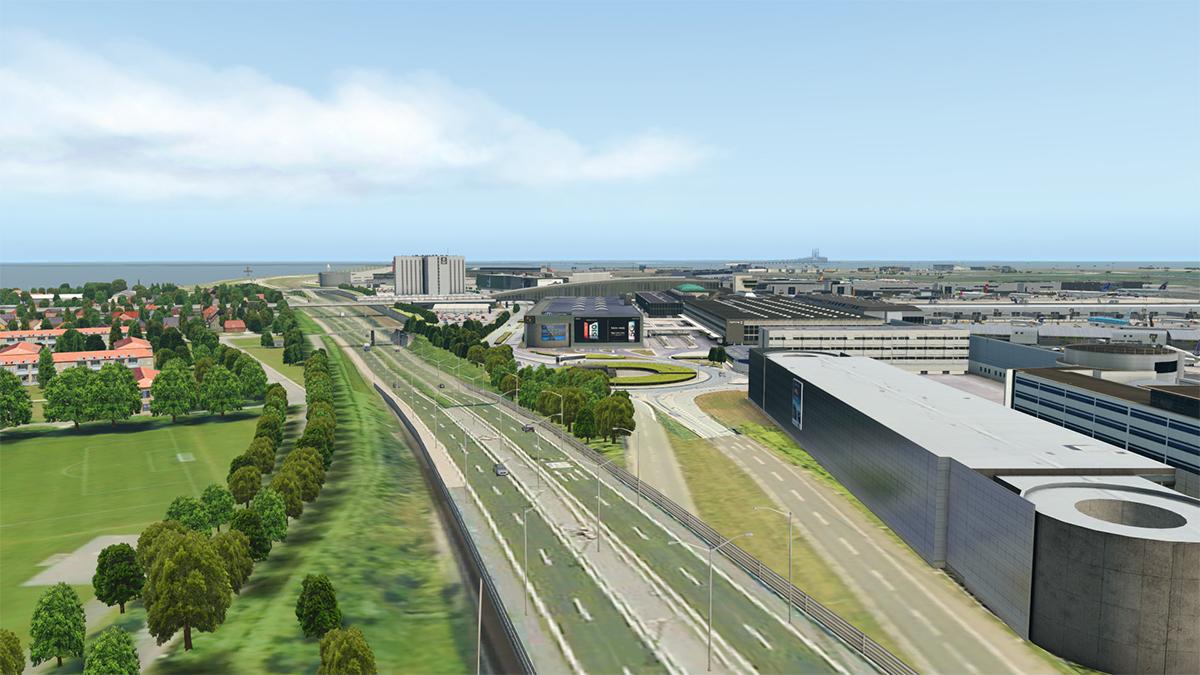
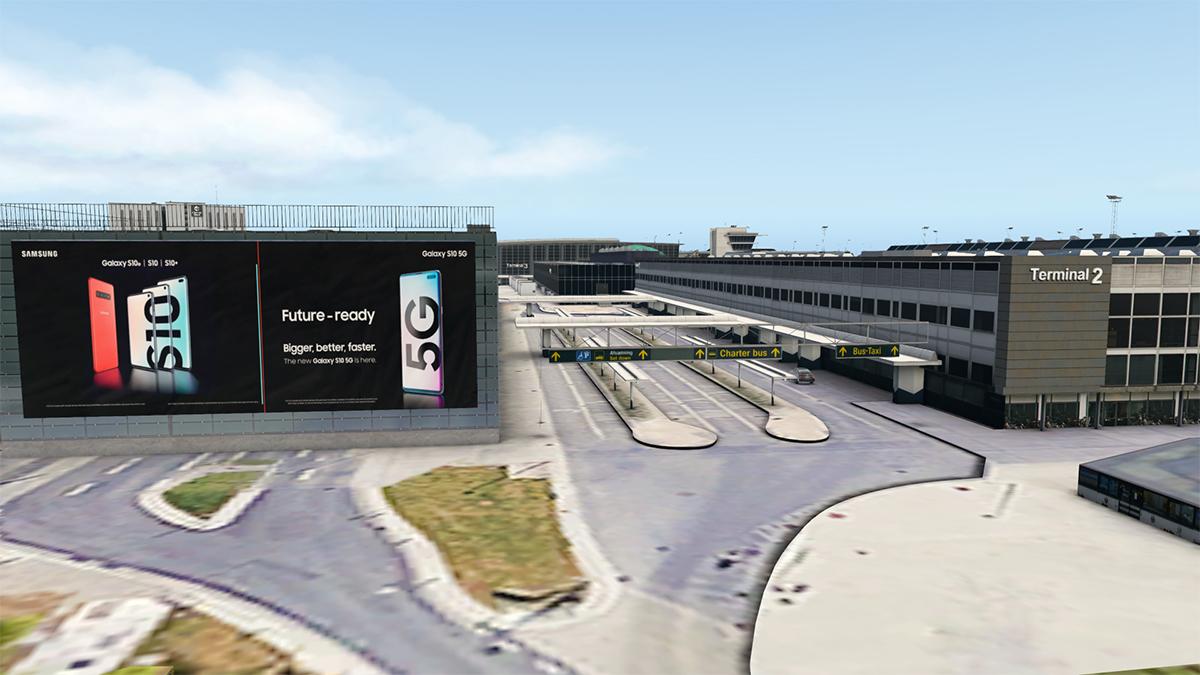
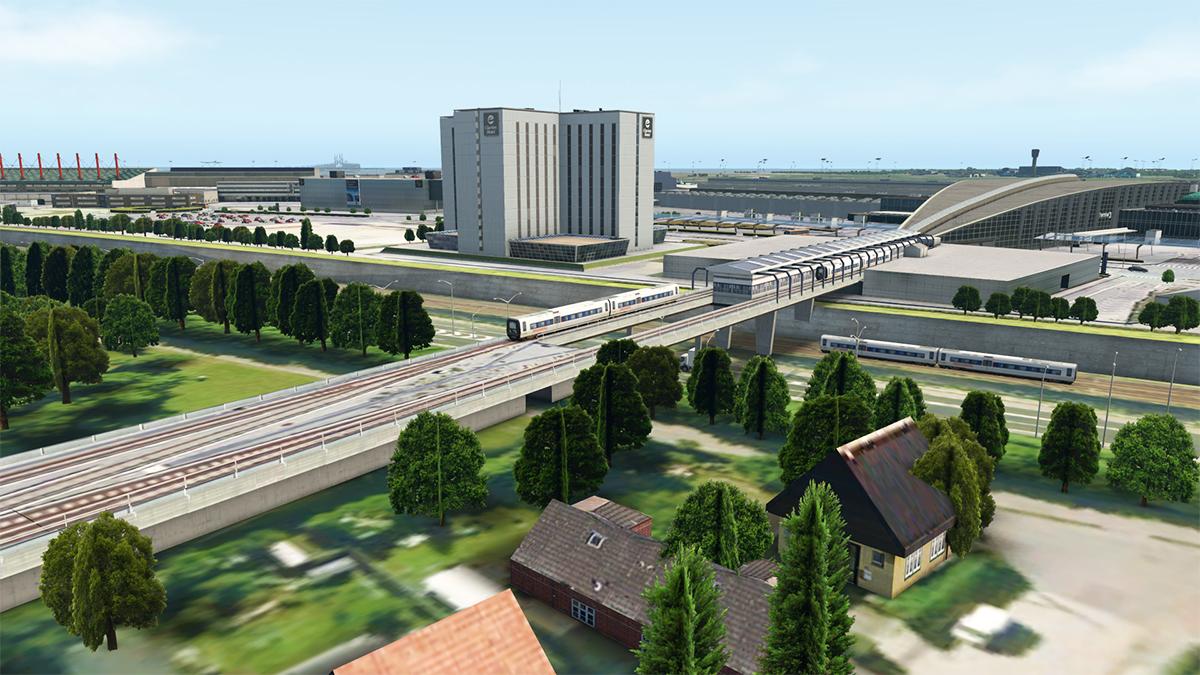
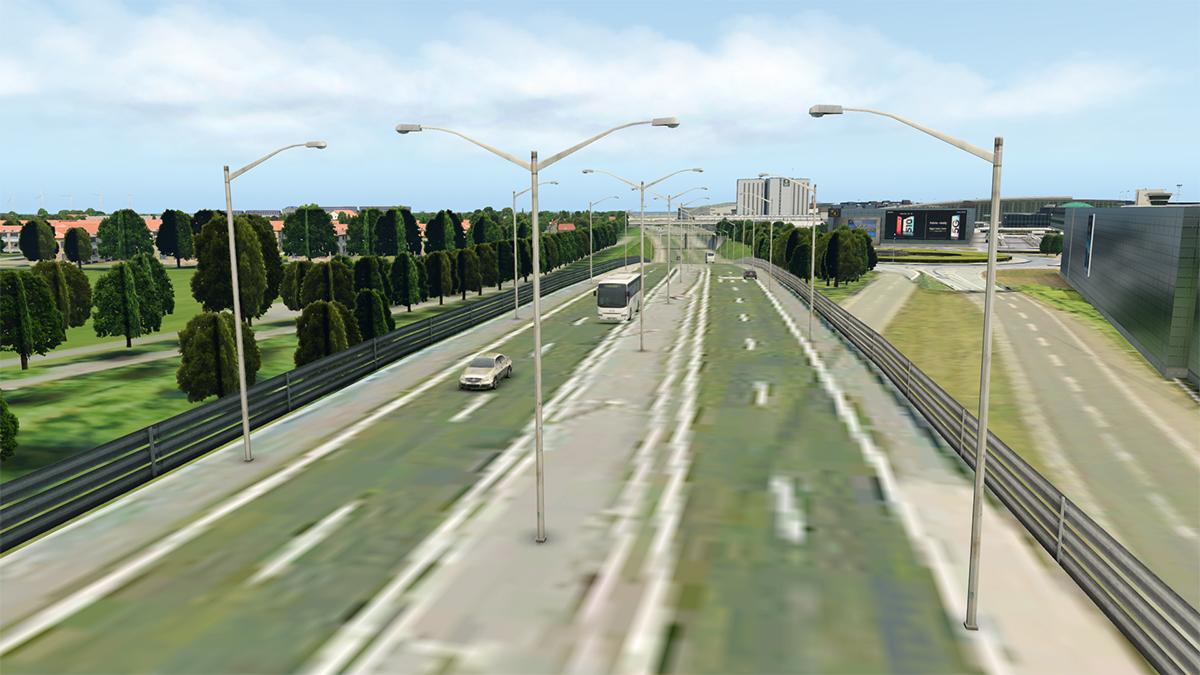
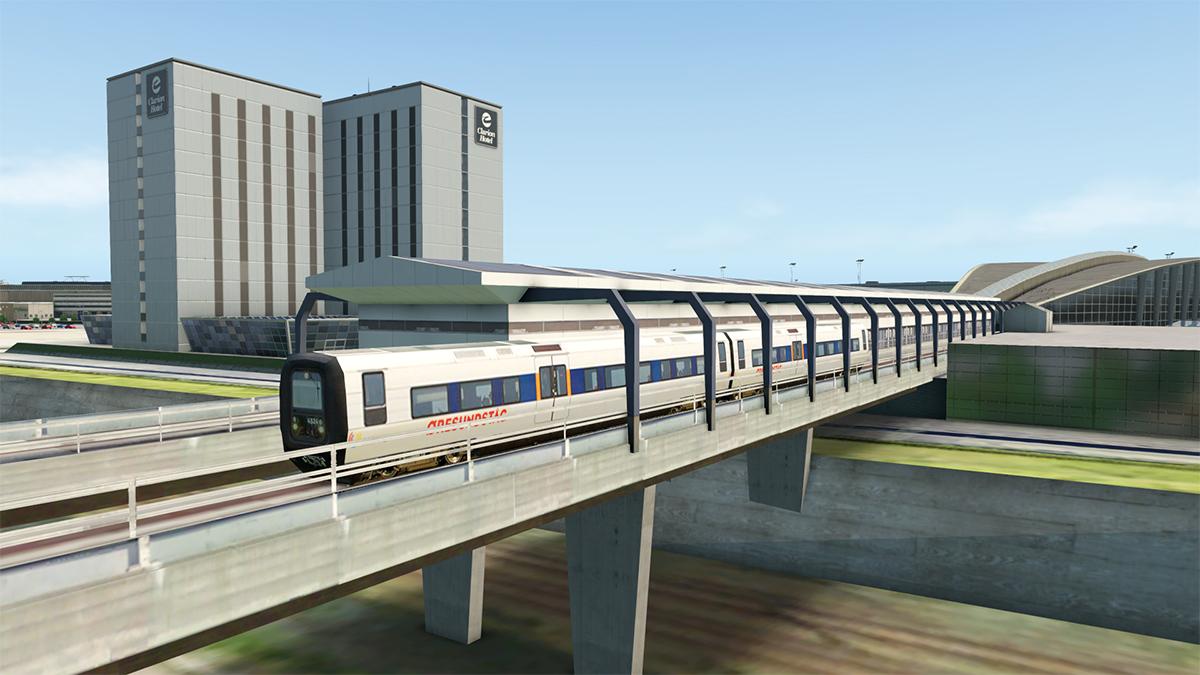
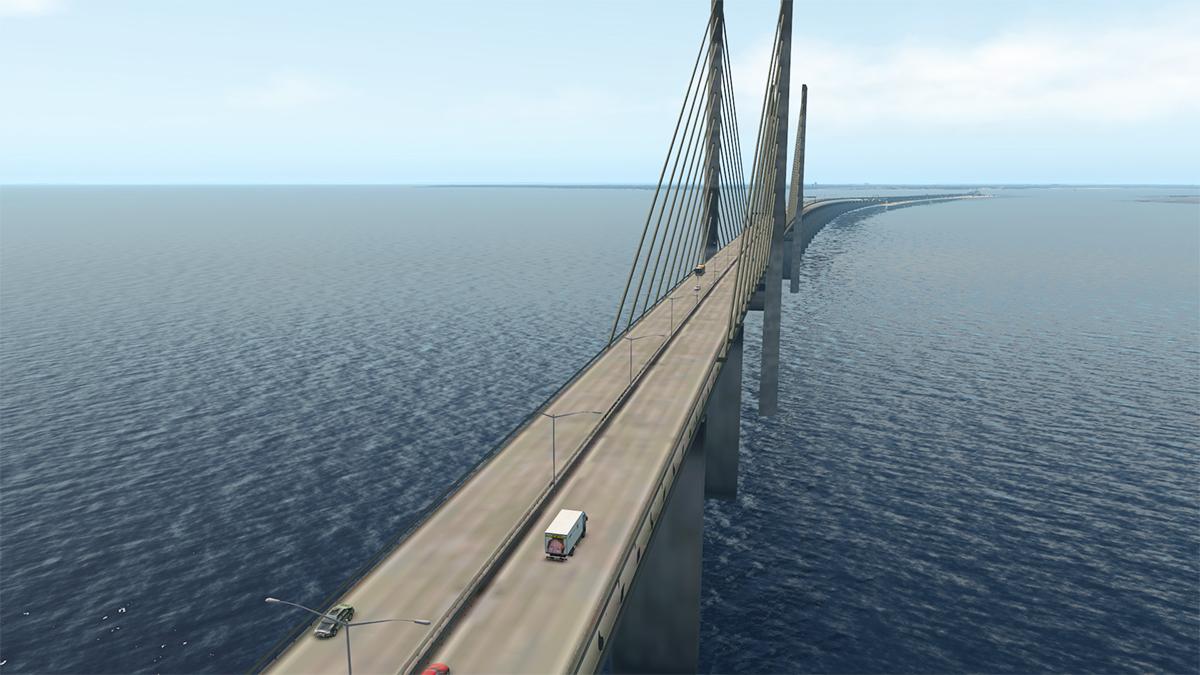
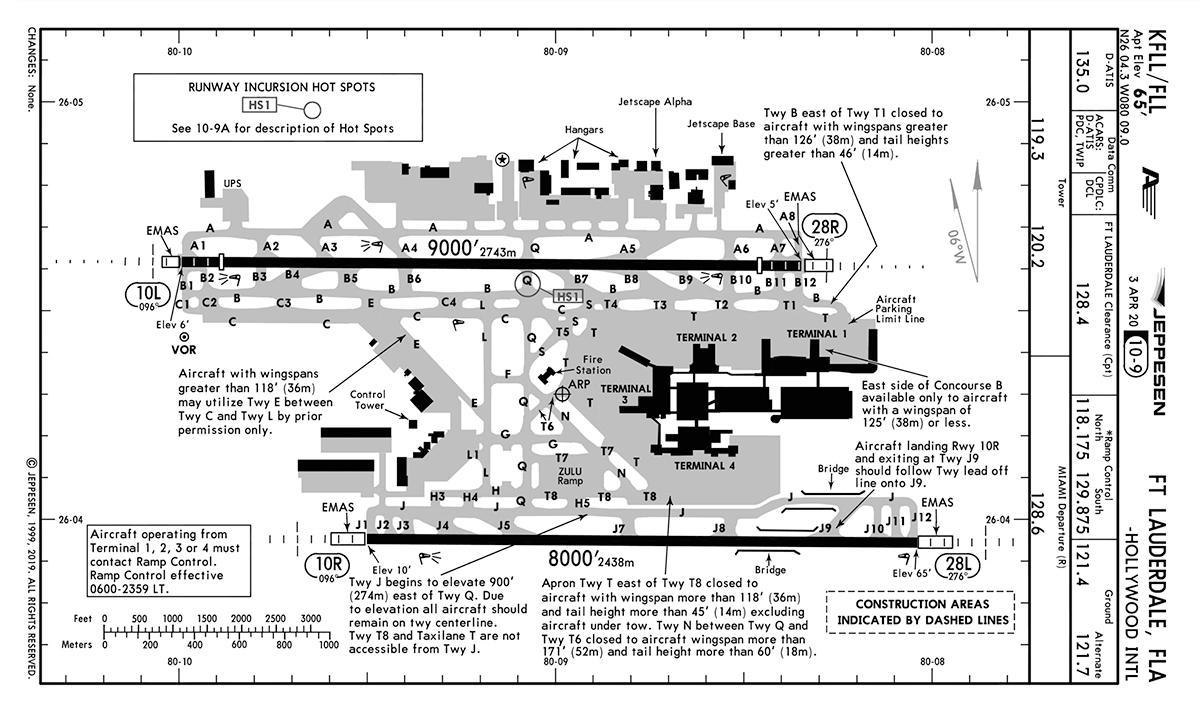
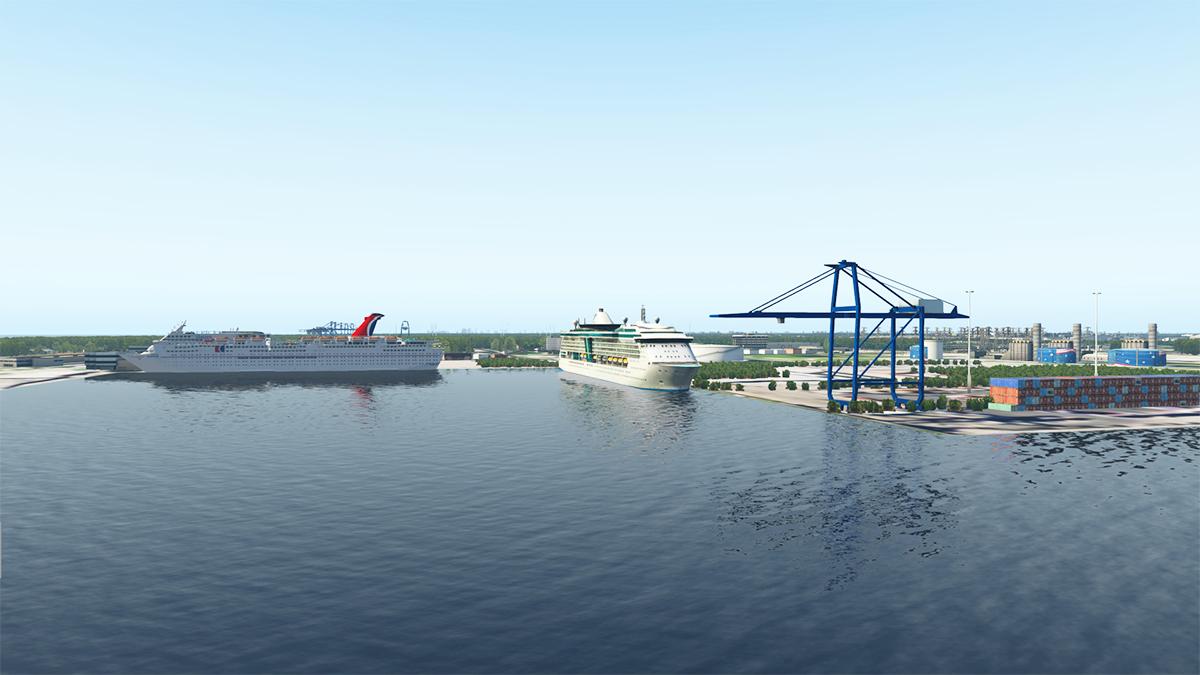
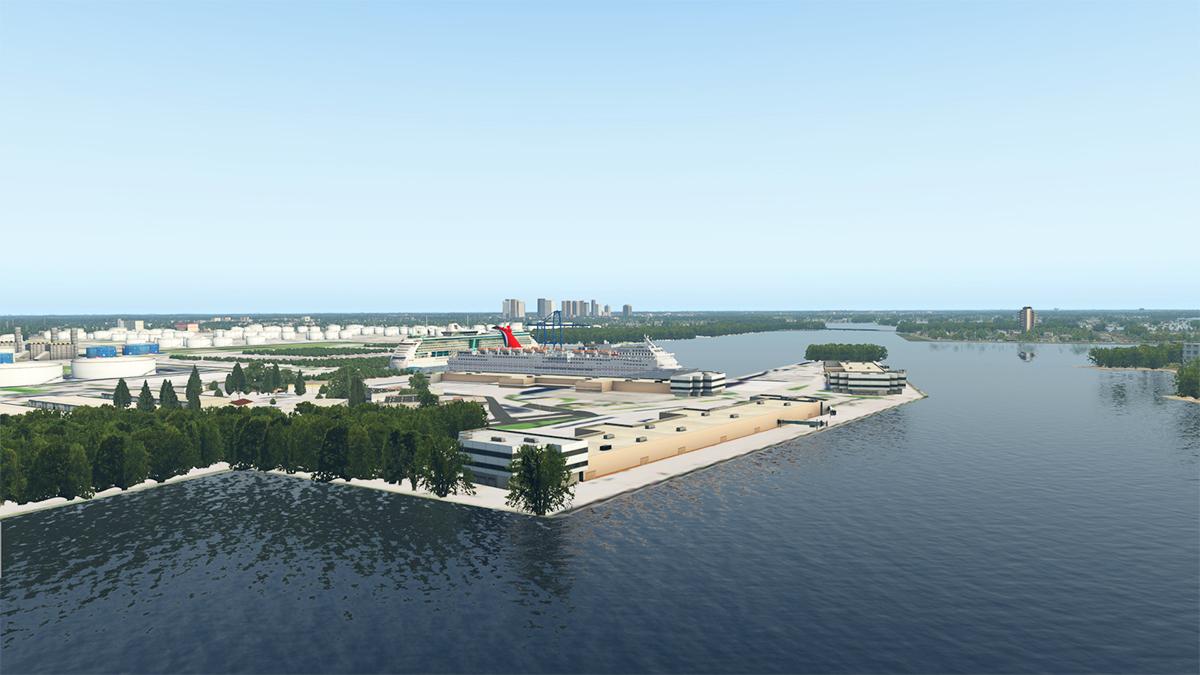
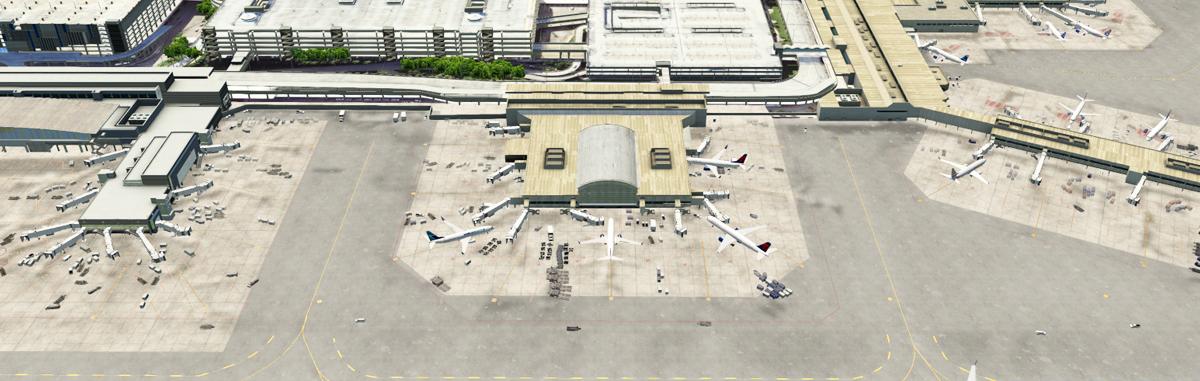
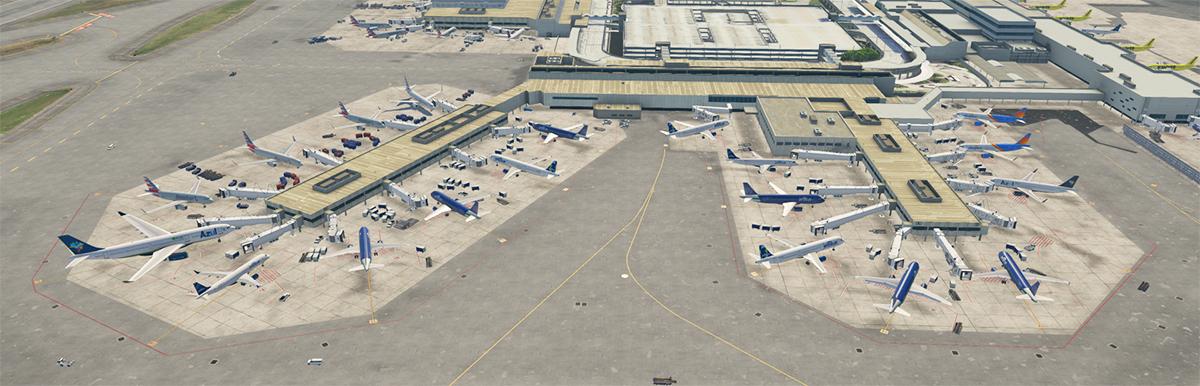
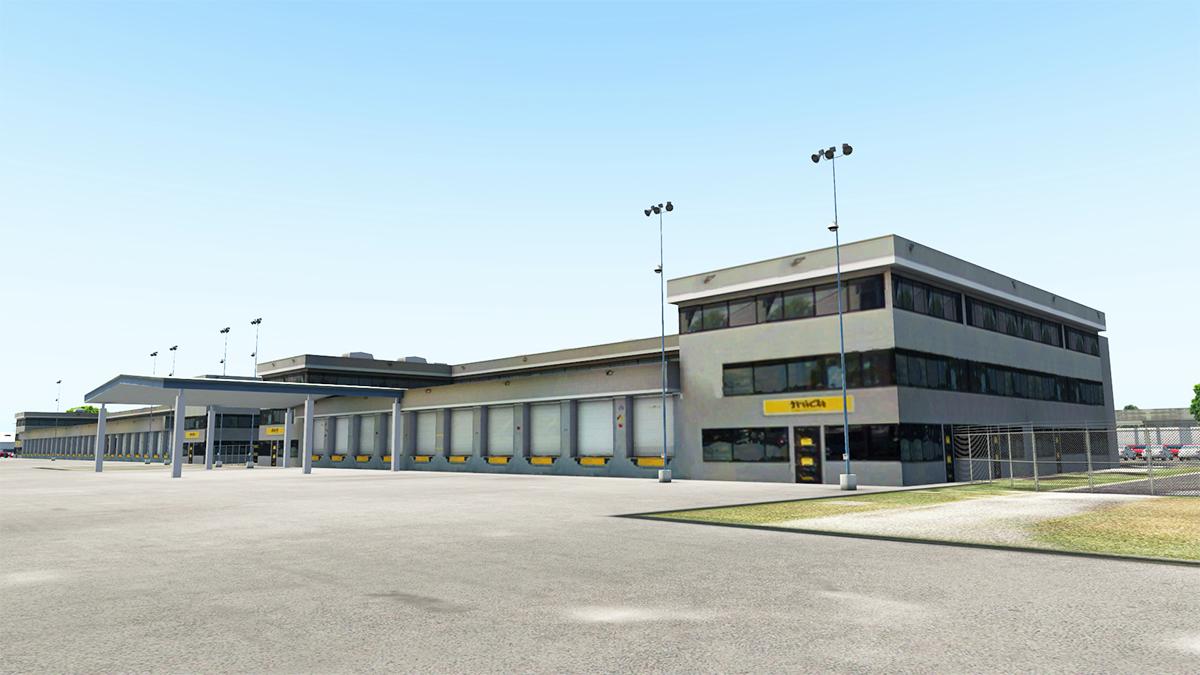
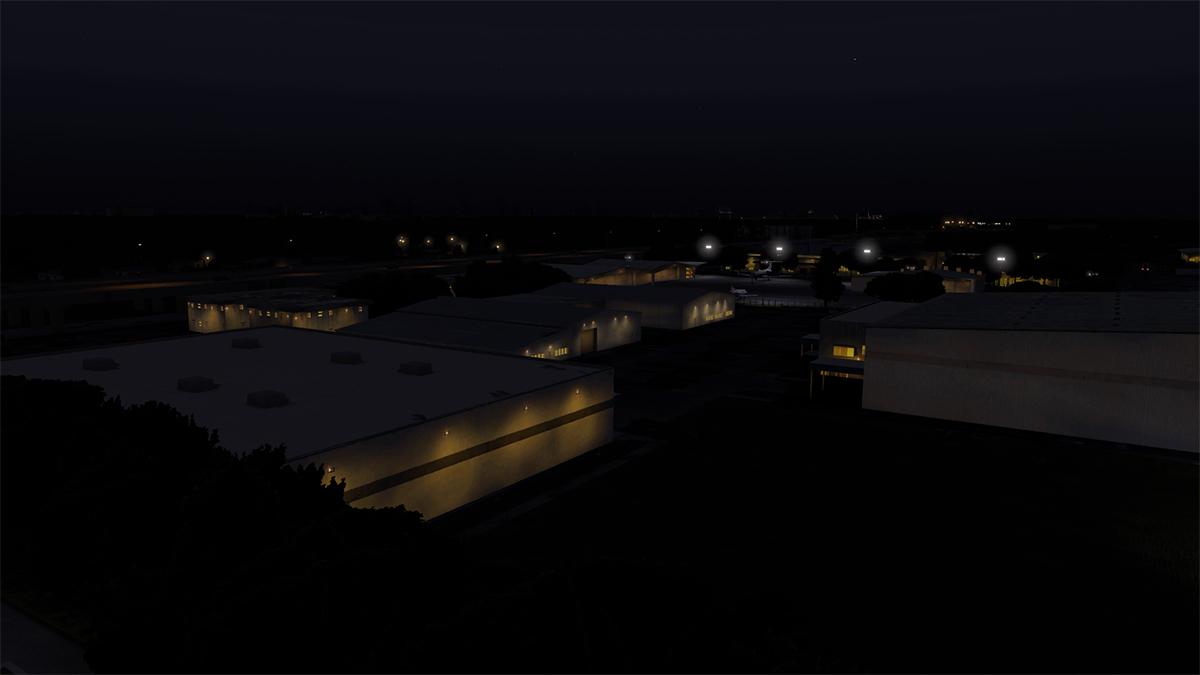
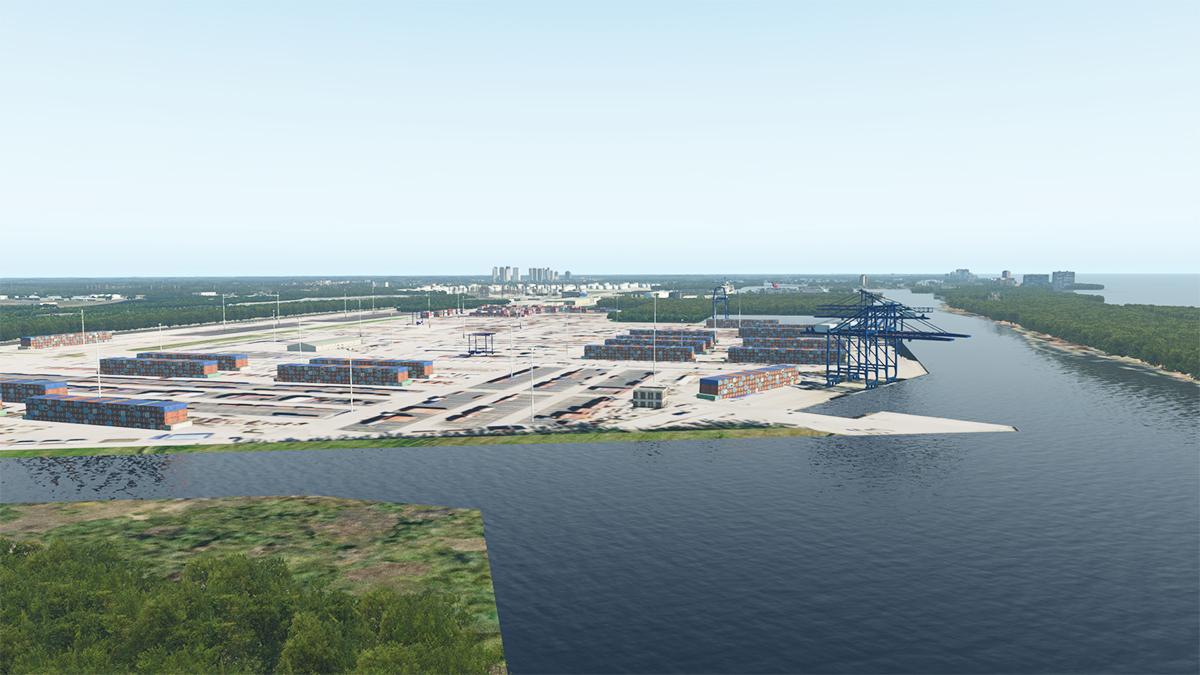
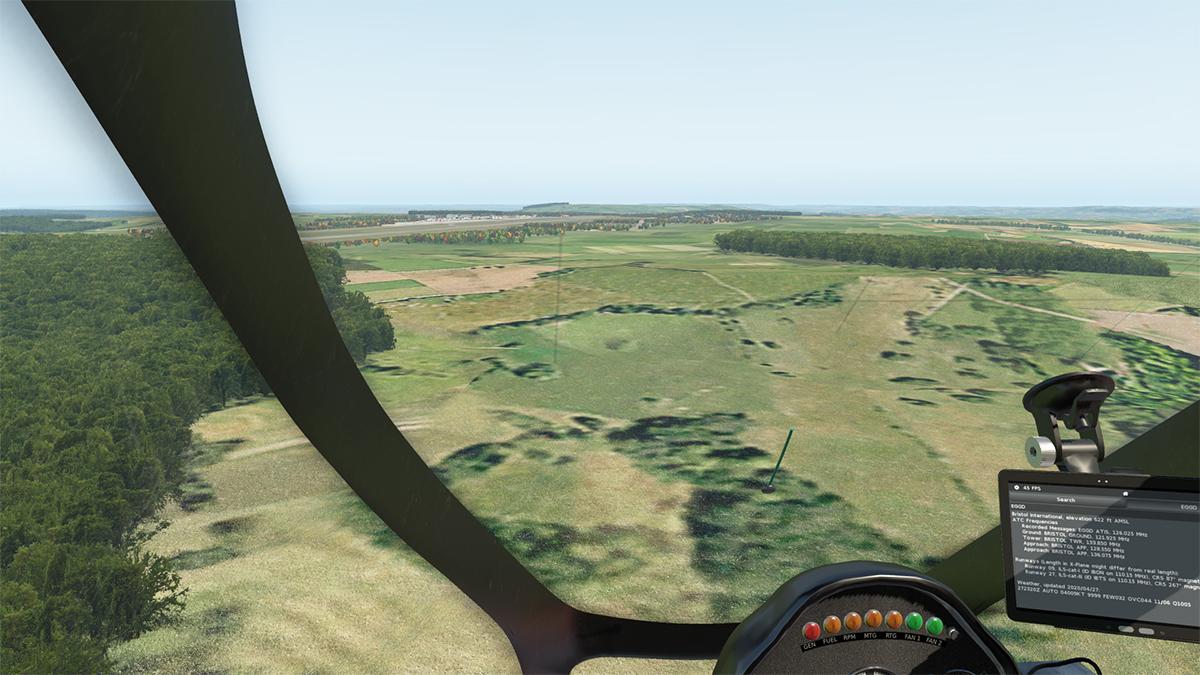
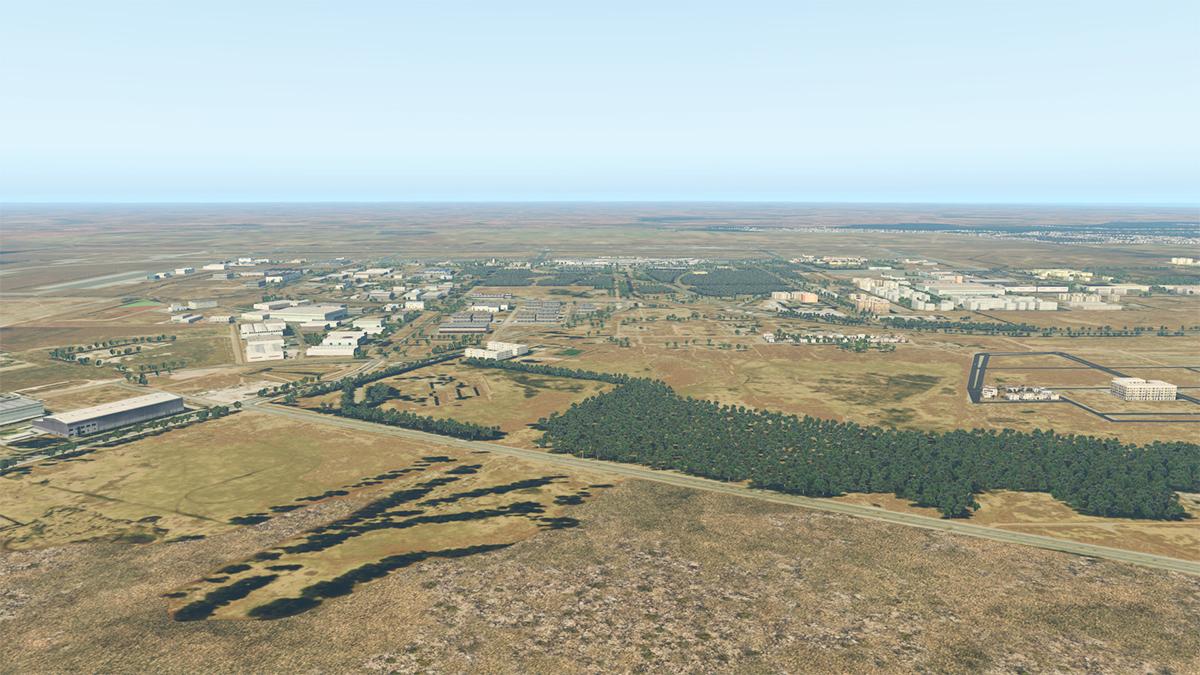
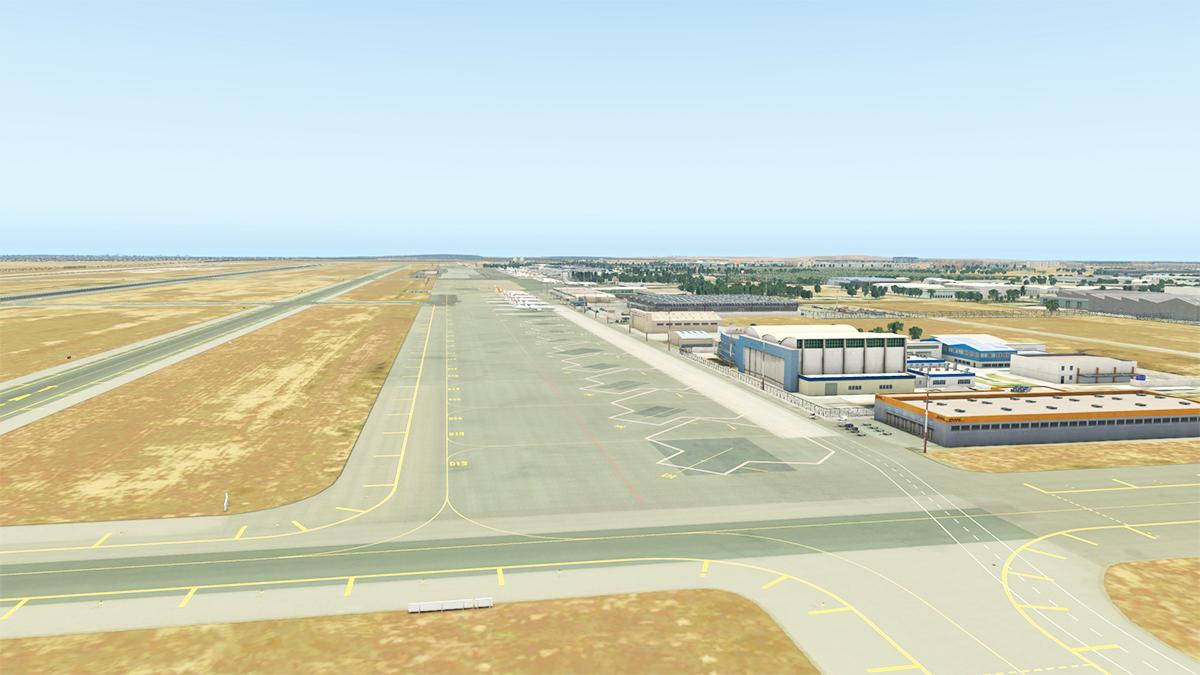
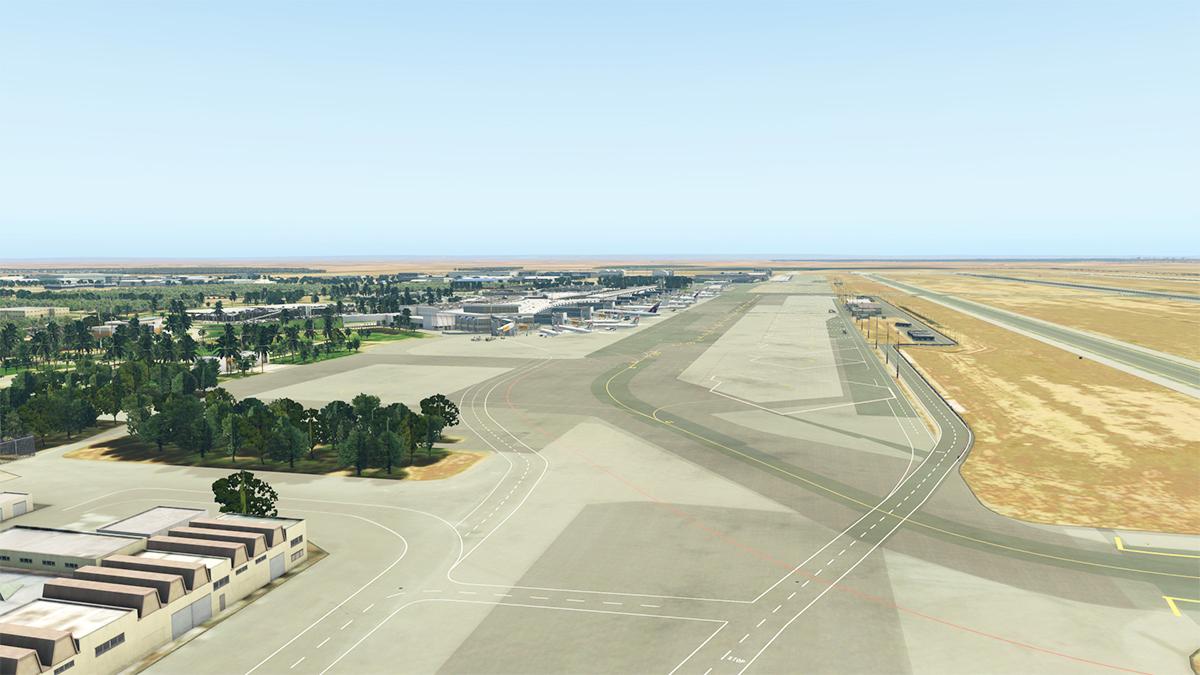
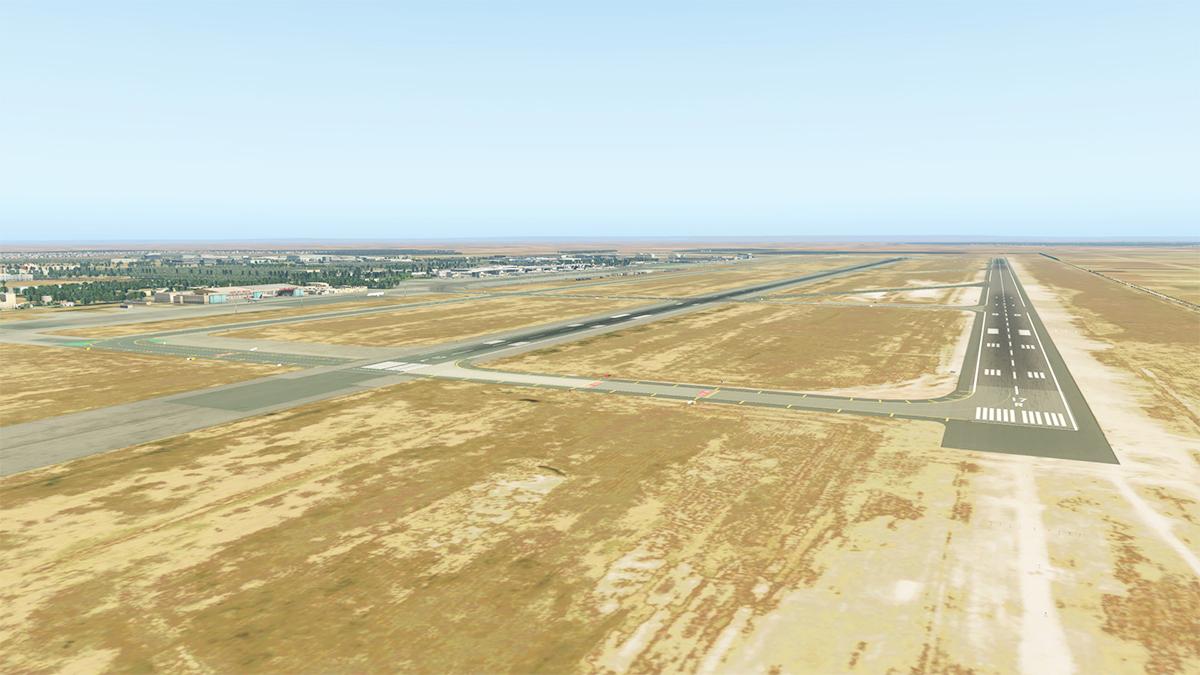
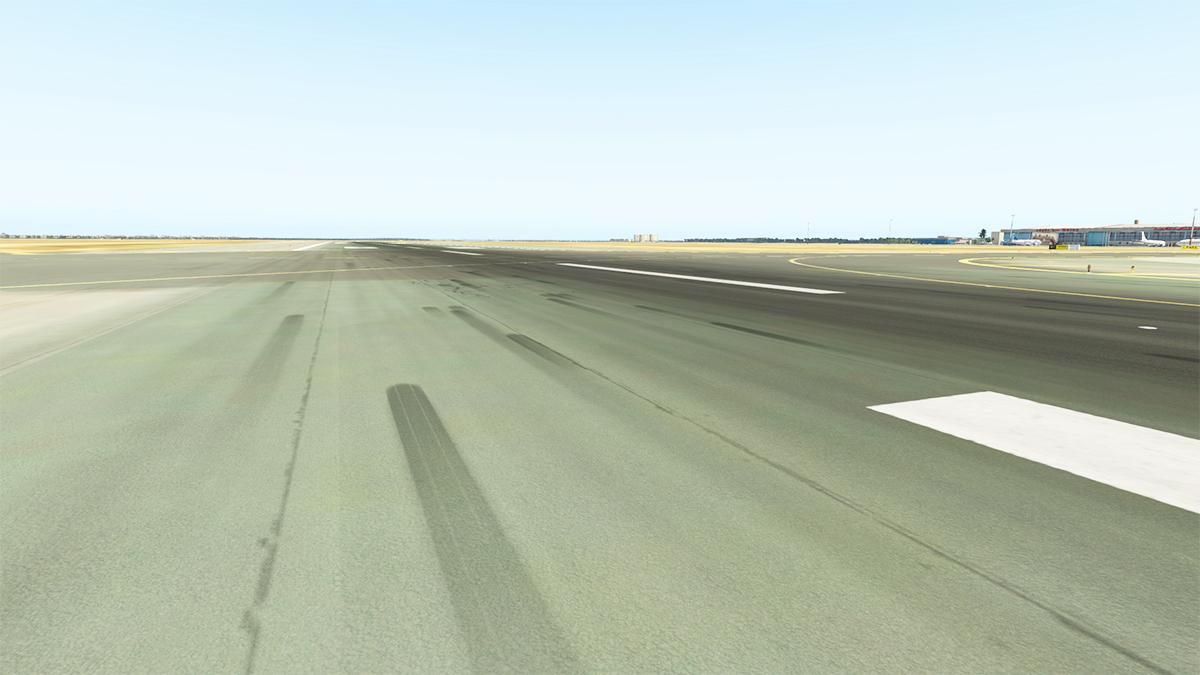
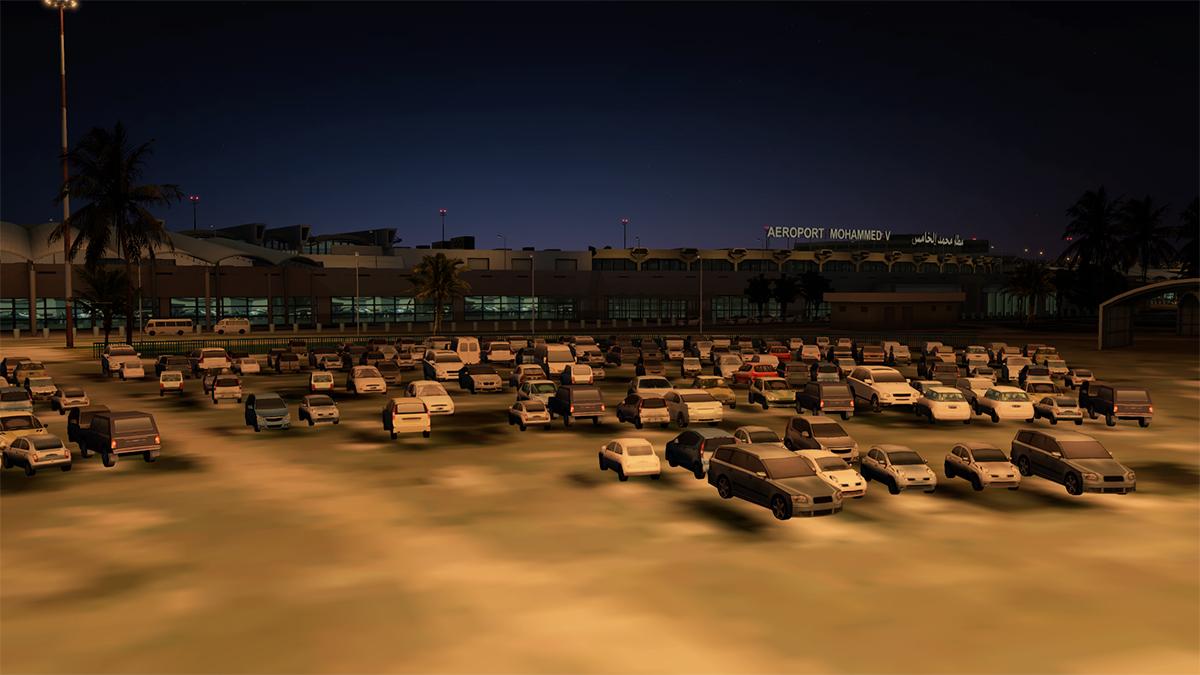
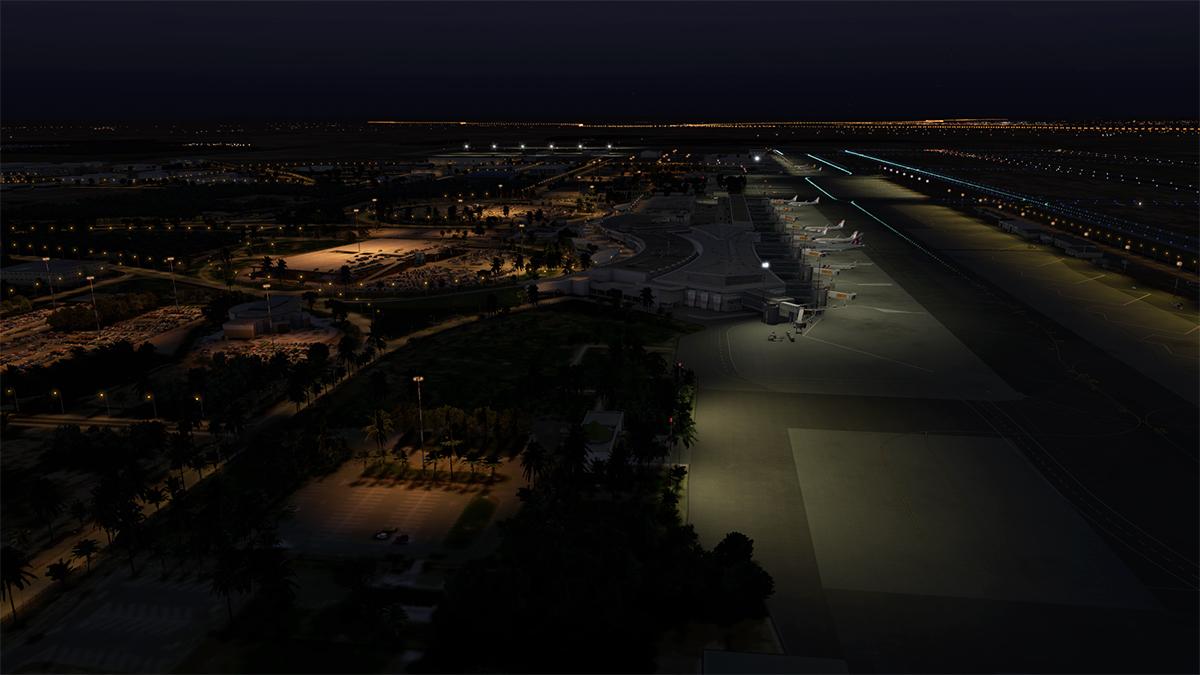
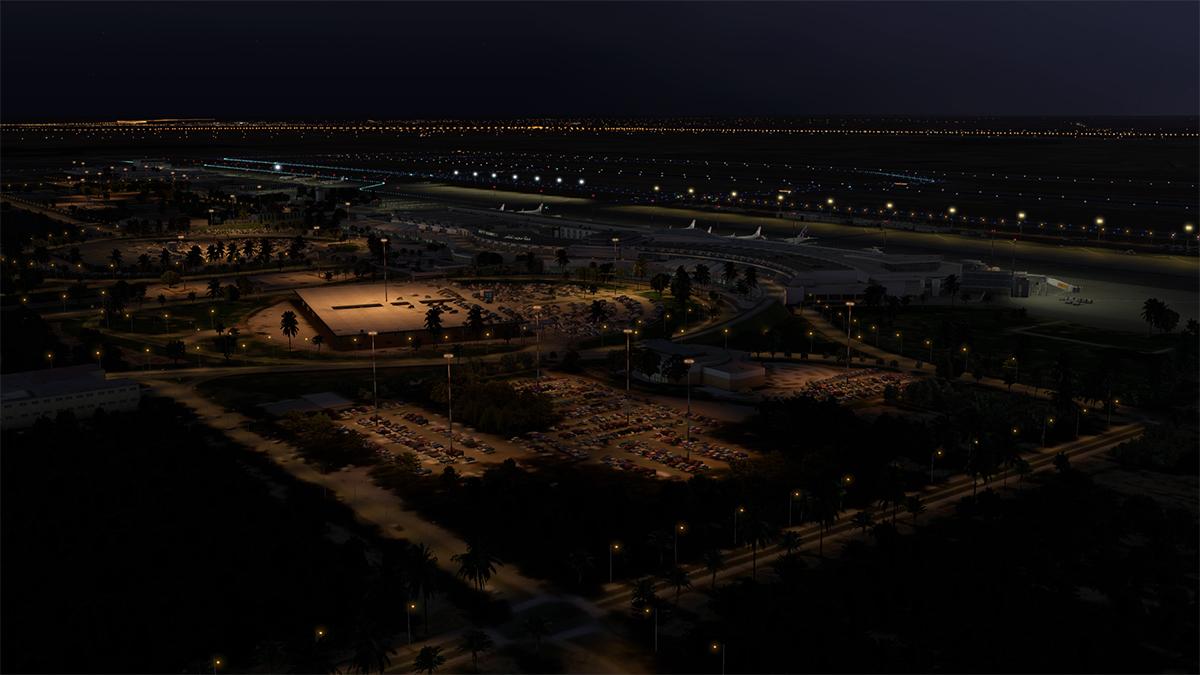
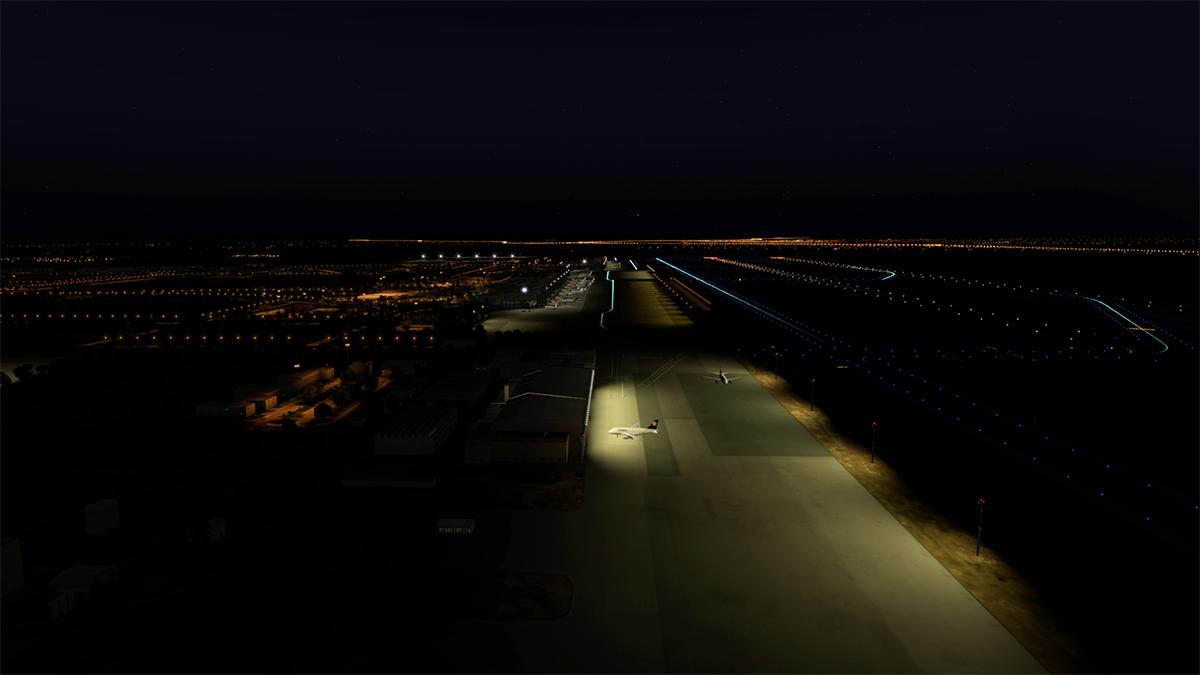
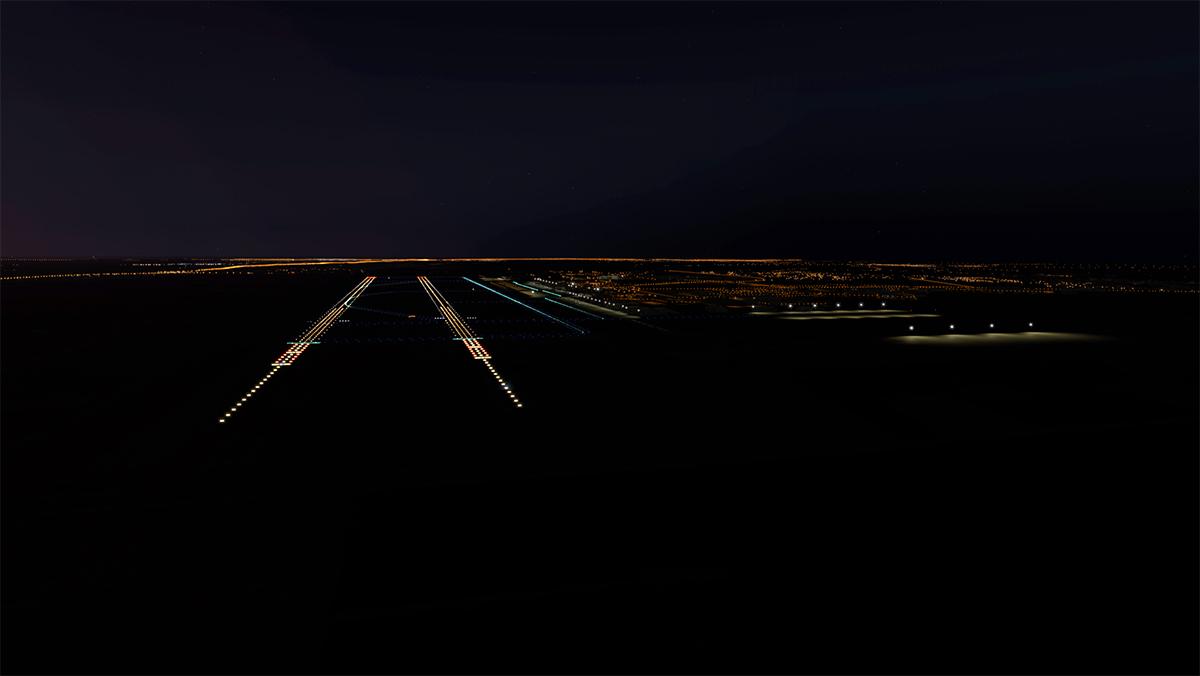
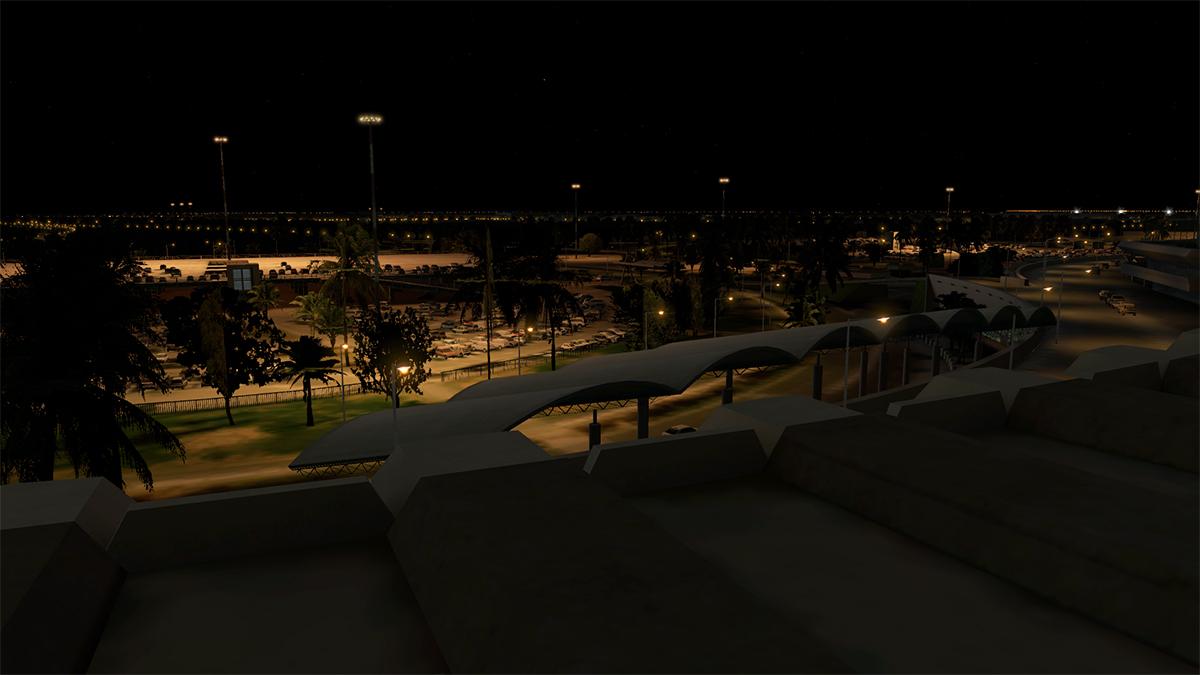
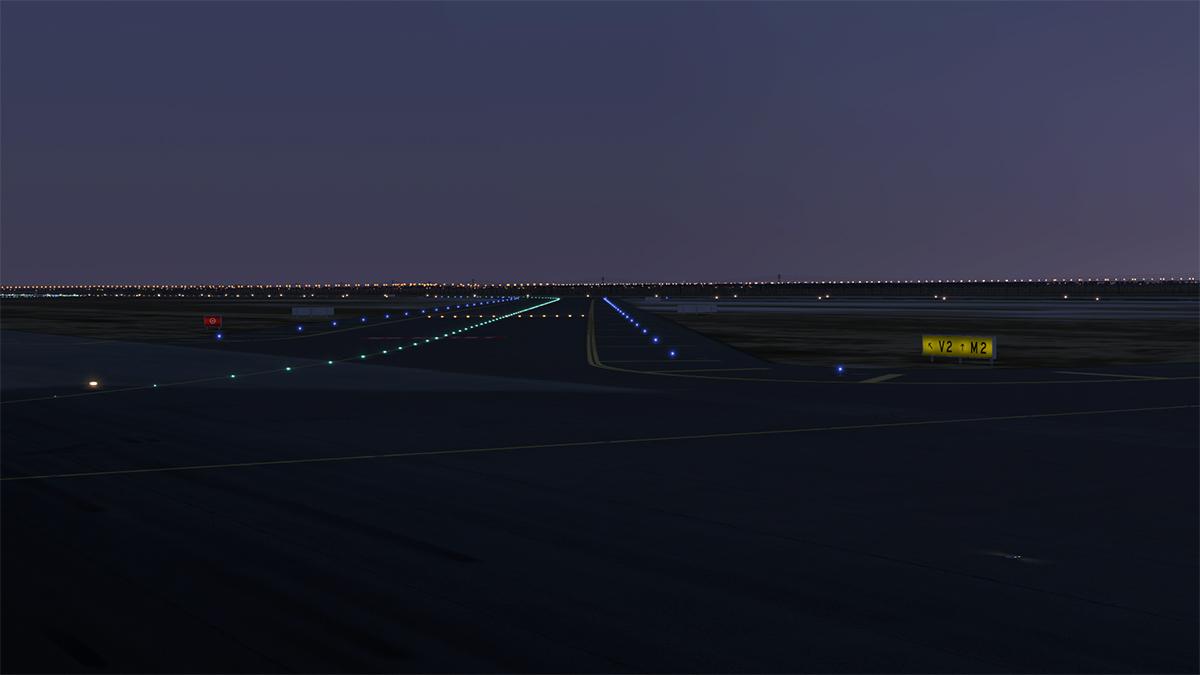
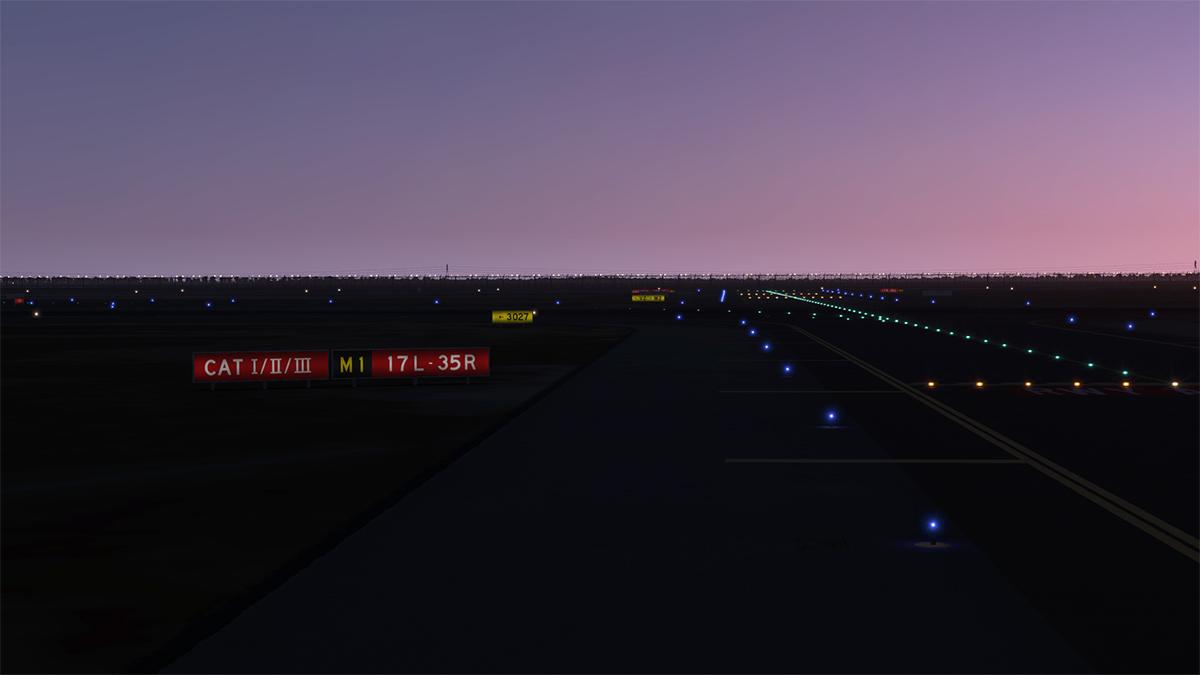
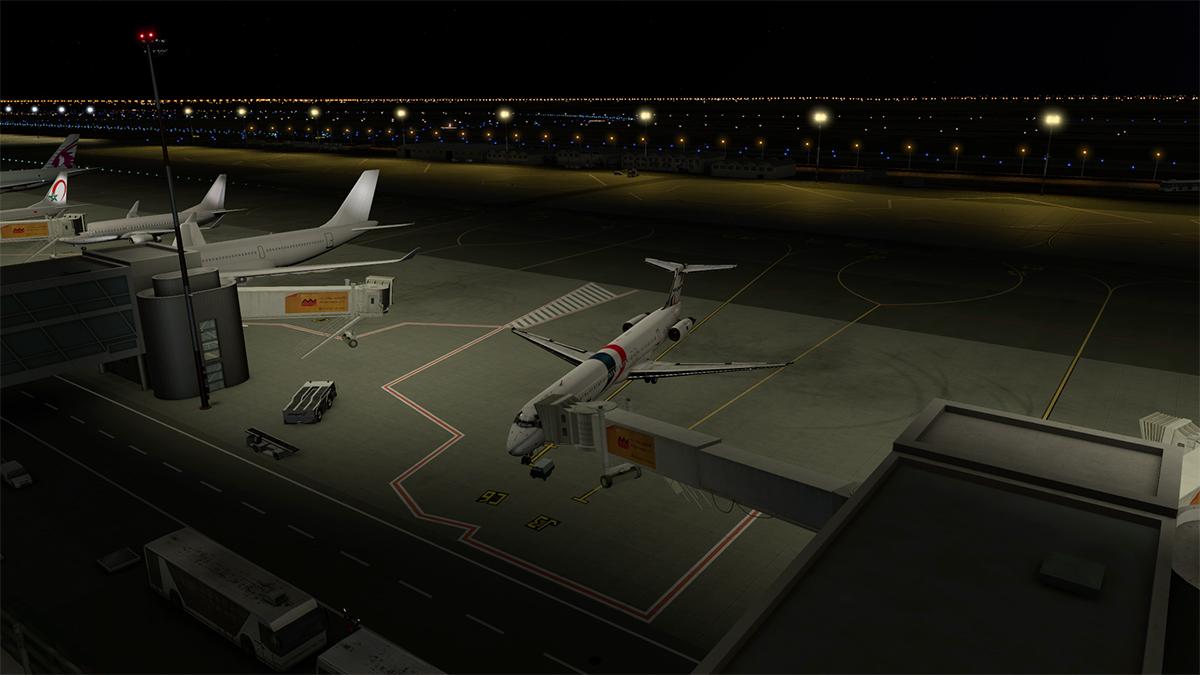
Scenery Review : EKCH - Copenhagen XP by FlyTampa Everyone has a bucket list. A list of destinations that they really want and still considering everything that list is still pretty long in X-Plane. Our hopes were quietly were raised as a few more of the iconic brands of FlightSim movement moved over into X-Plane, but in reality a lot of them if not all of the bigger scenery art houses don't do or release any of their most high profile products in the X-Plane Simulator. This was in fact a really big head scratcher in the fact that why try to make a big new presence in a new platform but then deliver the most and obscure scenery products that were so off beat, or worse off route, and almost all of the FlightSim developers are all guilty of this strange behavior. It is only this last year that Orbx has finally delivered scenery we would want to actually buy in EGHP-Edinbourgh and EGFF-Cardiff and maybe you could add in EGHI in Southampton, but where still are we wanting for any of their excellent Australian sceneries except for Broome, I mean who flies to Broome for god's sake even from within Australia? That brings us to FlyTampa... when FlyTampa announced they were going to do scenery products for X-Plane, then you could feel the whole X-Plane community go "Yes", finally we will get some decent scenery from their excellent back catalogue. But no offence what we actually got was Corfu XP? Yes again an excellent scenery, but really Corfu? who goes there, Corfu is really a once when in the right mood destination? So it is the same promise and the same FlightSim result. As noted many times before on this site, the FlightSim developers all noted that X-Plane was a simulator you simply can't make money out of? But the reality was they gave us nothing to want to actually want to spend our actual money on worthwhile either, so who is really doing the wrong business plan here and then blaming us all when it is not working. So here is one of the big ones, a top rate scenery from FlyTampa that everyone wants to use. EKCH-Copenhagen airport has been at the top of my scenery must have list for so long the print on the paper has faded... It is finally here, finally a decent, decent hub for us to (finally) access and enjoy... but does this EKCH live up to the extremely long, long wait we have had to persevere to get into Copenhagen's CPH (no offence to the hard working Freeware devs). EKCH - Copenhagen XP by FlyTampa Copenhagen Airport, Kastrup Københavns Lufthavn, Kastrup IATA: CPH - ICAO: EKCH 04L/22R - 3,600m (11,811ft) Asphalt 04R/22L - 3,300m (10,827ft) Asphalt 12/30 - 2,800m (9,186ft) Asphalt/Concrete Elevation AMSL - 5m/17ft Copenhagen Kastrup Airport is a bit of a sprawl, all the facilities and the terminals are all set tight together on the north side of the field, the runways 04L/22R, 04R/22L and 12/30 are a cross (04R/22L and 12/30) and a offset parallel (04L/22R) layout, but that is what make EKCH so very interesting as an airport. The Öresund We will get the obvious out of the way first... the Øresund Bridge. The famous (Nordic television show) bridge is indeed reproduced here in the FlyTampa scenery, I have used a freeware version of the Øresund Bridge for years, but this version of the bridge is far more detailed and quite perfect with great animated traffic that flows from one side (Denmark) to the other (Sweden). The Øresund Bridge is highly visible from Kastrup and so it is a big and important part of the overall aspect of the airport. In fact the E20 Øresundmotorvejen goes around CPH airport and on to the bridge. Terminals and Concourses Kastrup has three terminals... Terminal 1, Terminal 2 and Terminal 3. Terminal 1 In note Terminal 1 is now part or an arm of Terminal 2 and Terminal 3. Previously all domestic flights departed from Terminal 1, but from 29 March 2015 all departures have now been collected in Terminals 2 and 3... but for the sake of confusion and the size of the terminal arrangements at CPH we will still note the Terminal 1 as a standalone. One thing that immediately becomes apparent is that it is simply impossible even with some brave attempts to recreate these CPH terminals with facades and generic objects. The terminal design is simply far too complex and so distinctive, you would never ever get it right. Custom modeling is the only way to create the feel and shape of the terminal... that said even with a custom design you would have to be again seriously good artist to... One. To take the project on, and Two. actually pull off the complex architecture, shapes and material look to make it all look actually authentic... but the results is that if you do have the skills and the talent are simply outstanding, we will get to the details and materials in a moment, but first just look at the results. The detail is breathtaking, sublime.... on and on in accolades, even the departure areas internally are well recreated. A Stands A18-A23 are (five) airbridges, A25-A34 (ten) are all walkon-walkoff stands. Terminal 2 Terminal 2-3 IS CPH - Kastrup, Terminal 2 overall is simply HUGE! but confusingly both Terminals 2 and 3 are also part of each other and you can actually flow between all three T1,T2 & T3 as Copenhagen want to promote the Danish easy-flow travel experience... Terminal 2 has two (piers) concourses in Concourse A (A Gates), Concourse B (B Gates) and Terminal 3 has Concourse C (C Gates) and Concourse F (F Gates). We will still split up the Terminals to absorb the separate areas... Terminal 2 There are two halls as part of Terminal 2, one is easily visible, but the other hall (lower above) is hidden behind the Carpark P4. Obviously the second hall is a terminal built in a different era in design and in fact it was opened 10th May 1960 and very much looks like the Heathrow of the 60's era. The 60's era recreation here is excellent, the terminal design is totally authentic, as with the later addon extension of which is all glass. Both A and B piers were part of the original 60's terminal building, but have been both completely redesigned with the A Concourse now having a T shape with a rebuilt end, you can actually see parts of the original pier as part of the B Concourse, but again the design is now very modern and updated here with a circular end design rather than another T bar shape. If you love exceptional detail and for pushing simulation to the edges of extreme realism, then Concourse A will bring you to tears... ... the metal cladding materials with even all the riveting are just sublime. Reflections are also awe-inspiring with the same metal textures, and have your taxi-light light on when parking and it is about as real as it gets. Gates A4-A17 (Ten) gates and all are active airbridges. Airbridge detail and design is also drop-your-jaw magnificent, and they are all also SAM-Scenery Animation Management active, are you crying yet, you will be or should be. To note everything is not totally perfect as some FlightSim quirks have still come through, like with the transparency around stairs and a few objects turning blue, but this is overall simply heaven made quality for the most of us. Concourse B is just as good... same exceptional cladding here with stringers, the quality is excellent.... ... which brings us to the glass. I had a lot to say or complain about with glass in the KFLL-Fort Lauderdale scenery... notably that glass is very hard to get right or very wrong as the KFLL scenery showed... but here it shows you can actually do it right or use the right way to do realistic glass. Here reflective but dark tinted glass throughout the EKCH scenery is perfect and totally absolutely realistic, so it can be done correctly. Gates B4-B19 (ten) Both the Gates A and Gates B waiting internal areas are represented and well done, even the centre pier corridor is completed... impressive. Terminal 3 The arrow shaped building is the entrance to Terminal 3, connected to the railway station landside... ... Terminal 3 serves both the International departure terminal as well as the LCC (El Cheapo) Low-Cost Carrier terminal in one building and designwise it is hugely impressive. And even if the internal fitout is a bit sparse compared to the others, with just checkin counters situated each side. Terminal 3 airside is complex with a big C, it looks straight forward, but the actual terminal and Concourse C (C Gates) have so many different elements... ... it is a credit to FlyTampa that it looks so very if totally realistic, as even down to each parking bay then the design can be different... overall there is a sort of same design logic to it all, but totally sensational this design all is, glass is again sensational and get into the right lighting conditions and the quality simply blows you away... C37 and C39 are Class E or A380 stands, and really well done they are... I however couldn't get the Peter A380 to connect, sometimes it showed, but other times it didn't in the SAM? but I think it is the aircraft being more out of date than the SAM issue. Notable here are the A380 notes, the A380 can only use RWY 04R/22L (the smaller one?) and the permitted taxi routes are clearly defined, Navigraph supplies the correct notes (10-9C1) and the noted taxi routes. Gates C27-C39 are on the concourse, side on facing Terminal 3 are D1-D4, and all gates have animated airbridges. Internal Terminal 3 Concourse C is also modeled, from the main arrival area with shops to the corridors and waiting gate areas... ... internally it is not super detailed, but can be highly explored if you like that kind of thing... I think it has the right balance between detail and efficiency. The design circular language of the A380 zone is kept very real, and over the two arrival and departure levels. CPH created a new section called CPH Go, now called Pier F, and it is a dedicated low-cost carrier terminal with remote stands, Concourse F was opened in October 2010. CPH Go - Concourse F Clever in a way to create a dedicated area for LCC carriers. There is an actual terminal building that is connected to Terminal 3 via a covered walkway... ... but the connection is odd in that it does not actually connect to the actual F Terminal? On google Maps you can see the problem in that there is a missing walkway section (in red) from the main walkway into the terminal, an oversight? Stands E36, F1, F4, F5, F7-F9 front the terminal, F89-F98 are Remote stands with H101-H106 for the larger twin-aisle aircraft, there is an overflow area of E Stands fronting the SAS Maintenance Hangars, for stands E70-E82, buses are of course required. Airside on the F Stands it is simply sensational, a great place to arrive in a prop or domestic jet... internal Terminal F is again good. Airside clutter is sensational, all vehicles are SAS or CPH branded and just about perfect in density.... animated traffic is good as well, with cars, tugs, vans and buses all rotating around the airport, but I like the lower flow of vehicles that move around, enough for movement around the scenery, but not to be cluttered up with too much colliding traffic... ... note if using EKCH in v11.50 there is a need to update the Ground Traffic plugin, IMPORTANT details are in installation below. Landside Kastrup Airport landside has all the terminal designated carparks with all buildings having very up to date and great visual advertising... The Clarion Hotel (ex-Hilton) is well represented and has the same metal (reflective) cladding as the terminals. Considering the excellent clutter detail airside, then landside is completely different, actually more like the forgotten area, as spaces are quite empty and there is a general feeling of desolation, overall it is a stale feel... a sort of post-apocalypse world or post-virus disaster. There is traffic that circulates around the inner roads and on the whole it is good, but not actually very busy... I would add in more static elements to fill theses area a bit more in these drop off, pick up areas. ... green roads don't fit into the landscape either, and washout quite badly in other areas with such a Lo-Res texture, which is a shame as almost every other area is so well done in the scenery, but the traffic is great and so are the trains that travel all the way (and back) to central Copenhagen. SAS Maintenance Kastrup is a main SAS hub and airline base, and the airline has a major maintenance facility here with the four main maintenance hangers dominating the northeast side of the central terminal area. Sadly the doors don't open per SAM. Cargo The large cargo facility is far northeast and a separate area from the central terminal area on the threshold of RWY 10. Again very well represented the cargo haulers will love the large apron and well detailed clutter. The usual suspects in DHL, FedEx are well represented, but again more landside cargo clutter would have been nice. SAS Cargo have their own facility and this area is well done as is the SkyChef's catering building set behind. Area South and Copenhagen Airport South Diagonally opposite and southwest of the central terminal area is the noted Area South. Here is the Control Tower and a Military Supply area, plus various Danish Company Airport facilities like Maersk and Goldschmidt Aviation... mostly very military in feel and look, but that Danish design comes out well here as authentic. Kastrup Control Tower is an exposed concrete style affair, not very pretty, but very authentic and very well done here and opened and operated in 2008 by Naviair... tower view is set somewhere in the Terminal 1 zone? a very odd place and totally useless? Copenhagen Airport South The area southwest is the really old original section of Kastrup Airport and has the original 1920's terminal building as part of the area, which is now used as a VIP and Royal terminal. The Original terminal was moved about 2 km during the 1990s to its current position. SAS traffic has an office that resides at Copenhagen Airport South under the old control tower, and there are also few airport facility support buildings including the bus depot also located over in this area. Ground Textures The runway and taxiway textures are exceptional... rough edges and patches, with that highly realistic asphalt join marking on the runways that is really good to excellent detail. Rubber gloss on touchdown areas and so many other fine details, make these textures some of the best lately... ... all textures have PBR reflections and are excellent in damp or wet conditions, grain is very good and so is all the signage and markings, you just simply can't fault it. Grass is unique as well... this is the first multi-layered grass I have seen, and that low and tall grass/flowers effect is simply so effective for field realism. The scenery comes with SAM-Seasons built in and the winter textures are excellent... I don't run SAM-Seasons as I use xEnviro, but have seen them in action and they are very good. (images are courtesy of FlyTampa). Copenhagen FlyTampa are renowned for not only providing the actual airport scenery, but all the surrounding cityscape as well... In that aspect the Copenhagen XP does not disappoint. Because the whole area has a custom mesh then the Copenhagen Airport is very well immersed into the scenery, and obviously there are no boundaries or change of texture colour here. The cityscape is excellent with Danish objects that covers all the housing and buildings in Copenhagen. It is a little generic in feel, missing though are important church spires and the large government buildings and Palaces, but overall it is very good... Custom areas include Ørestad a modern area of the city with the Marriott Bella Sky building and the Bella Centre, but missing though is the very distinctive (now closed, but soon to be a museum) Svanemølle Power Station and it's three tall funnels that dominates the Copenhagen skyline and harbour entrance? Highly visible are the twenty power wind turbines (The Danish are very into climate change and the environment) that I thought were static... ... but they do actually turn as their speed of rotation depends on the strength of the wind speed, a nice feature, there is another wind turbine at Ørestad... and note the Øresund Bridge again in the background. Lighting Kastrup lighting is quite spectacular! There is a huge differential in tone between the airside's extremely bright areas and the landside's more subdued illumination. But bright on the ramps it is? this is one of the brightest ramp areas I think I have seen, personally I absolute love it, but I know it will seriously divide the punters. Even with the subdueded lighting it is more than one tone, so it works overall, but I still question if a bit more lighting was required landside? The lit advertising is very nice. Terminal 3 is bit dark, but overall the rail terminus, office and administration building lighting (SAS) is very authentic and looks good. Remote stands F and E are excellent. Area South is well lit, with a lot of nice drop lighting and overhead gantry... Cargo and SkyChef's catering is also very good. Copenhagen City is not bad, but there are areas of monochomic lighting and some tall buildings are not lit? but other buildings look great.... overall the city nightscape is very good. Recommended is to have v11.50's reflection detail switched on, the Øresund Bridge looks brilliant on arrival and departure at CPH under a full moon. ___________________________ Summary Iconic Flight Simulator developers for years have been taunting X-Plane users that they created exceptional scenery, but simply refused to develop for the X-Plane platform, but instead threw us usually the most obscure and even worthless product to convince themselves that X-Plane as a simulator was not worth their time or investment, and in most cases they then wondered why we never purchased anything from them. In other words both sides lost in a game of wasted resources, time and even good business sense. The slow death of the original FlightSim movement, and the rise of the quality of X-Plane11, the tide turned in the fact that to just survive with the movement of a lot of their own customers the FlightSim developer then decided to finally deliver quality products for the X-Plane Platform, but to a point because still the bigger scenery assets were going to take time to convert to the X-Plane specifications, so again we had to wait. But time was now running out in the fact the FlightSim world now had a new version in FS2020 (Still in development). For years X-Plane has been starved of the sort of mega quality scenery other platforms found accessible, it is not about money, it s about the quality of the scenery that is the attraction, plus the requirement that it also conforms to the X-Plane features and effects. So here is FlyTampa's first big mega scenery or a sort of leveller scenery that the FlightSim community have not had access to for years. And not only is this Copenhagen XP our really first taste of their top grade scenery, but also the quality that can help the simulator at least have fair balance on keeping Ex-FlightSim simmers in the X-Plane platform FS2020 not withstanding. The main point to make with this scenery is the way that FlyTampa has utilised the X-Plane PBR effects in metal and glass, not to mention the complex modeling in recreating a very highly realistic Kastrup, to not have done so would have ruined a major chance of any big FlightSim developer in creating any decent scenery for X-Plane in the future, in fact it could have killed any future development stone dead, as the poor sales figures would have seen to that alone. Copenhagen XP is really a huge triumph for everyone, both FlyTampa and X-Plane users in the sheer quality and quality of this scenery. As noted the modeling and the use of materials in this scenery are simply outstanding, as noted metal, glass and reflection effects are off the scale in quality, but also is the use of the mesh, textures and even down to the use double scale grass to create almost a masterpiece of Kastrup for X-Plane users to use. Small detailing of the branded clutter, good vehicle animation, SAM-Scenery-Animation-Manager airbridges and included also are season textures, Copenhagen city, Øresund Bridge and highly impressive lighting are also huge plus-points It is not perfect though, nothing is totally absolutely perfection. Landside is missing the heavier clutter detail of the airside, and actually required here to cover the more lower-resolution textures, the small but important missing connection between the walkway and Terminal F, green roadways and washed out textures could be more Hi-Res... and lighting could be just a bit better on the landside as well... the tower view is just MIA. The fate of FlightSim quality scenery is really now in our X-Plane wallets, ignore this scenery for poor freeware, or invest in a quality we deserve and also have a seriously important European hub for our route requirements. So buy and receive finally a scenery we have been begging for years for, it is now your choice and in reality vote with your wallets and show that yes X-Plane can be a profitable platform because this Copenhagen XP scenery gives us absolutely now no excuses because FlyTampa has certainly delivered here, the future is now set with how X-Plane as a community repays them for in doing so. As a note, FlyTampa announced EHAM Schiphol as another scenery to be released besides this EKCH, now that airport is also another certainly been worth waiting for if it as good as this Copenhagen XP..... Absolutely must have scenery. _____________________________________ Yes! EKCH - Copenhagen XP by FlyTampa is available from the X-Plane.Org Store here : FlyTampa Copenhagen XP Price is US$31.00 Copenhagen Airport Copenhagen Kastrup International (EKCH) Airport Addon Airport modeled with PBR material 3D bridges, Animated vehicles & trains SAM Animated Jetways SAM Docking Guidance system Copenhagen City Copenhagen city fully modeled Hand-placed vegetation, and 3D lighting High Resolution surrounding Photo Scenery with custom mesh Dynamic lighting Volumetric Grass WT3: WorldTraffic GroundRoutes are not provided and a generation is required, and overall the airport generation functions perfectly. Traffic Global runs fine Requirements: X-Plane 11 Windows or Mac (not compatible with Linux) 4GB VRAM Minimum - 8GB VRAM Recommended Download Size: 2 GB Current and Review version : 2.0 (May 10th 2020) Installation You download an Installer, that you then set the X-Plane install address and then insert your email address and the authorization key... the installer will then do the rest (Internet connection is required and fast if possible). Install is five folders set in order: FlyTampa_Copenhagen_0_airport FlyTampa_Copenhagen_0_city Flytampa_Copenhagen_1overlays Flytampa_Copenhagen_2Photoreal Flytampa_Copenhagen_3Mesh Total scenery installation is a huge big : 6.84gb SAM Plugin - Scenery Animation Manager - Suite 1.0 is required for this scenery Seasons Seasons for the SAM - Seasons (SAM2 Suite) is provided and the installer does the work for you at the Installation phase. Ground Traffic The Ground Traffic plugin does not work in v11.50 (Vulkan). There is a fix that can be downloaded here, and then you need to replace the Ground Traffic file.xpl in ALL the PLUGIN folders in the: airport, city, overlays and Photoreal folders... then it will work. Documents One extensive manual in English with notes (6 pages) but no charts FlyTampa-Copenhagen.pdf _____________________________________________________________________ Scenery Review by Stephen Dutton 20th May 2020 Copyright©2020 : X-Plane Reviews (Disclaimer. All images and text in this review are the work and property of X-PlaneReviews, no sharing or copy of the content is allowed without consent from the author as per copyright conditions) Review System Specifications: Computer System: Windows - Intel Core i7 6700K CPU 4.00GHz / 64bit - 32 Gb single 1067 Mhz DDR4 2133 - ASUS GeForce GTX 1080 8Gb - Samsung Evo 1TB SSD Software: - Windows 10 - X-Plane 11.41 - tested v11.50.b9 (fine) Addons: Saitek x56 Rhino Pro system Joystick and Throttle : Sound - Bose Soundlink Mini Plugins: Traffic Global (Just Flight) US$52.99 Scenery or Aircraft - Default Boeing 737-800 by Laminar Reserch

-
Plugin Review : Traffic Global by JustFlight
Stephen replied to Stephen's topic in X-Plane Plugins and Simulator Addons
Your going to have to supply more information than that? My Traffic Global works fine in both v11.41 and v11.50b -
No idea to be honest as I don't have VR?
-
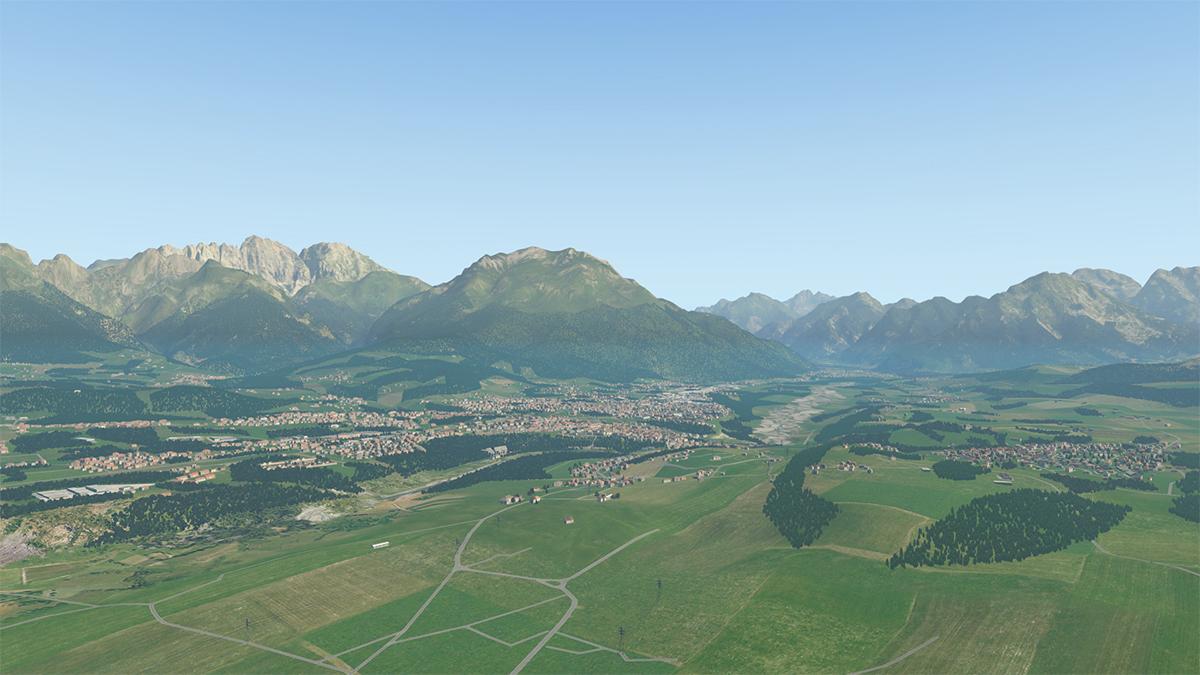
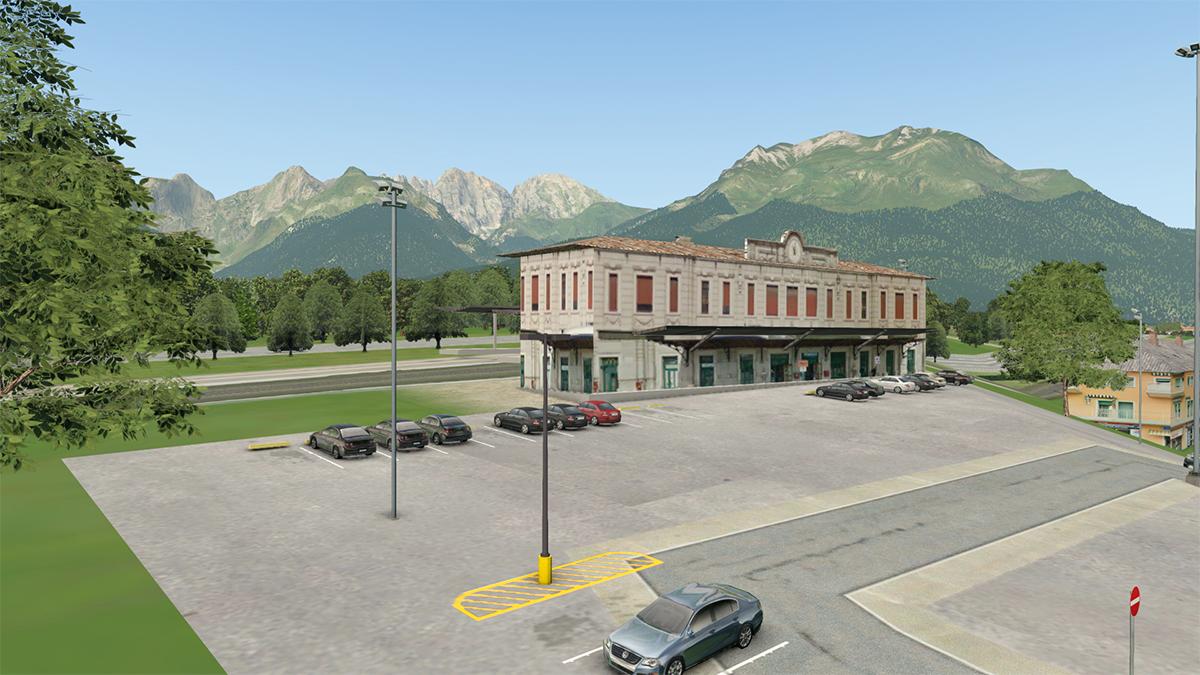
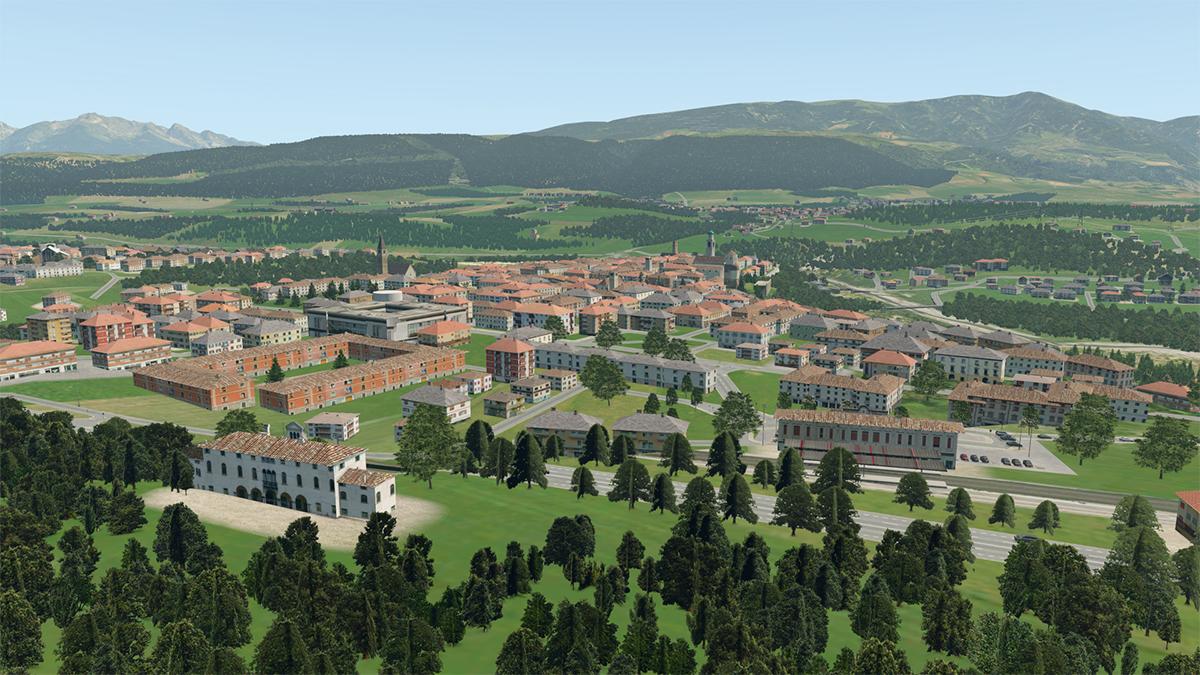
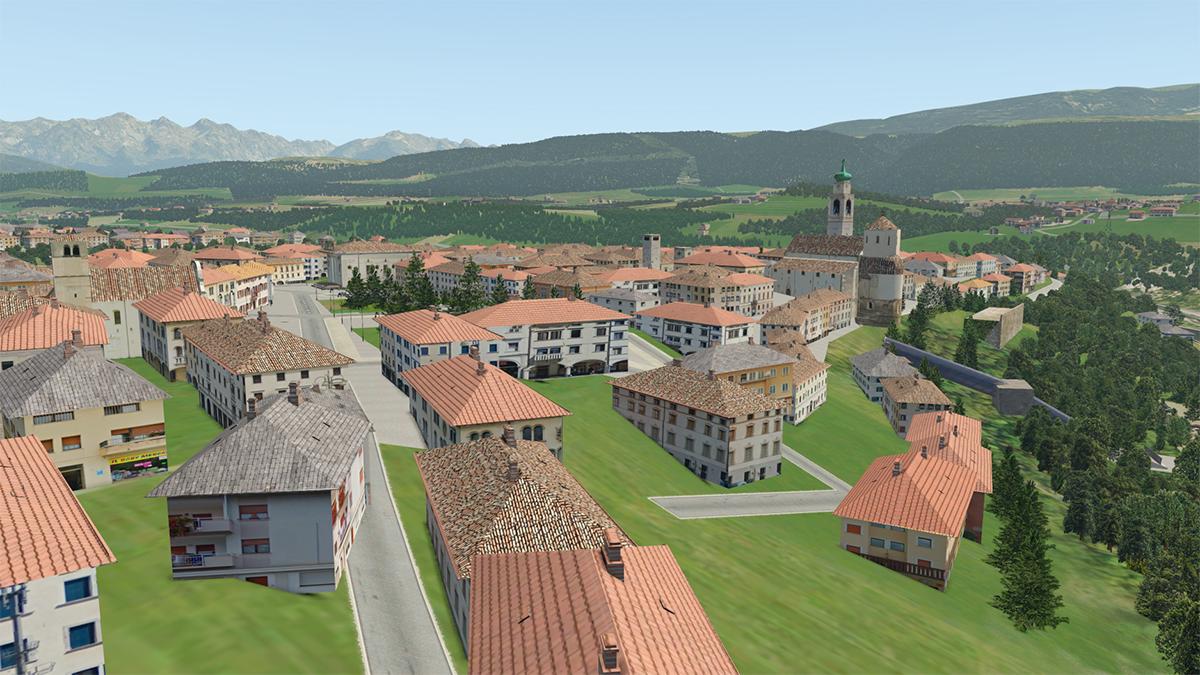
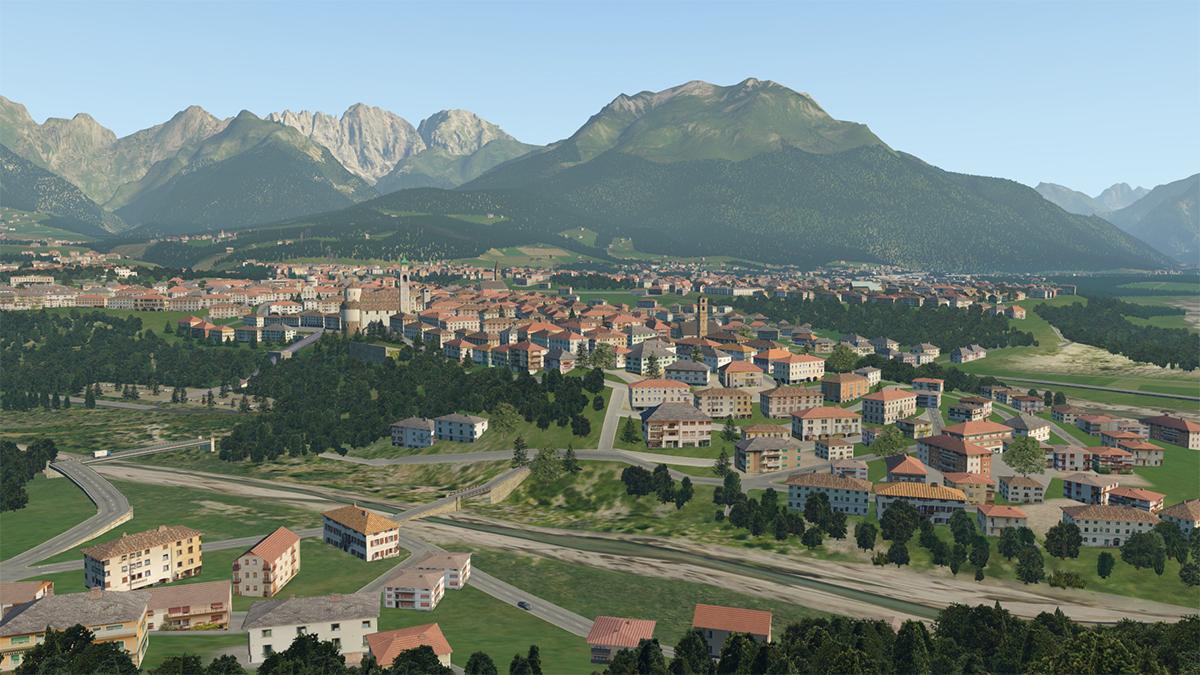
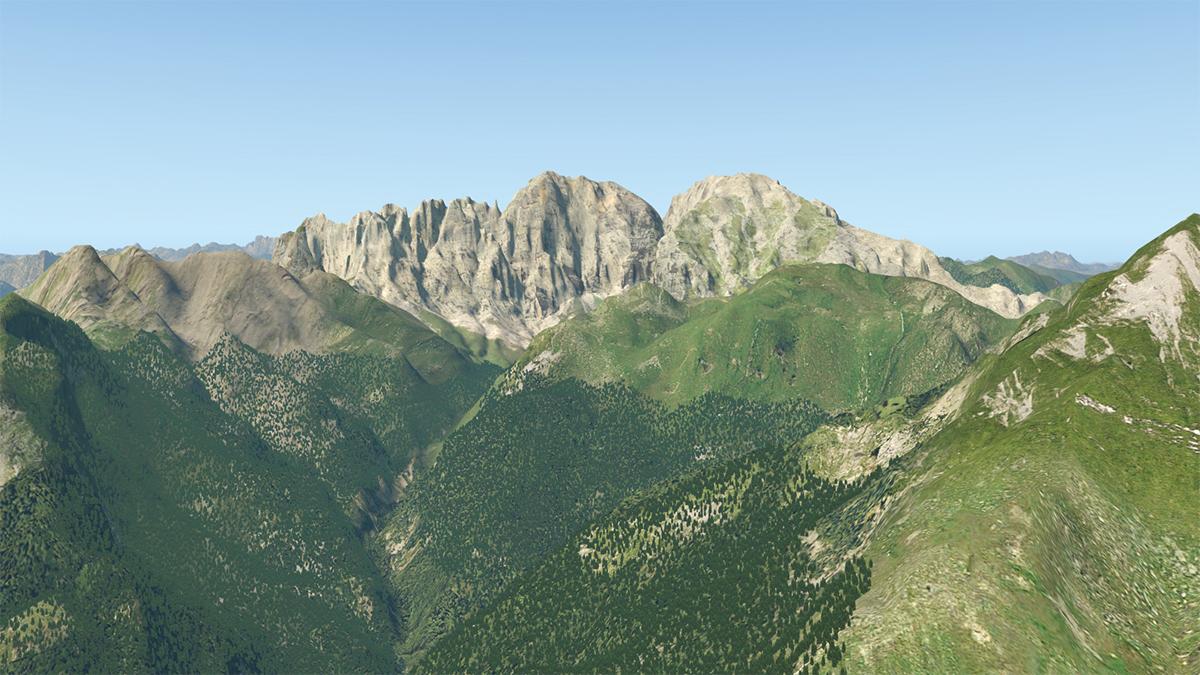
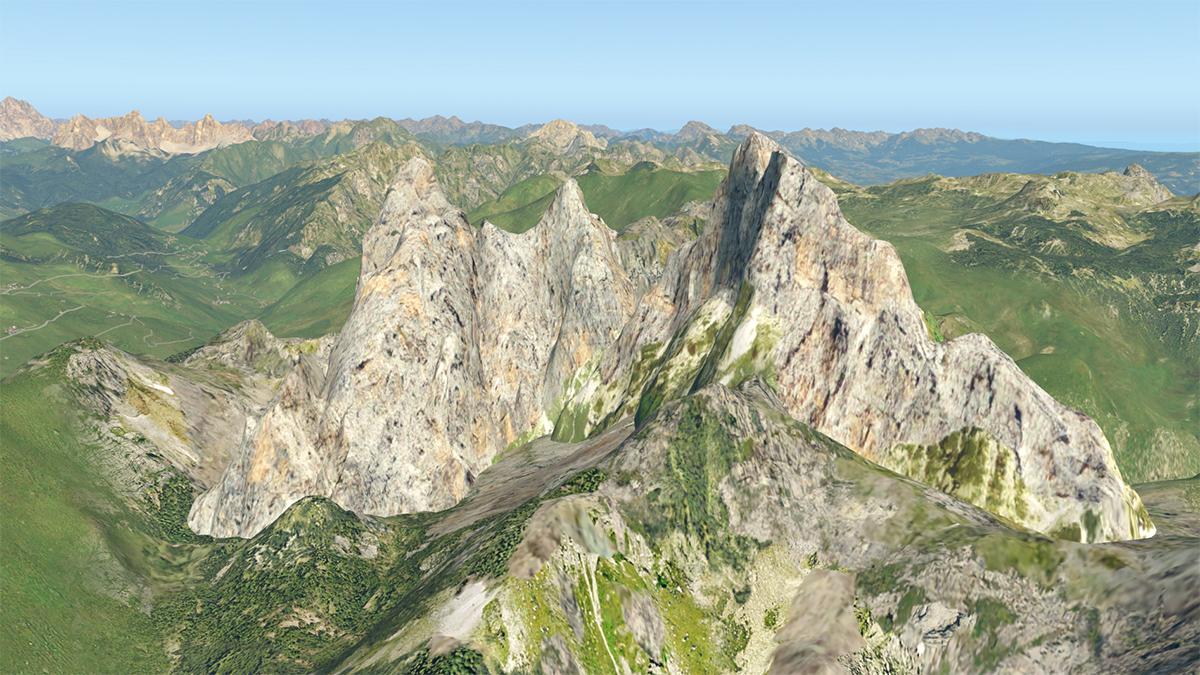
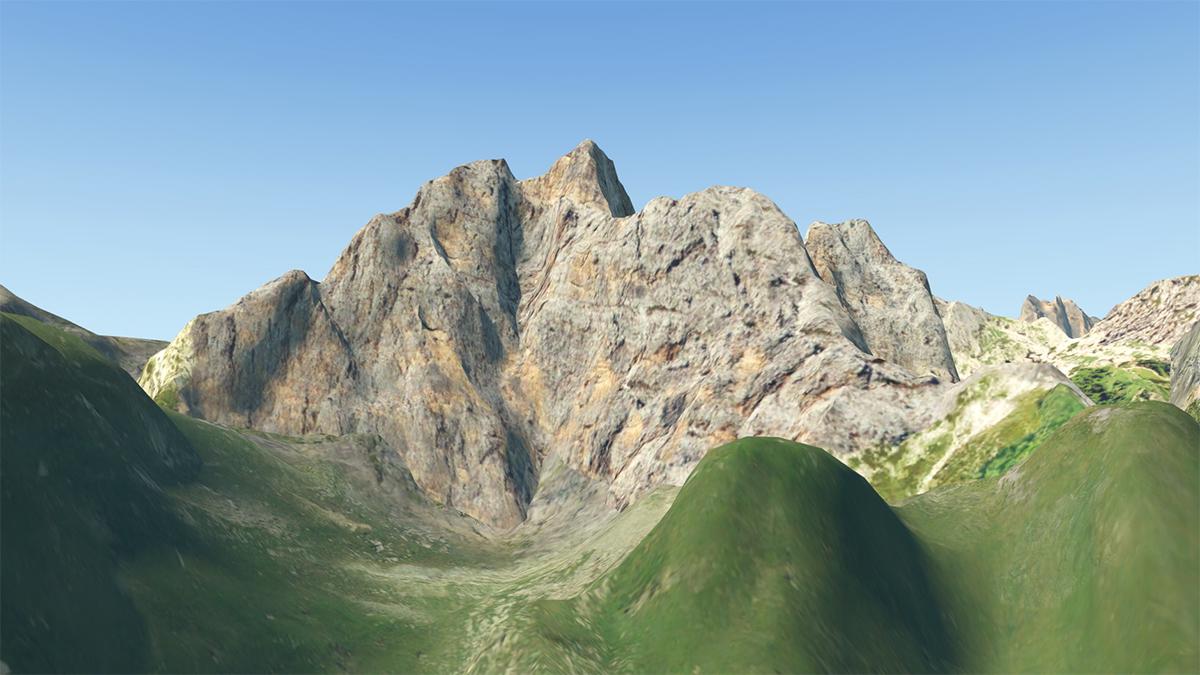
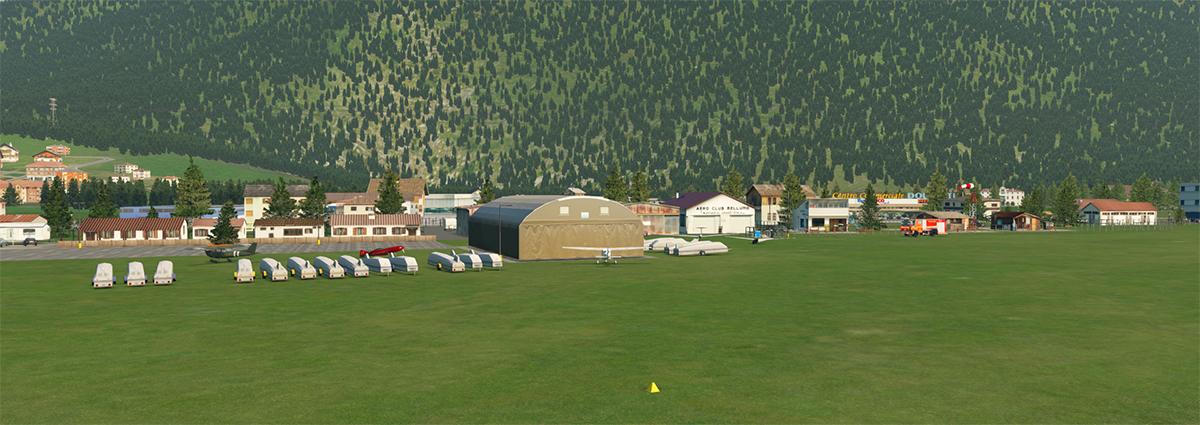
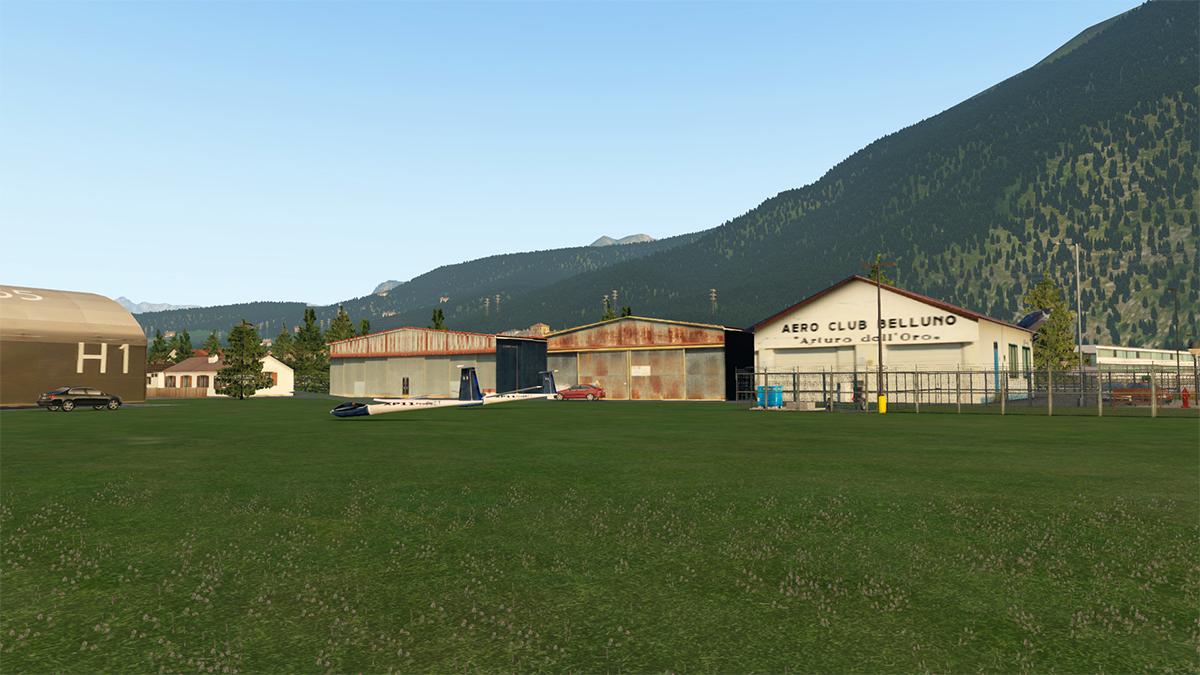
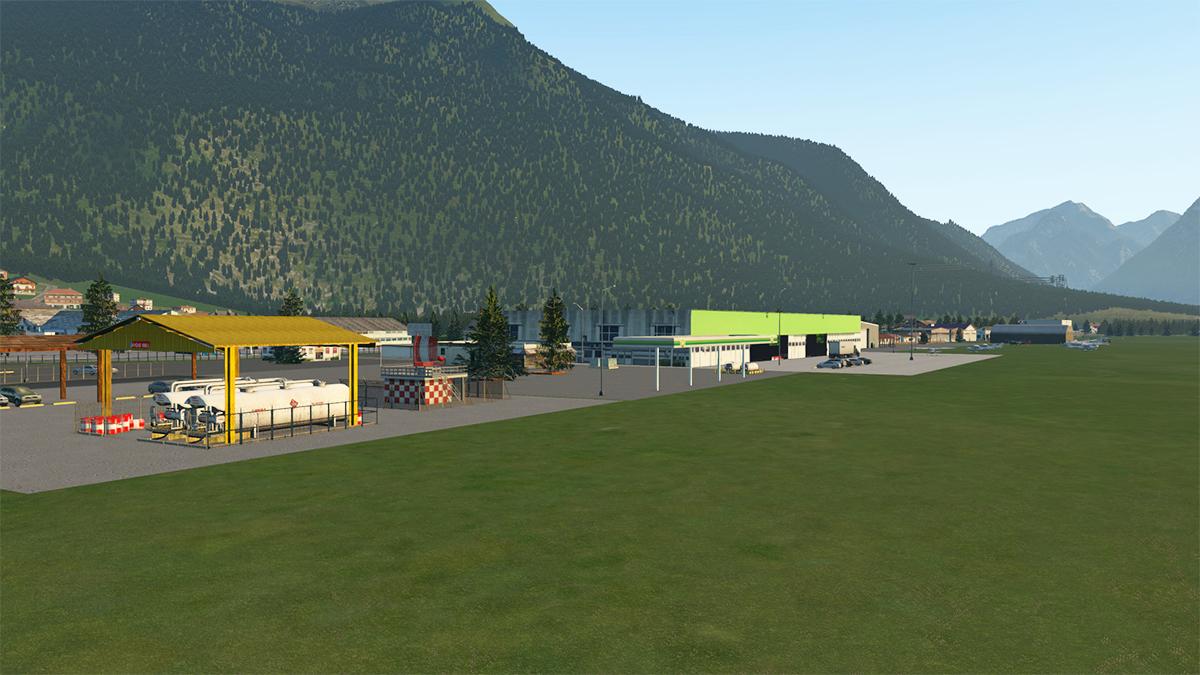
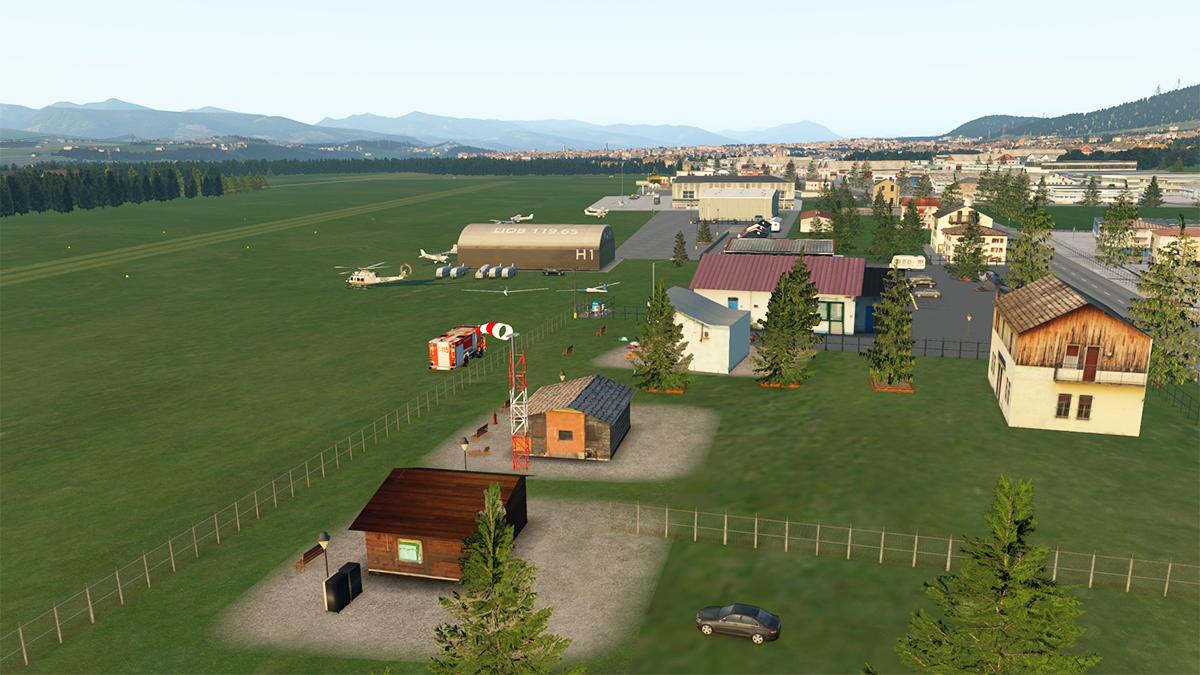
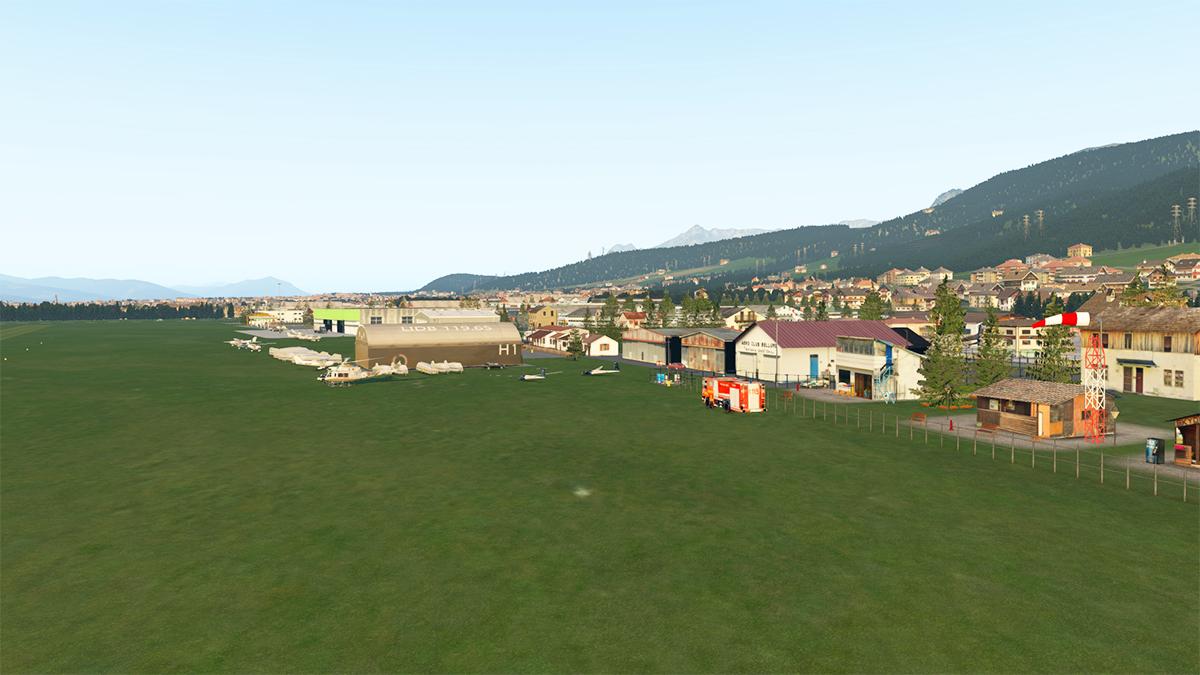
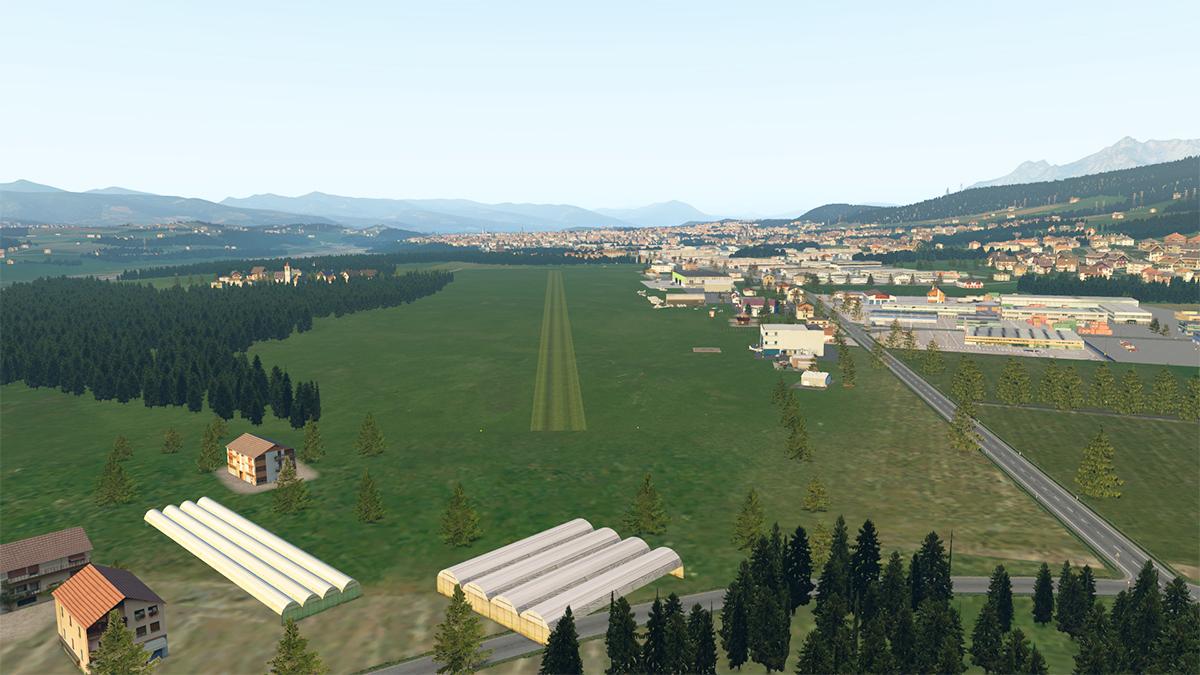
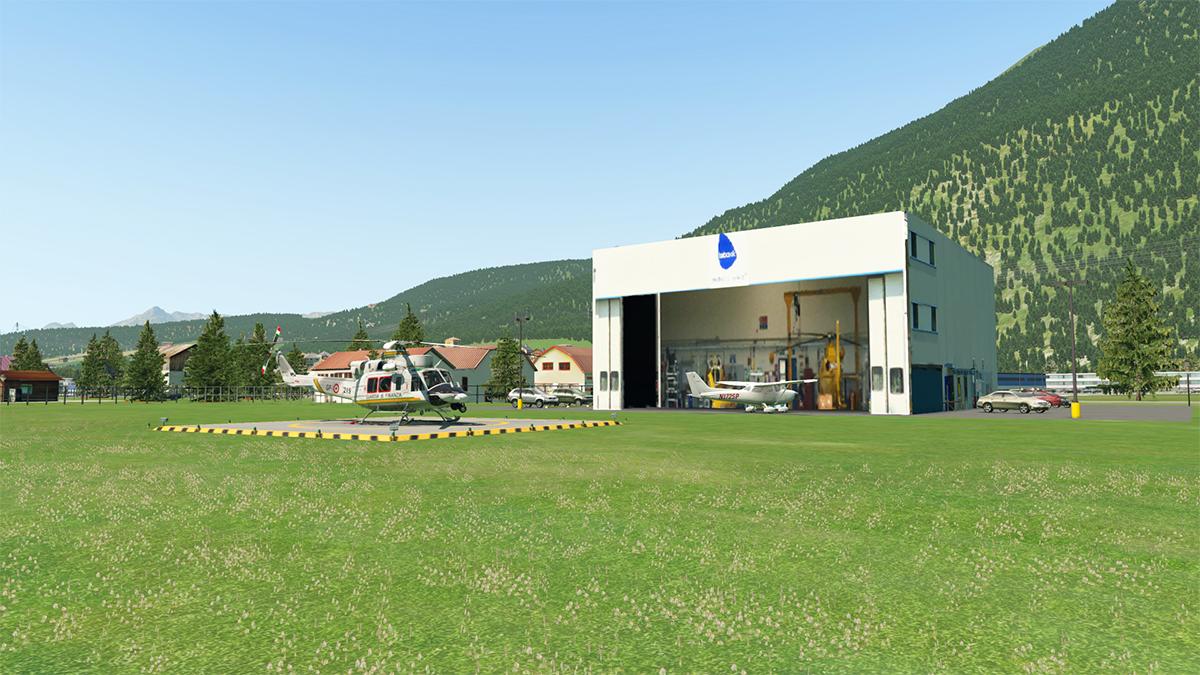
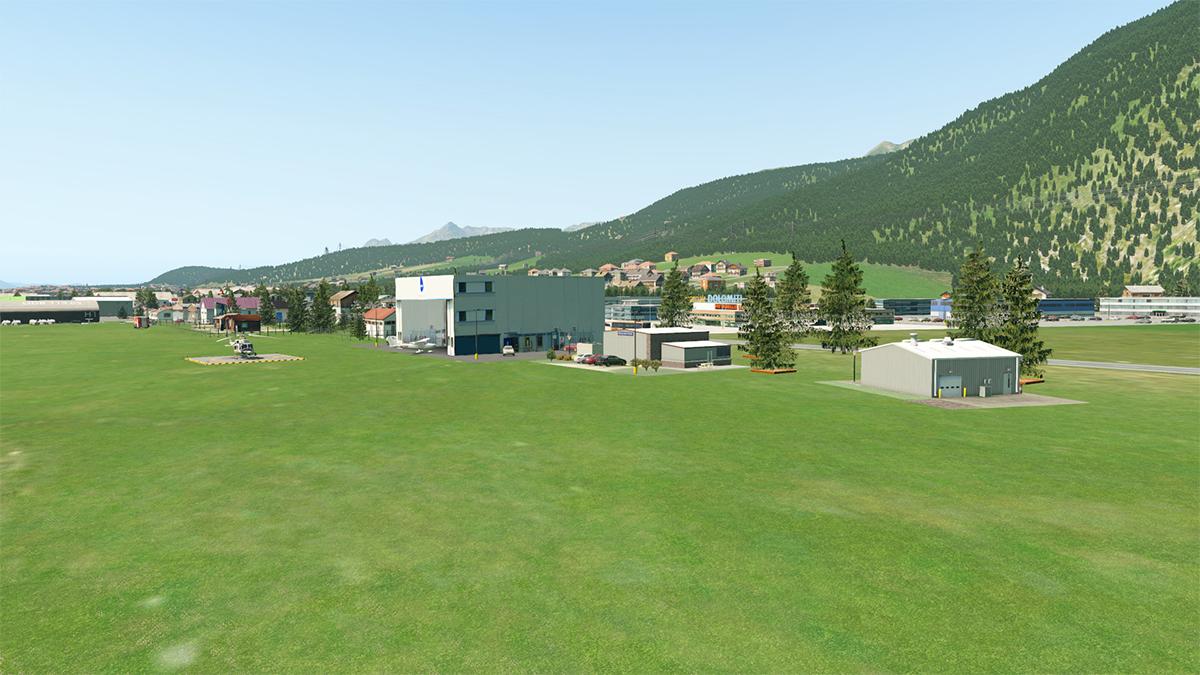
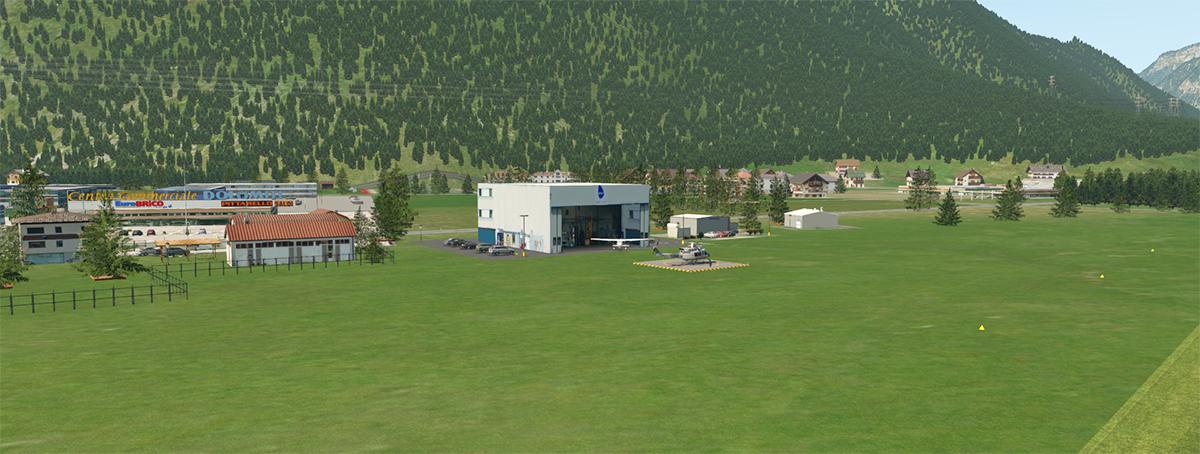
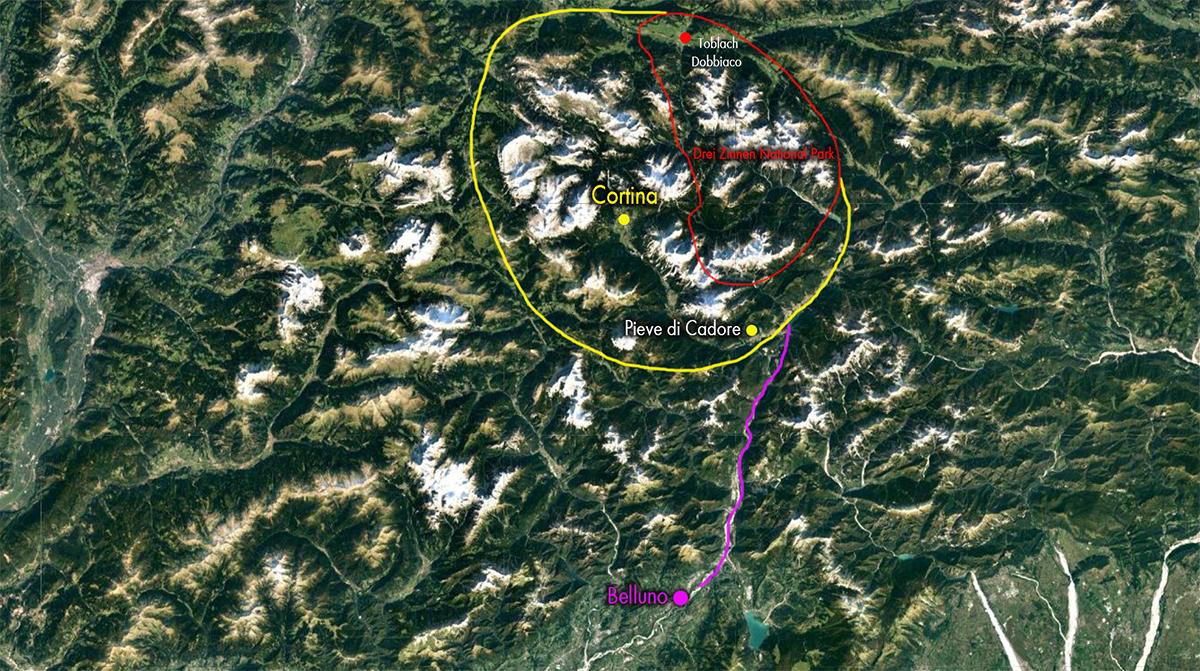
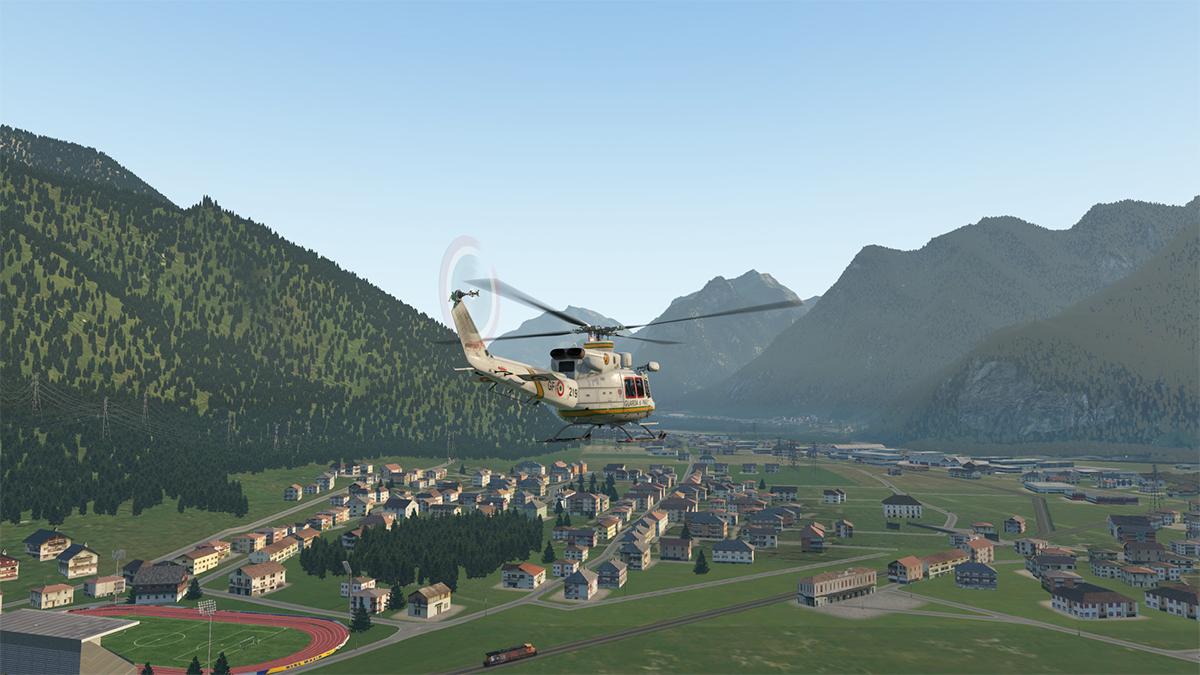
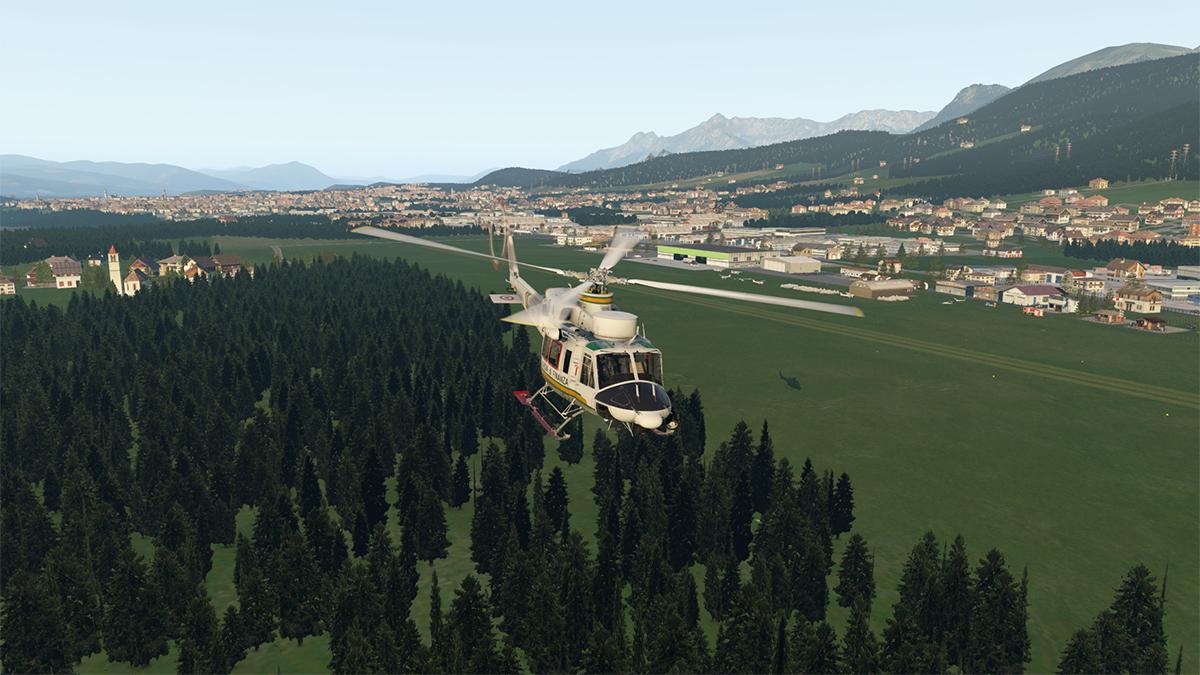
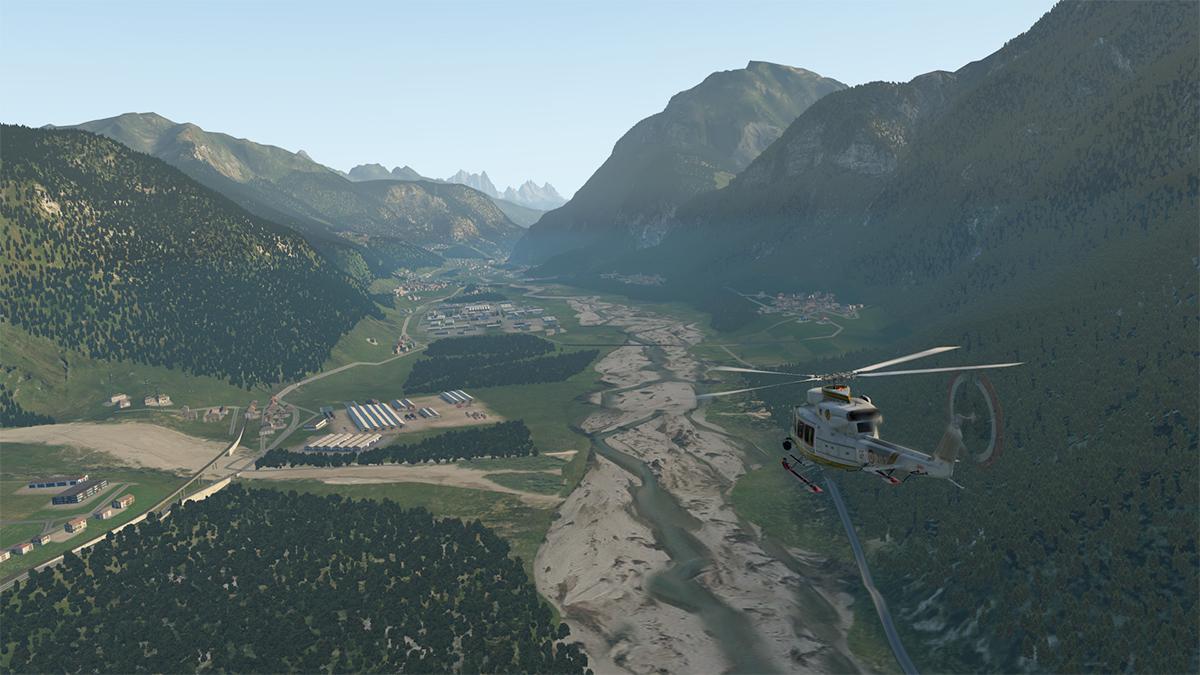
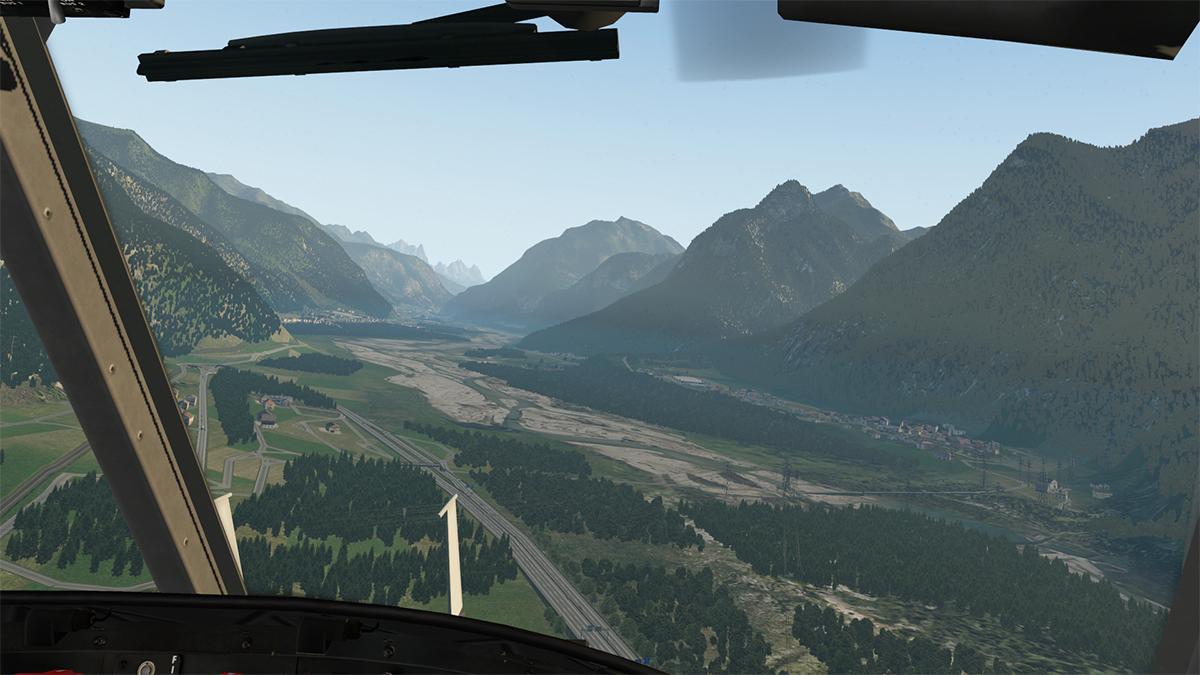
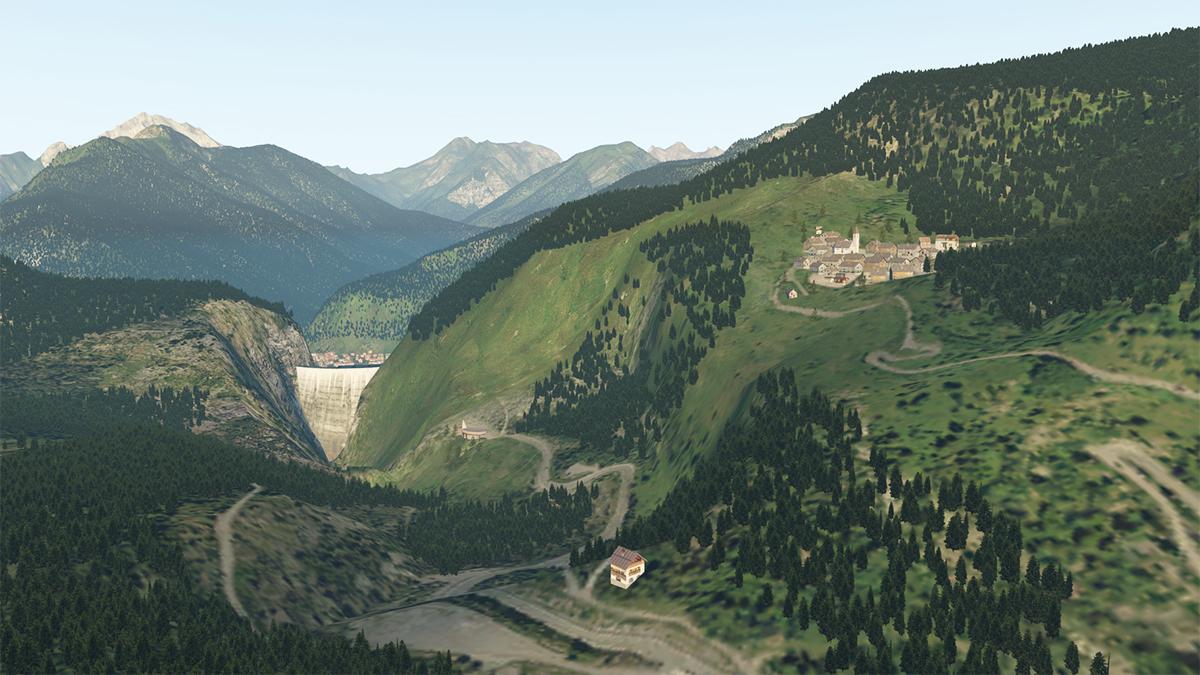
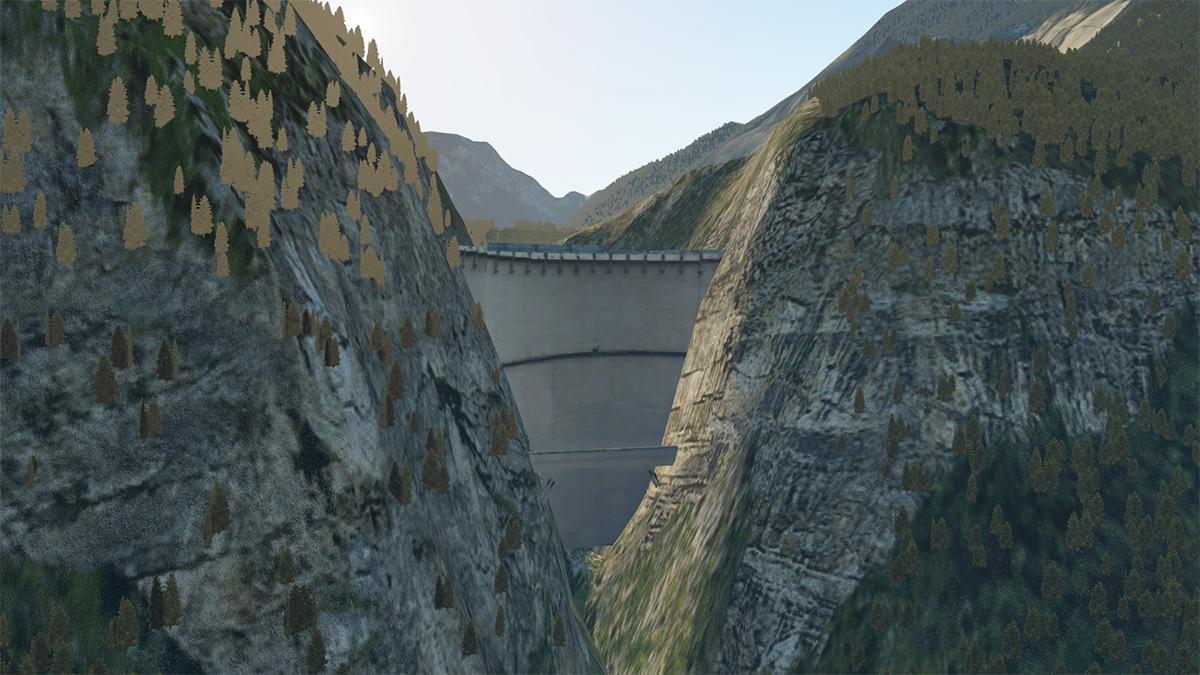
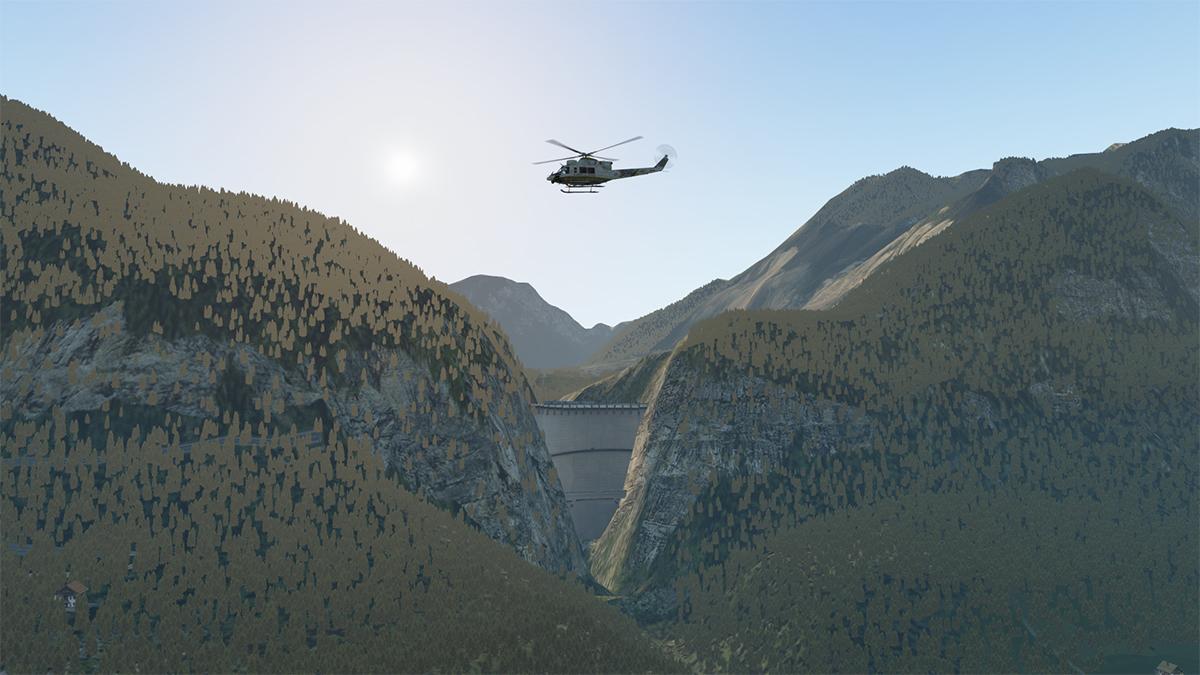
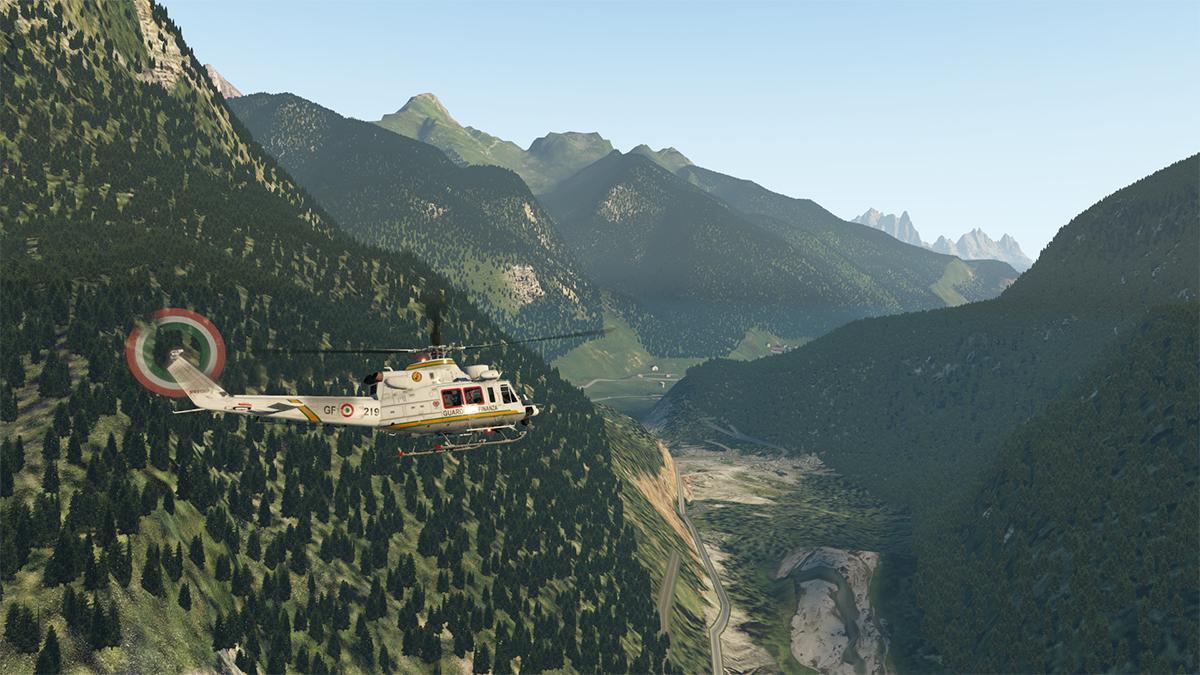
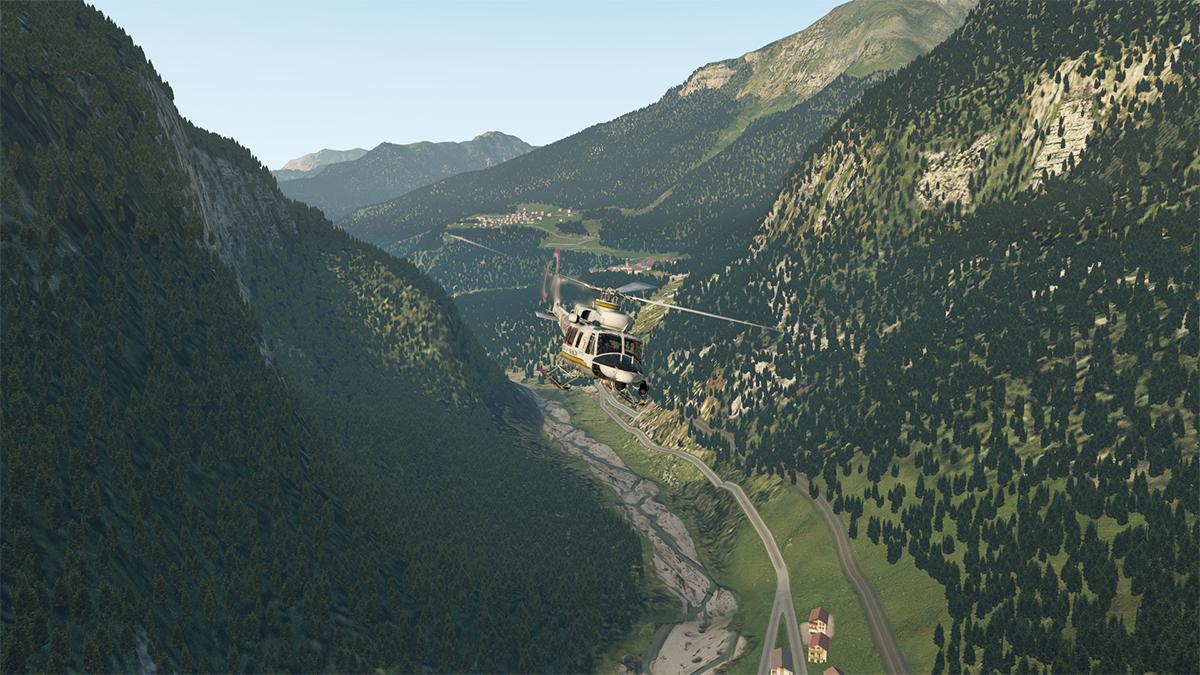
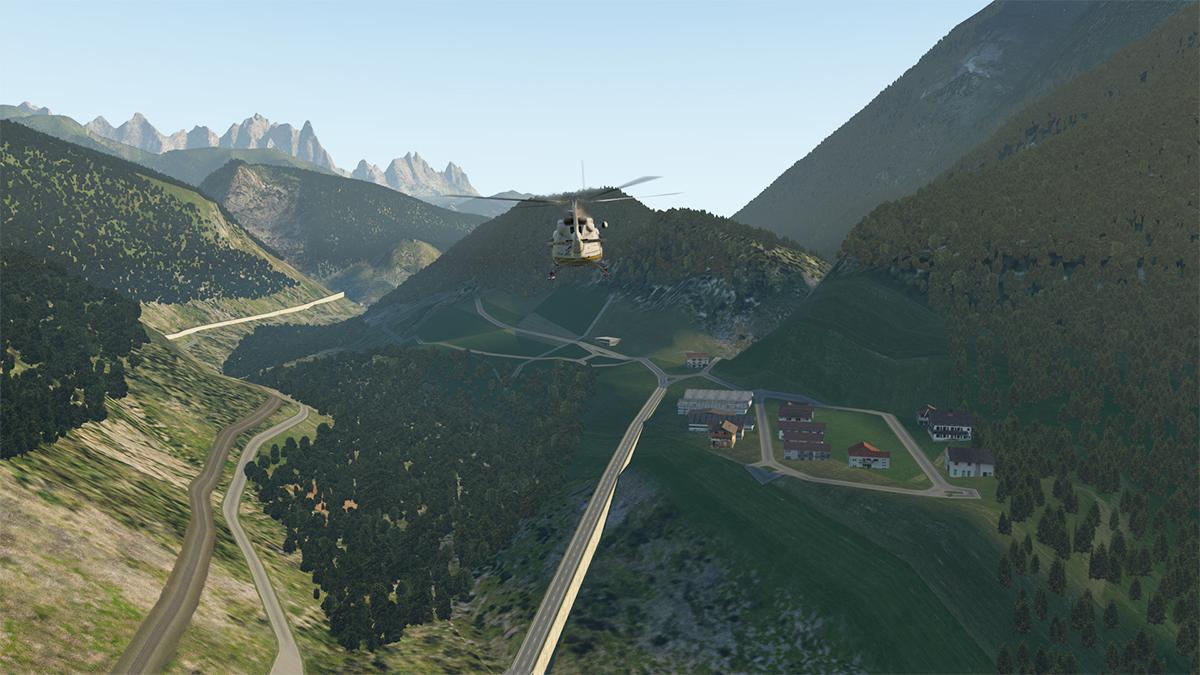
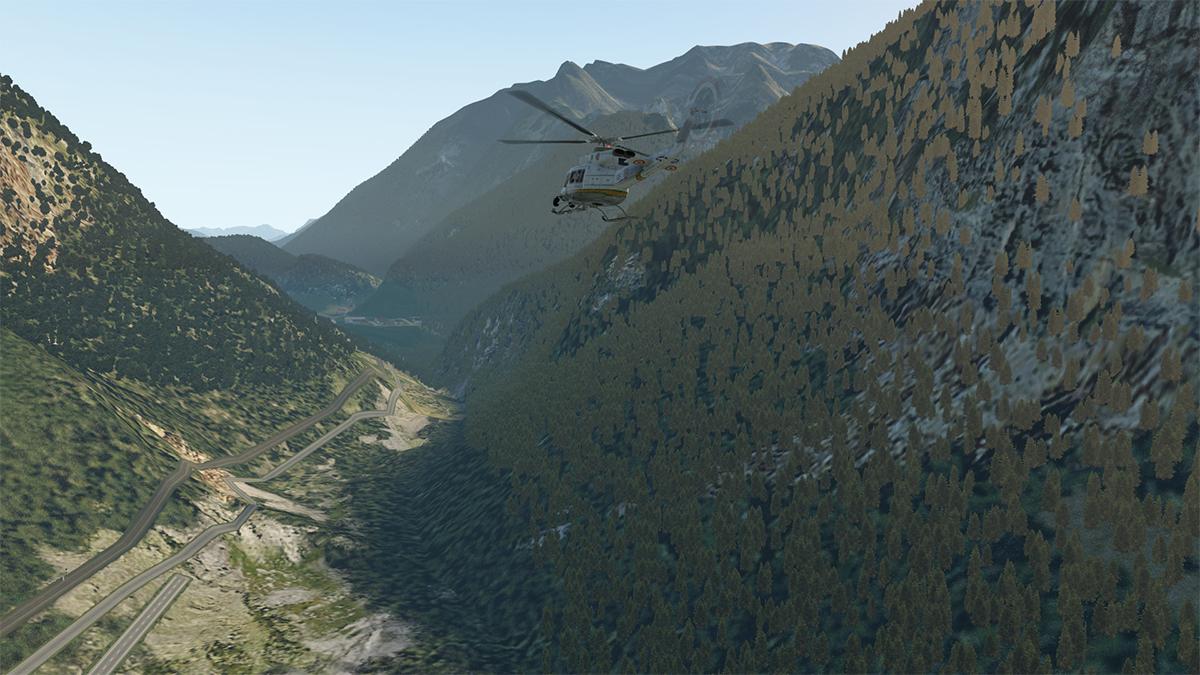
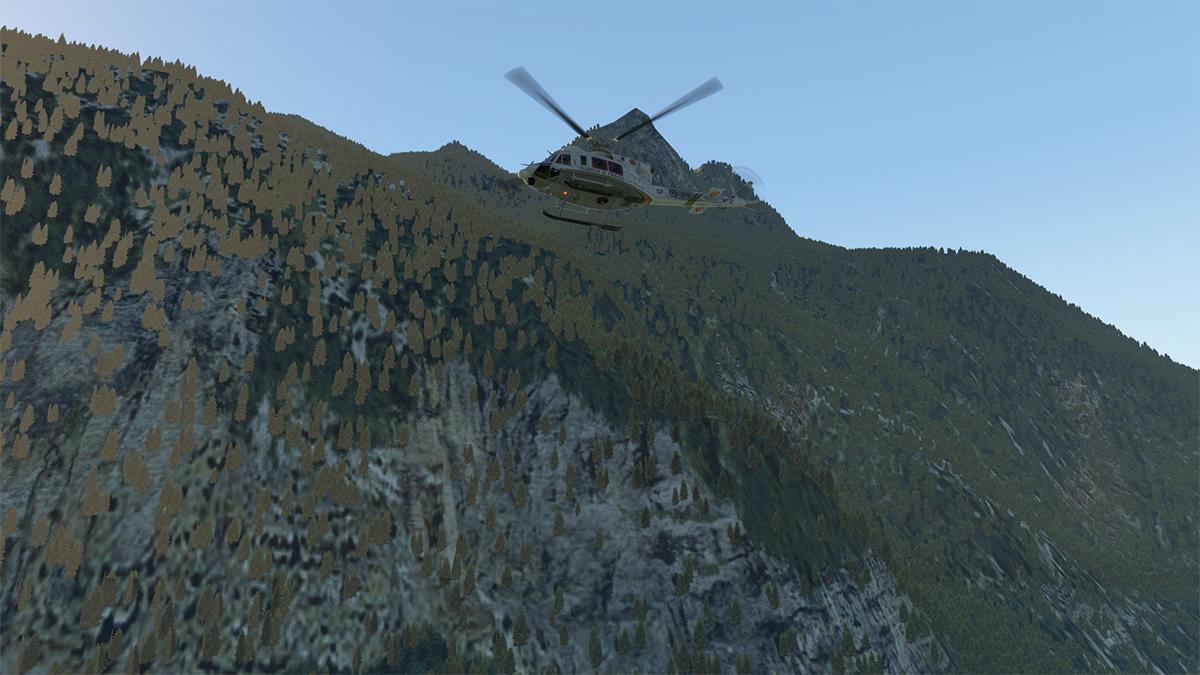
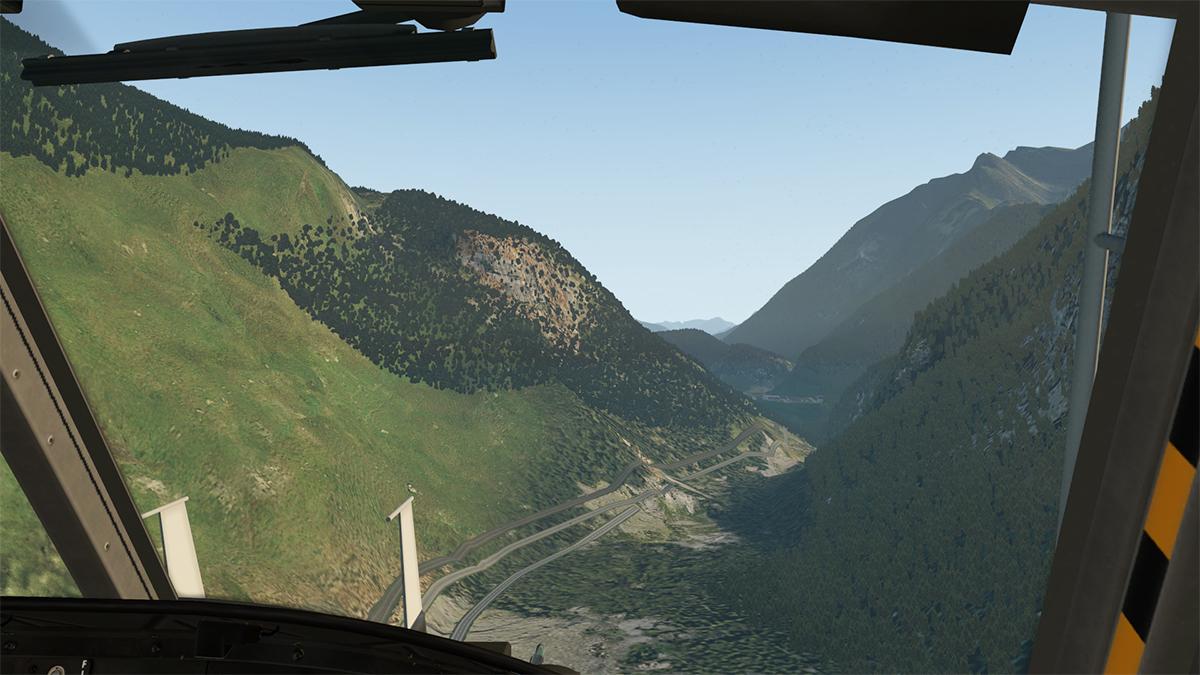
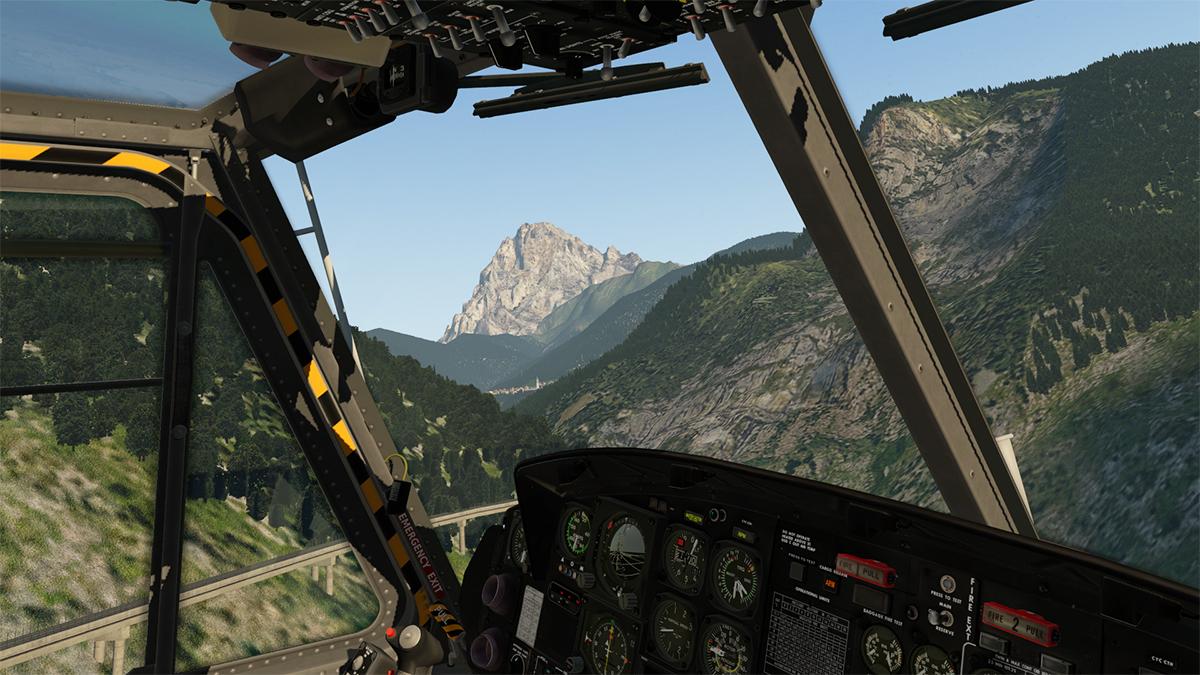
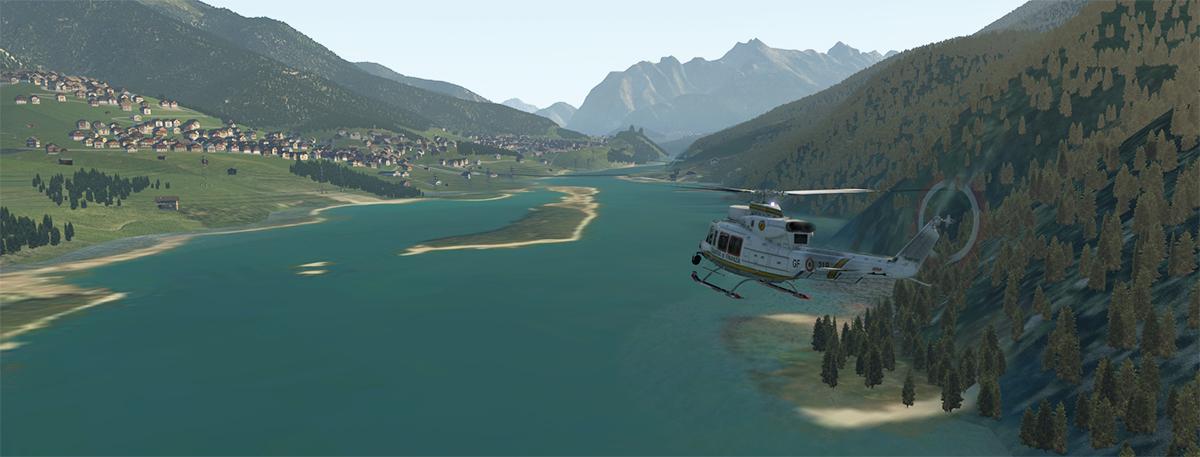
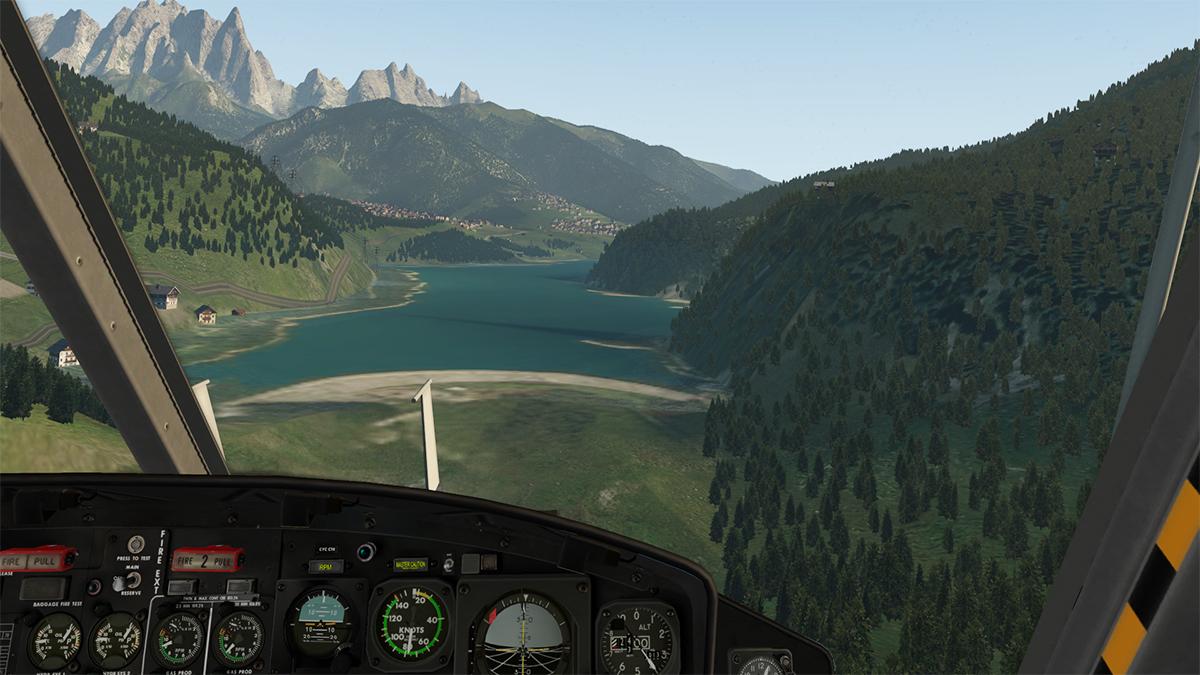
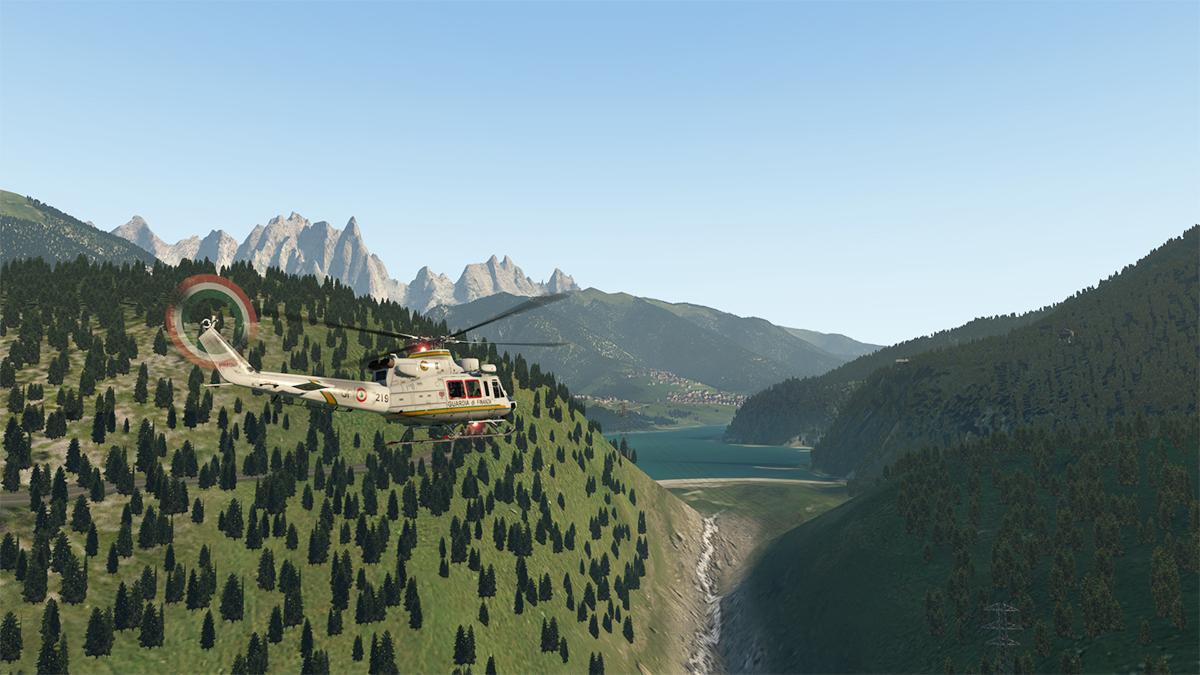
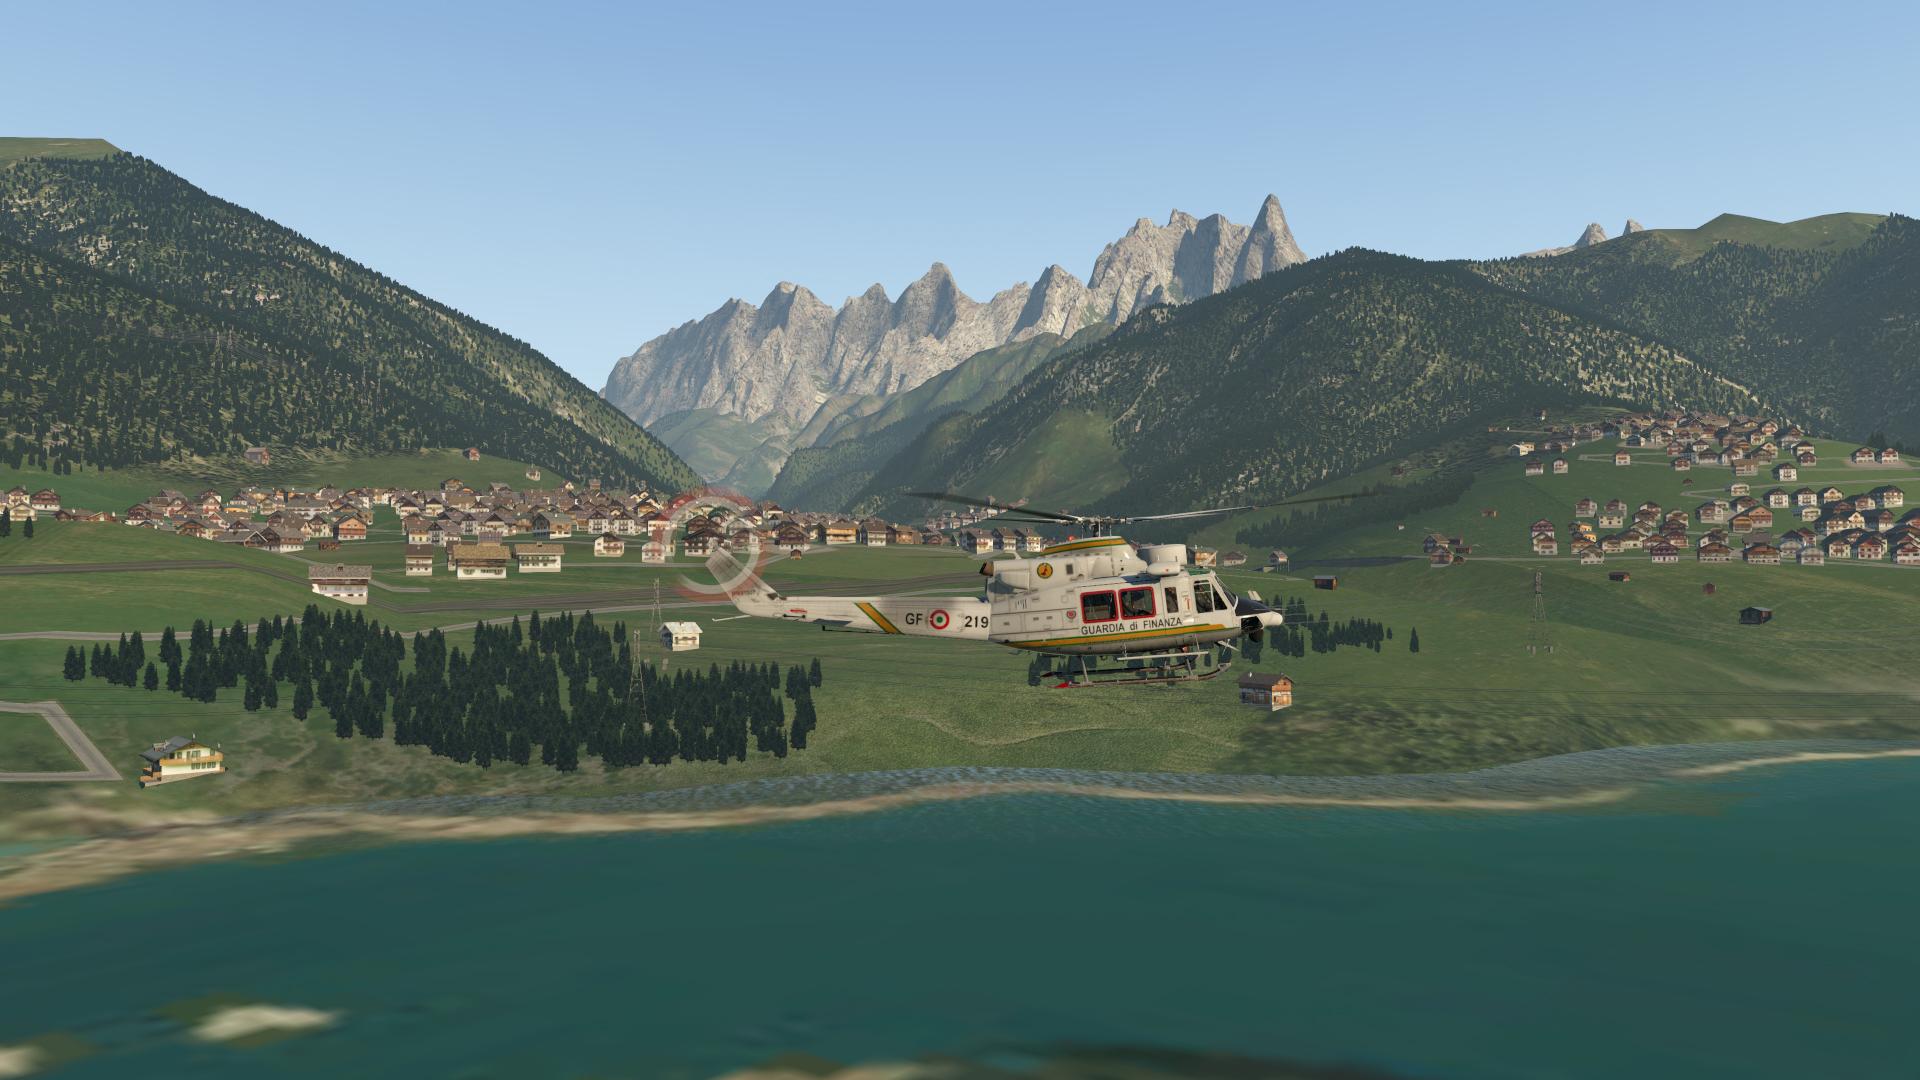
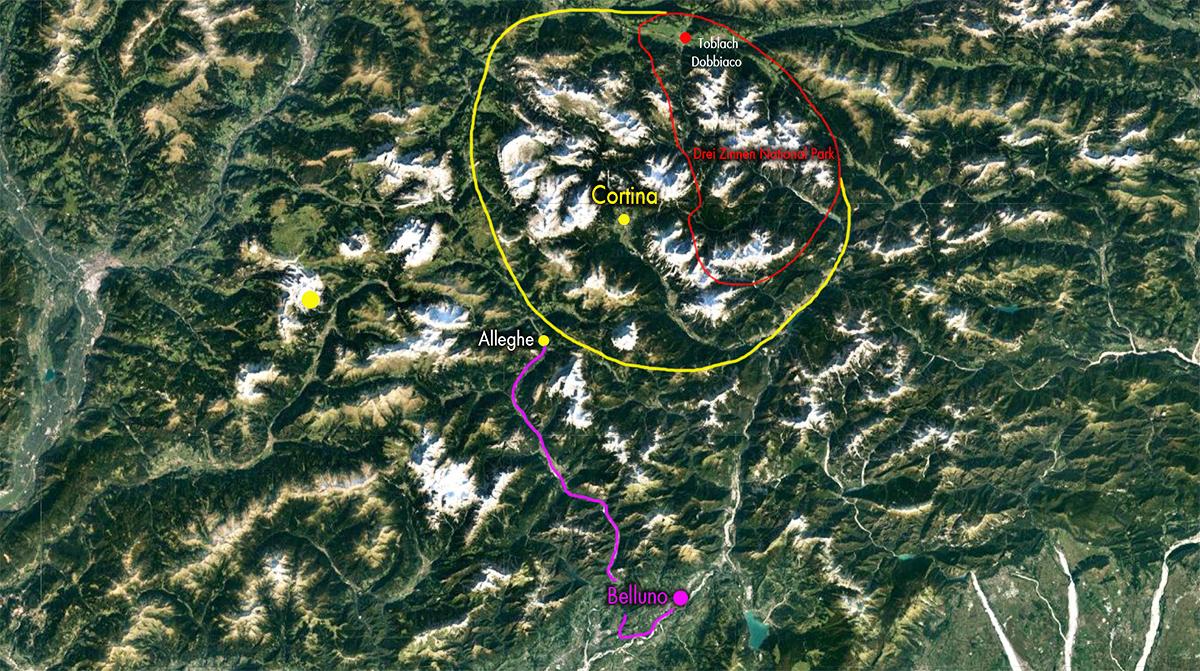
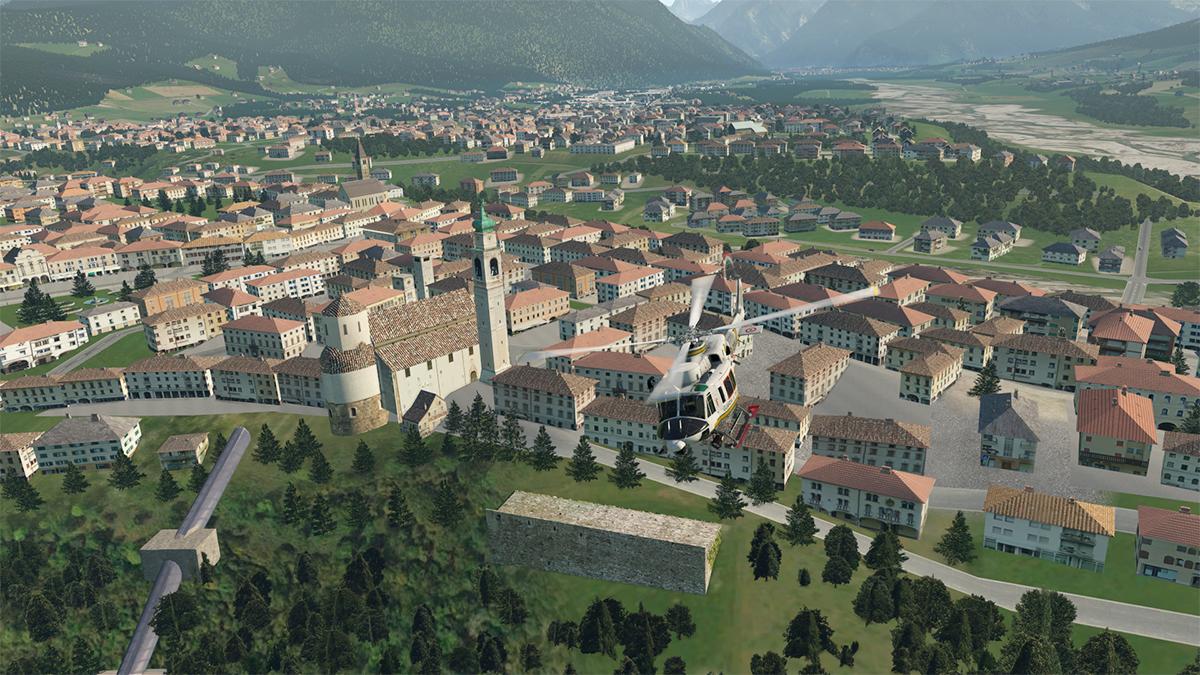
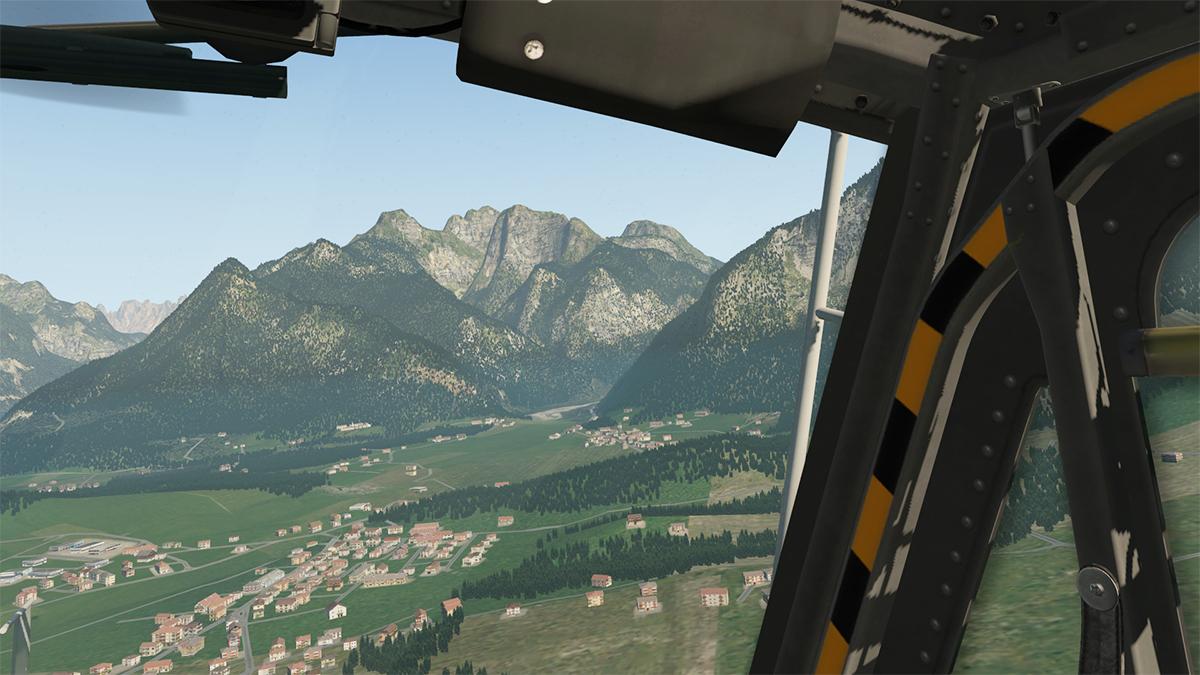
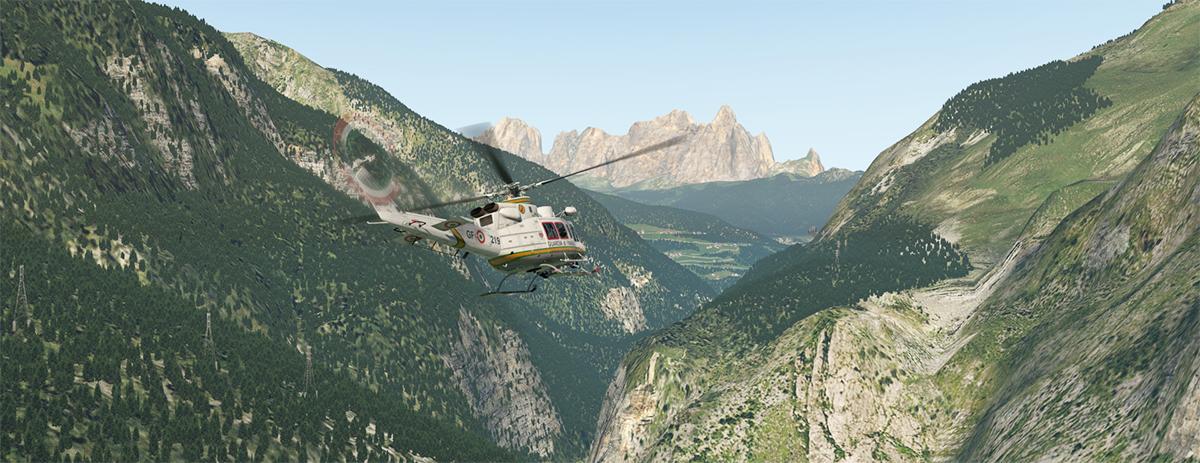
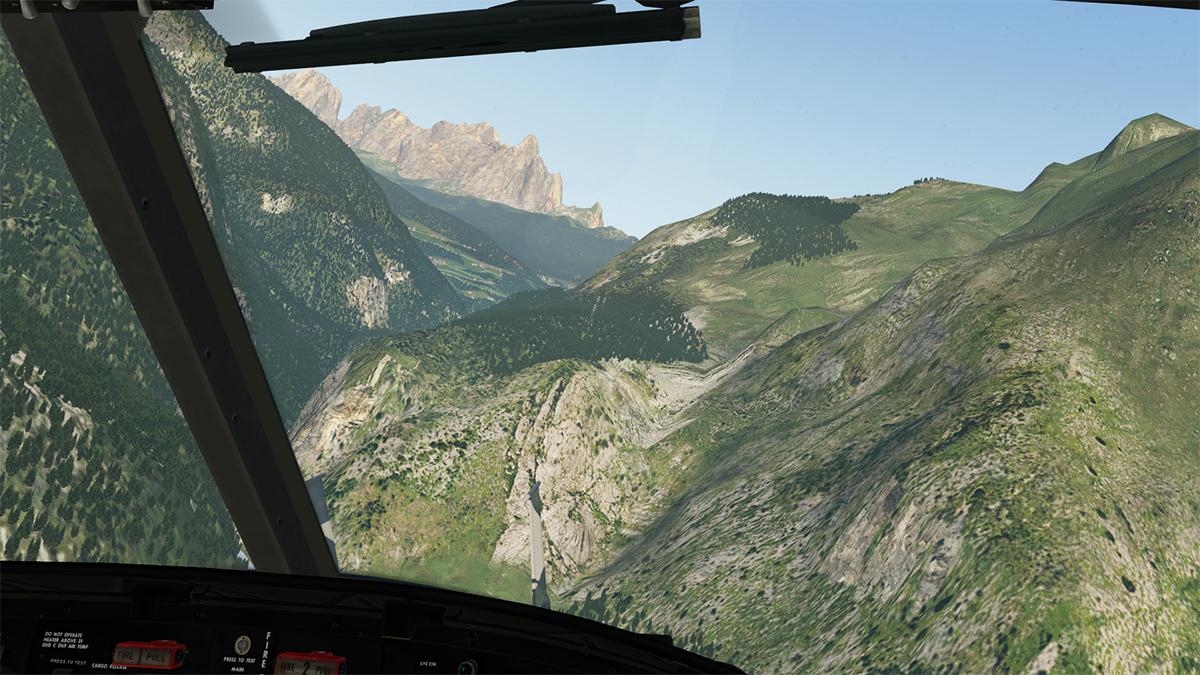
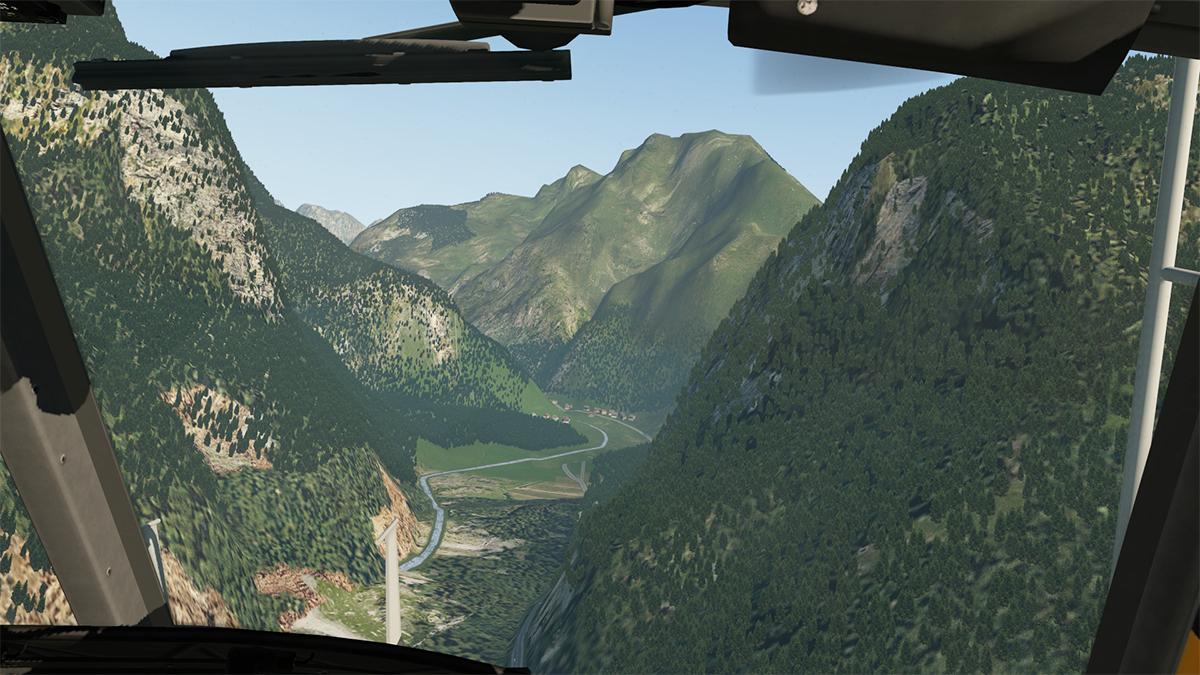
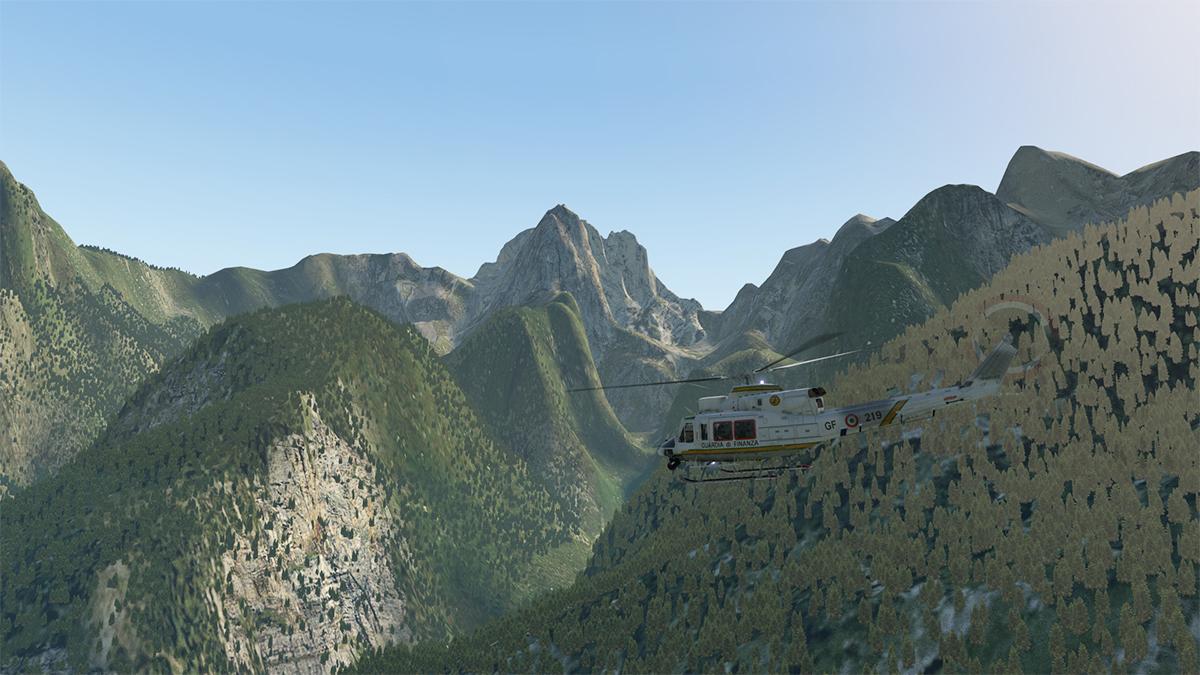
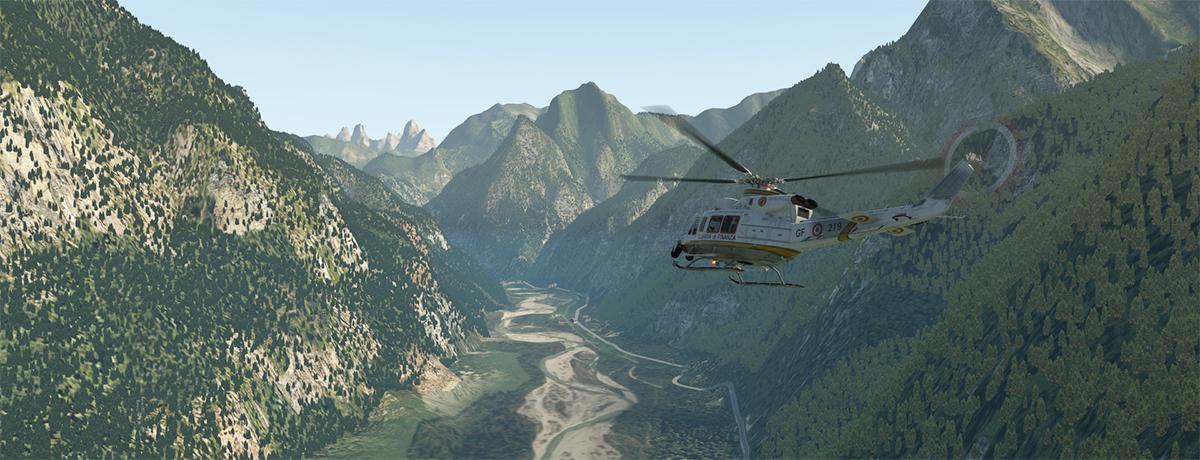
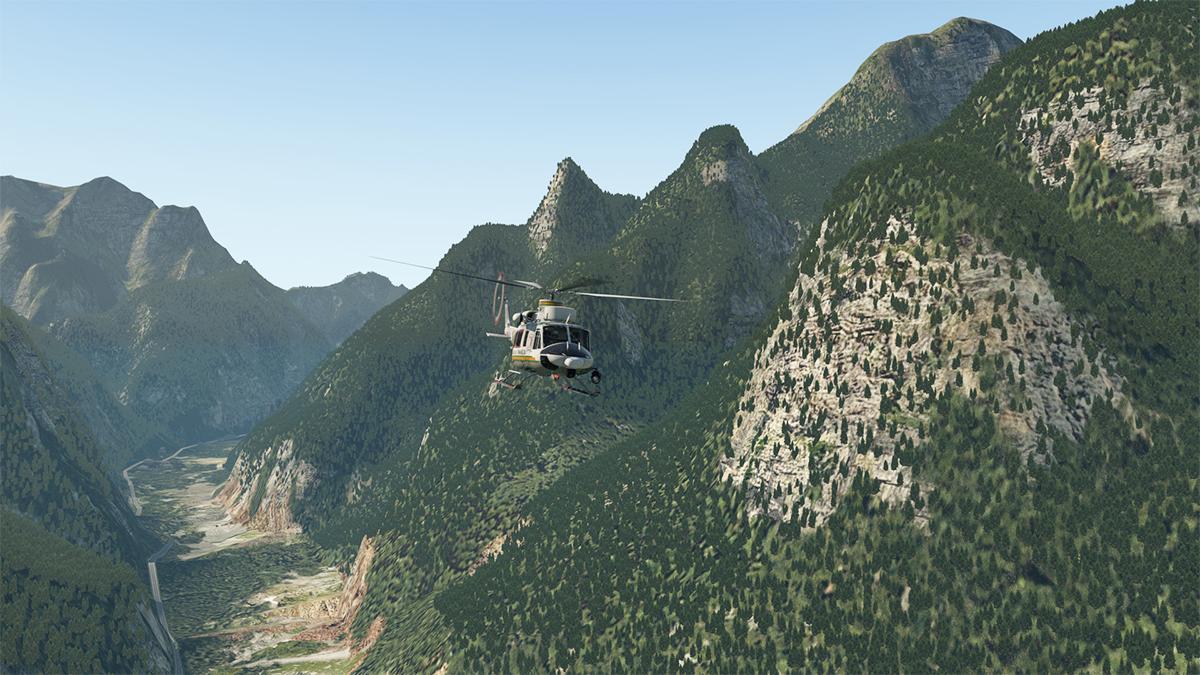
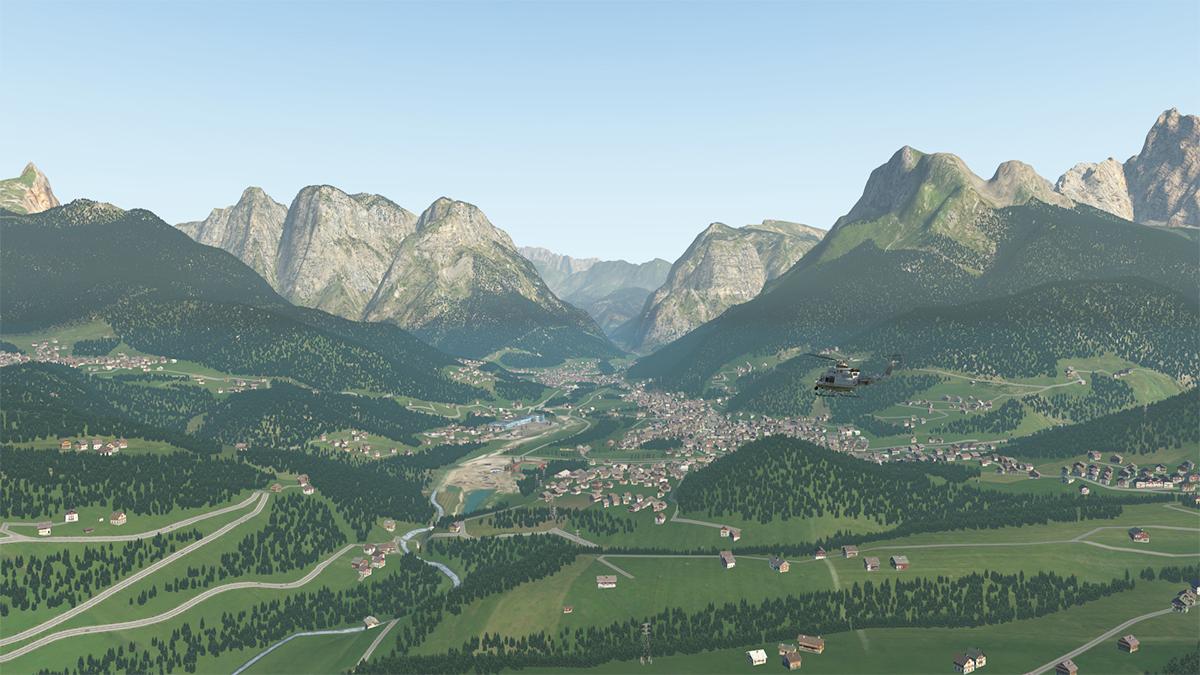
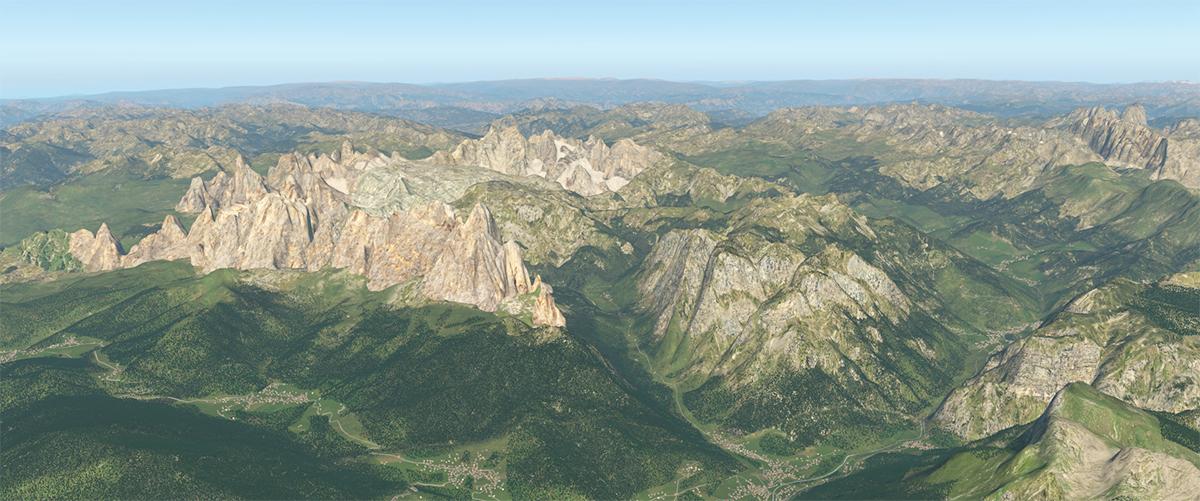
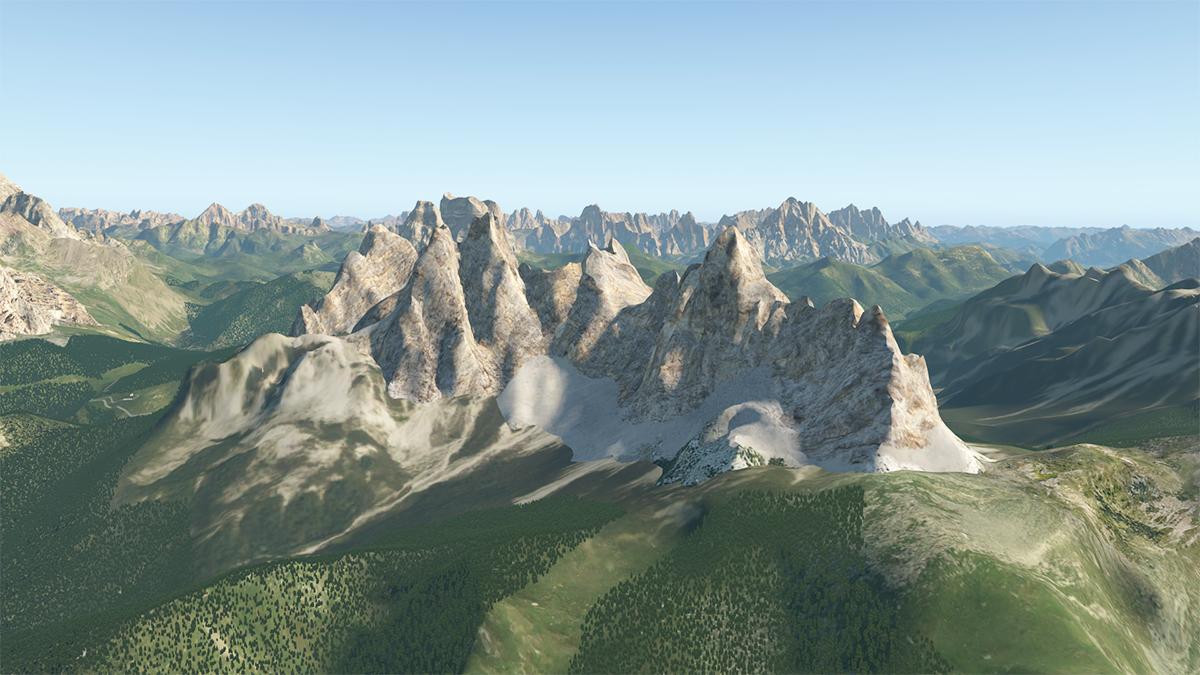
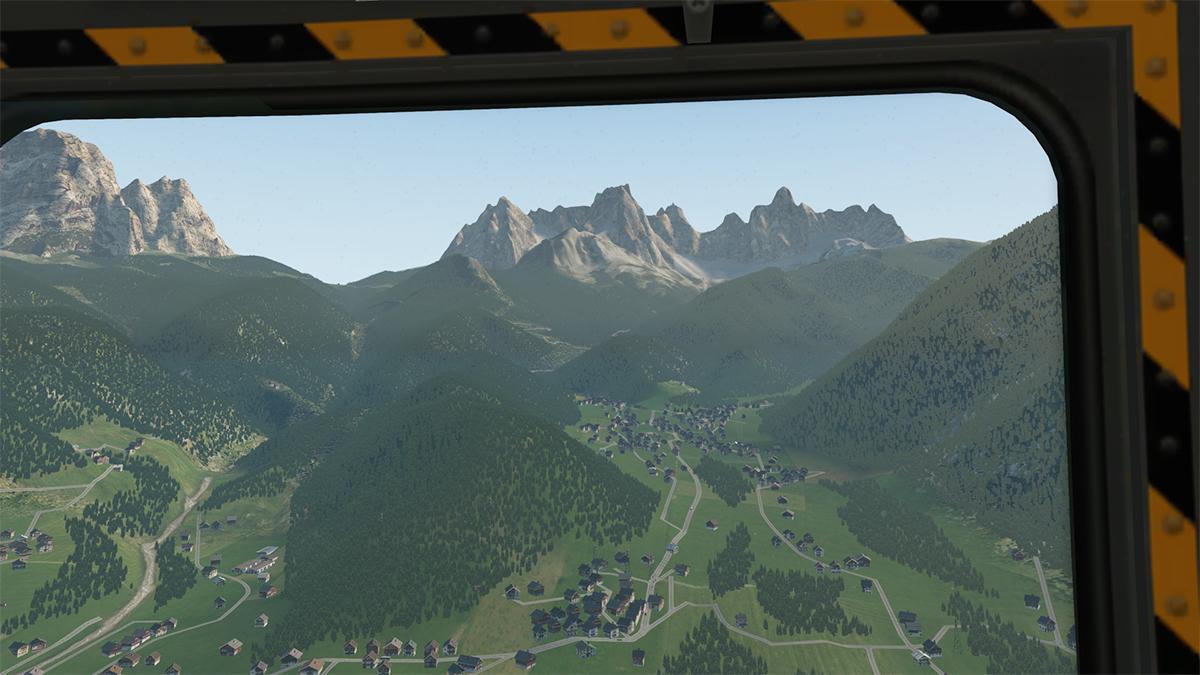
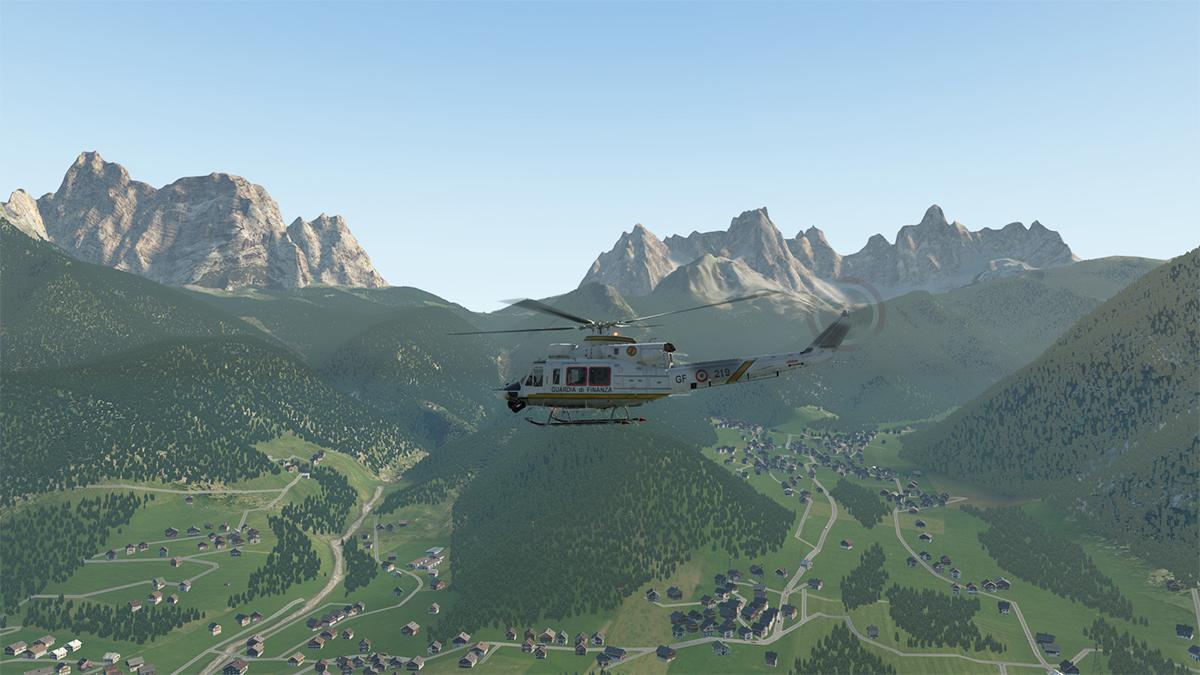
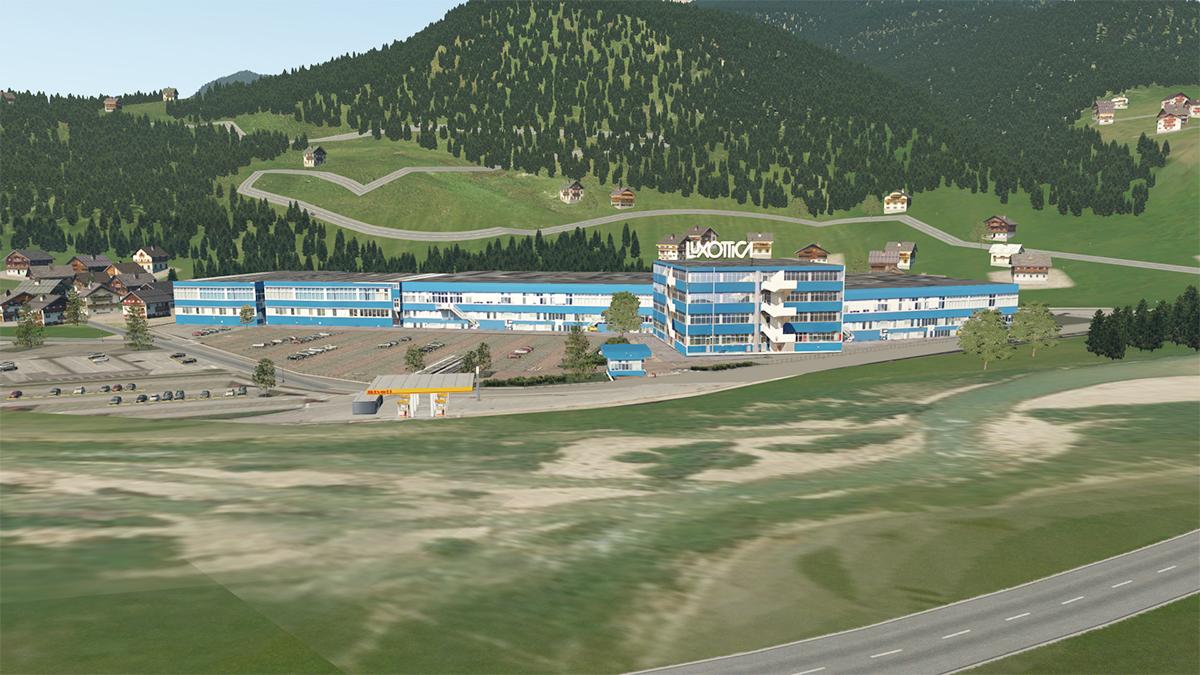
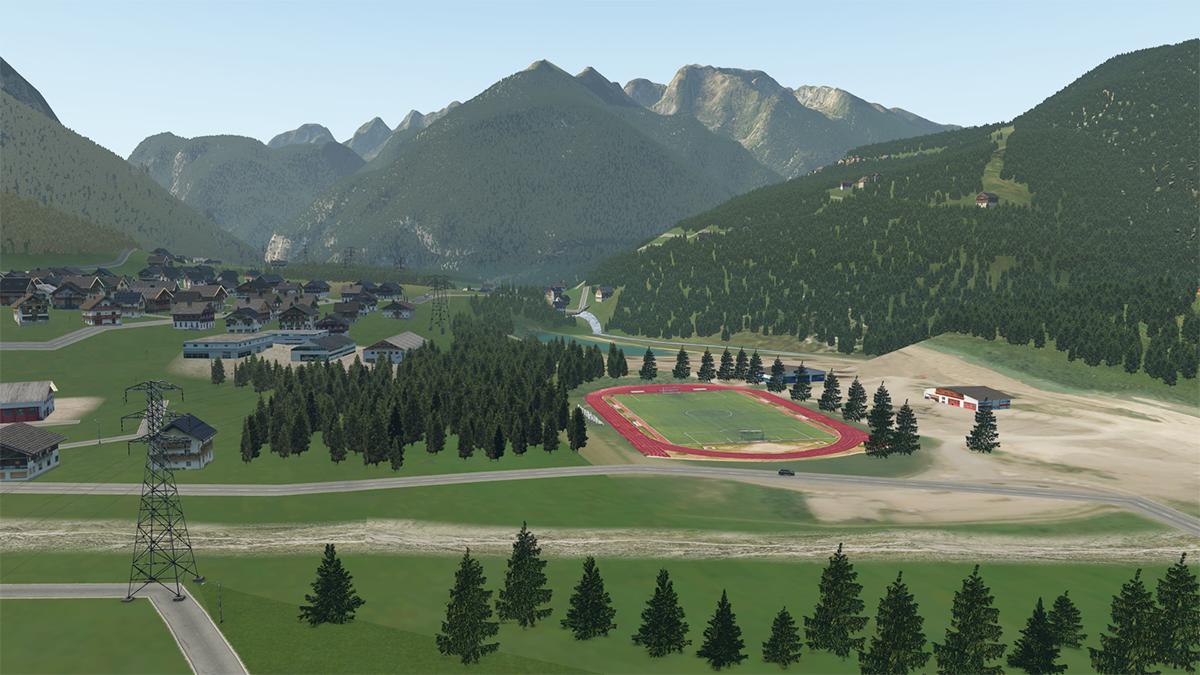
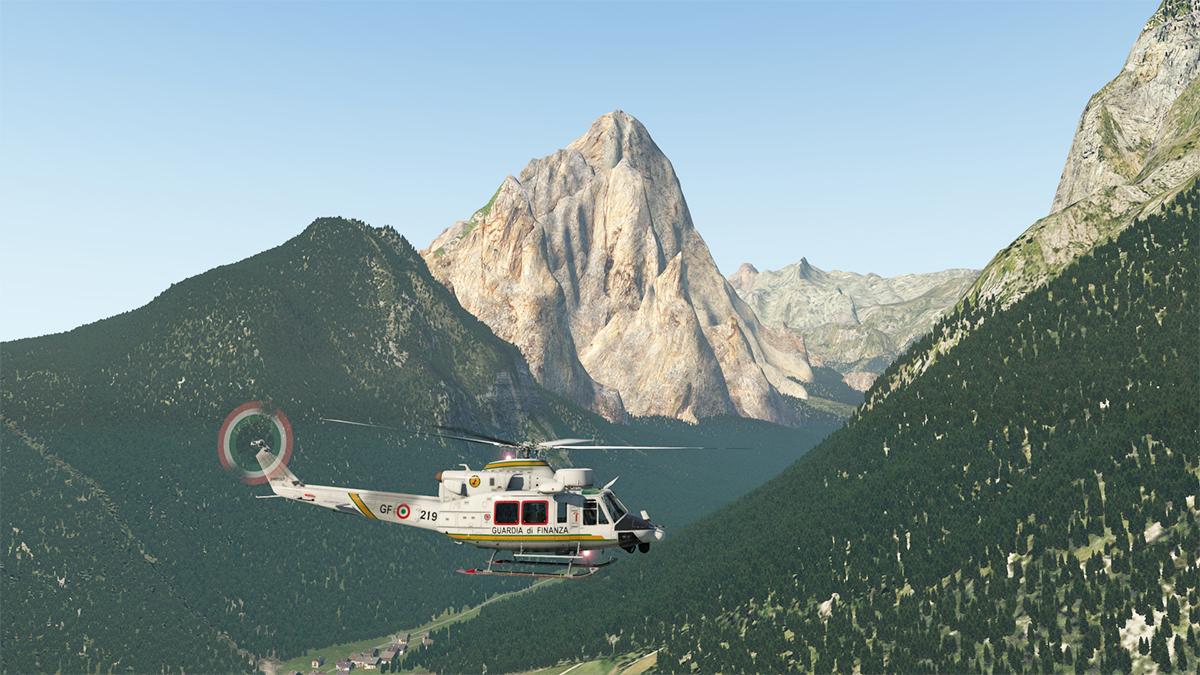
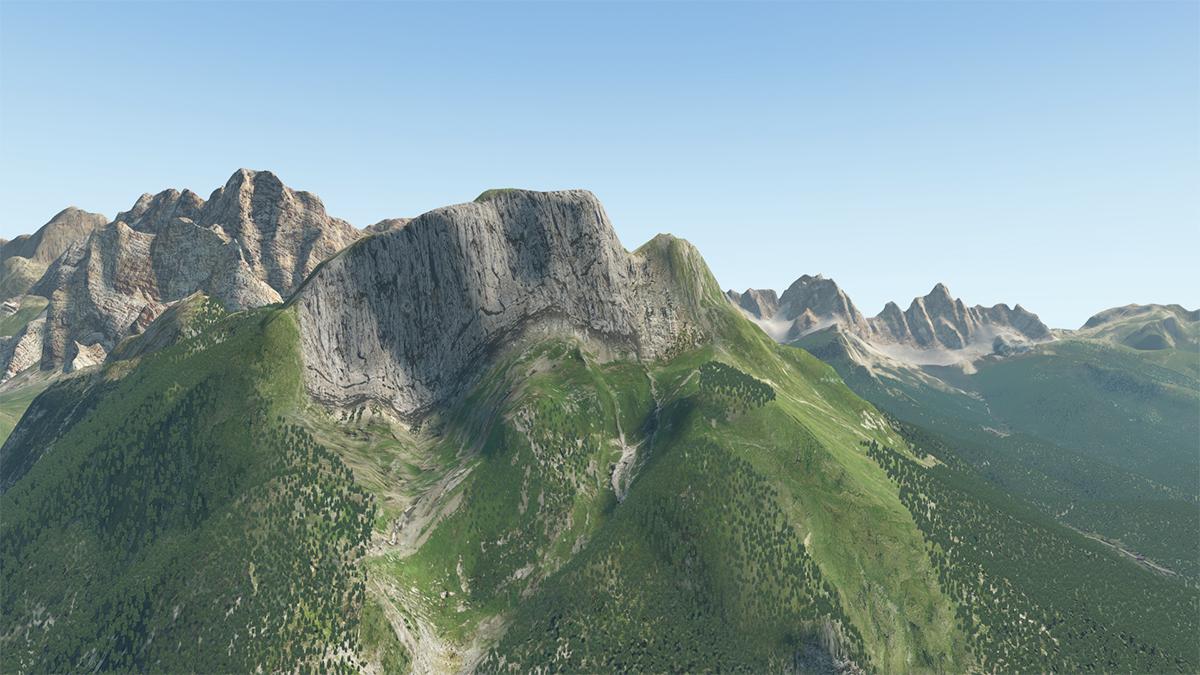
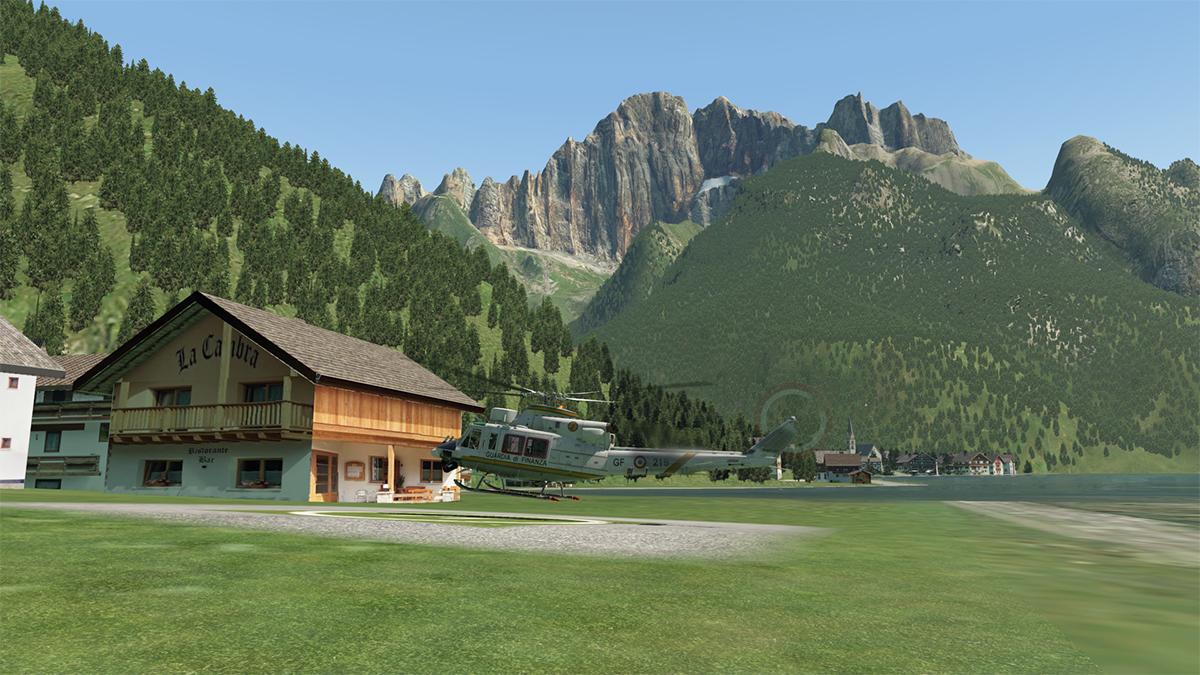
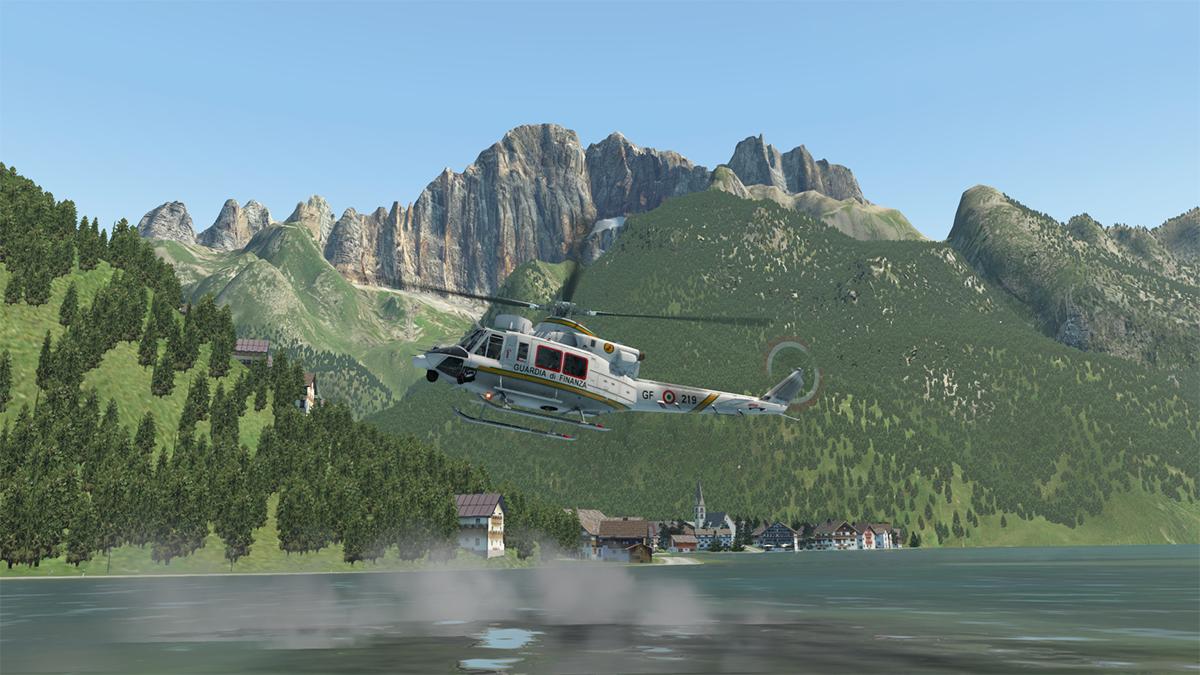
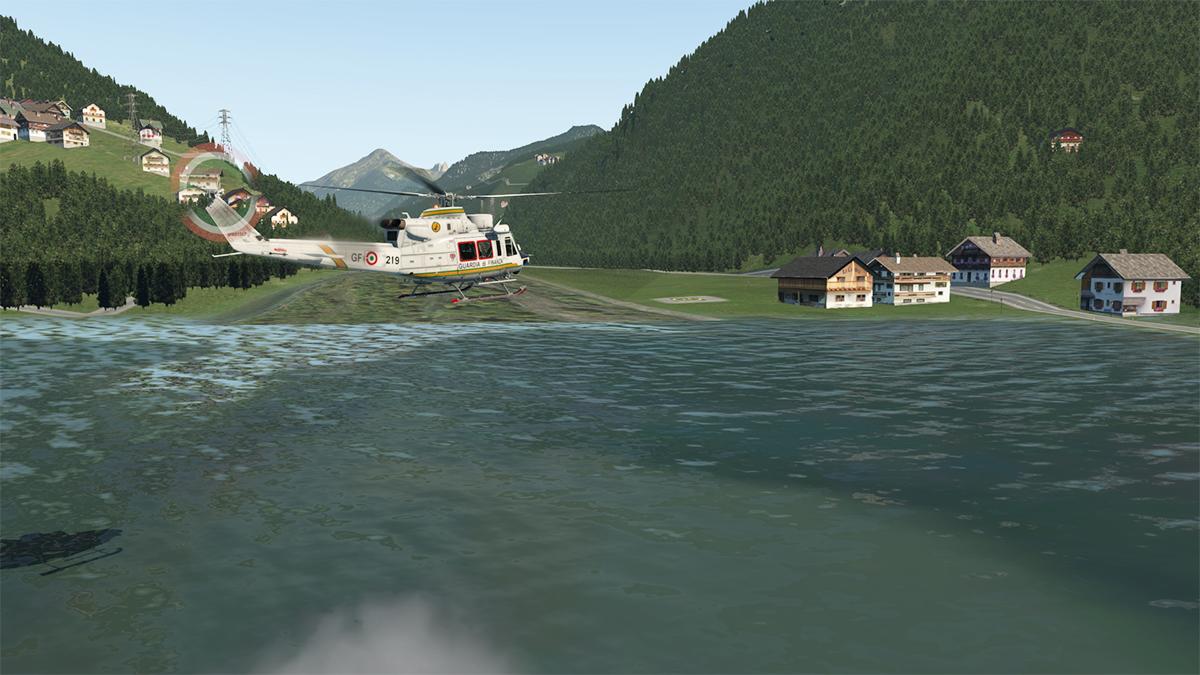
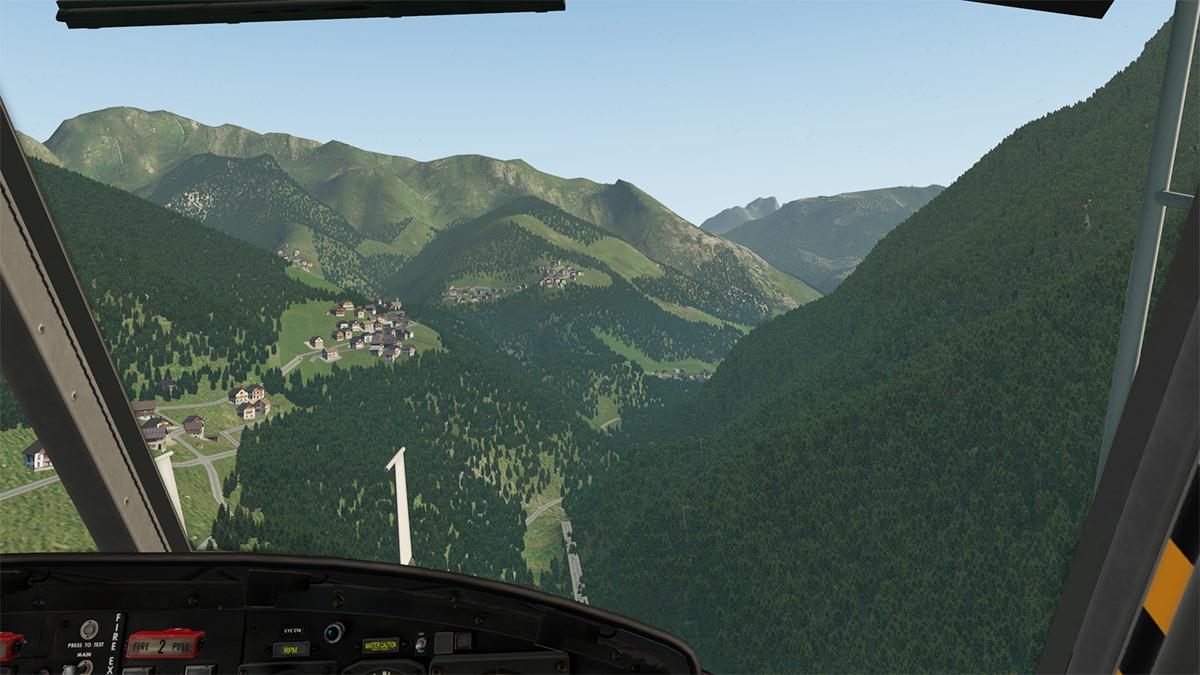
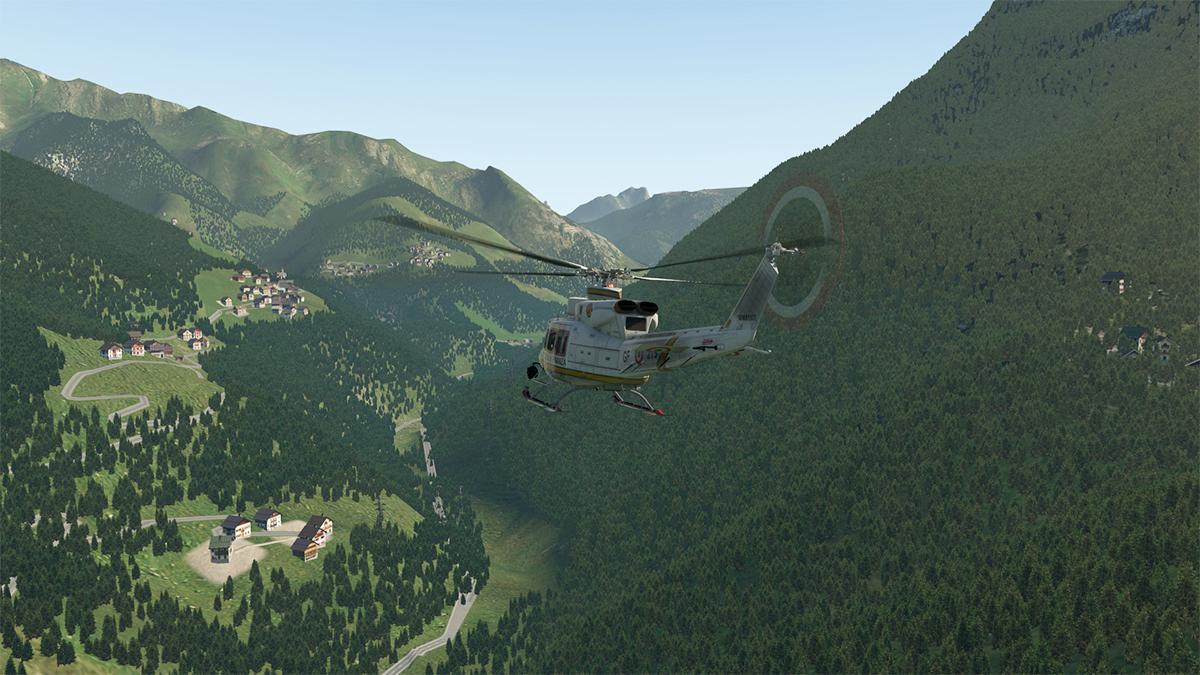
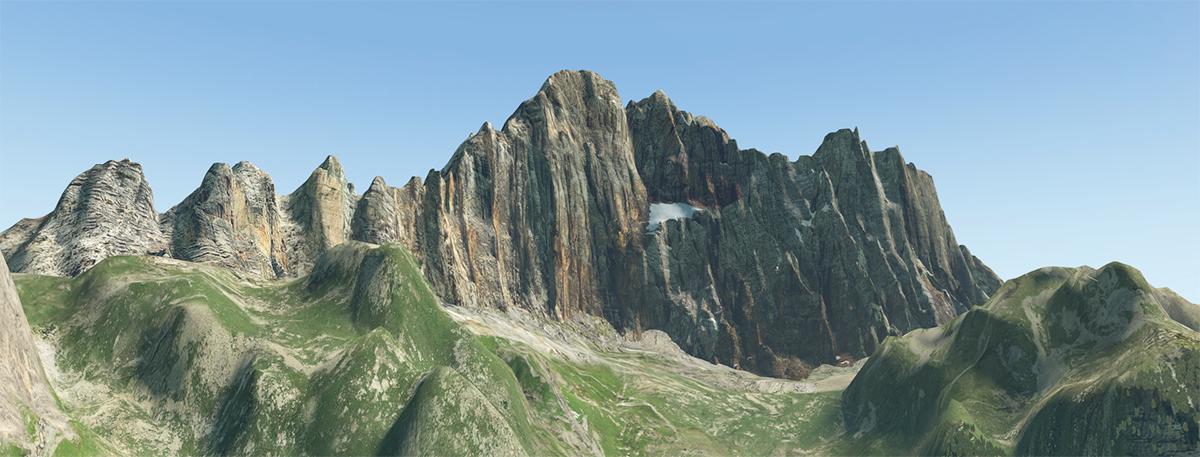
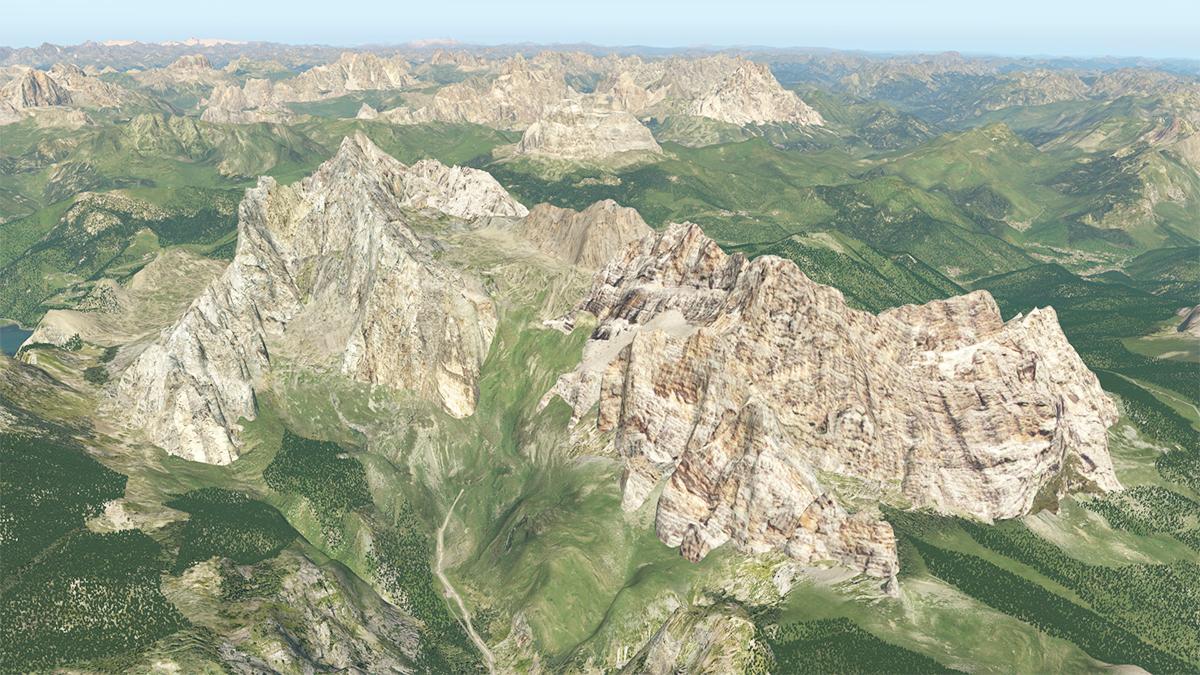
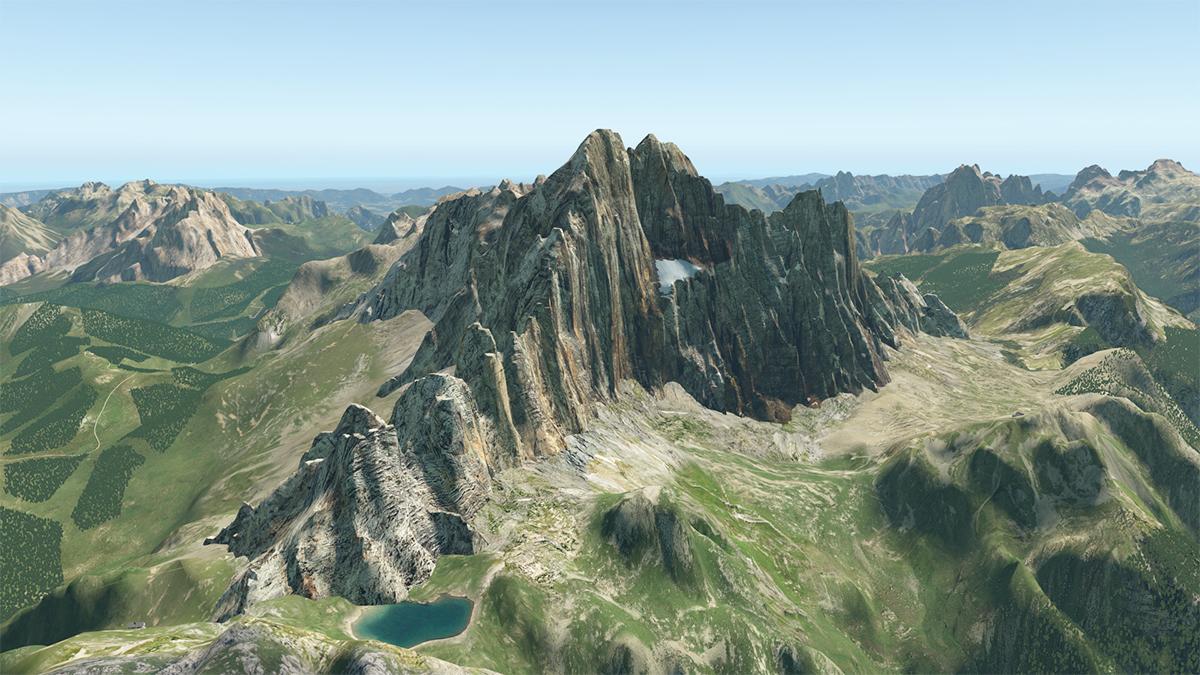
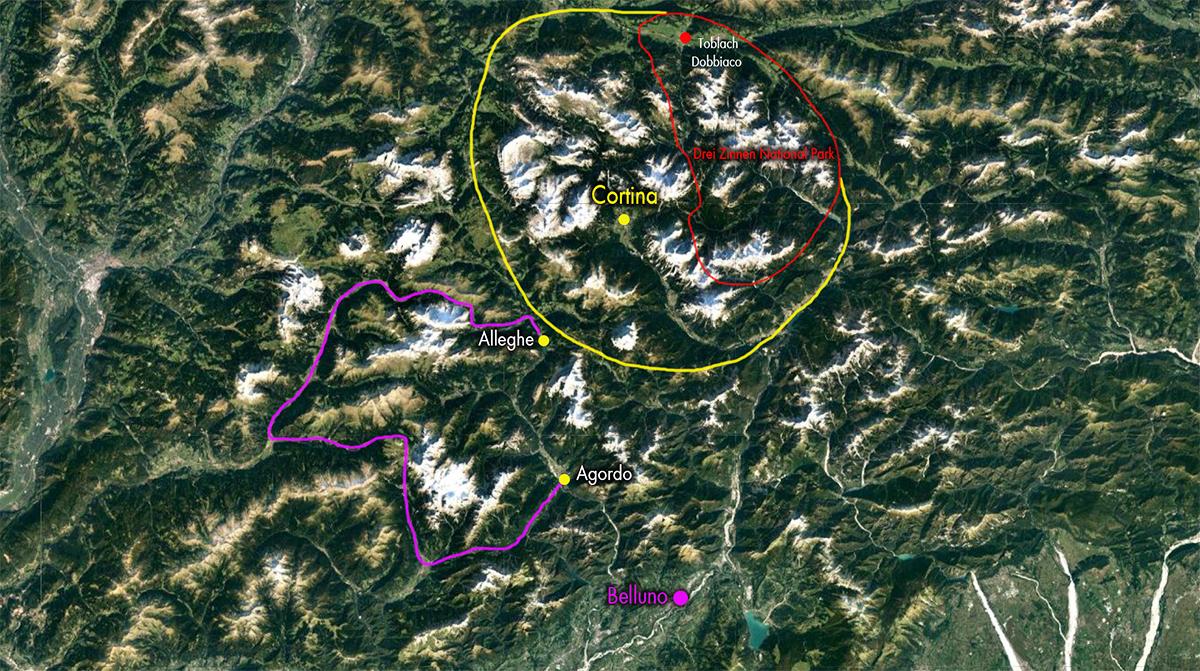
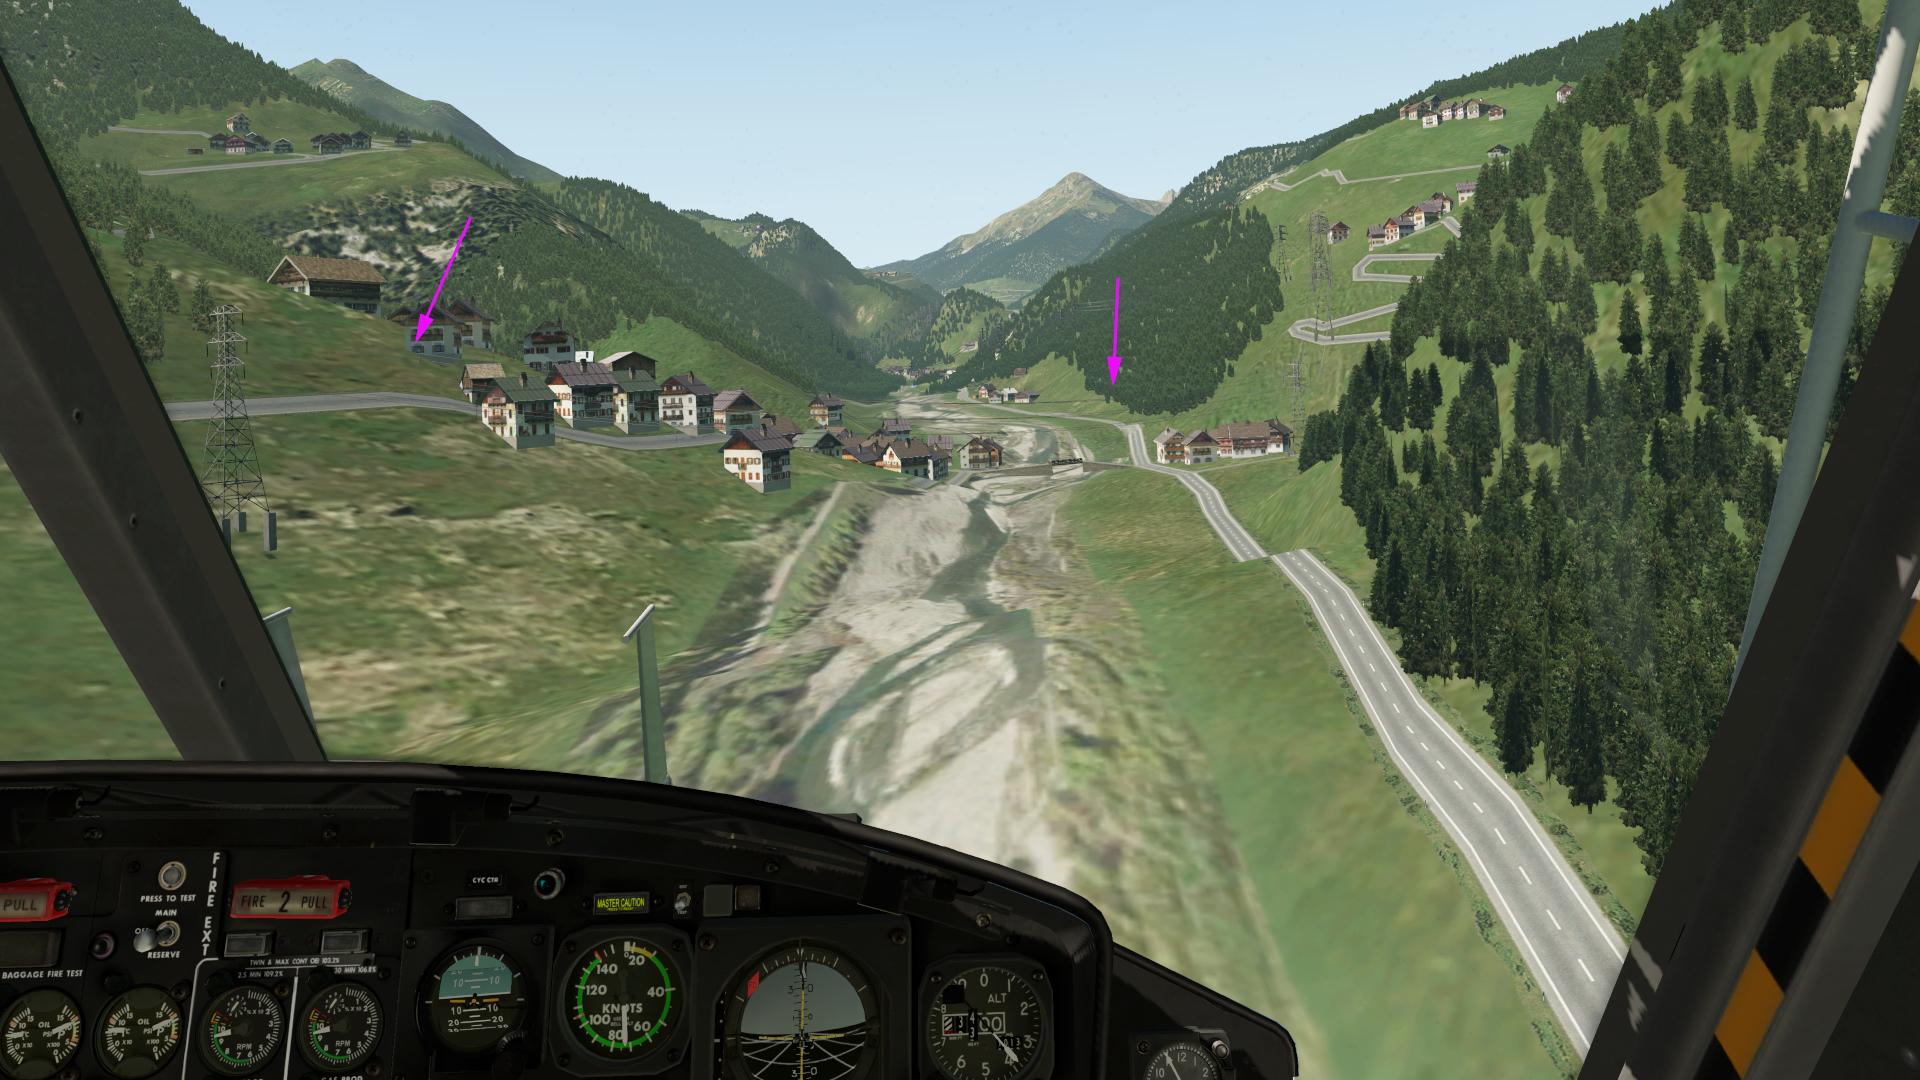
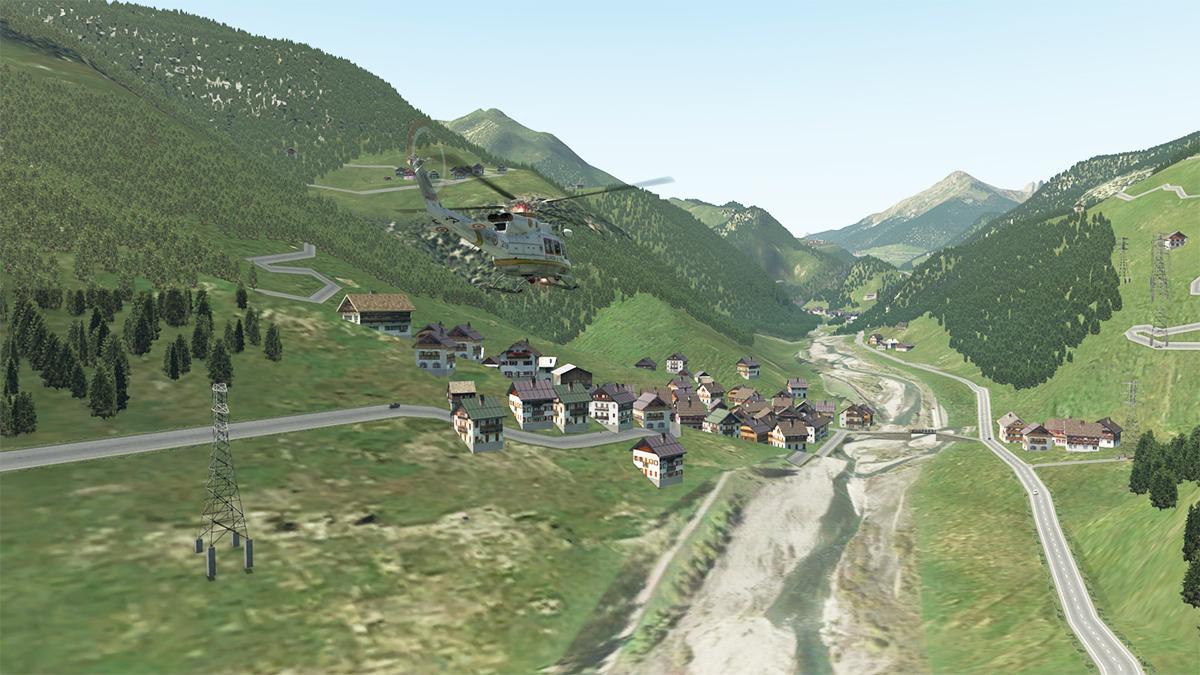
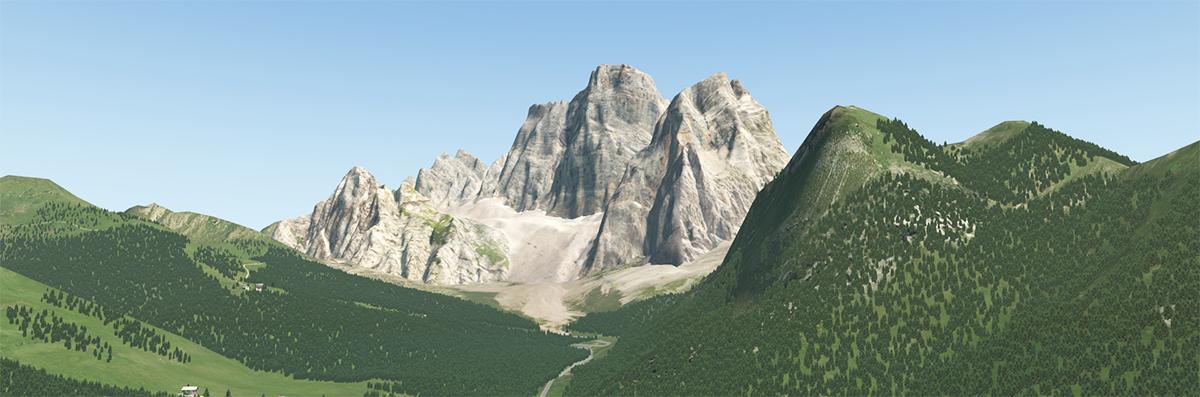
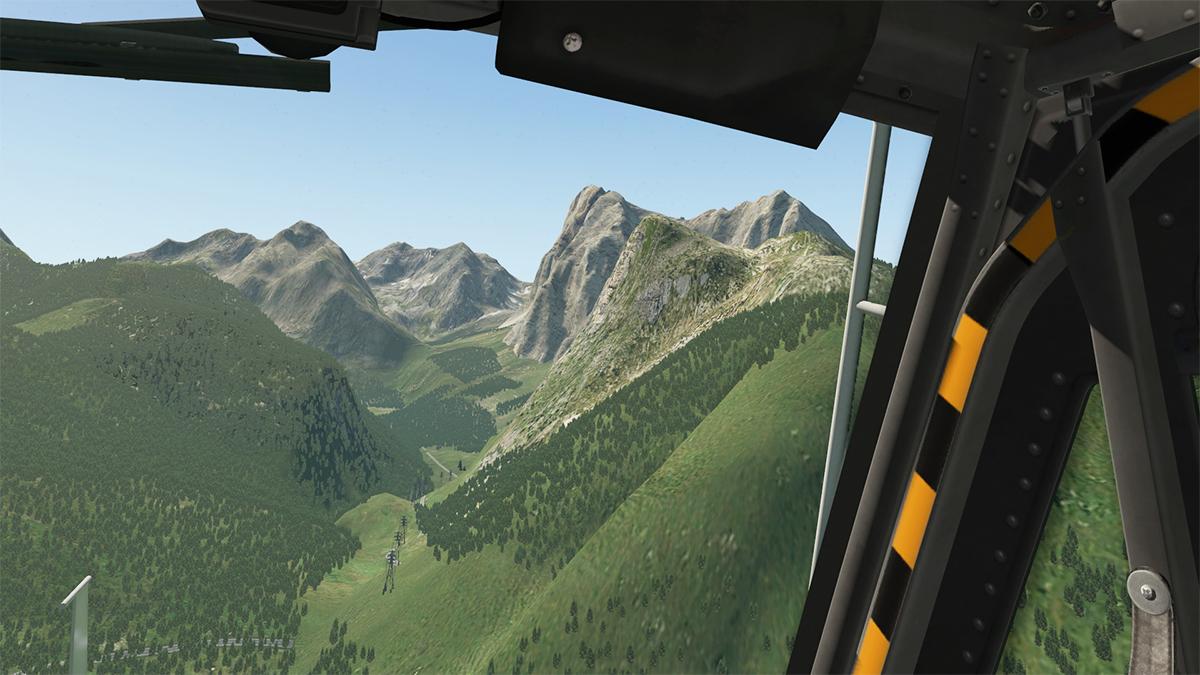
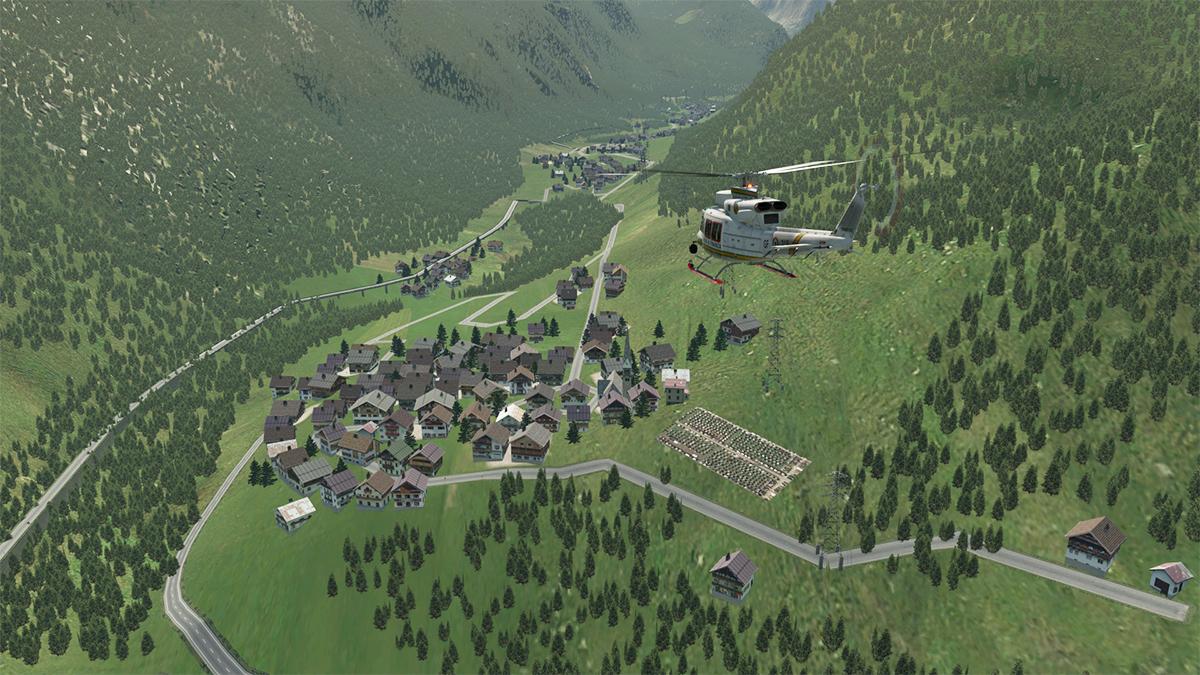
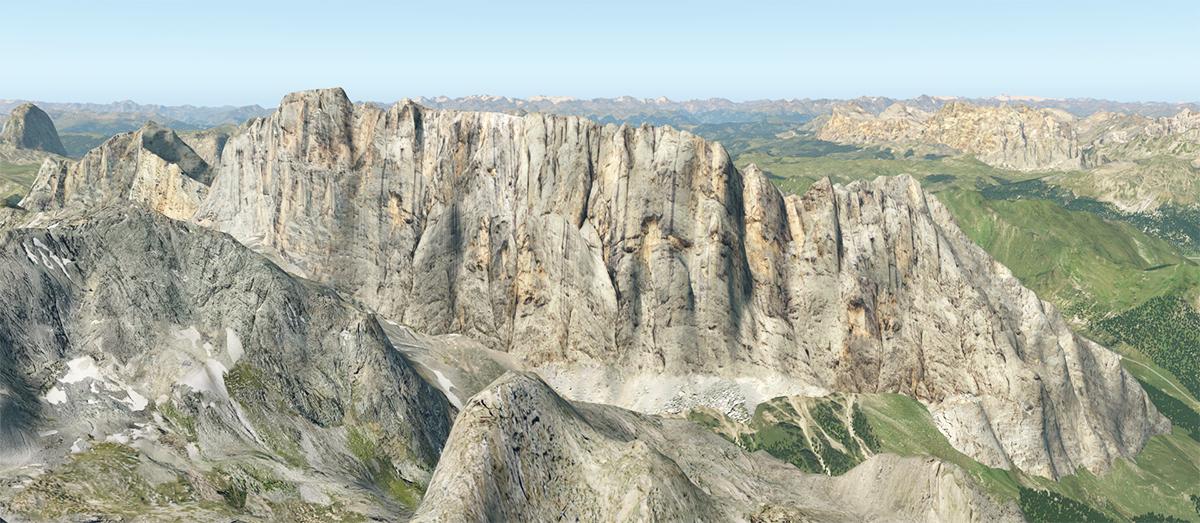
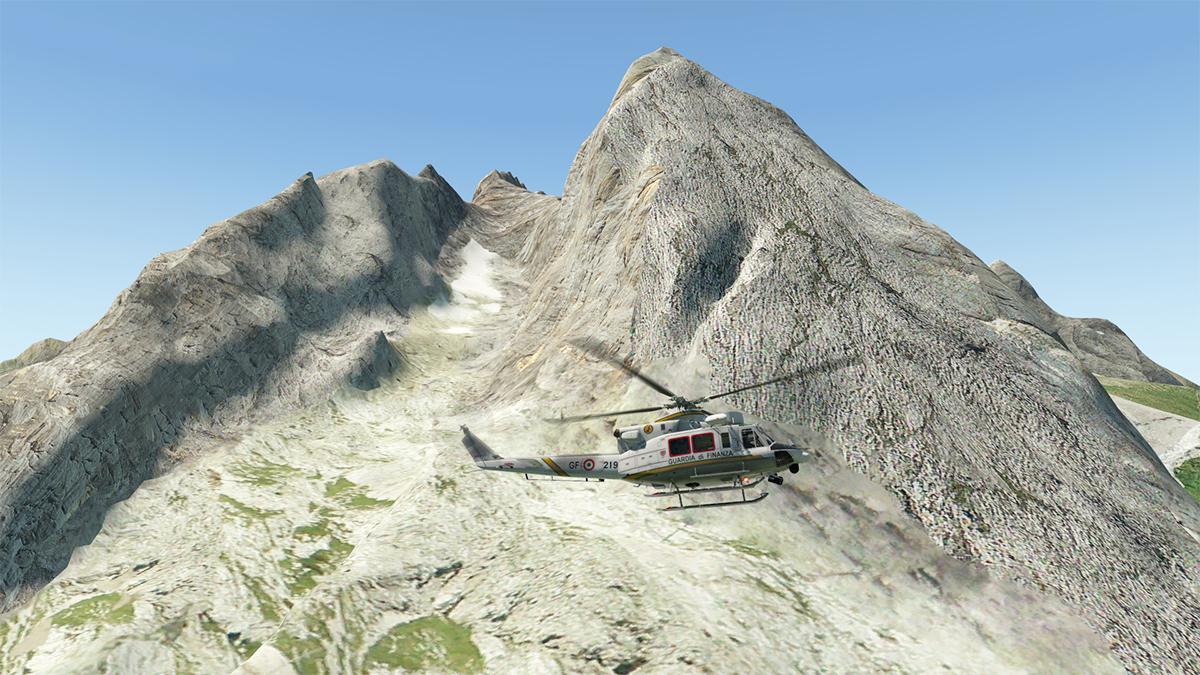
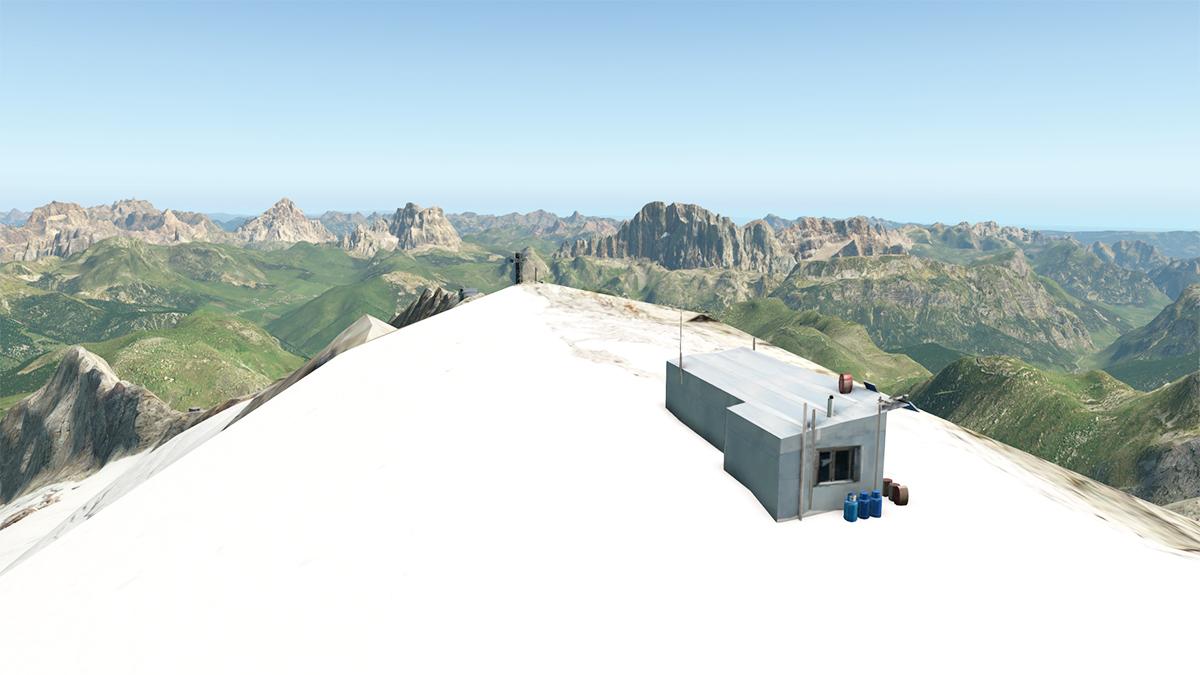
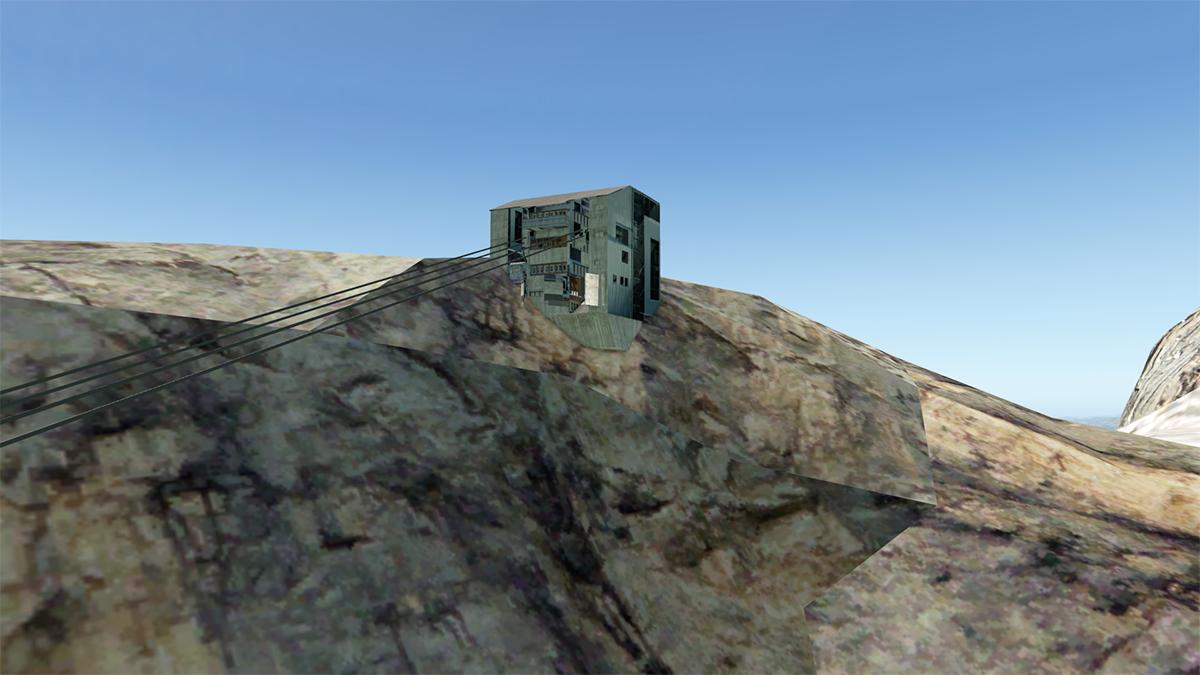
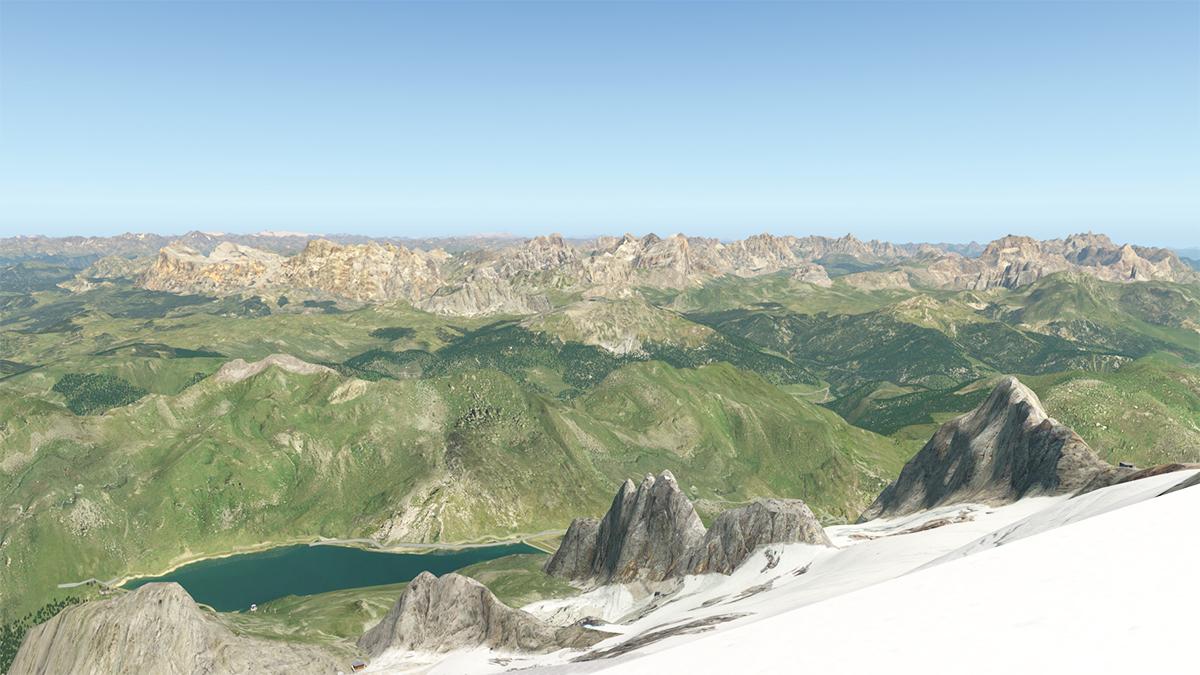
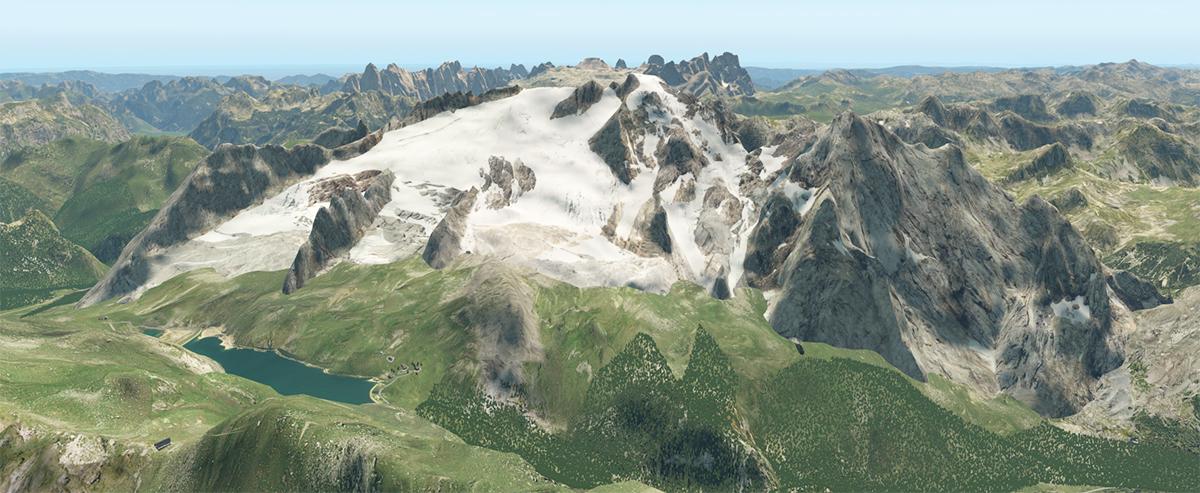
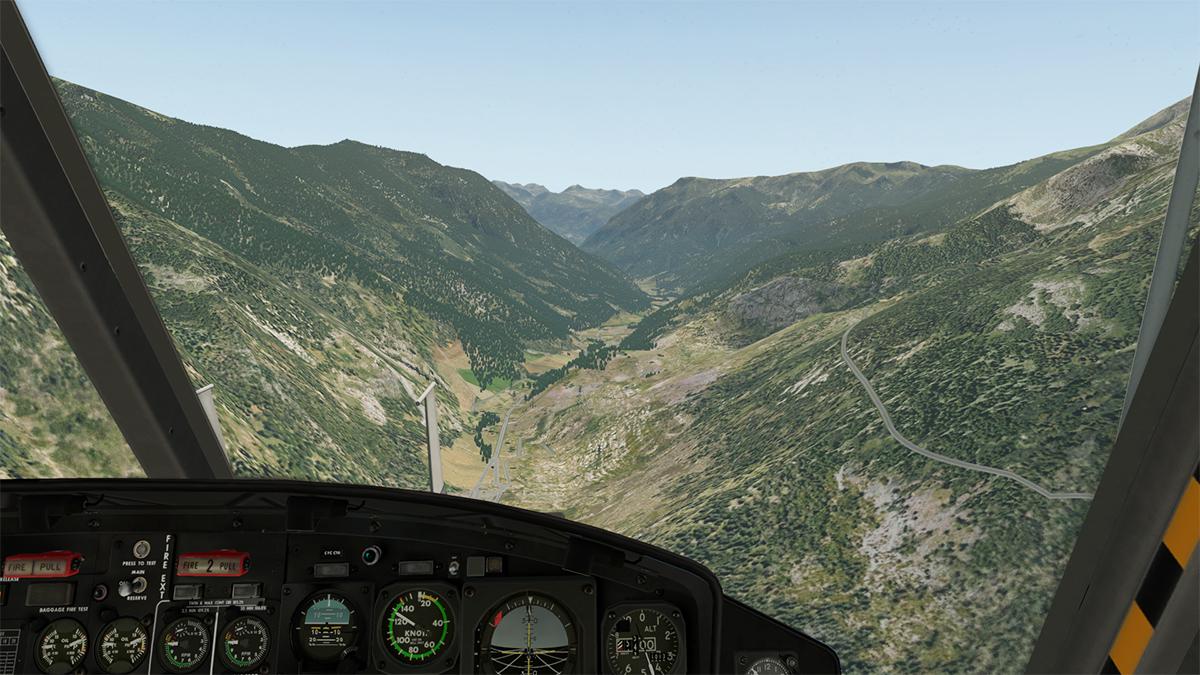
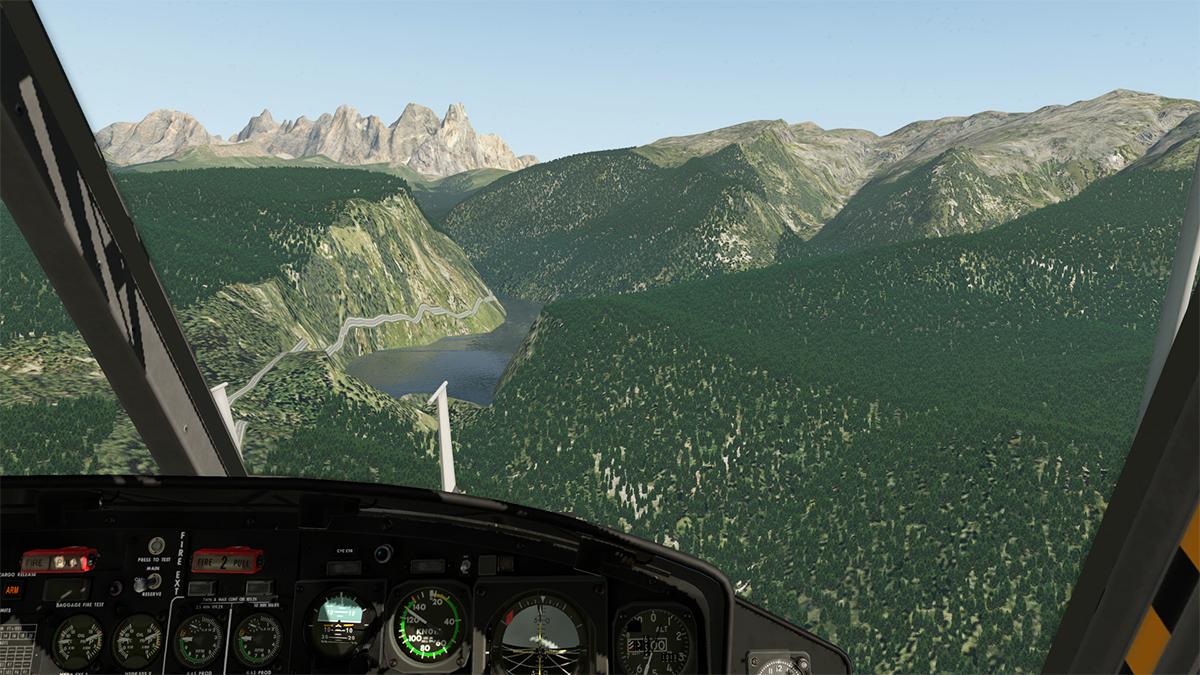
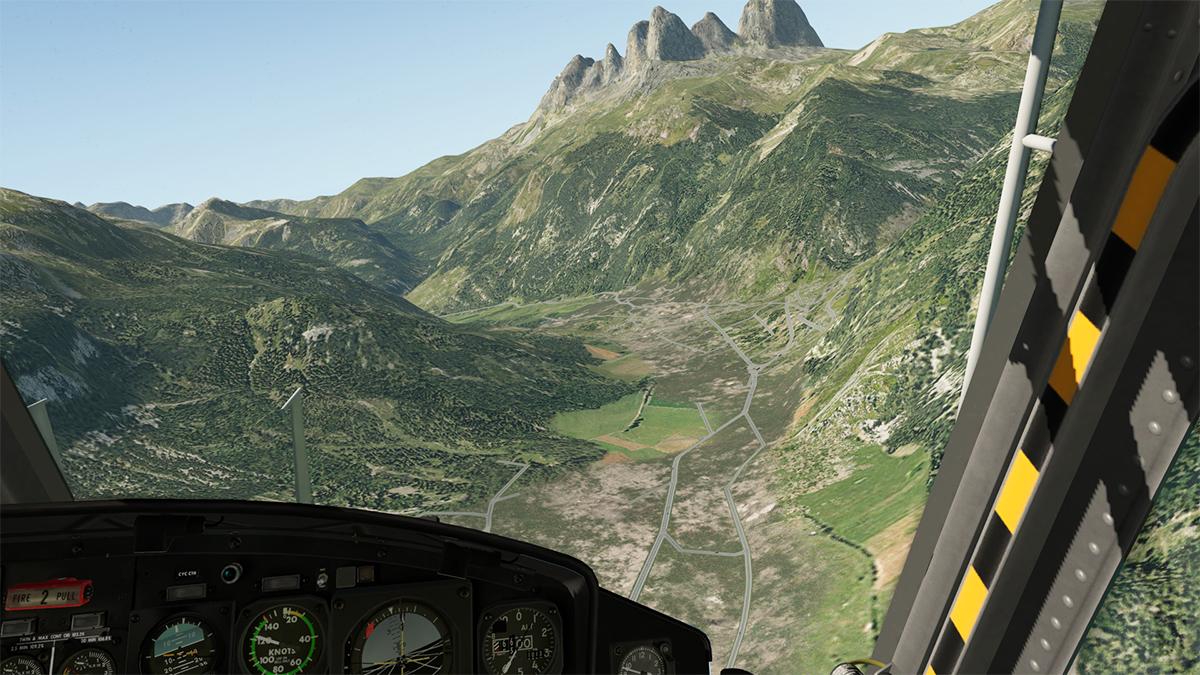
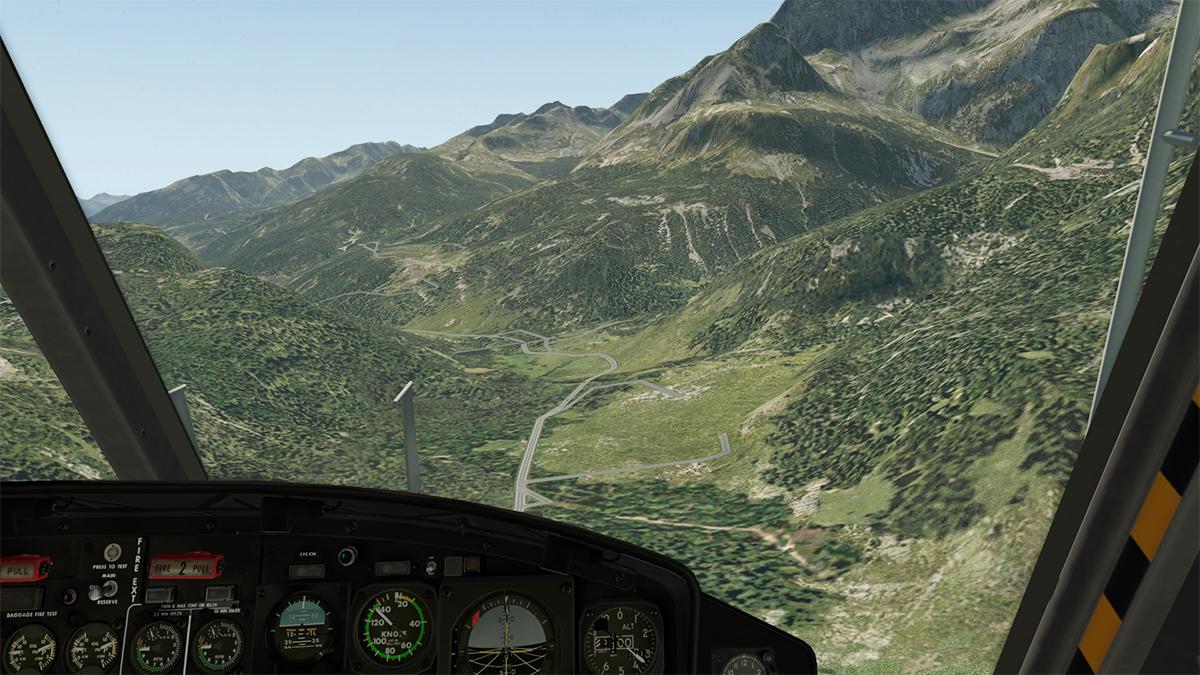
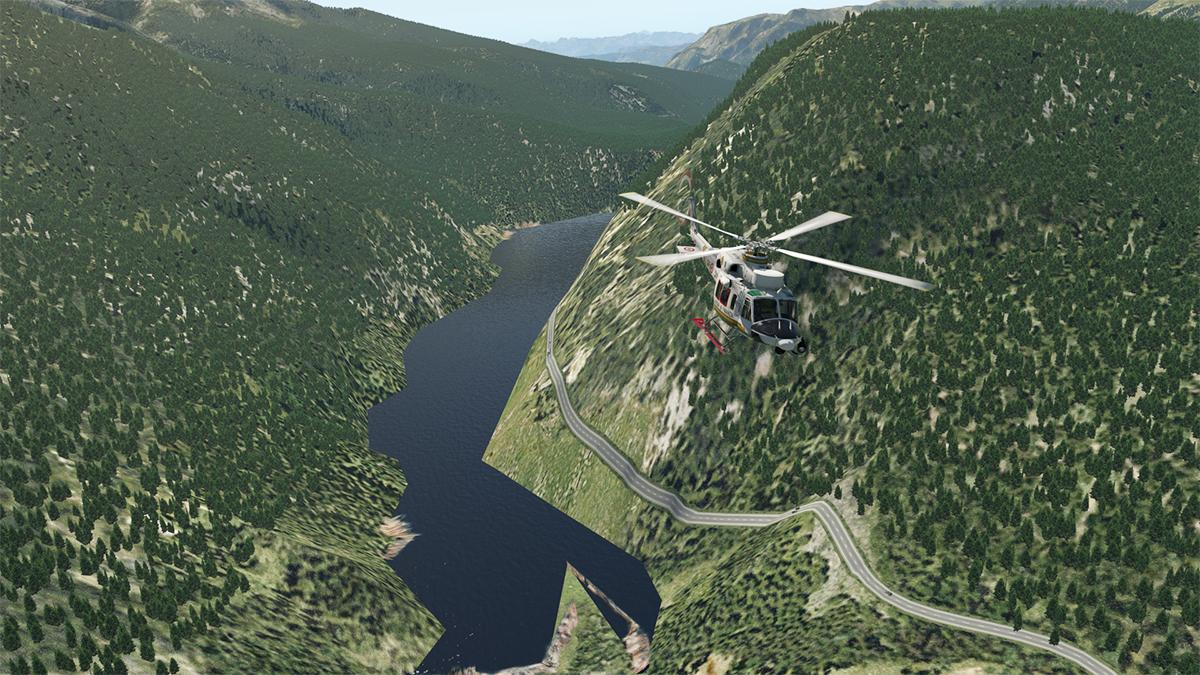
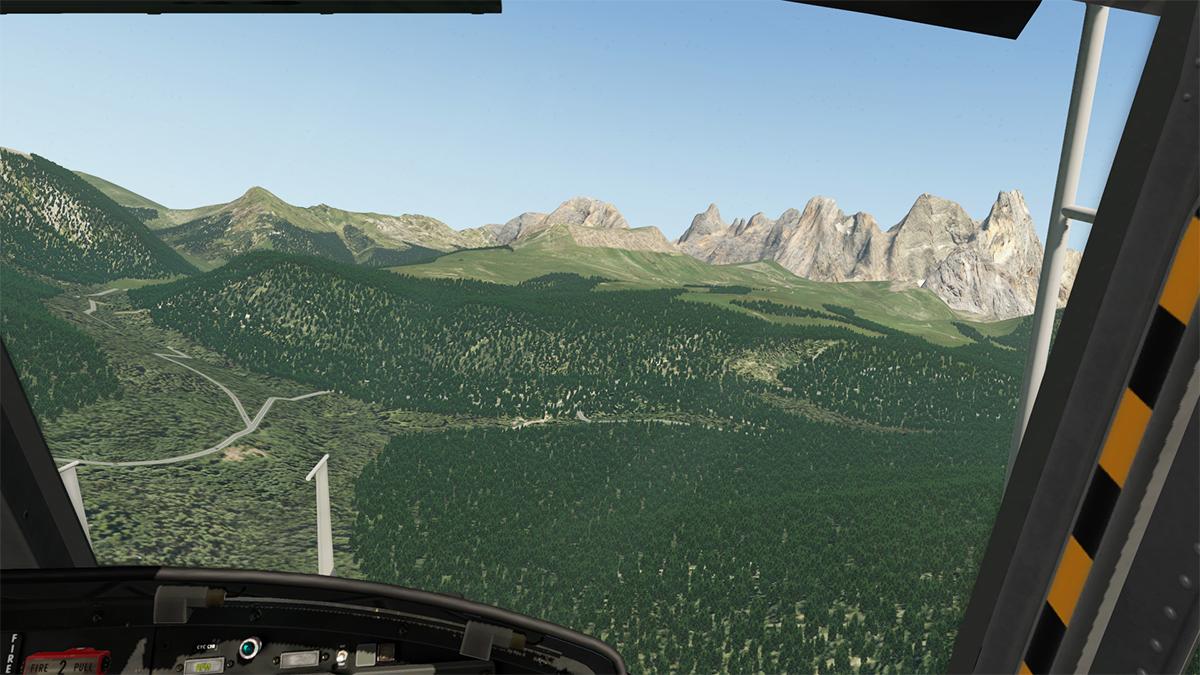
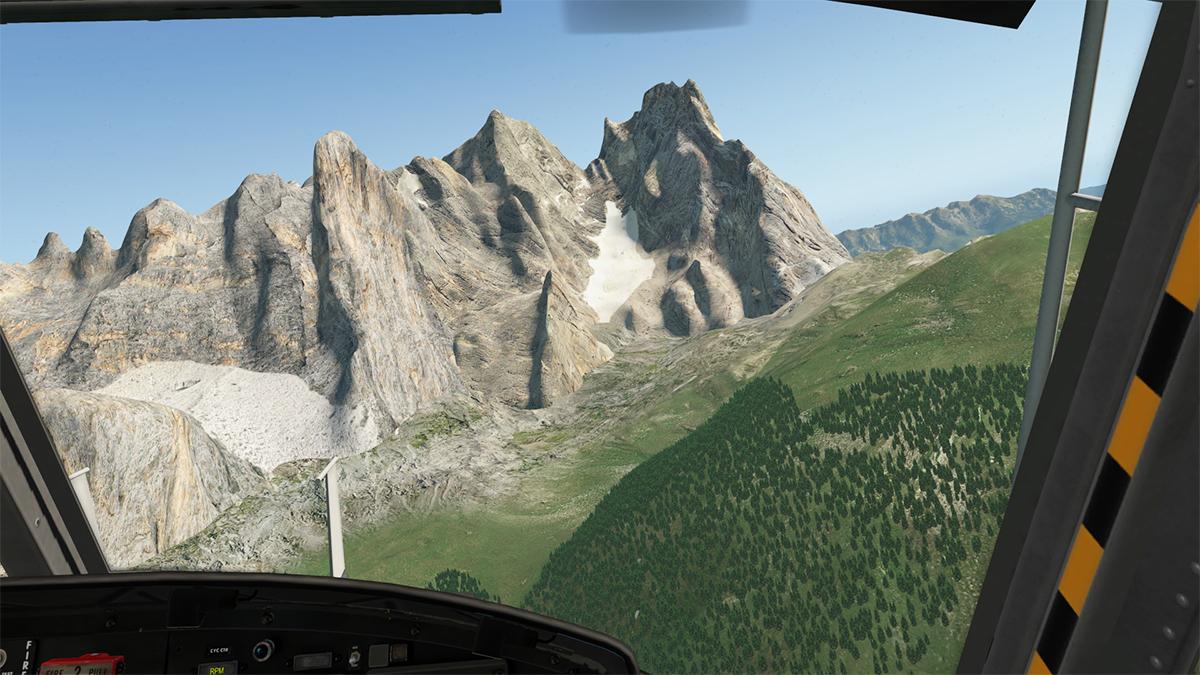
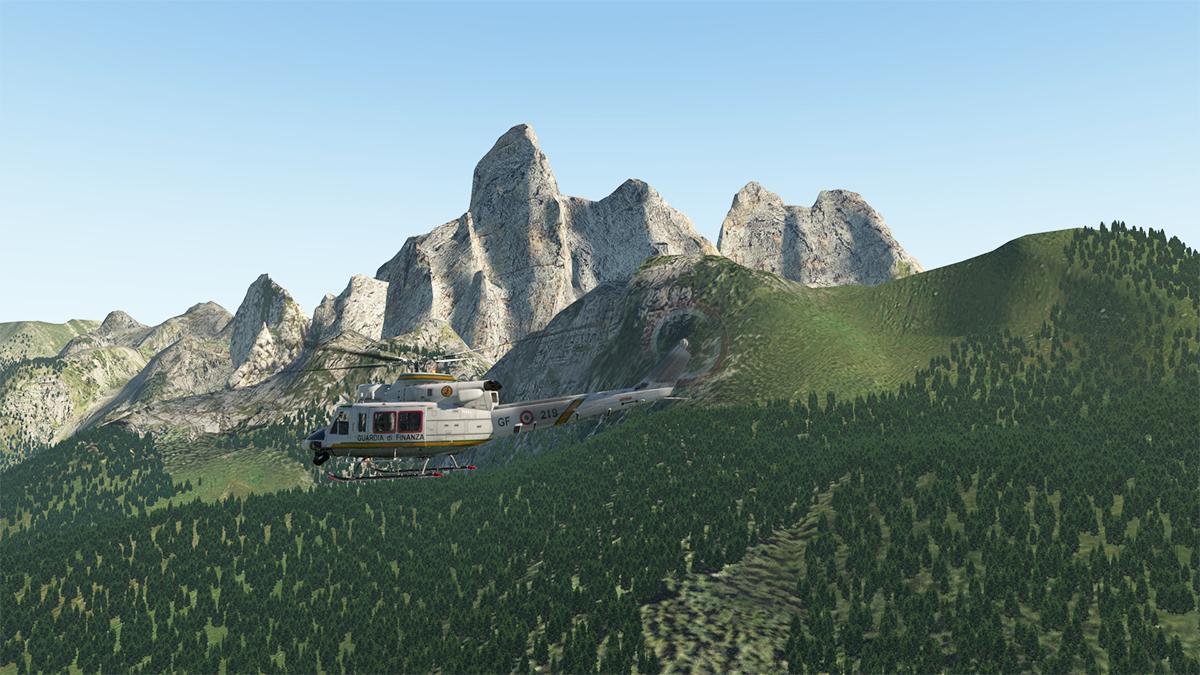
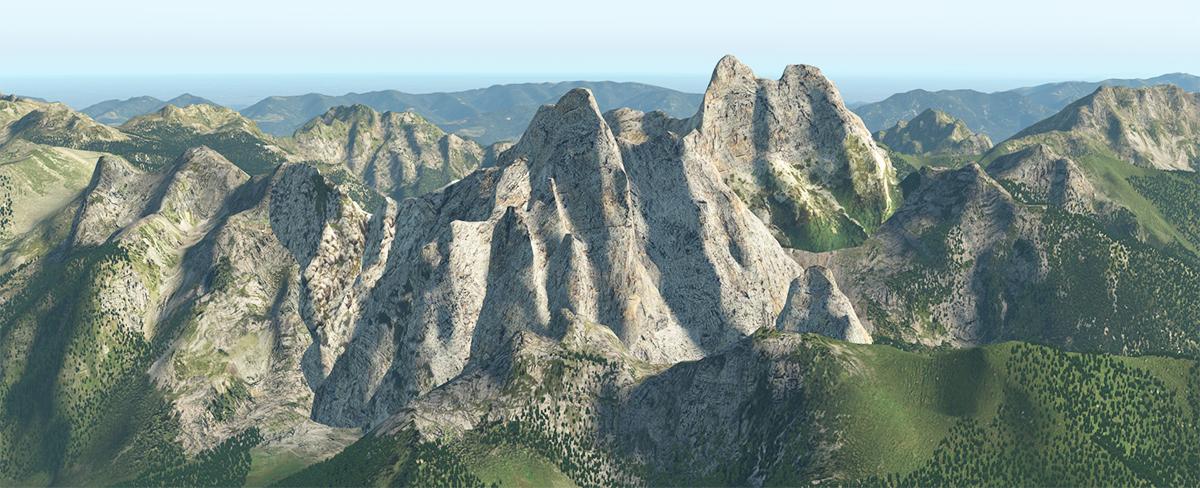
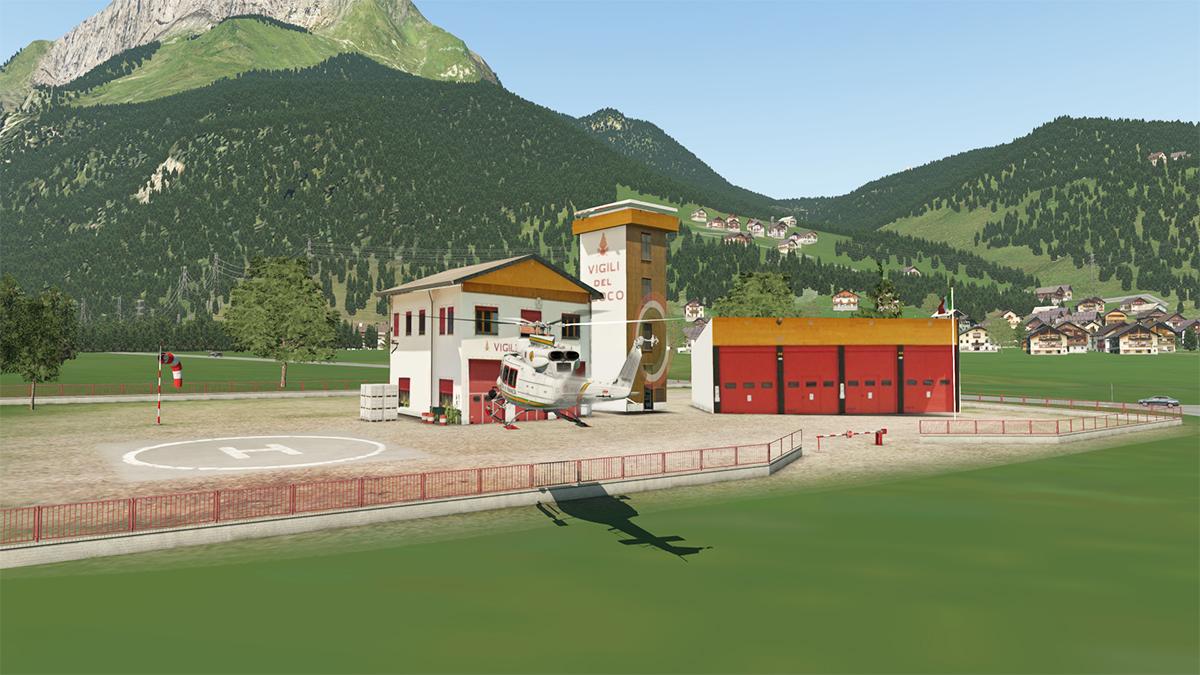
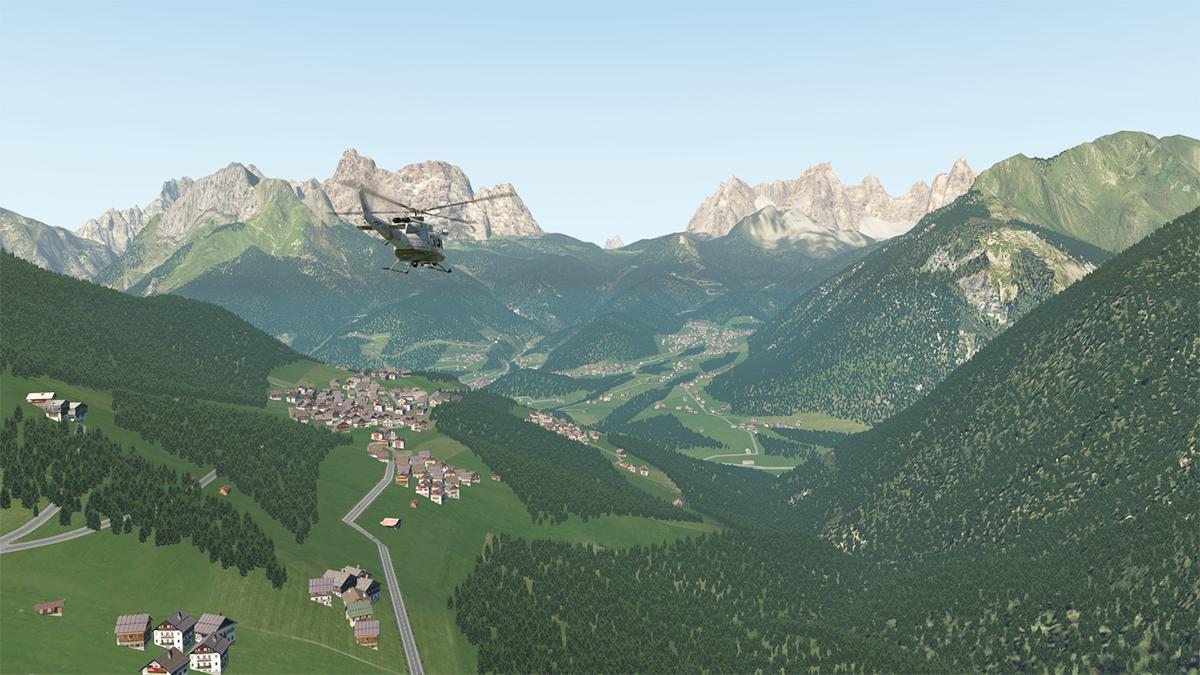
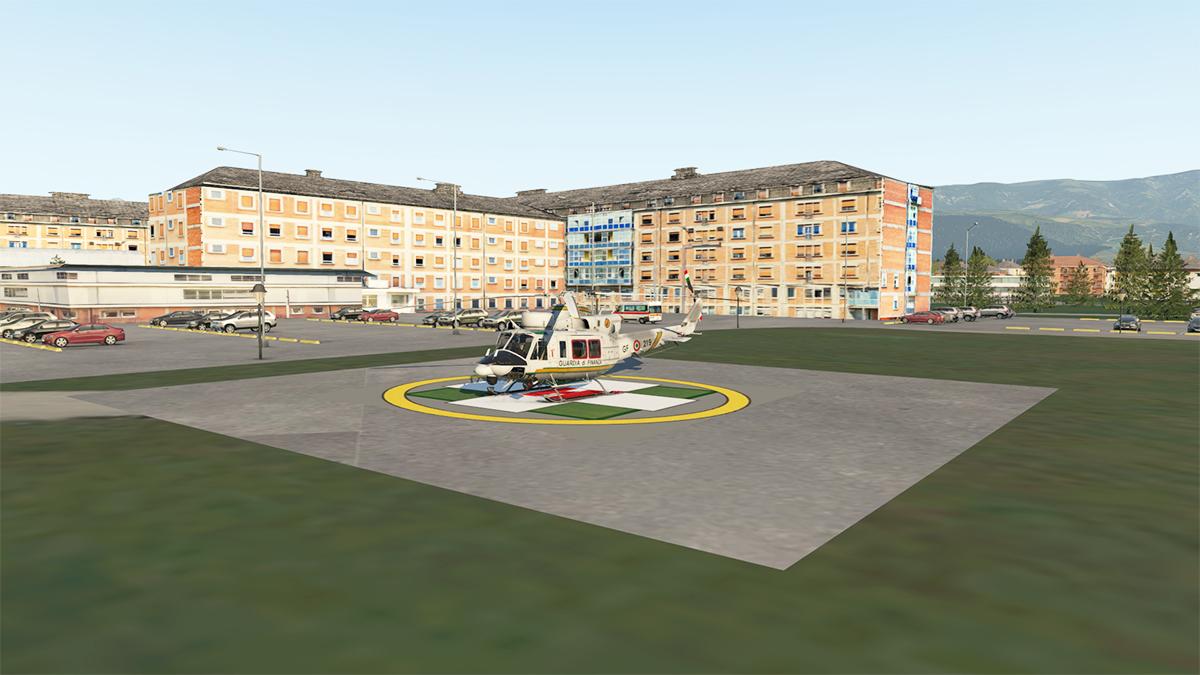
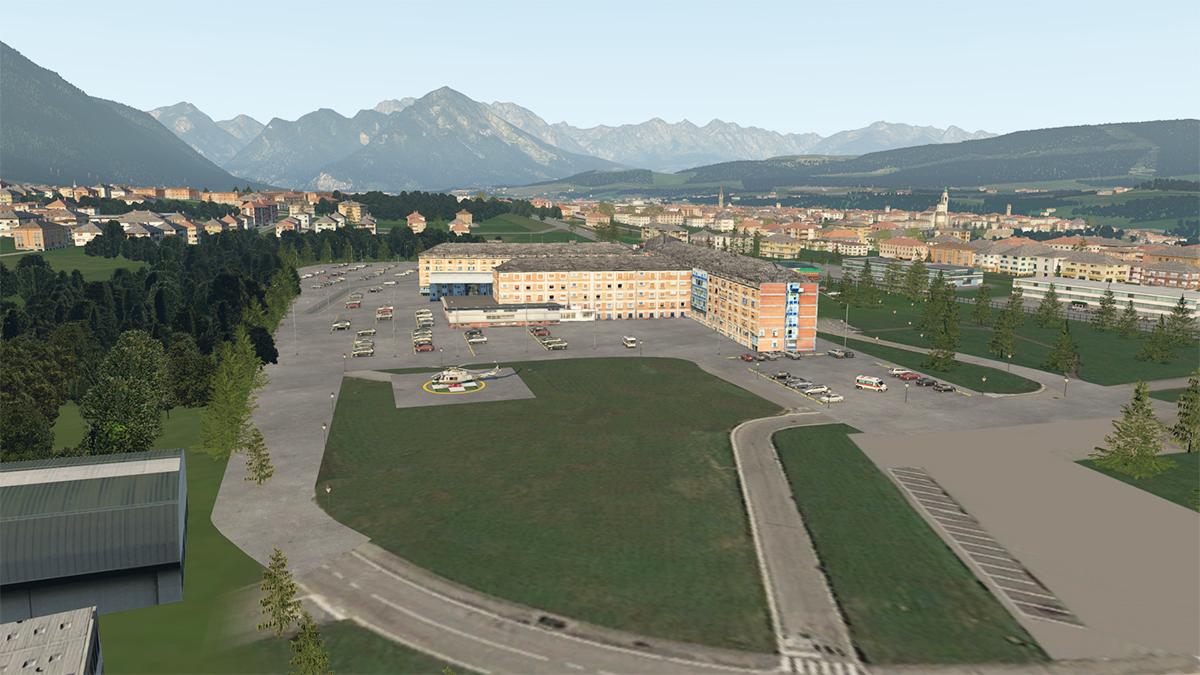
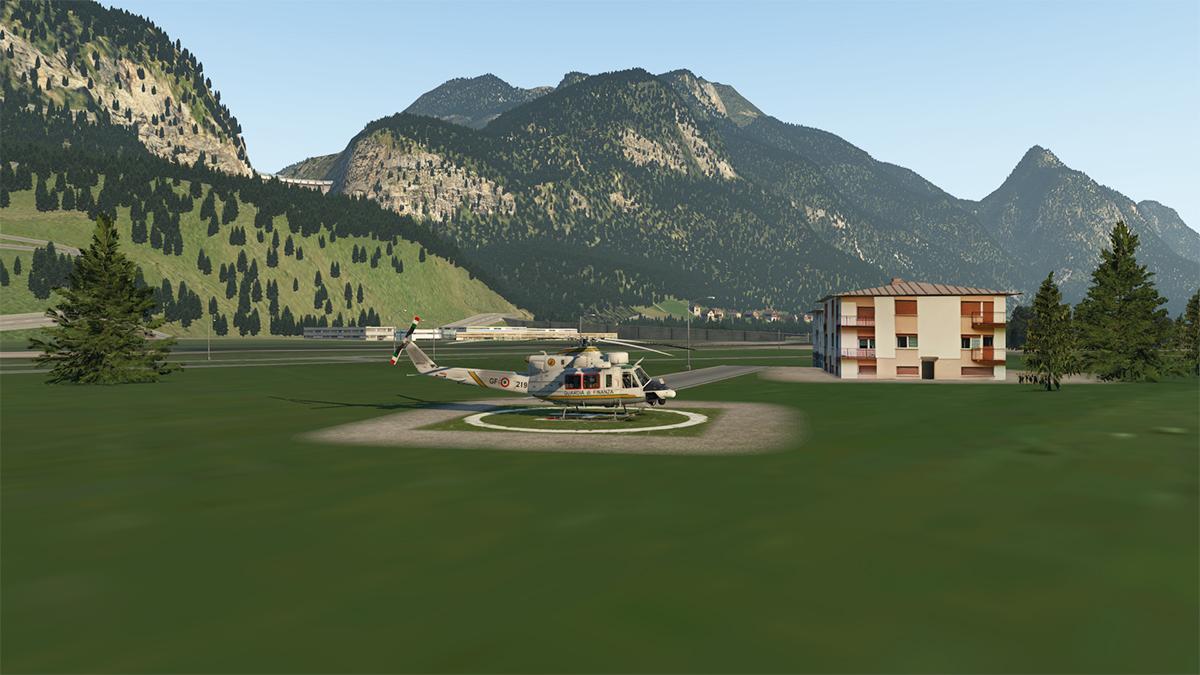
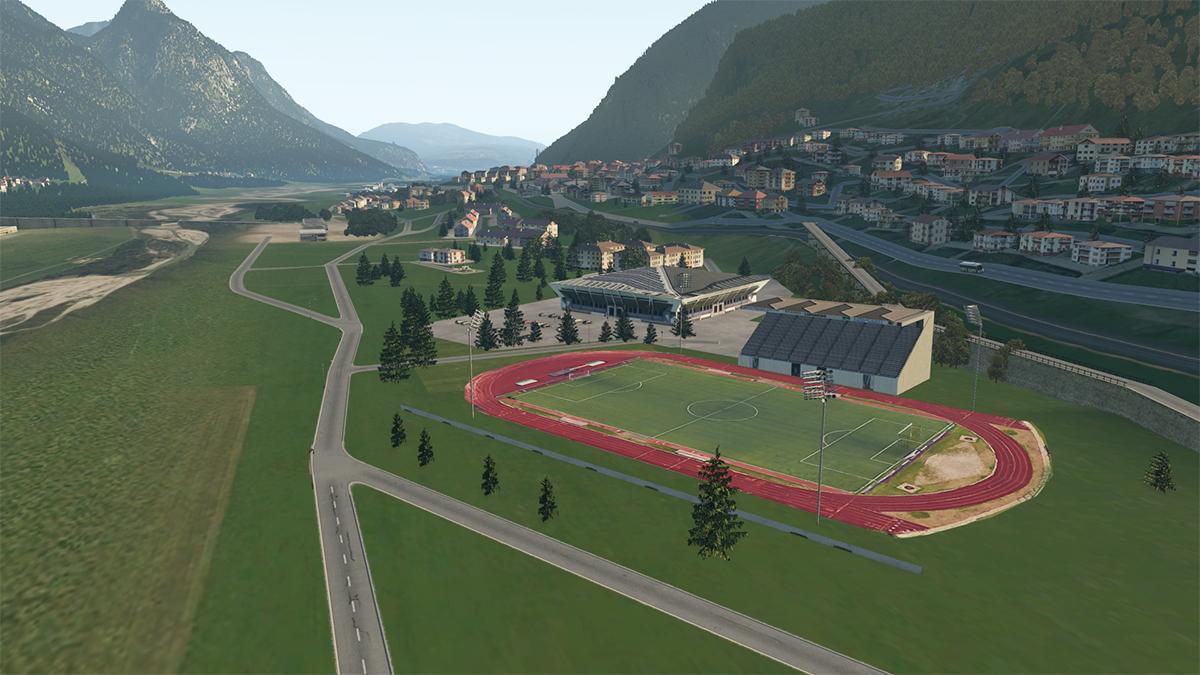
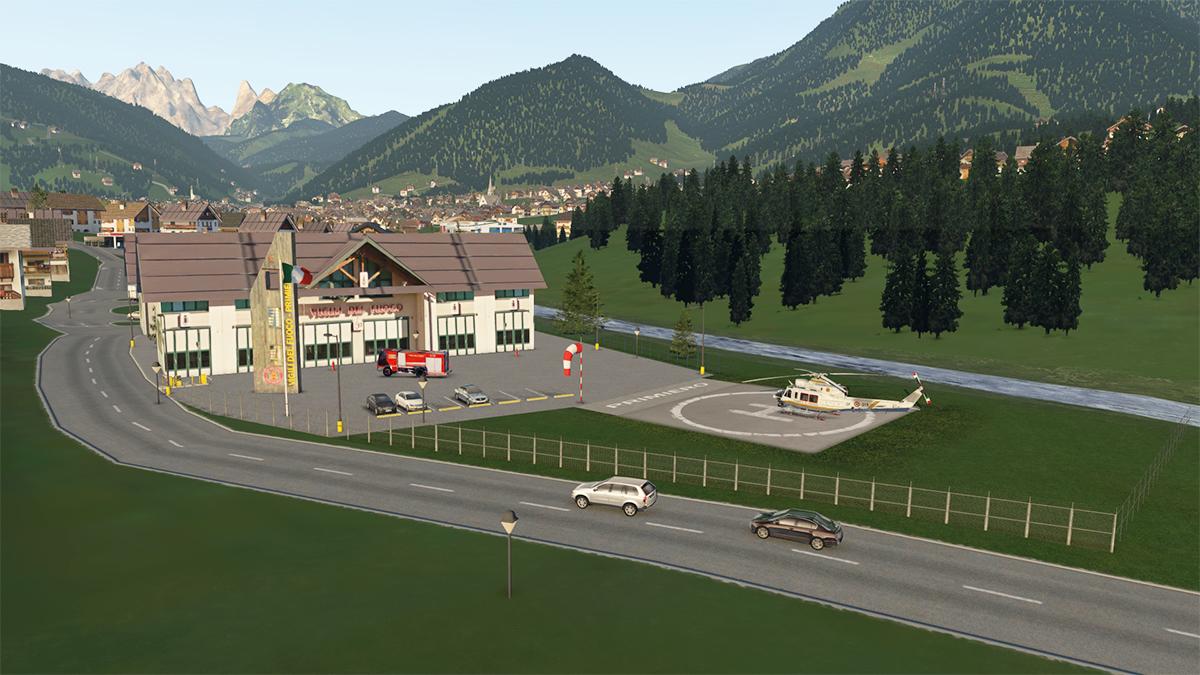
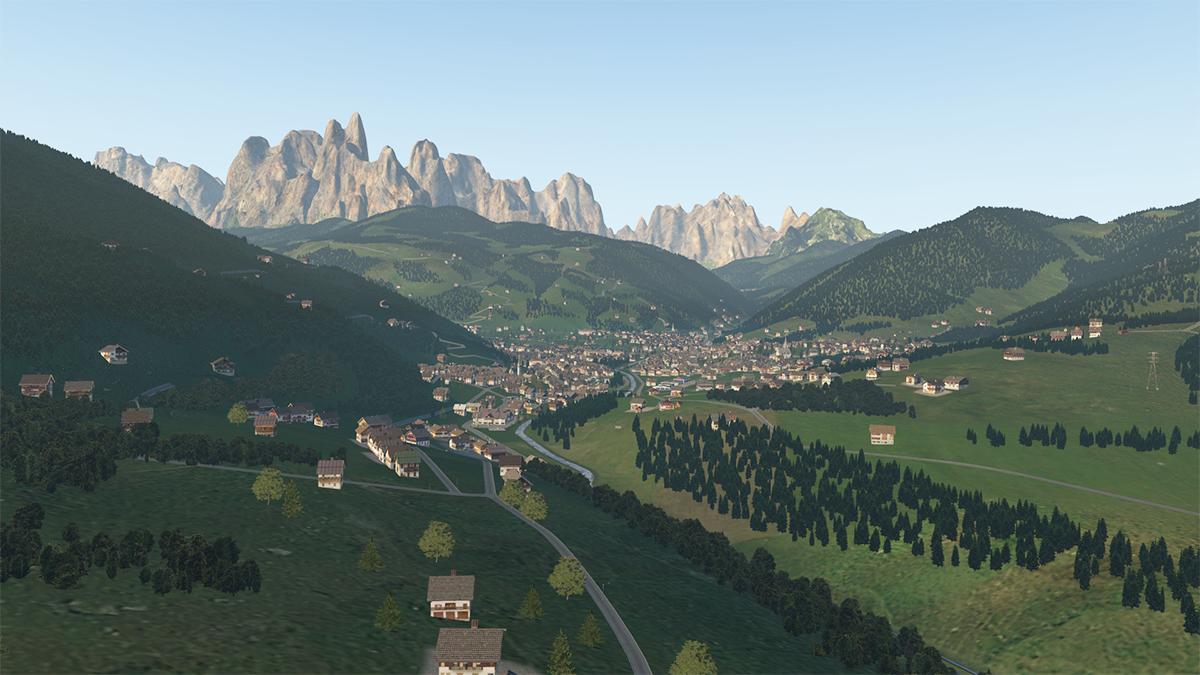
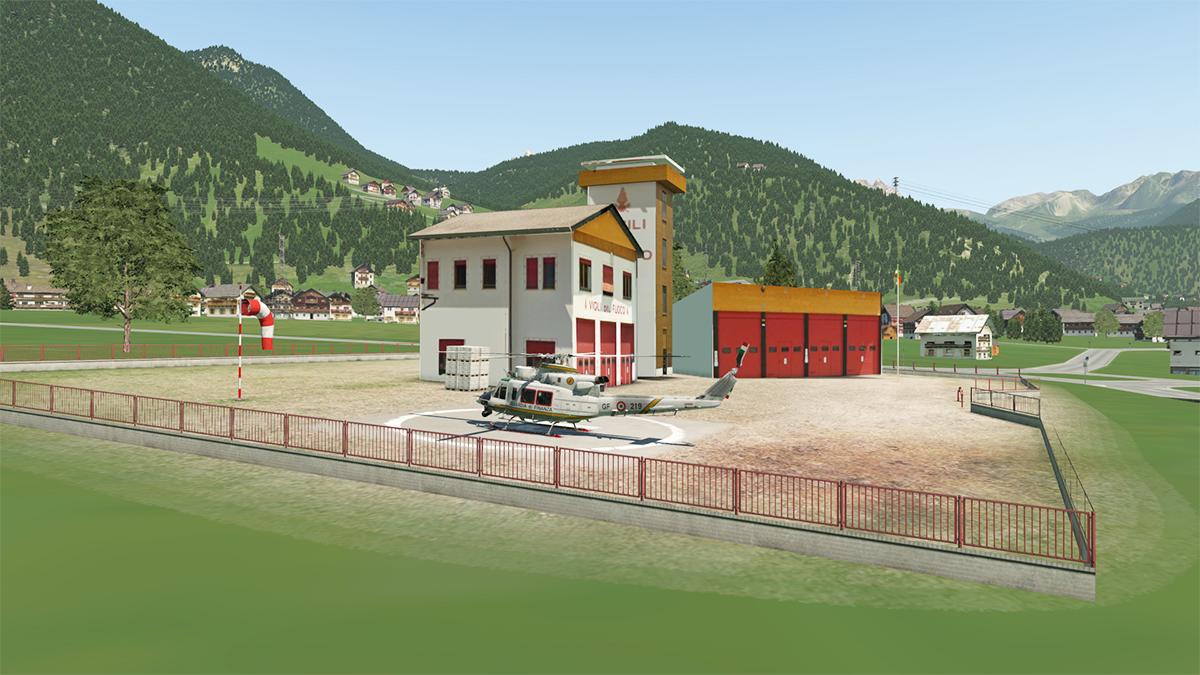
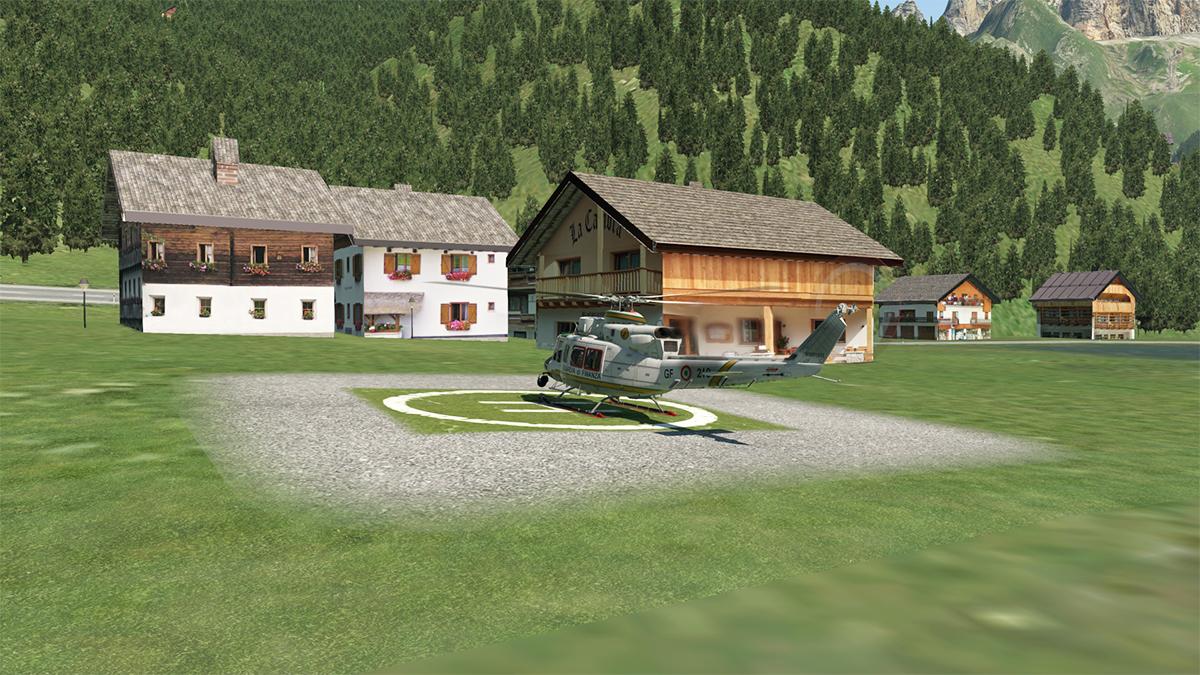
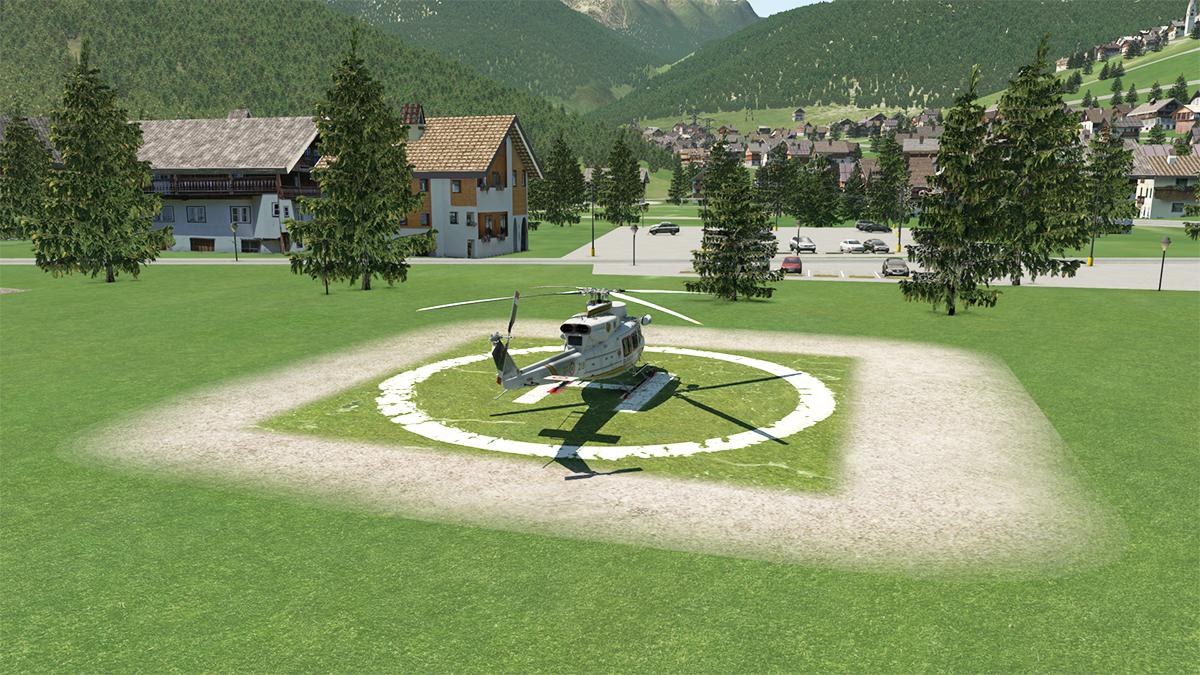
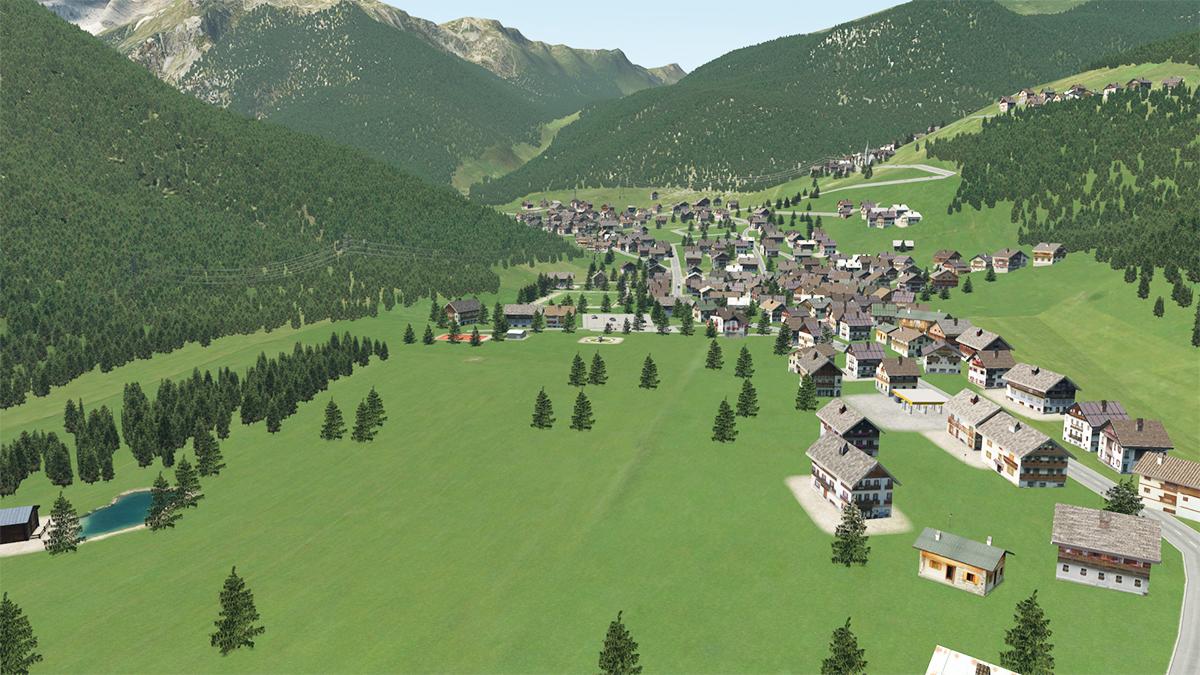
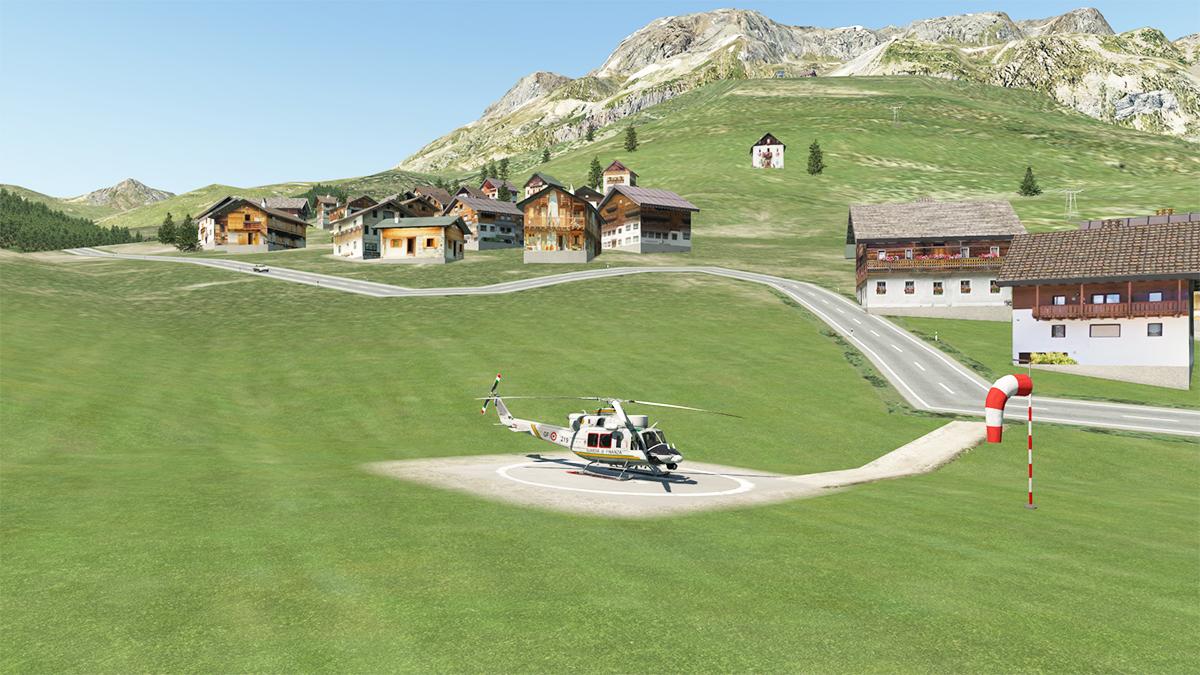
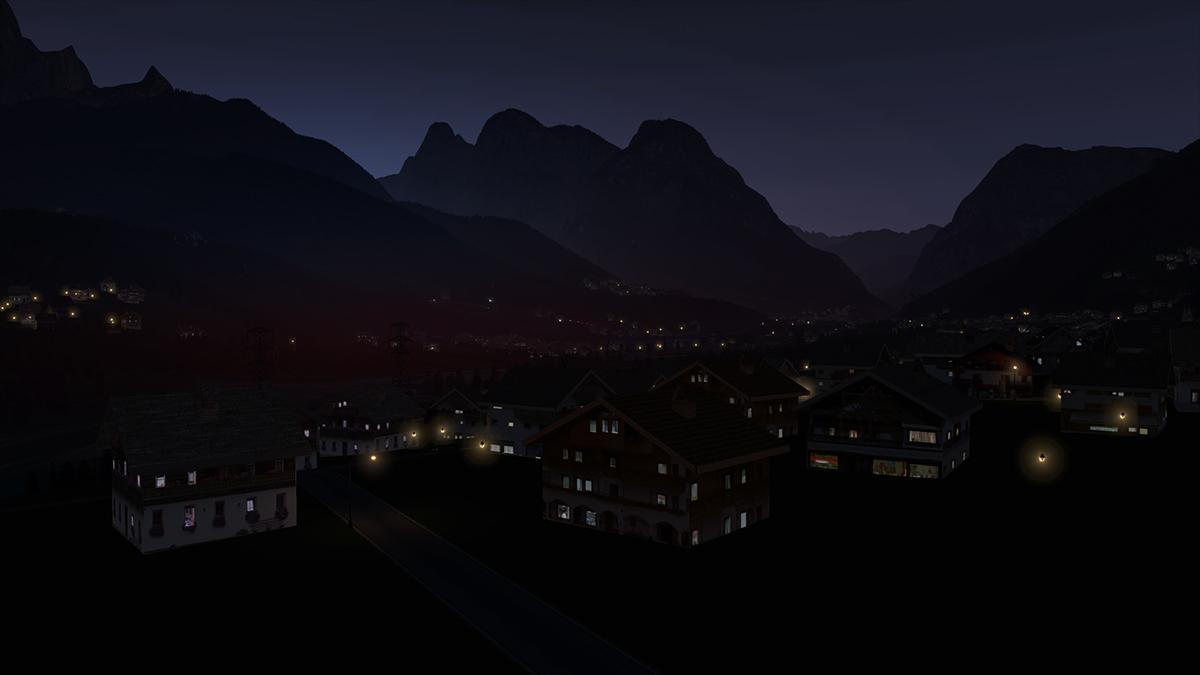
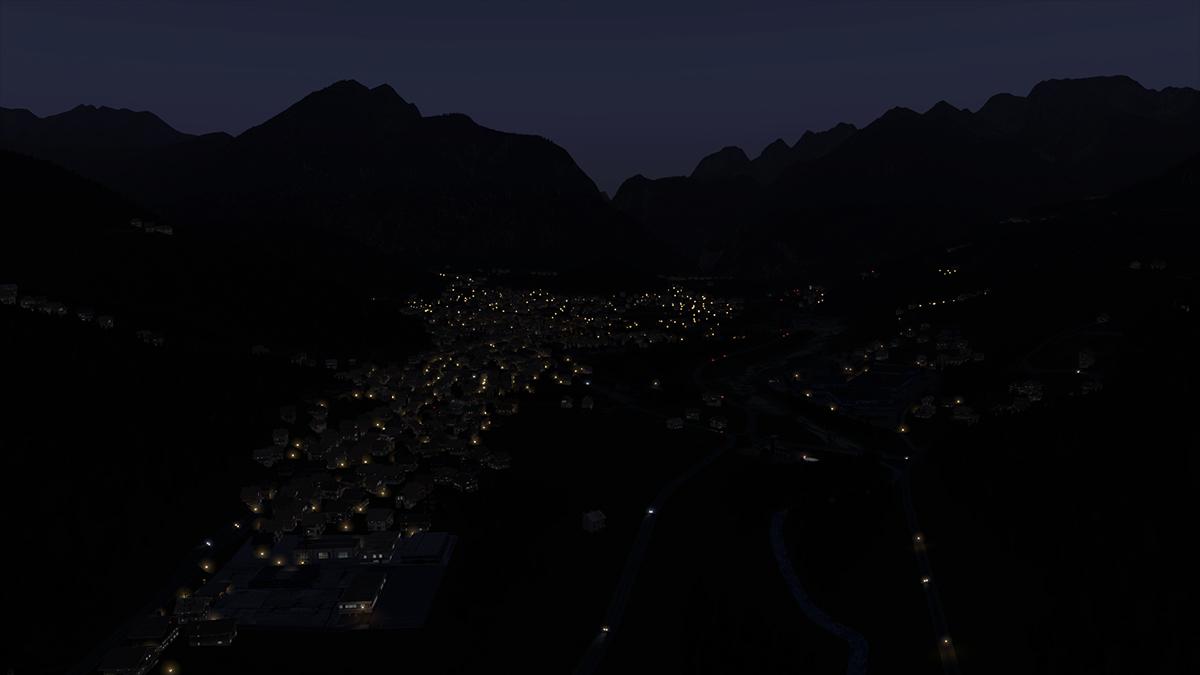
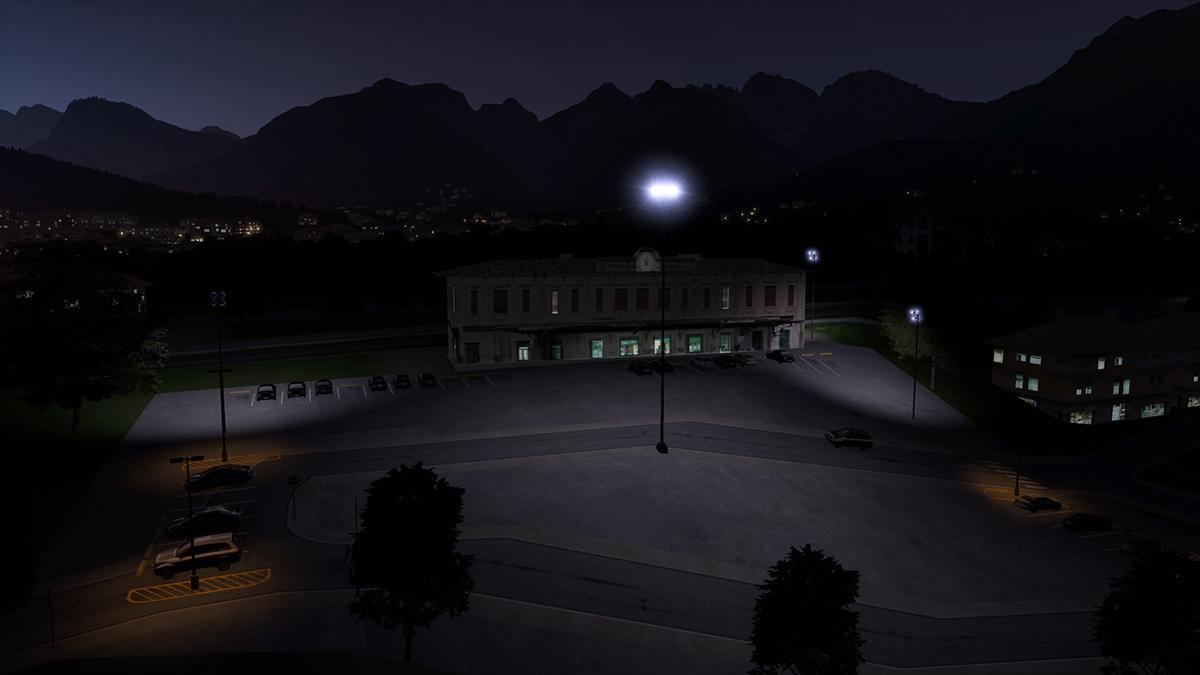
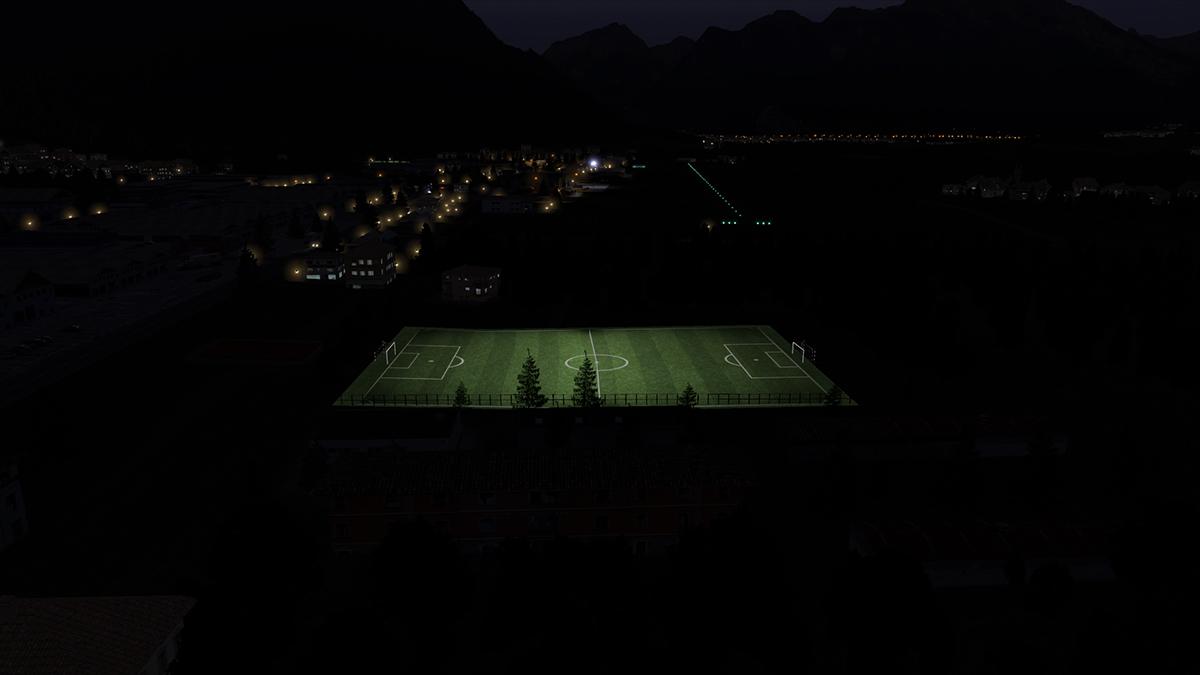
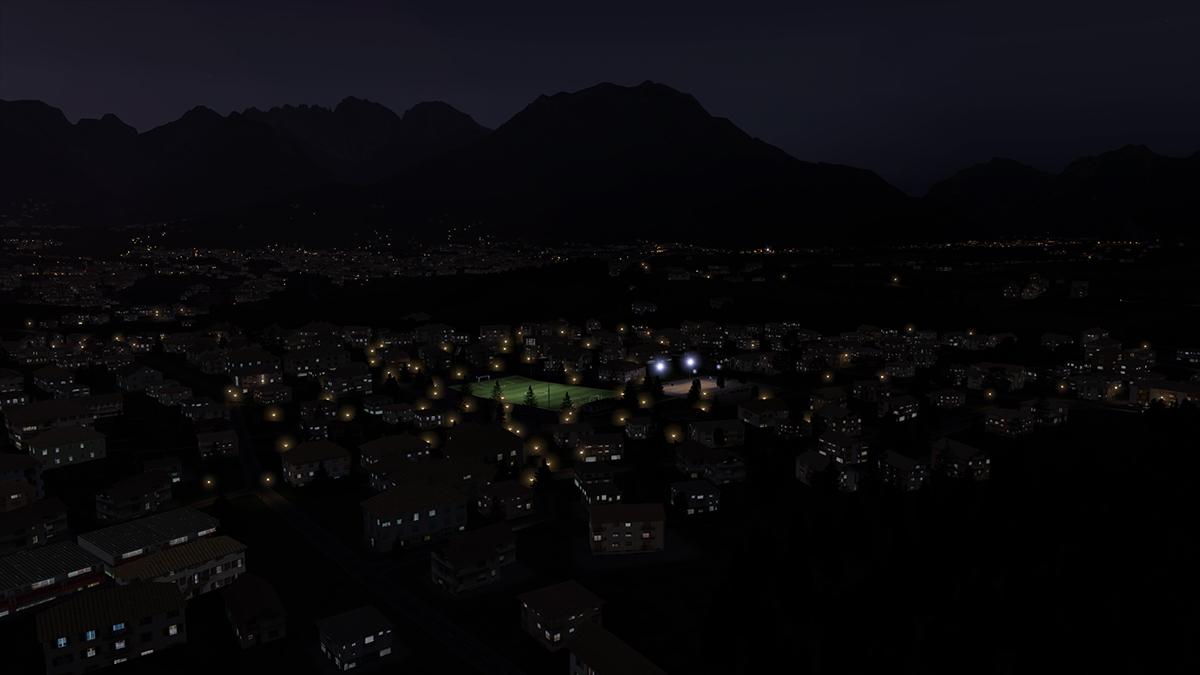
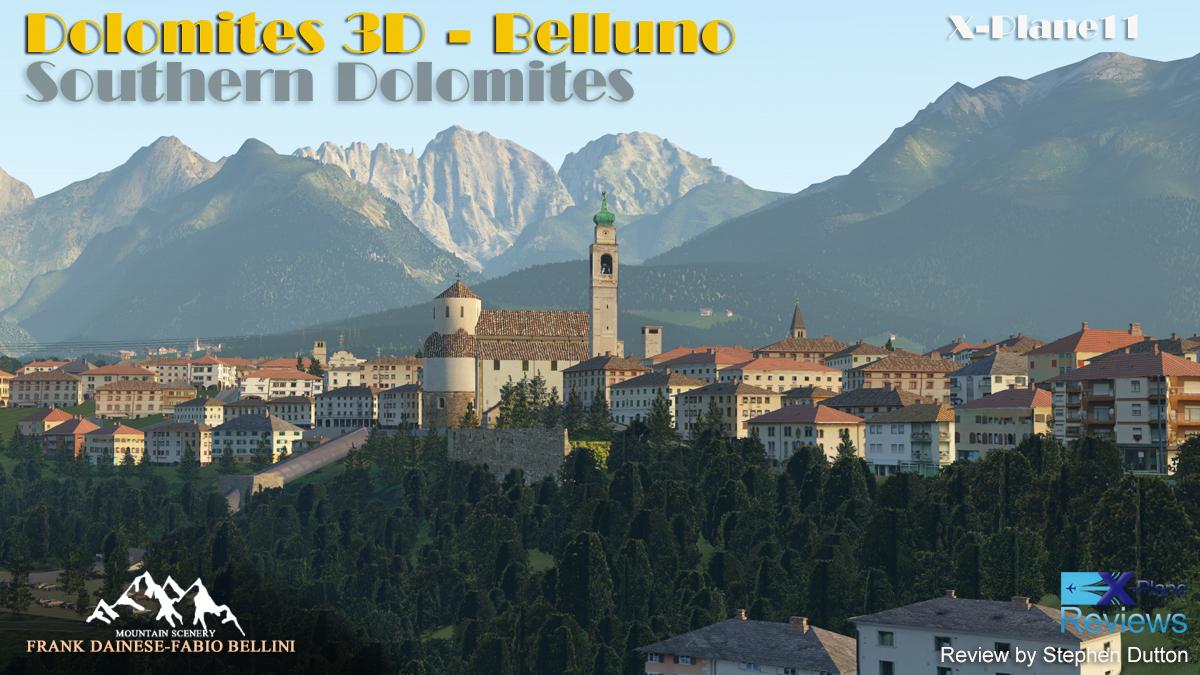
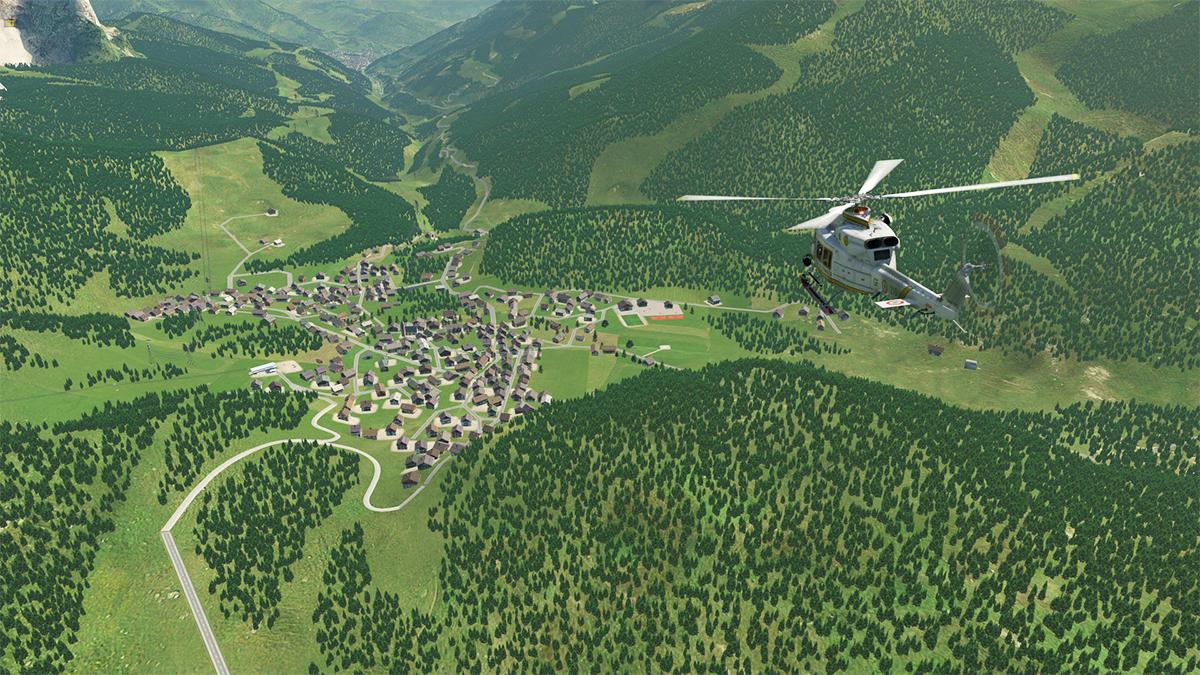
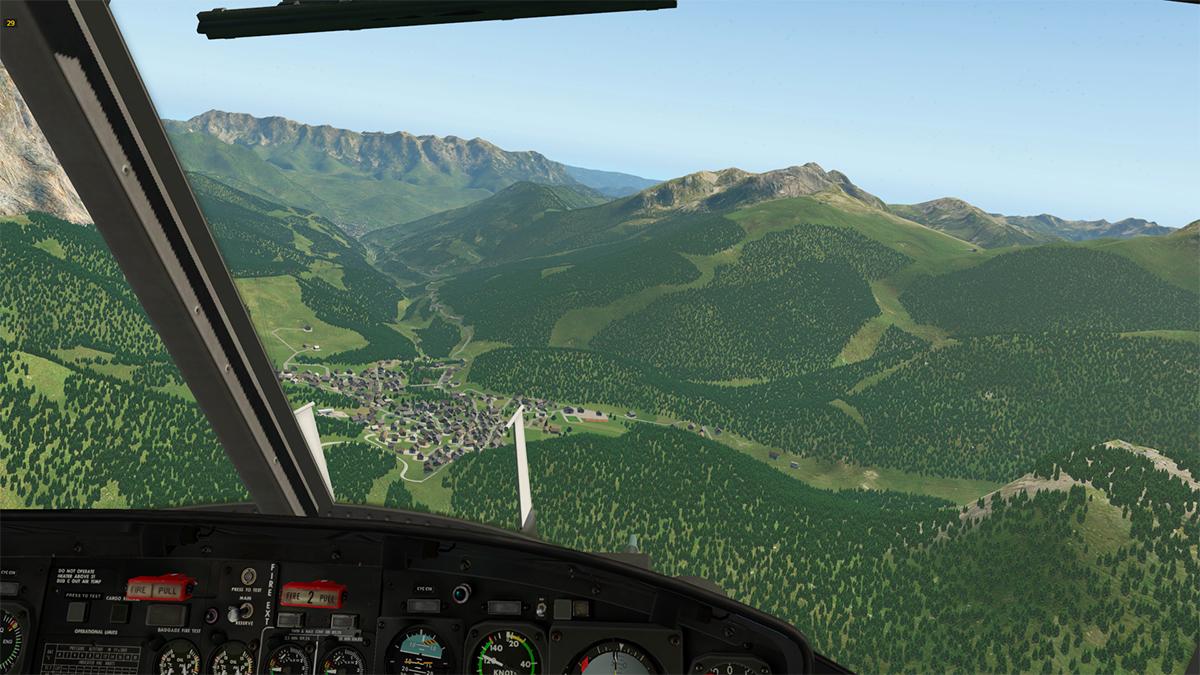
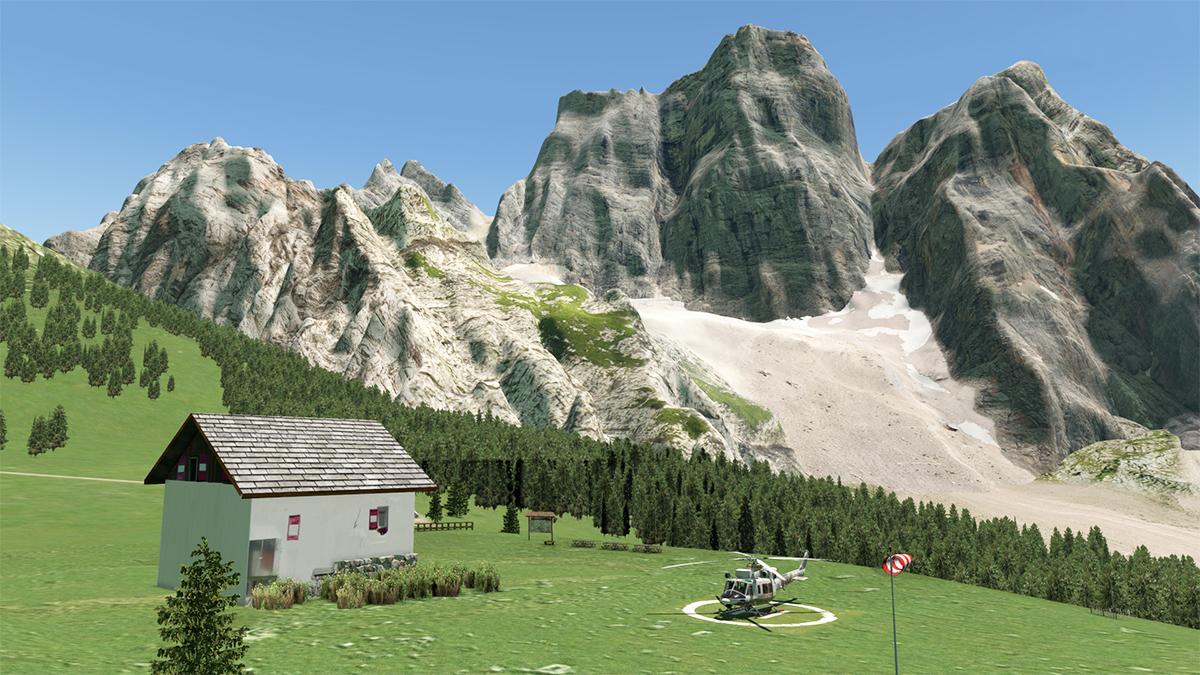
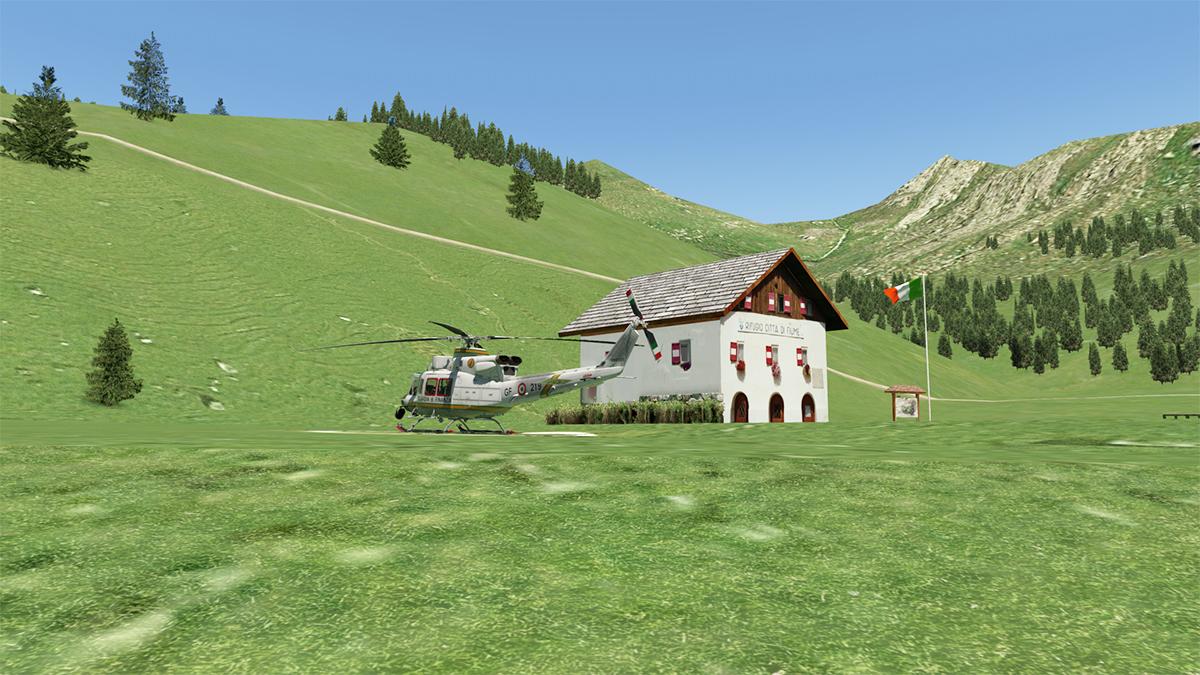
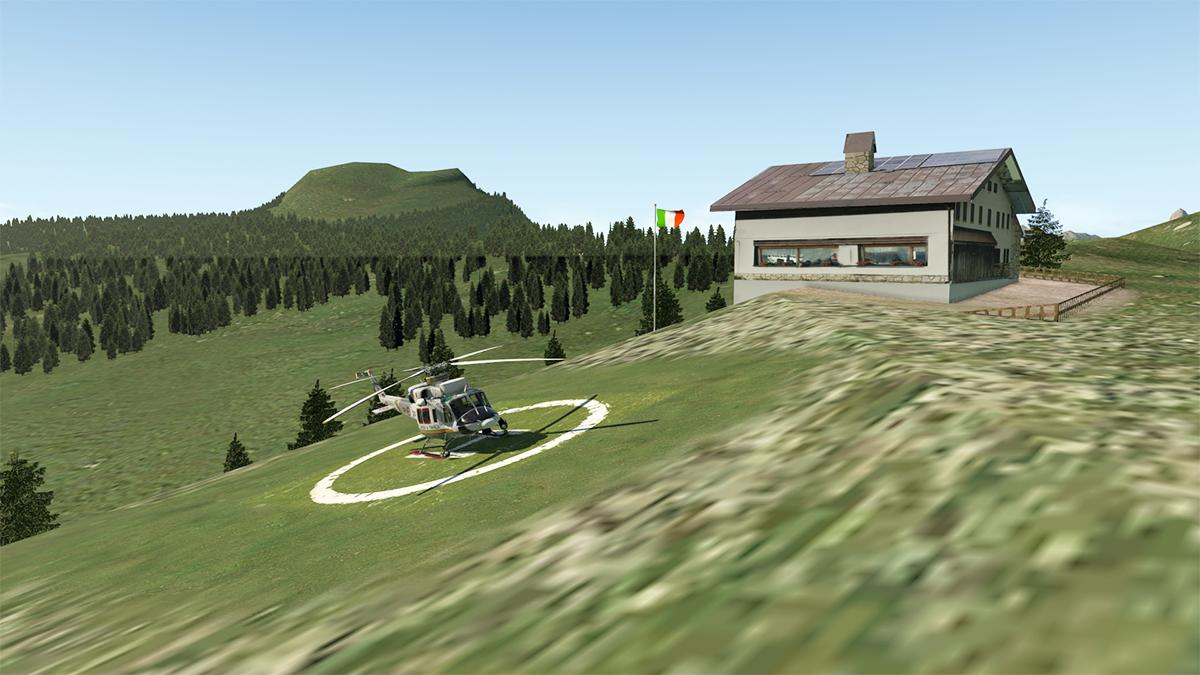
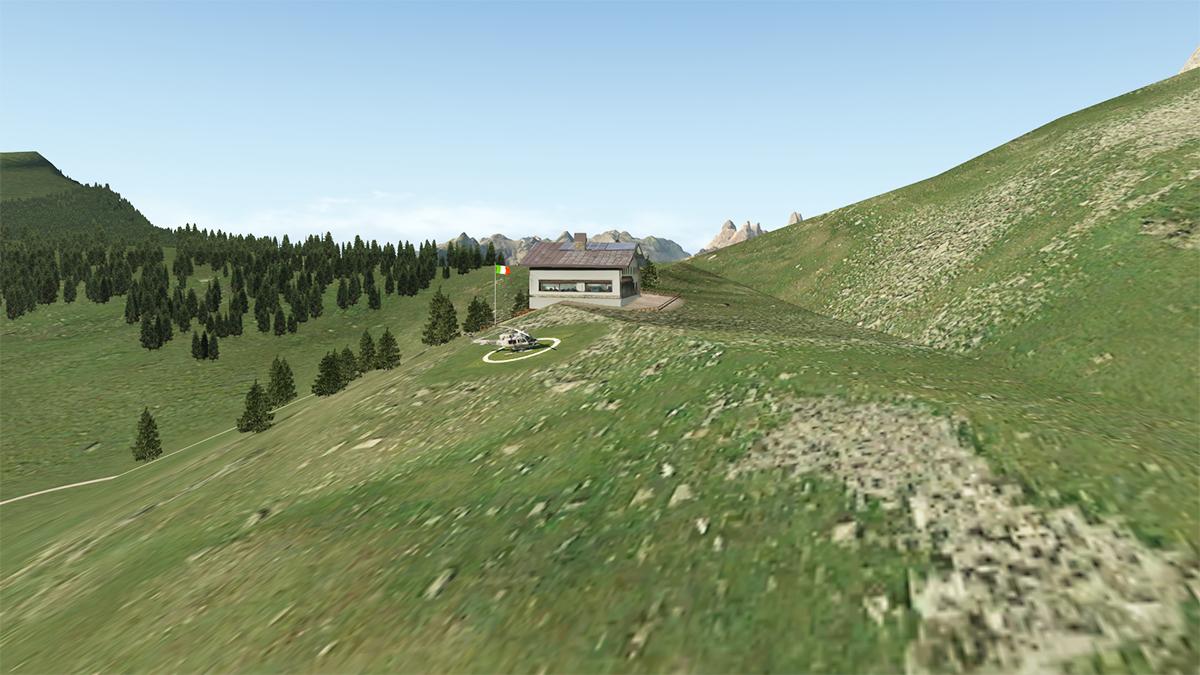
Scenery Review : Belluno-Southern Dolomites by Frank Dainese and Fabio Bellini This is the third of five sceneries that will cover the Dolomite Mountain Ranges in the eastern north of Italy. This new area covers the Belluno- Piave River Valley and Val Agordina areas, that are positioned directly south and west of the Drei Zinnen National Park, and then the Cortina - Cadore region. Here are the three regions... Each region backs on to the other with the Drei Zinnen (red) top east, then Cortina - Cadore (yellow) and now this new Belluno (Purple) zone, so in areas there is an overlap of one over the other, obviously you need them all in the three packages to get the whole set of overlapping views seen here in this review. Belluno Belluno is a town and province in the Veneto region of northern Italy. It is located about 100 kilometres (62 miles) north of Venice, Belluno is the capital of the province of Belluno and the most important city in the Eastern Dolomites region. With its roughly 36,000 inhabitants, it is the largest populated area of Valbelluna. It is one of the 15 municipalities of the Dolomiti Bellunesi National Park. These very extensive Frank Dainese and Fabio Bellini sceneries are not super detailed in a perfect reproduction of a township, the main focus is usually on the landscapes and the highly detailed mountains, but in this particular Belluno package the main focus is on the township of Belluno and the general area around it and the Piave River Valley and Val Agordina areas. All the objects in Dainese and Bellini sceneries are custom made, but are mostly generic, however there are a few items like the The Duomo (Cathedral, 16th century), with the 18th-century bell tower designed by Filippo Juvarra that are custom for this scenery as is the Belluno Railway Station. So there is a very Italian feel to the whole thing, and from a flying perspective the whole scenario does work very well. Perched high over Belluno is Schiara (2,565m) - (Italian: Monte Schiara) and the most visible of the southern Dolimites and reproduced here in great detail and is part of the National Park of the Belluno Dolomites. Far west of Belluno and the only other peak visible from the Piave River Valley is the Piz di Sagron (2486m) and close to the famous Cereda Pass. LIBD: There is only one airfield (Grass) in the Belluno scenery and that is Belluno Airport, the airport is also known as Arturo Dell'Oro Airport. There is a genuine Italiano feel to the airport, if you could call it that, as in reality it is just a collection of motley old hangers. But the signage and detail is very good. There is one grass runway 05/23 - 812m (2664ft) Grass at an altitude of 1,240 ft / 378 m ASML. HLIBD: To the east is a H Pad in front of a huge storage/maintenance hangar... Belluno - Pieve di Cadore There are several routes out of Belluno, the first one we will look at is too the northeast to Pieve di Cadore, Pieve di Cadore is part of the Cortina - Cadore scenery so of course a lot of the views shown here include that package. Also I have jumped ship to the X-Trident Bell - 512 from the Bell 407, as the 407's sound doesn't work here in v11.50 (DreamEngine). We are still in the Piave River (also known as Fiume Sacro alla Patria or the "Sacred River of the Homeland"), but now becoming a deep valley going northeast... Once above the valley floor you can see the volume and huge range of the custom objects throughout this scenery package... there are altogether 14,000 buildings positioned manually and reconstructed as in real, Churches, public buildings, soccer stadiums, hospital and even cemeteries over an area of 1200 sq. Km. The Piave River is very well represented along the valley floor, the detail is far better than earlier more basic valley floors which I didn't think were realistic enough for such high-grade scenery, but this is now really good and an excellent step forward. Looking ahead you can easily see the deeper Dolomite mountain chains with Drei Zinnen now poking up, but as you go in deeper and the valley closes in around you they disappear again. All the river side villages and comunes are represented including... Pian di Vedoia, Soverzene, Fortogna, Desedan and Provagna.... as you reach Longarone, look right as if you blink you will miss it.... the infamous Vajont Dam. The Vajont Dam was completed in 1959 in the valley of the Vajont River under Monte Toc. On 9 October 1963, during initial filling, a landslide caused a megatsunami in the lake in which 50 million cubic metres of water overtopped the dam in a wave of 250 metres (820 ft), leading to the complete destruction of several villages and towns below, and in the disaster created 1,917 deaths. The flooding in the Piave valley from the huge wave destroyed the villages of Longarone, Pirago, Rivalta, Villanova and Faè and turned the land below the dam into a flat plain of mud. the Vajont Dam is now disused. Note the village of Casso up to right of the dam, Casso has been reproduced in the scenery for the pretty village it is. The Zoldana Valley off west from Longarone is also represented in detail... Past Castellavazzo the Piave valley around Termine di Cadore and Ospitale di Cadore then the route narrows considerably, and you start to swing the chopper around though the tighter valley sides, and it is fun flying if you can hack it as the width of the valley gets narrower and more bendy after twisty bend. Snaky, snaky as you twist through the valleys, then around Rivalgo it gets really tight as the Sass de Mezzodì (2036m) towers above you ... ... finally around Perarolo di Cadore it opens out and around one final bend there is Y junction with the Monte Zucco directly ahead... ... look left in a glance and there is Pieve di Cadore with the towering Monte Antelao (3263m) behind, this is a short cut valley to Pieve di Cadore, but I am going right, it is tighter (in fact extremely tight) but it brings you out on the reservoir by Corte Longo and Domegge... .... follow the reservoir forward and it takes you up the Auronzo Valley (Drei Zinnen) and here you are now in Cortina - Cadore territory as Pieve di Cadore is left up on the hill. Note from Pieve di Cadore is now looking south it is a different perspective because the view has now been filled in and notably the Piz di Sagron, other major points from the Cadore Valley like Monte Civetta and Monte Pelmo are also very different with the adjoining Belluno package now in position. Belluno - Alleghe The main thrust into the Belluno mountain areas is via the La Valle Agordina, but there are two routes in, the main one of which we will follow through the La Valle Agordina and another route that still joins up at Agordo, the second entrance is via lago del Mis a short way east. Both entrances are framed by the Schiara and Piz di Sagron that we have already noted. Depature is again from Belluno Airport and we head west over the township of Bellluno itself... ... then you turn sharp north. The entrance into the La Valle Agordina is quite hard to see, a hint is that it is the valley without the water. It gets tight very quickly in the La Valle Agordina and you are very soon twisting and snaking between the steep walls... Not far into the valley and to your right up high is a side view of the Schiara, but your eyes need to be forward if you don't want to fly into the valley walls... ... a last turn and up and high to the left is the Pala Group of the Dolomites located near the village of Agordo which is represented on the valley floor. Note to your very far left as you come into the wide Agordo valley is another view of Piz di Sagron. Pala group and is known locally as Il Pizzòn, meaning Great Peak, And included in the ranges are some significant peaks including: Vezzana, (3,192m), Cimon della Pala, (3,184m), Cima dei Bureloni, (3,130m), Cima di Focobon, (3,054m) and the Pala di San Martino, (2,982) and Monte Agnèr (2,872m). The range also includes a large plateau (altopiano delle Pale), spanning for some 50 km² between 2,500 and 2,800 m and is an empty rocky extent. There are a few valleys to explore right around the Pala Group, but we will do that later. Directly opposite and to the east of Agordo is the San Sebastiano chain that includes San Sebastiano (2488m), Monte Tamer (2547m) and Moschesin - Moschesin Castle (2499m)... ... behind Monte Tamer further east is again Monte Antelao in the Cortina - Cadore package. Notably in Agordo is another of the significant amount of Football (Soccer) fields, and the original headquaters (now in Milan) of the Luxottica Group S.p.A. which is represented here. The Luxottica Group is an Italian eyewear conglomerate and the world's largest company in the eyewear industry with brands including Ray-Ban, Persol, and Oakley. Leaving north from Agordo there is a choice of valleys to pick from? The one to the west takes you past the base of Monte Agnèr... but fly on north and... .... up again to your right is Monte Civetta (3,220m) which is a prominent and major mountain range of the Dolomites and the north-west face can be viewed from the Taibon Agordino valley, and is classed as one of the symbols of the Dolomites. But first up high to your left is Lastìa del Framónt This is not the best view of Monte Civetta as that is from our destination at Alleghe, So it is more tunnel valleys and complex route choices north... ... until you reach Alleghe, which is situated by a picturesque lake. Note the brilliant X-Plane v11.50 reflections on the lake! There is a H Pad here HEALL at Alleghe... ... and the backdrop of the sheer north-west face of Monte Civetta while landing is astounding. Certainly one of the highlights of the Belluno package, you can only see the excellent detail in the Civetta range with the Moiazza area as the group of summits just South and East of the Civetta peak. Note in the background Monte Pelmo and again Monte Antelao in the Cortina - Cadore package, and you can see like at Pieve di Cadore the reverse view from the Cadore Valley the significance of the filling out of the view from both angles. Alleghe - Marmolada - Agordo This is a wide loop around Marmolada and the Pala Group which both represent the north and western boundaries of the Belluno scenery. Notable is that the western side of this area dips deep off the package, but I expect another of the last two of these Dolomite sceneries to cover this area of Bolzano, Departing north out of Alleghe there is an obstruction of a high set of power lines that are stretched right across the valley, so you have to gain altitude very, very quickly if not to fly through them, in fact there are loads of powerlines criss-crossing the valleys all through this scenery.... ... a lot of altitude is required anyway, as you can't stay low in the valley of where we are going to next. Not far north of Alleghe there is cross of valleys, we are going to go west along the Val Pettorina, which is a very tight left turn... ... turn right however into the Fiorentina Valley and it takes you right up to the base of Monte Pelmo (Cortina-Cadore), the valley in objects however has now been filled in and makes Pelmo now more accessable than from the east... the view of Monte Pelmo is very good as you can get far closer to the mountain... the village of Selva di Cadore is also well represented. All the villages along the Val Pettorina are represented, and the detail is very good, they include; Saviner di Laste, Rocca Pietore, Sottoguda-Palue and Malga Ciapela. But although the view is nice, you have a serious need to climb higher all along the Val Pettorina from 3,500ft to 6,500ft. Almost at the end of the Val Pettorina you have to take another hard turn left, but looming large in your windscreen is the magnificent Marmolada! Marmolada (3,343m) (Queen of the Dolomites) consists of a ridge running west to east and the highest peak in the Dolomites. Towards the south it breaks suddenly into sheer cliffs, forming a rock face several kilometres long. On the north side there is a comparatively flat glacier, and the only large glacier in the Dolomites (the Marmolada Glacier, Ghiacciaio della Marmolada). the ridge is composed of several summits, decreasing in altitude from west to east: Punta Penia (3,343m), Punta Rocca (3,309m), Punta Ombretta (3,230m)etres (10,600 ft), Monte Serauta (3,069m) and Pizzo Serauta (3,035m). The cross and memorial is represented at the summit as is the aerial tramway goes to the top of Punta Rocca. Views are sensational even by X-Plane standards as the Cortina and even the Drei Zinnen sceneries are all clearly visible, including the Fanes group and Fanes Plateau. The Lago di Fedaia is located at the foot of the Marmolada Glacier. You can of course fly around the full base of Marmolada, but in reality this is where the boundary of the scenery ends (until the next package)... You can still loop around the valleys as they are interesting and great for flying low(ish)... .... you can at Moena turn into the Passo di S. Pellegrino that will take still around the full circle base of Marmolada, but it also takes you directly back to Alleghe via the Val di Fassa. However I continued down to Predazzo and then a hard left and back into the Belluno scenery down the Val Paneveggio... the Pala Group now comes back into view but from the western aspect. Lago di Paneveggio is spectacular with the X-Plane v11.50 reflections (really loving the Vulkan reflection feature in this scenery?) But past the Lago there is really no easy pass or valley to slip though, so my choice was to get up close to the Pala Group and go up and over (it is the left turn here) to the Primiero valley ... ... from this angle the highest peak in the group, Cima della Vezzana is extremely impressive. A huge amount of work has gone into recreating these iconic Dolomite peaks, is as noted that the DEM data that is used and it is then further corrected with 3D graphics programs. Subsequently the textures were then applied in 4K resolution which are obtained from high definition photos. The positioning on the modified mesh is very accurate and respecting the dimensions and the main morphological characteristics of the terrain. And as the Dolomites are mountains with unique characteristics as they come with their large vertical and smooth walls. Heading south and on the western side of the Belluno package down the Primiero valley and next into view comes San Martino di Castrozza which is a major Dolomite ski resort... there is a H Pad located here: HSMC ... but it is time now to head back to Agordo, so bit further along the Primiero valley left turn at Fiera di Primiero puts you back in the La Valle Agordina. On the left you get another and more closer and significant visual aspect of Piz di Sagron from the Valle Agordina as the range is set to the south and close to the Piave River Valley. Further down the valley going west a familiar view opens up with San Sebastiano - Monte Tamer mountain groups as you arrive back at Agordo... Agordo has a H Pad HEAG by the Vigili del Fuoco (Fire Station), it is a tricky landing over a fence, but still doable. Lighting Overall lighting is not the main aspect of these sceneries... there is lighting of course, but it is mainly just housing (window) and the odd street lamps to create an alpine village feel, but in this package there quite a bit of it, so every major valley is lit... With Belluno being the largest township of any Dainese and Bellini sceneries there is of course far more here, and it looks quite authentic at night and works very nicely in recreating the valley effect, odd buildings or the main significant custom scenery objects and the many football (Soccer) fields are also well lit in the scenery. _________________________________ There is one airport and 11 H pads in the scenery, which is significantly more here than most other provided landing areas in Dainese and Bellini sceneries, provided are: LIDB - Airport - 46.1632024 012.2453913 – BELLUNO CITY HLIBD - HELIPAD - BELLUNO AIRPORT HELHB - HELIPAD – 46.13908690 012.2001516 –BELLUNO HOSPITAL HELLG - HELIPAD - 46.2721585 012.3034299 – LONGARONE HSMC - HELIPAD - 46.2631061 011.7960794 – S.MARTINO CASTROZZA HEPR - HELIPAD - 46.1694772 011.8224303 – VVF PRIMIERO HEAG - HELIPAD - 46.2789449 012.0309167- AGORDO HEALL – HELIPAD - 46.4119874 012.0159586 – ALLEGHE HEFL – HELIPAD - 46.3561542 011.8715286 – FALCADE HEAR – HELIPAD - 46.4957027 011.8718972 – ARABBA HERV – HELIPAD - 46.4159242 012.1566844 – Ref.VENEZIA HECFM – HELIPAD - 46.4369182 012.1221237 Ref.FIUME LIDB - Airport – BELLUNO CITY Set to the east of Belluno township is LIDB Airport. Unusually a real replication of an airport as most Dainese and Bellini airports are mostly fictional. Single grass runway 05/23 - 812m (2664ft) is complimented by some authentic designed hangars and mostly default objects. HLIBD - H Airport - BELLUNO AIRPORT Set on the eastern end of the Bellnuo Airport in front of a large service hanger HELHB - H BELLUNO HOSPITAL Great Medi helipad outside the Belluno Hospital, easily found and nice approaches. HELLG - H LONGARONE Placed next to the fancy Football Stadium and Sports Centre in Longarone, the approach is singular and difficult because of the trees and house. HSMC - H S.MARTINO CASTROZZA The most western H Pad in the shadow of Cima della Vezzana at San Martino di Castrozza in the Primiero valley. Approaches are very clean. HEPR - H VVF PRIMIERO This remote H Pad is in Primiero, which is directly in front of Pale di San Martino (Pala Group - Between Fiera di Primiero and Agordo). Approach is singlular down the valley but worth it. HEAG - H AGORDO H Pad is by the Vigili del Fuoco in Agordo, with a tricky fence and approach. HEALL – H ALLEGHE Right on the north edge of the lake, it is an extremely spectacular approach in from over the lake. HEFL – H FALCADE Deep central in the Val di Fassa between the ranges of Marmolada and Pala Group is Falcade, Trees and buildings on the approach from the west, but wide and open from the east. HEAR – H ARABBA At the northern foot of Marmolada, Arabba (Marmolada ski resort) it is the most furthest north position of the Belluno scenery, hard to find as it is in a lost valley called Cordevole valley. It is however a good place to go north or east into the Cortina - Cadrone areas. Slight incline but good approaches to the H Pad. HERV – H Ref.VENEZIA On the foothills of Monte Pelmo (southeast) this is a refuge H Pad. The H Pad is set out on an extreme slope, so it is extremely difficult to land or takeoff from. HECFM – H Ref.FIUME This Refuge is also on the foothills up the Fiorentina Valley of Monte Pelmo (northwest), this is another refuge H Pad. Note: if either HERV or HECFM Refuges don't appear, then remove the (D3H)_Exclusions folder? The folder is for x-europe or ortho4xp use. Most of all the refuges in the Belluno areas are represented, including: Coldai, Tissi, VII ° Alpini, Carestiato, Scarpa, City of Fiume, Venice Ref and more. _________________________________ Summary This is the third of five sceneries from Frank Dainese and Fabio Bellini that cover the Dolomite Mountain Ranges in the eastern north of Italy. This new area covers the Belluno Valley and Val Agordina areas, that are positioned directly south and west of the Drei Zinnen National Park, and then the Cortina - Cadore region. Areas recreated in this scenery package include: Belluno city , Longarone + Vajont dam, all the many valleys including: Agordina, Fiorentina, Zoldana, Cordevole, Piave, Prmiero All the numerous mountains and glaciers are all very highly created mesh from DEM data 3D graphics programs, and the Hi-Res textures are all in 4K resolution. The focus mountains are simply excellent in their 3D reproductions and the highlights are Pale di San martino (Pala Group), Schiara, Marmolada, Civetta, Moiazza, San Sebastiano (Tamer), Sass Set, Sagron. These excellent representations of iconic mountain areas of the world are for exploration, sightseeing or just plain exploring... and you could throw in a bit of geography as well. All are highly detailed of the areas they represent and the mountain ranges are of course the stars and the focal point. With this Belluno extension you do have a question that arises in that does it stand alone as a scenery by itself? That is big question to now answer unlike the former Drie Zinnen/Cortana Packages. Personally I can't see this package fully working effectively without the Cortina-Cadore extension as part of the same landscape, as the two Cortina/Belluno do heavily intertwine together at many points and boundaries, and the visual aspects from both sides of each scenery are duly both affected, together there quite outstanding in many viewpoints, and also now showing the truly huge landscape of the Dolomite area that is now visible. Hugely popular and yes I love these amazing and hugely detailed and now extensive sceneries that can change your perspective of an iconic area and allow them to come to life in your simulation world... Highly recommended, so three down and only two more Dolomites to go! ______________________________________________________________________ Yes! Dolomites 3D Belluno-Southern Dolomites by Frank Dainese and Fabio Bellini is NOW available from the X-Plane.Org Store here : Dolomites 3D - Belluno - Southern Dolomites Price Is US$24.95 Customer who already own Dolomites 3D- Drei Zinnen Park or Cortina can get this new scenery for $5 off. Please go to the original invoice for coupon code Features 1200 sq. Km of scenic Mountain Scenery Belluno Airport LIDB - Extremely detailed over 10 Heliports in strategic sites. Belluno city , Longarone + Vajont dam, many valleys: Agordina, Fiorentina, Zoldana, Cordevole, Piave, Prmiero ... Over 20,000 buildings positioned, with many buildings rebuilt. 10 3D models: Pale di San martino, Marmolada, Civetta, Moiazza, San Sebastiano (Tamer), Sass Set, Sagron ... All the vegetation mapped Inserted hundreds of polygons / textures to reproduce the photo-realistic terrain Reproduced the main skilift-plants, in particular the Marmolada with 3 sections. Reproduced all the main refuges in the area: Coldai, Tissi, VII ° Alpini, Carestiato, Scarpa,Città di iume, Venice Ref. ... WT3/Traffic Global: Your joking of course! no, you are on your own here Requirements X-Plane 11 Windows, Mac or Linux 4GB VRAM Minimum - 8GB+ VRAM Recommended Download Size: 600-950 Mb Release and Review version 1.0 (15th May 2020) Installation Download scenery file size is download 635.20mb and with the full installation installed in your custom scenery folder as there are Nine install folders in the order below in the .INI File (included and the listing below also includes the Drei Zinnen/Cortina packs): SCENERY_PACK Custom Scenery/D1A_DOLOMITI_3D_Part1/ SCENERY_PACK Custom Scenery/D1B_AIRPORT_LIVD/ SCENERY_PACK Custom Scenery/D1C_CableWay_Dolomitti1/ SCENERY_PACK Custom Scenery/D1D_PUSTERIA_Comelico/ SCENERY_PACK Custom Scenery/D1E_MISURINA/ SCENERY_PACK Custom Scenery/D1F_AURONZO/ SCENERY_PACK Custom Scenery/D1G_Exclusions/ SCENERY_PACK Custom Scenery/D2A_DOLOMITI_3d_Part2/ SCENERY_PACK Custom Scenery/D2B_AIPORT_LIDI/ SCENERY_PACK Custom Scenery/D2C_CableWay_Dolomiti2/ SCENERY_PACK Custom Scenery/D2D_CORTINA/ SCENERY_PACK Custom Scenery/D2E_CADORE/ SCENERY_PACK Custom Scenery/D2F_CRODALAGO/ SCENERY_PACK Custom Scenery/D2G_Exclusions/ SCENERY_PACK Custom Scenery/D3A_DOLOMITI_3D_Part3/ SCENERY_PACK Custom Scenery/D3B_CableWay_Dolomiti3/ SCENERY_PACK Custom Scenery/D3C_AGORDO_ALLEGHE/ SCENERY_PACK Custom Scenery/D3D_BELLUNO_Piave/ SCENERY_PACK Custom Scenery/D3E_VAL_CORDEVOLE/ SCENERY_PACK Custom Scenery/D3F_VALLE_PRIMIERO/ SCENERY_PACK Custom Scenery/D3G_Zoldana_Fiorentina/ SCENERY_PACK Custom Scenery/D3H_Exclusions/ SCENERY_PACK Custom Scenery/Dolomiti2_lib/ SCENERY_PACK Custom Scenery/Dolomiti_SIRX_VEGETAZIONE/ SCENERY_PACK Custom Scenery/MESH_DOLOMITI1/ Total scenery installation (Belluno) : 2.05gb connector scenery (D2G_Exclusions- Highlighted) is IMPORTANT in its position in the scenery order .ini to make sure there is a perfect transition between the two packages. Documents One manual with notes ______________________________________________________________________ Scenery Review by Stephen Dutton 17th May 2020 Copyright©2020 : X-Plane Reviews (Disclaimer. All images and text in this review are the work and property of X-PlaneReviews, no sharing or copy of the content is allowed without consent from the author as per copyright conditions) Review System Specifications: Computer System: Windows - Intel Core i7 6700K CPU 4.00GHz / 64bit - 32 Gb single 1067 Mhz DDR4 2133 - ASUS GeForce GTX 1080 8Gb - Samsung Evo 512gb SSD Software: - Windows 10 - X-Plane 11.41 and tested in v11.50b6 and b9 Addons: Saitek x52 Pro system Joystick and Throttle : Sound - Bose Soundlink Mini Plugins: None Scenery or Aircraft - Bell 412 XP11 by X-Trident (X-Plane.OrgStore) - US$35.95
-
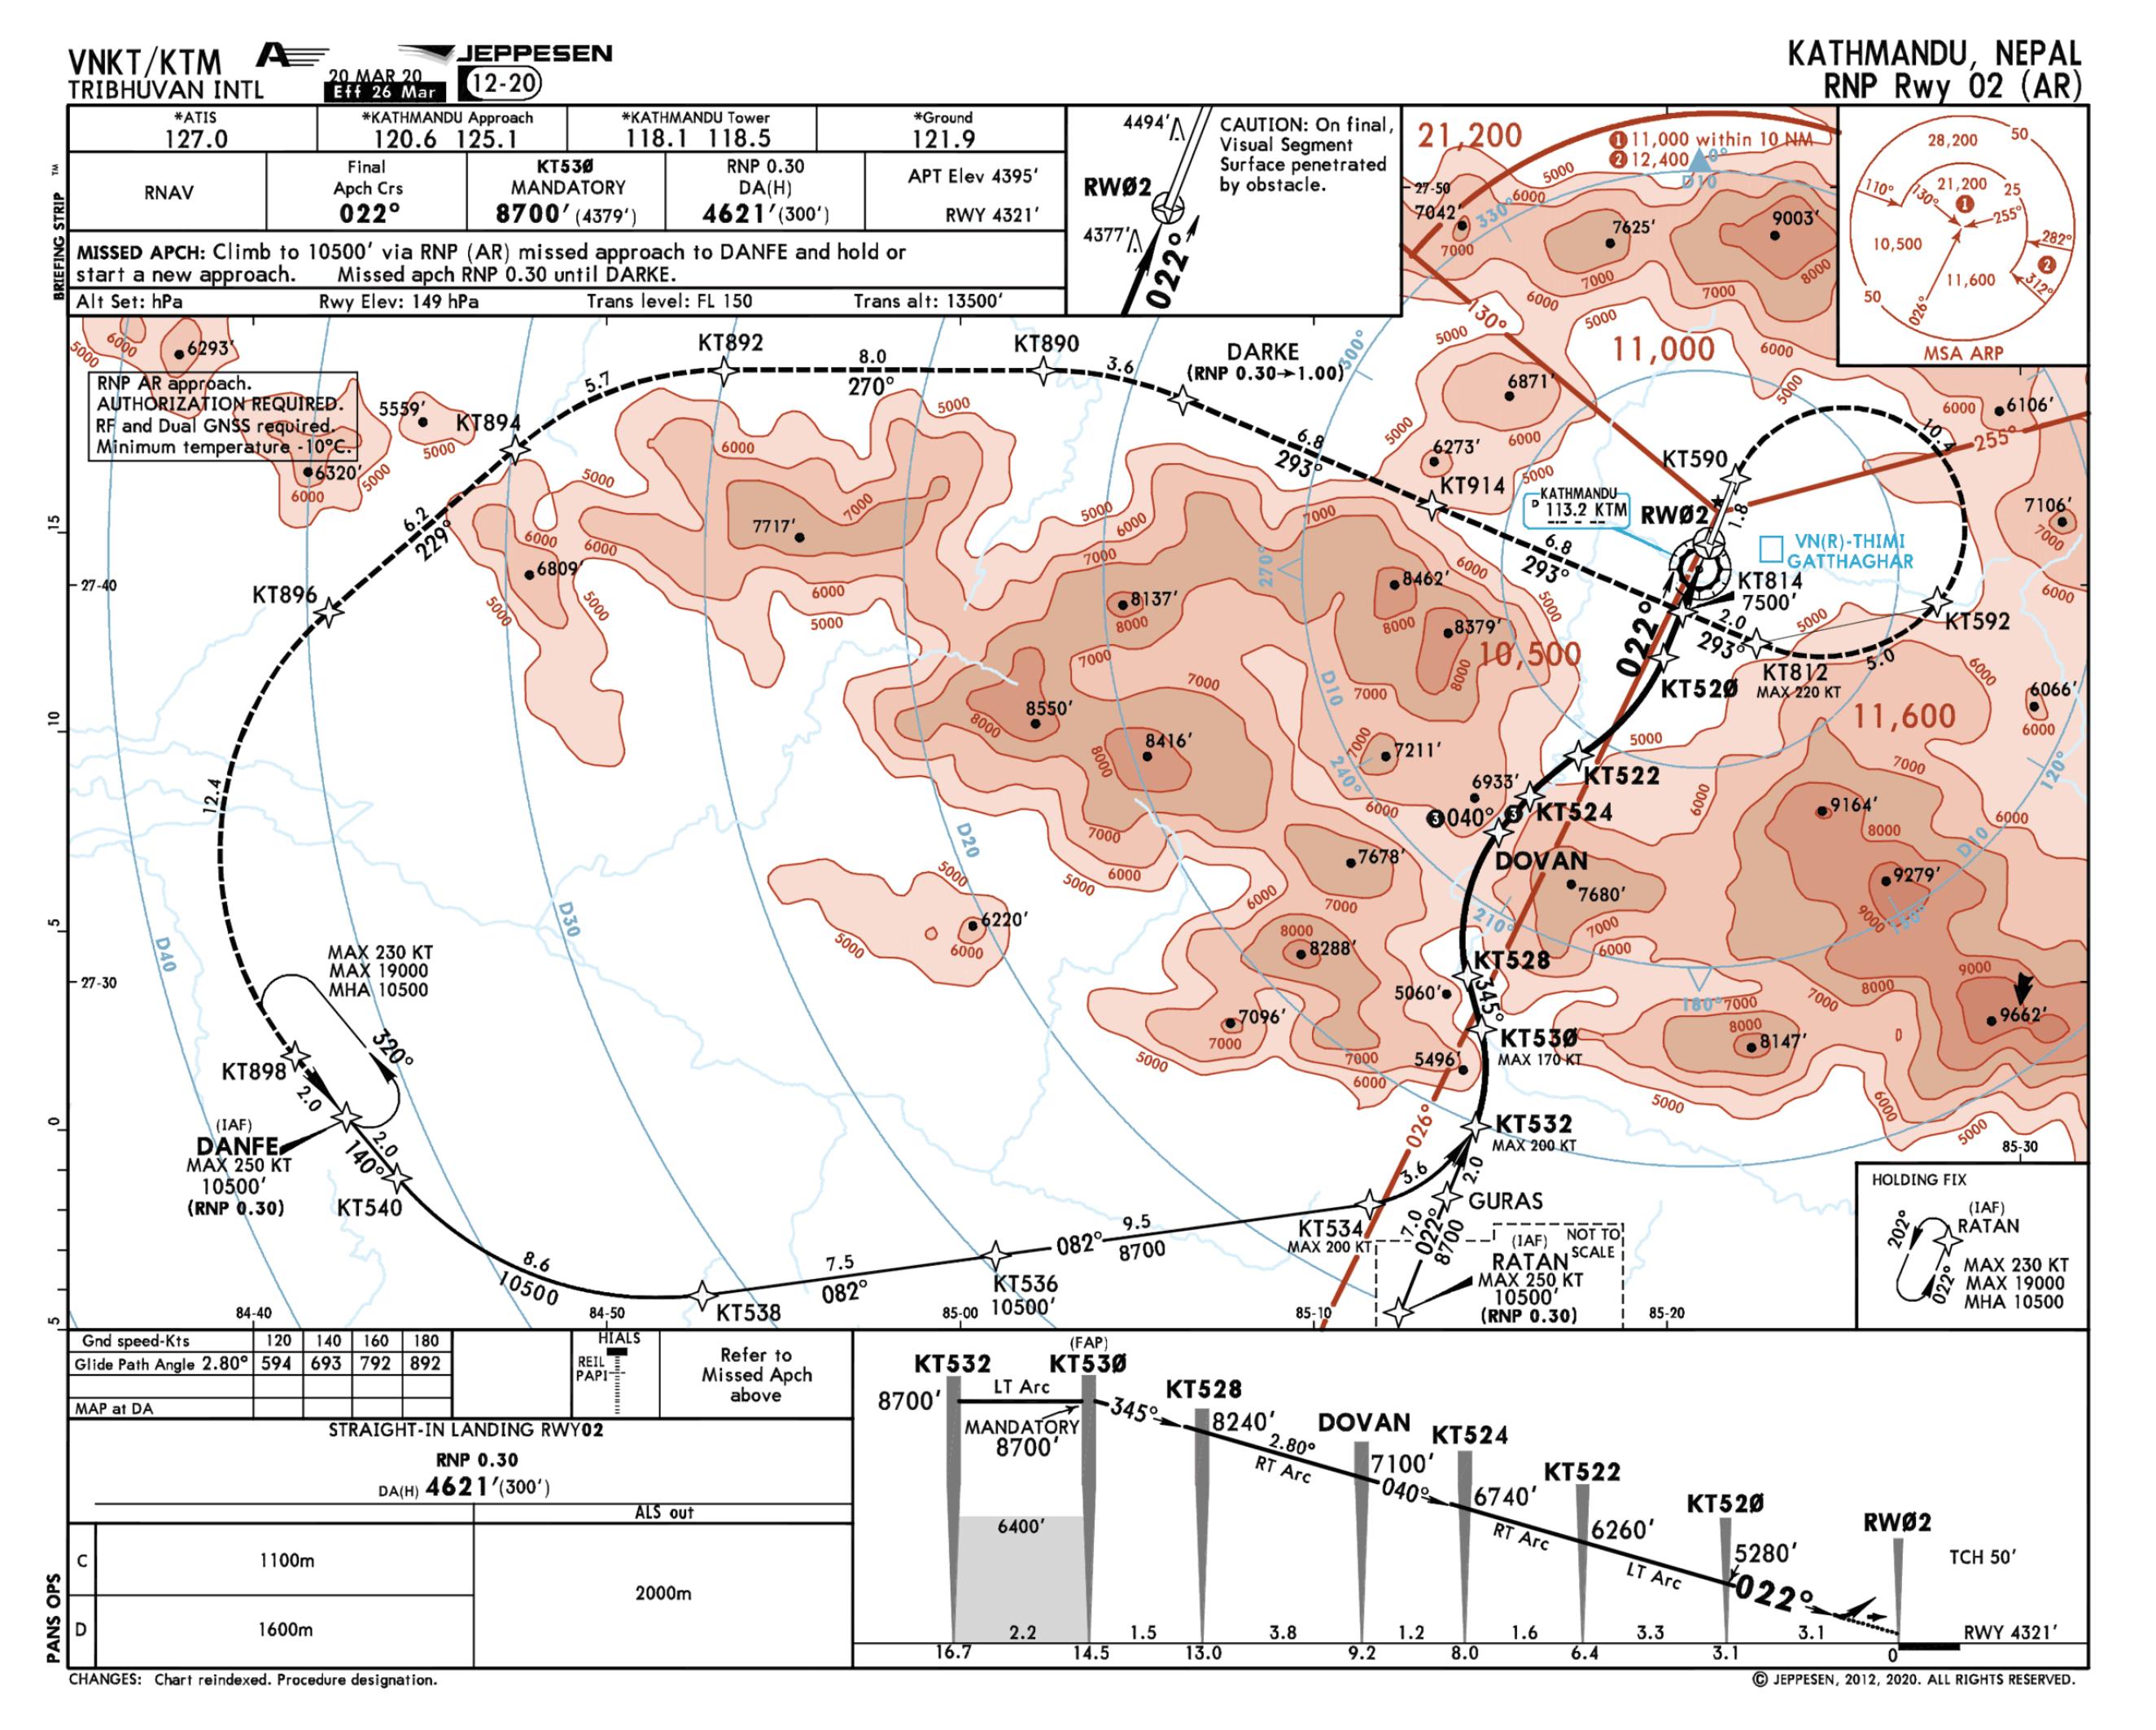
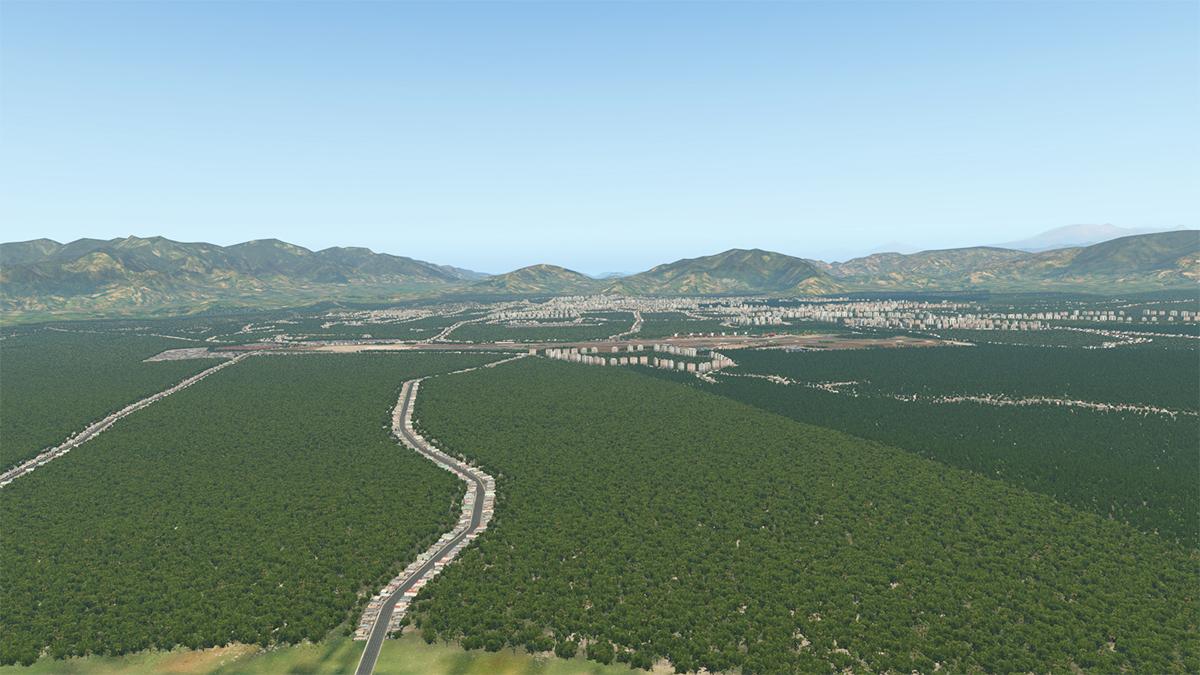
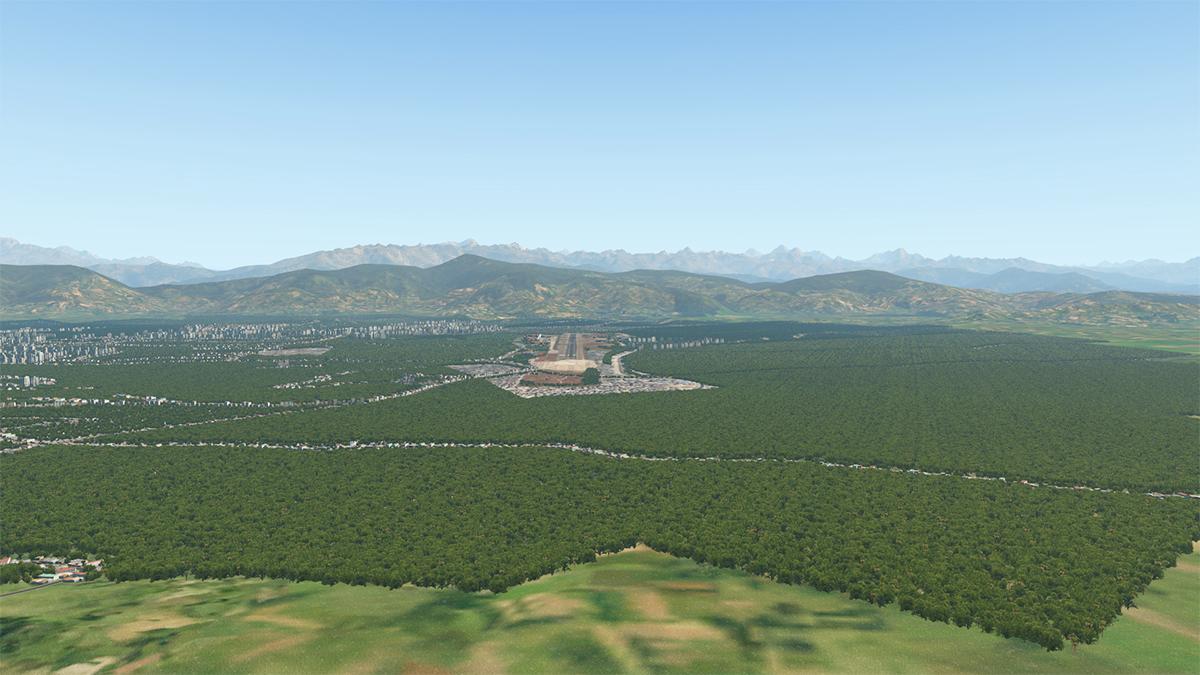
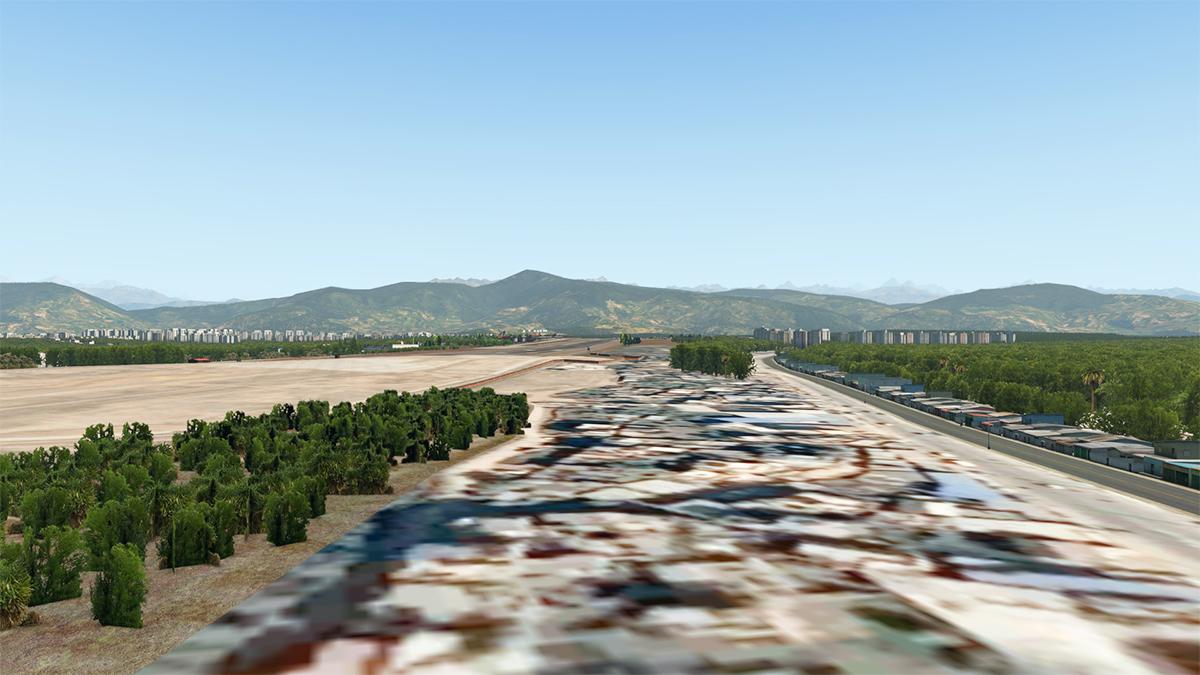
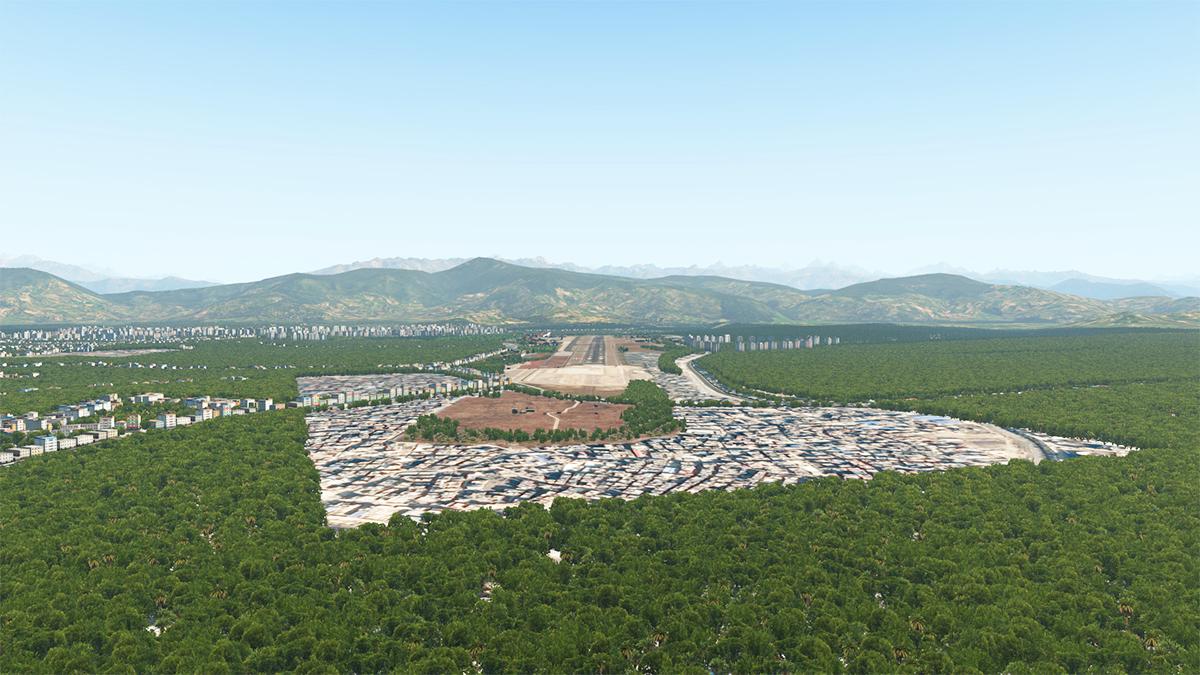
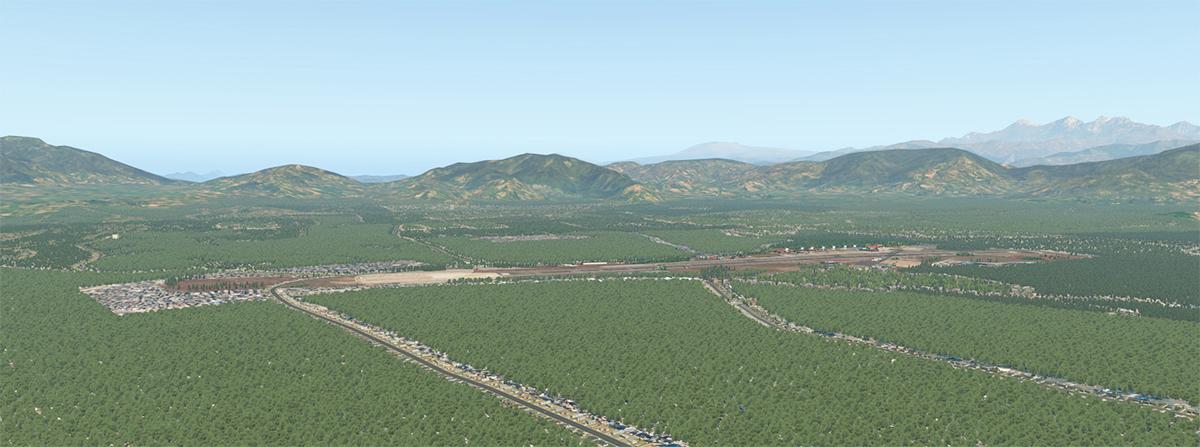
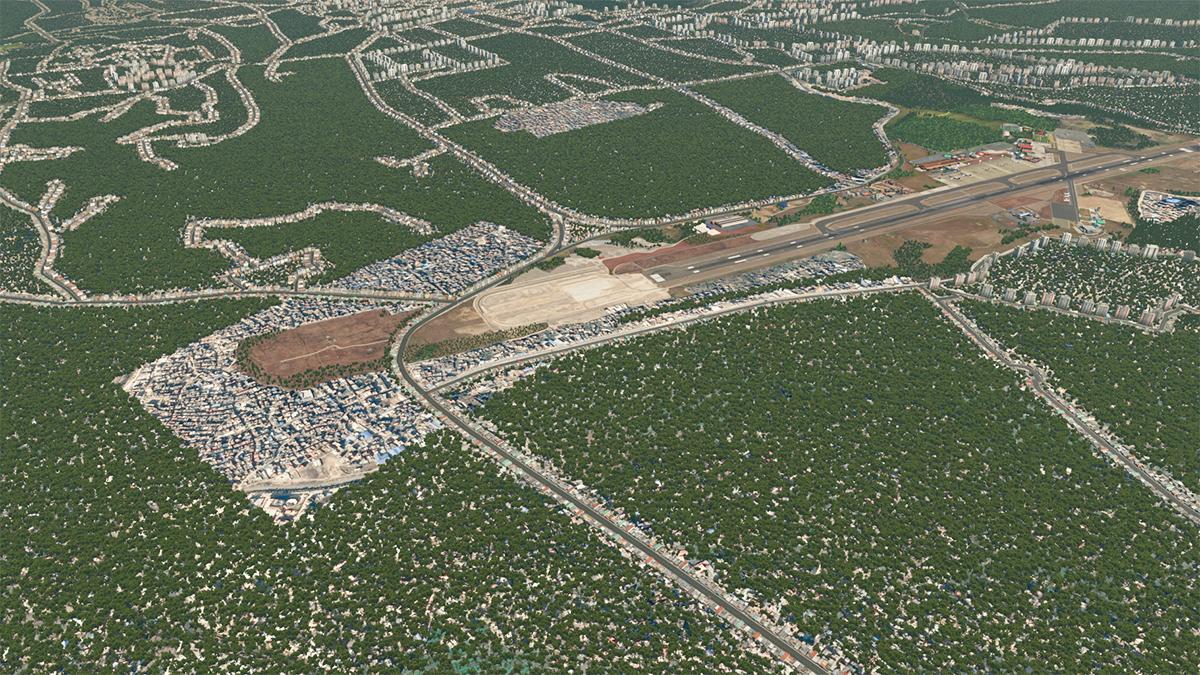
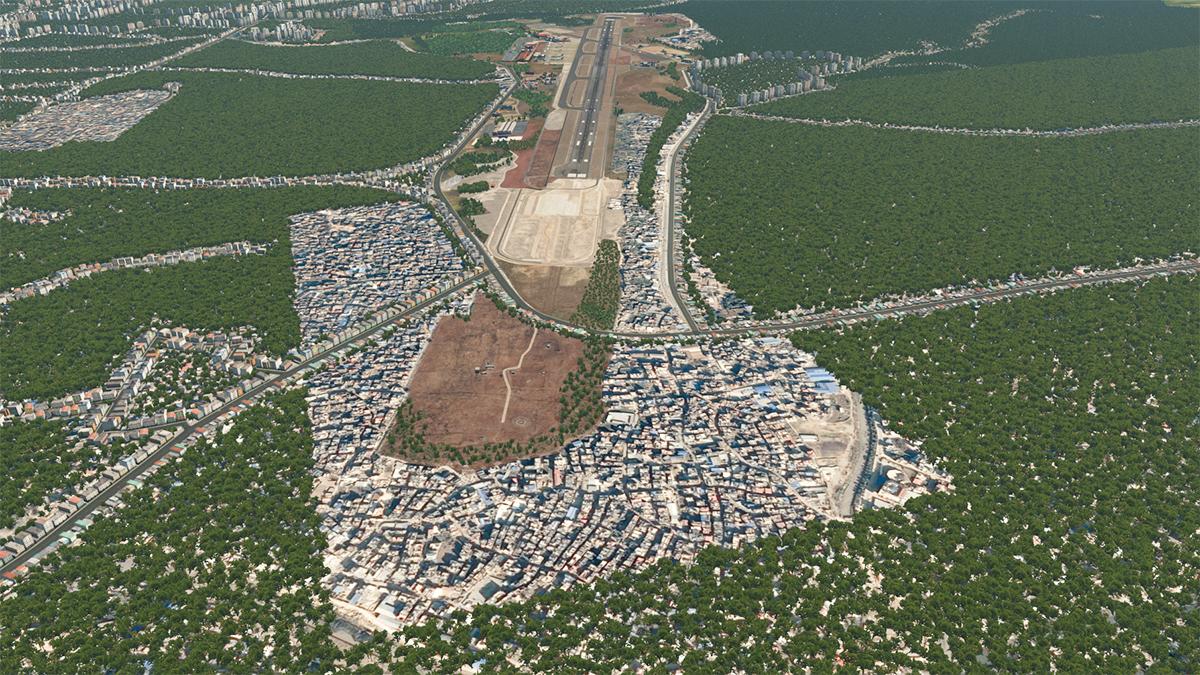
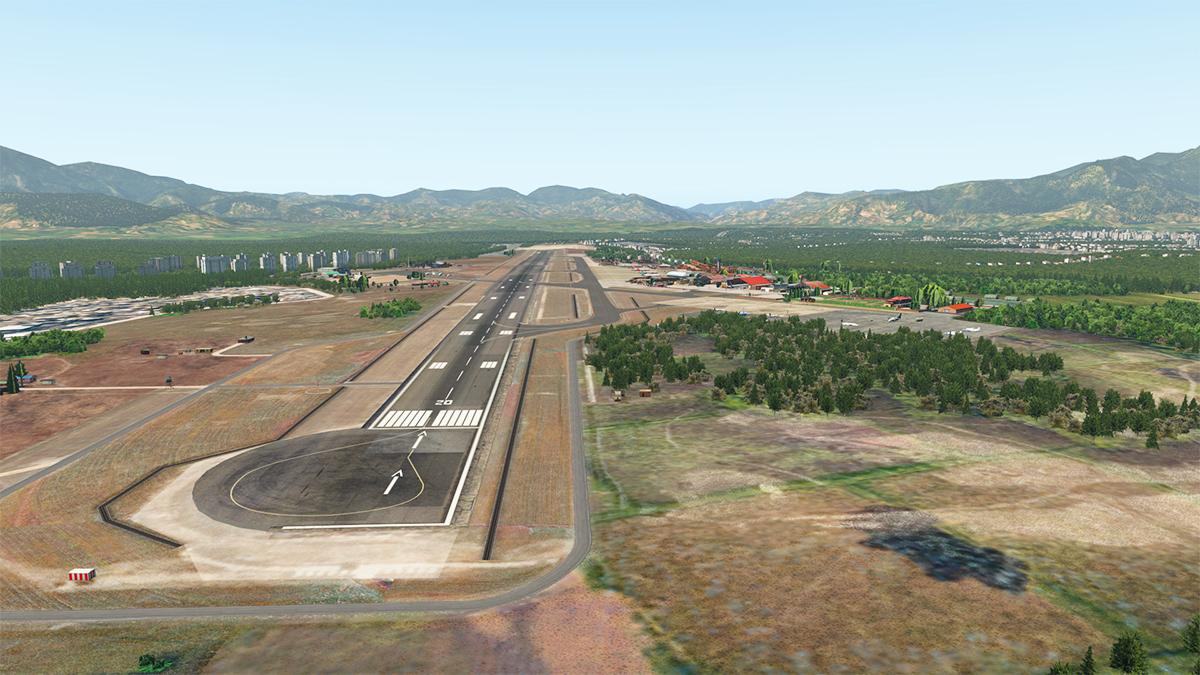
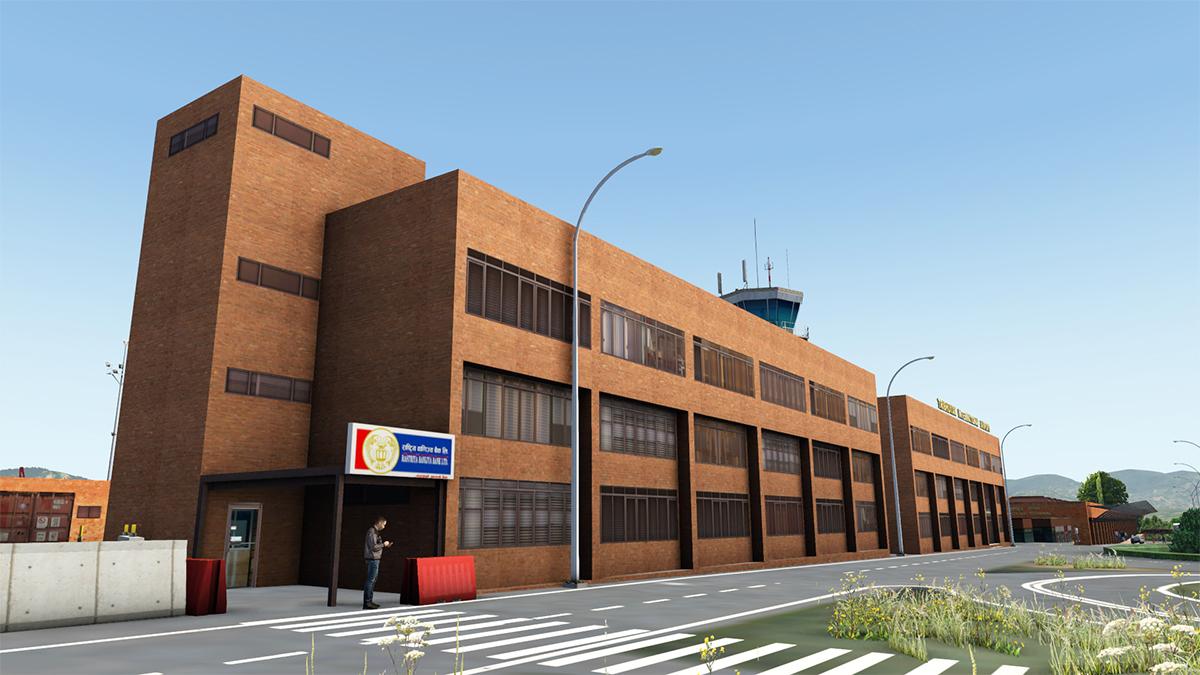
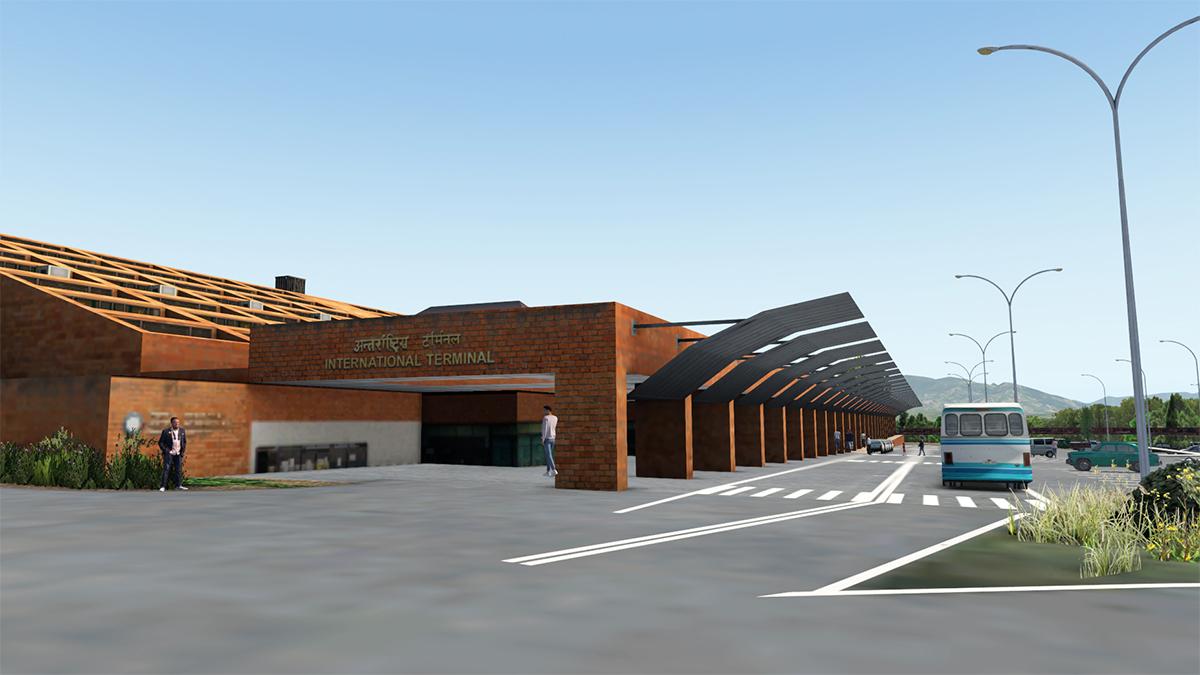
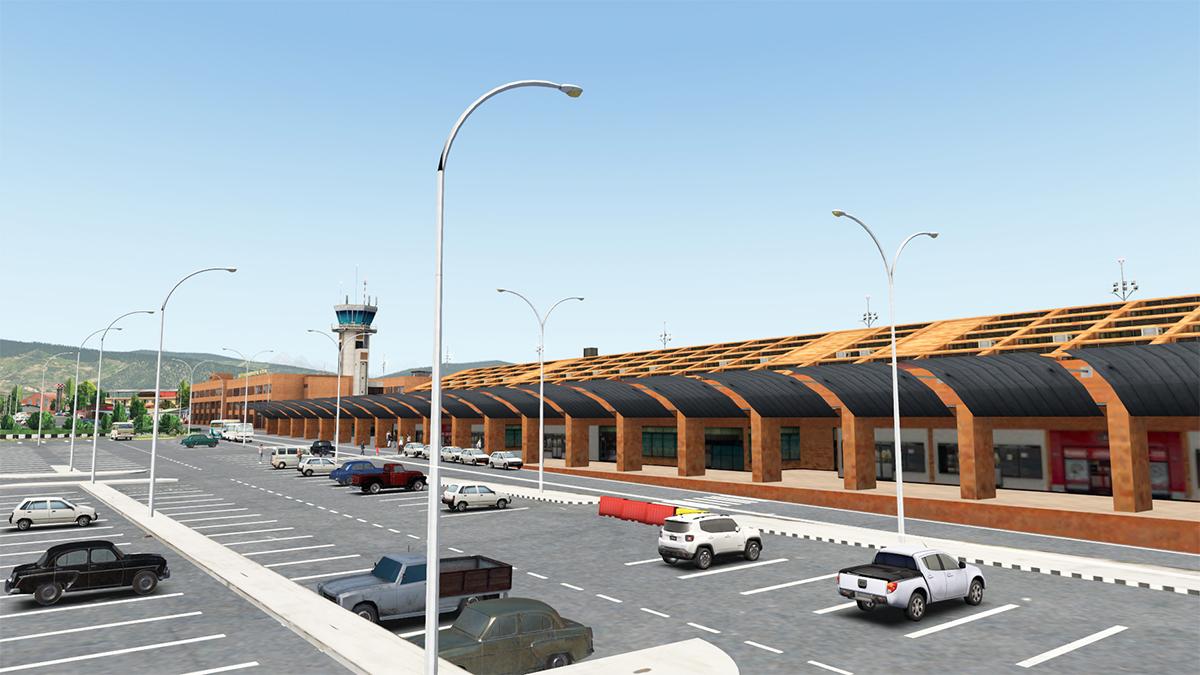
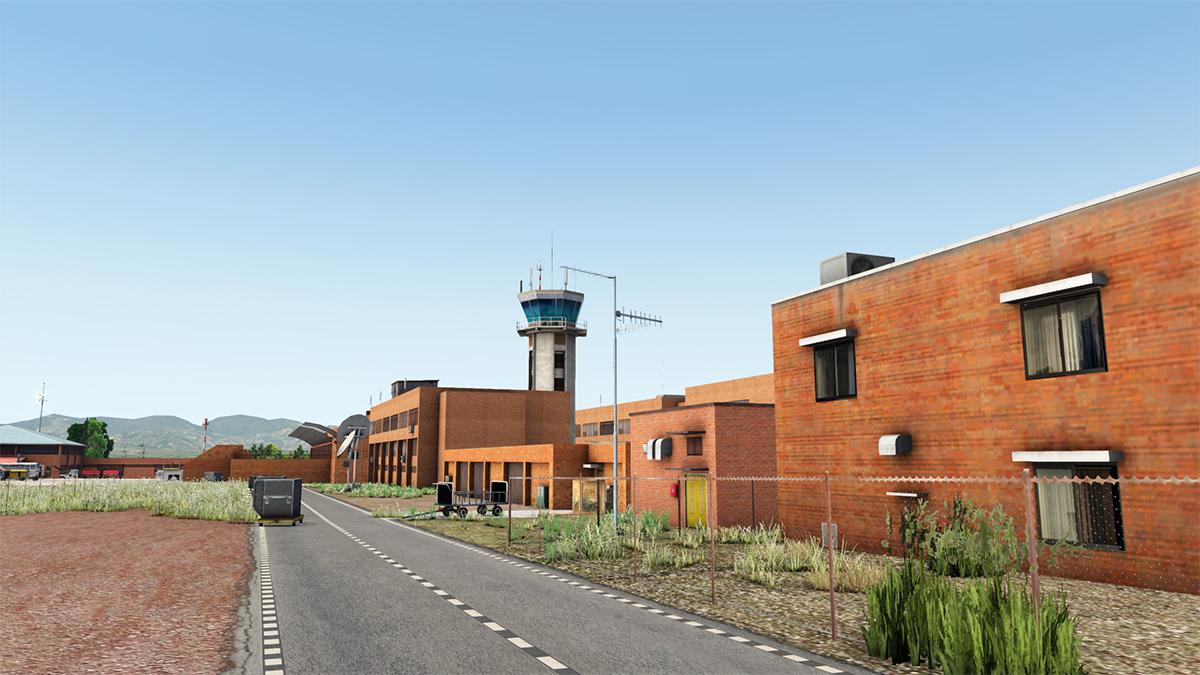
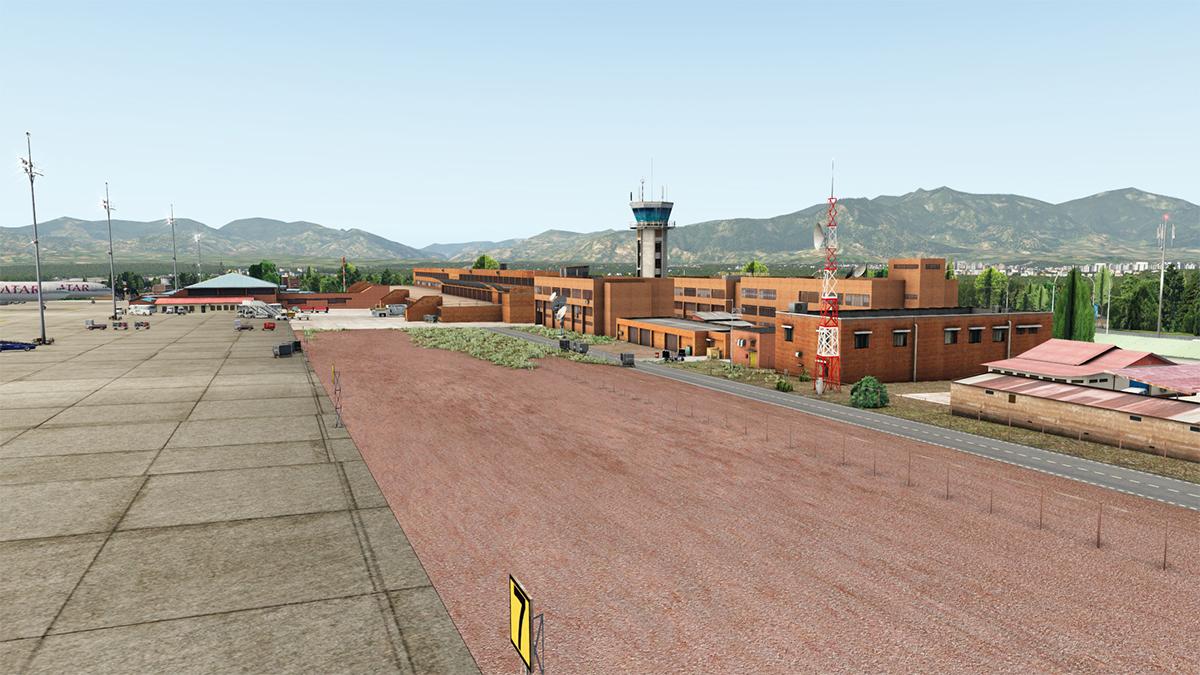
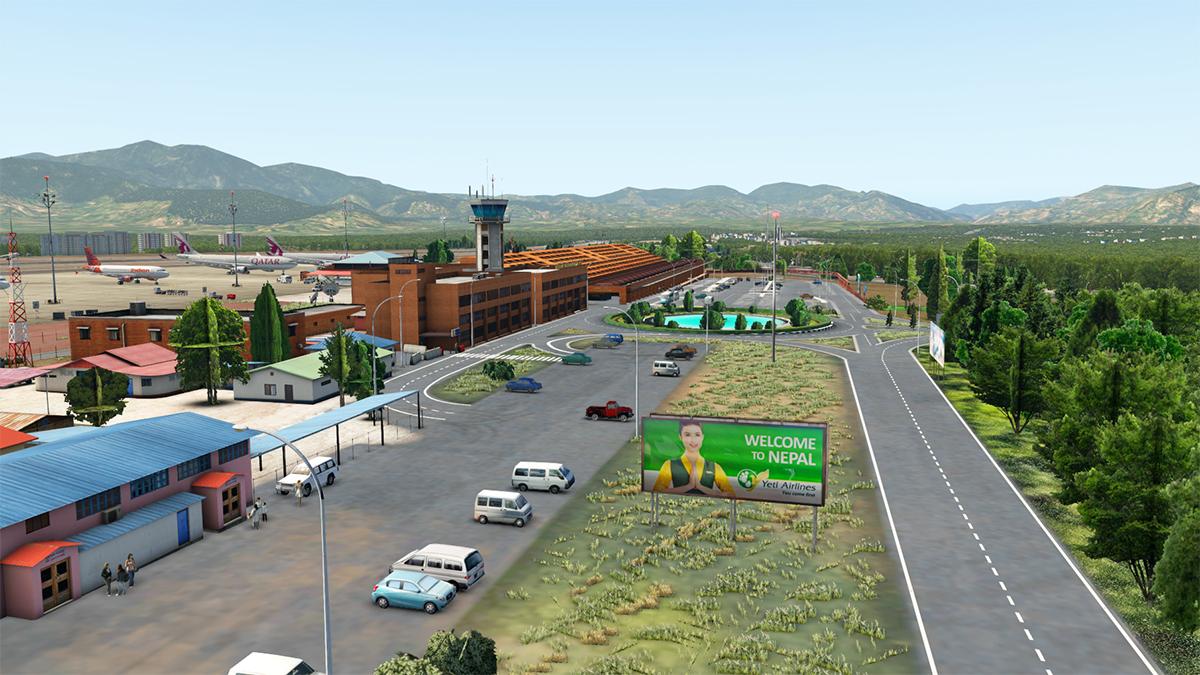
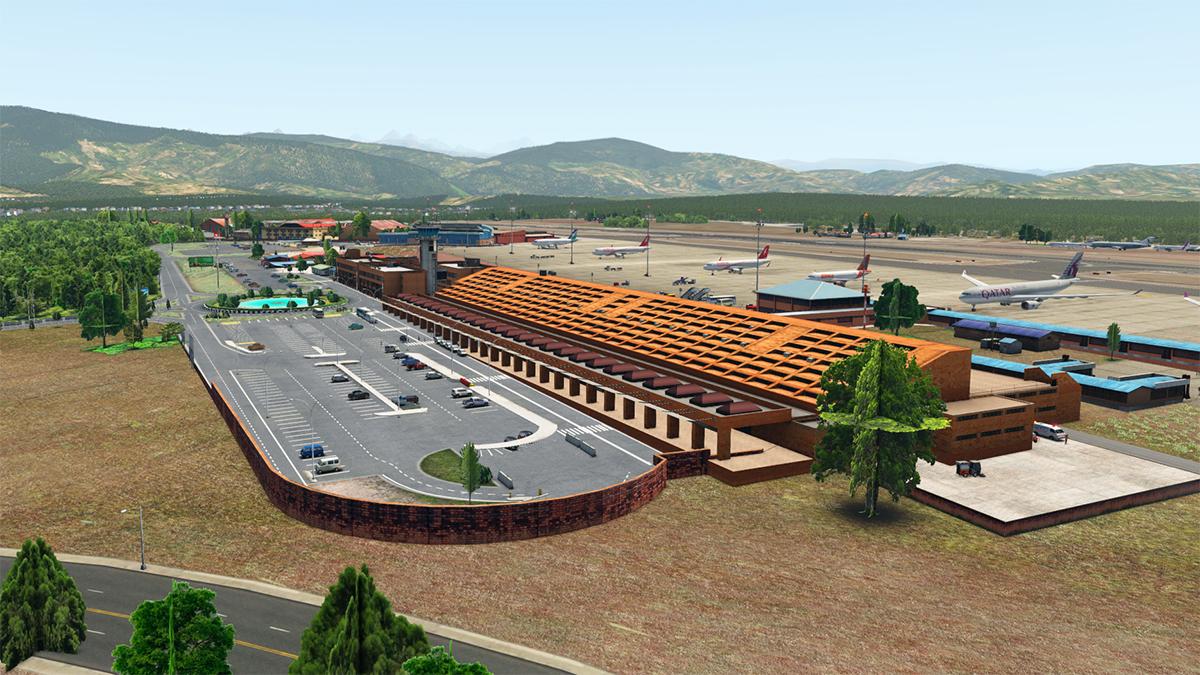
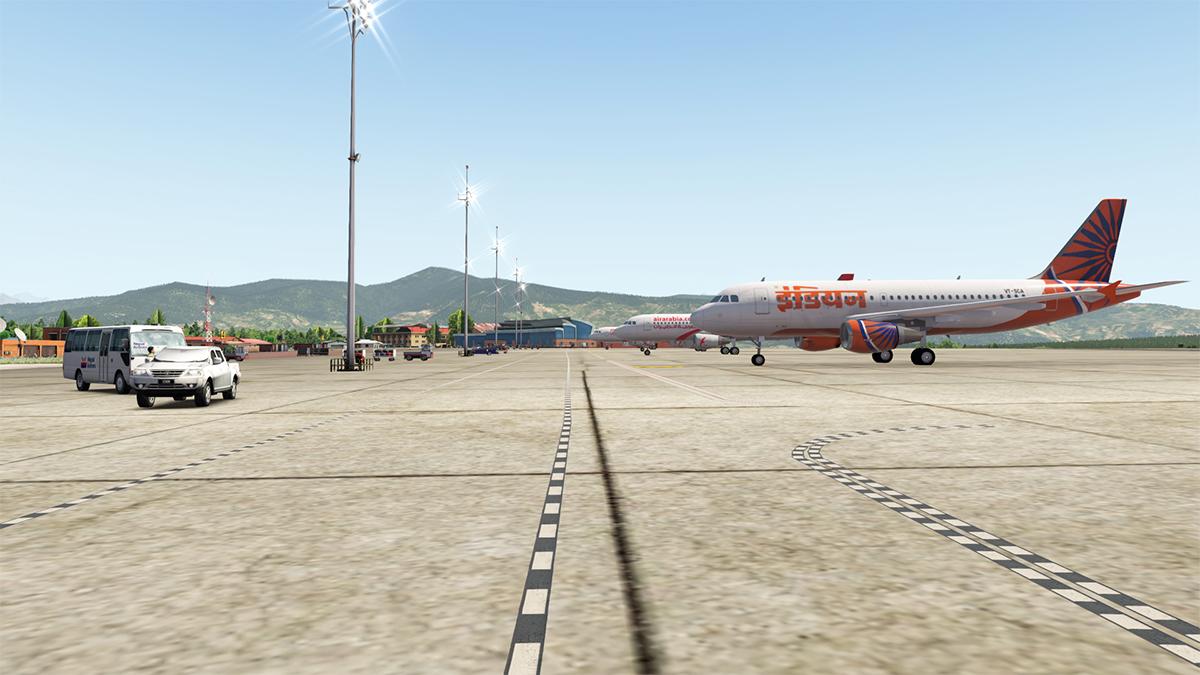
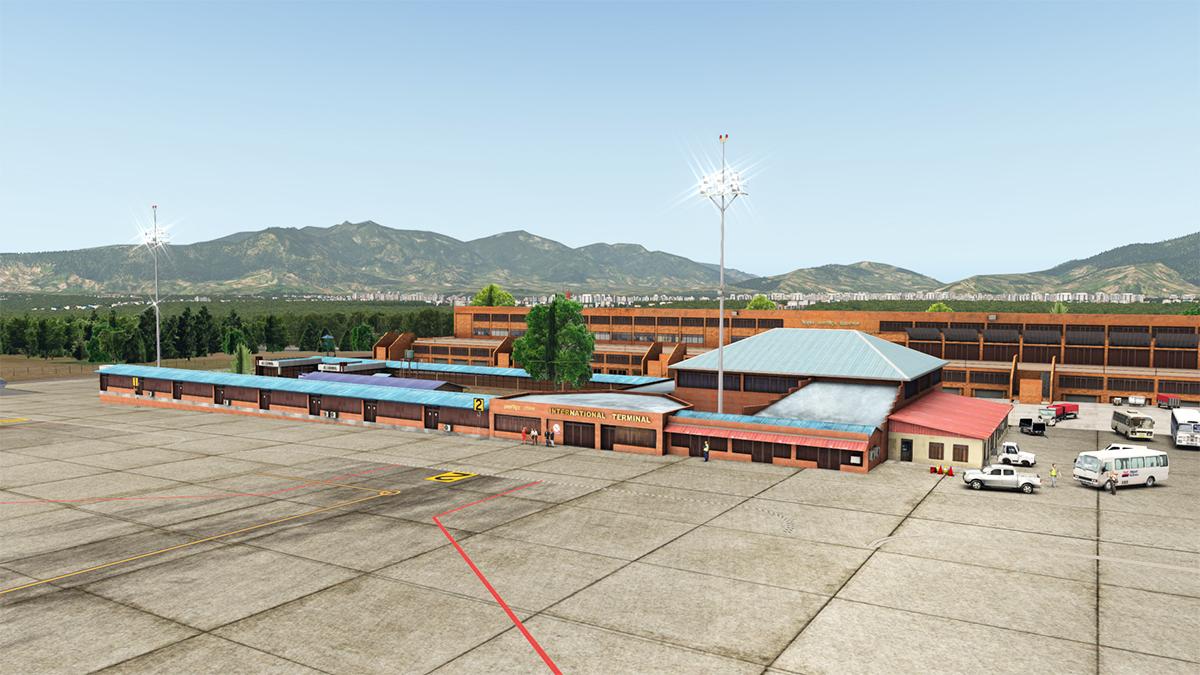
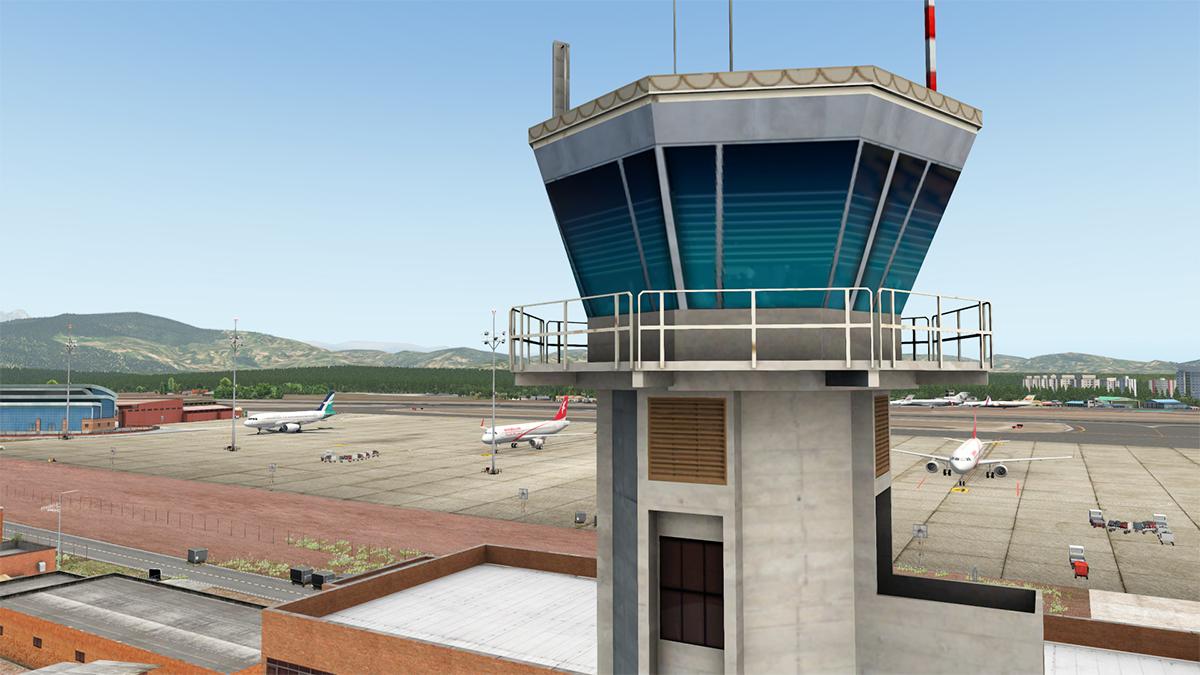
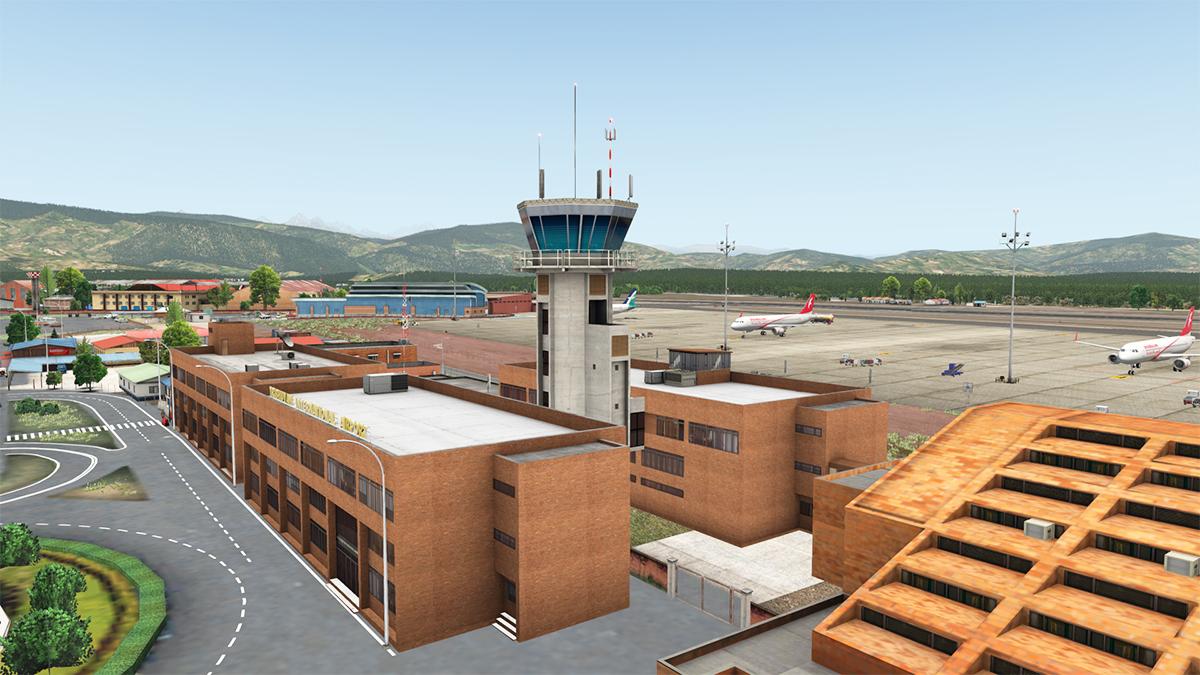
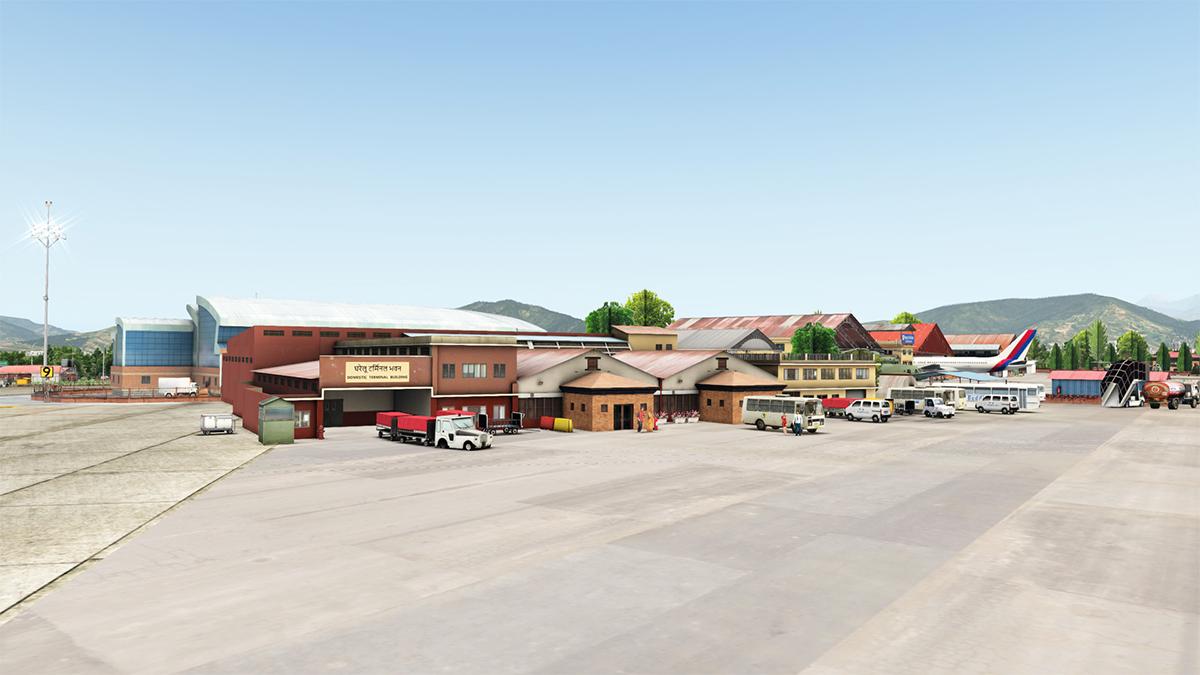
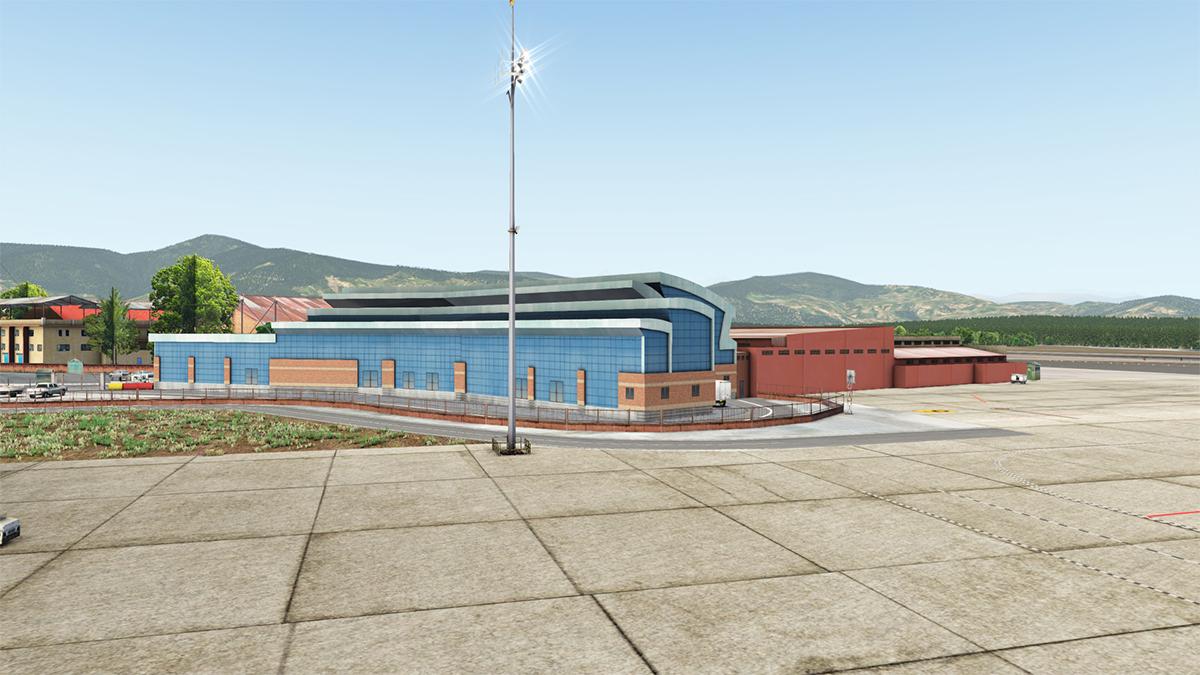
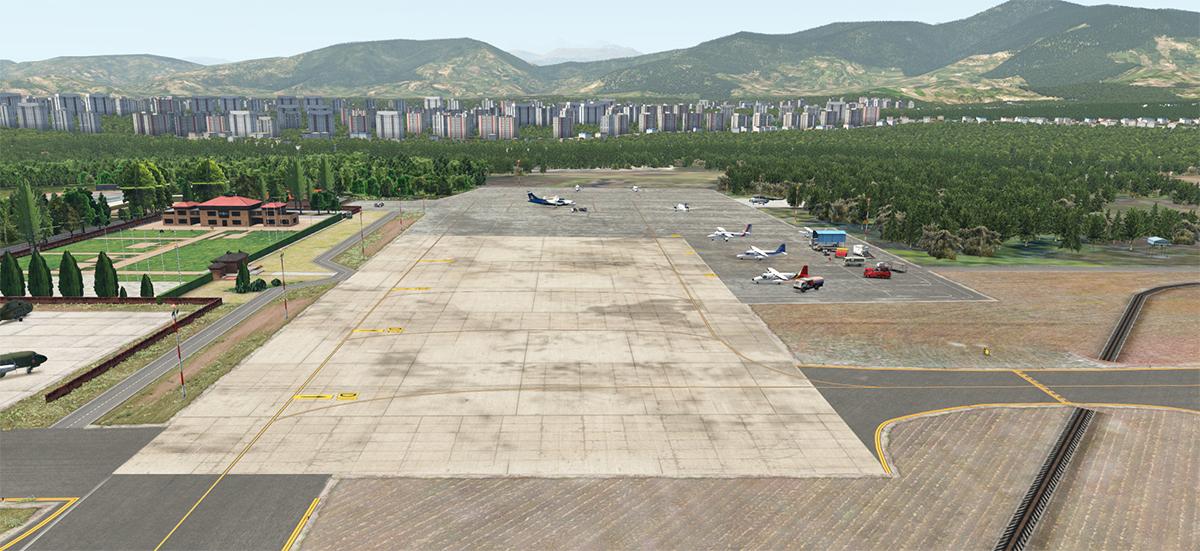
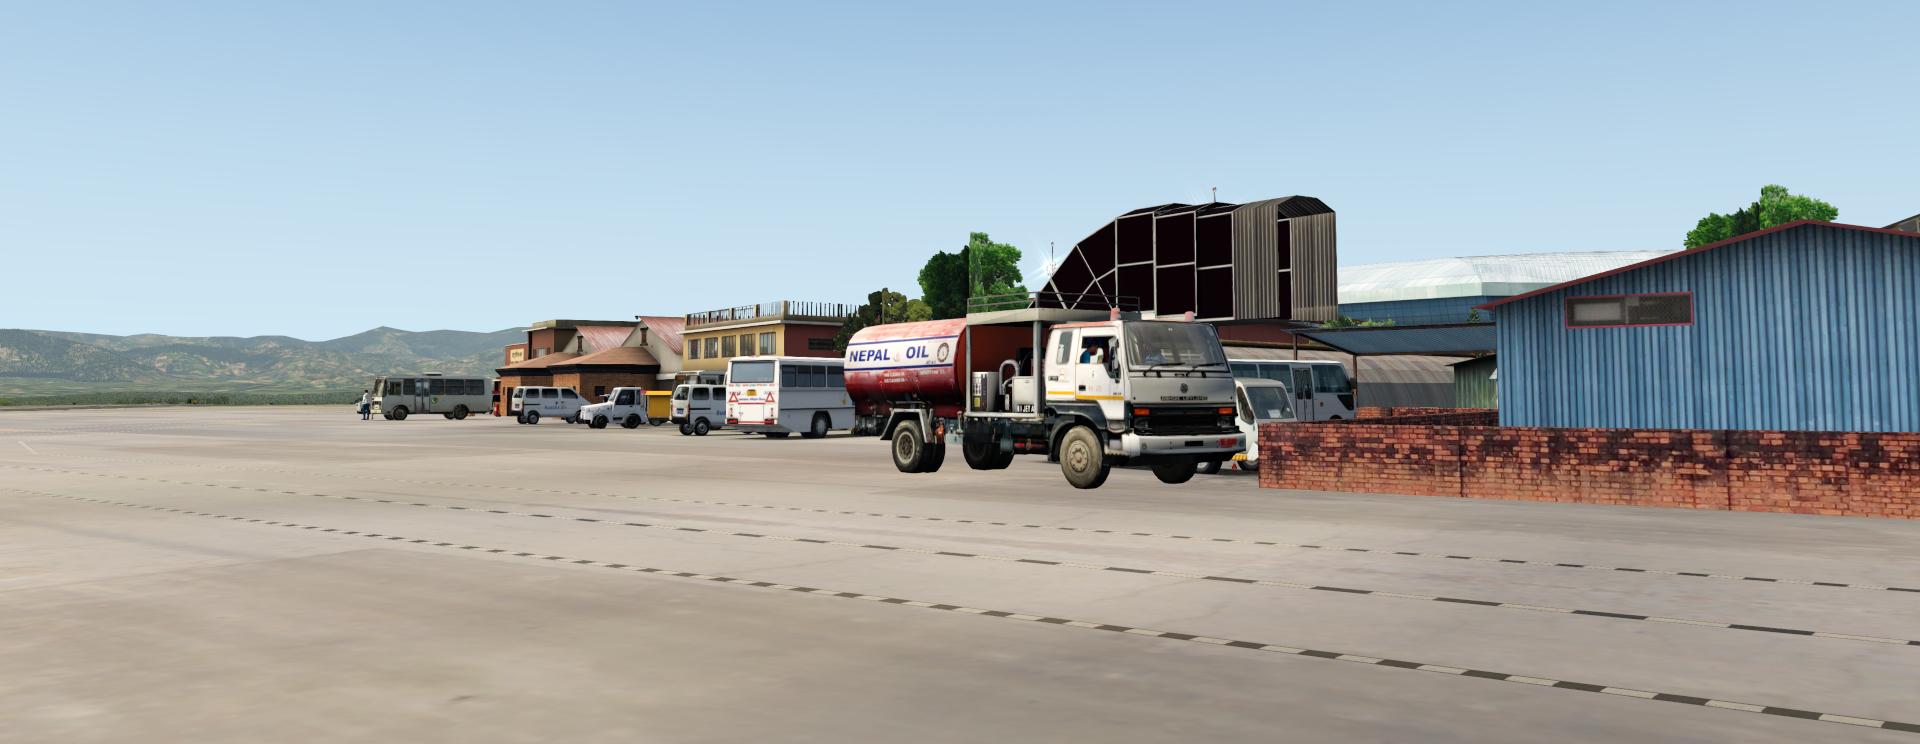
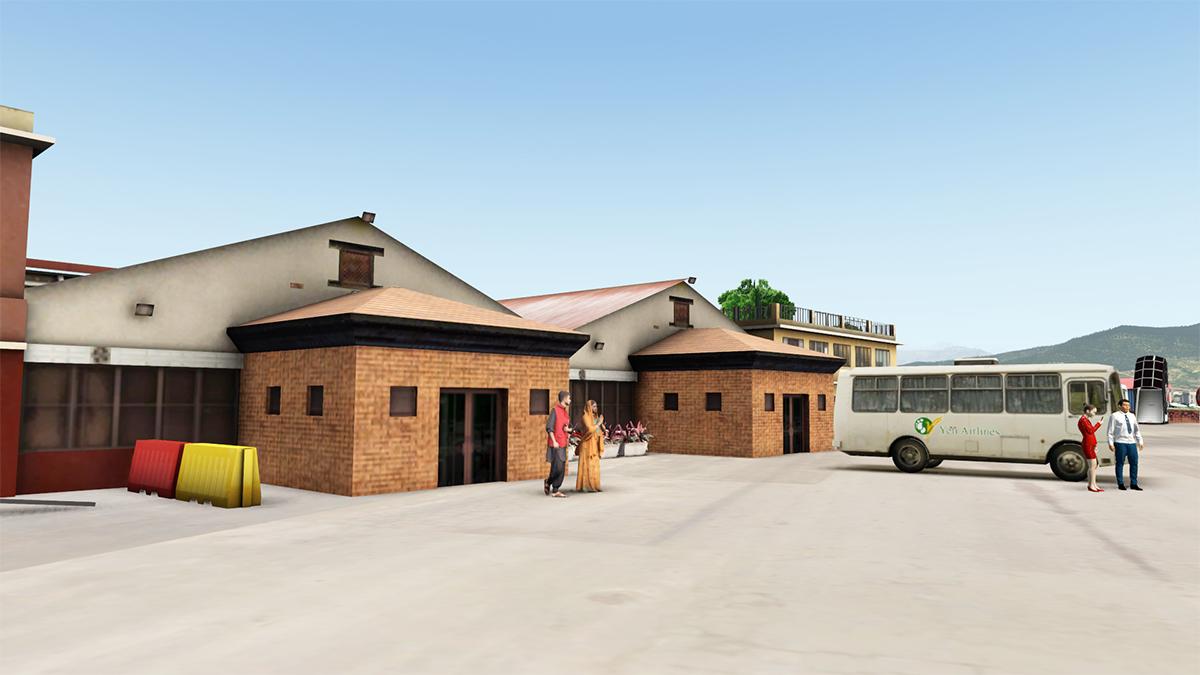
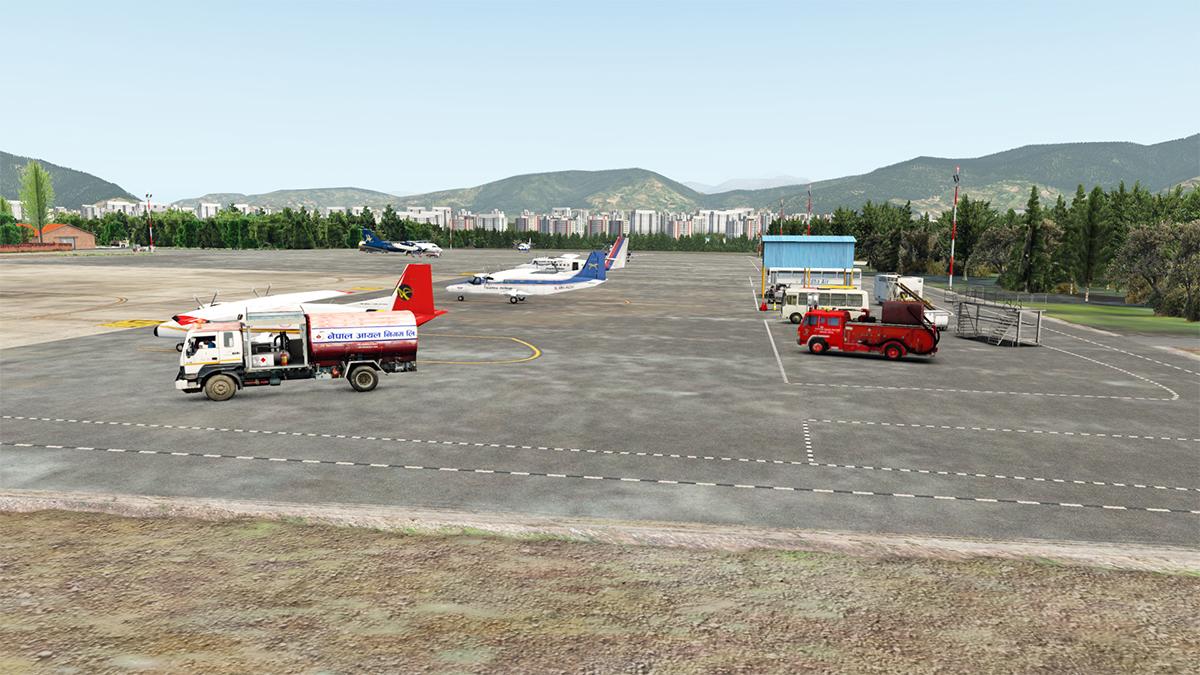
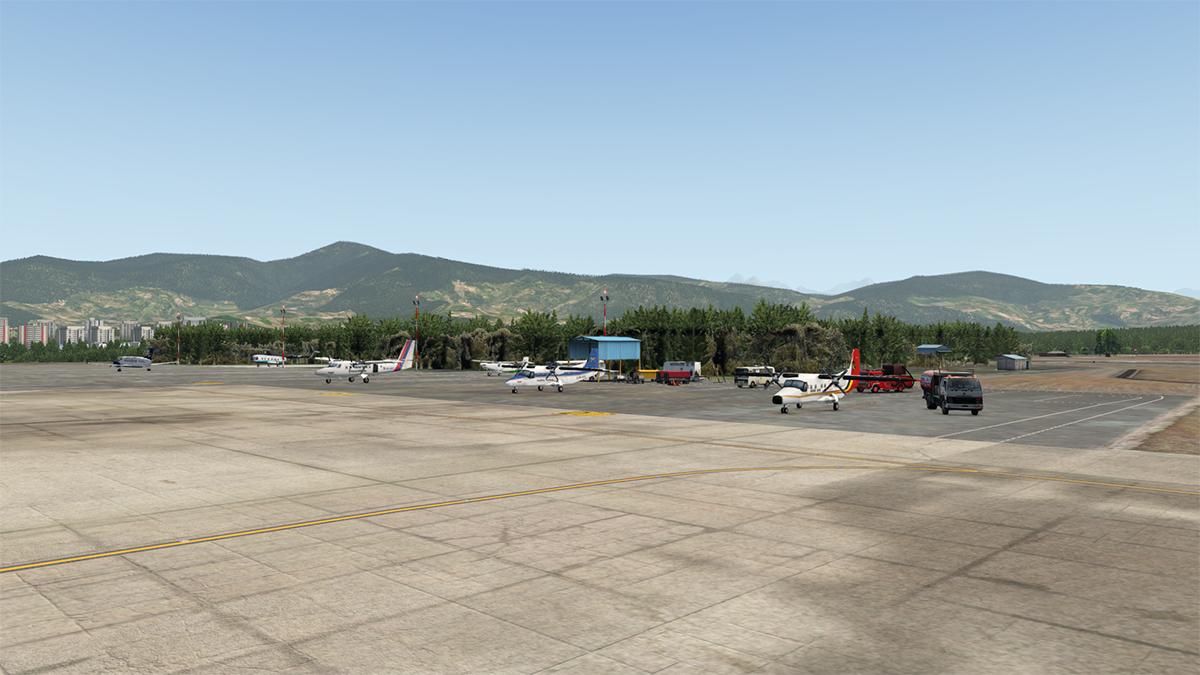
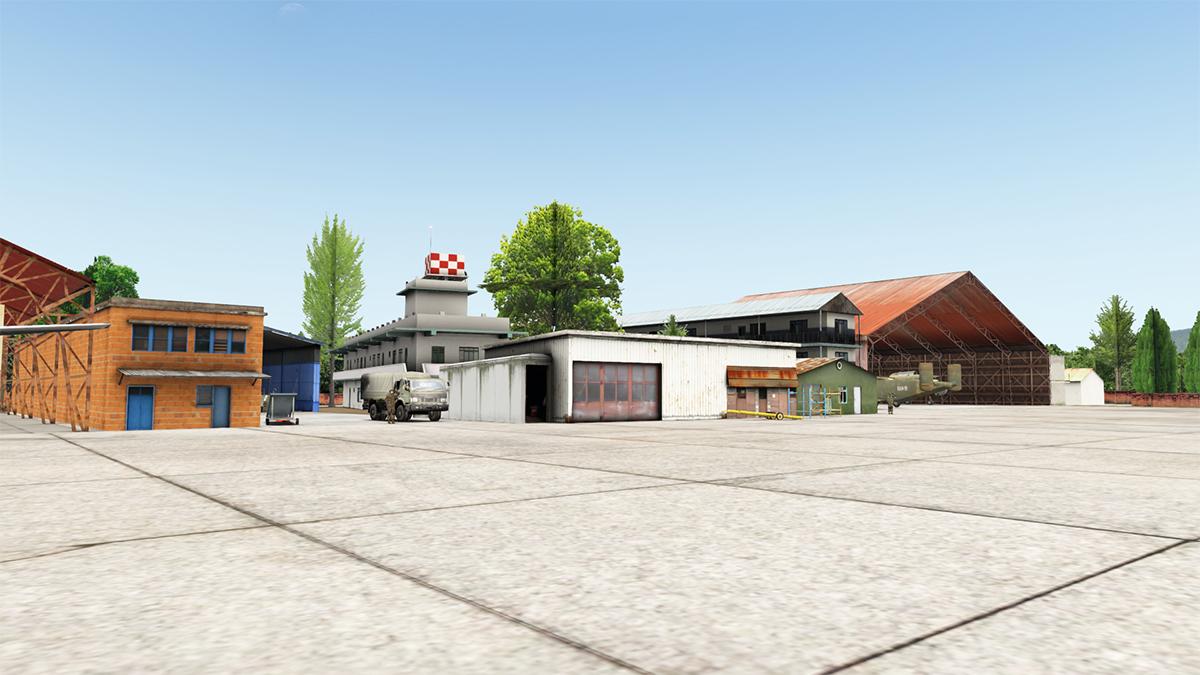
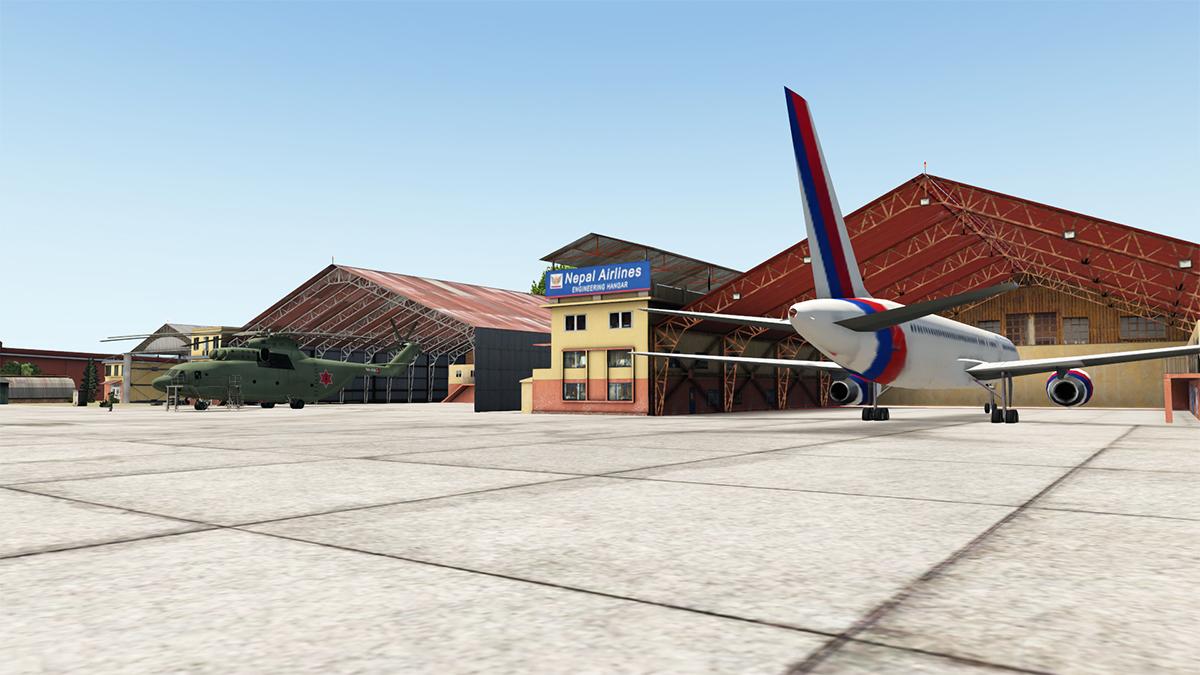
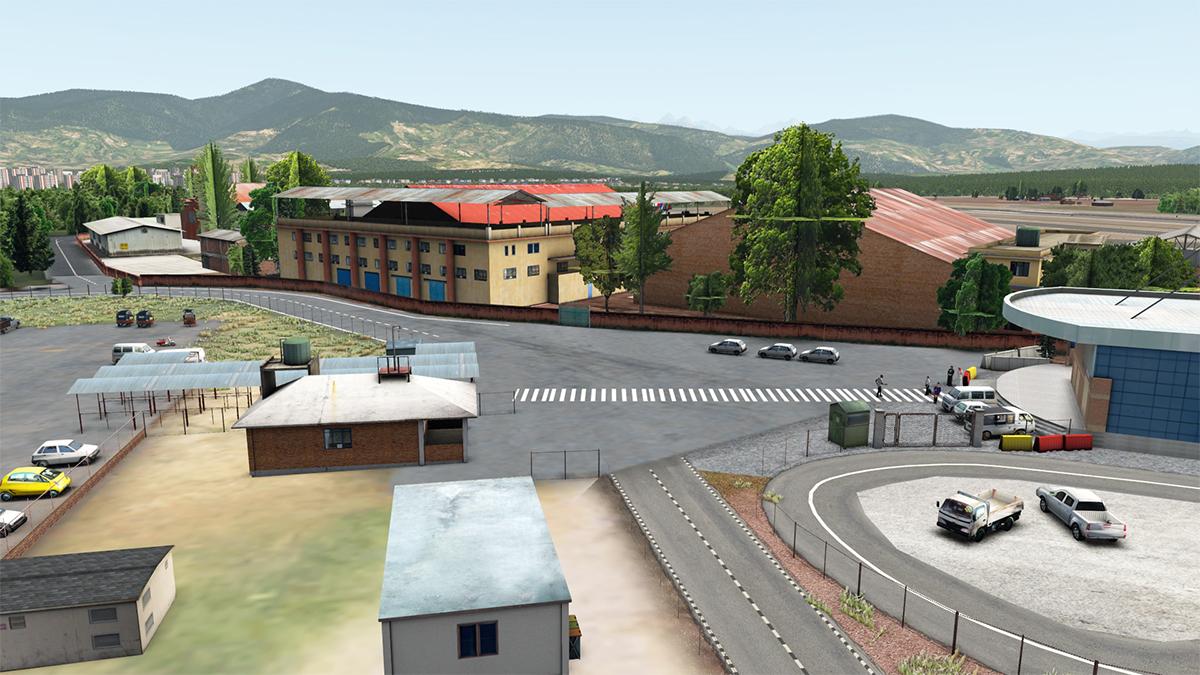
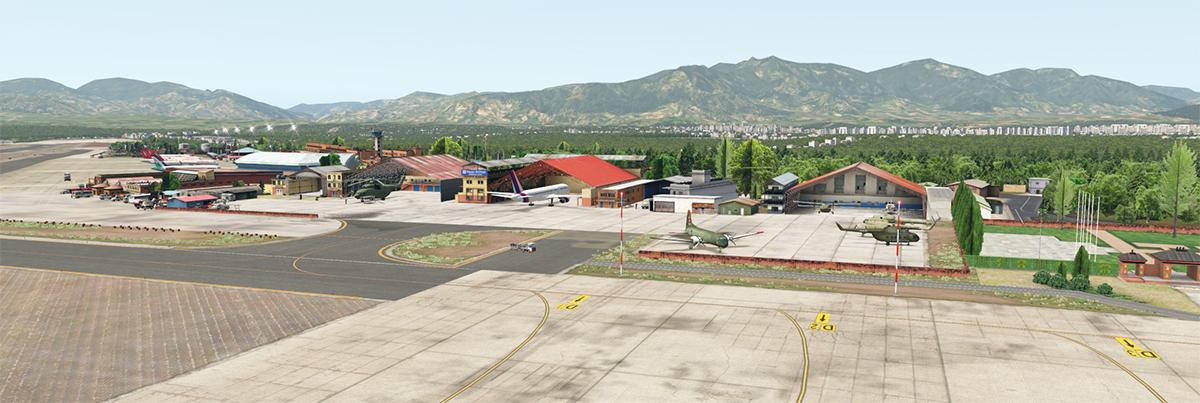
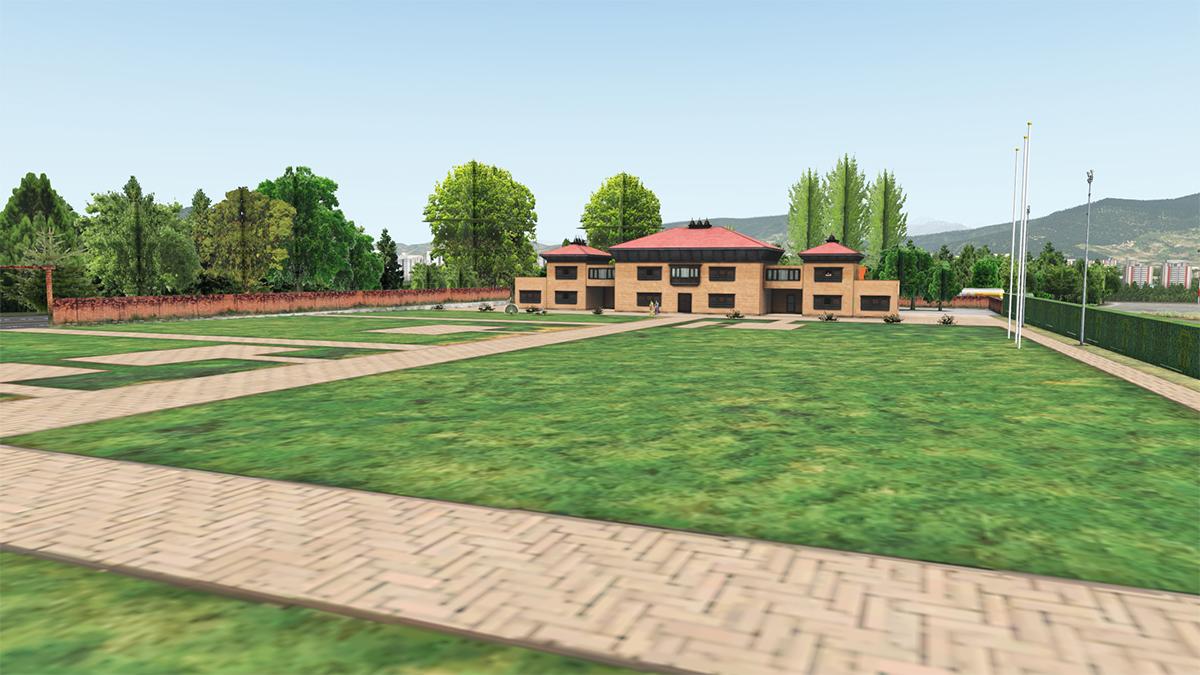
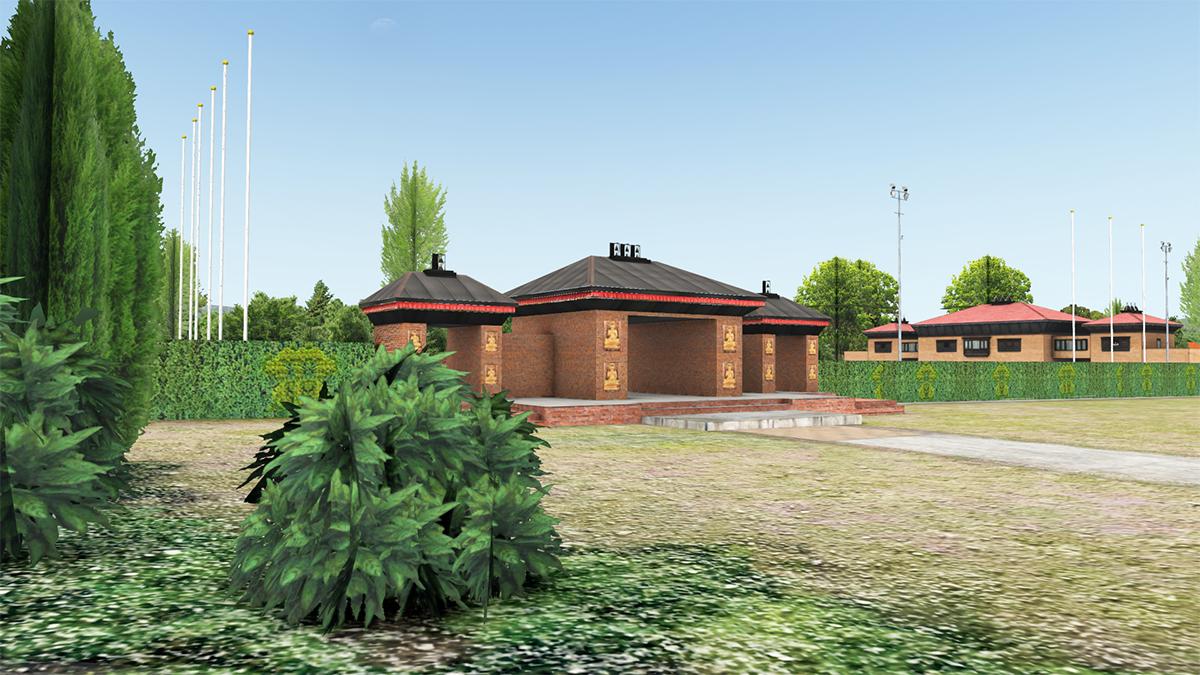
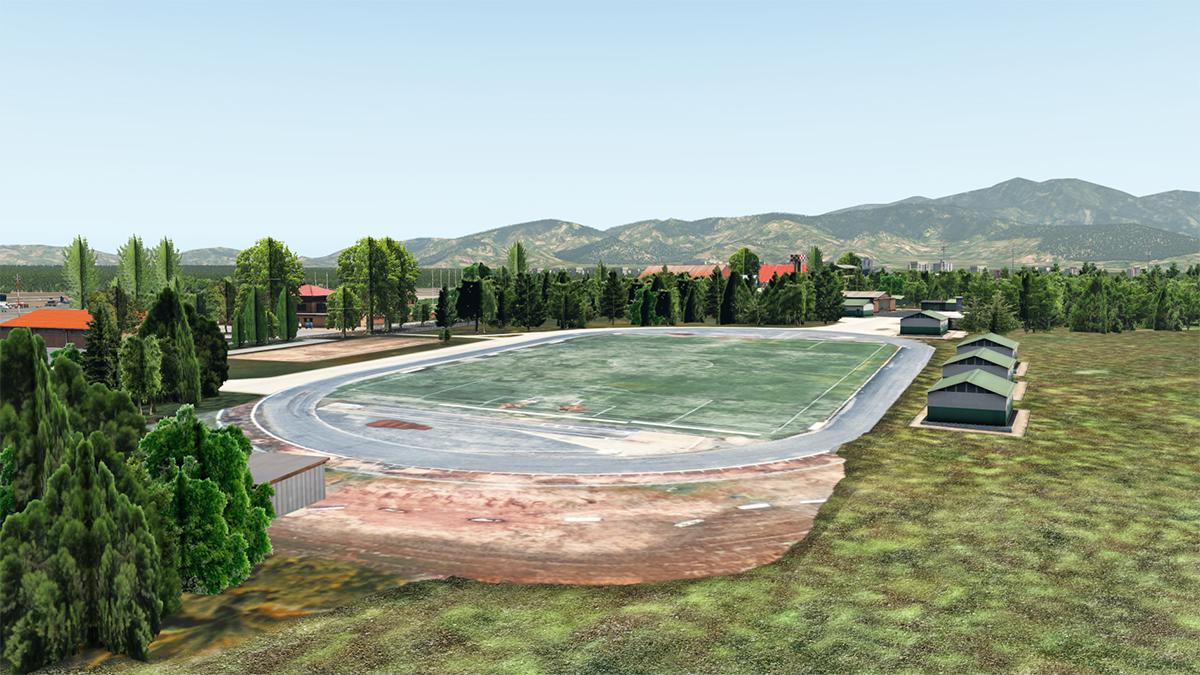
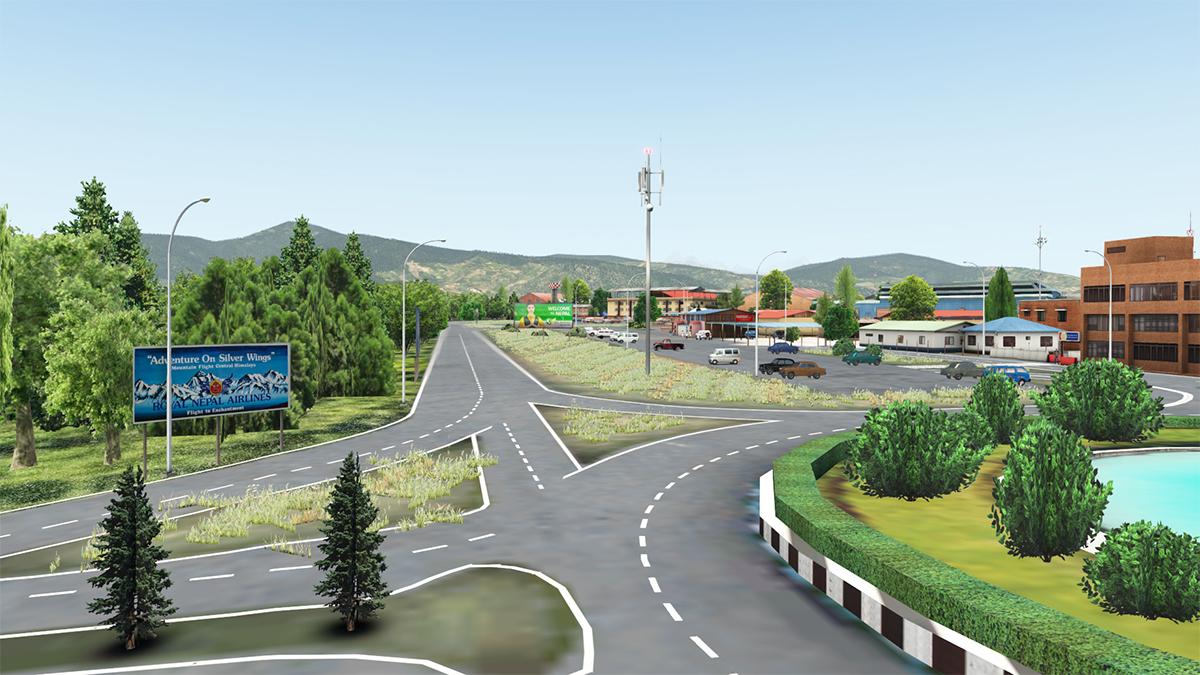
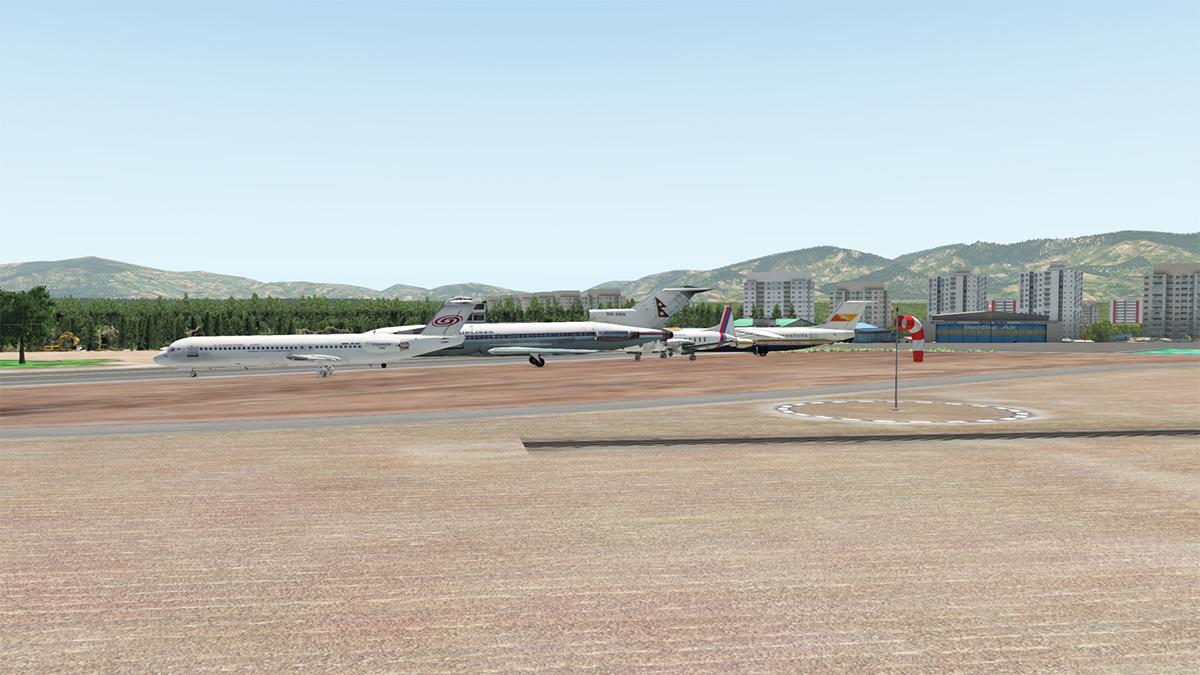
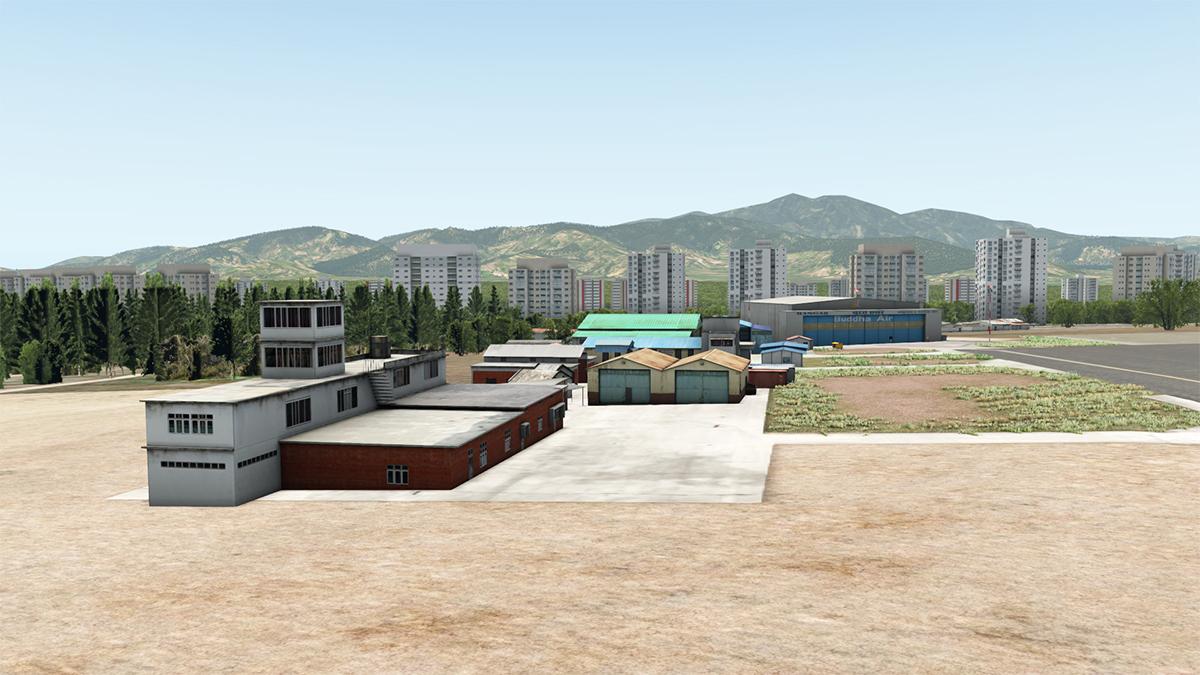
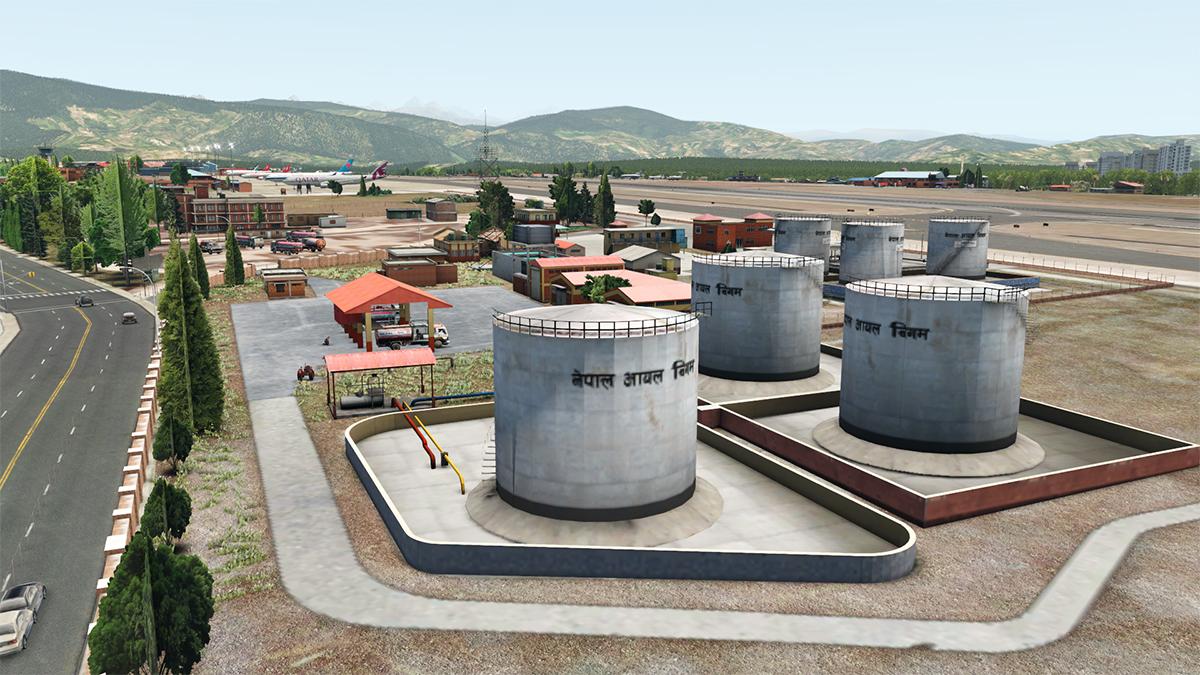
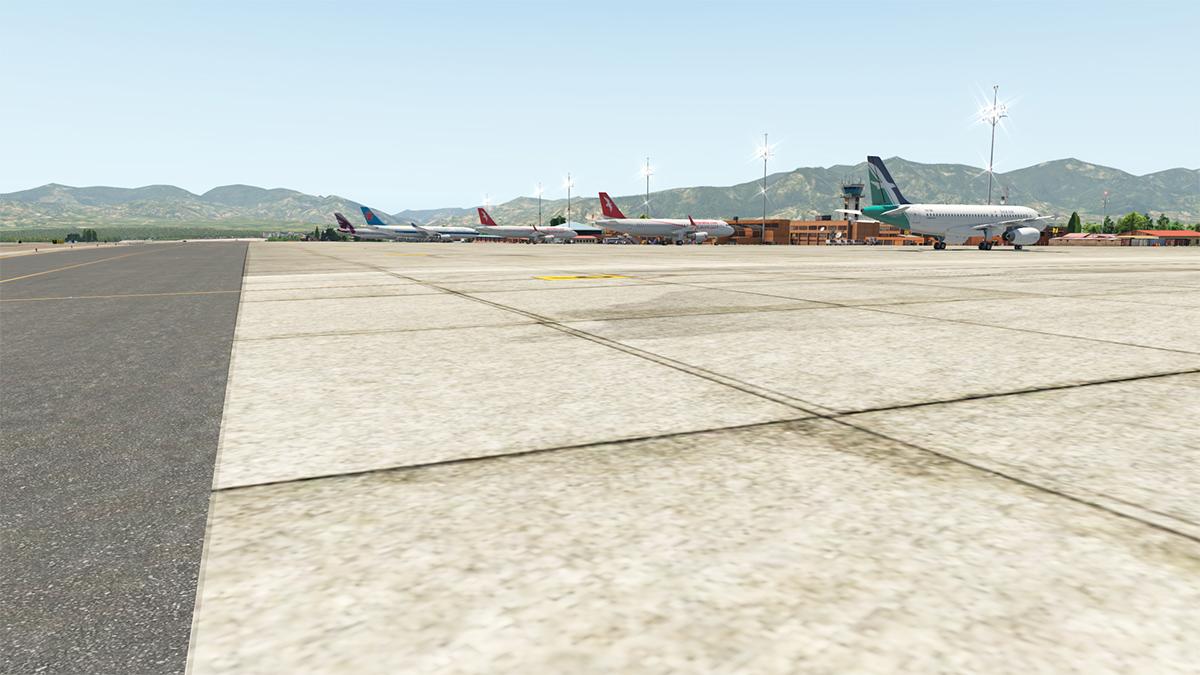
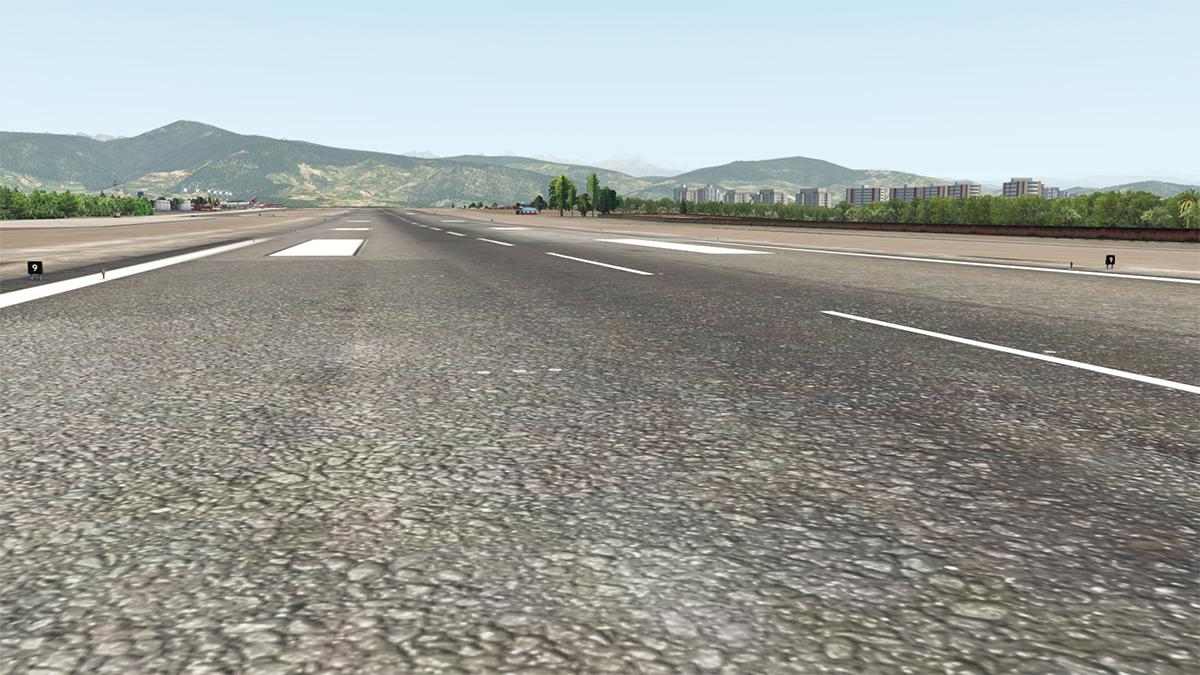
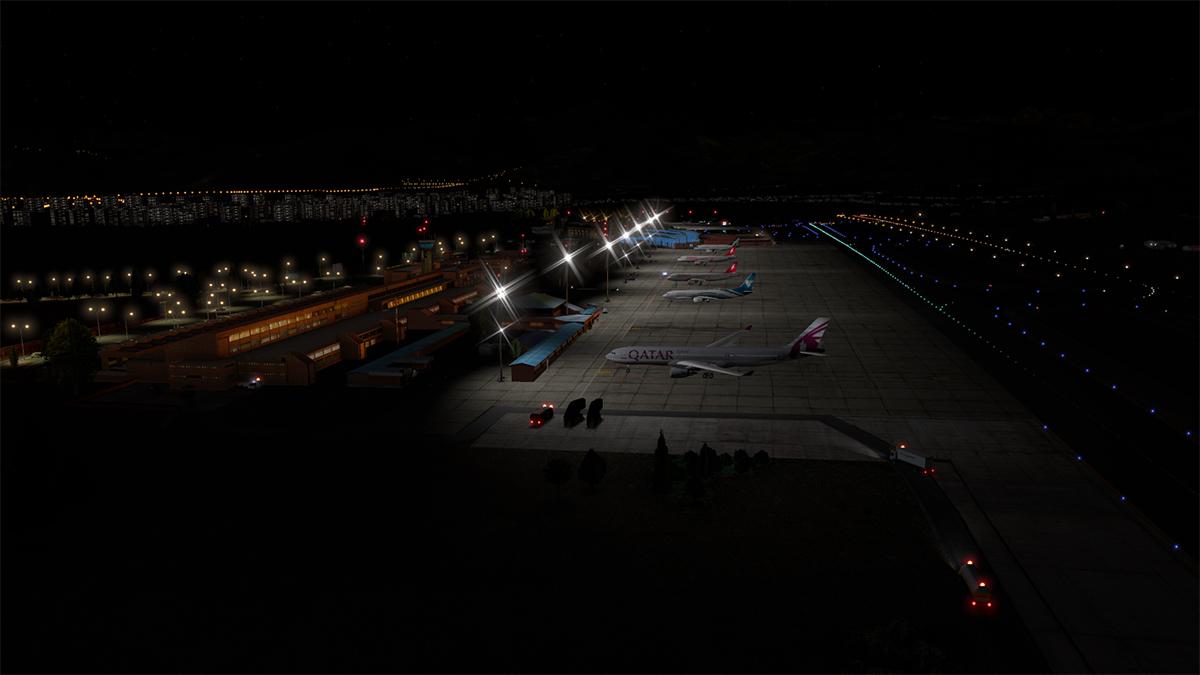
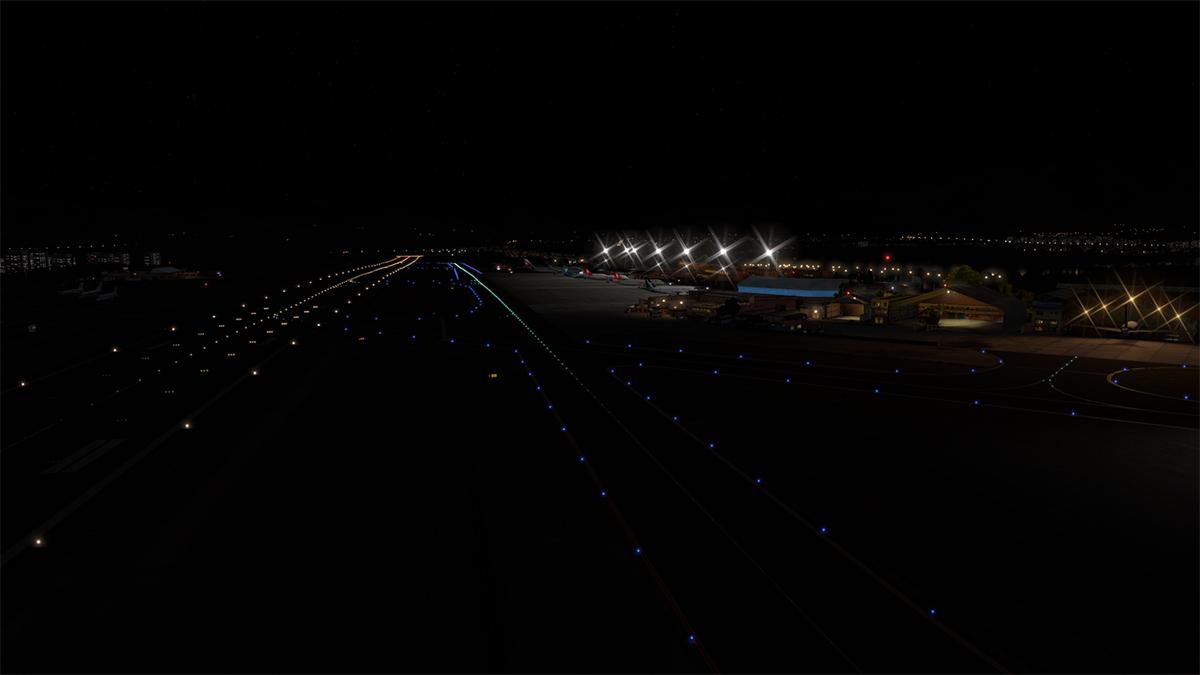
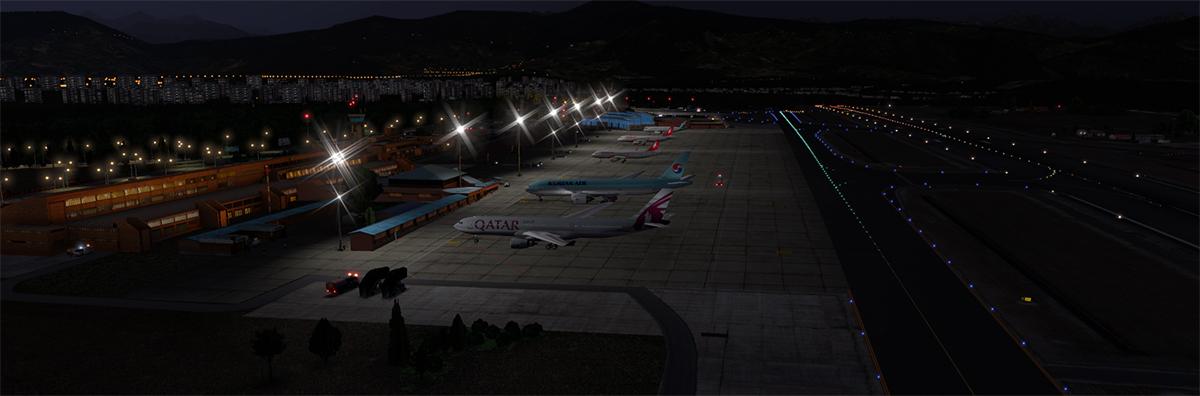
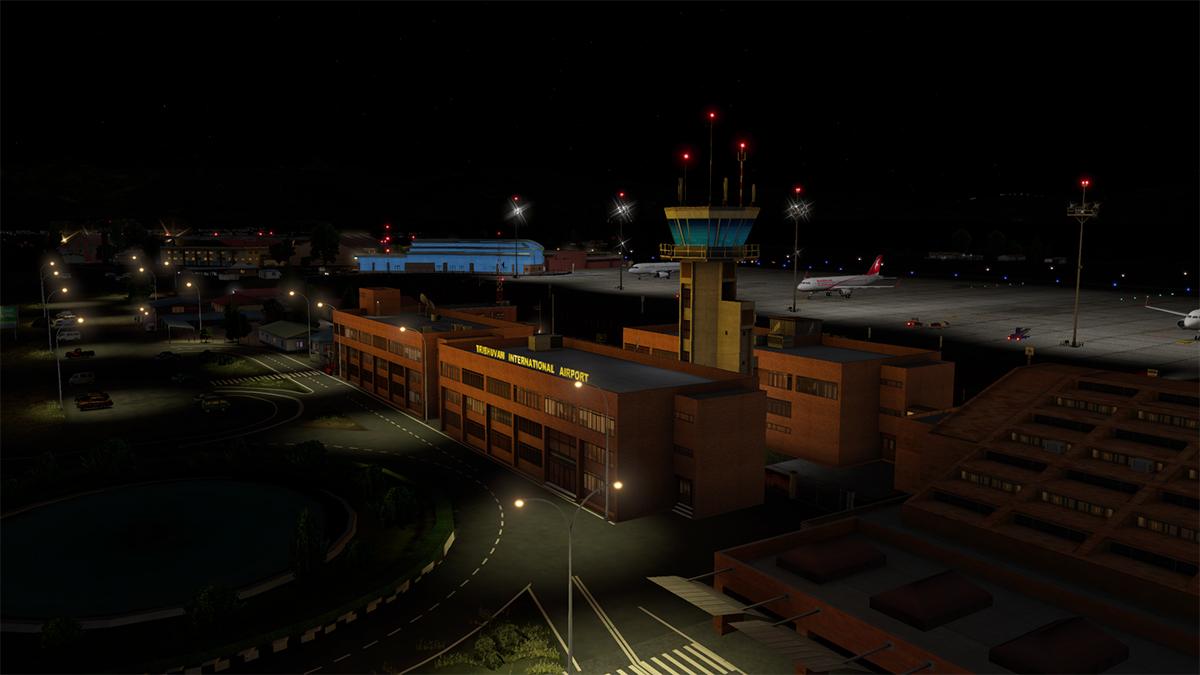
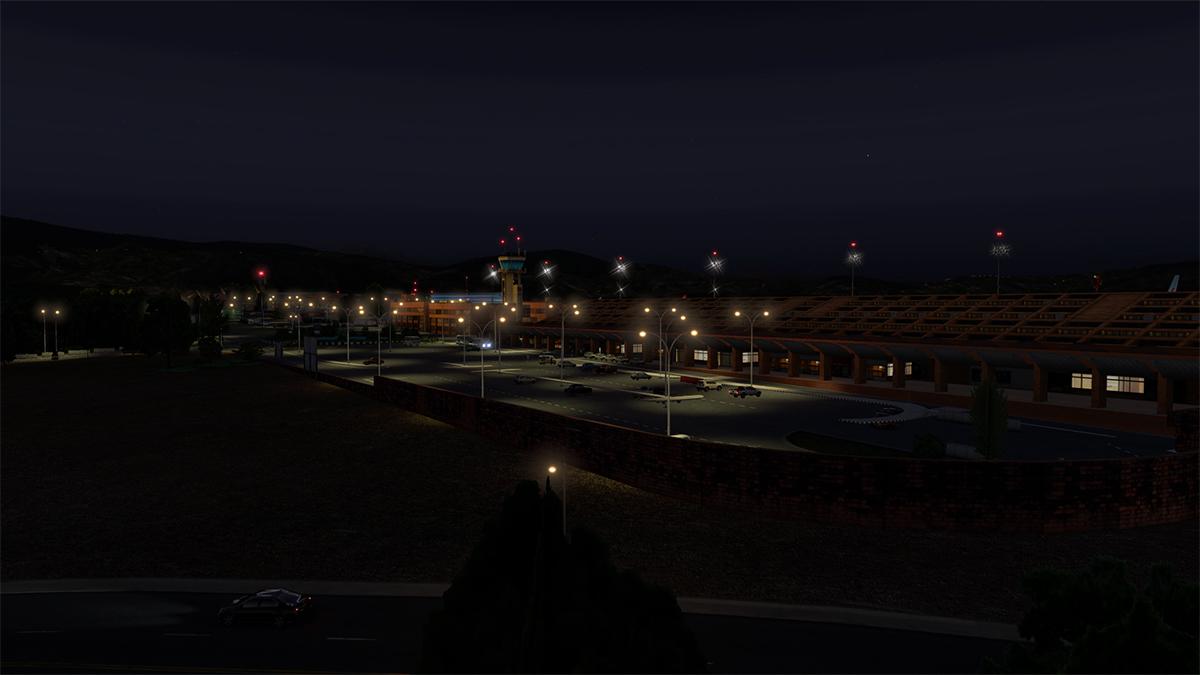
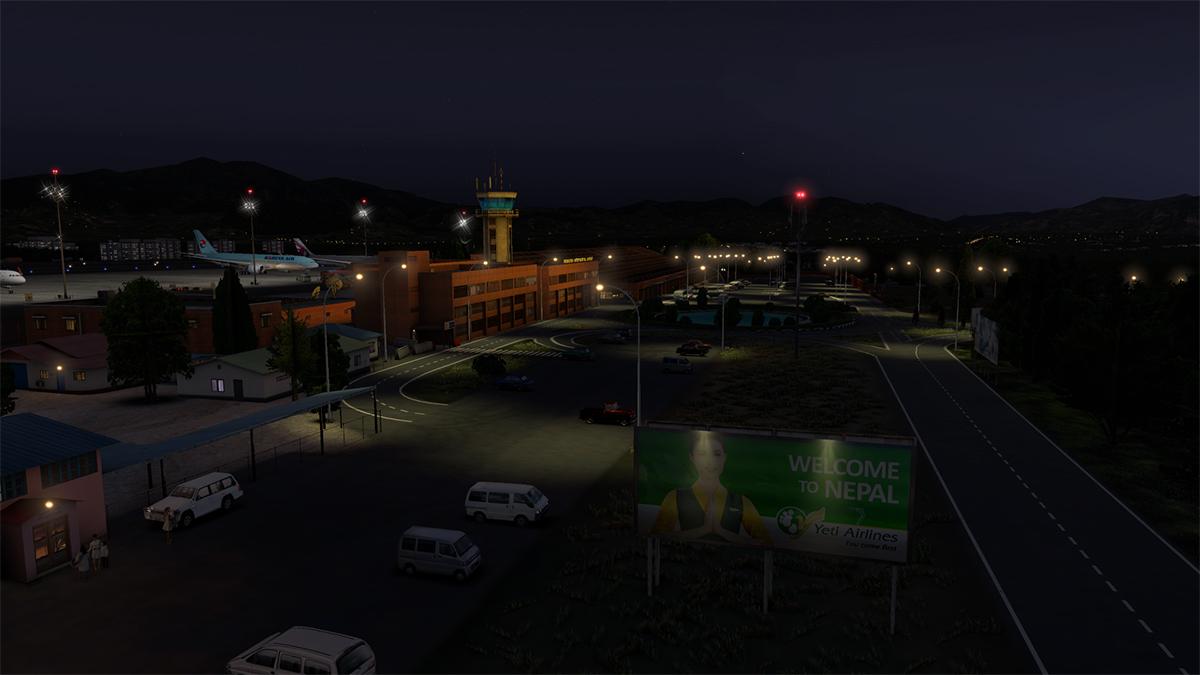
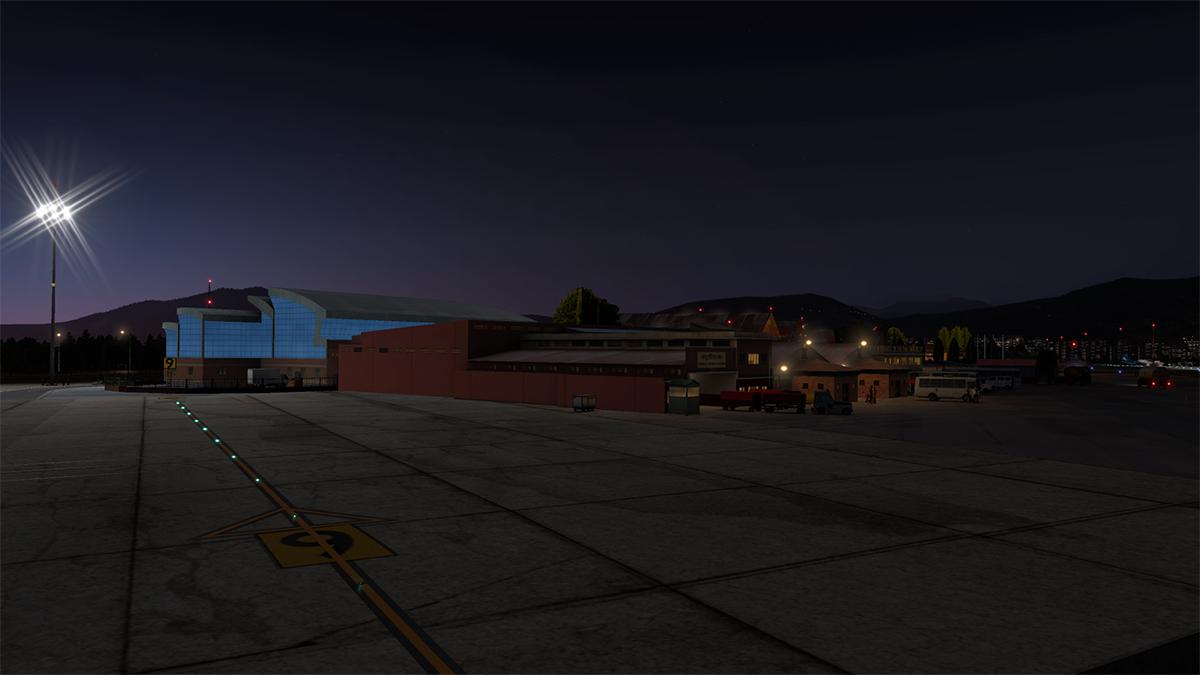
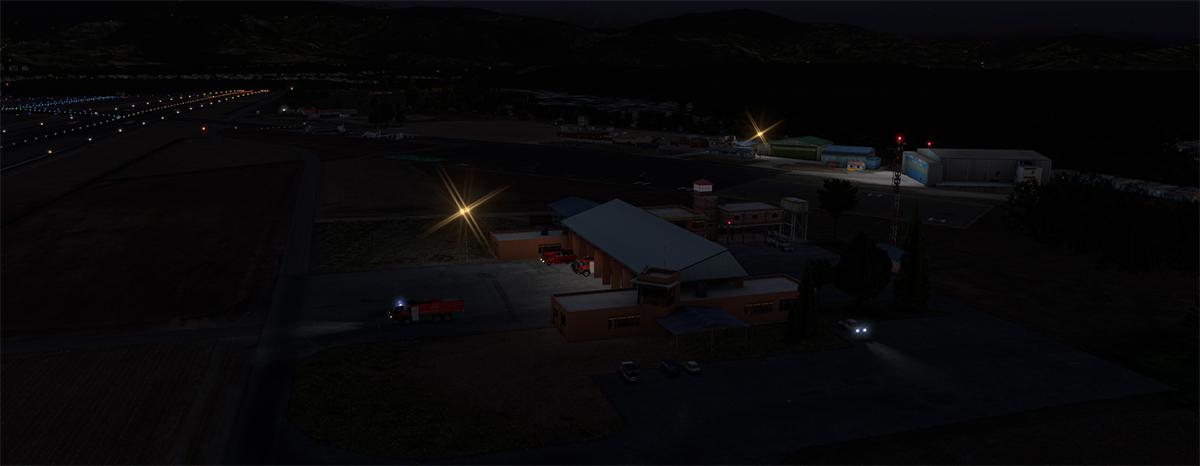
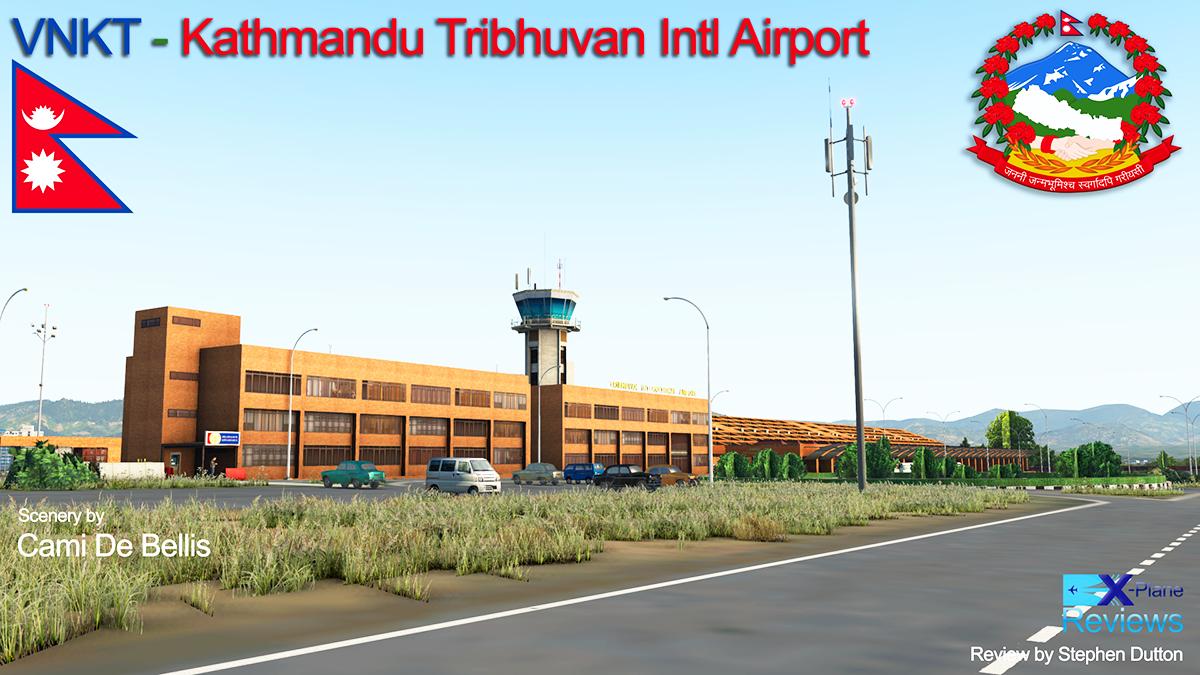
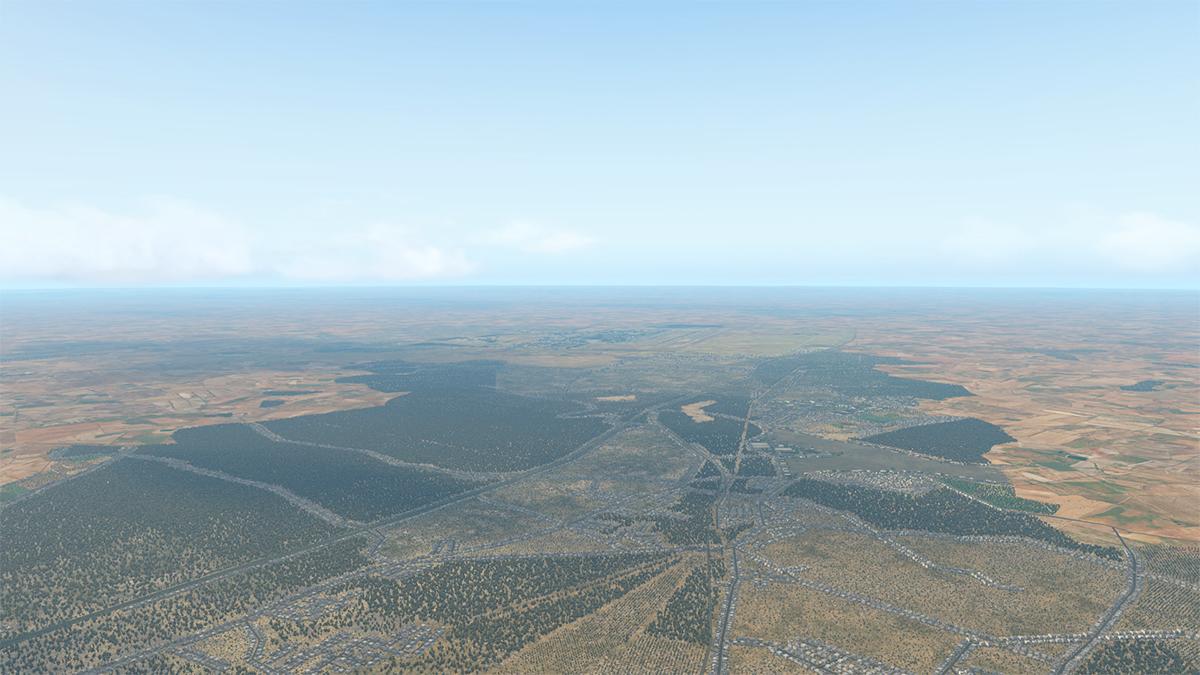
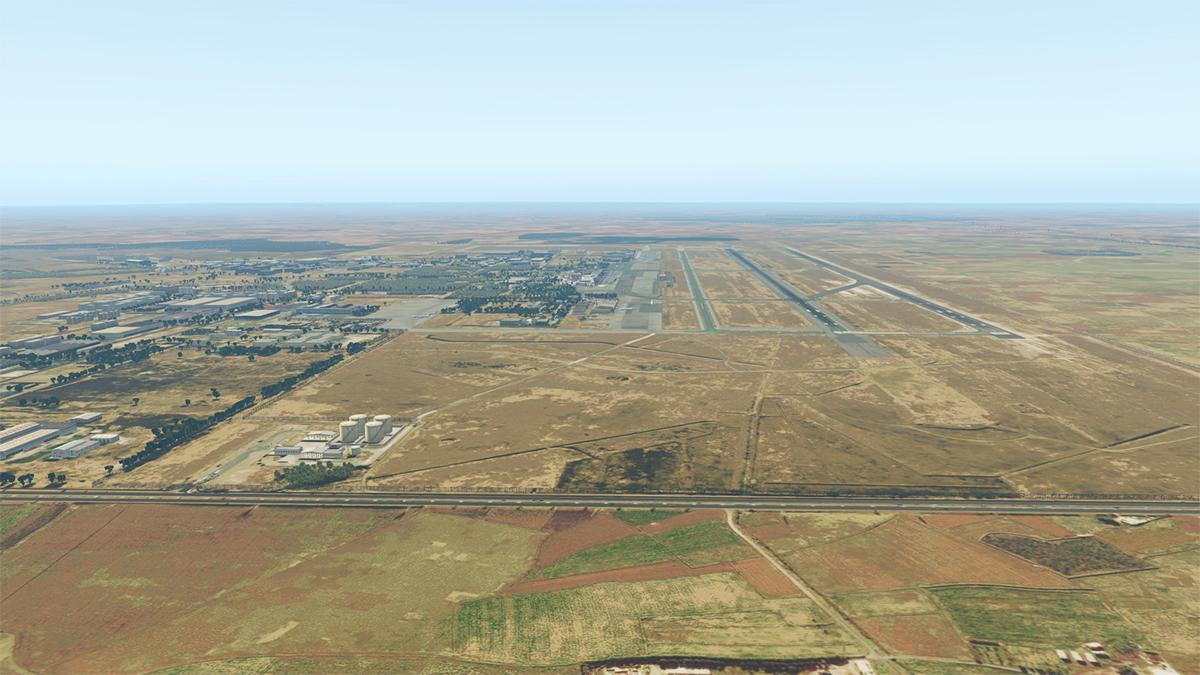
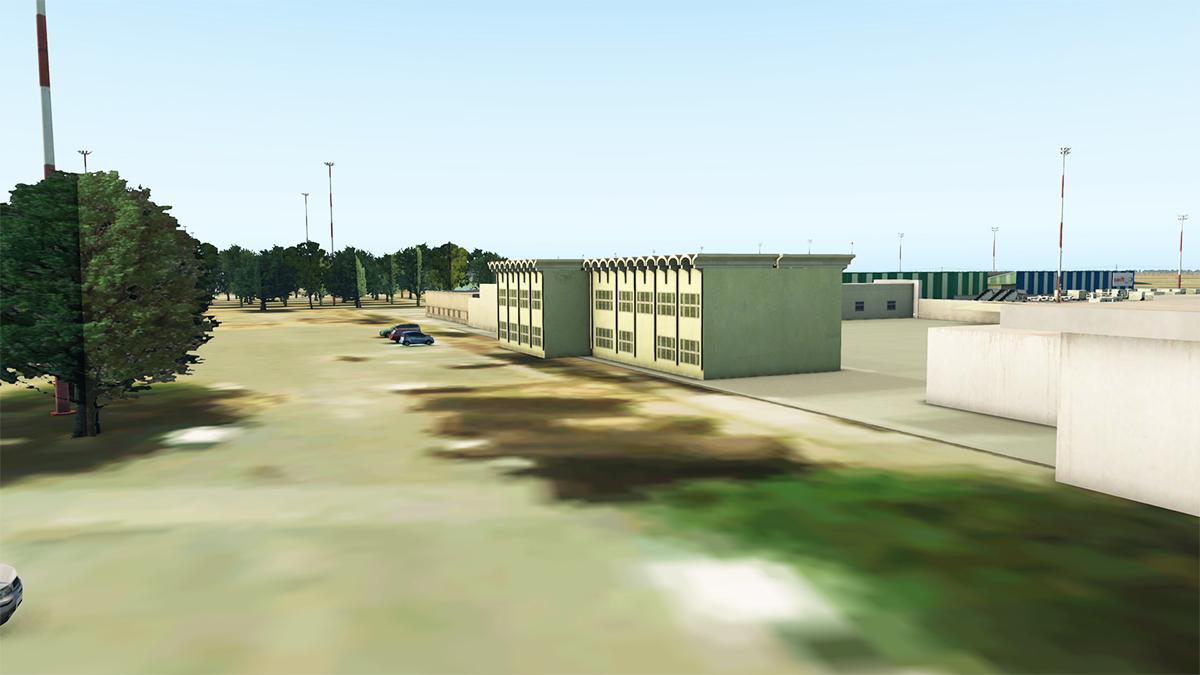
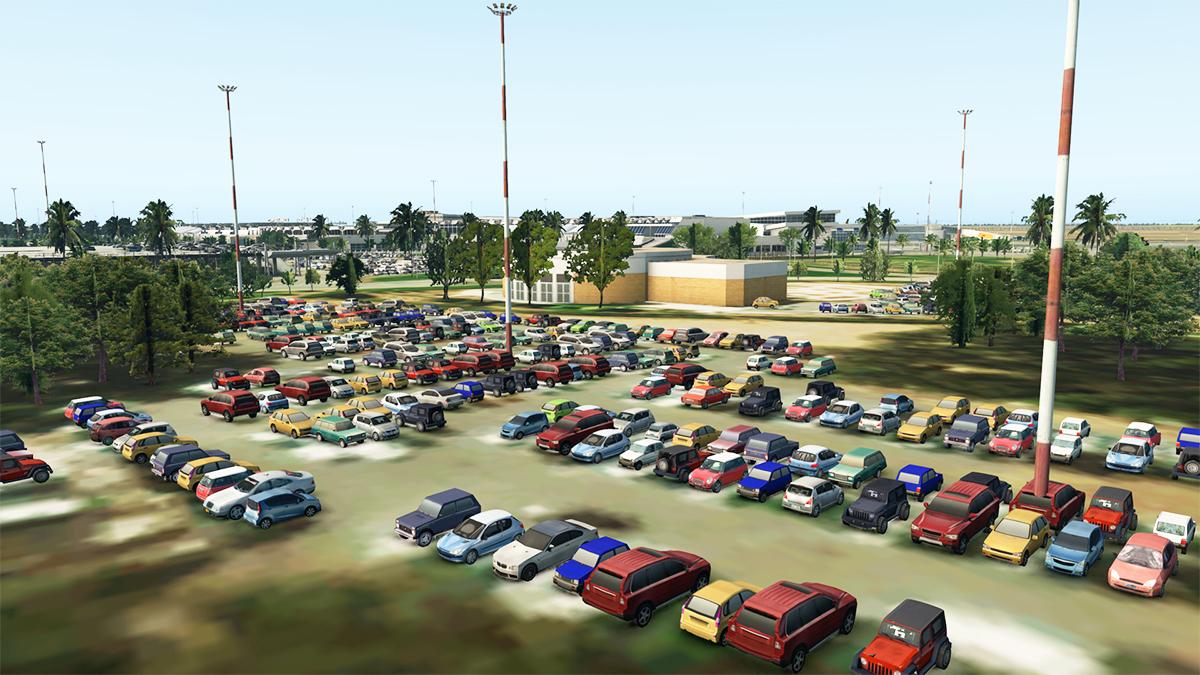
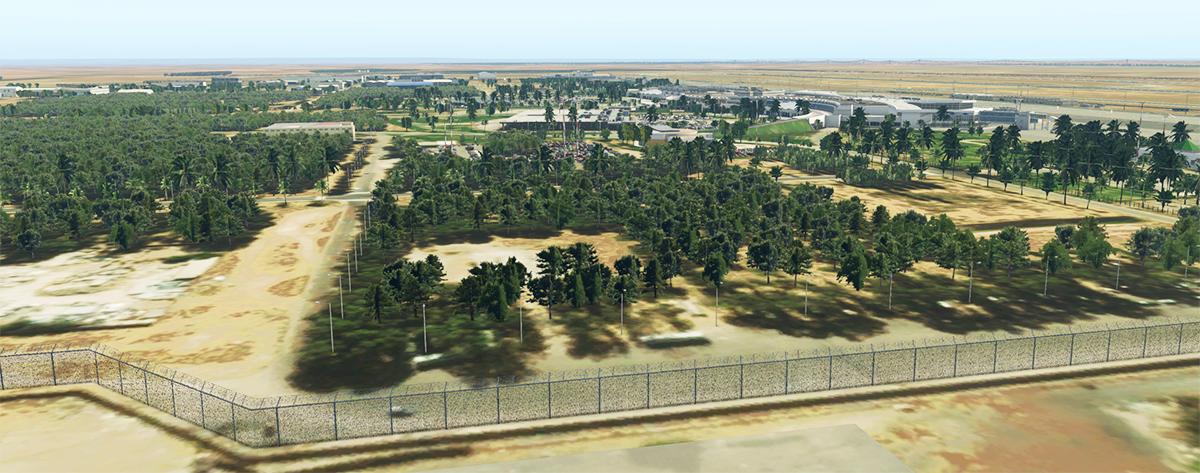
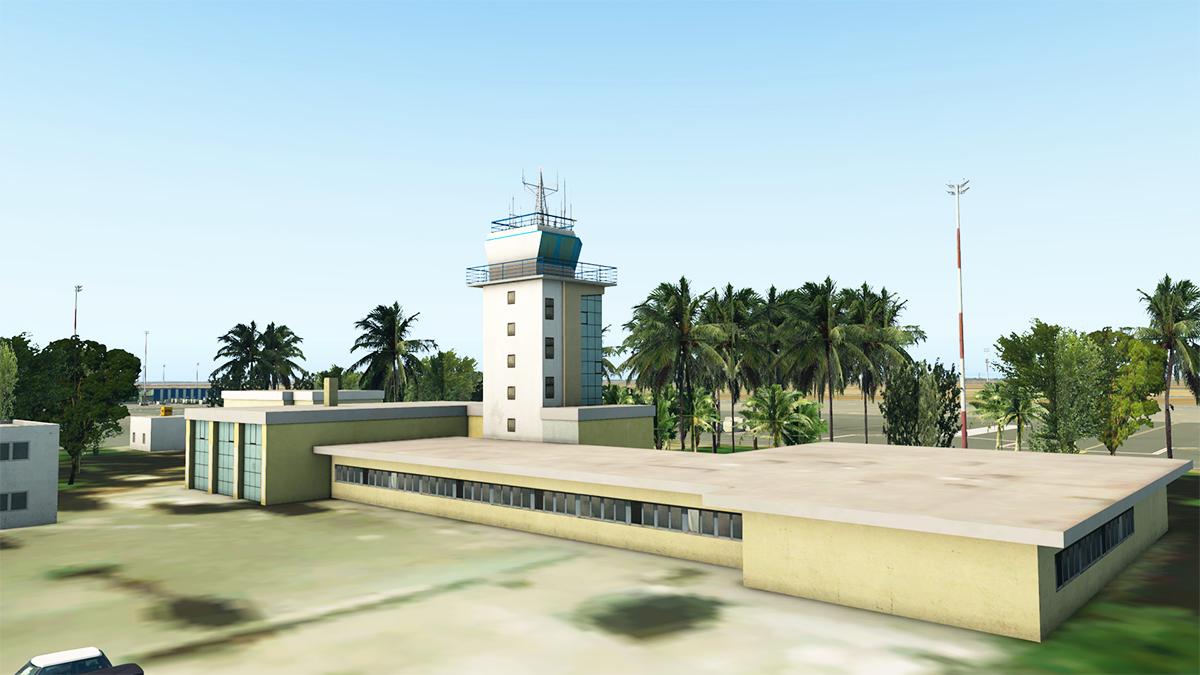
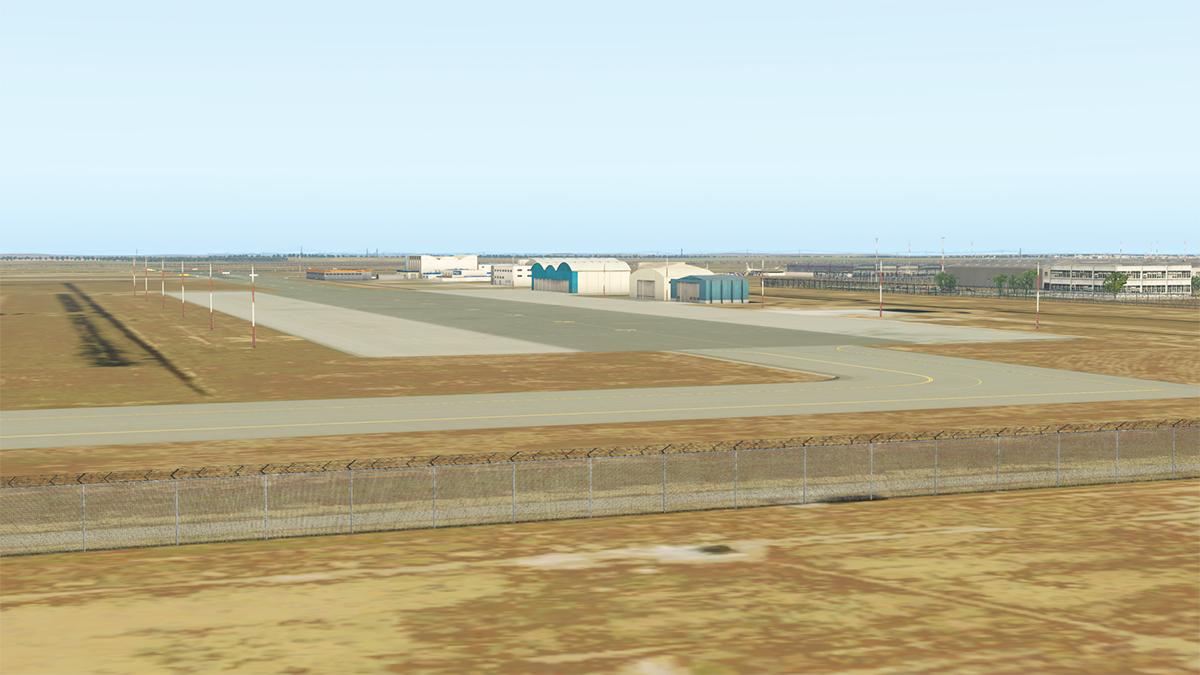
Scenery Review : VNKT - Kathmandu Tribhuvan Intl Airport by Cami De Bellis One thing always stood out with VNKT - Katmandu Airport and that it was hard, I mean it is a really very hard place to to get into and then out of. In a propeller aircraft it wasn't that bad with some tight turns and their low speeds, but in any heavy it was a nightmare as the airport is basically situated in a valley with walls of mountains surrounding any entrance or escape. The various real crashes of aircraft flying into mountainsides around Tribhuvan also highlights the danger (Air Crash Investigations). There is actually only two ways into VNKT - Katmandu, directly or from the west and both approaches go into RWY 02, the opposite end of RWY 20 is really a non-starter and is usually never used. So any approach requires planning and perfect altitude calls to get the approach absolutely darn perfect as the DOVAN approach is as snaky as they come.... so take a look at the approach chart to really understand the difficulty and planning required of flying the bigger machines around Katmandu Airport, and note the airport altitude at 4395 ft ASL (navigraph) Cami de Bellis has been around X-Plane for many, many years and has covered a lot of scenery in that time, but lately she has turned pro with now three sceneries as part of her portfolio... First was the Bhutan VQPR - Paro International Airport scenery, then NWWW La Tontouta Noumea - New Caledonia of which I really liked, this Katmandu returns her to the mountains and is more similar to the Bhutan feel. VNKT - Kathmandu Tribhuvan Intl Airport by Cami De Bellis I will note that in these views I am using the SFD (ShortFinal) local autogen, but in Katmandu I wonder if it reflects the wrong landscape? Yes Katmandu has high-rise buildings, but more colourful old Hong Kong than the more modern Rio de Janeiro look and feel we have here? Take out the SFD autogen and it is far more greener (below) aspect, but you lose the Katmandu skyline of buildings as well. A second note is that Cami provides a full downloadable (2.4gb) Ortho4XP version of the area, but most of the detailed ortho it provides is buried under the foliage. Overall my first impressions of VNKT were very good as Cami is very diligent in the way she creates her sceneries, but the approach to RWY 02 was not good? AS there is a very flat ortho image zone right sitting on the threshold of RWY 02, and the flat images also go right up the east side of the runway, both zones don't give any viewing pleasure on arrival at VNKT, which makes it all a very odd business? It doesn't work from in the air either because it looks like a set in rectangle, it looks like Google Maps, and it is not far from the truth? As with most airports around Asia they are in part very old and part new, and so it is the case with Tribhuvan Intl. Tribhuvan International Airport त्रिभुवन अन्तर्राष्ट्रिय विमानस्थल IATA: KTM - ICAO: VNKT 02/20 - 3,050m (10,007ft) Asphalt Elevation AMSL 4,390 ft / 1,338 m Development of the international terminal building was commenced in 1987, when the construction of the Airlines Operation and Control Tower building was completed and the taxiway was later overlaid in1989, the final construction of the terminal building was completed and opened on 18th February 1990. Many a freeware artist has try to create this TIA terminal over the years out of generic objects. But the terminal design and layout is simply too complex and far to diverse to try to recreate unless it is totally custom made. Notably the detail is required here for this elaborate design is simply off the chart and Cami has done a very good job of recreating the style and feel of this brick terminal and triumphs where most past were doomed to fail. Cami's detail is very good, even with local aspects like cars, buses and signage. The cars are imported Indian Hindustan Ambassadors based on the UK Morris Oxford series III model and they give the airport a very authentic look. Everything here is walk-on, walk-off even with a very long walk or to bussed out to the aircraft as it is laid out like a flightline. There are nine stands 1-9 in a line, so not an airbridge in sight. Control Tower is set mid-terminal and is quite exquisite and nicely done here. Tower view is correct, but there are a few obstructions... Domestic Terminal The Domestic Terminal is well separated from the actual parking apron, so again everyone is bussed over to the aircraft... There are seventeen stands D1 - D17 on the large apron... ... domestic terminal is two-faced in being a very modern facade on arrival, but a chaotic dated mess on the other airside, detail here is very good and again very local and I love the detail. Out on the apron again the detail is again first rate, worn trucks but again local liveries give a very authentic air to the scene. There are a lot of nice static aircraft to fill in the visual impact, mostly Twin-Otters and ATRs. Set as part of the Domestic Apron is the Government of Nepal's VIP-Terminal, looking more like a local temple it is a very nice place to receive international guests, like Queen Elizabeth II who landed in a Dakota plane for her first visit to Nepal in 1961. I am not crazy about a lot of the larger trees that are set around these parts of TIA, very cardboard looking and not very realistic in most lighting conditions, they stand out for all the wrong reasons. Between the Domestic Terminal and it's remote apron is a collection of motley maintenance hangars... more military focused than civil, the name however is "Nepal Airlines Engineering". Excellent roof lattice construction again highlights the great detail. It is really well done, because every building is very different and complex in design, worn and age are well conveyed for realism, so the overall aspect is authentic. Various MIl's in Russian helicopters and the odd Russian transport aircraft also fill out the scenario. Landside is very good with what you expect from Cami in again a lot of detail... carparks, billboards, signage are all first rate, and TIA has one of the most elaborate entrances to an airport in the world. On the eastern side of RWY 02/20 is a collection of buildings, a major maintenance hanger for Budda Airways and some nice if abandoned airliners... ... highlight is the remains of a 10 May 1973, a Douglas DC-3 operated by Thai Airways that overran the runway on landing with 100 of passengers and 10 crew on board, there was one fatality (the actual aircraft was a DC-8) that sits next to the very well done Fire Station. Southwest is a large fuel deport and airport support facilities, again the detailing here is very good and highly realistic... Ground Surfaces All the runway surfaces at VNKT are excellent, and there are a lot of various areas to replicate as well, stony shoulders and oily parking areas are all well realised... highlight is the threshold turnaround zone at the start of RWY 02. Lighting Overall the lighting is very good at VNKT. Approach and taxiway lighting is very good as is the navigation signage. Ramp lighting is very good with great apron coverage, the domestic apron is good as well but there are a few stand dark areas like with stand D-17. International Terminal lighting is very good considering the complexity and the terminal looks authentic at night. The control tower's windows are a bit too bright (they can't see out into the dark with bright lights inside) but the modern side of the Domestic terminal does not look like it is part of this scenery at all? it stands out, but in all the wrong ways. This is a personal viewpoint as I really don't like this sort of ex-Fsx early era glass colouring, and again I think it doesn't work here in context either... I understand why it was done this way, but I am not a big or even a fan at all of the bland artificial colouring look. Airside Domestic is very good as is the maintenance hangers, in that some are lit nicely inside. East side has minimal lighting but fine. WT3/Traffic Global. There are no WT3 ground routes that come with the scenery. A generation is good, but don't expect a lot of traffic up here Traffic Global works fine and fills up the airport, but there is not much actual action? _________________________ Summary Tribhuvan International Airport (TIA) in Katmandu is the only International airport in Nepal, and is set high in the Himalayan ranges. So the exotic placed scenery always deserved a good custom modeled version for such a prized destination in the X-Plane simulator. This is Cami de Bellis's third professional scenery after Bhutan's VQPR - Paro and NWWW La Tontouta Noumea in New Caledonia, and we know that any scenery from this long and experienced developer also comes with a lot of dedication, love and an outstanding focus on detail. Overall VNKT - Kathmandu Tribhuvan Intl is excellent, with detailed complexly rendered terminals and a very authentic reproduction of the Tribhuvan International airport, all the aspects are well documented with all terminals, International, Domestic and the VIP-Terminal all represented with the motley collection of maintenance hangars also well reproduced. Plenty of active traffic and very good lighting adds in to overall a great package. Aprons and ground textures are also first rate as is the landside detail, in fact all the detail is excellent and very local for that exotic Nepalese feel is very present. But several points do tend to overwhelm the scenery, with in one the approach (RWY 02) ortho textures are flat and highly visible in the wrong way, the idea again is correct, but it doesn't work in reality? Domestic terminal lighting (modern landside) again overwhelms all the other low key lighting of TIA, and there are also various floating objects landside and some of the larger trees again stand out for all the wrong reasons. Challenging and certainly in any approach and departure from NVKT, this a welcome addition to the X-Plane collection of places you need to go to to experience the full dynamics of the simulator. Cami de Bellis is also highly regarded within the X-Plane community and we all love her outstanding work as it comes from absolutely the right place... Highly recommended. _____________________________________ Yes! VNKT - Kathmandu Tribhuvan Intl Airport by Cami De Bellis is available from the X-Plane.Org Store here : VNKT - Kathmandu Tribhuvan Intl Airport Price is US$26.00 Features: Highly accurate scenery for VNKT-Kathmandu Tribhuvan Airport with all buildings modeled Over 220 custom objects all with Ambient Occlusion DSF mesh created and modified to fix bump terrain and set and correct the topography of Airport’s area Photo real textures on buildings, vehicles etc. Photorealistic ground textures based on a satellite image Professional ortho imagery 50cm – 25 km square meters – with share license authorization Detailed airport objects and vehicles Custom textured taxiways, runways, and apron Custom surroundings buildings Custom airport lights HD Custom forest and flora trees High resolution building textures – all in 2K and 4K Excellent night effects World Traffic 3 compatible Native characters created specially Requirements: X-Plane 11 Windows, Mac or Linux 4 Gb VRAM Minimum. 8 Gb+ VRAM Recommended CDB-Library v.2.4 is required Current and Review version 1.0 (May 9th 2020) Installation Download scenery file size is 980mb: VNKT_Kathmandu_by_CDB There is an optional Ortho4XP download available at 2.48gb. VNKT-Mesh VNKT-Kathmandu_Tribhuvan_Intl NEPAL Total scenery installation is quite big (excluding the Ortho4XP) : 2.74gb CDB-Library v.2.4 is required for this scenery Documents One extensive manual in both .pdf and rtf. English with notes (5 pages) but no charts. Ortho4XP download and install details. Ortho4XP.txt VNKT-Kathmandu NEPAL.pdf VNKT-Kathmandu NEPAL.rtf _____________________________________________________________________ Scenery Review by Stephen Dutton 13th May 2020 Copyright©2020 : X-Plane Reviews (Disclaimer. All images and text in this review are the work and property of X-PlaneReviews, no sharing or copy of the content is allowed without consent from the author as per copyright conditions) Review System Specifications: Computer System: Windows - Intel Core i7 6700K CPU 4.00GHz / 64bit - 32 Gb single 1067 Mhz DDR4 2133 - ASUS GeForce GTX 1080 8Gb - Samsung Evo 1TB SSD Software: - Windows 10 - X-Plane 11.41 - tested v11.50.b6 (fine) Addons: Saitek x56 Rhino Pro system Joystick and Throttle : Sound - Bose Soundlink Mini Plugins: Traffic Global (Just Flight) US$52.99 Scenery or Aircraft - Airbus A319 by ToLiSS (X-Plane.OrgStore) - US$69.00
-
Yes I was not a big fan of the AirfoilLabs sounds either, pretty rough... I will check on window situation as there was a picture of the developer recording them?
-
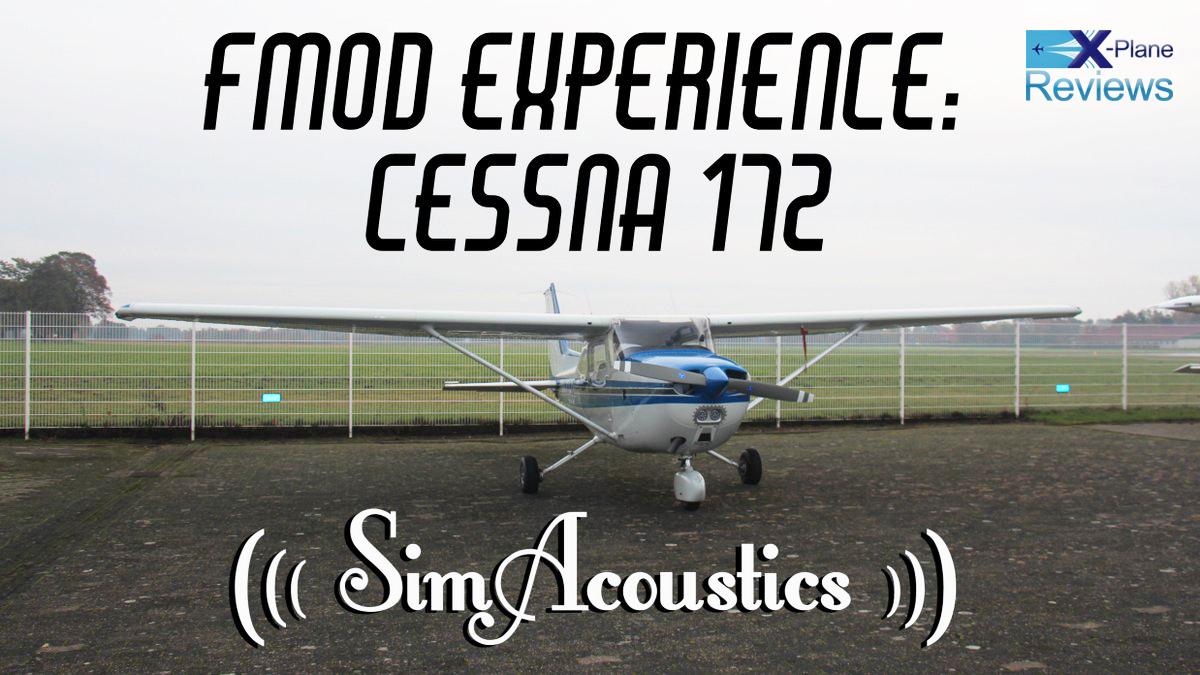
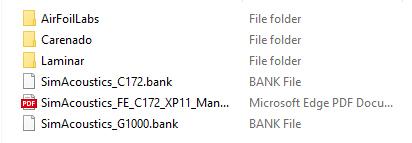
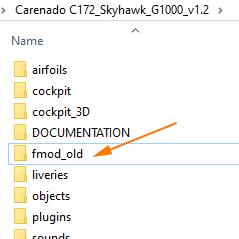
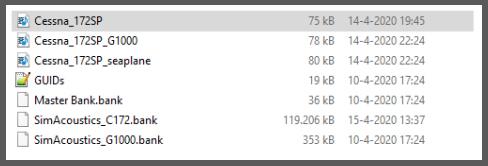
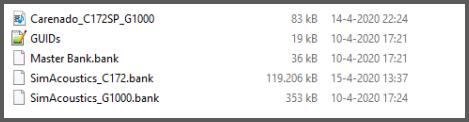
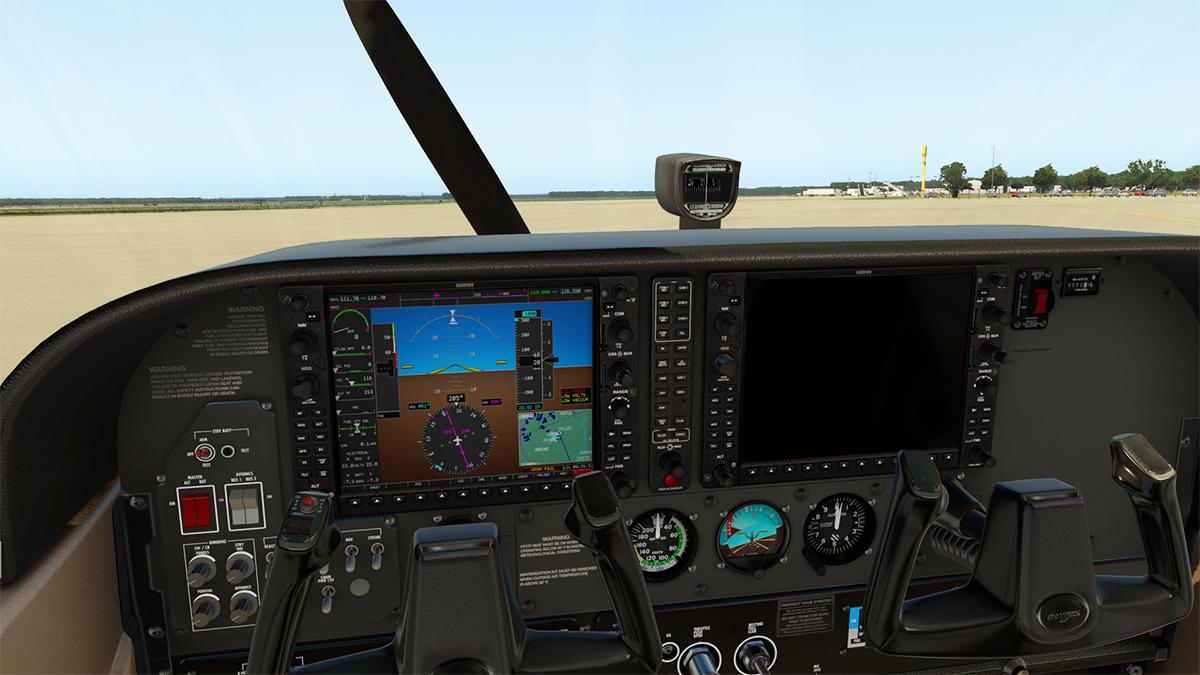
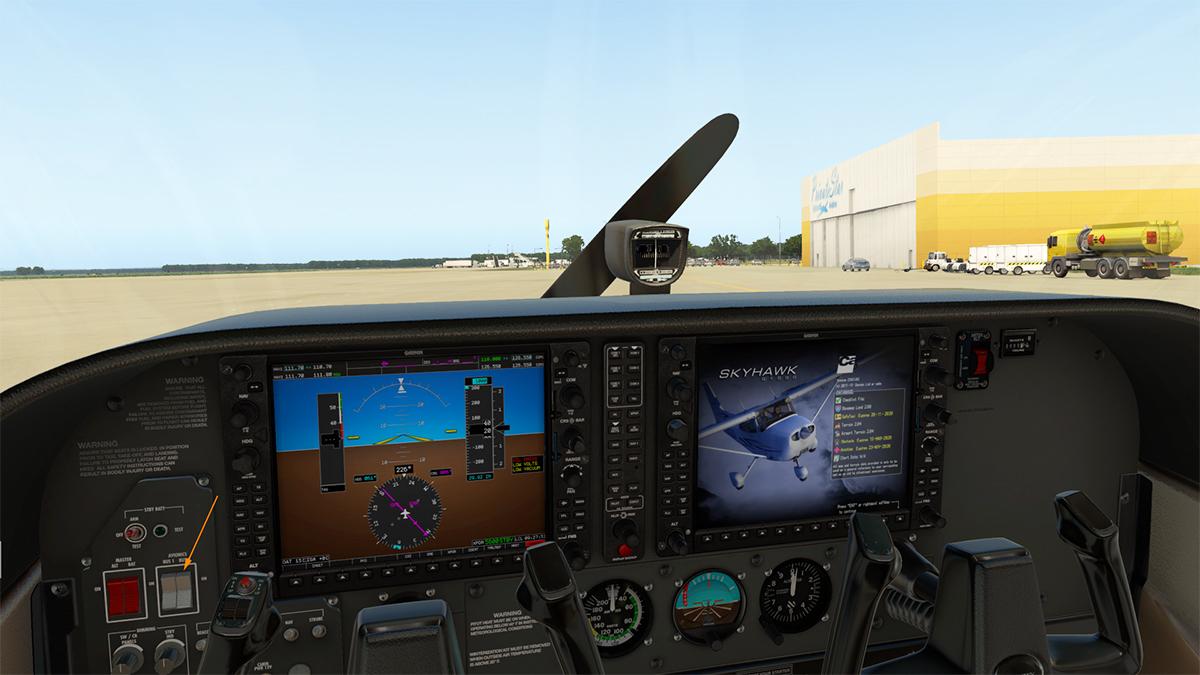
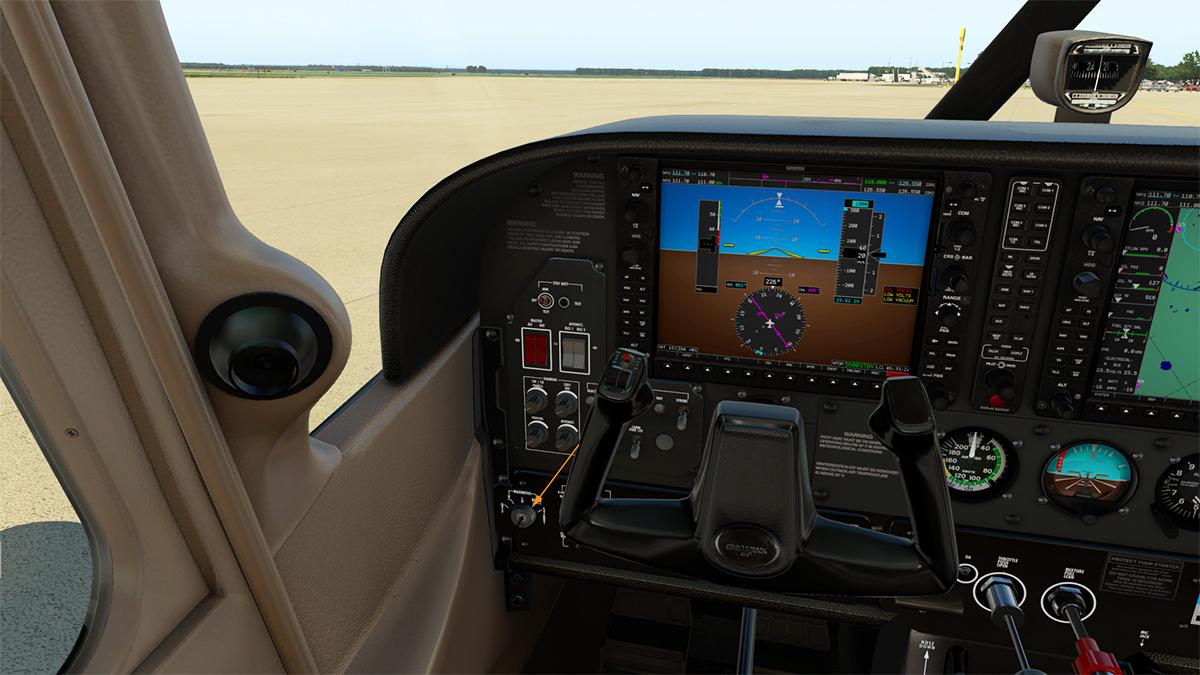
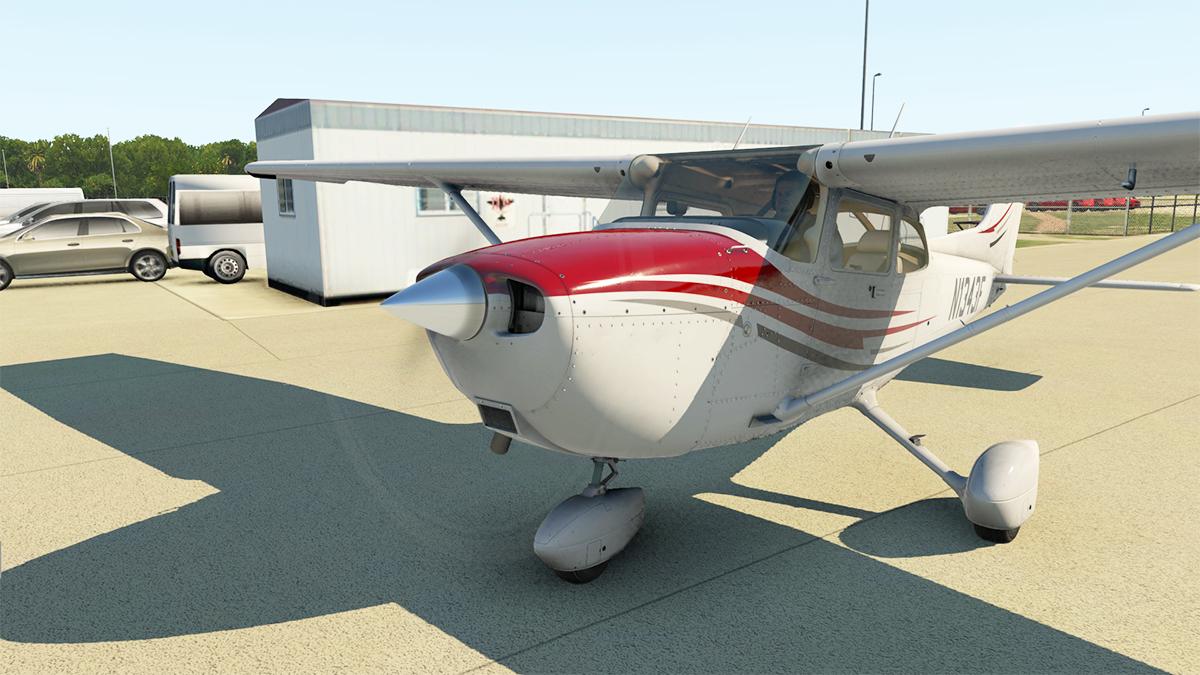
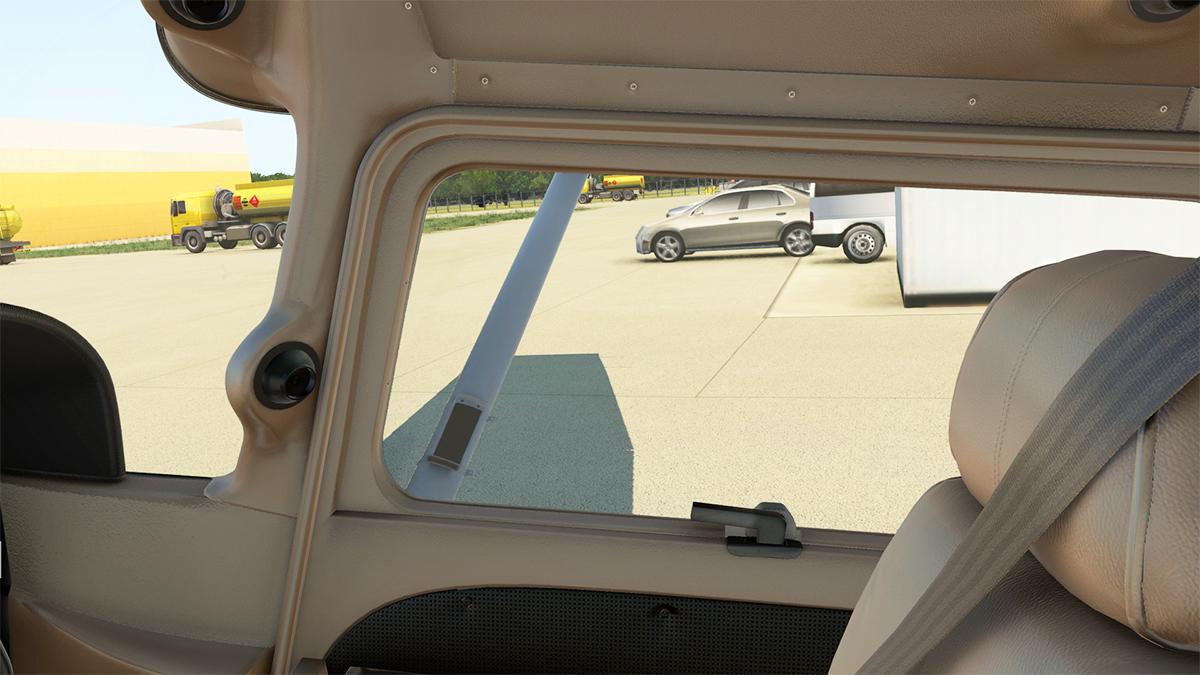
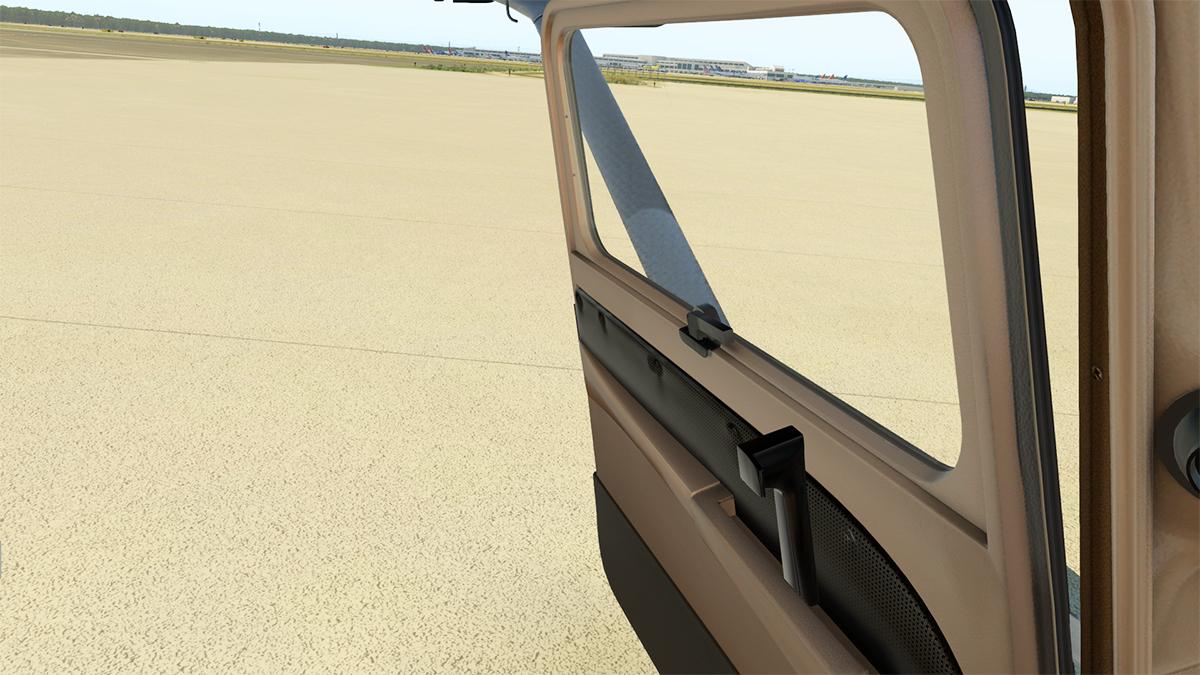
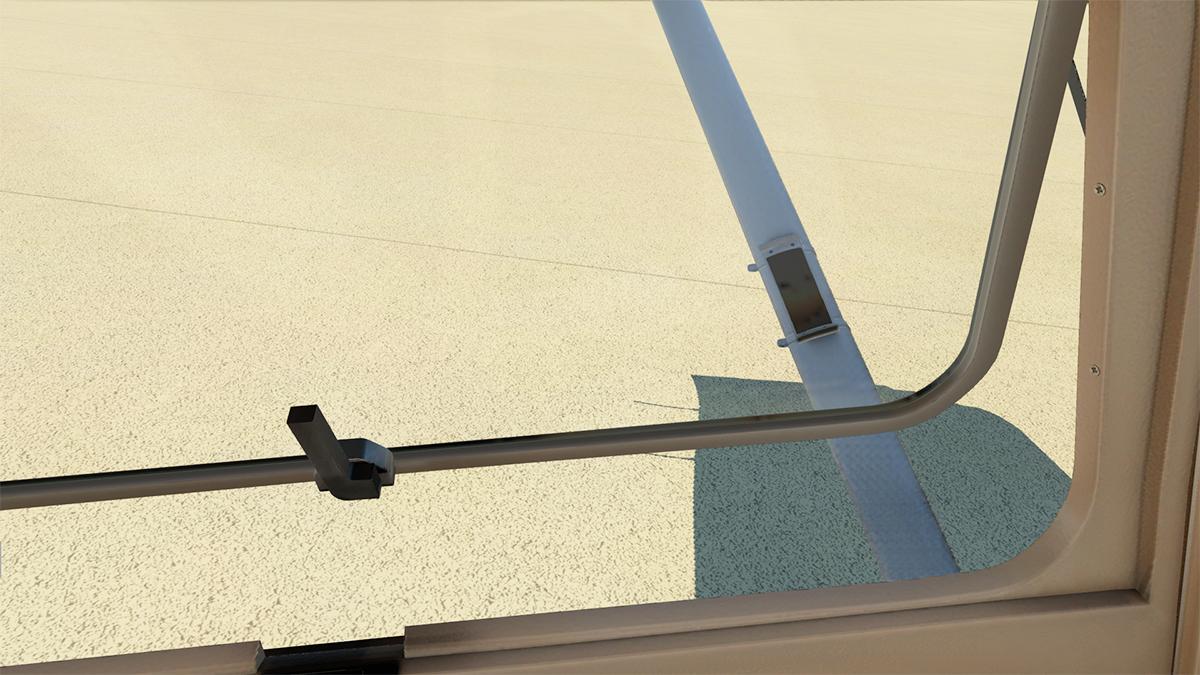
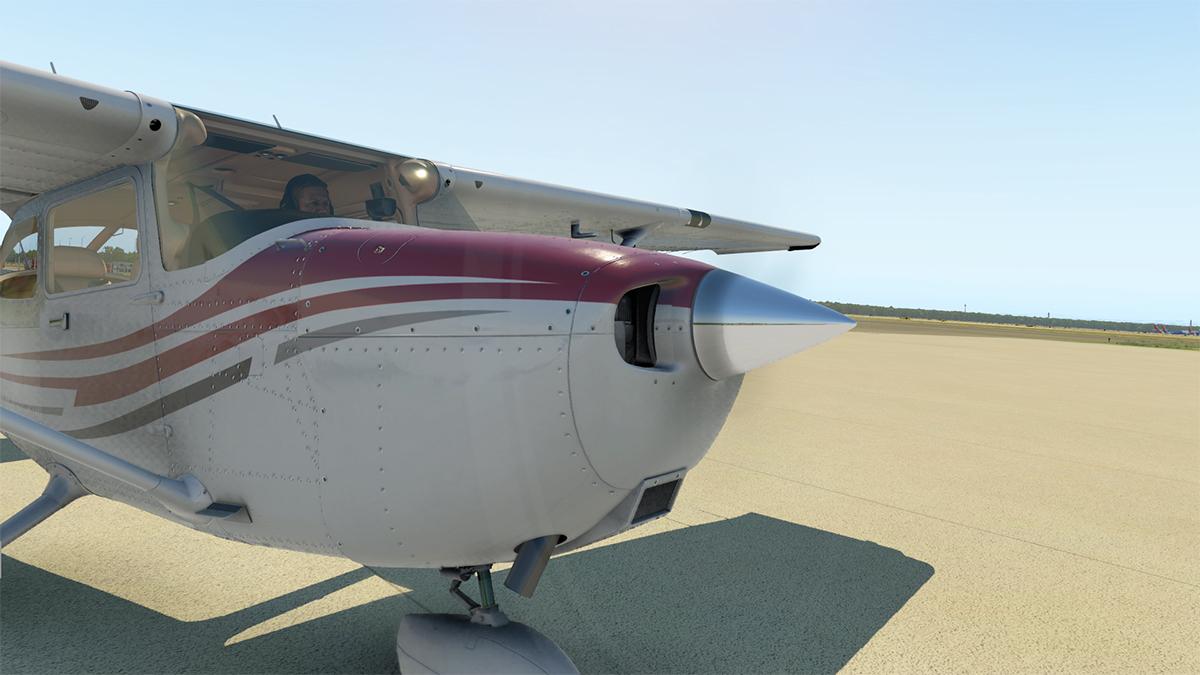
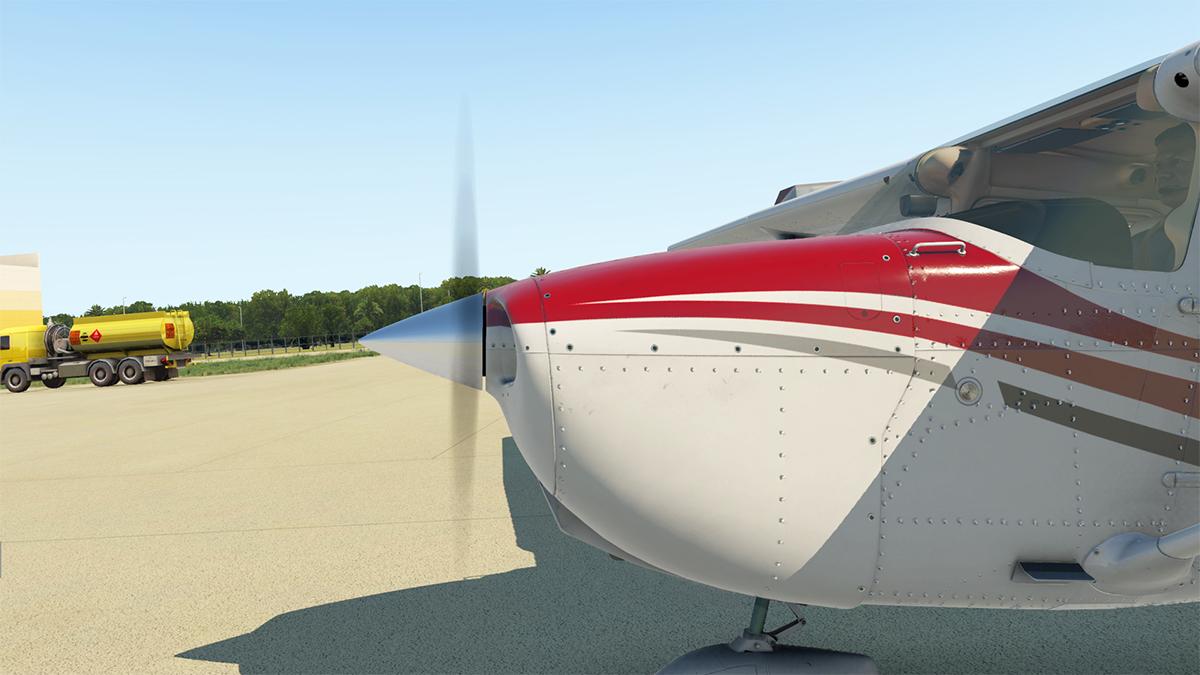
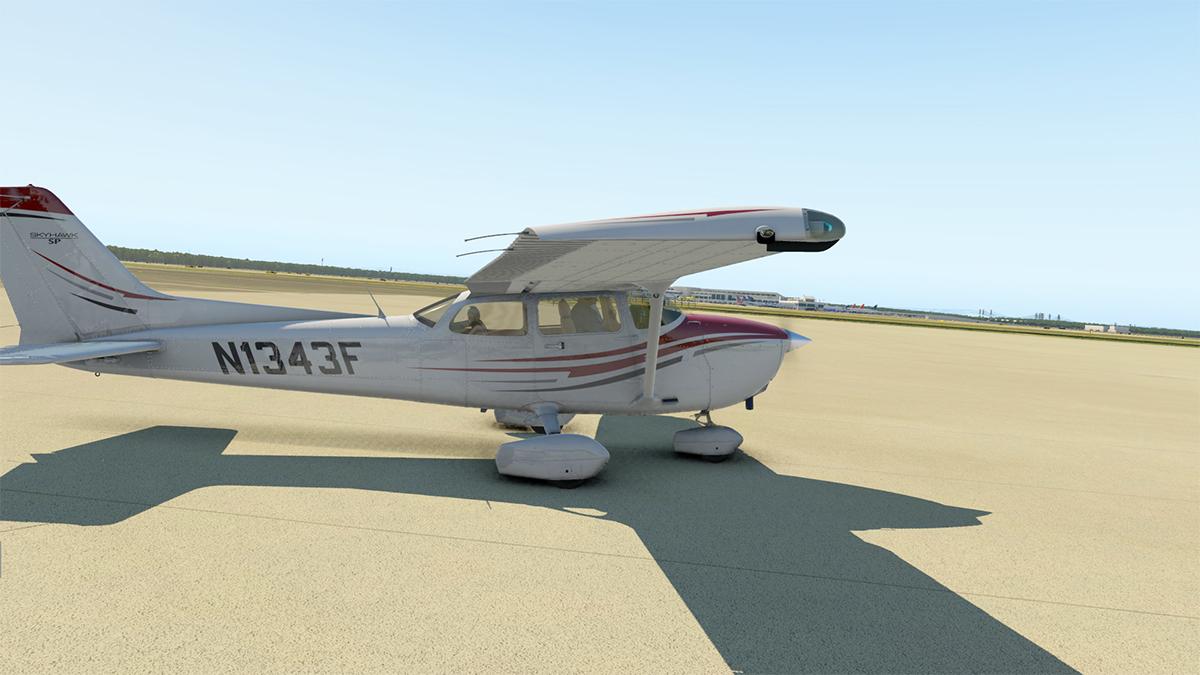
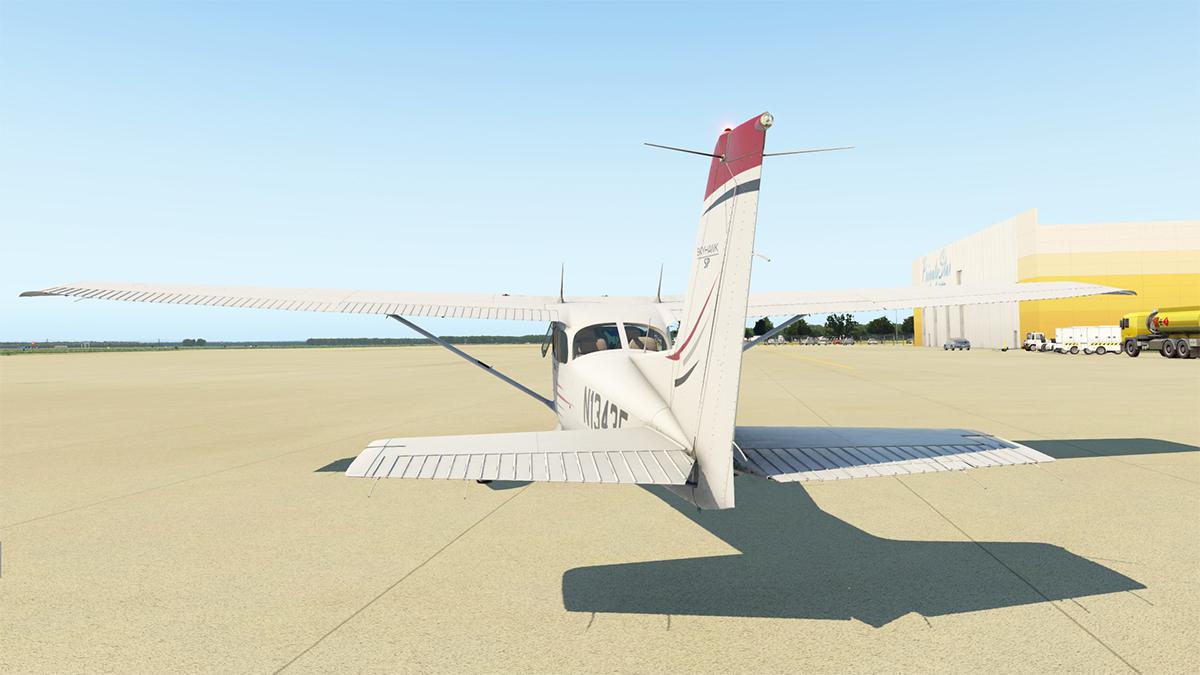
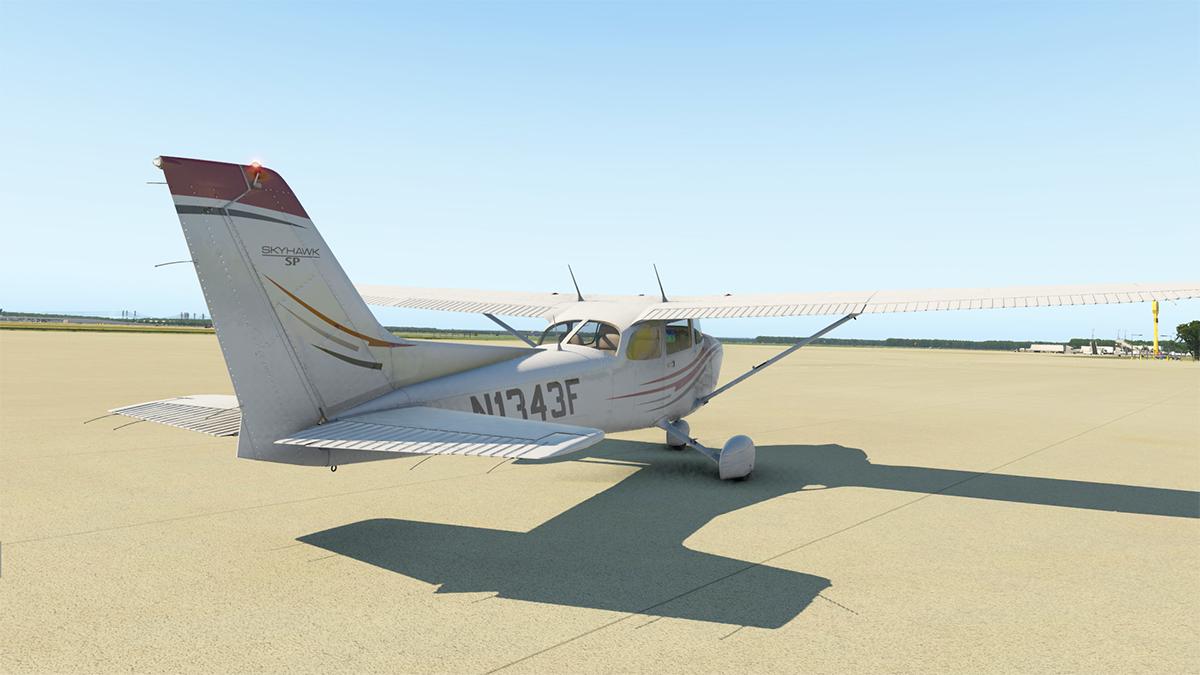
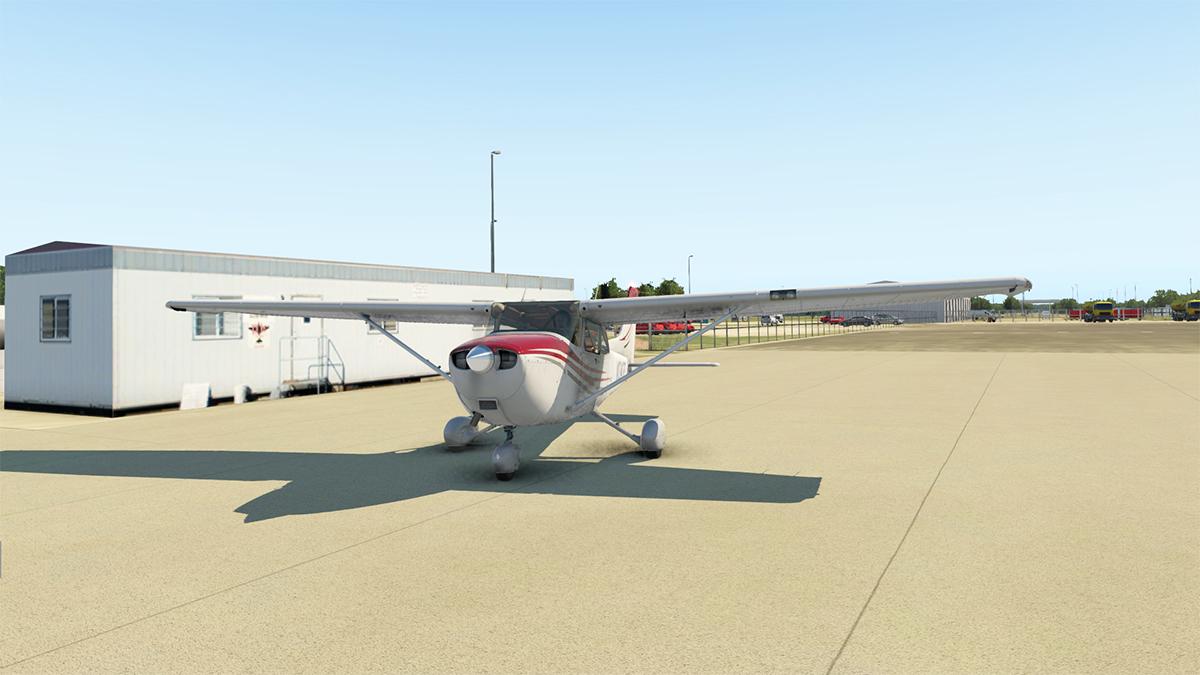
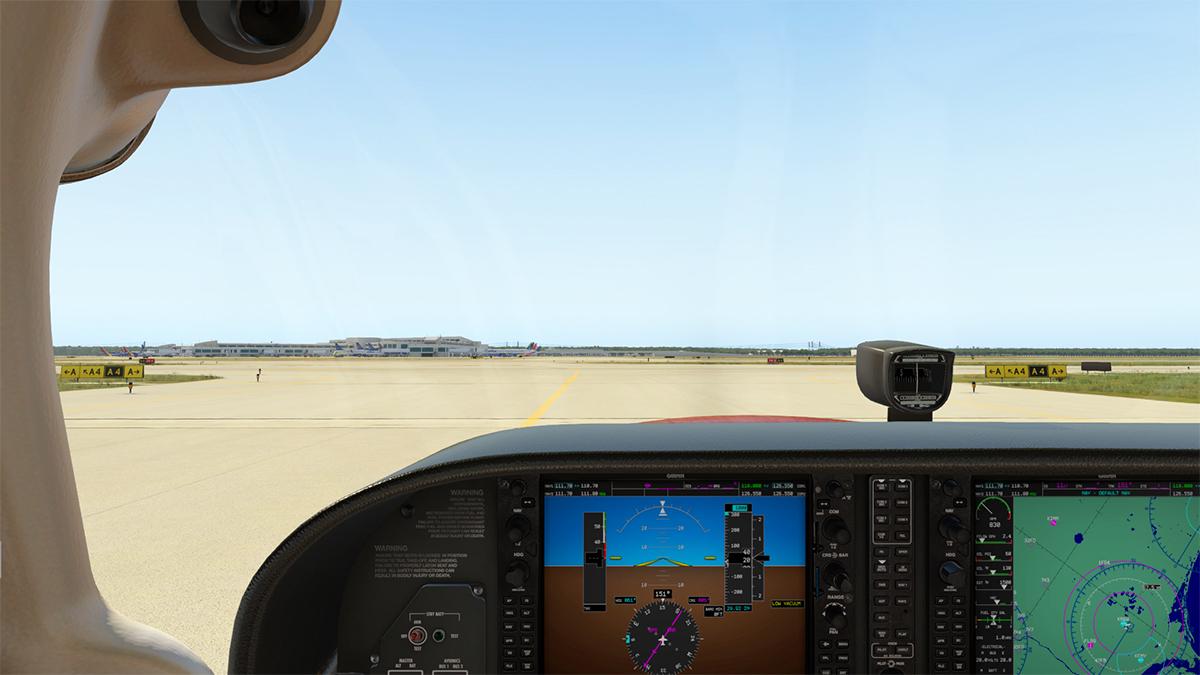
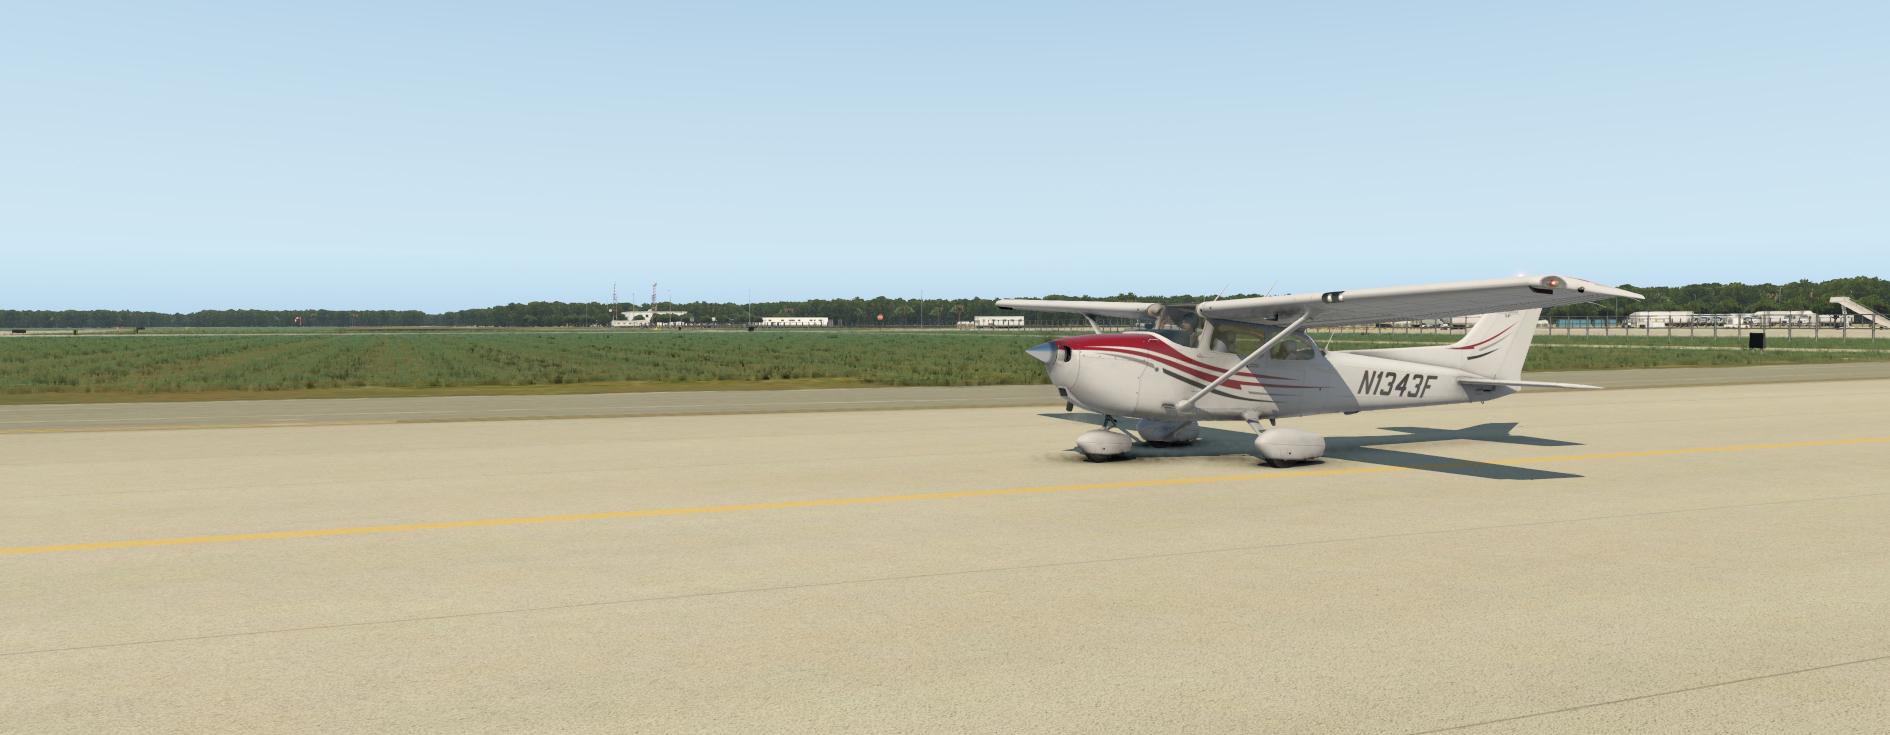
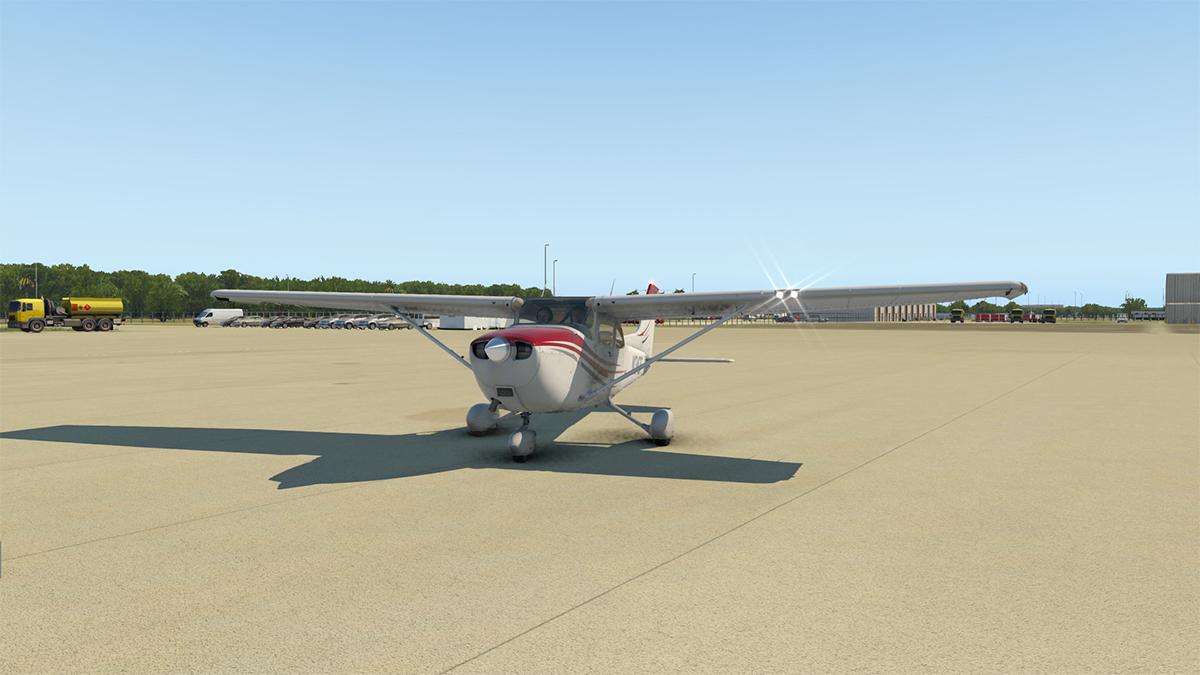
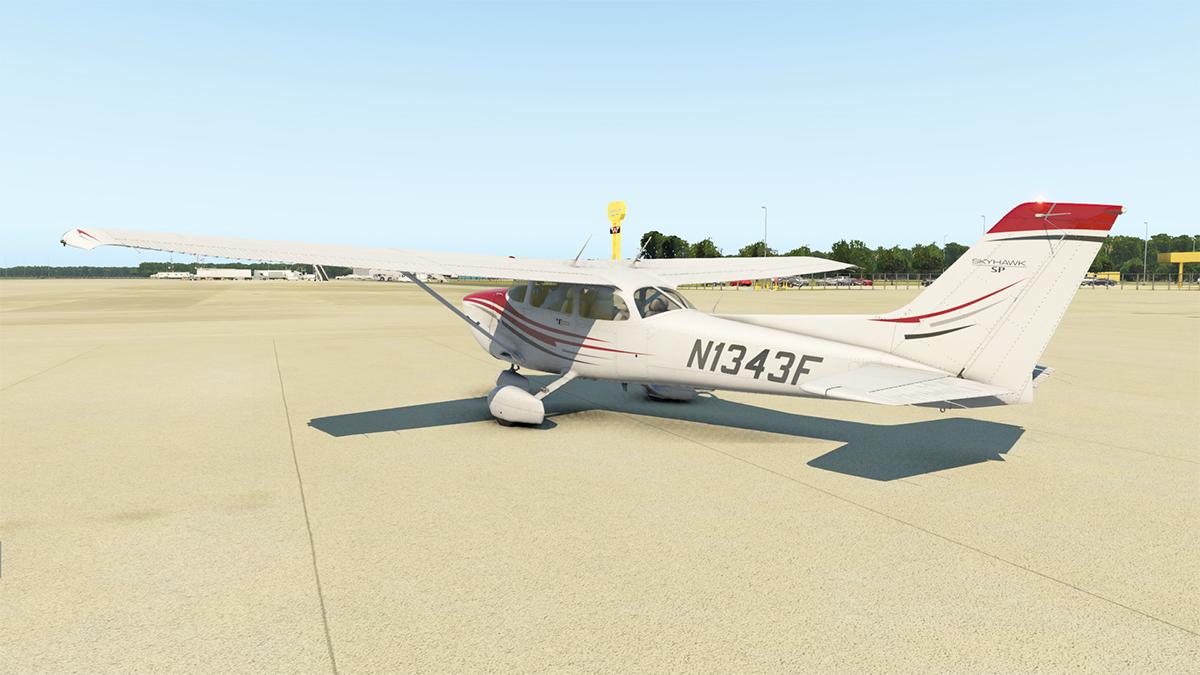
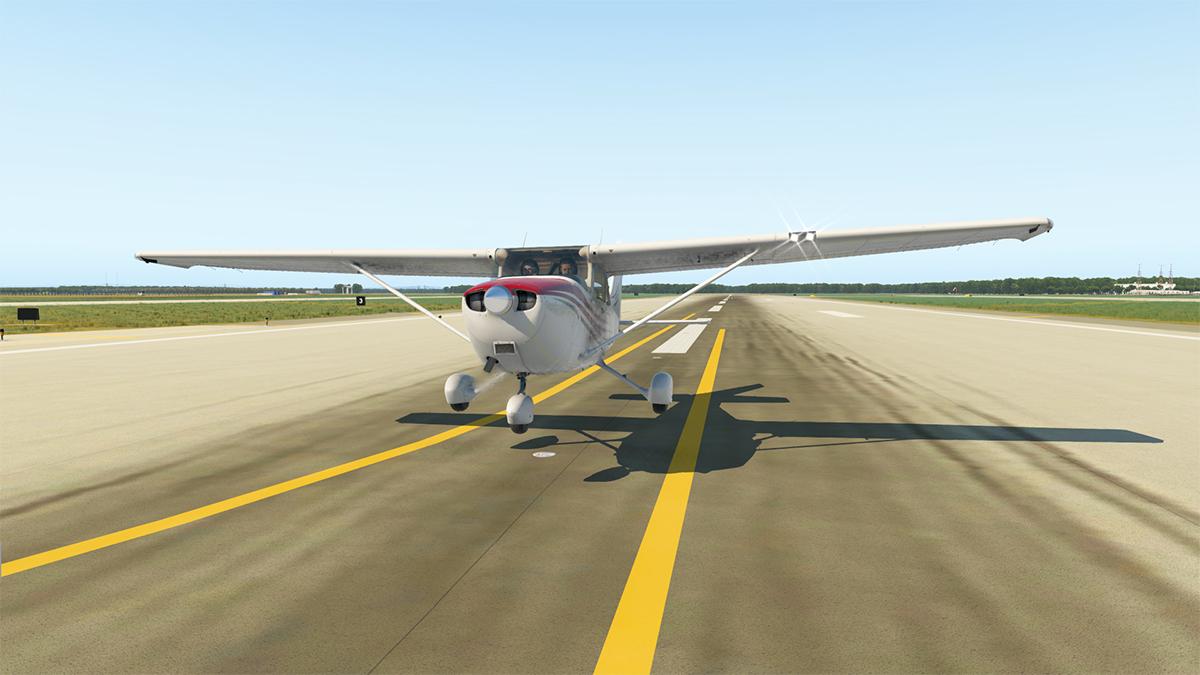
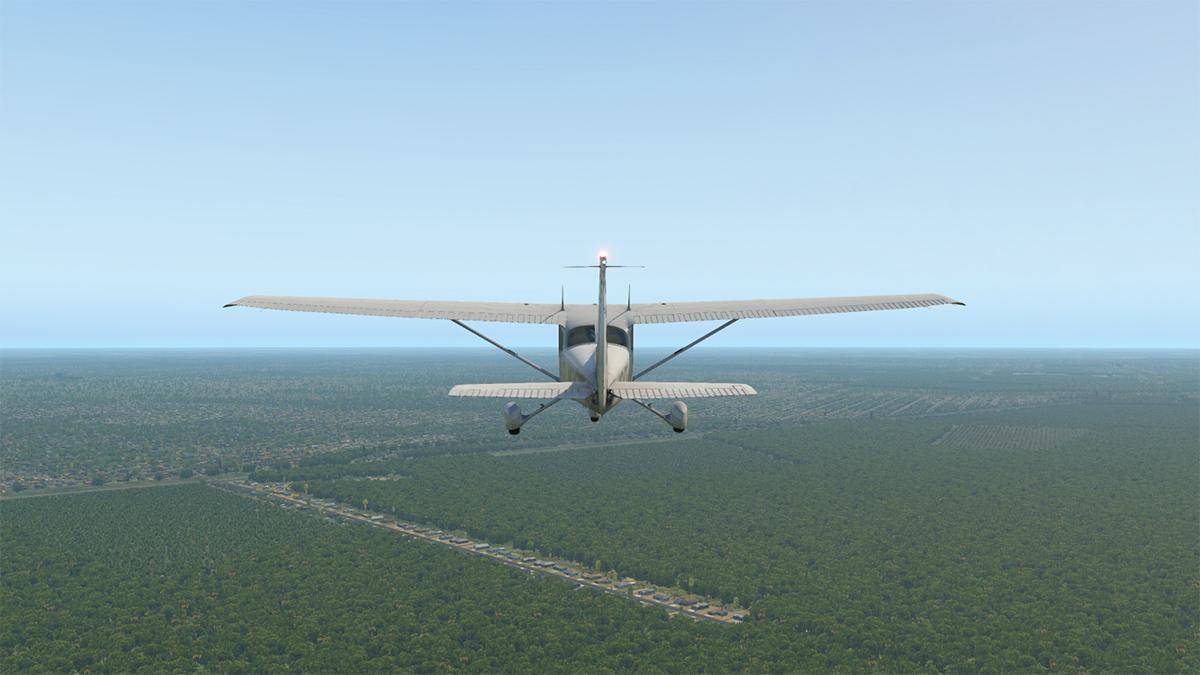
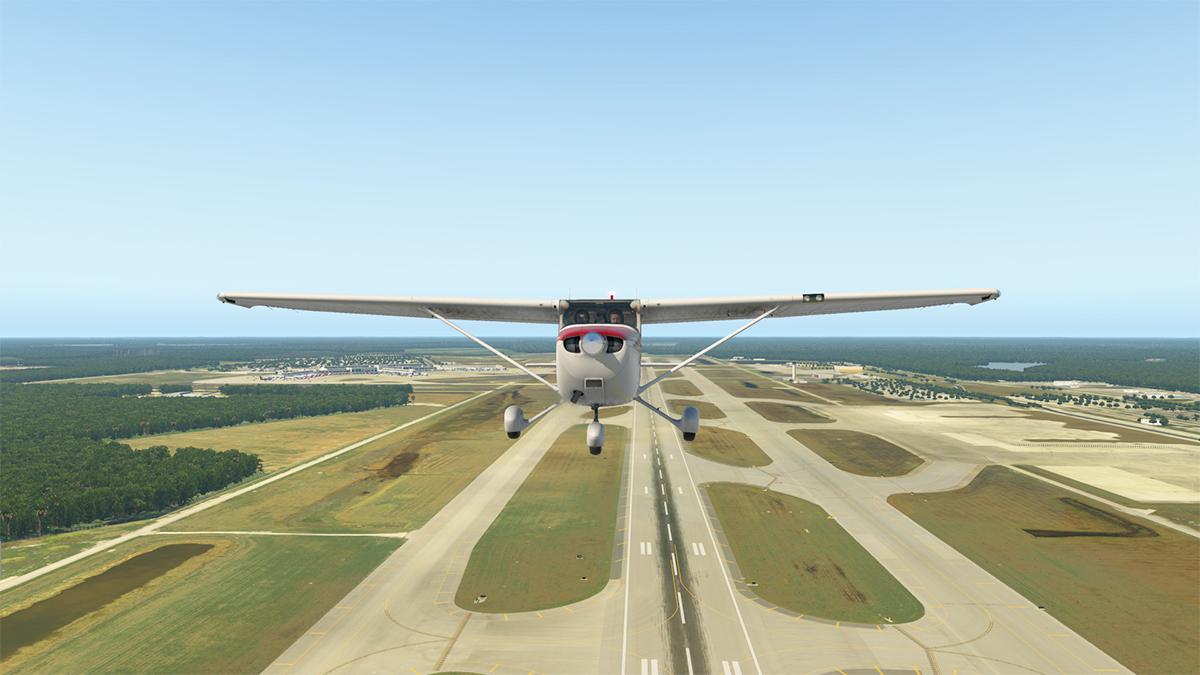
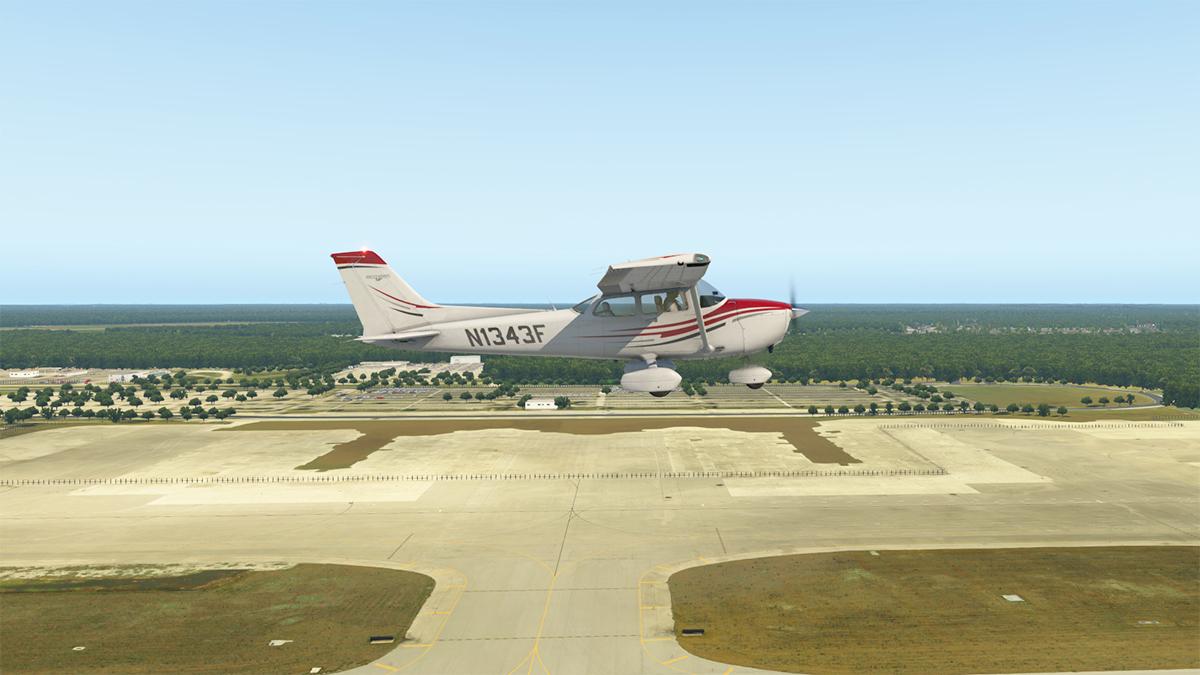
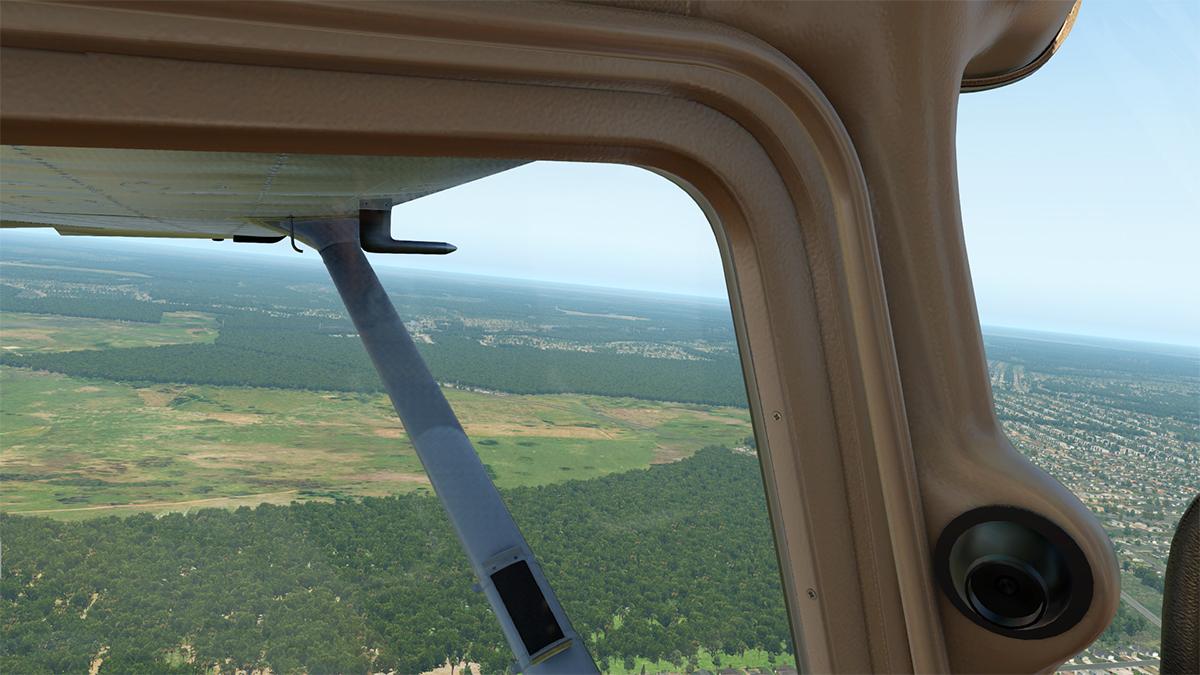
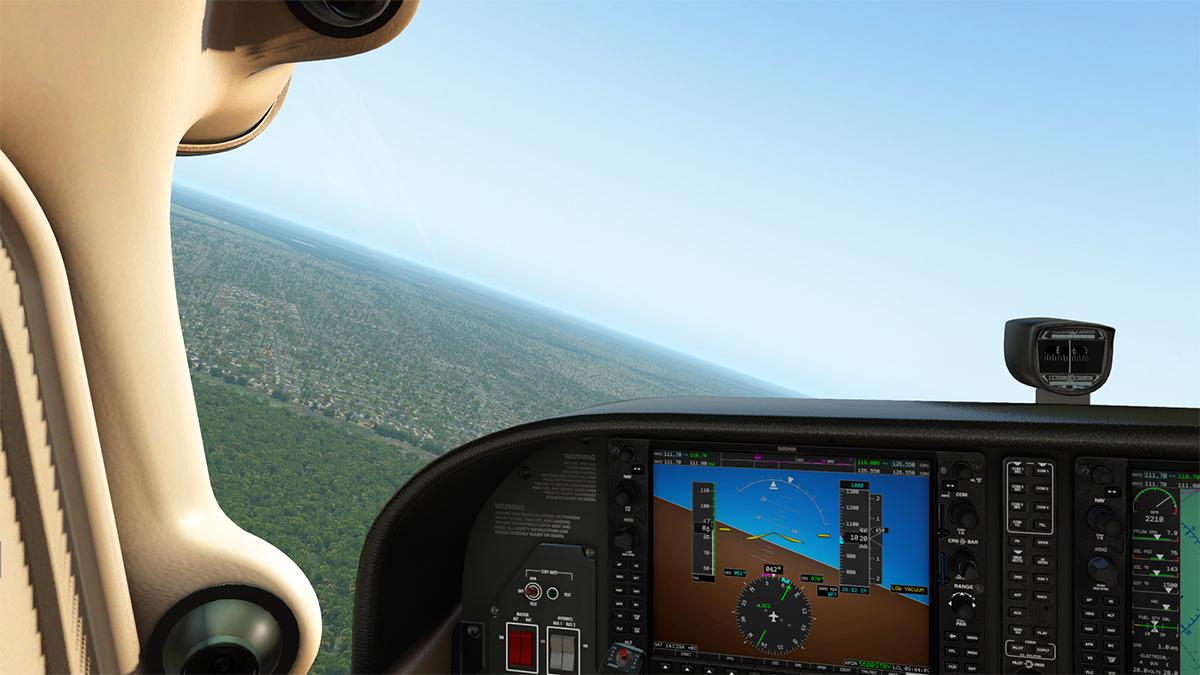
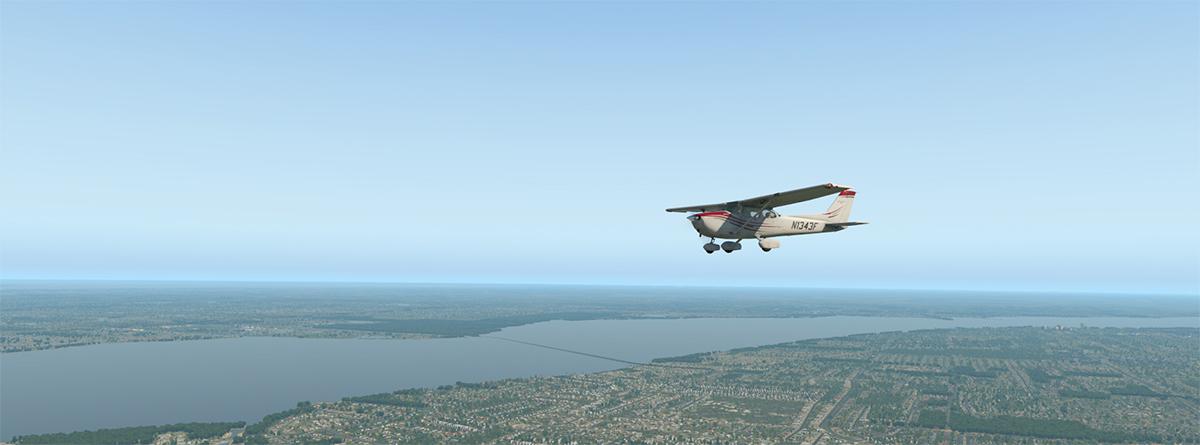
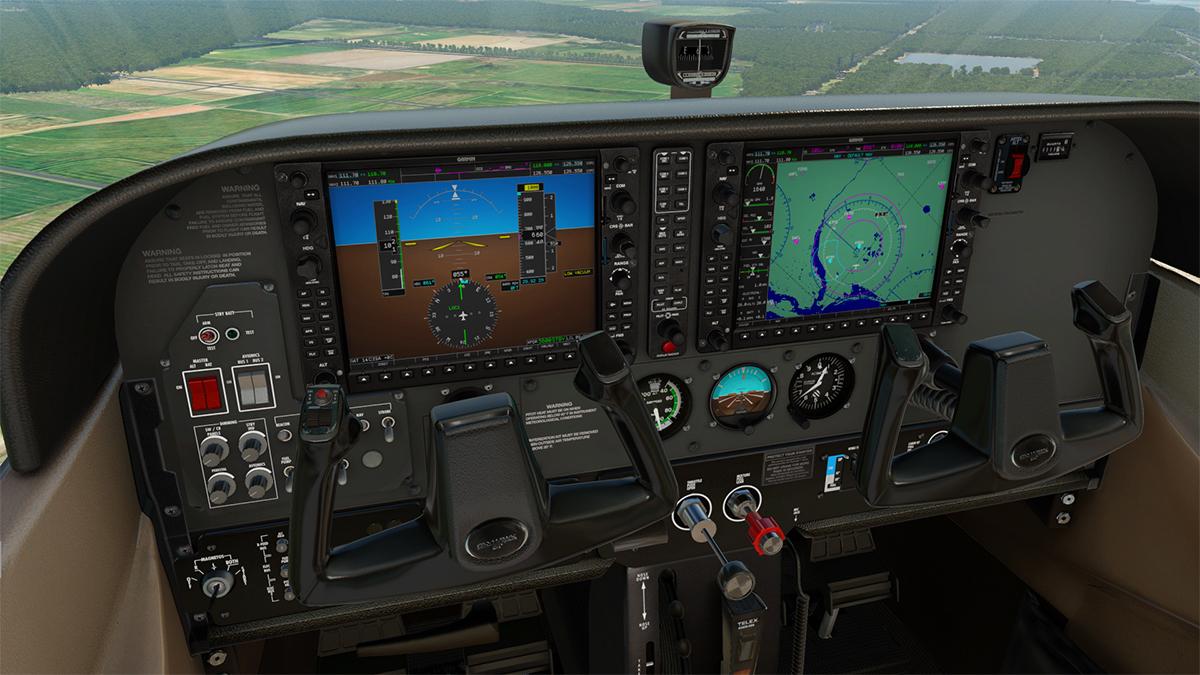
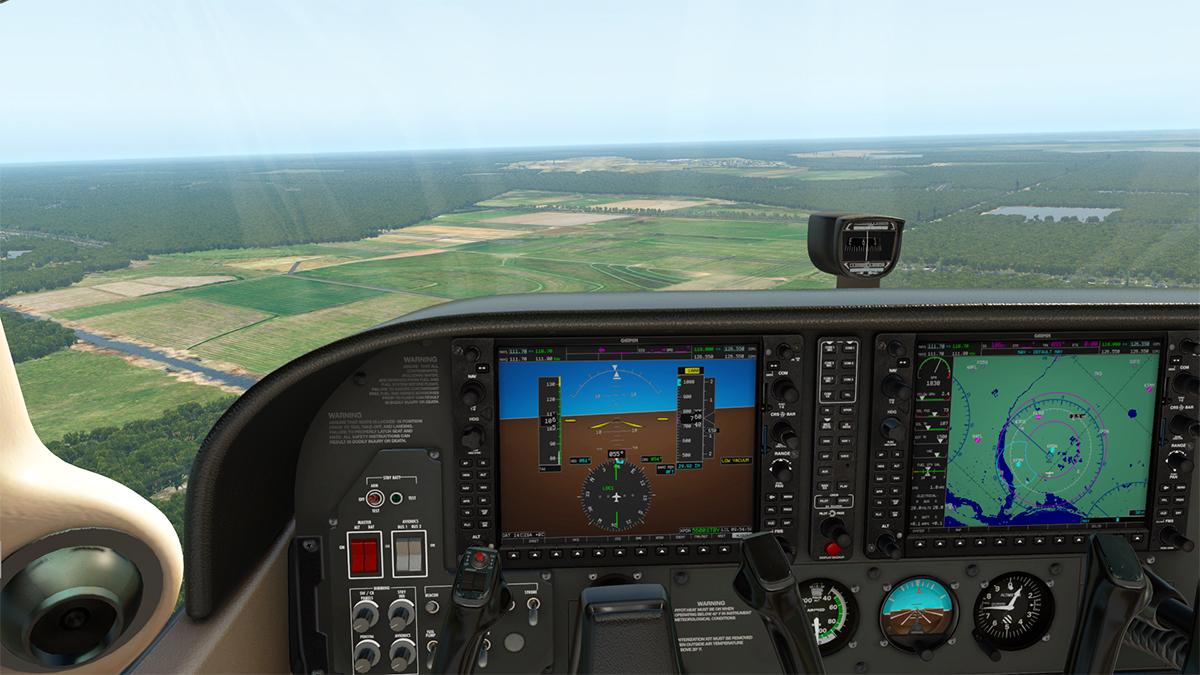
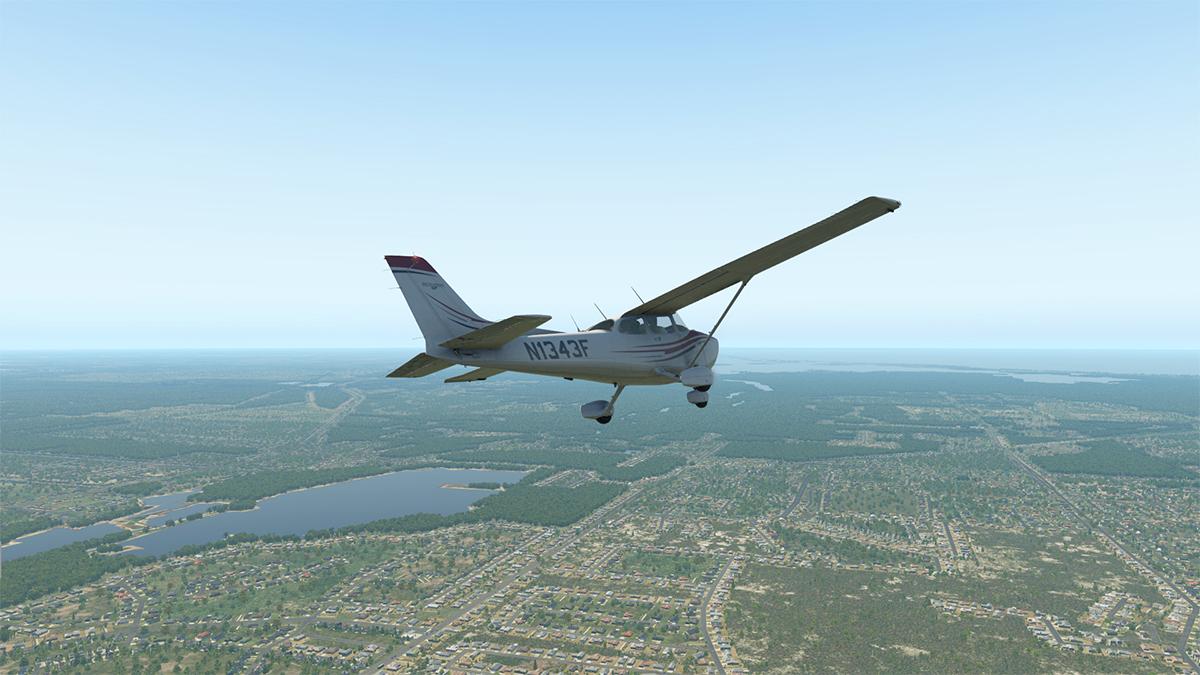
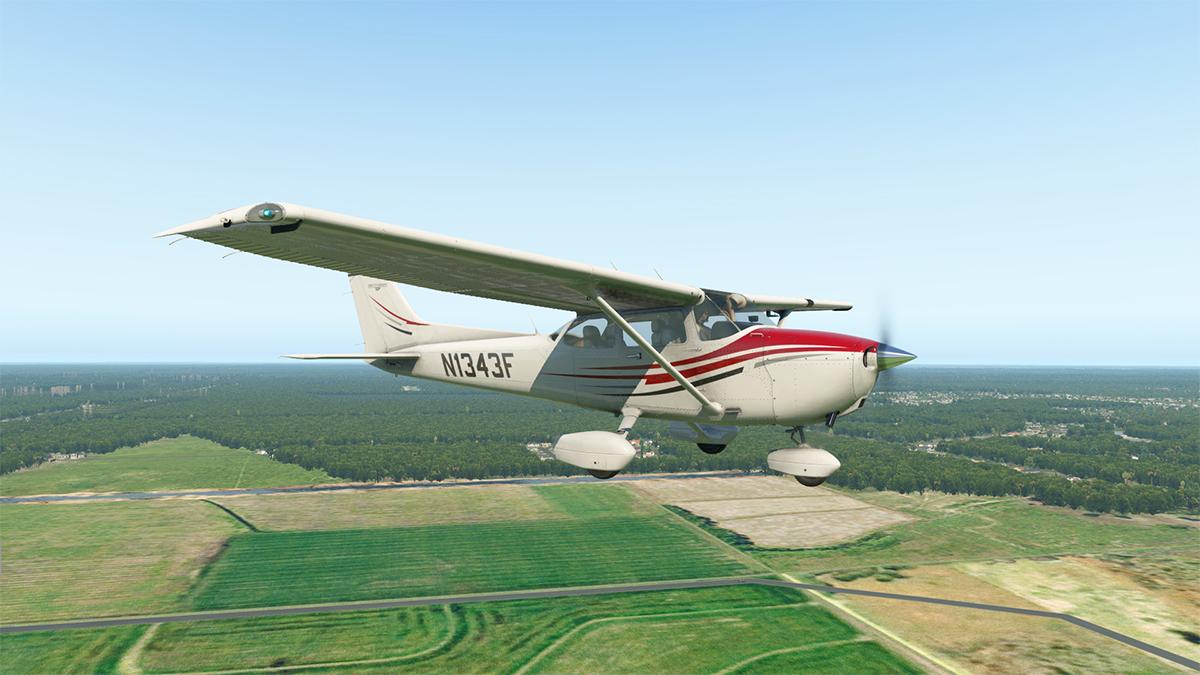
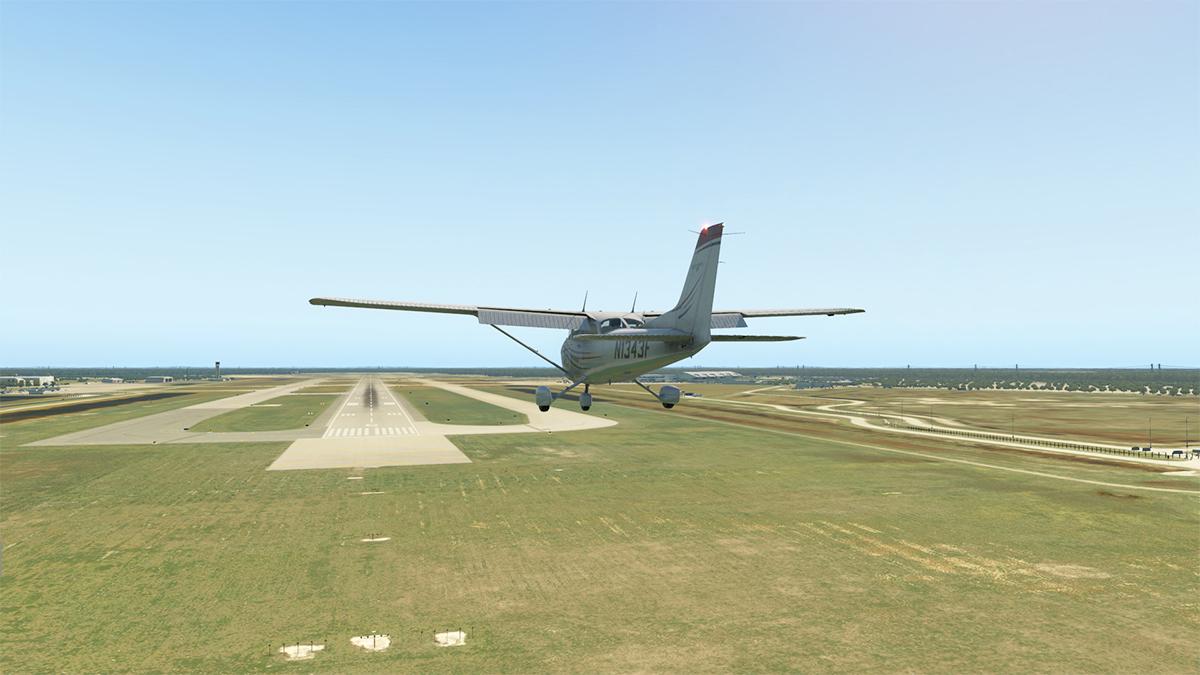
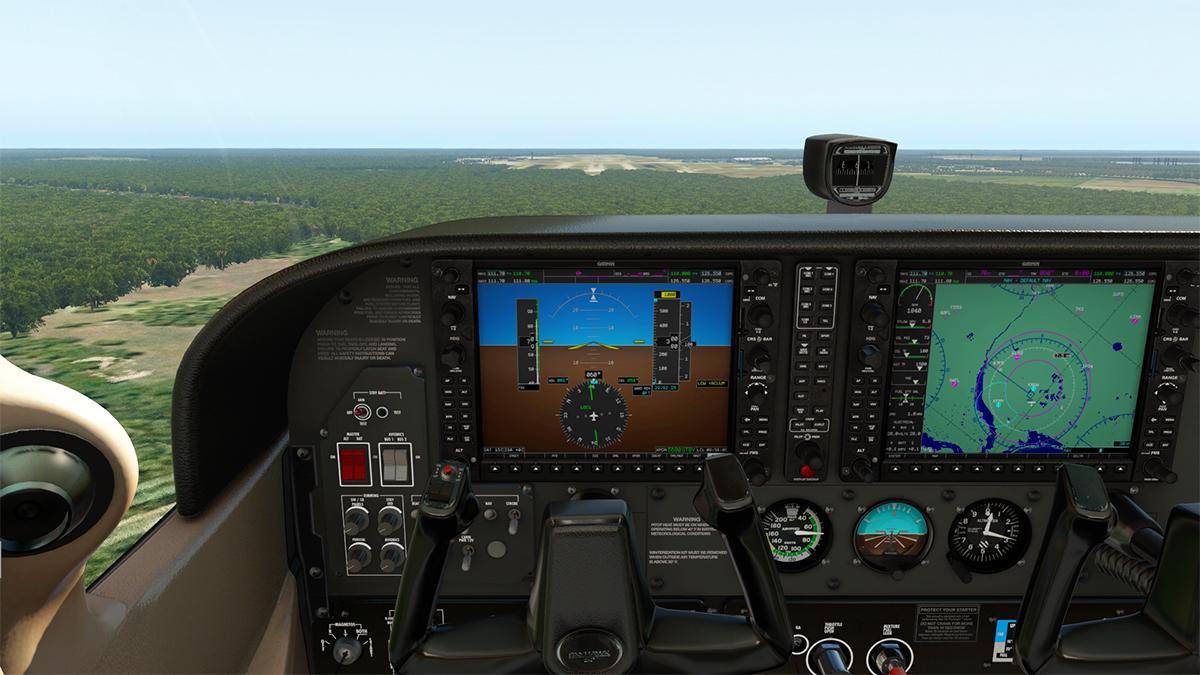
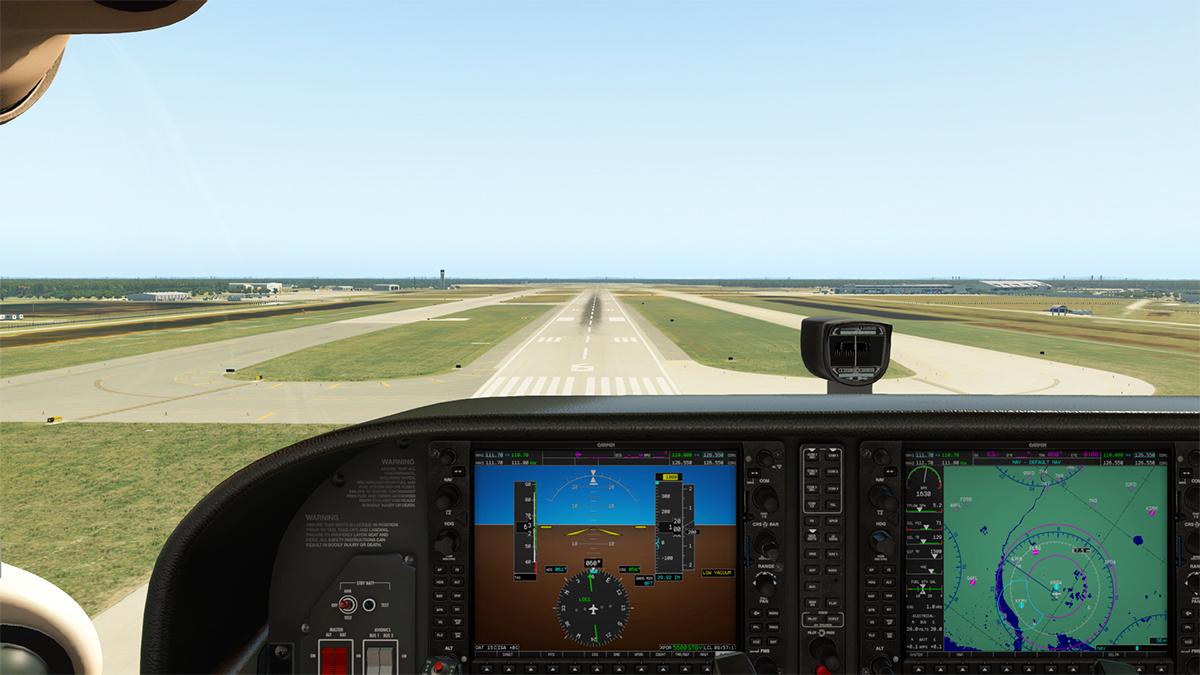
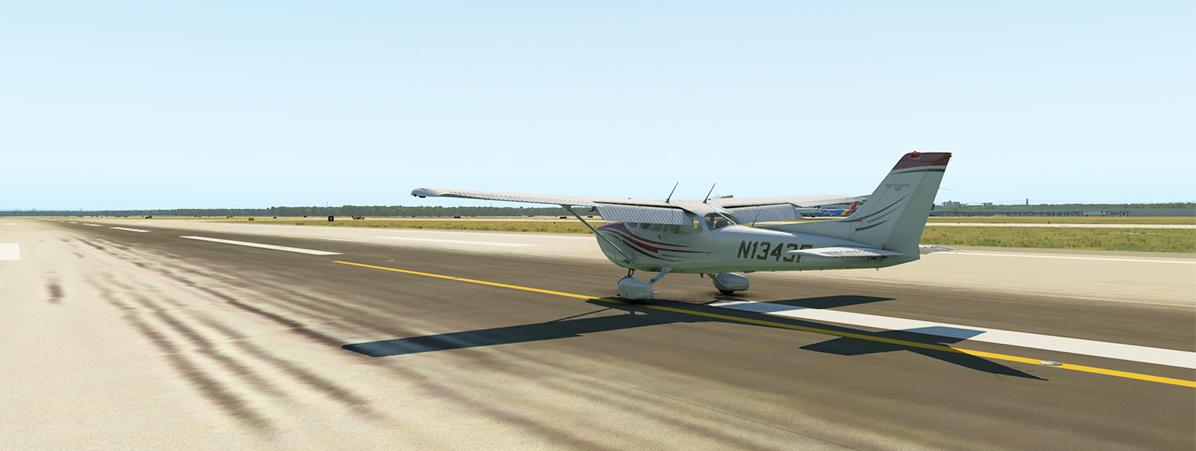
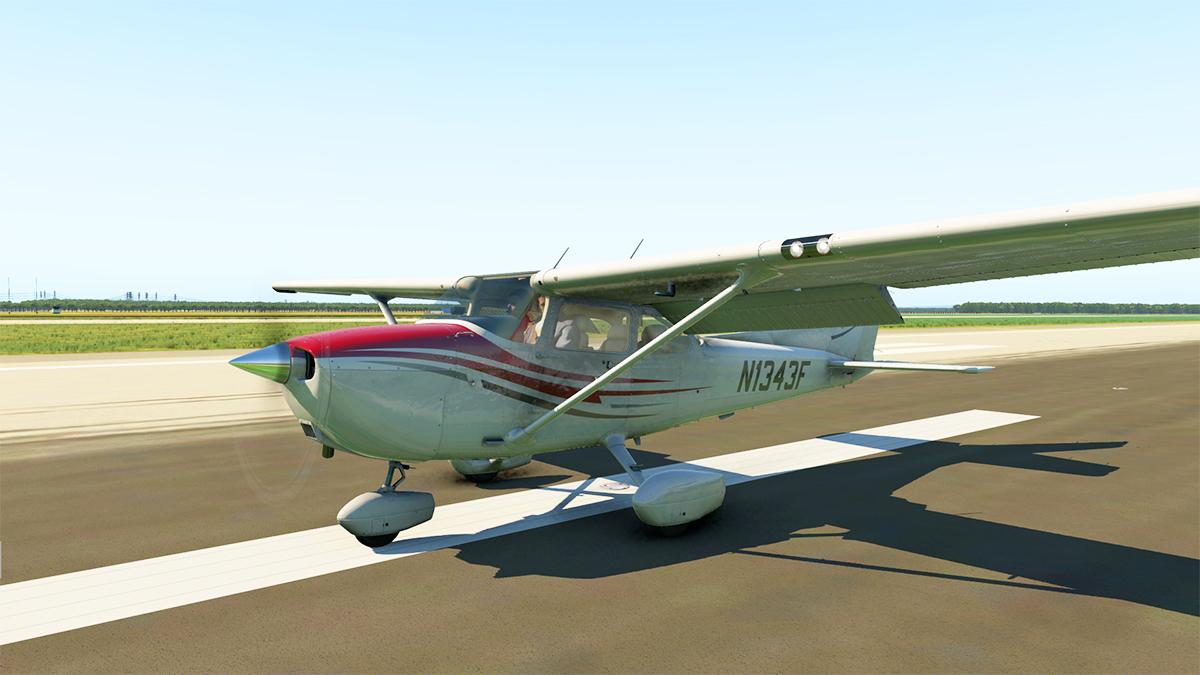
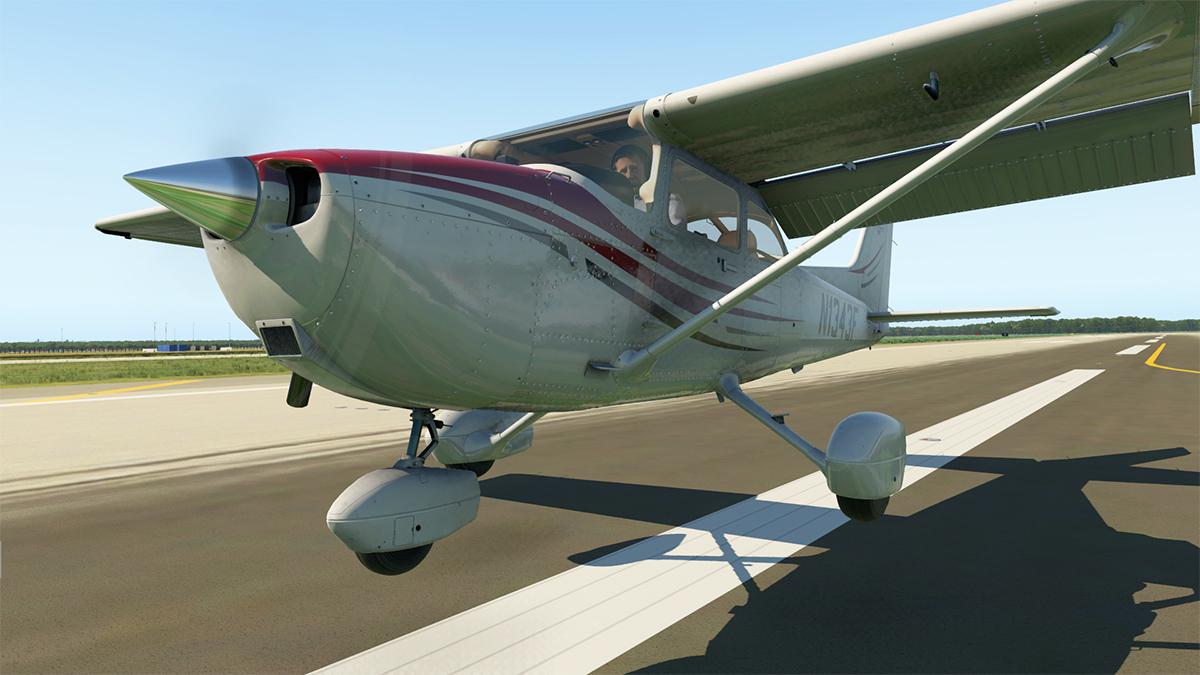
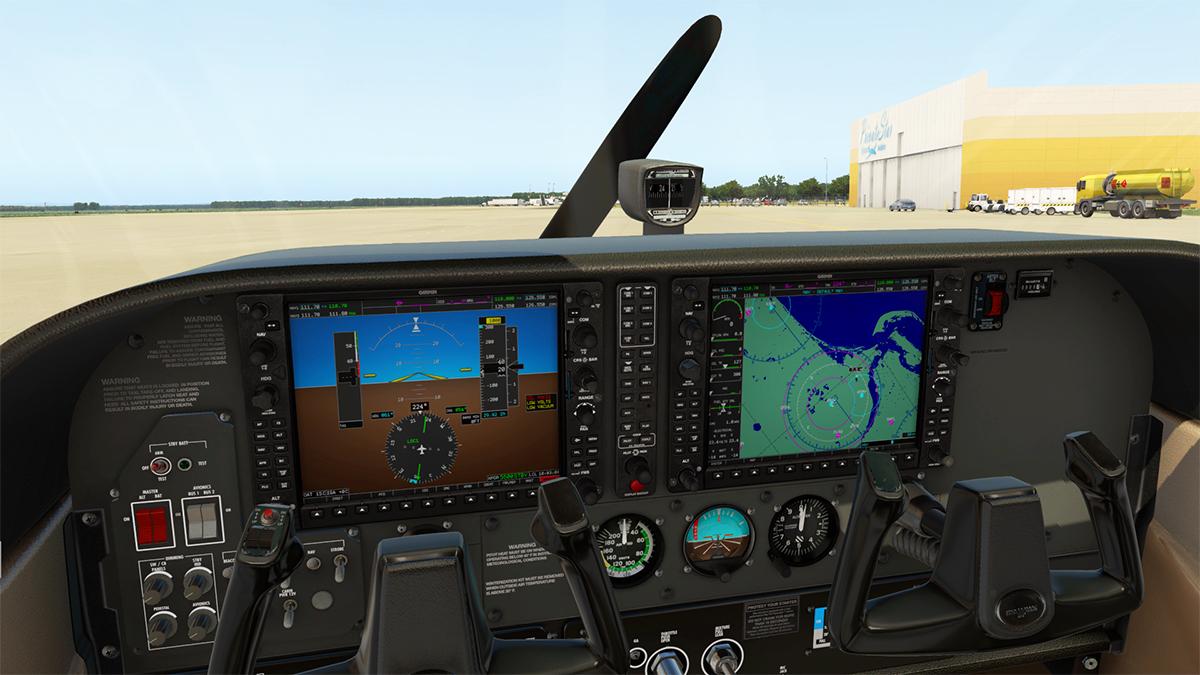
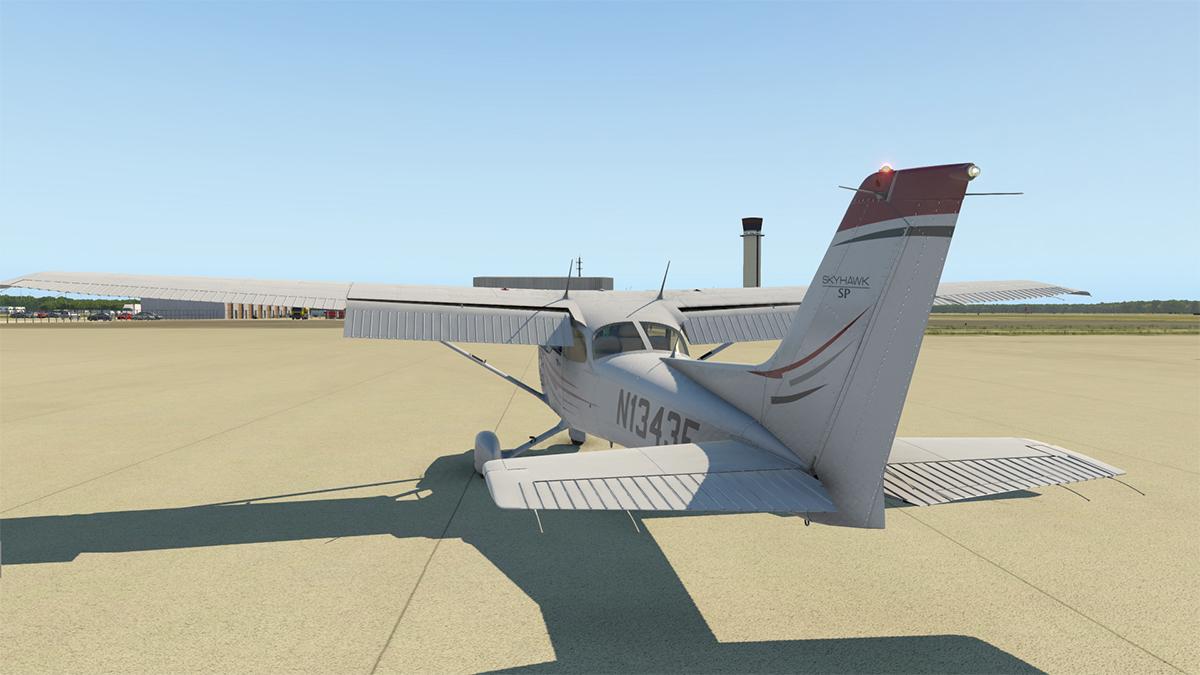
Sound Pack Review : FMOD Experience - Cessna 172 by SimAcoustics I have for awhile now been a big supporter of third party sound packages. Notable is of course is Blue Star Simulations (BSS) that add in another higher dimension to airliner realism. Admittedly many aircraft already do have very high quality audio, certainly now with FMOD design which is an internal part of the X-Plane simulator. FMOD is a proprietary sound effects engine and authoring tool for video games and applications that was developed by Firelight Technologies, in that you can play and mix sounds of diverse formats on many operating systems. In this audio package from SimAcoustics it is an upgrade for the beloved Cessna 172. There are three Cessna 172s supported in the package: • Laminar Research default C172 • AirFoilLabs C172 • Carenado C172SP G1000 Noted sounds are: Authentic engine, propeller and exhaust notes, Realistic sounds for all equipment inside and outside of the aircraft, True to life system and control noise of the G1000 navigation unit, Detailed airflow and weather sound effects, Ambient (nature) noise that makes the world come to life and the package is VR Ready for optimized 3D placement of every sound source. Installation The package is not an addon, but three sets of replacement sounds for the current default FMOD sounds, and a few extras. So the installation requires you to replace each of the aircraft's FMOD sound pack with the newer SimAcoustic package. The opened package looks like this. There are three separate aircraft sound folders and two generic .bank files and the manual. Obviously you have to remove the current FMOD sounds in each aircraft package and save them safe. I just added _old to the folder and moved it to somewhere safe. Create a new FMOD folder and insert the specific folder contents for each aircraft, then add in the extra two specific .bank files to each FMOD aircraft folder. Each new completed FMOD folder should look like this Laminar Default C172SP Careando C172SP G1000 AirFoilLabs C172SP And you are done... And it sounds like! I powered up the Carenado Cessna 172 SP G1000 and instantly it felt different... not an easy thing to do as the Carenado sound pack is already very good. I traced the sounds back to two sources, one was the avionics fan, switch the avionics on/off and hear the fan start up or wind down, "wow" impressive, the other noise was the fuel pump and again it was very good, whiny and highly audible, you can have a bit of fun just turning on or off this pump or any switch on and off as these sounds are very authentic (or noisy) and that brings me to a point. Are these background sounds too loud? or do we need some control over the sounds volume? The "Warning/Caution" sound is very high and loud enough to make you jump... Obviously a C172SP pilot would say yes or no to this question, but overall the internal atmosphere is very good. Time to start the Lycoming Model IO-360-L2A engine... you hear and even feel the starter motor engage, then the turn and eventually the firing of the horizontally opposed, four cylinder, overhead valve, air cooled, fuel injected engine... and you hear all of the cylinders firing in turn and then the running of the cylinders in sequence, that is good, very good... I am seriously impressed with the start up action and engine running sounds.... All the sounds of course come from a real C172SP (the one in the header image Cessna 172N registered PH-GEO) so they are of course real, but even recording the actual sounds is really not enough to create ultra realism. Remember these air-cooled engines are very simple at their heart but also have a very distinctive sound. Car engines are muffled by their water cooling systems, except for the early Volkswagens as they have the same horizontally opposed, four cylinder, overhead valve, air cooled layout, a 2 or 4 stroke motorbike can have the same sounds, but the point is you hear every cylinder firing as the louver cooling system does not contain the reactions as well as a block of a car's engine and again a car's engine noise is also suppressed by the engine compartments noise installation materials, but an aircraft has very little of these types of sound suppression. Internally it sounds brilliant with that knocking thrum that is very highlighted here, adjust the Fuel mixture lever (knob) and the tone changes with the lean or richer mixture setting... slower to deeper in the thrum, but the churning sounds as realistic are excellent... As a note I am wearing Bose QuietComfort QC35 ll headphones, and turning left then right and the engine noise moves nicely between the L and R ears, with a full dynamic sound straight forward... ... the rear is the same but of a different tone because you are a fair way rearwards from the engine sound source and the changes in tones as I moved my head L and R. Again I was significantly impressed in the quality of the Lycoming engine sounds thoughout the whole cabin. Opening the side window and then the door did not however significantly heighten the sound volume? This is an area that Carenado do very well, but it was missing here? Externally the sounds are certainly quite different. Here there is the complex matrix of engine sounds with the twin-blades cutting through the air and creating that distinctive chop, chop sound, but the bass deep throat engine sounds as well and the final layer is the exhaust outlet sound. I have always been quite disappointed in X-Plane in that most of the general aviation prop aircraft just don't deliver that sound you hear when you are at an airport, you know the sounds I mean, and mostly it is the missing distinctive air chopping sound and a throaty engine... but they are certainly front and centre here. Move again like you did internally around the engine (or moving propeller) and you feel that huge difference in sounds recorded here, muffled slightly from the rear to more engine pronounced sounds front on, again the sounds move dynamically around between the different side ear cans, yes it is again impressive and again adjusting the mixture creates very different sets of dynamic tones... in one word it is simply... realistic. Move further out from the sound source and you could swear you were right there at an airport standing in front of a real Cessna 172SP, okay fair enough as that is what these sound packs are supposed to do, but there is also a line between simulating the sounds and feeling the sounds and that is the difference here. The lower image left above was the most interesting angle as you were in the airflow slipstream, and sounds became jungled and muffled into the same aspect, the only thing missing was the actual slipstream, so a mounted hairdryer might be a new simulator addon now required? Time to hear the sounds from in the air... taxing out the knocking of the O-360-L2A engine would be a serious concern in a car as the crankshaft bearings would have been well past their used by date... but not in here, these knocking sounds are authentic and highly realistic on a C172SP. Moving my head left or right gave me a more dynamic feel to the taxi, but I miss the open window noise? Mixture up and Power up and the clanking gives way to a roar!, wow... again very impressive, even better was the changing in the sounds as the speed rose, they sort of come together in a tunnel effect and the audio is directly aimed at you, now the wind noise sounds are added into the mix and I really loved that last ummmmph of the focused throaty roar as you reached your flying speed. Without the ground noise aircraft go slightly quieter in the air, as it does here, but the climb sounds as you change your altitude is very good as well. In the air there is excellent balanced stereo each side, but reduced volume head on and rear... but overall it is a dynamic 380º experience as you move all around the aircraft and even above and below the fuselage. Internally there is the external wind noise as well as the mechanical sounds, so move your view and the sounds follow you dynamically and the feel is very similar to the dynamics on the ground... .... one thing I really hate are repetitive sounds, or you know the ones that you noticeably are on a loop... that aspect is not present here thank god, I never bored of the drone, which is a big part of a good soundscape as realism is a constant search in simulation, but like here with this sound package it delivers a higher awareness of that important requirement... to be as good as the real thing. As in everything it is the smaller details that are the most important, again adjusting the mixture mid-flight you hear and feel the changes to the engine, pull the mixture too far out and the engine is gasping for fuel... airflow and weather sound effects are heavily detailed and the package is heavily focused for VR - Virtual Reality headsets, like my Bose they can be a far better and even more authentic than desktop speakers. Coming into land and the roar is replaced by wind noise and and an softer idling O-360-L2A engine... .... the above right image aircraft angle in sound was particularly impressive in the coasting down to the runway feel. Power back on to counter the stage one flap position... ..... then far more power to counteract the full flap position and too maintain the height to the runway, then finally reduce power to descend down... all very normal, but you fly through your ears and not your hands or feet as each power change in sound is required for a certain action in the final approach, this is an instinctive aspect of flying aircraft, it is what you do, but feel it through the machine as it responds and that is the aspect that is important... and so that makes good sound very important in translating what the aircraft is doing and how it is doing it... again it is all about the realism. Contact ground sounds are very good, but it was the ground rollout sounds that really impressed me, not hidden by the revving engine you could hear the rumbling of the tyres on the asphalt and the wind still passing over the airframe... very impressive. Only thing that made me jump was the caution "bling" on landing, that is it's job in to warn you, but it still feels a bit loud. Adjusting the mixture I went slightly too low and got a brilliant frapping sound as the engine stuttered, then a bit more fuel and the taxi continued... ... final turn to parking and a bit of power to turn the Cessna, lovely, lovely as you adjusted the throttle for last bit of flying to a turn and a stop. Once the engine powered down, it is all again very impressive, as I was again alone in the nearly quiet cockpit sitting listening to the avionics fans! So I turned off the power to save the battery. _____________________________ Summary Custom sounds are not at the top of everyone's list of features, but actually to convey absolute realism they should be at the top of the list. This is a sound package by SimAcoustics for three Cessna 172SPs, The Laminar Default C172SP, the Carenado C172SP and the AirFoilLabs C172SP. Authentic sounds are taken from a real Cessna 172SP donor aircraft Cessna 172N registered PH-GEO. And brilliant they are and right down to the internal fans, switchgear and fuel pump. 3d aural realism is 380º and very dynamic, and very good with good headgear and in the VR - Virtual Reality headspace, all sounds are catered for in the FMOD sound effects engine and replace the default sounds to heighten the experience. Some areas don't feel quite right? Opening windows or doors don't change the sounds, and from certain directions the sounds don't activate, and you don't have any control of the individual volumes as some items are a bit on the loud side. Overall an exceptional experiences that brings forward a more realistic environment one of the most important aircraft aircraft ever built. The FMOD Cessna 172 Experience is a must have if you have the Cessna 172SP (In fact every one has a C172SP in that the default C172SP is part of the X-Plane Simulator) so a worthwhile addition and betters the standard if already very good Carenado sound pack, and for the default C172SP then just stand back.... Highly Recommended. ____________________________________ Yes! FMOD Experience - Cessna 172 by SimAcoustics is NOW available from the X-Plane.Org Store here : FMOD Experience: Cessna 172 Price is US$19.99 Key features: Authentic engine, propeller and exhaust notes Realistic sounds for all equipment inside and outside of the aircraft True to life system and control noise of the G1000 navigation unit Detailed airflow and weather sound effects Ambient (nature) noise that makes the world come to life VR Ready: Optimized 3D placement of every sound source Works on 3 different models (AirFoilLabs, Carenado and Laminar Research) Compatible with AI controlled aircraft Compatible with these Aircraft Laminar Research default C172 AirFoilLabs C172 Carenado C172SP Requirements X-Plane 11 Windows, mac or Linux Works with the default C172 included in XP11. Also works with the AFL C172 and the Carenado C172SP No other purchase required. Please note the installation procedure requires knowledge of moving files to appropriate directories (extracting, copying and pasting). Download Size: 120 MB Current and Review version : 1.0 (May 6th 2020) ______________________________________________________________________ Sound Pack Review by Stephen Dutton 9th May 2020 Copyright©2020 : X-Plane Reviews (Disclaimer. All images and text in this review are the work and property of X-PlaneReviews, no sharing or copy of the content is allowed without consent from the author as per copyright conditions)
-
Scenery Review : KFLL - Fort Lauderdale-Hollywood International by Departure Designs In my early X-PlaneReviews there one route that I used a lot and was from KLAL Kinder/Lakeland to KFLL - Fort Lauderdale. As I was flying in a general aviation aircraft then KFLL made more sense than the mega KMIA - Miami International which in reality is a bit of a light aircraft's nightmare with so much heavy traffic, in that KFLL is not lightweight in heavy traffic either as it hosts a lot of regional and even international traffic, but it is also far more general aviation friendly and accessible. So I used to enjoy immensely my little trips across Florida to visit Fort Lauderdale and the airport appeared in many a review... only issue was the scenery five or so years ago was absolute crap, and so as better scenery destinations became available then KFLL slowly but surely disappeared from my most visited list and so it was gone but not forgotten. So the chance to update to a far more modern and realistic version of KFLL - Fort Lauderdale International by Departure Designs brought forward a lot of memories, but would it be the same KFLL that I once loved and enjoyed.. there was only one way to find out, fly there. Fort Lauderdale–Hollywood International Airport IATA: FLL - ICAO: KFLL - FAA LID: FLL 10L/28R - 9,000ft (2,743m) Asphalt 10R/28L - 8,000ft (2,438m) Concrete Elevation AMSL 65 ft / 20 m In many ways the layout of KFLL is not much different than KMIA from the air, KMIA is of course much bigger and has that cross runway of 12/30, KFLL also had the same crosswind runway (13/31) but it was decommissioned on May 6, 2013. So from a distance in the air you could actually get them mixed up as the U shaped west facing terminal layout is very similar as well. Intergration into the Florida landscape overall is excellent, but there some question marks on the joins of the Federal Hwy (1) to the default scenery that passes the east side of the airport... ... fitting in to say Orbx's TrueEarth US Florida might be more perfect as I think it was designed in this aspect, but in default it looks a little messy. What stands Fort Lauderdale–Hollywood Airport out to be different and the main reason of it's existence is Port Lauderdale, which is the biggest cruise ship terminal in the world. A significant dogleg to the EFLL scenery is the Port Lauderdale aspect and it is done well... ... overall the port is basic, with a huge fuel depot set out behind... but you do get two nice cruise ships in the harbour with "Serenade of the Seas" and Carnival's "Carnival Elation", the two ships are nice but one more or even two would have hidden the basic wharf they are moored at, quality is Lo-Res as well, but on approach or departure the ships look in keeping of the scenery. The rest of Port Lauderdale is modeled, but it feels half completed in detail, and no ships in the port either only add in to the emptiness. The huge three massive central carparks dominate the scenery, along with the four terminals and the seven concourses that are set out around the U shaped parameter... Terminal 1, "The New Terminal" - (Yellow) Commonly referred to as "The New Terminal," The terminal opened in stages between 2001 and 2003, then another extension was added between late 2015 and was completed in June 2017. The noted Yellow Terminal has three concourses (A, B, & C) and 23 gates. Concourse A opened on July 5, 2017 and has 7 gates (A1-A7), Concourse B has 7 gates (B2, B4-B9), and Concourse C has 9 gates (C1-C9). Concourse A mainly serves Southwest. Glass is a major divider of developers in scenery as many get glass right, but a lot don't.... even the good ones. Terminal one is a huge span of a terminal that has a basic internal fit-out. Modeling is good, but not outstanding, however all the airbridges are SAM - Scenery Animation Manager active... The terminal building itself is not too bad, but the newer Concourse A Terminal has a highly reflective glass. From a lot of perspectives it looks okay, but the high reflection causes weird artifacts and creates an un-natural look and feel of the concourse? Internally in the terminal it looks like there is no glass in the building either? so it is all a bit weird... the real terminal glass is actually dark green. Externally the terminal thankfully looks fine. Terminal 2 - Delta - (Red) The Red Terminal has one concourse (D) and 9 gates and Delta Air Lines operates a Sky Club here, and one of six clubrooms in the state of Florida and this terminal is used by both Delta and Air Canada. The smallest terminal at FLL, Terminal 2 has a cavernous roof and again an all glass facade, the internal aspect is highly viewable, but has the same no glass look internally, so it doesn't look realistic. Terminal 3: - Main Terminal - (Purple) The Purple Terminal has two concourses (E & F) and 20 gates.This terminal is used by American Airlines, Azul, Emirates, JetBlue, Norwegian, and some Spirit Airlines flights. Terminal 3 works better because it doesn't try as hard to be realistic... no large glass areas and better green glass here make a large difference, the tired concrete facade looks good as well. Terminal 4: International Terminal - (Green) The Green Terminal has one concourse (G) and 14 gates (G1-G14) and one arrivals area for bussing operations. Concourse H was closed in December 2017 and has since been demolished. The former Concourse H was reconfigured and redesigned by the architectural firms of PGAL/Zyscovich joint venture with the newer three-story facility that was then renamed Concourse G. This terminal is used by Air Transat, Avianca, British Airways, Caribbean Airlines, Frontier, IBC, SkyBahamas, Spirit, and TAME which are all mostly International carriers. Terminal 4 is right and bang up to date in design with the old Concourse H nowhere to be seen. surprisingly the green glass is perfect here? and the terminal looks far better and the most modern design at FLL. Odd though is the clutter so well done and heavy at the other terminals is missing here? Landside is a bit boring and empty of detail with a lot of burnt in vehicles.... and the traffic does flow around the terminal is overall weak. There is a few animated traffic vehicles that go all around (I mean totally around the airport parameter?) and clutter except for Ter 4 is very good, but not FLL branded. Mid-Field Again like KMIA the control tower is far west mid-field, surrounding the tower are large (Private Jet) hangar parking (west) and various associated personal jet busnesses including: SheltAir, Bombardier (Learjet) and Signature... .... the control tower is presentable but not overly detailed, a few 3d cars placed over the burnt in ground objects (hiding) would have certainly helped, the radar on the tower is not animated either (boo) and the tower view is set right, but too low and obstructed? The far east "Naval Air Station Fort Lauderdale Museum" is present, but only as a building, I doubt the developer were aware of the Museum's significance to the area? It was NAS Fort Lauderdale that was the home base for Flight-19 the five TBM Avengers that disappeared in December 1945, leading in part to the notoriety of the "Bermuda Triangle" North Boundary Again very similar to KMIA is the north boundary of LFF with Cargo, and various aviation businesses and a catering company from left to right. Far north is the UPS depot with an abandoned static B727... followed by the main cargo with FedEx dominating the apron, and very well done the FedEx freight terminal is... Next door is called the "New Area" or a rebuilt area and National Jet is the main tenant, the building up close has some odd graphic glass, it is debatable if it works as there are no palm trees anywhere near the windows they are reflecting?... .... then next are three storage hangars. One of the biggest tenants on this north side is Spirit Airlines, incorporated in the same building is the Flightline Drug Testing facility and IBC Airways... .... Embraer have a regional service facility that is well done, then at the far east end is a few more private jet hangars and finally a SkyChiefs catering faclity far east. Interesting aspect is that at the end of each runway at KFLL is a EMAS EMAS, of which stands for Engineered Materials Arresting Systems, which is crushable concrete and it is packed into blocks about 3 feet thick and 4 feet wide. The blocks are layered in such that the farther a plane plows over the end of a runway, the more EMAS counter resistance it encounters. The affect is akin to driving a car into deep, soft sand and arresting the momentum of the aircraft. Ground Textures I find that most American airports have average ground textures, mostly in trying to replicate the concrete block approach of the way the US build's it's airports... But at KFLL and even from my first landing I realised the ground textures were really good here and very realistic. Shoulders are highly realistic and linage wear and tear is also very good. The complex different surfaces are also very well represented and you feel as a whole the field is very authentic... There is a highway (1) and runway 28L threshold crossover interchange, overall the crossover is done very well, but badly in other ways as under the overpass the roads disconnect and vehicles travel badly, the burnt in car images don't help either?.... .... but the elevations of the complex area is done really well with the mixture between the concrete and grass done extremely well. Grass is very good, but very tall were placed, but in other areas were there should be grass like with the inner field there isn't any grass? but the nature of the textures do however hide that... so overall the field aspect is excellent. Lighting Overall the lighting is below average? it also feels half-completed on release.... approach lighting is okay, but the biggest missing factor is.... .... there is no taxiway lighting or centre runway guidance anywhere? it is just a blackhole from the point you land to the gate. Central terminal area is also bleak, the gates are lit, but not by much, but with no landside or road lighting at all, it makes the whole area quite dark and foreboding. Not really it is not good enough really for a scenery in this payware category? Those poor terminal glass textures don't come across well in the dark either? They mostly come out in shades of grey.... .... the clear aspect of Terminal 1 is still debatable, many will like the open internal view, but it overall doesn't look very real? Ditto the same at Terminal 2. Terminal 3 is passable, but the ramp lighting has so little illumination throw and you will work down there mostly in the dark. Again it is the new Terminal 4 that looks the best here, it is passable but not brilliant in a "blow you away" effect. North boundary lighting is quite honest awful... as all the buildings are set in this yellow hue? I don't think there is worst FedEx building in the United States that looks like this at night, a shame as in the daylight this FedEx building looks great? .... the worst is the large windows of National Jet? it is just as horrible as you could expect them to be at a close range. This sort of photo lighting design went out with the worst of FlightSim years ago. The cruise ships look quite nice at their moorings, but the rest of both ports are in complete darkness, so you don't have much to look at on a night arrival or departure? There a some nicely lit billboards however, and they look quite good, but overall the lighting does not live up to the scale of the scenery. WT3/Traffic Global. WT3 ground routes come with the scenery, but the "KFLL-Parking Def" file is missing? This translates to yes a fully working FLL, but the arrivals don't work cleanly and the wrong aircraft are parked at the wrong gates and in the cargo areas? maybe a simple generation might do a better job than the provided files? Traffic Global works fine, but expect aircraft to mixed up at the terminal gates and not in line with their branding, and the same in other parking areas, like with an Emirates B777 at the FedEx cargo base, but the actual brand mix is very good with Spirit and JetBlue dominating. Postscript As I hinted at the head of this review I had a pretty if very basic office at KFLL for years, but this scenery wiped away the area I once staked out as my own... well I'm back and to note these items are NOT in the scenery package, but were placed there by myself courtesy of OpenScenery X. I commandeered or rather stalked out a stretch of grass outside the National Jet facility and set down my Porta-Office, with some seating, fuel and waste bins... so all set to go, and now open for business at KFLL, credit cards and PayPal accepted. _________________________________ Summary KFLL - Fort Lauderdale-Hollywood International airport is the second largest airport in Florida and in the mix as one of the most busiest in the USA. This scenery is by Departure Designs and quite difficult to surmise in context. It is one of those really frustrating sceneries you come across that has everything in there and required to be absolutely brilliant, but here it falls short. Overall KFLL looks and feels very good, but it is in the details and under development that really let it down. Modeling is very good, but the glass except for Terminal 3 and 4 is not very good at all, see though terminals may be to a lot of people look exciting and realistic, but I differ here... to me they just look empty and bland without any tinting, worst is that the reflective glass in that it just reflects everything and looks quite odd with strange weird artifacts at many viewing angles. The field and ground textures are very good, very realistic and so is the Fed Hwy (1) and RWY 28L crossover, but the join is not very authentic, but the elevation elements around it are well done. The external Port Lauderdale is well done but feels half-completed, and a few more cruise liners or even some cargo ships would have been nice. SAM - Scenery Animation Manager is supported and welcome. Lighting is below average... even weird in areas, but no centre-line runway lighting or the required green taxiway lighting is simply a major failure, and makes the scenery look dark at night, ditto is the missing landside road lightng that creates a blackhole in the centre terminal area, so in many areas the KFLL feels very under developed and it certainly does not live up to the expectations of what can easily be achieved here. Like in many areas in both aircraft and sceneries it is the polish, that final 10% of that 100% that creates the magic, and don't get me wrong in many areas I really love this Fort Lauderdale scenery as it fits in well with the south Florida aspect and as a great companion to the mega KMIA next door. If you want a good KFLL then certainly this scenery can certainly fill out that role, but it just needs a bit more finesse to be really good or even brilliant. _____________________________________ Yes! KFLL - Fort Lauderdale-Hollywood International by Departure Designs is available from the X-Plane.Org Store here : KFLL - Fort Lauderdale International Price is US$23.99 Features: Heavily optimized Airport PBR Textures throughout Airport Rain Textures SAM Jetways Accurate Elevated Runway Highly detailed Custom Animated SAM Jetways Custom WT3 support Custom Night Lighting color graded Satellite Imagery High Resolution 4K Textures Terminal layout circa Q2 2020 Compatible with all Florida sceneries Ortho4XP Compatible WT3: WorldTraffic GroundRoutes are provided and overall the airport generation functions perfectly but the package comes with no Parking Defs? Requirements: Windows, Mac or Linux 4GB VRAM Minimim - 8GB+ VRAM Recommended Current and Review version: 1.0 (May 2nd 2020) Download size: 2 GB Installation Download scenery file size is 1.85gb: Fort Lauderdale Annoyingly there is a folder within a folder here? So you will need to remove... Dep_KFLL ... and then place THIS file in the X-Plane Custom Scenery folder, if not the scenery won't work? Total scenery installation is quite big : 3.90gb SAM Plugin - Scenery Animation Manager - Suite 1.0 is required for this scenery Documents One extensive manual in English with notes (1 page) but no charts FLL Manual.pdf _____________________________________________________________________ Scenery Review by Stephen Dutton 8th May 2020 Copyright©2020 : X-Plane Reviews (Disclaimer. All images and text in this review are the work and property of X-PlaneReviews, no sharing or copy of the content is allowed without consent from the author as per copyright conditions) Review System Specifications: Computer System: Windows - Intel Core i7 6700K CPU 4.00GHz / 64bit - 32 Gb single 1067 Mhz DDR4 2133 - ASUS GeForce GTX 1080 8Gb - Samsung Evo 1TB SSD Software: - Windows 10 - X-Plane 11.41 - tested v11.50.b6 (fine) Addons: Saitek x56 Rhino Pro system Joystick and Throttle : Sound - Bose Soundlink Mini Plugins: Traffic Global (Just Flight) US$52.99 Scenery or Aircraft - Default Boeing 737-800 by Laminar Reserch
-
Scenery Review - EBBR Brussels Airport by JustSim
Stephen replied to Stephen's topic in Payware Airports and Scenery Reviews
Depends on the EBBR-Brussels scenery you have installed as the original version didn't work, if v2 then you need the (Marginal) VDGS plugin... my EBBR works fine? -
Aircraft Review : Dynali H3 Project - VSKYLABS 'Test-Pilot' Series Most recent releases from VSKYLABS in their "Test Pilot" series have been ultra-light helicopters, and here is another one in the Dynali H3 after the Cicaré-8, Guimbal Cabri G2 Heli and the Mini-500 Project, so there is now definitely a pattern going on here... The Dynali is a Belgian ultralight two-seat helicopter with a side-by-side seating configuration. It is authorised in several European countries under the ultralight helicopter category to comply with the European Class 6 microlight helicopter rules, in particular the French Class 6 Microlight Category, at a gross weight of 450 kg (992 lb). The H3 is supplied as a ready-to-fly helicopter, or as a kit from the manufacturer. H3 was designed for the flight training, utility and personal-use roles. Remember the VSkylab philosophy is that you purchase an ongoing project, so any aircraft you purchase is not fully completed and is 100%, that is the deal you sign up for to get access to the aircraft and all the development is ongoing. Small, inimate, teeny, dinky, pocket-sized, tiny and compact it is the whole thesaurus of a mini sized helicopter, with barely space for one human-being and never mind squeezing two inside that H3 tight cockpit. Detail is of course VSkyLabs quality and brilliant... Modeling quality is breathtaking... just look at the realism of the cockpit cowling and the hinged front canopy, the numbers must be very high to get that sort of smoothness and curves, the glass in shape and realism is also top notch. The highlight is of course the innards of the flying machine. The airframe is highly visible, as is the Rotax 912ULS four cylinder, liquid and air-cooled, four stroke aircraft engine that pumps out 75 kW (100 hp). The four-belt drive of the tail-rotor is really well done, and authentic in motion and note the under belly twin-fan cooling arrangement with working fans. Heat resistant material between the powerplant and basically your backsides is also highly realistic, so overall the reproduction of the machines internals are all very good. Details of the rotorhead in design and linkages are very good, but.... the main assembly is static in that nothing moves when you move the control stick, the collective however does move the blades to bite into the airflow... .... pusher tail-rotor looks and feels very small and fragile, components and assembly looks really well done and the rudder movement is active and visible. Internal Detail The whole canopy hinges forward for access. And the carbon-fibre seats look like the perfect fit... Seat detail is phenomenal even outstanding in realism, note the tank switch on the rear panel. Overall though the cockpit is basic and so is the instrumentation... .... flying controls are a twin-crossbar between the pilots. The T-Bar can be hidden by touching the base. Across the top of the instrument panel are seven warning lights, Instruments left to right/top to bottom are... Airspeed indicator (Km/h), Rotor/Engine Temp, Manifold Pressure - CHT Indicator (Cylinder Head Temperature), VSI (Vertical Speed Indicator), Altimeter, Engine Oil Temp - Battery Voltage, Engine Oil Pressure and MTG Temp (Main Transmission Gearbox). Lower is a row of seven power switches, All start but for a single light external switch. Lower panel has a Garmin GNS430 COM/NAV panel that pop-up (default Laminar), Garmin GTX327 Transponder. There is a working Circuit Breaker panel with seven breakers active, Power switch (starter button is on the T-Bar) and a low RPM indicator. Far bottom row is the Fuel Gauge and OAT (Outside Air Temperature. Hanging left of the main instrument panel is a very nice H3 Engine Information System and on the right is the heading dial and Vertical Card Compass. The Altimeter can be changed via clicking on the instrument from hPa to both hPa/in.Hg, but the in.Hg is however more blurry in detail to read? The AviTab Plugin tablet is also now fitted onto the canopy. It is a fixed unit that you can't move or hide, but it is well placed and a nice tool to have. You get a pilot who is oddly in the left hand seat?, you can hide him if you want to via pressing his seat. He comes with excellent hand and feet movements that look very realistic, but take the internal view external and he loses his head! Click on the passenger seat and a very attractive female pilot appears. There is no weight for the extra pilot noted but it is added, and the maximum total human weight allowed is 200 kg (440 lbs). There are no menus or static elements with the Dynali H3, and only the clickspots noted. There is the REALLY annoying STMA auto-updater that constantly pops up on the left of your screen, I usually pull the plugin out and throw it away. Flying the Dynali H3 The H3 is a Ultra-Light machine at 688 lbs empty, so that means it is a very nervy experience. vSkyLabs note to have the "Experimental Flight Model Mode" switched on (Menu/General). Twist the throttle on the collective to increase the power, and when the instruments have settled down then slightly raise the collective. I found even trying to hover above the ground a very tricky experience, even the slightest touch in movements sent the machine in directions I didn't really want to go in, but I sort of felt my way back to the zero movement point. The tail (rudder) feels very light with not a lot of power, that is more of the light weight of the machine than thrust from the tail-rotor, but even small changes for side-slip and changes in direction by yaw is hard... If you are used to more larger machines like the Bell 407 then you are going to have to relearn your skills, coming from vSkyLabs earlier light-weight machines is not as bigger a gap, but it is certainly the lightest chopper I have tried to fly. There is no doubt the high-range dynamics are at work here, this H3 is EXTREMELY responsive, so you have to adapt, but sorta carefully. There are Vertical and Horizontal marks on the canopy to aid your horizon orientation, but I also mixed up the lines up with the surrounding lighting masts around Bristol Airport? In a more distant situation then the lighting masts blurred into the same as the etched lines on the screen... very odd. Once you get a bit of a speed forward the machine very quickly comes back to you with a standard helicopter feel, the flying smooths out and the machine will cut through through the air very quickly... "Brisk" is the word I would say comes to mind, but you have to be aware of the red limiter zone above 155 km/h, VskyLabs notes the full four set of flying zones as: Red zone .......................................................................... 0 km/h – 85 km/h : Green zone......................................................................85 km/h - 130 km/h Yellow zone .................................................................. 130 km/h - 165 km/h : Red zone (VNE) ............................................................................. 165 km/h With also the first IAS red zone as marked between 0 and 85 km/h, and which is the recommended flight profile during any take-off and landing. There is a sort of Go-Kart in the sky feel as you power along, and certainly if you cruise fast and (very) low over the landscape... Sounds are in a dynamic Multi-Layer FMOD sound pack and sounds great, and certainly the aircraft is carefully aimed towards VR... Virtual Reality, so that full on VR experience must be exceptional. Specifications include: Cruise speed: 130 km/h (81 mph, 70 kn) and a never exceed speed of155 km/h (96 mph, 84 kn). Endurance is set at 3 hours, with a Service ceiling of 3,000 m (10,000 ft), and the Rate of climb is 4.6 m/s (900 ft/min) There are no flying aids in here, so it is all about the stick and rudder feel and being in one with the light machine. Coming back to translational-lift in from flying forward to the hover position is quite easy... then it wasn't in the actual very slow speed to the still hover zone... .... I landed, but under duress, as when in that hover zone the H3 was a bit of a handful or squirmy.... ... I got back into a static hover and was able to finally hold the H3 there, but I also completely lost the Dynali sometimes with some nasty results. Practise... of course and with time I would master the machine, but it requires a lot of skill in the hover zone as the H3 can very easily get away from you. Lighting The Dynali H3 is not the sort of aircraft you would really fly at night? But there is a nice reddish glow over the instruments that is pleasing, but the AviTab is quite bright in the dark, so there is a need to be able to turn it off or tone it down? External lighting is very basic, with red and green navigation lights and a tail-boom red beacon. Liveries There are four quite cool liveries, with the H3 Experimental as the default. H3-Orange, H3-Racer 14 and H3-VR Driver are all excellent. Three liveries have the carbon-fibre grey instrument panel, but the H3-Orange has the Orange instrument panel colour. ________________________ Summary This Dynali H3 is another Ultra-Light Helicopter from VSkyLabs, and now the fourth in a series of the same type of ultra-light rotor based machines. Extremely light the H3 carries two pilots in a tandem seating arrangement, it is quite fast, nervy, squirmy at slow speeds so the light-weight machine requires a lot of skill to fly professionally, obviously the highly skilled will revel in the dynamics, but the rest of us will just have to do a lot of practise to get it all right. Note that you are purchasing an ongoing project with any vSkyLabs aircraft and all that all the development is ongoing, so this is not a 100% fully developed project. Overall most vSkyLabs aircraft are basic, but is fully detailed to the extreme. There are no menus or static objects or extensive features as the focus is on the dynamics and flying performance and in that area the Dynali H3 really delivers. Only interactions are with the few interaction zones to select pilots, change altimeters, open the canopy and hide the T-Bar control column. AviTab intergration and exceptional VR-Virtual Reality is also available. Well designed and highly dynamic then the Dynali H3 is a challenge even for the medium helicopter pilot's out there, but that is also the attraction of mastering these Ultra-light machines... If you love that, then this Dynali H3 will be at the very top of your list. Now available from the X-Plane.OrgStore or directly from vSkyLabs ______________________________________________________________________ Yes! the Dynali H3 Project - VSKYLABS 'Test-Pilot' Series is now available from the X-Plane.Org Store here : Dynali H3 Project - VSKYLABS 'Test-Pilot' Price is US$29.00 - Currently on special for only US$17.00! Project Main Features: VSKYLABS 'Test-Pilot' Project. Highly defined model of the Dynali H3 helicopter Built around the powerful, native X-Plane 11.40+ 'Experimental Flight Model' environment (must be selected in the General settings window in X-Plane 11 Fully functional VR (Virtual Reality) compatibility 3D Pilot and passenger visualization for increased VR immersion Built-in Avitab compatibility (Avitab plugin not included) Multi-Layer FMOD sound pack STMA Autoupdater included Easy-to-use paint-kit included The project is under constant development Highly responsive VSKYLABS support forums Requirements: X-Plane 11 (latest stable version) Windows, Mac or Linux 4Gb VRAM Minimum - 8Gb+ VRAM Recommended Current and Review version: 1.0 (April 29th 2020 ) The AviTab Plugin is required for this aircraft. Note: In order to use and enjoy VR environment in X-Plane, user hardware and system specs should meet the required specifications for OS, CPU, GPU, MB and RAM which are specified both in the given VR hardware websites and at X-Plane.com. Designed by VSKYLABS Support forum for the Dynali H3 ______________________________________________________________________ Aircraft Review by Stephen Dutton 2nd May 2020 Copyright©2020: X-Plane Reviews (Disclaimer. All images and text in this review are the work and property of X-PlaneReviews, no sharing or copy of the content is allowed without consent from the author as per copyright conditions)
-
Behind the Screen : April 2020 April was Vulkan month, and Vulcan month as well. You had to believe that the extraordinary Avro Vulcan cold war bomber could come out the same month as the Vulkan (that of Star Trek fame) API in the actual same month, sheer coincidence but still mind-boggling in get the spelling right for either, and how many times I spelt Vulkan instead of Vulcan in the review and then had to change it.... the brain is wired in a certain way to do the daft way. Well Vulkan finally hit the simulator. In a way we didn't know what to expect except for Vulkan to be good... right. It is as I covered in my Analysis Review, I was pretty impressed, but this was still an early beta, so the show got on the road as a beta and the usual theatrics. A good one, a crash one, a brilliant one, a withdrawn one and so on, we are currently just worked up past the withdrawn one in beta 5, now fixed and beta 6 is now also with us. Beta 5 although it failed initially was the big one. It is the update that goes to the heart of the beta, and not because it was a large update, but because it it dealt with the core issues... It should be now more relatively easier from beta 5 onward in Laminar now just refining and fixing the minor bugs. In relation and to the complexity of the changes then the Vulkan switchover has gone very well, like the coronavirus, it came quickly and our simulation life will never be the same after it's impact. The final bottom line was that Vulkan is quite brilliant, but as telegraphed by Laminar before release it was not to be the Holy Grail of everything, in fact my framerate is now pretty much the same as before Vulkan was released, but my settings are now mostly at a full throttle notch, I now have as noted in the analysis in that I now have shadows and reflections and a far higher texture resolution for the same framerate hit, but then switch back to OpenGL in same settings and the computer hammers on down to single framerate digits, so that is showing a huge improvement in reality. Add in then the supreme smoothness, no stutters at all... and with every simulation is clean and totally smooth. The quality is shown in the reviews with crystal clear images that are sharp and quite beautiful. So Vulkan is certainly a huge step forward. I had more issues loading in Aircraft (mostly in restarting with the authorisation done) that resulted in a Vulkan crash or screen blackouts, yes some plugins crashed, but overall most are now working absolutely fine with developers (except xEnviro as usual) doing fixes to get their products running in Vulkan, and already WorldTraffic3, Traffic Global, SAM, BetterPushBack... etc are all working fine, so at this point the transition is working out very well, and if in the final refinement Laminar can give me back some framerate as well then that for me is a total Vulkan win-win. But it is the sheer smoothness of the simulator in Vulkan that really gets my googles going, in that every flight is now so good, but you do still however feel the unrefined elements that still need attention, so Vulkan at this point is not perfect and there is still a fair way to go. Problems with beta's are that they take one step forward, then a step backwards, step two forward and then take another a step back again, you feel the movement and then something that worked, suddenly does not work anymore. One tool I really love is the new "Plugin Performance" tool. This was made for Laminar and developers, but it is now an essential tool for your own use in seeing what plugins are doing you the most damage, or worse even running while they have no actual use and using up a lot of your valuable framerate (and yes we now know who you are?) Your choice is quite simple, pull theses nasties out unless you are actually using them, but how was this allowed to happen in the first place? The tool will reform your plugin folder as developers will now have to face you if their plugin is not at all efficient, and so they should, as you can't simply have these monstrosities doing this much damage to your simulation while hidden away. Well they are now all lit up in the glaring bright light of exposure and there is now nowhere to hide. I have always been aware of very bad performing plugins and mostly with their badly written code, now you can now see the actual results, but some do surprise you as well. Take Rotate's MD-88, which by all context is a very complex and detailed aircraft, but it's plugin is one of the most lightest and refined plugins in your system... "who would have thought?". Mostly you would have thought it would have been one of the heaviest and draggy on the system, but in fact it is as light as a feather, kudo's to Rotate. And there is surprisingly a lot of surprises still waiting to be found but buried in that performance tool, and a few more to still on to make you aware of on how your system is really operating, and also now rather differently than you thought it was. Except for those blackouts and a few related crashes then v11.50 Vulkan has been for me has been pretty smooth as Beta's go. But what silly users there really are out there. There was the do-dah about "reshade" last week in that idiots were complaining that the "reshade" was not working anymore and threw their rattles out of the Bassinets when told not to use it... babies. The core of Vulcan is actually the new shaders, or new Vulkan is in the fact that the complete shader system has been completely redone for Vulkan, it had to be for the new memory allocation. But still they insisted on using the old shader system... why, because the new shader system is far better now anyway, in fact it is really, really good, certainly not as good as xEnviro's shaders as they are brilliant, but as a default you can't really fault them, and our skies at dawn or dusk are now magnificent, clean and very efficient. You really do wonder were their heads are and the damage they caused as the crashes caused by Reshade sent the Laminar reporting system into meltdown, Laminar had to come out tough and say "Stop this nonsense" but also shows the difference between on how to do a Beta run and how not to do it. As noted my v11.50 Vulkan app is basic, that is BASIC in what I have in there and what I put currently into the Vulkan world. Each aircraft and plugin is carefully tested and installed one by one, I certainly don't throw in the toybox of everything and then wonder why the App goes crazy and crashes all the time, but you would be really surprised on how users did just that... the worst effect on doing that is that you have simply now idea of what or if in what area is causing the constant crashes, or even why either and it totally confuses the Laminar bug reporting system, yes we would love (and to a point after Beta 6 we are now getting there) to have a fully functioning v11.41 as v11.50, but this is again like that nasty virus out there in sorting it all out will be a "one step at a time". Another strange debate in April was between the Flightfactor Airbus A350 and their Boeing 777. I got daily (sometimes hourly) comments and messages on which aircraft was the better to buy. Well basically neither at this point because both are ancient in X-Plane terms, neither are good simulations that reflect the state of the current simulator, but still users wanted to know. There sounded like a desperation out there for some decent long-haulers to fly and I really share that pain, but both aircraft are (well overdue) for updates and both should happen this year, with the A350 very soon and the Boeing 777 hopefully towards the end of the year... but it was a weird debate that went on and on. X-PlaneReviews has a new reviewer on board by the name of Bernardo Pierdona Casa or Casa so look out for his reviews. He took up the challenge to do a comparison review on the above A350 and B777 debate so check it out: Aircraft Comparison : Boeing 777 vs Airbus A350. Overall I love other peoples point of view on a review. No matter how many years you have done this reviewing palaver, another point of view on any area of the simulator is welcome and not as one sighted or from one perspective and yes you learn something when it is pointed out from another total point of view, we welcome that new vision. See you all in a post-virus world next month Stephen Dutton 1st May 2020 Copyright©2020 X-Plane Reviews
-
Scenery Review : Casablanca XP by Aerosoft/FSDG You feel like going somewhere and doing something exotic! But you are also wanting to fly a route for not very long, in fact you don't want to break your two hour flying rule either? You have also flown most European connections and even ventured as far north as Iceland, but you are wanting now something a bit different, even a challenge... so what about North Africa (South Africa is too far). With all these parameters then what about Casablanca, as it is a very exotic and quite a popular destination and only a two to three hour flight from most southern European ports... in reality it is a done deal. I have been to GMMN - Casablanca - Mohammed V International Airport a few times before, and then used a quite average freeware version, But have always loved GMMN if for it's north western coastal African position, not too far from Europe but more importantly it is also an airbridge to South America as a refueling stop. So when developer FSDG or FlightSim Development Group released CMN - Casablanca I just wanted to go back there and finally to a decent full quality X-Plane Casablanca scenery. Casablanca is situated on the very top the northwest coast of Africa, and is a mere two hours from anywhere in Southern Europe. I flew from LEBL - Barcelona which is exactly 2h flying time (okay 2h - 1m give or take a minute), Frankfurt is 3h - 21m which is a bit outside the two hour rule but still doable. The distance from Casablanca (Port) to the Mohammed V International Airport is about 25km directly south, or about 30min driving time. I will note in these views I am using the SFD (ShortFinal) local autogen to give the area a local flavour... Mohammed V International Airport مطار محمد الخامس الدولي ⴰⵣⴰⴳⵯⵣ ⴰⴳⵔⵖⵍⴰⵏ ⵎⵓⵃⵎⵎⴷ ⵡⵙ5 Aéroport international Mohammed V IATA: CMN - ICAO: GMMN 17L/35R - 3,720m (12,205ft) Asphalt 17R/35L - 3,720m (12,205ft) Asphalt Elevation AMSL 656 ft / 200 m Both runways 17L/35R and 17R/35L are exceptionally long at both over 12,000ft in length, they are in a parallel western layout together with all the airport infrastructure situated all to the eastern side of the field. The main apron is one huge continuous apron set into zones of parking in B-C main inner Terminals, E outer remote, J Middle outer Remote, D Cargo inner remote. There is a separate area to the east far south that you could note as General Aviation with parking G (inner) and F (outer) and far south is another remote... remote stand parking. Terminals Both terminals one and two are fused together via an S shaped design, Terminal One is north and more modern and Terminal Two is south. Terminal One: There are four main airbridge stations, but in an odd arrangement of three gates per bay. The use here is for either a narrow body or a wide body aircraft, but it does make it complicated into finding your right parking line and airbridge. In most cases two narrow-bodies will fit into each bay. SAM - Scenery Animation Manager plugin is available with both Marshaller (Terminal One) and VDGS guidance (Terminal Two)... .... but SAM does have it's quirks at CMN? Again selection of the right gate (airbridge) to the type of aircraft is important. The MD88 is a low to the ground aircraft, so on one gate with the airbridge connected the airbridge was then set at a steep angle to the low door? Another (image above) on the far right line (or third) didn't connect to the airbridge? but the position would have been perfect to connect to the low MD88 door position? The correct position was actually the first line into each bay for the MD88... your choice to the aircraft? SAM airbridges are again very good with Attijariwafa Bank branding. Clutter is good, but not too much in overwhelming way, so a pass here... but only a few are custom branded and most clutter visible comes from the Laminar collection. Terminal modeling is okay... ish. Overall it is not bad as a design, but you are missing any real or realistic detail, glass is reflective but still looks bland. Biggest issue is that the photo ground ortho-photo textures as they are all very low-res and flat. So this makes all the modeling looked like it is all placed on to the top of the flat surface, of which of course it is? Carparks are the same, a flat washed out photo base with objects placed on top, that there is a lot of objects on the surface to at least fill out the scenery, trees are horrible... cardboard and flat looking they don't relate well to the light at all, again at least there is a lot of well placed fauna to cover over each others flaws. And yet in an overview the scenery does actually work, the trick is just don't look for the close intimate detail and at the different areas too closely. Control Tower The control tower is mid-field and set back behind trees... again close up the glass is boring and flat, so the tower comes out the same way... but it is detailed well. Tower view (T) is however set perfectly with great views of all approaches. Cargo The cargo hub is huge and well represented at Mohammed V... Royal Air Maroc Cargo, operating as RAM Cargo has a huge base here. Swift-air Cargo, DHL and UPS are also represented. Airport operators including EADS and Regional Air Maroc are both shown with custom buildings and with hangars to the south.... .... to the north is is the large Royal Air Maroc's base and it comes with twin maintenance facilities. One twin maintenance hangar is set on the main apron north, but behind is another large apron with another large maintenance area, there are some nicely placed static aircraft including a RAM Boeing 747 that is done very well. Note the army surplus holding yards for vehicles. Area Infrastructure To a point the feature that saves this scenery is the large placed infrastructure landside behind the airport. The infrastructure comes with tenant buildings, warehouses, factories and general buildings to make up a pretty good visual aspect of the airport. Note the nice fuel depot. ... a lot of the buildings are very basic and repeated, but a lot are also custom made to fit into the area, and on the whole it works very well. Far south General Aviation area is good, but a few static aircraft may have lifted the area a little... Surfaces Runaway and taxiway surfaces are good, not brilliant, but good, the detail is there and I like the tyre markings.... all markings and signage is excellent (although there was a taxiway in the scenery not on the Navigraph chart?) however the surfaces and markings are all a bit too new with no wear or tear, but overall it is not too bad. All surfaces are PBR (Physically Based Rendered) and have nice reflection details, wet and damp conditions are very good (does it actually rain in Morocco?), but there is no 3d field grass or flowers in creating a very flat airfield. Lighting I was genuinely surprised by the lighting at GMMN, as it is very good. Mainly it is because there are two hues in bright apron lighting airside and a copper lighting landside, but it is visually very effective. Approach (RAIL) and taxiway navigation lighting and signage is excellent, so you won't get lost here. All apron areas are well lit, but it is the landside... .... that stands out, mainly because I think the lighting hides the poor Lo-Res photo textures, but it does all look very realistic and pleasing to the eyes. Also helpfully is fact that the street lighting is done well into the landside areas and goes out a fair way from the terminals. Again very effective from the air when departing or arriving at GMN. Terminal glass is better at night as well, as there are lit images on the glass, not even close to good, but still better than the daytime blandness, the landside images though look like a car showroom? Summary GMMN - Casablanca - Mohammed V International Airport is the main port into Morocco and a great destination that is available within the two to three hours flying time from central or southern Europe. FlightSim Development Group (FSDG) have released a good payware airport with Aerosoft for X-Plane to cover this very exotic destination. Overall the airport is very good, with a lot of features and great detail going landside, but the word that keeps coming up here is "Workmanlike", good but so close to being excellent. The scenery is let down by the usual Aerosoft practise to use very Low-Resolution textures for the scenery's base, very zig-zag blocky, washed out and no detail, the lo-res textures create a flat (boring) surface that shows up the placed above object elements, it could have been so much better with more detail, poor cardboard looking trees also don't help in the visual impact. Glass is flat (meaning bland) but better with images at night that don't help either, but still this Casablanca scenery does not give up without a fight to be good, because the (If complicated gate arrangements) SAM - Scenery Animation Manager plugin tool is excellent, and well done here. Overall I actually do like this GMMN - Casablanca, and yes I will use it and probably on a regular basis, because in the areas I want it does actually create a worthwhile Mohammed V International Airport. It works like a lot of Aerosoft sceneries do, you want them to be better and they can easily be in that aspect, but you use them anyway because they work for you well in another aspect... workmanlike, but still so close to being a very high-quality scenery. _____________________________________ Yes! Casablanca XP by Aerosoft/FSDG is available from the X-Plane.Org Store here : FSDG - Casablanca XP Price is US$25.95 Features: Accurate rendition of Casablanca Mohammed V International Airport, Morocco (GMMN) Includes new ground layout Superb quality and performance Animated jetways and marshallers (with SAM plugin) Animated ground traffic Routes and positions for AI traffic and static aircraft included Manual included WT3: WorldTraffic GroundRoutes are not provided and a generation is required, and overall the airport generation functions perfectly. Requirements: X-Plane 11 Windows or Mac (not compatible with Linux) 4Gb VRAM Minimum - 8Gb+ VRAM Recommended Current and Review version: 1.0 (April 9th 2020) Download Size: 1.3 GB Installation Download scenery file size is with the full installation installed in your custom scenery folder with a (Windows Installer) Mac is zip FSDG-Casablanca_XP Total scenery installation is 1.3Gb SAM Plugin - Scenery Animation Manager - Suite 1.0 is required for this scenery Documents One extensive manual in English with notes (6 pages) but no charts Manual_FSDG-Casablanca_XP.pdf _____________________________________________________________________ Scenery Review by Stephen Dutton 29th April 2020 Copyright©2020 : X-Plane Reviews (Disclaimer. All images and text in this review are the work and property of X-PlaneReviews, no sharing or copy of the content is allowed without consent from the author as per copyright conditions)
-
Many developers put the main aircraft files in a folder, but then deliver it in another folder (usually with extras or manuals or whatever) but you need the only the main .acf folder in X-Plane (aircraft) unless it can't see it. I have done this in the Mac File so it shows the folder arrangement, Aircraft/Boeing777 Extended/Files
-
To little information to help you? the package has to be installed in the X-Plane aircraft folder? If so then check it is not in a double folder
-
Messages are at the top in the envelope icon? Yes try an reinstall, but there is something not right with that Cardiff scenery, I would either do a redownload, or send them your weird copy? My guess is that the earth data is wrong, I don't have the Orbx Cardiff scenery so I can't check for you.
-
Ah Timezones... fine, maybe better to use the messages than clog up the comments section? Sleep tight....
-
That is a all very weird setup? There seems to be a conflict with the Orbx scenery Cardiff? Failed to open Custom Scenery/Orbx_EGFF_A_Cardiff/opensceneryx/placeholder.obj: the file cannot be opened. 0:00:27.869 E/SCN: Custom Scenery/LFBS_Justsim_v1.0/Earth nav data/+40+000/+47+007.dsf: 0:00:27.869 E/SCN: Unable to load object file: Custom Scenery/Orbx_EGFF_A_Cardiff/opensceneryx/placeholder.obj Why are they conflicting as the are in totally different loading regions?, pull out Cardiff and try to see if LFBS load fine, EGFF requires (opensceneryx), but a payware scenery should not require OpensceneryX as it is a freeware object... it is all very weird? Cardiff looks very buggy, and yes the Orbx objects may need to be updated. You need to fix Cardiff (or redownload) before fixing LFBS (JustSim's scenery really never crash?).
-
Then send me that log.txt?
-
The warning is not in the log.txt? you have to start from LFSB or at least load it to get the warning... I think you started at LOWW_Wien? wrong airport?
-
You need to do as the warning says... Go to your X-Plane Log.txt and see what the problem is and fix it, odd though because JustSim's scenery rarely uses external library objects? This is NOT Orbx scenery... so does not use Orbx objects, check the log.txt?
-
Aircraft Update : Epic Victory v2.0 by Aerobask
Stephen replied to Stephen's topic in General Aviation Aircraft Reviews
Aerobask tries to replicate the system in the real aircraft, so it may not look like a G1000 but the system actually is, no you are not going to get a full G1000 set up in the Victory, but try to use the system provided? I do admit the Victory is due for an an update as this release is 2016, so your prayers my be answered anyway... -
Aircraft Review : Avro Vulcan B Mk.2, K.2 and MRR by JustFlight The Avro Vulcan (officially Hawker Siddeley Vulcan from July 1963), is a four-engined jet-powered delta wing strategic bomber, which was operated by the Royal Air Force (RAF) from 1956 until 1984. The Vulcan B.1 was first delivered to the RAF in 1956; deliveries of the improved Vulcan B.2 started in 1960. The B.2 featured more powerful engines, a larger wing, an improved electrical system and electronic countermeasures (ECM); many were modified to accept the Blue Steel missile. As a part of the V-force, the Vulcan was the backbone of the United Kingdom’s airborne nuclear deterrent during much of the Cold War. Although the Vulcan was typically armed with nuclear weapons, it was capable of conventional bombing missions, a capability which was used in Operation Black Buck during the Falklands War between the United Kingdom and Argentina in 1982. Aircraft manufacturer A.V. Roe and Company (Avro) designed the Vulcan in response to Specification B.35/46. Of the three V bombers produced, the Vulcan was considered the most technically advanced and hence the riskiest option. Several reduced-scale aircraft, designated the Avro 707, were produced to test and refine the delta wing design principles. The other V Bombers were the Vickers Valiant and the Handley Page Victor. The aircraft produced here also includes Avro Vulcan B Mk2 modeled on XH558 "The Spirit of Great Britain". Which is the last flying Vulcan that is flown by the Vulcan to the Sky Trust and the aircraft XH558 and is currently based at EGCN - Doncaster/Sheffield of which X-PlaneReviews covered in a review just earlier this year. The project here is a collaboration between JustFlight and Thranda Design, JustFlight with the initial modeling and design, and Thranda with the excellent X-Plane conversion, sounds, flight dynamics and systems. This is not the First Avro Vulcan however for X-Plane, there is an old FlightSim version that was converted to X-Plane and released as freeware back in 2014; Freeware Release : Avro Vulcan BMk2 by Daniel G and for the time period this Vulcan version was pretty good, but In reality you can't compare that aircraft to this ground up built X-Plane version, certainly not in the high detail. There are three variants of the Vulkan covered here, in the Mk.2, K.2 and the MRR Mk.2 Standard Vulcan in Mk.2 guise. K.2: Six B.2s were converted for air-to-air refuelling with the Mark 17 Hose Drum Unit (HDU) mounted semi-recessed in tail cone. The TFR was deleted. The Three tanks are positioned in the bomb bay giving the K.2 a fuel capacity of almost 100,000 lb (45,000 kg). The six aircraft were converted to used as an aerial bridge to the Falkland Islands after the War, as the Victors had by that date had more limited capacity and airframe (old) limitations. MRR: Nine B.2s were converted to the Maritime Radar Reconnaissance role, these aircraft came with the underwing MRR - (sniffer) Pods for taking samples of the upper air for scientific analysis and nose blade aerials. There are also seven individual optional equipment choices (done from the livery/‘config.json’ file) that includes: Inflight Refueling probe, Both 201 and 301 Rolls Royce Olympus engines (201 - 17,000 lbf (76 kN) thrust) - (301 - 20,000 lbf (89 kN) thrust), TFR Dome (Terrain-Following Radar ), Modern Aerials, ECM (Electronic Counter-Measure) tail cone, K.2 Drum Kit and the MRR air sampling pods and nose blade aerials. Detail In this price range you do expect great modeling detail. In fact JustFlight set themselves a very high level with their excellent BAe Systems Hawk T1/A, and a supreme high-quality machine that was... But they have done just as well here also with the Vulcan Mk2. This is respectfully a far a harder aircraft to get detail into, because basically the Vulcan is all wing, and not much aircraft per se... ... that full wing shape also created inadvertently a large advantage in that it also had a very small radar signature, In being a cold-war bomber that is certainly a bonus in warfare and the start of the race to create very low radar signatures on most current designs, with the F-17 Nighthawk being the most extreme example. The JustFlight modeling team had full access to Vulcan M655 based at Wellesbourne Mountford and is the default livery of the series, and that intimate detail is certainly shown here, but the aircraft noted is in it's current restoration state, and that is good in creating the right feel we would want from these old cold-war birds. So note the worn window surrounds and tired glass, this is not a new aircraft but a very authentic reproduction of XH588. It is all very well done. Gear detail is the same in aged, slightly corroded, but highly realistic. Internal wheel wells are filled out with great detail, so nothing is hidden here or missed. Complex, but original... the gear construction is first rate (so are the animations) with all struts and supports well modeled, and note the huge wheel well box sizes. That wing leading edge is complex with a big C from a modellers perspective. So it is very easy to take the easy way out and just do the straight wing, but here it is all the complex curves interacting with each other and the work is extremely well done. Wingtips are really art in the way they are created with such smoothness... impressive. Lovely bulbous tailcone is really again well modeled, note the engine exhausts that are neatly set into the wing, small details abound to again create that authentic feel, the Olympus engines are buried within the wings, sadly, but their internal shapes are well seen... .... again the tired worn glass of XH588 is seen on the tail, but this is a beautifully rendered tail, lots of shape and highly realistic. So the modelling overall is excellent and a great representation of this great old (cold) warbird. Note if the power is selected off and the parking brake is on then the Vulcan displays the static elements. They include engine inlet and exhaust covers, chocks, flags and the two pilots disappear in the cockpit (hard to see). Menu The JustFlight menu is to the left of the screen, the arrow tab can be hidden via a scrolling your mouse over the tab. There are 18 selections including the 2D pop-up panels: Checklist, Flight computer, Payload menu, Alternator control panel Secondary supplies panel/AAPP control panel and Autopilot control panel. And button selections for: Toggle cold and dark, or engines running (WARNING - Also totally resets the flight), Air refuelling hose (K.2 variant only), Pilot’s helmet sun visor, RAT deployment, (show/hide) ground equipment, (show/hide) control sticks, Deploy drag parachute, Instrument reflections, Window reflections, Show/hide the co-pilot, (open/close) Bomb bay doors and (open/close) Crew access door Checklist, Flight computer: Here you have a 16 page checklist that covers most aspects of starting up and shutting down the Vulcan. Second is a Flight Computer display that covers: Outside air temperature (OAT) – Celsius and Fahrenheit, Groundspeed (GS) – nautical miles per hour, statute miles per hour and kilometres per hour, Endurance – hours and minutes, Range – nautical miles, statute miles, kilometres, Nautical miles per gallon and statute miles per gallon, Density altitude and pressure altitude (feet), True airspeed (knots), track (degrees) and drift (degrees), Fuel flow – gallons and litres, Fuel used – total fuel burn (gallons), Crosswind component (knots), Headwind/tailwind component (knots) and the total fuel burn can be reset by clicking on the lower RESET FUEL BURN button. Payload menu: Next is an excellent Payload menu for easily setting up the aircraft of what type or combination of weapons and equipment you require for the mission. It is extremely easy to use (the menu looks nice as well) you can set your loads to match your mission. Choices are: Blue Steel... The Avro Blue Steel was a British air-launched, rocket-propelled nuclear armed standoff missile, it was built to arm the V bomber force. It allowed the bomber to launch the missile against its target while still outside the range of surface-to-air missiles (SAMs). The missile proceeded to the target at speeds up to Mach 3, and would trigger within 100 m of the pre-defined target point, it was a forerunner of the current Cruise Missiles. MK13 bombs: Three racks of Mk13 bombs. The Mark 13 is a nuclear bomb and its variant, the W-13 nuclear warhead. Mark 13 design used a 92-point nuclear implosion system (see Nuclear weapon design). It is a similar 92-point system was used in later variants of the Mark 6 weapon and the Mark 13 nuclear bomb design was tested at least once, in the Operation Upshot–Knothole Harry test shot conducted on May 19, 1953. The estimated yield of this test was 32 kilotons. WE.-177: The WE.177, originally styled as WE 177, and sometimes simply as WE177, was a series of tactical and strategic nuclear weapons equipping the Royal Navy (RN) and the Royal Air Force (RAF). WE.177A weighed 272 kilograms (600 lb), and had a variable yield of 10 kt (42 TJ) or 0.5 kt (2 TJ) and WE.177B weighed 457 kilograms (1,008 lb), with a fixed yield of 450 kt (1900 TJ). Both WE.177 A/B were flown on the Vulcan. With the JustFlight Vulcan you get two WE.177 nuclear bombs to play with. MRR-PODS: As seen in the MRR version above. The K.2 or MRR version is required for this option. Saddle Tanks and Cylinder Fuel Tanks: There are two 5,000 lbs of fuel Saddle Tanks available, these compare to the 8,000 lbs Cylinder Tanks used for refueling, but both sets can be carried. Other visual Menu items include: Alternator control panel Secondary supplies panel/AAPP control panel and Autopilot control panel. The alternator control panel features the following controls and indicators: Voltmeter and frequency meter for the selected incoming alternator. RAT and AAPP test push-buttons, used to obtain the readings for these supplies on the meters. Alternator selector switch, incorporating a push-button to facilitate synchronisation of alternators. Use the mouse scroll wheel to rotate it and left-click to push in on the centre push-button. EXTRA SUPPLIES TRIP push-button, used to trip any extra supply (RAT, AAPP, 200-volt ground supply) from the synchronising busbar. Mimic diagram of the 200-volt system. The diagram incorporates a voltmeter and a frequency meter to show supplies at the synchronising busbar, magnetic indicators which show continuity when an S breaker is closed and amber lights to show when an alternator is not connected to its own busbar. Magnetic indicators for the RAT and AAPP show continuity when they are connected to the synchronising busbar. Centrally positioned red alternator failure warning light (duplicated on the centre instrument panel) which illuminates steadily if one alternator fails and flashes if two or more fail. AAPP ON push-button. Beside each S breaker indicator is an alternator ISOLATE button. Beside each amber light is an alternator RESET button. NON-ESSENTIAL SUPPLIES TRIP/RESET switch, spring-loaded to the central (guarded) position. This switch can be used to trip non-essential supplies without releasing the RAT and to reset non-essential supplies once power has been restored. Left-click the switch to move it up to TRIP; right-click to move it down to RESET. Four KW/KVAR meters, one for each alternator; normally read KW with a centrally positioned button labelled PUSH FOR KVAR to read KVAR. Four ON/OFF switches, one for each alternator. The AAPP - Airborne Auxiliary Power Plant consists of a gas turbine driving a 40 KVA alternator in a bay aft of the starboard wheel bay. It can provide a 200-volt supply for use in emergency or for use on the ground when an external power unit is not available. On the ground it can provide bleed air to the cabin conditioning and air-ventilated suits. A Mk.10 autopilot is installed as part of the Military Flight System. The autopilot uses 115-volt AC and 28-volt DC. Power to the autopilot is controlled by a switch on the right console. It is a relatively basic autopilot, but missing on this panel are the direction controls in lateral direction and pitch. RAT deployment: The Vulcan is fitted with a Ram Air Turbine (RAT) under the left wing, that will drop down to give the aircraft power. Refueling Hose and Drag Parachute: Both the Refueling hose (K.2 Version required) and the drag parachute can be applied from the menu, both items are far more easier to activate than trying to find the switches in the cockpit. Ground Equipment:The Houchin ground power unit (GPU) can be used to provide electrical 28-volt ground supply power to the aircraft whilst on the ground. The GPU is parked underneath the port wing and is plugged into the aircraft just aft of the bomb bay. Also there is a Palouste compressor which is used to provide compressed air to the engine air starter motors, facilitating engine start whilst on the ground. The Palouste is parked underneath the starboard wing and the air supply hose is connected to the aircraft just aft of the starboard landing gear. Bomb bay doors and Crew access door: Both the Bomb Bay Doors and the forward Crew access (Hatch) Door can be operated from the menu. There are a few other menu items but we will look at them whist in the cockpit. _________________________ Cockpit The underbelly hatch is the access up to the cockpit... .... it is quite a climb all the way up there, or a long fall way back down if you slip! It is quite dark and foreboding in here, but eventually you see the twin huge Martin-Baker ejection seats. In the prototype they wanted an escape pod, a la the F-111, but that was seen as too costly and too heavy. Only the cockpit is modeled? The rear crew area is not in here, and so you are missing the other rear facing ejection seats and the pull-down 5th crew member seat, There are five member Vulcan crews including; Pilot, Co-Pilot, AEO - Air Electronics Officer, Navigator Radar and Navigator Plotter, and their rear area installed and their stations would have certainly added in a another dimension to the aircraft. But finally you are up here and into the cockpit... .... and how impossibly small it all is, on how everything is crammed into this small space and it is simply an ergonomic nightmare! But you have to admit is is a reproduction marvel, you can almost smell the musty tired leather of an old aircraft, lovely reflections come off the authentic gauges (did I mention the access to XH558, well that aspect is certainly on show here). One of the most interesting aspects is that once you have manoeuvred yourself into your seat, you can then pull back (pull up) the centre console with the fuel and autopilot panels attached by the rear handle. If we are in need to see anything inside this cockpit then we will need the power connected and switched on... Instrument Panels Obviously there will be a need to study the instrument layouts on the Vulcan Mk 2. JustFlight (thankfully) provide a very comprehensive manual, listing all the instruments and systems, so it is well worth your time in studying the manual and all the related details to the aircraft. Systems like Fuel, Electrical and Hydraulics are simplistic in a complicated layout, if you sort of know what I mean... so there is a need to work them out and of which button does what... this Vulcan is not your common Boeing 737, and throw in a military layout known as the MFS (Military Flight System) as well and so there is a lot to learn. Pilots main Flying instruments are quite standard, Centre line has the excellent Artificial Horizon (Director Horizon) centre, Beam Compass (heading) below and a Mach meter above. Left instruments are Speed (kts) and Altitude. Right instruments are Radio Altitude, VSI - Vertical Speed Indicator and lower a standby Artificial Horizon and slip indicator. Co-Pilot right hand side has the same MFS layout but with some additional instruments... these include (left) a ADF indicator, (right) a Fuel Flow Indicator, Total Fuel Flow (with reset switch) and Oxygen Flow Indicator. Middle panel is for the four engine instruments, which have that lovely post-war clockwork dial system. Non-Engine related instruments include: Accelerometer (G-meter - top left), Control surfaces position indicator (centre) and TACAN indicator (shows bearing to NAV 1 VOR). Note the MFS selector Panel (top right). This navigational selector has five positions: BOMB – non-functional REMOTE – the heading information is controlled by the default GPS Central (normal) – all heading indications by the heading pointer are magnetic LOC – ILS localiser beam or NAV 1 signals are fed into the system. The BEAM flag on the director horizon shows and the beam bar on the beam compasses indicates the aircraft position relative to the beam. GP – both localiser and glidepath signals are fed into the system. Both the BEAM and the GP flag show on the director horizons and the glidepath pointer moves relative to the centre dot to show the relative position of the glidepath to the aircraft. Top panel is: RAT release handle and the Engine fire warning lights and extinguisher buttons... below are the four main fuel cocks. Under are twelve warning indicator lights and doors (Canopy, Bomb and Entrance) unlocked warnings. Fuel in the Vulcan is carried in fourteen pressurised tanks, five in each wing and four in the fuselage, above and to the rear of the nose-wheel bay. The tanks are divided into four groups, each group normally feeding its own engine. A cross- feed system enables the various groups to be interconnected. Automatic fuel proportioning is normally used to control the fuel CG position. The Fuel contents gauges, one for each tank group, are situated on a panel forward of the throttle levers. The fuel switchgear is set just below on the retractable centre console, Cross-feed cocks and indicators are usable. The Bomb Bay Auxiliary tanks are controlled via a panel below the main Fuel Panel, and remember these tanks are also used in the air-to-air refueling system, so they have twin uses. Lower is the Autopilot Panel (Pop-up available via the Menu)... ... but these AP switches are used in conjunction with the actual direction controls in lateral direction and pitch that are situated directly under the throttles on the retractable console. Throttle Quadrant The four throttle levers are a work of art, as is the whole quadrant... note the built in engine relight buttons that actually work. To shutdown the Olympus engines the levers are pulled out and then pulled down to the shut-off position.... ... lower is the Airbrake selector switch, note the missing flap lever, as the delta wing does not require such flying surfaces. The really nice Control Sticks have four switches; Nose-wheel steering engage button, Elevator and aileron feel relief switch, Aileron and elevator trim switch and a Press-to-transmit switch, both Control Sticks disappear together either by selection or by the menu. Pilot's left side panels consist of (right to left): Oxygen Regulator, Radio altimeter controller, Store safety-lock and warning lights, Bomb doors control, RT2 tone switch, ILS/TACAN/ADF audio switch and TFR controller.... ... Audio warning isolation and audio warning test button, RT1 tone switch, V/UHF radio and the engine start buttons with Rapid start, Normal start selector, ignition switch, Air cross-feed indicator, Start master switch and finally the air-ventilated suits temperature controls. Lower panel are switches for; PFC and artificial feel start buttons (x3), Yaw Damper, PFC stop buttons, Mach Trimmer and Artificial feel warning and lock switches. On the Co-Pilot's right side (left to right): Oxygen Regulator, Temperature switches for Cabin, Cabin Control, Cold air unit, Ram air, Ram air Valve, AAPP air bleed, Cabin AAPP indicator, Abandon aircraft switch and Air-to-Air refueling panel... .... far right is the Anti-icing temperature gauges and Engine anti-icing switches. Lower panel are the pitot and external lighting switches - Lighting Master switch, Identification/Morse switch, Landing/Taxi Lights and Navigation Steady/Flash switch. As there is no rear compartment with an engineers station, the Electrical Panels are both pop-up: Noted both as ACP (Alternator Control Panel) and A.A.P.P. (Airborne Auxiliary Power Plant) which is an onboard Auxiliary Power Unit or APU. The lower section of the AAPP is a "Secondary Supplies Panel" or a continuation of the main electrical board. Other cockpit notes include... The Co-Pilot's station box (Radio) is right lower panel, and you have two very nice E2B compasses on each central window frame. The Wiper controls are hard to find, but they are high each side of the main instrument panel and are speed reversed, in faster first then slower in the third bottom position. Left switch is Pilot and central window, Right switch is Co-Pilot only. You have to remove the Martin Baker ejector seat pins before any flight (and yes the ejector seats actually work, so don't pull the handle?) The pins are positioned high on the side of the seats, and when selected they move to the side of each pilot on to the "Safety Pin Stowages" hooks panel. One option you don't have on a commercial airliner are "Flash Shields" or Nuclear FLASH shields. These are two sets of blinds set above the pilots and each can be separately pulled down to cover over the large circular side windows to provide protection from nuclear weapon flashes and radiation... .... the outer metallic one is still semi-visible, but the inner (heavy one) completely covers and blacks out the window, very handy to have when you need it. Flying the Vulcan Mk.2 It is known as the "Vulcan howl" which is a distinctive sound made by the engines are at approximately 90 percent power, due to the arrangement of the air intakes. It is a misconception is the fact that although the Vulcan shares the same name as the Concorde Olympus engines the versions are quite different, here we have the Olympus 301 were as the Concorde has the Olympus 593 with afterburner (or reheat), the only commonality is the two-spool axial-flow turbojet core... but it is known that the Olympus 593 did fly on a Vulcan airframe as a test bed for the engine (but not actually for Concorde but for the abandoned TR.2 Fighter). You get that lovely familiar whine as you sit ready to go, strangely there is not a lot of settings to set, no flap position, speed selection or altitude. But there is a lot of selection of switches to set like the ENGINE AIR and CABIN AIR switches, which you tend to change quite frequently... all selections are covered in the tutorial part of the provided manual. The Vulcan is quite a powerful aircraft (for the period). So depending on your mission weight it will taxi quite easily. Being in the cockpit though is bit like trying to fly from inside a post box and looking through the slot? It is dark in here and tight, it feels far more tighter than a fighter which will have that open glass canopy around you, but in here you do feel restricted as most Vulcan pilot's note... try this with a flying helmet on as well and then hope you are not the screaming claustrophobic personality type. The Beam Compass (heading) needs to be set... pull the knob (arrowed) out to turn the outer heading ring to your current heading. (note this ring will not turn as the aircraft changes direction, so you fly to the heading on the ring), push the knob in again to set the autopilot heading pointer. It takes some getting used to if you fly modern aircraft. You can move/hide the lovely armrests as they get in the way of the side panels, then check if there is oxygen flow... The VOR radio is on the left panel, you set it via the knobs and a very modern looking frequency, that disappears quickly. Time to fly, but the Vulcan is a past era dirty mongrel. The aircraft will gain speed very quickly and even with a heavy fuel and weapon load, rotate is around 155 kts at a pitch of 45º angle which can be maintained all the way up to the flight level.... .... and you really feel the huge lift from this flying wing, it will lift off anyway but you need to keep in control via holding the stick forward. Pitch is extremely pivotal, it is like the you are balancing the aircraft directly in the center with a very light nose and tail.... so you need to control the pitch movements with very small inputs and with smooth pitch changes, a few flights and you are usually ready next time, but it doesn't get any easier. Gear animations are excellent and cleaning up the underbody airflow helps with the handling and noise factors. The aircraft is surprisingly very nice under manual control, setting the trim is required, but it can upset the autopilot (AP) when switched on, so you have a choice... trim and fly manually or leave the trim alone if you are going straight to the autopilot. You can set the Autopilot ready via the switch on the Co-Pilot console and then pulling out the "power" switch on the AP panel, the white light comes on to show you the AP is active and ready. Level off and then "ENGAGE" then select TRACK to follow the set heading. You can select climb via IAS or hold the ALT (recommended). The forward panel then controls your lateral direction and pitch directions, remember this is a very basic 2-Axis system. The lower AP control are out of sight and too a point out of reach, it would have been nice to have had them on the pop-up panel with the rest of the AP controls, press the centre of the knob to lock in the trim... up or down is in 1000 fpm selections which are big movements in pitch. Specifications are impressive... Cruising speed is Mach 0.86 indicated and Max is Mach 0.93 (301 Engines), to note the early straight wing Mk 1 version was faster at Mach 0.95 indicated. Ceiling is 45,000 to 56,000 ft (14,000 to 17,000 m) which is high, but this is a nuclear bomber... Range is 1,500 nautical miles (1,700 mi; 2,800 km), but you do have the extra tankage available and that extends the range out to 4,603 mi (4,000 nmi / 7,408 km) or allow you to stay on station for hours. Getting up to 45,000ft is the easy part, then you have to come down again.... and it is a long way down without a decent Vertical Speed tool... ... helpful are the twin upper and single lower (originally double both upper and lower) airbrakes which are highly effective. Do you cheat by using a moving map to locate your position or try to do it the authentic navigation way, remember these aircraft had a dedicated Navigation Crew Member to do just that specific job. 3,000ft approach and the lights of EGCN - Doncaster are in the postbox slot... eh windows. Approach speed is around 170 kts but there is the known factor of a Pre-Stall buffet between 160 kts to 180 kts and that requires more rudder input in turns, but you still have to keep that tight, and remember the huge amount of lift this aircraft's wing can generate and with that also comes the huge ground effect reflection as you get down closer to the runway. Slowly you reduce your speed to around 150 knts over the threshold, but it is a fine line between going too fast and stalling... Vulcan's don't naturally stall in the slight nose up position, the ground effect gets too strong and they tend to seriously wobble on the large cushion of air then simply fall out of the sky as noted in a few Vulcan accidents, but touch down is around 140 kts. RAF Finningley (at EGCN-Doncaster) has a long 2,893m (9,491ft) runways as did all nuclear bomber airports, it is required as even at 140 kts as you fight the aircraft to slow it down. The manually operated airbrakes do help, but even then the parachute is still required to run off the excess speed. Overall the Vulcan is a terribly interesting aircraft to fly, and in many way quite different from your average commercial airliner... you must approach the Vulcan this way and expect time to understand and even plan each mission when you fly the aircraft, it will take time and study but in that aspect the Vulcan really delivers, it is certainly not a jump in and do a circuit sort of aircraft... it is a full mission aircraft with areas like said planned and be detailed ready from the start. Lighting UPDATED : this section of the review is updated to v1.1 that now includes large changes to the Vulcan's internal lighting. Before the Internal lighting was quite simple, one switch to light up the instrument panel and the side panels.... In v1.1 the side lighting knobs which were static before now work... The four lighting knobs are now active (orange arrows), but so also now is the functional swivel lights between the knobs, the swivel light illumination is controlled by the lower knob (yellow arrow) The same panel light knobs are on the Co-Pilot's side as well as is the same functional swivel light. Changed also is the main instrument panel lights which are now split for each side of the panel, the Co-Pilot's panel switch is on the panel far right (arrowed). The rotating knobs now give you two options, the original WHITE lighting or the very Cold War RED hue, it is very realistic... .... Main panels (separate) both side panels and the centre console are all fully adjustable individually, just like with the white hue. The functional swivel lights are very good as well, totally adjustable and not only for illumination, but also for compete axis movement... you can illuminate any part of the cockpit you desire.... .... turn the swivel light to light up the other side of the cockpit and it is highly effective, with almost daylight illumination. Externally there are options for ID Lights in STDY (Steady) and MORSE (Flashing) and Navigation lighting in ST/DY and FLASH. Three red beacons flash on the top of the aircraft or a steady in one single red beacon on the belly... navigation is wing and twin lower tail, strobes in the wings, in reality you don't want your nuclear bomber light up like a fairground do you, so it is very good... .... twin Landing/Taxi lights are build into the end of each wing and they are both retractable and have also been updated with refined functionality in v1.1 Liveries The scale of the liveries is quite impressive at seventeen, but many a registration are doubled for both Mk.2 standard and K.2 Tanker or MRR. USA and KIwi (New Zealand) and White Flash white nuclear test aircraft XL361 and XL426 are all represented as is XL426 in it's usual Camo livery... XM655 is default. Operation Black Buck had seven operations... During the 1982 Falklands War, Operations Black Buck 1 to Black Buck 7 were a series of seven extremely long-range ground attack missions by Royal Air Force (RAF) Vulcan bombers of the RAF Waddington Wing, comprising aircraft from Nos. 44, 50 and 101 Squadrons against Argentine positions in the Falkland Islands, of which five missions completed attacks. The objective of the missions was to attack Port Stanley Airport and its associated defences. The raids, at almost 6,600 nautical miles (12,200 km) and 16 hours for the return journey, were the longest-ranged bombing raids in history at that time. The Operation Black Buck raids were staged from RAF Ascension Island, close to the Equator. The Vulcan was designed for medium-range missions in Europe and lacked the range to fly to the Falklands without refuelling several times. The RAF's tanker planes were mostly converted Handley Page Victor bombers with similar range, so they too had to be refuelled in the air. A total of eleven tankers were required for two Vulcans (one primary and one reserve), a daunting logistical effort as all aircraft had to use the same runway. The Vulcans carried either twenty-one 1,000-pound (450 kg) bombs internally or two or four Shrike anti-radar missiles externally. Of the five Black Buck raids flown to completion, three were against Stanley Airfield's runway and operational facilities, while the other two were anti-radar missions using Shrike missiles against a Westinghouse AN/TPS-43 long-range 3D radar in the Port Stanley area. Shrikes hit two of the less valuable and rapidly replaced secondary fire control radars, causing some casualties among the Argentine crews. One Vulcan was nearly lost when a fuel shortage forced it to land in Brazil. Black Buck 1- Port Stanley Airport runway 30 April–1 May - XM598 (Reeve)XM607 (Withers)Performed; primary aircraft cabin failed to pressurise shortly after takeoff, replaced by reserve Black Buck 2 - Port Stanley Airport runway 3–4 May - XM607 (Reeve) XM598 (Montgomery) Performed Black Buck 3 - Port Stanley Airport runway 13 May - XM607XM612 - Cancelled before takeoff due to weather conditions Black Buck 4 - Anti-aircraft radar 28 May - XM597 (McDougall) - XM598Cancelled 5 hours into flight, due to a fault in the Victor fleet Black Buck 5 - Anti-aircraft radar 31 May - XM597 (McDougall) - XM598 (Montgomery) Performed Black Buck 6 - Anti-aircraft radar3 June - XM597 (McDougall) - XM598 (Montgomery) Performed; primary aircraft forced to divert to Brazil due to a broken refuelling probe Black Buck 7 - Port Stanley Airport stores and aircraft 12 June - XM607 (Withers)- XM598 (Montgomery) Performed My personal experience was with Avro Vulcan XL391, that sat at Blackpool Airport for years. I saw the aircraft on a visit home, but by this time the bomber was not in a great condition. Vulcans maybe prepared for nuclear attacks, but Blackpool's corrosive sea air did a lot of more serious damage to the aircraft. One aspect is that you could get very close and even look internally and the engines were still installed, but the aircraft was certainly never going to flown again... it was scrapped quite ingloriously on the June 20th, 2013. Summary This is a reproduction of the Avro Vulcan Mk.2, that was a 60's Cold War Nuclear bomber from the United Kingdom. Based on the last fully operative version of the aircraft XH558 "The Spirit of Great Britain", this same aircraft was used to create a very realistic rendition of this classic airframe. The aircraft comes in three variants with the standard Mk.2, K.2 Air to Air refueling tanker and the MRR - Maritime Radar Reconnaissance role aircraft. Detail and modeling is hugely impressive, so are the complex post-war systems. And the Vulcan comes with a lot of choices and features including the choice of the different Mk.2, K.2 and MRR setups via the liveries (can also be set manually), the range also is impressive in the liveries provided for the Vulcan's different mission roles including nuclear bomb testing flash white. Extensive menu is very good as is the choices of weapons (mostly nuclear with Blue Streak) and different belly fuel tank options. Sounds include the famous "Vulcan Howl" and are very immersive and 180º dynamic with 3D audio effects, atmospheric and distance effects and adaptive Doppler. Instrument panel, side panels, throttle quadrant and retractable centre console in detail is overwhelming, but missing is the rear crew cabin with stations for the other three crew members and importantly parts of the aircraft electrical systems panel, they are provided here only on pop-up panels from the menu? Internal lighting was also impressively updated in v1.1 In some ways the Vulcan is very easy to fly in a manual mode, and this flying wing has a huge amount of lift, but the ergonomic post-war instruments and 2-way axis Autopilot do require a lot of study and practice, so to fly the Vulcan in a serious mission role does require a lot of skill and practise on the airframe, but you don't doubt the authenticity of the Vulcan package to the high calibre and serious simulator user. Overall brilliant, but for the serious fliers only. _______________________________ The Avro Vulcan B Mk.2, K.2 and MRR by JustFlight is now AVAILABLE at the X-Plane.Org Store: Also available from JustFlight Avro Vulcan B Mk.2, K.2 and MRR Priced at US$49.99 Features MODEL Accurately modelled Avro Vulcan B Mk2, K.2 and MRR built using real-world aircraft plans and comprehensive photography of the real aircraft (XM655) K.2 air-to-air refuelling variant with Hose Drum Unit (HDU) and animated hose Maritime Radar Reconnaissance (MRR) variant with air sampling pods and nose blade aerials Many detailed animations, including: - Crew door - Bomb bay doors (with realistic deployment speed) - Multi-position airbrakes (accurately linked to landing gear position) - Drogue and main brake-chutes - Deployable ram-air-turbine (RAT) - Variable-speed wipers - Tilting main landing gear - Flying controls (including elevons) - Animated pilots - Retractable taxi/landing lights (with realistic ‘blowback’ above 180 knots) A range of payload options, selectable via a custom 2D panel: - Blue Steel nuclear stand-off missile - 1,000lb bombs - WE.177 nuclear bomb - Saddle bomb bay tanks - Cylindrical bomb bay tanks Ability to configure external model options for each livery – refuelling probe, 201/301 engines, TFR dome, modern aerials and tail fin ECM, HDU, air sampling pods and aerials Olympus 201 and 301 engine nozzle types Ground equipment, including Houchin GPU and Palouste compressor for engine start, and engine covers and chocks 4096x4096 textures are used to produce the highest possible texture clarity PBR (Physically Based Rendering) materials with real-time environment reflections for superb quality and realism Detailed normal mapping for down-to-the-rivet precision of aircraft features COCKPIT A truly 3D virtual cockpit right down to accurately modelled ejection seats and screw heads - every instrument is constructed fully in high polygon 3D with smooth animations Cockpit textures feature wear and tear, with PBR effects, based on reference photos taken in the real aircraft to produce an authentic environment Interactive engine start checklist Checklists for every stage of flight Panel state system which will automatically save the panel state whenever a flight is saved and reload the panel state whenever that flight is loaded Aircraft configuration system that will allow you to choose between 'cold & dark' or 'ready for take-off' Realistic V/UHF radio unit – save and recall commonly used frequencies Fully functioning magnetic indicators, warning lights and push-to-test buttons Numerous interactive animated blinds and visors Realistic flight instruments, including direction horizon, beam compass, control surface and CG indicators Option to activate flashlight from within pop-up window, to aid in those pitch-black cold and dark starts at night Option to remove window and instrument reflection effects All knob, switch and button animations routed through plugin logic, for optimum movement fidelity and sound synchronisation No detail is too small – even the option to switch between day and night modes on the landing gear indicator is included! AIRCRAFT SYSTEMS Numerous custom-coded systems: - Fuel system – fuel tank groups, transfer and cross-feed - Electrical system – alternators, Airbourne Auxiliary Power Plant (AAPP), Ram Air Turbine (RAT), synchroniser busbar and 2D AEO panels for controlling the AAPP, RAT and secondary supplies - Flying controls system – Powered Flying Controls (PFCs), Mach trimmer and auto-stabilisers - Engine start system – Rapid or normal engine starting, cross-bleed and Palouste external air supplies - Hydraulic system, including the electrically-operated hydraulic power pack unit (EHPP) - Oxygen system, including oxygen regulator system with realistic consumption based on altitude – watch the oxygen quantity drop with usage - Air conditioning system – cabin pressurisation and air conditioning, emergency depressurisation controls - Thermal anti-icing system, including airframe and engine anti-icing - Autopilot, including pitch and bank hold Airbrakes, bomb doors and brake-chute can be operated using standard control assignments for ease of use OTHER FEATURES Realistic and accurate flight dynamics based on real world performance and handling data Authentic sound set, generated using X-Plane's state-of-the-art FMOD sound system, including the distinctive Olympus 301 howl! Custom sounds for bomb doors, airbrakes, entrance door, switches, wipers and more, featuring accurate location placement of sounds in the stereo spectrum, 3D audio effects, atmospheric and distance effects, adaptive Doppler, exterior sounds spill in when the crew door is open, different sound characteristics depending on viewing angle etc. Dedicated pop-up window for sound mixing, allowing for individual adjustment of the volume of exterior sounds, in-cockpit sounds and various effects Comprehensive manual with panel guide and performance data PSD Paint Kit included so you can create your own paint schemes Interactive logbook panel for logging your flight details (X-Plane native) Custom external light logic with custom strobe light pattern and custom light halos for added realism Requirements X-Plane 11 CPU: Intel Core i5 6600K at 3.5GHz or faster 8GB RAM or more DirectX 12-capable graphics card from nVidia, AMD or Intel with at least 4GB VRAM (GeForce GTX 1070 or better or similar from AMD) Windows 10 / 7 / Vista / XP, MAC OS 10.10 (or higher) or Linux 2GB hard drive space Current and Review version: v1.1 (April 29th 2020) Installation and documents: Download for the Avro Vulcan B Mk.2 is 2.3Gb and the unzipped file is deposited in the aircraft "Fighters" X-Plane Aircraft folder at 2.37Gb. optional equipment choices can be done from the livery/‘config.json’ file. Librain (rain effects) plugin is required, get it here and install in your plugins folder: Click Here Documentation: Documentation consists of a 89 page overview and tutorial for the Vulcan Bomber, details available cover most areas including the complex systems. EULAstandardcommercialandacademic2019.pdf Avro Vulcan B Mk2 X-Plane manual.pdf ________________________________ Review by Stephen Dutton 29th April 2020 (updated) Copyright©2020 : X-Plane Reviews (Disclaimer. All images and text in this preview are the work and property of X-PlaneReviews, no sharing or copy of the content is allowed without consent from the author as per copyright conditions) Review System Specifications: Computer System: Windows - Intel Core i7 6700K CPU 4.00GHz / 64bit - 32 Gb single 1067 Mhz DDR4 2133 - ASUS GeForce GTX 1080 8Gb - Samsung Evo 1TB SSD Software: - Windows 10 - X-Plane 11.41 - tested v11.50.b4 (fine) Addons: Saitek x56 Rhino Pro system Joystick and Throttle : Sound - Bose Soundlink Mini Plugins: Traffic Global (Just Flight) US$52.99 Scenery or Aircraft - EGCN - Doncaster Sheffield by FlyX (X-Plane.OrgStore) US$17.99