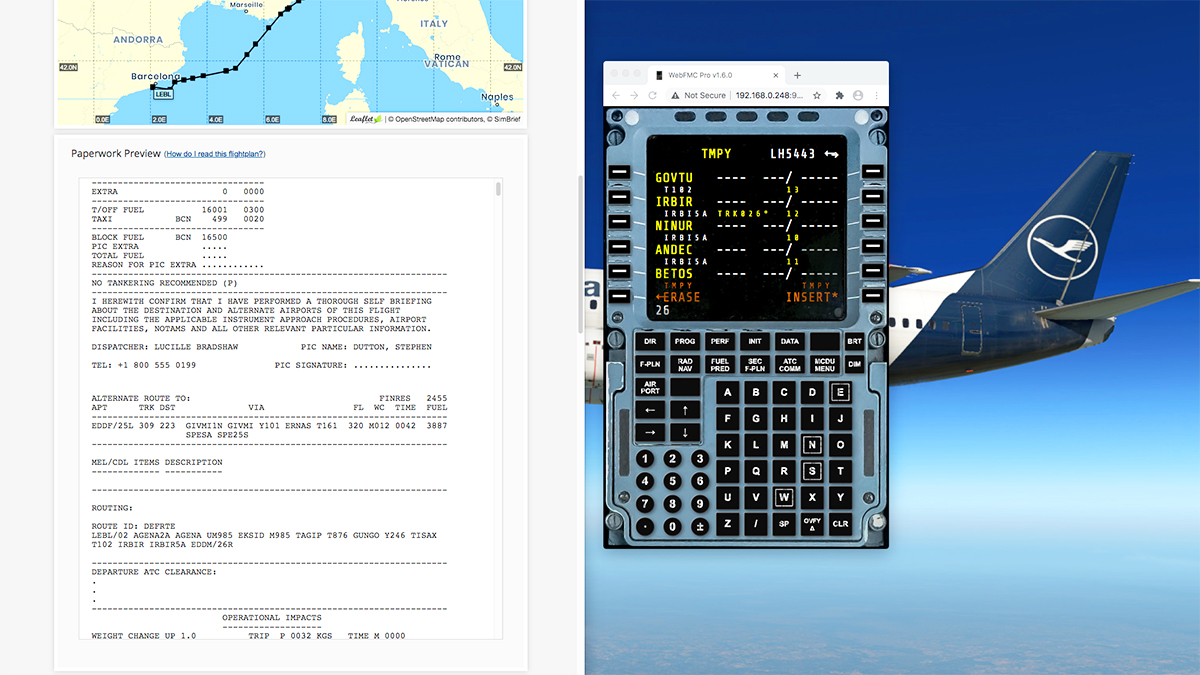
Stephen
-
Posts
2733 -
Joined
-
Last visited
-
Days Won
354
Content Type
Profiles
Forums
Articles
Everything posted by Stephen
-
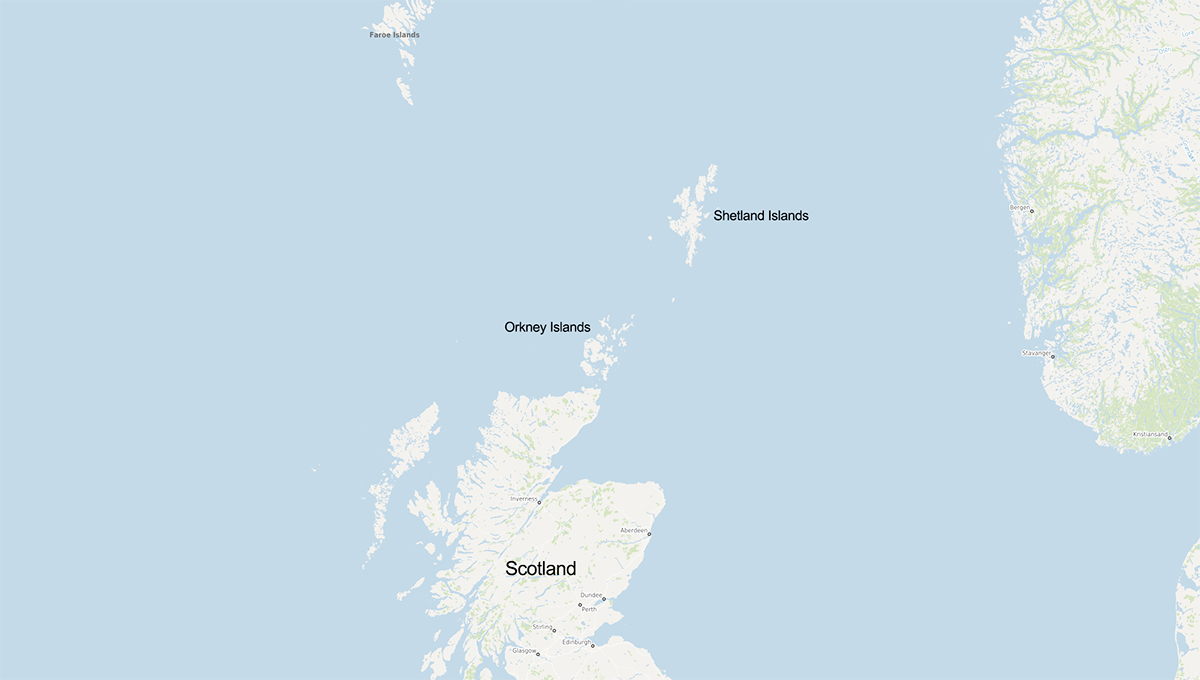
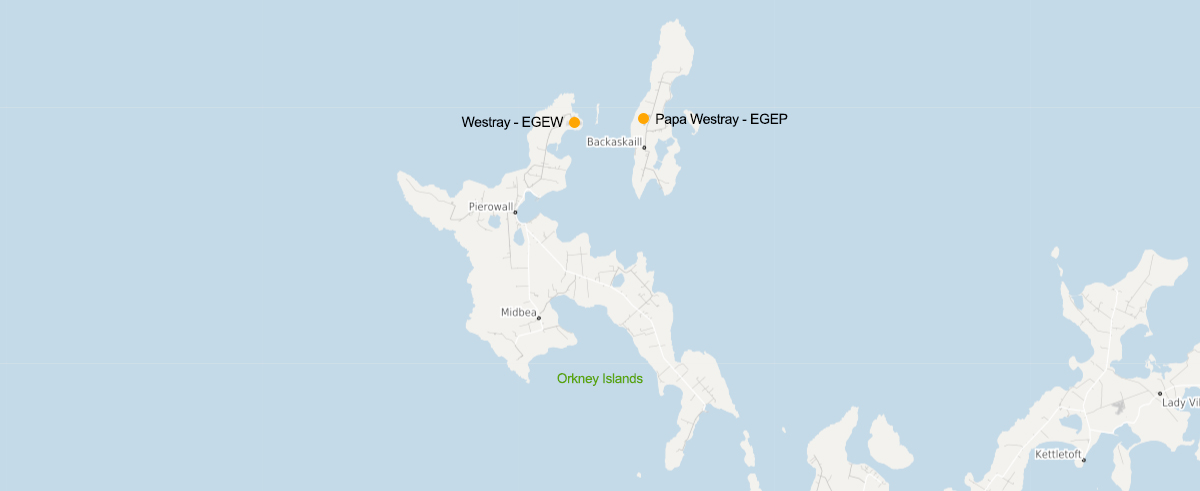
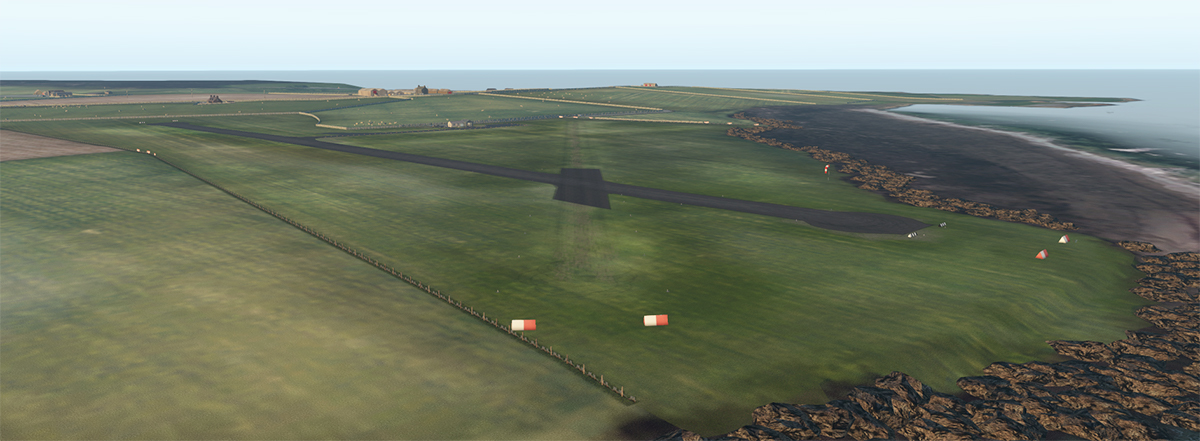
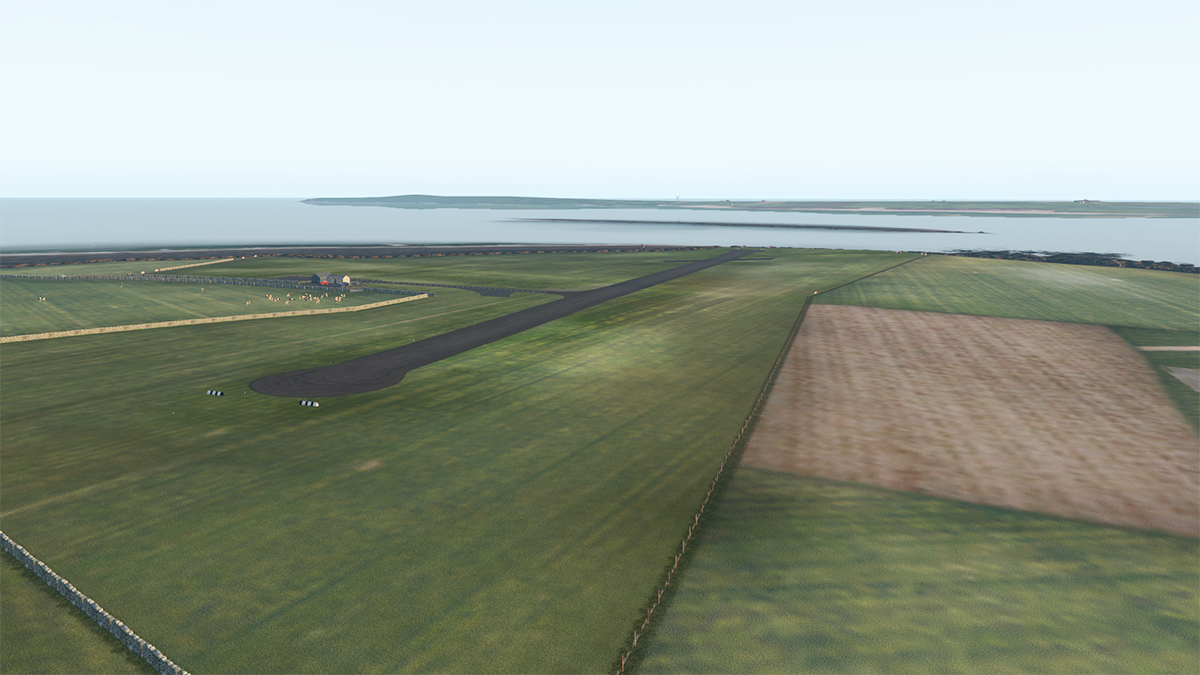
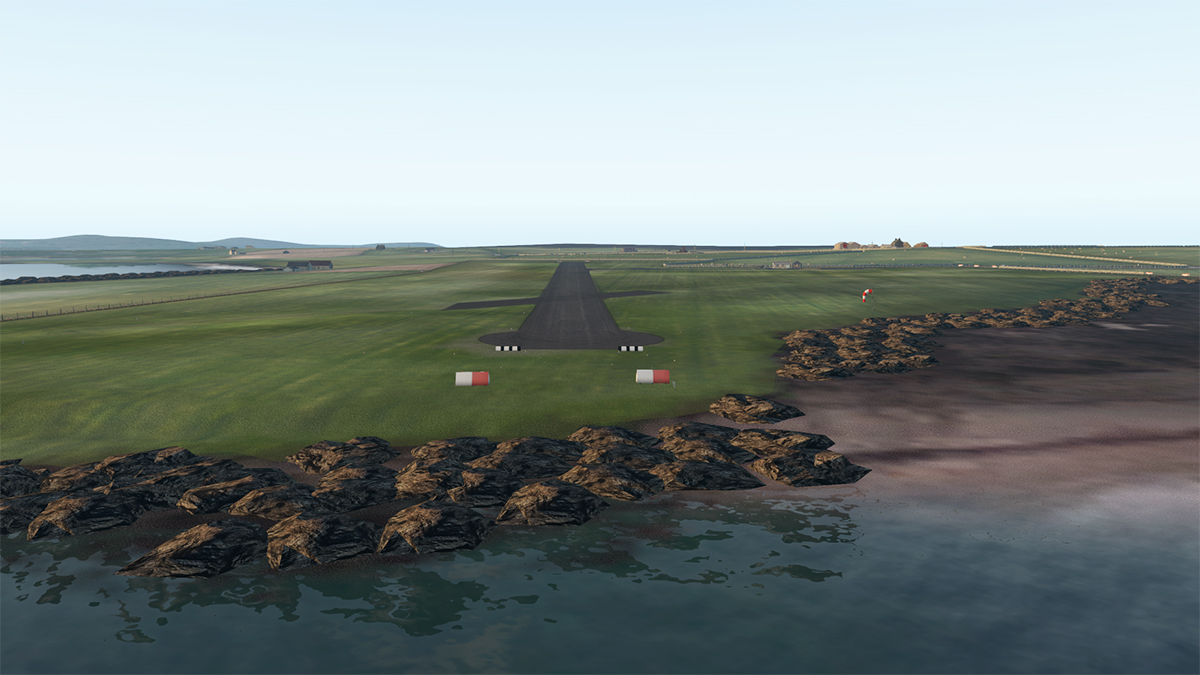
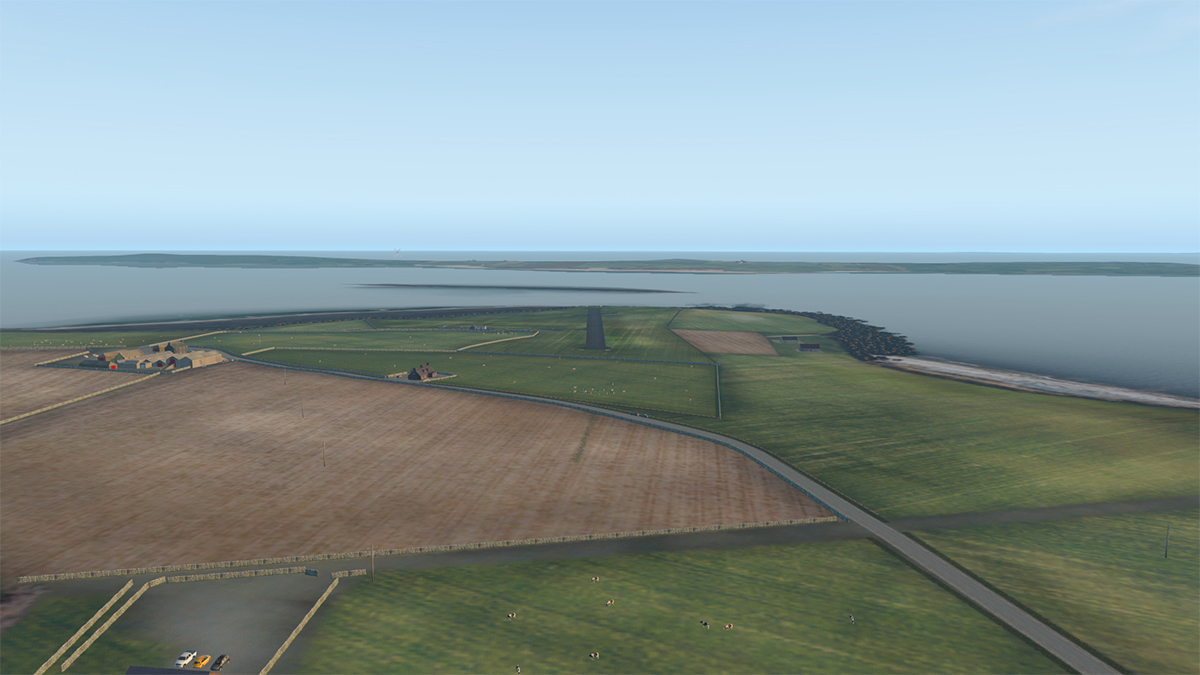
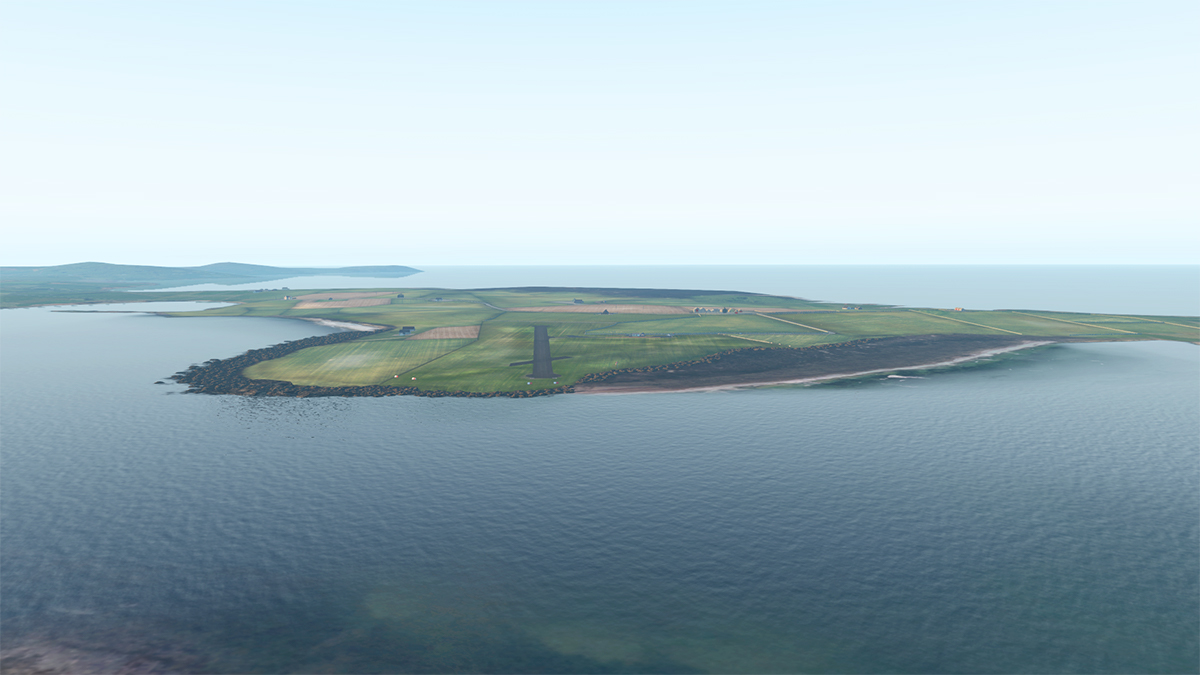
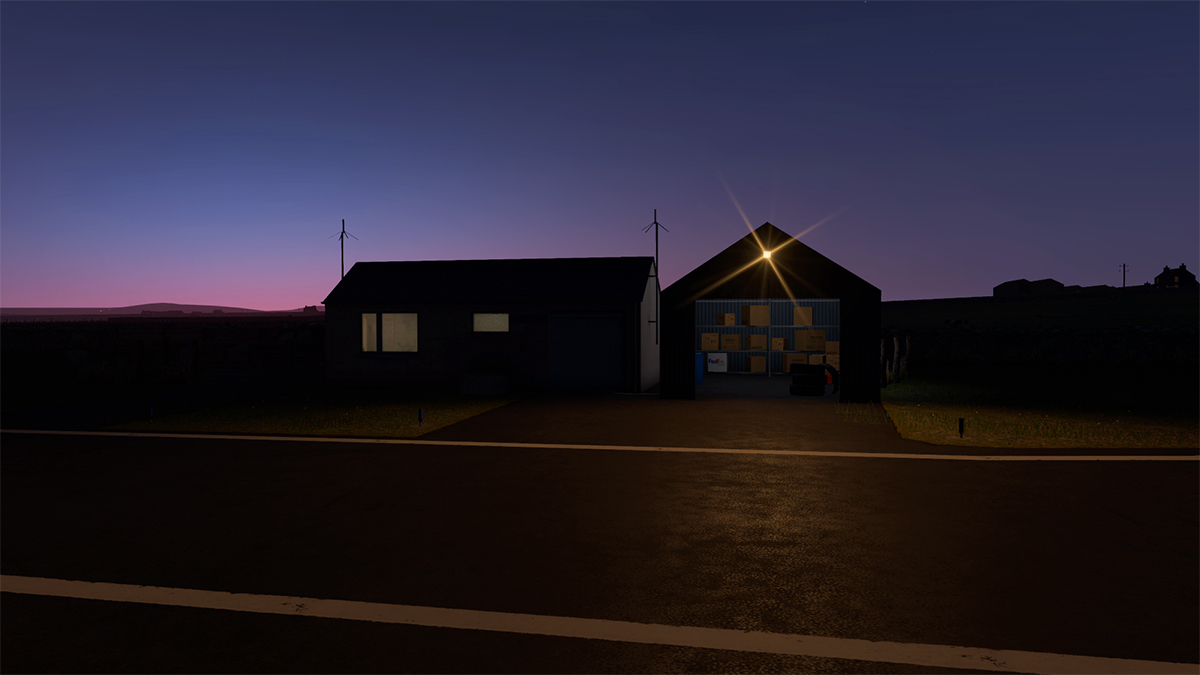
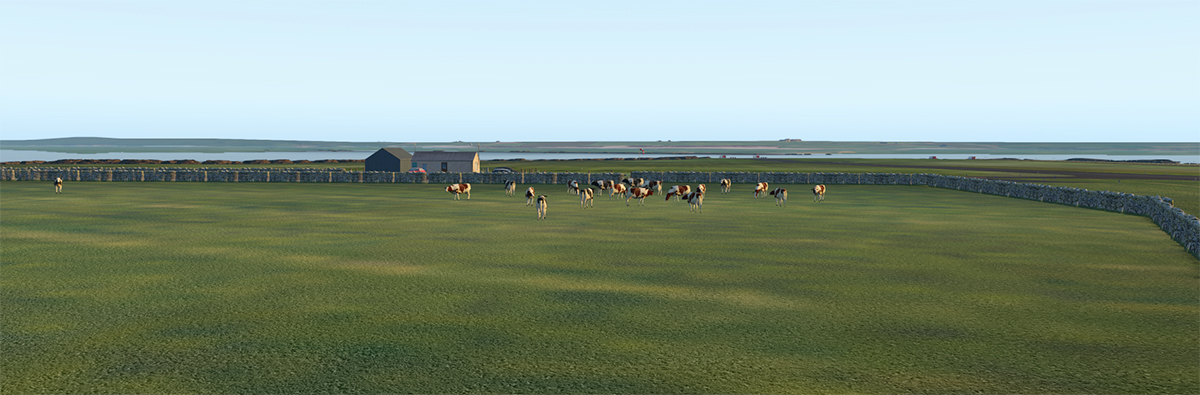
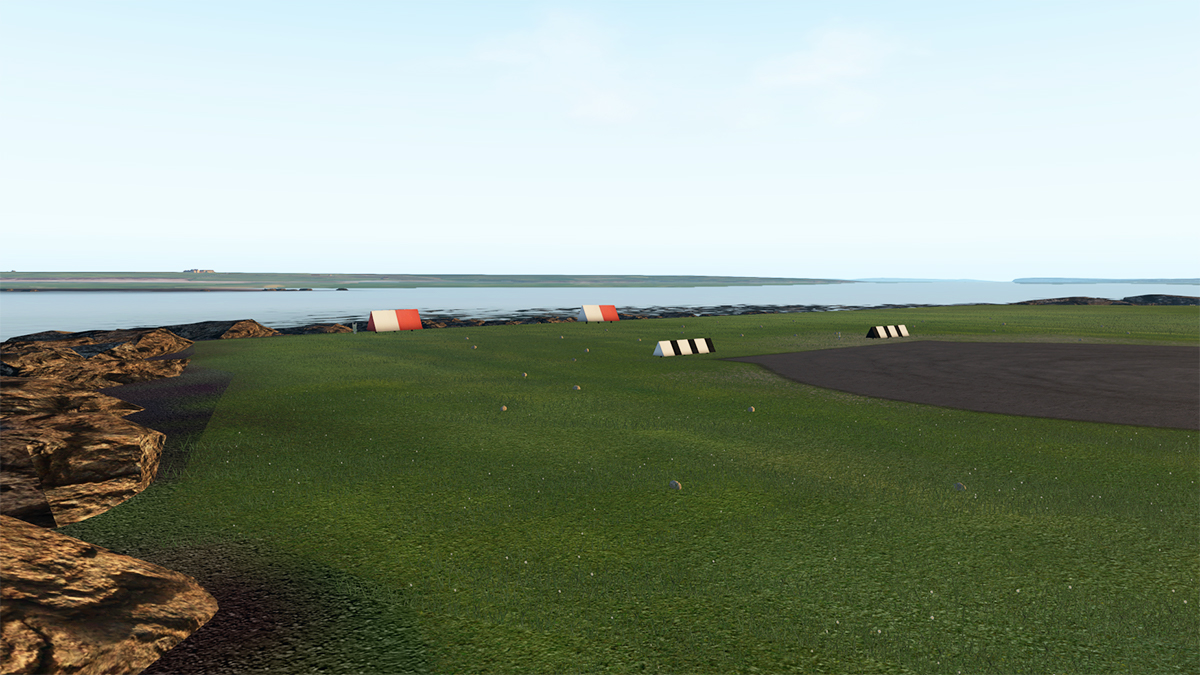
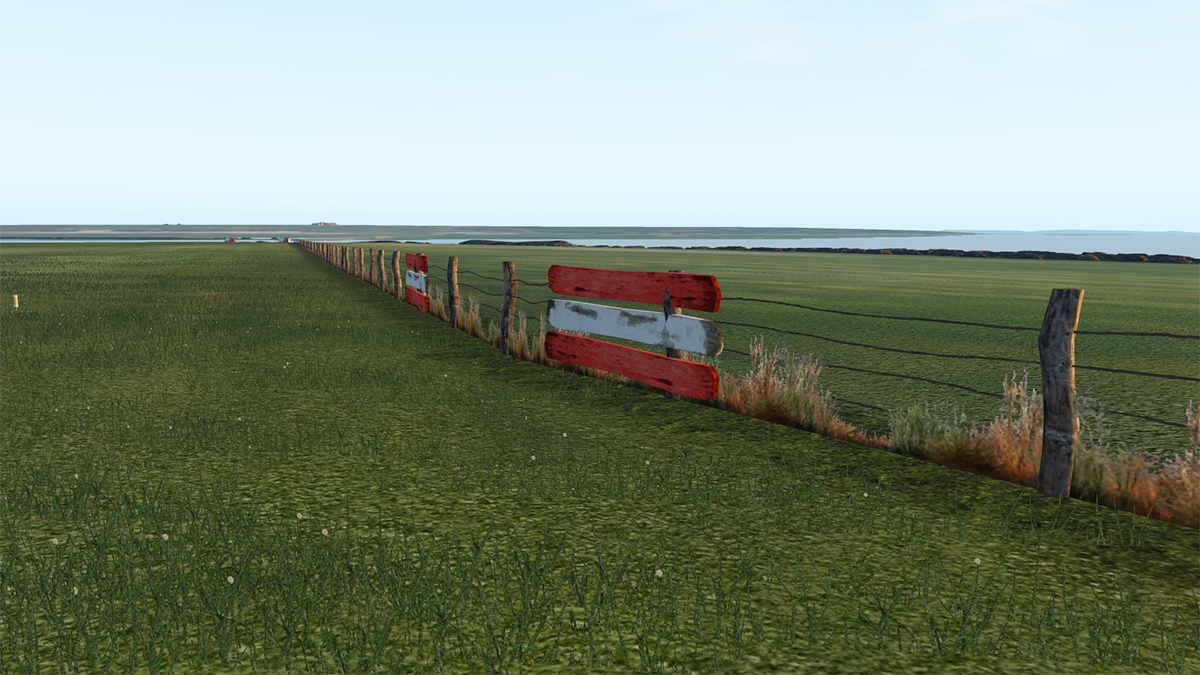
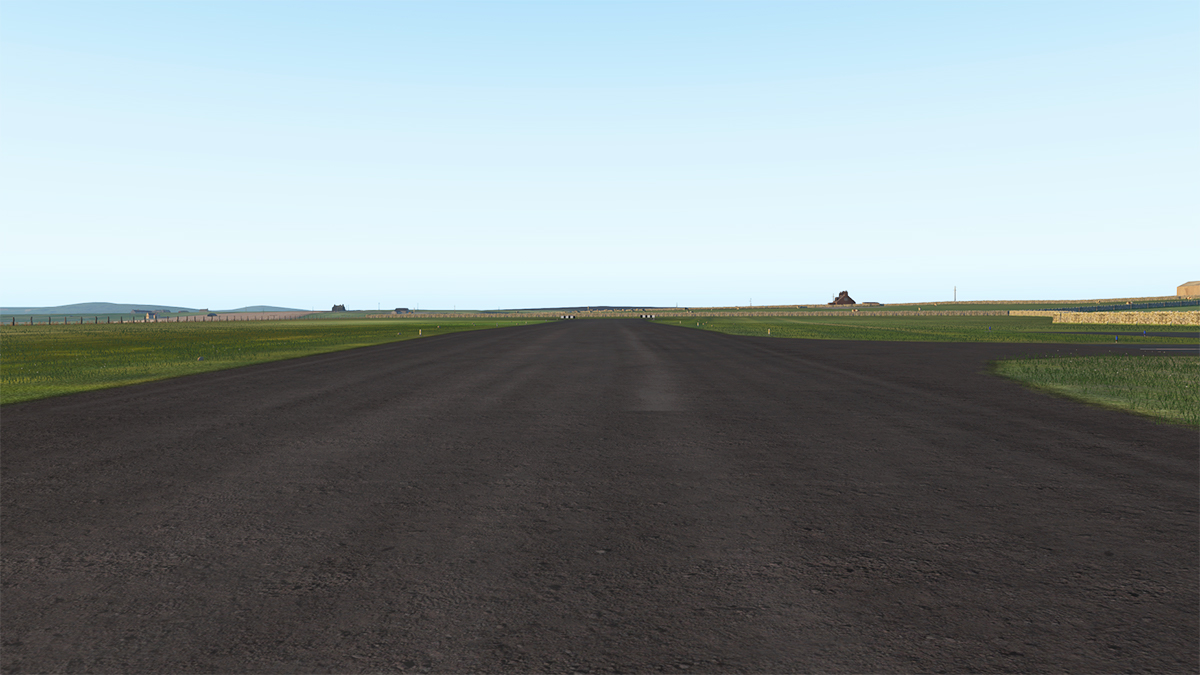
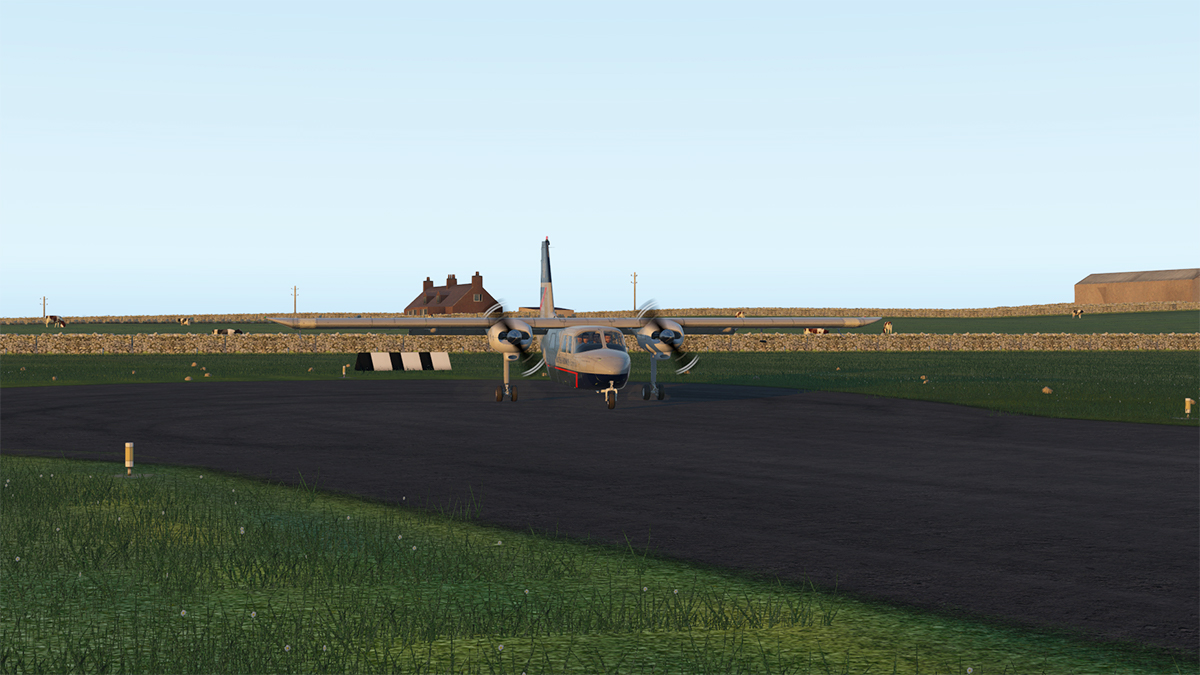
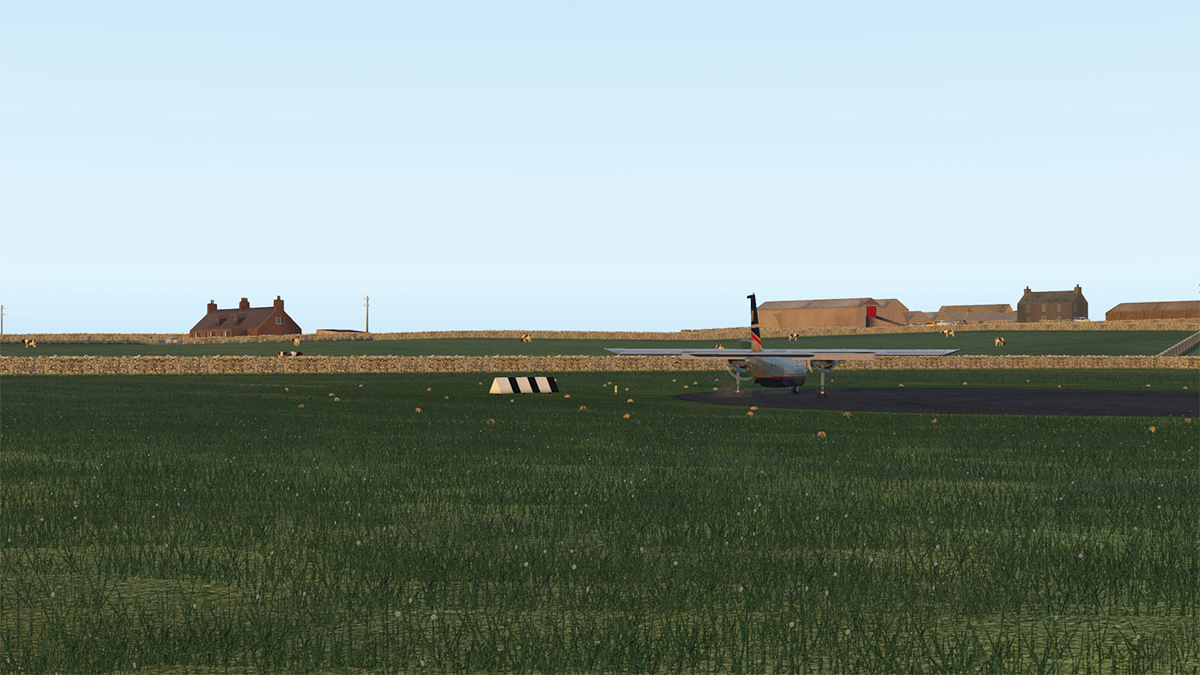
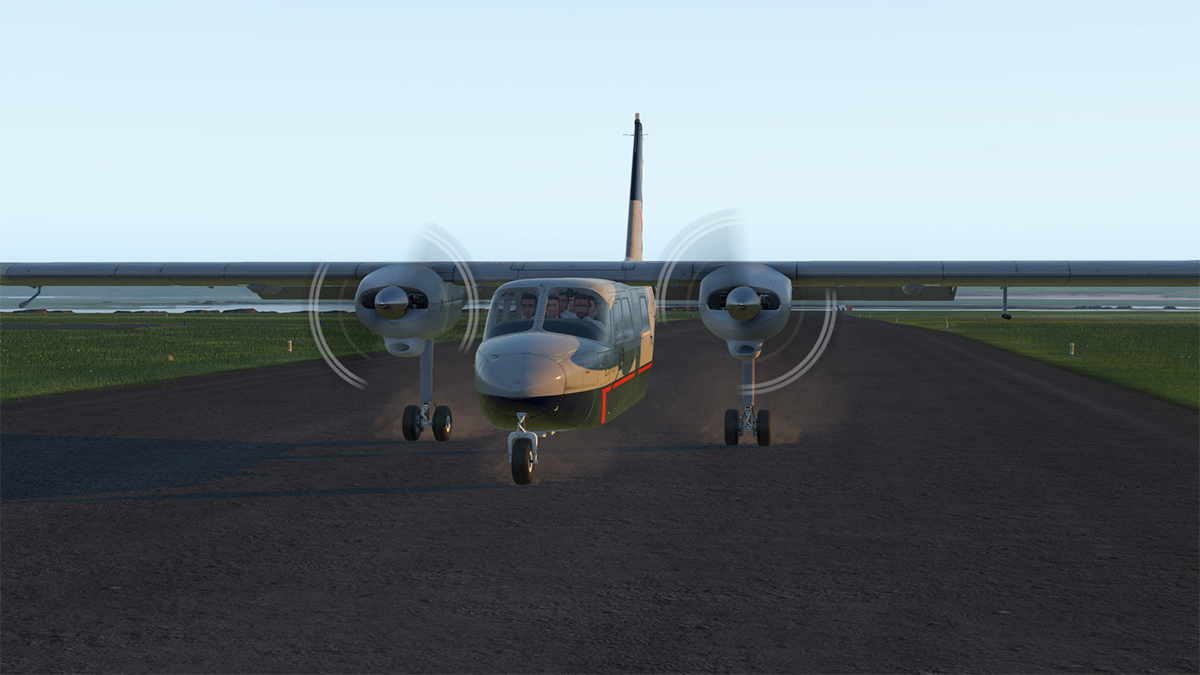
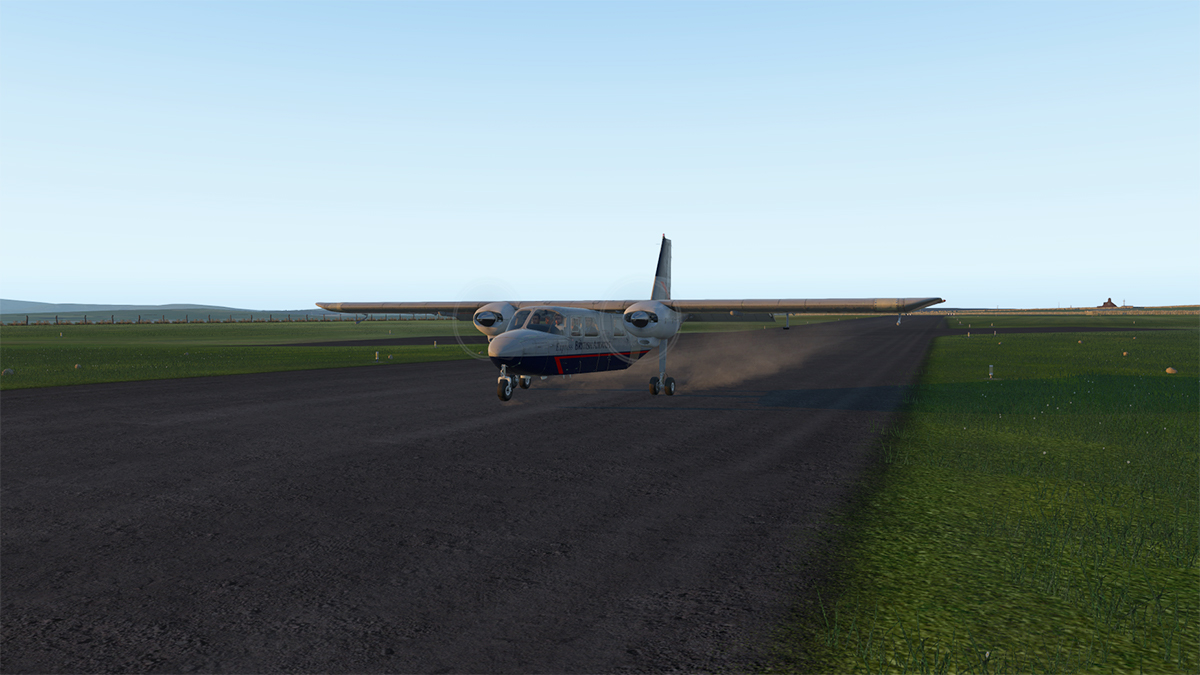
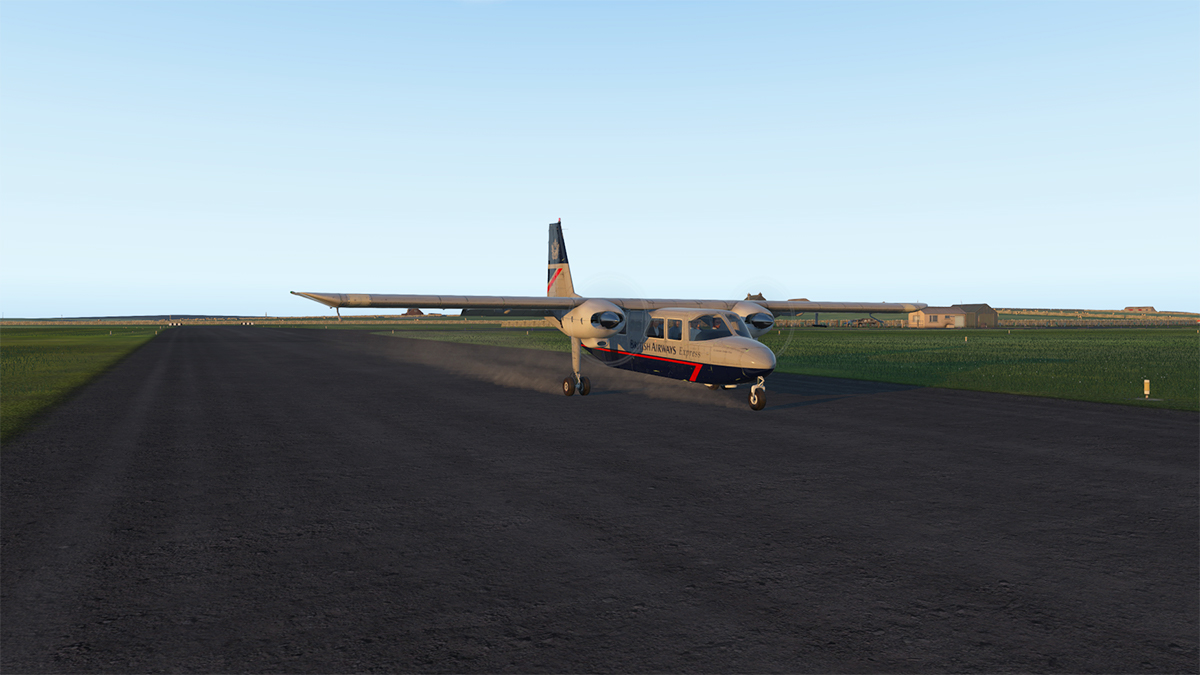
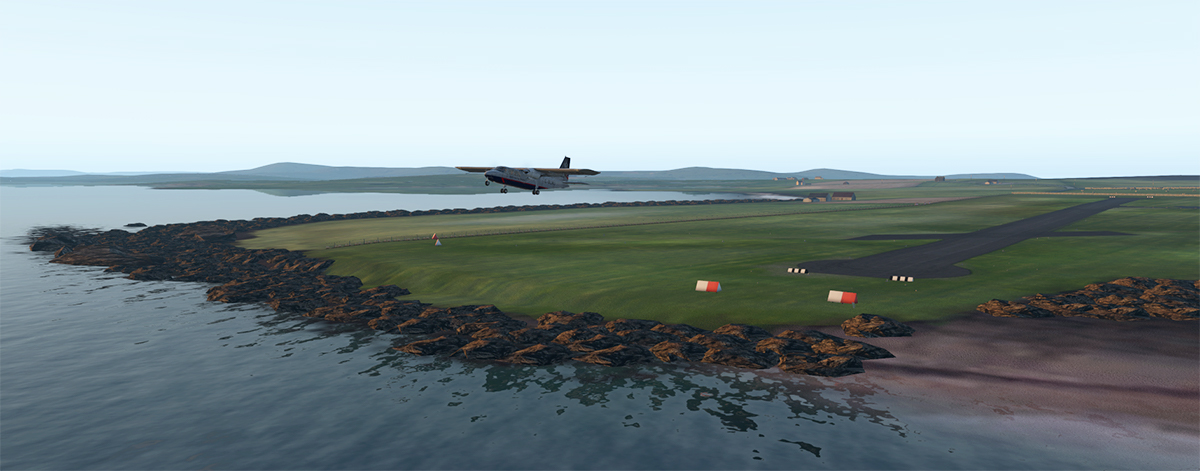
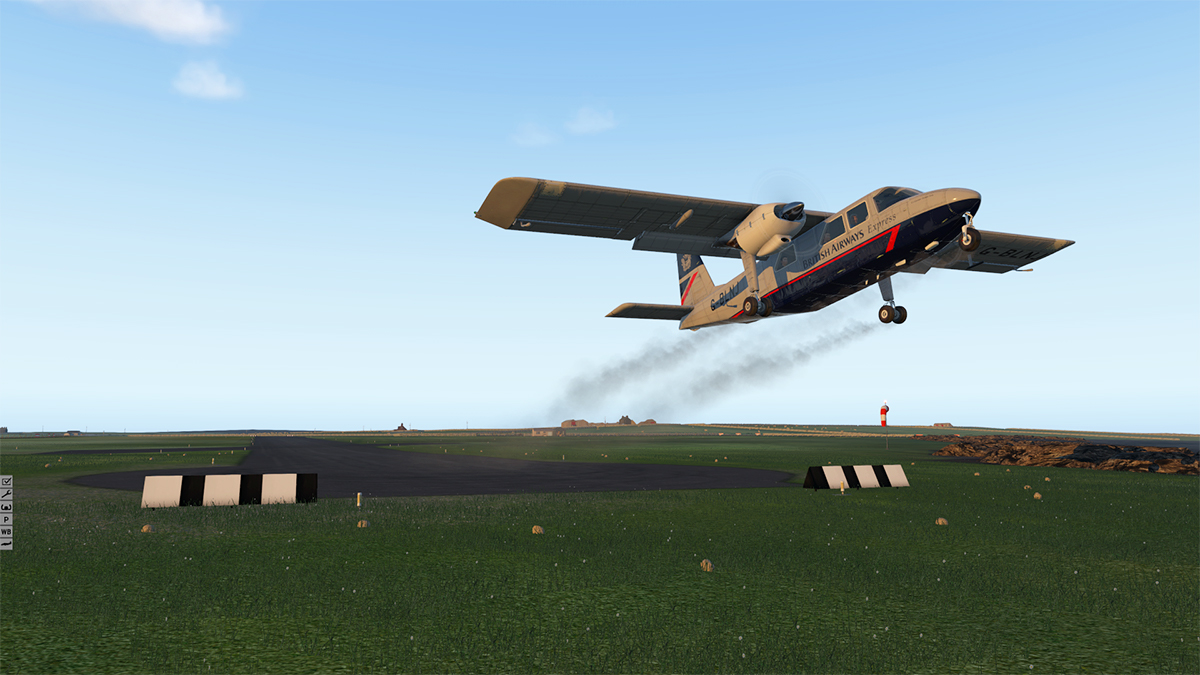
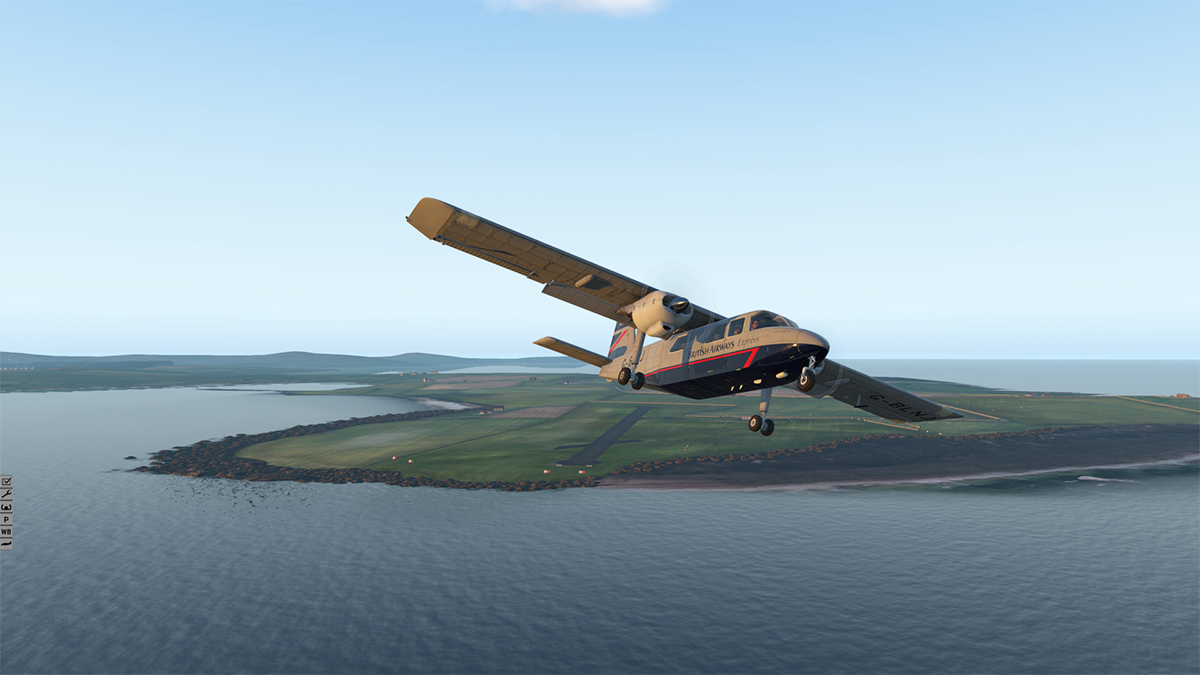
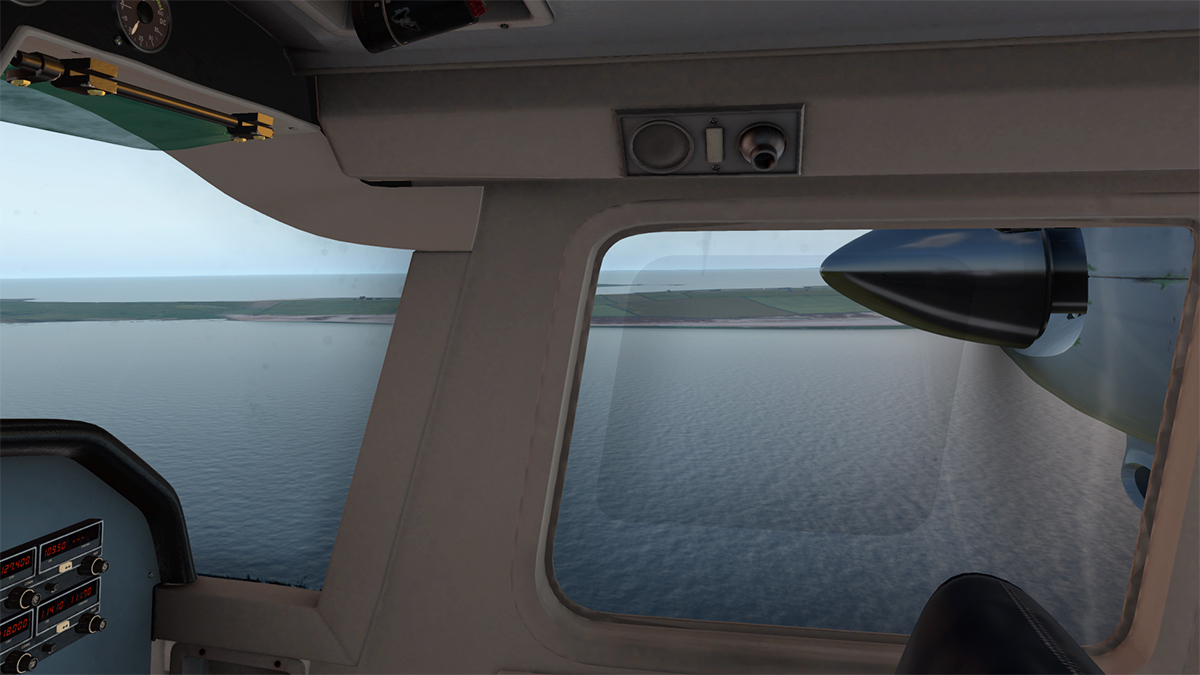
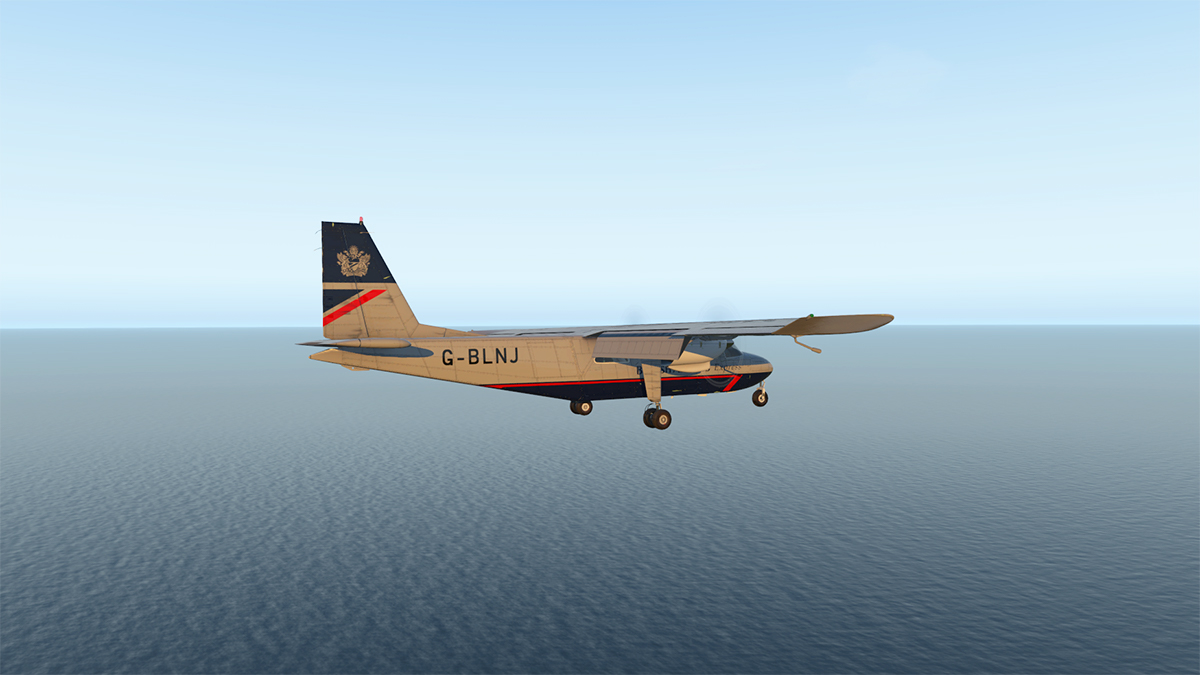
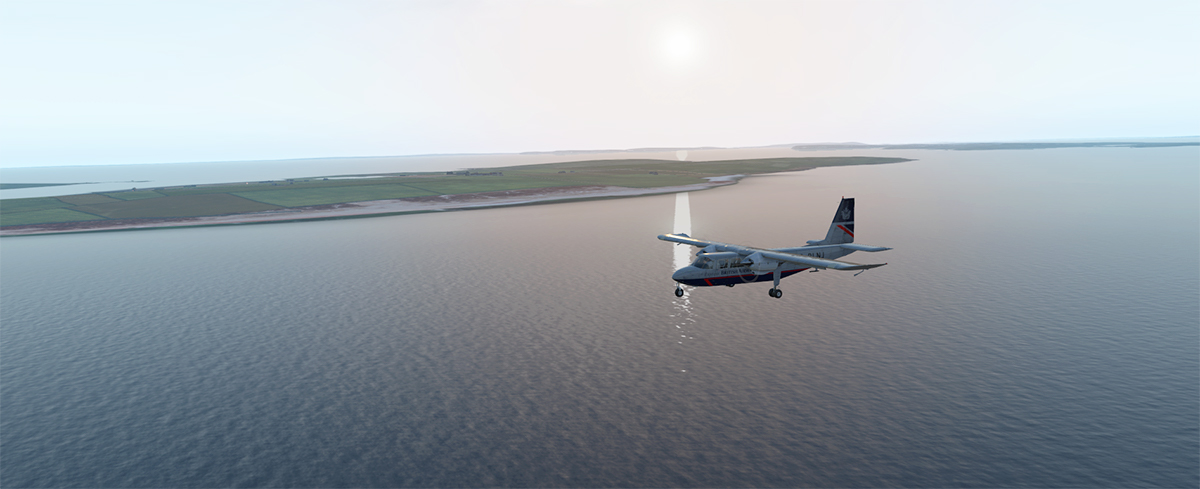
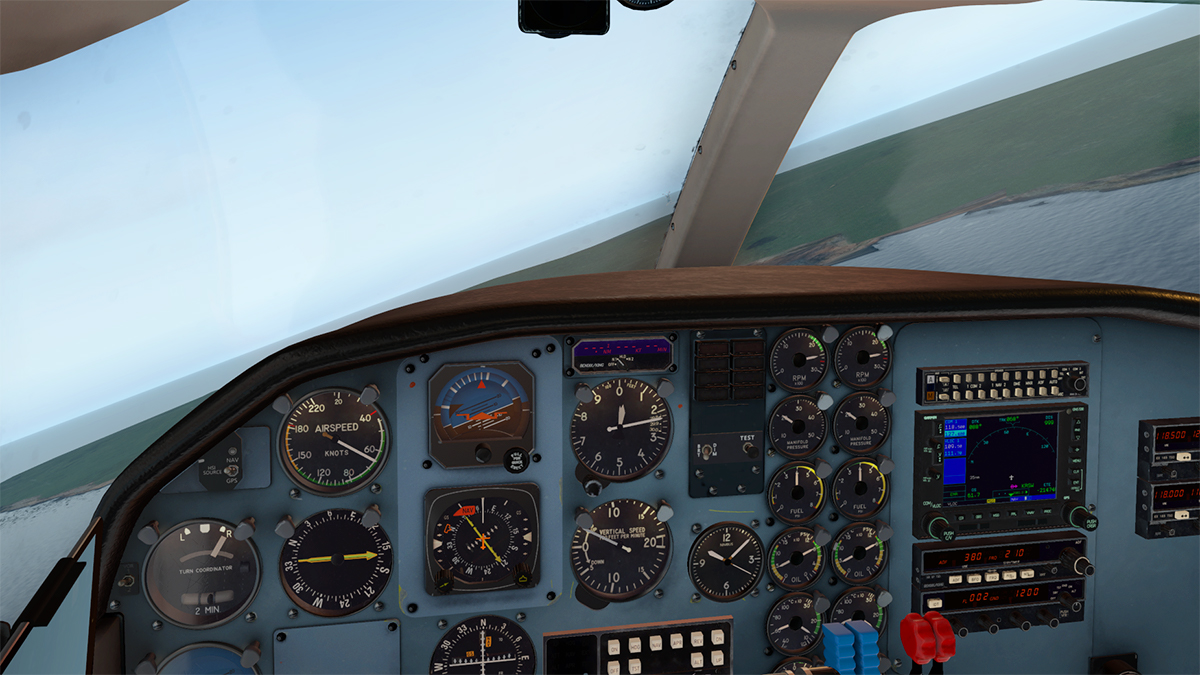
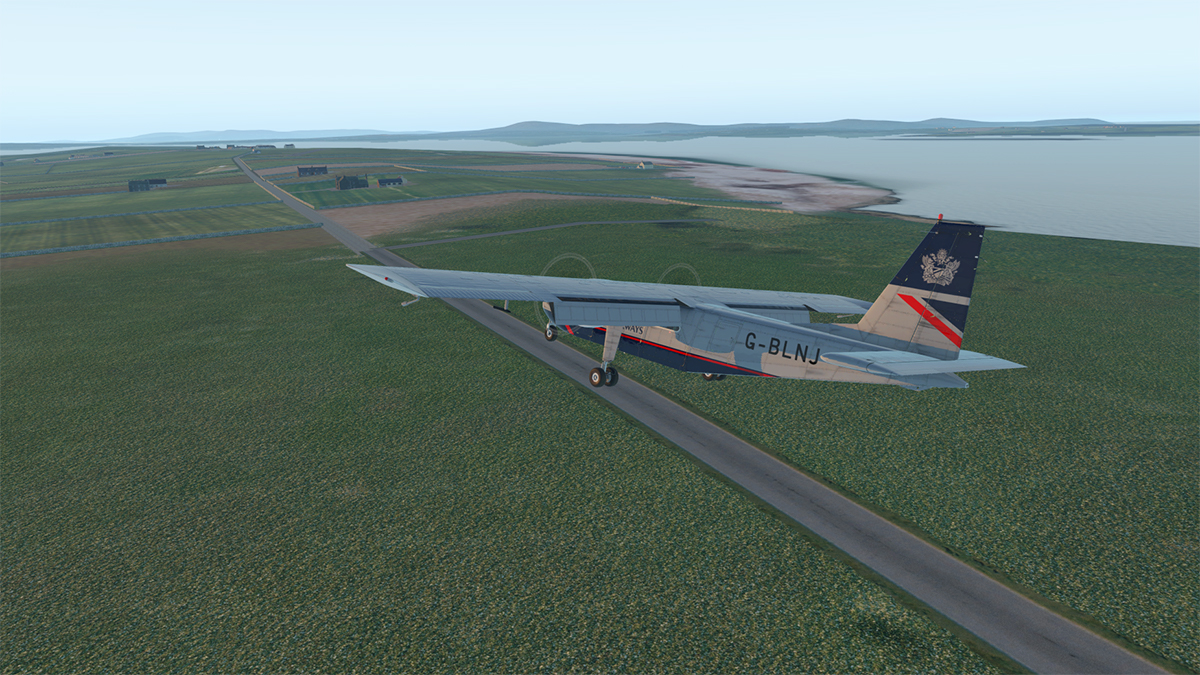
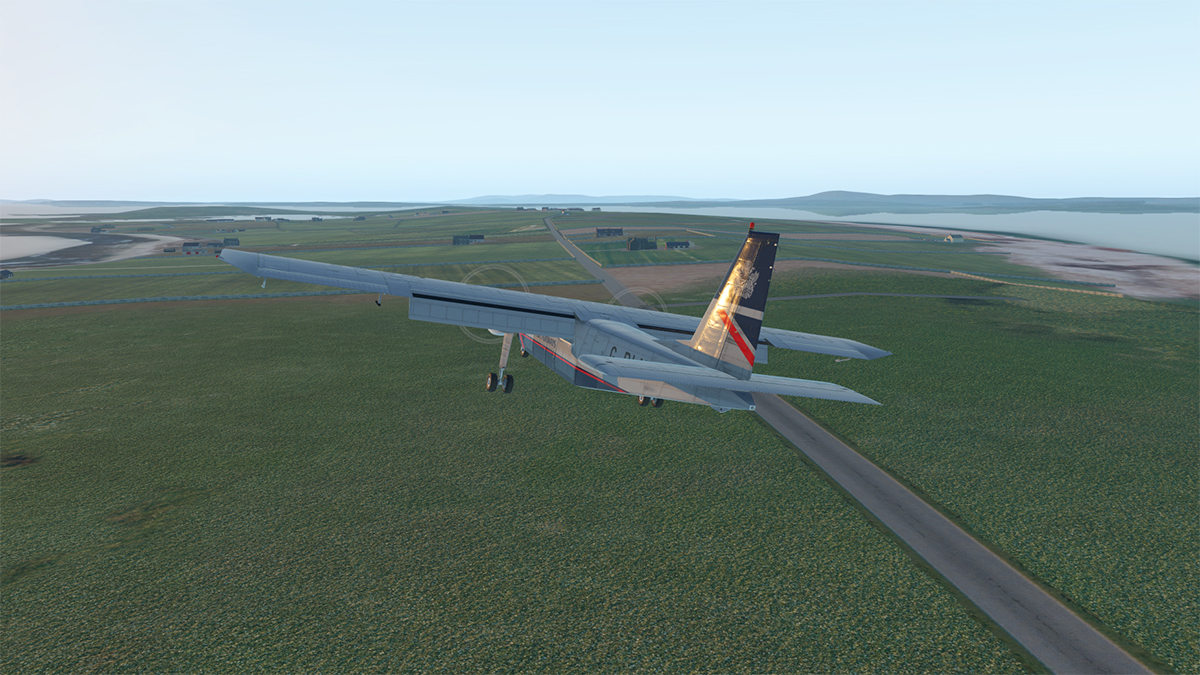
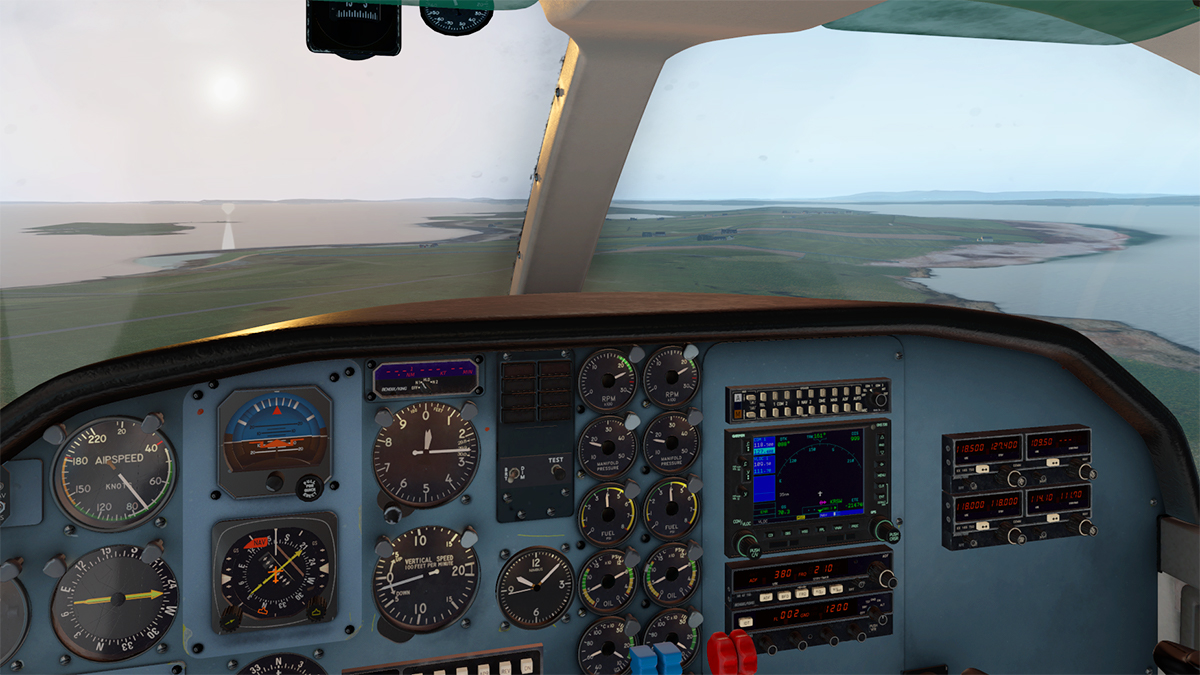
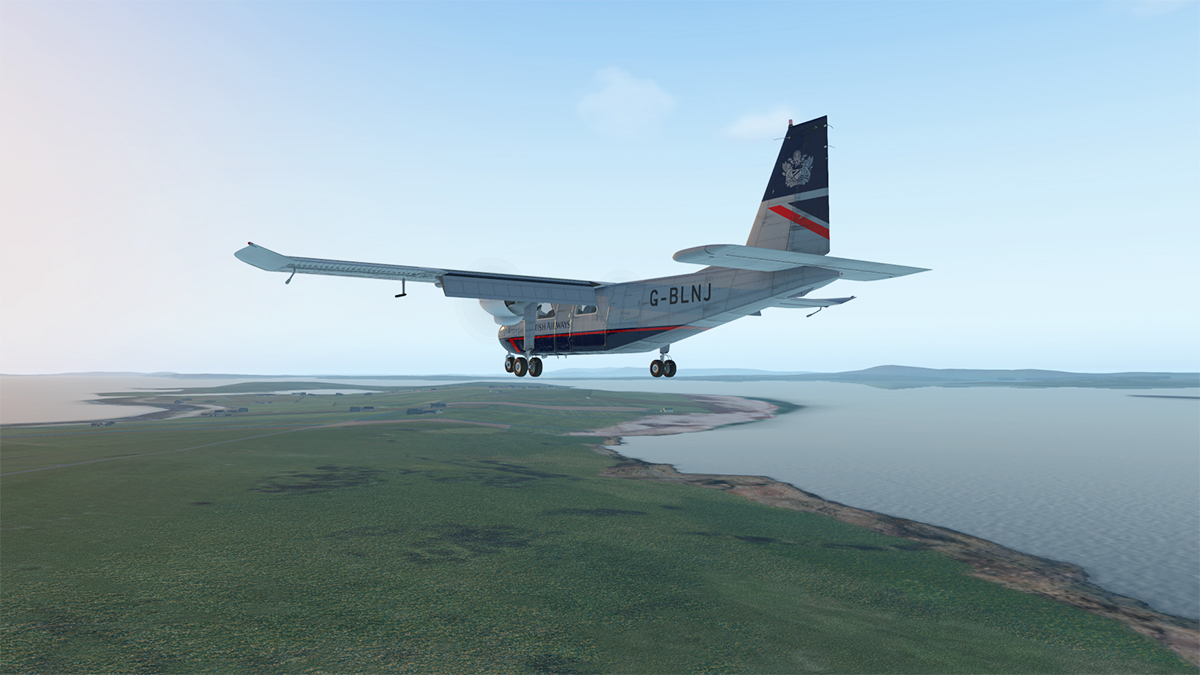
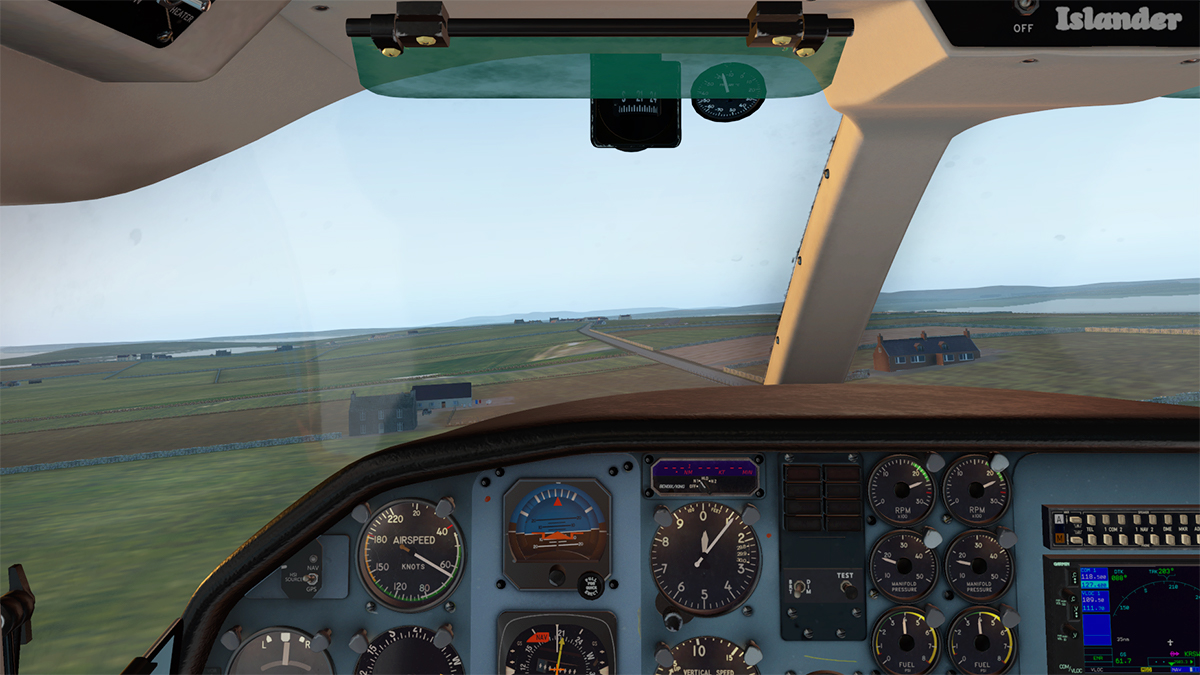
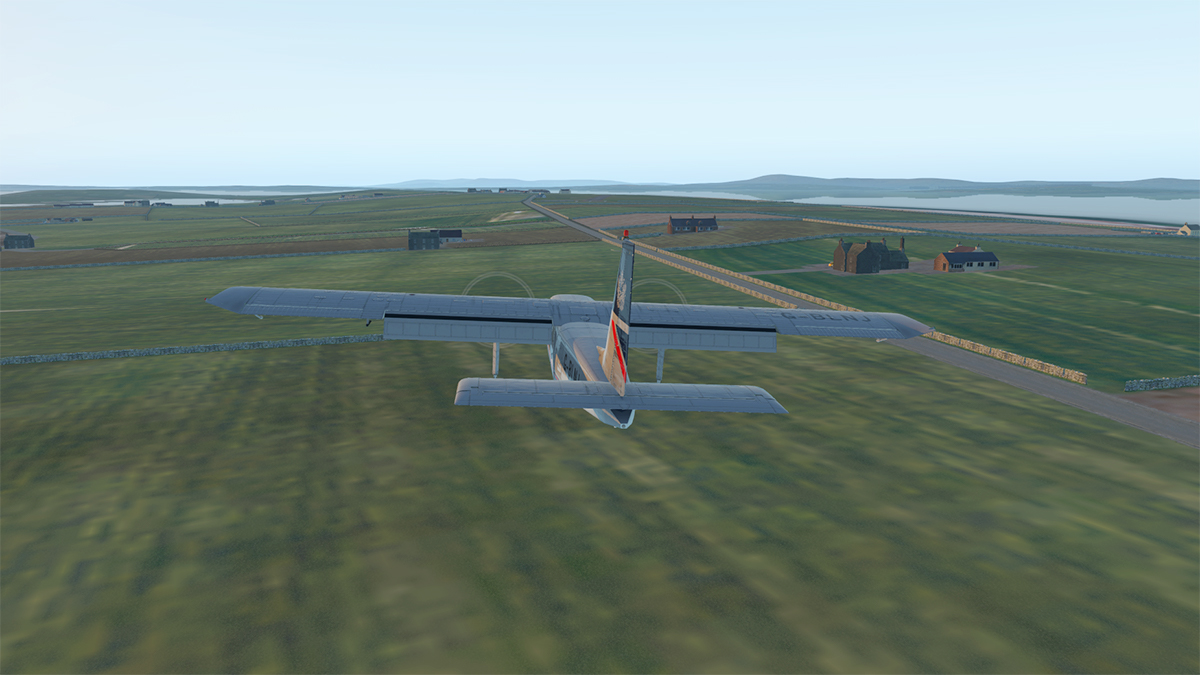
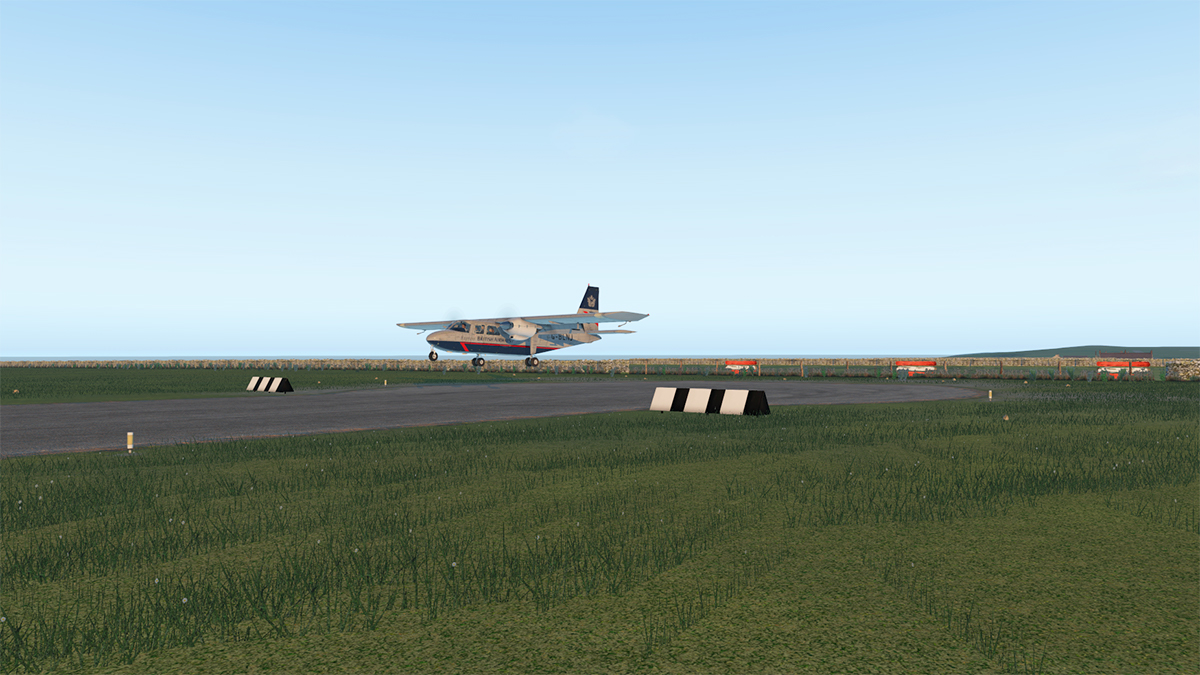
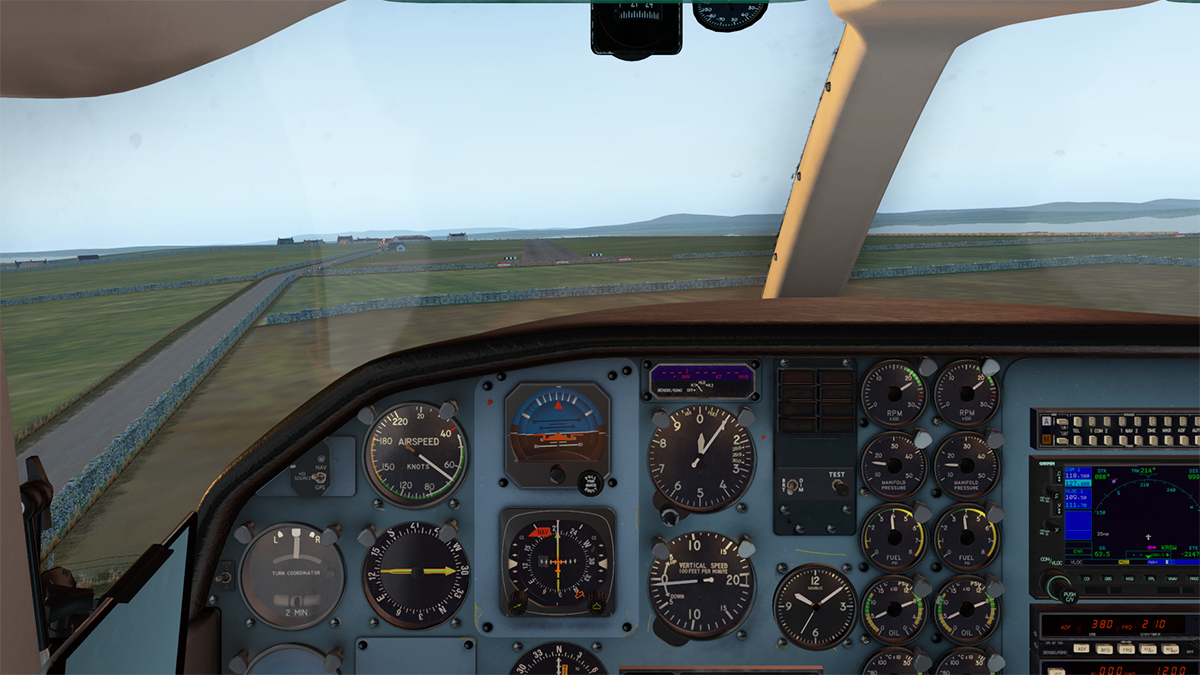
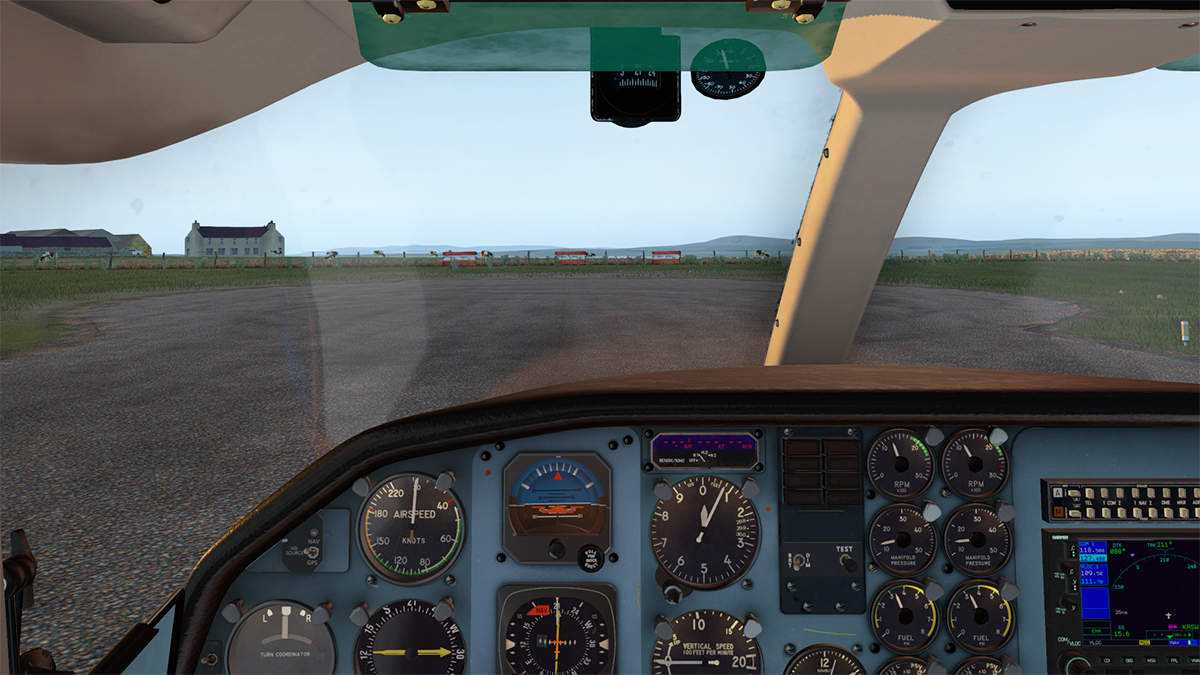
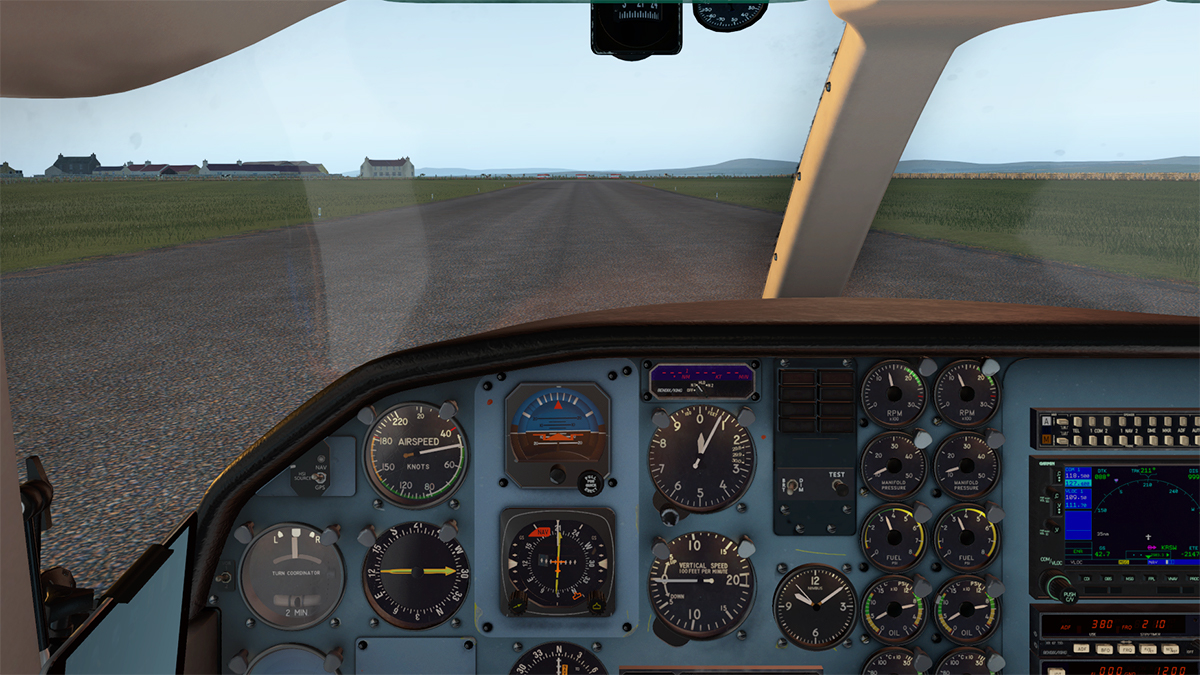
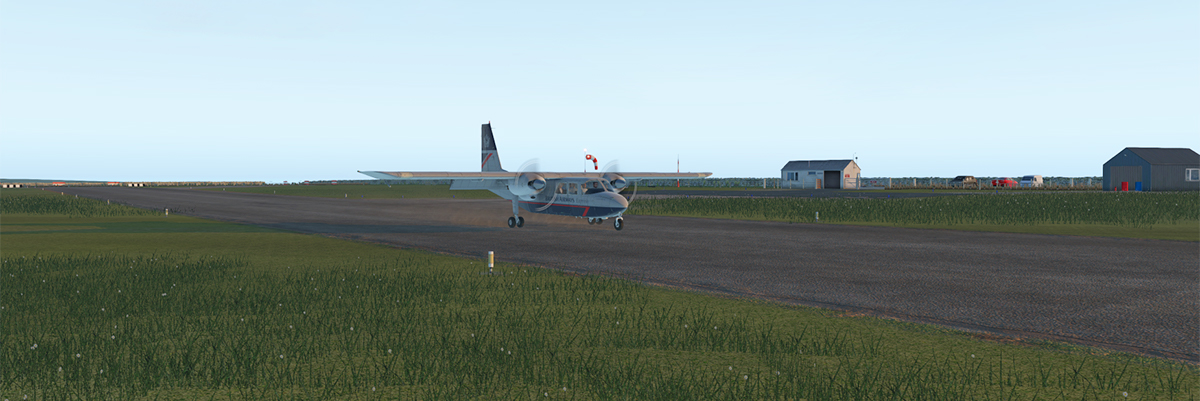
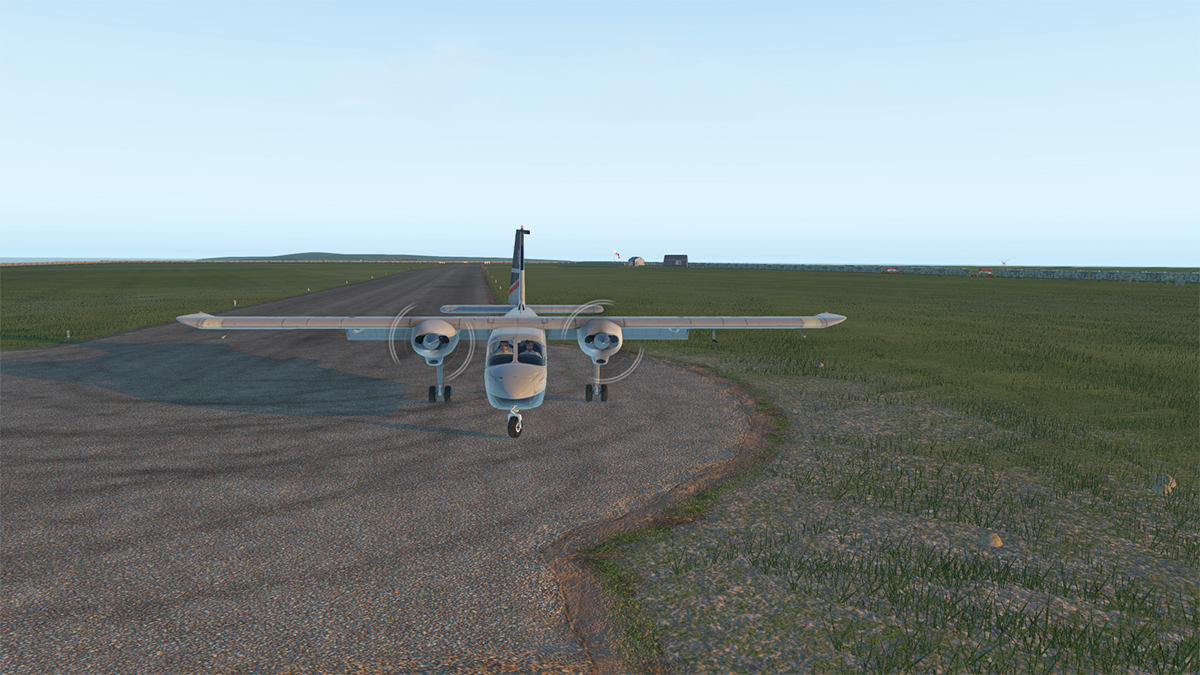
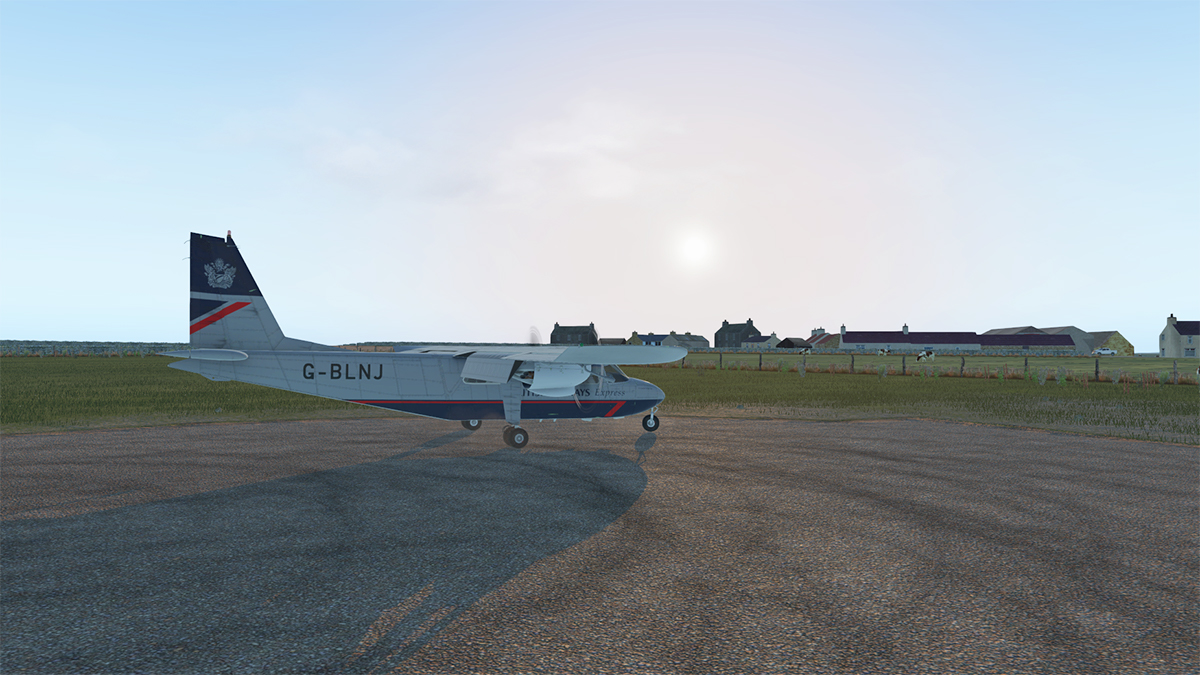
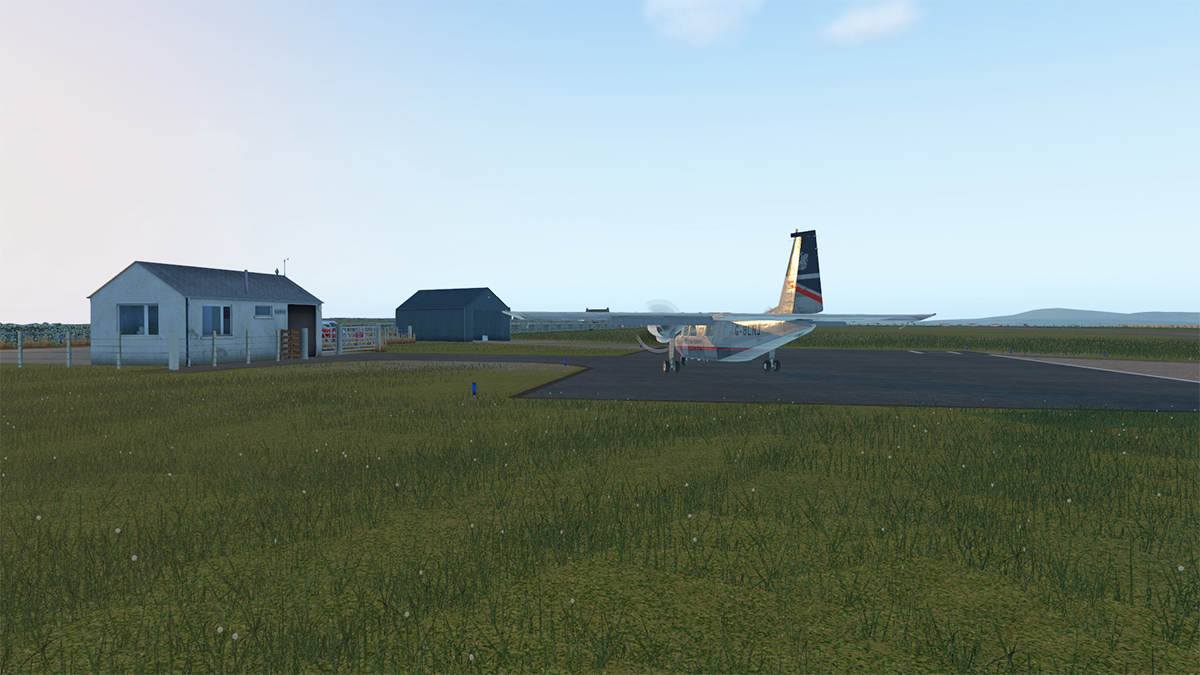
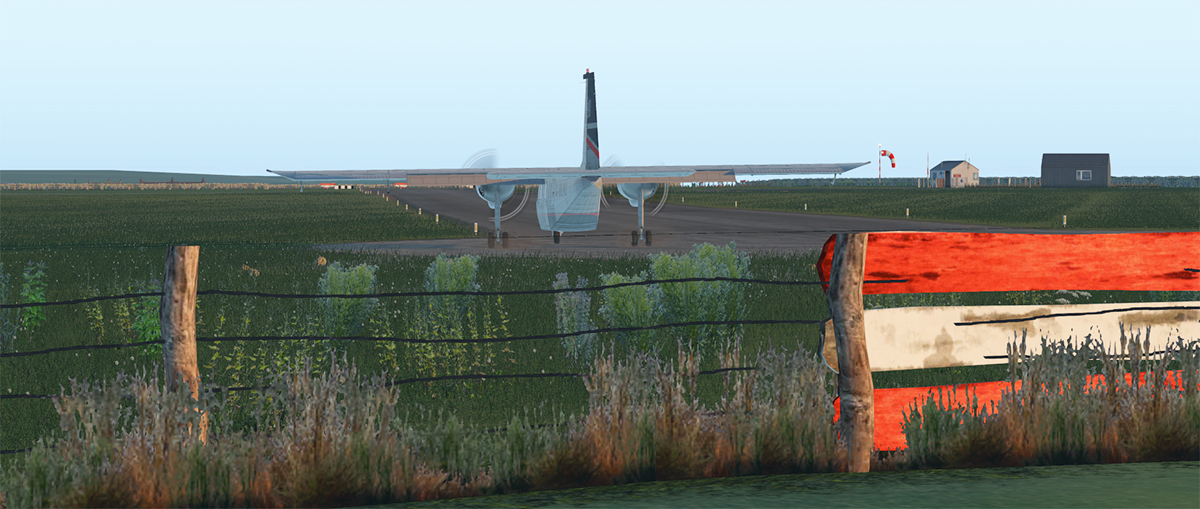
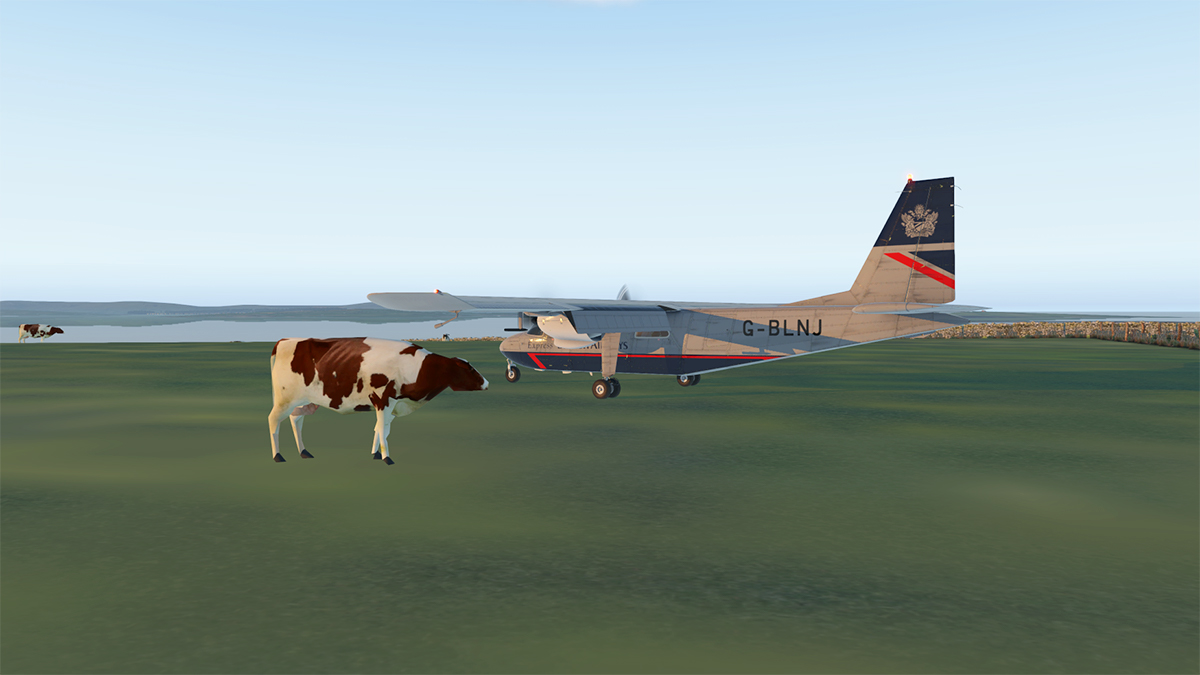
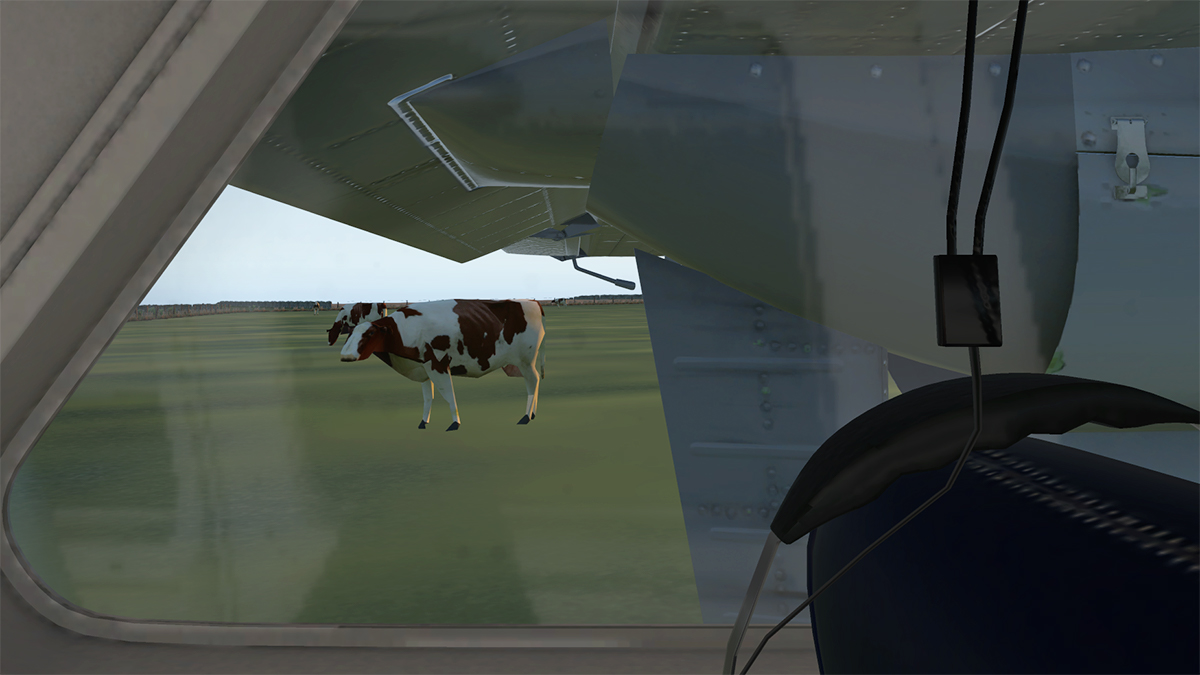
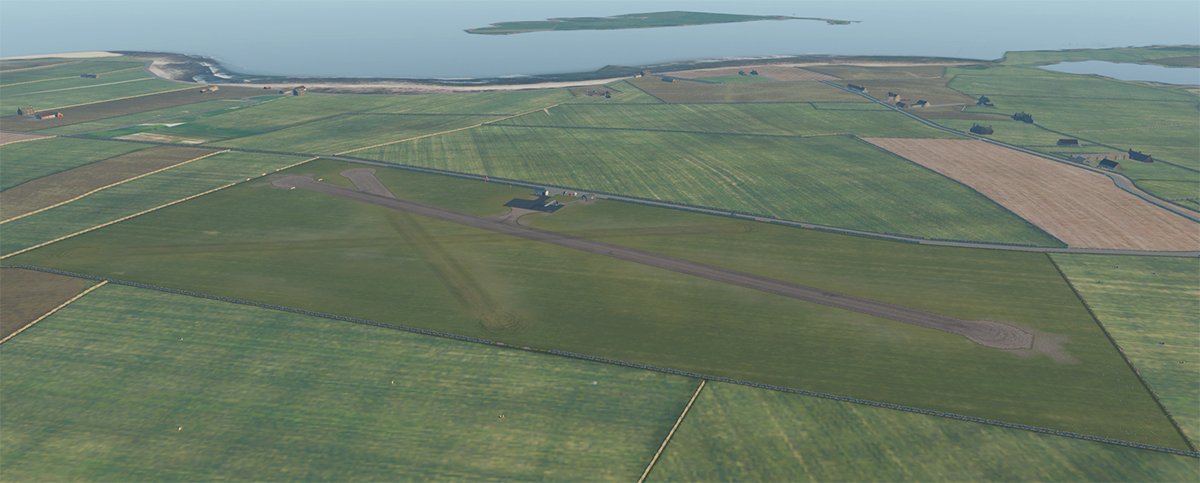
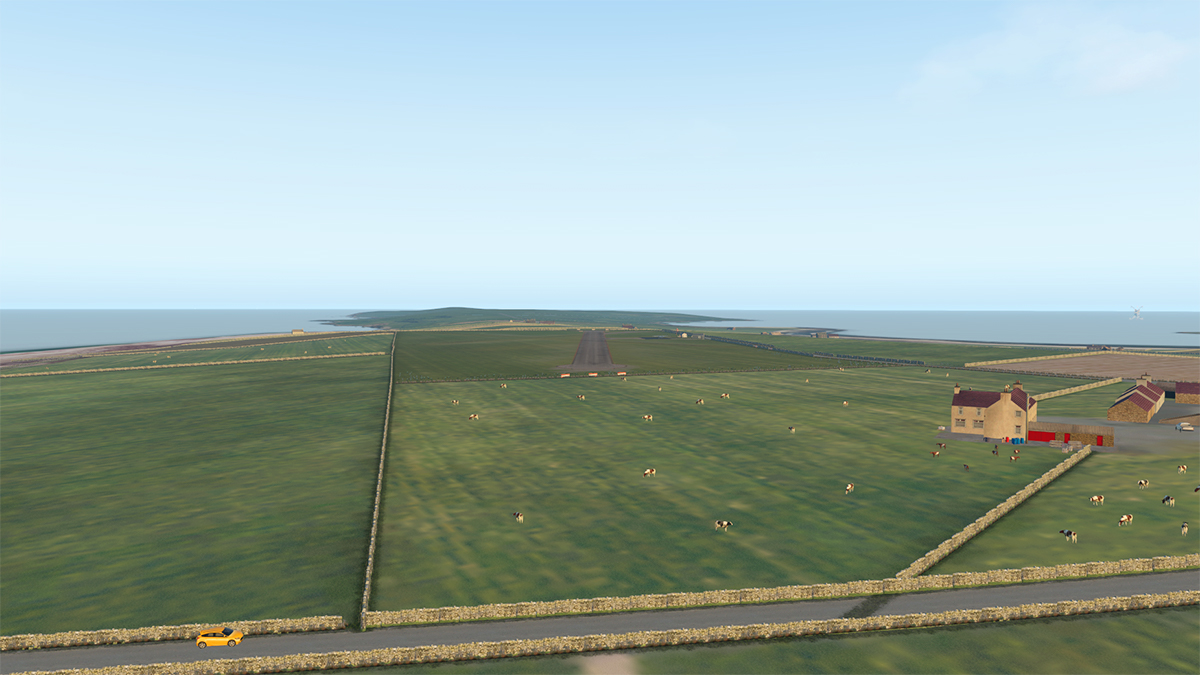
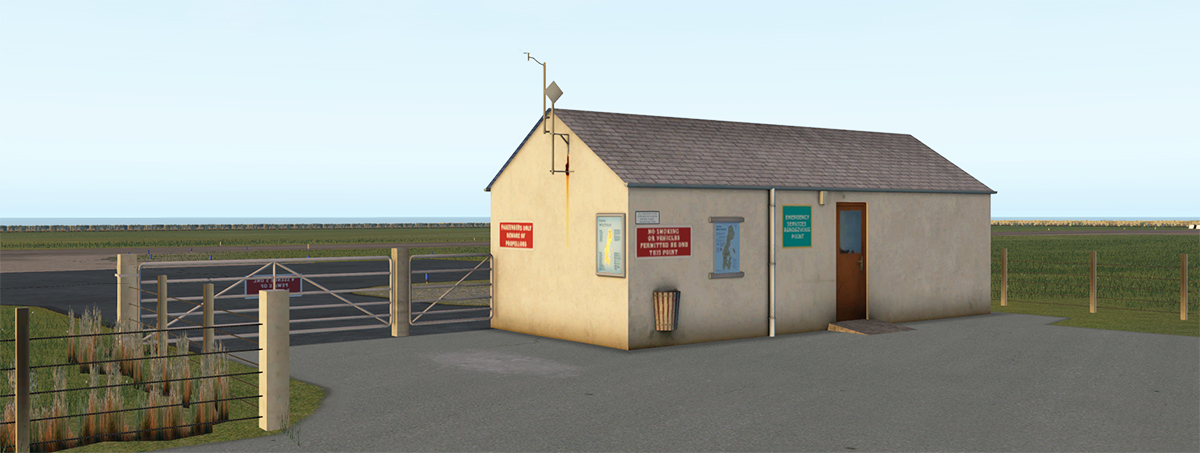
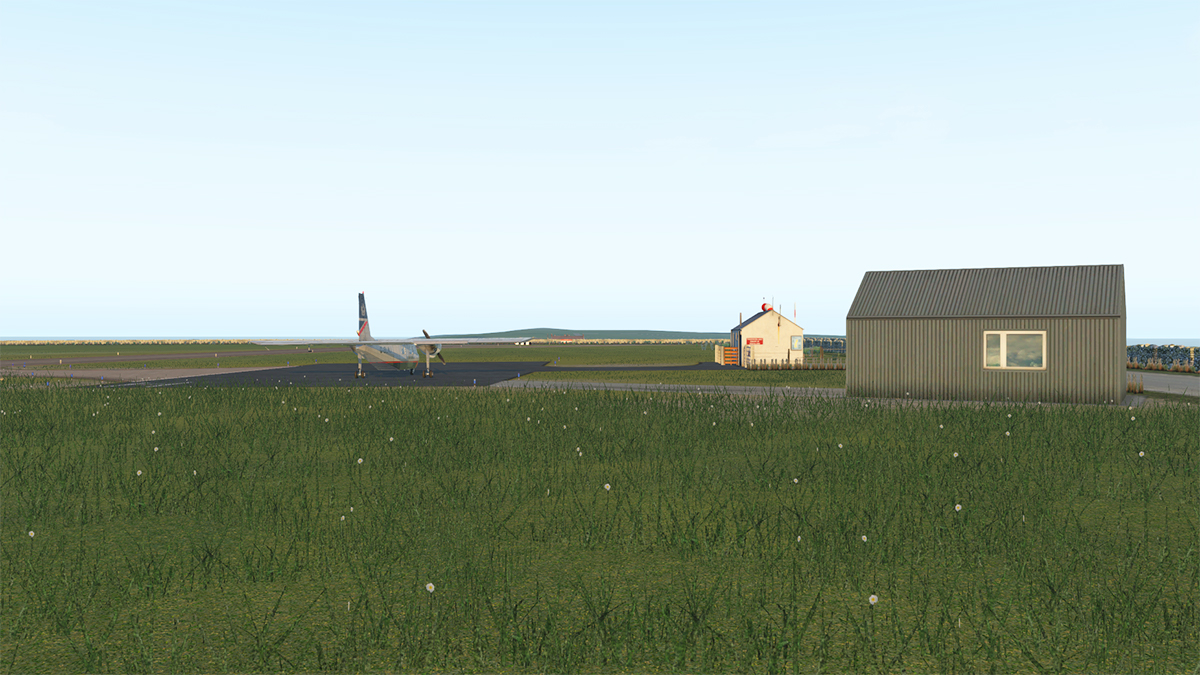
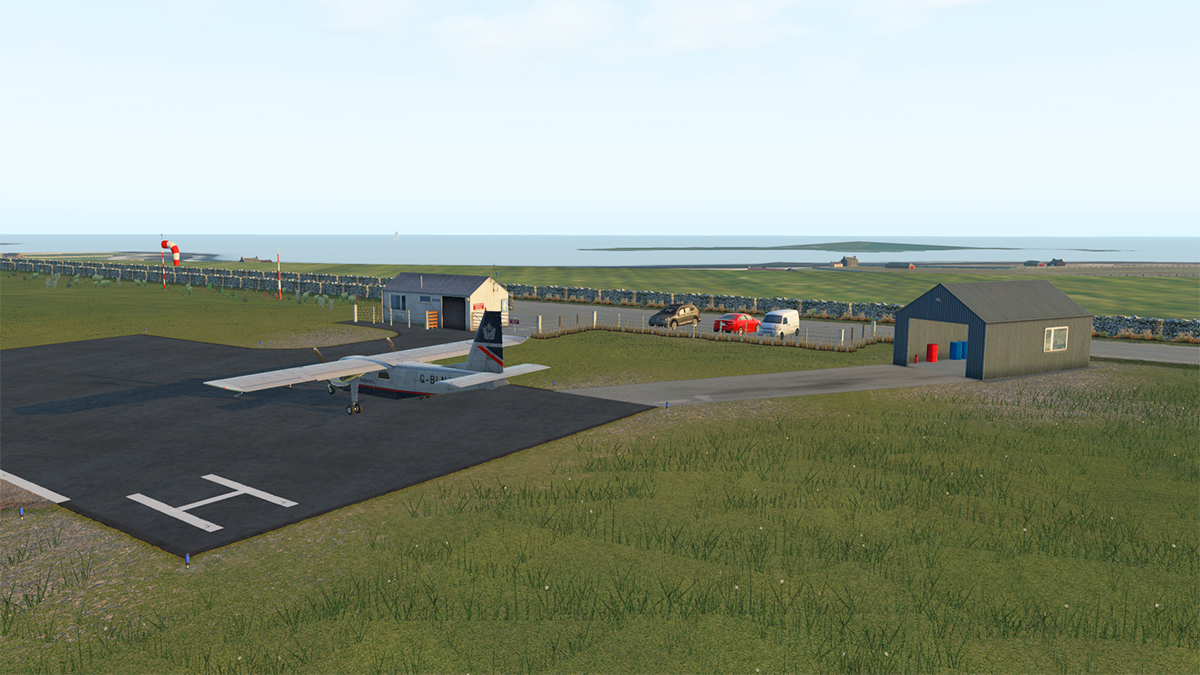
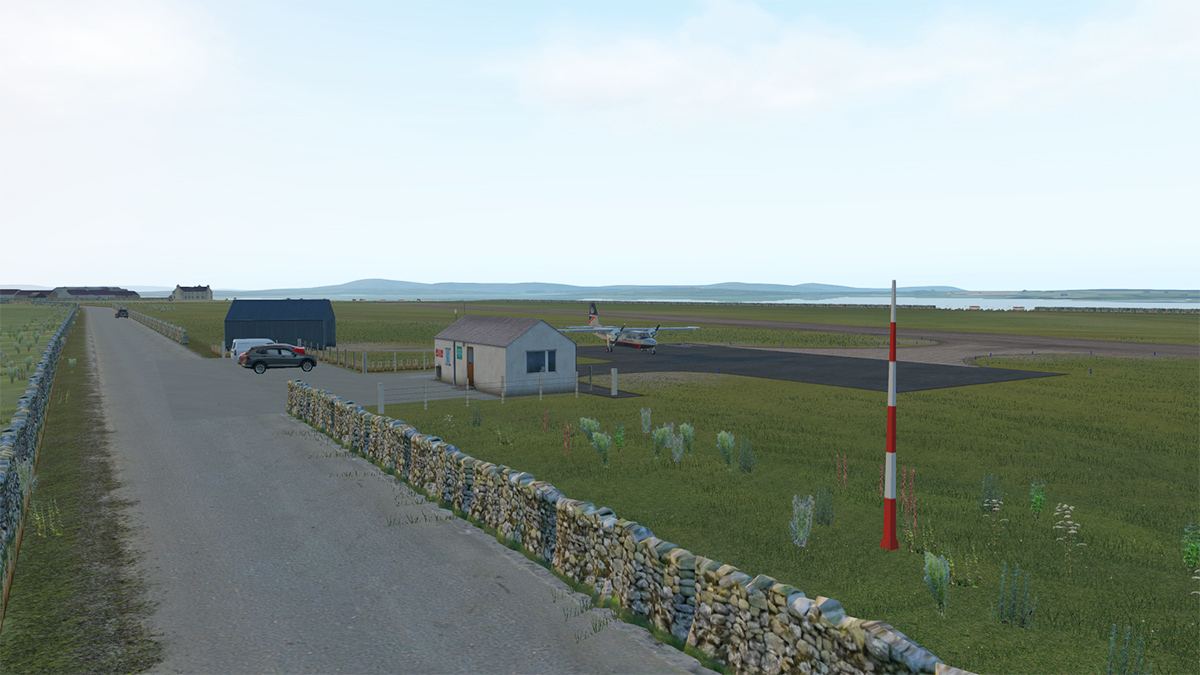
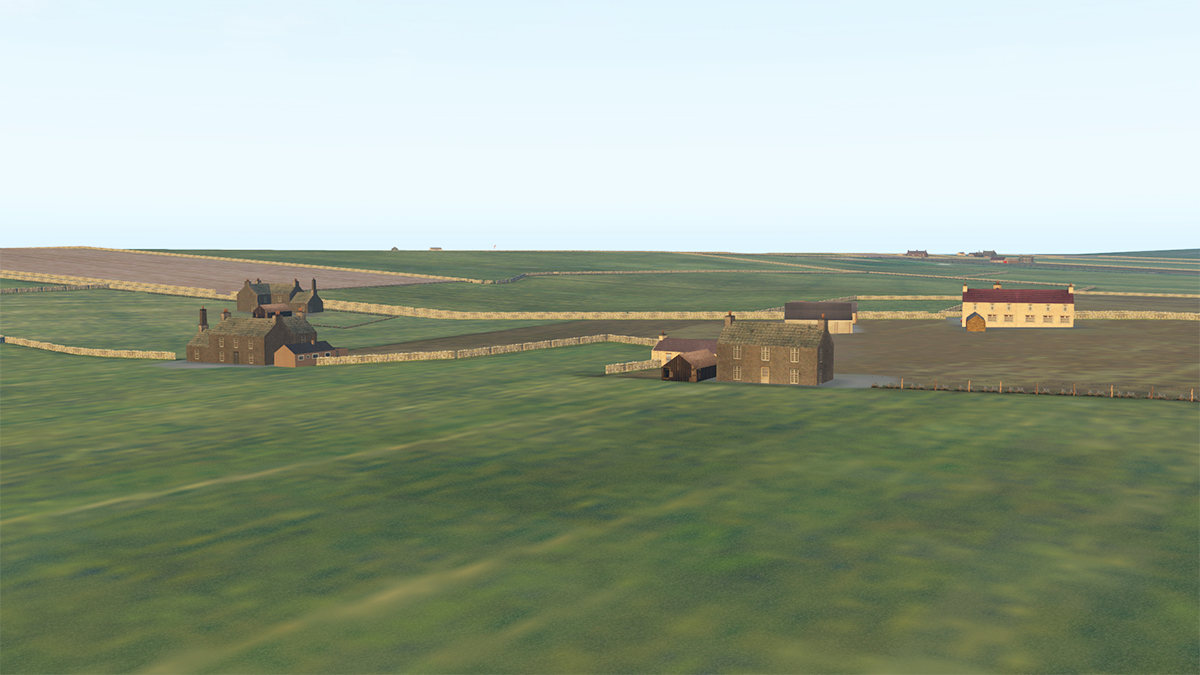
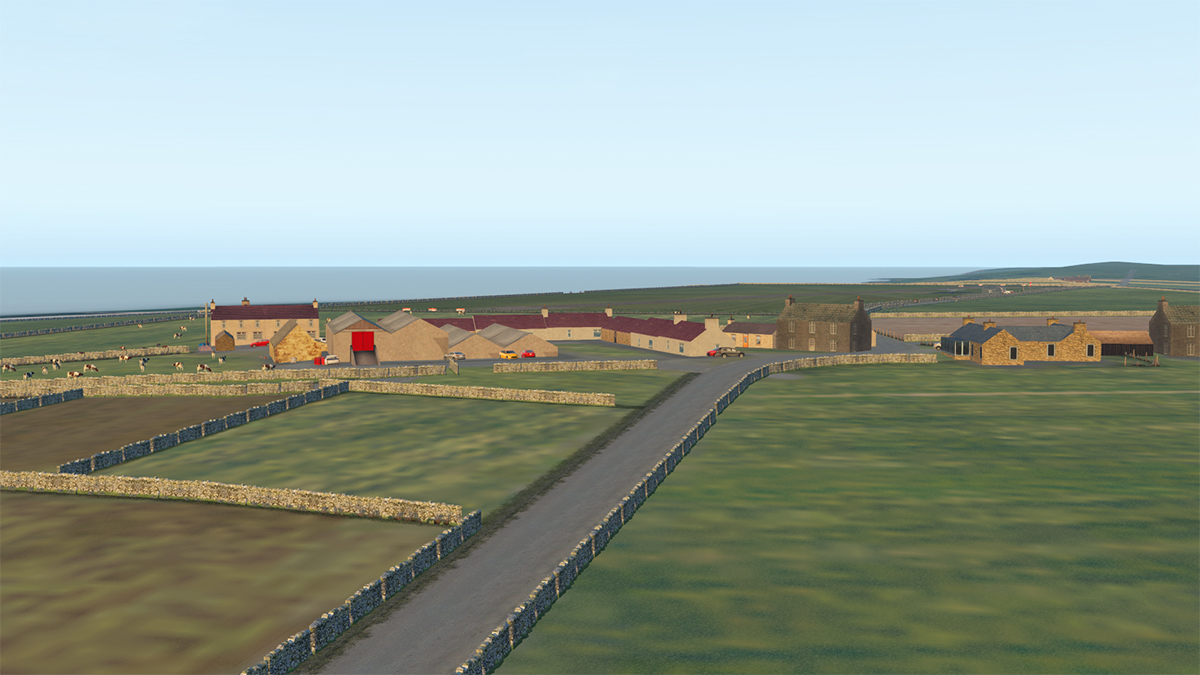
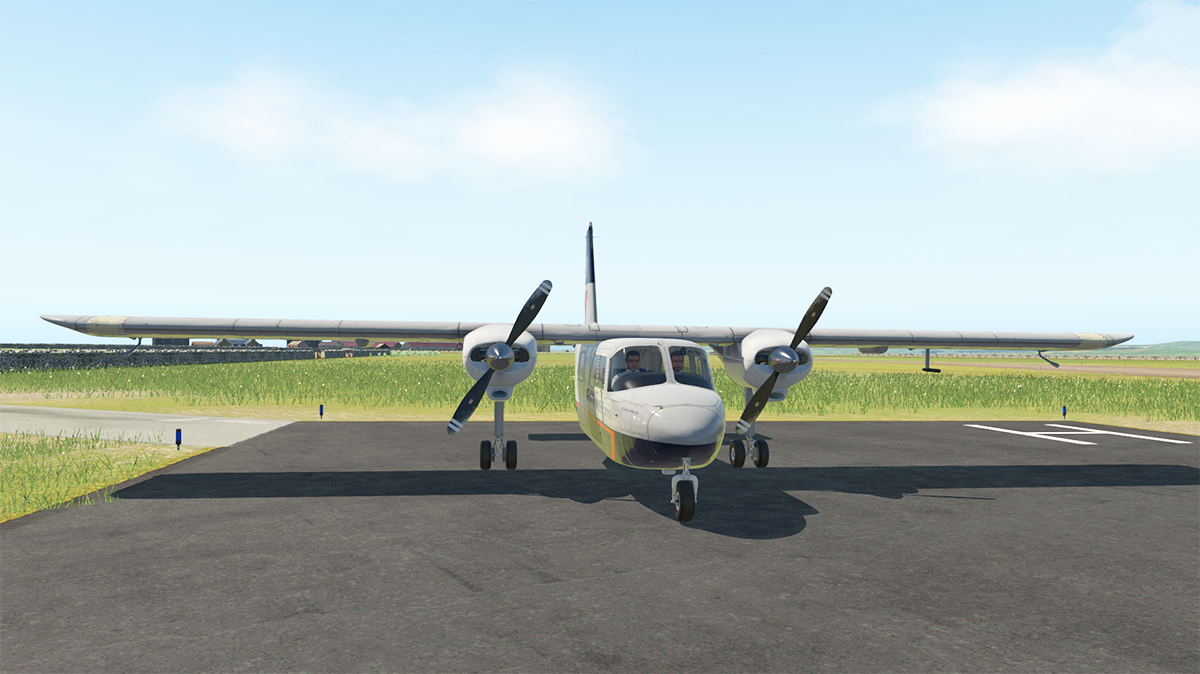
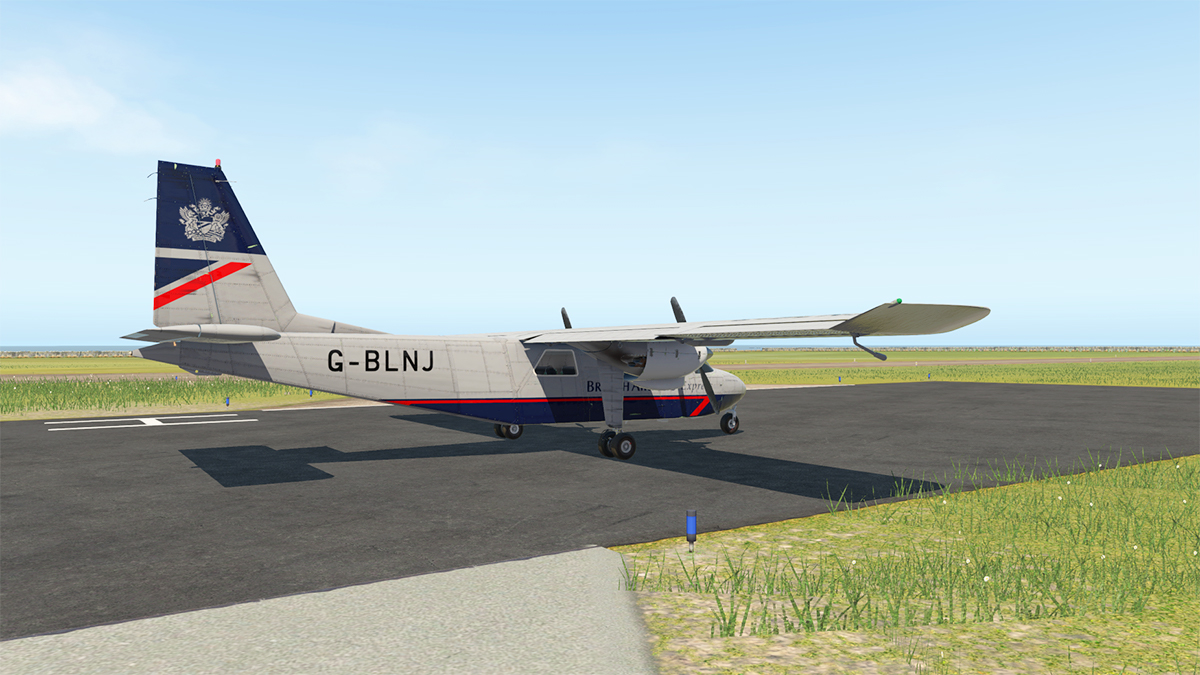
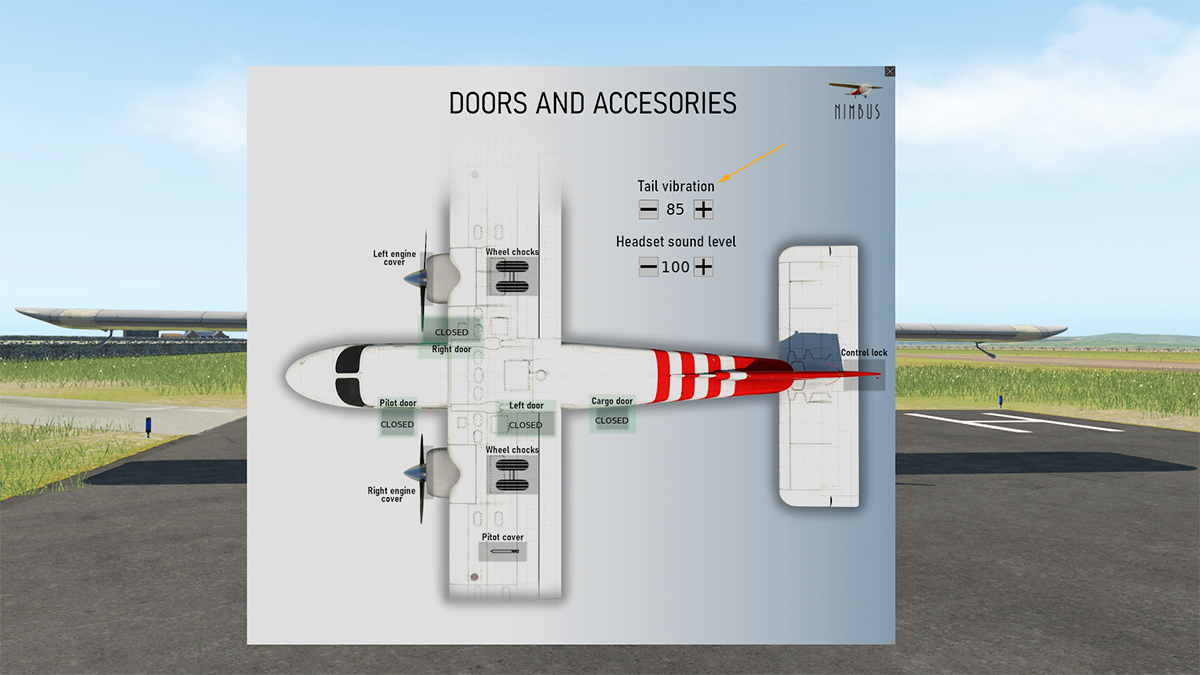
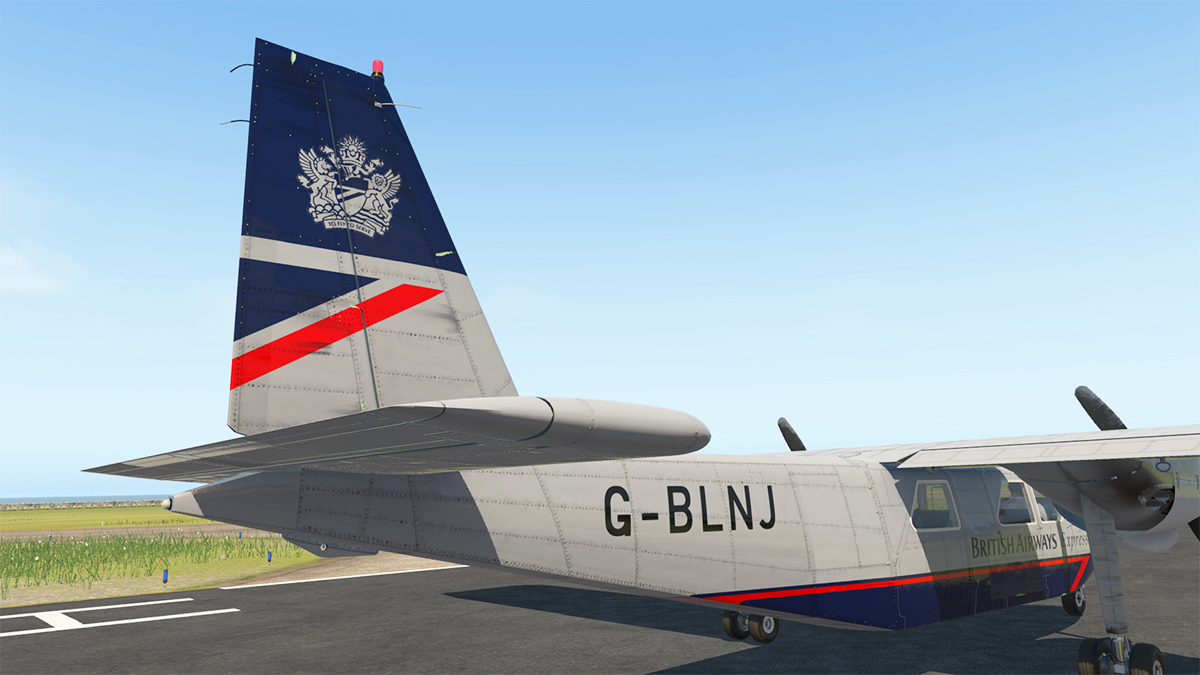
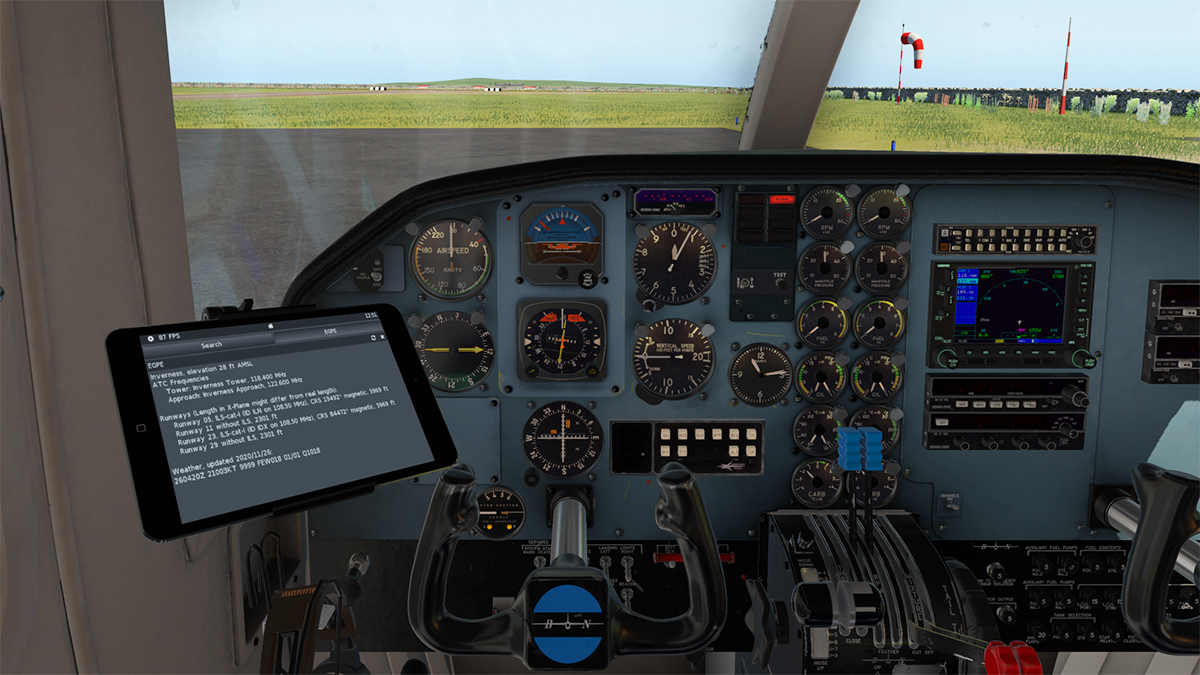
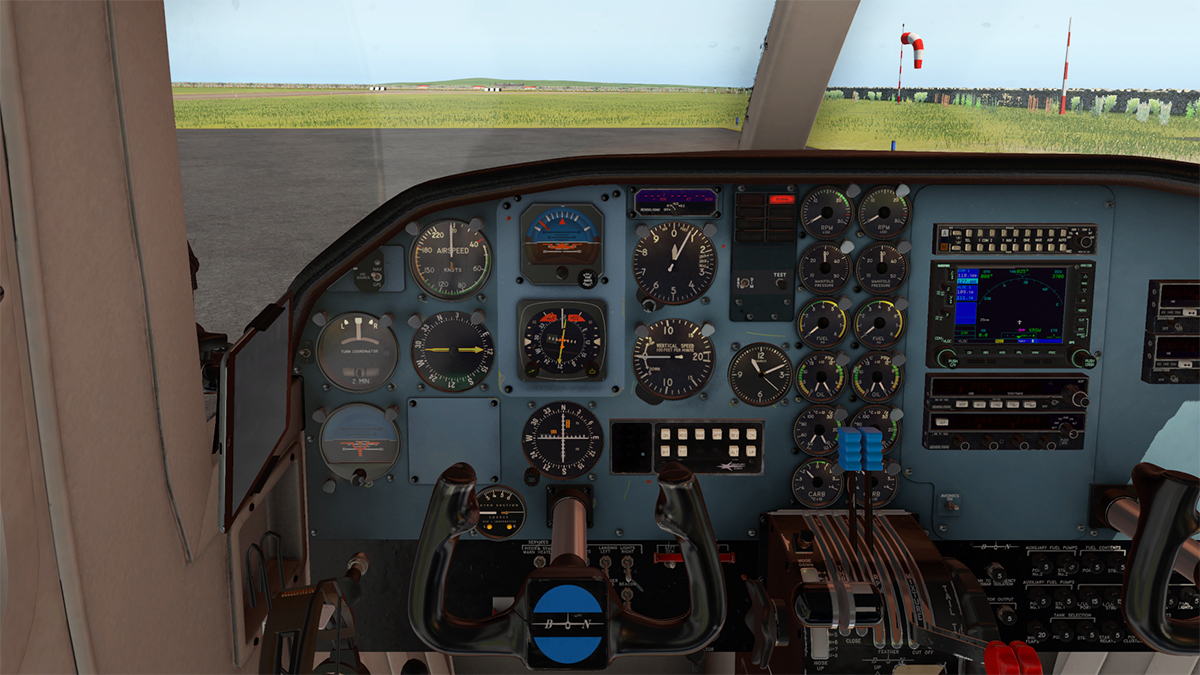
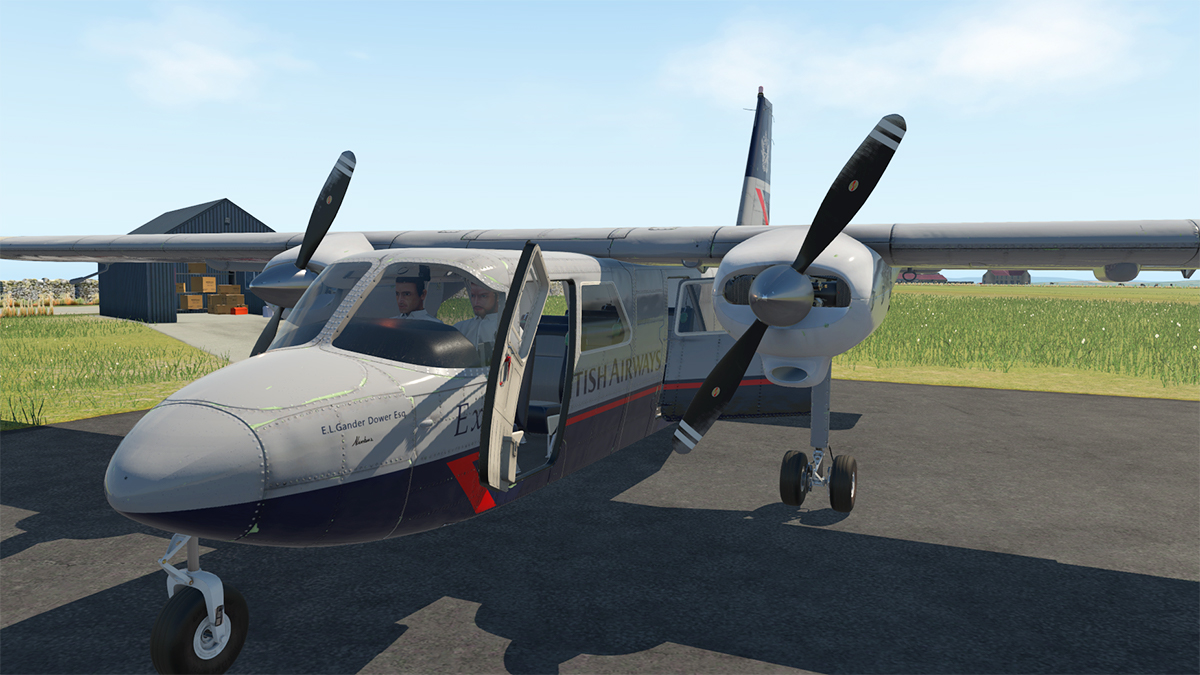
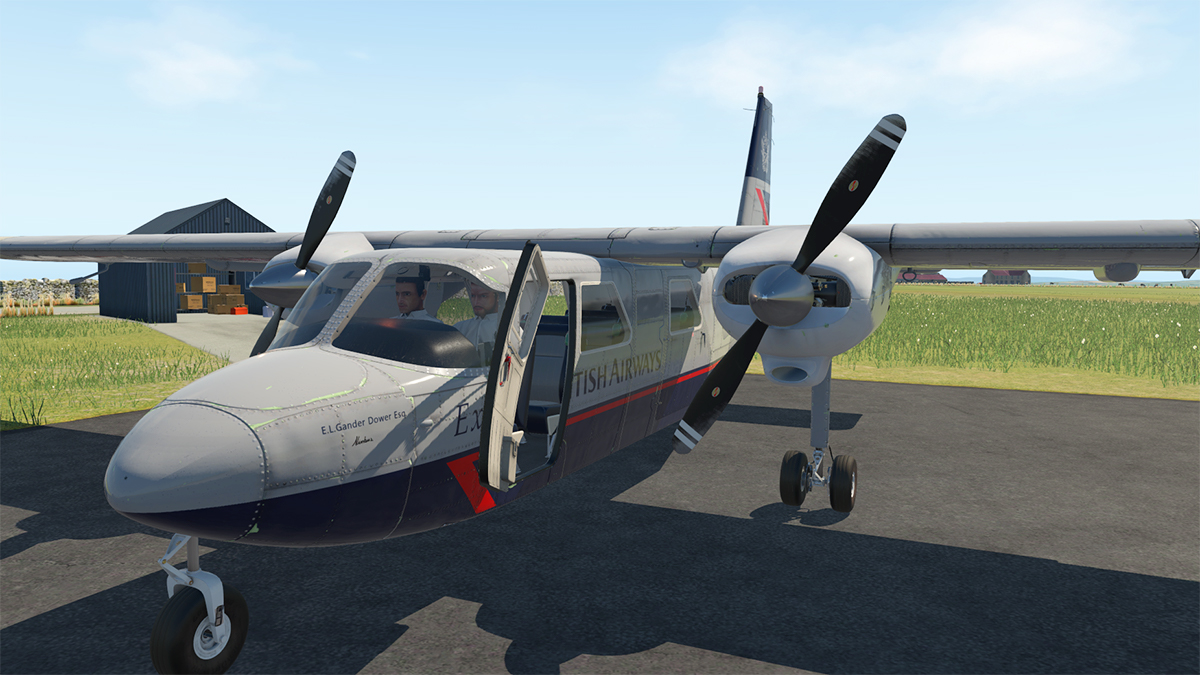
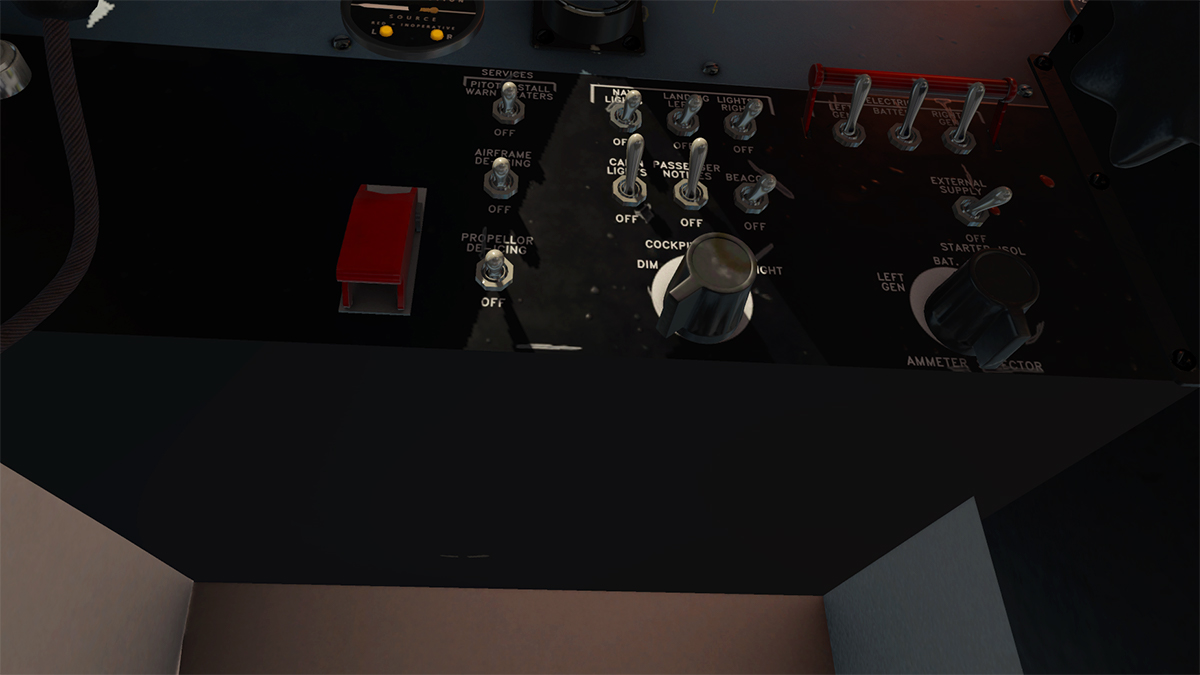
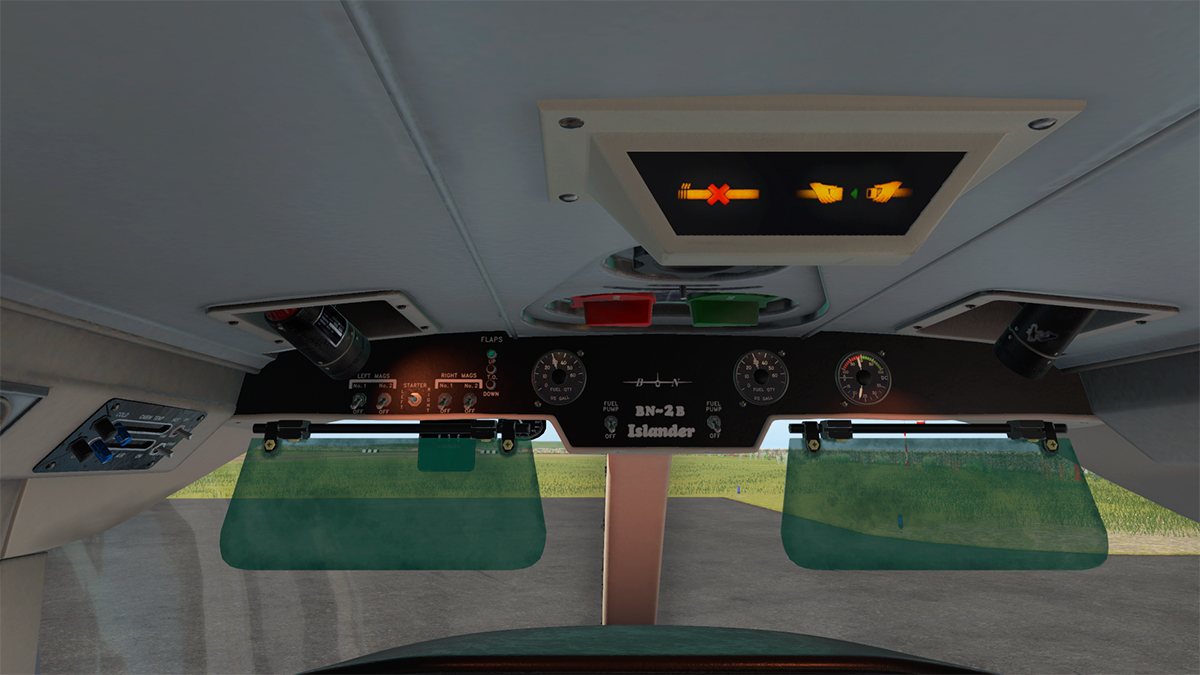
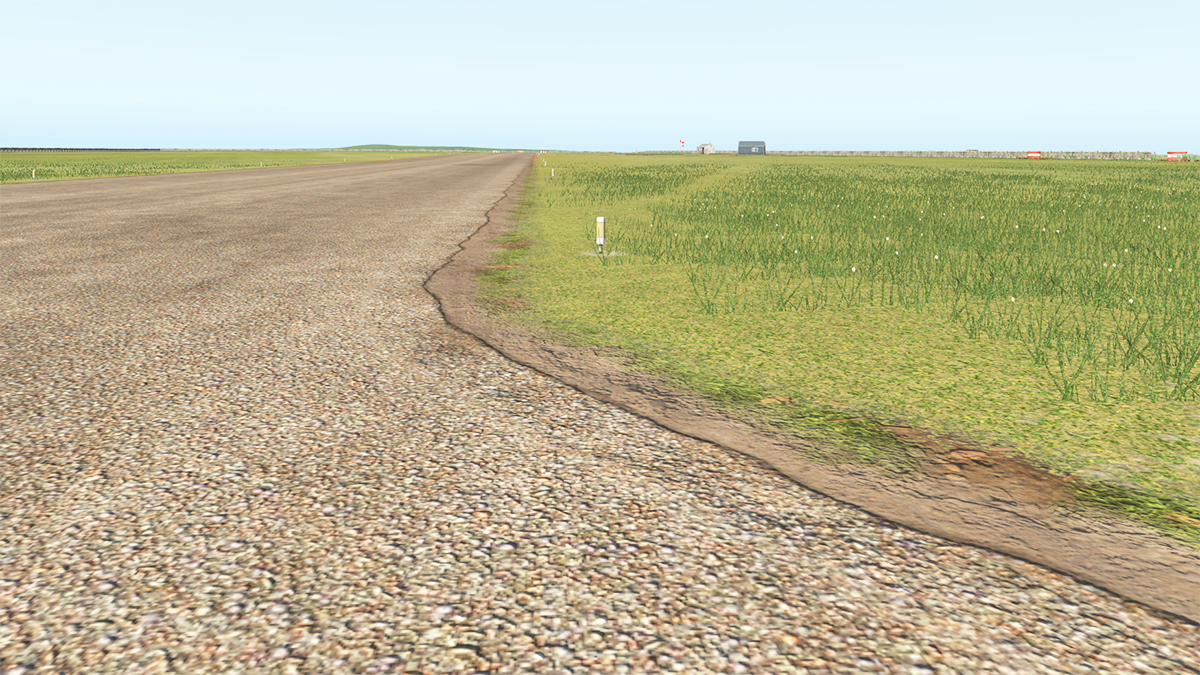
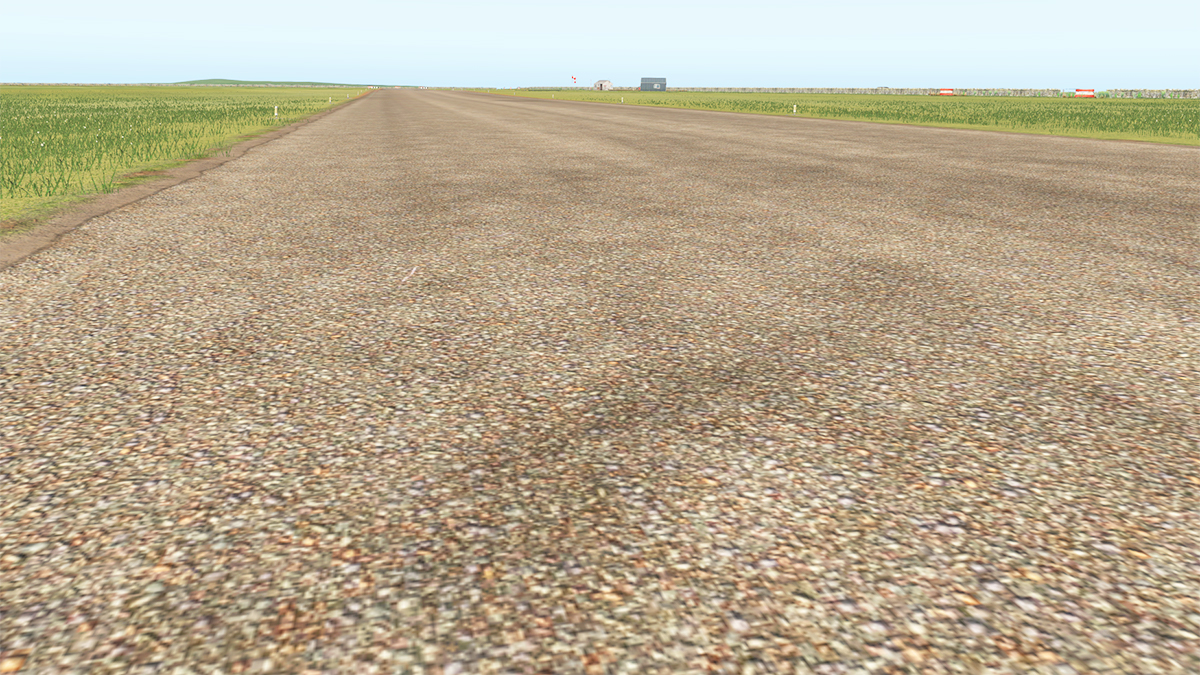
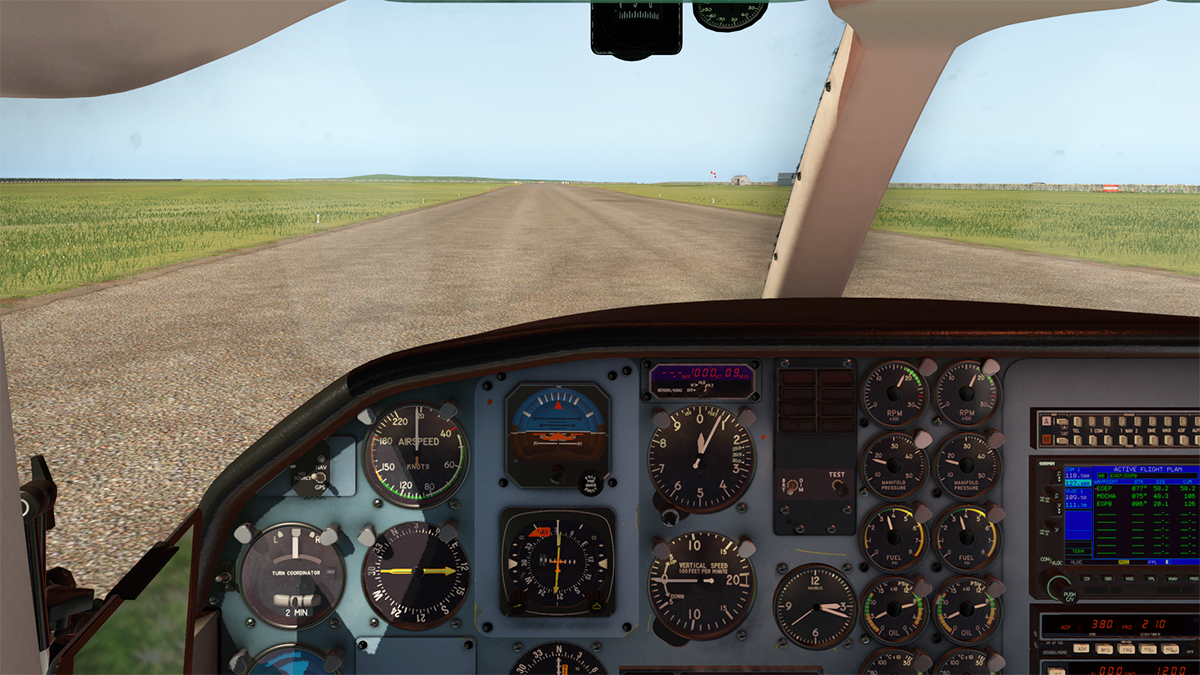
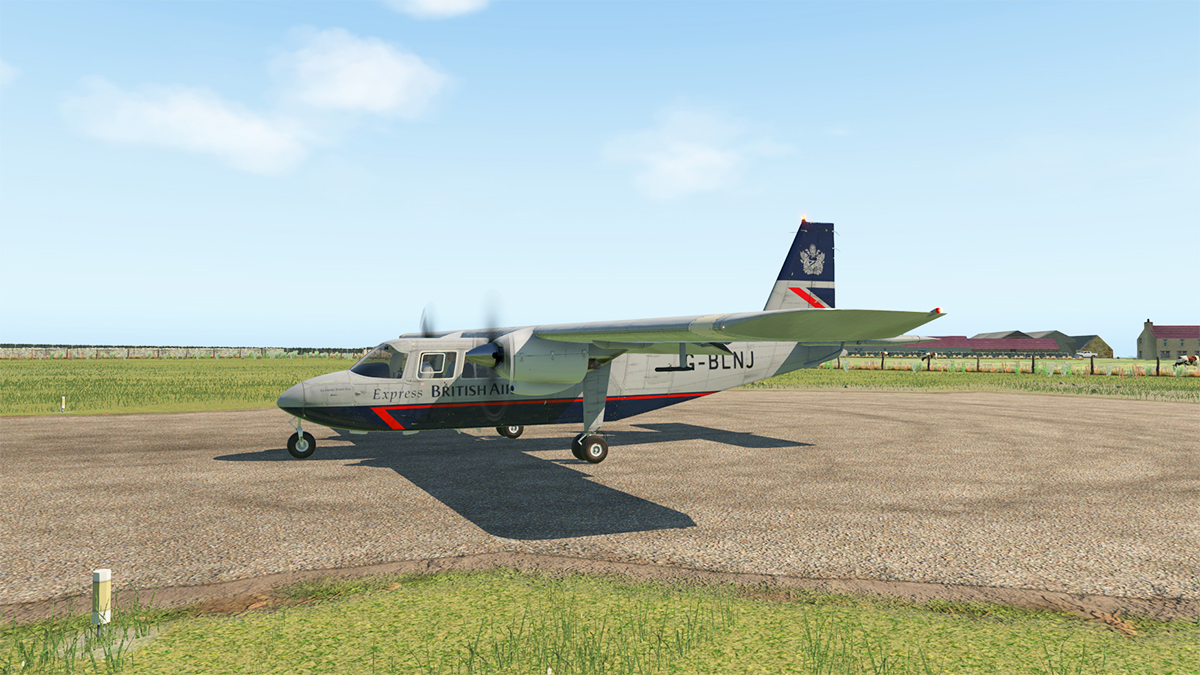
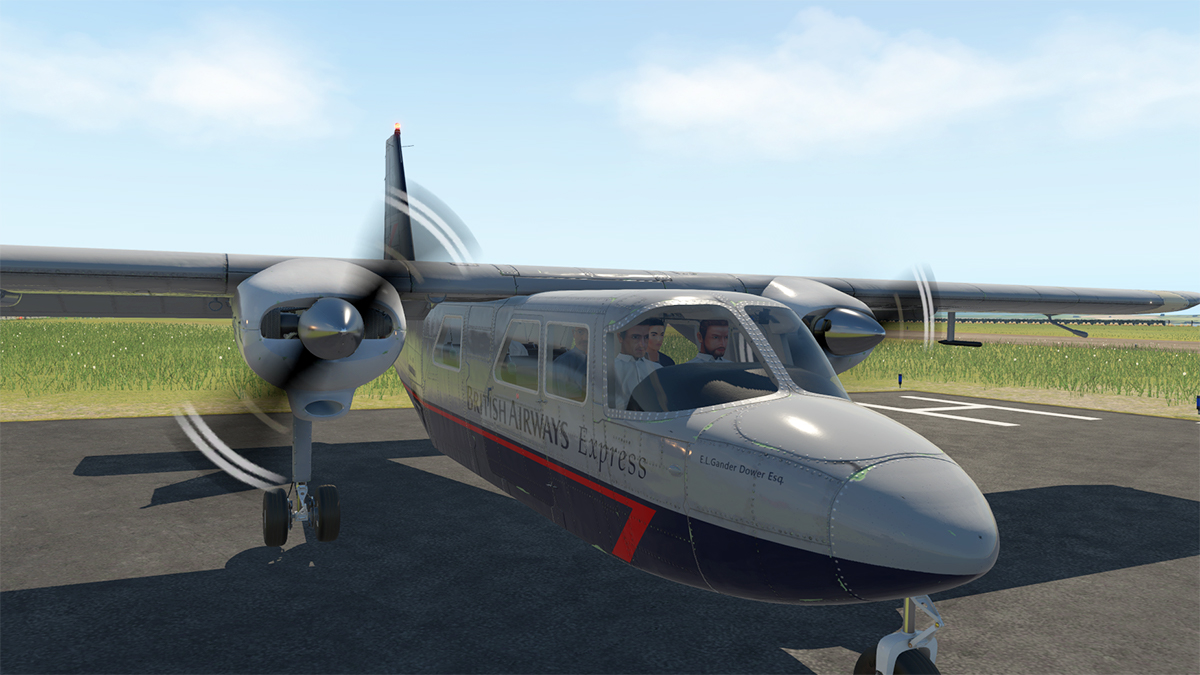
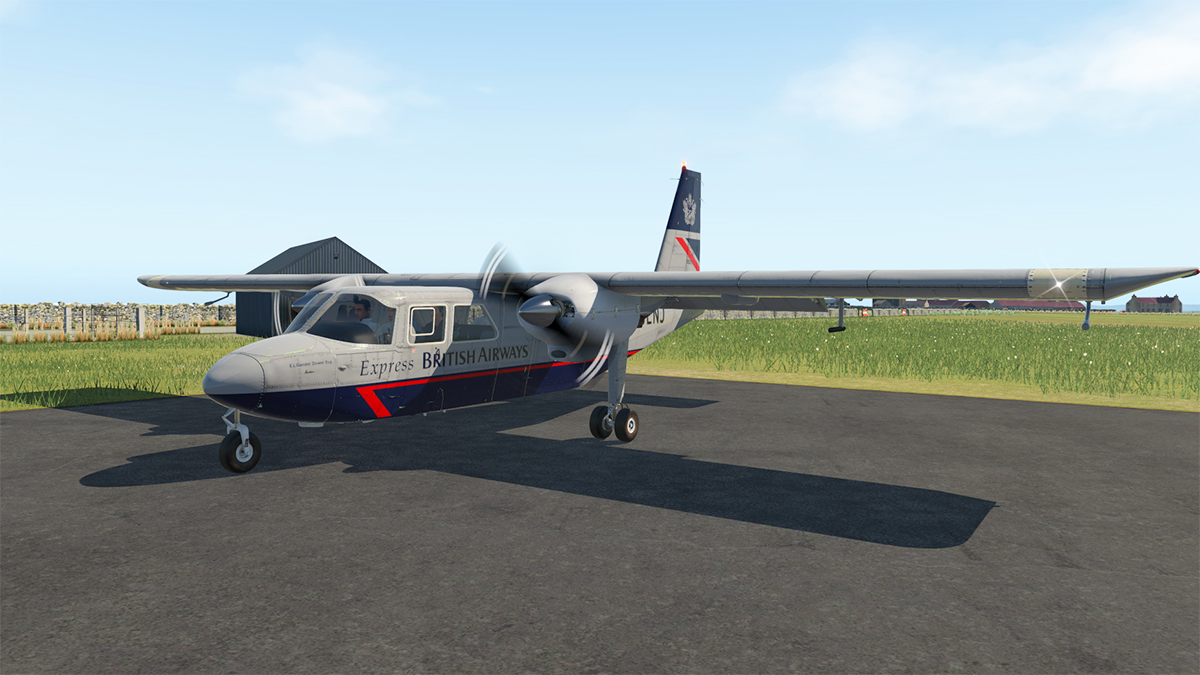
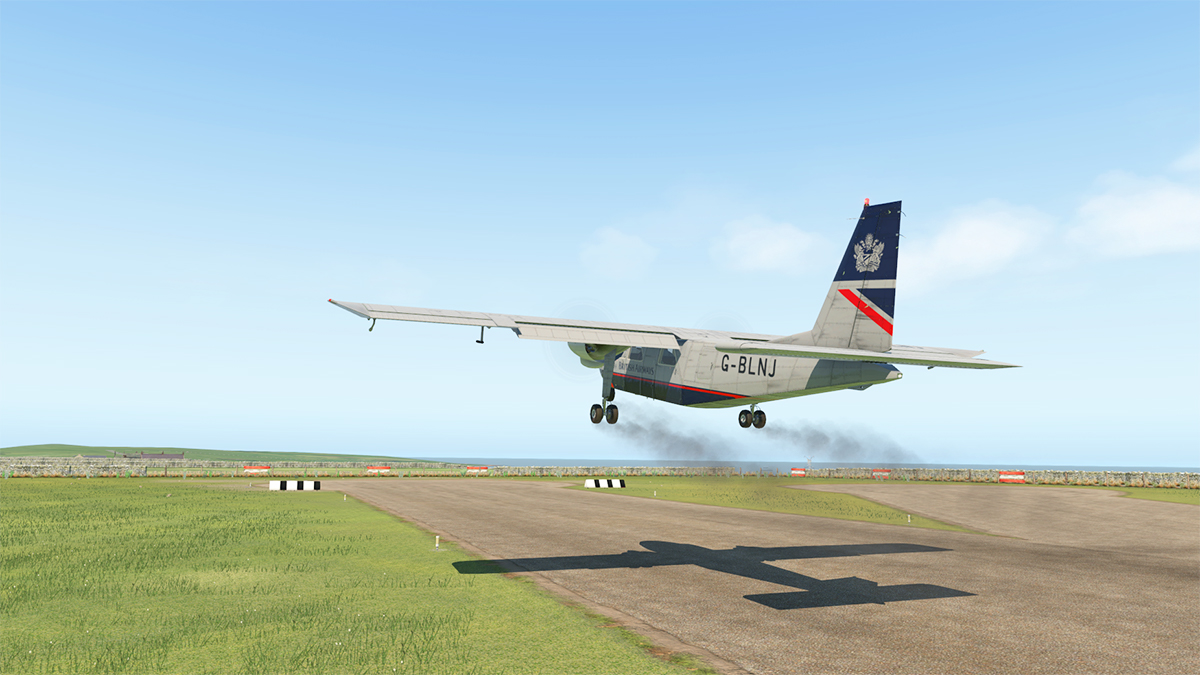
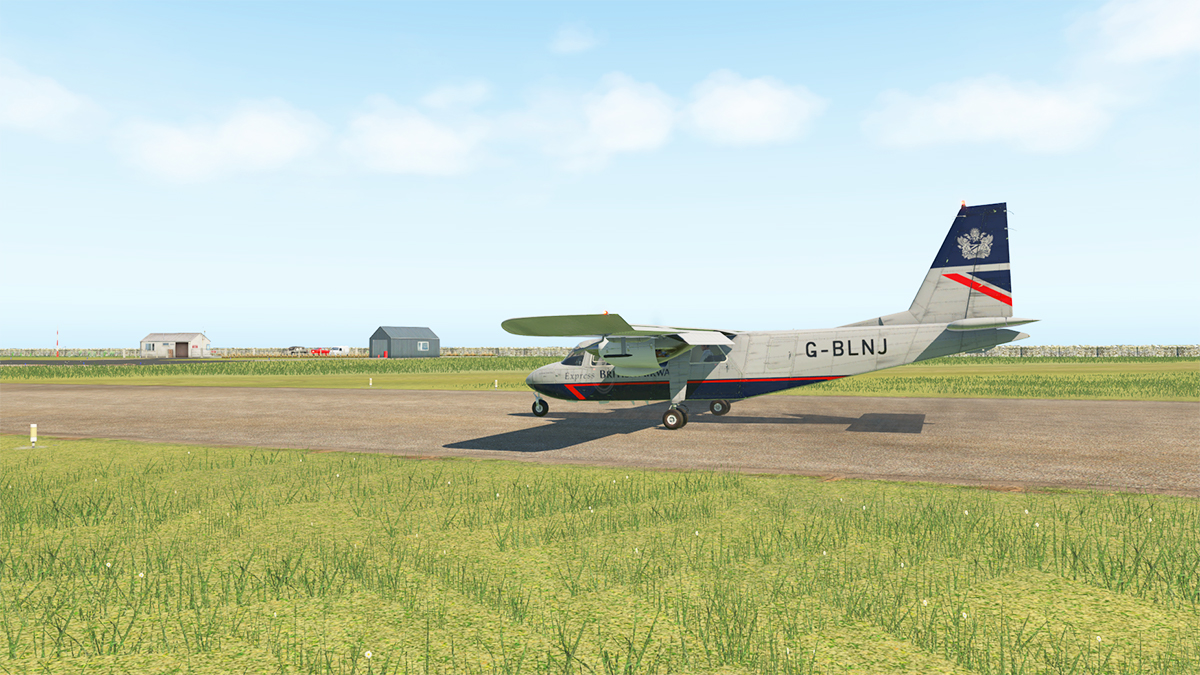
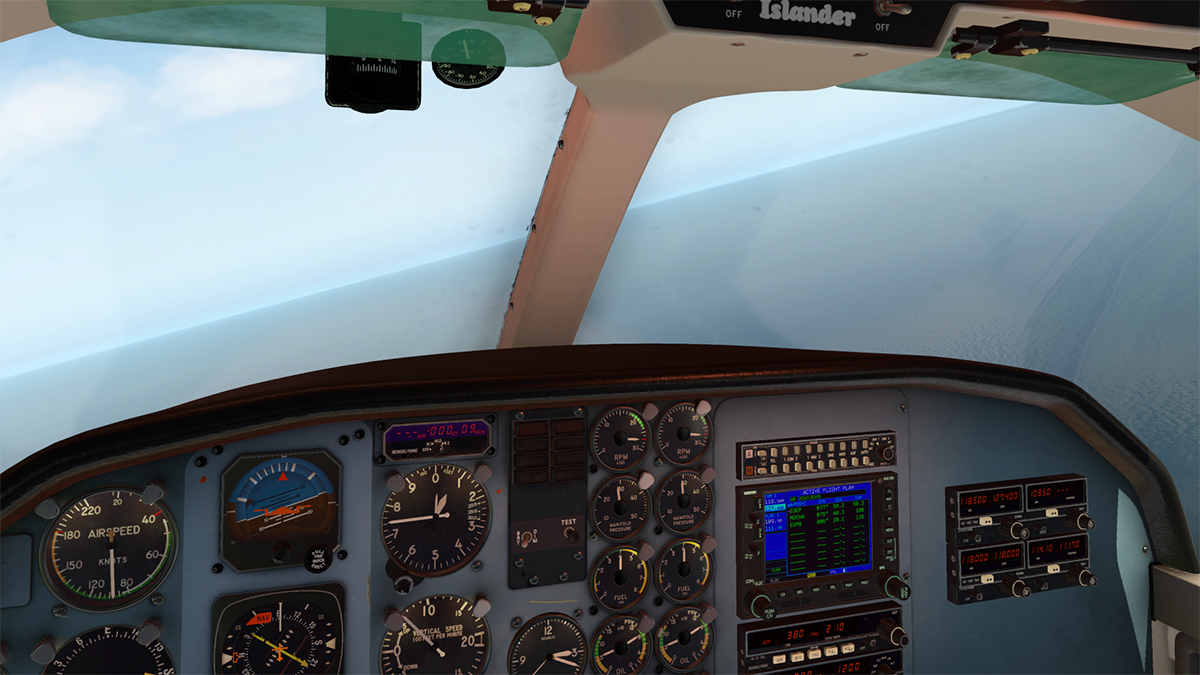
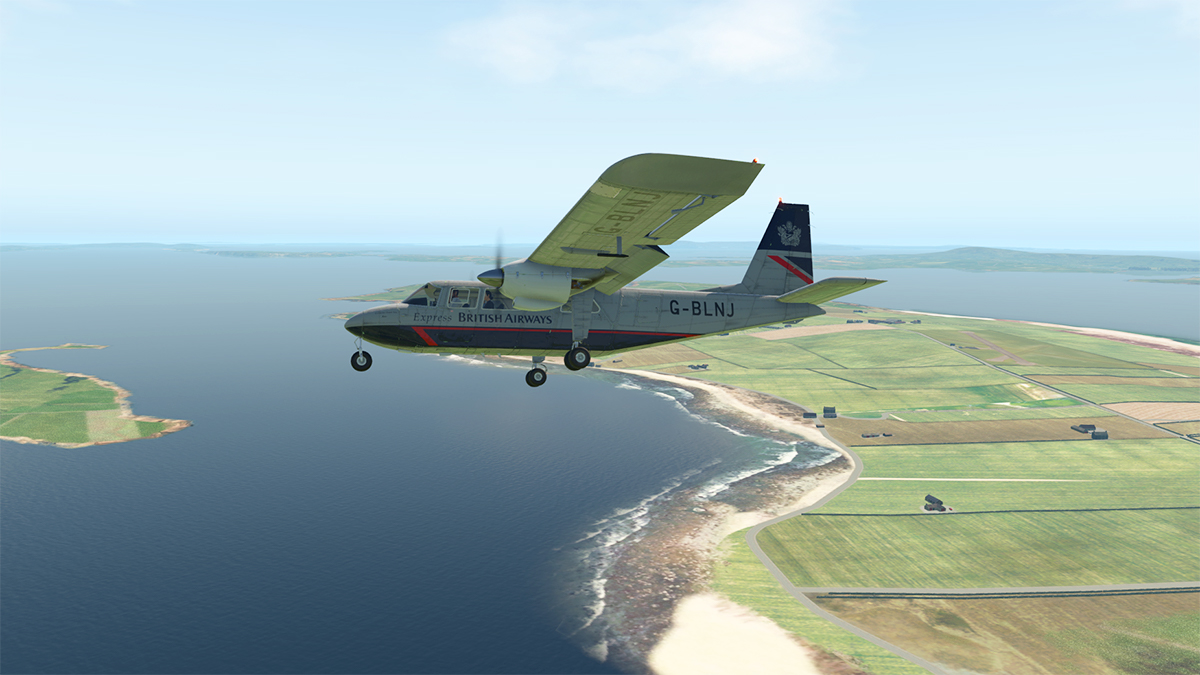
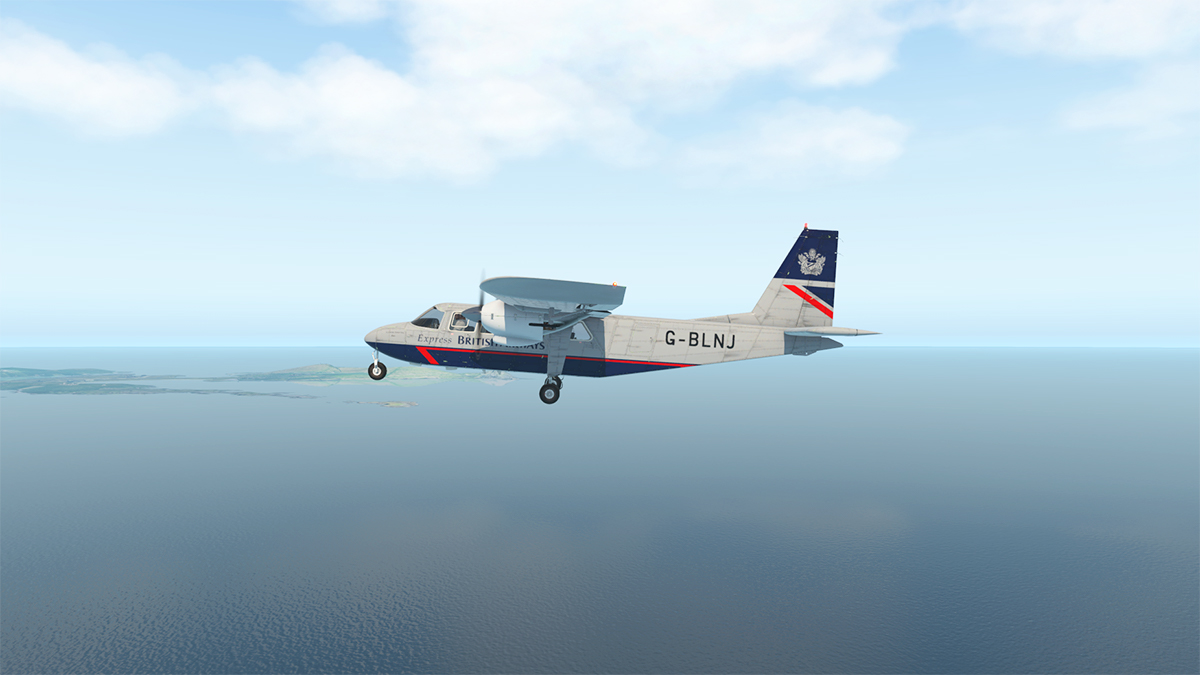
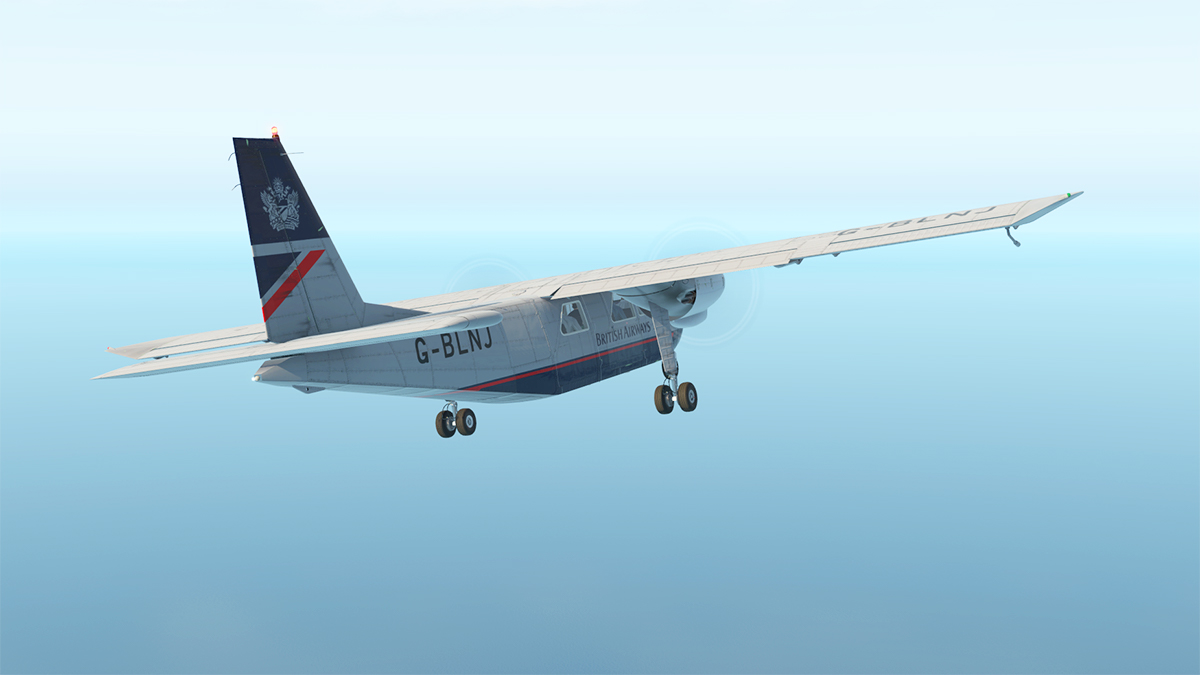
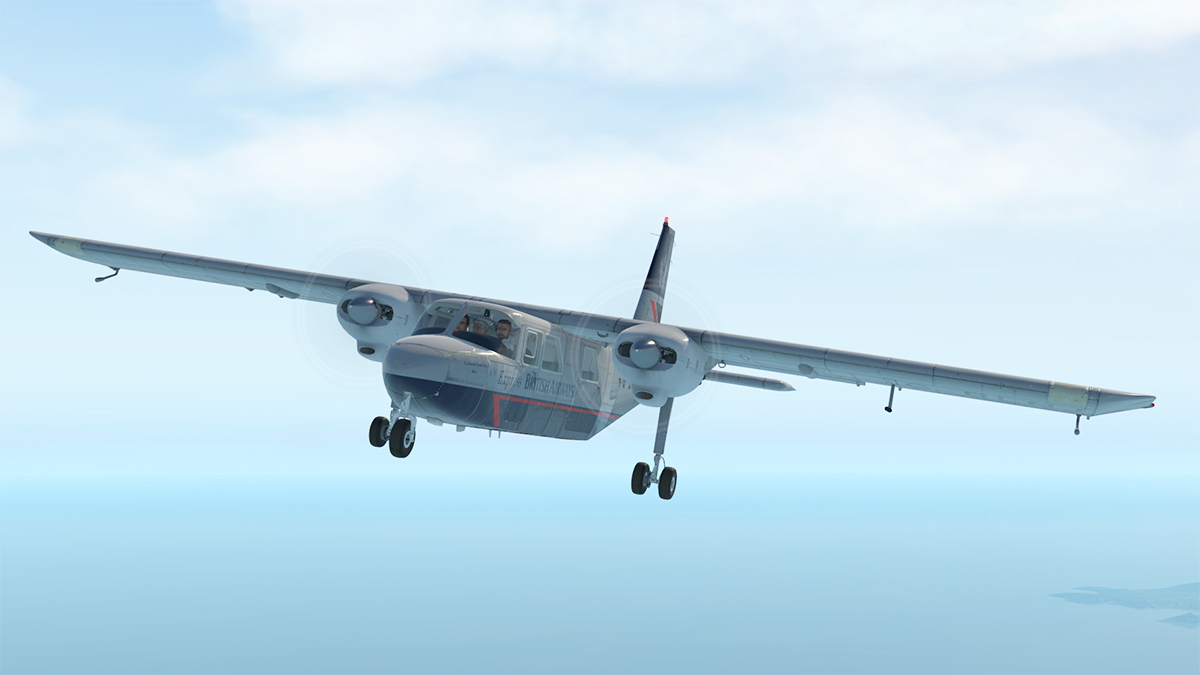
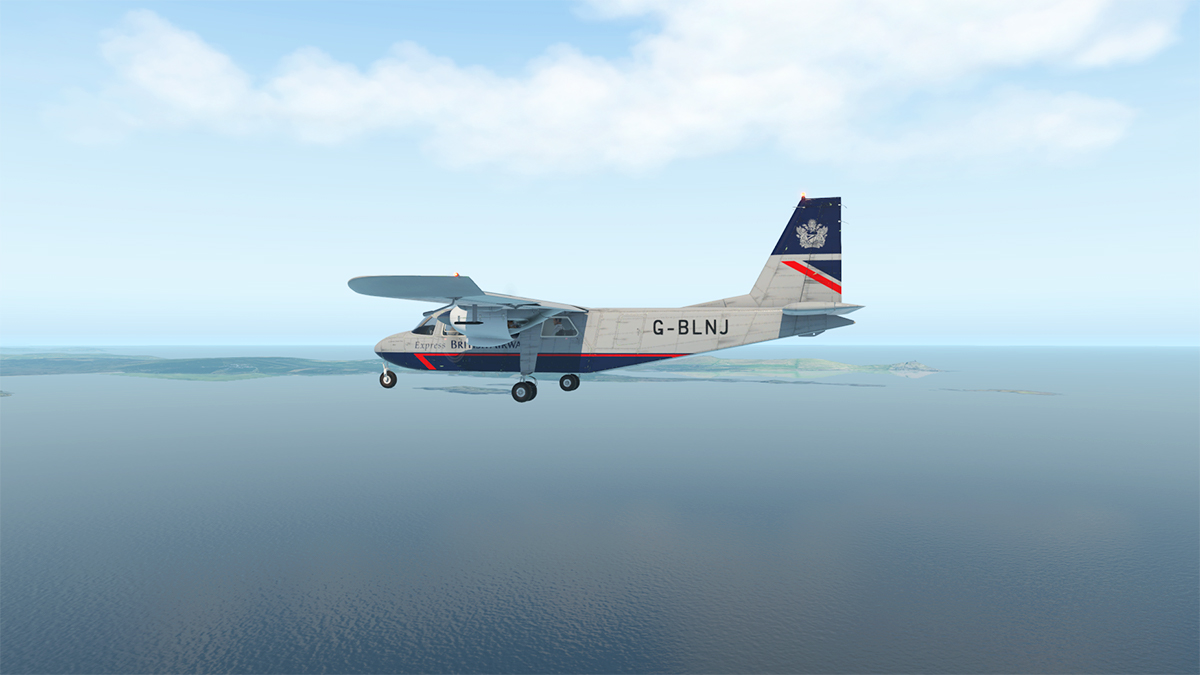
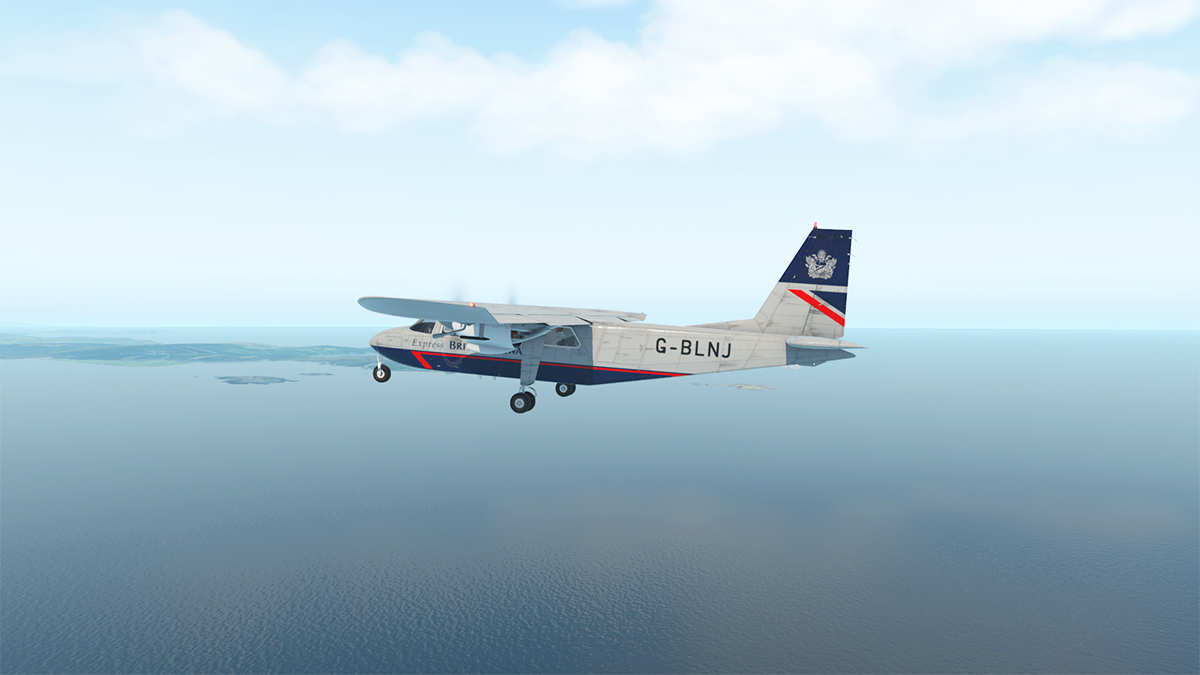
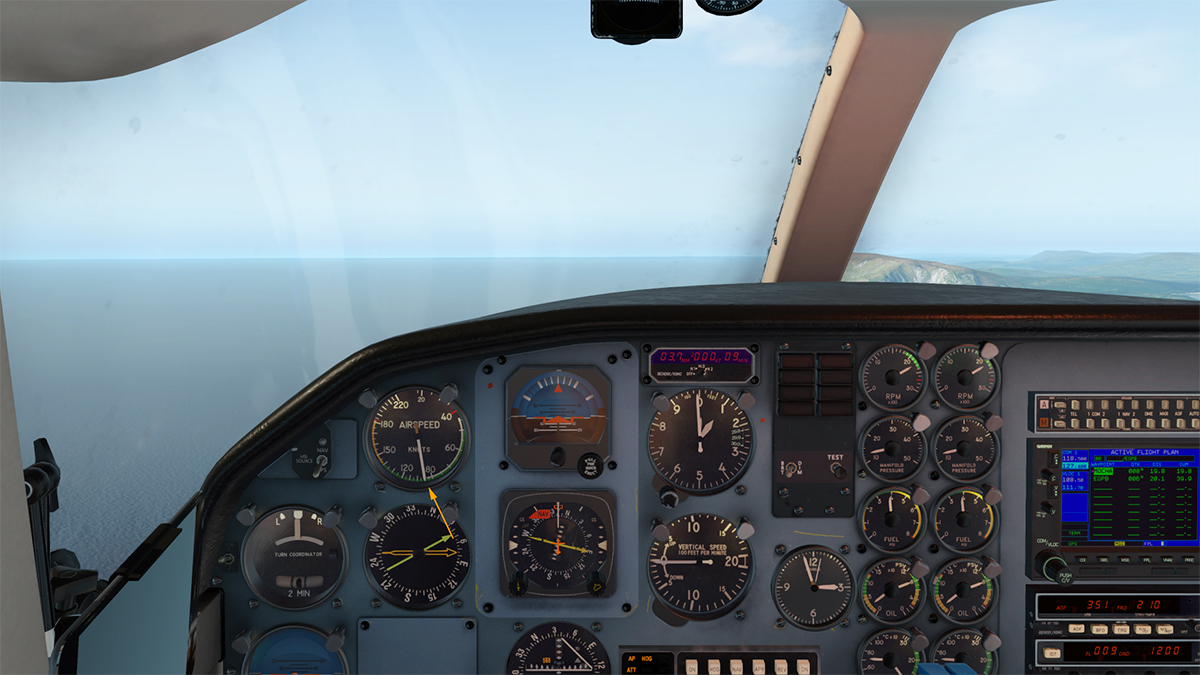
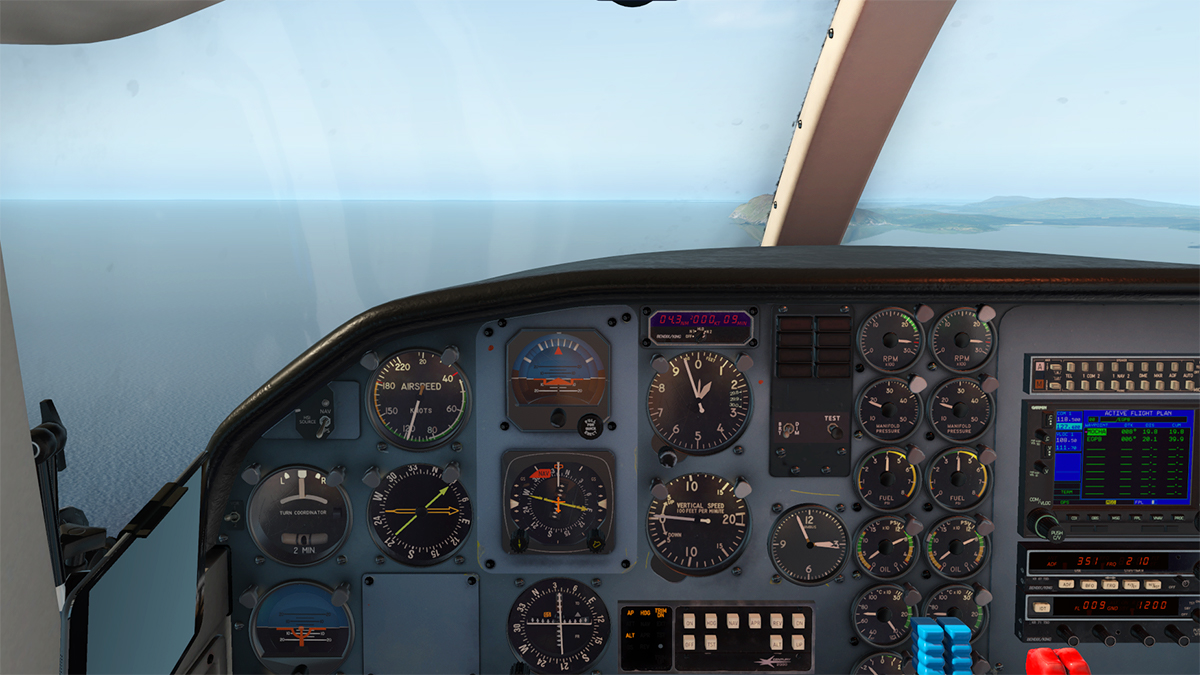
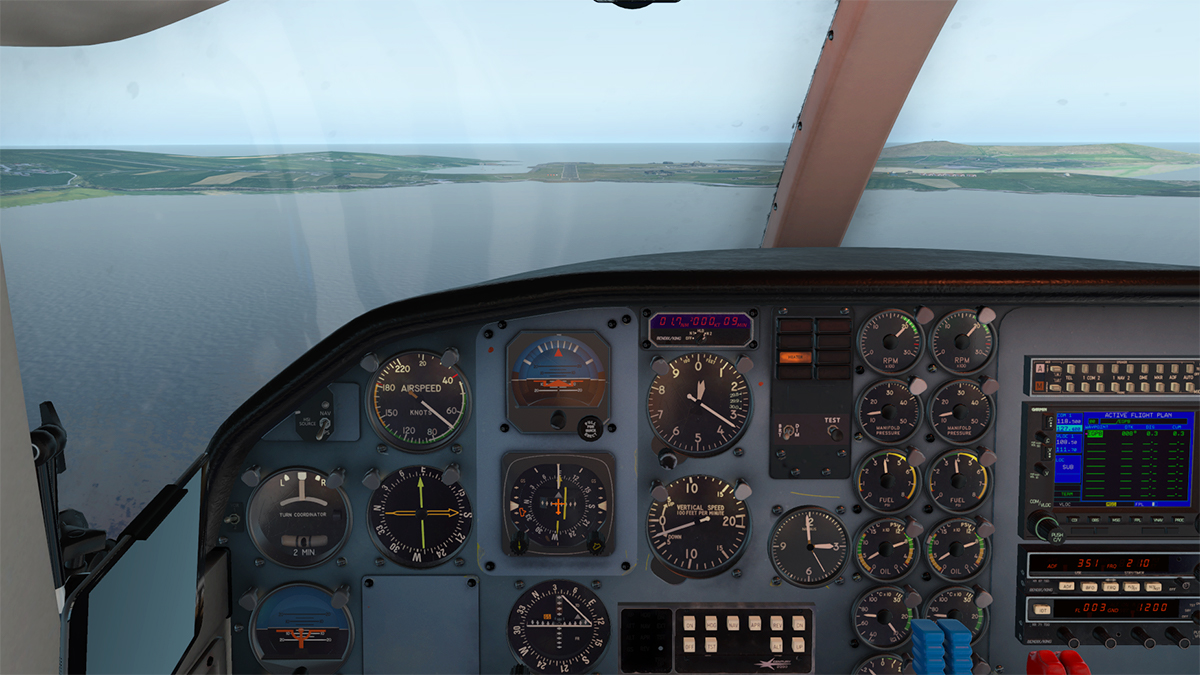
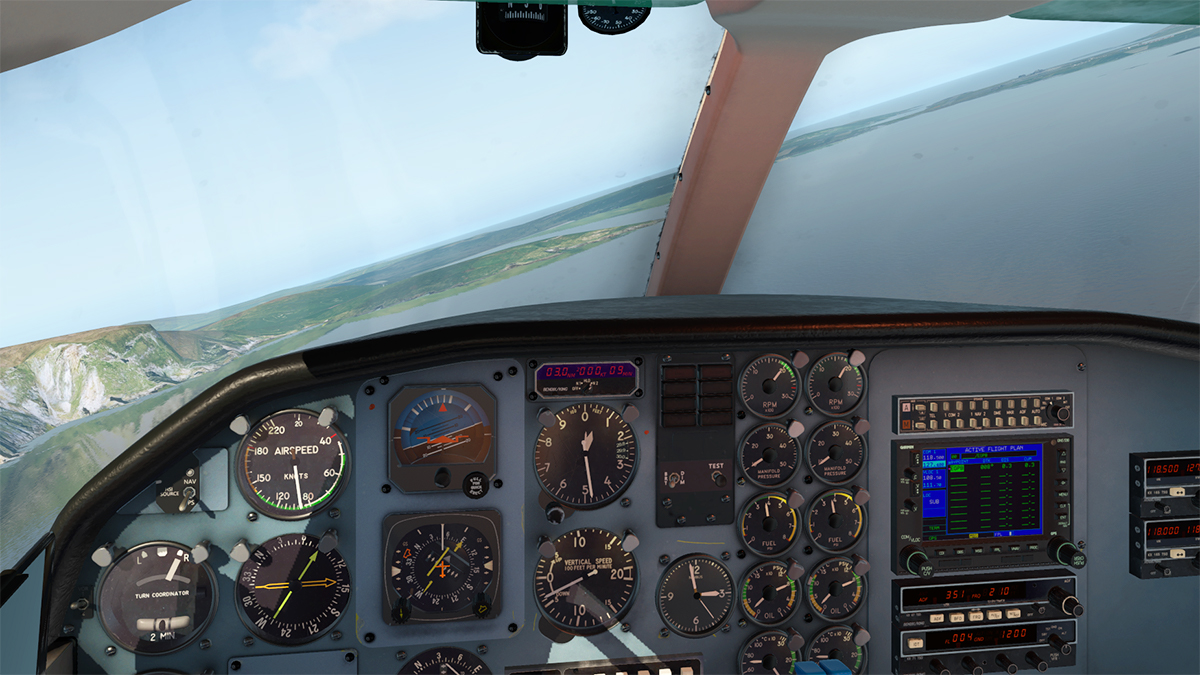
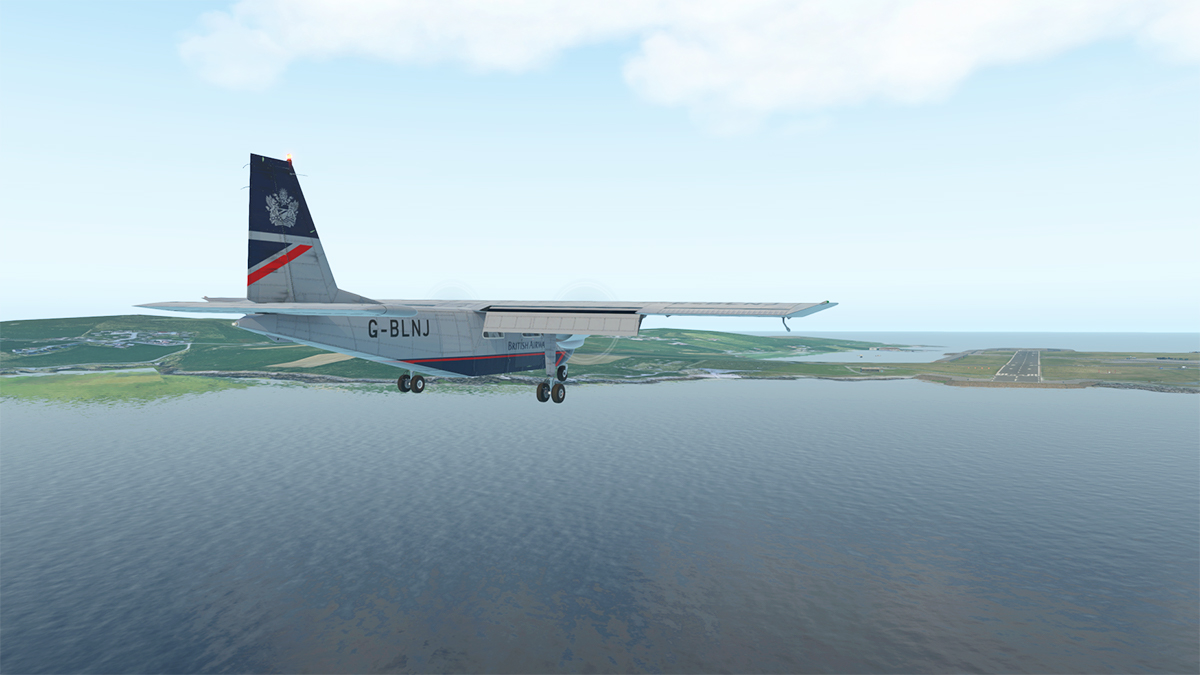
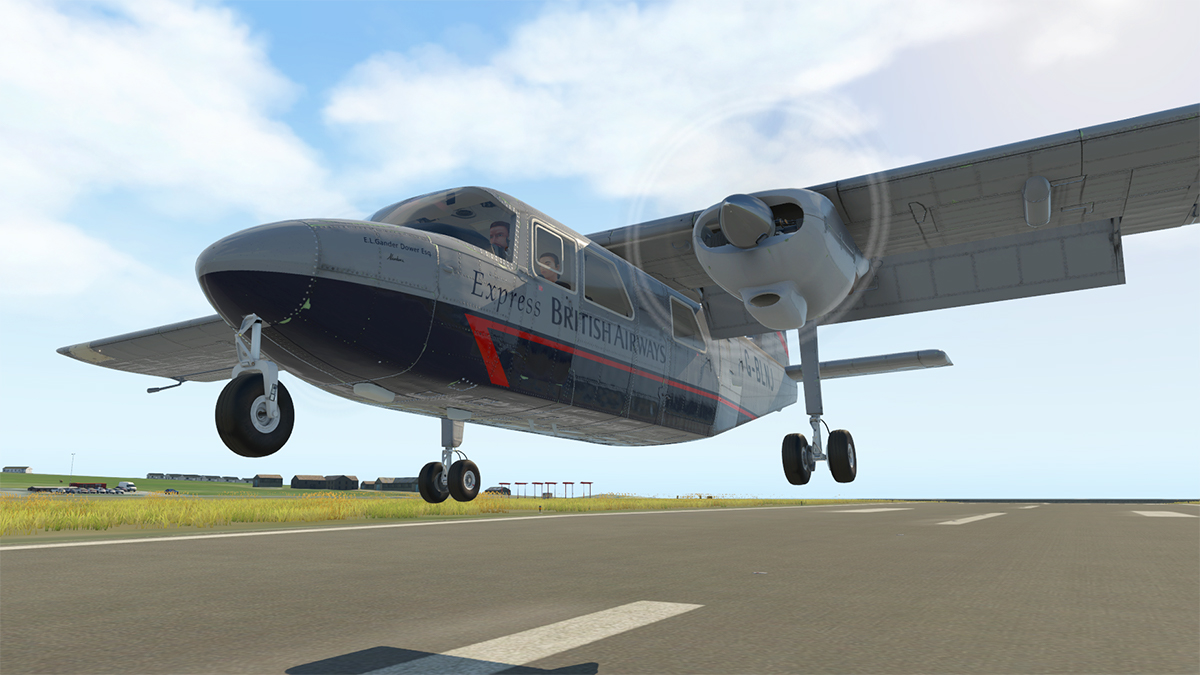
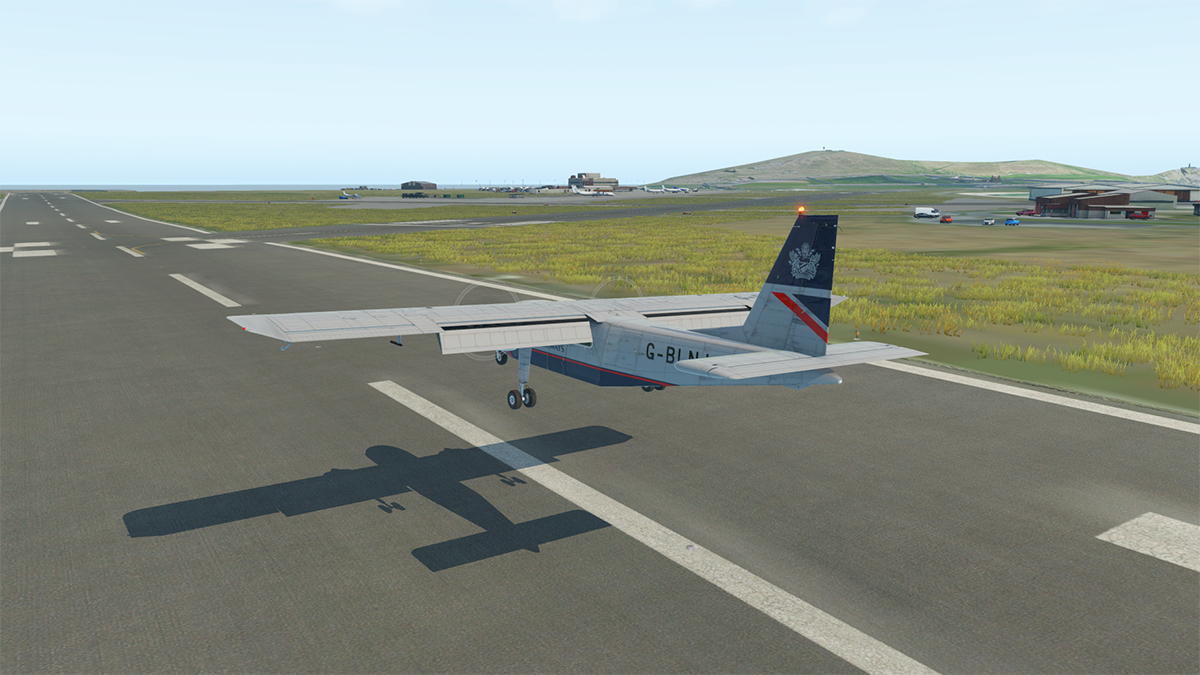
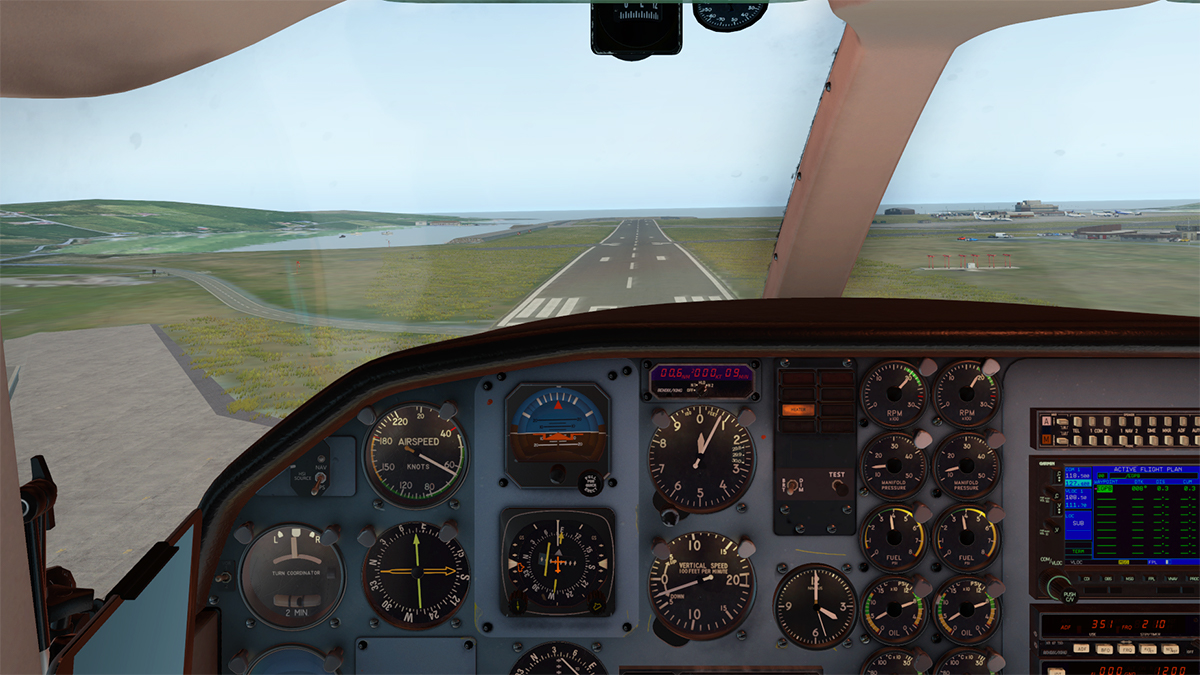
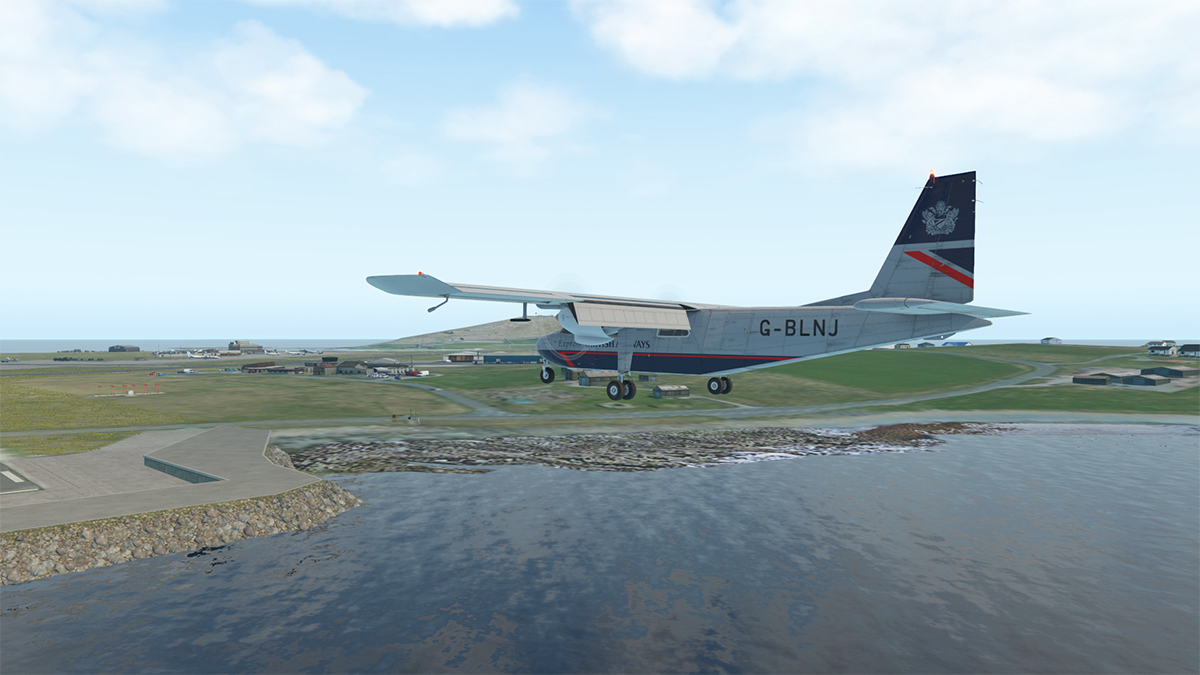
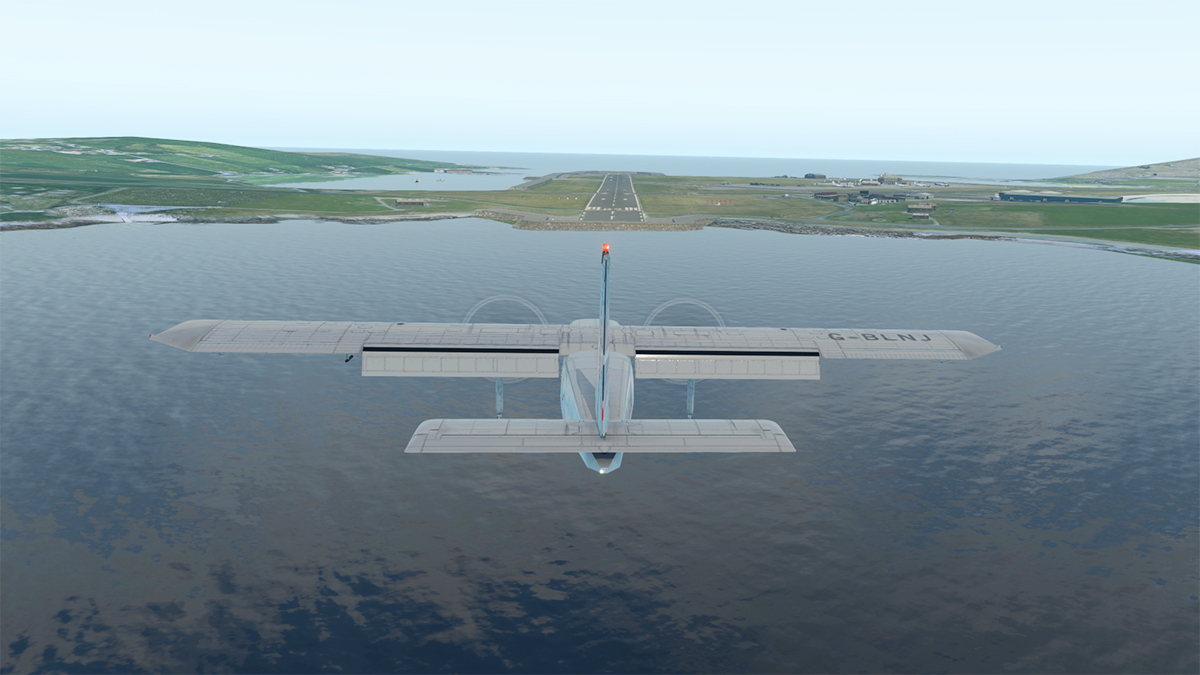
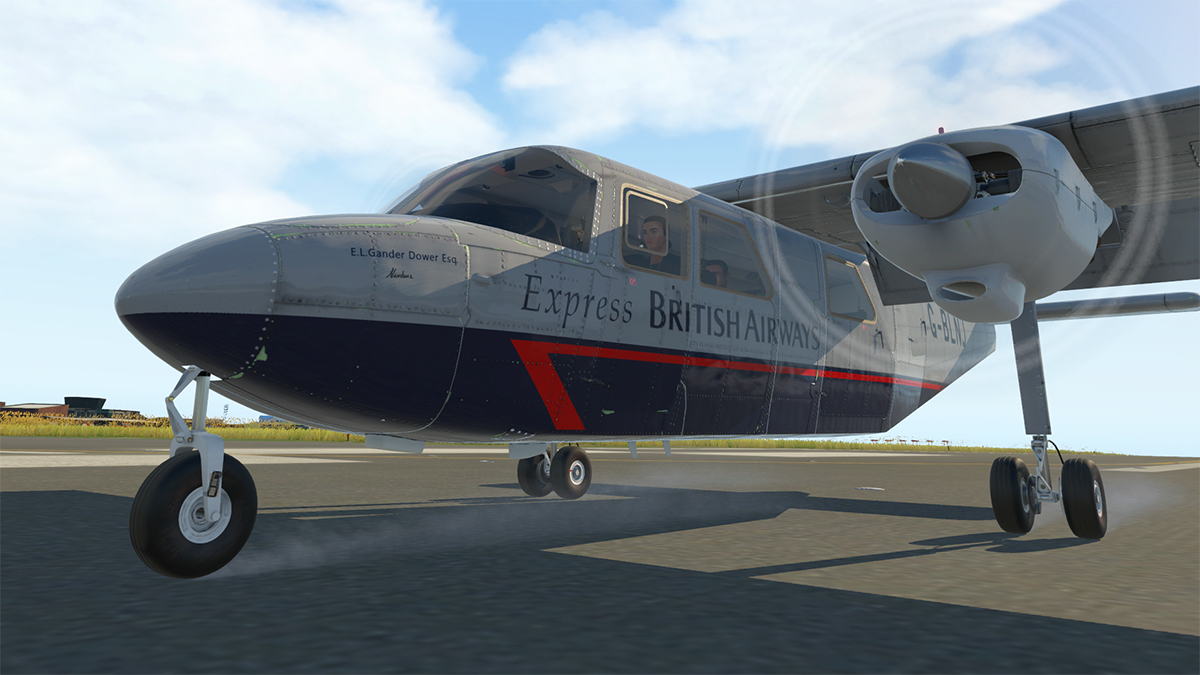
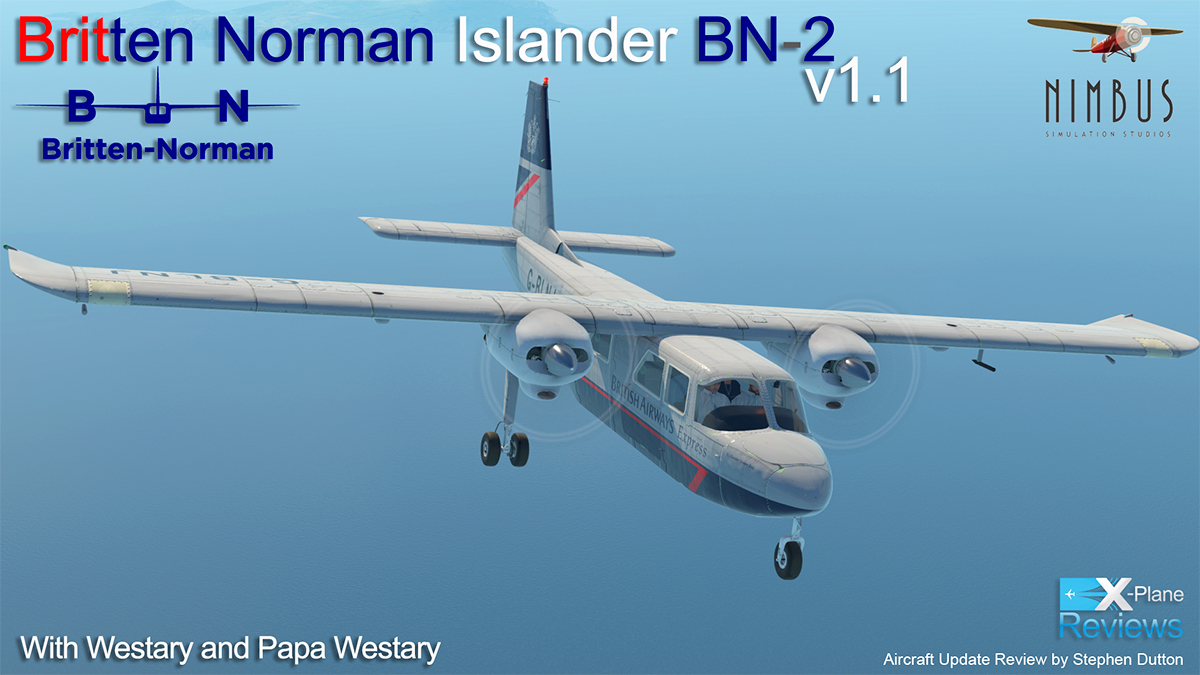
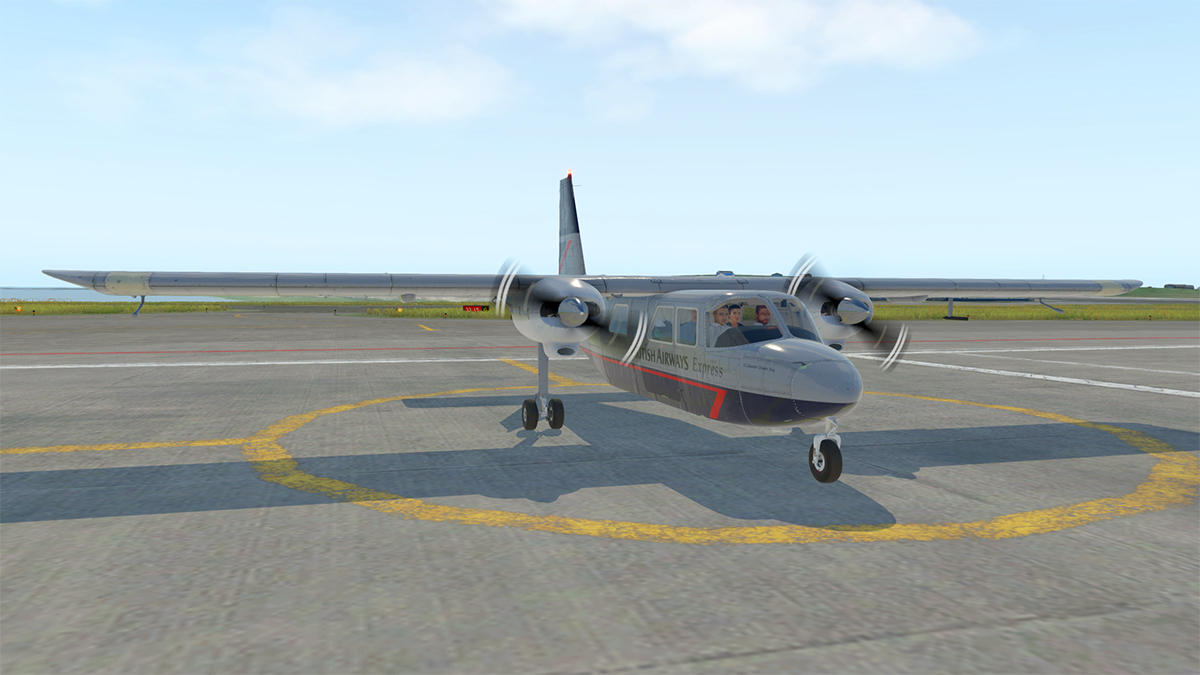
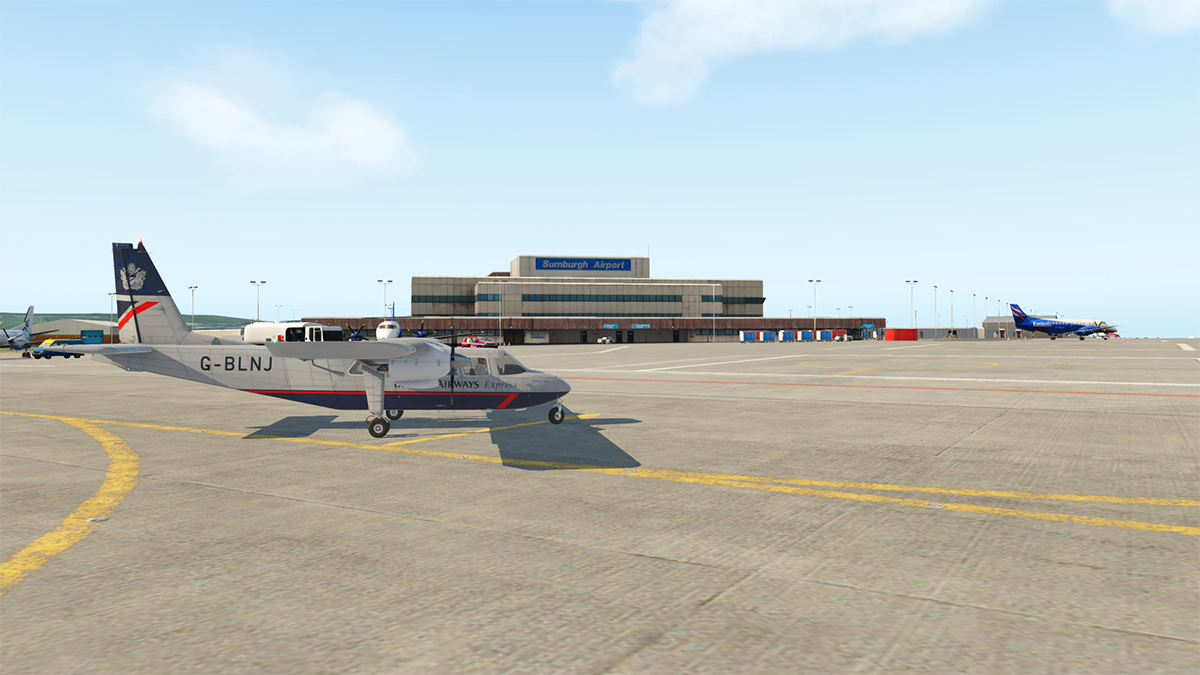
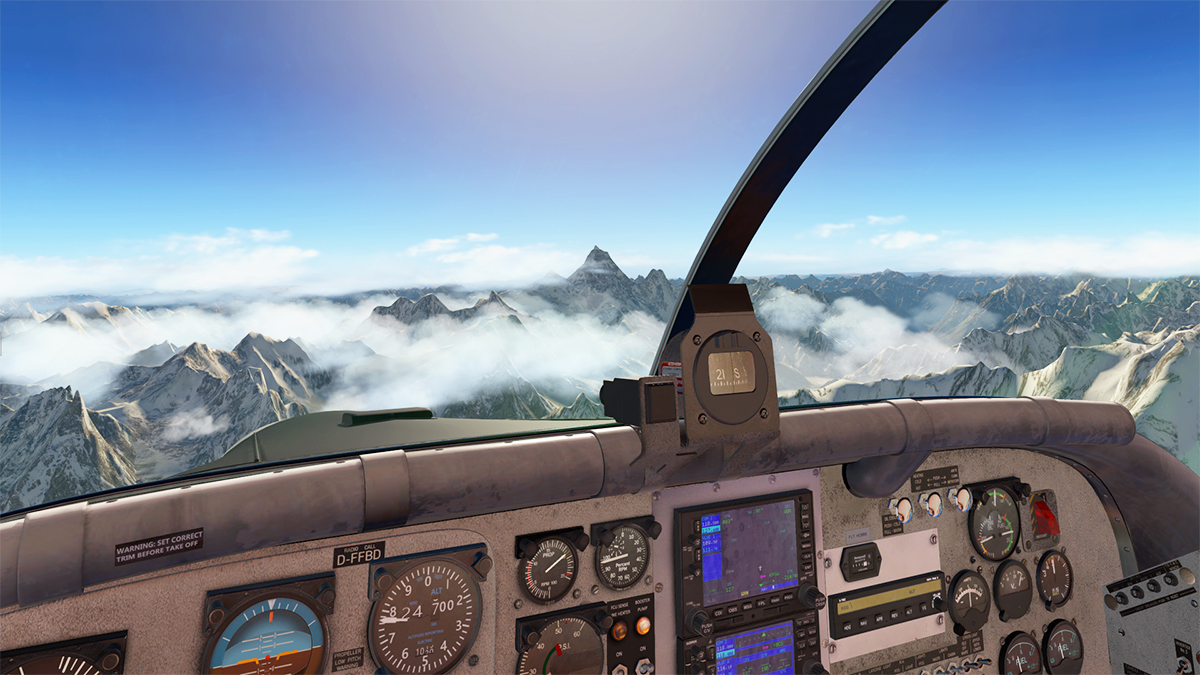
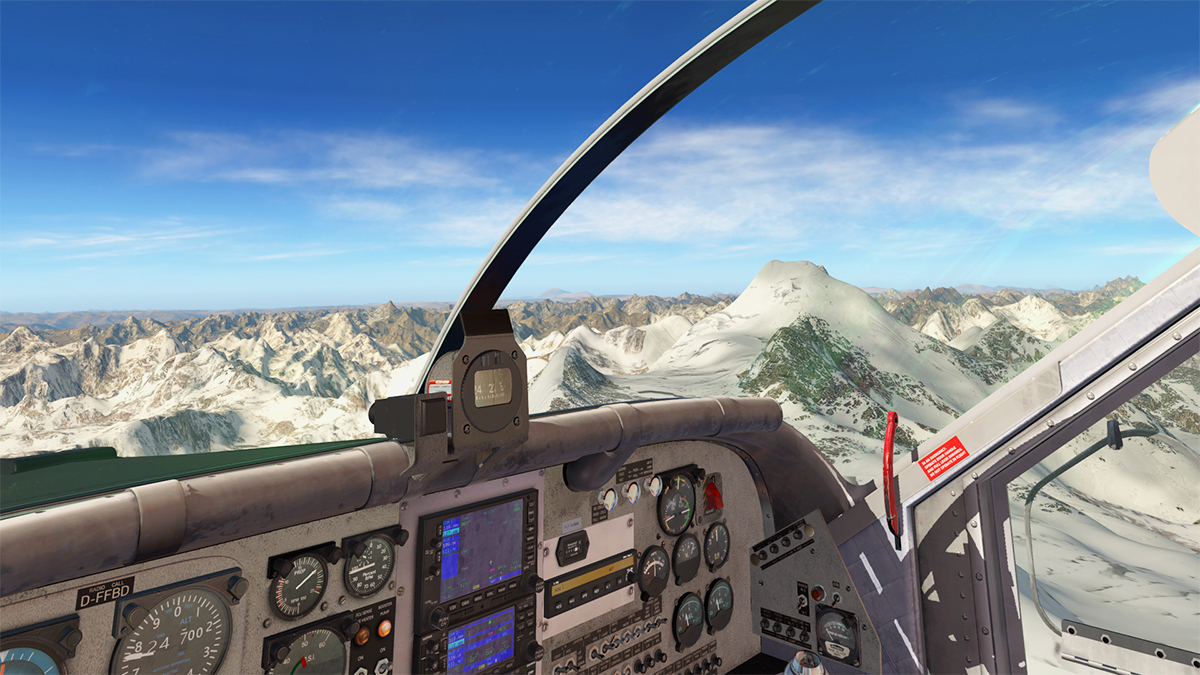
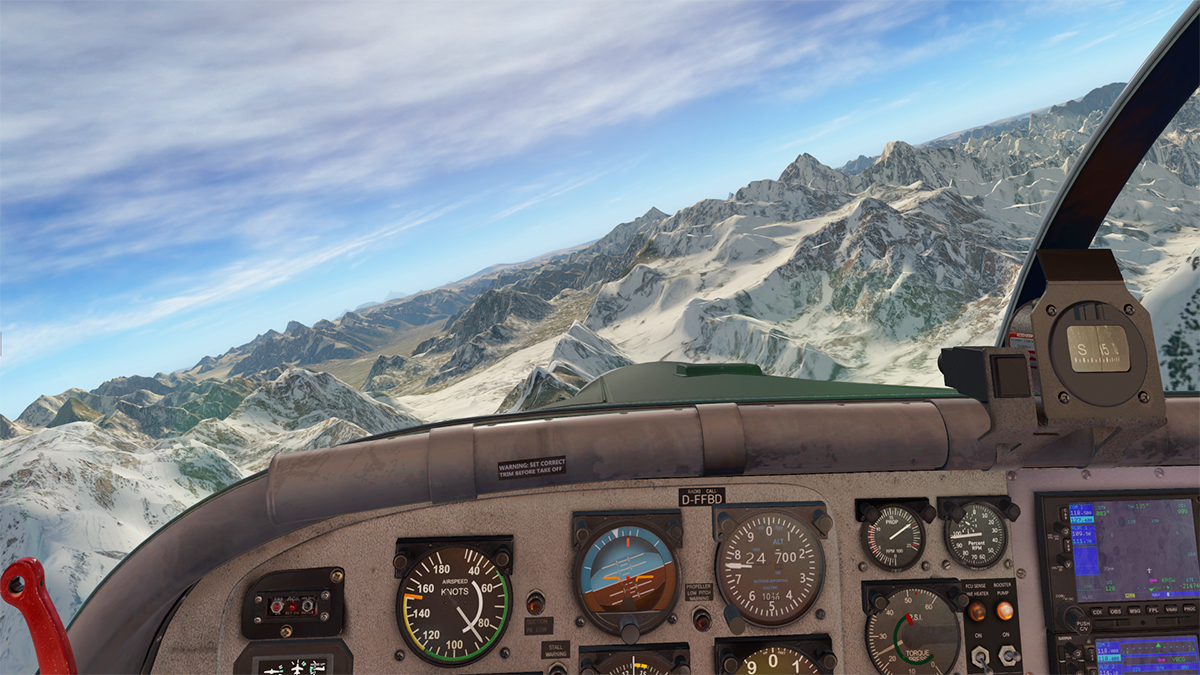
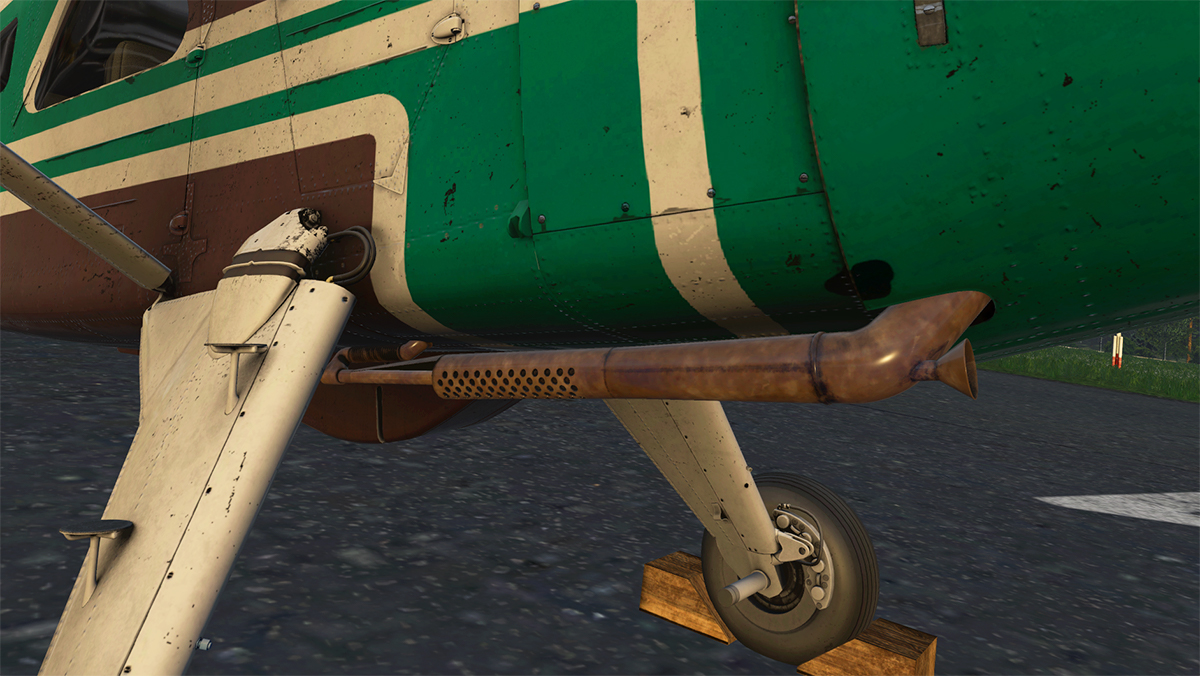
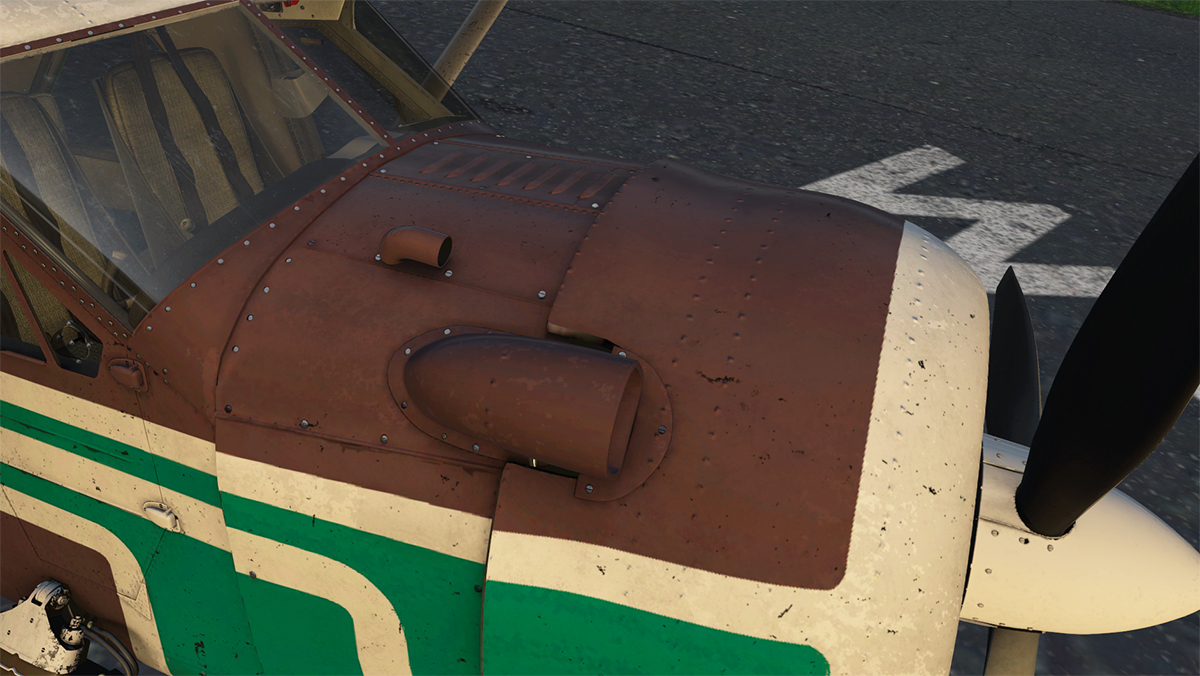
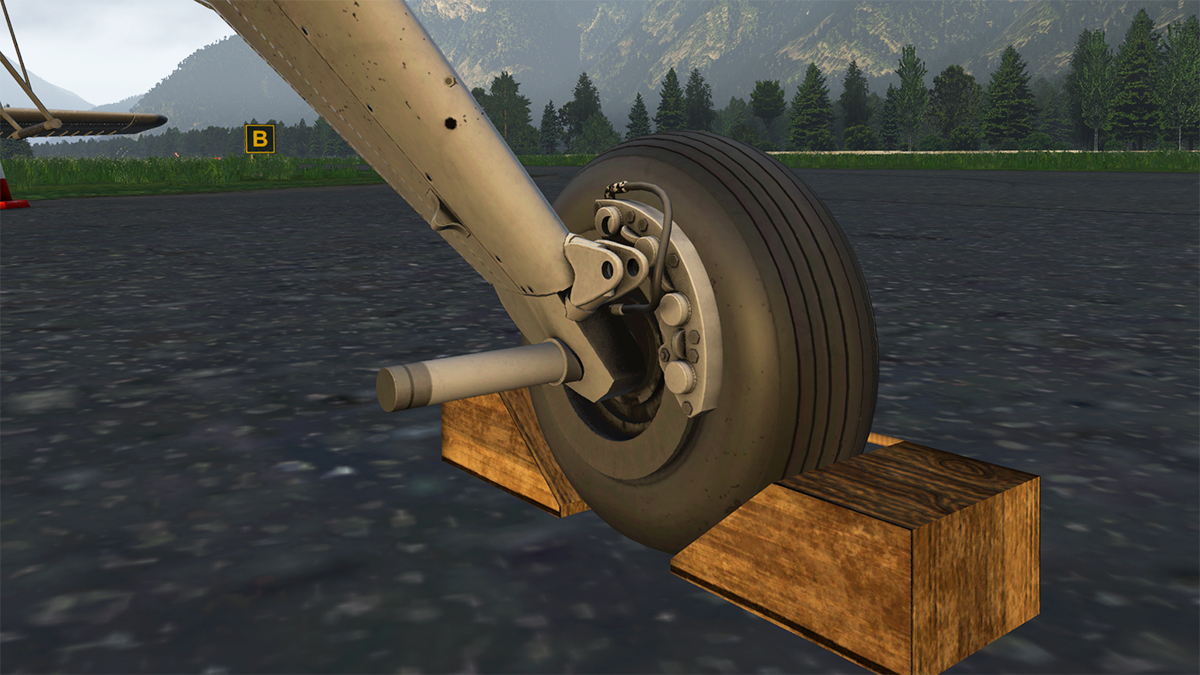
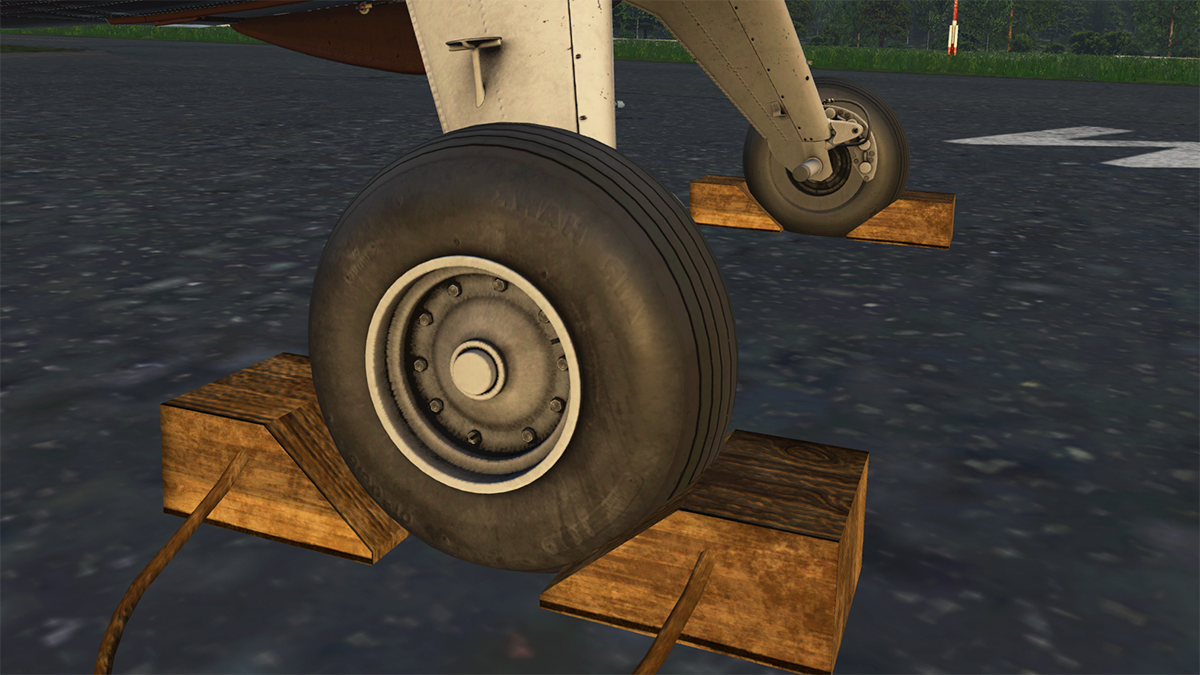
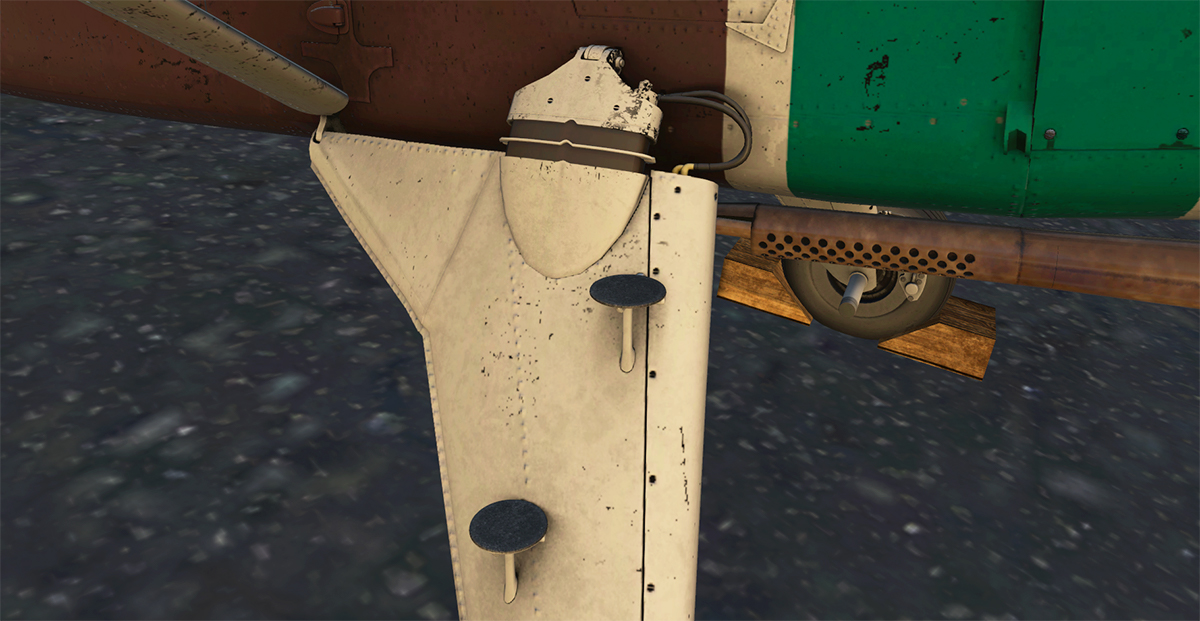
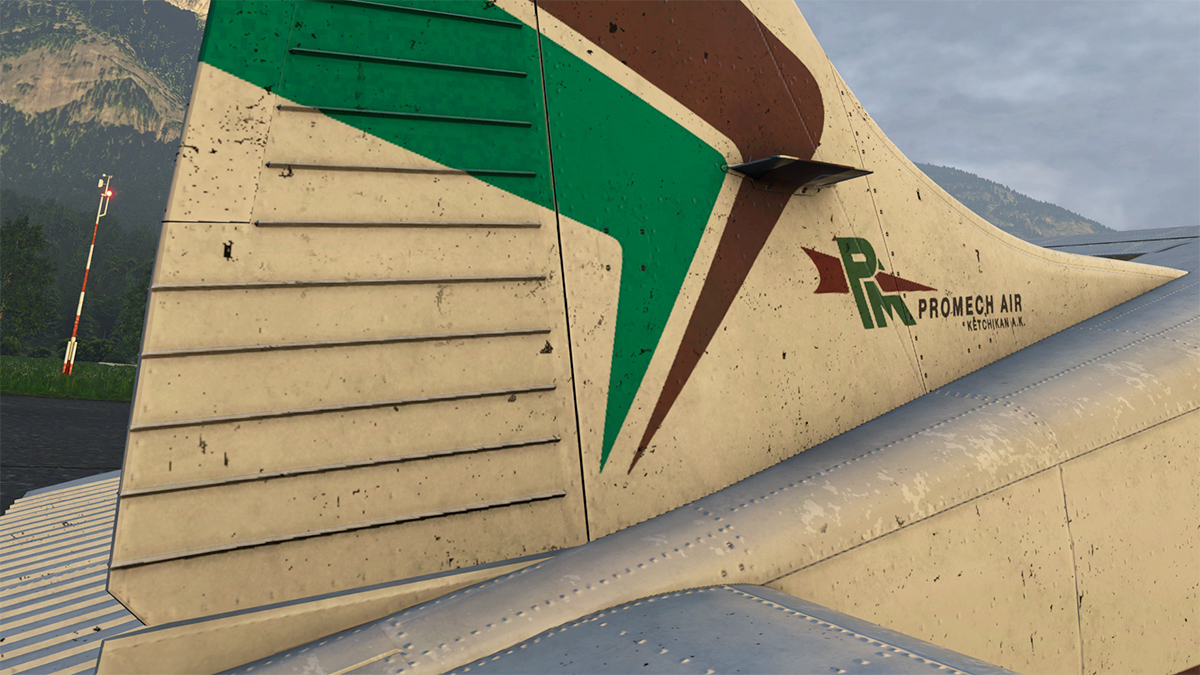
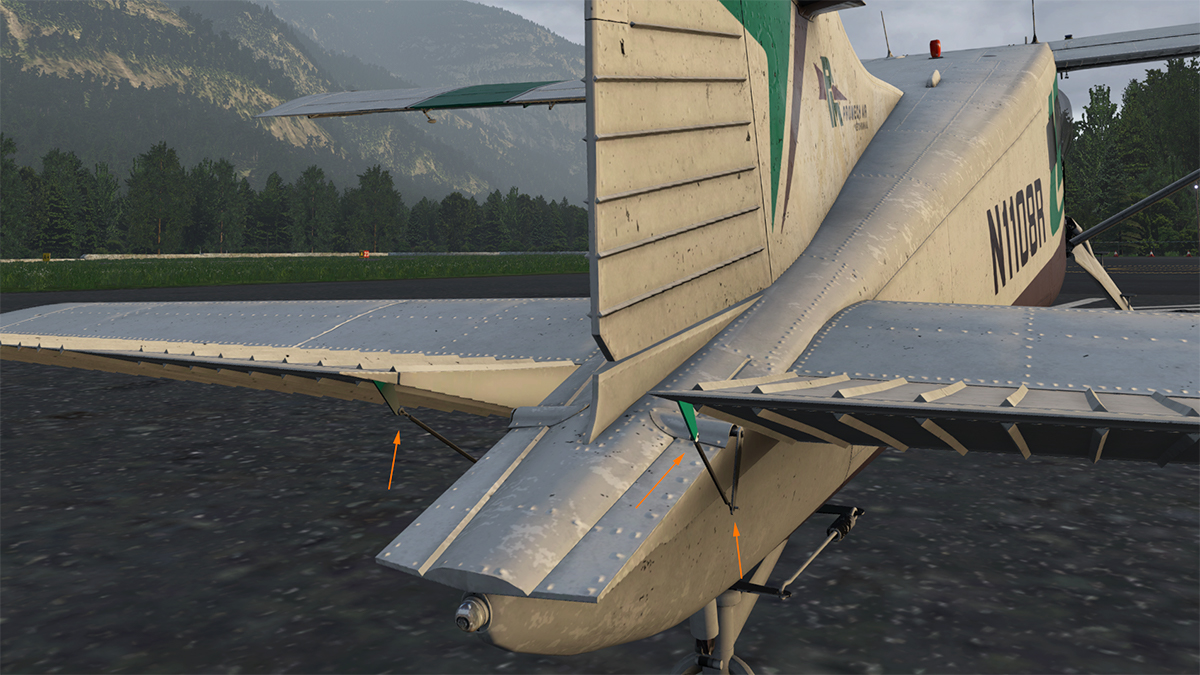
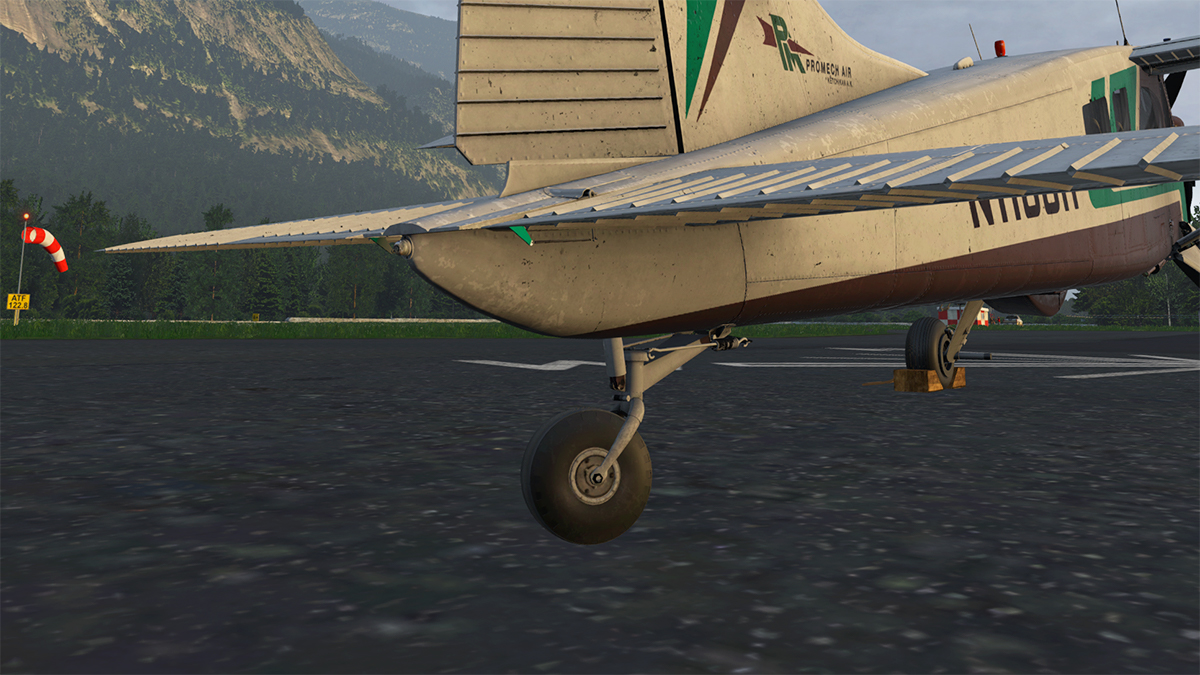
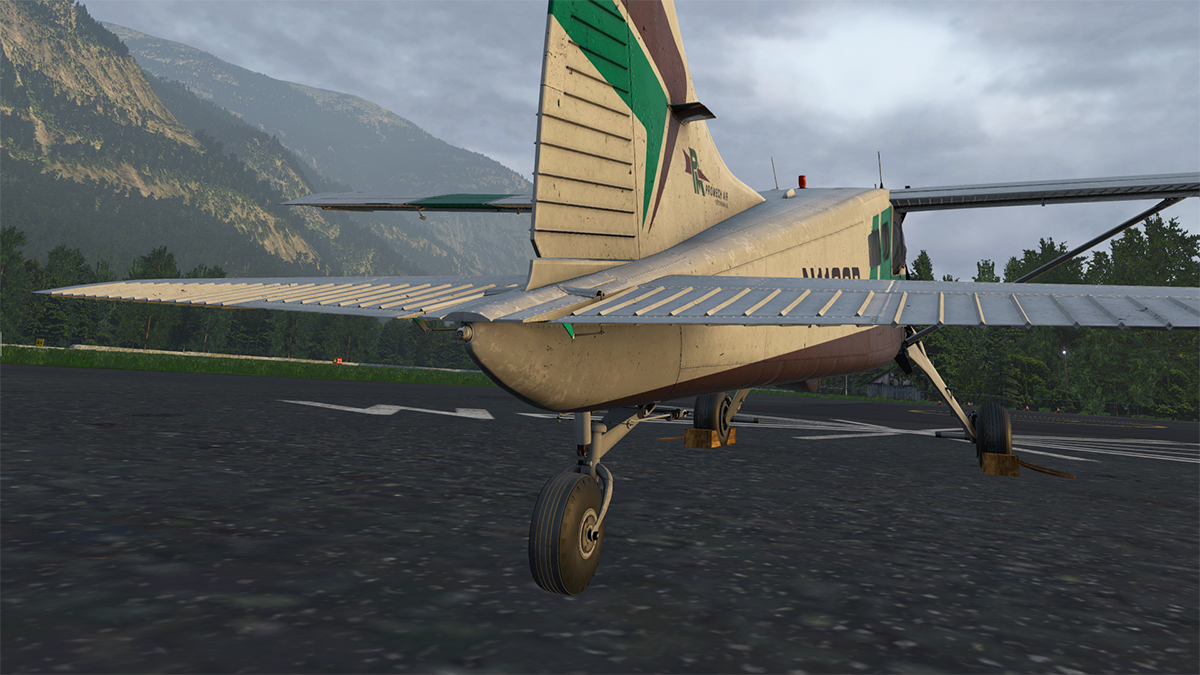
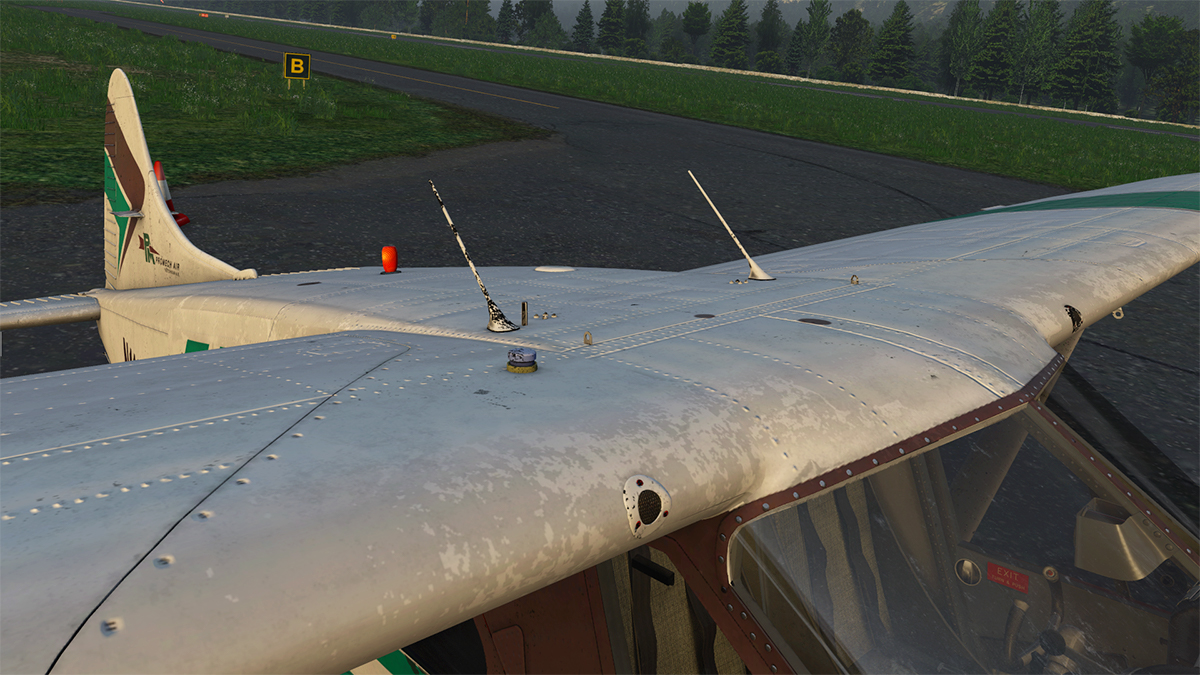
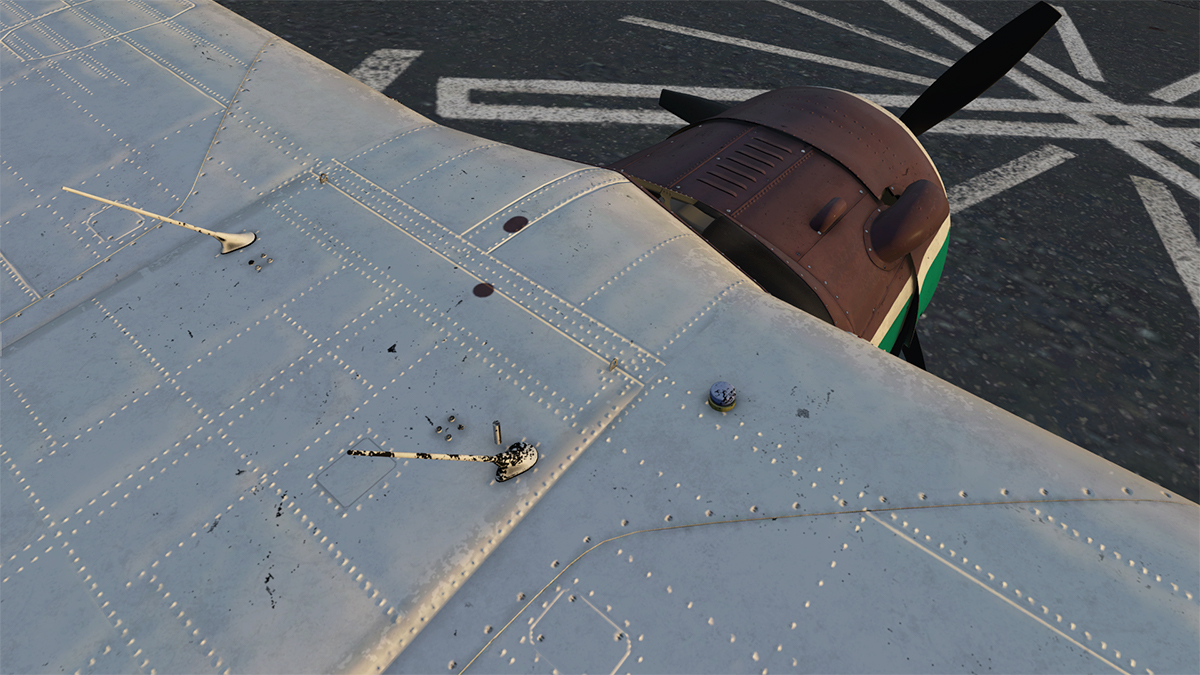
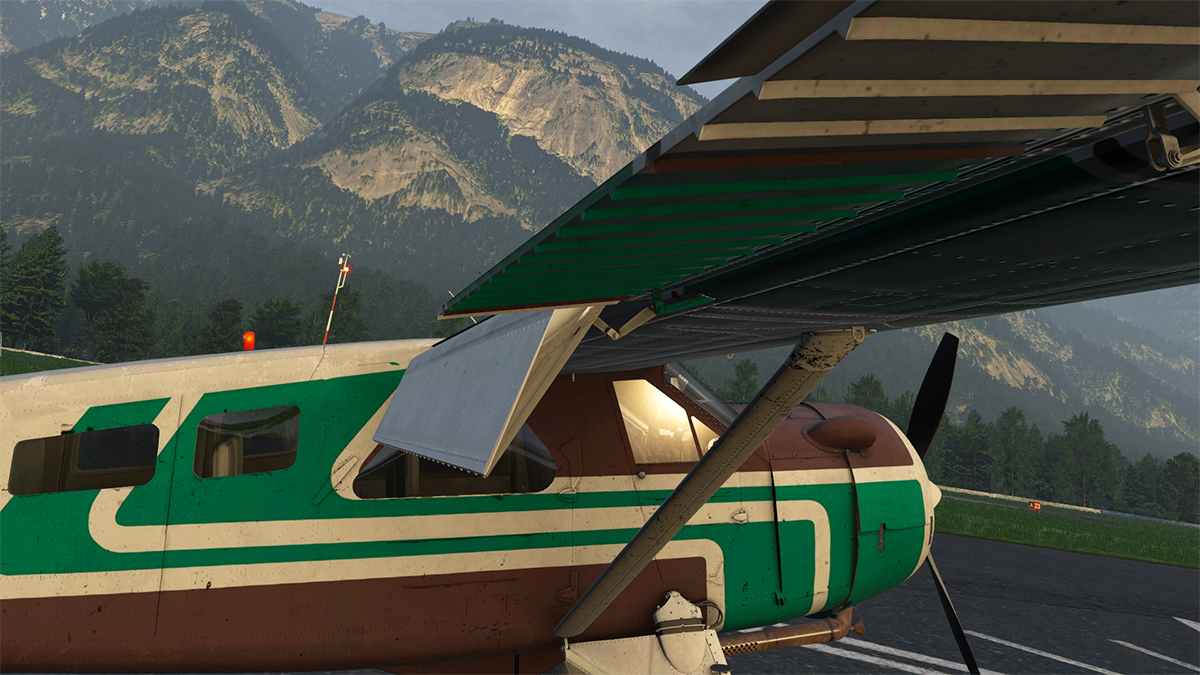
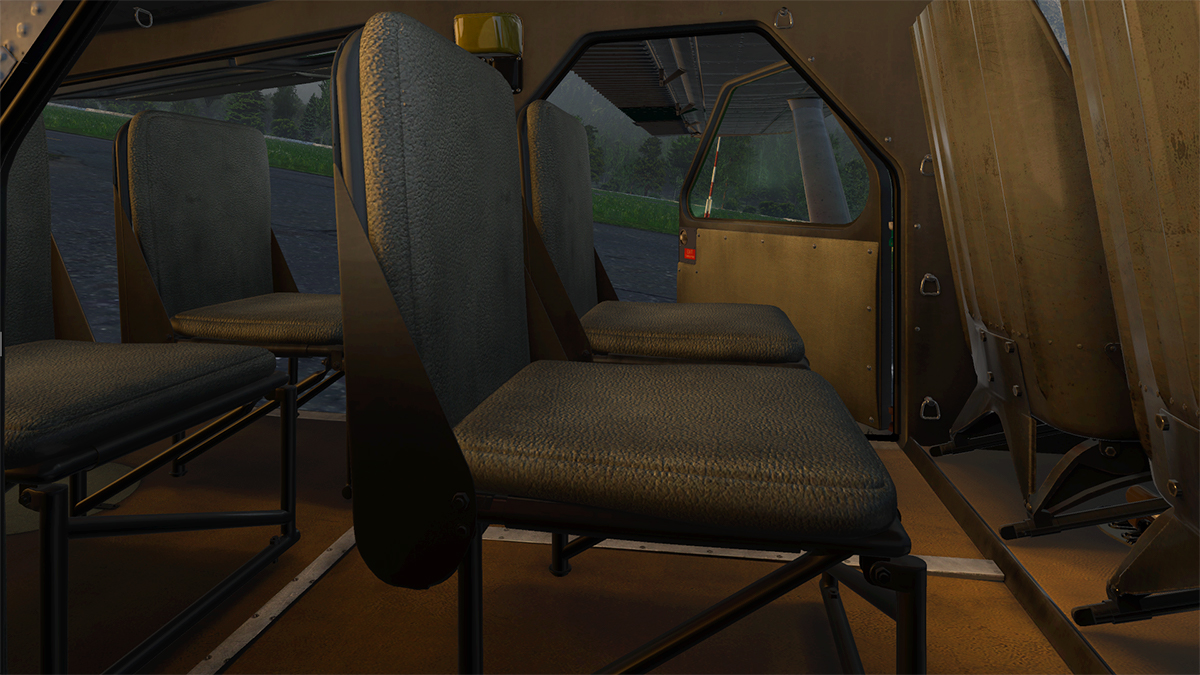
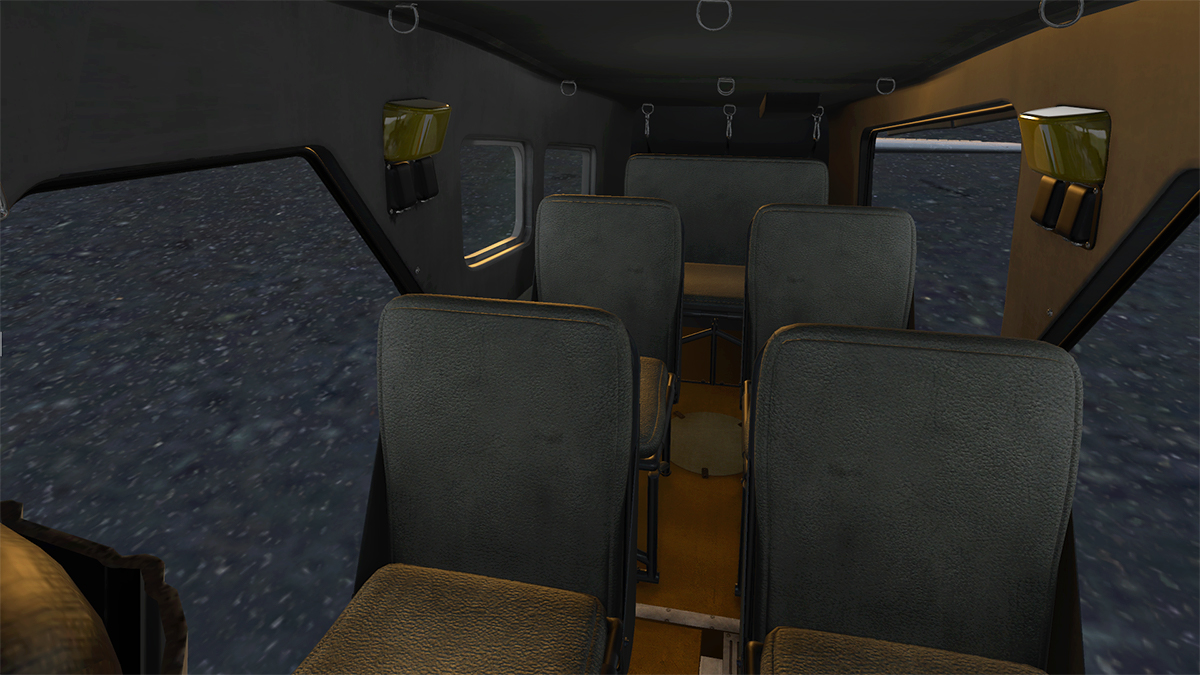
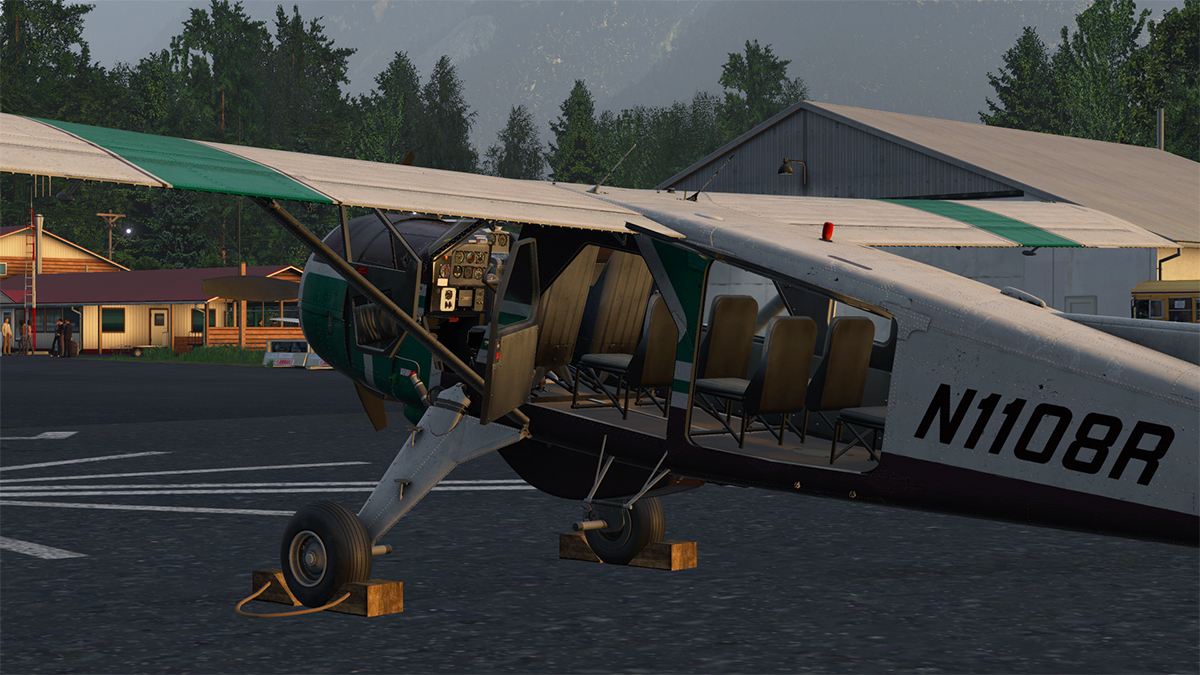
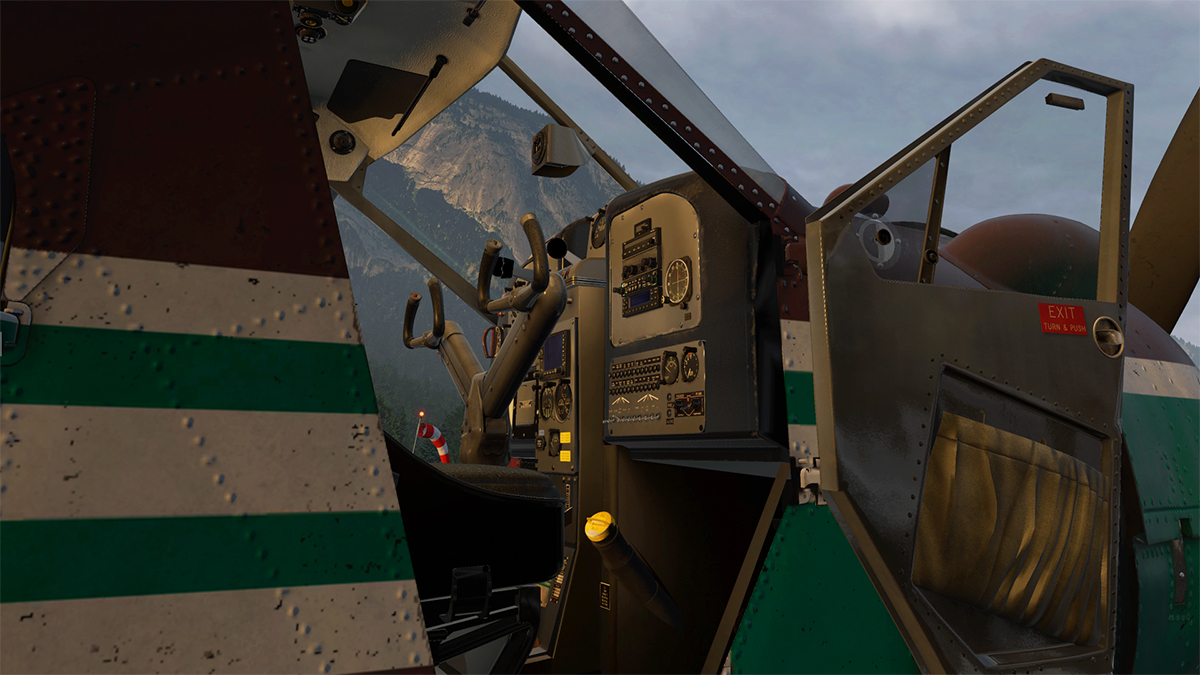
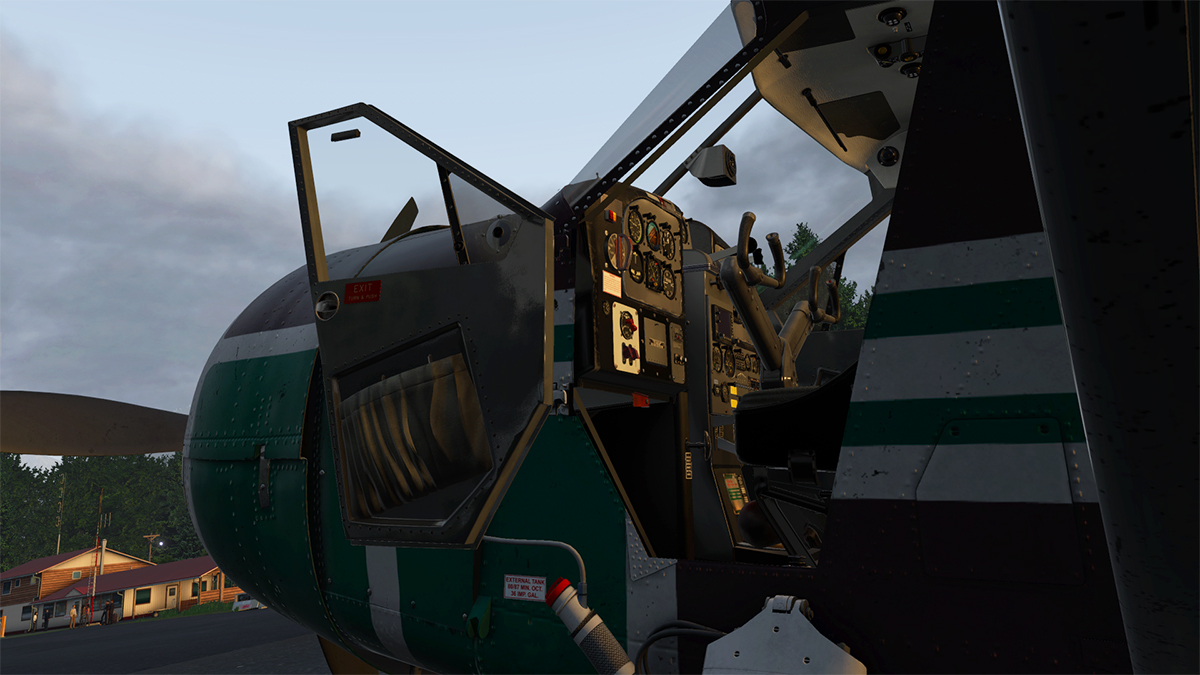
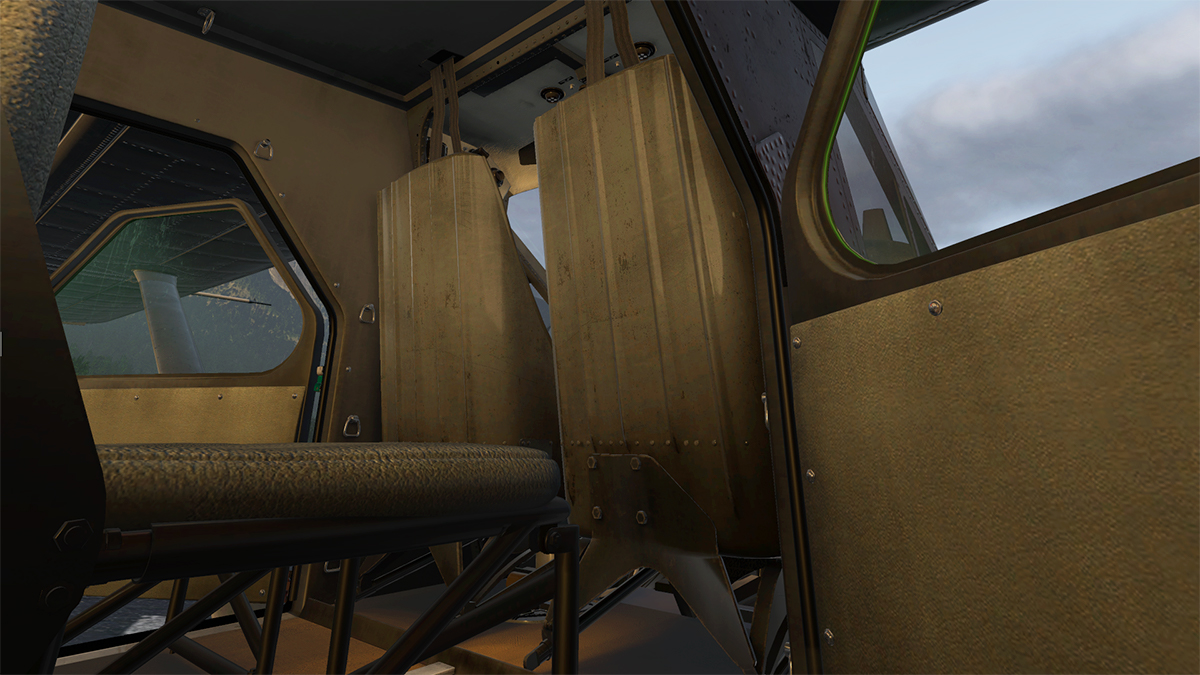
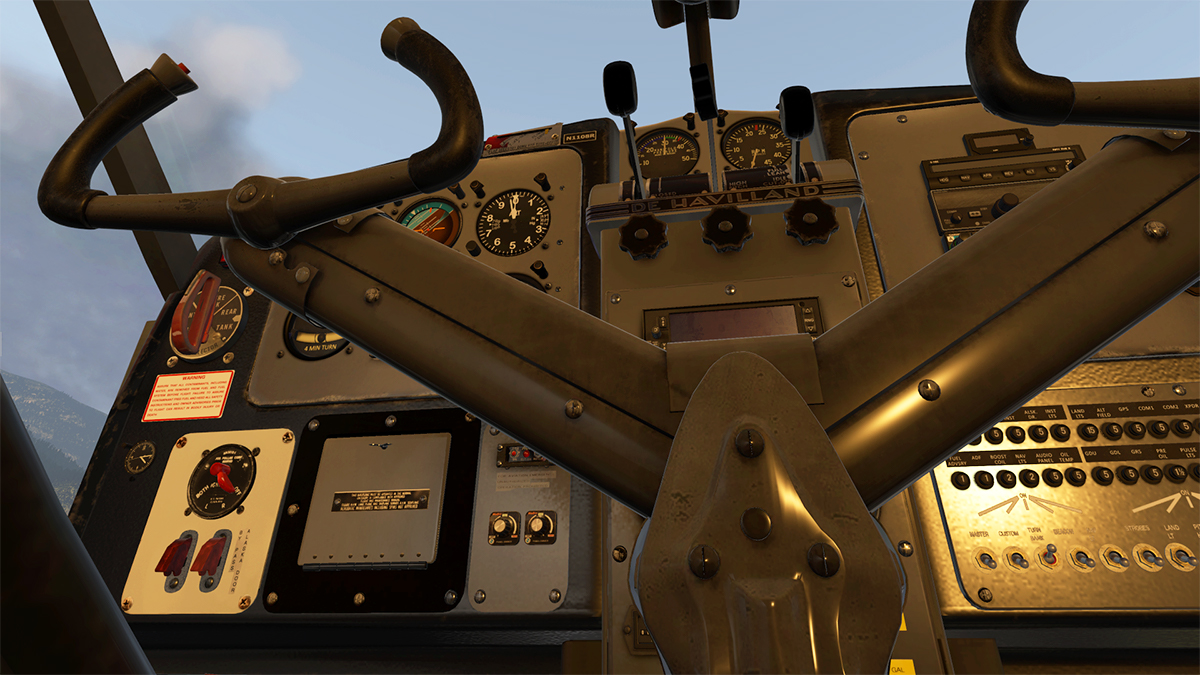
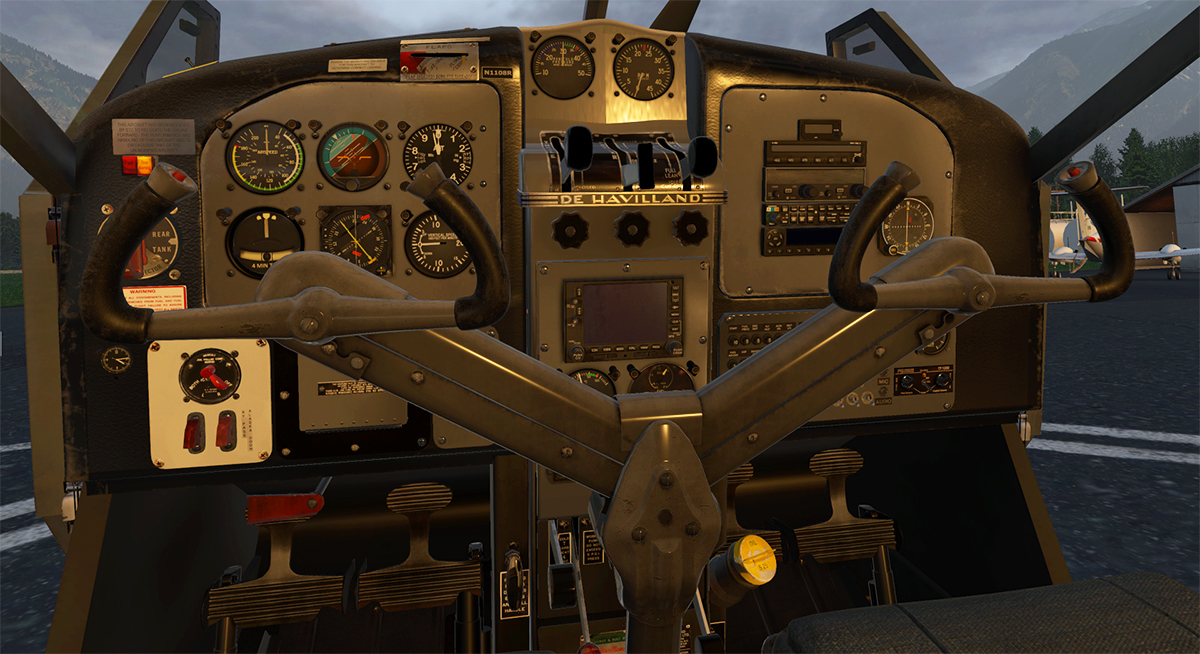
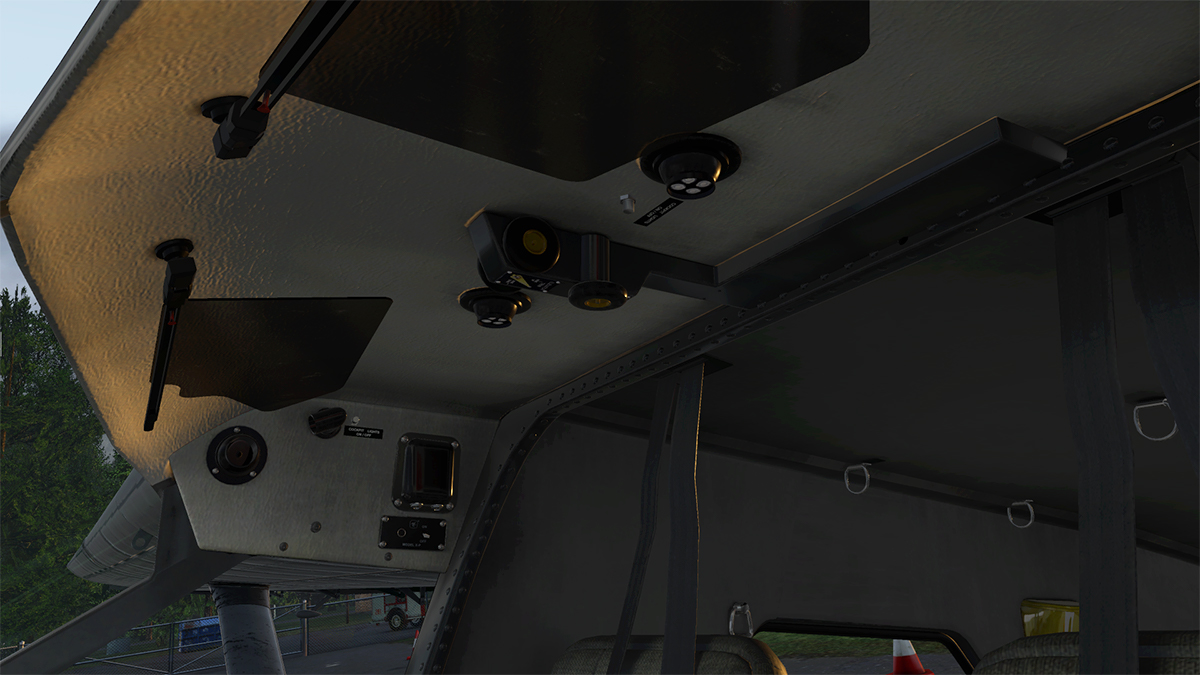
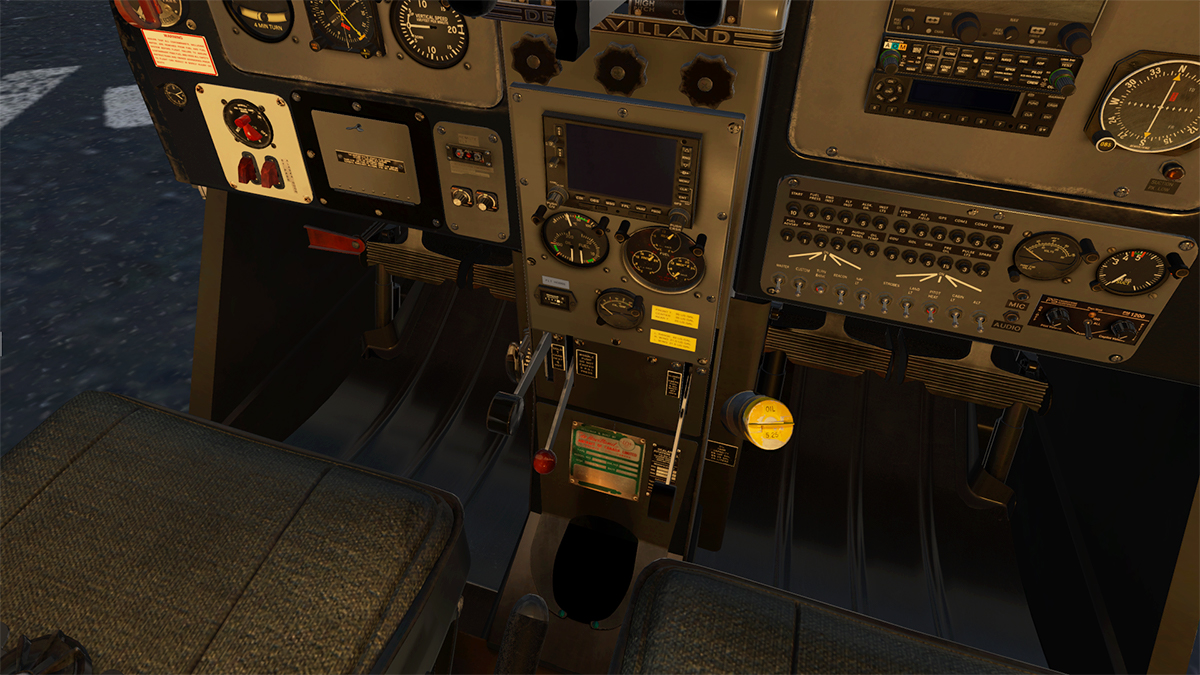
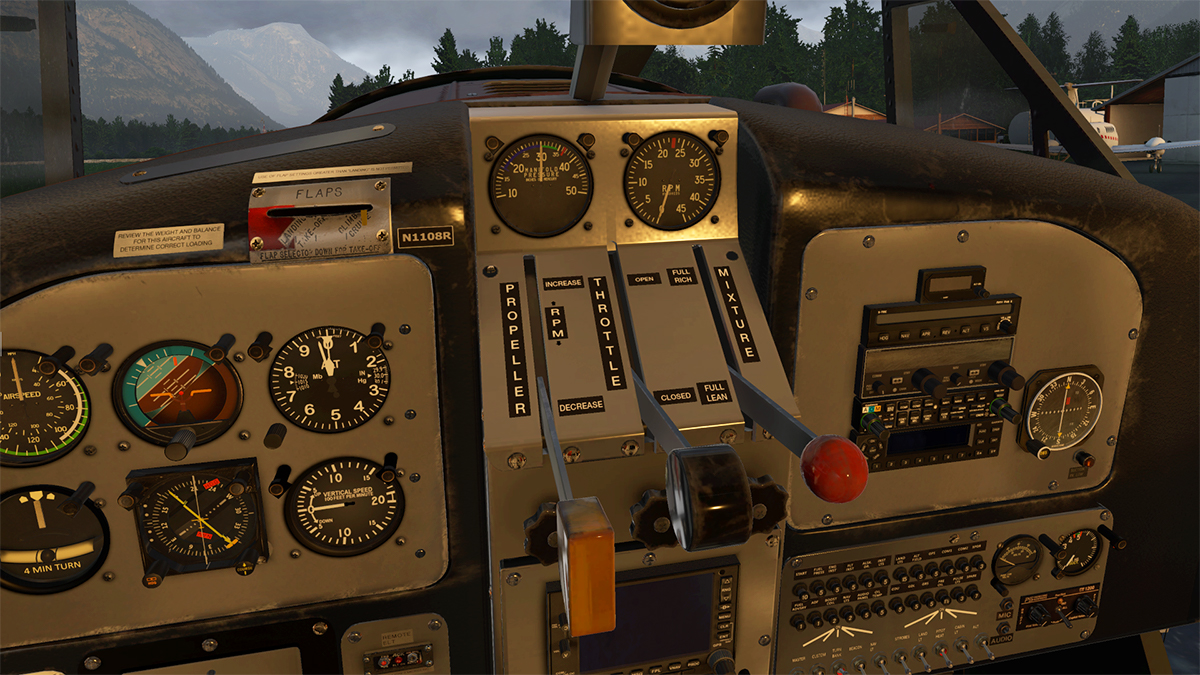
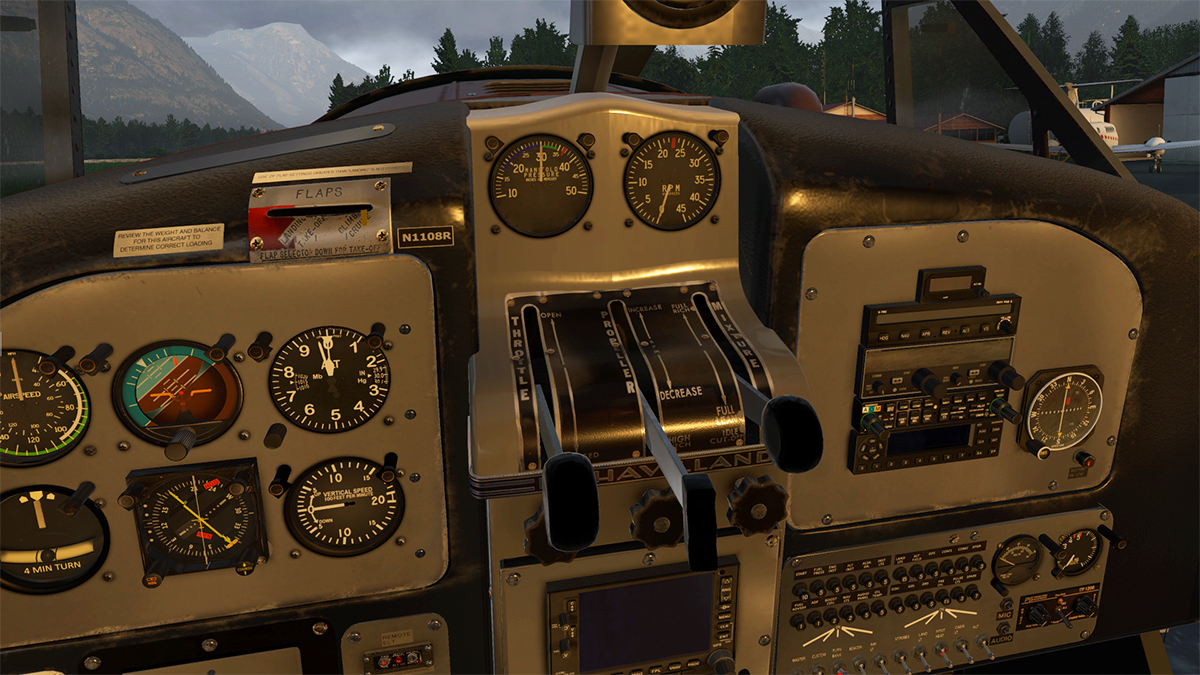
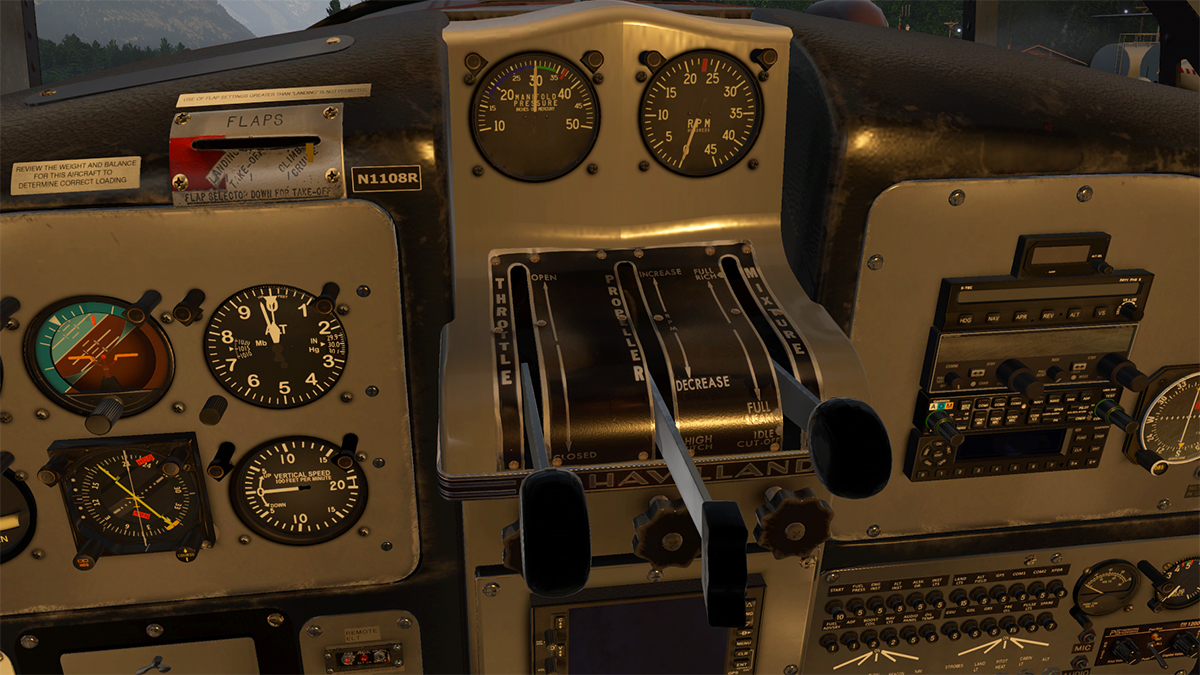
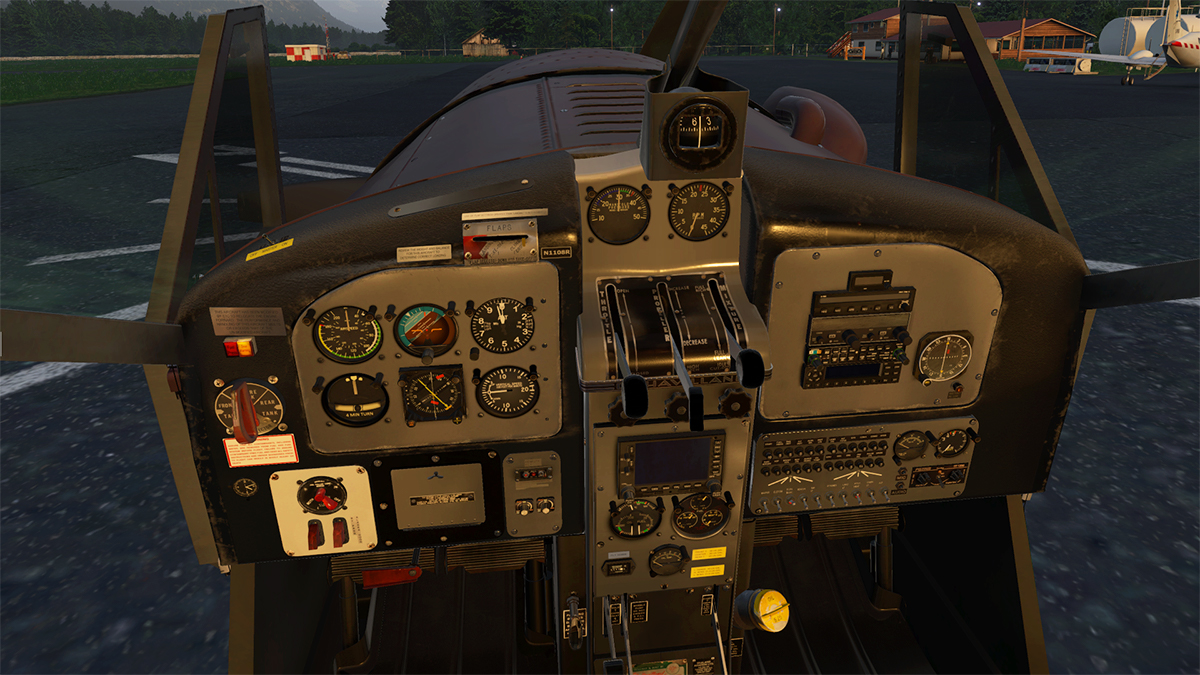
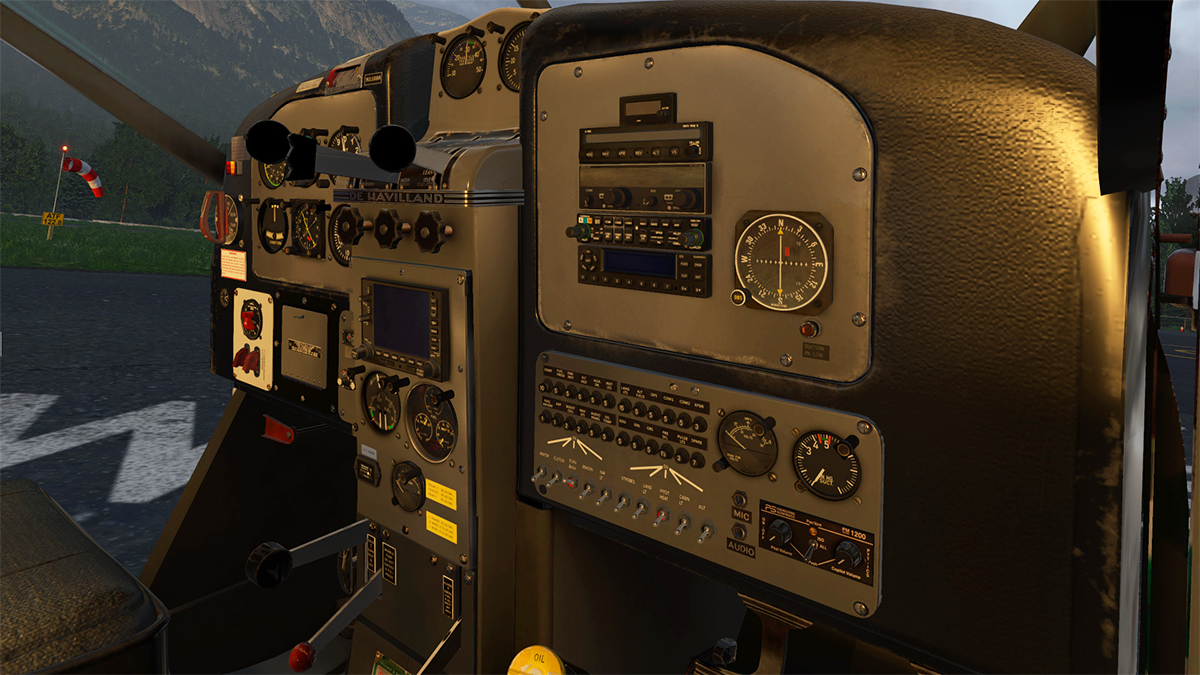
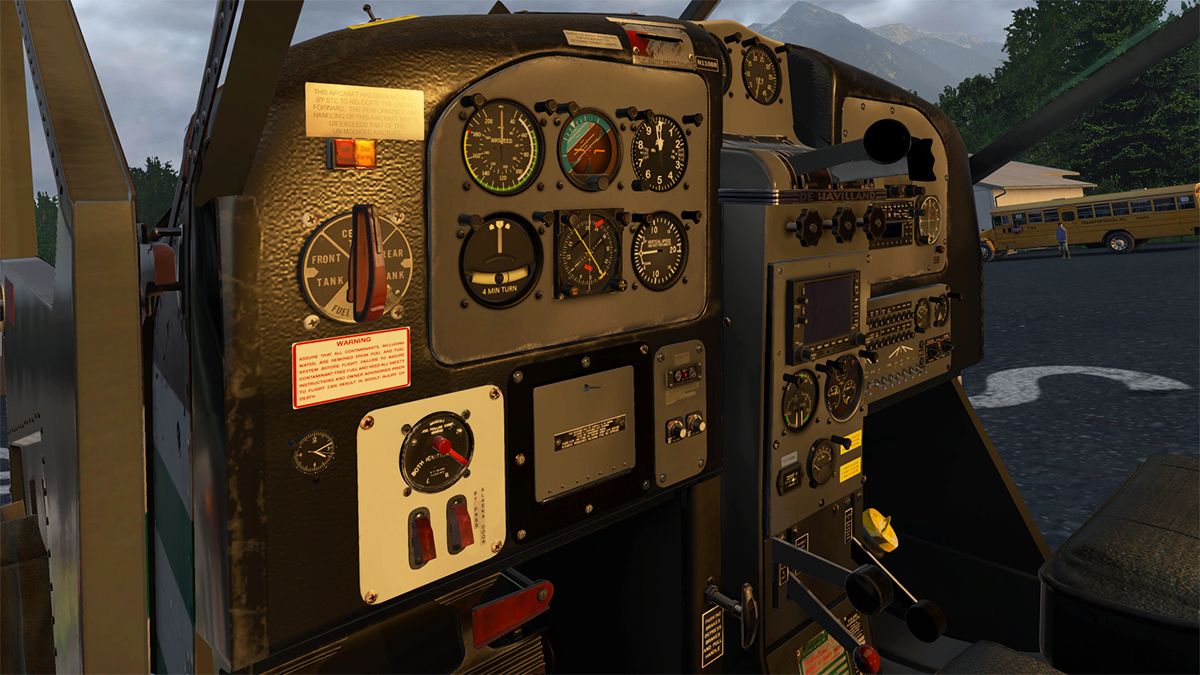
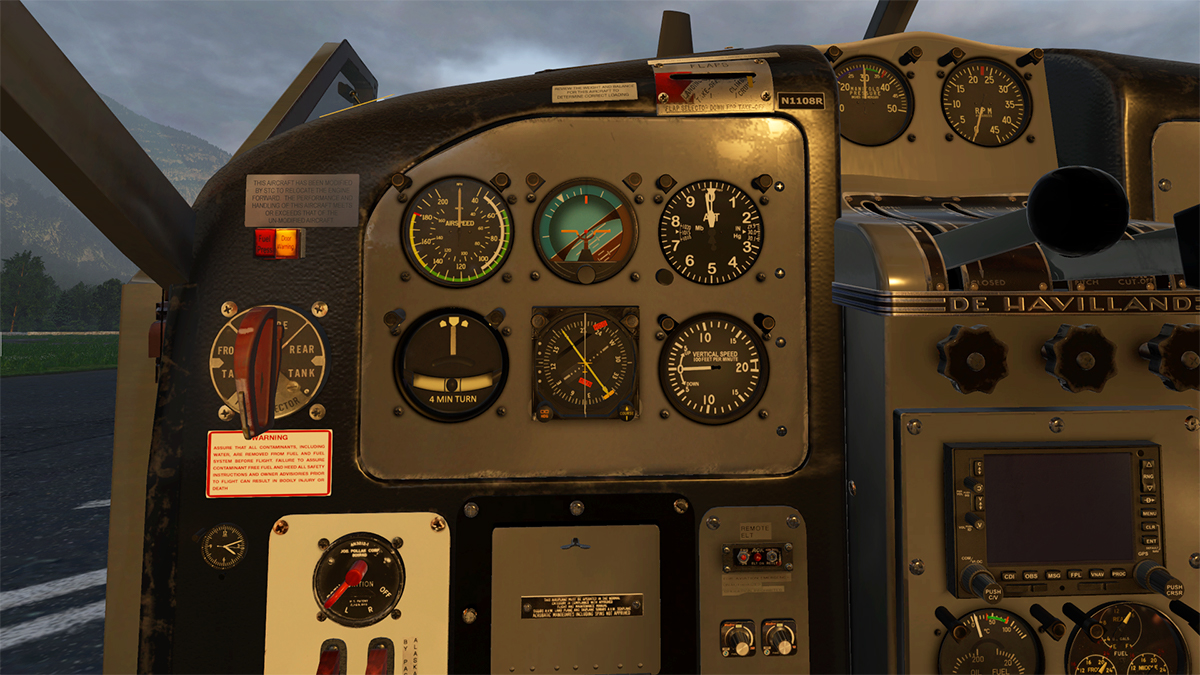
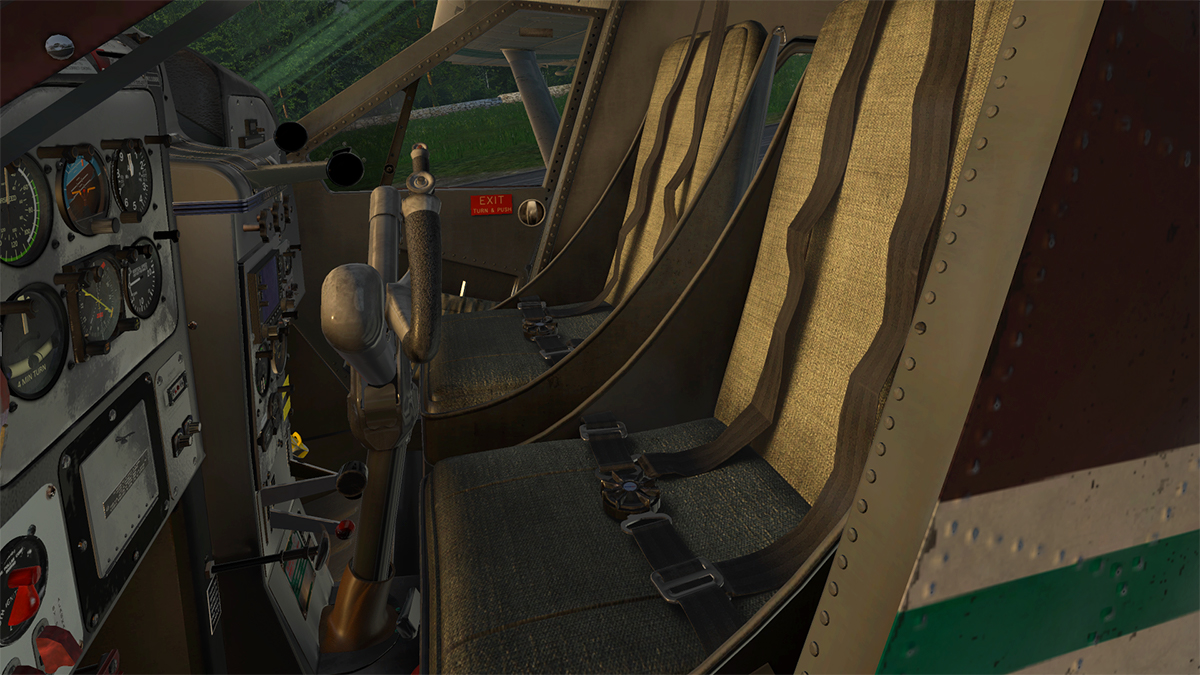
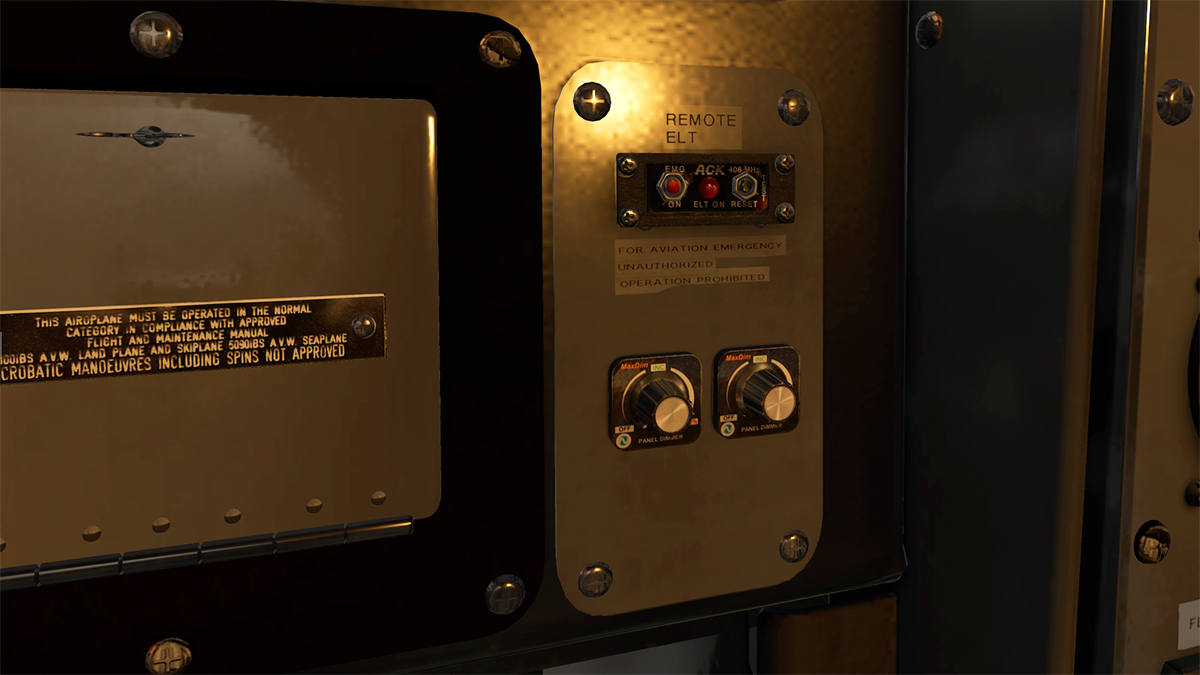
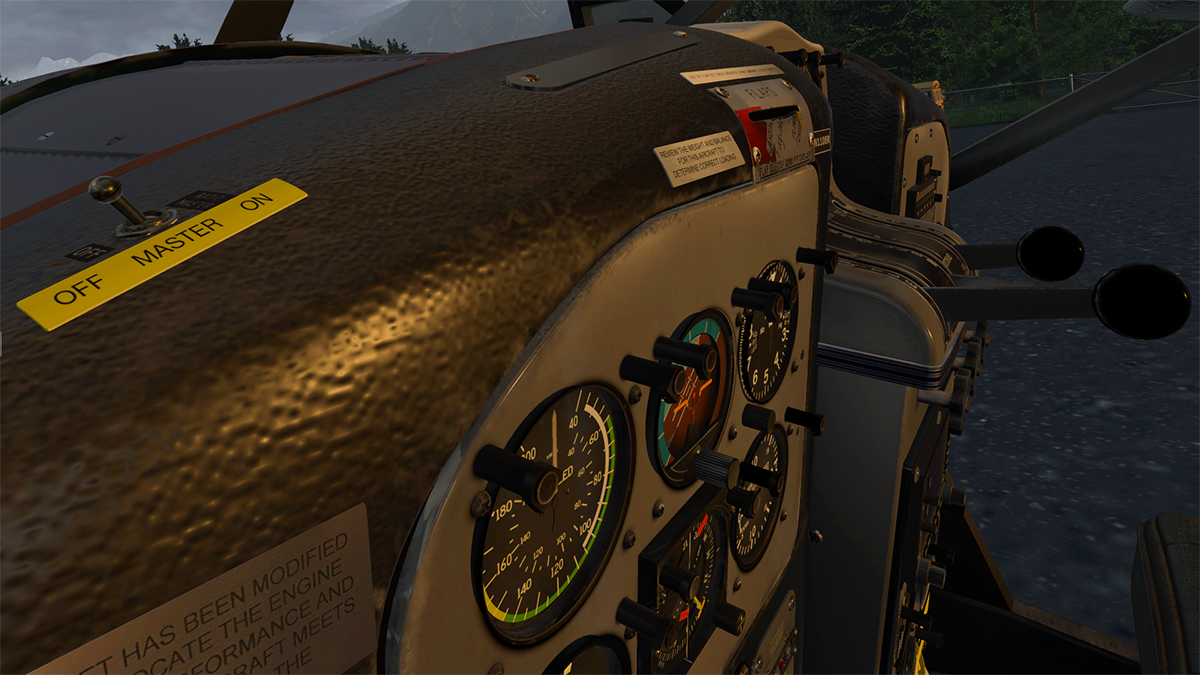
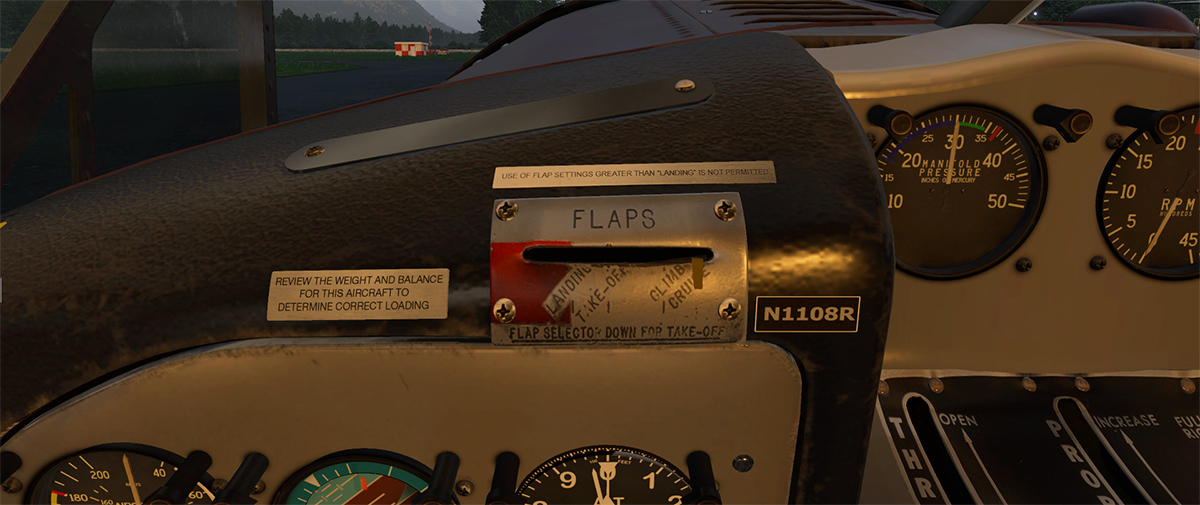
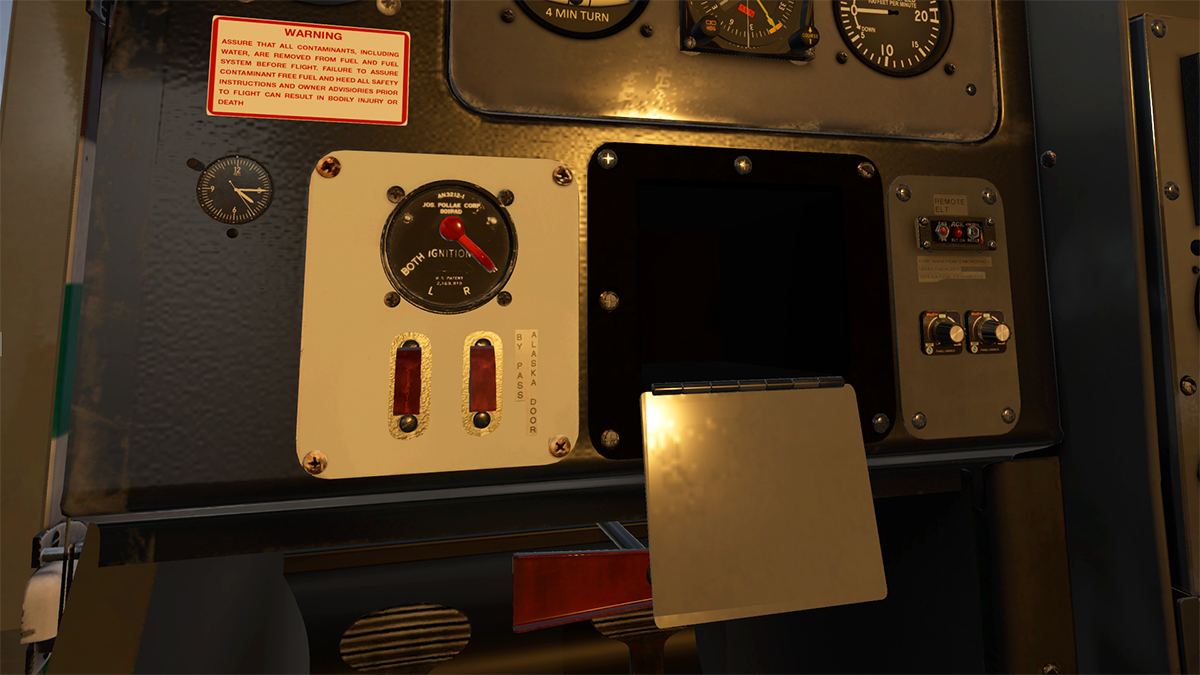
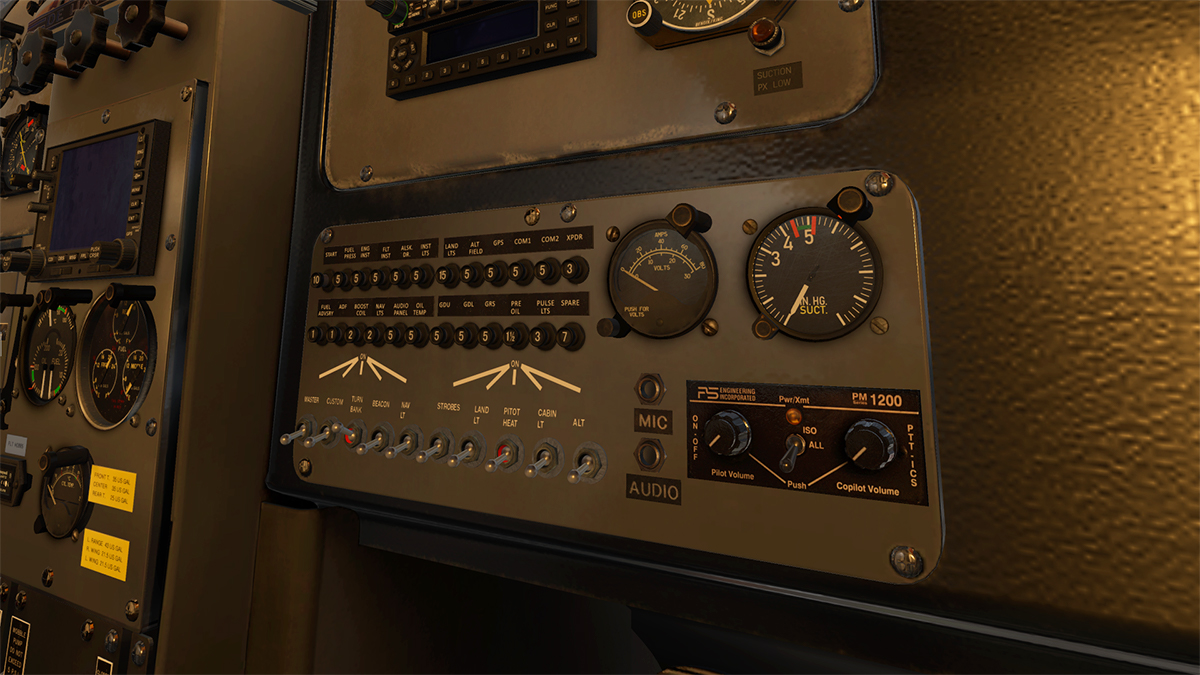
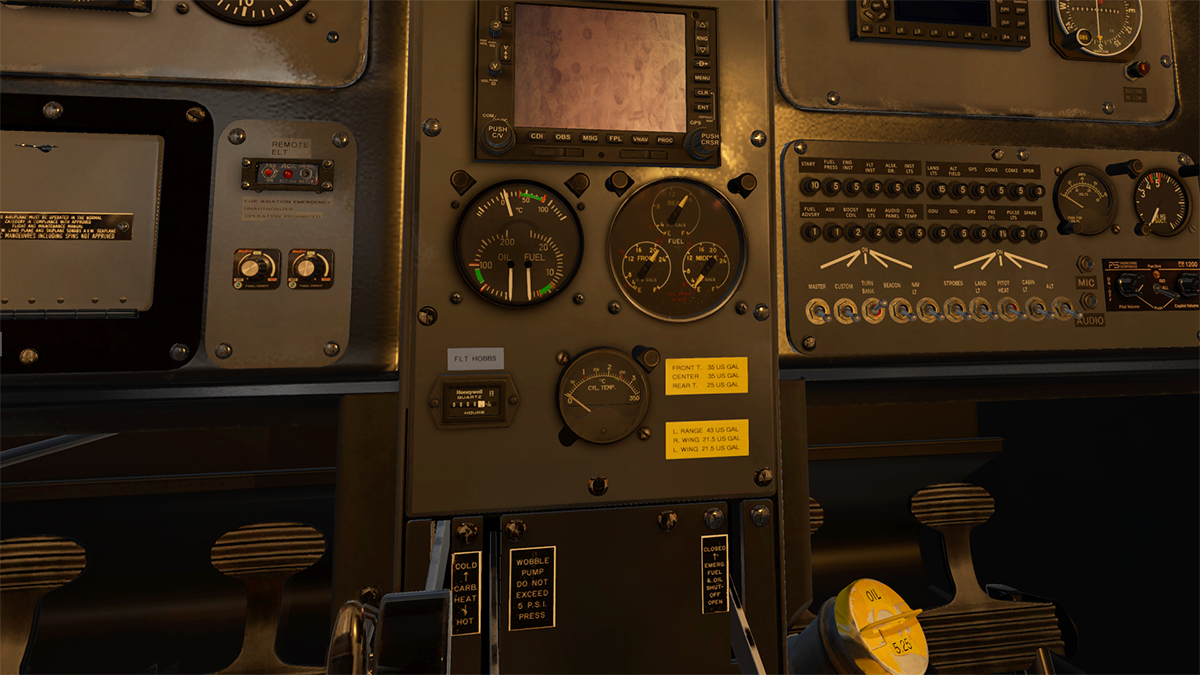
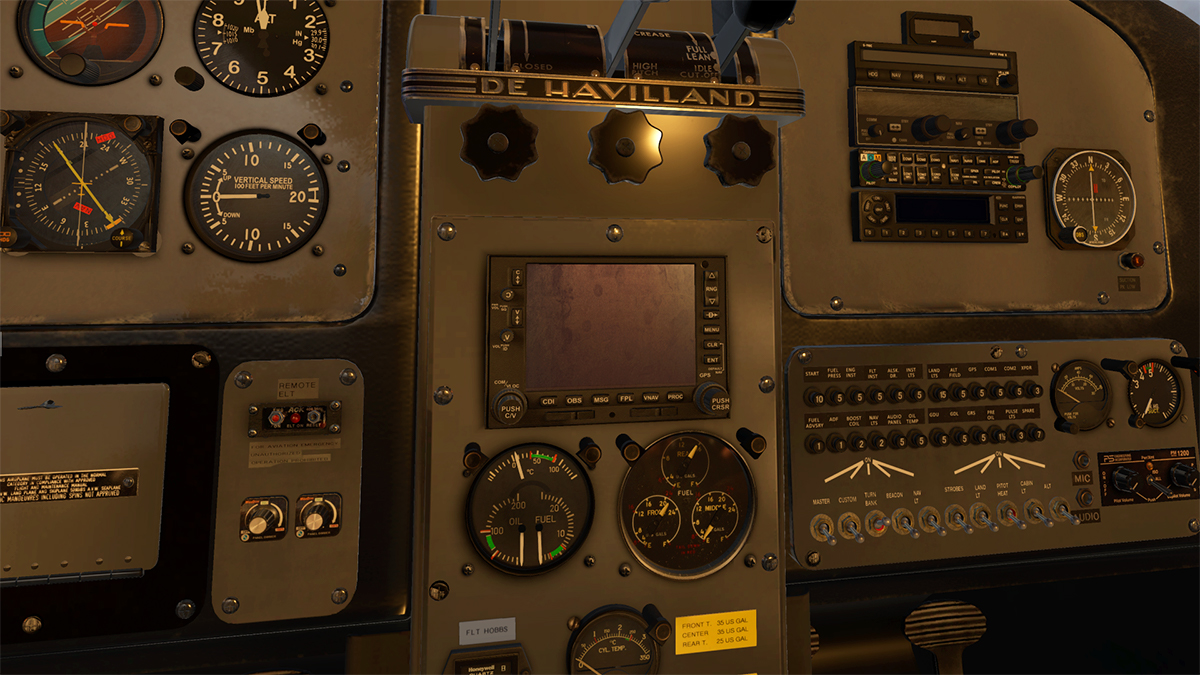
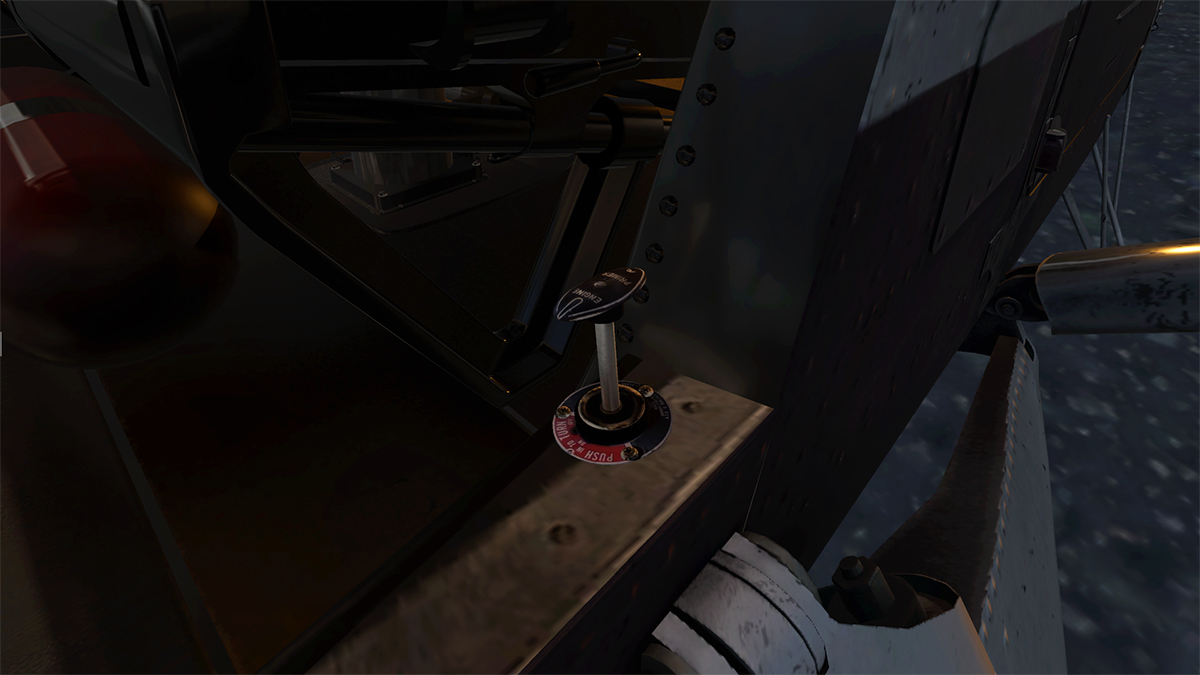
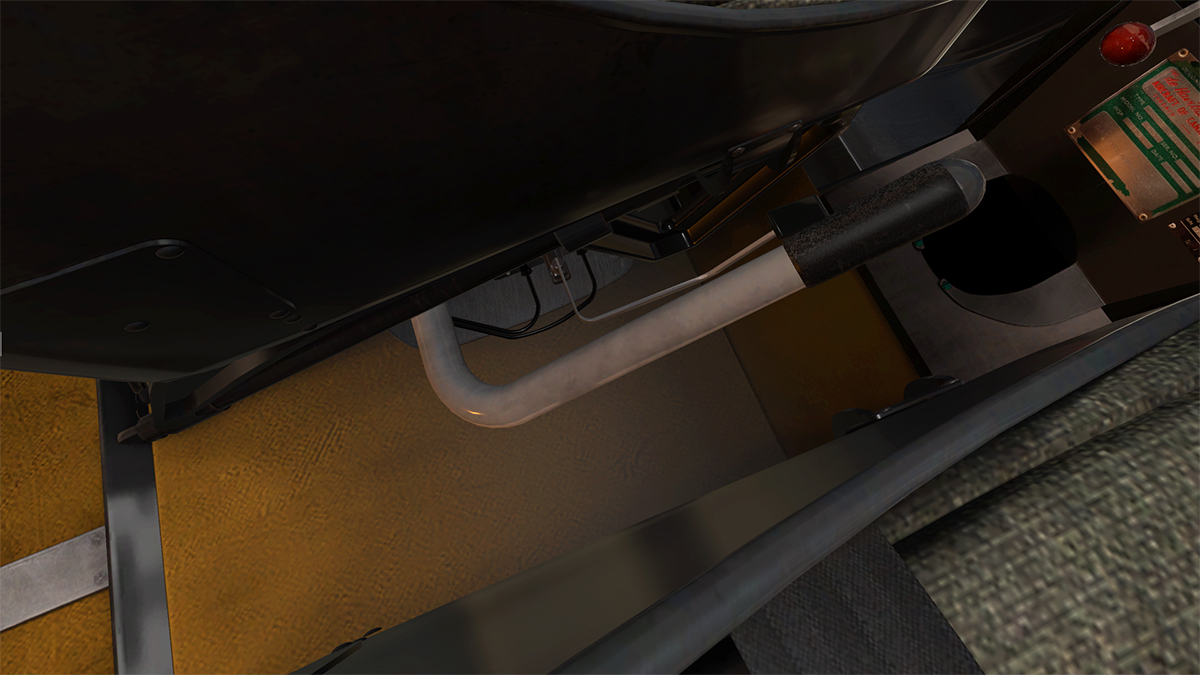
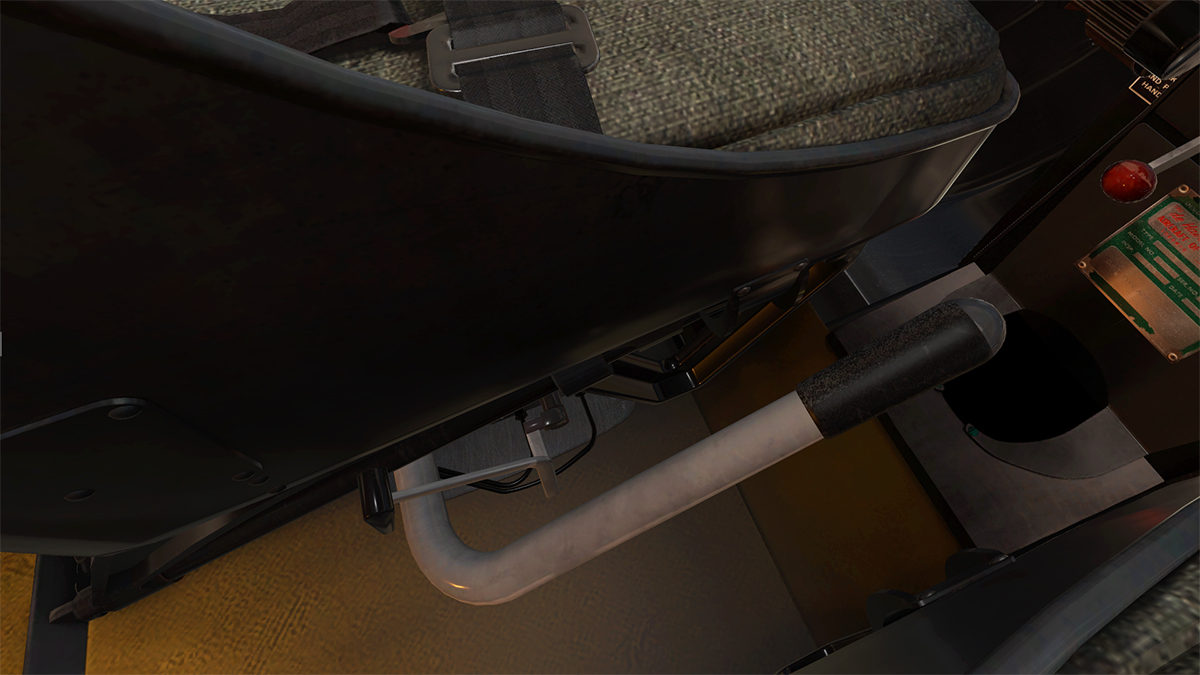
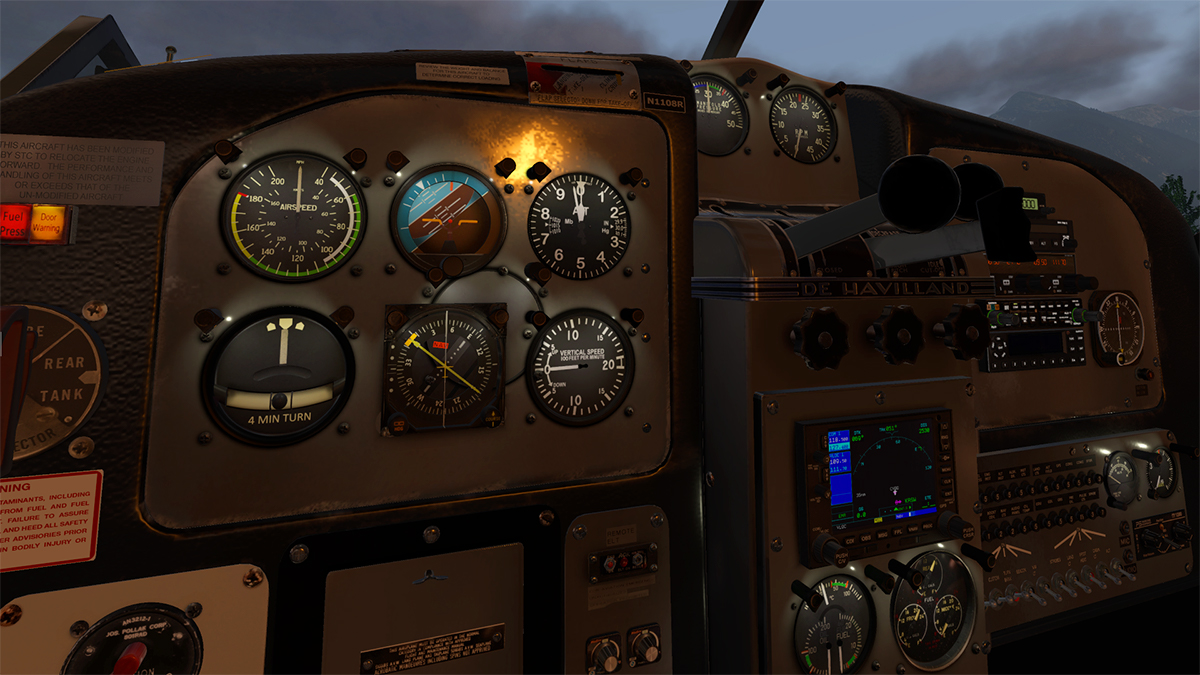
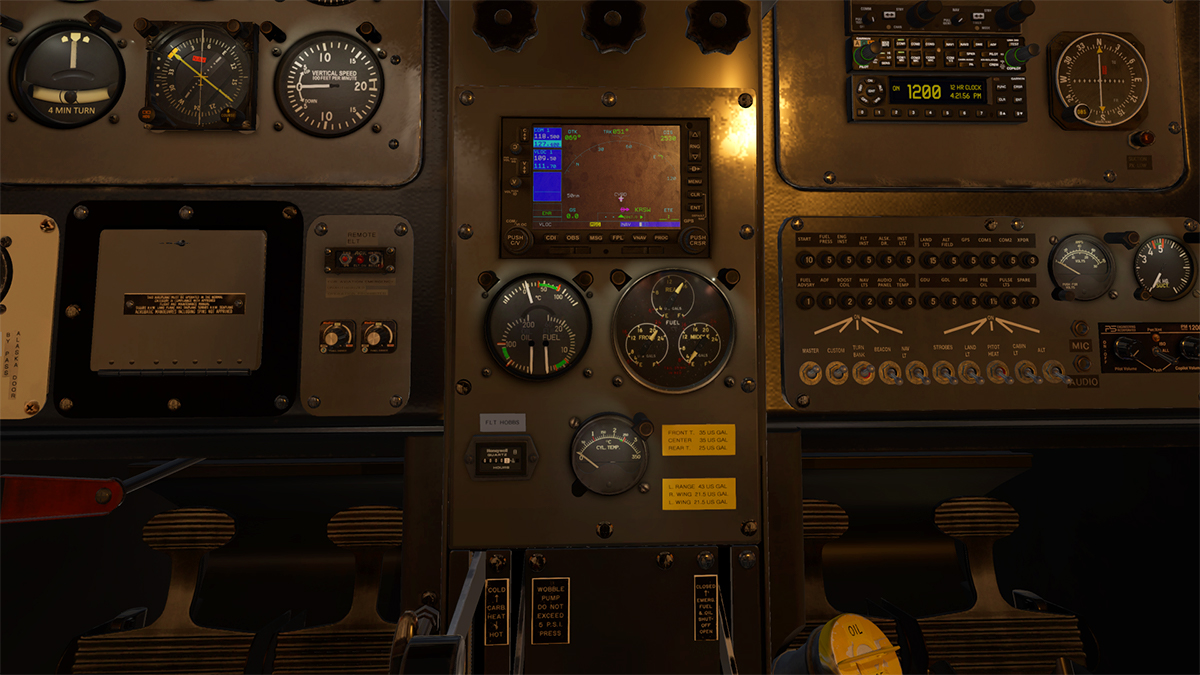
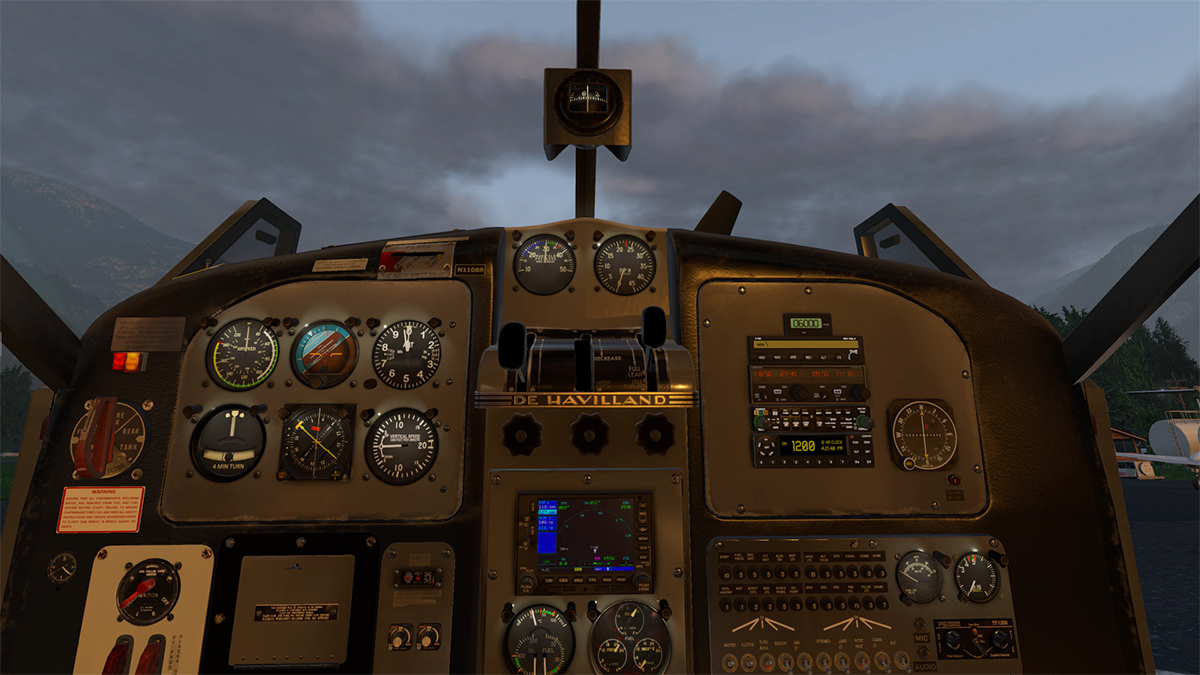
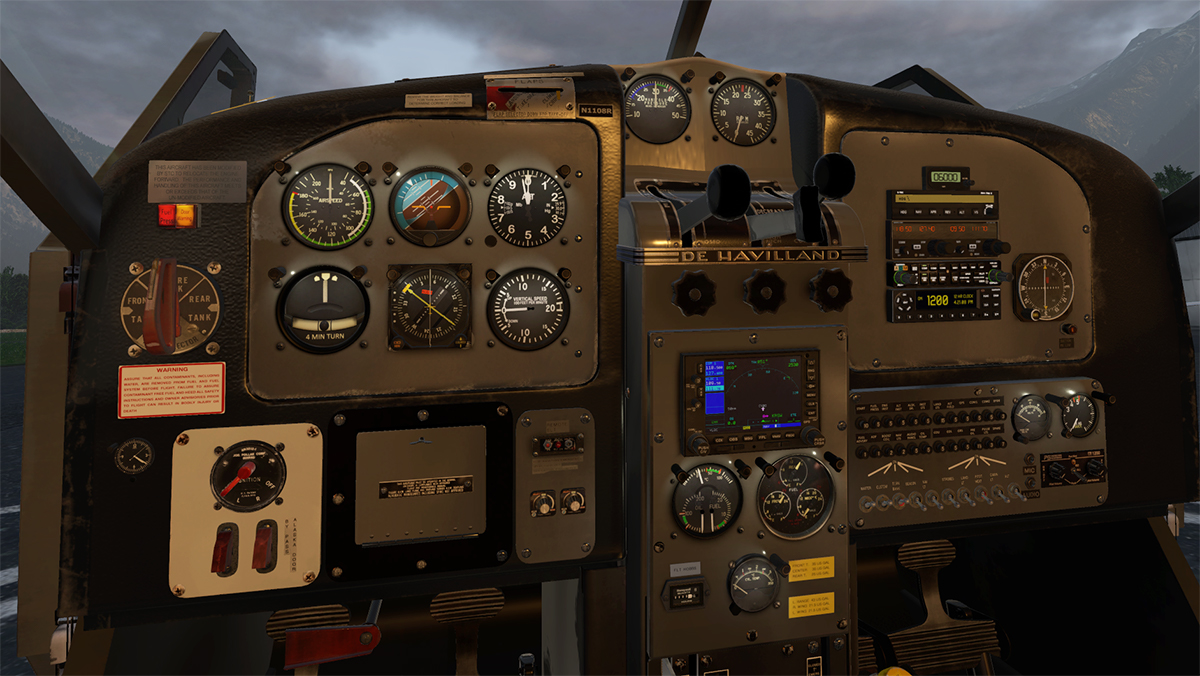
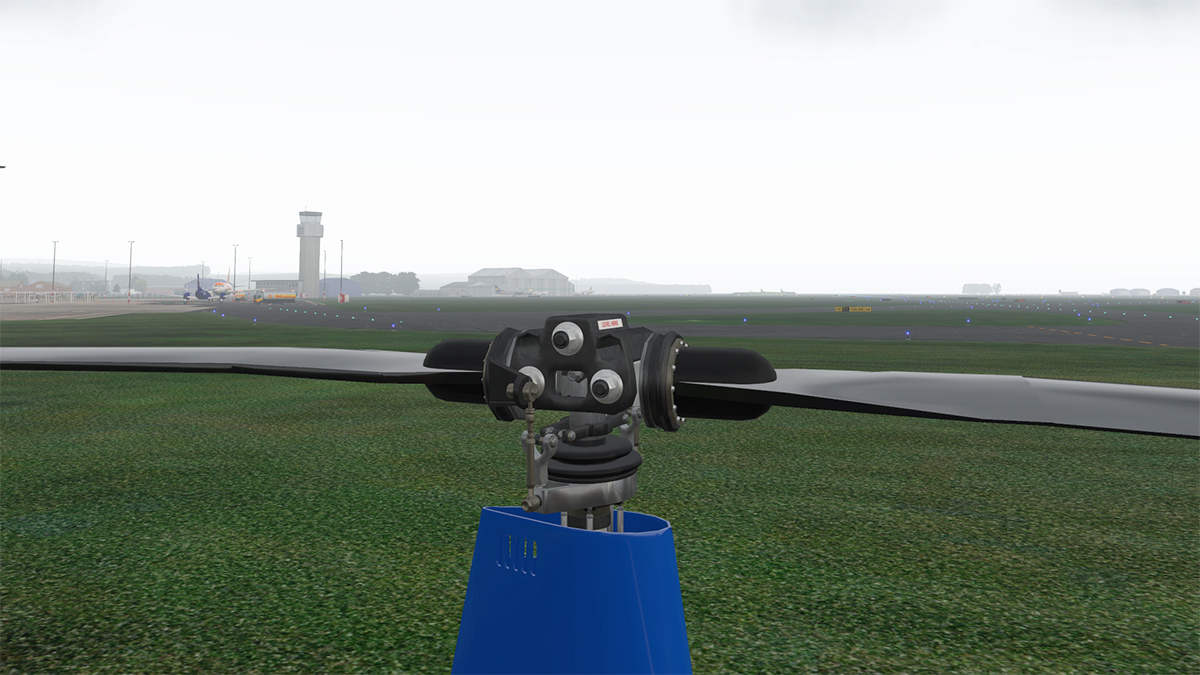
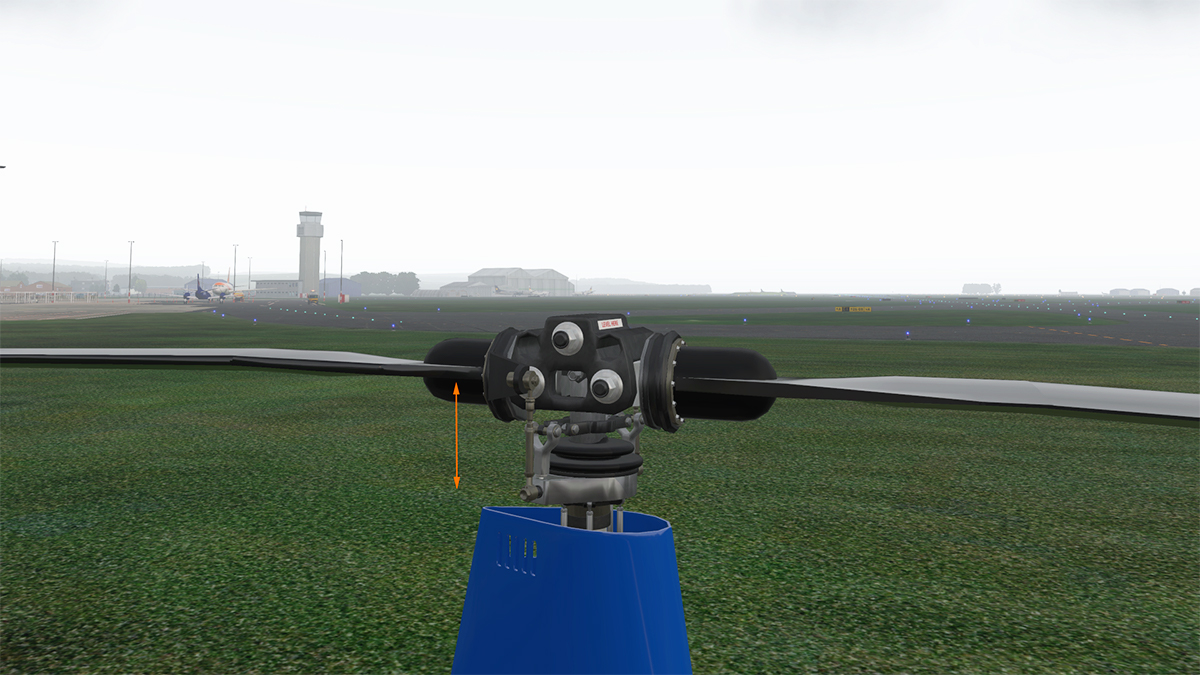
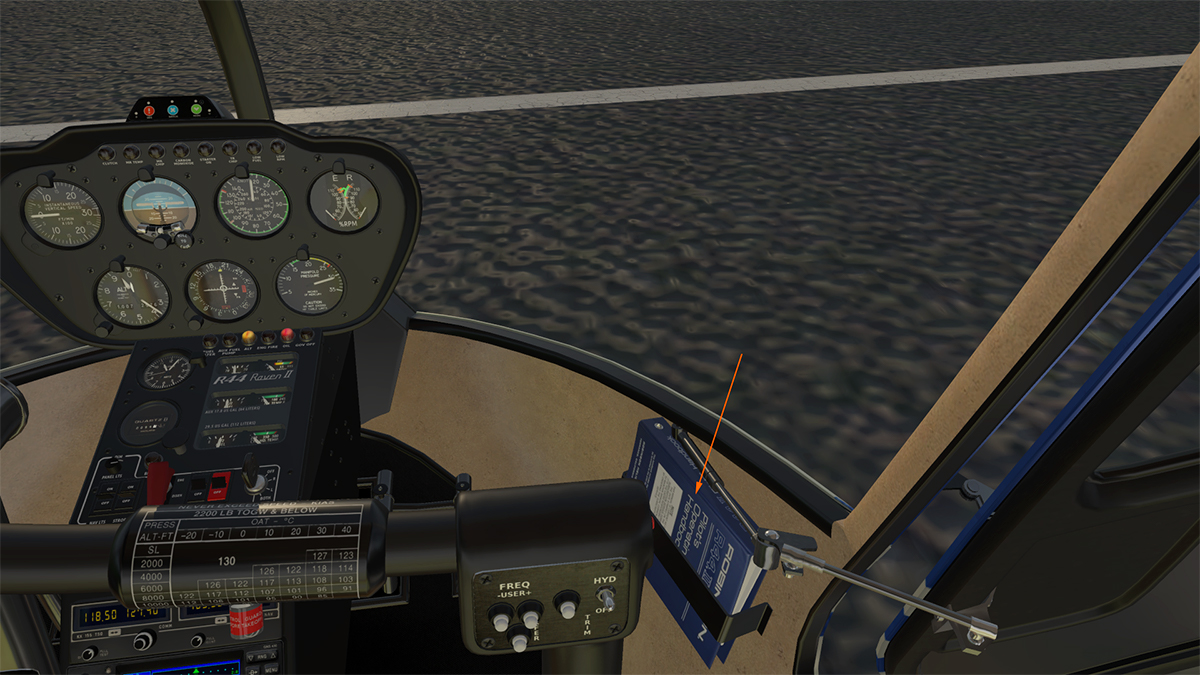
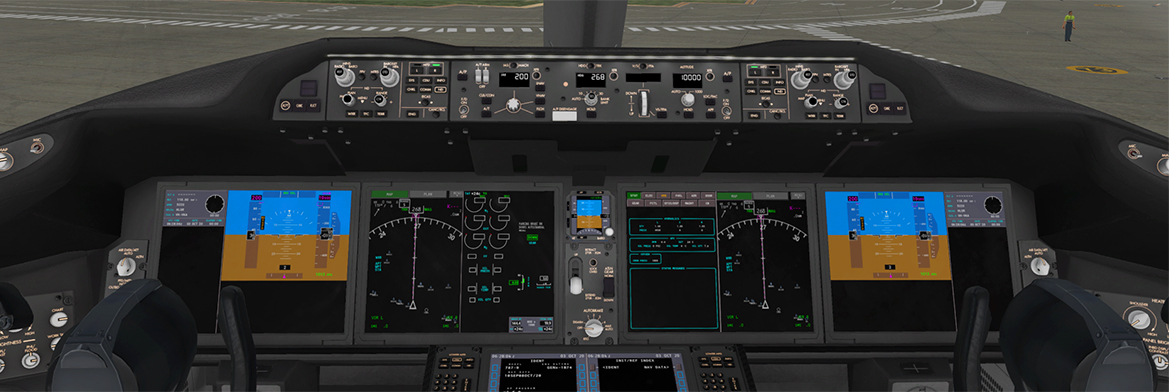
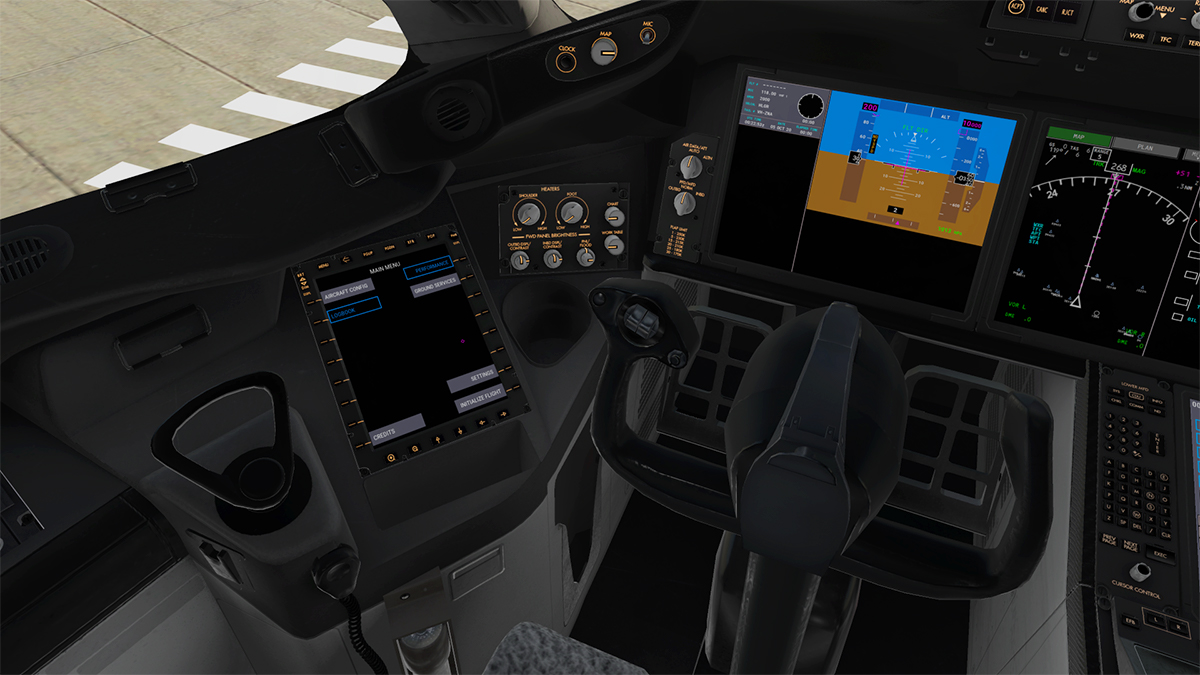
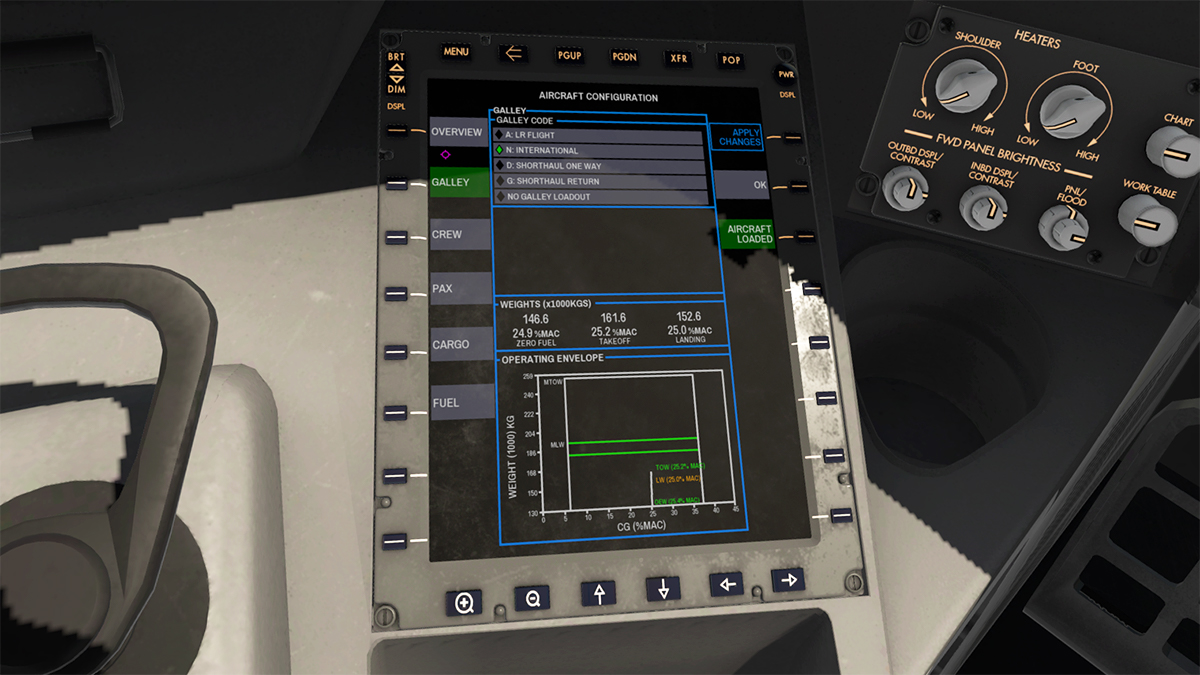
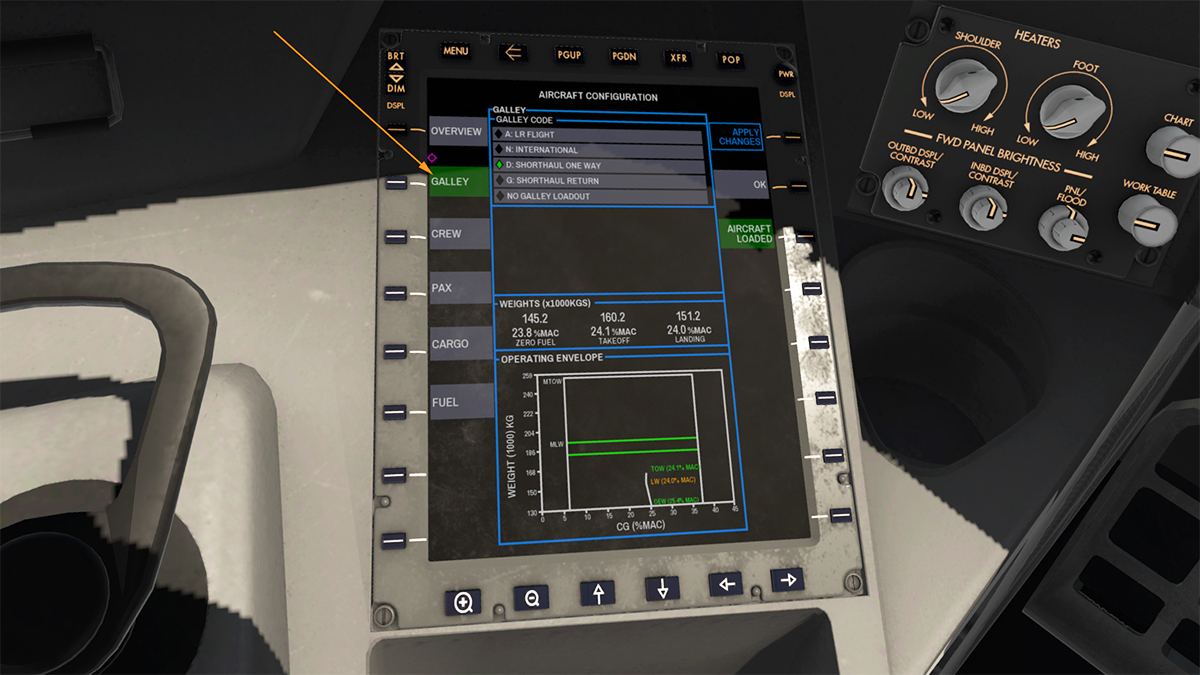
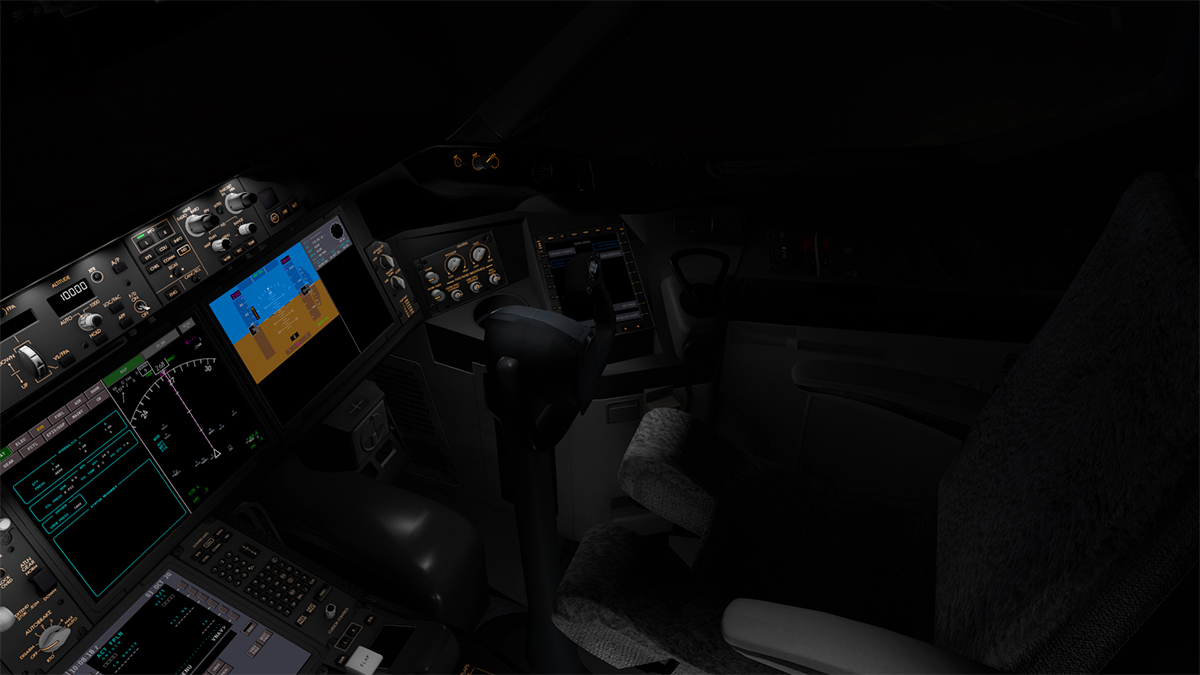
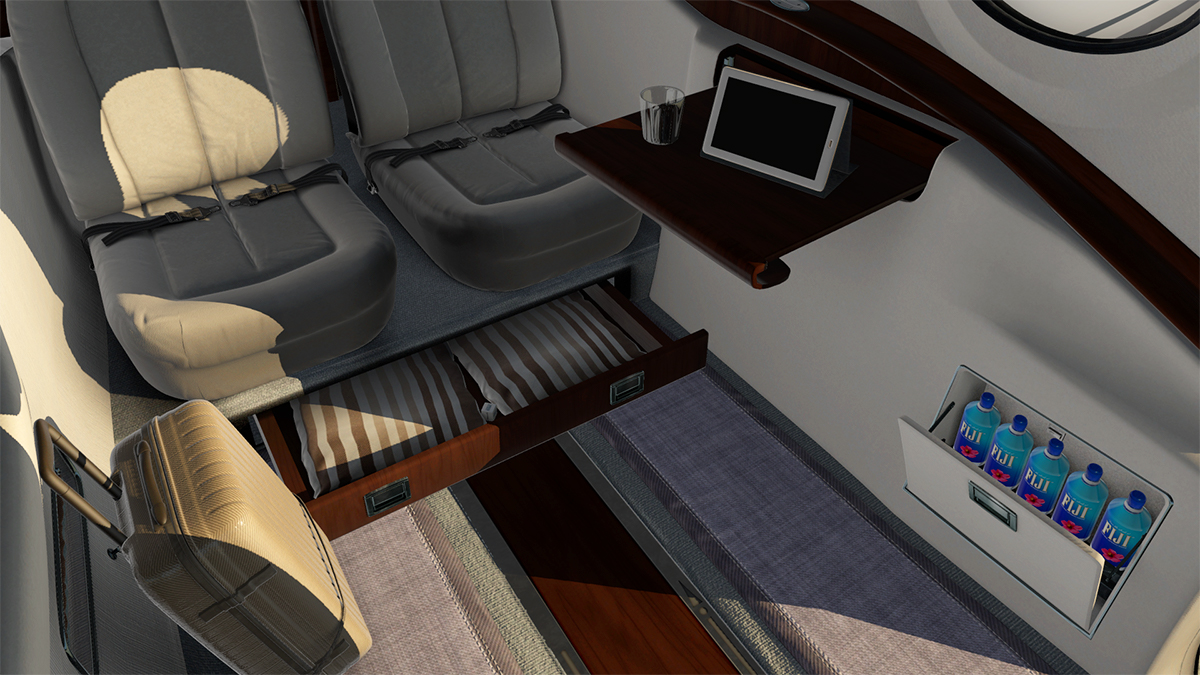
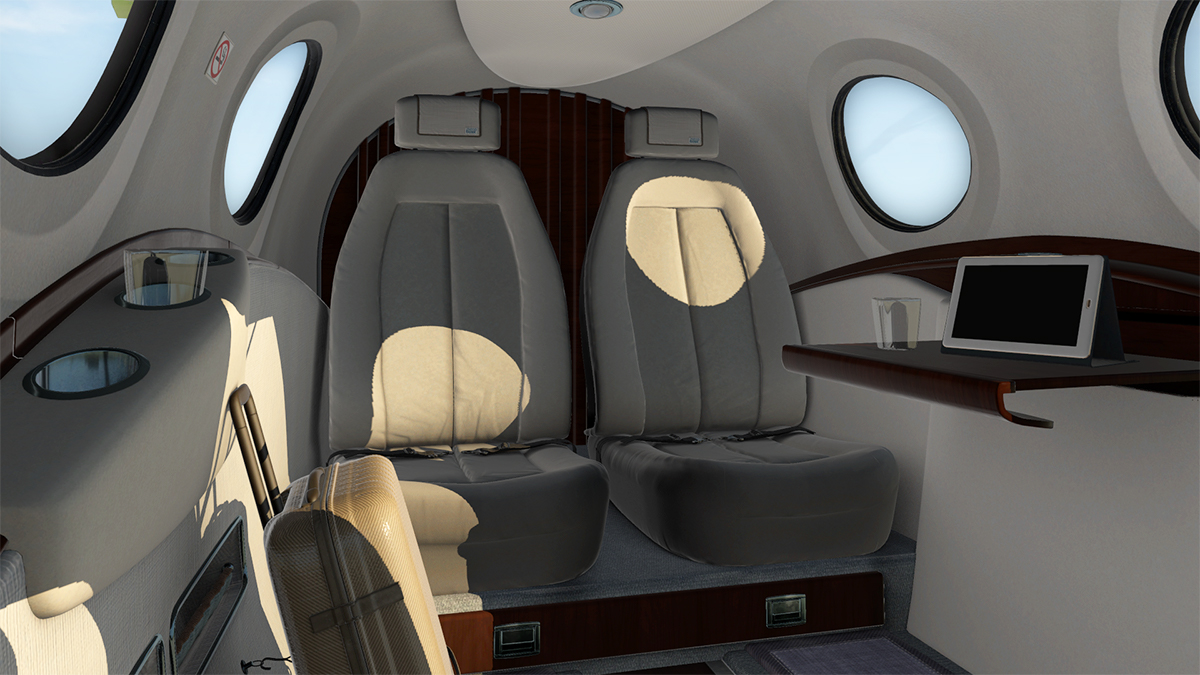
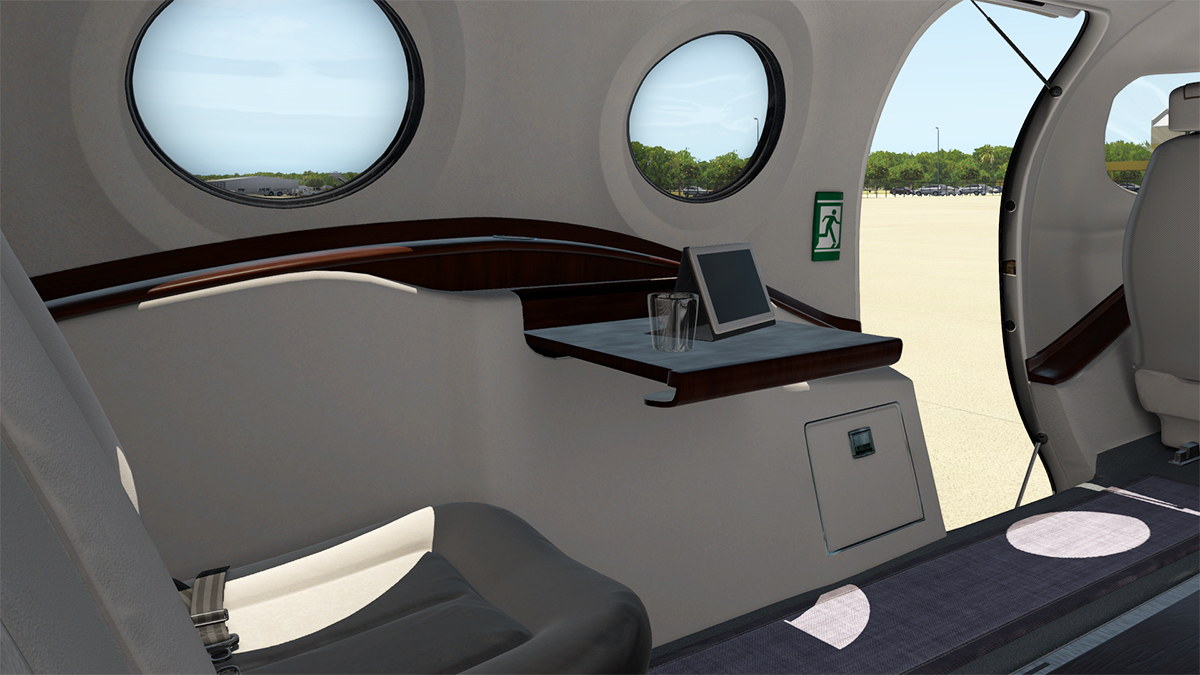
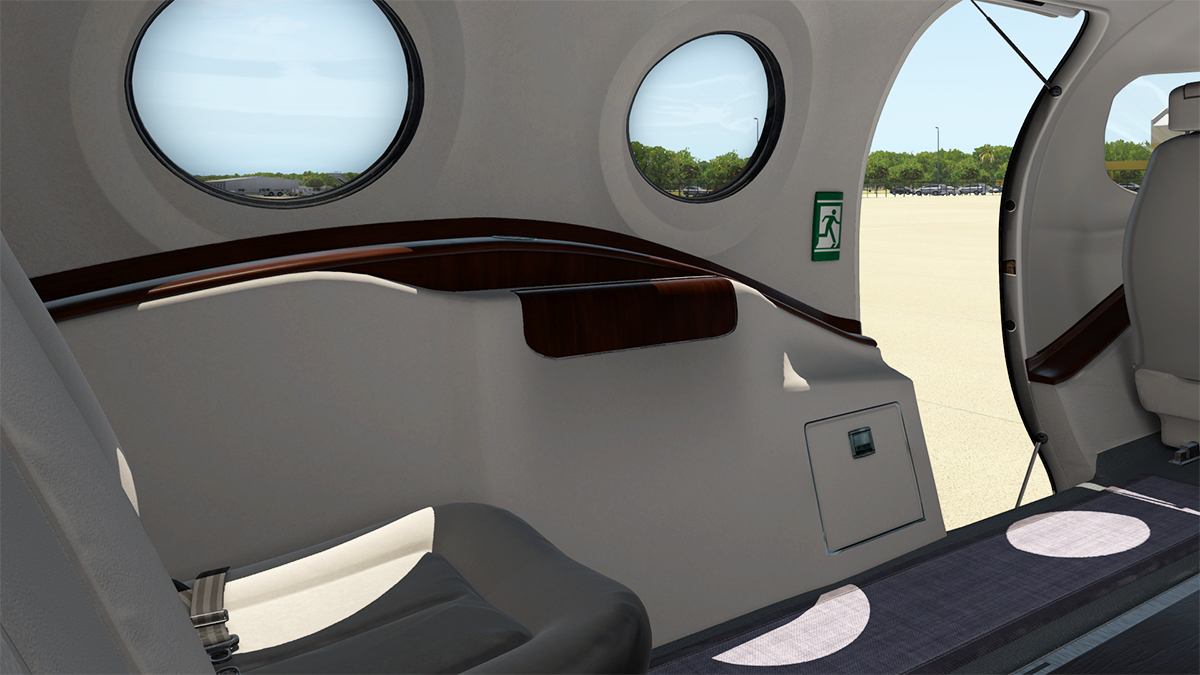
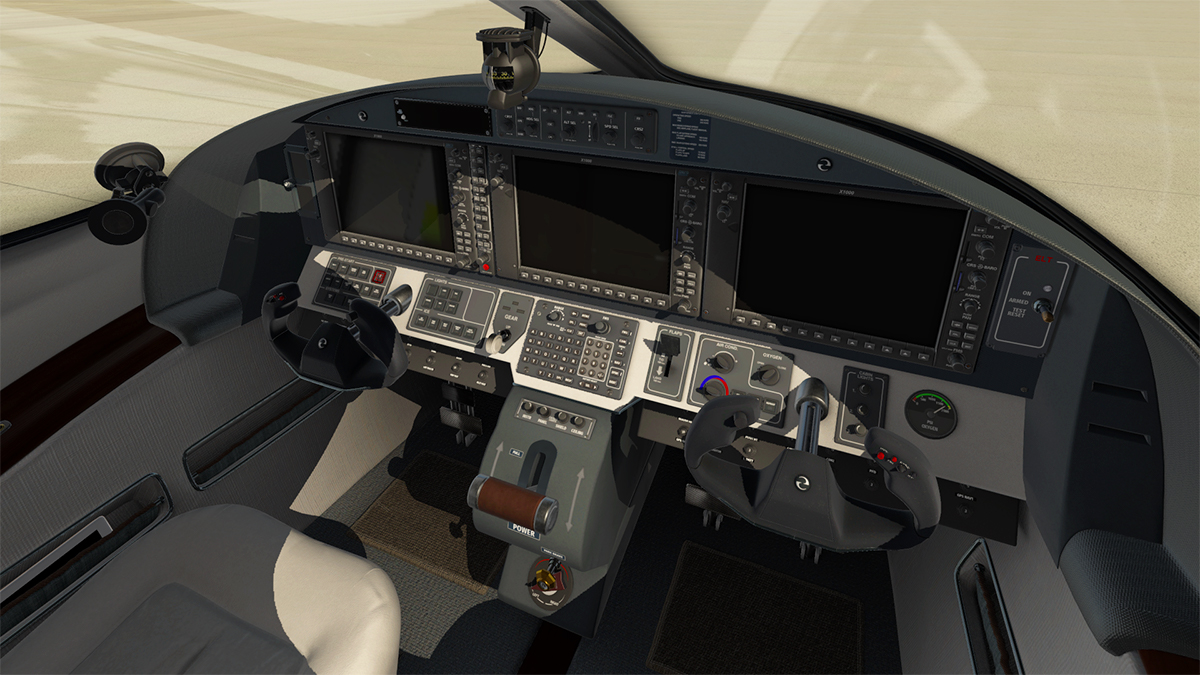
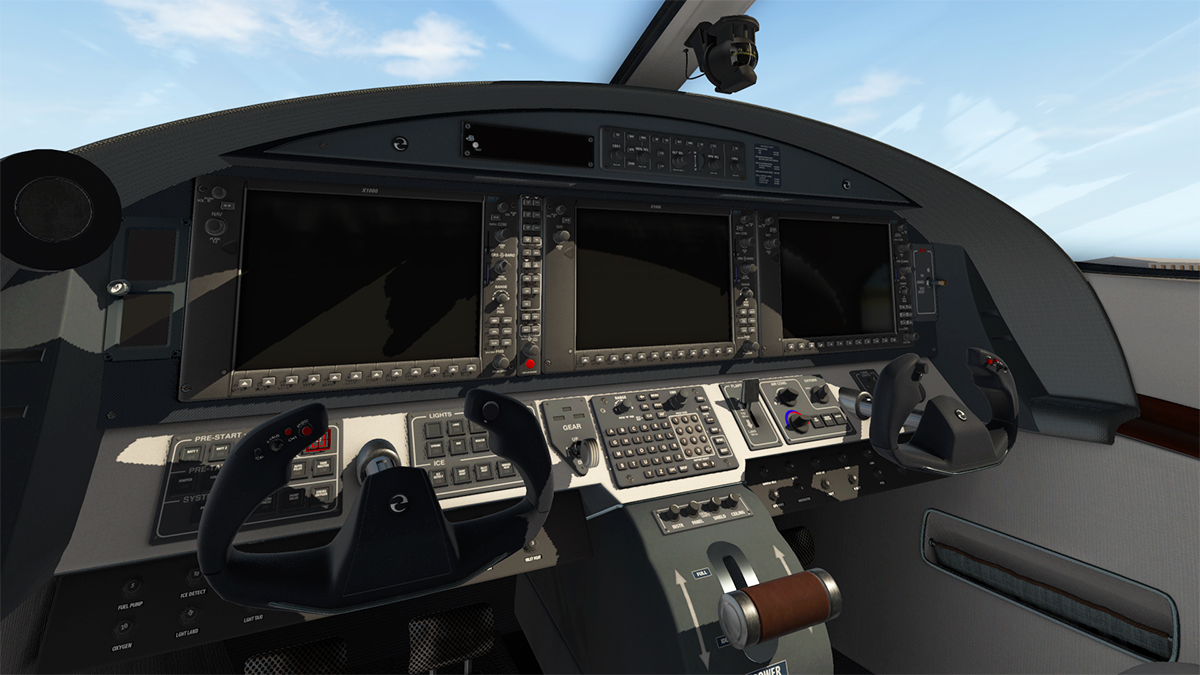
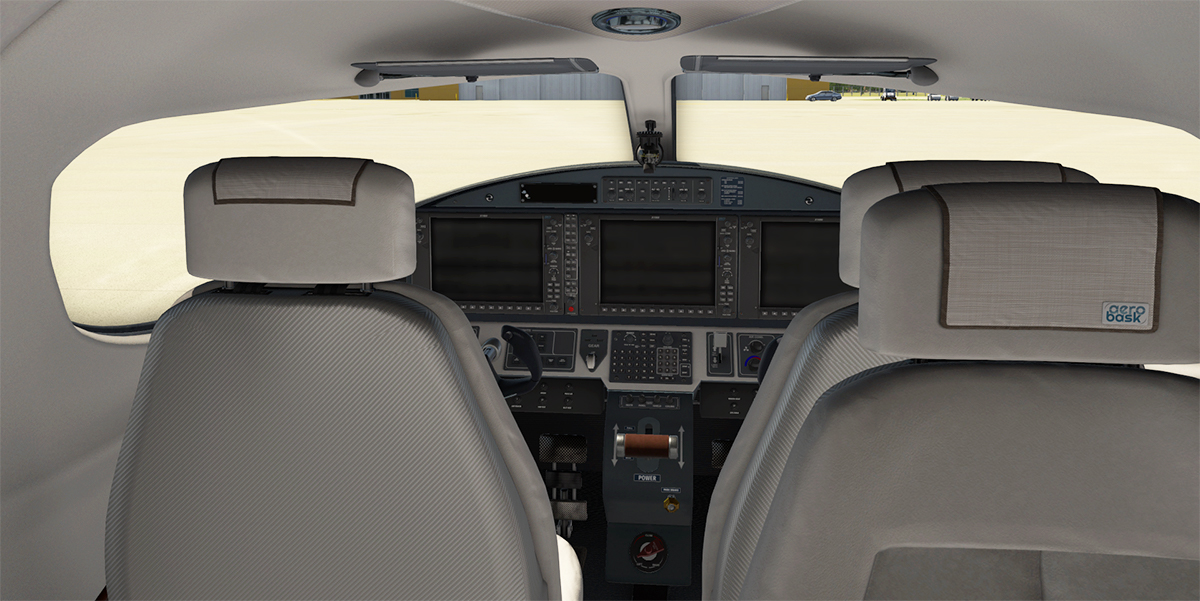
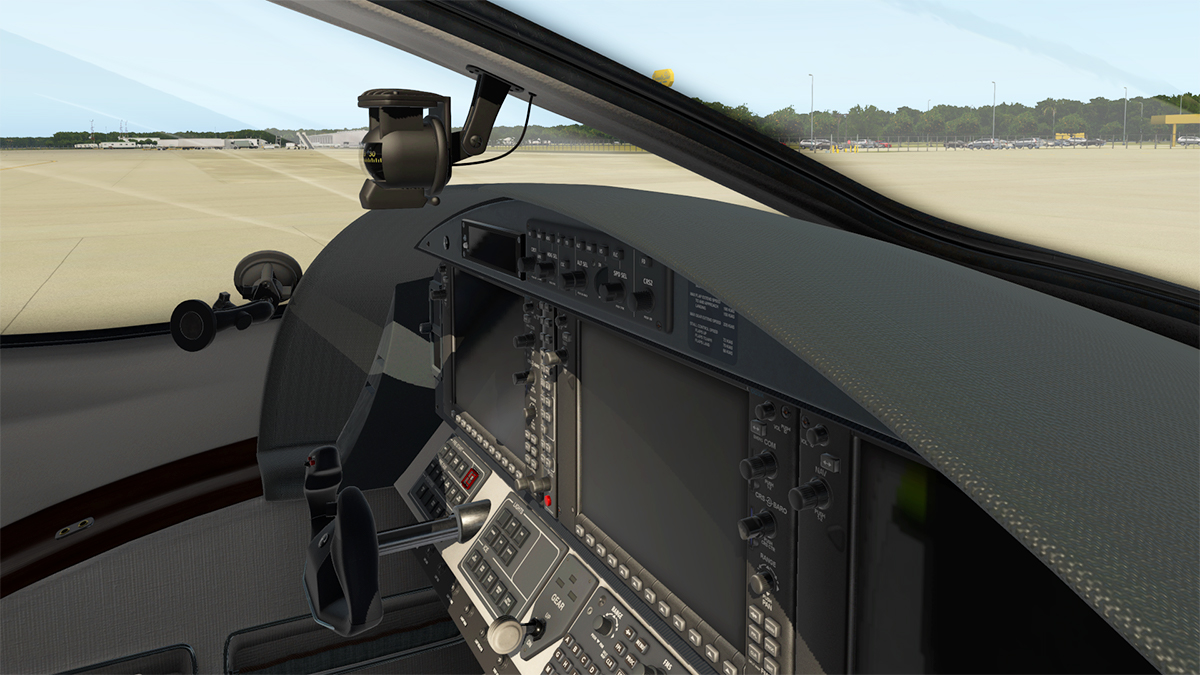
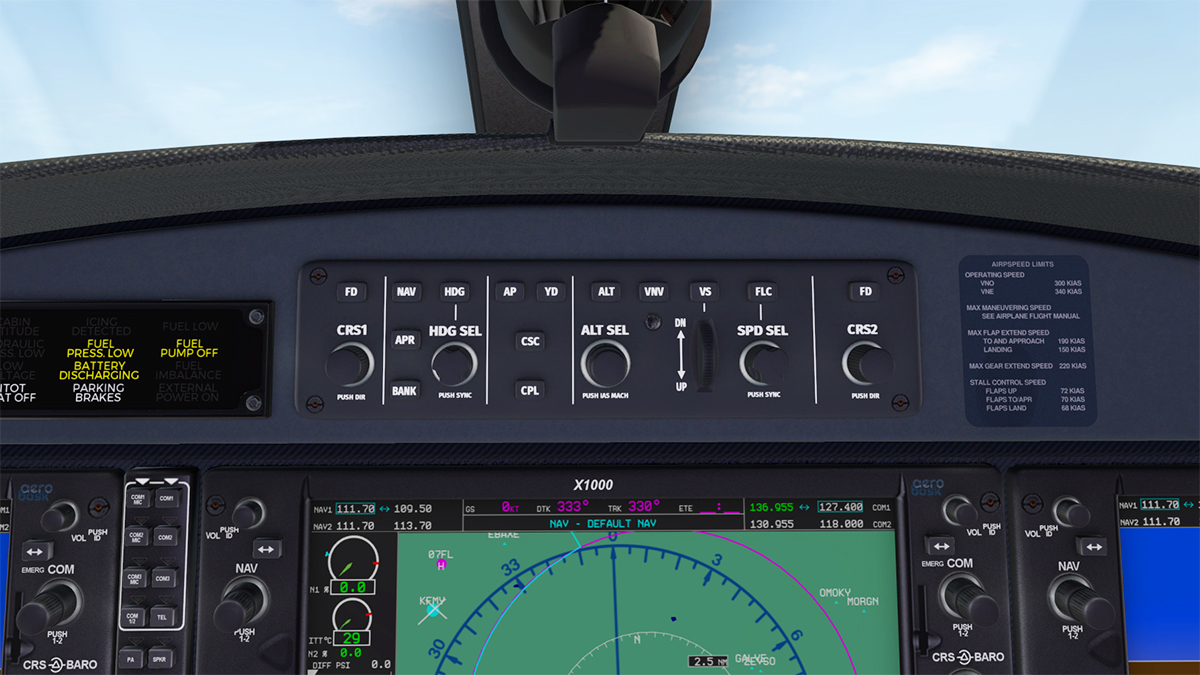
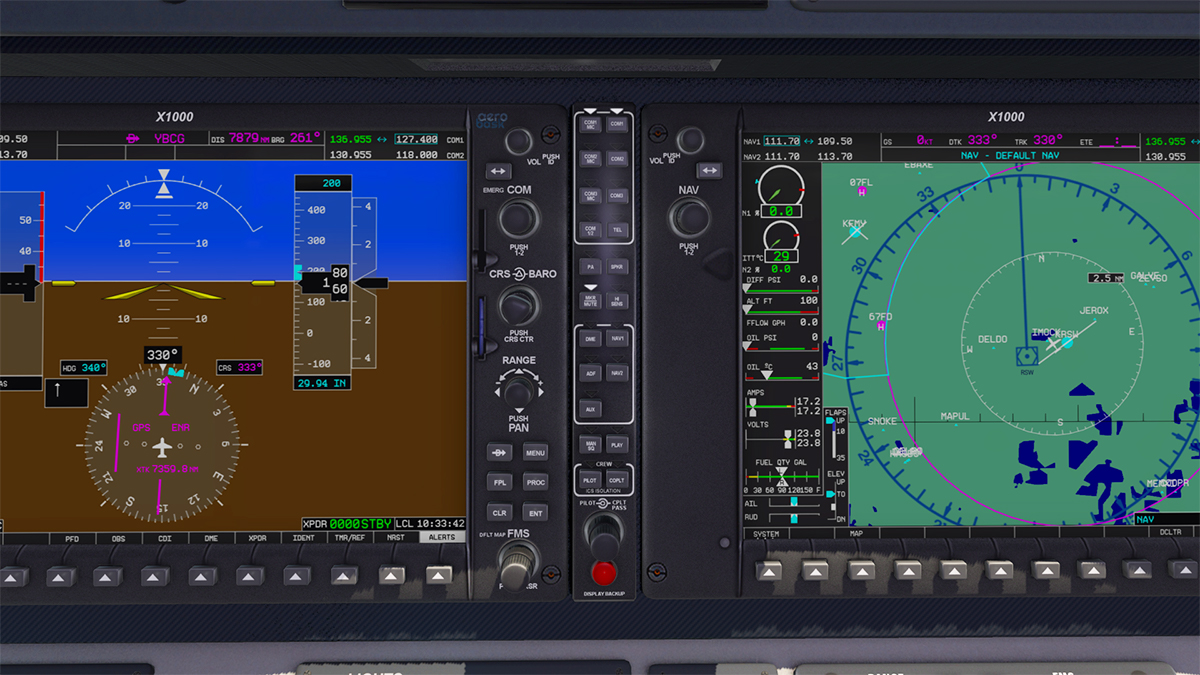
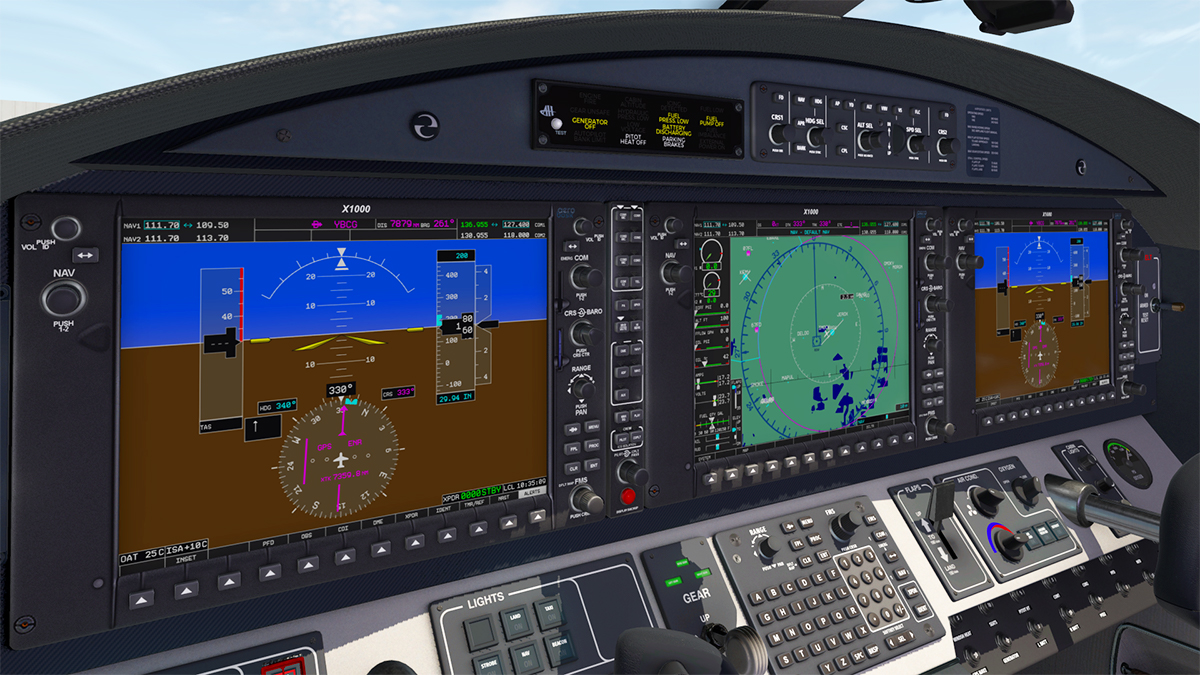
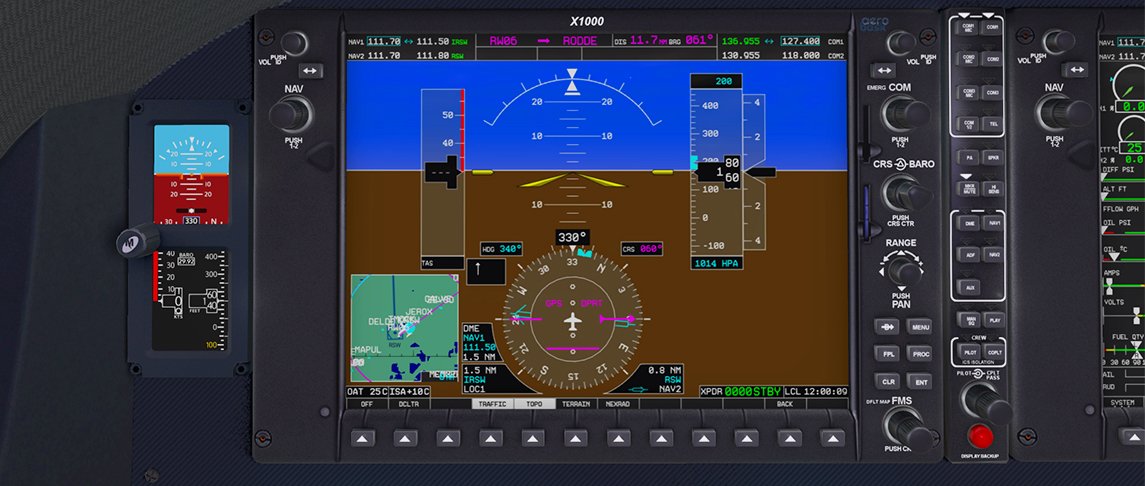
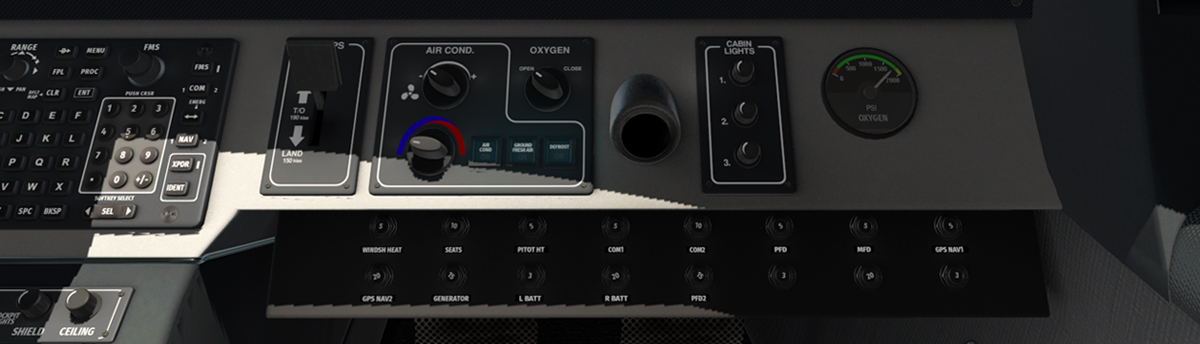
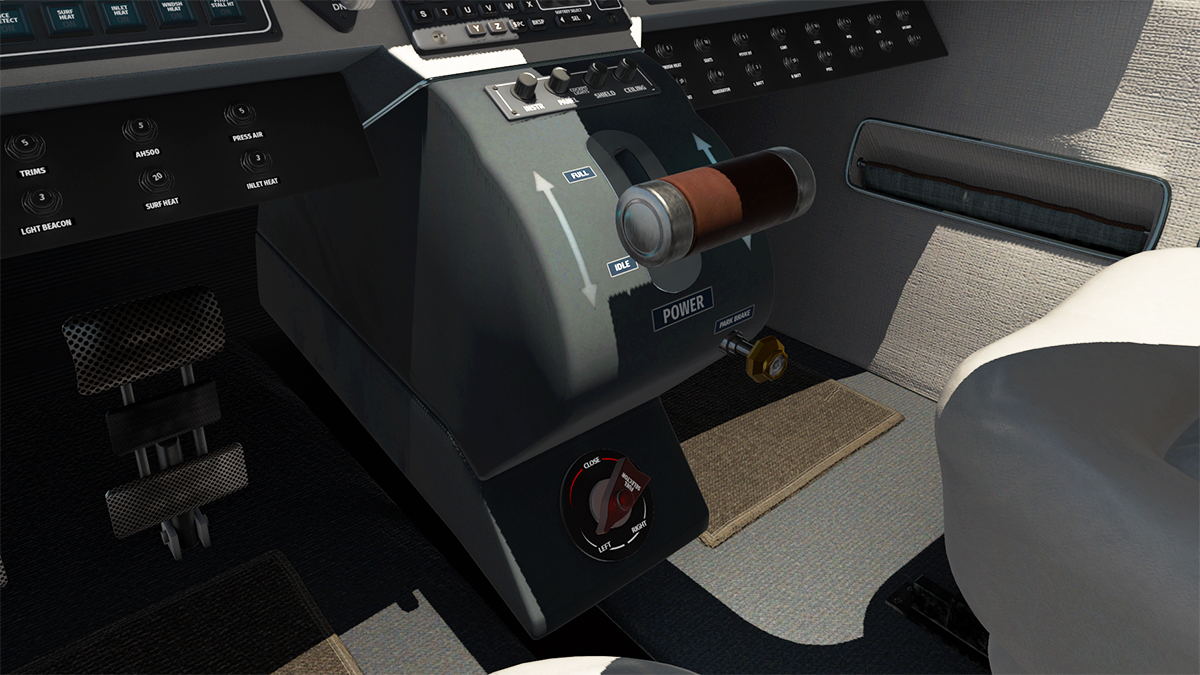
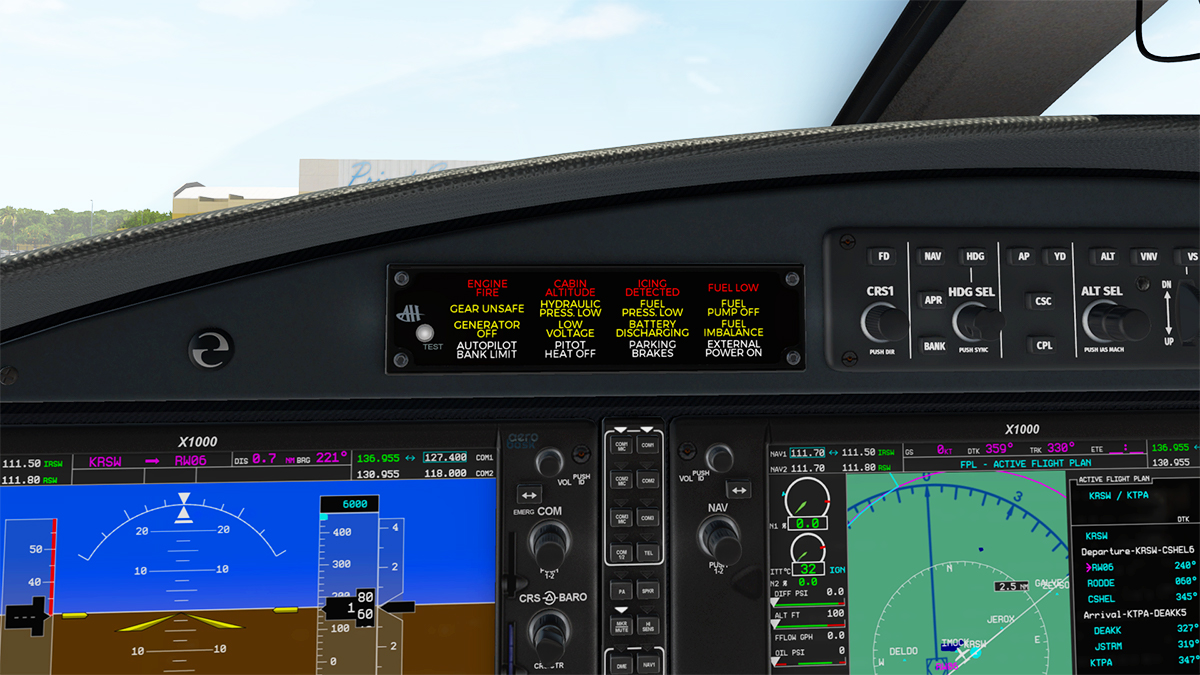
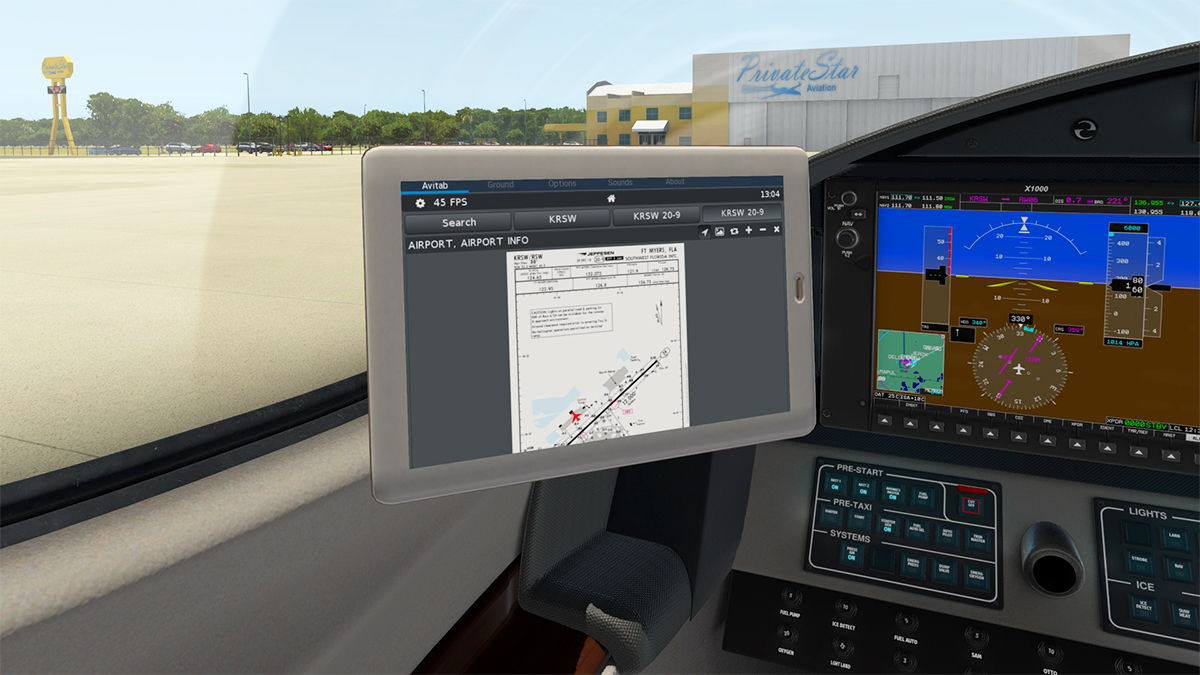
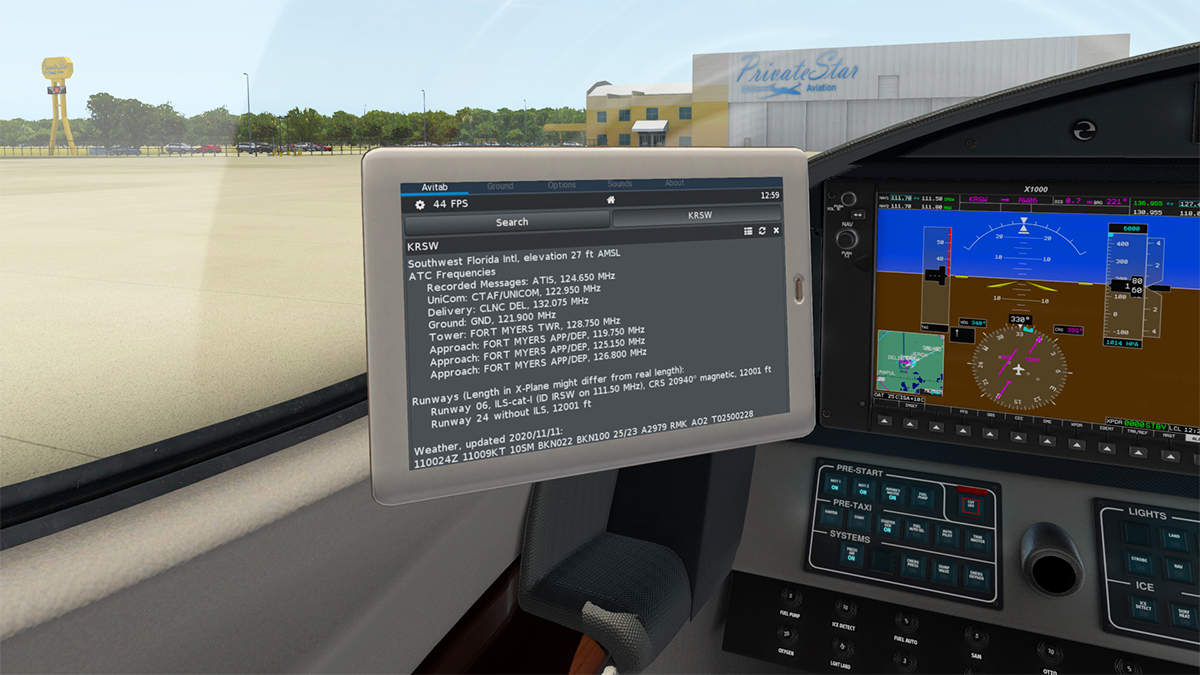
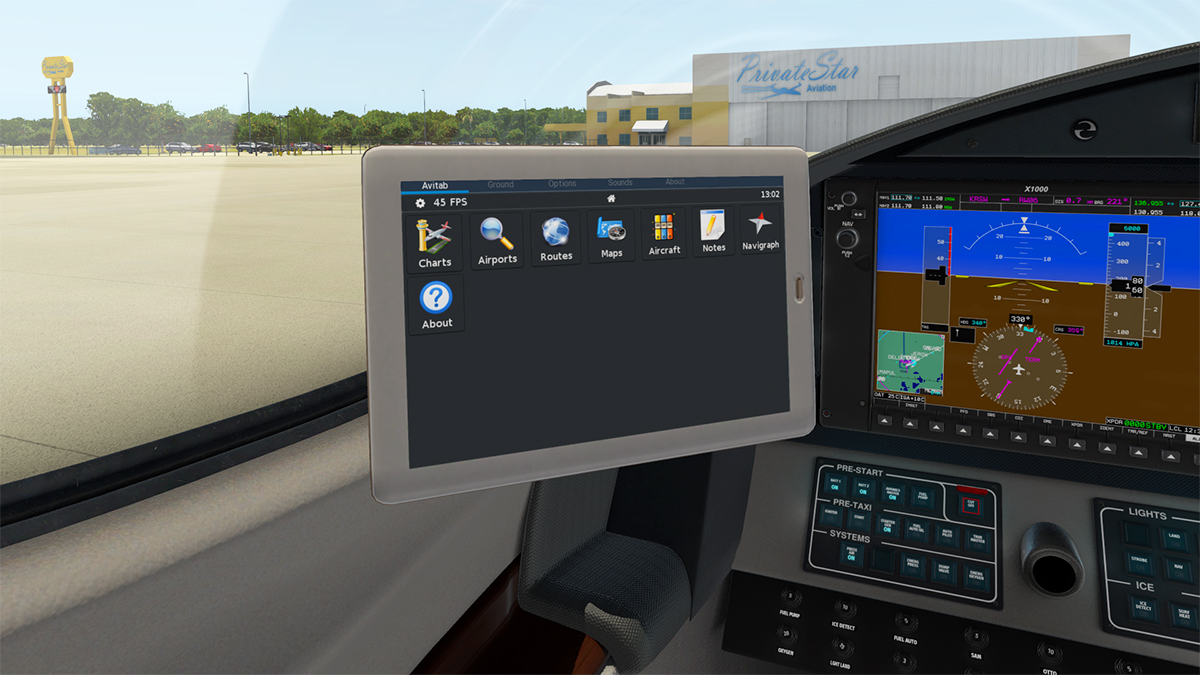
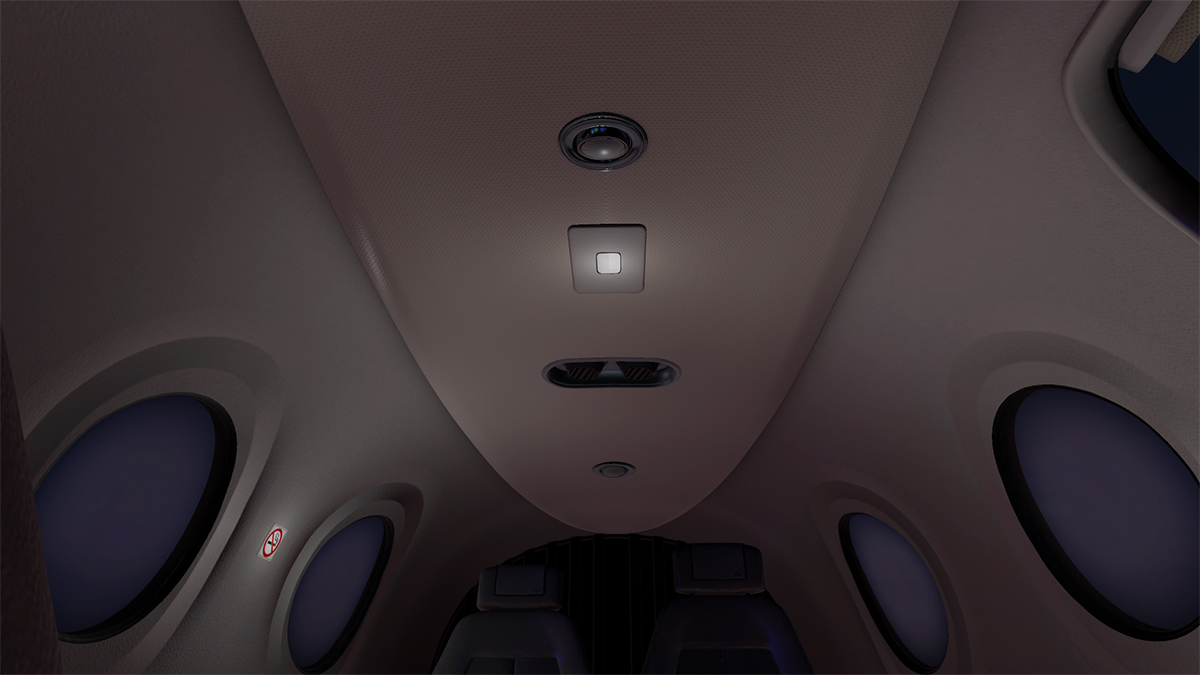
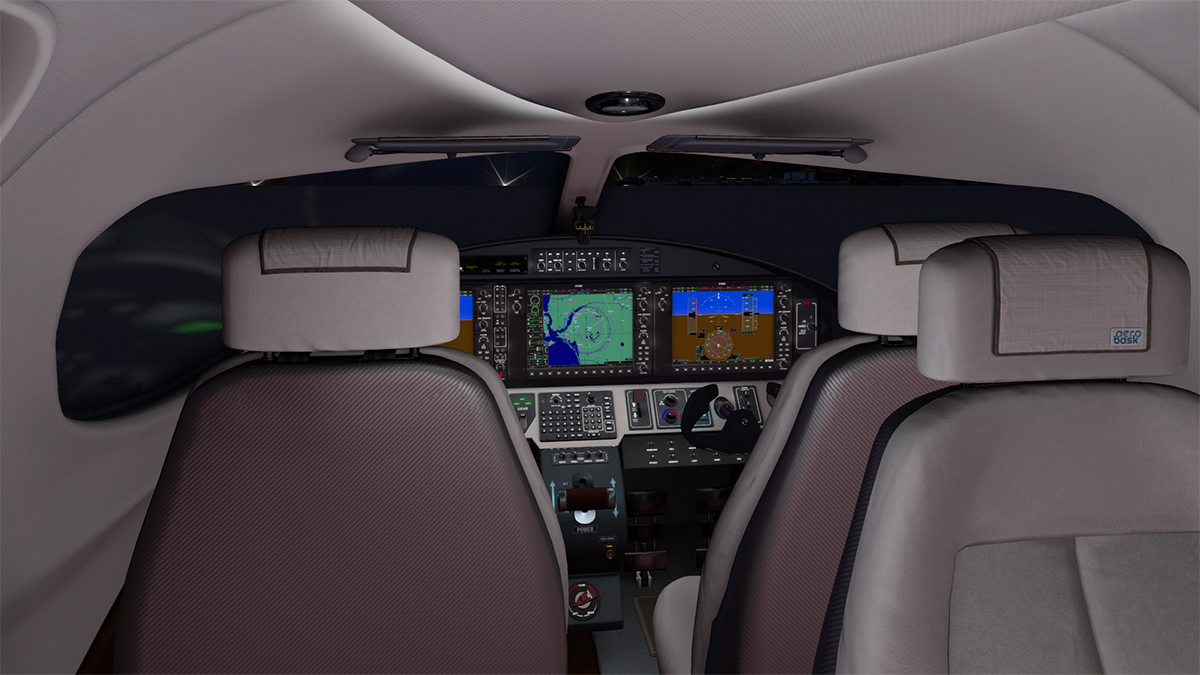
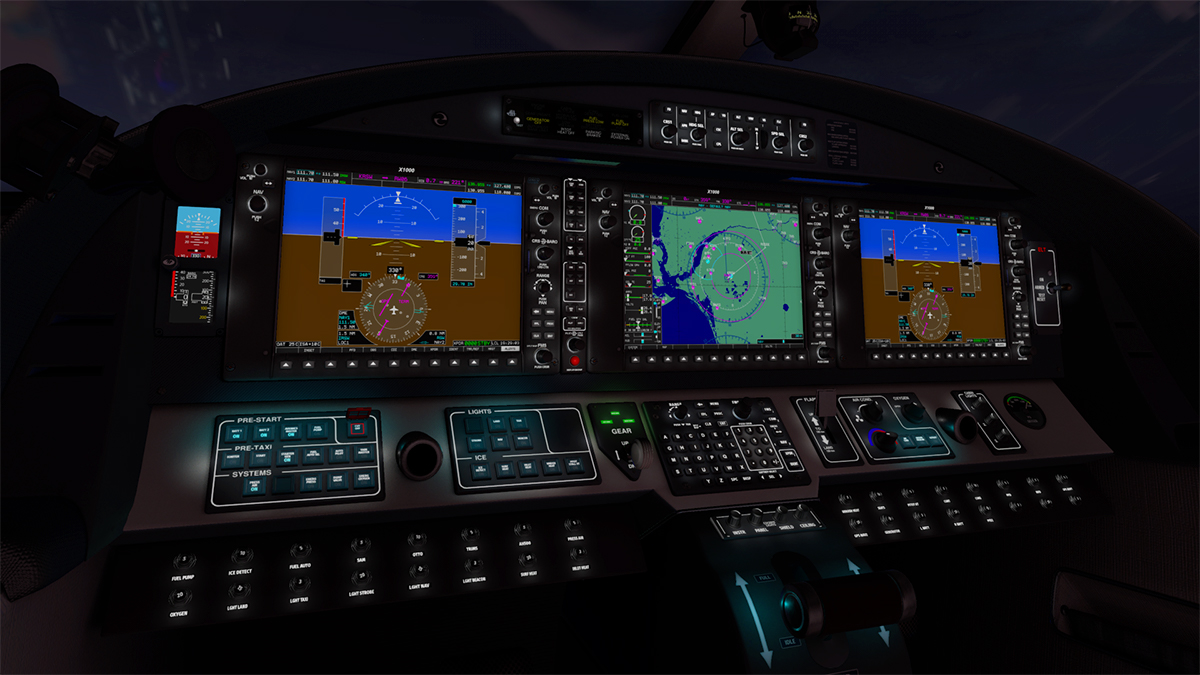
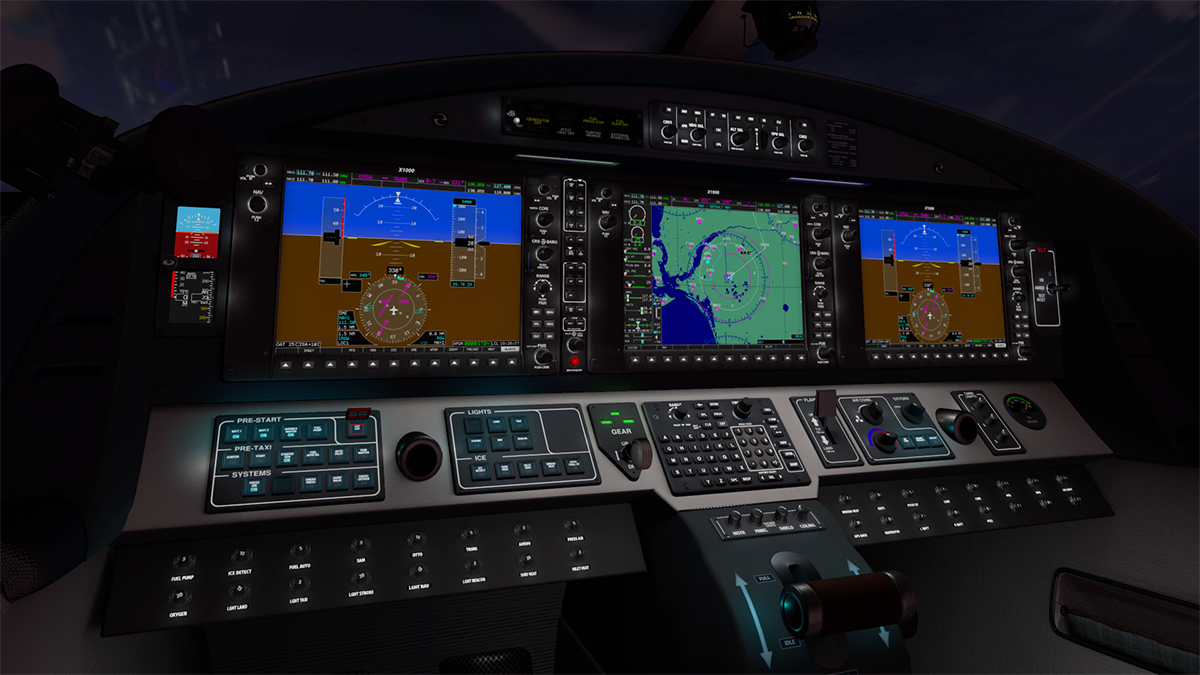
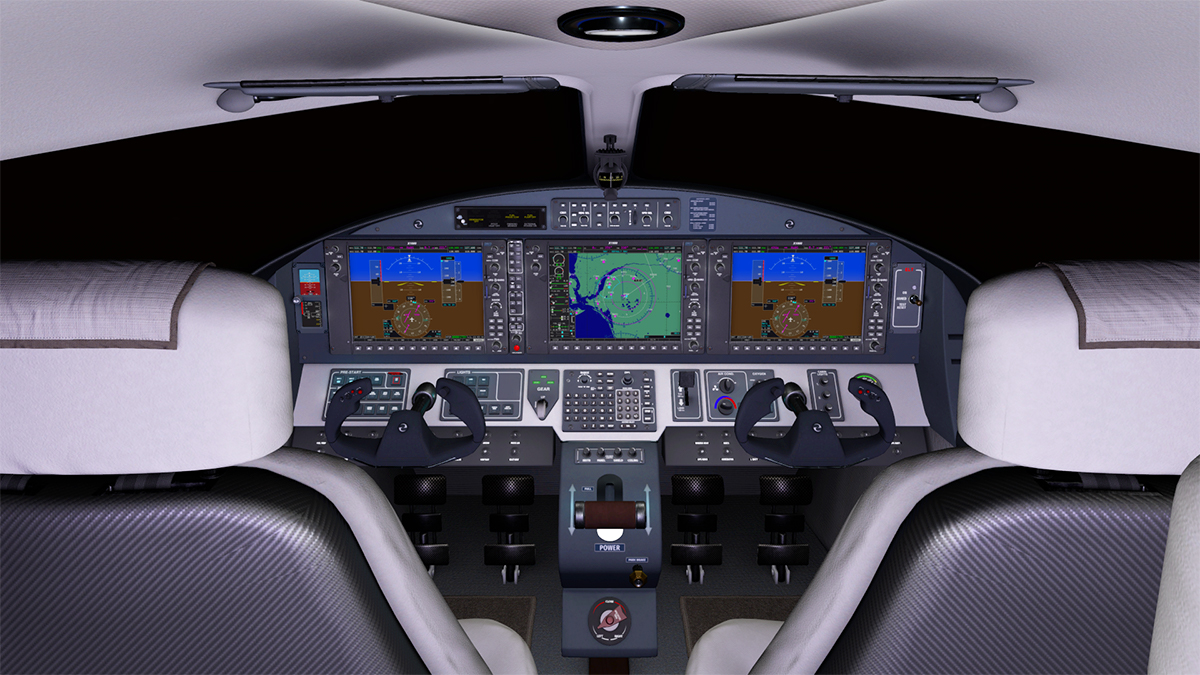
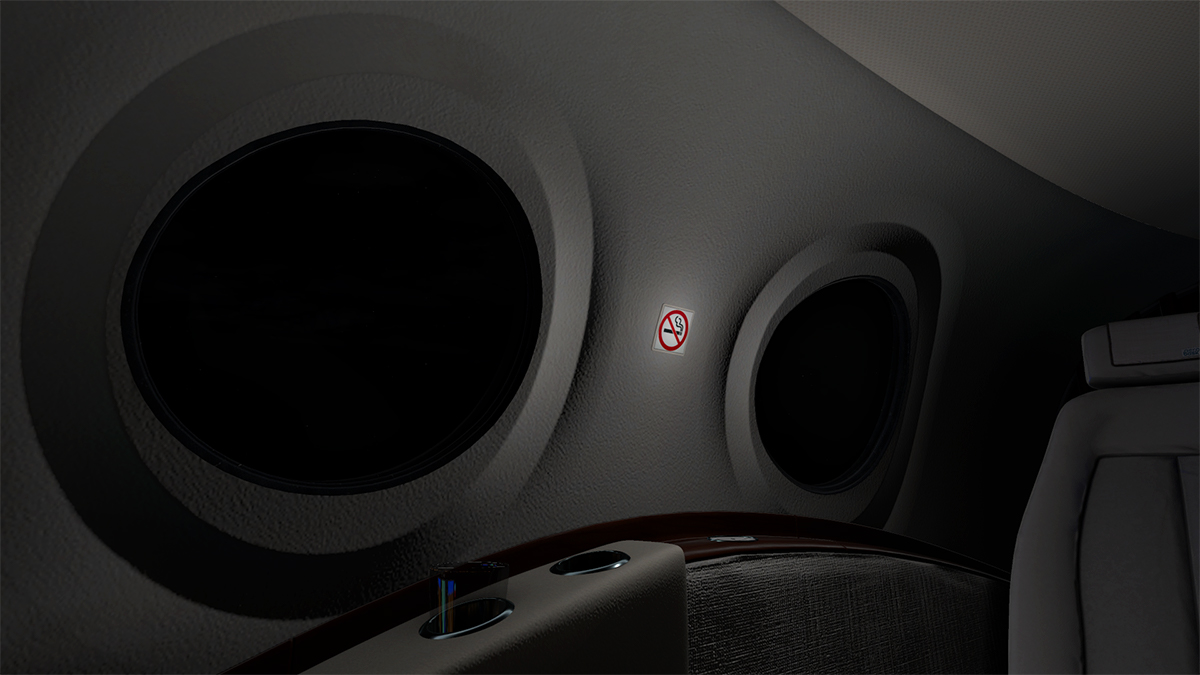
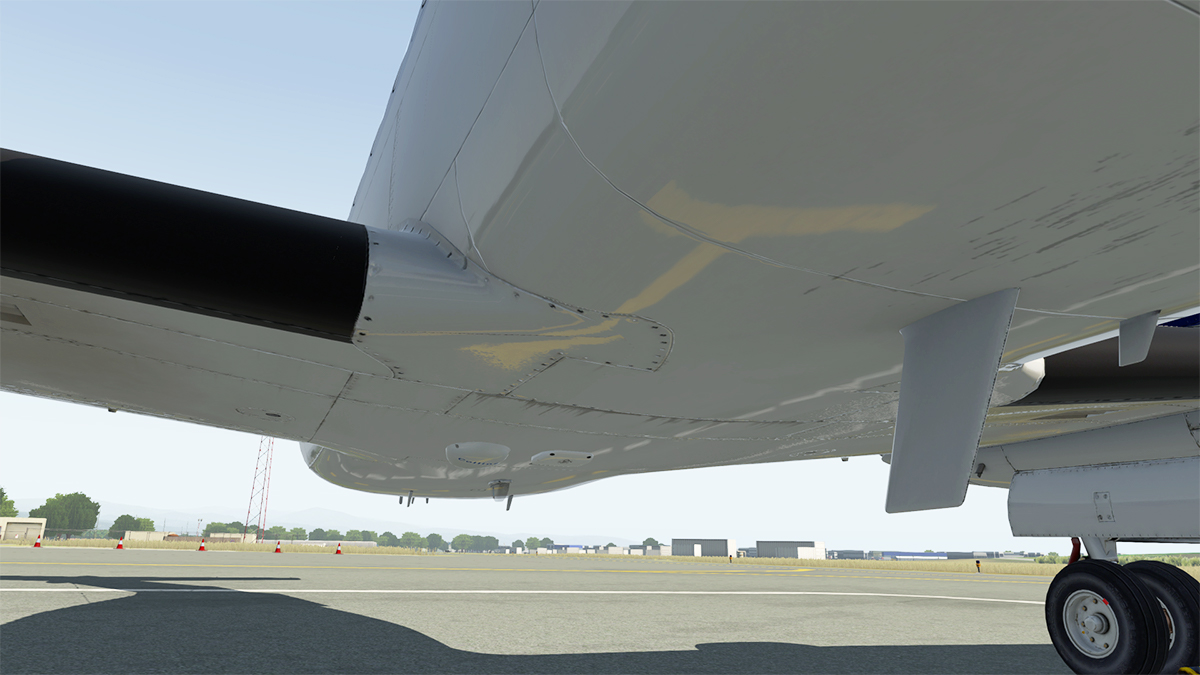
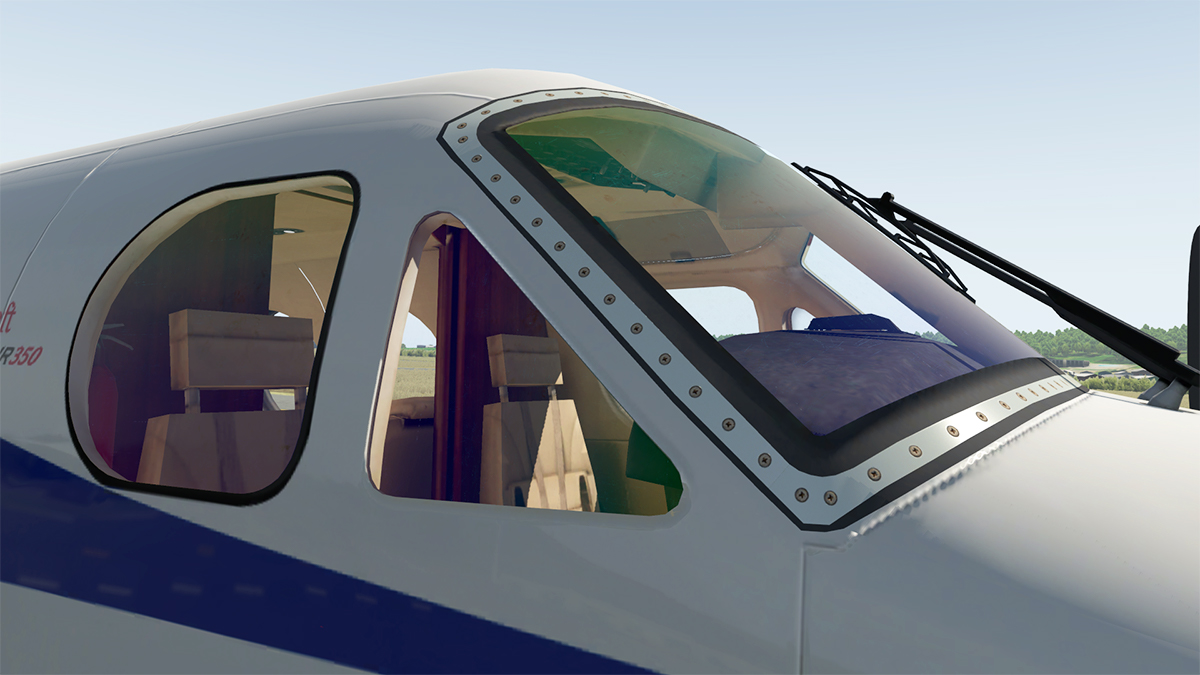
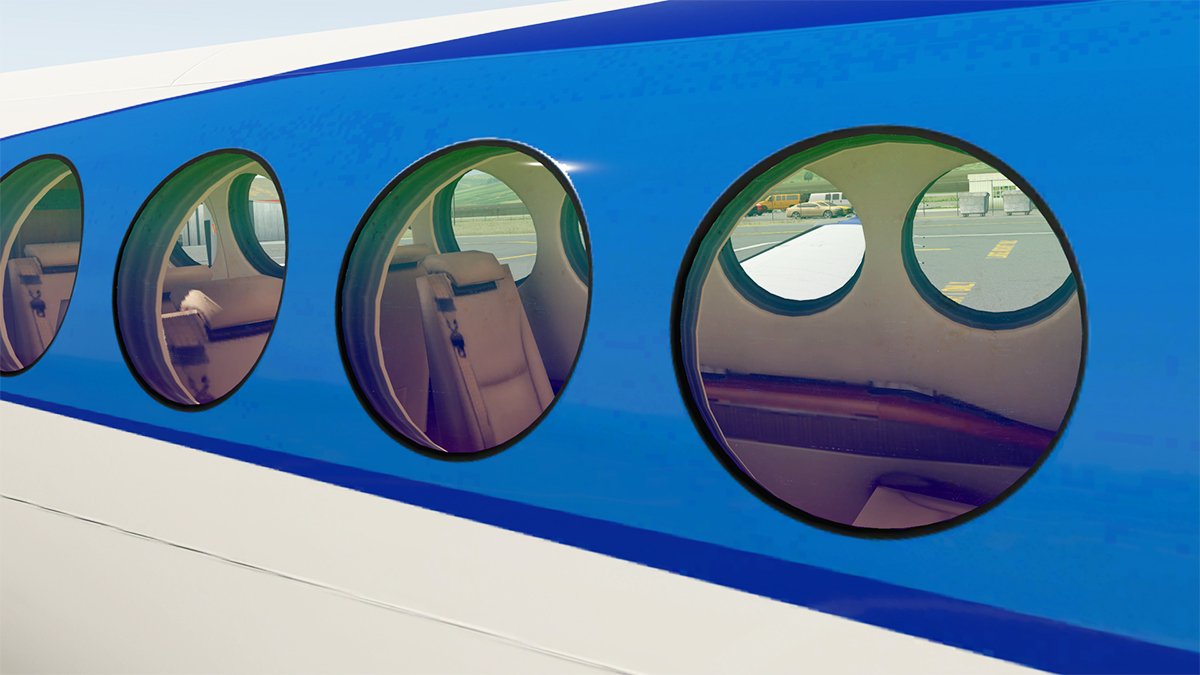
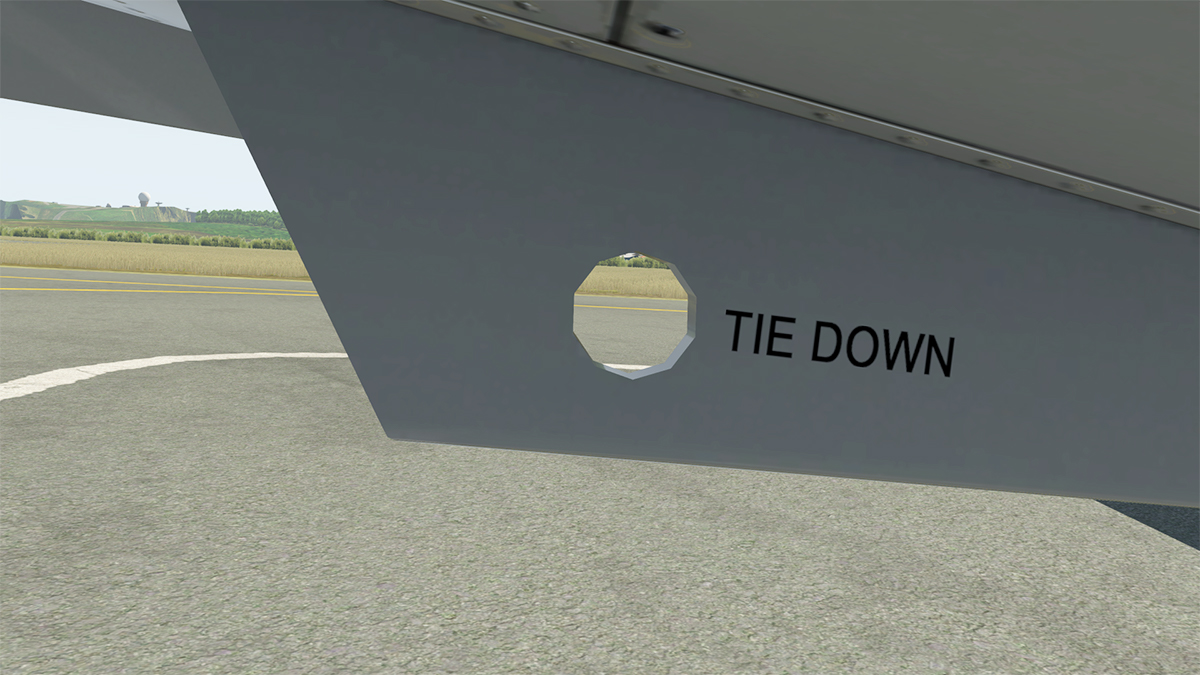
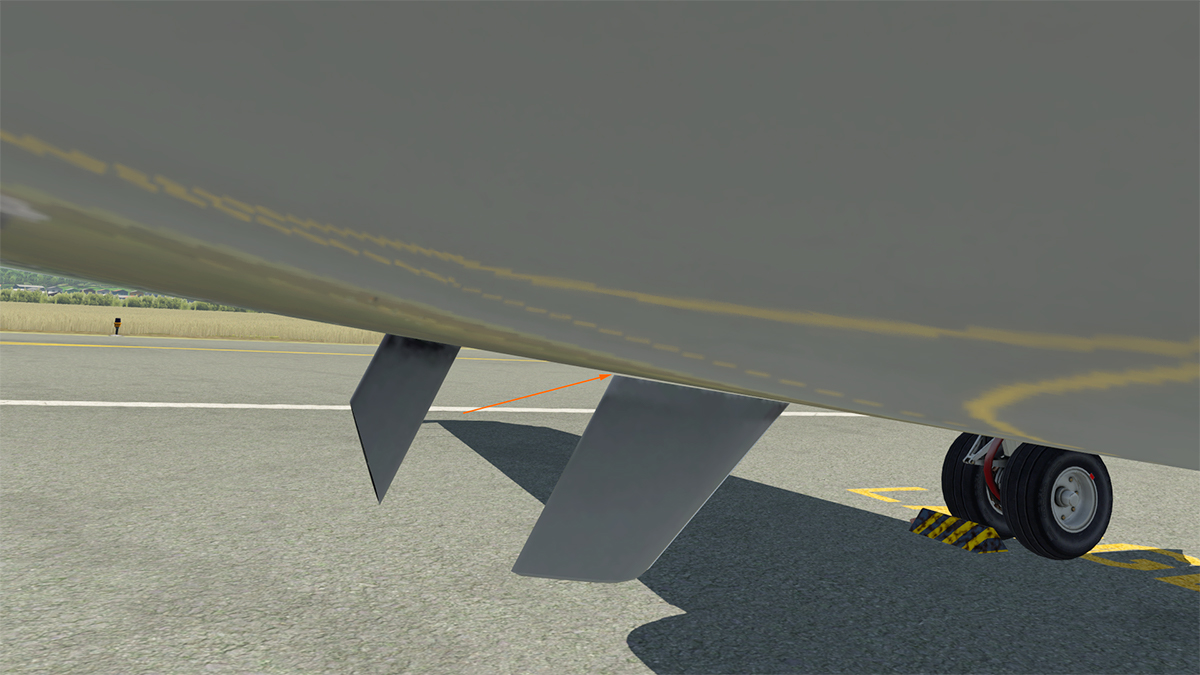
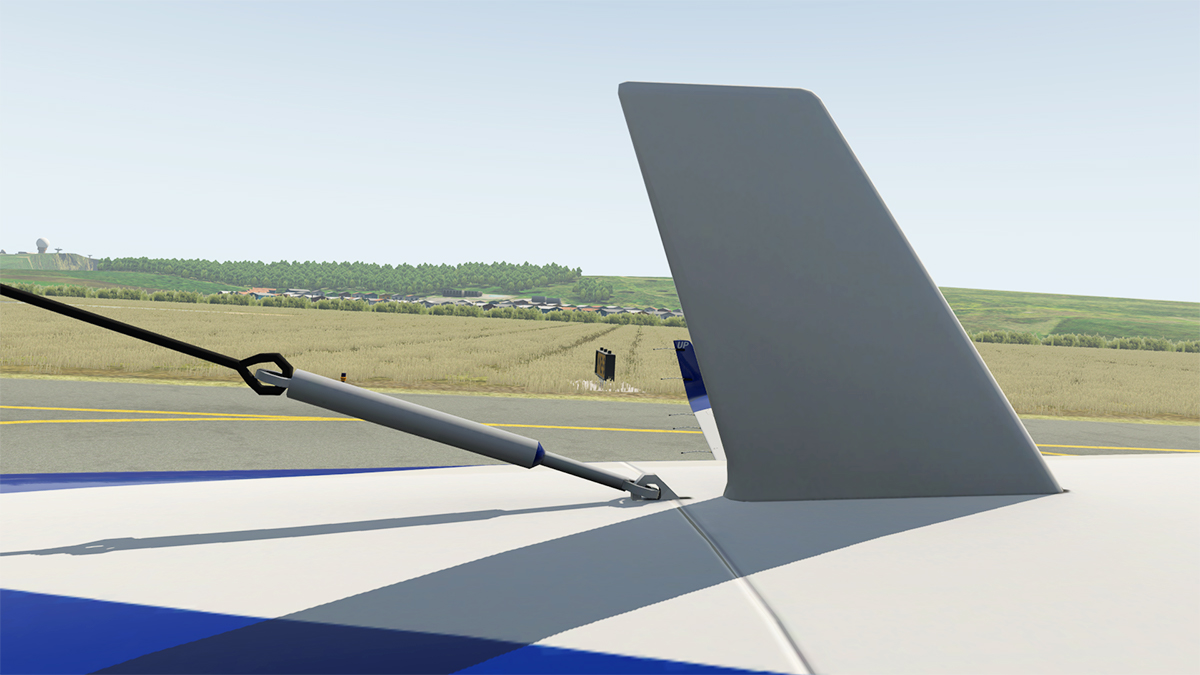
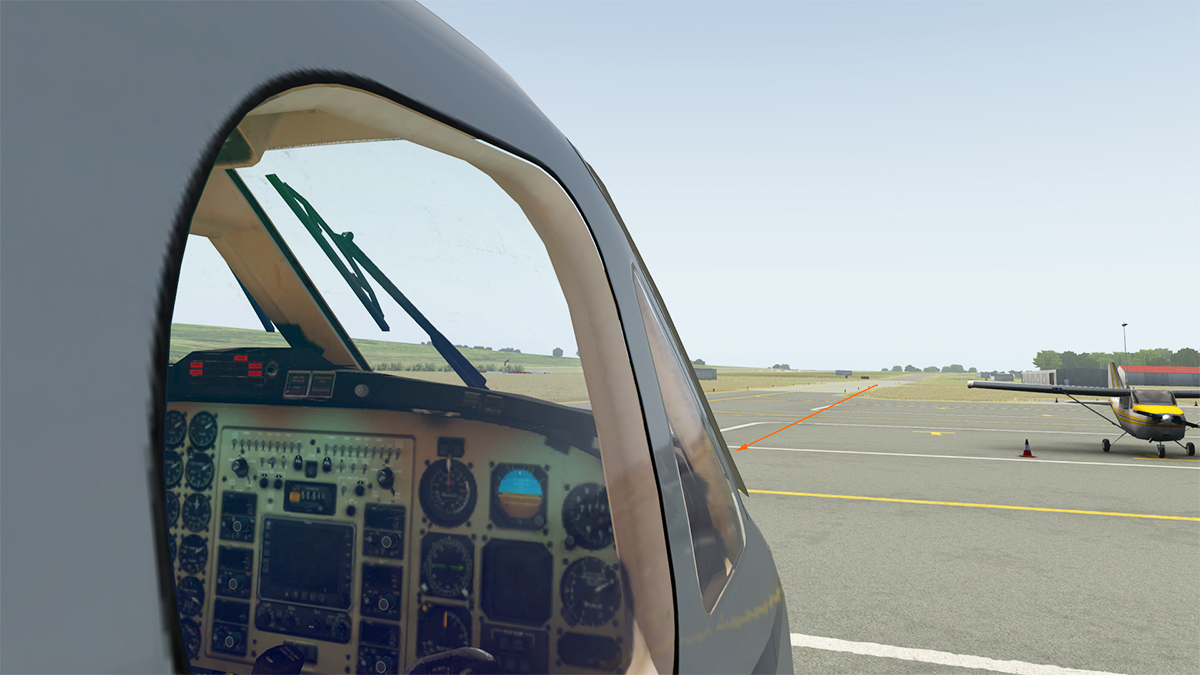
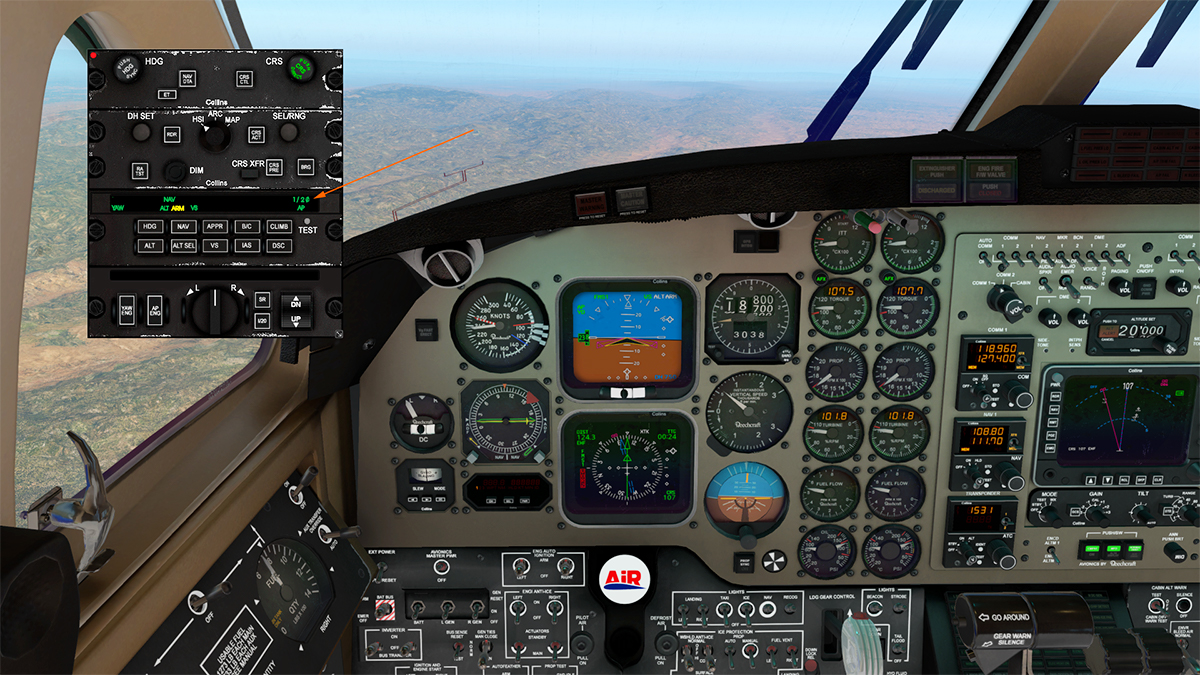
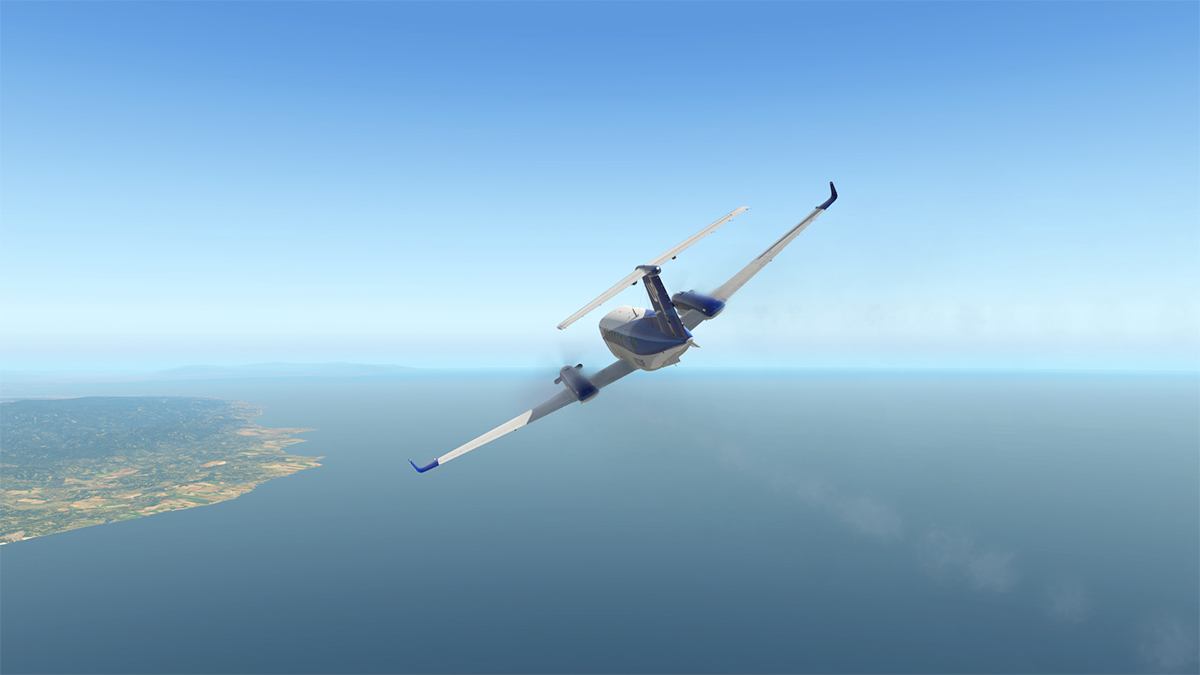
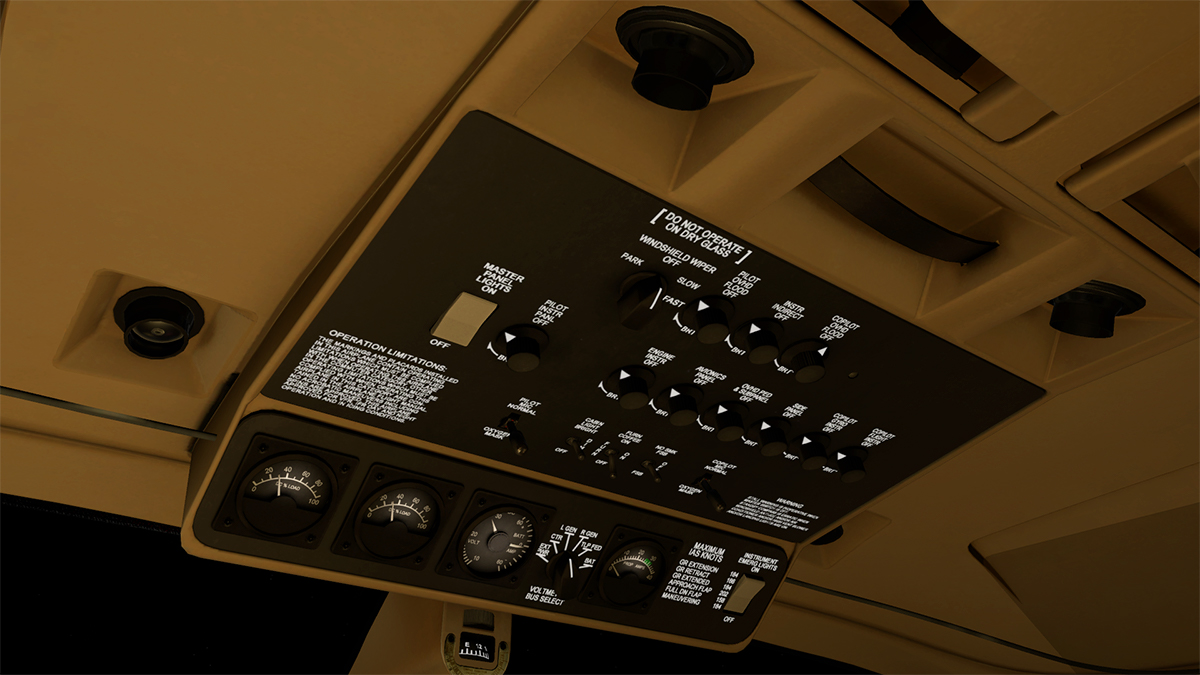
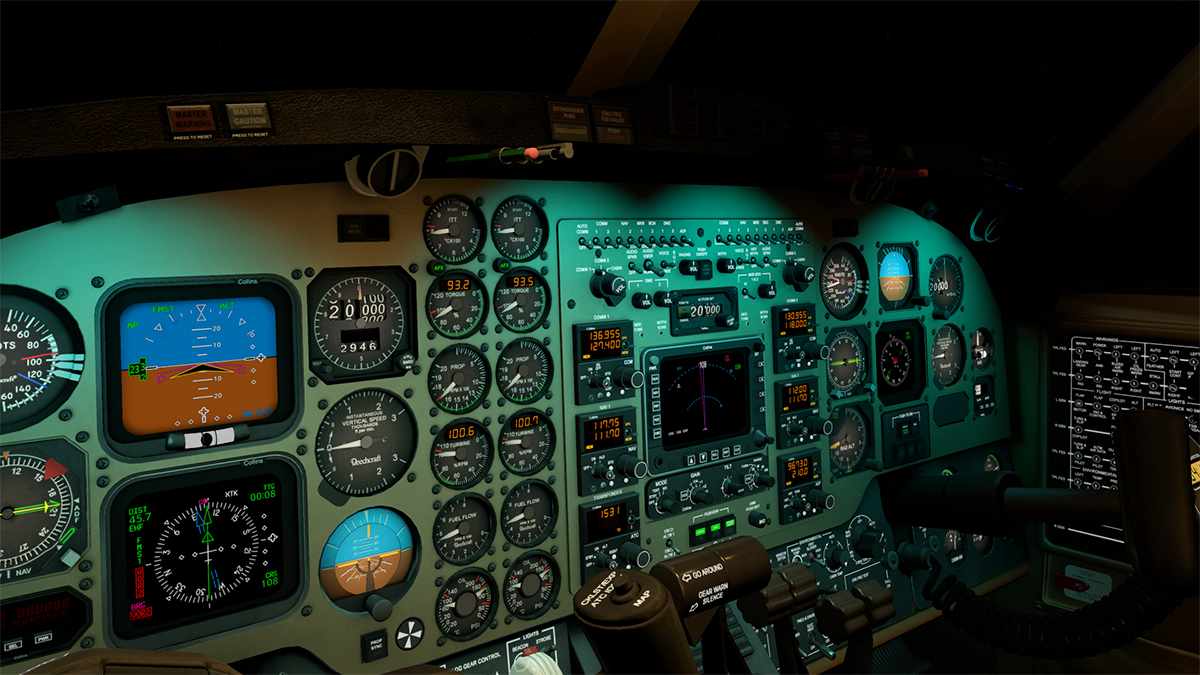
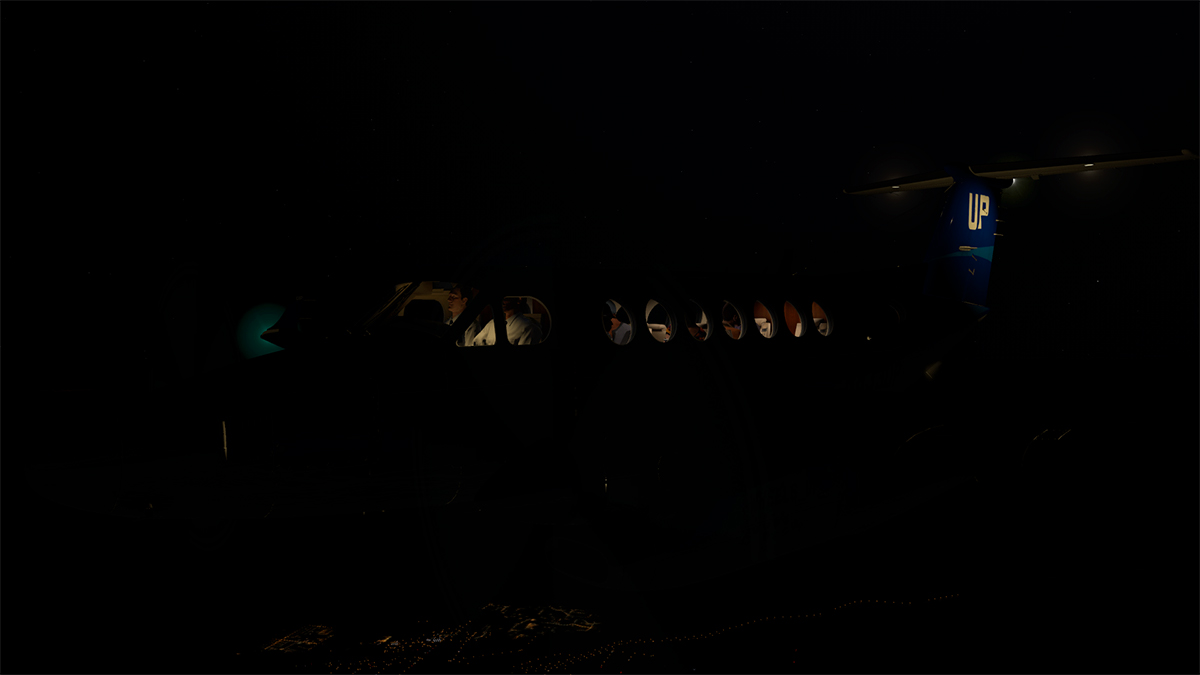
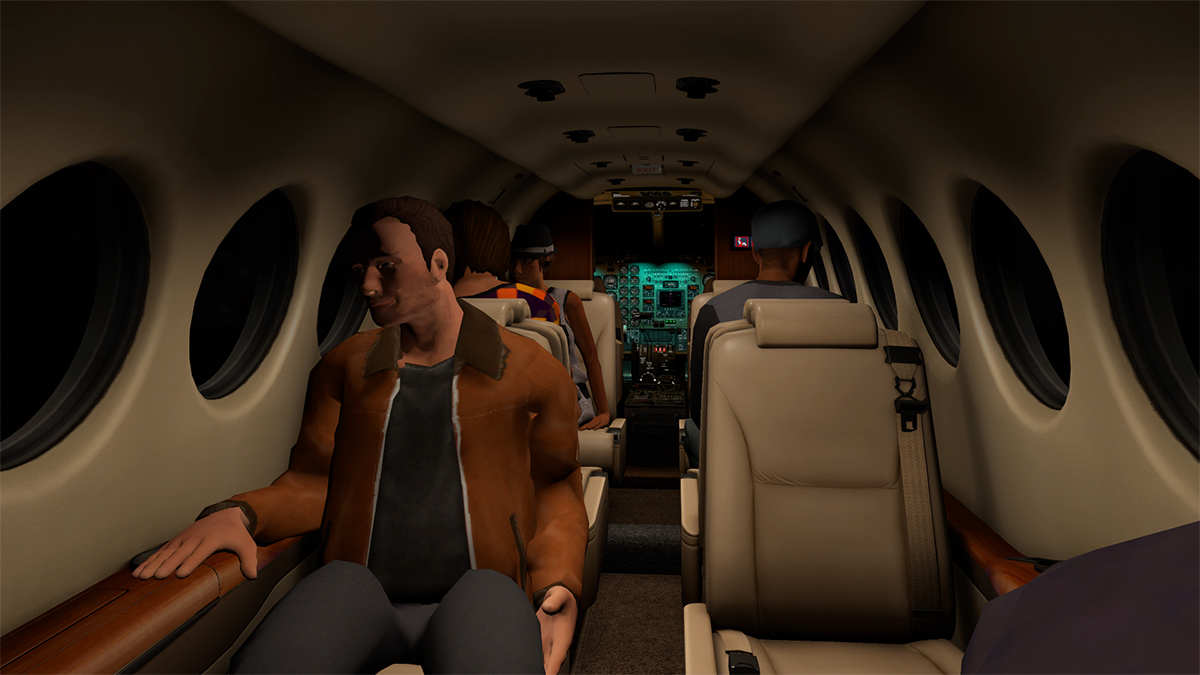
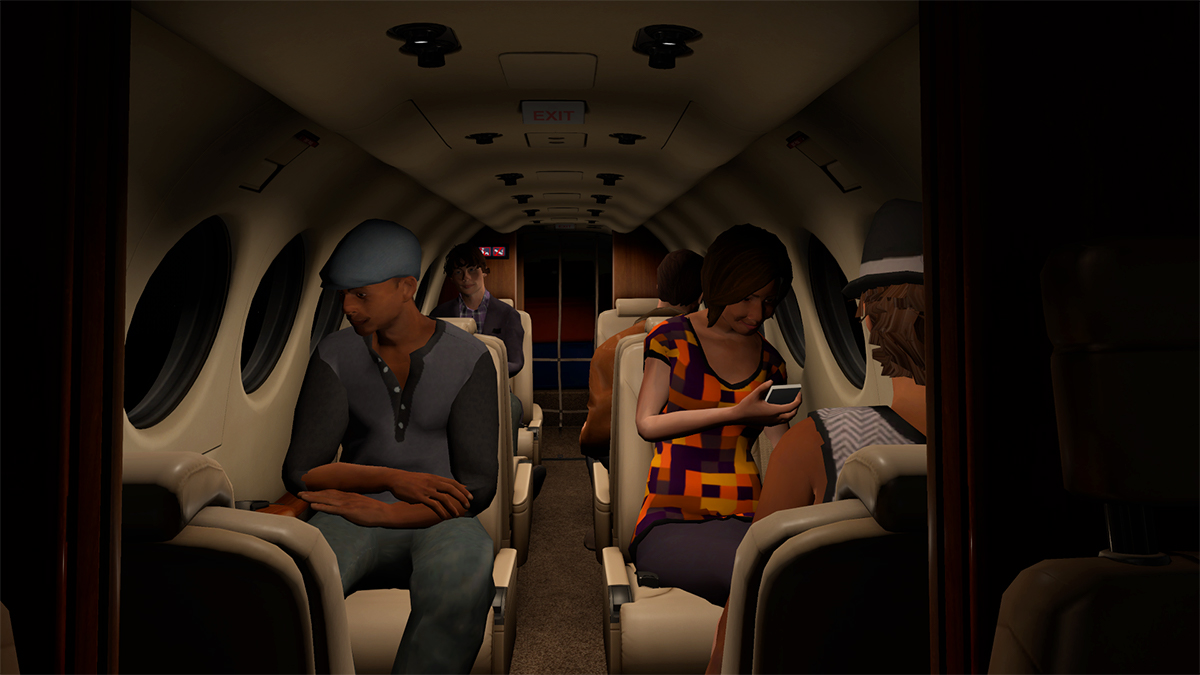
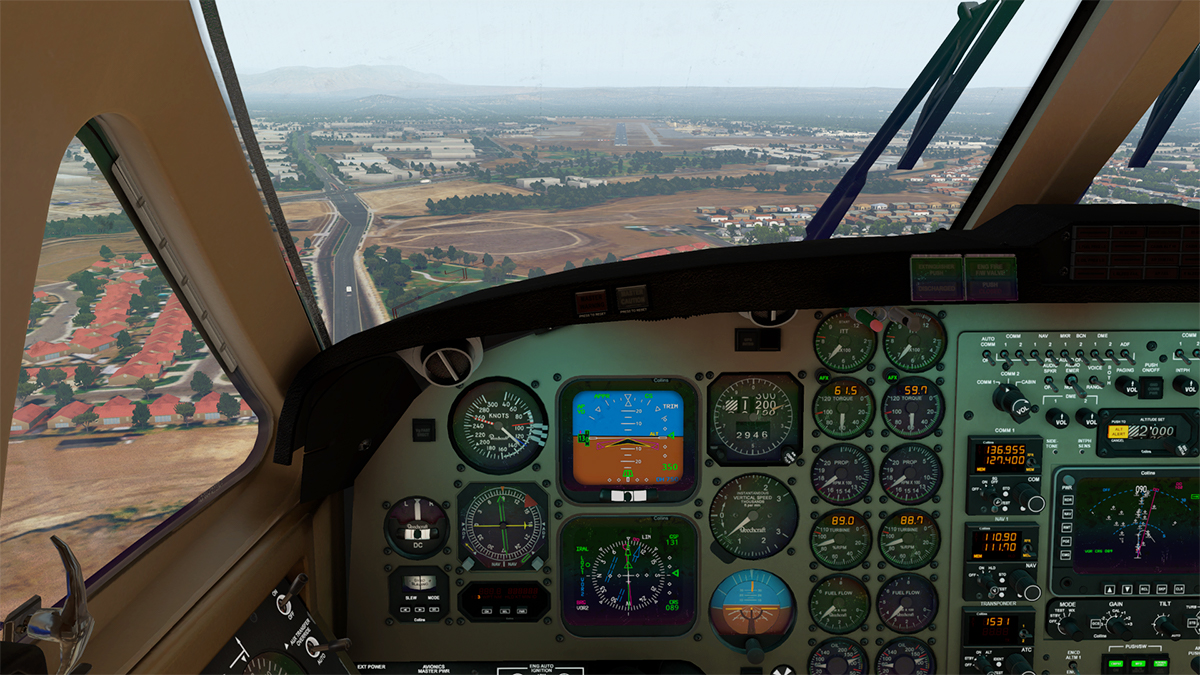
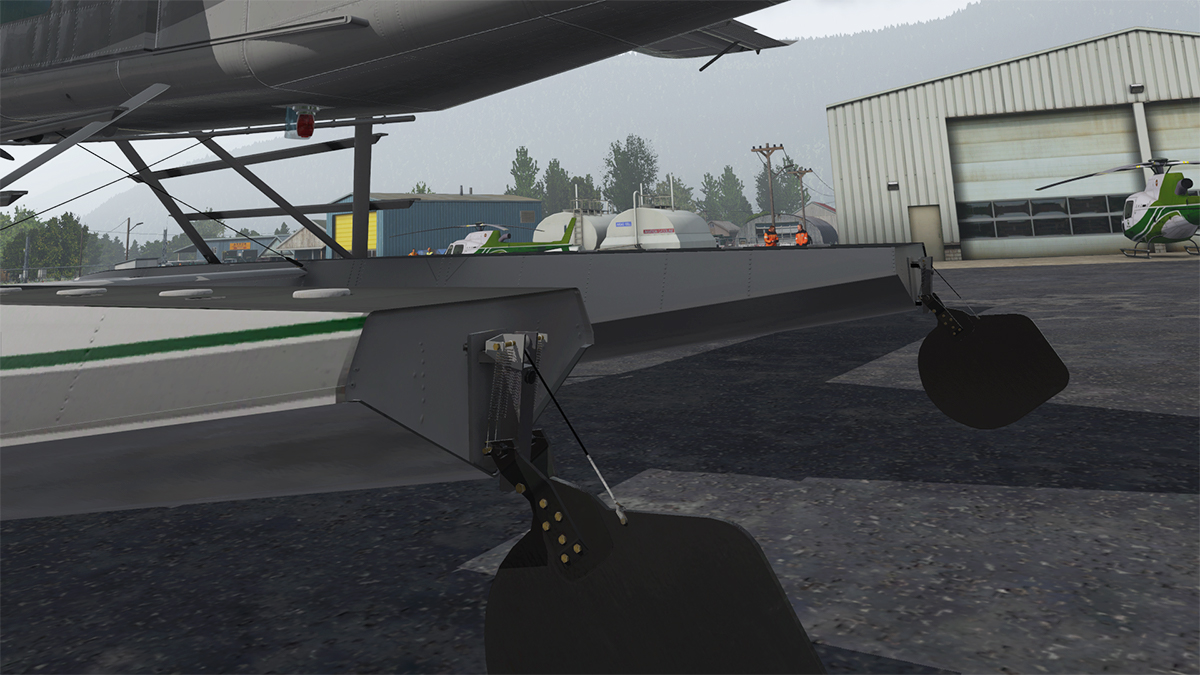
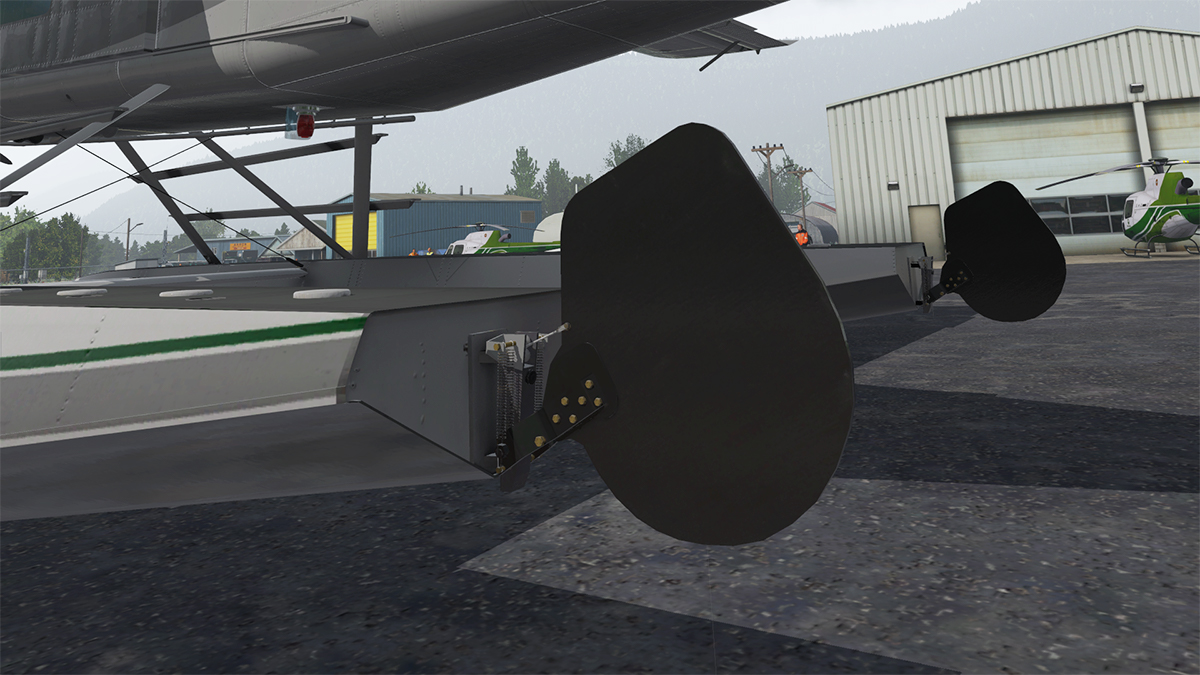
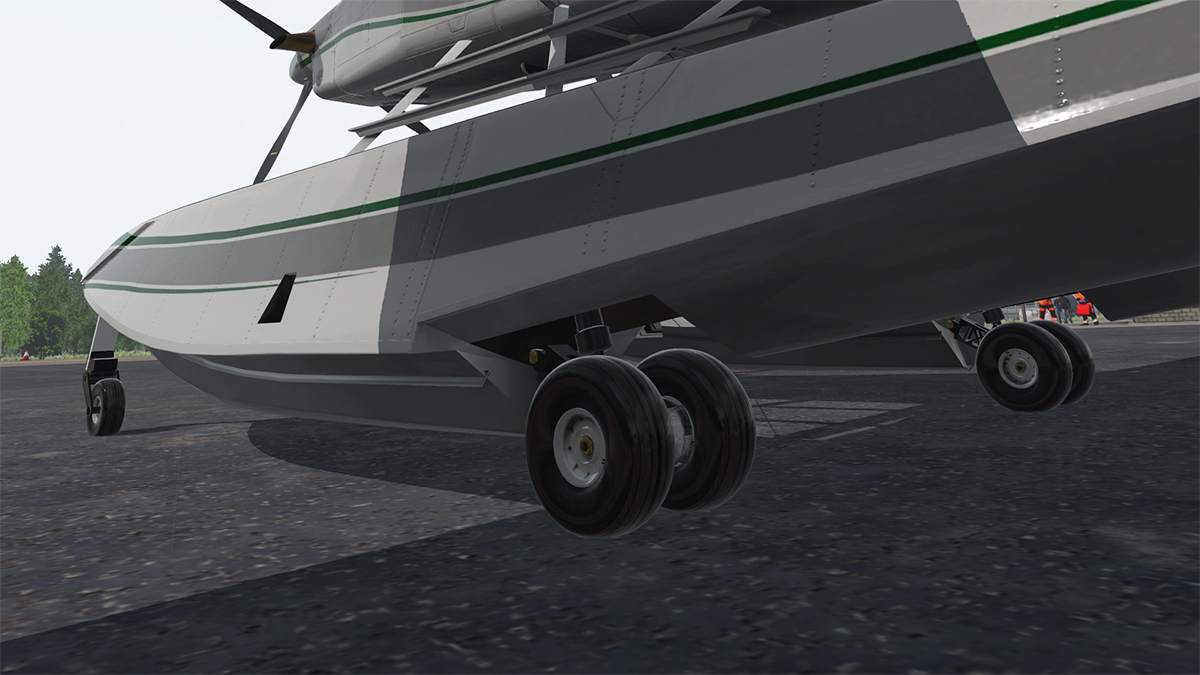
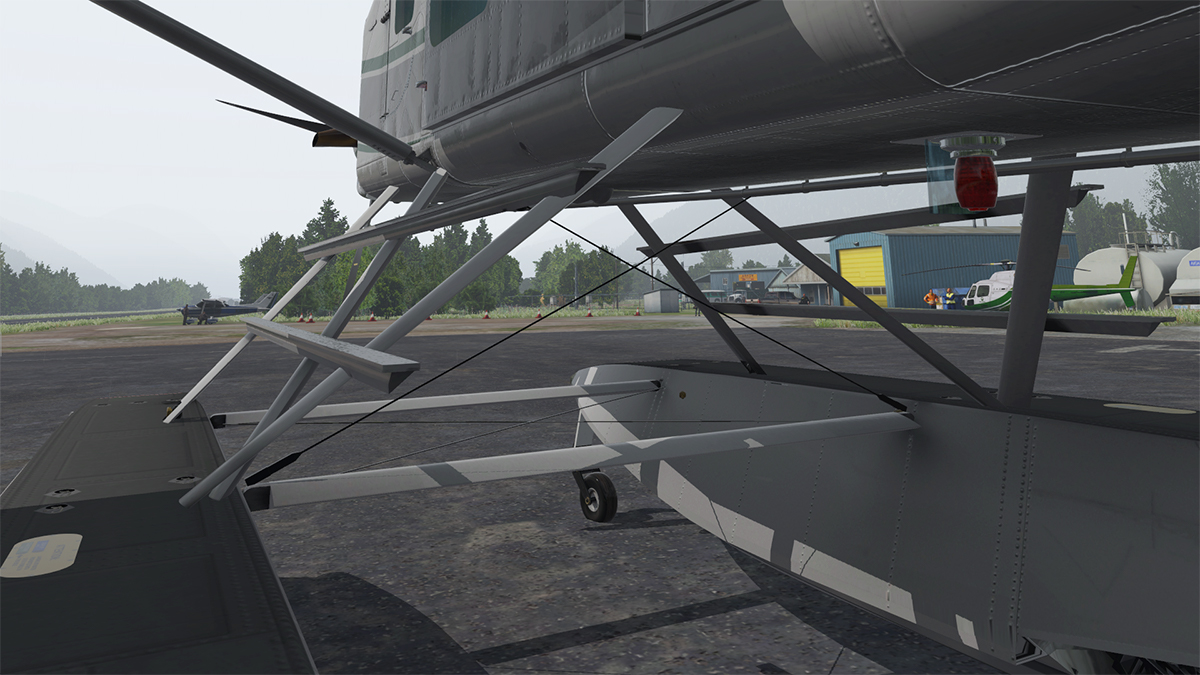
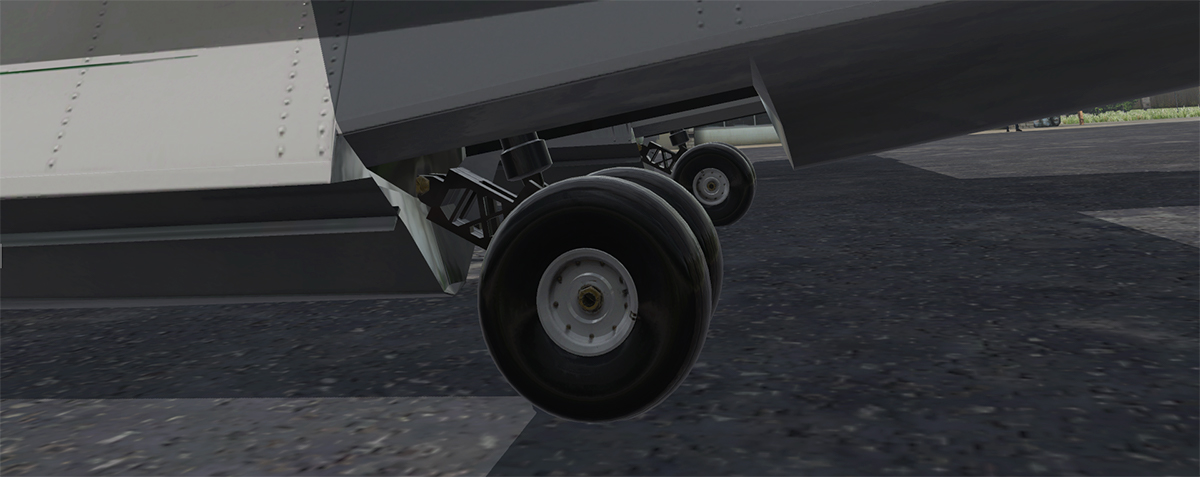
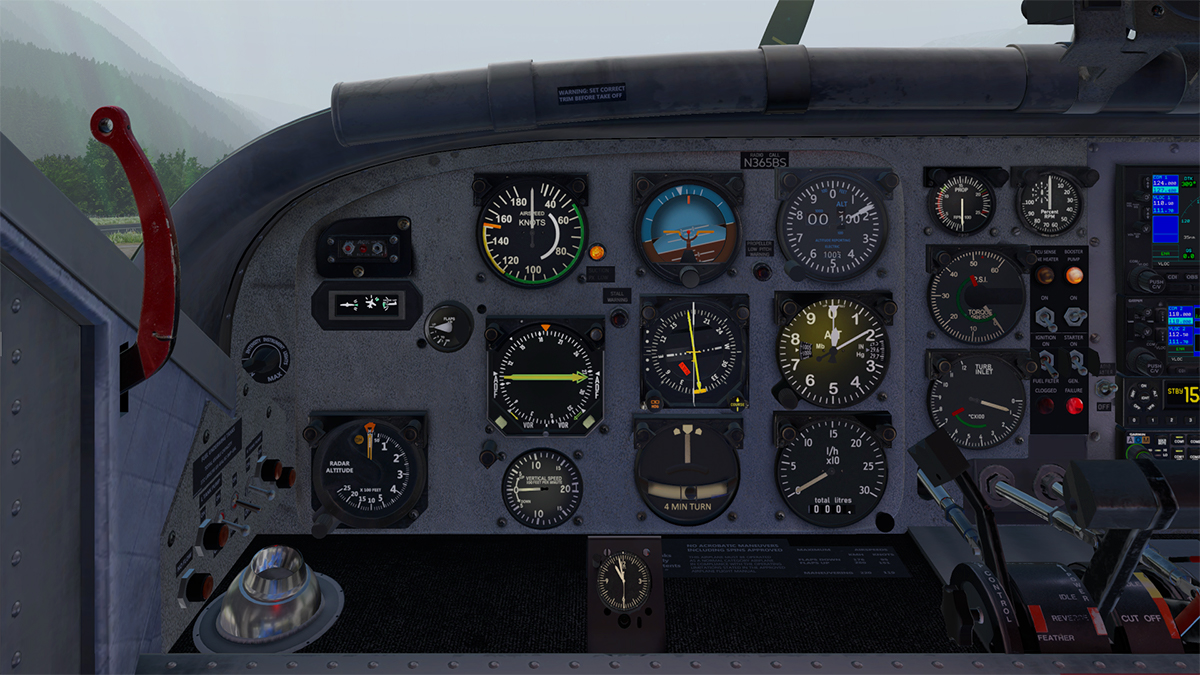
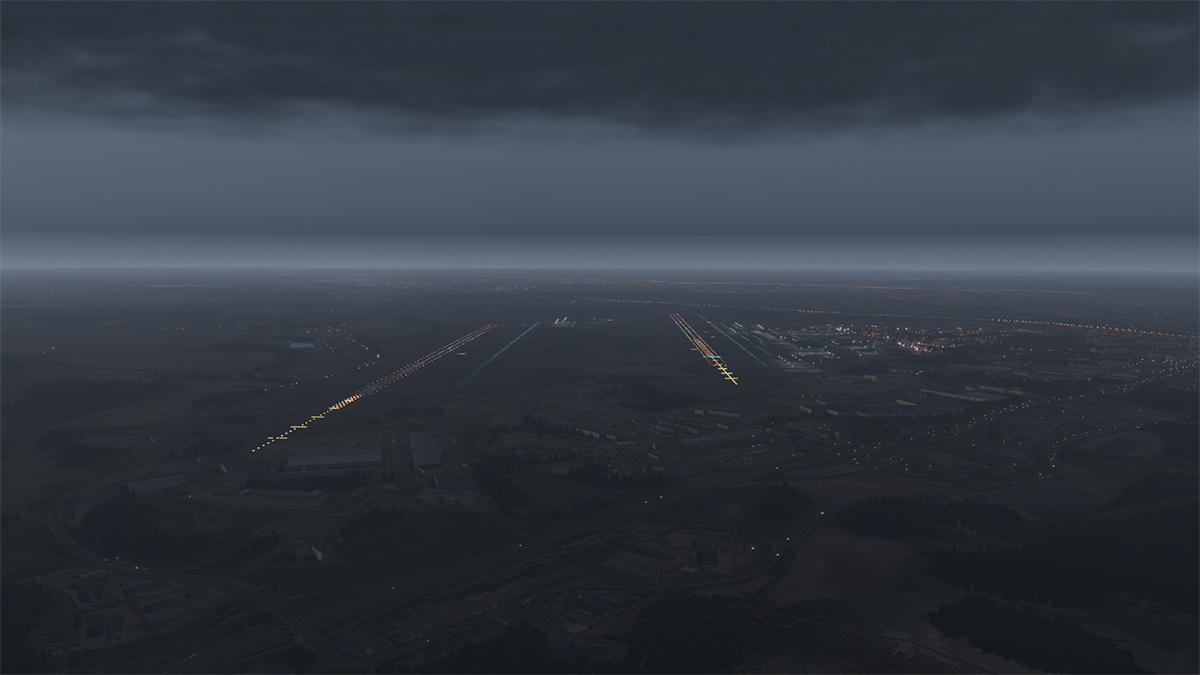
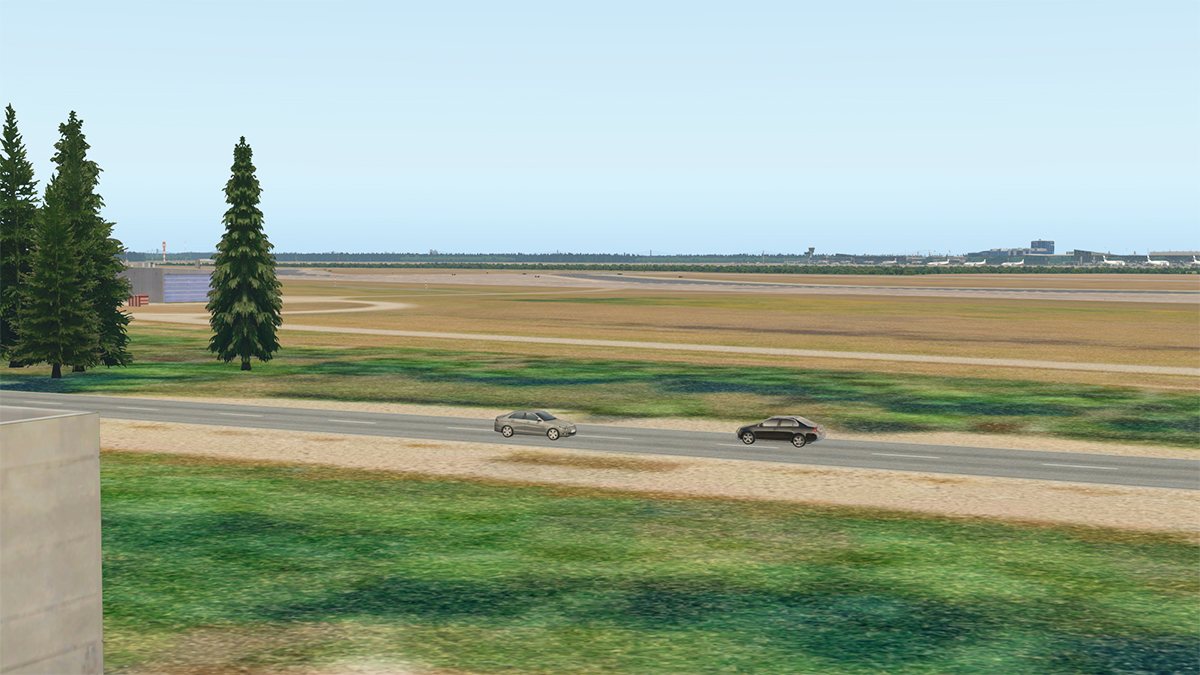
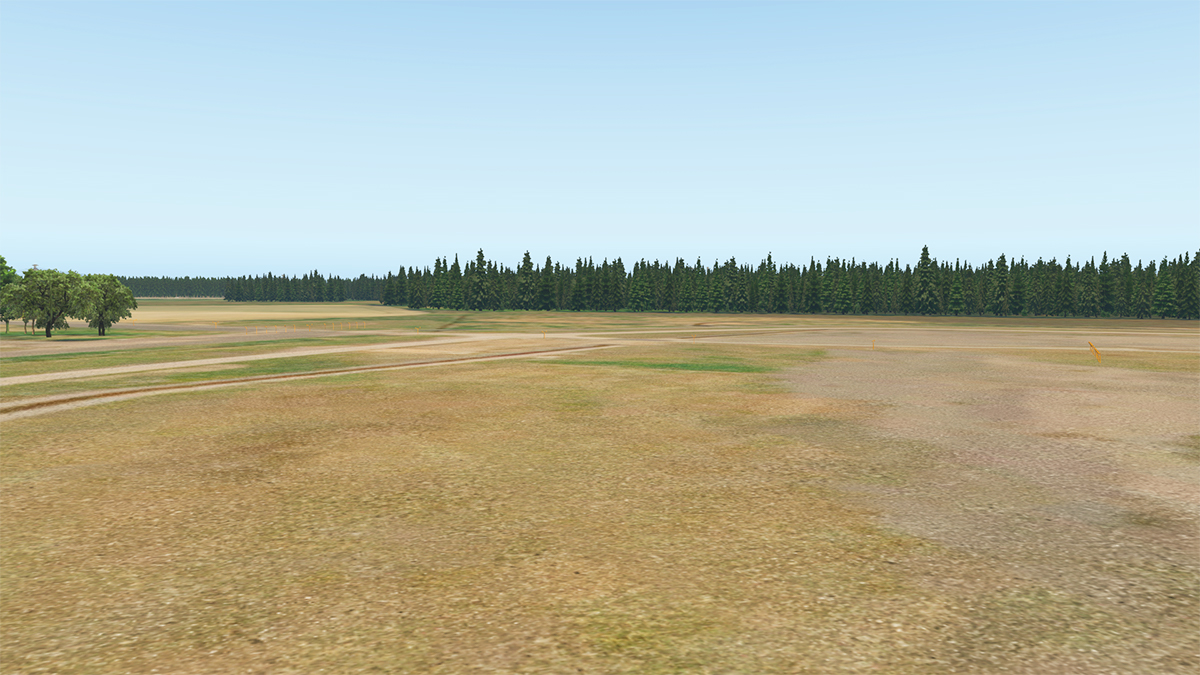
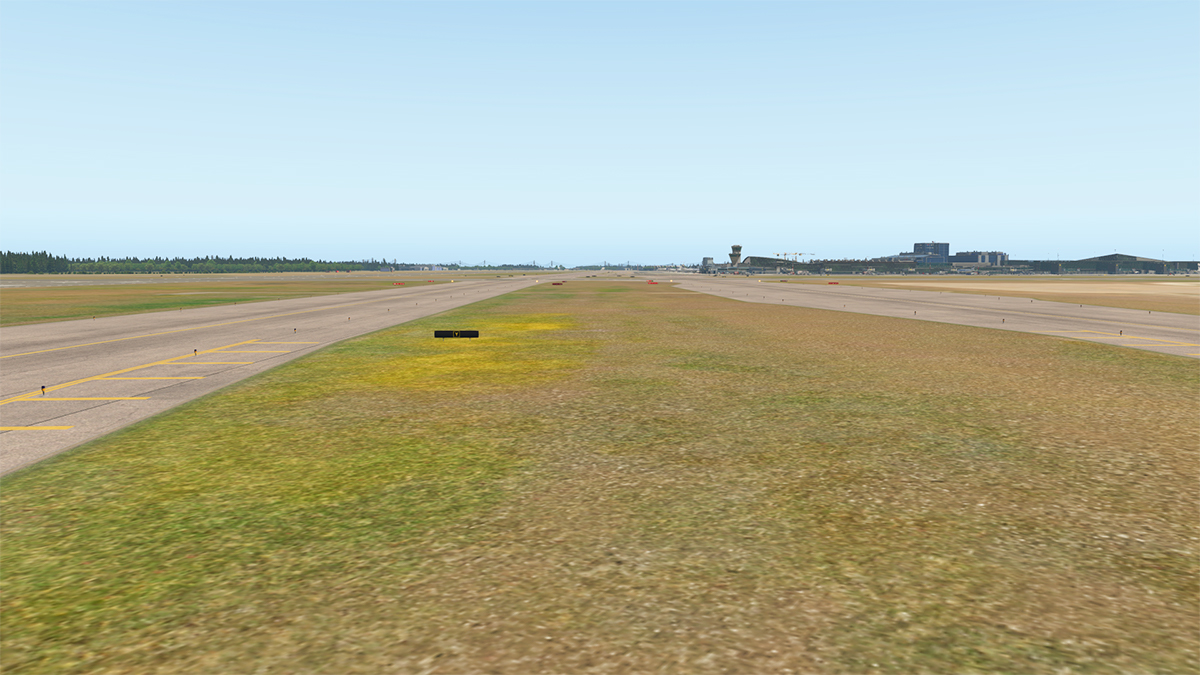
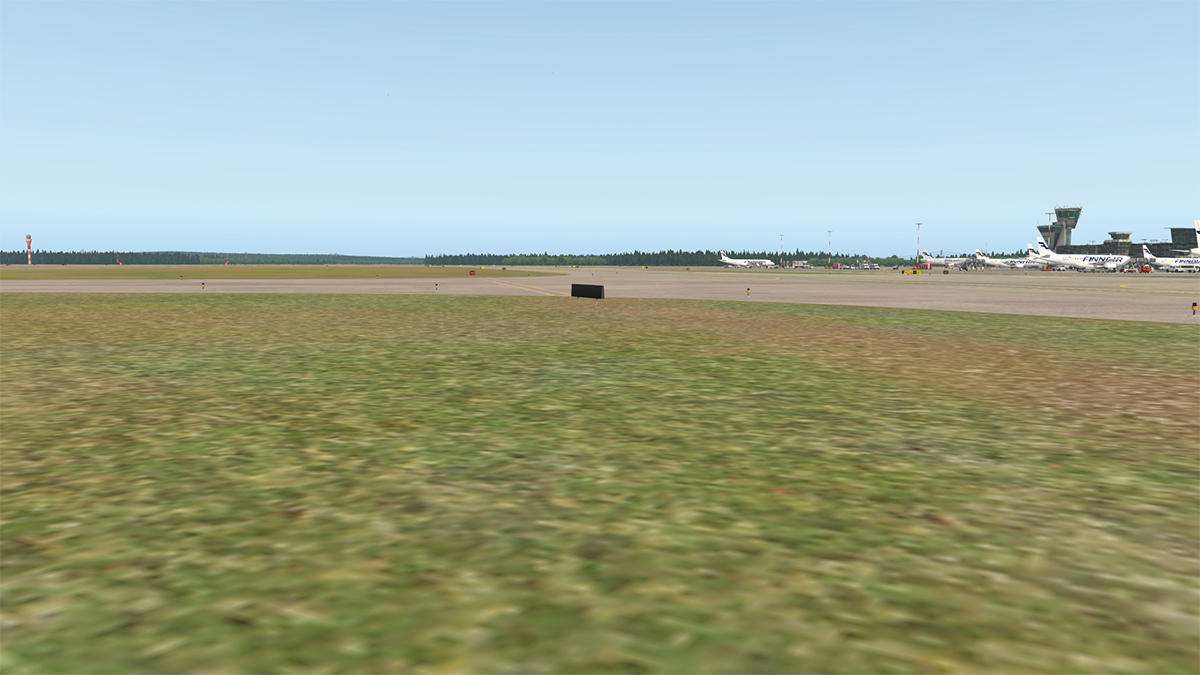
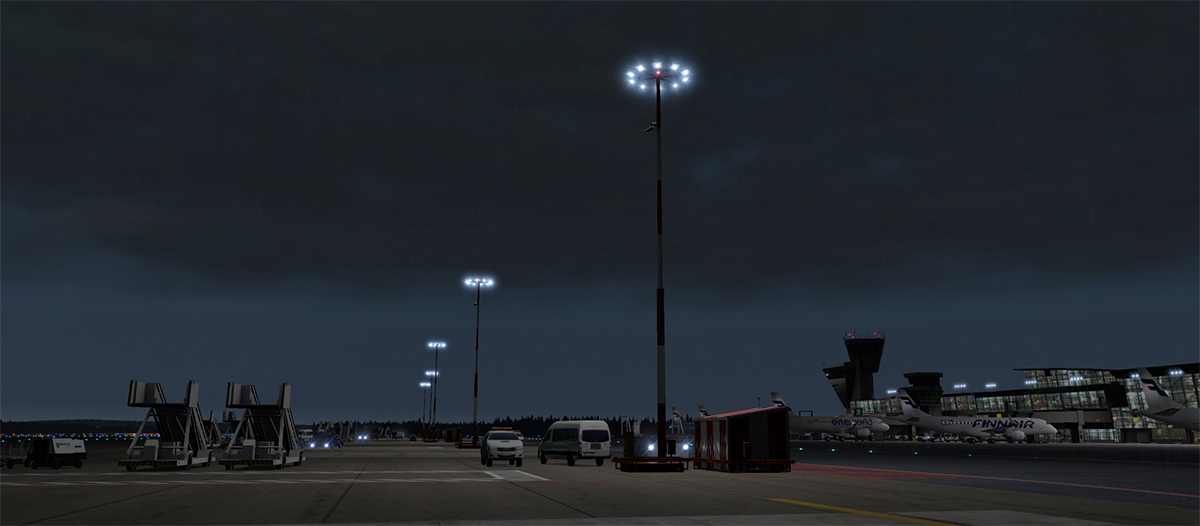
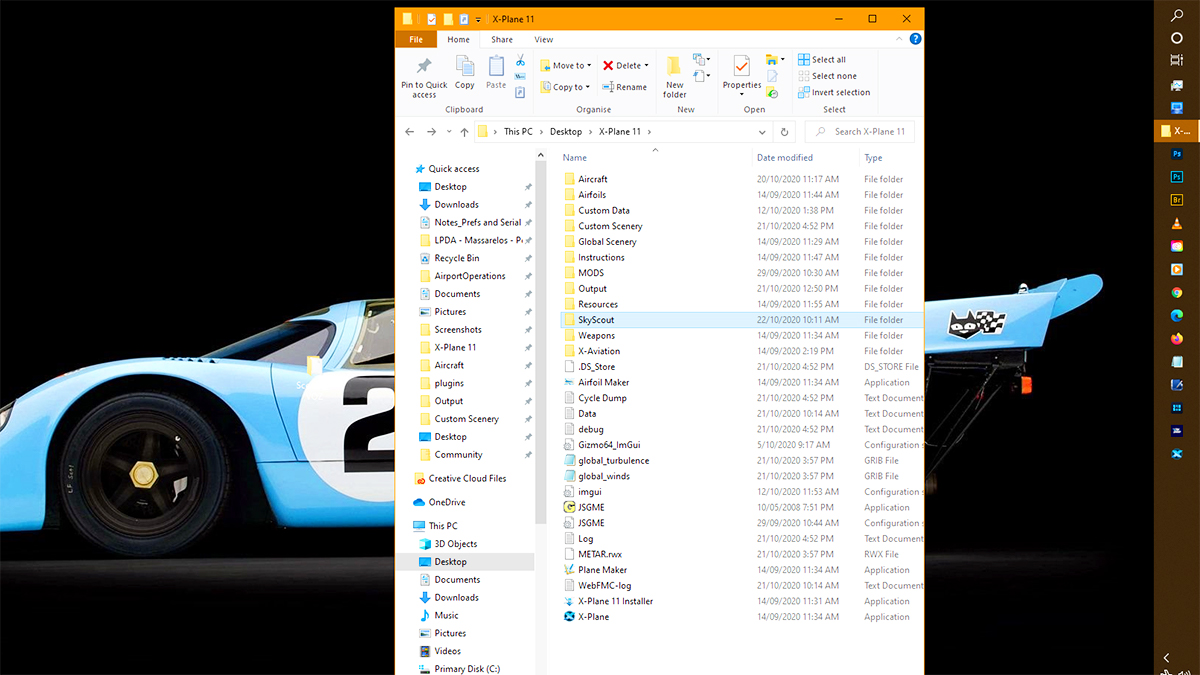
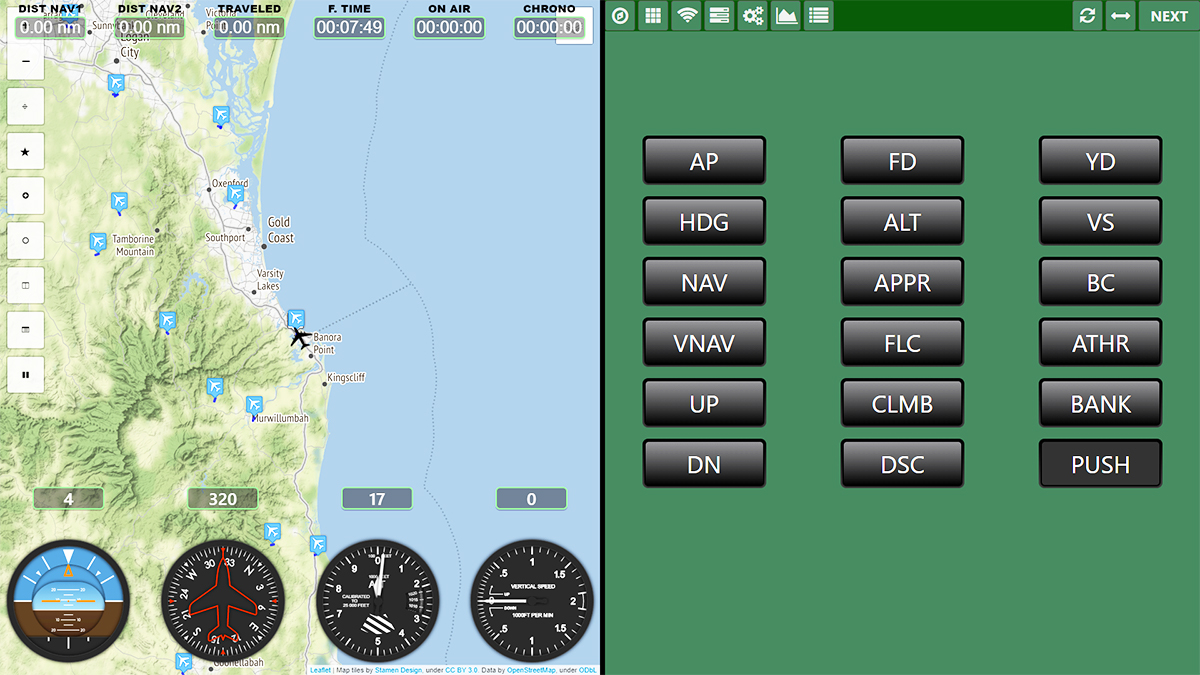
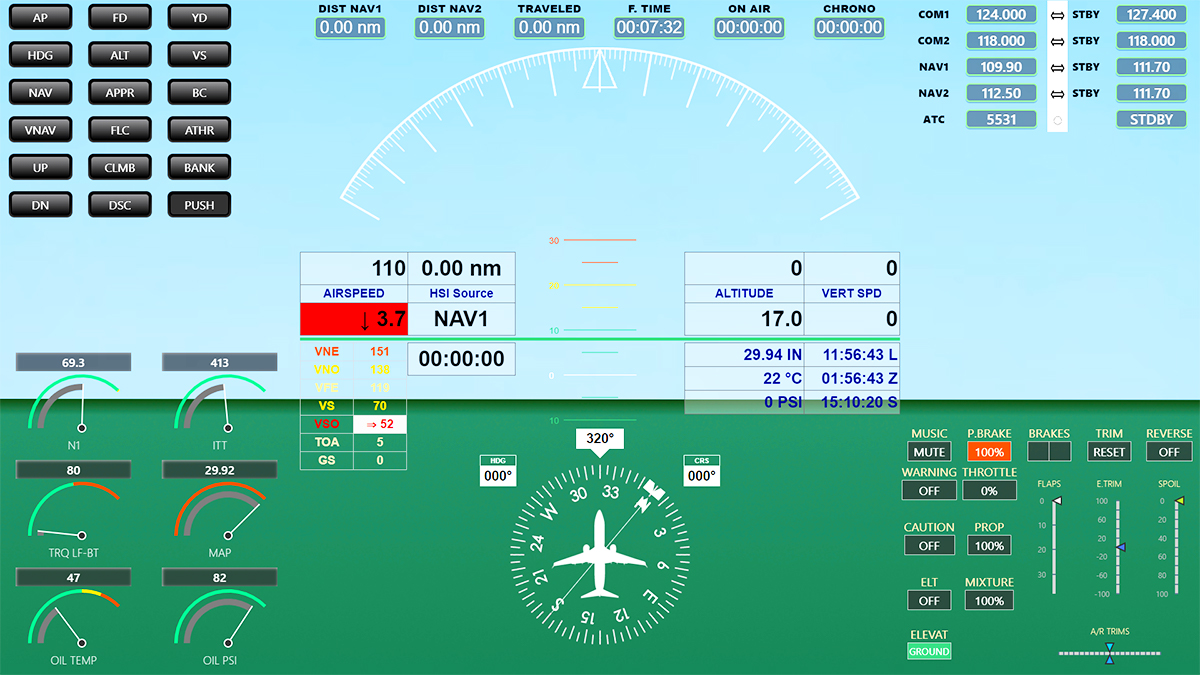
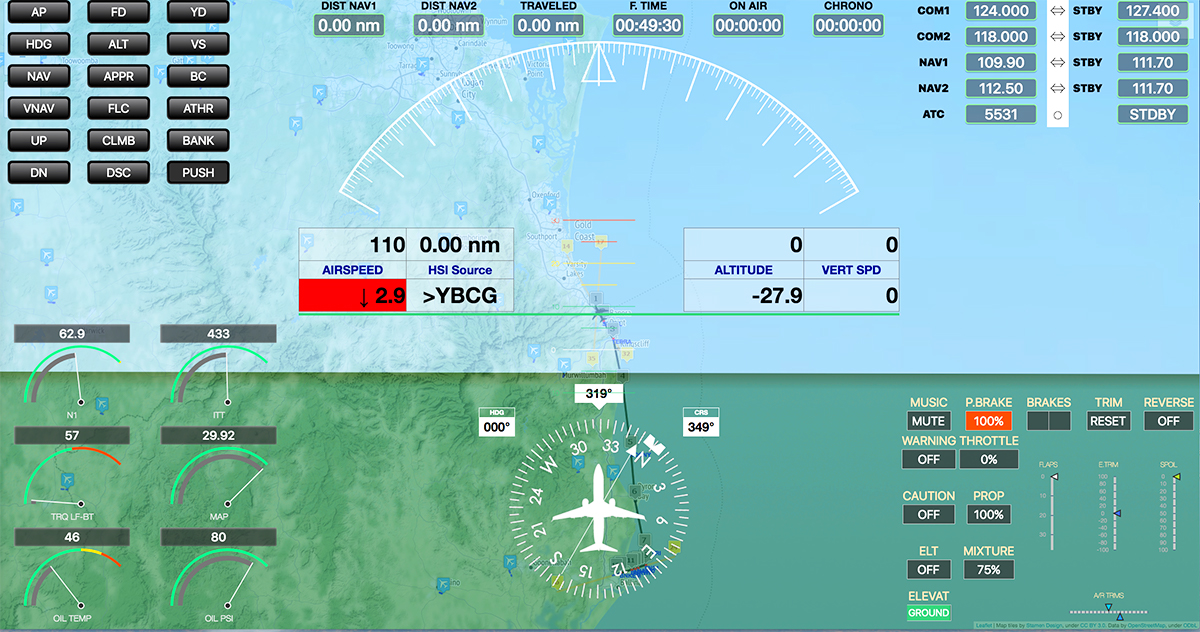
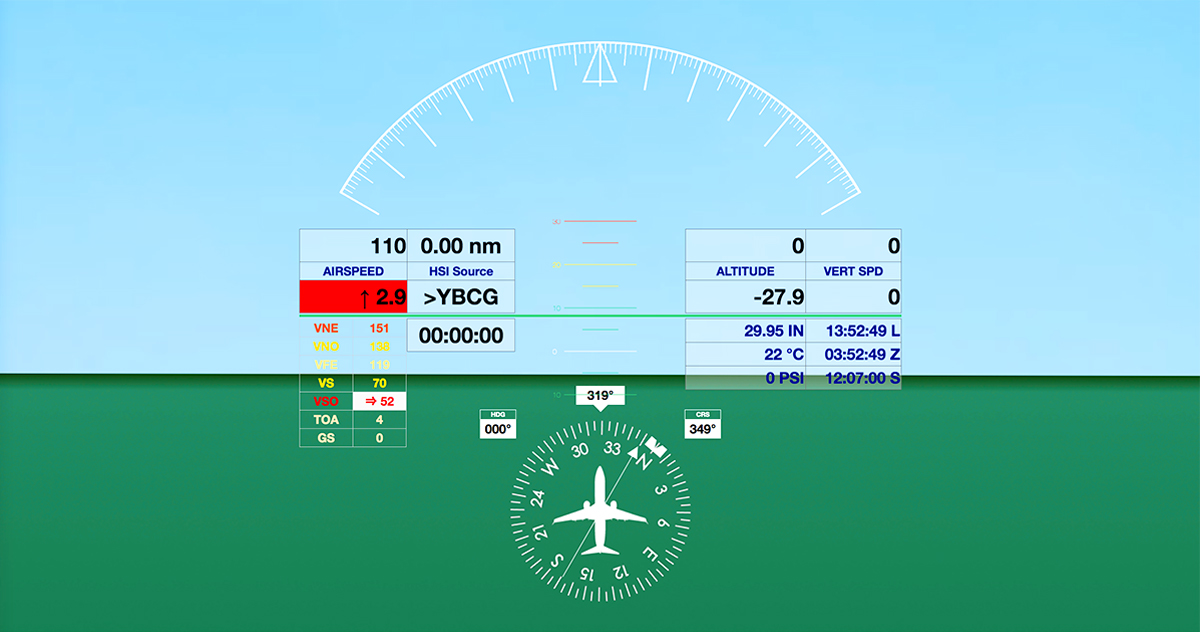
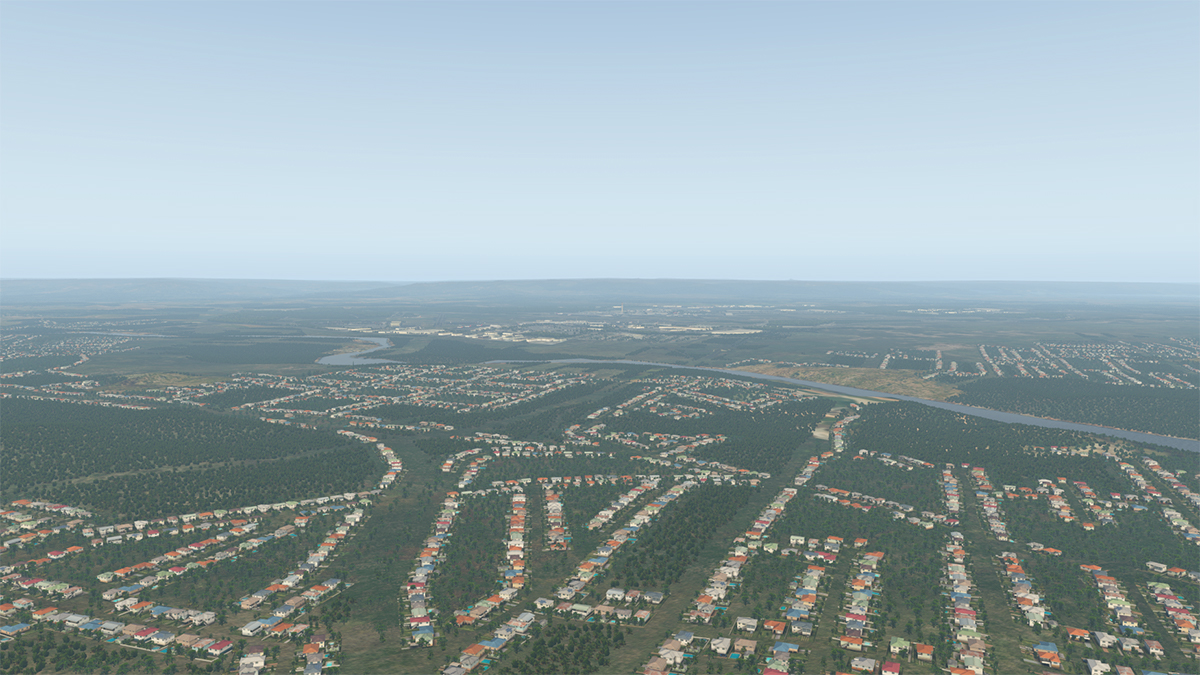
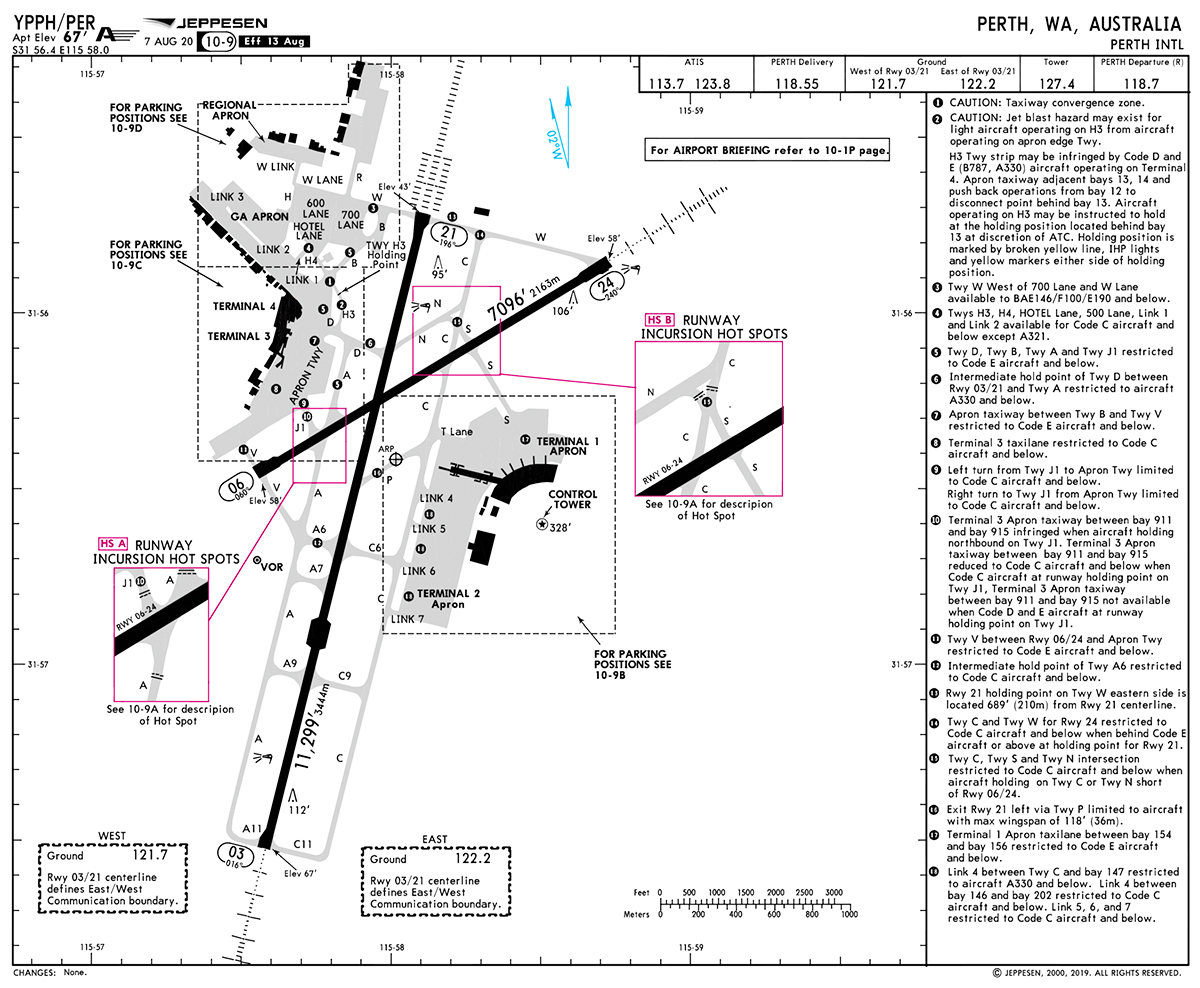
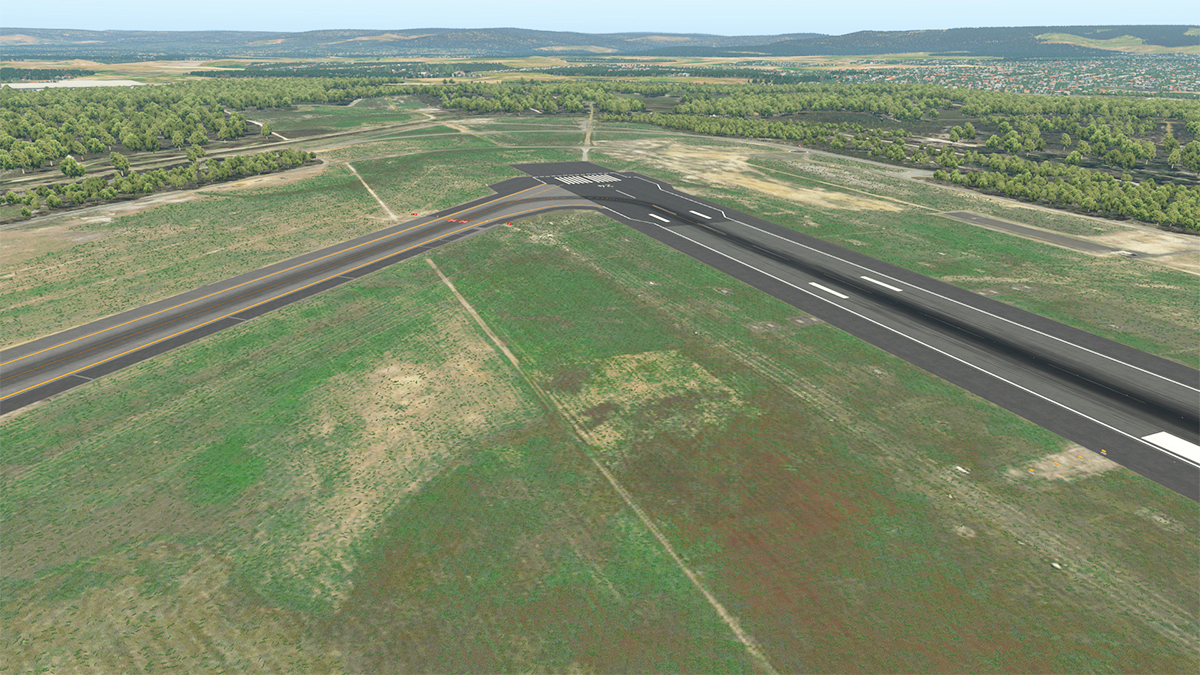
 Update Review : BN-2 Islander v1.1 by Nimbus Studio's I covered the release of the BN-2 Islander by Nimbus Studio's a few months back in June 2020 here; Aircraft Review : Britten Norman Islander BN-2 by Nimbus Studios Overall I loved the aircraft, but it felt still a little under-developed, there was two quick reaction updates in v1.05, then v1.07 that helped, but here is the larger v1.1 update, that also comes with a promised scenery package as an extra... Westray. The BN-2 is famous for flying the Islander service Loganair's Westray to Papa Westray flight, in the Orkney Islands, which is the shortest scheduled flight in the world at 1.7 mi (2.7 km); the scheduled flight time including taxiing is just two minutes. Both the Westray Airports are now part of this BN-2 package, and very good they are... So lets us see that aspect of this v1.1 update first. It is a very handy skill in that Nimbus is above all first a scenery developer, who later moved into aircraft design. So in an addition to the aircraft you now have the option to download Westray or Westray - EGEW and Papa Westray - EGEP, which is basically two island sceneries that are separated by a short strait of the northern reaches of the Atlantic Ocean in the Orkney Islands. Westray is old Norse for 'West Island' (Navigraph) Note Kirkwell on the "Mainland" Island of Orkney and the main gateway into the Orkney Islands area. Westray - EGEW Westray airport or airstrip is located at Aikerness... and Pierowall is the main village. There are actually three runways, but only one is as graded hardcore 09/27 (527m/1,729ft), the two others are grass in 01/19 (291m/955ft) and 13/31 (421m/1,381ft), elevation is only 30ft and all are represented here. There is not much in infrastucture at EGEW, except for a single reception building and a cargo shed, but it is well done. Note there is a H pad at Westray, but not ICAO. I particularly like the Scottish Island feel of the stone walls and fencing, the area feels also very windswept, because it is. Lighting is almost zero, but good in context. The area is full of farms and farming detail... and plenty of cows. All the houses are again very authentic and come with that stoic stone architecture.... but significantly missing is the Noup Head Lighthouse? It is visible not only from the airstrip, but certainly on the runway approaches? The runway is just fresh stoney asphalt with no markings, and really well done is the surface detail and roughness which is highly realistic, there is some lovely 3d grass as well, and the boundary fencing detail is again exceptional. End of runway markers are again really good as in all the rock seawalls... overall it is a highly realistic airfield. There are no charts available for either EGEW or EGEP, but this set of notices are excellent and well worth downloading; EGEWEGEPCharts201904 The shortest scheduled flight in the world It may be only a short flight, but the flying is technically very hard to do. Tip number 1#, go and observe each runway before attempting this flight, as finding the runway over on Papa Westray is quite hard, almost impossible flying in blindly. It took me three runs before I perfected it. Oddly again there is no "Loganair" livery supplied, which is the Scottish Airline that currently flies the route with two BN-2s, so I used the BA "Express" version, which has done this same route. The cost is £36 return or £45 for a “sightseer fare.” Two things to remember... important. Check your trim is central and that your flaps are one setting down in the TO position... ... I love the dust that flows up from the wheels... at the threshold of RWY 09 there is a turn circle, and you need to use every bit of the turn to turn as tight as you can, this is to get as much runway distance as you can usefully get. Hold the brakes to power up the engines, as again you have no margin to do a slow build up of speed, you need to almost leap off the brakes and go down that stretch of asphalt as rapid as you can go... ... those end of runway markers come at you sooo fast, so once you reach the end of the white zone at 80 knts, you lift the nose... and pray! Get it right and you should clear the markers, but it can be close... you climb, but not far, only to 400ft - 500ft at the most, and once level you are already getting ready to land, flaps full "Down" and reducing your speed... .... Papa Westray - EGEP is directly across the strait from EGEW, but the runway is orientated 04/22, which is a cross angle to EGEW's 09/27. So you fly west and then turn around back into Rwy 22. If you try and be a smarty pants, and just fly over island to island and expect to land on 22 directly, then you won't see it or even find it... the really hard part is getting the turn perfectly right into the final approach, you have to have enough speed and power to get around the tight turn, or the Islander will simply drop off a cliff in speed at the bank angle and go straight into a bad stall, that is if you don't regulate enough power on the turn... ... once through the turn then again settle you speed to around 70 knts, you are now looking for some farm houses, DON"T LOOK FOR THE AIRFIELD, because it is simply impossible to see. You aim is to fly directly between the farm houses at around 200ft to 150ft and little more drift towards the right farmhouse... and then if you get it all right you will finally see the runway 22 markers straight ahead. Your new target is to now go low and slow, and just miss that fence at the end of the runway and not rip it all out of the ground... ... once over the fence and and it is a "let" or "get" down the BN-2 on to the hard stuff as quickly as possible. Even when down that end of runway fence is again coming at you at a high speed, and you only have your brakes to rub off the speed. As a note the BN-2's in use in a video have the three-bladed reverse thrust propellers, and you can hear the reverse thrust in operation, but we don't have that feature on the Nimbus version of the Islander? There is another turnaround circle at the threshold of RWY 04, again the field layout is almost as identical as Westray. The apron area is also almost identical with the same single reception building and a cargo shed, but here at EGEP they are set wider apart. You think it is easy, but my first try shows how difficult it actually is... I originally ended up in the field with a cow not greatly impressed with my antics! Papa Westray - EGEP As mentioned the layout of Papa Westray is not that much different than EGEW, same cross runways of a single asphalt 04/22 (527m/1729ft) and noted as the same "Graded hardcore", 07/25 (partly) Graded hardcore and 18/36 Grass. The same building elements are used for both EGEW and EGEP, but the detailing has been changed to reflect the different locations. One thing to note is that the daylight up here in the Orkney's in December (winter) is very short to basically six and a half hours or 8.45am to 3.20pm, and set very low in the sky, so the area does not get particularly bright, certainly a seasons pack would have been nice. Runway textures are different however than Westray, more stoney or pebble than the black asphalt at EGEW, but it looks good and is a great and authentic looking surface, the surface edges are really good as well. Again the Westray landscape is covered with the same stoic stone architecture as on Westray, again very good. BN-2 Islander v1.1 There was a few areas that felt very under developed on the release version of the Nimbus BN-2 Islander, as noted overall I liked it, but felt it was not finished up to a certain quality, this update is six months on, and a lot on the list has been addressed, but a lot has not either? The aircraft came with a unique feature, a vibrating tail. Personally I loved the feature, but a lot of users hated it? So in the update you can now adjust the vibration to your liking, via a - or + of 100%. That should keep them happy. The aircraft now has the Avitab (Aviators Tablet) plugin intergration... the iPad is set to the left, and can be flattened away via it's support arm... But you can turn it off, but the clickspot is hard to find lower right, The iPad button only resets to the menu, not the on/off power, you can however also make the AviTab fully disappear by pressing the top of the support arm. But a very nice to have. Doors now make full sounds when opening and closing... and the door alarm will now go off if the doors are open when you start the engines. The passenger "warning" lights have been fixed (they now light up) and now both the window blinds work (Co-Pilot's earlier did not), and so has the nasty under the instrument panel hole that has now been thankfully covered over. Not so is the horrible front gear hole around the front strut, or the under engine vents that look average and both are highly visible in flight? The short flight from EGEW to EGEP was not long enough to check other parts of the undate, so a flight to Sumburgh EGPB (90 nm) was a better test... so I fully fueled (143 GAL) and boarded a few passengers and added a bit of freight (350 lb) and headed for the Shetland Islands. If you remember with the original release review I had a long list of gripes, and yes the BN-2 was certainly under-developed. First I found a lot of the switchgear didn't work to the X-Plane commands, and the important ones like the braking and flaps, which are badly positioned to use (in a simulator, not in real flying). Thankfully all these items have now been corrected and the parking brake logic has also been done, so they work! but the landing lights still have to be switched on/off manually. Another gripe was the landing lights were too dim, they are better but still quite small, but better. Propeller animation were also quite average and "disky", they still are with no real depth, but I am more acceptable to them this time around... my thoughts are that to change the two-blade to the three bladed, reverse thrust version would give the props more depth? Flaps to TO (Takeoff) and as noted I'm full in both tanks, my thoughts are on the short EGEP 04/22 runway at 527m or 1729ft long, would I be too heavy to get off with a full total aircraft weight of 5340 Lbs? One way to find out... Yep... and with a bit (not a lot more) to spare, particle effects have been added and like I noted earlier I love the dirt coming off the wheels, but the engine exhaust still does not have any of the needed effects? First thought's are that yes the aircraft certainly performs far better, as it has been retuned for better performance with experimental model (switched on) and it shows in the handling, the aircraft is far more sturdy and highly flyable. The BN-2 is an impossibly slow climber at 850ft per minute, but that is what the aircraft is. Sounds have also been greatly improved. I liked the lower speed (idle/taxi thrumm) before, but was not so much impressed in the cruise, that area has certainly improved, but can still be over time a little droney, but there is far more depth to the sounds if you change the throttle (power) position, added also are the new internal sounds, sounds with only one engine running, fuel pumps and the avionics sounds have been toned down. There has been a lot of refining done also on the main instrument panel... The autopilot lighting was too dim, but looks good now, and I really like the flashing "TRIM UP" and "TRIM DN" effect, the VSI night texture also was too dark and the Pitch trim indicator was not visible at night. I did have a big gripe about the flaps.... the up flap setting still shows a 2º in the down position? Islanders are known to fly in this configuration, but still I'm not completely happy?, the BN-2 still flies pitch up, and the overall speed does show with the drag in that odd aerodynamic angle... You can trim this out manually, but not under the Century 2000 2-Axis Autopilot, hence the still slightly odd nose up flying perspective... and your cruise speed is still limited to under 120 knts, say around 115 knts, it should be around 130 knts? The issue pops up again on approach... Into the circuit to land at Sumburgh RWY 33, it became impossible to reduce the speed under the 80 Knt threshold (white band) to lower the flaps to DOWN, so as you pulled the power back the nose just went up and up in pitch, but not the loss of the speed... ... the only way to balance the aircraft was to disconnect the autopilot, and trim the aircraft manually, get the speed down and set up the landing configuration of 70 knts and full flap. (I will admit the BN-2 is nice to fly and control in this configuration). My point is that, if you wanted to use the ILS, on the autopilot, then you wouldn't be able to balance or trim out the aircraft, yes in most cases you would do a manual landing anyway, but sometimes you may need the ILS guide if the weather is bad, and mostly that is the case up here and around these northern Scottish Islands. If you remember in the release review I struggled with a good landing configuration, and couldn't get the BN-2 under 80 knts without it stalling, but I am not feeling that effect today, thankfully the BN-2 feels more planted and controllable, I still think the approach speed is still a little too high for a STOL aircraft, but it is far better than before. Even the strong swirling winds that can accumulate around this western approach into Sumburgh, fail to ruin the approach phase, I am easily under a nice controllable aircraft, a vast change from the earlier release approach... ... I settle around 60 knts, and it is perfect landing. I am overall pretty happy with that landing, so there has been a significant improvement (not absolutely perfect) and a major refinement in the handling. And I still really love those wheel particle effects. Not only the physics been improved, but the whole aircraft is certainly far altogether better, again is this update in being what the release version should have really been in the first place? _________________ Summary Nimbus Studios released their version of the STOL Twin-Engined BN-2 Islander in June 2020. The summary of that release review I felt the aircraft still needed more development and refinement. Since that release there has been three updates, with the accumulation of this the third in v1.1. Update v1.1 also comes with the highlighted feature of including a scenery, or two in Westray and Papa Westray in the Orkney Islands off the coast of Scotland, the two airports are famous for the being known as the "shortest scheduled flight in the world", at 1.7 mi (2.7 km); the scheduled flight time including taxiing is just two minutes. Both Westray and Papa Westray sceneries are excellent, great detail and both have a great feel for these Orkney Islands, technically they are very challenging as well, and so a very good addition to the Islander package. The aircraft refinements are notably very long (see changelog below, and all three of the updates are listed) as is the performance (but not yet perfect), and the addition of the Avitab (Aviators Tablet) plugin . Notable are the changes in v1.1 was to mostly small items, like sounds (better and now the door sounds work), instruments (lighting and manipulators), X-Plane commands (Brakes/Flaps), manual adjustment of the vibrating tail, under instrument panel fill and passenger notices. Still outstanding is the annoying see through hole in the nose (front strut) and nasty inner under engine air-intakes, average propellers (in movement), pitch nose high performance under the autopilot, that affects cruise speed and approach speeds and oddly no Loganair livery for the included sceneries (note you download the sceneries separately from the aircraft). The BN-2 Islander by Nimbus Studio has come a seriously long way in refinement since it's introduction in the middle of 2020, in many, many areas it is refined (or fixed), but oddly some glaring obvious items (above) have not had the same attention. But overall this a far better and major step forward for the BN-2 Islander, and yes I am loving the aircraft in it's current condition, "very, very close but no cigar" yet. _______________________________ Yes! the Britten Norman Islander BN-2 v1.1 by Nimbus Studios is available from the X-Plane.Org Store here : BN-2 Islander Price is US$34.95 Features: Highly detailed 3D model 4K textures Full PBR Textures for quality refection 3D Custom Sound System Animated switches Rattling and vibrations Accurate handling and flight characteristics Accurate performance based on performance charts Realistic night lightning with custom lights and textures VR ready (includes yoke manipulator) Ice buildup visual effect 8 liveries and more to come Nice Comprehensive Menus Windows for managing maintenance, weight and balance, doors and accessories, controls position and performance charts. Maintenance module: If you want a more realistic experience you can choose if you want the aircraft to require maintenance with time and usage, depending on how you fly and engine exceedance the mechanical components will degrade and performance will be affected. Weight and balance: A graphic interface gives you the chance to modify the cargo, passengers, fuel and CG Doors and accessories: Open and close doors, add or remove wheel chocks, engine and pitot covers or controls lock. Performance: This window will also allow you to see some performance charts. Controls position indicator: A small window on the right bottom corner will show the position of your controls. Bonus: airports of westray and papa westray Requirements X-Plane 11 Windows, Mac or Linux 4GB VRAM Minimum - 8GB VRAM Recommended Download Size: 1 GB (Plane + Liveries) Current and Review version : 1.1 (November 27th 2020) Installation and documents: Download is 1gb and the aircraft is deposited in the "General Aviation" X-Plane folder at 1.10gb Installation key is required on start up and is supplied with the purchased download file. Avitab (Aviators Tablet) plugin, is now required for this aircraft. Documents supplied are: Manual.pdf Changelog v1.1 changelog.txt _____________________________________ Aircraft Review by Stephen Dutton 4th December 2020 Copyright©2020 : X-Plane Reviews (Disclaimer. All images and text in this preview are the work and property of X-PlaneReviews, no sharing or copy of the content is allowed without consent from the author as per copyright conditions) Review System Specifications: Computer System: Windows - Intel Core i7 6700K CPU 4.00GHz / 64bit - 32 Gb single 1067 Mhz DDR4 2133 - ASUS GeForce GTX 1080 8Gb - Samsung Evo 1TB SSD Software: - Windows 10 - X-Plane 11.51b3 Addons: Saitek x56 Rhino Pro system Joystick and Throttle : Sound - Bose Soundlink Mini Plugins: Avitab - Free Scenery or Aircraft - Westary and Papa Westary are now supplied with the aircraft package.
-
Well written, interesting... It is a fine line in doing these reviews in that I don't want to bore the reader, but in most cases the details are the same. Hopefully I find the right balance, and yes I agree, those long droning videos are very self-indulging, and in most cases just from the fliers perspective (or showing off), I personally hate them.
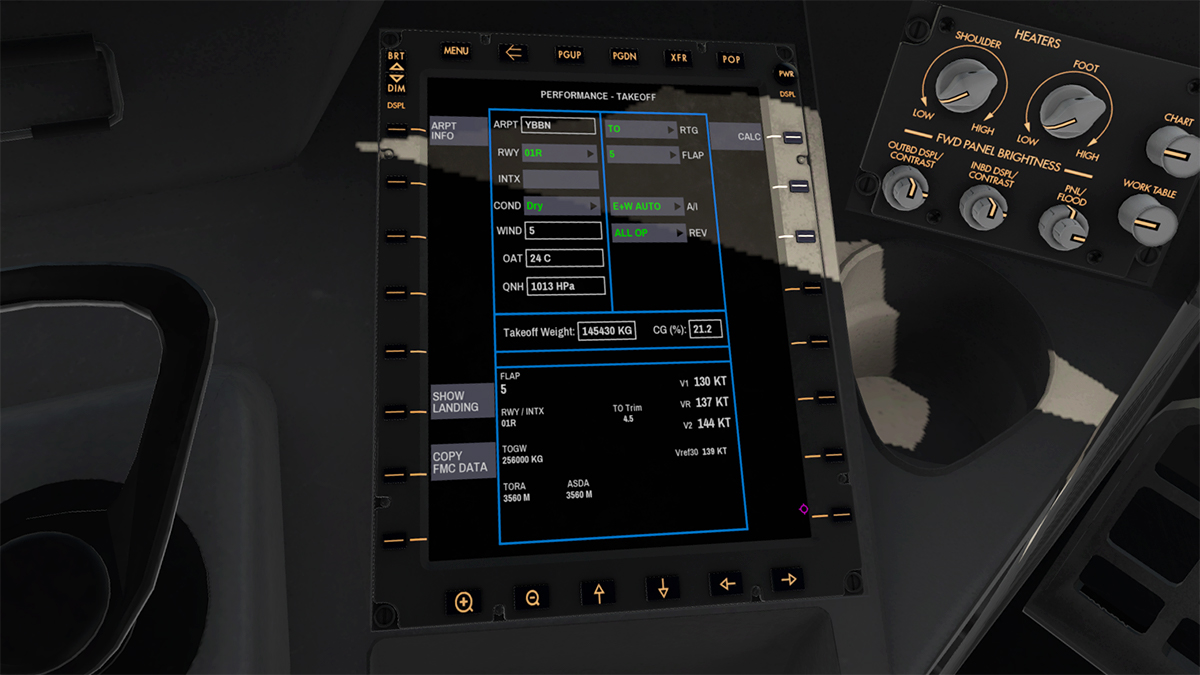
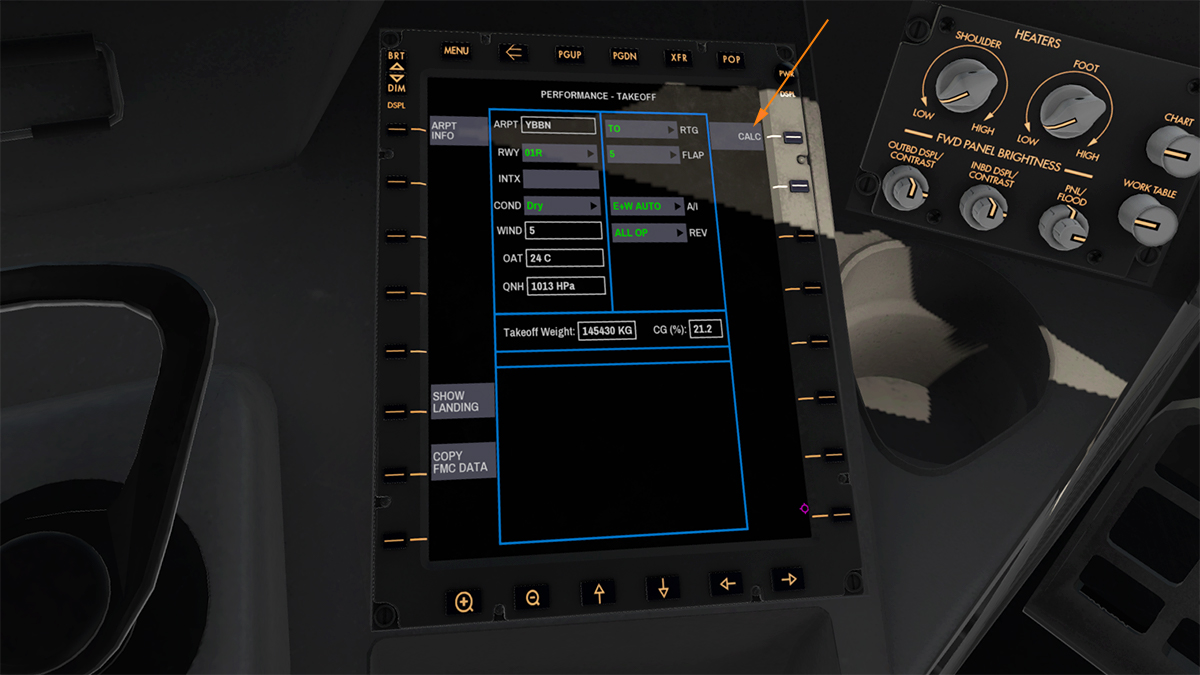
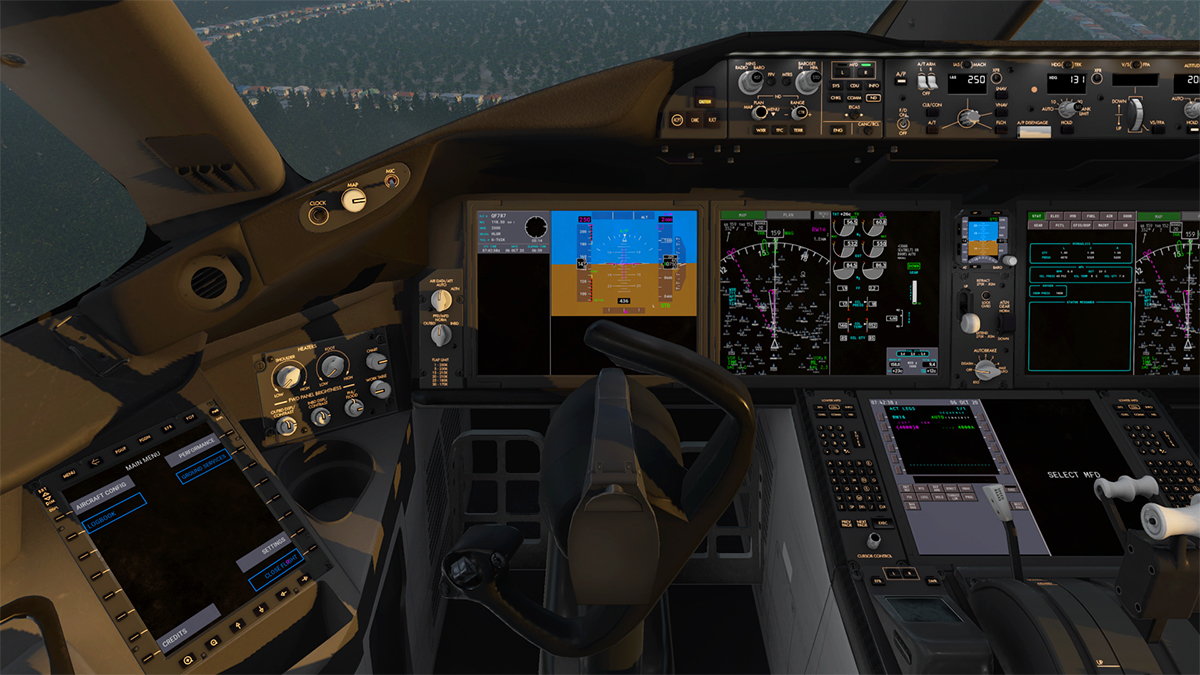
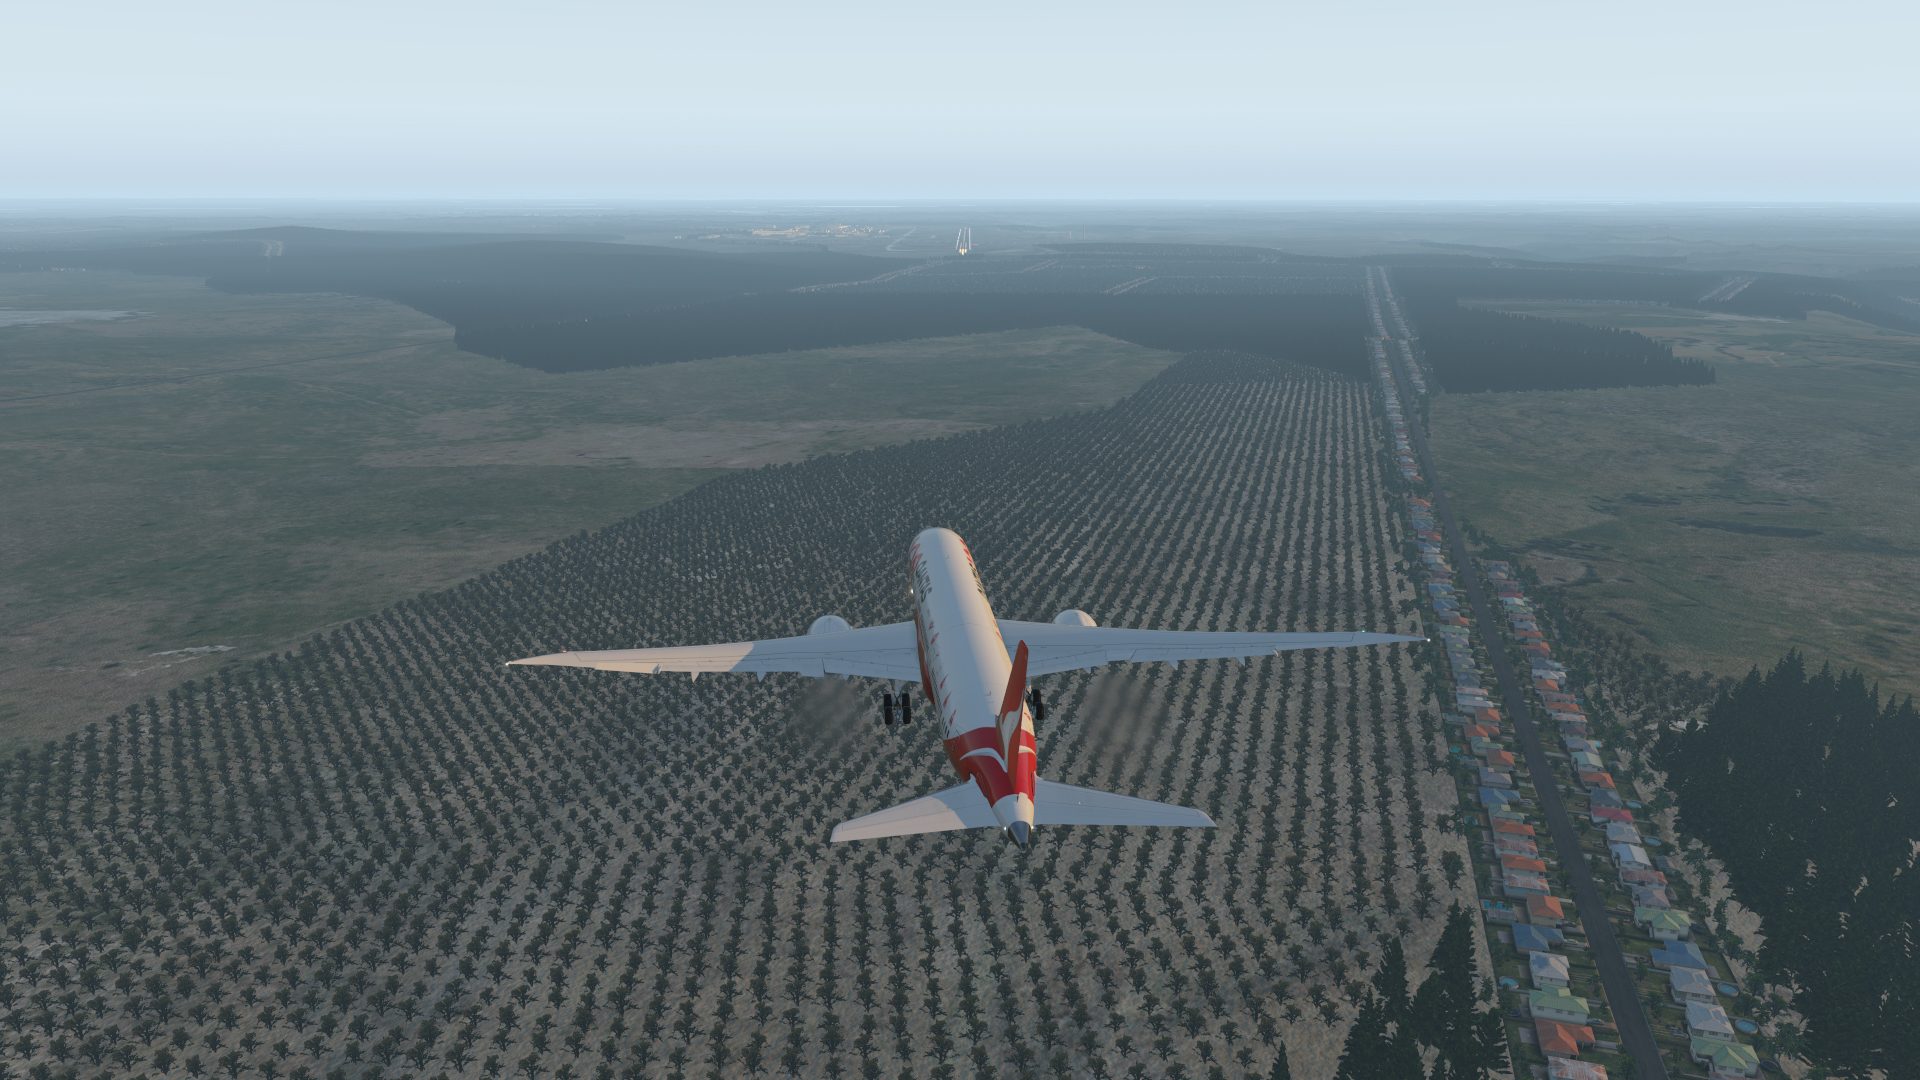
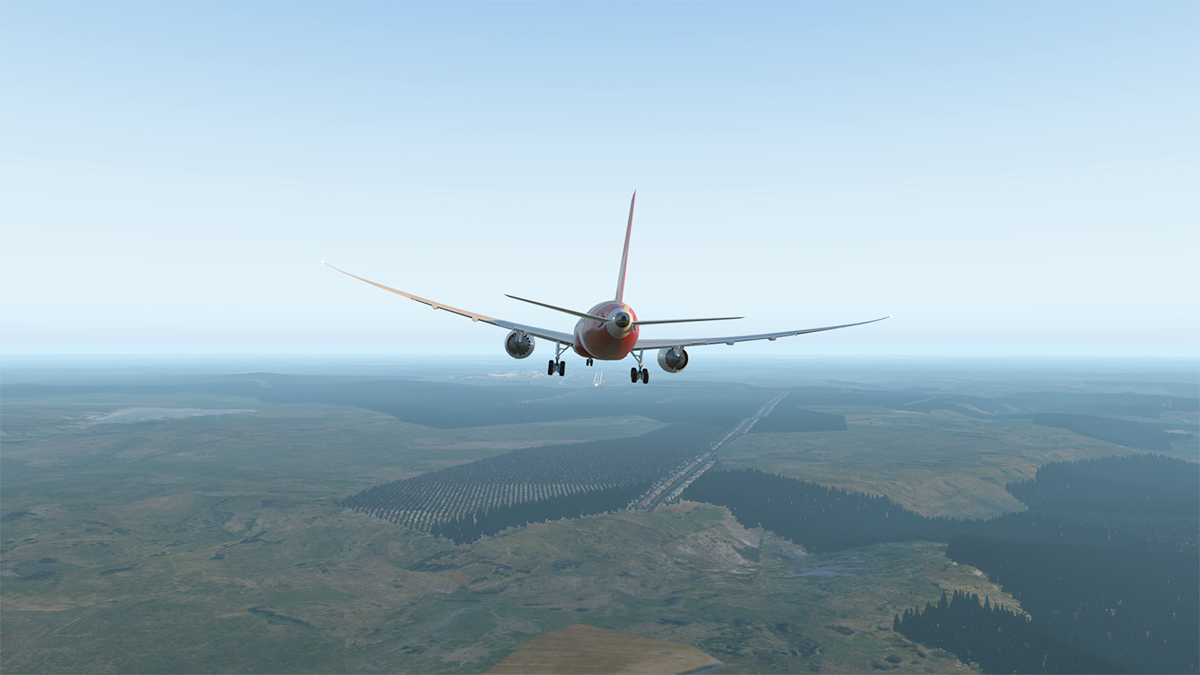
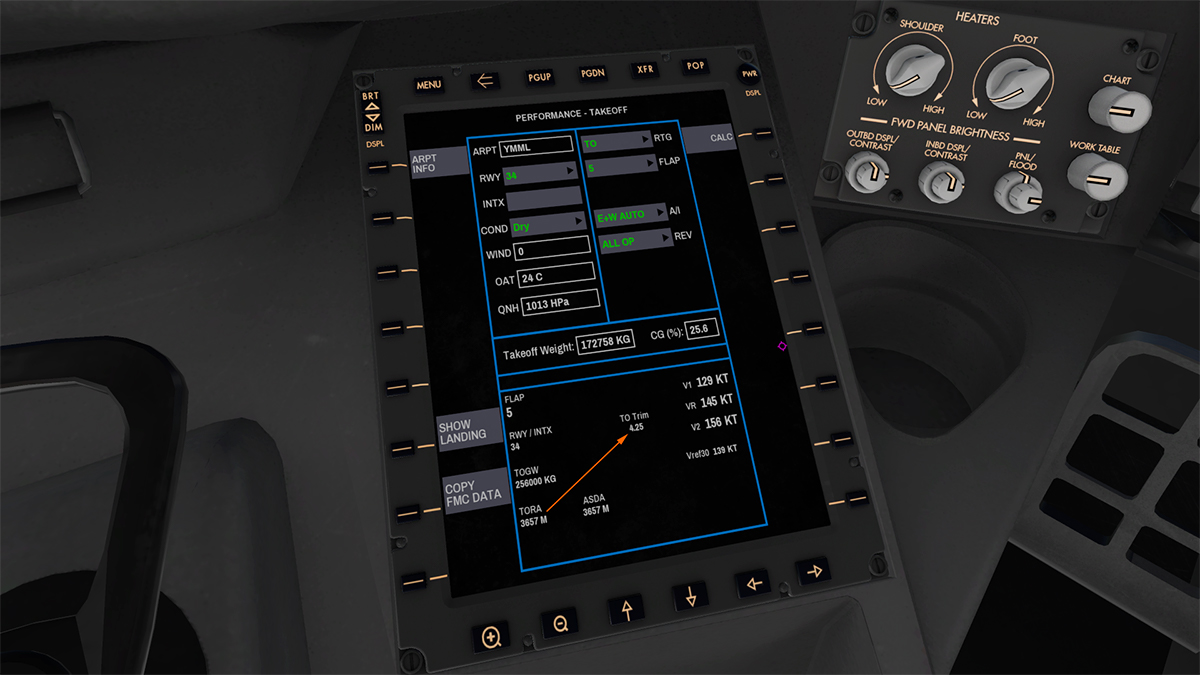
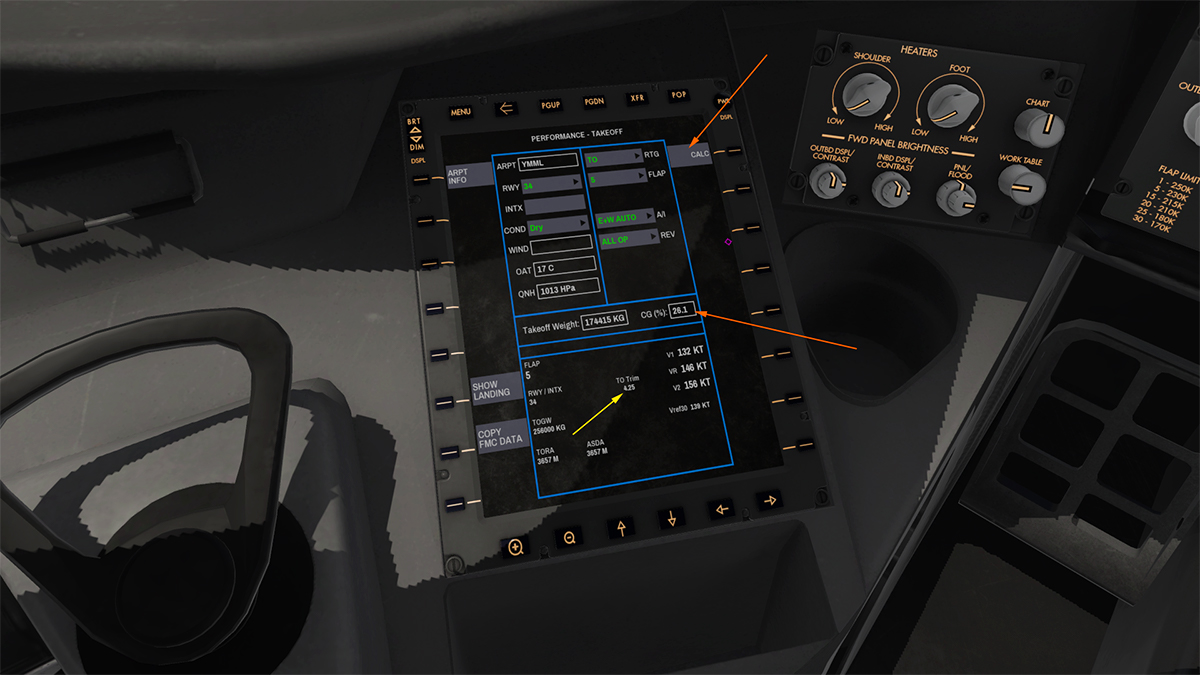
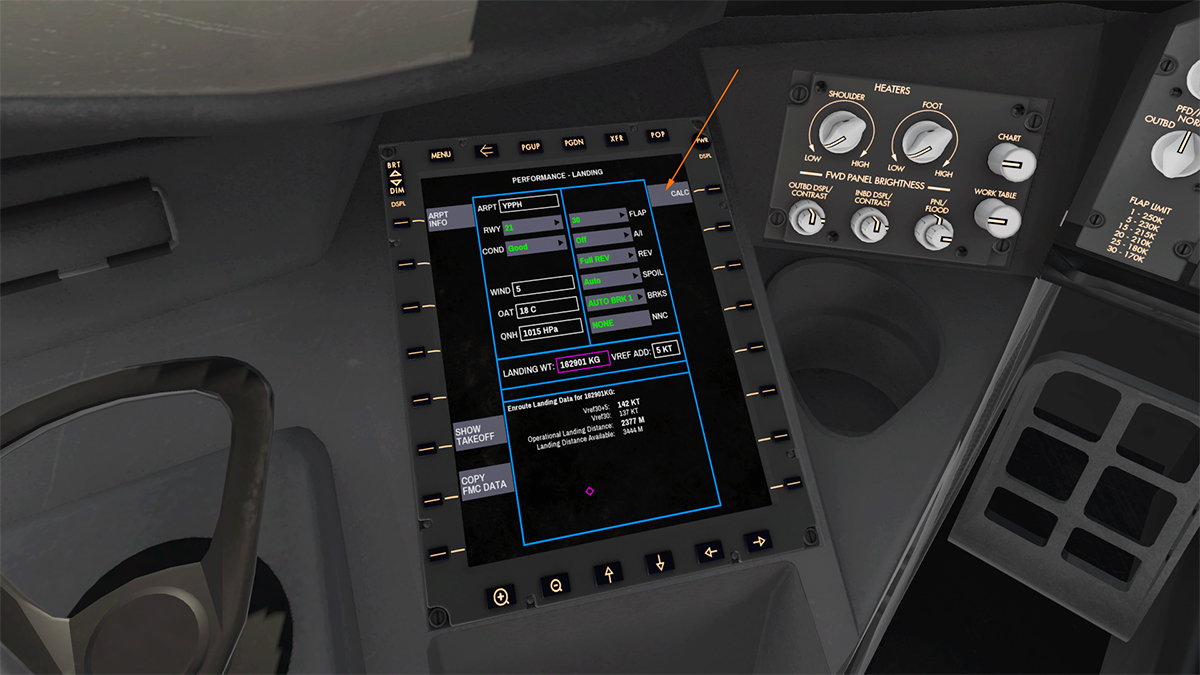
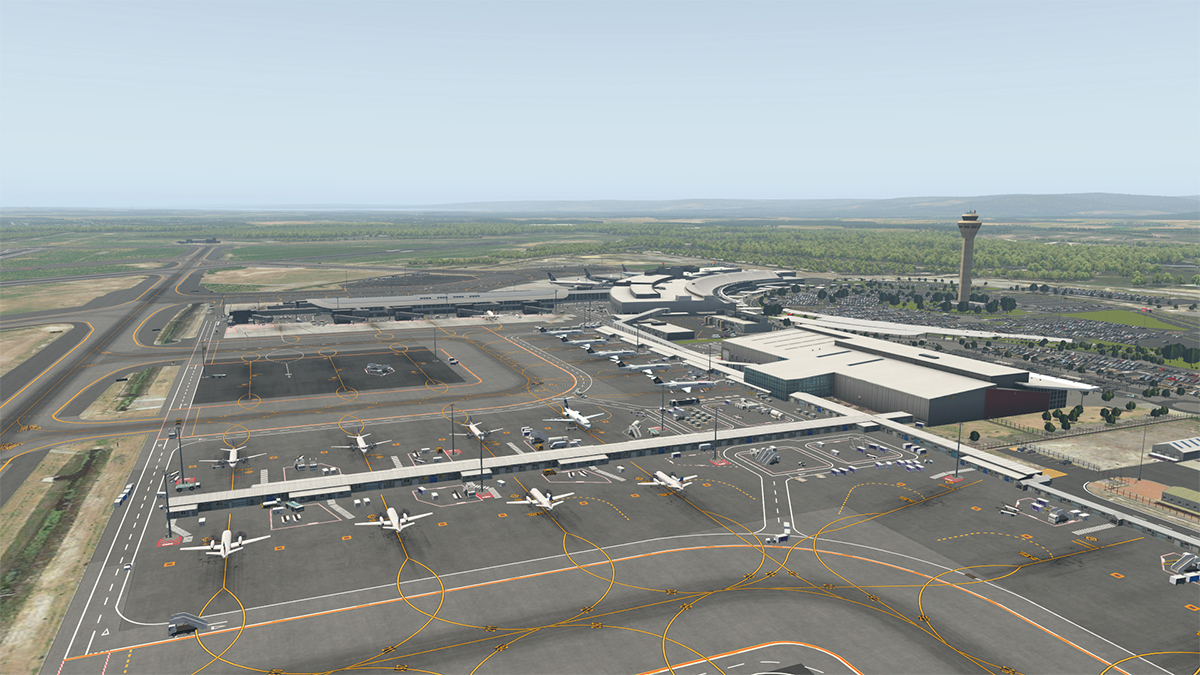
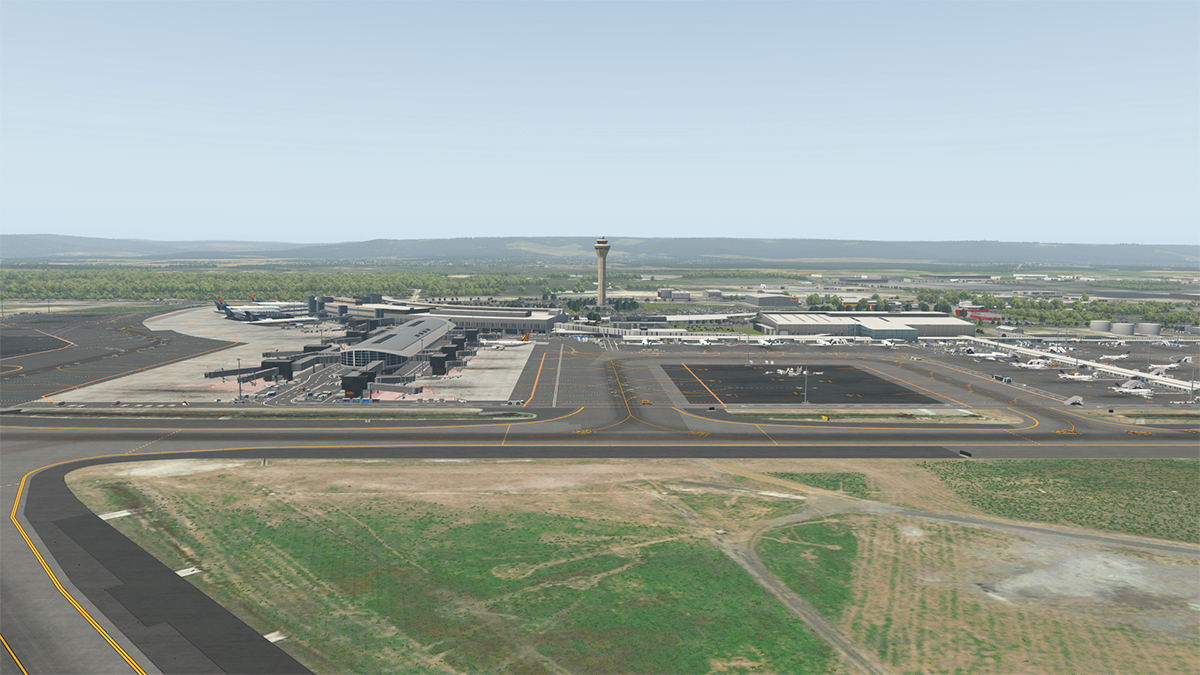
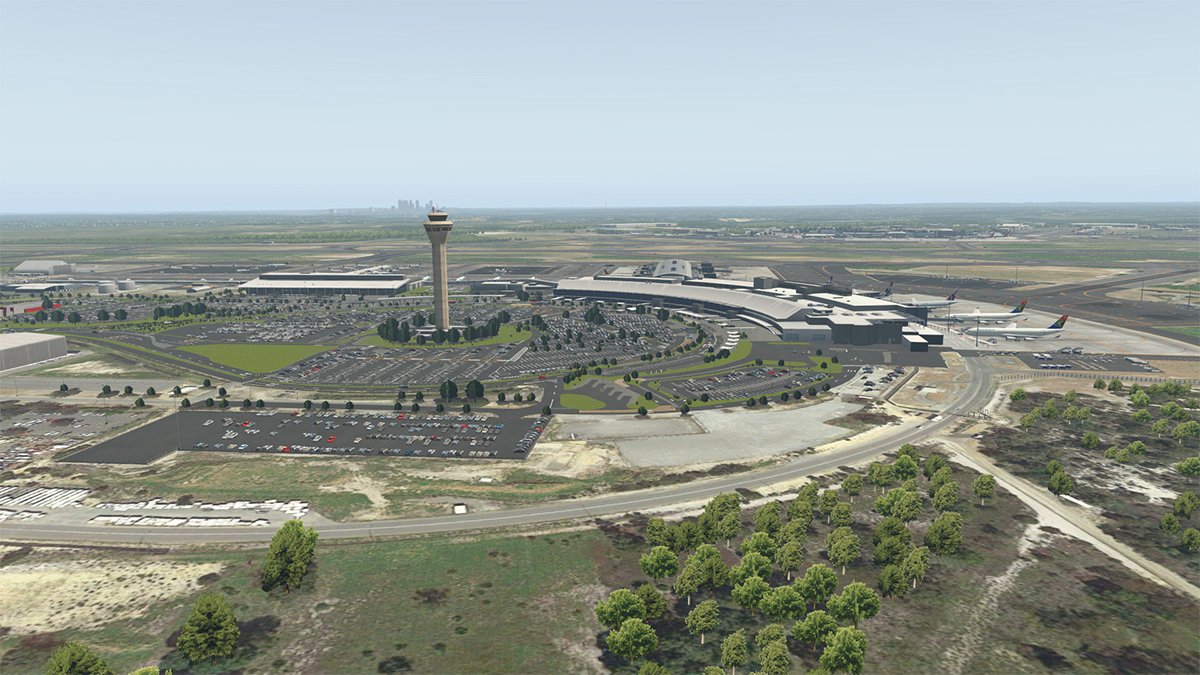
-
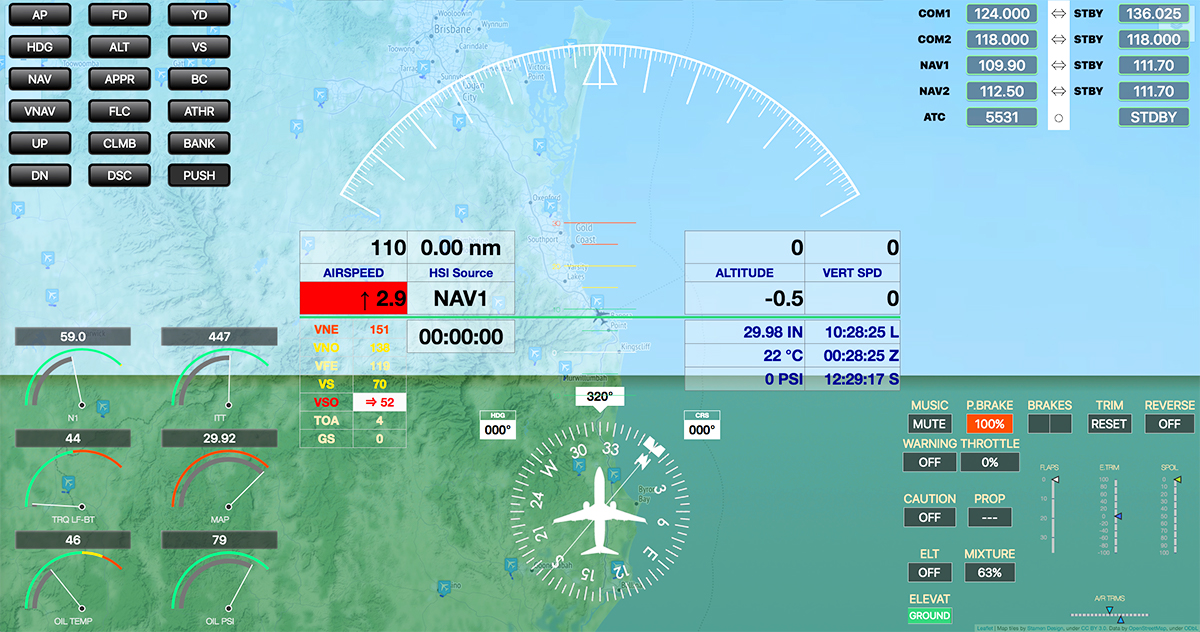
Behind the Screen : November 2020 Here at X-PlaneReviews we do the reviews as we see them and in the moment. The idea is that what we see, you see warts and all, in other words "being honest" and overall the results are usually pretty close to what the product or addon on really is. That is important to you in making decisions on the product and how it will fit into your simulation aspect. I will admit I don't like ongoing development products, yes we know that most released aircraft (or even scenery for that matter) are not completely 100% completed (except maybe for Aerobask), because the sheer variable nature of the X-Plane simulator does not allow for that, and then throw in major simulator update like Vulkan/Metal and it can really put you out of context. But I mean aircraft development, that is always ongoing, like the Magknight Boeing 787-9, Colimate's Concorde FXP and most of VSkyLab's "Test Pilot" Series. Yes you get early access, but also a very disjointed simulation, as a rule I don't review them unless I feel they are quite stable and are ready to deliver your value for money. But I did something in November that I rarely do, I went back and re-edited an original review, and that was of the MagKnight Boeing 787-9. At the time I did the original update review for the B787-9 it was a hellish update month. For some reason September has become "Hell" month for a tsunami of updates, computer updates, simulator updates and product updates... then add in the before mentioned Vulkan/Metal 11.50 final release... another update. It does something to computers and your workflow, plus you have to sort out all the nasty little issues they create, like this works, but now that does not, and then add in a few odd weird failures from the actual computers themselves, it slowly burns you out. I note that everything noted here had nothing to do with the issues with the B787-9, but it didn't help in your mindset either. The update review of Boeing 787-900 v1.6.0 by Magknight didn't really get off to a good start, as I got more confused in trying to sort out the significant changes to the EFB (Electronic Flight Bag) and totally missed a major nose-wheel feature change, or got completely confused by it. But it was that nature and in reality the very reason I don't review ongoing development aircraft in that I missed a vital setting. When I came to flying the Dreamliner from Brisbane (BNE) to Melbourne (MEL) in the review it was quite a frustrating disaster, but I was willing to show the mess for what it was, but in that aspect it was not good for any readers of the review and certainly not good for the developers either, but a nagging aspect was that if the B787-9 flew as badly as I had covered it to be (odd wing angles and terrible takeoff performance) then why wasn't the X-Plane forums not lighting up with loads of aggravated pilots... it didn't make sense, I did post my findings on the forum, but no one answered? but the point was if there was no other complaints, then it had to be me... and that point nagged at me for weeks. More oddly was that I had already flown the MagKnight B787 from Hong Kong to Melbourne, it was quite a passive flight, but there was still a few odd, no a lot of under developed areas, but in that case I was able to fly around them, but not in the v1.6.0 review, the aircraft was simply terrible to fly. So when an expected product was late and needed more development, I suddenly had a free day to re-fly the Boeing 787-9 from Melbourne (MEL) to that very nice new Perth (PER). Maybe there was less pressure or my mood was better with no corroding computer issues, or simply whatever. Anyway I went through the Magknight systems this time in far more detail... first fixed was the odd nose-wheel steering feature. It is a first that you can use your joystick in a "Roll" and also a "Yaw" setting, and going between the two settings of "Use Roll for the NWS" and "Use Tiller Axis", all great features, but complex in understanding the right combination to get the nose-wheel steering you wanted, but once you understood the idea and the use of the Roll in taxiing the aircraft the more I liked it... but I could also see why I got so lost in the first review (it also didn't help that setting for the Roll is reversed). But the handling aspect of the Magknight B787-9 was not really my fault, but still made me look like an idiot or in being very incompetent in being a Pro reviewer. The Magknight B787 aircraft is still basically two aircraft in one, it's roots stem from it being a completely X-Plane Plane-Maker design, so the PFD, MAP and even the FMS is all still basic Laminar designed and default installs, but part of the ongoing development allows for a custom plugin interaction and mostly by that now very good EFP. But the two worlds are not yet connected, because Magknight are still developing a custom FMS and primary flight display system to install into the aircraft, FMS or Boeing's FMC - Flight Management Computer are very complicated beasts that are quite hard to design and use. The problem was simply setting the aircraft's Takeoff trim or setting the Centre of Gravity to balance the aircraft on takeoff. The Boeing 787 is a heavy aircraft, not a General Aviation aircraft were the trim is set manually, and In most cases you set the Takeoff trim in the FMC, usually on the performance page in a Boeing, or the INIT page in an Airbus (mostly the INIT 2 page). But the issue with the Magknight aircraft is that it is still stuck in a twin hybrid world of a basic FMS and no auto trim adjustment via the electronics. The way Magknight gets around this discrepancy is to put the TO (Takeoff) Trim setting in the MAP/NAV window, and you set the TO Trim manually, by the CoG percentage computed in EFP ("CALC") settings, it is however not done in the usual fashion via FMS... so I completely missed it. Once the correct TO Trim and CoG was set, the Dreamliner flew... well like a dream. Still not perfect though, because the aircraft still had a slight leaning roll, this was also corrected via using the keyboard X-Plane setting "Rudder Trim Centre" to over-ride it, and fix it, or still using another basic X-Plane command. So you can see the dilemma, I flew the aircraft like the Pro I am, but it's systems are still quite basic and workaround. That is the downside of these so called transitional aircraft, they are neither one thing or another, and in simulation you want authenticity, because you are flying the aircraft in a professional manner. It may suit the "wanna be" pilots because they love their eye candy first and even at the expense of quality and authenticity. There is no doubt that the Magknight Boeing 787-9 will soon have full custom systems, and probably very good it will be, because even now you can see that in the ideas and features in the aircraft, but in reality, they have developed the aircraft the wrong way around as many developers going after a market share have a habit of doing, it is all features and at the cost of the basics first, were as the FMC and correct Flight displays should have been the first priority... the problem for Magknight is that FlightFactor will certainly not make that mistake in their version of the Boeing 787 Dreamliner. Which brings us to xEnviro created by Dark Space. In November Dark Space finally released another update in v1.14 for X-Plane of the xEnviro environmental weather engine. First don't get me wrong, but I am a devoted user of xEnviro and do promote the plugin, because at it's heart it is a very good (if a very buggy) replacement of the now quite dated and boring weather engine that comes with X-Plane11. The history of Dark Space's development of xEnviro could be best served as a series for a comedy show, it's roadmaps are quite bizarre and it's development paths are as weird, and even the results in the different versions can be a bit hit and miss, in a good one, then an average one and then a whatever version, in reality the only really good version was v1.07, the rest were a bit wonky in one form or the other, but xEnviro when it worked in the right conditions was awe inspiring, so you held the faith (our family motto). Again the development path of bringing consistent new features, but never really getting the basic engine right has cost Dark Space years of development and users just a load of frustration, yes this sort of program is hard to do, yes it it is an intensive tool to create, but somehow their mindsets create more confusion than what they could help themselves with, in most cases instead of fixing the obvious they have a habit of completely changing around the features that already worked very well, and they wonder about why users kept on arcing up at them. They say it is hard and even impossible to do, yes it is, but Microsoft with the new MS FlightSimulator have done just that in the impossible, and in half the time that Dark Space have been banging away on this. But here we are now in another of their bizarre mindspaces. In with the release of v1.14, xEnviro will currently only still work in OpenGL, or not with the new Vulkan/Metal v11.50 dynamics... who wants to use OpenGL in v11.50? it is only a fallback situation if Vulcan fails, and too a point who wants to actually use X-Plane only in the older OpenGL mode, I think I have only about twice used OpenGL, and that was to test an older plugin situation. So all the advantages of using Vulkan/Metal are all lost on the plugin, and here is the thing, if any plugin has huge advantages in Vulkan/Metal it is a complex environmental engine like xEnviro. Dark Space has or had a lot of reasons to delay the start of change over to Vulkan/Metal, and note from now on it is "Vulkan, Vulkan, Vulkan", but... I think it is too late this time. Why on earth in that the moment Vulkan went final, didn't Dark Space start Vulkan development, or even a month or so before, so there has now been already three or four months wasted. They do note a major personal issue (again) also affected the v1.14 development, fine you accept that, but still development was started far too late and again the canvas has to now be totally redone from scratch. V1.14 took a long eleven months to do, for what is actually nothing or for something the majority of users can't actually use, Dark Space note that v1.15 (Vulkan) won't take as long, but to be honest I think we have already dialed out of these idiosyncratic development cycles of this product, I know I have. If Laminar deliver the expected new environmental engine to rival MDFS's version in X-Plane12, there will be only the need to put the cross on the grave of what was once a wanted great tool and even the loss of the enormous promise an exceptional plugin in the name of xEnviro. In several ways, both Magknight and Dark Space are very similar in the way they approach their development with their products, but both also are guilty of chasing features over making their products perform in a basic and credible way, both are in their ways incredible products, but have been let down by not doing the important boring areas, unfortunately, it is boring bits that make them a brilliant product when using them in the simulator. X-PlaneReviews will deliver a final 2020 "Behind the Screen - Year in Review" with a roundup of 2020 in the next few weeks, until then... Stephen Dutton 1st December 2020 Copyright©2020 X-Plane Reviews
-
I don't have a multi-monitor setup, so I would not have seen that issue, it sounds complex? I did see another note of the same thing on the XPRealistic forum... you may have to go directly to the developer...
-
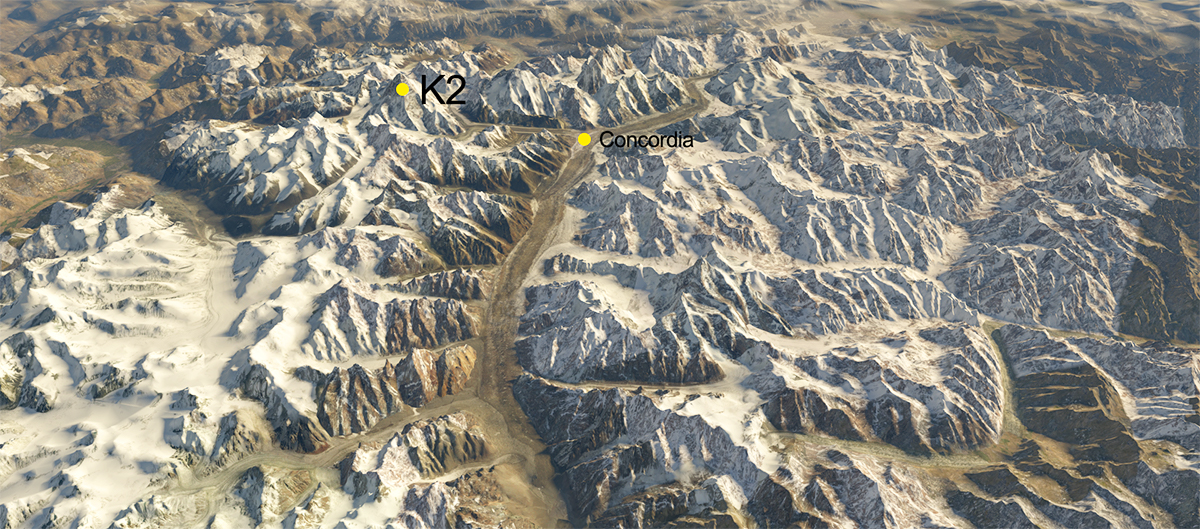
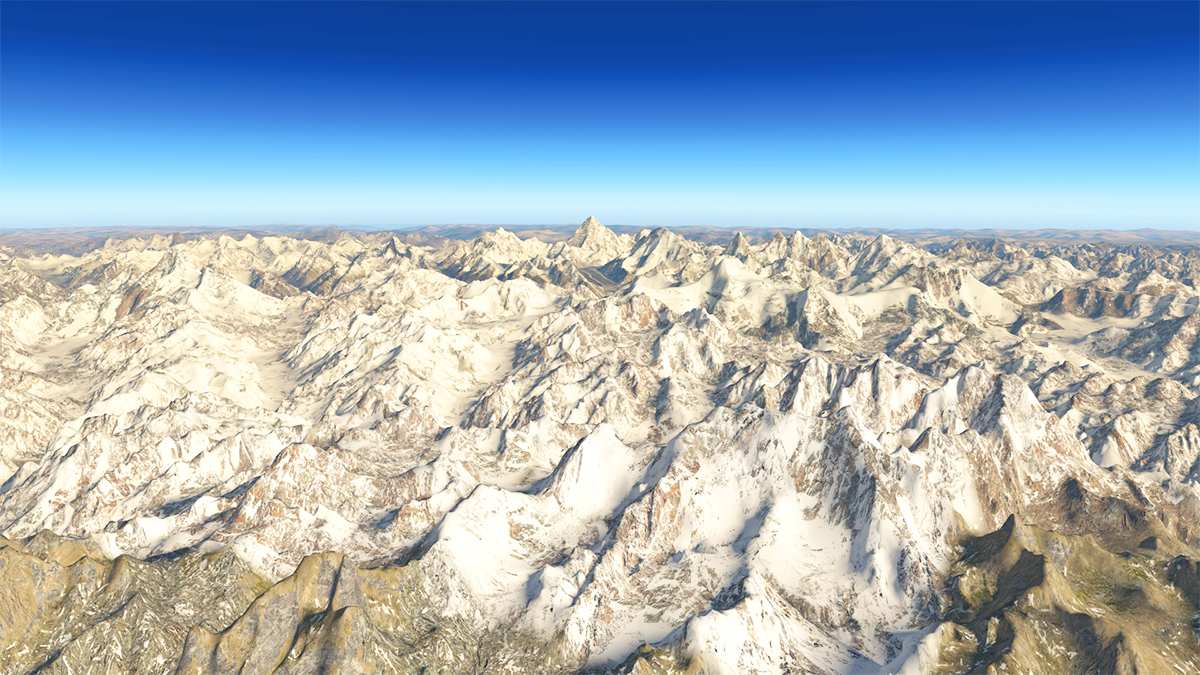
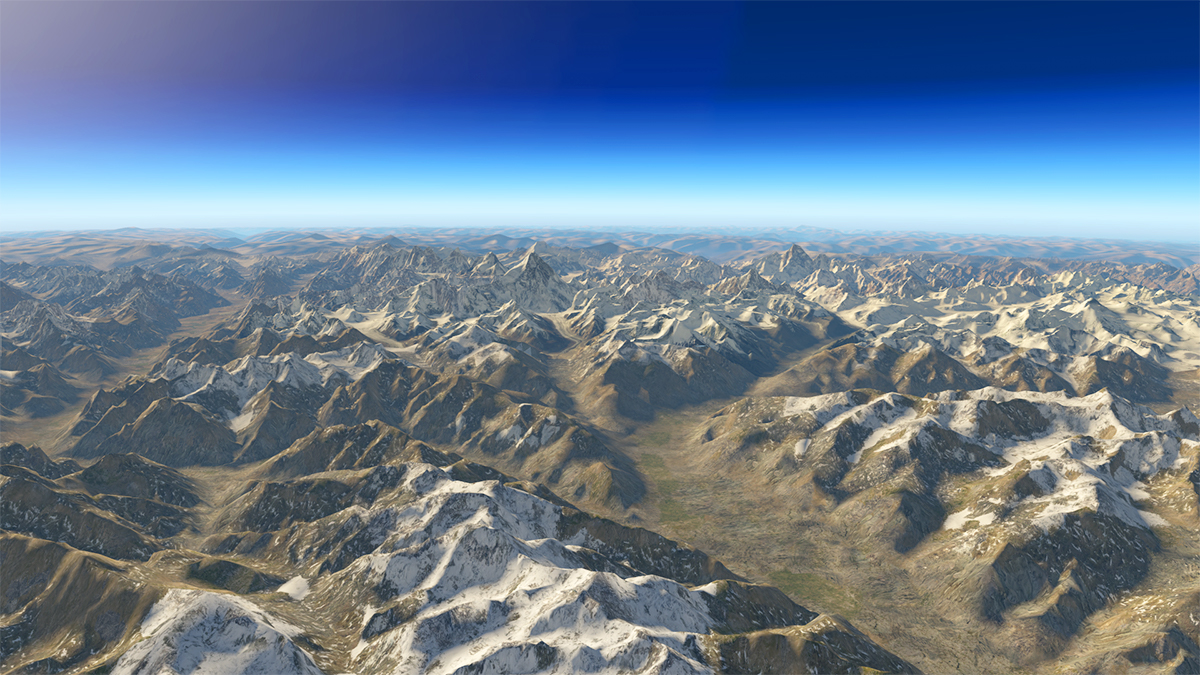
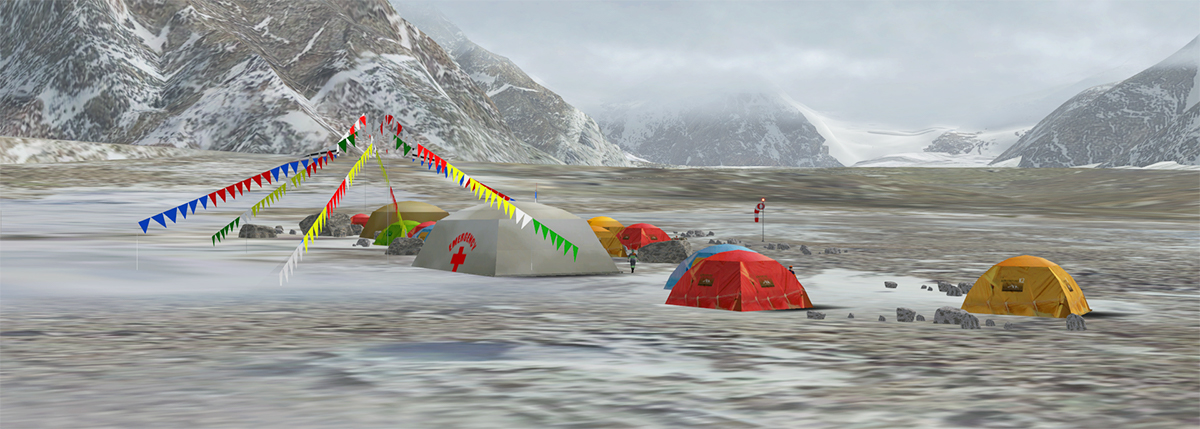
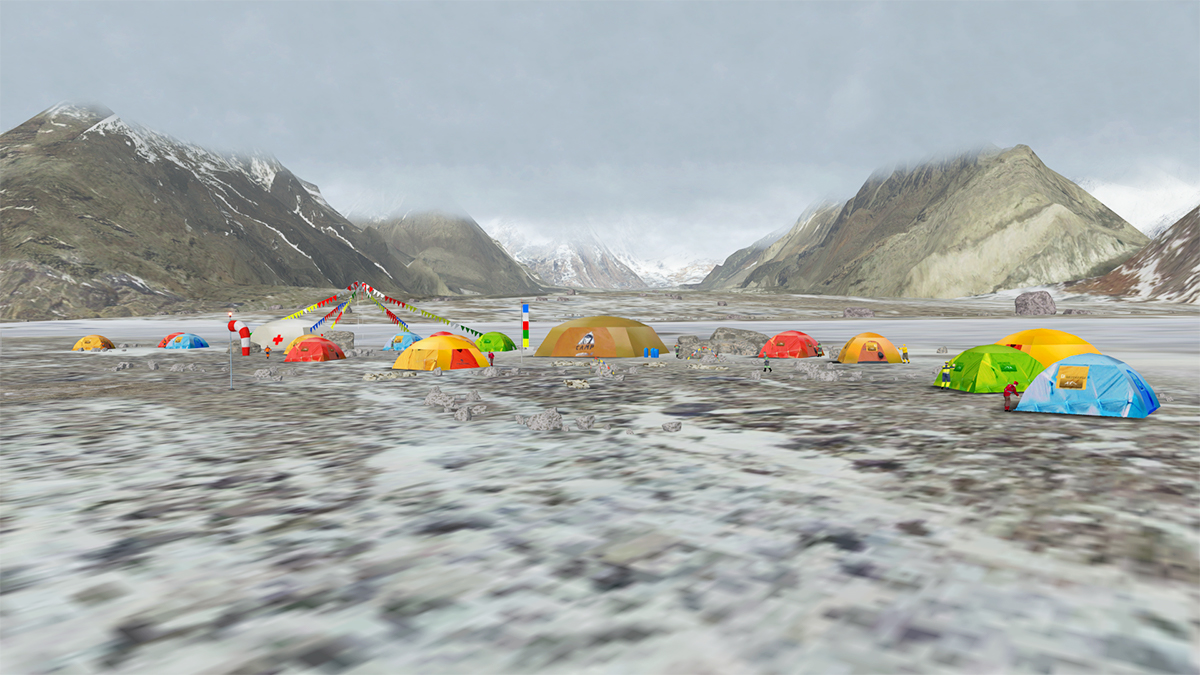
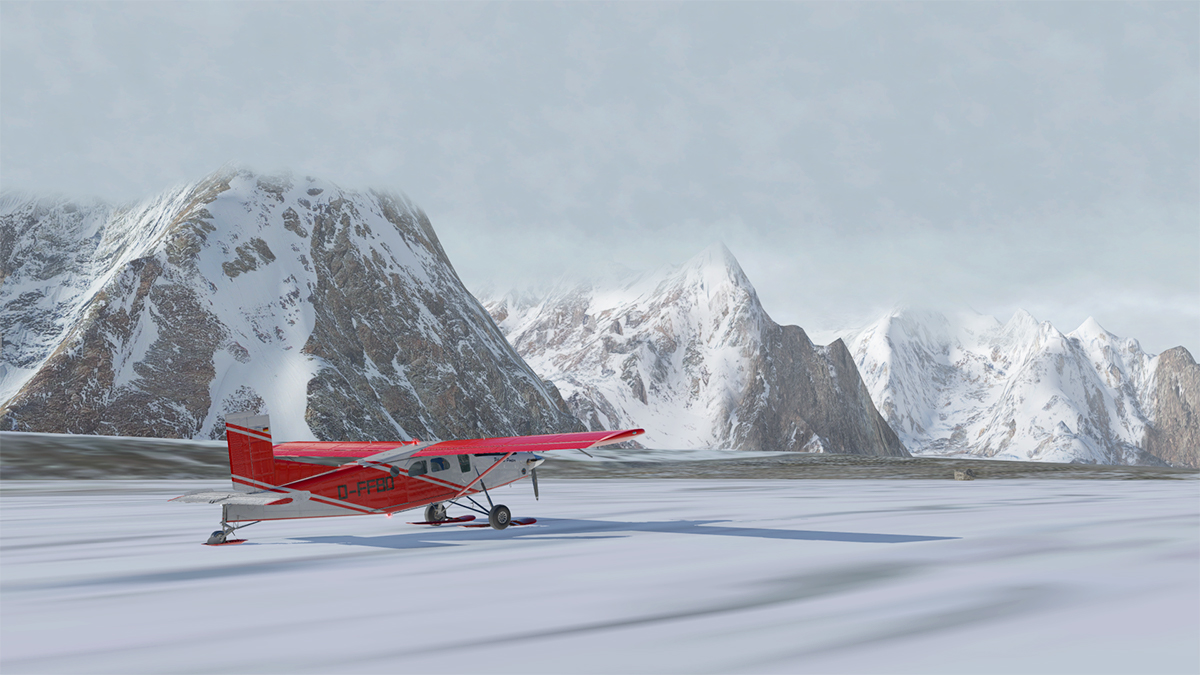
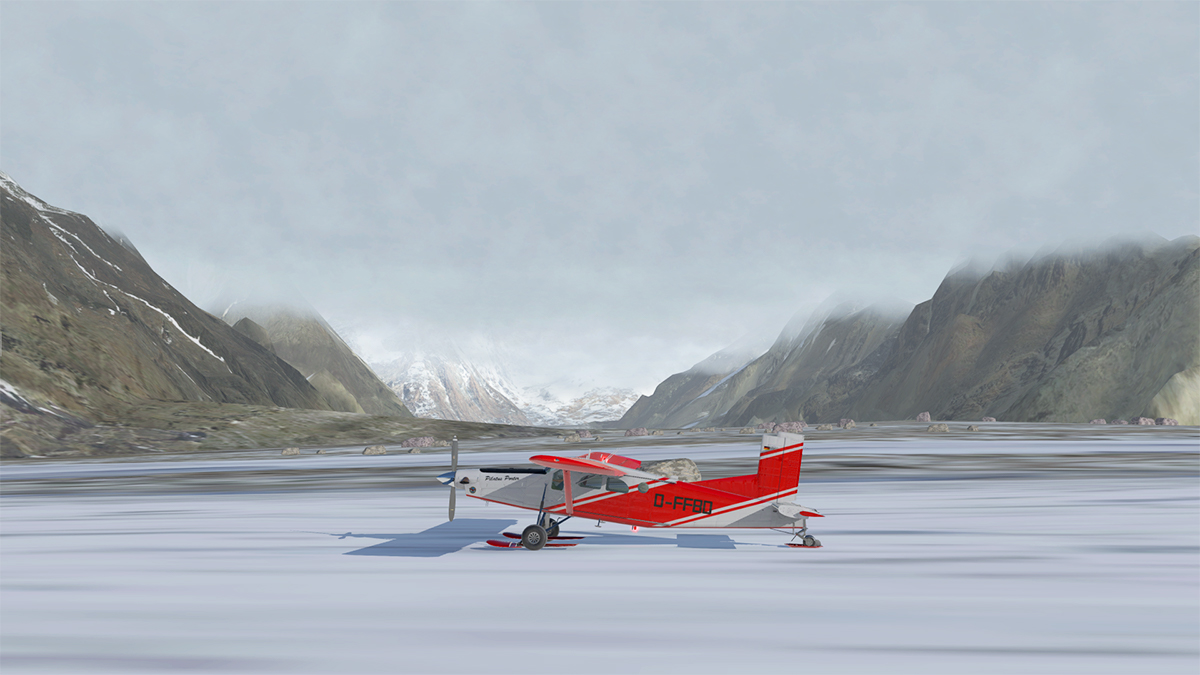
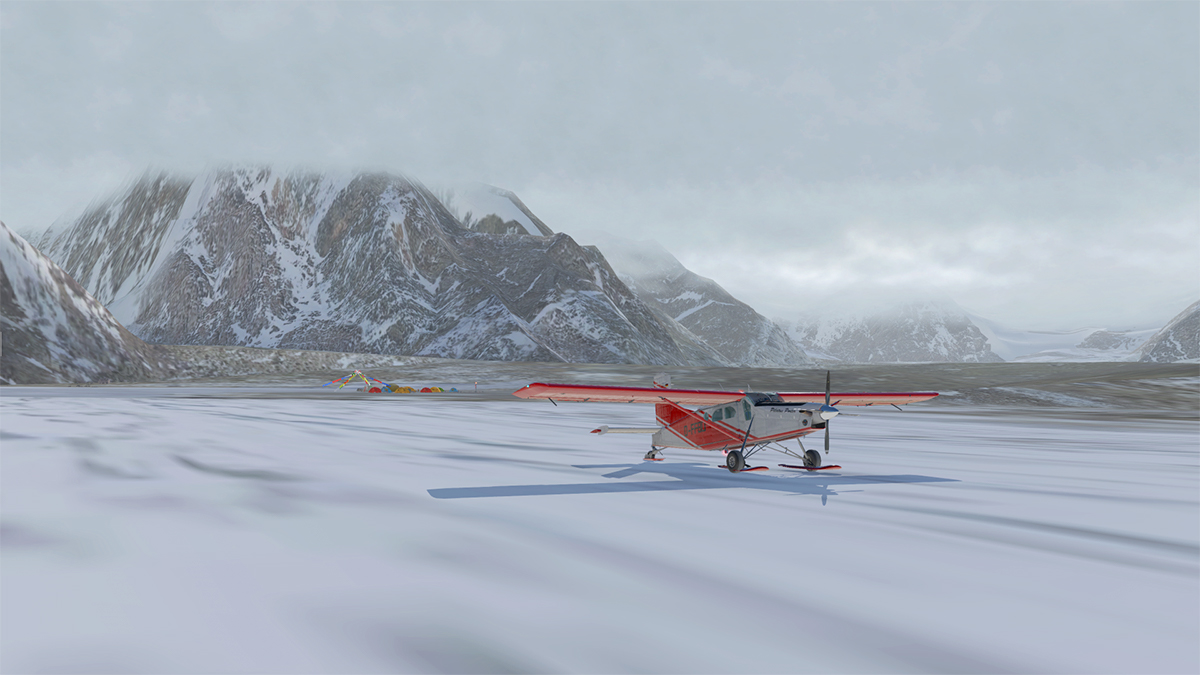
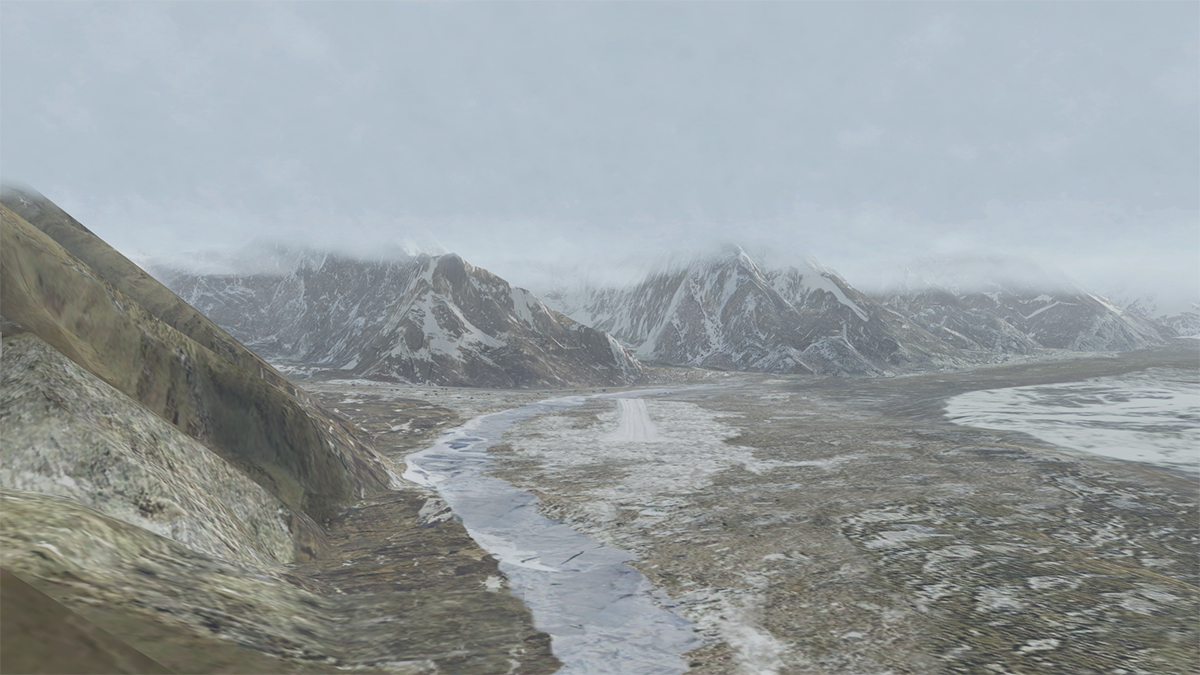
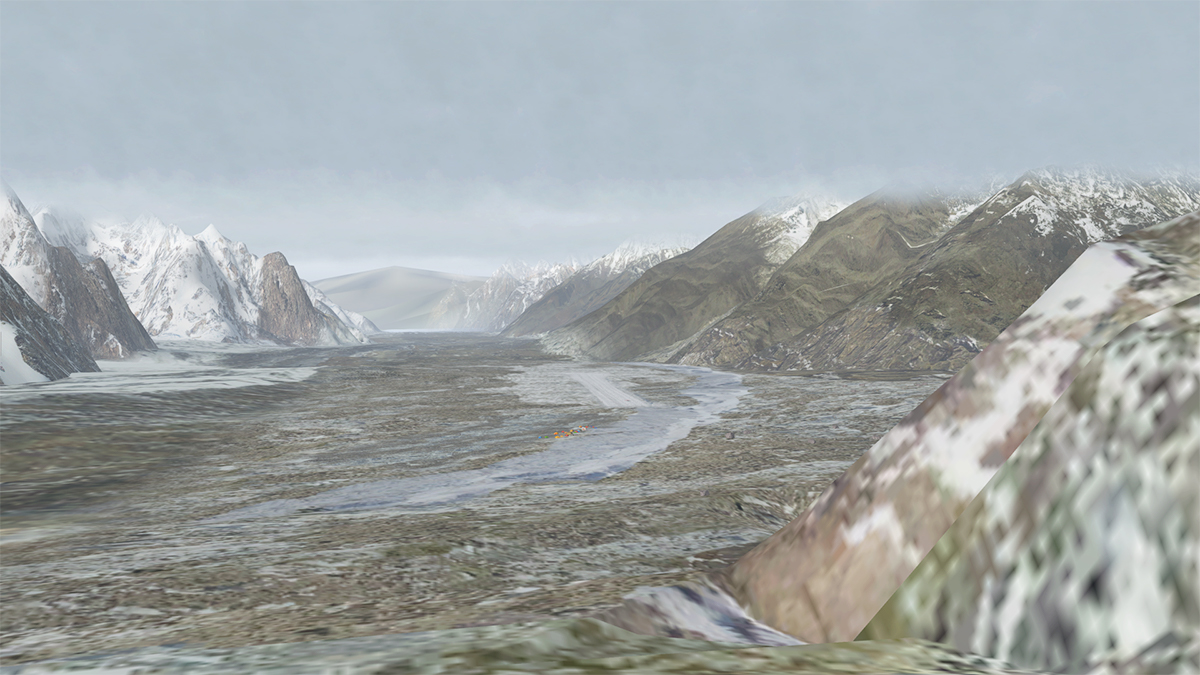
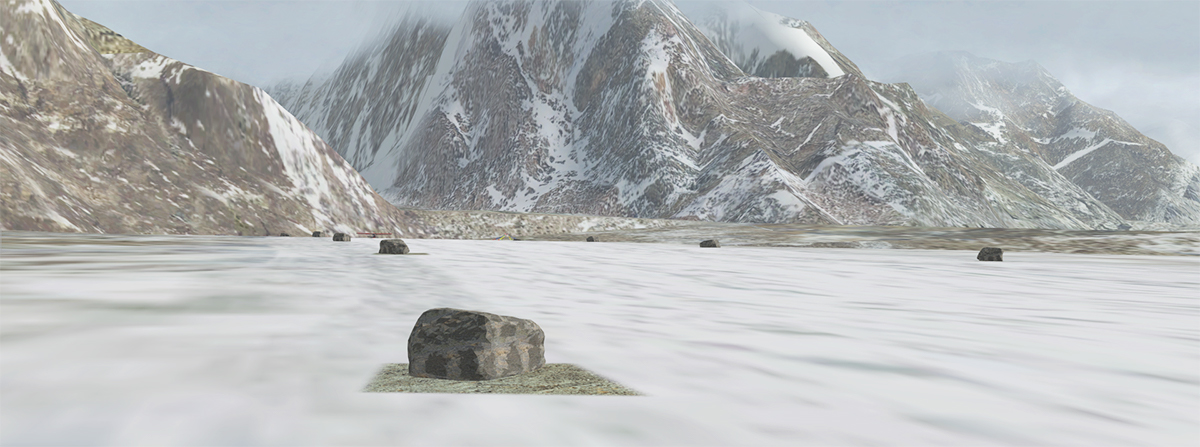
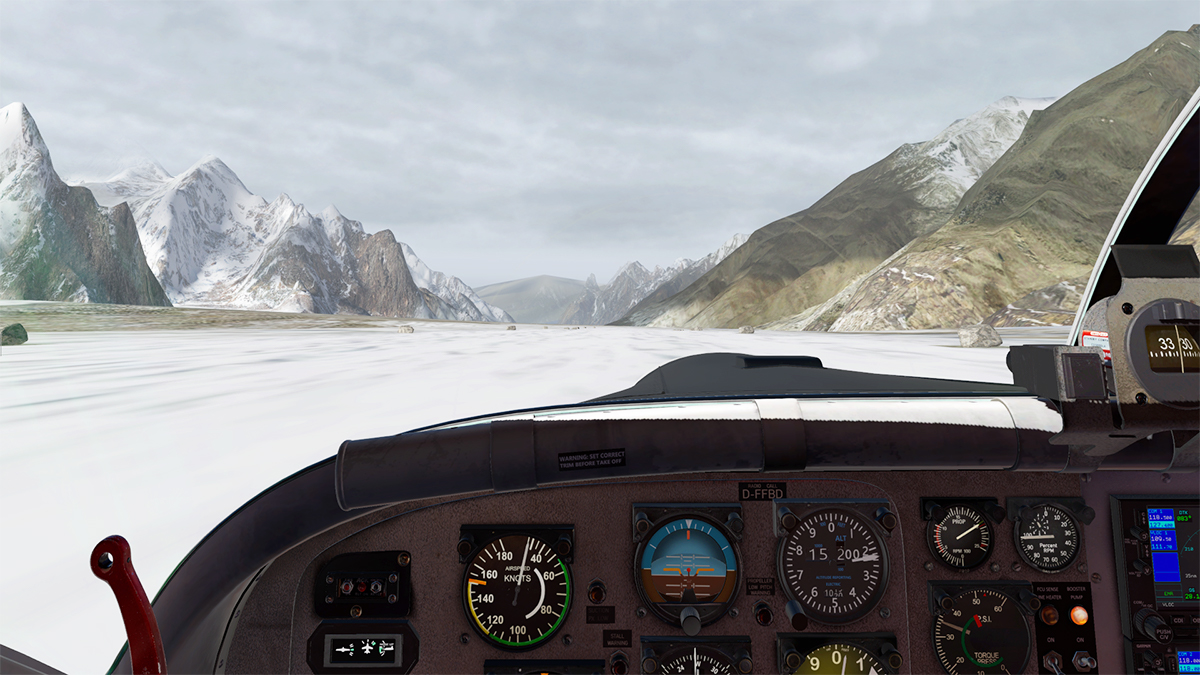
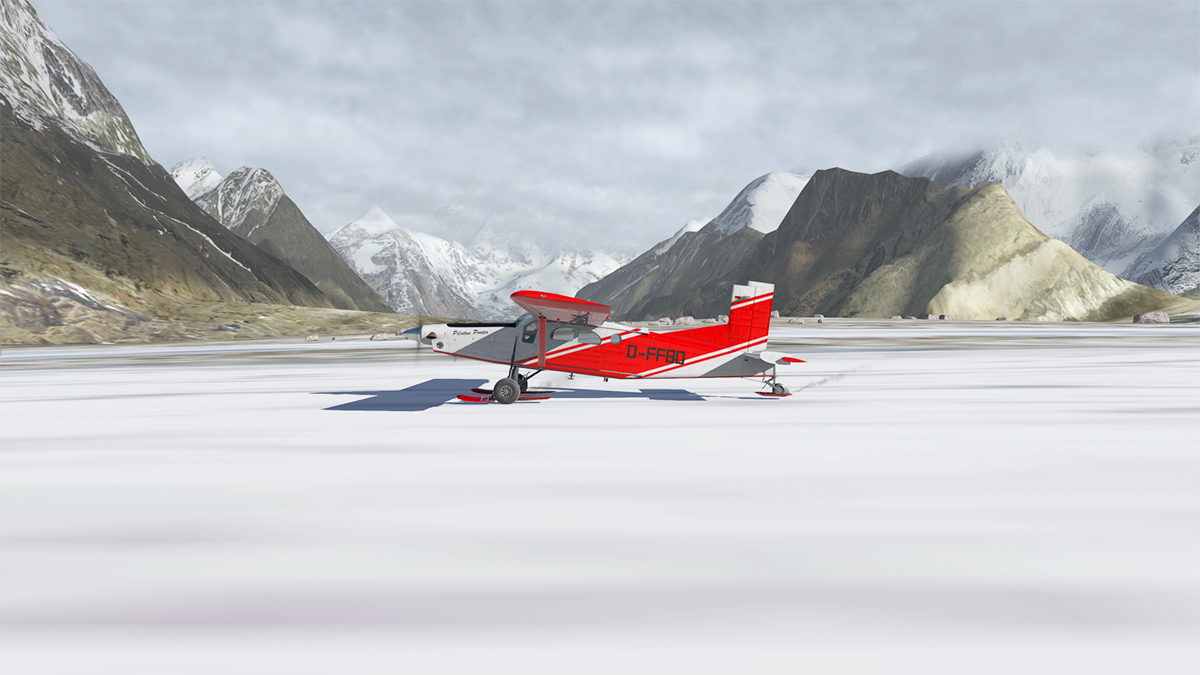
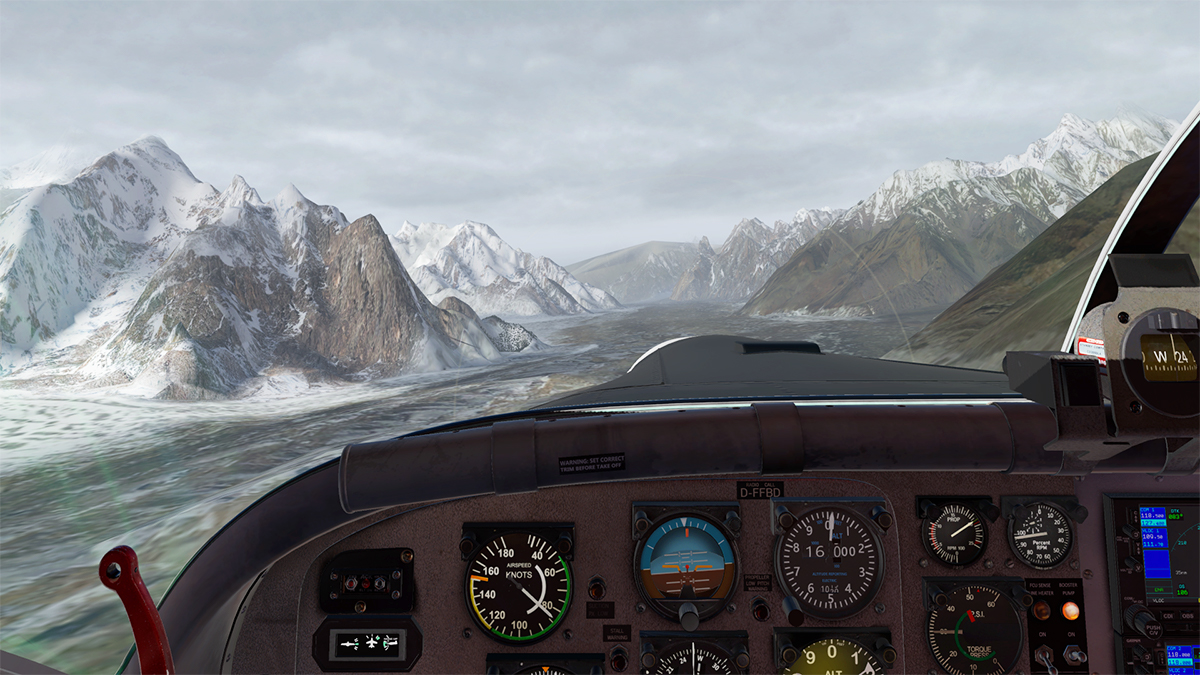
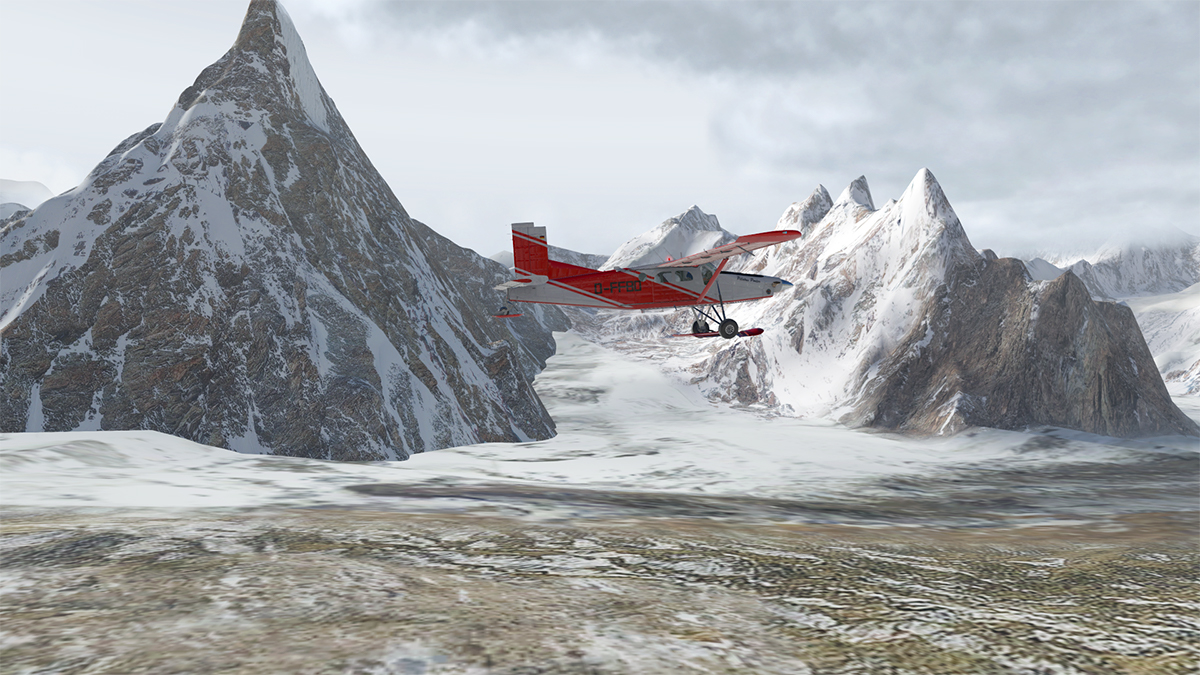
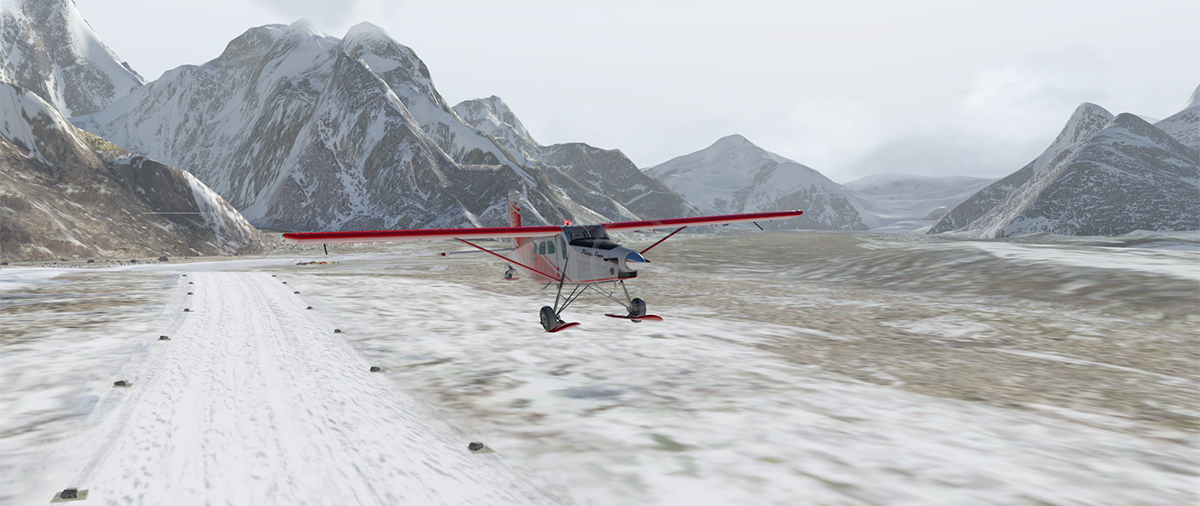
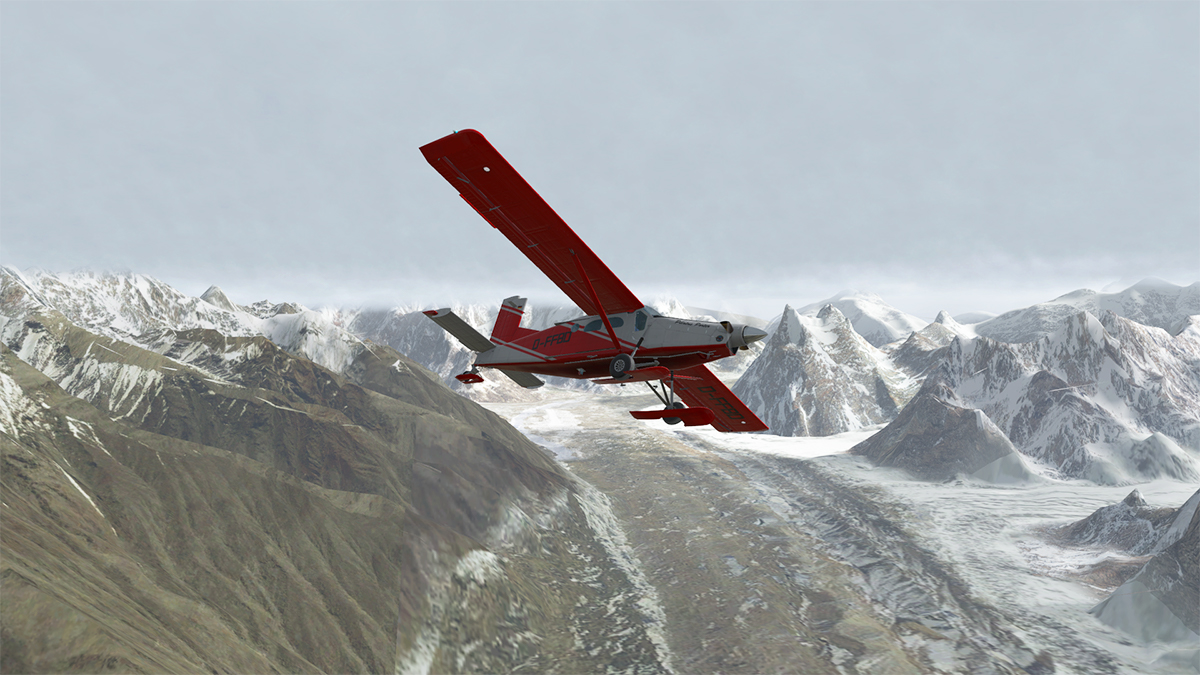
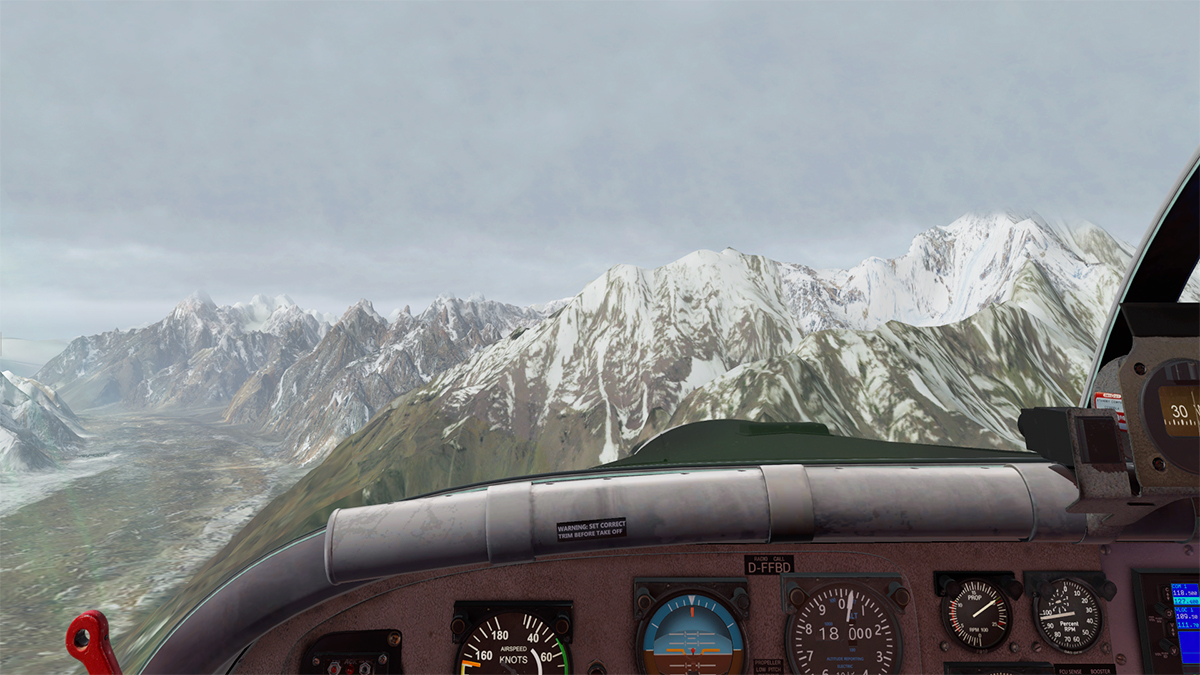
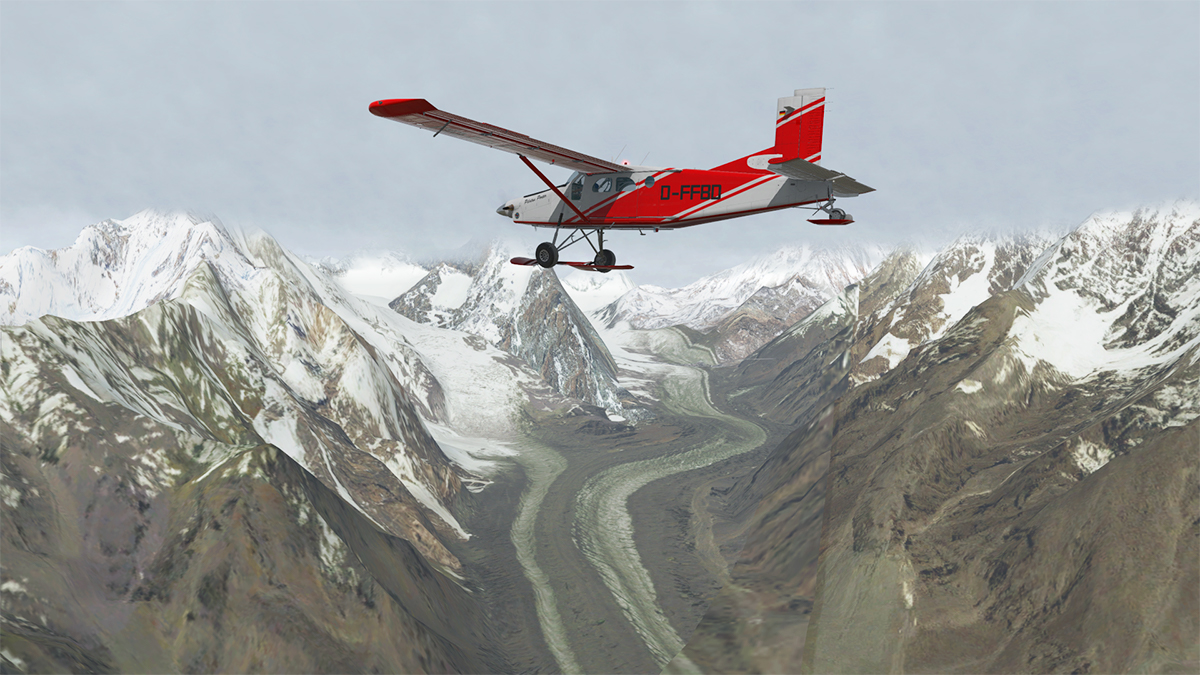
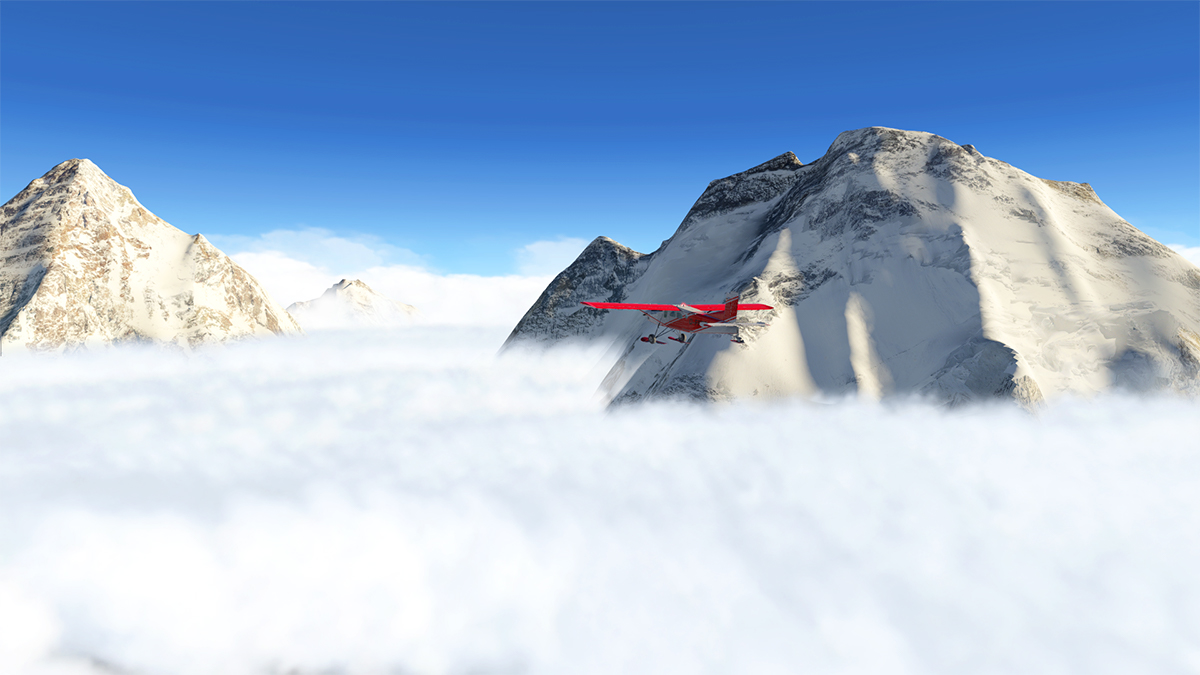
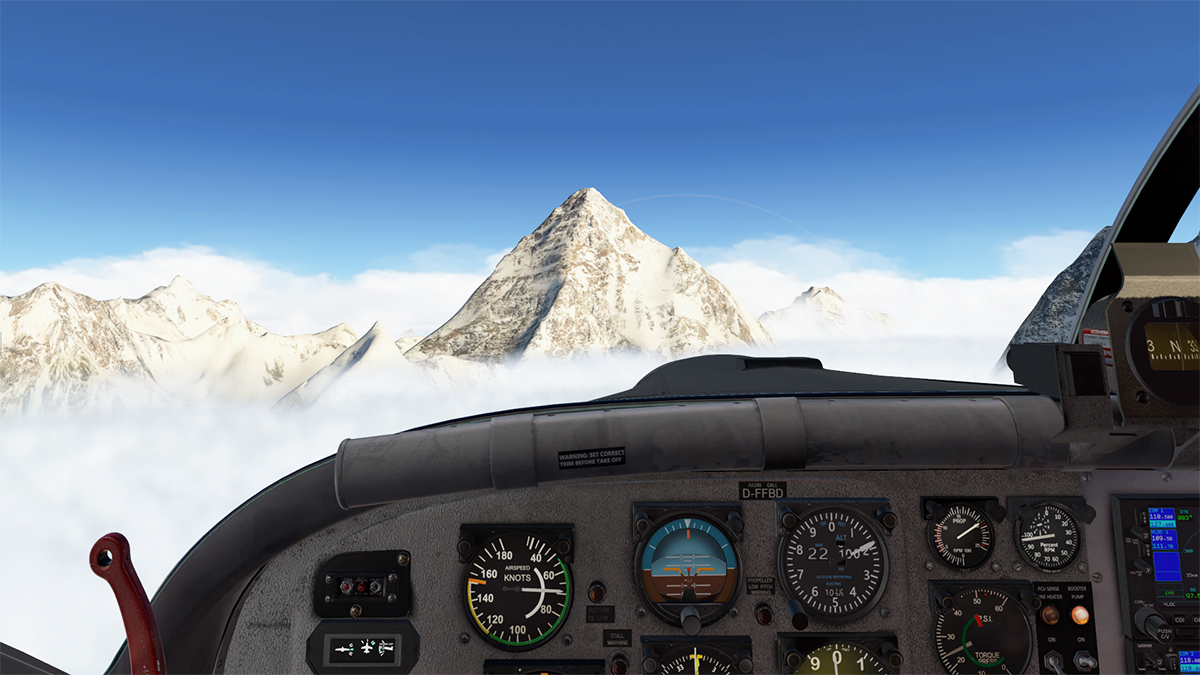
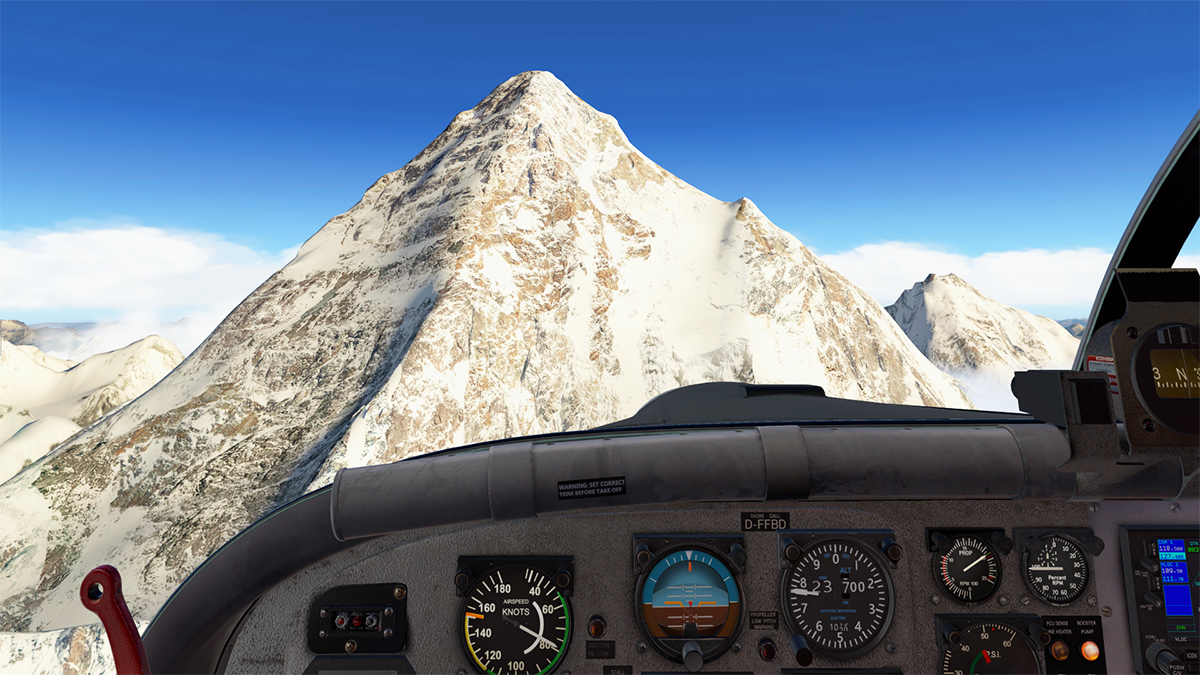
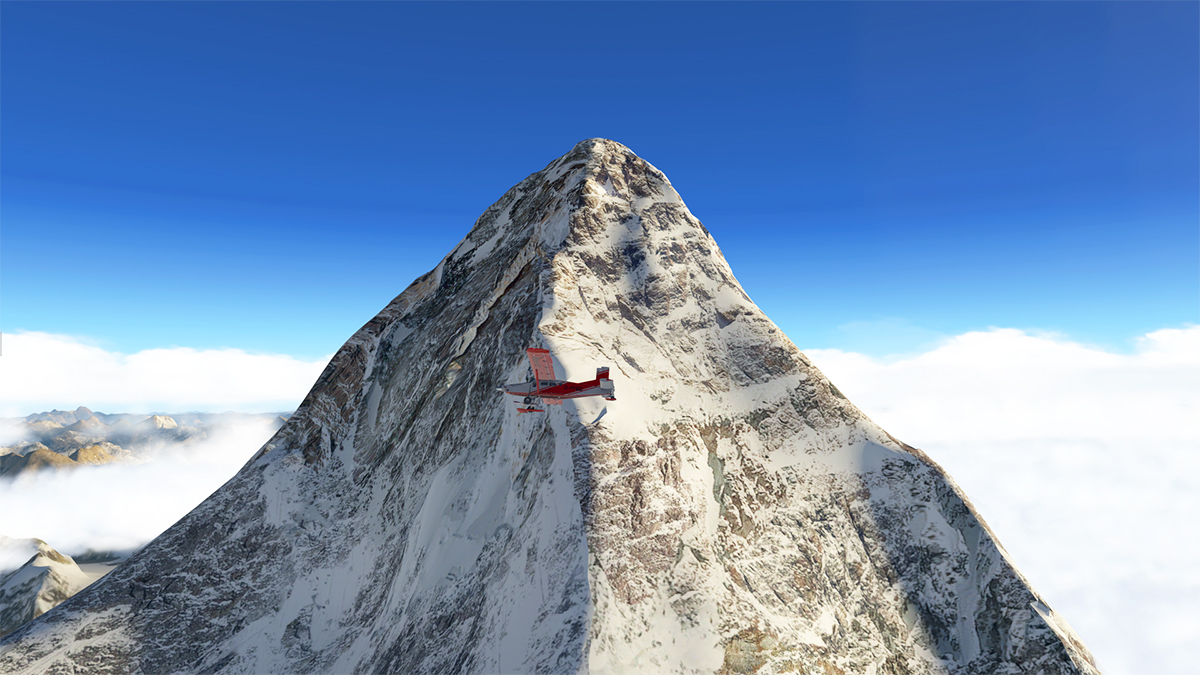
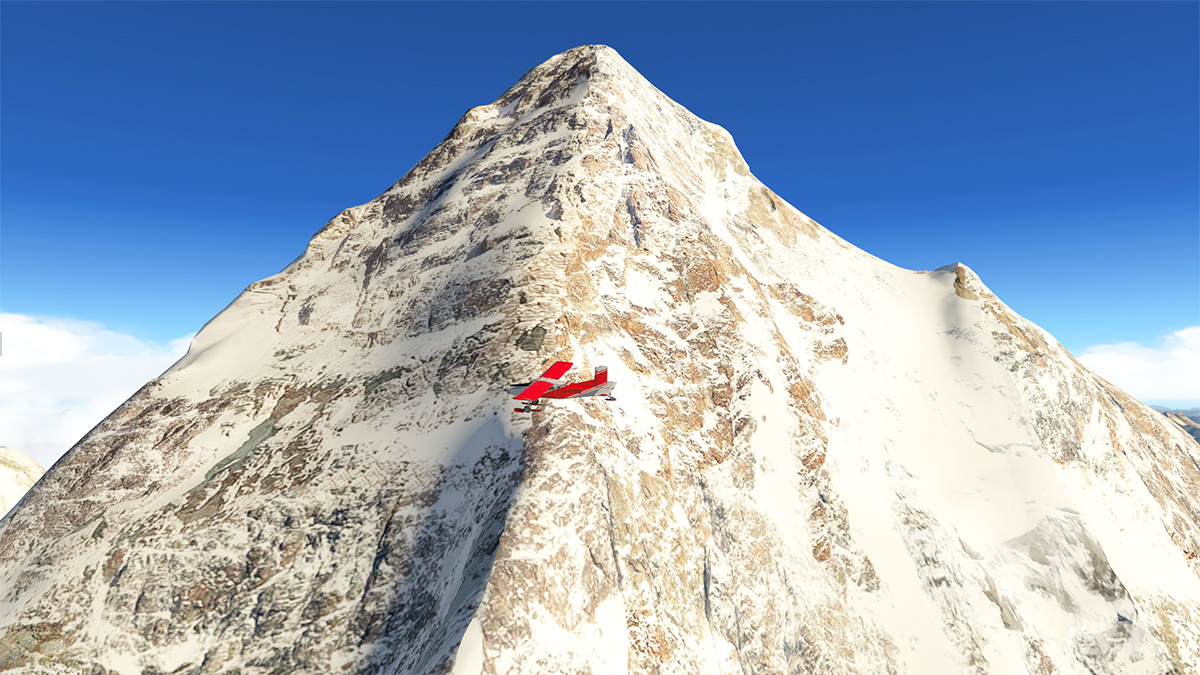
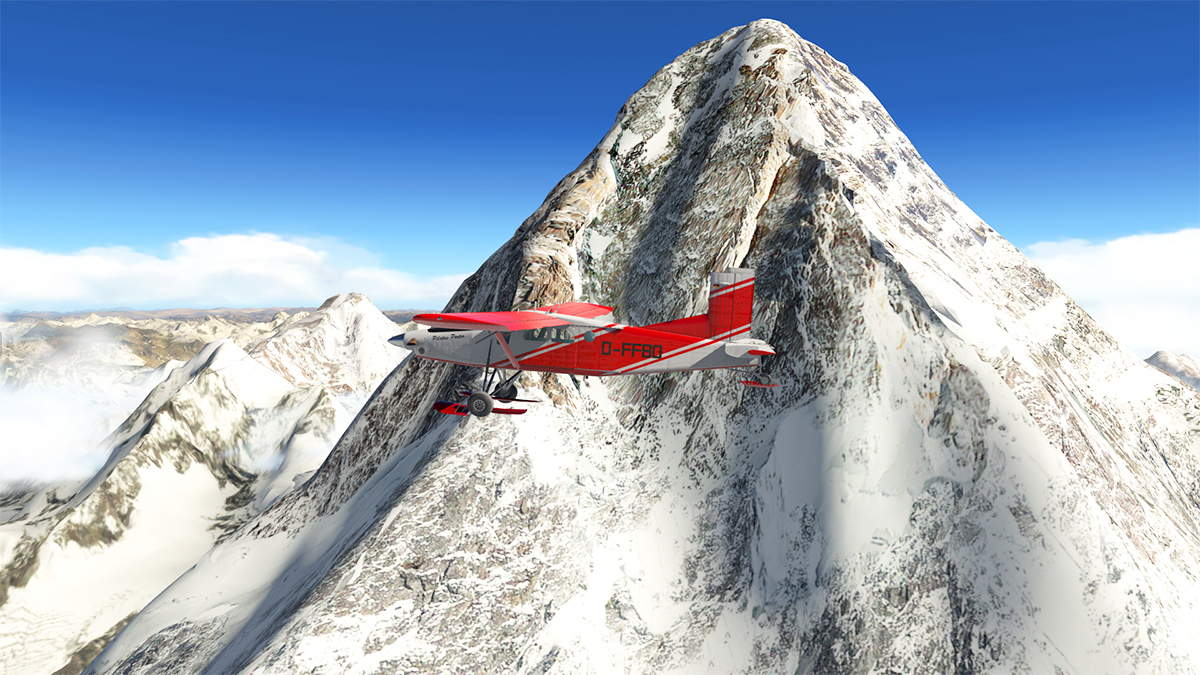
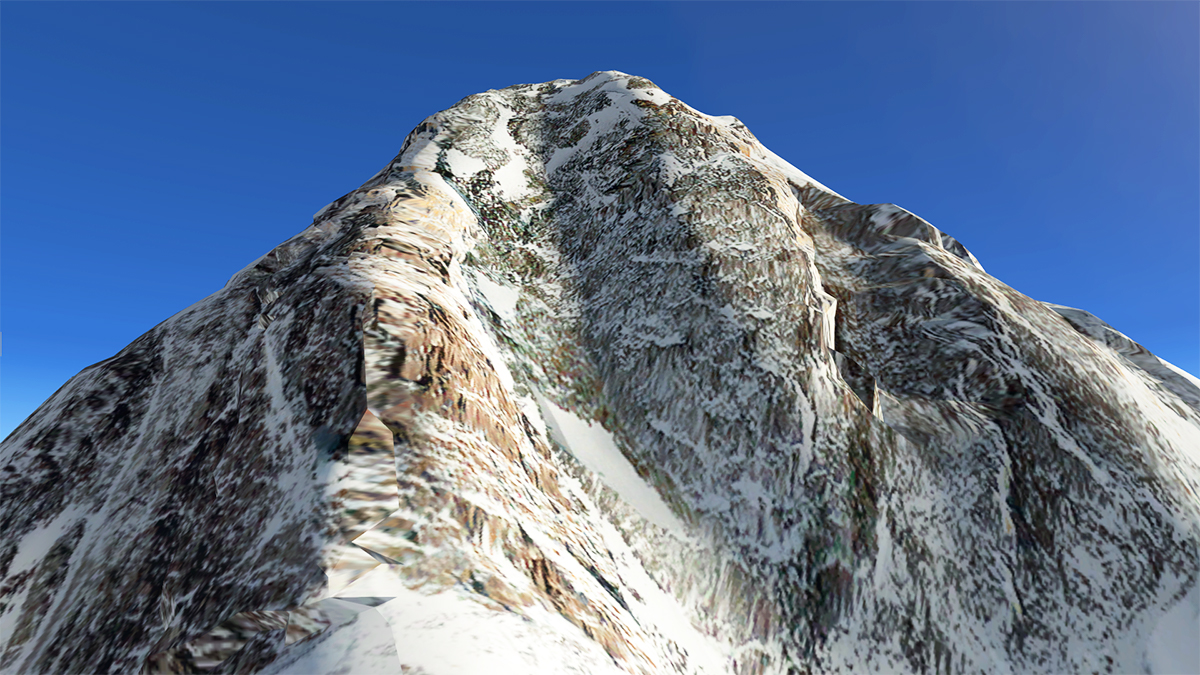
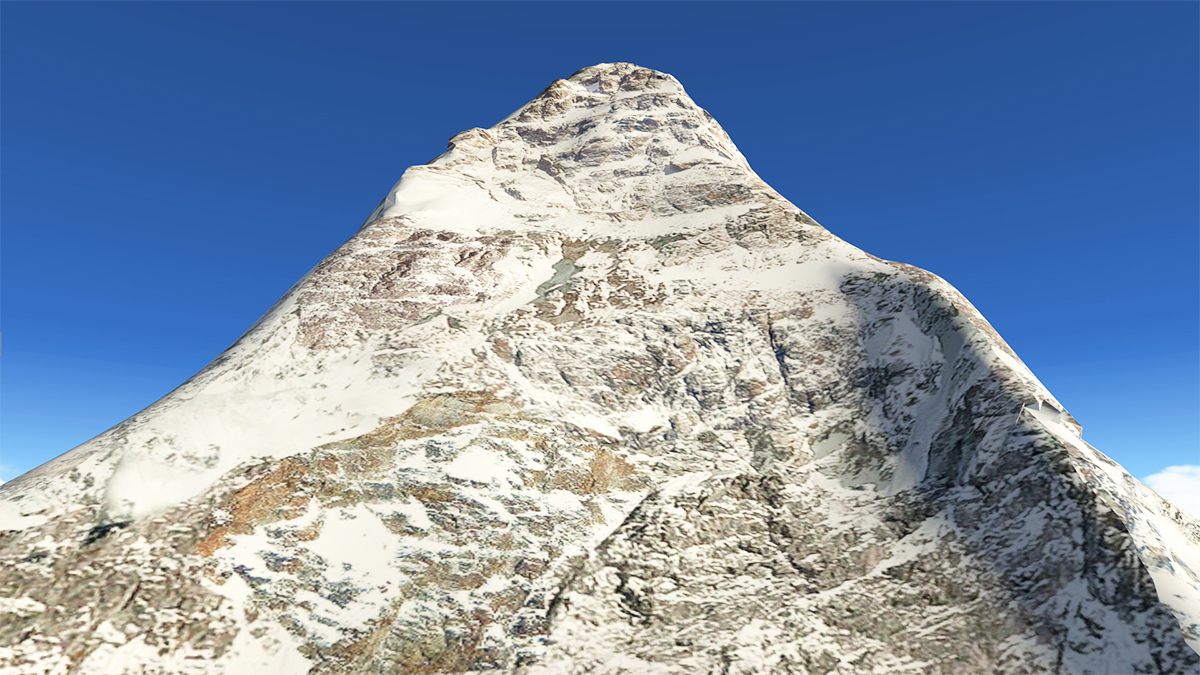
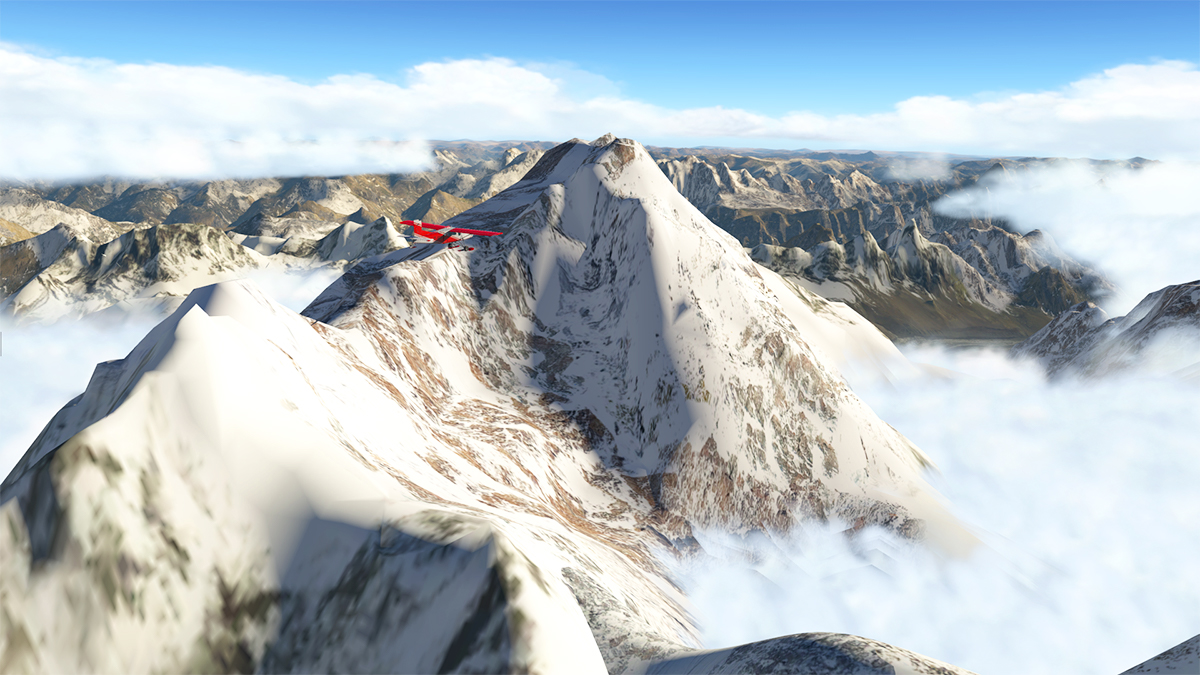
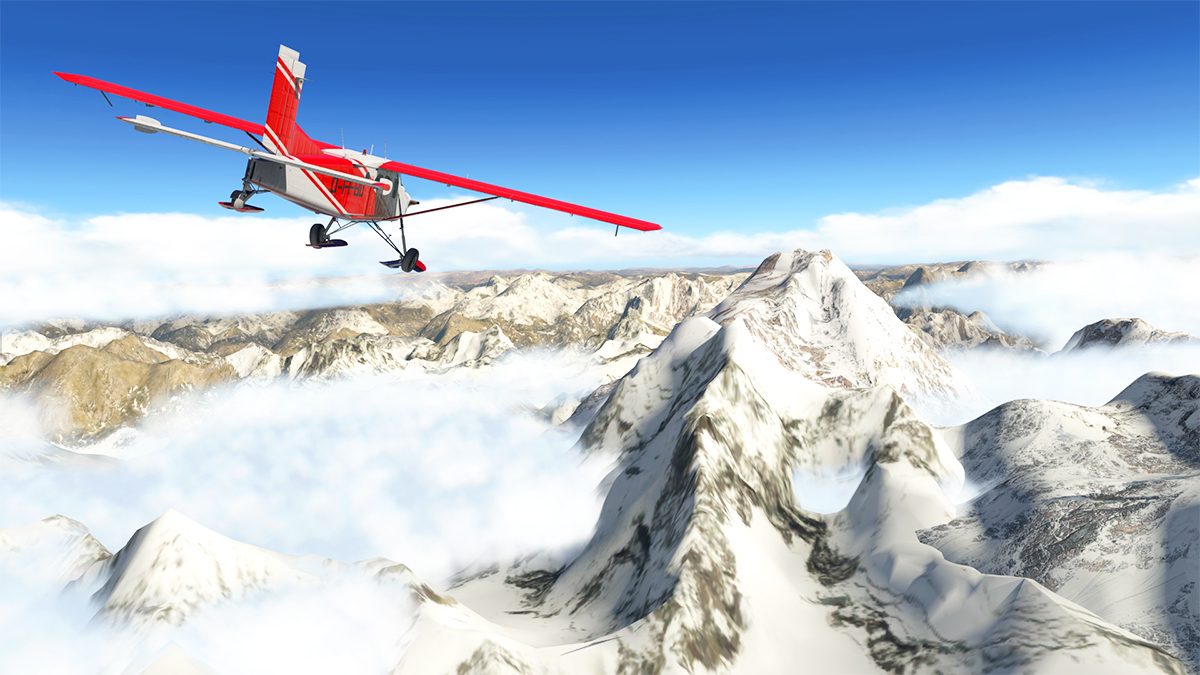
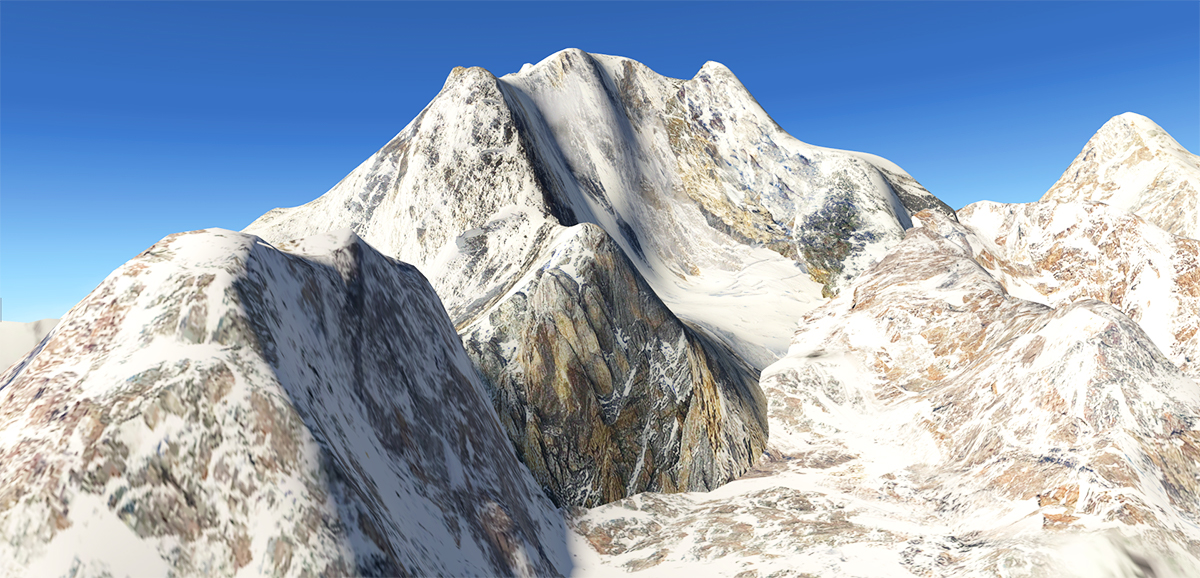
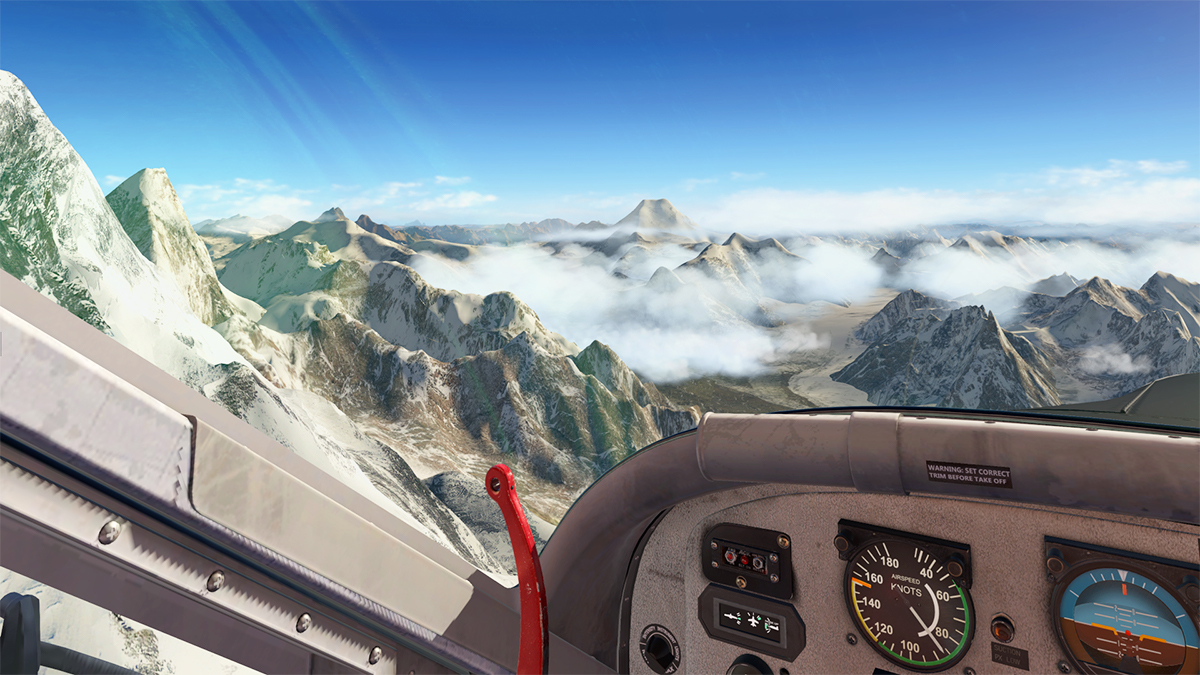
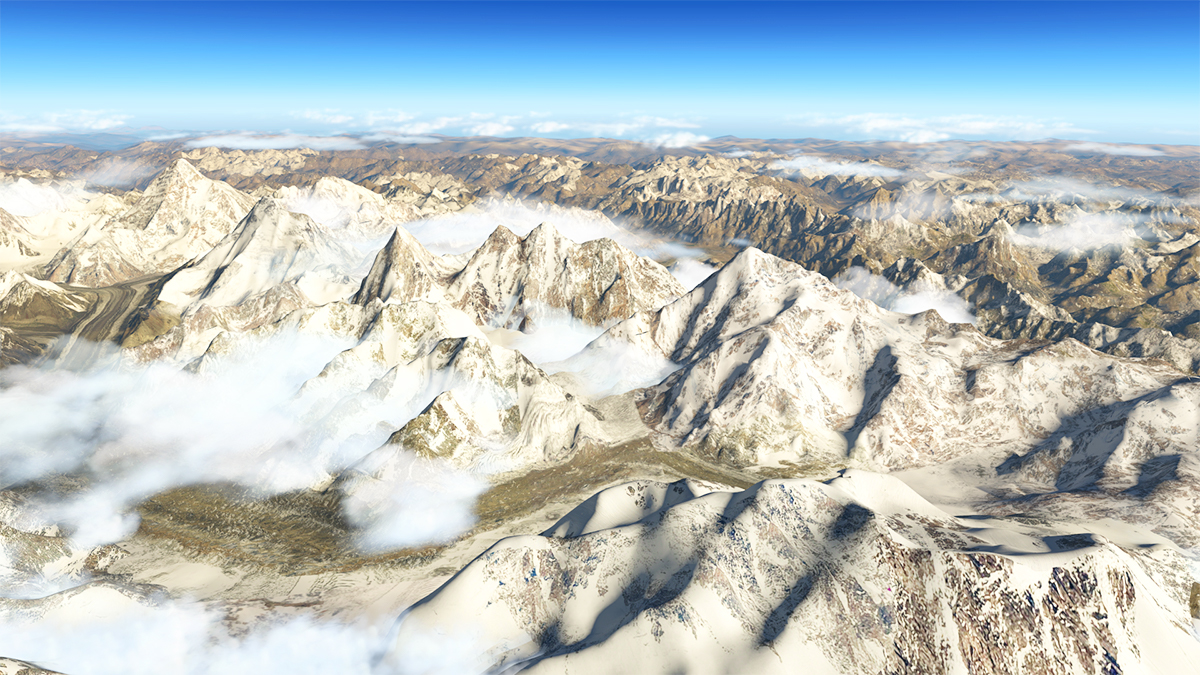
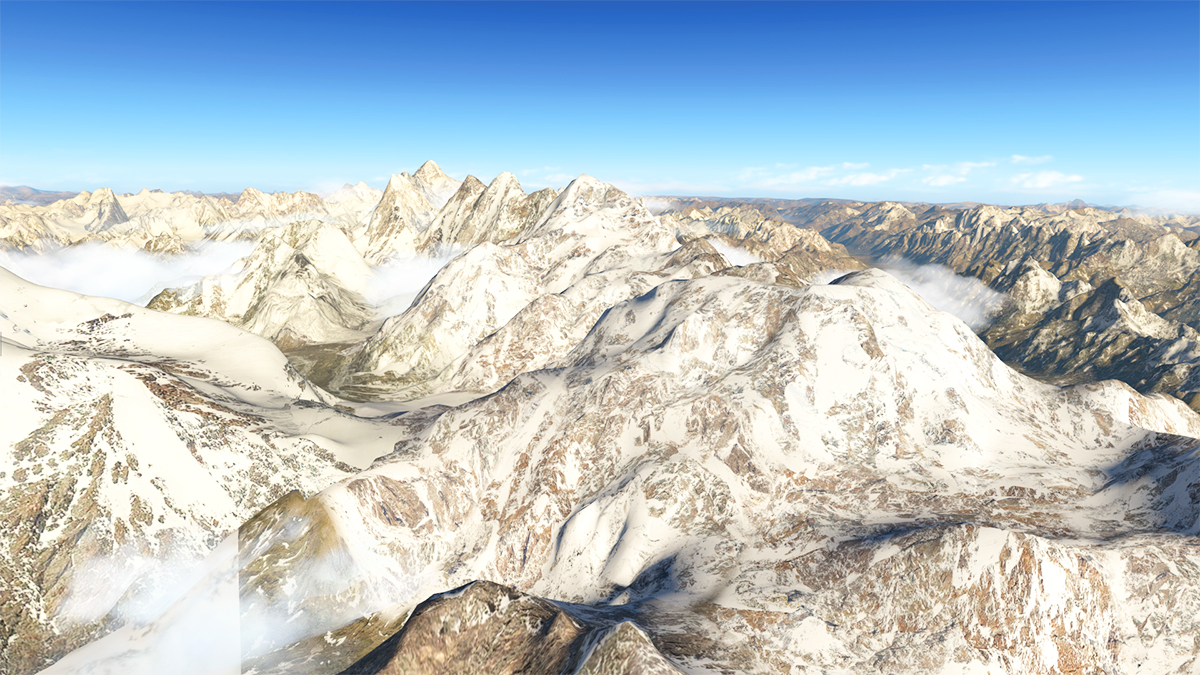
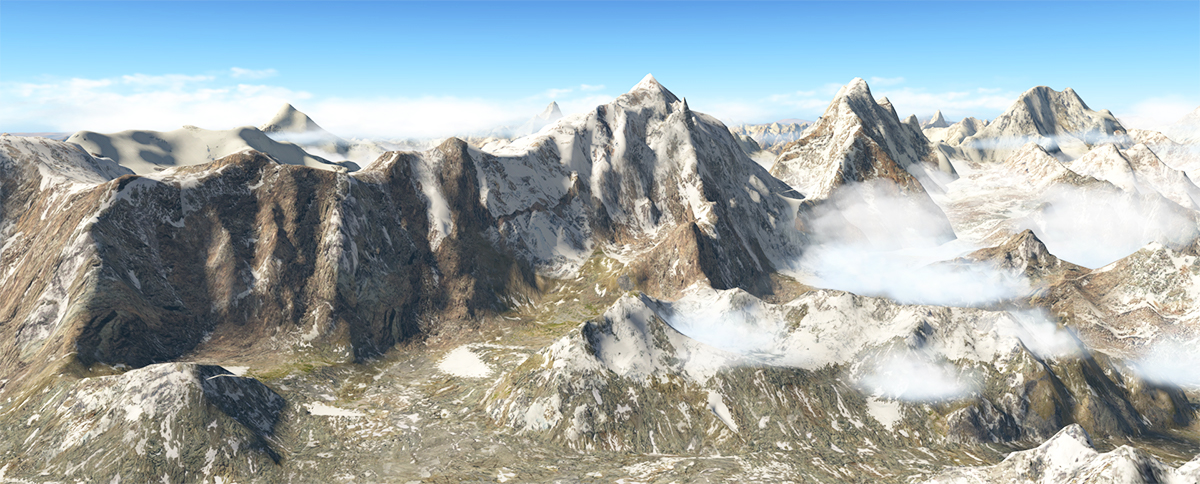
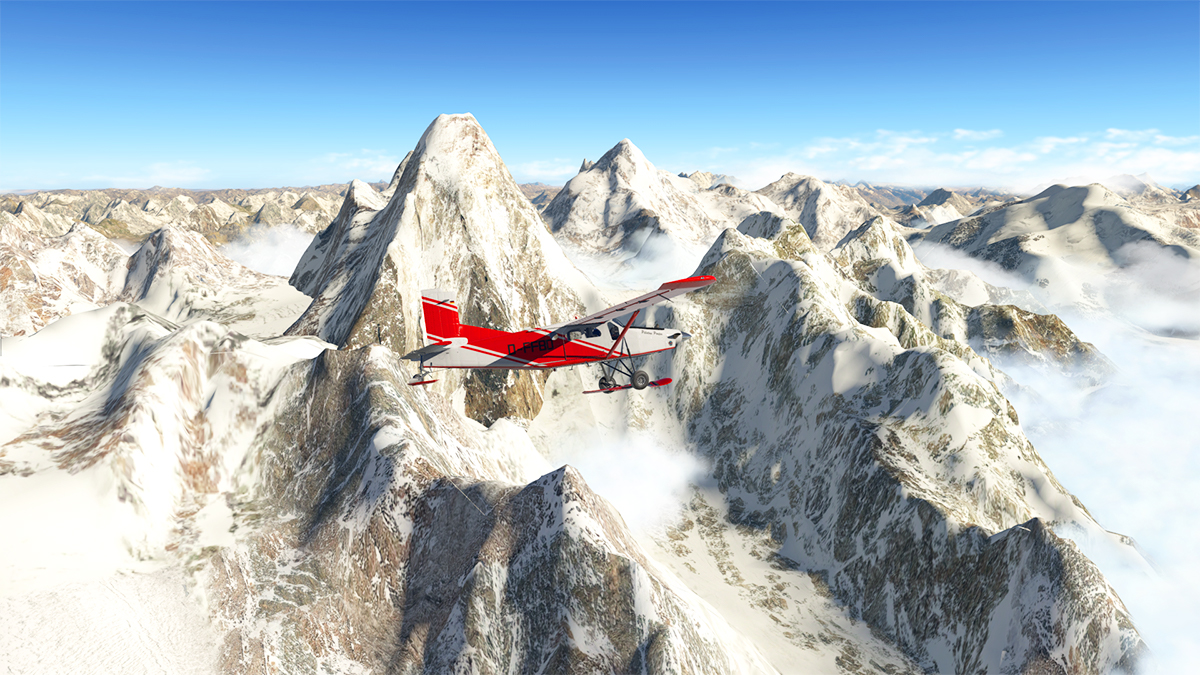
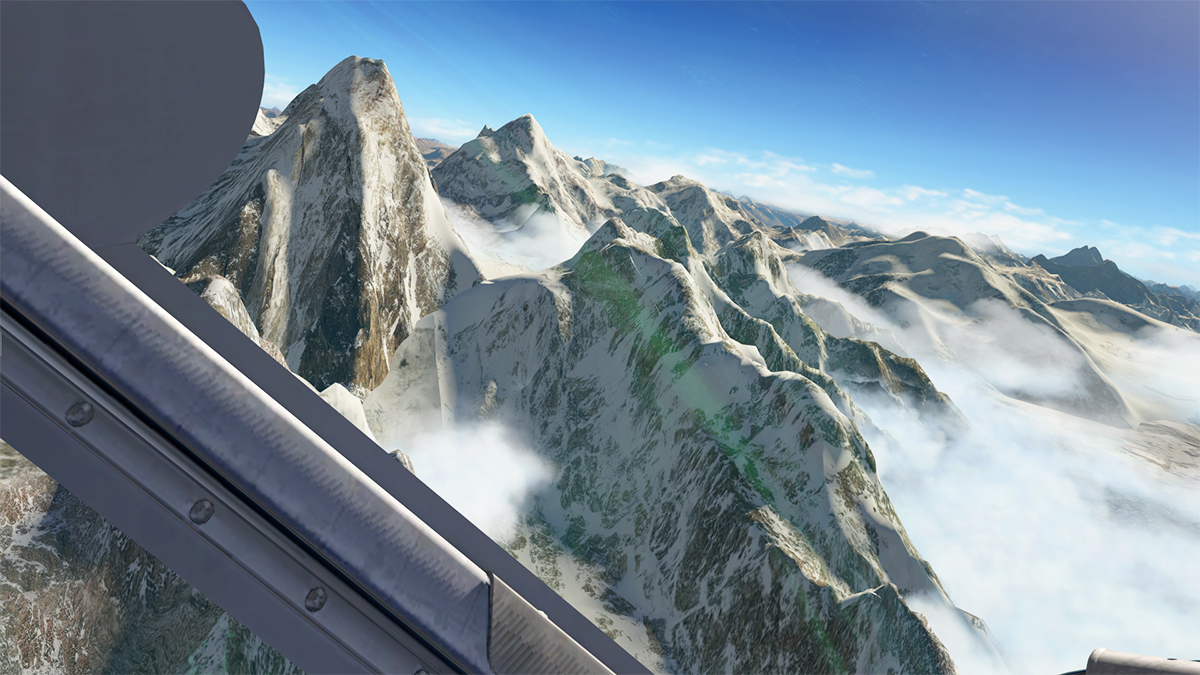
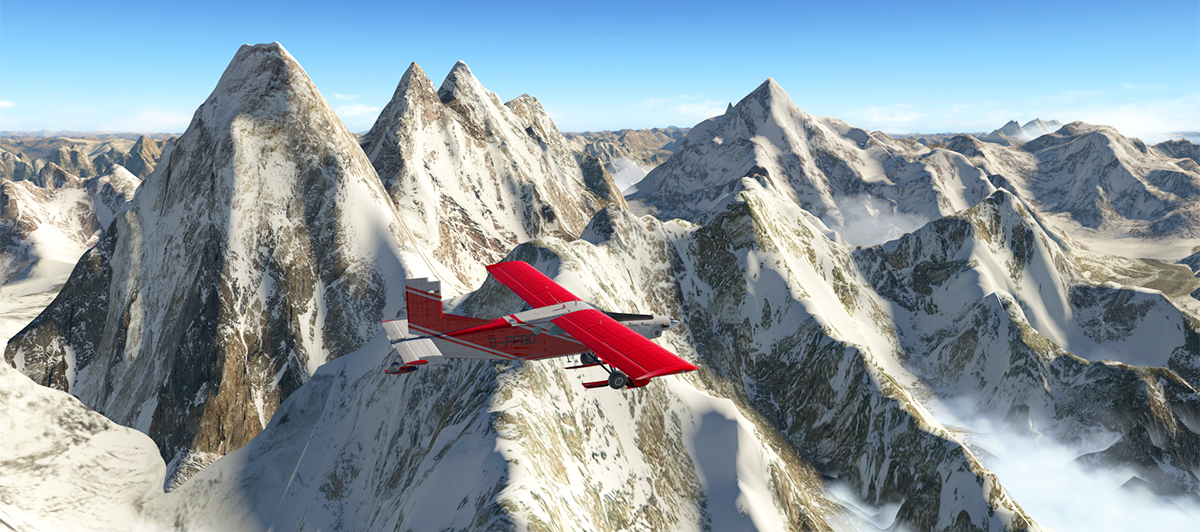
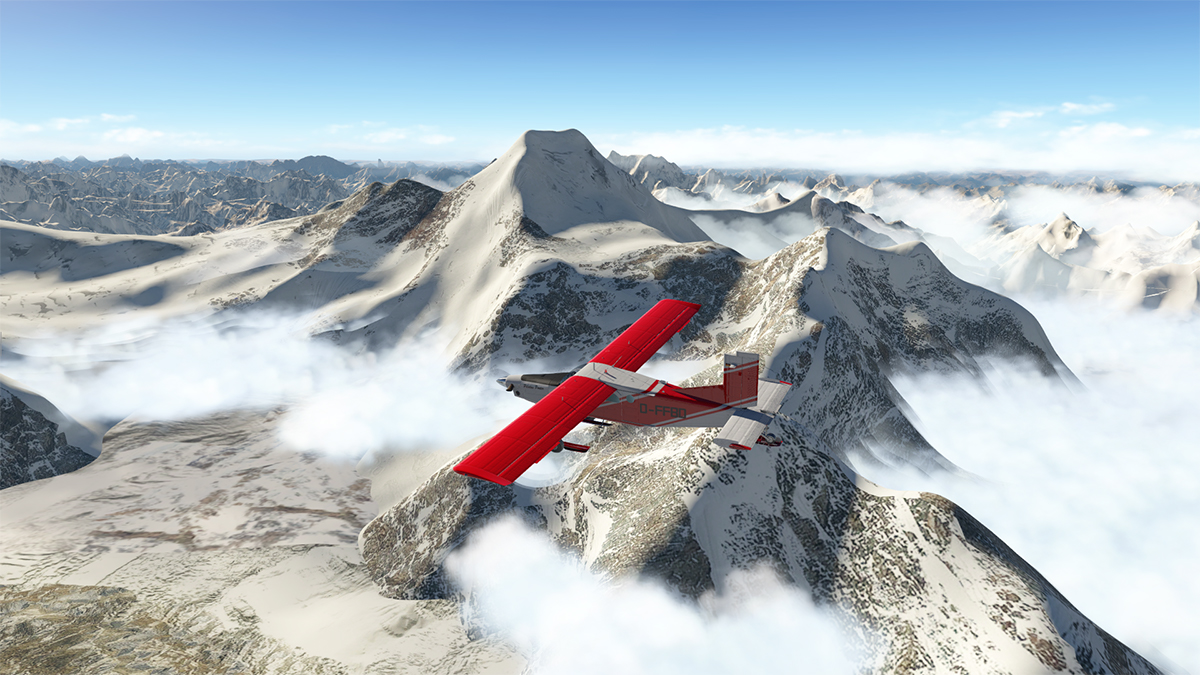
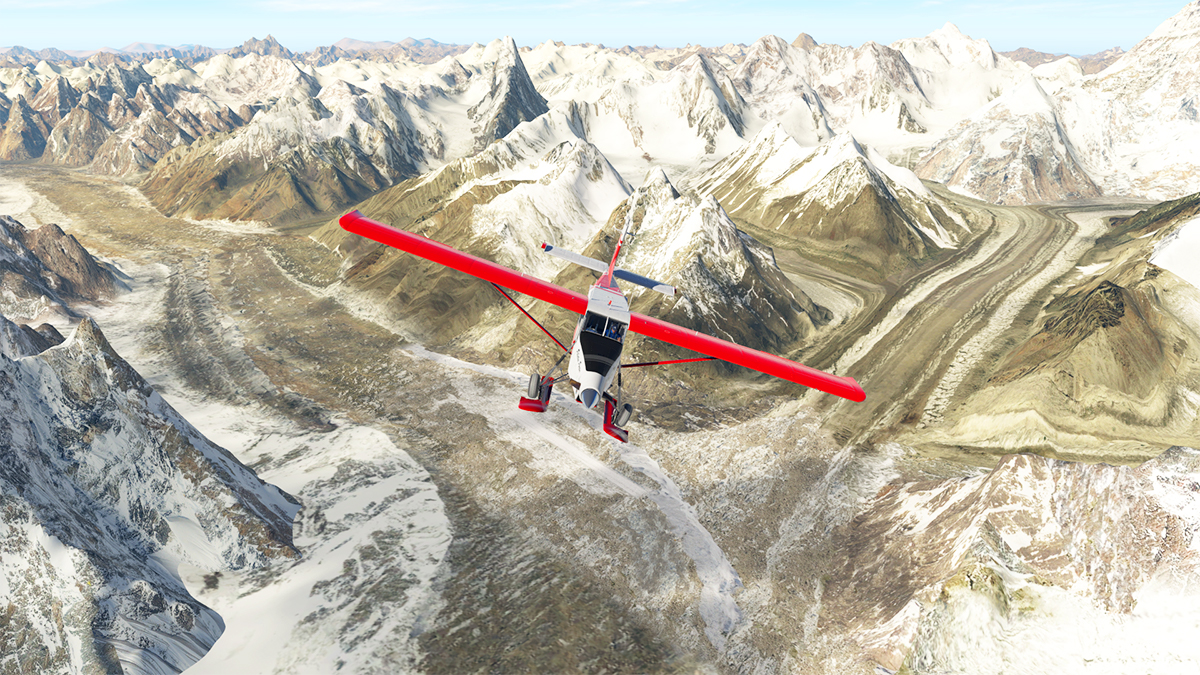
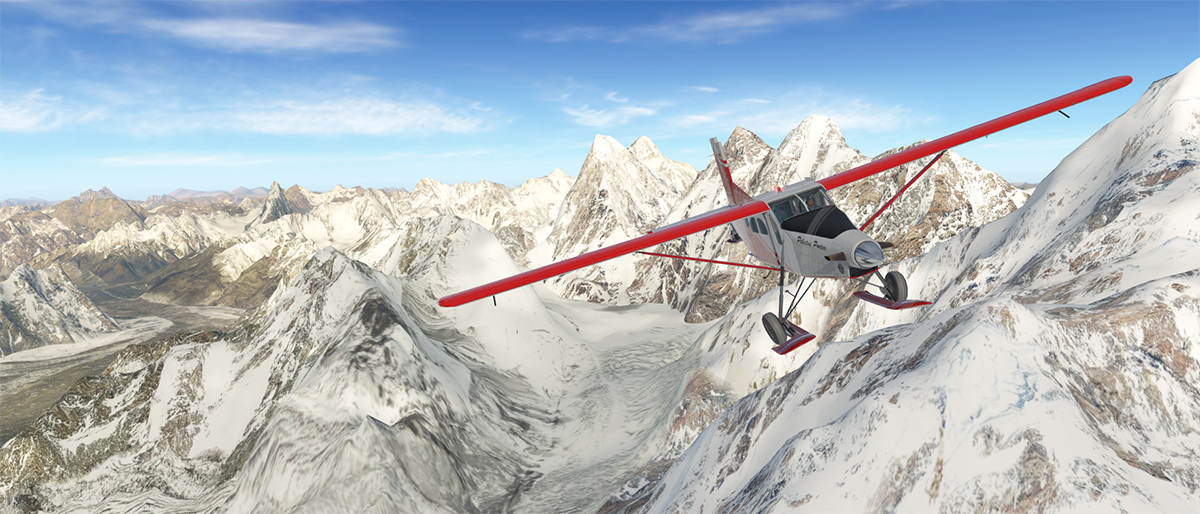
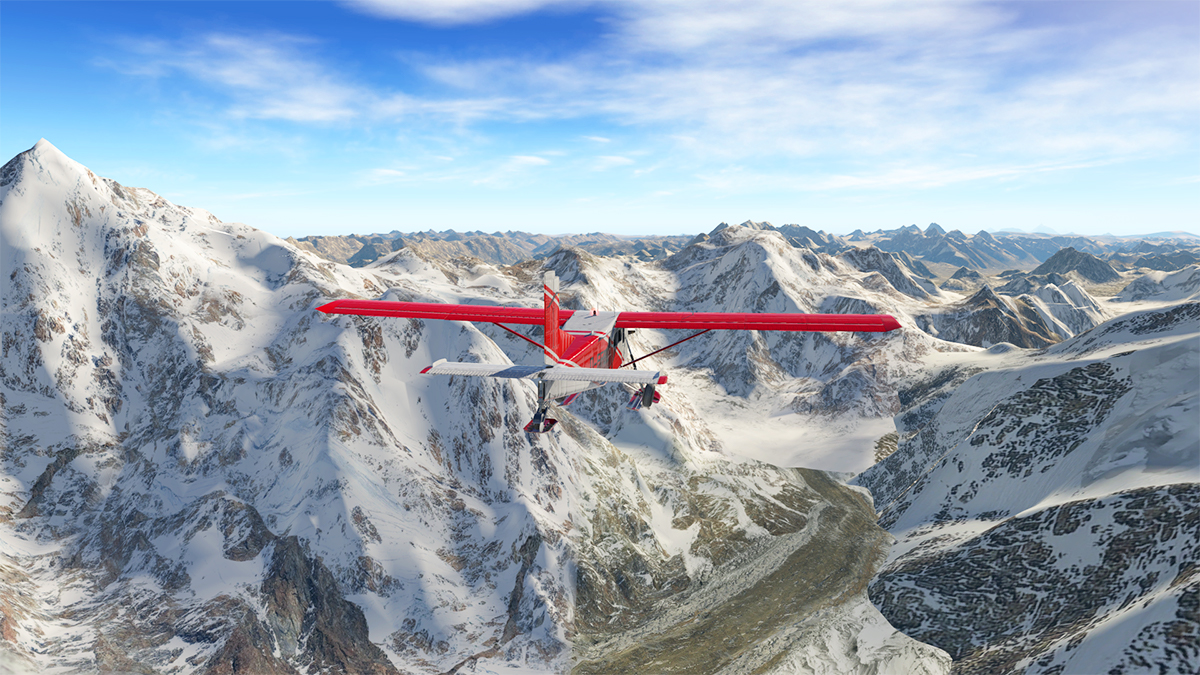
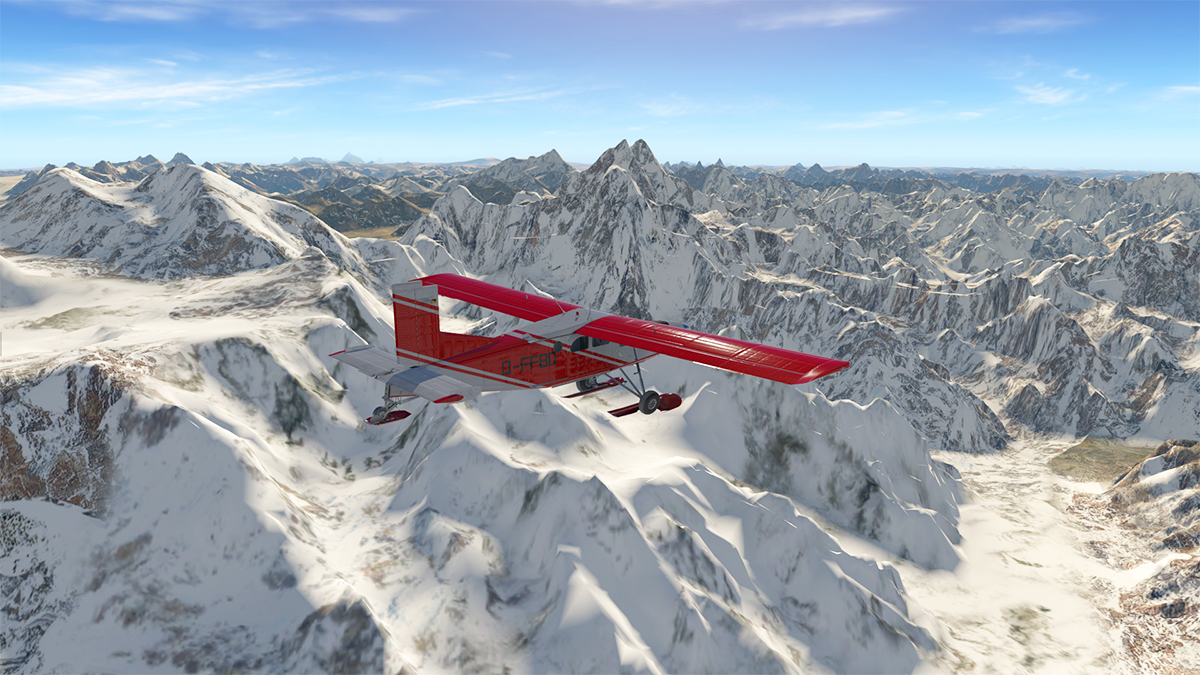
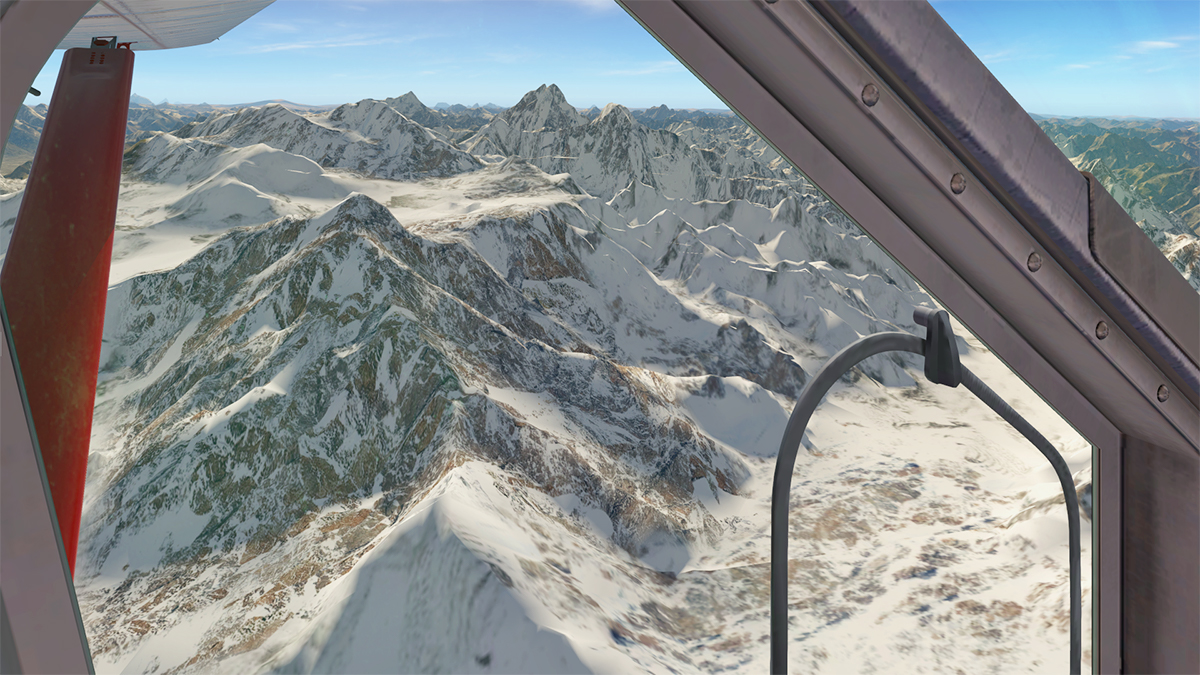
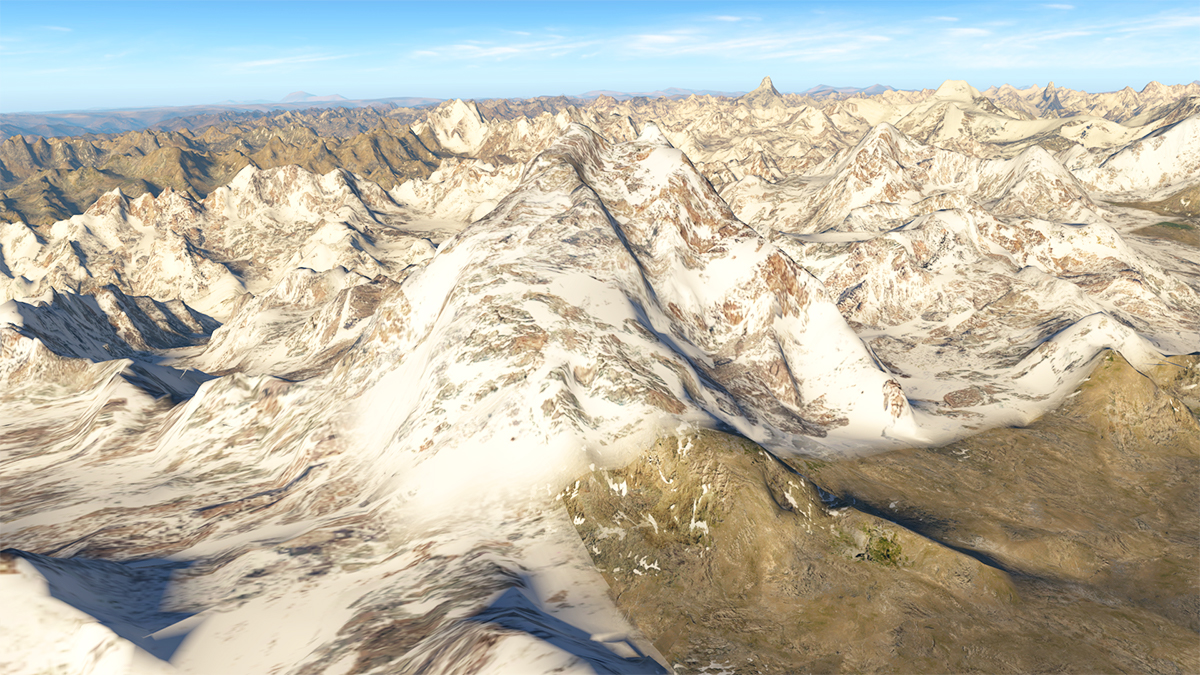
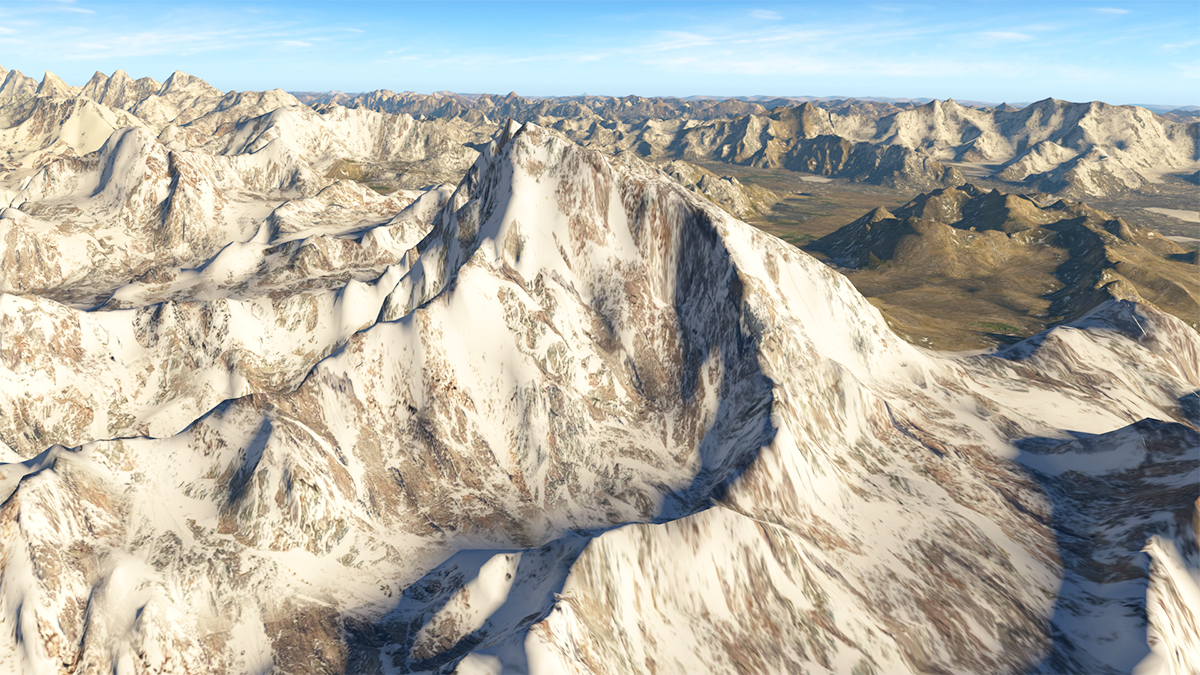
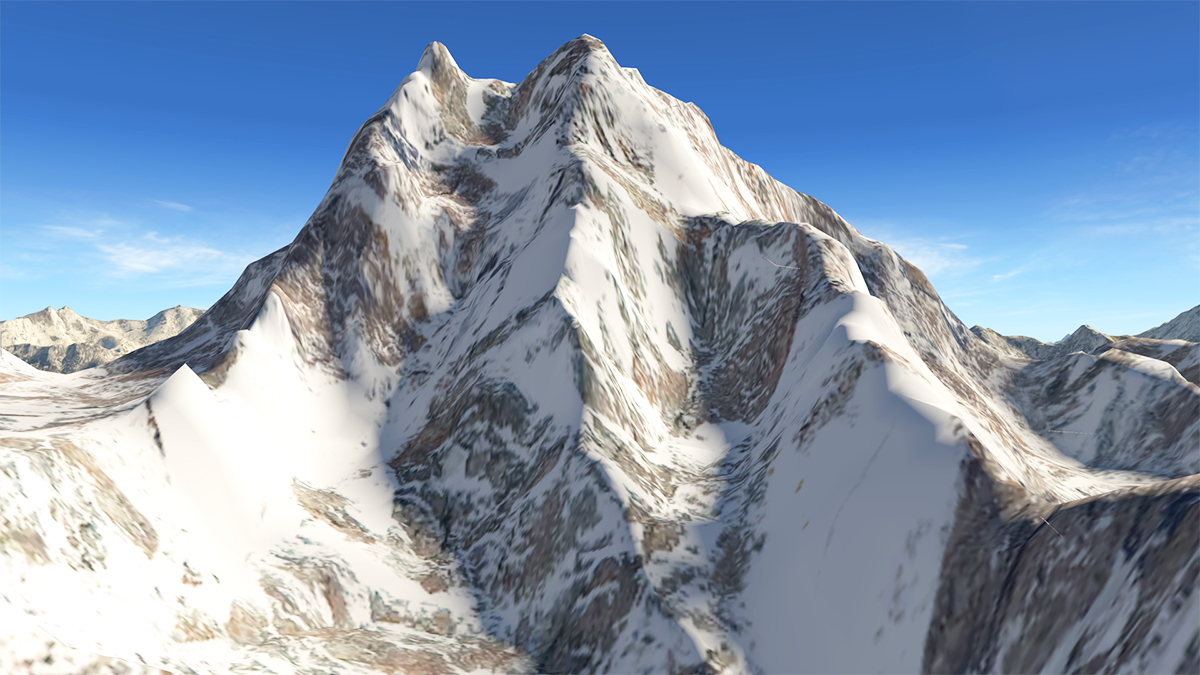
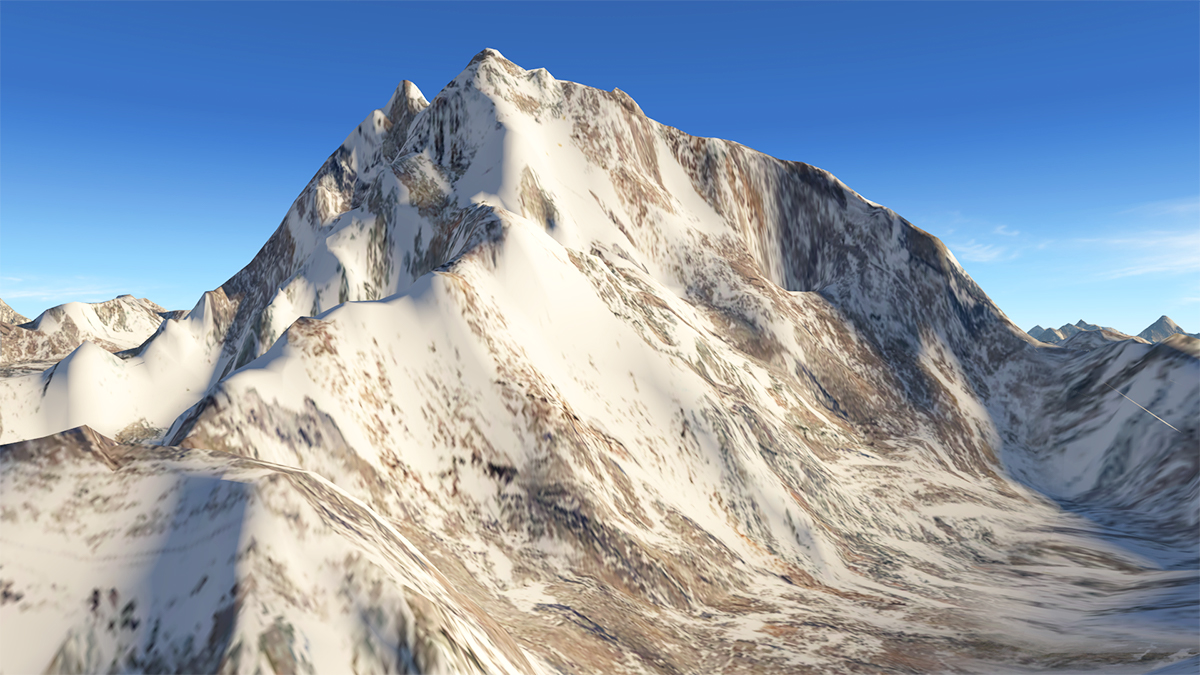
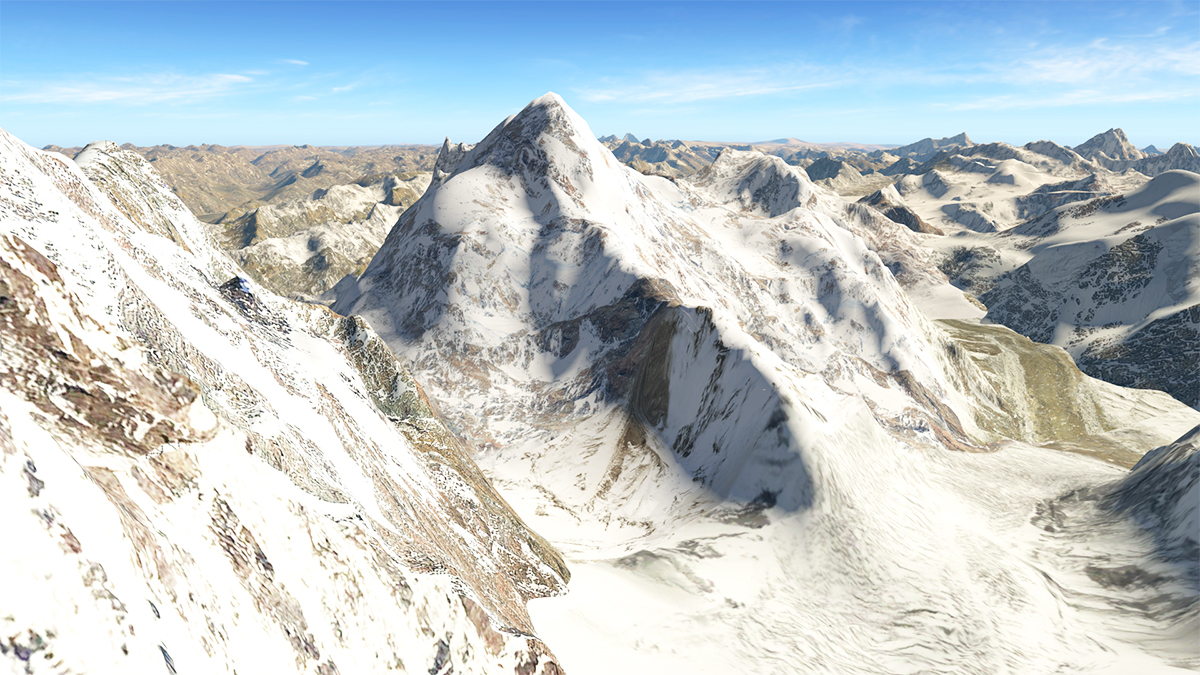
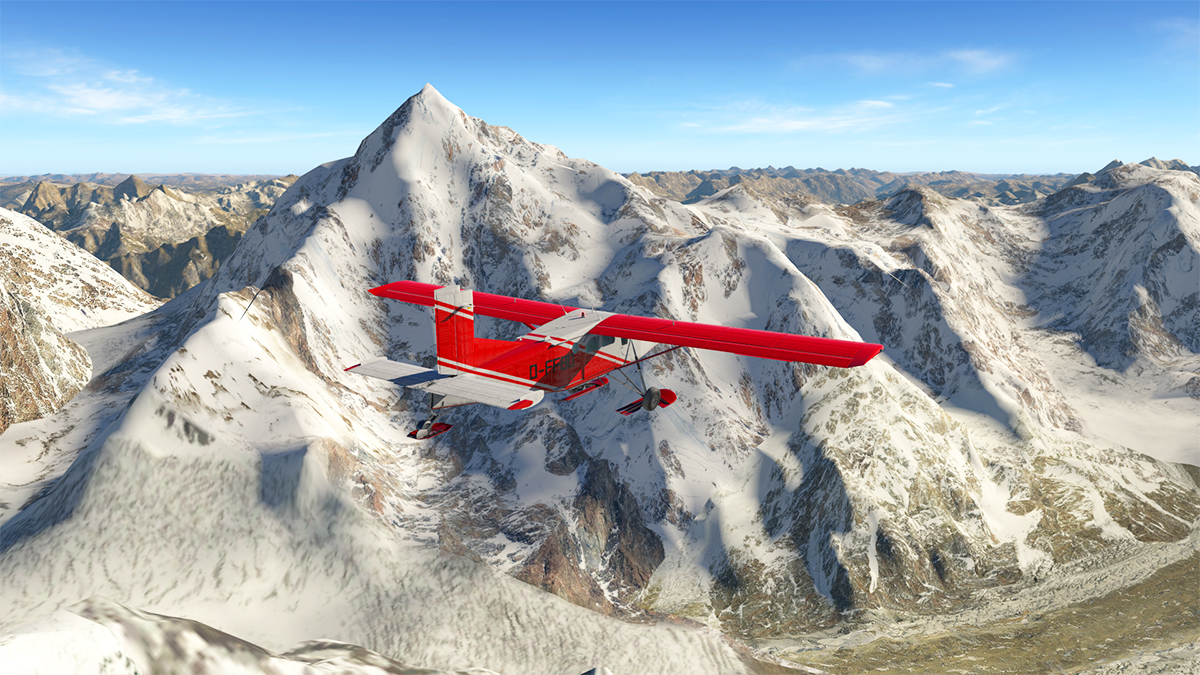
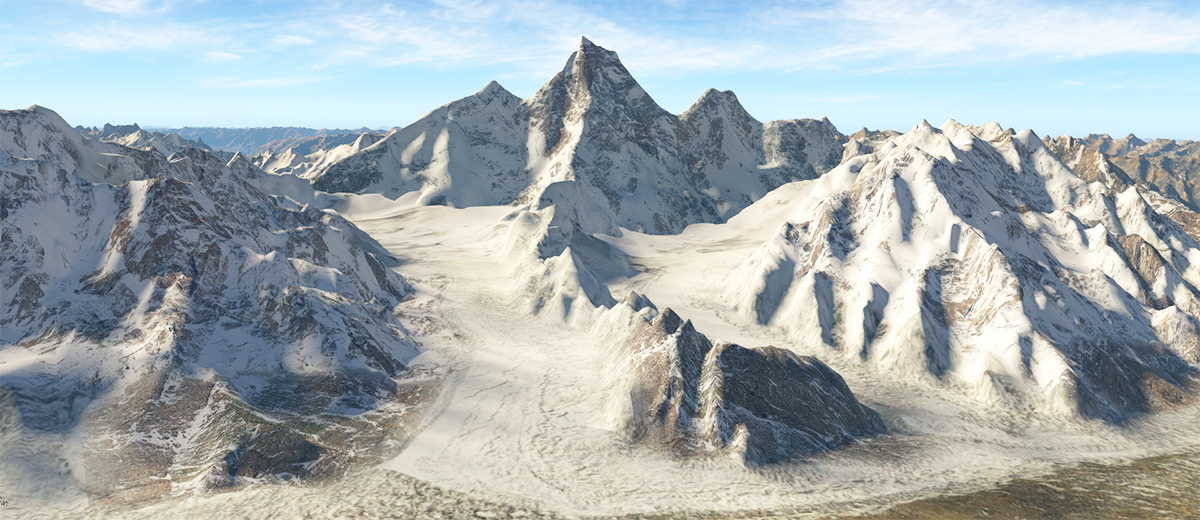
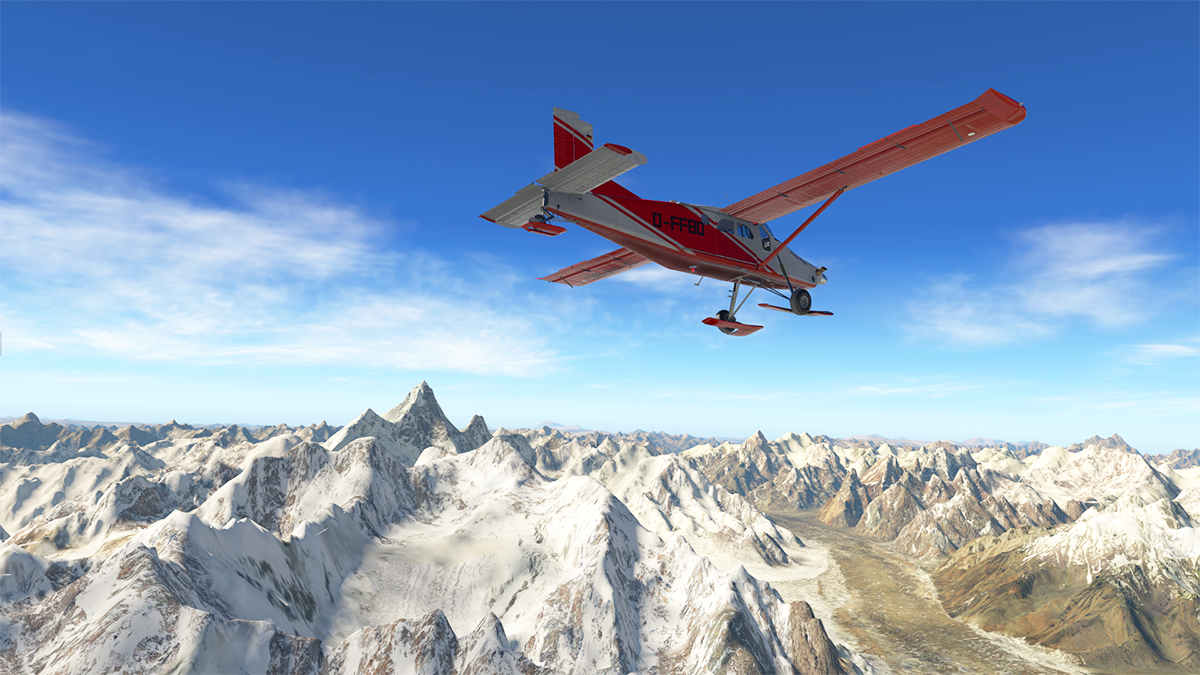
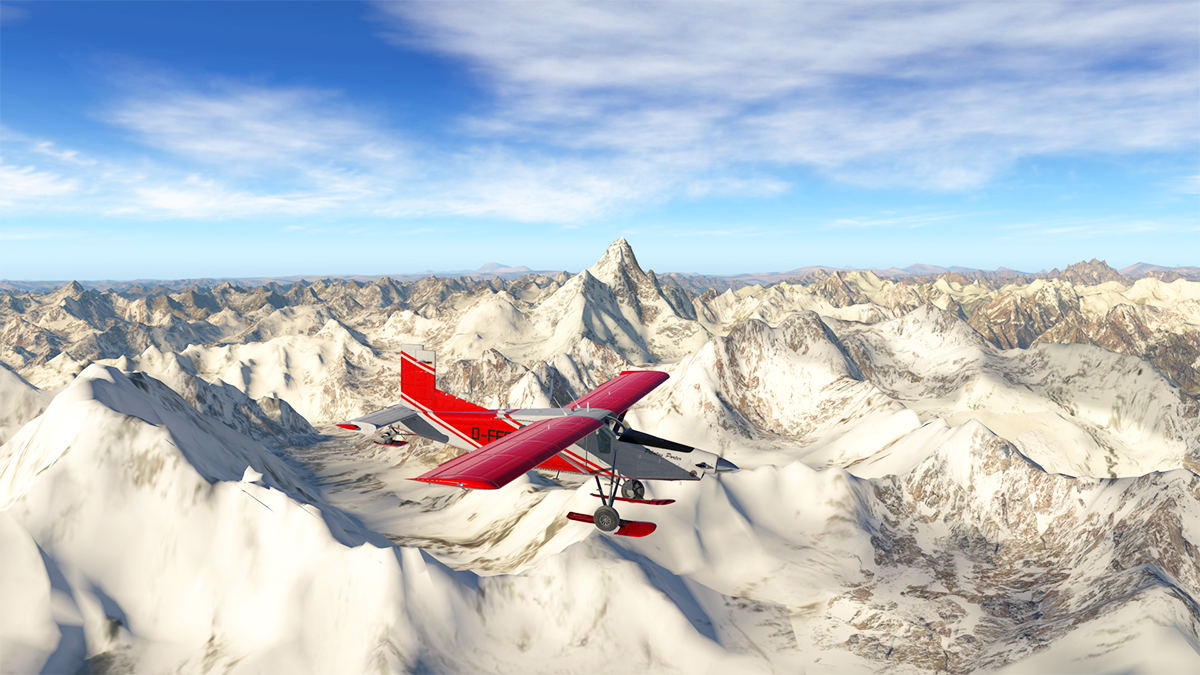
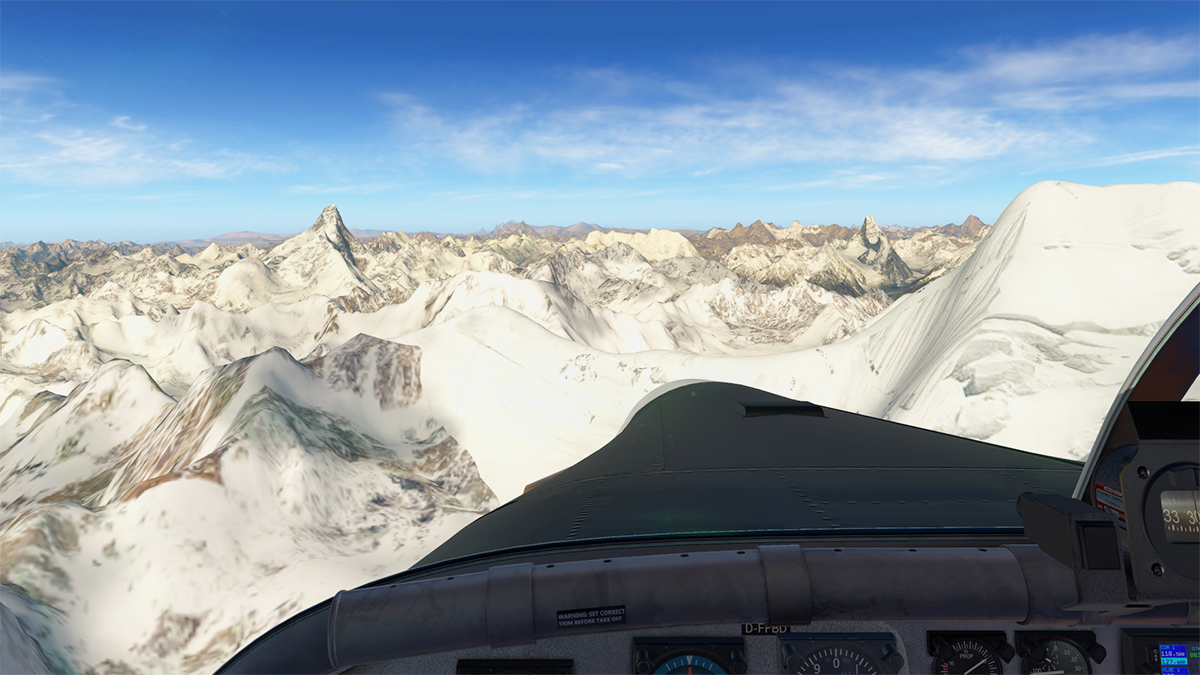
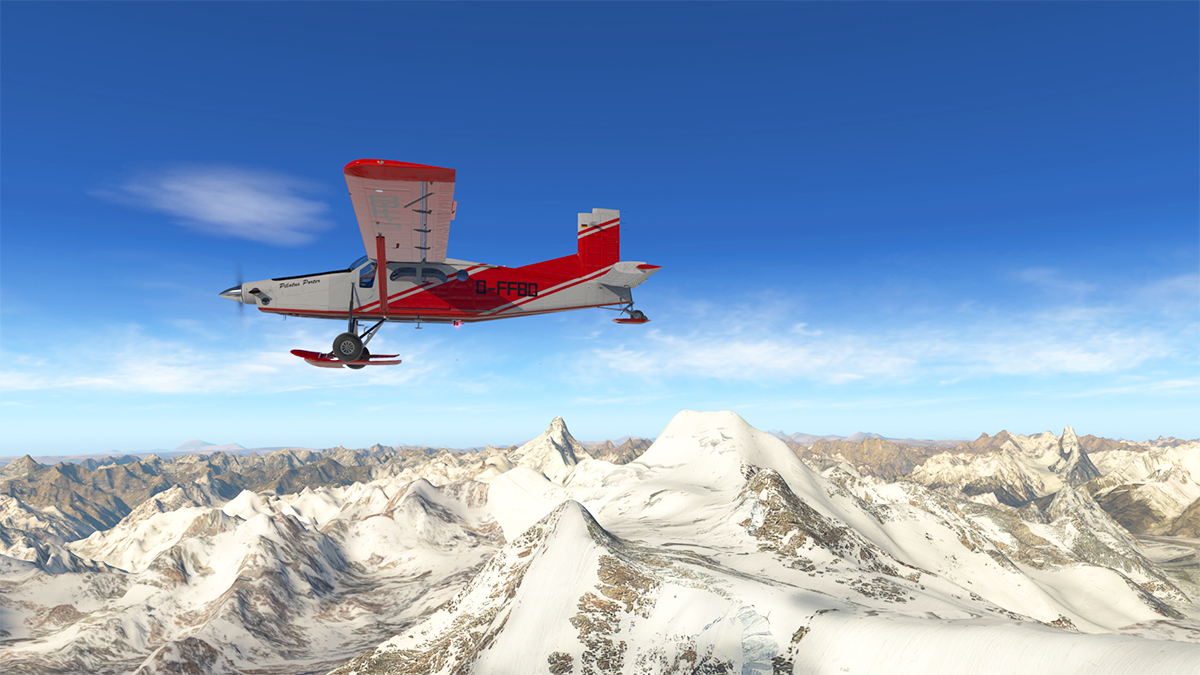
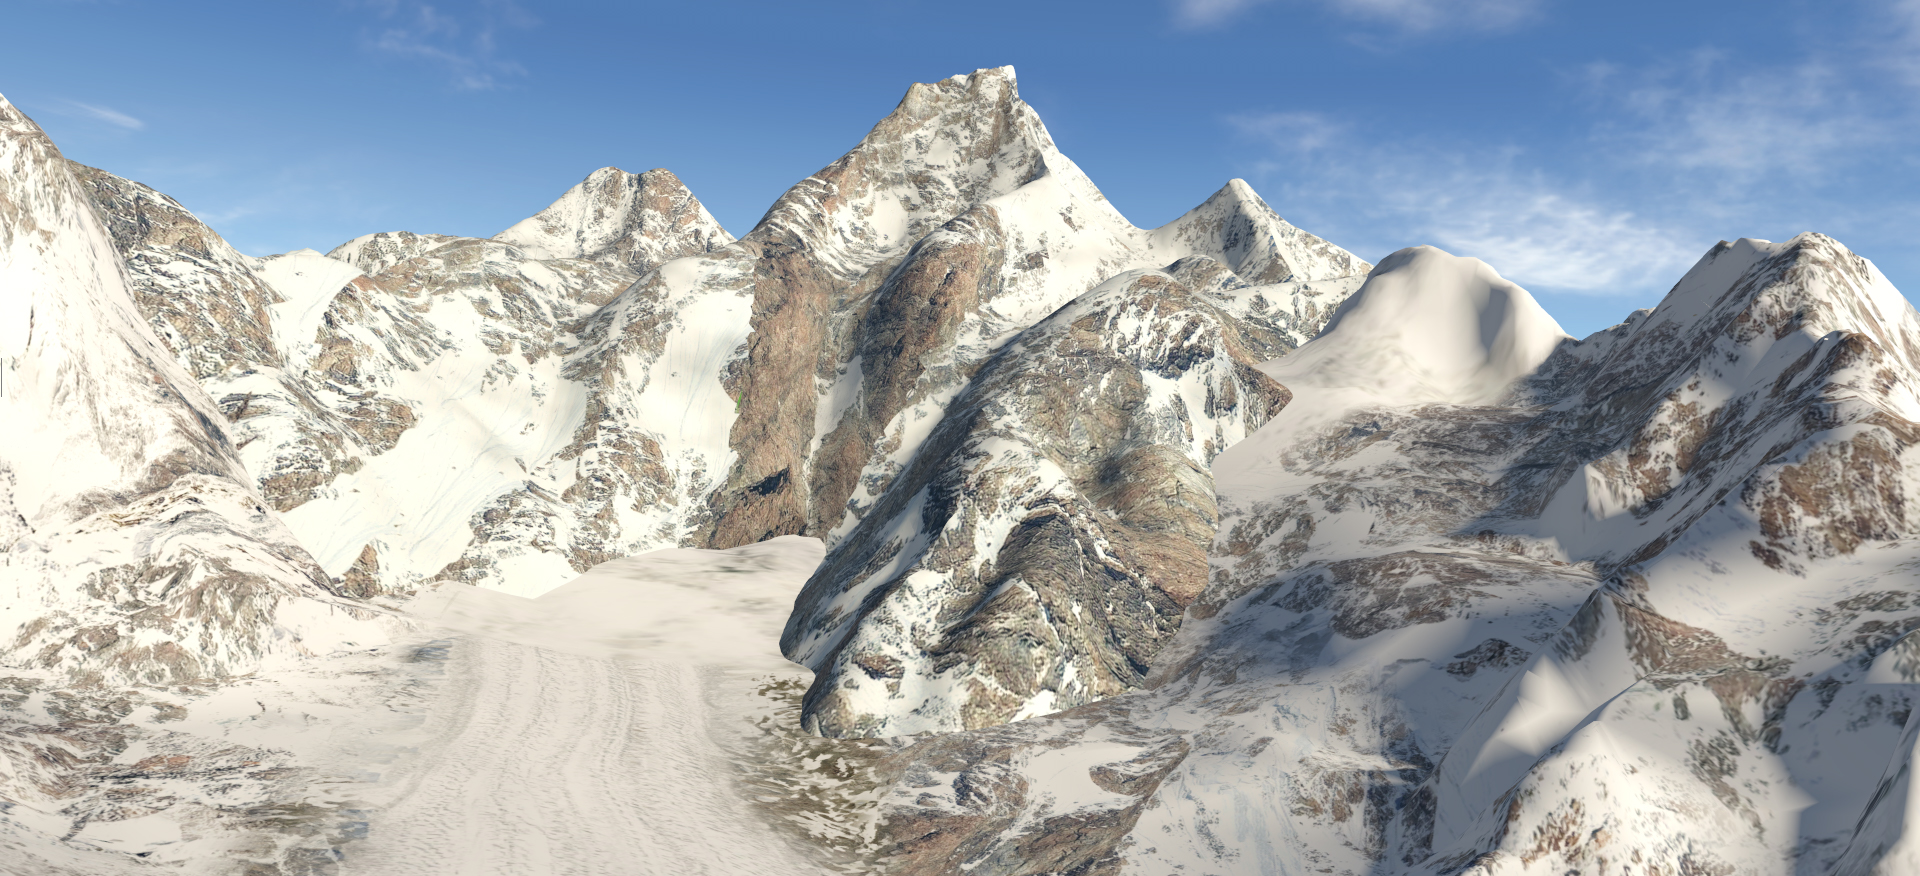
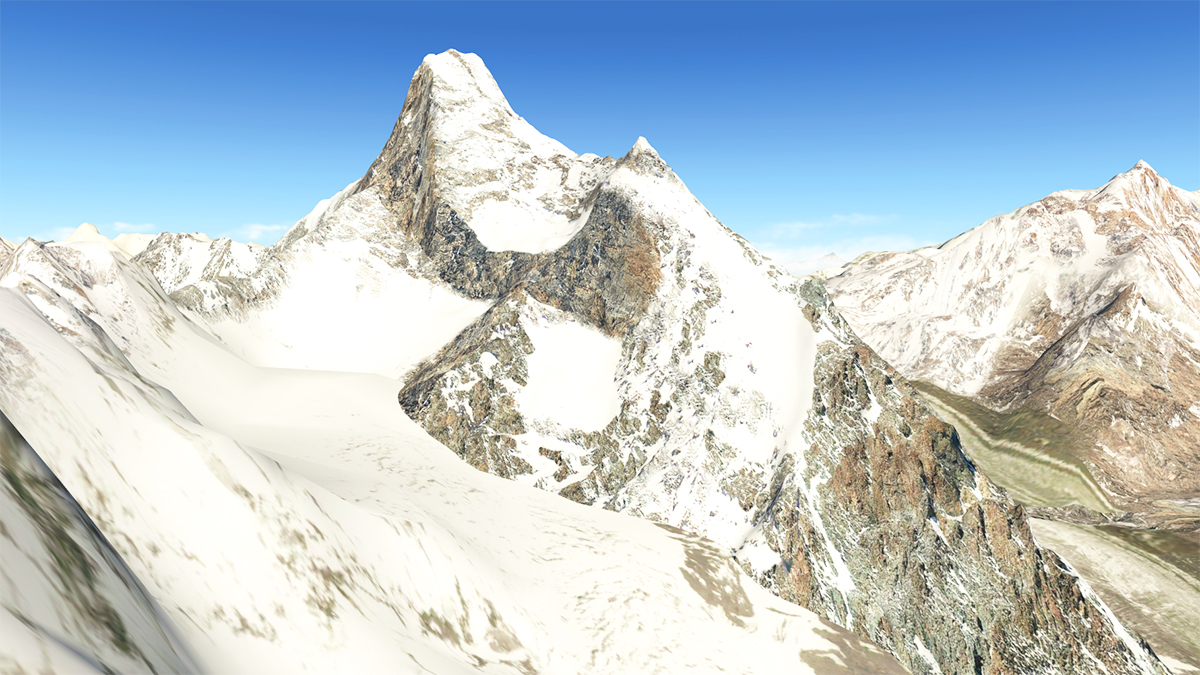
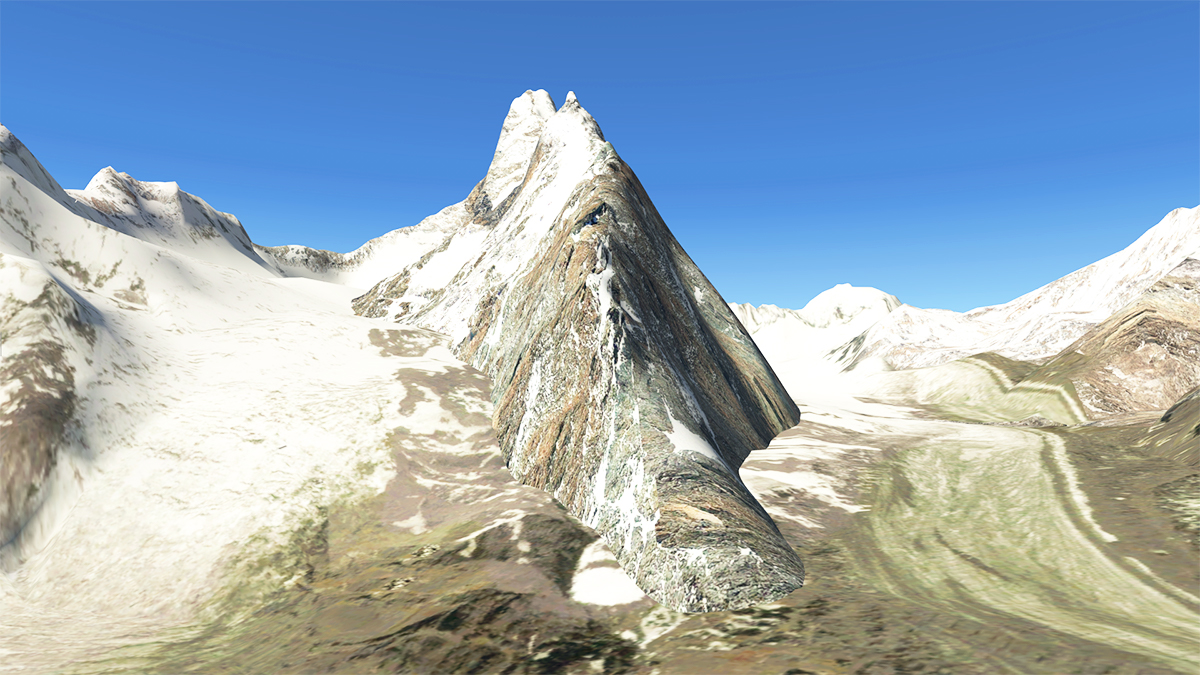
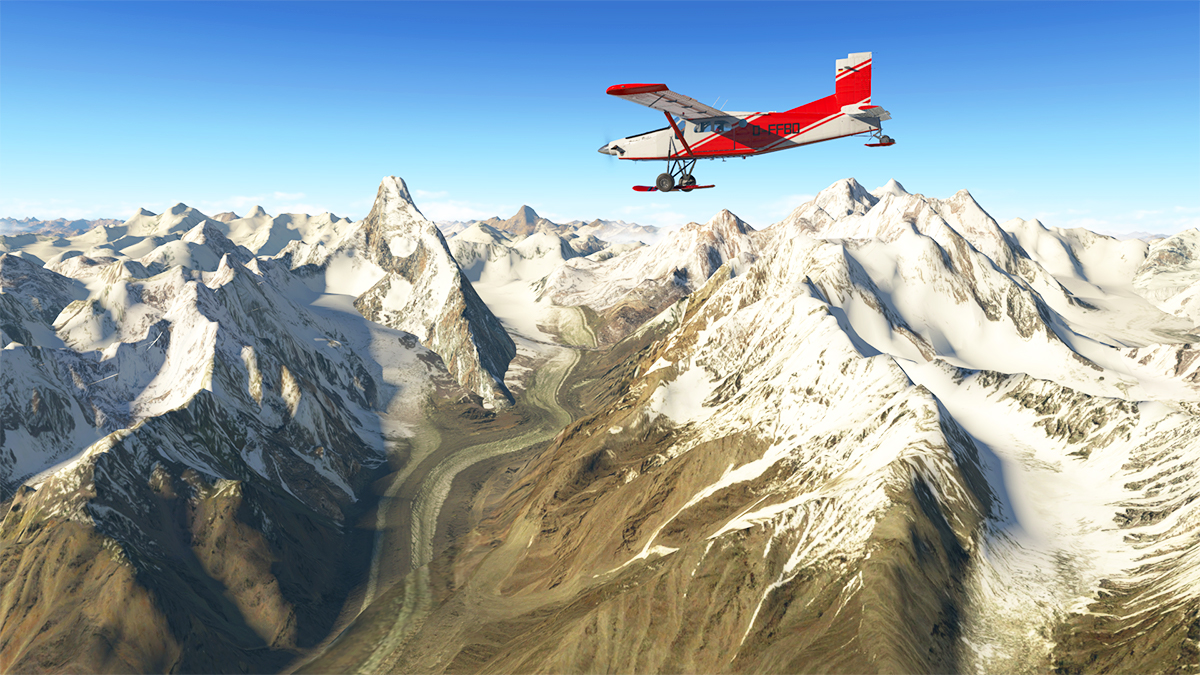
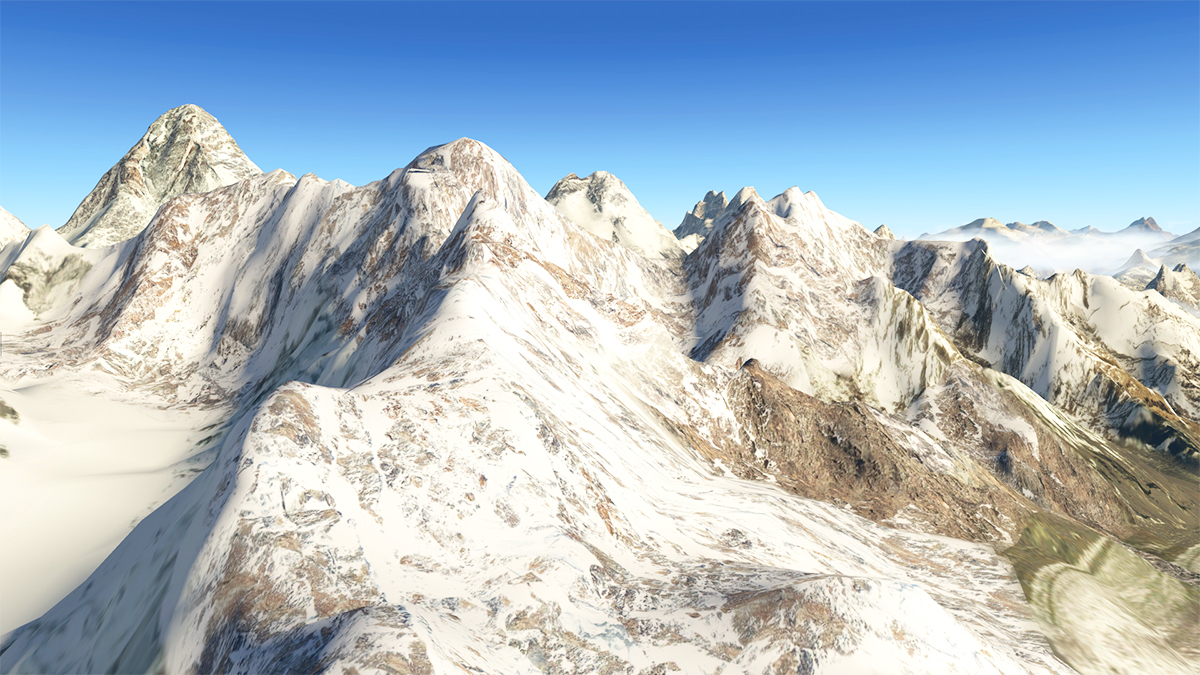
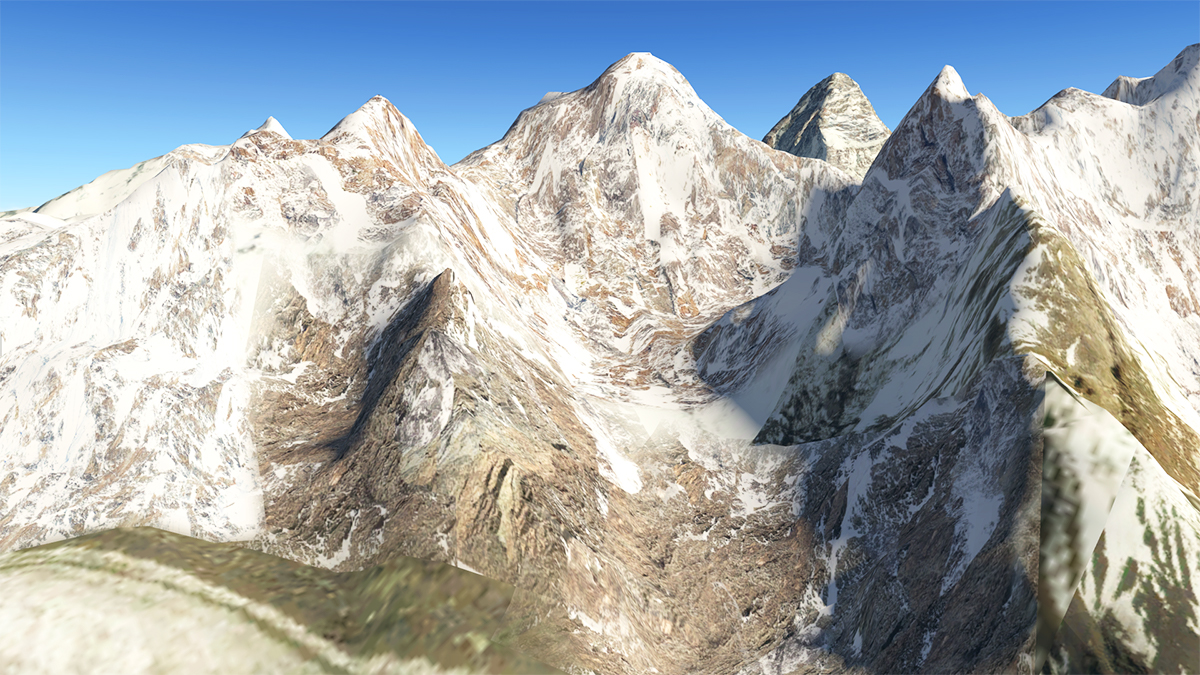
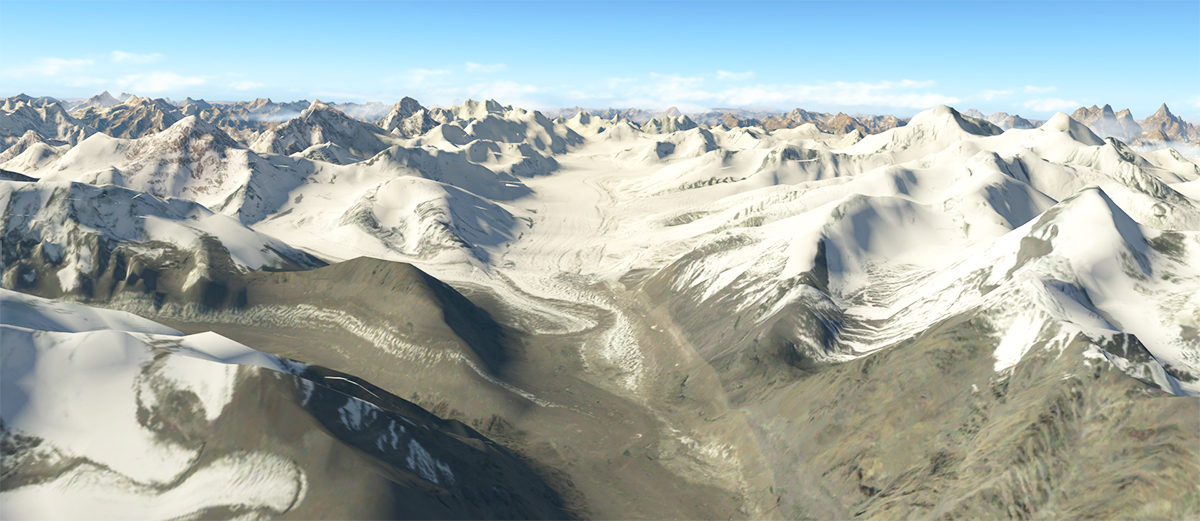
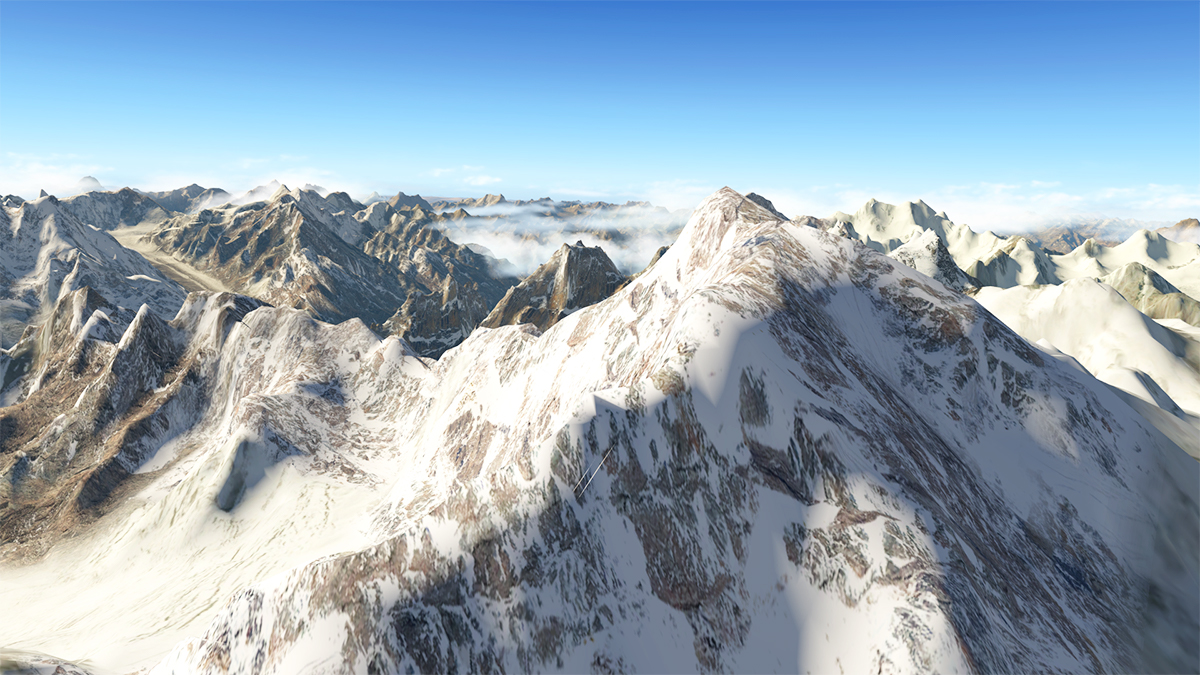
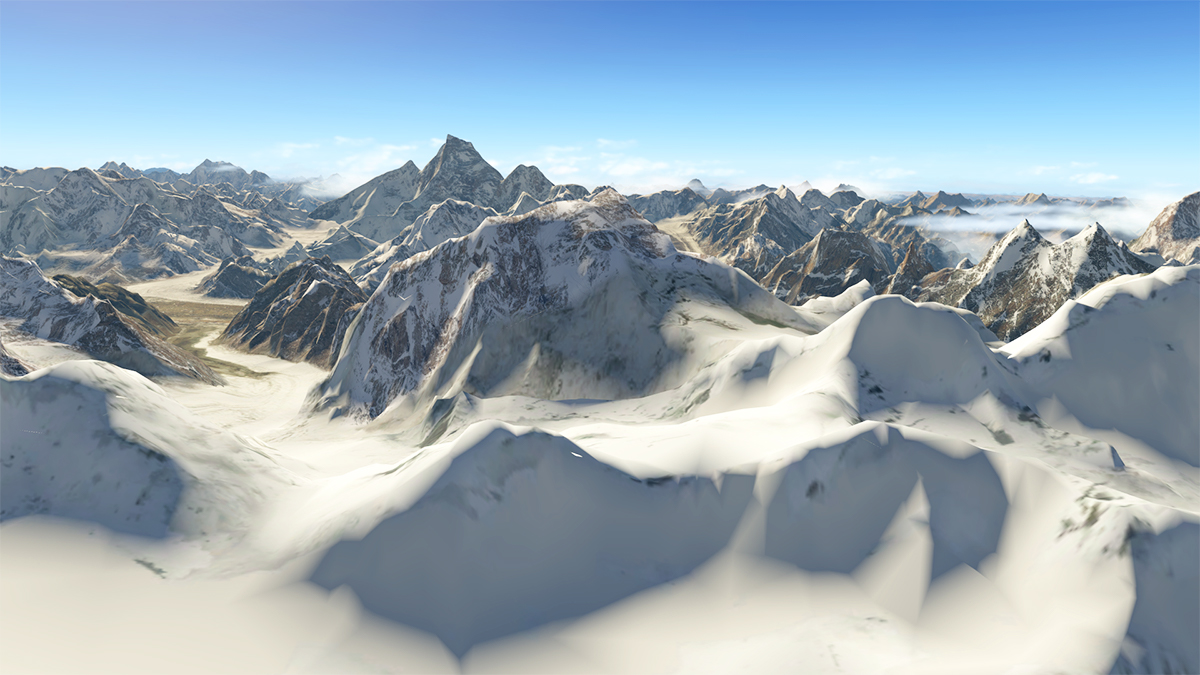
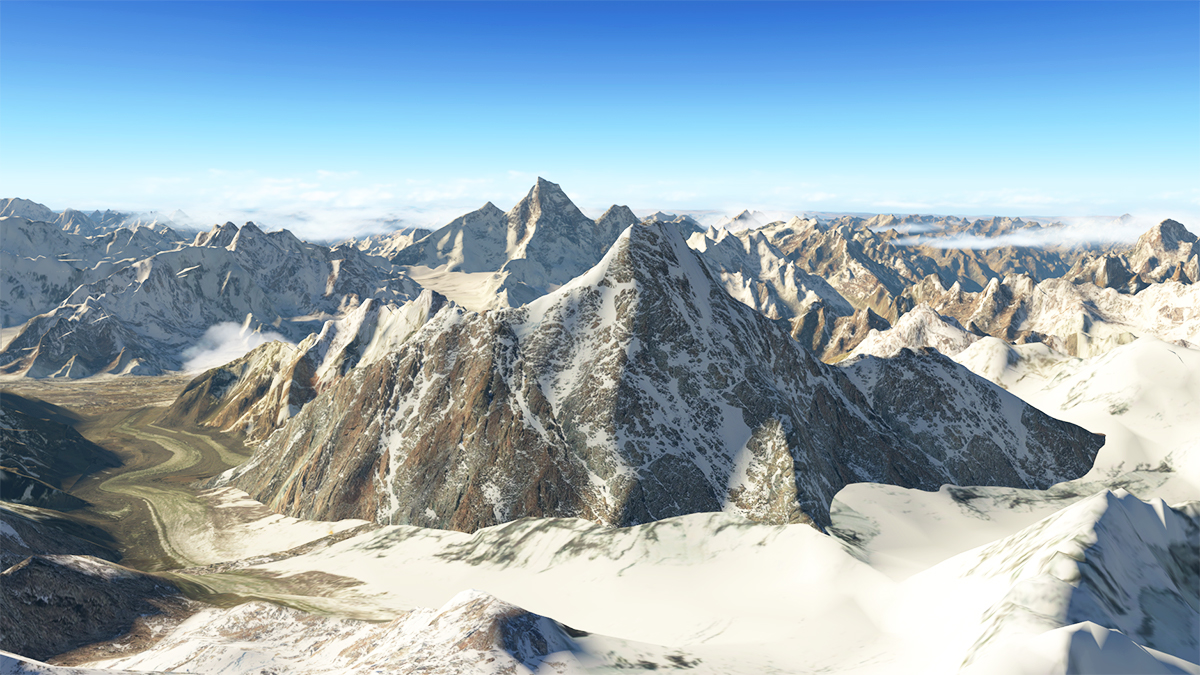
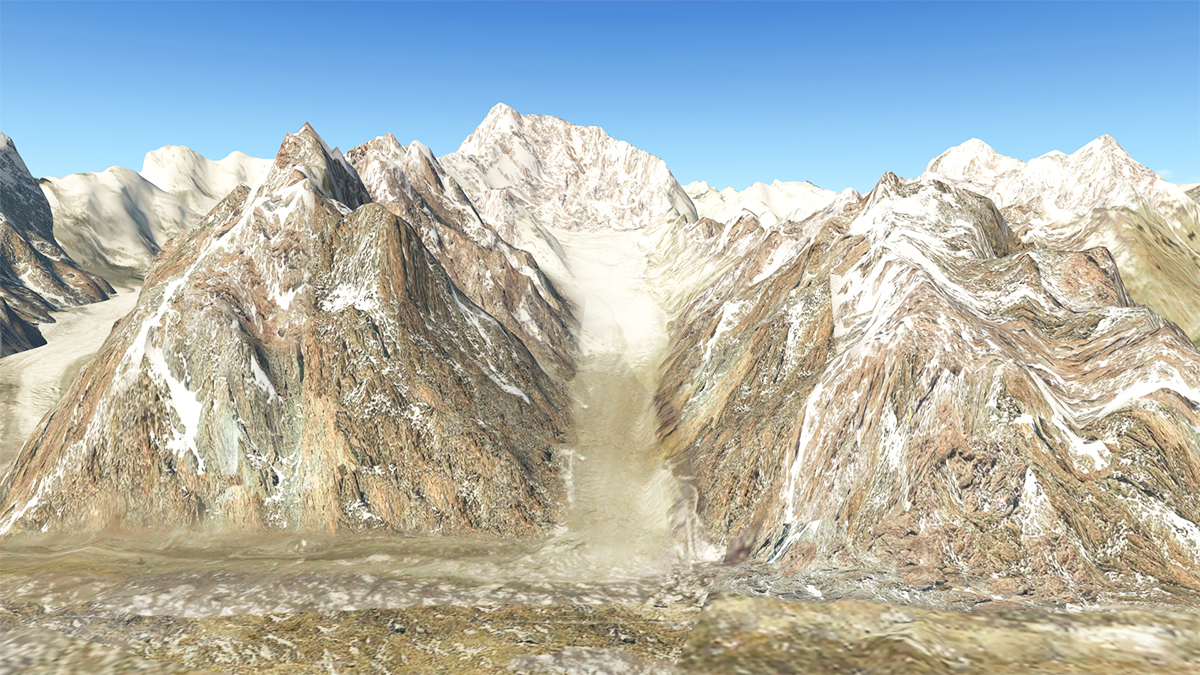
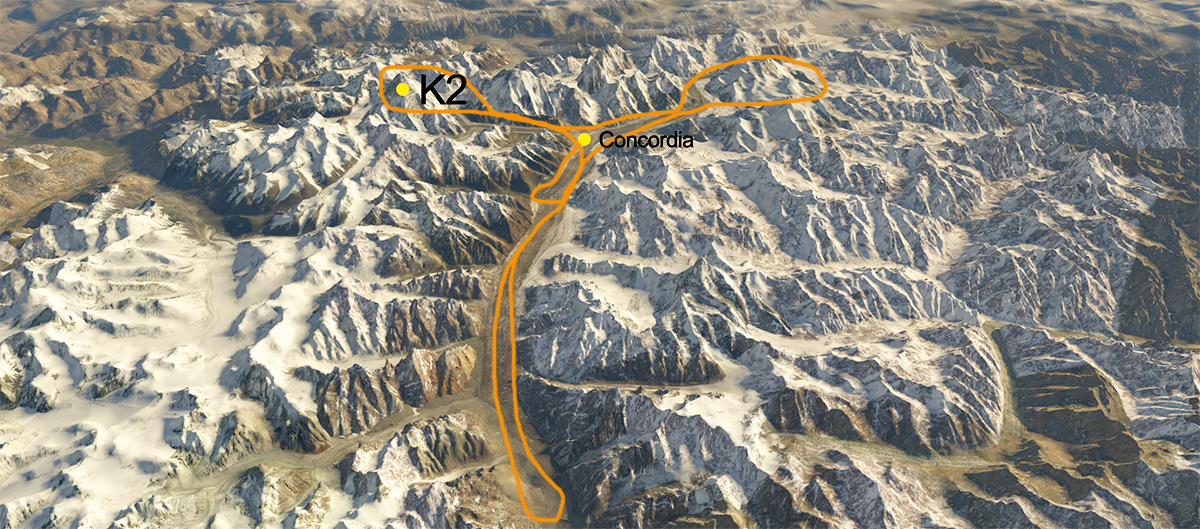
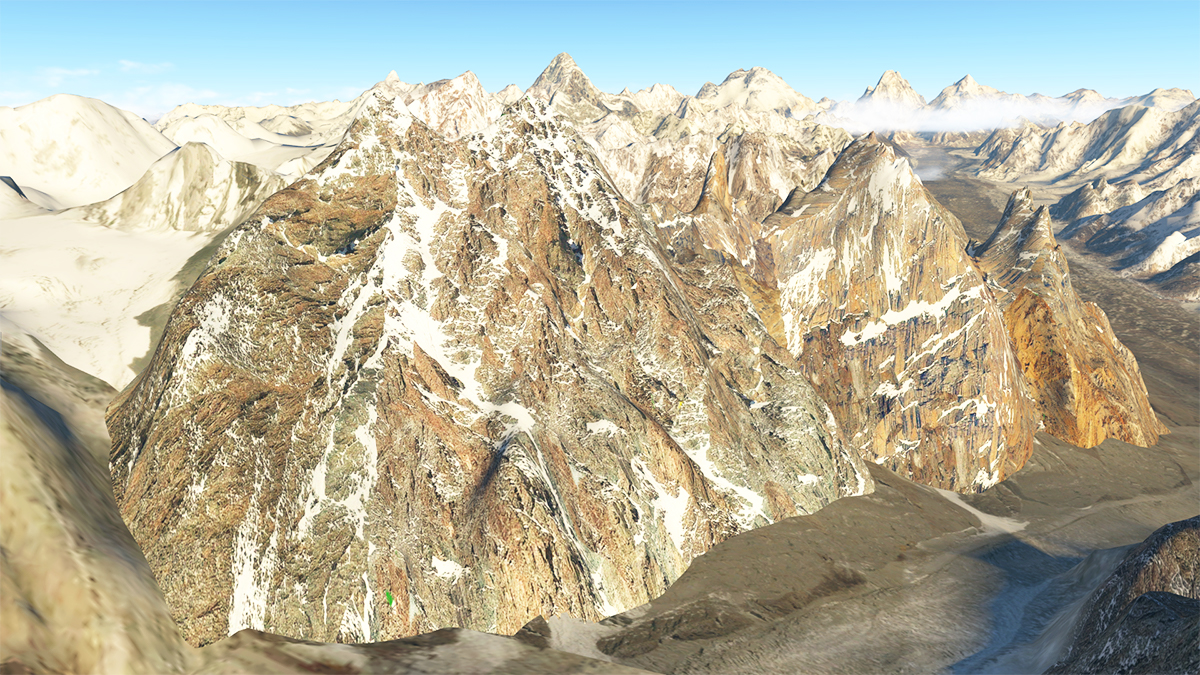
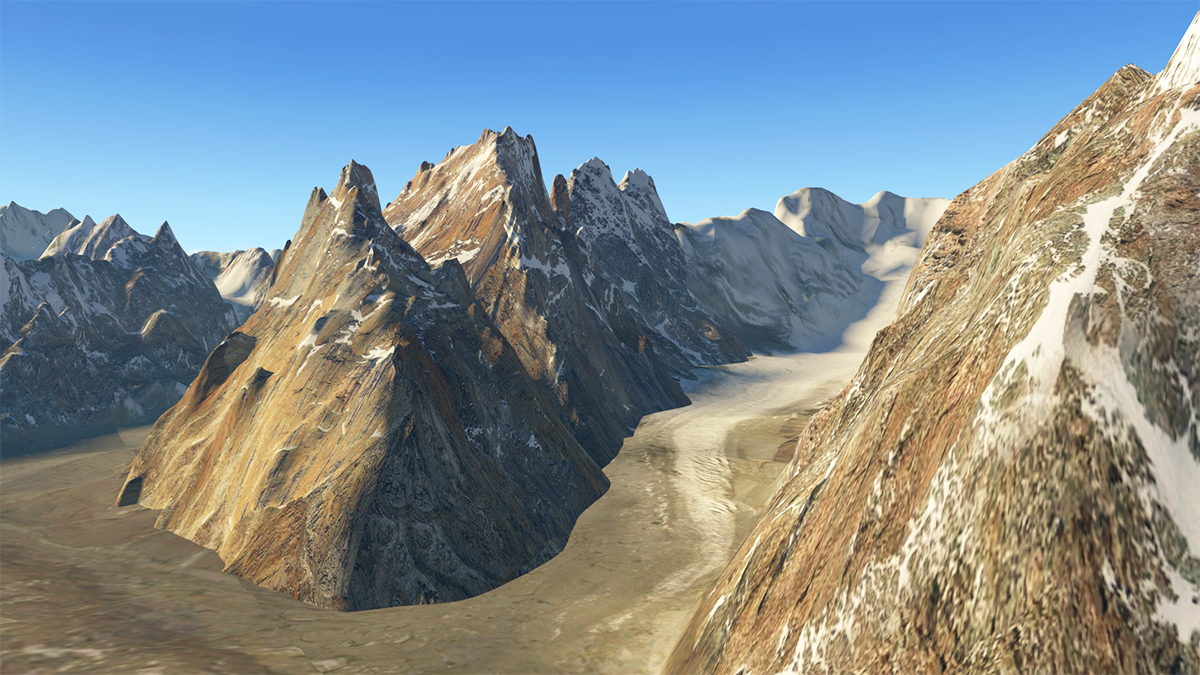
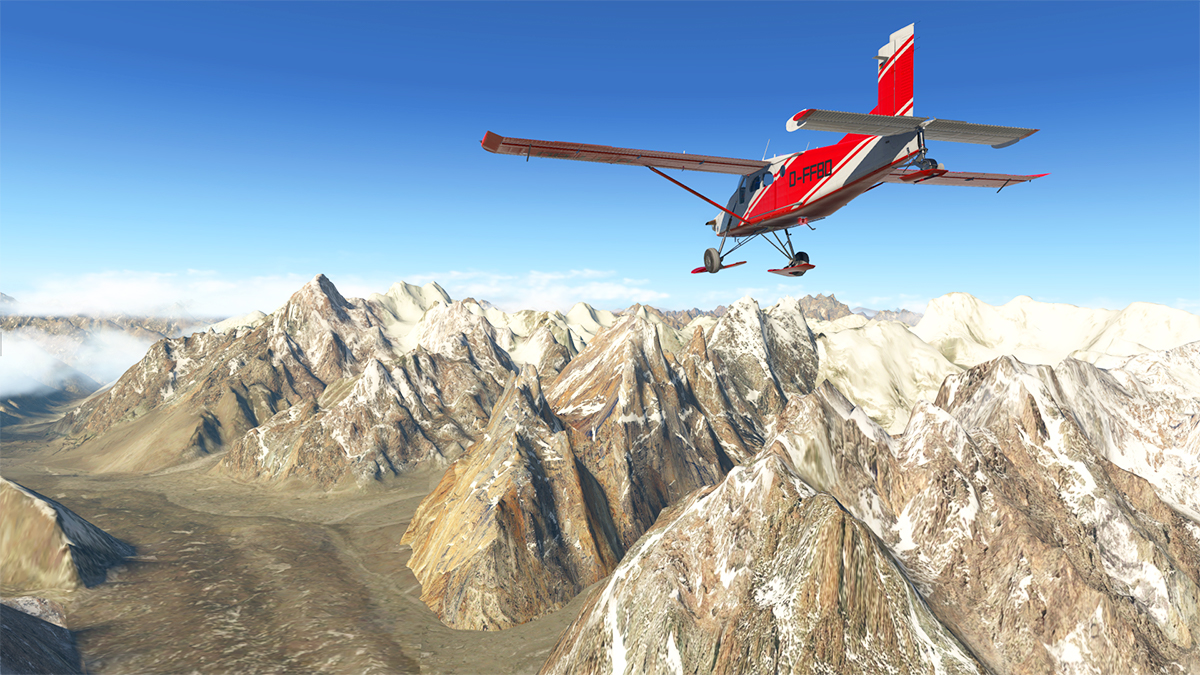
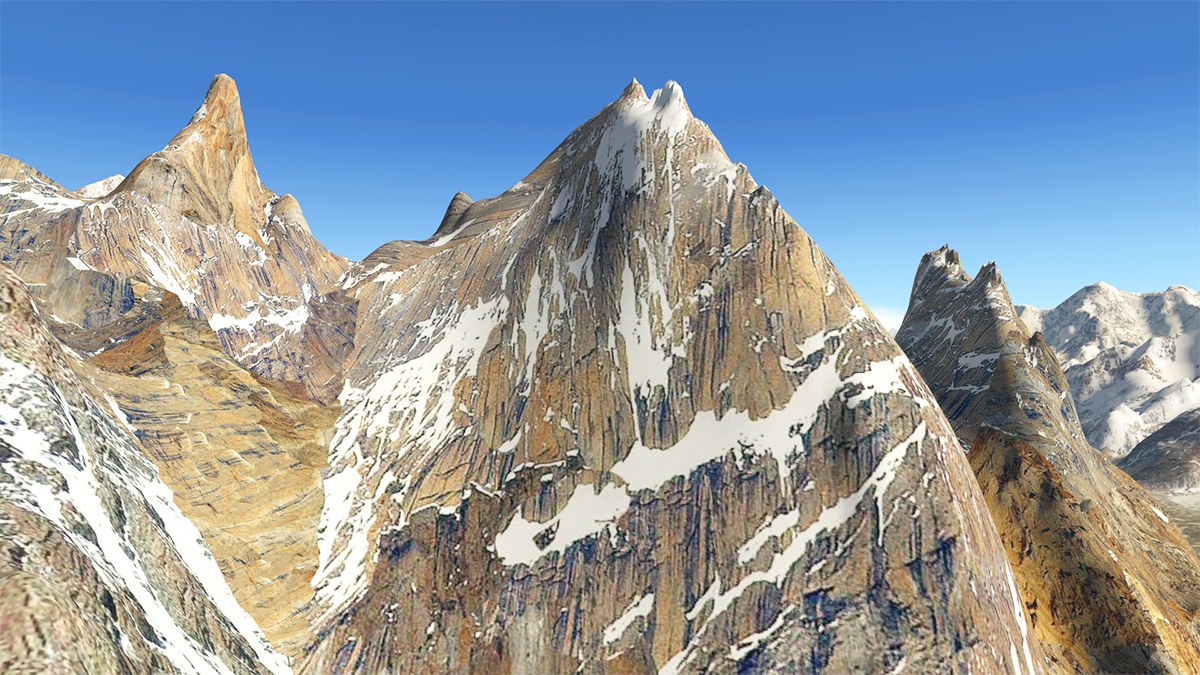
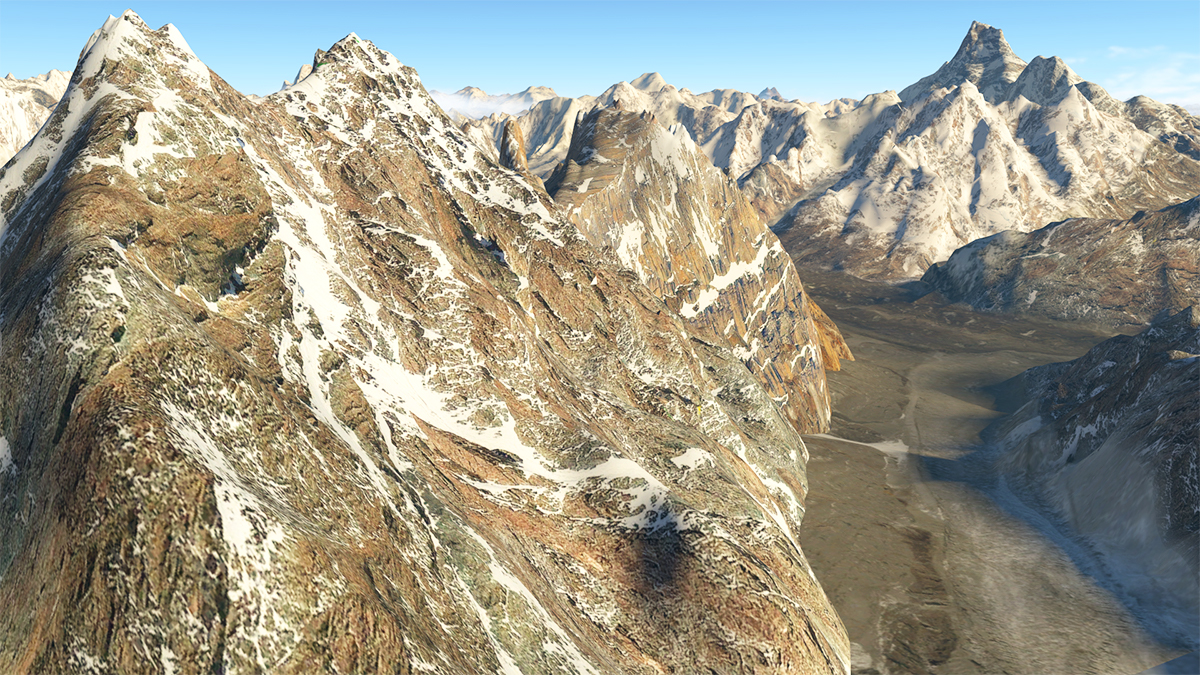
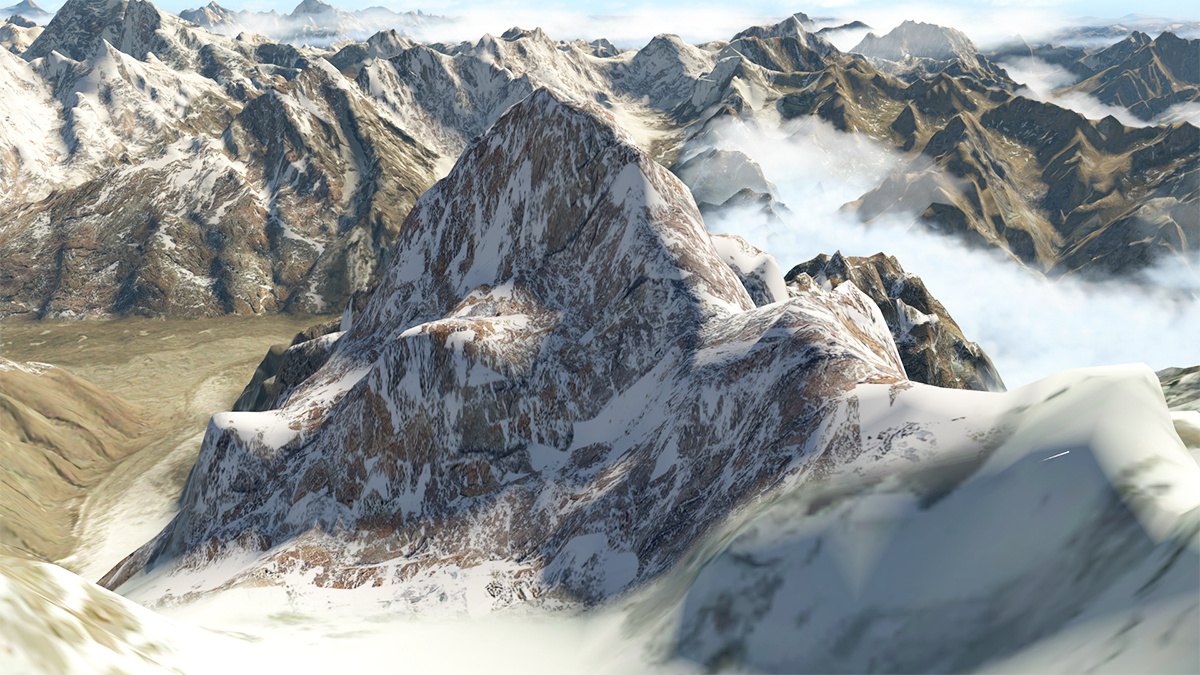
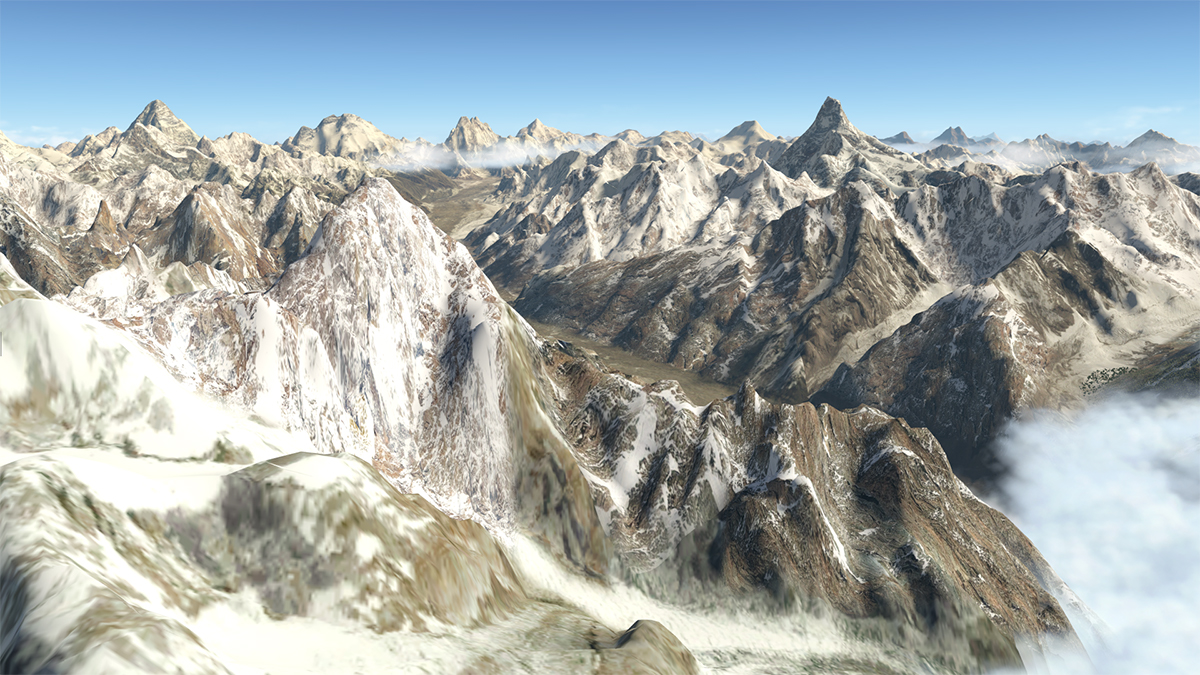
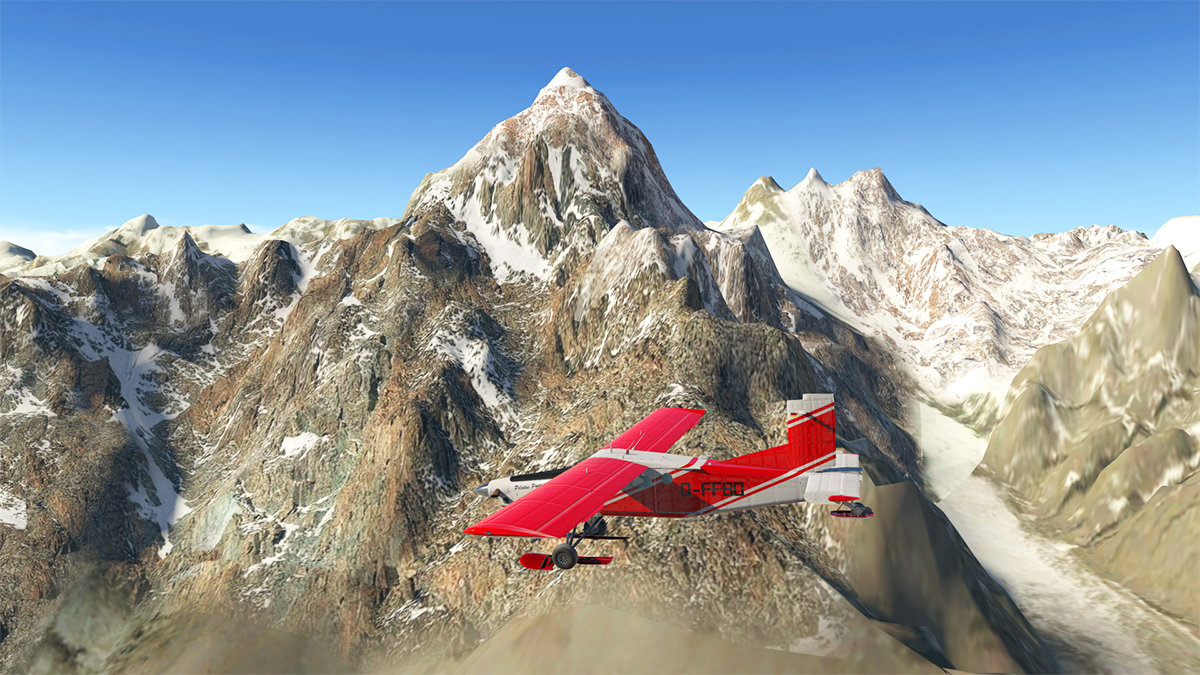
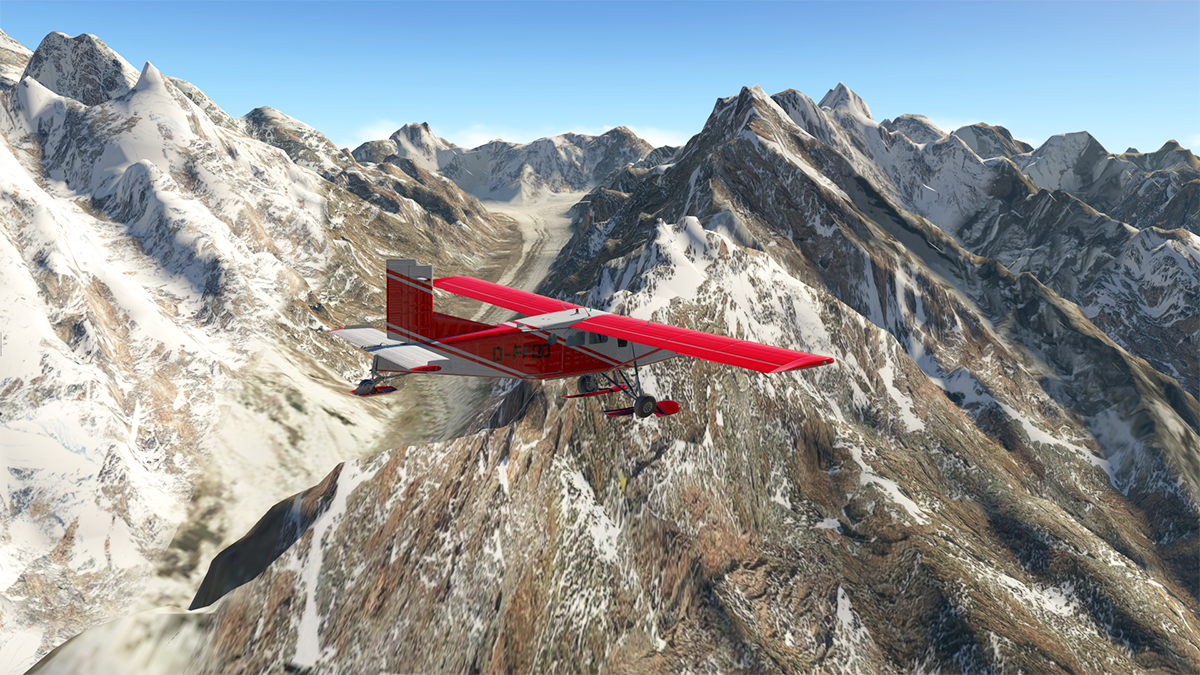
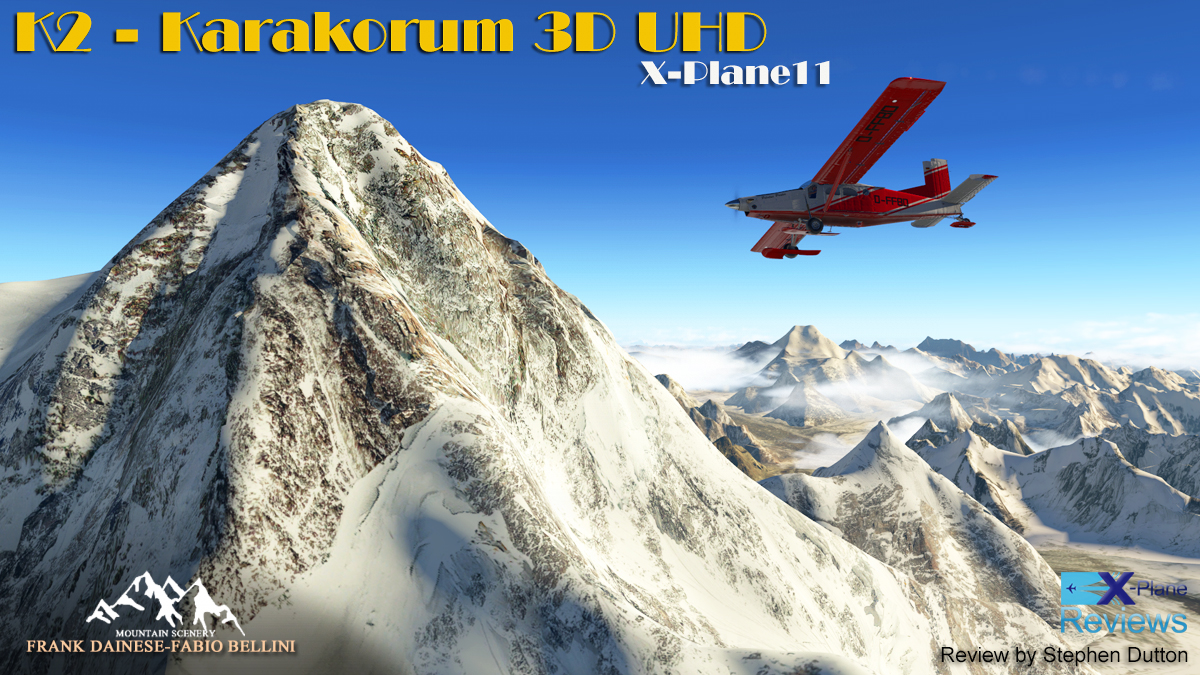
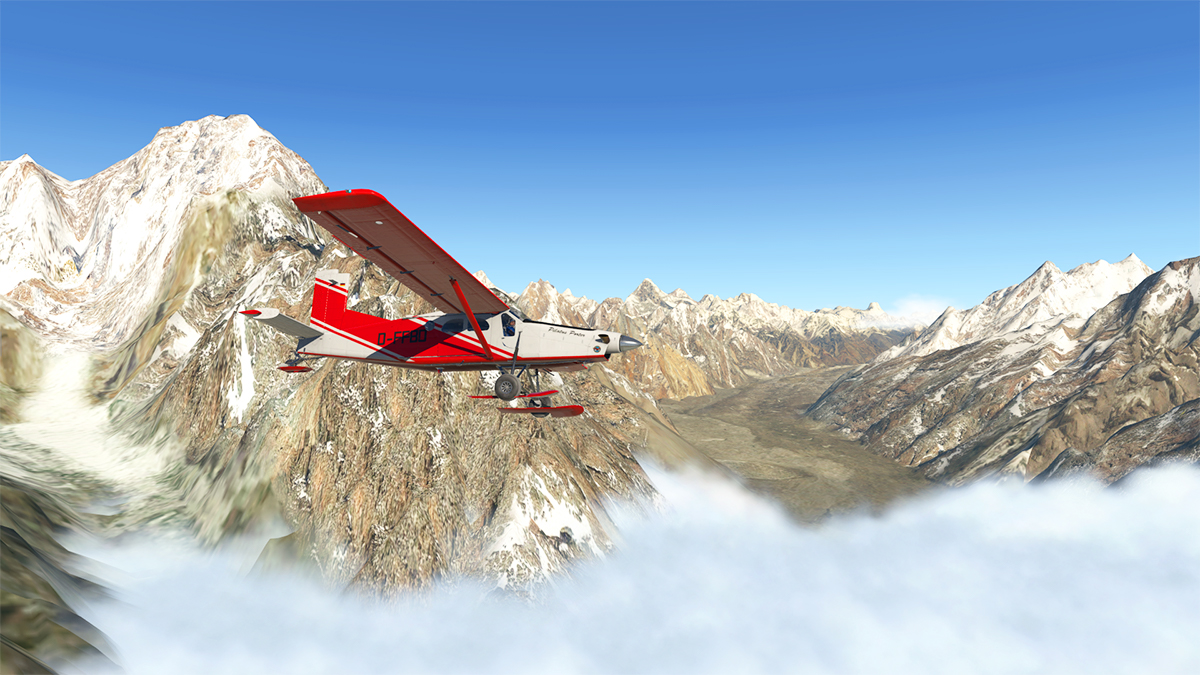
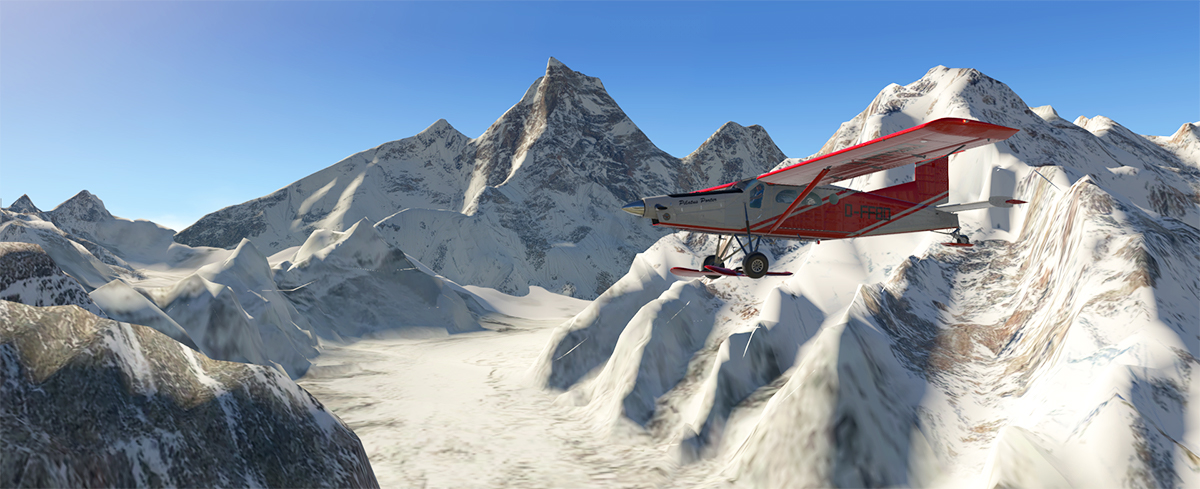
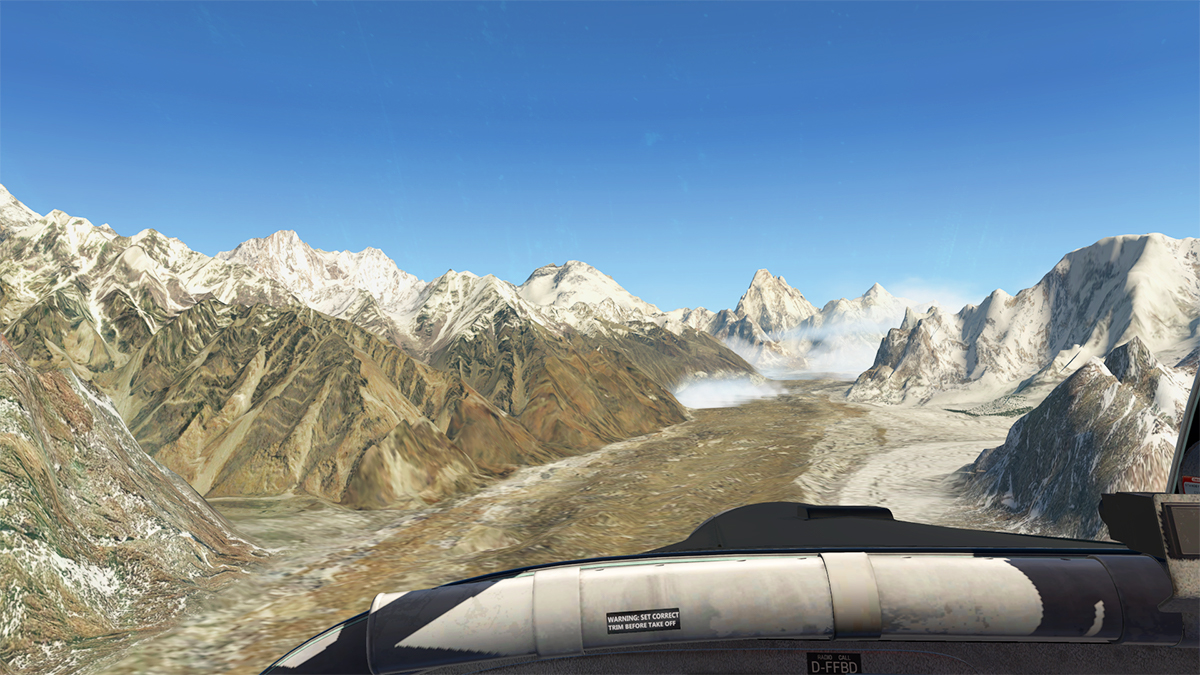
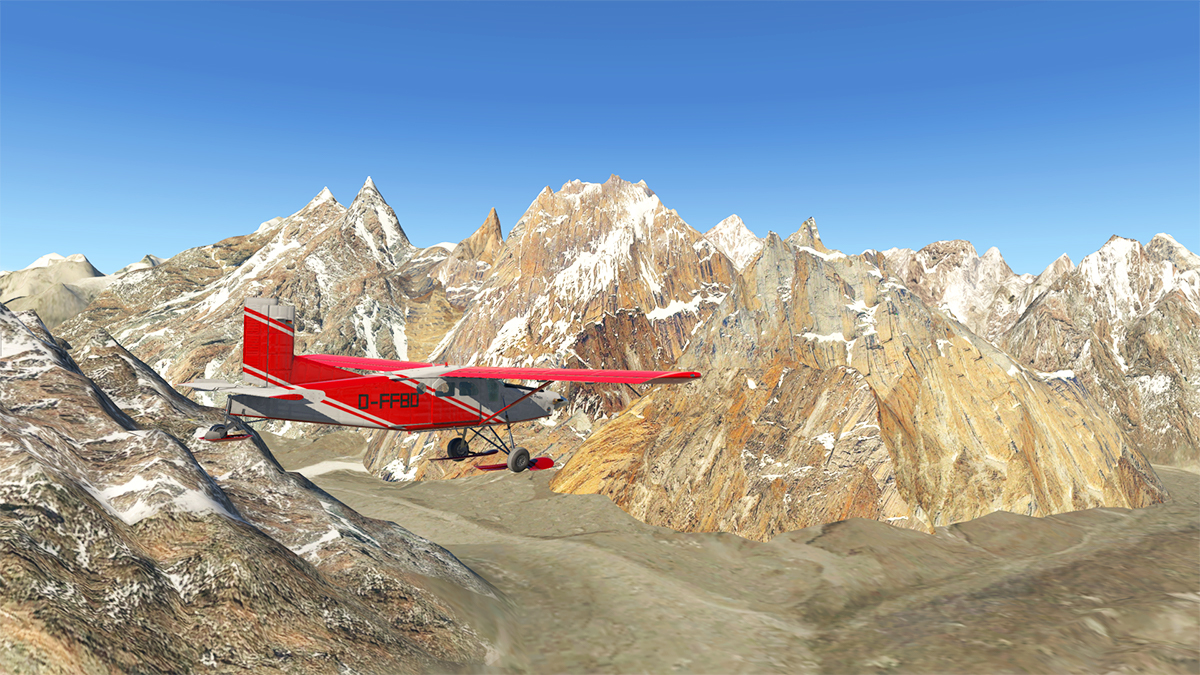
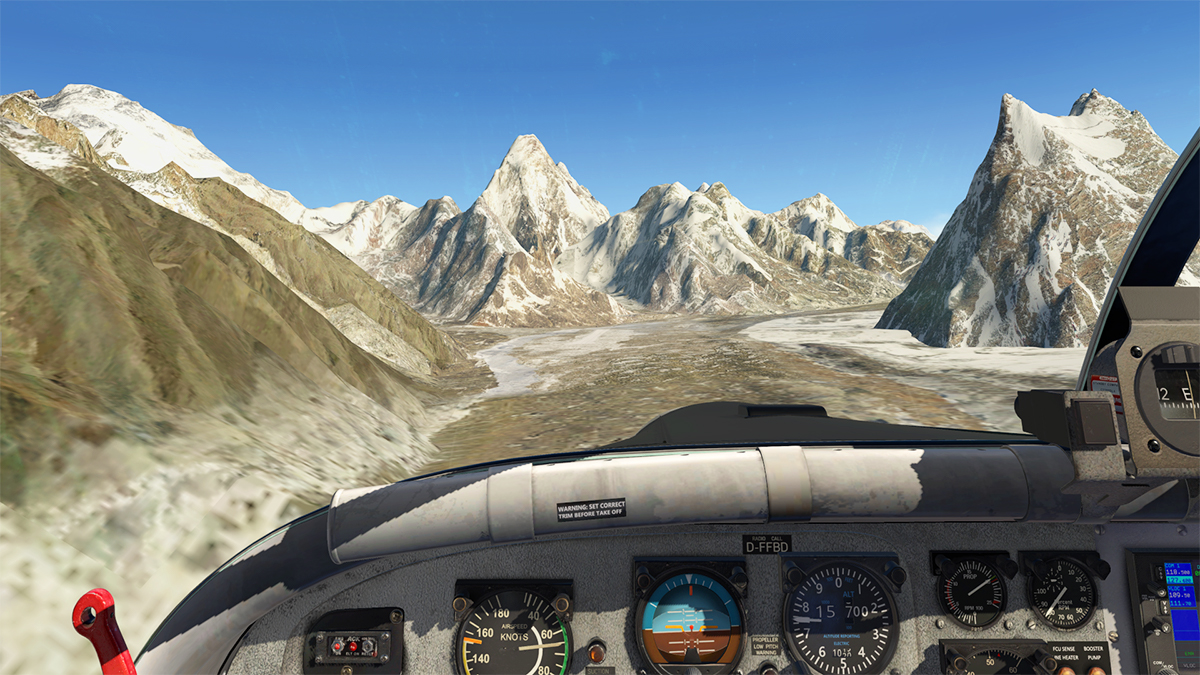
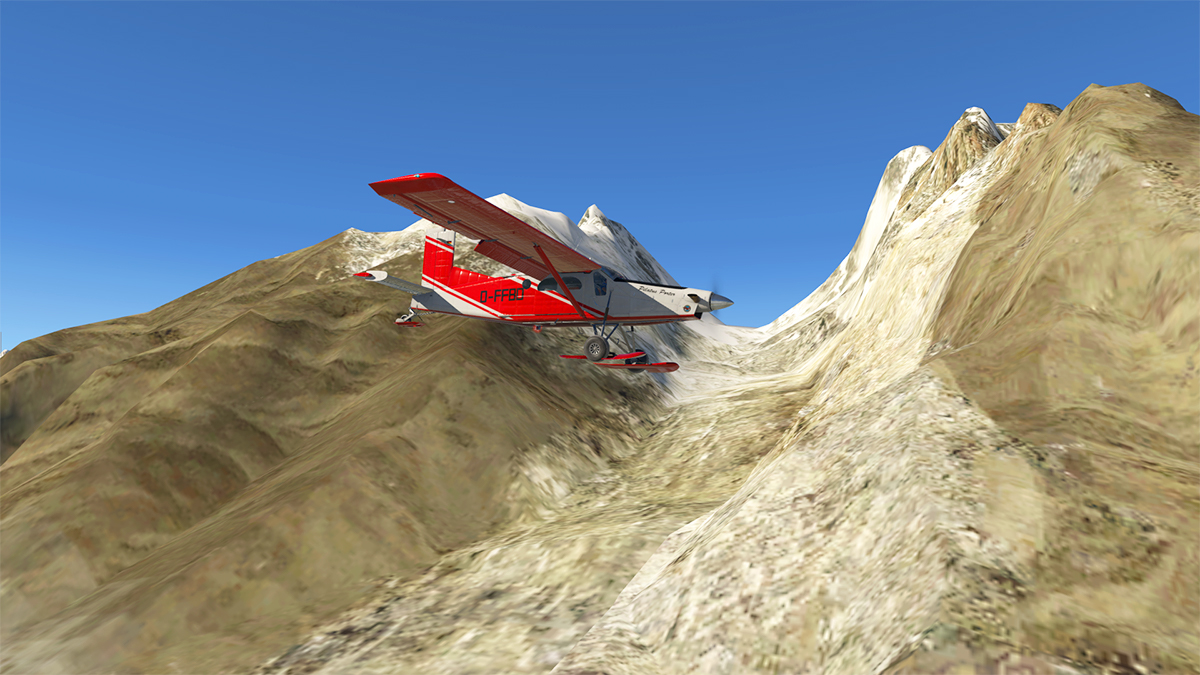
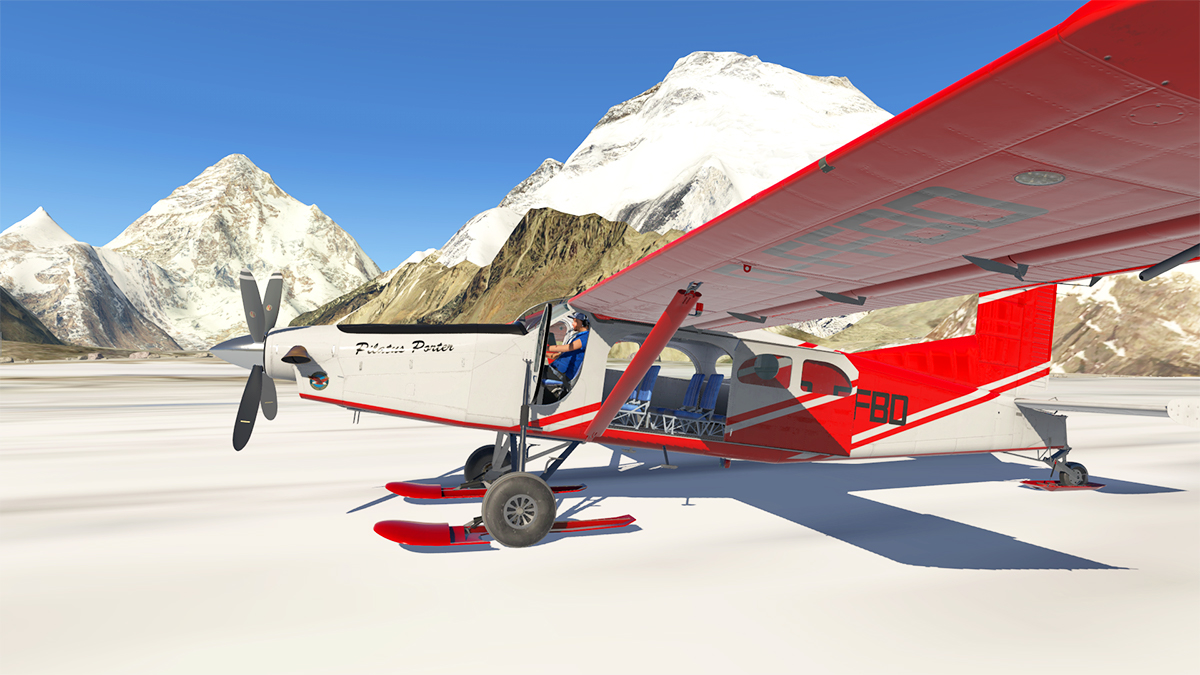
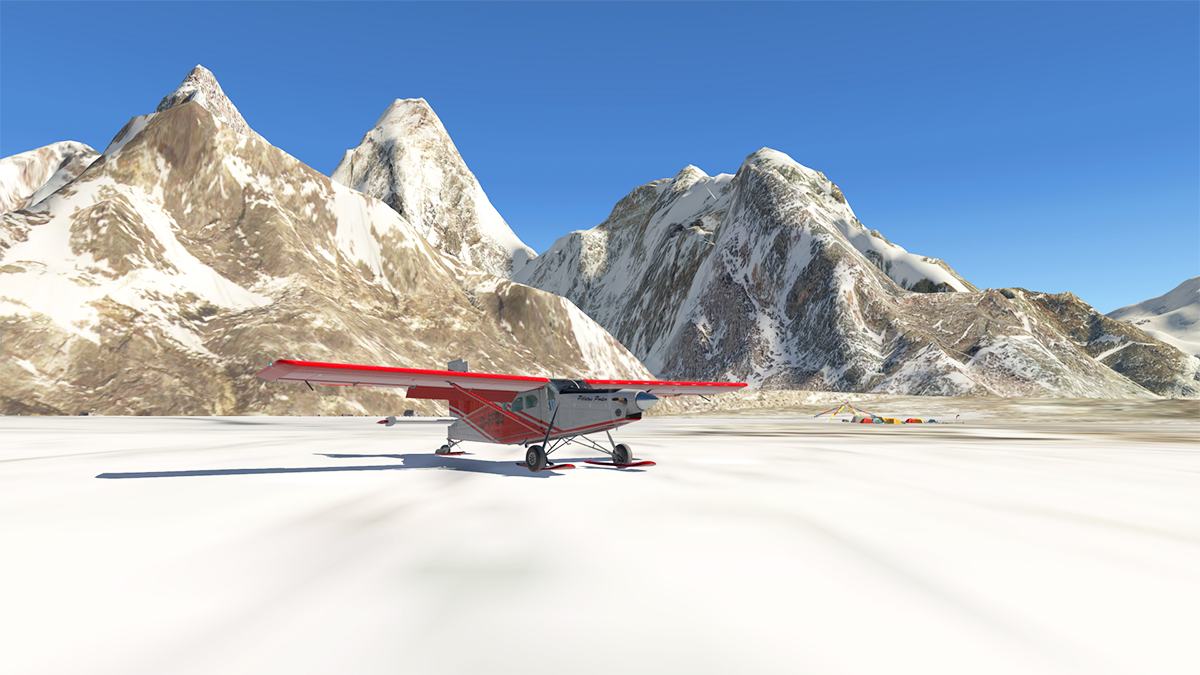
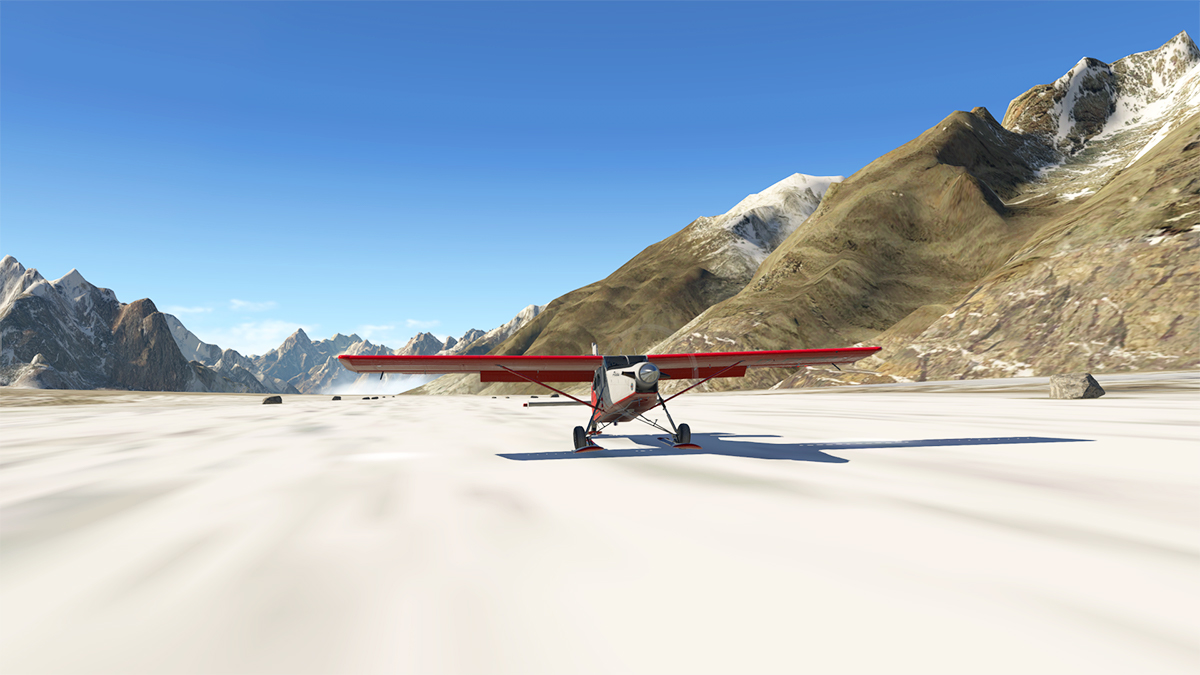
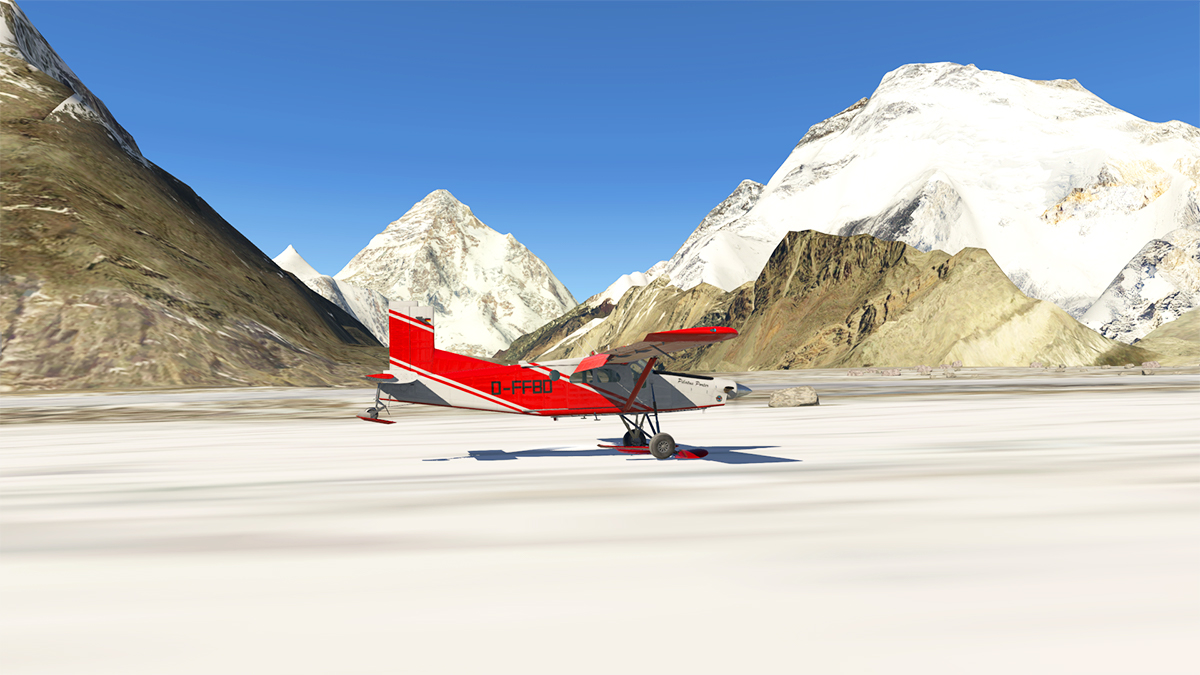
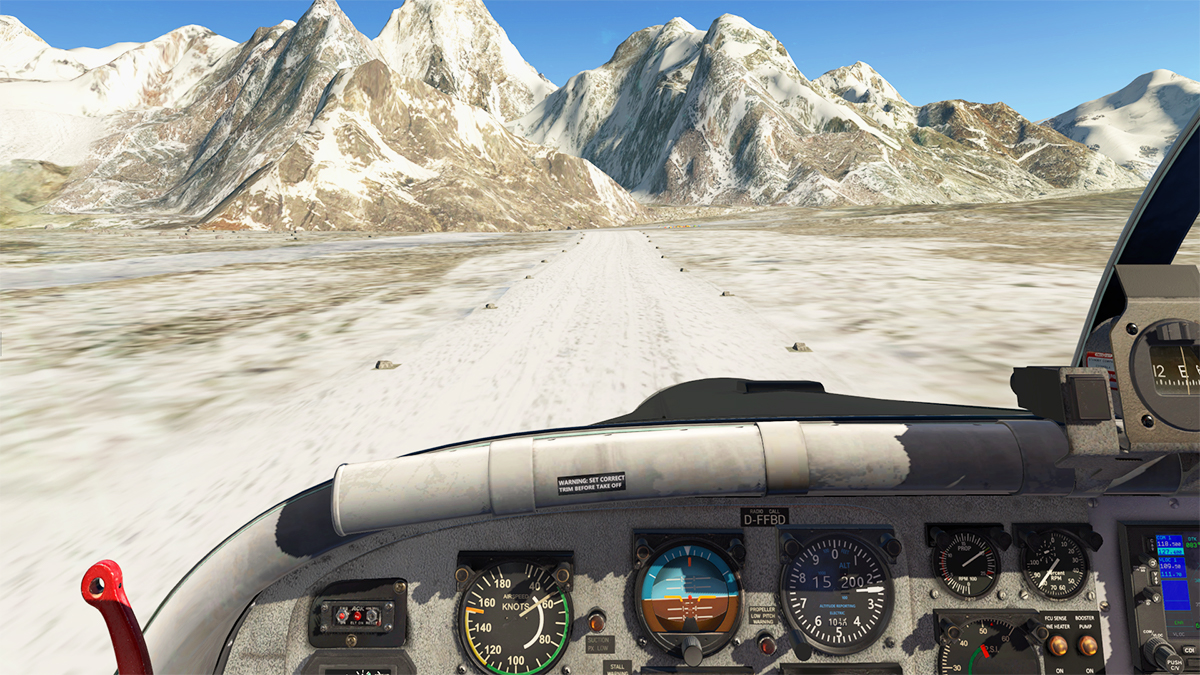
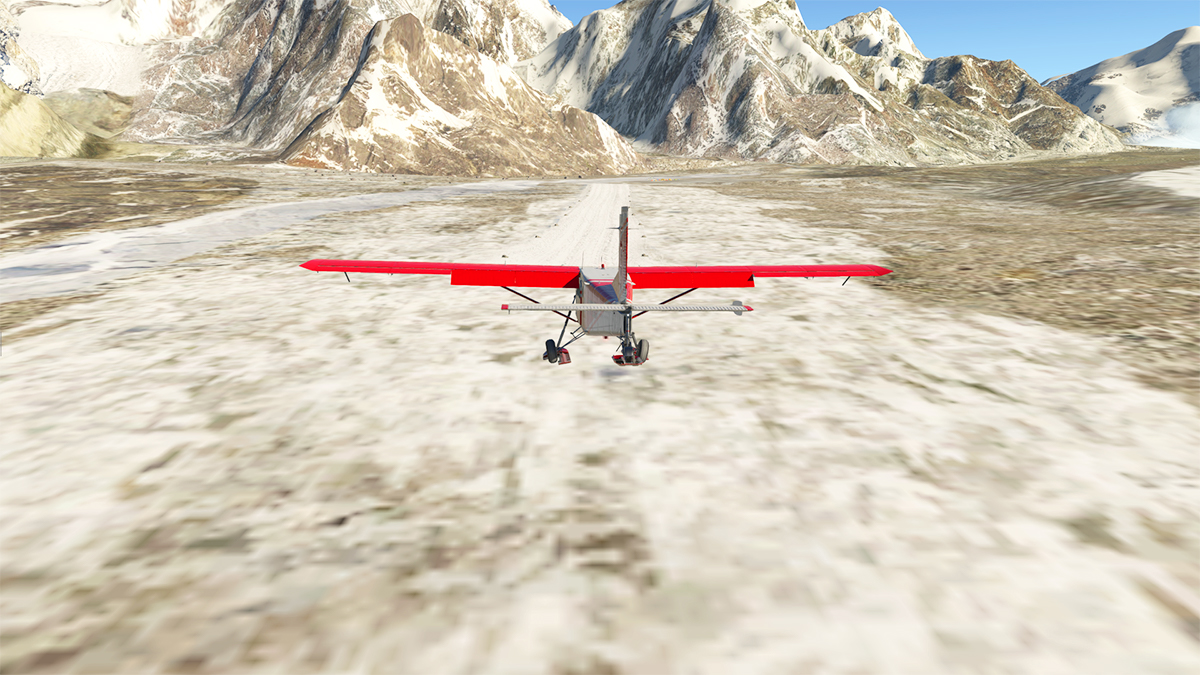
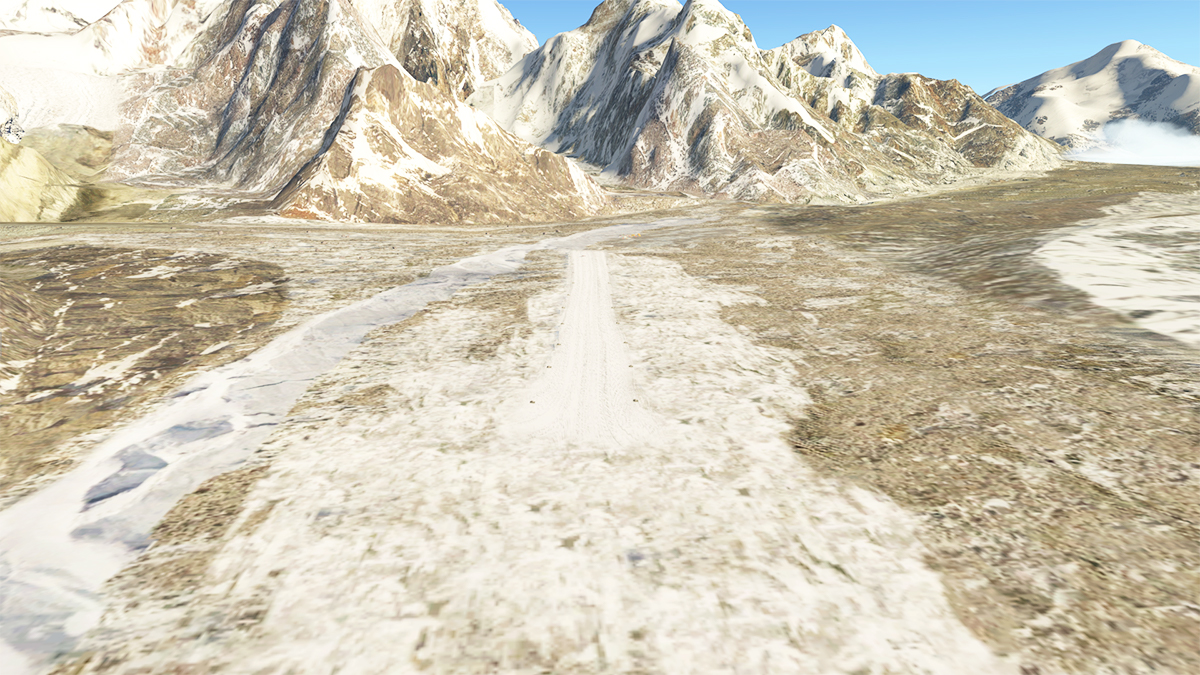
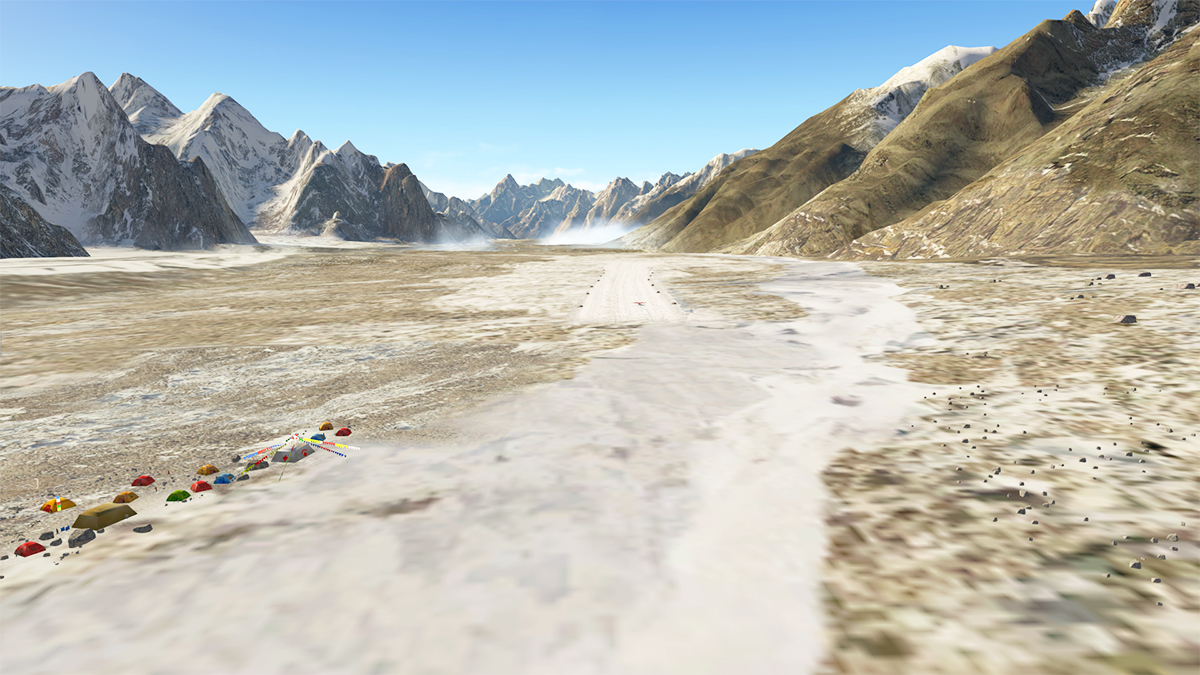
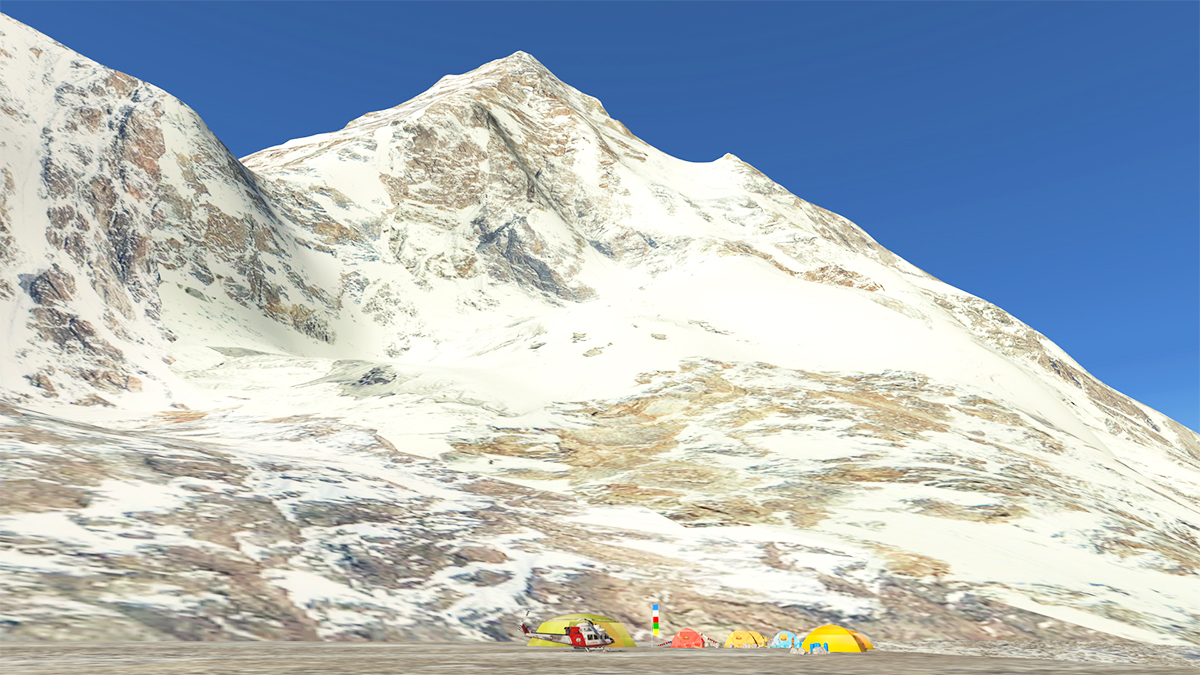
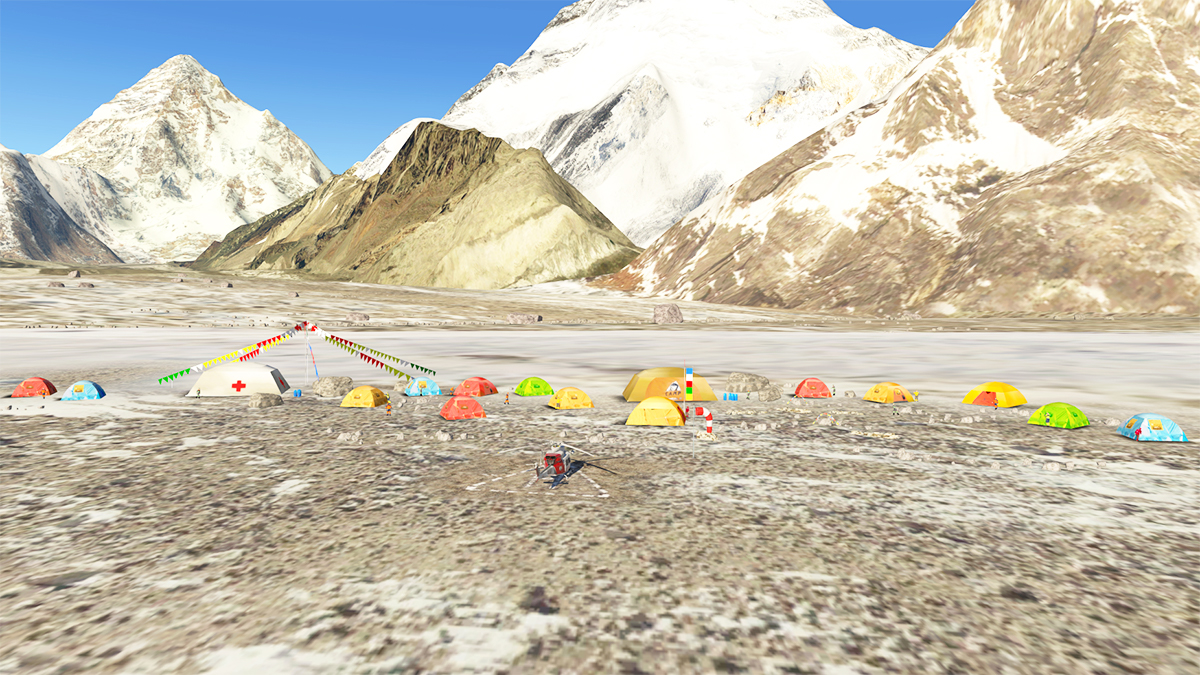
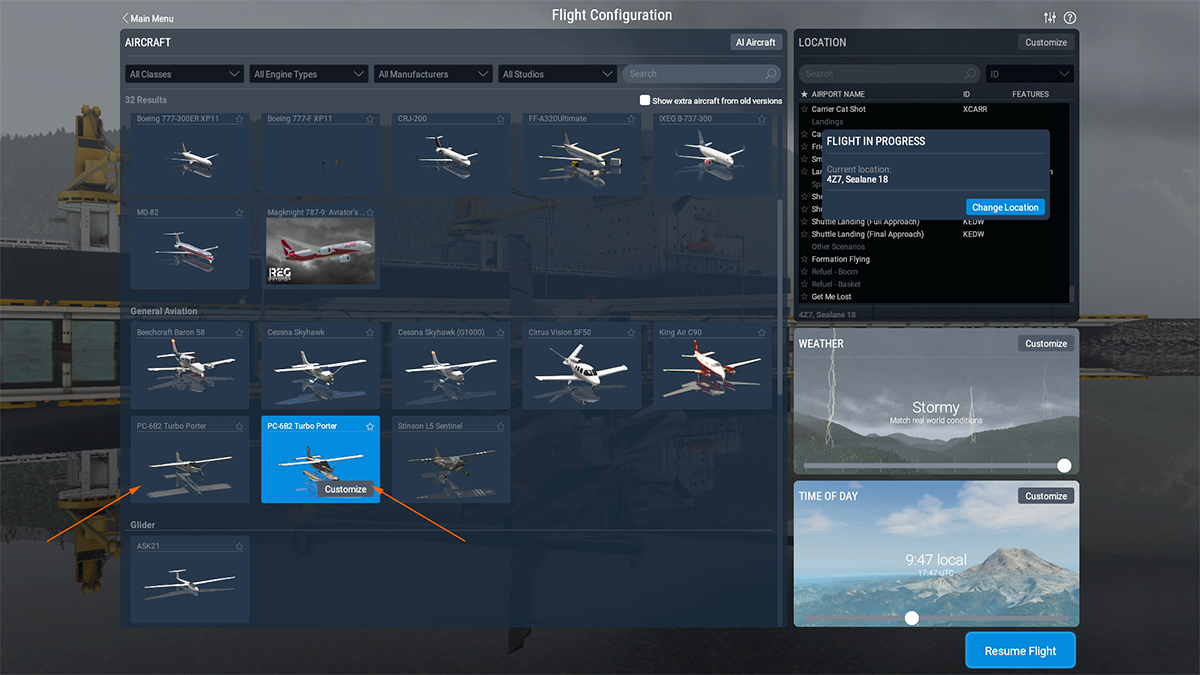
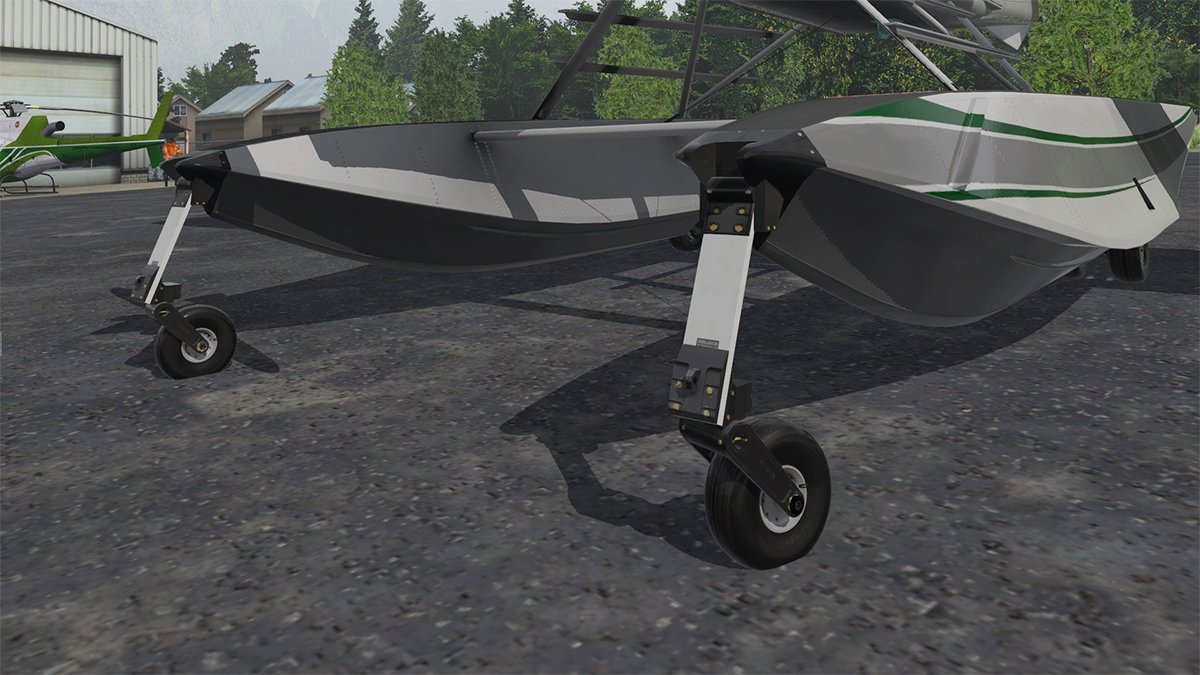
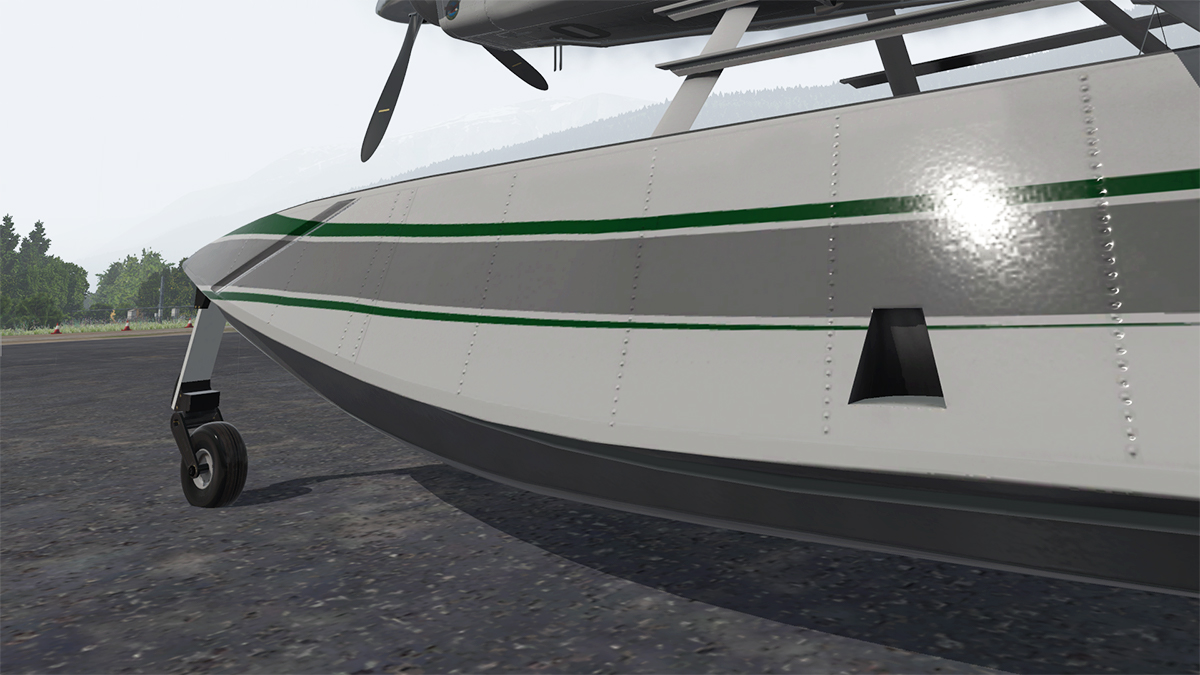
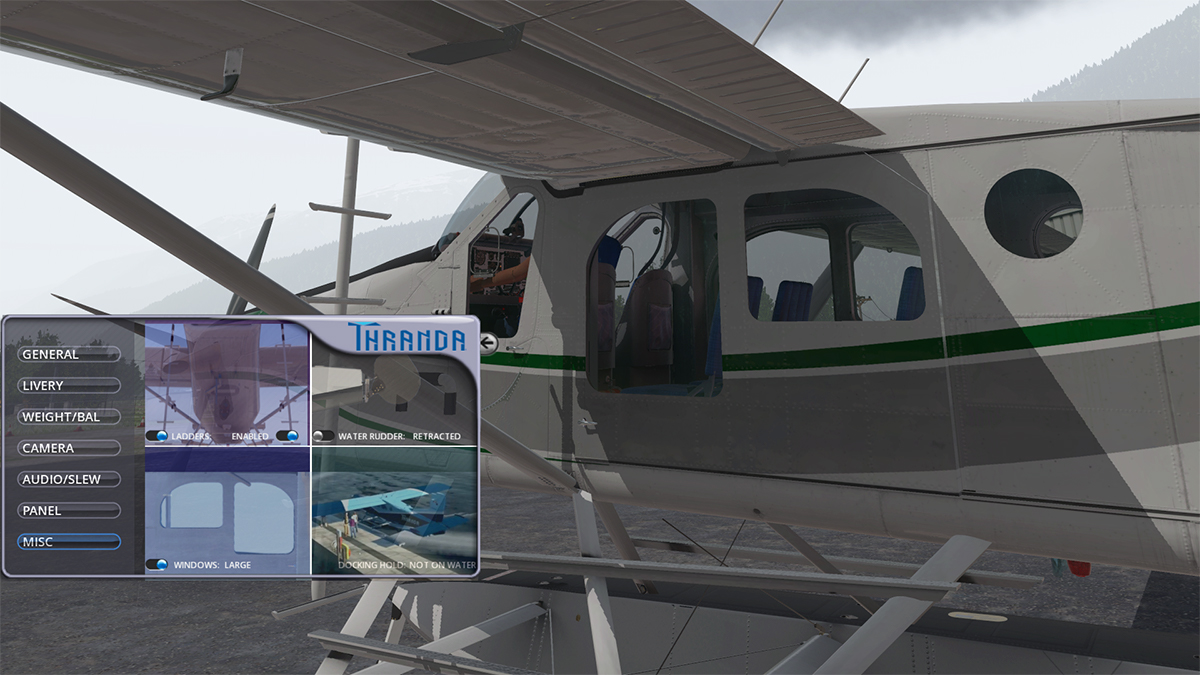
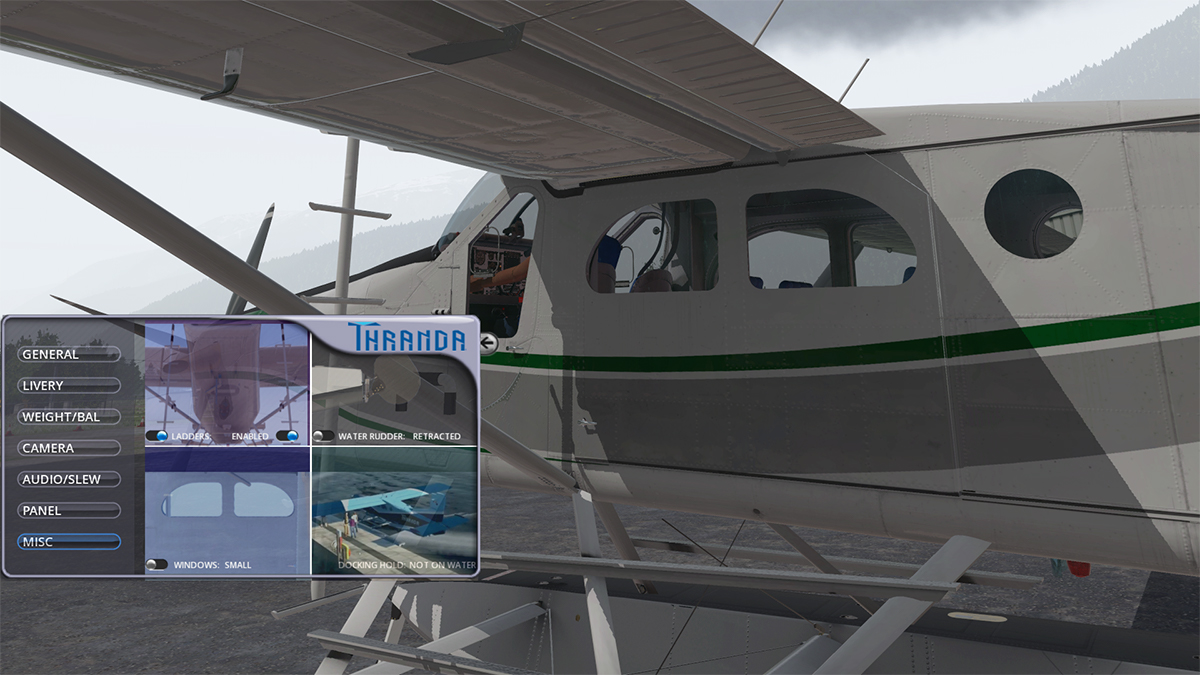
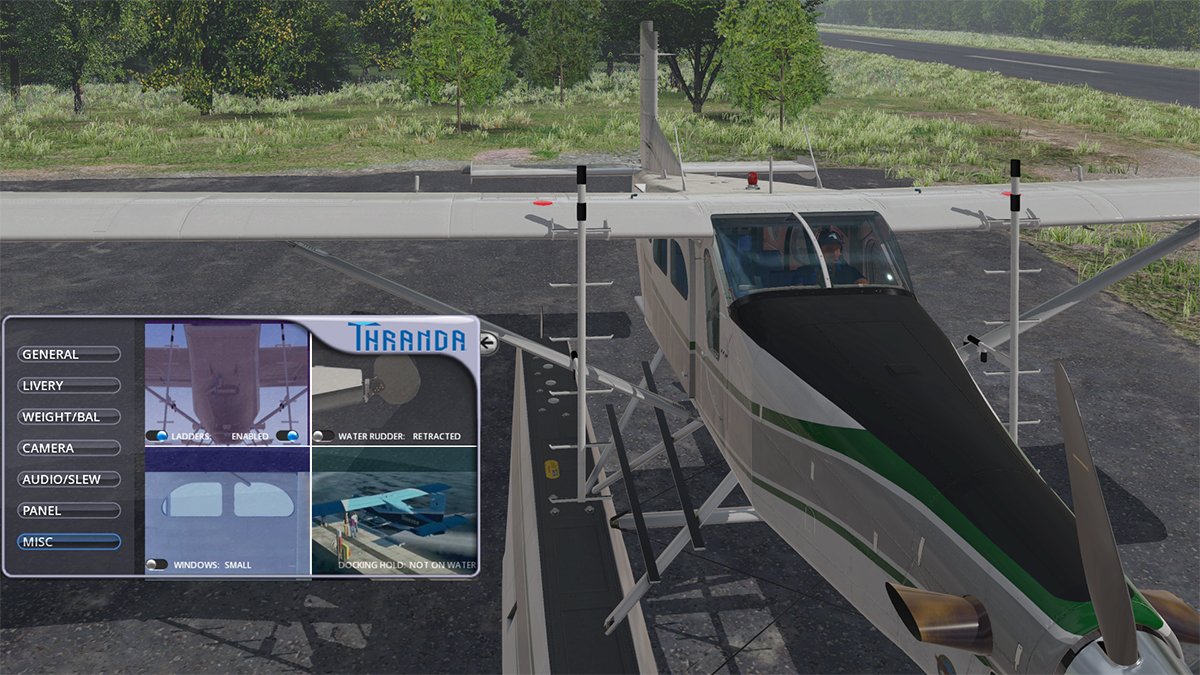
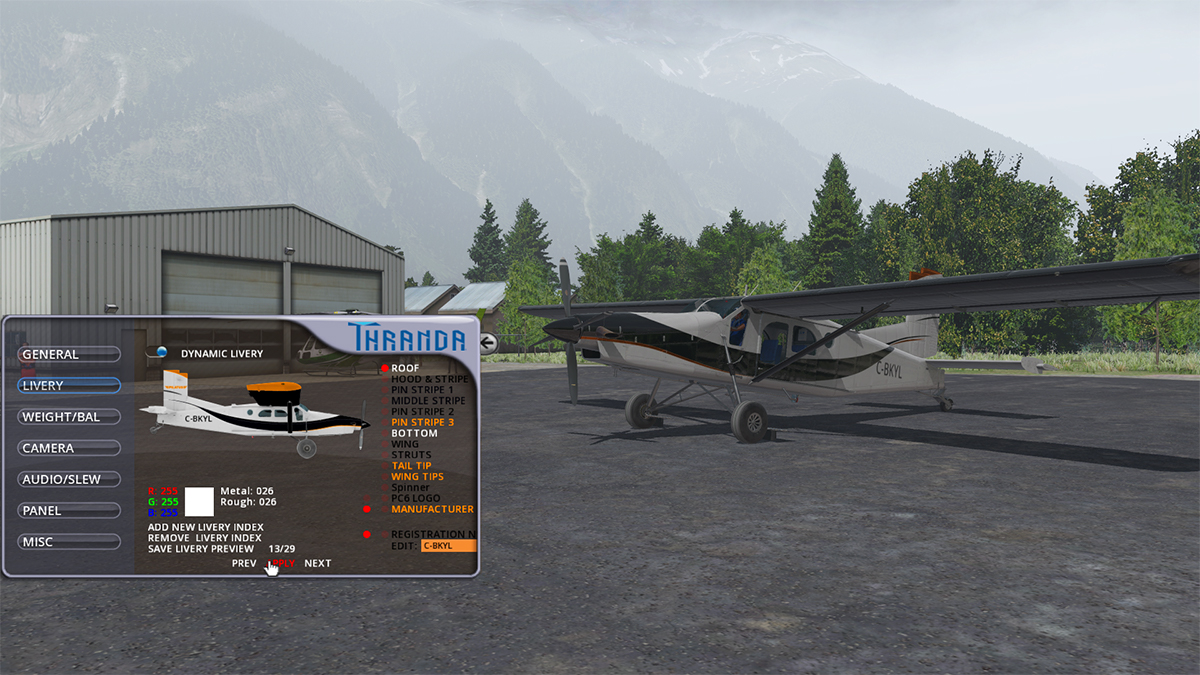
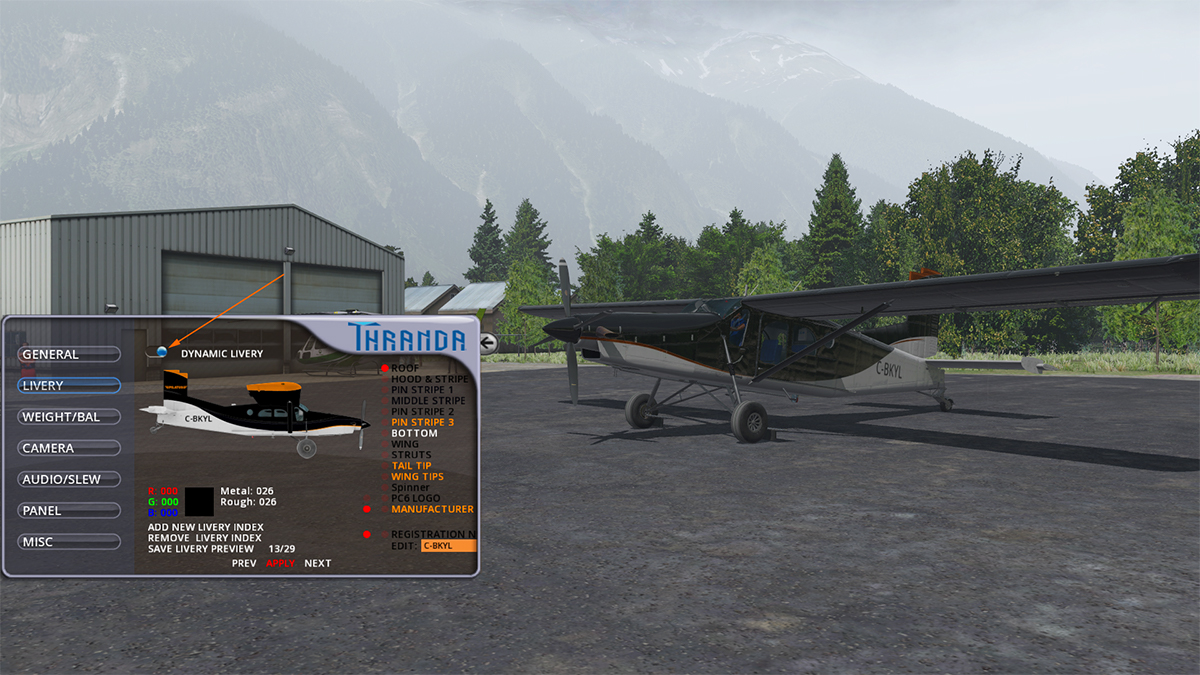
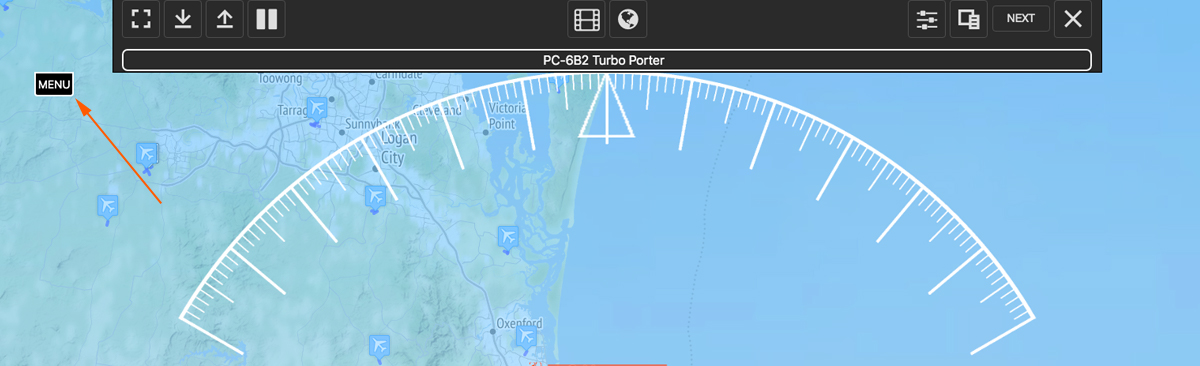
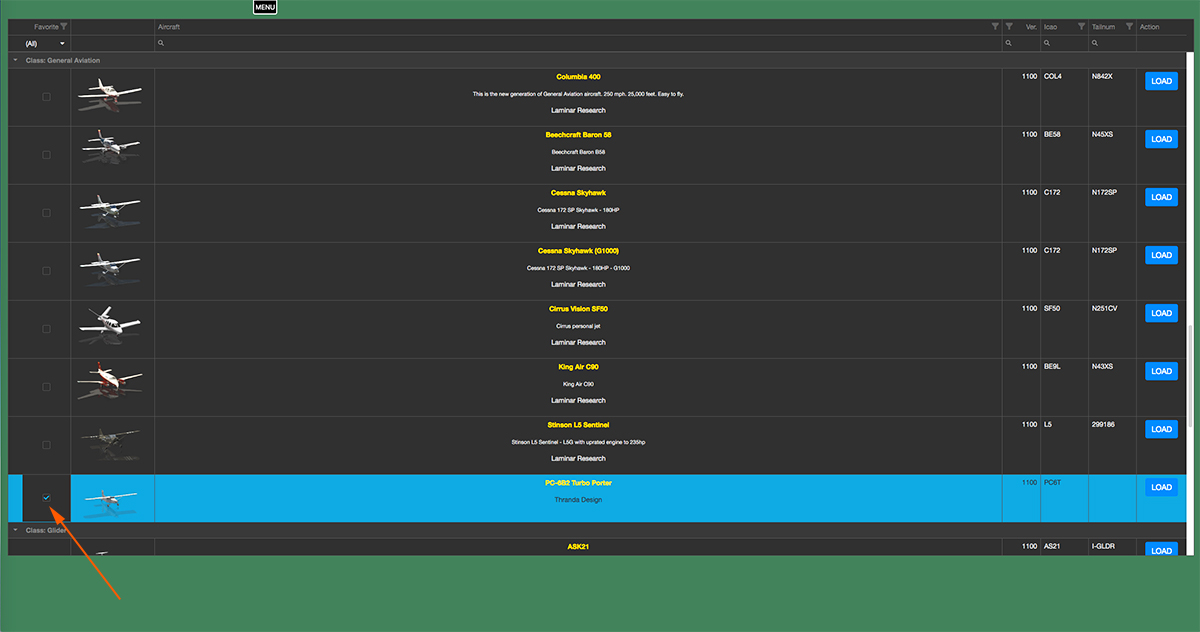
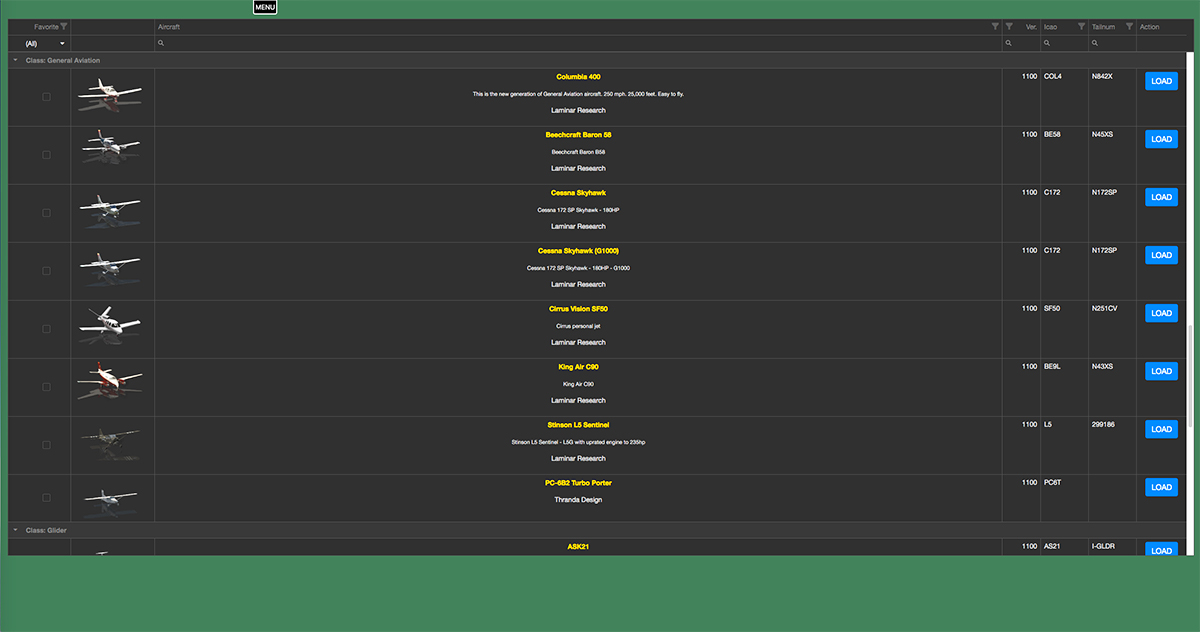
Scenery Review : K2 - Karakorum 3D by Frank Dainese & Fabio Bellini When Sir Edmund Hillary and Tenzing Norgay, a Nepali Sherpa climber finally conquered the impossible of Mount Everest in Nepal, they summited at 11:30 local time on 29 May 1953 via the South Col route. It was a major victory to climb the most highest mountain on the planet at 8,848 m (29,029 ft). But they both knew the summiting of Everest was in a way bittersweet, because in technical mountaineering terms, Everest may be the highest and most massive mountain on earth, but it wasn't the most difficult or the most dangerous peak to actually climb, that mountain lay 1,315 km to the northwest in the Karakoram mountain range that spanned the borders of China, India, and Pakistan. The name of the mountain is quite simple, in K2... but it is known mostly as the "Killer Mountain" or the "Savage Mountain" and the "King of Mountains", but nothing about K2 is simple, getting to it, climbing it or mostly even just surviving it, and in fact 1 in 4 climbers had perished in the only 367 people who have actually completed the ascent, and there have also been 86 deaths during these attempted climbs. So talk to any serious mountaineer and they look at K2 at 8,611 metres (28,251 ft) above sea level and the second highest mountain in the world, as the ultimate mountaineering challenge. It has been climbed to the summit of course by two Italian climbers who were Lino Lacedelli and Achille Compagnoni of the 1954 Italian Karakoram expedition , and when they finally succeeded in ascending to the summit of K2 via the Abruzzi Spur on 31 July 1954, it was not without controversy.... K2 is always highly controversial. The name K2 is derived from the notation used by the Great Trigonometrical Survey of British India. Thomas Montgomerie made the first survey of the Karakoram from Mount Haramukh, some 210 km (130 mi) to the south, and sketched the two most prominent peaks, labeling them as K1 and K2, where the K stands for Karakoram. K1 was found to be known locally as Masherbrum. K2, however, appeared not to have acquired a local name, possibly due to its remoteness. as the mountain is not visible from Askole, the last village to the south, or from the nearest habitation to the north, and is only fleetingly glimpsed from the end of the Baltoro Glacier, an area beyond of which few local people would have ventured. The name Chogori, derived from two Balti words, chhogo ("big") and ri ("mountain") has been suggested as a local name, but evidence for its widespread use is scant. It may have been a compound name invented by Western explorers or simply a bemused reply to the question "What's that called?" It does, however form the basis for the name Qogir which is the Chinese name for K2. K2 - Karakorum 3D by Frank Dainese & Fabio Bellini You have to admit, the twin developers of Dainese and Bellini have had a mega year of X-Plane scenery releases in 2020, not only for the five exceptional packages of the Dolomites, but also the recent release of the Torres del Paine National Park, and now this a package of another significant mountain region in Karakoram. The Karakoram region is dominated by the immense Baltoro Glacier (76 kilometres (47 mi long) that is the highway directly through the region, the glacier is Y shaped with the Upper Baltoro Glacier going up the right Y arm, and the Godwin-Austen Glacier the left arm that goes directly to the base of K2. Central Baltoro Glacier is Concordia, which is usually the base camp zone for any assaults on K2 or any of the other significant peaks of eighteen summits over 7,500 m (24,600 ft) in height, with also four of them exceeding the famous 8,000 m (26,000 ft) altitude. Concordia There is a snow strip at Concordia (15,056 ft MSL), so it is "Ski's on the aircraft gentlemen please"... The runway is designated XLK2 K2-Karakoram. XLK2 is a long and flat runway with a 16/34 orientation, even then there is plenty of open wide areas for any run-overs, but there are also some very large and nasty rocks or boulders that define out the runway's boundaries. To the southeast there is the designated "Concordia Camp", which has been highly and colourfully represented. There is also another similar camp called K2 Base camp, at the floor of K2 (see H Pads). In a part of the camp is a H-PAD HEK2, mostly just a H set out in the ground with a windsock. The aircraft flown here is the Thranda PC-6 Turbo Porter (Adventure Pack). And usually I leave the scenery's highlight to the end of the review but in this case we will loop around K2 first... We are already at 15,056 ft MSL, but we will still have bit of climbing to do. The Porter's ceiling is 8,197m (26,893 ft), so we won't cover K2's full height of 8,611 metres (28,251 ft), so it will be an altitude sorta around 25,000ft in the flight circle of the mountain, overall there is 2000 kmq of the karakorum Range- Baltoro (Pakistan) to explore. This is a basic route of the flight (and yes I know it looks a bit like.... umm) To the right the K2 Peak is shrouded in mist, but the cloud cover is quite thin at only 2000ft. Power up and away we go... You need a fair bit of power (about 80%) to overcome the drag of the ice, and it is slow moving at first, but then suddenly as the speed builds the inertia of the PC-6 falls away, you then quickly break free of the drag of the ice and the tail rises... and you are then suddenly barreling down the icy strip... .... at 60 knts (TO Flap) you rise and fly. I need to go west and while also climbing down the Baltoro Glacier, then you loop the Porter back around and over the Concordia Camp... ... at the Biango Glacier I aim directly at the rock face, then twist the PC-6 into a steep turn back... views out the aircraft are sublime, you have to love this extreme vista of high mountain ranges gliding past all around you. ... 16,300 ft and still climbing, the Porter is actually struggling, full rich mixture and 90% throttle and you are still barely moving forward at 70 knts. Finally you turn into the Godwin-Austen Glacier, and sitting on the east corner are the Gasherbrums, but the one to be careful of is the larger Broad Peak (8,051m), one of the four eight-thousanders on your right and sitting further down the glacier. K2's towering peak is now right and square in your windscreen, and Broad Peak is to your right and you are now at 22,000ft MSL I don't want to play chicken with such a dangerous mountain, so it is time to dip to the left and then go right around the peak. The modeling and detail on show here is in closeup K2 is quite breathtaking. The mountains of K2 and Broad Peak, and the area westward to the lower reaches of Sarpo Laggo glacier, consist of metamorphic rocks, known as the K2 Gneiss, and part of the Karakoram Metamorphic Complex. The K2 Gneiss consists of a mixture of orthogneiss and biotite-rich paragneiss. The K2 Gneiss is separated from the surrounding sedimentary and metasedimentary rocks of the surrounding Karakoram Metamorphic Complex by normal faults. For example, a fault separates the K2 gneiss of the east face of K2 from limestones and slates comprising nearby Skyang Kangri. All the scenery is 3D and according to the DEM data (digital elevation model) and further elaborated with many structural details. The many textures are all based on 4K (4096x4096) extreme quality images. Close up at 24,500 ft and the K2 surface detail is the best I have seen yet, the gritty rock detail is excellent and you see and feel the contours of the rock faces, the feel and look is very similar to Everest's. On the K2 peak are our two famous climbers... Dainese and Bellini Heading back towards the Godwin-Austen Glacier we can now take a better look at Broad Peak... ... the name is apt, the top of the mountain is wide and it has only a slight peak to the north, again the rock face detail is excellent. To your far right is the striking peak of Muztagh Tower and to your left in the distance is Chogolisa, immediately however on the corner of the Godwin-Austen Glacier and Upper Baltoro Glacier is the huge Gasherbrum massif range. The Gasherbrum massif of nine peaks contains three of the world's 8,000 metre peaks (if Broad Peak is included). Although the word "Gasherbrum" is often claimed to mean "Shining Wall", presumably a reference to the highly visible face of Gasherbrum IV, it comes from "rgasha"(beautiful)+"brum" (mountain) in Balti, hence it actually means "beautiful mountain". The nine peaks are all numbered in sequence, Gasherbrum I (8,080m), Broad Peak (8,047m), Gasherbrum II (8,035m), Gasherbrum III (7,952m), Gasherbrum IV (7,925m), Gasherbrum V (7,147m), Gasherbrum VI (6,979m), Gasherbrum VII (6,955m) and finally the Gasherbrum Twins (6,912m and 6,877m). At the end of the Godwin-Austen Glacier, we are now back over Concordia, but turn east up into the Upper Baltoro Glacier, the Gasherbrums are still on your left, but on your right is the Chogolisa (Great Hunt) at 7,668m, and it looks like a large tooth, sprouting out of the landscape... Chogolisa has several peaks: the highest, on the SW face (Chogolisa I), rises to 7,668 metres (25,157 ft); the second highest at 7,654 metres on the NE side (Chogolisa II) is the one named Bride Peak by Martin Conway in 1892. In 1909, a party led by Duke of the Abruzzi reached 7,498 m (24,600 ft) from a base camp located on the northern side and a high camp on the Chogolisa saddle at 6,335 m. Bad weather stopped the party from ascending further, but their climb established a world altitude record. The first ascent of Chogolisa I was made on August 2nd, 1975 by Fred Pressl and Gustav Ammerer of an Austrian expedition led by Eduard Koblmueller. At the top of the Upper Baltoro Glacier, you get a Y branch and directly in the middle of the Y is Baltoro Kangi (Golden Throne) at 7,312m you then take the right branch of Abruzzi Glacier... turning south. As you go around the range the peaks of Ghent Kangri -Mount Ghent (7,742m), Sherpi Kangi (7390m), K6-Baltistan Peak (7,282m) and K12 (7469m) are now visible as are all the Saltoro Mountains subrange which now come into view... ... far south is the spectacular Saltoro Kangi (7742m). The Saltoro Kangri which is the highest and most prominent peak of this Saltoro Mountains subrange, also known as the Saltoro Range. Saltoro Kangri is a name generally used for the twin peaks, the Saltoro Kangri I to the south and the Saltoro Kangri II to the north which are both connected by a saddle. While comparing the heights the generic term Saltoro Kangri is applied to the higher peak, Saltoro Kangri I, which is the 31st highest mountain in the world. I am circling around Chogolisa and heading back to central Baltoro Glacier and again Concordia, and dominating the view west is… K1 or Masherbrum (7,821m), and K1 is the 22nd highest mountain in the world and the 9th highest in Pakistan in the Masherbrum Mountain range, K1 looks like a tripodal throne. It was also the first mapped peak in the Karakoram mountain range, hence the designation "K1". It is so huge it has not one but three of it's own glaciers in Yermanendu Glacier (east) and Mandu Glacier (west) and... ... Masherbrum Glacier on the south side. Again with this being a large focus mountain the detail is higher and quite spectacular, but more so from the southern aspect. The range of Baltoro Muztagh is opposite K1, and the highlight in the range up the Biango Glacier, is the famous (and difficult) Muztagh Tower (7,276m)... .... again the detail and shape of the Muztagh tower formation is spectacular, narrow front on, but wide to side, is is an amazing mountain. Opposite is the Skil Brun or Skilbrum (7,410m), K2 peaks up (no pun intended) in the background, with Broad Peak. The next valley and you have the Muztagh Glacier and the highlight here is the Biale Kangri with an elevation of 6687m. Note the massive three pronged sentinel K1 across the valley... Biale is In fact is framed by four Glaciers, three in Dunge Glacier, Biale Glacer (which is centre above) and the Muztagh Glacier east.. ... and set north behind the Biale formation is the huge wide Sarpo-Laggo Glacier (below)... all these glaciers are done here with great skill in this package. The next set of formations are another iconic climbing folklore... the Trango Towers. The Towers offer some of the largest cliffs and most challenging rock climbing in the world, and every year a number of expeditions from all corners of the globe visit Karakoram just to climb these immensely difficult granite rocks. The formations are framed by both the Trango Glacier and the Dunge Glacier. The largest is the Great Trango which itself is a large massif , with four identifiable summits: Main-Great (6,286m), South or Southwest (6,250m), East (6,231m), and West (6,223m). The Tranago Towers is a complex combination of steep snow/ice gullies, steeper rock faces, and vertical to overhanging headwalls, topped by a snowy ridge system. Just northwest of Great Trango is the Trango Tower (6,239m), often called "Nameless Tower". This is a very large, pointed, rather symmetrical spire which juts 1,000 m (3,300 ft) out of the ridgeline. North of Trango Tower is a smaller rock spire known as "Trango Monk." To the north of this feature, the ridge becomes less rocky and loses the large granite walls that distinguish the Trango Towers group and make them so attractive to climbers; however the summits do get higher. These summits are not usually considered part of the Trango Towers group, though they do share the Trango name. Trango II (6,237m) which lies northwest of the Monk, and the highest summit on the ridge, Trango Ri (6,363m) lies northwest of Trango II. Just southeast of Great Trango (really a part of it's southeast ridge) is the Trango Pulpit (6,050m), whose walls present similar climbing challenges to those of the Great Trango itself. Further to the south is Trango Castle (5,753m), the last large peak along the ridge before the Baltoro Glacier. Again all these remarkable rock face surfaces are incredibly well done, and the reproduction gives you a very authentic representation of these famous climbing walls. The last significant formation in the Karakoram scenery on the north side of Baltoro Glacier is Choricho (6597m). The boundary of the scenery ends here, but the Baltoro Glacier does go on a little longer, another significant peak but not represented in this custom scenery, but still can be actually seen from this aspect in the distance is Nanga Parbat (8,126m) another of the 8,000m monsters. Make no mistake on how much of the famous Karakoram area is covered in this package, it is impossible to cover every peak but only the most significant ones in a review... but most of the south area I left unexplored. But not only have all the peaks been covered, but also the significant glaciers are completed here as well, like the Liligo Glacier (below right). Time to head back to base camp at Concordia... .... since climbing to the highest altitude of 24,500ft, I have gradually and slowly reduced my height back down to 16,500ft. If coming into the Baltoro Glacier from the west then you have to also watch that altitude number, so now sitting at 16,500 I still sit quite high above the glacier, but as I fly more into the cavernous glacier alley then the shifting ice floor will climb up quite steeply towards me, until I only have a 1,000ft between myself and the glacier. below... so very steep is this ice shelf. You are always very aware of how quickly the glacier floor is coming up at you, but you still give yourself time to glimpse the magnificent Trango Towers and K1 from this lower perspective. Although now a clear day up here, XLK2- Concordia can still be hard to see (impossible in more misty conditions)... The massive Gasherbrum l at a soaring 8,080m is your runway aim point... ... you realise you have to sort of dogleg left to get directly into the steep approach, but height and speed is critical into get the landing perfectly right. You can afford to take your time as the 16/34 runway is quite big (meaning long), but don't be too greedy, or you will run out of space... ... at 50 knts the tail drops down and it is like throwing anchor out on to the ice, and your landing speed drops away quickly. A kick of right rudder and ton of power, twists the PC-6 around, and then all you can do is stop and look at the full magnificence of the most dangerous and killer mountain on the planet... K2. ICAO Noted Airports and H Pads There is One Ice-Strip and 2 H Pads in the scenery, and provided are: XLK2 - AIRPORT – CONCORDIA HEK2 – HELIPAD - KARAKORUM HELIPAD CBK2 – HELIPAD - BASE CAMP K2 XLK2 - AIRPORT – CONCORDIA An Ice runway set at 16/34 orientation, with large boundary boulders, the Concordia camp is set nearby. HEK2 – HELIPAD - KARAKORUM HELIPAD Set behind the Concordia Base camp, it is a rough ground style H-Pad with no approach restrictions CBK2 – HELIPAD - BASE CAMP K2 Set at the very base of K2, it is another rough ground style H-Pad with no approach restrictions, and a small tent city base camp. ___________________ Summary 2020 has been a big year for the scenery combo of Frank Dainese & Fabio Bellini and not only for the five exceptional packages of the Dolomites, but also the South American Torres del Paine National Park, and now this a package of another significant mountain region of Pakistan's Karakoram. Karakoram is also home to one of the most dangerous mountains on the planet, of which is K2, and at 8,611m the second highest mountain behind Everest. And if you think this scenery is just one mountain, then think again as the Karakoram has four of the noted 8,000m mountains (five if you count Nanga Parbat to the west) in the biggest climbs and challenges known to any climber. The Karakoram area is well represented in peaks with not only K2, but also K1 (Masherbrum), Broad Peak, the Gasherbrum massif of nine peaks, Chogolisa, the Saltoro Mountains subrange including Saltoro Kangi, Baltoro Kangi, Muztagh Tower, Biale Kangri, Choricho and the famous Trango Towers. All the associated glaciers are also completely represented including the immense Baltoro Glacier. There is one (fictional) airport and two H-Pads included. Except for two Base Camps (one large and one small) there is no other object placement in the scenery, it is all just about the spectacular scenery. All scenery is 3D with DEM data (digital elevation model) and further elaborated with many structural details. The textures are all based on 4K (4096x4096) extreme quality images. Extremely difficult to do, These excellent representations of iconic mountain areas of the world are for exploration, sightseeing or just plain exploring... and you could throw in a bit of geography as well. All are very highly detailed of the areas they represent and the mountain ranges are of course the stars and the focal point of the scenery packages. Hugely popular and yes I seriously love these amazing and hugely detailed and now extensive sceneries that can change your perspective of iconic mountain areas and allow them to come to life in your simulation world, in this case the extreme world of the Karakoram region... Highly recommended. ____________________________________________ Yes! The K2 - Karakorum 3D by Frank Dainese & Fabio Bellini is NOW available from the X-Plane.Org Store here : K2 - Karakorum 3D Price Is US$22.95 Features: Area included in the degree + 35. + 076. Mountains scenery with 3D models of the main mountains of Karakorum Base Camp Concordia from where the expeditions for K2, Broad peak, Gasherbrum and Cogholisa depart. Base Camp K2, the real Base Camp for the conquest of K2. helipad near to base camp 1 snow-runway 500 mt. long, near Base Concordia 3D models +textures, all in 4K : K2, Broad peak, Gasherbrum group, Cogholisa, Masherbrum, Mitre Peak, tower Musthang, Tower Trango Photographic polygons/ textures as covered of terrain typical zone of great mountains. Polygons/textures 4K area covered 2000 Square Kilometers WT3/Traffic Global: Your joking of course! no, you are on your own out here Requirements X-Plane 11 Windows, Mac or Linux 4 GB VRAM Minimum - 8 GB+ VRAM Recommended Download Size: 485 MB Release and Review version 1.0 (1st December 2020) Installation Download scenery file size is download 459mb and with the full installation installed in your custom scenery folder as there are two install folders in the order below in the .INI File... the mesh has to be set below the main KARAKORUM_3D (780mb) MESH_KARAKORUM (135mb) Total scenery installation (K2 - Karakorum) : 915mb Documents One manual with notes ______________________________________________________________________ Scenery Review by Stephen Dutton 1st December 2020 Copyright©2020 : X-Plane Reviews (Disclaimer. All images and text in this review are the work and property of X-PlaneReviews, no sharing or copy of the content is allowed without consent from the author as per copyright conditions) Review System Specifications: Computer System: Windows - Intel Core i7 6700K CPU 4.00GHz / 64bit - 32 Gb single 1067 Mhz DDR4 2133 - ASUS GeForce GTX 1080 8Gb - Samsung Evo 512gb SSD Software: - Windows 10 - X-Plane v11.51 Addons: Saitek x52 Pro system Joystick and Throttle : Sound - Bose Soundlink Mini Plugins: None Scenery or Aircraft - Bell 407 XP11 by Dreamfoil (X-Plane.OrgStore) - US$35.00 - Pilatus PC-6 Turbo Porter - DGS Series by Thranda (X-Plane.OrgStore) - US$34.95
-
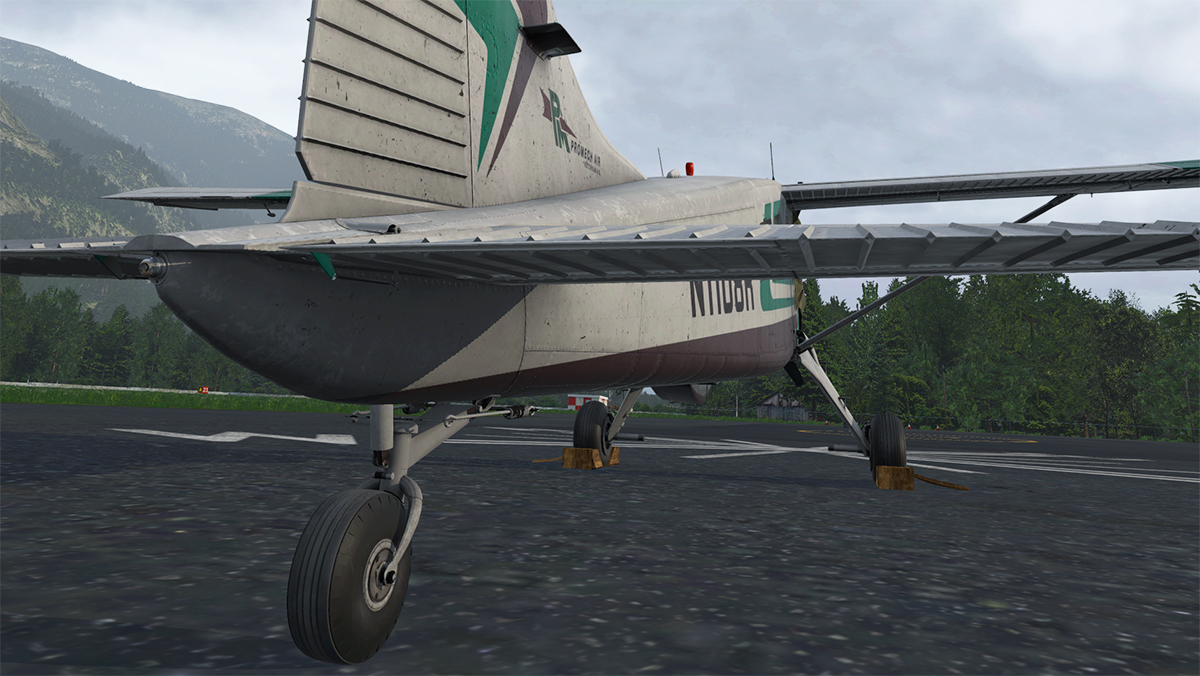
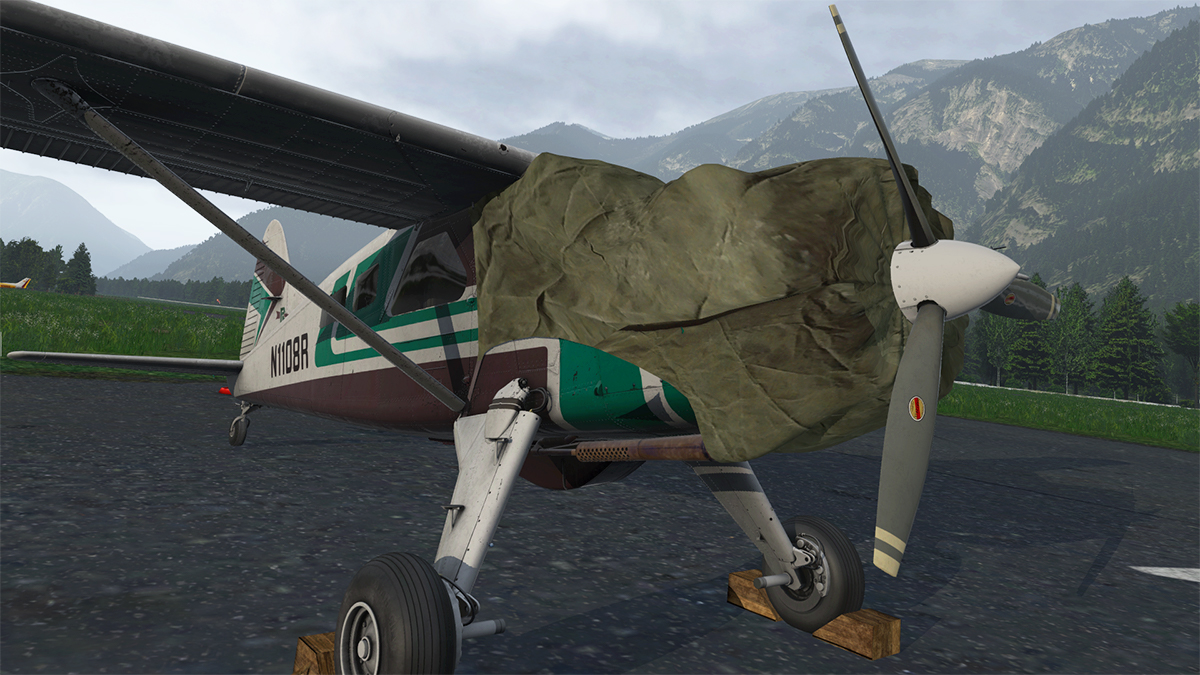
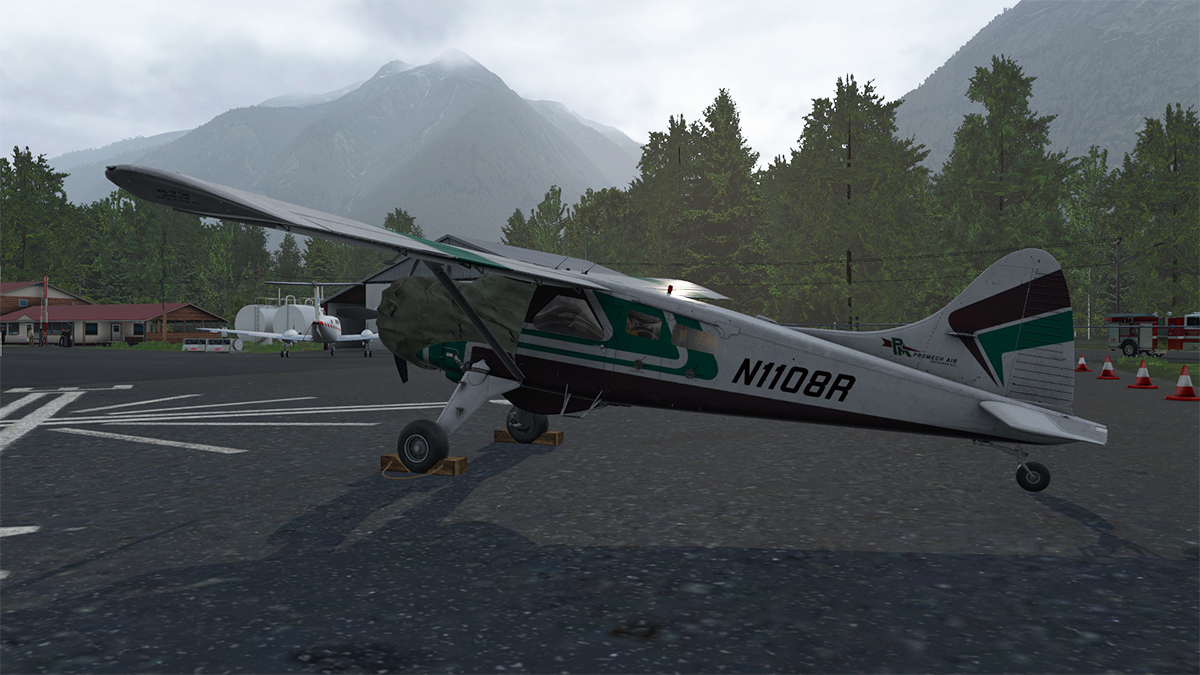
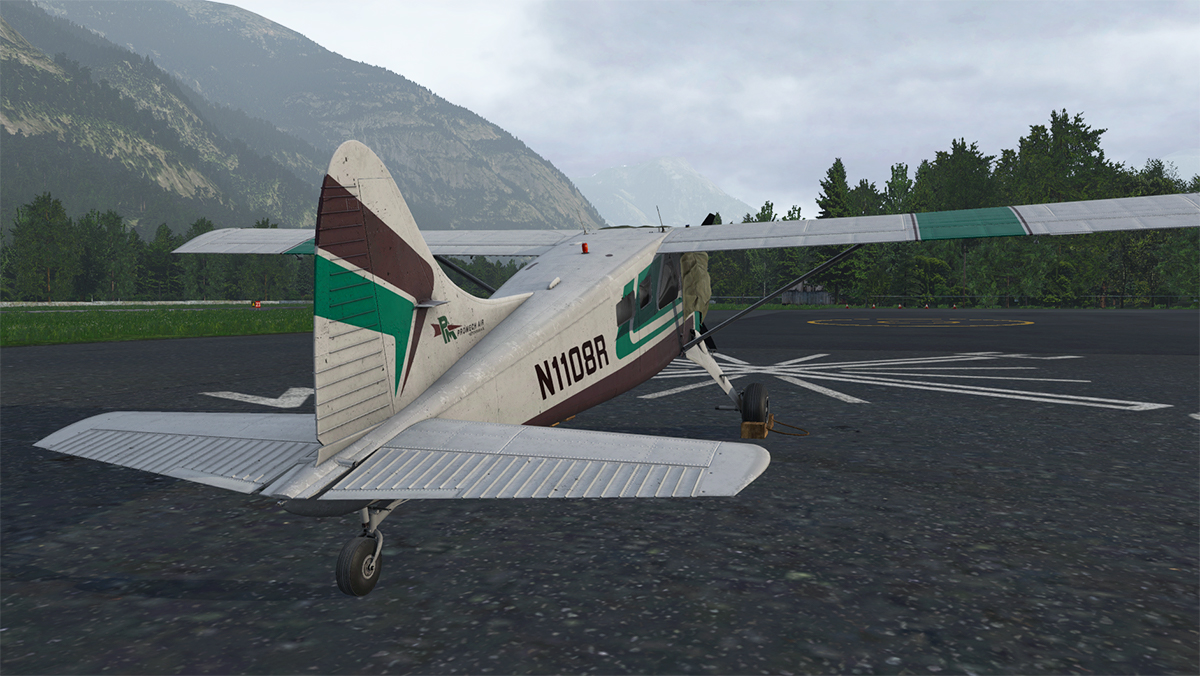
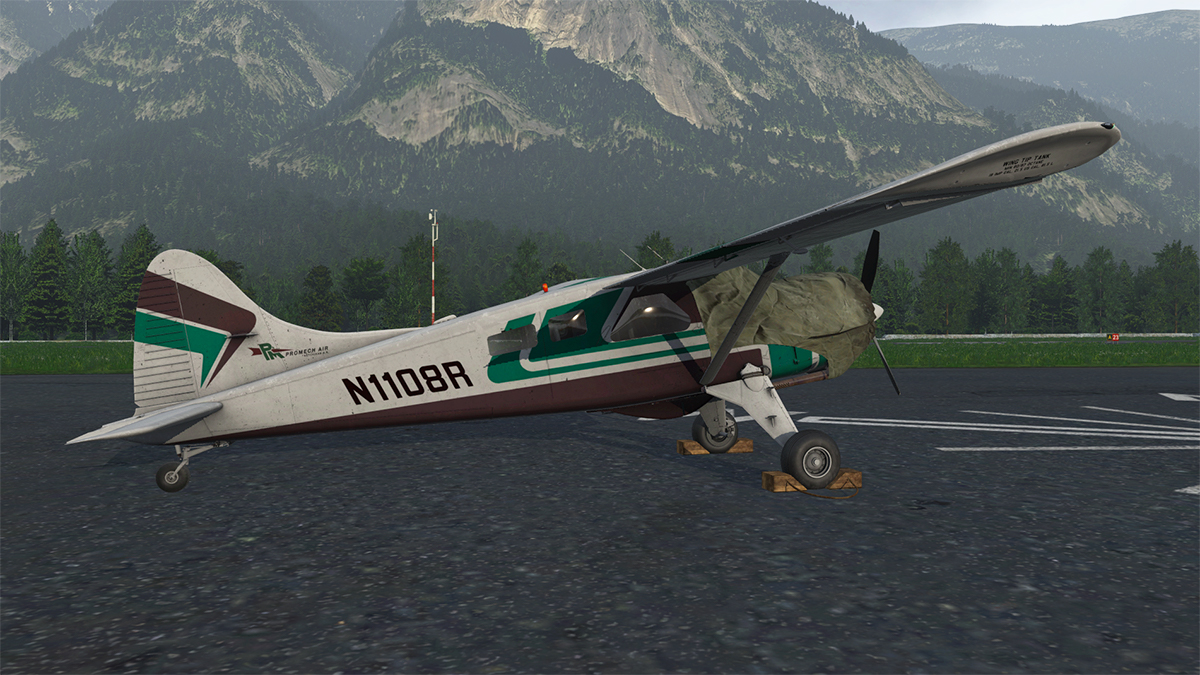
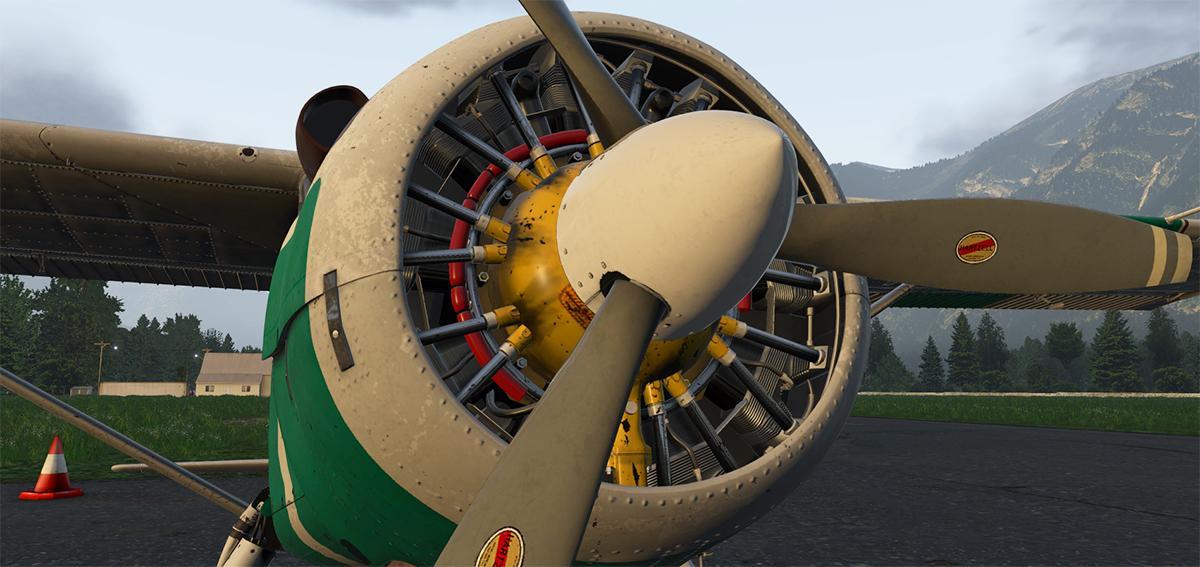
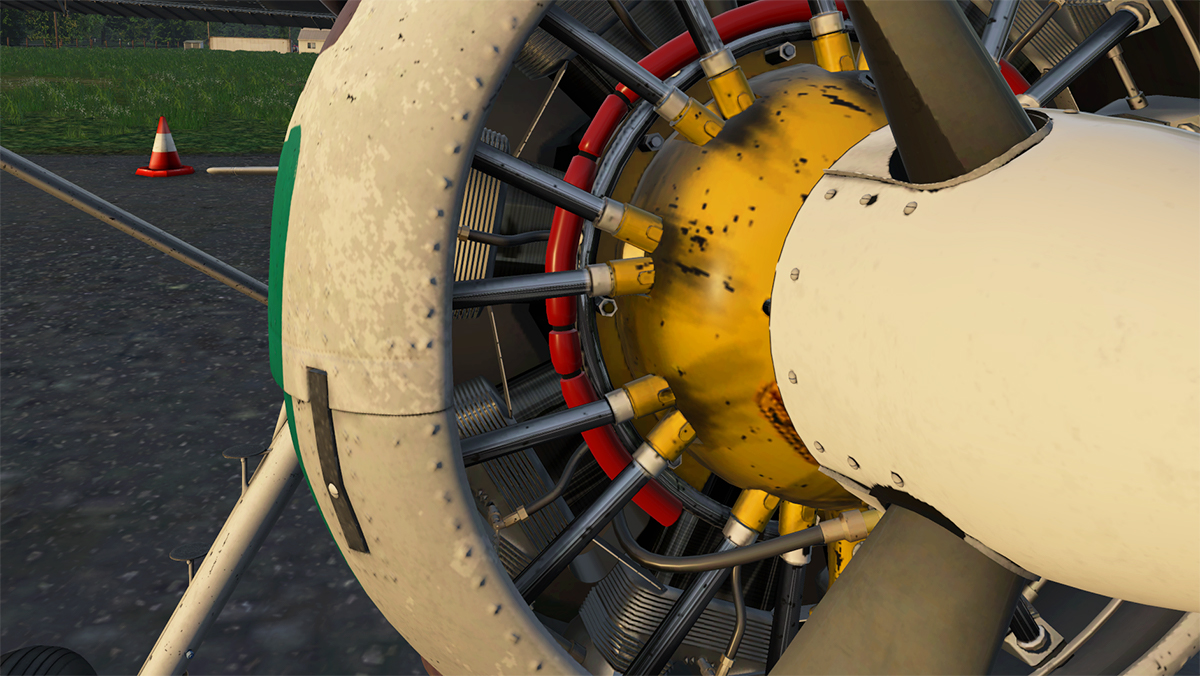
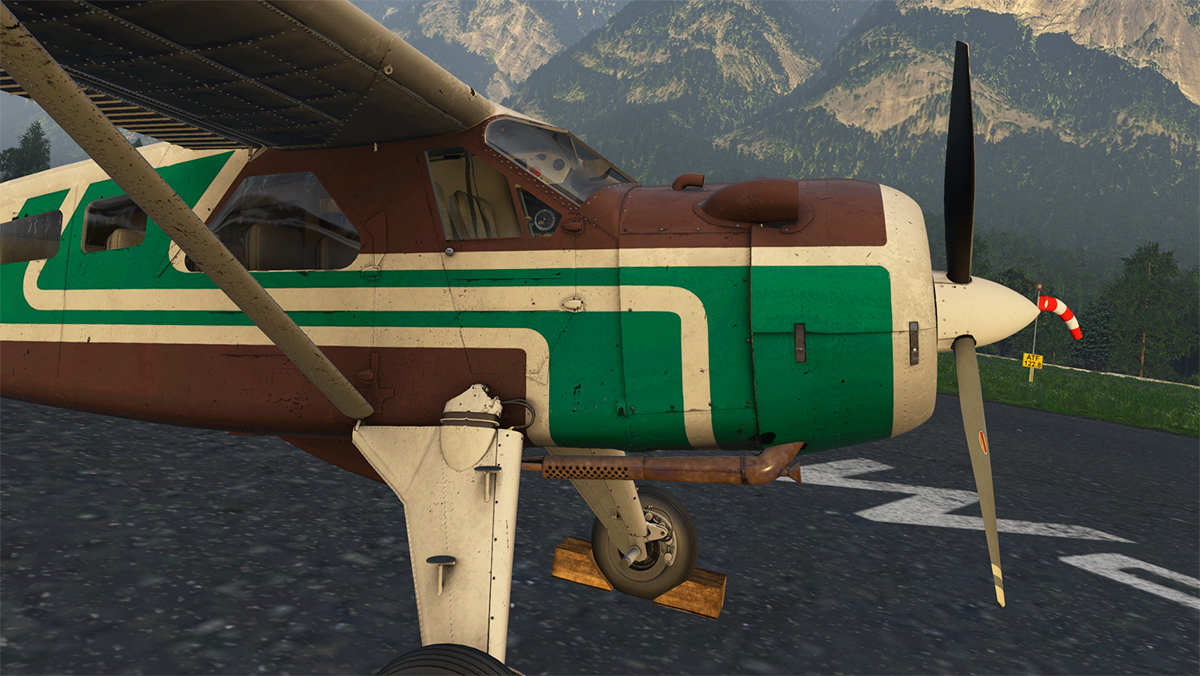
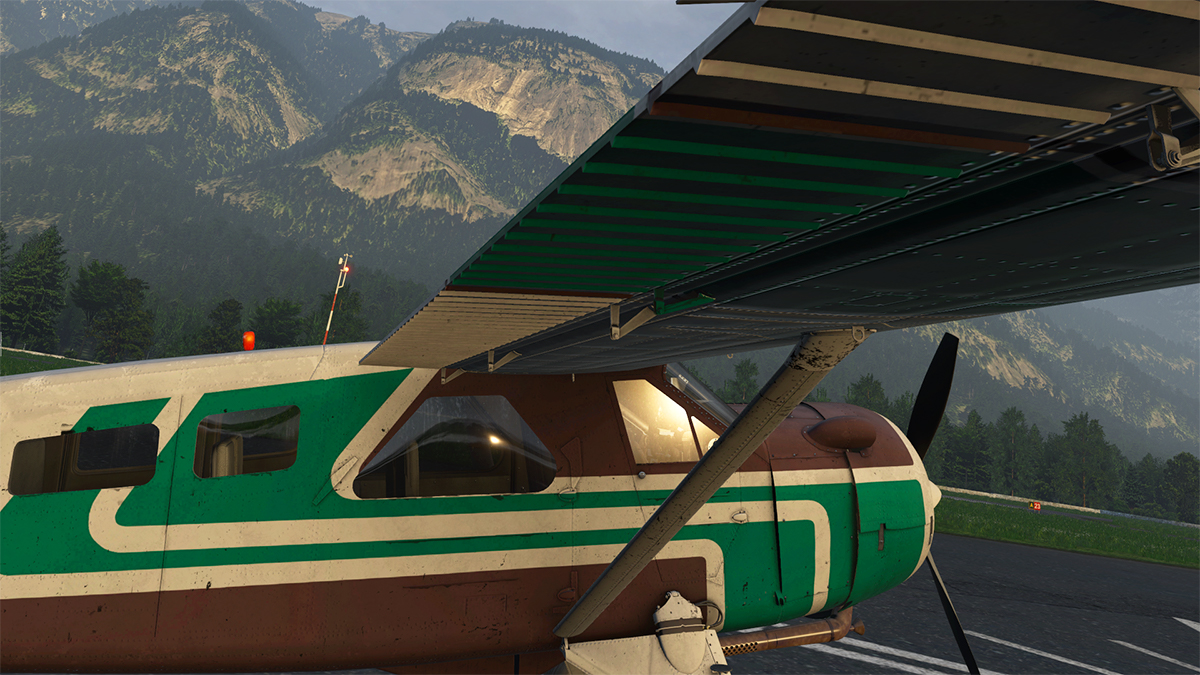
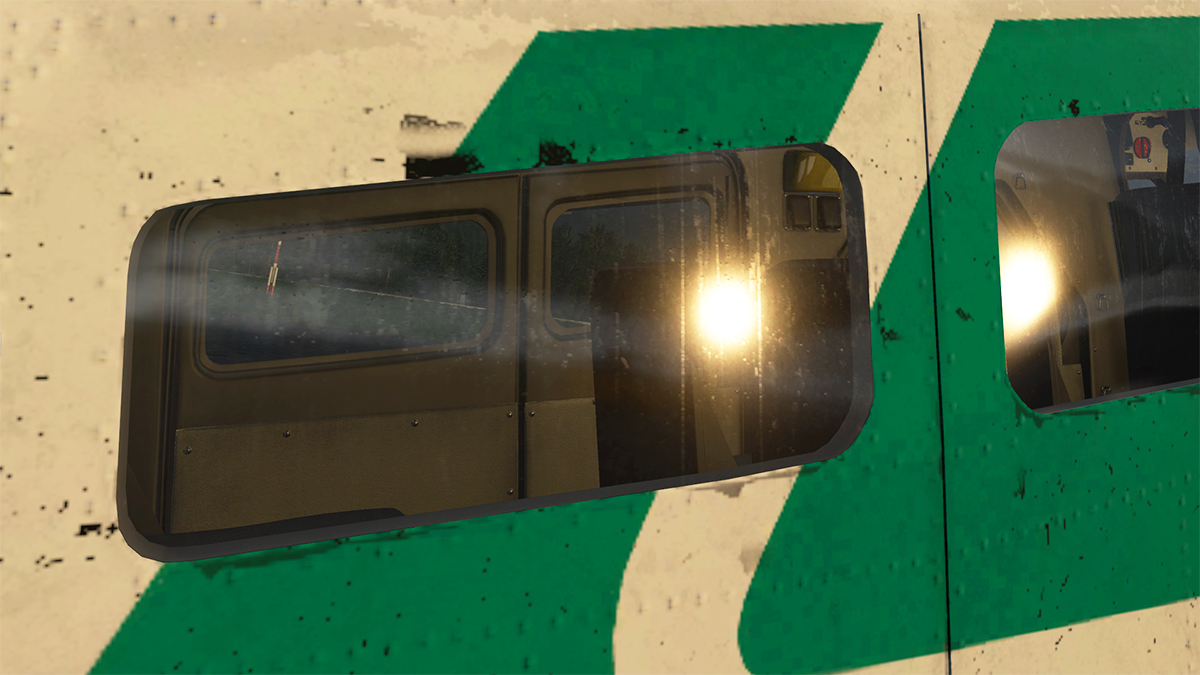
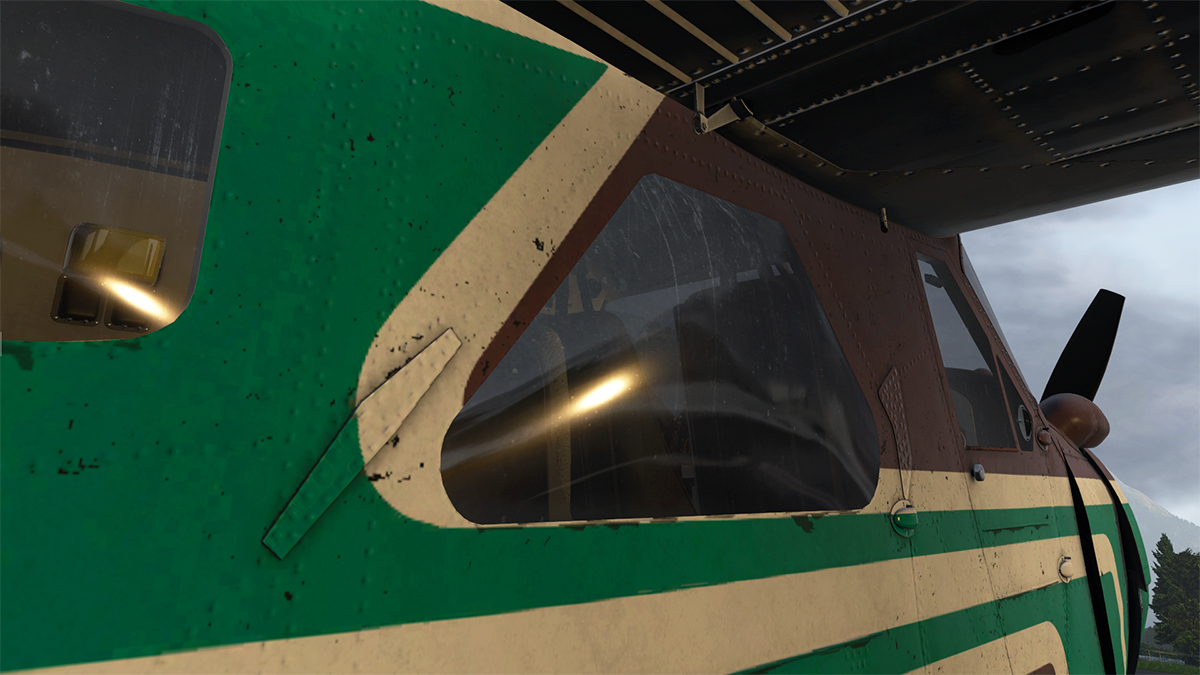
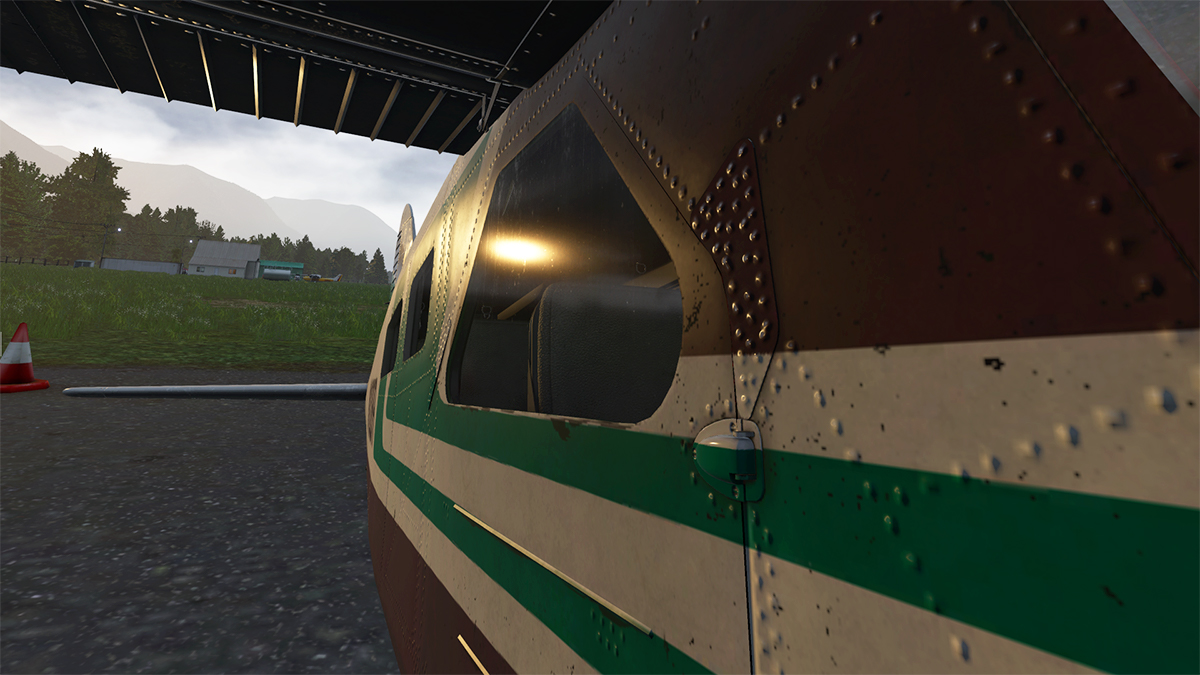
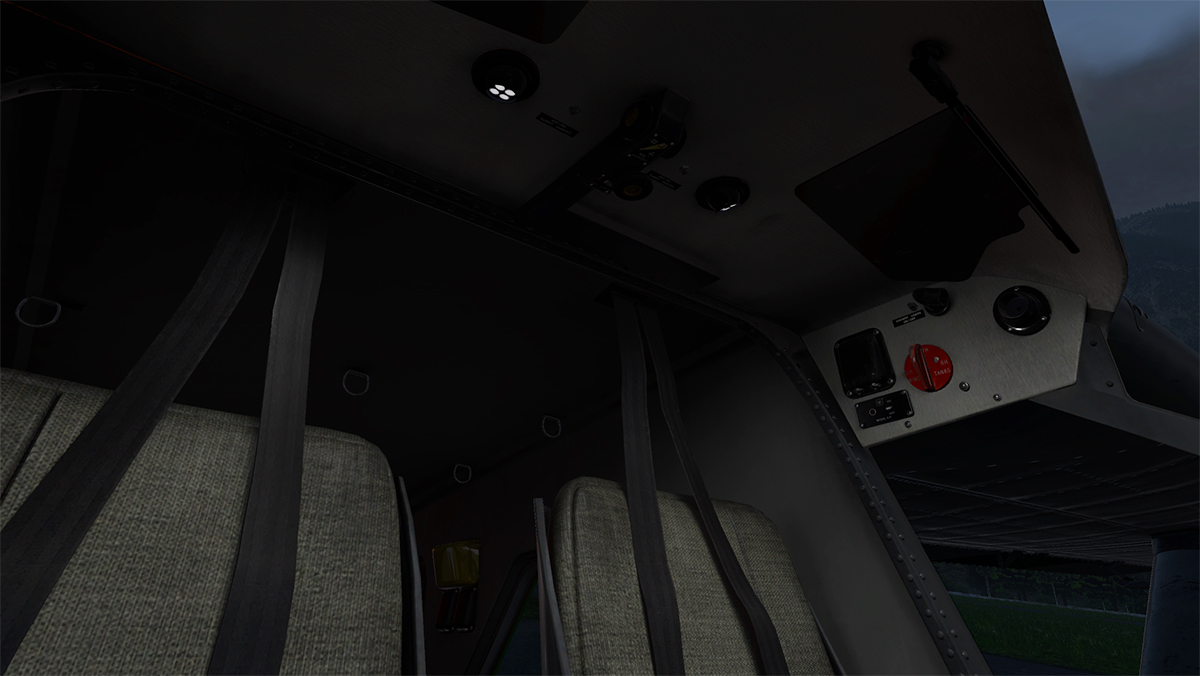
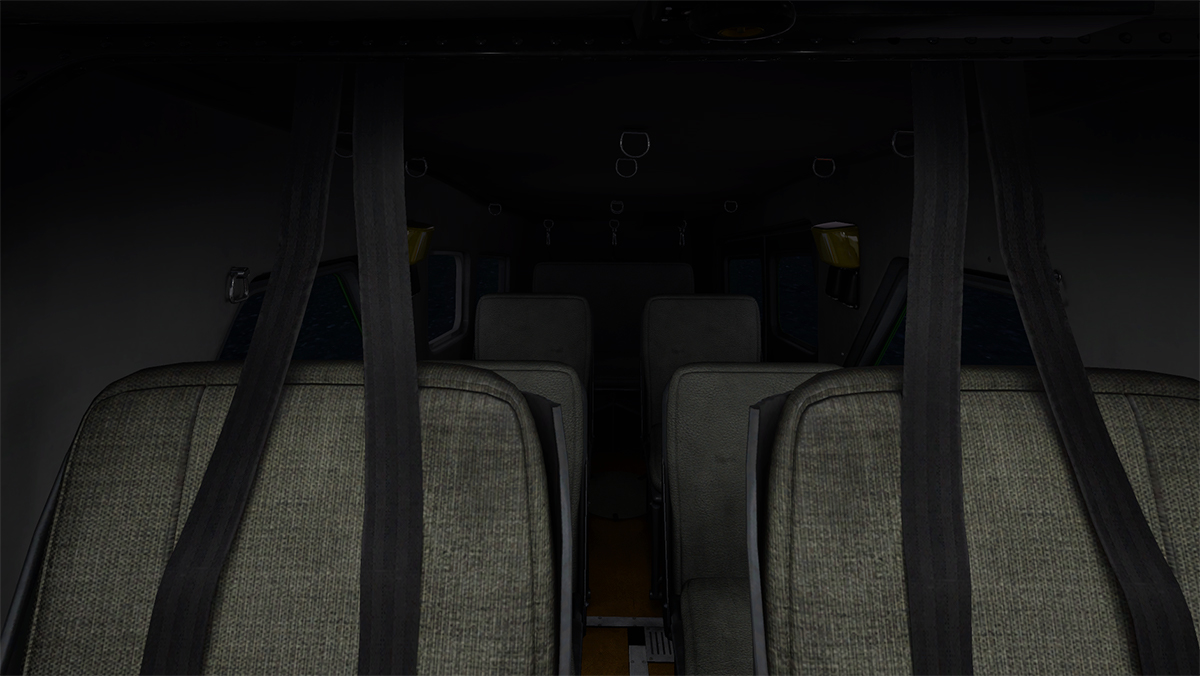
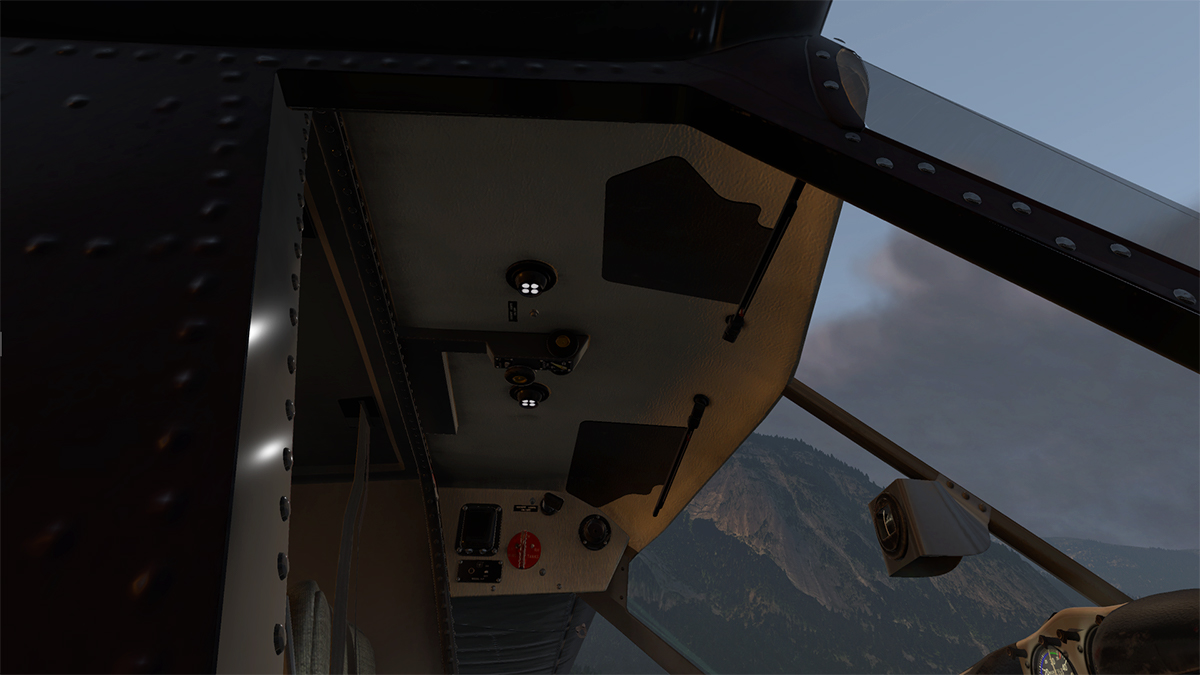
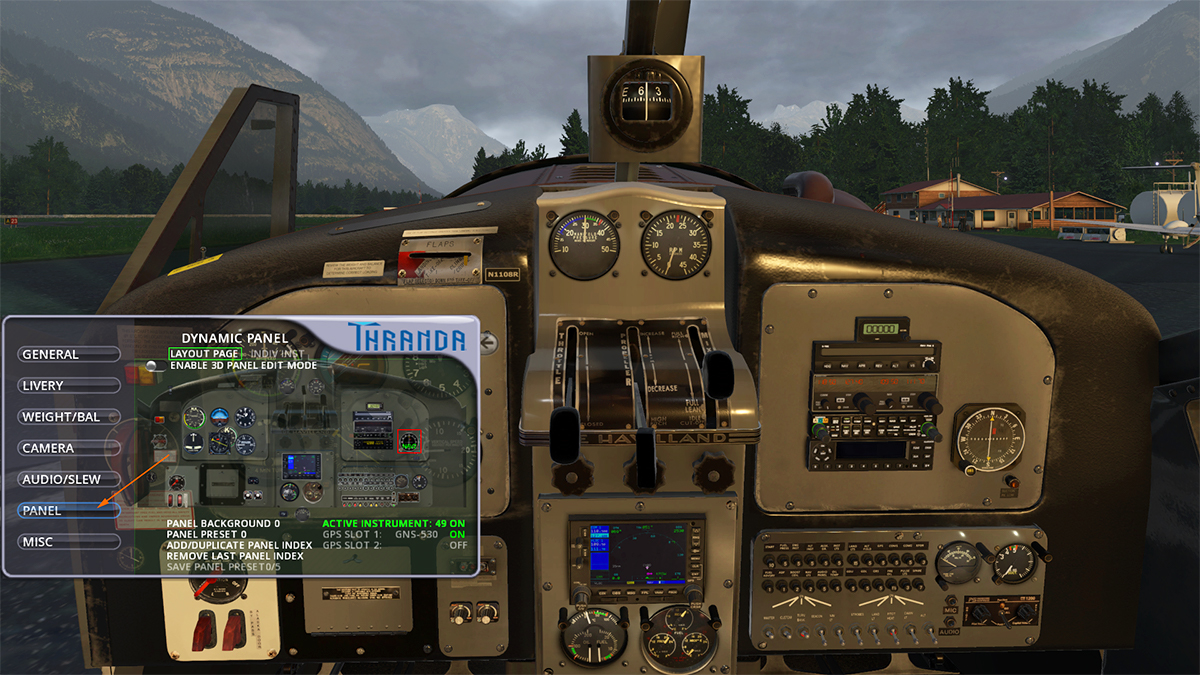
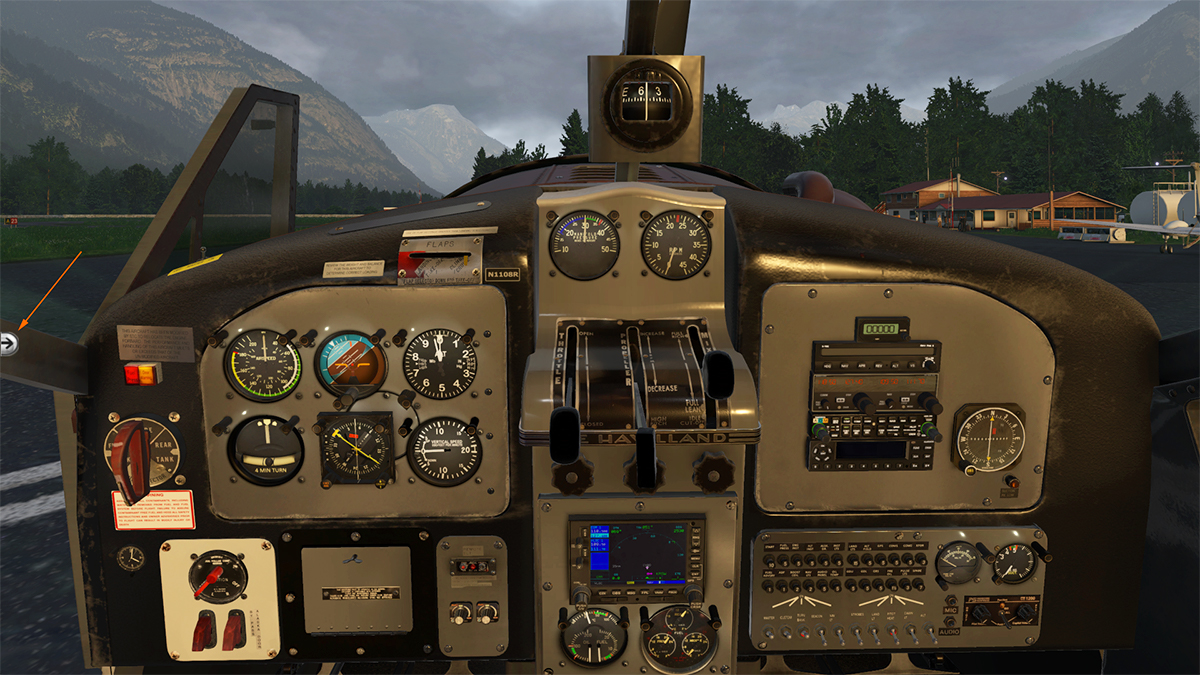
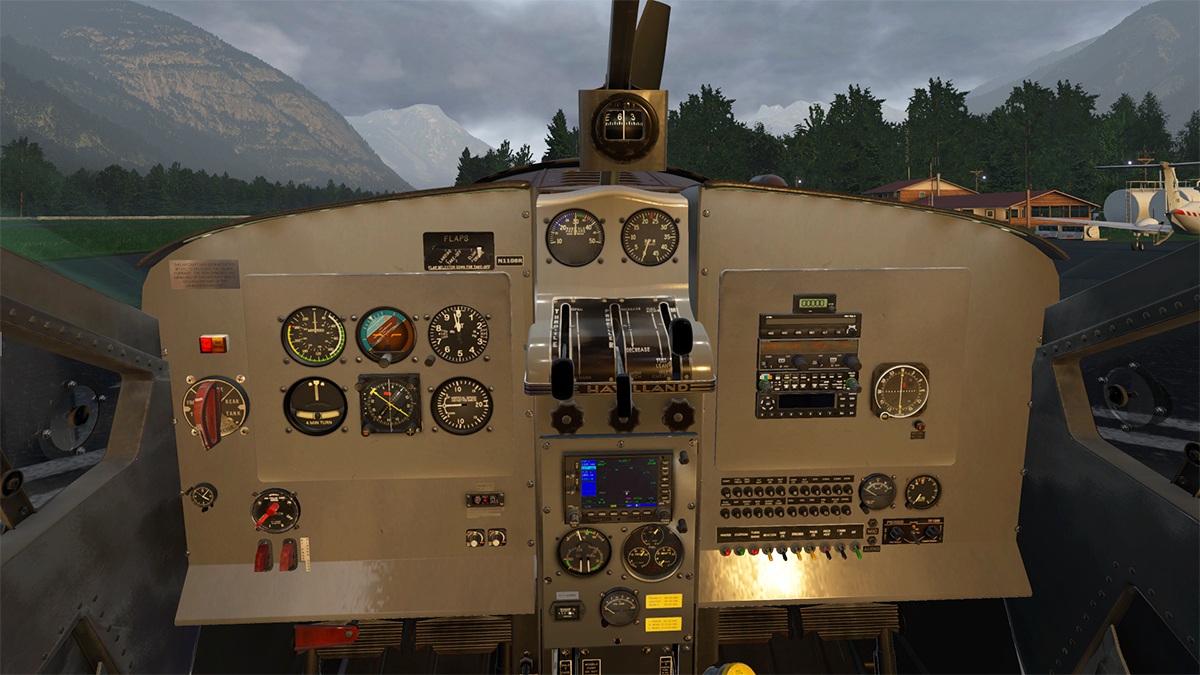
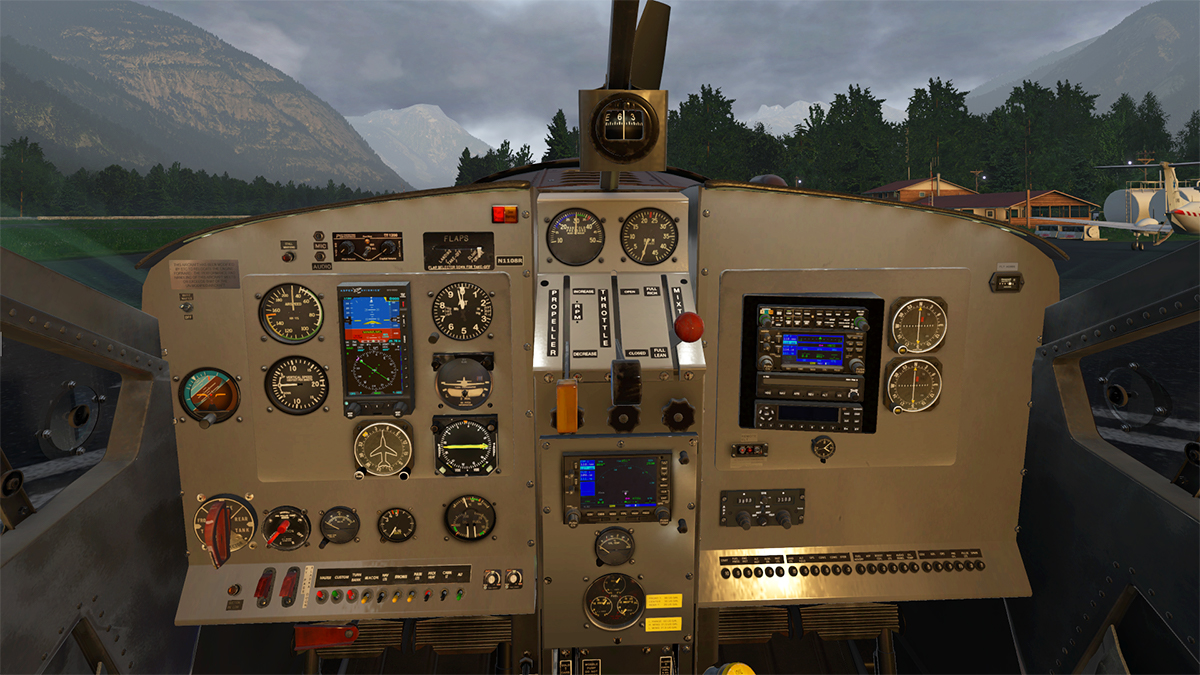
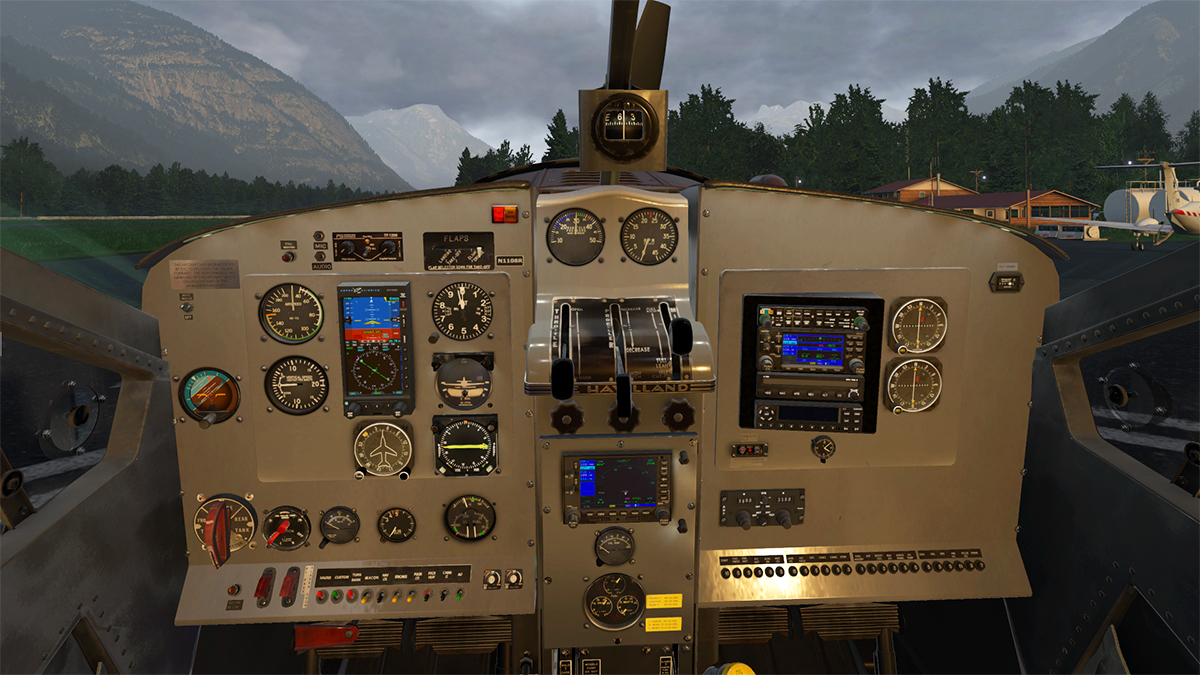
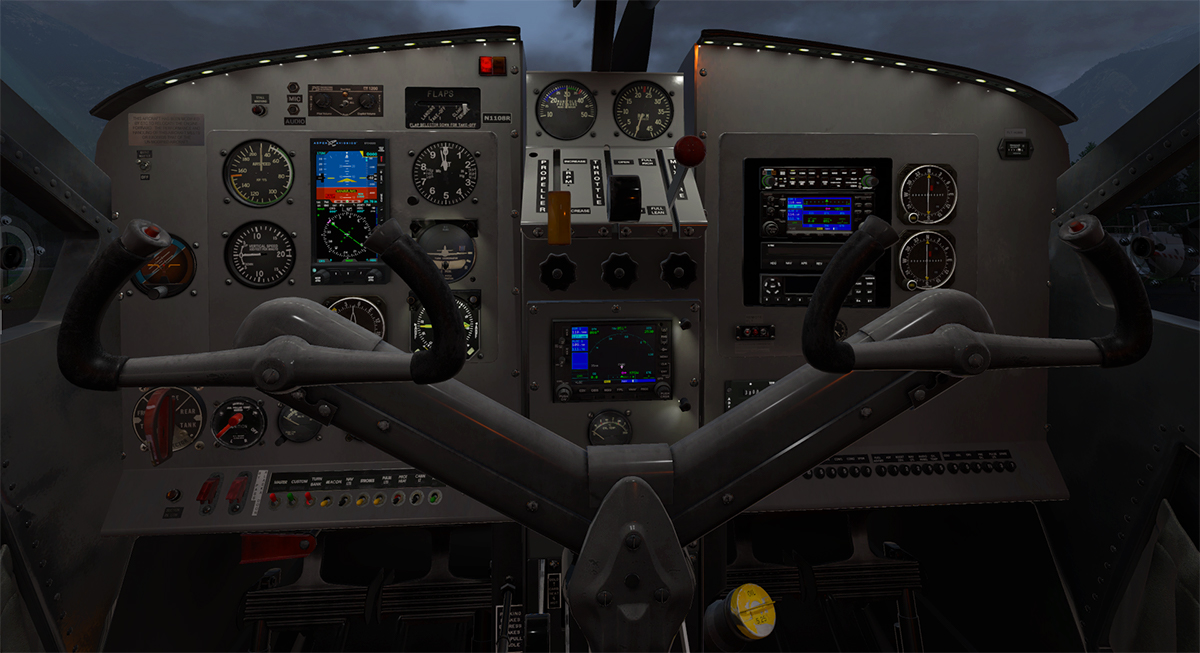
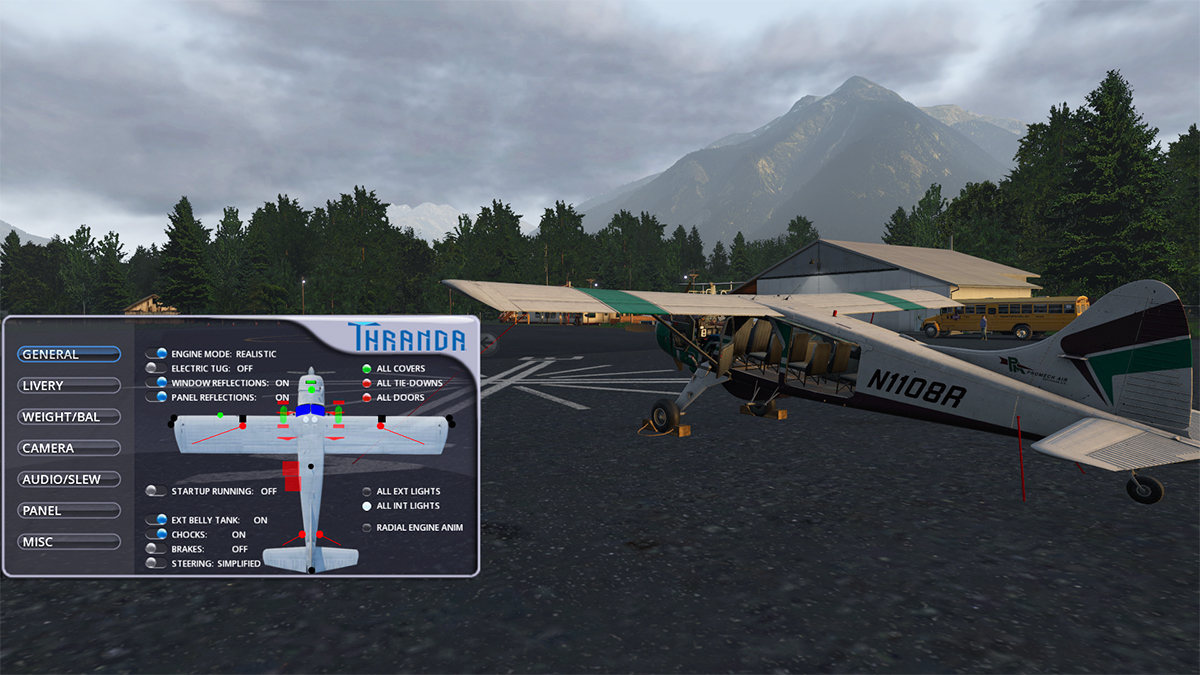
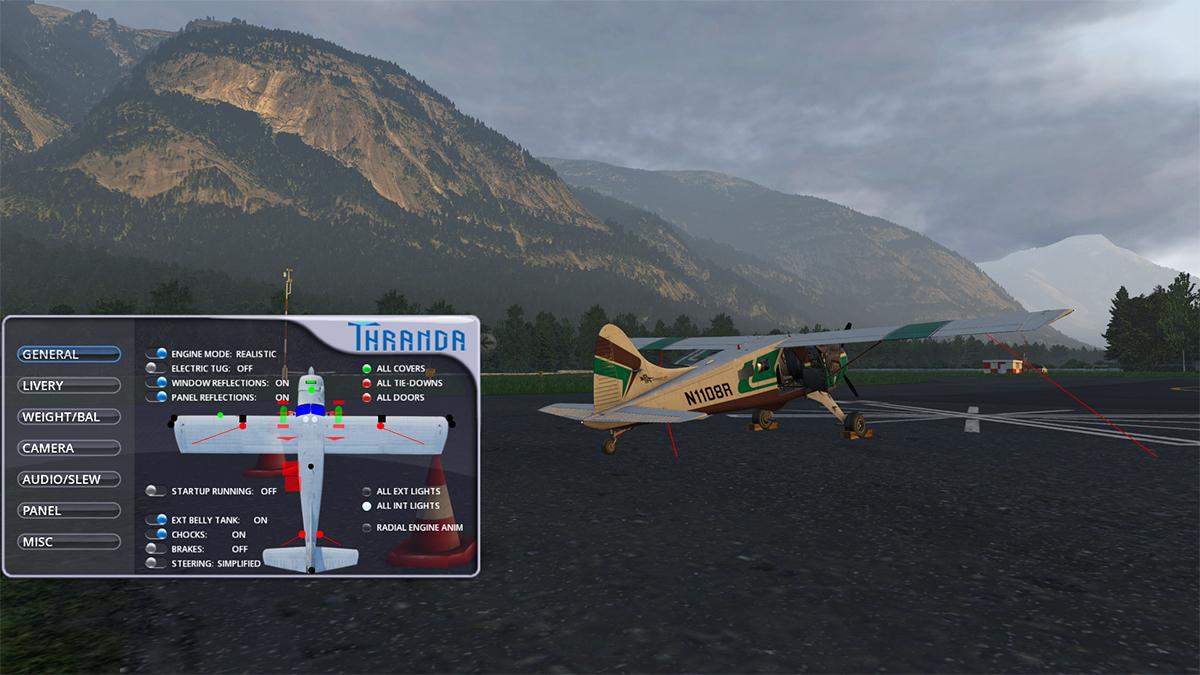
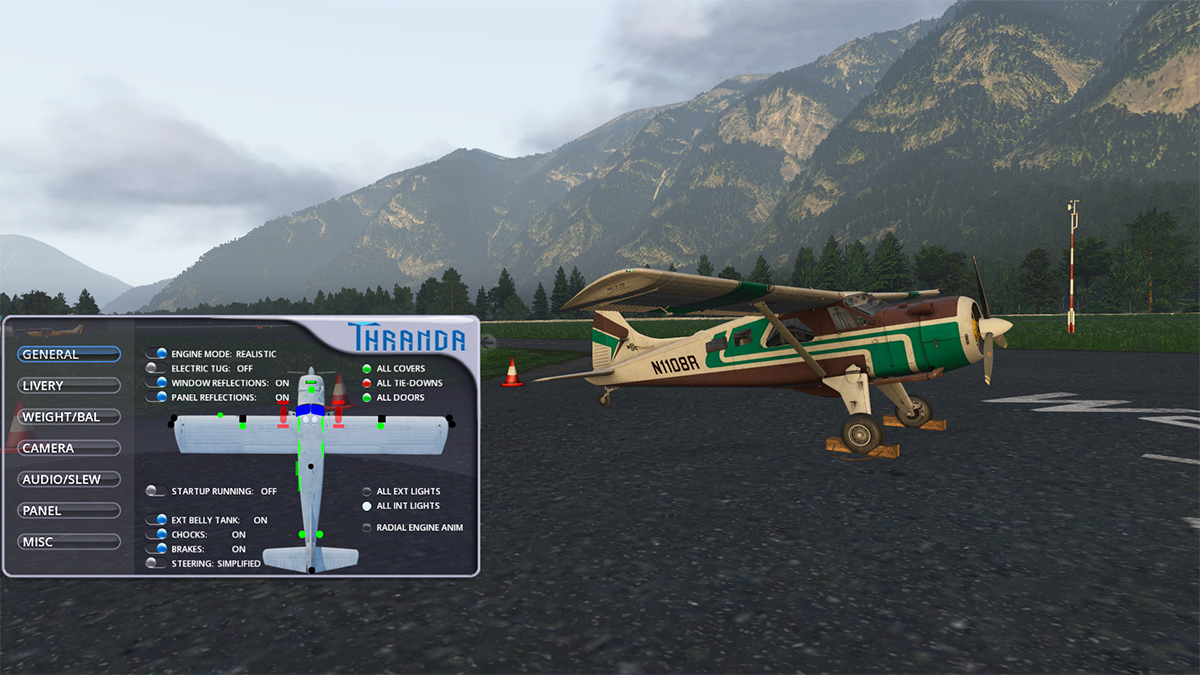
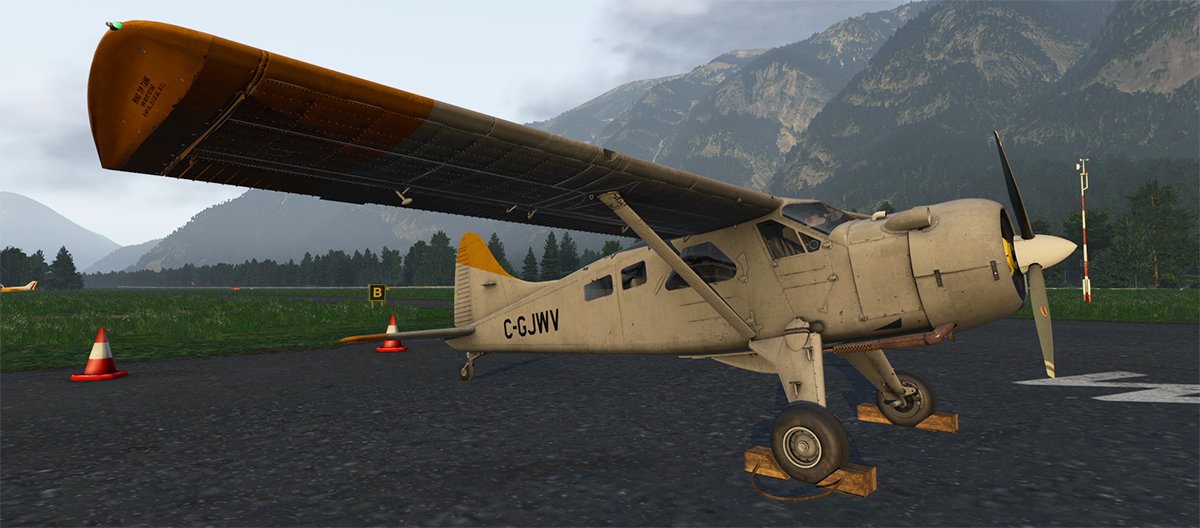
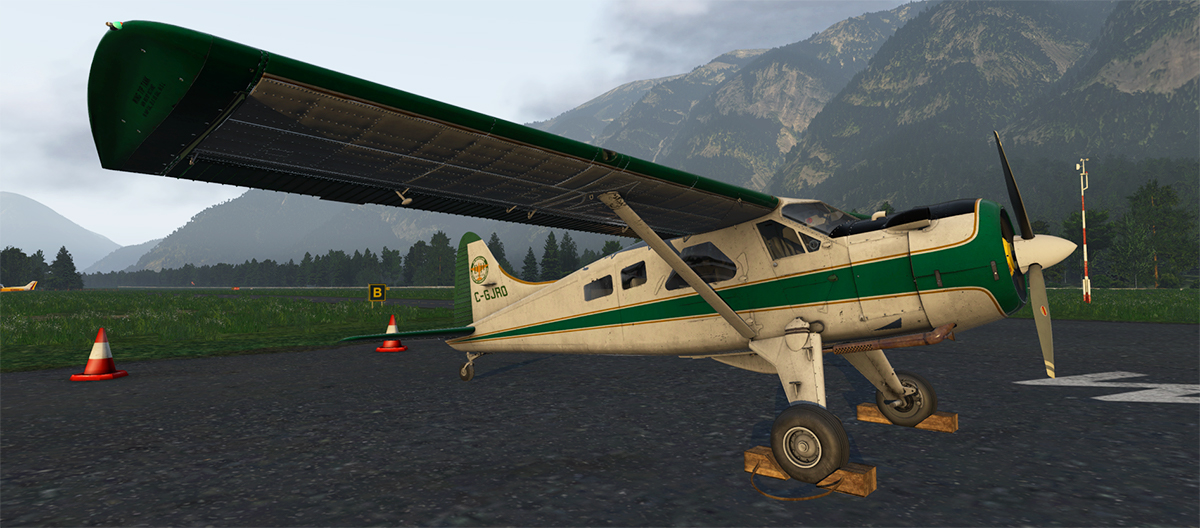
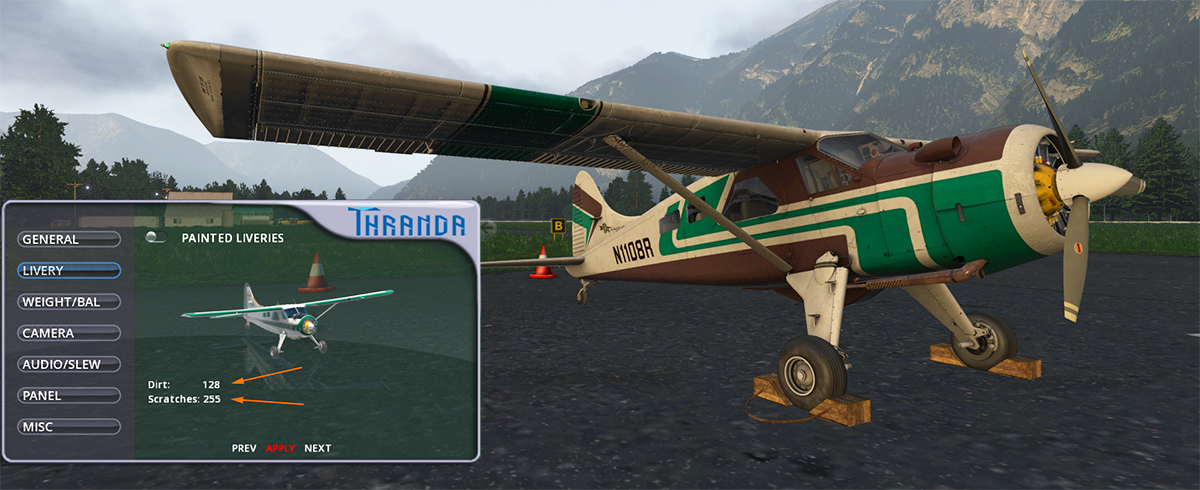
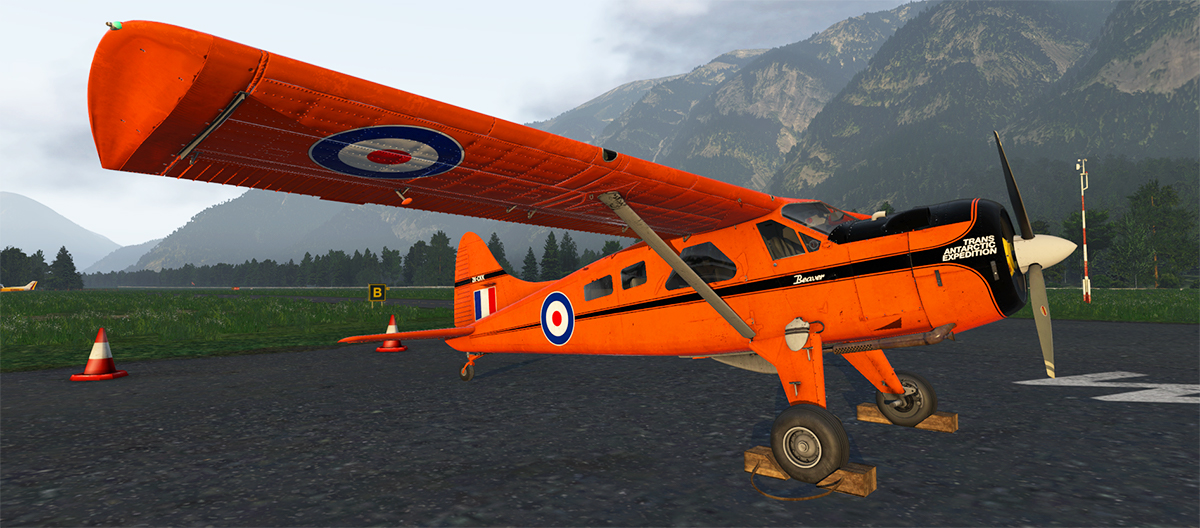
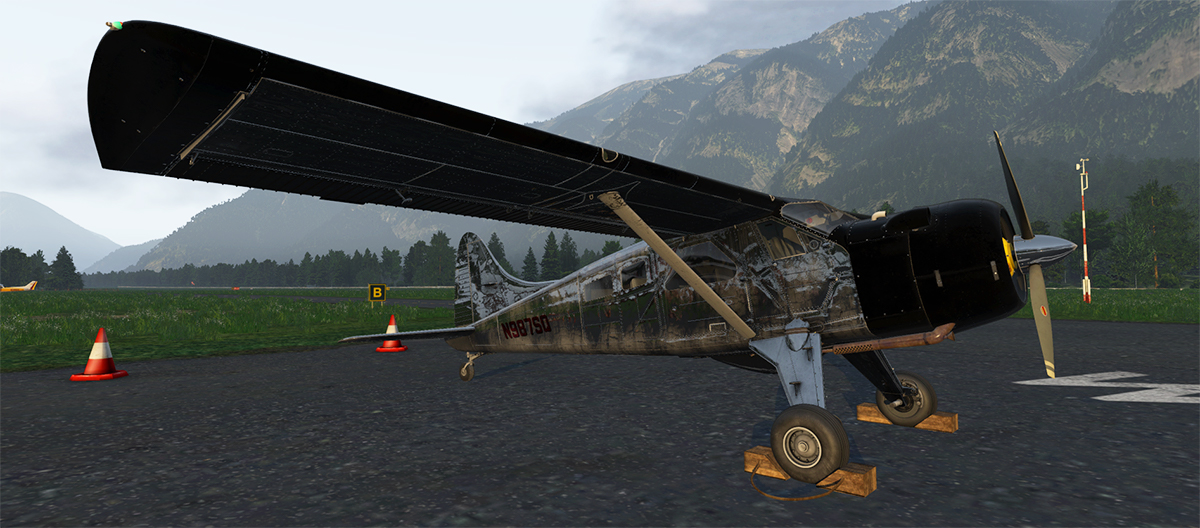
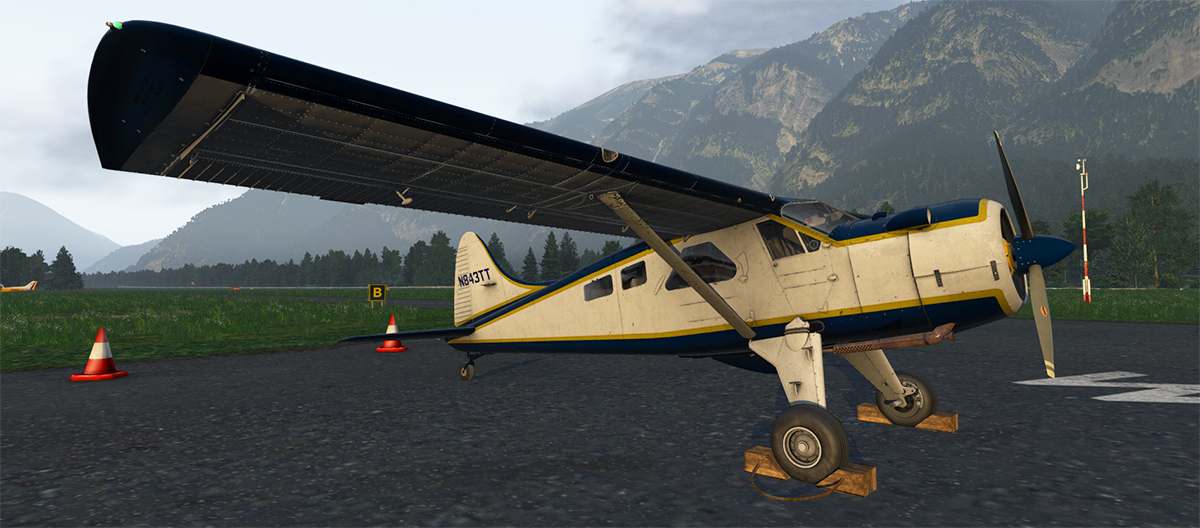
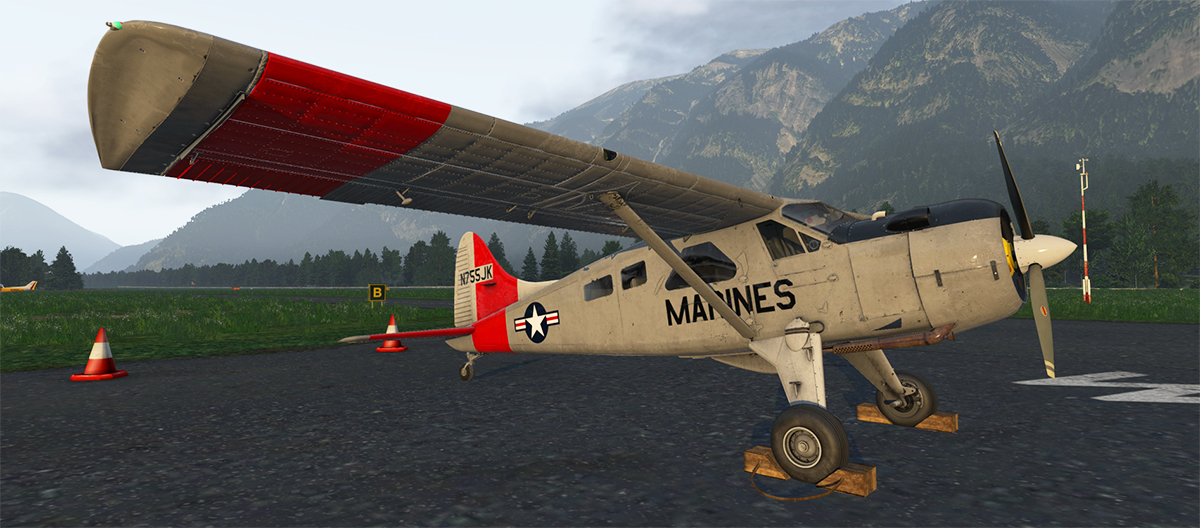
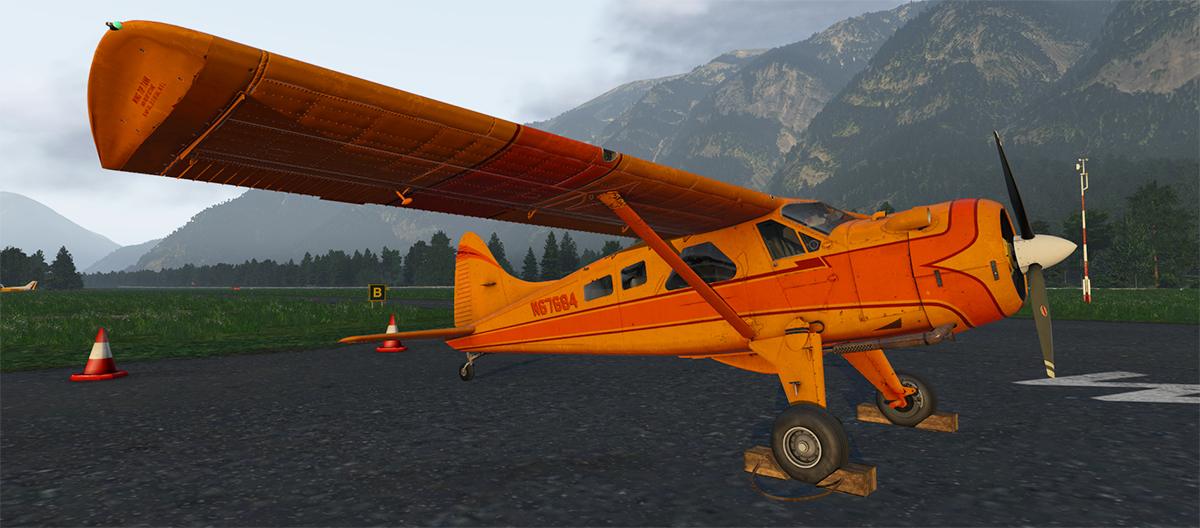
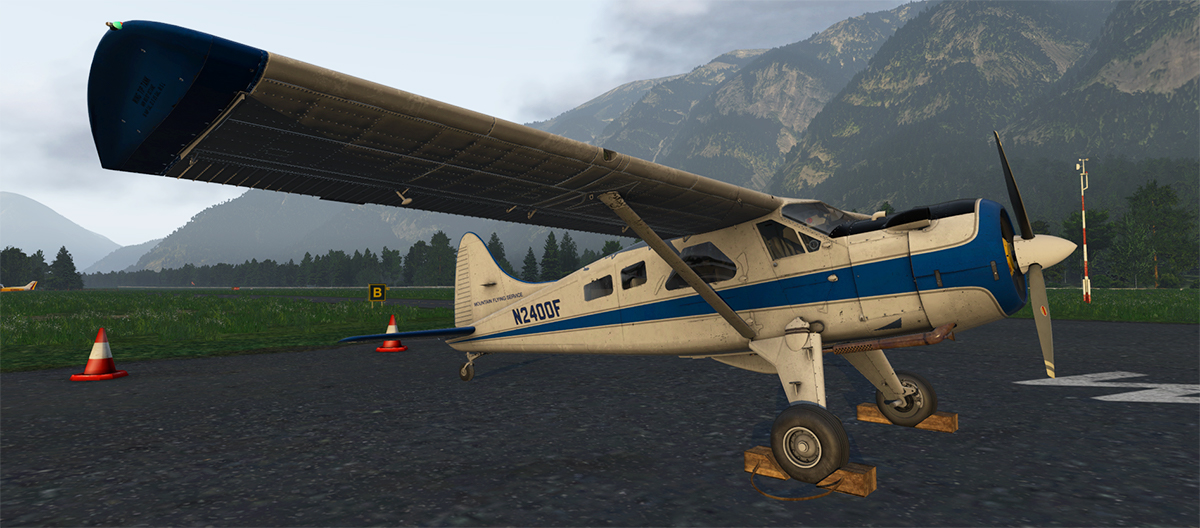
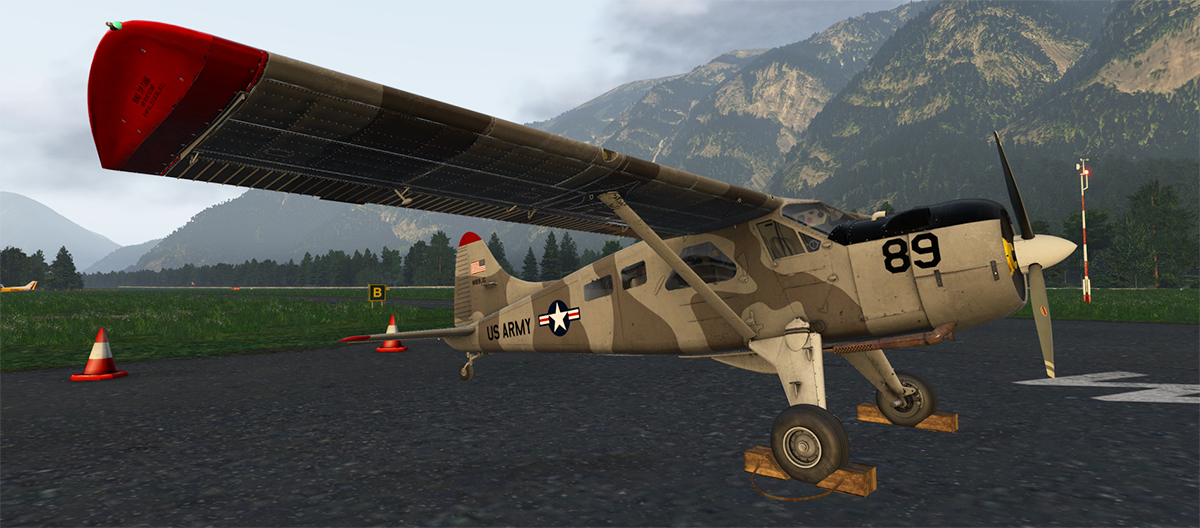
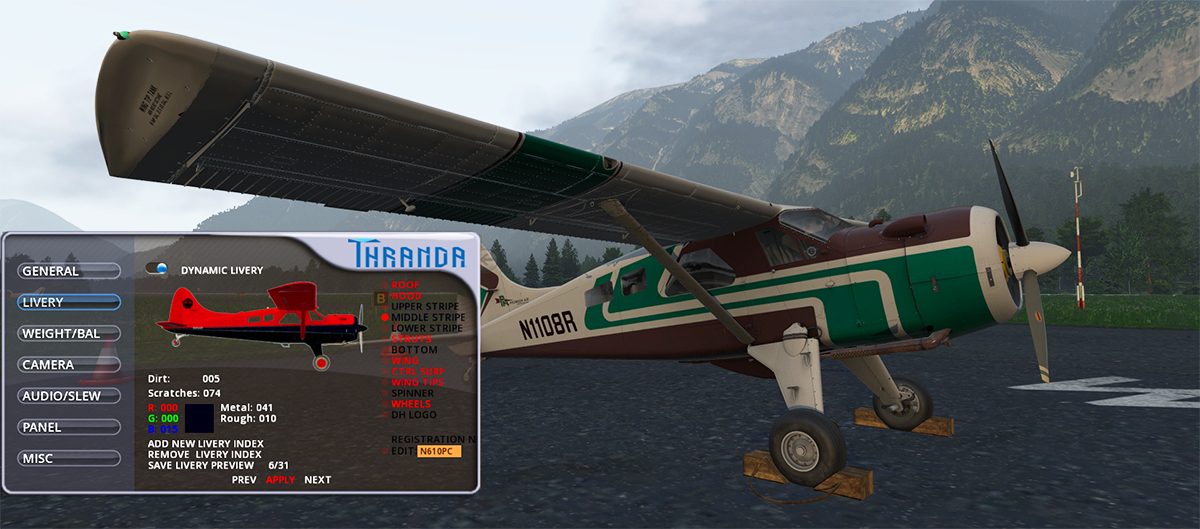
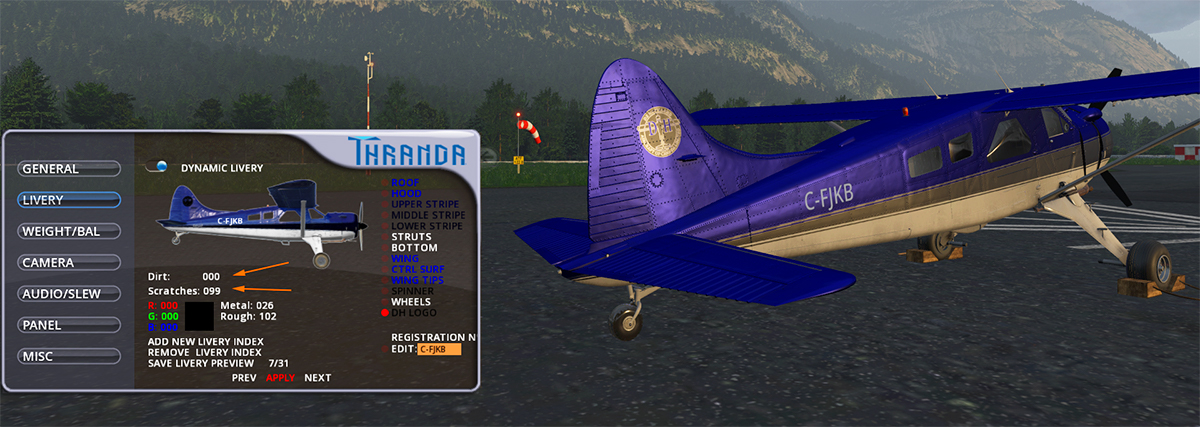
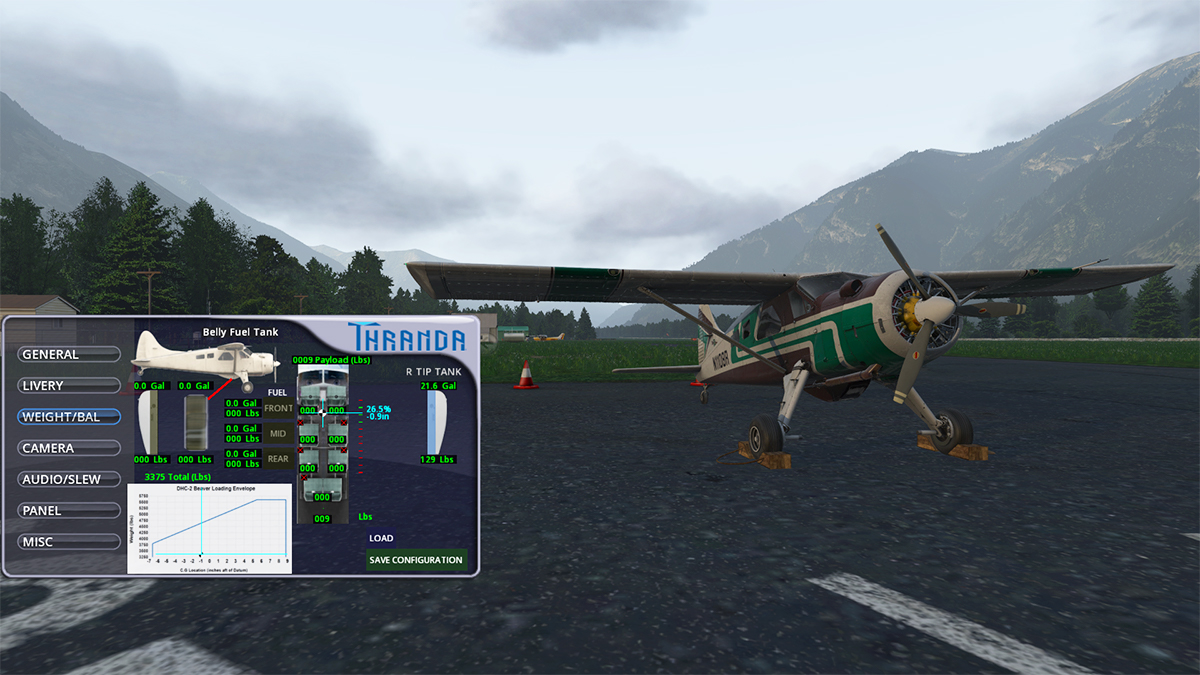
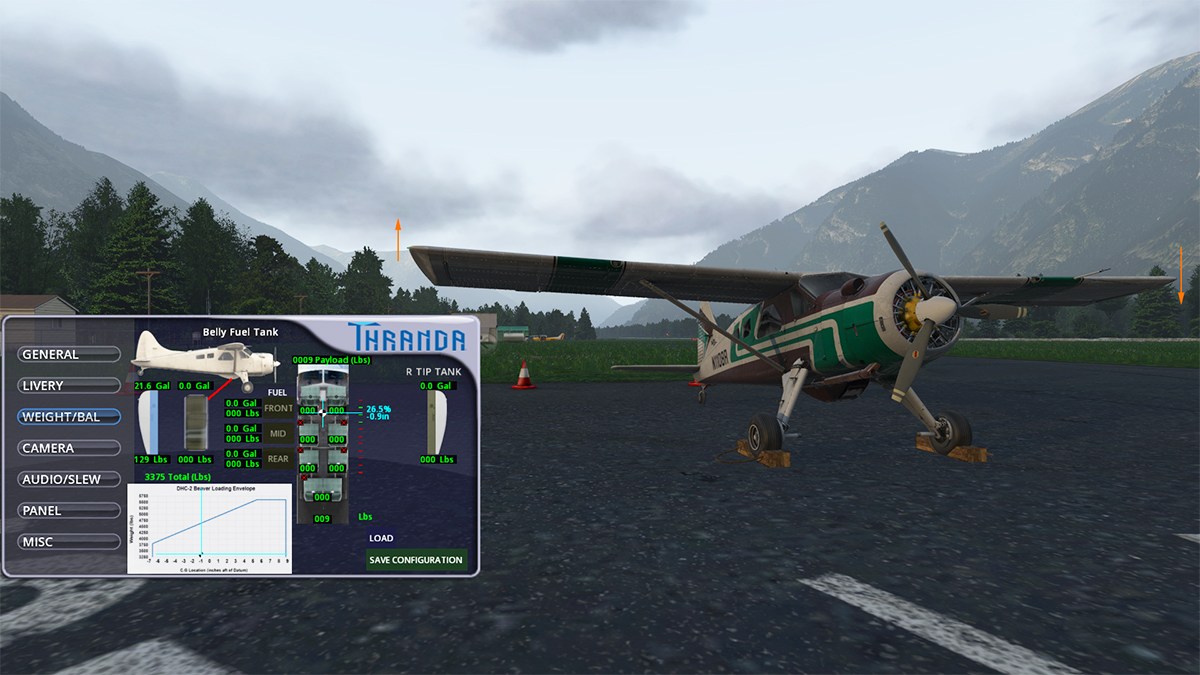
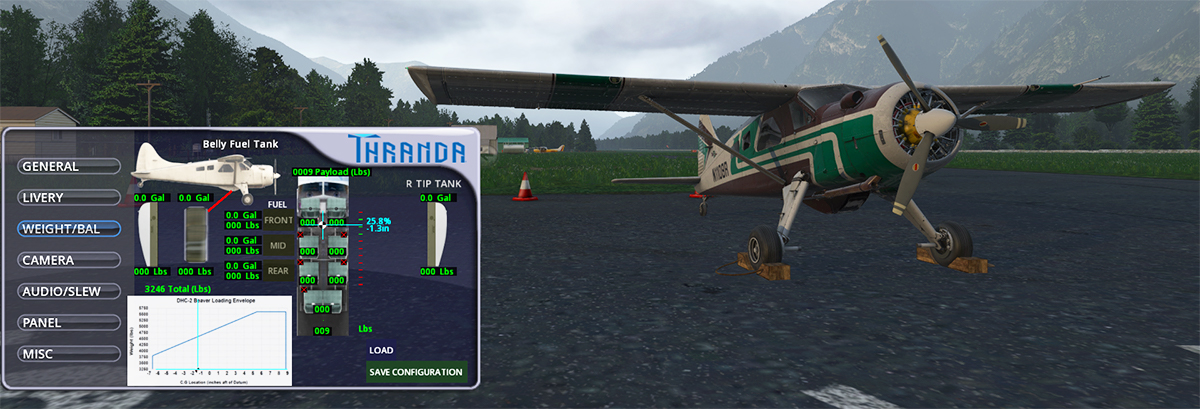
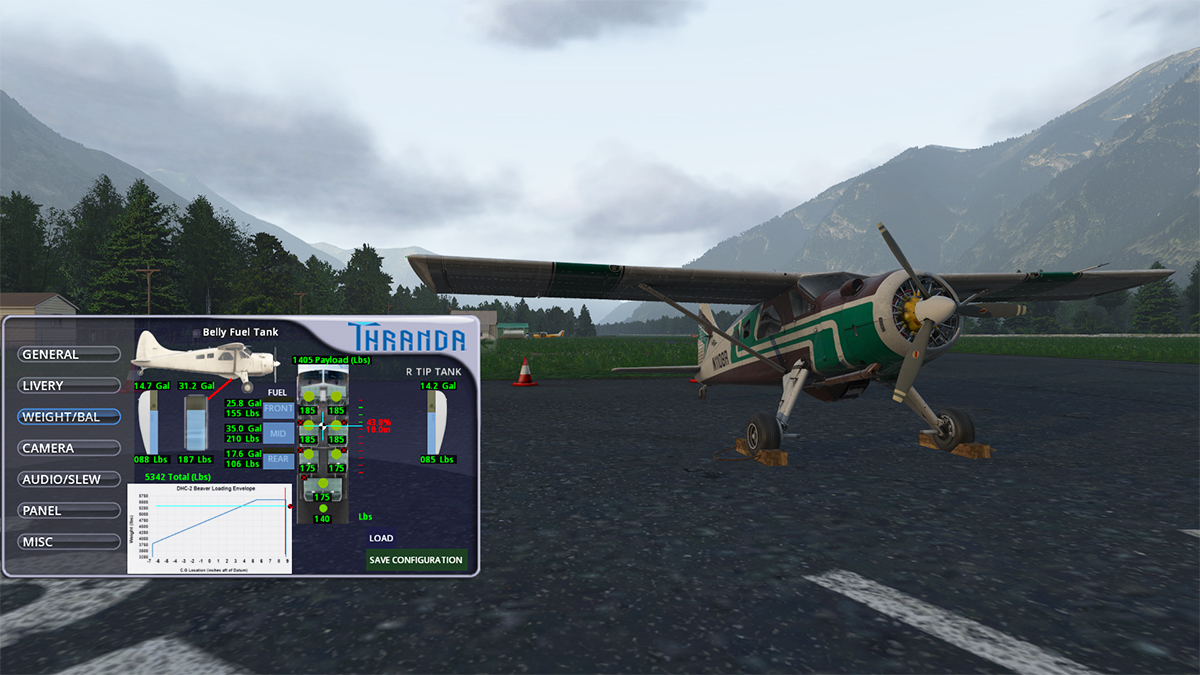
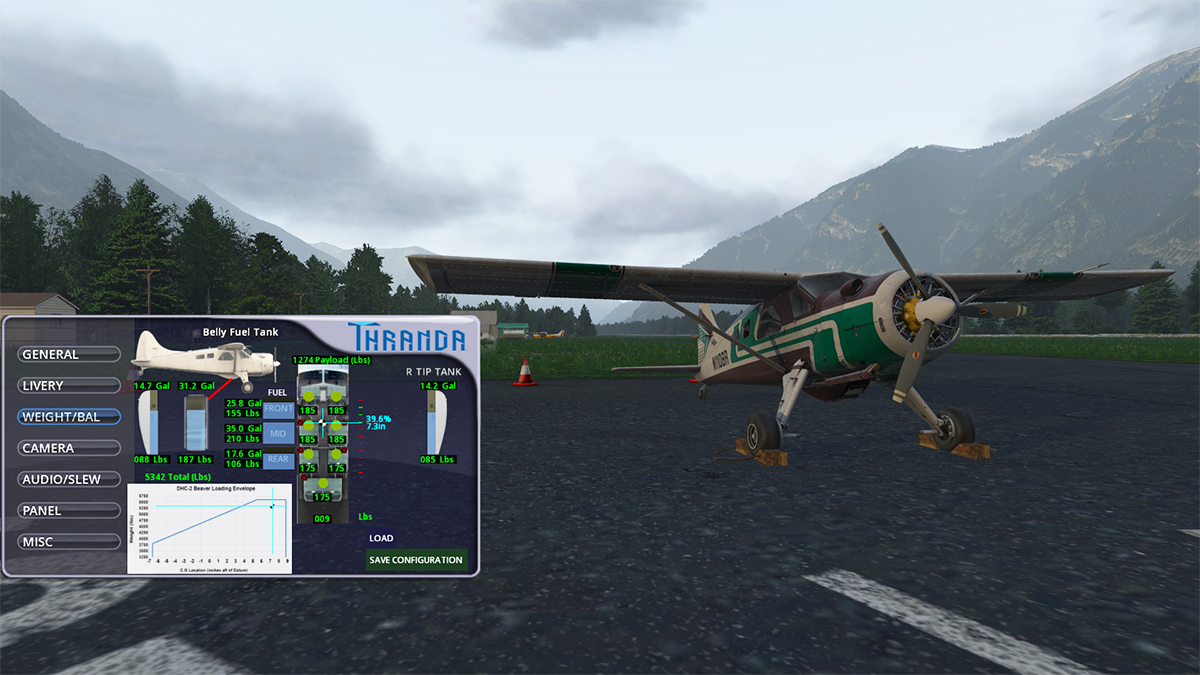
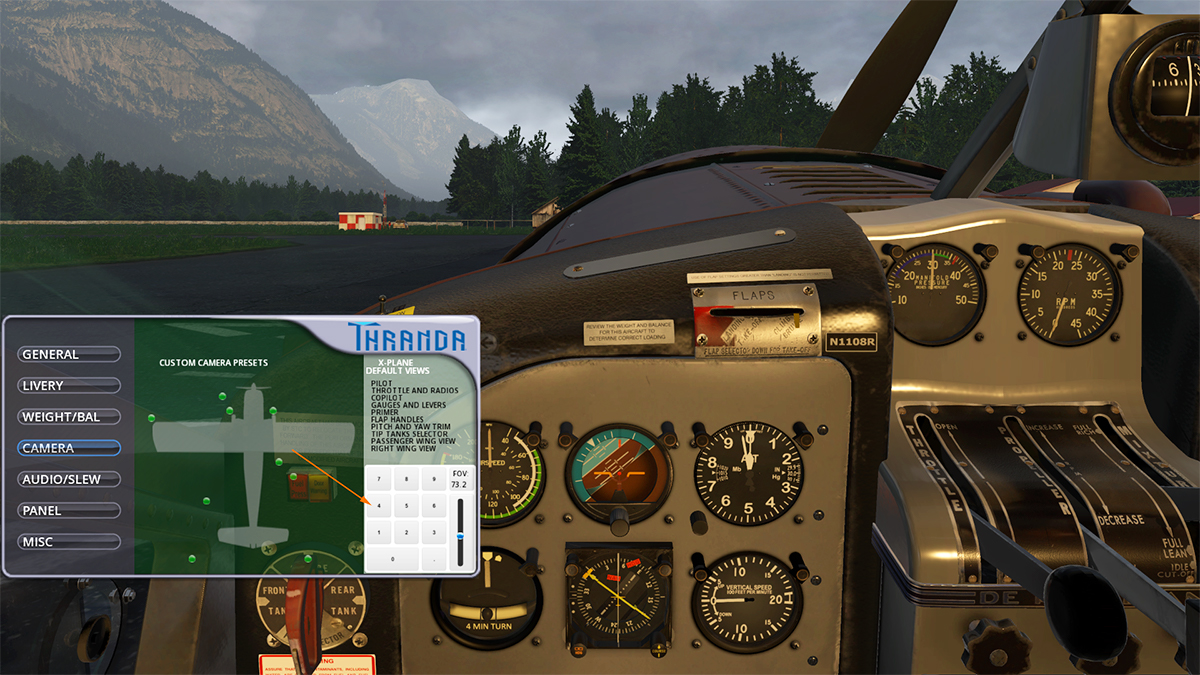
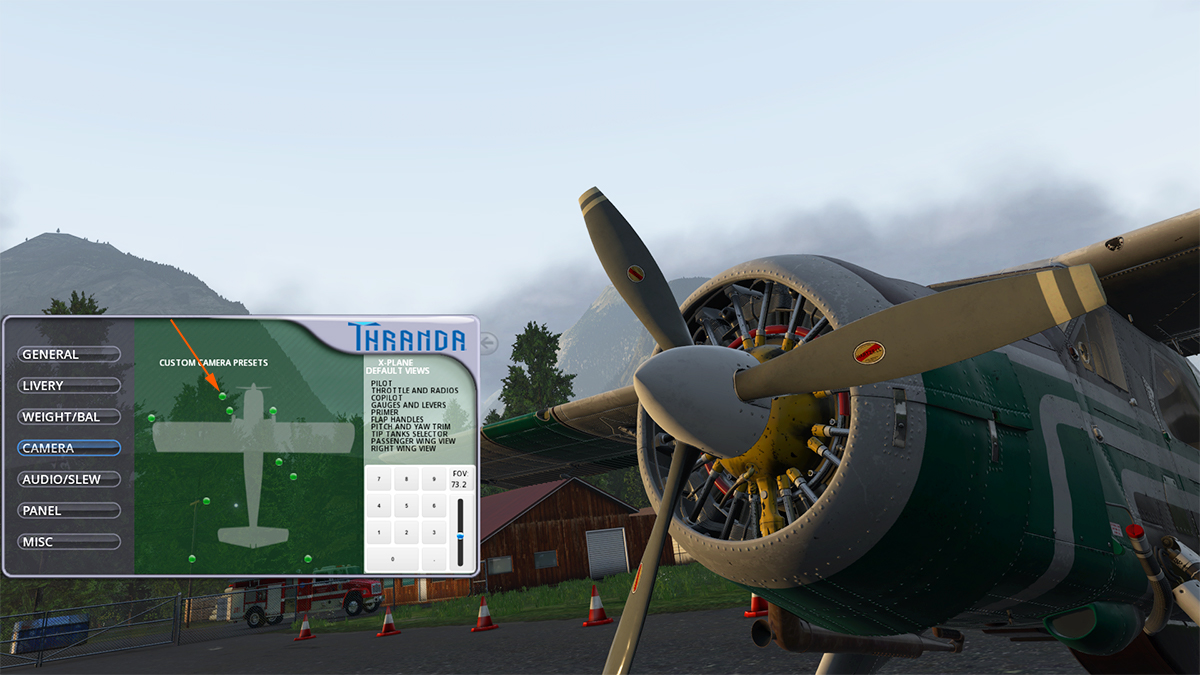
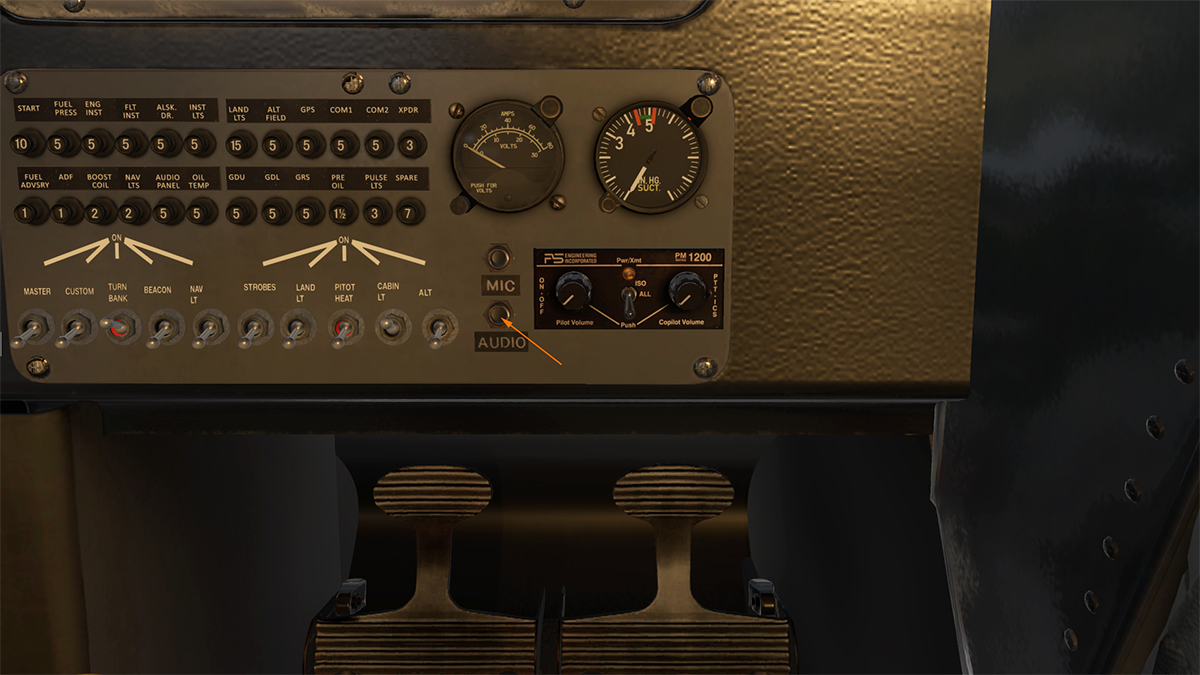
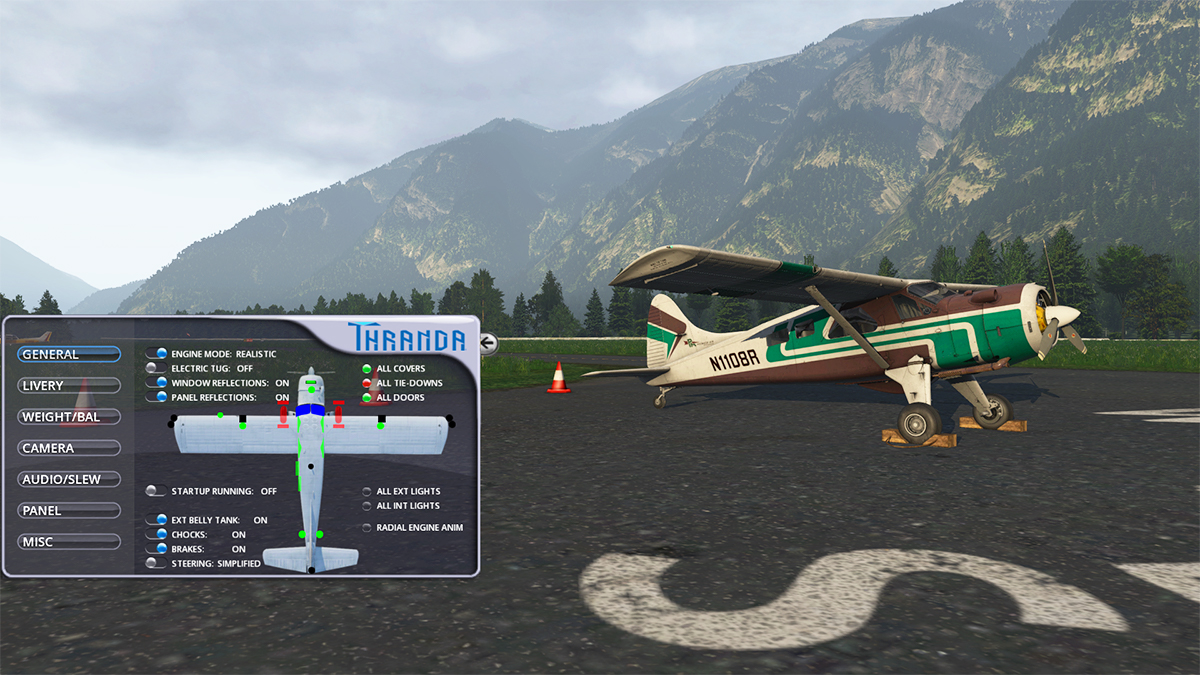
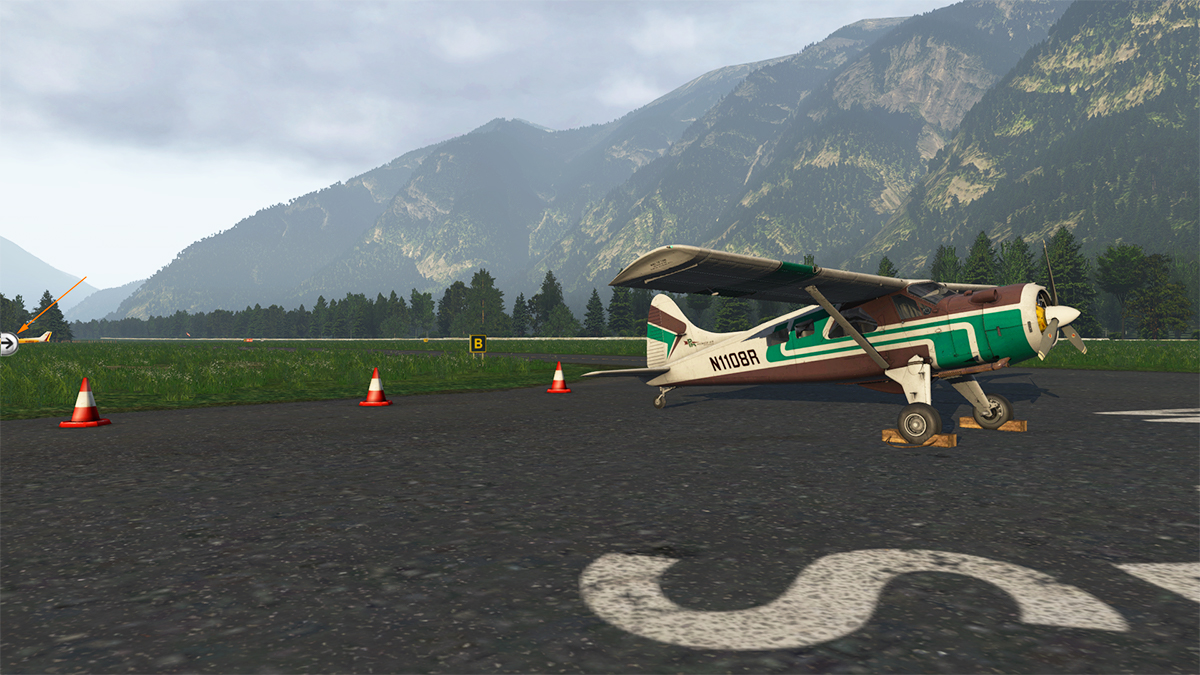
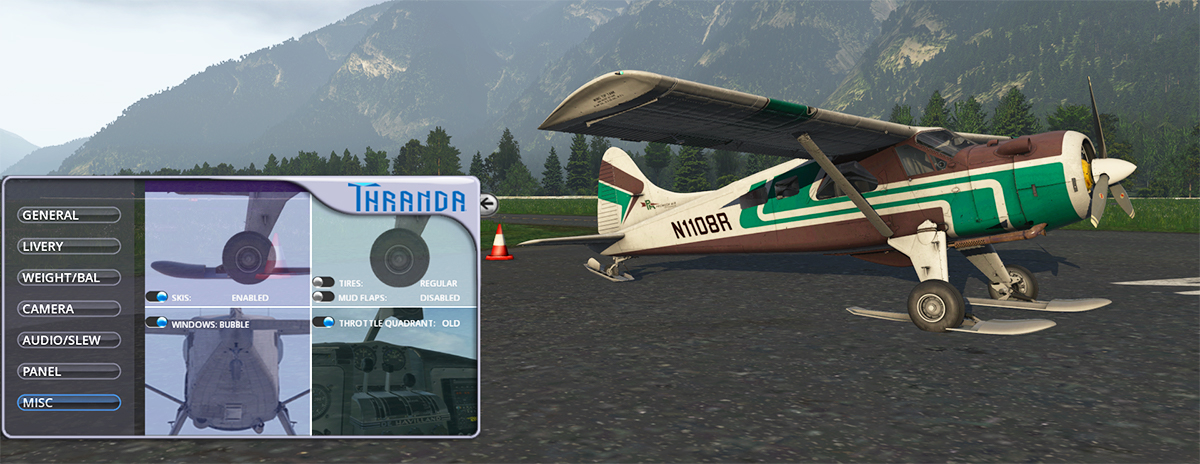
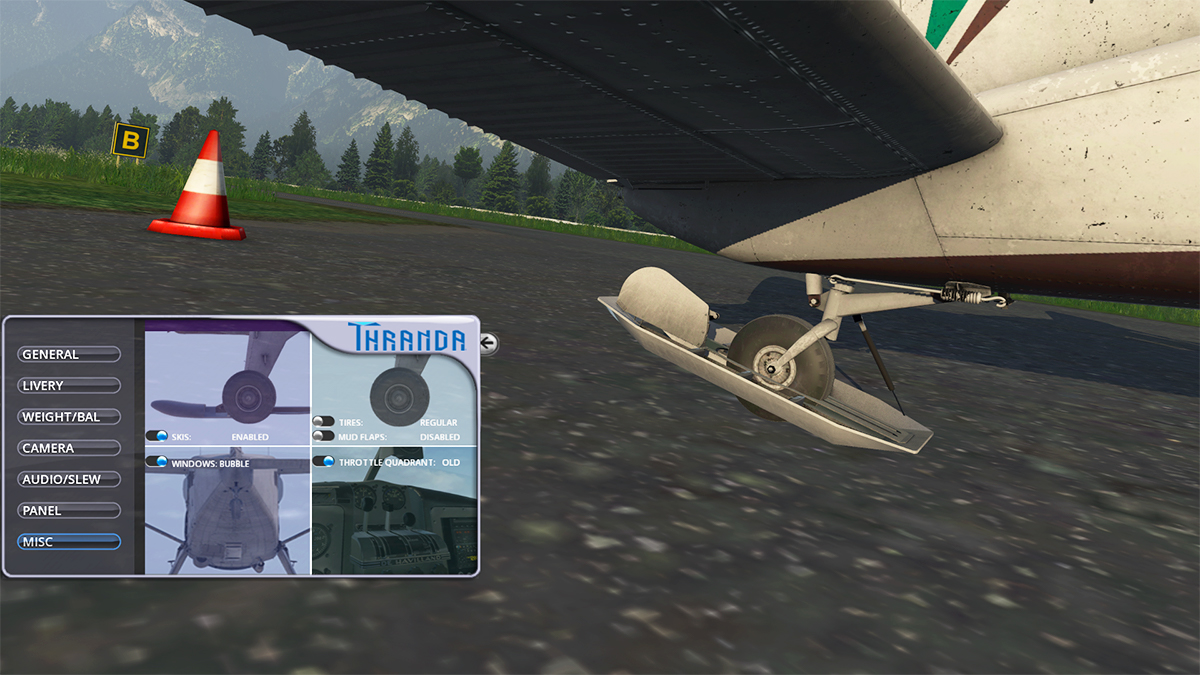
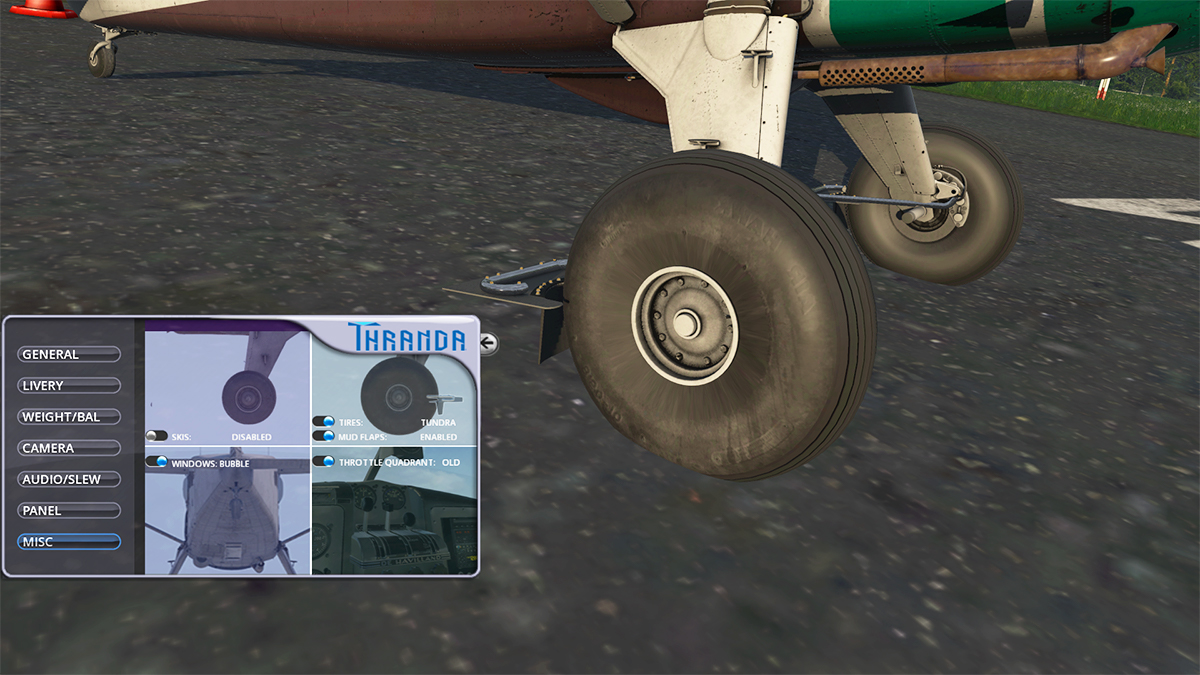
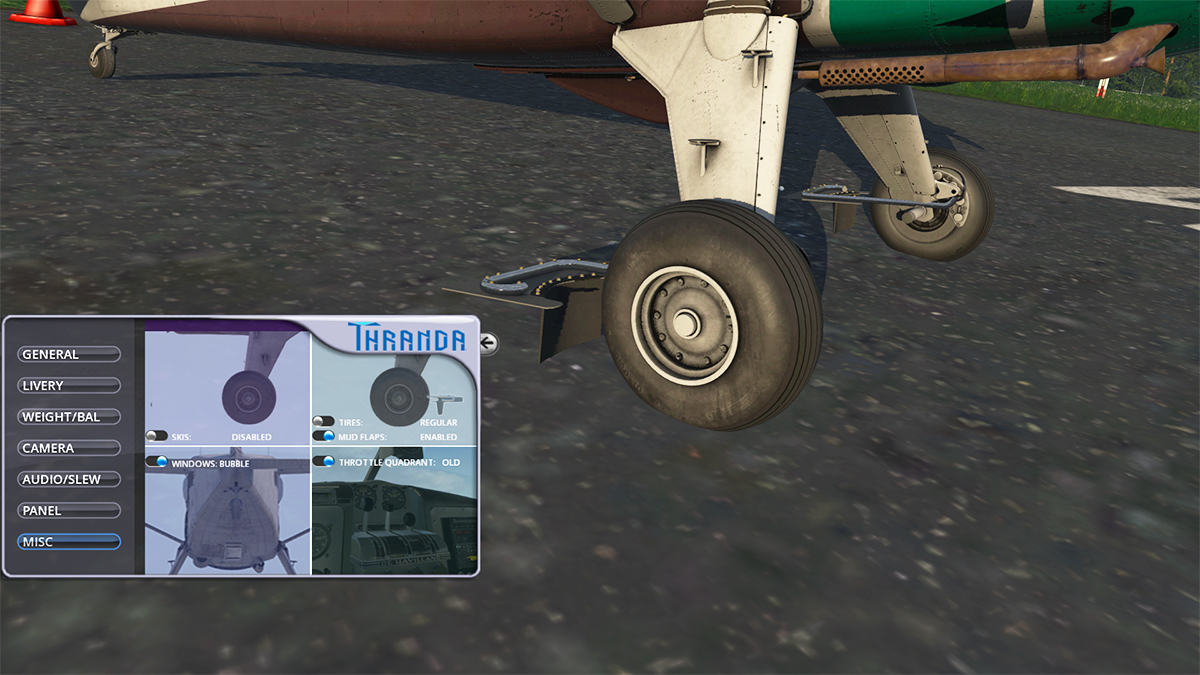
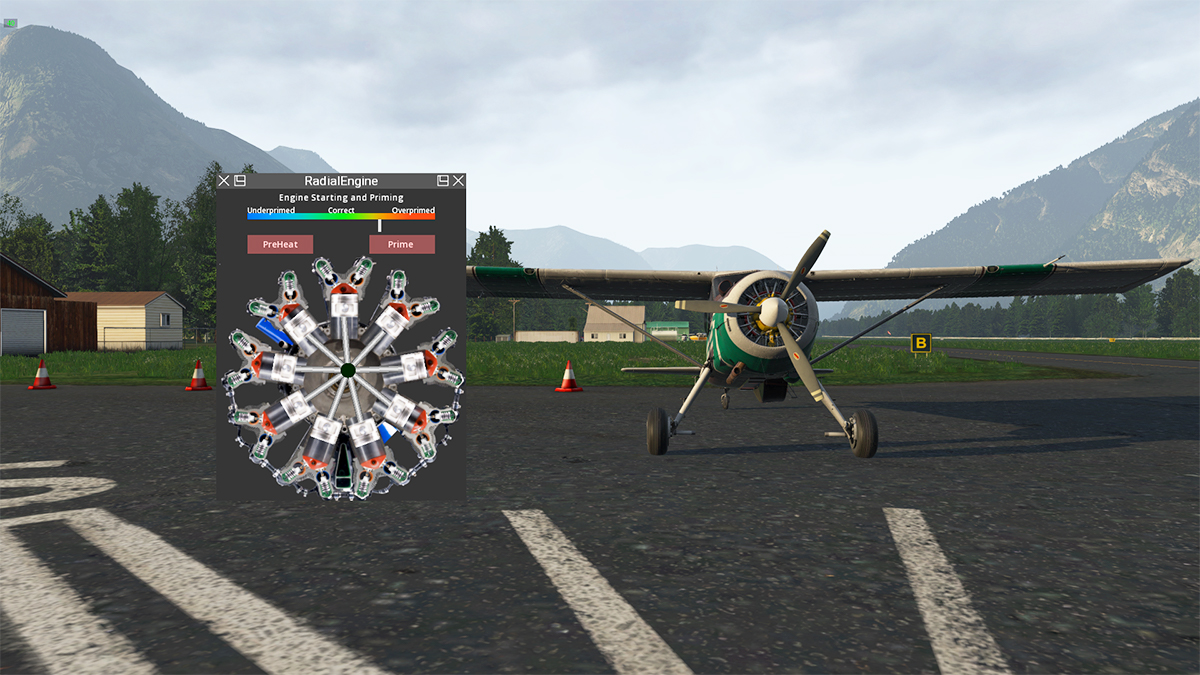
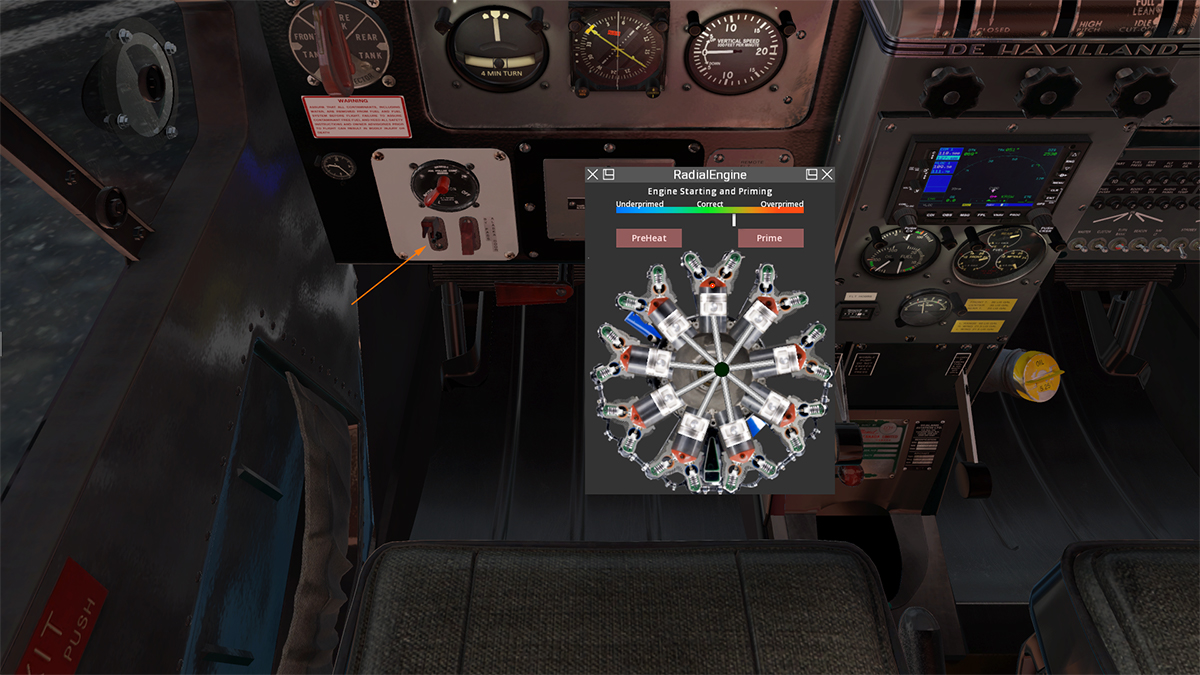
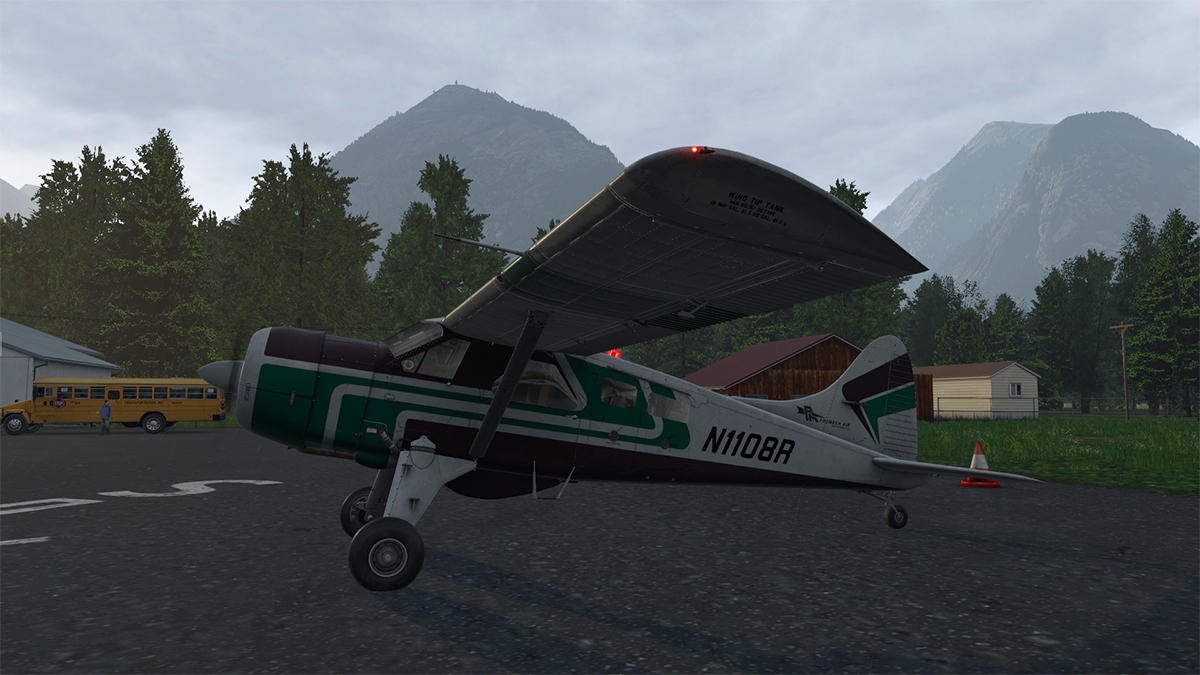
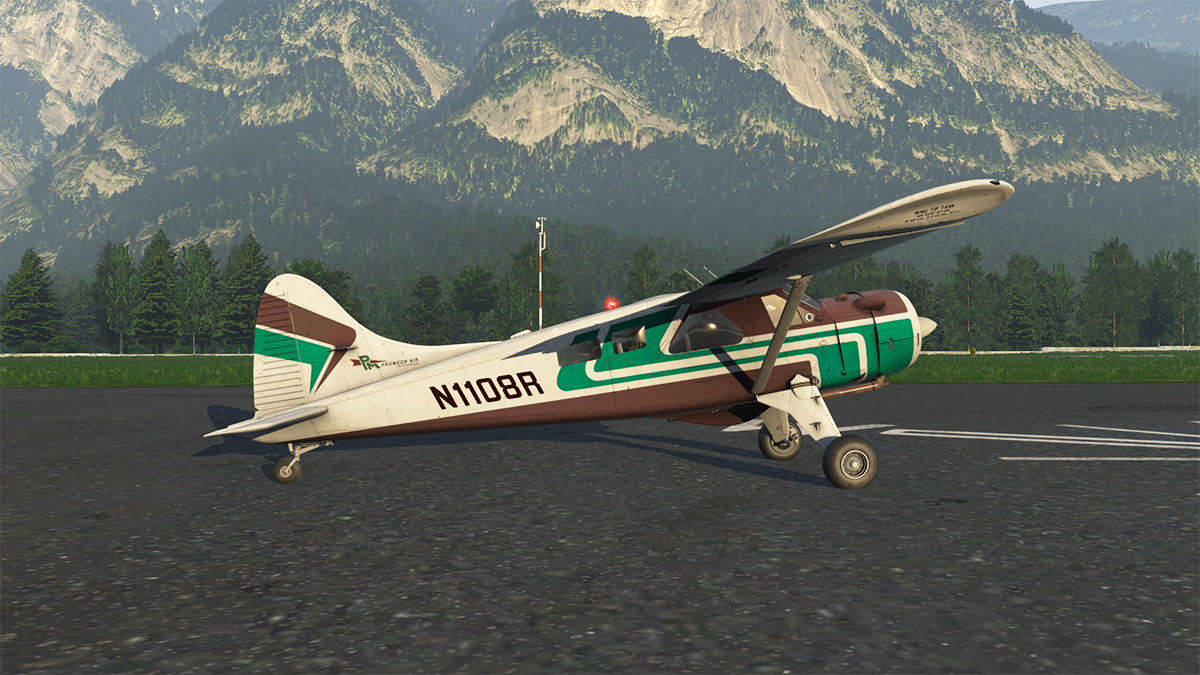
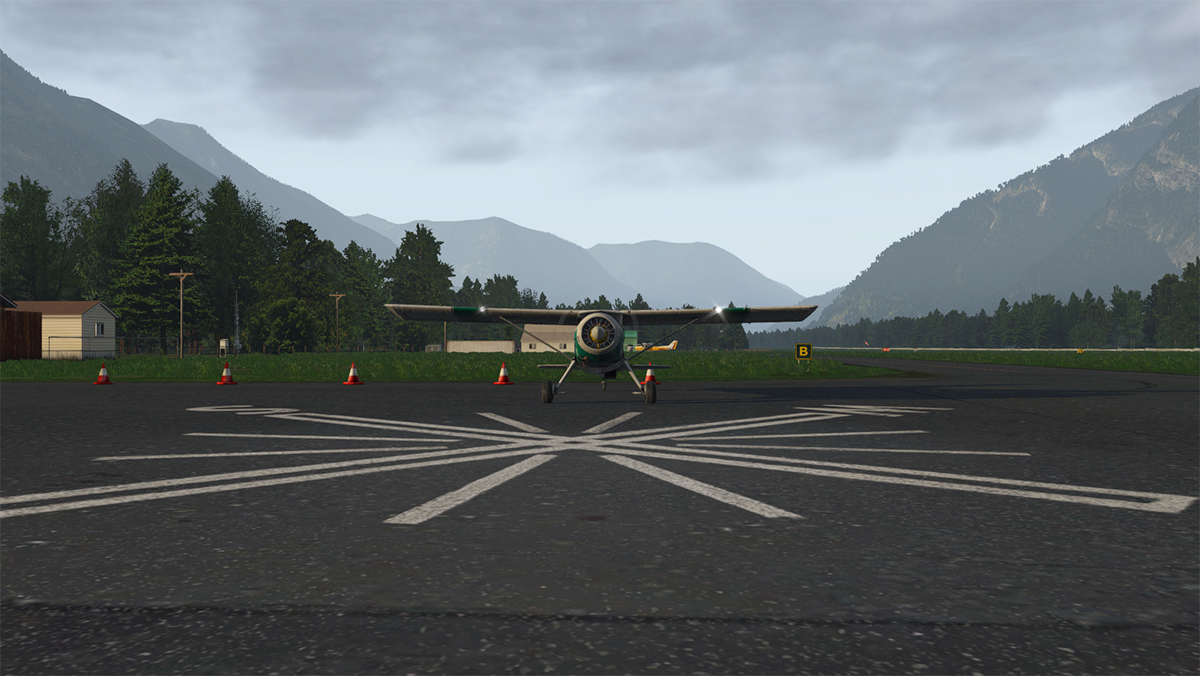
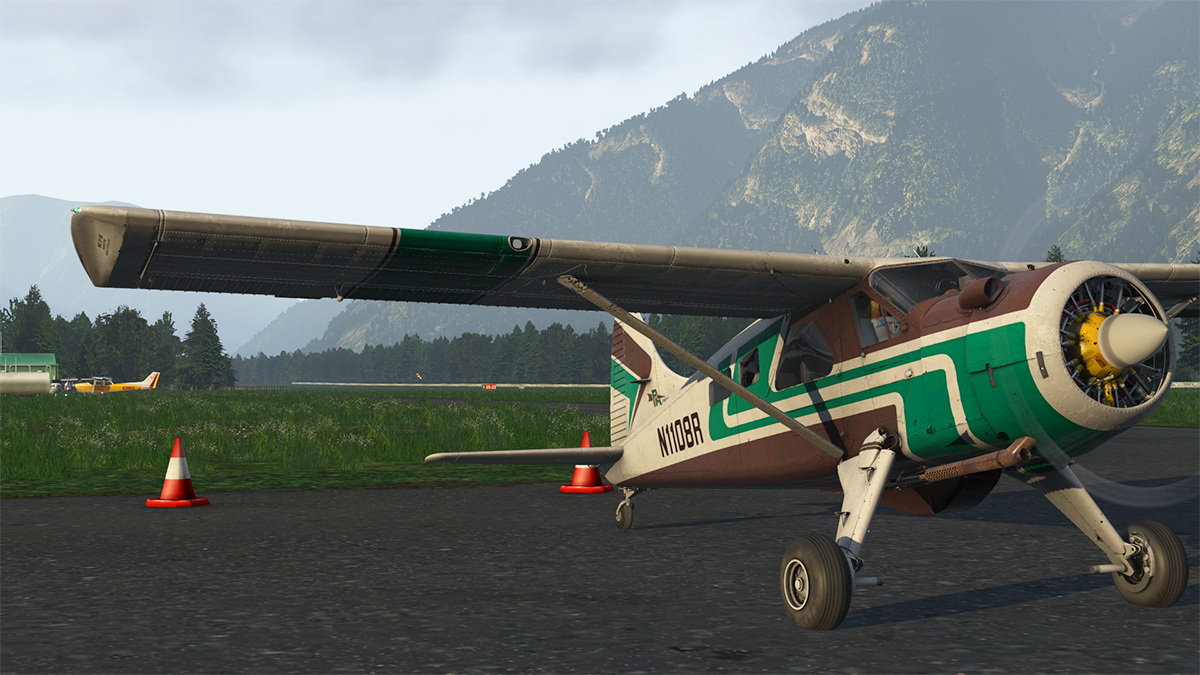
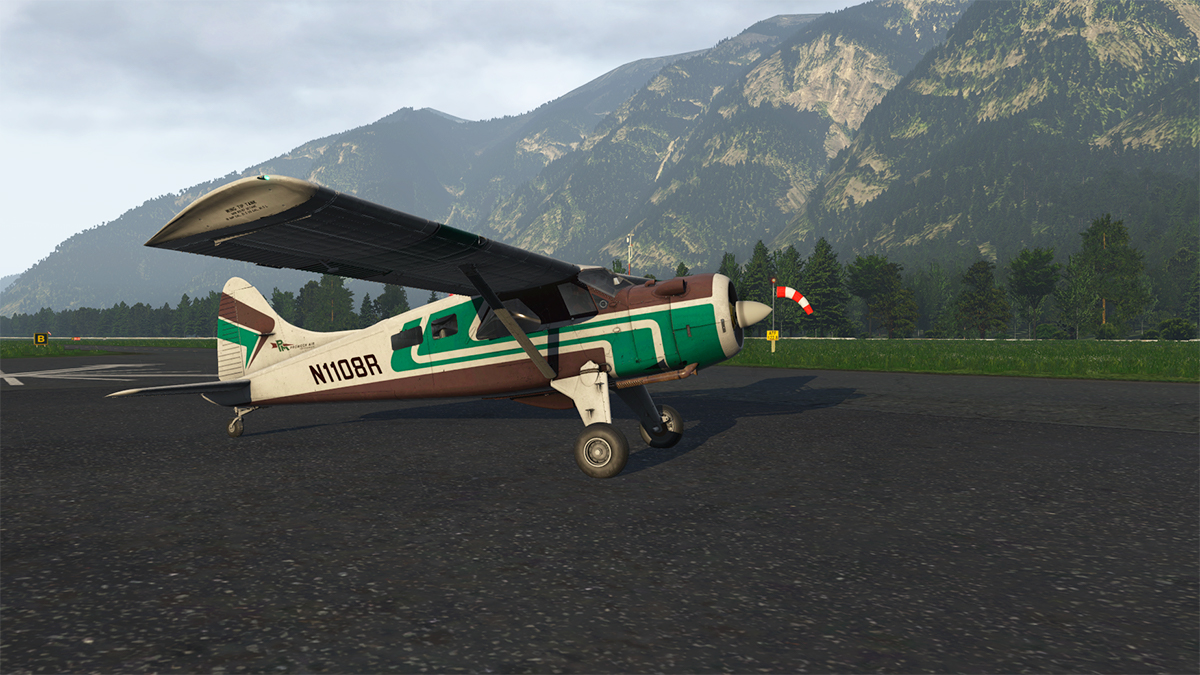
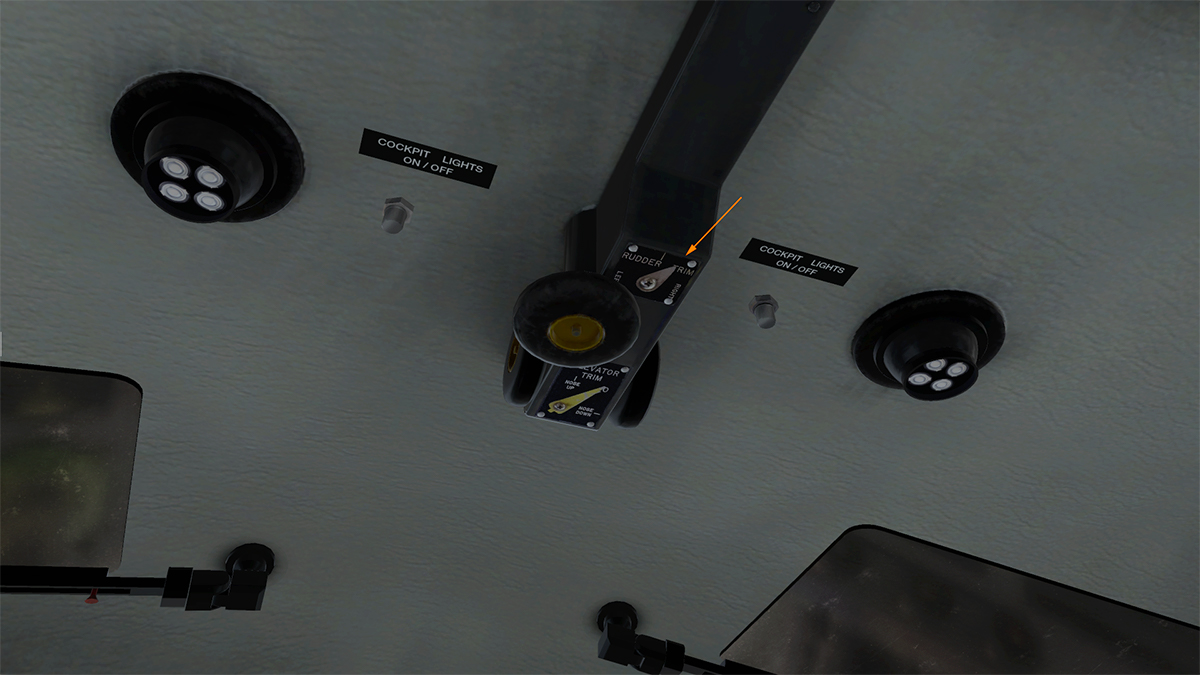
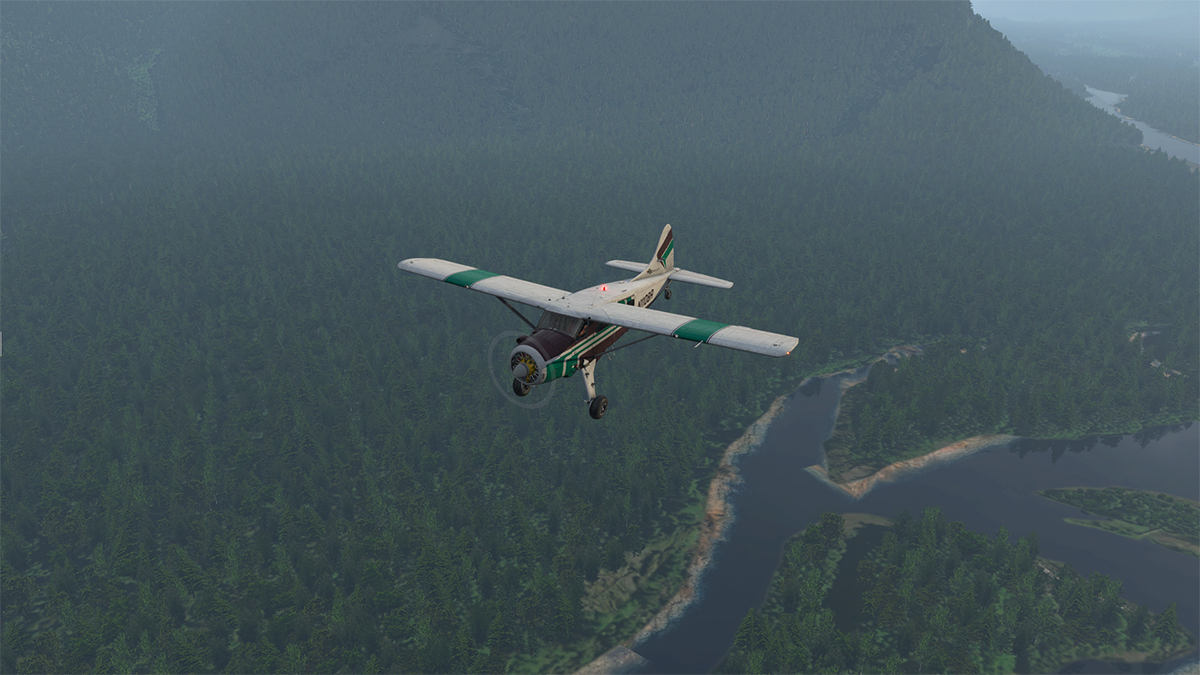
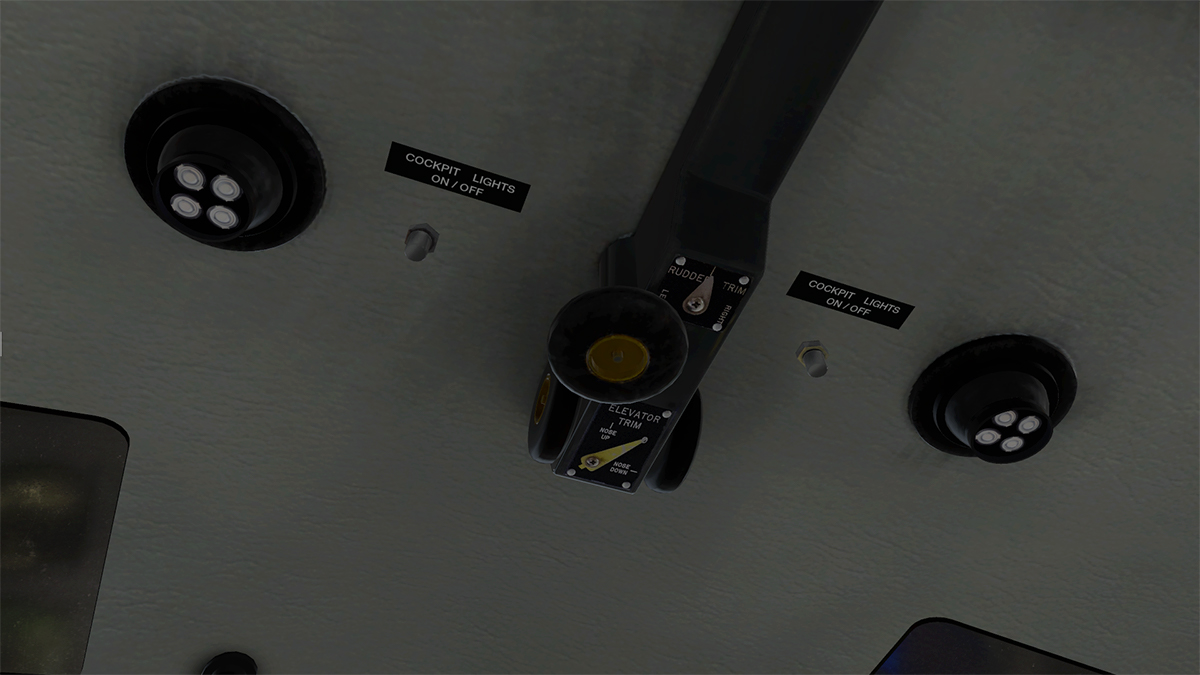
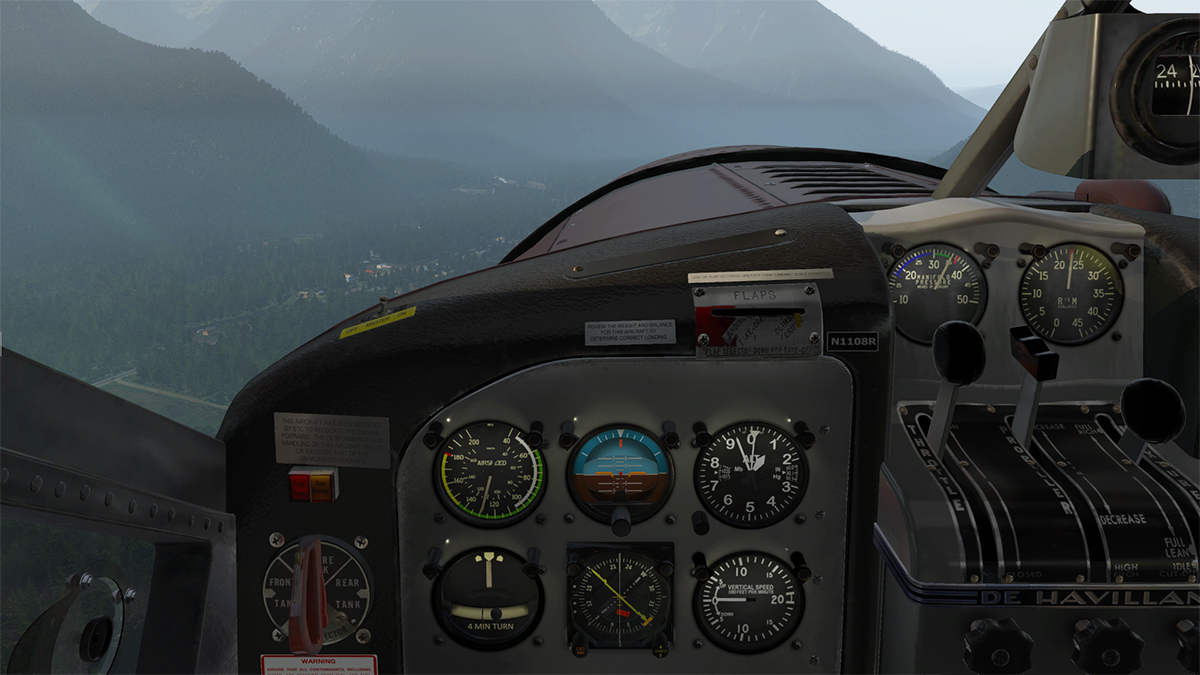
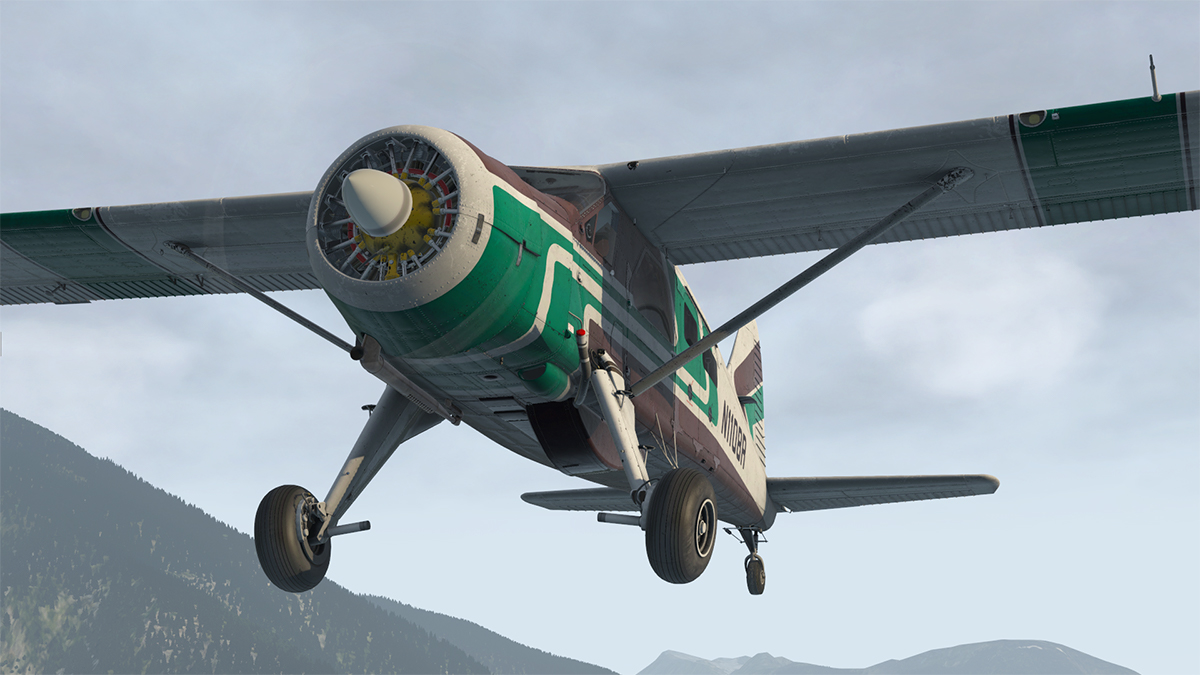
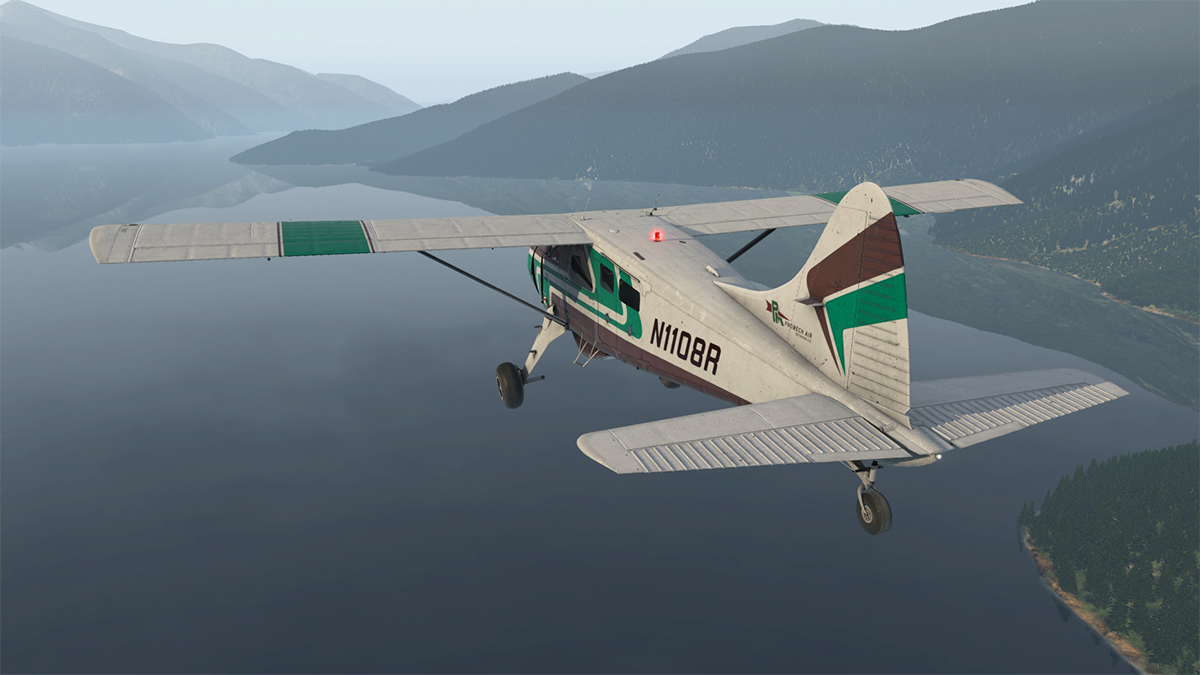
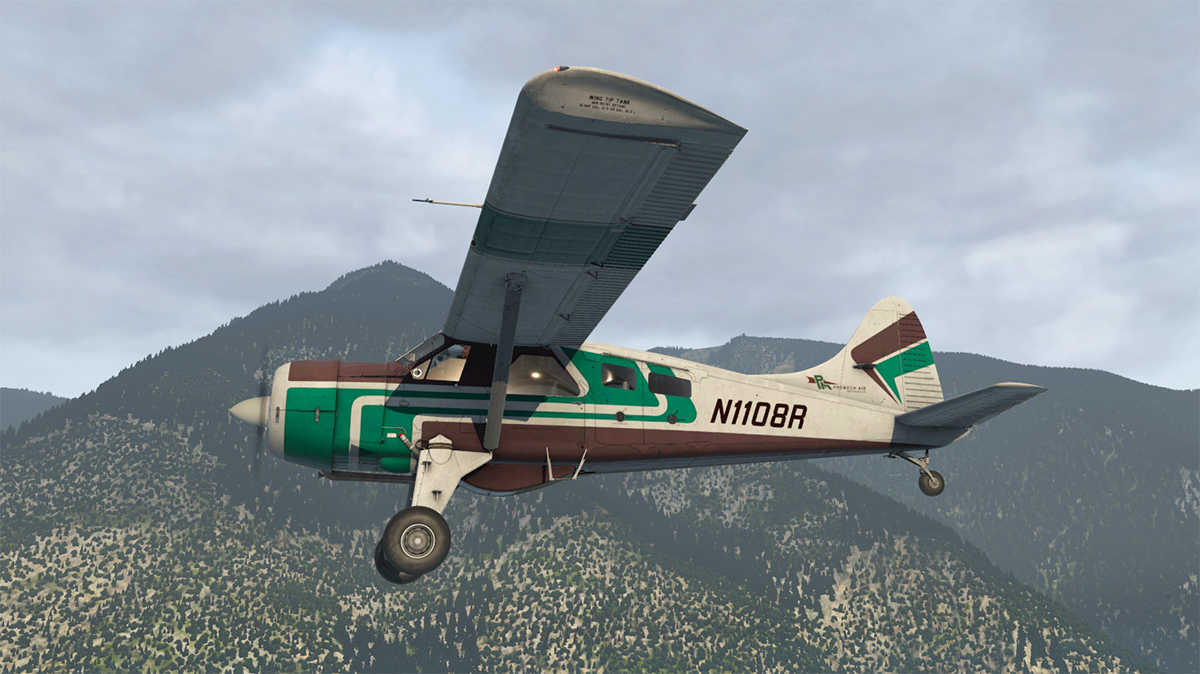
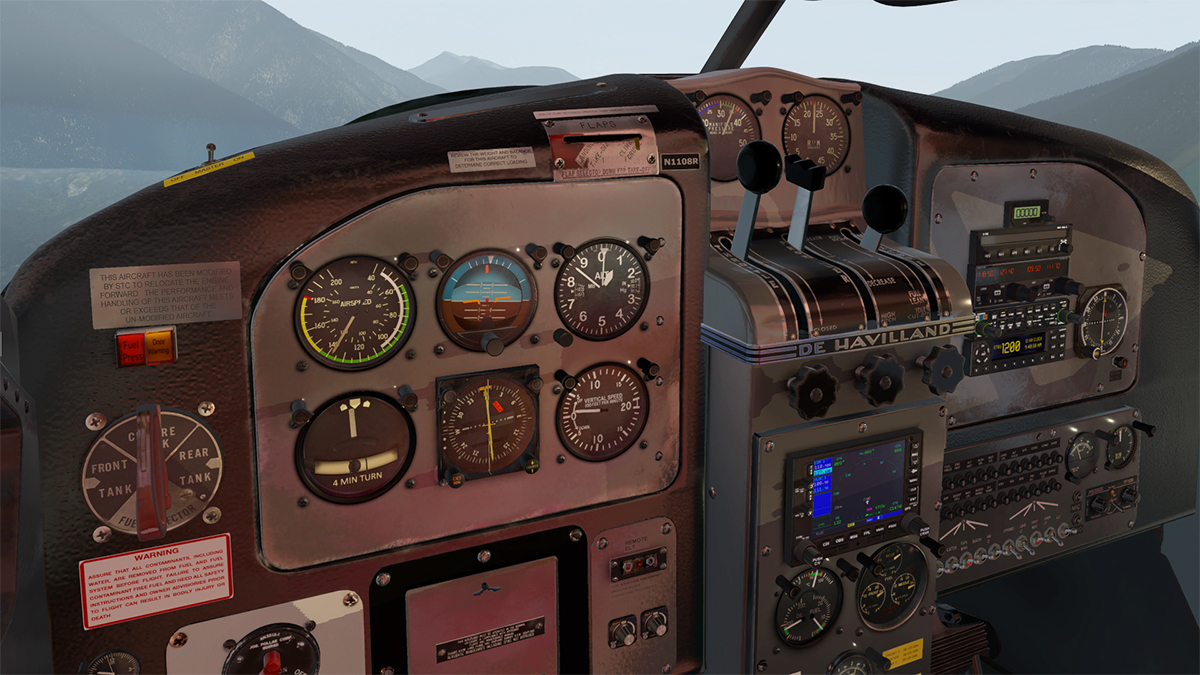
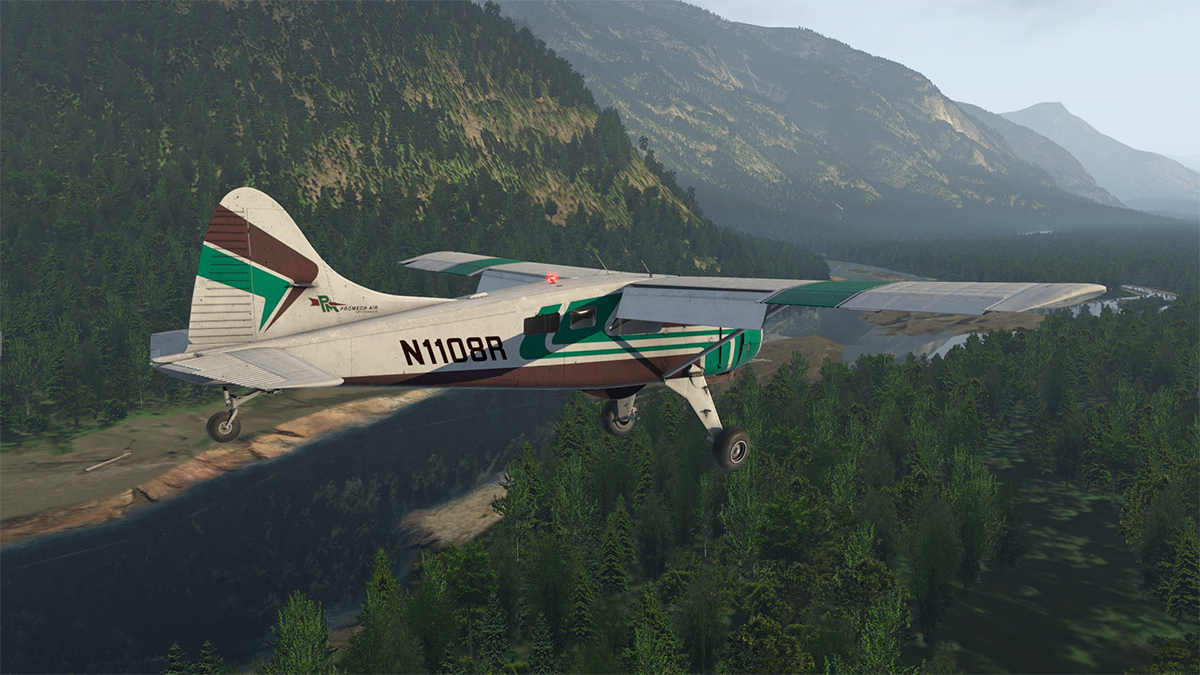
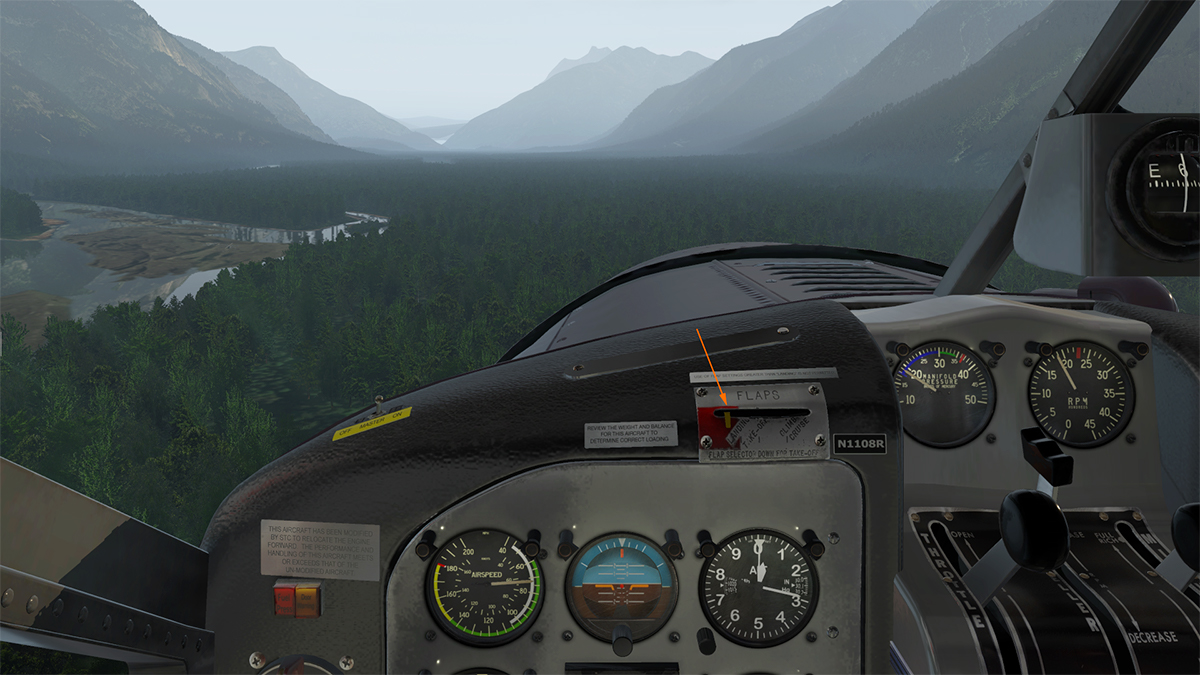
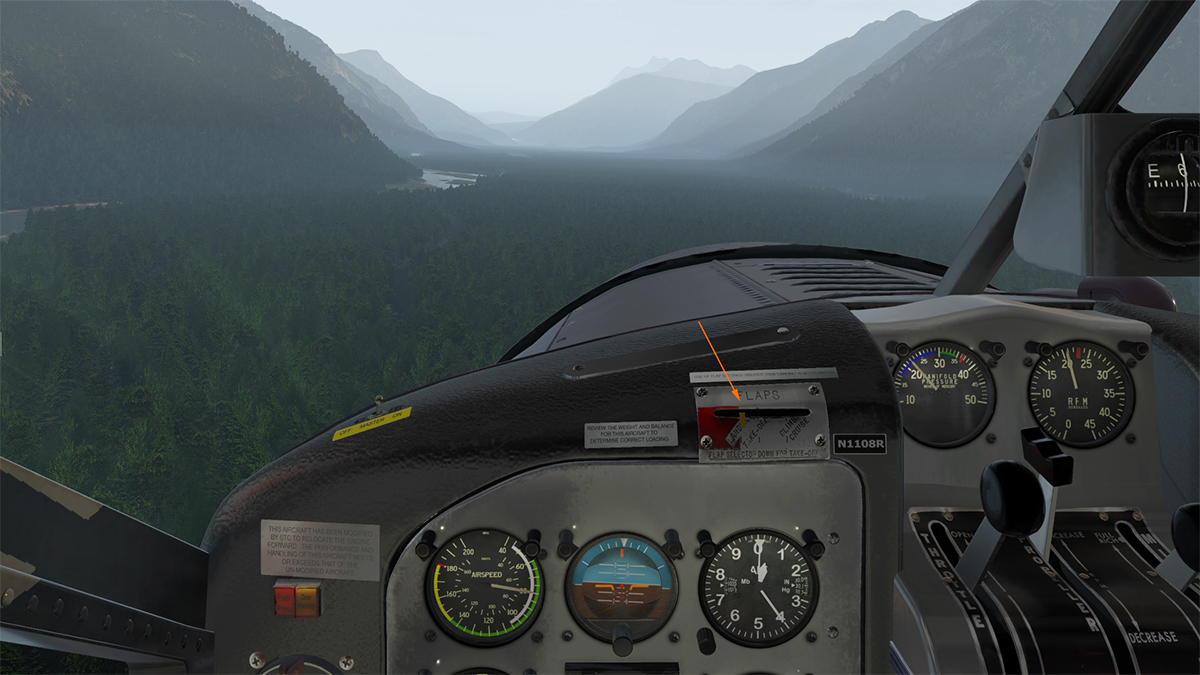
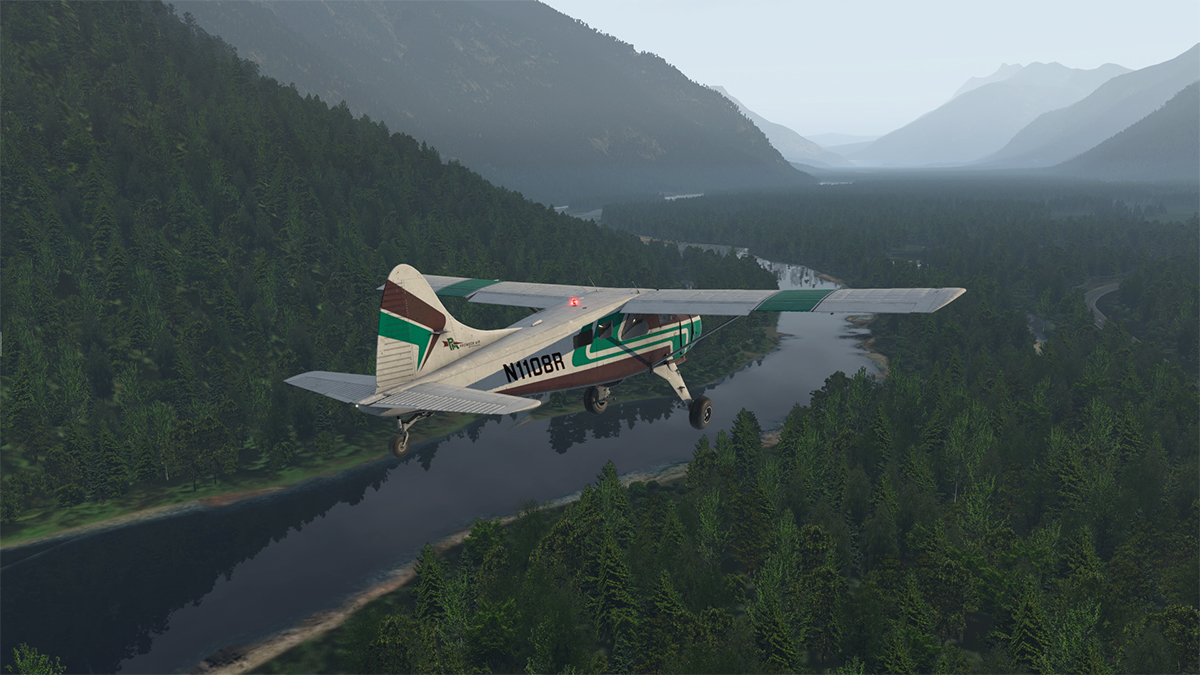
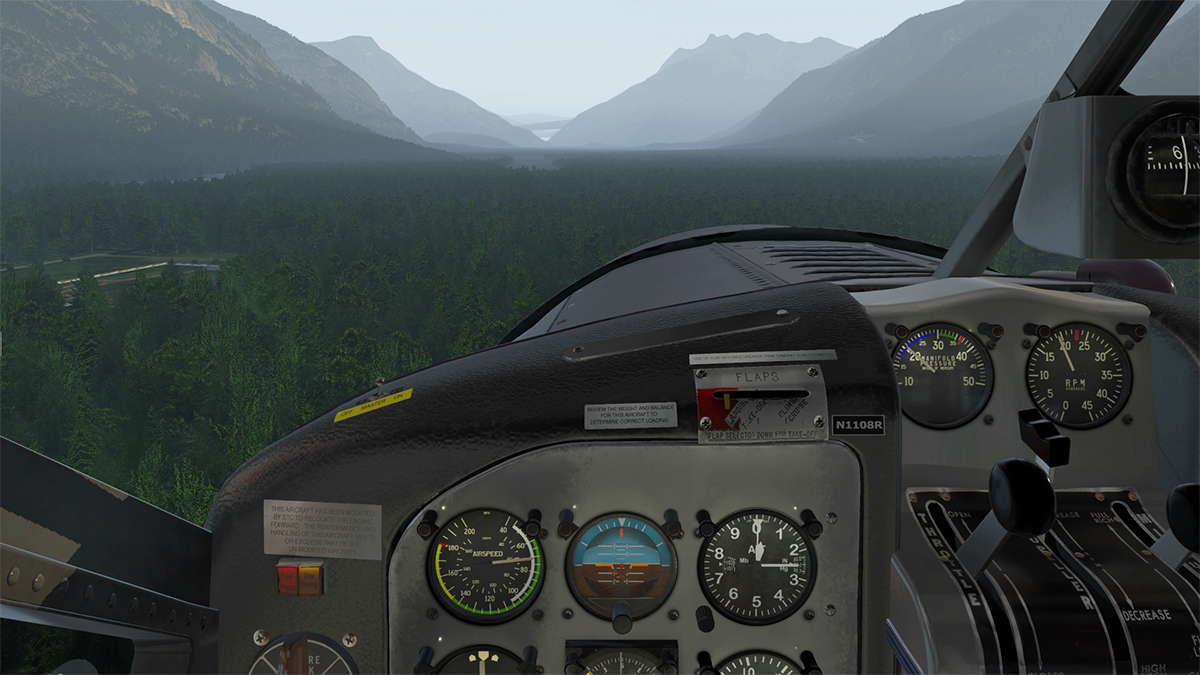
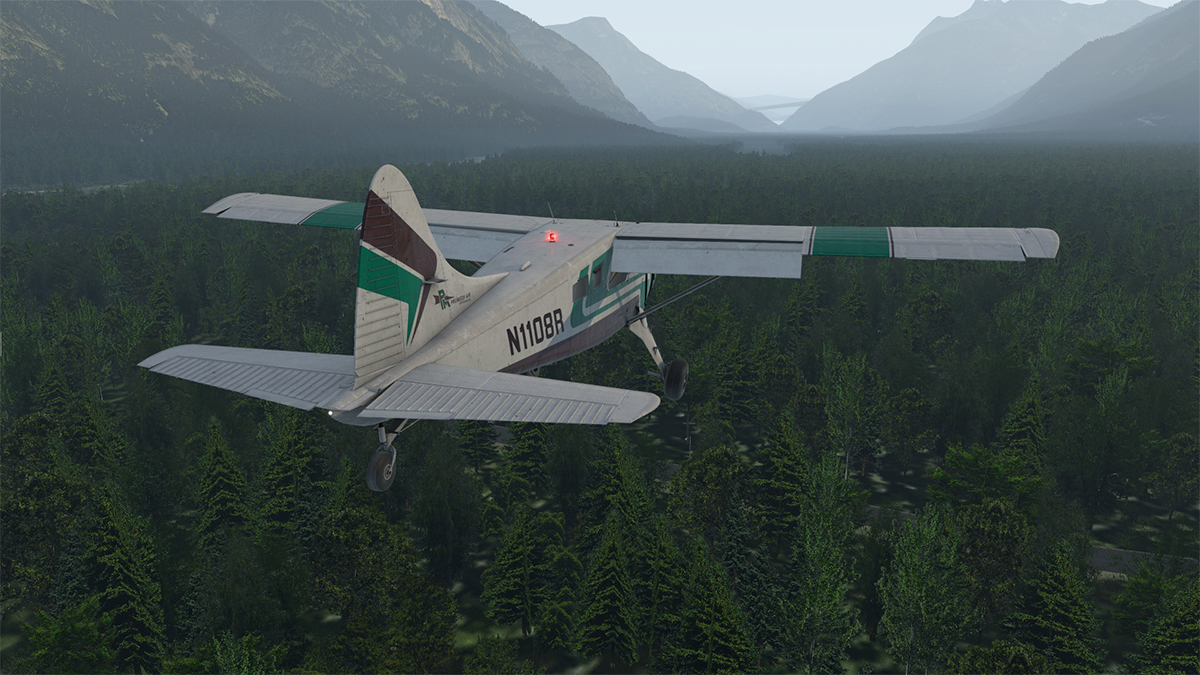
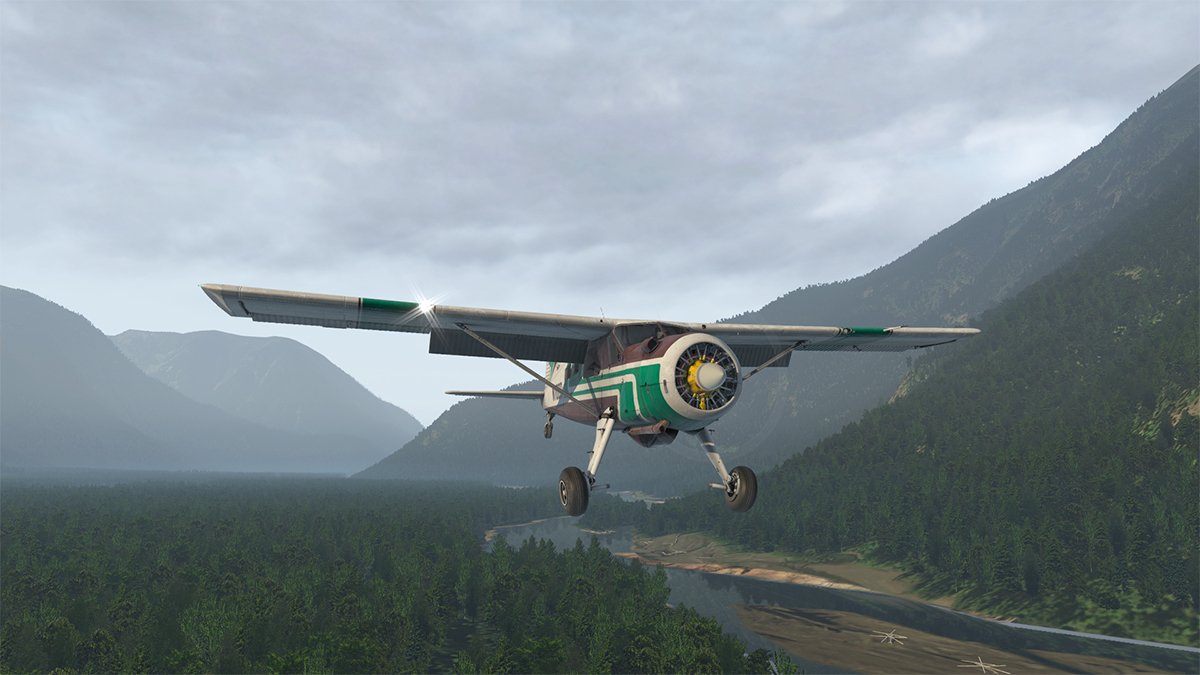
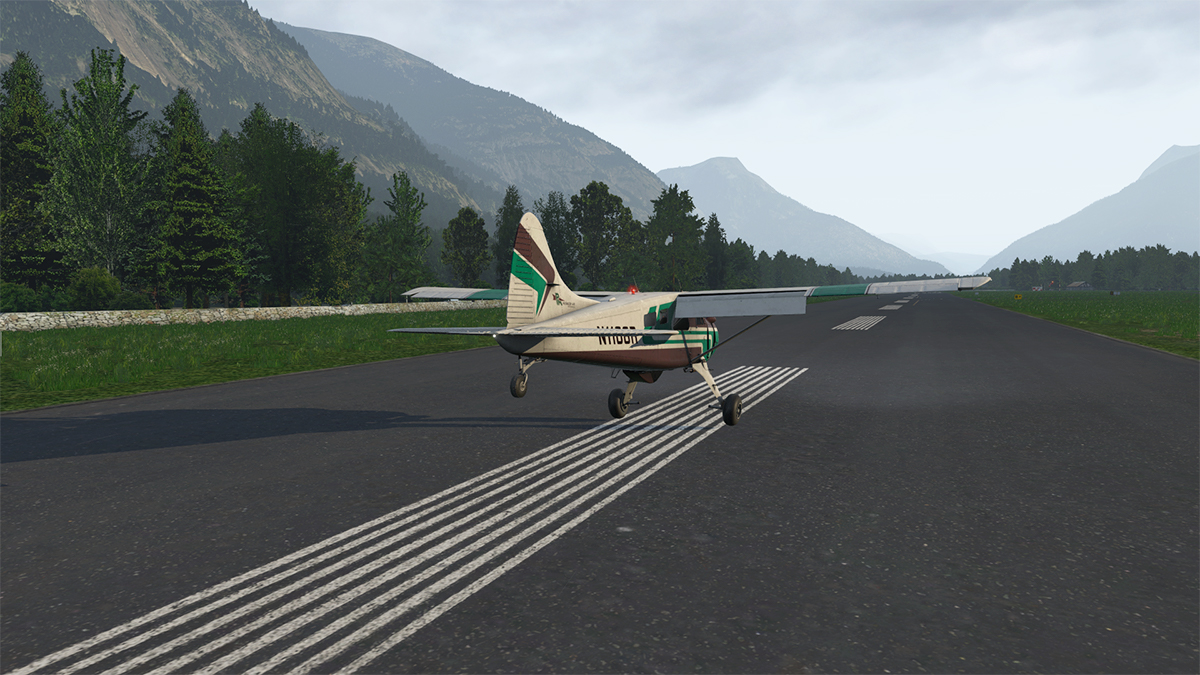
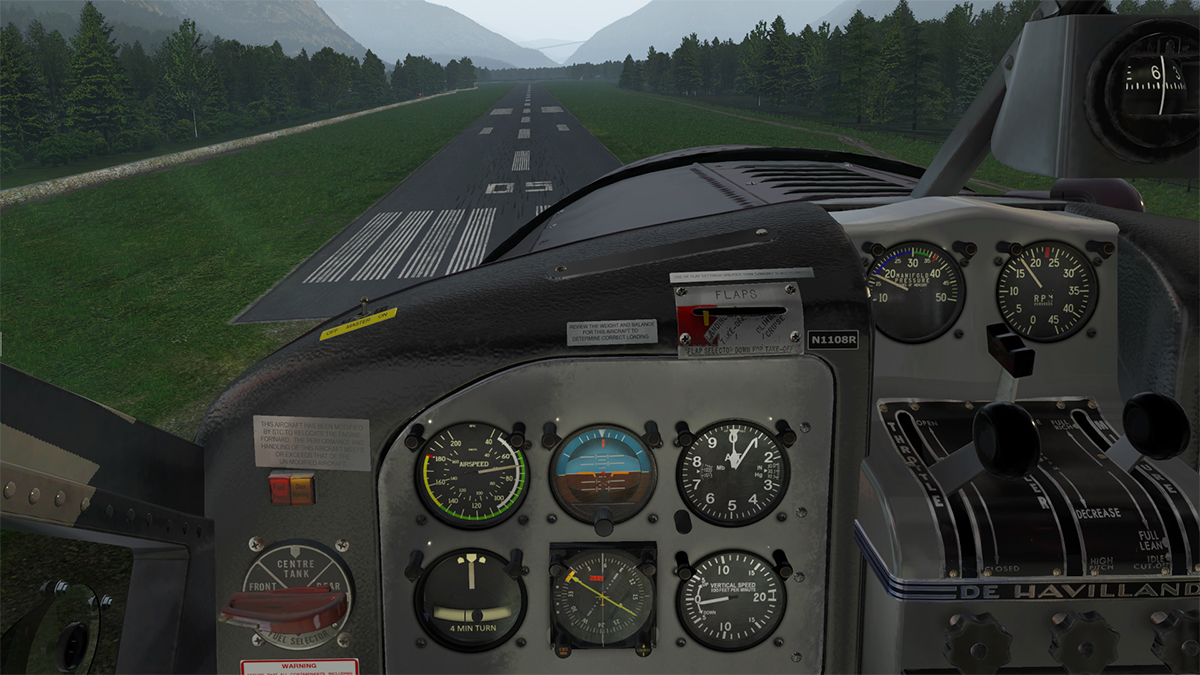
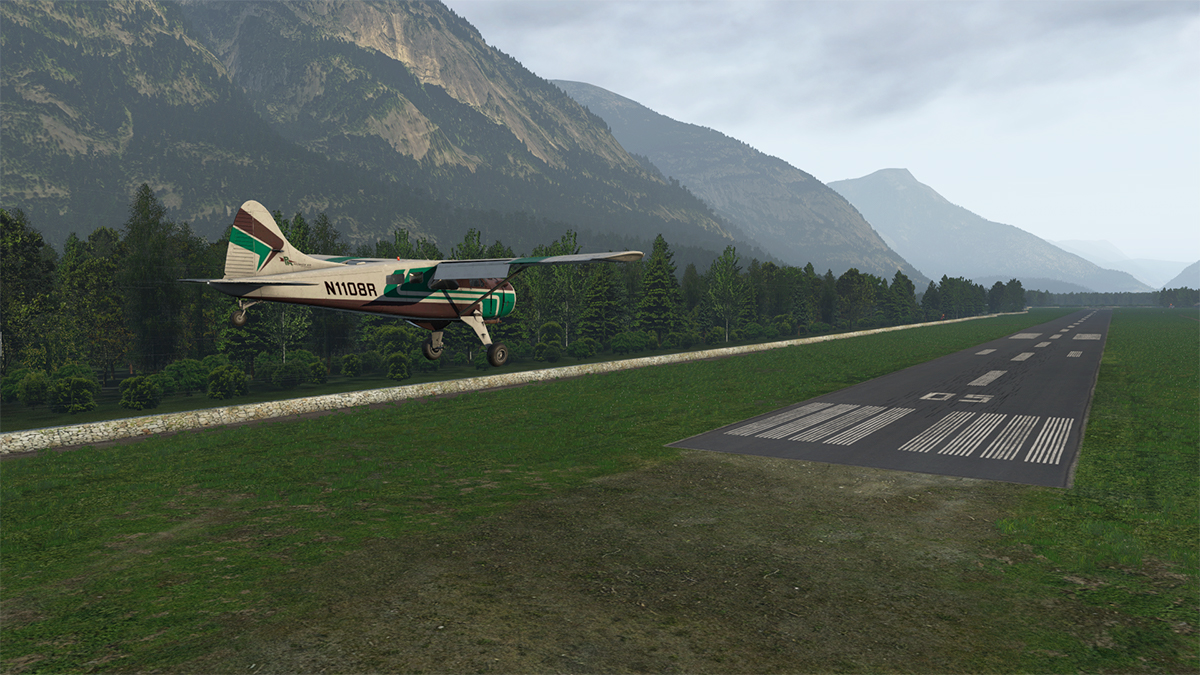
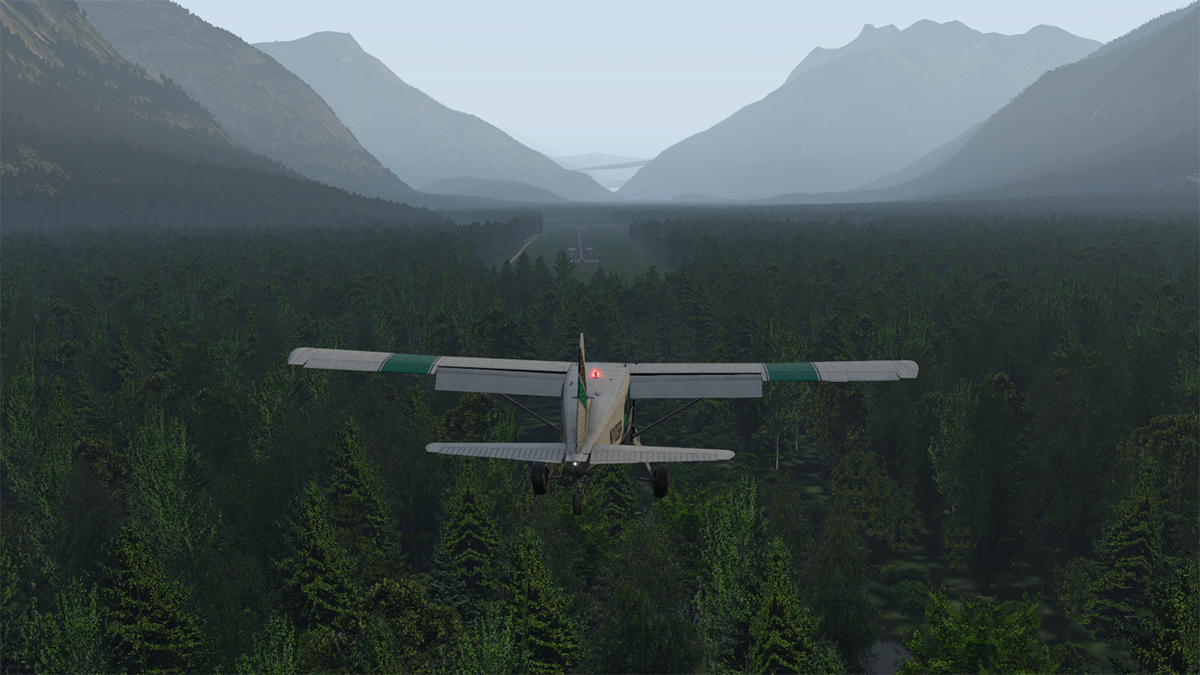
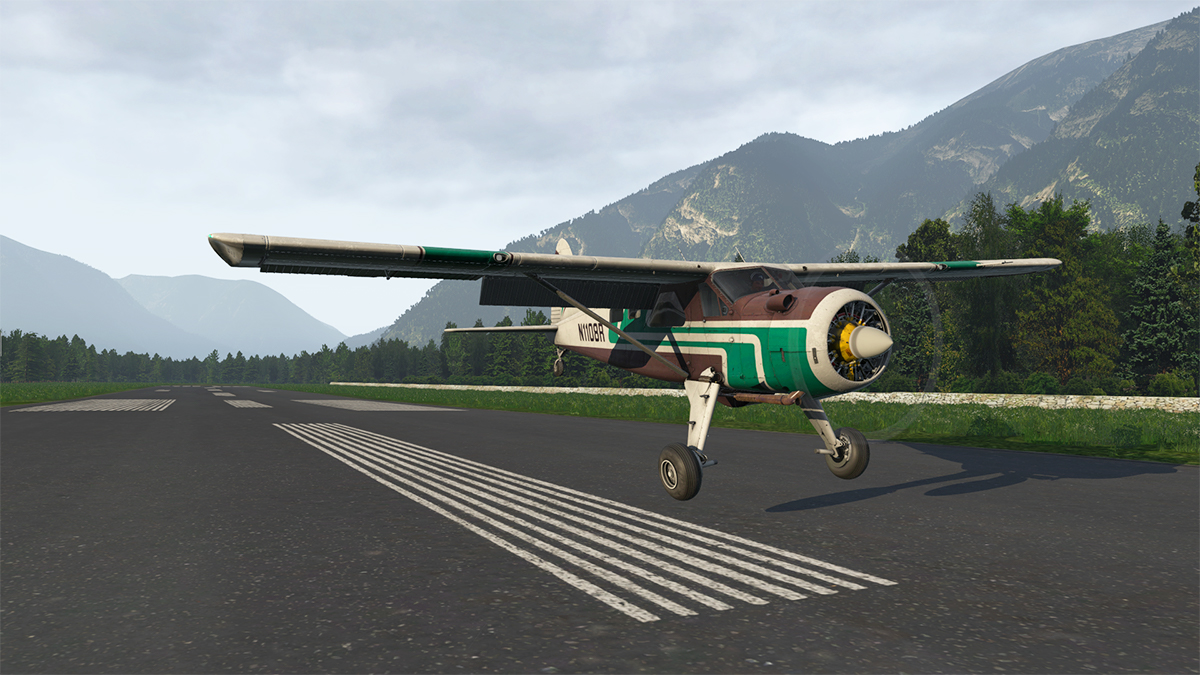
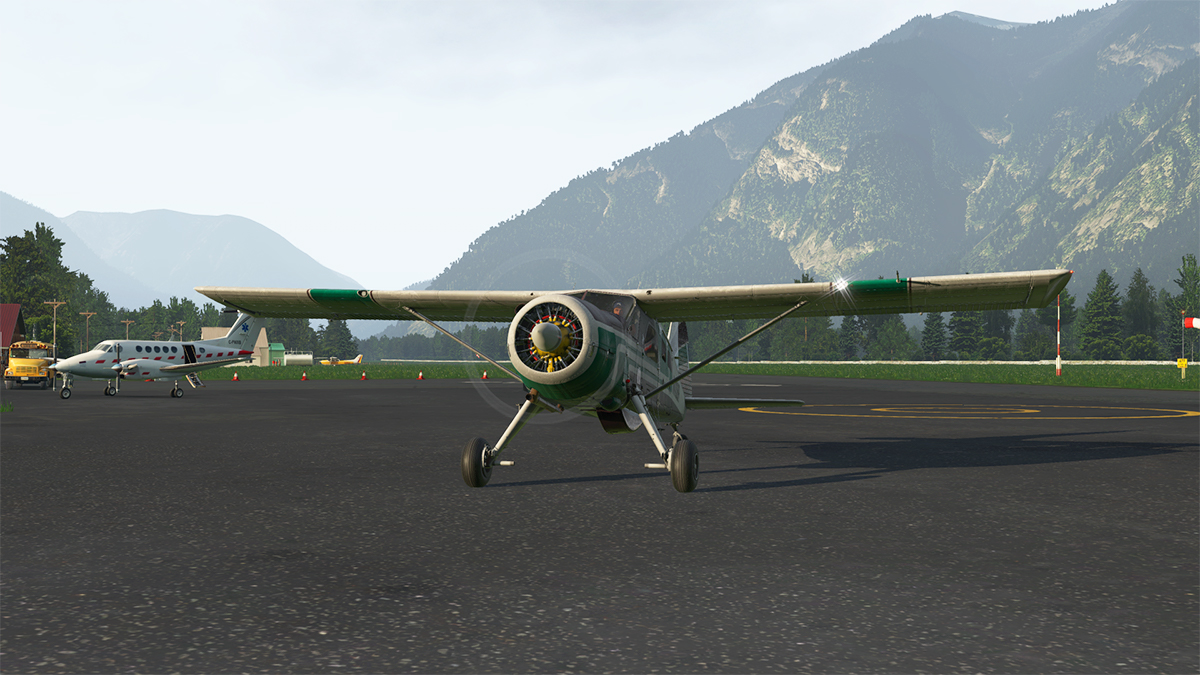
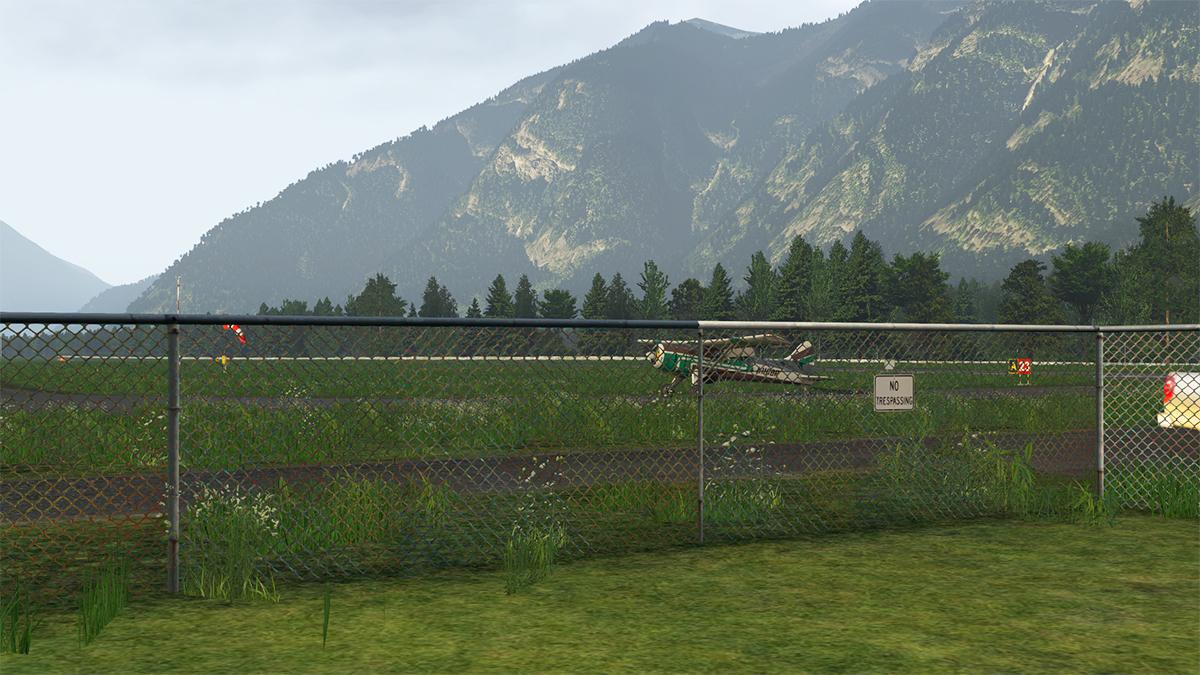
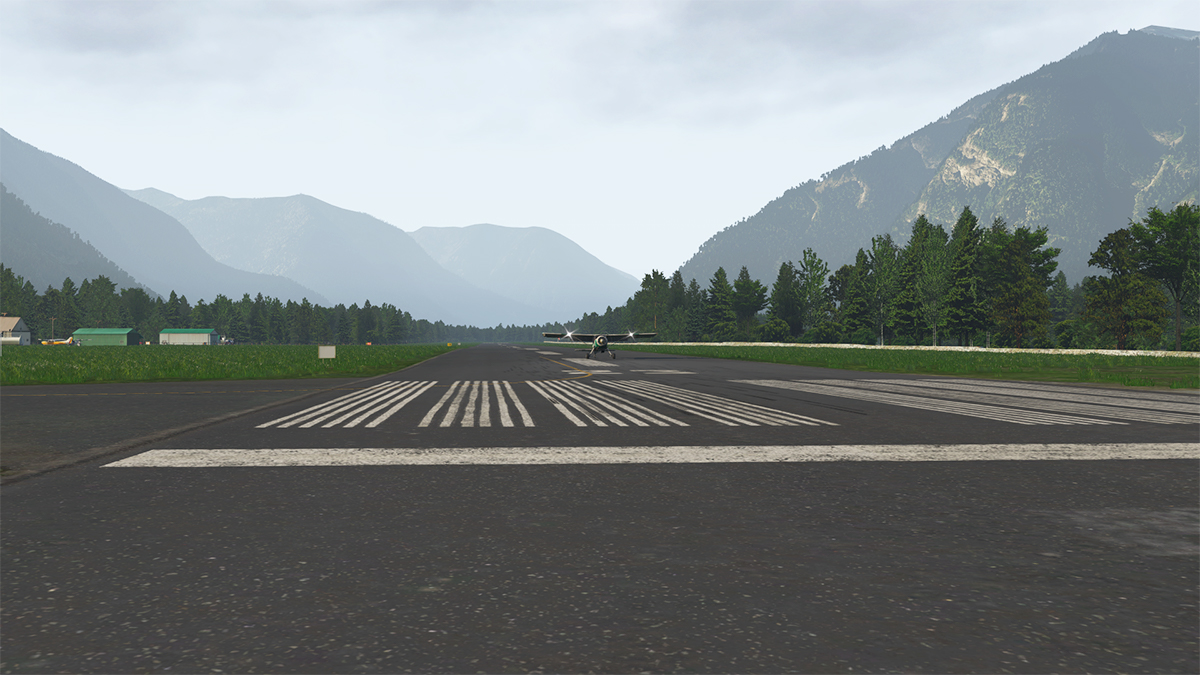
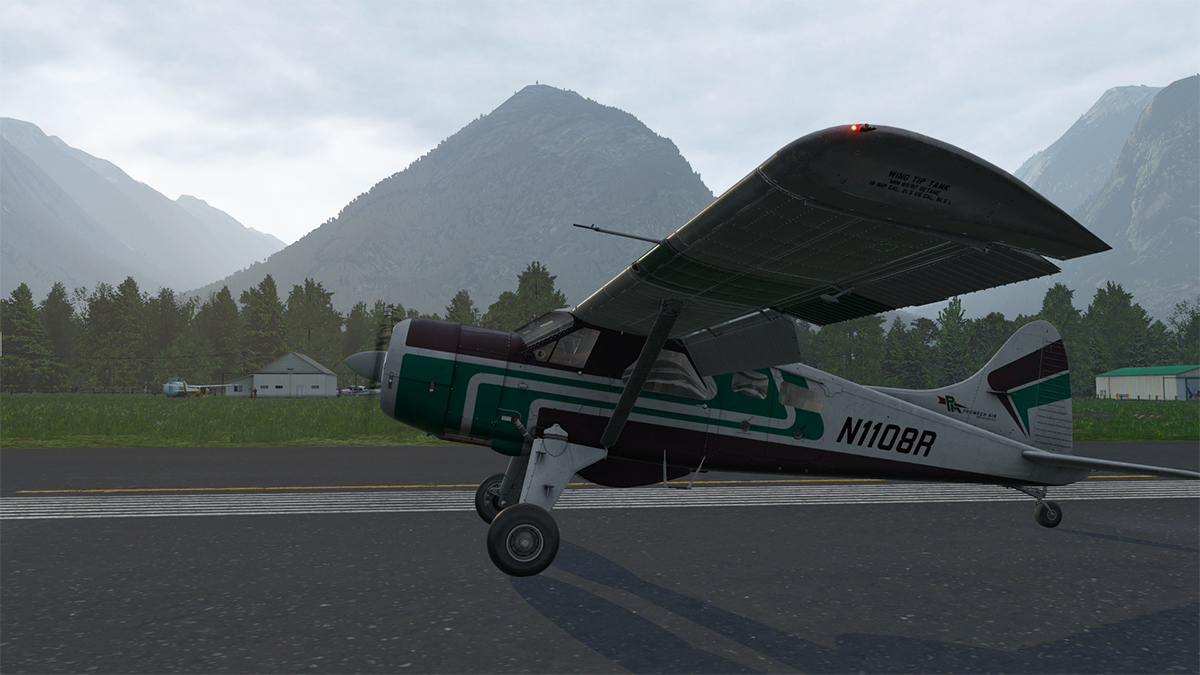
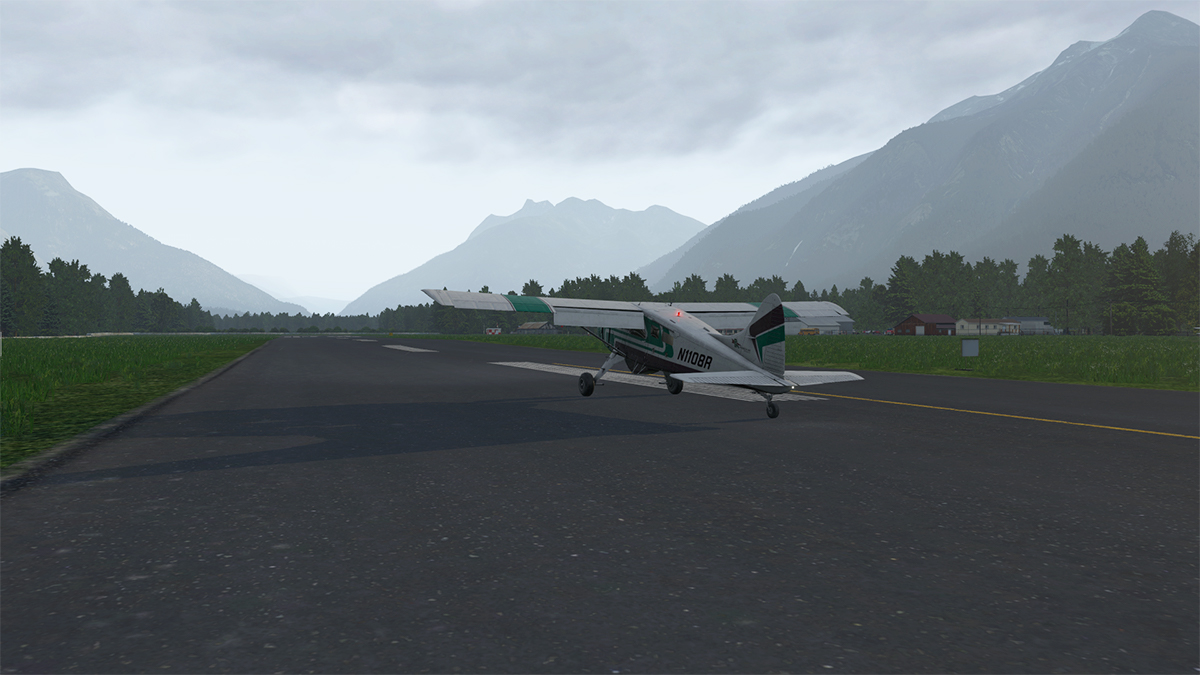
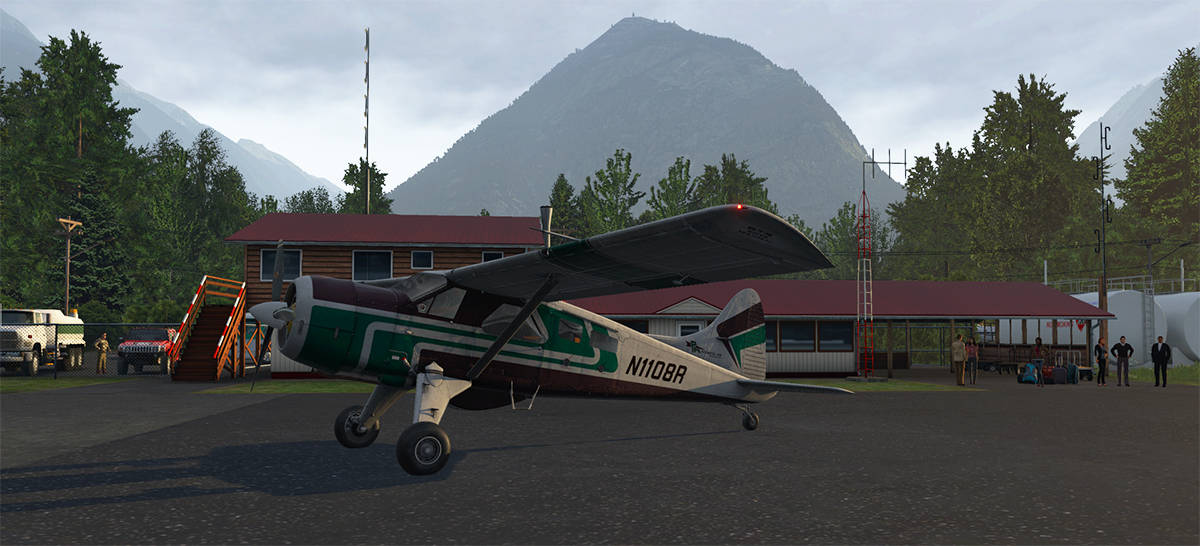
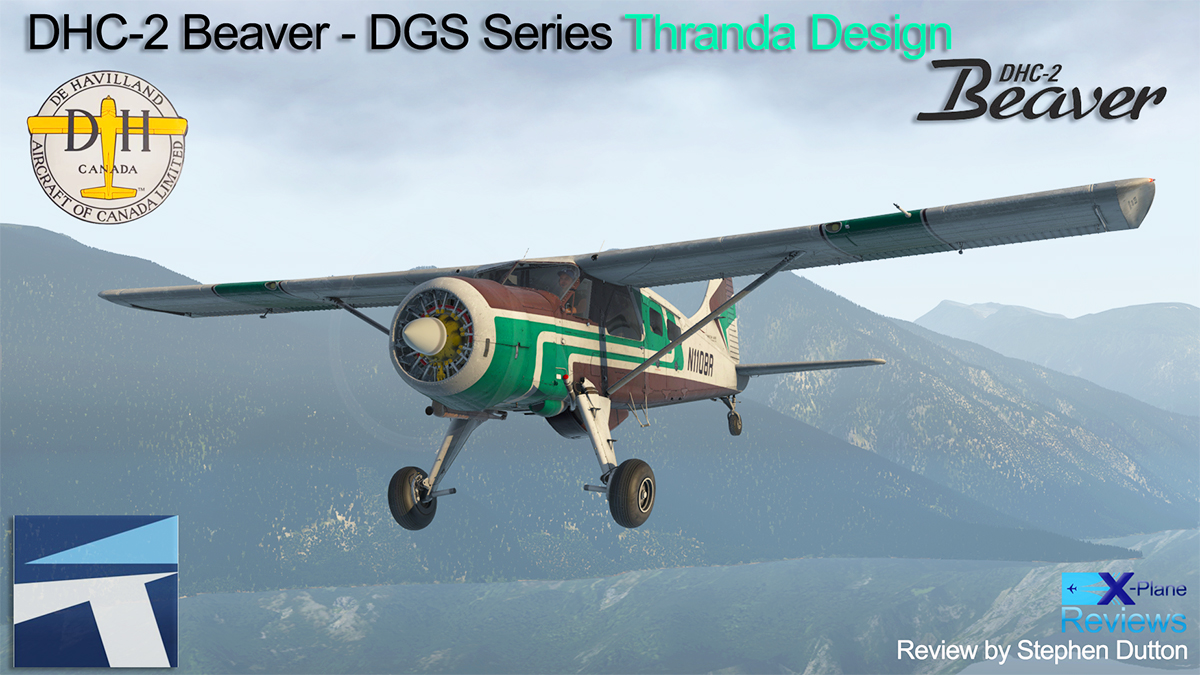
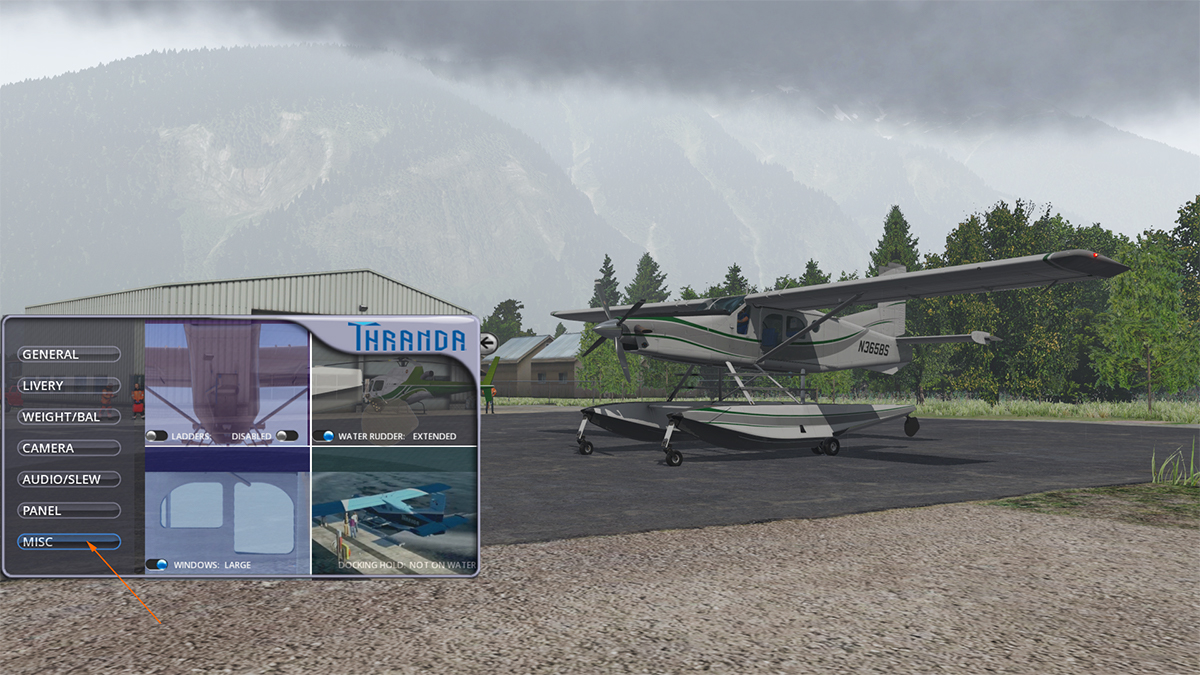
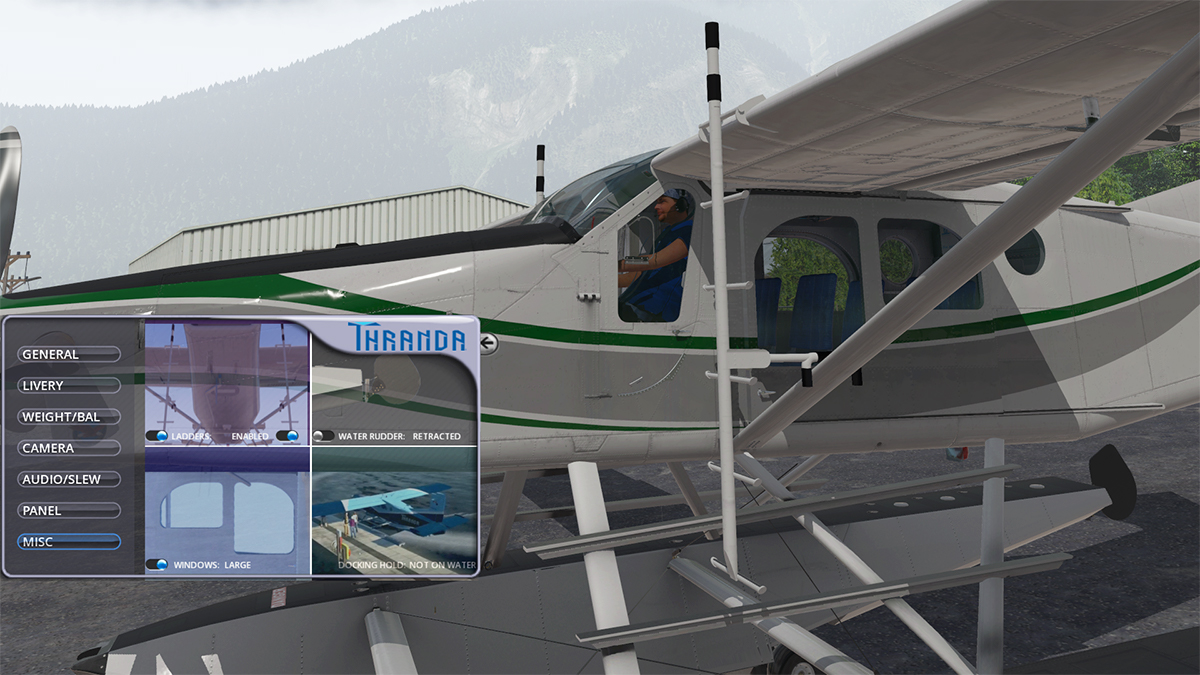
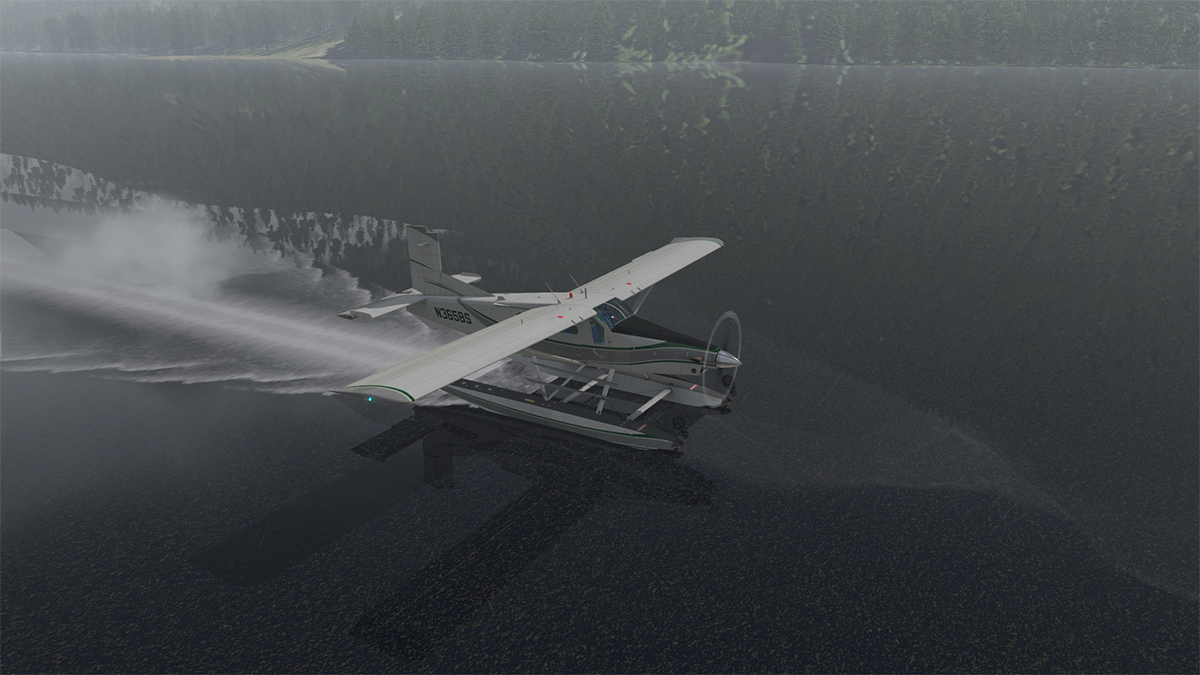
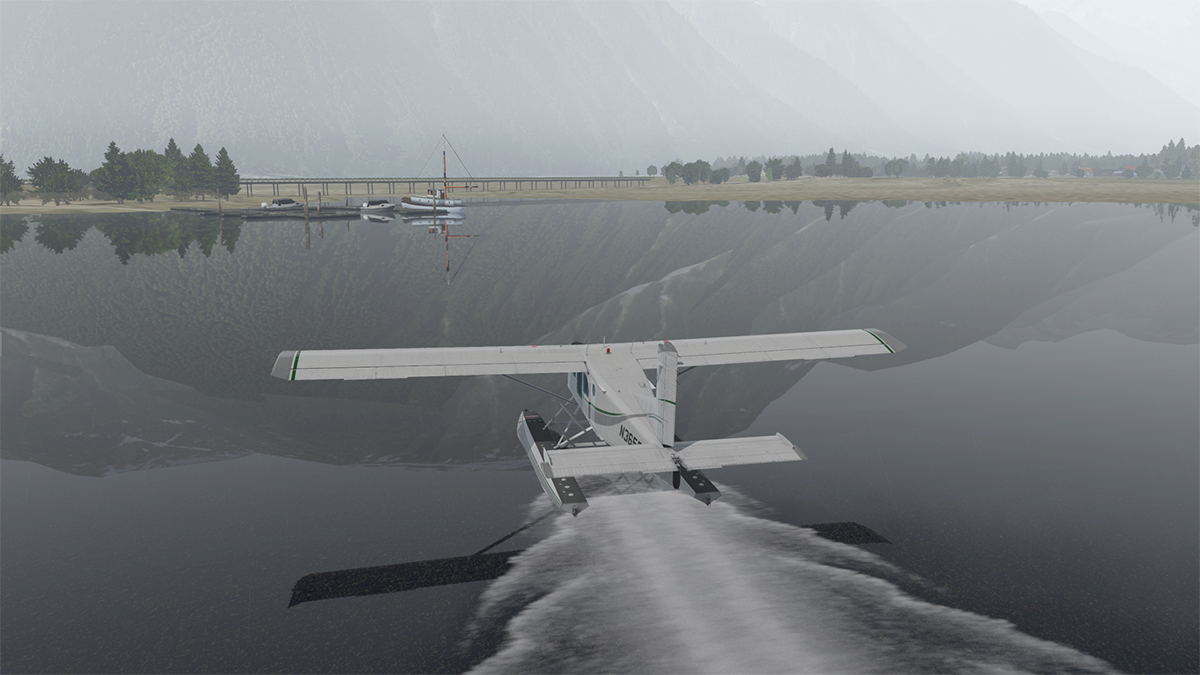
Aircraft Review : DHC-2 Beaver - DGS Series by Thranda Design
Stephen replied to Stephen's topic in Classic Aircraft Reviews
There was a LOT of crannies to check out... great aircraft though. -
Aircraft Review : DHC-2 Beaver - DGS Series by Thranda Design Mention the word "Beaver" and "de-Havilland" and any pilot will go misty eyed, and gaze at you blindly lost in cloud of personal memories, it is an emotive aircraft. The DHC-2 Beaver is a single-engined, high-wing, propeller-driven, STOL aircraft that was developed by de Havilland Canada in 1946, and is known as a bush plane, in fact one of the most highly regarded bush aircraft ever created. There was 1,657 Beavers built between 1947–1967 and half are actually still flying and working hard. In fact you can currently buy a zero-time frame and just rebuild your current aircraft and keep the machine flying as long as you can afford the new airframes... so why replace perfection. History de Havilland Canada hired Punch Dickins, a famous bush pilot, as Director of Sales who began an extensive program of collecting requests from other pilots and to understand what they needed in a new type of aircraft. Almost without variation, the pilots asked for tremendous extra power and STOL performance, in a design that could be easily fitted with wheels, skis or floats. When de Havilland engineers noted that this would result in poor cruise performance, one pilot replied "You only have to be faster than a dog sled". Other suggestions that seemingly sound mundane but important in the bush plane world; full-sized doors were installed on both sides of the aircraft so it could be easily loaded no matter which side of a dock it tied up on. The large doors (known as Alaska doors) were also made wide enough to allow for a 45 Imperial gallon drum to be rolled directly up and into the aircraft. On September 17, 1946, de Havilland officially put together a design team consisting of Fred Buller, Dick Hiscocks, Jim Houston and W. Jakimiuk, led by Phil Garratt. The new aircraft was designed to be all-metal in using "steel from the engine to the firewall, heavy aluminum truss frames with panels and doors throughout the front seat area, lighter trusses toward the rear and all monocoque construction aft". At the time de Havilland Canada was still a British-owned company and there were plans to fit the evolving design with a British engine. This limited power, so the wing area was greatly increased in order to maintain STOL performance. When Pratt & Whitney Canada offered to supply war-surplus 450 hp (340 kW) Wasp Jr engines at a low price, the aircraft ended up with extra power as well as the original long wing. The result was unbeatable STOL performance for an aircraft of its size. it was decided that the new bush plane was much like the hard-working beaver and so as many aircraft at the time were named after animals, the aircraft was designated after this industrious animal. The first flight of the DHC-2 Beaver was in Downsview, Ontario by Second World War flying ace Russell Bannock on August 16, 1947. The first production aircraft was delivered to the Ontario Department of Lands and Forests, a design partner, in April 1948. The Beaver was designed for flight in rugged and remote areas of the world. Its short takeoff and landing capability made it ideal for areas normally only accessible only by canoe or foot. Because it often flies to remote locations, often in cold climates, its oil reservoir filler is located in the cockpit and the oil can be filled in flight. A series of upgrades to the basic design were incorporated. One major customer introduced the use of flat steps replacing the earlier tubes, a feature that is now almost universal. In 1987, the Canadian Engineering Centennial Board named the DHC-2 one of the top ten Canadian engineering achievements of the 20th century. The current ownership of the certificates and tooling gives Viking Air of Victoria, Canada the exclusive right to manufacture new Beavers. Viking now sells a remanufactured and rebuilt DHC-2T Turbo Beaver upgraded with a Pratt & Whitney Canada PT6A-34 680 hp (507 kW) turboprop engine. With a maximum gross takeoff weight increased to 6,000 lb (2,700 kg) it can carry 2,450 lb (1,110 kg) of freight. However, Viking Turbo Beavers are only rebuilt from existing air frames, and are not new-builds, unlike Viking's own DHC-6 Series 400 Twin Otter, which is manufactured from a completely new airframe. (wikipeida) Performance - Maximum speed: 158 mph (255 km/h) - Cruise speed: 143 mph (230 km/h) - Range: 455 miles (732 km) - Service ceiling: 18,000 ft (5,486 m) - Rate of climb: 1,020 ft/min (5.2 m/s) DHC-2 Beaver - DGS Series by Thranda Thranda Design seem to want to develop, strong rugged utility aircraft, first was the Caravan like Quest Kodiak, then the excellent Pilatus PC-6 Turbo Porter and now the greatest of them all in the DHC-2 Beaver. This version is the Beaver that incorporates the "Holmes Extended Engine Mount", which moves the 917lbs engine forward by almost 10 inches. This modification then moves the center of gravity of the plane forward, and in then allowing additional loads to be carried in the back without exceeding the aft CG limit. Comparisons are going to be made with the original X-Plane Beaver from SoulMade Simulations DHC-2 version a few years back, that aircraft is a pure DHC-2, were as this version is a more slightly modernised version, the SMS version is also now slightly older with only a few updates, were as this version is all completely wizz-bang and up to the current state of X-Plane dynamic standards. A first look at the aircraft reveals a very nice and very authentic feeling aircraft, you know that this DHC-2 is going to be really good... even when covered over to protect the aircraft from the elements, that rugged engine/window cover is a brilliant start. Those first impressions are highly important, you know that certainly the Thranda Design ethics are always going to be some of the very best in X-Plane, that is always a religious known, but that extremely high standard we always expect from Thranda does not come easy either... but there is always value and quality abound, and again here you feel every aspect of that as well as see it. Time to pull the cover off, and see the aircraft below... That is better, "Magnificent" isn't it! The detailing is exceptional, the mapping of the precision of the rivets are simply excellent, and I love the gap in the cowling, actually done twice with the extended engine mount if you look closely. The Pratt & Whitney R-985 Wasp Junior engine, is rated at 450 BHP at sea level. This is an air-cooled, carburetted, 9-Cylinder radial engine, incorporating dual magnetos and an engine-driven single-stage supercharger. And the engine detail really jumps out at you with the coloured inner components, that aspect should not work on such an old aircraft, but it looks simply brilliant here... ... note the chrome valve guides and oil circulation, insanely good, and detail to die for. The Wasp Jr is connected to a single 3-bladed constant speed propeller mounted at the front. The aircraft will easily support the most discerning eye, the detail is so, so good, note the upper engine vents, exhaust, and the excellent landing gear support detailing as it is mounted on the fuselage. You can look at the landing gear assemblies is absolute detail, because the quality will support your critical eye, note the lovely disk brake assembly and it's attachments. Your paying for minute detail and you are certainly getting your money's worth here. Cast your eyes over the rear, the elevator detail is excellent with great mapping detail and note the fine elements of only a few simple metal rods (arrowed) that control the vertical aerodynamic surfaces... these rods are all there is between you and certain death. The rear tailwheel is also highly detailed with excellent control cable animations for realism. Tailwheel can be either free castoring or locked to the rudder. There is a complete lovely raw roughness and wear to all the surfaces with again that excellent rivet mapping that gives you such a heightened realism... lovely stuff. One of the requirements was that the DHC-2 had great STOL (Short Takeoff and Landing) performance, the depth of drop of the flaps at a 58º degree show this performance, again the detail is very good. Thranda pioneered great glass and reflections in X-Plane, and that same skill is on show here. Main windshield is a work of art, but so are the amazing bubble windows in shape, and wear (note the excellent glass streaks). You also have the option of either bubble or flat side windows. DHC-2 Internal Looking up into the cockpit and you know this is going to be good, and the detail even from seen down here is excellent. On the left side there are four opening doors, cockpit, underwing side door and a twin set of "Alaska" doors that are made wide enough to allow for a 44 Imperial gallon drum to be rolled up and inserted into the aircraft. On the right side is the Co-Pilot front door, and another underwing door. All doors can be opened via the internal latches, or from the menu. Cabin is in a dark grey, and highlighted by some nice chrome support rings. Seats are basic but beautifully modeled in detail, all seats have metal plate cushion supports. There are four forward seats and a twin-bench seat rear, the cabin fit-out is a bit drab, but very authentic to the period... .... note the very large rear and curved side (bath) metal construction of the Pilot and Co-Pilot seats, the metal construction and floor supports is simply extremely well done, with even with wear and tear on the metal surfaces. Note the nice individual door trim screws. Up onto the foot support and a look into that iconic cockpit... and wow! The Thranda Beaver cockpit is not like the antique cream version like on the SoulMade Solutions DHC-2, that is very much beloved by me as to it's reference to an early Beaver. But this version is very much a more relative version to most of the working Beavers out there and it is extremely well done. The SMS version had a single left side Yoke, but here you get the TwinBar Y double version that disappears if you press the base, so well done. Roof trim and blinds and under seat (metal seat bucket frame is also insanely great) detail is excellent. The famous name plate says it all. There is a leather surround with the internal metal facias. The polished metal reproduction is simply extraordinary, just outstanding... and in the right lighting conditions it just glows and shines like it has just been lovingly and newly polished. There is real craftmanship here, You wonder if ever you would get aircraft detail like this to fly in Microsoft FlightSim, if aircraft detail is what you want, you could never get this extreme quality over there, but you can access it in X-Plane. There are two choices of the famous throttle quadrant, the older original classic version with the Throttle Lever left, with in order Propeller lever and Mixture right... or the more modern squared off version with the Throttle centre, Prop left and Mixture right. Cenrte top are the magnificent large DHC-2 iconic Manifold Pressure and RPM gauges and the mid-screen mounted whiskey compass. The pilot gets all the flying instruments in the form of the six standard flight instruments in the Airspeed, Artificial Horizon, Altitude, Turn/Slip Indicator, Heading Indicator and the Vertical Speed, left is the main fuel tank selector It has positions of OFF, FRONT, CENTRE, REAR. Cosmetic detail is astounding, metal flaps indicator is a work of art, and you can't believe in intimate authentic detail here, like the ACK ELT and the logos MaxDim panel lighting knobs lower left panel, the metal plate storage box opens as well. Right side panel has the avionics and electrical panel... There is an altitude selector top, then an S-Tec Fifty-Five x Autopilot, KX 155 NAV/COMM Radio (NAV 1/COM 1), Garmin GMA 340 Comm radio, and a Garmin GTX 325 Transponder lower... it is to be noted that these items are the default set of avionics, but as we shall see, you can use more different units if you want to. To the far right is an OBS Course Deviation Indicator (CDI) - VOR NAV 2. Lower right panel is an active (Fuse) Circuit Breaker panel, with the relevant electrical switches set below for power and lighting (Avionics power switch is high up on the left side panel facia). Next to the Fuses is the AMPs gauge, and Suction Gauge, and below is a lovely PS radio volume panel. Centre panel is a default X-Plane GNS 530, but it can be replaced with a Reality XP GTN 750 if you own the extra feature. Mid-Panel are the engine gauges, with the Oil temperature shown on the top of the gauge, oil pressure on the left, and fuel pressure on the right. Next right is the sublime gauges to indicate the quantity of fuel remaining in the three primary internal fuel tanks. From left to right these gauges indicate the Front tank, Rear tank, and Middle tank, and below is a CYL. (Cylinder) Temperature gauge, with a Hobbs hour meter. Three lower levers cover (LtoR) the carburetor heat control lever, the famous Fuel Wobble Pump Lever and the Fuel and Oil Emergency Shutoff Lever. To the right is the internal Oil filler (yellow cap). Detail again comes to the fore with the Manufacture's and Aircraft registration plates. The authenticity is simply mind-blowing and it keeps on coming with the ratcheting carb heat lever, the manually pumped flap system (with direction valve), and the primer system that are all faithfully modelled for maximum immersion. The fuel system is complicated, with three internal tanks Front (35 GAL/132 Lts), Centre (35 GAL/132 lts) and Rear (25 GAL/95 lts), two wing tanks (21.6 GAL/85 Lts each) and an optional Belly Fuel Tank (43.1 GAL/163 Lts)... for a total of 181 GAL/685 Lts of fuel. The main internal tanks are controlled via the red switch left panel, the wing tip tanks via a red switch upper door left, and the belly tank via a handle under the instrument panel (Vacuum air pressure is required). Another notable feature in the cockpit is that you can open or lower both front door windows, and into any position you like... ... and the forward window air vent can also be rotated. There are loads of pumps and levers on the Beaver, one is the pump handle for the flaps, down right of the pilot's seat and another is the engine primer pump on the left of the pilot's seat, the actions of both are really well done and authentic. Internal Lighting Turn on the power and adjust the instrument lighting and it is.... "oh WOW, WOW!" "Totally stunning" is the one set of words you can find, "blown away" is another, the panel lighting is simply gorgeous, as there is a real depth to the lighting and in the detail. Overhead lighting is provided by two fixed side spot lights... and two highly adjustable LED roof mounted lights... ... oddly there is no lighting in the cabin? But you can turn the roof LEDs right backwards to give some illumination, but a few rear lights in the cabin would be nice, it is just a little too dark back there. Customising If you have the Thranda PC-6 Porter, then you will be aware of the instrument panel customising feature to suit your own tastes. So in reality there is no default instrument setup... and that same system is available also here in the Beaver and it is called DGS or "Dynamic Generation Series". Menu is selected via an arrow tab left screen (it can be scrolled clear), on the menu is the "PANEL" selection. This brings up the dynamic panel options... There are two basic panel selections, the iconic version we know so well, but also a flat metal grey facia version. Panel choices become endless, angled avionics, better fuel switch positions, and both either the GNS 430 or GNS 530 can be used... .... and the grey flat panel is far better with the more modern squared off throttle quadrant to which gives you even more layout variations... Optional Items include; Aspen EFD 1000, S-Tec 55x autopilot, RealityXP GTN 750/650 Touch 3D bezels (these are optional addons) and a lovely Collins 614-12 ADF... There are over 50 instruments to select from or to rearrange around on the panel facias... .... basically you can even start with a completely blank panel and then create your own unique or personal instrument layout... and have up to or you can save 14 different layouts and there are five defaults to get you started... for absolute layout choice it is simply crazy! Menus The menu is selected via the arrow (the arrow can be scrolled translucent) on the left side of your screen... ... and there are seven tab selections; General, Livery, Camera, Audio/Slew, Panel and Misc. The menu PANEL selection has already been covered above, the rest of the selections are covered below. Menu - General The menu "General" sections covers quite a lot of options, the layout is highly detailed and very comprehensive. Three selections cover group items but any one separate item via "Click Spots" can be individually selected or hidden via the aircraft graphic. "ALL COVERS" will select the huge engine canvas cover and pitot cover, "ALL TIE-DOWNS" for propeller and wing tie-downs and "ALL DOORS" for both cockpit doors, both cabin underwing and twin "Alaska" doors. The Engine can be set into two modes... SIMPLIFIED or REALISTIC In Simplified mode the engine will be automatically limited the engine and engine start up is instant start. In Realistic mode it will be up to the pilot to avoid exceeding the engine limitations, and go through the full procedure of starting the Pratt & Whitney R-985 Wasp Junior radial engine, which means a lot of lever and knob setting and a lot of hand pumping. Other General menu selections cover Window and Instrument Panel Reflections on/off, Startup Running on/off, Use the External Fuel Tank, Chocks and brakes on/off. All EXT - External Lights can be switched on and off as can ALL INT - Internal lights. The lights activation can also be accessed on the aircraft graphic and finally the "Radial Engine Animation" of which we will look at soon. The Electric Tug is attached to the rear tailwheel, that is controlled via your joystick (for motion forward or backwards), with the yaw turning the rear tailwheel and the attached tug. There are an fully animated pilot (actually Dan Klaue) and his lady friend (actually his wife) as a Co-Pilot, both will disappear if the power is off and the wheel chocks are set, if you don't select a Co-Pilot, then Dan flies alone. Menu - Liveries Second Menu option is liveries, there are two options here with the first being "PAINTED LIVERIES". There are altogether 14 liveries or one blank and thirteen designs, and all are of extremely high quality and creative flare. One is a ZZTEMP that is just totally clear (not shown). Note the Dirt and Scratches (arrowed) numbers, as they are important later. Dynamic Liveries Not happy with any of those designs, then why not create your own! With their earlier release of their Kodiak then Thranda also introduced a clever feature to design your own livery.This is done by switching from PAINTED LIVERIES to DYNAMIC LIVERIES top. You have a menu to select on the right that can colour a certain part of the aircraft, like the Roof, Wing, Tail or Wing tips. Select which one you want and then adjust the RGB colours for that area, it looks hard but you can easily design a very nice livery in about twenty minutes... ... when done you can "save" the livery and then "APPLY" it to the aircraft. It was quite easy, but I found the dash symbol - couldn't be inserted in the registration except for the lower case version? So I had to take it out. This is why there is an transparent aircraft in the liveries? There are also four effects you can apply. The said "Dirt" and "Scratches", and also "Metal" and "Rough(ness)" this gives the aircraft a dirty rough appearance. So applying these Dirt and scratches on the airplane will make the surfaces rougher, this is giving you the full PBR control in creating stunning metallic liveries, or matte, sand-blasted look, and these aspects will also slightly affect the Beaver's drag, and therefore it's cruise speeds. With full dirt and scratches you can expect a loss of 2 to 3 mph of cruise speed. Cleaning the plane by setting both values back to 0 will give you a smoother and slightly faster plane. Two extras can also be added with DH logo which is very nice and the said registration number, the final result is excellent. Menu - Weight/Bal The DHC-2 has a great Weight and Balance menu. Both Lbs and Kgs weights are shown... Fill one wingtip tank full and the Beaver will seriously lean, and so will the other tank... this shows how sensitive you are going to have to be to balance out the aircraft. .... Fuel can be added to all the tanks in the three internal, twin-wingtips and the Aux external tank and they are all shown and are adjustable as well in the menu (above). Pilot, passengers and cargo can all be set for individual weights and the CofG (Centre of Gravity) parameters are also all shown on a graph, when done you can save the configuration and reload it. Working out that right CofG balance is critical, setting just inside the parameters is just not really good enough, you need for the aircraft to be balanced in it's fuel and load weights, or you will have difficulty flying the aircraft, put too much (cargo) weight aft and you are tail heavy. Note in that taking out the Co-Pilot here will make her disappear in the cockpit, but pilot Dan stays. Menu - Camera There is a camera feature under the menu "Camera" selection. To the right is the internal default views to be selected via a menu, or press the keypad to select the view. The FOV or Field of View is adjustable via a slider. The left side of the panel is the "Walkaround" views, just pick the dot viewpoint you want to see to rotate around the aircraft. Menu - Audio/Slew Sound can be adjusted via the sound menu. There are seven slider selections with: Master, Aircraft External, Aircraft Internal, CoPilot, Radios, Environmental and User Interface... press the Audio slot and you get a audio simulation of an active noise canceling headset, which is seen as wearing a headset. Sound quality is excellent. Slew mode Slew mode is experimental, but allows you to manually move the aircraft around in X-Plane. It functions by temporarily overriding the various aerodynamic and physical forces on the plane, it is to allow the user to reposition the plane as desired. This feature is however highly touchy! In reality you don't use "Slew Mode" on the ground, it is mostly for manoeuvrability on water and for docking... If you want to see this in action then check out the PC-6 Adventure pack review. Menu - MISC The Misc page covers options on the Beaver, and there are four options; Skis, Tyres, Windows, and Throttle Quadrant. We have seen the Bubble Windows and Throttle Quadrant options above in either "Flat" or "Bubble Windows", and the "Old" or "New" quadrants. Skis Ski quality and design is again exceptional, with no ordinary straight planks here, they are all highly realistic and the same as on the PC-6. Bush (Tundra) Tyres and Mud Flaps Another option is for the larger Bush tyres or "Tundra" tyres, the over-sized wheels also come with another option of having "Mud Flaps" attached (The mud flaps can be used on both the Normal and Tundra tyre options). Flying the DHC-2 Beaver There are two options to starting the DHC-2, the (very) easy way via the option in the Menu/General panel... and the long winded way. The full engine start up procedure is in the manual. Did you always want to look inside your engine? Well now you can and the idea is to see how the engine is primed to start... Dan Klaue genius strikes again! There is the option via a menu selection "Radial Engine Animation" that brings up an animated Wasp Radial engine, you can PreHeat and Prime your Wasp ready for start, but you have to be careful not to "OverPrime" the Cylinders. The starter switch can be hard to find because it is not labeled, but it is under the left red switch cover, if primed correctly then switch on the starter (no more than 15secs a try) until the Wasp finally coughs and powers up, the animation can give you exciting feedback on what is going on in the ignition phase of the engine, and then when it runs it is another "Wow" moment... yes. Pistons are exploding, and the animation is amazing beyond belief, adjust the throttle for a some serious movement, but the animation will also react to the adjustment of not only the throttle inputs, but the fuel mixture from "Rich" to 'Lean" adjustments as well. These movements and the running of the DHC-2 also compliment the amazing sound range as well, there is a consistent adjustment of the excellent engine sounds to the condition of the running of the engine, that is the "Ugh, Ugh" of low lean to the high power "roar" of the full throttle. The sounds actually give you clues as to what's happening under the hood as is for the shear band of extensive sound patterns available here that show no gaps or same patterns that just gets you all tinkly down your back... it is highly, highly aurally realistic... well like a full throated real 450 hp Wasp Jr engine sounds like, and the hope that your neighbour and you are on (very) good terms. So yes the sounds are good, or totally excellent. External lighting is very good, but on an aircraft like the Beaver quite limited to the basics, there is a nice red beacon top fuselage, and the navigation lights are nice and pert as is the tiny wing strobe lights. Main landing lights are both LED, and very good in the distance, but can't be seen close up on the wing? As noted you can have a freewheeling rear or locked to the rudder yaw, You really need a set of rudder pedals with built in toe brakes to use the freewheeling option, which I don't have, so I have to use the yaw option. Your have to find a nice balance with the mixture and throttle levers so there is a need to experiment to find that right balance... but it is there to be found and highly realistic, and the feel is excellent. So a bit of throttle and you are moving, the Beaver is excellent on the ground as taildraggers can be twitchy, but you can actually feel the weight and the aircraft is quite smooth in it's movements. You sit high, and the view out is quite good for a taildragger, but a slight glance to the left will align you up with the runway... flaps set (to Takeoff) and your ready to go. Speed builds gradually then suddenly the tail unstick's and you need a kick-full of right rudder to maintain the straight ahead line... ... but don't get me wrong, the aircraft is not twiddly in this phase but beautifully controlled as it is all very easy tail up to steer directly on the centreline, most taildraggers are nasty and nervy at this point, but not the DHC-2... Takeoff is around 90 knts, but you don't need to pull back the stick as the Beaver just glides into the air on lift alone, to climb only requires a little pitch to meet the 600 fpm climb you need. You can climbout at a 1,000 fpm, but the 600 fpm is perfect, the one thing that should be highly noted is the aircraft's weight feel, this is a huge bonus in me holding that centreline, but also when you lift you really feeeel that WEIGHT of the aircraft, and that is rare in X-Plane, it is so very, very good is this DHC-2. Unlike other aircraft you can use the flaps and even in level flight, most aircraft need the flaps in and clean as soon as possible, but not the Beaver, as if you have a slightly uneven balance (front to rear) in the aircraft you can use the flaps to even out the balance without touching the trim, it is a tool every Beaver pilot's use. Obviously you don't go very fast... 158 mph (255 km/h) or 140 knts is max and your cruise speed is only 143 mph (230 km/h) or 125 knts, but you don't really care about that factor, this aircraft is an absolute dream to fly. Trimming the DHC-2 out is easy, the trims are set up up on the roof (But I use keyboard commands), and the Beaver trims out the pitch beautifully, now just small stick and rudder inputs keeps DHC straight, but better still yet is if you trim out the rudder as well, and now you can take both hands and feet off the controls and the Beaver will still fly like a dream straight and level.... this is one amazing simulation of a real aircraft. So for any novice pilot, this is a brilliant aircraft to learn to fly on, even if it is a taildragger (all the better), as it's balance is second to none, but you also feel the aircraft weight in every manoeuvre that you do, but this is not an aerobatic machine, it is a workhorse only, like a large Clydesdale horse it is heavy, slow and incredibly docile... that is the word to note here in docile, but I simply love it as the aircraft is very comforting and I have had enough nervy aircraft lately to last me a lifetime.... this is a true pilot's aircraft in every form... and I simply love it. The DHC-2 is so docile and neutral I am am not quickly reaching for the autopilot (S-Tec in this case), as the Beaver is just nicely (but noisily) cruising through the air and I certainly don't need any artificial help in flying the aircraft at all... open the side window to get the full throaty roar of the Wasp Jr, it is certainly noisy but exciting as well, I note the aircraft as docile, but that is in it's character, it is still however an immensely exciting aircraft to fly because it is "that good". Do a hard turn and the DHC-2 needs a little more power and a slight pitch back to slightly compensate for a loss of speed and altitude, but these reflexes come naturally each time you manoeuvre the aircraft in large variations. Thranda have already noted that an Amphibious version of this DHC-2 is coming and soon, maybe in the new year (2021), that will be another worthy add-on, and give the aircraft an even greater capability and versatility (if it is anything like the recent PC-6 version). Cockpit is stunning in the air. We are soon back over Bella Coola and heading back to the strip at CYBD... Interesting are the flaps... lower the flaps and you don't need to change your throttle position either, the Beaver just slows down to the lower speed of the flap position, with any or no sudden expected lift (Interesting though would be the aircraft at a very light loading weight, I didn't try that aspect out).... the Beaver is known as a "flap-happy" aircraft and you can see and feel that aspect of why here... That is the "Landing" setting, but you can go even slower if you go deeper with more flap and into the red zone to the full 58º degrees... Approach speed is around 70 knts, here your altitude is controlled only via your throttle, more power to go up and less power to go down, but even the mixture adjustments can even have an effect, so be aware if you are leaning out the engine more while reducing power. Final approach and you are under complete control of the aircraft, you and the machine are as one, even slight reductions of power and you lose height, but you also have uttermost confidence in the aircraft, in other words it is easy, but skillful in the same aspect. One note I will say is that the touchdown speed is still around 70 knts, dropping to 60 knts on the runway, and that feels a tad fast at full flap? but the speed does still give you full aerodynamic control on the landing and you can finely follow the centreline as good as when you took off, the question begs is that could a headwind change the aspects of a landing such as this... ... so the big trick is rubbing off the speed without touching the brakes, tricky, and that aspect may need a bit of practise is needed before getting it right, I would be more happy with a landing speed of around 50 knts or less in these circumstances. But let us be thankful, this is an amazing experience of an aircraft... the best aircraft of the year 2020? _______________ Summary This is the third aircraft in a series of rugged utility aircraft from Thranda Design, the first being the Kodiak, then the excellent Pilatus PC-6 Turbo Porter and now here comes the most iconic and the most famous bush aircraft of them all in the DHC-2 Beaver. This version has the "Holmes Extended Engine Mount", which moves the 917lbs Wasp Jr engine forward by almost 10 inches for a better rear load balance (Centre of Gravity). Any aircraft coming from Thranda Design is usually full of amazing features and outstanding quality design, and certainly you are not disappointed here. In the design aspect the aircraft is extremely the best yet from Thranda, the quality is overwhelming to the point of ridiculous... the DHC has full hi-res PBR realistic effects, featuring true-to-life plate deformation and to-the-rivet precision, not to mention the high quality materials internally and externally. Detailing and the modeling is absolutely first rate, this is an outstanding Beaver. Not only is the instrument Panel one of the best yet in X-Plane, it is also fully customised via the "Dynamic Generation Series" in not only giving you your own control over the way the instruments are laid out, but to swap and change other instruments as well including; Aspen EFD 1000, S-Tec 55x autopilot, RealityXP GTN 750 (these are optional addons) and a Collins 614-12 ADF. Fourteen liveries are provided, but also again you can create and design your own liveries with the DGS system. Options include, Skis, mud flaps, Old and New quadrants and bubble windows, and an amphibious version is noted as coming soon. Notable is the instrument lighting, it is simply awe-inspiring. Sounds are outstanding, with High fidelity, multi-track sounds with smooth transitions and amazing atmospheric effects, 3D audio effects, including "blade slapping" sound when view is perpendicular to propeller, start up and engine mixture variance is also highly realistic. Menus are also extensive, with sound adjustments, weight and balance manager with visual chart, lighting, doors, views, reflections and an amazing radial engine visualisation in a pop-up window, which showcases the inner workings of the engine. Again like the PC-6, you would want, or like a cargo option? and there is no lighting in the rear of the cabin? Yes I have been gushing in this review, extraordinary and brilliant are full of the praise of what is delivered here from Thranda Design, not only in the options, effects and in the sheer experience available, but also in the way this Beaver flies as well... it is the full package and in my guess for the aircraft of the year in 2020. So the note here is to the converts of Microsoft's "ground breaking" new simulator, because aircraft like this coming out of X-Plane changes the dynamics of simulation. Yes MSFS may have pretty scenery, but it will never have aircraft such as this iconic Beaver as in depth, with as much quality and come with the sheer force of ideas available here, and in reality isn't that is what simulation is really all about, brilliant aircraft with exceptional quality and flying dynamics and a huge feature list, and only top level developers like Thranda Design will be in the X-Plane simulator and not the other one, so if you really want the very best then here it is.... Highly, Hugely Recommended. _______________________________ Yes! the DHC-2 Beaver-DGS Series by Thranda Design is NOW available from the X-Plane.Org Store here : DHC-2 Beaver-DGS Series Price is US$39.95 (Currently only US$34.95) Features Special features: FULLY configurable 3D instrument panel. Over 50 instruments to choose from! (Including Aspen EFD 1000, and support for RealityXP GTN750) Move any instrument to any location on the panel, or even between pilot and copilot's panel! Comes with 6 panel presets, but can easily be expanded by moving instruments around, using simple and intuitive interface. Save your own presets, and even share them with the community! Instruments can be moved in 3D directly, on a 2D pop-up preview window, or by numerical entry for precise placement. Intricate, realistic fuel tank system, featuring tip tanks and removable belly tank. Overflow logic when transferring too much fuel from other tanks to primary tanks. GNS430 and 530 can be swapped out, but a restart of the plane is required, as 430s and 530s are mutually exclusive in terms of compatibility in X-Plane Dynamic livery editor (like in the Kodiak and the Pilatus PC-6) Full PBR control! Create stunning metallic liveries, or matte, sand-blasted look in mere seconds! Additional control over dirt/grime, scratches/nicks, adjustable in real-time to dial in the exact desired amount of wear and tear. Affects airspeed. Clean plane will fly 2-3 MPH faster. Create "virtual" liveries, based on one common design layout, and assign any colour to any available paint segment. Quickly create preview of livery in real-time, using intuitive controls. Previews now include visualization of metallic materials and dirt overlays. Apply selected livery in real-time, right in the sim, without the need to even touch a 3rd party image editor! Option to include/hide manufacturer logo on tail, and control its colour. Option to change the tail number in real-time, or disable it altogether. (Enter a "space" instead of a callsign number to create a blank tail number.) Easily and quickly create dozens of paint schemes in-sim! Also supports 12 traditionally painted liveries, all visible in a convenient pre-selection preview window. Uses SkunkCrafts Updater. Option to participate in Beta program, via check box in SkunkCrafts Updater. Excellent hi-res PBR realistic materials, featuring true-to-life plate deformation and to-the-rivet precision. Feature-rich elegant fly-out menu with the following features: Realism settings for engine and tail wheel (simplified vs. realistic modes) Radial engine visualization in pop-up window, which showcases the inner workings of the engine. Real-time primer and pre-heat logic, with visualization indicating correct priming range Innovative electric tug, with in-panel controls to move forward/backward at the desired speed, and steer proportionally Control over chocks, individual tie-downs, covers, internal lights, external lights, etc. Option to enable/disable Belly Tank, with realistically simulated weight, momentum, rotational inertia, and drag characteristics. Option to start up running (all systems ready), or cold-and-dark, for realistic startup procedures. Option to run engine in a simplified manner (no pre-heat, no priming, easier starts) Control landing lights, strobes, beacon, and nav lights via pop-up window Detailed weight and balance manager with visual chart, individual passenger seat weight control, Lbs/KG unit toggle, CG control, external tank control, and the option to save and load configuration. Multiple camera snap points, above and beyond what's available by default in X-Plane, so you can perform your walk around checks. Adjust your camera's Field of View without having to go to an X-plane menu, allowing for real-time adjustments. Audio mixer: individually control audio channels in real-time, so you can adjust volumes while hearing them play. Slew control: move your plane around the world, temporarily bypassing flight physics. Includes ground mode and air mode. Dynamic panel control page, with a separate view for the entire panel layout preview, or a per-instrument view, allowing for fine-tuning of instrument position, as well as copy-paste function to quickly replace instruments. The "Misc" page in the fly-out window contains options to customize the plane, such as: skis tundra tires mud flaps bubble windows throttle quadrant model (choose between classic and new design) Flight dynamics and systems: The Beaver has unique flight dynamics, characterized by being a "flap-happy" plane. This is faithfully reproduced in the sim version. (Can require slight flap extension during cruise, depending on conditions). The Beaver is the quintessential Canadian classic STOL workhorse, whose flight characteristics and excellent STOL capabilities are calibrated to maximum precision in the sim. Details, such as the wobble pump, the ratcheting carb heat lever, the manually pumped flap system (with direction valve), and the primer system are faithfully modelled for maximum immersion. Tie-downs and chocks actually keep the plane from moving, even in high winds. Advanced FMOD-based sound system: Pioneer in procedural engine sounds. (No two starts sound alike: coughing, sputtering, and clanking valves all contribute to a nuanced, rich, immersive sound experience.) High fidelity, multi-track sounds with smooth transitions and amazing atmospheric effects. Individual volume control over different aspects of the sound experience, adjustable in real-time (while listening to the sounds) Different sounds for front of plane than for back of plane Panning around the plane in exterior view yields awesome 3D audio effects, including "blade slapping" sound when view is perpendicular to prop Individual buttons and switches in the cockpit each have their own unique sound. Sounds actually give you clues as to what's happening under the hood Outside wind intensity is affected by slip and AoA. (The more the surface area of the fuselage is hit by oncoming wind, the louder the sounds Requirements X-Plane 11 Windows, Mac or Linux 4 GB VRAM Minimum. 8 GB+ VRAM Recommended Download Size: 988 MB Current and Review version 1.0.2 (November 23rd 2020) The aircraft comes with an auto-updater. Free auto updates for the life-cycle of X-Plane 11 _______________________________________________________________________ Installation and documents: Download is 998.10Mb and the aircraft is deposited in the "General Aviation" X-Plane folder. Installation key is required on start up and is supplied with the purchased download file. Documents supplied are: Changelog.txt Thranda DHC-2 Beaver Joystick Settings.pdf Thranda DHC-2 Beaver Graphics Settings XP11.pdf X-Plane G430 Manual.pdf Thranda DHC-2 Beaver Documentation.pdf X-Plane G530 Manual.pdf A Blank Livery (PNG) of four files are provided for painting. Checklists and loads of Performance graphs are provided in the manual. ______________________________________________________________________ Aircraft Review by Stephen Dutton 25th November 2020 Copyright©2020 : X-Plane Reviews (Disclaimer. All images and text in this preview are the work and property of X-PlaneReviews, no sharing or copy of the content is allowed without consent from the author as per copyright conditions) Review System Specifications: Computer System: Windows - Intel Core i7 6700K CPU 4.00GHz / 64bit -32 Gb single 1067 Mhz DDR4 2133 - ASUS GeForce GTX 1080 8Gb - Samsung Evo 1TB SSD Software: - Windows 10 - X-Plane 11.51 Plugins: Skunkcrafts Updater Scenery or Aircraft - CYBD - Bella Coola by XPORG (formally Beti-x) (X-Plane.OrgStore) - US$17.50
-
Aircraft Release : Airbus A320-214 Ultimate by FlightFactor Aero
Stephen replied to Stephen's topic in Airliners Reviews
Data "nav1 and nav2" have to updated, and so has your X-Plane data to match in the same AIRAC cycle, it is a very different arrangement than most navigation data in the other aircraft. -
Aircraft Review : Robinson R44 Raven II - VSKYLABS 'Test-Pilot' Series VSkyLabs is back, and it is another light-chopper... again. The list is now getting quite lengthy with the Dynali H3 after the Cicaré-8, Guimbal Cabri G2 and also the earlier Mini-500 Project, this new one is the four-seater Robinson R44 Raven ll which is quite a mouthful, I mean ask your girlfriend if she wants a twirl around the coast in a "Robinson R44 Raven ll", I am quite sure she will give you a look of horror of wanting to fly in something that is representative of a big black nasty bird. But in fact it is quite a pretty looking aircraft. The R44 is a bigger aircraft than the other ultra-light machines, but you fly it in very much the same way, deftly. Two notes first, one is the VSkylab philosophy is in that you are purchasing an ongoing project, so any aircraft you purchase is not fully completed or is 100%, that is the deal you sign up for to get access to the aircraft and all the development is free and ongoing. Theses projects are under constant development: development road-map is including flight model refinements, enhanced systems depth, additional liveries and other improvements. Second is that the aircraft is designed around the powerful, native X-Plane 11 'Experimental Flight Model' environment, so that means the Menu/General "Use the experimental flight model" tickbox has to be selected on. The R44 grew out of the Robinson R22 which was a two-bladed, twin-seater, single-engine light utility helicopter manufactured by the Robinson Helicopter Company based at Zamperini Field in Torrance, California. The R44 first flew on 31 March 1990, and has been in sales the most successful over the last few decades with over 6,331+ aircraft produced. In January 2000, Robinson introduced the Raven with hydraulically assisted controls and adjustable pedals. In July 2002, Robinson then introduced the Raven II featuring a more powerful, fuel-injected engine and wider blades and allowing a higher gross weight and improved altitude performance. The version represented here is the Raven ll with the Lycoming IO-540-AE1A5 6-cylinder air-cooled horizontally-opposed piston engine, 245 hp (183 kW) VSkylab's always do great modeling and detail, and it is no exception here, however there isn't that ultra-realism feel, if even a little bland with no of say the real world wear or tear feel, so the R44 feels pristine factory new. The detailing is however very good, and realistic. Rotor head is very well constructed, with all the complex linkages correctly designed, the assembly is fully animated as well, but the pitch and roll movements don't have very extensive movements, but at least they are authentic... ... twin-blades droop very nicely when parked, again well done. Tail-rotor is again a well done assembly, and again animated if still with slight movements. Glass important on a helicopter, here it is very good, with good thickness, curves and lovely reflections. You can open the four doors individually via the small catch externally or the metal loop handle internally... press the door hinge (arrowed) and they all disappear... ... so you can't just remove one door, it is all or nothing. VSkyLabs don't do menus, or any external options. All items that can used as options are just clickpoints, so that tends to limit the features and the options list for their aircraft. Robertson helicopters tend to be pretty basic, or as light as possible. So the cabin is not built for luxury or for VIP travel. The cabin is however well fitted out, with those four low-backed leather seats. Internal detail is very good, and love those hanging headsets and cables. Note the (operating) pull down (handle) rotor brake (arrowed). There is also a single roof-mounted map light with switch. All Robinson's use the T-Bar Cyclic, but this one is not a twin grip, but a single grip to the right, HYD switch and red side button work. Notable is the revolving Speed placard on the T-Bar and you can hide the T-Bar via pressing the cover lower. A large pedestal supports the Robinson Classic 7 holes analog instrument panel. Lower pedestal has a Garmin GTX 325 Transponder lower, and then the default X-Plane GNS 430 GPS unit that pops out for use. Top is a basic KX 155 NAV/COMM Radio (NAV 1/COM 1) that can be switched from Com1 to Com2. The knob above turns to open a vent. Left centre pedestal is top a large clock, and a Quartz (Hobbs) meter set below, Right pedestal is all the engine and fuel gauges with an Amp gauge and Oil Pressure top, Aux Fuel Tank (17.0 US GAL/64 Liters) and Oil Temperature centre, Another Main Fuel Tank (29.5 US GAL/112 Litres) and a CYD HD (Cylinder Head) Temperature gauge is bottom. Lower centre pedestal is the electrical panel, with Lighting, Instrument Panel (adjustable) top, Nav Lts and Strobe lighting below. Clutch (Eng/Diseng), ALT (Alternator), Master Battery, and (Pump) Prime switch. The main instrument panel "Classic 7" has two rows of dials, top row is (LtoR) Vertical Speed (V/S), Artificial Horizon with Slip Indicator, Speed (knts), and engine readouts RPM %. Lower row is Altimeter, Heading Dial and Engine Manifold Pressure. Very simple but effective. Note the excellent rolling turn bubble and you can adjust the Horizon bar. The instrument detailing is very, very good and of good quality. Two features are aimed directly at VR (Virtual Reality) users. There is a Handbook down right, but it is only a single page "Checklist" held right under your nose, but it is well done. Second feature is the Avitab (Aviators Tablet) plugin intergration, the iPad is a basic install, but it is in a good set position, there is no rotation to portrait mode, a feature I grumble about every time, and you can't turn it off either, so you have to just make it disappear if you are not using it (you click the sucker mount). There is an active (fuse) Circuit Breaker panel under the left seat, and the main Landing light switch is on the lower T-Bar Cyclic handle. From the external view there is a pilot, he is highly animated with arms and feet matching the Cyclic and Rudder pedals, more of the same in passengers would have been a nice feature. Flying the R44 Starting the light chopper has a set procedure, and it is wise to understand the enclosed R44 manual, but the R44 needs to be mostly started via the extensive pop-up checklist. Several things to know. Clutch has to be disengaged, you PRIME, then switch to BOTH, and the Fuel (Mixture) knob has to set to RICH (or in) there is a animated cover to note to "not to pull it out, or you will fall out of the sky" marker. Governor switch is on the end of the Collective (off to start, then on), and the Fuel tank (switch) is on the bulkhead behind... ... starting is via the red starter button on the right Cyclic. Throttle is controlled on the Collective, and you move it left or right (left for power which is reflective in the RPM%). When all correct the Heading Compass will shake to the rotor rotation, which has that twin-blade Huey "chop,chop" sound at idle. You know it is going to be tricky, and the R44 does not disappoint in that department, in saying that, as with all very light "nervy" choppers you adjust, refine your inputs. Tail rotor direction of rotation on the R44 is reversed compared to the R22 for improved yaw control authority. On the R44 the advancing blade is on the bottom. Once up I side-slipped, but arrested it, then finally went in the direction I want to go, in forward. .... the tail is very edgy, and you can very easily over compensate, then go too far the other way. So you are consistently and always refining your inputs, and then find out that the minute adjustments work out better. But there is still the ongoing need for a while to keep on refining your inputs to the machine. Obviously your minute Collective movements are synchronised with the Cyclic movements (more so) and you finally then get a more controlled flight. Once central in your controls you sort of relax and enjoy the aircraft... This is certainly not a helicopter to learn on, not even close. But if you have had (a lot) of rotary flight flying then you should easily convert over to the aircraft, and certainly if you have already any of the other VSkyLab light heli aircraft. Any Helicopter Pro will love this R44 and it's input challenges, in that department it is very, very good... but skill is required in handfuls, these Robinson aircraft have quite a nasty reputation. For a little chopper it is quite smooth, once you get into the groove, and it is quite a nice feel. in 1997, a Robinson R44 was piloted by Jennifer Murray for the first helicopter circumnavigation of the world by a woman, covering a distance of 36,000 miles in 97 days. For me personally I couldn't fly that far manually, but an R44 also holds the piston speed record of 227 km/h. Confidence grows easily as I turn back to EGNS (Ronaldsway)... I follow the amazing IOM TT racing course to get my bearings, those bikes go so fast... Top speed of the R44 is 130 kts (150 mph, 240 km/h), with a Cruise speed of 110 kts (130 mph, 200 km/h) and a Range of 300 nmi (350 mi, 560 km)... 14,000ft is the ceiling, but flying even that high is not recommended, I still think the bikes would beat it round the IOM. More confidence as I approach EGNS Rwy 21, I am not going to be putting myself under any stress, I want a wide open space to get this right first time... I go easily through the "translational lift" phase, tricky is slowing down as the R44 is so light, but I get my approach quite right and approach speed is a nice forward 25 kmh. Over the fence... .... I slip nicely into the hover, but that tail is so nervy. It is a bit like being in a cage with a wild animal, say a lion... you know one false move and you will be eaten alive, so you stay cool, calm and collected, then just let it flow as you come down to soft landing. So the procedure was, very twitchy, nervy at first, but you soon find the balance, then once you settle then so does the aircraft... by the end I was able to do the impossible in doing a nice touch landing from the hover, never thought about doing that at all about an hour ago... in I could actually land this machine! I personally like heavier helicopters, say the Bell 406 or the X-Trident AB412... but the Robinson R44 is not too bad at all. Lighting Lighting is okay... Very nice Instrument lighting and the overhead spot light does a nice job for map reading or for general lighting External lighting is average.. I like the twin red and white strobe lights on the long beam tail, but those twin nose Landing lights, Navigation lights are all very blobby, they can all be far better. There are currently only two liveries, Black and shiny Blue... more are promised. ___________________ Summary Another Light Helicopter in the series from VSkyLabs after four Heli releases already. This one is the more slightly heavier Robertson R44 Raven ll, a light helicopter that seats a pilot and three passengers. Note that you are purchasing an ongoing project with any vSkyLabs aircraft and all that all the development is ongoing, so this is not a 100% fully developed project. Overall most vSkyLabs aircraft are all mostly basic, but they are fully detailed to the extreme. There are also no menus or static objects or extensive features as the focus is on the dynamics and flying performance. The R44 requires the experimental setting, but delivers a very credible flying performance. Only interactions are with the few interaction zones that; lock the mixture, move the throttle, change altimeters, open the four doors (you can remove them as well) and hide the T-Bar Cyclic control column. AviTab intergration and exceptional VR-Virtual Reality is also available. I don't think this is an aircraft for the very immature helicopter pilot, it is just too finely controlled and nervous in the wrong hands, in saying that once you adapt then the aircraft comes to you, so yes vertical flying skills do count here, but once mastered the aircraft is very nice to fly, always challenging, but nice to fly... let the pro's line up and be counted as they will love it. So another nice helicopter from VSkyLab's, you want more of course in features and details, but that is not what VSkyLab's is about... it is about the flying pure and simple, and in that area the Robinson R44 Raven ll really delivers... recommended. Now available from the X-Plane.OrgStore or directly from vSkyLabs ___________________ Yes! the Robinson R44 Raven II Project - VSKYLABS 'Test-Pilot' Series is now available from the X-Plane.Org Store here : Robinson R44 Raven II Project - VSKYLABS 'Test-Pilot' Price is US$33.95 Project Main Features: VSKYLABS 'Test-Pilot' Project. Robust and Highly Defined flight dynamics model of the Robinson R44 Raven II helicopter, built around the powerful, native X-Plane 11 'Experimental Flight Model' environment. Highly detailed model of the Robinson R44 Raven II helicopter. Autorotation capable. Comprehensive systems which were designed to follow the real R44 Raven II POH, as authentically as possible within X-Plane 11 flight simulator limitations. Fully functional VR (Virtual Reality) Ready: highly interactive cockpit environment including levers, switches, guards, 3D checklist viewer, modular cyclic and more. Equipped with Robinson's classic 7 holes analog panel. R44 Auxiliary fuel system. Removable doors. Fully featured GNS530. Built-in Avitab Compatibility (Avitab plugin not included). Multi-Layer FMOD sound pack. The project is under constant development: development road-map is including flight model refinements, enhanced systems depth, additional liveries and other improvements. STMA Autoupdater is included: project updates are fast and efficient! Highly responsive VSKYLABS support forums. Requirements: X-Plane 11 Windows, Mac or Linux 4 GB VRAM Minimum - 8 GB+ VRAM Recommended Current and Review version: 1.1 (November 9th 2020) The AviTab Plugin is required for this aircraft. Note: In order to use and enjoy VR environment in X-Plane, user hardware and system specs should meet the required specifications for OS, CPU, GPU, MB and RAM which are specified both in the given VR hardware websites and at X-Plane.com. Aircraft download is 240 Mb, and unpacked then installed 389 Mb Documents VSL R44 Essentials.pdf VSKYLABS Robinson R44 POH.pdf Designed by VSKYLABS Support forum for the Robinson R44 by VSKYLABS _____________________ Aircraft Review by Stephen Dutton 20th November 2020 Copyright©2020: X-Plane Reviews (Disclaimer. All images and text in this review are the work and property of X-PlaneReviews, no sharing or copy of the content is allowed without consent from the author as per copyright conditions)
-
Plugin Review : WebFMC Pro by Green Arc Studios
Stephen replied to Stephen's topic in X-Plane Plugins and Simulator Addons
Hi Mike, I think you miss the idea of the WebFMC Pro... it is a mirror to the FMC installed the aircraft, if the Aircraft has that function, then yes the WebFMC Pro will have that function as well, or set the Vspeeds, but you don't say which aircraft you fly here in the simulator, if the default B738 then I would say no, if it is the Zibo mod version, then the answer is maybe yes. -
Scenery Preview : CYUL Montreal by GlobalArt
Stephen replied to Stephen's topic in Payware Airports and Scenery Reviews
The mesh order is quite complicated at Global Art's CYUL, and you need to get it right for the right effect, it also depends on the ortho configuration you use, the manual covers these aspects. -
Aircraft Review Update : Boeing 787-900 v1.6.0 by Magknight This is an updated review of the edition I published in early October (5th). I review as I see it, and that is good in the fact is what I see you can also see warts and all, the good and the bad. But in this case with Magknight's Boeing 787-9, the aircraft didn't come out in the flying aspect very good at all, in fact it was awful, and it was a simply awful experience all round. The review bothered me in several aspects, mostly I want you to get a realistic perspective on the aircraft, and from the perspective of the developer's development, that review had done neither, but the biggest nagging doubt was why the aircraft behaved as badly and as oddly as it did? So I went back to the aircraft and flew it again, and three times over the same route to answer a few of my own questions... that report is down and in the "Flying the Boeing v1.6 Dreamliner" section of this review, the rest is as per the original report, only to note my departure airport was switched from BNE-Brisbane to MEL-Mebourne, so the original report section was based at BNE and the updated section is set at MEL and hence the differences. Magknight has timely released their latest v1.6.0 version of the Boeing 787-900 Dreamliner, so was it just another update or a reaction to the announcement by FlightFactor, as that yes indeed their next "Pro" aircraft is going to be also a Dreamliner. Either way X-Plane needs all the Dreamliners it can get, pilot's want to fly the latest aircraft and currently along with the Airbus A350-900 then the Dreamliner is it. But the development process of Magknight's project has been a long one, if even a confusing one at that... what started out a small Dreamliner freeware project, became a payware project and then a sort of "Pro" (nee expensive) project. Users followed like devotes to some religion, but their dedication has been rewarded, if only by going the really long way around than a straight forward development process. The external design or modeling has gone through I think about three incarnations, as also has the internals, from average, to good, to far better.... The externals were again (if finally) updated in version 1.4 so any of the extensive list of earlier liveries now won't work and they went straight into the trash bin, so a completely new paintkit and anything past v1.5 now has to be redone, but all for the better mind you. v1.4 also gave you (another) cabin revamp and new GE engines, and then v1.5 dropped an experimental version of the RR Trent 1000 engines... although someone here is not at all impressed with your engine choice! And ACARS the Aircraft Communications Addressing and Reporting System was also introduced on the v1.5 release. Boeing 787-900 v1.6.0 Gradually the Dreamliner has been molded into shape, from a far better external shape (and that earlier nose profile?) to a far better cabin and cockpit. But here again in v1.6.0 the cockpit gets another complete revamp, another remodeling to get closer to the Dreamliner's office in realism. Outwardly at first glance the 787 cockpit does not seem THAT different... .... but once you start to dig, you see a lot of changes. The detail of the switchgear is now quite superb, detailed and has that lovely plastic quality, even the attachment screws are clearly visible. Now Mousewheel Manipulators (scroll) work as is all of the manipulators and animations across all buttons are now also all new... I however found a few halve arrow adjustments, like for the heading just far too small and tight to use effectively and efficiently, and as many click and as quickly disappear from view? The glareshield is more better textured, and so is the main instrument facia surround, you are now starting to see a realism, rather than the more earlier modeling feel to the aircraft. The problem has that the changes have been introduced at a glacial pace, a few here and a few there over countless updates, but suddenly you look around you everywhere and you are noticing that this is now a seriously nice cockpit. That once missing authentic detail is now starting to pour out of the aircraft, and it is losing that cheapness (freeware) look and it is now slowly being replaced by an overall quality feel. What was once looking like a bad price deal, is now starting to look like a really good value for money experience, the Dreamliner is quite not totally up there yet, because of one big infraction... the FMS, as it is still the old Laminar version in a glossy interface... note there is no actual FMS facia as the system is built into the lower monitor display (you can also move it to the upper displays), and the display does have that grey interface, it looks actually odd in context, but it is correct to B787's installation. It works well with the new double screen WebFMC Pro interface as well. But with added in system interactions it is now getting way along on the road to being a study aircraft, certainly there is still far more that has to be installed, but you finally feeling that you are flying and interacting with a new-era cockpit, rather than a 60's relic.... or worse a basic PlaneMaker interaction. EFB - Electronic Flight Bag The Electronic Flight Bag (EFB) has been a "Work in Progress" over several update releases, originally it was quite basic (and buggy), but this v1.6.0 version is now starting to to be far more comprehensive and more importantly a more mature system to use. Both left (Pilot) and right (First Officer) EFBs work (but not independently of each other)... ... there is a direct (mouse) cursor control (you have to touch outside of the EFB screen to regain cockpit manipulator and view control), and the same cursor system works on the other direct access displays in the FMS and Main MFD (Multi-Functional) display) And the cursor idea works very well with selection and general EFB use. New (besides the general better layout and use) there is a better WTBAL (Weight/Balance) calculator... "PERFORMANCE" won't activate unless you set up your route and INITIALIZE (Initialise) the EFB, the aircraft's weight and loading also has to be done first as well to get the correct fuel/Weights loadings for the flight. Then press the PERFORMANCE tab... Adjust any details you require for the Takeoff (performance) then press the CALC button, and then the correct takeoff data is displayed lower section... change any parameters and the CALC will readjust the performance data to match the changes, and excellent it is. ... same with the Landing (Performance), but as you know, in a lot of scenarios, you don't know the landing data until you get closer to your destination (Wind/Air Pressure and even the aircraft's weight), so you may get a negative display. Calculations included are: Takeoff calculator, Automatic derate calculation, Automatic trim calculation, NTX and runway slope support (using extremeData) and Max weight for runway, and the same for the Landing calculator. Also noted is now the full selection of autobrakes RTO, 1-4 and MAX selections, and if you are using on landing Full Reverse, Thrust or Auto Spoilers settings... very impressive! We did see part of this Performance Calculator working in earlier versions, but not to this now a far more finished and polished interface. Aircraft Configuration Loading the aircraft (weights) is also now a far more better interaction. Access is via the AIRCRAFT CONFIG tab... ... and the first tab gives you the aircraft's current loading situation. The rest of the tabs then give you access to Crew, PAX (Passenger), Cargo and Fuel loadings. The detail is excellent including even the selection of Crew baggage (weight) on a Domestic or International Flight (Long Haul), the selection is via the number of crew on board or 15kg if International. Passenger baggage weights are automatically calculated with the numbers carried, and as I am doing here only a domestic service (Brisbane to Melbourne) then the fuel load is not very high either (15,000kg) as per SimBrief. When you have sorted out your loading, then press "Apply Changes" to set the required loads and weights, which are then detailed as your ZFW (Zero Fuel Weight), Takeoff and Landing Weights with you Centre of Gravity (MAC) percentages. Interesting tab is the "GALLEY" tab... here you can set the weights for the "Galley Code" in LR (Long Range), International, Short-haul One Way, Short-haul Return and No Galley Fitout. Loading weights are quite surprisingly quite different between the domestic and long-haul choices, a really nice to have and clever feature. Another new change on the EFB under the "Settings" tab is that you can now set the windows and cockpit (panel) reflections On/Off. ACARS In version v1.5.1 there was the introduction of the excellent Aircraft Communications Addressing and Reporting System or ACARS, under the COMM page. There was a ACARS message formatting issue and an ACARS spelling mistake, and both have rectified in this update version, excellent, but it would be nice to have the Oceanic Clearance work, can it work in X-Plane? Very handy... EICAS - Engine-Indicating and Crew-Alerting System has had bugs attended to with Stab trim indicator is now correct, EICAS settings too high now adjusted, and the EICAS warning/caution reset now fixed. and the PA volume has been made a bit louder, and noted more persistent. Lighting As per Boeing panel layouts the Boeing 787 has several lighting selections that all do really the same action... DOME will bring up the main cockpit (rear lights), but STORM does the same thing but is not adjustable, there is a third full cockpit lighting adjustment with MASTER BRIGHT, and the button at the bottom will do a full override of the adjust knob. I always really loved that LED dropdown panel lighting, and it is still as brilliant as ever, more so with the better switchgear... There are now two forward overhead spotlights for MAP lighting and nice lighting fillers they are... The B787 is a long hauler, so you have to be seriously comfortable in here over the long hours in flight, and it is now perfect. As you know I am funny about light bleed into the cockpit, but the Magknight B787 is getting extremely good at finding the right settings for the right lighting situation, so there has been some significant improvements to the lighting here in v1.6.0, and all to the very good. Cabin lighting is very good as well, but still not adjustable, but I have no doubt that option will come in future releases, but what we have is still nicely done... oddly I found the Dreamliner cabin feeling a little small for a twin-aisle aircraft, more a A332 than a wide B777. The cabin is now blue throughout, and the horrible rainbow lighting effects has been dropped in First and Bus class, thank god. External lighting aspect is looking pretty nice as well, and very realistic from every angle. Flying the v1.6 Dreamliner As noted this section has been revised... The flying aspects of the Magknight B787-9 have always been a bit average, mostly because many of the basics are as noted still connected to Planemaker and not to a dedicated plugin, to a point this has caused most of my confusion in flying the aircraft as we shall see, and to note a very long list of complaints of when I did the last v1.4 Boeing 787-9 Aviator review... But back in BNE with after pushback, I got seriously confused... "Dynamically there are some serious basics wrong here... a lot of time early in the flight after pushback was wasted trying to get the tiller to work... you can set the tiller for a manual control, what the "settings" need to be though is for the "Use Roll for the NWS" to be ON to actually get nose wheel control, this should be default and not the other way around, reload the aircraft and it switches it back off again, annoying." Those comments were noted in the last v1.6 review, and I have finally figured the odd system out... and odd it is? There are two settings for the nose wheel control with the joystick, the rudder is moving with yaw on the same movement of the front nosewheel, this is the standard setting for most X-Plane flying.... Yaw is when you twist your Joystick left or right... but both controls in rudder and nosewheel move at the same time, but the B787 is like the A320 in that the nosewheel in movement moves slightly slower than the rudder which is not good, realistic but not suited to a yaw action. .... but there is an option to use the "Roll" on the Nose Wheel Steering in the menu, first this disconnects the nosewheel from the rudder yaw, which means you can move the rudder without any movement of the nosewheel, and that is important! In the "Roll" option then the Nose wheel Steering is controlled via the "Roll' or bank movement of the Joystick... .... so now by tilting your joystick left or right the nosewheel will turn, but the rudder stays straight. It feels odd and certainly takes time in getting used to, but it does give you a far more tiller feel to your taxiing, but there is more important reasons to use this feature as we shall see. A note is that if you have rudder pedals, then there is another setting in "Use Tiller Axis" to switch to over those. One other important note is that aircraft's engines have to be running to move (or to power) the nosewheel, another blind alley I went up. In earlier flights I found the aircraft really weird in takeoff and in the air, again I quote myself in the last review... "Power up and the sounds do come in, but still very, very low, even from the cabin perspective. at v1 - 129kts and "whoa" the nose lifts... 5º of flap should not lift the nose at v1? so suddenly you are fighting the aircraft to keep the nose wheel on the ground (unsuccessfully), the aircraft is now twisting on you as well (note, the Dreamliner is a very automated aircraft, but this "I will fly the aircraft for you", is certainly not realistic?" I go on when in the air... "Climbing out the B787 is unstable? and worse I am running out of pitch to keep the nose down, the aircraft just wants to go vertical nose up... I fixed this by adjusting the pitch trim (manually from the keyboard)... a lot, in fact far too much adjustment was required to bring the nose down to an acceptable climb rate. I am fighting to keep this aircraft in the air... take a look at the FCTL of the elevators, and that elevator position is not normal...." The clue is in the above comments, and it nagged at me for ages... and then I found it! When you do a "CALC" (Calculation) on the EFB, it gives you your load CG (Centre of Gravity), in this case 26.1% with a TO trim as noted (yellow arrow) of 4.25º, so you need to adjust your trim for Takeoff, it makes sense of course. The fix is to simply adjust your takeoff Trim in the MFD into the green zone of 4.25º, and doing this is via the manual pitch trim (you will need to use a keyboard input). So how could such a seasoned pro like me get it so wrong? The issue is that Magknight are still using Planemaker as their basis of the aircraft. Setting manual pitch trims for takeoff is mostly done on pre-80's aircraft, say the Rotate MD80 or FJS Boeing 727/737, even the IXEG B733, but on current modern heavy aircraft it is done via the FMC, usually on the secondary PERF or INIT pages (some developers add it in automatically when filling the data in). But Magknight here doesn't use a dedicated FMC for the Dreamliner, but just the bog standard Laminar FMS, and there is no CG entry on the FMS system, hence the manual input... my original guess was as the Magknight B787 was very automated, then to get around this deficit they added it in automatically from the "Calc", page... obviously not, as it is just a simple manual adjustment, I was thinking high modern new era cockpit, but the setting was actually low basic X-Plane. Another point (yes another) is the B787 requires the "Experimental Flight Model" to be selected off (Settings/General), if not the aircraft will not fly correctly, this was changed in v1.14... I am flying from MEL-Melbourne to PER-Perth and a distance of 1521 nm (3h34m), and it takes a few moments to adjust to the odd way of taxiing via leaning the joystick to the right or left... you sorta get used to it, but your instincts want to twist and not to lean. Sounds are really very good, but you don't have much control over them... in taxiing they are too low in volume (The Dreamliner is amazingly very low acoustically internally) but there is almost nothing you can hear here at all if you want to hear those lovely GE engines (or RR if fitted). On takeoff you will need skill to get it all right, first control the direction via the roll tiller (slightly), then when once the aerodynamics kicks in you can then leave it alone and go for the rudder yaw, the tricky part is not to over-react with the roll tiller and holding on to it too long because you will lift a wing (it is connected to the Roll, not the yaw) and that will make for a messy takeoff and a twist away from the centre of the runway, so you are all the time feeling out the rudder to get it's own direction control, once the rudder becomes active you are then in complete control of the direction... it sounds easy but it needs a little practice, to perfect, but get it right and it feels all very realistic. In time I felt the use of both the Roll and Rudder interaction together as the cross over point, then you transfer the actions from one to the other, it is all in the feel. Again it is vitally important that all the input performance data is correct and "Intialized" in the EFB, and of course you correctly set the TO Trim setting at 4.25 as noted for takeoff. Depending on your weight your rotation should be around 175 knts +10, and thankfully normal. Because the Trim is set correctly, so your not fighting the aircraft in the climb either because it is balanced correctly... Before it was... "At v2 and then v2+10 I'm already well off the runway, then fighting the aircraft in the air to keep it level? It is twisting on me like it is in a 18kt - 20kt crosswind, but I only have an almost head-on 9º wind force, the B787 should not twist like this hard in these conditions? It feels like the engine power is completely out of balance?" Now the Dreamliner flies correctly and true. I did find in a few test runs the V/S (Vertical Speed) would not activate, annoying... turning the A/P off, then back on fixed it, but it is annoying at a critical point of the climb. Fixing the pitch trim seems to have also fixed a bank trim, that I simply couldn't dial out before... ... now the aircraft is flying level, but it can still strangely behave a little weird now and again, and if you are paranoid (like me), you can use the X-Plane setting "Rudder Trim Centre" to over-ride it, and fix it. At altitude the sounds are very good, but still sound the same in the cabin as in the cockpit, but I do really love the excellent in flight hum. Annoying is the fact that the Magknight B787 is so really good now in the cockpit, as this place is now a seriously nice place to be, it looks and feels excellent, but still slightly a hybrid of two completely different system philosophies. The Great Southern Land Adelaide (YPAD) and your purring along at 38,000ft, m87, and 370 nm out of Melbourne, it is a very, very nice place to be. I am arriving in Perth via STAR BEVLY 5A, I found with the Laminar FMS, I had to fill in the BEVLY 5A STAR waypoints, there are six of them, but essential for a clean arrival... If you go directly to HAIGH waypoint the turn is too tight to collect the Rwy IGD 21 ILS, and you will miss it, essential is the WOORA waypoint before HAIGH, to soften out the turn. I can now also reset my arrival details in the EFB - Performance-Landing page, crucial is your landing weight, you will need to evaluate the weight perfectly, as it makes a difference. (hint you can use the LAW on Simbrief, but there is still the need to doublecheck with your current weight)... and then CALC for your landing speed (here 142 knts F30º). Loving the ACARS report for YPPH (below), very handy. Controlling the speed and height coming into YPPH from the north is again essential, as you arrive there is a 3000 ft ridge that is part of the Julimar State Forest, go too low and you fly into the ground, but be too high and you could miss the ILS as well, so I am set seriously slow at 190 knts at 5000 ft to clear it. Altitude has to be 3000 ft at WOORA, then down to 2500ft (or more) for HAIGH... You have to be a whole situation ahead of the aircraft, gear down early and the flaps set early as well, and control that speed with skill. It is a very tense arrival! Once through HAIGH, you are already straight into the IGD 21 ILS, so hit the APP as soon as you can, being below the glideslope (2500ft) can give you more time to react, but even then it is very tight. Cross wind is nasty, but normal... ... unlike back earlier at my arrival at MEL... Whoopsy Daisy That arrival didn't feel at all normal, but I will admit that I still think the Magknight B787 does slightly over react in thrust and and wind gusts Dreamliners land really sloooow at here in PER at only a 138kts... "touch" is good, but you do have the interesting aspect of the rudder in not being connected to the nosewheel, so you can adjust the aircraft's angle, but don't have the fear of the aircraft swinging sideways when the nose gear grips as it is still pointing straight. That said, the way you have to input your joystick is extremely different than the way your brain is so used to doing it, so it takes time to adjust to the new way under your stick movements, but I found with (a lot) of practise it works very well once you are used to it (the need to reprogammed your brain), in fact I like it a lot, and think a lot of other developers should look at the idea, but it is all very weird at first, and also makes for some pretty hairy takeoff and landings. "Welcome to Perth" But let us be clear, the aircraft is still slightly buggy because it is still really a hybrid, part Planemaker and part plugin, and that won't be fixed until Magknight has updated the Flight Management System to a fully customised unit, so you need a lot of time to get used to the aircraft foibles and the odd things it throws at you, but clean flights can be achieved and in that with all respect with the aircraft, I find is highly rewarding. One other note, is that both the Save or Load of a "Situation" or "Replay" does not work, which is highly annoying, if you use a "Replay" while still in your current flight the recorded replay will work, but close the flight and exit X-Plane, then your replay is gone? I noted lastly in the earlier review... "I record my reviews directly from the flight I have in the simulator, good or bad. What I detail here is how the simulation unfolded in front of me, so I am hiding nothing from you... so the question has to asked. Did I have a bad download of the aircraft?, did I set up the aircraft wrong? and am I really missing something fundamental in the way that I am using the Autopilot? all good questions, but I did do a quick test flight the day before (I always do a quick recollection flight to reset me into the aircraft) and the B787 was quite a handful then also." Well it was not a bad download, but getting the settings perfectly correct is absolutely essential. Not just the obvious, but in every single area and mostly the filling out of the EFB in "Aircraft Configuration" and "Performance" is again essential, and setting up your Trim (certainly the TO Trim) is also highly important point. Areas cross-reference in this aircraft, so if one area is not correct, it affects another area as the EFB is basically a default FMC for perfomance in disguise... so the manta is do "everything", cover "everything" and the aircraft will work well. __________________________ Summary This is the ongoing development of the Boeing 787-900 from Magknight. It started out as a basic freeware version, then became a payware, and now a pro-payware. You accept with the purchase that the aircraft is still in an on-going development format, this is v1.6.0. This v1.6.0 update focuses on (again) a new cockpit redesign, with far better textures, PBR and better switchgear. Lighting has also been highly upgraded. EFB - The side Electronic Flight Bags have also been mostly now finished off from their "in development" early stages, and the results are excellent with great weight/loading features, performance calculations and other new features added and in areas like the crew baggage and galley loading weights are all very clever. Overall the aircraft designwise now is excellent... but I expected a big step forward in performance, flight dynamics and even by now a replacement for the default MAP screens and basic X-Plane FMC systems... But that aspect is still coming, and with the now coming FlightFactor Boeing 787 Dreamliner Pro... they are now also running out of time to fix it and the FMC (and the PFD/MFD) needs to be their only priority in new features. Noted is the fuel consumption is still a little out, far better than earlier, but still not burning enough fuel to the Simbrief numbers. Getting every setting correct is now essential, note the Trim settings and aircraft set up settings have to be perfect, also the feature of using the Roll as a way of moving your nosewheel steering, odd at first it has a lot of bonuses once you master it, the old Yaw for steering is also still there, but in this aircraft it actually works against you. This is an update on the original early October (5th, 2020) review, I was not impressed the first time around with the flying aspects of the aircraft, but I felt that Magknight and their team deserved a better review and better overall reflection of the aircraft. But more so than that is the fact that the B787 needed a more deeper understanding of how it really is as a aircraft.... it is buggy, it does have foibles and to a point you have to fly around those aspects because it is an aircraft still in development, but overall it does deliver an interesting if highly enjoyable simulation, it requires work and patience, but that is also rewarded if you are willing to do the depth of work the aircraft requires, the pactice it requires, and so it is not an easy aircraft to set up and fly, but it is highly rewarding. ______________________________________________________________________ Yes! the Boeing 787-900 Aviator Edition Dreamliner v1.6.0 by Magknight is available from the X-Plane.Org Store here : B787-9 Aviator Edition Price is US$44.95 Upgrade cost to the "Aviator Edition" from the original payware release version is US$10, see your X-Plane.OrgStore account for the upgrade. Features General Brand new flight model built for X-Plane 11.40 and 11.50+ Improved wingflex Custom IRS simulation, with quick align Auto-update for the lifetime of X-Plane 11 LED exterior lights Pause at top of descent and jump to waypoint 3D cabin New: Next-Generation Cockpit Comprehensive cockpit lighting options High resolution textures with PBR throughout the cockpit and cabin Optional tinted cockpit and cabin windows Realistic Panel dimensions New: Integrated EFB Comprehensive weight and balance calculator, with per-livery cabin configurations Takeoff and landing performance calculators Multiple engine choices Choose from the mainstay GE engines, or the new experimental RR engines Each engine has different flight characteristics Custom flight controls 5-setting autobrakes with RTO capability Dynamic flap timing and order Roll spoilers based on speed and wingforce Surface droop on hydraulics loss Surface fadeout by speed Hoppie ACARS intergration Intergration with the Hoppie ACARS network Allows uplink of pre-departure clearances and weather information FMOD soundpack by audiobirdXP Fully custom FMOD soundpack for the GENx engines Extensive integration with systems Cockpit switch and button sounds 3D cabin and fuselage Ground-up exterior fuselage model including optional tinted windows 3D cabin with optional seating Cabin is optional, configurable in EFB for performance Liveries Blank livery included by default Other liveries available at https://magknight.org/liveries Liveries from before 1.4.0 are not be compatible due to change of engine and fuselage models Auto-Updater Uses the Skunkcraft Updater for Automatic updates Requirements: X-Plane 11 Fully updated Windows, Mac or Linux 4GB VRAM Minimum - 8GB+ VRAM recommended Current and Review version : 1.6.0 (September 23rd 2020) Installation : Download is 587.30mb which is unzipped and is inserted in your Heavy Aircraft folder as a 1.91gb folder Note: liveries are not included, but can be download... only v1.5+ liveries will now work with this aircraft Documentation : Manual (partly completed?) Simbrief and Navigraph are highly recommended with this aircraft. v1.6.0 changelog (attached) B7879 - 1.6.0_Changelog.txt ______________________________________________________________________ Review by Stephen Dutton 17th November 2020 Copyright©2020: X-Plane Reviews (Disclaimer. All images and text in this review are the work and property of X-PlaneReviews, no sharing or copy of the content is allowed without consent from the author as per copyright conditions) Review System Specifications: Computer System: Windows - Intel Core i7 6700K CPU 4.00GHz / 64bit - 16 Gb single 1067 Mhz DDR4 2133 - ASUS GeForce GTX 1080 8Gb - Samsung Evo 1Tb SSD Software: - Windows 10 - X-Plane 11.30b2 (aircraft will only fly in 11.30) Addons: Saitek x56 Rhino Pro system Joystick and Throttle : Sound - Bose Soundlink Mini Plugins: Traffic Global - JustFlight-Traffic (X-Plane.OrgStore) US$52.99 : Global SFD plugin US$30.00 : Scenery Animation Manager - Suite 2.0 - Free : BetterPushBack - Free Scenery or Aircraft - YMML Melbourne 1.01 by ISDG (X-Plane.Org) - Free - YPPH - Perth International Airport by Axonos (X-Plane.Org) - US$22.65 -
-
I still really love my Bonanza 🙂 And yes I recommend it, yes it is old, but not in that way... I love it. The Navajo surprised me, I like that as well a lot, but haven't flown it in a while... the Bonanza is very good for VOR to VOR flying.
-
Aircraft Upgrade to XP11 : Douglas DC-8 Series by Wilson's Aircraft
Stephen replied to Stephen's topic in Airliners Reviews
Translation Polish: This plane is not available in the X-Plane store Nope it has gone, the developer pulled it, sadly. -
Aircraft Review : Epic Victory G1000 Edition by Aerobask Throughout the last year, Aerobask has revised most of their aircraft over from a custom G1000 system to the default X-Plane Laminar G1000 GPS avionics system. Both the Diamond DA-62 and the (freeware) Robin DR401 CDI 155 have had conversions, more closer and noticeable is the Epic E1000 - G1000 Edition from early 2019, now it is the time or the re-tune of the Epic Victory. The Very Light Jets (VLJ) were created for a market in air taxi services that never really came to pass. But that should not take the quality away from this very clever and even brilliant design of a very small private jet from Epic Aircraft Company of Oregon in the United States of America. The aircraft seats five including the pilot, and the Victory is very small modern aircraft and it is very easy to operate and fly. In this version from Aerobask the engine has been upgraded to the more powerful PW617F engine, from the earlier Pratt & Whitney Canada PW600, the PW617F produces 1,615 pounds-force (7.18 kN), to the earlier 900 pounds-force (4.0 kN) in the PW600, a significant power increase. The new default "Green Bird" livery is bright... green, the aircraft however looks brilliant. Complex surfaces and the modeling is also simply brilliant... ... if you think this composite style is easy to do, then it isn't, as to get it wrong it looks plain and fake, the opposite of the expert skills at work here. Undercarriage is excellent as well. All the extensive linkages and assemblies are perfect, and note the way the trailing front gear assembly rotates around the upper solid section, and the trailing arm main gear is also very well constructed and well detailed. Glass is very good, with depth and reflections (reflections can be turned off if required)... ... single entry door is split upper and lower, You open (or close) via the catch (or menu) and it unfurls nicely. Aerobask is all about materials, excellent material detailing and from the moment you open the door you are not disappointed on the inner door textures, they are lovely. Cabin Internally the cabin is exceptional... as per any Aerobask aircraft, but those materials are to die for.... ... twin-style roof lining is really nice and textured as is the lovely side material, all the detailing comes with a nice wooden teak touch. It is an especially roomy cabin for a small aircraft with plenty of leg space, but your luggage comes with you. Notable details include a folding out table with an iPad and drink glass, below the lower seats opens a pillow draw and water cooler storage. All three passenger seats can adjusted via the switches and the side panels, movement of the back-rest (forward/backward) and head-rest (forward/backward) are all available on every rear seat. And If you don't think, things don't change then look at the original Victory Interior, and understand how far we (in X-Plane) and Aerobask has come. Cockpit The detail and quality of this modern cockpit is again exceptional, again to note it is far harder to make modern detail more authentic than the older clockwork dial cockpits, and again it is very, very good in here. It is again the material detail that blows you away, quality, quality and more quality. The Victory comes with the Laminar Research G1000 Avionics system, but obviously it also comes with some custom tweaks. It is a PFD - MFD - PFD (Primary Flight Display/Multi-Functional Display/Primary Flight Display) configuration... ... with the COMMS panel set between the Pilot's PFD and the MFD. The GFC700 autopilot with custom CSC mode (FADEC-based autothrottle) is set mid-top panel. Laminar G1000 Primary Flight Display/Multi-Functional Display Aerobask originally created for the Victory a Garmin G900 Primary Flight display (PFD) for each pilot, and the center display (MFD) as a modified X-Plane GNS530 unit. And to note that those G900's were only an accurate representation of a real G900 even then. It worked, but as the MFD G1000 avionics suite it was a bit of stretch in more ways than one. But at the time it was actually very good. Since that time Laminar Research have created as default in X-Plane a full G1000 avionics suite, and so the "G1000" moniker on this aircraft package reflects the install of that default system on the Victory, and that is the system now installed here. There is a PFD - Primary Flight Display and a centre MFD - Multi-Functional Display (or MAP). Both displays can be popped up or out.. ... either with the Aircraft symbol, centre PFD, The pop-out selector is also quite hard to find on the MFD as it is not like the PFD centre aircraft symbol, but a touch spot that comes on to the screen for you to select (arrowed). Screens are highly adjustable and you can hide the bezels (for home cockpit use or custom setups). PFD - Primary Flight Display The main PFD has the split horizon which is here even more darker than the dreary brown and blue of the default look... of which I don't really care for, the older version was the far nicer gradient version, and this bland default background display can be actually be adjusted as Carenado did on their Cessna 172SP G1000. The G1000's PFD main flight instruments that are all correct with the artificial horizon, speed and altitude tapes, bank roll scale and roll pointer and HSI (horizontal situation indicator), course and heading pointer which are all in one. The FD (Flight Director) elements are also shown. Other features include "Inset" map, alerts, REF/TIMER, NRST, XPDR, both VOR 1 and 2 pointers, DME and Wind (3 options) ... top banner includes Radio NAV (left) and COM (right) Autopilot info (centre). A few custom features allow you to adjust the radio frequencies directly with a mouse scroll wheel while holding the cursor over the frequency you want to adjust. Another custom pop-out adjuster panel can also be used with the "Altitude" (press arrowed), Heading and Baro pressure... you just press the green band to insert the number, very quick and easy. The optional Engine Information System (EIS) is available on this version in the PFD in the Emergency mode, selected by the Red button (arrowed), it also shows the EIS and an insert Map left lower screen. A Backup Horizon and Speed Tape that is situated far left is the MD 302 Standby Attitude Module (SAM®) made by Mid-Continent Instruments and Avionics. MFD - Multi-Functional Display The Multi-Functional Display covers the Engine Information System (EIS), MAP and Flightplan. There is a custom setting top left (arrowed) on the EIS that changes the N1, EGT and N2 readouts to N1 (with number readout) and ITT- Inter Turbine Temperature (with number readout). Centre EIS shows DIFF PSI, ALT FT, Fuel Flow GPH (Gal per hour). Oil Pressure and Temperature, Electrical Bus AMPS and Volts, Fuel quantity (GAL) is for both tanks (100.0 Gal per tank) in a scale... and AIL (Aileron) and RUD (Rudder) position, More engine readouts can be accessed via the "System" button. Fuel readouts are top with Fuel Flow GPH, Fuel Flow PPH (lbs per Hour), Fuel Pressure (PSI) and quantity left and right tanks (lbs) - Fuel Totalizer shows lbs Remaining and lbs Used. Totalizer amount can be increased, decreased or reset. Lower is the Electrical Gen A (amps)and ALT A (amps) and Bus 1 Volts and Bus 2 Volts. On both EIS displays are also the Aileron position marker, Rudder position marker, Elevator position marker and Flap position UP-10º-35º. Top banner has the same layout as the PFD... Radio NAV (left) and COM (right) Autopilot info (centre). MAP, is standard Laminar, but still extremely good in range from 2000ft to 800nm, Options include TROPO and AIRWAYS. Garmin Flight Management System (FMS) GCU477 The biggest change from the earlier Aerobask Victory is the removal lower panel of the MVP50 EIS (Engine Information System), and it is replaced by a Garmin Flight Management System (FMS) GCU477 (alphanumeric keypad) supporting new LR commands, similar to the panel used in the SR-22... ... I am a big fan of these bigger keyboard panels as they make data and route (flightplan) entry into the FMC and much more a far easier option. GCU477 Panel pops out via a clickpoint on any corner of the dash's panel, panel is size adjustable as well. Inputting direct letters or numbers is a huge time saver than the knobby, clicky affair of using the G1000 knobs, editing, like this a complex short route between KRSW (Florida Southwest) to KTPA (Tampa) is far easier, and flightplan altitudes were also a breeze to input. You can click the upper left ‘K’ to enable/ disable your physical keyboard to use the GCU unit manually via keys. GFC 700 Autopilot The Victory comes with a full custom GFC 700 AHRS-based Autopilot with a CSC mode : CURRENT SPEED CONTROL (CSC). This makes the CSC a basic autothrottle. Adjustable pop-out is again via any corner clickpoint. GFC 700 has an extensive set of contols; CRS 1&2, FD 1&2, NAV, APR (Approach), BANK, HDG, AP, YD, CSC, CPL, ALT, VNV, VS (Vertical Speed) and FLC (Flight Level Change). Lower Panel There are a twin switchgear panels set out behind each of the lovely yokes (both yokes can be hidden, but not separately) On the left side shoulder panel is the main switchgear. The Victory like the E1000 aircraft has a unique way of switching on the various systems... the three rows of buttons are set out to be used at the various points of getting the aircraft ready for flight and in switch order. Top row is the "Pre-Start" Second row is the "Pre-Taxi" and the lower row is the "Systems". The layout although arranged by the same rows of buttons as the earlier Victory, but the sequence of activation of the items are actually arranged differently, so you will need to relearn the buttons sequence. Pre-Start includes - Batteries (Batt 1 & Batt 2), Avionics Master, Fuel Pump and (Engine) Cut off Pre-Taxi Includes - Igniter, Start, Starter Gen, Fuel Auto, Autopilot, Trim Master Systems Includes - Press Air, Emerg Press, Dump Valve and Emerg Oxygen On the right is the "LIGHTS" panel the lighting panel. Items included are; Land and Taxi lights, Strobe and Navigation lights and a Beacon. Another lower button panel is your "ICE" buttons for; Ice Detect, Surf Heat, Inlet Heat, Windshield Heat and the Pitot Heat (Pitot Stall HT). Below are a set of 16 active fuses (Circuit Breakers), and the landing gear knob is to the right. All the breakers are functional and animated and click any breaker to enable/disable the dedicated system, You can choose in the Options menu the breaker reliability and a full reset. Right lower side shoulder panel are the cabin's Air Cond and Cabin Oxygen controls and another 16 active Fuses (circuit breakers). There is also the Flap Panel (T/O and Land) Cabin overhead spot lighting panel and PSI Oxygen gauge, the Oxygen system works, so you can fly high! (Ceiling is 28,000ft). There is a very nice in your face active warning annunciator panel (testable), and the mini-pedestal is lovely in detail and finish. Throttle is a single unit that covers all three actions, Throttle, Propeller and Mixture, above is a panel lighting adjustment, and below the park brake... the lower section has a lovely crafted Fuel Switch for CLOSE- LEFT- RIGHT (Tanks). Note the finely crafted Rudder Pedals. VR iPad AviTab One of the great features is the iPad and it is located in the side storage bin. Obviously created for VR interaction, it is highly useful for the 2d generation as well as It works with the Avitab (Aviators Tablet) plugin. It works quite well in a basic form with mostly for access to stored pdf files and note taking, but internet access would be a nice feature. My use here was with the Navigraph Chart (Subscription) access that is now available (make sure you have AviTab v0.3.18). You login and create access to your Navigraph account, it is all seemless and it works extremely well... You can bring up all your charts and airport information to have it all by your fingertips. My only wish (again) is for the tablet to be in both landscape and Portrait modes because most charts are set in the portrait orientation. Menus There are three ways to access the Victory's menu. One is from the pull down plugin menu, Two is from the 'Epic Logo" symbol tab top panel, Three is via the iPad in the side storage bin. The menu is laid out in the new Laminar XP11 pop-up style and there are four tab selections with : Ground, Options, Sounds and About. Ground : Is both a menu and a basic Weights and Fuel setup in one. Fuel sliders top will set the amount of fuel required in both kgs and Gal and show the fuel weight... A side note here on refueling the Victory. You have to be really careful to balance out the fuel on the Victory, both on the ground and in flight. The aircraft will lean, let alone fly. There is a "Custom Load Manager" option, that changes from your basic weights to the full set of options available. You can select passengers (pilot is free but he still counts in the aircraft weight). With a Co-Pilot, Front Passenger and rear R&L Passengers. Baggage is None, 60kg and 120 kgs... and all weights of loaded Fuel and passengers are shown in detail with full all up weight and Maximum weight allowed. There is no CoG scale or graph. All passengers are shown but the bags that were shown on a luggage trolley has been removed, Passengers are not visible internally and only externally except for the Co-Pilot, which is a shame as the modeling of the people is very good and racial diversity applies. Static elements include: Chocks, Engine inlet/outlet covers, pitot covers, towbar, exhaust cover and loads of flags... but they are all or nothing. So it makes closing up the aircraft a bit awkward with say the towbar attached or if you just want the chocks after a flight? The Ground Power Unit (GPU) is now a more heavy duty design than on the earlier Victory, it is very nice... but also extremely noisy if the door is open. Button will open the single door or via the internal/external handle. Options : Are mostly for selections of the G1000 and custom features, like the change of the custom to default G1000 engine display, disable G1000 pop-ups (VR), enable custom popups and touchscreen features, enable disable Bezels, keep aspect ratios (PFD/MFD), Show TAS (True AirSpeed) in Knts under the speed tape. You can choose to keep the pop-ups inside the screen (VR) and switch on/off the instrument and window reflections. Top of the menu is the reliability of the electrical system via the circuit breakers, or you can reset them all in one push of the button. Top of the Options page is the Breaker reliability slider and reset. Sounds : The sound panel is just a carbon copy of the X-Plane11 sounds panel and if you adjust it here, then you adjust it there and vice-versa, there are just two added buttons with the "Enable Sounds" and "Enable Speech" selections. About : The final selection is a credit page on who created the Aerobask aircraft. There maybe a bit of a confusion in that as you are reading through the details of the Victory, and wondering "well it is all very familiar"? well it is because the instrument layouts and the menus are very, very much the same as the earlier Epic E1000 from Aerobask. There are differences, but most refer to the propulsion in a prop for the Epic E1000, and a jet engine for the Victory, in most other aspects the aircraft are very similar. So if you know and fly the Aerobask E1000, then the change over to the Victory is going to be very easy. Internal Lighting The lighting is quite exceptional. There are so many different lighting aspects for you choose from, and various settings you could twiddle around with for hours. There are basically two sets of lighting panels, one on the mini-pedestal, and a cabin set of three overhead lights, right panel. For one there is a lovely "Halo" effect that fills the cabin (Ceiling knob)... and the three overhead lights that can be adjusted via the right panel or directly with manipulators... ... but the centre light stays on all the time. With the right settings you can always find the right feel in the cabin. There is the excellent dropdown "Shield" lighting and the panel lighting, again you can perfectly adjust the instrument panel to find the right ambience. If you want the full 2001 lighting effect, then you can have that as well. Lighting detail is also outstanding... entry lights on the door and all the warning signs are lit up.... ... when the aircraft is pressurised it is noted via four LEDs on the upper door! And the external Power Cart has a built in light to unconnect the cable... amazing detail. Flying the Victory G1000 Daniela Rodríguez Careri has done a FMOD sound package for the Aerobask Victory G1000, and very, very good it is. Sit in the pilot's seat and have the door open, then activate the External Ground Power unit, and the start up (and shutdown) sounds are very authentic, while running it can be easily heard as well. Piloting a Epic Victory is not really like owning an aircraft, more like a car ownership that flies. Everything is made absolutely basically simple to use. Turn on the two power switches, avionics, fuel pump (top row) and then press the igniter and "Start' buttons (second row)... and that is it, it is just like turning a key in a car and going. Again leave open the door to hear that excellent whine up of the Pratt & Whitney Canada 617F engine, then close the door to a hush quiet, and don't forget to shutdown the external GPU. Engine n1 settles down around 26.7%, and the cabin is just a nice hum... brakes off and a small nudge of the throttle and your moving.... so very easy and simple. Taxiing is excellent, touch a bit of throttle and you move forward, pull back the throttle and the speed decreases, lovely to set the right speed and movement... view out is also very, very good with the wide and long embracing front windows... ... 2000ft Map range means you can navigate around any airport with ease, Flaps set to T/O position, lights on and we are good to go. You can check your flap position on the EIS, and adjust your trim to TO... then it is power up, and bang... away you go with a shove in the back. I am half fuel and a full passenger load at 5500lbs, but the Epic just goes... rotation is around 125kts, and the Victory bites the air. Gear goes up in a "whoosh", and your climbing.... Climb rate is 3000 feet per minute, but you need to hold the Epic at 10º pitch, or it will keep on pitching upwards, in a moment I am already flying past my set 6000ft altitude... "where did that go? so I readjust for 9000ft. If you want to channel your inner "Chuck Yeager" then the Victory feels like a boated X-1, with passengers in the back. Note that I had to centre the rudder trim to refine a bank in level flying, then when under the autopilot, I had to again readjust the same rudder trim to take out another slight bank... but the aircraft did respond well both times to the trimming. Nice is the engine particle effects, a little dark smoke gives it that pure jet exhaust look. Sounds have full Full-mode FMOD aircraft and accurate doppler, distance attenuation and flyby effects. You hear those excellent sounds them and feel them as well Epic looks amazing in the air. There is an auto selection to switch the fuel tanks over, but if you do it manually and forget, you will get a warning until you switch the tanks over. It is so very fast this Victory... Max Cruise speed is 320 knts, 592.22 km per hour or 368 mph, range is 1,380 mi (2,222 km, 1,200 nmi) and I covered the distance over Florida like a bullet, so the aircraft, climbs and covers the ground like nothing else. In the back it is first rate luxury as a passenger. In heading to Tampa, I nearly flew right over it? Reducing speed is about finding balance, put the flaps down to LAND (a noted 150 kias) and then you need to find that perfect position speed of around 110 knts, the speed margin is extremely small, drop slightly under 100 knts and your nose up, go too fast and your nose down, the line and the balance inbetween is extremely tight. Ditto when you drop the gear... suddenly the drag will pull down your speed, so you have re-find and reset that neutral throttle balance again... .... so your throttle actions have to sublimely smooth and only come with small adjustments, get it right and the aircraft responds nicely... so flying the Victory it certainly brings out a bit of a character in the aircraft, it looks extremely easy on the surface, but there is a deeper hidden layer to really fly the aircraft perfectly and need the use all of your flying skills to do so... I love it. In the ILS glideslope or on final approach you drop to 90 knts to keep that perfect balance (gear and flaps full down)... .... again those slight throttle adjustments are absolutely required... 80 knts is required for a slight nose up landing, but I am happy with that. Nice touchdown is at around 70 knts, but now comes the tricky part? You have no airbrakes or thrust reversers, so you have to do a long rollout... ... and it takes forever to rub off the speed, you just can't touch those brakes, until you are well down to around the 30 knts mark, even then only very lightly, so there is a bit of skill needed here. Fast taking off, fast climbing... but also fast when on landing, it is a rapid little aircraft. KPTA - Tampa is a complicated airport to navigate, so the AviTab and Navigraph charts are essential, I like the size and position, not too big or in your face, but handy for use. It is a long, long taxi to the GA area, but the passengers are happy. External lighting The Victory's external lighting is pretty basic, but good. There is a red beacon lower, navigation and strobe lights. The landing lights are in the left wing and there is a single taxi light on the front wheel strut. It is now far, far better than the original lighting. Liveries In reality there is only one livery in "Prototype". But Aerobask have created eleven unique liveries with clever names. Green Bird is default... ... there is also; Blue Sky, Cubism, Deep Purple, Desert Storm (old default), Gold Curve... two Prototypes are in 4K and 2K sizes, Matte Grey, Red Line and Red Vic... all are excellent, but Cubism is amazing. __________________ Summary Aerobask released back in early 2016 an interesting light jet in the Epic Victory. This aircraft had been designed as a world beating air-taxi aircraft to carry a pilot and four passengers and their luggage, Sadly the concept did not get off the ground (no pun intended). But that is not to say what was created by Epic Aircraft which was a ground breaking design. There was an update to the Aerobask victory later that year 2016 in v2.0. So here is a completely new version of the Epic Victory from Aerobask, a fully ground up design and it brings the aircraft up to date to current design and X-Plane parameters and features. It's biggest change is to the Laminar Research (default) G1000 avionics package, but it still comes with a few custom features above the default layout. Aerobask have always been an outstanding developer, and this aircraft is another of their outstanding machines. Modeling externally is excellent, but it is in the internal aspect and the use of materials that this aircraft is just another if layers above what it was in quality before, superlative is a word to associated with this internal design. Not only is the cabin excellent, but so are the lighting effects, high quality sounds, adjustable seats, drink cabinet, seat draw and folding table and a authentic sounding GPU. The G1000 comes with a host of features as well, including the Flight Management System GCU477, GFC 700 AHRS-based Autopilot, MD 302 (SAM®) and AviTab intergration, againn the cockpit qualiy and lighting is first rate. Liveries are excellent in ideas Menus have also gone Laminar based, basically the same, they however do look more bland compared to the original menu layouts, static elements are fixed (one and all), and the passengers are not seen internally (god knows why), but there is a basic weights and fuel page. Personally I would love a separate static elements page, the current idea is just too restricting, and the AviTab to rotate portrait wise There are a lot of similarities between the earlier Aerobask Epic E1000 - G1000 Edition released earlier last year 2019, if you have that aircraft then it is an instant step into this aircraft, or a Propeller version with the E1000, and jet engined version with the Victory, they are quite the same. The only area they differ is in performance. Like I noted in the original review, the Epic Victory looks quite simplistic in it's design and operation, but under that simple exterior is quite and interesting aircraft that requires skill to fly and in finding a deeper and fulfilling simulation, so the Aerobask Epic Victory- G1000 is quite an outstanding package... Highly Recommended. _______________________________ The Epic Victory- G1000 Edition by Aerobask is NOW available! from the X-Plane.Org Store here : Epic Victory G1000 Edition Priced at US$34.95 Features : Aerobask UHD Model High quality interior and exterior 3D model High quality PBR 4K textures Various 4K PBR liveries Additional 2K PBR livery for low-spec hardware Enhanced night-time lighting ambience with more of 200 spill lights for a great rendering Livery-dependent assorted interiors VR-ready and VR-friendly New Flight model New flight model fitting the powerful PW617F engine Fun to fly both fast and slow Custom engine failure High quality sounds High quality FMOD sounds from Daniela Rodríguez Careri Full-mode FMOD aircraft - Accurate doppler, distance attenuation and flyby effects. Deep system emulation G1000 PFD and MFD from Laminar Research - Custom popups G1000 custom EMS (optional) G1000 TouchScreen features (optional) GFC700 autopilot with custom CSC mode (FADEC-based autothrottle) - GFC700 2D popup GCU477 (alphanumeric keypad) supporting new LR commands for XP11.50 - GCU477 2D popup GCU477 physical keyboard on-demand capture MD302 Standby Attitude Module AH500SD Programmable annunciator - Aero Safety Systems Simulated breakers with custom reliability Simulated pressurization and oxygen system Avitab support in 3D tablet Requirements X-Plane 11 Windows, MAC or Linux 4 GB VRAM Minimum - 8 GB+ VRAM Video Card Recommended Download Size: 708 MB Current and Review version: G 3.18 (November 11th 2020) Installation and documents: Download for the Epic Victory - G1000 Edition is 725.50 Mb and the unzipped file is deposited in the aircraft "General Aviation" X-Plane folder at 823.70 mb. Avitab (Aviators Tablet) requires the download of the plugin and for the Navigraph charts you need a Navigraph account. Documentation: Huge amount of documentation, with an excellent full manual, recommended settings and performance guidelines Install_recommended_settings.pdf Aerobask Victory Checklist Normal Operation.pdf Performance_Guidelines.pdf Aerobask Victory G1000 Edition Flight Manual.pdf ______________________________________________________________________ Aircraft review by Stephen Dutton 13th November 2020 Copyright©2020 : X-Plane Reviews (Disclaimer. All images and text in this preview are the work and property of X-PlaneReviews, no sharing or copy of the content is allowed without consent from the author as per copyright conditions) Review System Specifications: Computer System: Windows - Intel Core i7 6700K CPU 4.00GHz / 64bit - 16 Gb single 1067 Mhz DDR4 2133 - ASUS GeForce GTX 1080 8Gb - Samsung Evo 1Tb SSD Software: - Windows 10 - X-Plane 11.51 Addons: Saitek x56 Rhino Pro system Joystick and Throttle : Sound - Bose Soundlink Mini Plugins : Avitab (Aviators Tablet) - Free : Skunkcrafts Updater (required) : Traffic Global US$52.99 Scenery or Aircraft - KRSW - Southwest Florida International Airport by Aerosoft (X-Plane.OrgStore) US$24.95 - KTPA - Tampa International Airport by VerticalSim (X-Plane.OrgStore) - US$26.99
-
Update Review : King Air 350 v1.4 by AirfoilLabs I will state from the start this is a hard update review to note. In most cases the updates cover certain specific areas and changes, but since the release of AirfoilLab's King Air 350 back in early April 2019, there has been a flurry of significant updates to the aircraft. And here is the critical point, yes the aircraft is good, but the same aircraft on release was also significantly under developed, particularly with the new introduction of a new coding plugin called Xjet. So yes there was a lot to rectify, and the first update in v1.1 (May) had a fix list as long as your arm, another followed v1.3 (June) and now finally we have v1.4. The issues were also confused by the introduction (as part of Xjet) in the use of a Product Manager, a sort of SkunkCrafts updater in disguise, and the installation at the time was a comedy of errors, again the sort of issues that should have been refined well before putting your product on the market, yes it works now, but that is not the issue when launching a new and highly significant aircraft. So to note the version changes in detail, of which is the usual thread of update reviews, my approach in this review is more to the overall state of the aircraft now. You can read the original review here; Aircraft Review : King Air 350 by AirfoilLabs Xjet's Product Manager The Xjet Product Manager has come a long way with a few revisions (currently v1.5.0), and boy it needed to... I still found the setting of your required X-Plane Application folder a bit messy, but otherwise it now loads and installs correctly. Everything is done within the Product Manager from doing the Key Authorisation, to the file install of the aircraft (Updating the aircraft as well) into your X-Plane "Aircraft" folder. Other AirfoilLab products and sceneries are also accessed through the Product Manager... overall a good step forward from the messier earlier tool. Looking again at AirfoilLab's King Air 350, it still has that huge "Wow" factor, this is one seriously nice aircraft. Detail is very good, and in areas extremely impressive, panels are very good with screws and rivets, great detailed roof and belly radio aerials... undercarriage assemblies and gear doors are exceptional... But oddly some areas are still wanting... and should have been (rectified) refined by now. Front windscreen sticks out? and there are still items (like the radio aerial) that are untextured, the actual cable is a bit average as well, gaps on the lower aerials to the fuselage and the tie-down lower hole is poorly (cheaply) modeled... .... I was not a big fan of the original window surrounds either, and they are still very average, glass is debatable as well in thickness and tint (see lighting). Remember you are paying US$50 for this aircraft... oddly it does not make much sense is that in most of this aircraft the modeling is exceptional, but in these few areas the details are also quite the opposite in mediocre, confusing. Cockpit still delivers, it is very well done in here and extremely well detailed. Cabin is nice as well... and I also found the pop-up monitors! (there was no manual with the release) but you have to open the tables first or they clash (stopping the table from closing). Double-club seating (all with tables) means this is a very large cabin even for a large twin-prop.. The extensive Menu system is excellent, but it can also overlap some areas you that need to access to because of it's sheer size... ... I have often also been frustrated in wanting to access a manipulator, button or switch that the menu overlaps, There needs to be an option to turn it off (access can be by the drop-down Plugin menu, or a select tab). The extensive list of features on the menu is still mind-boggling, and all them are very well done. I found the Fuel Loading feature confusing the first time around, and to a point I still do... You can load in the fuel to each of the four tanks (3611lbs) via selecting the Fuel cap of that tank and operating the pump handle, the pop-up shows you your Total Gal (Kg's is also available) Gal to Full Tank, Unit Price and Total Price.... .... adding in Fuel manually however is not reflected on the excellent Weight & Balance Menu? so what is the point, but only to look very nice? Both areas should mirror each other for realism, the idea however is excellent, but again not yet refined. V1.4 Update The main focus of the v1.4 update is the aircraft's compatibility with Vulkan/Metal. Also is the installing of the GTN750 payware add-on by RealityXP, as you can now do two x GNS530s, and or two x GTN750s GPS units displayed. As referenced above with the refueling pop-up, there is the noted "Refueling window fix" but it still does not work actively with the Weight & Balance Menu and the Digital refueling Display has also had some changes, but I can't see any difference. There is also noted 3d model changes (again nothing I can see?), Textures corrections and Icon fixes, but as noted above the main offenders that should have had attention (windows, aerials) are still present. KHAF to KRAL This is a flight to connect together two of Rising Dawn's sceneries of KHAF (Half Moon Bay) to KRAL (Riverside Muni). I like the engine startup procedure and the sounds are great, but the power supply is odd... You need the EXT (external power supply) on to provide power, but start one engine, and switch on the GEN and you still don't get power to the bus? (yes the bus switch is set at L (or R) GEN depending on the engine source)... and the only way you can get power to the bus is to turn off the Ignition and Engine start switch... So you have to keep the EXT connected to start the engine until you can turn off the start switch? Also if you turn the Voltmeter selector and select BAT then it does not supply any power... all very odd? Note the annoying menu overlap, yes you can move the pop-up (Pilot) panel out of the way, but anything moving on the left side of the screen gets in the way of the constant pop-out of the main menu, lower view menu and far right lower checklist menu... and after a time the constant menu pop-ups get seriously annoying. You have to make sure your Trims are all set correctly, as the aircraft remembers the Trim settings from the previous flight, and takeoff without checking the correct positions can make the KA350 do some very odd things... ... and the "Pitch Trim" switch has to be switched off, and then switched back on again for no reason? I don't remember this issue on the release version, but taxiing is now tricky... After starting you have to keep one engine in the "Feather" range or if not you disappear into the scenery with far too much power even with the levers set at idle? that is also with the Mixture (Condition), and Propeller all set at their minimum (idle) settings... keeping one engine in a full feather at least gives you control over the taxi speed, still not perfect but at least it is usable in a taxi speed. Another annoyance is that the Park Brake is not connected to the X-Plane key settings, so you have to release it manually... once done the park brake (100%) and regular brake (50%) do then work (I use the trigger on my x55 joystick), but the actual push/pull brake switch still does not move with the switch action? After a time you get a bit narky in trying to release the brakes, and then trying into getting forward thrust to move the aircraft You don't know if the brakes are on or of, or the prop condition is in the right place. Finally you are moving, but it wasn't a great start. A side note is that there is a built in (Situation) Save mode on the Menu, this will reset the aircraft to the saved state (Not the same as the X-Plane, Situation save, the new plugin remember). This save feature lower main menu was introduced in v1.1 (May). It does a good reload of the aircraft, but not of your set FMS FlightPlan and check your fuel loads, so you will usually have to redo those procedures again. Resetting the mixture and Prop levers you need to wait until the power is balanced, it takes a while to do, so you can't push up the levers and just go, as the power (thrust) will be uneven, but it is nice touch. I'm very light at 11,000lbs (11, 222lbs), so you have to be prepared... the KA350 will takeoff like a jetfighter, but from the moment you set your 10º pitch in the climb your fighting the nose to come down, but the KingAir wants to go almost straight up... ... any sudden movements and the aircraft will react, so you are very aware of keeping the aircraft very focused in the climb, it doesn't feel heavy in the air and almost arcade like through the controls, it is up to you to counter that feel. Your yoke is already already at full forward, so you are already turning the manual pitch trim in trying to get more control back, and you need a lot of trim... a LOT. Your Trim goes a long way back, but finally your level (and in control)... I tried the takeoff again, but this time with a -4º negative trim, this made the aircraft far more stable on the takeoff, and also gave you more yoke movement in the forward pitch, I would give the trim a bit more say -5º, to get it perfect, but it seriously helps in the critical climb phase. .... I then set the AP (Autopilot) and then changed my heading. Under manual control like with the pitch you have to seriously control your turns as the KA350 will bank (very) sharply, so you need to make a aim at a set roll degree marker and turn to it, and hold it, so under the AP, if you do a bank (change the heading) the KA350 will also bank sharply and not smoothly to that heading, which I don't feel is very realistic in either manual or auto modes... ... selecting the half-roll 1/20 option, does seriously help in bringing some reason back into the turn, so I leave it on for most the time in the AP active phase.. These manoeuvres (pitch, bank) feel a little arcade, the controls are too light, so you don't feel any backpush realism, when the KA turns or pitches it just does it blindly with no feedback, so you have to be very smooth and precise to keep everything under control. As a Pro I can overfly this and in keeping the aircraft smooth, but I want a natural feeling aircraft, and I am not getting that here. (A note, I did try to reset my X-Plane "Control Sensitivity" to try to get more feel, but it didn't really make a lot of difference). Several things have however been fixed... the poor (triangles) in the particle exhaust, has been rectified, the exhaust looks now very good. The other annoying issue was the angled bank in flight, it is still (very) slightly there, but nothing like the extreme off kilter I had to deal with on the release review, the KA350 at least now flies level. I think we should be very clear here. The AirfoilLab's KA350 is using a completely new Xjet plugin system (most aircraft in X-Plane use the well and tested SASL3 plugin), and most of the comments noted here are highly related to that factor. The new plugin system will need time to be fine-tuned and refined, and that is not going to be done overnight, and the feel here is that there is a slight disconnect from the aircraft... don't even think about using the X-Plane Replay mode, it is nasty, and you don't come back to the real world intact (I was returned with no fuel in the tanks!), so you can see where this review is going in that aspect. Certainly I do wonder what sort of aircraft this KA350 would have been with the standard SASL3 system, my guess it would have been excellent. Refining your flying to counter act the aircraft's odd tendencies, can overcome a lot of these negative areas, mostly around trim, in making sure the settings, adjustments and manual movements are all correct and specific, another point is that again the Trim wheel does not move via the keyboard commands, it does however do the required key adjustments, and if you (use the mouse) directly then the trim wheel then does move, so again there is that disconnection between X-Plane and the new plugin. The office is very nice in flight, nicely detailed and overall extremely well done. Lighting is very good, but could be better. You have a lot of adjustment in the cockpit with two (Pilot/CoPilot) overhead lights and the nice indirect lighting on the panel.... overall I really like it. The cabin lighting is still the same as in the release version... over-bright. There is the noted brightness selection of BRIGHT and DIM, but still there has been no adjustment between the two in all the updates... I simply don't like it? Externally it looks horrible as well, the cockpit and cabin looks like there is no glass from the outside, so it looks fake... overall the external lighting including the white strobes are passable, but the tail lighting is nice. Arrival at KRAL-Riverside Muni, and thankfully the dreaded drop (after coming out of the ILS beams) with the aircraft has been thankfully adjusted out, the landing feel is now far, far better... It is tricky aircraft to land as the Xjet plugin does not give you too much give... get the landing procedures in speed, rate of descent correct and the KA350 is actually really good, but get the approach procedures (even slightly wrong and the aircraft is not very forgiving, if downright nasty. I found two out of four landings were very good if not perfect, but some were just horrible with the twitchy controls, however reverse pitch is very good. Then it is back to the over-thrust of the Pratt & Whitney Canada PT6A-60A engines (1,050 shp / 783 kW) in the taxi-phase, tricky... that word again. Summary With the release of the AirfoilLab's KingAir 350 back in April 2019, I was very much in two minds about the aircraft. On the one hand it has an extraordinary list of features and overall it is a very high quality aircraft. But secondly the aircraft came with a completely new plugin system called Xjet, and then you have a developer with only one earlier aircraft released to their name in a Cessna 172SP. Again the Cessna was noted as "very highly ambitious", but the punters absolutely loved it's huge feature list and quality. On that release I was willing to give the AirFoilLab's KA350 aircraft some slack, as per usual the aircraft felt it was released well before ironing out and refining the details, complicated by the Xjet plugin and it's very nasty Product Manager at the time, that has now been sorted, again the moniker of "very highly ambitious" is all over this project as well. But this update review is after four significant and lengthy updates v1.1, v1.2, v1.3 and this one with v1.4 which caters for the Vulkan/Metal X-Plane update and GTN750 payware more add-on RealityXP installations. other significant fixed areas are the particle effects, balance in negative bank and no ILS dropouts. The aircraft is around the US$50 product price point, and don't get me wrong you do get a huge amount of features and aircraft for your money... but it is on the refinement aspect there is still a lot to cover. Core issues are that still the Xjet plugin does not still intergrate smoothly into the X-Plane simulator as well as it should be doing so by now, you see it, and you feel it. Actions are not replicated in the aircraft like with the parking/regular brakes, trim wheels and a very nasty replay mode. Worse is the feel, as the aircraft reacts too sharply or even to arcade like for my tastes to control input, I can overfly these aspects, but aircraft feel should be there, and don't get me even started on the over-thrust of the engines at idle. A Pro Pilot can fly around these aspects, but I think it takes away from the general feel that how could much better this aircraft could be with some focus on basic refinement than features, especially concerning the plugin aspect. A lot has been rectified since April 2019 to date, but a lot hasn't either, with still some poor modeling in areas (aerials and glass), seriously annoying pop-out menu (menu is actually extremely good, but distracting)and the lighting (cabin) and the Xjet plugin is still quite buggy. Like with most releases, it is that last 10% that gives an aircraft that special or even outstanding factor, the AirfoilLab's B350 is about 15% per cent short, not a big or an impossible barrier to overcome and there is so much even outstanding here, but it is about a good 15% never the less, we will look again at the aircraft in another six months. _____________________________________________________________________________________ The King Air 350 v1.4 by AirfoilLabs is a new release for X-Plane11 and NOW available here at the X-Plane.OrgStore King Air 350 Price is US$49.95 This aircraft is a noted aircraft for X-Plane11 only and version v1.4 is required Features User Interface What you need is always reachable quickly. Main Menu appears on the left side when you are close to the left edge. Camera Views appears in the left Bottom Corner when you are there. Cold&Dark, Before Engine Start, Before Taxi and Before Takeoff states are available. 2D Panels: The practicality is overwhelming. You can very comfortably manage different aircraft systems that are modeled in detail also in 3D, but it is so much easier, especially during busy flight phases. All windows are detachable and can be placed anywhere. Ground Services: Manage your ground services quickly and easily. You can certainly go outside and touch and manipulate all too, if you don’t hurry. Weight & Balance: Tens of pages in the real Aircraft Manual are transformed to algorithms and graphics that permits you to play with your fuel and weights limits. Everything is very well graphically arranged. Settings: All is stretched to minimum option so that you don’t have to spend time going through settings rather than flying the aircraft. What we can, we are implementing directly in X-Plane. The Aircraft Handbook will appear in the right bottom corner. Sections: Aircraft Specs and Limits, Checklists, Performance. Automated Checklists: The Checklists can be set as fully automated with speech, hints and messages. You can look and learn and next time you can put the automation down a notch and try it for yourself. By the way the Speech System represents 768 separate audible sentences. Performance - Hundreds of real world performance pages are transformed manually to programming language to calculate Takeoff and Landing speeds and distances. Walk feature - You can walk everywhere, inside and outside of the aircraft where collision zones are programmed. You can climb stairs and there is 1G force simulation. The walking interferes with X-plane terrain too. PBR 3D Model Extraordinary Ultra HD details both in interior and exterior. Every rivet, every sign, every screw, every light, every instrument inside and outside is modeled to the highest fidelity. And photorealistic engines. Ultra realistic cockpit details, glasses, dirt, scratches. Ice on wings, windows, rain effects, wipers and more. High Optimization Method - to save performance all details were designed in separate overlay objects to enhance 3D detail and economize on texture size. 18 amazing, hand painted Liveries with artistic touch. All liveries are based on real paint schemes. 3D FMOD sound 924 sound events and snapshots in total. Real recording from 350 was used, too. The principle is that all you can touch and move is provided by manually and meticulously edited sound samples. Enhanced Multi Layered Engine Sound Design meets realism and complexity. These details are taking into account: Location, Propeller, Propeller Pitch, PT-6 engine (no propeller) On, PT-6 windmilling, Starters, Igniters - all modeled separately to cover all real world situations. Realistic cockpit sounds are modeled to such details as Bus Ties Relays (electrically operated switches), Ticks in the audio system, electrical discharges during igniters, etc. Ground Movements, Tire rumble based on surface, Cockpit vibrations based on G-Forces, breaks squeaking, skidding, Impacts based on G-Forces. When manipulating with aircraft in the exterior everything is provided by a sound: caps, latches, remove before flight objects, doors, electrical towing, refueling etc. Pilot/Copilot Callouts indicating V speeds and other details during takeoff and landing phase. Ambiences - you feel, when you are outside, real wind sounds based on X-Plane 11 weather system, outside precipitation Aircraft Systems Simulation 2 x G530 Implementation 2 x GTN750 Implementation Electrical System: Custom made system for simulating complex electrical DC and AC behavior in details with electrically operated relays, load distribution per component, inverters, sensors and more. The load of the system influences even how bright the annunciators lights are. Simulated buses: Battery Bus, Center Bus, Dual Fed Bus, Left Gen Bus, Right Gen Bus, Tripple Fed Bus, Left AC Bus, Right AC Bus, Avionics buses 1, 2 and 3. Lighting: All lights in Cockpit, Cabin and Exterior, described in the real aircraft manual are operational and connected to correct buses. Master Warning System And Annunciators Logic with dimming. Fuel System: Realistic layout of the fuel cells with boost pumps, transfer pumps, crossfeed system, firewall fuel valves, vents and drains for manual Fuel Check in exterior preflight. Auxiliary Power Unit simulation with engine start, realistic electrical behavior. Engine: Custom made simulation of Alpha, Beta(Ground Fine) and Reverse regimes. X-Plane Commands modified to match real behavior. Inertial separator simulation. Custom Feathering system. Custom Autofeather system and test logic based on real aircraft. Simulation of Primary Governor, Overspeed Governor, Fuel Topping Governor. Low Pitch Stop and Test simulation. Rudder Boost logic and Pitch Trim system logic based on Manual. Fire Protection: Engine Fire System detection replica with FW Valves logic and Fire Extinguisher. Pneumatics: Custom logic matching the real system dependencies to environmental controls, pressurization vacuum system, gyros suction. Ice and Rain Protection: Engine Inlet Lip Heat, Inertial Separators, auto-ignition system, windshield anti-ice, wipers, propeller deice system, pitot heat, surface deice boots simulation. Pressurization: Cabin Pressure Control systems with testing logic simulated. Hydraulic Power System. Avionics: all systems are modeled as close as possible to the real instruments. Radio instruments (COM 1, COM 2, NAV 1, NAV 2, ADF, Transponder) all modes available with memory function and simple testing sequence. Avionics power and gyro initial spin-up replica. All digital displays graphics and logic based on real aircraft data. EADI (Primary Pilots Display), EHSI (Pilots HSI/Map), MFD (Main Map Display), EHSI Copilot. Weather radar simulation. The provided FMS is X-Plane 11 FMS, therefore the aircraft uses standard navigation database integrated in X-Plane. Autopilot Modes Logic and interconnections are custom made to match the real one. Aircraft performance is tuned to match speeds in real performance tables XJet The product is based on our new technology XJet. XJet is a new plugin system for X-Plane 11 that provides licensing, software distribution, automatic updates as well as full integration in X-Plane 11 via the newest X-Plane SDK. It works on Windows, Mac and Linux. The cool think is that it integrates also Aircraft Systems Logic Tools enabling us for example to simulate realistically very complex electrical systems that X-Plane is not able to simulate. One of the very exciting features is also the Interactive Checklist System that is able to control the aircraft automatically with camera focusing and audio specs. Based on our experience from previous development we have focused in every possible detail to make the aircraft as much “X-Plane 11 default” as possible, in a very positive sense. It is Very Easy To Use and very complex at the same time. Both Gamers and Fanatic Flight Simmers will be satisfied. If you wish you can push one button and fly the aircraft and if you want to study hard you can immerse deeply into aircraft systems. Requirements: X-Plane 11 (Fully updated) Windows, Mac or Linux 4Gb VRAM Minimum - 8Gb+ VRAM Recommended Download size: 800Mb Current and Review version: 1.4 (October 29th 2020) _____________________________________________________________________________________ Installation: Download for the AirfolLabs KA350 is done via an installer "AFL+Product+Manager+Windows+installer" and final install in X-Plane folder is 2.29gb. Final authorisation is done via the X-Plane plugin. Manual is available only in the .php format? ____________________________________________________________________________________ Review by Stephen Dutton 9th November 2020 Copyright©2012: X-PlaneReviews (Disclaimer. All images and text in this review are the work and property of X-PlaneReviews, no sharing or copy of the content is allowed without consent from the author as per copyright conditions) Review System Specifications: Computer System: Windows - Intel Core i7 6700K CPU 4.00GHz / 64bit - 16 Gb single 1067 Mhz DDR4 2133 - ASUS GeForce GTX 1080 8Gb - Samsung Evo 512gb SSD Software: - Windows 10 - X-Plane 11.25 Addons: Saitek x56 Rhino Pro system Joystick and Throttle : Sound - Bose Soundlink Mini Plugins: : XPRealistic Pro v2 effects US$19.95 : SimBrief - Free Scenery or Aircraft - KHAF - Half Moon Bay by Rising Dawn Studios (X-Plane.OrgStore) - US$19.00 - KRAL - Riverside Municipal by Rising Dawn Studios (X-Plane.OrgStore) US$24.99
-
Considering all the ho ha, MSFS has gone extremely quiet recently... the obvious is obviously, why buy airports that you can't use? Yes the GA's are usable, but why would you spend money on a mega airport that is empty, to fly to another empty mega airport? Yes the Dev Houses are pumping them out, but to who... I did notice a few new MSFS users poking around in X-Plane, why because they can use it. In early 2021, I think the penny will drop for the Dev Houses... That MSAFS will not be the gold mine they expected, if that aspect has not already dropped... but blind faith.
-
Yes, I do also seriously wonder why developers do the really strange releases when they do, as noted why release around Black Friday, or 4th July, because the cash is always going to go somewhere else? JustSim had the same issue with Düsseldorf Airport EDDL, but it fixed itself... and guess what, so did EFHK? I think it is an X-Plane related issue.
-
Aircraft Addon : Pilatus PC-6 Turbo Porter Adventure Pack by Thranda Design This year 2020 in early June, Thranda Design released their amazing Pilatus PC-6 Turbo Porter, a modern (if you can call the 1960's modern) bush aircraft with a utility bias. Excellent it is, but being a versatile utility aircraft then there is the need for options to cater for the aircraft's multi-role capabilities, and here it is in the "Adventure Pack". This Adventure Pack is an addon, so yes you will currently need the Thranda PC-6 Turbo Porter aircraft to use it. Installation notes are important here, so we will cover them first. First an important note!, to install you have to have the latest v1.2 version of the aircraft, if not you will get a startup conflict, followed by a nasty crash to desktop (CTD). Download and unzip the Adventure Package, then select and merge the elements into the original PC-6 folder... .... note if you use a Mac then make sure you do a clean Merge or Copy and Paste as some files overlap... when starting up you will need to authorise both aircraft (Original and Adventure Pack) with two separate keys, if correct you should have both aircraft (Wheels and Amphibian) present for selection on the Flight Configuration panel. Options There are various options to configure the aircraft for it's role, these include; Amphibian Floats, Ski's, Bush Tyres (Tunda) and Mud Flaps. Amphibian Floats Floats are always a big attraction for flying bush aircraft, and you will not be disappointed with the quality ones presented here... Not only is the shaping really, really good, then so is the hull riveting. It is this extraordinary detail of the fittings that stands out here, front support wheels and struts are excellent, pontoons to aircraft supports are also realistic with tension wires... ... the pontoon undercarriage (retractable) is high quality as well, with every nut and and bolt well rendered, The undercarriage (and front struts) are raised or lowered via a panel on the instrument panel. (Note, there is feature on this aircraft in that you can custom design your own instrument panel, so the location shown here of the location of the Gear Panel may be placed or located anywhere on the instrument panel). But the highlight are the twin rear rudders that can be raised or lowered into the water, note the springs and wires that move with the tilting action. The rudder action is controlled by a selection on the new "Misc" tab on the pull-out menu, centre left of your screen. (you can also use the beautifully crafted lever on the side of the pilot's seat). Other menu options include wing ladders, again expertly crafted, and the choice of short or long passenger windows. There is a nifty "Slew" tool to over-ride the X-Plane physics, that allows you to control the docking of the aircraft, just move (slowly) the crosshair to manoeuvre the aircraft to your wishes, and a very good tool it is as well. Overall the Amphibian Floats are an excellent addition, and look very, very nice in operation. Skis With the merged Adventure Pack, the wheeled version menu is changed as well. You now have the selection of Skis on the same "Misc" menu. Ski quality and design is again exceptional, with no ordinary straight planks here, they are all highly realistic. Bush (Tundra) Tyres and Mud Flaps Another option is for the larger Bush tyres or "Tundra" tyres, the over-sized wheels also come with another option of having "Mud Flaps" attached (The mud flaps can be used on both the Normal and Tundra tyre options). Bush tyre and flap detail is again very, very good and highly realistic, even the connection of the Mud-Flaps to the wheel assembly is done with perfection with bolts... you can't ask for more. Note; on the wheels version there are the same options for the long passenger window, and a "Coming Soon" to note "Synthetic Vision". Garmin G1000 Glass Cockpit The Turbo Porter now also comes with a G1000 two-display Glass Cockpit. It is the standard Laminar default G1000 setup, but it is still another nice feature to have. Note there is no Autopilot panel set on either of these displays, but I suppose you could adding the S-TEC 55x which is available under the panel options, and a secondary note in that there is also the EFD 1000 which is a self-contained multi-function digital display which is also available as an option instead of the G1000 layout... the G1000 option is found and selectable in the Dynamic Panel feature. PBR Metal and Rough(ness) Thranda has a unique feature on their aircraft, and that is the ability to design your own livery, or "Dynamic Liveries. Dynamic Liveries are covered in depth in the release review: Aircraft Review : Pilatus PC-6 Turbo Porter by Thranda Design In the Adventure Pack, there has been two additions to the Dynamic Liveries tool in the options to adjust the PBR (Physically Based Rendering) effects, this is the Metal (Metalness) and the Rough(ness) of the panels. The PBR effects require a bit of experimentation to get the right look and feel that you require, but you also learn of how Metalness is used in X-Plane to get the right lighting realism effect, the process is a little slow in experimenting (reloading) but your patience is rewarded.... clever though. One surprise that is missing on the Adventure Package is there is still no "Cargo"? option, in removing the seats and adding in freight, hopefully the option is still on the "to do" list. Skydivers! It wouldn't be a Dan Klaue project without something totally mindblowingly original, and here he does not disappoint again.... Skydivers! Selection of the skydiver feature is on the Menu under "Misc", when you turn the selection on you will get ten skydivers sitting in the aircraft, it is a quite a tight squeeze. It is very important your Baro pressure is set, so the pop-up panel is set at the same altitude. Then it is the takeoff and the long, long climb up to altitude and I recommend 800fpm... "oh Hi!" Note the "Open Right Rear Door" alert... the difference of the weight of a full load of skydivers on the aircraft is very evident, and I like door closed as I climb up... when you open the right rear door you get this huge load of wind noise and a far higher volume, "I love it". On the pop-up panel it shows you your ten skydivers, their smoke colours left and the choice to either "Stay With Plane" or "Join (the) Skydivers"... There is a minimum Skydiver altitude recommended, but I would double that height if you want more fun, here I aimed for 6000ft.... Press the Spacebar and out of the door they go... Their descent altitude is shown for each Skydiver, and the smoke colour shows you which skydiver they are... Now it's your turn! Select "Join Skydivers" and press the Spacebar... once "Jumped" you get additional key commands (shortcuts)... you can move the camera to the Previous or Next (C - Shift C), open the Chute (E), control your speed W (fast) or S (slow), Toggle Smoke (X) and (Q) to Release Bindings.... Two inputs are however the best fun in Right (A) or Left (D), which allow you to turn or twist in the air. You can change to any falling Skydiver you want to by selecting the Skydiver on the menu and his altitude is noted on the large altimeter. And yes it is a lot of fun.... and visually very clever if you have all ten Skydivers in the air at once.... I did find the feature a bit buggy currently (no freefalling), but the idea is very clever. Original PC-6 release review is here; Aircraft Review : Pilatus PC-6 Turbo Porter by Thranda Design _________________________ Summary After the release of the exceptional Pilatus PC-6 Turbo Porter from Thranda Design in June 2020, it was announced of an addon package, and here it is in the "Adventure Pack" for the aircraft. The package include; Amphibian Floats, Ice Skis, Bush (Tundra) Tyres, Mud Flaps, Ladders and Short or Long Windows. The G1000 avionics ( Laminar default) is also now available in the excellent "Dynamic Panel" tool and PBR Metal and Rough(ness) options have also been added to the "Dynamic Livery" tool. Highlight is the clever "Skydiver" feature, with ten Skydivers that you can jump out of your aircraft or join and control their descent to the ground. Highly original with smoke effects and keyboard commands. Oddly the much wanted Cargo (freight) option was not included? (It is available on the Thranda Kodiak). Messy authorisation with two keys required. Quality and detail on the new options (features) is second to none, all items are highly realistic and masterful in detail, as you would expect from Thranda. You asked for it, and now it is here in options for the PC-6 Turbo Porter, yes the aircraft was versatile before, but now you can expand your flying into far more rugged territory, say water, Ice and unpaved runways, that is what you wanted, that is what you got.... overall brilliant! _______________________________ Yes! the Pilatus PC-6 Turbo Porter Adventure Pack by Thranda Design is NOW available from the X-Plane.Org Store here : Pilatus PC-6 Turbo Porter Adventure Pack Price is US$16.50 The Adventure Pack is an expansion of the Thranda PC-6, which is required first. Features of the Adventure Pack: Amphibian floats With separate gear control panel Bush tires with their own aerodynamic and ground handling physics Skis for Glacier Operations Articulating Skis that follow the ground Mud flaps select them on /off on all versions G1000 panel Part of the Panel Presets PBR Painting via real-time livery editor Larger door windows to allow skydivers A new livery Requirements The Thranda PC-6 is required for the Adventure Pack. This is NOT a standalone aircraft Download Size: 480 MB Current and Review version 1.2 (October 24th 2020) _______________________________________________________________________ Installation and documents: Download is 479mb. A merge of both Aircraft and Adventure Pack files is required (see above), note the updated v1.2 is required for installation. Two Installation keys are also required on start up and is supplied with the purchased download file (and the original Aircraft key). Documents supplied are: ChangeLog.txt Thranda Pilatus PC6 Joystick Settings.pdf Thranda PC6 Expansion Pack Manual.pdf Thranda Pilatus PC6 Graphics Settings XP11.pdf X-Plane G430 Manual.pdf X-Plane G530 Manual.pdf Thranda PC6 Documentation v1_2.pdf Thranda PC6 Documentation.pdf A Blank Livery (PNG) of four files are provided for painting. Checklists and loads of Performance graphs are provided in the manual. ______________________________________________________________________ Aircraft Review by Stephen Dutton 4th November 2020 Copyright©2020 : X-Plane Reviews (Disclaimer. All images and text in this preview are the work and property of X-PlaneReviews, no sharing or copy of the content is allowed without consent from the author as per copyright conditions) Review System Specifications: Computer System: Windows - Intel Core i7 6700K CPU 4.00GHz / 64bit - 32 Gb single 1067 Mhz DDR4 2133 - ASUS GeForce GTX 1080 8Gb - Samsung Evo 1TB SSD Software: - Windows 10 - X-Plane 11.50r3 Addons: Saitek x56 Rhino Pro system Joystick and Throttle : Sound - Bose Soundlink Mini Plugins: Skunkcrafts Updater (required) Scenery or Aircraft - CZST - Stewart by Beti-x (X-Plane.OrgStore) - US$25.80
-
Behind the Screen : October 2020 Currently the very last assembly of an Airbus A380-900 was completed in Toulouse, and this Ship 272 is destined for Emirates, the largest user of the giant jet with over 123 A380's in it's fleet. So the superjumbo's project is now coming to a close. Worse for the A380 is that most airlines with Covid 19 are already selling off or retiring their A380 fleets. So the question is that "Was the A380 a commercial failure", most would laugh and say yes, but again we have the horrible, "we didn't build it, so won't use it mentality" of the American operators, same as Concorde, it is a terrible mindset, but a very real one and a damaging one to the industry. But to already put the giant out to pasture may also be a big mistake. Yes the A380 has a very high fuel consumption (four gurgling engines), and yes it is huge aircraft to fill out with passengers and cargo every day, but the initial concept behind the A380 is still there and that aspect is still as threatening. The world has currently 8.6 Billion people, and 4.4 billion of those people traveled by air in 2019... that is 4.4 billion passengers. No doubt Covid 19 will change that perspective completely, but currently that is the situation now, not in five years time. The A380 was created solely as a hub to hub or major population centre to major population centre transport, and again people are not going to leave the cities all to soon to go and live in the wilds of Scotland or Alaska. The last significant major generational change was of course the original wide-body in the Boeing 747, it's like are now being retired also in high numbers, but the B747 very quickly changed the perception of mass transport, so what went wrong for the A380. One is that the aircraft is not being configured to do what the A380 does best, lift a huge amount of people and cargo in one flight. The Boeing 747 started out the same way with whole decks set out as bars and lounge rooms, but that went by the wayside very soon as aircraft yield became the operators focus, in other words bars and showers take up space on aircraft that can fit in paying passengers. The A380 has also been heavily configured towards these sort of luxuries, yes the yield factor is very different as a First Class or Business passenger will pay far higher for the extra space and services, and mostly airlines find that a far bigger yield in those areas than with the rear cattle class, so overwhelmingly they cater to them. Covid 19 will certainly now again change that situation. So the first reaction is to just get rid of the giants because the airlines cannot see anyway of creating better yields from the aircraft, which I think is quite short-sighted. Airlines are focusing on those 20% savings that a New Generation A350 or B787 can deliver, and there is no doubt that these airframes will be come the dominant aircraft of our generation, just like the B747 was for our former generation, and again you can see the A380 is out of step. But in areas you need two of the new generation on the same route to cover the requirements of an A380, and that is two full sets of crews as well, that is if the A380 is reconfigured to be a more dense configuration, just like the B747 was in the eighties. That also creates another change for the A380 in the Covid era. The past mentality of packing in passengers densely can't continue either, as the current very tight seat pitches are not only already extremely unhealthy, and profit margins aside airlines have to change, it will take only a few to litigate their health concerns to open a rush of major court cases in that the old arugument of "Low Fares" to space can't continue, It is extremely unhealthy with these current seat pitch practices, Covid will now totally highlight the issue magnified. I am not talking domestic pitch here (which is still very bad) but on International routes over 8 hours, currently we are pushing 18 hour sectors and 21 hour sectors are being planned, it is total madness. Change the aircraft configuration to fit the new pitch rules and suddenly your 20% margins are going to take a hit. The one thing the A380 has is space, loads of space... yes it is an expensive aircraft to fly, but with better configurations you can do better yields, suddenly that open expensive space dominated by First or Business class suddenly looks like wasted space, certainly on new era Big Twins, but not on the A380. Emirates (the airline) have noted and proved that the aircraft can be a money maker, passengers love the aircraft and the world is now finally configured to handle it's giant size, the biggest drawback was it's 300m+ cost, and the earlier aircraft were overweight (why most of these versions are being scrapped), overall it is a very young airframe as well, so second hand versions are now also going to be very competitive in yield. Most will note that the era of a jumbo sized airliner is over, the A380 as the dodo of the air, but I wouldn't write it off to history just yet. Once we can fly again then the perceptions of the new Covid era will change our world, and as with most things Covid has already totally changed the game, for the A380 a virus could be its ultimate saviour. X-Plane World On a few days off mid-October I reminisced about the past ten years that I have used the X-Plane Simulator, where it has come along and thinking of it's current future. Yes MSFS has been the big debate in 2020, besides that other nasty distraction of a virus. In a pandemic it is best to not panic, in a simulation revolution it is again wise not to lose your head but to think clearly, because in both aspects the results are always the same... when the changes are over and done with, it is usually not never what you expect on the other side. But back to the past. I didn't know of course what a smorgasbord I was letting myself into, I also found out through X-Plane I had also a very nasty addictive personality, a collector of wanting absolutely everything... worse X-Plane divulges you no end in feeding you endlessly in this terrible inflicting personality disorder. I came into the simulator in the last throws of X-Plane9, you know the one with the very poor mesh textures, although they did look brilliant at the time, but thankfully they didn't last long as X-Plane10 cleared them all away, and even as X-Plane12 nears we still have them, but in a much more OSM (OpenStreetMap) refined form, and in reality this mesh is basically the same tiles as it was released eight years ago, however they do look completely different, and even still actually highly realistic in the visual aspect. Go back only to five years ago and you now wonder at the basics we were flying and using, although the current future in detail and dynamics were already there in certain aircraft, like the JRollon CRJ-200, of which I had the pleasure of revisiting recently. Go back ten years and most of the aircraft popular then are now long gone, only one is highly significant from that period in a Boeing 757 from the XP-Freeware Project, in that it had the first and at the time the only 3d rendered cockpit, all the other instrument panels were 2d or flat, it feels now like the stone age, but we did a lot of flying with 2d panels. We also collected a lot of aircraft, now all lost on platters of forgotten hard drives, hours and hours of painstaking work, now gone. Scenery collection was also a big deal. You made lists, lots of lists and collected and ticked them off with gutso, now only a few survive... most went after a serious cull a few years ago, with a rebuild this time consisting of only quality scenery that I only required and had not collected. Most of those developers back then are gone as well. A few survived like Dan Klaue and Jack Skieczius, but to be fair back then they were the new breed and the next coming generation and became the great generation. Sadly the hardest thing to observe was the demise of the older original X-Plane developers. As the changes came through and they were certainly faced with PBR lighting and the more extreme dynamics, extreme modeling, deep systems and then the final axe was the old school struggled to transition their craft from Planemaker to SASL plugin coding, all are now gone, but remember the X-Plane that we know today was built on their shoulders. To a point in retrospect, the core of the simulator has not changed actually that much when you really think about it, but externally it has been transformed by the two major moves to 64bit and Vulkan/Metal, the weather currently also covers over a lot of the old mesh and textures, and the dynamics have highly transformed the simulator around it's core base. Ditto the excellent plugin's and addons, that again they have gone around or replaced earlier significant tools, for me only one still survives, a little plugin called "DiscreetFPS", that shows you your current framerate in a small numbered window on the top left of my screen... simple but still very effective, but for the rest like pushbacks, moving maps, airport docking and rain/movement dynamics, well they were all replaced years ago. So what brought all this nostalgia on? Well take a good look at X-Plane in it's current form, because if my gut is right, then the last elements that connected X-Plane back to these heady days also are about to be removed. Like the significant step from X-Plane9 to X-Plane10 in the look and feel of X-Plane a decade ago, then it is all about to happen and totally change again soon. As after X-Plane12 the simulator will be different, different mesh, different textures, different weather dynamics, different lighting dynamics, and although these significant changes won't happen overnight, but by this time next year you will have to agree with me on that finally X-Plane will not be the X-Plane simulator we have flown together in the past, X-Plane11 will be the X-Plane9 of the past and with that change there will then also be finally no connection to that far past era either, as it will be a totally new era for X-Plane and simulation per-se, you dreamed of an X-Plane in the future a decade ago, and here it is, now you will be dreaming of the next era of X-Plane, and that aspect is now coming very soon. See you all again next month Stephen Dutton 1st November 2020 Copyright©2020 X-Plane Reviews
-
Plugin Updated : WebFMC Pro v1.6.1 by Green Arc Studios The latest update to the excellent WebFMC Pro v1.6.1 plugin is again a significant update with a new great feature and more added aircraft. The WebFMC is a plugin that allows you to use a FMC (Flight Management Computer) on an external screen via a web browser. That is an another computer or tablet. It is a remote tool, but a very beneficial tool and even a powerful one in programming in route and performance data and following the set aircraft route in flight and in mirroring the aircraft's built in FMS (Flight Management System). Added into the functionality is a load of features in the use of the FMC on another screen.... and yes I am a huge fan. There are two versions available and the PRO version is now listed with an impressive 21 aircraft, but three in the list of the Zibo Mod 737-800 and the 737-900ER/700 Ultimate are also available in the Free Demo version. I use the WebFMC tool for two significant reasons, the first is to program the route and set up the aircraft's preferences, this is done in conjunction with the excellent SimBrief Flight Planner (above) the second reason is to cross-reference the SimBrief profile with the FMC in flight, and then basically "watch the numbers" in route and the aircraft performance... there is another trick in that if I am called away from the computer I can still access the flight via putting the FMC on my iPhone (Chrome is best on the iPhone), and with that I won't miss the descent phase (or overshoot the descent point) by being away from the computer. For the plugin install/set up information see the original release review: Plugin Review : WebFMC Pro by Green Arc Studios WebFMC Pro v1.6.1 Since the release of v1.6, Green Arc Studios have done another brief, but significant update to v1.6.1. Details are noted; - Windows binaries (the plugin and webfmc-win.bin) are now digitally signed. - Fixed detection of all Boeing 777 variants. - Fixed a small UI glitch where loading A350 after A319/320/321 with F/O active would display side-switching indicator even though A350 doesn’t support dual CDU. - Fixed printing to X-Plane log from non-main plugin thread which was against Laminar’s recommendations regarding thread safety of X-Plane API. - Fixed a bug where access to some internal state of the plugin was not properly synchronized between threads in some cases, which could lead to undefined behavior. - Detect and handle webfmc-lic.txt.txt file (double txt extension) as we found many cases where users struggled with license error because of a mistake like this. - Removed enumeration of network interfaces and their IP addresses (they are no longer printed in the log file) as we suspect this contributed to the false-positive alerts from AVs. This was purely diagnostic and has no impact on functionality. Most fixes are related to the use of certain aircraft preferences, but two in there are very important "Fixed printing to X-Plane log from non-main plugin thread which was against Laminar’s recommendations regarding thread safety of X-Plane API", Also "internal state of the plugin was not properly synchronized between threads in some cases" These items are directly related to Vulkan/Metal and required fixing, so it is important to update to the newer v1.6.1 version.... please note the below Visual C++ update required to now run WebFMC Pro Important: please note the new requirement regarding Microsoft Visual C++ Redistributable for Visual Studio 2015, 2017, 2019 available here: https://support.microsoft.com/en-gb/help/2977003/the-latest-supported-visual-c-downloads (see the original announcement of WebFMC Pro 1.6.0). WebFMC Pro v1.6.0 So what is new in v1.6.0, well the main new feature is the use of dual FMC's where aircraft have separate Flight Management Systems, in other words the left and right consoles for both the Pilot and First Officer. The layout shown above is simple to setup, startup Chrome and set up the browser address in the address window, I have the WebFMC set on a favorite (icon) for instant access, then do the same again with another browser tab, and split the tabs into two screens (like above). Obviously you need the selected aircraft running in X-Plane, this is the FlightFactor A320-214 Ultimate. If the dual FMS (Airbus MCDU) devices are available you will get a pointer (arrow, above right) to switch the FMS to either the left or right FMS device... ... and now both FMS devices will mirror the same in the aircraft. Click which tab of the browser you want to use (for data input) and that side is active, both show current and active data even if only one browser side is selected. Input via a keyboard is easy, and the FlightFactor pop-up panels are quite dark to use and the buttons are small. One thing to note is that if you are using the "PLAN" mode on the EIS Switching Panel, then make sure you are using the corresponding NAV/MAP display with the correct FMC... If you are using the right hand (First Officer) FMC to input the route, then any route data will only be shown on the right hand NAV/MAP display, it is all too easy to use the right FMC and note that nothing is happening or changing in the aircraft Pilot's NAV/MAP display, you will have to switch to the left FMC to see any changes or to check out your routing waypoints.... Guilty as charged. Loving the MCDU access in flight... A glance to my right to the other monitor (computer) and there the dual flight data is updating... so there is no need to change my forward instrument/windscreen view or move the viewing angle down to see the MCDUs. Approaching LIRF (Rome) via VALMA 3P, I found a loop in the flightplan at LUNAK, so a fix (DIR-TO) to TAQ (118.8) was required, the approach phase was also calling out for current landing data as well... so both screens were required to fix the issues, far easier than trying to do it all head down in the cockpit. All was quickly resolved, but the point of this how having both MCDUs working can really help out with the heavy periods work flow... yes I am impressed. Better again is that I don't have to pull up or have the pop-up windows spoiling my simulation, it is all there right by my SimBrief notes. I found the ease of use here in being excellent, and the advantage of being able to see the two sets of data on a remote screen, made the aircraft set up procedures and the flying aspects even quicker and far better. New Aircraft: There are three new aircraft FMC systems now also available in v1.6.0..... JRollon CRJ-200, FlightFactor Airbus A350 XWB and the FlightFactor Boeing 777 (all variants) Yes the perennial JRollon CRJ-200 is still flying out there, and surprisingly it still flies very well (the excellent optional BSS Sound package really helps) even in X-Plane v11.50. The FMC in this aircraft is quite different and even unusual by today's more advanced units. So the larger (WebFMC) FMC interface is a real bonus in programming out the route. Routing data is far more highly evolved from when the CRJ-200 took the stage, but the FMS works fine. Complicated approaches like LXGB (Gibraltar) can be easily more tuned and refined to get the approach correct, note the RNP approach to RWY 09 is really like that via PIMOS. Second aircraft is the updated FlightFactor A350-900 Advanced XWB This FMS was actually available on WebFMC before the update, but only as the default Laminar FMC. With the changes in v1.6 (update review) it didn't then work with the new cursor system (than the usual key system) as it would be extremely hard to replicate via a remote standalone application, so a workaround is to again use the rear FMS panel that is basically the default data driven unit... ... you don't lose anything with the new cursor system via the different inputs on the rear unit except for scrolling through the waypoints of a route, for this you still have to scroll via the pointers on the upper FMS (arrowed below). It is actually time saving as you don't have to construct the route via the intricate A350 XWB MCDU menu system, as you can fill out the route as per normal key based FMS. And the editing of tricky approaches like at EDDM (Munich) can be more easier and quicker to do. It is debatable if you wanted to use the unique cursor system here, but overall the speed savings over-ride the complexity of the cursor style interface, in the end the inputs are still the same. Third aircraft addition is the Boeing 777, this WebFMC addon covers all the B777 variants including the -200ER, -200LR, -300ER and the -F Freighter... the WebFMC only works on the left FMC unit as the FlightFactor B777 only has the left side operational. Although the FlightFactor Boeing 777 is now considered dated, it is still very valuable as there is not many aircraft in this category that can cover the the range and service variants that you get here, Long Haul is very limited (but getting better) in aircraft types, and another perennial aircraft like the B777 is quite still a required long haul machine. Long Haul requires a lot of data input, I once edited in 35 waypoints (LON-HKG) and it takes time and concentration to input and correct routes this long... WebFMC is a huge if invaluable help in having the console so handy and accessible to do the work... Again in flight you can cross reference to the SimBrief data on the progression of the flight... invaluable is the only word I can think o _____________________________ The current complete list of 21 supported aircraft / FMCs with version 1.6.1: Dual CDU is noted is noted in red, new aircraft in purple Default X-Plane FMC - requires X-Plane 11.35+ - Dual A319 by ToLiss - Dual A321 by ToLiss - Duel A320 Ultimate by FlightFactor - Dual A320 by Jar Design A330 by Jar Design - requires JD330 v3.1r2+ A350 XWB Advanced by FlightFactor - old style CDU only B737-300 by IXEG - Dual B737-800 Zibo Mod - Dual B737-900U Ultimate - Dual B737-700U Ultimate - Dual B747-8 by SSG (VMAX) - all variants; old v1.9.2+ and new v2.1+ B757v2 by FlightFactor- all variants; requires 757 v2.2.13+ - Dual B767 by FlightFactor - all variants; requires 767 v1.2.6+- Dual B777 by FlightFactor all variants CRJ-200 by JRollon EADT x737 with x737UFMC all variants; requires x737UFMC EADT x737 with Default FMC all variants - Dual Embraer E170 by SSG - requires v1.4+ Embraer E195 by SSG- requires v1.4+ MD-80 by Rotate - requires MD-80 v1.42+ ________________________ Summary This WebFMC Pro is a great plugin tool that can be used in a browser on another computer or a tablet. It is a remote tool, but a very beneficial and even a powerful one in programming in route and performance data and following the set aircraft route in flight in mirroring the aircraft's built in FMS (Flight Management System). This version v1.6.1 adds in even more versatility of now using both the dual FMS (MCDU) screens on a remote screen or tablet on assigned aircraft, other changes is the addition of two more aircraft to the Pro version of the tool with the JRollon CRJ-200 and the FlightFactor Airbus A350-900 XWB Advanced. By and large this is again not a big update but still a significant one. The option to use your fingers directly on a tablet screen to programme a FMC is not to be underestimated as is using a keyboard, but with my current work-desk arrangement it is a great setup to layout routes and input data, performance and routing quickly. My biggest choice here is how good it is for editing and creating routes with both the SimBrief and subscription Navigraph Chart applications, all are brilliant tools to create the most perfect routes to fly with and be visible for convenience in flight... Highly Recommended _____________________________________ Yes! WebFMC Pro v1.6.1 by Green Arc Studios is NOW available from the X-Plane.Org Store here : WebFMC Pro Price is US$19.99 The v1.6.1 update is free to previous purchasers of the plugin, go to your X-Plane.OrgStore account to download the new version. Access CDU / FMC of select X-Plane 21+ airplanes via any modern web browser running on your PC or mobile device over local network. Quick and easy access to the FMC Get easy access to the FMC: quickly edit the flightplan, monitor flight progress, set up your approach and do all the typical work of the pilot without having to move around in the cockpit, even if the plane doesn’t support FMC as a popup natively - on the same PC, or different monitor, tablet or phone - in fact you can use multiple displays at the same time! Make pilot tasks easy and comfortable Enjoy external views during cruise while monitoring flight progress on separate screen or take a quick look at your phone to verify calculated landing speed with just a glimpse of an eye during busy time on approach. Make flying complex SIDs / STARs easy as you can focus on the important flight parameters while having overview of the constraints all the time. Take your mobile to the kitchen as you cook a dinner during a long haul and never miss T/D again! Convenient to use Use physical keyboards on PC with extra keys such as Prev/Next page mapped to keyboard keys for easy access. WebFMC scales dynamically to fit any display or window size and can look as native app on mobiles by using browser's "Add to home screen" feature. Aircraft support WebFMC Pro supports a growing number of 3rd party aircraft starting with NEW CRJ-200 by JRollon NEW A350 XWB Advanced by FlightFactor - old style CDU only NEW FlightFactor Boeing 777 (all variants) Default X-Plane FMC (requires X-Plane 11.35+) FlightFactor A320 Ultimate FlightFactor 757v2 FlightFactor 767 ToLiss 319 JarDesign 320 Rotate MD-80 IXEG 737-300 EADT x737 (x737FMC required) Zibo Mod 737-800 737-900 Ultimate JARDesign A330 SSG E-Jets Evolution Series SSG Boeing 747-8 Series 737-800 Zibo Mod* 737-900U Ultimate* 737-700U Ultimate* * Available on the free demo WebFMC plugin Requirements: The WebFMC plugin requires X-Plane 11 running 64-bit Windows 7 operating system or newer Mac OS 10.14.x (Mojave) Ubuntu Linux 16.04 LTS or 18.04 LTS (64-bit) Web Client The CDU can be displayed on any modern and up-to-date web browser with JavaScript support. We recommend the latest versions of Google Chrome on PC or Android and Safari on iOS. No internet connection required, remote device needs to be on the same local network as X-Plane PC. Support for WebSockets RFC 6455 standard is required which implies at least iOS version 6. Updated and Review version: 1.6.1 (October 25th 2020) Not required but highly recommended is SimBrief (Free) and Navigraph Charts (Subscription) ______________________________________________________________________ Plugin Update Review by Stephen Dutton 30th October 2020 Copyright©2020 : X-Plane Reviews (Disclaimer. All images and text in this review are the work and property of X-PlaneReviews, no sharing or copy of the content is allowed without consent from the author as per copyright conditions) Review System Specifications: Computer System: Windows - Intel Core i7 6700K CPU 4.00GHz / 64bit - 32 Gb single 1067 Mhz DDR4 2133 - ASUS GeForce GTX 1080 8Gb - Samsung Evo 1Gbgb SSD Software: - Windows 10 - X-Plane 11.33 Addons: Saitek x56 Rhino Pro system Joystick and Throttle : Sound - Bose Soundlink Mini : SimBrief (Free) : Navigraph Charts (Subscription) Plugins: Scenery or Aircraft - CRJ-200 by Javier Rollon (X-Plane.OrgStore) US$39.95 - Airbus A350 XWB Advanced by FlightFactor (X-Plane.OrgStore) US$64.95 - A320 Ultimate by FlightFactor (X-Plane.OrgStore) US$89.95 - Boeing 777 Worldliner Pro- Extended Pack by FlightFactor (X-Plane.OrgStore) US$84.95
-
Scenery Review : EFHK - Helsinki Vantaa International by JustSim I have a bucket list of scenery that I really want to complete my services network in X-Plane. Airports that I think are crucial into not only the simulator per-se, but are also a requirement into create good strong route networks. In competition as a simulator then it is a requirement to cover the basics and X-Plane in reality has been woeful in these areas. These airports or sceneries have been on my list since day one and that list was from as long as 10 years ago, but still a lot of of important quality scenery has not been covered, now the spectre of Flight Simulator could even end that speculation, but I don't think so. But for everything else and a virus, 2020 has been a very good year in for filling out a lot these blank holes in the X-Plane's network... most users will note that most (not all) have been covered by Freeware versions, and that is a fair comment. But we look at the simulator from a quality aspect and in most cases a facade built airport just can't cover the detailing required for a high quality scenery, no matter how talented the author. But back to 2020. If you count late last year 2019 the LIMC-Malpensa was a nice hole filled, but it was FlyTampa's extraordinary EKCH-Copenhagen that was a huge network filler, next was FSIA-Seychelles, admittedly not on any high traffic route was also a nice filler, CYVR-Vancouver was also a requirement, as was (finally) a KTPA-Tampa, two airports have opened up Africa with HKJK-Nairobi/FALE-Durban and finally the most exclusive of them all in YPPH-Perth... It's been a really good year in that respect. After EKCH-Kastrop then my other biggest route hole in Northern Europe is Helsinki, or EFHK-Helsinki, I fly there now, but the multiple Freewares were always lacking in one area or another, I wanted, always wanted a decent Vantaa, I love flying to Helsinki, but the quality was just not there when I got there. For many years TruScenery created some great if brilliant scenery in Finland, and they actually worked on but never released a EFHK... So I was seriously excited when JustSim a quality developer announced that they were doing a EFHK-Helsinki, "Thank the Lord Jesus". Helsinki-Vantaa Airport or simply Helsinki Airport, is the main international airport of the city of Helsinki and its surrounding metropolitan area, and the Uusimaa region in Finland. The airport is located in the neighboring city of Vantaa, about 5 kilometres (3 mi) west of Tikkurila, and 9.2 NM (17.0 km; 10.6 mi) north of the Helsinki city center. The HEL airport is operated by state-owned Finavia. Helsinki-Vantaa Airport Helsinki-Vantaan lentoasema Helsingfors-Vanda flygplats IATA: HEL- ICAO: EFHK 04R/22L - 3,500m (11,483ft) Asphalt 04L/22R - 3,060m (10,039ft) Asphalt 15/33 - 2,901m (9,518ft) Asphalt Elevation AMSL - 55m/179 ft First to note that in this review I am using the SFD Global addon for autogen, which gives you a more authentic Scandi feel to the housing and infrastructure than the Germanic default autogen. Vantaa's layout is basically an L shape around a high cross runway and a spare north runway field layout. Terminal 1 and Terminal 2 are in reality meshed together and are further confused by the separate Schengen sections and further more with the now completed extensions to both Terminal 1 and Terminal 2. The airport is however currently nominally divided into two terminals, located 250 metres (820 ft) apart and linked by an internal pedestrian connection both airside and landside. In practice, however, the airside parts of the terminal buildings are not divided into Terminal 1 (the former domestic terminal) and Terminal 2 (the former international terminal) but to Schengen and non-Schengen areas. The terminal capacity of the airport is approximately 16–17 million passengers per year. Domestic flights, as well as flights to European Schengen countries, are operated from gates 11–31. Long-haul and European non-Schengen flights are operated from gates 31–38. As the newer terminal extension is completed, the airport will then have 60 gates altogether with 19 gates in Terminal 1 and 41 in Terminal 2. The airport is known for it's fastest transition between flights (International - Domestic) in the world. Terminal 1 You can from the air see the division of the earlier passenger terminal opened in 1952, and then in being totally replaced by the 1969 iconic version we know as Vantaa and it's two-tier corner Control Tower. And a first look at the T1 Domestic terminal shows how it was impossible it was to replicate in a facade environment, JustSim however have done a brilliant job of it, and the building has nice if perfect reflective glass. The corner Control Tower is excellent in it's sheet metal facade and glass, and the Tower View is set perfectly. Airbridges (15) 12-27 are excellent in detail, and are the "Autogate" Marginal system (Plugin required)... there is Visual Docking Guidance System (VDGS) and also the A-VDGS (the A standing for advanced) available. 23, 24 and 25 are finger gates, but the connection corridor is perfectly modeled to match in with the custom Airbridge and terminal. Opposite are three remote stands (121-123). Terminal detail is excellent, all items like ladders, walkways,vent and air-conditioning units are all present. Scenery has animated traffic, but uses the X-Plane default traffic vehicles, but as the default traffic is SAS branded then it all works perfectly here. There is good clutter, but not overwhelmingly so. Terminal 1 has been expanded by four separate departure gate buildings which will be connected by walking corridors. Each building will have one departure gate excluding one, which will have three gates. Gates (5–11). This is the new Walkon/Walkoff LCC section for Schengen arrivals and departures... the extension is very well done here in the scenery and well suited for regional operations. Terminal 1 Landside is well done... but most of the area is taken up by the construction of a new carpark, the trouble with this is that the area comes across as very bare or even empty? there are a few cranes, but it looks like a construction project that has been abandoned, it needed far more construction fill as it is highly noticeable, or better yet the completed carpark. Terminal 2 The original T2 has basically disappeared inside the massive redevelopment of the newer terminal additions. There are glimpses of the older facade of like of where T1 joins to T2. The new piers are noted as "South Pier" and West Pier", however earlier it was part of the plan to build a satellite terminal next to Terminal 2, but the plan was cancelled in favor of keeping the expansion under a single terminal building concept. There are four gates (28-31) in the older style on the T2 older section and with another three remote stands set opposite (124-126), note that all these six remote stands would be used for Domestic services (121-126). T2 detail is again excellent and with perfect glass, Landside however is all a bit bland and bare (that construction)... South Pier The new South Pier of Terminal 2 was inaugurated on 10th July 2017. The first scheduled flight from the new pier, AY006 departed from Gate 54 to New York City. The new pier covers 8,300 square metres (89,000 sq ft). In addition to the new terminal building, new dual boarding gates S54 and S55 as well as aircraft stands 171 and 172 were opened. Construction of this southern wing of Terminal 2 was started on 4th January 2016 and the construction took around 18 months. There are two floors: one for arriving passengers, the other for departures and gates 52 to 55. All the gates have dual boarding jet bridges. The new wing also features the first moving walkway at any airport in Finland. The modeling and certainly the expansive glass in the South Pier is really well done, notably in the walkways between the old and the new sections, there is however a general feel of emptiness, maybe a few figures on the walkways or in the corridors would have helped. The first part of the west wing that was built was the large central plaza, "Aukio", which was opened in February 2019 set between both the "South" and "West" piers, and the plaza is very well represented here. Gates in the new zones have a "W" or "S" prefix in front of the number, as per the Apron number (Apron 1W). W is facing the northwest, and follows on from the older T2 in gates (W34-W48) and Gate W48 is able to accommodate the Airbus A380 class E. The feel and look is very much like Heathrow Terminal 5, with tall towers with an associated airbridge, with a two-level loading and unloading system. The internal apron "Apron 1S" continues with on the 'South Pier" gates (S43-S49). West Pier The "West Pier" was completed in October 2019, and it brings together 25,000 square metres (270,000 sq ft) of new passenger and baggage facilities to the airport. The pier is equipped with four gates (S52-S55) for widebody jets. The design and style for the "West" is exactly the same as the "South" section. Internally in the corner of the L are a Hilton Hotel and the twin Finavia office buildings, on the taller Finavia there is a nice large red Radar on the roof of the offices, but it does not rotate? The distinctive P3 Domestic circular car parking buildings and the large P5 International car parking building are all well represented Also noted is the newer Vinavia building known as the House of Travel and Transportation, or "HOTT", and the well done striking checkerboard Clarion Hotel. Cargo Overall there are three Cargo zones at EFHK... The newer large Finnair cargo depot is set out behind their huge, massive Finnair maintenance hangar, with three stands (961-963) on Apron 9 The rest of the action in two separate cargo zones is based around the threshold of Runway 33... East is Apron 4, with DHL and TNT in residence, Airfix Aviation and Scanwings are based here as well... West is Apron 2 or the original HEL Finnair cargo facility. Because of the Domestic LCC extension the cargo's facilities parking stands have been reduced to four (201-204)... ... and three more stands are available (206/301-302) in front of private cargo contractors including, Swissaport, Posti and Jetlite. Far southest of Apron 2 is Apron 3... here is a very nice VIP terminal and a small General Aviation parking ramp... ... and further southeast is the airport's fuel depot and very pronounced Neoplan Transfer bus maintenance facility, it is highly visible on the RWY 33 approach (you look for the building and not the runway for the approach). Far north along the Runway 04L/22R boundary there is some very nice visual infrastructure, with a DHL distribution facility, and the large Apron 6 De-Icing area. There are also several other smaller De-Icing areas noted off most taxiways. Infrastructure Overall the infrastructure around EFHK is excellent including a very well done DB Schenker transport hub, but... ... on the very visual approach of 04R, there is in parts only a flat ortho image, and you notice it, worse is on the final approach of RWY 33, here you have a completely large flat ortho-image right under your nose, and one that is seriously horrible to the eye, why??? and it needs fixing fast. Ground Textures Overall the ground textures are excellent, they do feel slightly softer at my Texture Quality setting of only "High", but my guess is they are set for maximum framerate efficiency more than absolute quality (which is noticeable throughout this scenery)... mostly you would never notice anything anyway, but good and detailed in every area they are. There is great grunge, oil and rubber dirt were required and the lineage is lovely and worn, but also highly realistic... just a nice job. Yes we have PBR reflective (wet) active textures and also have excellent burnt-in ambient occlusion, but it is not as gritty as a few I have seen, again the more softer aspect does come though, but that is not to say you won't get that North Scandi winter aspect, because in the right conditions the ground textures will certainly deliver... on that note there are no winter textures provided here, which considering Vantaa's very northern aspect is surprising. There are some 3d bushes where required, but overall there is no 3d grass?... ... the missing 3d grass is however highly noticeable, with areas feeling empty and flat, why no 3d grass as it is de-rigueur now on any payware scenery... worse there is no boundary or airport sectional fencing either... NO FENCING? This is a major oversee by JustSim, fencing creates boundaries and segregates areas, but there is absolutely nothing here? The fencing lines are of course burnt into the Ortho-textures and certainly you can easily walk anytime on to a taxiway or an active runway... A hanging offence. Lighting As with everything else with EFHK the lighting is excellent by JustSim... ... but one aspect has to be noted. When in non-alignment with a runway, then it's lighting will disappear? so if you are on an approach circuit at night, then it can be hard to get an alignment on your arrival runway until turning into the final direction of your approach, and this can make landings and orientation difficult. JustSim have used the lit graphic approach to building lighting, some will hate it, but most including myself love the vibrancy the lighting gives off, the terminals feel bright and alive (which is a great arrival feeling)... ... close up the metals and windows reflect nicely and the lighting is well done and realistic. Also excellent is the apron lighting, and you can work down on here easily. Signage lighting is very good, as is the excellent drop lighting. Hotel and office window lighting could have had a bit more pizzazz and considering the graphic terminal lighting, then why not light up these buildings as well? Overall though the lighting is very good. Note... I recommend adding in as part of the Finnish JustSim EFHK scenery... EFHF-Malmi (US$16.90) by TruScenery. The EFHF scenery is on the approach to runway 33, directly on the approach and looks brilliant, and an ideal General Aviation base in Helsinki. _____________________ Summary JustSim are a very good X-Plane scenery developer with an excellent past record of airports including Hannover, Brussels, Barcelona, Malta, Hamburg and may, many more, and JustSim are known for their excellent quality and value to price factor.... and here is their next scenery in EFHK-Helsinki. X-Plane has never had a decent HEL or Vantaa Airport, and mostly because the iconic building structures require skill and detail to work correctly, so a fully developed Helsinki Airport from a leading developer is very much welcome. And so the scenery delivers in spades, great terminal modeling with a lot of detail includes all the latest terminal expansions and changes, glass is excellent with reflections and PBR, layouts and ground textures also are excellent as is the all round lighting, although the use of graphic images may not please many, to most though they will love them as they are highly effective at night. All the airport and surrounding infrastructure is also well done (JustSim have always been very good at infrastructure)... and all the terminals come with the "Autogate" Marginal system with VDGS. There is the feeling that the scenery was released before being fully completed, although in most areas everything from great clutter, traffic animations and the general overall layouts it is extremely well done, but there is the feel of some blank areas? The construction carpark area behind the T1&T2 Landside is a bit too bare and empty, it feels abandoned more than a building site, more fill is certainly required, missing infrastructure detail and only flat ortho-textures on the critical approach areas to Runways 33 and 04R is an oversight, as is the totally missing any airport security or building fencing? No 3d grass is also a big oversight and hurts the overall excellent quality feel. But if you crave good quality to quality route simulation sceneries, then this quality one from JustSim should be at the very top of your list and a brilliant companion to the excellent FlyTampa EKCH-Copenhagen. I fly to Helsinki a lot, I mean a lot, and to now have a high quality airport ready at the destination. So then this scenery from JustSim will certainly get a lot of action from X-PlaneReviews, not only for passenger but cargo as well... Yes an absolute recommendation, JustSim's EFHK-Helsinki is a must have! _____________________________________ Yes! EFHK - Helsinki Vantaa International by JustSim is now available from the X-Plane.OrgStore EFHK - Helsinki Vantaa International Price is US$21.50 Features: Detailed airport objects and vehicles Custom textured taxiways, runways and apron Custom surroundings Custom airport lights Compatible with X-Plane 11 features Shading and occlusion (texture baking) effects on terminal and other airport buildings High resolution ground textures / Custom runway textures High resolution building textures Excellent night effects Realistic reflections on glass World Traffic compatible X-Life traffic compatible Optimized for excellent performance WT3: WorldTraffic3 GroundRoutes are NOT provided but the scenery is compatible and extremely good and Traffic Global also operates perfectly, Requirements: X-Plane 11 Windows, Mac or Linux 4GB VRAM Minimum - 8GB+ VRAM Recommended\ Download Size: 1.1 Gb Current and Review version: 1.0 (October 25th2020) Installation Download scenery files required are in one zip folder download 1.13Gb Only one folder is placed in the X-Plane Custom Scenery Folder EFHK_JustSim_v1.0 Total scenery install is: 2.33Gb ShortFinal Global SFD plugin is highly recommended with this scenery. Documents No Manual but an Install note (very basic) _____________________________________________________________________ Scenery Review by Stephen Dutton 29th October 2020 Copyright©2020 : X-Plane Reviews (Disclaimer. All images and text in this review are the work and property of X-PlaneReviews, no sharing or copy of the content is allowed without consent from the author as per copyright conditions) Review System Specifications: Computer System: Windows - Intel Core i7 6700K CPU 4.00GHz / 64bit - 32 Gb single 1067 Mhz DDR4 2133 - ASUS GeForce GTX 1080 8Gb - Samsung Evo 1Tb SSD Software: - Windows 10 - X-Plane v11.50r3 Addons: Saitek x52 Pro system Joystick and Throttle : Sound - Bose Soundlink Mini Plugins: Traffic Global - JustFlight-Traffic (X-Plane.OrgStore) US$52.99 : Global SFD plugin US$30.00 Scenery or Aircraft - Default Boeing 737-800 by Laminar Research - EFHF-Malmi by TruScenery (X-Plane.OrgStore) - US$16.90
-
Aircraft Review : Boeing 747-8 Inter v2 Anniversary Edition by SSG
Stephen replied to Stephen's topic in Airliners Reviews
As noted in the review, is that the engine blades turn to the speed (or strength) of the wind, why would you not want that feature? -
Plugin Review : SkyScout - Web based EFIS - PFD/MFD/EICAS by XPlane Aviator Through X-Plane's Network menu tab, you can set up multi-visual setups for monitors, it can also be used with or on a local network (or WiFi) in using your IP address with other external devices, or basically you can use any other computer, tablet (iPad/Android), phone or any device that can run a compatible web browser... and mostly preferred on Chrome... for it's Chromium Engine Framework, but it will also work on Firefox and other browsers. Chrome however is still the main recommended choice. This same system was also used to great effect by the WebFMC Pro application, of which I am a huge fan. This application is a quick no-wires (WiFi) connection way to get the an aircraft's main PFD (Primary Flight Display) or EFIS/MFD/EICAS on to an external display, this application is mostly focused for home built cockpits, but with this system it is a home-built cockpit you could pack away after a days flying. The idea is to complete a set up quickly and efficiently if you have enough displays, or even with just one. Obviously it is a great training tool, but home cockpits also require a lot of home dedicated space, and a lot of us don't simply have that luxury. In full page mode with SkyScout running there is a lot of PFD detailed information, but even with a small resized window it is still quite fully functional and highly useable. But first before we go through the options and details of SkyScout we will do the installation. Installing SkyScout After downloading and unpacking, you place the SkyScout folder in your X-Plane root folder (that is NOT in your usual plugins folder). Important: That you have to have the Microsoft .NET Core 3.1 Runtime installed to use this application, and the details and a link is provided in the Installation Manual. Note SkyScout also provide a dedicated browser (connects automatically with the application) as part of the package, but at this point it is Windows only... Click on the application (make sure your Firewall does not hinder the application), and first up comes the start up screen in a DEMO mode. This is a fully-functional demo version of SkyScout that runs for free with flight time limitation only. The free demo version of SkyScout will work for 10 minutes each flight and will terminate both SkyScout and X-Plane sessions after this time period. (note it WILL terminate your flight, not the application). If purchased you can authorise your "Pro Version" purchase and register the application. You can start X-Plane from within the application (I recommend starting X-Plane as usual, then starting the application), and then you get a Main Menu screen. We can't get to far in front of us here? as this startup is via the built in SkyScout browser. To set SkyScout up on an external browser... The hard part is setting up and sending the data to the device and its browser. The required browser address is http://localhost:9889 or 192.168.0.248:9889 where as "localhost" is your computer address (the one running X-Plane). This is found on the Network menu on the middle left of your screen under This Machine's IP Addresses (arrowed). There are several other options to connect up SkyScout say via a network that are covered extensively in the manual. Computer firewalls can also be an issue, but If set up correctly then the SkyScout should instantly appear in the browser window. There is a lot of fault finding and help in the manual, I just started my WebFMC Pro app on my browser and added in the new connection address (9889) and it connected up instantly. From this point, then just add in on any local WiFi your SkyScout browser address to any browser, and the application should work fine. One important note; is that the SkyScout uses a lot, if not most of your X-Plane commands and remotely. This is very good in a training operators situation, but just be aware that while you are adjusting and changing items on the application or with the remote screen, then X-Plane will mirror those changes. Main Menu The main menu has four main window selections; PFD (Primary Flight Display), MFD (Multi-Functional Display), XPD (X-Plane function display) and MAP (moving Map). Select the PFD button and you get a large Artificial Horizon or HSI (horizontal situation indicator) with a lot of information. These are "Widgets" that can be accessed via clicking anywhere on your screen, and access to each Widget is via it's Tab label. By default the Widgets are; from left to right and up to bottom: Autopilot (top left), Flight information (top center), Elevation chart (top right), Engine instruments (bottom left), Basic aircraft controls (bottom right) and a Map set behind... ... pressing the tabs allows you to clean up the display to show just the Artificial Horizon, and the screen can also be adjusted more to take out the MAP background opacity and leaving you with a just a clean blank (Normal) Artificial Horizon if required. Primary Instruments have also built in data. Main instruments and indicators include: horizon line, pitch scale, roll scale and pointer, slip/skid, turn and compass, attitude, air speed, altimeter, vertical speed, autopilot information and indicated values, flight director, reference speeds, HSI source, GPS information, reference speeds, barometer, temperatures, pressure and time indicators. Selecting an indicator (box), you can change it's values via a pop-up keyboard (here I have selected the Altitude), note that inputs work fine and directly on a touch screen for speed, and press "Accept" to input the data. The Heading can and Course can also be input this way via the keyboard, and so can the HSI Source and Baro (below). There is a secondary PDF Menu set into the top of the screen that is selected via the "Menu" label. Menu options are (Left to Right); Full screen browser, Show/Expand all widget tabs, Hide/Collapse all widget tabs, X-Plane toggle pause, Normal EFIS mode and background, Transparent map for EFIS background, Display settings, Map source selector, NEXT menu page and the X Closes the PFD and goes back to the Main Menu. Note the nice display of your current flying aircraft. Selecting the "Normal" HSI mode gives you a normal HSI, and pressing the world icon selects the MAP background. In the secondary Menu, the menu has nine icon selections (left to Right); Panels, Views, Radios, Fuel, Route, WebFMC, SIM (X-Plane) and Music! Note - the icon selections noted here are the same as listed on the Main Menu under the MFD and XPD buttons. These adjustable panels are all very good and gives you the option to set up a configuration of the X-Plane simulator that you like on a remote screen, Notable is that under the SIM option is a Framerate widget, and very good it is, for in showing you your highest, lowest and your current frame rate. The connection of WebFMC Pro is again welcome but the facia is a bit oversized. You will find a lot of the options here can be, and even confusingly can be found again under other menu options, like on the Main Menu. Under the Settings Menu you have some good choices with: map transparency, time and field of view. The transparency range is excellent, and you can find that balance of detail that you want, full slider to the right is no map and a clean HSI interface. There are ten MAP selections, and a great set of selections they are as well... I have shown six of the best here including: Default, Tropo, Black & White, Toner, DarkMatter and GeoPortal France. Main Menu Sub options Besides the main selections of PFD, MFD, XPD and MAP there are eight sub-options on the Main Menu, these include: Start Flight, Aircraft, Positions, Airports, View Manager, Route Manager, Configuration and Engine Editor. Before going into the actual Menu selections there is a selection or "Favorite" option that has to be done first because it relates to the uses of the above selection options on the Main Menu. First is to select a "Favorite" Aircraft and Position. Aircraft; There is an "Aircraft Selection panel that mirrors your X-Plane one, out of this list you can select a "Favorite" via the tickbox (arrowed) left. Position; There is the option to "Favorite" a certain position (Situation). Place your aircraft in the position you would like to select. Then there is a * (star) "Favorite" selection in the side menu (arrowed), Where here you add the favorite position a text box that pops up to record your details in: Position, Country, City, Airport, Runway, Description and you can add in an image URL as well.... then SAVE or CANCEL the favorite. Start Flight The selection "Start Flight" is a variation on the X-Plane "Flight Configuration" screen. If you have set up your Aircraft and Position "Favorites" then they show up here for selection, when selected then just press the Start New Flight" button to activate. Options to change the aircraft or position are also available. You can also adjust the "Time of Day" here also. Aircraft This is a variation on the X-Plane "Flight Configuration, Aircraft" screen in selecting and loading in Aircraft into the X-Plane Simulator. Selection of the "Favorites" are shown above and the "Load" button of that selected aircraft is opposite (arrowed). Positions This is a variation on the X-Plane "Flight Configuration" in showing you your selected position "Favorites", and loading them into the X-Plane Simulator for your selection, press "Load" to go to that favorite position. Airports This is a variation on the X-Plane "Flight Configuration, Location" in finding an Airport. There are various search options to locate an airport including using the ICAO code. Once selected there is information available about that airport, plus the option to "Go To The Airport" and other route creation options. View Manager This screen allows the user to create plane-specific views. There are three master views: Pilot, Cockpit and Copilot, and the user can set three of them differently for each plane allowing to bypass the standard X-Plane field of view in monitor settings. SkyScout will then load them automatically every time a plane is loaded and with the selected set Pilot view at the beginning of a flight. Route Manager This screen allows the user to select a route and load it (into the Route Editor) from the X-Plane fms file folder. And you can also load and delete the route file (warning it deletes the route from your X-Plane FMS folder!) Configuration This selection provides different configuration options in SkyScout, including; Custom Buttons, Backup (SkyScout’s Data subfolder backup option), License, Elevation (Elevation database user’s installation assistant) and FlyWithLua. Engine Manger You can use this tool to create indicators for the engine panel of the loaded aircraft, six available slots as show in the screenshot above, two per row, three rows total. ____________________ Using the SkyScout If your eyes have not glazed over yet with the zillion menu options, then there are still a zillion more, but first we have to set up a flight. First you have to start the SkyScout application from within the SkyScout folder and it gives you options to open it in your installed browsers, if using remotely in another browser then you don't know if SkyScout is "Actually" running until it pops up an alert box? You can start X-Plane from the inside the application by pressing the "Start X-Plane" button (arrowed below left). If you are already running X-Plane then start up the remote browser and add in and go to the set IP address... if all correct then SkyScout should appear and go directly to the Main Menu page. SkyScout has a very good built in "Route" editor... to access the editor then go to the MFD page. Of which I did find it quite confusing if the editor is not set out currently in the MDF but set instead for other widgets?... but It is selected via the "Edit Route" button on the "Route Menu" page. Three selection tabs cover "Active Route", "Flight Plans" and "Route Menu". The "Active Route" tab is the route or flightplan building or current waypoint list. There are three panels... an Editor, Airport finder (left) and MAP (right, and the panels can be switched around to your preferred choice), Start by pressing on the Airport Icon by your Departure aircraft and select the airport... ... then select MENU and it appears in the Airport Panel. But sometime I found the Airport Icon selection didn't work at times (airport popup did not appear or only flickered.. and most times it just disappeared!)... so there is another way to use the Airport selector. Press "Find Airport" in the "Route Menu" page and you can search and select your required airport. You can then insert the airport via the "Add to FFP" (Flightplan) button lower. The departure Airport is then listed as the first (1) waypoint... .... there is a layer selection on the top right to show airport icons, runways, ILS markers, runway markers, waypoints or if you want to then just press on any location on the map (User Points/Co-Ords). To add in waypoints then go back to "Edit Route" button on the "Route Menu" page. And this brings up the "Route Editor" input box top left of your screen.... .... select your waypoint (or Co-Ords) and it comes up instantly in the Route Editor, press ADD to add in the waypoint (note is that confusingly next to ADD is INSERT? and it is very easy to mix them up). It is with this editor extremely easy to build up a flightplan route quickly, just select the waypoint and ADD... If you want to change or delete a waypoint then just select that waypoint selection and DELETE... .... what you can't do is select and switch around the waypoint rows (one program does actually lets you do this), but the ease and speed of the editing here easily outways that option. The speed you can construct a route is breathtakingly quick and easy, but I do find the route list far too big, yes there is a slider to go up or down the extended route list, but the text size is just far, far too oversized, and you just don't need it that big, and you could easily add in far more waypoints until you needed the slider. What I really do like is the runway heading and alignment line that is set out in the route and on the map showing the runway numbers. With the route completed then press the "Route Menu" tab and now you can "SAVE FPL AS..." or to save the flightplan to your FMS flightplan folder... ... You can GET or SEND the FPL to the aircraft (but I found this option didn't work?), so I loaded the Flightplan in directly from the FMS GNS folder list. You can of course CLEAR ROUTE and start again or reload in the saved route via the centre "Flightplans" tab and "Activate". __________________ Layouts There is no doubt the SkyScout is a versatile tool, so there are a lot of various ways you can set it up to use it. The main applications are for training, with a remote operator as the main focus... as most things connected to a flight can then be remotely controlled via the application and is really it's main overall goal and for home cockpit builders want an instant screen access to the simulator. But the various setups you can create with the application are really quite flexible, so we will show a few ideas here... I am using both a my iMac (desktop) and a Windows Surface laptop, the latter is interesting because it has an active touch screen, an iPad would work in this context as well, but my iPad3 didn't work as with the older operating system would not load the latest Chrome browser? so be aware or test that factor if you use older or extinct displays. A basic setup would give you an Artificial Horizon (HSI) on the lower screen, and the choice of the aircraft in forward view or with the aircraft visible. Add in some aircraft widgets for; AP (Autopilot, Radio, Engine, Controls), and you have more on screen in flight options. Or you could use the setup as just in a Flightplan mode, with your flightplan front and center, with the larger Map screen handy with the route details... .... or just use the secondary layout as a "Moving" map, as we always need a visible "moving" Map and this one is very good. Another option is to interact with the panels, say here I have the Radio and lighting switchgear panels visible, and I can physically adjust the sliders via the active touch Surface screen. But you do feel you want more switchgear set more together, and that in by putting two or three panels or all four on to the one screen would be more a more efficient and a productive case. This also leads to using the screen to have both the AP and Map together in one screen (there are of course a lot of different screen variations) for you to choose from. SkyScout with X-Plane This short flight follows the Flightplan from YBCG (Coolangatta-Gold Coast) to YBNA (Ballina). You very quickly adapt to the SkyScout in my case in a rear projection of the PC-6. I set the screen to just the HSI PFD to get a feel of the main instruments... and took off and flew up to my set Altitude (6000ft) going North 320º while using the Surface Laptop screen as my HSI reference. Once set at altitude I selected both the "AutoPilot" and "Controls" Widgets for information and control buttons... Then I could press directly on to the touch screen to switch on the AP (plus the FD/YD), and the set command is noted in the centre of the display (arrowed), ALT was pressed to hold the Altitude. Note the full screen width Artificial Horizon, which is highly effective if learning. I selected 060º heading via the keyboard and the aircraft responded, but when I selected 190º Heading the PC-6 went the long way around and did a complete circle to come back to the correct southern heading, instead of taking the shorter heading direction change? Two things other things now also came to the fore.... I can't adjust the Map on the PFD?... A lot of times the overlapping Widgets don't allow you to access the Map screen, and even if you can clear the widget out of the way the range tool of the Map it still does not work when pressing it (I tried directly by finger and mouse), annoying... in fact in various areas on pages the Widgets overlap and disable other actions, and usually the actions you want to access. Second thing was that I couldn't "Direct" to a waypoint in the flightplan, As I had had flown north and then circled back (several times) towards the flightplan, I then needed to reconnect at another waypoint (CQ32Z), but there are no tools in the SkyScout to do this, so it had to be done via the aircraft's GNS - Direct option. Cruising at altitude is great, as you can access information and do adjustments (on the fly so to speak), bring up the flightplan and follow the route... the flightplan however does not adjust to the changes in the GNS? Nor is there any highlighting of a particular waypoint, neither in the flightplan or on the Map screen, or you can do as I did in selecting the waypoint directly for reference, but an automatic selection or highlight of the current waypoint would be nice. You can fly the aircraft completely from the remote screen and with your joystick, VS (Vertical Speed) can be done directly by touch and keyboard, as can the selection of Flaps, which are shown in degreesº in the "Controls" Widget. Other items include your Trim (I really liked the press to reset, the trim) and Spoilers and Reverse Thrust... .... For a final last thought is that this application is very good for projecting on to a large screen, if the smart television has a built in browser and WiFi connection, most now do, so again as a training application it is very good. Summary Sky Scout is an X-Plane application that a web based EFIS (PFD/MFD/EICAS) system specially designed to provide an external experience outside the simulator. The application allows you to easily emulate a pack away glass-cockpit-style at home just using additional monitor, laptop computer, iPad, iPhone, Android tablet or phone: all you need is one or more devices with a compatible web browser, preferably Google Chrome. Four primary selections PFD (Primary Flight Display), MFD (Multi-Functional Display), XPD (X-Plane function display) and MAP (moving Map) give an indepth remote control of the X-Plane simulator, including a very good Route-Flightplan editor, acccess to aircraft systems (touch command if you have a touch screen or tablet), on screen widgets that cover Autopilot, Engine Parameters, Controls, Elevation Charts and also a highly selectable and changable (moving) MAP. A very extensive HSI (Horizontal Situation Indicator) with keyboard input is also highlighted. There are a lot of elements that make up this application, and on a first introduction and navigation of the layouts can be complex and confusing, but familiarity and use does sort out the confusion but some elements still do over lap others. Set up is also external from the simulator, but if you are familiar with the WebFMC application then it is the same system, but it does allow for a large and varied intergration of screens and remote interaction with the simulator. Overall the Sky Scout is excellent, but it does currently have a few bugs, and layouts are still in a need of a bit of refining, the concept is really good and works very, very well... but crashes are known and tools can be tricky to use. The built in route editor is really good but still buggy and needs more refining... and seriously requires smaller text, and an active route that mirrors the X-Plane GNS is not available and neither is "direct to" editing remotely... Widgets of aircraft panels and instruments are good, but bare and could be assembled together for better interaction, also the Map is buggy in white blanks, disappearing airport icons and other idiosyncrasies. Note that a modern browser is required to use this application, so older extinct tablets and computers may not work. This is an application that is extremely useful, and even indispensible, but currently also complex. But that does also mean there is huge amount of layouts, options and features that any review can't cover them all. So in that aspect it is a hugely featured application. For temporary home cockpit builders, and training, then Sky Scout is indispensable, for the rest of X-Plane users then the net is very wide on how you can configure the application to suit your own needs, so yes it is a great application with a multitude of uses. Recommended _____________________________________ Yes! SkyScout - Web based EFIS - PFD/MFD/EICAS by XPlane Aviator is NOW available from the X-Plane.Org Store here : SkyScout - Web based EFIS - PFD/MFD/EICAS Price is US$39.95 Access requires any modern web browser running on your PC or mobile device over local WiFi network. Features: PFD features Autopilot control Route information Flight information Elevation chart Radio panel Engine gauges Fuel informaion Electrical information Inset and bacground moving map Flight controls MFD features Full size map or dual panel Autopilot control Switches panel Radio panel Fuel control Engine and electrical panel Elevation chart Route manager Route editor Airport list and information Interactive weather and views control Inflight background music Requirements: X-Plane 11+ (Fully supported) Server Required: Microsoft .NET Core 3.1 RUNTIME preinstalled Standard X-Plane 11 requirements apply CPU: Intel Core i7 (recommended) CPU with 2 or more cores, or AMD equivalent 64-bit Windows, Mac or Linux version fully compatible with Microsoft .NET Core 3.1 Runtime (Check your OS version compatibility) 16Gb+ RAM recommended Free disk space: 600Mb minimum. 1GB recomended Web Client Additional dedicated monitor or and external computer, android tablet or iPad SkyScout can be executed on any up-to-date web browser with JavaScript and WebSockets support Latest versions of Google Chrome or Firefox on PC or Android and Safari on iOS is recommended Support for WebSockets RFC 6455 standard There is a demo version available for evaluation purposes only: click here to know more about the demo version ______________________________________________________________________ Application Review by Stephen Dutton 27th October 2020 Copyright©2020 : X-Plane Reviews (Disclaimer. All images and text in this review are the work and property of X-PlaneReviews, no sharing or copy of the content is allowed without consent from the author as per copyright conditions) Review System Specifications: Computer System: Windows - Intel Core i7 6700K CPU 4.00GHz / 64bit - 32 Gb single 1067 Mhz DDR4 2133 - ASUS GeForce GTX 1080 8Gb - Samsung Evo 1Gbgb SSD : Apple 27" iMac running Chome : Microsoft Surface 3 running Chrome Software: - Windows 10 - X-Plane 11.50r3 Addons: Saitek x56 Rhino Pro system Joystick and Throttle : Sound - Bose Soundlink Mini Scenery or Aircraft - Pilatus PC-6 Turbo Porter - DGS Series by Thranda (X-Plane.OrgStore) US$34.95
-
Scenery Review : YPPH Perth International by Axonos Australian scenery at the moment is dire compared to even say South America or Africa in meaning that we really don't have any quality scenery at all, or currently any payware to fill in the gaps. In reality Australia is actually a very easy place to fill in, as there are the state capitals and a few significant regional airports and that is about it, but the current situation is borderline horrible. The history of scenery in Australia has been on the back of two sources. The biggest contribution has been by Barry Roberts and his Voz and AussiePak sceneries, very good but still basically X-Plane 9 in feel and look, but still a good filler for the out of the way regionals and outback airports. In Capital airports there has been a lot of freeware, but nothing really significant. Only one in the International Scenery Development Group (ISDG) is a worthy install with coverage of YMML Melbourne, YSSY Sydney and YPAD Adelaide, but they only did small YRED Redcliffe at Brisbane and not YBBN?... the important one. TDG did YBBN and my local YBCG Coolangatta, but they are facade freewares. CDG also does a Brisbane 2000, but it is still again a freeware. Sadly ISDG pulled out of scenery development a few years ago, so their sceneries are now getting quite dated without any updates and hence the now sad state of Australian scenery... but everything in reality is still mostly all freeware, and in other words not up to the quality and detail we really expect in 2020. There are (just) a few Australian paywares. RIM&Co did a very... well interesting YAYE - Ayres Rock, and Orbx did Broome WA. Orbx is the really confusing one here because they built their reputation on creating brilliant Australian airports for FSX/P3D, including their excellent Hervey Bay and a stunning YBBN Brisbane and every capitol airport and major regional points were covered except one (guess which one)... but nothing for X-Plane. FlyTampa also did a brilliant YSSY Sydney FSX/P3D, but we never got that one either. But one airport never actually made it on to any list... zilch, not even Orbx covered it (they did cover YPJT Jandakot) and so you had a massive hole in any Australia network with this vital missing link. This critical airport was YPPH Perth in Western Australia. There was a extremely basic YPPH Perth, but it was not worth flying the three hours or so to go over to, in a big twist of fate the first really high quality scenery to come to X-Plane and Australia is YPPH Perth from Axonos. Even then this scenery has a bit of a history. First conceived by Malaysia Flight Sim Development Group, the project was passed over and converted by JustAsia, then the development house was rebranded to Axonos as the Perth scenery was to be the team's flagship showcase of their development skills, and this YPPH scenery has been in development for a long time as notes of progress were listed as long ago as late 2019. The rebranding process from JustAsia is highly significant as they transition from producing converted sceneries to creating their own in-house products. YPPH Perth International by Axonos Perth Western Australia is certainly a city that what you would class as being at the end of the world. Perth is pretty well away from everywhere else is every context, even in it's own continent it is three hours flying time from anywhere (Brisbane/Sydney/Melbourne), Asia or Indonesia is still again just under four flying hours (3h 44m) and Africa across the Indian Ocean is a lofty 10h 51m... Perth is really a total nowheresville. And yet without this valuable port then your X-Plane network has a massive if huge hole in it. Simple across the continental flights are a nice requirement if you love flying in Australia. If flying to South Africa then a fuel stopover is required before tackling the expanse of the Indian Ocean, ditto Singapore or even Dubai... the airport's most recent claim to fame was the connection of two global continents in the direct "Sunrise" Perth - London services with QFA9/QFA10 Dreamliner 787, Perth is the stopover refuel before the 18h 30m slog to Heathrow and return. The moniker "Sunrise" on this QF flight is actually wrong... "Sunrise" is the project name of a direct flight from Australia's "East" coast to London, not from Perth, although it is noted a "Sunrise" flight from Perth to the western ports of the United States are also under the project's agenda, and that aspect these routes have yet to be still achieved. But the PER-LON still is a significant route in that it is the first non-stop flight service between Australia and the United Kingdom. Another significance of Perth is that it is the biggest and busiest FIFO airport in the world. FIFO is "Fly In, Fly Out" As in people who fly to their workplace (usually for a week or two at a time) and then fly back home, and the network covers most of Western Australia's vast mining and mineral resources and in this context Orbx's YBRM Broome scenery is now a great addition to this YPPH scenery. We have waited an extremely long and painful time for a decent scenery of YPPH Perth, and thankfully that long excruciating wait is over... As this a very worthy YPPH Perth from Axonos to in fill that massive Western Australian blank hole. First impressions are overwhelmingly good, not only is the airport extremely well detailed, but it has a genuine quality about it as well.... But the scenery install for me was not perfectly straight out of the box experience? In an oversight in that I left in an old YPPH scenery (buried) in my custom Scenery folder which means that Traffic Global did not work at all here, as aircraft are parked all over place and mostly inside terminals and on field areas. So the point is you have to double check on the install (or forgotten) of any older sceneries that may interfere with the newer scenery install.. Once fixed and Traffic Global worked fine. Axonos do also however provide WorldTraffic3 ground routes as part of the package and they are very good. Axonos also provide a static aircraft option, but be aware of the library requirements to get all the Australian registered aircraft brands, in this aspect WT3 is the best of the three options. Perth International Airport IATA: PER - ICAO: YPPH - WMO: 94610 03/21 - 3,444m (11,299ft) Asphalt 06/24 - 2,163m (7,096ft) Asphalt Elevation AMSL 67ft/20m Like most Australian Capitol city airports there is both a Domestic facility and a separate International facility at YPPH. Originally Perth had a single combined passenger terminal that was opened in 1962 with airlines operating out of hangars beforehand. However with the advent of larger aircraft like the Boeing 747, there became the need for a far larger and separate facility of which construction of a new International terminal and control tower that commenced in March 1984 on the south-eastern side of the airfield. International Perth is one of those airports that is always growing beyond it's capabilities, so the basic infrastructure is always being added on to, this scenery represents the current updated layout. The original half-moon shaped International Terminal 1 (T1) has been added on to with a new large finger concourse, but this is a Domestic terminal also known as Terminal 1 (T1) and it was opened in 2006. Stands 143 to 156 are airbridges, with 160 to 163 in A/B/C configurations are remote stands opposite the terminal(s). Terminal 2 (T2), is located to the immediate south west of T1. Virgin Australia Regional and Alliance commenced operations from T2 in 2013, and Tigerair Australia moved its operations there in 2013 (no gone!). Regional Express Airlines uses T2 for its services to Esperance and Albany. Stands 201 - 220 are all covered walkon/walk off, were as 250-255 and 260-269 are remotes stands. This terminal could be noted as regional. Terminal modeling is very good, but the textures are a little bland in lacking a sort of grittyness or that higher realism we now expect... ... you can't exactly say or put your finger on what is missing but it all comes across as a bit clean, because it is actually all very well done with great and even an abundance of Australian branded clutter. Ortho-photo textures are used extensively thoughout this scenery, and maybe their use in the landside aspects may have helped out in the context of instead of using just coloured or mottled ground textures. Glass is very good, reflective and thankfully green and realistic. Landside the open spaces also feel far too open, and that something is missing that would bring it all to life. No advertising is one? People, but it is the textures that don't bring the structures to life and ground textures are again stark. That said it is all really well executed, the detail is excellent with a lot of animations and local branded Perth buses and vehicles, and I really like the T2 glass and detail, it is done here very nicely. Ditto carparks in that they are really well done, and also so many of them and all are fully completed... and there is definitely that Australian airport entrance feel. The Perth scenery uses the excellent SAM (Scenery Animation Manager) system with both animated airbridges and Marshallers... .... and bays 150/151 are catagory E A380 active. All gates are active. The Perth Control Tower is set in the middle of the International Terminal complex. Built in 1984 it is still the tallest Control Tower in Australia. The tower and it's surroundings are really nicely modeled and clad, detail is very good and so is the excellent reflective glass. Tower view is set perfectly as well with both approaches are nice and clear in any direction. Domestic The Domestic Terminal at Perth had become a battleground between Qantas and earlier Ansett and then lately Virgin Australia on how high each could go on providing higher quality facilities, lounges and services... you are never going to beat Qantas, but that doesn't count in aviation warfare... this round will obviously now go to Qantas (again) as the loss or near loss of Virgin Australia still hangs in the balance. Limited space means that both terminals are frequently gutted and rebuilt, inside both terminals they are now like cathedrals... Terminal 3 (T3) has five jetways (16-20) and a total of nine gates (16-24). Since 23 November 2015, it is currently used by Jetstar, although some Qantas services also operate from the terminal. It was the previous location for Virgin Australia and until recently they had an expanded members lounge. Axonos have done a good job of this very iconic Domestic facility. Terminal 4 (T4) is the Qantas terminal, it is operated by the Qantas Group and is dedicated to the domestic operations of Qantas, QantasLink and fellow budget subsidiary Jetstar. The terminal has four jetways (12-15)and a total of nine gates (12-15A). It has two member lounges: The Qantas Club, which was expanded in March 2013 to cater for an additional 140 passengers; and the Qantas Domestic Business Lounge, which was opened in 2014. In 2018 Qantas opened a new international area in T4 as it had started the QFA9/QFA10 flights from Perth to London. Opposite T3 are nine remote stands (901-911) and opposite T4 are four remote stands (915-918). There is certainly more character and design with Domestic T3/T4 than with T1, the mish-mash of buildings (terminals) have created a sort of complexity, that has been nicely reproduced here and seen as being very well done from the roofs of both terminals, again the glass is very well done and the reflections brings the terminals to life. The complex system of boarding corridors have also been faithfully reproduced. Domestic landside has really well done with nice metal trusses support girder work (T3) and the original concrete curved awnings (T4). Landside carparks are all exceptional but they also raise again an earlier question... .... here Axonos has done both, in a use of the coloured or mottled ground textures behind the main terminals, but also used the photo-ortho textures on the more remote carparks as seen above right, so which one is the better application... both work in context, but the photo-ortho does bring out far more detail (more flat buildings as well) but the textures are very much lighter, however the clean darker textures create that bland feel but are very dynamic, so I can certainly see why Axonos did what they did, but would have the photo-ortho all over been the better overall choice... it is debatable. Expansion to cater for the every growing FIFO market there is a lot of considerable amount of apron parking here at YPPH. They are all known as regional aprons, but are noted only by stand numbers, clockwise is 901-911, 501-512 (right is the GA Apron), SO3-SO14 and 601A-604/701A-703B. There is another apron used by WA regional operators Skippers Aviation, Cobham (formally National Jet) that are mostly an aviation services provider with aircraft and crews, but the arrangement with the Boeing 717 services on behalf of QantasLink ended in July 2020, Cobham still however runs the WA state's QantasFreight network. This area is now more a maintenance area than an operating facility, but Cobham still have FIFO lounge/terminal based here. Other maintenance and services areas here cover; Network Aviation, AirFlite and ExecuJet Aviation in an over-bleed apron. General Aviation Following on from the T4 is the large GA and Private Jet Apron (in reality the old original Perth airport area). Based along the flightline here are; Maroomba Airlines, Alliance Airlines (maintenance) Hangar, Hawker Pacific/Maxem Airlines, Star Aviation and Flight Centre and all are faithfully reproduced.... .... close up the modeling and textures are a bit cardboard, but still well done, highlight nicely shaped QantasFreight "StarTrack" (Australia Post) hangar and some really good clutter detailing, and all QF branded. Airport animations are also excellent... all vehicle traffic is Qantas or dnata branded, and there is a large variety of vehicles... again the looping Perth "Connect" branded buses are the highlight. Far north on Taxiway W and close to threshold RWY 21 is a Fire Station... Infrastructure There is a lot of off field infrastructure surrounding the terminals including a huge DFO (Direct Factory Outlet) store, Perth Mail Centre, Storage King (Perth) and Liebherr-Australia west... .... and infrastructure east is covered with the expansive Qantas Freight Terminal, dnata Freight, Toll Intermodal and Specialised and the massive Coles Distribution Centre. All in all the external areas are very well catered for, and for filling out that surrounding visual aspect. Perth CBD Axonos have created a skyline Perth CBD, a few buildings including the Elizabeth Quay and RAC Arena are noted, but overall it is quite basic with a lot of open ground and certainly not really VFR requirements... as for just being a skyline it works, but a better base fill out could have made the area a far more worthy visual aspect. Ground Textures The ground textures overall are excellent... there is that nice grooving in the asphalt that makes the surfaces feel very if extremely realistic. There is a huge variation in surfaces as well from the worn, concrete to newly laid tarmac, the grunge, oil and rubber dirt in the parking areas is all very well done... The lineage however is a bit "Too" strong, straight and clean? Yes it looks good in context, but not really what you would call "very real world realism", a more experienced developer would have soften out these lines and made them more slightly cracked worn, ditto the hard runway asphalt edges. All the surfaces are nicely PBR reflective (wet) active textures and have excellent burnt-in ambient occlusion, so they are all very weather dynamic. The use of ortho-photo is very good, and well blended into the surrounding mesh, but a few flattys have been left in the images... a flat (Bae 146) aircraft by the Fire Station is extremely distracting?... ... and so is the burnt in radar installation, which then begs the question... "where is the radar installation"? Grass is well done and the coverage is wide with thin and thick areas, it is only a single vegetation but then Australia is very harsh on it's fauna, the sheer heat withers away anything or the seasonal fires then burn it away anyway. Lighting YPPH Perth's lighting is excellent, even sensational... ... Approach, Runway and Taxiway lighting is very good, overall apron area lighting also gives good coverage, if you wanted to nitpick then there is only one lighting tone, many developers do the carparks and landside in other tones to break it all up a little (See Bristol). International area is really good, the aprons are well lit and I was worried about the lit window lighting being a bit bland, but it is however really good with nice detail... Only blot in the copybook is the brightly lit upper control tower window lighting, control towers are dark not bright at night (to see out of). Landside is really, really good in realism... the T1 and T2 terminals are lovely. Domestic is very good as well with the same excellent lit detailed glass and it all looks very realistic, and that is what we are aiming for. All the remote FIFO ramps are also well covered in lighting detail as well as having good working lighting... for those early dawn departures (FIFO's most busiest activity time). .... again the single tone over on the domestic side can get a little too much of the same, but overall the coverage is excellent. Field navigation signage has a nice ground reflection, and are easy to use (with a airport chart of course, as YPPH is a large airport. _________________________ Summary Perth Western Australia has been seriously neglected in X-Plane for a decent YPPH Perth scenery, except for a very few average freewares, there has been nothing really worth flying over here for.... in fact Australia as a whole in scenery is badly neglected anyway. Oddly the first decent scenery for this "Great Southern Land" is PERTH, yes Perth from Axonos, and in that context YPPH fills in a huge hole in the local area Australasian network, including routes to the east coast of Africa, Indonesia (Bali) and Asia. And thankfully this YPPH is an extremely good, massive and a quality scenery... Axonos is a rebrand of the JustAsia Group and this scenery was first started by the Malaysia Flight Sim Development Group. The scenery is noted as a "flagship showcase" of the teams skills. And a massive scenery this YPPH is... in detail alone you are getting serious value for your money, but the overall concept is very, very good as well. Perth is a huge FIFO (Flyin/Flyout) airport and this aspect is well covered here. Modeling is good, if you don't look too closely or want absolute serious detail, ditto the building textures, but there is a lot of it for your money... the glass is excellent as in very good and even so is the excellent overall lighting. Landside areas use facade texture coverage and in other areas it is using an ortho-photo background and in context it works, but the harder textures do create a sort of empty feel, and in creating a something is missing feel, that could even be advertising, or even people of which there is none, a more skilled application of these areas with Ortho-textures could have been a better solution. Ground textures are again excellent, but the linage is a bit strong and too clean, ortho-photo ground with 3d grass is again really good (except for a few burnt in objects). WorldTraffic3 ground routes are supplied, but Traffic Global works fine here as well (when you take out the old scenery), Static aircraft if required is also available. SAM (Scenery Animation Manager) system is intergrated into the scenery and there is excellent local branded animated vehicles, a (very) basic Perth CBD is also provided. On first impression of the Axonos Perth scenery I seriously loved it, it filled in a goal, and as a high quality scenery as well, Value at well under US$23 is impressive for the detail and quality you get here, as they say "Winner, Winner, Chicken Dinner" and now here in WA you are a winner all round with this airport... Highly Recommended. _____________________________________ Yes! YPPH Perth International by Axonos is now available from the X-Plane.Org Store here : YPPH Perth International Price is US$22.65 Feature List: Axonos’s first in-house scenery development The latest airport layout and developments Custom 3d modelling and assets throughout PBR texturing in 4K Detailed airside and landside Living and breathing with dynamic moving vehicles Detailed Groundwork with PBR texturing High resolution orthoimagery Perth CBD modelled Accurate and stunning night lighting Compatible with World Traffic 3 & Traffic Global WT3: WorldTraffic3 GroundRoutes are provided and is extremely good and Traffic Global also operates perfectly, there also a static aircraft option, but be aware of the library requirements. Requirements: X-Plane 11 Windows, Mac or Linux SAM v2 Plug in (Freeware) Download Size: 2.4 GB Current and Review version 1.0 (October 11th 2020) Installation Download scenery files required are in one very large zip folder download 2.48Gb Two folders are placed in the correct order below in your .INI list YPPH_Perth_Axonos_1 (76.2kb) YPPH_Perth_Axonos_2 (3.31Gb) Total scenery install is: 4.07Gb SAM Plugin - Scenery Animation Manager - Suite 2.0 is required for this scenery ShortFinal Global SFD plugin is highly recommended with this scenery. Documents One basic manual in English with notes (4 pages) Manual.pdf _____________________________________________________________________ Scenery Review by Stephen Dutton 21st October 2020 Copyright©2020 : X-Plane Reviews (Disclaimer. All images and text in this review are the work and property of X-PlaneReviews, no sharing or copy of the content is allowed without consent from the author as per copyright conditions) Review System Specifications: Computer System: Windows - Intel Core i7 6700K CPU 4.00GHz / 64bit - 32 Gb single 1067 Mhz DDR4 2133 - ASUS GeForce GTX 1080 8Gb - Samsung Evo 1Tb SSD Software: - Windows 10 - X-Plane v11.50r3 Addons: Saitek x52 Pro system Joystick and Throttle : Sound - Bose Soundlink Mini Plugins: Traffic Global - JustFlight-Traffic (X-Plane.OrgStore) US$52.99 : Global SFD plugin US$30.00 : Scenery Animation Manager - Suite 2.0 - Free Scenery or Aircraft - Default Boeing 737-800 by Laminar Research