Stephen
-
Posts
2740 -
Joined
-
Last visited
-
Days Won
360
Content Type
Profiles
Forums
Articles
Everything posted by Stephen
-
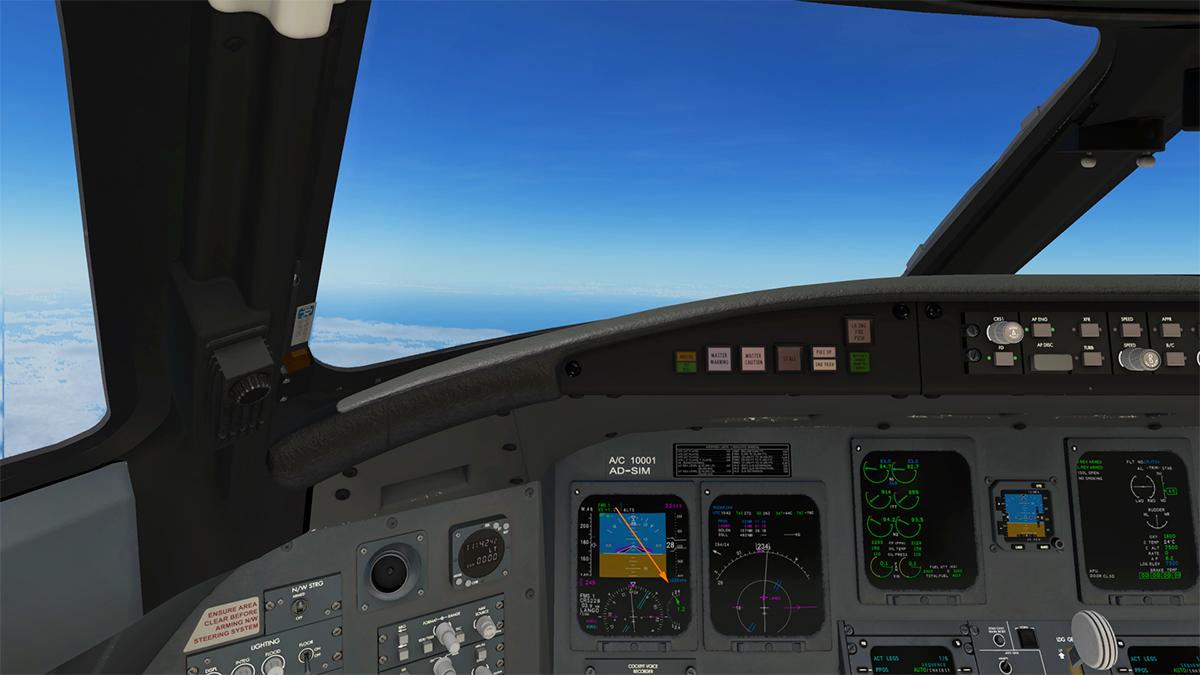
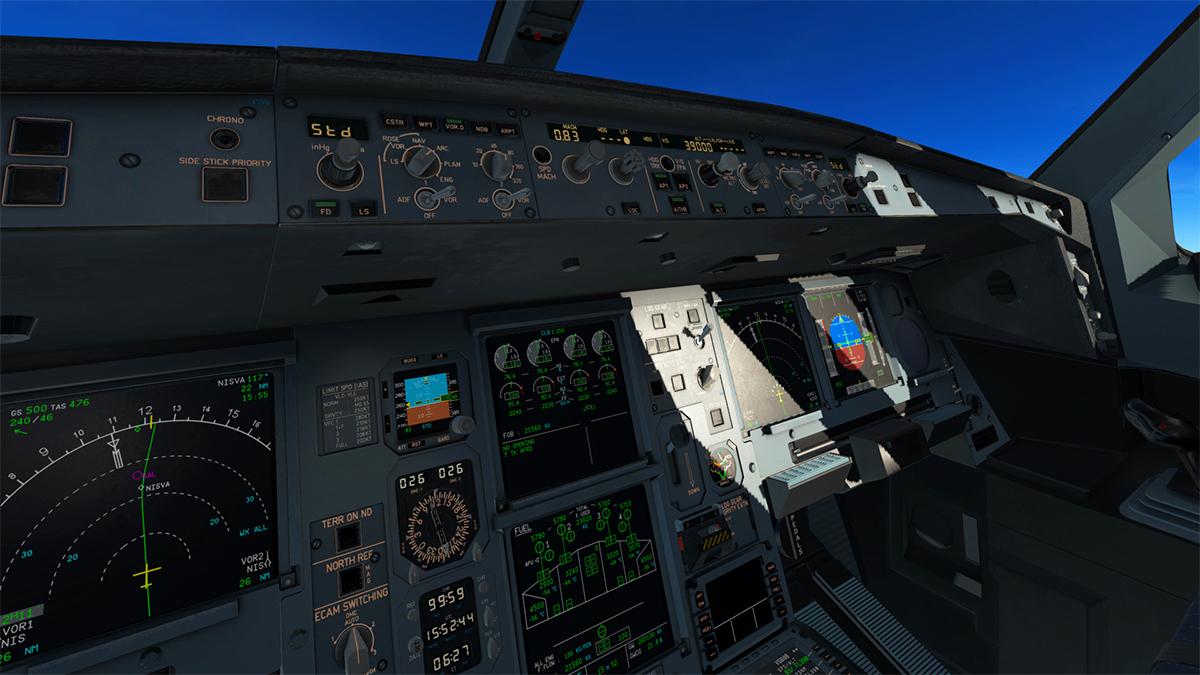
Thank You for your PC advice, I may take it yet. Yes I totally agree on the Vulkan/Metal transition... from Laminar's point of view it was and is the main focus, later in X-Plane 12's run those benefits will come to the fore, like with the earlier 32/64 bit transition. As I have noted repeatably the missing whole new texture implementation is the reason I got so down with the earlier XP12 announcements. In my eyes they were the most important factor, One to counter MSFS global visuals, but secondly and more importantly I think for X-Plane long term is to bring back those extensive missing 3rd party (orbx) city sceneries to the platform. It may still happen, but any developer currently won't do so unless the base textures are better. That said, with most of the (annoying) other details now fixed in X-Plane12, Laminar could do a full new texture implementation unhindered as you noted. So I come full circle as I think that with the new texture implementation will also come multi-threading? So you can see where I am going with the i9-12900KF and it's 16 cores. Thanks for the Comment 🙂
-
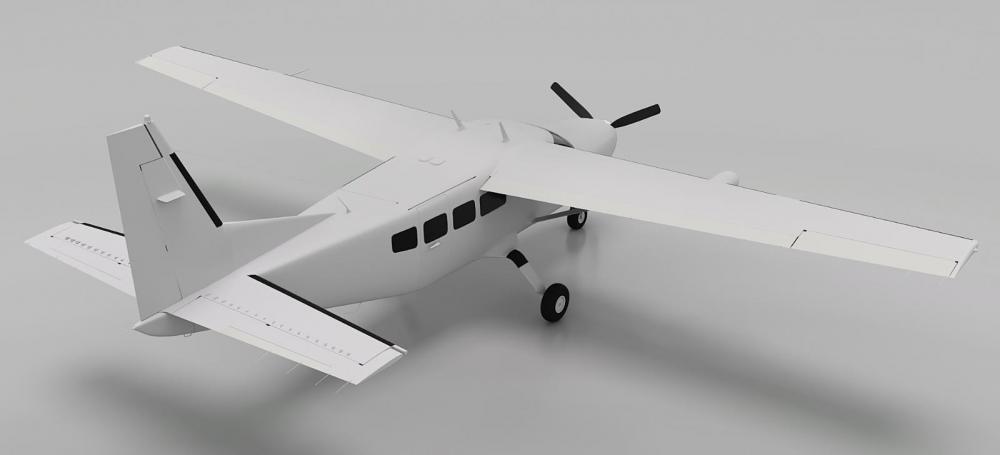
 NEWS! - New Aircraft from Thranda Design - Cessna Caravan! Thranda Design have announced their next project. It will be a Cessna Caravan in two different variants, a C208 Caravan 675 and a C208B Grand Caravan. Nice! The Cessna 208 Caravan is a utility aircraft produced by Cessna. The project was commenced on November 20, 1981, and the prototype first flew on December 9, 1982. The production model was certified by the FAA in October 1984 and its Cargomaster freighter variant was developed for FedEx. The 4 ft (1.2 m) longer 208B Super Cargomaster first flew in 1986 and was developed into the passenger 208B Grand Caravan. The strutted, high wing 208 typically seats nine passengers in its unpressurized cabin, is powered by a single Pratt & Whitney Canada PT6A tractor turboprop and has a fixed tricycle landing gear, floats or skis. By November 2017, 2,600 have been delivered and 20 million flight hours logged. Caravans are used for flight training, commuter airlines, VIP transport, air cargo and humanitarian missions. There is an old version Carenado Caravan in X-Plane, but it is now highly dated. No word on if a CargoMaster variant will later become available, but I am very confident it will be added on as a upgrade. Production images have been released here. Dan Klaue notes... "all the Thranda Dynamic Generation Series goodies... dynamic liveries, dynamic panels, dynamic dirt controls, DynaFeel flight dynamics enhancement, dynamically configurable for cargo, passenger, and executive version, and a whole lot more things that can be altered and configured without the need to restart the plane." Release time, who knows but Thranda note that "but we are now entering the final stages of production... and it's feeling great! " Notable is that Thranda has in a previous life did the developer management of the Carenado Caravan, so Thranda are not new to the design or dynamics of the Cessna Caravan... Put it on your wish list now! Developer thread is here.... Thranda Cessna 208 Caravan / Grand Caravan ___________________________ News by Stephen Dutton 4th February 2022 Copyright©2022: X-Plane Reviews (Disclaimer. All images and text in this review are the work and property of X-PlaneReviews, no sharing or copy of the content is allowed without consent from the author as per copyright conditions) All Rights Reserved
-
NEWS! - UPDATE : FACO F-15C Eagle v1.2 Quite possibly the F16 Eagle is one of the most famous fighter aircraft of all time.This is an American twin-engine, all-weather tactical fighter aircraft designed by McDonnell Douglas (Now Boeing) in the 70's. The "C" variant is the Improved single-seat all-weather air-superiority fighter version, and 483 were built between 1979–1985. The last 43 F-15Cs were upgraded with AN/APG-70 radar and later the AN/APG-63(V)1 radar. Released mid-last year it is the second and quite comprehensive update from FACO Simulations... I have supplied all the Changlog details. Changelog Details Version 1.2 (February 3rd 2022) - Exterior model nose, canopy, tires corrected - Interior model VSD, TEWS improved - Violent shaking near Mach 1 patched - Autopilot fixed - TACAN fixed - Lower T/O Rotation Speed - Compressed textures for smaller file size and faster loading - AviTab Auto-Enabled, Position adjusted. - Flight plan import issues fixed - HUD was True airspeed now Indicated airspeed - Radar mouse scrolling fixed - Caution lights correctly illuminate - Barometer reads correctly - VSD roll bar reversed (corrected) - STT closure rate reversed (corrected) - Thrust corrected - Pitch Ratio smoothed - Interior flaps switch fixed - ADI bank tic marks corrected - ARMT page names corrected - Several small interior model improvements Version 1.1 (May 10th 2021) -HSI/HUD/Compass alignment -Manual Frequency now adjustable by third-party plugins -AoA indicator fix -Autopilot fix -Several FMOD sound fixes causing rattling and tire thump sounds to play at the wrong time -HUD SRM seeker head alignment -Default view adjusted to include more of instrument panel -Takeoff trim adjusted Version 1.0 (May 2nd 2021) Initial Release The v1.2 update is now available from your X-Plane.OrgStore Account, just logon and download... __________________ Yes!... F-15C Eagle by FACO Simulations is Available from the X-Plane.Org Store here : F-15C Eagle Price is US$39.95 (Currently reduced to $29.95 You Save (25%) Requirements X-Plane 11 Windows, Mac or Linux 4 GB VRAM Minimum - 8 GB+ VRAM Recommended Download Size: 760 MB Current version : 1.2 (February 3rd 2022) ___________________________ News by Stephen Dutton 4th February 2022 Copyright©2022: X-Plane Reviews (Disclaimer. All images and text in this review are the work and property of X-PlaneReviews, no sharing or copy of the content is allowed without consent from the author as per copyright conditions) All Rights Reserved
-
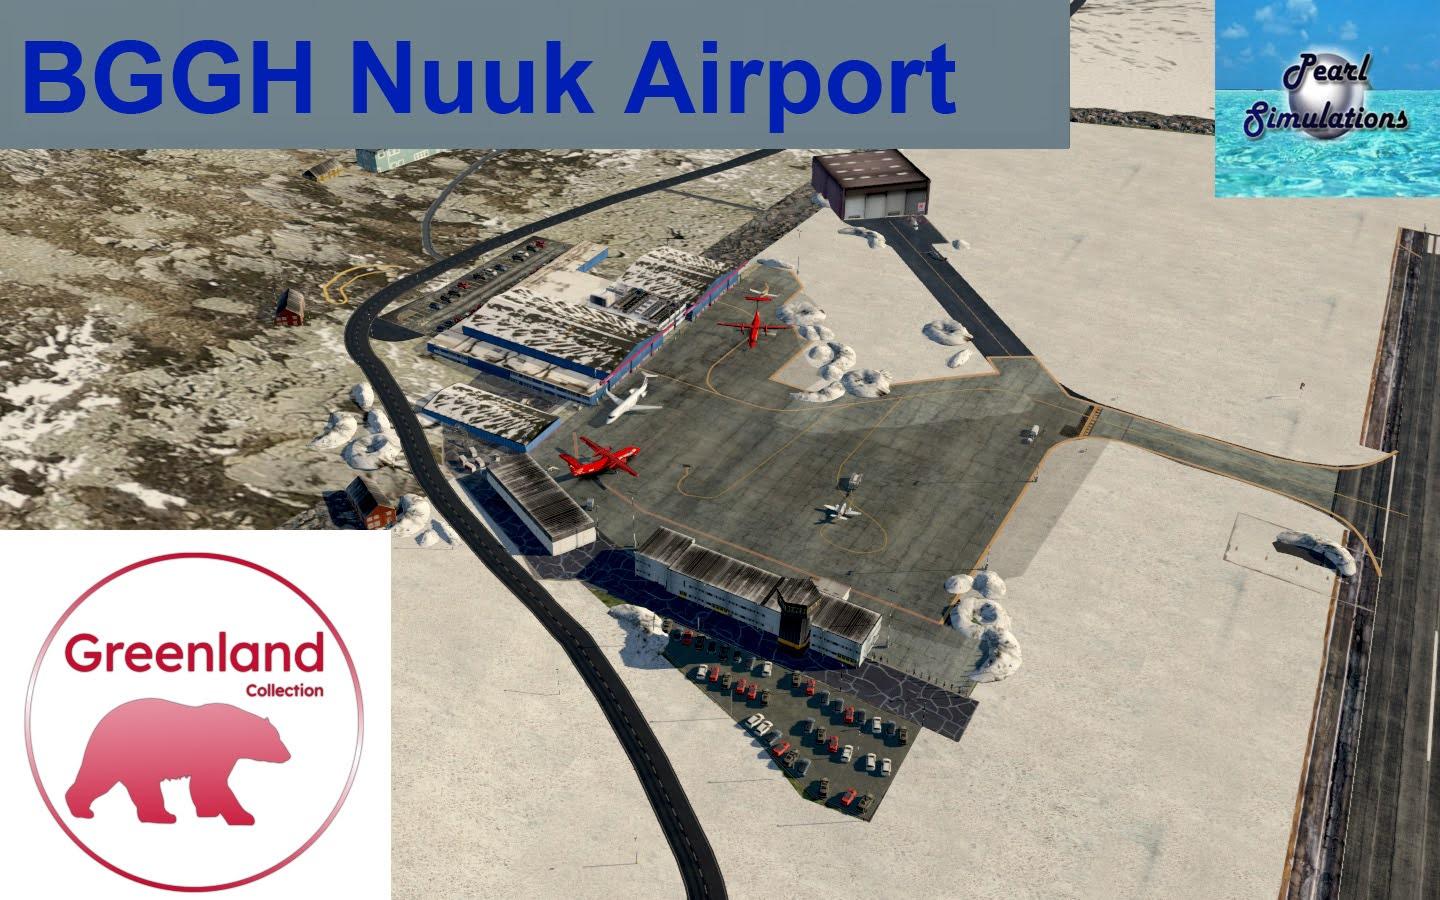
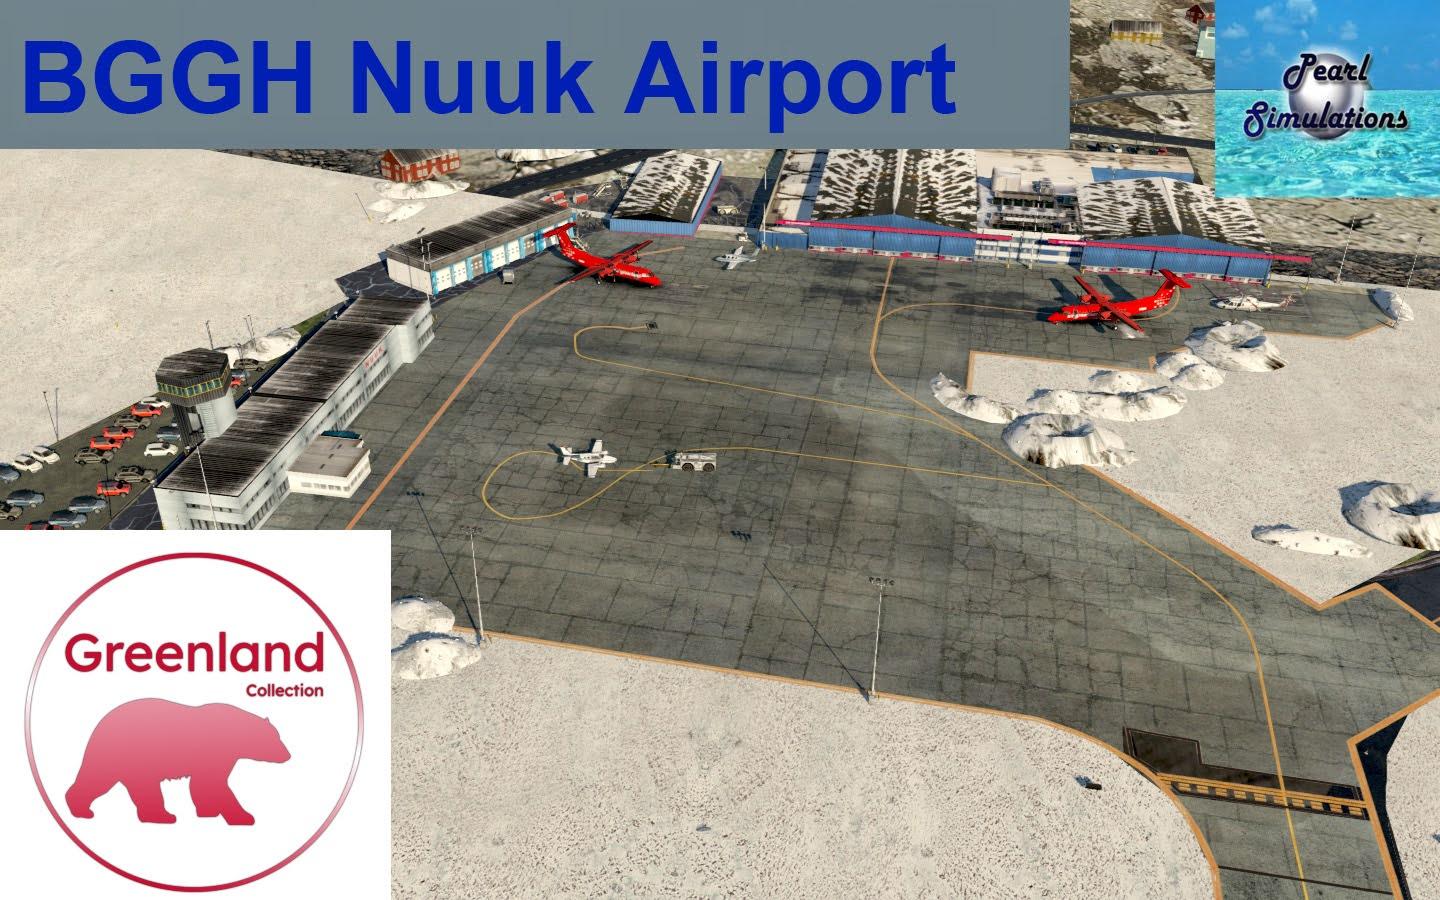
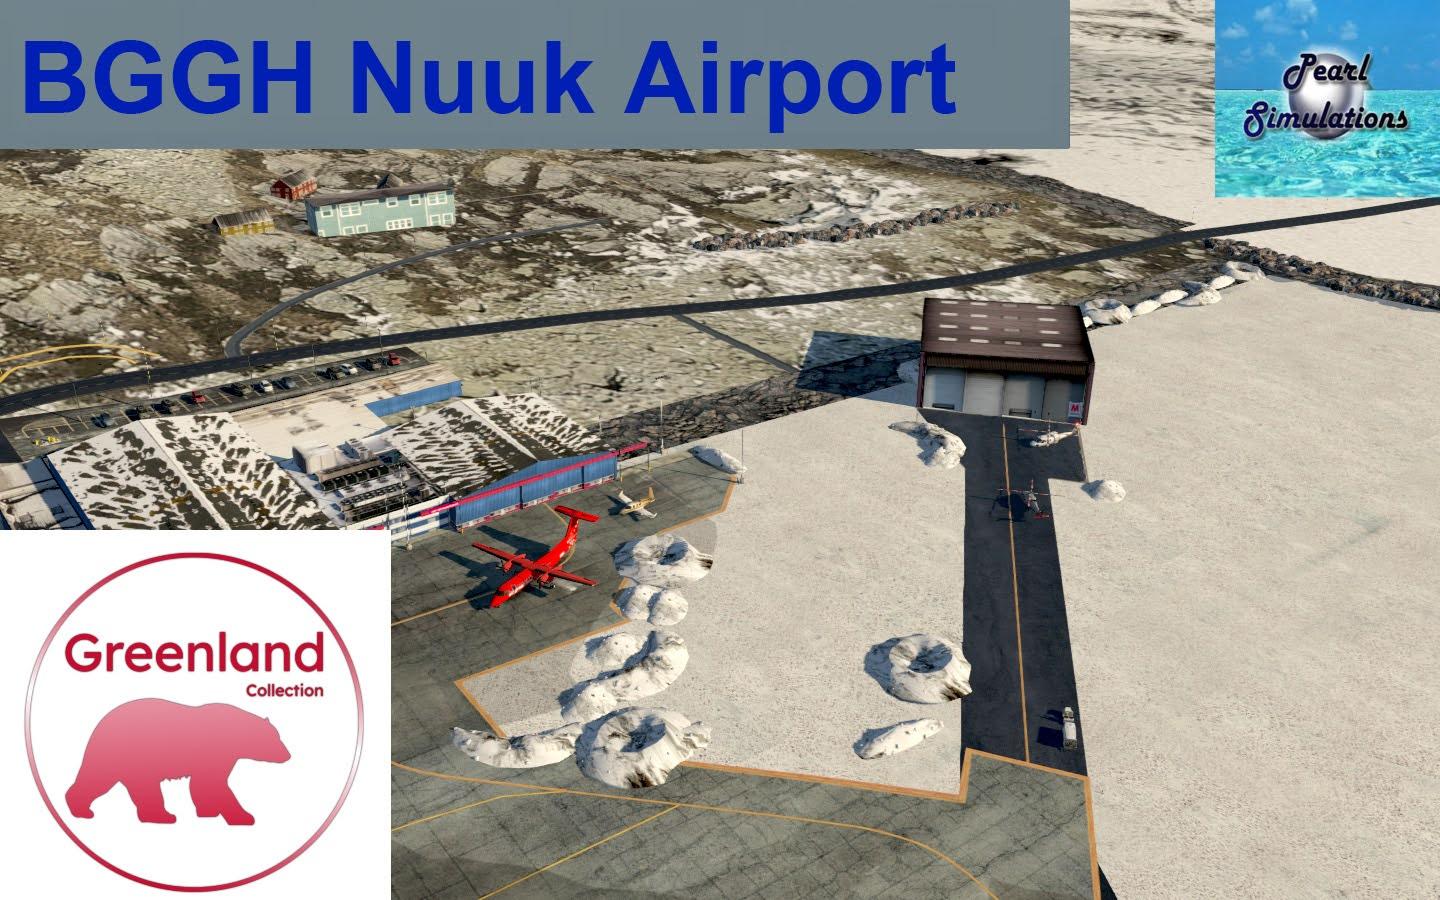
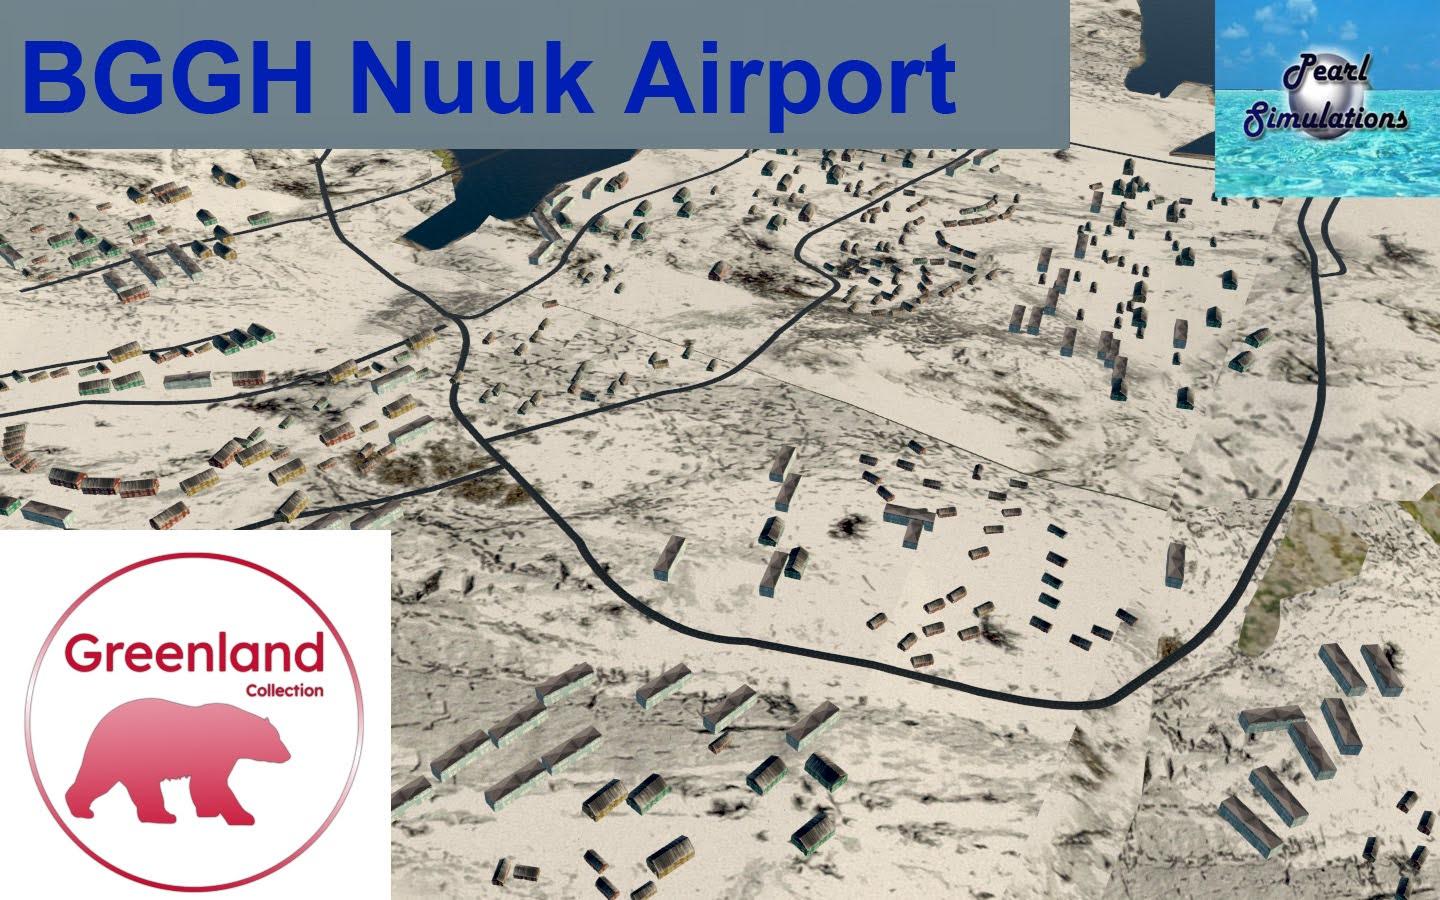
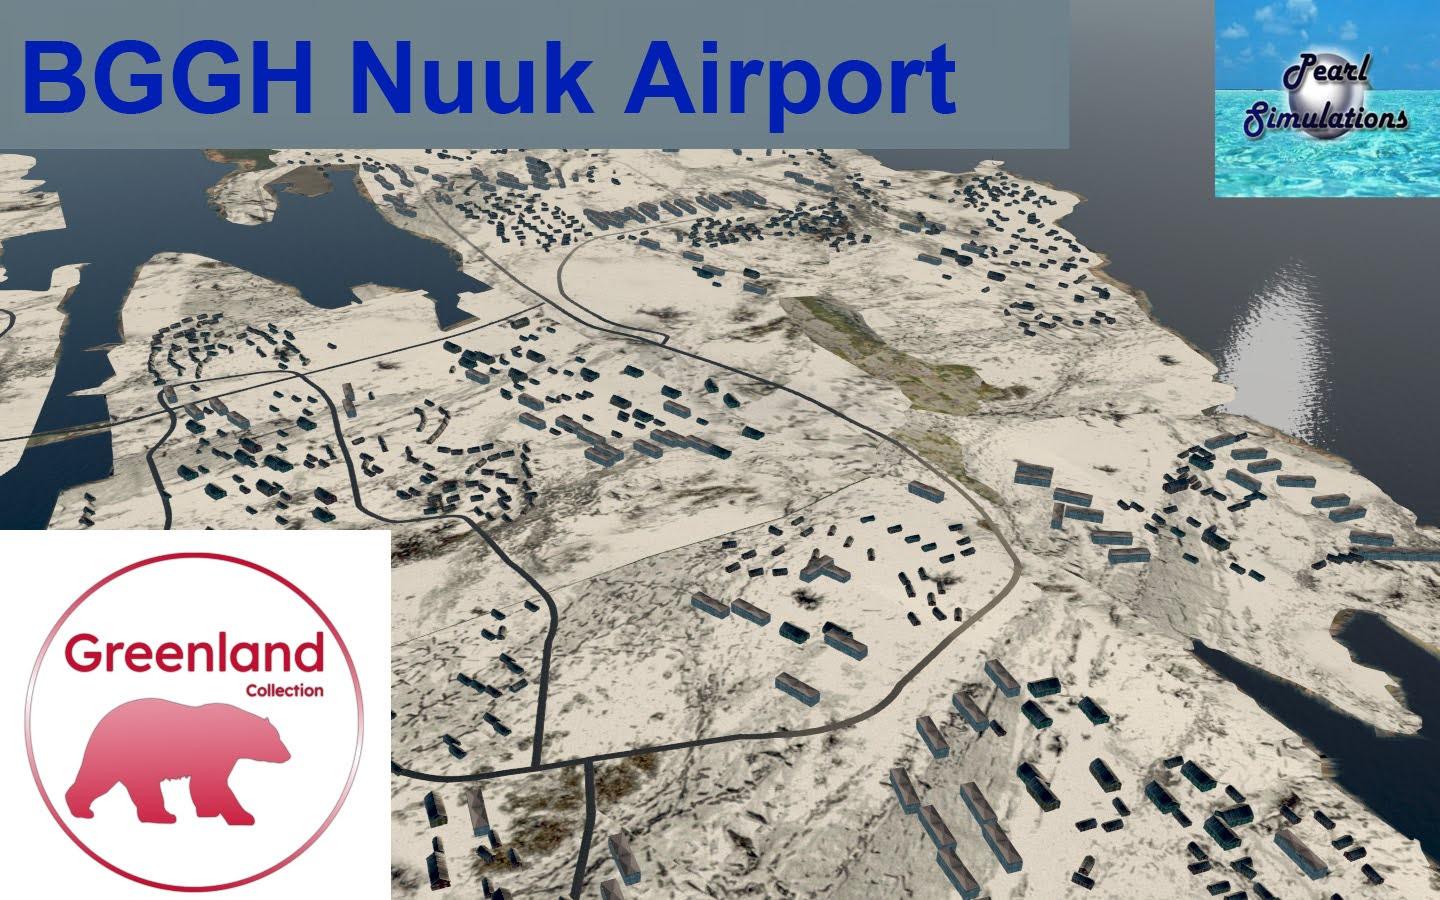
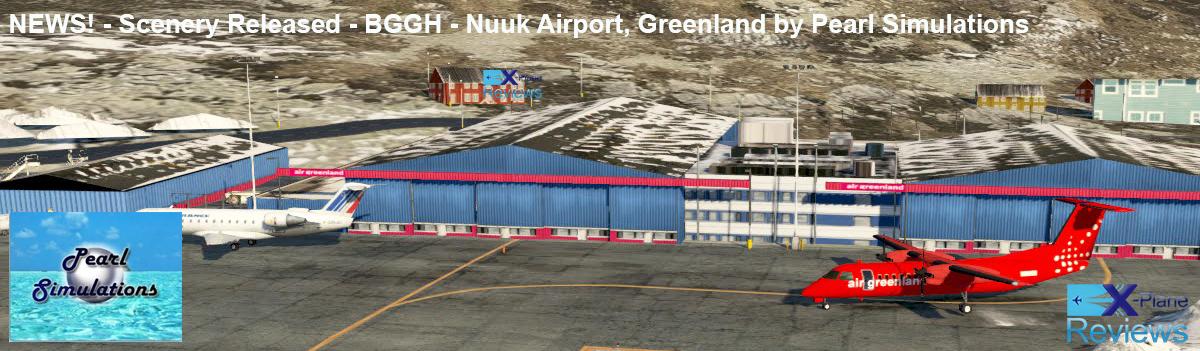
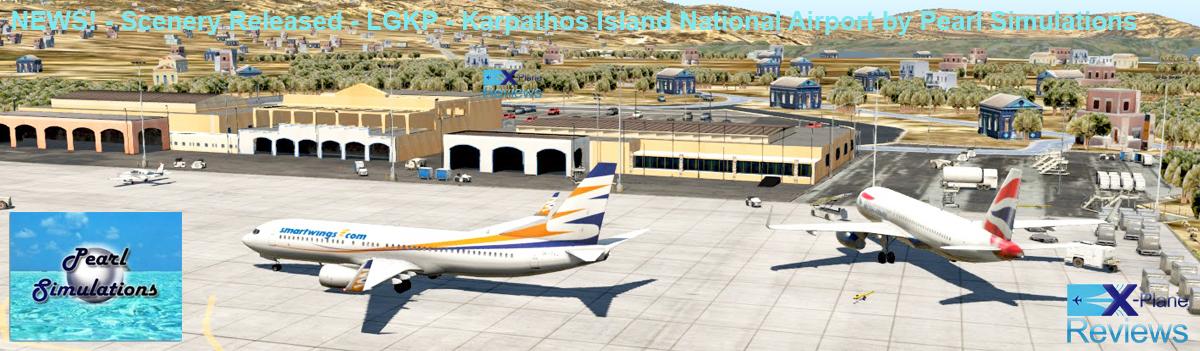
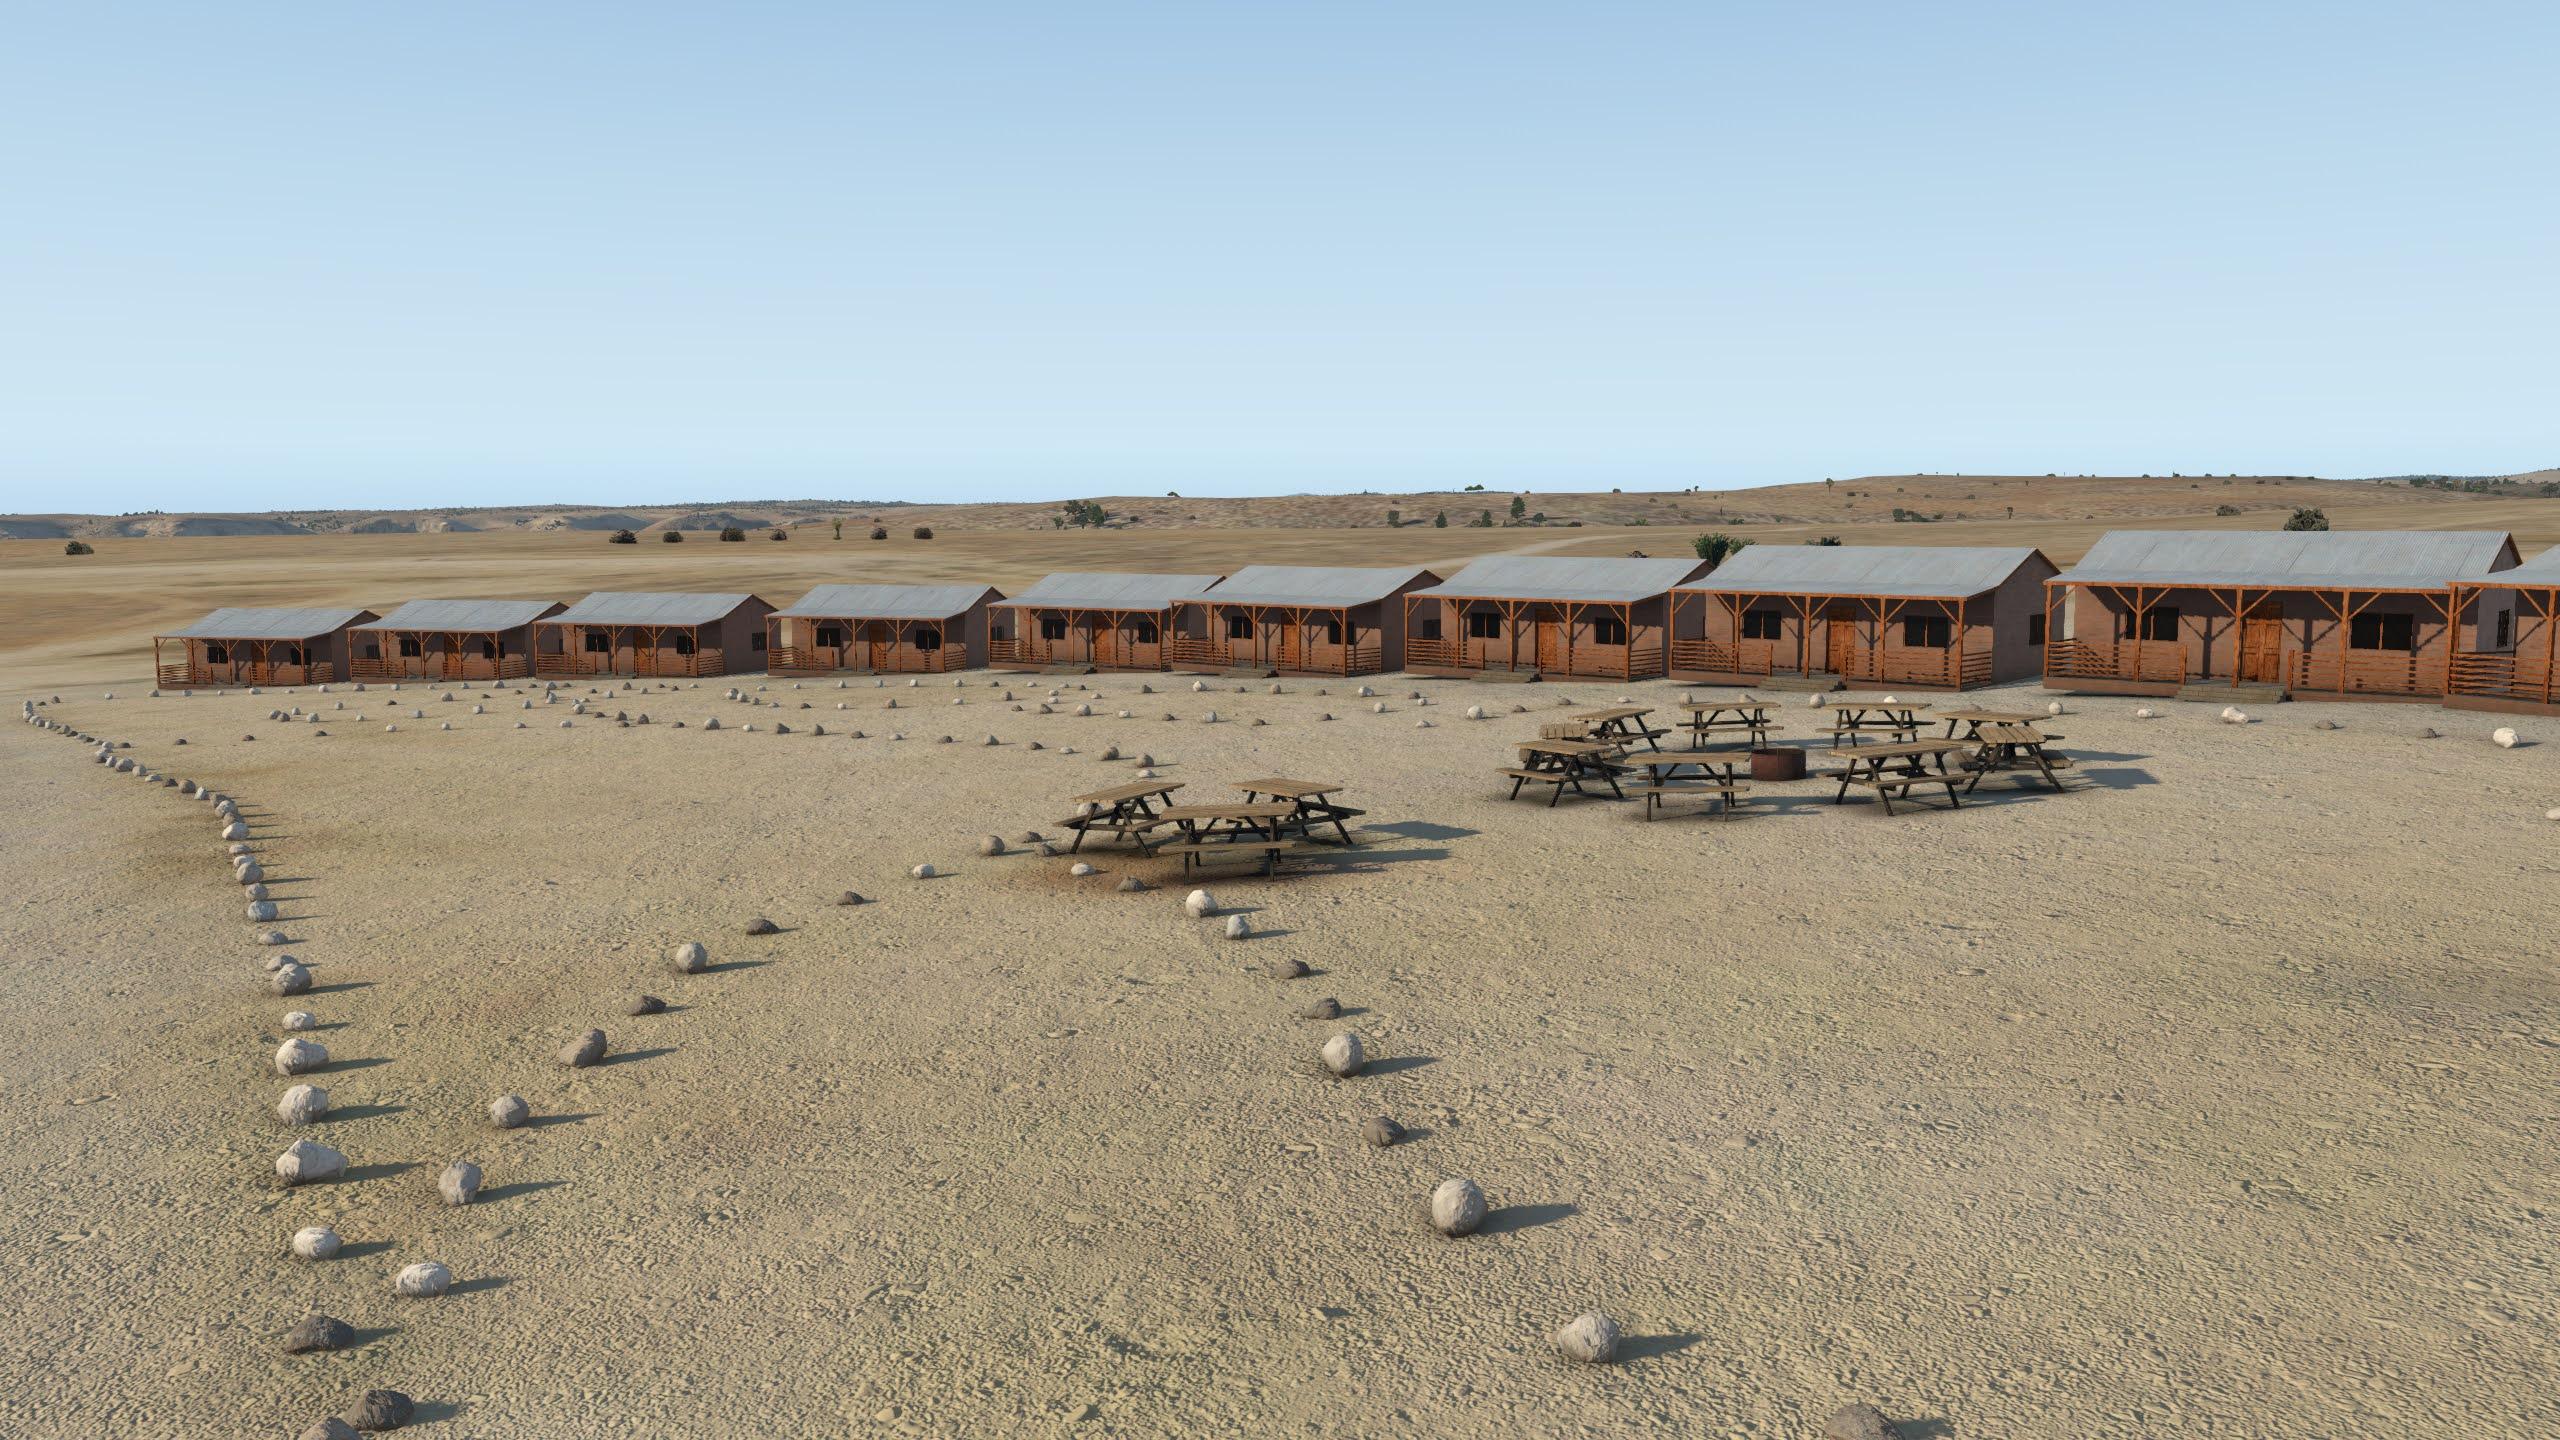
NEWS! - Scenery Released - BGGH - Nuuk Airport, Greenland by Pearl Simulations Greenland is a really interesting area for Simulation... Greenland? you say, yes Greenland. I admit there isn't much actually there and this BGGH-Nuuk Airport, even if it is a capital city aircraft is small, even micro compared to most most capital airports. But the interesting part is getting there and out again. Plus one of my most favorite flights (of all time in X-Plane) was a sunrise over Greenland while traveling from Anchorage, Alaska to East Midlands airport (a cargo flight). Those visions are burnt into my brain, so this new scenery makes it even more interesting to actually visit. And this Nuuk scenery is also priced at a low US$14.99, a great deal. Greenland, which compares to around 25% of land area of America, has one of the lowest population densities on earth, approx. 0.028 per square kilometer, resulting in a total population of around 56,000. Most inhabited places are at the coast, and very remote. Therefore it is no surprise the airline traffic plays a fundamental role in Greenland, and most credit goes to Air Greenland, an airline with a striking red livery. And flying in Greenland isn’t easy, many airports have complex terrain and very short runways and can only be reached by STOL aircraft. If you enjoy flying Dash 7s and Dash 8s and all kinds of small props and turboprops, and doing short flights connecting small airports, Greenland is a great place to do so. Therefore, we will be releasing several packages covering multiple places in Greenland. We’ll start with Nuuk, Greenland’s capital, which is one of these tricky airports, with a 950 meter runway. It features a small terminal and a technical base for Air Greenland. Air Greenland connects Nuuk with several domestic airports, including Aasiaat, Ilulissat, Kangerlussuaq and others. Features: Models: On-Site Modelling and Texturing of Nuuk Airport with plenty of buildings with PBR effects and thousands of objects Ground: Accurate and realistic 4K Ground Texturing with PBR and wear and tear, high level of details Realistic Night Texturing and Lighting High Res Orthophoto and Trees Rendition of Nuuk City with multiple thousand hand-placed streetlights and houses Images are courtesy of Pearl Simulations _____________________________________ Yes! - BGGH - Nuuk Airport, Greenland by Pearl Simulations is NOW available from the X-Plane.Org Store here : BGGH - Nuuk Airport, Greenland Price is Currently US$14.99 Requirements X-Plane 11 Windows, Mac or Linux 4 GB VRAM Minimum - 8 GB+ VRAM Recommended Download Size: 1.5 GB Current version : 1.0 (February 1st 2022) ___________________________ News by Stephen Dutton 3rd February 2022 Copyright©2022: X-Plane Reviews (Disclaimer. All images and text in this review are the work and property of X-PlaneReviews, no sharing or copy of the content is allowed without consent from the author as per copyright conditions) All Rights Reserved
-
NEWS! - UPDATE : Airport Madrid XP v1.1.1 by Aerosoft What again? Yes again... Aerosoft or SimWings has done another single digit update to LEMD Madrid in v1.1.1. This is a single item in a Ortho patch to the scenery... I have listed all the changelog changes. Changelog Version 1.1.1 (February 2nd 2022) Added Ortho4XP Patch Version 1.10 (January 7th 2022) Added default AI Traffic Version 1.02 (Oct 20th 2021) Fixed Tarmac grain Improved FPS for Night and Day Version 1.01 (April 20th 2021) Fixed Runway Markings Version 1.0 (April 20th 2021) Initial Release The v1.1.1 update is now available from your X-Plane.OrgStore Account, just logon and download... __________________ Yes!... Airport Madrid XP by Aerosoft is Available from the X-Plane.Org Store here : Airport Madrid XP Price is US$27.99 Requirements X-Plane 11 Windows, Mac and Linux 4 GB VRAM Video Card - 8 GB+ VRAM Recommended Download Size: 2 GB Current version: 1.1.1 (February 2nd 2022) ___________________________ News by Stephen Dutton 3rd February 2022 Copyright©2022: X-Plane Reviews (Disclaimer. All images and text in this review are the work and property of X-PlaneReviews, no sharing or copy of the content is allowed without consent from the author as per copyright conditions) All Rights Reserved
-
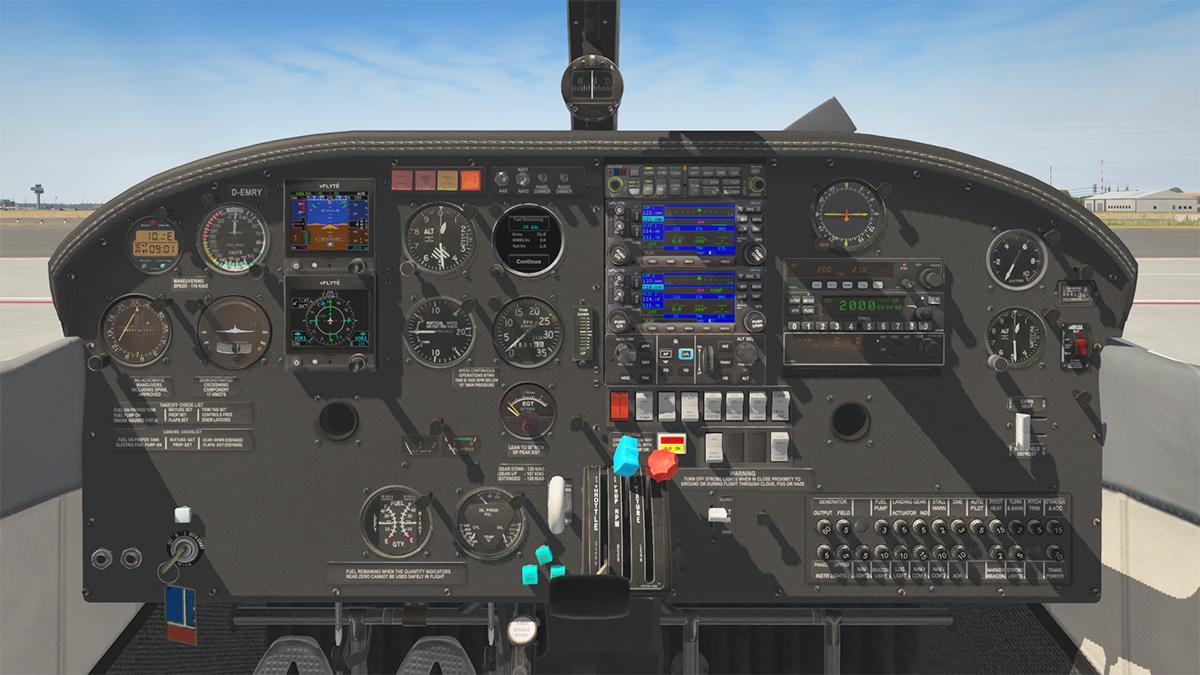
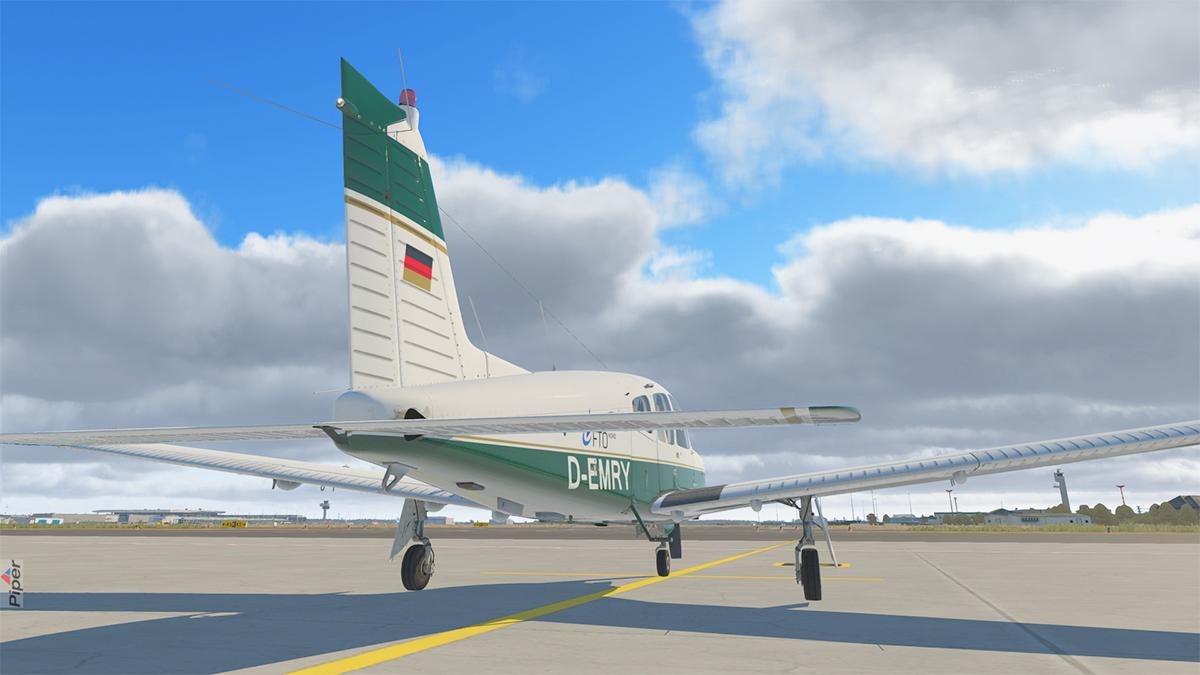
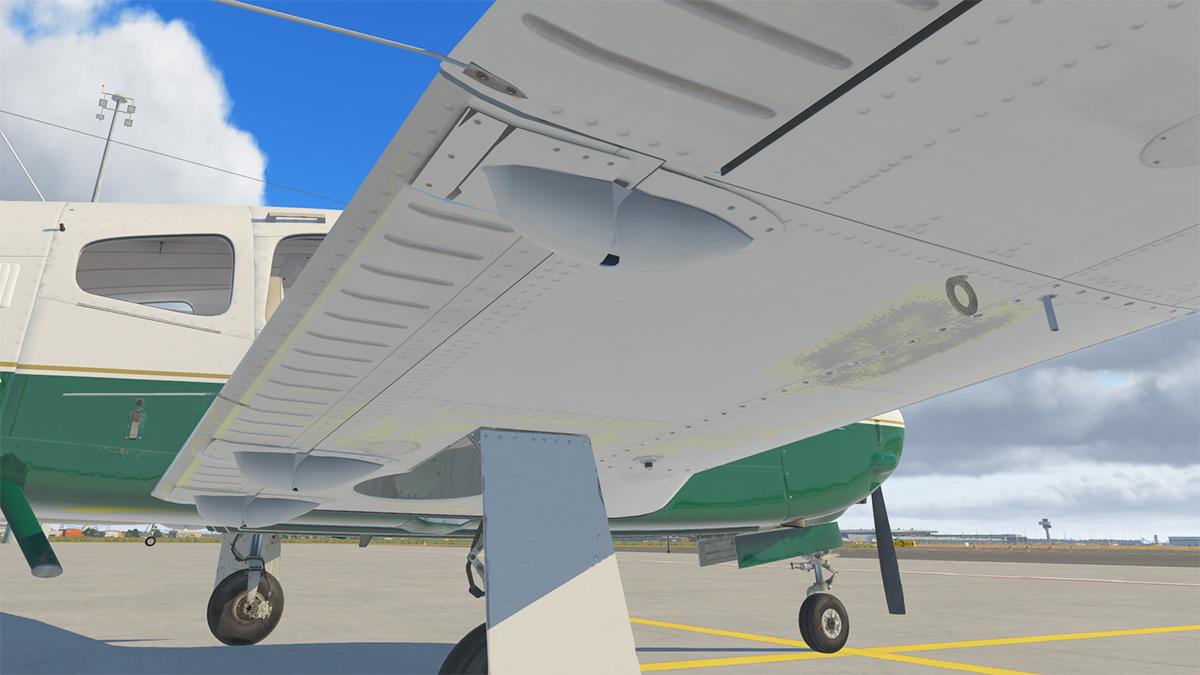
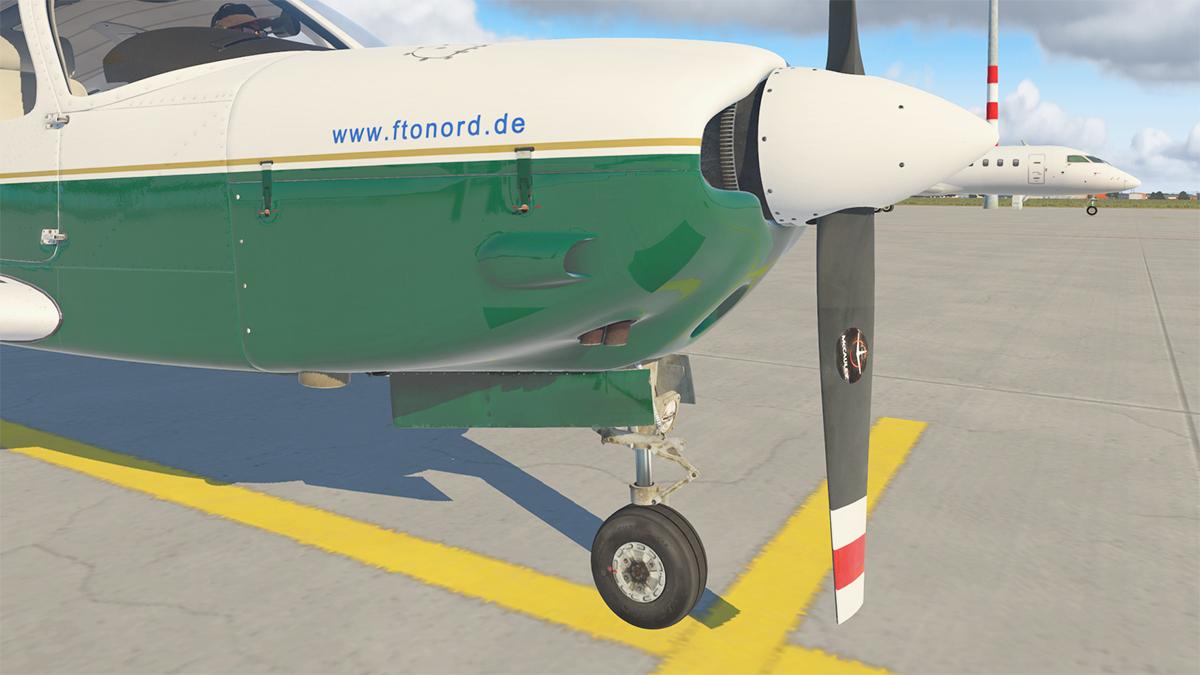
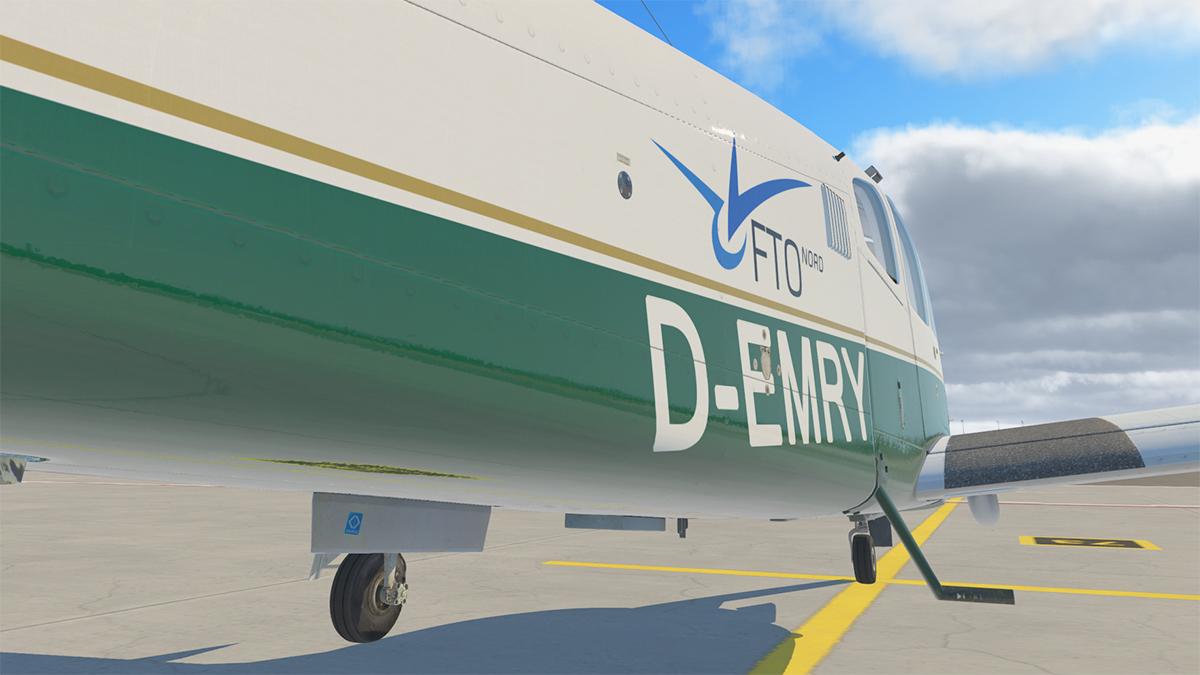
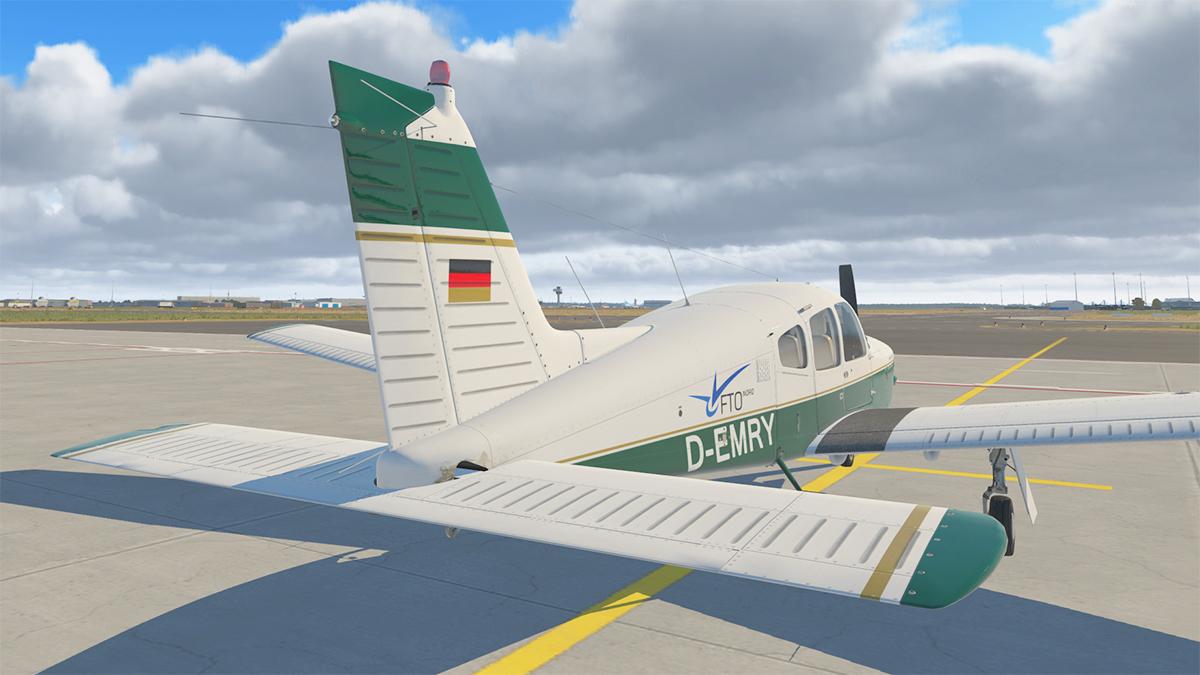
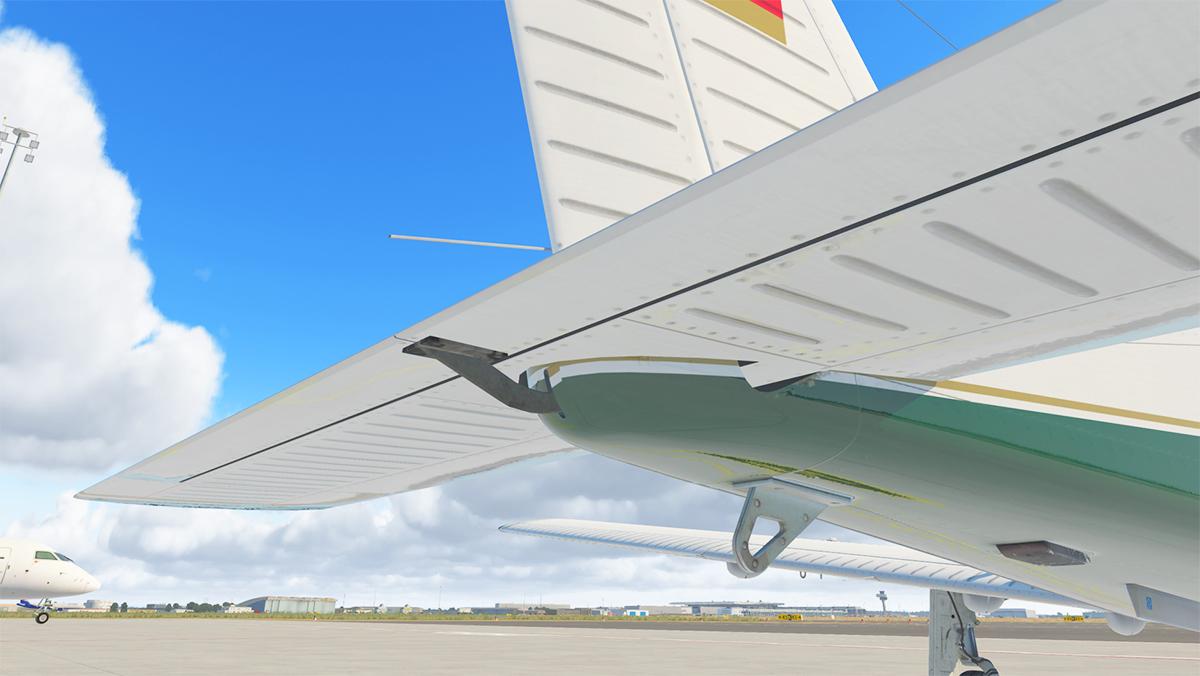
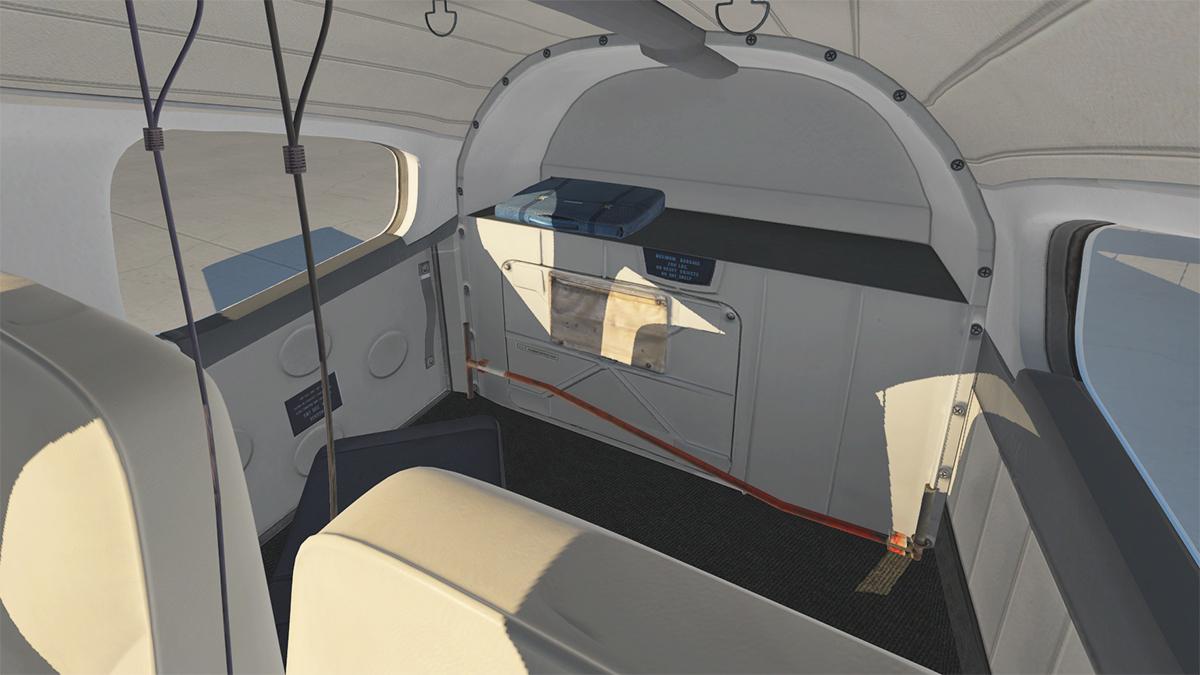
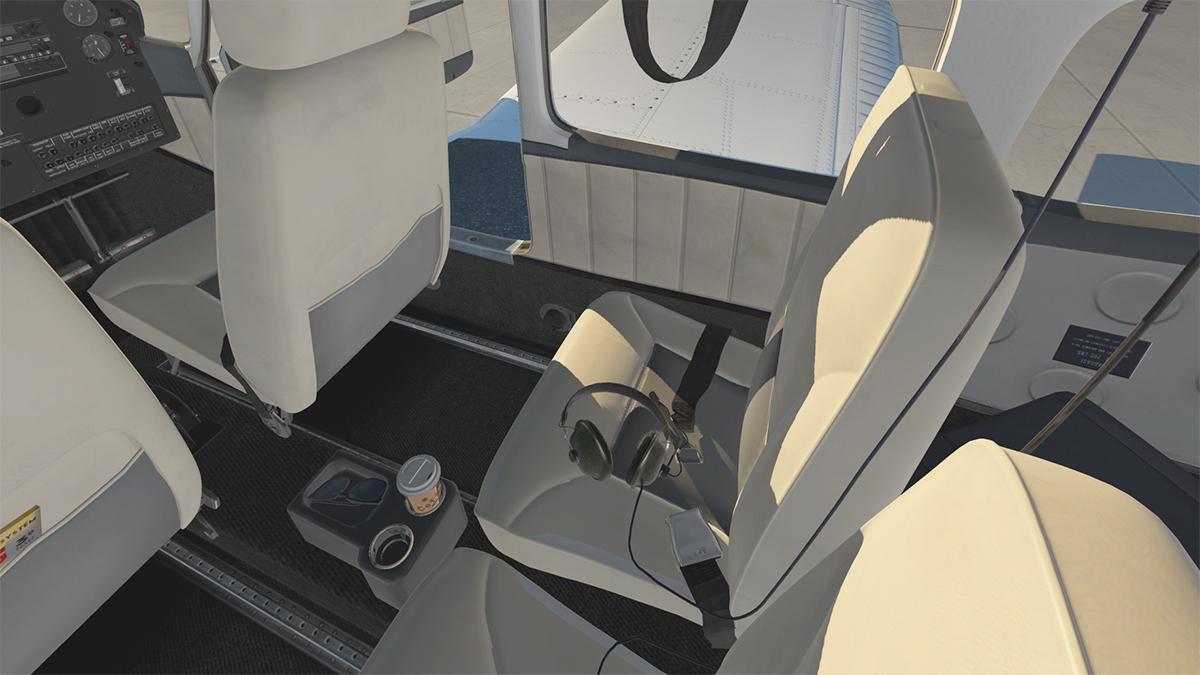
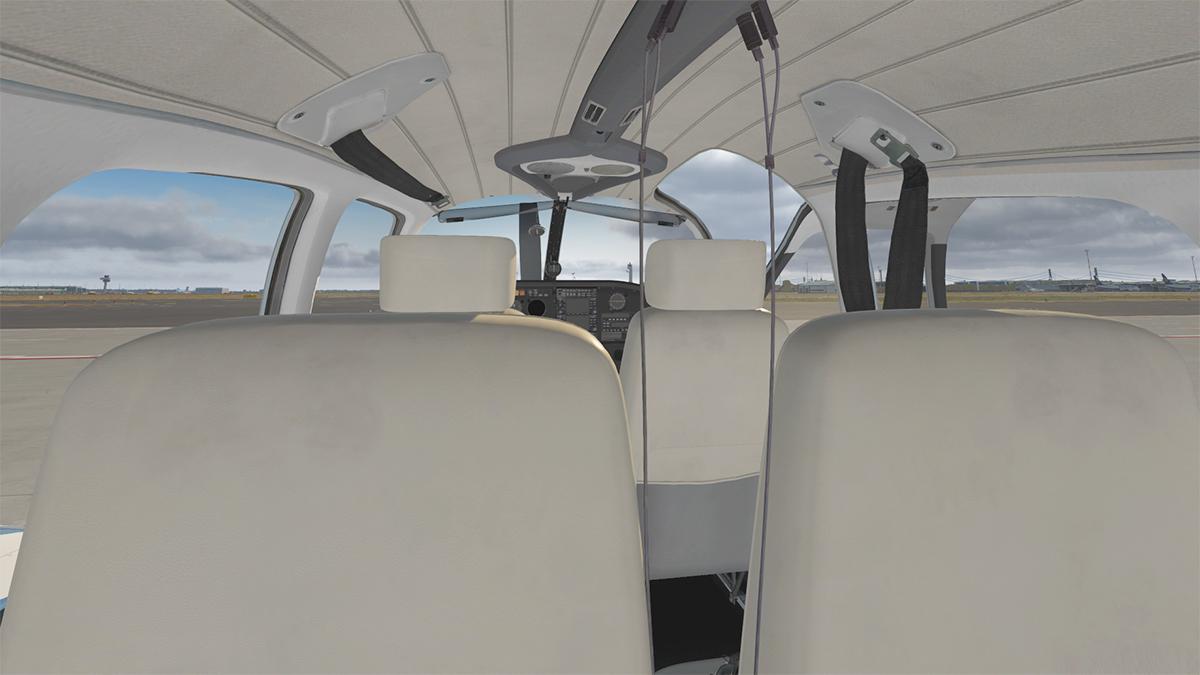
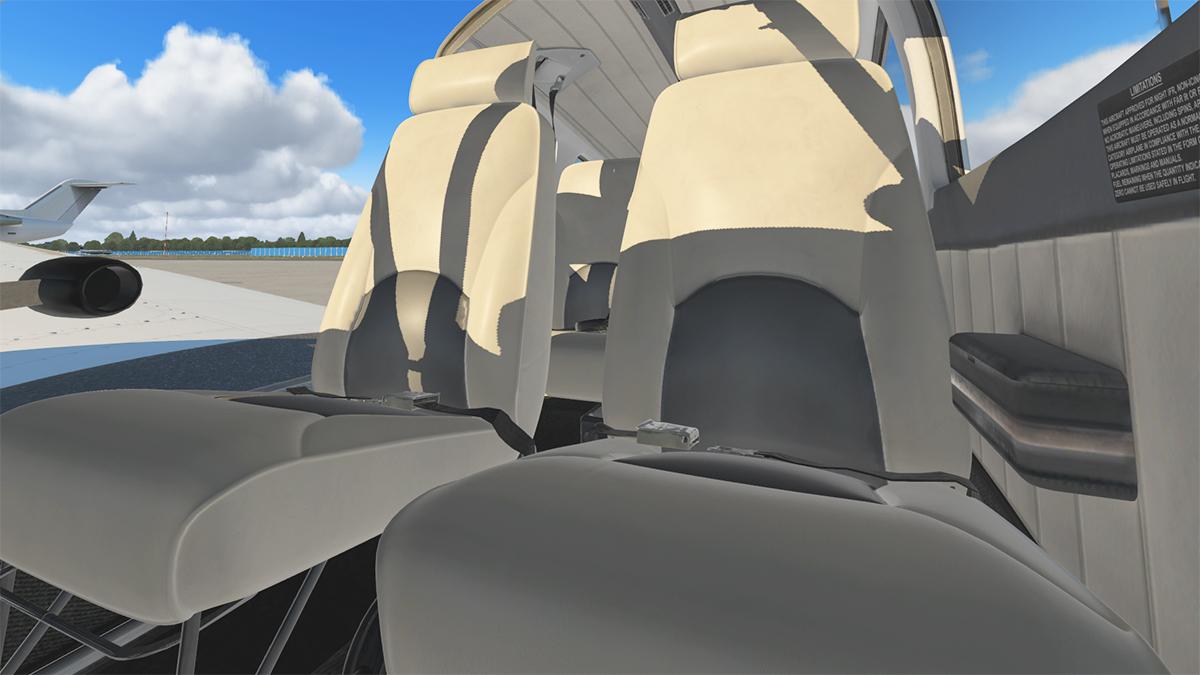
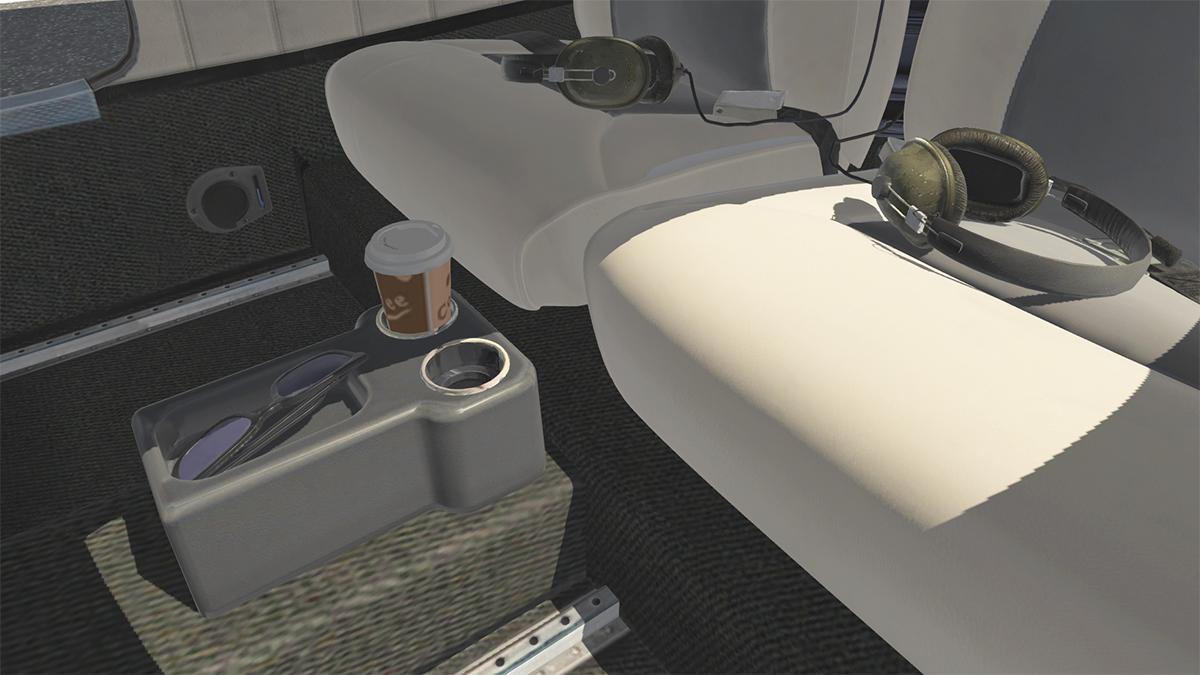
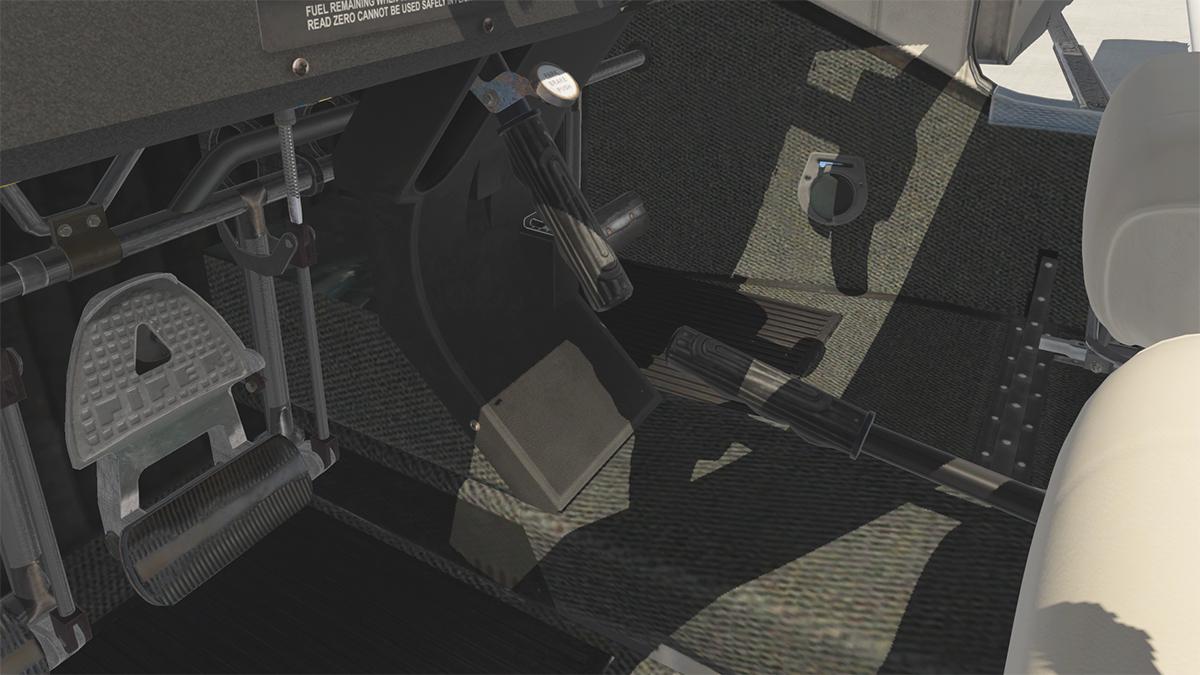
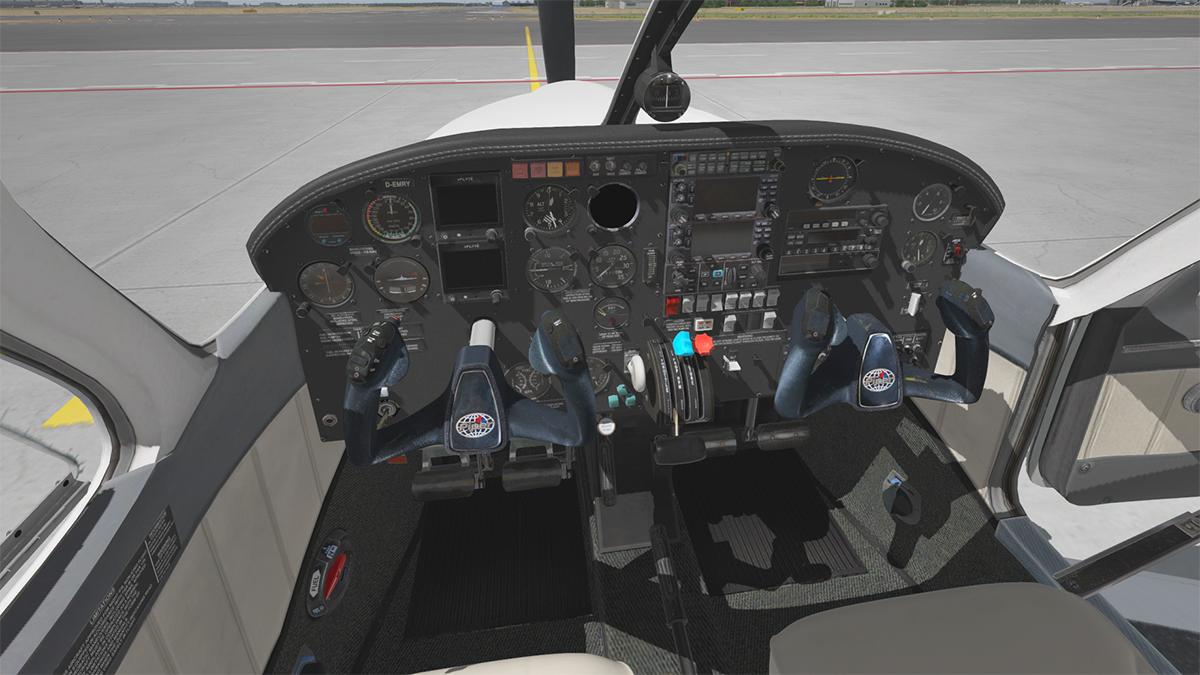
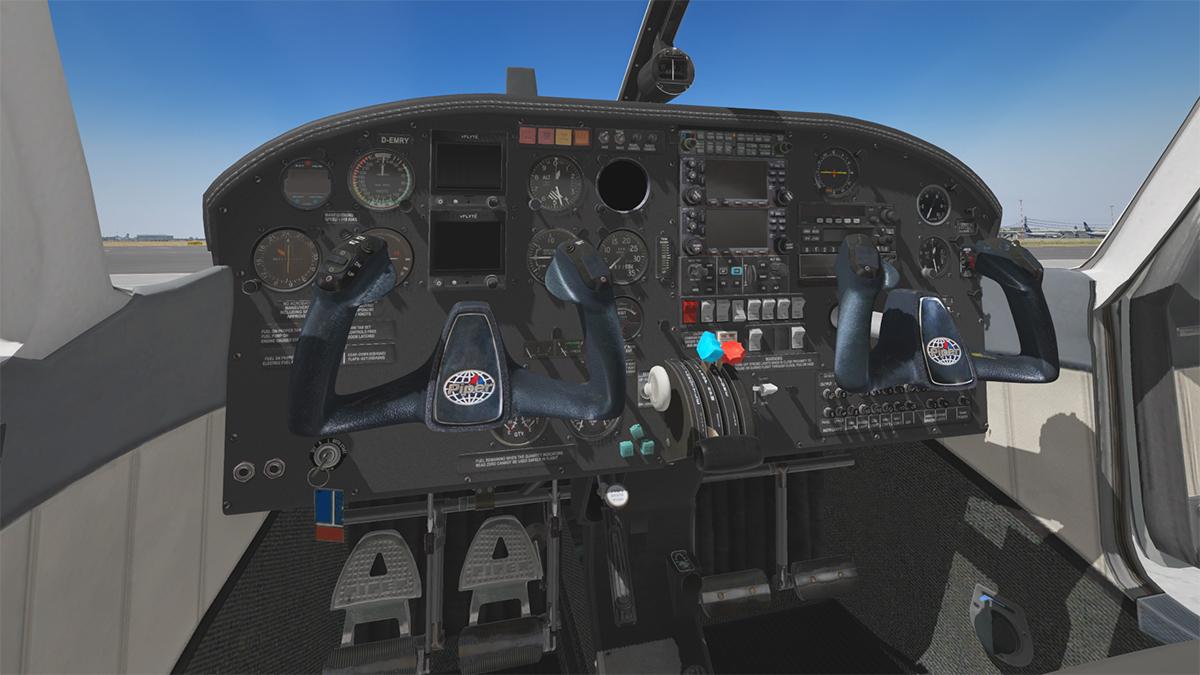
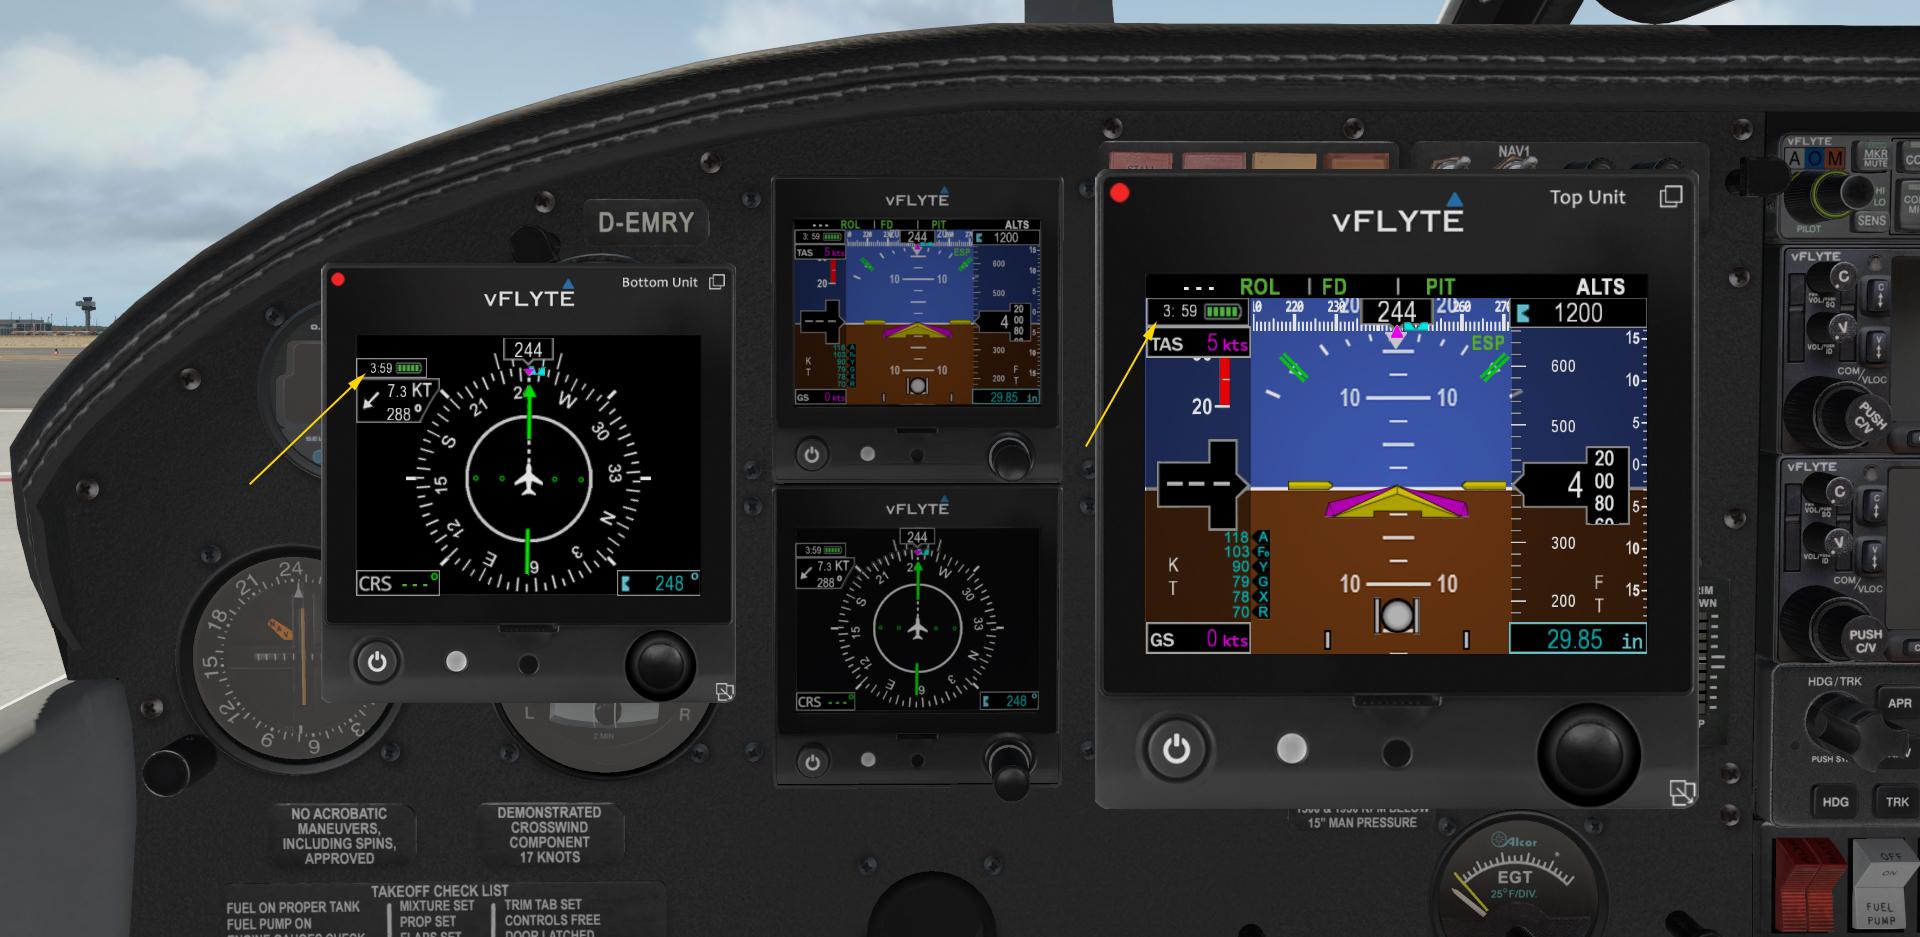
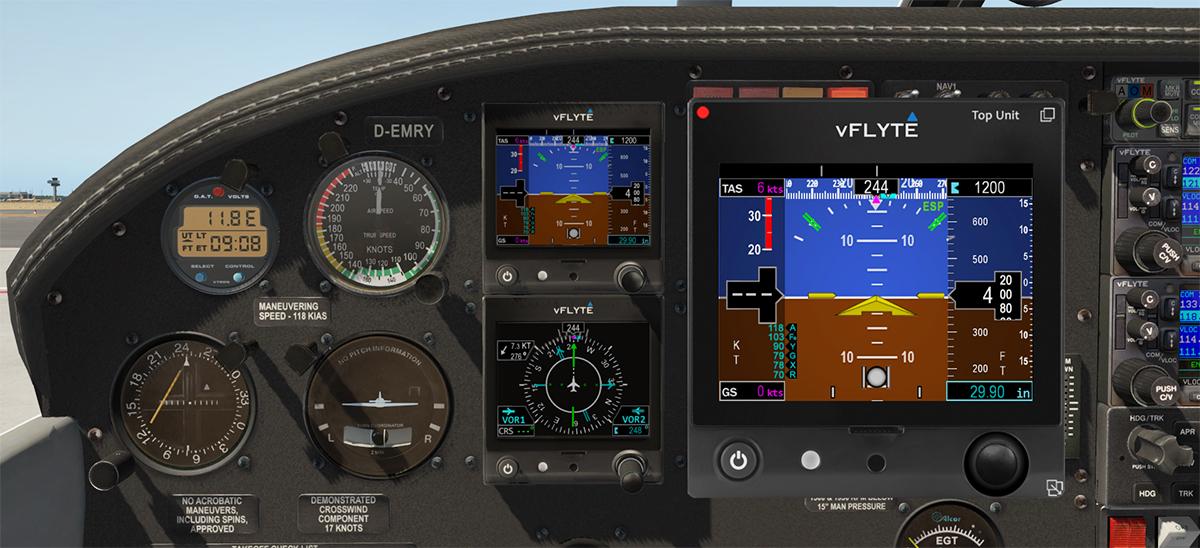
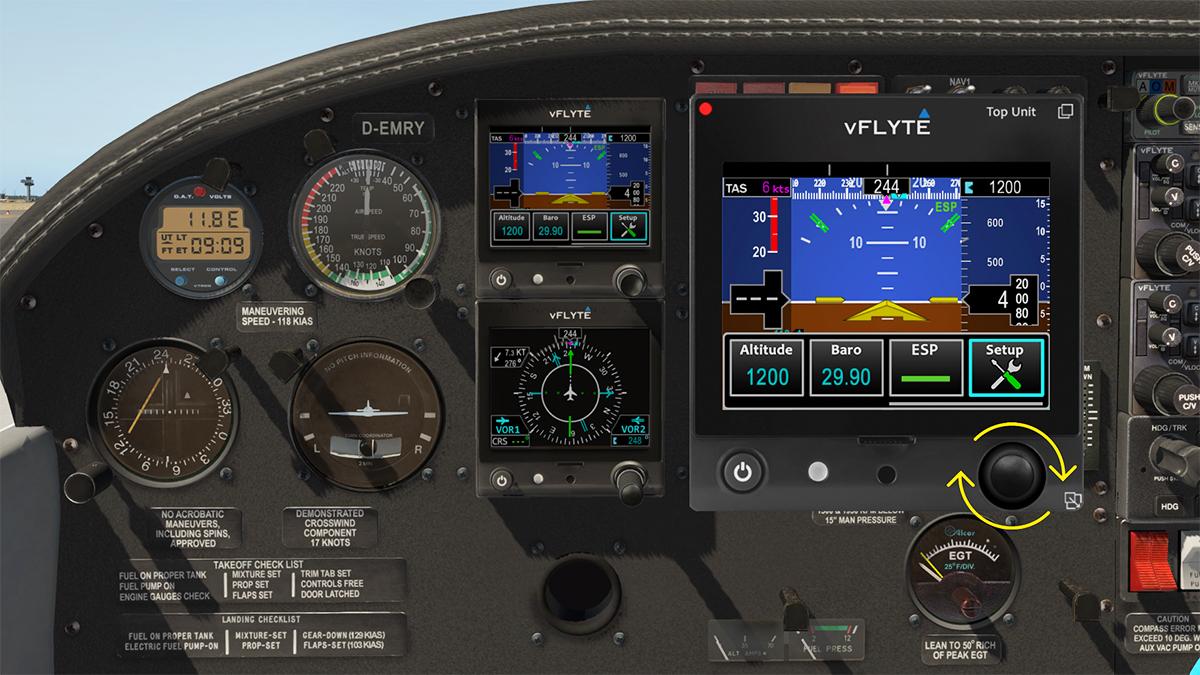
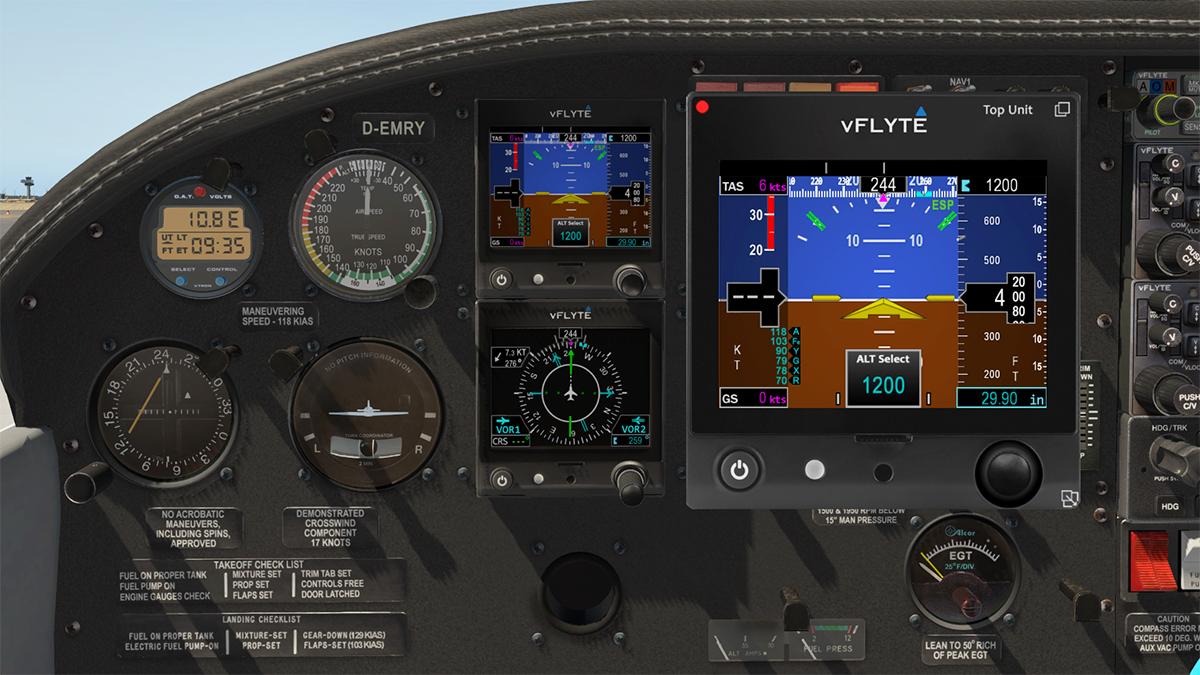
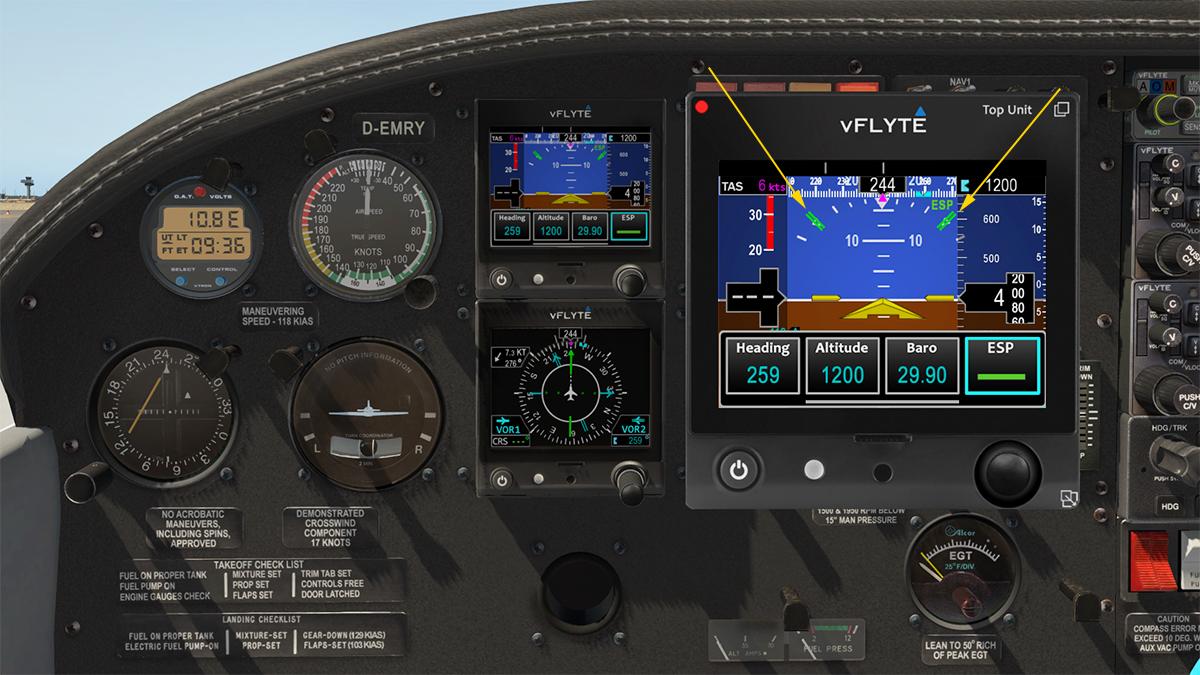
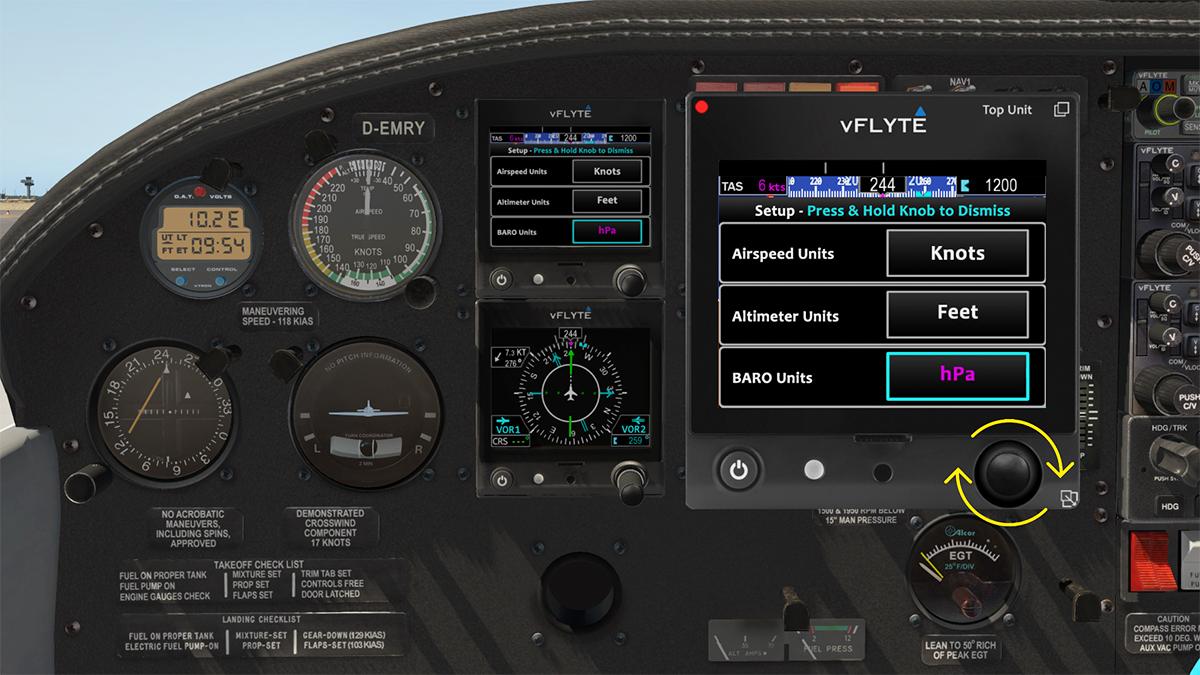
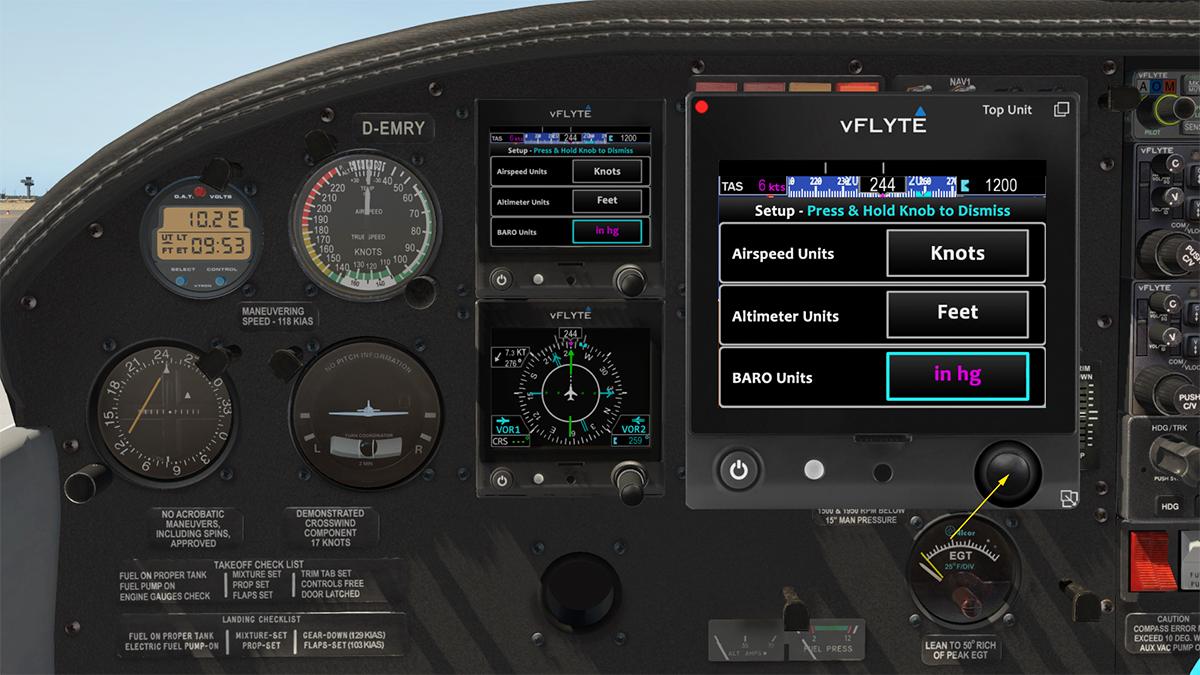
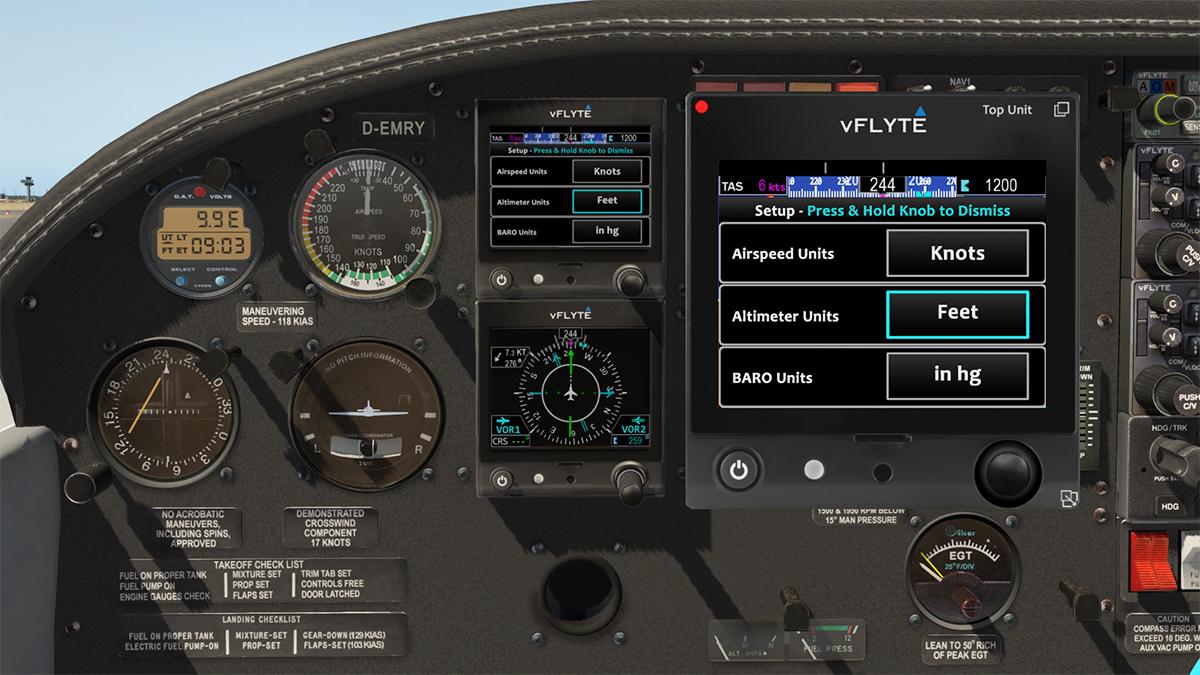
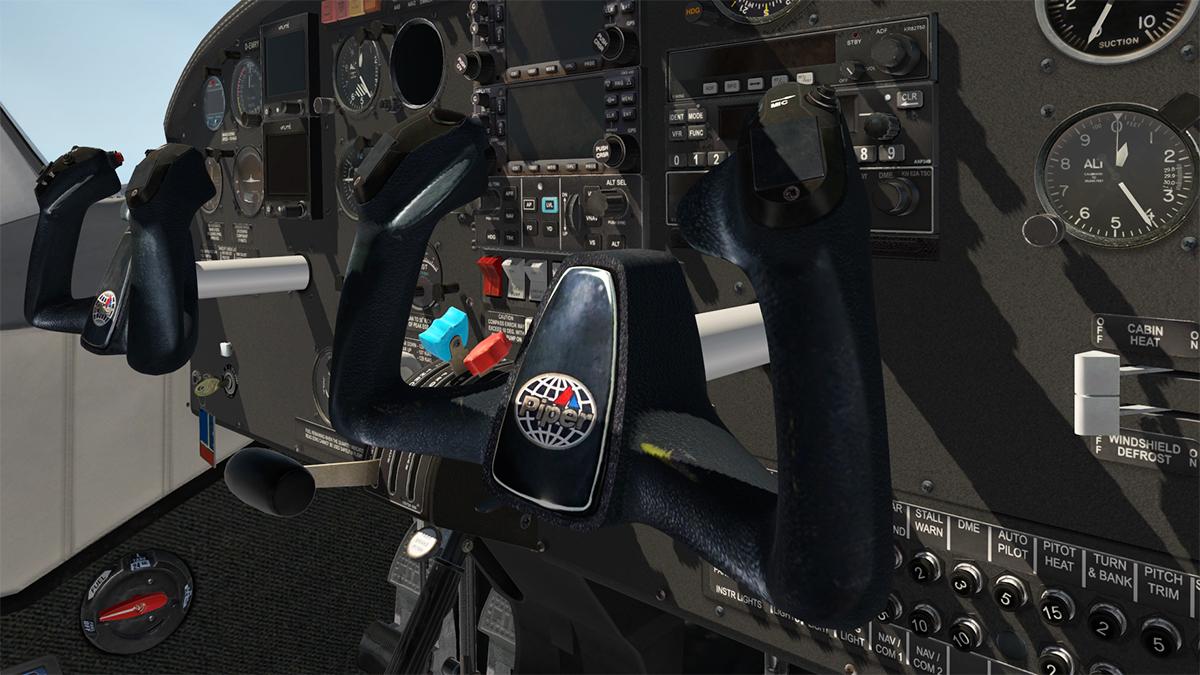
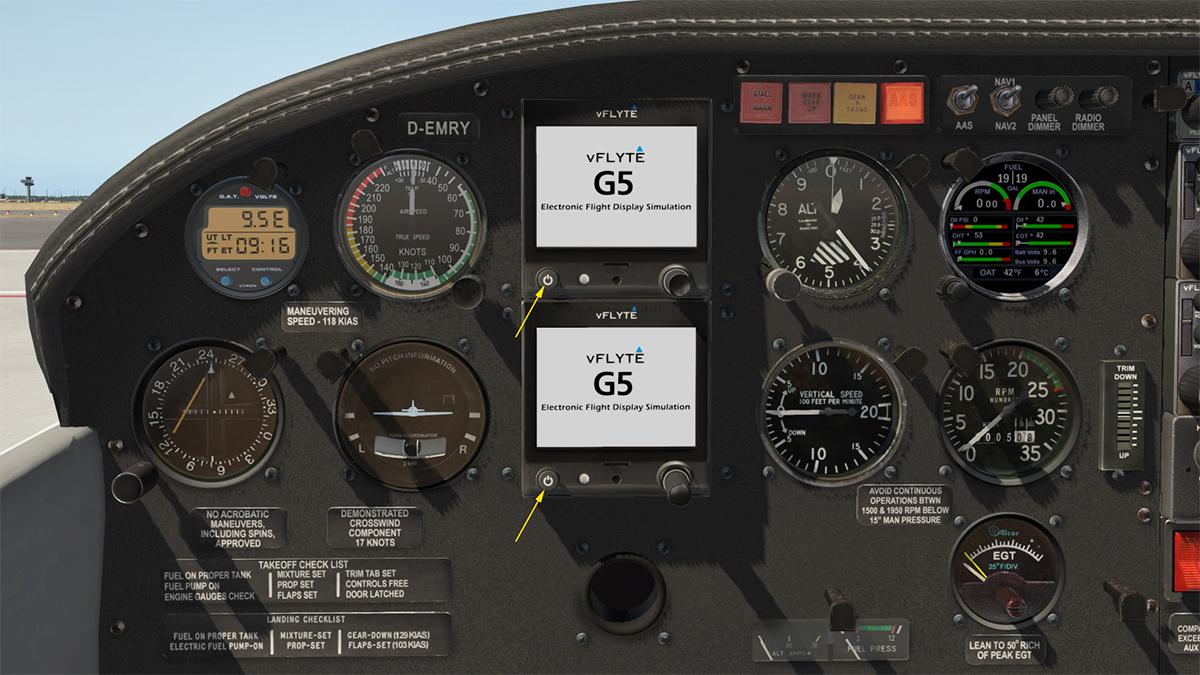
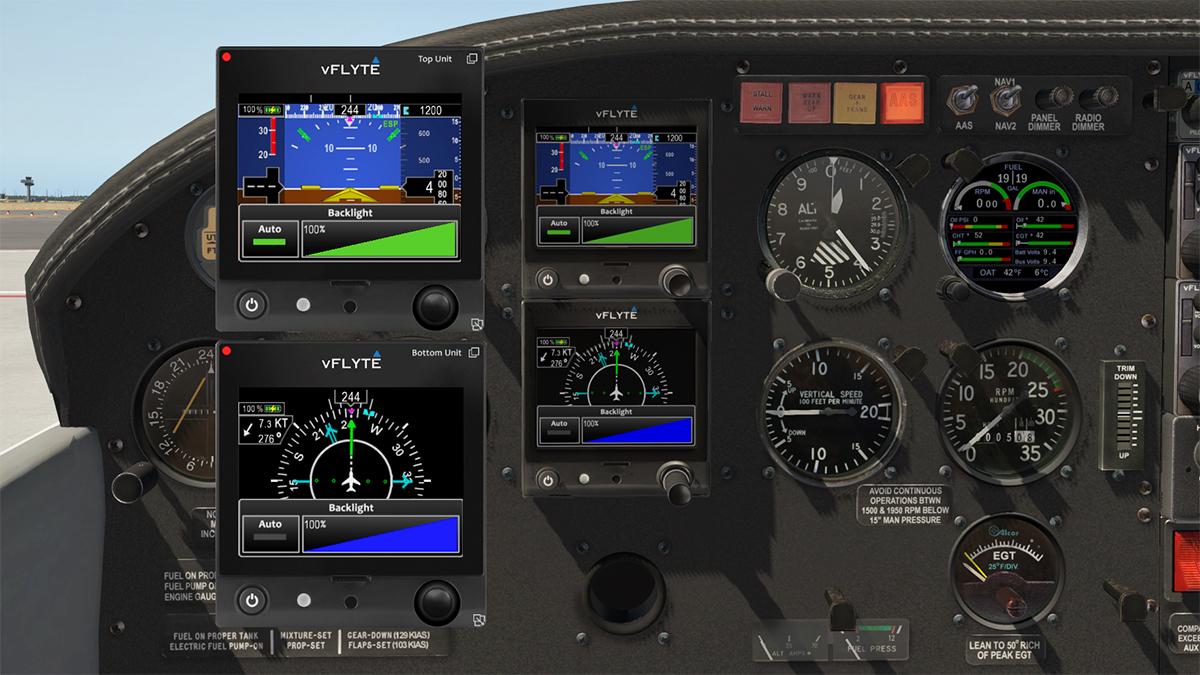
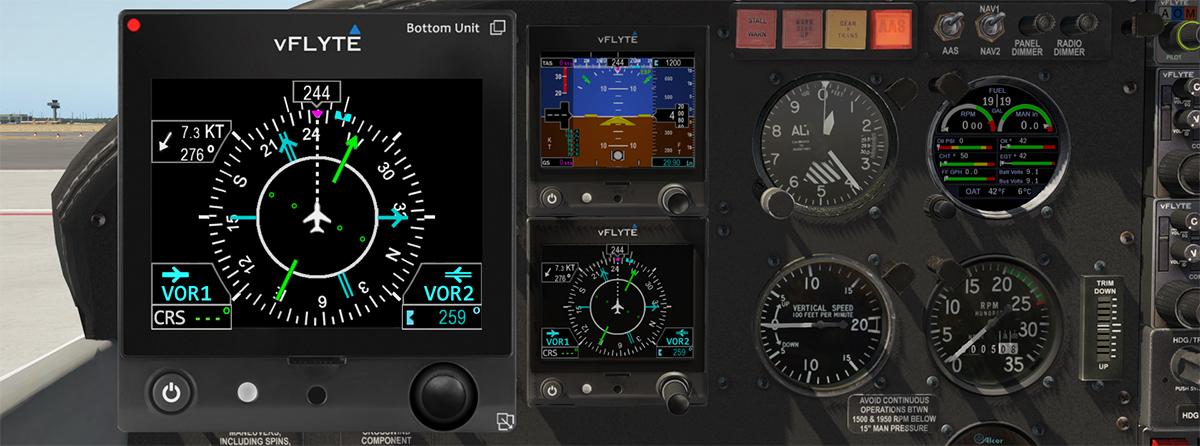
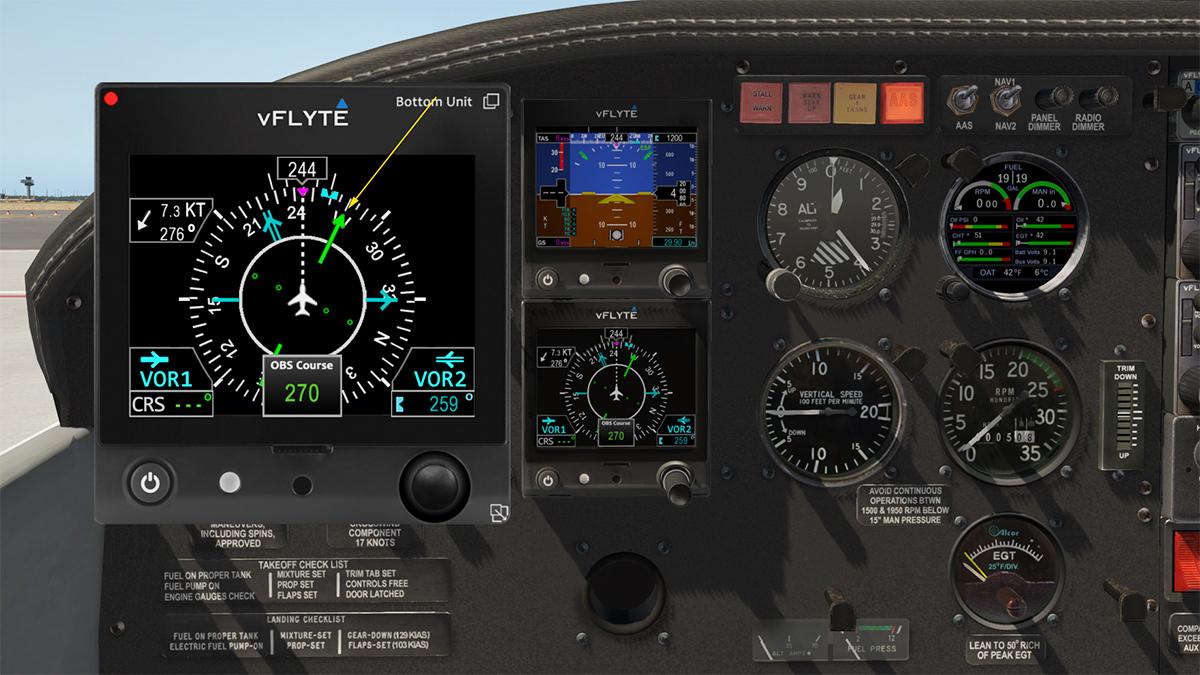
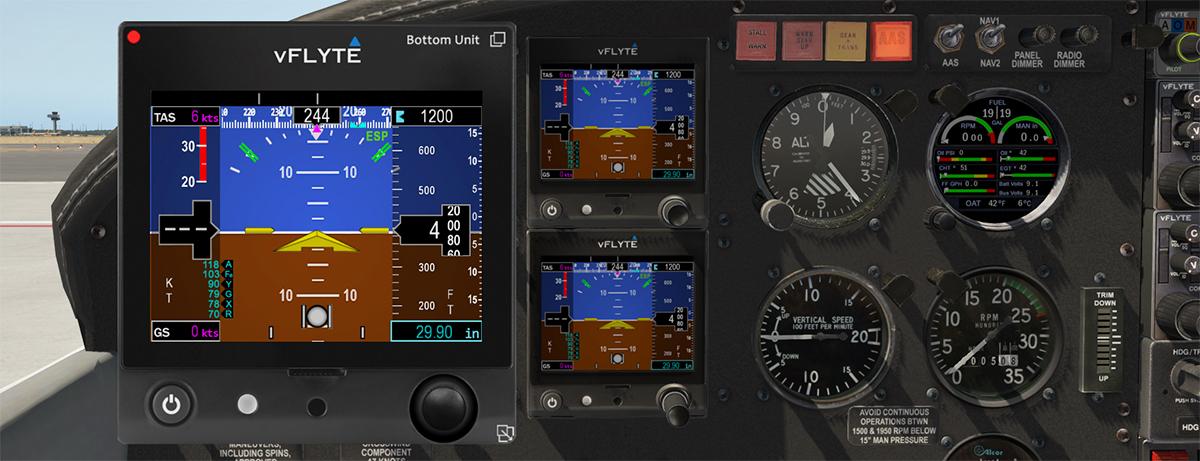
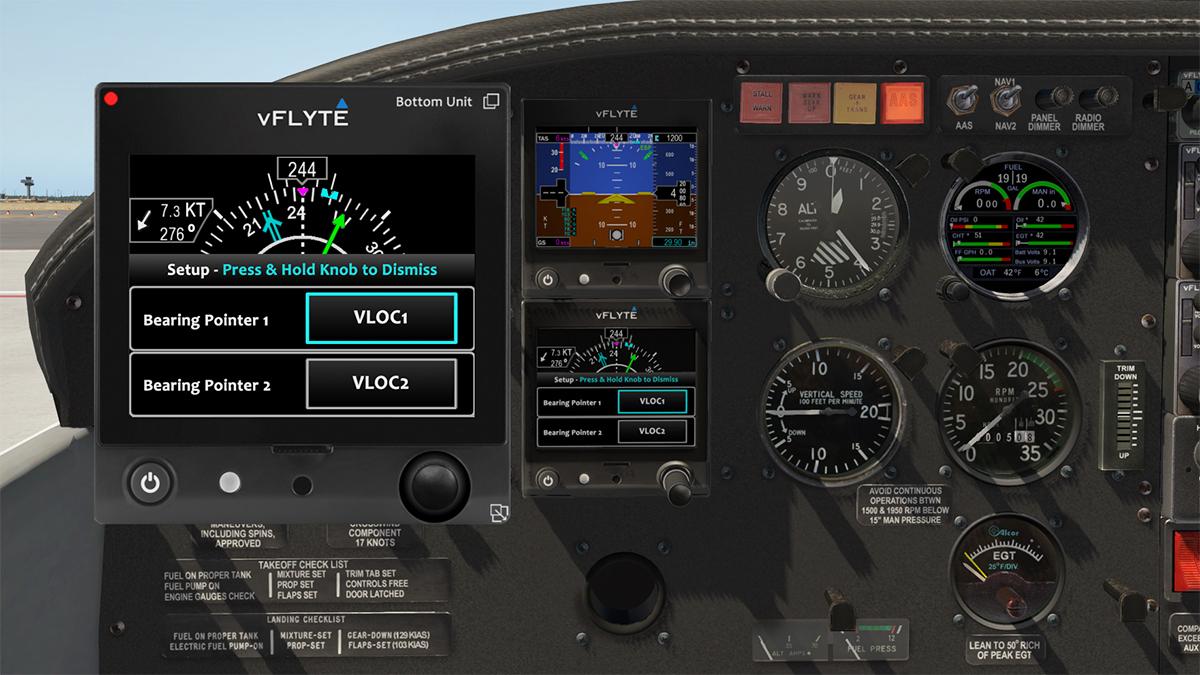
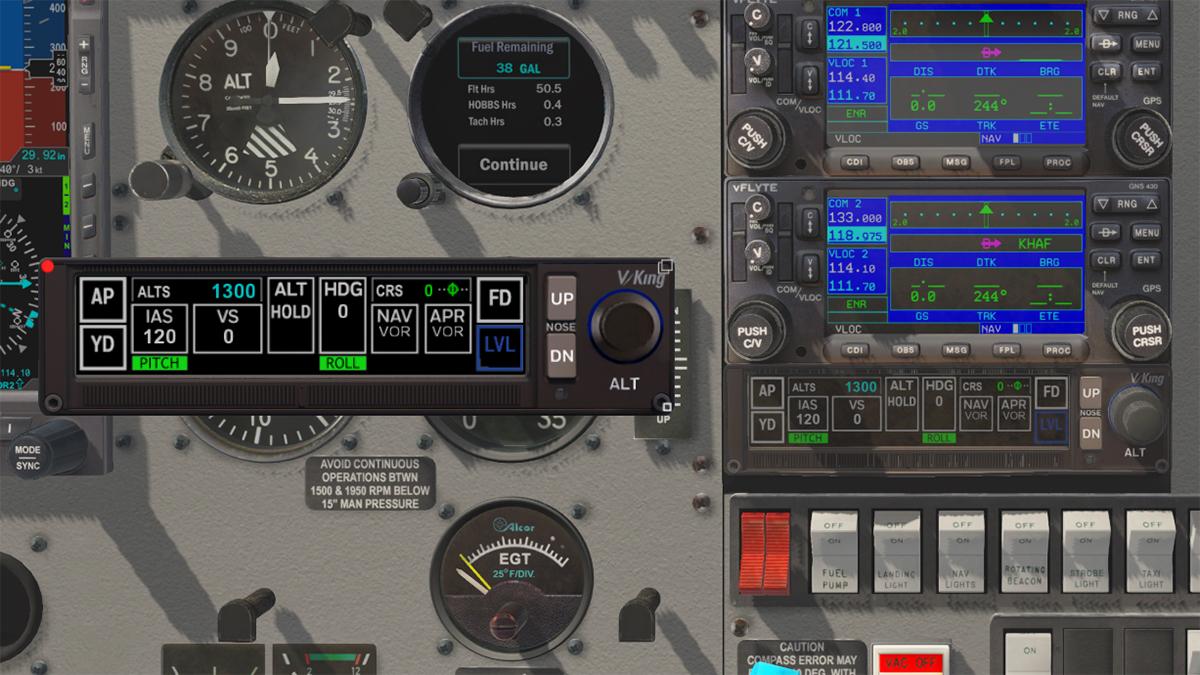
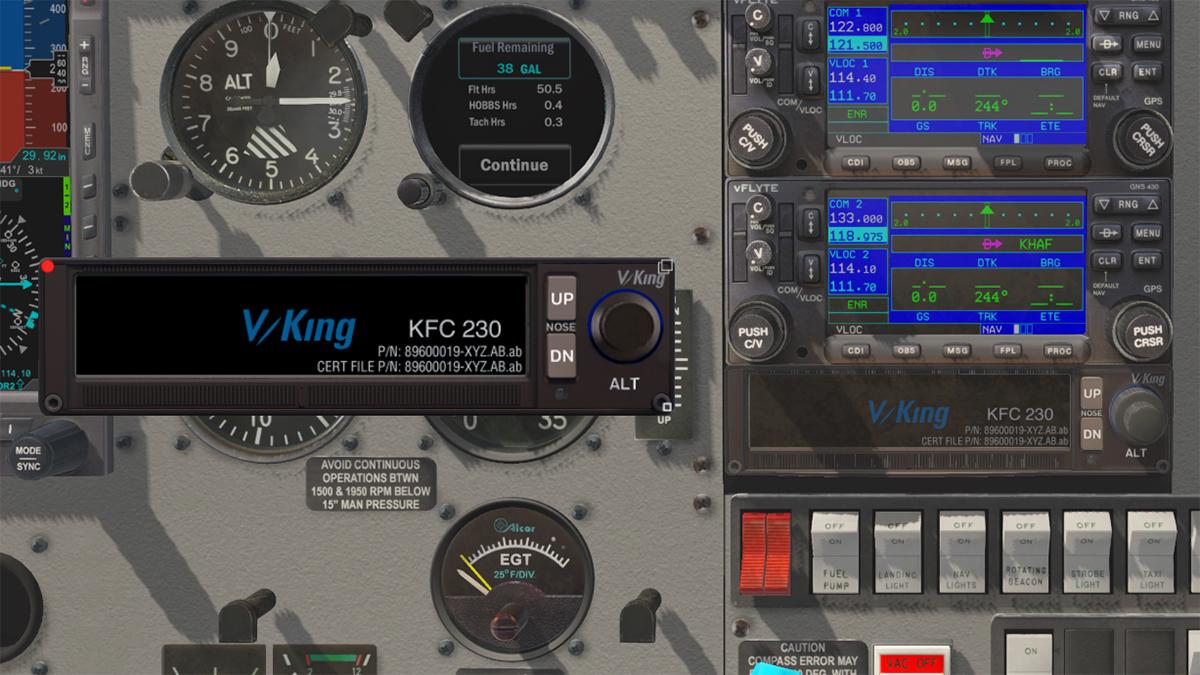
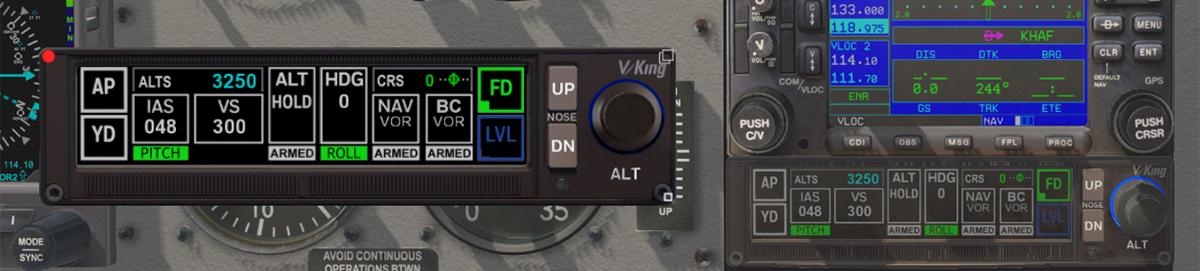
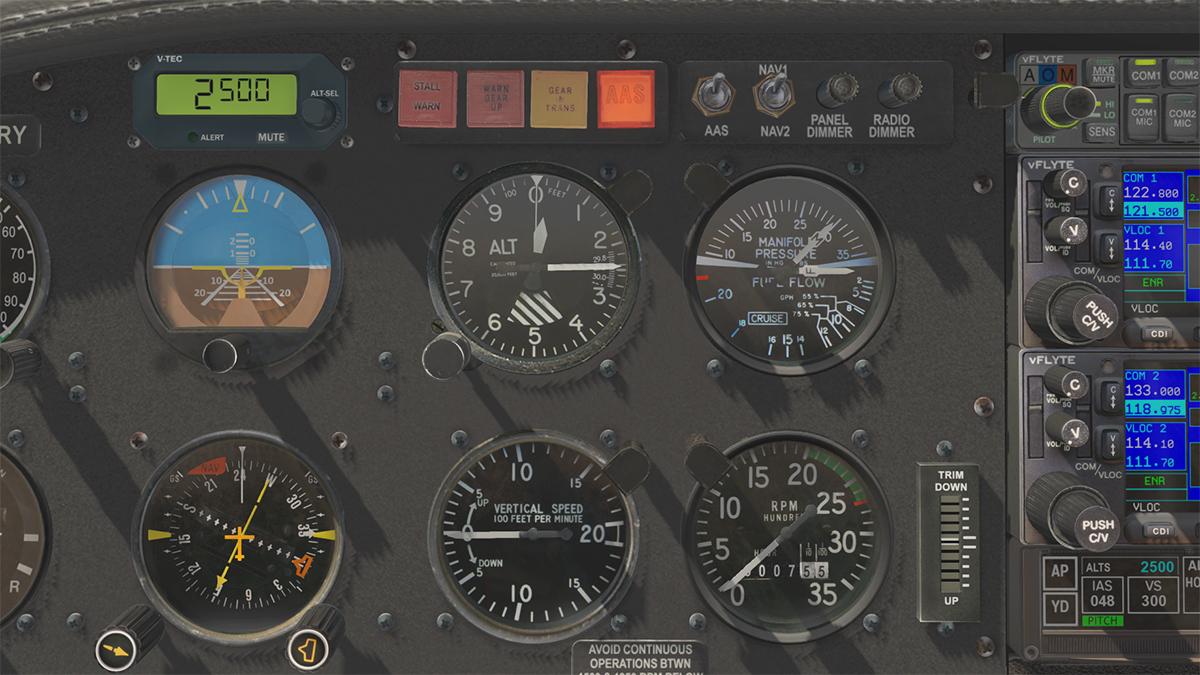
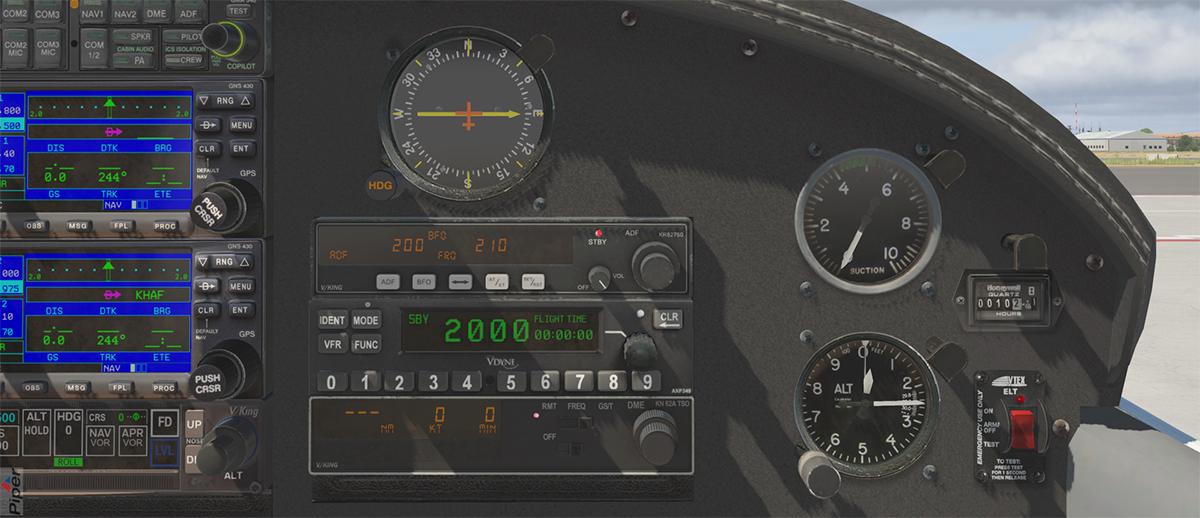
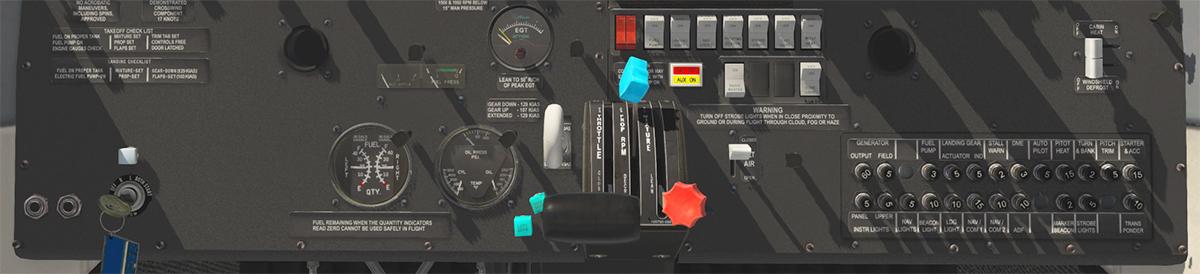
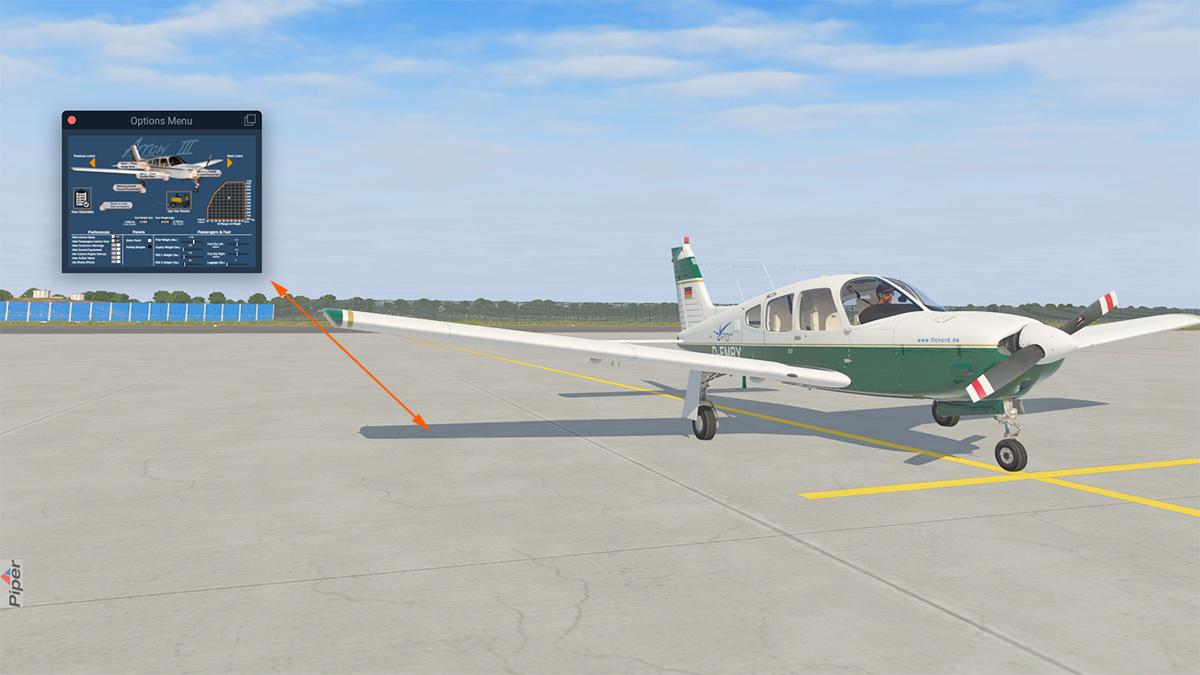
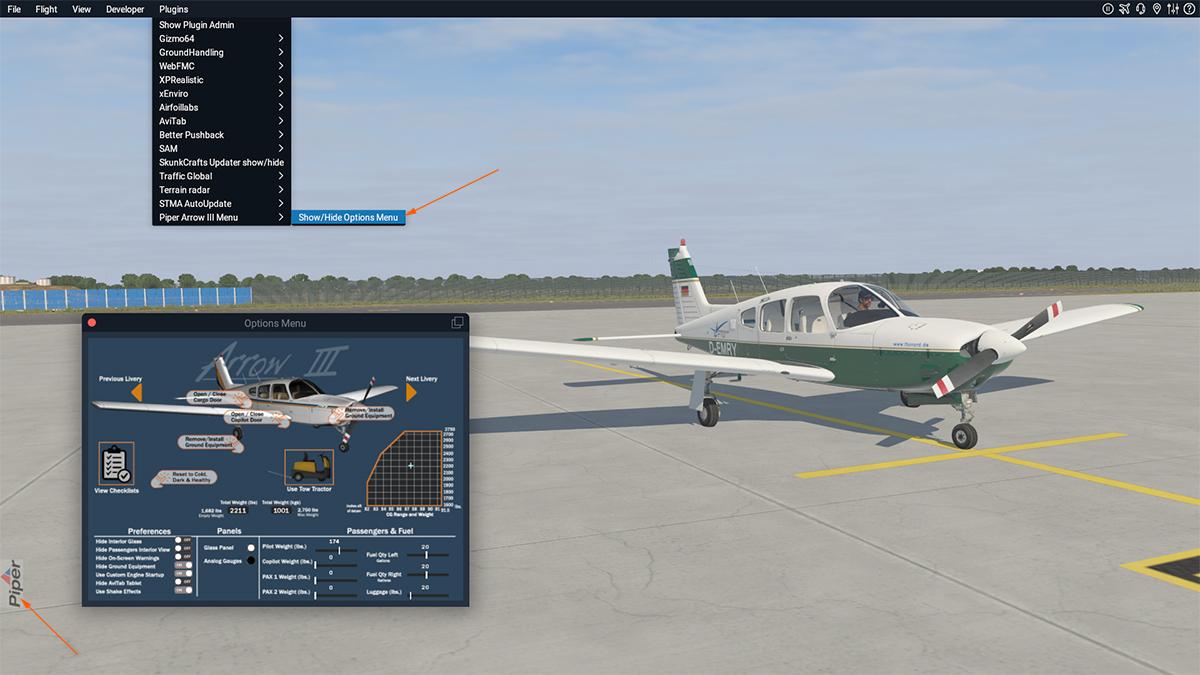
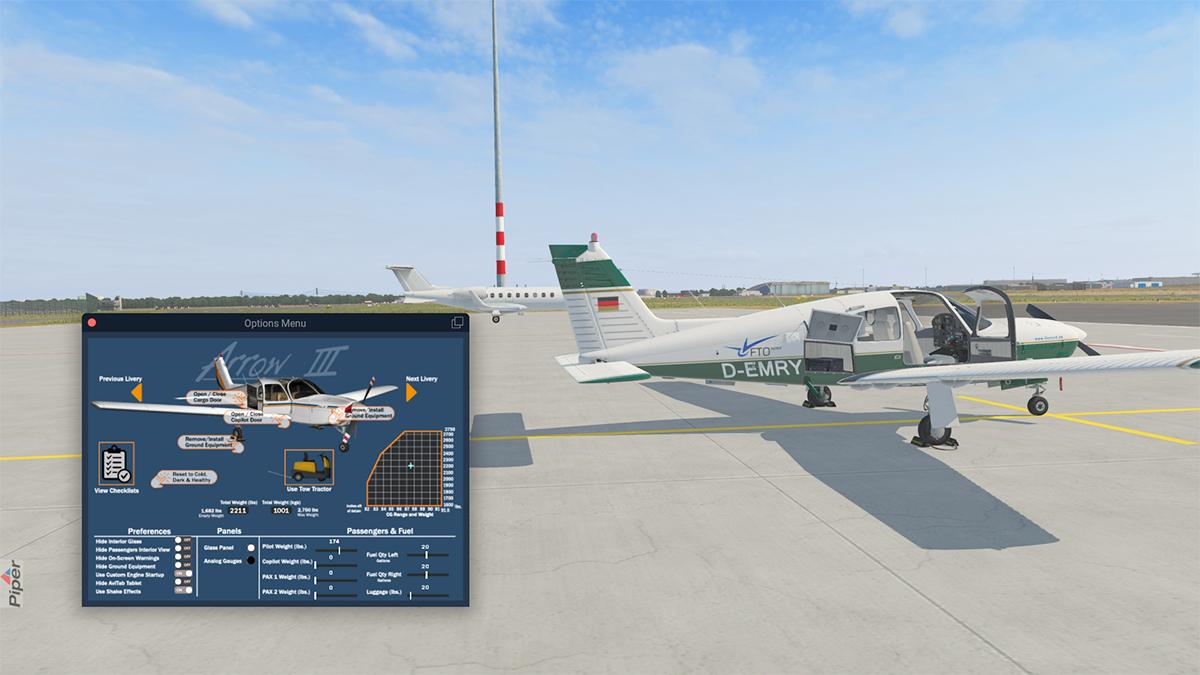
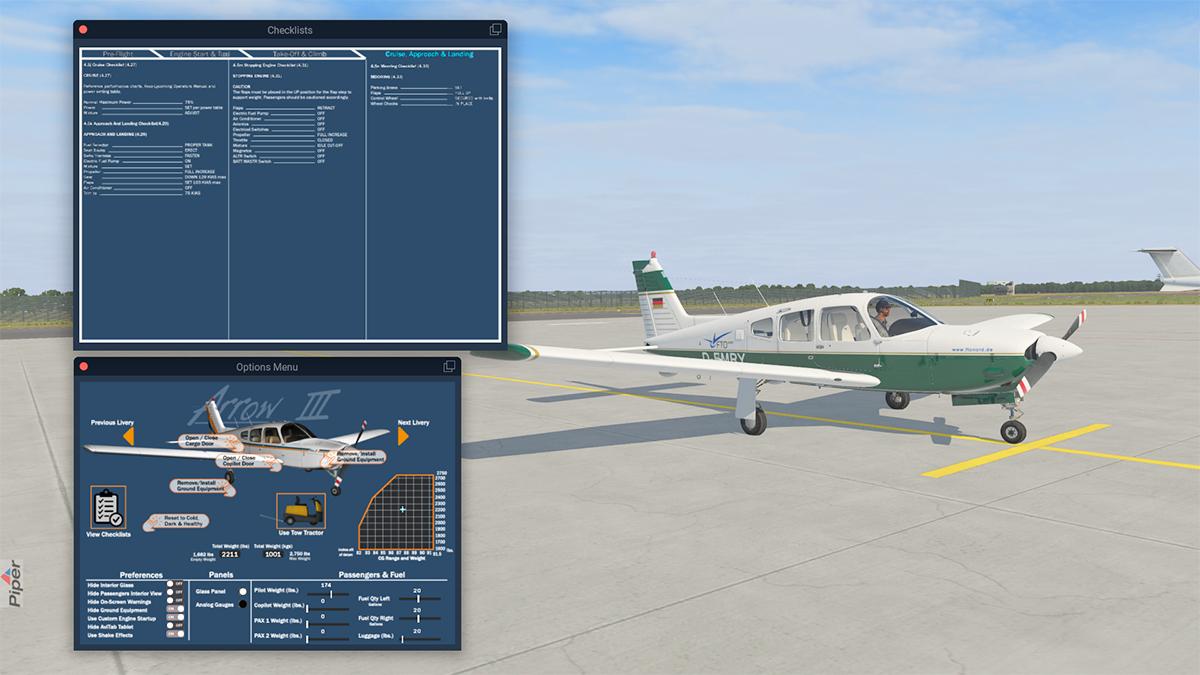
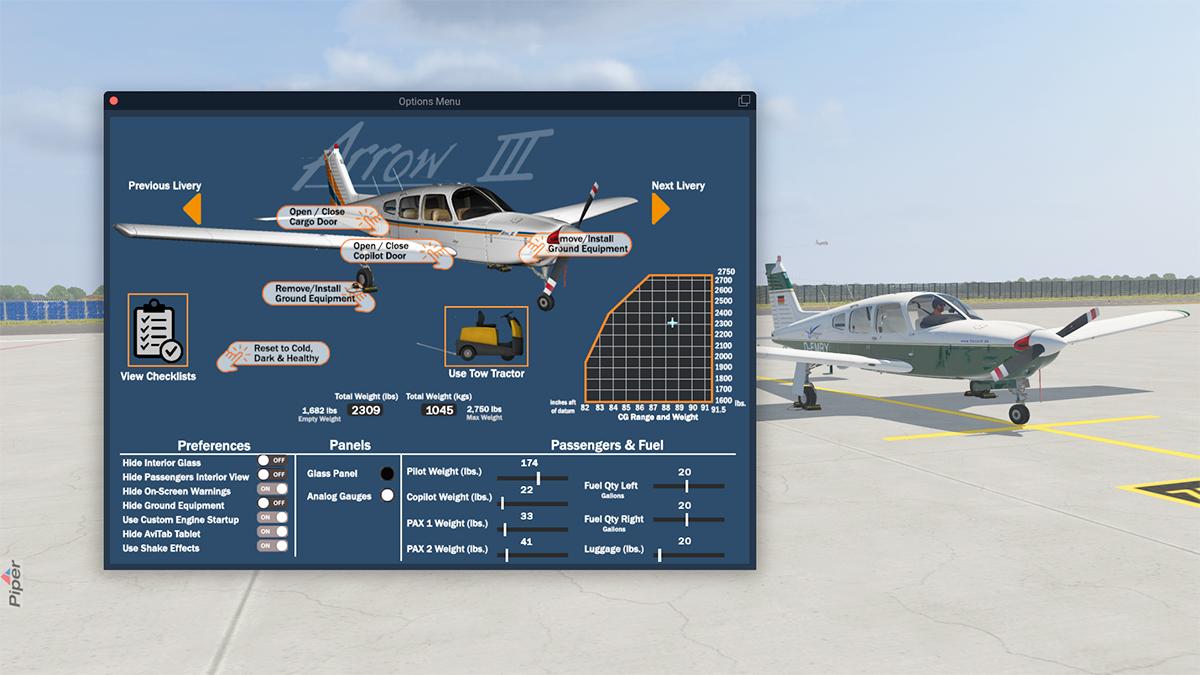
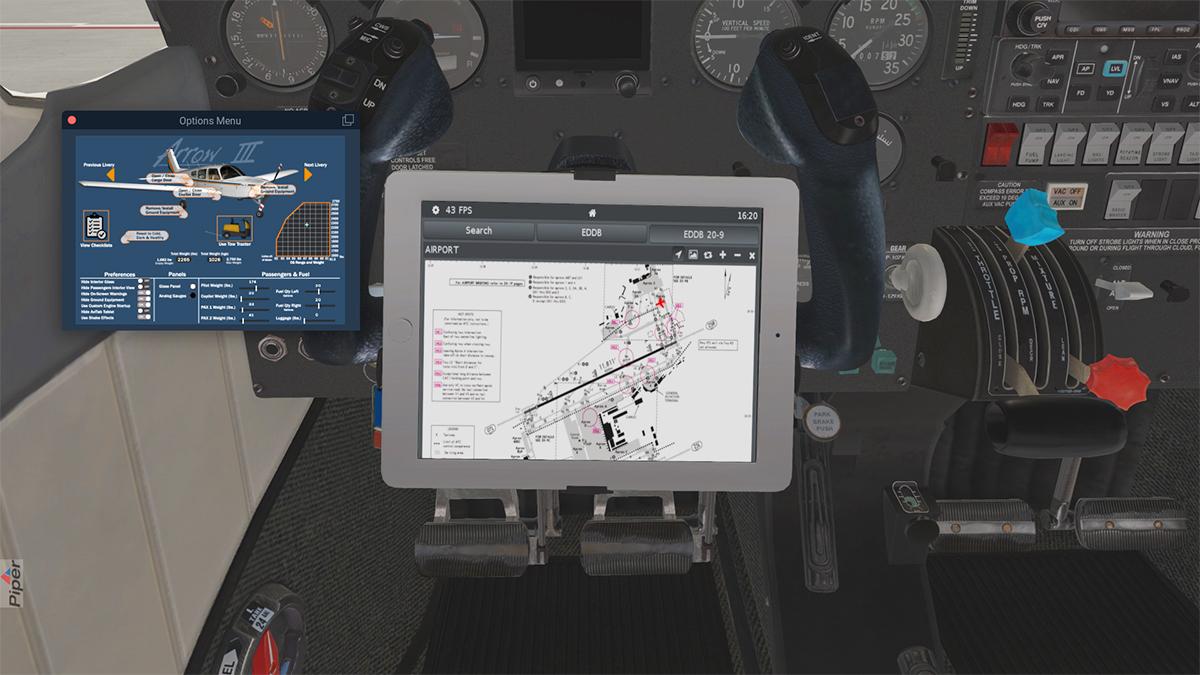
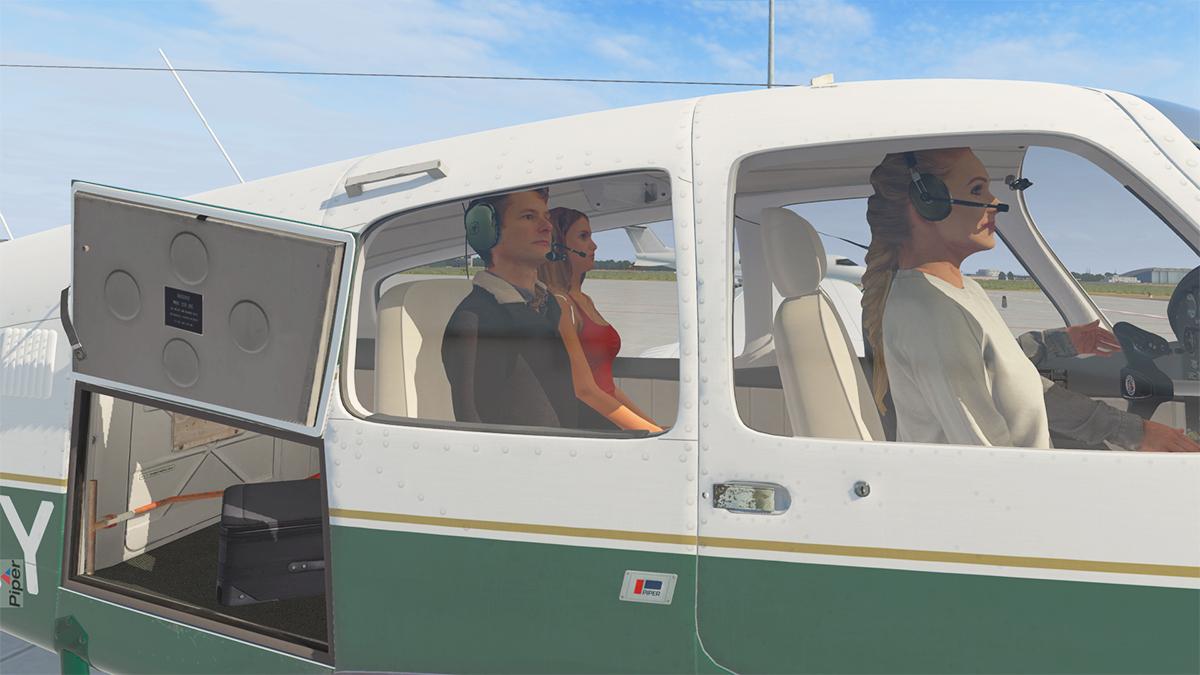
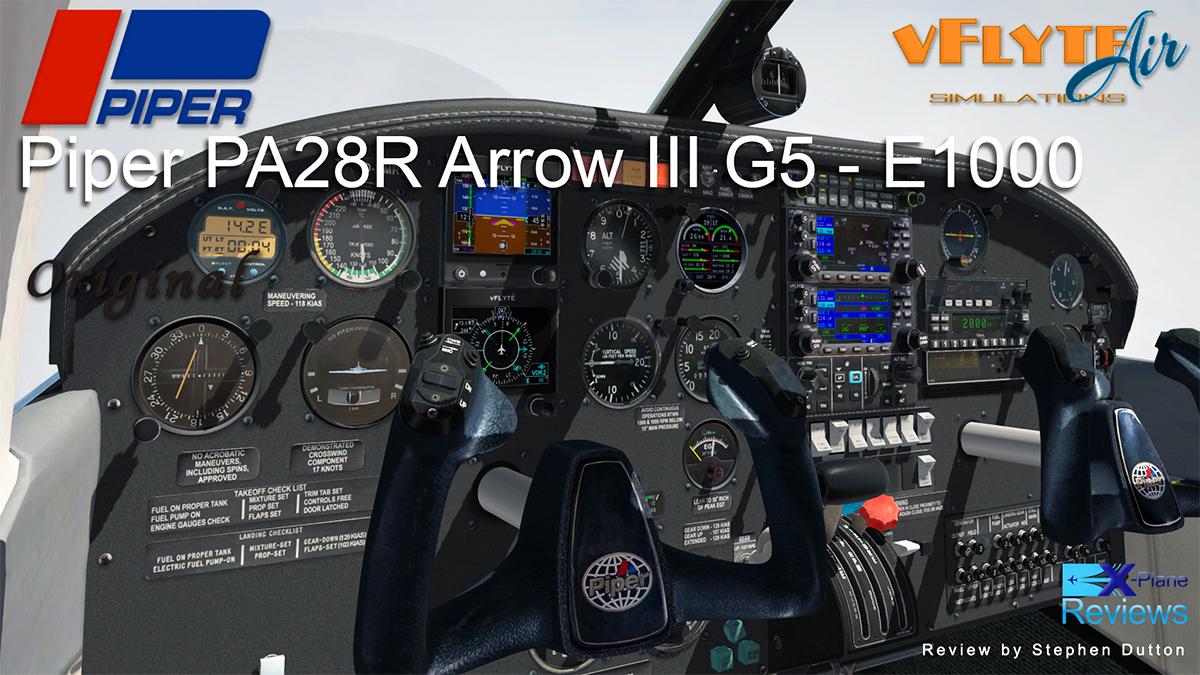
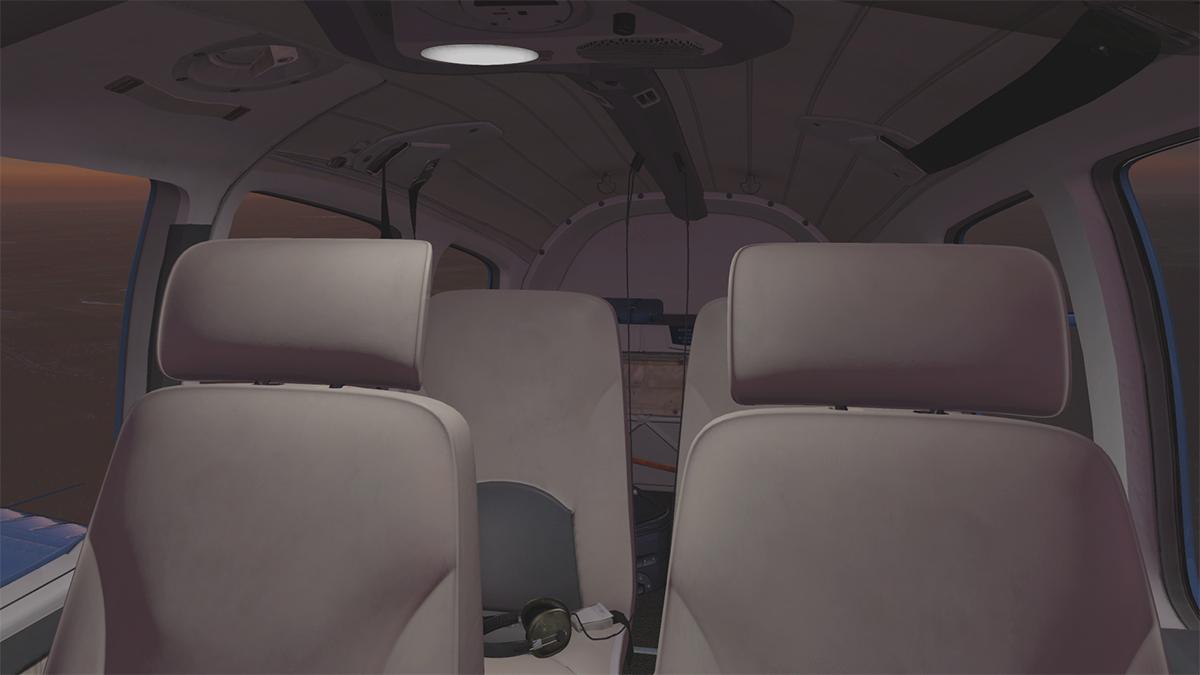
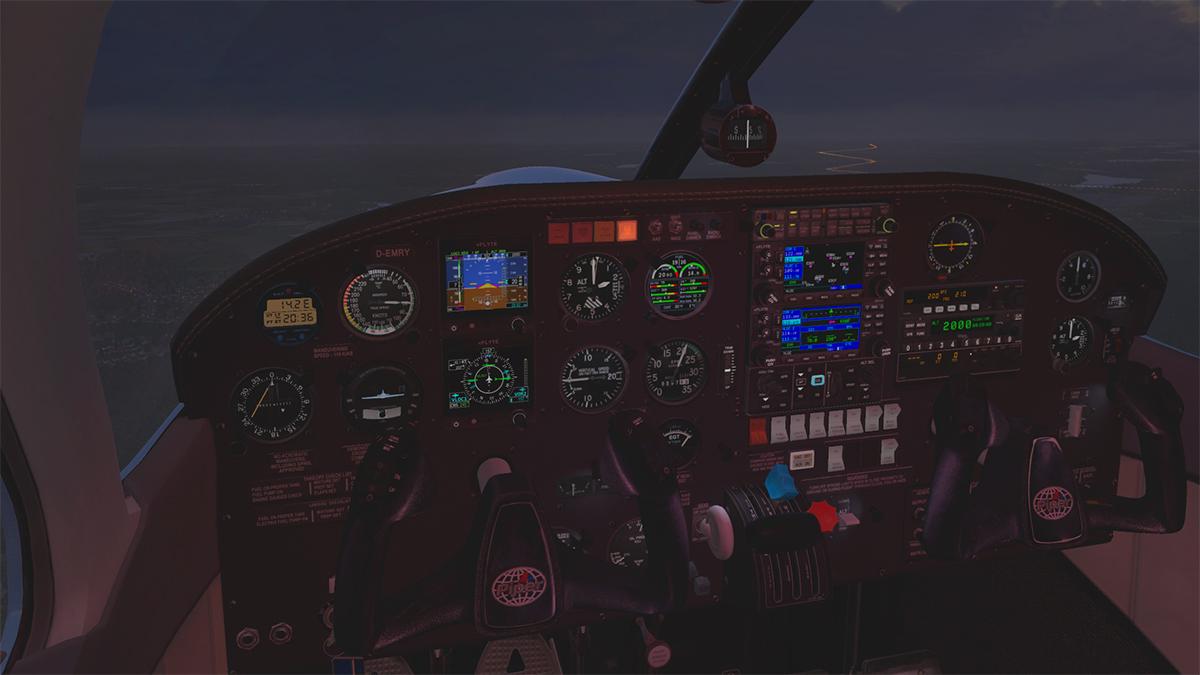
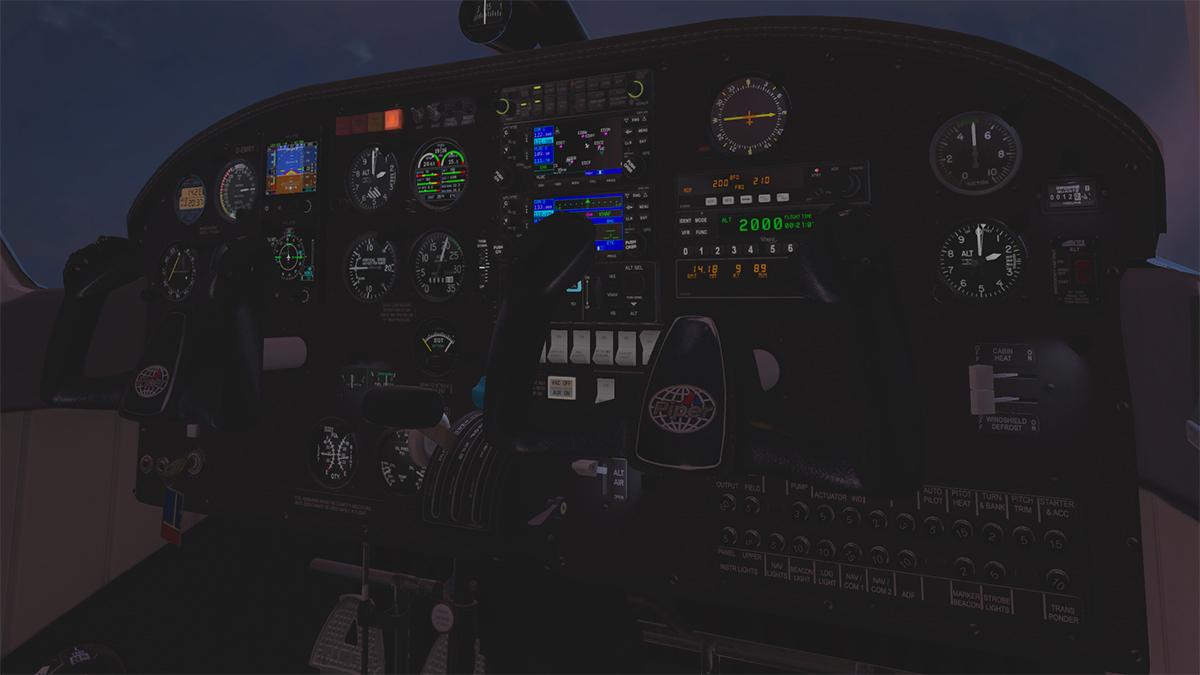
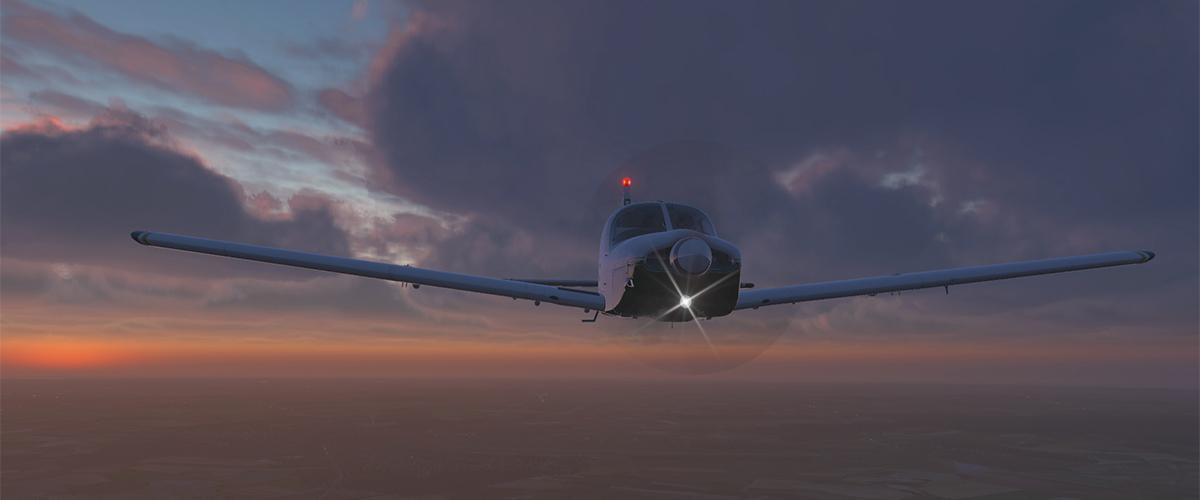
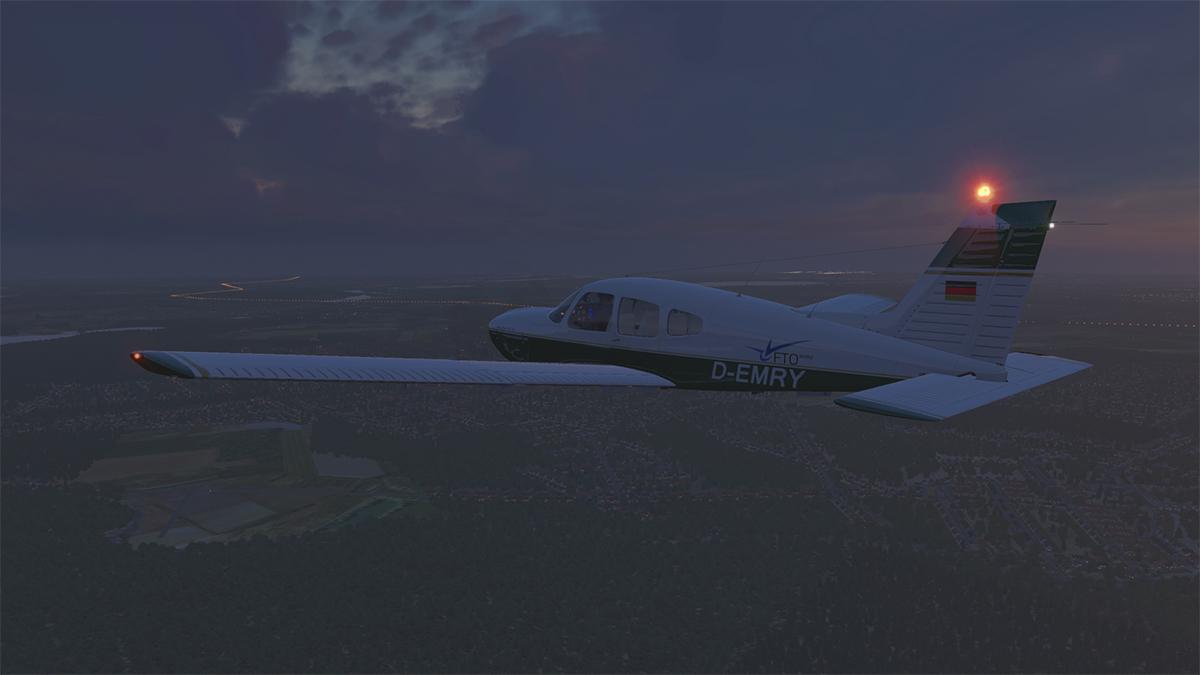
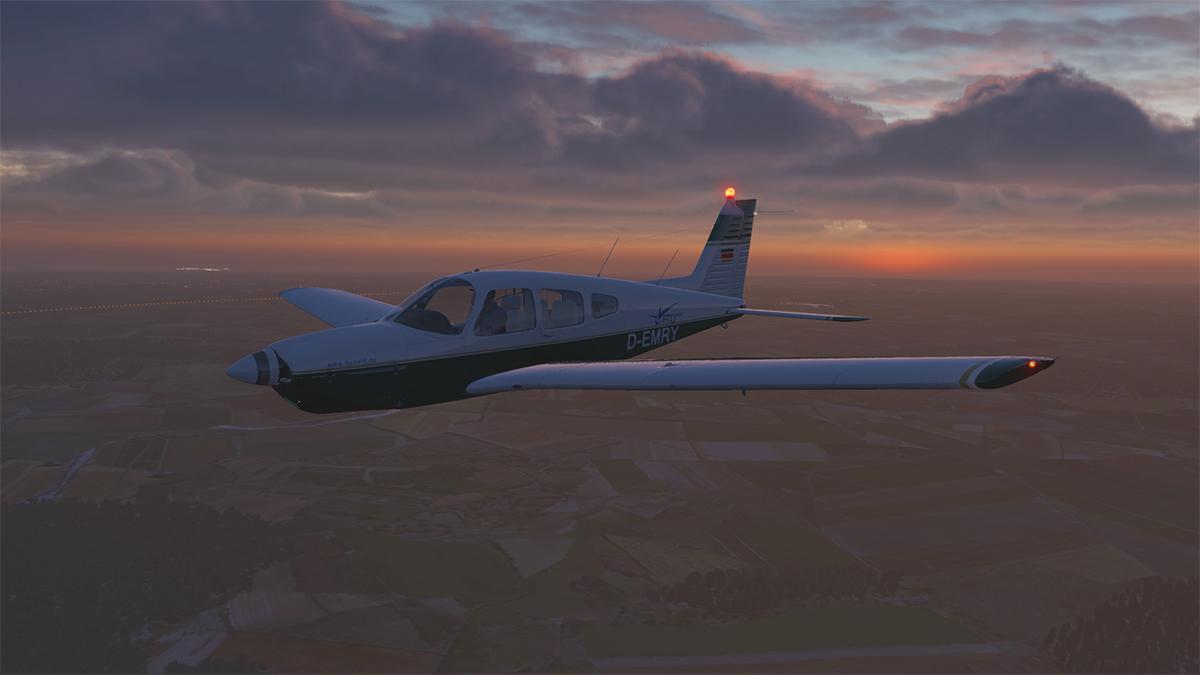
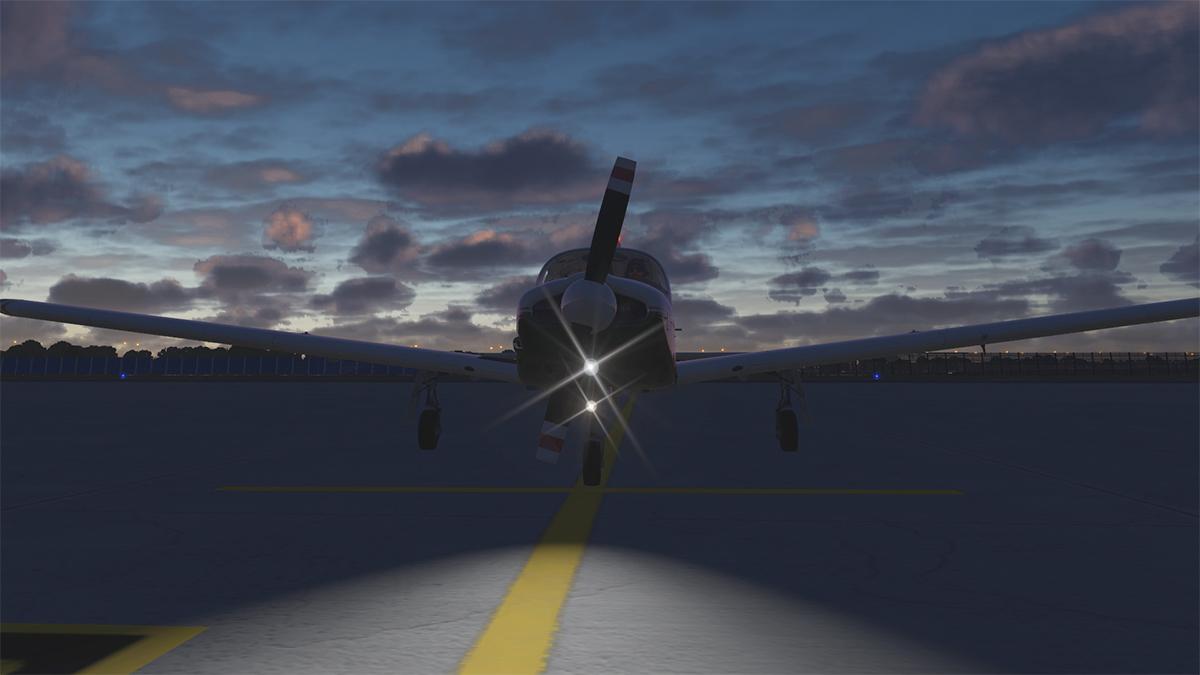
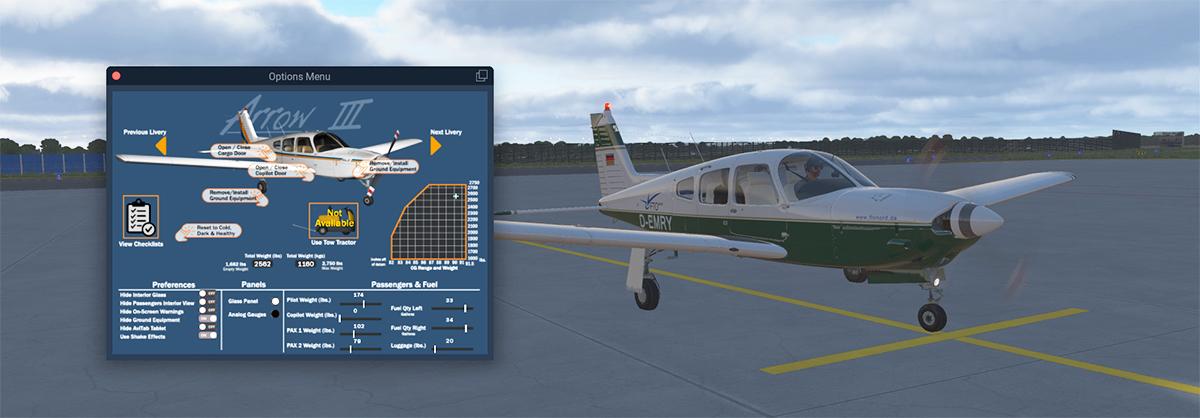
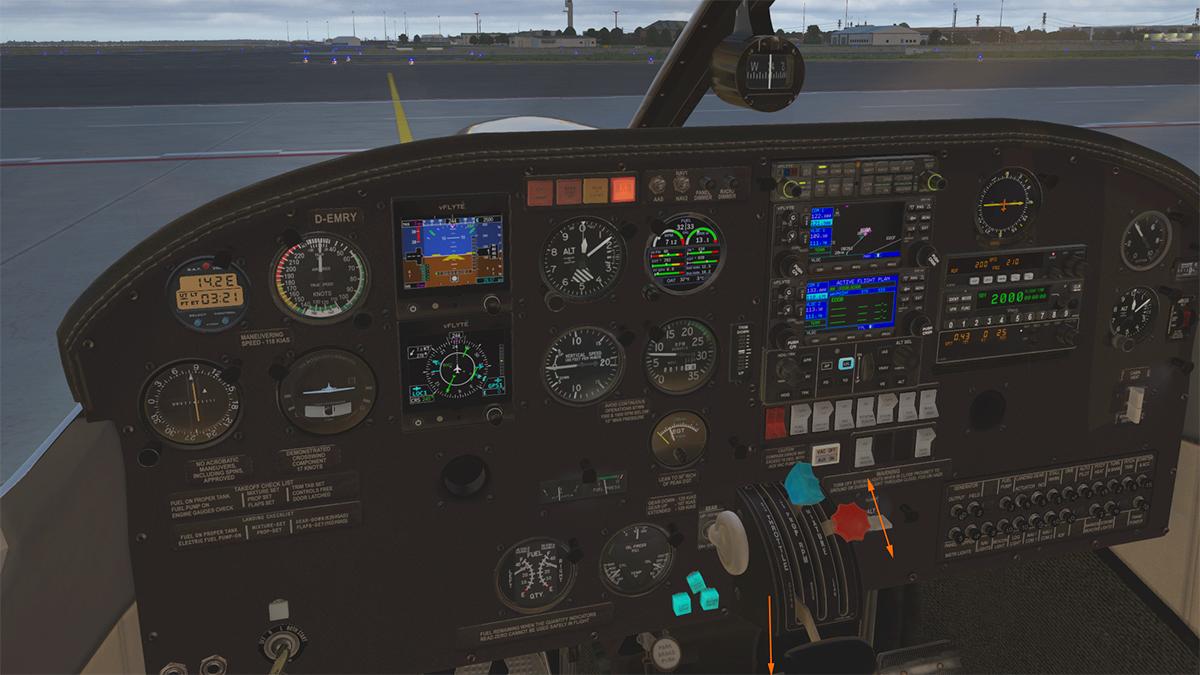
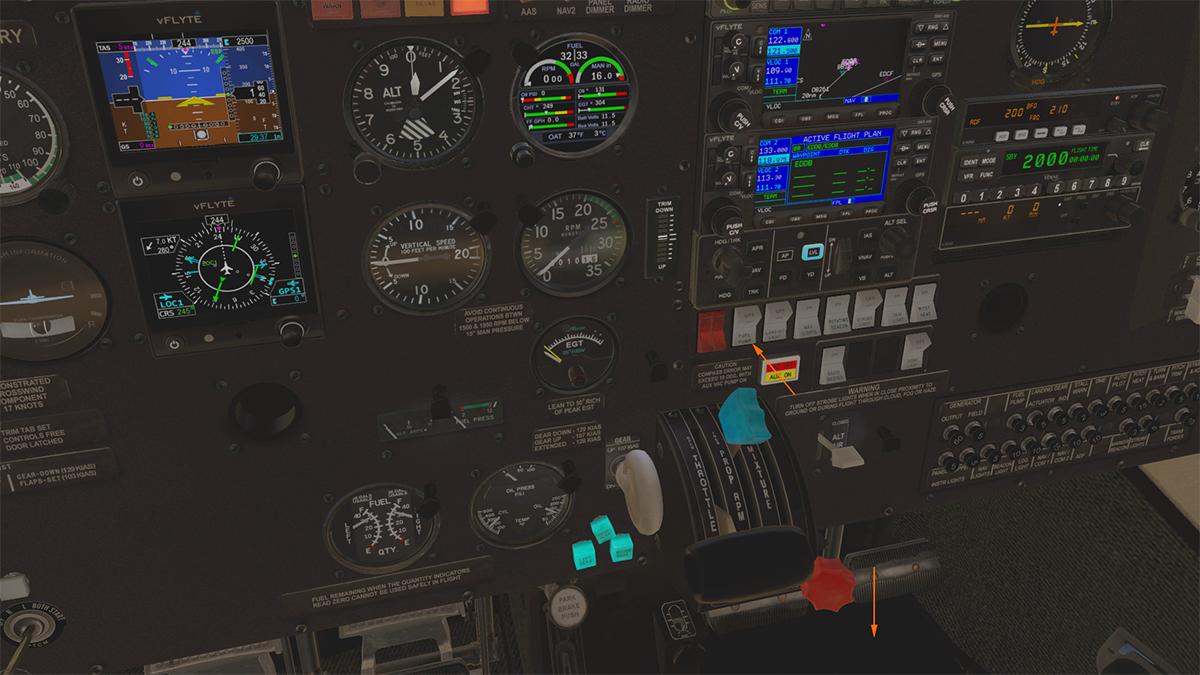
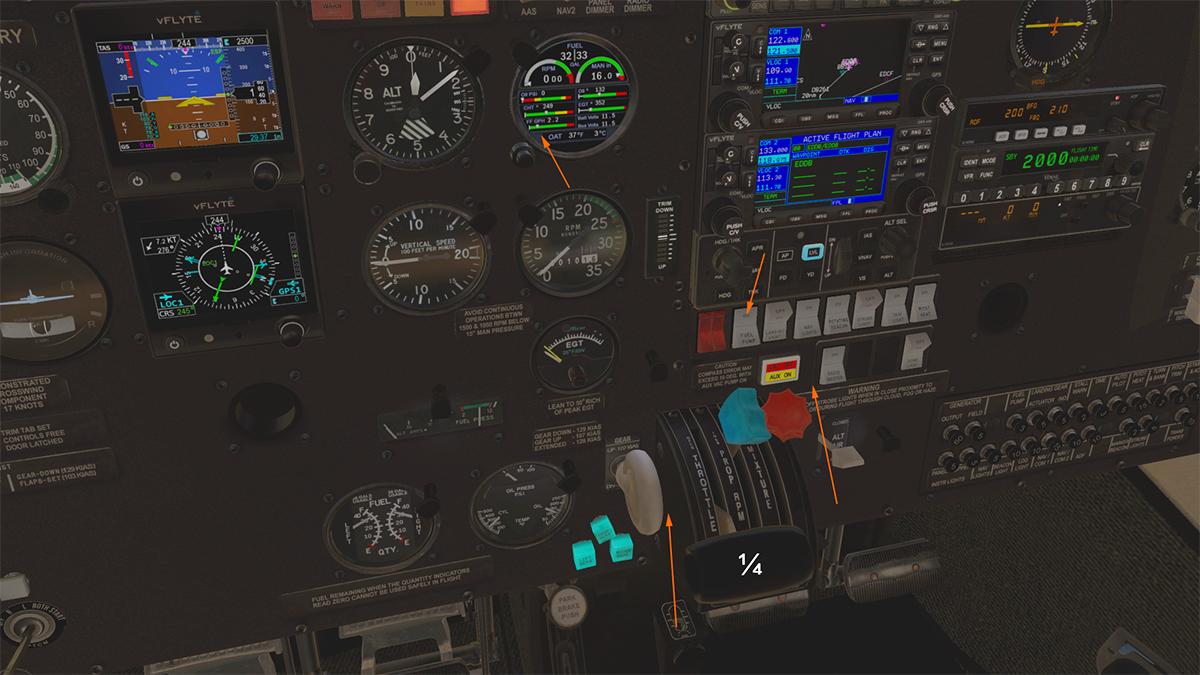
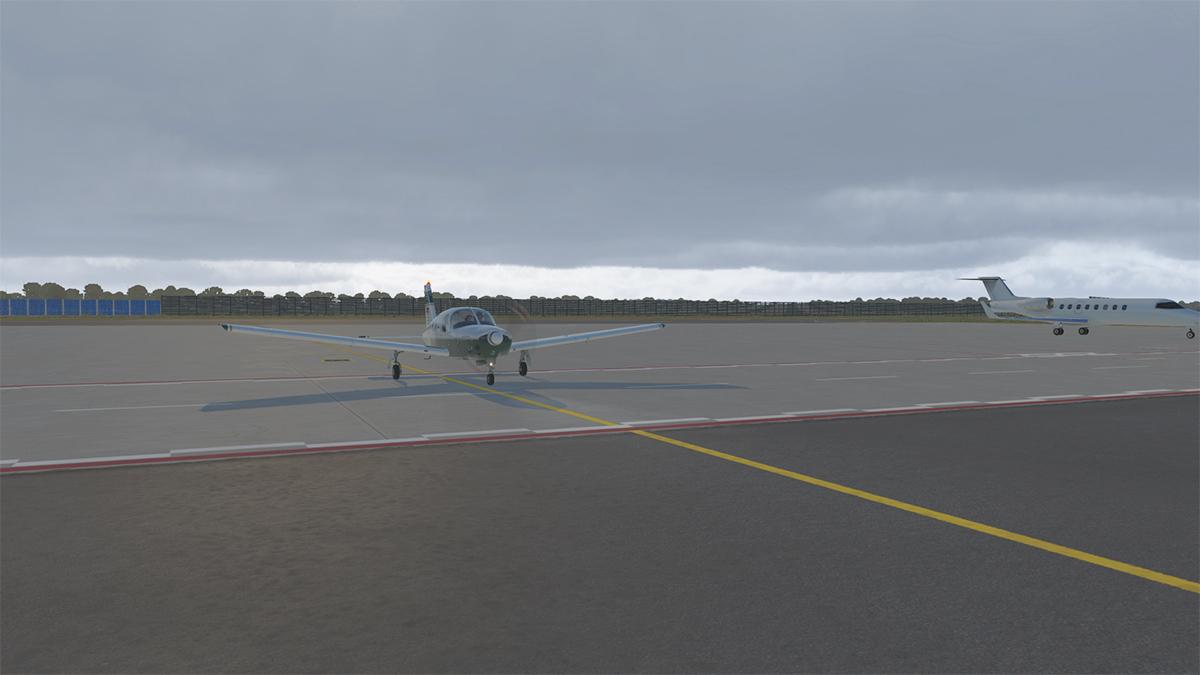
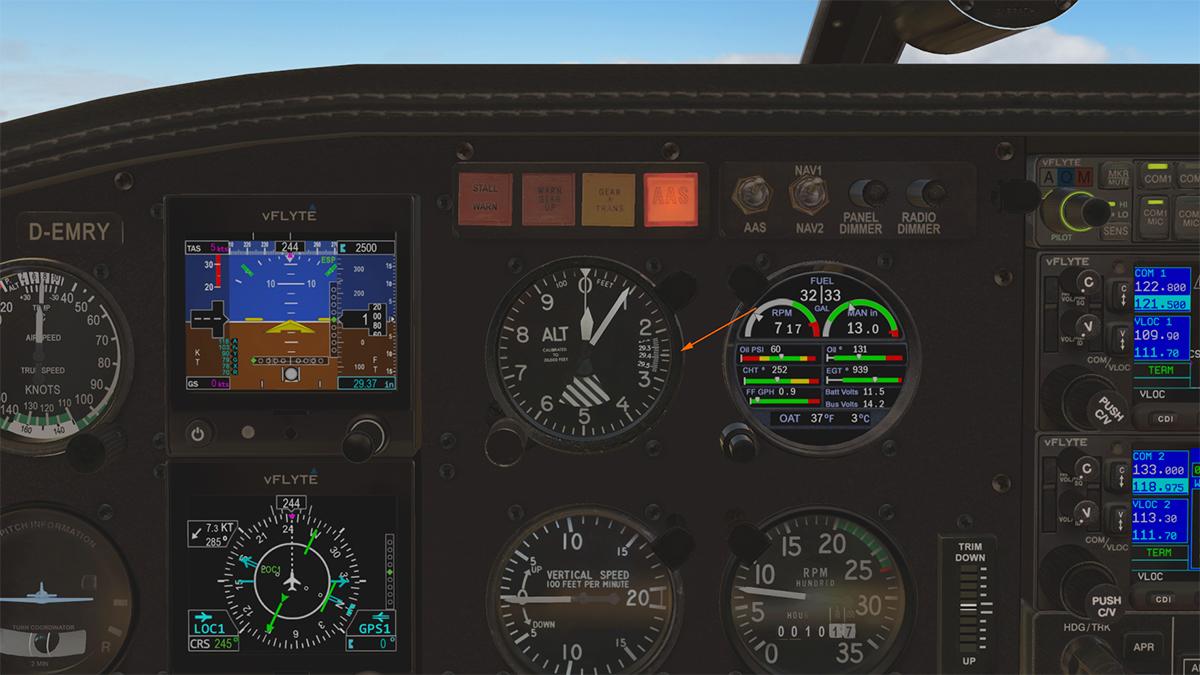
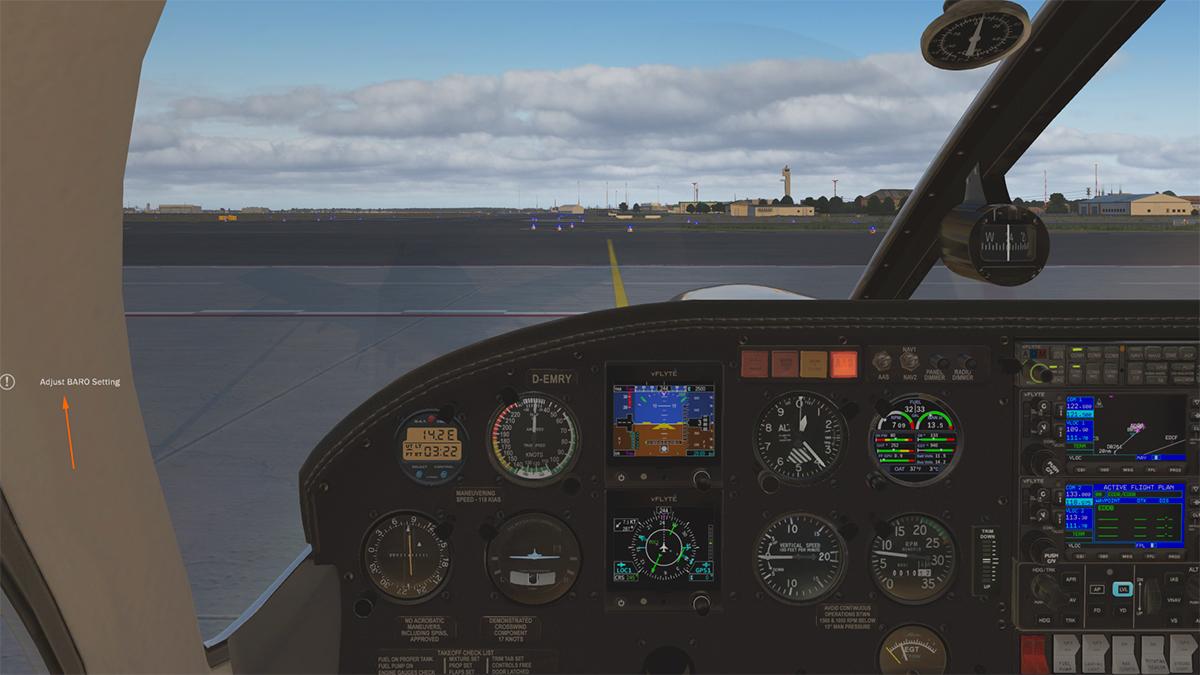
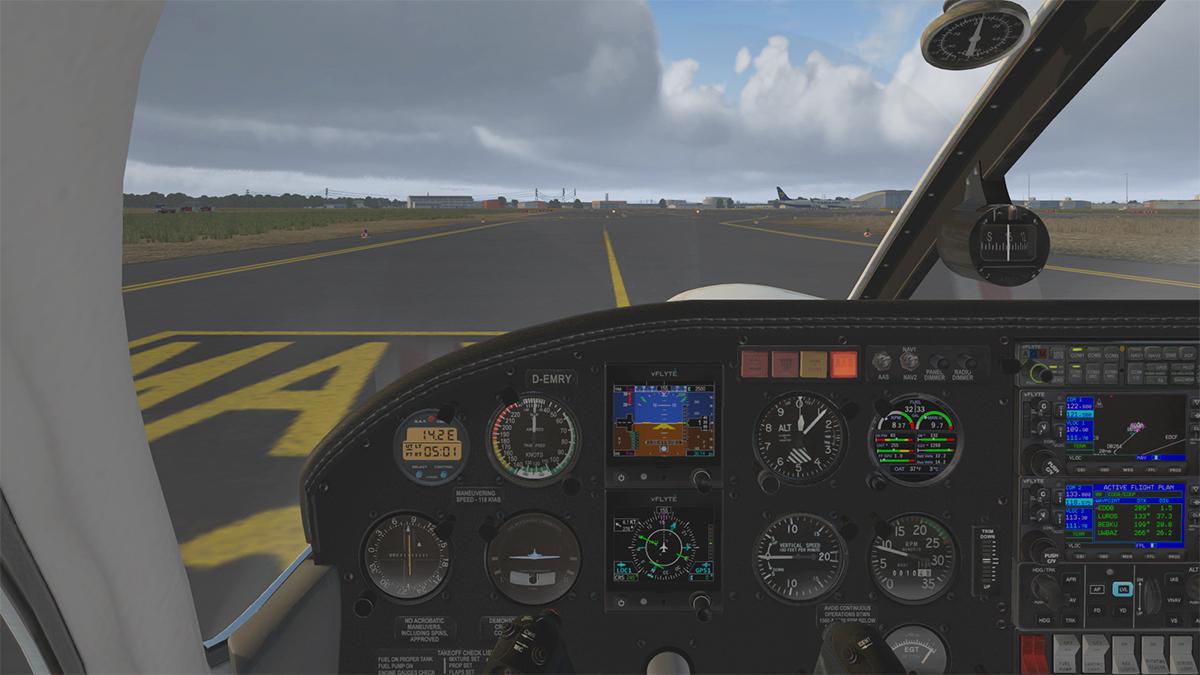
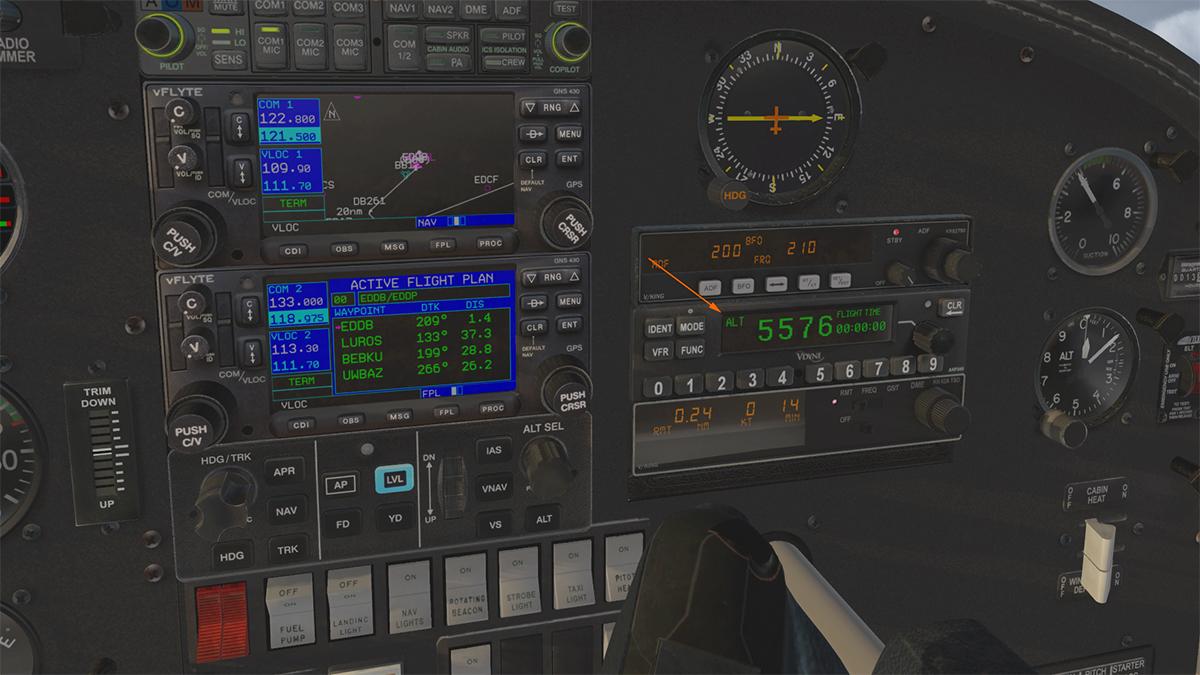
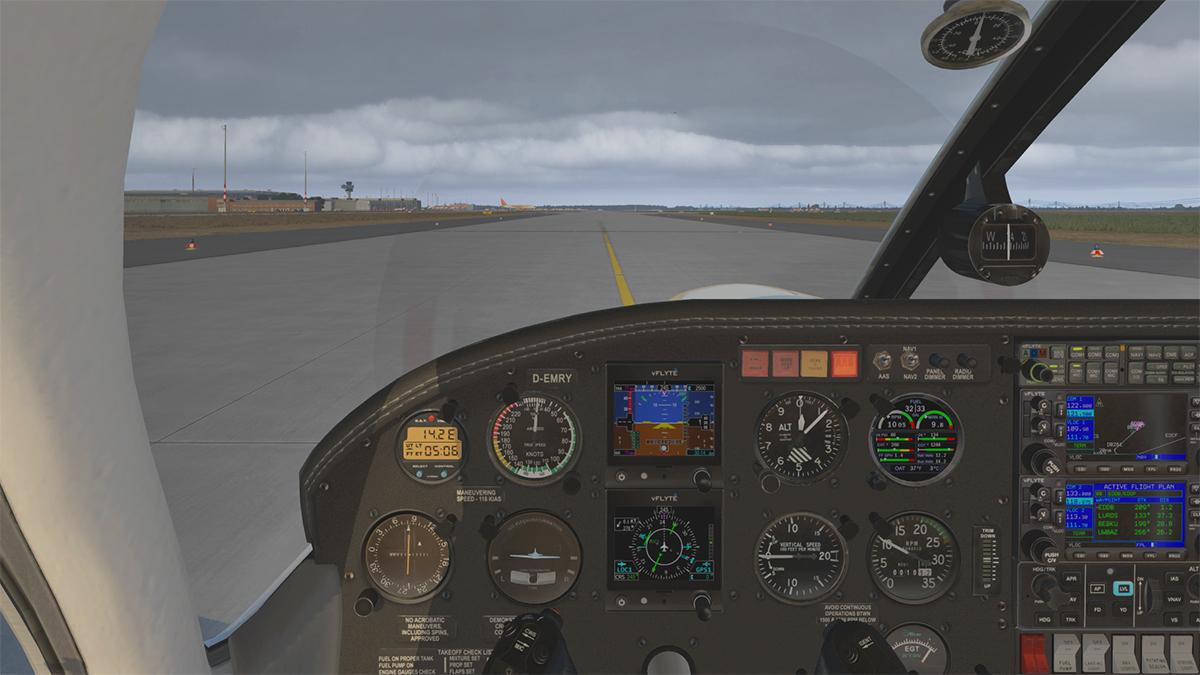
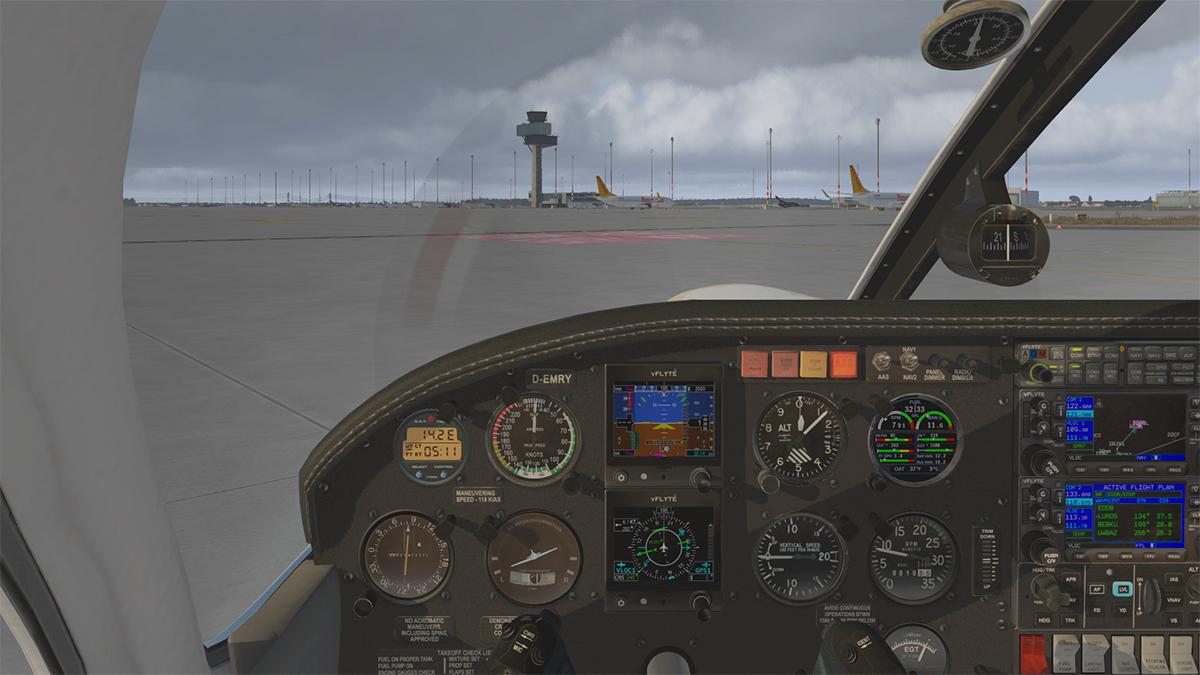
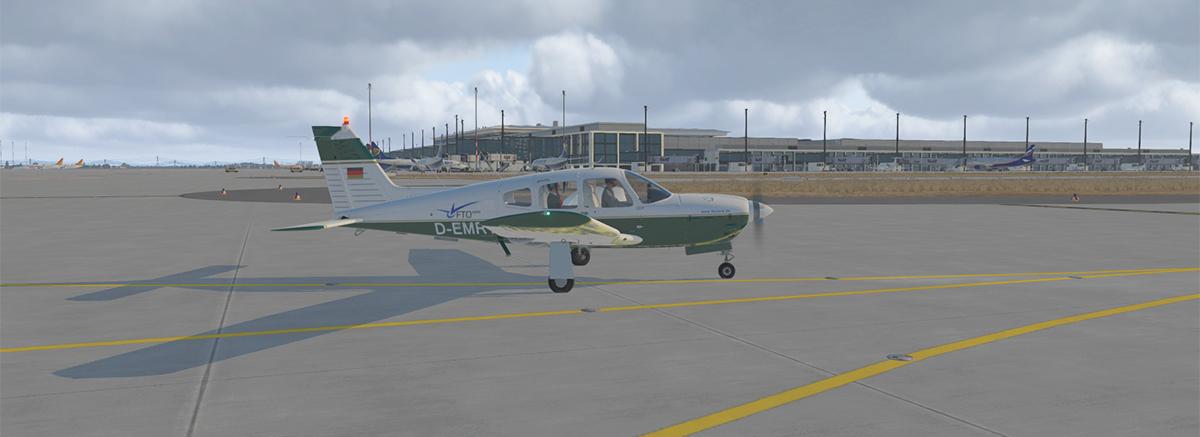
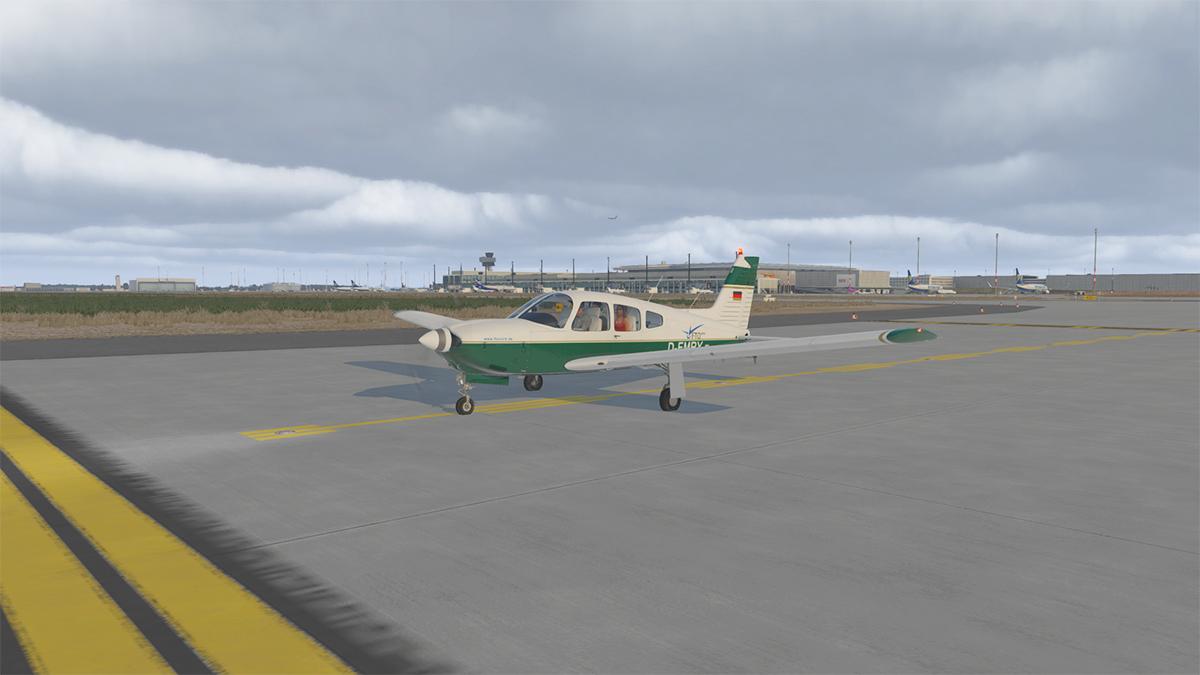
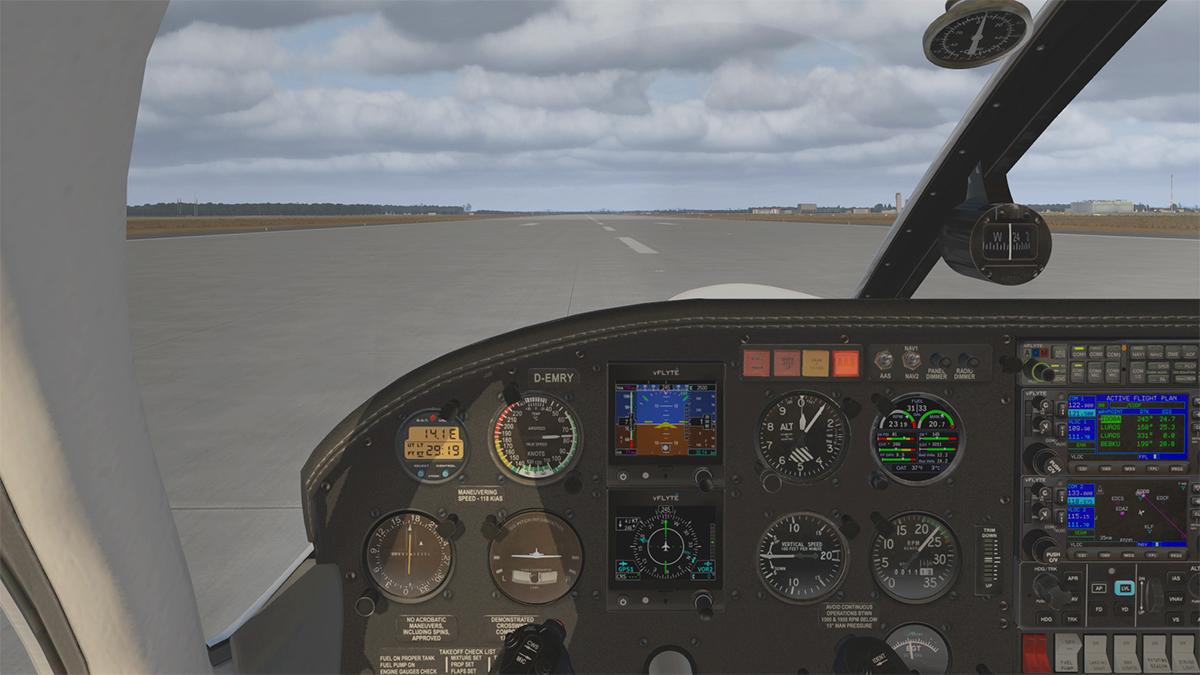
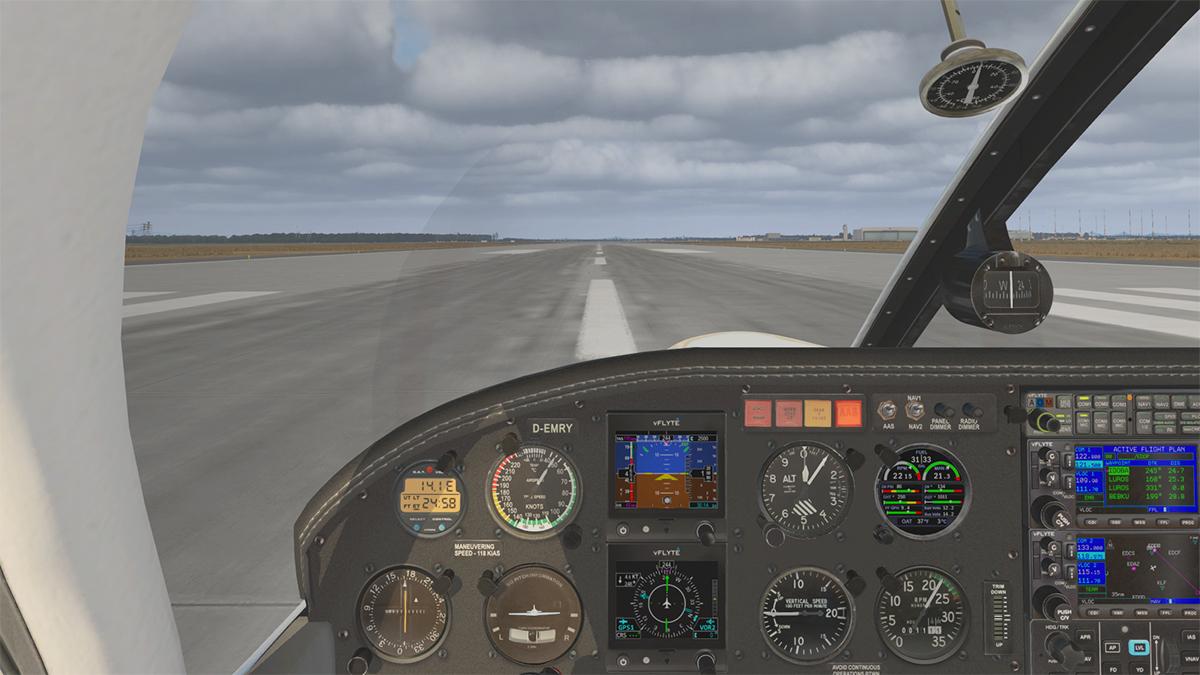
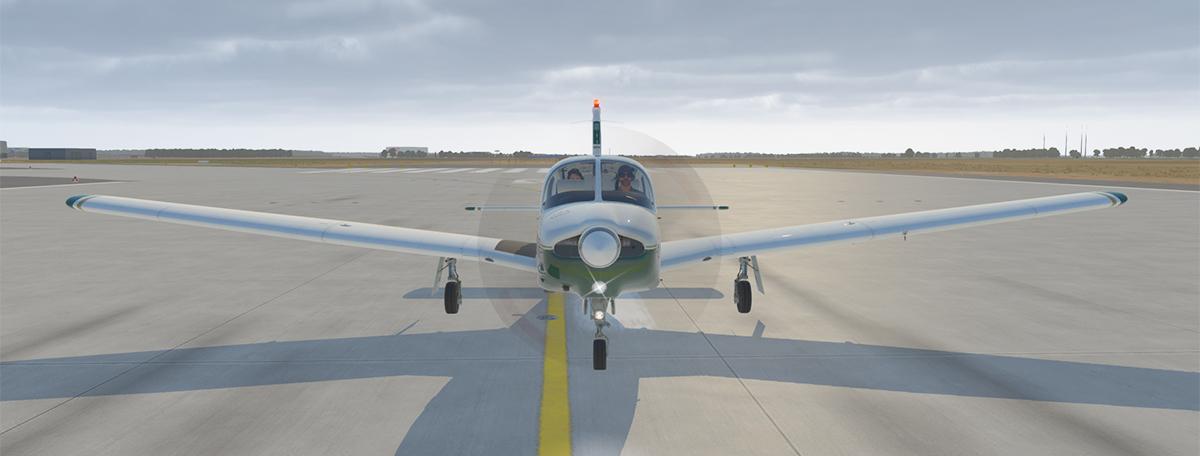
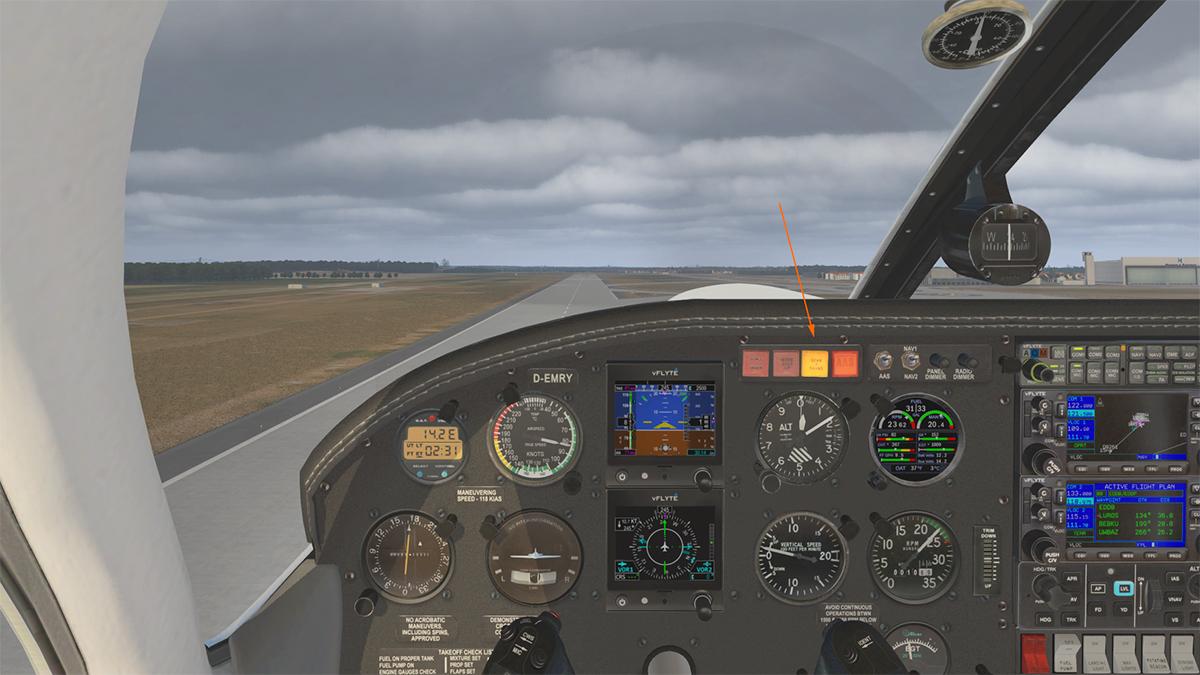
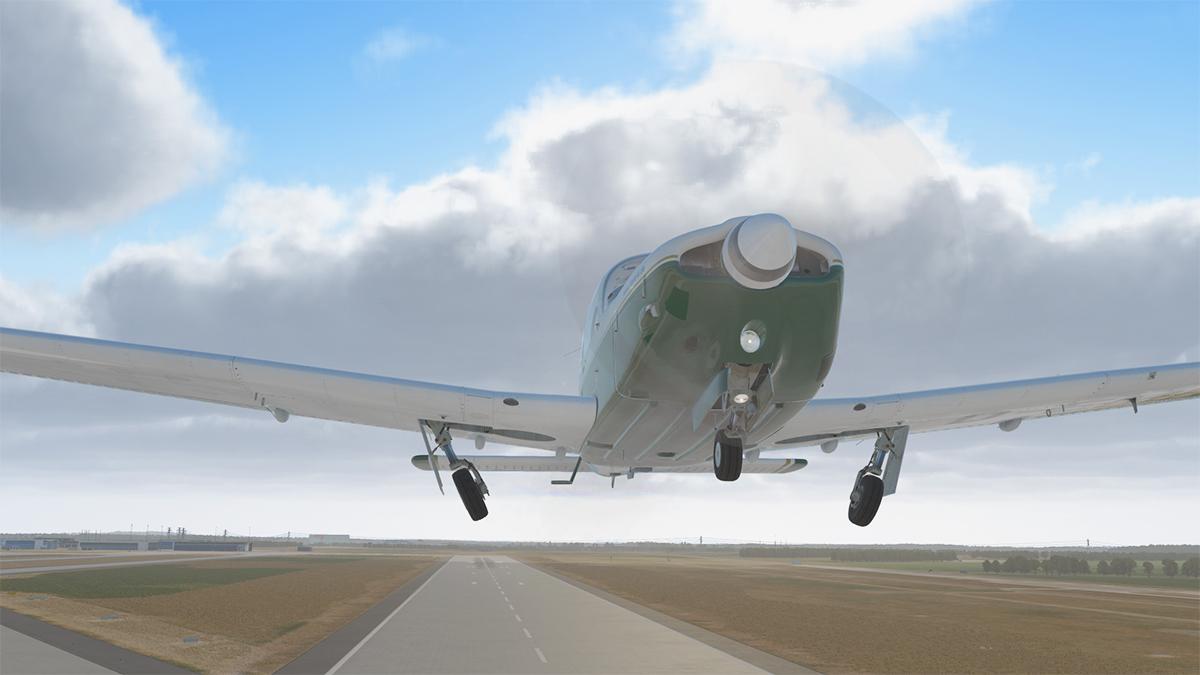
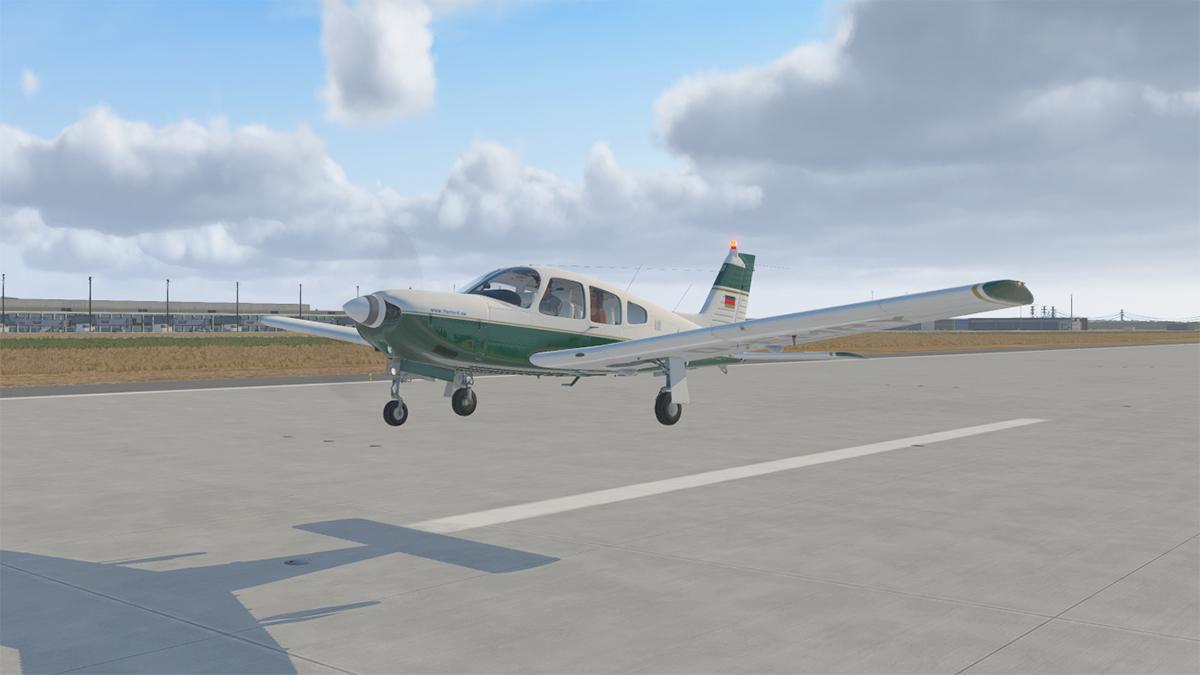
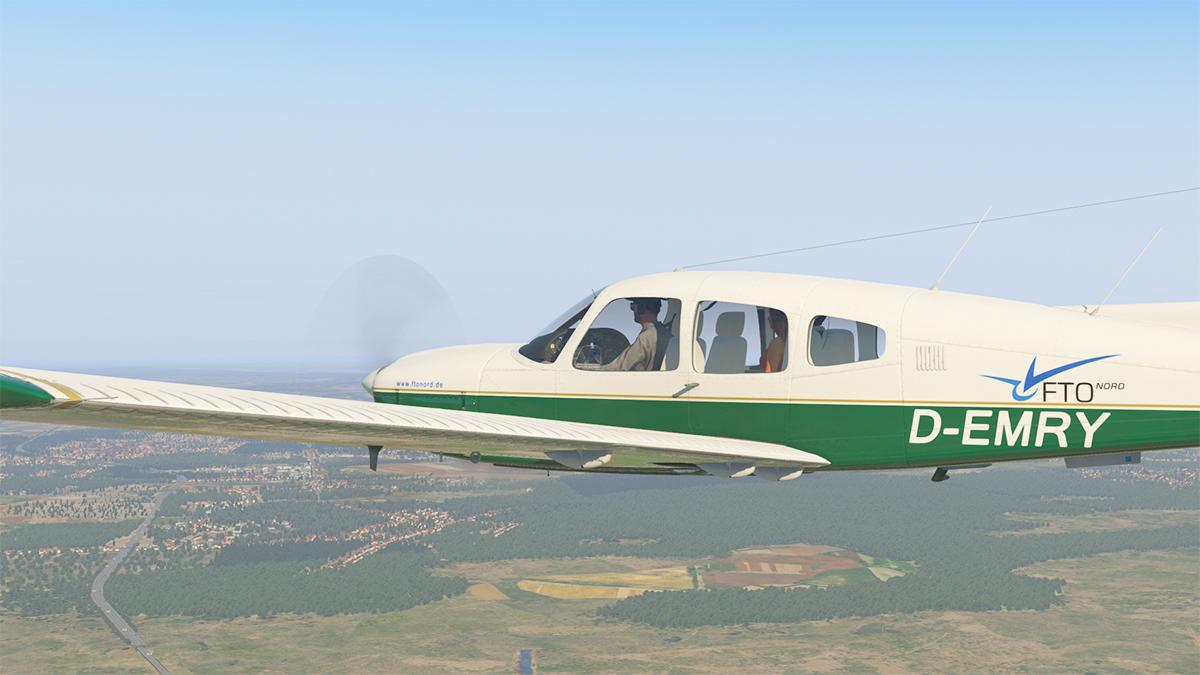
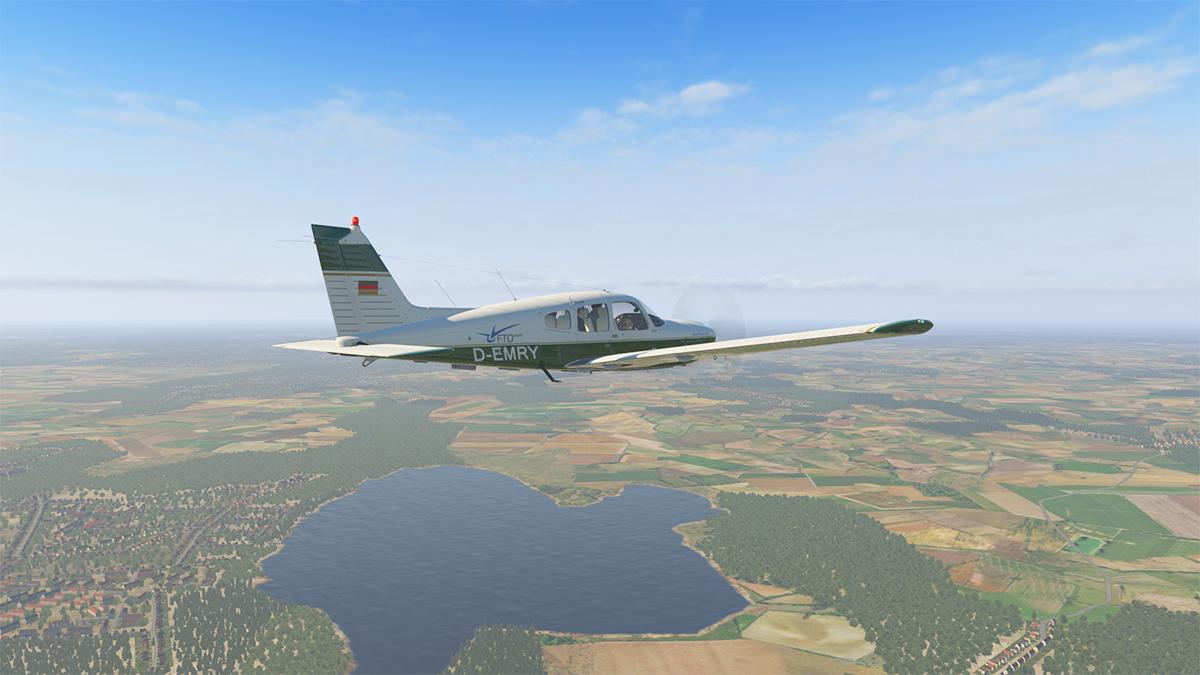
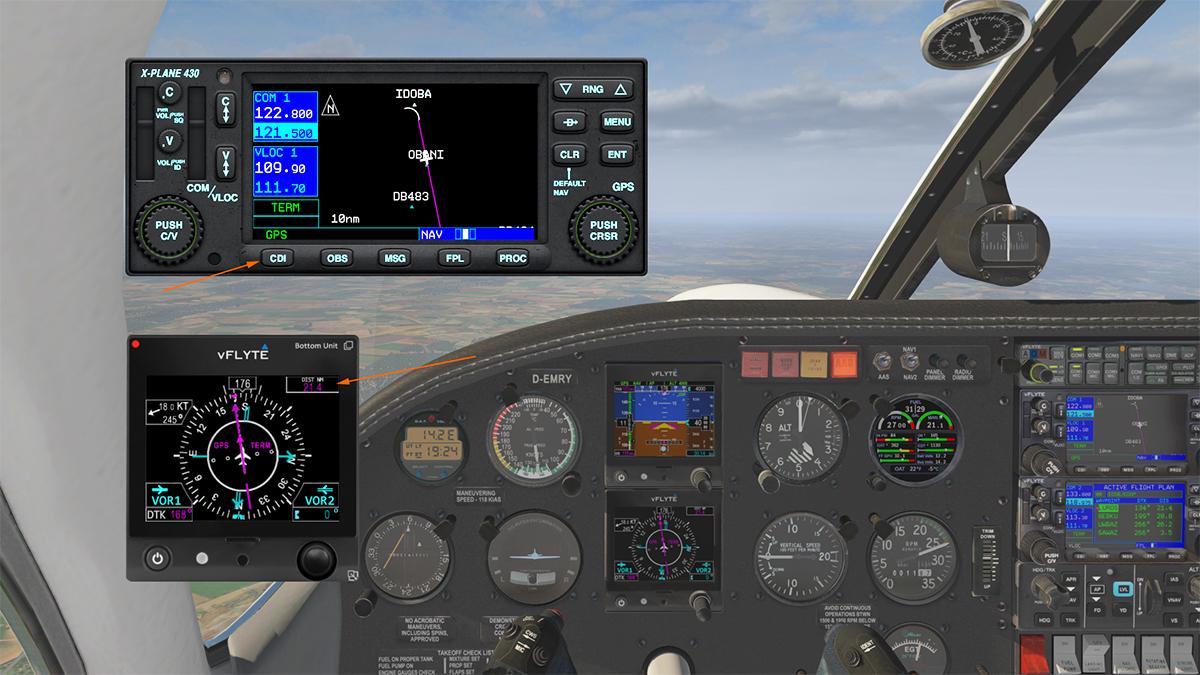
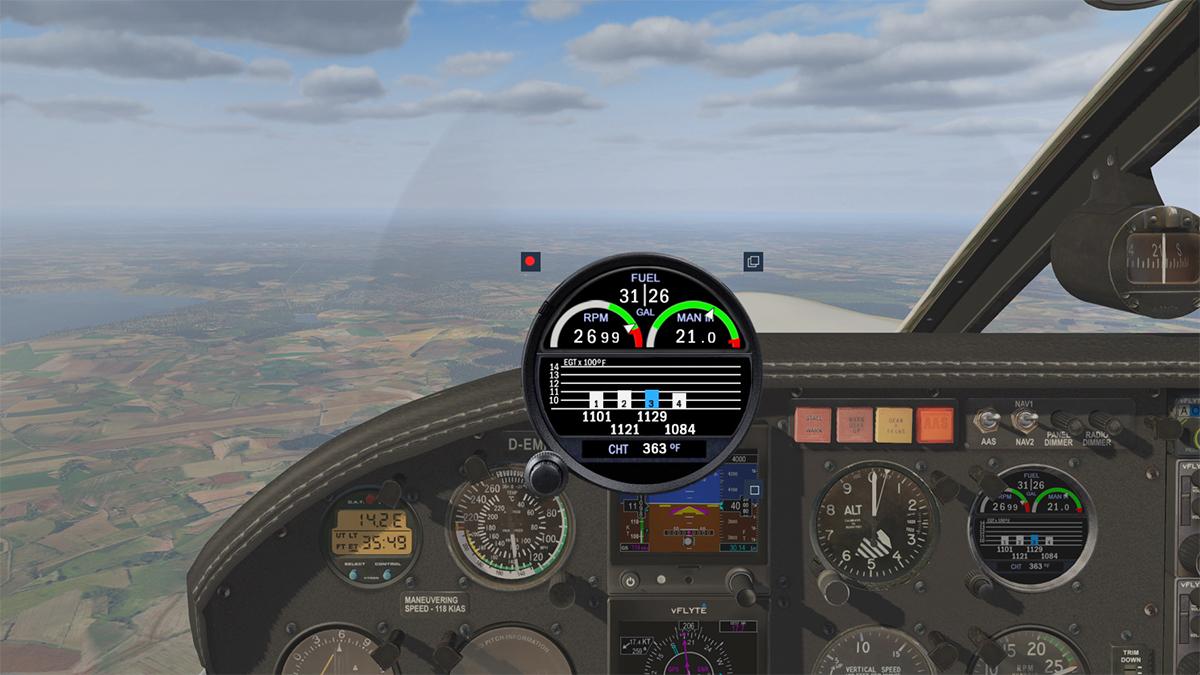
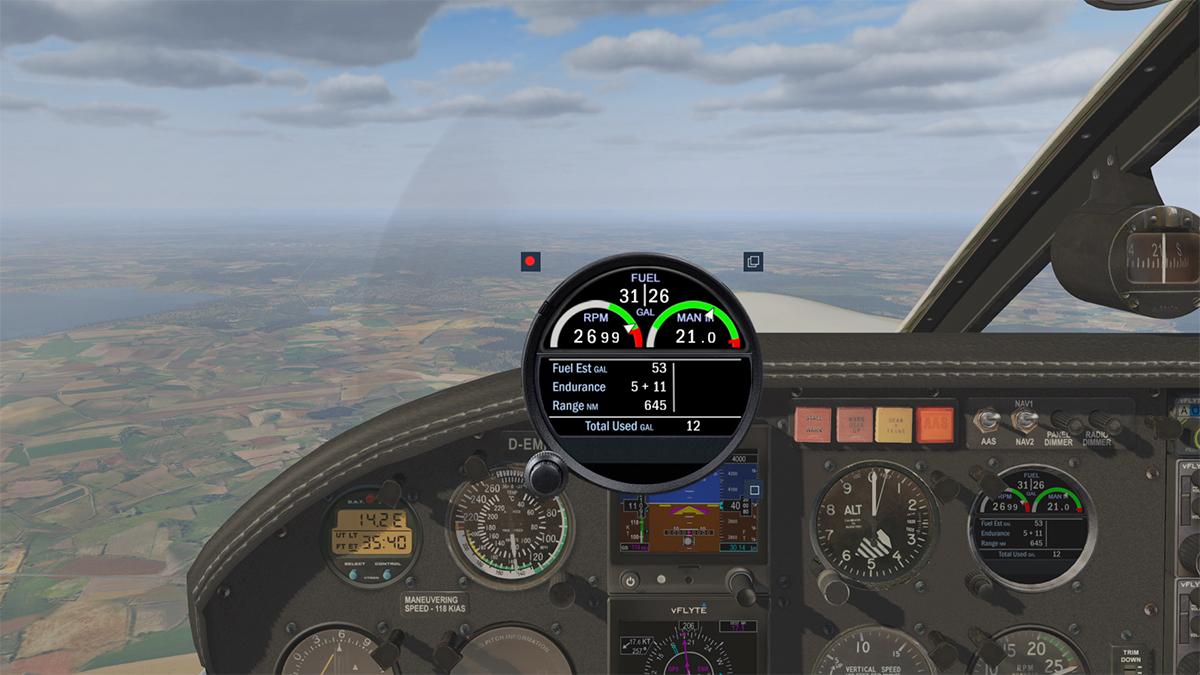
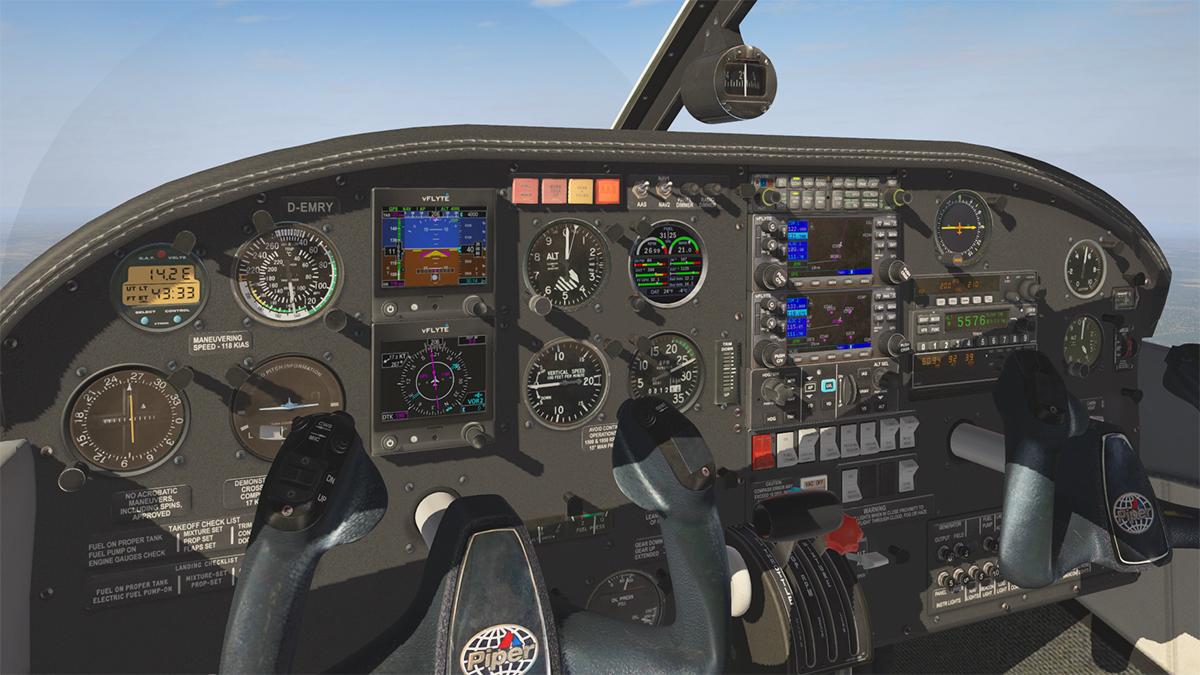
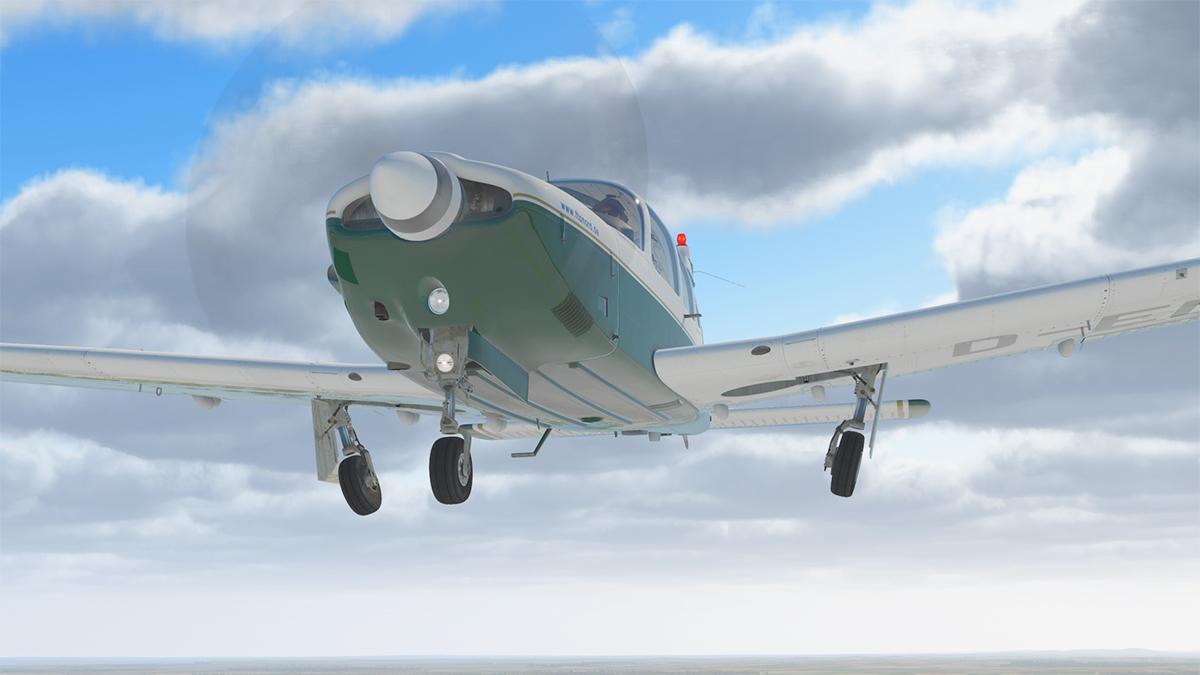
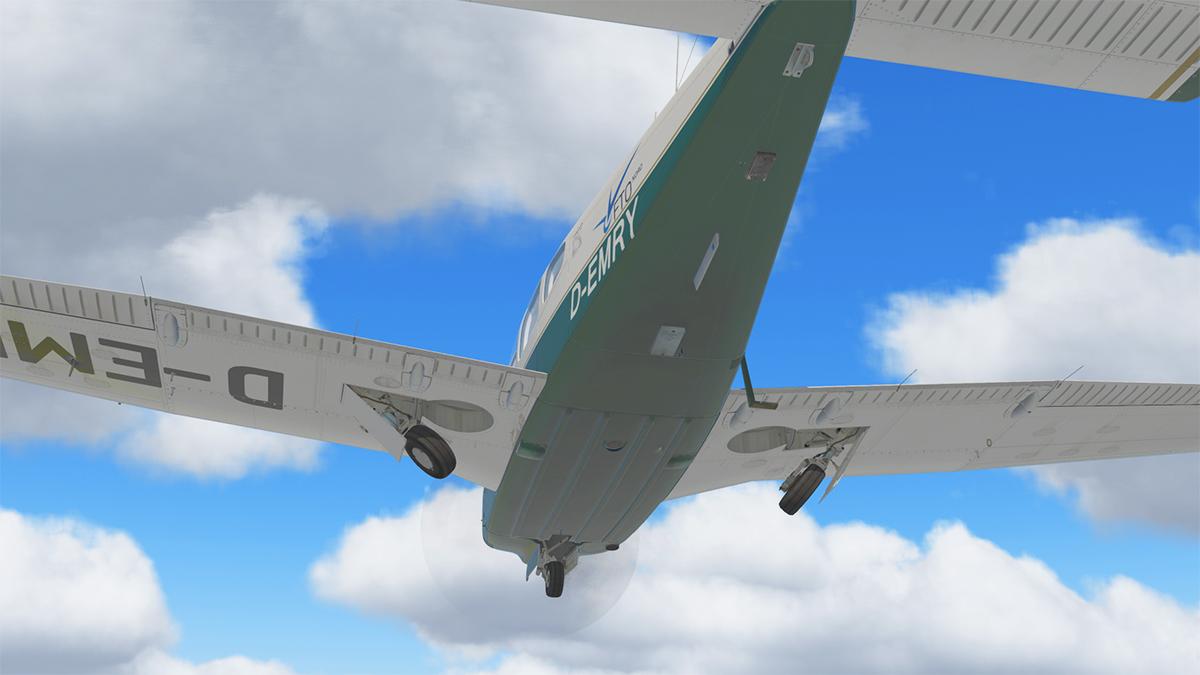
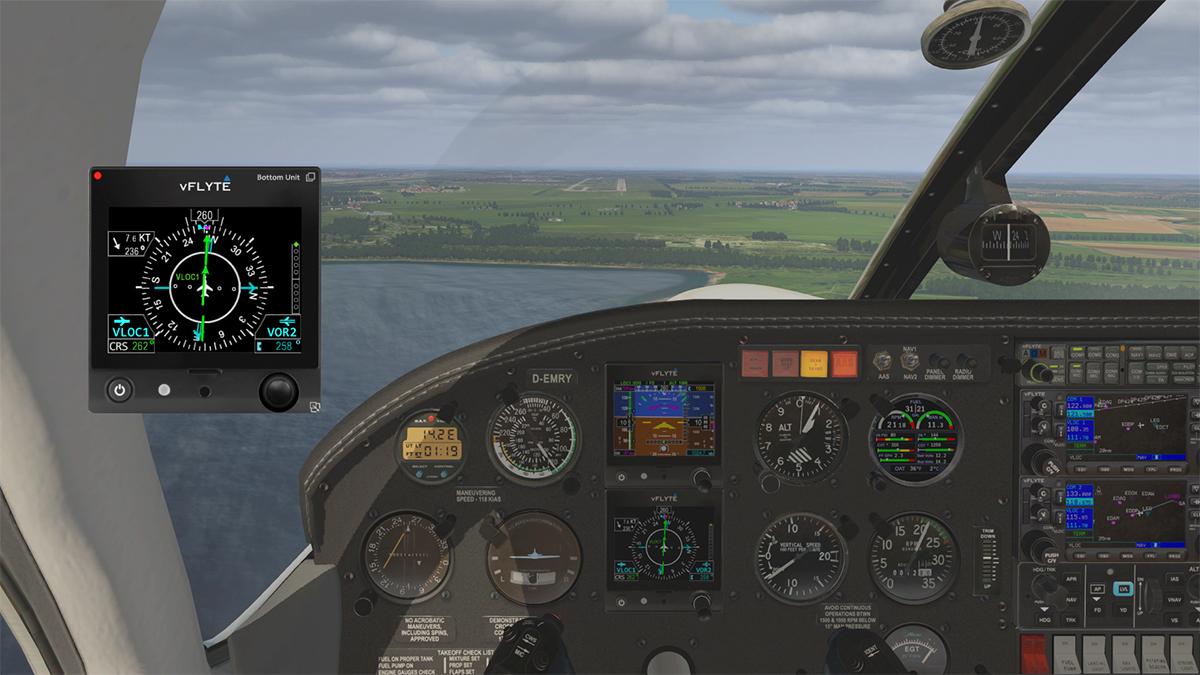
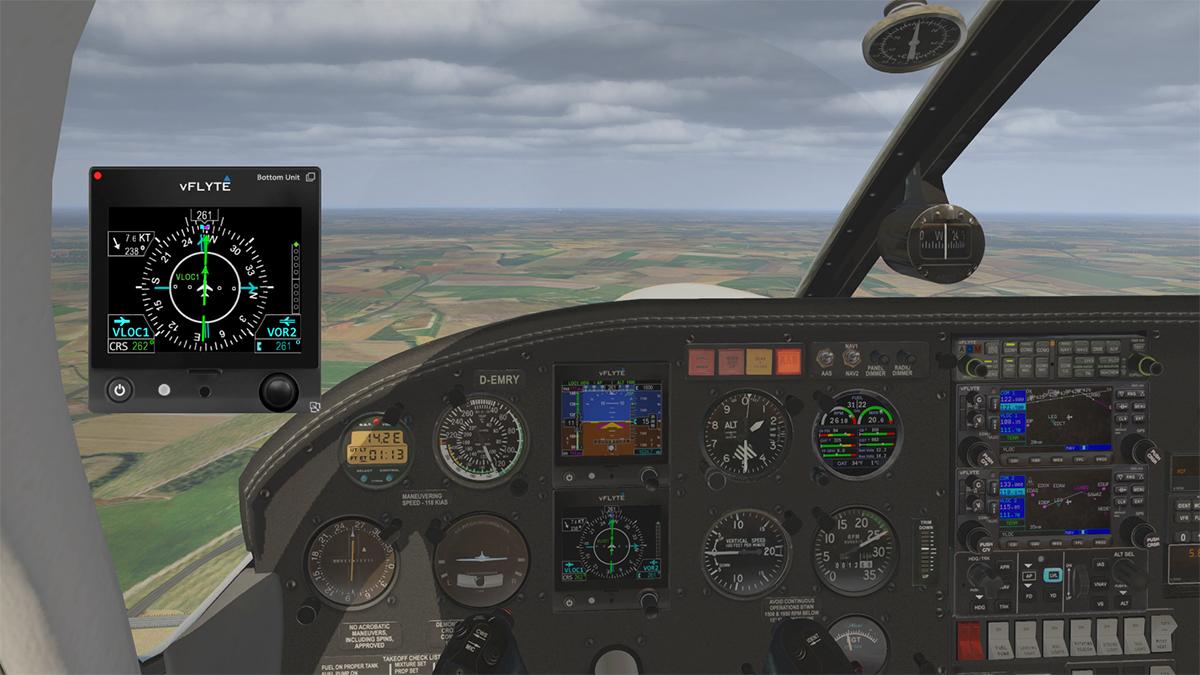
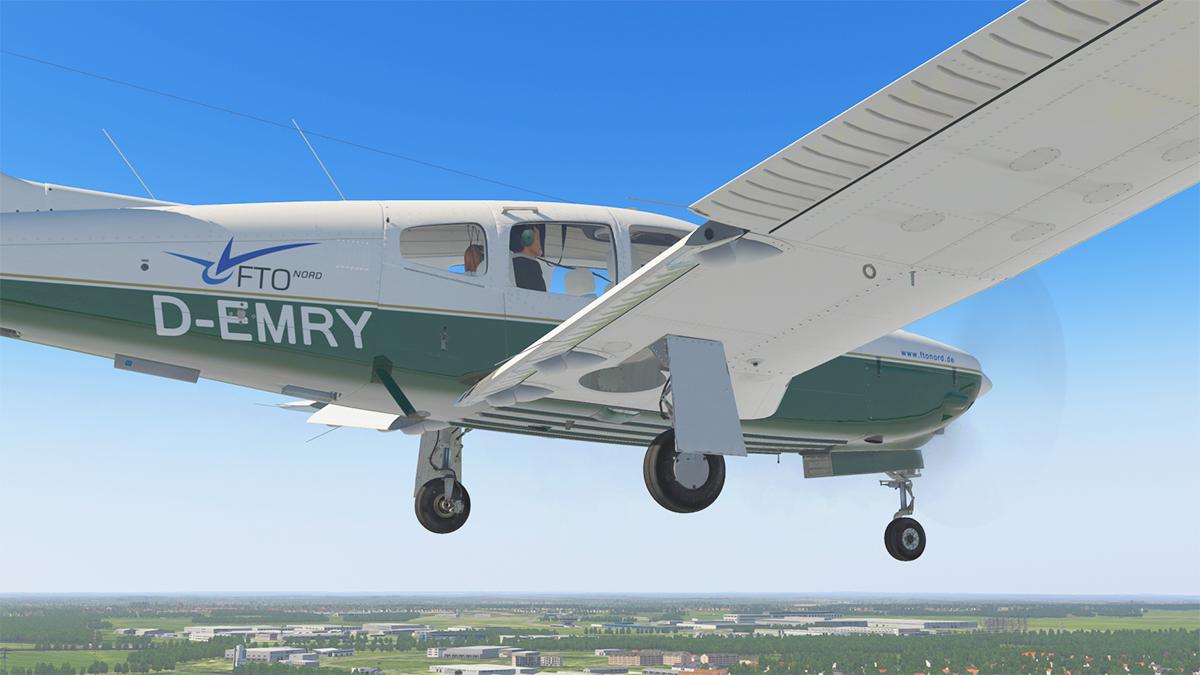
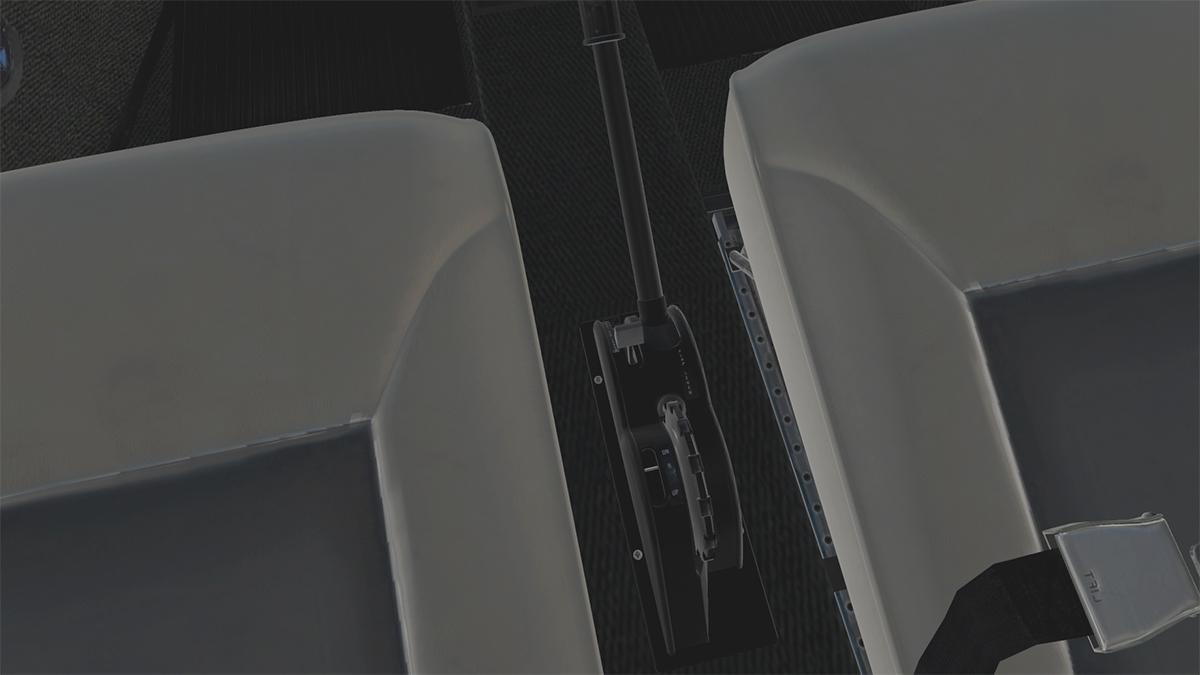
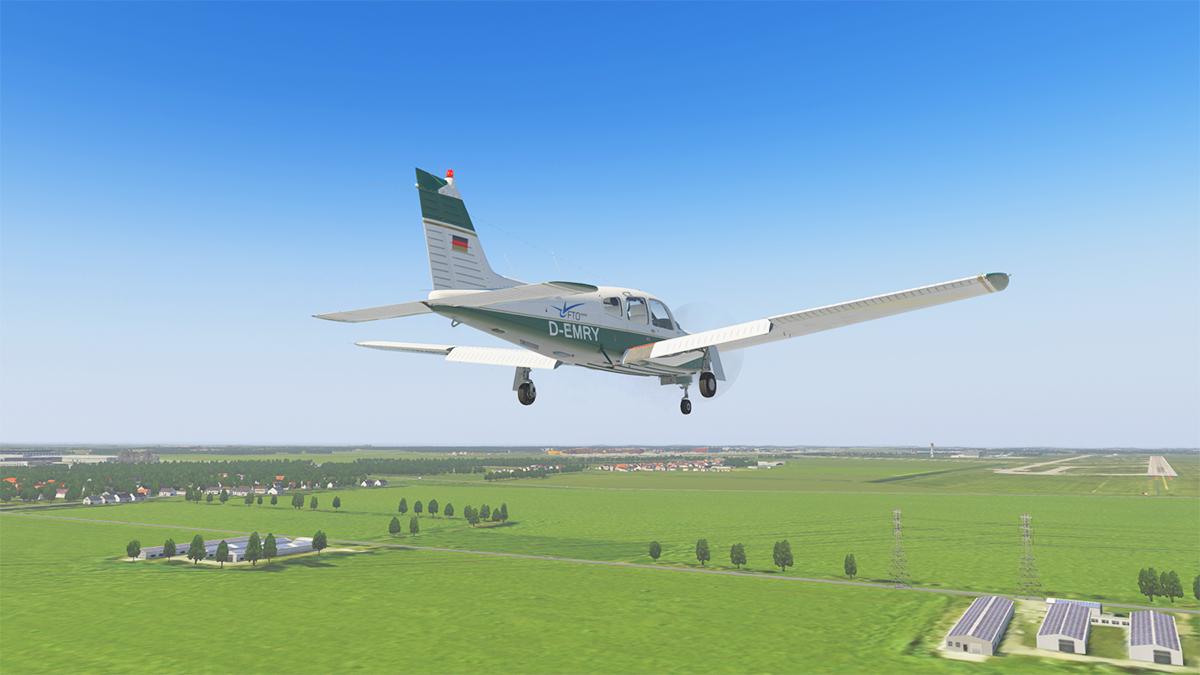
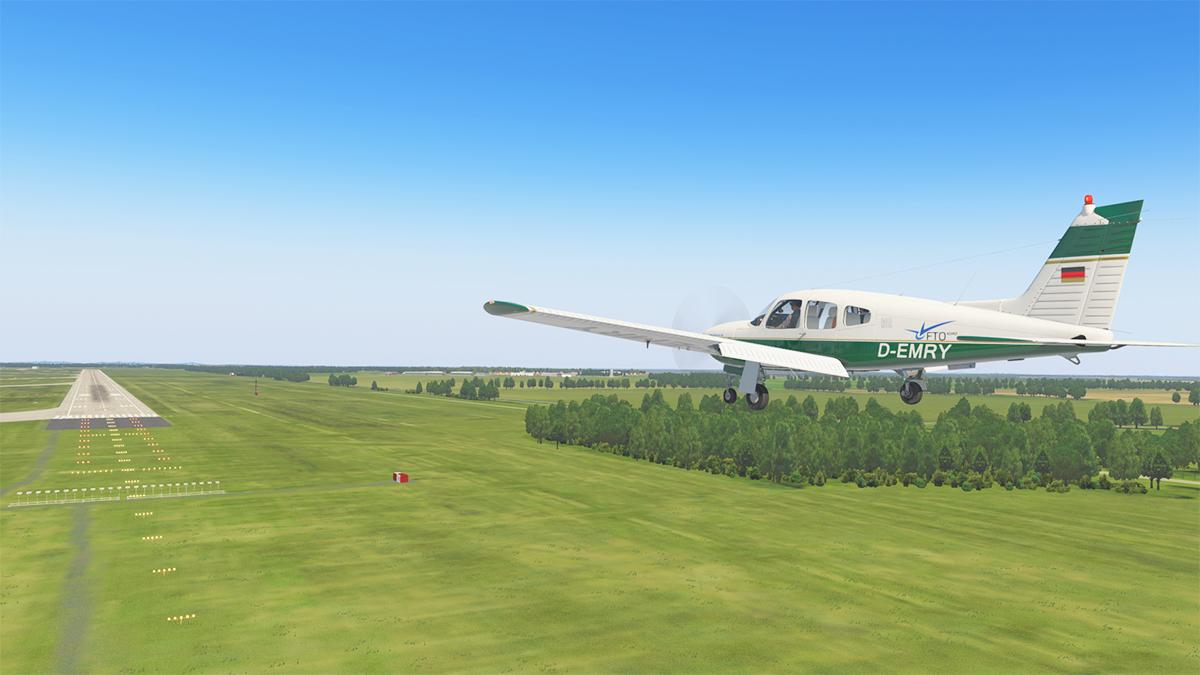
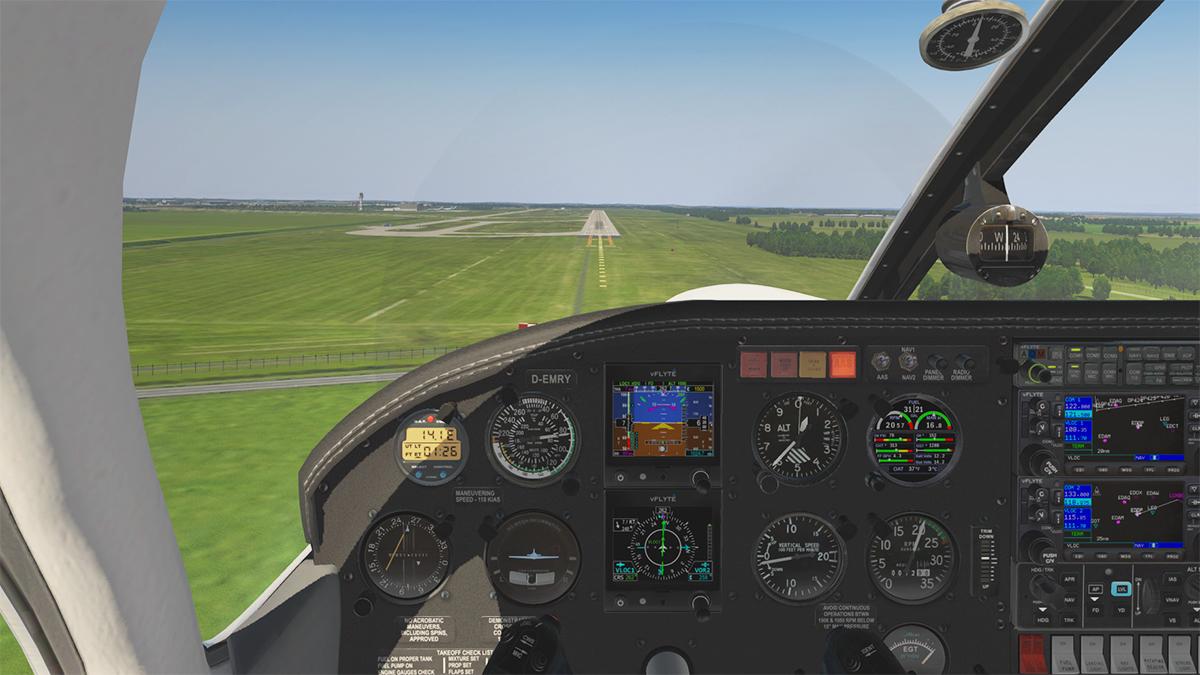
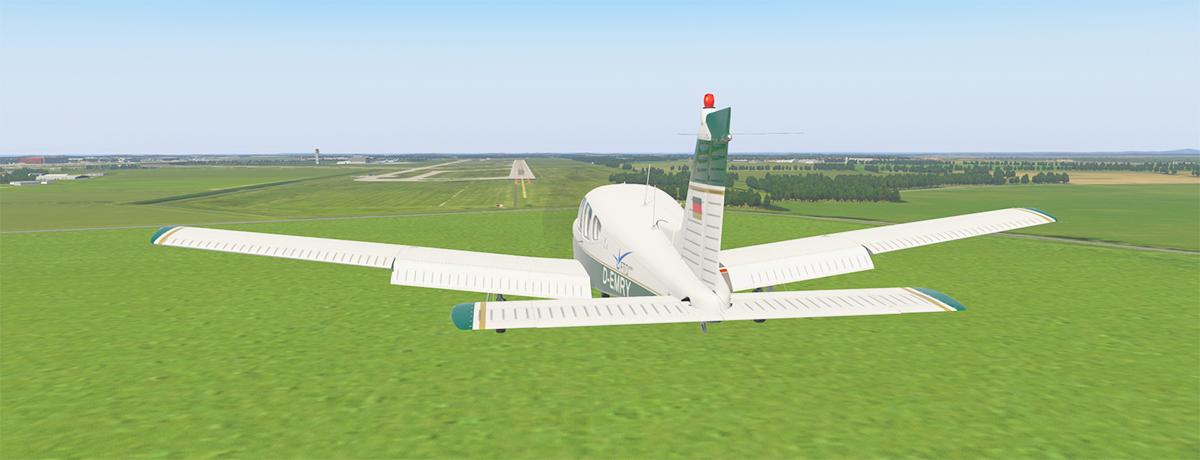
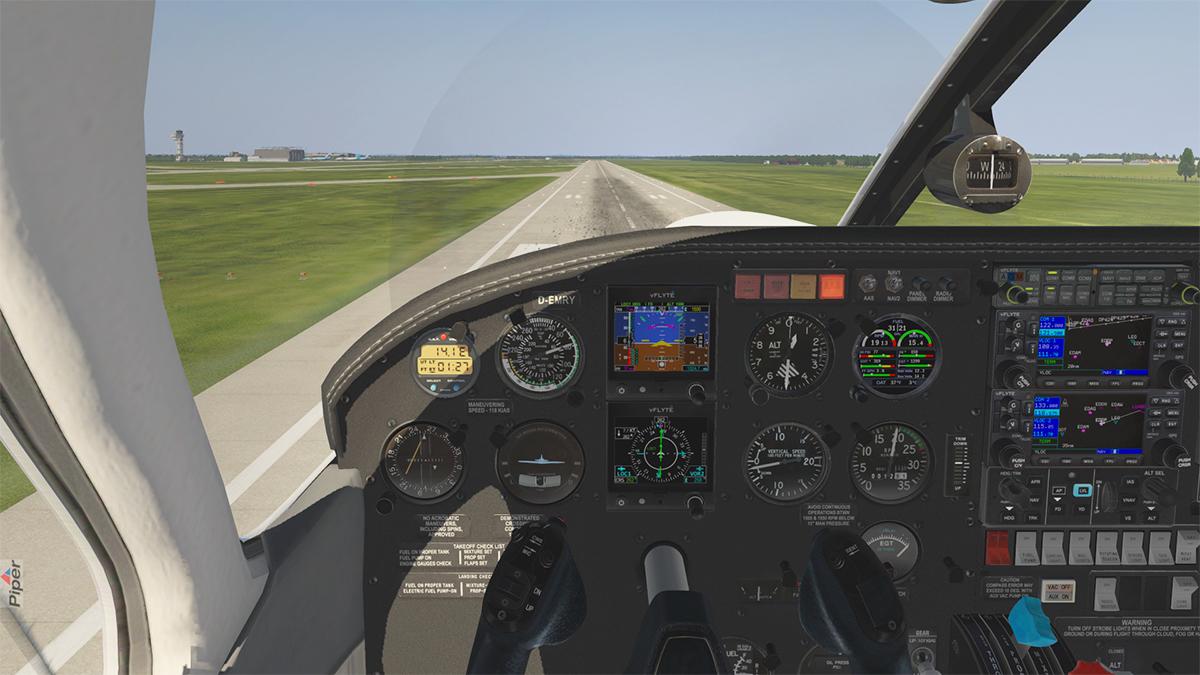
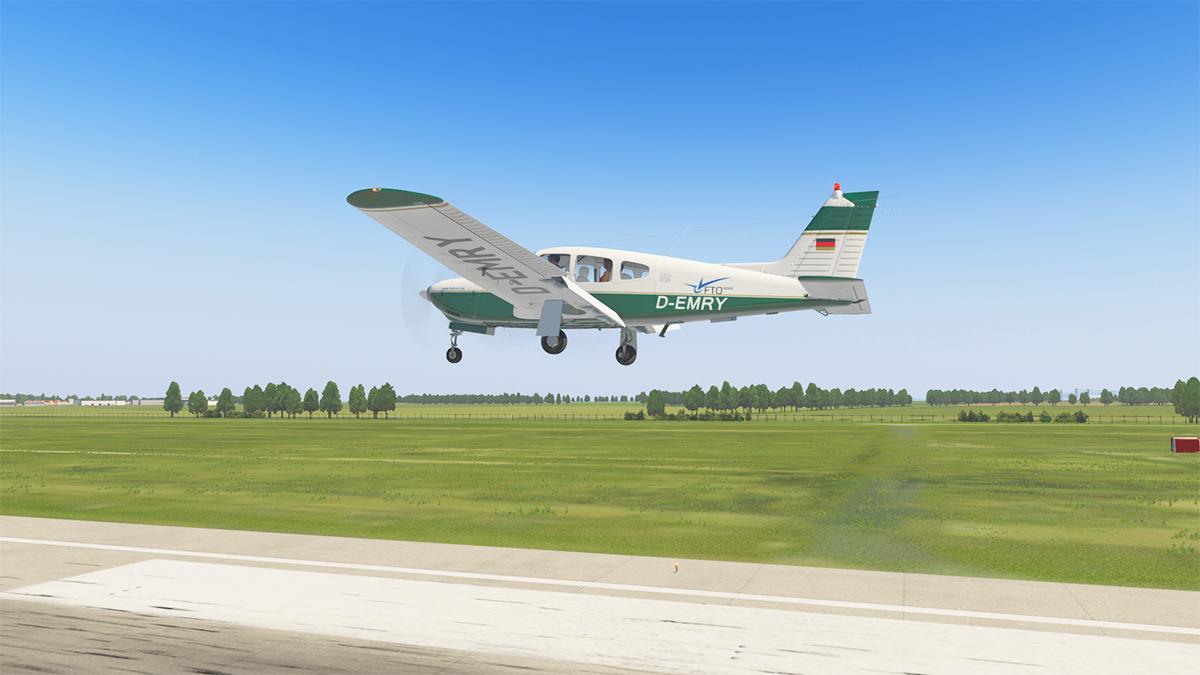
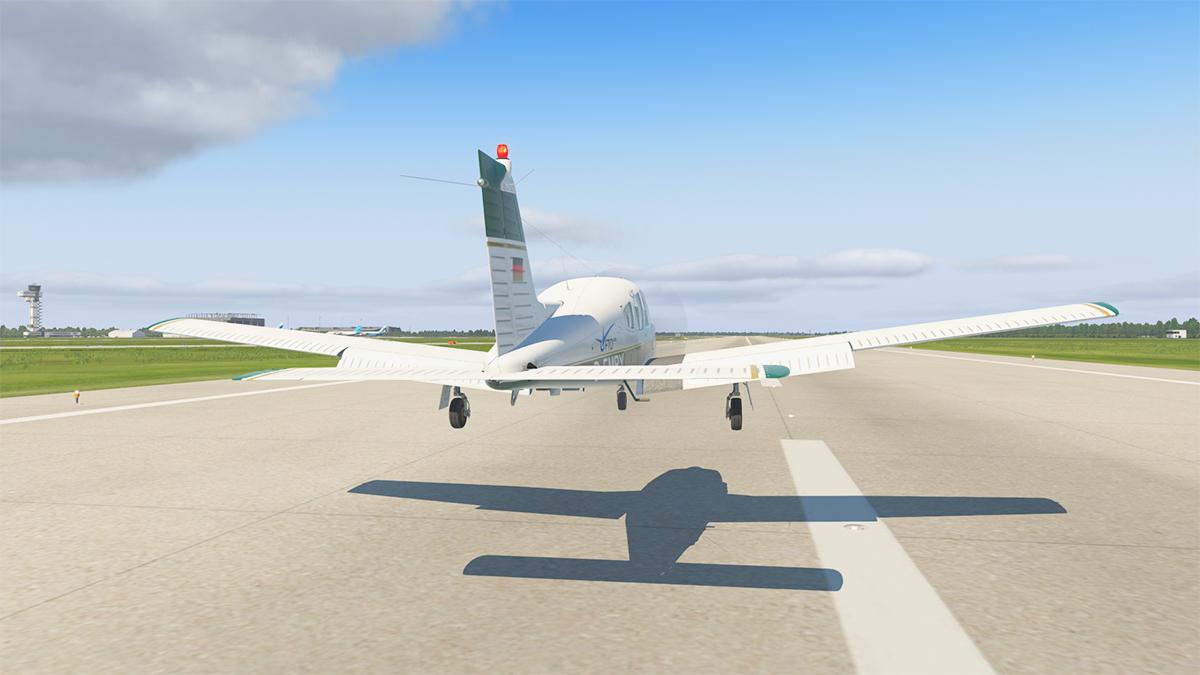
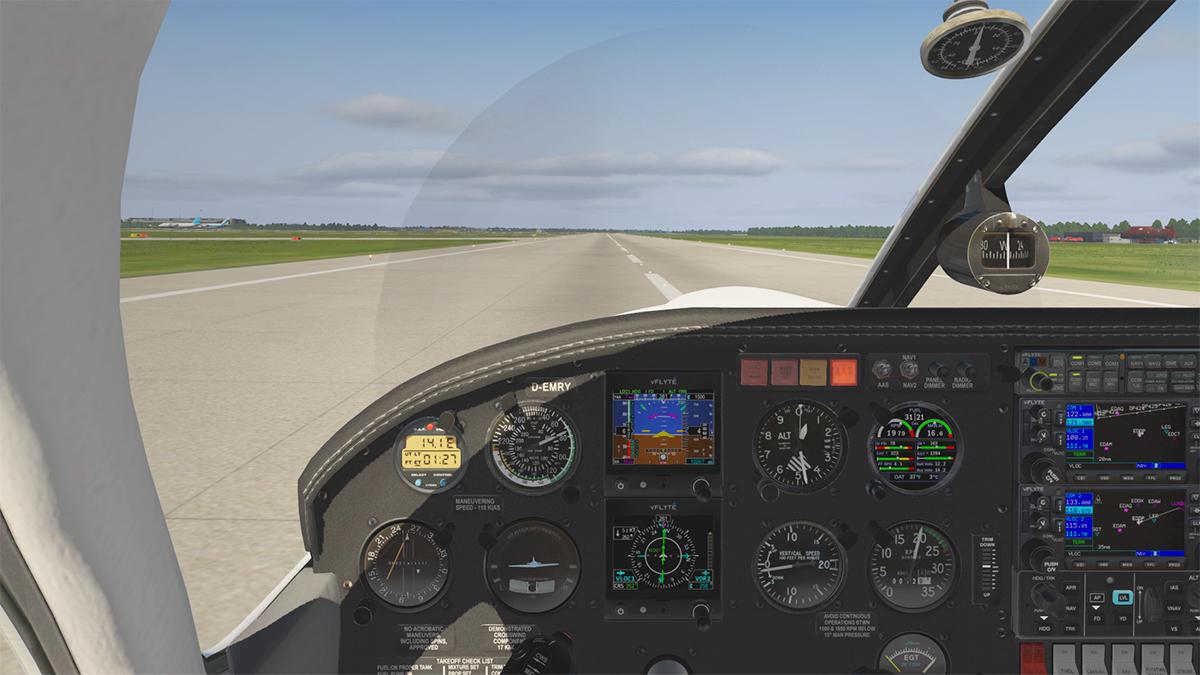
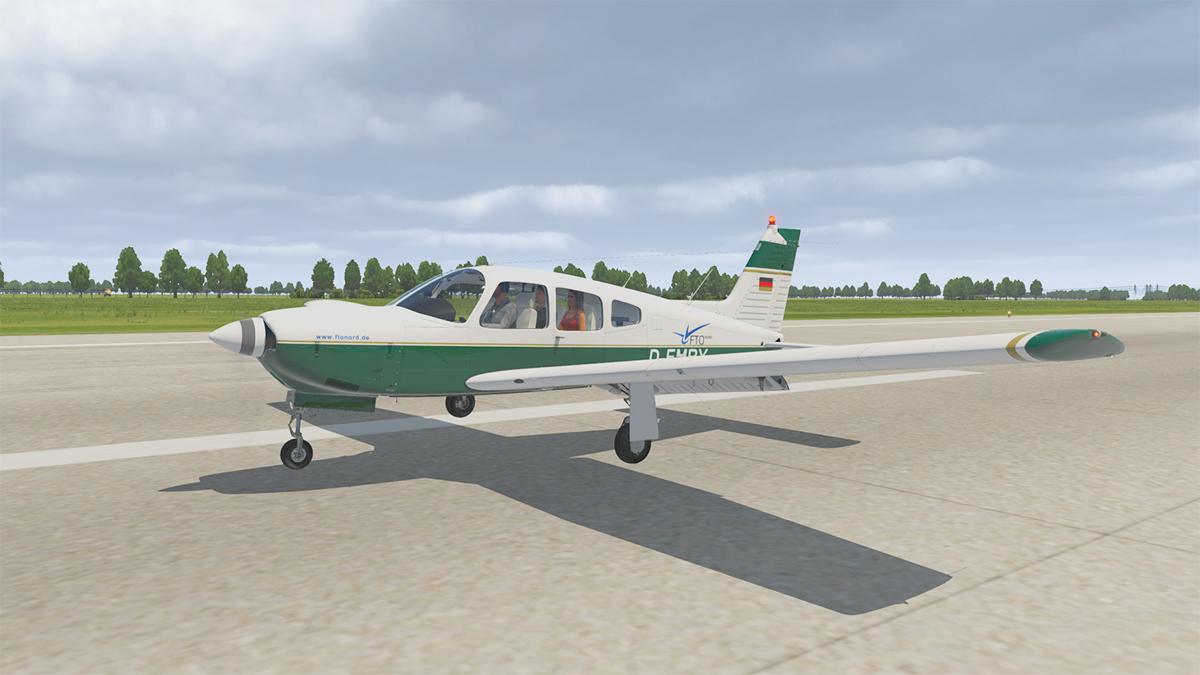
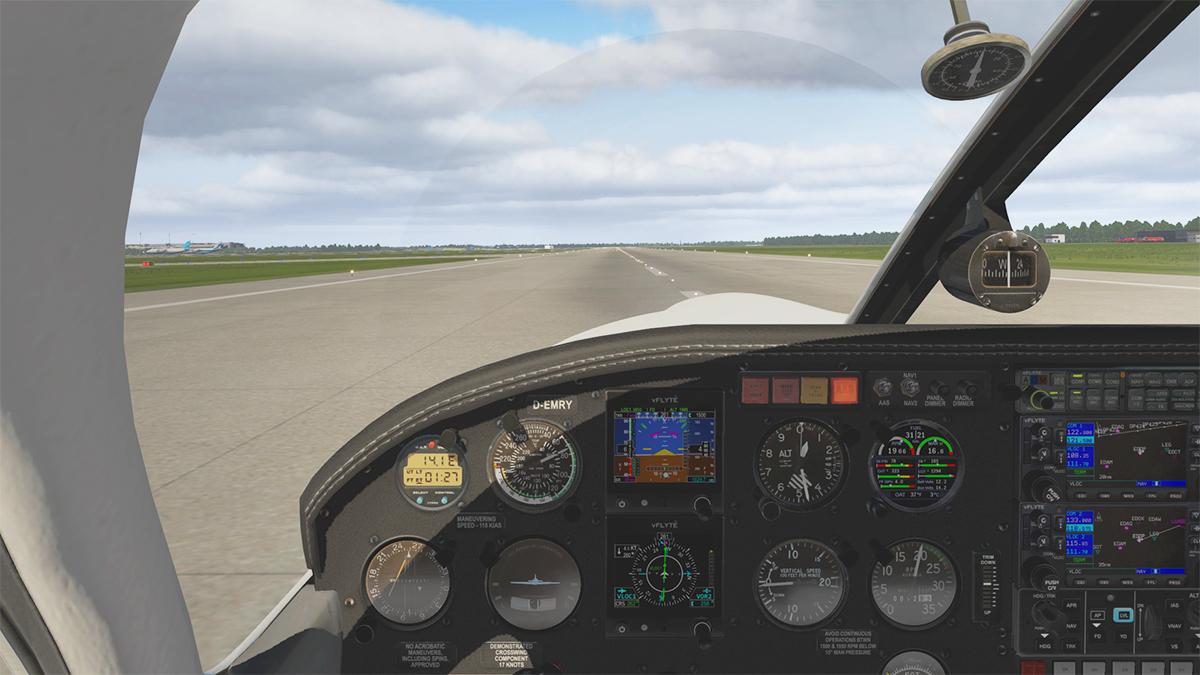
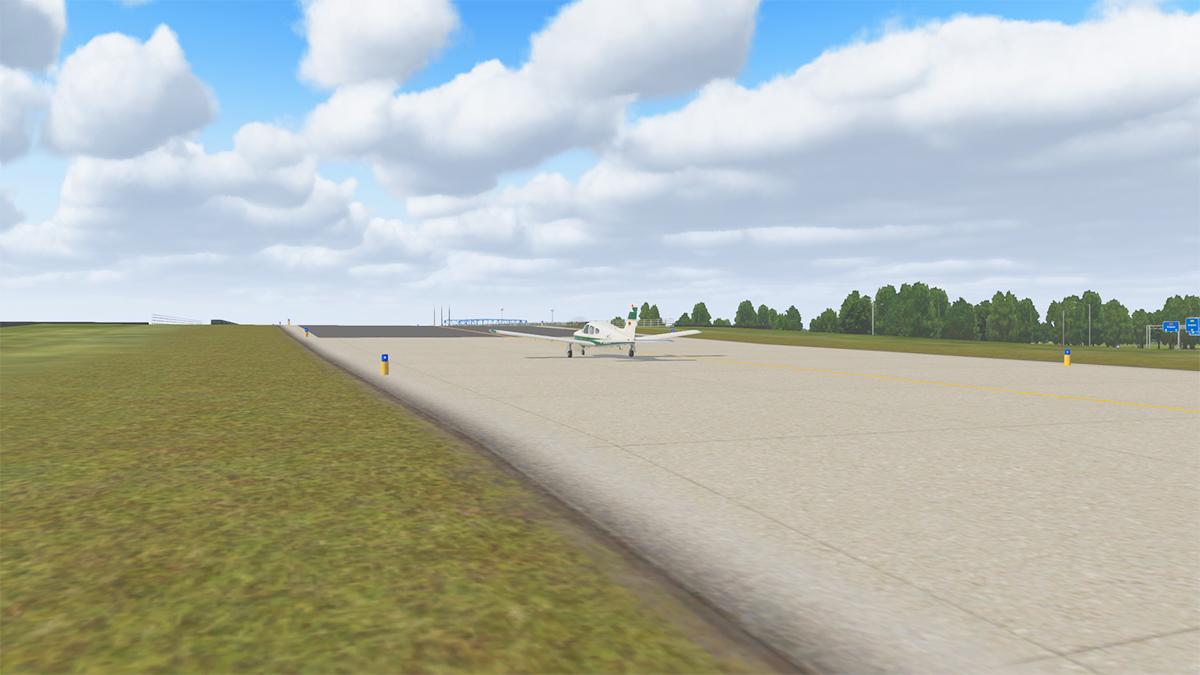
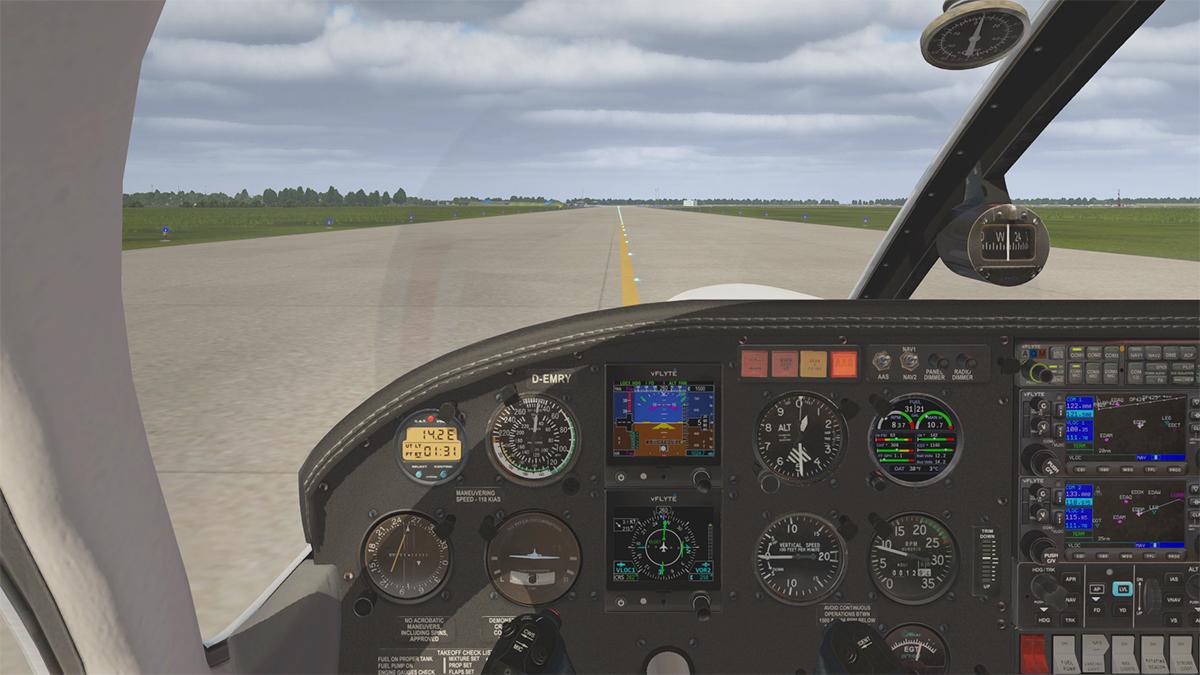
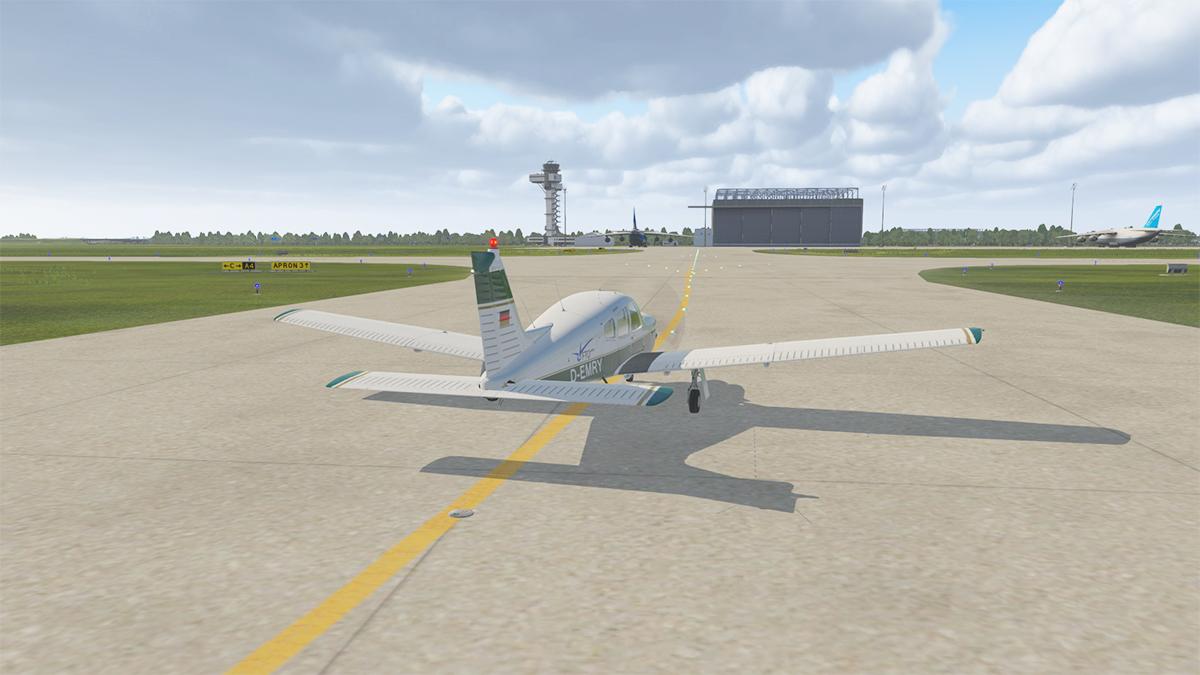
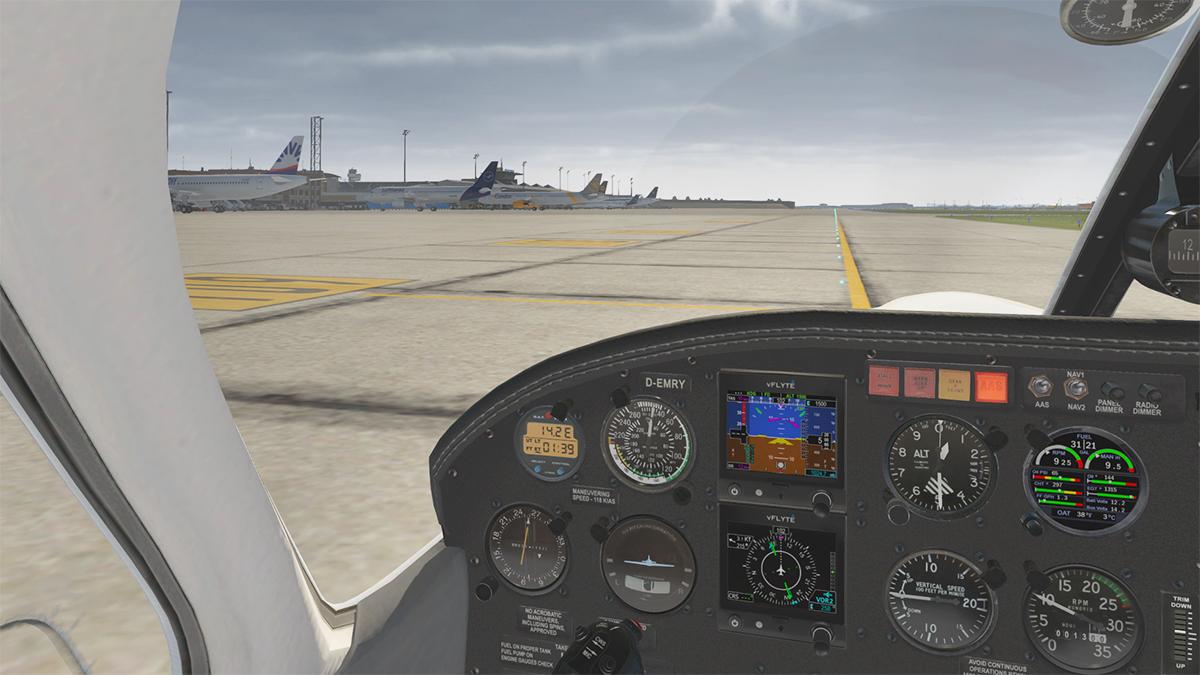
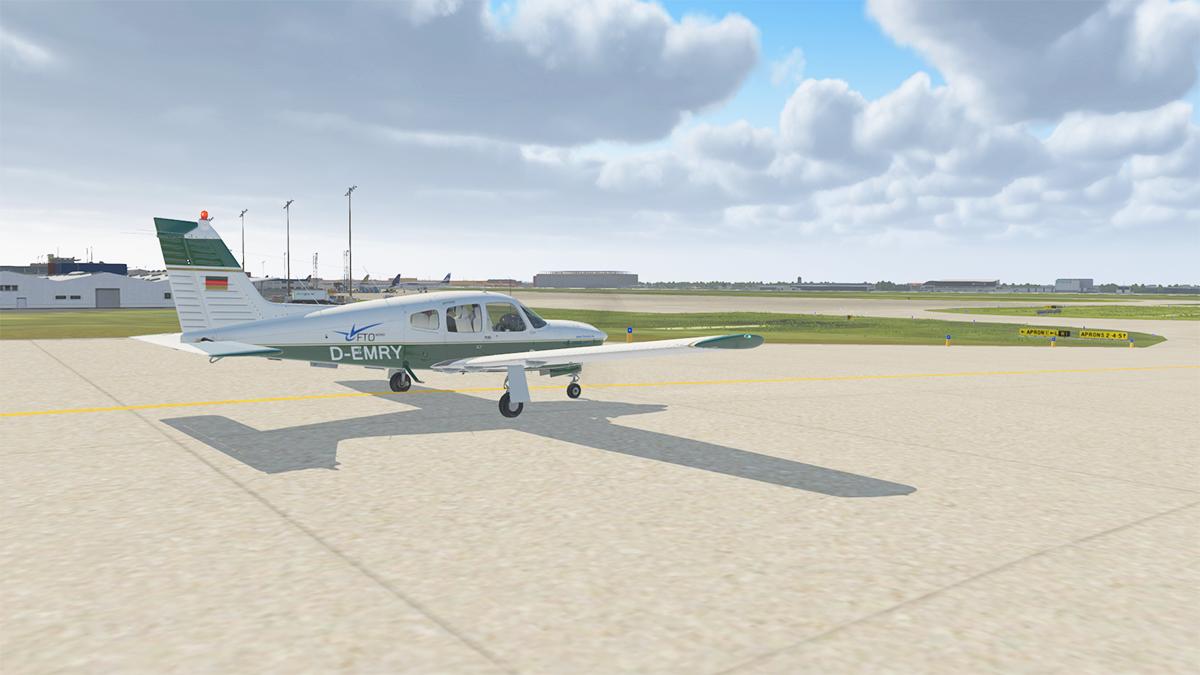
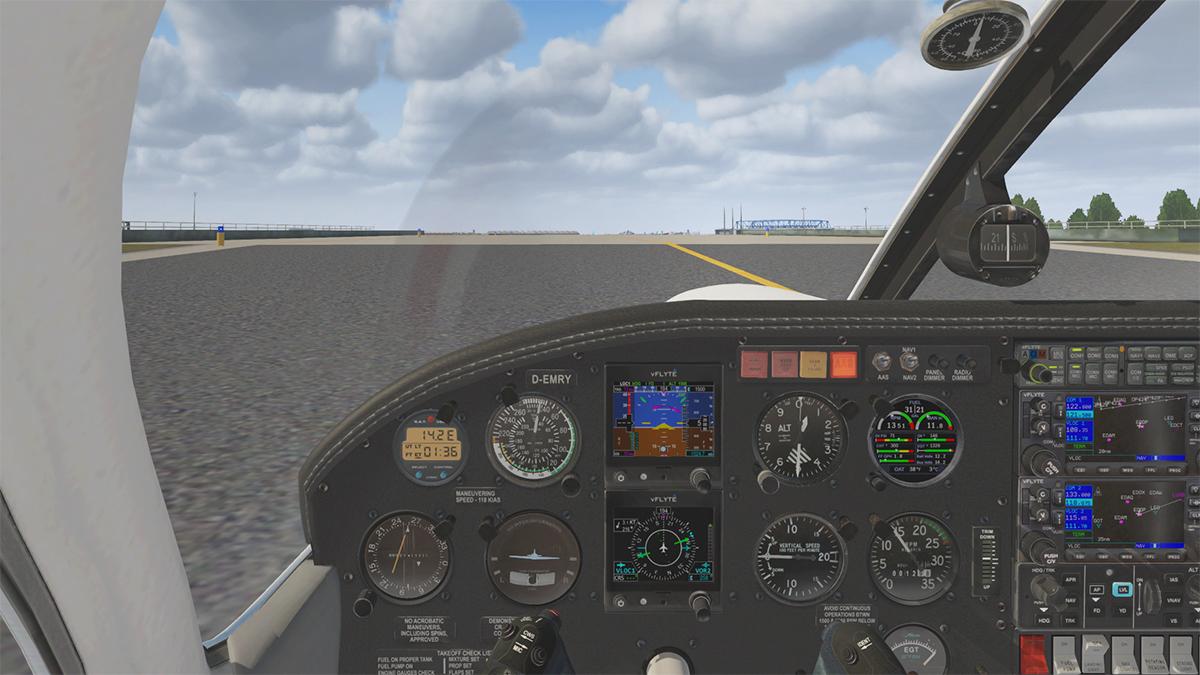
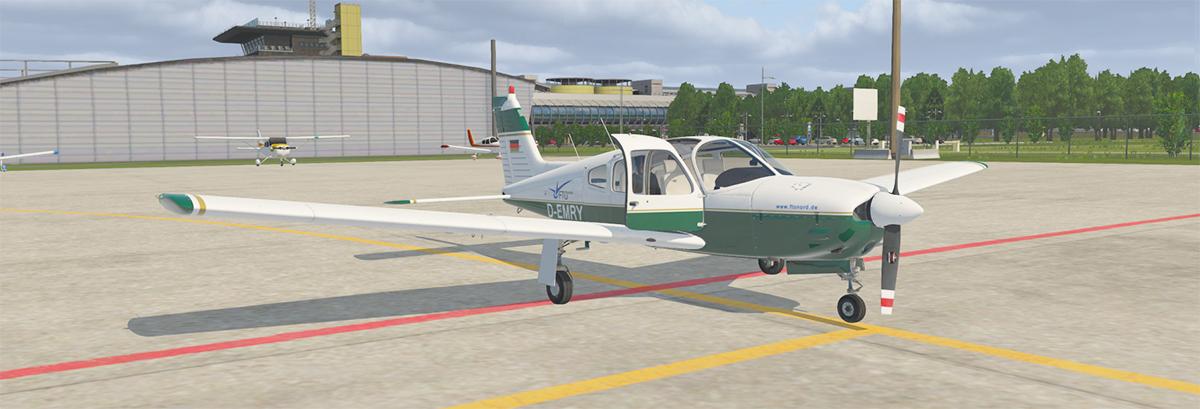
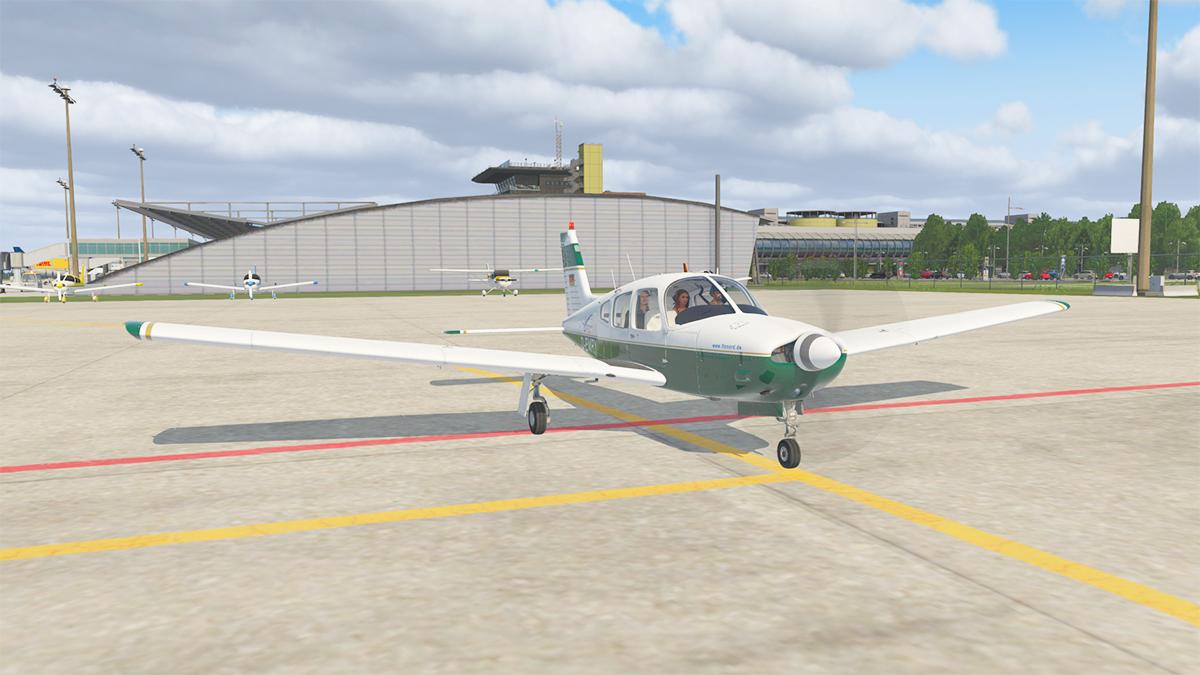
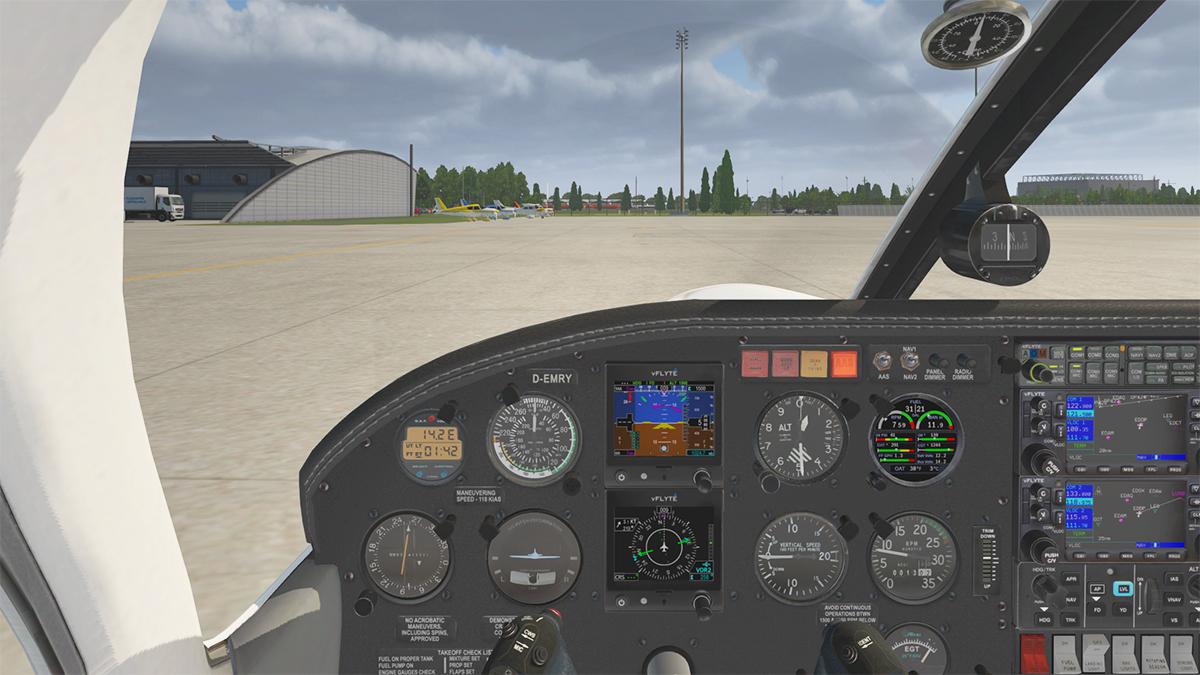
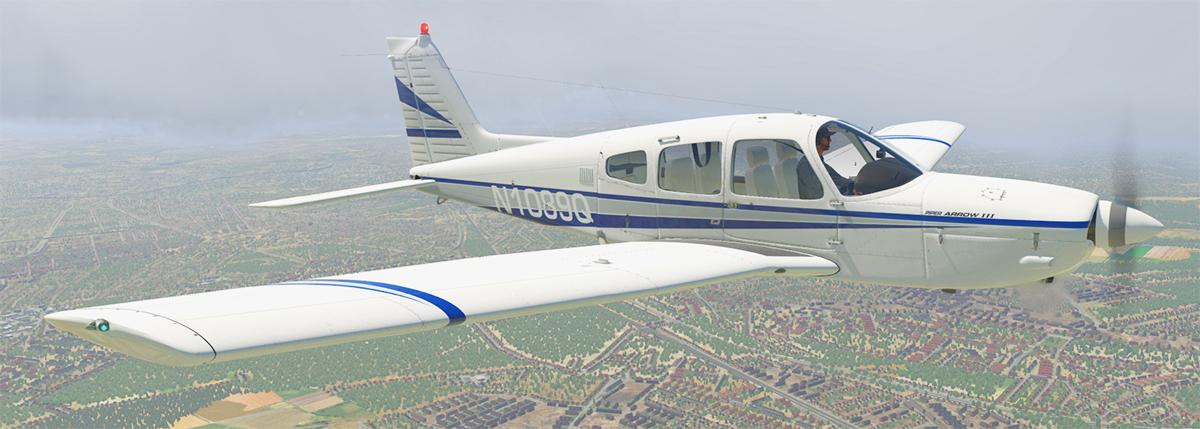
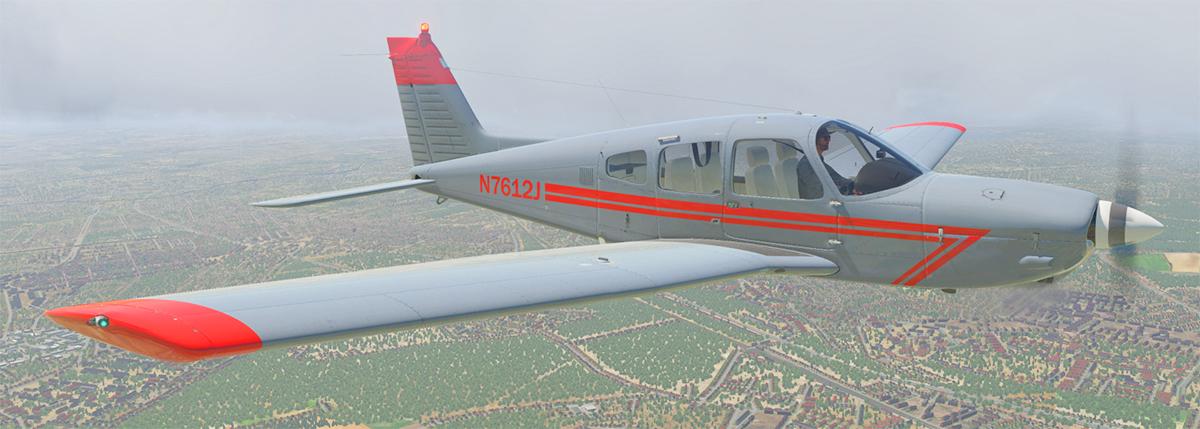
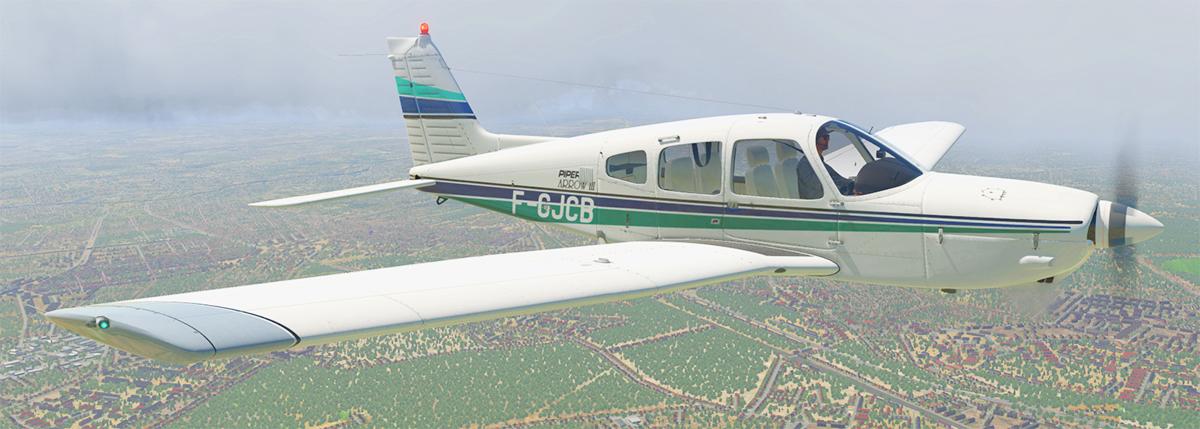
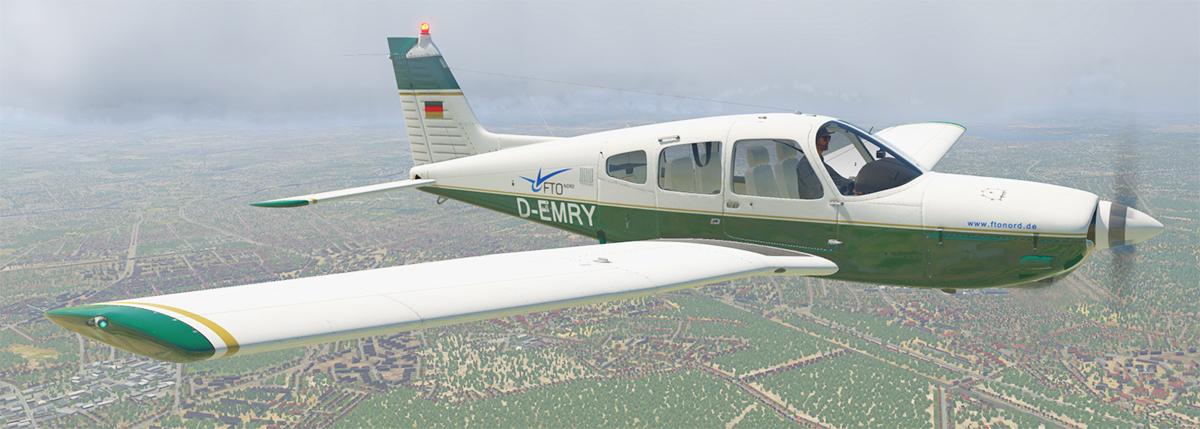
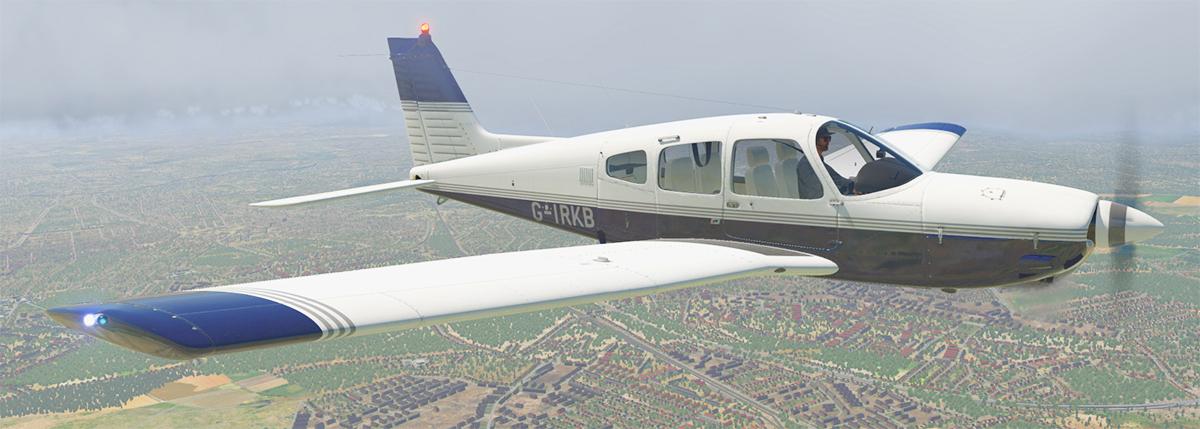
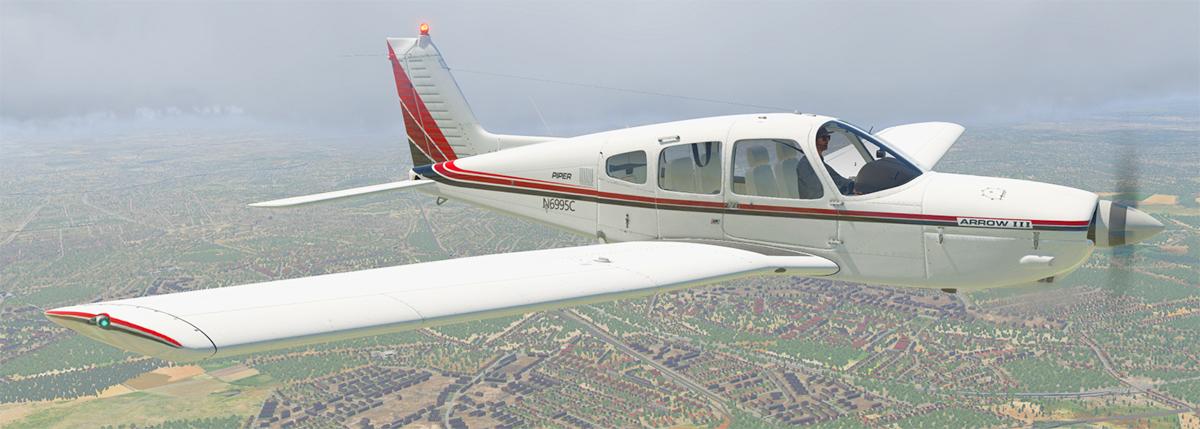
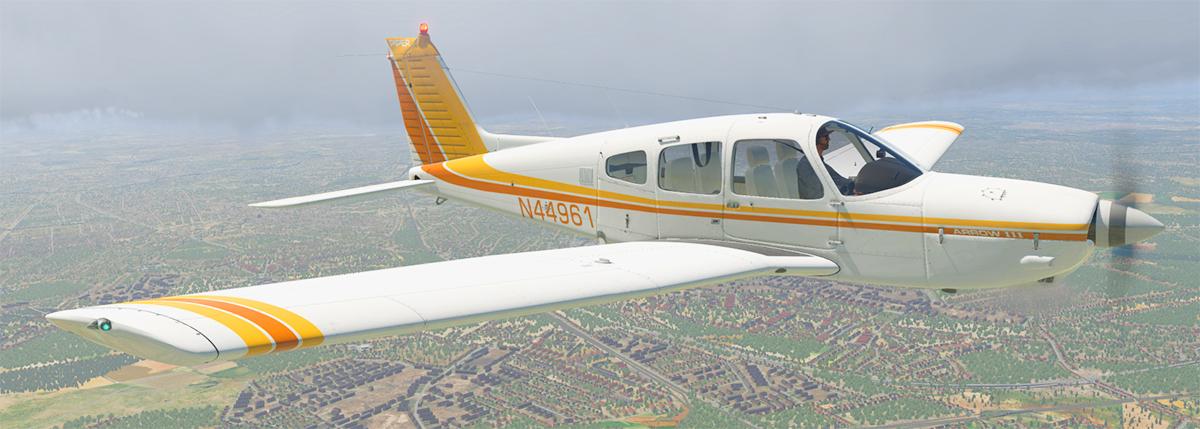
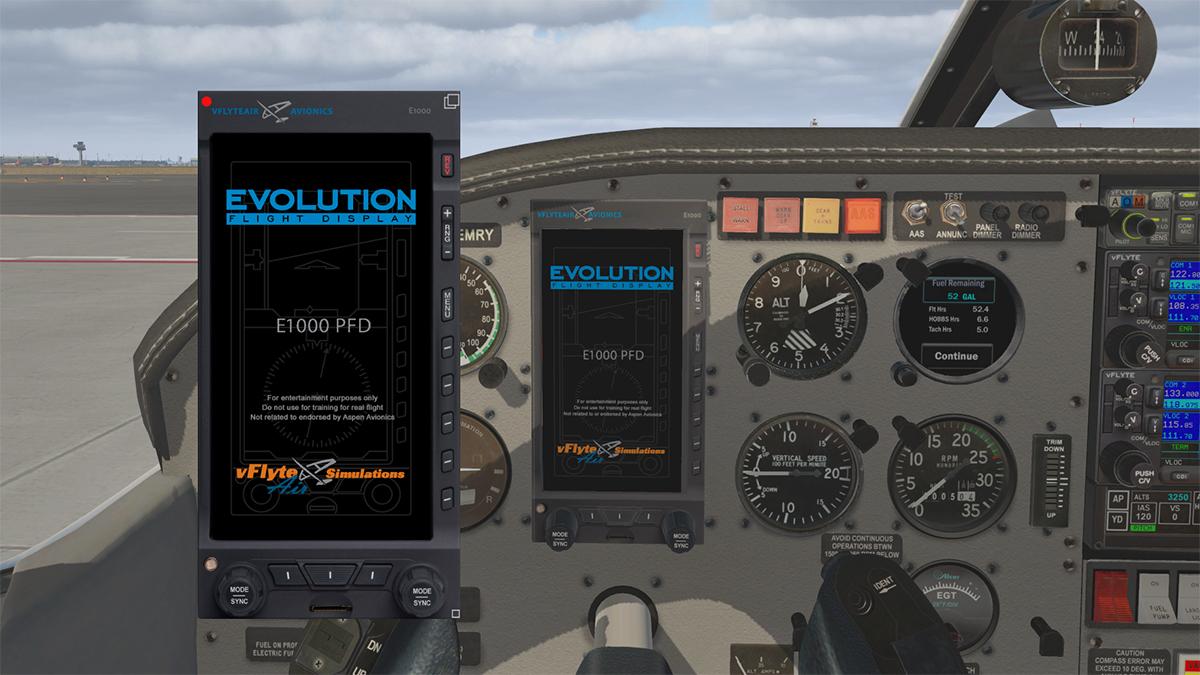
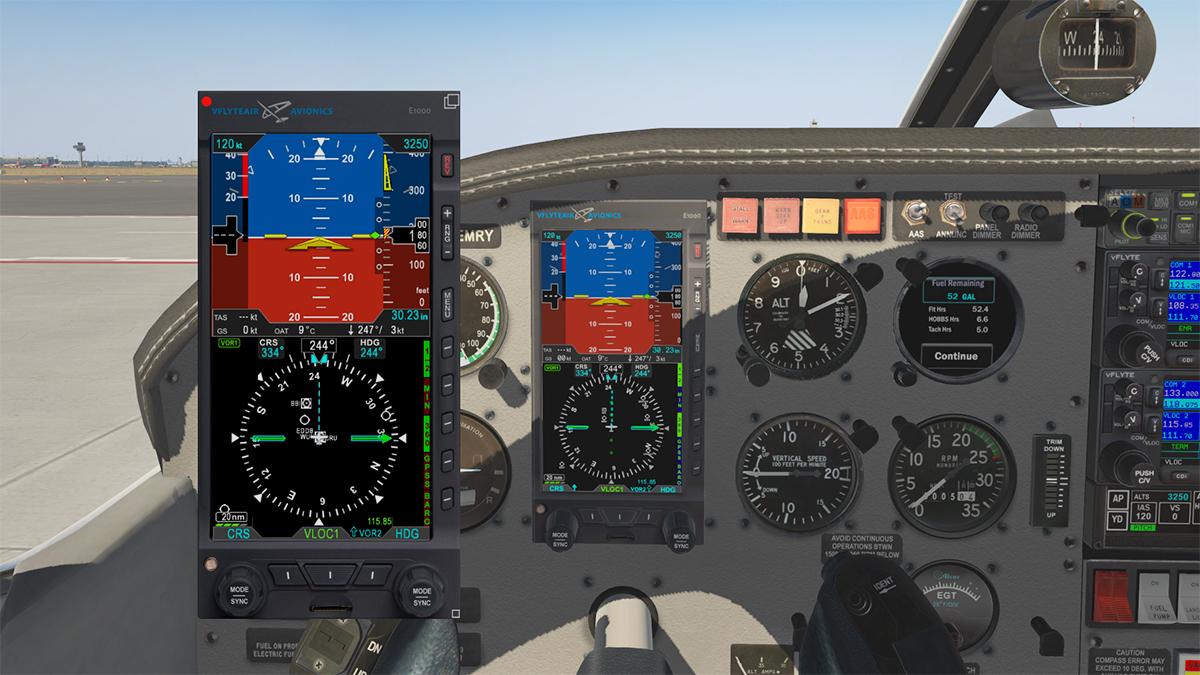
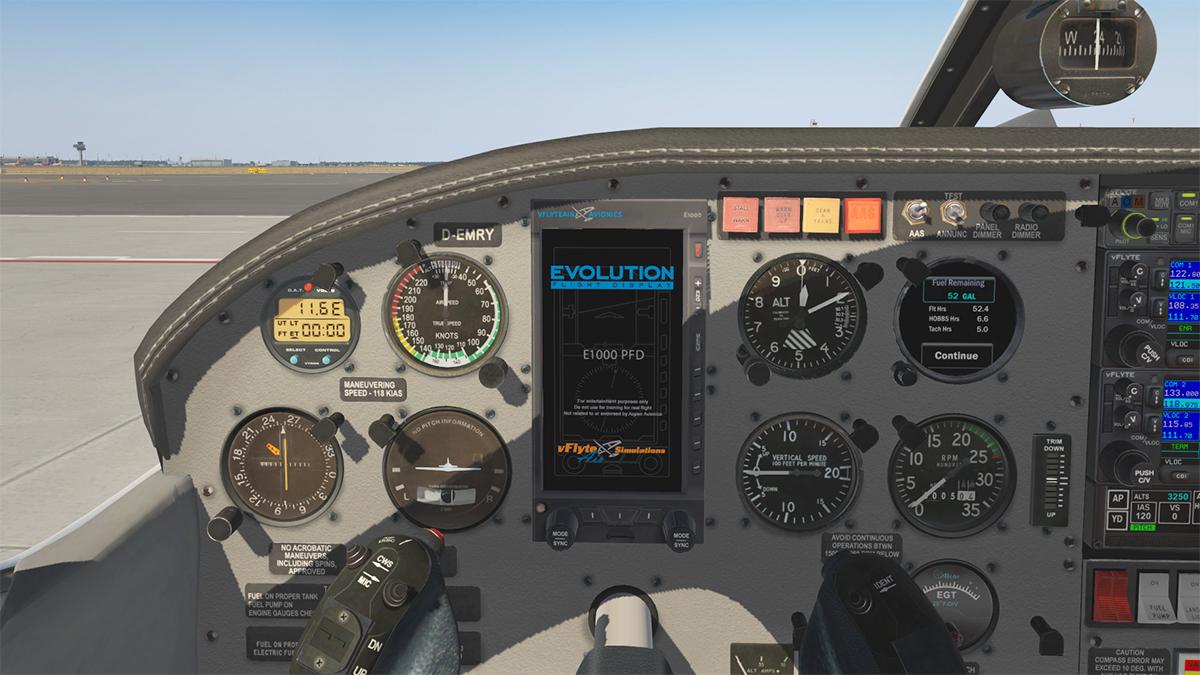
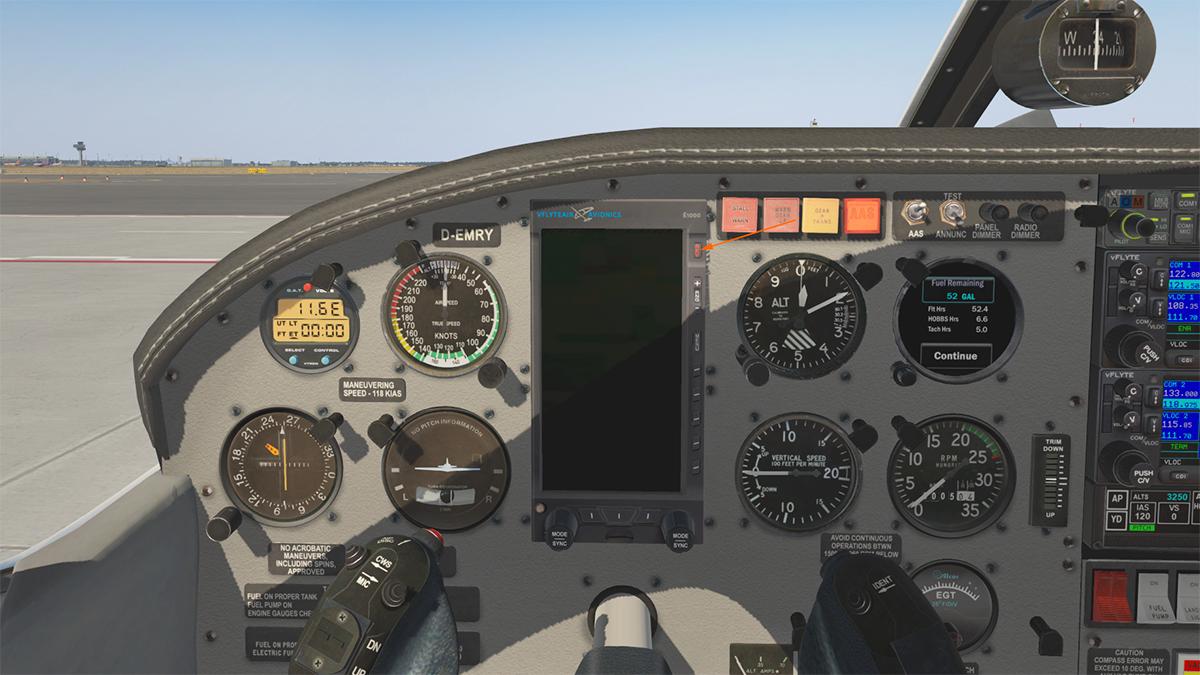
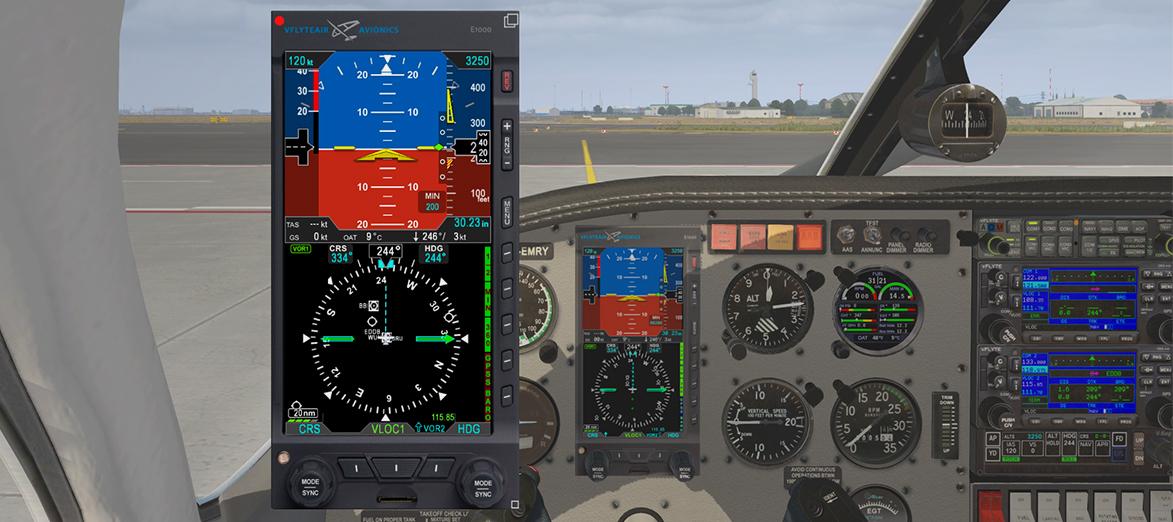
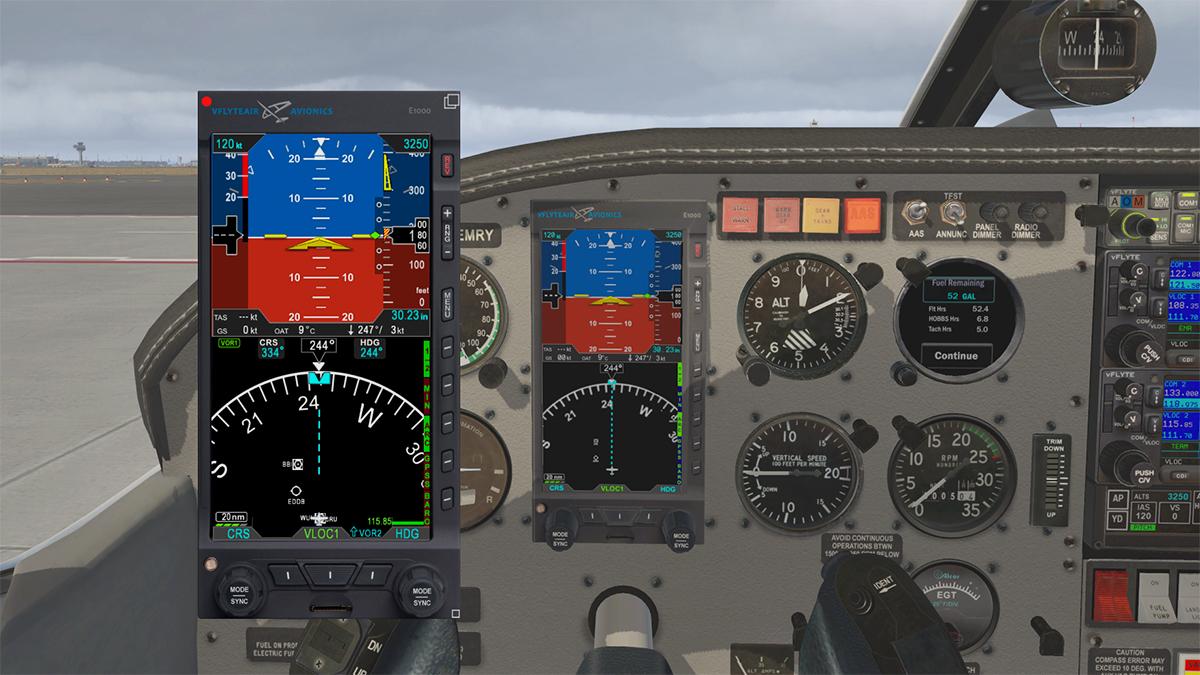
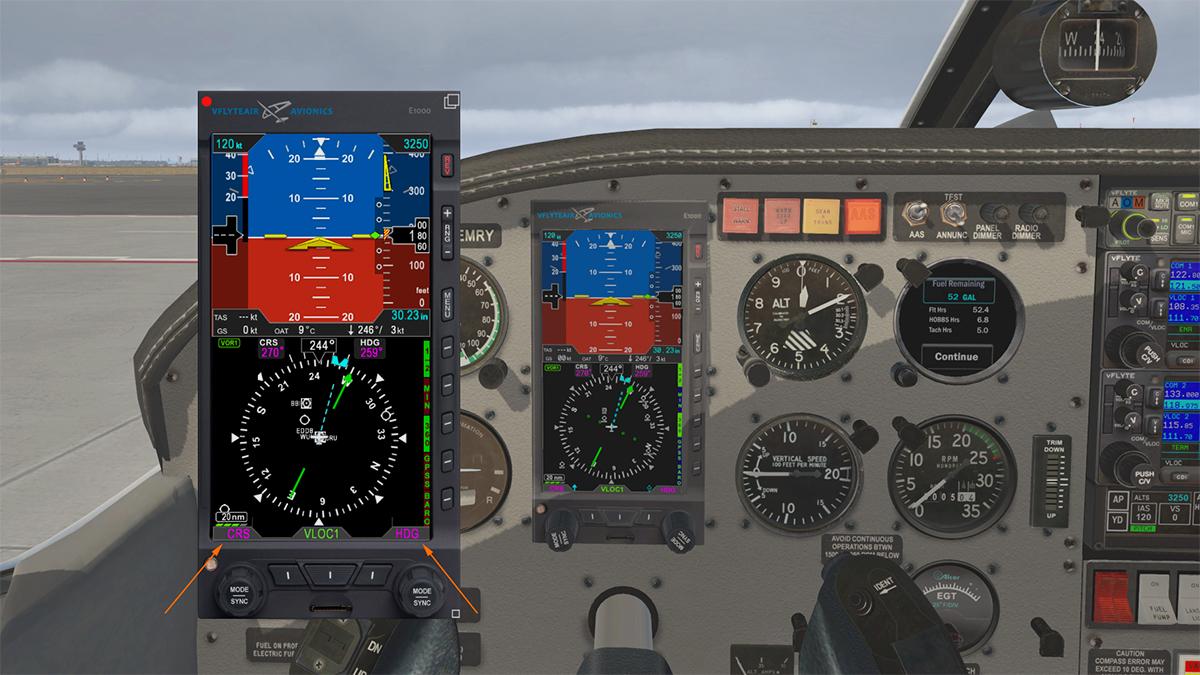
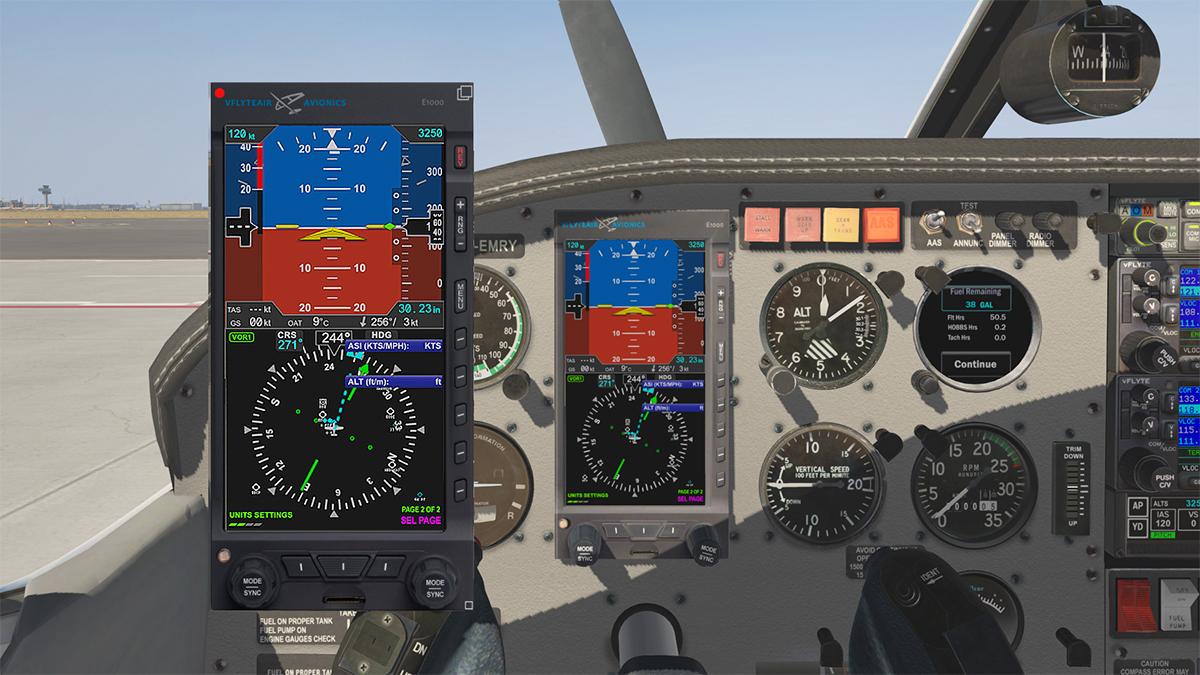
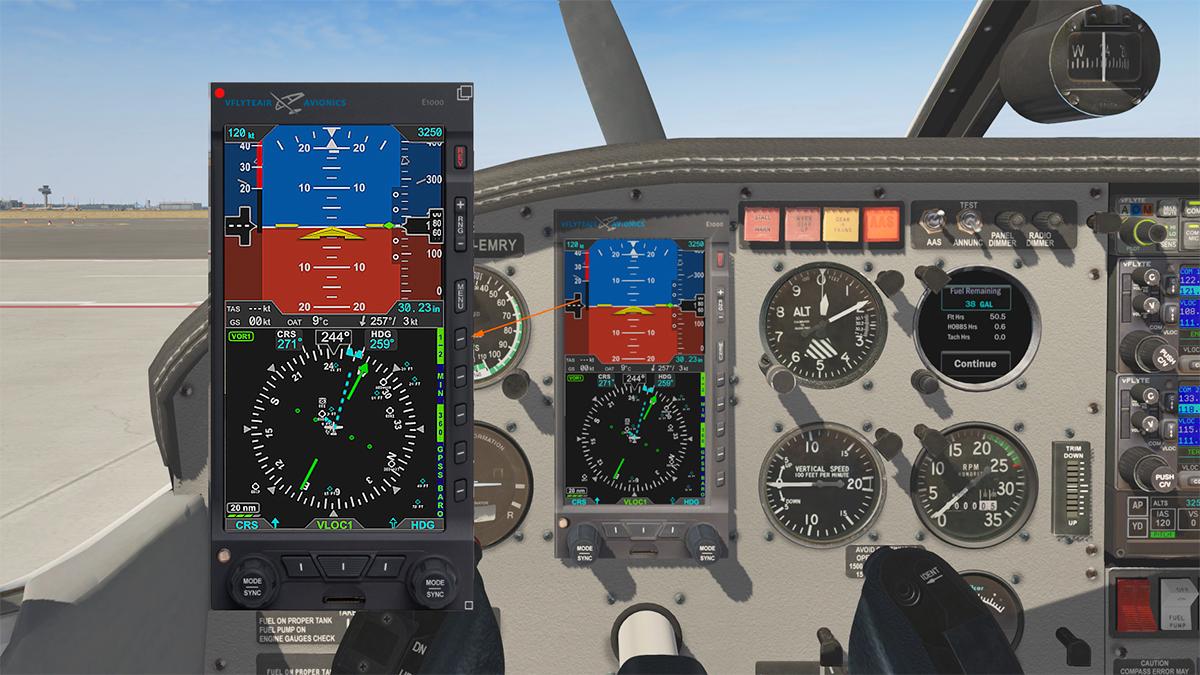
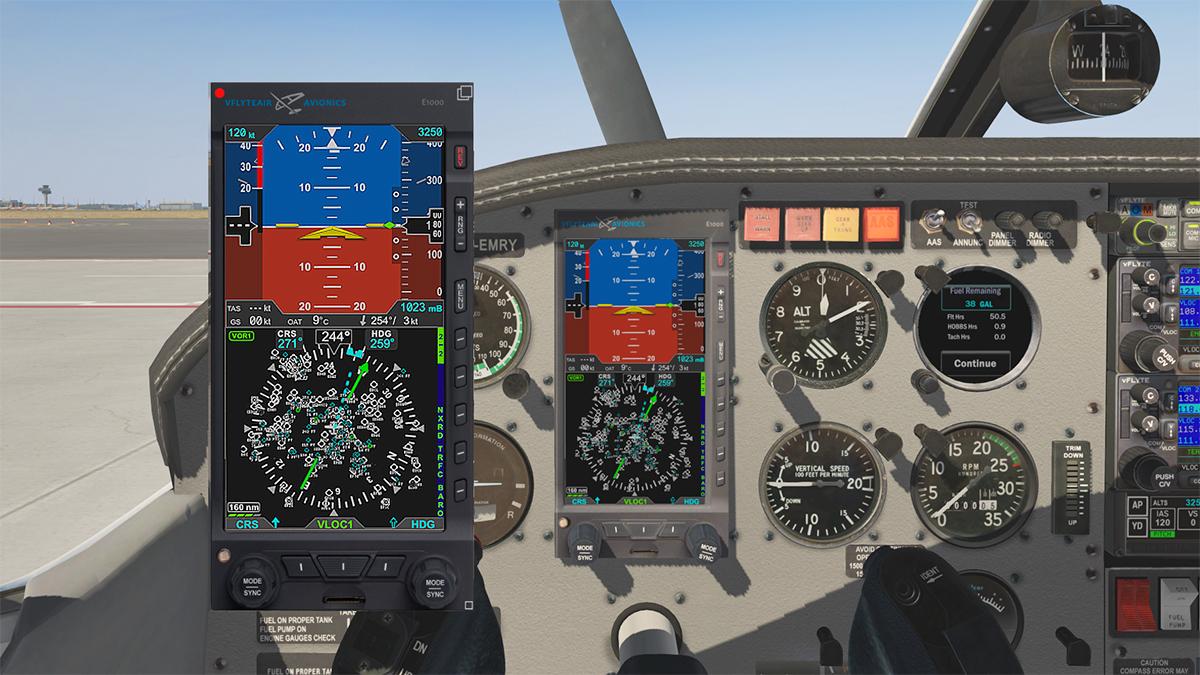
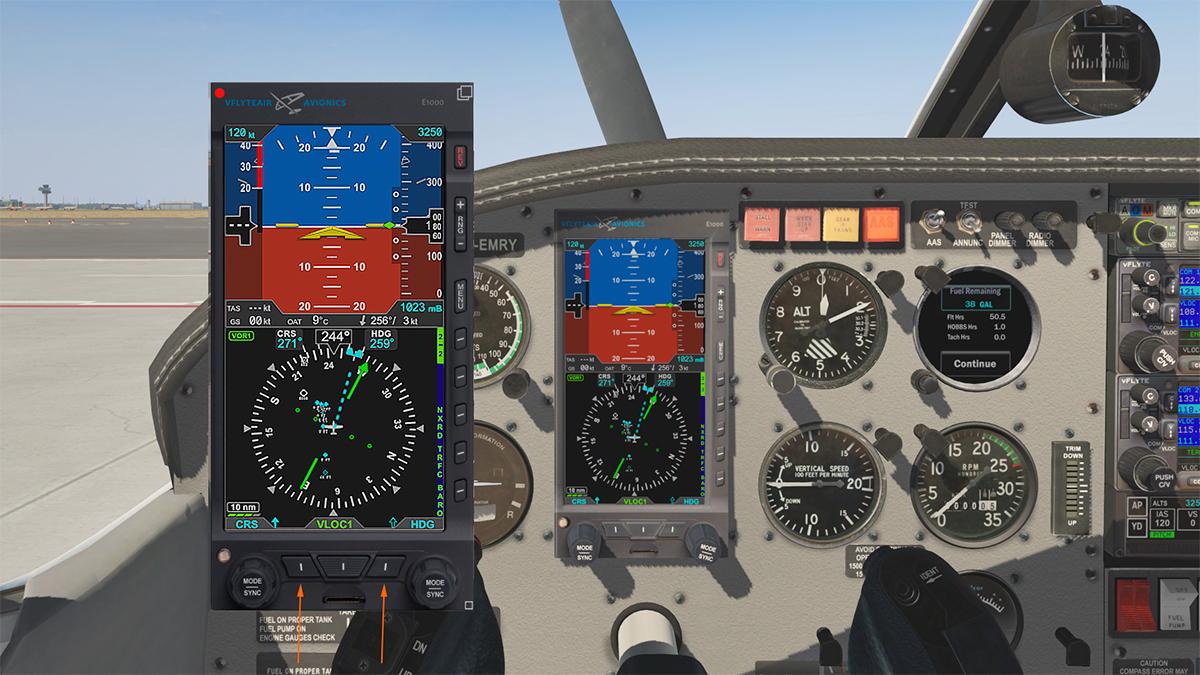
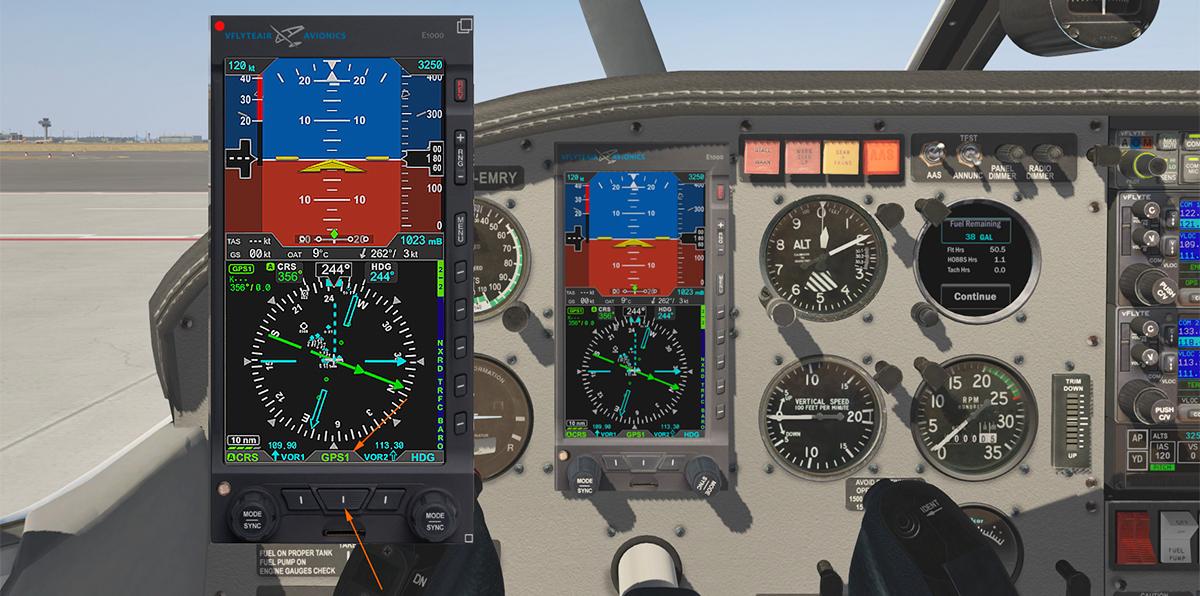
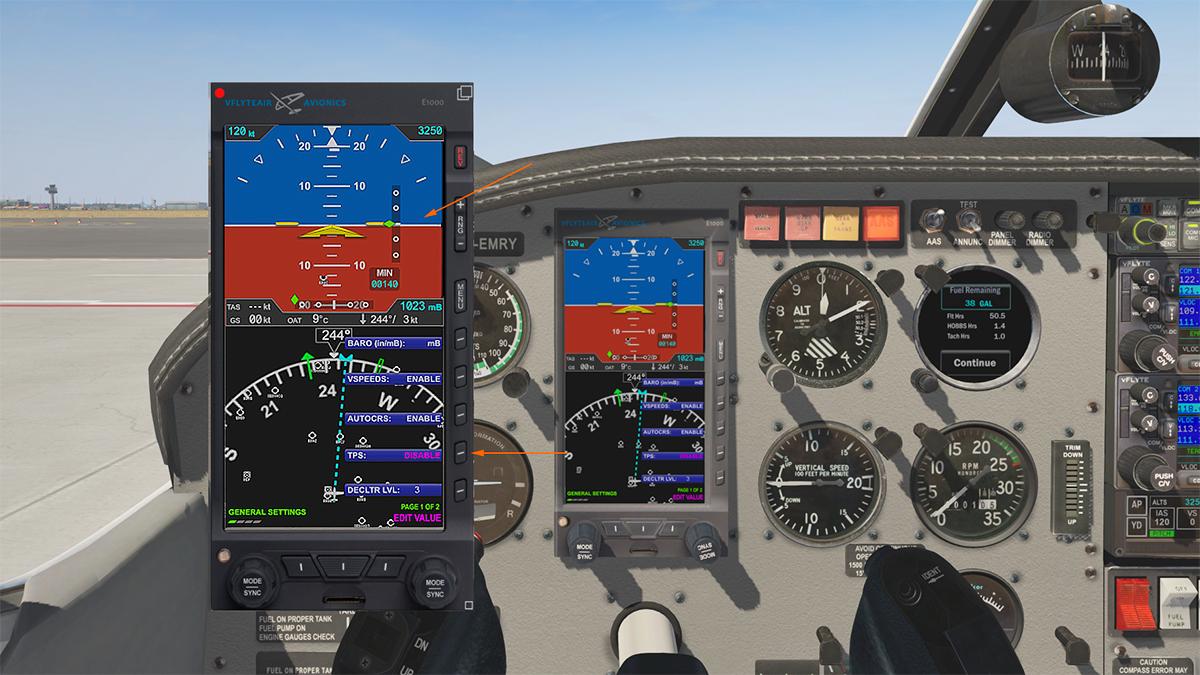
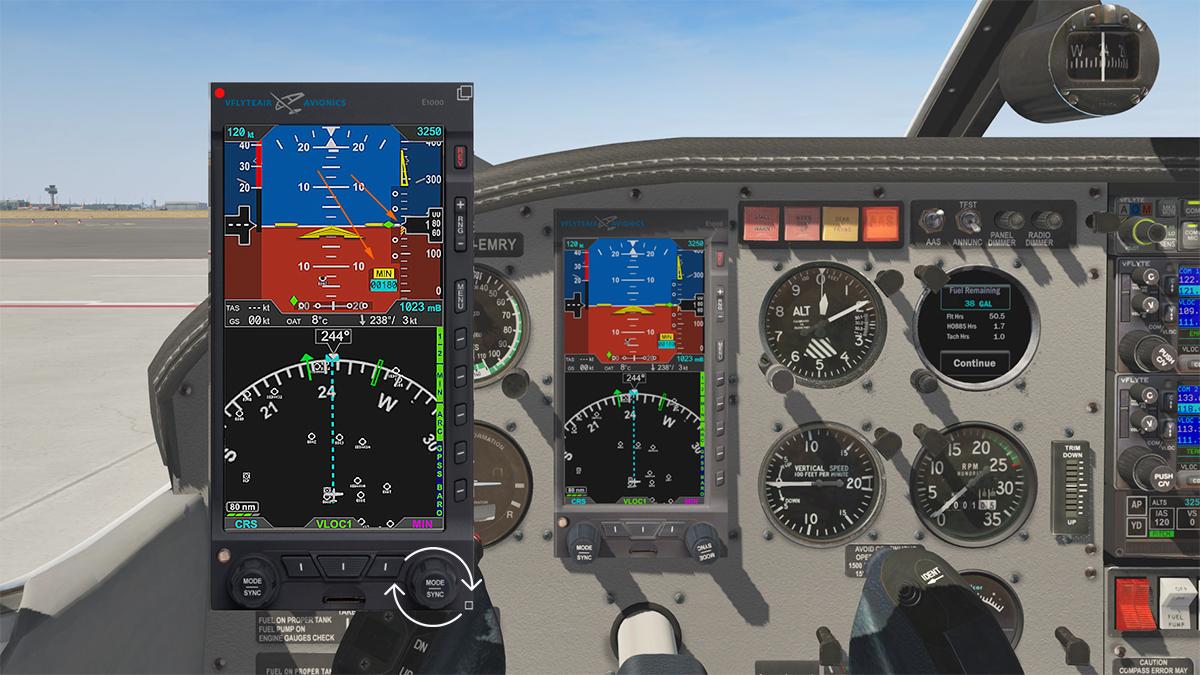
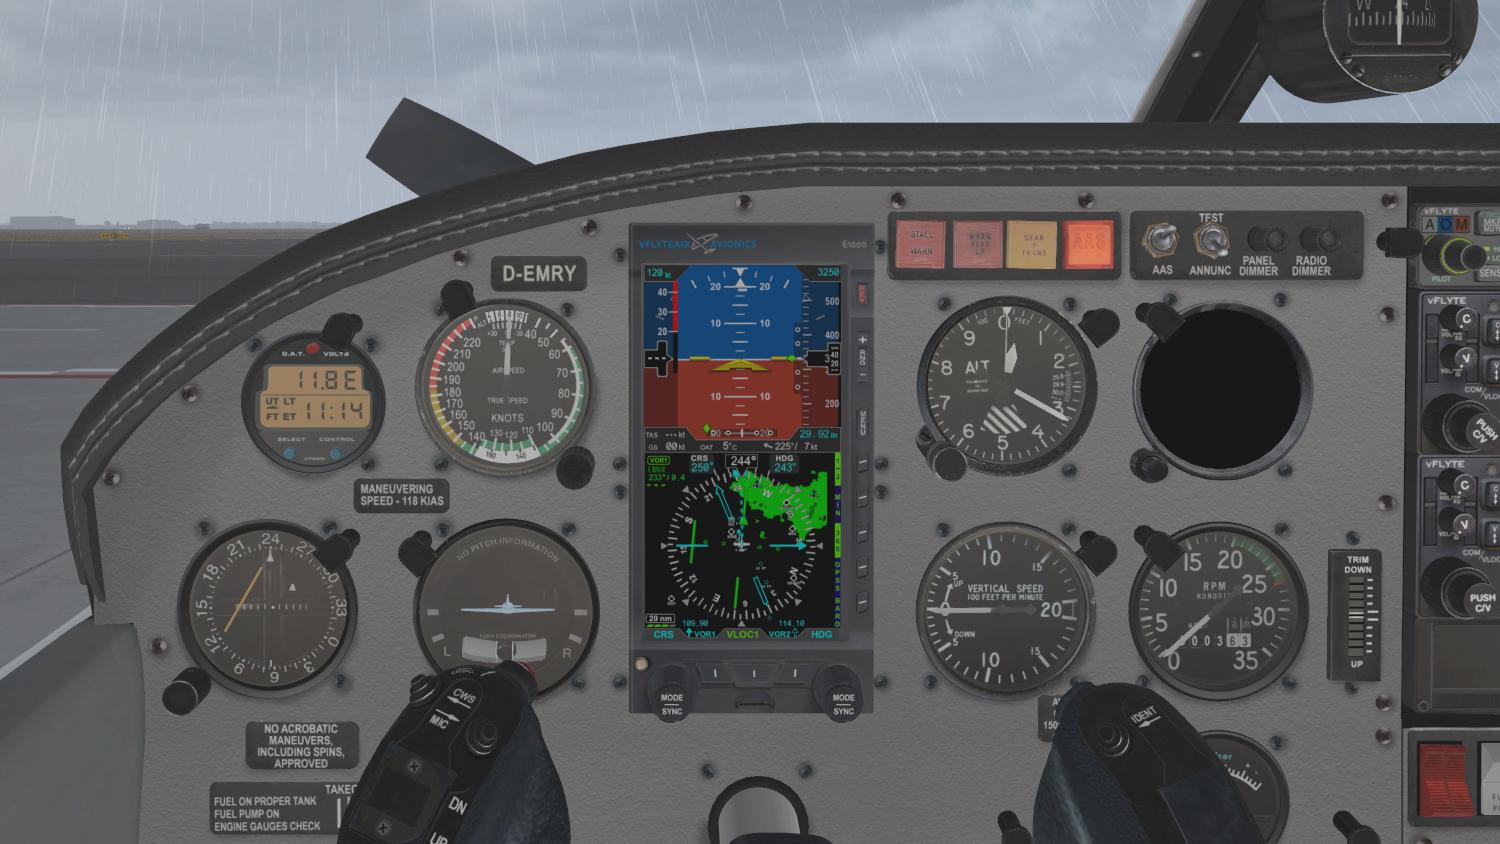
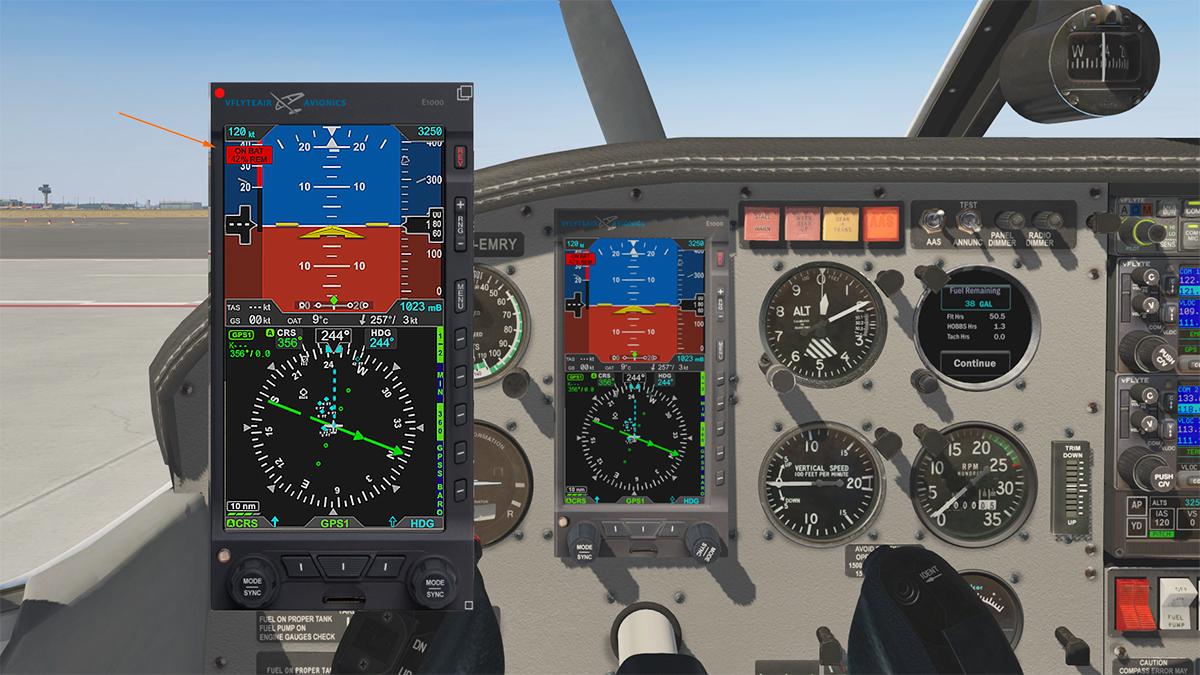
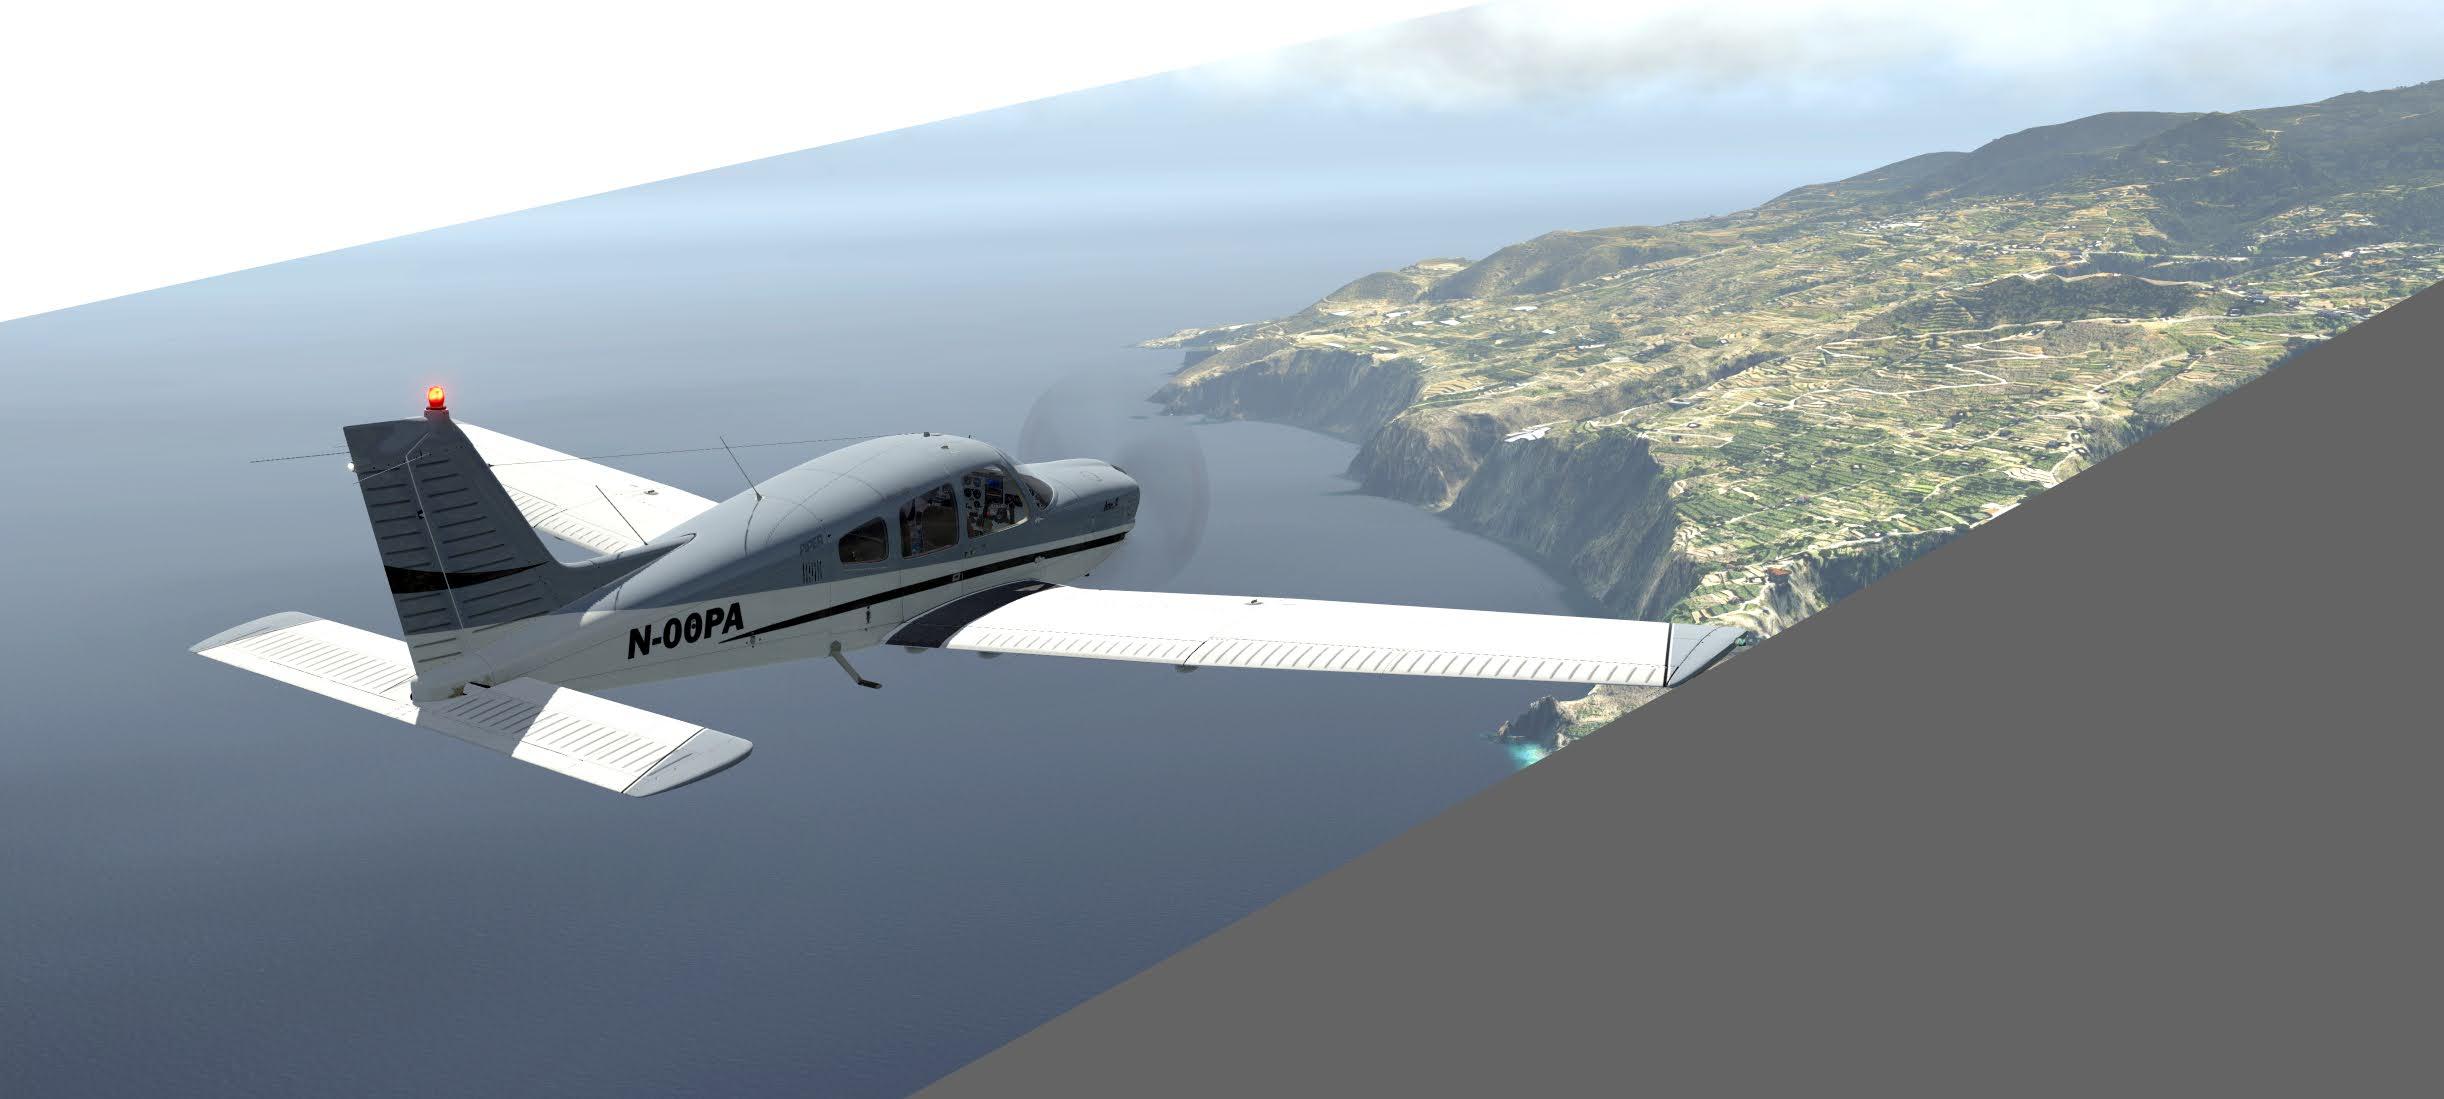
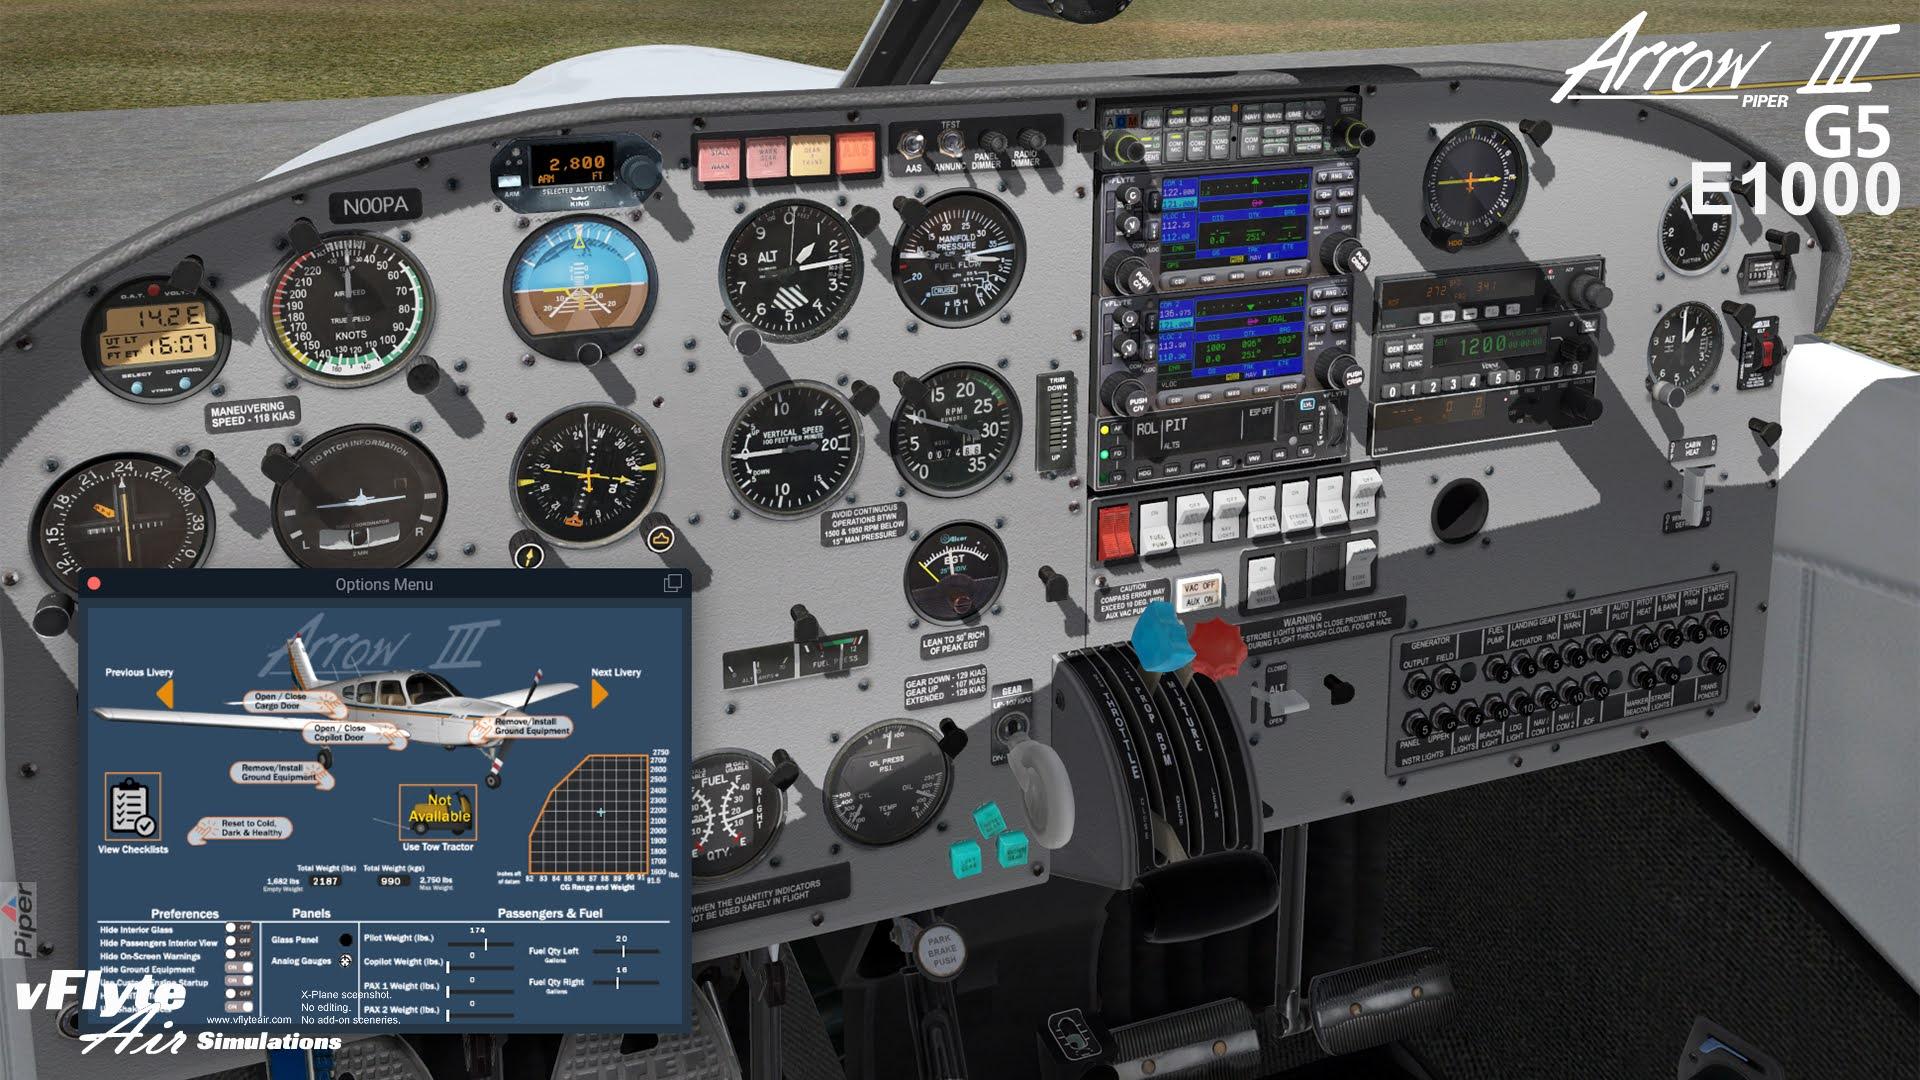
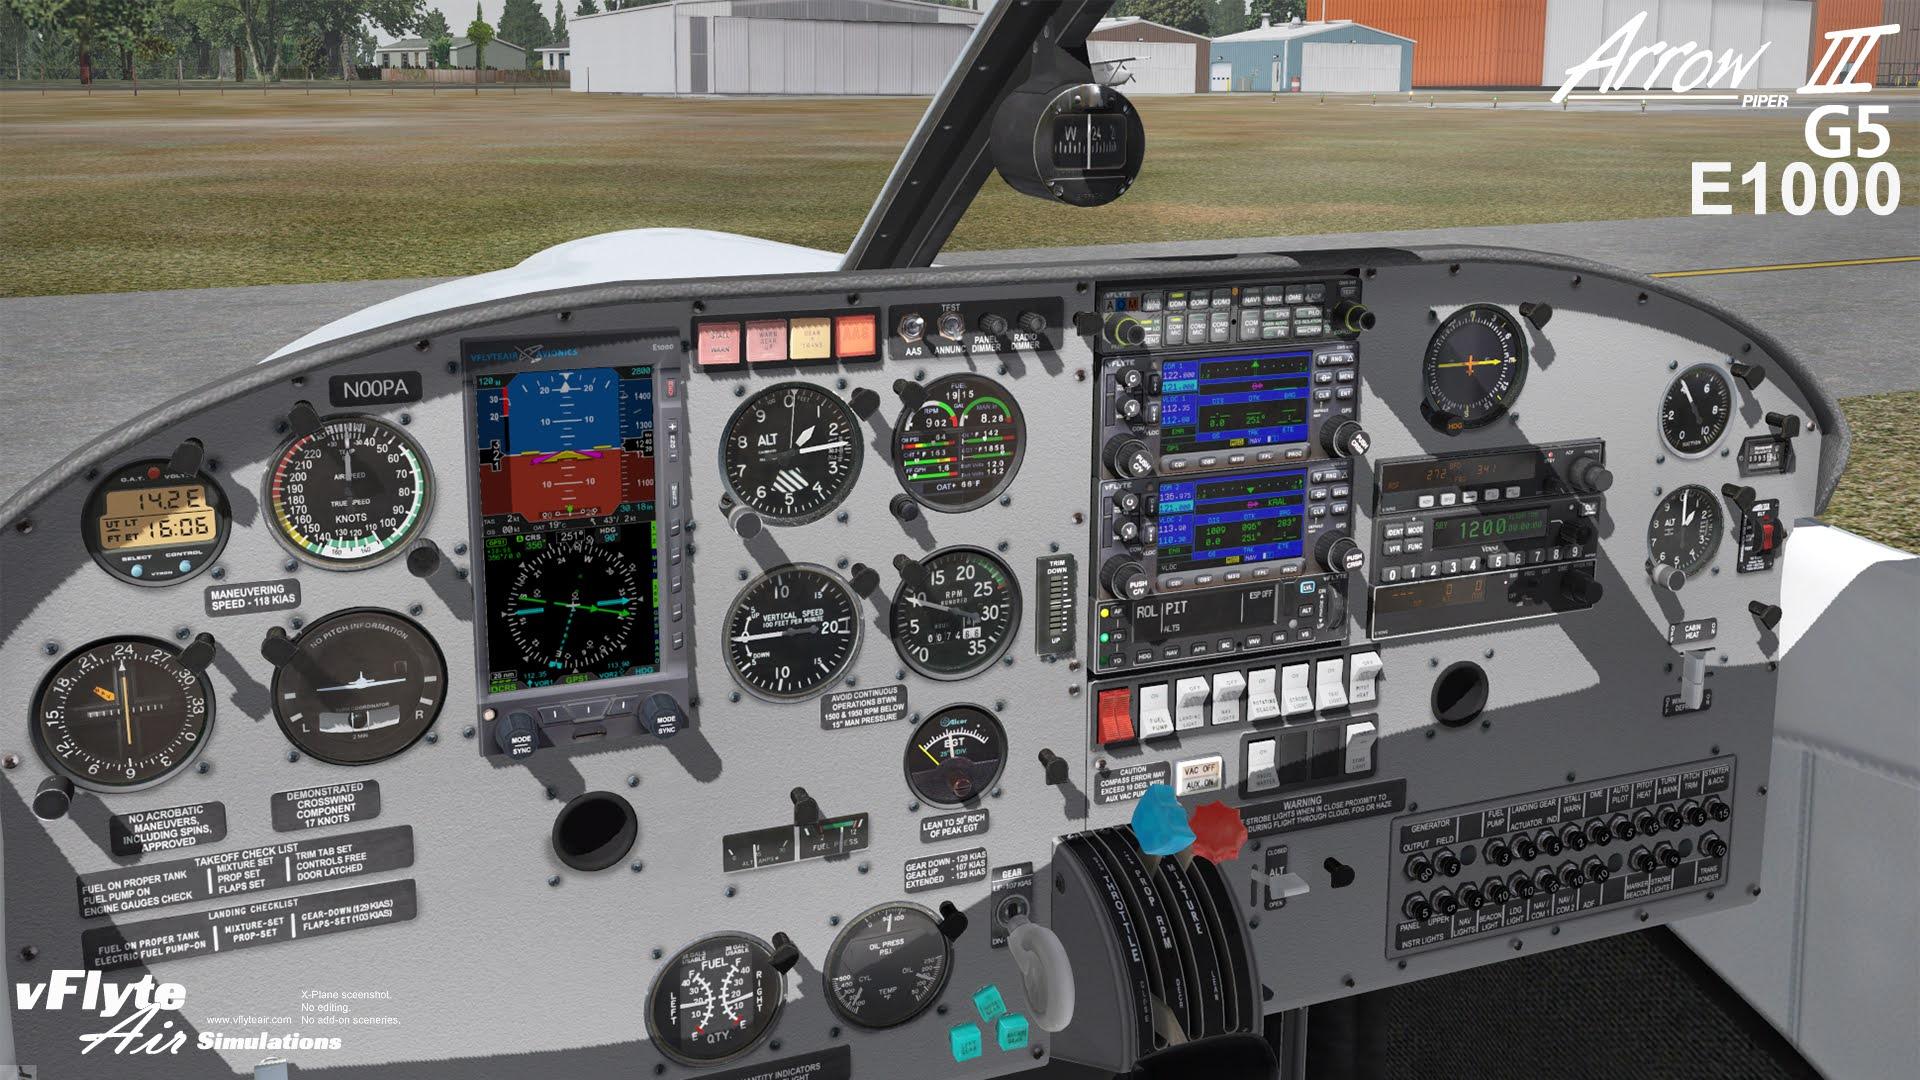
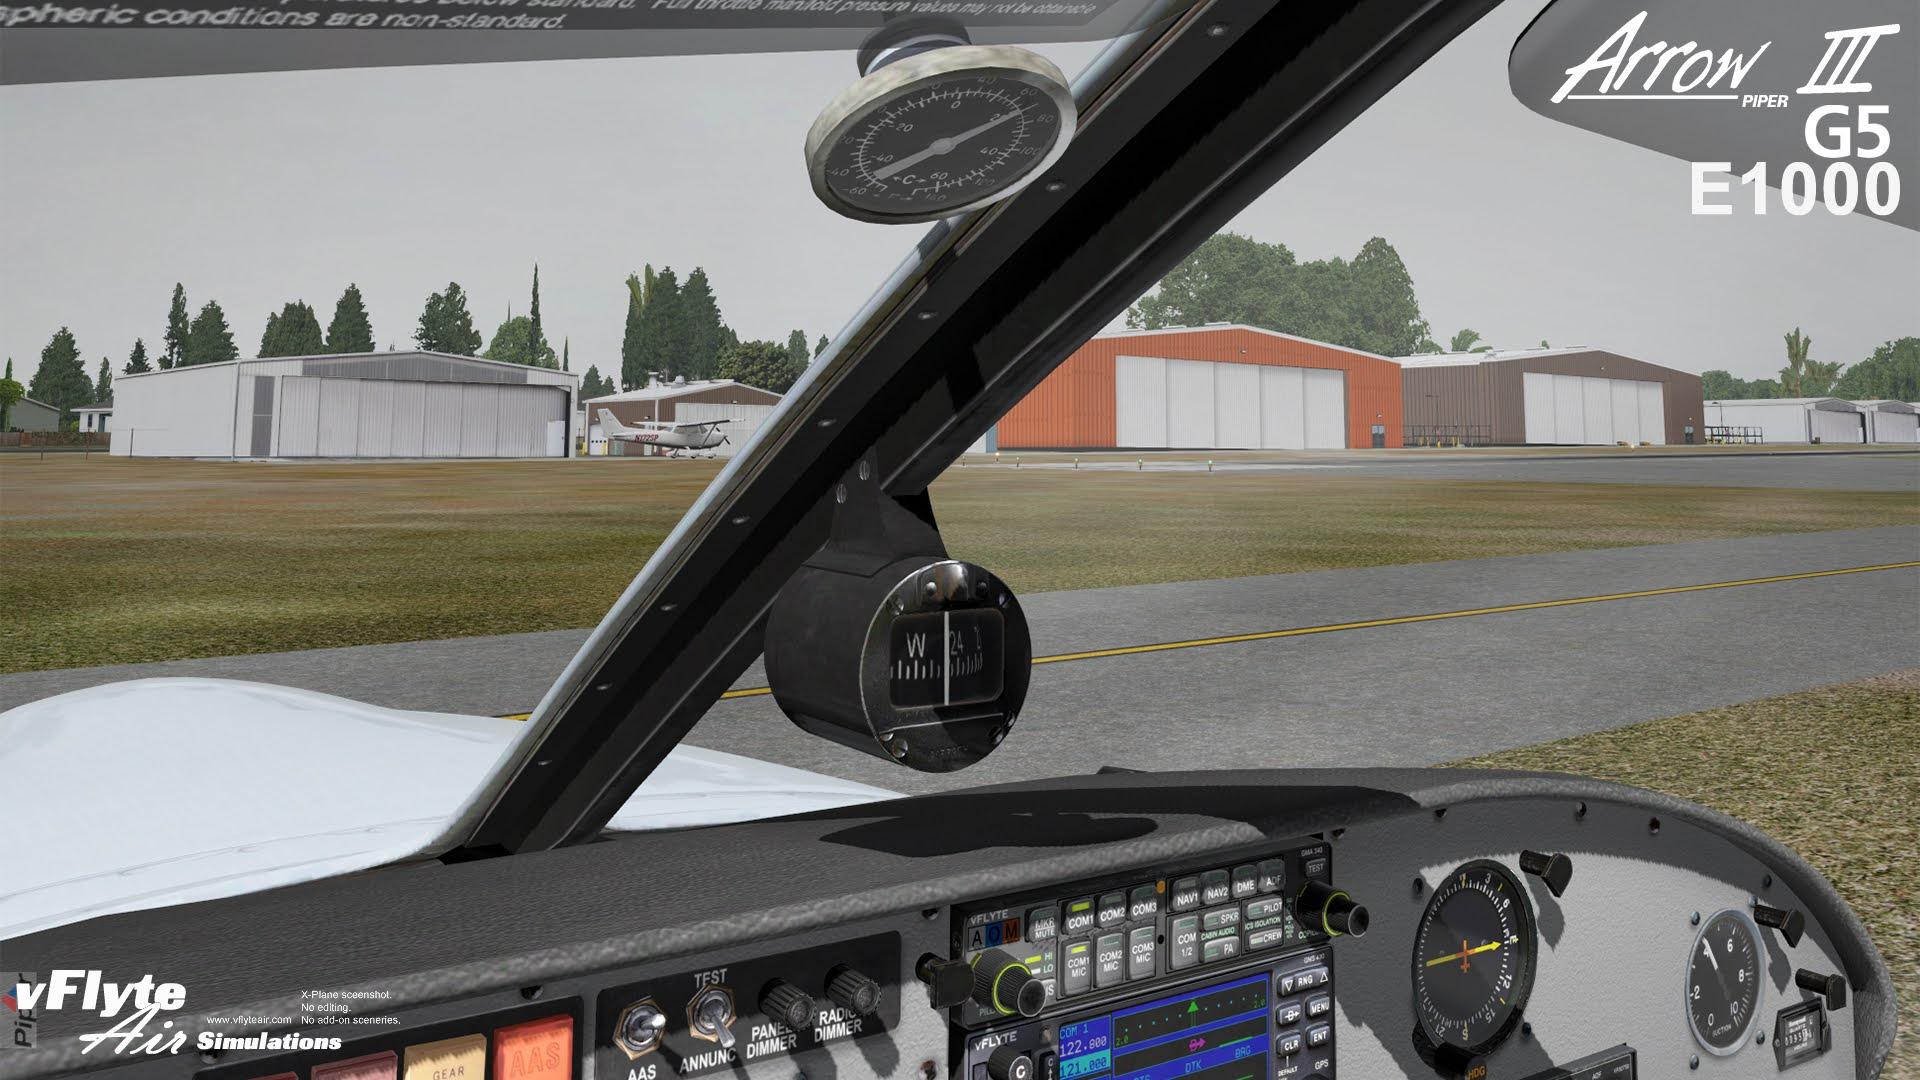
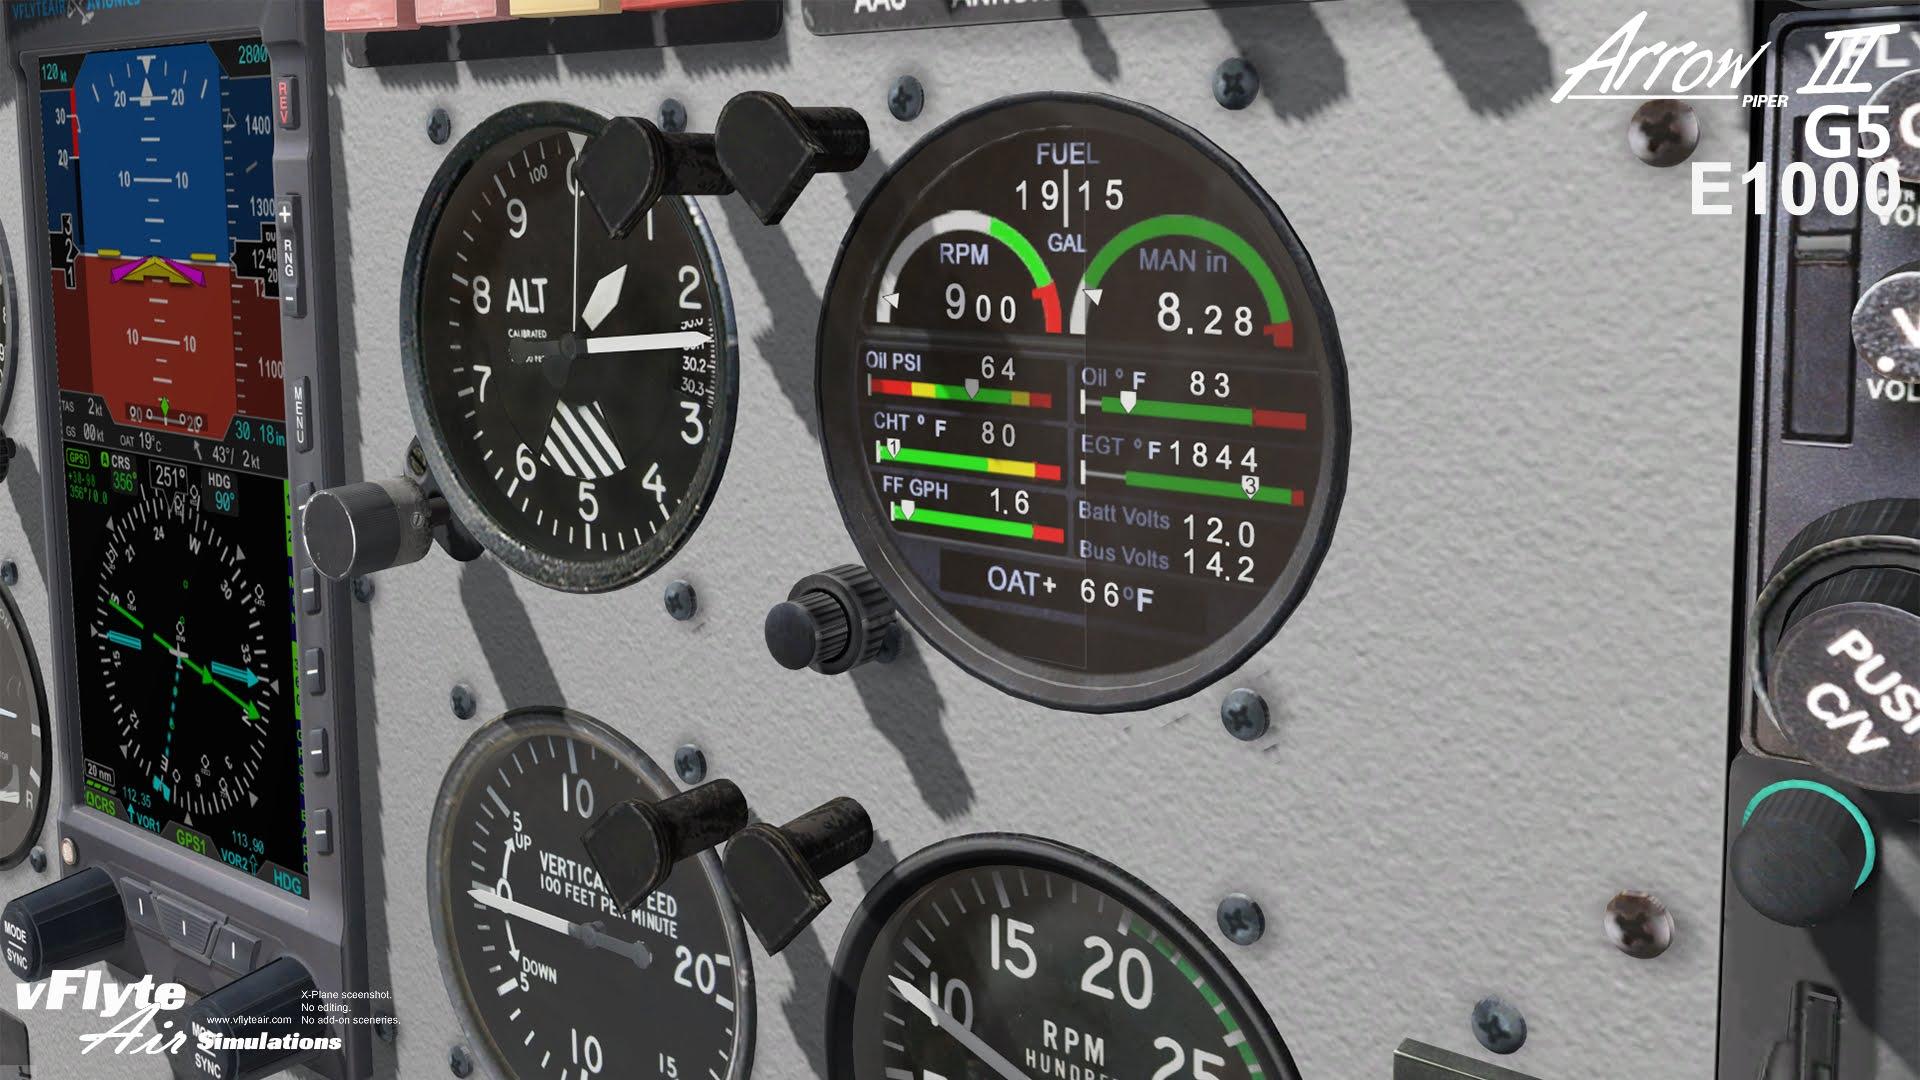
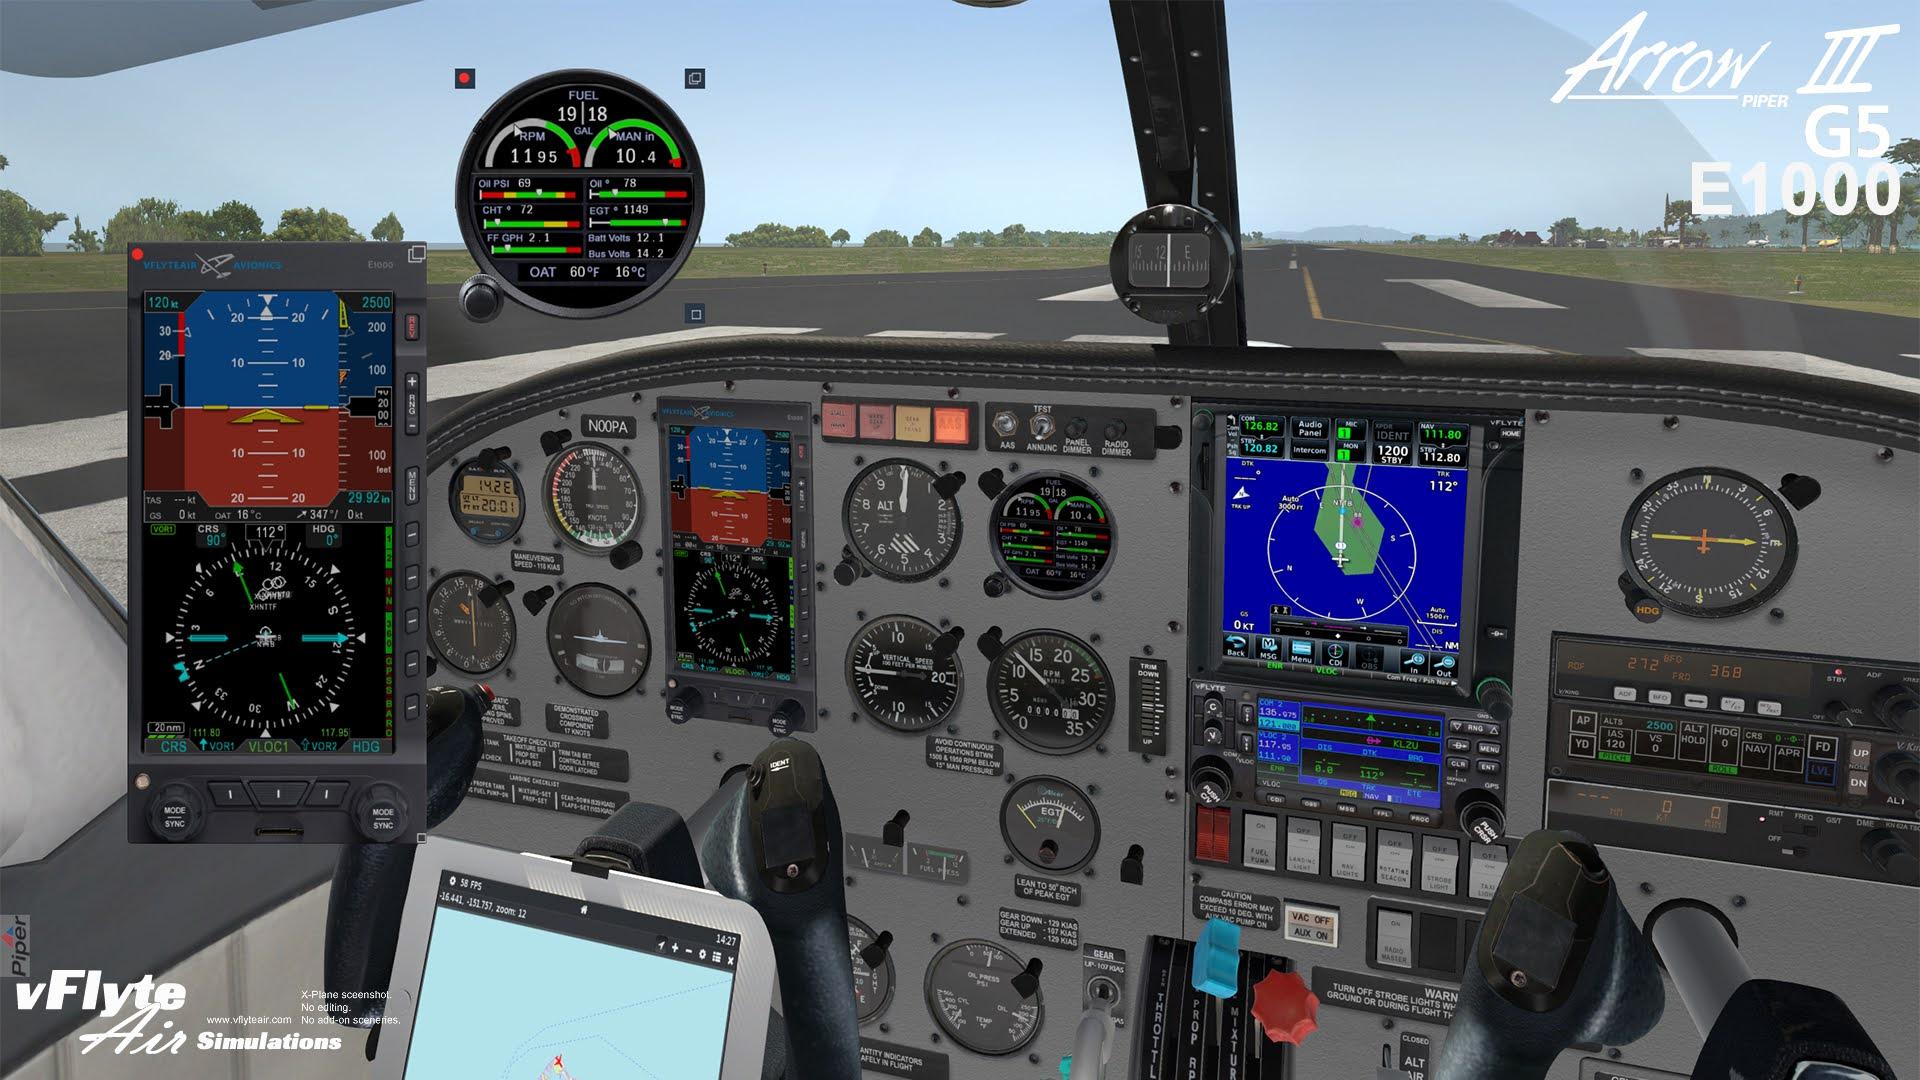
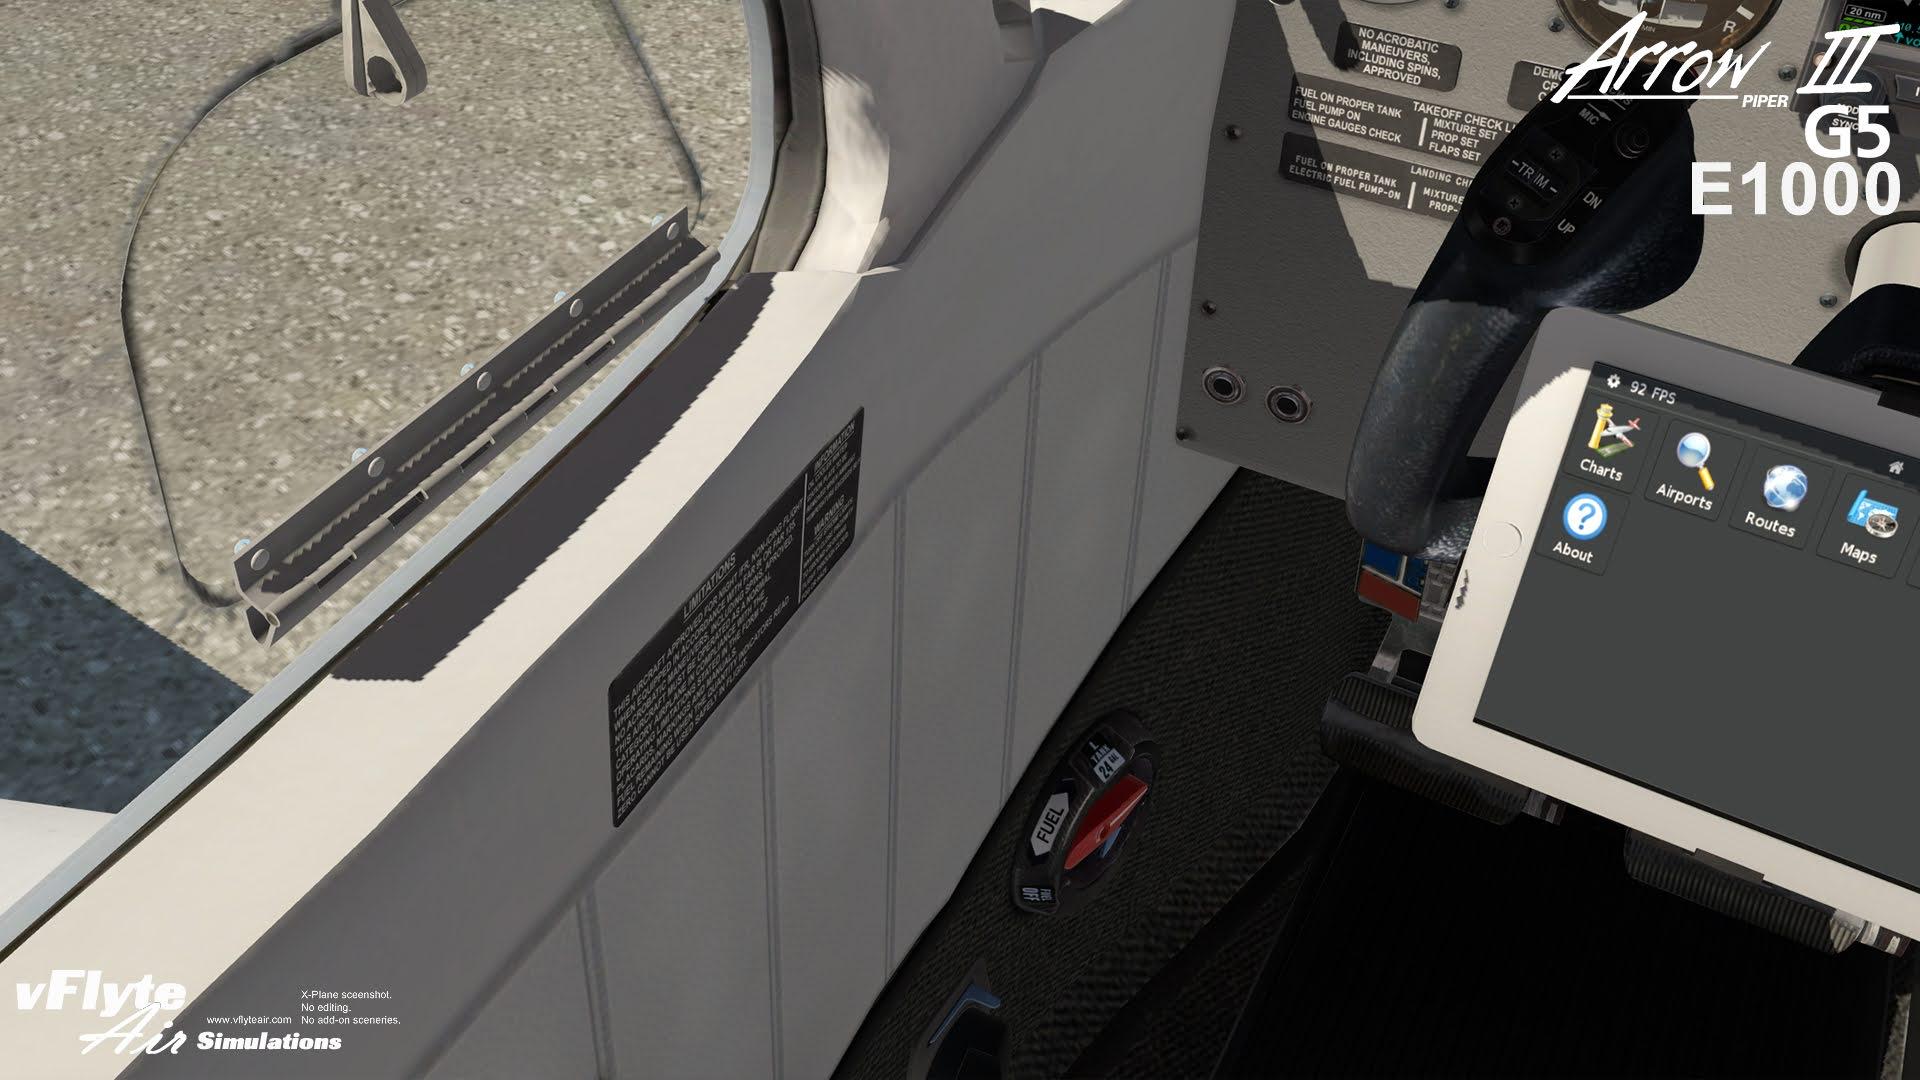
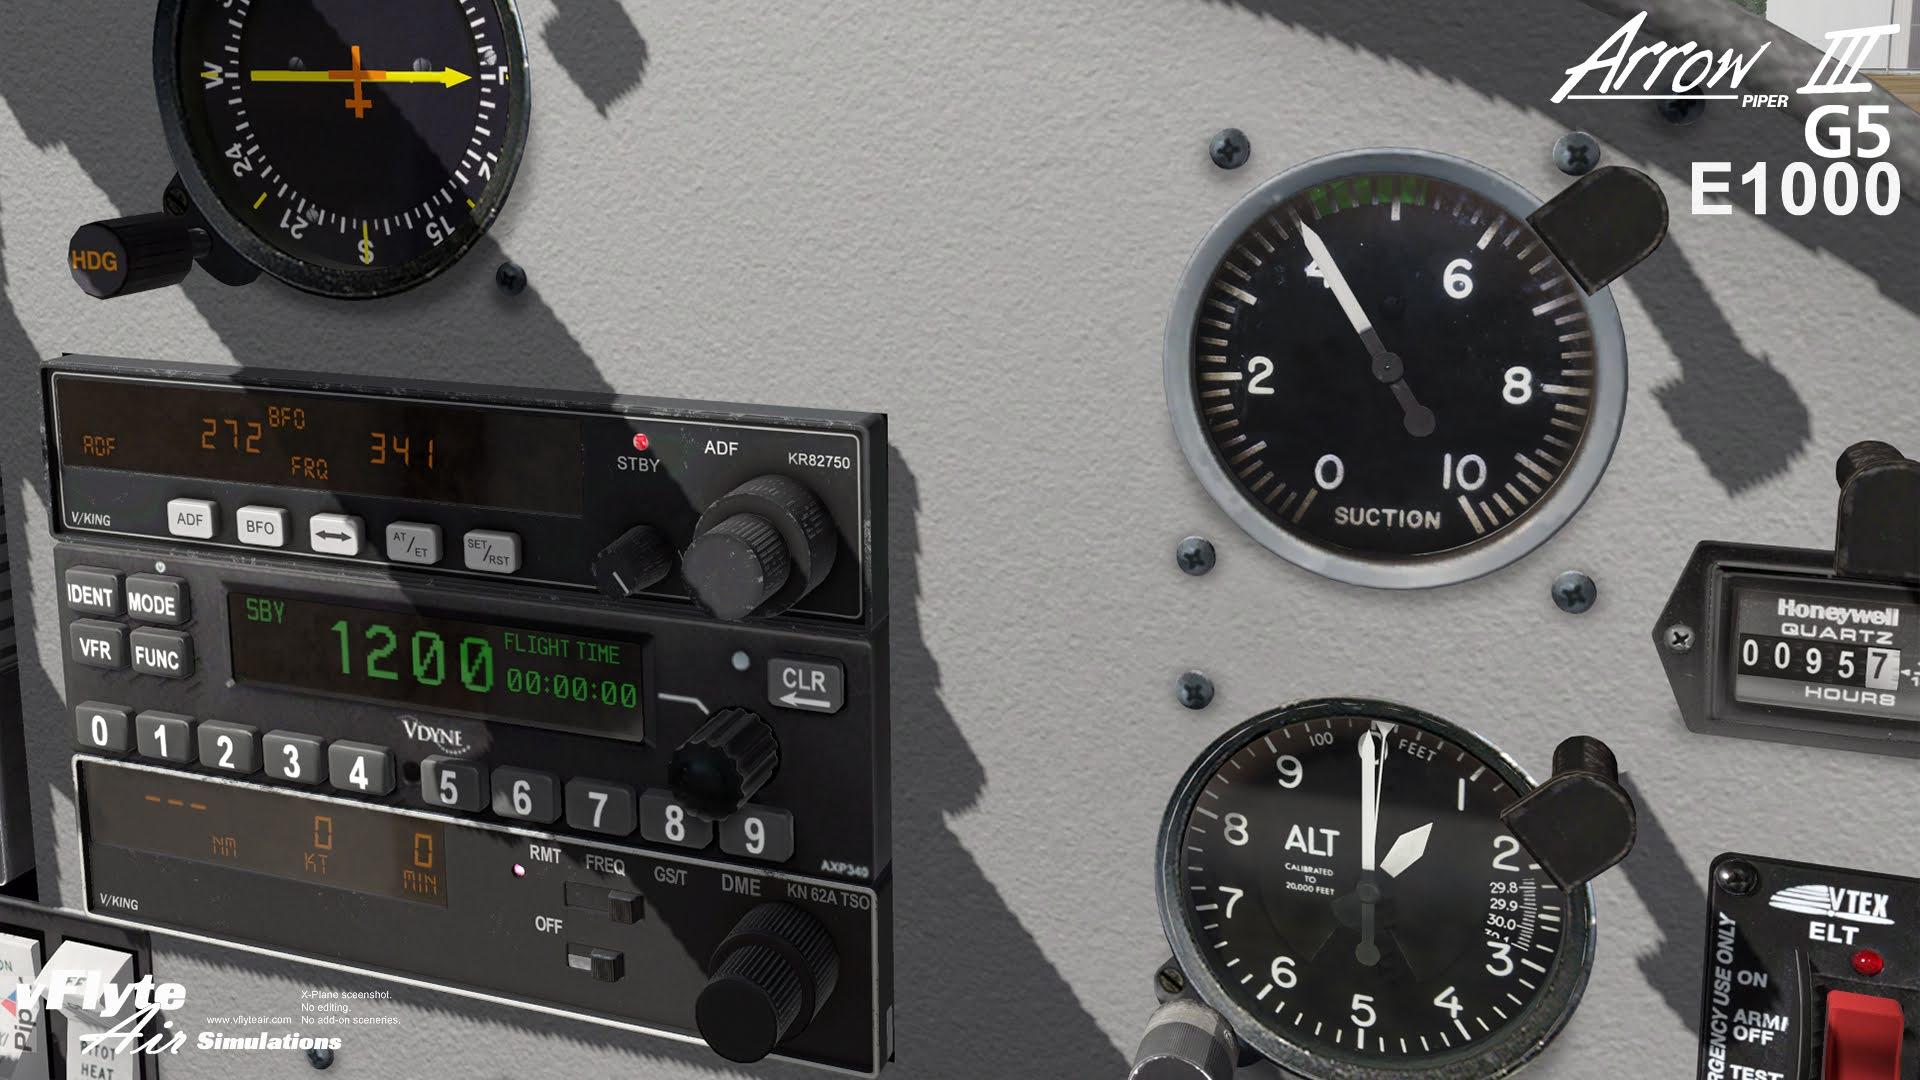
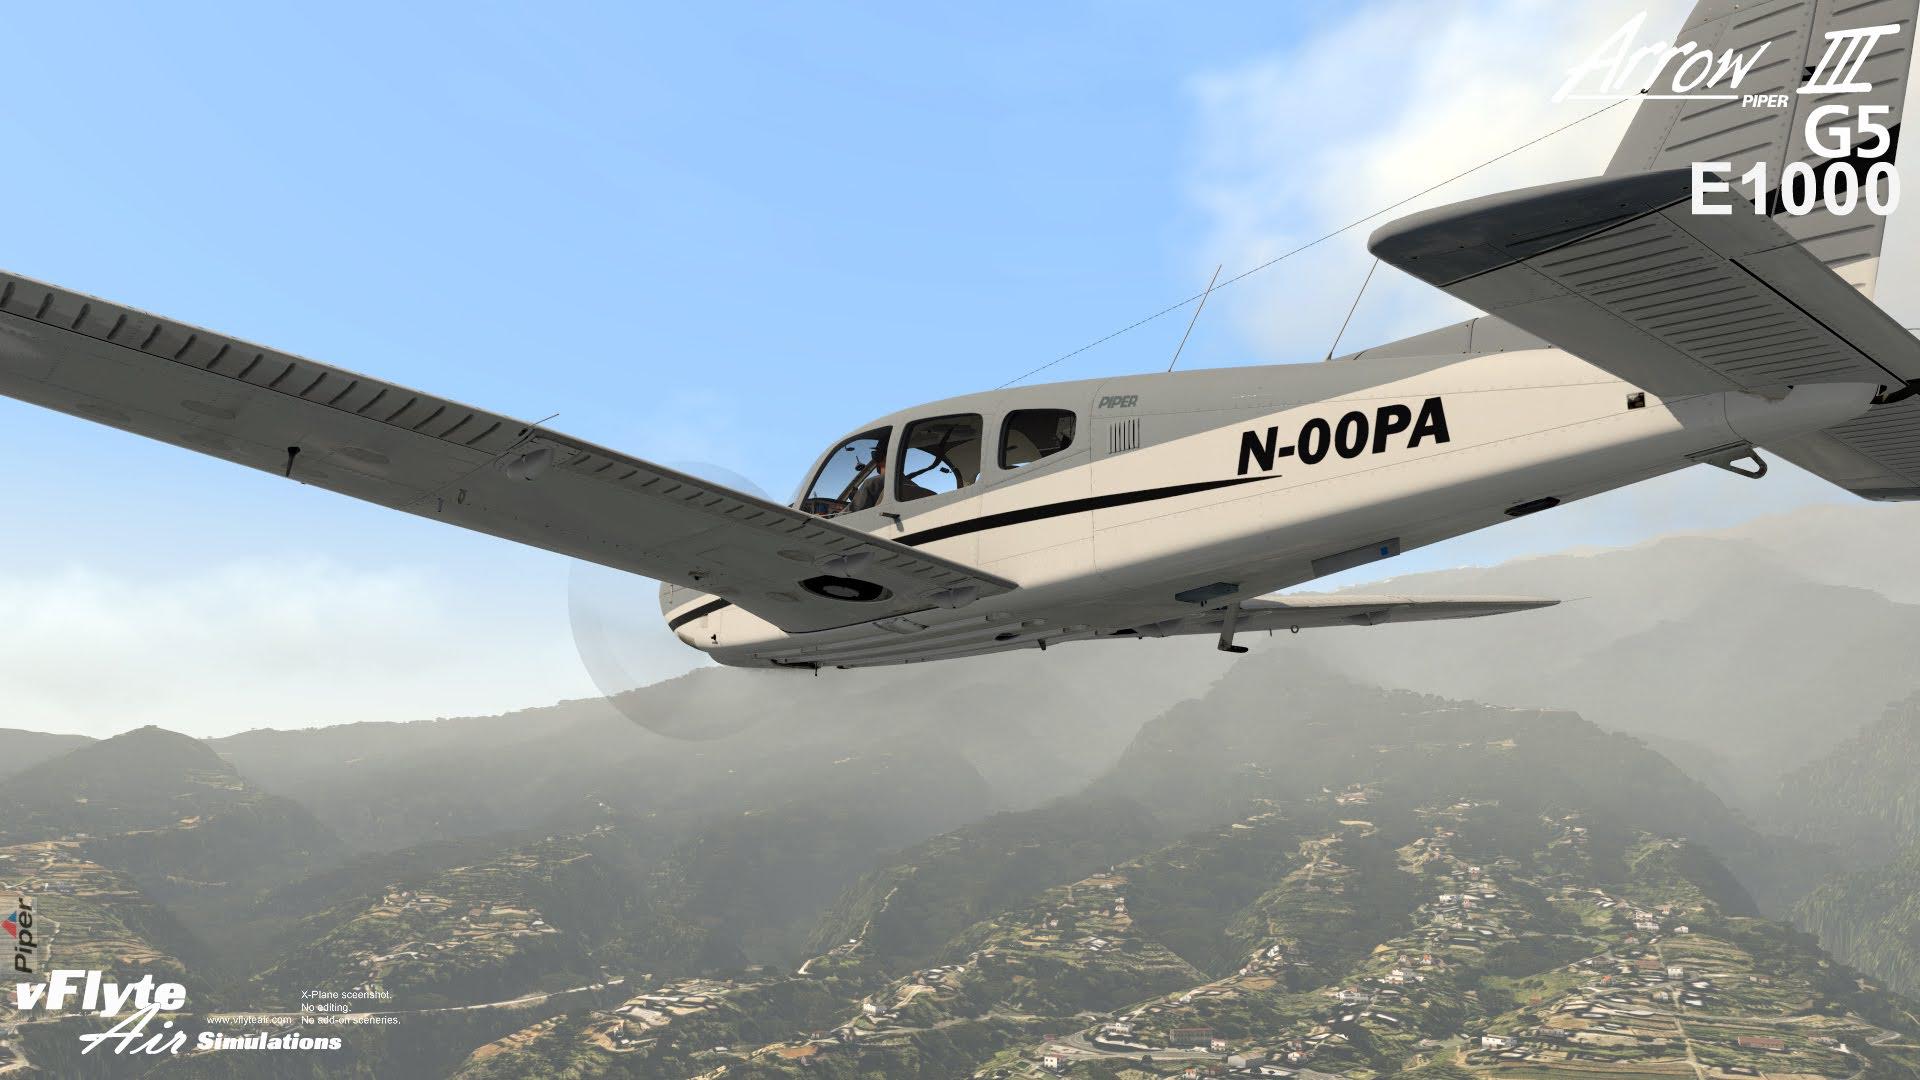
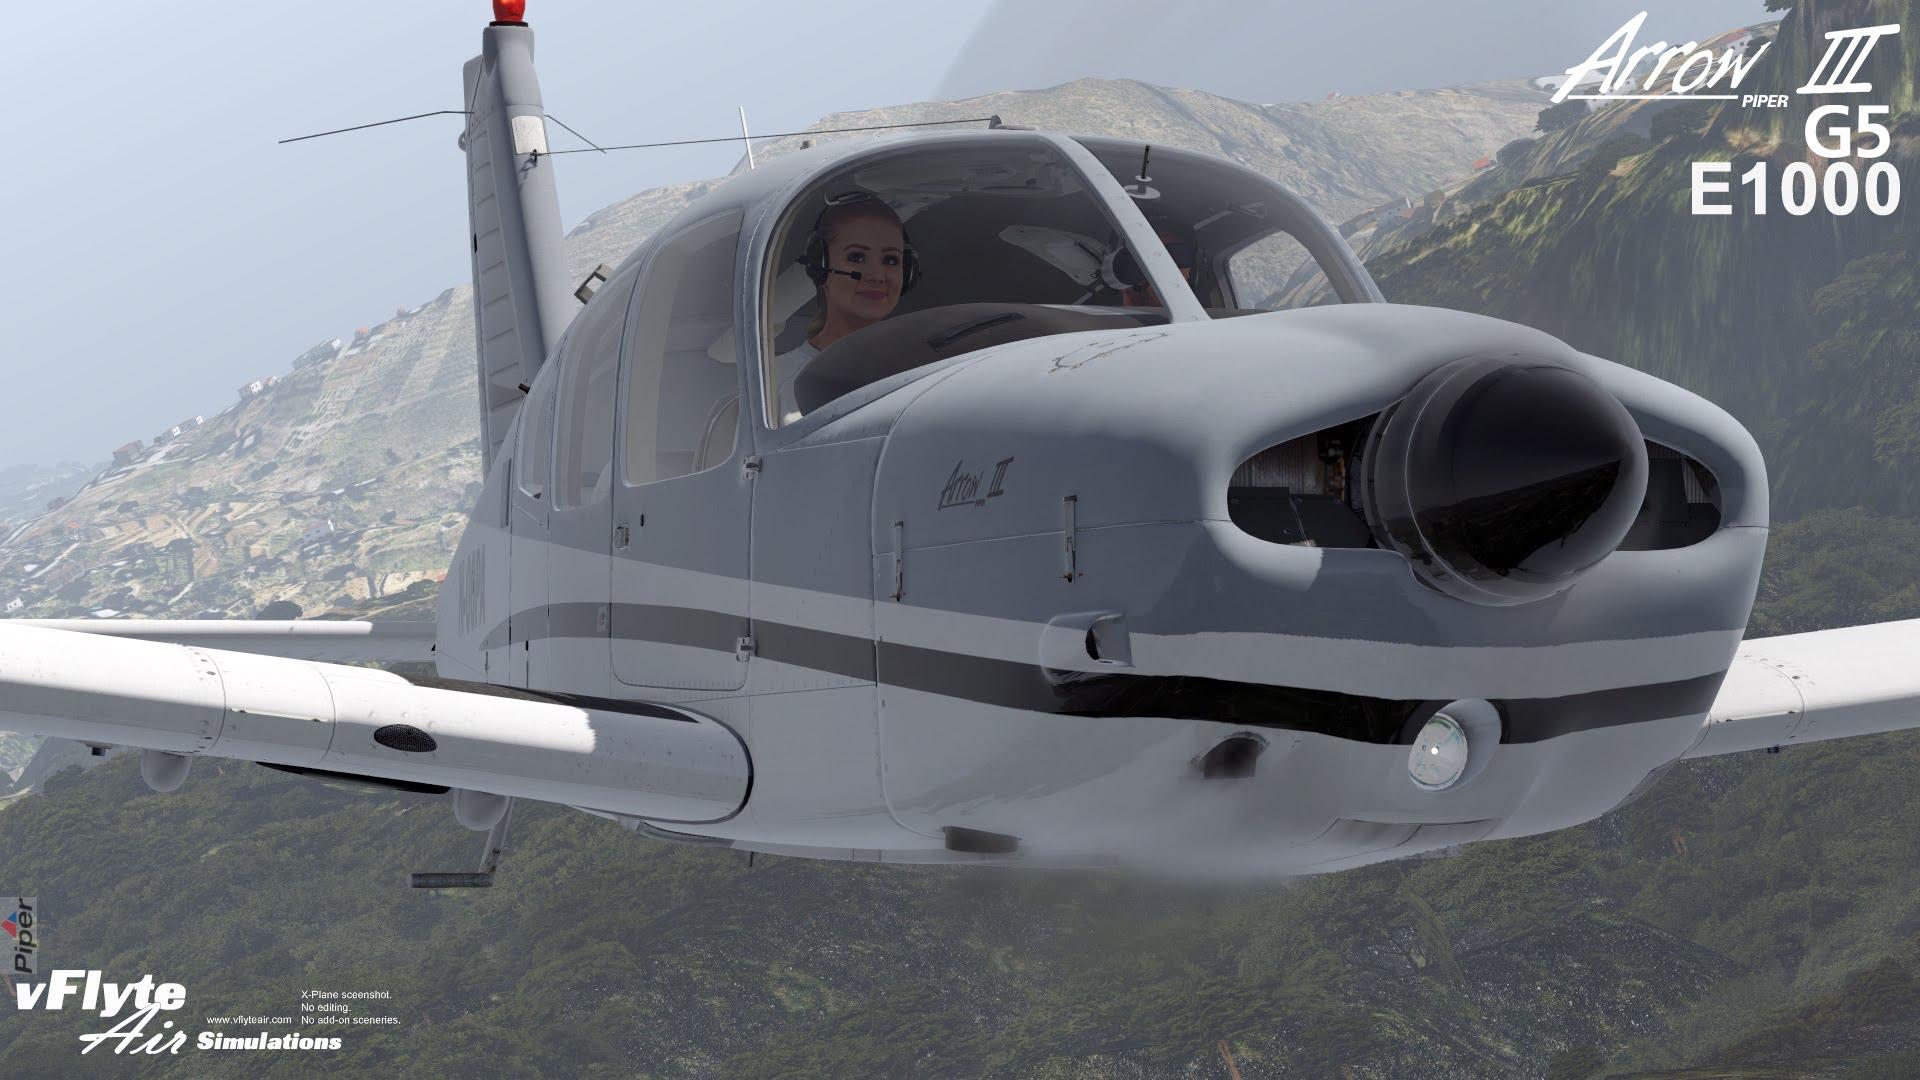
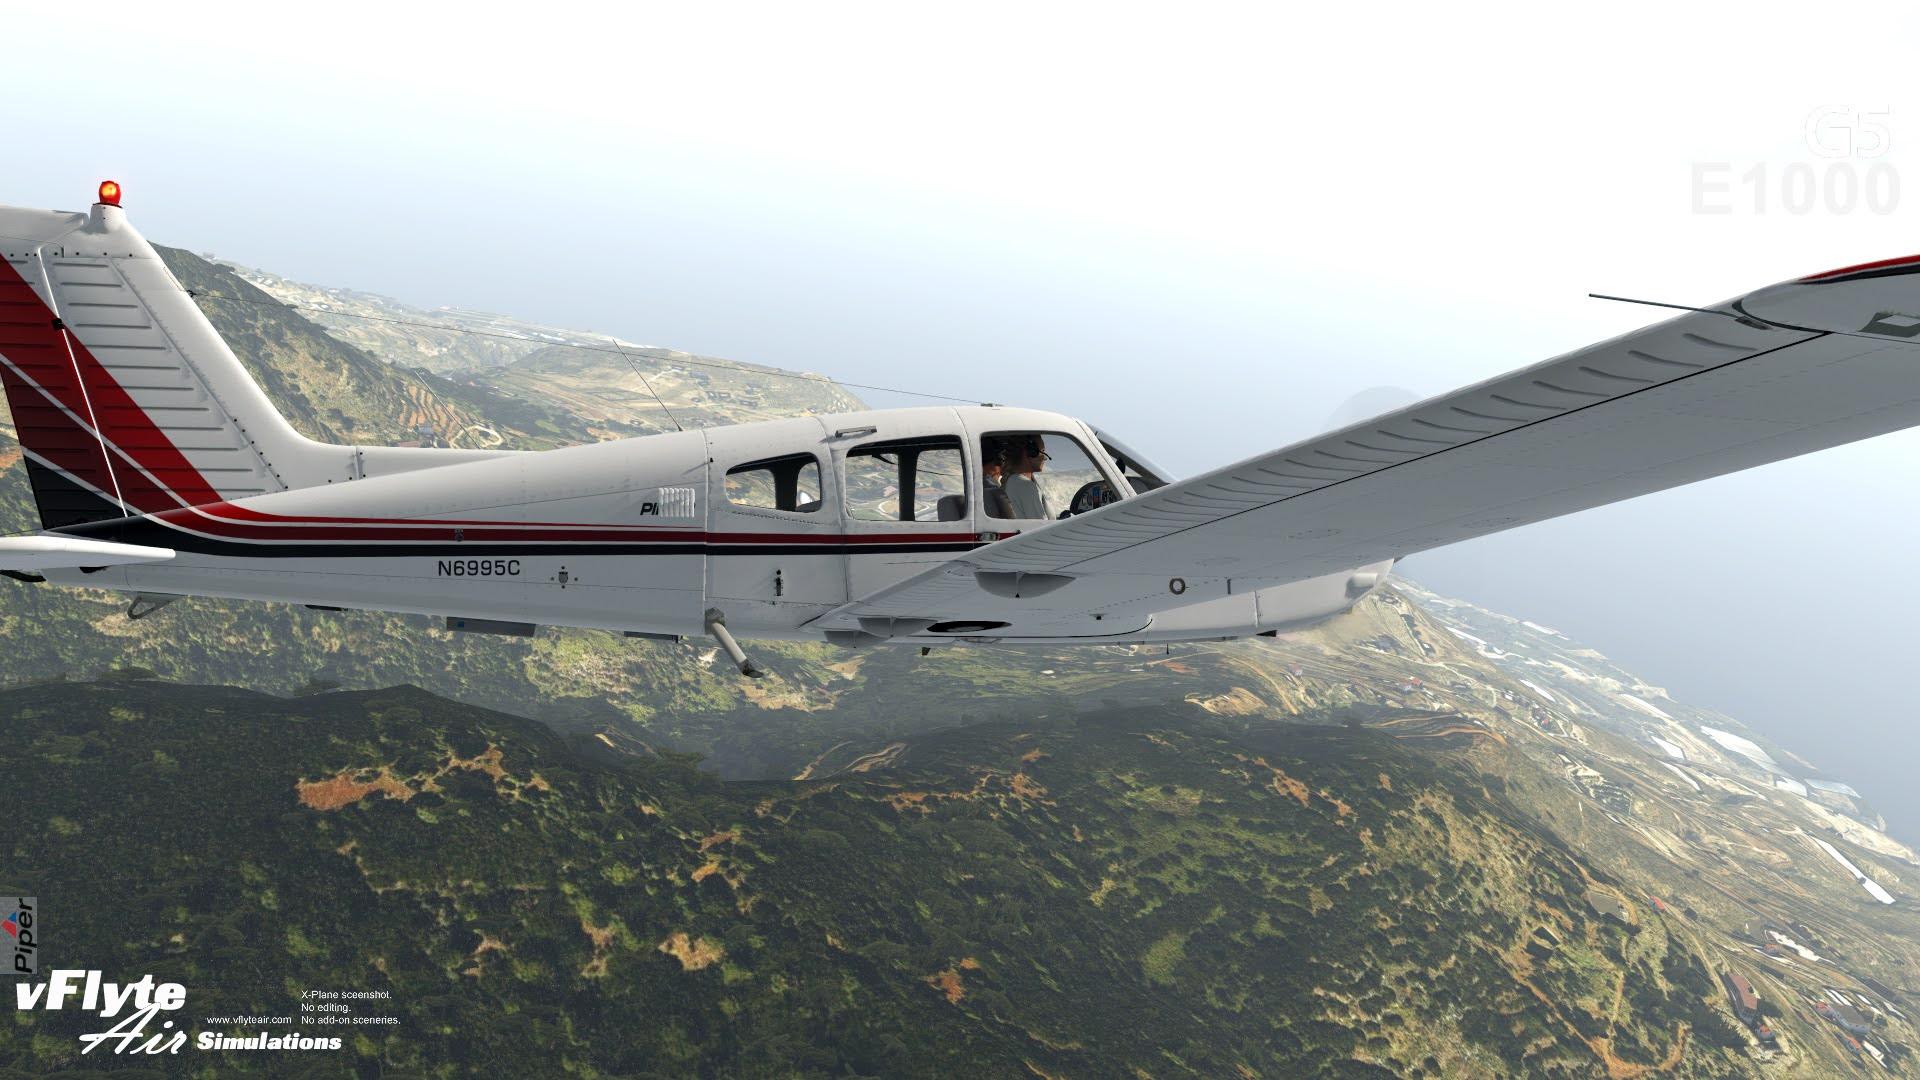
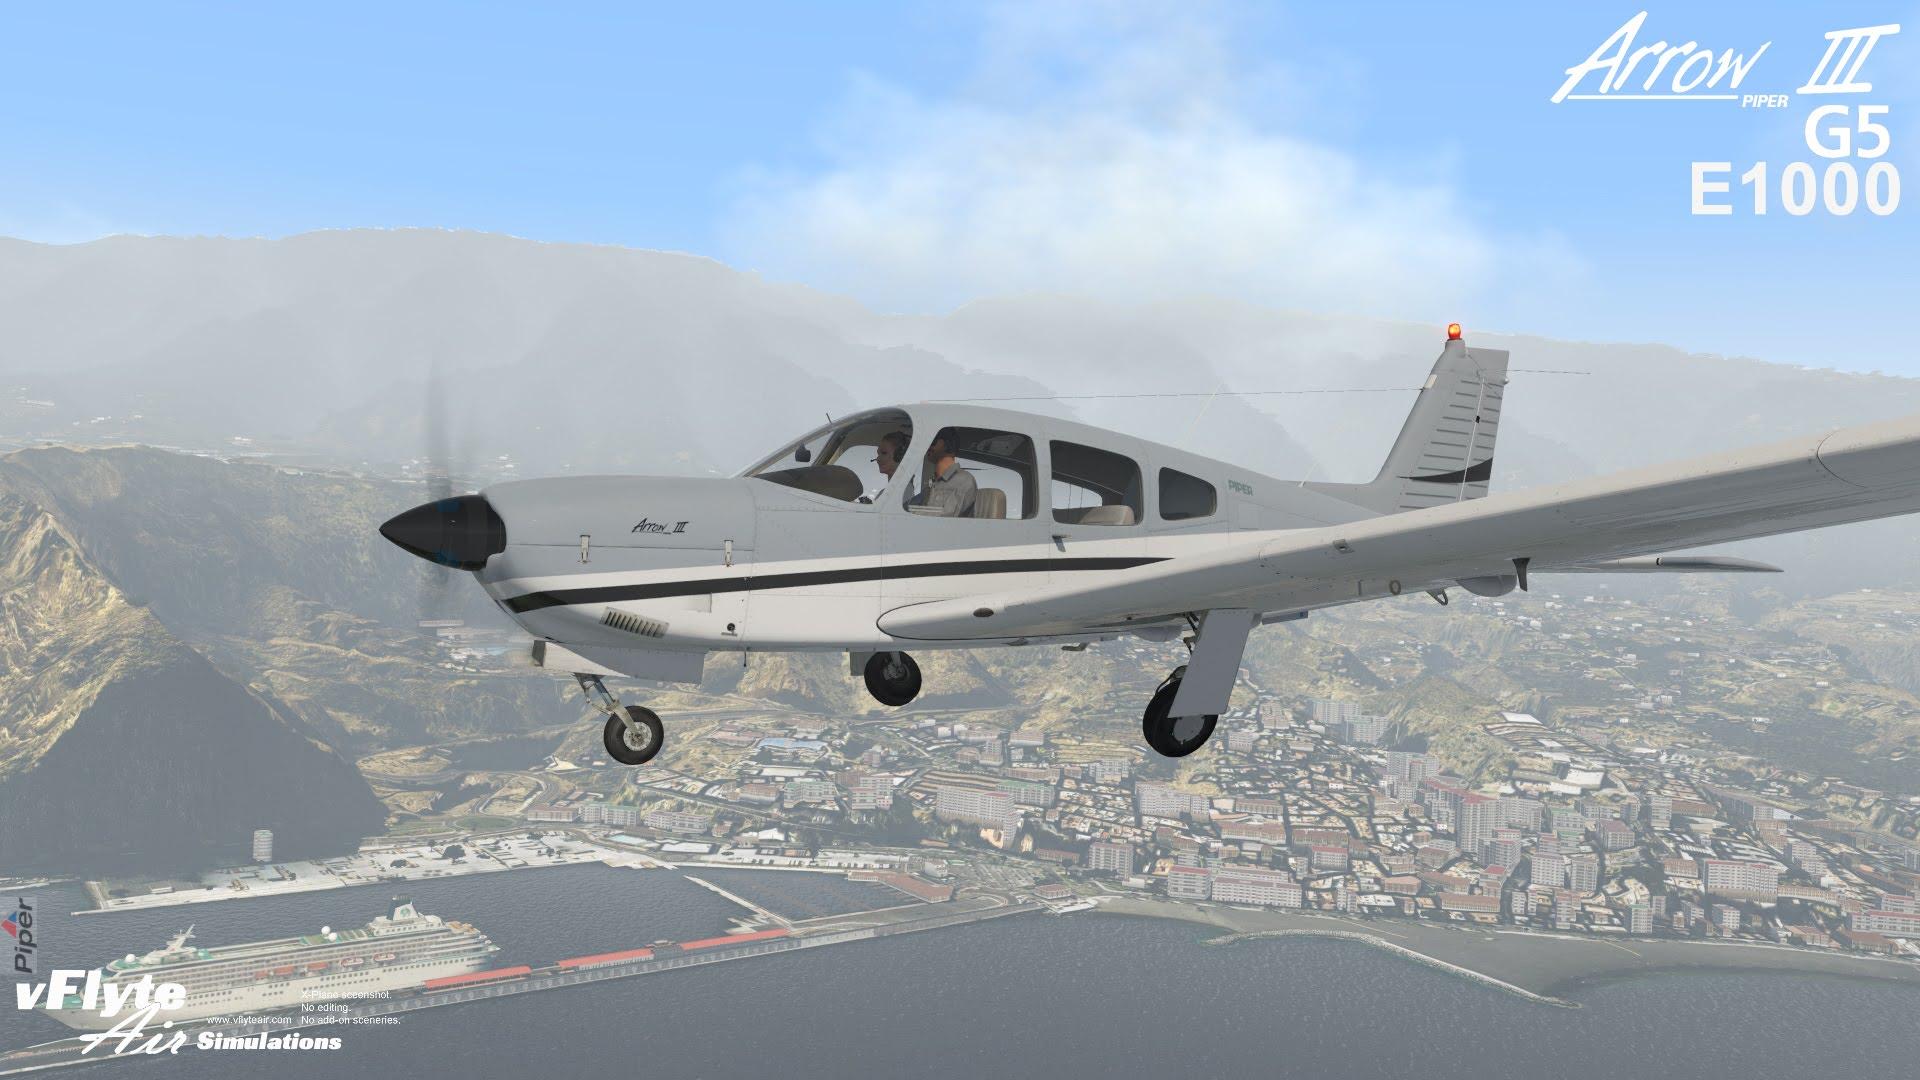
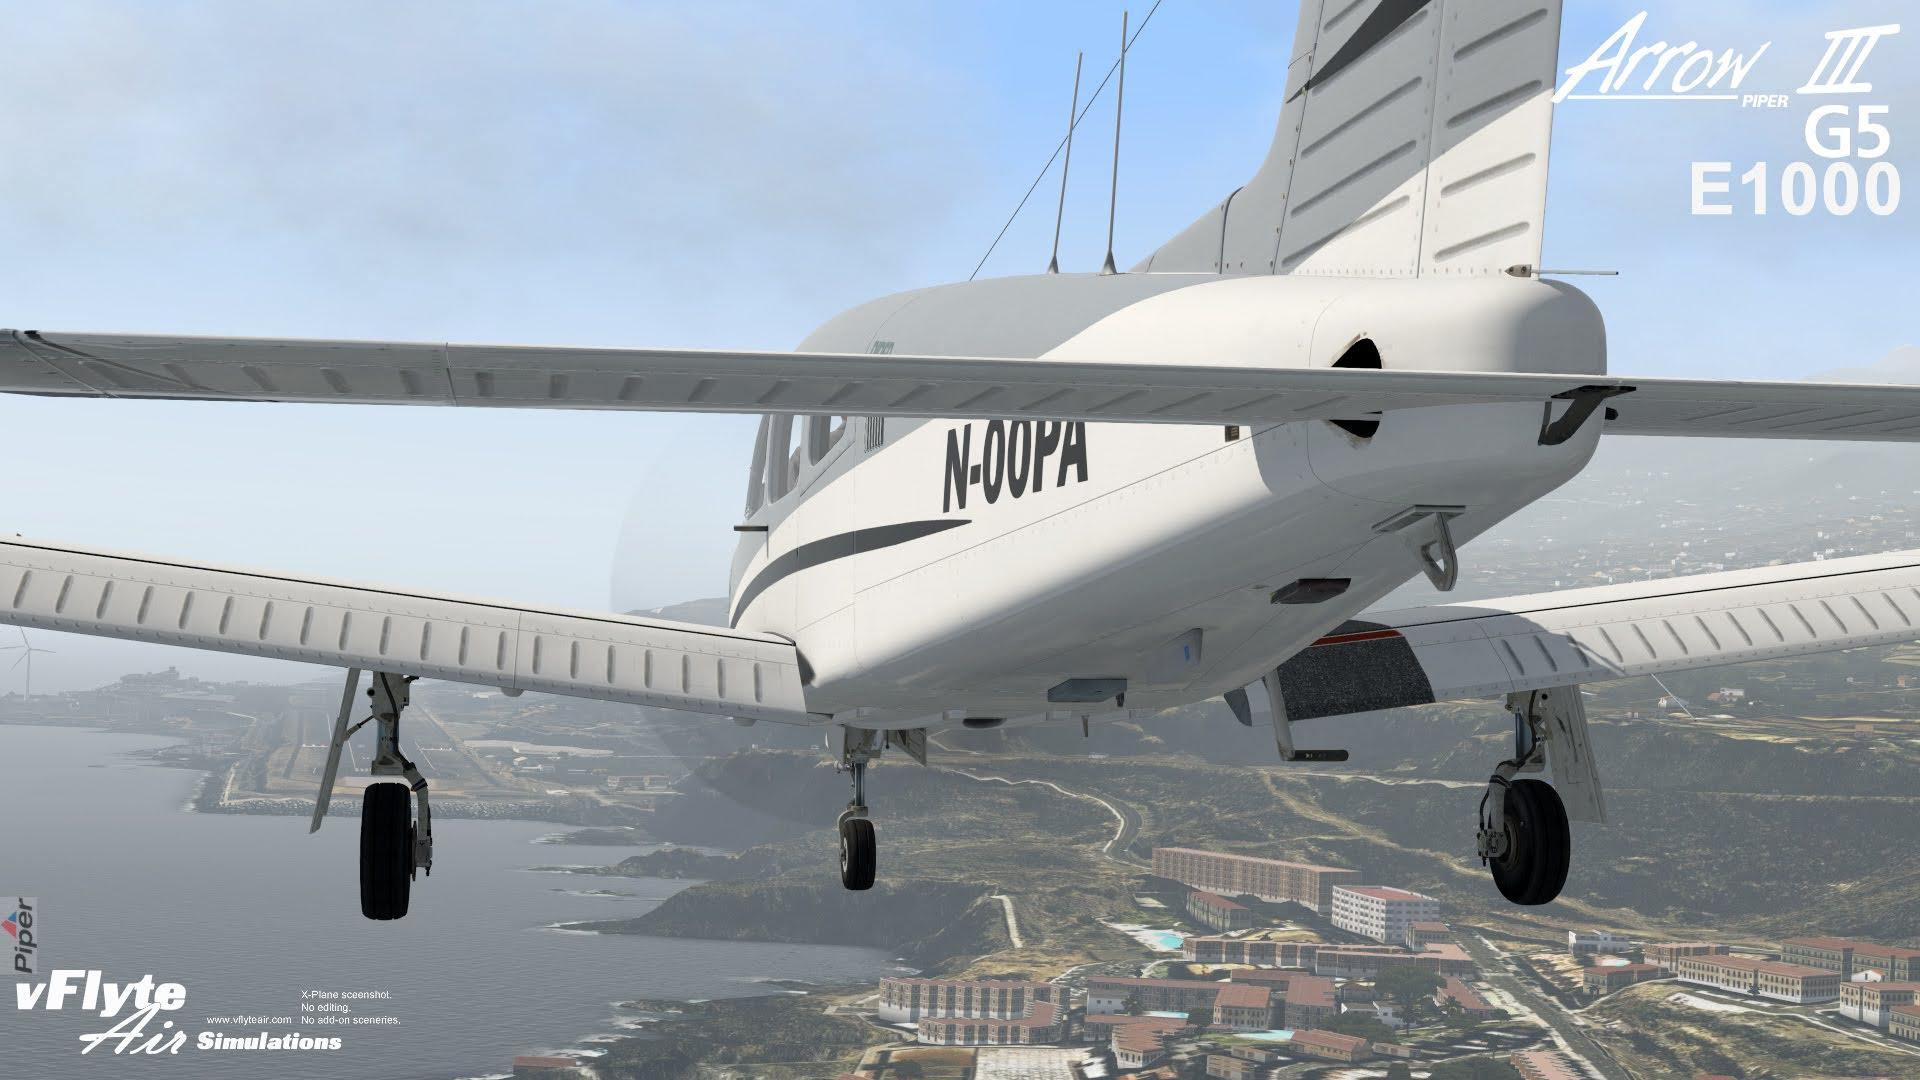
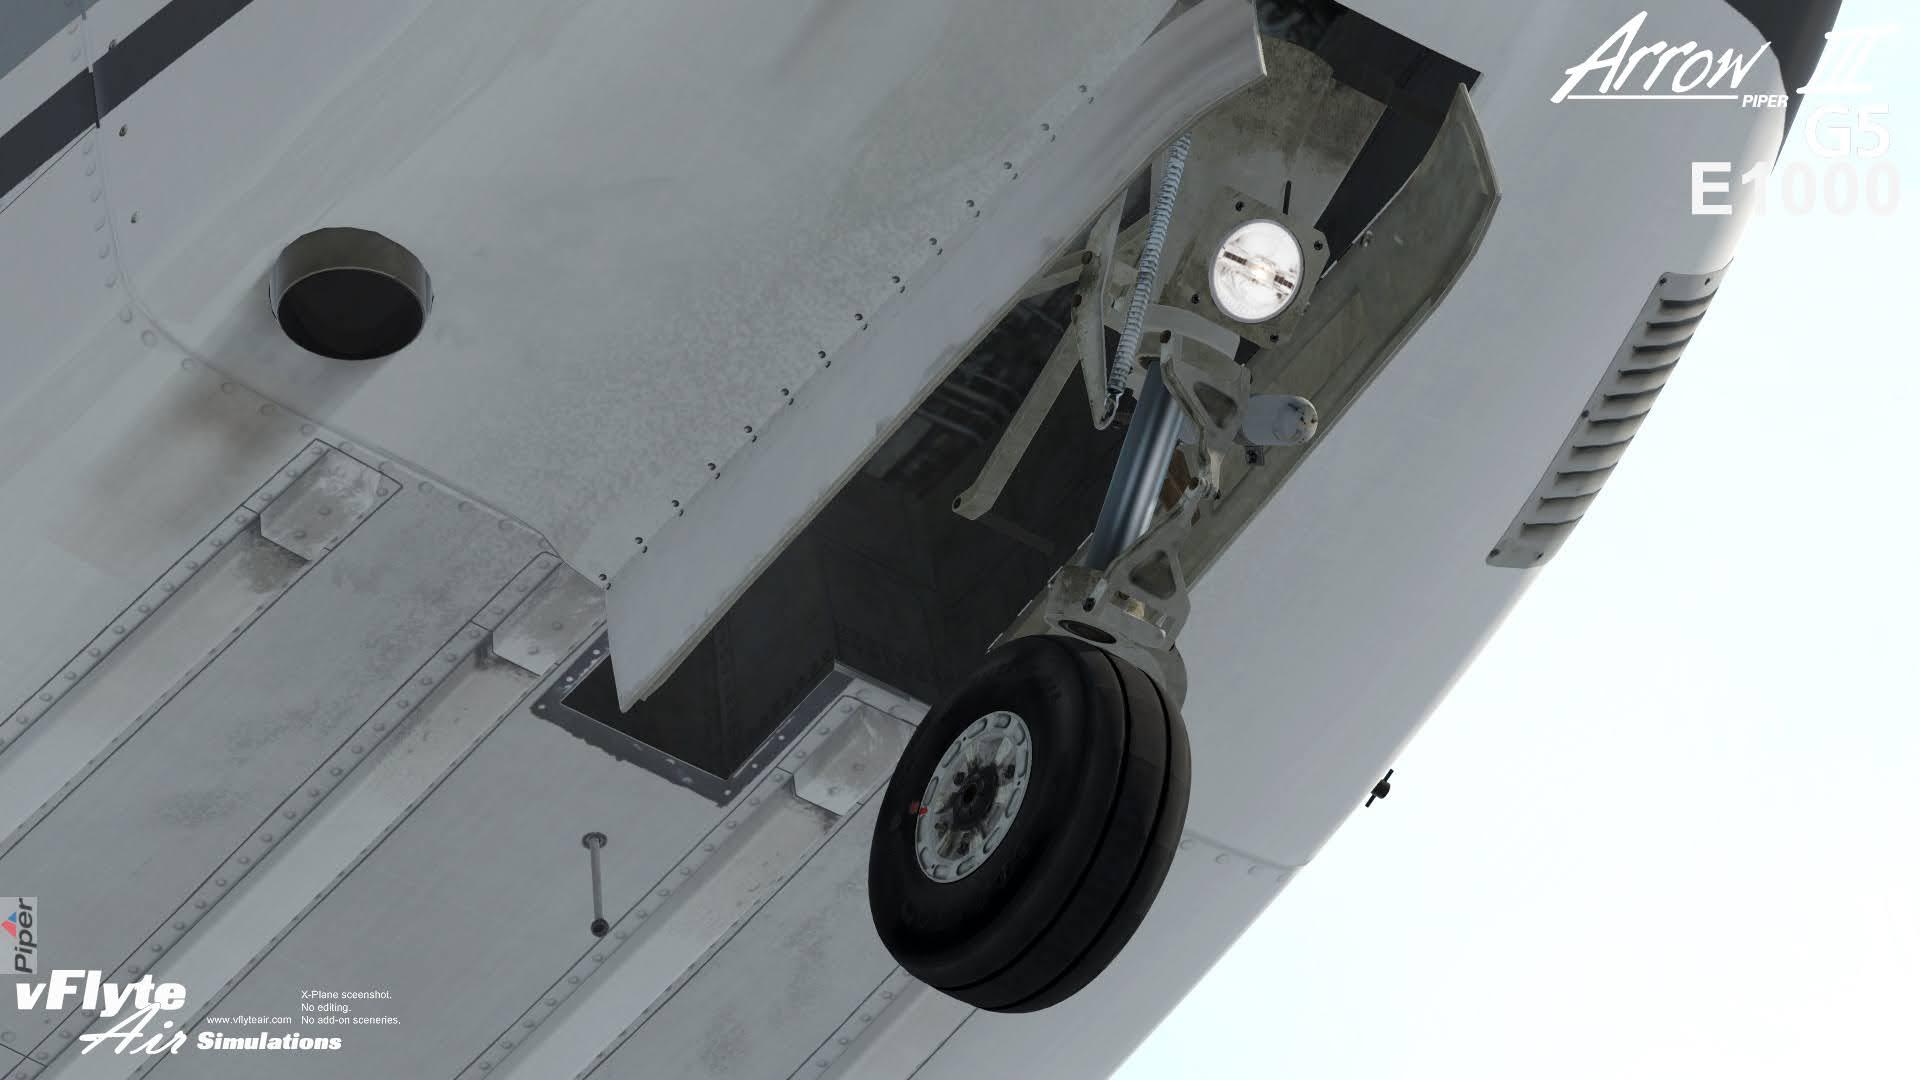
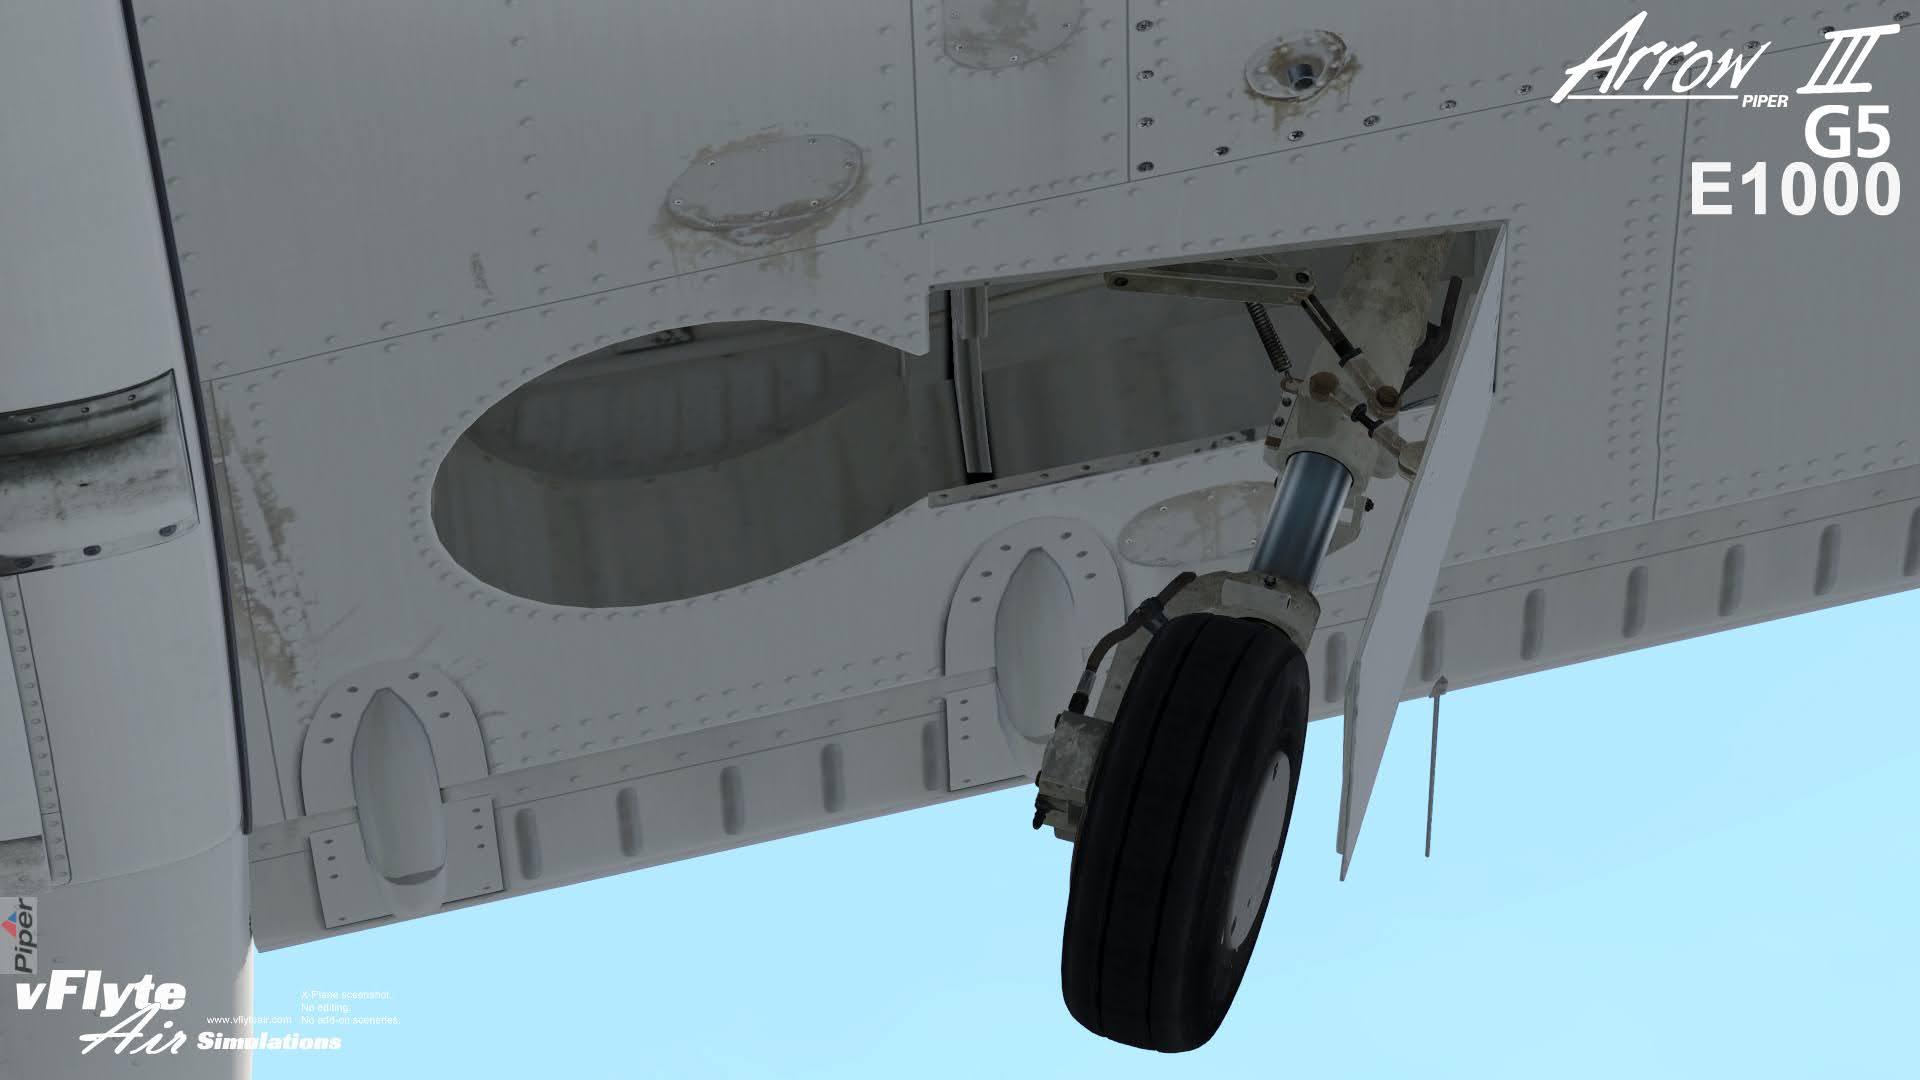
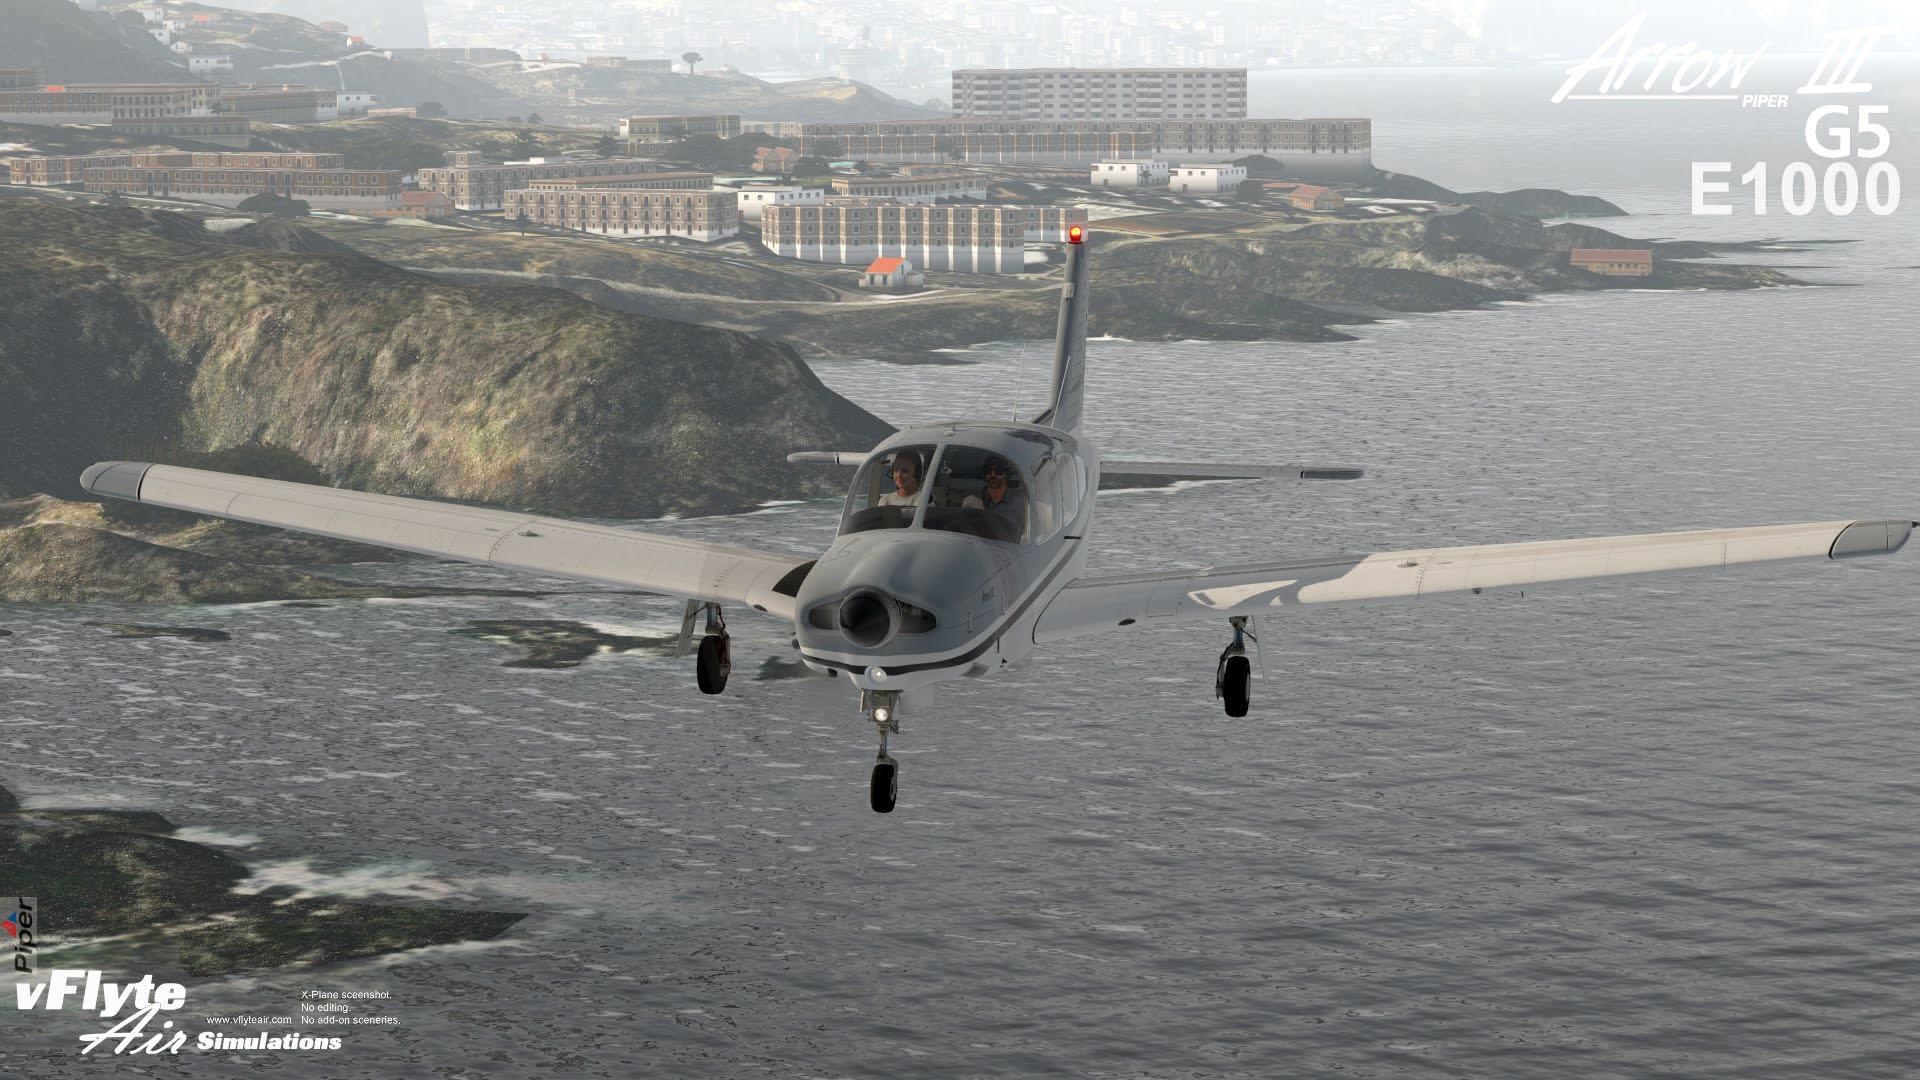
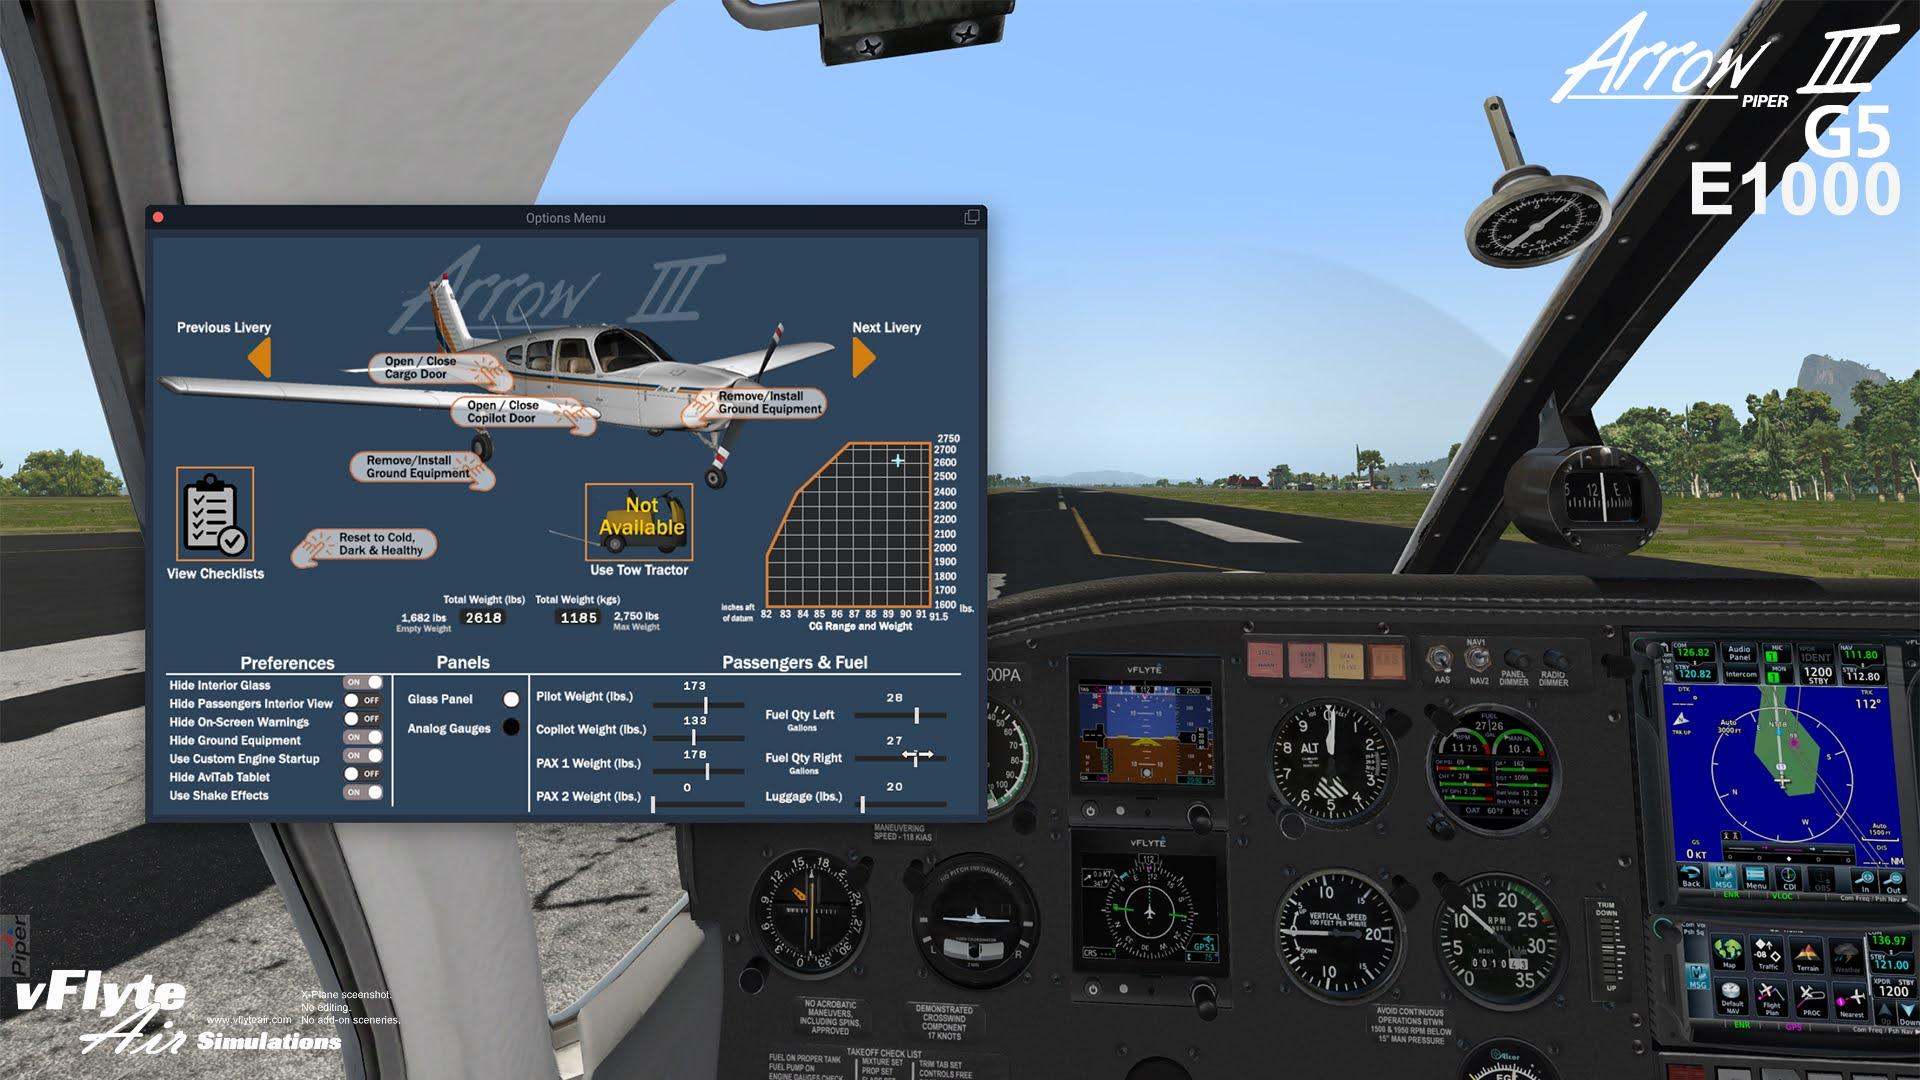
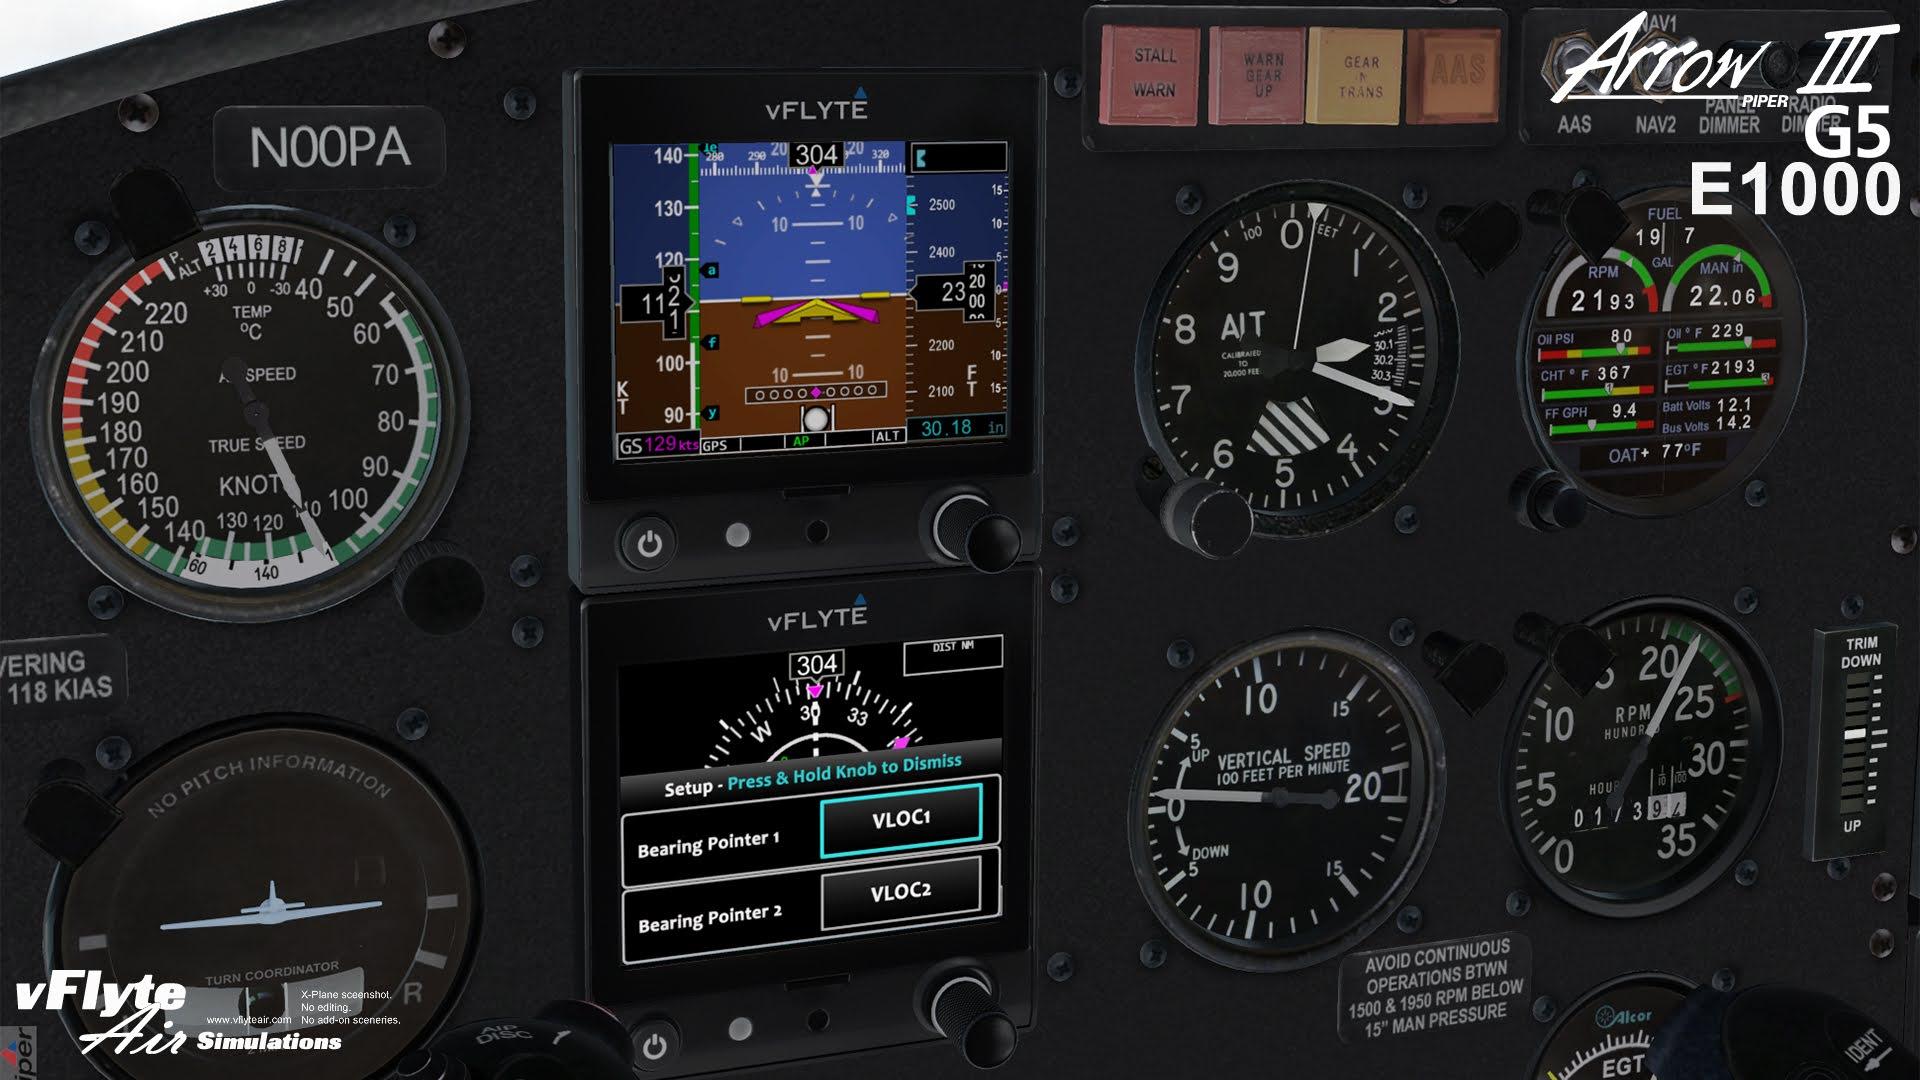
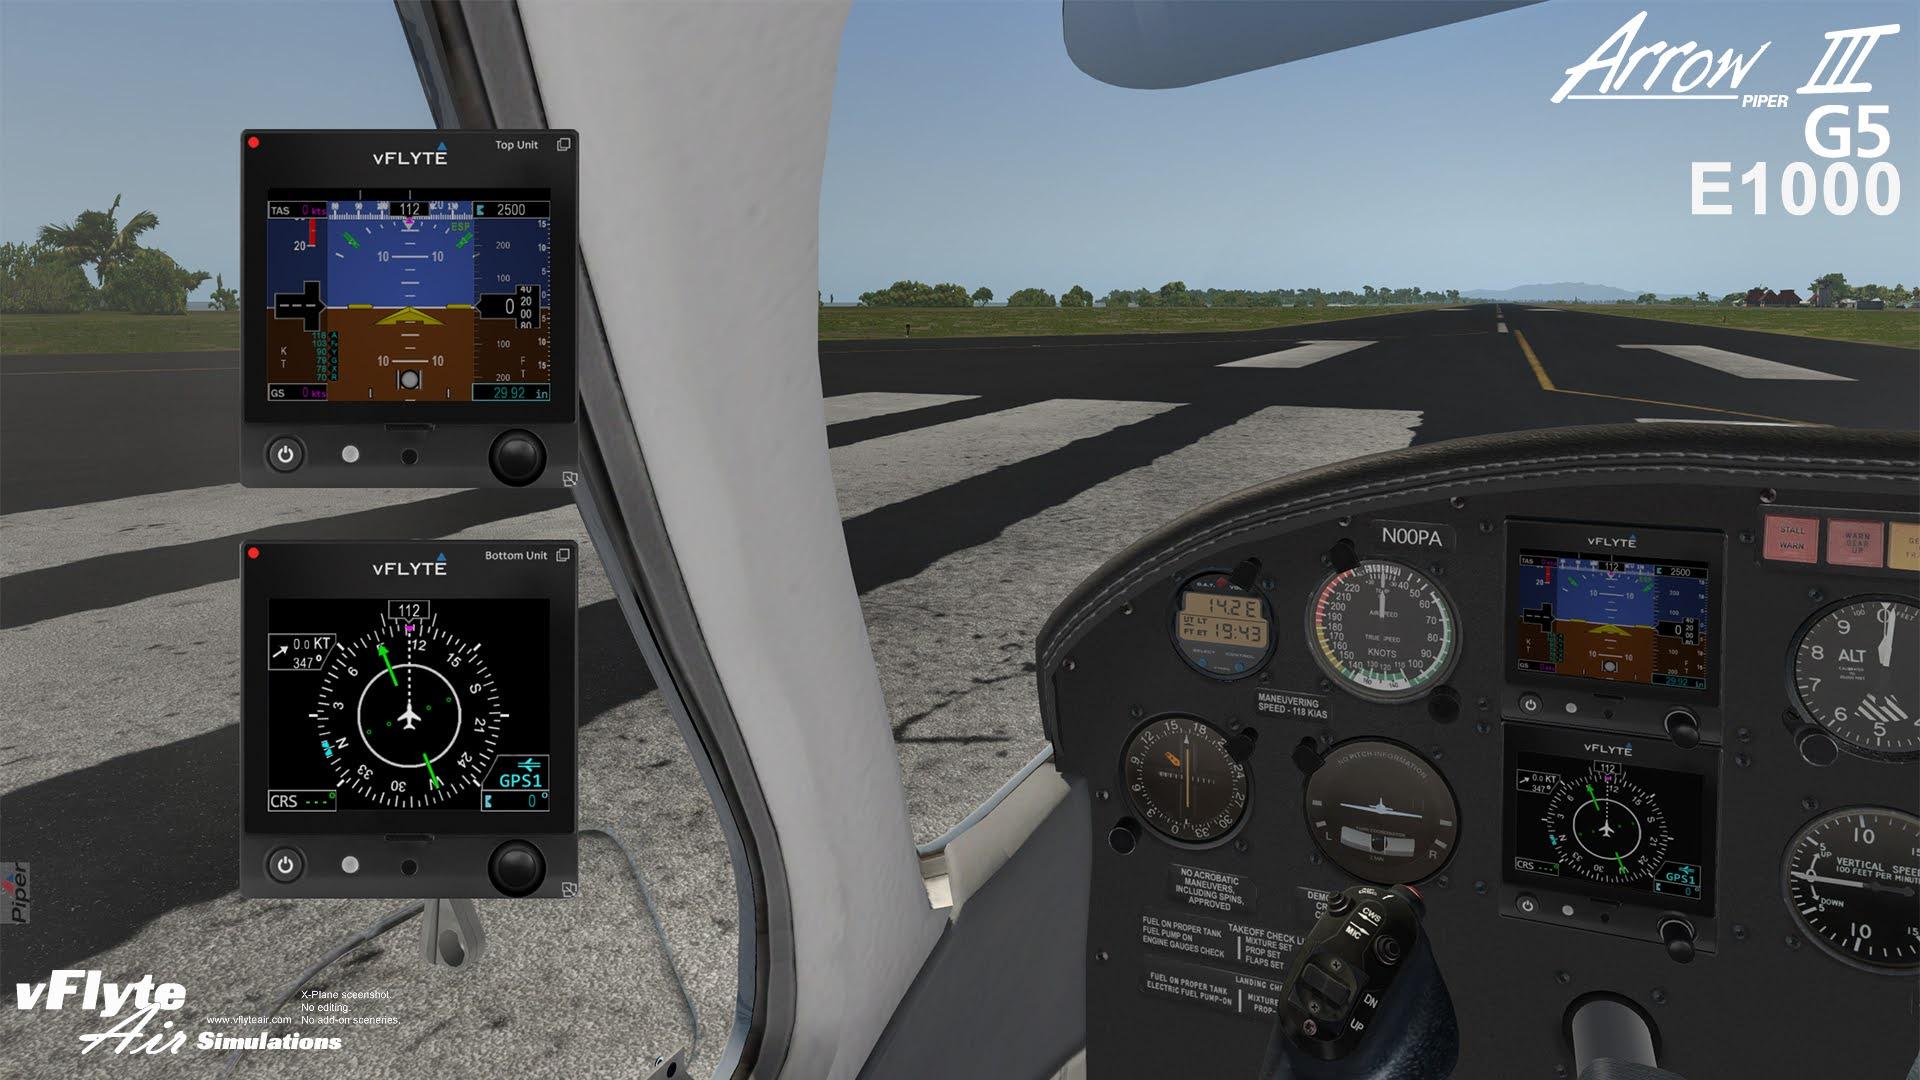
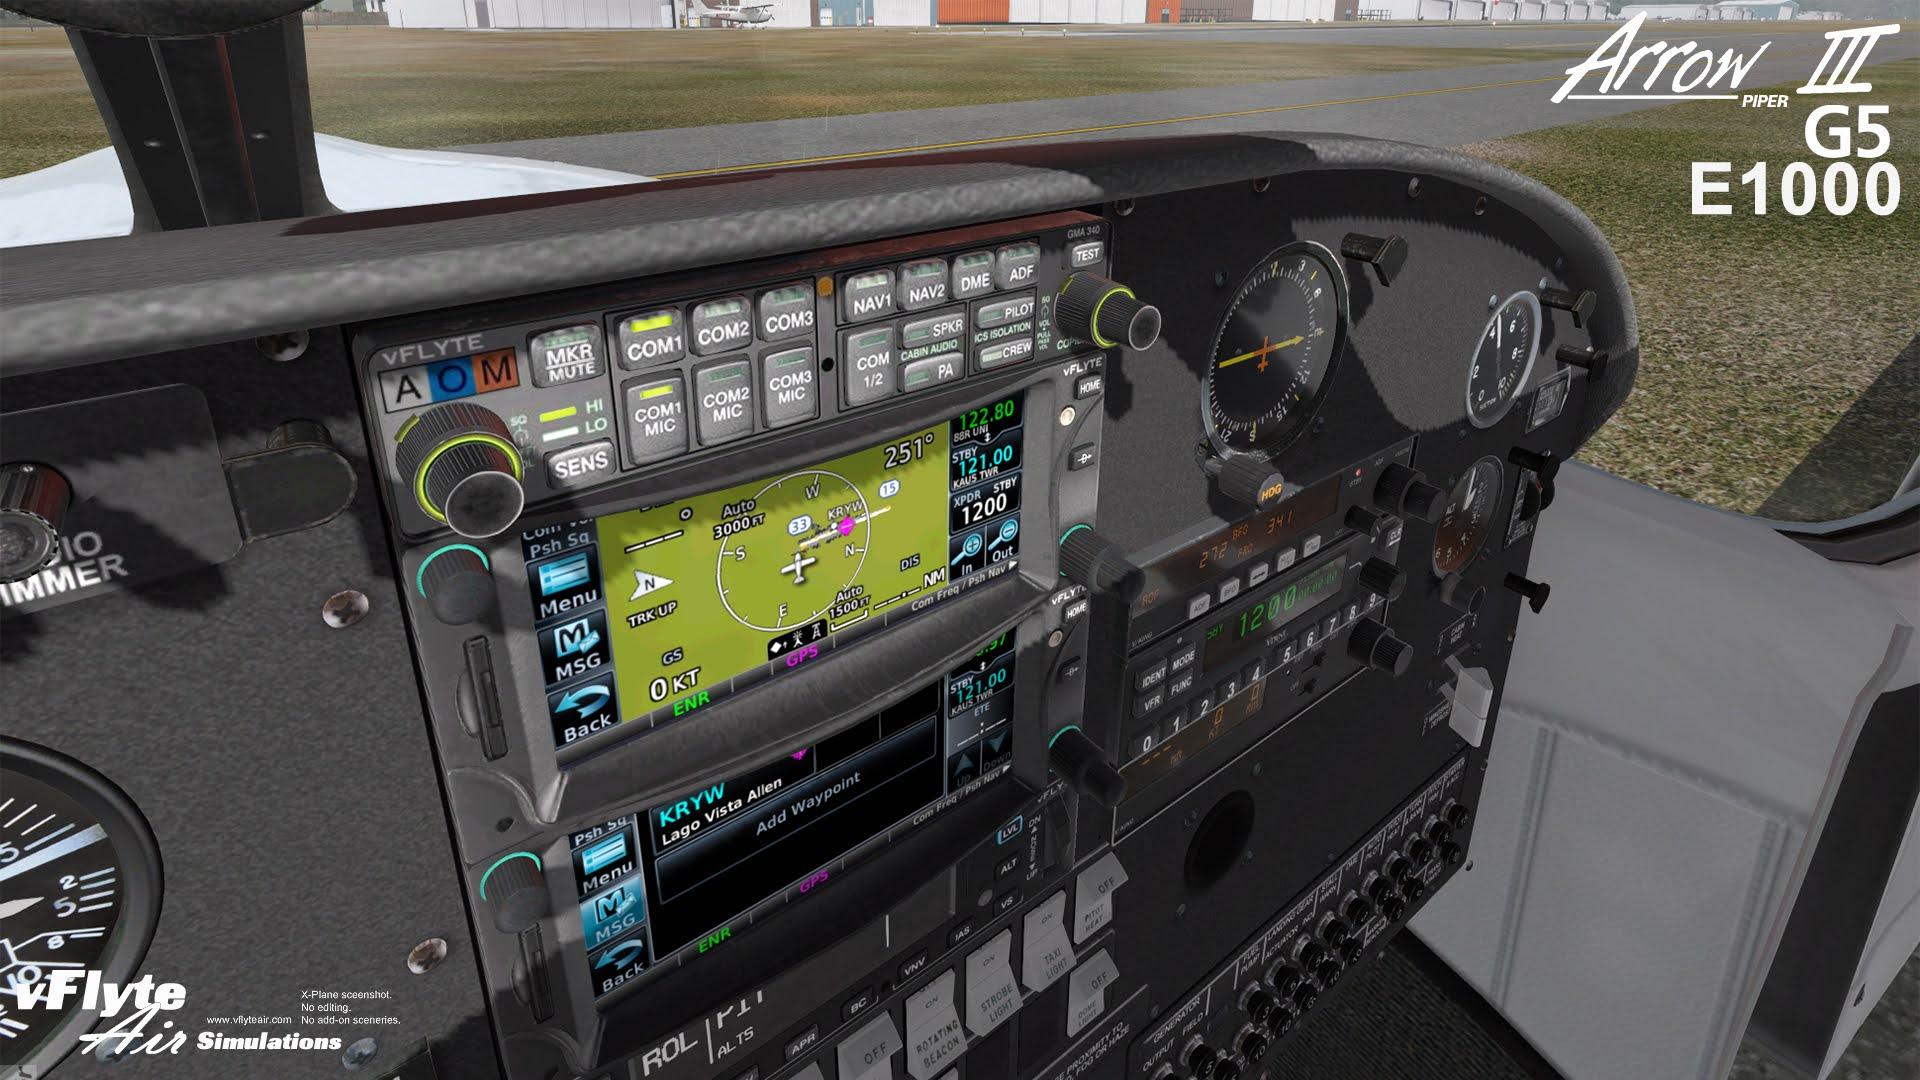
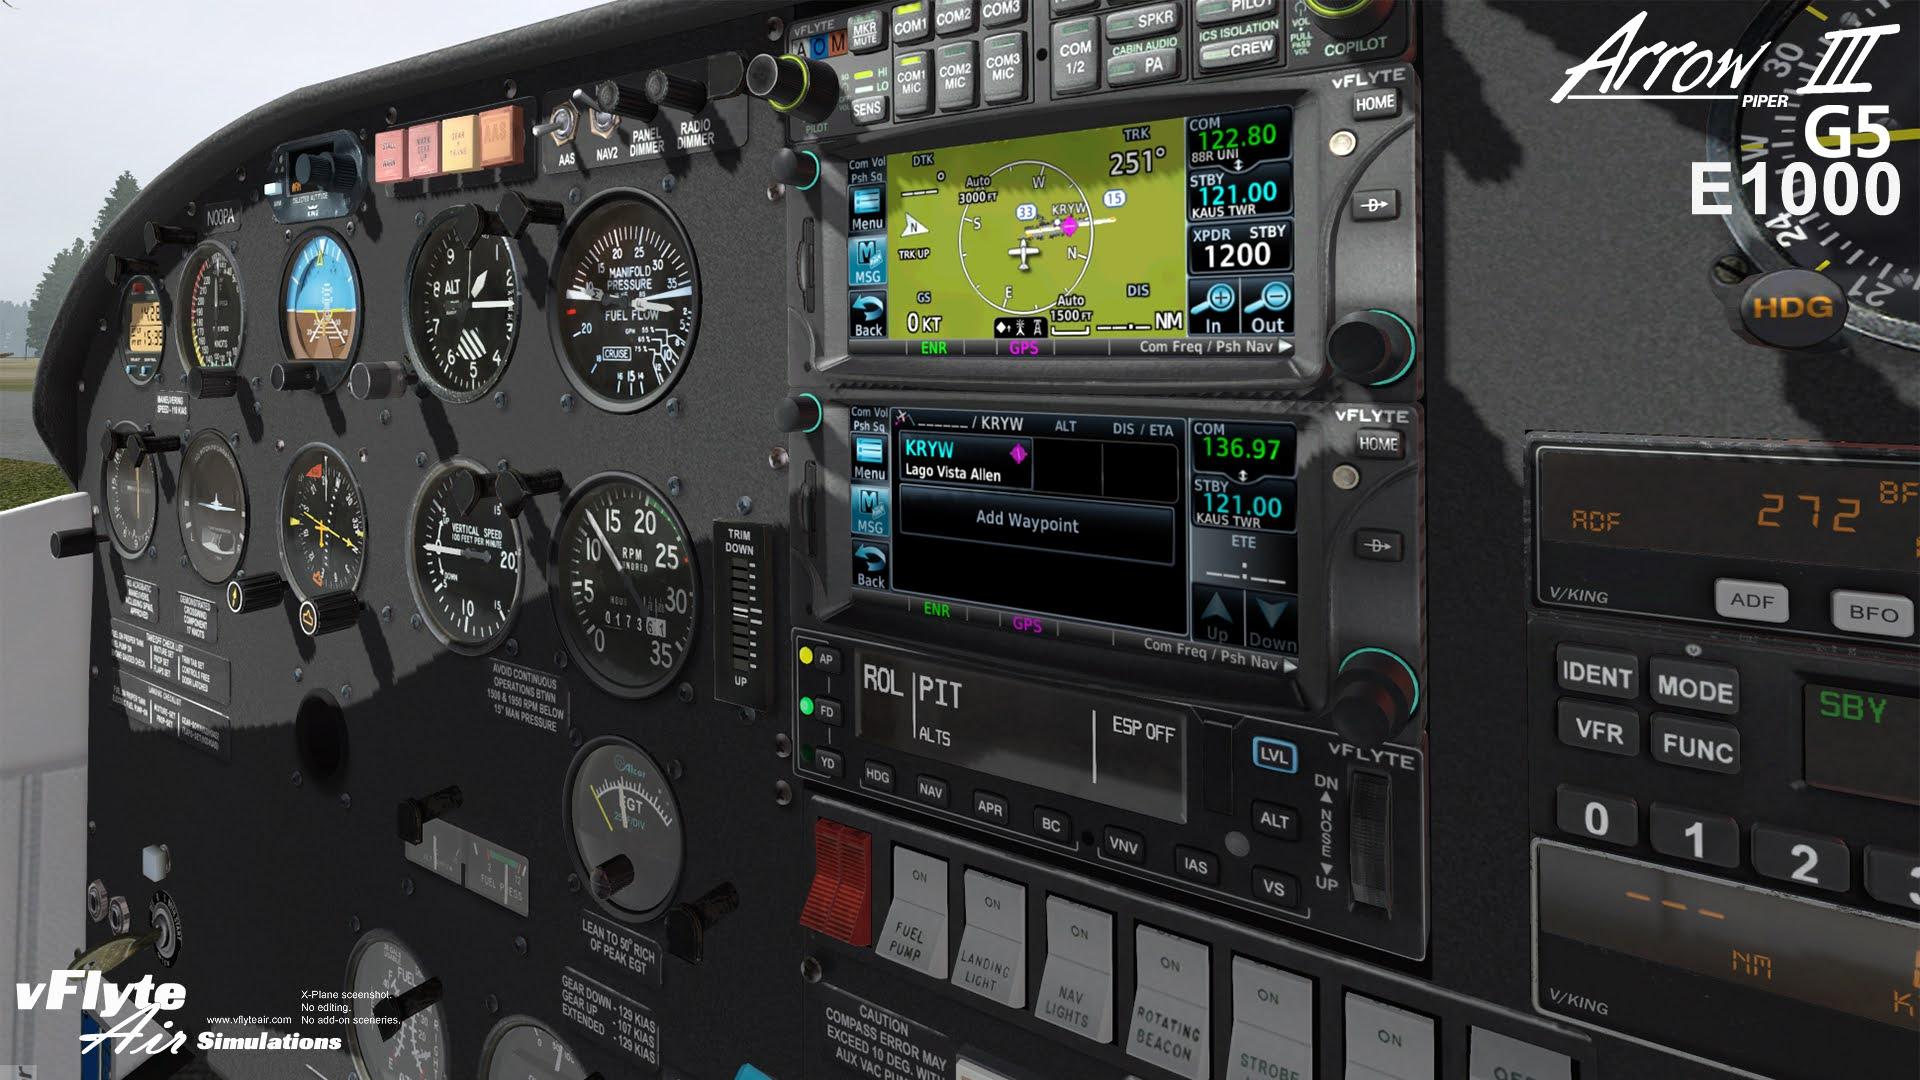
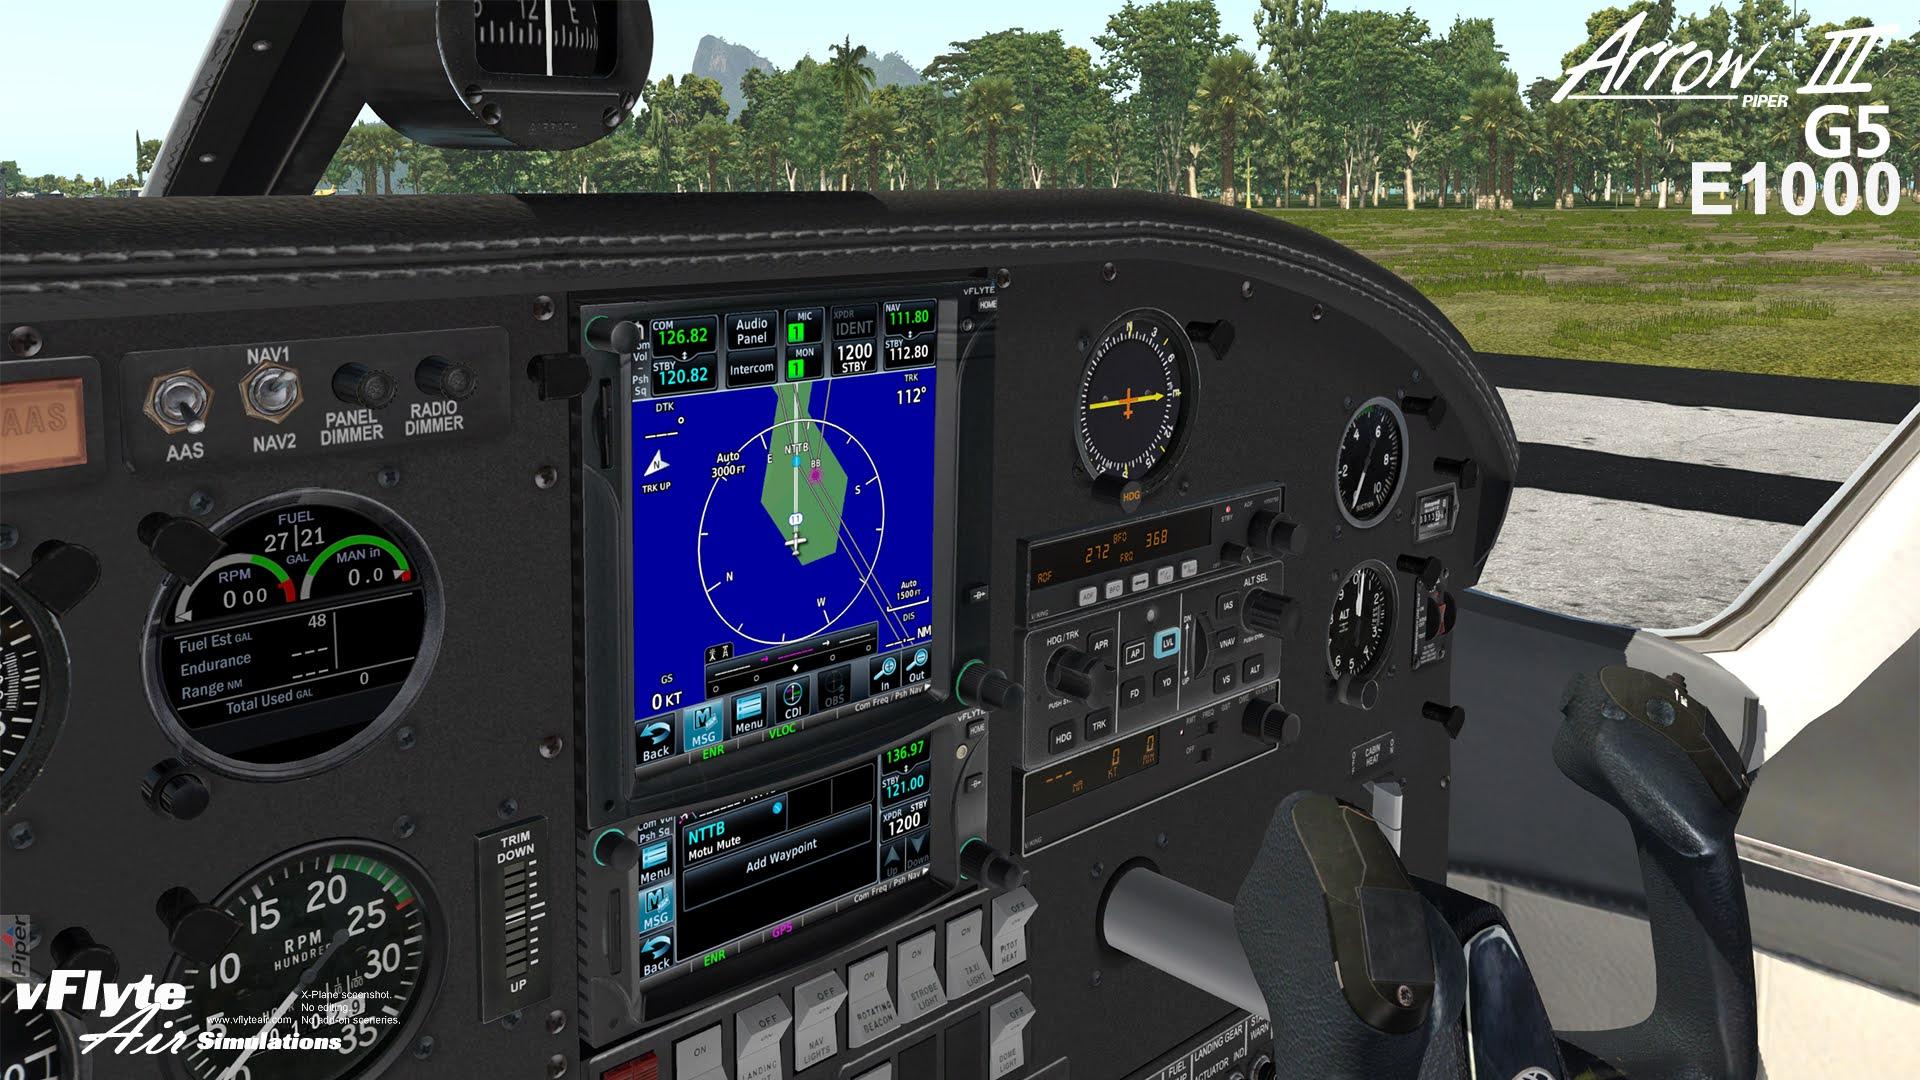
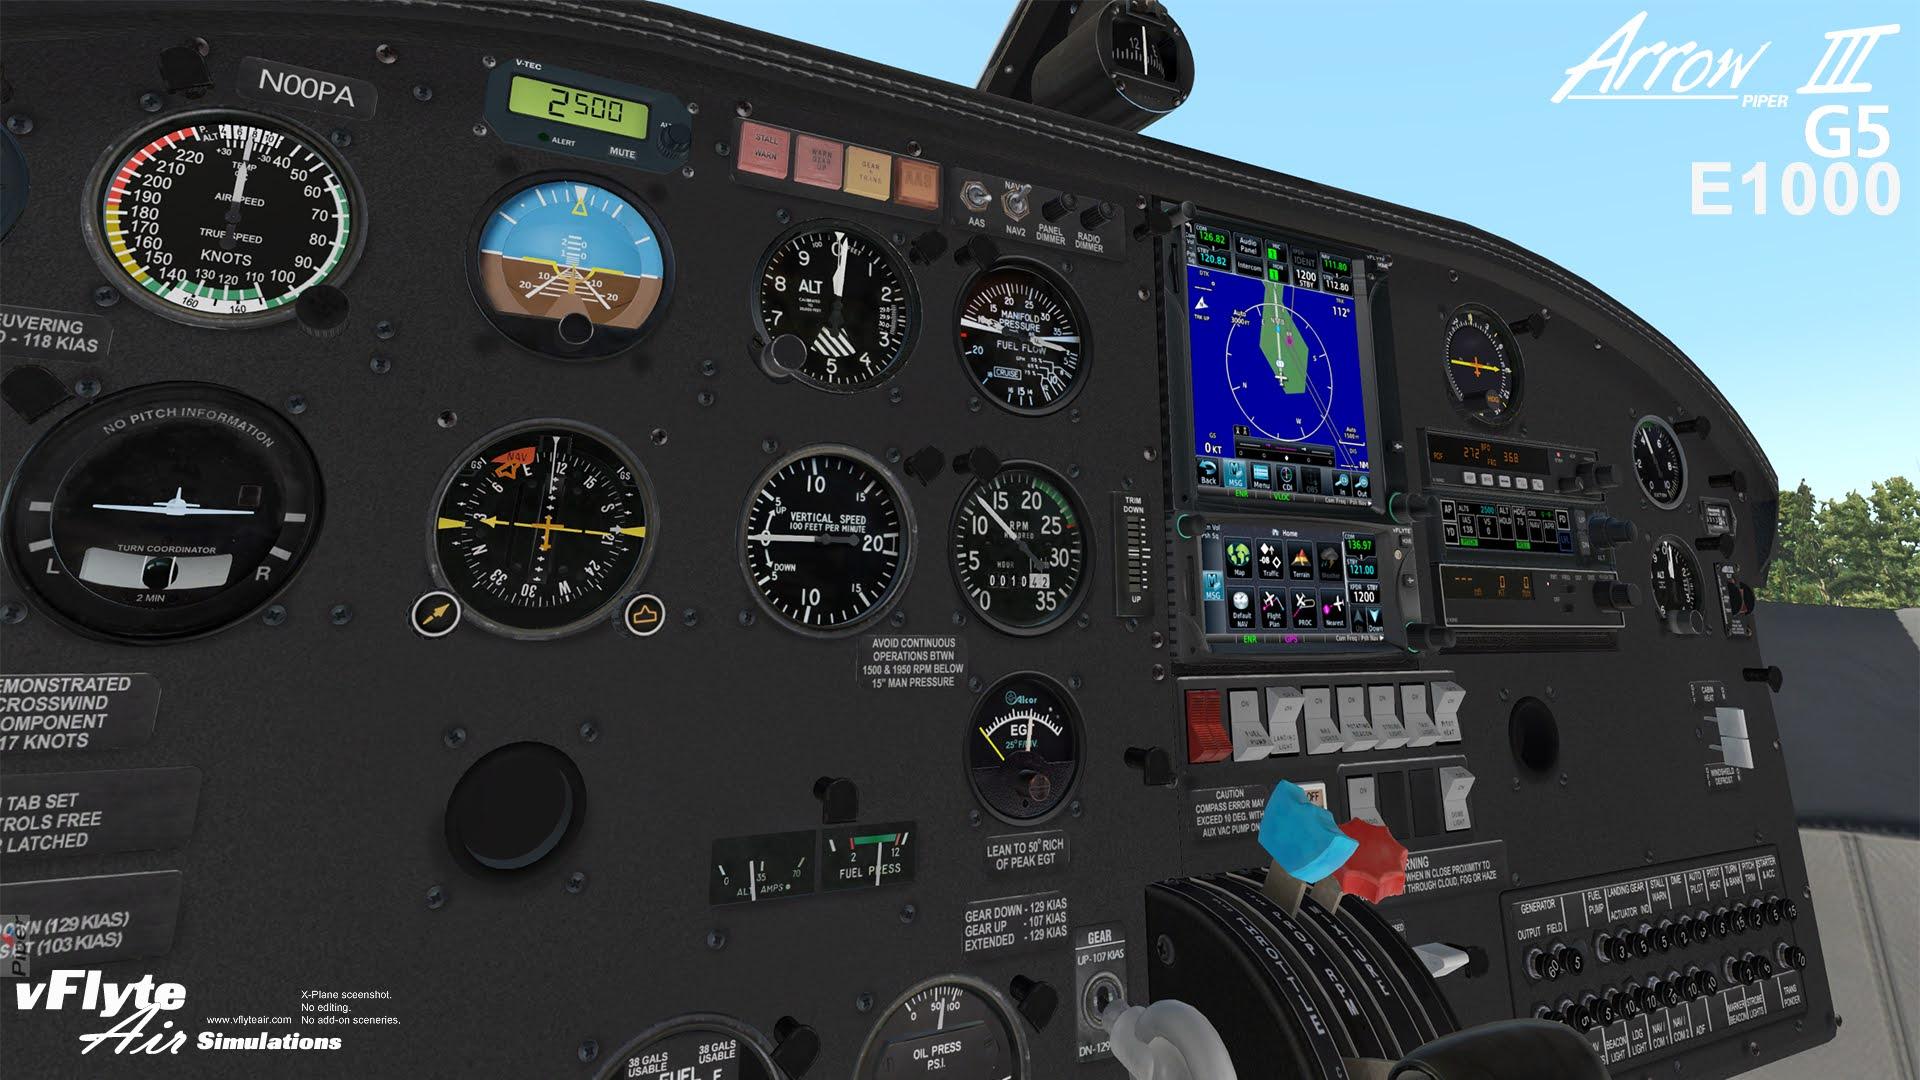
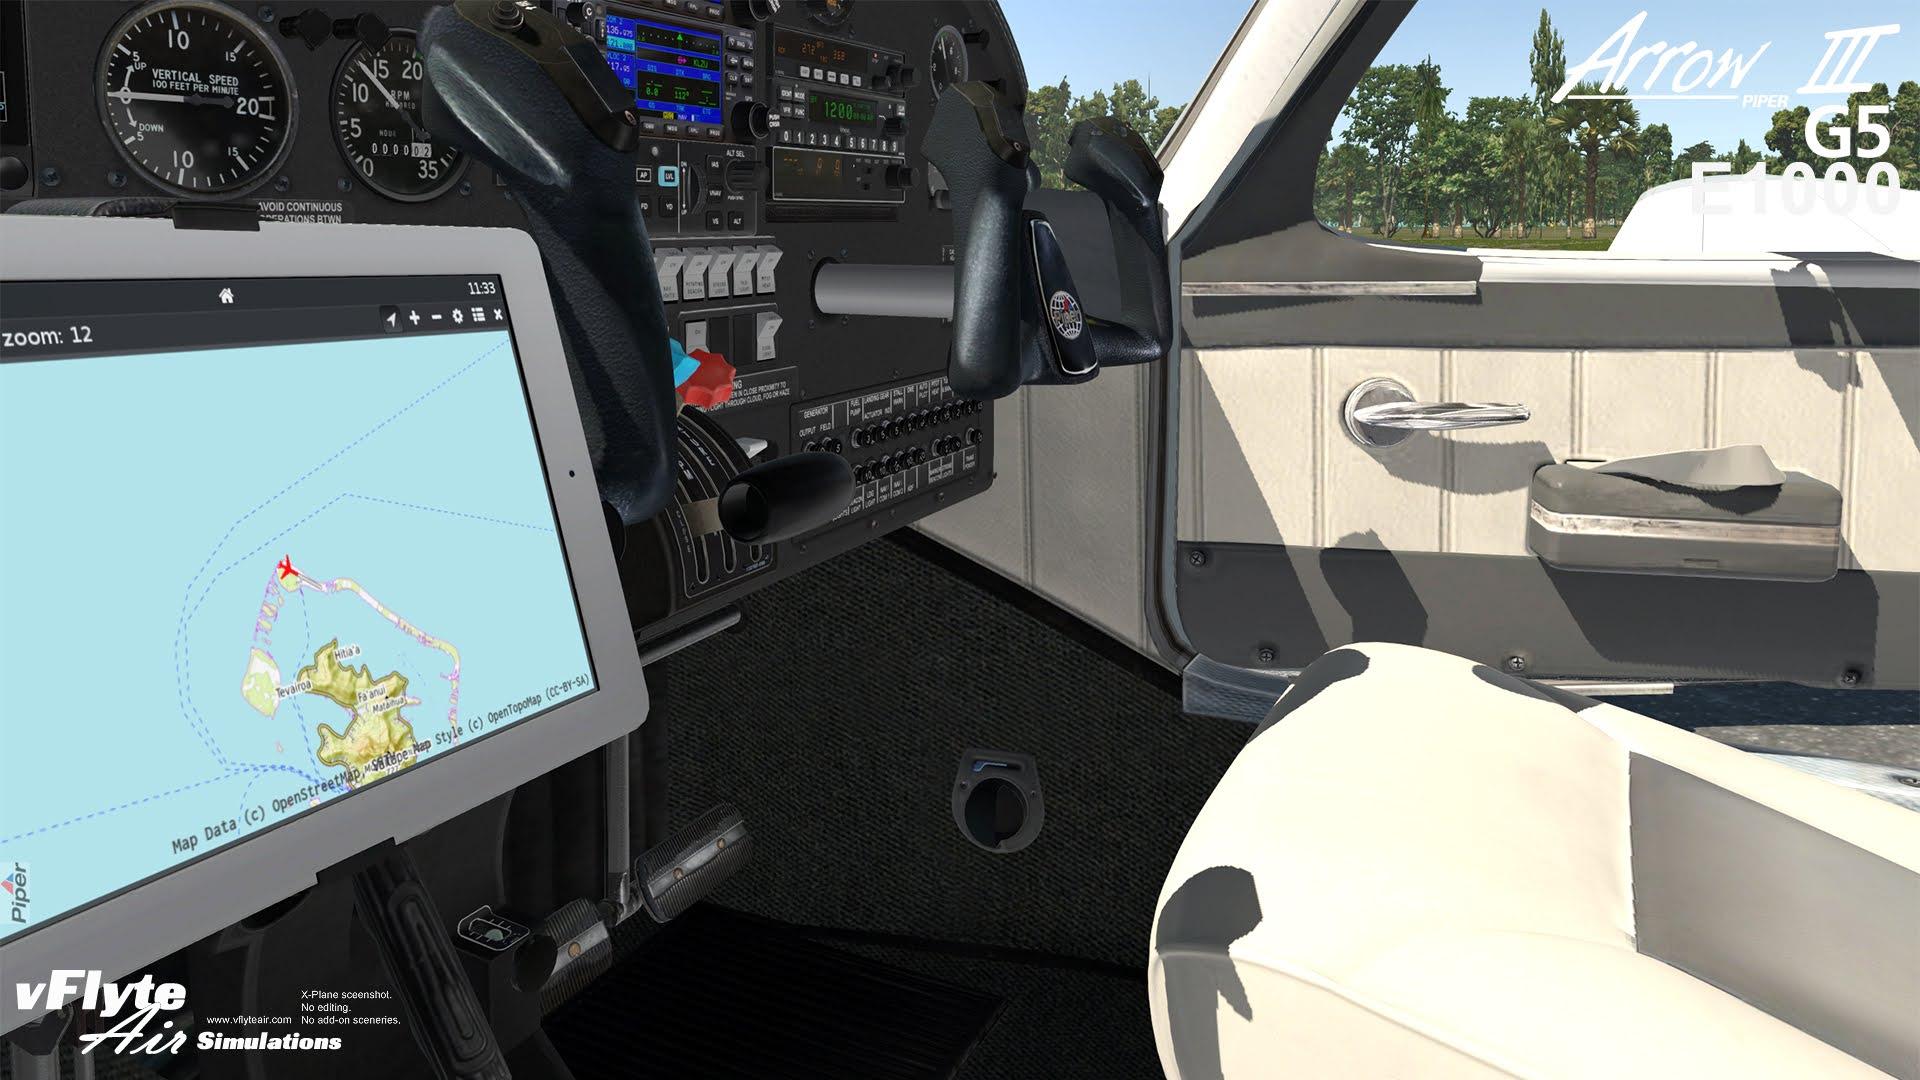
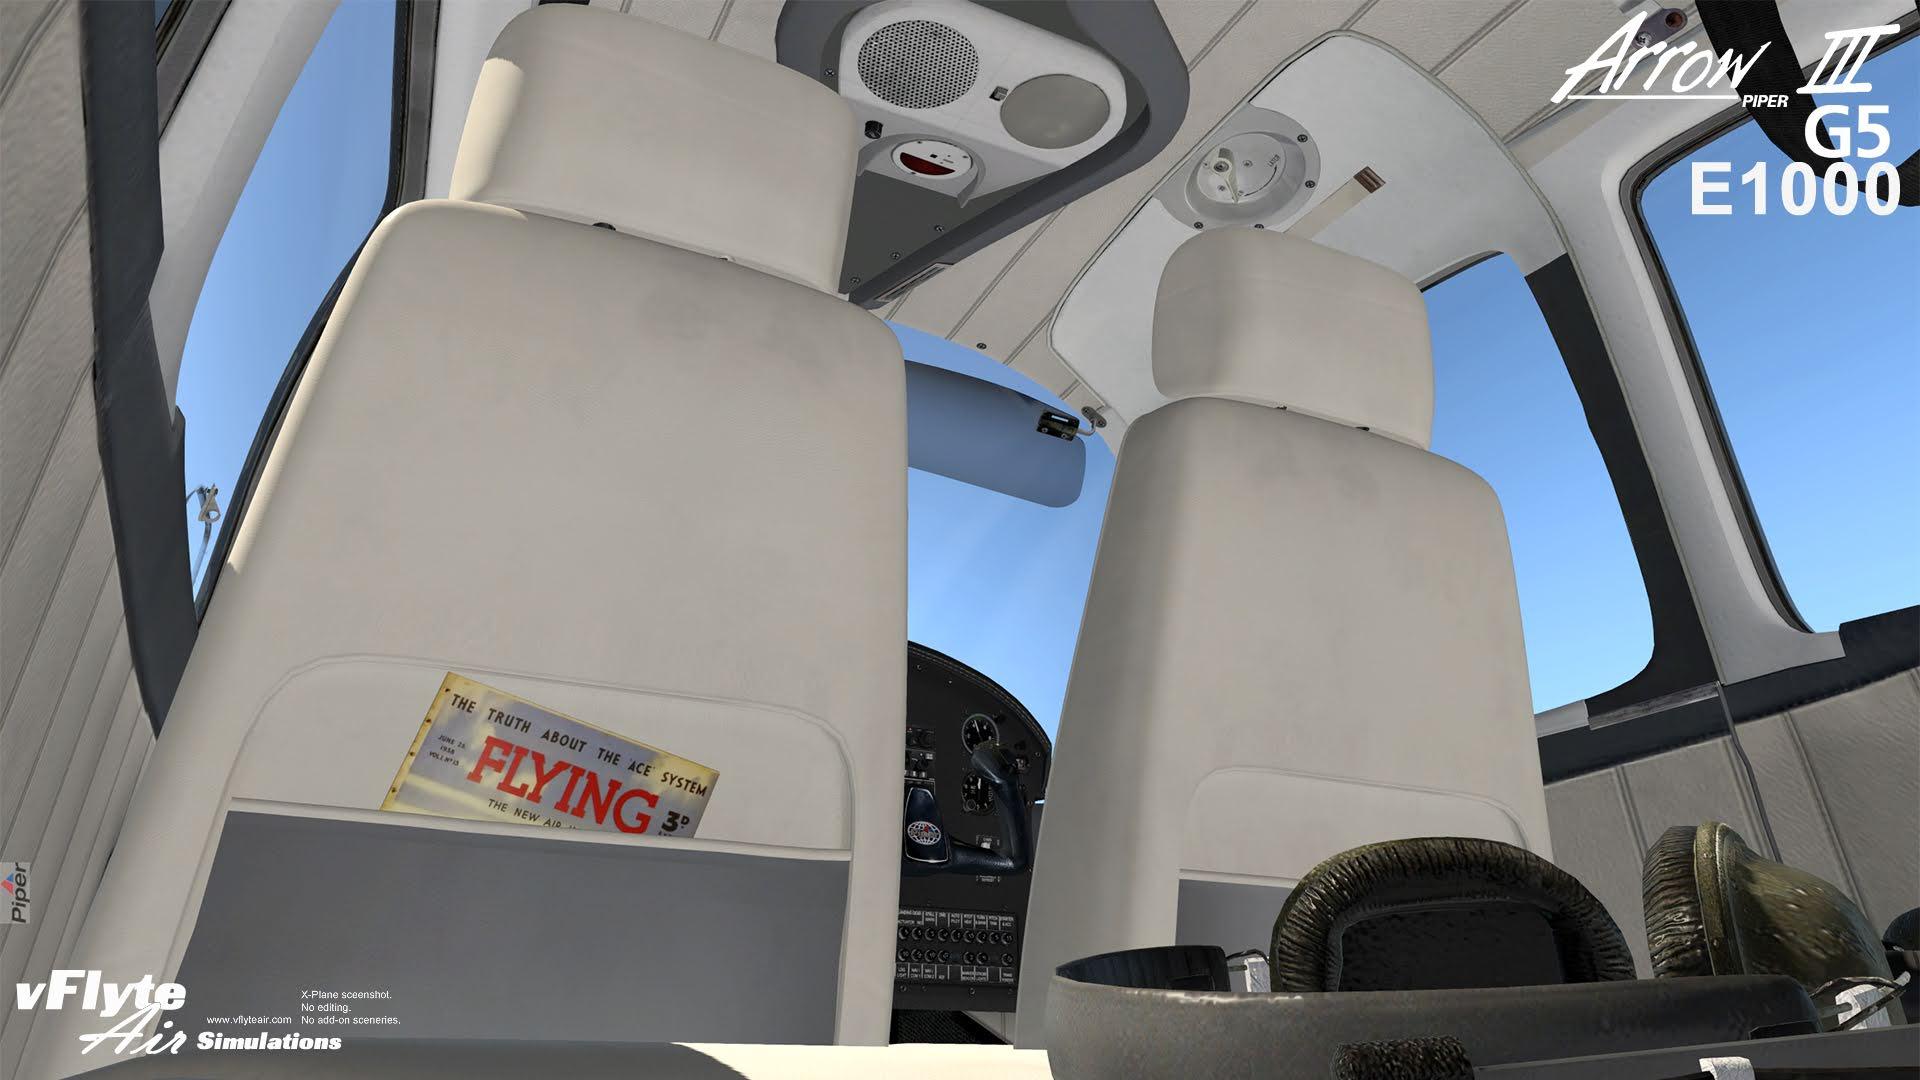
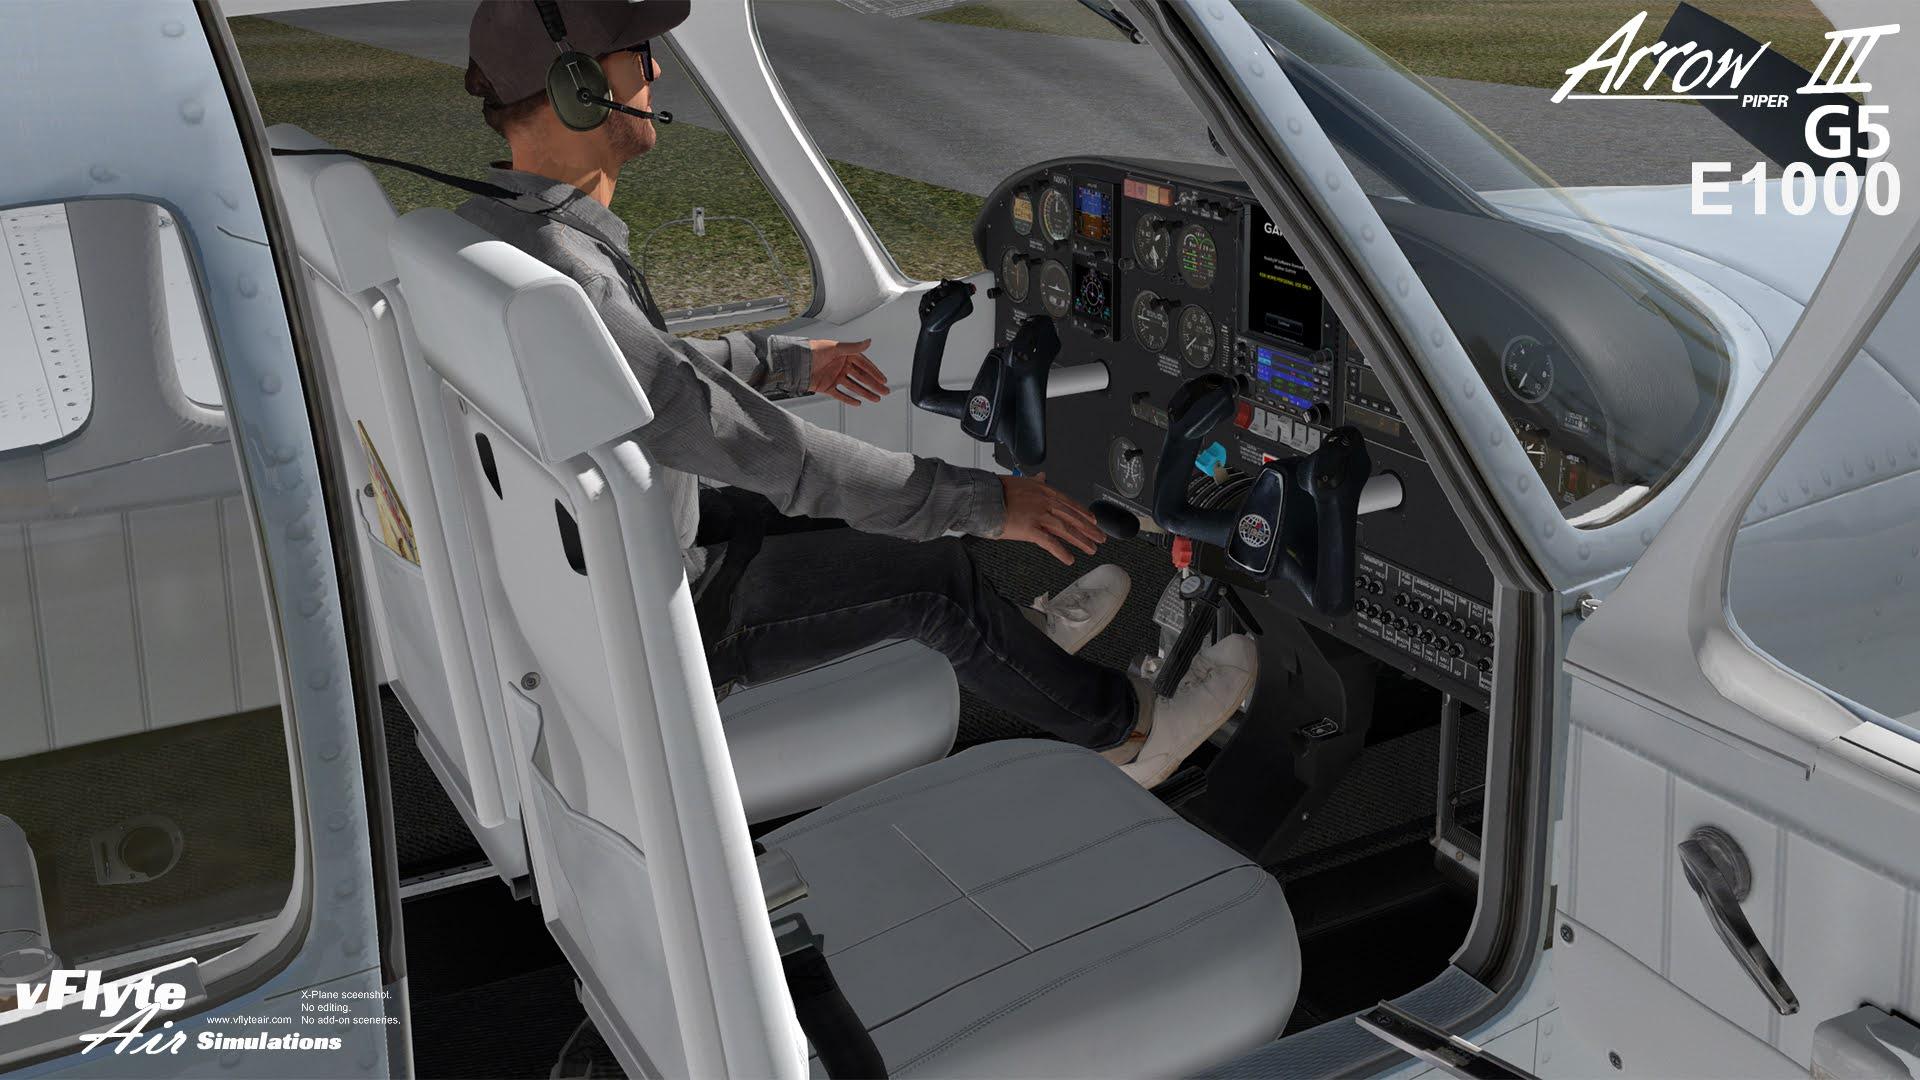
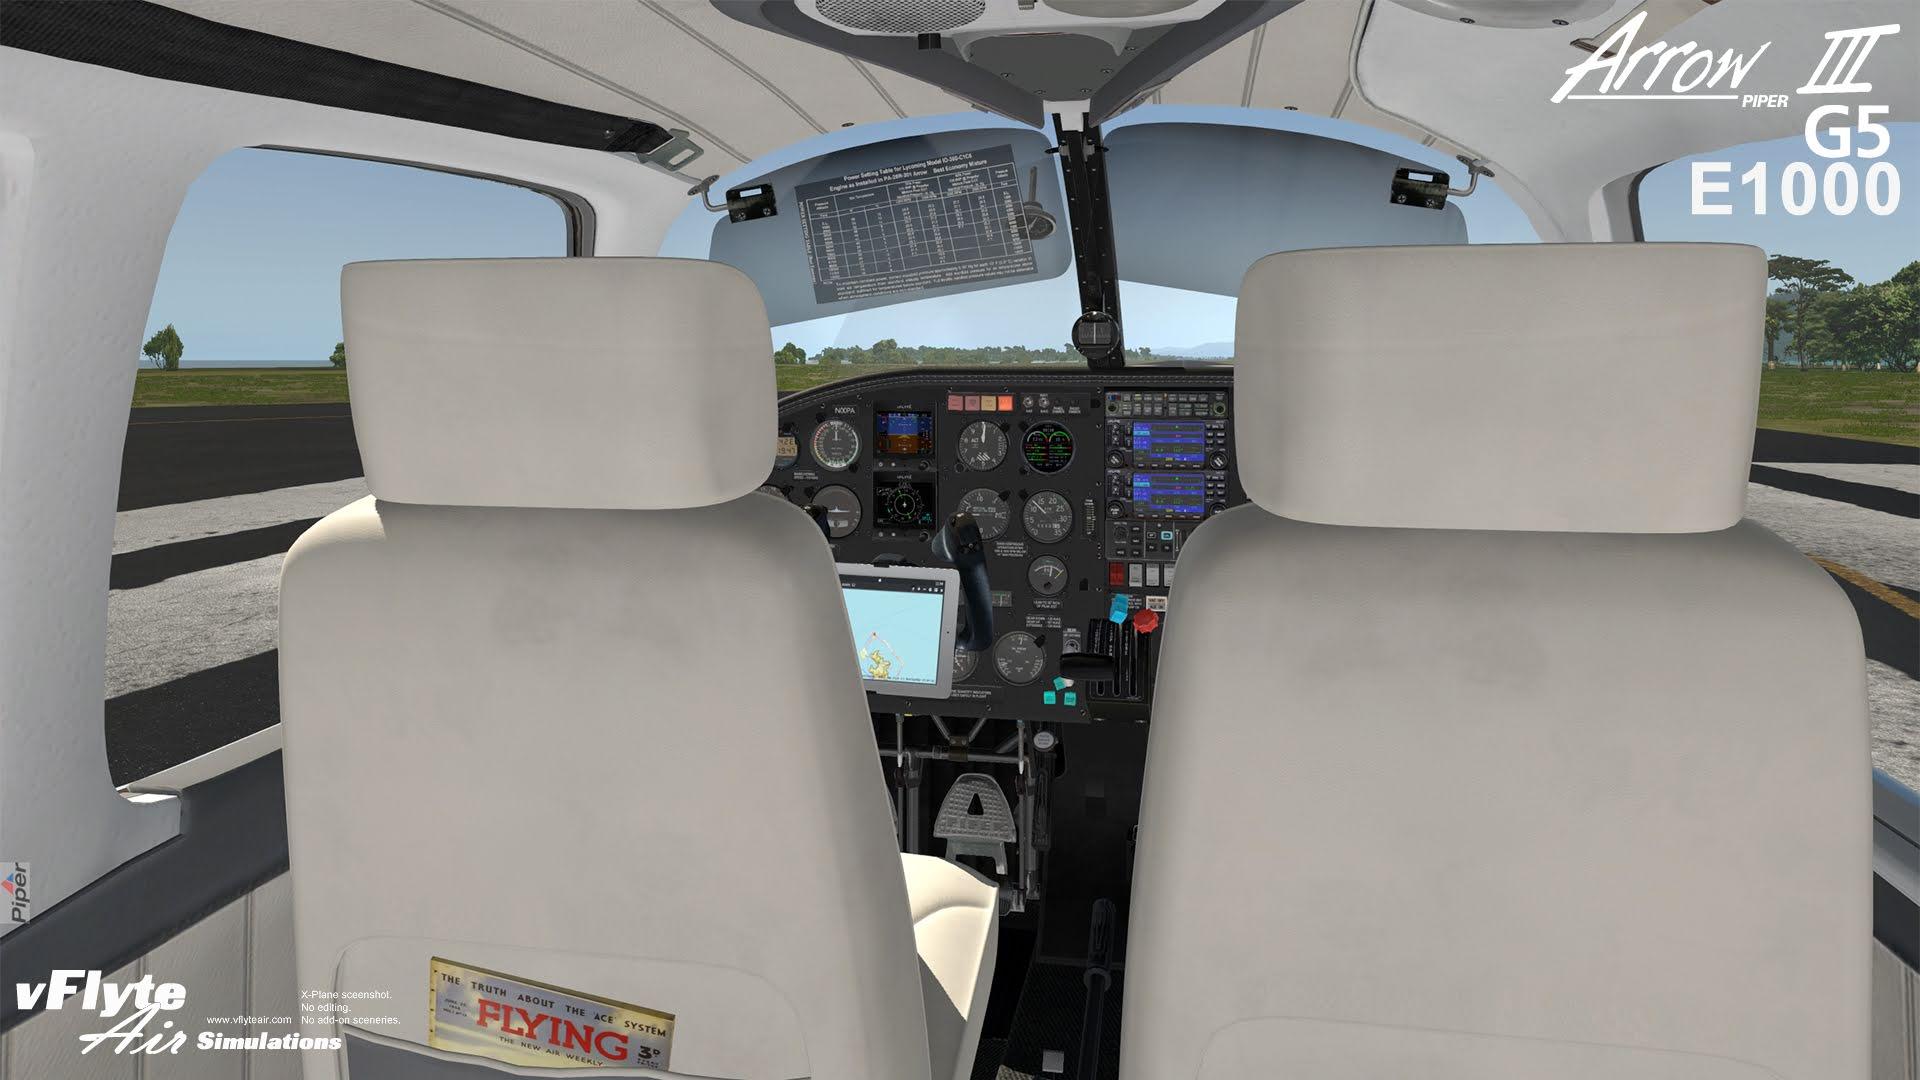
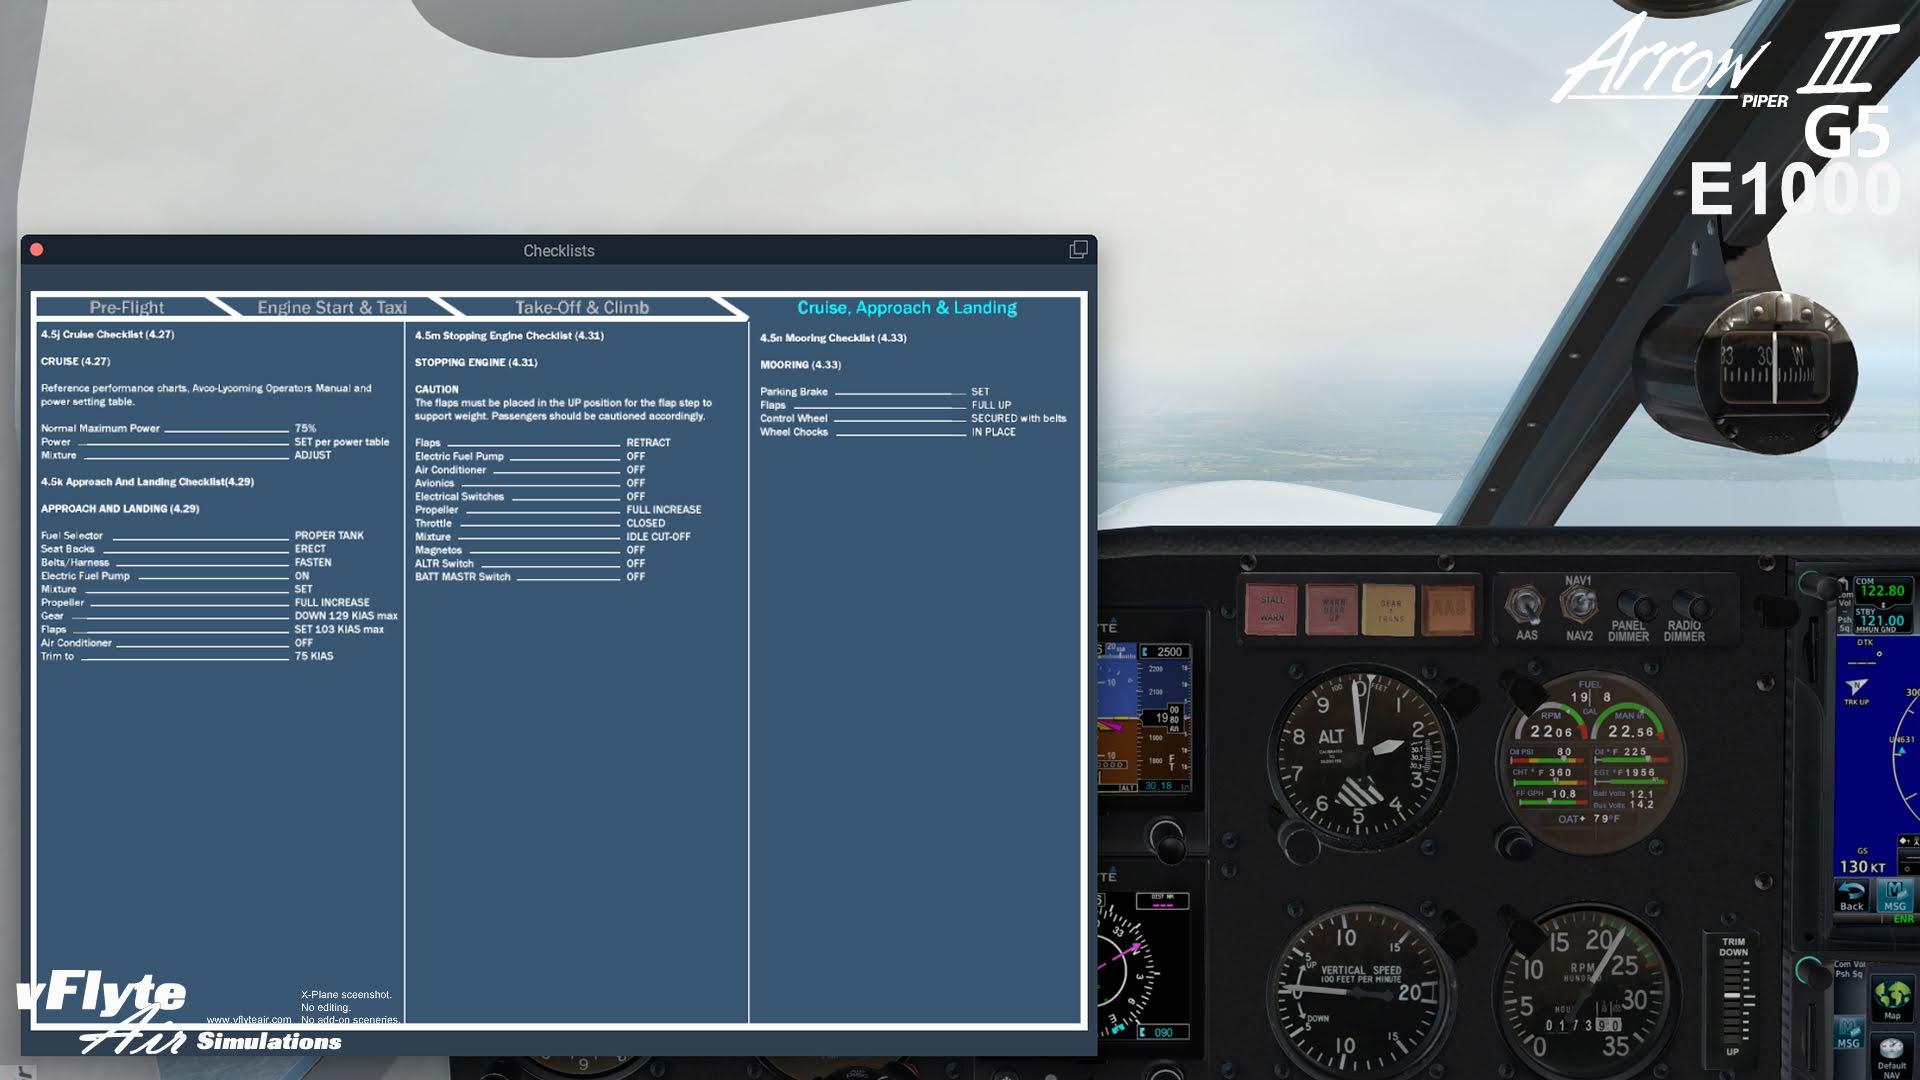
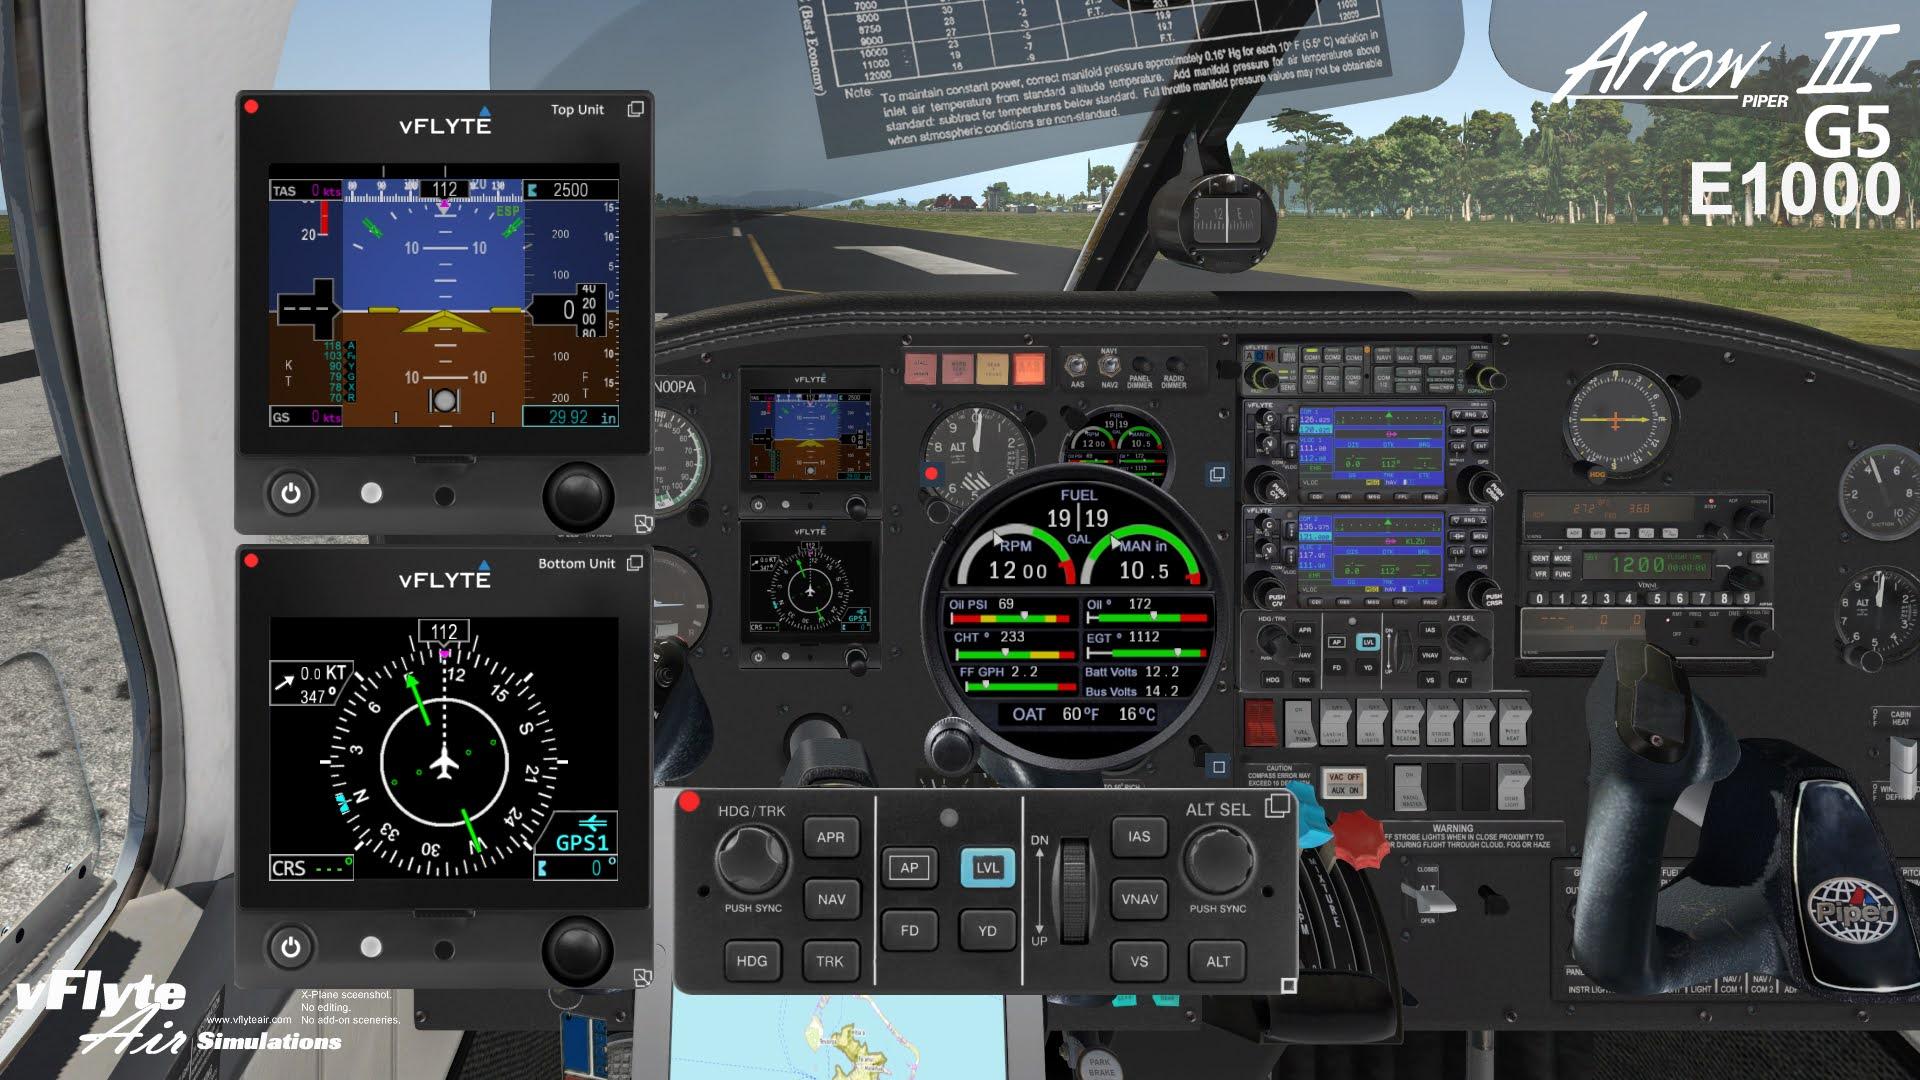
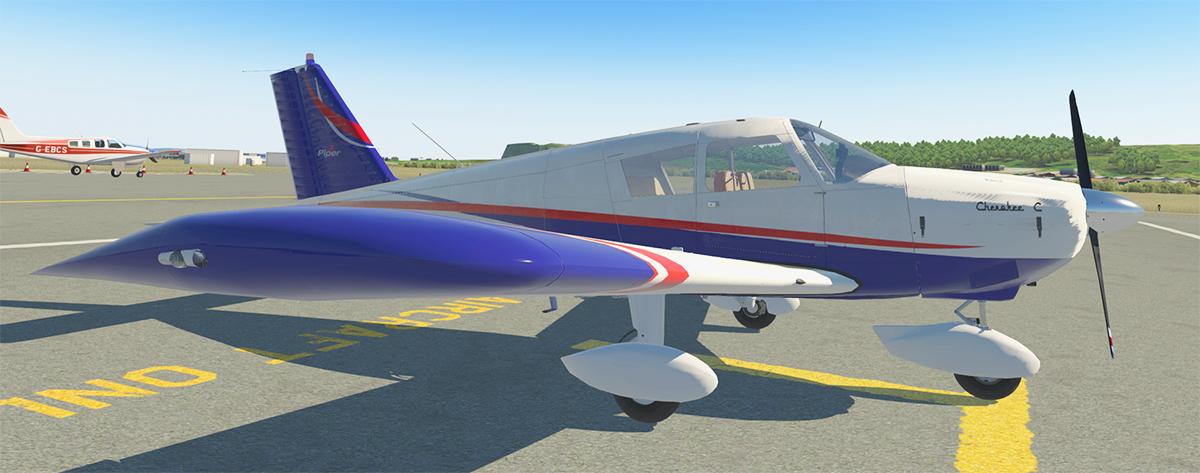
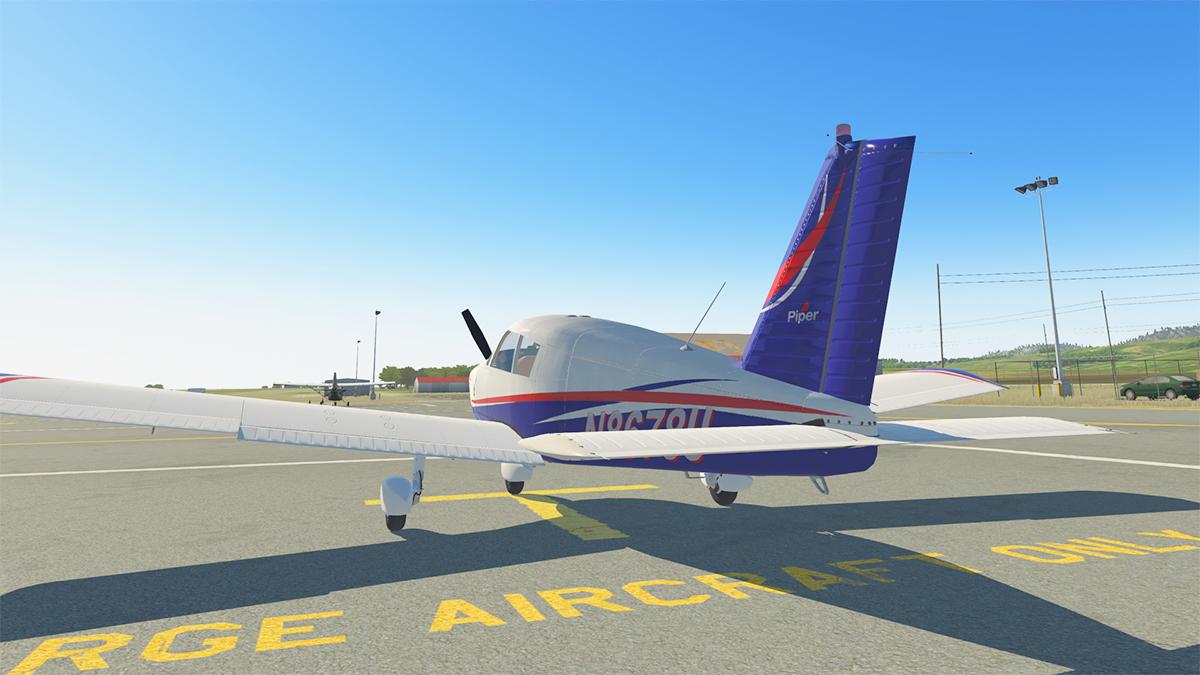
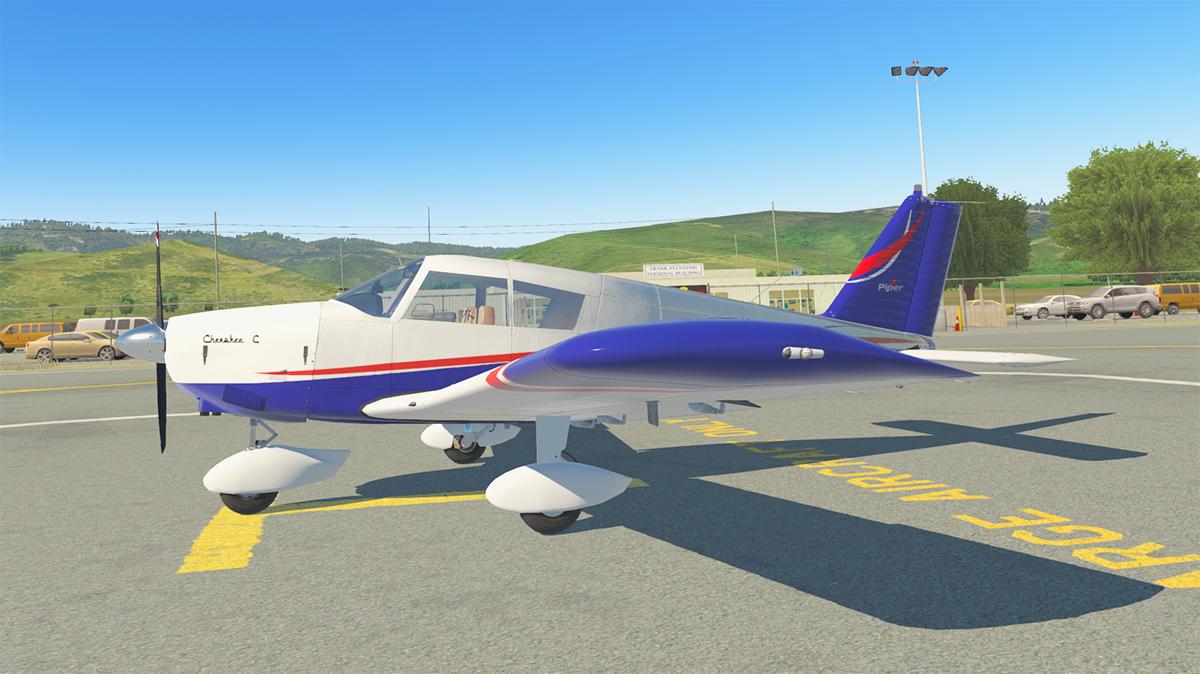
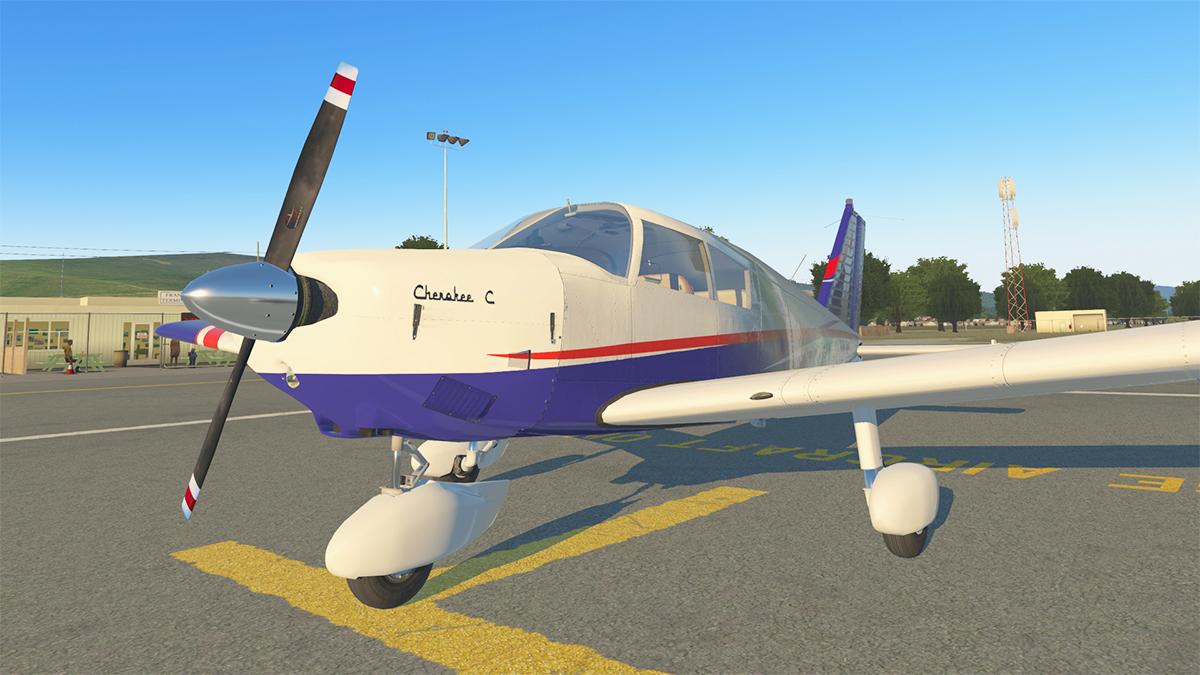
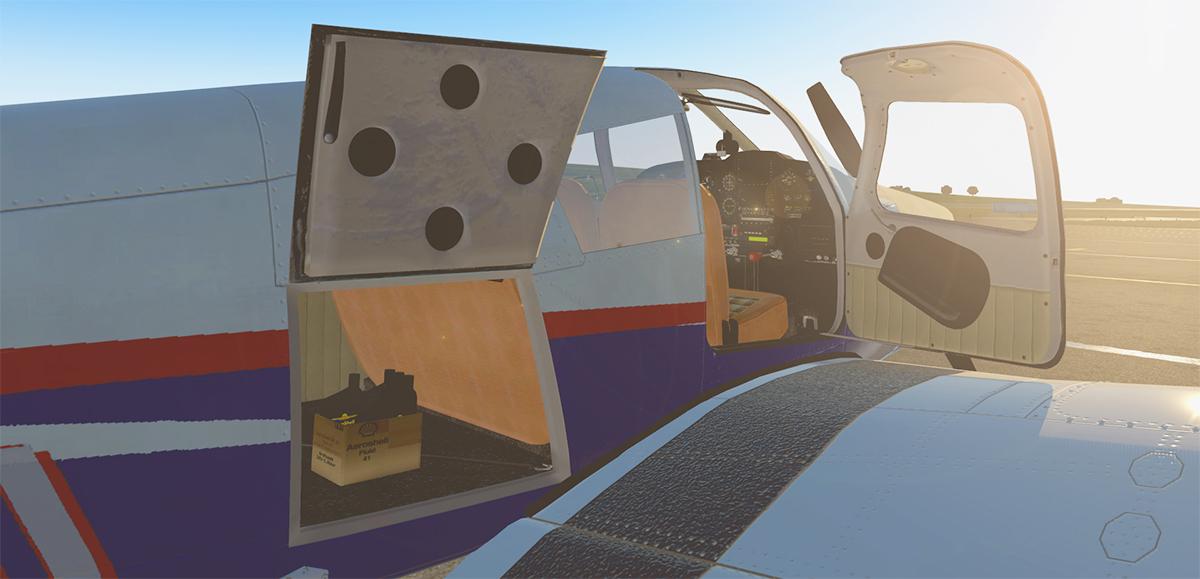
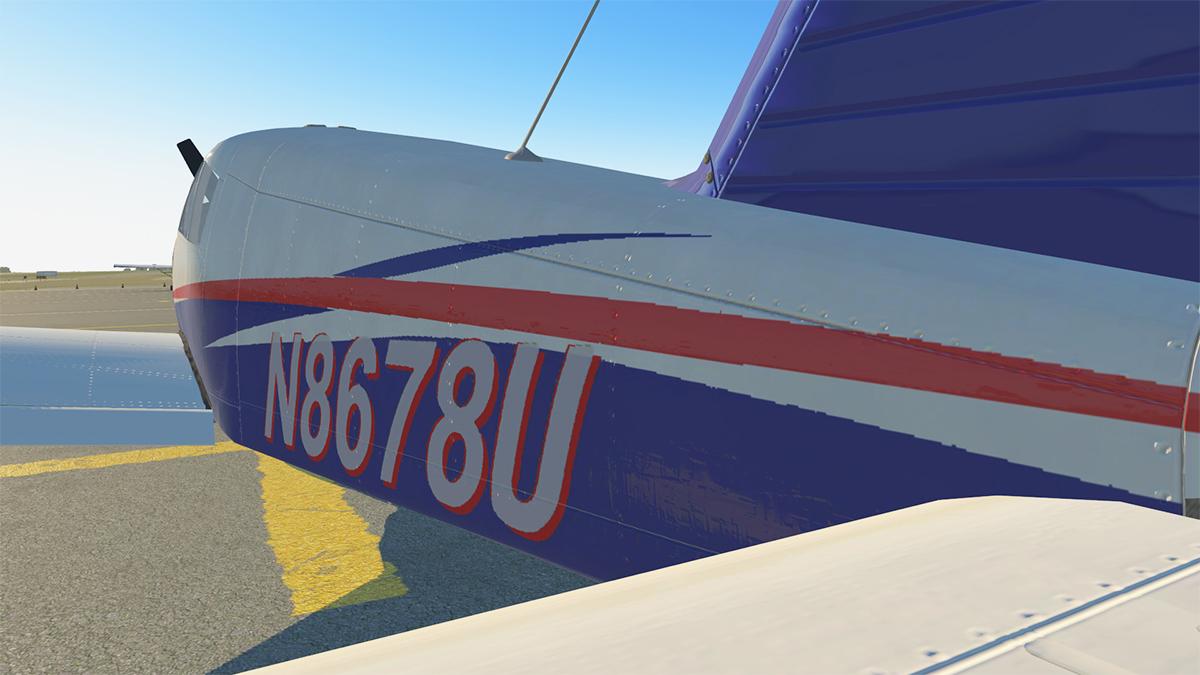
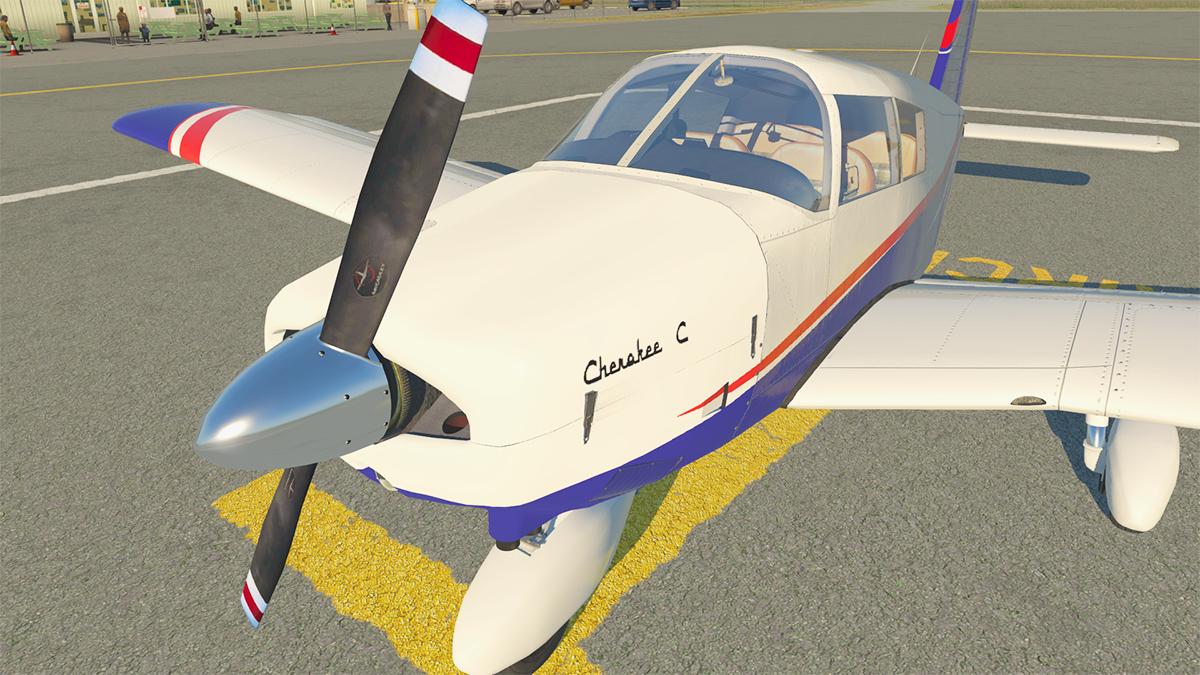
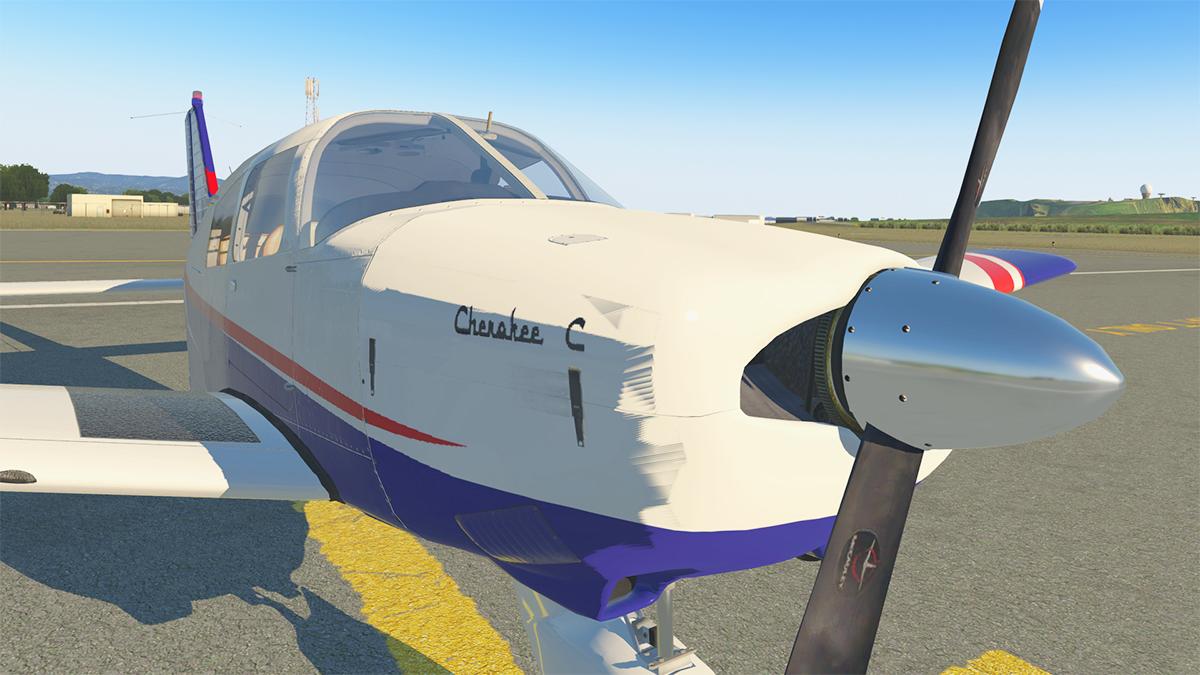
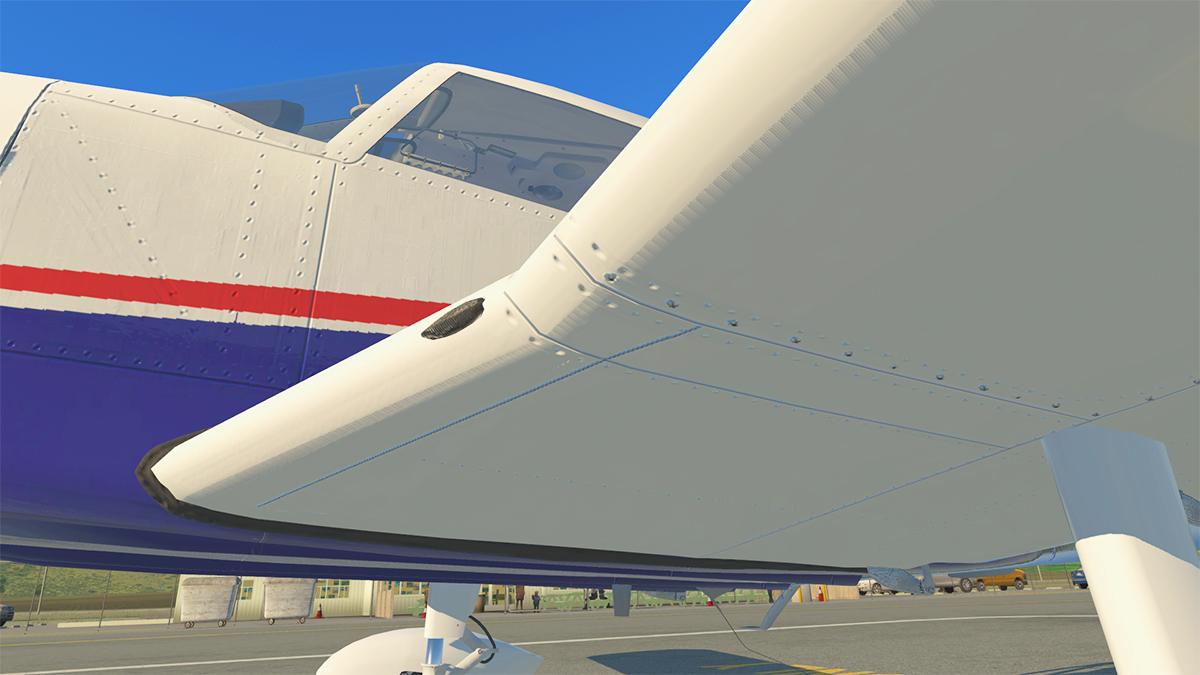
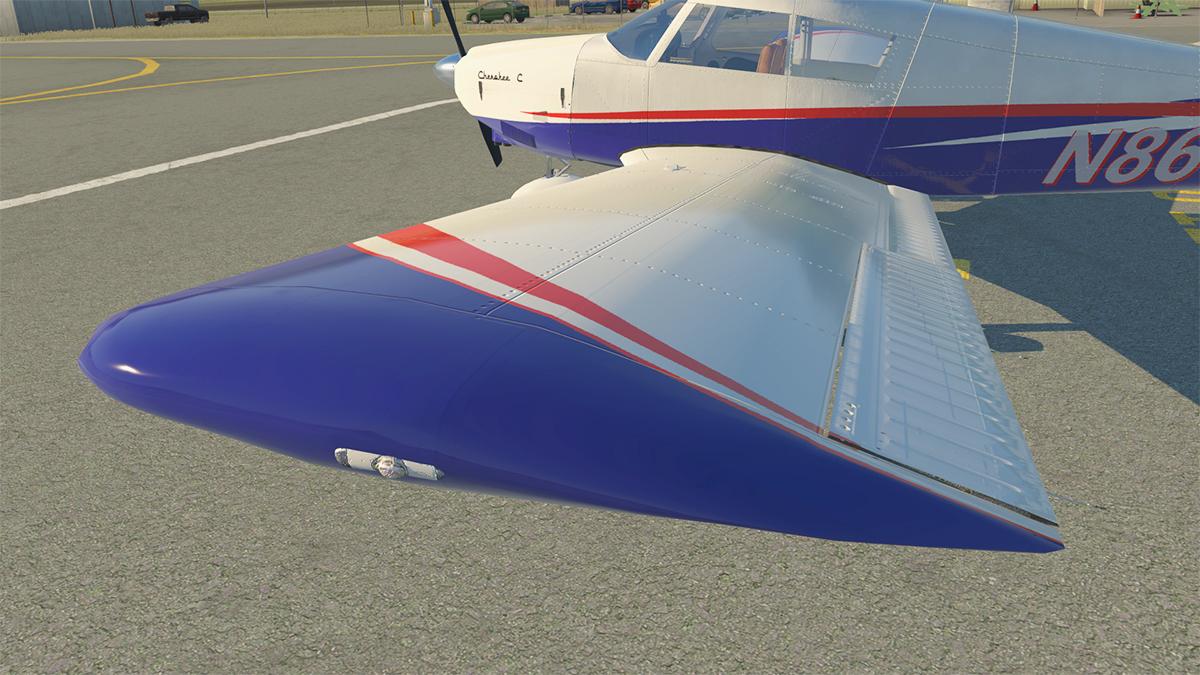
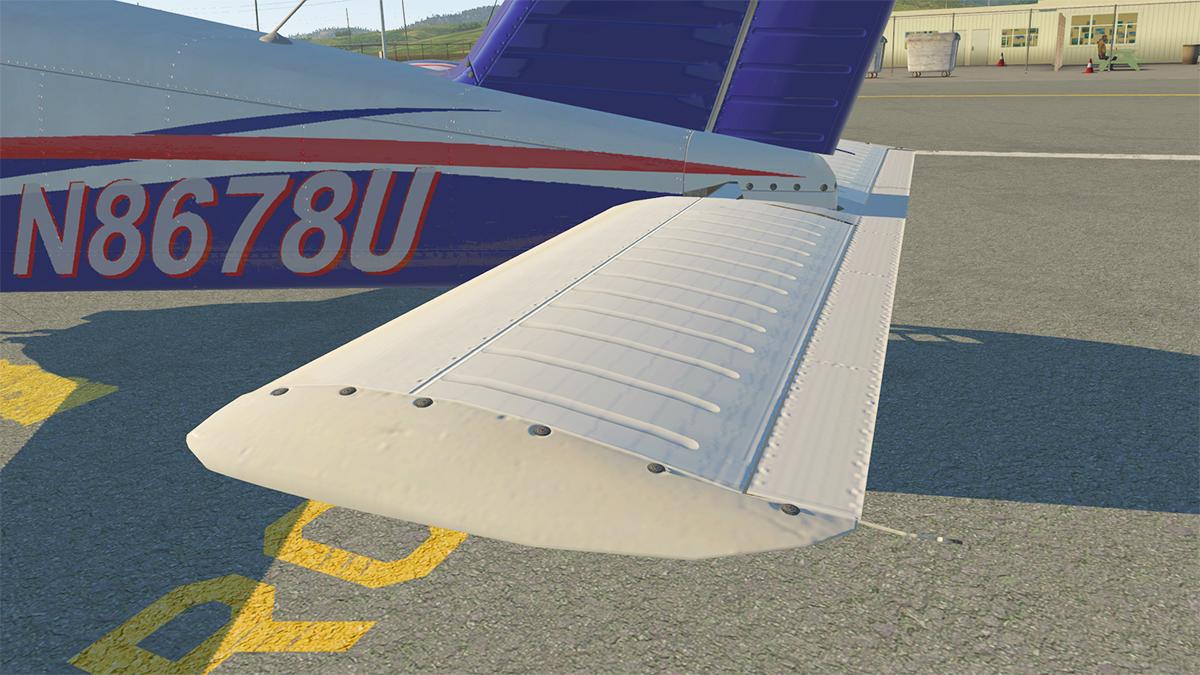
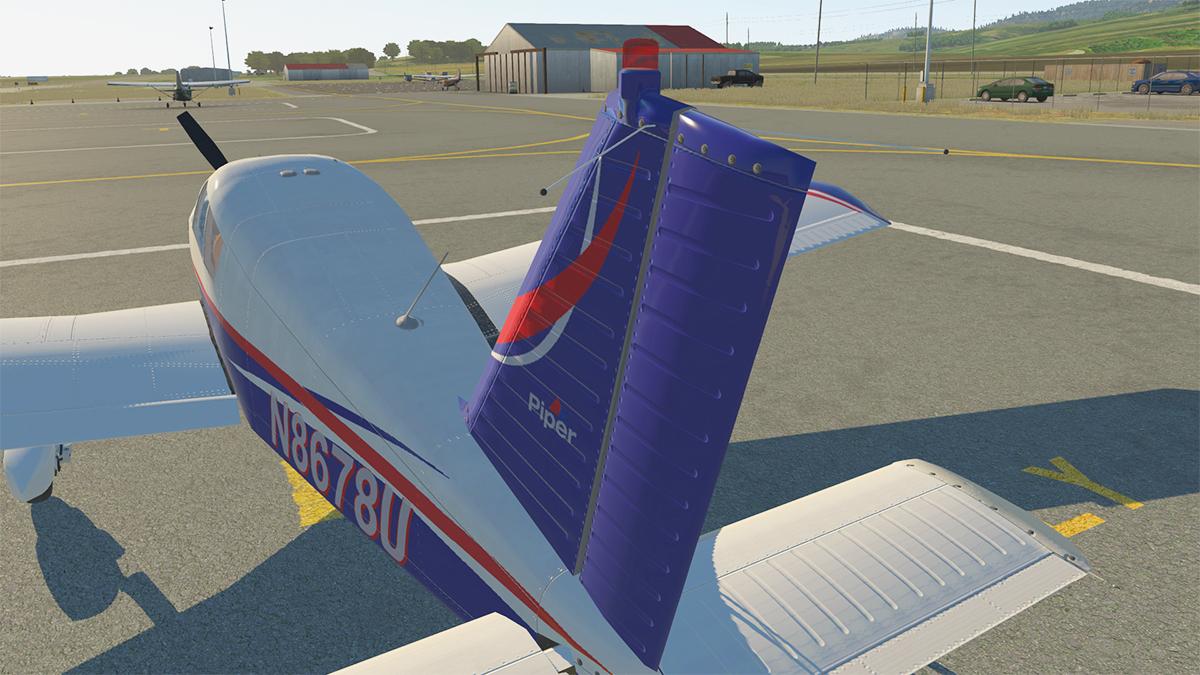
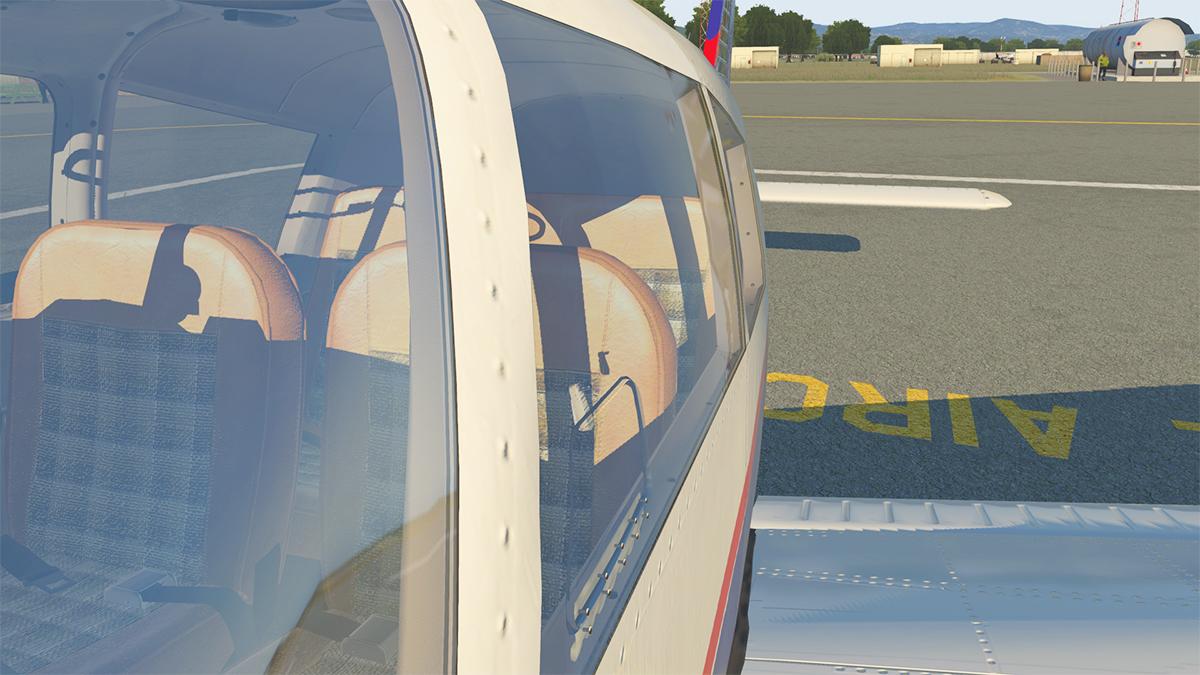
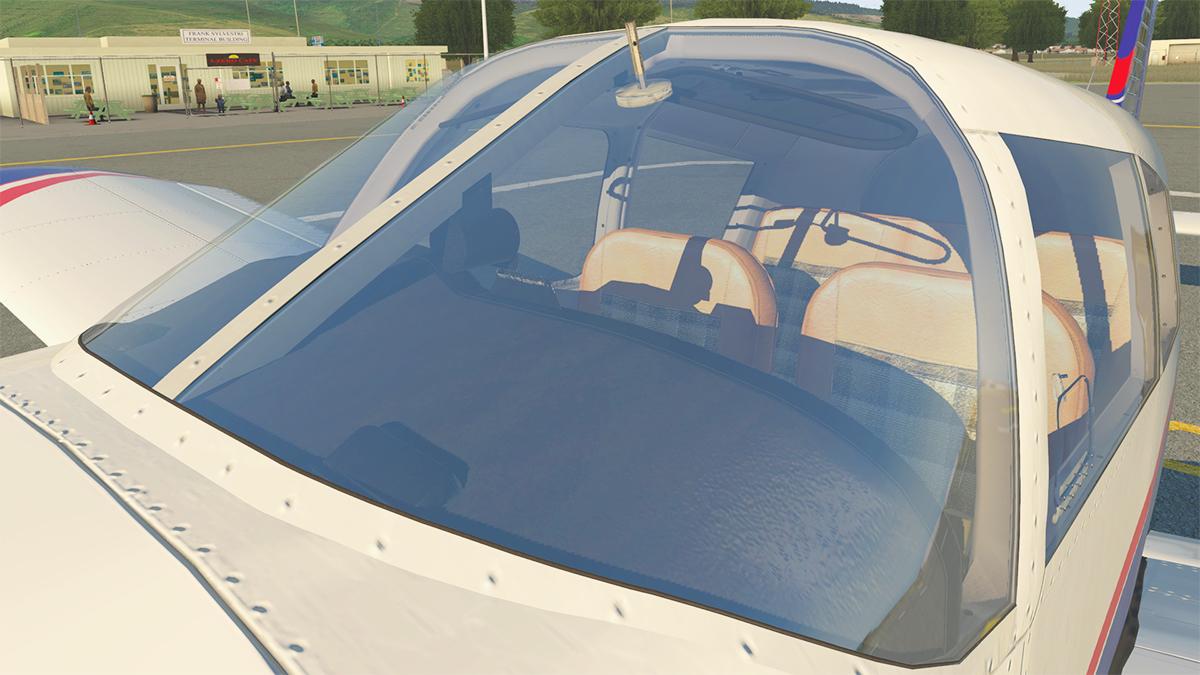
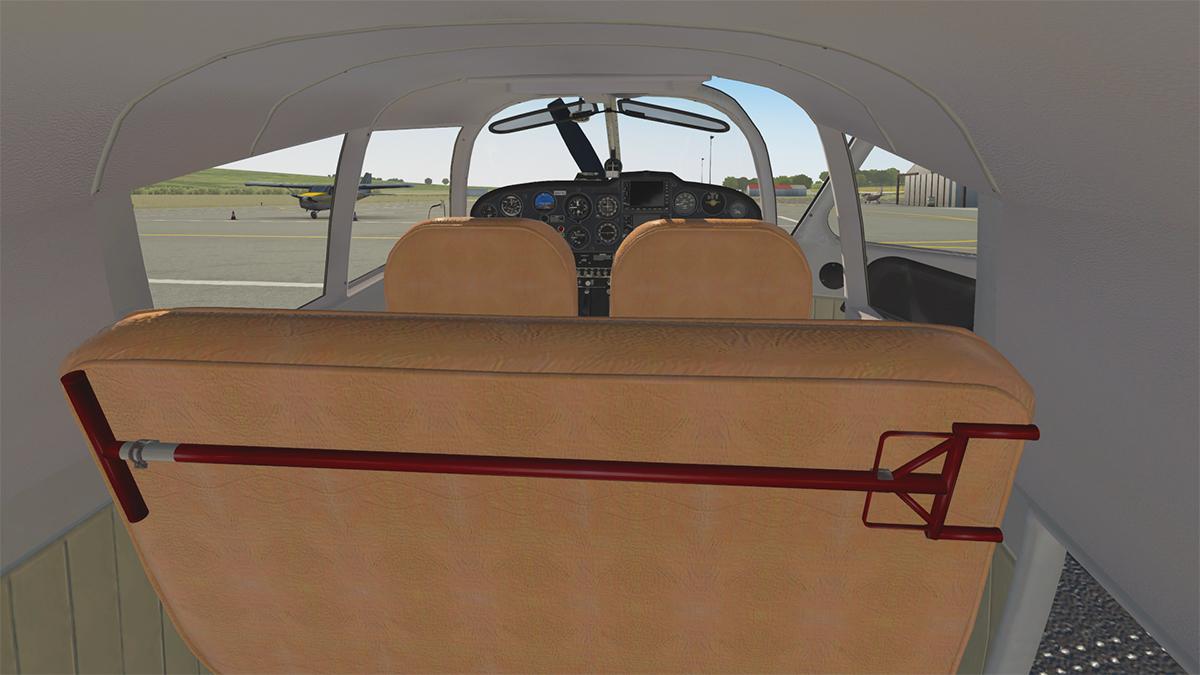
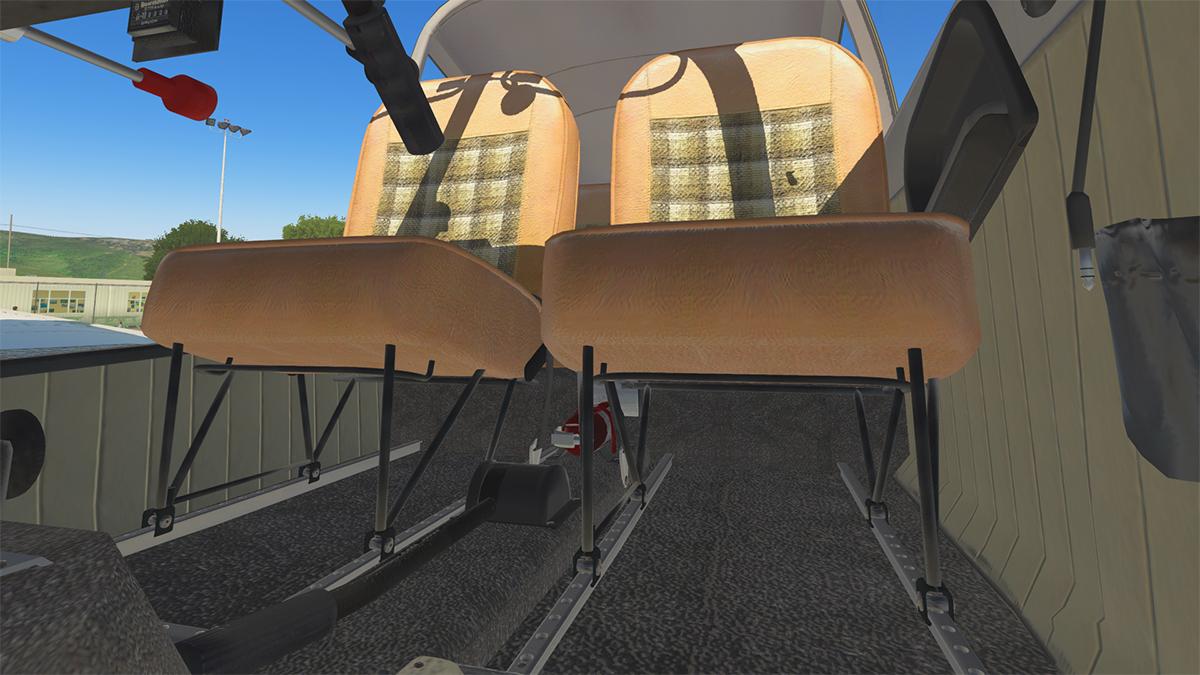
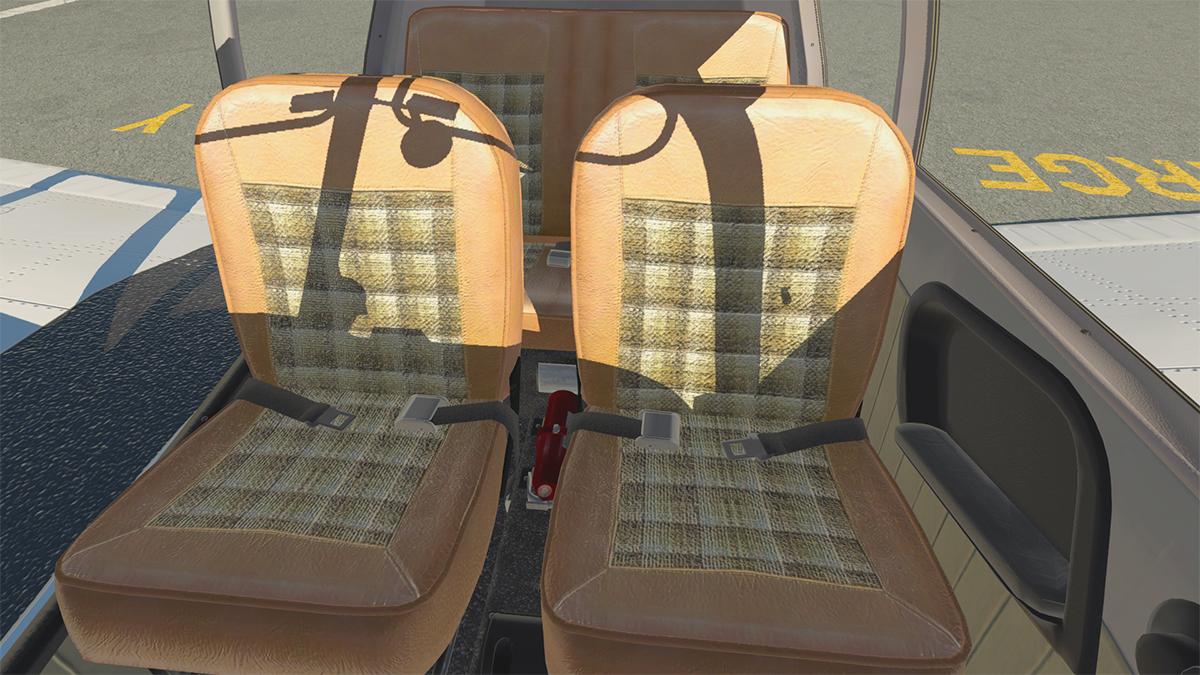
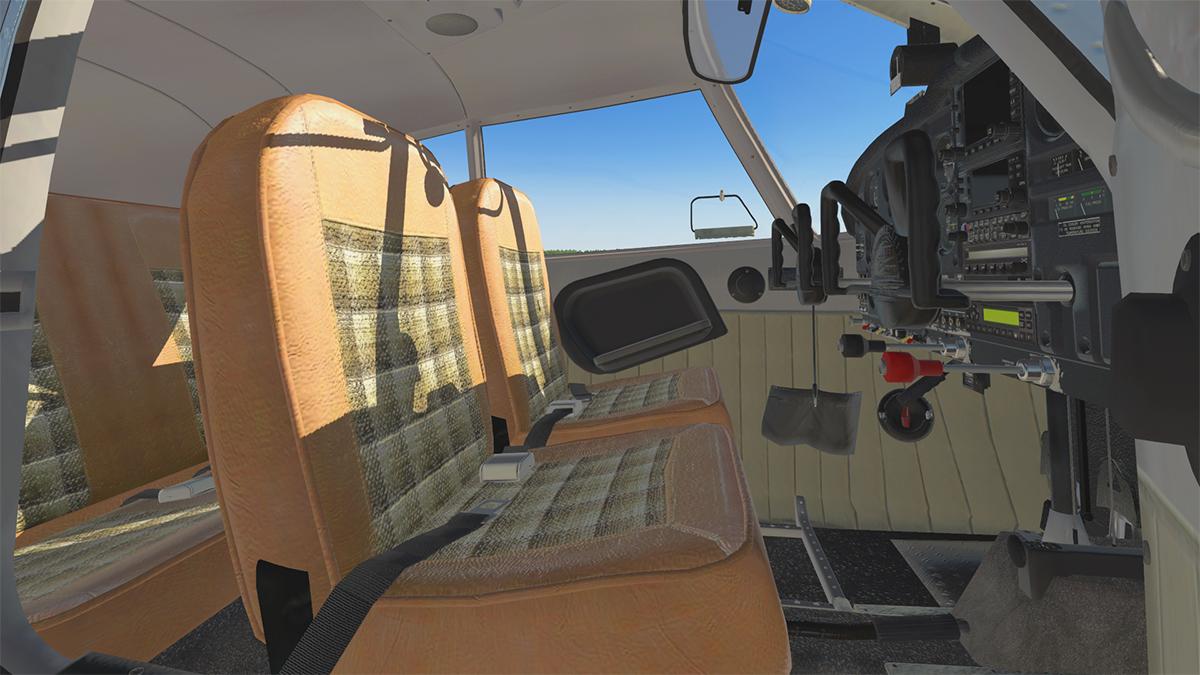
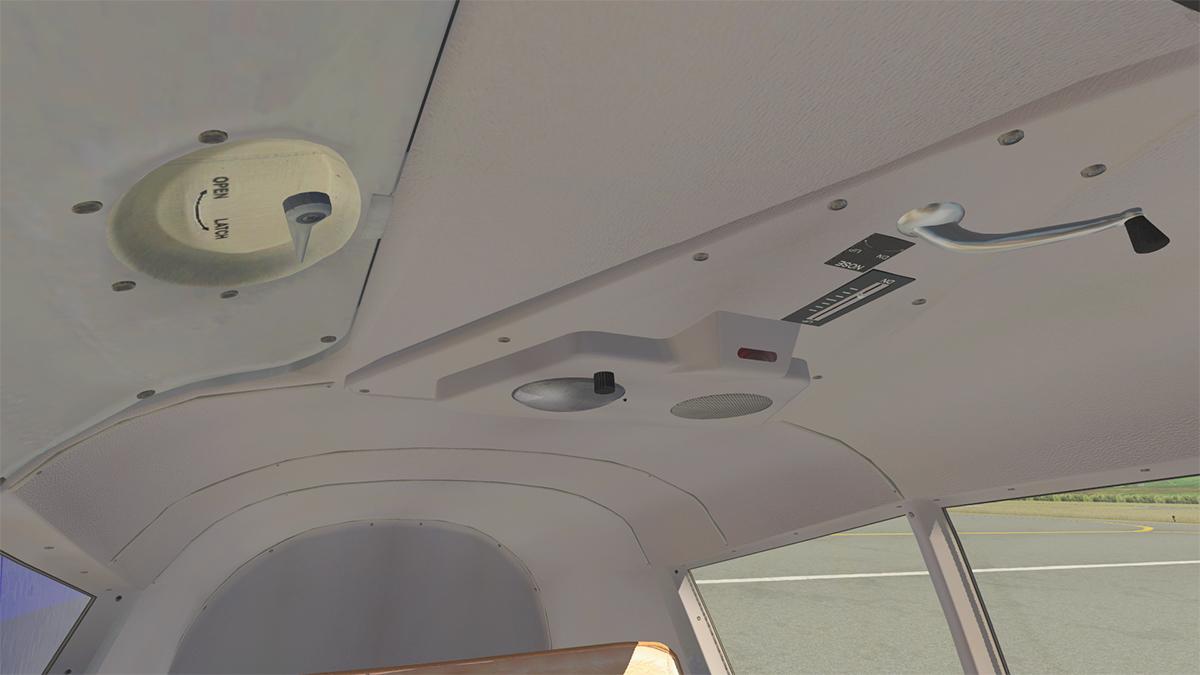
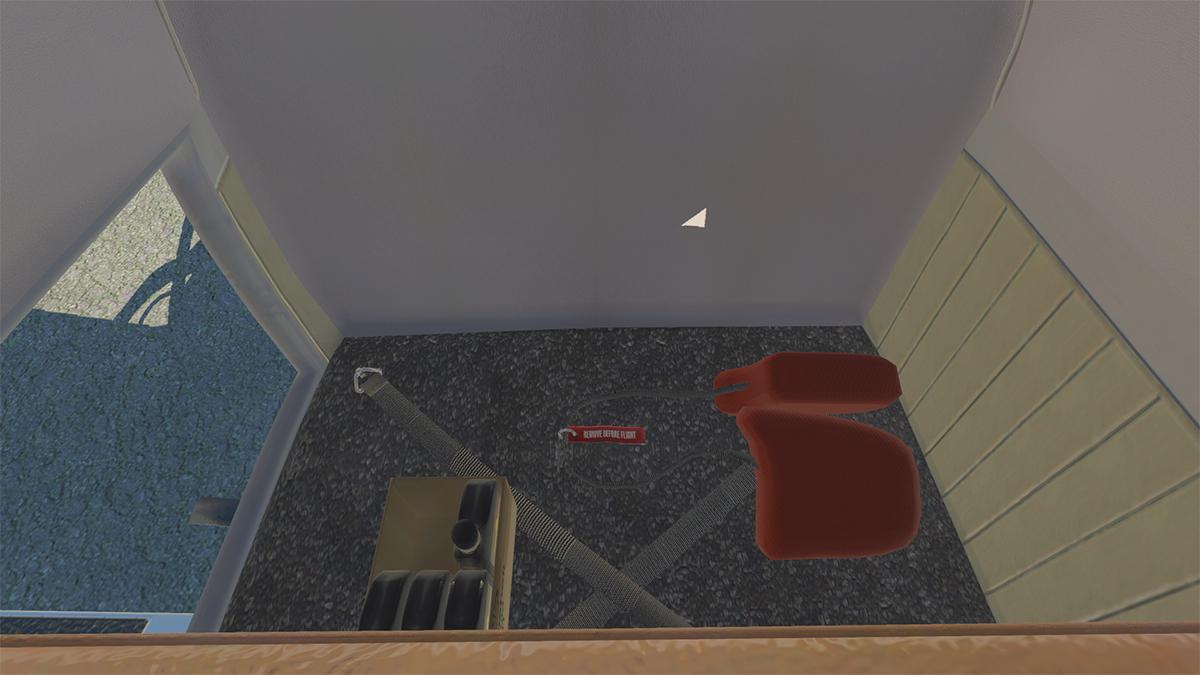
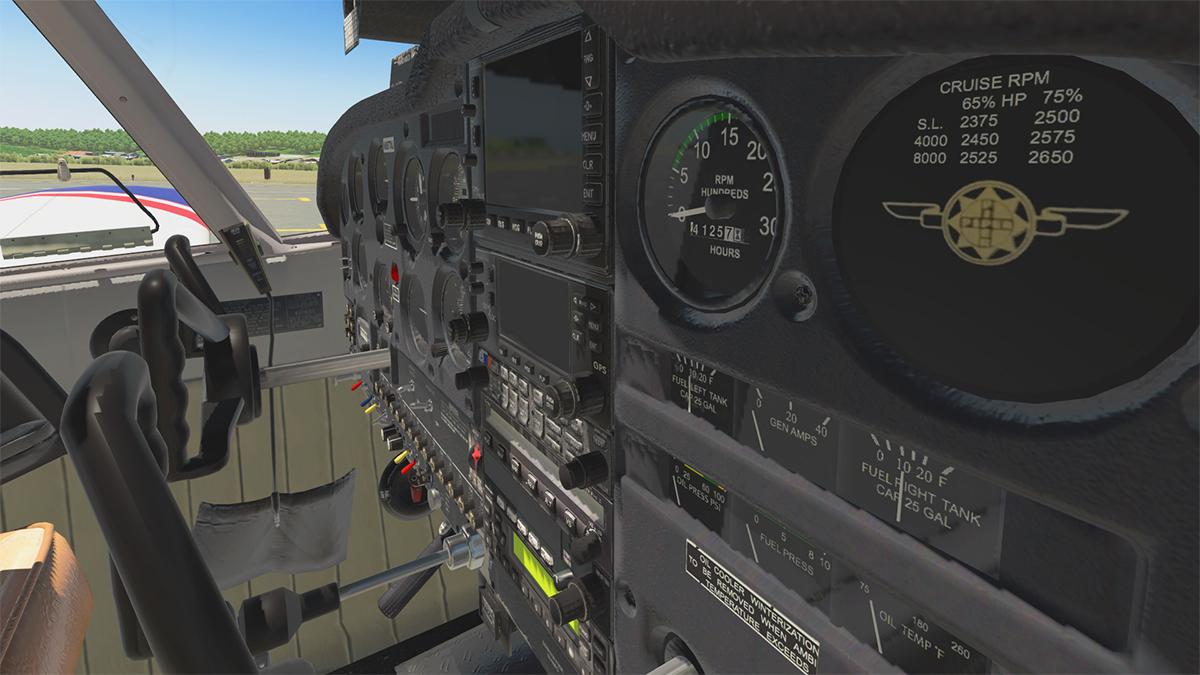
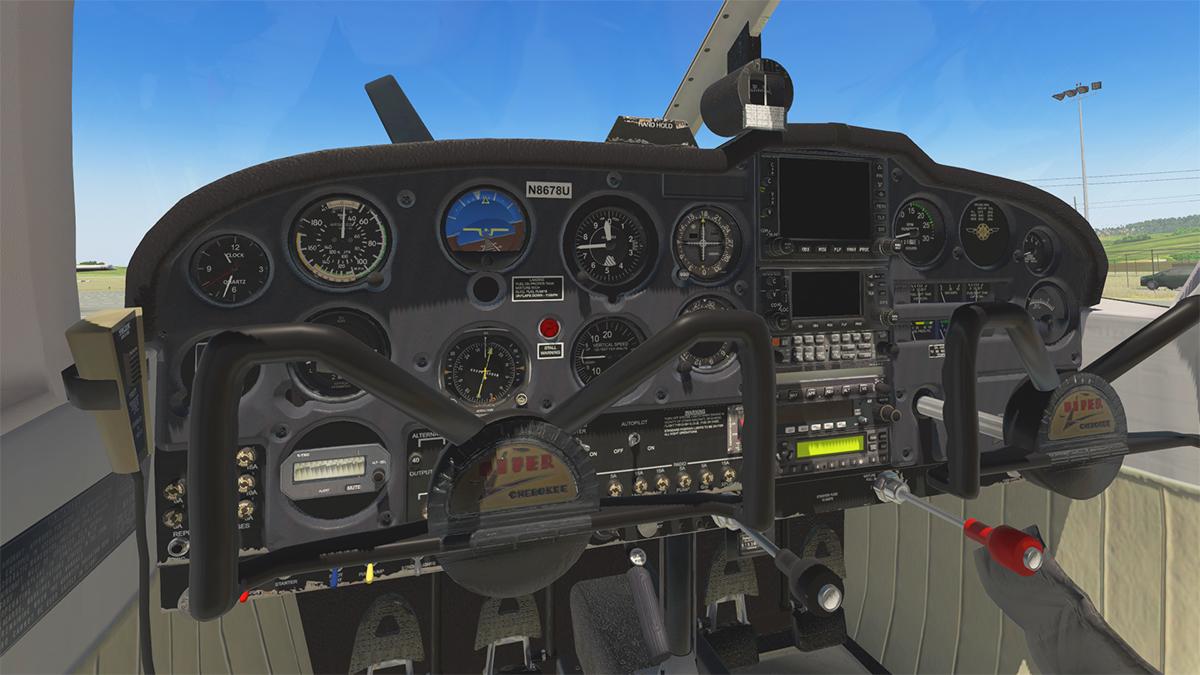
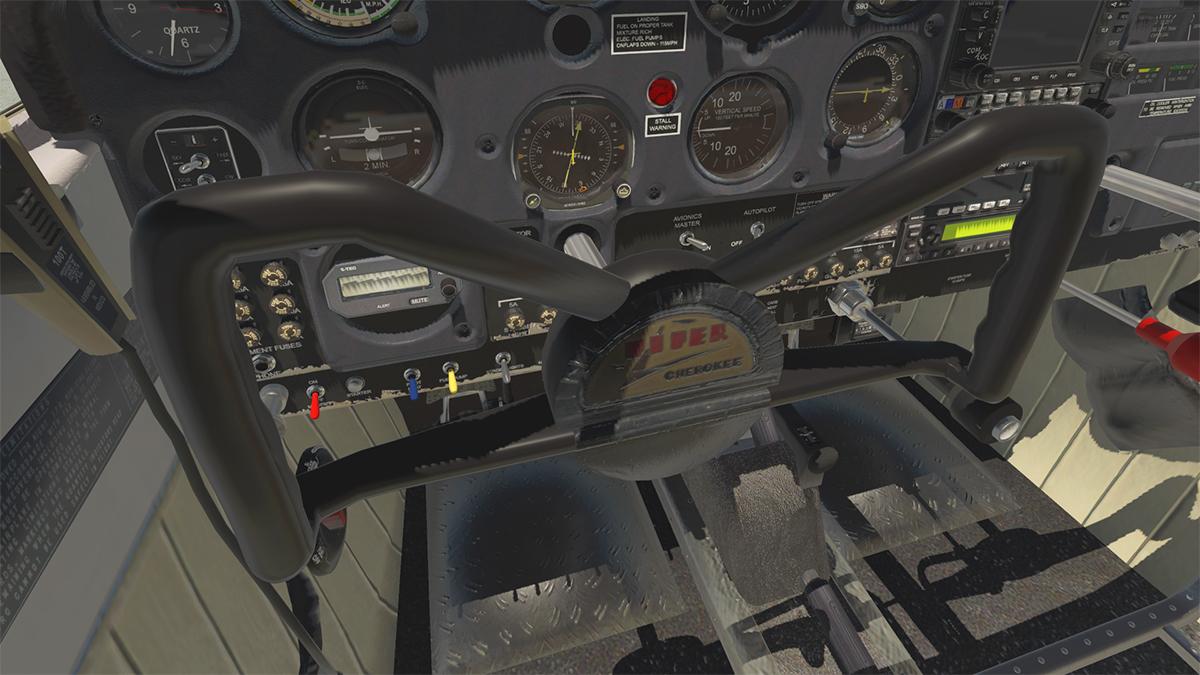
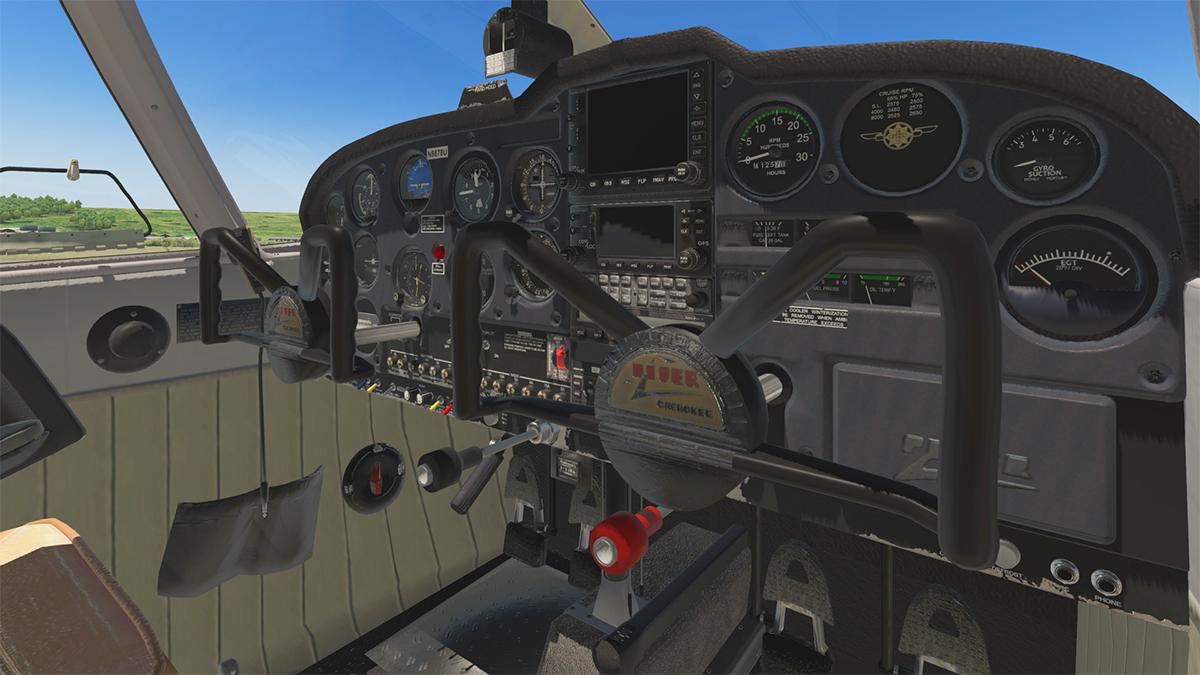
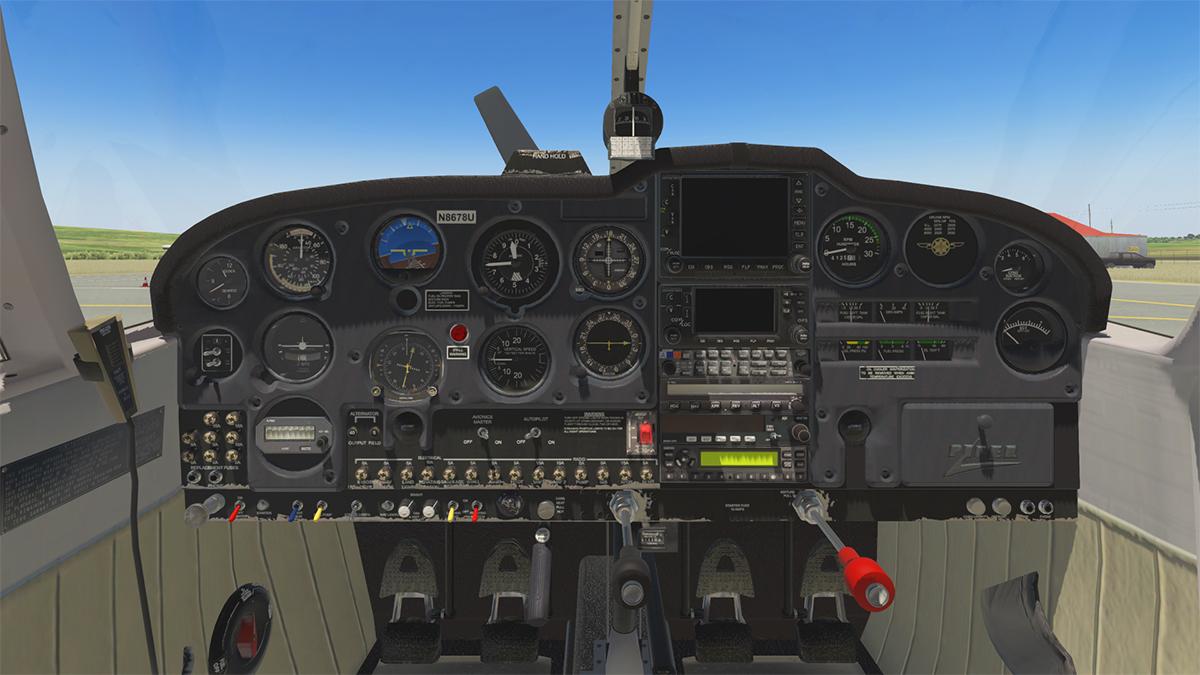
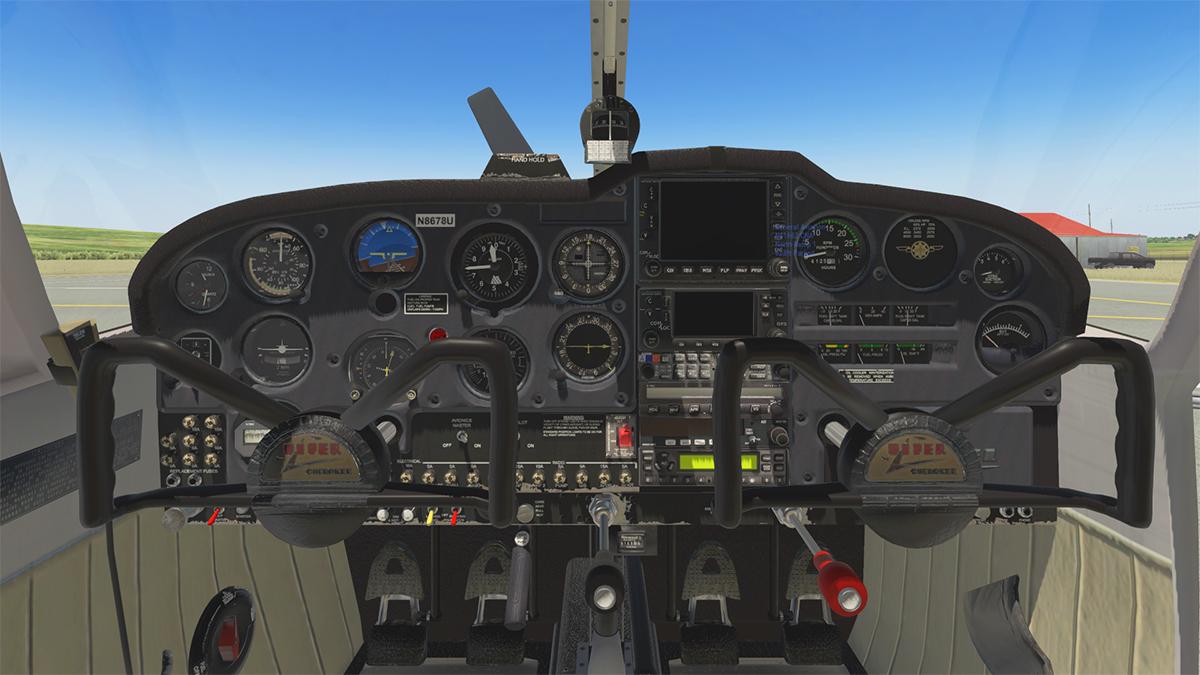
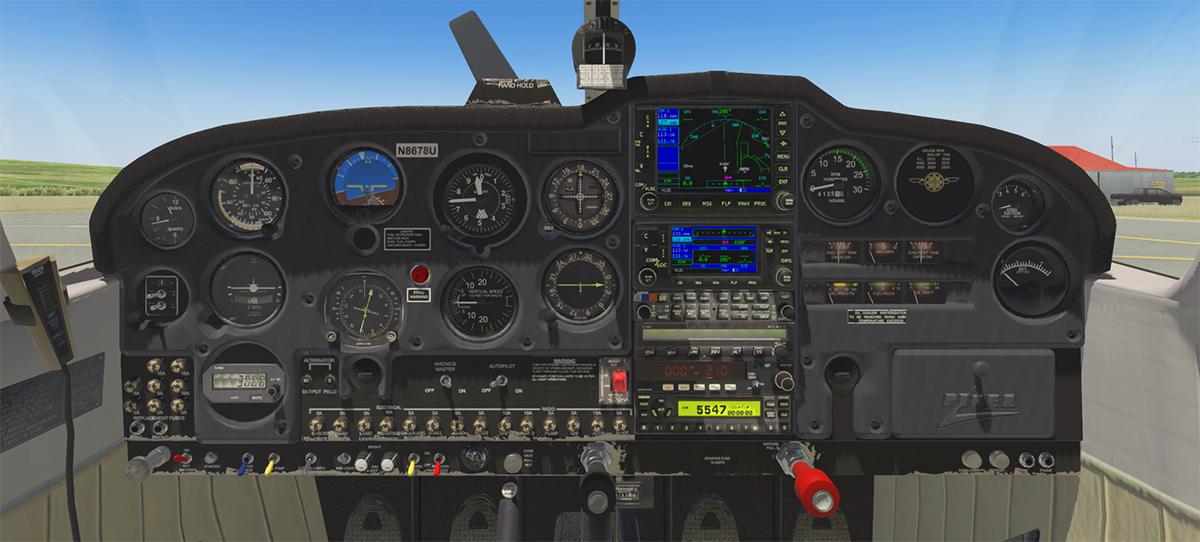
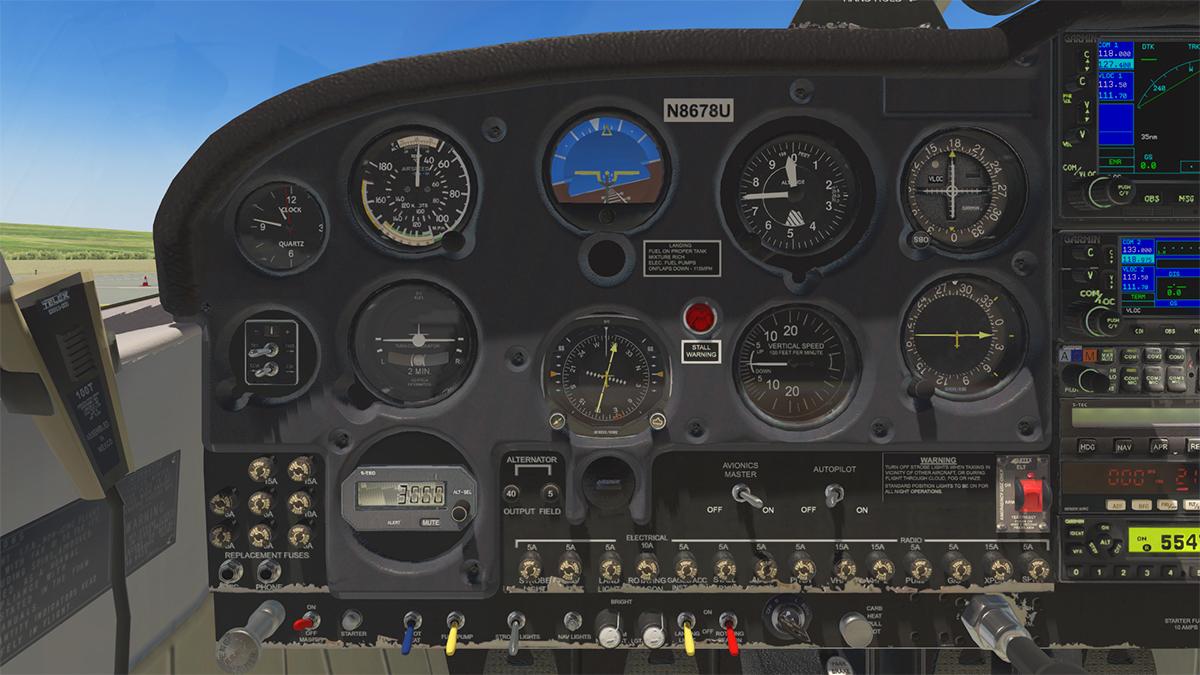
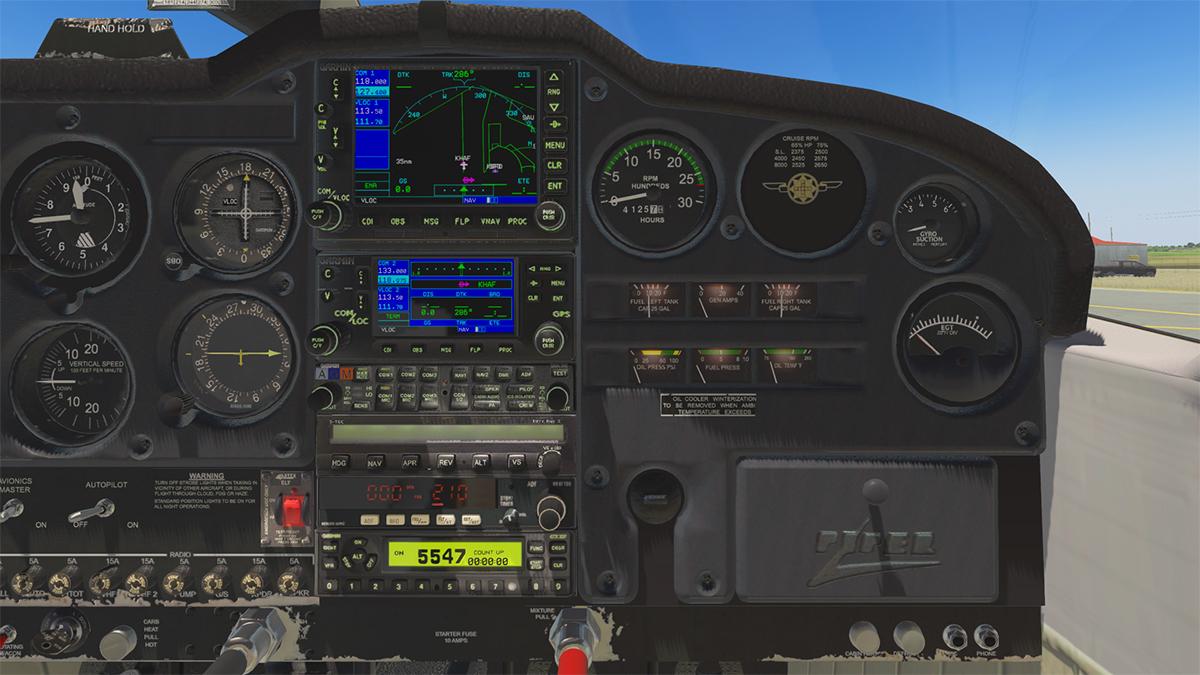
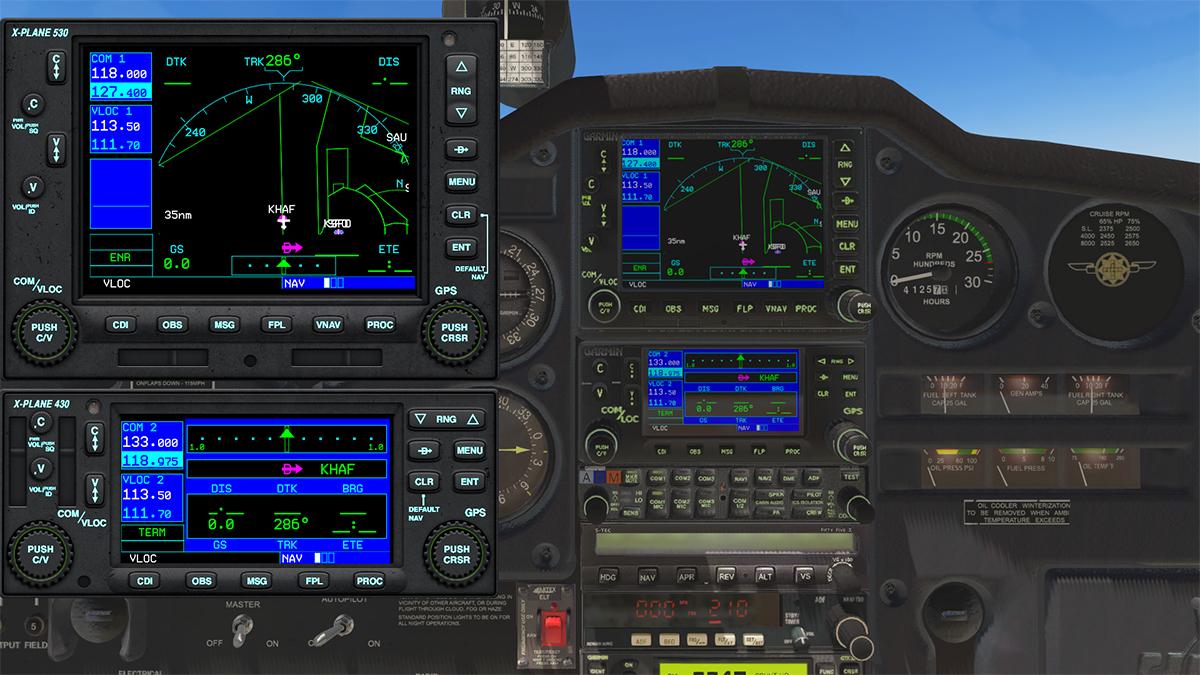
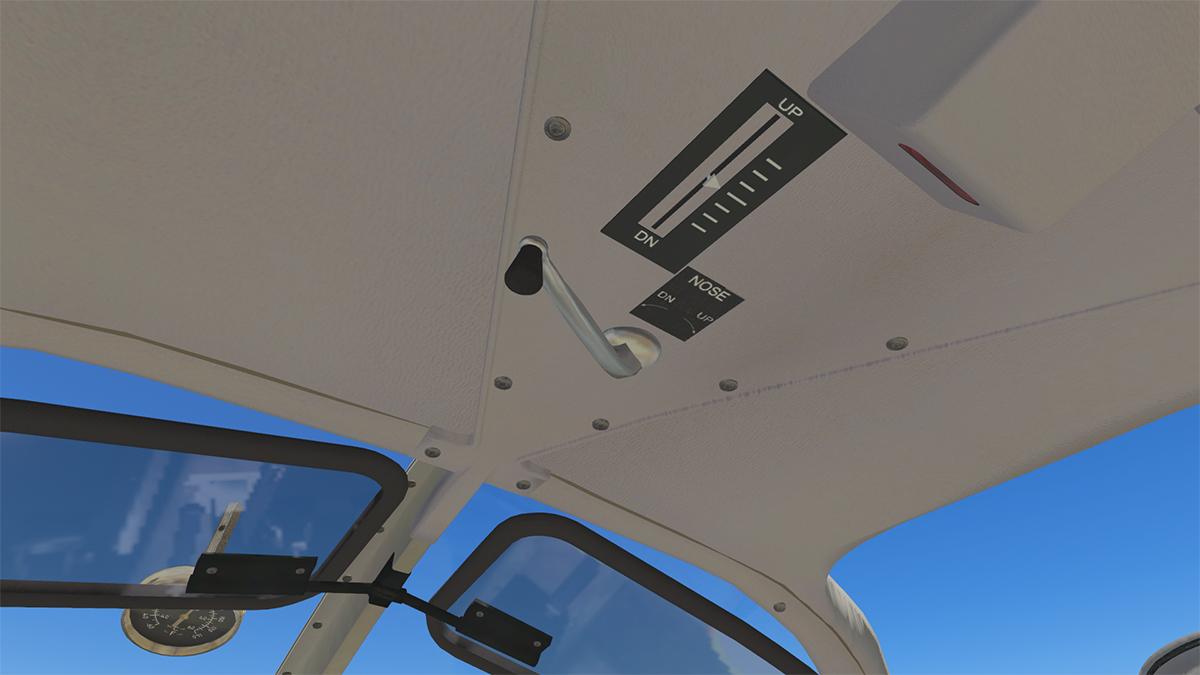
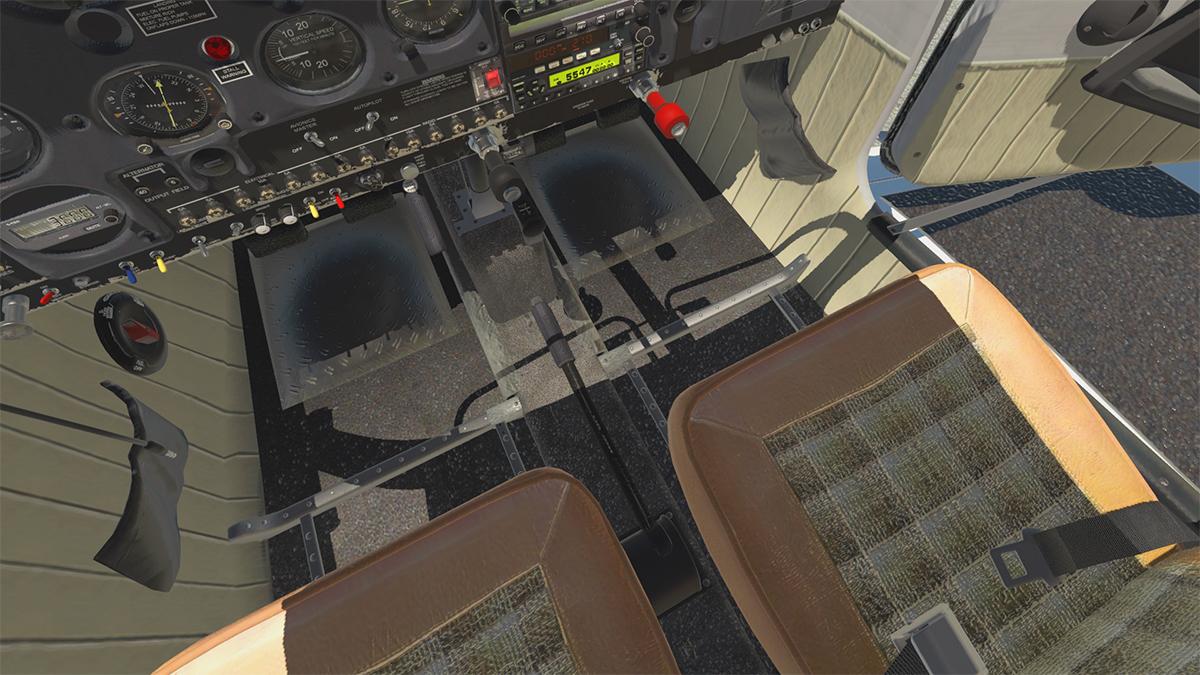
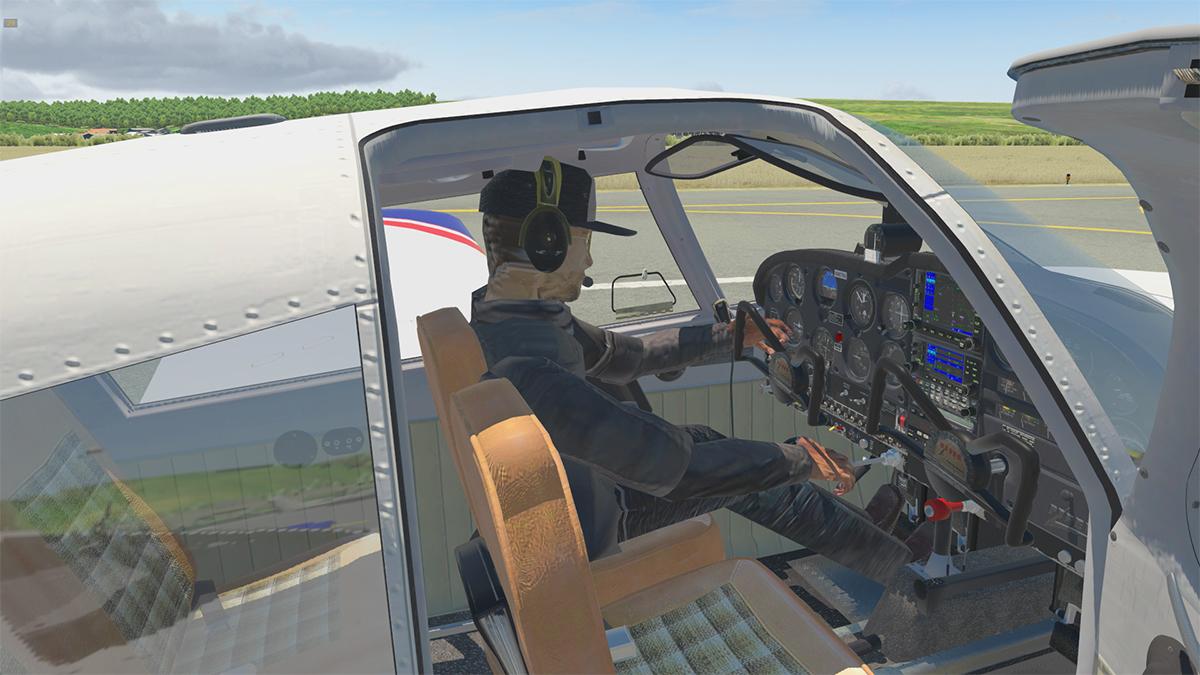
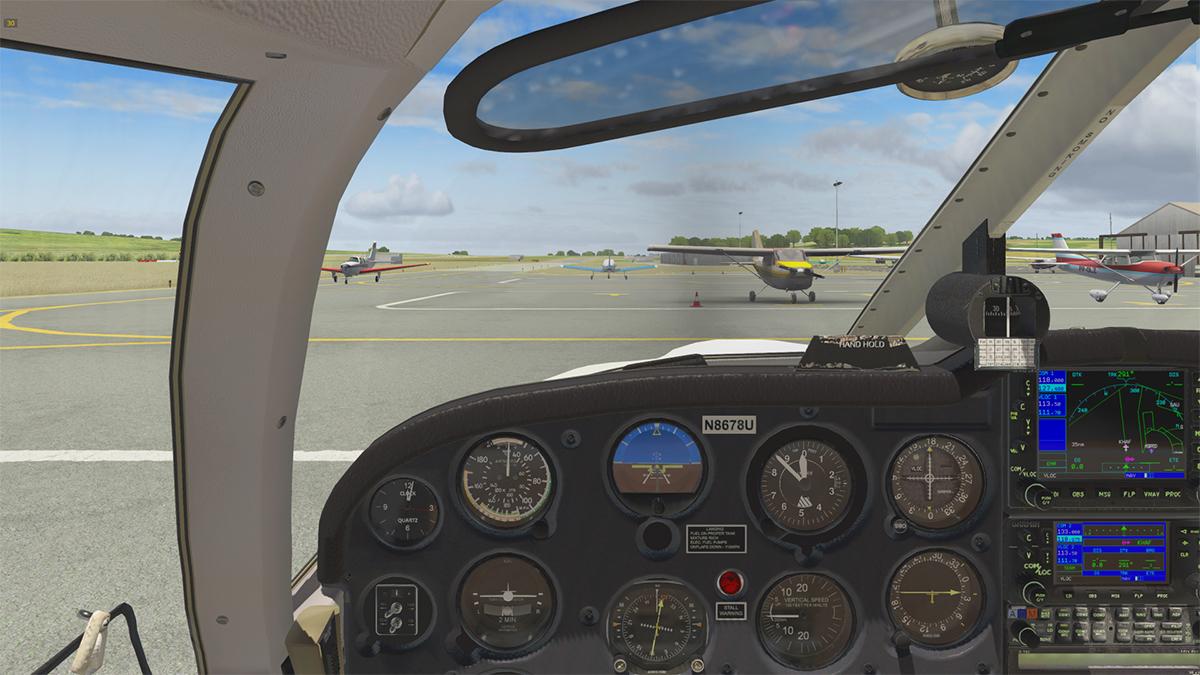
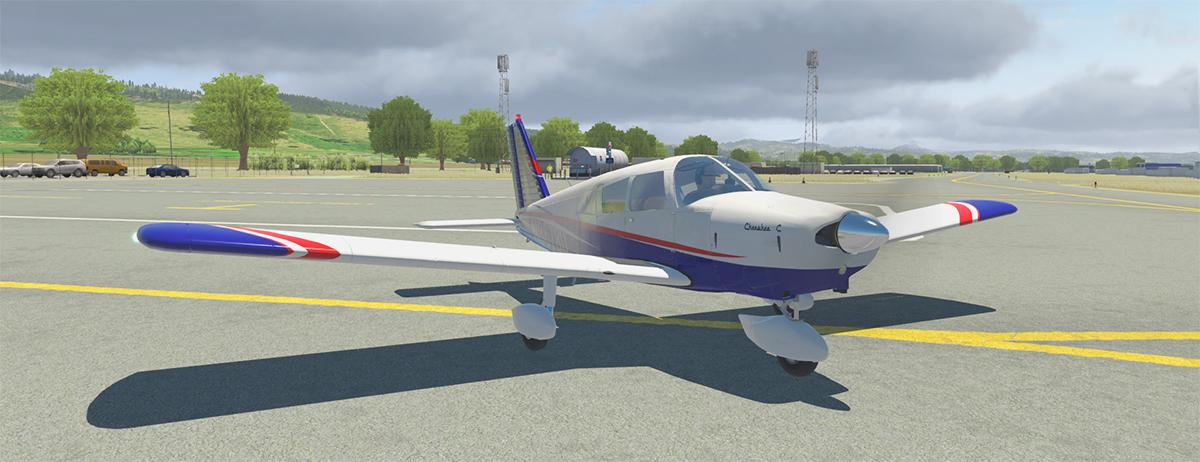
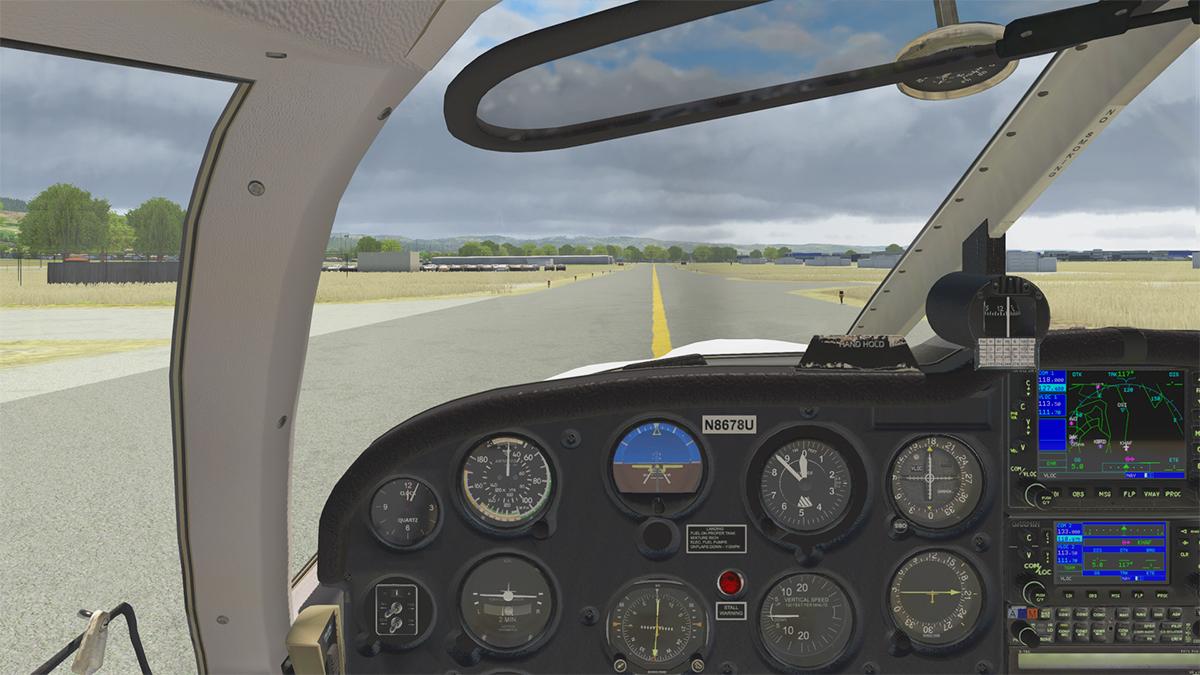
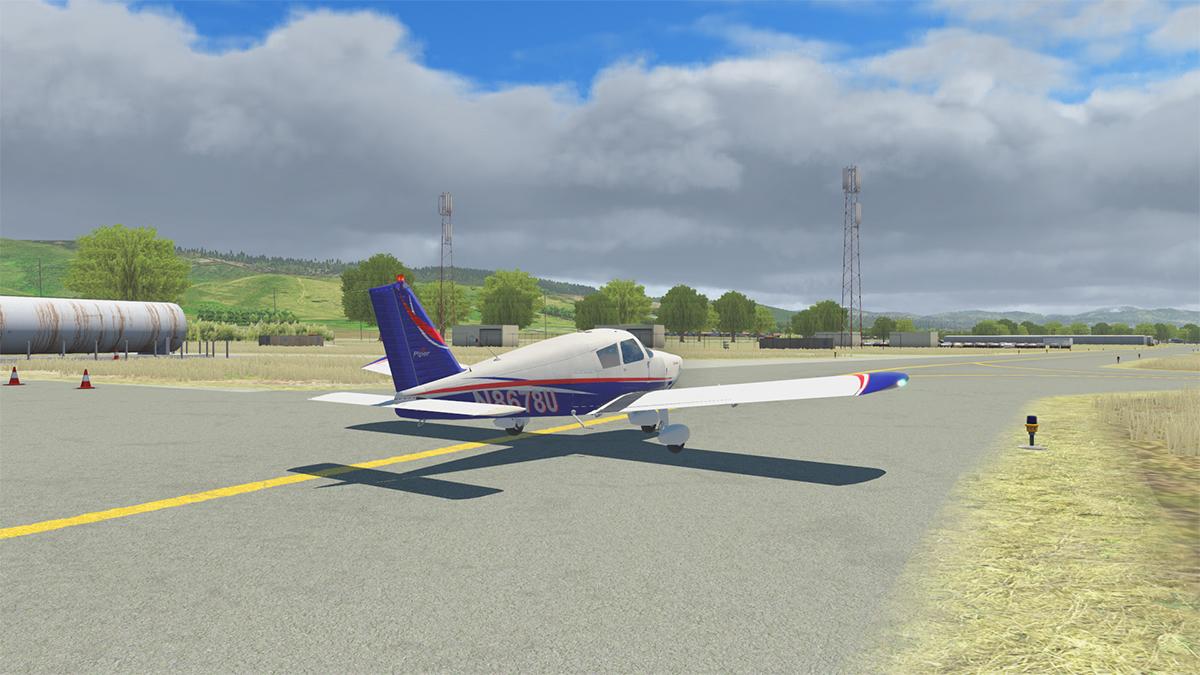
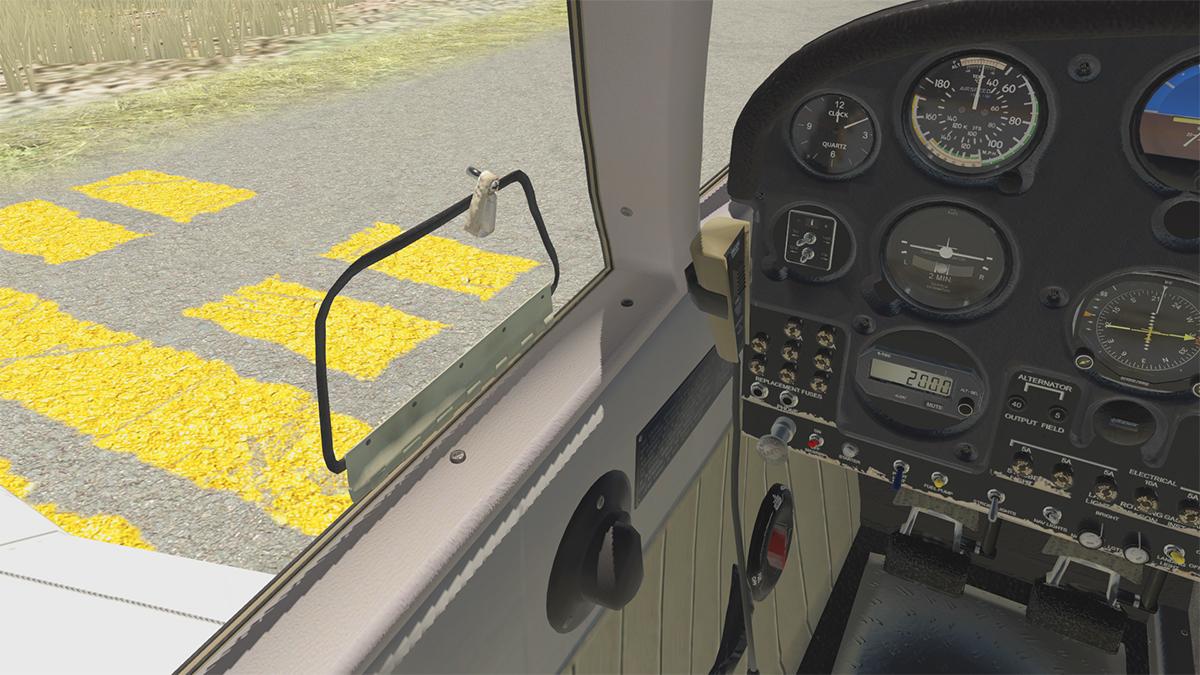
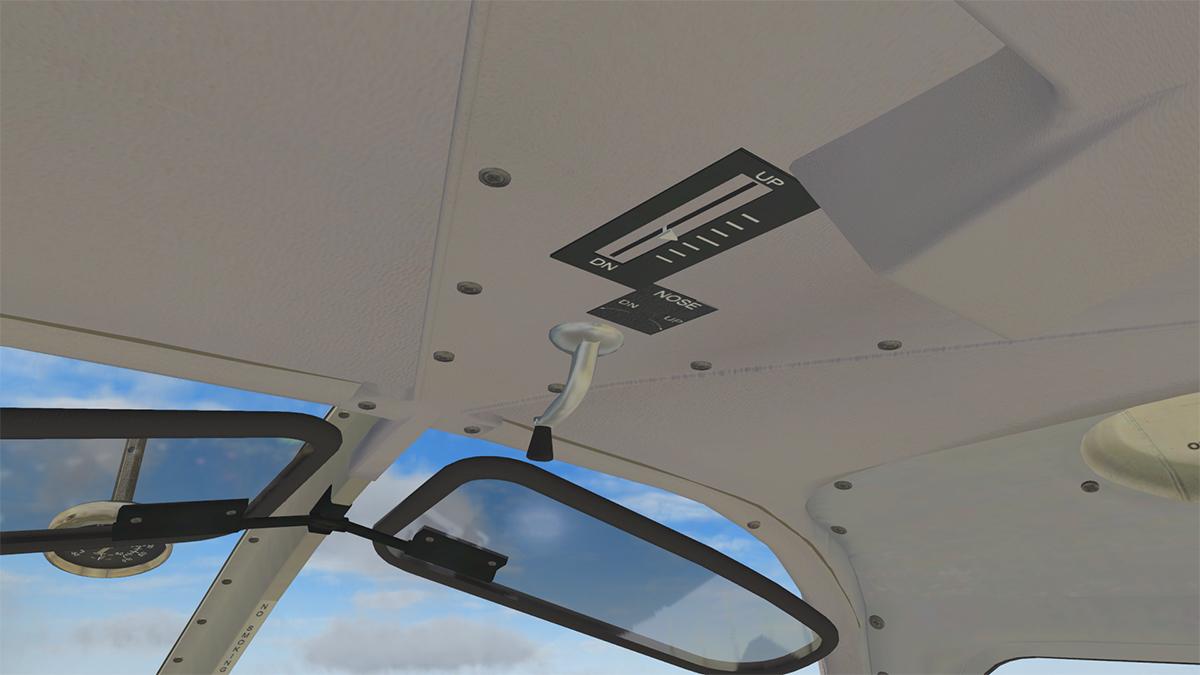
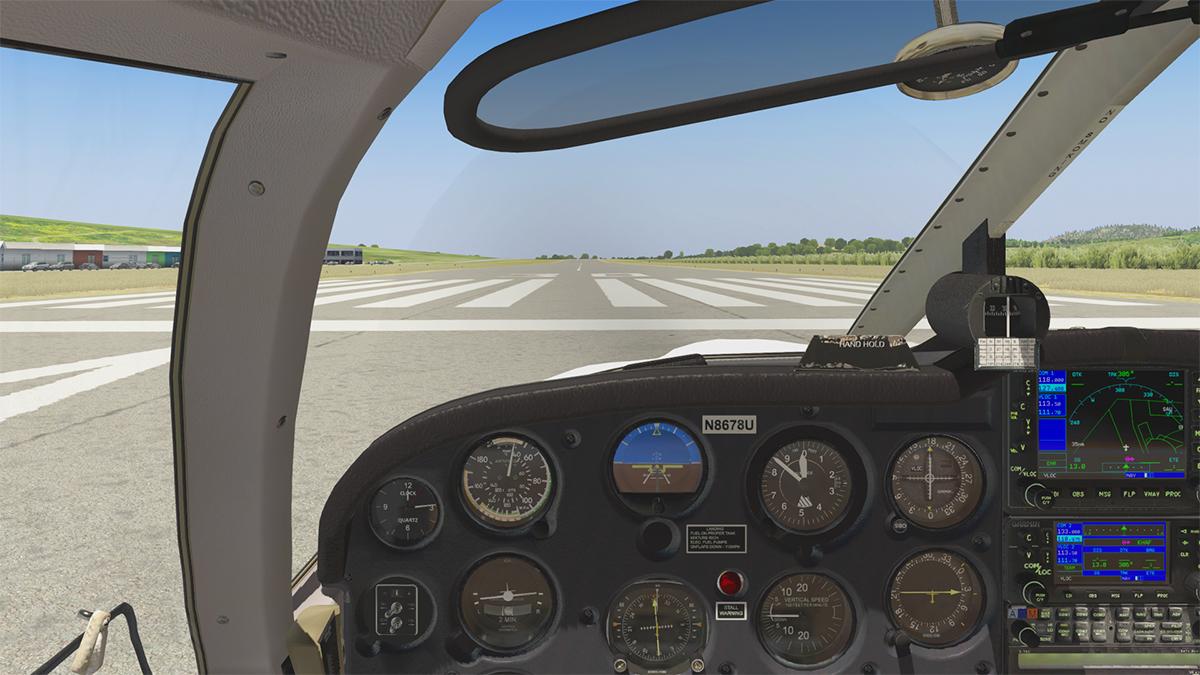
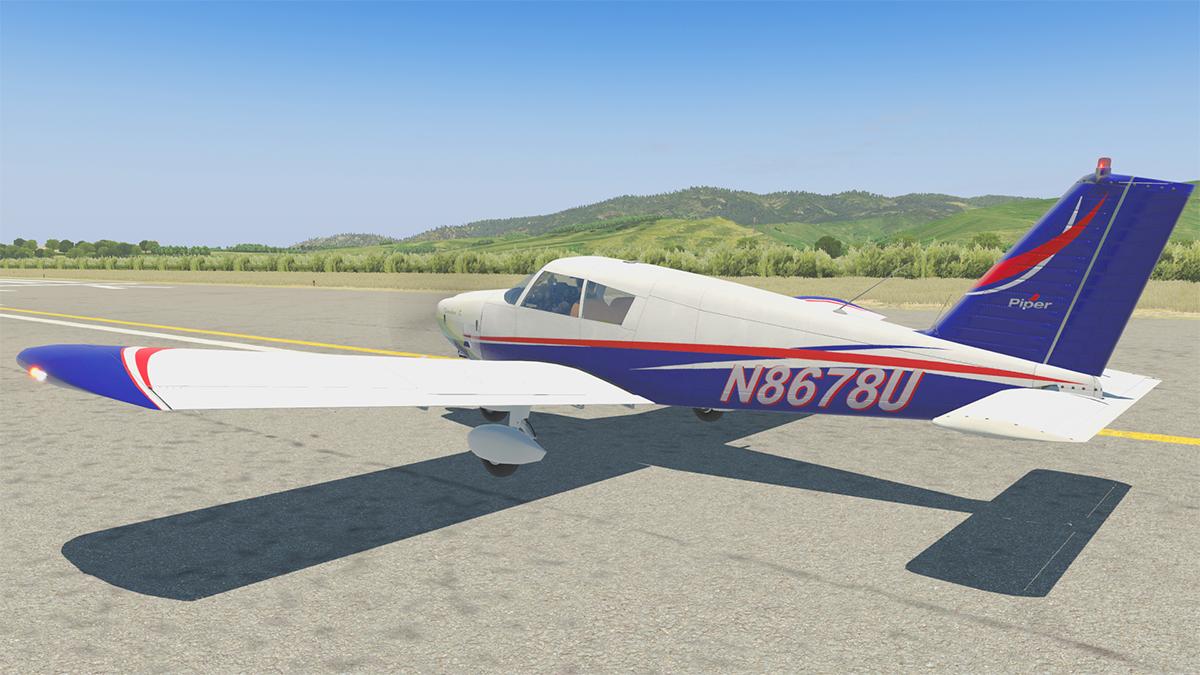
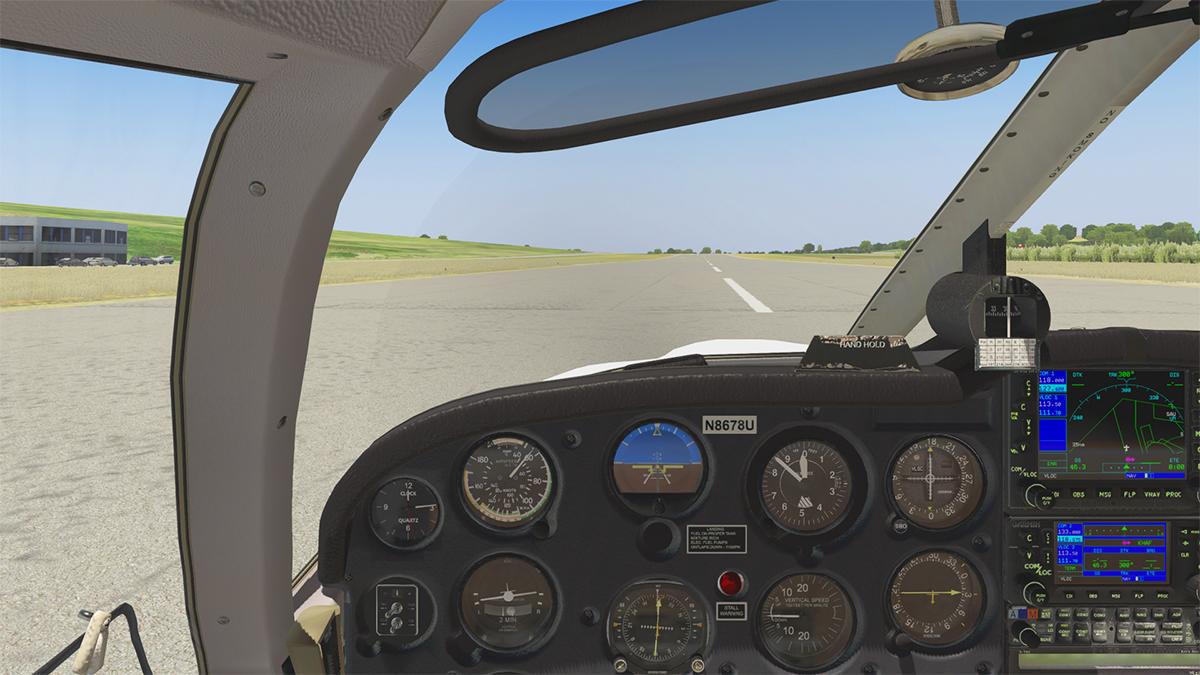
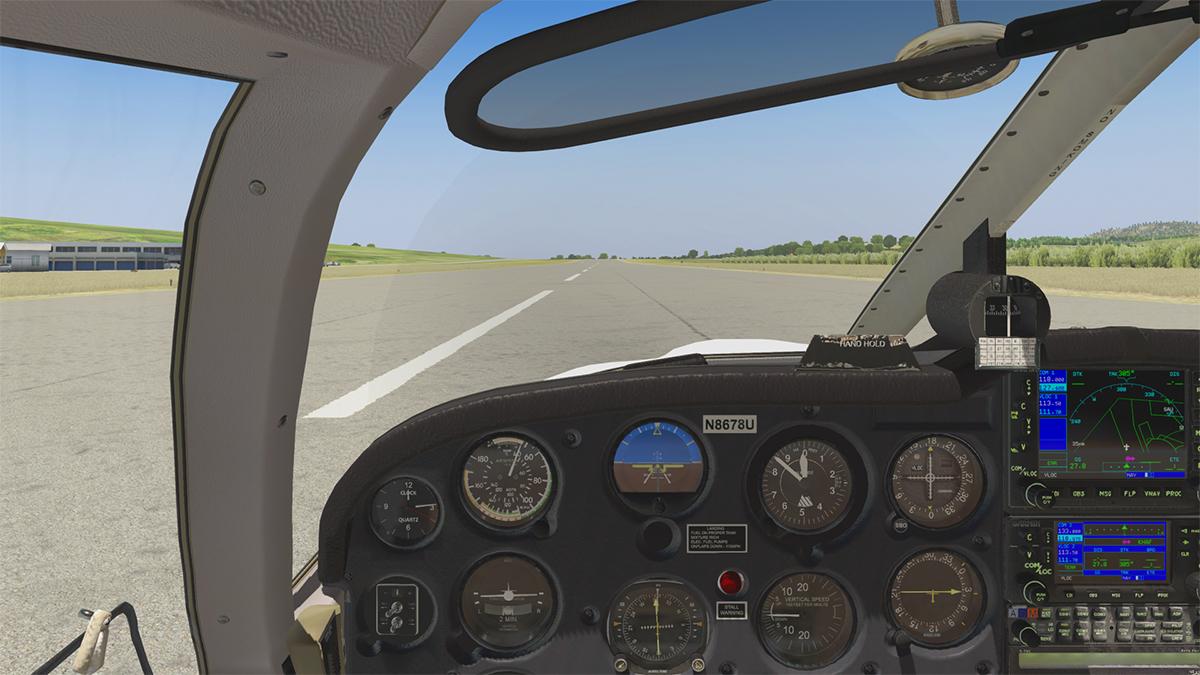
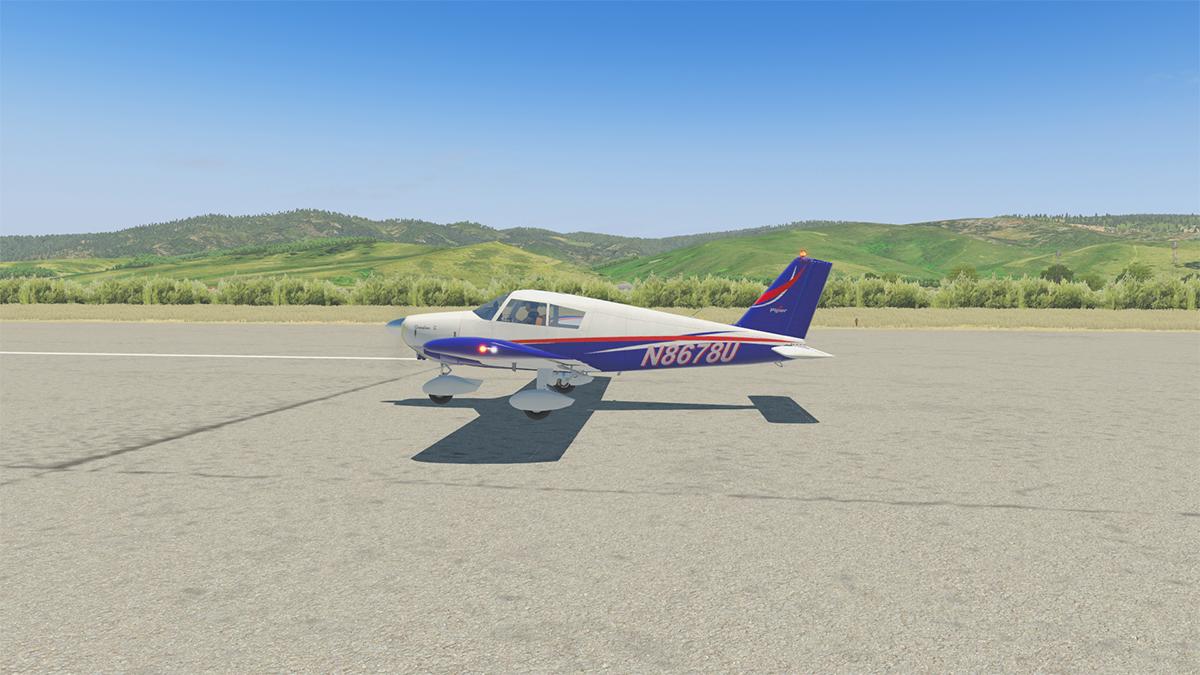
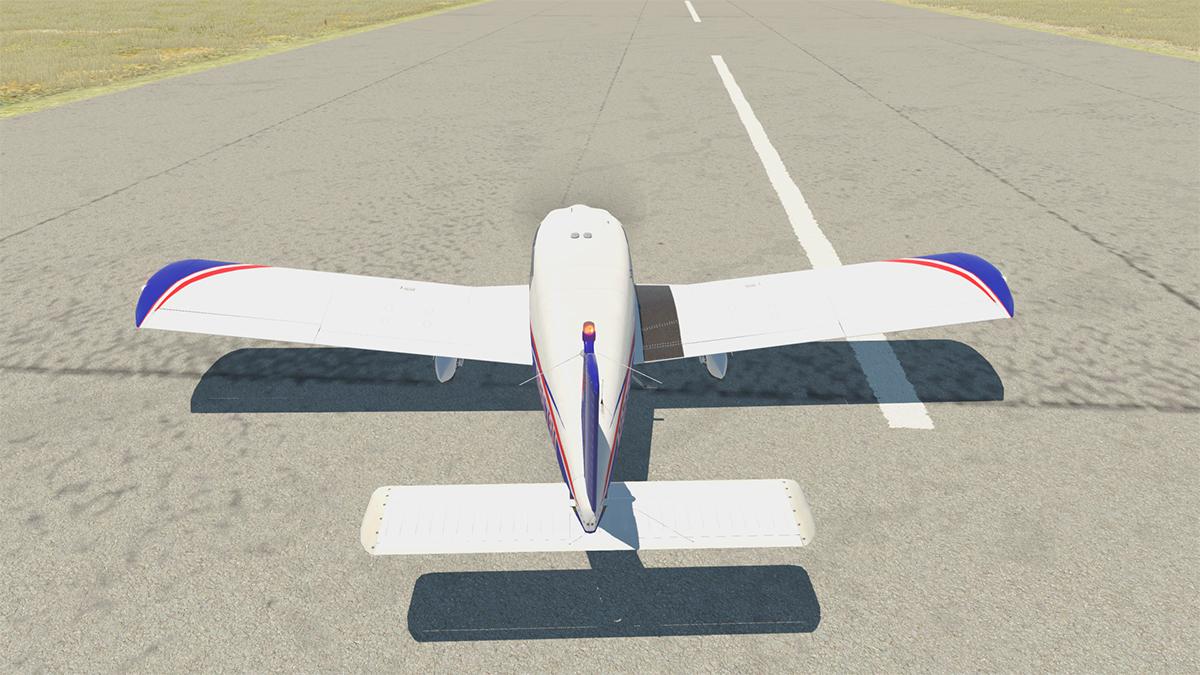
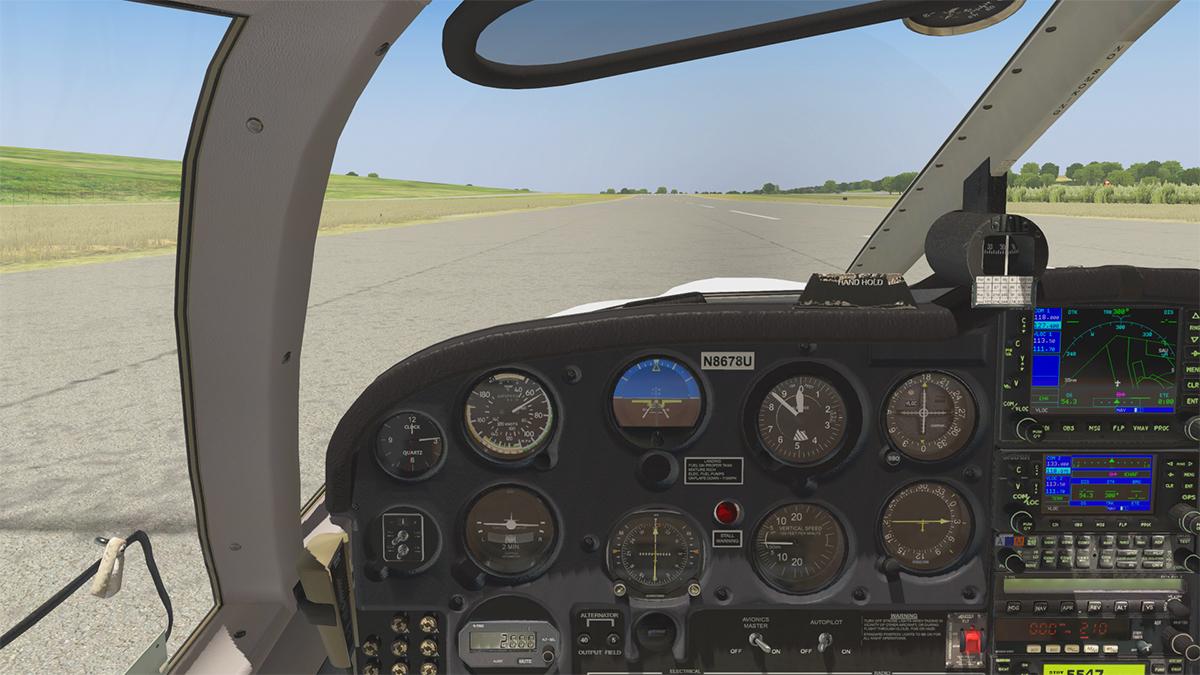
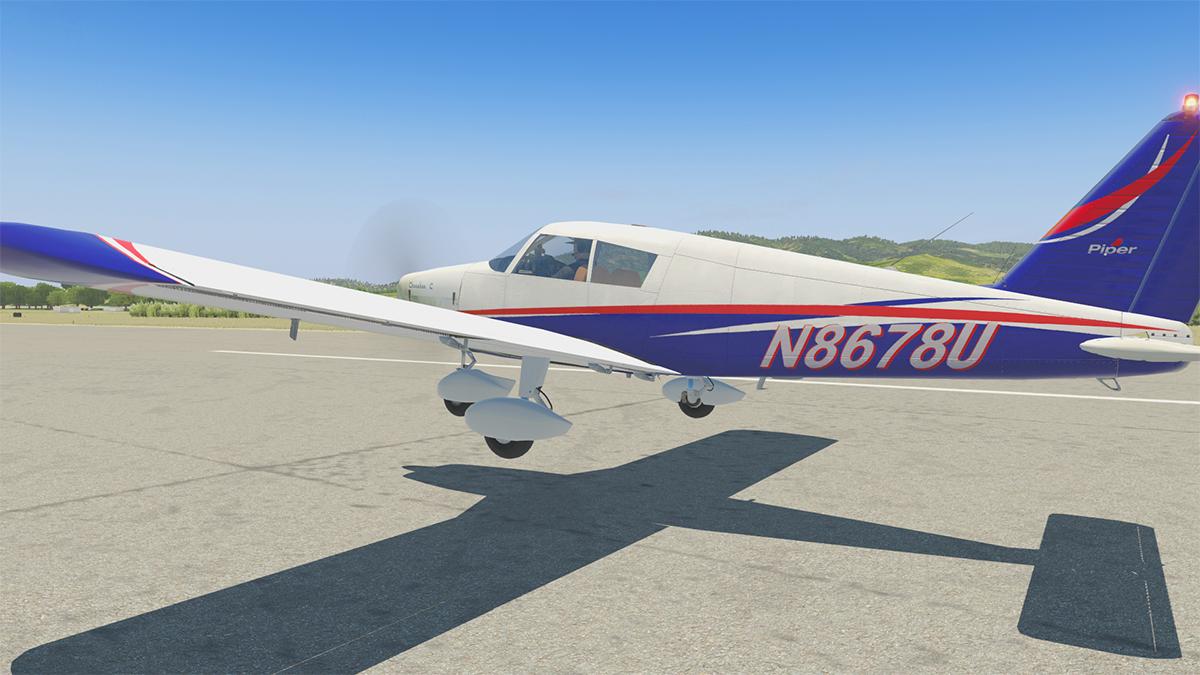
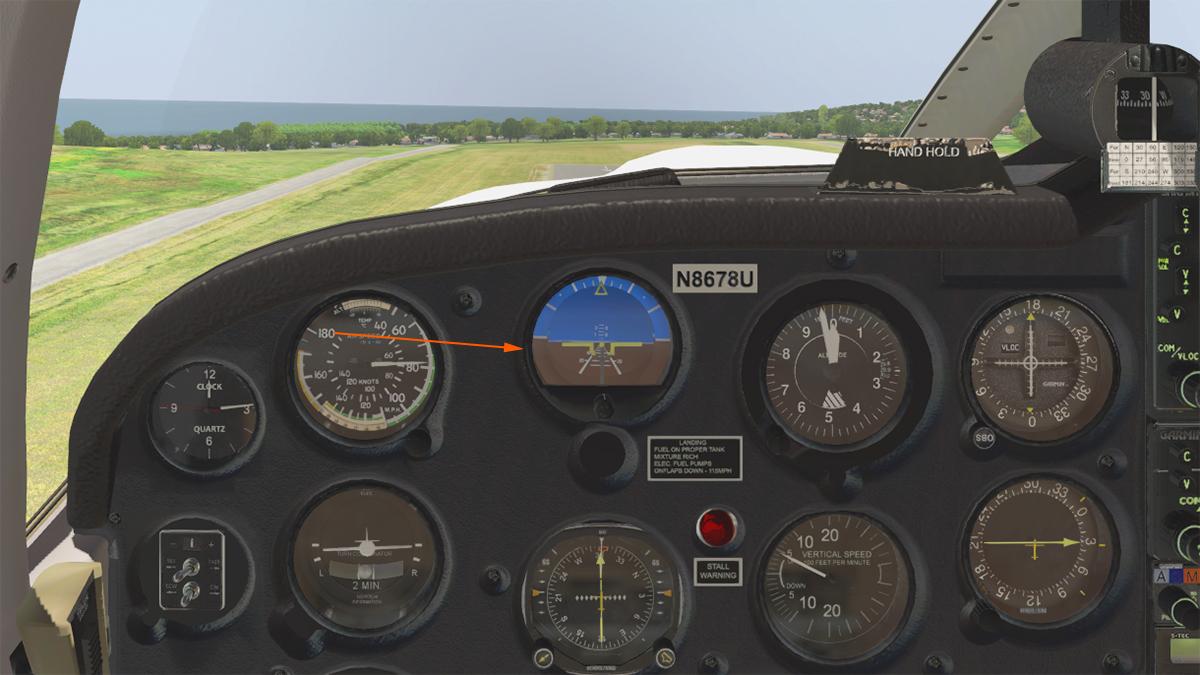
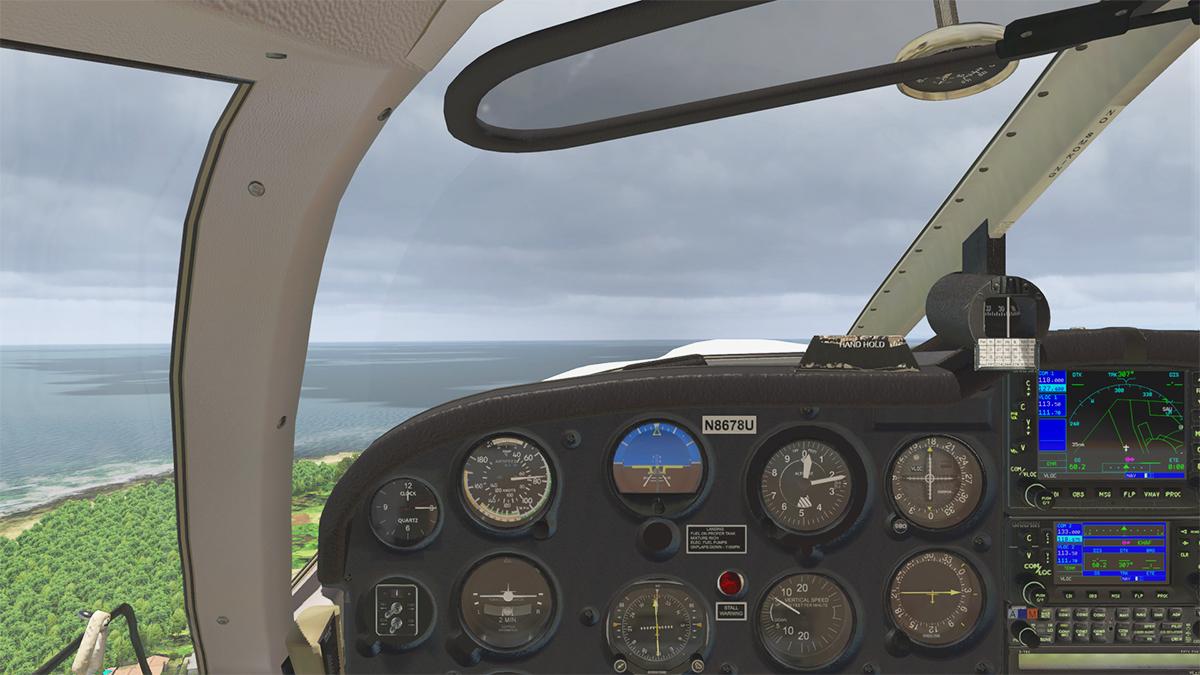
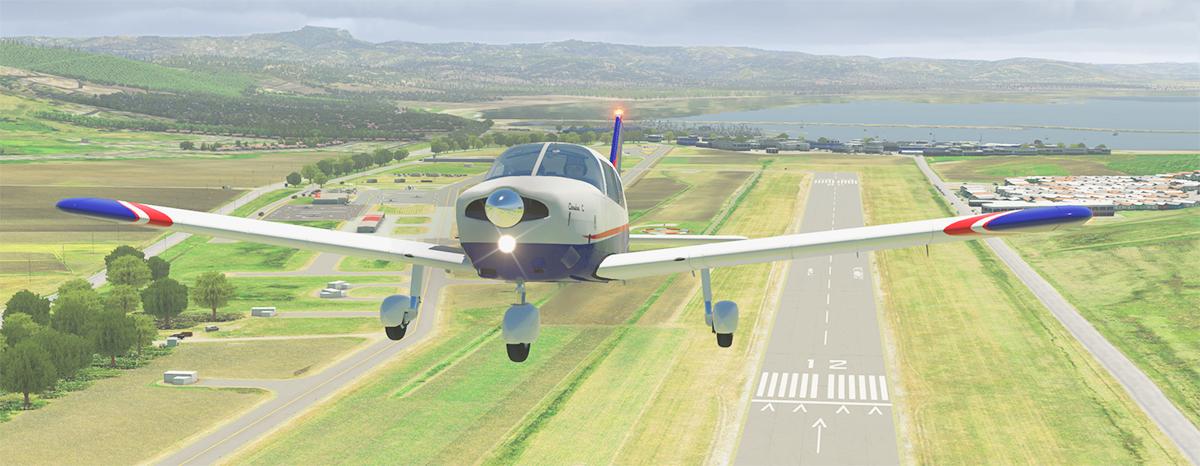
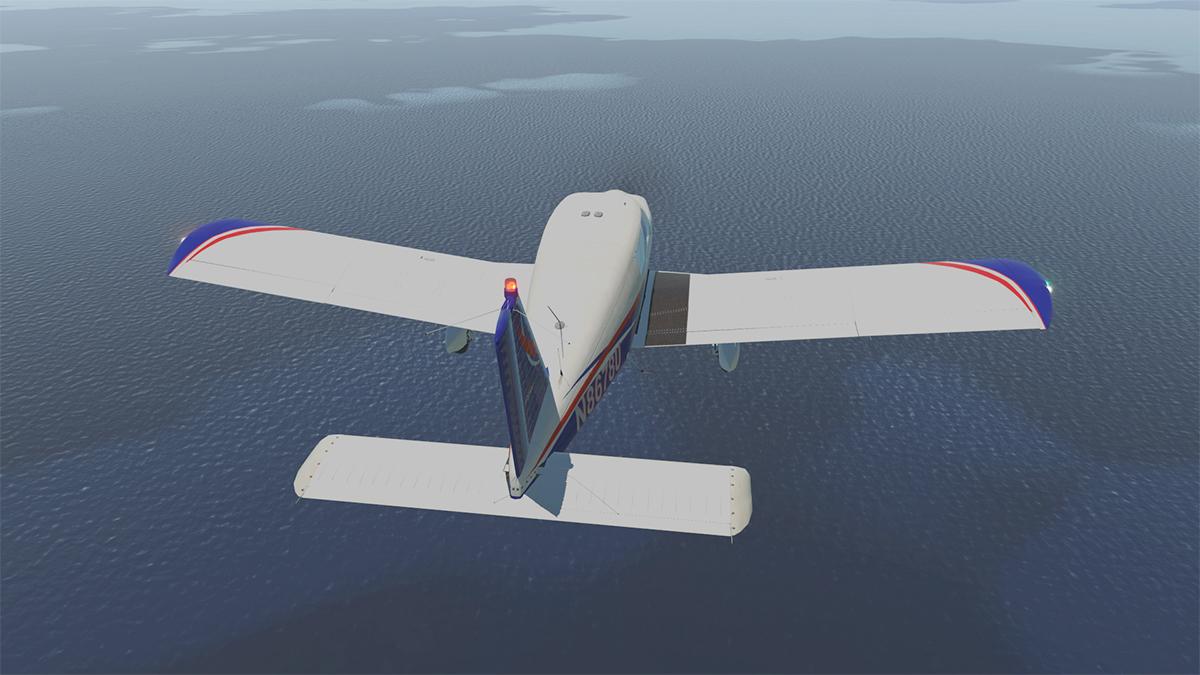
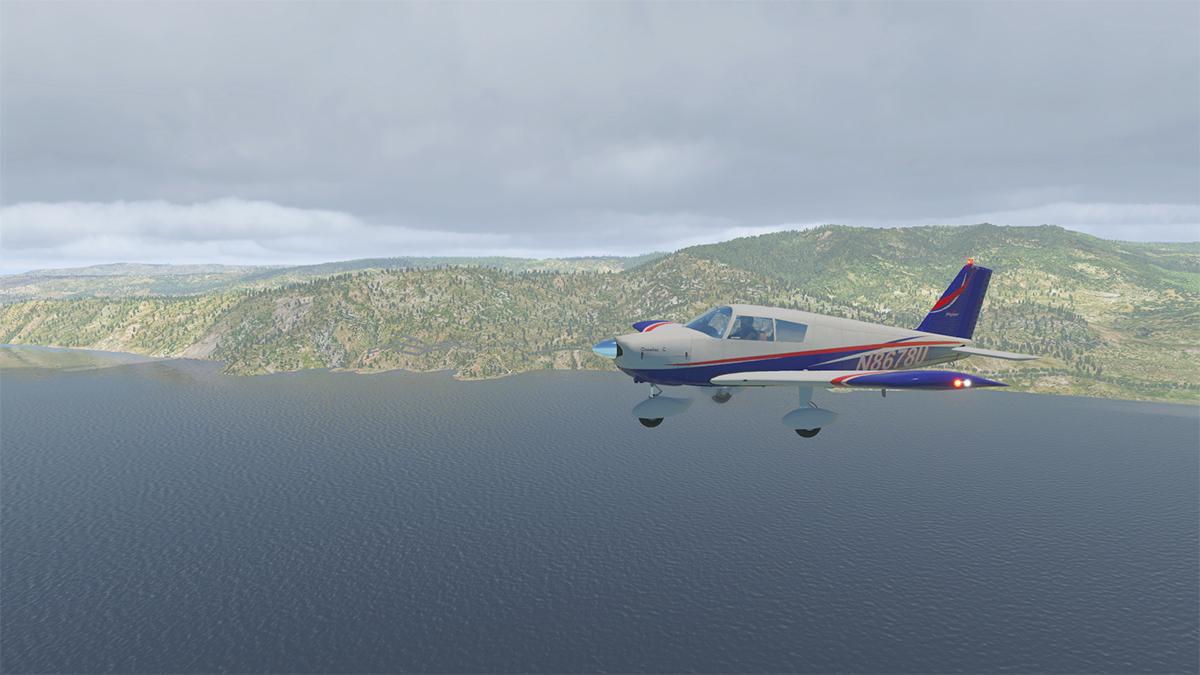
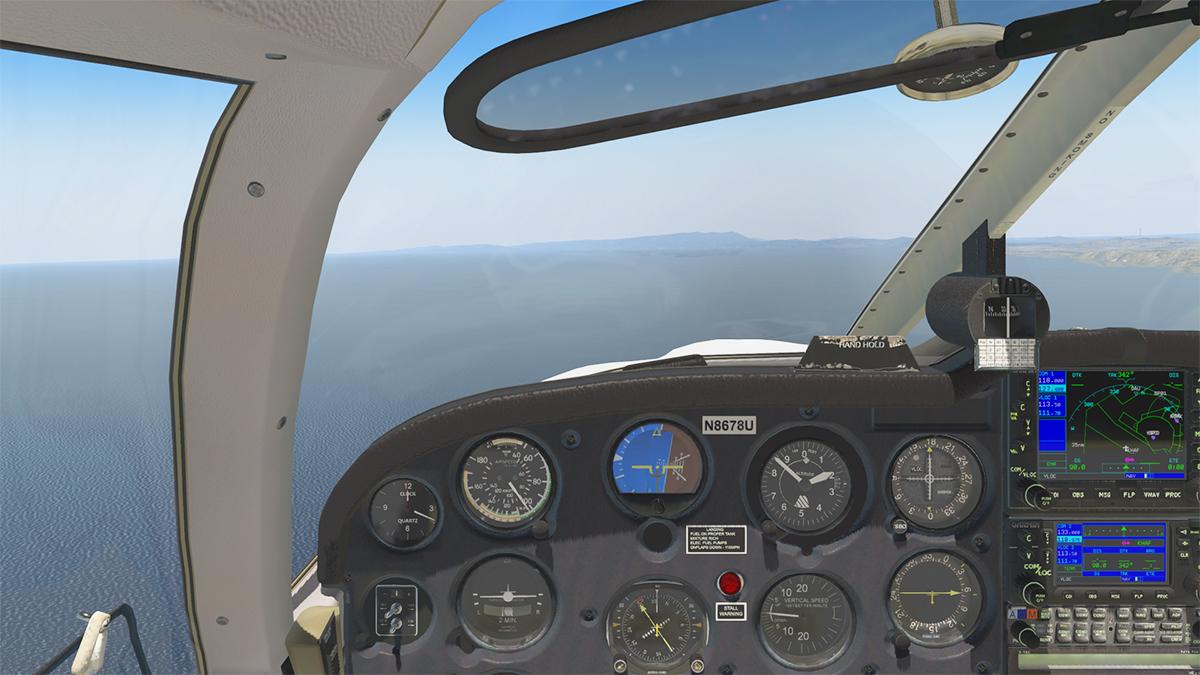
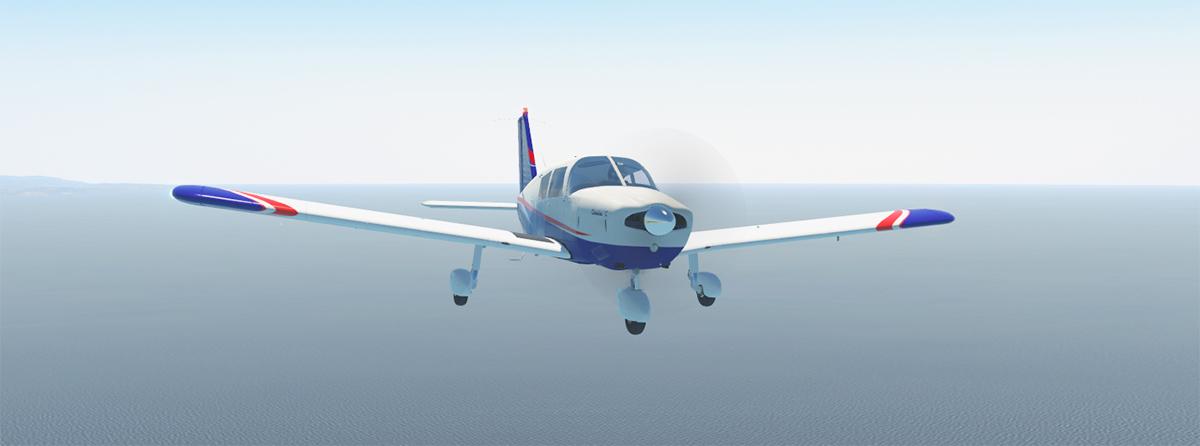
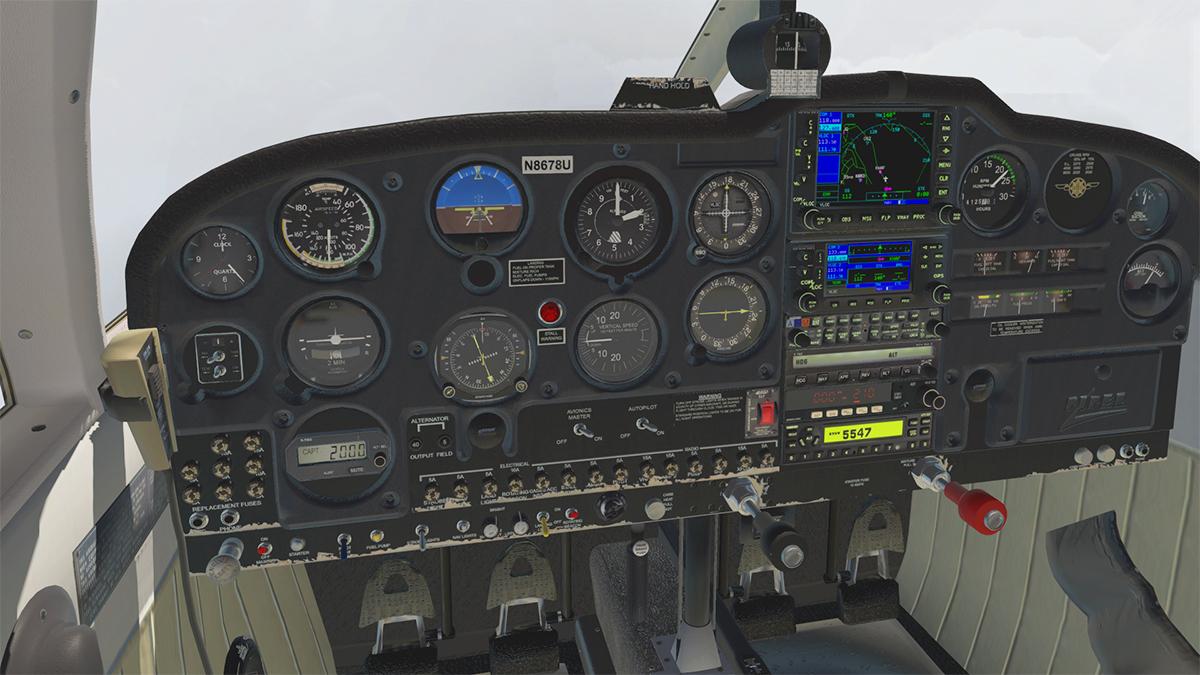
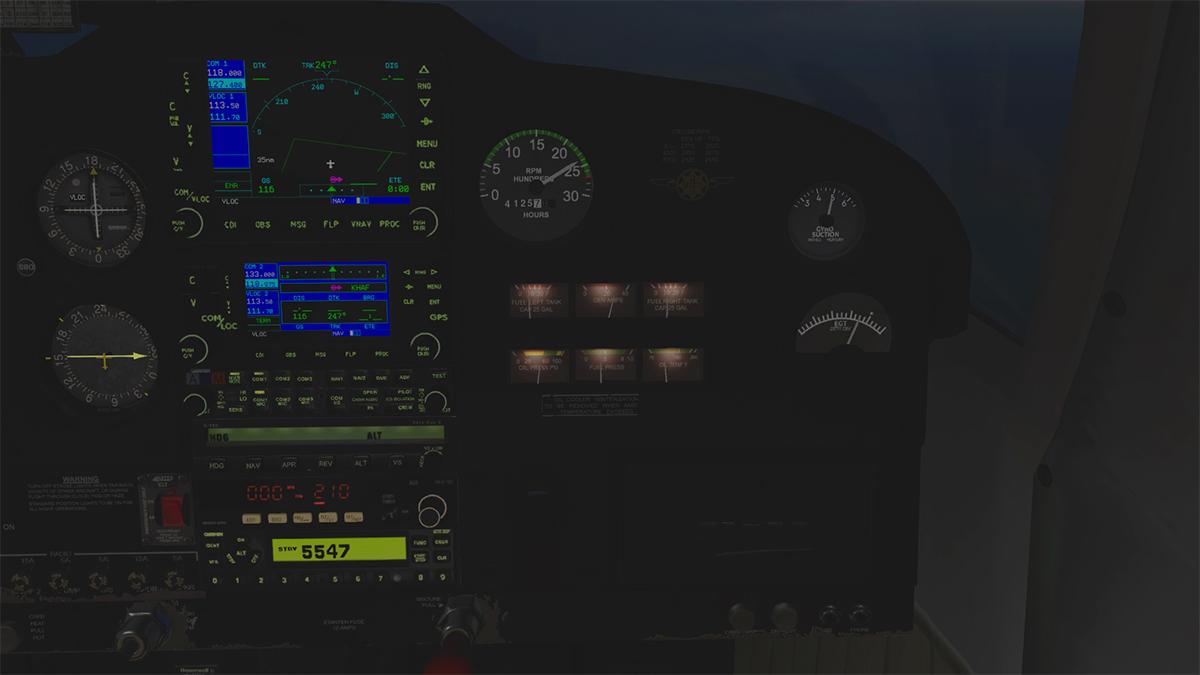
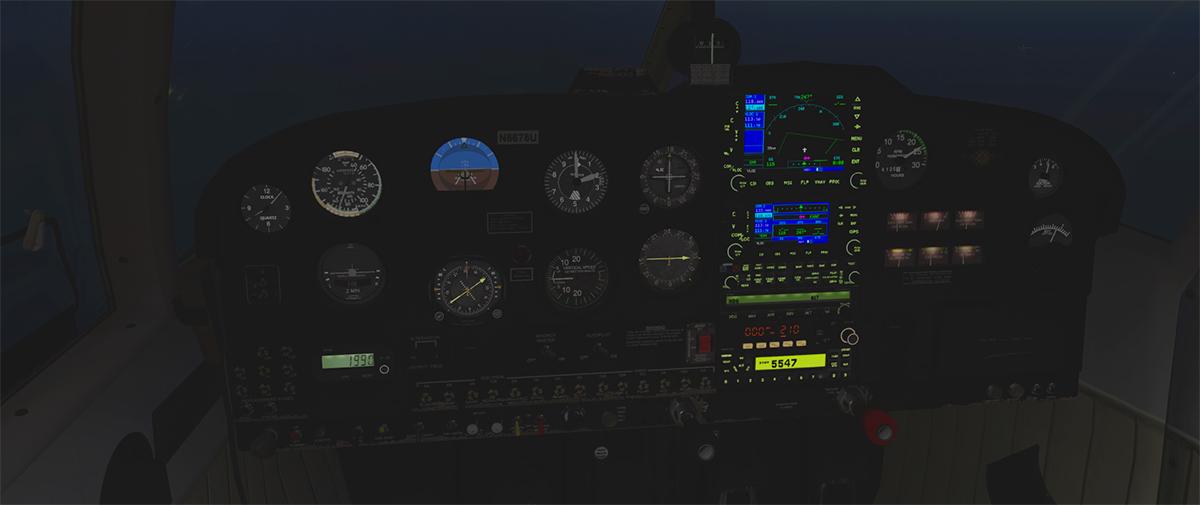
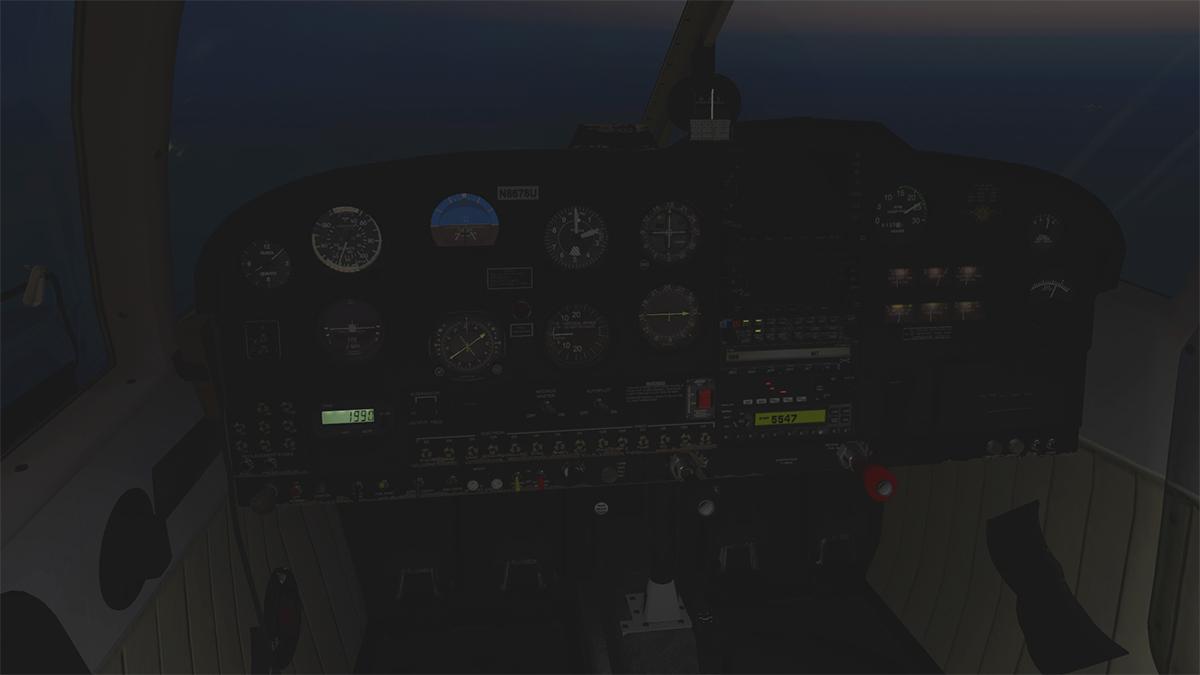
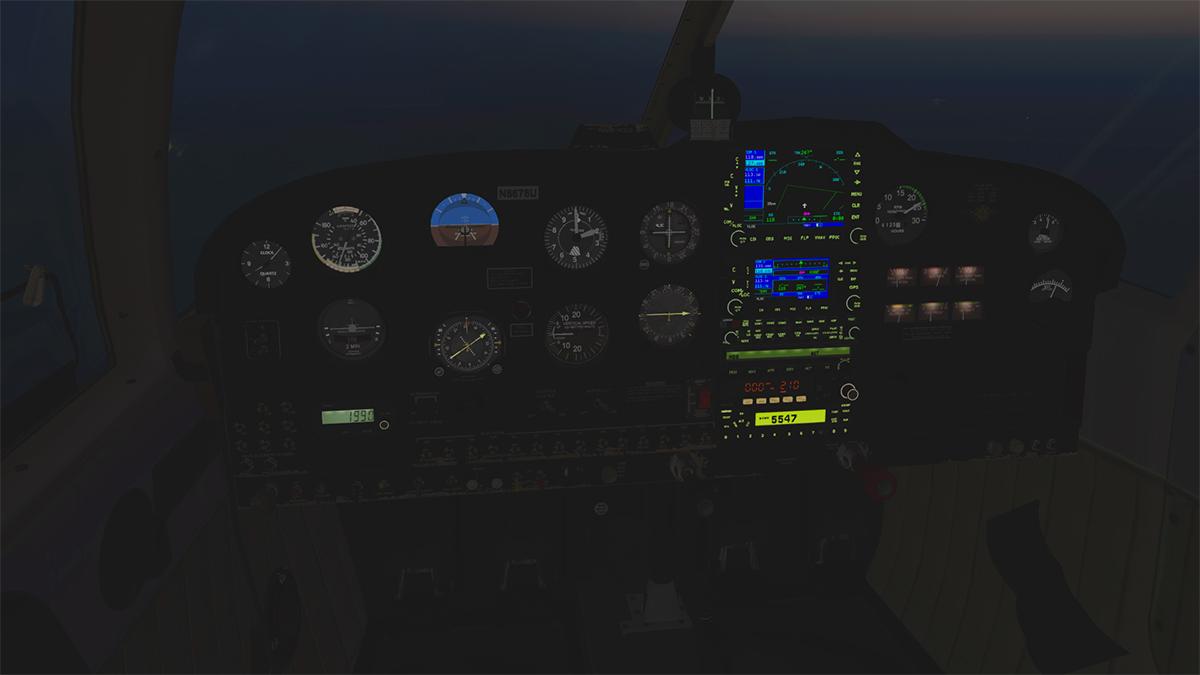
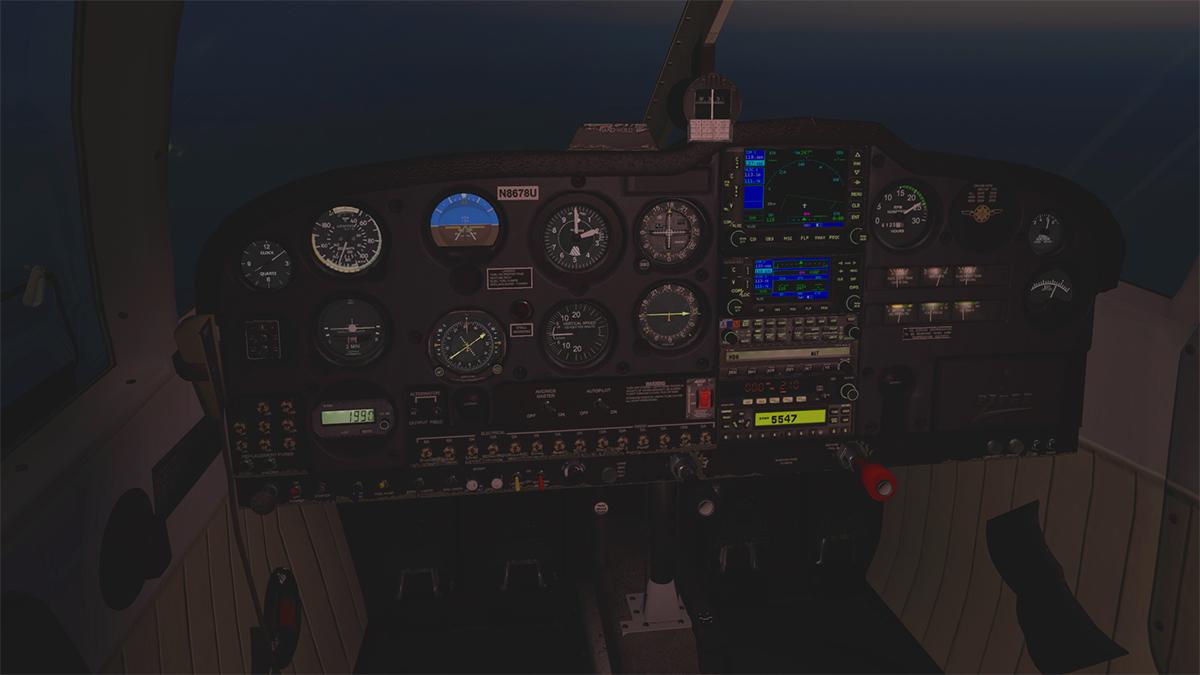
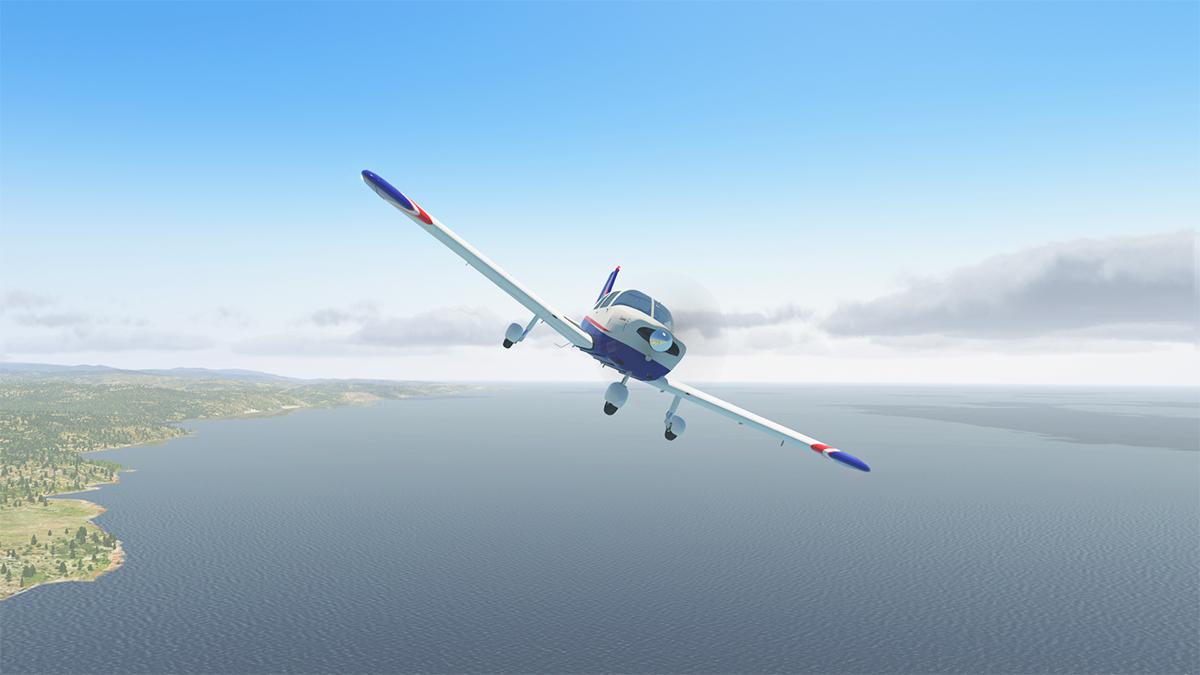
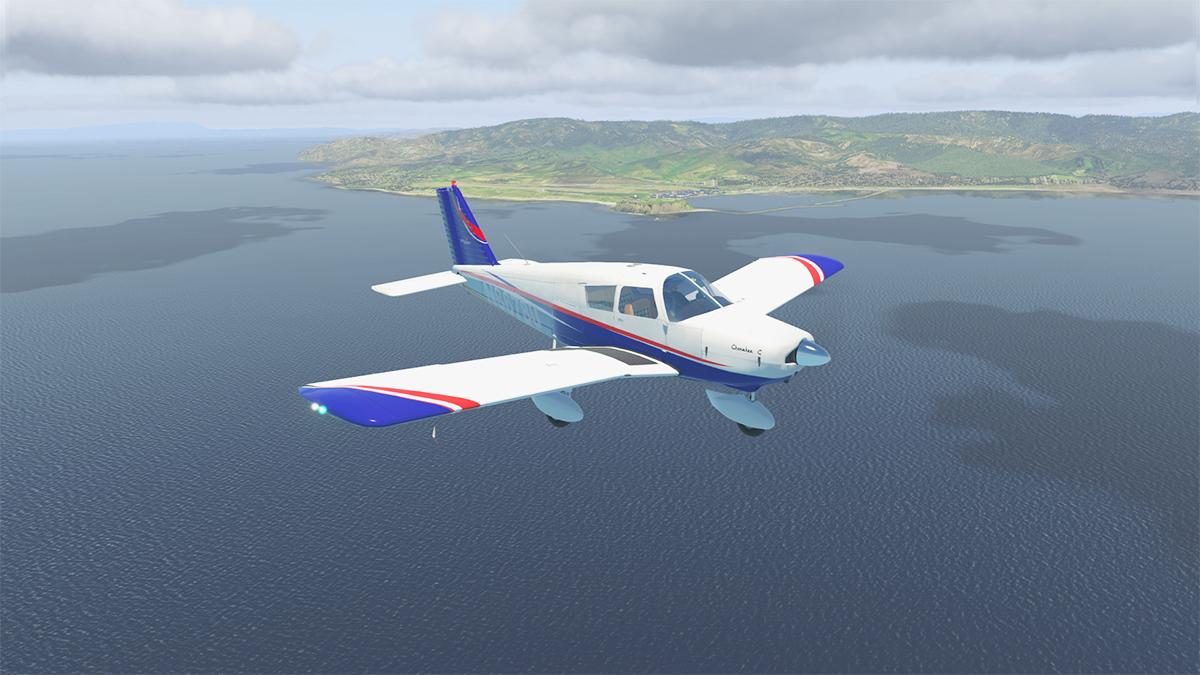
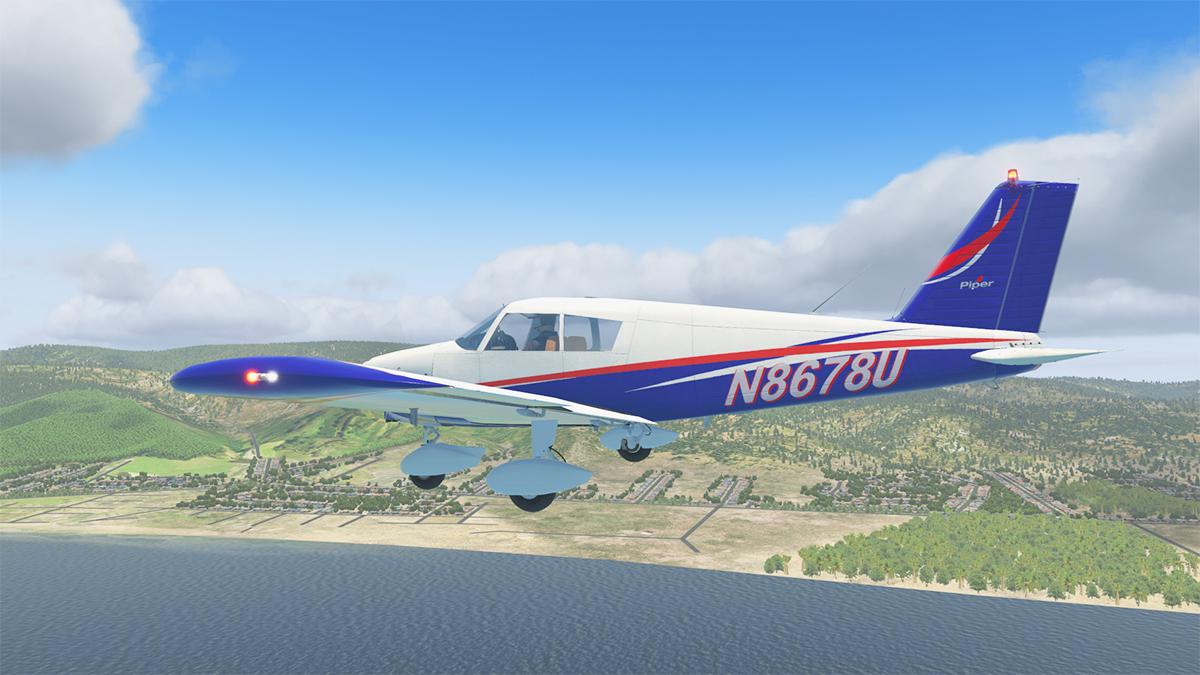
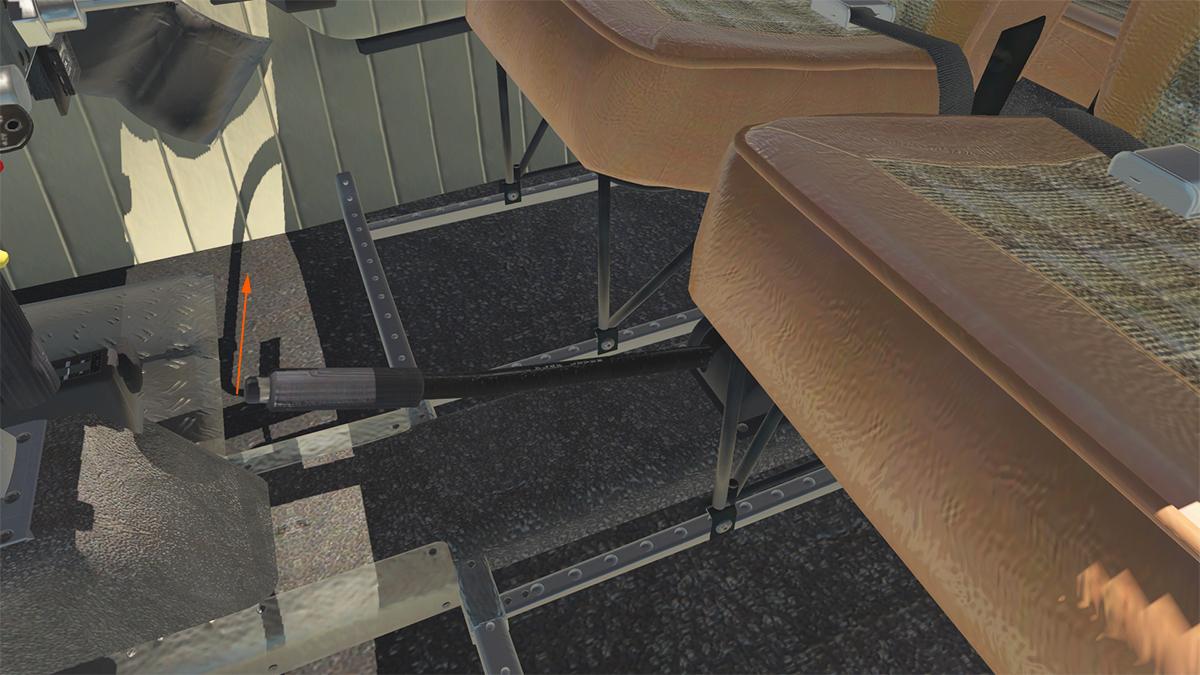
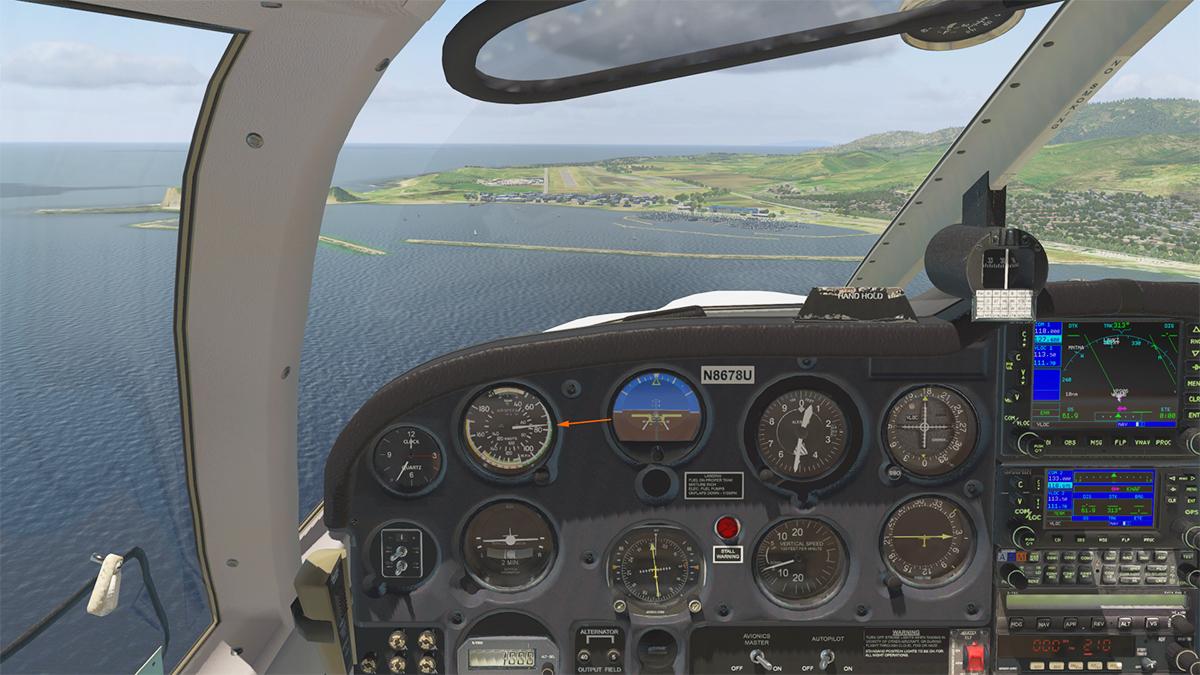
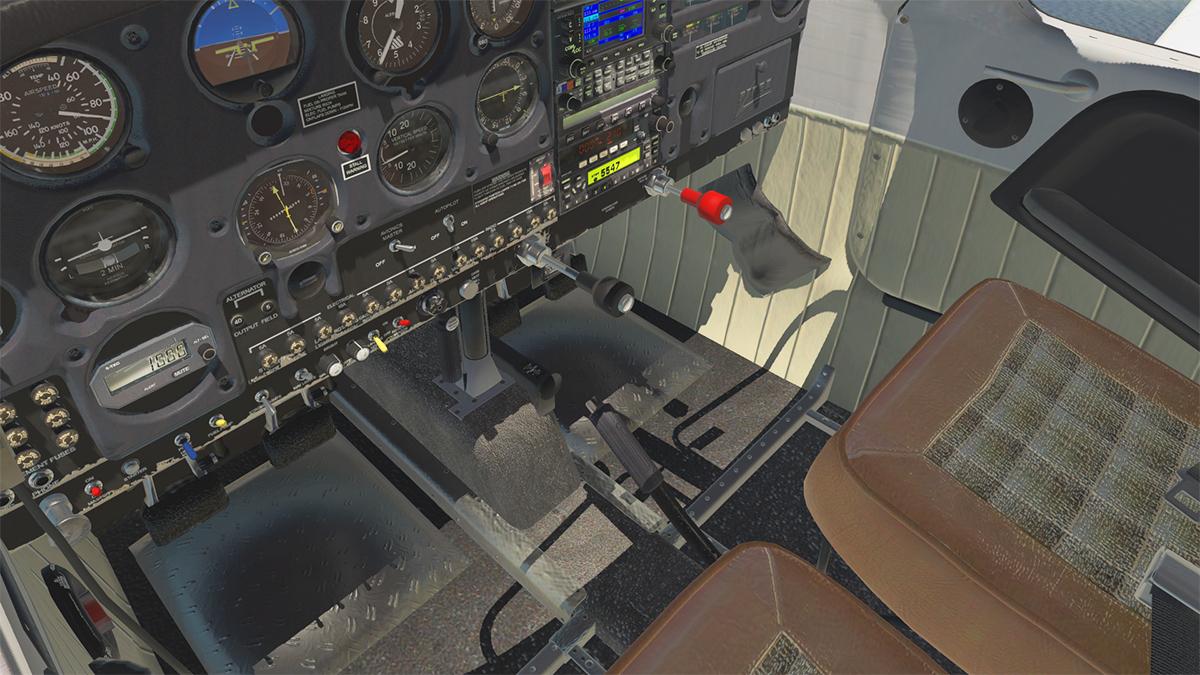
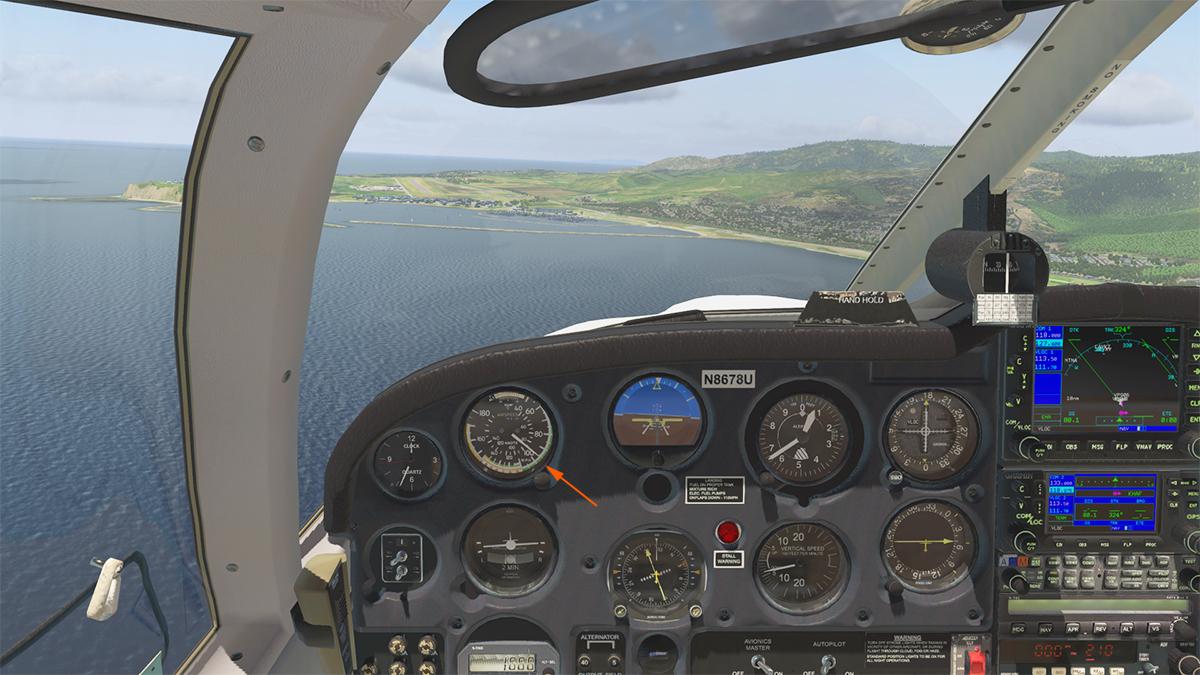
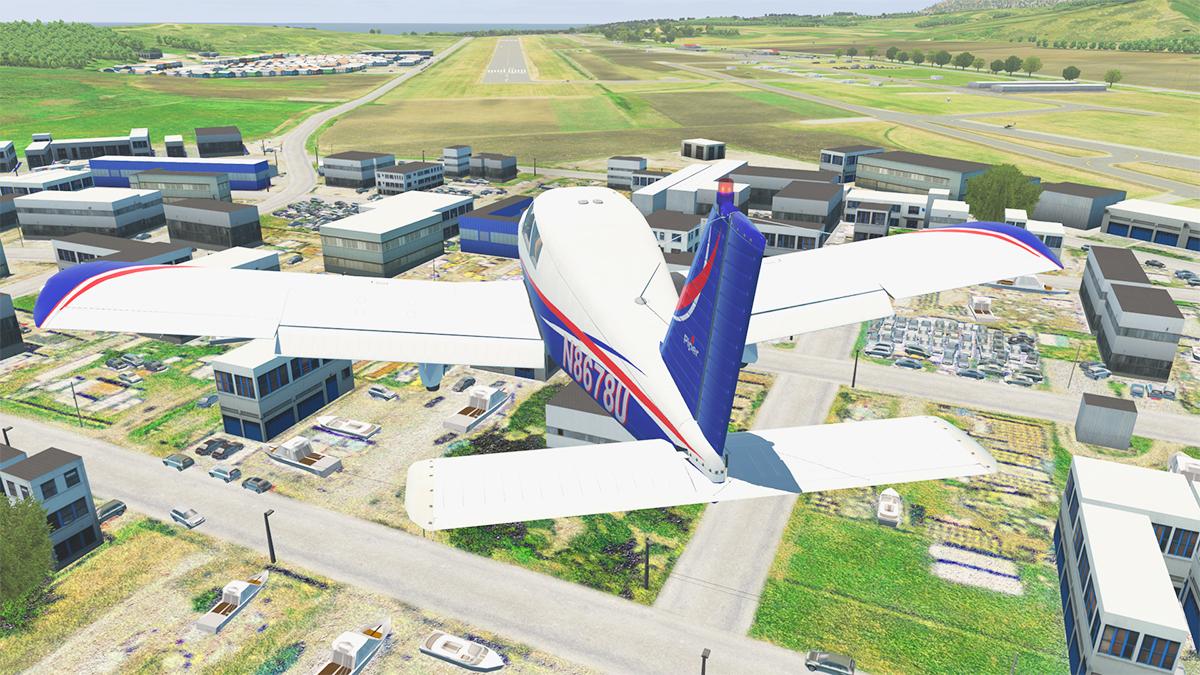
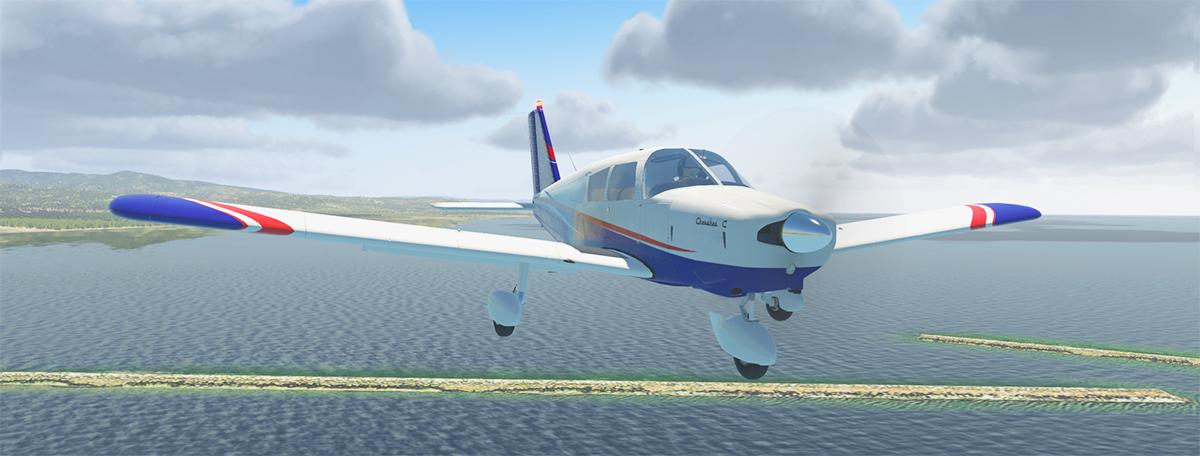
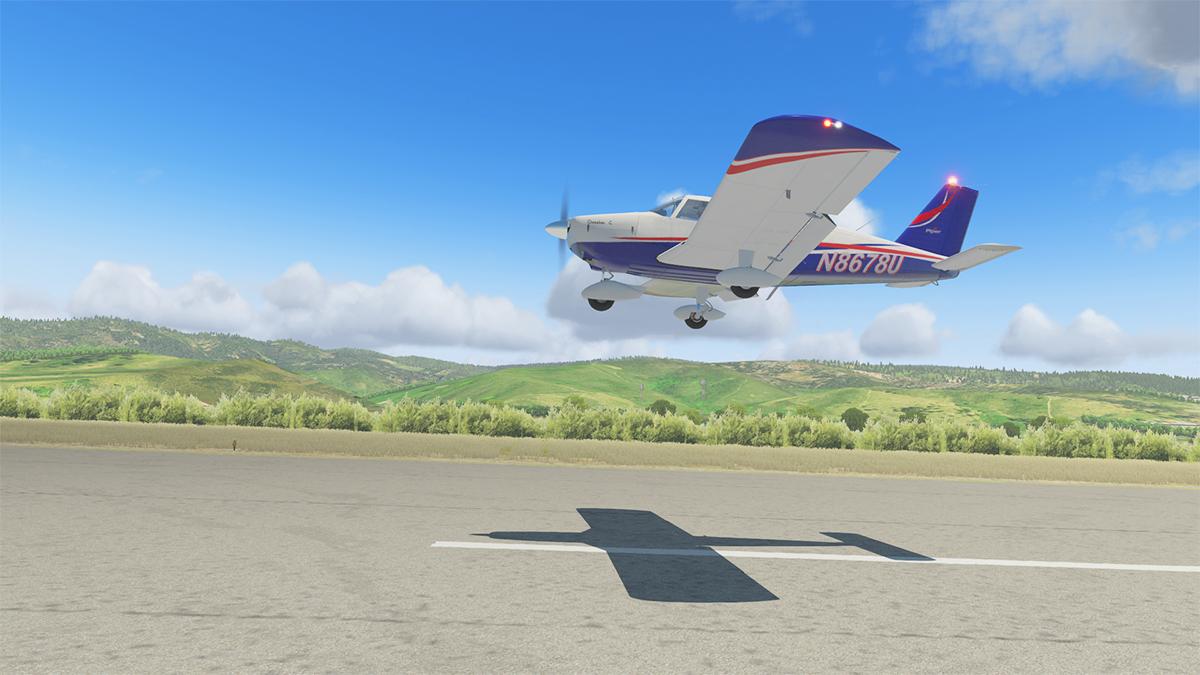
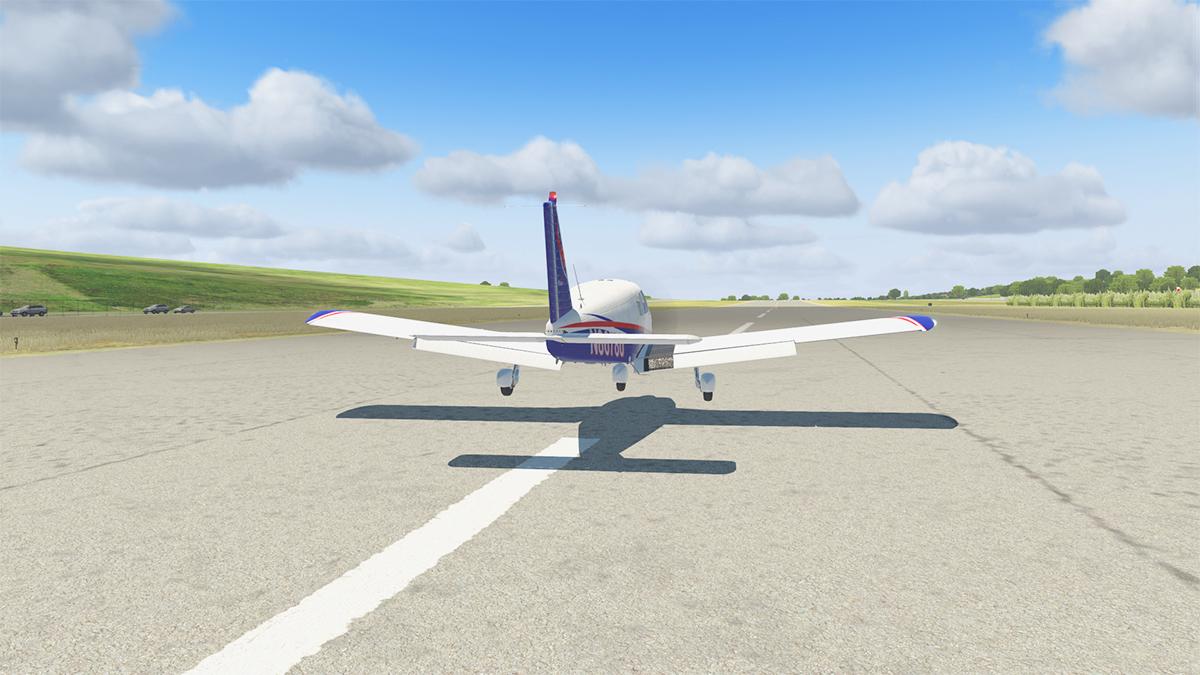
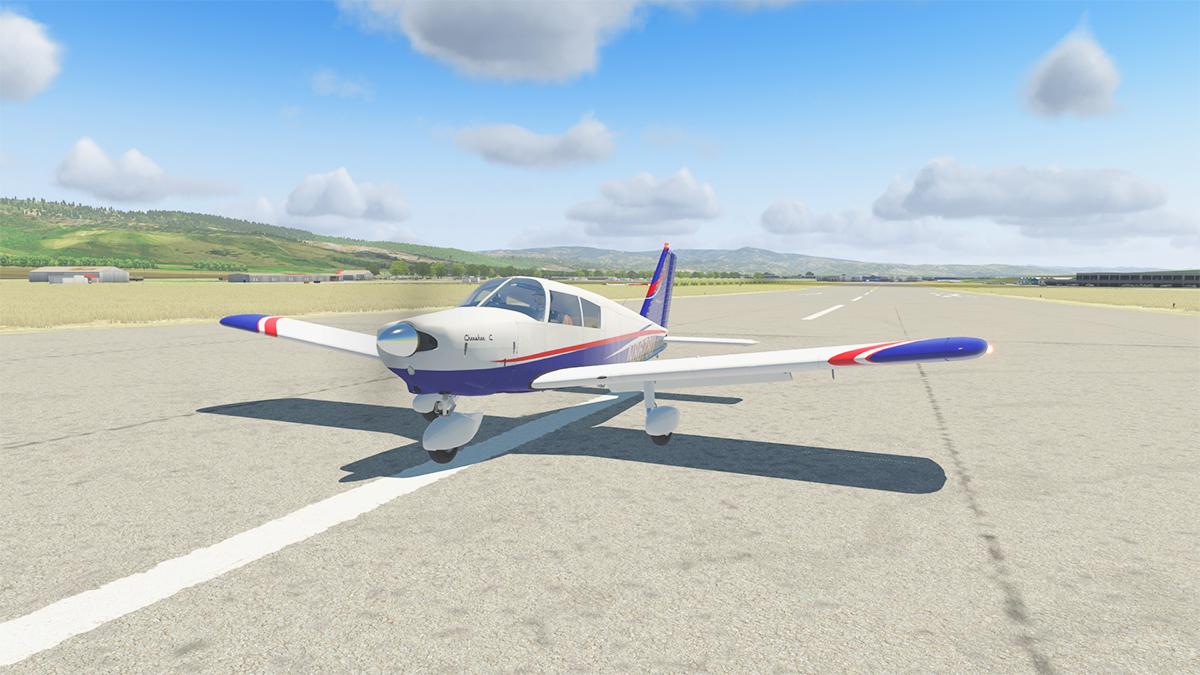
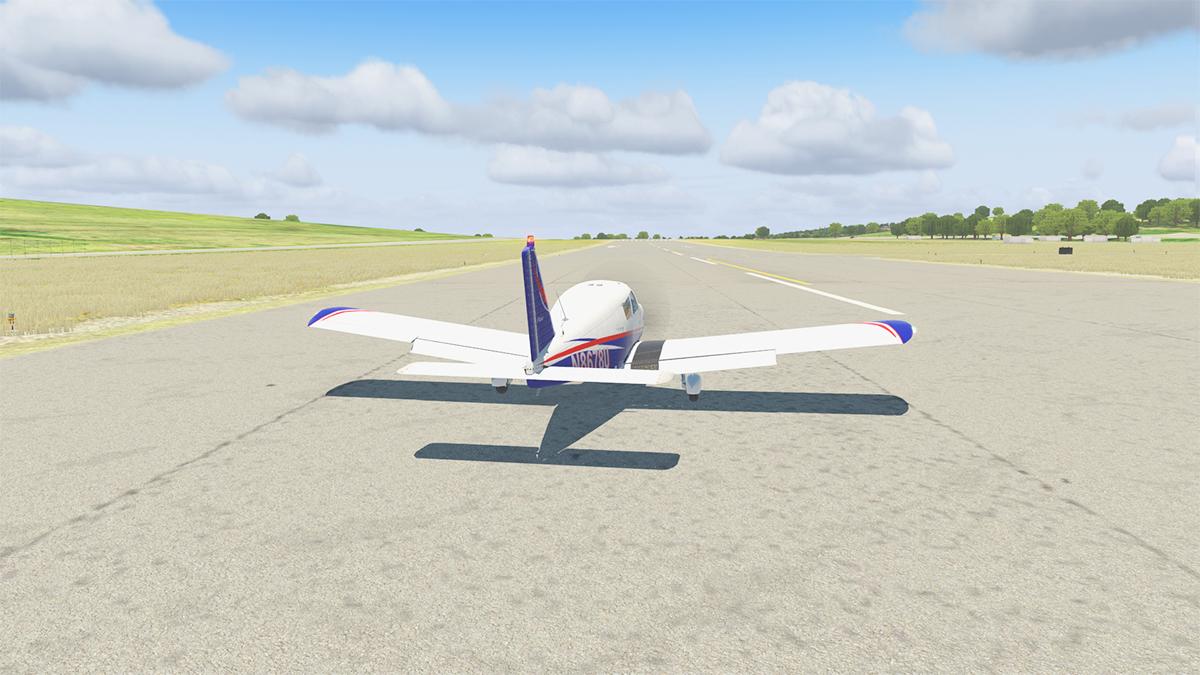
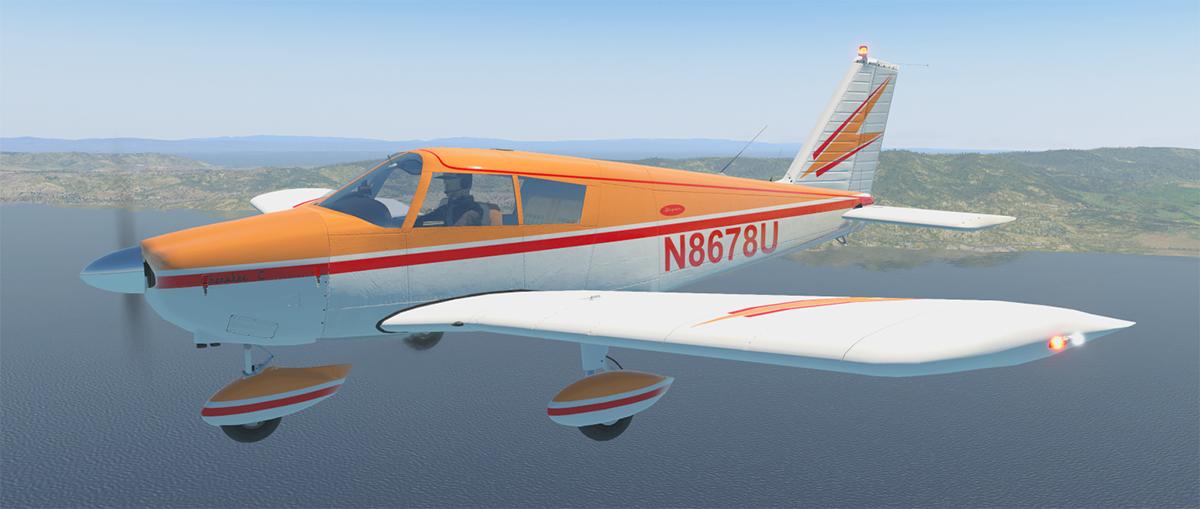
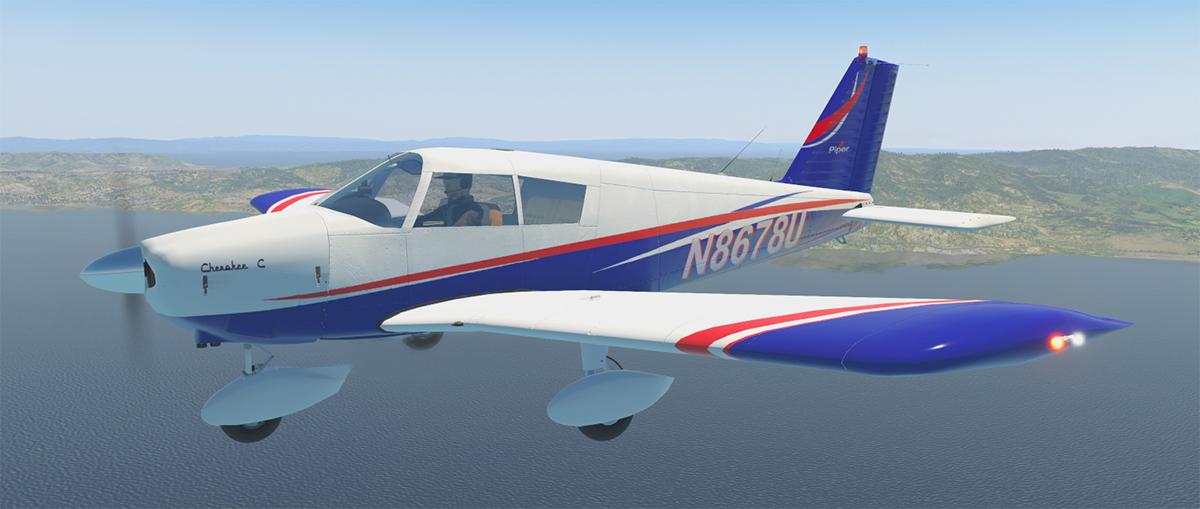
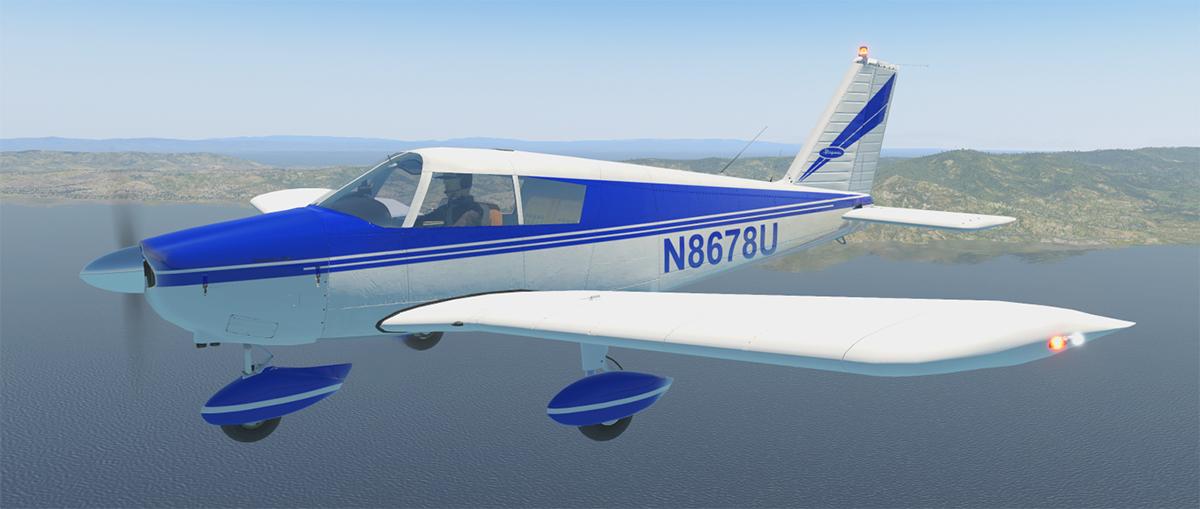
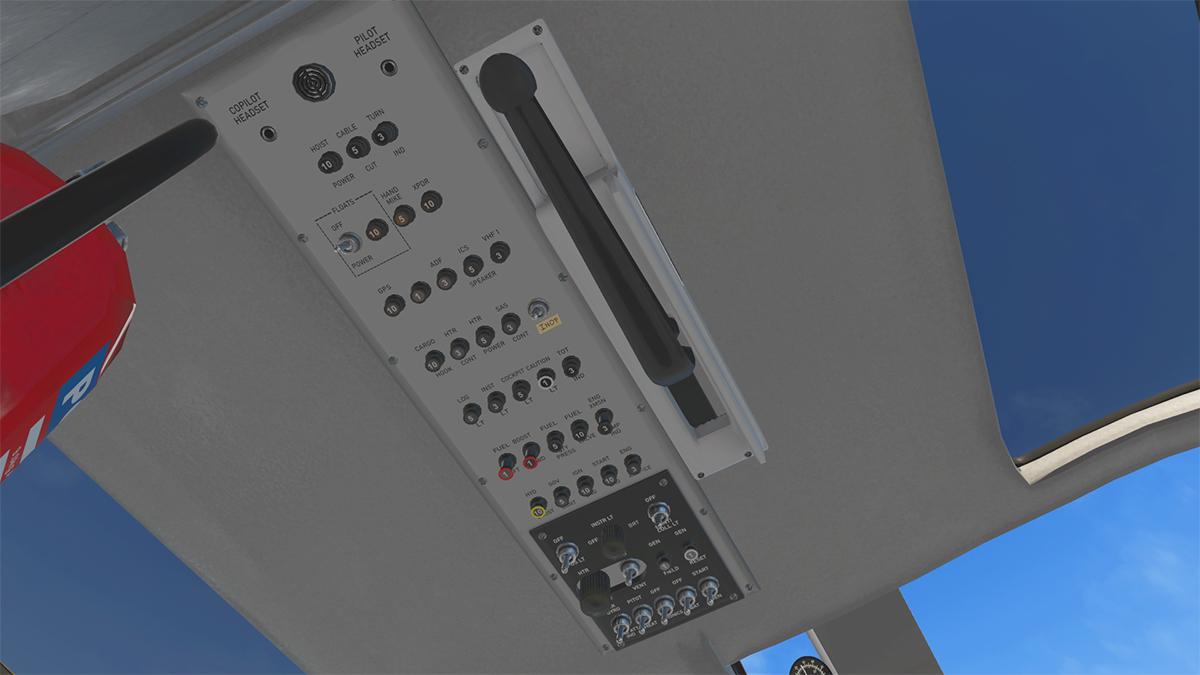
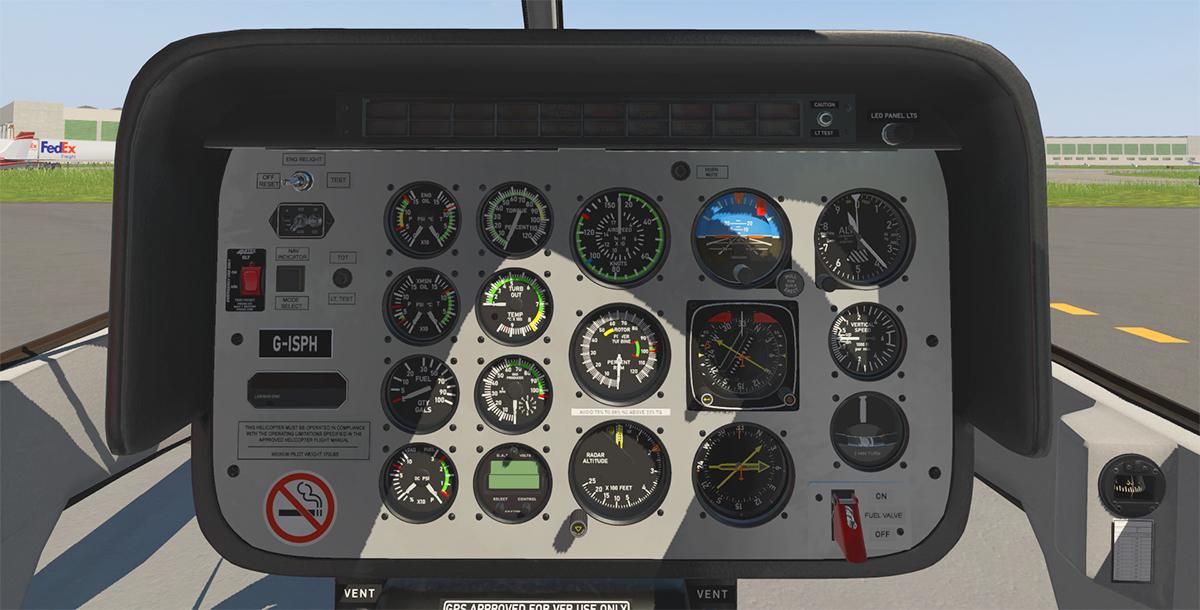
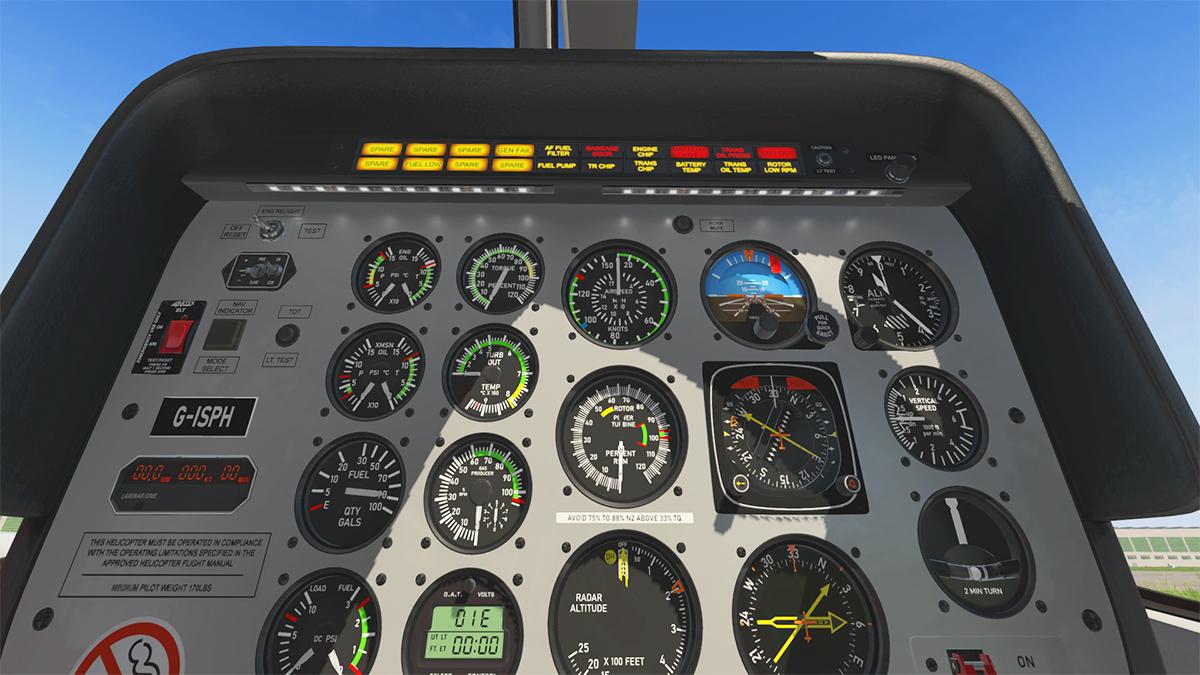
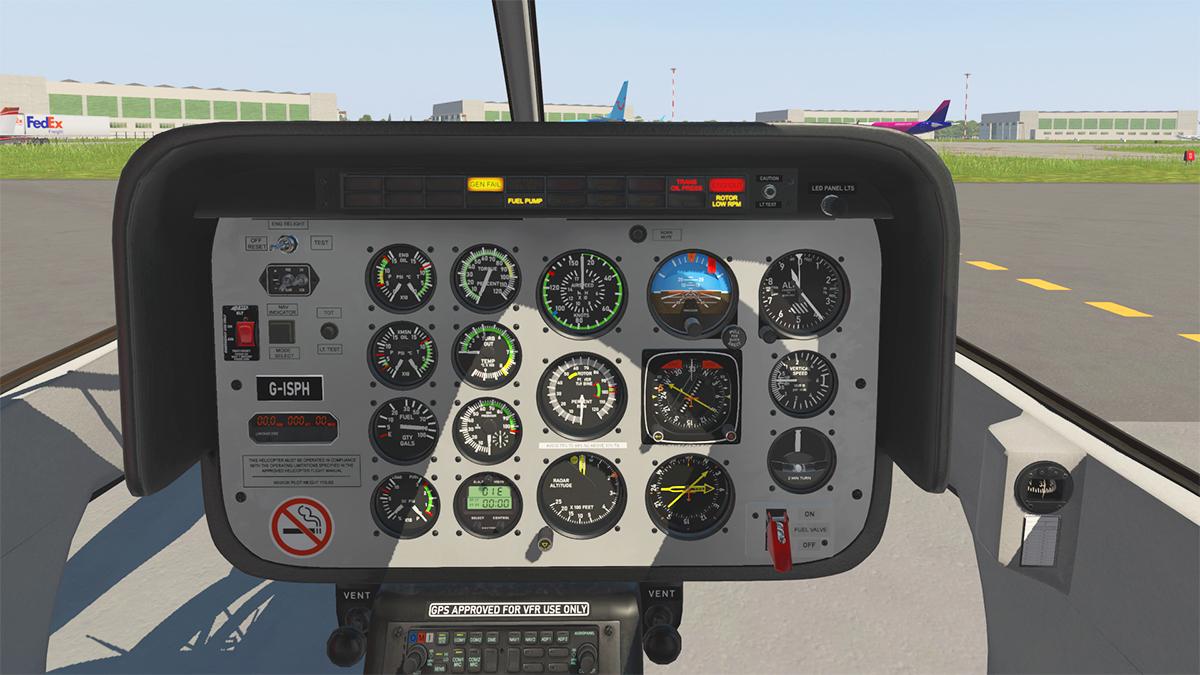
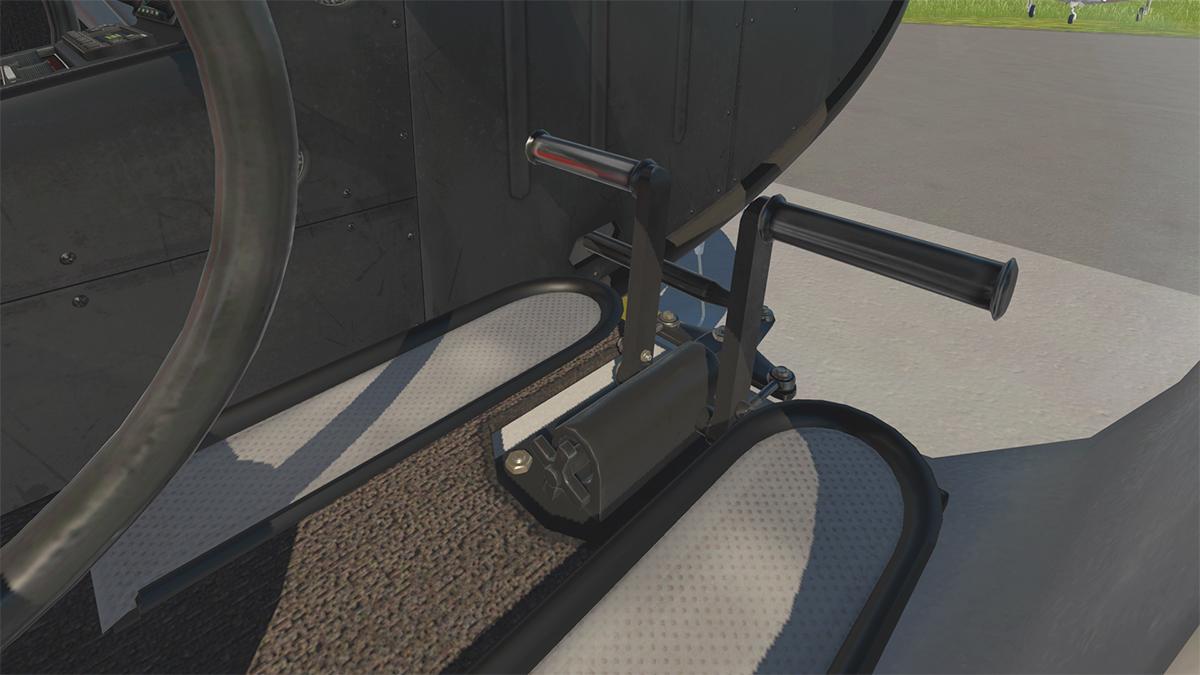
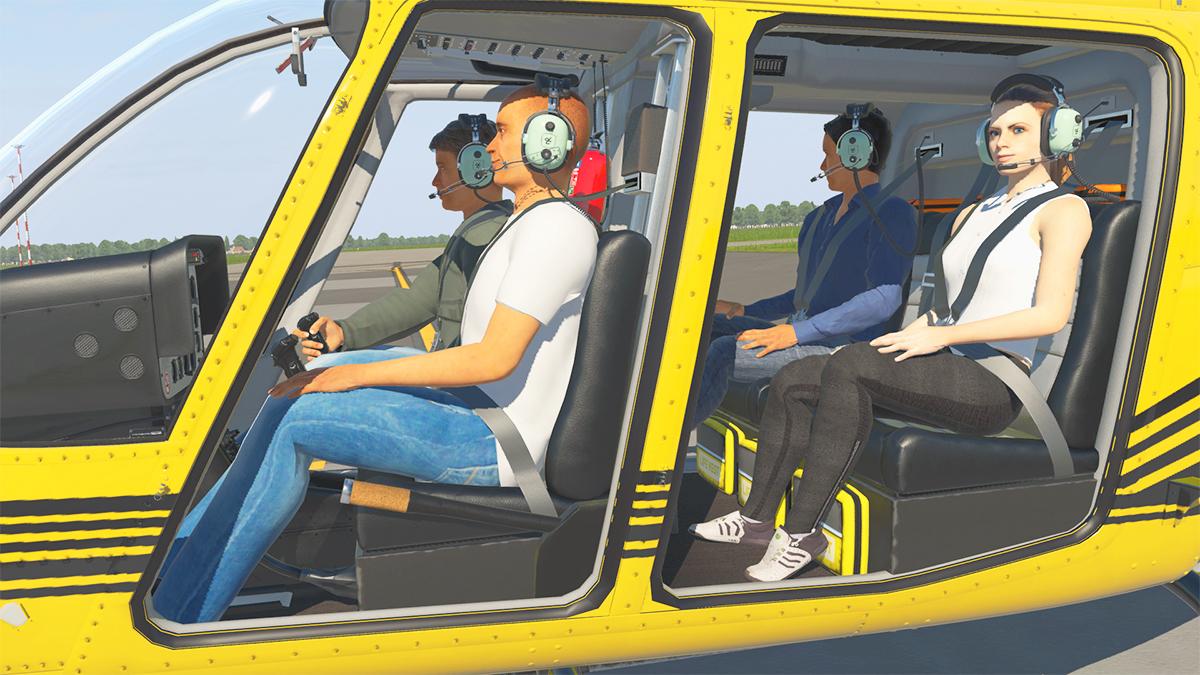
Aircraft Review : Piper PA28R Arrow III G5 - E1000 by vFlyteAir You are now requiring a spreadsheet to workout all the versions and the configurations of vFlyteAir's venerable Piper PA28R Arrow lll. And also not to be confused with the very similar vFlyteAir Piper Cherokee PA140 Original/Modern versions, the latter with the Aspen E1000 Evolution. There was three earlier versions of the Arrow lll, and this new version tends to bring everything together into one single package, but is this not an upgrade as in v4. But it looks like an extensive upgrade even though it is not listed as one, as the basic aircraft is still the same. Lost however now to the changes of time, is the original early version of the Archer lll. The first releases of the vFlyteAir Piper PA28R Arrow lll was a relic from the Piper's past with brown leather seats and woodgrain panels, and replicated on a real life aircraft in a 1977 PA28R-200 located in Texas, USA. You can check out the original 2014 release review here; Aircraft Review : Piper Arrow IIIv2 PA28R-200 by VflyteAir You can easily see that the external side of the aircraft has barely changed at all (except for better HD and PBR effects), but internally it is a very different world to this new release. Debatable is the fact if you wanted an olde world version of the Archer lll, then I doubt that original feel and look would now ever come back into our lives, but in a lot of ways I really liked the older deal of it all. That was then, and this is now. Notable is that this release of the Piper PA28R Arrow III is noted as an all new release, meaning it is a new aircraft and NOT a free update. But there is a release discount available (limited time) for previous owners of the earlier vFlyteAir Archer lll. Piper PA28R Arrow III G5 - E1000 by vFlyteAir As noted this release tends to bring together all the past different variants and elements into this one version... Basically there are three different configurations in the two aircraft selections. The two aircraft selections are the "Arrow lll E1000" and "Arrow lll G5" from your X-Plane "Flight Configuration" page... The "E1000" aircraft is the Aspen E1000 Evolution by Mario Donick. The "G5" is the Garmin G5 is also developed in house by vFlyteAir On either of the above configuration choices there is still the option of the use of the original traditional "steam gauge" analog panels. External Since the last HDR makeover not much has changed externally for the vFlyte Arrow lll, but that it needed any revision anyway. Brilliantly done, the Arrow lll is extremely well modeled. And it has some serious competition from JustFlight with their own extremely detailed PA28 Arrow lll. The external areas have been refined, but just enough to bring them up to date in the level of detail and the extreme quality that X-Plane in this category requires today. Internal Inside though the vFlyte Arrow lll is very different to the placid external changes. The cabin fit-out and the materials used inside are extremely different of the earlier brown leather and wood. It is bright in here, with the lux cream seating with grey inserts. Linings are also a modern cream and beige, so the whole cabin is very bright and airy. The detailing is of very high and lovely quality. It does feel lush in here... there is no exposed metal lower down, and the heavy grey carpet pile and rubber mats adds into the luxury feel... current X-Plane trend of Coffee (cups) in aircraft also continues. It is all very plush. Note the nice headphones on the seats. Unlike the older molded 70's style instrument panel, all three panels are now just a mottled sheet metal in dark grey for the G5 and Analog versions, and the light grey for the E1000 Aspen. Panel metal and texture feel is excellent, very realistic. Menu The menu system has sort of changed a little from previous vFlyteAir menus. You select the Menu via either the "Piper" tab lower left screen, or from the X-Plane Plugins Menu "Show/Hide Options Menu". Note the Piper Tab is fixed visible, one thing I don't like as I like a clear screen when flying. The menu can be moved around the screen, but also scaled from very large to very small... a nice change as early vFlyte Menus were over large and fixed. You can change the livery via the arrows (Previous and Next Livery). The main cabin door and behind right wing baggage door can also be opened as you can also add in "Ground Equipment" Chocks, Inlet covers and tags. Oddly there are two ground equipment options that do the same thing, actually there are three? "View Checklists" you can also pop-up the checklist panel that is also scalable, but under a certain size it is totally unreadable? There is a "Tow Tractor" that allow you to manoeuvre the aircraft on the ground. and a CG (Centre of Gravity) graph to find the best balance. Total Weight Lbs and Total Weight Kgs are also shown. Preferences cover; Hide/Show Interior Glass, Hide Passengers Interior View, Hide On-Screen Warnings, Hide Ground Equipment (that third choice?), Use Custom Engine Startup, Hide/Show Avitab (plugin required) and Use Shake Effects. The AviTab is positioned on the Left Yoke, which makes it very easy to use and view. Panels; Here you can select the Glass Panel or the older Analog Gauge Instruments Passengers & Fuel; There is always a Pilot, (you can actually hide the Pilot, but only by leaving the cabin door open? I mean leave the aircraft with an open door all the time when the aircraft is not being used? very odd, if even stupid idea... just have him disappear when the power is off) You can select the Pilot's weight, and then selecting the weights of the other three passengers will make them all appear in the aircraft... ... they are all very well modeled and lifelike, they are also all animated to the axis of the pitch, roll and yaw. Adding in the baggage weight will add in bags (in Lbs) into the rear baggage area. Fuel can be added into each tank via the sliders (38 Gals each) and everything is calculated on the CG Graph. Instrument Panel(s) First the twin-yokes are chunky and filthy dirty... fabulous. The A/P disconnect works as does the MIC (it brings up the X-Plane ATC panel). Both yokes can be hidden, but not individually. Oddly the yoke Electric Trim buttons don't work or move, usually de rigueur by now. Dial layouts are the same for the E1000 and G5 and the analog, however the G5 uses a different Garmin GFC 500/600 Autopilot Highly noticeable is the blackhole circle in the instrument panel? The glass seems to be not installed or it is non-reflective, it looks however very odd, and users have complained the instrument is missing? It isn't, it is just this blank dead hole in the instrument panel. Powering up the panel... and the dead instrument comes alive, it is the Garmin GI 275 EIS Engine Instrument System. It has two modes, first the Fuel Remaining, Flt Hours, HOBBs Hours and Tach Hours display, then press the "Continue" to go to the main EIS display. The engine instrument display can also be popped out and scaled. The EIS display covers; (top) Fuel GAL, RPM, MAN (Manifold Pressure) in, Oil Pressure and Oil Temperature, CHTº (Cyl Head Temp), EGTº (Exhaust Gas Temperature) FF GPH (Fuel Flow Gals per hour), Batt and Bus Volts and OATº (Outside Air Temperature). There are other EIS feature we will see in flight. Avionics As it is the main feature of this release we will start with the Garmin G5. Garmin G5 EFI Branded here as the vFlyte G5 EFI (nice Garmin touch on the logo), when you turn on the power you have to still manually activate the 3.5 inch colour displays G5s by turning on both units on via their retrospective power buttons. Then they both go through a short startup and alignment routine. The same start button activates a "Backlight" adjustment (hold down to turn off), or you can use the "Auto" lighting setting (far too low for me, as I found out over 200 nm!) Adjustment of the brightness is via the right knob. Both the upper ADI (Attitude Display Indicator) and the lower HSI (Horizontal Situation Indicator) displays pop-out for ease of use. And for a home cockpit installation both can also be set as a window and scaled to size. Another feature is that the G5 System has a battery backup, that can be used in time before the system shuts down (above). If you lose power, on the timer shutdown procedure you can press the adjustment knob to switch over to the backup battery that has a 4 Hour backup limit. The power or time remaining is shown on both displays upper left (arrowed). ADI (Attitude Display Indicator) Although only 3.5 inches in size the G5 displays cram in a lot of flight information. They look like a slightly larger central integrated standby instrument (ISFD). Speed and Altitude tapes dominate each side with V/S on the far right, with a Bearing Compass top. Banner top has Radio setting, and Autopilot functions. Centre is a large Artificial Horizon with Pitch and Flight Director Bars. Lower is a ball Rate of Turn Indicator. TAS, GS ALT and Baro are also displayed as are vRefs. Press the right button to bring up the G5 Menu, you can scroll through the menu via turning the rear knob... .... there are six menu selections; Back, Heading, Altitude, Baro, ESP and Setup. Heading and Altitude are basically the same as using the A/P panel... changes are again by using the rear knob. Baro adjustment is just the pressure adjustment.... ESP is interesting? Electronic Stability & Protection is a feature designed to keep a watchful eye on an aircraft’s flight condition. When it is selected on ESP shows the boundaries permitted before the aircraft will take action to protect itself, and bit like Lane Assist in a car. If you roll (or pitch) out of the aircraft safe parameters, then the system will correct the parameters to protect the aircraft. You can turn it off here, if you dare. But I think the feature is not yet active by vFlyte, it isn't mentioned in the Manual. Setup : selects a menu with three choices; Airspeed Units, Altimeter Units and BARO Units. Again it is a select and turn adjust system. When selected the option turns purple, then adjust the rear knob for the selection, here between Baro Millibars to hPa. Hold down the knob to hide the Menu. It is all quite simple to use. Airspeed Units are KNOTS-MPH-kM/h, and Altimeter Units are FEET and METERS. HSI (Horizontal Situation Indicator) The lower HSI (Horizontal Situation Indicator) is the rotating compass in a heading north orientation with 5º markings. Shown is anti-clockwise; Heading, Wind/Direction, Pointer (VOR1), CRS (Course), Heading Setting, Pointer (VOR2). Like the ADI the HSI has a Menu. This Menu has a few more the same selections on the ADI Menu, and some selections just for the HSI. HSI Menu : Back (ADI), Heading (ADI), Altitude (ADI). OBS Is the Course Pointer setting. Bearing Pointer : This selection will hide the Pointer tools and leave you with a plain compass ROSE. PFD : Changes the Lower HSI into the ADI or a secondary Primary Flight Display. Setup : selects options for the HSI. These include the Bearing Pointer options in Pointer 1; NONE - VLOC1 (VOR1), VLOC2 (VOR2), GPS1 (NAV).... Pointer 2; NONE - VLOC1 (VOR1), VLOC 2 (VOR2), GPS1 (NAV). The G5 here is a nice bit of kit. Extremely well done and very easy to use (once you work out the knob actions, as both knobs have double actions). I love it, and notable the screens are a little on the small side for the complex information they show, but there is always the pop-outs if you want to get closer. G5 Avioncs The G5 Avionics has the Garmin (sic vFlyte) GMA 340 Radio top, then two Garmin GNS340's below. There is also significant automatic in-panel support for up to six different RealisticXP RXP plugin configurations, including RXP GNS430W, RXP GTN650 and RXP GTN750 options. on both the E1000 and G5 versions. The G5 uses the Garmin GFC500-GMC507 attitude based Autopilot, it has all the built in Heading, Altitude and V/S adjustment knobs. Right are three avionics in top the Bendix/King KR 82 ADF Reciever, VDYNE AXP 340 ADS-B Transponder and a Bendix/King KN 62 DME Aspen E1000 Evolution Flight Display Another avionics ADI/HSI system is the Aspen E1000 Evolution by Mario Donick. The system in here is almost identical as the Aspen E1000 in the vFlyteAir Cherokee 140 C Modern. Like the G5, the Aspen has a nice startup sequence. Power is via the REV button top right. Here though (thankfully) the E1000 isn't on the 140 C rotating VR angle idea... but the more simple (and effective) Pop-out and Window arrangement for home cockpit builders. You can also move and scale the pop-out. The Aspen EFD1000 is far larger but still a very compact but highly functional pro display that is split into three sections. With at the very top section is your speed and height in the PFD (Primary Flight Display) or ADI with Artificial Horizon with a built in pitch and rate of turn indicator that also comes with both airspeed and altitude tapes (switchable on/off.) In the middle section is your TAS/GS speeds, OAI (Outside Air Pressure), Wind Direction/Speed and Baro. In the lower section is the Navigation Display HSI with 360°/ARC heading, but the third Map function on the 140C Modern is not separate here but part of the ARC option. Left tuning dial (SYNC /MODE) is for CRS (Course) and IAS (Speed). Right tuning dial (SYNC/MODE) is for HDG Heading, Target Altitude, Baro Pressure adjustment. Blue is currently set and Magenta is for adjusting, the selection is changed by pressing the centre of the tuning knobs. When set you just leave the knob alone and it will reset back to the blue (lock) setting. There is the right side button/menu options selections. REV on/off RNG (Range) adjusts the map range + or -, the range distance is shown lower left display. MENU (Preferences): There is a Menu button to access two more menu selections. One is GENERAL SETTINGS and the other is UNITS SETTINGS, selected by the right selection knob and shown lower left of the display. GENERAL SETTINGS; include... BARO (In or mB millibars), VSPEEDS on/off, AUTOCRS (Auto-Course), TPS (Tapes) on/off, DECLTR LVL (De-clutter Level). TPS (Tapes) allows you to hide the Speed and Altitude tapes in the ADI, giving you a cleaner Artificial Horizon. UNITS SETTINGS; include ASI (KTS or MPH) and ALT (Feet or Meters) HOT KEYS: There are five "HOT KEY" buttons to select in two page menus. (top HOT KEY button 1/2). Page one selections include MIN (Minimums), 380/ARC, GPSS (GPS Steering Mode) and Baro. Second Page selections covers NXRD (Weather), TFCU (Traffic) and again Baro. MIN (Minimums) is selected via the right SELECT/MODE... When you adjust your minimum landing altitude there is a slider on the altitude tape, go outside the slider boundaries and you will get a MIN warning. The centre three selection buttons select (right to left) Single-line Pointer (VOR1, VOR2, GPS1) – CDI source (BLANK, VLOC1, GPS1) – Double-line Pointer (VOR1, VOR2, GPS1). Data displayed is excellent, with all frequencies, distances and waypoint ICAO. Two last E1000 features include a "ON BATTERY" and a percentage of the power left in the battery available. Second is that the X-Plane weather works very well in the HSI. The EFD 1000 is excellent and thankfully bright, but it comes two oddities, one is the EFD brightness is adjusted by the RADIO brightness knob instead of a intergrated lighting action, and the REV as the Power switch? Bendix/King "Aerocruze" KFC 230A Autopilot On both the E1000 and Analog variants, is the Bendix/King "Aerocruze" KFC 230A Autopilot. This is a very nice "Touch" selection autopilot. Like with all the Avionics here there is a very good start up "Self Test" procedure... Upcomes up first the manufacturer's logo and model number. Then a "PreFlight Test" in 1-10 seconds, then a test "PASS" before starting the system, very good it is as well. Actions are "White" off, "Green" active and you press the symbol required for the action, AP (autopilot) YD (Yaw Damper), FD (Flight Director), LVL (Level) square the display, ALTS can be selected via the twin-knob right. Pitch can be held... the V/S (vertical Speed) is selected via the twin UP/DN (Down) buttons also right, ALT (Altitude) can be "ARMED as can the BC (Back Course)" Finally centre the HDG (Heading) shown can be held All in all a lovely system and so easy to use, it looks very up to date and modern on the panel... the display also pops out for ease of use and scalable, it comes with also a popout window option for home builders. Analog Instrument Panel All instruments on the Analog layout is the same instrument layout for both the G5 and E1000 panels, there are a few exceptions. Obviously the centre analog Artificial Horizon and lower HSI are replaced, as is the upper far right Manifold Pressure/Fuel Flow gauge from the GI 275 EIS. There are two rows of five main instruments. First upper far left is a VTRON M803 Chronometer (a full manual is provided). Notable only on the analog panel is the SA 200 Altitude Selector (GMC 507 Control Head). Two switches cover the AAS (Audio Advisory System) and the NAV/NAV2 selection. Panel and Radio dimmer knobs are here as well. Lower centre is the "Trim" electronic display. Airspeed, Artificial Horizon, Altimeter, Manifold Pressure/Fuel Flow gauge covers the top row. Course Deviation Indicator CDI (Nav2), Turn Coordinator, HSI, Vertical Speed Indicator and RPM, and far lower is the Exhaust Gas Temperature (EGTº) gauge. Right panel is top a ADF gauge, Suction gauge and backup Altimeter, far right is a HOBBS hour meter. In reality all the instruments not replaced with the avionic packs could be noted as "Backup Instruments" or "get you home" in case of the G5 or E1000 system failure, that is the way the panel has been set up. The same (as G5) GMA 340 Radio top, then two Garmin GNS340's below, then right Bendix/King KR 82 ADF Reciever, VDYNE AXP 340 ADS-B Transponder and a Bendix/King KN 62 DME are present right panel. Lower (knee) panel is the main starter switch far left, ALT AMPS, Fuel Pressure and below the Fuel Left/Right QTY (Quantity) 38 GAL per tank and Oil Pressure, Cylinder Temperature and Oil Temperature gauges. Gear Switch (UP/DOWN), Throttle, Propeller RPM and Mixture levers. Above are the Electical Power and Lighting rocker switches and far right is the active Circuit Breaker (Fuse) Panel... full details of the Arrows electrical system is provided. ______________________________________ Flying the Arrow lll (G5) In reviewing you fly everything. But there is always that aspect of how well the aircraft is refined. Starting out in some aircraft and the average handing and refinement is immediately noticeable and certainly in the General Aviation category, so the question arises are we, or myself is expecting too much on how the aircraft can perform on a desktop computer. Then an aircraft from a polished developer, and in this case vFlyteAir comes along and blows that whole theory completely out of the water. The startup procedure of a light single aircraft can give you nightmares. Get it right and it is easy. Get it wrong and you can sit there tearing your hair out and not loving this simulation gamey-thingy not very much at all. The procedure here for the Arrow lll is - throttle open 1/4", prop forward, mixture idle cutoff, master on, fuel pump on, mixture full rich until fuel flow indicates, mixture idle cutoff, fuel pump off, starter engage, mixture forward as engine cranks, ensure oil pressure within 30 seconds, RPM to 1000, mixture leaned for ground operations. Simple yes.... and it WORKS! Well it does work now, but not originally as the vFlyte start-up logic was not correct. If you can't start the Arrow lll then make sure you have the v1.1+ update installed. So lets do that again... 1/4 Throttle, Fuel Pump on, Full Mixture then watch for the Fuel Flow for pressure. Then the Mixture to cutoff and Fuel Pump off. Start by turning the key, then bring in the Mixture up until the Arrow lll fires, once running then you adjust the mixture, let the Lycoming IO-360-C1C6 settle and slightly warm up, then bring the throttle back down to idle... simple really when you know how to do it. Flight is taking two passengers from Berlin (EDDB) to Leipzig/Halle (EDDP) with a 1160 Lbs full up weight, fuel is set at 67 GAL. Up comes a warning? You get on-screen warnings (that you can turn off in the menu), but they are very handy... this one here is for the Baro. The Baro change also has a trick way of switching between hPa or inHg. This is done via pressing the centre dial of the barometer.... clever and easy to do. I was assigned Rwy 25L at EDDB... WHAT! that is halfway across Germany from my stand 73 position near the older Berlin gateway of Schönefeld Airport. One bonus is that it is always a good runway departure to go south, but getting there is a roadtrip in itself. Brakes off and the Arrow lll does not move... that is good not bad. There is nothing more worse than unlatching the brakes and heading straight off for the scenery! Here you need a little thrust to get the Arrow moving, in doing so you feel the weight of the aircraft and the throttle required to move the mass... a very nice start to the day. Another Warning. This time to set the Transponder to "ALT", a lot of popups, but I still don't turn the warning feature off, it is helpful. It is taxiways K to K4 to L7 to the long C taxiway towards the newer EDDB in Berlin Brandenburg terminal area, now this airport is finally open and usable in X-Plane. Taxiing is really, really nice. I hate fighting GA aircraft while they are taxiing, too much power and if the aircraft starts to weave badly, so all you do is drop the power and it then does the opposite and crawls to a stop... not very realistic. But with this vFlyte Arrow you can get that perfect power to weight feeling that is so nicely needed. So you simply adjust the throttle to the speed, a bit more on the straight, a bit less in the turns and if you lower the throttle the aircraft will slowly but perfectly slow down as it should with the weight and it's rolling mass. So you have less artificial simulation here and much more realism. Across the BER flightline Apron B to taxiway V2. The view of all the parked domestic aircraft is keeping the passengers busy, but the odd glance of concern is across their eyes in wondering "Where the bloody hell am I taking them". "Better than walking" I quip, but they don't seem that amused... through V2 to Taxiway A and finally down M8 and the hold-point for Rwy 25L. Thankful the Arrow lll is so good on the ground, I wouldn't have wanted to fight an aircraft for that long over such a distance, I would be swearing and cursing by now.... but not in this sweet Piper Arrow. Mixture to rich, and were rolling... takeoff on EDDB Rwy 25L. The Arrow (depending on the weight) with 200 hp (149 kW) at your disposal will gain speed quite quickly.... asymmetrical prop thrust is not a major issue here, small inputs (mostly to the left foot) will keep you directly on the centreline, as noted, you don't fight this Arrow, but to basically flow with it and it is a beautiful thing. Once the speed is around 75 knots (clean, as I have plenty of a long nice wide runway), you can lift the nose, up she will come nicely. Climb-out is around 400 fpm, 660 ft/min (3.4 m/s) is the official vertical speed, but say 400 fpm to even 500 fpm is perfect, Click up the gear and you get a hydraulic sound, but watch the gear go up and it is not clean, but authentically slightly jerky... I love it. There is a Yellow light high on the glareshield to note the "GEAR * TRANS", love that as well, because the three blue gear lights are buried very low down on the panel. The FMOD Sounds come with Spatial Effects, but they are far more than that... they are exceptional. You feel the levels of sound within sound, they sound but also feel totally and highly realistic, under load, and the release of load when you reach your altitude, or any of the changes to the mixture or throttle settings, they all felt here, but they can also be quite loud. That is good in one way, but after a while also slightly annoying, so you have to adjust the volumes to what is best.. or select the headphone jack on the panel to replicate wearing a headset (lowering the volume). But I don't doubt the sounds as they are as pure to the Arrow as you could get... they also do come from a real Arrow lll available to vFlyteAir. I manoeuvred the Piper easy, or expertly, because the aircraft allows you to do that. Trim is perfect in adjusting, you feel the changes with the adjustment, not in a "chunk, chunk" kind of way, butin a smooth liner adjustment, again very, very good... in fact all the rolls, turns and direction changes are sublime... old and tired of saying this, but you "really feel" this aircraft... the best yet in general aviation handling, it really has to right up there with being the exceptional. I could easily fly manually all the way to Leipzig/Halle (In fact I did earlier in the reverse first flight). But the G5 is really good with the intergrated GFC500-GMC507 attitude based Autopilot. Easy to use as well. The AP system selections is shown on the banner of the ADI. Vertical speed is noted, and a pink line of the V/S is shown far right in the ADI. At altitude the aircraft will automatically level off at the set altitude... So it is more a modern setup, than a simple set the altitude manually when reaching the your altitude (2 axis) for an aircraft of this age bracket. As is the distance to the next waypoint on the HSI is nicely displayed, but you still have to use the default GNS340 CDI (course deviation indicator) selection to select GPS on the flightplan set GNS... it is not set as you would expect on the G5 HSI? That could also cause confusion in finding the NAV setting. We covered the main display of the Garmin GI 275 EIS Engine Instrument System earlier, but there are three other modes you can select. First is "Fuel" in Fuel Est (Estimated) in GAL, Endurance and Range (NM) and Total (Fuel) Used (GAL). Second mode is the EGTº (Exhaust Gas Temperature) but per each cylinder, and CHTº (Cyl Head Temp). Last mode is the same but swapped around to show the CHTº (Cyl Head Temp) of each cylinder, and the EGTº total. Maximum speed of the Arrow lll is 123 kn (142 mph, 228 km/h) with a cruise speed around 108 kn (124 mph, 200 km/h). Both MPH and KNTS are both shown on the Airspeed indicator which is helpful. Range is 465 nmi (535 mi, 861 km and the service ceiling is 14,300 ft (4,400 m). Lighting The Arrow lll lighting is excellent. Two knobs upper panel adjust the instrument dials and the avionics, as noted the G5 has it's own adjustable brightness system, the E1000 as part of the avionics brightness. Looks brilliant at night. There is an adjustable overhaed forward red cockpit/panel light that is very effective, and one large cabin on/off light via the overhead button, or the far right panel rocker switch. External lighting is perfectly refined as well... In the nose there is a nice single landing light, and below a taxi light built into the front strut. Navigation lights are all nicely refined, strobes nicely timed, and so is the beacon tail top. Even though I am going to do a hand's on manual landing... the G5 HSI tools are very good to first find and then lineup the Arrow lll for EDDP's Rwy 26R. Modern tools on an old aircraft design. Gear down and the familiar "thump, thump, thump" is again brilliantly done. There is a bit of a trick or tricks to landing the Arrow lll. This is my fifth try! Flap extensions are very smooth if you get each speed zone correct, and you feel the buffet forces as they come in, but no ballooning. Flaps are beautifully done. The flap indicator on the floor is simply impossible to see... so you have to count; 1, 2... 3 and hope you are down at full flap, but you feel it anyway. You settle in around 86 knts at full flap on approach, which is quite fast... ... the trap is not strangely being totally in tune with the aircraft. As the Arrow will easily lead you into a false sense of security. This is not a vFlyte issue but an X-Plane issue. So you feel you are going in too fast, and probably you are, so your instincts are to slow down with less throttle... ... but if you reduce your power too low (which feels natural), then the X-Plane ground catcher will simply drag/pull/force you straight down to the ground, and you will have no power to overcome the quick fall... so you will do a very bouncy nasty fast landing. The trick is to actually put the power ON (slightly) to arrest the fall at the critical point in the descent, but then to also pitch the nose up slightly as well to drain off the speed... ... in keeping that nose slightly up, then both these actions should counter that dragging effect down, but then finally and slowly also then reduce your landing speed. Don't be afraid not to use most of the runway to perfect this approach, it will take a few goes to get it really right. Having a real T throttle handle and not a sliding push/pull knob, really helps in getting the right position of throttle power, in the real aircraft this would have been a worthwhile bonus in flying the PA28R. Finally you should touch around a slower 70 knts... and smoothly. Again get it wrong in landing too fast and you will lose the Arrow to the nasty in swerving all over that damn wrestling place, and trying then feverishly to control the aircraft... it is really a focus, skill set sort of stuff to getting it all right.... but it is very if extremely rewarding. Your stall speed is 47 kn (54 mph, 87 km/h), but unless you do something stupid, you would never or should go under 60 knts while landing. Welcome to Leipzig/Halle But landing on 26R means another long, long taxi around to the GA Stands by the terminal? So it is Taxiway A4 to Taxiway C, at the end of the long C, was another obstacle on Taxiway W1... a taxiway bridge over the A14 motorway? The Piper Arrow "Huffs and puffs" its way over the bridge, so you will need a fair bit of throttle to climb the slope... ... then you have to be careful in controlling the descent down the other side... it is all very tricky. Once back again on the flat it is another domestic flightline... I feel I have taxied around for most of this flight than actually flying it... Finally I am in EDDP's GA area.... and I find the parking stand. In most cases that flight would have been a quite an ordeal, but not with this aircraft... the vFlyteAir Arrow lll is just simply extraordinary! Liveries There are nine liveries, and all the same liveries as with the earlier Arrow lll versions. Still they are all very good and of very high quality. Default is the Grey, black stripe and white. ______________________ Summary This is the fourth generation of the Arrow lll from vFlyteAir. And in every reincarnation it has changed, mostly in the avionics or in the internal style. Gone now is the olde world earlier brown leather and wood of the original 1977 PA28R-200 located in Texas, USA, to be replaced by a lux White, grey insert and cream/beige cabin. Externally the aircraft is very much the same, and the same brilliant perfect modeling, except for the higher texture qualities to match today's modern requirements. Focus and the main features here in this package are of the avionics, not just in the small units, but in some of the big avionic options available today, and you don't get one choice here but three, and all in one exceptional package. First is a new avionics package and a built up custom unit of the Garmin G5 glass ADI/HSI avionics suite. Second choice is also a glass ADI/HSI avionics suite in the Aspen E1000 Evolution which is also a customised vFlyte unit. Finally there is the older choice of the Analog (steam-gauge) panel layout. More avionics features include two Autopilots, in a sensational Bendix/King "Aerocruze" KFC 230A Autopilot (E1000 and Analog), and a Garmin GFC500-GMC507 attitude based Autopilot in the G5 setup. A Custom GI 275 EIS Touch-Screen Engine Monitor, VTRON M803 Chronometer, GMC 507 Control Head and AAS (Audio Advisory System). There is also the significant automatic in-panel support for up to six different RealisticXP RXP plugin configurations, including RXP GNS430W, RXP GTN650 and RXP GTN750 options. on both the E1000 and G5 versions. It is a A LOT of avionics in choice and choices. Probably even the best glass/avionics set up for a general aviation aircraft in X-Plane. Menu is very good, with weights, CG Graph, pilot and passengers, basic static elements, checklists and Tow Tractor feature. The Menu can also be scaled and moved around the screen for convenience. Notable there are a few bugs, and mostly in the E1000 unit, the black hole for the GI 275 EIS in the panel is not that at all nice either. The Pilot won't disappear unless you have the door open? And I still hate the popping up STMA updater... the "Piper" menu tab can't be hidden either, which ruins a clean screen. The above extensive list of features in most cases would surely be enough. But the dynamics, lighting and the excellent sounds are just as brilliant, again the vFlyte Arrow lll is probably again the the very best flying and realistic general aviation aircraft today in X-Plane, the one that sets the high standards and the goal of any other developer to match. Price is an excellent low US$34... a bargain... Only the word "extraordinary" comes to mind. The full summary here is quite simple. The vFlyteAir Arrow lll G5-E1000 package sets the current highest standard in the X-Plane Simulator. The best in every respect, if you want the best and most versitile general aviation aircraft in X-Plane, then here it is... you won't be disappointed, but to just fly it always.... Absolutely Recommended. ______________________________________ Yes! the Piper PA28R Arrow III G5 - E1000 by vFlyteAir GA is now available from the X-Plane.Org Store here : Piper PA28R Arrow III G5 - E1000 Price is US$33.95 Requirements X-Plane 11 Windows, MAC, or Linux 4 GB VRAM Minimum - 8 GB+ VRAM recommended Download size: 475 MB Version 1.1 (January 28th 2022) For a very limited time, owners of the Arrow III by vFlyteAir can get a discount on this model. Please find your discount code in the original Arrow III invoice. Note: This is not an update, this is a brand new model. The discount code will only be active for a few weeks. ___________________________________ Installation and documents: download for the Arrow lll is 451 Mb and the aircraft is deposited in the "General Aviation" X-Plane folder. Full Installation is 1.26 Gb Documents supplied are: vFlyteAir_LimitedUseSoftwareAgreement.pdf vFlyteAir_KN62A_PilotsGuide.pdf vFlyteAir_GMA340_PilotsGuide.pdf vFlyteAir_KR82_PilotsGuide.pdf vFlyteAir_AXP340_PilotsGuide.pdf vFlyteAir_GI275EIS_PilotsGuide.pdf vFlyteAir_M803Chrono_PilotsGuide.pdf vFlyteAir_GFC500_GMC507_PilotsGuide.pdf vFlyteAir_E1000_PilotsGuide.pdf vFlyteAir_KFC230Autopilot_PilotsGuide.pdf vFlyteAir_G5_PilotsGuide.pdf vFlyteAir_ArrowIII_G5_and_E1000_PilotsGuide.pdf PA28R-201_POH_NotForRealFlight.pdf Extensive Avionic manuals covers all systems and POH Manual, original Arrow lll POH is also included, Impressive. vFlyteAir Support is here: Piper PA28 Arrow Use of font required an author credit link<a href="http://www.onlinewebfonts.com">oNline Web Fonts</a> _____________________ Aircraft Upgrade Review by Stephen Dutton 9th February 2022 Copyright©2022: X-Plane Reviews Review System Specifications: Computer System: Windows - Intel Core i7 6700K CPU 4.00GHz / 64bit -32 Gb single 1067 Mhz DDR4 2133 - ASUS GeForce GTX 1080 8Gb - Samsung Evo M2 2TB SSD - Sound : Yamaha Speakers YST-M200SP Software: - Windows 10 - X-Plane 11.55 Plugins: Global SFD plugin US$30.00 : Environment Engine by xEnviro US$69.90 : RK Apps XPRealistic v2 - US$34.99 Scenery or Aircraft - EDDB - Berlin-Brandenburg V2 XP by Aerosoft (X-Plane.OrgStore) - US$29.99 - EDDP - Leipzig/Halle International Airport by JustSim/Digital Design (X-Plane.OrgStore) - US$20.00 (Disclaimer. All images and text in this review are the work and property of X-PlaneReviews, no sharing or copy of the content is allowed without consent from the author as per copyright conditions) All Rights Reserved
-
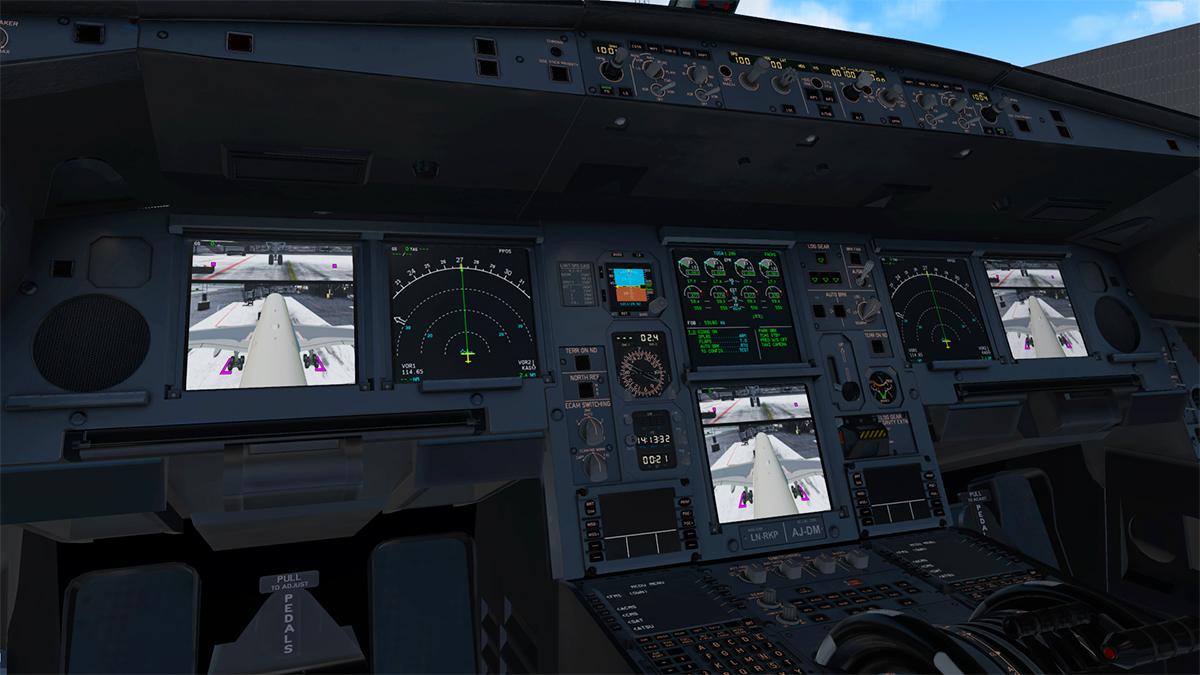
NEWS! - UPDATE : ToLiSS A321+Neo v1.3.2 ToLiSS has (again) updated the Airbus A321-231 to v1.3.2 as is aloso updated is the companion NEO addon. The update also aligns the A321 with the earlier v1.6.4 update to the Airbus A319 update a few weeks ago (20/1/22). Changes from build 1463 (V1.3.1) to 1469 (V1.3.2) Major new features: - NEO specific new feature: Support for FCS eRudder configuration Minor new features: - Added visible chocks to facilitate figuring out why the heck the airplane does not move - Cockpit sound improvements - Added the Option to have NAV mode reengage automatically on Go Around initiation - Added CVR Test function Bug fixes: - Increased ground cart pressure for better engine start performance - fixed issue that may lead to the Master Warning not always lighting up when it should - some external light improvements - Inhibited the speed trend indication below 30kts IAS on ground - Vertical FD guidance during TO rotation much smoother now - Improved fault light logics for hydraulic overhead switches - Improved indication of PTU operation to prevent it going on and off repeatedly The v1.3.2 update is now available from your X-Plane.OrgStore Account, just logon and download... _________________________ Yes! the ToLiSS321 (A321-231) v1.3.2 by ToLiSS is now available from the X-Plane.Org Store here : Airbus A321 by ToLiSS Price is US$79.00 A321 NEO ADD-ON to the ToLiss Airbus A321 Price is US$29.95 Requirements X-Plane 11 Windows , Mac or Linux 4 GB VRAM Minimum - 8 GB+ VRAM Recommended Download Size: 680 MB Version 1.3.2 (January 1st 2022) _________________________ Update Review by Stephen Dutton 2nd February 2022 Copyright©2022 : X-Plane Reviews (Disclaimer. All images and text in this review are the work and property of X-PlaneReviews, no sharing or copy of the content is allowed without consent from the author as per copyright conditions)
-
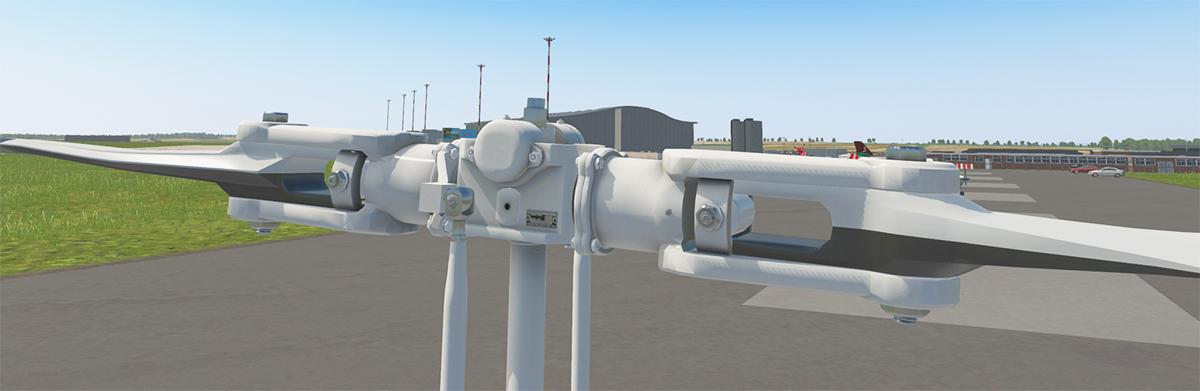
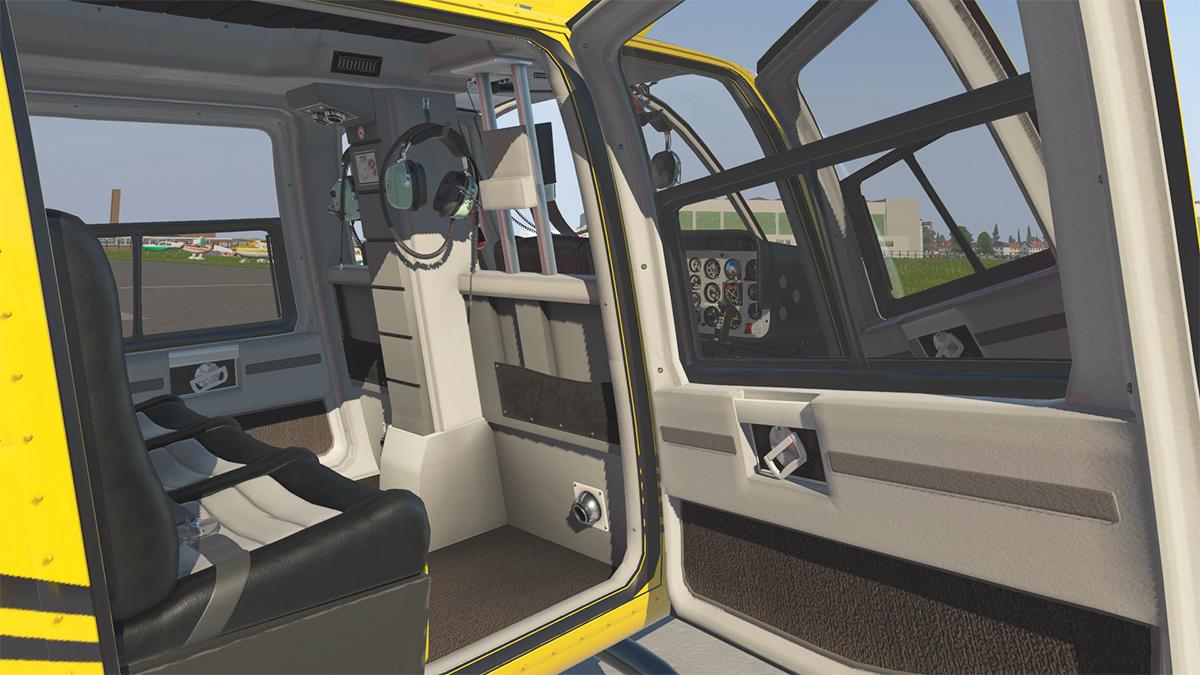
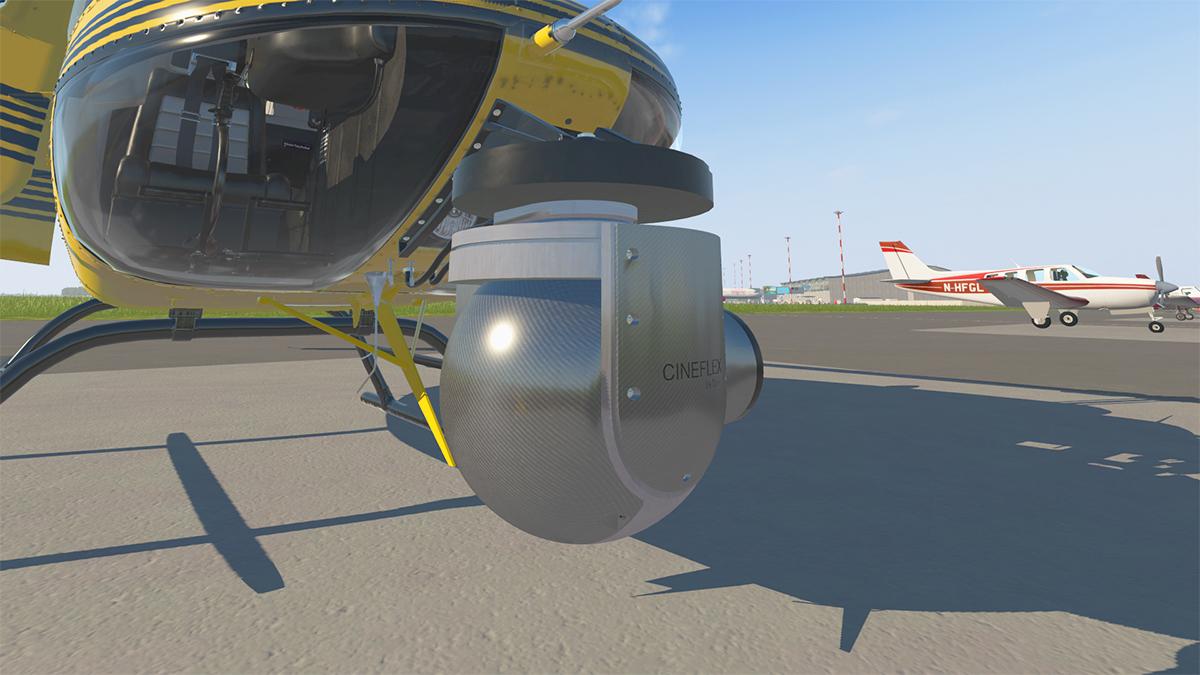
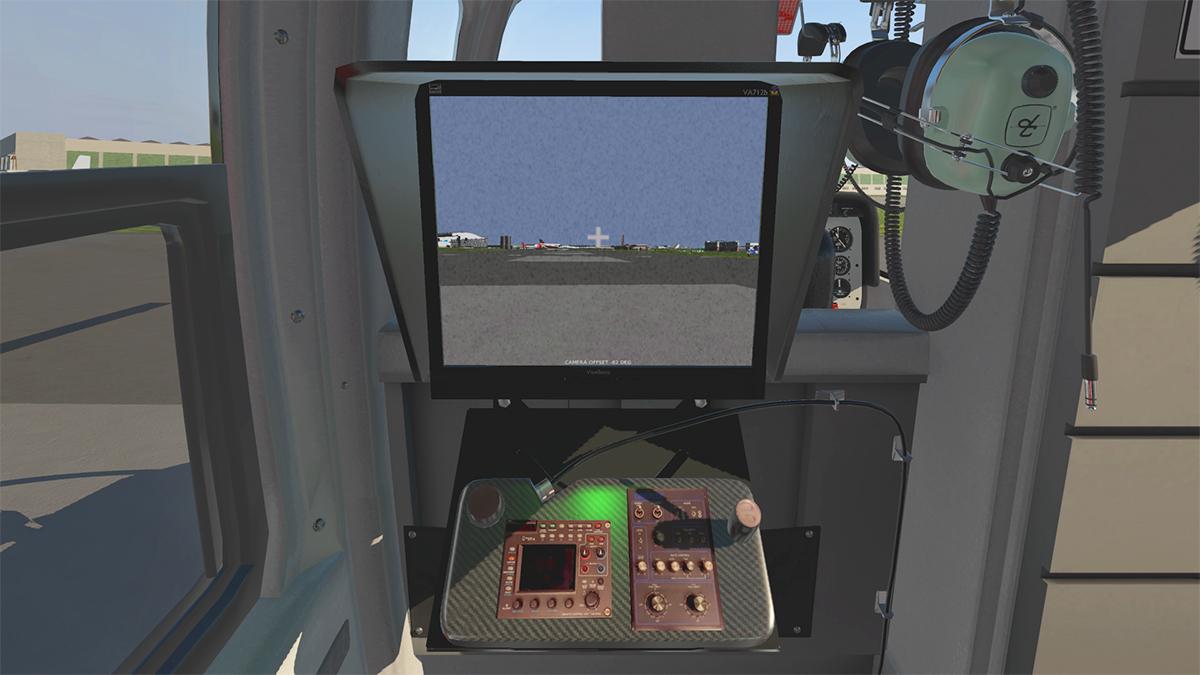
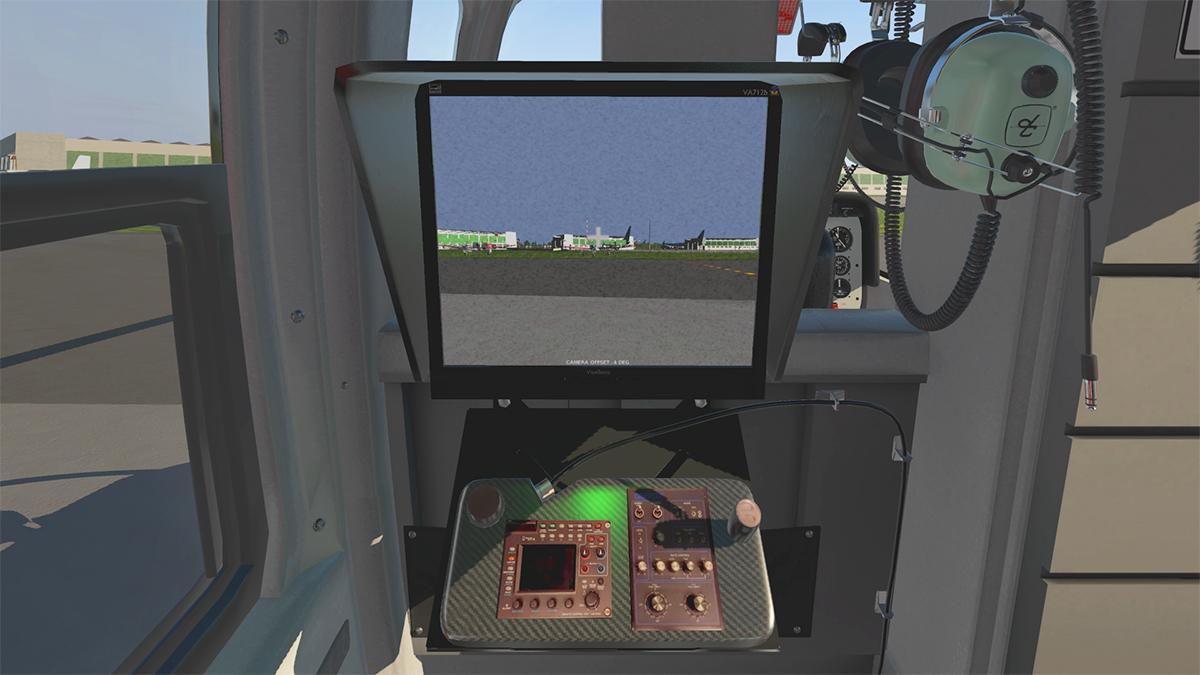
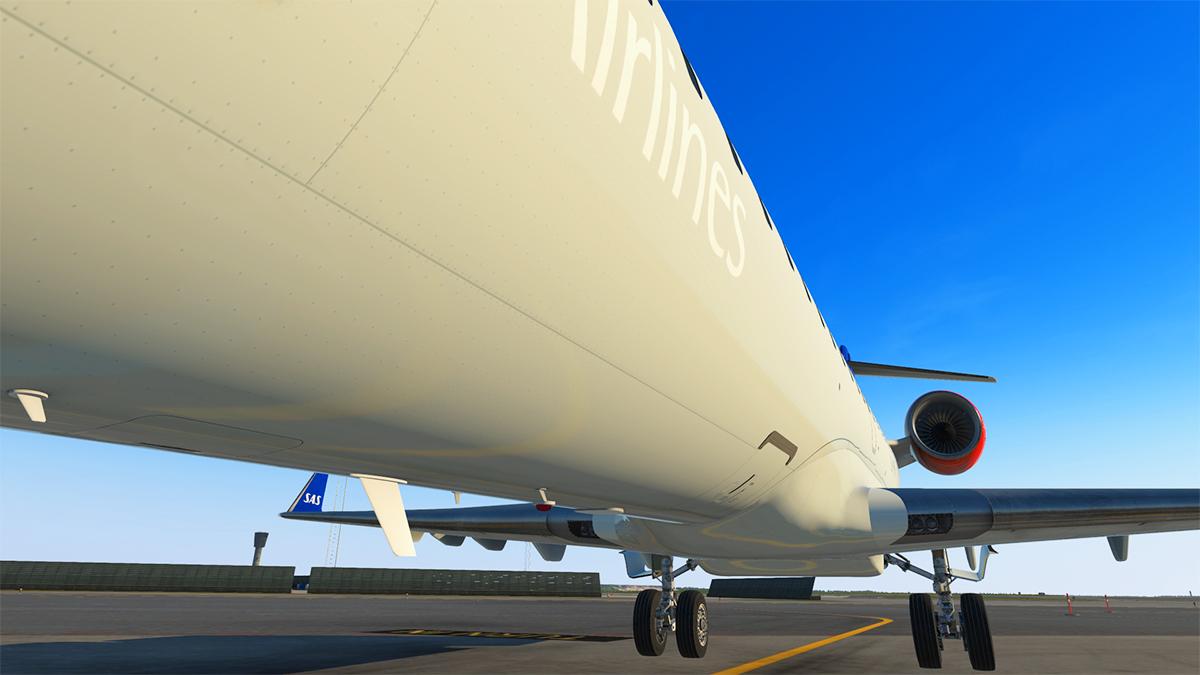
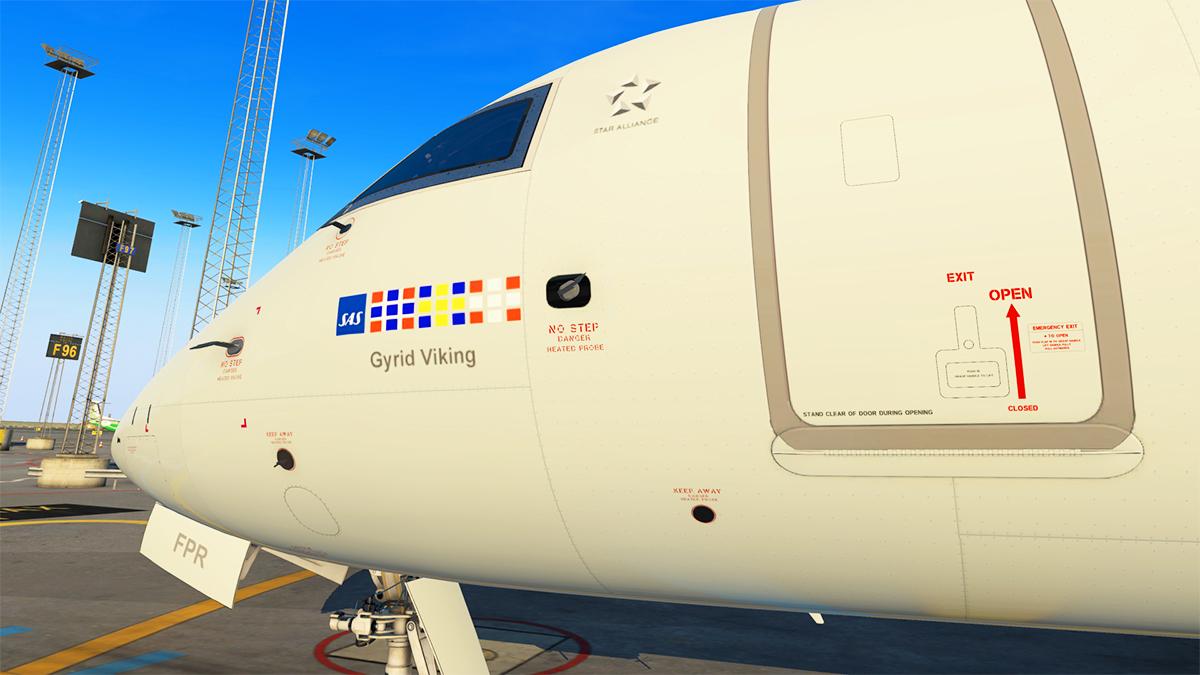
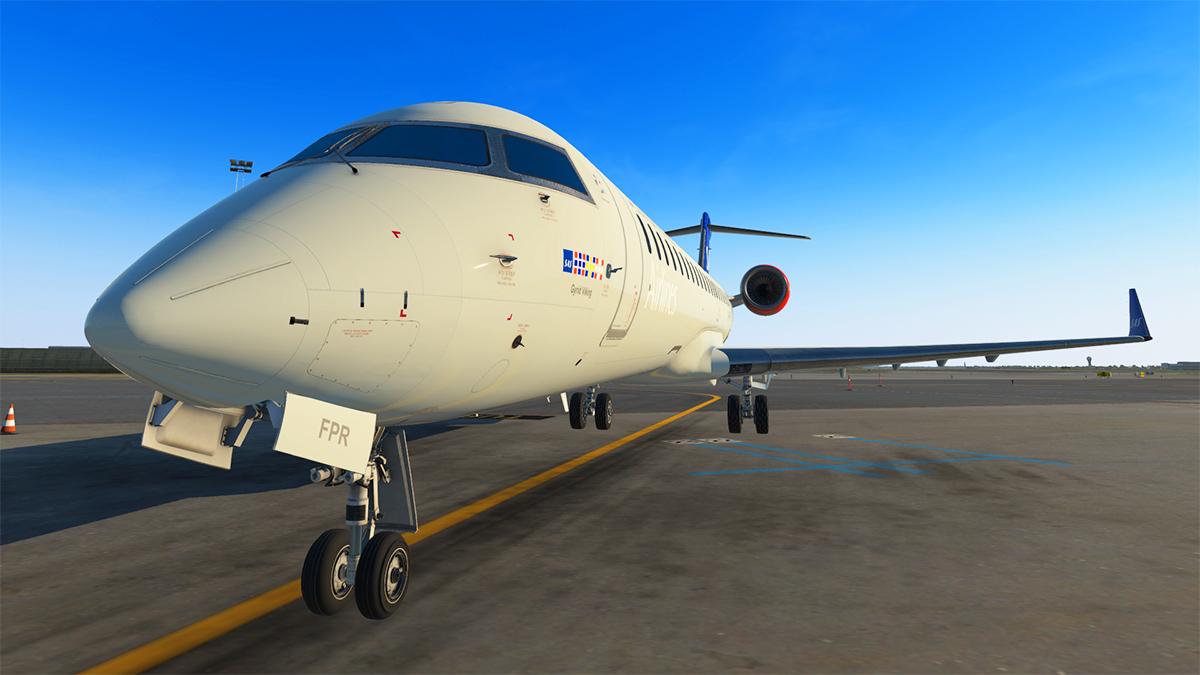
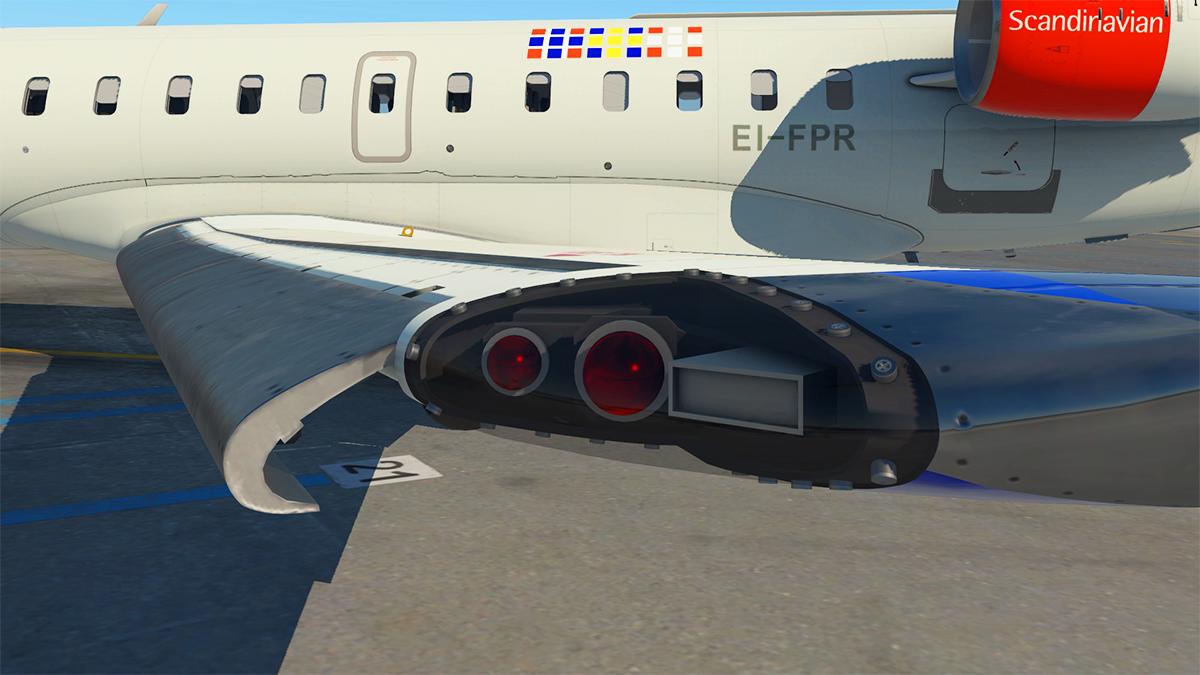
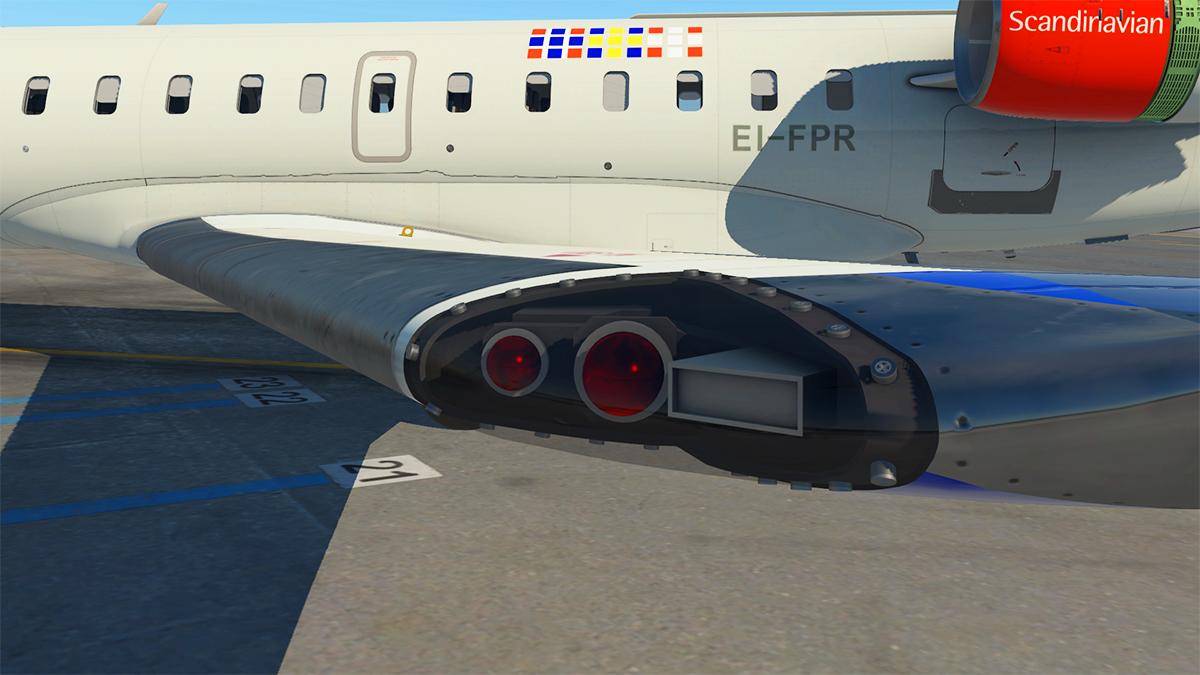
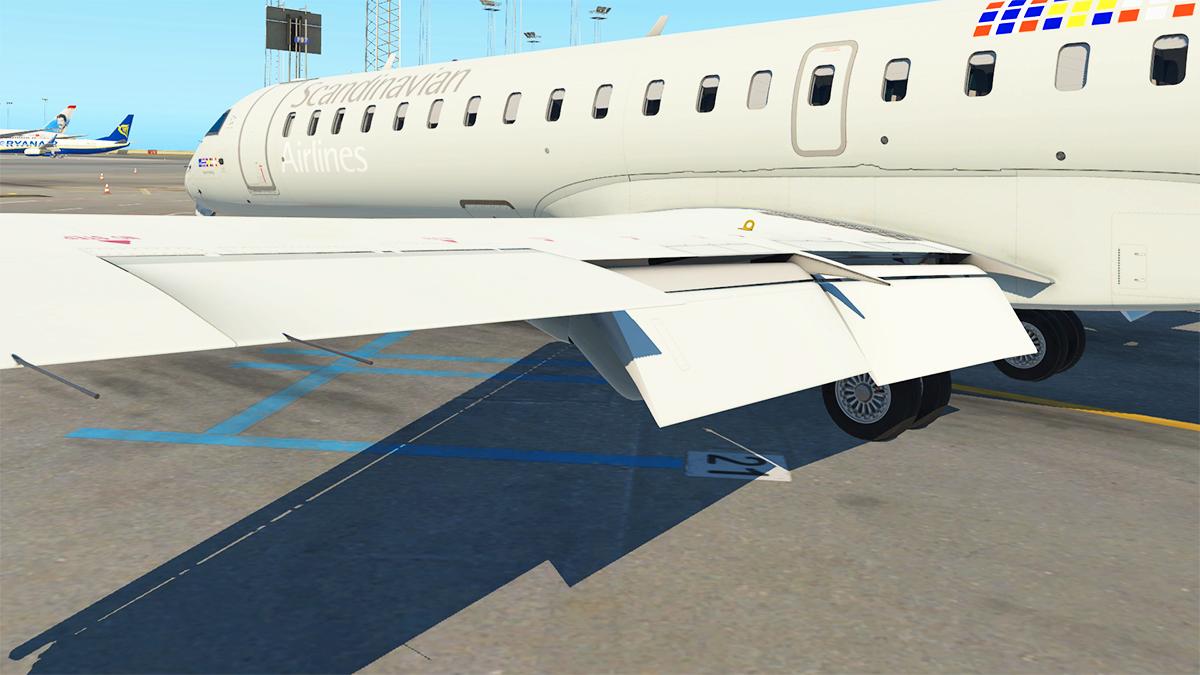
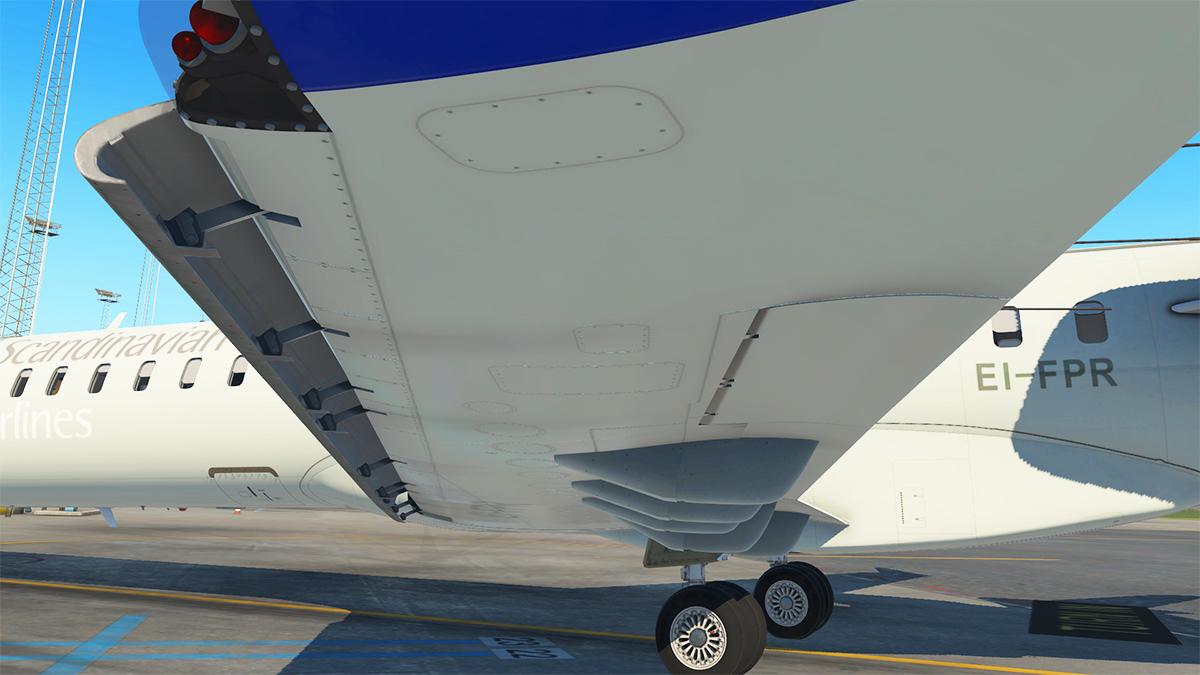
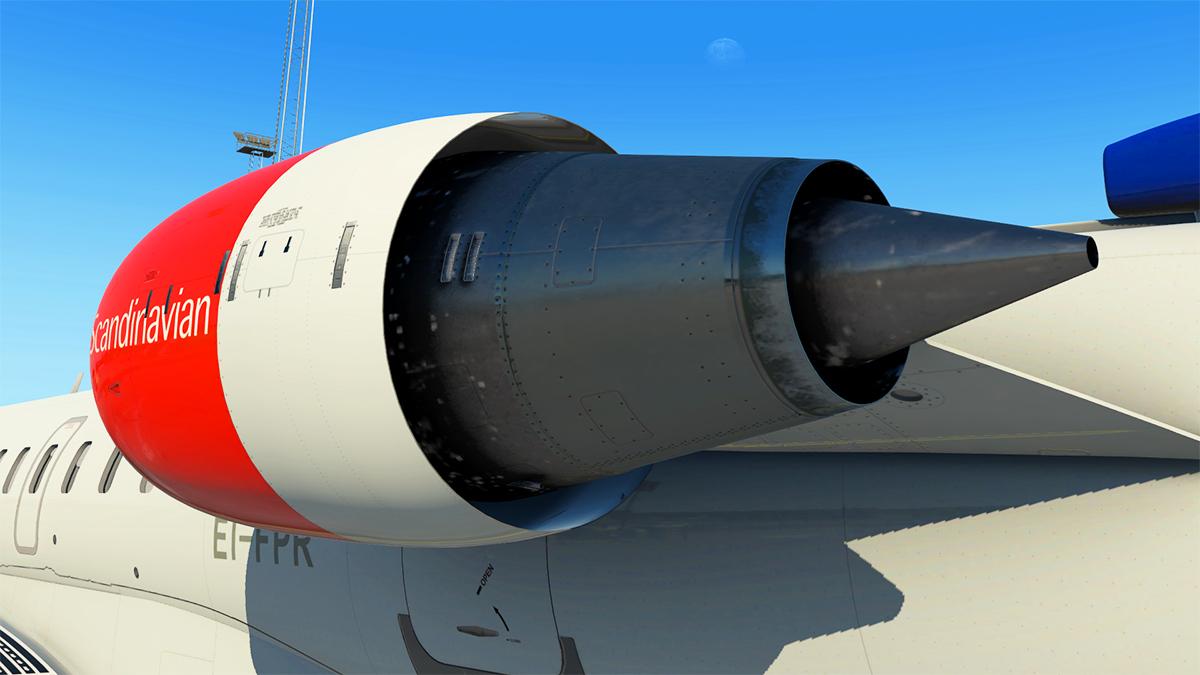
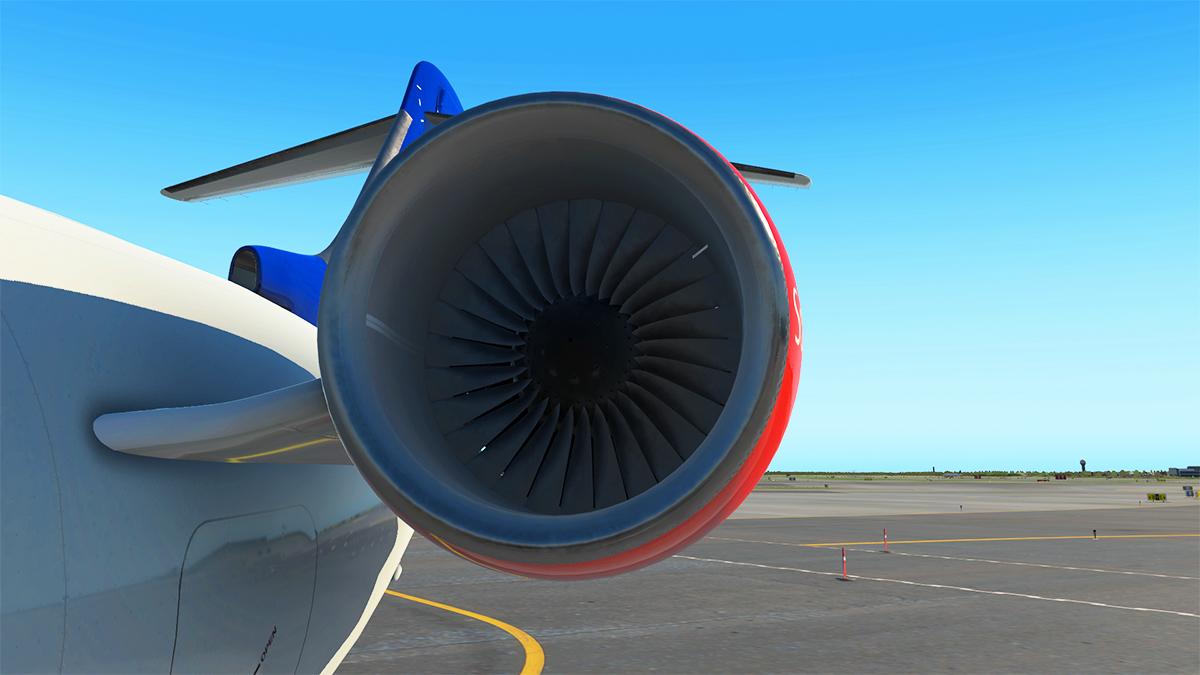
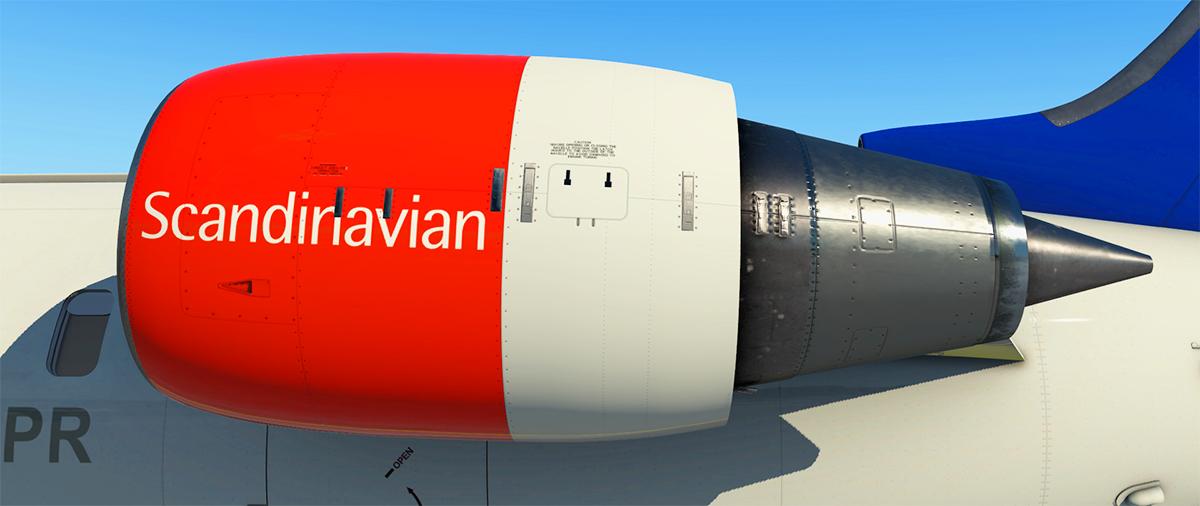
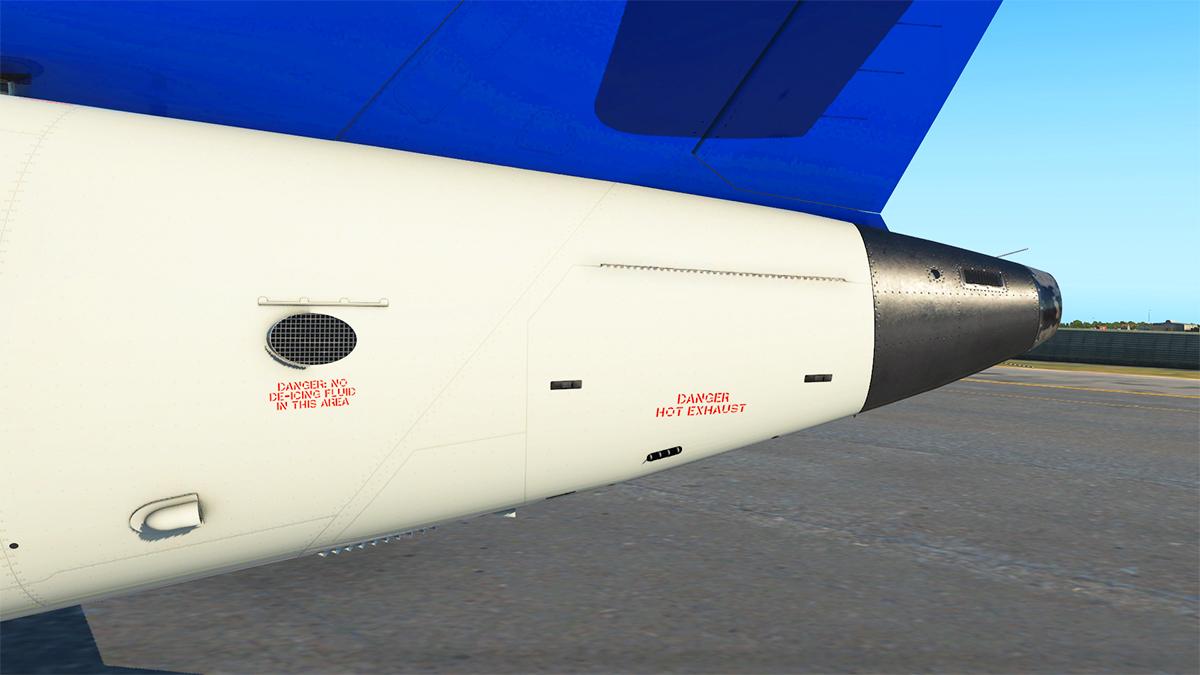
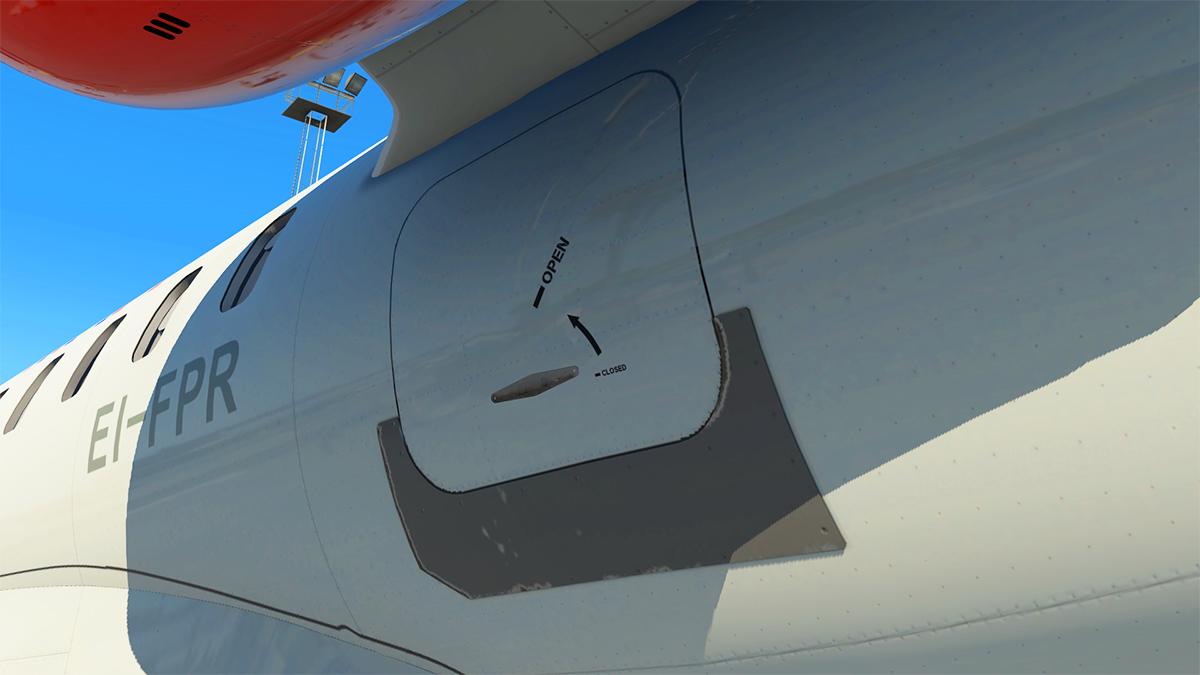
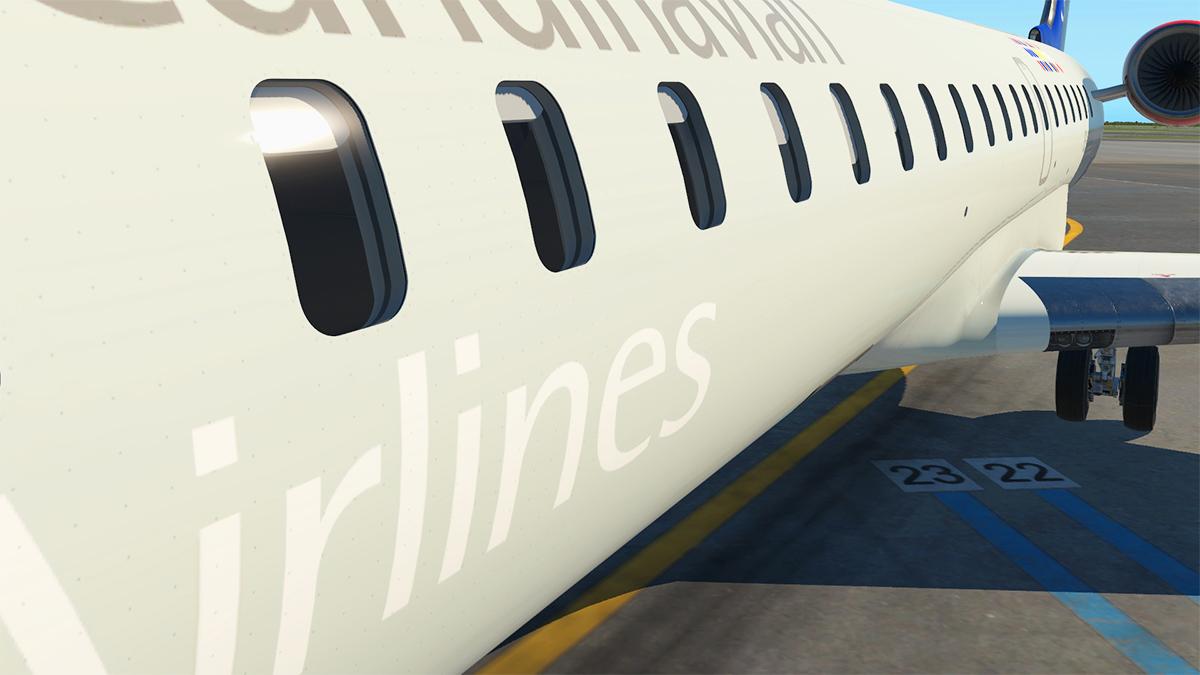
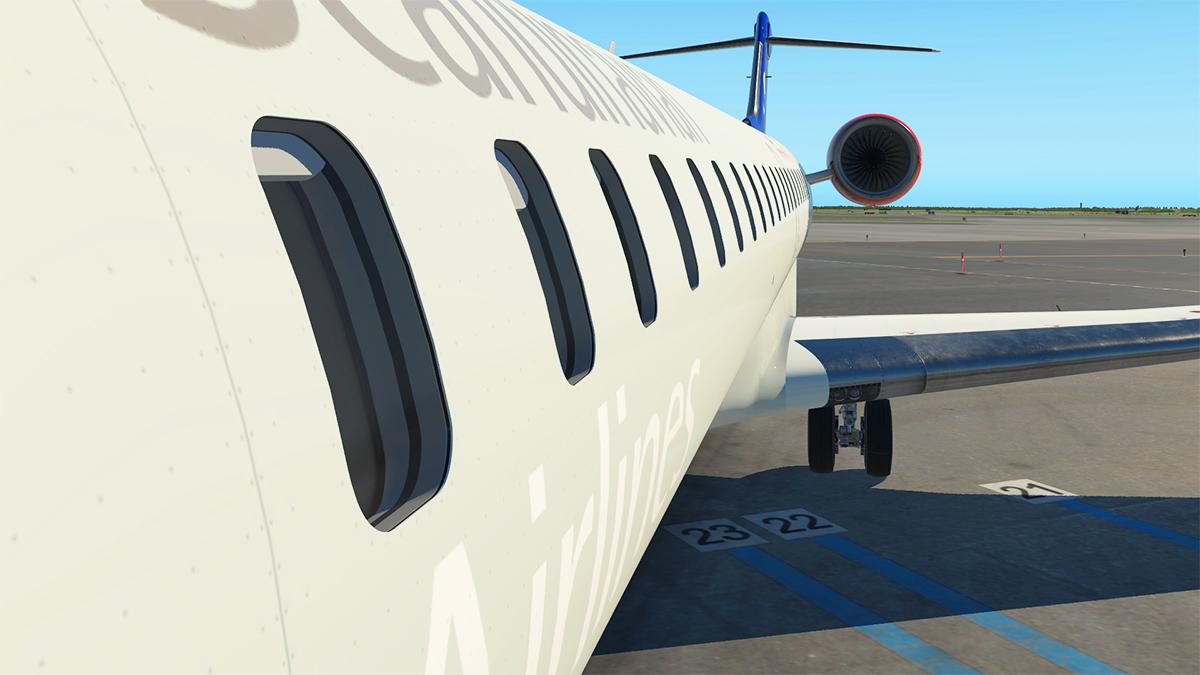
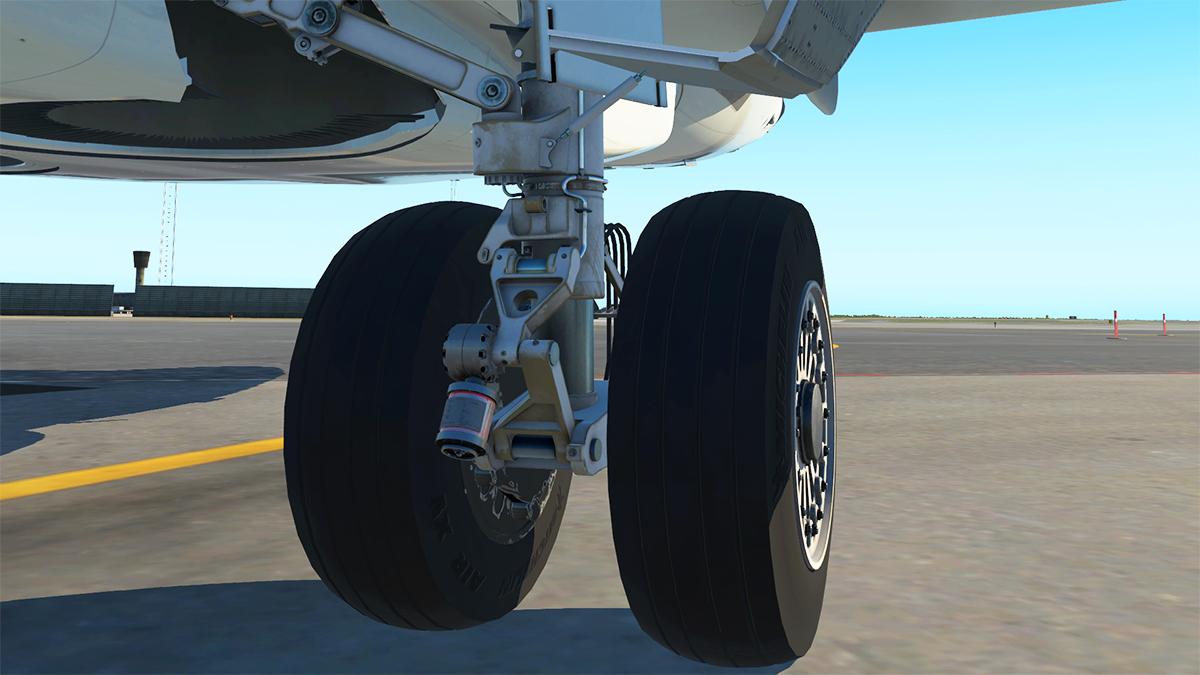
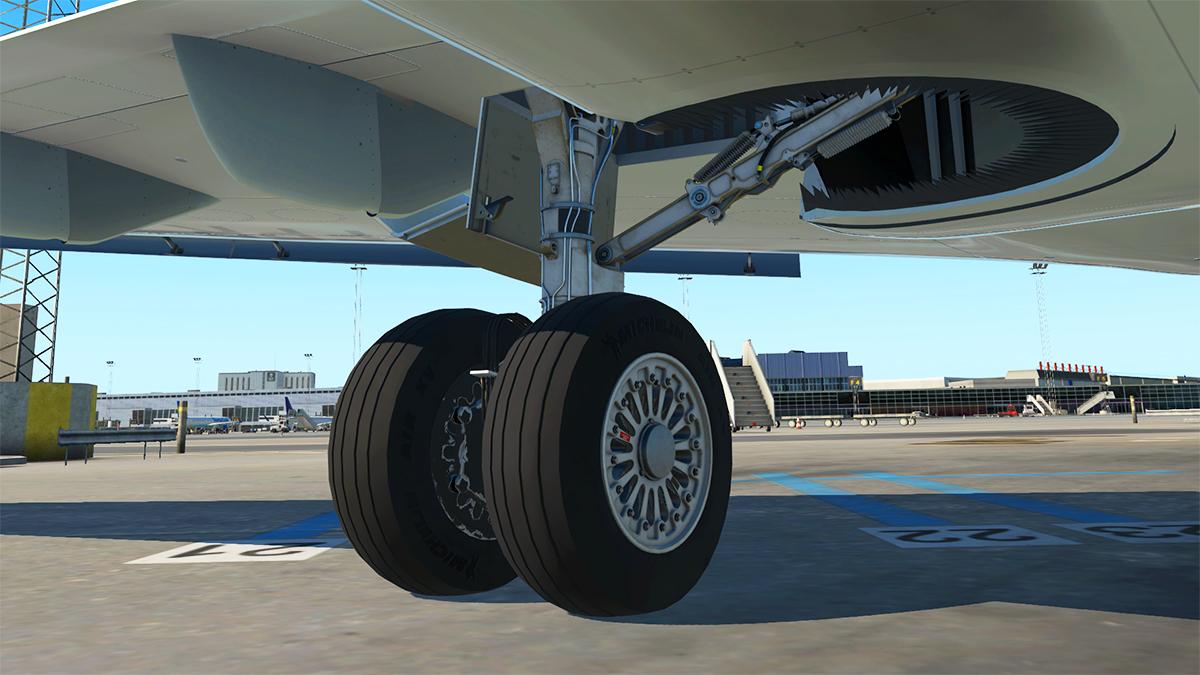
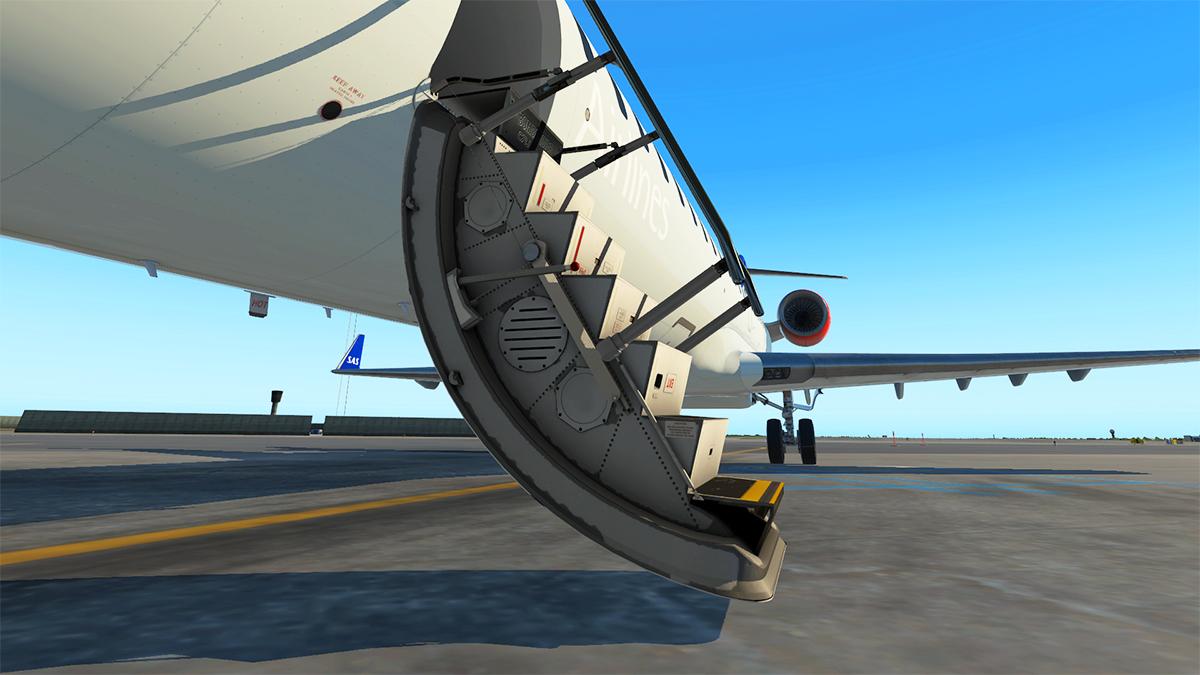
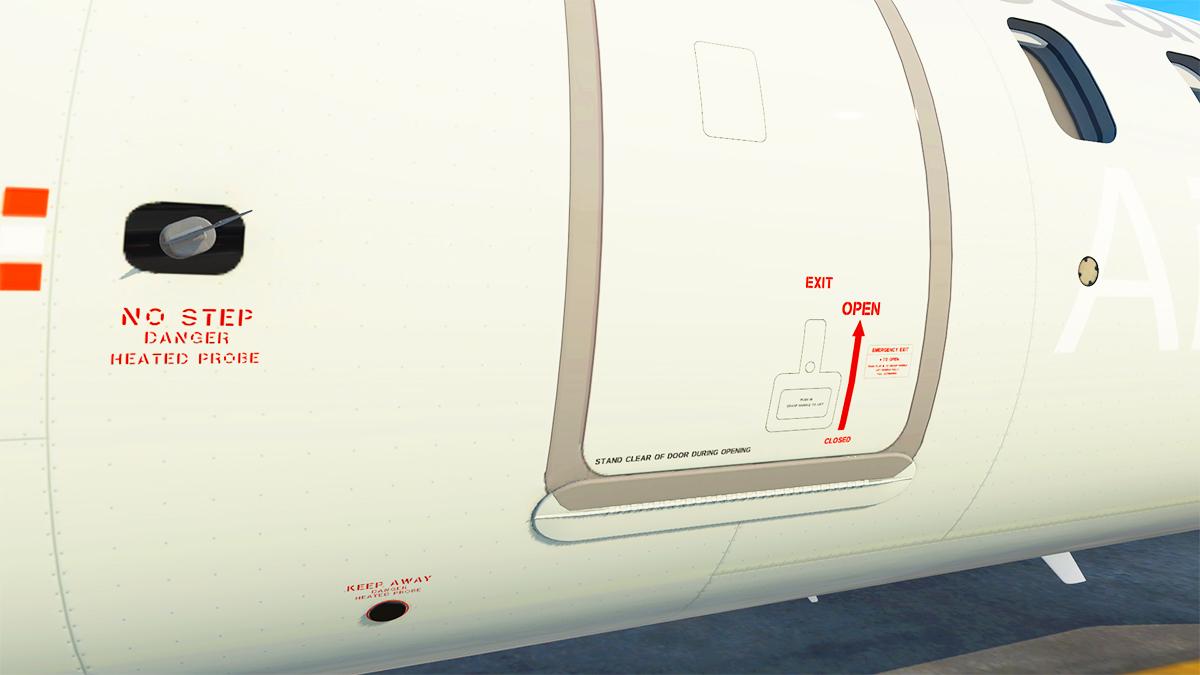
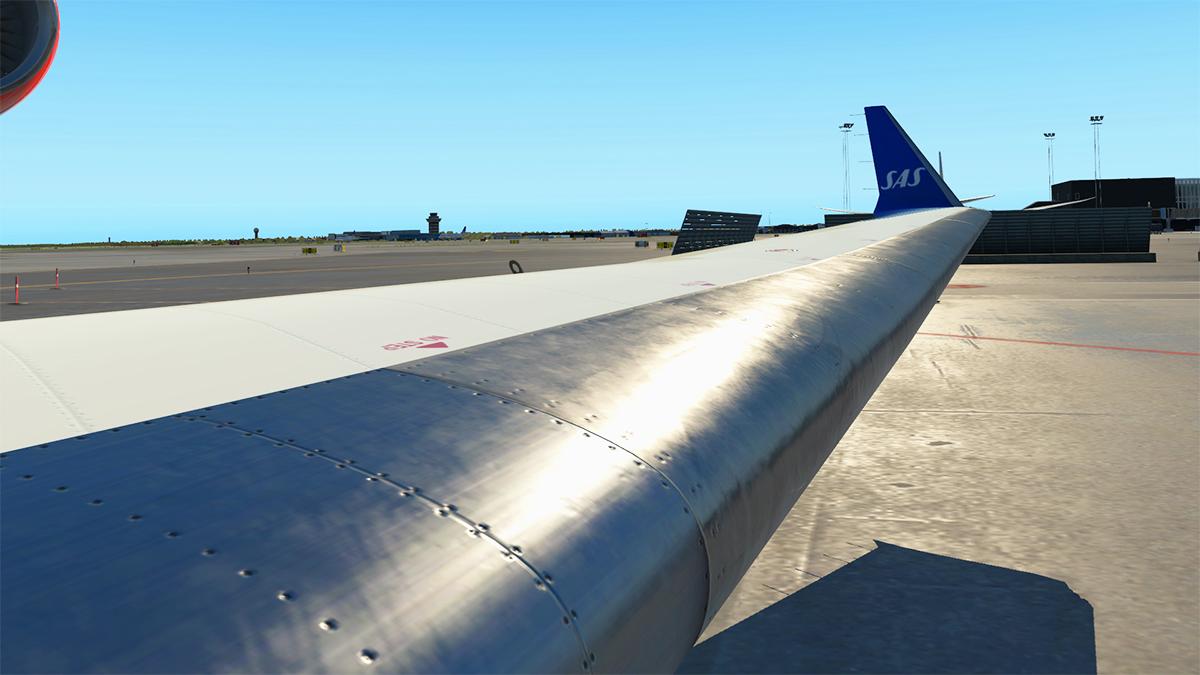
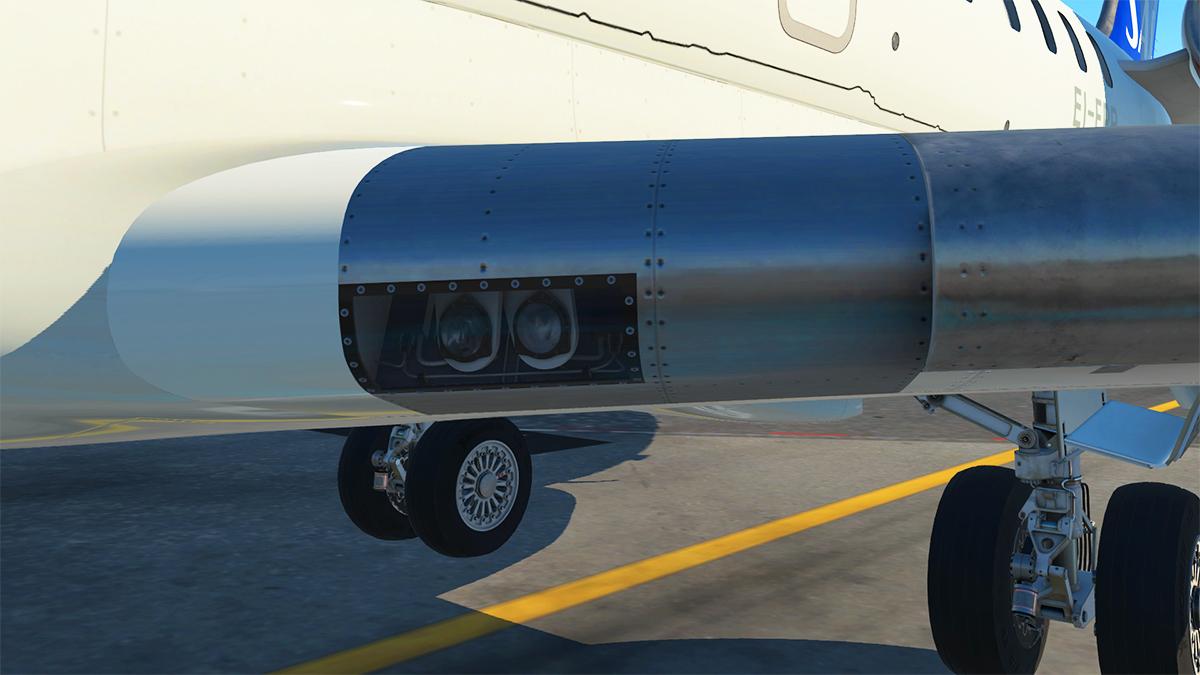
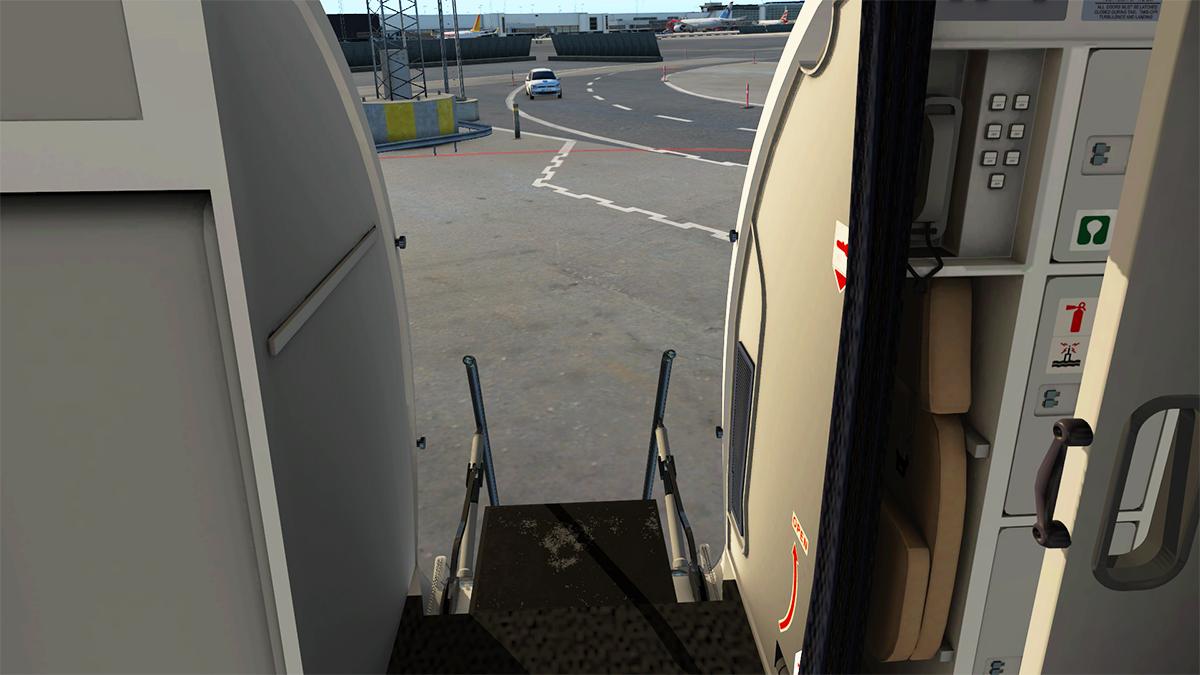
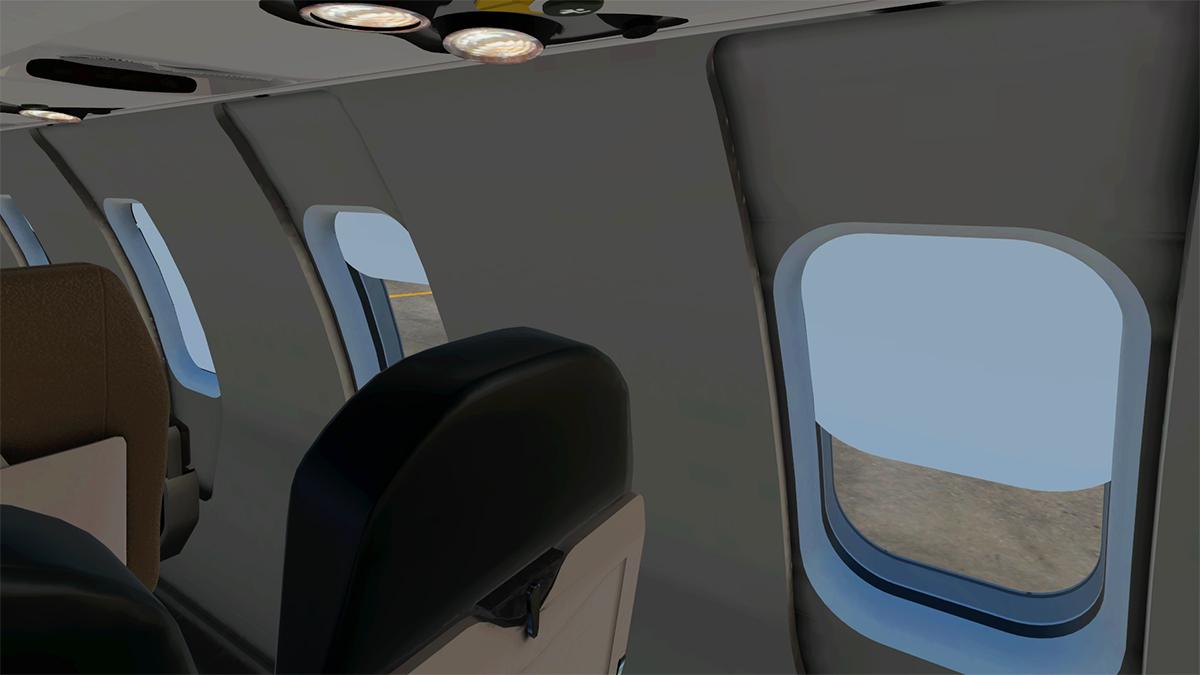
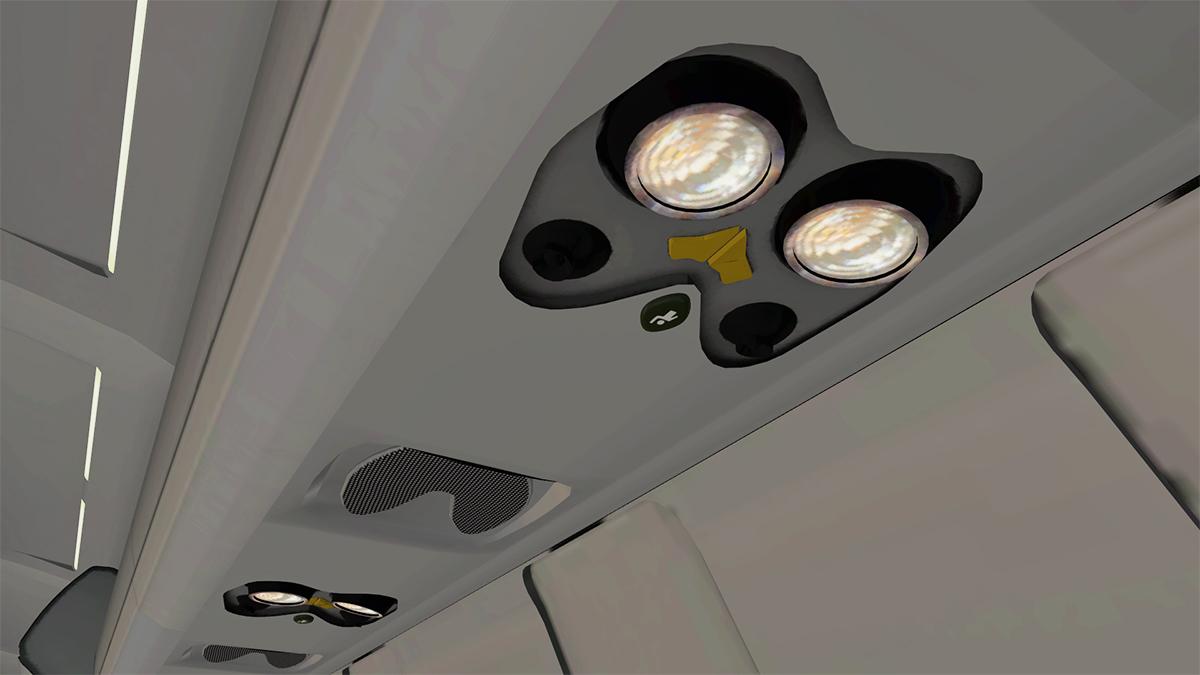
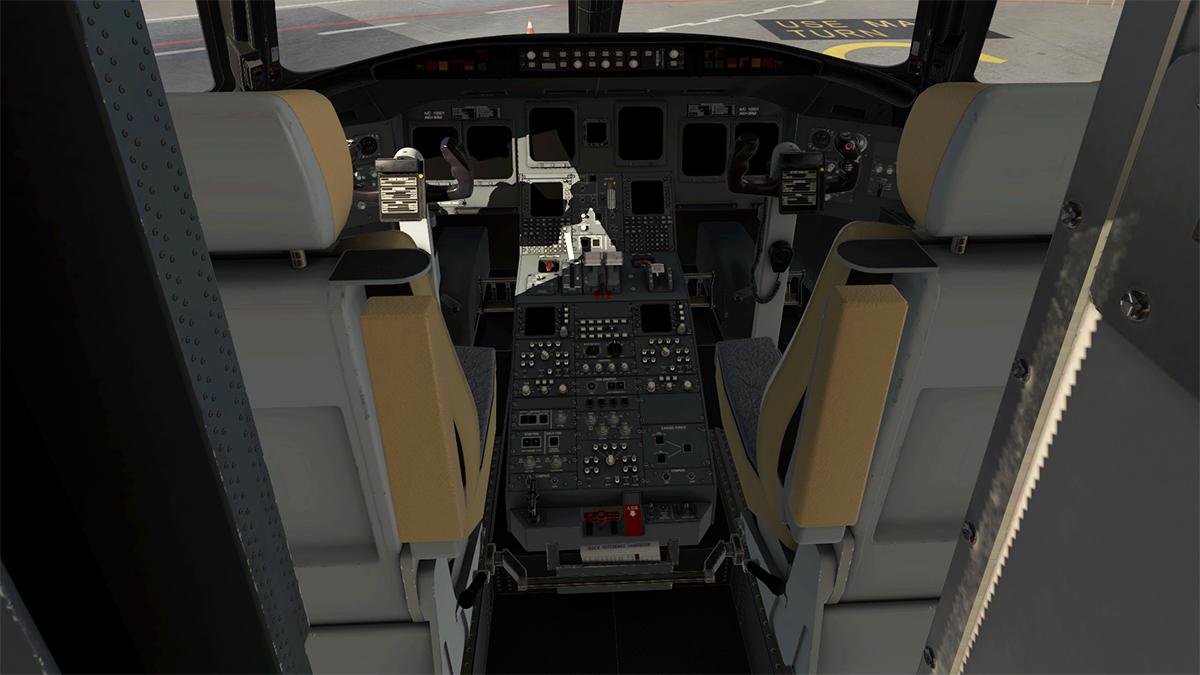
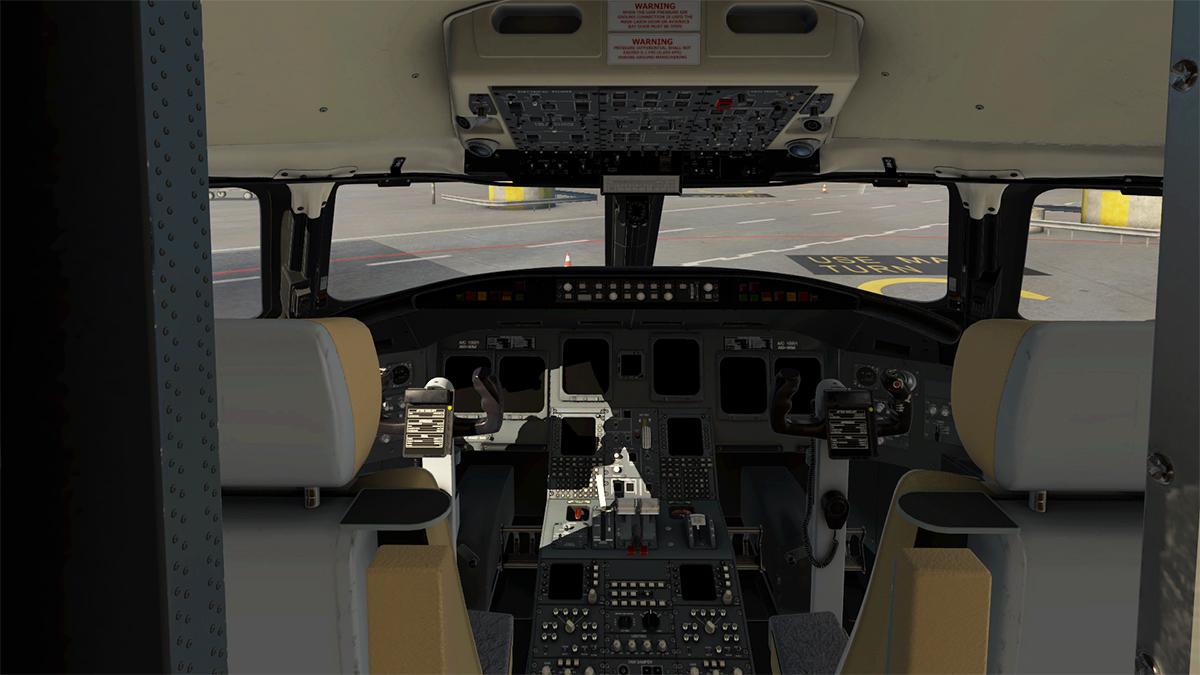
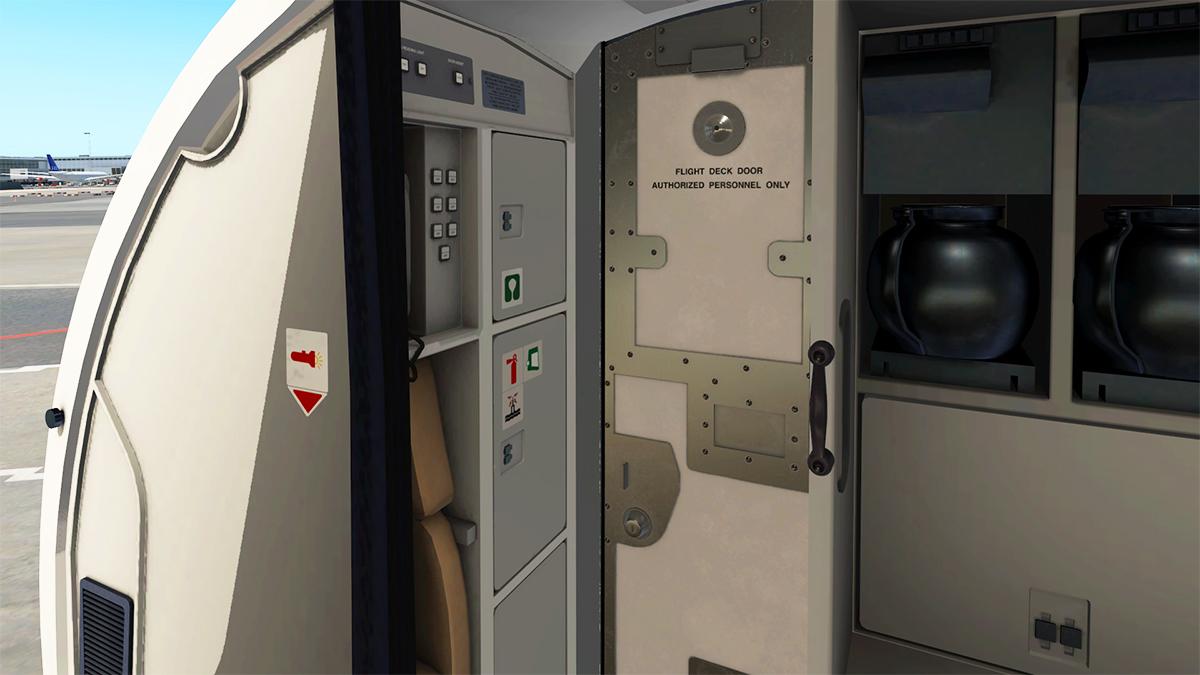
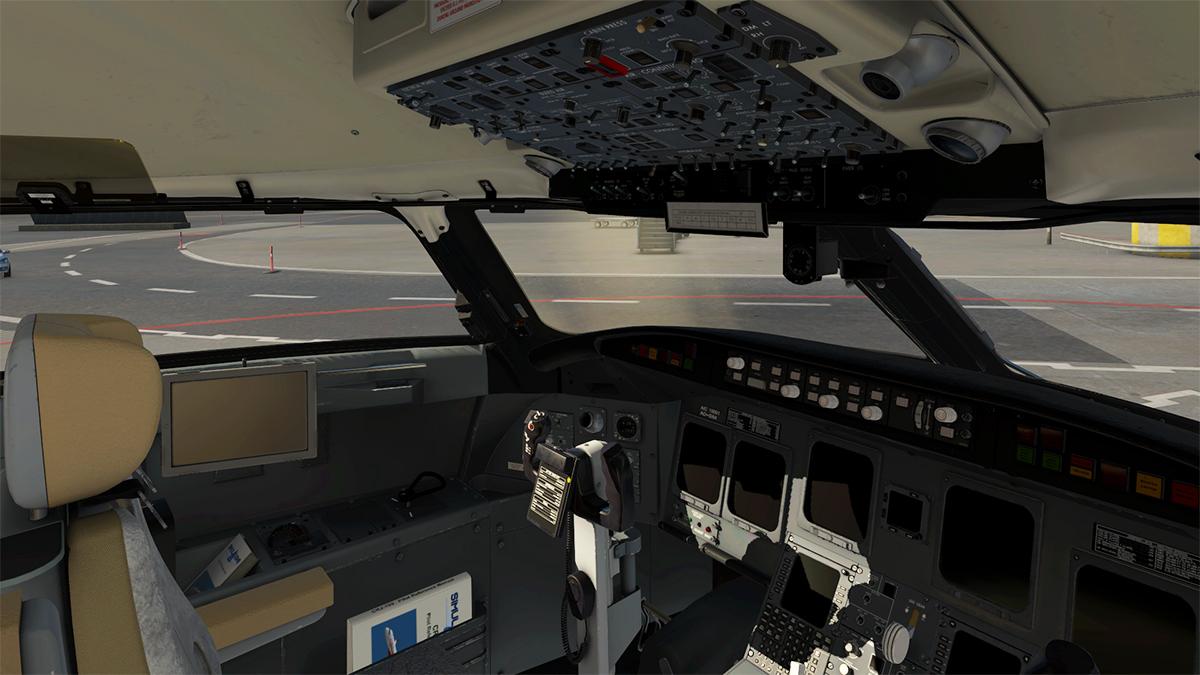
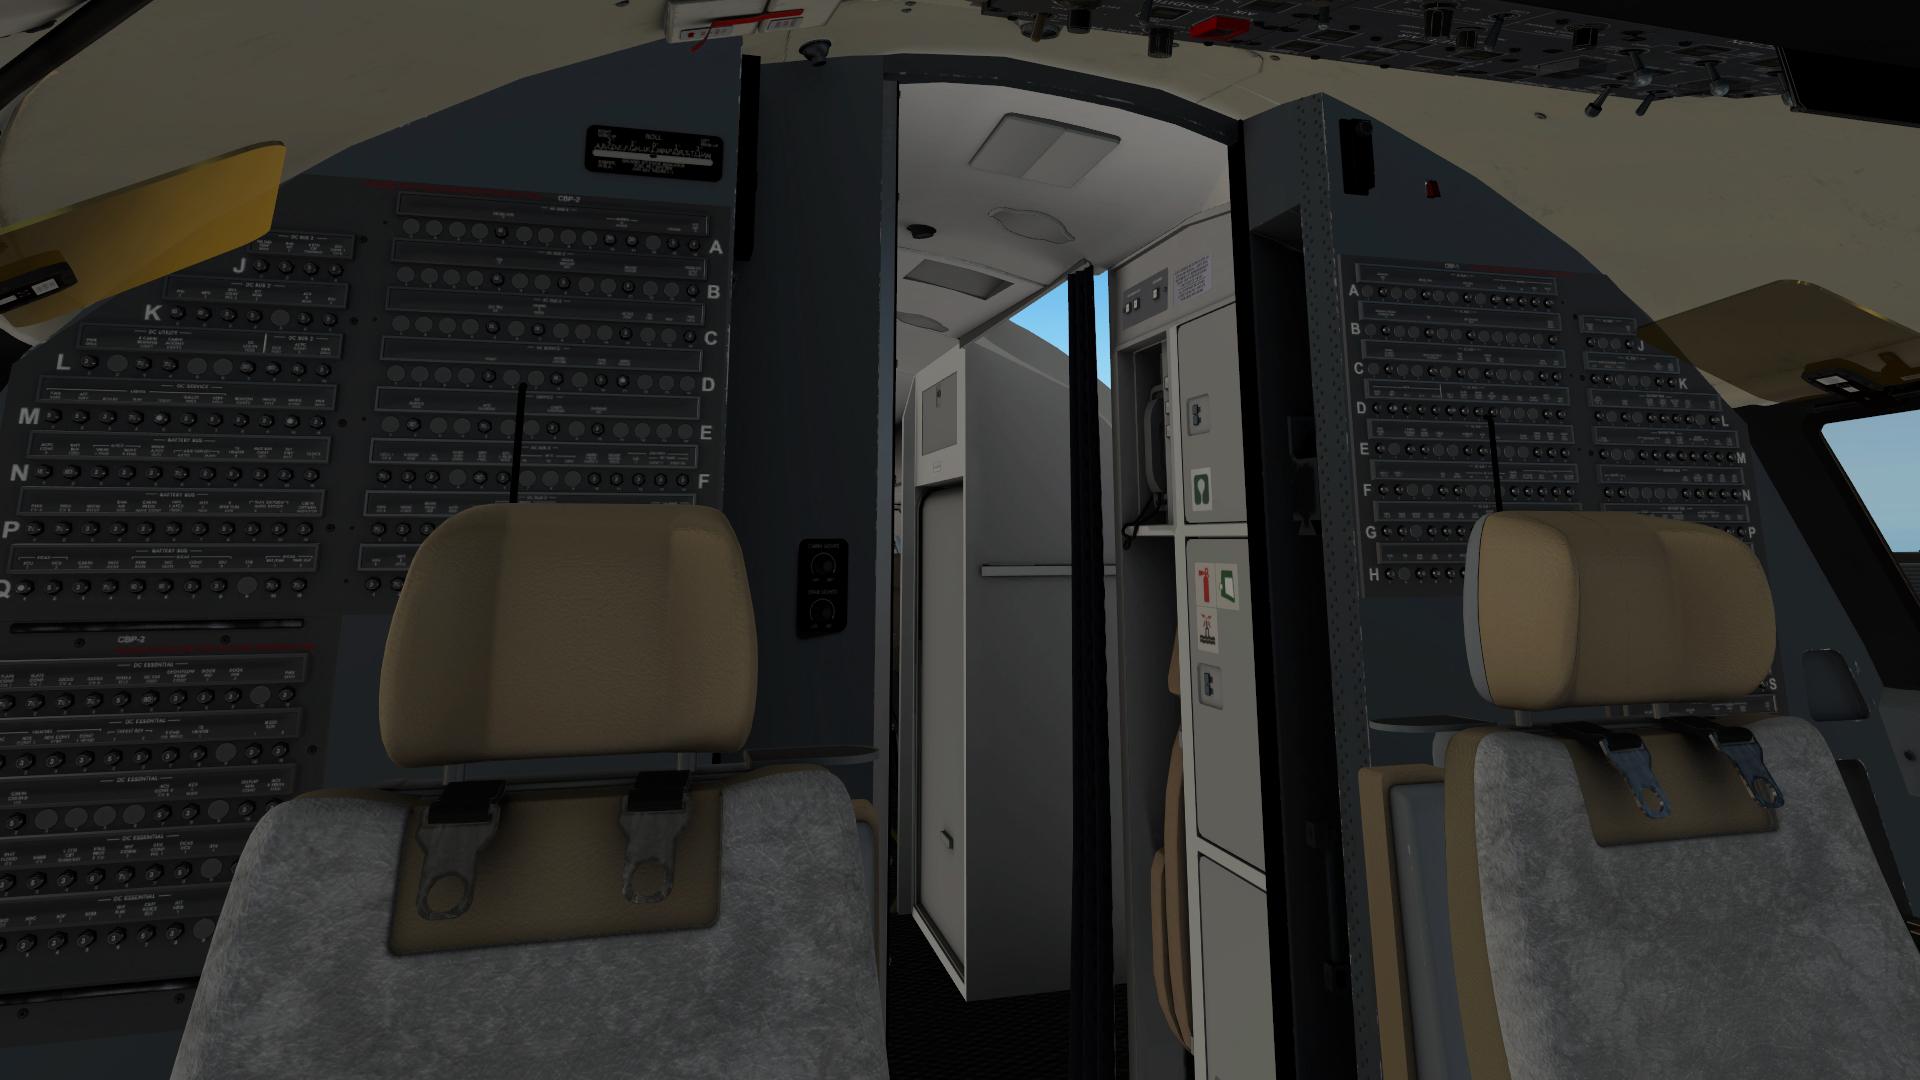
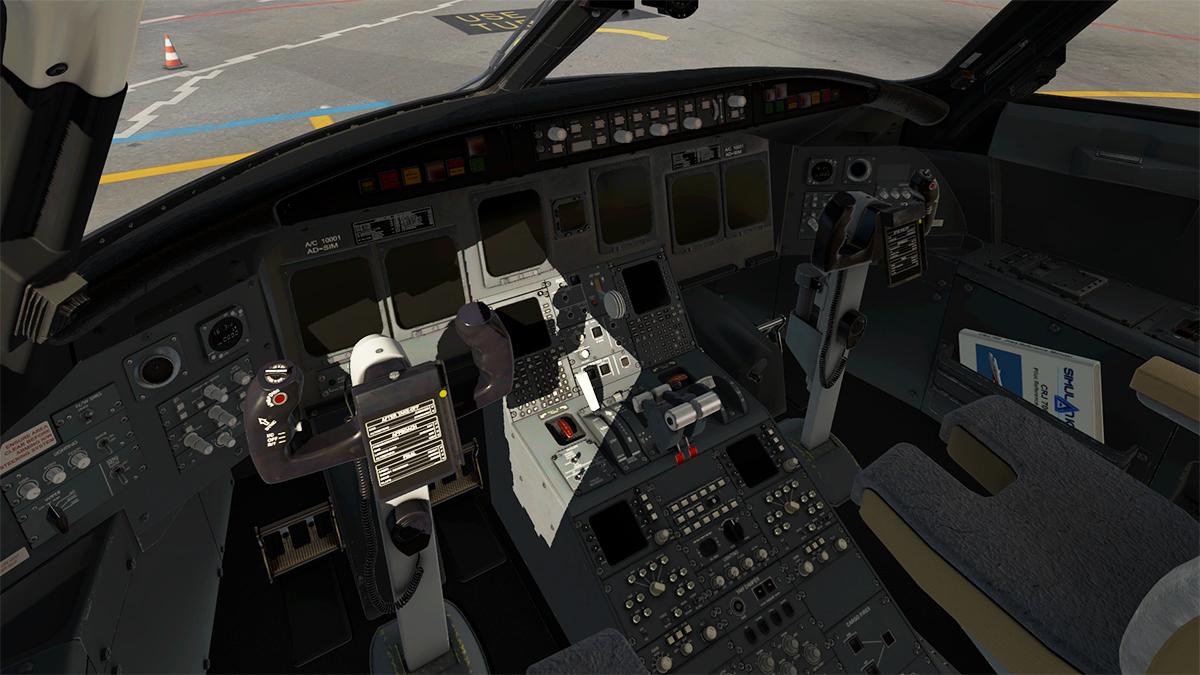
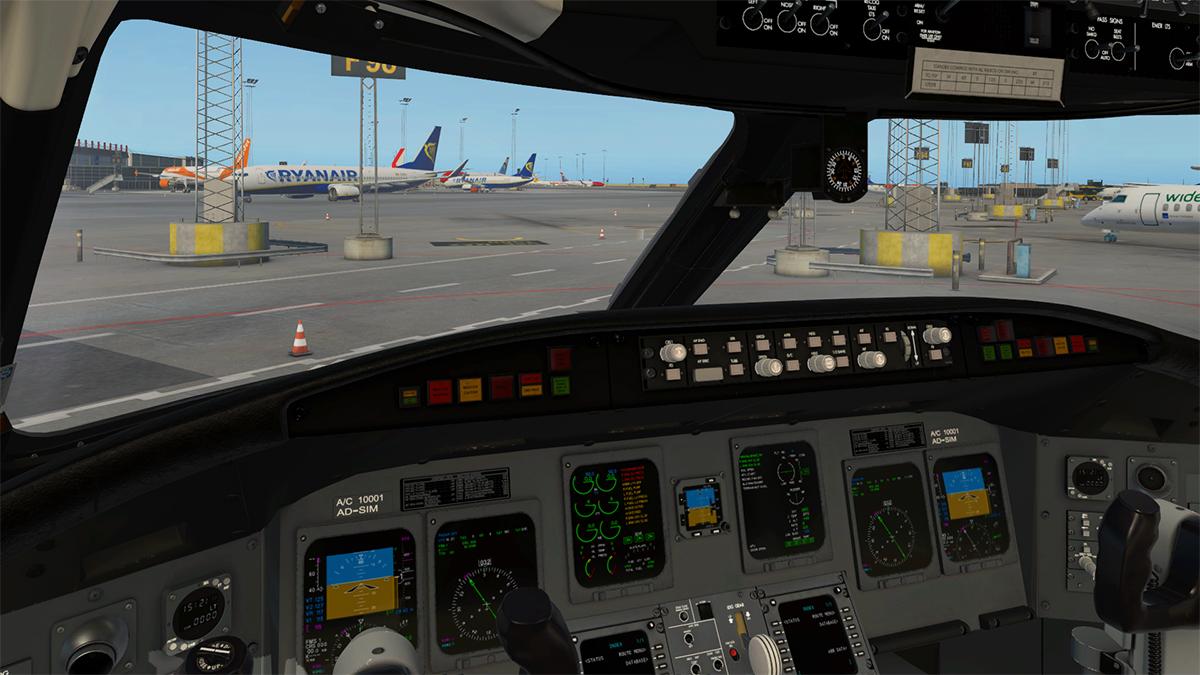
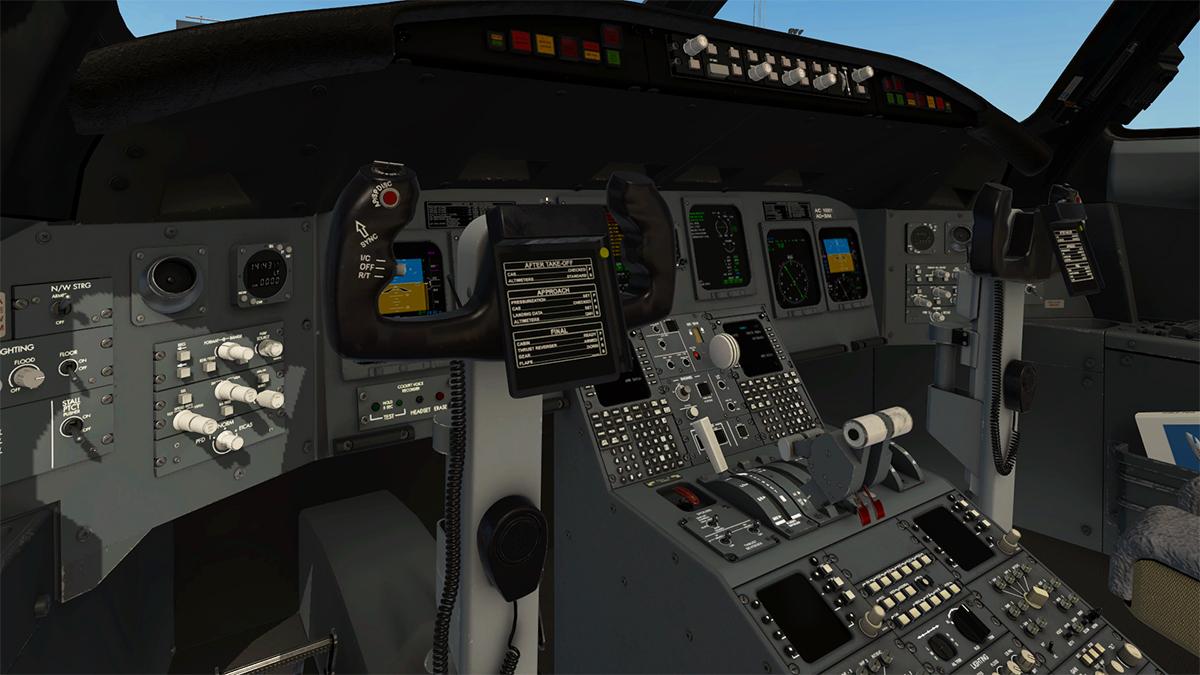
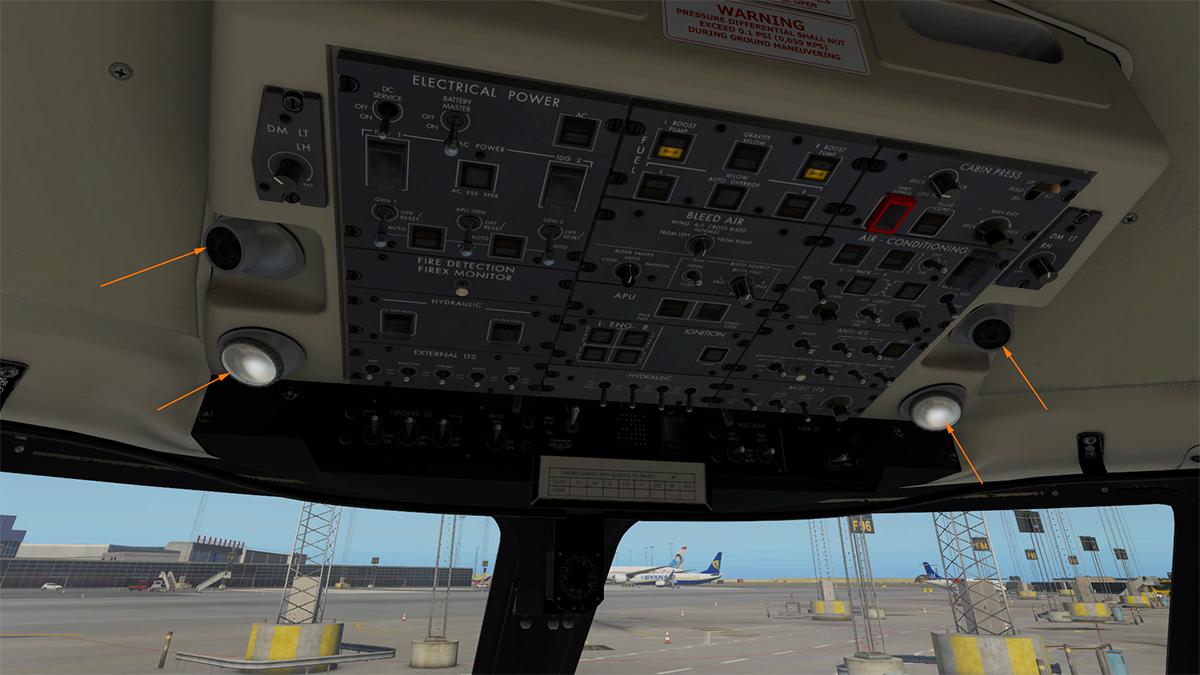
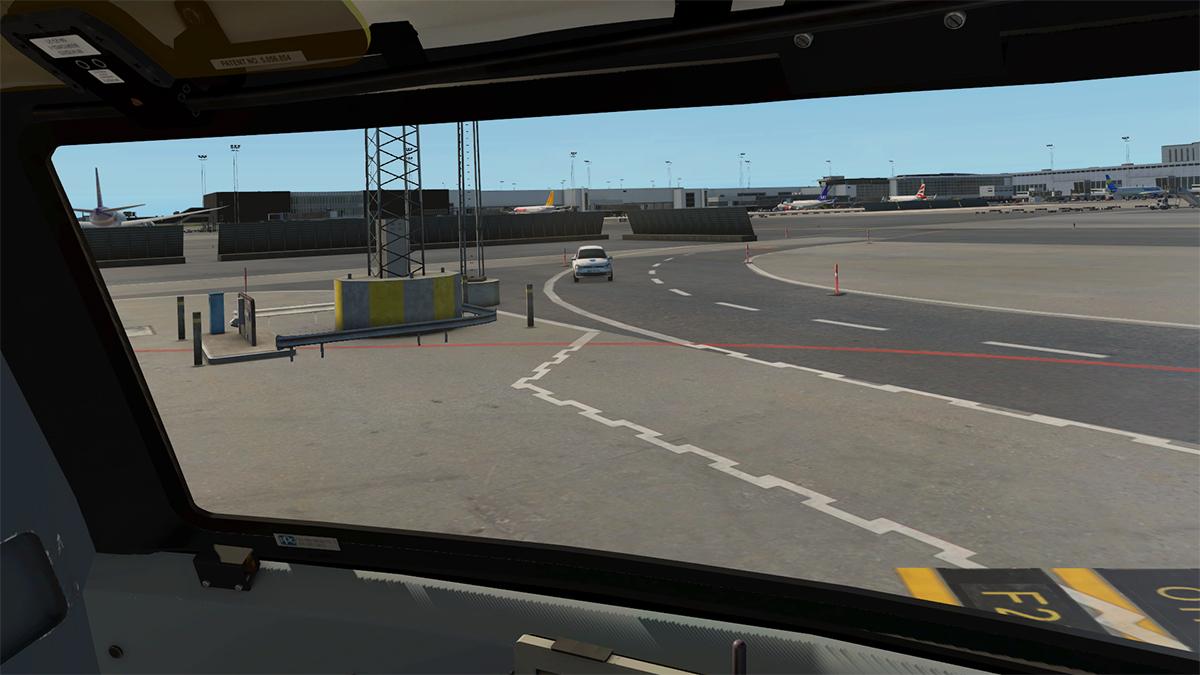
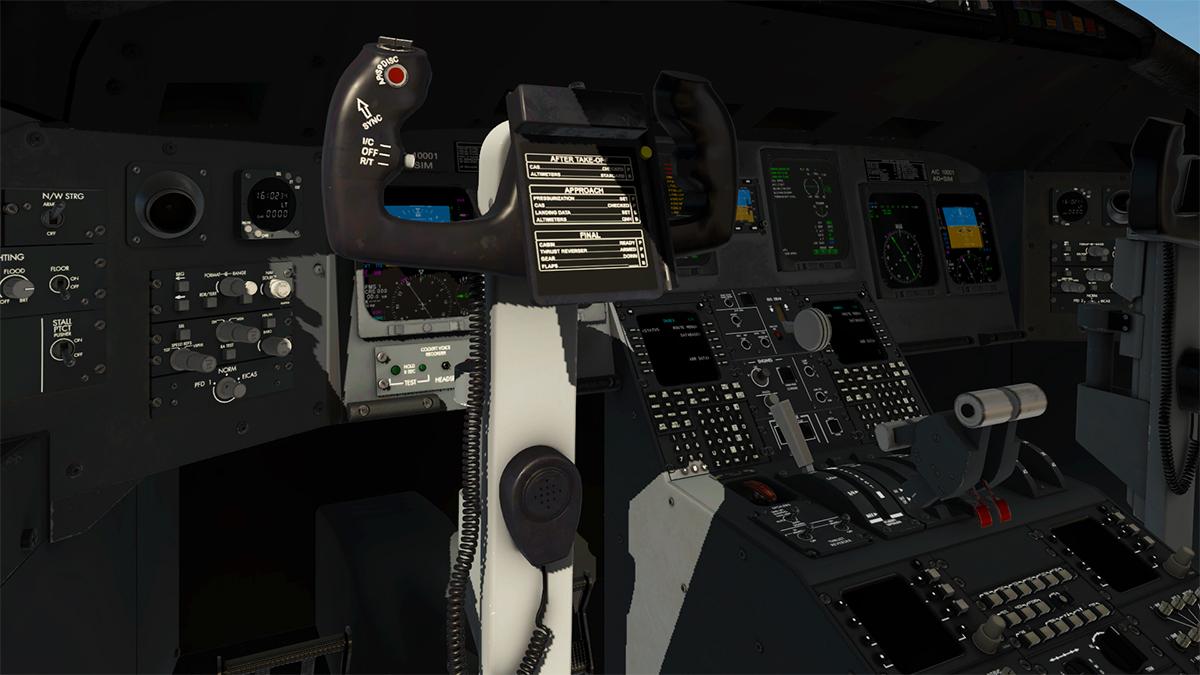
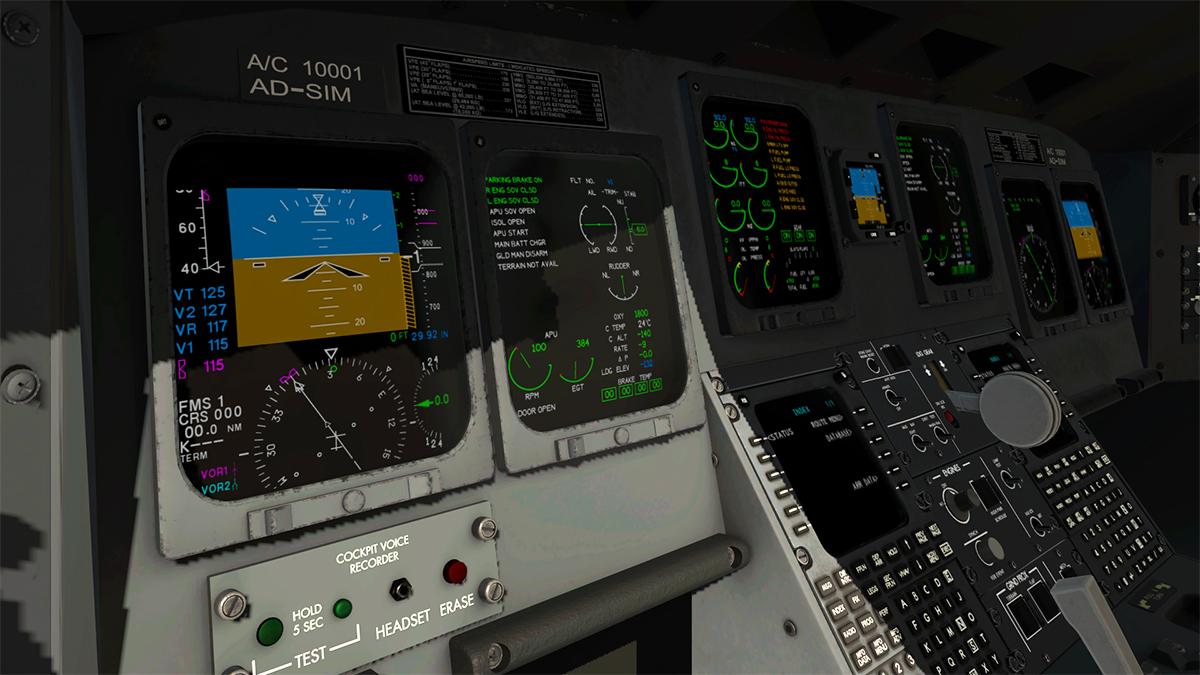
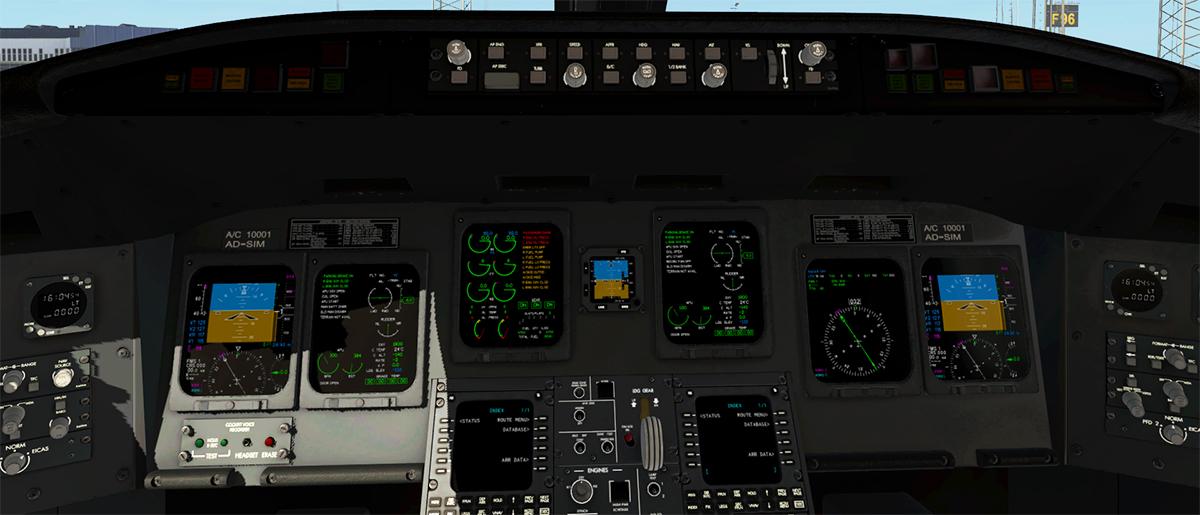
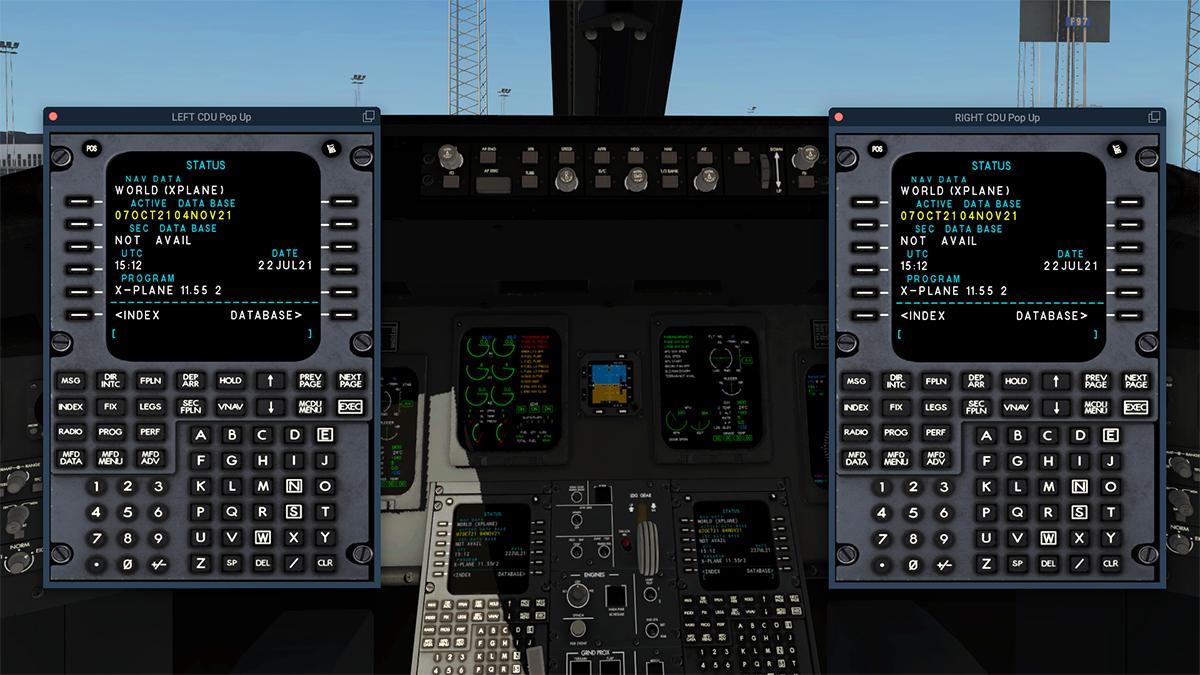
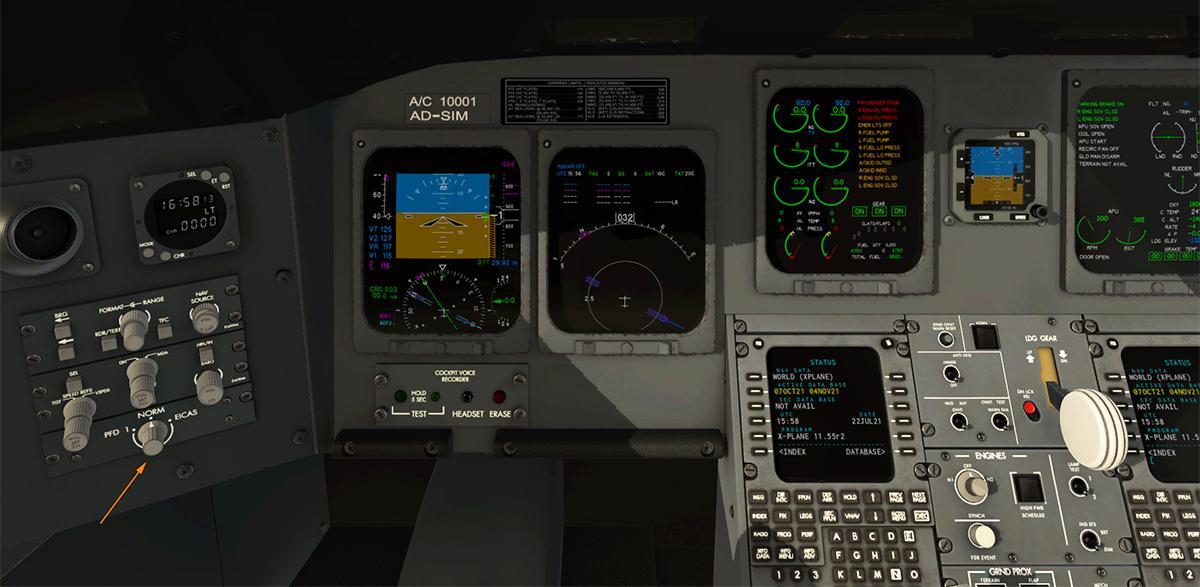
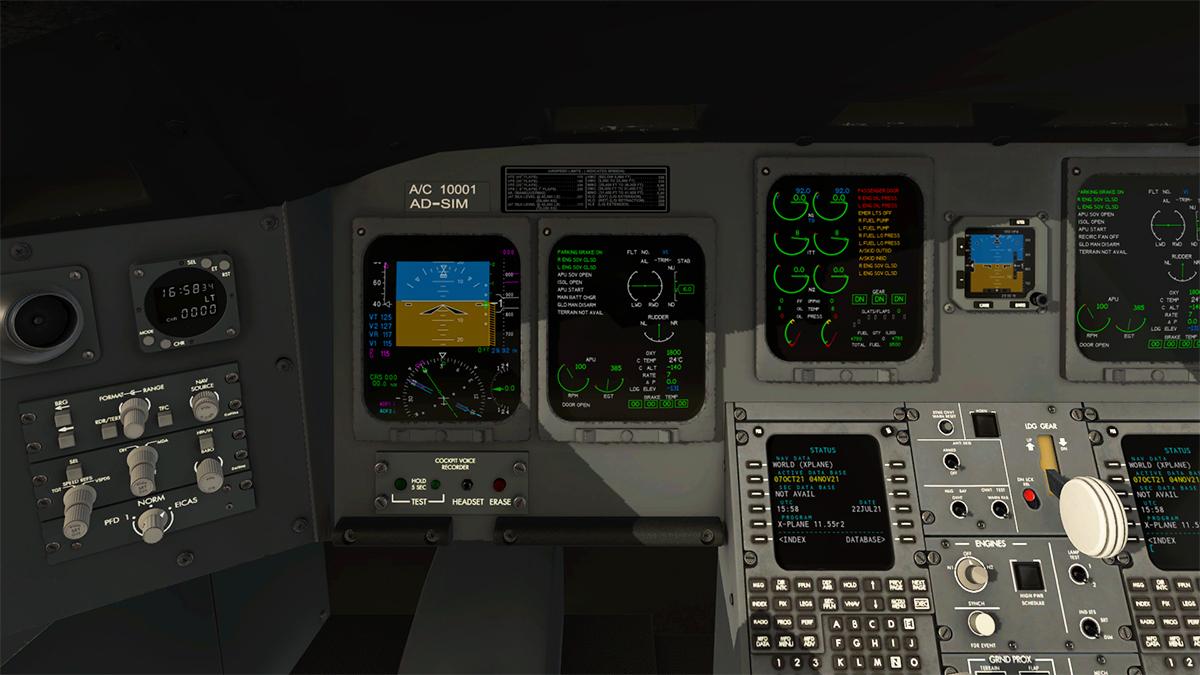
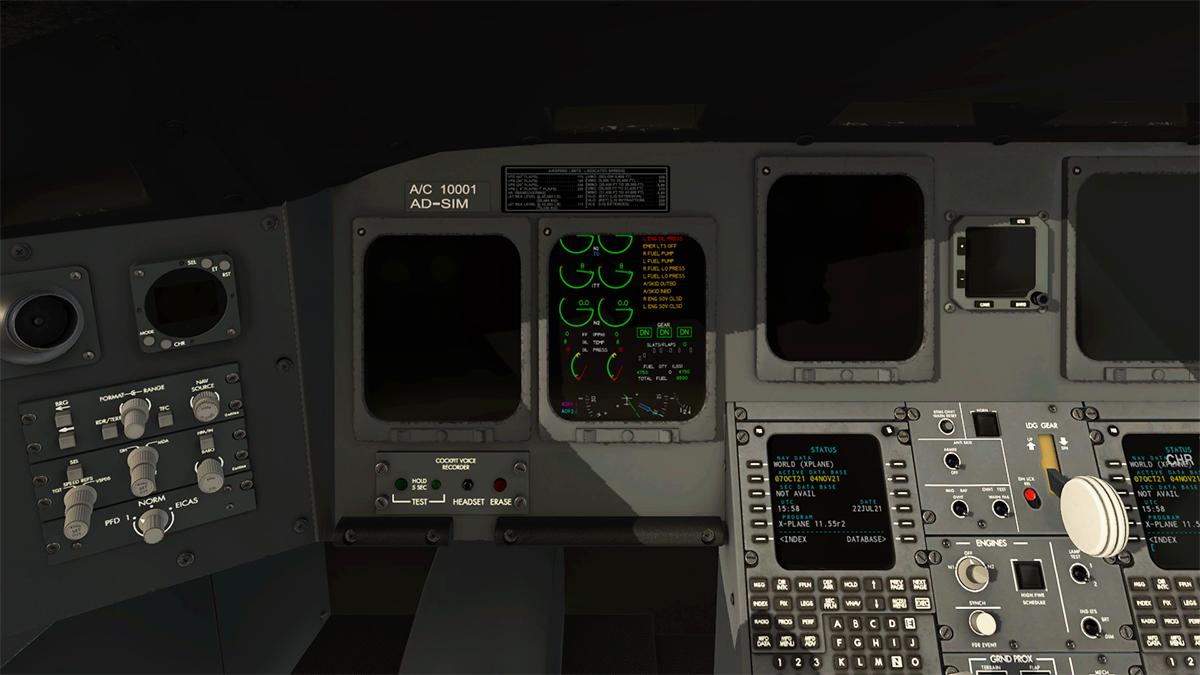
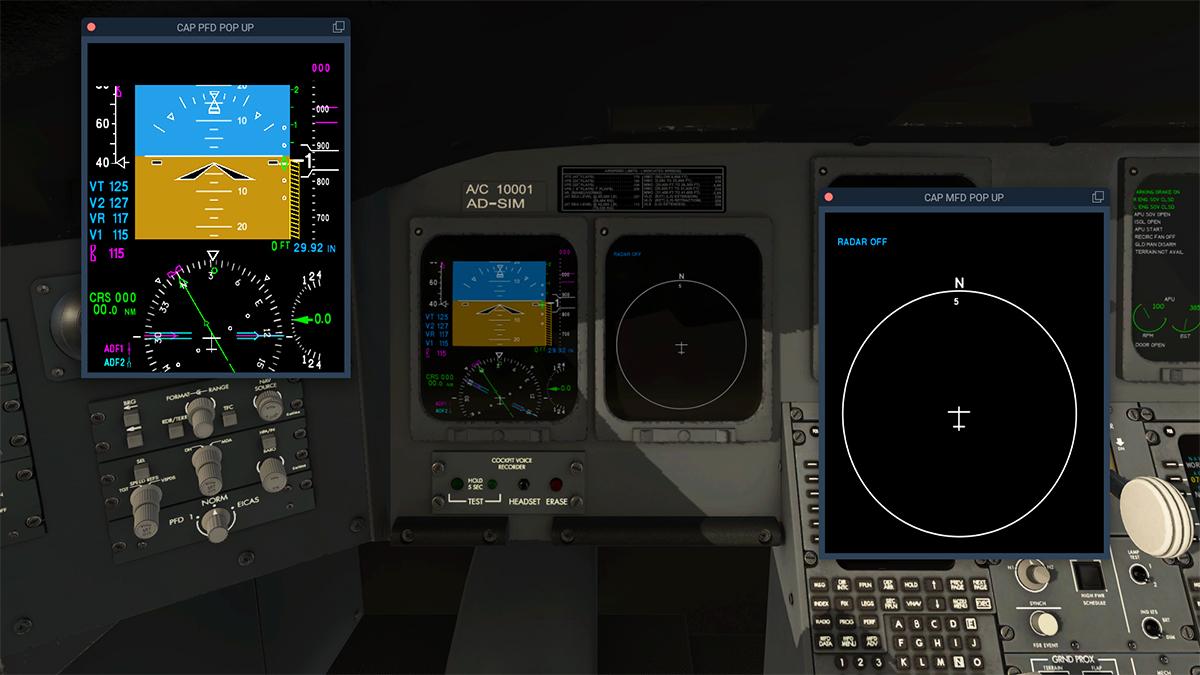
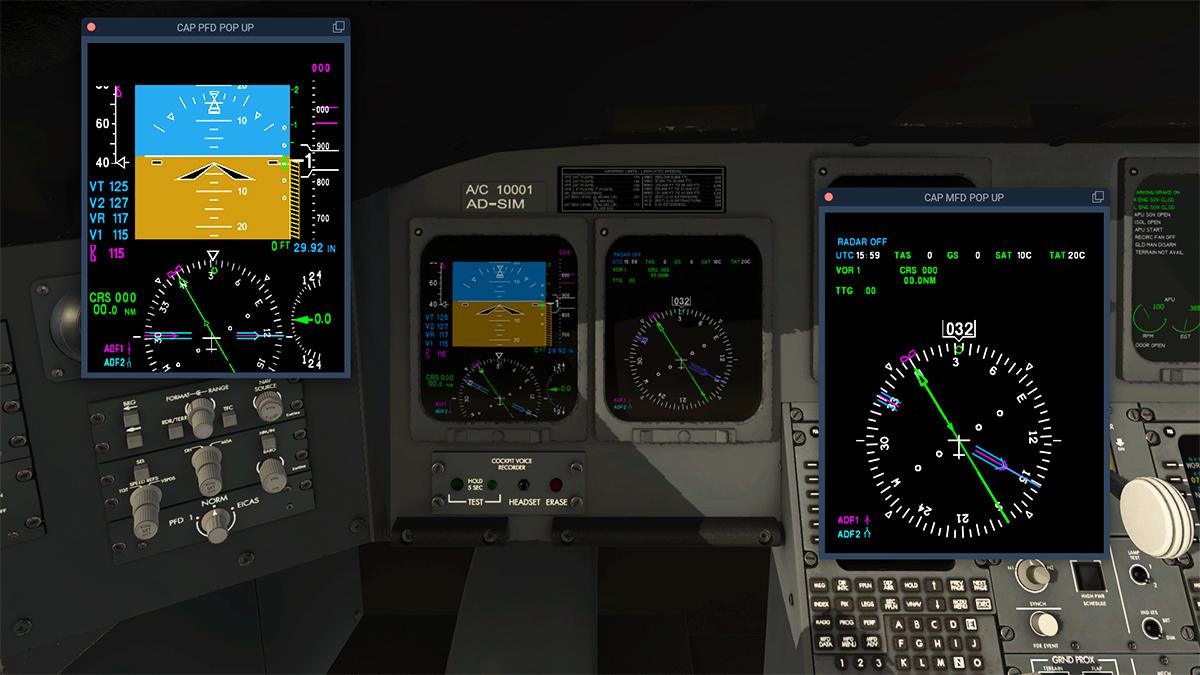
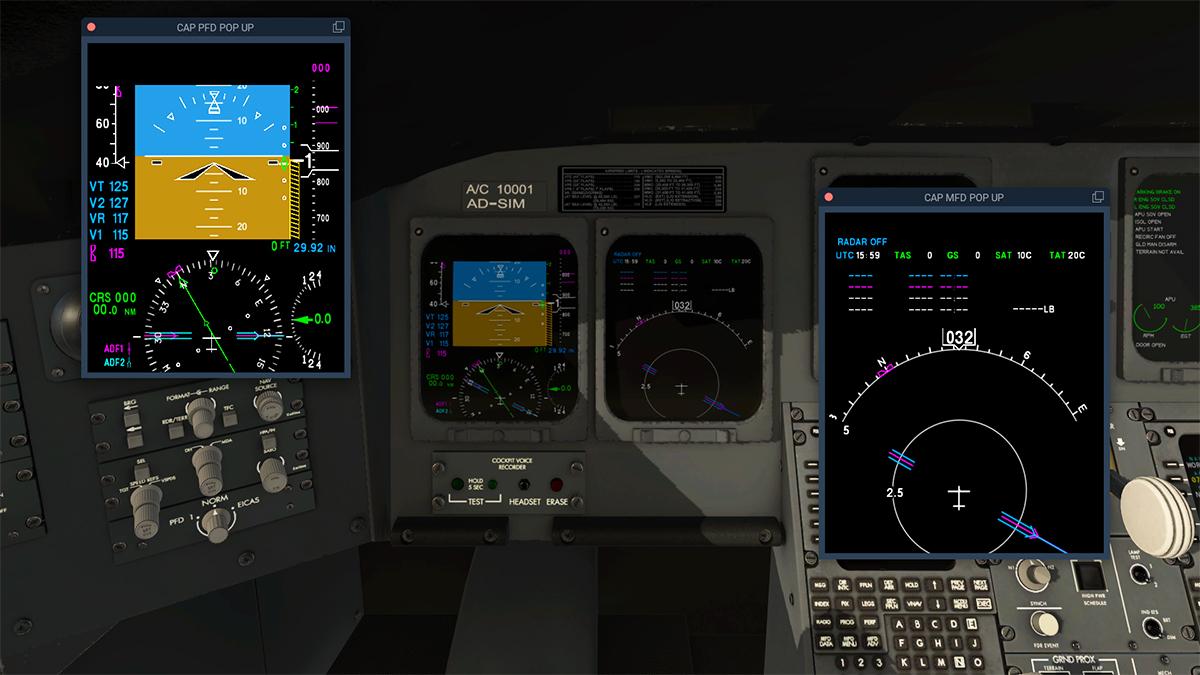
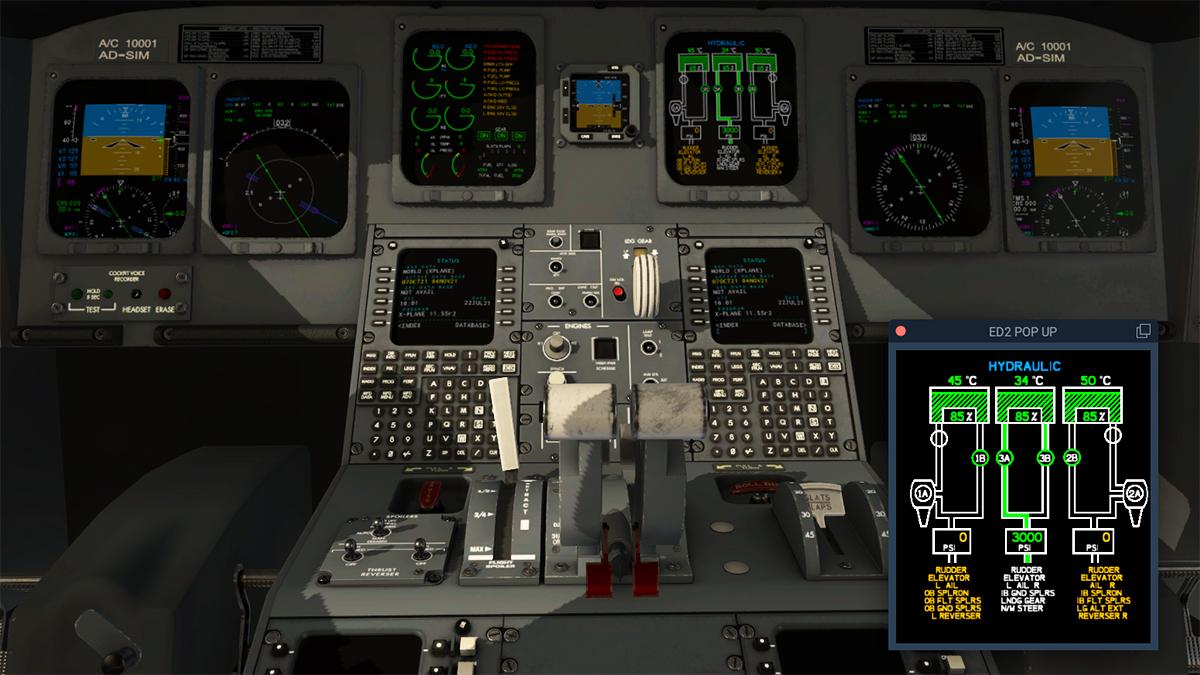
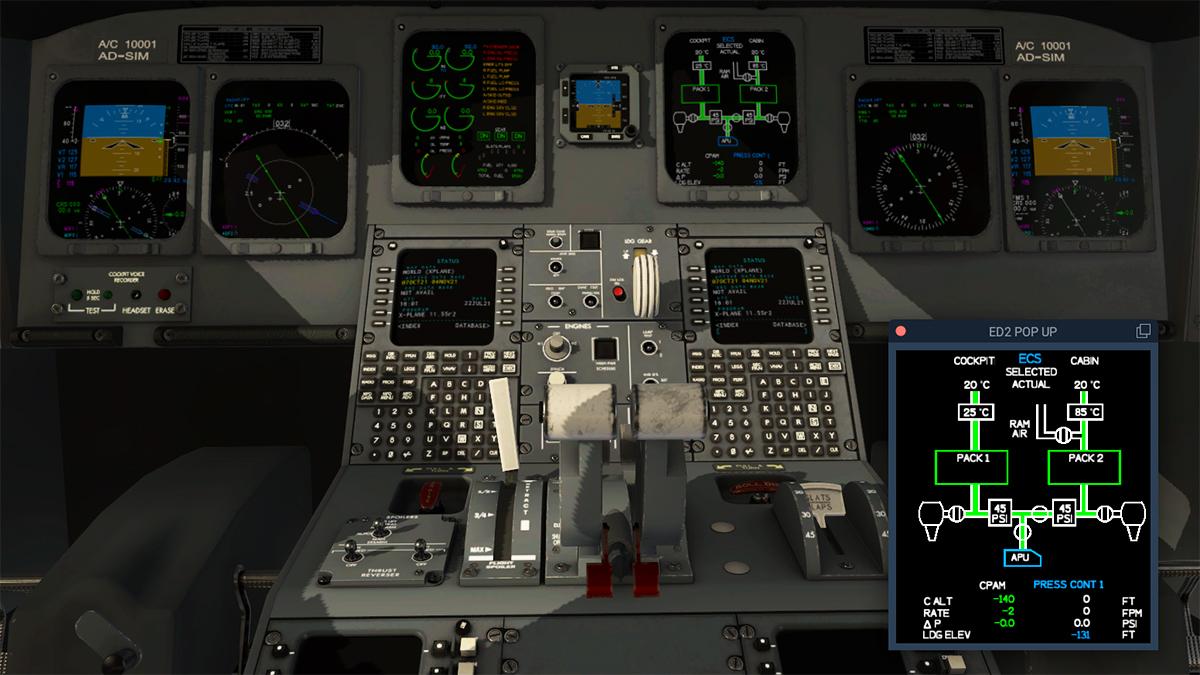
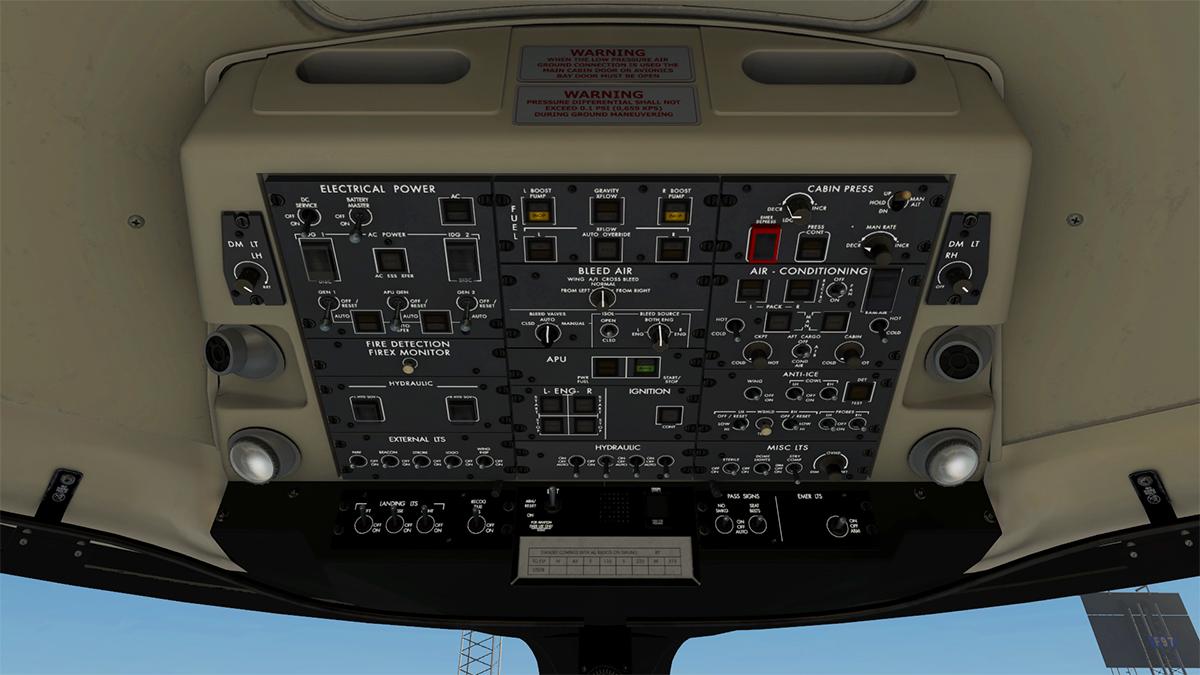
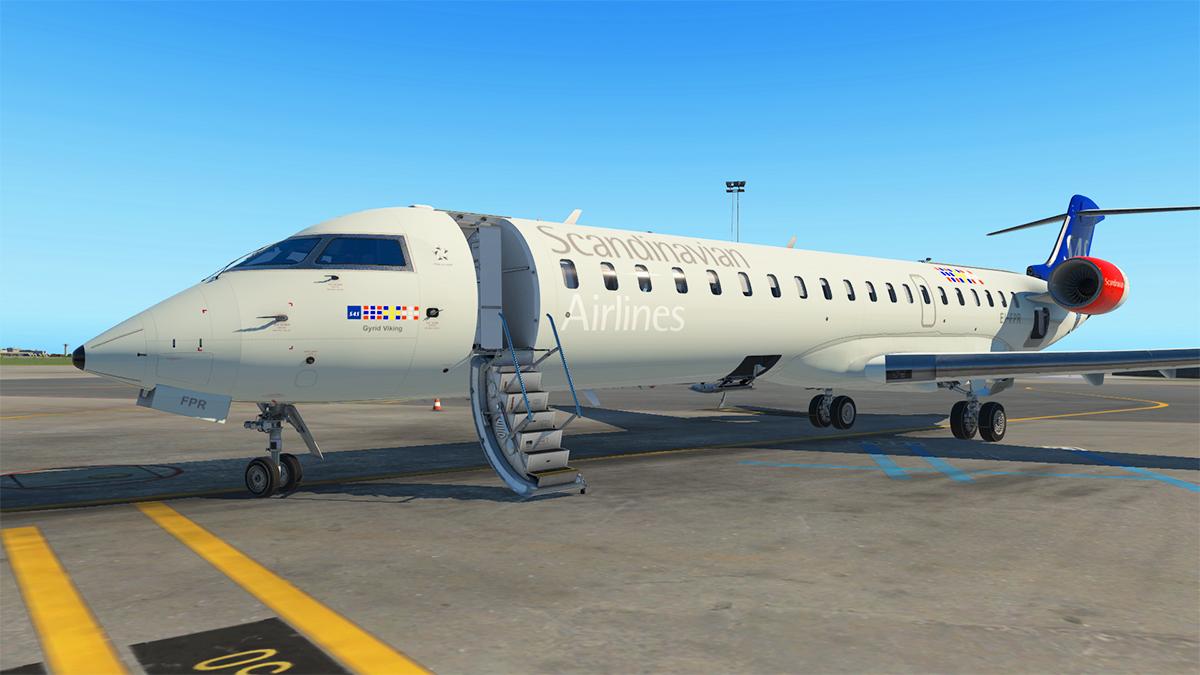
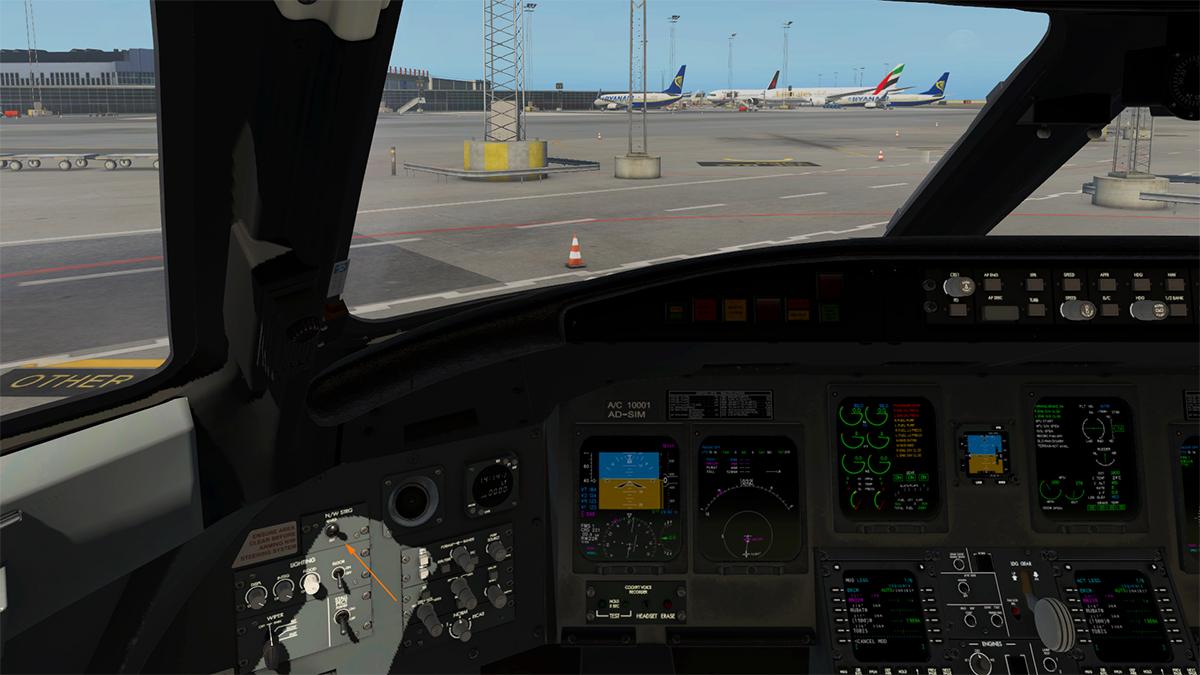
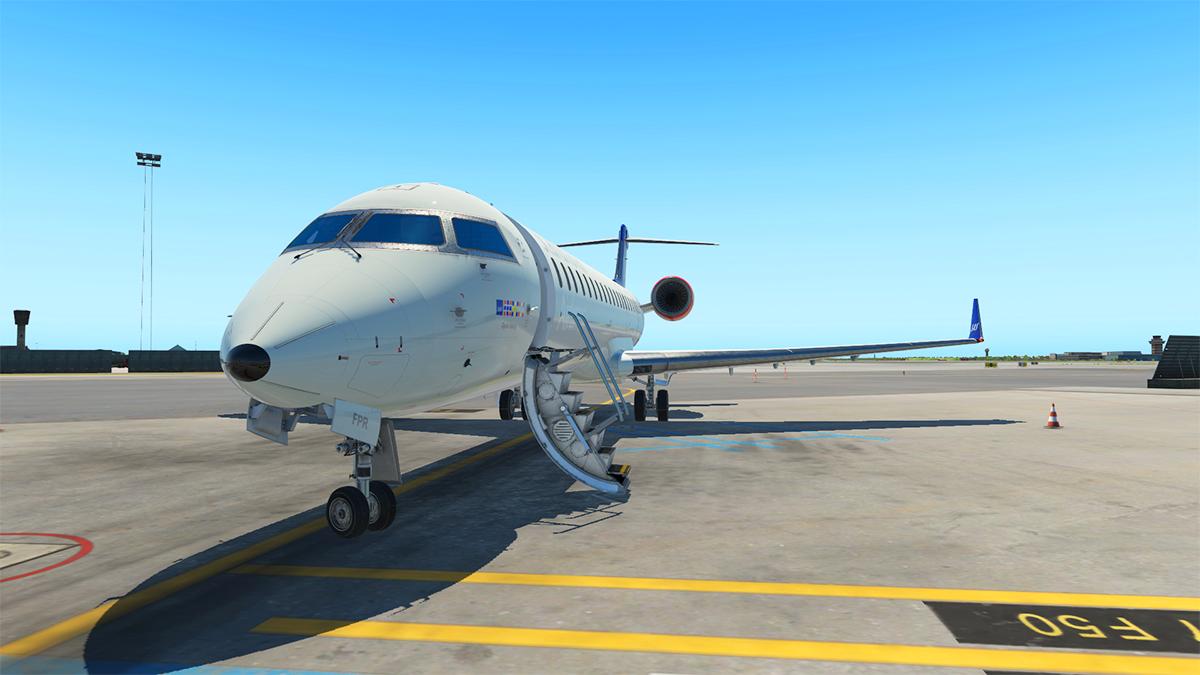
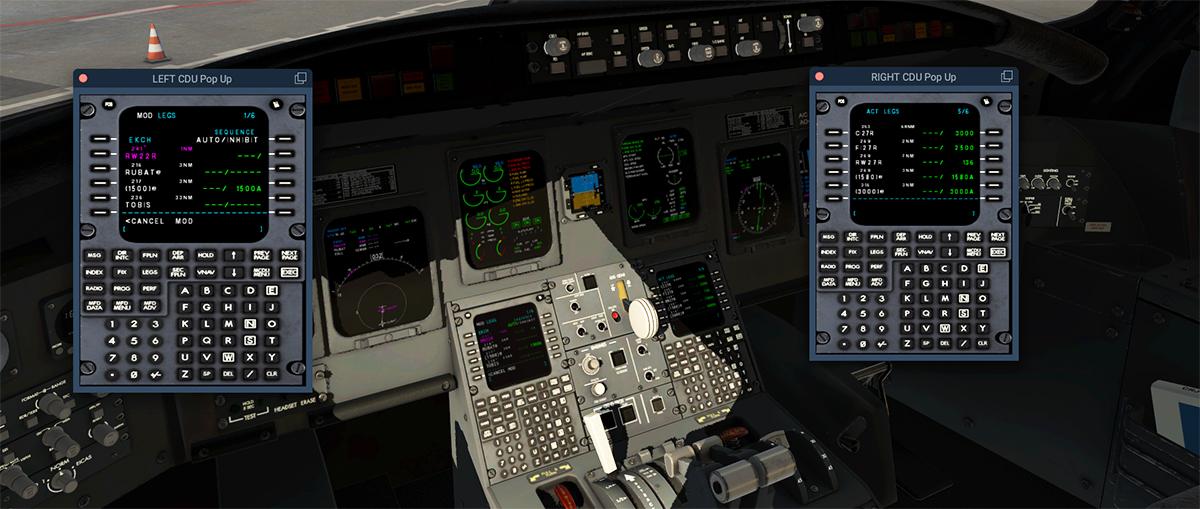
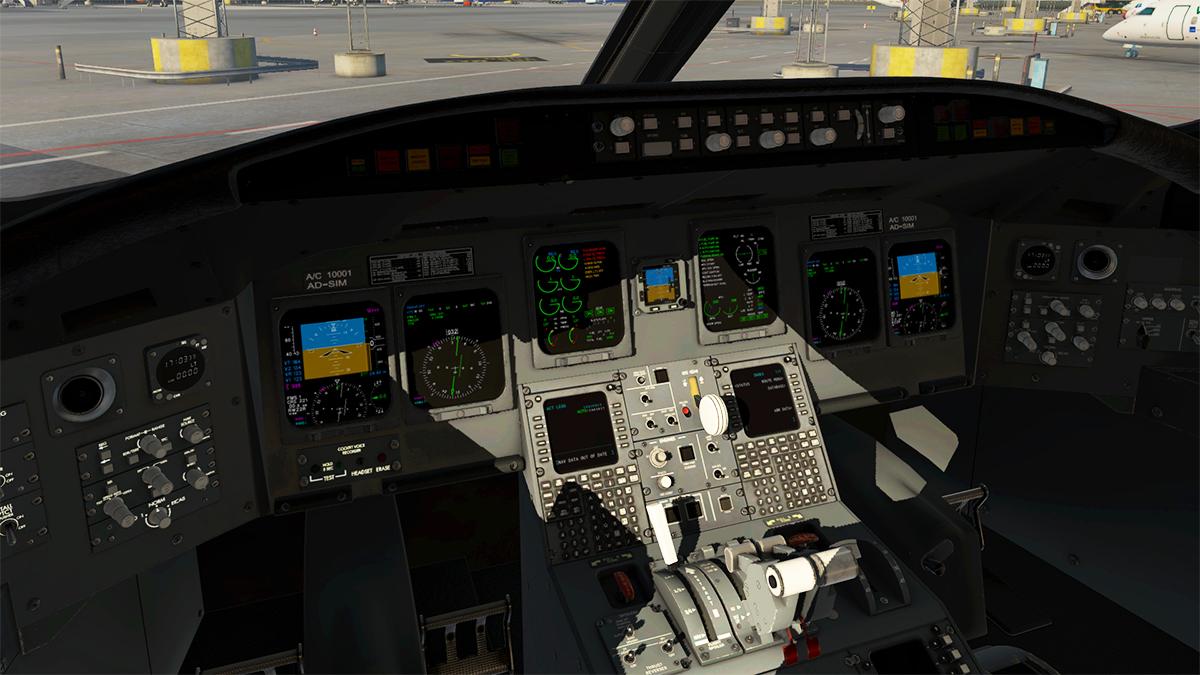
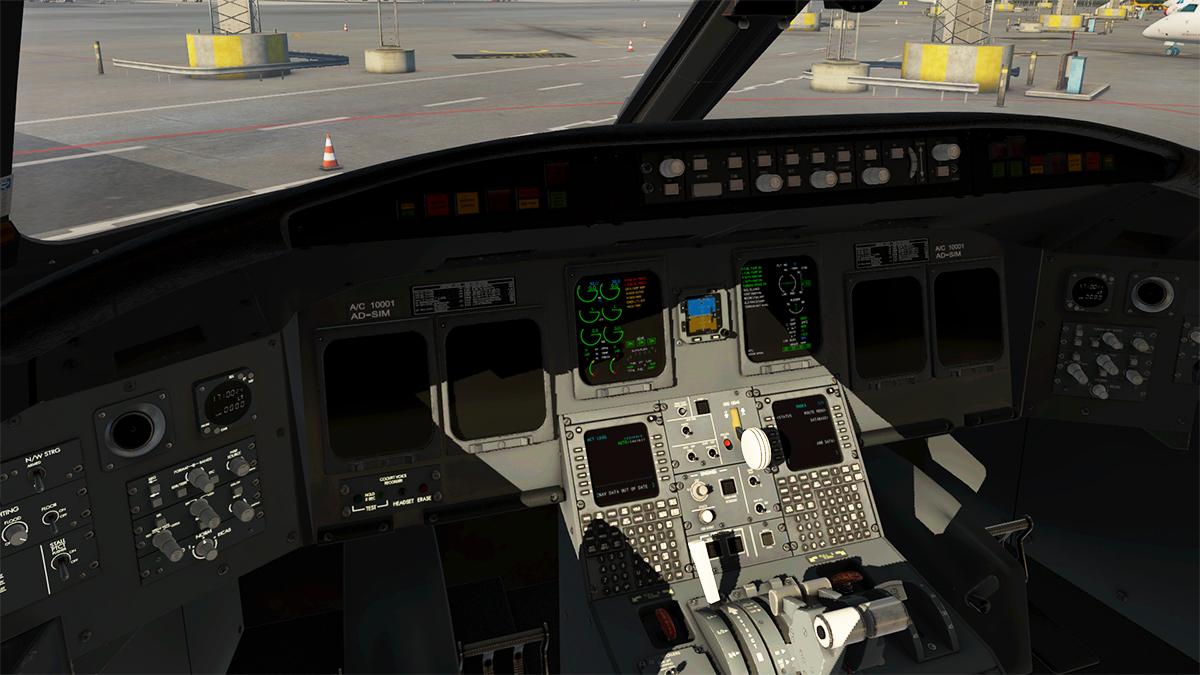
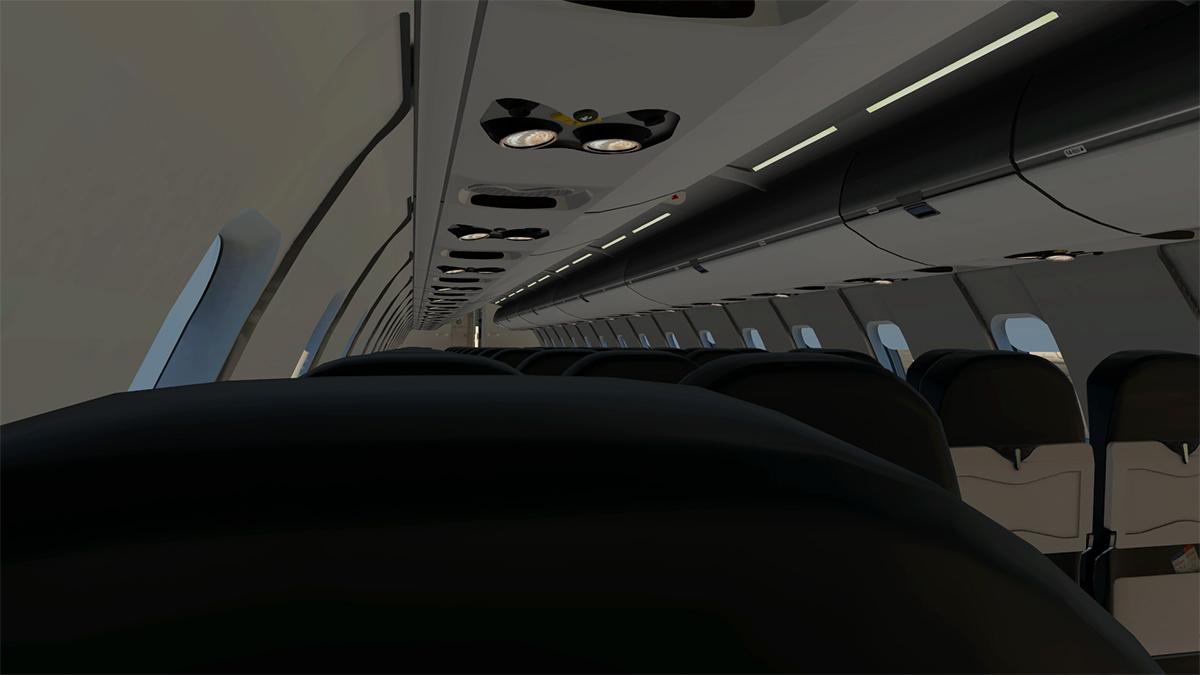
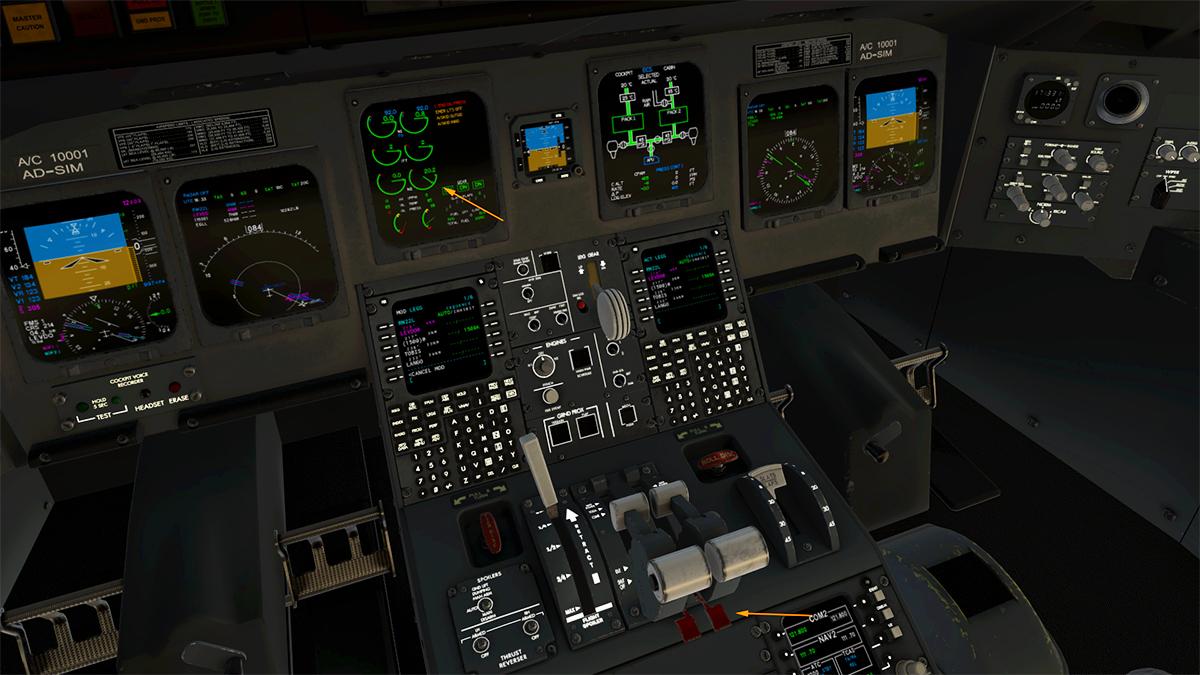
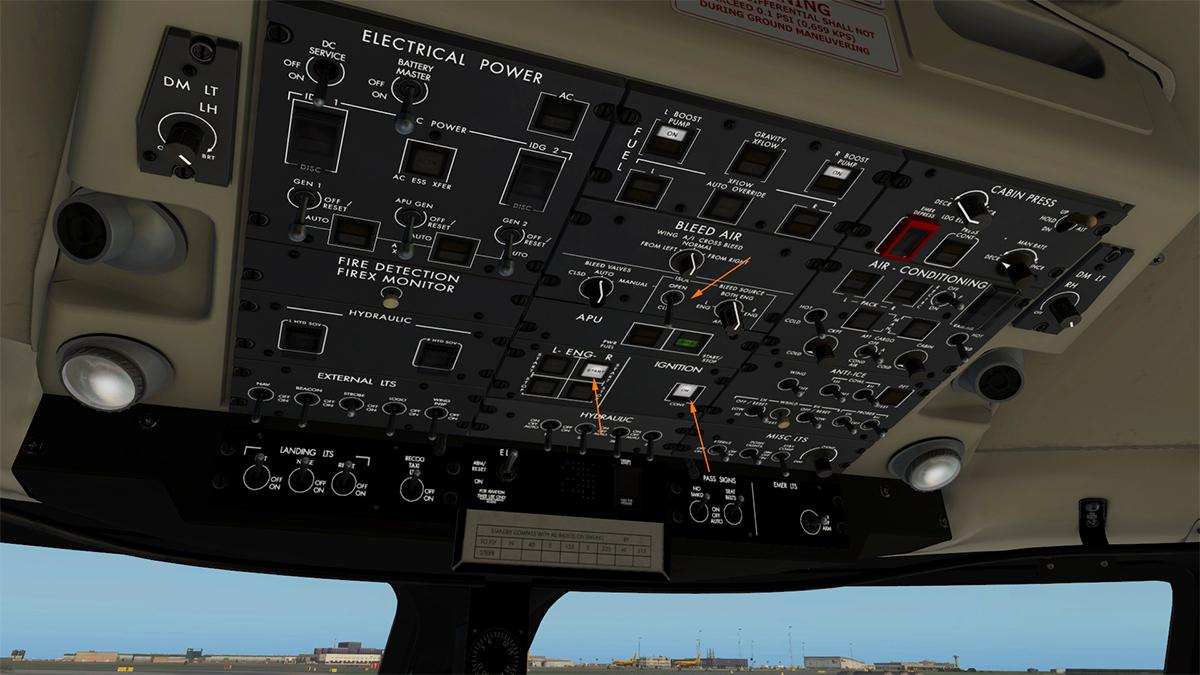
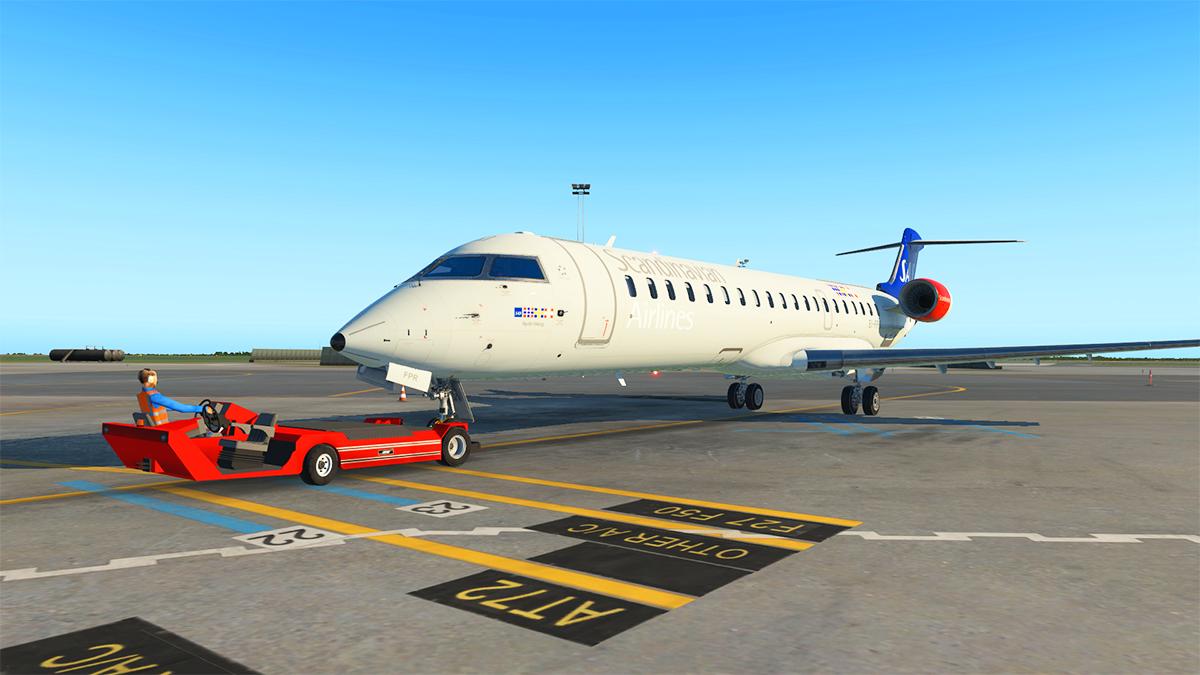
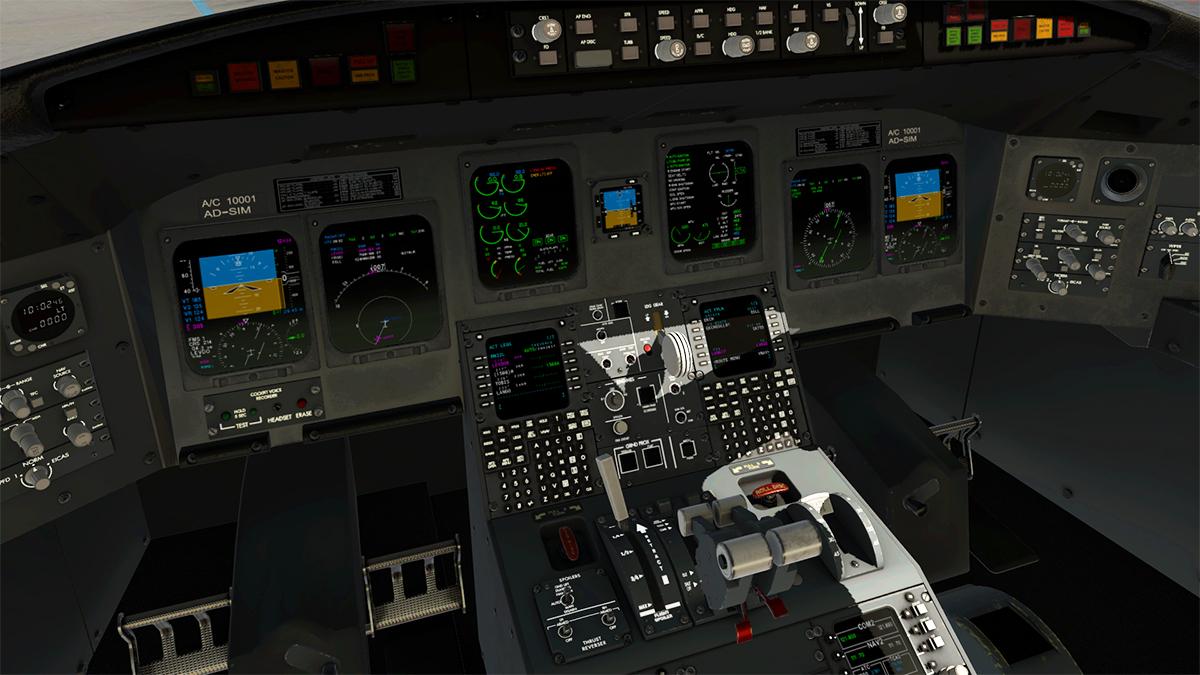
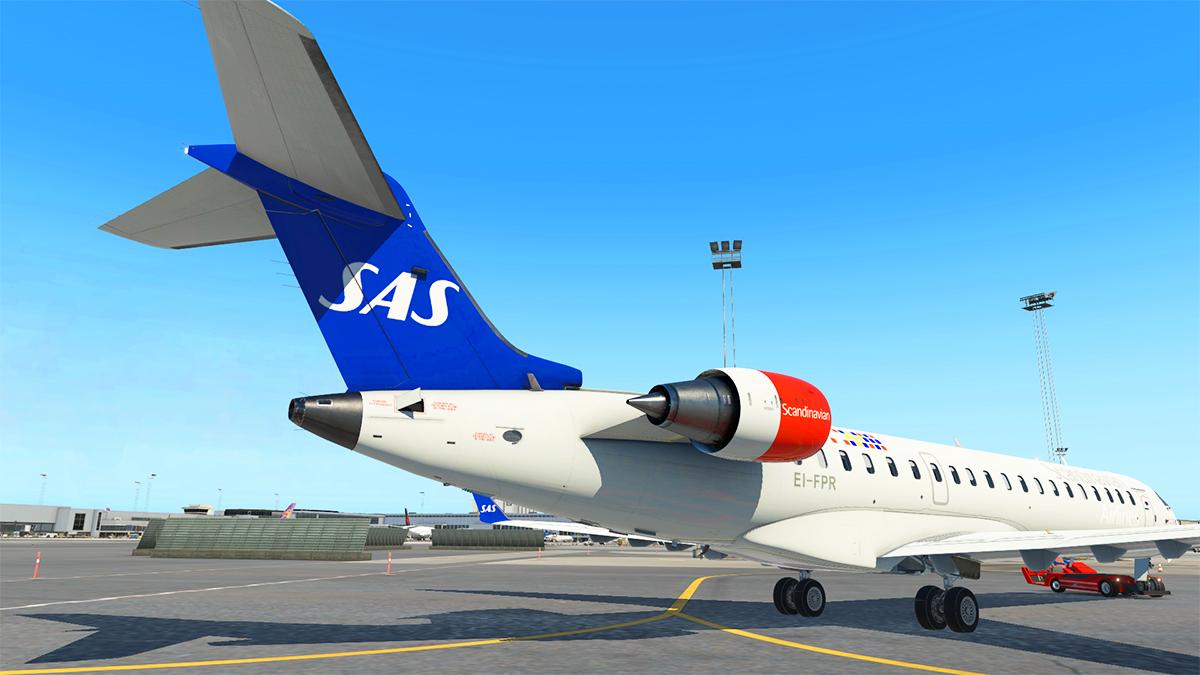
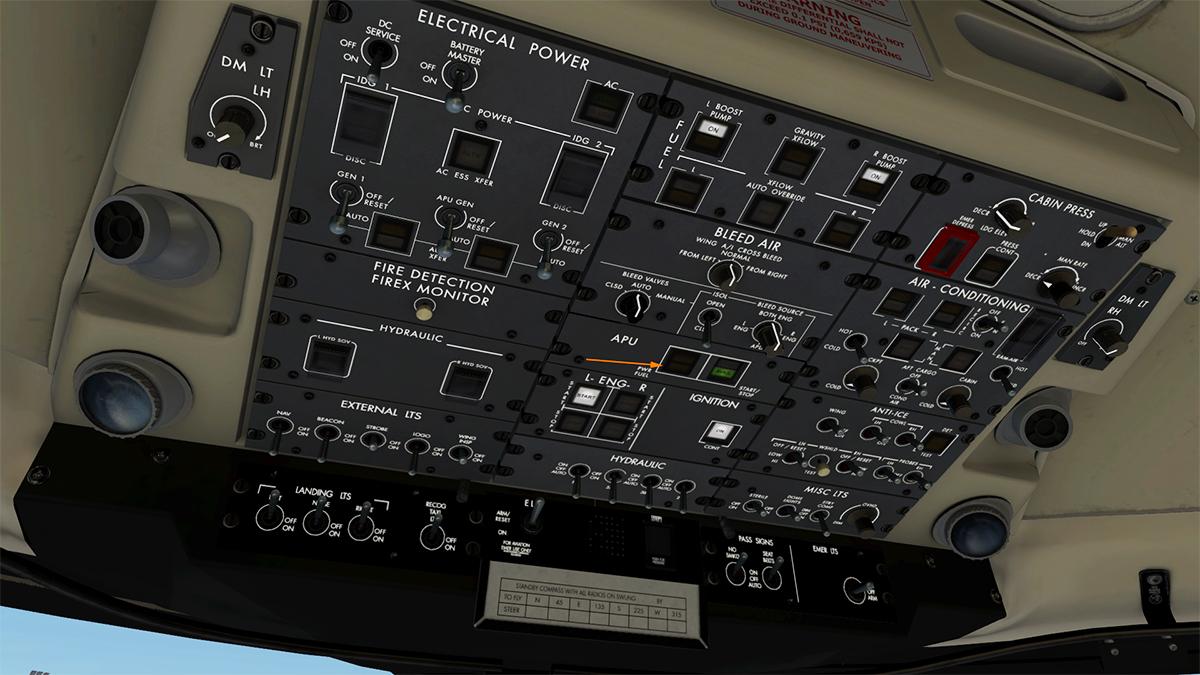
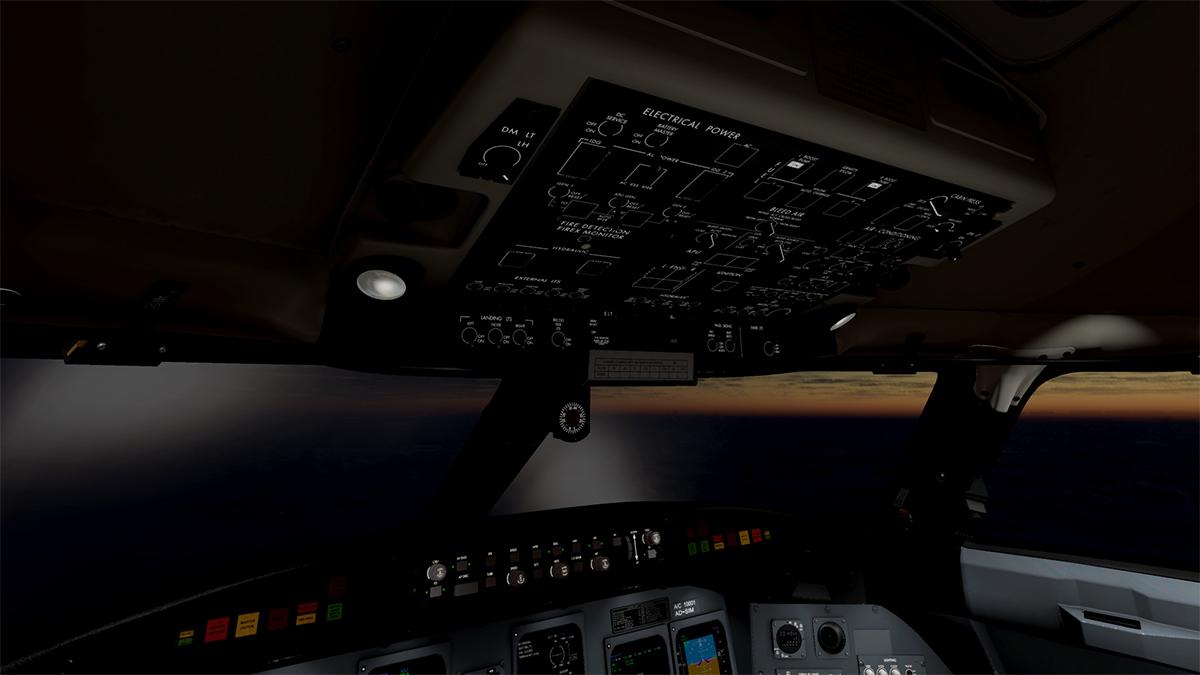
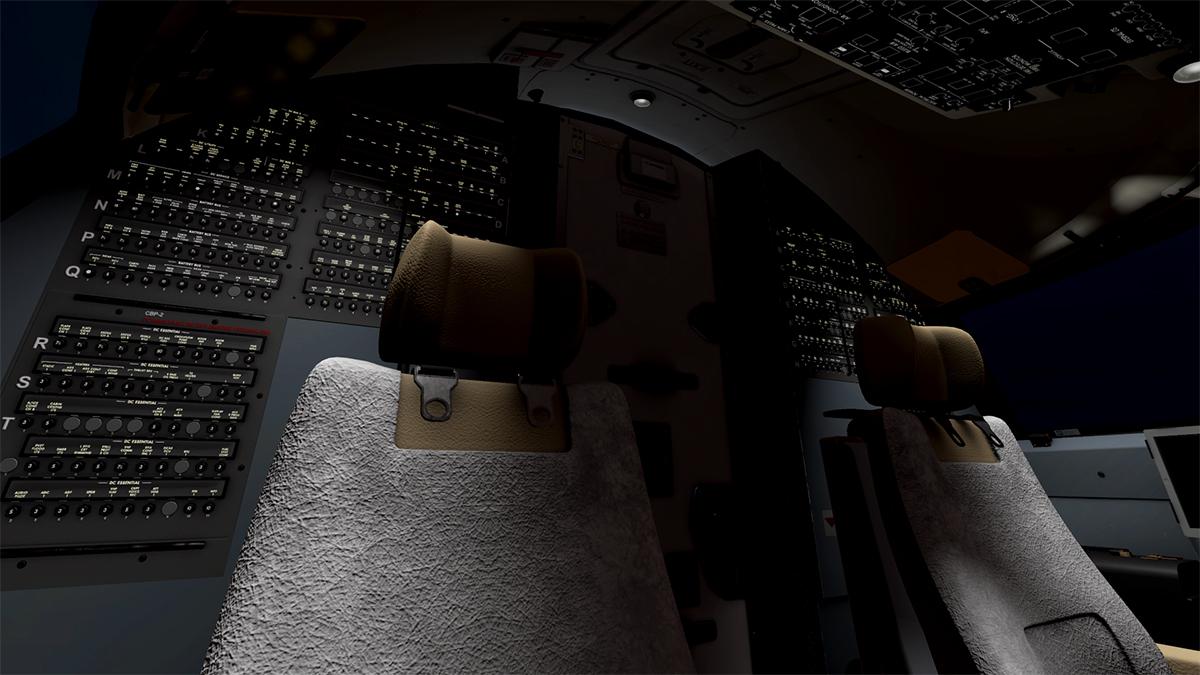
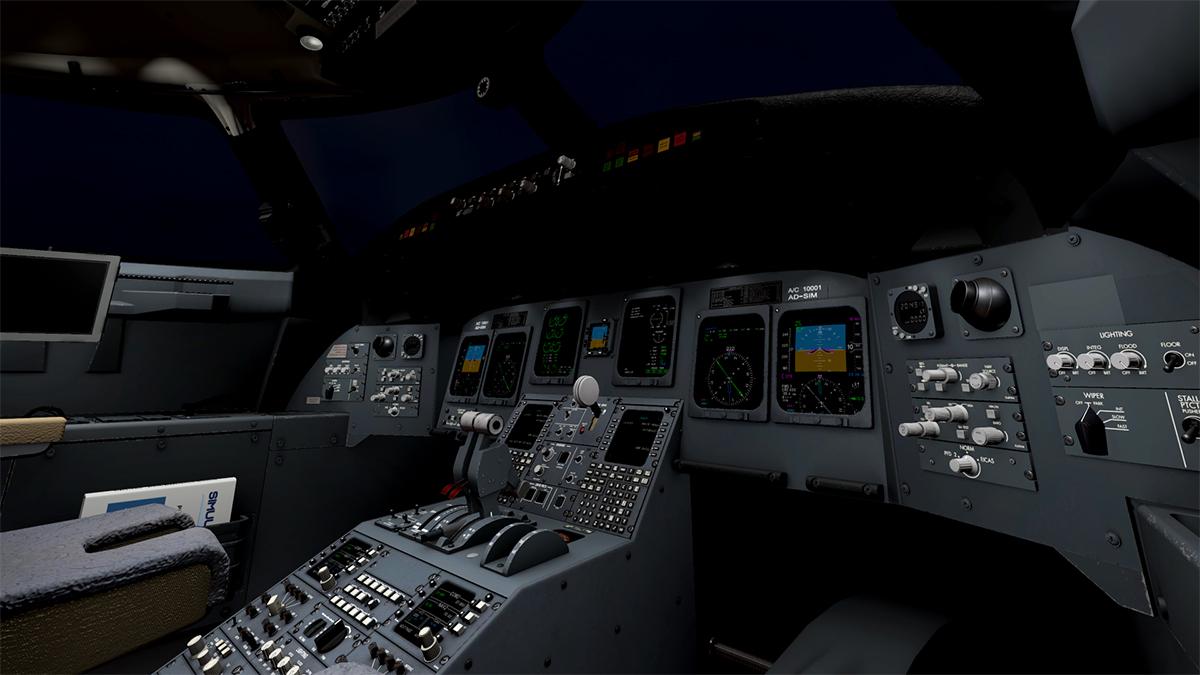
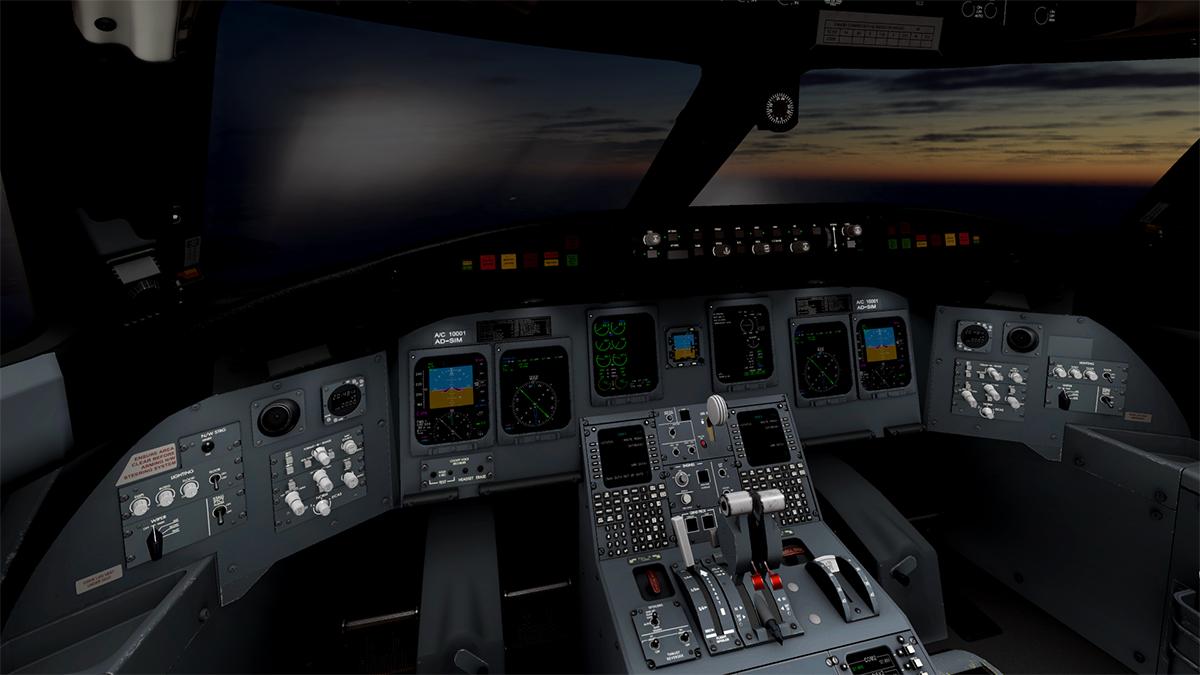
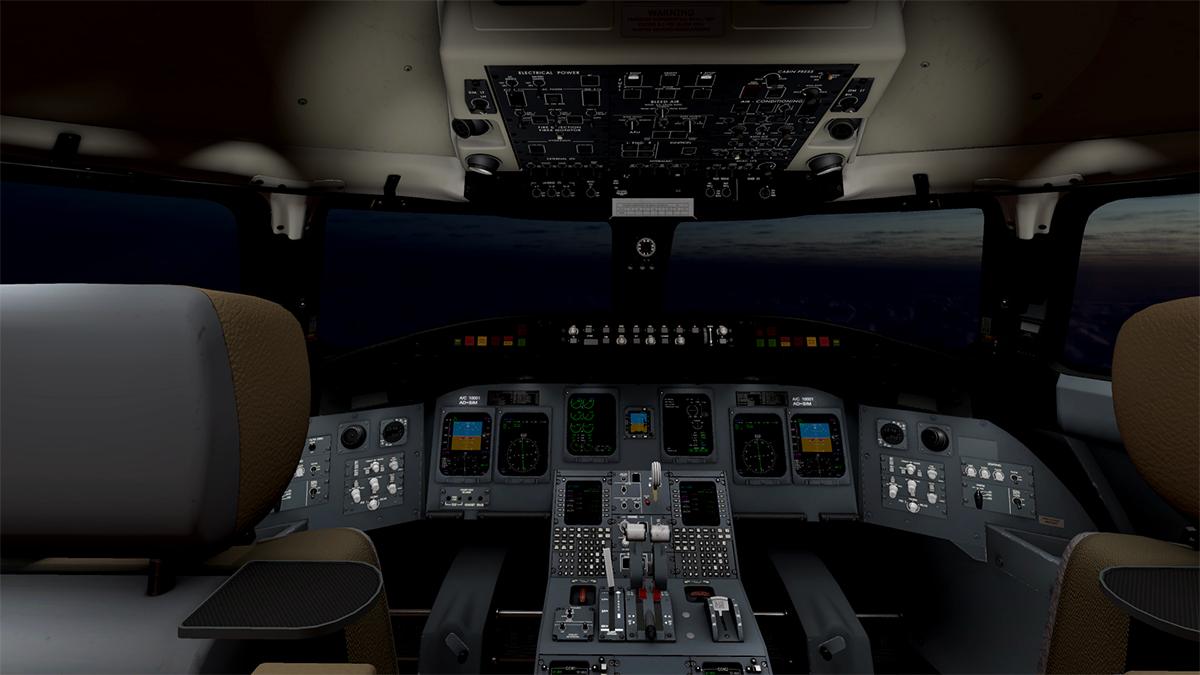
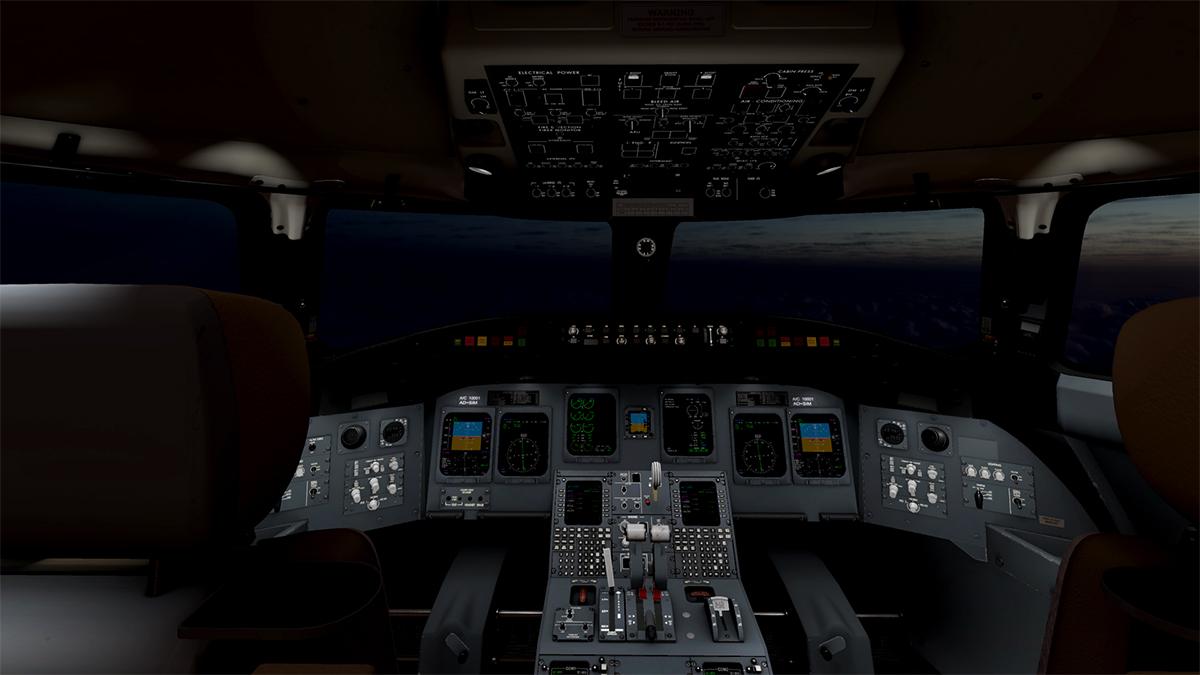
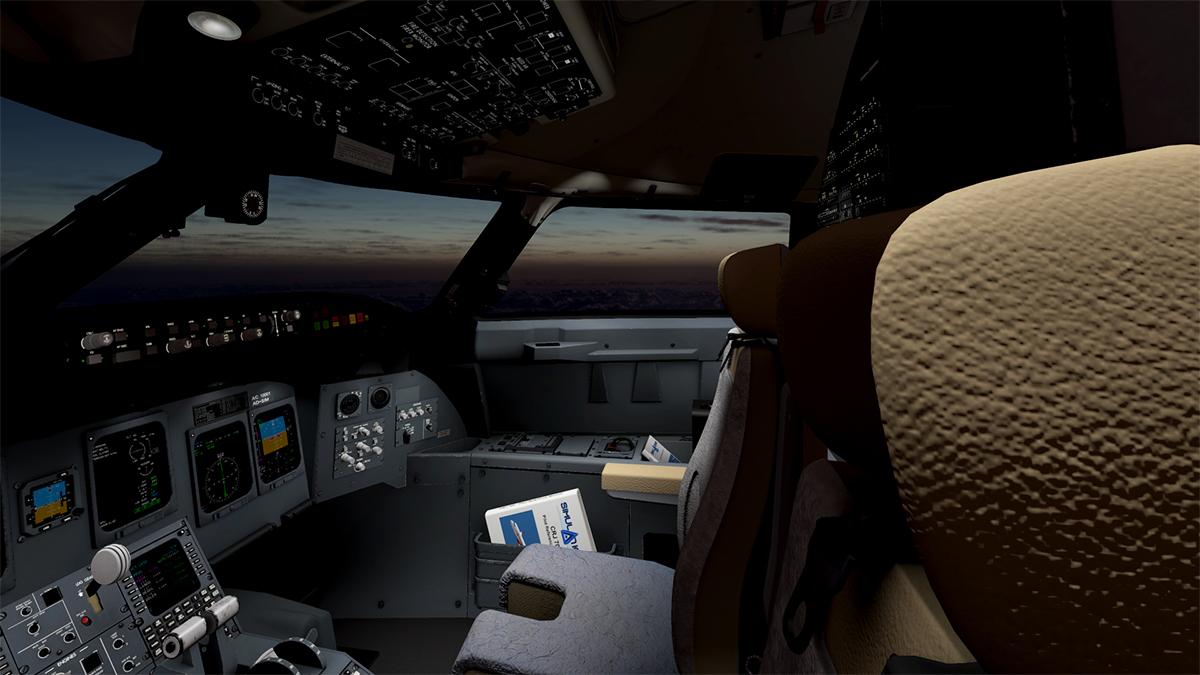
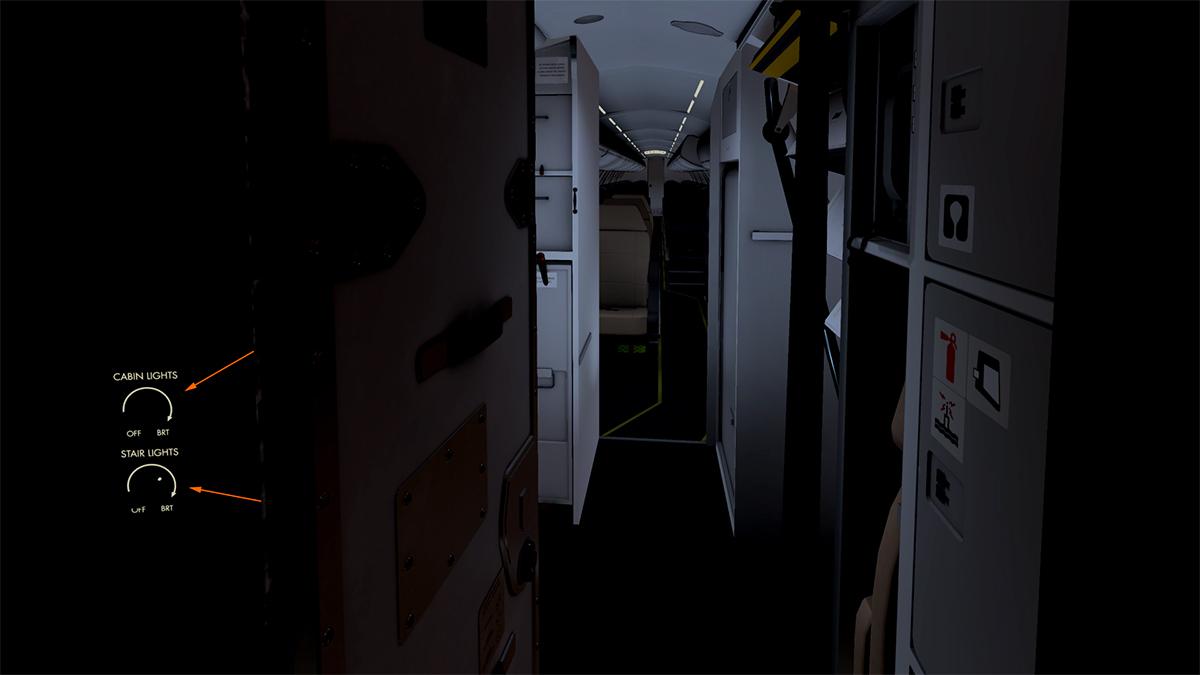
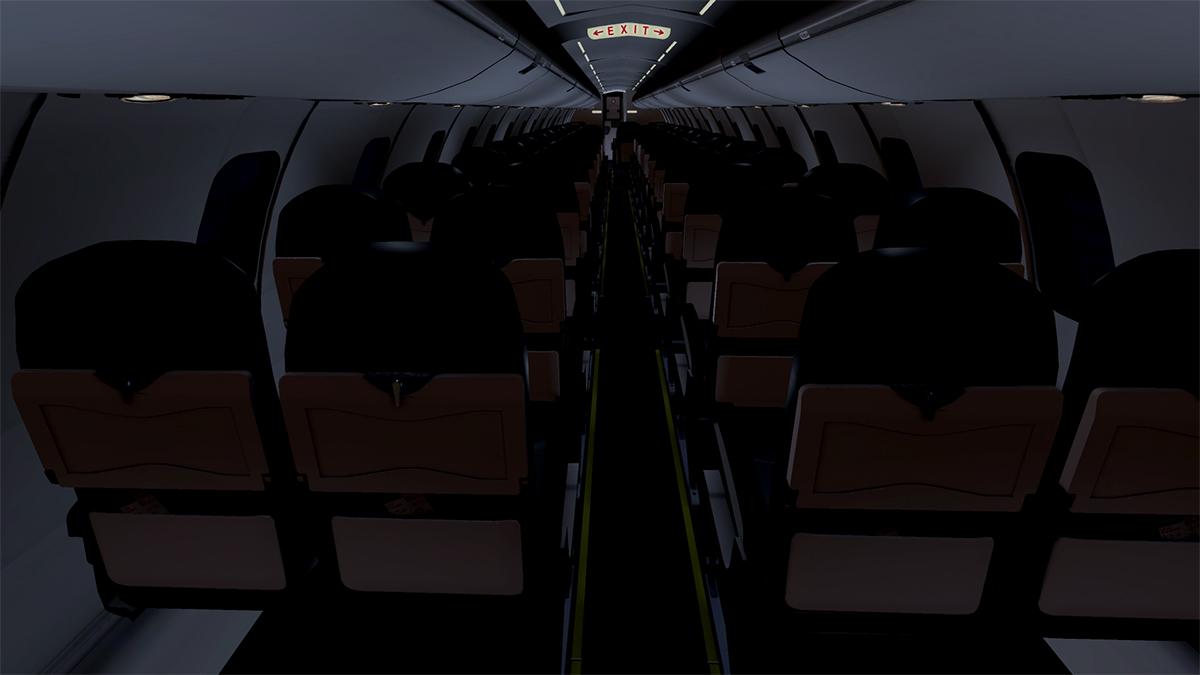
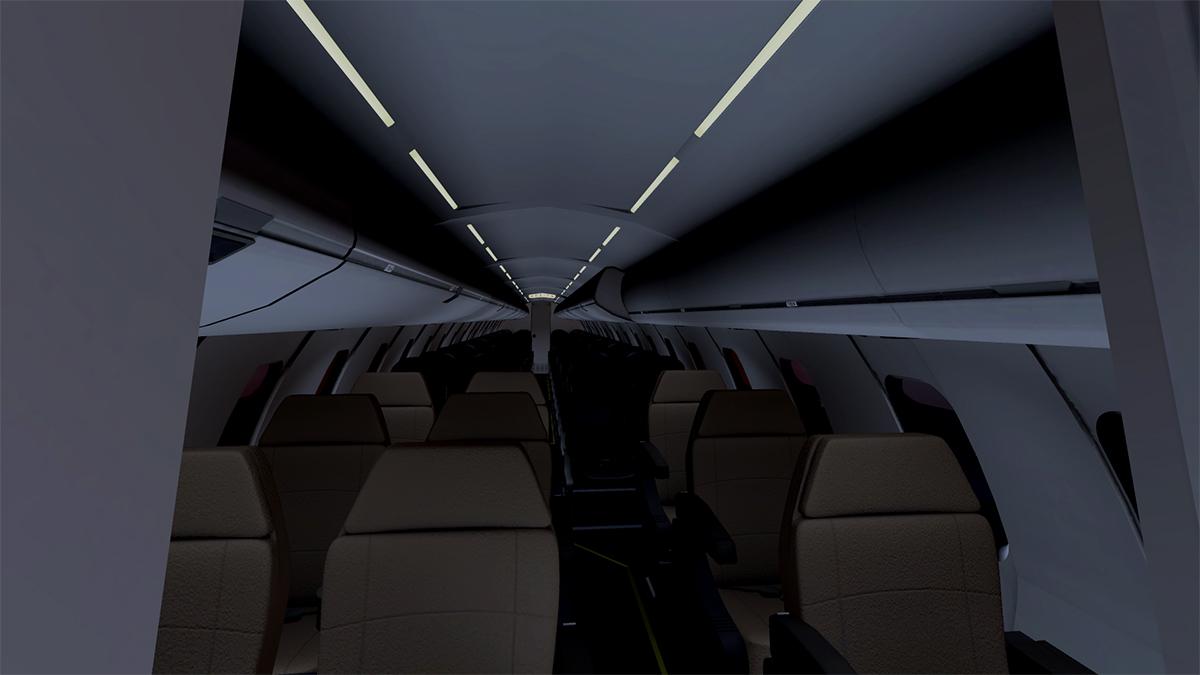
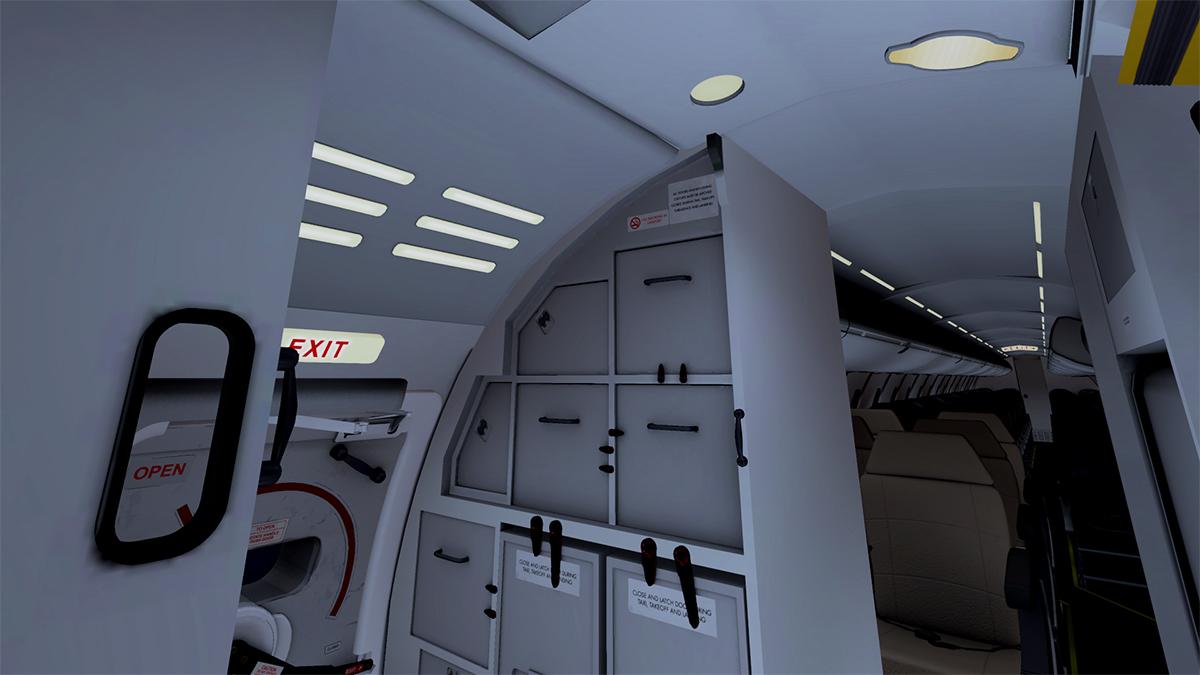
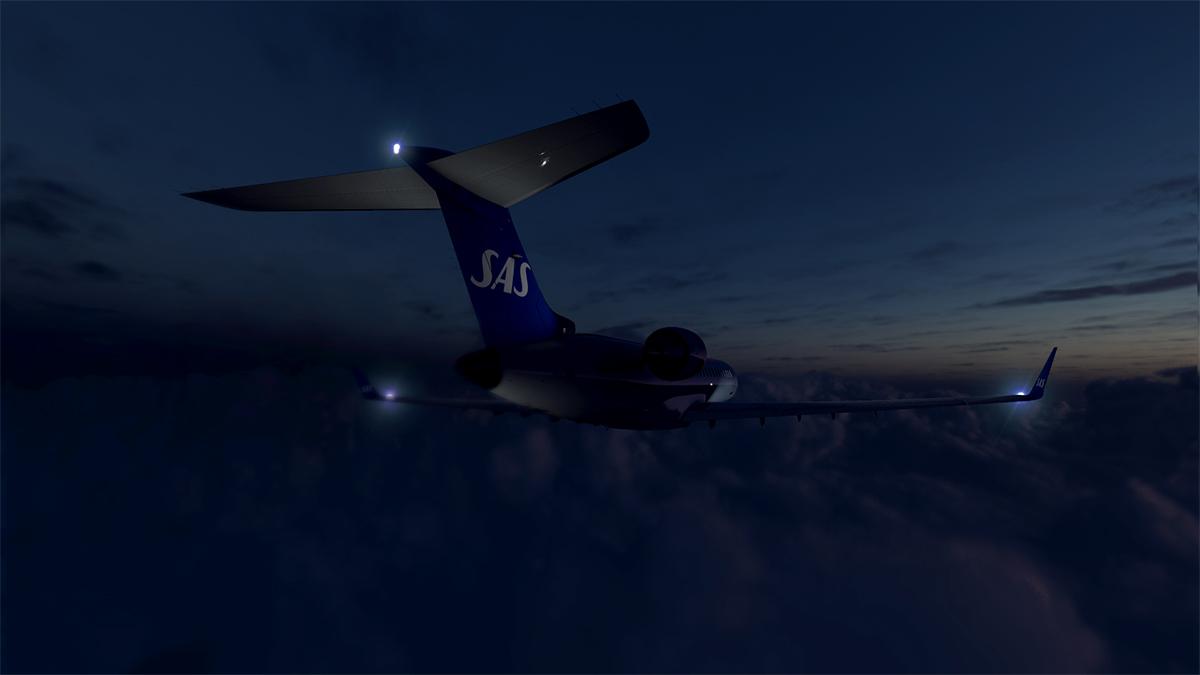
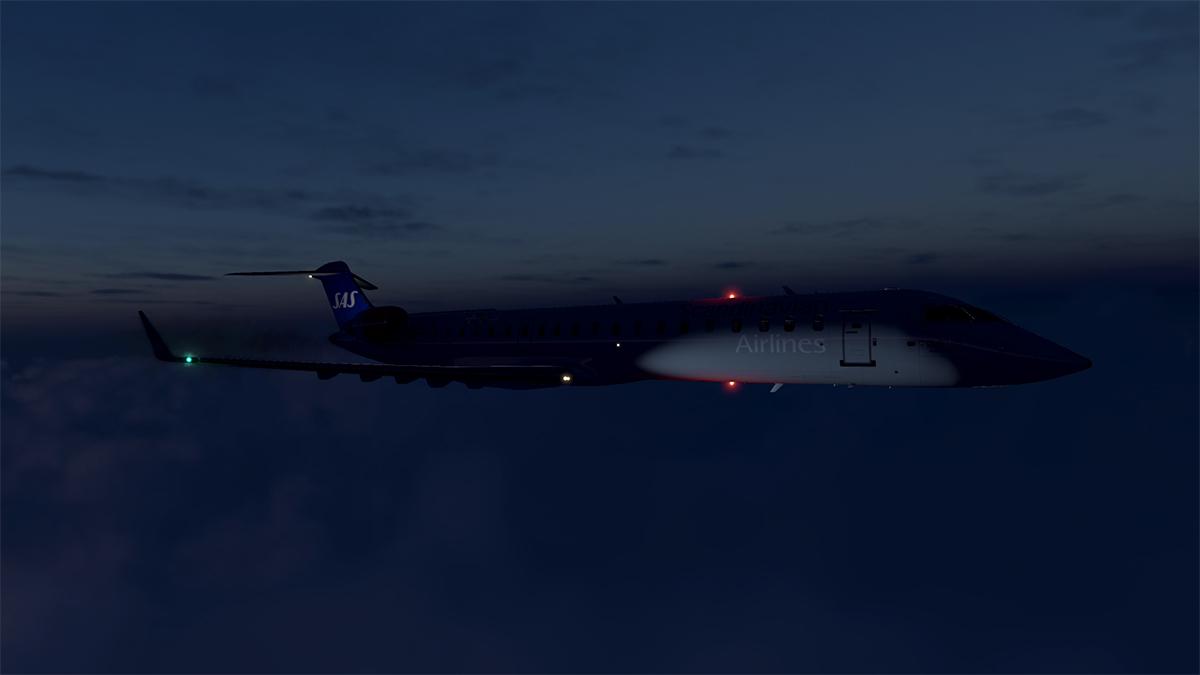
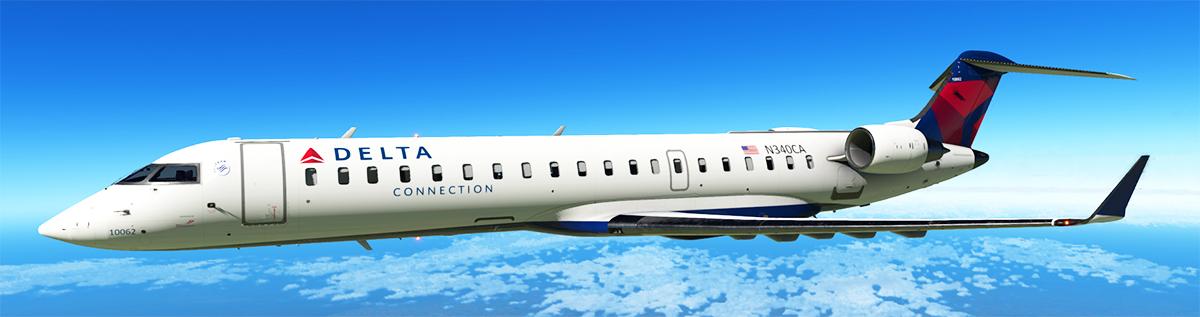
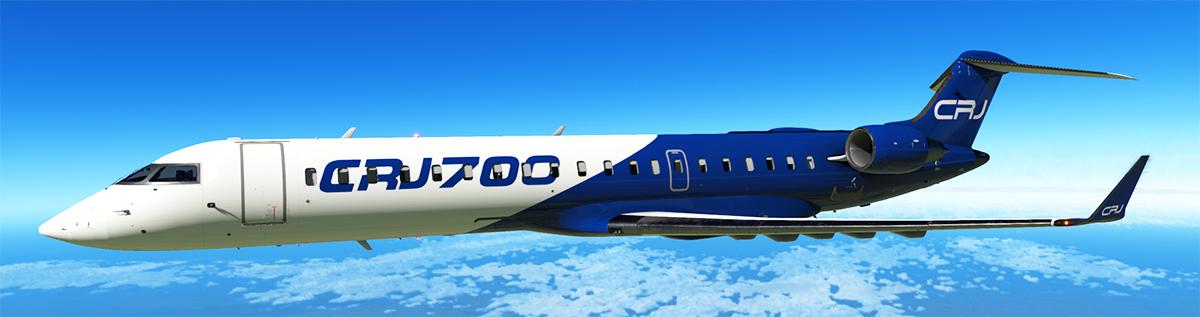
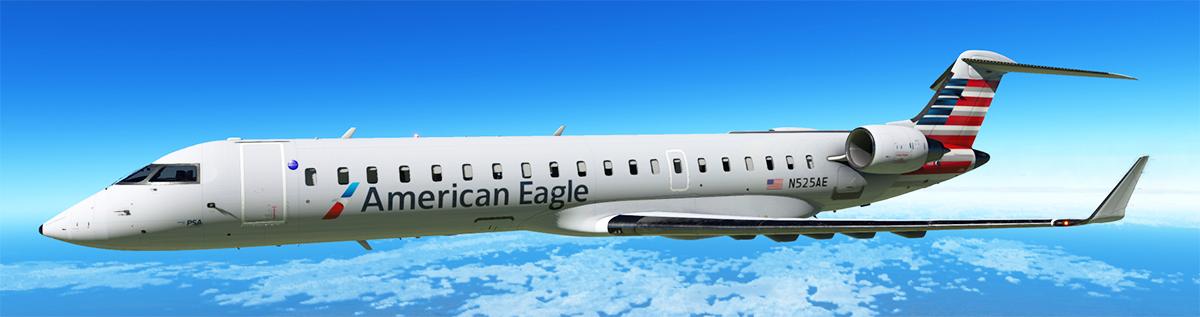
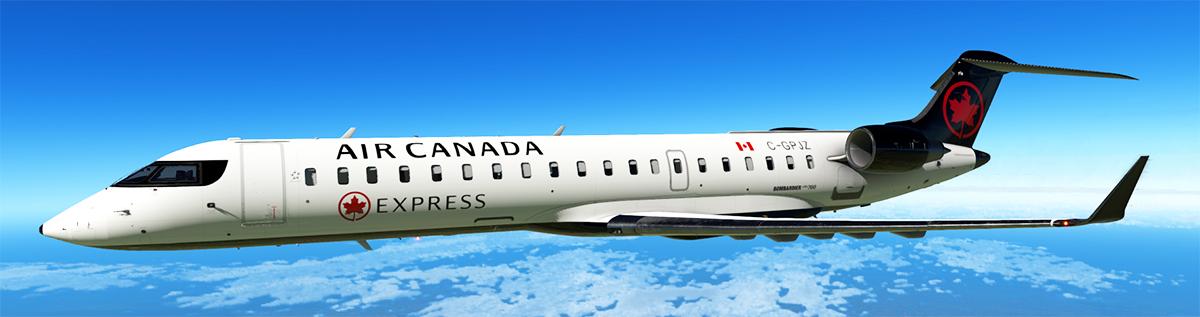
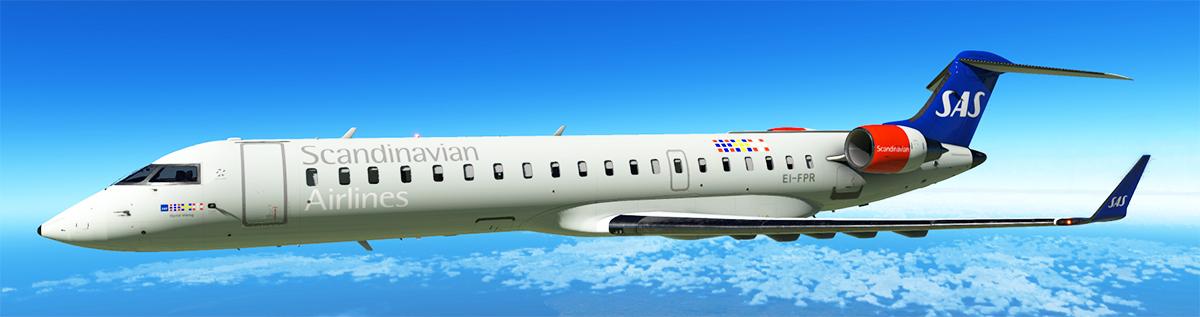
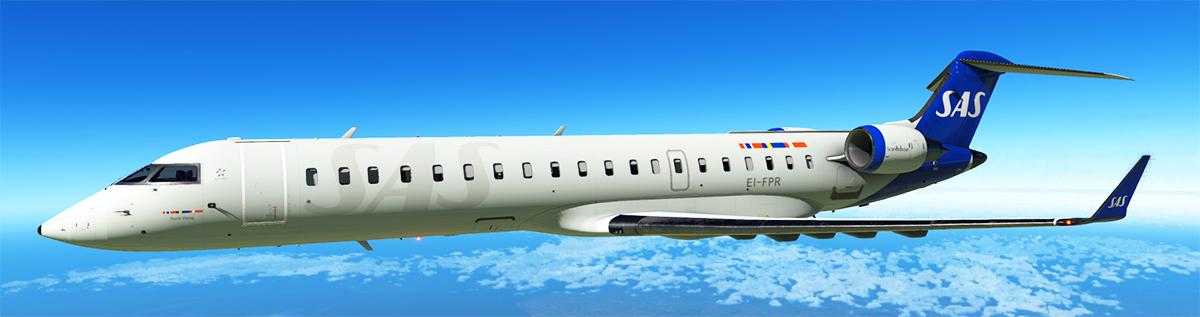
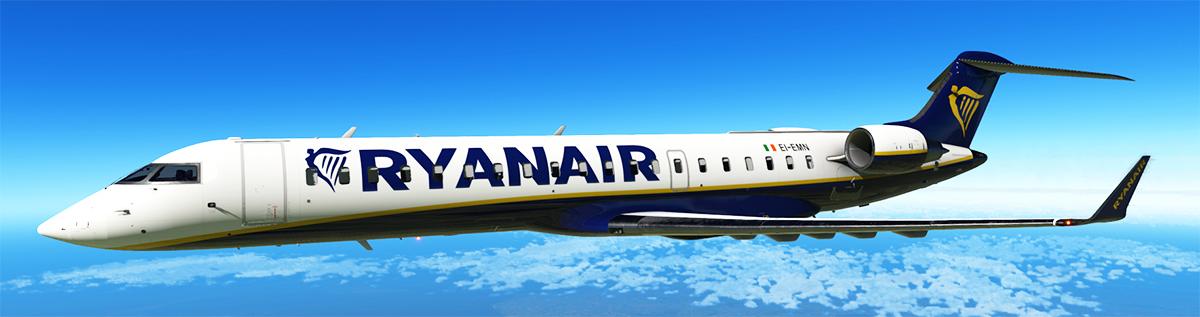
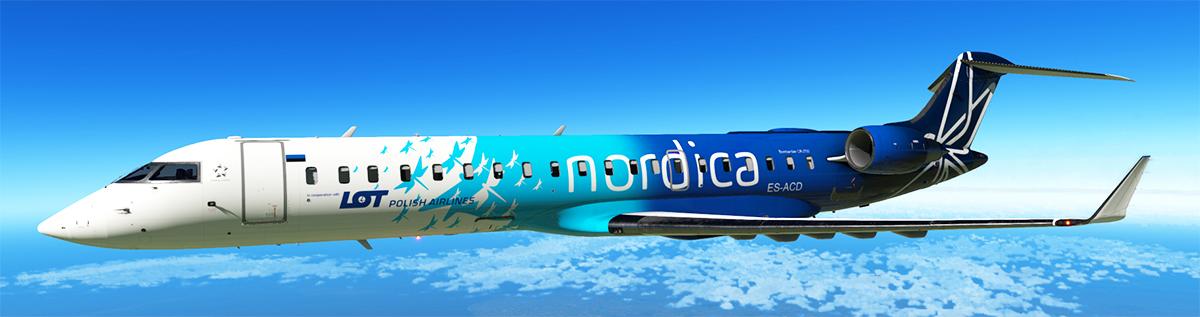
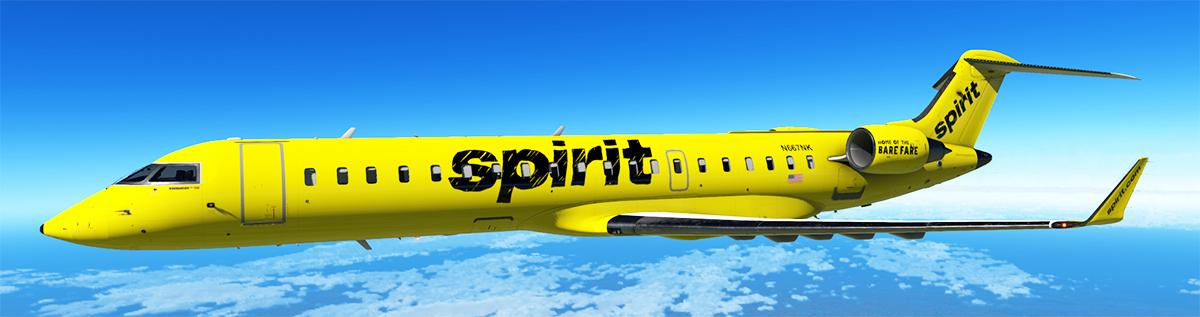
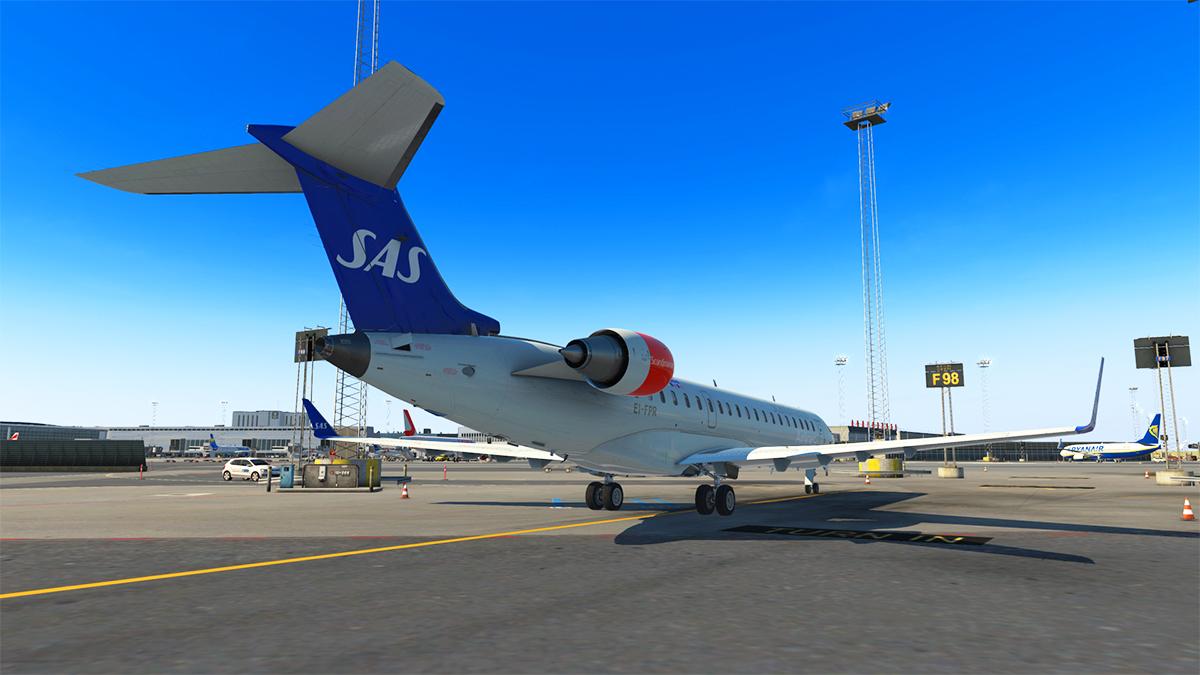
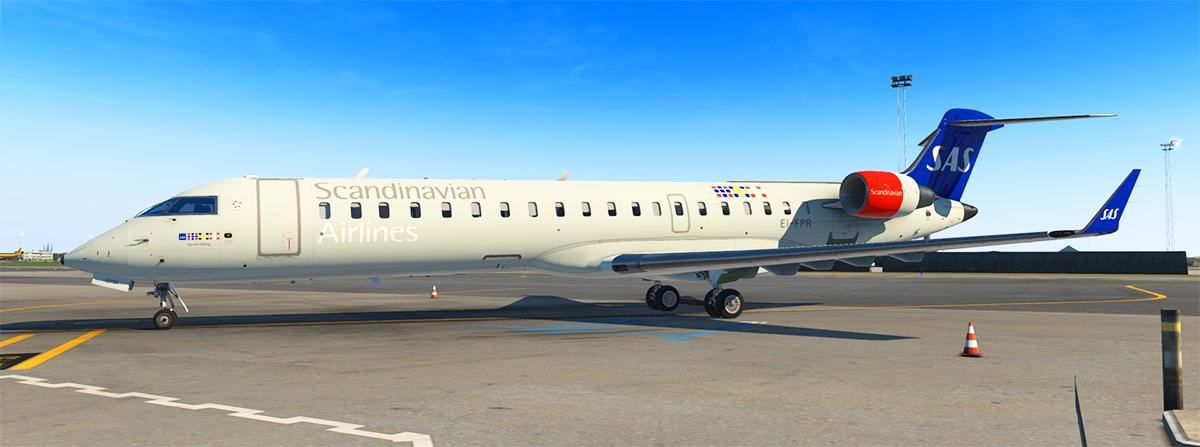
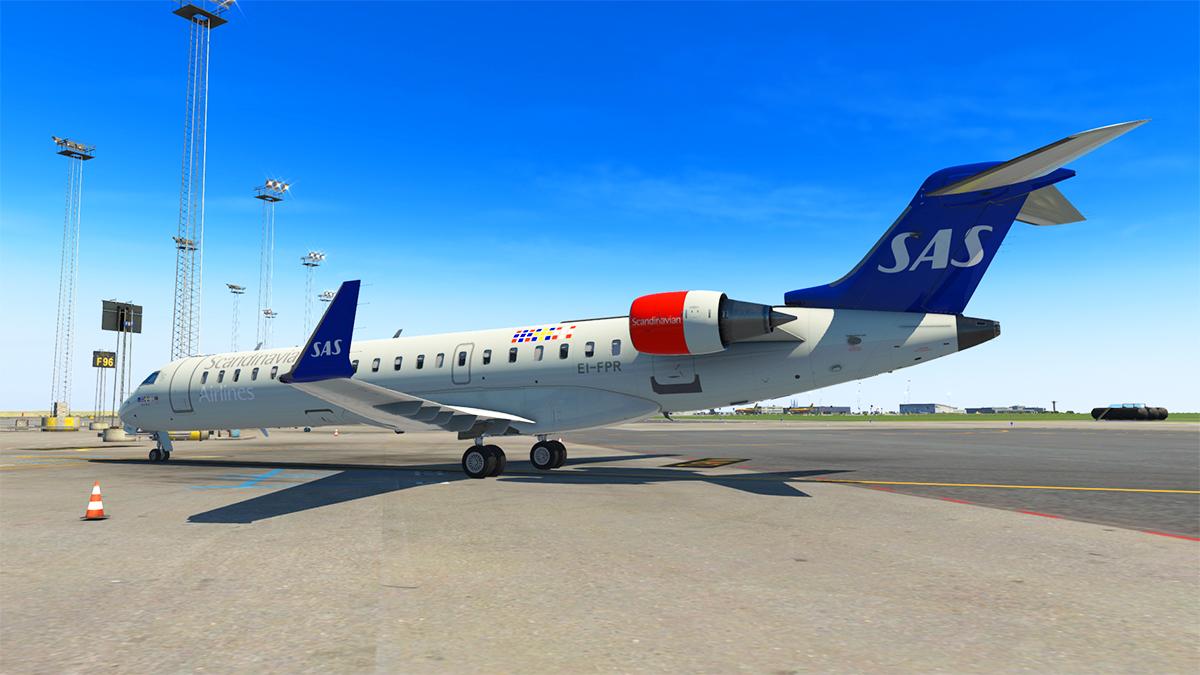
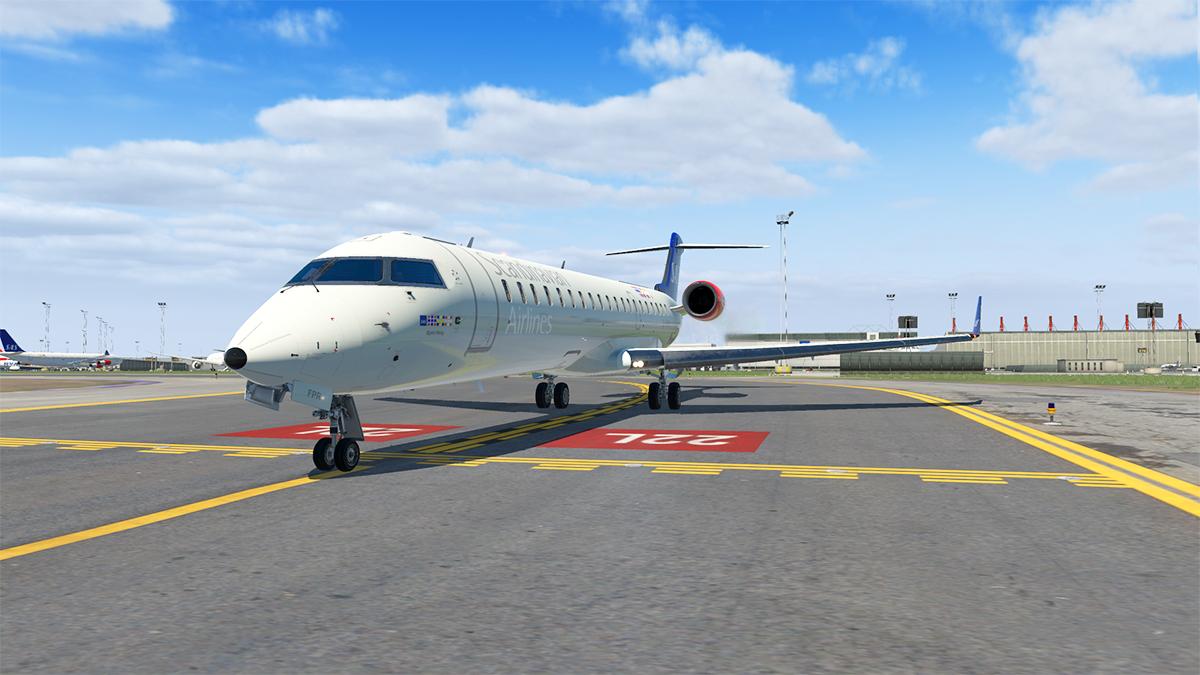
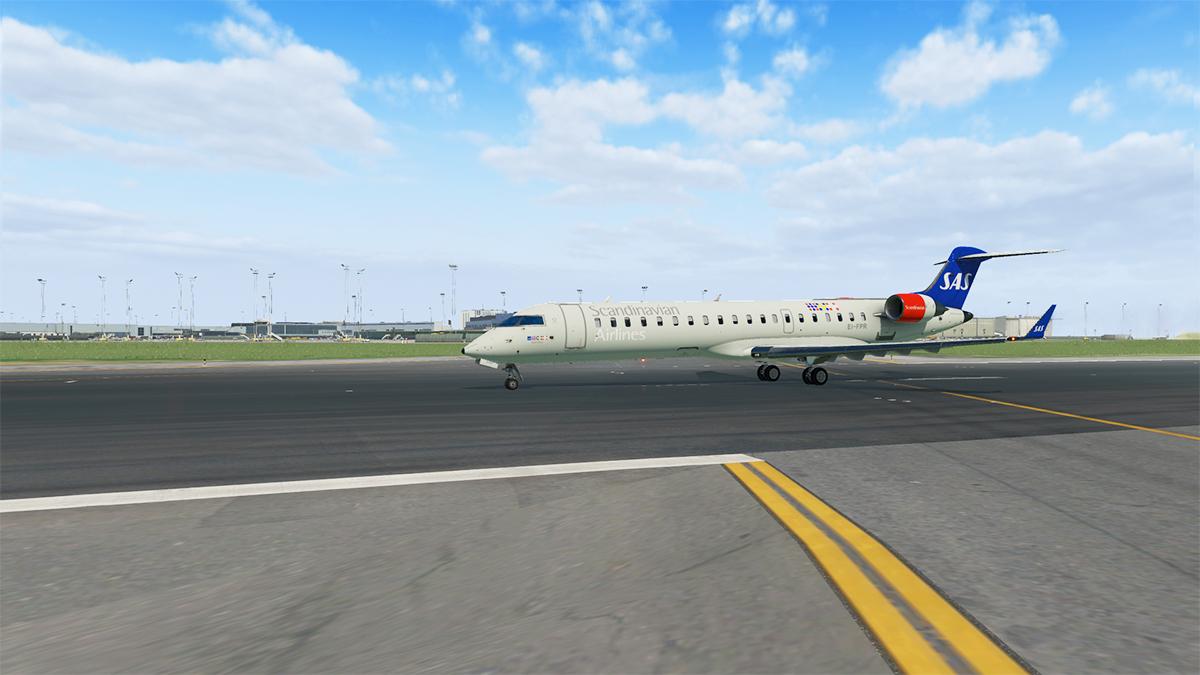
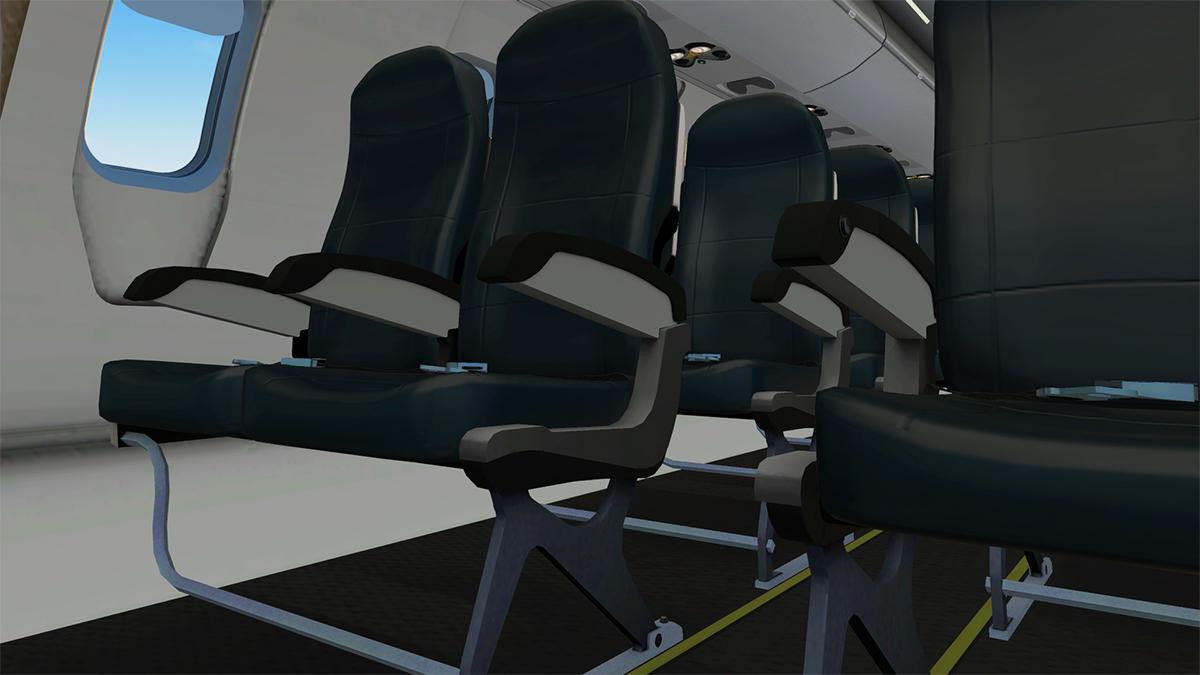
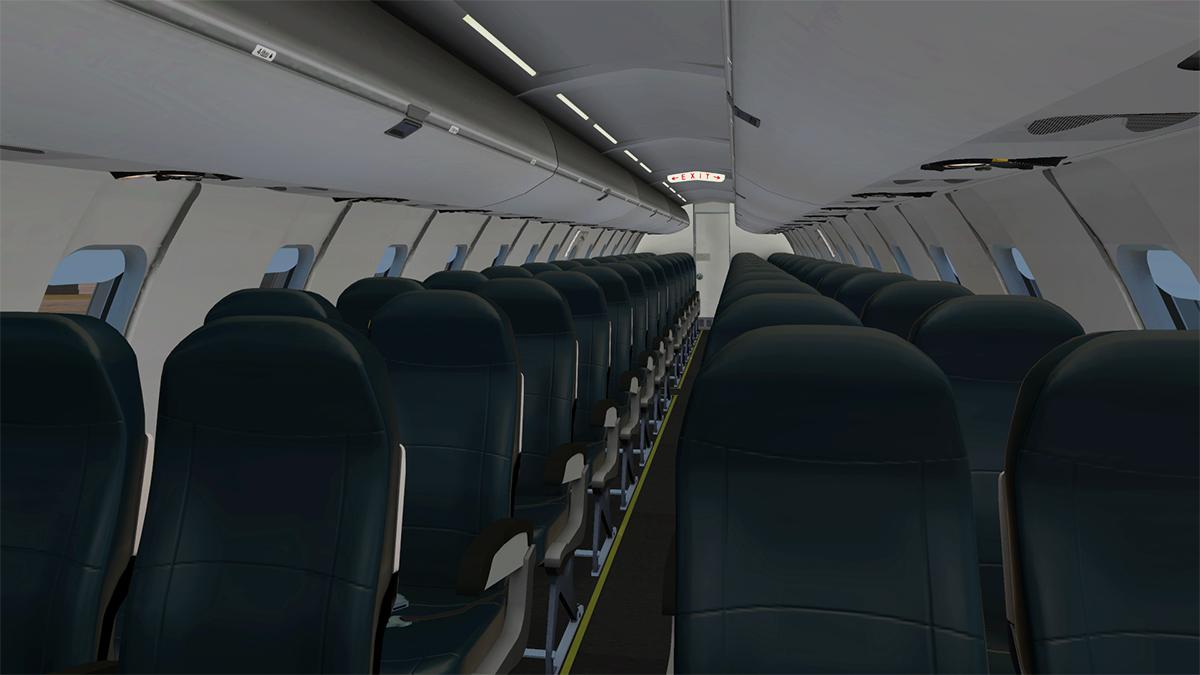
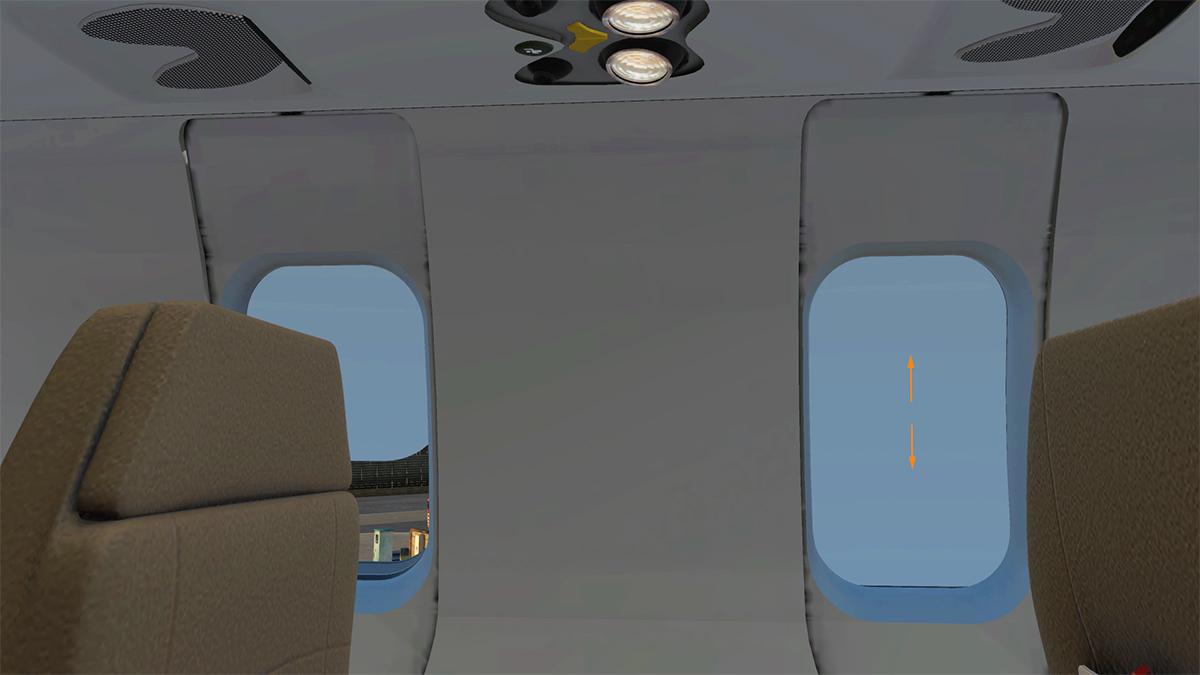
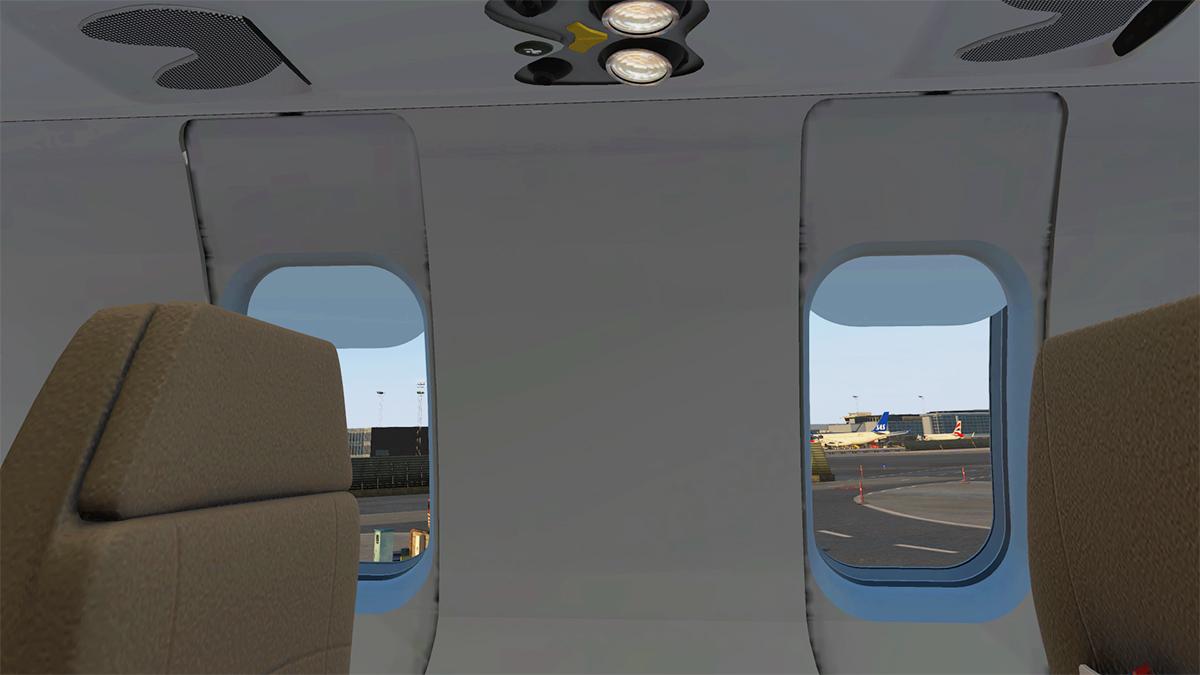
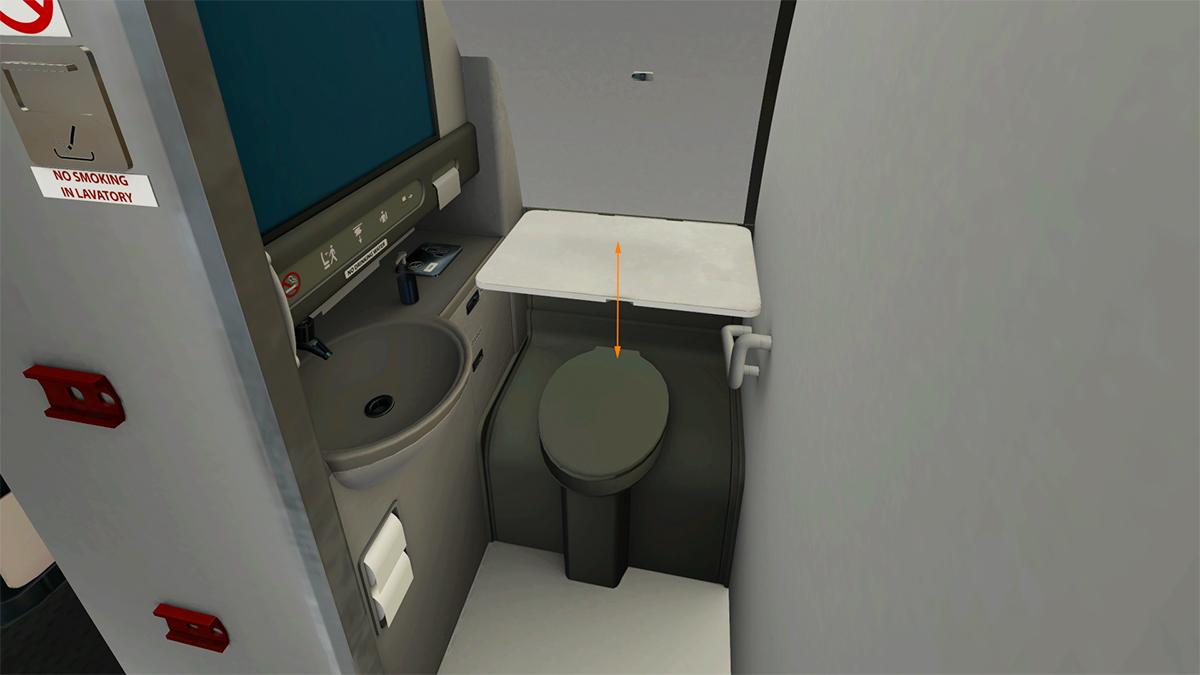
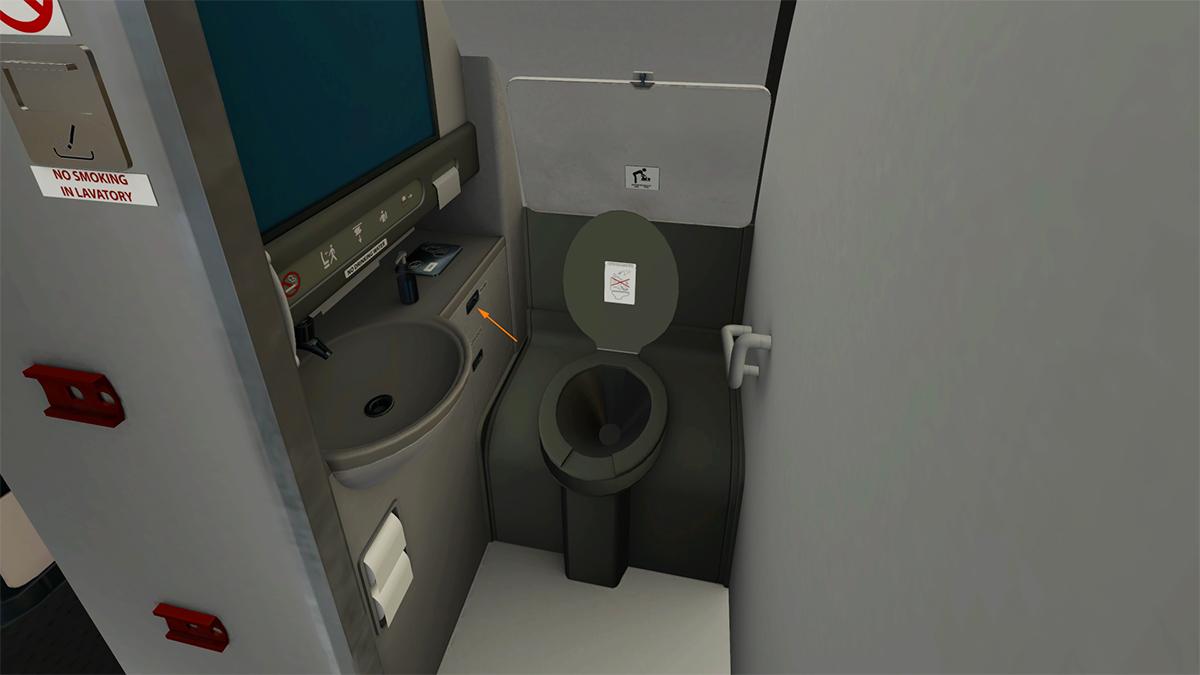
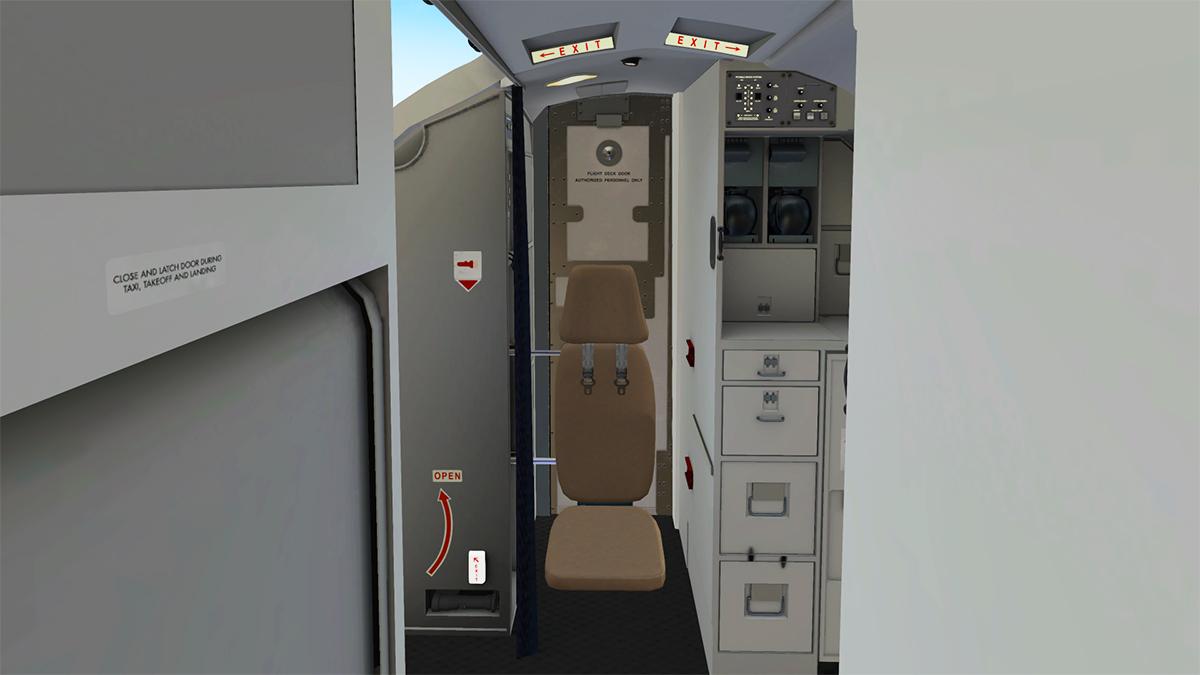
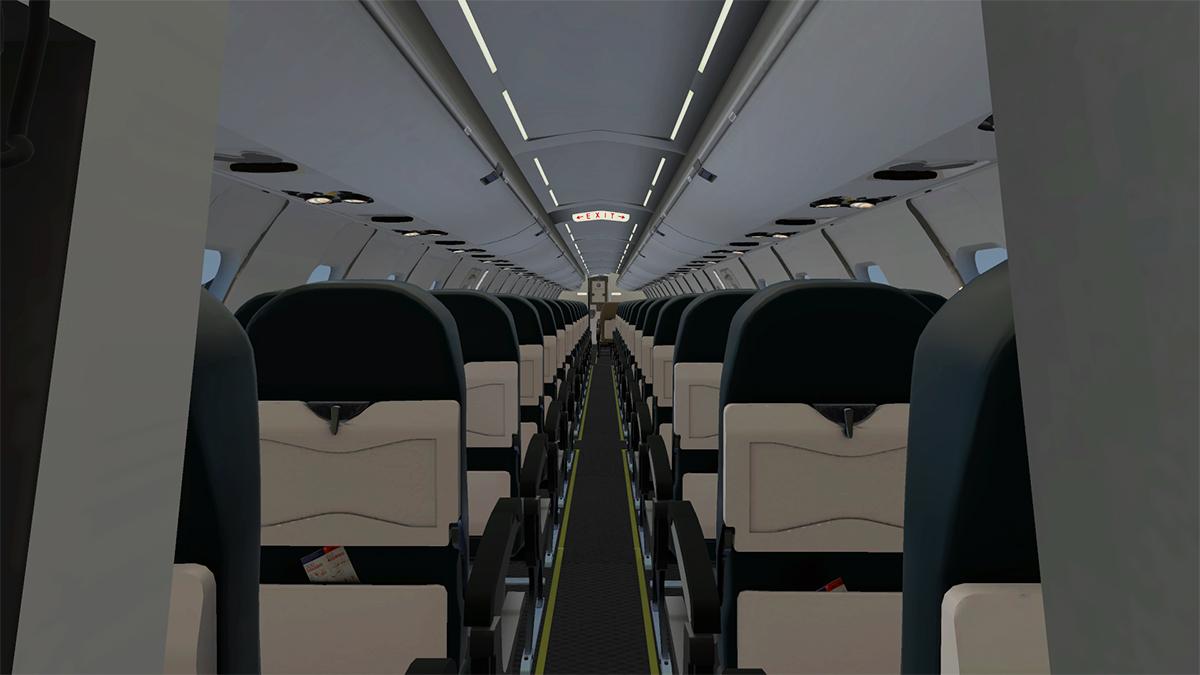
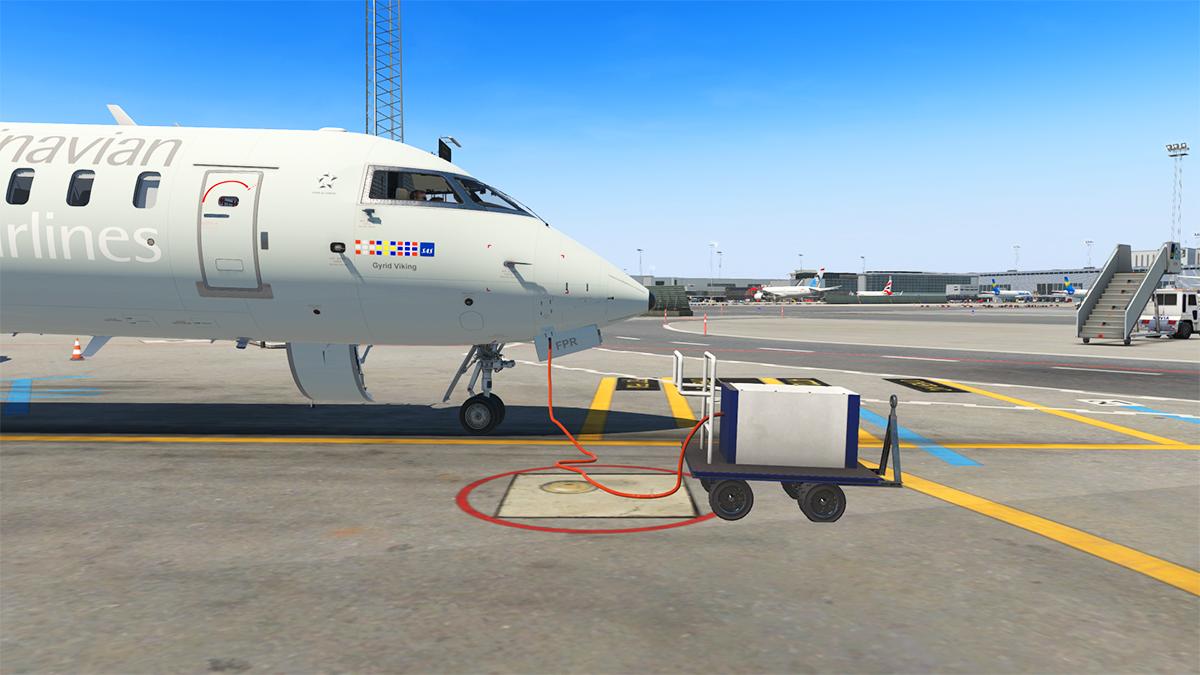
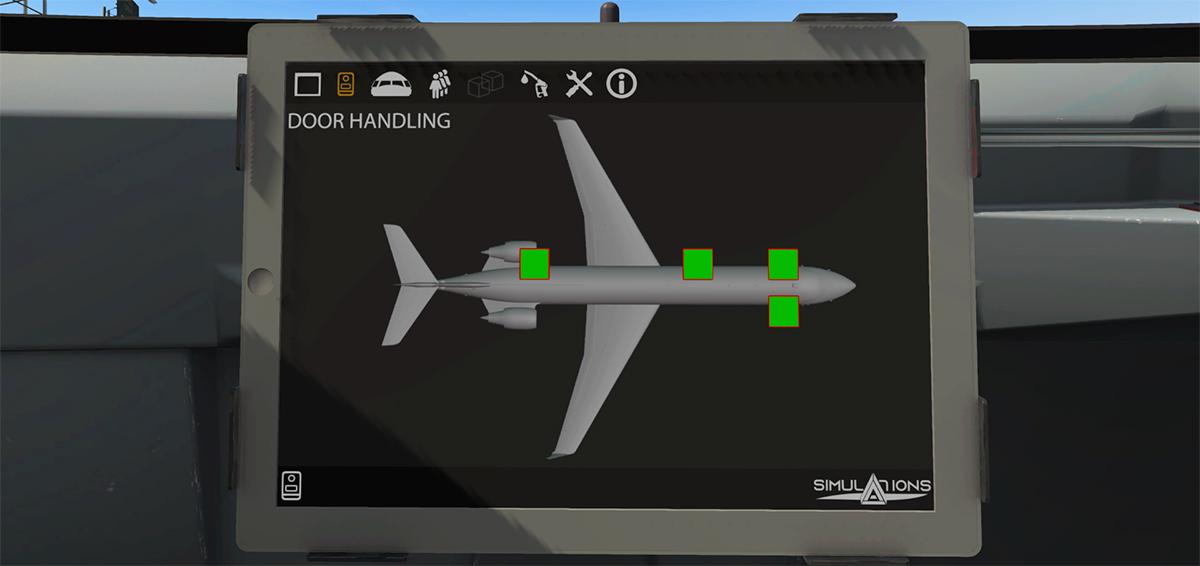
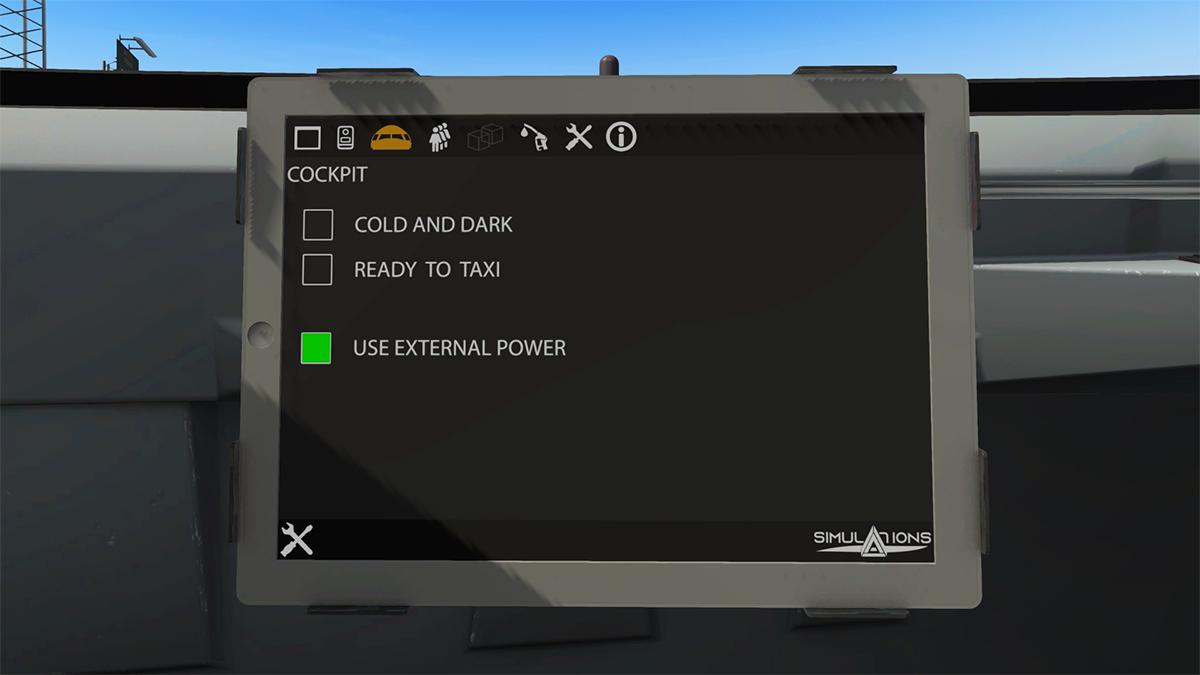
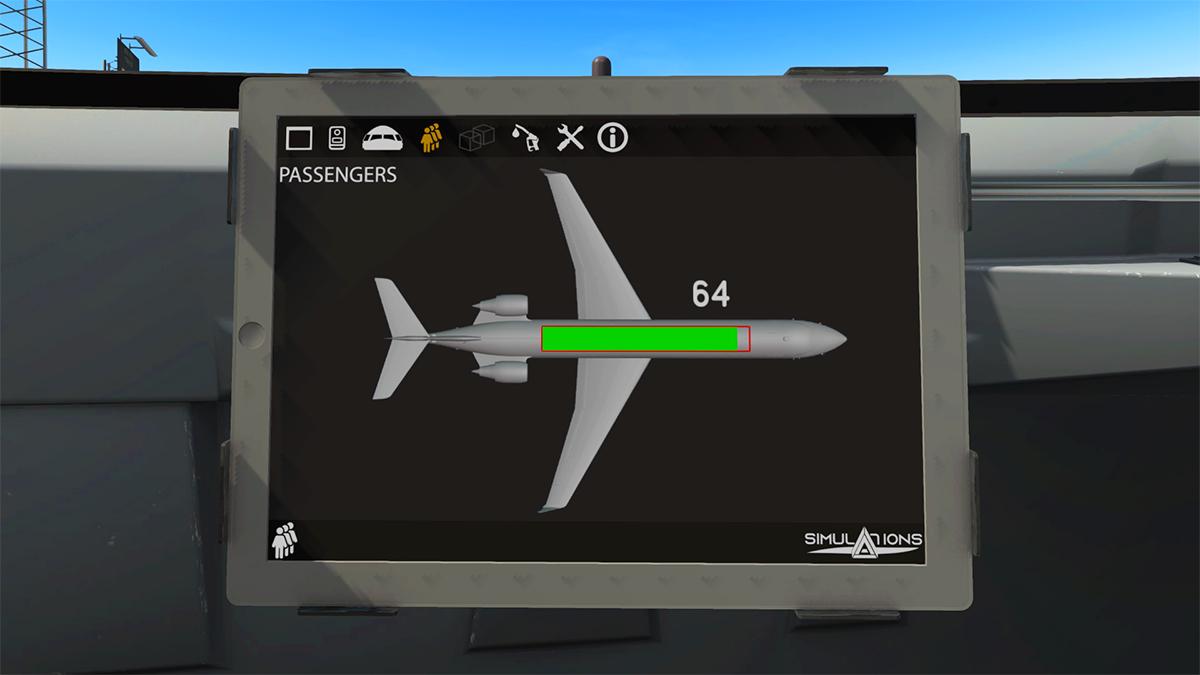
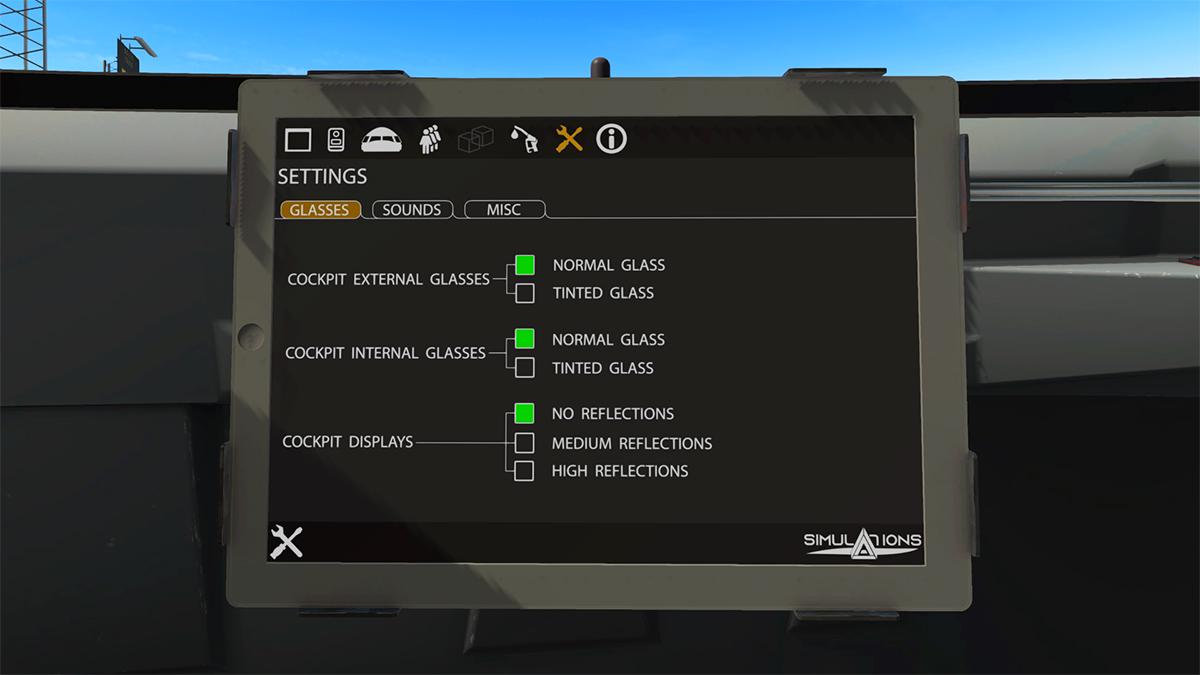
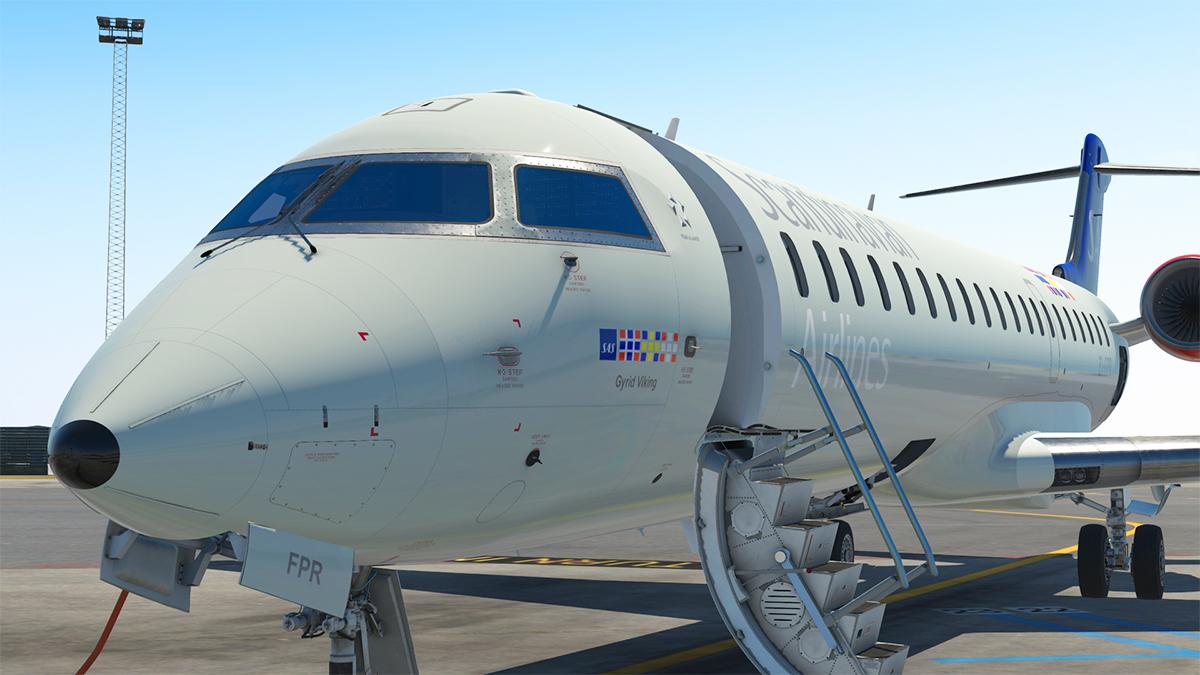
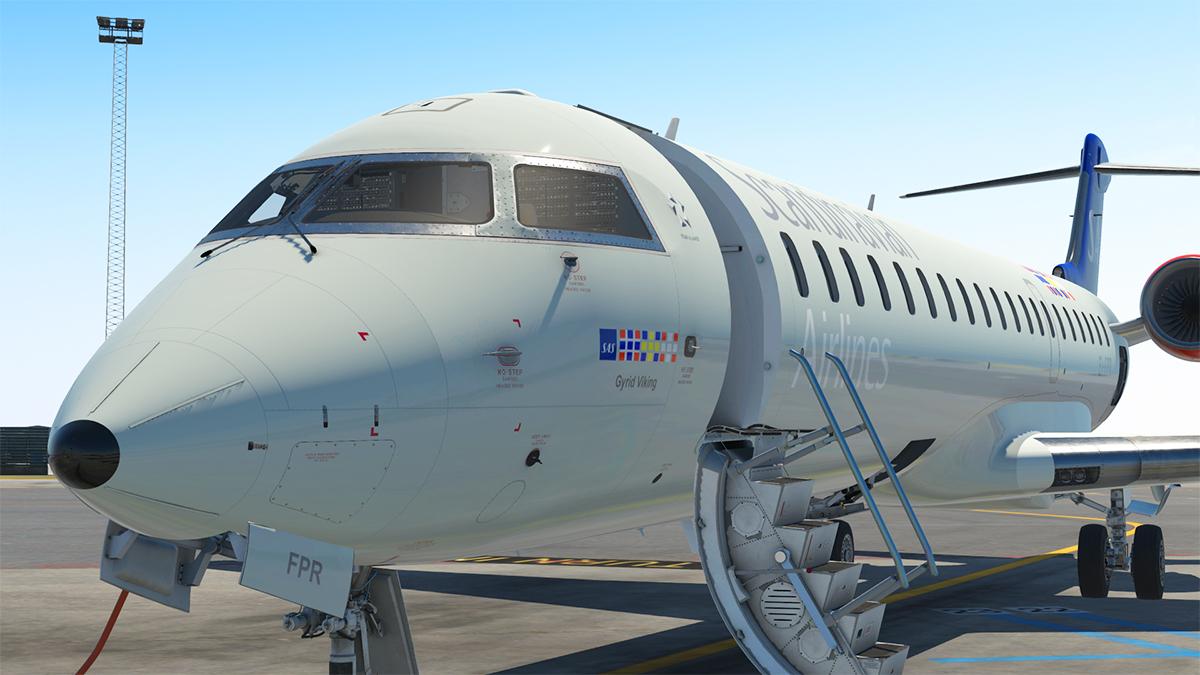
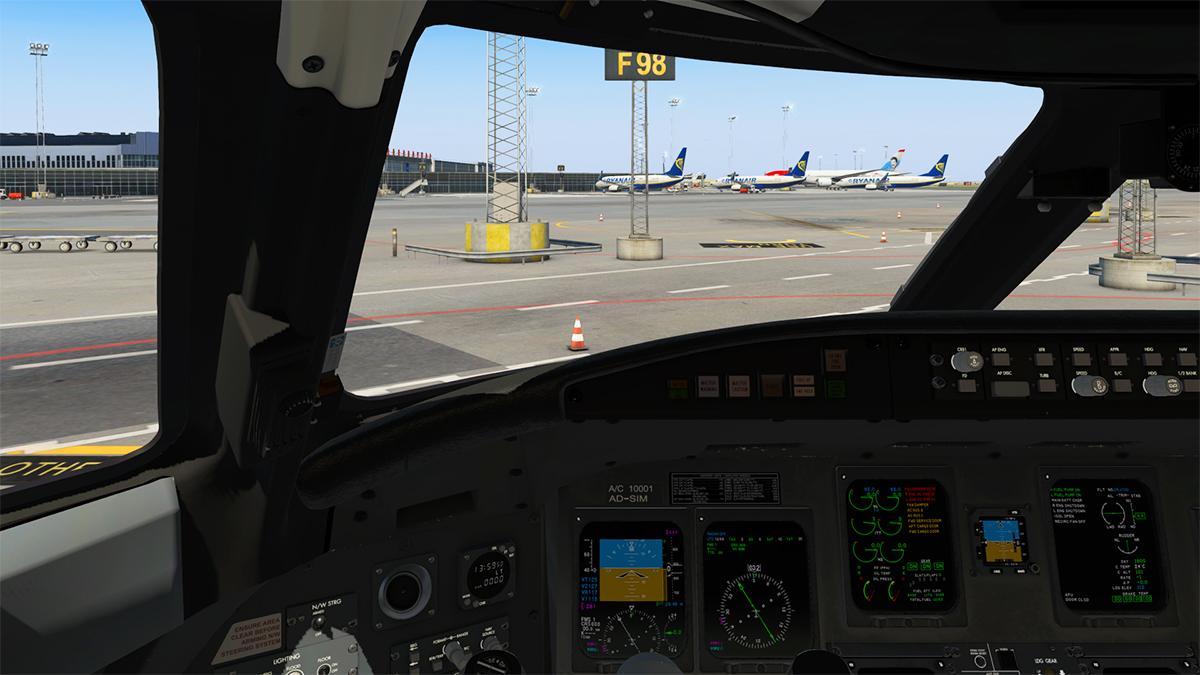
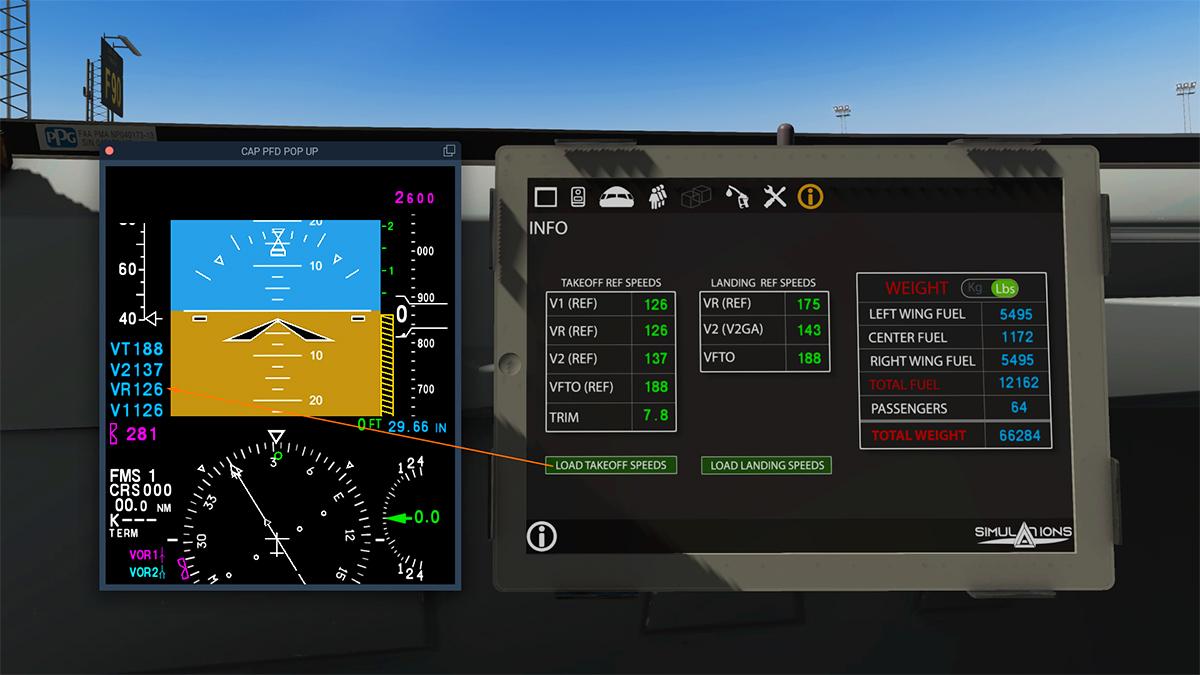
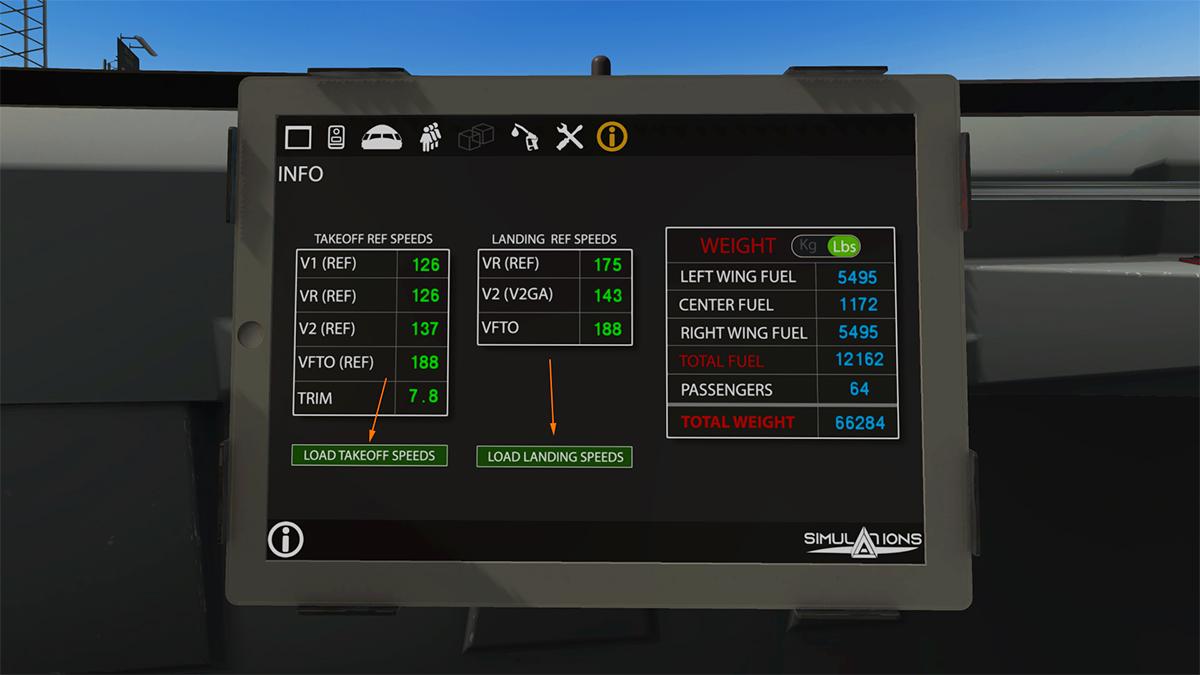
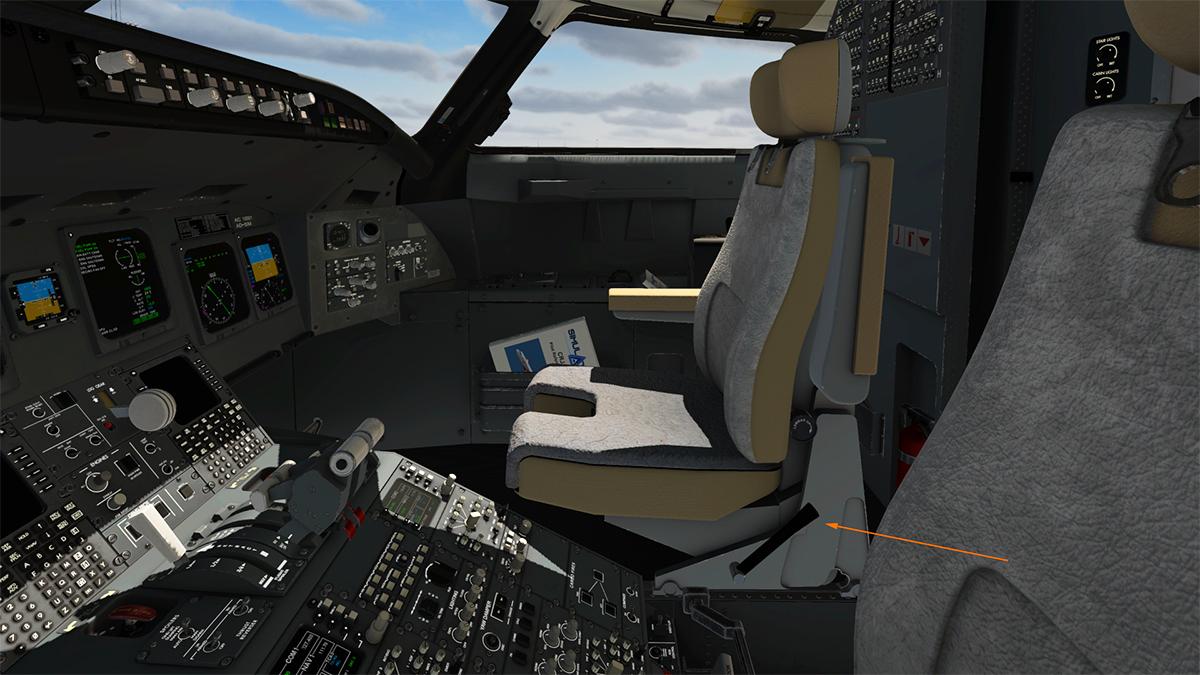
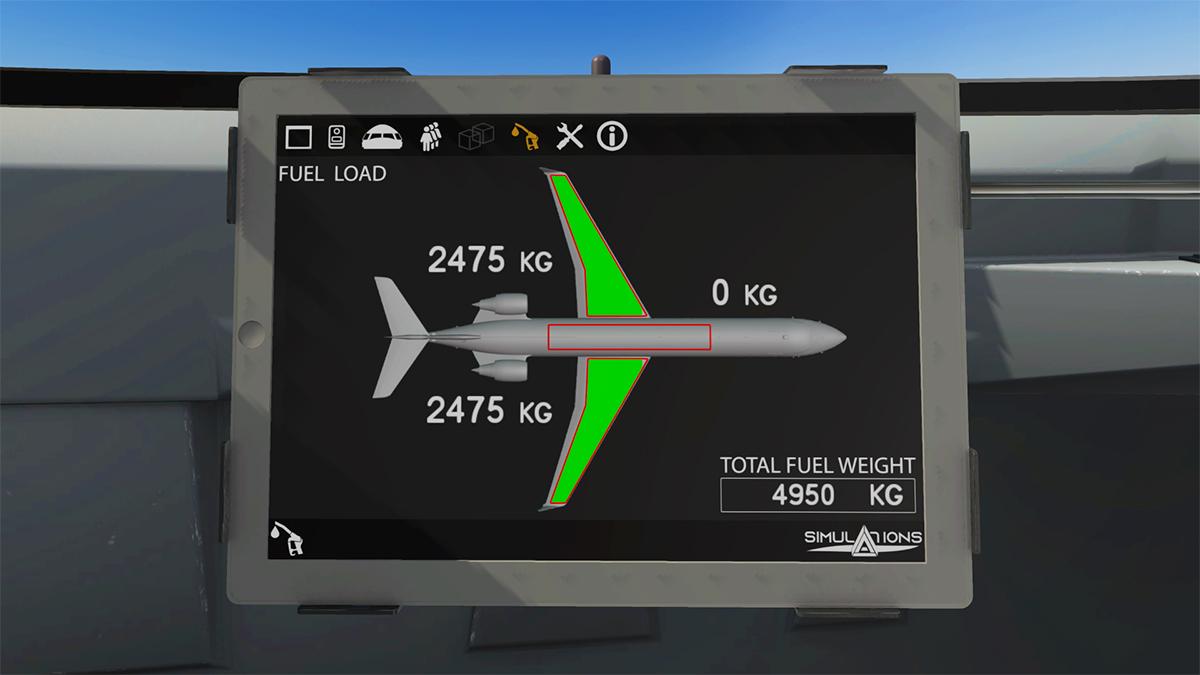
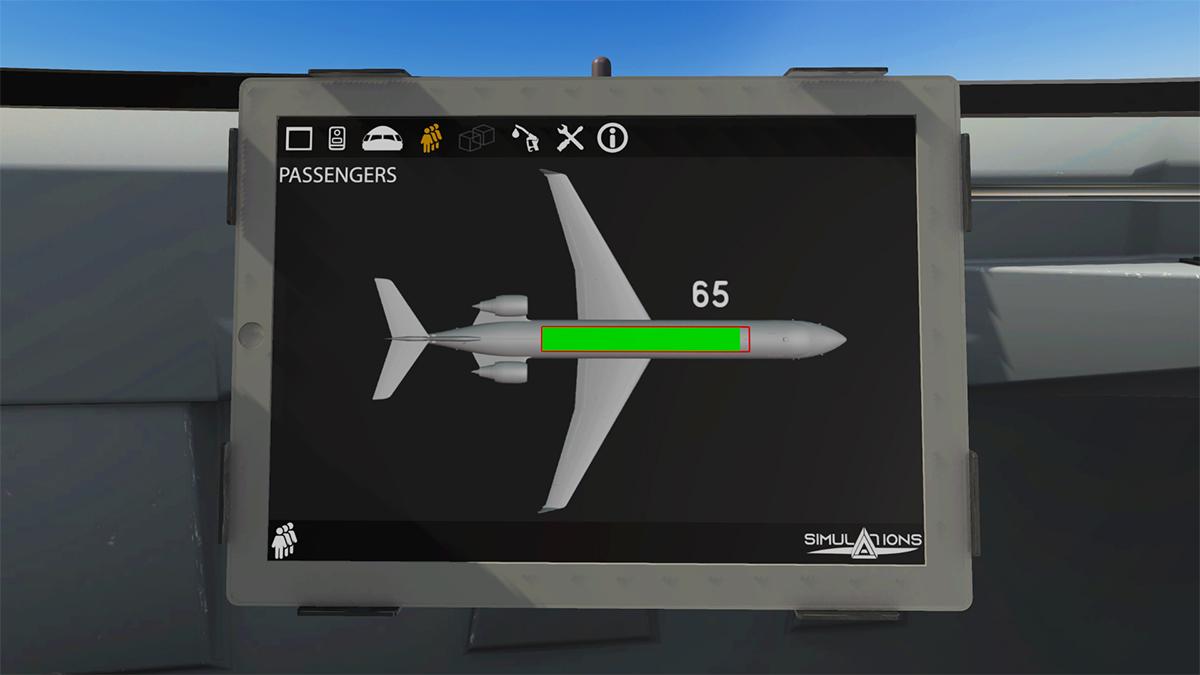
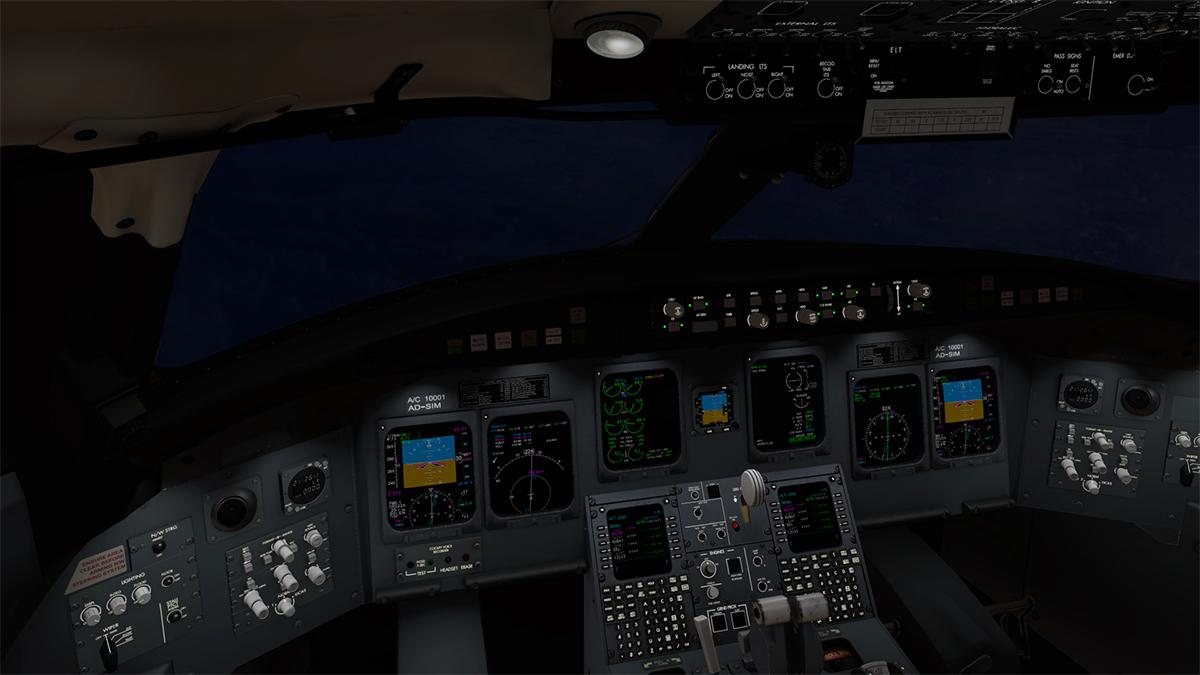
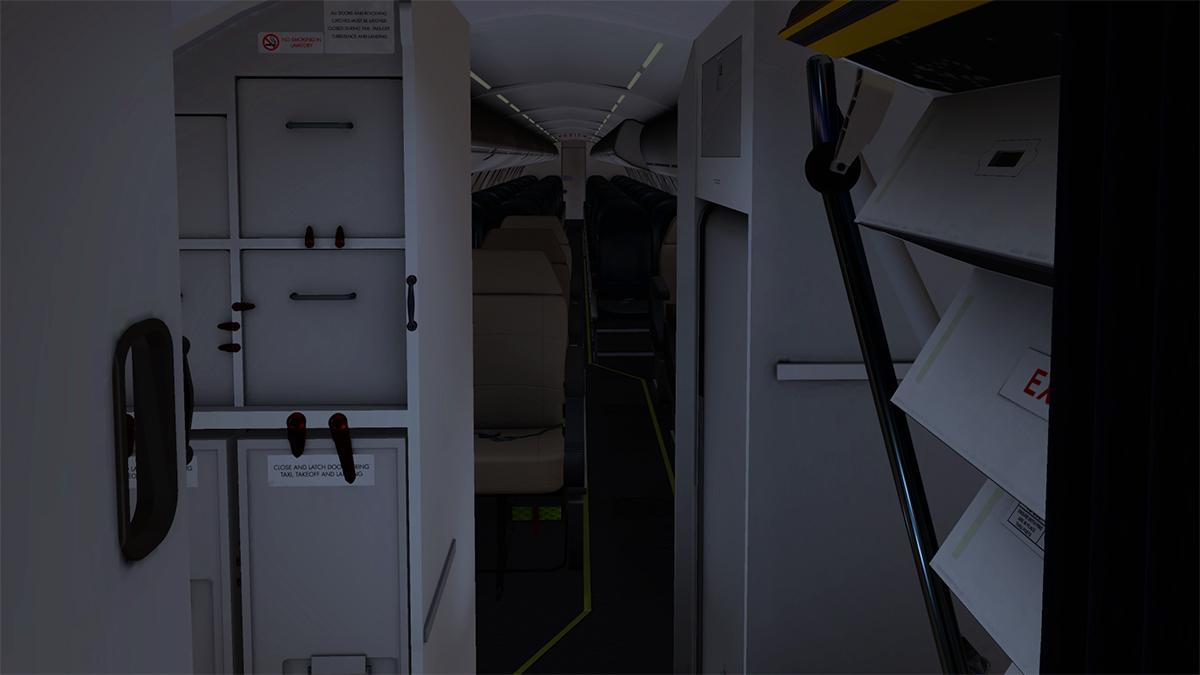
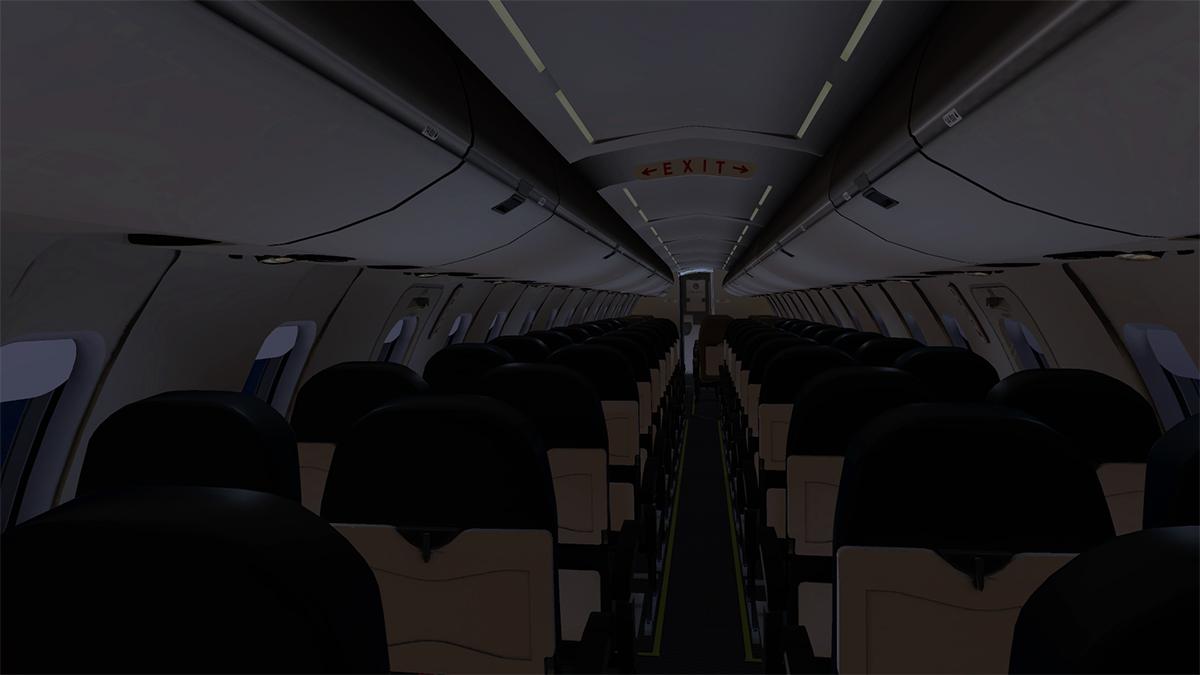
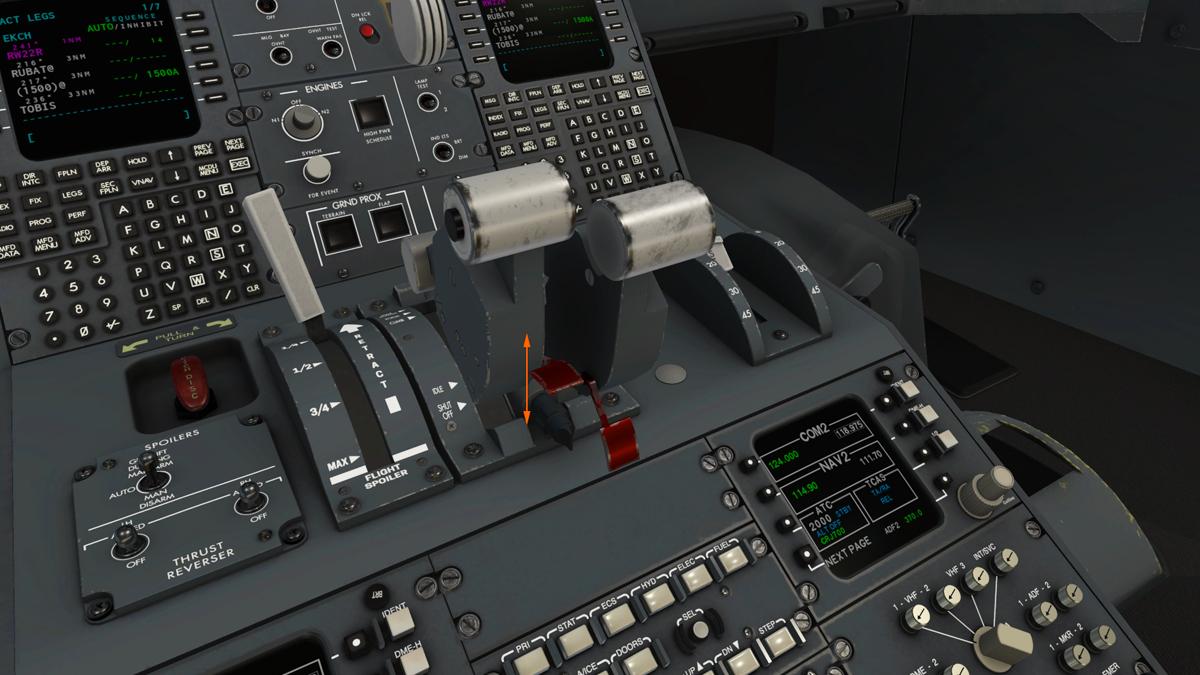
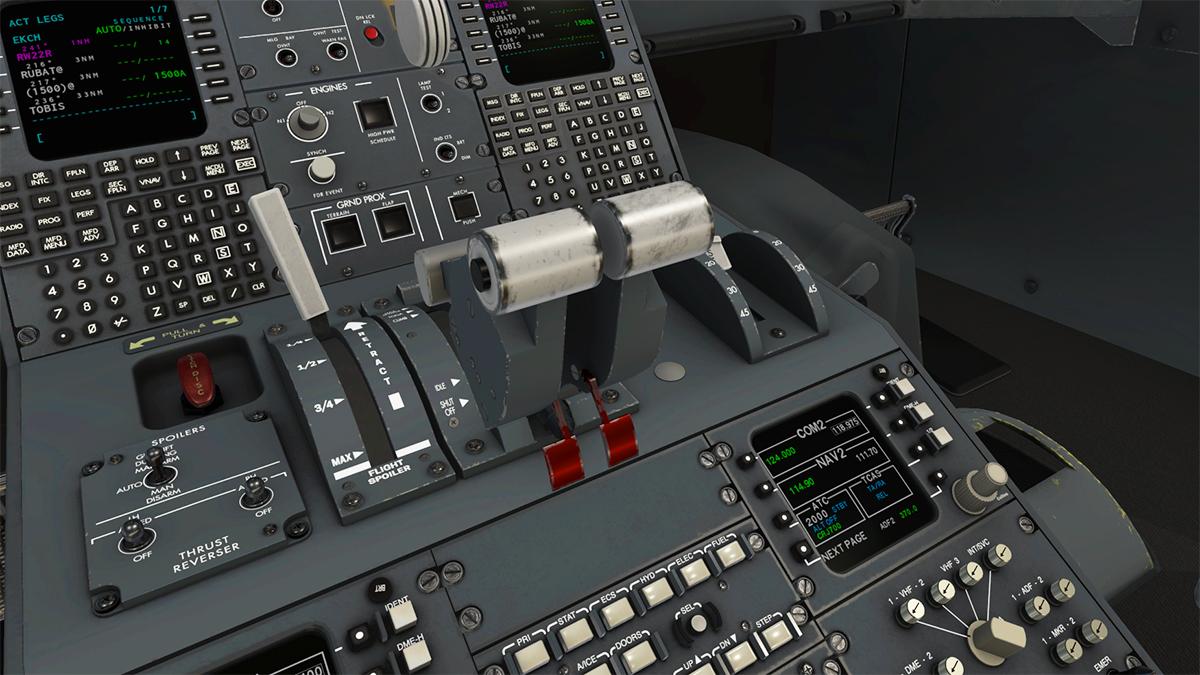
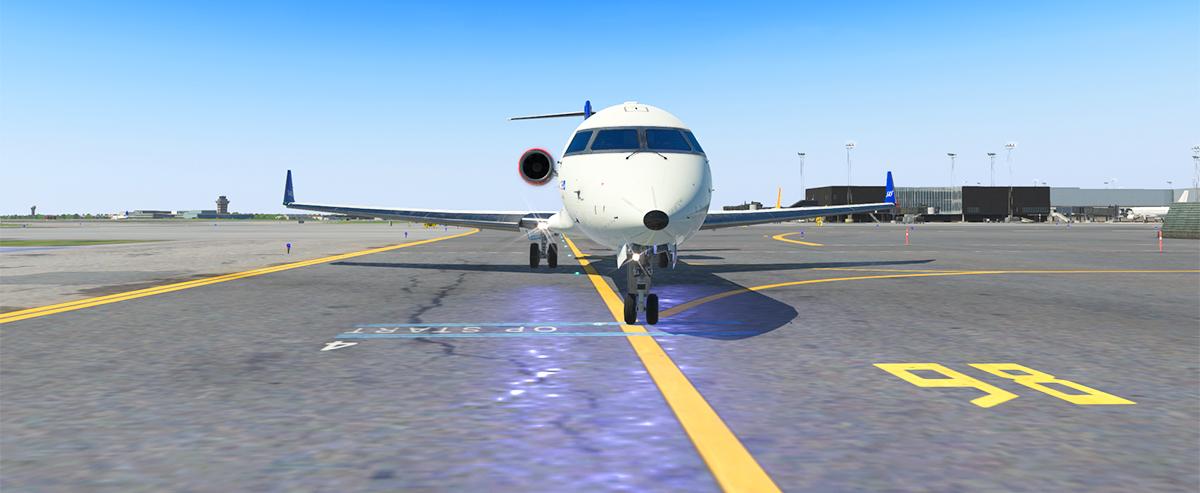
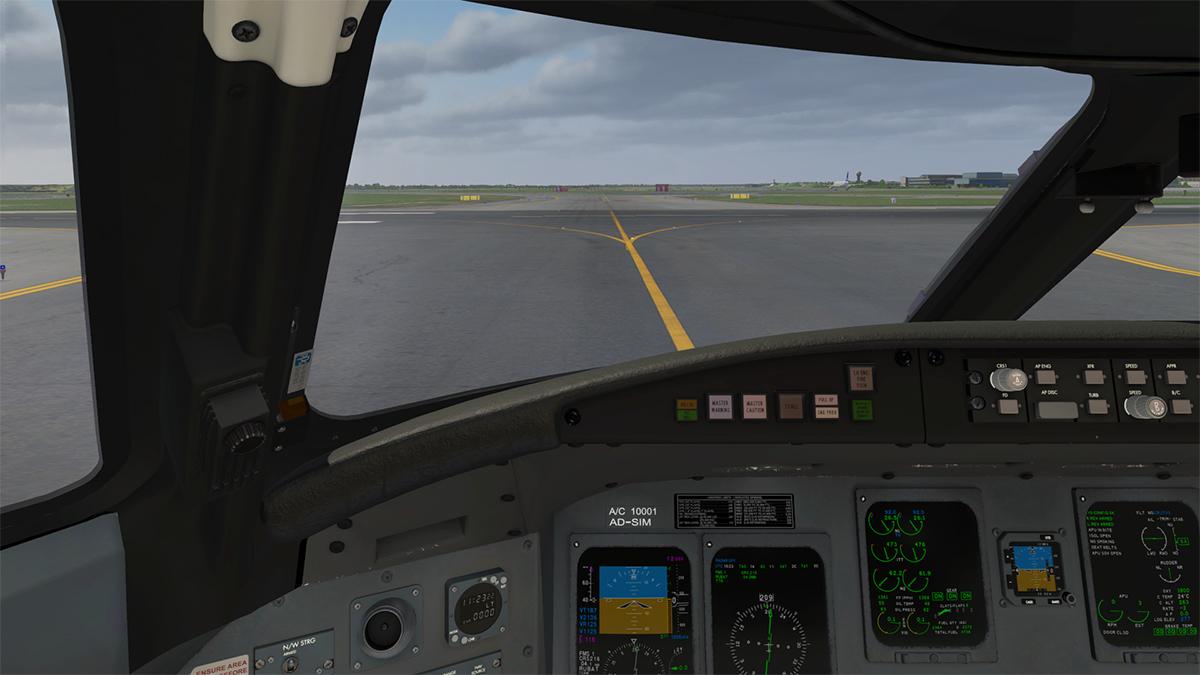
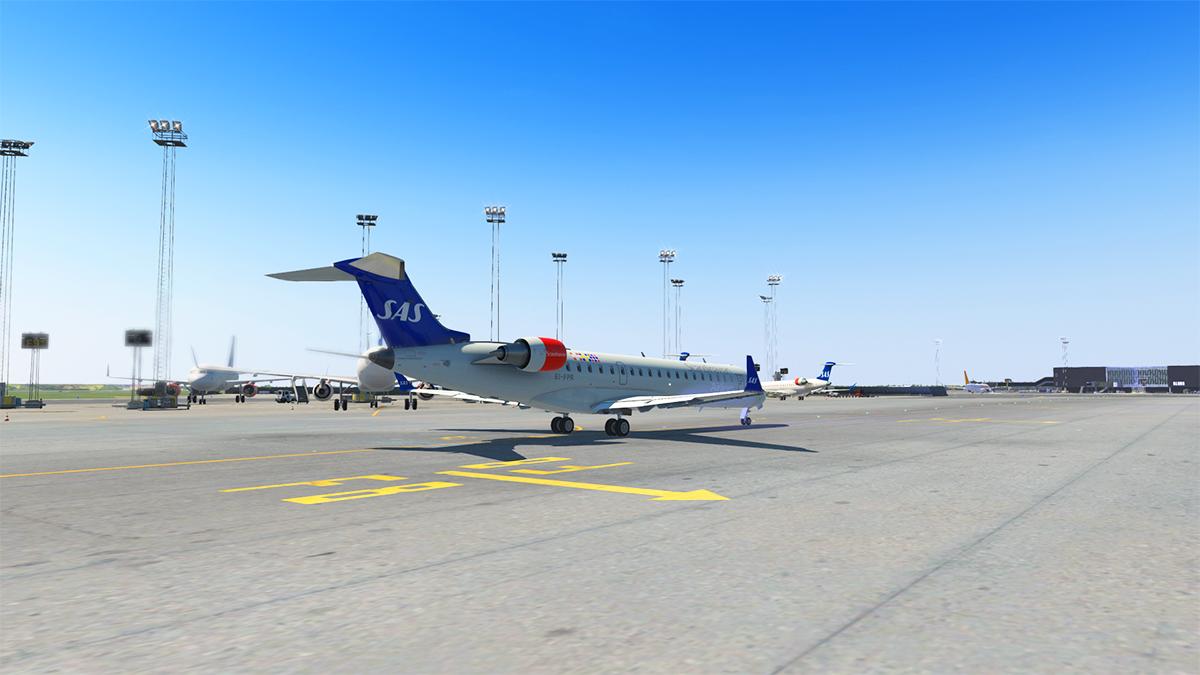
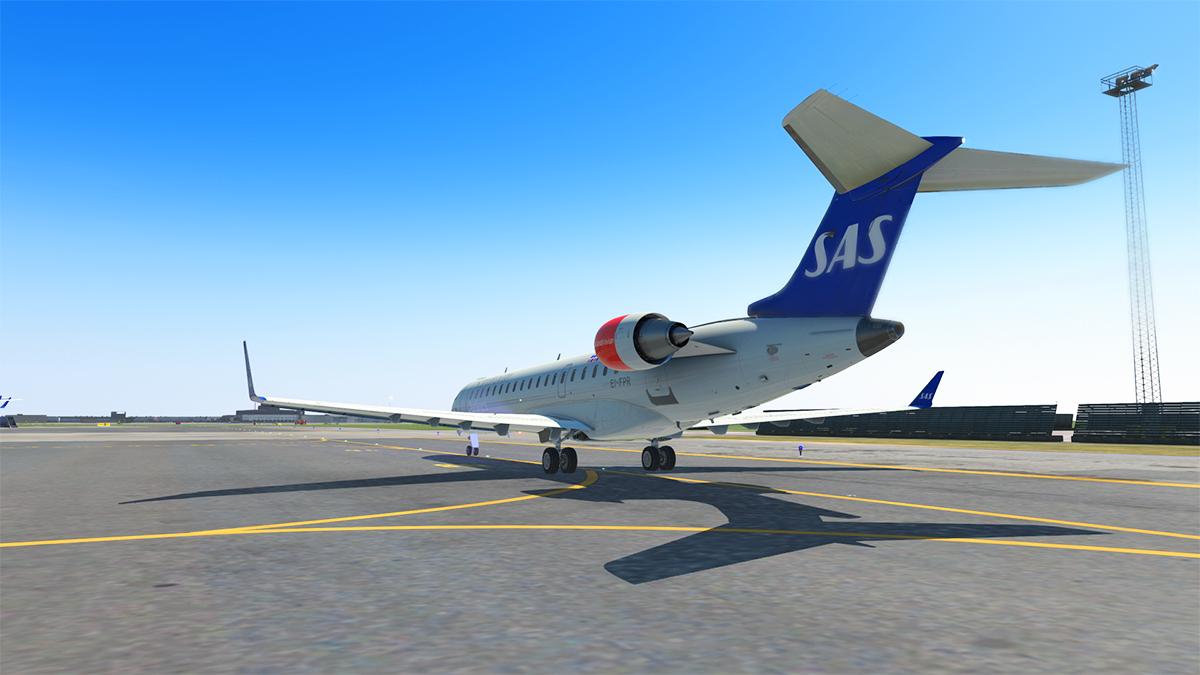
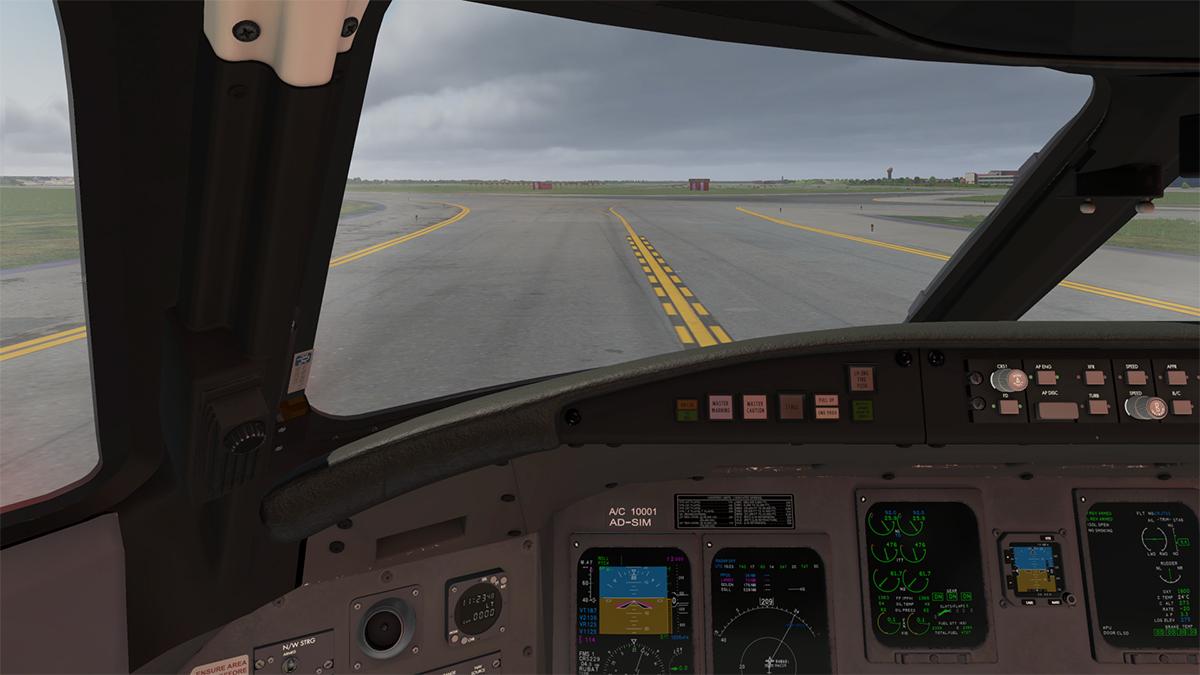
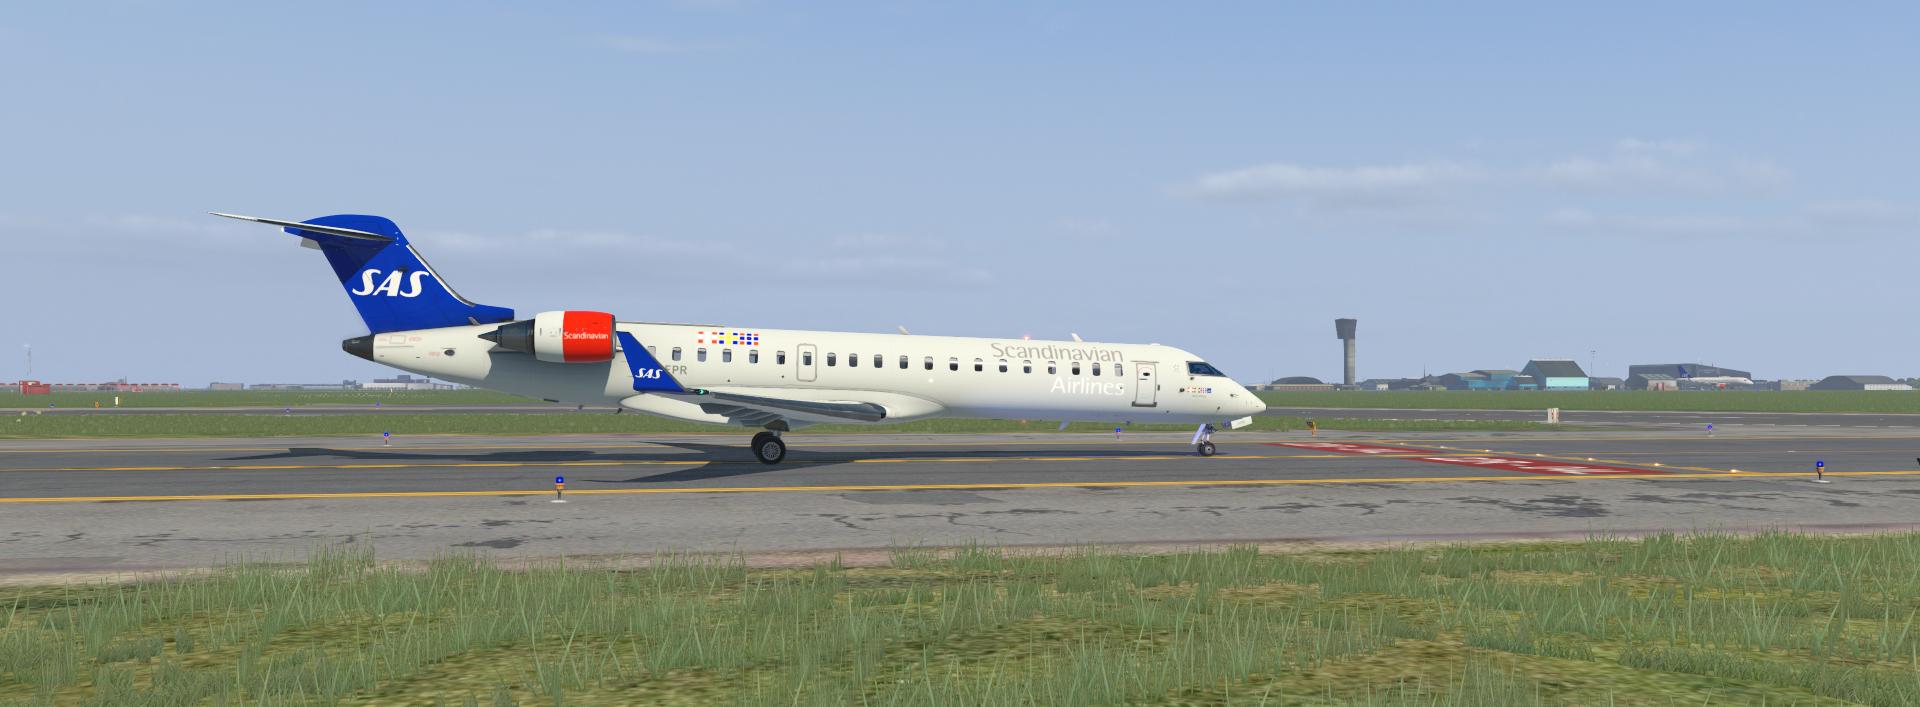
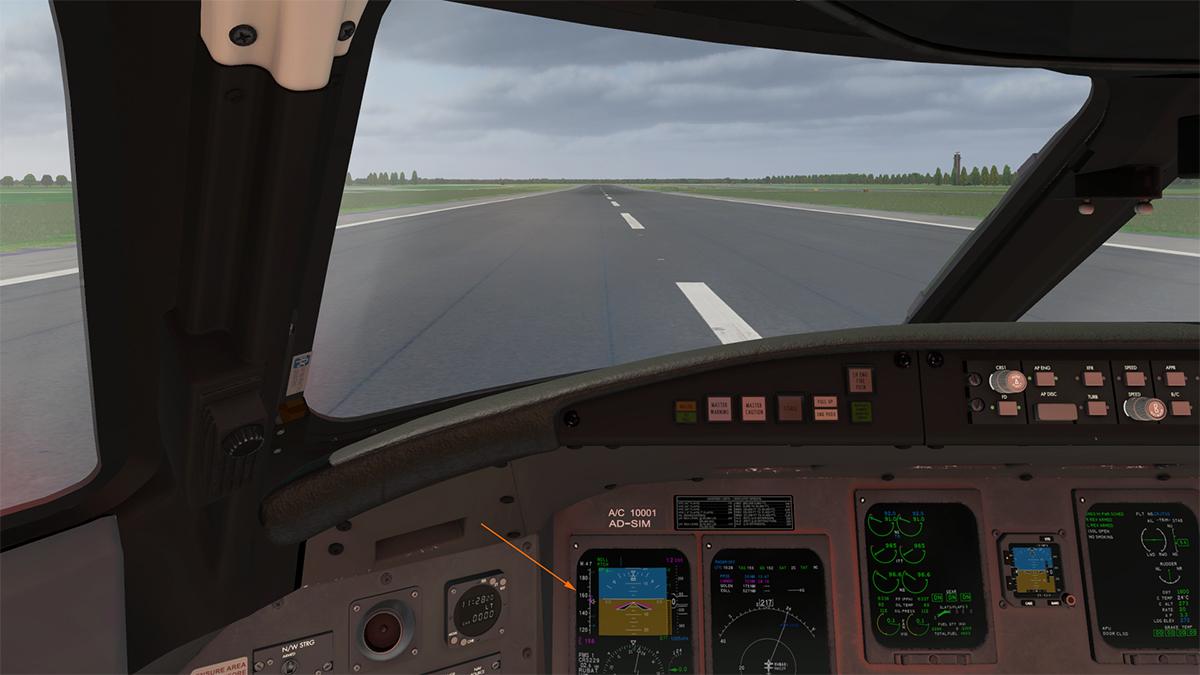
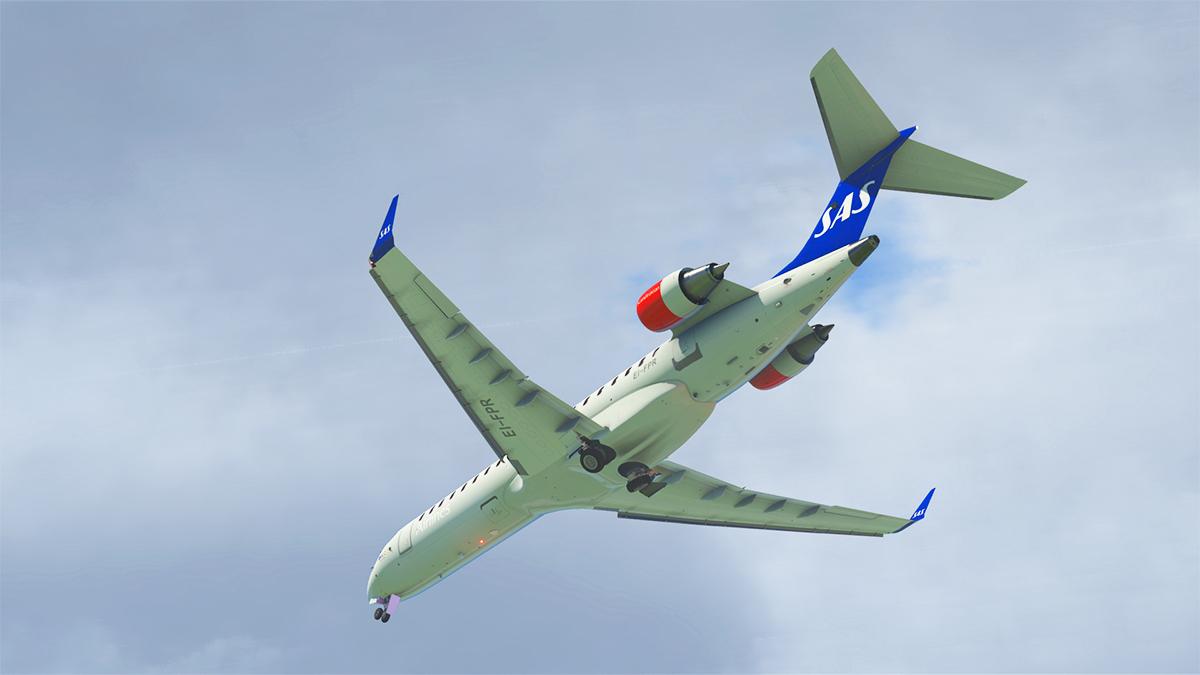
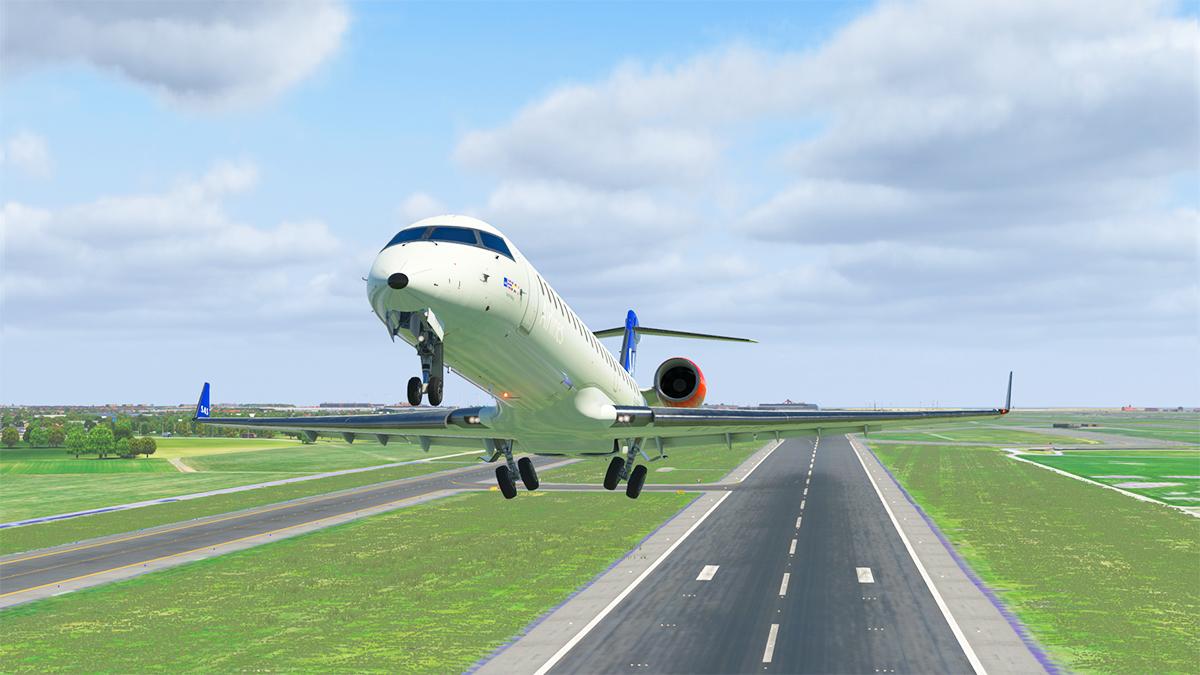
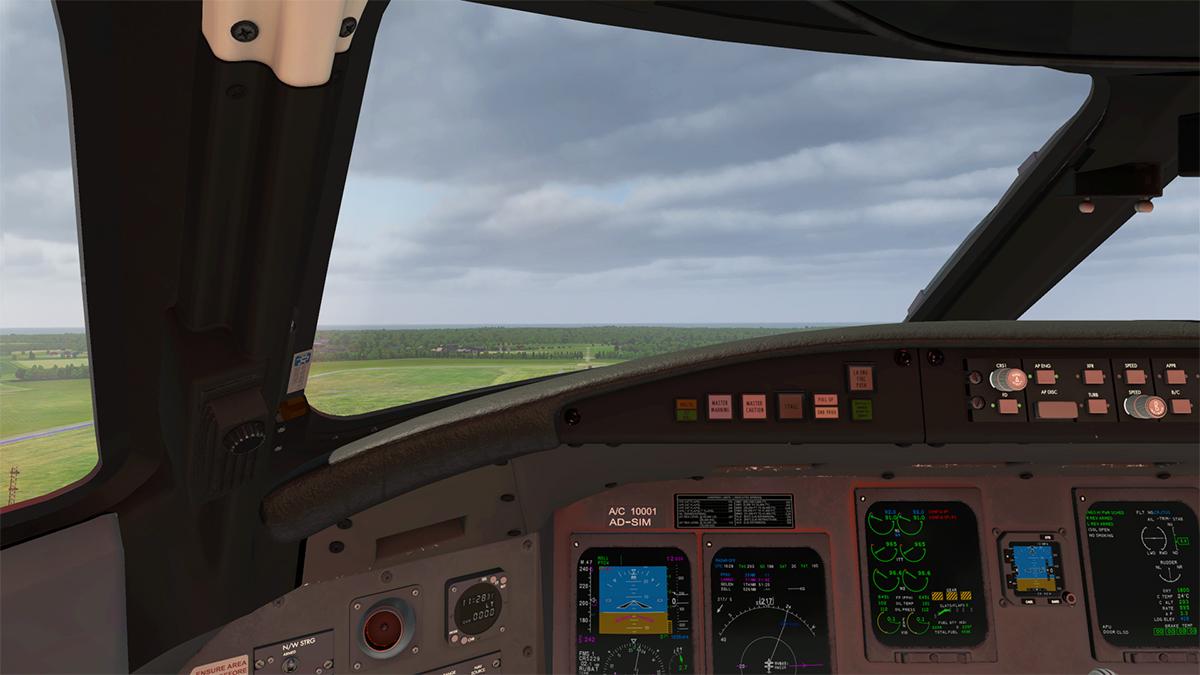
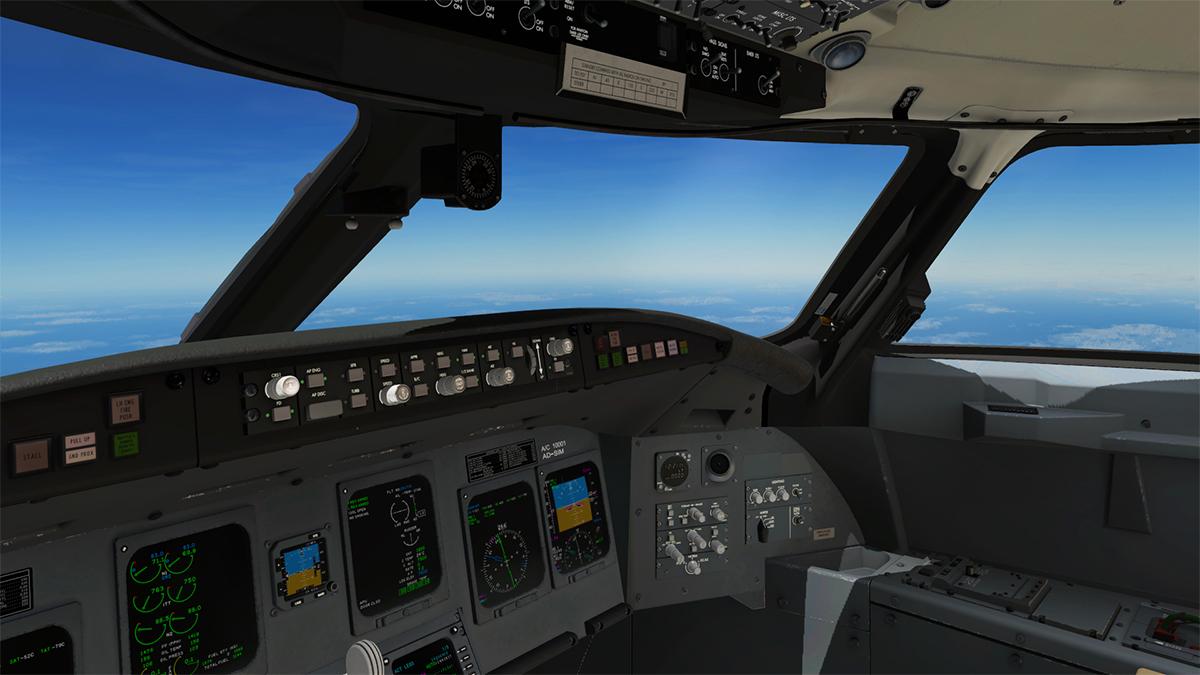
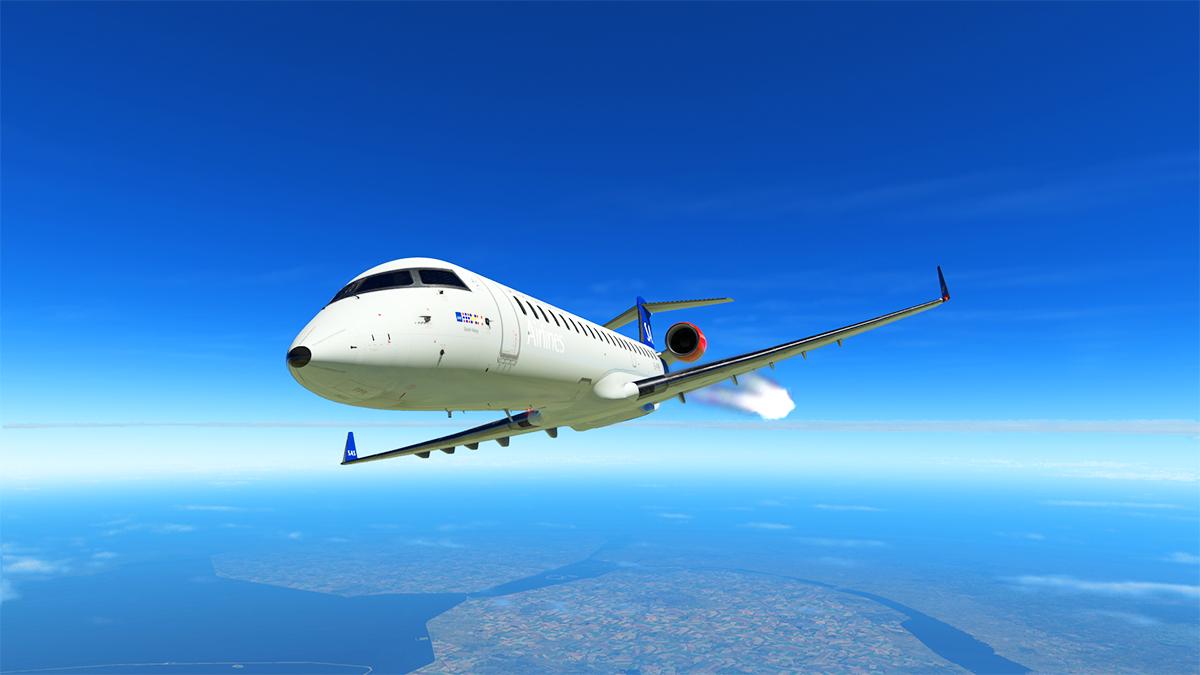
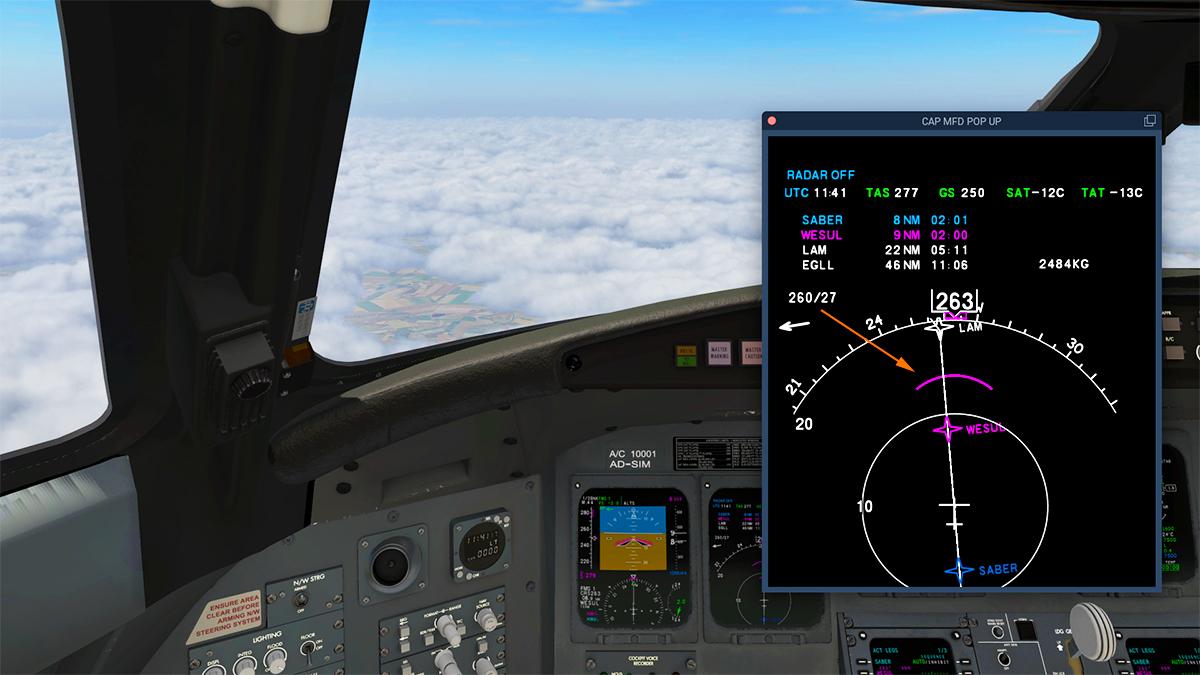
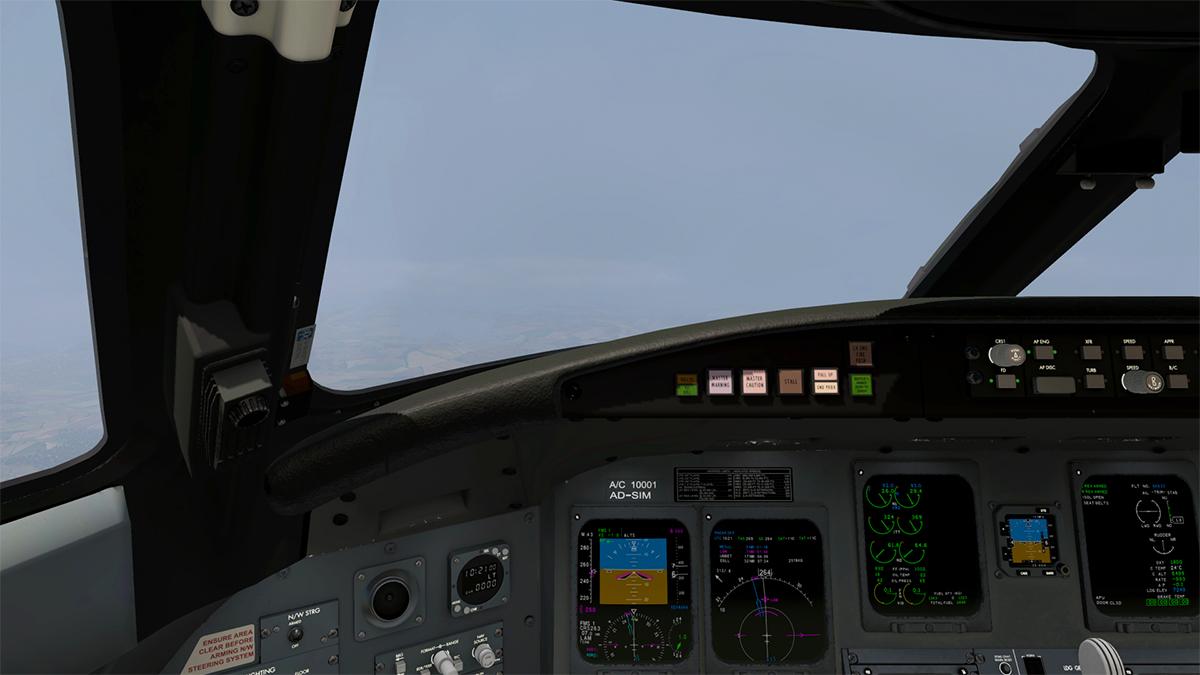
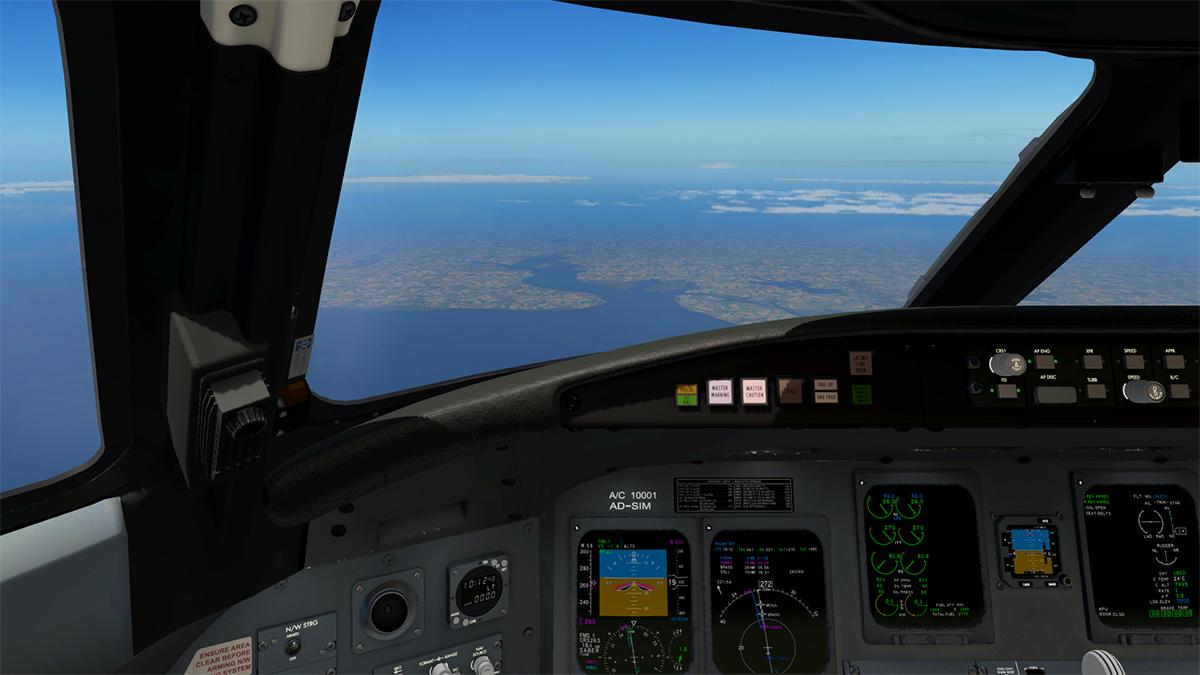
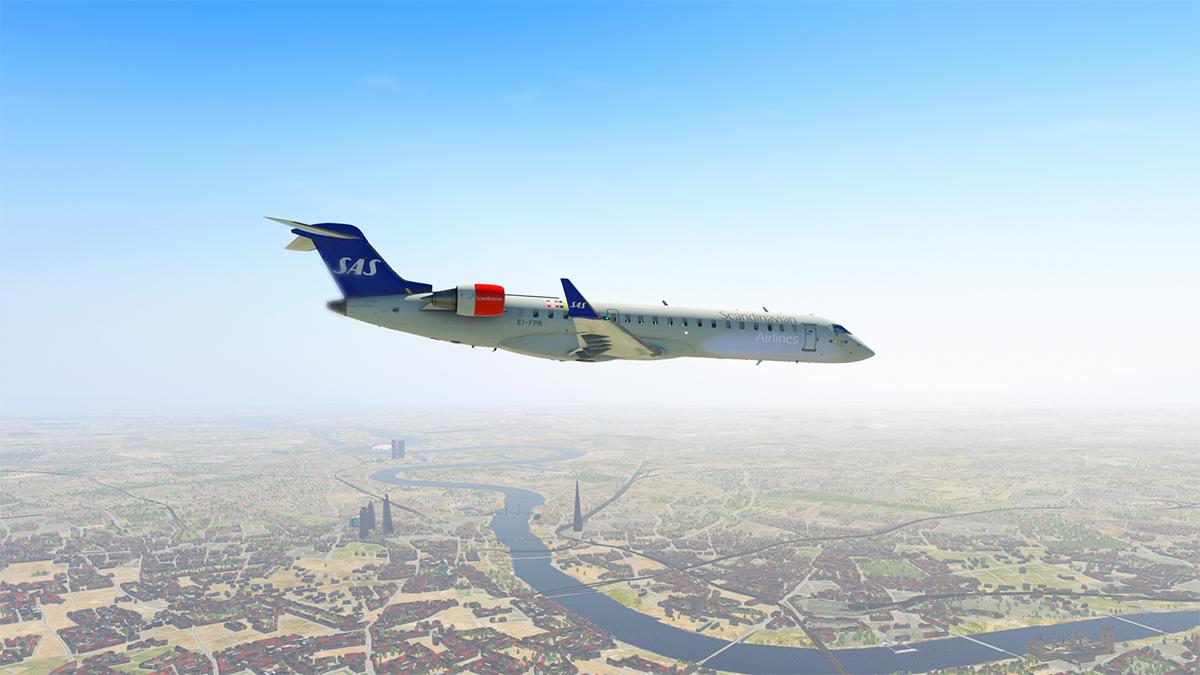
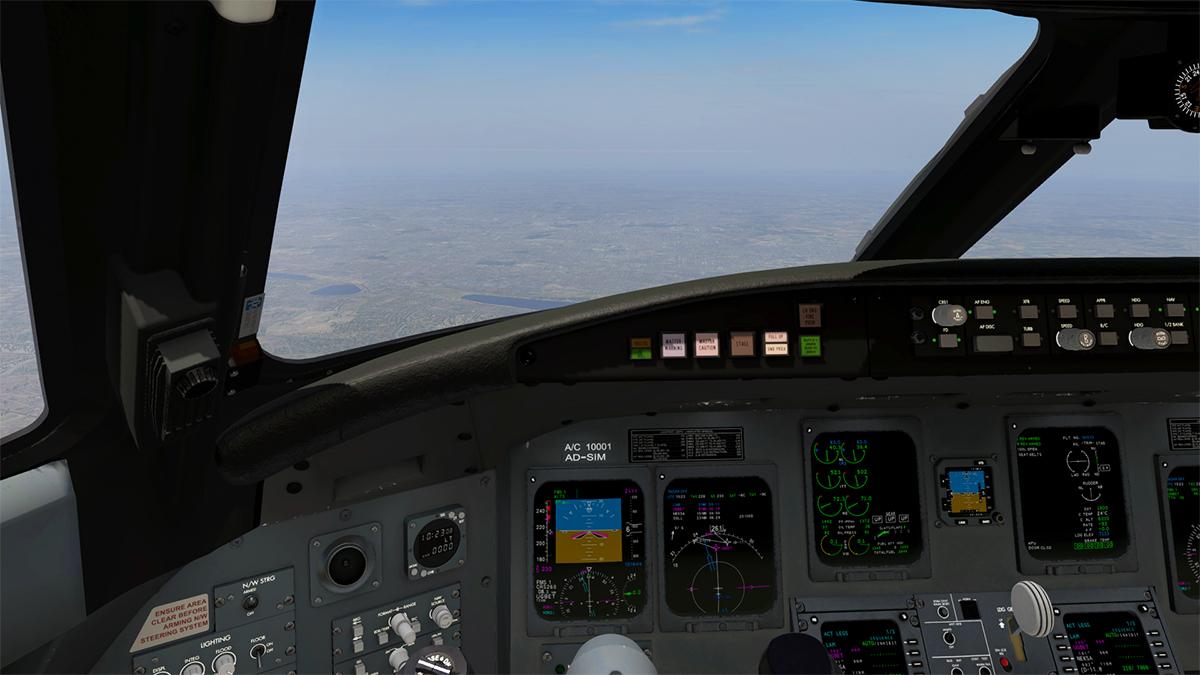
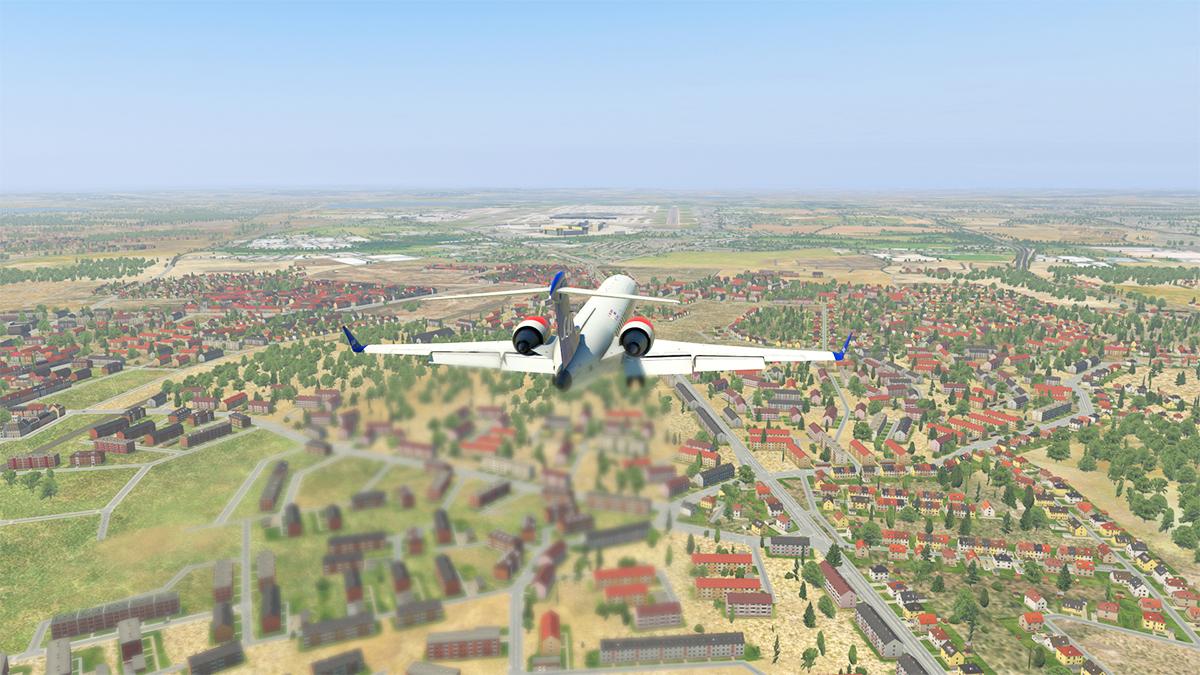
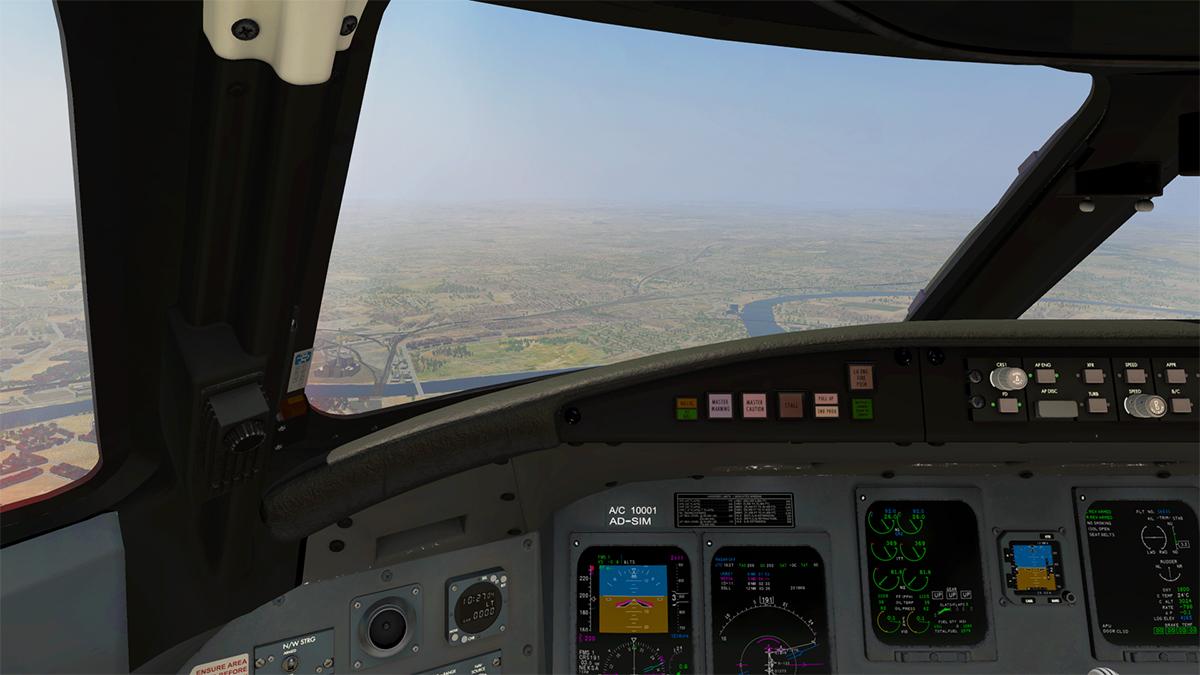
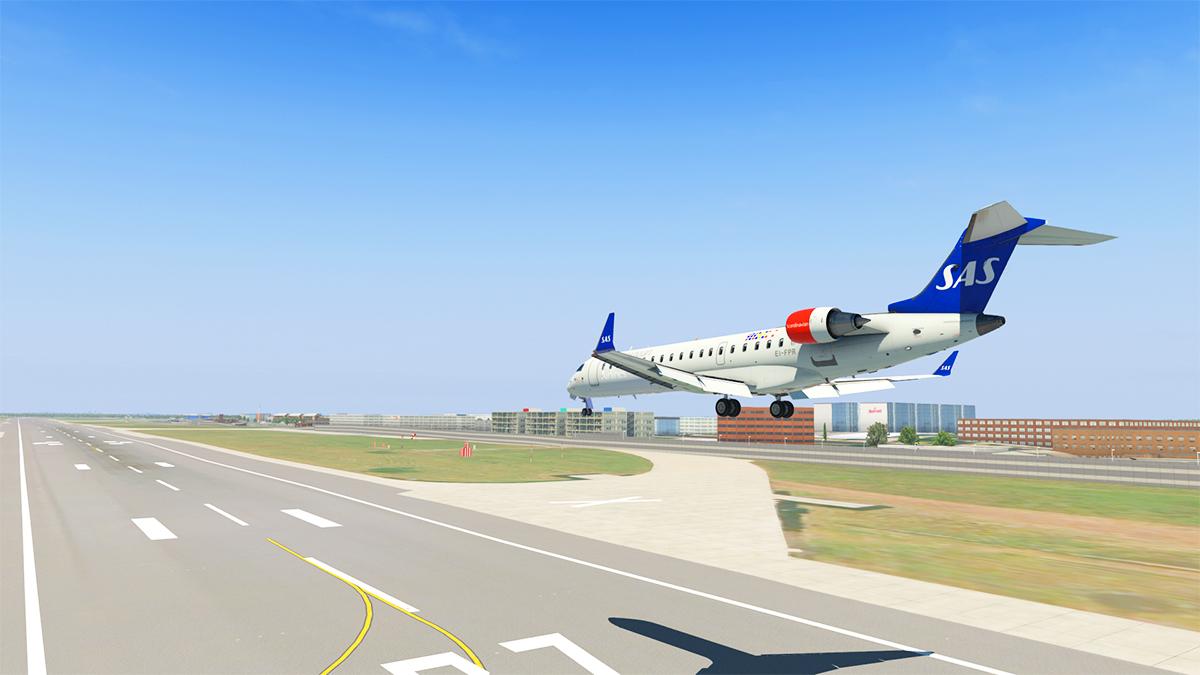
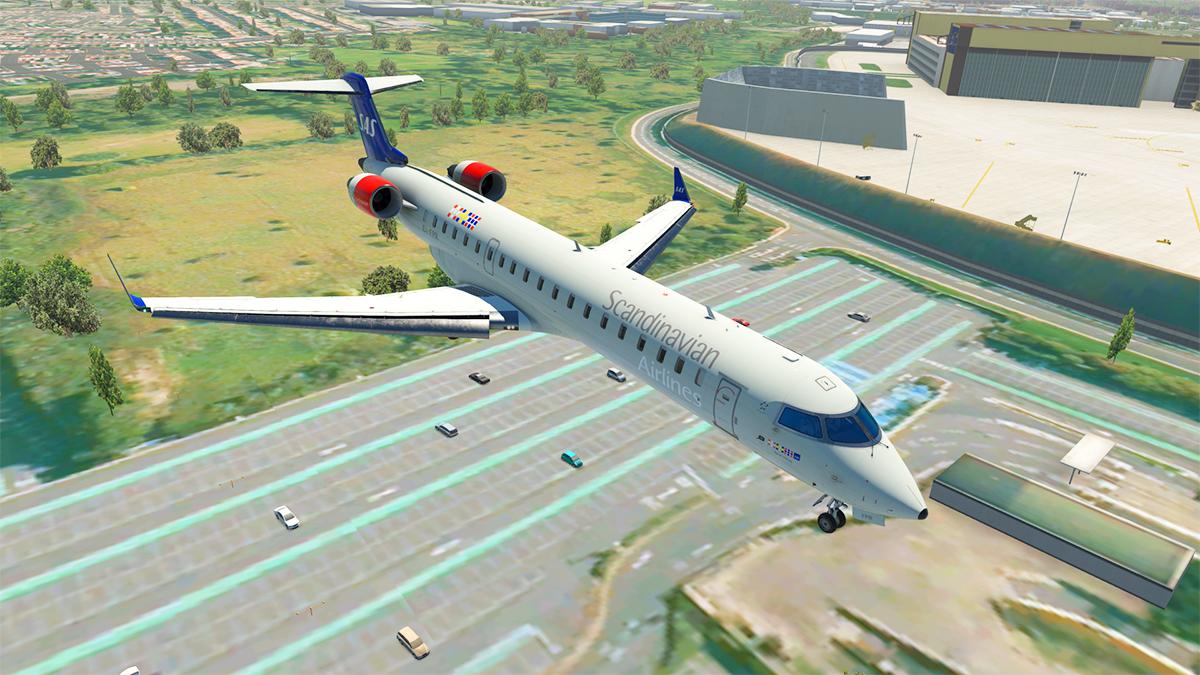
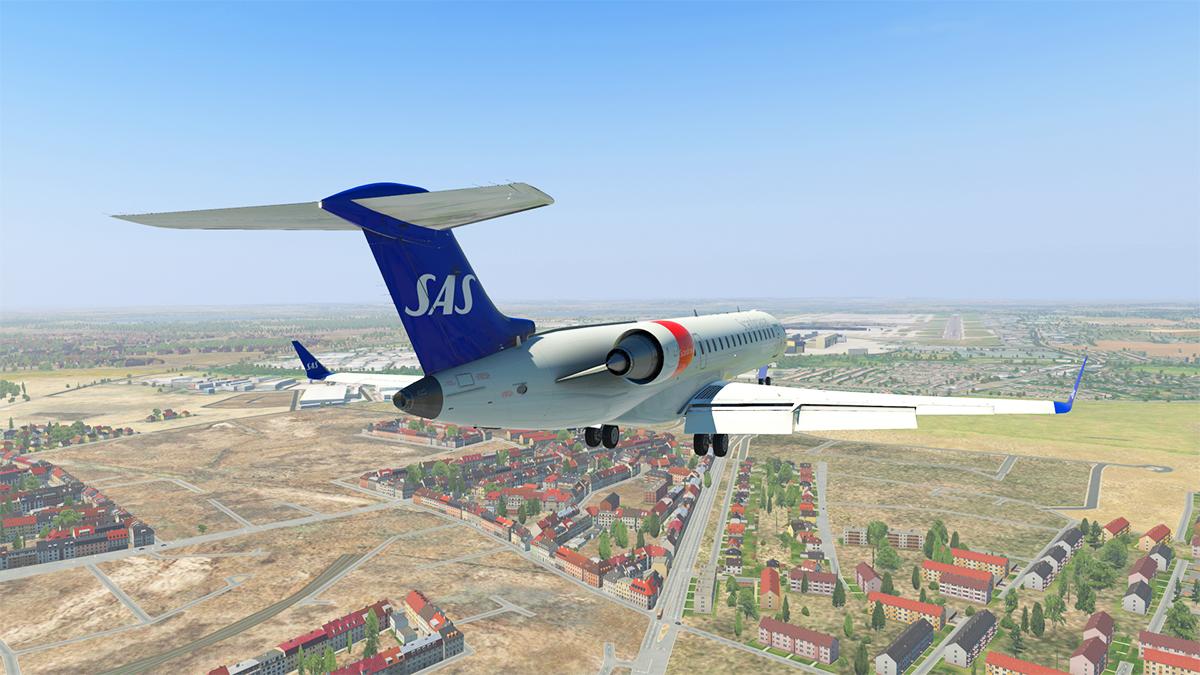
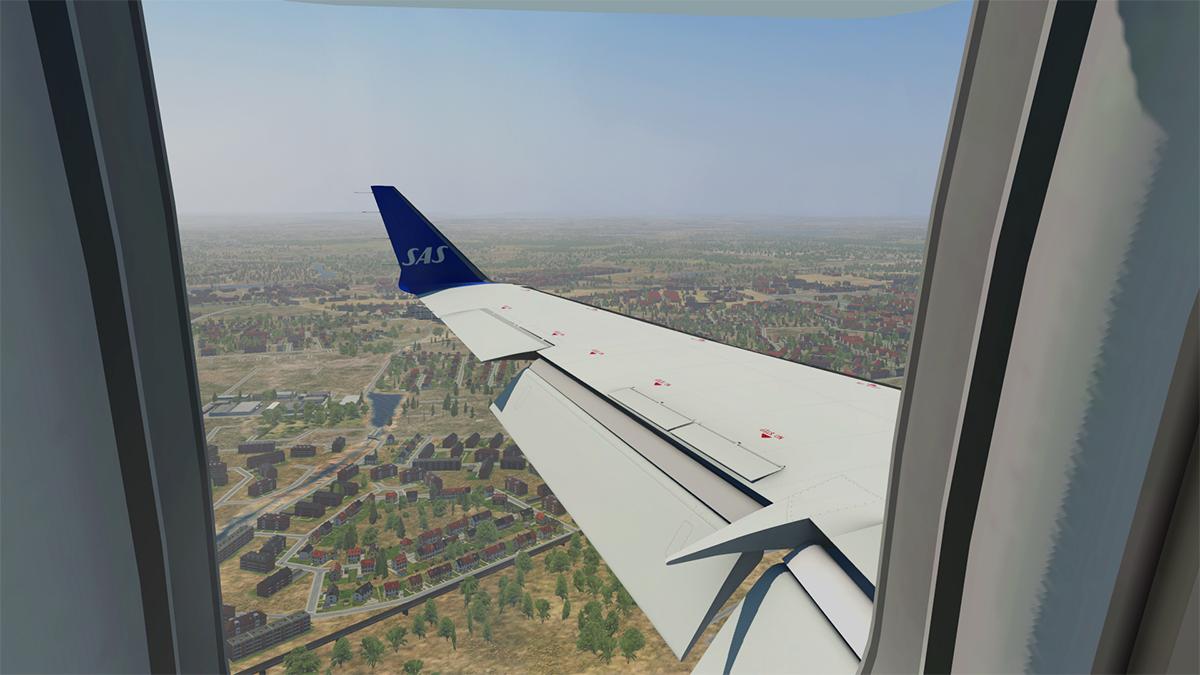
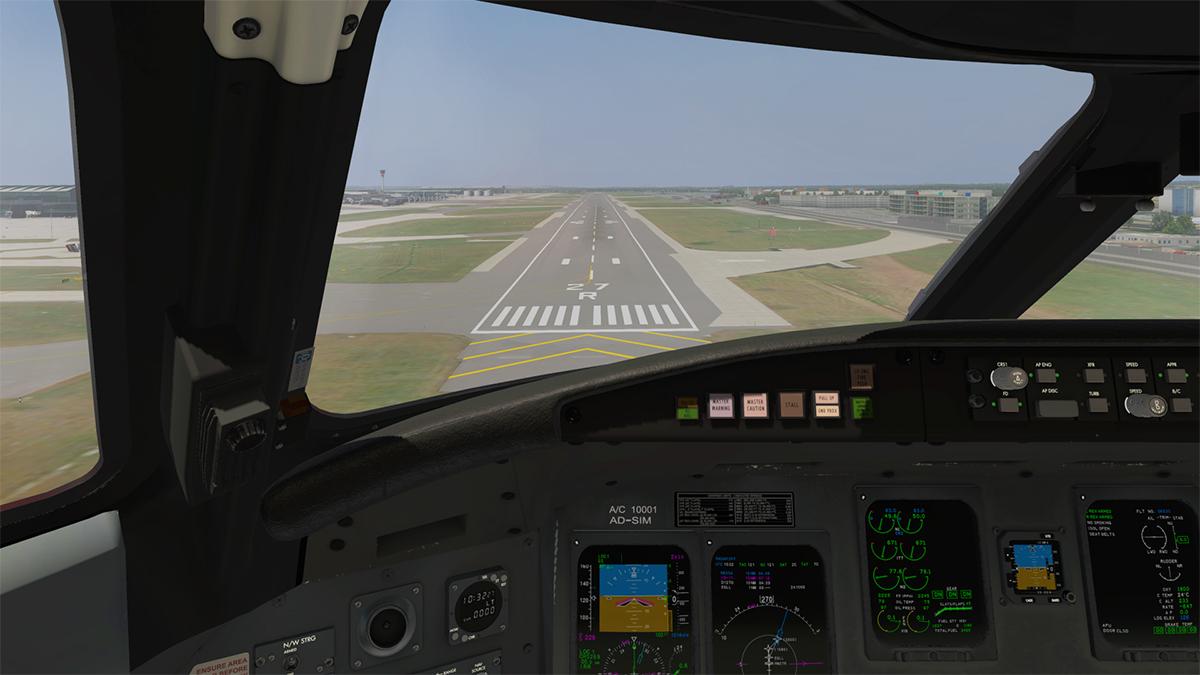
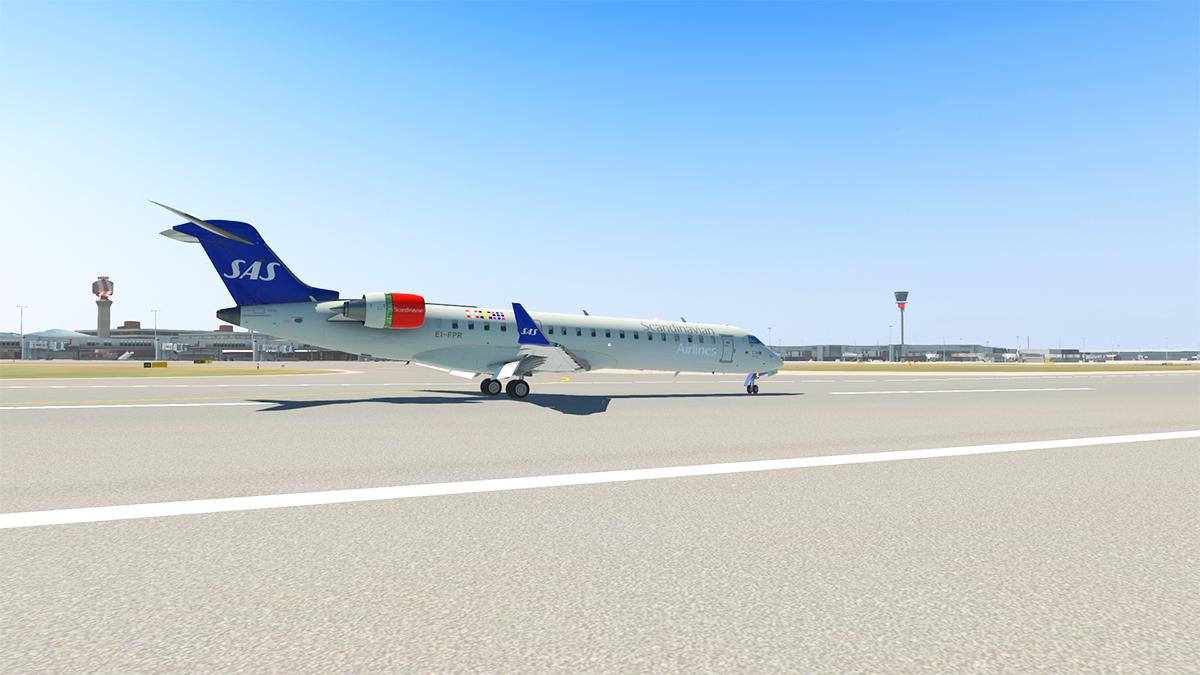
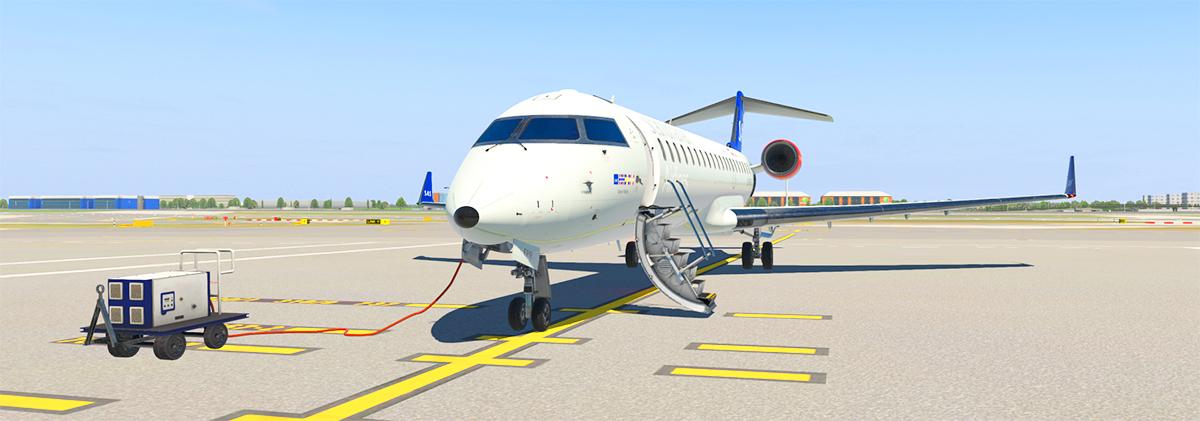
Aircraft Review : CRJ-700 by AD Simulations/Delta Wing
Stephen replied to Stephen's topic in Airliners Reviews
An aircraft well worth sticking with... when sorted after a few refining updates it will be a bargain at that $50 price with the features. It will certainly be in my flying fleet. -
Behind the Screen : January 2022 I came into the X-Plane Simulator in the last few months of X-Plane9, so the next version of the Simulator was only a step away in X-Plane10, the next update was X-Plane11 (the current version), and then like now, in just over a decade ago the next edition in X-Plane12 is now due. In reality in that intermediate decade I have only been introduced to two new complete X-Plane versions. It actually doesn't sound like a lot of change, but there has been also huge landmark changes during each X-Plane version run in HDR (High Dynamic Range) and Vulkan/Metal API (Application Programming Interface), which are actually more significant revolutions than the new release versions themselves, they also both came to the fore with X-Plane11. The change from X-Plane9 to X-Plane10 was the most significant period ever for the Simulator. The changes were quite extensive in mostly the environment additions in new mapping ground textures and "Plausable world" autogen, that in reality changed the whole face and feel of the simulator. Back then XP10 came in a metal box (Aerosoft) of nine CDs and took up around 80Gb of space on your limited hard drive. Another indirect change was the movement from 2D to 3D cockpit environments and different if early ideas on non-art clouds (Austin's little "Puffs"). A lot of users at the time stayed devoted to X-Plane9, mostly for it's very extremely light framerate use, X-Plane10 was at the time framerate heavy with it's now far more advanced scenery aspects and that demand took it's toll on the sort of graphic and processing limits of the period. In hindsight X-Plane9 was the mid-point between the early basic 2D stick drawing simulation, and the more complex 3D world simulators coming after. I still check it out... mostly for nostalgic reasons, but to mostly see those 100% framerates (they are a beautiful thing). X-Plane11 feels like it has been here forever, in reality the change to X-Plane12 is also a year late, so half a decade with one version feels like an eternity and it is no wonder we are all biting at the bit for something new. Noted that X-Plane11 could have been in reality two versions, before Vulkan/Metal and after the API upgrade, so the timeline there is also a bit screwed up in context. That brings to mind the changes the new version will create. Most find that a new X-Plane version is also not a just a software update. Your hardware is also a consideration for an upgrade as well as X-Plane10 changed that aspect. A lot of users year in and year out change their computer configurations with the seasons, to them X-Plane12 will be just another simple upgrade. I use the Tick-Tock system... in one year a Graphic Card (Tick) update, the next a Board and Processor update (Tock). But that aspect went awry with the prices of Graphic Card prices going through the stratosphere with the move to real-time ray tracing and bit-coin mining. Three times the price currently of my old card means I will have to stick with my current one for still a while yet, but it is still very good. The "Tock" aspect however is a problem. Far older (five years) since the last update means I am in trouble. In reality I should have updated my board and processor three years ago, but like with everything Covid got in the way... to be honest until recently I was not really bothered as the system coped really well, helped along the journey with the mid-release Vulkan upgrade. But now I am seriously feeling the pressure, in that most of last year it was getting to be an ongoing struggle to keep my stutters at bay. So you were always in dialing your graphic preferences back, but I was never greedy there in the first place. But the pressures now required of X-Plane means I am feeling the growing wall of it all getting closer and the requirements getting higher, and everything is now also closing in on me every day to X-Plane's 12 release. I am already in trouble as I can't upgrade with my current processor to Windows 11 either (boo to Microsoft), which seems a dumb scenario as my current chips are not actually THAT old... but no. (Most users will say "stick with Win 10 as Win 11 is shit anyway), but I like to be current in system areas like that. The last time I did my "Tock" it was quite a simple choice of board (Gigabyte) and Intel i7-6700K CPU, not the most powerful at the time, but very efficient (and not too hard on the bank account), and they have performed well over the years. I have already fixed one other pressure of the last year in Storage. One of the statements of the last version upgrade was to an SSD drive... back then it was a 500Gb Samsung, that quickly turned in to an upgrade of a 1Tb Samsung, only months later... The growing size of files soon found me again in fast diminishing space, cascading past my 300Gb marker with only 250Gb of space left. You think that 250Gb of space is a lot, but it isn't in today's storage terms with consistent 3Gb to 5Gb scenery files and even now big files with some aircraft, and I don't have or use the large ortho sceneries either. Around Cyber Monday or with the Christmas sales there were deals, and a Samsung 970 EVO Plus SSD 2TB - M.2 NVMe was secured and installed on my board. "Is that it?" It is weird at the minute sized board compared to some of my older 12GB (yes only 12GB) drives I use to prop up my monitor, and for the minute size it is a little powerhouse of M.2 NVMe storage... so is the advances of computer hardware. Installing was the easy part... recompiling X-Plane and every required windows application to the new drive is a BIG job. It is amazing on how or much or how many applications work in the background to make X-Plane function correctly. Every aircraft (and even now sceneries) have to be also reauthorised back in one by one... it was a huge job that took weeks to get to a refined running situation of a transferred, if slimmed down clean X-Plane install. Bonus is that I now have a spare 1.3TB space to fill, that alone feels good... or last at least I'm safe for another 12 months. But my main dilemma remains, a new board and processor. The earlier mentioned Intel i7-6700K CPU was good but not the top of the range in power, so I never had "Tons of Power" at my disposal. I was always okay with that as it was a good benchmark for reviews. But sometimes you really missed that grunt, I also have what I call a few "Bleeders", the worst is xEnviro at around 10 fr to 15fr, which really is at the current core of my problems, bigger problem is that I can't switch it off for the bonus environment it creates against to almost everything it ruins, it is a real love-hate application. Being slow or late updating my processor has oddly brought me a significant benefit. 12th Generation Intel processors. Super powerful and heavily multi-core, they are Intel's reaction last year to the decades dominance of AMD Ryzen in huge power and speed. The desirability factor goes through the roof "POWER" all that power, but a 12900KF comes with a significant cost, many in fact. The problem is not just buying a new expensive board (you need a new motherboard to run the new 12th Generation chips in a LGA 1700 socket), but other factors as well. The i9-12900KF chip requires more power (It sucks down power like running a small country in electricity), secondly the i9-12900KF is like having a mini nuclear reactor sitting in your desktop computer... it runs seriously HOT, Cray computer hot!, this makes my current processor arrangement look benign. So it is not just as simple as installing the new board and chip, but giving it more power and keeping it some how cool (or cooler) is going to cost... a lot. So what was just a simple upgrade is turning into a megalomaniac scenario, but just the thought of X-Plane running with all it's bells and whistles flowing can only bring anyone to dream of well.... megalomania. Your answer is maybe then just buy a cheaper but less demanding processor like last time, but I have been down that road for the last four or more years, jealous of others having it all, plus there is the actual practical side of having power to do what I want for reviewing, I am also tired of compromises, fighting applications and stuttering framerate to just do simple jobs, I just want the tools to do my work. Thankfully I have time... try to buy an Intel i9-12900KF and you are faced with "Not in Stock" or the currently high blackmarket prices. There is a computer chip shortage going on out there as well, again thanks to Covid. Here starts the mind games. Will dropping xEnviro and a few other power hungry applications cancel out the extra power requirements of X-Plane12, in other words "come out even". Tricky one isn't it. If not I'm in trouble as I have nowhere else to currently go. Laminar Research did note that X-Plane12 will run fine on current computers, they themselves have not bought any new hardware for the new X-plane version, but the requirement specifications released early in the month puts me on the side of the lower and not the "Recommended" requirements required to pass the banner. X-Plane12 will obviously run on my current system, but how well I don't know, or I'm in the dark. X-Plane 12 is also an unusual Simulator update version. Most numbered updates have had very significant banner features to get you to upgrade to the next version... X-Plane12 is nothing like that at all. Basically it is a fix it all up upgrade, more of the same but just done far better, and in the fixing all the things we have wanted (or should have been) fixed for years. It would have interesting what sort of different Simulator upgrade it would have been if Microsoft had not brought back their original Simulator last year. There are a lot of changes in X-Plane12 relating directly to MSFS 2020, the non-fixed abandoned elements, that suddenly got attention because MSFS 2020 highlighted them. Environmental, ATC, Lighting, landscapes, Seasons... even down to the newer and better ground service vehicles that all reflect on the highlights of MSFS 2020... and the very areas we have all moaned about for years. Did Laminar's roadmap get highjacked? or how different would have X-Plane12 been if Laminar had in fact just been their usual selves. No doubt MSFS 2020 was a serious wakeup call in the X-Plane Simulator's weaknesses, is that to our final benefit or to the loss of other innovative ideas. Personally I think the changes are to our benefit. My coda is that if the basics are running right then the rest will follow, and the basics to be honest are currently a mess... left there languishing far too long in the "To hard to do basket". So the release of X-Plane12 may on the surface look like more an update than an upgrade, deep down though it will be a significant change to the Simulator... another benefit is that now that crowded list of problematic issues have been finally addressed and fixed, the table has been finally and thankfully cleared up. So Is X-Plane12 the upgrade we all had to have. This also then allows Laminar to get back to what it does do very well in innovate again. X-Plane12's single aim however no matter which way you seriously look at the release is just to counter the effects MSFS 2020. This is not for the Gamers out there (but that would be nice). But with the hard core Simulator Users. These are the ones that spend and build up their collections. And where the money goes, then follows success and activity producing for that platform. X-Plane has a serious advantage in the high quality of it's aircraft and tools, it is in the experience that MSFS 2020 gets to do better. Balance that effect better and X-Plane will become the more serious (even competitive) Simulation platform. For years I have noted that core city areas, followed by autogen surrounding areas is the most effective way to run a Simulator. In reality X-Plane12 again misses this aspect, and that is where our biggest concern is... A few token city objects was always going to fail in context. Over the last six weeks or so Laminar have been tempting us with X-Plane12 previews in images, videos and even waterbottles. The focus has been mostly on the Airbus A330 that will be the leading new default aircraft, but it is in the smaller revels that we get a glimpse of what X-Plane12 will be. Because there are no extravagant tentpole features coming in X-Plane12. Then our expectations are not extremely high this time around either, but that may also be why X-Plane12 may will be the most interesting release for a long time. It will change the way we will do Simulation again, but not in the usual way, but in the nuance of the changes it may change our Simulator to the far, far better simulator, and in that aspect it is very exciting, and getting more exciting day by day to the release of the beta. When will that release be? Most say Easter, but I think still it will be way before then... hopefully soon, very soon. Stephen Dutton 1st February 2022 Copyright©2022 X-Plane Reviews
-
NEWS! - Aircraft Released : Piper PA28R Arrow III G5 - E1000 by vFlyteAir It's weird sometimes. Only a few days ago I mentioned in a review that vFlyteAir have been very quiet for a while now, and you guessed it... out comes their latest release. This is the promised (a while ago) version of the Arrow lll with a custom Garmin G5 Avionics package, there is the E1000 setup in there as well. And you get an extensive if huge in-detailed feature list,as vFlyteAir are very good at those areas... Note; this Arrow lll G5 is not an update, this is a brand new model, but there is a discount code for previous purchasers... but be quick as it will only be available for a few weeks. Features for the Arrow III G5/E1000 include: G5 Version Our custom Garmin G5 simulation was developed by vFlyteAir with the assistance of real-world pilots who regularly fly the Garmin G5. With their help, we believe we have created a very plausible and realistic simulation of the G5 exclusively for use in our own fleet of aircraft. No 3rd party plugins required! The G5 version can also be switched to a traditional analog-gauge panel using the Options Menu. The G5 can be configured to use either Imperial or Metric units for altitude and airspeed. Your G5 settings are saved each time you fly, and are restored the next time you fly. We have even modeled Electronic Stability Protection which provides over-pitch and under-pitch, over-speed and under-speed and over-roll protections to keep the Arrow III within acceptable flight envelope parameters. G5 Version has Integrated GFC500 Autopilot with GMC 507 Control Head With the G5 glass panel option selected, the Arrow III is equipped with the GFCD 500 autopilot that uses a GMC 507 controller. The GFC 500 is tightly integrated with the G5 PFD, which displays autopilot states on-screen, The GMC 507 controller can be popped out to separate window for easier viewing and manipulation. E1000 Version For those who prefer the Aspen EFDE1000, we have updated our E1000 simulation to provide a more realistic and accurate experience. The E1000 version can also be switched to a traditional analog-gauge panel using the Options Menu. The E1000 can be configured to use either Imperial or Metric units for altitude and airspeed. Your E1000 settings are saved each time you fly, and are restored the next time you fly. E1000 with KFC 230 Touch-screen Autopilot The Arrow III E1000 version uses a touch-screen KFC 230 autopilot which can be popped out to a separate window for easier viewing and manipulation. Pop-Up Options Menu with Checklists Click the small Piper logo at bottom left of the screen to pop up the Options Menu, which allows you to select options and preferences, choose Glass Panel or Analog-Gauge instrument panel, summon a Tow Tractor, add fuel and passengers, open/close doors, remove wheel chocks and cowl plugs and display the Normal Procedures check lists. Tow Tractor Feature When you are on the ground with the engine off, you can summon a Tow Tractor to tow the Arrow III out of the hangar. A pop-up control panel allows you steer and control the forward and reverse speed of the Tow Tractor. Custom M803 Chronometer Our M803 chronometer simulation works like the real instrument. Functions include Universal Time Display, Local Time, automatic Flight Timer, Elapsed Timer (Count UP) and Elapsed Timer (Count DOWN). The upper part of the display shows the bus voltage being generated or outside air temperature in either Celsius or Fahrenheit. Custom GI 275 EIS Touch-Screen Engine Monitor The GI 275 EIS has four different pages of engine and flight information, and can be "popped out" as a separate window. Switchable Panels - Glass Panel or Analog Panel - Both the G5 and the E1000 versions can be switched "on the fly" to a traditional analog-gauge panel using the Options Menu. RealityXP® Plugin Support Both Arrow III versions have integrated, automatic in-panel support for up to six different RXP plugin configurations, including RXP g430, RXP GTN650 and RXP GTN750 options. Custom Engine Start Logic With the Custom Engine Start option enabled, engine starts are dependent on engine temperature and ambient temperature at your airplane’s location. Cold conditions require a longer starter crank time. Per the Arrow III POH, engine starts require full rich mixture and throttle open 1/2". In addition, the pilot must follow the Cold Start or Hot Start procedures described in the Arrow III POH to ensure a successful engine start without flooding the fuel injectors. This option can be turned off using the Options Menu. On-Screen Warnings and Notifications Warnings and notifications will appear on-screen under certain conditions such as forgetting to set the transponder to ALT mode, or leaving a door open dur-ing taxi. Can be turned off by the user. Save-States your preferences and settings are saved automatically each time you unload the Arrow III, and are restored the next time you load the Arrow III. Your settings for the G5 and the Aspen instruments are saved in separate files and restored when you fly again. Wheel Chocks and Cowl Plugs—Use the Options Menu to remove the wheel chocks and cowl plugs. If the wheel chocks are left in place, the airplane will not move. Realistic Airframe Vibration/Shake Effects The airframe and controls shake slightly when the engine is running. The shaking is more noticeable when the Arrow III begins to stall, on touch-down , and when the engine is shut down. You can turn off the Shake Effects using the Options Menu. Accurate Flight Model Our Arrow III model has been completely rebuilt in X-Plane Planemaker to provide accurate flight characteristics and ground handling. The Arrow III can be flown with X-Plane’s Experimental Flight Model feature turned ON or OFF. The new version corrects issues with ground handling experienced in the previous versions Detailed3D Model and Hi-Res Textures the Arrow III features highly detailed 3D modeling and super hi-res textures for the most realism possible in a flight simulator. PBR textures and 3D lights are used throughout to add to the realism. VR-Ready cockpit controls have been optimized for Virtual Reality Animated Pilot, Copilot and Passengers The pilot and passengers are animated with random movements, and they also respond to aircraft bank and pitch. Dynamically Calculated Weight and Balance—as you add fuel and passengers, the airplane weight and Center of Gravity are recalculated and adjusted in X-Plane. Use the Weight & Balance chart on the Options Menu to check your aircraft weight and center of gravity under the current loading. FMOD Sounds with Spatial Effects Support for AviTab Plugin If you have the AviTab plugin installed, an e-tablet will appear mounted to the pilot yoke. You can hide or show the AviTab tablet using the Options Menu. Support for libRain plugin—NOTE: We provide support for the libRain plugin with the Arrow III. However, at time of release, the libRain plugin does not work with X-Plane Vulcan. The libRain plugin is NOT included with the Arrow III and must be downloaded separately. vFlyteAir are now one of the premier General Aviation developers, so the Arrow lll is certainly a high-quality aircraft... did I mention feature rice, yeah that as well. Nice. Now available at the OrgStore! Images are courtesy of vFlyteAir ______________________________________ Yes! the Piper PA28R Arrow III G5 - E1000 by vFlyteAir GA is now available from the X-Plane.Org Store here : Piper PA28R Arrow III G5 - E1000 Price is US$33.95 Requirements X-Plane 11 Windows, MAC, or Linux 4 GB VRAM Minimum - 8 GB+ VRAM recommended Download size: 475 MB Version 1.0 (January 28th 2022) For a very limited time, owners of the Arrow III by vFlyteAir can get a discount on this model. Please find your discount code in the original Arrow III invoice. Note: This is not an update, this is a brand new model. The discount code will only be active for a few weeks ___________________________ News by Stephen Dutton 29th January 2022 Copyright©2022: X-Plane Reviews (Disclaimer. All images and text in this review are the work and property of X-PlaneReviews, no sharing or copy of the content is allowed without consent from the author as per copyright conditions) All Rights Reserved
-
Aircraft Review : Bell 47G-2A1 by FlyInside Through early morning fog I see Visions of the things to be The pains that are withheld for me I realize and I can see That suicide is painless It brings on many changes And I can take or leave it if I please The above lyrics are actually related to a Helicopter, a very famous one, in fact the silhouette of the machine signified the category that is covered by Vertical Takeoff aircraft. The song is "Suicide is Painless" from the film M*A*S*H by director Robert Altman, and the subsequent American Television Show that ran for seemingly decades but actually only for one (1972 - 1983). The Bell 47 is a twin-rotor, single-engined light helicopter manufactured by Bell Helicopter. It was based on the third Bell 30 prototype, which was the company's first helicopter designed by Arthur M. Young. The 47 became the first helicopter certified for civilian use on 8 March 1946. The 47G introduced in 1953, can be recognized by the full "soap bubble" canopy, exposed welded-tube tail boom, saddle fuel tanks and skid landing gear, in also creating that famous iconic silhouette of what a helicopter design and it's layout is. Basically the machine is turned inside out so you can see all the bits that make it work. Note the aircraft in M*A*SH was the military 47G version in the Bell H-13 Sioux helicopter. Engines are either Franklin or Lycoming that are vertically mounted piston engines of 178 to 305 HP (150 to 230 kW) positioned directly behind the bubble cockpit. Seating varied from two (early 47s and the later G-5A) to four (the J and KH-4). There is no notice on the engine version, but as this is a 47G version, so I will go for the Lycoming VO-435 engine producing 240 hp (179 kW). This engine was produced under license by Westland Aircraft as the Sioux for the UK military. The 47G-2A-1 version also had the wider cabin, improved rotor blades and increased fuel capacity. First flight was December 8, 1945, and the aircraft was produced between 1946-1974, and 5600 Bell 47s were built. FlyInside Bell 47G-2A1 First off the important stuff... the FlyInside Bell 47G-2A1 is currently Windows only, so Linux or Mac users can not apply. My guess that is because of the installer... The Bell 47G-2A1 comes with an "Application" (XP Setup Wizard) installer called "HeliManager" to install the helicopter into the X-Plane Simulator. Click to Install... ... first it asks you for your X-Plane folder and installation "Destination Location" address, if it is easy to find it will pop-up in the address bar, hard to find then you can locate it yourself via the "browse" button. The application will also set up and insert a "Start Menu" shortcut folder on your Windows system... .... then it will proceed to install the aircraft and Start Menu folders, when done it also asks you if to want to see the "Manual". When starting up the X-Plane Application, again the installer will ask you now for your Authorisation Key (Product Key).... it is very odd (or rare) to do changes while the Simulator is booting up? But the same Menu is still available once you have loaded the aircraft. The menu is positioned in the X-Plane banner bar... but don't get too excited, as it is only two Tabs in "Controls" and "Flight Model" and one of them doesn't do anything anyway. Flight Model; gives you the choice of three options in Easy, Medium and Realistic. and to "Enable Engine Governor". There is also a segment in the manual on how to best up the 47G for X-Plane in settings. Flight Controls; just tells you that the aircraft uses the "Standard X-Plane Helicopter Bindings". This aircraft is a direct port (the first!) from MSFS (Microsoft Flight Simulator) 2020 by the same FlyInside developer to the X-Plane Simulator.. the same menu settings in the MSFS version are of course slightly different... three tabs; "Controls", "Flight Model" and "Settings". But they don't have any other options either, so there are not many differences cross-platform. There is actually only one option or "Hotspot" below the door catch, in that you can have the doors attached or removed, and no they don't open either... "What the doors don't open?" sheeesh. Colin Firth is the pilot, with wavy hair and everything. But he is not animated, and it shows badly in the clear bubble aspect, as the cyclic, collective and rudder pedals all cut into the person. In the MSFS version there are two (different than X-Plane) pilots, a male and a female, who come off even worse than the X-Plane version does. Modeling and detail Overall the Bell 47G-2A1 is well done, nice construction on the bucket style cockpit and the framework lattice-tube tail is very authentic to the original 47G. The Lycoming VO-435 engine is extremely well modeled in all it's piping and cabling glory, but the MSFS version has more chrome and finer texture detail not on the X-Plane version, not much mind you, but enough to notice... The twin-saddle 29-gallon fuel tanks are lovely, and nicely detailed and piping is excellent... ... the bubble glass though I think is awful... too clear and not at all defined in thickness or definition, it just does not look realistic? And this is where we have a sort of issue with the aircraft. No doubt the modelling here is quite superb, extreme in detail. But the use of textures to create a realism is missing, the 47G is overall a pure if brilliant modelling example, however the feel is bland, and not dirty authentic. The problem is that the helicopter genre is usually in the very high and complex category, but they are also known for their extreme texture detailing as well to create that total authentic look and feel. Last year's Boeing CH47-D Chinook by X-Trident set a benchmark to be matched. I am not saying that, that this extremely detail and texturing has to matched every time a helicopter is to be released, but this is the level that we are used to now, anything else can look average in comparison. Although the Bell 47G is one of the early innovators of the modern helicopter, the control systems are quite if very complicated. They are a complex set of plates, links and rods from the lower swashplate to the upper flybar and head grip. You would think it would have been quite a basic simple arrangement on such an early machine, obviously not. In this aspect the modeling is excellent, it is really highly detailed on how these control systems work, and systems are also fully animated... Lower swashplate pitch is up/down... there is not a lot of pitch movement on the upper flybar, but the rear moving stabilators (they are stabilisers when they are fixed wings) work perfectly. Roll is managed by the upper swashplate via the washout rods to the flybar, again all the movements are fully animated. The Collective (bite) is really nicely animated... lower rocker around the mast and push rods connected to the blades give a large collective movement to the twin-blade assembly. Notable is the compression of the rubber sleeve around the mast. Tail-rotor torque shaft is also animated which is a nice touch. Tail assembly is excellent, with the wire style ground protector, and set tail panel (nicely done with a metal support strip). A simple tail assembly that has full yaw animated movements on the blades, and all the linkages work perfectly. In this aspect of a very dynamic helicopter with the systems replicated, it is well done, even impressive. Cockpit The bubble canopy has a three abreast seating arrangement in a more civil woven grey/black weave (even modern) layout. Or there is the older brown leather option on the military version, but overall you are in wanted the post-war twin-seat olive green worn seating to make it feel ultra realistic. Instruments The iconic tall central instrument panel is not at all complicated, but it comes across as a bit too basic though in this modelling and non-textured form. White in the civil and olive green in the military, changes the concept quite a lot. There is a surprisingly a lot of the white panel variants out there. We will get the obvious out of the way first... the two levers left are "Mixture" (red) and "Carburettor Heat" (yellow). Avionics are a Bendix/King KT 76A Transponder (top) and a ICOM IC-A200 radio (Comm) below. Top left gauges are the "Carburettor Air Temperature" and right "Magneto's" Ignition. Power switches are below left, right Volt light and Fuel Prime (three non-working Circuit Breakers Bat, T.R. and ENG). Lower left is the "RPM" and the "Airspeed" right... Next row left the "Manifold Pressure", right the Altmeter. Next row the "Oil Pressure, Transmission or Oil Temperature" (switchable, below) and the Fuel gauge is noted as inoperable. right is the "Vertical Speed" (V/S) instrument... lower instrument row covers THE real "Fuel Gauge" and engine "Cylinder Temperature". Bottom row has five switches, Instrument (power), Navigation Lights (NAV), Beacon, Spare and Landing Lights (sic), switch for Oil Temperature or Transmission Temperature can be selected to each parameter, as can the Strobe lights ON/OFF. You would think the main flying instruments would be arranged in the top two rows, obviously not and they are quite had to see in flight... and you are still missing something? That would be the Heading Dial, that is positioned on the left cockpit window bar. The left sided (pilot is positioned left) has a "Starter switch" and "Govenor Switch", and the turning throttle grip. Cockpit and instrument lighting is basic, basic... There is no backlit instrument lighting, but just a single red light up on the bulkhead, the Heading dial is very hard to read in the dark? Flying the 47G-2A1 Starting up the 47G is easy... BATT on, Alt Switch off, Magnetos to Both, Mixture Full Rich or the red lever to full up... ... Instructions in the manual ARE FOR THE MSFS version? X-Plane uses an AUTO Govenor that doesn't follow the manual instructions, however, if you turn the Govenor off (Collective) it will act in the MSFS startup procedure... Now press the "Starter" button the Lycoming VO-435 will start up and come to life, it sounds a bit like a lawnmower, abet a very big one in the startup. With the "Gov" off the RPM needles should be separated, with throttle going up to 100% they should then combine in the RPM green zone at around 30 RPM. "Gov" ON (X-Plane) and the aircraft should warm up and go directly to the 30 RPM setting. It was time for Colin to earn his keep... Remember this 47G is not new but sixty year old technology aircraft, the Lycoming only puts out 240 hp, even then it feels too much power... this machine is fragile. So you can't abuse it... you lift the collective like pulling a bandage off a sore wound, slowly and easy... ... because of the weakness of power, its not THAT poor... the power, but adequate. But it does give you another dimension in flying the 47G, your not fighting it at all... so even straight up off the skids it will hover completely in control, move this way... or that way in complete authority of the machine, it is easy, nicely easy. You have to be aware though of another weakness? this is the yaw or the thrust power of the tail-rotor, nose right (the blade is on the right side of the tail) and the nose will swing easily, but the left is another matter again... there is direction but it can be weak. So any early flight finds you moving the yaw (rudder pedals) a lot to find your correct feel. The feel is not hard to find, but the centre line is with your left foot doing a lot of the work in keeping the 47G straight, no matter the power setting. You do feel the In Ground Effect (IGE), and slightly climbing higher the Out of Ground Effect (OGE), but I still think the conversion requires a little bit more fine-tuning, not much, but X-Plane demands a bit more finesse than MSFS in this area, and it shows. But all areas like the vortex ring state, engine failure, and retreating blade stall are all covered. Confidence grows very quickly and easily, the slowish speed and the solid platform really helps in you quickly relaxing and enjoying the machine, it is a sort that "your not going anywhere fast, so just relax and enjoy it" sort of scenario and your eye has to be on consistently on the Manifold Pressure gauge, too much pressure or the red line and the engine will blow out and YOUR going down, so again just relax and enjoy the scenery. The almost non-obstructive view is excellent, and your up there in your own private bubble, yes that pun was intended! The maximum speed is a dawdling 91 knts (105 mph, 169 km/h), with a crawling cruise speed of 73 knts (84 mph, 135 km/h), the 47G is not exactly FAST is it... and you have a circular range of 214 nmi (246 mi, 396 km), but your not going to go too far from base anyway without navigation tools... if you are going to climb then the official rate of climb is 860 ft/min (4.4 m/s), but again you don't or could go anywhere near that, you will just climb slowly and steadily. Service Ceiling was a remarkable 3,322 m (10,900 ft). I found I couldn't push the 47G, if you wanted to climb fleetingly upwards or add on a lot more forward speed the aircraft, then the limiter would complain loudly, so you more had to coax the 47G than expect it to do what you wanted it to, again changing direction with that weak yaw requires a bit of roll and smooth left foot inputs to go left, to go right requires the same in case you get a hard turn right, so coax is the word and... patience. External lighting is what I expected, just basic. Navigation and strobes are on front end of the skid crossbar, and there is one beacon mid-tail boom. All need refining, but not bad either. The Landing/Spotlight under nose is fixed. The sounds are not bad actually. It feels right to the ears and the dynamics, and they are FMOD in design. They certainly add in to the general feeling of what the 47G would be like to fly in, delicate, slightly under-powered but unique. Time to head back to the pad. Sad really, because I am really enjoying flying this unique post-war aircraft, it's fun and even may I say relaxing because of the speed. The Bell 47G does have Auto-Rotation. The aircraft is not that good in gyrocopter mode, but it will support you enough to get you down and onto the ground, I never tried it here in the review, but it is possible. Approach is also slight differently from the same. With the slow approach speed you don't get that severe Effectively Translational Lift boundary or ELT, as you sort of smooth your way in and so the transition to the hover is very sweet and even placid, ditto for a Vortex Ring State for everything the Bell is quite a stable platform. Obviously you need to balance the aircraft, but it is not as hard as it looks.... ... manoeuver over the landing spot is quite easy, a touch this way, then a... touch that way and the helicopter responds nicely. You are still aware of that weak yaw, so your approach to the landing area is best straight on, than requiring turning manoeuvers over the spot, yes you can still do that of course, but be aware of the weak left foot and the strong right foot. You can hold it here without slipping, but don't overwork the cyclic... and the 47G responds nicely. Hold the hover and then gently lower the collective to touch down nicely, to easy. Pull down the Mixture lever right down to shut off the fuel and run down the engine. Yes I really enjoyed that. One note though... currently the FlyInside Bell 47G does not fly well in the X-Plane replay mode, it changes location and some does very weird things, which is sad as you want to see your expert handywork from the external perspective... the replay needs to be fixed quickly. ________________ Liveries There are ten liveries which are all quite nice. One Army and of course the M*A*SH 4077 livery, the MASH livery also comes with outer stretchers on the skid supports, which is a nice touch... Two Orange Modern/Old and a HeliSimmer livery. Blue-White is default. ___________________ Summary The Bell 47 is a single-rotor single-engine light helicopter manufactured by Bell Helicopter, and one of the most iconic helicopter silhouettes of all time. First flight was December 8, 1945, and the aircraft was produced between 1946-1974, and 5600 Bell 47s were built. Famous for its "soap bubble" canopy, exposed welded-tube tail boom, saddle fuel tanks and skid landing gear, the 47 was powered by a Lycoming VO-435 engine producing 240 hp (179 kW). This is the later 47G-2A-1 version that also had the wider cabin, improved rotor blades and increased fuel capacity. This Bell 47G is the first release from FlyInside for the X-Plane Simulator, interestingly is that it is the first cross-platform aircraft created in Microsoft's MSFS 2020 Simulator to then be ported over to the X-Plane platform, so direct comparisons can be made. notably it was also a "Crowdfunding" project as well. MSFS has a more optional menu than the X-Plane version (X-Plane does a lot, like the Govenor automatically). Notable is that this aircraft is only WINDOWS currently, mostly for the installation application. In a pure sense the modeling here with the 47G is sensational, but it is only in the modeling as the aircraft comes with no texturing, this aspect gives the aircraft a slightly dated appearance, even bland, compared to the rich ultra detail we get now. If that aspect had been done, the work would have been off the planet in quality. You get used to it, but overall this style direction of Simulation is now quite old fashioned. In animations the aircraft is very good... all the rotor systems and detail are highly and correctly animated as also is the tail driveshafts and the rear stabilators. The "Bubble" canopy in glass is however poor, with no depth, definition or realism. There are really no options (you can hide the doors, but not open them). There are not the huge options of ideas that you usually get with helicopters, say floats or not even a spray kit, different avionics or even instrument layouts or AviTab, it is highly noticeable. Dynamically the Bell 47G is not at all bad..."Interesting" is the word. The aircraft is fragile to fly with a weak left yaw, and it is seriously not very fast either... but you really love the dynamics here. Notable is that is the machine really and highly refined to the X-Plane Simulator, after cross-platforming, the general feeling is no, there is more to come or required as the developer gets more experience with the X-Plane way of doing things, even dynamically...it's not that far off (the developer is a helicopter pilot), but minute detail is what separated the best from the brilliant, currently the X-Plane Replay is a mess. This Bell 47G (military H-13 Sioux) is one of the most iconic of aircraft, more so via the Film and long running Television show of M*A*SH, created (supposedly) in the Korean War (1950-1953). But the aircraft's significance is also in that this machine created the standard helicopter configuration we know so well today, the first real commercial helicopter. Overall I really liked it, it is an interesting and very rewarding aircraft to fly, you enjoy it and even relax and savour it for the returns it gives back to you. But overall you wanted more... more texture realism, more options and more refinement for the X-Plane Simulator... It will be certainly be one aircraft one to watch in the future if the developer delivers more on these aspects. __________________ Yes! the Bell 47G-2A1 by FlyInside Helicopter is now available from the X-Plane.Org Store here : Bell 47G-2A1 Price is US$34.95 Requirements X-Plane 11 Windows Only At This Time 4 GB VRAM Minimum - 8 GB+ VRAM Recommended Download Size: 658 MB Current and Review Version: 1.59 Features: Revolutionary and realistic flight model, developed and tested by an experienced Bell 47 pilot Support for full helicopter flight physics including effective translational lift, ground effect, transverse flow, flap-back, auto-rotation, and more Support for failures and dangerous regions of the flight envelope including vortex ring state, engine failure, and retreating blade stall Extremely detailed 3D model with high quality PBR textures and animated drive and control systems Realistically modeled engine parameters, including full start-up and shutdown procedures Highly customizable realism settings allow for a smooth, easier flight model for those who are less experienced, and a hardcore, realistic flight model for the veterans experienced with the complex and challenging flight dynamics of helicopters Interior Features: Detailed 3D cockpit model 100% operational switches, levers, and gauges Removeable doors Realistic night-lighting High-quality sound design Exterior Features: Beautiful exterior model Fully modeled engine Animated mechanics including swashplate, rotor-head linkages, tail torque shaft, and more Functional lights and beacons Ten distinct liveries Installation and documents: download for the 47G-2A1 is 674Mb. The download comes in the form of an installer (Windows Application) called HeliManager, and the installation is done via the app. Key Authorisation is also via the application (as described at the start of this review). Full Installation is 6.85Gb (yes that is 6.85 Gigabytes!) Documents supplied are: FlyInside Bell 47G2 User Manual XP (22 Pages) Manual is quite basic but covers X-Plane setup, instrumentation layouts and few (but good) flying tips. Support forum for the FlyInside B47G _____________________ Aircraft Review by Stephen Dutton 29th January 2022 Copyright©2022: X-Plane Reviews Review System Specifications: Computer System: Windows - Intel Core i7 6700K CPU 4.00GHz / 64bit -32 Gb single 1067 Mhz DDR4 2133 - ASUS GeForce GTX 1080 8Gb - Samsung Evo M2 2TB SSD - Sound : Yamaha Speakers YST-M200SP Software: - Windows 10 - X-Plane 11.55 Plugins: Global SFD plugin US$30.00 : Environment Engine by xEnviro US$69.90 : RK Apps XPRealistic v2 - US$34.99 Scenery or Aircraft - EDDP - Leipzig/Halle International Airport by JustSim/Digital Design (X-Plane.OrgStore) - US$20.00 (Disclaimer. All images and text in this review are the work and property of X-PlaneReviews, no sharing or copy of the content is allowed without consent from the author as per copyright conditions) All Rights Reserved
-
NEWS! - Scenery Released - LGKP - Karpathos Island National Airport by Pearl Simulations Over the last few years there has been a lot, no a huge amount of scenery destinations for the X-Plane Simulator released for Greece and Turkey... it is the new, new area to explore past central Europe. So here is another destination in Karpathos Island National Airport. Karpathos Island National Airport is an airport on the island of Karpathos, Greece. The airport first operated in 1970 and back then it had very limited facilities (a small building of only 500 m2). Today its terminal and associated buildings cover an area of 12,500 m2. The current airport facilities were constructed between 2005 and 2009. The inauguration of the new airport terminal took place on 25 July 2009. The island is a popular tourist destination and frequented by SAS, TUIfly, Eurowings, Austrian and Condor. Among Greek airlines, Olympic Air flies to Athens and Thessaloniki, and Sky Express connects Karpathos with the neighboring Kasos Island and Rhodes. The runway is relatively long, at 2,399 meters, especially given that Karpathos is home to only 6’000 inhabitants. Features: Modelling On-Site Modelling and Texturing of Karpathos Island National Airport with all important buildings with PBR effects and plenty of objects Ground: Accurate and realistic 4K Ground Texturing with PBR and wear and tear, high level of details Mesmerizing Approach Views over the Aegean Sea Realistic Night Texturing and Lighting High Res Orthophoto and Trees Holiday Feeling Another destination for your Greek collection! Images are courtesy of Pearl Simulations _____________________________________ Yes! - LGKP - Karpathos Island National Airport by Pearl Sim is NOW available from the X-Plane.Org Store here : LGKP - Karpathos Island National Airport Price is Currently US$19.99 Requirements X-Plane 11 Windows, Mac or Linux 4 GB VRAM Minimum - 8 GB+ VRAM Recommended Download Size: 1 GB Current version : 1.0 (January 26th 2022) ___________________________ News by Stephen Dutton 27th January 2022 Copyright©2022: X-Plane Reviews (Disclaimer. All images and text in this review are the work and property of X-PlaneReviews, no sharing or copy of the content is allowed without consent from the author as per copyright conditions) All Rights Reserved
-
NEWS! - Scenery Released : Grand Canyon West - 1G4 by X-Coda Fresh of his triumphant and clever Yellowstone National Park scenery, X-Coda is back with another national park area, and this time it is the Grand Canyon in Arizona. 1G4 Grand Canyon West Airport sits atop the south rim of the Grand Canyon. When on approach for runway 35, below you is the Colorado River snaking through the Grand Canyon, to the right is Guano Point and the old tramway, and to the left is the famous Grand Canyon Skywalk, a glass bridge that extends over 60 feet over the Grand Canyon. The approach for runway 17 is equally scenic with the Cabins at Grand Canyon West as well as a historic western town to your right, and directly ahead, a clear, stunning view of the Grand Canyon. Easily flown from Las Vegas (FlyTampa's Las Vegas is highly recommended), the trip up to the "Rim" has to be experienced in X-Plane, and this new scenery is an ideal drop-off point to explore not only the Grand Canyon, but the excellent facilities up there. 1G4 - Grand Canyon West is a detailed beautiful recreation of the real airport for X-Plane. In addition, the famous Grand Canyon Skywalk, Guano Point and the old tramway, and the Cabins at Grand Canyon West as well as the historic western town are all included. In addition, a 30m Ortho4XP mesh with ZL16 NAIP imagery that has had most major shadows removed from the imagery is included covering roughly 40% of the Famous Grand Canyon. Features Detailed rendition of 1G4 – Grand Canyon West: All buildings feature ultra high resolution textures. All buildings feature advanced PBR normal maps for realistic reflections and bump mapping. All buildings are highly detailed, down to even door handles. Most buildings feature "lite" interiors to give windows more depth. Large scale realistic ground textures with high frequency tiled normal maps for detail. All models optimized for maximum performance. Living scenery: Wet ground textures for the airport. Ground equipment automatically serves your aircraft upon request. Local Landmarks Detailed rendition of the famous Grand Canyon Skywalk. Detailed rendition of Guano Point and the old tramway Detailed rendition of the Cabins at Grand Canyon West. Custom surroundings 30m mesh surrounding the airport covering roughly 40% of the Grand Canyon (+36-114/+35-114) ZL16 USGS NAIP Orthoimagery is used for both ortho tiles. Nearly all ugly shadows removed from Orthoimagery for a clean realistic view of the canyon. Forests procedurally placed from ortho show vegetation in the correct areas, and nowhere else. Alpilotx’s UHD Mesh V4 provides all other overlay elements (used with his permission). A brilliant scenery at a brilliant low price, if you fly choppers you "Gotta" have it, the Grand Canyon... That is! Images are courtesy of X-Coda Designs _____________________________________ Yes! - Grand Canyon West - 1G4 by X-Coda Designs is NOW available from the X-Plane.Org Store here : Grand Canyon West - 1G4 Price is Currently US$14.99 Requirements X-Plane 11 Windows, Mac or Linux 4 GB VRAM Minimum. 8Gb+ VRAM Recommended Download size: 4.8 GB Current version: 1.0 (January 23rd 2022) ___________________________ News by Stephen Dutton 25th January 2022 Copyright©2022: X-Plane Reviews (Disclaimer. All images and text in this review are the work and property of X-PlaneReviews, no sharing or copy of the content is allowed without consent from the author as per copyright conditions) All Rights Reserved
-
Aircraft Review : Piper PA-28-180 Cherokee C by Aerosphere Simulations Over the last few years the biggest aircraft category in the X-Plane Simulator has had a bit of a decline. The cause was two dimensional, one was the drawback of Carenado/Alabeo from the X-Plane simulator after Thranda Design decided to pursue a different developer direction, but two was also the fact the category had been saturated with almost every conceivable General Aviation (GA) variant possible over the last decade. In GA now there are only a few developers actively developing the so called classic Piper, Beechcraft and Cessna models. One is VFlyteAir whom have also been quiet lately, and the nice collection of Just Flight Pipers. Another developer are of what you could call an X-Plane "Classic" developer is Aerosphere Simulations however are still pumping out with regularity with nice if quite modest General Aviation aircraft. A few months ago it was the PA-32-260 Cherokee Six B, and here is the little brother in the PA-28-180 Cherokee C. The "C" model is signified by it's square-cut windows and the iconic “Hershey Bar” wing. The “C” variant also has a four cylinder carbureted version of the Lycoming O-360 that produces 180HP and is equipped with a two bladed fixed pitch propeller. Notable is the aircraft variant has the "Push-Pull" throttle and Mixture controls instead of the earlier lever quadrant and in creating more space cabin forward. This 180 horsepower variant had an empty weight with an autopilot of 1270lbs, and a gross weight of 2400lbs and resulting in a useful carry load of 1130lbs. And the basic Cherokee is not to be confused with the Archer, which had a longer fuselage. The Cherokee 180 was first certified on 3 August 1962. Aerosphere could be classed as a "Classic Style" developer. Up front there is none of that nonsense of popup features or even a menu. So don't go looking for items like static elements, removable panels, detailed engine, fuel cart, weights and fuel etc; as there isn't even any chocks to stop the aircraft rolling away. The Aerosphere 180 is however VR (Virtual Reality) friendly, and has FMOD sounds. Only external animations are the main right cabin door (latch only works from the inside), and the large baggage store area (behind the rear bench seat) door, that has a set of non-usable chocks and some spare engine oil set inside. Modeling could be noted as "Classic" as well... The polygon mesh is quite large, hence the visible lines on curves, overall the modeling is not bad and the Cherokee shape is well done, but don't go looking for the ultra mesh detailing that is common today... hence the dated feel. The detail however is saved by a lot NML normal mapping, or Dot3 bump mapping which is really quite good... all the panels are visible as are the sunk and raised rivets... best detail is the tail and wide rear single elevator that are nicely detailed to bring out the metal strengthening aspects of the panels. minute detailing is a bit average, notable in the wingtip lighting assemblies and leading edge vents. Wing chord shapes are not bad either. The wheels are all covered by large fairings which can't be removed. The internal side of the wheels in detail is not very complex either, so there is no authentic high detailing here. The cockpit glass feels thin, and not heavy as you would find on a sixty year old aircraft, there are no scratches, wear or dirt to give it a more aged old feel... it is all simply clear, but nicely shaped for the front windscreen. The highlight is the nice twin-blade propeller and chrome spinner, which is a McCauley prop. The starter ring can be seen as well which is a nice intimate detail. Cabin The cabin could be described as "Late 50's Country", with it's light tan and woollen tartan inserts. Don't expect any comfort, they are as flat as they look with ribs, and again feel dated. But the dated feel is correct for the period. Under seat frame is nicely done, and the wheel puller affixed to the rear bench seat is a nice touch. Rear seat baggage area is huge, and feels like wasted space, the cabin roof detail is however very nice. There is a full animated pilot that moves in all directions, pitch, roll and rudder yaw, not exactly the most human like model (more like a mannequin), but it is a fair go I suppose. Instrument panel There is no doubt were all the attention and detail work on this Piper 180 C has been focused on... the instrument panel. The molding and quality instruments are very authentic, but like in a new Cherokee 180 C, not a 55 year old Cherokee 180 aged sort of way. So there is no cracked facia, foam spewing detail or weather worn faded areas, there is however a nice bit of gaffa tape keeping the panel together over the avionics. Notable are the very nice reflections on the instruments, it gives the panel a very realistic feel. The authentic yokes are very nice with well done finger grips on the rear. Again though they both feel new, more than aged or worn down in time, but I do like the authentic PIPER Cherokee centre yoke logos. Both yokes (together) can be hidden via pressing the chrome yoke stem behind. Panel layout is pretty standard, however the Standard Six (Eight here?) flying instruments are more grouped very wide in front of the left side pilot, with nothing, and not even any backup instruments for the right side pilot. Left to right top row has Clock, Airspeed Indicator, Artificial Horizon, Altimeter and directional Garmin CDI (Course Deviation Indicator) VOR2. Bottom row; Turn Coordinator, Heading Dial and Vertical Speed Indicator and Bendix/King ADF pointer... all are perfectly laid out, with the VOR OBS (Nav2) and the ILS alignment Dial clear and nice to use. I like the layout a lot. Lower left is the S-Tec Autopilot adjustment panel, then lower knee panel are all the lighting switches and adjustment knobs, starter switch, with the pitot, fuel pump switches. Avionics and Autopilot power switches are mid-lower panel. Centre-right is the Avionics stack. Top is both a Garmin GNS530 and below a Garmin GNS430 (both units pop-out), Standard Garmin GMA 340 Radio, S-Tec Fifty Five X Autopilot, Bendix/King KR87 ADF receiver (incorrectly labled?) and Garmin GTX 327 Transponder. Engine dials and gauges are all far right. Top a very large RPM and built in hour counter, right Gyro Suction gauge, and EGT (Exhaust Gas Temperature) gauge. There is a block of six gauges that cover; Fuel Left Tank, Gen (Generator) Amps, Right Fuel Tank top row, and Oil Pressure, Fuel Pressure and Oil Temperature bottom row. So over all it is a very basic instrument setup and one that anyone should know in everything laid out here, in other words a "Simple Layout', but one that looks good and is easy to use. Under panel is nicely done. Note the Throttle and Mixture knobs and a HOBBs meter hangs below. Under left is the park brake, far left the Fuel Selector... Rudders however have no toe-brake effect. Flap lever set is between the seats, and the trim winder is on the roof. _________________ Flying the Cherokee 180 Being a basic aircraft. Starting and setting up the 180 is very easy. A few pumps of the engine primer, mixture to half-way, touch of throttle, Switch on and then hit the "Starter Button", a few twirls of the prop and your running... If you don't get the mixture to running set correctly, then lower to mid lean is about right. If not the 180 C will lurch quickly off the ramp when releasing the park brake, get the tuning right right and you will have some control. Like a lot of GA aircraft there is too much thrust, even at idle... more control is needed as the brakes can be sharp as well... ... be very light on the toe brakes, even be more so in being as even as you can. If not the the aircraft will brake sharply to the direction of the brake effort... I even resorted back to my (50% Regular) pinky lever to keep the braking effort as even as possible, but with a bit of experience you can feed in the toe brakes slightly to control the speed, which is quite powerful at a taxi speed. You can trundle the 180 C along, but keep the speed down with a lot of braking effort. At the runway KHAF RWY33) hold point, I set the trim to pitch down slightly forward (you will see why in a moment). The small "Storm" window, a bit of trivia in that a "Storm Window" or 'ice window' is a carryover from when aircraft did have opening windows that were meant as a Direct Vision DV window in case of ice formation on the windshield, or the wings. Mostly today it is used as ventilation. Here you can open it to the rising external noise, the opening door will give you the same effect. But the outer edge of the window frame disappears as you do? Sounds are actually very good at idle speeds, and okay as the power rises. My biggest issue is that in areas the sounds are too quiet, then too loud on the spectrum, there is not a consistency I would like (in other words I kept turning the sounds up, then turning them down again with complaints from the family that it was too loud). First I will state I have never flown a real Cherokee 180, but I do have a lot of GA Simulator experience... if the following is correct to the behavior of a Piper 180 C, then so be it. Off brakes, full rich mixture and feeding the throttle in, and the 180 C initially goes right, which is slightly corrected... ... Then the asymmetrical prop thrust kicks in with a bang, and you go seriously... even lurching to the left, which means a lot of right rudder to compensate, to keep the 180 C straight I am almost at full right rudder, with only a 5 knt wind in my face? I have done this takeoff run nine or ten times now... and I am now always ready for the coming left lurch, but never really catch it, or it always catches me out every time? Correcting the drift, I am then always caught out again straight away in that the Piper 180 C is now also airbourne? The lift point is around 65 knts... is that right? at no set flap or clean? I thought it would be around the mid to late 70's in knots or even in the early 80 knts.. ... strong control is needed as you climb out, both the rudder and yoke needs a lot of power to the right to keep the Piper straight and level... I have another gripe here as well. The Artificial Horizon marker is very, very small? You can't set say even find a 5º or 10º pitch, as it barely moves position even though you are climbing out at 500 fpm. So the 180 C is already very physical aircraft to fly. That may be to your tastes or challenge, depending on your flying skill set. Rate Of Climb is 750 fpm, but you will do usually your 500 fpm, maybe 600 fpm. Ceiling is noted around 15,700 ft. I feel I am flying the Cherokee a bit lopsided... as I have to use some persistent right rudder and right yoke to keep the aircraft flying straight and level, so it is tiring to fly distances manually, as you are pulling right against the left forces consistently. You can of course use the X-Plane rudder trim (COMMAND) to adjust the rudder angle to compensate for the drift, but that is not the 180 C presented here. So if you want feel from an aircraft in feedback then you certainly get that here. Another anomaly was my Artificial Horizon played up weird as well... I was straight and level, but my Artificial Horizon told a completely different orientation? as it was also periodically spinning on it's axis... Fly into any dense cloud conditions and this scenario could be deadly. Top Speed is around 132 kt, with a cruise speed of 124 kts, the 180hp version is not very fast, but is noted to be quite dependable. Range is around 510 nm at a total Fuel Capacity of 50 gal. S-Tec autopilot is pretty basic, but helpful here. You can set the altitude (10 set increments) via the S-Tec panel left lower panel, but that is about it, the rest is standard servos of HDG, NAV, APR, ALT and VS in Vertical Speed. Lighting There are two lower panel lighting adjustment knobs for the instruments and avionics... the avionics can be a bit too bright, so you dial them down about halfway to match the instrument lighting. Overall it looks quite nice and everything is highly readable... highlight is the six pack Fuel and Engine gauges, that look great lit up in the dark, even authentic. There are two roof mounted lighting options. The first is an adjustable overhead red glow light for the instrument panel, that is highly effective... .... the second is a cabin light with a very tiny (miss it) button switch and not the big round knob (for the red glow light), this lights up the rear cabin nicely. External lighting is quite average? All the navigation lights are not refined and blend into each other, and the single-nose landing light is a big orb... The tail top mounted beacon is another orb (when it shouldn't be), and the strobes are just plain awful. You do actually get more comfortable with the handling of the Piper 180 C the more you spend time in the aircraft, that is if you get used to your right foot doing all the work. It is a good place to be once you acclimatise to the feel and motion of the aircraft... and into the landing circuit for KHAF Rwy 33... Flaps are three steps via the Flap lever on the floor. First step is only 10º, which can easily be overlooked, to a speed on or around 95 knts... .... Second and Third steps are 25º, and 40º degrees with speed drops of 90 knts (25º) and to a full 40º and should settle around 75 knots for the final approach... ... there is no ballooning or that feeling of being lifted out of your seat if you get those speeds perfectly right, in this case the 180 C is a very stable aircraft to set up. You are down to about 70 knts for the final approach phase, and the 108 C will sink nicely and is very nicely controlled. Pushing hard with my right foot, brings the nose around to meet the runway... you feel you are landing in a strong crosswind, but your not. Slight pitch up flare rubs off the speed and flows you down to the runway... again very stable in this final phase. Touchdown is around 60 knts, give or take a few knots... 180 C's Stall speed with flaps full down (dirty) is 50 kts, only 10 knts below. On landing again the Piper lurched to the left and needed some quick and expertly handled corrections... ... so at points the 180 C is and can be a tricky even challenging aircraft to fly, or is that it's appeal! Liveries There are six liveries with the Piper 180 C. One is white if you want to do some of your own designs (and another white with rego). The rest are all American registered and a bit "ho Hum" in not being very creative in design, or in their names. ________________ Summary This is the Piper Cherokee "C" model that comes with the square-cut windows and the iconic “Hershey Bar” wing, the “C” variant has a four cylinder carbureted Lycoming O-360 that produces 180HP and is equipped with a two bladed, fixed pitch propeller. Six years ago or more X-Plane was awash with these sort of "Classic" style aircraft from old school developers. Most had diversified out of the original X-Plane PlaneMaker into what you would call a Pro or Professional take on the system, but didn't expand on further into the plugin realm. So the aircraft didn't have the huge feature lists and effects of which the more modern aircraft do... and that is what we have here a "Classic" design with no menus, pop-up screens or features, unless (like with the GNS in that are X-Plane default items). The designs are not Ultra-Quality either in the modeling or detail. But they are creative and to a point a "Pure" X-Plane aircraft... and that is what we have here from Aerosphere Simulations in their Piper PA-28-180 Cherokee C. By those "Classic" standards the aircraft is very good, nicely designed and the focus on the Instrument Panel is genuinely well done, but the details are basic as is the polygon mesh, and say in the minute details of wingtip light assemblies and wheels. Sounds are good if a little variable, but instrument wise the 180 C is well done with a nice layout and avionics. Lighting internally is very good, but poor externally in not being at all refined. Interesting is the flight model of where being a pure PlaneMaker then these aircraft can shine. idiosyncratic is the word here. But are you adjusting to the aircraft's idiosyncrasies (or flying around them), or is the aircraft itself idiosyncratic? The more you fly the aircraft, then the more you adapt to it's say odd idiosyncrasies? It is an interesting dilemma that only real 180 C pilots can answer. I have flown the vFlyteAir 140 a lot, yes a lot less powerful Piper, but the aircraft was a gem to fly... that aspect is missing here in that it is a challenging aircraft to fly but is that it's attraction. A few things like the hard left pull and the odd Artificial Horizon in being hard to use and bizarre behavior, makes you wonder about the rest. Overall these "Classic" style aircraft are extremely popular as they represent the "Purity" of X-Plane and it's system itself. Users snap them up and collect them, then fly them consistently with their extremely low framerate penalties, there is not the burden of wading through pages of manual or details to get down and dirty to the flying aspect. And that is their beauty, to a point the "Classics" are a pure X-Plane aircraft. _____________________________________ Yes! - Piper PA-28-180 Cherokee C by AeroSphere Simulations is NOW available from the X-Plane.Org Store here : Piper PA-28-180 Cherokee C Price is Currently US$29.95 (Currently on SALE at 17% off US$24.95) Features: 4 HD (4096 x 4096) liveries with a plain white texture that can be used for custom paint schemes. Steam gauge classic general aviation panel with required instruments for IFR. Garmin 530 & 430 All gauges are 3D Detailed flight model and interactive 3D virtual cockpit with animated knobs, buttons etc. cabin door, storm window and front/rear baggage compartment door. Toggle button to remove/display yoke Compatible with HDR and normal lighting effects Many textures taken from the actual aircraft Virtual Reality friendly and includes the click regions and hotspots required for VR gameplay. FMOD sounds Requirements X-Plane 11 Windows, Mac or Linux 4 GB VRAM Minimum - 8 GB+ VRAM Recommended Download Size: 195 MB Current Version : 1.0 (January 20th 2022) ___________________________________ Installation and documents: download for the Cherokee 180 C is 190.50MB and the aircraft is deposited in the "General Aviation" X-Plane folder. Full Installation is 209Mb Documents supplied are: ReadMe.pdf Basic "ReadMe" (2 pages) of the history of the aircraft and features. _____________________ Aircraft Review by Stephen Dutton 25thg January 2022 Copyright©2022: X-Plane Reviews Review System Specifications: Computer System: Windows - Intel Core i7 6700K CPU 4.00GHz / 64bit -32 Gb single 1067 Mhz DDR4 2133 - ASUS GeForce GTX 1080 8Gb - Samsung Evo M2 2TB SSD - Sound : Yamaha Speakers YST-M200SP Software: - Windows 10 - X-Plane 11.55 Plugins: Global SFD plugin US$30.00 : Environment Engine by xEnviro US$69.90 : RK Apps XPRealistic v2 - US$34.99 Scenery or Aircraft - KHAF - Half Moon Bay by Rising Dawn Studios (X-Plane.OrgStore) - US$19.00 (Disclaimer. All images and text in this review are the work and property of X-PlaneReviews, no sharing or copy of the content is allowed without consent from the author as per copyright conditions) All Rights Reserved
-
NEWS! - Aircraft Released : Piper PA-28-180 Cherokee C by AeroSphere Simulations Continuing their model line with another release of a Piper Cherokee after the earlier release of the PA-32-260 Cherokee Six B mid-year 2021. This is the "C" model with the square-cut windows and the iconic “Hershey Bar” wing, the “C” variant also has a four cylinder carbureted Lycoming O-360 that produces 180HP and is equipped with a two bladed, fixed pitch propeller. This 180 horsepower variant had an empty weight with an autopilot of 1270lbs, and a gross weight of 2400lbs... resulting in a useful load of 1130lbs. The Cherokee 180 C also featured the “push-pull” style throttle and mixture controls instead of the throttle quadrant levers that Piper introduced in 1968. The panel and interior were designed after the same era with updated avionics such as the autopilot and Garmin GPS system that is commonplace among Pipers. The Piper Cherokee is what started the main line of Piper aircraft today and many of the Piper aircraft trace their roots back to the Cherokee. The original Cherokee was produced with three different horsepower models (150, 160, and 180) thus the “180” denoting which model it is. Features: 4 HD (4096 x 4096) liveries with a plain white texture that can be used for custom paint schemes. Steam gauge classic general aviation panel with required instruments for IFR. Garmin 530 & 430 All gauges are 3D Detailed flight model and interactive 3D virtual cockpit with animated knobs, buttons etc. cabin door, storm window and front/rear baggage compartment door. Toggle button to remove/display yoke Compatible with HDR and normal lighting effects Many textures taken from the actual aircraft Virtual Reality friendly and includes the click regions and hotspots required for VR gameplay. FMOD sounds Since the quiet withdrawal of Carenado... then where do you get your basic General Aviation Fixes? vFlyteAir are still producing gems, but so are AeroSphere, like with their Cherokee Sixes B and C here... Images are courtesy of AeroSphere Simulations _____________________________________ Yes! - Piper PA-28-180 Cherokee C by AeroSphere Simulations is NOW available from the X-Plane.Org Store here : Piper PA-28-180 Cherokee C Price is Currently US$29.95 (Currently on SALE at 17% off US$24.95) Requirements X-Plane 11 Windows, Mac or Linux 4 GB VRAM Minimum - 8 GB+ VRAM Recommended Download Size: 195 MB Current Version : 1.0 (January 20th 2022) ___________________________ NEWS! by Stephen Dutton 21st January 2022 Copyright©2022: X-Plane Reviews (Disclaimer. All images and text in this review are the work and property of X-PlaneReviews, no sharing or copy of the content is allowed without consent from the author as per copyright conditions) All Rights Reserved
-
NEWS! - KAWO Arlington Area UHD by AeroFoilLabs In the release of the AeroFoilLabs Cessna C172SP NG DIGITAL, AirFoilLab's noted that an accompanying scenery with active elements relating to the C172SP would be released in the near future. And here it is in KAWO Arlington Area UHD. Based around the Arlington Municipal Airport (ICAO: KAWO, FAA LID: AWO), Arlington is a public airport located three miles (5 km) southwest of the central business district of Arlington, a city in Snohomish County, Washington, United States. Extensive is not a word used lightly here... as the scenery includes includes 3 airports (KAWO, Fugios Ranch, and Gabriel's Farm), 2 Adventure Stillaguamish Riverbank Landing Spots, the City of Arlington and the full surrounding neighborhood. When using the AirFoilLab's C172SP it also interactively controls a remotely controlled hangar, 3D Navigational Aids, and more. Features Include: Precise representation of the airports and the surrounding area with an immense amount of details Manually edited photo scenery Custom-made HD ground textures, lines, and dirt with realistic reflections optimized for best performance Thousands of 3d objects with PBR normal maps and DDS textures 3d grass and flowers for realistic ambiance All open hangars provided with detailed interior Ground traffic - animated vehicles, people, animals Animated flags with behavior related to weather in X-Plane Users of Airfoillabs C172 NG DIGITAL get a Remotely controlled Hangar, 6 Traffic Patterns for all 5 locations, represented as 3D navigational aids, and quick orientation scenery arrows. The video supplied here is well worth watching for the immense detail included in this scenery, to the point it is overwhelming. Did I mention extensive... this scenery certainly is, and a very good "Walkabout" scenery it is as well.... well worth investigating as a great General Aviation flying base. Both the images and video are courtesy of AirFoilLabs ______________________________________ Yes! the KAWO Arlington Area UHD by AirFoilLabs scenery is now available from the X-Plane.Org Store here : KAWO Arlington Area UHD Price is US$24.95 Requirements X-Plane11 Windows, Mac or Linux. 4 GB VRAM Minimum. 8 GB+ VRAM Recommended. Download Size: 1.1 Gb. Disc space needed: 2.4 Gb Current version: 1.2 (January 12th 2022) ___________________________ NEWS! by Stephen Dutton 19th January 2022 Copyright©2022: X-Plane Reviews (Disclaimer. All images and text in this review are the work and property of X-PlaneReviews, no sharing or copy of the content is allowed without consent from the author as per copyright conditions) All Rights Reserved
-
Aircraft Review : Messerschmitt-Bölkow-Blohm Bo 105 DBS-4 by JRX Design It has been a very strange few months. Aircraft that were very significant in past milestones for the X-Plane Simulator have been recently replaced with more modern versions. First it was the FlyJsim Q400 in it's new Q4XP guise, then along came the CRJ-700 from AD Simulations that echoed the very landmark CRJ-200 from JRollon and now here is another machine in the Messerschmitt-Bölkow-Blohm Bo 105 DBS-4 by JRX Design. This one echoed another very significant aircraft in the ND Art & Technology's BK-117. Tired now, but the BK-117 was simply sensational back in it's day, and the one machine that drew me to helicopters and wanting to fly them... Sitting now in the JRX MBB Bo 105 brought all those recessed BK-117 memories back to life with a bang! The BK-117 is a later evolution of the MBB Bo 105, the machine reviewed here. But the similarities are quite impactful when comparing the aircraft. The Messerschmitt-Bölkow-Blohm Bo 105 is a light, twin-engine, multi-purpose helicopter developed by Bölkow of Ottobrunn, West Germany. It was the first light twin-engine helicopter in the world, and the first rotorcraft that could perform aerobatic maneuvers such as inverted loops. However aerobatics are verboten, and aerobatics are actually prohibited in the Rotorcraft Flight Manual. While not being considered a visually attractive helicopter by some pilots. The Bo 105 was known for possessing steady, responsive controls and a good flight attitude. Most models could also perform steep dives, rolls, loops, turnovers, and various aerobatic maneuvers; according to MBB the Bo 105 is cleared for up to 3.5 positive G force and one negative. One benefit of the Bo 105's handling and control style is it's superior takeoff performance, including significant resistance to catastrophic dynamic rollover; this is a combination of light weight and the twin-engined configuration that enables a rapid ascent in a performance takeoff. Perhaps the most significant feature of the Bo 105 are its rotor blades and rotor head. The rotor system is entirely "Hingeless", in the rotor head consisting of a solid titanium block to which the four blades are bolted; the flexibility of the rotor blades works to absorb movements typically requiring hinges in most helicopter rotor designs. The rotor blades are also made from reinforced-plastic glass-fiber composite material; the flexibility of the main rotor allows for active elements other than rotor pitch changes to be removed, greatly simplifying maintenance and extending blade lifespan. The reliability of the advanced rotor system is such that, in over six million operating hours across the fleet, there was a total of zero failures (as of 1991). The rigid rotor blade design adopted on the Bo 105 has been partially responsible for the type's agility and responsiveness; and it remained an uncommon feature on competing helicopters throughout the Bo 105's production life. The aircraft unusually was also not designed or created in a proposal by the military, but was very quickly procured by the German Army when they decided to create a specialist anti-tank version armed with up to six Euromissile HOT missiles, designated as the Bo 105 PAH-1. A total of 212 Bo 105 PAH-1s were delivered between 1979 and 1984. The Bo 105 is however far more famous for it's significant (EMS) Medevac, and Police surveillance work, MBB at one point held 35% of the total EMS market share, which the cabin can be configured to accommodate up to three passengers on a single rear bench, which can be removed to make room for cargo or a stretcher, which can be loaded and unloaded via the large clamshell doors located at the rear of the fuselage. Totally 1500+ aircraft have been built built between 1967 and 2001. Notable is the DBS4, which is a version of the CBS4 that was certified in the UK for the offshore oil and gas market. The aircraft features a full IFR kit, dual inverters, provisions for pop-out floats and a fuel dump system, radar alt, and a number of other small features and systems that make it different from other 105s. MBB Bo 105 DBS-4 by JRX Design First impressions of the Bo 105 are striking, but not surprising, as the earlier JRX SA 341B and SA 342J Gazelle was also excellent in it's design and quality fit-out. The same totally applies here as expected. The paneling and the general shape of the fuselage is excellent... ... but the riveting is painted on and not mapped, it passes the test as you have to get close to be aware of the non-mapping, however that level of 3-dimensional detail is now quite common in any high-quality aircraft. Were required however the raised mapping is actually done, and the detail delivers in great louvre detail and surface appendages. You have four nice engine exhausts with two per two 313 kW (420 shp) Allison 250-C20B engine. And note the internal cones on the inner two exhausts. Tail-boom, horizontal stabiliser and upright support are also very good as is the required aerials and tail-skid. Notable are these small wings at the rear... they are stabilators when they have a degree of movement, and stabilisers when they are fixed. They are “upside down” airfoils that provide downforce instead of lift, just like on race cars. One of their functions is to reduce the nose-down attitude in cruise which makes the fuselage fly more level and reducing drag by exerting a downward force on the tail-boom, which raises the nose. Here on the MBB 105 they are quite notably big aerofoils Glass is excellent. Nice shape and depth and feels very realistic. Glass has to perfect on helicopters so you get the right perspective vision, perfection makes it also authentic. The green overhead tinted-windows are also perfect (in opacity) but clear internally... ... Highlights are the excellent twin-wipers with worn-wear arms and the perfectly set blades. I'm not crazy about the inner window frame, just a plain coloured frame, here it doesn't feel very realistic, however the inner window opens though via a "Hotspot" middle window, but the same arrangement on the rear windows are not animated. The unique fixed-head rotor is perfectly realised and recreated. Detail is as expected in all in the required components, bolts and assemblies. The mast is quite short but the plates and their rod link assemblies are colour coded and well done. Nice details are the balance weights on the inner blades and notable the very nicely aerofoil shaped blades with great realistic wear on the ends. Exactly like the Gazelle, the rotor system is also only semi-animated... the Collective (bite) is nicely animated, but the rotor head (pitch/sideways) movements are again not active. Rear tail-rotor assembly is also very good, links and rubber covers that are all very realistic, note the short rear almost square blades. There is a full yaw animated movement on the blades, and all the linkages work perfectly. Doors... have both the front and sliding rears open by direct "Hotspots", and so do open are the twin-cam opening rear doors. There is a cavernous open space inside, with the option of filling it with cargo. The two forward cabin doors can also be removed via the menu. Cabin Yours eyes are immediately drawn to the full bulkhead padded rear seating for three people. Both cushion support and soundproofing in one, it covers the full huge rear bulkhead. Seat material is black leather with white stitching, gives off a very nice comfortable feeling, and very well done here, the 70's style foam covered headrests are also extremely well authentic to the period (70's Ford cars anyone, Escort, Capri). Front seat assemblies are excellent, with military style tracks and metal drilled frames. Shame the seats are not animated, that would have been a real treat. The feeling in the cabin is however dated, not by a poor application, but by design. It has that clamshell dark cream molding technique and again from the period. This is also very evident from the restricted view from the pilot's seat. The frame curves into your forward view, and the sides feel thick and chunky, the huge instrument panel also takes up a lot of the forward view, most choppers feel airy, but not in here as it feels enclosed. Menu Top Instrument panel are two options. Left is a folded map, that when selected, then selects the X-Plane Local map. The right selection is the "Flight Manual", which pops out VR (Virtual Reality) style. The manual both inserted and expanded is quite old fashioned in layout and design (another throwback to the BK-115). The top section is the "Aircraft Configuration" or options and settings. The "Set Fuel Load" in 25%, 50%, 75% and 100% filling percentages, and below "Weights". Important in that any selection of the options must be made before flight... once in the air you can't then change anything on the menu! The lower section is a "Checklist style" area... there are 10 Tabs in the "Checklist" that cover everything from PreFlight to Aircraft Limitations. You go through the checklist via two hotspots set on the top (Go Backwards) and the bottom (Go Forwards) of the VR "Flight Manual". Checklist detail is extremely good, but difficult to read in the set position and small font text. Aircraft Configuration The Aircraft Configuration list (of options) are all colour coded. Top to Bottom, you have in red; "Remove Before Flight" and "External Power Unit"... the first puts tie-downs, rotor covers and flags on the aircraft, the second option puts a connected to the aircraft, a trolley GPU and even a very nice operator positioned to monitor the unit. White options include, "Fly With Co-Pilot" and "Duel Flight Controls". The Bo 105 already comes with a very nice and head animated pilot, the option here also gives you a Female Co-Pilot with strange hair but lovely "Mechanix" gloves who is also head animated, but not to the controls like the pilot's. I heard that rear passengers are coming. "Duel Flight Controls" gives you the option to have a second set of controls on the left side (Cyclic and Collective). Seagrass Green options include; "Remove Doors", "Flight Steps", Search Light", "Internal Cargo Load", Missile Rails, "Cargo Hook" and Emergency Floats. All the options here are excellent and of high quality detailing. The "Remove Doors" option will take away the front doors, and lock the rear doors open. Cargo option fills that huge vacant rear area with nice crates, but they add a lot of weight to the aircraft with no adjustment to the weight. I don't know if the Cargo Hook works, as it is not mentioned in the manual? The side steps are nice as is the forward Search Light. The Emergency Floats are also highly detailed with a fuselage attached airpump (but again I don't think the floats inflate?). Super nice are the six Euromissile HOT missiles. The HOT (French: Haut subsonique Optiquement Téléguidé Tiré d'un Tube, or High Subsonic, Optical, Remote-Guided, Tube-Launched) missile is a second-generation long-range anti-tank missile system developed originally as an effort to meet a joint German-French Army requirement. The HOT missile is tube-launched and optically tracked using the SACLOS guidance system with command link through trailing wires which steers the missile using thrust vector controls on the sustainer motor during the missile's flight. When the gunner fires the HOT missile, the missile activates a thermal battery, flares and a small gas generator spins up the gyro. The same gases for the gyro pop the covers off both ends of the cylindrical container the HOT missile comes packed in. Moments later, both the sustainer motor and the booster are fired, ejecting the missile from the container. Unlike most antitank missiles, in which the booster burns completely before leaving the container and then the missile coasts a safe distance before the sustainer motor ignites, HOT's booster burns both inside the container and outside the container for approximately one second giving the missile a high speed. The sustainer motor burns for 17 seconds, a flight time whose path exceeds the length of the trailing wires which dictate the maximum range of the missile. Note the changed olive-green seating for the military (German) livery. Green options include; AviTab (Plugin Required), RealityXP GTN 750/650 Touch avionics unit if you have that optional product and bottom is the option for the Dittel AutoPilot Unit. I found the AviTab would only display with the engines running, slightly annoying if you want to study charts on the ground. This is a nice Autopilot module by Dittel (now TQ Avionics), but oddly it is set (or feels) to the left of the top of the instrument panel than the centre (of which it actually is) or even to the right of the sided pilot's reach, it feels far away? but it is well done. Weights; In Yellow are the aircraft weights. Both the MTW (Maximum Takeoff Weight) is noted (2500kg) and the current TW (Total Weight) is displayed. The TW will change with any options and fuel weights, and you can add in extra Kgs in 10kg increments (up or down), or reset the aircraft's weight. The current version (B1.40) is also shown here for reference. Instrument Panel The Instrument Panel has a huge (massive) hood over the instruments, making it look far larger than it actually is, even so it is still a big unit. The centre pedestal (console) is also very long and detailed as well. The main flying instruments are grouped down on the right in two columns... Top row is (left) the Artificial Horizon and the Altitude Meter, Second row is the HSI (Horizontal Situation Indicator) and Vertical Speed Indicator, Third Row is the ADF Pointer and Radio Altimeter, slung below is a Clock. The instruments are all very clear and readable. The centre section has mostly top in the Backup Instruments (for the Co-Pilot). Airspeed Indicator, Artificial Horizon and main (pilot) Airspeed Indicator top row, Altimeter and Directional Gyro, that looks more like a CDI or Course Deviation Indicator. Installed is the AVAD (Audio Voice Alerting Device) that can be turned off here. And a testable is the specific MBB "Mast Moment" MMI indicator.. "A rigid (or sometimes called hinge-less) rotor system is capable of transmitting high bending forces to the main rotor shaft. When a pilot makes a cyclic movement causing the main rotor disc to tilt, the fuselage wants to follow. In flight, with a rigid rotor the mast bending moment is low. However, when the fuselage is in contact with the ground and cannot follow the main rotor disc the bending moment can be very high. Because large cyclic displacements on the ground have the potential to damage the mast assembly, a mast moment indicator (MMI) is installed. The gauge is a single dimension indicator that shows the total moment being applied to the mast. When the gauge reads high, the pilot has to figure out what direction to move the cyclic to reduce the mast moment." Next row is a Torque Indicator... The Torque Indicator is interesting as it is set on a 90º angle, and not positioned directly upwards? It is noted this way for Slinging (loads), but it looks very odd?. Next to the Torque Indicator is the RPM in N2 (Engine #1 and Engine #2). Then there is right a group of six dials that cover engine TOT (Turbine Outlet Temperature) for engine #1 and #2, and below N1 (Engine #1 and Engine #2)... bottom row right covers Fuel Gauge and Fuel Pressure. Two groups of three gauges bottom left cover (top) Oil Temperature, and lower Oil Pressure. Far left is the DME readout. Forward Pedestal (console) are the electrics (Buses) and working Circuit Breakers (Fuses). Gauges right cover Volts and Amperes. Between is the Hydraulics Test. The red cover left is the Fuel Jettison, the two right red covers the "Emergency Fuel" cutoffs. Between are the Instrument lights (switch), Emergency Floats, Inverters (1&2), Engine Anti-Icing (1&2) and wipers... bottom are the two VHF-COM 1 and 2 Radios, Starter switches (pink covers) and Main Battery and Generator (Eng 1&2) switches. Centre Pedestal is the Fire Extinguisher Panel. Below are Collins CTL23 NAV 1/2 radios, with a CTL62G ADF unit. Unusual is a "Funkwerk" Transponder. Bottom is a Garmin GNS 350, or if available the RealityXP GTN 750/650 avionics unit. Note the usable Collective Lock . Lower pedestal are two NAT N301A Audio Panels. There is a nice feature on the lower NAT audio panel. You can select 1 hour of "Radio Chatter" by selecting AUX and the chatter comes in three languages; American, French and Italian via the flag icons... but no British ATC? Actually British law prohibits the use of ATC broadcasts, as per "LiveATC", but still it would have been nice. The collective has two light switches (Search and Landing) and engine regulator. Cyclic has a HAT switch trim and RPM WARNING (cancel) button. Both controls are very well modeled and highly realistic with the Cyclic a B8 style handle. There is a small overhead switch panel with the twin-engine throttle levers (the rotor brake is down floor right of the pilot). Switch gear up here covers Pitot Heats (#1 and #2), Continuous Ignition Eng (#1 and #2), Fire Test, Floats Test, Fuel Pumps, Generator Fields (#1 and #2), Interior lights, External lights, Temperature Controls and an electronic HOBBS Hour meter. Overall it is a complicated cabin, that requires a little study before flight to workout where all the switch gear and items are located, once used you will work the aircraft well and correctly, but it is not all set out very ergonomically, as it is all very 70's in style and usability. ____________________ Flying the MBB Bo 105 First is the setting for those twin throttles. JRX originally set the throttle movement to the "Wing Sweep" setting, but reverted back to the standard "Throttle" setting. You can set each throttle to a slider (Throttle 1/Throttle2) to work independently, but I use the second throttle lever (Saitek X56) as my collective, so here a single "Throttle' setting works just as well. The Bo 105 startup procedure is quite easy. The Main Battery switch is under your left hand, and the two Bus Avionics switches far left upper pedestal. Each bus does a certain circuit, so you only get the VHF1 radio with only one switch on. The Collins CTL23s and the ADF CTL62G have to be switched all on manually. You can adjust the panel lighting (when switched on) via the top knob left centre panel, and very good it is. Next all the Auxiliary options are switched on via the OHP; Fuel Pumps, Pitot Heat, External lights/Anti-Col... then you are ready to start. Make sure your throttle is set in the IDLE position, then flip up the STARTER cover (pink) for the engine you want to start... then press the inner switch. Straight away the N1 will rise and then you go straight to the required overhead engine throttle lock switch (Fuel Cutoff) and press it. You don't have to touch the throttle at all, if the throttle lock does not work then the lever is still not set at the IDLE position. Once the RPM for that engine is at 50% then you switch off the start switch... pretty easy. Now you do exactly the same for the second engine start. One note is the dreaded "RPM Needle Split Horn" alarm. Mostly here to warn the pilot if the engine outputs or the RPM are not in the same performance parameters, or an engine out scenario... It is LOUD, and can be annoying if you can't shut it up. On the second engine start until it reaches within 12 points of other running engine's RPM it will go off "its trotter" as it should do, to kill the alert there is a kill switch left on the Cyclic, or you can set a button COMMAND to do the same thing (RPM Needle Split Horn). But I found sometimes I couldn't shut the damn thing up, even when the engines were shutdown? (found to be a aircraft reload or location move reset). Once running you also have to provide separate power (unlock) both to the Main and Backup Artificial Horizons is they are powered directly off the battery, this is done via the second switch under the glareshield right. There is a full video available on the startup (and Shutdown) procedures that is well worth studying. I do like the flickering of the N1 dials to show the power is running through the engines. Throttle up to 100% RPM and we are ready to go. I was not perfectly attuned to the JRX SA 341B Gazelle, it is known as difficult aircraft to fly, and very fine movements were minutely required. I mastered it, but was not what you could say very proficiently. The Bo 105 is known as a more steady and responsive machine, and I felt that straight away. It feels also like a weighty aircraft, so you have confidence in balancing it easy and the very light push required by the tailrotor helps the cause as well. That came to pass... I easily found I could hover in the same position and only required slight stick movements keeping myself in a perfect hovering position. Any drift was also easily corrected, so the more I sat here in the hover the more confident I got by the minute. Touch of collective and touch of forward stick, and I was moving upwards and forwards easily... .... placid it may be, but you have a lot of power available via those two Allison 250-C20B turboshaft engines, too much collective and you will literally takeoff and go straight up (official Rate of Climb is 8.00 m/s (1,575 ft/min)), and with this extreme climb power the Bo 105's also have a tendency to roll right when in a high-power right turn which has been documented with a MBB test pilot in Siegfried Hoffmann crashing and killing himself. So the trick is not to showoff in here, just keep everything smooth and contained and the aircraft will follow along quite nicely, you can see why the Bo 105 was so good for EMS work, in fact perfect as it is a steady easily controlled and flyable aircraft. One of my favorite pastimes with the ND BK-115, was to track down motorways or highways at low but fast speeds. So I just couldn't resist the temptation again in the Bo 105... the thrills came back with vengeance, it is fun and exciting to fly low level at speed, but you have to watch out for all those cross highway powerlines. Maximum Bo 105 speed is 242 km/h (150 mph, 131 kn), with a never exceed speed of 270 km/h (170 mph, 150 kn), usually you cruise around 204 km/h (127 mph, 110 kn) (best range cruise), so the Bo 105 is not the fastest aircraft out there. Range is 657 km (408 mi, 355 nmi) at 1,525 m (5,000 ft) (standard fuel, maximum payload) with a ferry range: 1,112 km (691 mi, 600 nmi) at 1,525 m (5,000 ft) (with auxiliary tanks). Overall you get an endurance 3 hr 30 min (standard fuel, maximum payload) and a service ceiling of 5,200 m (17,000 ft). The aircraft has a fuel capacity of 160 Gal (570 l), and the fuel is stored in only one main tank which is connected to a single supply tank at the front of the aircraft and the engines then draw their fuel by the engine-driven pump(s) from the supply tank. The supply tank only holds 74Kg (around 93 liters or 205 pounds) as a backup supply. I could do this all day... Sounds of real Bo 105's are very hard to come by... what we have here is a collection of community based recordings, but they are actually very good right through the range with only a few loops here and there, blade slap is present, but were over-rode in my case with the XPRealistic blade slap being more prominent, overall I have heard a lot worse than we have here. Not entirely happy with the trim... a single movement of the trim or HAT switch made the aircraft surge up or down violently, in that the trim increments were extremely wide. So there was no adjusting but you got these large changes to the angle of the controls. The only way to get control back was to use the Trim Centre command to reset the trim back to neutral. The Dittel AutoPilot also feels still too far away, although it is centred on the windshield (the map/manual storage is offset). The unit is a very basic 2-Axis unit, which means you centre the aircraft at the right speed, heading and altitude and turn on the AP to the corresponding servos, and it will hold those alignments.... but it is not a solid feel or use, as any slight movement or knock of the cyclic and it loses the alignment, so you have to monitor the systems continuously. It works but don't at all rely on it. Lighting Overall the JRX Bo 105's lighting is excellent. We already know you can adjust the instrument brightness, which is already very good. But there is another option via the second knob set below the instrument brightness knob... this is the green tint option, that gives you a military look and feel. You can blend the two together if you wish, but one or the other is preferable. Not finished there with colours, there is also the overhead red cabin light. This effect with the green tint looks a bit like a traffic light reflection... but it is very realistic, and looks sensational externally. Externally the lighting is also very good... There is a single landing light in the nose that can be adjusted brighter and darker (OHP), but it still comes on too strong as a lot of users have noted, the light source can be seen through the body work as well (X-Plane issue). Here I have the Search Light on as well. Navigation lights are on the outboard of the stabilisers, as are the strobe lights, and single white navigation is rear. Top tail beacon is very effective and so are the near perfect strobes. Arriving back at the field the Bo 105. I found it was easy to lower the speed in a slight centering of the cyclic, while reducing height with the collective... you can find the collective lift does need a reduced amount of bite, and that can send you into a false sense security in recovering the lift power (or too late in dropping out of the air). Point the nose down slightly is a better way of descending, but that obviously comes with more speed... the trick is somewhere in the middle to get the best approach descent and control the speed. I had to do a few approaches to get the procedure right. Nice is that you are not fighting the tail or yaw, slight rudder movements will control that aspect, again you can see why this machine is so very good in it's EMS and S&R roles, the workload on the pilot is quite light at those really critical aspects of the flight. As noted the JRX Gazelle is highly (if extremely) challenging of your skills, certainly in the approach, transition and hover phases, but that it is not the same case here with the Bo 105.... if in fact the opposite. The ETL or Effectively Translational Lift boundary is noted on the Airspeed Indicator at the line between the Green and Yellow bands, about 50 knts, which is also a nice approach speed... but watch you don't drop the collective too far or lose the lift, it is very disguised in the feel... ... once though the ETL boundary and you reset the approach to around 20 knts (not the usual 30/30), and this feels nice with great control. Into the hover and a 90º yaw is need to line up with the markings, that aspect is also done with ease... ... aligned, a slight slip to the left is now needed... I'm showing off now, the Bo 105 responds perfectly to my movements while controlling the hover status... ... I can see the marking line to judge my position and a slight let down of the collective and that landing was as good as it gets. "Sweet as" There is nothing to give you that buzz when it all goes right. But this is certainly an aircraft is one you can easily parallel with. Helicopter flying not easy and will never be, but an aircraft like this can meet you say... halfway in your limited skills. _________________ Liveries There are 26 liveries and all are excellent. They vary from Civil to Air Ambulances, Coast Guards, Police, Red Bull (2), Rescue and Military versions... hell even the Northern Lighthouse Board aircraft is in there! ADAC (German) is the default. A PaintKit is also provided. _________________ Summary For a decade "Mr Helicopter" in the X-Plane Simulator was DreamFoil Creations, but now there is another "Mr Helicopter" in the form of Joe Rowe of JRX Designs. First it was the spectacular debut of the SA 341B and SA 342J Gazelle in 2020. Now here is JRX Design's second release in the Messerschmitt-Bölkow-Blohm Bo 105 DBS-4, a general purpose helicopter favoured by EMS and Policing departments around the world. Not initially created as a military aircraft, the platform was still successful as a German specialist anti-tank version armed with up to six Euromissile HOT missiles, designated as the Bo 105 PAH-1. The aircraft is also reminiscent of another X-Plane MBB classic the ND Art & Technology's BK-117 from a decade ago. The Bo 105 is notable for being the first "Hingeless" rotor head aircraft, which consisted of a solid titanium block to which the four blades are directly bolted; the flexibility of the rotor blades works to absorb movements typically requiring hinges in most helicopter rotor designs. The rotor blades are also unique in being made from reinforced-plastic glass-fiber composite material. Most helicopter releases for X-Plane are usually extremely highly detailed and feature laden. And that is also the case here with this excellent Bo 105. Modeling and detail quality is of the highest order (and the JRX Gazelle had already set the benchmark high). Externally and internally the Bo 105 is exceedingly good, with very if excellent good lighting effects. Sounds are community sourced, but also very good in context. The VR Menu (manual) is cleverly done with built in Checklist, with the usual features of remove (front) doors, Cargo Hook, Searchlight, Emergency Floats, Flight Steps, Internal Cargo, Twin Controls, Pilot/Co-Pilot, and very well done Euromissile HOT Missile Rails. Other extras incude AviTab, RealityXP GTN 750/650 avionics unit option, and a basic Dittel Autopilot. Both "Radio Chatter", specific MBB "Mast Moment" MMI indicator and AVAD (Audio Voice Alerting Device) are also represented. Huge set of 26 liveries are provided with the package, as is a PaintKit. Flight dynamics and performance is also very good, as the MBB Bo 105 is a sweet flying machine. But a few areas can still be refined, as I am not crazy about the current trim actions, and aircraft has an odd issue loading pattern when reloading in Sim. (Starting from the Desktop or doing a Developer reload is fine). A few "wishlist" items would be nice... certainly a EMS variant, rear passengers (noted as already coming), winch (working would be even better) and adjustable cargo weights... not asking too much! And YES it will be X-Plane12 compatible. Another superb release from JRX Design's, can it get better than this? Yes just more of the same from the new "Mr Helicopter" Joe Rowe. The Messerschmitt-Bölkow-Blohm Bo 105 DBS-4 is now available for purchase from the X-Plane.OrgStore. __________________ Yes!... Messerschmitt-Bölkow-Blohm Bo 105 DBS-4 by JRX Design is now Available from the X-Plane.Org Store here : Messerschmitt-Bölkow-Blohm Bo 105 DBS-4 Price is US$34.95 Requirements X-Plane 11 XP12 Support when Available Windows, Mac or Linux 4 GB VRAM Minimum - 8 GB+ VRAM Recommended Download Size: 1 GB Current and Review Version: 1.40 (January 15th 2021) ___________________________ Features High detail, fully animated 3D-model with PBR textures up to 4k resolution. Fully VR compatible, configured by SimVRLabs. Accurate flight model tested, developed and approved by a current MBB Bo 105 pilot. Complete and accurate start up and shut down functionality. Dynamic weights for optional fuel and part configuration. Bespoke custom made and accurate instrumentation sourced direct from a 105 DBS-4. Optional autopilot unit and a full IFR navigation instrumentation suite. Fully functional circuit breakers and electrical system including AC / DC buses. Working fire warning and extinguishing system. Custom instrument HDR spill lighting. HDR internal and external lighting. Dynamic vibration model with speed increase / decrease, including entering and exiting translational lift. RXP GTN integrated on a custom tablet. AviTab with custom tablet. Highly detailed pilot and co-pilot, with optional dual controls. Optional body decals including HOT3 missiles, working floats, flight steps and cargo hook. Complete FMOD sound package with 113 individual sounds sampled from a real 105. Headset attenuation, with optional ATC radio chatter (US, FR and IE) for better immersion. Particle system for heat blur animations. 26 liveries including civil, service and military variants. Included paint kit for body, seats, ID plates, interior trims and pilots’ uniforms. Flight configuration and options, all done in cockpit either in 2D or VR. Full documentation, including all flight reference cards in cockpit. Real-life reference documentation and video tutorials including the start-up / shutdown procedure: https://youtu.be/BLxWiC1FnOs https://youtu.be/bz9NmdjchDM https://youtu.be/qGsdB9Jmk-c Full lifetime support at the forum, product updates and development as required: JRX MBB Bo 105 - X-Plane.Org Forum Windows, Mac and Linux compatible. Requirements X-Plane 11 Windows, Mac or Linux 4 GB VRAM Minimum - 8GB+ VRAM Recommended Download Size: 2.1 GB Current and Review Version: 1.1 (January 8th 2022) ___________________________________ Installation and documents: download for the 206 B3 is 993Mb and the aircraft is deposited in the "Helicopter" X-Plane folder. Full Installation is 2.63Gb Documents supplied are: BO 105 Real Life Documentation JRX Design MBB Bo 105 USER GUIDE V1.01.pdf Manual is quite basic but does come with very good instrument references, X-Plane basic system references... Checklist is built into the VR menu, and the provided video tutorials are excellent. The Eurocopter sourced documentation is excellent, enough detail here to build your own MBB Bo 105 from the ground up! Required is the AviTab (Plugin) Support forum for the MBB BO 105 _____________________ Aircraft Review by Stephen Dutton 21st January 2022 Copyright©2022: X-Plane Reviews Review System Specifications: Computer System: Windows - Intel Core i7 6700K CPU 4.00GHz / 64bit -32 Gb single 1067 Mhz DDR4 2133 - ASUS GeForce GTX 1080 8Gb - Samsung Evo M2 2TB SSD - Sound : Yamaha Speakers YST-M200SP Software: - Windows 10 - X-Plane 11.55 Plugins: Global SFD plugin US$30.00 : Environment Engine by xEnviro US$69.90 : RK Apps XPRealistic v2 - US$34.99 Scenery or Aircraft - EDDP - Leipzig/Halle International Airport by JustSim/Digital Design (X-Plane.OrgStore) - US$20.00 (Disclaimer. All images and text in this review are the work and property of X-PlaneReviews, no sharing or copy of the content is allowed without consent from the author as per copyright conditions) All Rights Reserved
-
Aircraft Review : CowanSim 206 B3 The Cowan Simulations 206 B3 is the Bell 206, a two-bladed, single and twin-engined (TwinRanger) helicopter manufactured by Bell Helicopter at its Mirabel, Quebec, Canadian plant. The 206 is also known by it's more common name of the "JetRanger". Bell had developed the D-250 design into the Bell 206 aircraft, redesignated as YOH-4A in 1962. Proceeded to produce five prototype aircraft for the Army's test and evaluation phase Light Observation Helicopter (LOH) proposal. The first prototype flew on December 8, 1962. The YOH-4A also came to be known as "The Ugly Duckling" in comparison to the other contending aircraft. Following a fly-off of the Bell, Hughes and Fairchild-Hiller prototypes, the Hughes OH-6 was the selected LOH in May 1965. When the YOH-4A was eliminated by the Army, Bell went about solving the problem of marketing the aircraft. In addition to the image problem, the prototype helicopter lacked cargo space and provided only cramped seating for the planned three passengers. The solution was a redesigned fuselage, sleeker and more aesthetically appealing, and adding in 16 ft3 (0.45 m3) of cargo space in the process. A Bell executive contributed to this redesign by drawing on a sketch two lines extending the fuselage to where it meets the tail. The redesign was designated Bell 206A, and Bell President Edwin J. Ducayet named it the "JetRanger", denoting an evolution from the popular Model 47J Ranger. The Army then reordered the revised aircraft as the Bell OH-58 Kiowa, that went on to used in the Vietnam War. Bell Helicopter ended production of the Bell 206B-3 version finally in 2010, after 7,300 production aircraft were built. Of all the helicopters of the last half century, the JetRanger is probably the most visually famous, it is the one aircraft that seems to be everywhere, and mostly because it is the main go-to aircraft for any Hollywood or American television production, News gathering, light Med-Evac, Lifesaving and also it is very economical for Sightseeing and Business charter work. versatility is the number one criteria of the Bell 206B. When you live with such a prominent aircraft in your life for so long, it becomes a personal favorite. Made easier as the aircraft is also very accessible, I have probably flown on a Bell 206B more than any other helicopter, and have easily lost count of how many flights. Plus you simply couldn't avoid the machine in the hundreds of American car chases that dominated most of the 70's and 80's Film and Crime television shows. The aircraft also became the face of Bell Helicopters, the iconic nose was a streamlined version of the stubby-nosed Bell's of the post-war period, but smooth nose and high boom tail set out the layout for most of the Bell aircraft that followed it, if later versions had retractable wheeled landing gear. The CowanSim 206 is not the first Bell JetRanger for the X-Plane Simulator. There is the now quite old but well done DreamFoil 206 Ranger III, and a freeware Joe Rowe Bell 206 that is still in a beta phase after now two years (but still a highly flyable machine). But the CowanSim release is a full payware and featured machine, so you here you have a more modern updated Bell 206B than the both of the other released aircraft. CowanSim has been around now for a few years. First up was the Bell 222B + UT, and then the exceptional CowanSim 500E or Hughes 500 of P.I. Magnum television fame. More enthusiastically American than the cold calculating European sort of developer, they have very quickly created a fan base around their aircraft, so you could say that any CowanSim aircraft are very popular aircraft. CowanSim 206 B3 There are two 206 B3 versions to choose from in the download package. One is the lighter 2K, and the other is the standard 4K. I like the idea you can choose which version to load into your X-Plane aircraft folder, better than having double aircraft folders of which one you will never use... note the Paintkit that also provided in the package. Noted here is this review version is Version 1.1 (January 8th 2022) Menus The CowanSim Menu (CowanSim-206B3) is selected as part of the main X-Plane menu top left of your screen like on the earlier B222B and 500. There are two selections with top one the 206B3 OPTIONS, and a secondary "Configuration Manager" which is another word for a VR (Virtual Reality) popup menu. Both versions basically show the same OPTIONS, but the Configuration's Manager is easier to use because it will stay on screen while you do your selections. Notable is that if you select any of the options, the Configuration's Manager will also show you (in red) the extra weight of that applied option on the aircraft, but there is no all up Gross Weight shown. The VR Configuration Manager is split between two pages and interesting is the "VR HEAD CONFIG" option in that it allows you to set your best head position in the aircraft and save it... as noted in the manual. "(You) Change your VR position using the up, down, left, right, forward and backward arrows. When in the perfect spot then hit the Save Position button. This writes directly to the vrconfig file... Your selected spot will then be save(d) for future flights.". The list of menu OPTIONS is quite extensive with 27 choices: AUTOMATED START, REMOVE ALL DOORS, RXP GTN750 OWNER (optional RealityXP GTN750 avionics), HIDE FLYING HANDBOOK, HIDE AVITAB, ROTATE AVITAB, ENABLE WINDOW RAIN, SKID STEPS, CONVEX SKID MIRROR, REMOVE DUAL CONTROLS, RADIO STACK, DUEL WIRE CUTTERS, UTILITY FLOATS, SHOW PILOT, SHOW COPILOT< SHOW PASSENGERS, CINEFLEX CAMERA, SPRAY KIT, SEARCH LIGHT, LOW SKID VERSION, AUTO HOLD START BUTTON, PARK AND SECURE ROTOR, BLOW FLOATS, TURN ON GROUND POWER, TURN VIBRATIONS OFF, TURN HEAD FORCE OFF and SET VR HEAD POSITION to CURRENT POSITION. We will look at the aircraft and the options available together. But first a scale note... the CowanSim aircraft designed here is slightly larger in scale to a real B206B-3. Odd yes, but it has been created this way to get the right VR (Virtual Reality) perspective. The point is debatable. But personally I would rather have a true to scale aircraft or a realistic interpretation of the aircraft than a blown up machine to match a marginal feature, so yes the aircraft in every perspective looks and feels bigger than the really cramped B206B in real life. Detailing is very good, certainly the rivets and window frame sections, vents are highly realistic and so overall the construction elements are all presented perfectly. Glass (important on the distinctive profile of the 206) is really good as well and gets the Bell's shape really well, and the glass has nice depth and tint... so the details are numerous. Highlights are the lovely door latches (that work), and the opening side window runners. All four doors are opened by their (inner/outer) latches, or you can remove the doors completely, and in closing they "Clunk" nicely. There is a load of "Skid" options. You can have "High" or "Low" skids... .... "Utility Floats" that can be "Blown" or Floats (note the gas bottle attached to the underside of the fuselage). Other skid options include a "Convex Mirror" front right skid, a right rear "Search Light' that can be manoeuvred via COMMAND keys. Two upper/lower Wire Cutters and "Skid Steps". Also optional is a huge "Spray Kit" that is "Cowan Spray Systems" branded. The spray unit also works via key COMMANDS in "Spray On" and "Spray Off". The rear fuselage is really nicely shaped and modeled, as is the excellent engine/gearbox bay mesh vents with latches... very impressive. You can see the Allison 250-C20J (this is the B-3 version of the 206) and also known as the "Rolls-Royce M250" at 420 hp (310 kW) turboshaft engine through the mesh grill (well the auxiliary piping anyway). But in a few areas the upper cowling needed more detail. The exhausts at the point they come through the cowling is not at all very realistic, as is the high curve on the rotor post cowling in being more in lines than actually round, the internal rotor post area is blank as well and doesn't look like a used working area. The rotor head detail however is really good, and all the assemblies (and control rods) are nicely visible.... .... and I like the way the blades will move up or down realistically in the wind. Like the 500, the rotor head is only semi-animated... the roll action works and so does the collective action (bite). But the pitch action is contained to only to the animated lower base plate. The striking distinctive JetRanger tail is perfectly realised here, as are the mid-tail winglets... the rear tail assembly is also well constructed with the animated yaw (rudder) blades. There are the options to "STOW ROTORS" and add on "TIE DOWNS'. Provided for selection is a Pilot, CoPilot and two rear Passengers... the pilot is also animated hands and feet to the controls. So overall externally it is a very nice version of the JetRanger 206B, and very CowanSim in detail and quality. Internal detail Open the wide doors to revel a really nice cabin... there is the dreaded three-seater bench in the rear. You never wanted the middle seat as it is cramped and comes with no vision forward because of the bulkhead post, so you always rallied (okay, threw a tantrum) for one of the outside seats. Note the three front seat lifejackets. Seats are a lovey black leather with light grey trim inserts, and the rear cabin as a whole is a few levels higher in detail and quality including detailed trim materials and screws than with the past CowanSim aircraft, certainly a marked improvement. Oddly the side sliding windows don't work in the rear like they do on the front doors? but the inner door panel detail in the same light grey comes with really nice internal door latches that are very authentic and work correctly. CineFlex Camera Although attached externally, the great feature with the CowanSim 206 B3 is the CineFlex Camera option. Beautifully modeled and detailed the CineFlex system looks sensational. This is the stored flying position to protect the lens. You also need the power to be on before using the camera, then you can control the camera from the left rear camera station in the cabin... ... the camera is fully animated with the right controller doing the UP/DOWN and LEFT/RIGHT movements, and the left knob adjusts the ZOOM. You can map the camera controls to a separate joystick or hardware. And it is noted to "scroll all the way to the bottom to find the camera options?" But I couldn't find them? More detailed information is required there... because flying manually and also using the rear cabin mouse controls is a real non-possibility. The reality is the B206B is quite a very basic helicopter. There is not a lot of panels or features on the machine to highlight, for instance there is no autopilot (they come in either in two-axis or four-axis systems), so everything in here is all manual flying. But you do however get basic twin-controls... i.e. Rudder, Cyclic and Collective controls. The design in the front is the same as the rear, twin seats are again in that nice black leather with light-grey inserts, and note the really nicely crafted headsets, in two rear and two front (the two front headsets are animated and reduce the volume when used), the detail up close is excellent. Note the nice and handy red fire extinguisher. Instrument Panel Oddly for such a small helicopter, the distinctive 206B hooded Instrument Panel is huge.... but most of the rest is intimate. The panel facia and instrument layout can be split into two areas. Nine Instruments grouped right are the Flying Instruments, then the two left rows of Eight are the Engine (aircraft) readouts and gauges. The Standard Six Flying Instruments are (Top Row Right); Airspeed (Knots), Artificial Horizon, Altimeter. (Mid Row Right); RPM, Heading Dial and V/S Vertical Speed. (Lower Row Right); Radar Altitude, ADF Pointers and Rate of Turn Indicator... Fuel Valve is bottom right. Left engine parameter instruments and gauges are (LtoR Top) Engine Oil Temp - Engine Oil Pressure, Engine Torque dial. (2nd Row); XMSN (Gearbox) Oil Temp - Oil Pressure, TOT (Turbine Outlet Temperature), (3rd Row); Fuel Gauge (GAL), Gas Producer (%RPM). (4th Row); Fuel Pressure, DAVTRON LCD Display (Chronometer/OAT/Volts). Far left panel is the ELT and DME (VOR2) readout. Far right on the cabin wall is a Compass. Top Instrument panel is a huge excellent (testable) annunciator/warning panel. LED lights for the panel can adjusted. Set to the right of the Instrument binnacle is an "AVITAB" optional feature (Menu). The Avitab can be rotated from the landscape horizontal into the Portrait vertical position... it is however anything displayed is quite squashed in detail in the portrait mode and not very if at all usable? On the roof is a 29 alive or active Circuit Breaker (Fuse) panel, with a forward panel for Lighting and Power (AVIONICS/BAT/GEN), the Rotor brake is positioned right of the OVD Panel. Avionics are in the centre lower facia and console... Garmin GMA 340 Audio Panel (split for Pilot/CoPilot) is top. Followed by a GNS530/GNS430 combo below, that unit can both be replaced with a Reality XP GTN 750/650 Touch avionics unit if you have that optional product. Lower (console) is a Garmin GTX 327 Transponder and a Bendix King KR 87 ADF tuner . You have the option to switch over the top GNS530 unit for two COMM/NAV 1- COMM/NAV 2 older Bendix/King KX 165 units. Far bottom are switches for the Air Conditioning... Caution Lights, Engine De-Icing and turn the Hydraulic System on or off. On the collective it is quite basic as well... Landing Lights, and GOV/RPM selections, Starter Button and the Idle Release (IDLE REL), this is so you don't go past the idle position (or shutdown the twirly bits over your head). Rear is a really nicely done cork throttle grip... Note the CowanSim 206 model uses the “Wing Sweep” slider and not the “Throttle” slider for the twist grip throttle control, you usually reverse the axis (as I do for the Collective as well). There are a few selections on the Cyclic noted as a " B8 style flight grip", and this is a very good one in a replica of the real grip.. you can set the COMMAND settings for both the all the "Trim Hat Switch" movements (recommended), and a secondly for the "Force Trim" button. Rudder pedals are beautifully recreated in detail and design. __________________ Flying the CowanSim 206 B3 Like the B206 overall the startup procedure is very simple... Battery on, Avionics on Position and Anti-Collison lights on (but not the GEN switch). Fuel pumps on, which are hard to find (or miss) as they are grouped in the Circuit Breaker (fuses) packs... and rotor brake up (or Off). Then open the Fuel Valve and lock it in place via the Red cover guard. The throttle grip should be in the shutoff/cutoff position below the IDLE Release... if correct then press the STARTER button until the N1 (Gas Producer) gets to 20%, then twist in the throttle grip until the IDLE Release button pops up, then keep on holding the starter button until the engine start up procedure settles down around N1 60%... easy. Now switch on the GEN Switch... and you are now ready to fly! So how familiar is that startup sound... CowanSim redid the sounds at the very last minute and that was the reason for a very quick update v1.1, it was well worth the effort though because they sound as perfectly as I remember them. I found testing in the replay mode that if you went very fast forward or in reverse the "Visual Offsets" went crazy and off view? No doubt caused by the "Head Force" feature, but I had also turned the "Head Force" feature off as I don't like controlled head movements when I'm flying, I use my eyes or view angle to change my view focus, not my whole head. Ready to go, I increased the throttle RPM (the grip on the collective) from Idle to the green zone 100%. As noted you use the "Wing Sweep" setting to control the throttle RPM. On a slight hover I found the controls light and easy to manoeuvre, with not a lot of yaw force needed to keep the aircraft straight. So just a slight touch of the right rudder, or to bring it back to centre was all that was required to turn the 206B on it's axis to the right... ... I wanted to try that standard steep nose pitch down and accelerate out of shot scene like you see all the time in the American Cop shows, but failed dismally to get it right. But the B206 did fly extremely nicely. You need a little left rudder all the time, but actually not that much yaw is required to keep the machine in a straight line, so unlike a lot of machines you are not fighting it, but simply coaxing it... the JetRanger is extremely easy aircraft to fly and the real aircraft are also noted for it's mild handling and forgiving nature, and that aspect comes across well here. However there is not much difference between the IGE power (In Ground Effect) to OGE (Out Of Ground Effect) in which you use different power outputs for different aspects of the flight, IGE is obviously lower thrust in the hover (because of the up-wash ground effect), were as OGE, is where more power is required in free air. The JetRanger will climb and accelerate quick quickly... "agile" is the word that comes to mind, certainly not twitchy like a lot of these light-helicopters, so it is a very calm but athletic machine to fly... which is perfectly great for chasing bad guys in swashbuckling action packed stunts. Rate of Climb is 1,350 ft/min (6.9 m/s), and you feel all of it, and you are easily at a 100 knts going forward... Max speed is 120 kn (140 mph, 220 km/h) and the never exceed speed is 130 kn (150 mph, 240 km/h), so you get a lot of performance out of a twin-blade, single turbine arrangement. Trimming the B206B is sweet, you can easily find that perfect balance via the Hat-Switch, notable is the faster you go, the less left-rudder you require, but I found it still needed a smidge of movement to keep the JetRanger perfectly on track, that is nice with no servo helpers in here, so you can easily cross-country without getting overworked and tired. My comfort zone was 110 knts at 2500 ft, and I was now smoothly cruising along over the English landscape towards Manchester (EGCC). The Range is 374 nmi (430 mi, 693 km), with a Service ceiling of 13,500 ft (4,100 m), but you would never use that altitude. Lighting Overall the internal lighting is very basic... there is only the Instrument (brightness) and the LED drop-down lighting on the Instrument panel... The LED effect however looks brilliant. Turn the LEDs down and the instruments are still very highly readable, very nice. But there is no overhead or cabin lighting at all... nothing, which is rather odd, unless real... so overall the cabin lighting is not very usable. External lighting has those two landing lights in the nose, in one angled and one vertical. There is standard navigation lights on the rear stabiliser wing and rear tail, and a beacon top tail. A lot of users bemoaned the fact the CowanSim 206 B3 had no cargo hook? Which seems to be a bit of an oversight. Granted the Bell 206 is not known as a lifting helicopter like say the Bell 512... but it does have carry up to 600kg on the hook, with a max lift of 909 Kg, not that unreasonable. Internal views in flight are extremely realistic, and I have been in here very often, the rear always felt a bit cramped with the heavy divider from the front, but the views out were always very good with the biggish windows. Approaching Manchester and it is time to lower the altitude as there is a lot of low hanging cloud around, backing off the speed was also easy with just a slight pitch up with a slight touch of collective.... control was so docile and forgiving, the B206 B3 is so very impressively easy to fly. Moving into the hover or transitioning from fast forward flight known as Effectively Translational Lift (ETL), the JetRanger was very, very smooth, and no severe power changes were necessary. Approach to EGCC was a 1,000ft and 70 knts, then reducing to 500 ft and 45 knts when going over the airport boundary. if the IGE power is a factor or not I don't know, but I found the transition seemless... .... into the hover and there was no nasties to trick you up, the JetRanger is perfectly composed and easily controllable, helpful is the light yaw (tailrotor) in that you don't have to fight it, but just feed in the amount of movement you require lightly... I am not the absolute Helicopter professional I admit, but even I found it easy to control the machine with confidence. I got special clearance to do a bit of a PR exercise in landing on the "I ❤️ MCR" logo, so I wasn't going to mess up my moment. In I came with a perfectly considered judgement of were I wanted to place the aircraft, and did a nice rolling on to the spot landing. So the CowanSim B206 is impressive and can be flown by users with not the extreme skills that is sometimes required with these machines, and surprisingly even for a Helicopter in this Light-Heli category... as most in this classification can be very nervy and challenging machines to fly, but JetRanger finds that sweet spot in handling, control for great and easy (even enjoyable) flying. __________________ Liveries There are 58 Liveries included, yes FIFTY EIGHT. So they cover virtually most active countries that the B206B's operate in with 20 selections for the United States. Julien Lebrun and Marc Hamilton both made significant contributions to the list. As noted there is a PaintKit also provided if you want to personalise your own private JetRanger. I have picked a collection of 17 of the best liveries for your consideration. Including two N-XPLNs in "Gloss" and "Metallic", Two KPRC TV, Australian Army, Red Bull, Skyforce 10, Dick Smith's Aussie Explorer and Burswood Casino Australia... N206NU is default. __________________ Summary The Bell 206B is one of the most famed light-twin bladed Helicopter of the last half century. Seen everywhere (mostly in Films and on American Television), the machine is also the most familiar in almost every aspect of local flying, from Medi-Vac, Television Reporting, Sightseeing and Personal or Business transport, chances are if you are of a certain age you would have flown on a B206. Again the aircraft is a reject of an American Army's Light Observation Helicopter (LOH) proposal, that order went to the Hughes OH-6. Bell. Then Bell redesigned in the fuselage (making it far longer and more sleeker), more powerful and the JetRanger was born, and then the Army ordered hundreds as the Bell OH-58 Kiowa. This B206-B3 is CowanSim's third helicopter for the X-Plane Simulator, after the Bell 222B + UT, and then the exceptional CowanSim 500E or Hughes 500 of P.I. Magnum television fame. With all CowanSim aircraft is that they come with their own style and shall we say American bravado, but hasn't stopped the aircraft being very, very popular and well regarded. And the B206-B3 is another in the line of aircraft, but has a more slightly better quality and detailing. One early aspect is however of significance. The Aircraft is designed not to absolute scale, but is scaled slightly larger for VR (Virtual Reality) considerations. The B206 is a small aircraft, even of very tight proportions, but here it is almost in the Bell 512 size category... so if you want an exact replica of the B206, then this is not that aircraft... that is a very odd thing to do in a simulator. The feature list is long and extensive, with loads of tools (spotlights, wire cutters, high/low skids, working spray booms, blow floats) and an interesting working CineFlex camera, a notable missing feature is a cargo hook. You also get a (animated) Pilot, CoPilot and Passengers, opening windows (front only), RXP GTN750 option and a rotating AviTab. A huge collection of 58 liveries are also a nice addition. CowanSim's aircraft are always interesting machines to fly, as is this JetRanger. The point could be made in that is it too docile in it's flight parameters? That aspect certainly helps wannabe Helicopter pilot's and this is certainly a great and simple aircraft to be introduced to vertical flight, I think it is slightly both ways, both in that the flight envelope is a not as highly technical as it should be, but the JetRanger is also known to be also very easy if athletic aircraft to fly, but certainly it is not in the poorly developed capacity, as overall the machine in all aspects and certainly performance is very good. It's a CowanSim... overall you know what you buy when you purchase a CowanSim aircraft, and this Bell 206B-3 is certainly the best designed and detailed CowanSim yet... Nice. _______________________________ Yes! the CowanSim 206 B3 is NOW available from the X-Plane.Org Store here: CowanSim 206 B3 Price is US$32.95 Features: Free Future Updates Tested and Zeroed in by Real Pilots Several Commands for Mapping Hardware Remove Before Flight Accessories Pilots & Passengers Working Floats System Low & High Skid Versions Dynamic Weight Options Functional Spot Light Functional Spray Kit Functional Cineflex Camera 2K & 4K Versions FMOD Fully Dynamic Sound Pack Window Rain Effects Compatible with Vulkan API Virtual Reality Ready AviTab Integration RXP GTN 750 Integration Realistic Flight Dynamics 4K & 2K PBR Custom 3D instruments Detailed Night Lighting xLua for Systems and Animation SASL v3.12.1 for Custom Plugins Realistic Flight Dynamics This model has an authentic feeling while exploring the virtual world thanks to Laminar Research for developing a fantastic flight sim. 4k Physically Based Rendering Textures 4k PBR textures, or physically based rendering, provides the ability for very realistic lighting that mimics the flow of light in the real world. This model takes full advantage of X-Plane’s lighting with dynamic reflections and materials. Custom 3D Modeled Instruments Everyone loves a detailed and realistic looking cockpit. After all, that is where we spend most of our time in the sim, flying! The 3D instruments were developed to a high standard and are fully functional, with extensive custom coding to make it as realistic as possible. A Nice Cozy Cabin Sit back and relax in the cozy rear cabin and enjoy replays of your flight from a passenger’s perspective! Was it as comfortable and smooth as you thought it was from the pilot seat? This is especially interesting in VR and landing replays are the best. Paint Kit & Liveries Comes with several liveries and we also included a detailed paint kit. The kit is provided in both GIMP and Adobe® Photoshop® formats. A UV map layer included in each file allows for easy and accurate repaints. Vibrant and Detailed Night Lighting X-Plane has wonderful night lighting. The 206B3 project aimed to have plenty of lights, inside and out, making night flights possible. From the landing light to the cabin lighting, this helicopter really stands out at night. Animation & Sound Thousands of lines of custom code make up animations and systems. The fully immersive sound set was developed with FMOD. Sounds and animations work together with visual rotor-speed vibrational feedback, dynamic blade slap, rain effects and more. Reality XP GTN 750 Integration The Reality XP GTN 750 can be fully integrated into the cockpit. Reality XP GTN 750 Touch is the genuine simulated device used by flight simulation enthusiasts navigating the virtual skies as well as real world pilots for familiarization with the device. This add-on is a payware add-on and you can purchase it here: https://reality-xp.com/ Requirements X-Plane 11 Windows, Mac or Linux 4 GB VRAM Minimum - 8GB+ VRAM Recommended Download Size: 2.1 GB Current and Review Version: 1.1 (January 8th 2022) ___________________________________ Installation and documents: download for the 206 B3 is 1.96Gb and the aircraft is deposited in the "Helicopter" X-Plane folder. Full Installation is 1.44Gb Documents supplied are: CHECKLISTS - START-UP - 206B3.pdf MANUAL-206B3.pdf Manual is half completed with no instrument references or just basic system references, but settings are well documented with a very good checklist that shows well intergrated startup and shutdown procedures. Support forum for all helicopters by CowanSim _____________________ Aircraft Review by Stephen Dutton 14th January 2022 Copyright©2022: X-Plane Reviews Review System Specifications: Computer System: Windows - Intel Core i7 6700K CPU 4.00GHz / 64bit -32 Gb single 1067 Mhz DDR4 2133 - ASUS GeForce GTX 1080 8Gb - Samsung Evo M2 2TB SSD - Sound : Yamaha Speakers YST-M200SP Software: - Windows 10 - X-Plane 11.55 Plugins: Global SFD plugin US$30.00 : Environment Engine by xEnviro US$69.90 : RK Apps XPRealistic v2 - US$34.99 Scenery or Aircraft - EGCN - Doncaster Sheffield by Fly X (X-Plane.OrgStore) - US$17.99 - EGCC - Airport Manchester by Aerosoft (Currently not Available) - not to be confused with the current Aerosoft Manchester XP11 (Disclaimer. All images and text in this review are the work and property of X-PlaneReviews, no sharing or copy of the content is allowed without consent from the author as per copyright conditions) All Rights Reserved
- 1 reply
-
- 1
-

-
NEWS! - Plugin Updated : WebFMC Pro v1.8.1 by Green Arc Studios Green Arc Studios have done a single digit update to their popular WebFMC Pro plugin. The update v1.8.1 is basically to cover the LevelUp 737NG Series, which covers variants ranging from the short -600 to the stretched -900ER. Although based on the Zibo Boeing 737-800X, the LevelUP required changes to the WebFMC plugin to work... notable is that both/dual FMCs can be accessed from the plugin in the LevelUp aircraft. The WebFMC is a plugin that allows you to use a FMC (Flight Management Computer) on an external screen via a web browser. That is an another computer or tablet. So it is a remote tool, but a very beneficial tool and even a powerful one in programming in route and performance data and following the set aircraft route in flight and in mirroring the aircraft's built in FMS (Flight Management System). Added into the functionality is a load of features in the use of the FMC on another screen. WebFMC Pro v1.8.1 support for LevelUp 737NG DualCDU NEW! added option to scale without keeping aspect ratio improved going into screen only mode The full current complete list of supported aircraft / FMCs with WebFMC version 1.8.1 Default X-Plane # - FMC requires X-Plane 11.35+ A319 # by ToLiss A320 Ultimate # by FlightFactor A320 by Jar Design requires JD320 v3.4r1+ A321 # by ToLiss A330 by Jar Design requires JD330 v3.1r2+ A340 by Jar Design A340 # by ToLiss A350 XWB Advanced by FlightFactor - old style CDU only B737-300 # by IXEG B737-800 # Zibo Mod* 737NG # LevelUp B737-900U Ultimate #* B737-700U Ultimate #* EADT x737 with x737UFMC all variants; requires x737UFMC EADT x737 # - with Default FMC all variants B747-8 by SSG (VMAX) all variants; old v1.9.2+ and new v2.1+ B757v2 # by FlightFactor - all variants; requires 757 v2.2.13+ B767 # by FlightFactor - all variants; requires 767 v1.2.6+ B777 by FlightFactor - all variants CL650 # by HotStart NEW! CRJ-200 by JRollon Embraer E170 by SSG - requires v1.4+ Embraer E195 by SSG - requires v1.4+ ERJ Family # by X-Crafts MD-80 by Rotate requires MD-80 v1.42+ Q400 (Q4XP) # by FlyJSim - Requires v1.09 NEW! There are two versions available and the PRO version is now listed with an impressive 28 aircraft + Default X-Plane FMC, but three in the list of the Zibo Mod 737-800* and the 737-900ER/700* Ultimate are also available in the Free Demo version. Noted # aircraft are dual CDUs : # aircraft are Triple CDUs ____________________________________ Yes! WebFMC Pro v1..8.1 by Green Arc Studios is NOW AVAILABLE from the X-Plane.Org Store here : WebFMC Pro Price is US$19.99 The v1.8.1 update is free to previous purchasers of the plugin, go to your X-Plane.OrgStore account for the new version. Access CDU / FMC of select X-Plane 11 airplanes via any modern web browser running on your PC or mobile device over local network. Quick and easy access to the FMC Get easy access to the FMC: quickly edit the flightplan, monitor flight progress, set up your approach and do all the typical work of the pilot without having to move around in the cockpit, even if the plane doesn’t support FMC as a popup natively - on the same PC, or different monitor, tablet or phone - in fact you can use multiple displays at the same time! Make pilot tasks easy and comfortable Enjoy external views during cruise while monitoring flight progress on separate screen or take a quick look at your phone to verify calculated landing speed with just a glimpse of an eye during busy time on approach. Make flying complex SIDs / STARs easy as you can focus on the important flight parameters while having overview of the constraints all the time. Take your mobile to the kitchen as you cook a dinner during a long haul and never miss T/D again! Convenient to use Use physical keyboards on PC with extra keys such as Prev/Next page mapped to keyboard keys for easy access. WebFMC scales dynamically to fit any display or window size and can look as native app on mobiles by using browser's "Add to home screen" feature. The WebFMC plugin requires X-Plane 11 running 64-bit Windows 7 operating system or newer Mac OS 10.14.x (Mojave) Ubuntu Linux 16.04 LTS or 18.04 LTS (64-bit) Web Client The CDU can be displayed on any modern and up-to-date web browser with JavaScript support. We recommend the latest versions of Google Chrome on PC or Android and Safari on iOS. No internet connection required, remote device needs to be on the same local network as X-Plane PC. Support for WebSockets RFC 6455 standard is required which implies at least iOS version 6. _________________________________ NEWS! by Stephen Dutton 11th Jan 2022 Copyright©2022 : X-Plane Reviews (Disclaimer. All images and text in this review are the work and property of X-PlaneReviews, no sharing or copy of the content is allowed without consent from the author as per copyright conditions)
-
Aircraft Review : CRJ-700 by AD Simulations/Delta Wing In January 2012, the JRollon CRJ-200 was a landmark release for the X-Plane simulator (X-Plane10). It was a trendsetter aircraft in being the first aircraft in X-Plane with deep systems and a real FMS (Flight Management System) by Philipp Ringler, and was also in using one of the first Plugin SDKs. Tricky to fly, but as a simulation it was years ahead in design, feel, and in bringing the aviation realism to the desktop. In 2016 the JRollon CRJ-200 also got an exceptional custom sound pack by Blue Sky Star Simulations. This package brought new life into an already old design, and even now I find the aircraft just as fulfilling as it did all those years ago, and amazing is that aircraft will be actually a decade old in just a few months. That aspect alone is exceptional for any aircraft release. A version v2 CRJ-200 was started, but never released by JRollon as Philipp Ringler is not now available to update the original FMS, but never say never. Comparisons to the Aerosoft CRJ Series is always also going to be a consideration, as that aircraft is highly regarded. Basically we don't cross platform, so the only comparisons is with the only other CRJ in X-Plane and that is the JR CRJ-200. The only area that most simulator flyers proclaimed was that the JRollon design was of the -200 version of the CRJ, it was in fact the most marginal of all the CRJ variants created by Bombardier Aerospace (Which is also very JRollon, as his Jetstream 32 was also a very marginal aviation seller). However in reality everyone always wanted the more longer and the more active airline regional aircraft in the CRJ700, CRJ900, and CRJ1000 series. It has been a long wait, but here is a CRJ-700 series aircraft by AD Simulations. Notable is that the development of this aircraft started under the Supercritical Simulations Group banner (SSG), but a breakup a year ago saw the development teams all take off in all different directions, and probably each with their own different aspects of the development. The work to release is now by only AD Simulations, but notable was that AD Simulations has announced a partnership with “Delta Wing Simulations” to further develop the aircraft, with Delta Wing taking on the systems side of the work that was previously done by SSG. But the point of view here is in if this aircraft had progressed to release via SSG, that aspect would have certainly been seen as an interesting aircraft as for the SSG development capacity is well known and of high quality in the X-Plane Simulator. During the early 1990s, Bombardier Aerospace became interested in developing larger variants of the CRJ100/200 series and the associated design work commenced in 1994. The CRJ-X, as the new range was initially designated, sought to compete with larger regional jets such as the Fokker 70/Fokker 100 or the BAe 146 family. The CRJ-X featured a stretched fuselage, a lengthened wing and up-rated General Electric CF34-8C engines while maintaining a common type-rating with the basic CRJ. Leading-edge extensions and high-lift slats improved the wing performance, other aerodynamic changes included an enlarged horizontal tailfin. During September 1998, Bombardier also studied an all-new 90-seat BRJ-X model. The company later shelved it for a less expensive, stretched CRJ-X version, later designated CRJ-900, while the original CRJ-X was designated as the CRJ-700. The CRJ-700 incorporated several CRJ-900 features, such as its revised wing and avionics improvements. The CRJ-700 and CRJ-900 also share a type rating, permitting cross-crew qualification via a three-day course. The Series 700 is limited to 68 passengers. I came to the AD Simulation CRJ-700 directly after reviewing the FlyJSim Q4XP, is that fair? Not really as the Q4XP is a level above almost everything else in X-Plane, and in price. So you have to wind back some of the expectations here, even if they share the same regional airliner category. But even in this lower level and pricing category, the quality promoted here is still very, very good and not far behind it's expensive but higher quality brethren. Note: This review includes the extensive update v1.0.1 (December 20th 2021). Differences are stark between the release version and the update and the changes are noted here. (debatable as always is releasing a product before serious testing and initial refining). This review was originally started under the release version of the CRJ-700, but then held over (at the wishes of the developer) to the updated version, which is something X-PlaneReviews rarely does, but in this case the hold over was warranted. External Detail First impressions are impressive on the aircraft walk-around. The aircraft is really very nicely modeled, with some really good detail, nose and fuselage shapes are excellent, you are admiring the work significantly here. The minute detailing is not bad either, the rivets are a bit lo-res, but the construction panels are well visible. The winglets are simply excellent in shape and show off the well done NML normal mapping, or Dot3 bump mapping which is really very good here, note the lovely metal and neat concave riveting. So when you look close you see this impressive depression detail work all over the aircraft. Odd is the line around the inner wing root fairings? It is squiggly line, not exactly promoting anything, and it stands out, I couldn't find this odd line on any real life CRJ images either. Exceptional is the wing detail. Wingtip lighting components and metal shroud is really well done, as is the inner landing lights enclosure. Also is the metal leading edge (in different metallic compositions) that looks highly realistic... ... leading edge extended shows off the internal detailing, which is of course first rate, ditto those long double-slotted hinged barn door flaps that are authentic to the CRJ series. The CRJ Series uses the General Electric CF34-8C turbofans with a power output between 13,790–14,500 lbf (61.3–64.5 kN). The turbofans were a significant highlight on the earlier JR -200 aircraft, they are also very well represented here. Engine pod shape is excellent, and cleanly modeled, with great detail (all the shroud latches and access panels are all represented and highly detailed). Inner pod detail is nice, with great both fan and detailed spinner. Rear exhaust cones are lovely metallic and also very nicely detailed, and have the nice exhaust gas burns where required. Rear left cargo hatch is situated under the CF34-8C engine. Rear vents and APUs (Auxilary Power Unit) burnt exhaust mottling are again really well done, this detail is just all very good. There is that Challenger 300 feel to the tail form, as it is the Bombardier's relative and the design is certainly noticeable on the higher sections. Again the design flows are excellent, the tail looks and feels very realistic. Tail leading edge metal shroud is again excellent, and note the placed elevator trim markings on the tail. Debatable are the cockpit windows... The tint is extremely dark in this option, overall they just don't look right and are highly noticeable externally. AD Sim have now also given you an optional clear version, but this option now goes too far the other way in the windows being completely clear, the tint just needed to be adjusted a little lighter... .... windscreen surround detail is excellent (again) in detail, every screw is visible on a nice metal frame... top marks. The cabin windows also give you a sort of illusion. They look like they have no glass in them, but they are correct and very nice in the right lighting conditions. Landing gear mains are also exceptional. Highly quality modeled and intricately detailed, with internal bay detail also exceptional. The wheels sit flush (à la Boeing 737) with the fuselage, and a nice detail is the overlapping wheel skirt around the wheel bay(s). You simply can't fault the gear detail, each piston, link, support and hydraulic line is highly detailed, not the highly visible front-forward positioned hydraulic filter.... exceptional. Wheel rims are also extremely good with nice chrome bolts... detail, detail. Nose-gear is just as intricate and detailed, with the internal bay which is just as good... .... so it is well worth getting up really close to inspect the excellent detail, you won't fault it either. So externally you don't expect FJS Q4XP's detail and quality, the CRJ is not that high, but not that far below either, and to note you are paying far less and a category below for all this extreme quality... well worth your money in my eyes. Internal Details The main front left door is highly detailed, gone are the days of just a fuselage shape with a set of steps built in, nowadays all the construction and detailed door sections are now highly detailed and visible, including the welcome metallic "Bombardier CRJ" fold out plate. The rails can be lowered (or raised) via a key command (and a hotspot) if you wish to park at an airbridge. The view up into the cabin is excellent, highly realistic. You are instantly aware on boarding that the external quality extends internally, note the really tight and small galley for an aircraft of this size with all of 65 passengers to feed. It is a two class cabin. With nine (3 rows -3 abreast) business seats and 56 (14 rows - 4 abreast) economy seating... The seating and cabin feel has actually (already) been revised in the update. Originally it was a darkish brown and gave an overall dark feel to cabin... revised (v1.01) and the brighter lighter tan of the business seats and nice shiny black vinyl of the economy seating is giving you now a far better aspect, and adds in a very luxury feel to the cabin, sidewall and the roof of the cabin are both very well done. Window side panels are not lit (no sidewall lighting) but the overhead lighting is nicely detailed with centre strip lighting and the large personal twin passenger lights... originally the window shades were fixed (which I totally hated), but are all now individually animated up or down and also adjustable via a scroll wheel. There is no rear galley, but behind the central door is a washroom/toilet. One of the biggest changes in the v1.01 update was this rear bathroom (comments abound on why a bathroom is actually more important to a vital systems/performance update?). Originally just a single central toilet.... the detail has been totally revised in a sort of current X-Plane fad of a restroom "Space Race" on who can create the best onboard amenities... this CRJ layout is certainly (now) right up there with the very best. Door lock slider works (as does the engaged marker) and the lock in turn, turns on the internal overhead light, very snazzy. To the right is the full set of amenities.... ... including a nicely animated toilet seat and lowering baby changing table... press "Flush" (à la Q4XP) and the toilet flushes. Two other new animations in the update, are that now both the crew seats slide out for takeoff and landing at each end of the cabin. Overall the cabin is now very nice, and certainly far better after the v1.01 update. Cockpit Re-enforced (post 9/11) cockpit door looks formidable. The cockpit entrance way is extremely well detailed, but the cabin lighting and control panels are still blank buttons. Cockpit is tight or large business jet in size, because basically this aircraft grew out of a business jet design. It is very nice in the office, but also very dark... courtesy of those heavily tinted cockpit windows, hence it is also dark and murky looking viewing out of the aircraft as well? Highlight is the lovely overhead console (not really just a panel).... beautifully crafted and detailed, you have to admire it. The cockpit escape hatch is lovingly detailed as well, but does not open. To see anything in here you need lights and power... on the OHP upper left. I turn on the APU. It is odd on turning on the APU as the left PWR/FUEL button is not illuminated, but still required to start the APU and show you it's startup state on the MFD (Multi-Functional Display)... so you press the switch(es) twice or more times in frustration. Notable are that the airvents and forward spot lights that are animated (moveable), very nice, so you turn on every light you can find. Cockpit quality is of the highest order, everything nicely replicated and feels very CRJish. The pilots seats are nice as well, but the sheepskin covers feel more molded than actually woolly, the seating materials are however really good, as are the lovely wing headrests. The armrests are now also (v1.01) animated, but tricky to use until you understand the lever pressure points, left seat, left armrest still needs some refinement and note the nice chrome seatbelts. Also animated in the update is that you can now move the seats position backwards and forwards to your preference, via the side seat lever (arrowed), but the wing headrests can intrude into the FOV space full forward if set at the standard 73º. So you set the seat about halfway down the track. Sit in the pilot's sea and... BOOM! and you are suddenly very aware of your intimate connection with this aircraft, or rather the CRJ-200 of JRollon environment without all that heavy graphic art. With it's long rear sidewindows the CRJ always felt more like sportscar than an aircraft, and that feeling with the distant low instrument panel only heightens the awareness. Note the nice window surround molding. Thick chunky yokes are super nice with built in AP Disconnect and moving checklist counter (both also have Command settings) Intercom and cable are masterful modeling, but the hotspot to hide the yokes is very hard to find as it is only a small black button on the glareshield (arrowed). Instrument Panels Lovely instrument panel has the six across Rockwell Collins Pro Line 4 avionics suite. The displays are nicely reflective (most current releases are going for the boring matt reflection effect, but you can be set this non-reflective feel if you want to). But I would rather have this more realistic reflective display. All the display fonts have been monospaced in v.1.01 for a better real-life match as well as rendering and scaling, this is certainly far better as earlier the red fonts would bleed badly, it is more highly readable now. All six Primary (PFD) and MultiFuctional (MFD) displays pop-out in windows, that can be highly resized for the home cockpit brigades... The FMS (Flight Management System) is standard Laminar default, hopefully a custom Collins FMS-4200 system will be attempted in the future as installed in the CRJ-700. However both pop-out FMS facias are nicely CRJ replicated and Laminar version is based on the Collins, but not in pure detail. Other central upper panel notes include; LDG Gear (Landing Gear) handle, Anti-Skid, Engine Settings, GRND PROX (Ground Proximity). You can switch displays via the left (or right) reversionary panel; NORM, PFD 1 or EICAS. PFD (Pirmary Flight Display) has the Speed and Altitude ribbons, with a rate of turn above the Artificial Horizon. There are built in ILS bands and Baro. VRefs which are set to the lower right. Set below is a HSI (Horizontal Situation Indicator), with built in Heading, Course, ILS Freq, and VOR1 and VOR 2 bearing indicators with the V/S Vertical Speed indicator set to the right. Multifunction Display (MFD) is set in HSI Mode as default. This displays Radar mode, Time/Temp, Course display, Selected heading, Course Pointer, Bearing pointers, Bearing Pointer and ILS Lateral/Vertical Deviation scales. The rotary FORMAT knob can be used to select one of the following navigation formats; HSI compass, Navaid sector map, TCAS, FMS present position map, FMS plan map and Weather radar. A central integrated standby instrument (ISFD) is located between the EICAS (Engine Indicating and Crew Alerting System) displays. Left EICAS (ED1) covers the FADEC (Full Authority Digital Electronic Control System). Shows are digital dials for N1 (fan Speed), ITT (Interstage Turbine Temperature), N2 (compressor speed), FF (Fuel Flow) and OIL Temp and Pressure... right lower is the GEAR position, SLAT/FLAP position and FUEL QTY (Quantity) in tanks and TOTAL FUEL. The FADEC Caution/Warning alerts are noted top right. The secondary EICAS (ED2) right is known also as the STATUS page. It covers; Flight control trim indications, Auxiliary power unit (APU) RPM, exhaust gas temperature (EGT) and APU inlet door status, Pressurization data such as cabin altitude, cabin rate of change, cabin pressure differental and landing field elevation, Oxygen system pressure, Brake system temperature and Crew alerting system (CAS) messages in the form of green advisory and white status messages There are Aircraft systems synoptic pages selected via the EICAS Control Panel rear of the throttles and covers PRI (Primary Page) - same as the ED1, STAT (Status), ECS (Environmental Control System), HYD (Hydraulics) ELEC (Electrical), FUEL, F/CTL (Flight Controls), A/ICE (Anti-Ice), DOORS and MENU. Notable is that you use the EICAS Control Panel to (MENU) to move through the actions, with UP/DOWN and SEL options. The CAS alerts cancel selection is here as well. Centre pedestal also covers Radios (note to turn up the brightness manually). Aileron and Rudder Trims, Lighting Panel, YAW Damper, Weather Radar Parking Brake and Cargo Fire selections. The next two areas are again very JR CRJ-200 familiar, and you will feel very much at home in using them. The OverHead Console is well laid out (top-down ergonomics). ELECTRICAL top left, FIRE, EXT (External Lighting), FUEL, BLEED AIR, APU, ENGINE STARTER(s), HYDRAULIC, CABIN PRESS (Pressure), AIR-CONDITIONING, ANTI-ICE and MISC LTS (Miscellaneous Lights). Lower front panel includes External - LANDING LTS (Lights), ELT and right NO SMKO/SEAT BELTS and EMER LTS (Emergency Exit Lights). Glareshield has the AFCS (Automatic Flight Control System) which has the basic usual Autopilot control panel set up, with a ½ Bank and FD (Flight Director) options. I am not crazy about the left and right warning light buttons, as they don't have the depth of feel like on the JR CRJ. Ditto the JR CRJ on each side are the Pilot and Co-Pilot... N/W Steering, Lighting, Wiper and Reversionary panels, the Digital Electronic Clocks are situated here as well (but don't work than telling the time). Final feature of the cockpit is the window blinds that are both animated. They are extremely tricky to use unless you understand how they work... basically touching the central fitting moves the blind left or right, and up and down is via the left (UP) and right (DOWN) blind regions. The blind can moved all the way around to the central window position on it's rail. We will look at the cabin lighting in the air, as the airport lighting is too bright here. Tablet Menu AD SImulation's Menu system is still currently quite basic, compared to others of late. There is only one tablet (Pilot side), and like the window blinds you can move it left and right along a track for the right position you personally like.... and the tablet can also stow downwards (via the top little stick). You turn the tablet on via the button hotspot, and if you press the AD Simulations logo you get the window pop-out option. There are SEVEN icon menu options. The first icon box is the default blank screen and not counted here.... in order; DOOR HANDLING, COCKPIT, PASSENGERS, (ICON not currently active?), FUEL LOAD, SETTINGS and INFO. DOOR HANDLING : There are four doors on the CRJ-700. Passenger Door (front left), Service Door (front right), Cargo Centre Door and the Cargo Aft door. All door animations are very good, with handle movements... door detail and the cargo interiors are also excellent. There are key COMMANDs for the doors, but they are buried deep in the key command menus. They are not listed under DOORS?, or even TABLET? but under the crj700/tablet/doors selection, in the second "tablet" selection, and positioned lower down and not in the first selection of "Tablet" commands as that selection only turns the tablet on/off?... it's a little complicated. COCKPIT : In the cockpit menu you can select to start up "COLD and DARK" or "READY to TAXI" or the aircraft completely shutdown or completely powered up and ready for flight. Missing is the central state of "Turnaround", which remembers the last situation of the aircraft and an aircraft state option I mostly use? "USE EXTERNAL POWER" places a very nice and connected GPU (Ground Power Unit) outside to the right of the aircraft. (note this COCKPIT menu option was moved in the v1.01 update from the SETTINGS page). PASSENGERS : You load the amount of passengers via the central slider which is totally impossible to use. Thankfully in v1.01 AD Sim has now given you the option to now input the passenger count directly... seriously I really hated the slider only idea before and at least this is an improvement if it is still fiddly. FUEL LOAD : Like loading passengers, the fuel loading is also done with a slider and thankfully now (in v1.01) the direct passenger amount input is also available. Before it was simply impossible to input your fuel load? (however you can also set it also directly on the X-Plane default WEIGHT, BALANCE and FUEL page, which is recommended here as overall it works better). The full "TOTAL FUEL WEIGHT" is shown lower right of the menu screen. SETTINGS : As noted the SETTINGS menu page has been completely revised into three new menu selections; GLASSES, SOUNDS and MISC. GLASSES; changes the tint and reflection options for both the cockpit windows and displays. COCKPIT EXTERNAL GLASSES - changes the window external tint from "Normal" (Clear) to "Tinted" (Dark) COCKPIT INTERNAL GLASSES - changes the window internal tint from "Normal" (Clear) to "Tinted" (Dark), and the difference is quite significant. COCKPIT DISPLAYS - Gives you three options of reflections in; No Reflections, Medium Reflections and High Reflections of any of the display surfaces... shown here is "No" and "High" reflection options on the menu tablet. SOUNDS and MISC; The SOUNDS page gives you five sliders covering; EXTERIOR ENGINES, INTERIOR ENGINES, WIND EFFECT, WEATHER & EXT ENV (Environment) and finally Cockpit and Cabin (sounds). The sliders can again be tricky to use and mouse scrolling is the best way of using the sliders, otherwise the settings jump to the wrong choice? MISC currently only has one setting for FLIGHT MODEL in "FLY BY WIRE" or "SIMULATION" FLY BY WIRE – is the version that makes flight model more computerized (as in real life fly-by-wire systems) and SIMULATION – is the version that emulates real CRJ-700 flight model without any computer alteration. INFO : The menu "Information" page shows you your WEIGHT with Left Wing/Centre/Right Wing Fuel quantity and TOTAL WEIGHT. This will compute your VRefs and STAB TRIM, and you can load these parameters directly into the system. You can also change from Kg to Lbs. No doubt the Tablet Menu is still a WIP, but now far better than the initial poor release version. Notable is that the many of the menu settings still don't save your settings or asks you to save them, so you have to recheck (mostly the GLASSES settings) every time you start the CRJ Simulation. Overall it is still a very basic menu layout and limited options with no Centre of Gravity numbers or graph charts... Flying the CRJ-700 Familiarity with the JRollon CRJ-200 pays off dividends in flying the -700 variant. Almost all of the switch gear and procedures are very much the same, the biggest difference however between the two aircraft is that the CRJ-200 was basically a one sided pilot focused aircraft, in the CRJ-700 it is available to fly on both sides. But the quirks in here are quite noticeable. Power up... If you are powered battery on only, then only the twin centre EICAS displays are operational, but not the outer PFD/MFD displays. They will only come on later with direct power with the APU running, in a flip. Unlike a lot of newer aircraft lately, the screen power up (and test procedure) is not implemented. But it sorta works. The nosewheel always starts up at an angle? which is not very realistic. Like a lot of actions in this CRJ they are very manual in nature, that would be an automatic setting in an airliner, again reflecting it's Private Jet heritage. The N/W STRG needs to switched ON (Upper far left console) to straighten the gear out correctly. I found adjusting the X-Plane; "Weight, Balance, Fuel" menu I could get the correct fuel load inputted (thankfully) rather than using the dreadful slider, but for the Passenger load the only option it was a direct input. All weights are shown on the INFO page. Although basic... the original CRJ-200 FMS was very authentic to the aircraft. The default Laminar FMS in here is certainly not, but it is very simple to set up a route and programme. Here our route is EKCH (Copenhagen) to EGLL (Heathrow, London). But note that a few of the arrow buttons (PLAN) buttons are not on the default FMC facia. Both the No Smoking and Seat Belt signs work individually, but the EMERGENCY (Exit) signs have (still even in v1.01) no AUTO mode, so it is unrealistic to set in ON or OFF, but at least they work correctly in the cabin. On pushback... engine (No.2) startup is simple and duplicates the -200 procedure. FUEL BOOST on, IGNITION-CONT on, BLEED OPEN (ISOL) Valves can be set to MANUAL or AUTO, then press the starter button for either R (Right) or L (Left)... ... at 20% N2, you flick up the Fuel shutoff lever lower throttle and the CF34-8C turbotjet engine purrs into life. Mirror the start procedure for engine No.1 and your powered up. Comments on the "Fuel Shut off" tabs in that they are not very realistic here to use or quite tricky to understand? There is no definite click or action on the gate, and the tabs can be moved up or down at any point of the throttle position unlike on most simulation aircraft it is usually just a one click release. So you click twice to not only induce the fuel, but to get the throttle release action for the second click... there is a method in the actions, and I sorta understand it, but it feels it needs a more definite tab action to be real world realistic. Engine start up sounds are very good, certainly not even a brush on the custom -200 BSS sounds which are incredible... but they are pretty aurally good here (so are the cockpit system sounds)... when started the engines settle down around 23.6% N1. Notable are the thrust effects, more a cloud than exhaust thrust in the original release, but they are now a far more realistic blur. On board APU can be now shutdown via the button next to the APU Start/Stop button, APU running is shown in the lower ED2. Now also the engine IGN and BLEED ISOL (Closed) can be set back to normal. As noted you have set the systems manually. The Reverse thrust has to be set into AUTO mode, and SPOILERS also to AUTO mode. A note on the BLEED ISOL. The setting stays on all flight no matter the BLEED ISOL position? The developers note to switch the BLEED to MANUAL... but that does not kill the ISOL warning, but annoyingly adds in another MANUAL BLEED warning? External taxi lighting has been changed in the v1.01 update... standard before it has now a more halogen look and feel, it looks certainly more modern... but should you have the choice? You have to give the throttles a fair movement in their gates on the release version before the thrust kicked in, but in v1.01 the thrust is now readily available... but the throttles also do flicker badly sometimes in their gates which is distracting. Note the very dark cockpit environment in the full tinted internal setting, but you get used to it. Using the "Tiller" in taxiing it is a bit sharp or "touchy", but you also get used to it... a more wider slightly (slower) movement would feel more realistic So you taxi fast with the throttles at idle and need the consistent braking to control the speed, as there is always too much power at idle, which begs the question has the throttle position active thrust zone been pulled back tooo far? Though CRJ pilot's note they do taxi only on one engine, but here now with both throttles already set at idle, you are still taxiing around at speed... it is simply too much thrust. You need to set the trim to 5.8 (STAT Page). Which is quite low in the green zone, if you set it central around 7.8 (as noted in the INFO) the nose will lift early, a reference that needs to changed. Secondly is positioning the SPEED counter on the Speed Ribbon as a pointer to rotate (VFTO 187) or Vr 177+10 (Flap 8º) as I noted earlier, as it is hard to see the small green line Ref Speeds as they are small and distant, so the speed counter is a far better marker to rotate to... Throttles are both pushed to the Takeoff Marker or 90% percent N1, and release the brakes... sadly or annoyingly the timer counter(s) are not yet working either? At VR (187 knots) you raise the nose and find a positive climb. Climb rate is 3500 fpm, but on average you will initially do 3000 fpm, reducing down to 2000fpm around 12,000ft... I seriously like watching the gear go up on the CRJ... nice here. You have to watch the speed closely... get up close to or over 300 knts and the nose will start to porpoise violently? So you have to keep the climb speed around the 250 knts to 260 knts zone to get a clean climb... which doesn't feel very right to me at all, as the official climb speed is noted at 290 knts. That is not achievable here as it then creates an overspeed zone to cause buffeting? Secondly the CRJ does not react to the change of a climb pitch, say down from 2000 fpm to 1200 fpm in increasing the speed, only back at an altitude level does the speed finally climb up to it's normal 0.74-0.78 cruise speed, and even then the change in speed is very slow... Everyone is complaining that the CRJ is over powered, but the speed changes are odd as well up or down the speed ribbon. Again I use the SPEED marker (above) to note my final m 0.74 cruise speed. Maximum CRJ-700 Speed is 0.825 Mach (470 kn, 871 km/h) and the cruise is 0.78 Mach (447 kn, 829 km/h), with a Ceiling of 41,000 ft / 12,479 m.... Range is 1,378 NM / 2,553 km (ER). Lighting On most high quality aircraft released for X-Plane today the lighting is usually very good, and so it is here in the CRJ-700. It looks (in the right lighting conditions) really brilliant with ten (count them) dropdown lights for the side panels and the centre main instrument panel. But be aware on how much of the lighting reflects back on to the windshield... ... There are two animated spotlights either side of the OHP Console, they are animated and adjustable... very nice, but very hard to actually manoeuvre with your mouse (moving left to right is via your scroll). There is also a rear spotlight over the cockpit entrance. Note the very nice two tone adjustable Whiskey Compass centre windshield. The DOME lighting only covers the front section of the cockpit lighting, very nice, but still quite dark for working inflight. If you want a brightly lit cockpit then the each far side LIGHTING panel gives you that per side lighting option and very good it all is. You can easily find that sweet lighting aroma for Takeoff and Landing in dim cockpit conditions. The FLOOD knob rear pedestal controls most of the downlighting, with the side panels and rear pedestal DSPL knobs controlling the display brightness... yes it is all very excellent. The cabin lighting is currently controlled via a couple of knobs on the rear cockpit bulkhead. CABIN LIGHTS and STAIR LIGHTS. (originally set the wrong way around, that oversight has now been fixed)... The galley is excellent with sensational bright and modern lighting (note the working EXIT signs). The Galley area lighting does not go low or dark, but just more sombre. The cabin is nice as well. There are no window downlights in the CRJ, as here you use the twin spots above every seat, which creates along with the central ceiling strip lighting a really nice internal ambience... ... and adjusting the cabin brightness can give you the perfect lighting for a mid-flight snooze or nice low lighting for taking off or landing... perfect! External Lighting The CRJs external lighting is very good as well. Nothing is missing here. Notable is that the landing lights (again as per the -200) they are wing and nose, with the taxi-lights positioned in the inner wing and not on the nosewheel as per usual (the nosewheel light is a landing light). But everything is nice with the standard Navigation, Beacon and Tail lighting. The Wing lighting is very good as well in lighting up the inner winglets. The CRJ looks nice in the air because of it's subdued cabin lighting, so overall the CRJ looks great in flight in night flying conditions. London beckons. There is a certain skill in holding the correct airspeed. Like with all mostly regional aircraft there is no auto-throttle management to do the work for you. Here you have find that correct throttle position, but to also adjust consistently in flight to compensate for the fuel use or lighter weight. So like a baby you can't leave the speed alone for too long or you will find yourself going too fast, then too slow as you try to recalibrate the thrust. Just a slight nudge down on the throttles now and then in flight will keep the speed on the MACH target and around the set SPEED marker. Regional aircraft tend to not like going down either, it is very easy to get a horrible nose pitch down if you have to descend too quickly. So picking your TOD (Top of Descent) point and a more shallower descent rate (1.6 to 1.8) it feels and looks better, certainly for the paying passengers. There is an "Altitude Marker" (Arrowed) on the MAP/NAV, but it is currently not very reliable (or bounces around too much) to be perfectly accurate, but you can still use it as a basic guide. There is no BARO Sync either, so you have to set your BAROs independently, thankfully it is easy to do. The east coast of England, and instantly as usual London is lost in low overcast conditions and visibility is almost zero... Controlling the speed is vital in to getting a good landing. I get the speed down early, and just past LAM (Lambourne 115.6 MHz) I'm already under the 230 knts mark and set the Flaps 20º. If you try for more flap (you need a minimum of 185 knts at 30º) then like on the JR -200 you get a nasty nose down pitch. Any route into Heathrow on the eastern approach is very hard, as there are very few waypoints to make a decent line into (this case) Rwy 27R. Add into the fact that the default FMS is (crap) at doing detailed approach waypoints (numbered waypoints are not well supported), so you have to know the approach path very well to align up to the runway correctly, thankfully I do know the approach well, so don't rely on the FMS to do a great job here, because it will let you down (A trick is using the BARNS waypoint for 27R, and RICHY waypoint for 27L). Getting the speed down (all the time) is tricky, as even with the throttles at idle, you are still going too fast. You certainly don't dare not raise the nose going into the ILS Cone in for losing the beam track. Thankfully I can work it out and get the CRJ to 120 knts and 45º (Full) flap, which is perfect for the beam's 3000fpm descent into LHR 27R. Approach views from the cabin are excellent... ... but up front I am still in wanting less speed, the 3º slope has increased the speed slightly, but I have nowhere to go as I am already at throttle idle. So you arrive at the threshold (if lucky) flat or even slightly nose down in being slightly too fast, thankfully as the slope kicks out the speed drops away (very slowly), and you can do a slight final flare... ... if you armed the reversers (You did ARM the reversers didn't you!) as they are very effective, both in slowing you down and in the great ROAR sounds they make, they look really good in operation as well. "Welcome to London" To be fair though the JRollon -200 was a tricky beast on approach as well. It had a wide gap between the 30º and 45º flap points that could pitch the nose down severely, and so you had to know the very exact speed to be at before doing the flap change, which still gave you a slight nose up, before a nose down situation. Expert flying however could get you around that foible. Here it is too much power at idle and no lower thrust that keeps the speed too high all the time with nowhere for you to go, so here you need more flexibility to fly the aircraft more expertly as the current parameters are too confined. Challenging, but also rewarding if you can get it all right. _______________ Liveries Already there is a wide selection of liveries to be used with the CRJ-700, as it is a very flexible aircraft. Here are a few now available, and all of great quality they are... with two in a "House" CRJ700 livery and a AD Simulations livery (default). _____________________ Summary Most simulator users in X-Plane revere the early JRollon CRJ-200, and for good reason in that the aircraft broke new ground and created a new category for high quality detail and aircraft systems, including the very first authentic FMS system in the X-Plane Simulator. The JR CRJ-200 was brilliant in it's time, and even still holds up today nearly a decade older. But what online pilots really wanted was the larger variants of the CRJ Series in the -700 or the -900 (even the -1000). And we have had to wait almost a decade to get one in the CRJ-700 (CRJ-900 is promised to follow) in a release from AD Simulations now partnered with Delta Wing Simulations, with the earlier dropping of the association with Supercritical Simulations Group from the project late year 2020. Modeling wise this aircraft is absolutely first rate, far better than it's pay grade, and certainly in the quality US$70 marker. The detail is superb, and everything looks and feels very realistic. And you get a load of aircraft for your money. The detail follows on inside the aircraft in the lovely cabin, galley and lately even a snazzy bathroom, and the lighting throughout is excellent. Sounds are also excellent, but certainly not up to par with the CRJ-200 optional BSS custom sound package which is simply sensational (we all hope of the same BSS pack for this -700 version). Cockpit detail is again also sensationally modeled, but not with the extensive animations of the Q4XP, and the CRJ comes with only the standard X-Plane FMS system, but still it is visually modified to look and feel like a custom Collins FMS-4200 system like in the real aircraft. There is also currently no Skunkcrafts Updater or AviTab, but both which have been promised in a future update. Systems wise it is good, but not deep, deep if you get what I mean but on p[ar with the Aerosoft aircraft. But there is a very functional Rockwell Collins Pro Line 4 avionics suite that comes with great EICAS ((Engine Indicating and Crew Alerting System) and FADEC (Full Authority Digital Electronic Control System) availability and access. Notable is that this CRJ-700 review was the first update to v1.01 on which this review is based. I like to review on an aircraft at it's release point, as "What you see is what you get"... but in this case I think (as usual) the aircraft was released too far early as bugs and details are still in areas bountiful and certainly on the performance side... The weaknesses are obvious as the AD Simulations CRJ in that it currently feels like overall in being an X-Plane basic performance aircraft, and not a refined CRJ performance aircraft. Delta Wing should cover these aspects and is doing so quickly, but that finesse is certainly not there yet, but getting there real fast, if you know what I mean. These aspects should have also been covered by a decent beta phase. As the still in-progress menu system, the non-finessed flight dynamics and aircraft's performance and the buggy environment, the CRJ was obviously not ready for such an early public release. I have noted a fair amount of issues and bugs throughout this review. But don't the get the review in the wrong way as any CRJ is very challenging aircraft to fly... Skill is needed and yes the aircraft will test those skills thoroughly, but also getting a complete composed flight is quite easily possible, as noted CRJ isn't yet perfect in the performance aspects. When it is though it will certainly be a very compelling simulation... or when the dynamics match up with the quality design. But long term this CRJ-700 from AD SIm and DW is certainly destined for X-Plane classic status for just in the fact it is so much wanted to fill in those regional flying roles. The Aerosoft CRJs are already highly desirable, but has never oe will be be cross-platform delivered, but now that factor doesn't matter any more as we now have our own and a CRJ. Certainly even currently it is a "Must Have" aircraft and at a sub US$50 price to sweeten the deal, now all there is to do is for the developers to fine tune the aircraft to deliver the built-in potential of the aircraft, and there are certainly a few areas yet here to yet cover to achieve that highly desirable "Classic" status, but that aspect won't hopefully take too long... we will watch with interest. _____________________ Yes! the CRJ-700 by AD Simulations/Delta Wing is NOW available from the X-Plane.Org Store here : CRJ-700 Price is US$49.95 Features Systems Systems are modeled based on real life CRJ-700 aircraft. 5 CRJ real life pilots and few simulator enthusiasts were helping us to develop and make them work just like in real life. Flight Control Panel knobs support fast scrolling via left mouse button press and hold and precise scrolling via mouse wheel scroll Mode Control Panel SPEED and other modes simulate the real Autopilot modes on the CRJs. The screens are as close to the real ones as possible. Center Glareshield All Center Glareshield Knobs and Pushbuttons animated and functional Displays Displays are exceptionally crisp and with letters and symbols easily visible PFD Primary Flight Display is modeled exactly as real life counterpart MFD Multifunction Display can display following modes HSI The horizontal situation indicator shows the compass card with overlaid selectable navaids, bearing and course pointers NAV SECTOR Navigation display with compass card and a background map. The navigation display shows course pointer and deviation bar. VOR bearing and DME distance information is shown FMS MAP Flight Management System Map shows the track and waypoints programmed in the CDU (Control Display Unit). FMS MAP shows the aircraft heading. TCAS Traffic Alert and Collision Avoidance System investigates the air traffic control transponders of nearby airplanes and identifies and displays potential and predicted collision threats. FMS PLAN MAP shows programmed waypoints of the route. Shows north at the top of the display. Waypoints can be selected by using UP and DOWN arrows on CDU (Control Display Unit) RADAR- to be implemented in future versions EICAS (ENGINE INDICATION AND CREW ALERTING SYSTEM Displays. Following displays can be shown using ECP (EICAS CONTROL PANEL) PRI STAT ECS HYD ELEC (AC and DC) FUEL F/CTL A/ICE DOORS CAS PopUp Displays, movable, scalable able to be dragged to multiple monitors Tablet/EFB Captain and FO PFD (Primary Flight Display) Captain and FO MFD (Multi Function Display) Primary EICAS Secondary EICAS Left and Right CDU (Control Display Unit) Skunks Updater To be implemented in the future Cockpit Lighting There is FULL lighting implemented, FLOOD, INTEGRATED and DISPLAYS with animated knobs and switches. You can adjust the intensity of displays, panels and light in any combination you like. In addition CABIN LIGHTS and STAIR LIGHTS are also adjustable via corresponding switches in the back of the cockpit External Lighting FULL external lighting is available via animated corresponding switches Tablet/EFB There is a Tablet and popup Menu WIP Sounds FMOD Custom sounds are implemented using FMOD. Engine sounds Cockpit sounds: Avionics, Gyro, Relays, Fans (Packs), Controls (Buttons/switches, levers) Warning sounds: Take-off GPWS (Too Low Terrain, Too Low Gear, Too Low Flaps, Terrain Caution, Bank angle, Sink rate, Don’t-sink, Pull Up) Autopilot, Fire, Alerts Cabin sounds: Galley, Cooling Exterior sounds: Gear Roll/Touch, APU, GPU, Flaps, Hydraulic and Fuel Pumps, Wind drag, Packs Weather sounds: Wind, Rain, Thunder, Wind Gust (on the ground only) Cabin and Cockpit muffing effect caused by Cockpit Door closed/open Flight Model Flight model has been carefully adjusted to match the real life CRJ-700. Real life CRJ-200/700/900 pilots were involved in the process. Realistic wing flex Wing Flex has been modelled and adjusted for realistic aircraft behavior FMS FMS and it's Pop Up is customized as far as look but based on the Default X-Plane one. Note: Default XP FMC is based on the Collins FMS-4200 and CRJ is using that one, no Honeywell and Thales types. 3D Modeling and Textures Almost all maps are 4K High Resolution Exterior is modeled with all details existing in real aircraft. Pilots are visible in external views and turn thir heads slightly to ward camera view Interior modeling has been made paying attention to details in the real life CRJ-700 cockpit. Cabin and Stairs have adjustable lighting Unique Package Features Stairs Rails can be raised and lowered (per customer request) Cockpit shaders slide and rotate as you need them VR Compatibly Package is VR compatible but future enhancements will be added Requirements X-Plane 11 Windows, Mac or Linux 4 GB VRAM Minimum - 8 GB+ VRAM Recommended Download Size: 850 MB Current and Review version: 1.01 (December 20th 2021) Installation Download of the CRJ-700 is 828Mb and it is installed in your Airliner Folder as a 1.55Gb folder. Activation is via the standard authentication Key. There is no Auto-updater by Skunkcrafts for updates, so currently you have to redownload via the X-Plane.OrgStore. Documents Provided are two documents Included with the package. A "QuickStart" Manual that covers the aircraft's layouts and systems, and a "Checklist" with Normal Procedures. A version changelog is also provided. CRJ-700 Changelog.txt AD_Sim_CRJ_Checklist.pdf CRJ-700_Quick_Start_Guide.pdf _____________________ Aircraft Review by Stephen Dutton 10th January 2022 Copyright©2022: X-Plane Reviews Review System Specifications: Computer System: Windows - Intel Core i7 6700K CPU 4.00GHz / 64bit -32 Gb single 1067 Mhz DDR4 2133 - ASUS GeForce GTX 1080 8Gb - Samsung Evo M2 2TB SSD - Sound : Yamaha Speakers YST-M200SP Software: - Windows 10 - X-Plane 11.55 Plugins: Global SFD plugin US$30.00 : Environment Engine by xEnviro US$69.90 : RK Apps XPRealistic v2 - US$34.99 Scenery or Aircraft - EKCH - FlyTampa Copenhagen XP (X-Plane.OrgStore) - US$31.00 - EGLL - Airport London-Heathrow by Aerosoft (X-Plane.OrgStore) - US$29.95 (Disclaimer. All images and text in this review are the work and property of X-PlaneReviews, no sharing or copy of the content is allowed without consent from the author as per copyright conditions) All Rights Reserved
-
Big Question?... What is real and what is not? The big difference is feedback isn't it, that is were RL has an superior advantage, and no matter what on a computer we just don't have that aspect. But you can still feel the machine if the programming is very good, but there will always be that wall. The question always arises, is it the Sim or the Aircraft that is not performing, or even in a lot of cases yourself. So in my position I have to find that answer, but a collective of views will also show you the situation. One or two can be wrong but not a multitude, but most videopilot's are actually quite poor is this aspect... and everybody follows them thinking this the right way to fly? Refining the way you are positioned in the aircraft can help though, I use set command keys for the internal view, messing with the right-click mouse (unless weirdly good) is not the best way to fly (yes i will get thousands of comments about that), but a quick view movement to the set view you want is the best way to control the internal environment, and can not be as so distracting , only in odd views do you need to right-click, so my (number) keyboard is set up the same way for every aircraft, certainly if you are doing aerobatics and need to focus on certain points of view, there should be a point were as you find the same perspective as in RL, certainly VR helps or actually doesnt, because you get the visual perspective, but also a barrier created from the aircraft and it's controls... the future is interesting here were as the computer and RL start to merge, roll on 2051!
-
NEWS! - Updated : ToLiss updates A340 to Version v1.0.2 Aircraft updates have been coming thick and fast over the Northern Holidays from ToLiSS. First was the A319 late November 2021 v1.6.2, then the the A321 v1.3.1 in early December and now coming back around the circle comes the A340 to v1.0.2. (there was a small post release release v1.01 October 30th 2021). Details include features the addition of an animated RAT (Ram Air Turbine ), a CVR and Battery self-test, flap and nose gear animations with different wheel speed animations with particles AND animated hydraulic lines to the landing gear for higher realism. And an ECAM taxi camera... The "Taxi Camera" feature is AMAZING... You get the choice of all three screens in the Pilot (Replaces PFD, but switchable to the MFD/NAV via the PFD/ND button far left). The same for the Co-Pilot and the lower ECAM SD display. All three screens are controlled by a "CAMERA" switch panel lower left Pedestal. Quality is excellent, and finally someone has worked out on how to deliver a very realistic Camera feature to the flightdeck.... obviously it would be ToLiSS! Note on the RAT. I found some (earlier) A340 liveries shows the RAT uncovered (right wing) on a lot of the liveries, so the liveries have to redownloaded to later versions or to use the latest V1.2 paintkit to fix the issue. Full Changelog v1.0.2 is below Version 1.0.2 (January 6th 2022) Minor new features: - Electrical system now features battery self test - ISCS sliders now allow editing the values with keyboard for better precision - Custom landing gear particle model - Custom landing gear tire rotation model to allow individual speeds for the forward and aft wheels on the same bogey - Cargo fire extinguishing test is now operational - Fault injections can now trigger on increasing or on decreasing values of altitude and air speed - Added flap animation and nose landing gear animation to taxi cam - Added CVR self test - Added chocks to keep aircraft in place at the gate - Reworked cockpit, ground contact and engine sounds (with friendly support of Henrik Ku) - Added animated hydraulic lines to landing gear - Added animated RAT Bug fixes: - Resolved an issue with the brake fans - DC BAT bus shows invalid data, if BAT1 and BAT2 are switched off - When preselecting a heading on ground, the FCU heading window will initialize with the current heading - Reduced IRS drift values by half for more realistic values - Made behaviour of CLR button XPDR panel more realistic - When selecting flaps 1 for landing, the Status page will now be called (As it should) if status is not normal - When status paged called automatically, the STS key now lights up and can be used to remove the status page - When Using Auto Brake to full stop, pressing pedals won't disengage it like is the case in real life - Minor FMGS fixes - Corrected locations of wing condensation emitters. - Moved location of engine particle emitters further aft to better match engine location - Fixed standby compass - Corrected pack inhibition condition on ground with doors open (applies now only when engines are running) - Fixed animation of spoiler 3 actuator on right wing - Fixed flex temp range - Fixed FBW roll angle limits - Improved AP turn direction depending on FCU heading rotation knob - FCU green button lights now respond to the ANN LT switch as they should (instead of the FCU background light rotary) - SD Weight/CG on ground indication is now a function of the data entered on INIT B page, and will be replaced by FMGEC estimated weight in flight - Retuned idle thrust for more accurate descent profile following - Improved reliability of automatic pitch trim setting prior to take-off - Increased ground cart pressure for better engine start performance Full ToLiSS X-PlaneReviews A340-600 release review is here: Aircraft Review : Airbus A340-600 by ToLiSS Notable was the CPDLC (Controller–Pilot Data Link Communication) feature was not included with this update, but it is still in-development, as is the rear MCDU MENU. The v1.0.2 update is free to all current purchasers of the ToLiSS A340-600, just go to your X-Plane.OrgStore account and download the new aircraft file or use the SkunkCrafts updater.... For new a purchase of the A340... the details are noted below. _________________________________ Yes! the Airbus A340-600 v1.0.2 by ToLiSS is NOW available from the X-Plane.Org Store here : Airbus A340-600 by ToLiSS Price is US$89.99 Requirements X-Plane only - not available for MSFS Support for X-Plane 11 and X-Plane 12 when available Windows, Mac or Linux 4 GB VRAM Minimum - 8 GB+ VRAM Recommended Download Size: 1.5GB Current version: 1.0.2 (January 6th 2022) ___________________________ News by Stephen Dutton 8th January 2022 Copyright©2022: X-Plane Reviews (Disclaimer. All images and text in this review are the work and property of X-PlaneReviews, no sharing or copy of the content is allowed without consent from the author as per copyright conditions) All Rights Reserved
-
You will need the "AutoGate - Animated jetway and docking guidance system" (Marginal) plugin to make the autogates work? But found it a bit haphazard, it is a dated (but good) Aerosoft scenery now, and needs a conversion to SAM to be totally effective.
-
Released! - Bell 47G-2A1 by FlyInside We wrapped up the year 2021 with a helicopter release (CowenSim 206 B3) and start the New Year 2022 with guess what... another helicopter release! This time around it is the famous bubble cockpit Bell 47G-2A1 of M*A*S*H* fame. The groundbreaking Bell 47 took its first flight on December 8, 1945 and became the first helicopter certified for civilian use on March 8, 1946. The Bell 47 has been used for flight training, crop-dusting, by the military, and even by NASA. The Bell 47 makes for a beautiful low-and-slow VFR aircraft, providing excellent views out of its giant bubble canopy. The FlyInside Bell 47G-2A1 features completely custom flight dynamics that are sure to challenge you. Thanks to our built-in configuration screen, the Bell 47 can be tuned to fly as easily or as realistically as you'd like, on the fly. Currently the aircraft is "Windows" only. Features: Revolutionary and realistic flight model, developed and tested by an experienced Bell 47 pilot Support for full helicopter flight physics including effective translational lift, ground effect, transverse flow, flap-back, auto-rotation, and more Support for failures and dangerous regions of the flight envelope including vortex ring state, engine failure, and retreating blade stall Extremely detailed 3D model with high quality PBR textures and animated drive and control systems Realistically modeled engine parameters, including full start-up and shutdown procedures Highly customizable realism settings allow for a smooth, easier flight model for those who are less experienced, and a hardcore, realistic flight model for the veterans experienced with the complex and challenging flight dynamics of helicopters Interior Features: Detailed 3D cockpit model 100% operational switches, levers, and gauges Removeable doors Realistic night-lighting High-quality sound design Exterior Features: Beautiful exterior model Fully modeled engine Animated mechanics including swashplate, rotor-head linkages, tail torque shaft, and more Functional lights and beacons Ten distinct liveries Images are courtesy of FlyInside ______________________________________ Yes! the Bell 47G-2A1 by FlyInside Helicopter is now available from the X-Plane.Org Store here : Bell 47G-2A1 Price is US$34.95 Requirements X-Plane 11 Windows Only At This Time 4 GB VRAM Minimum - 8 GB+ VRAM Recommended Download Size: 658 MB Current Version: 1.59 ___________________________ News by Stephen Dutton 5th January 2022 Copyright©2022: X-Plane Reviews (Disclaimer. All images and text in this review are the work and property of X-PlaneReviews, no sharing or copy of the content is allowed without consent from the author as per copyright conditions) All Rights Reserved
-
Released! - CowanSim 206 B3 Released on Christmas Day 2021 was the third helicopter from CowenSim, with the Bell 206 B3. The Bell 206 is a family of two-bladed, single- and twin-engined helicopters, manufactured by Bell Helicopter at its Mirabel, Quebec, plant. Originally developed as the Bell YOH-4 for the United States Army's Light Observation Helicopter program, it was not selected by the Army. Bell then redesigned the airframe and successfully marketed the aircraft commercially as the five-place Bell 206A JetRanger. The new design was eventually selected by the Army as the OH-58 Kiowa. The famous JetRanger is certainly the most popular light helicopter ever produced with 7,300 aircraft coming off the production line. CowanSim started with their very accessible B222B+UT aircraft, then released the more famous CowanSim 500E based on the Hughes 500E of P.I. Magnum television fame... earlier detail was certainly rising with the 500E, so we are expecting a lot with the 206 B3. Feature list is extensive! Free Future Updates Tested and Zeroed in by Real Pilots Several Commands for Mapping Hardware Remove Before Flight Accessories Pilots & Passengers Working Floats System Low & High Skid Versions Dynamic Weight Options Functional Spot Light Functional Spray Kit Functional Cineflex Camera 2K & 4K Versions FMOD Fully Dynamic Sound Pack Window Rain Effects Compatible with Vulkan API Virtual Reality Ready AviTab Integration RXP GTN 750 Integration Realistic Flight Dynamics 4K & 2K PBR Custom 3D instruments Detailed Night Lighting xLua for Systems and Animation SASL v3.12.1 for Custom Plugins Realistic Flight Dynamics This model has an authentic feeling while exploring the virtual world thanks to Laminar Research for developing a fantastic flight sim. 4k Physically Based Rendering Textures 4k PBR textures, or physically based rendering, provides the ability for very realistic lighting that mimics the flow of light in the real world. This model takes full advantage of X-Plane’s lighting with dynamic reflections and materials. Custom 3D Modeled Instruments Everyone loves a detailed and realistic looking cockpit. After all, that is where we spend most of our time in the sim, flying! The 3D instruments were developed to a high standard and are fully functional, with extensive custom coding to make it as realistic as possible. A Nice Cozy Cabin Sit back and relax in the cozy rear cabin and enjoy replays of your flight from a passenger’s perspective! Was it as comfortable and smooth as you thought it was from the pilot seat? This is especially interesting in VR and landing replays are the best. Paint Kit & Liveries Comes with several liveries and we also included a detailed paint kit. The kit is provided in both GIMP and Adobe® Photoshop® formats. A UV map layer included in each file allows for easy and accurate repaints. Vibrant and Detailed Night Lighting X-Plane has wonderful night lighting. The 206B3 project aimed to have plenty of lights, inside and out, making night flights possible. From the landing light to the cabin lighting, this helicopter really stands out at night. Animation & Sound Thousands of lines of custom code make up animations and systems. The fully immersive sound set was developed with FMOD. Sounds and animations work together with visual rotor-speed vibrational feedback, dynamic blade slap, rain effects and more. Reality XP GTN 750 Integration The Reality XP GTN 750 can be fully integrated into the cockpit. Reality XP GTN 750 Touch is the genuine simulated device used by flight simulation enthusiasts navigating the virtual skies as well as real world pilots for familiarization with the device. This add-on is a payware add-on and you can purchase it here: https://reality-xp.com/ Images are courtesy of CowenSim ______________________________________ Yes! the CowanSim 206 B3 Helicopter is now available from the X-Plane.Org Store here : CowanSim 206 B3 Price is US$32.95 Requirements X-Plane 11 Windows, Mac or Linux 4 GB VRAM Minimum - 8GB+ VRAM Recommended Download Size: 2.1 GB Current Version: 1. (December 25th 2021) ___________________________ News by Stephen Dutton 5th January 2022 Copyright©2022: X-Plane Reviews (Disclaimer. All images and text in this review are the work and property of X-PlaneReviews, no sharing or copy of the content is allowed without consent from the author as per copyright conditions) All Rights Reserved