Search the Community
Showing results for tags 'thranda design'.
-
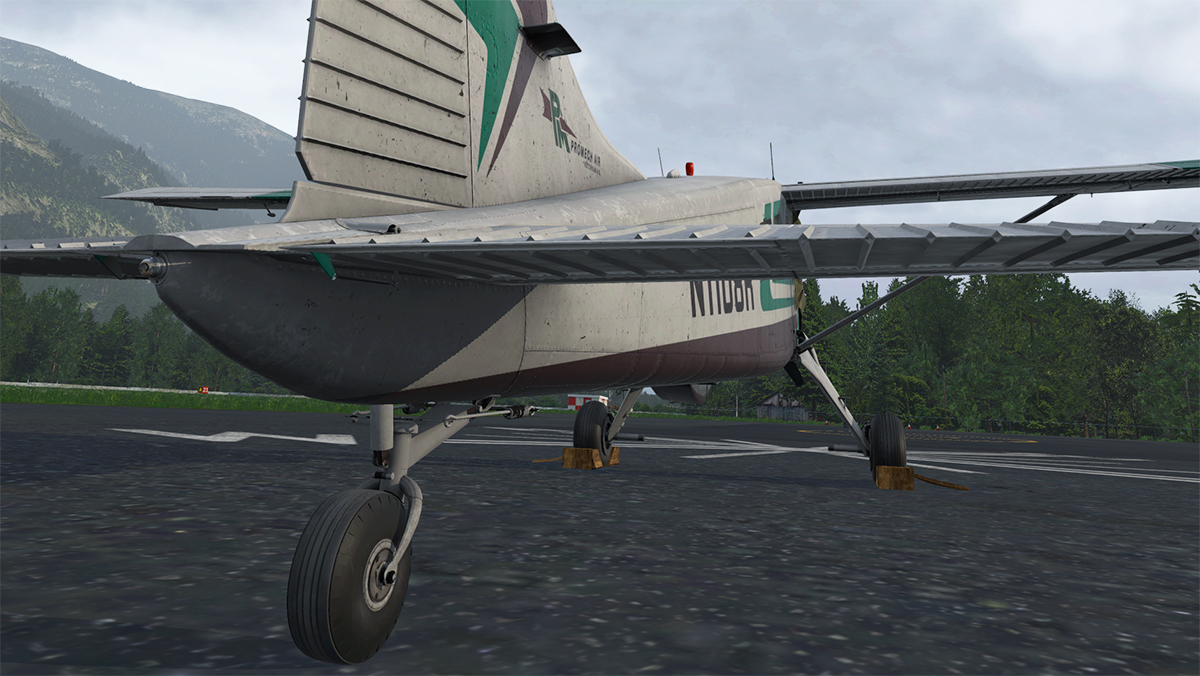
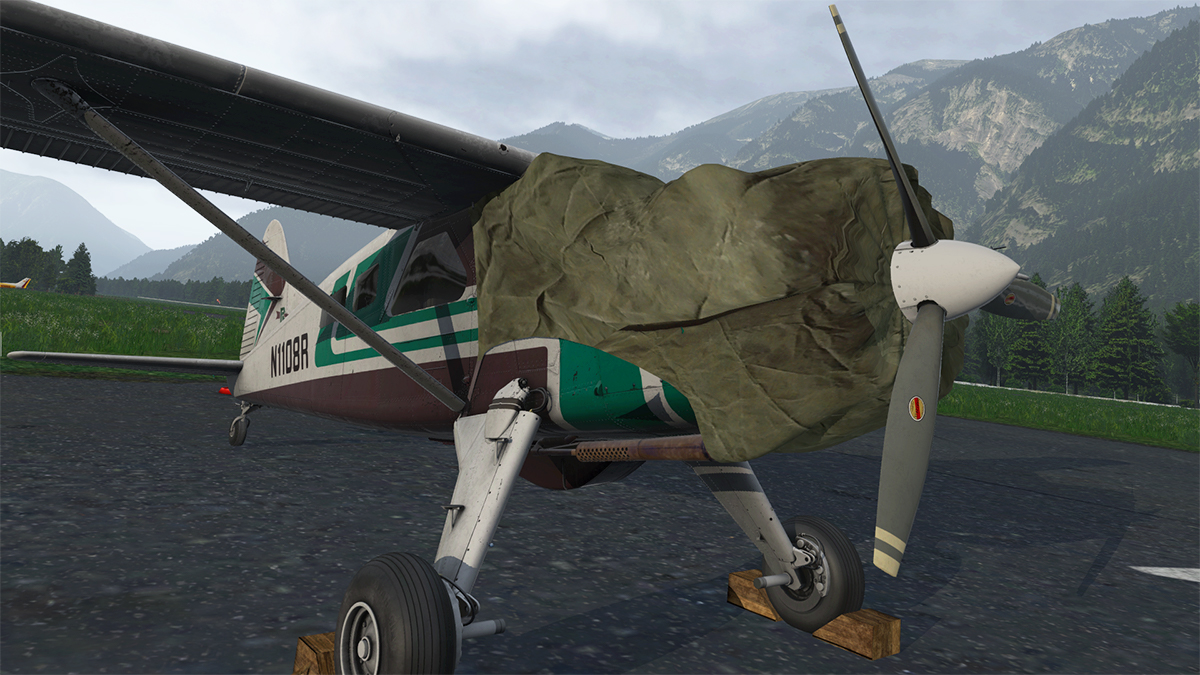
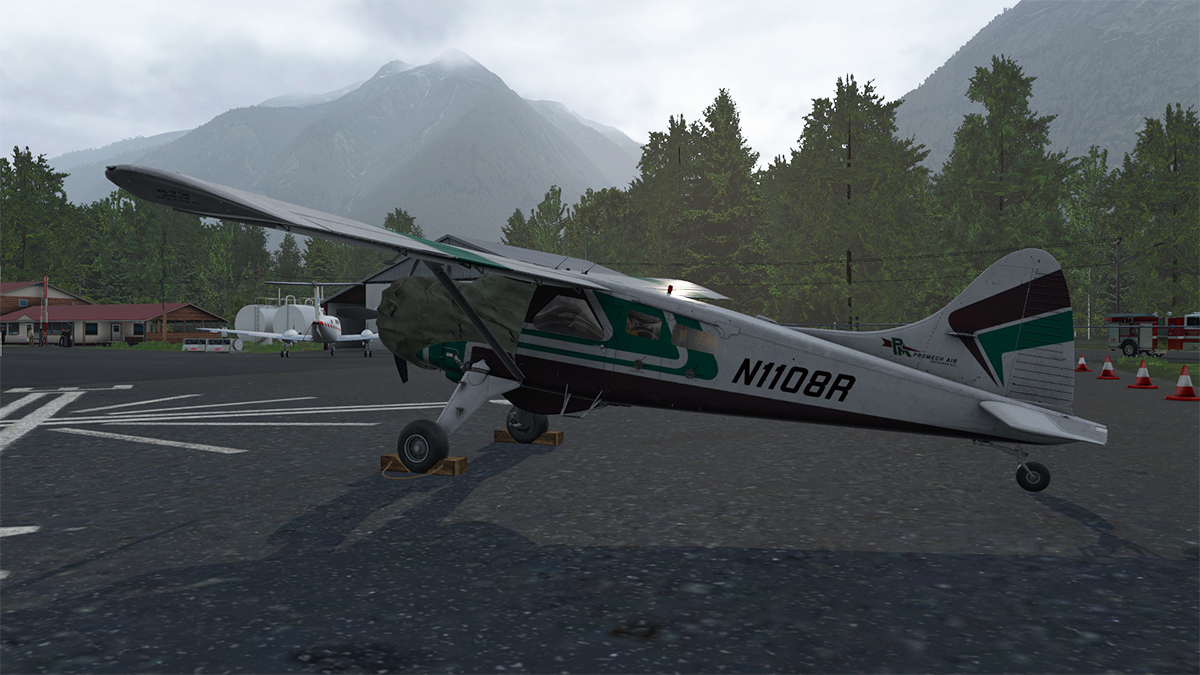
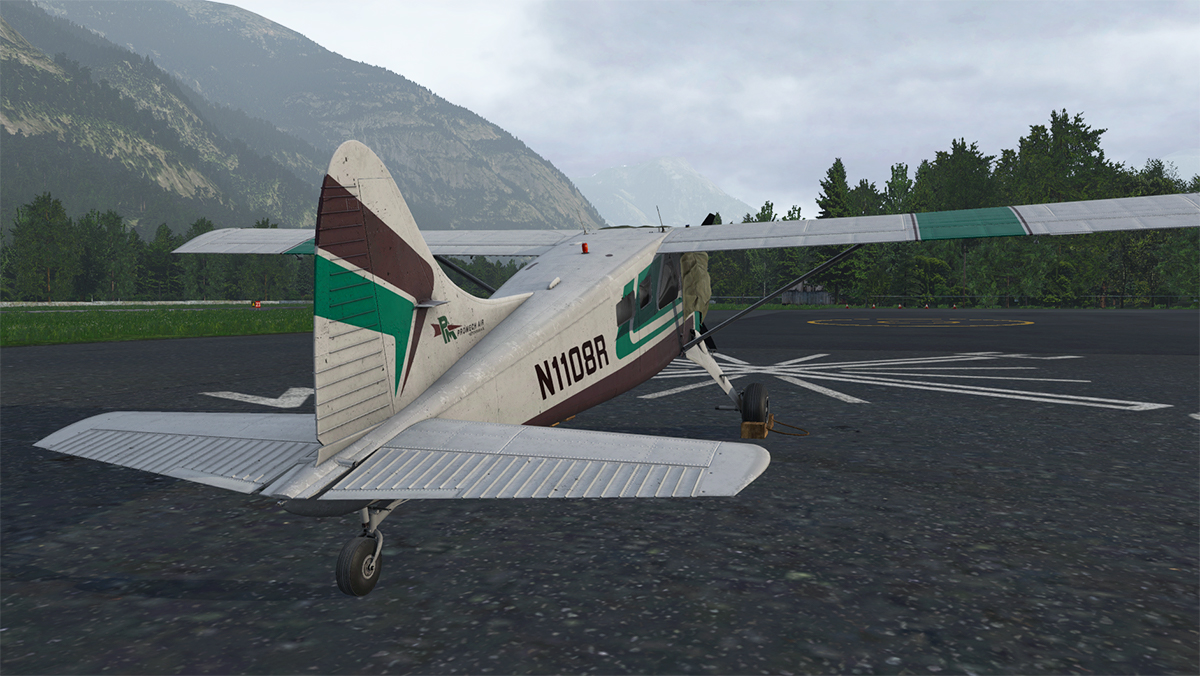
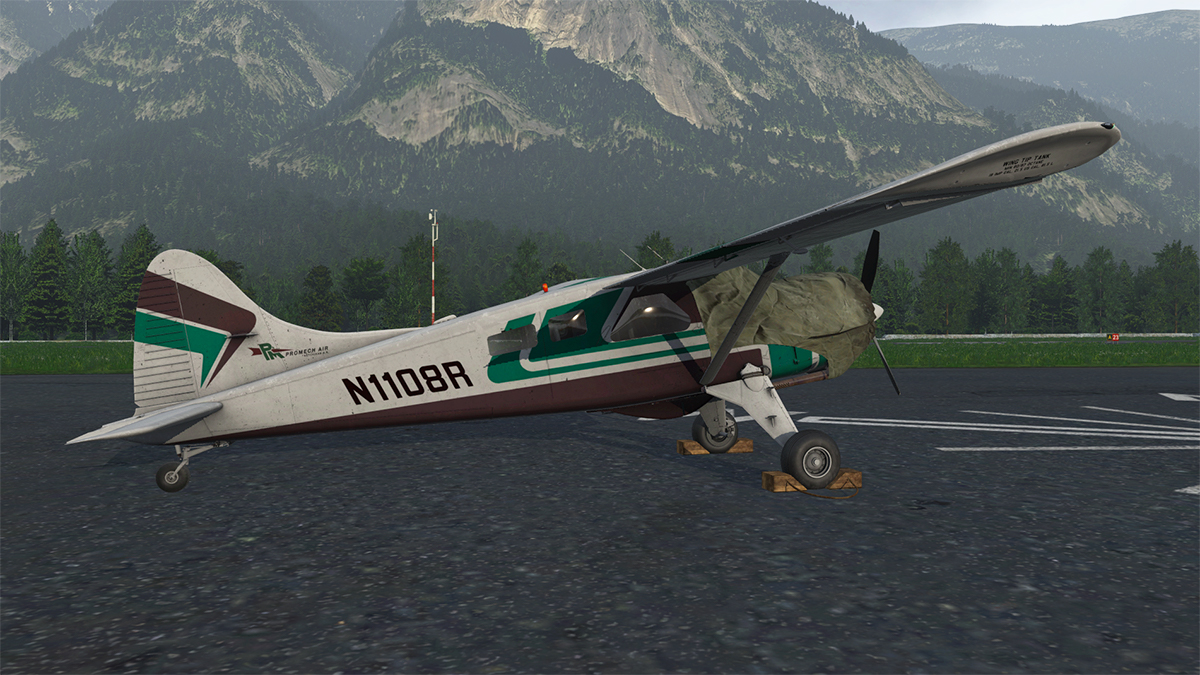
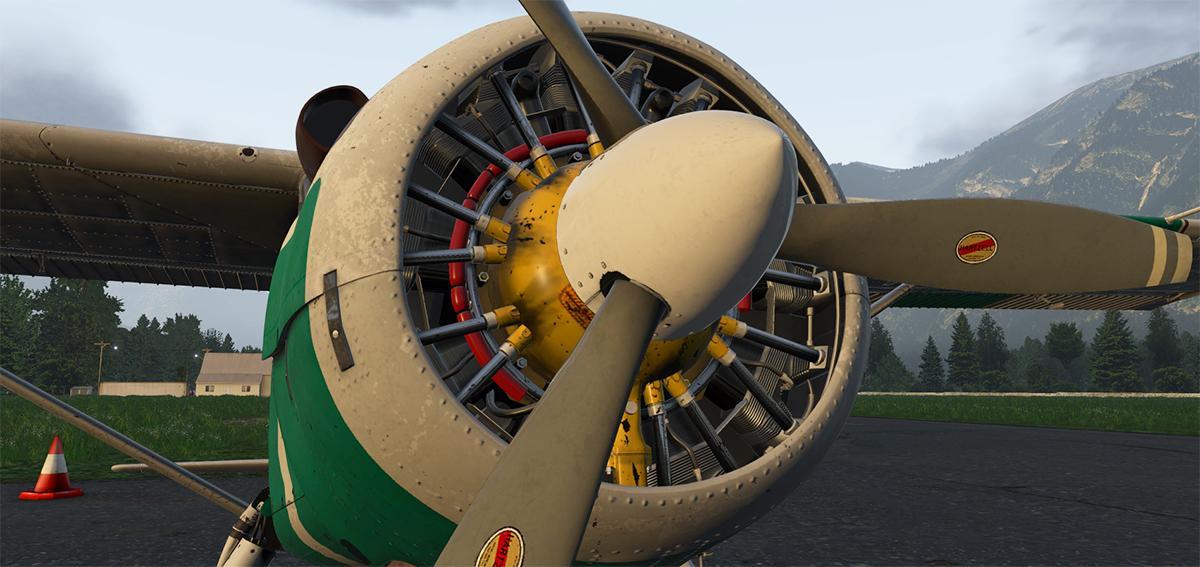
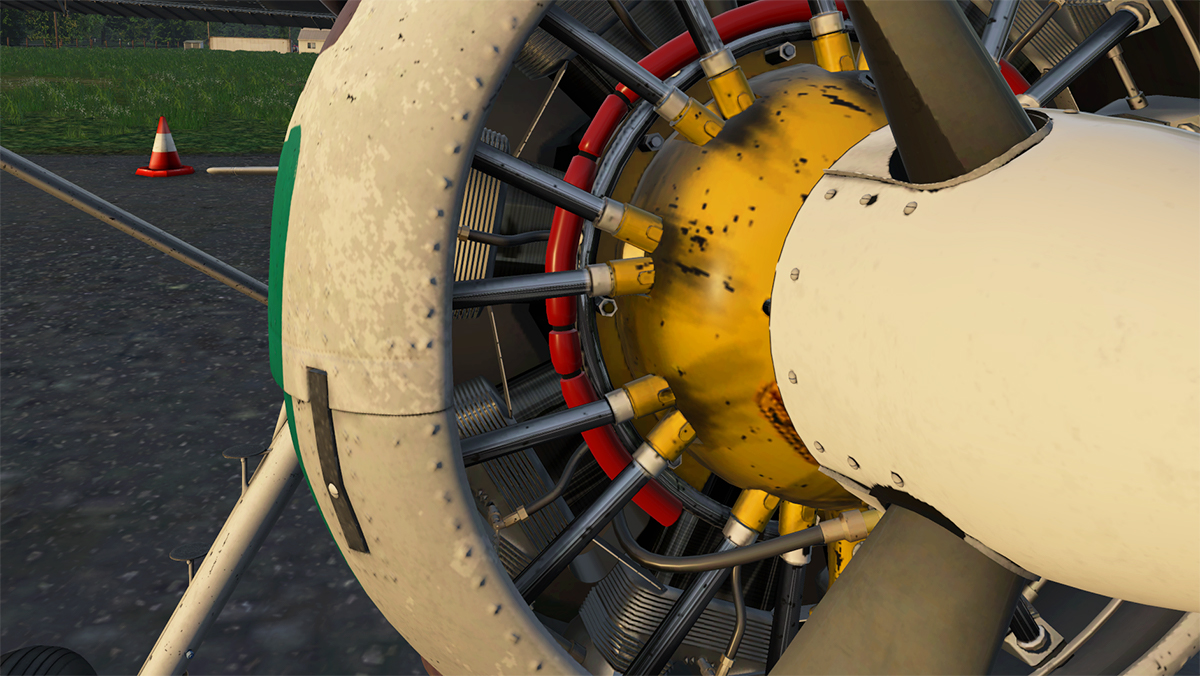
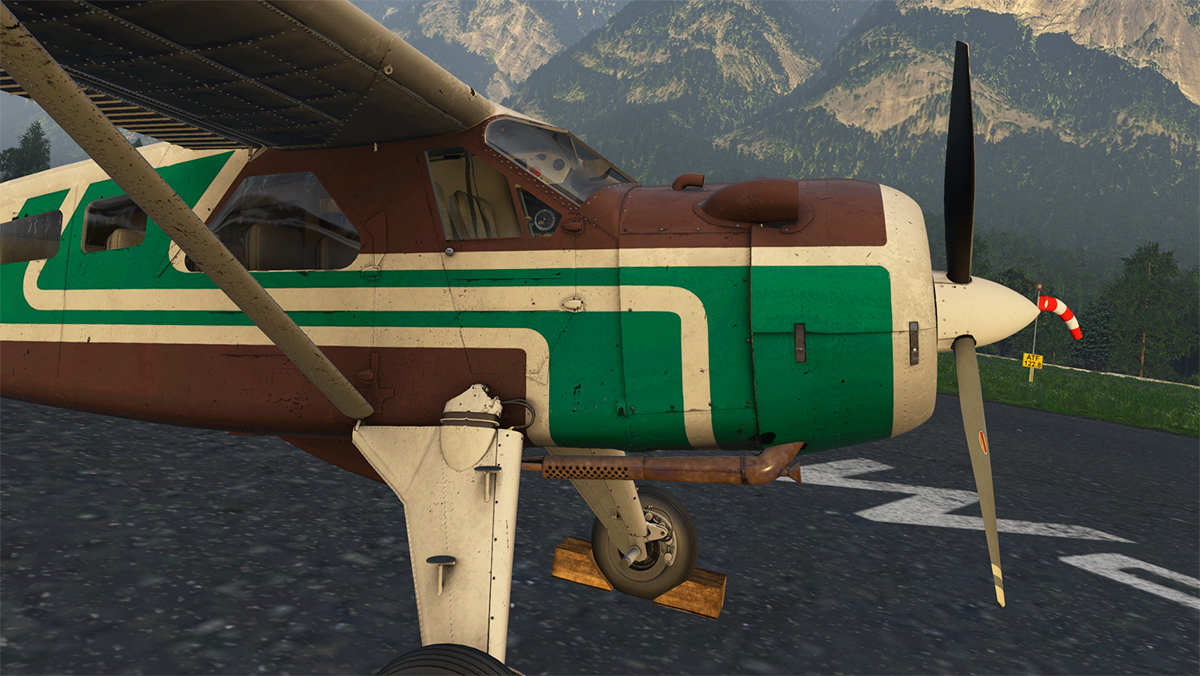
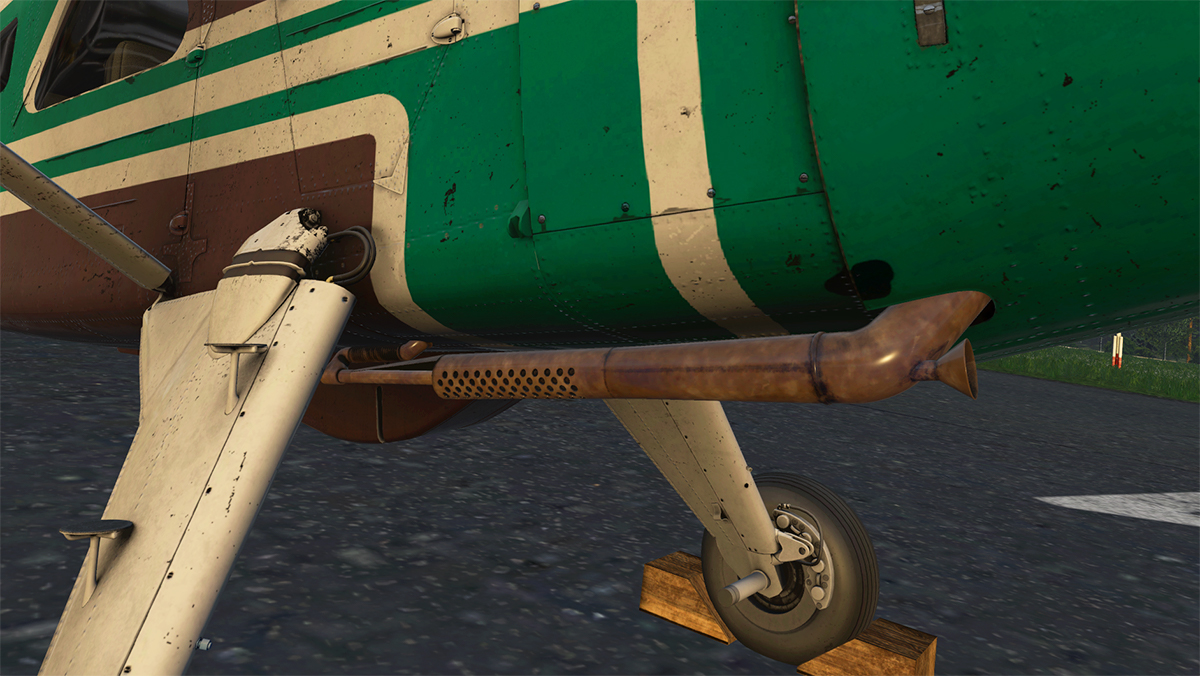
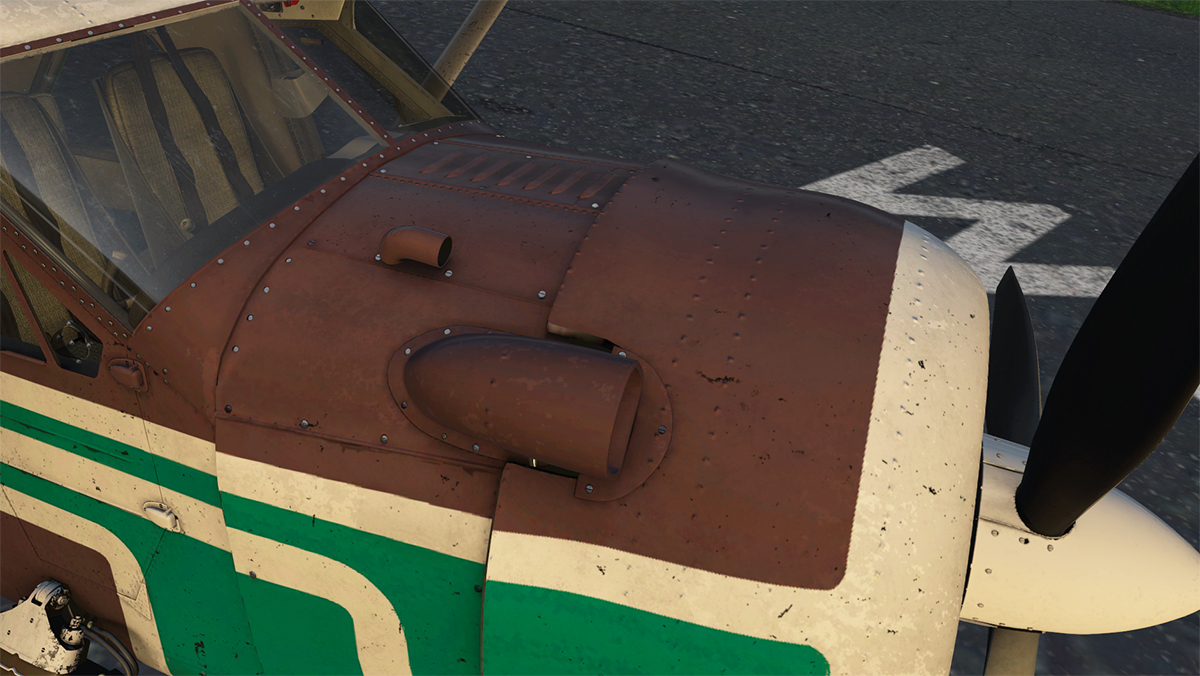
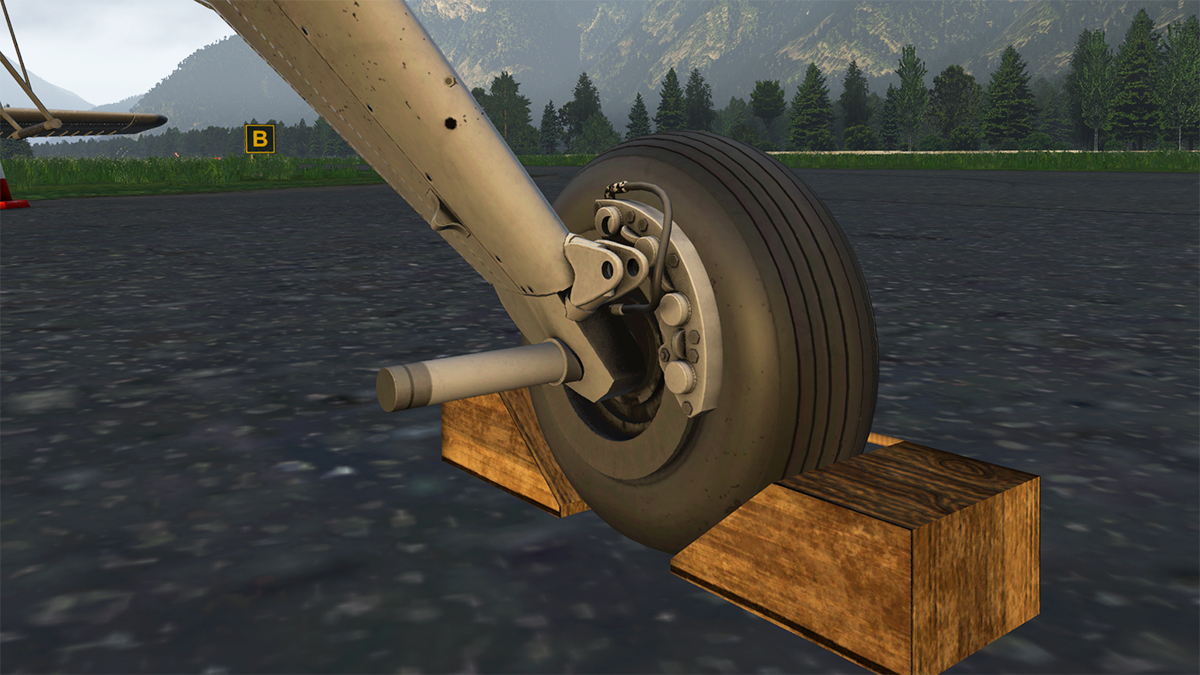
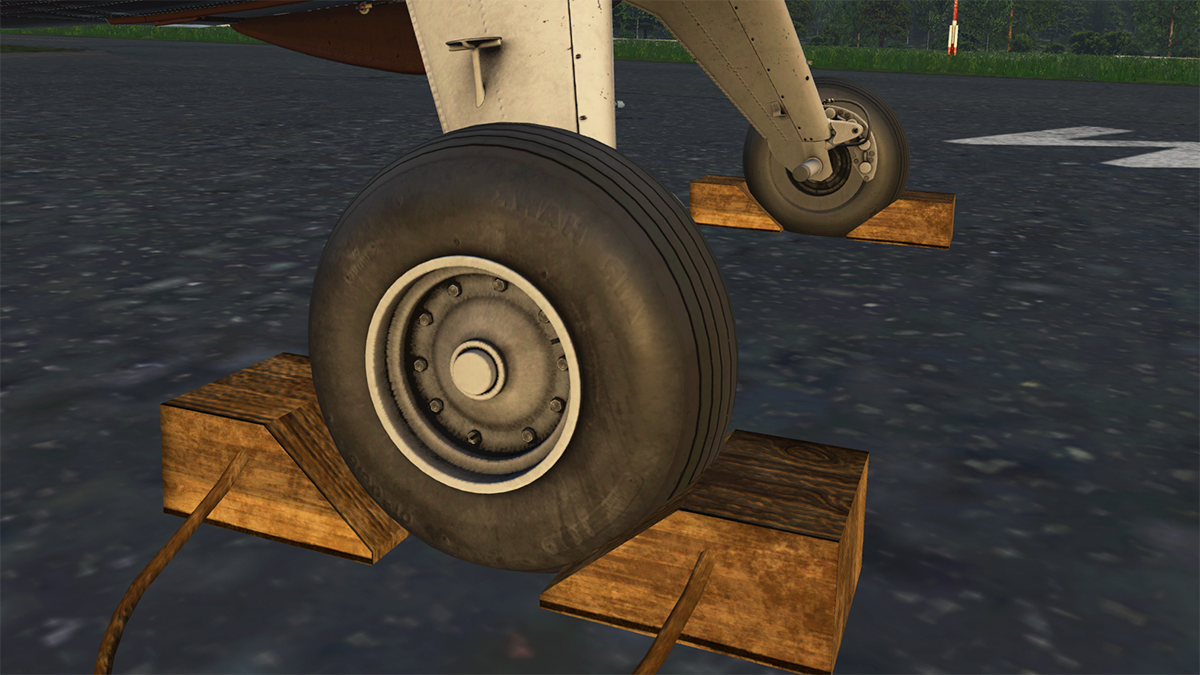
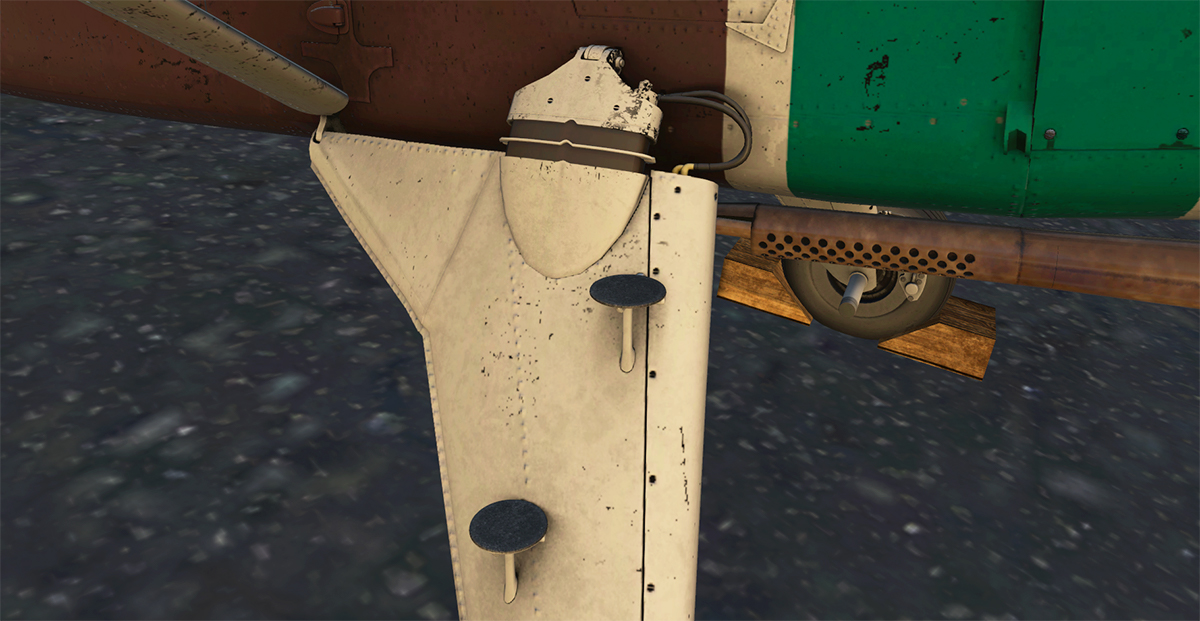
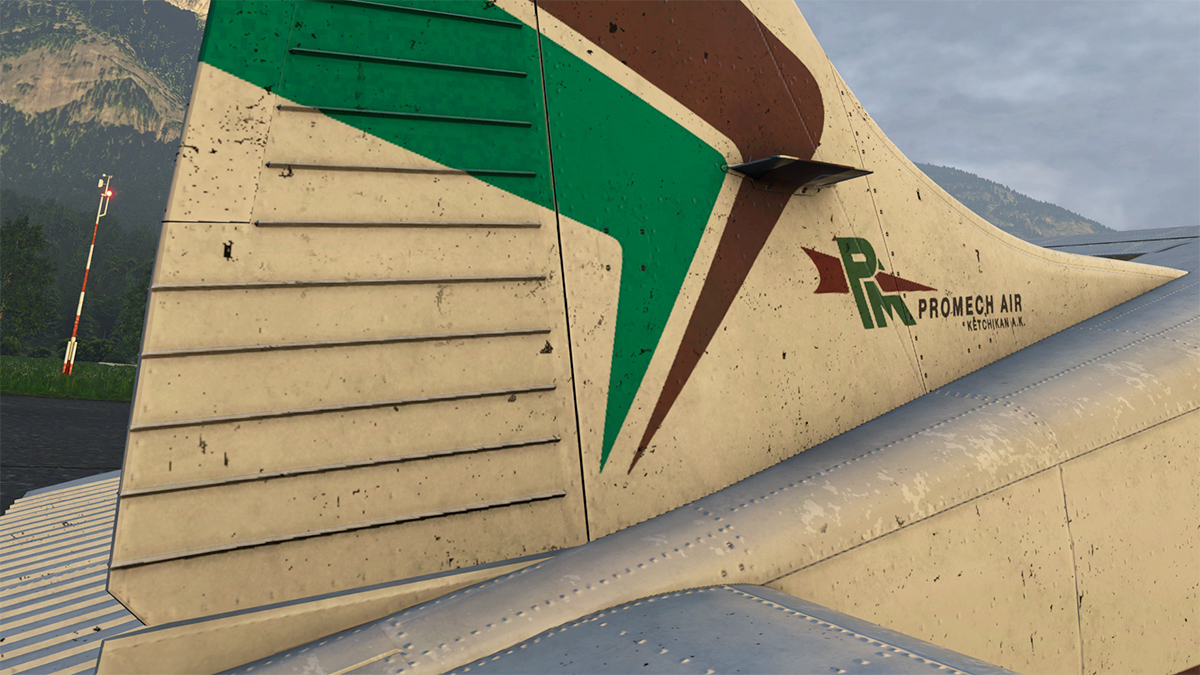
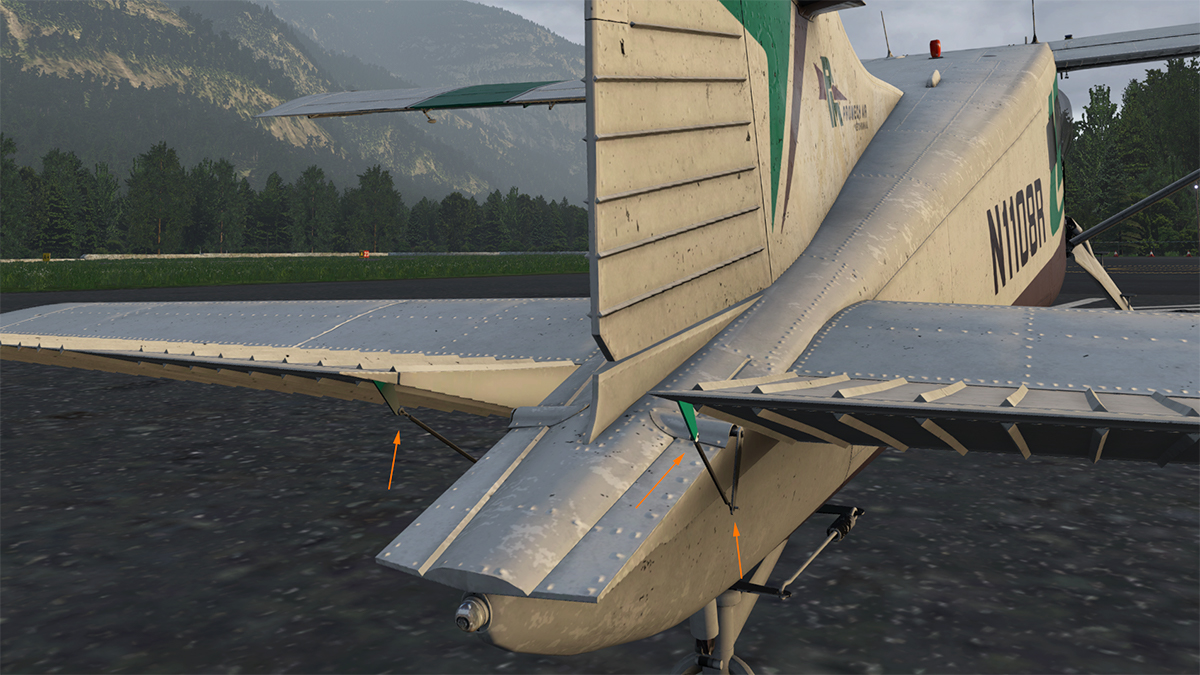
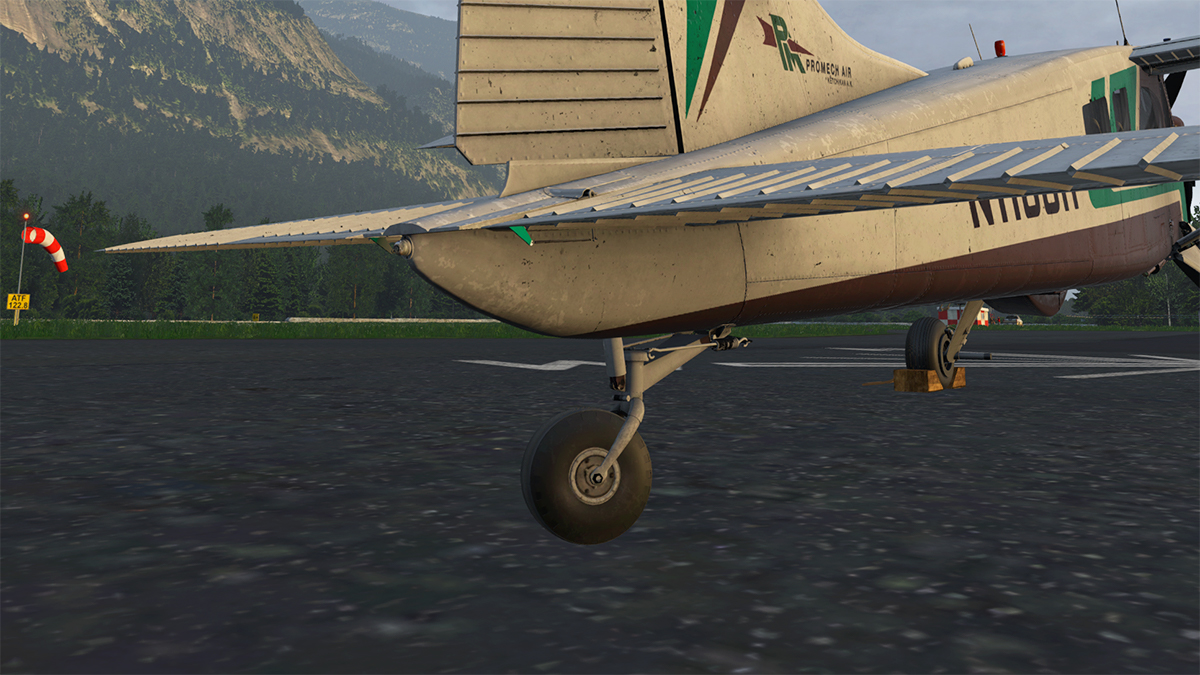
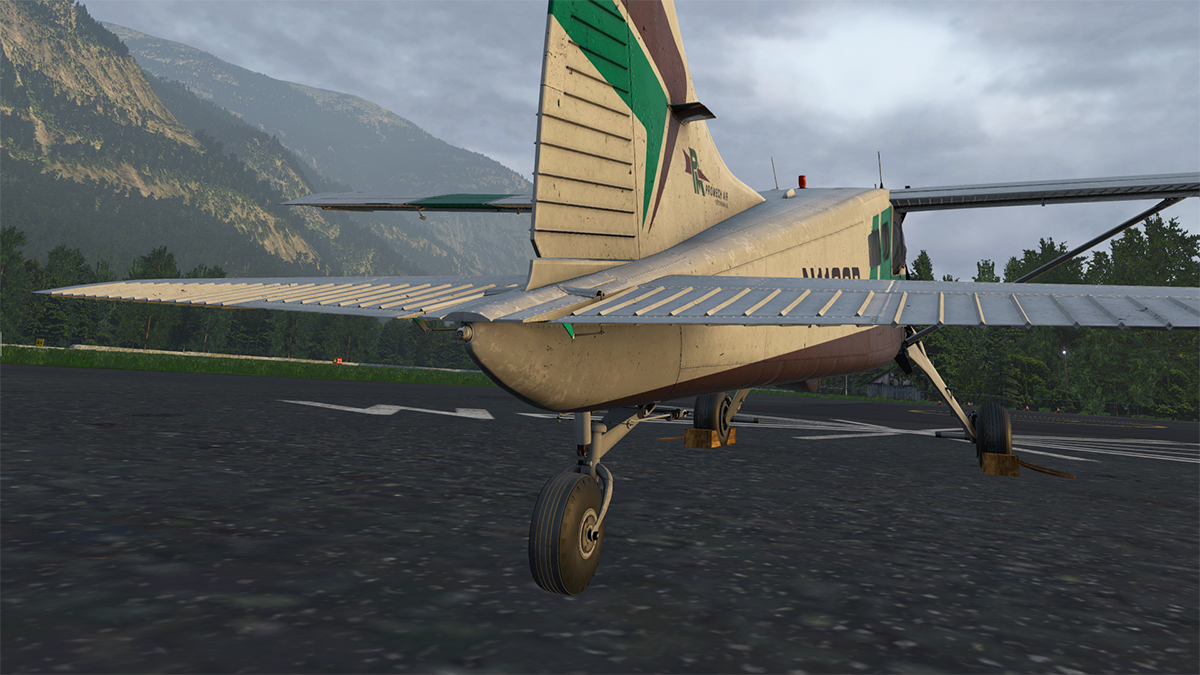
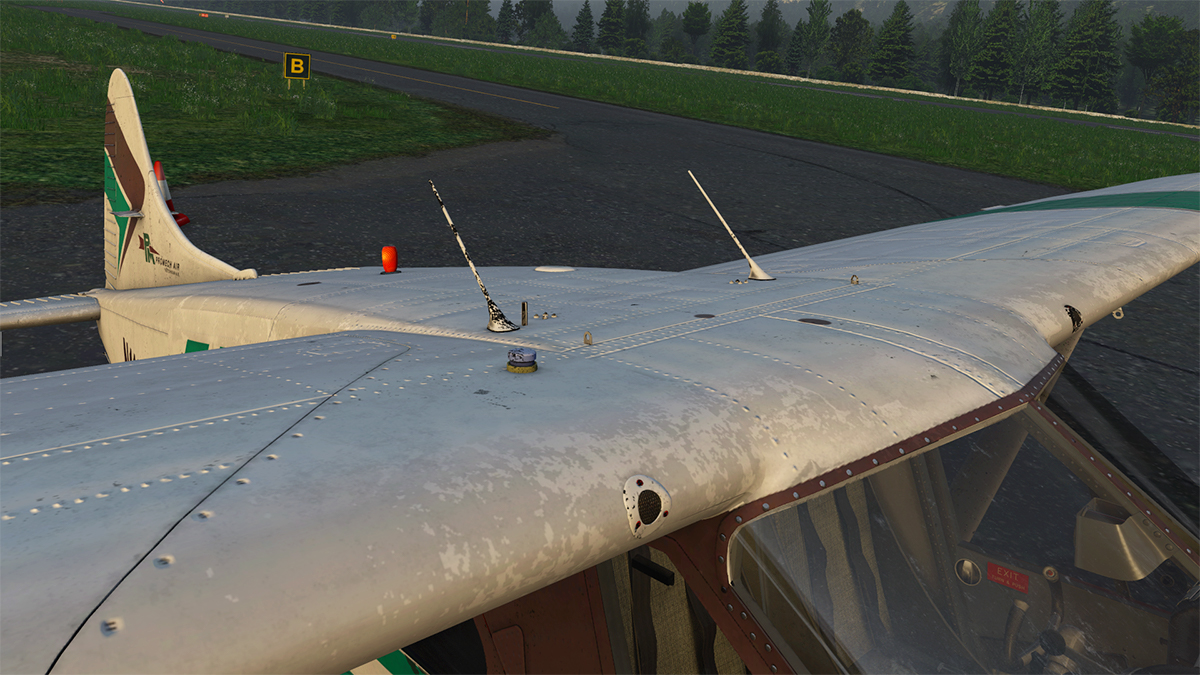
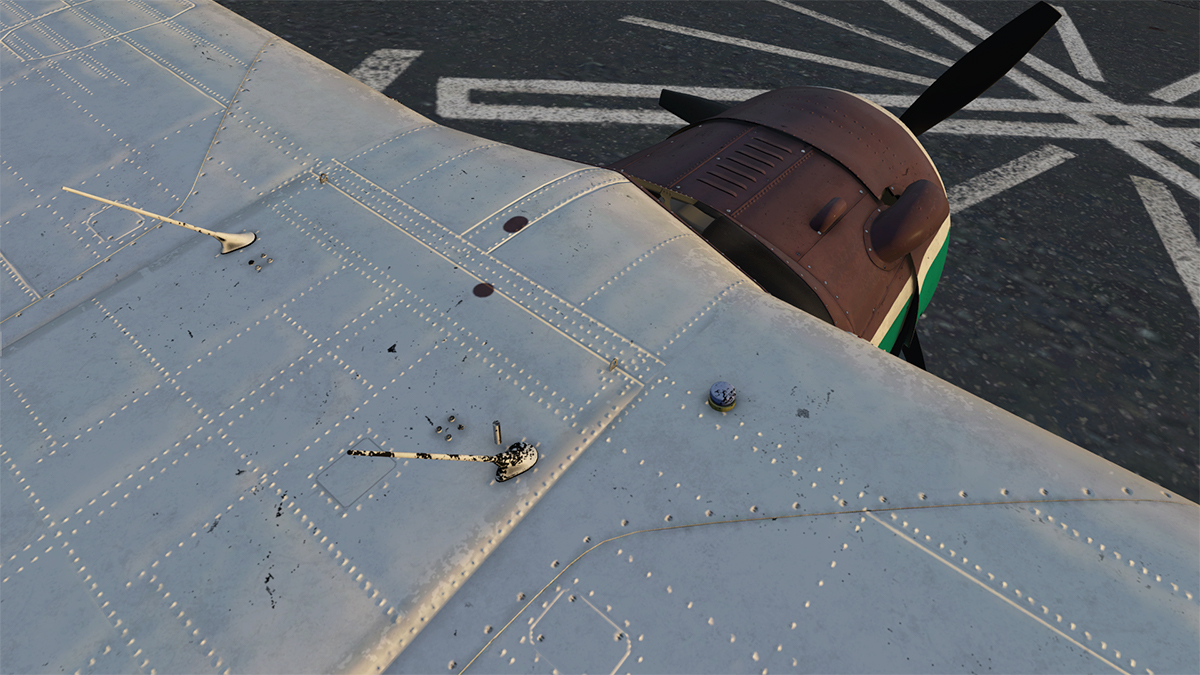
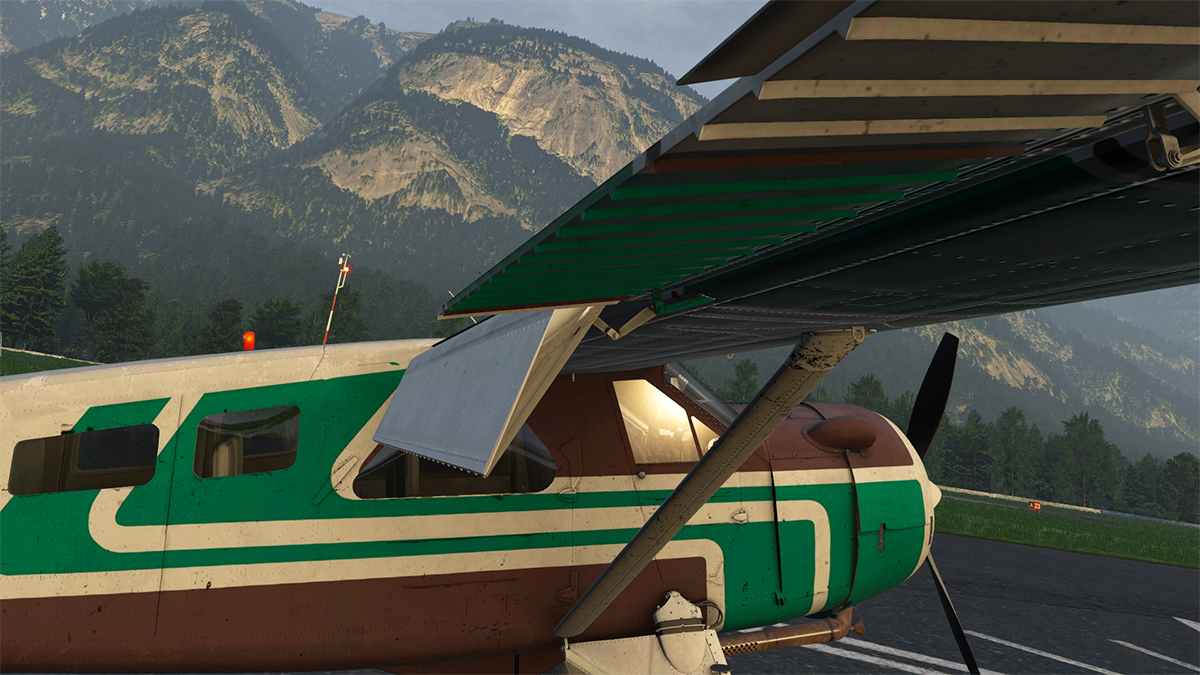
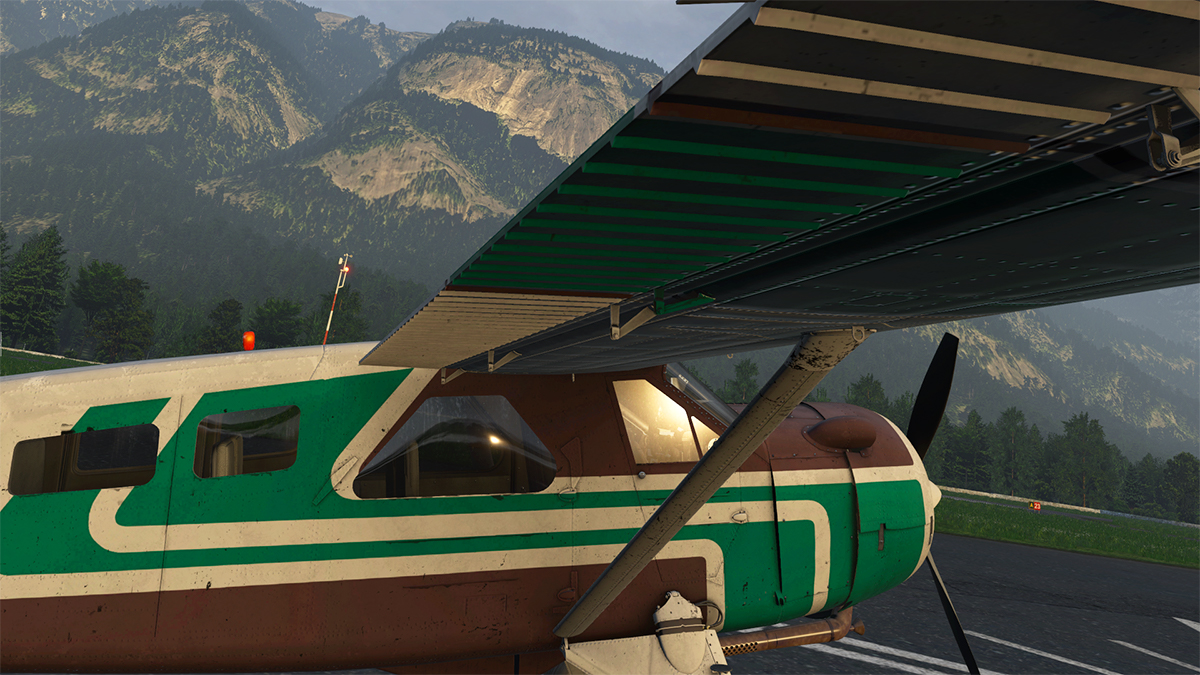
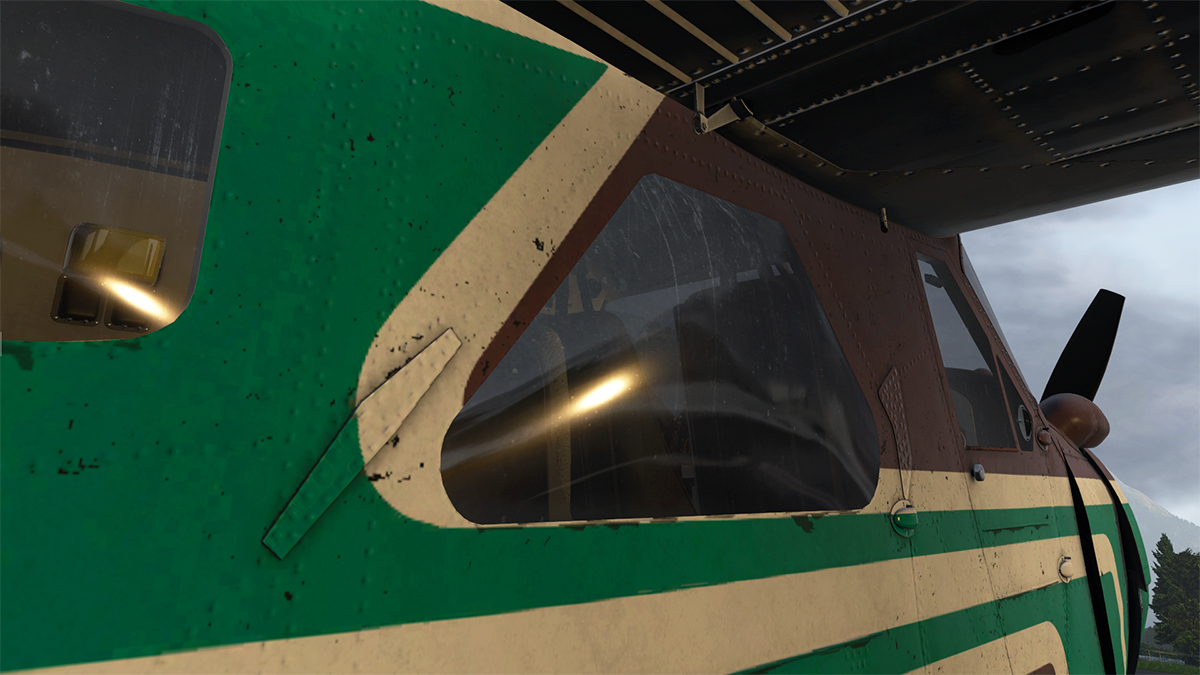
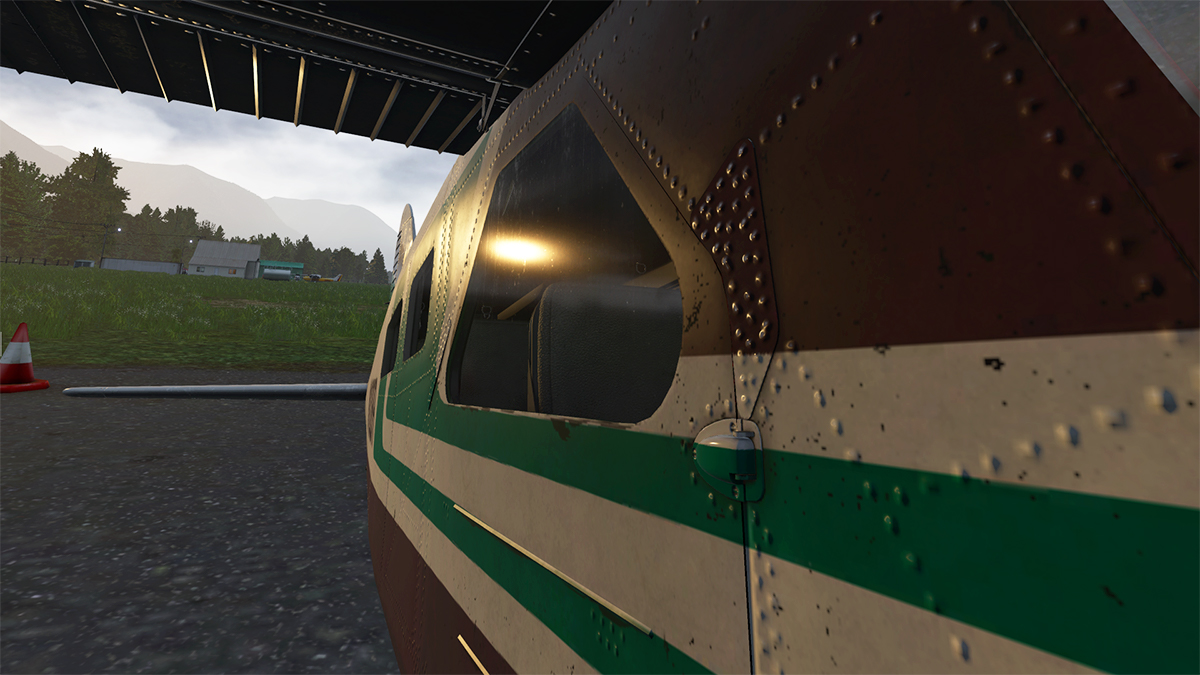
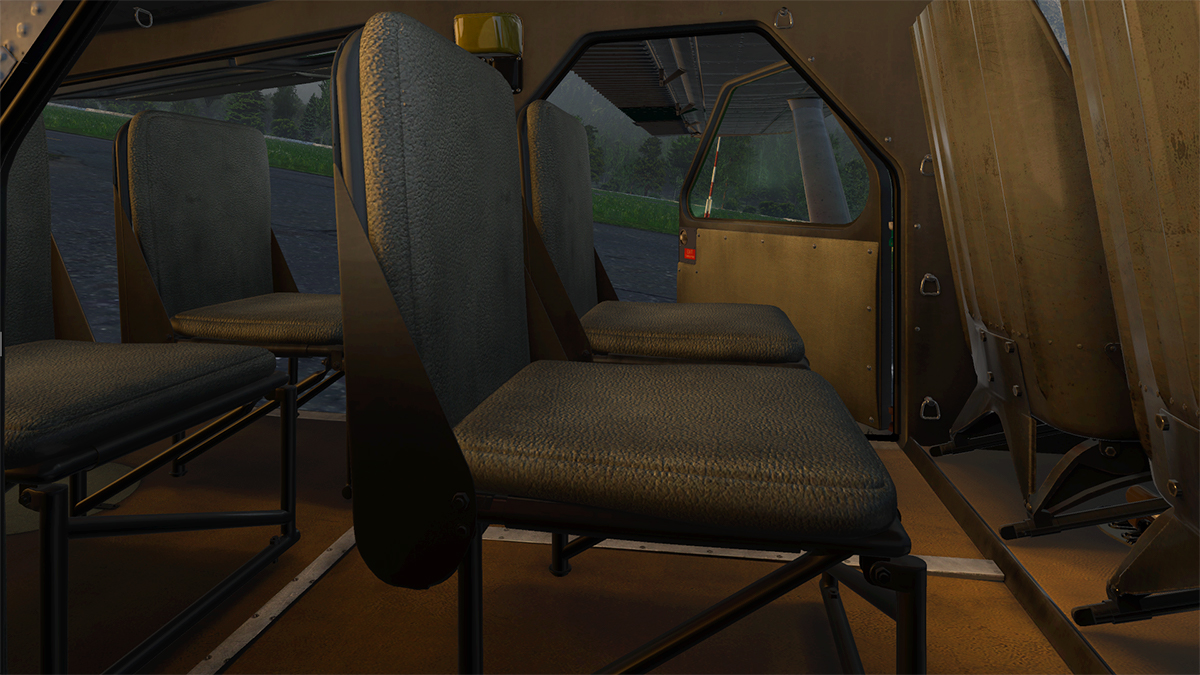
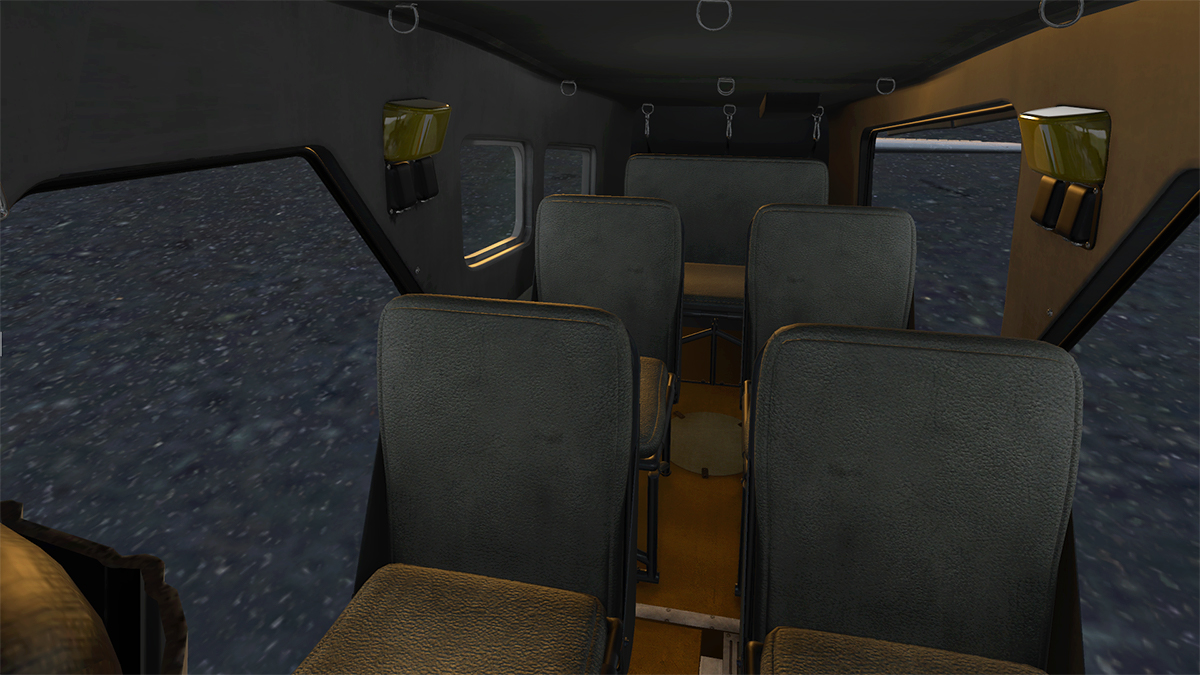
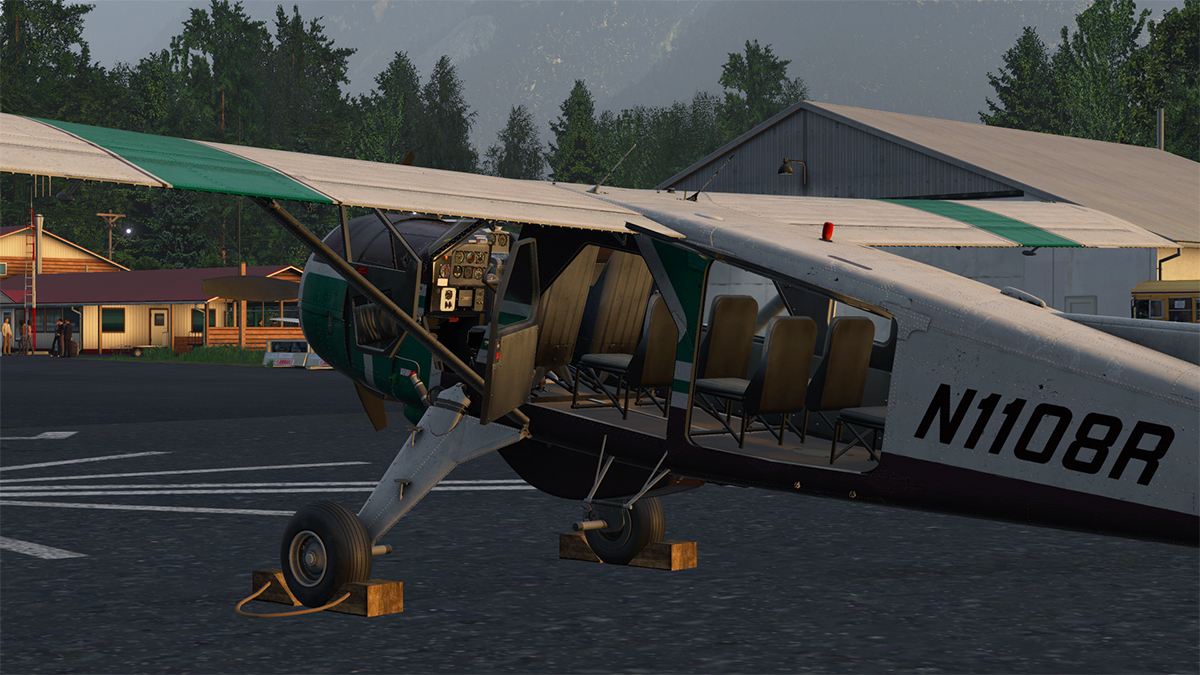
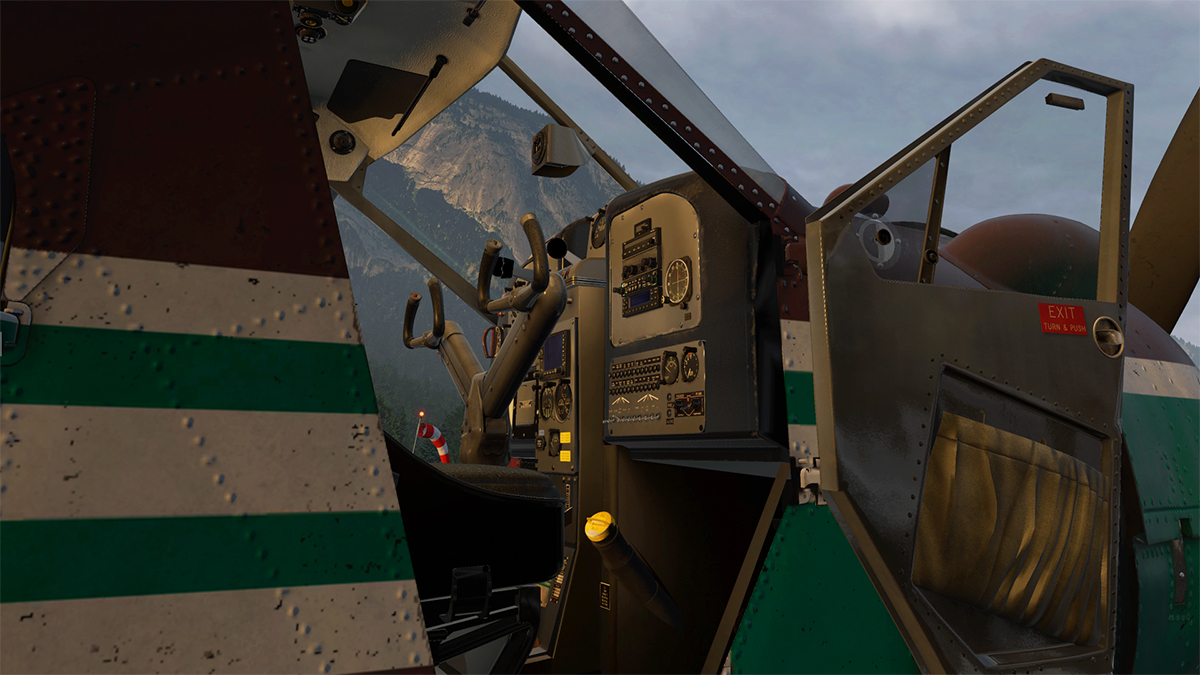
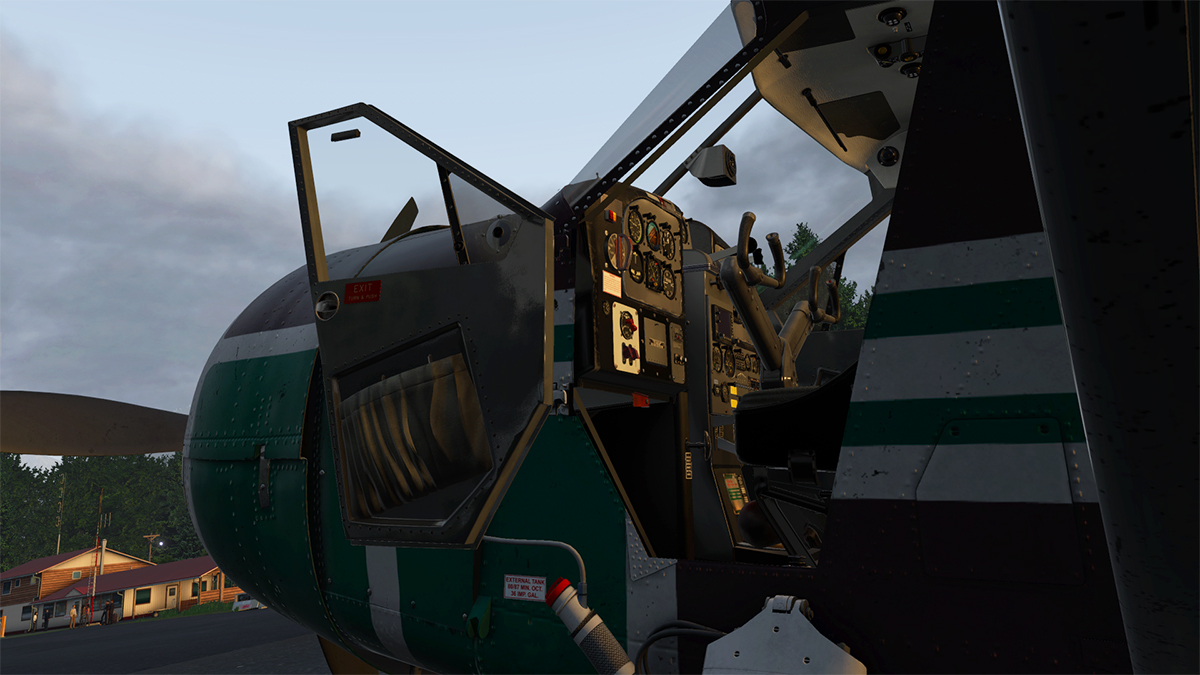
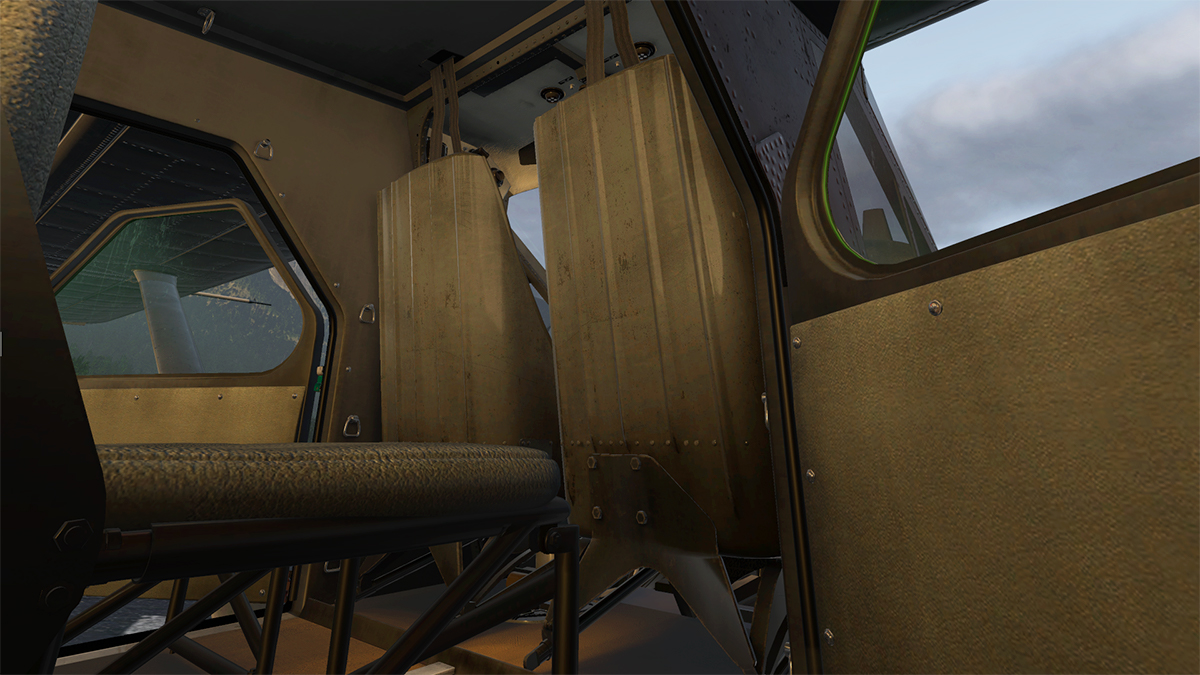
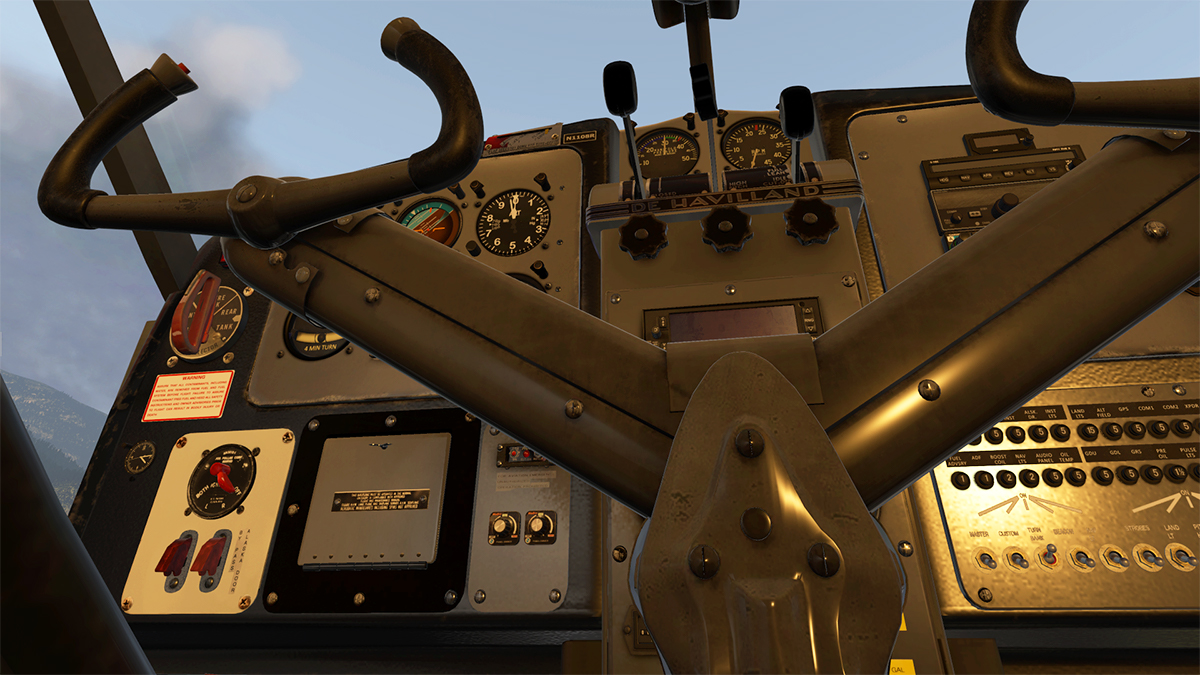
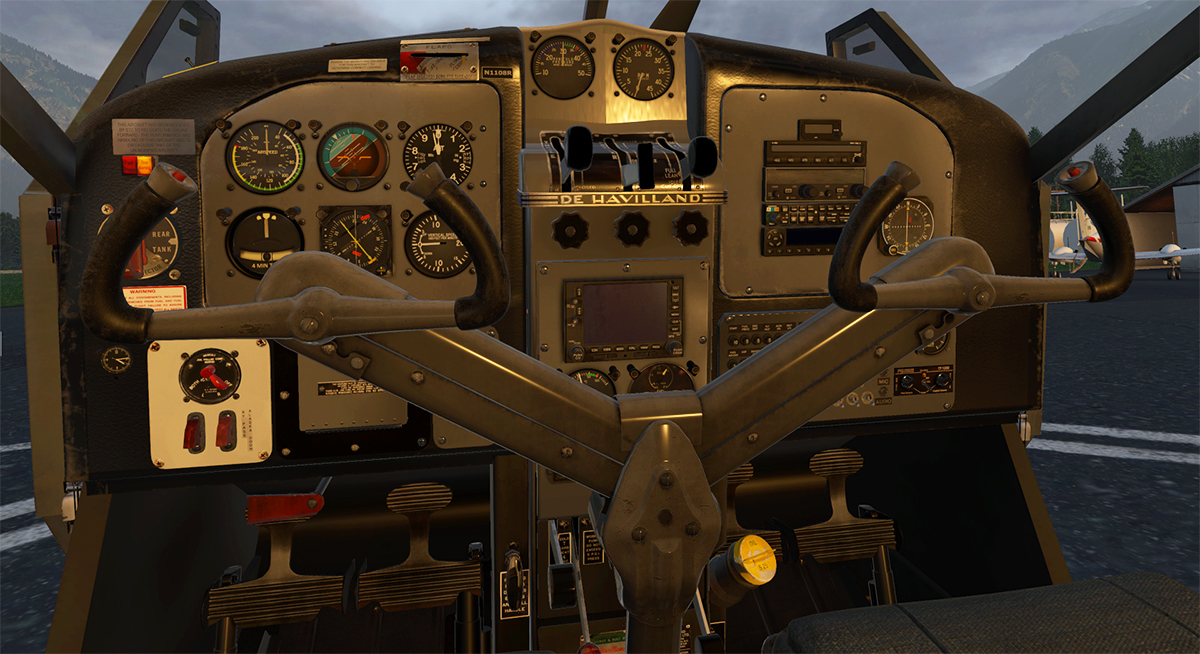
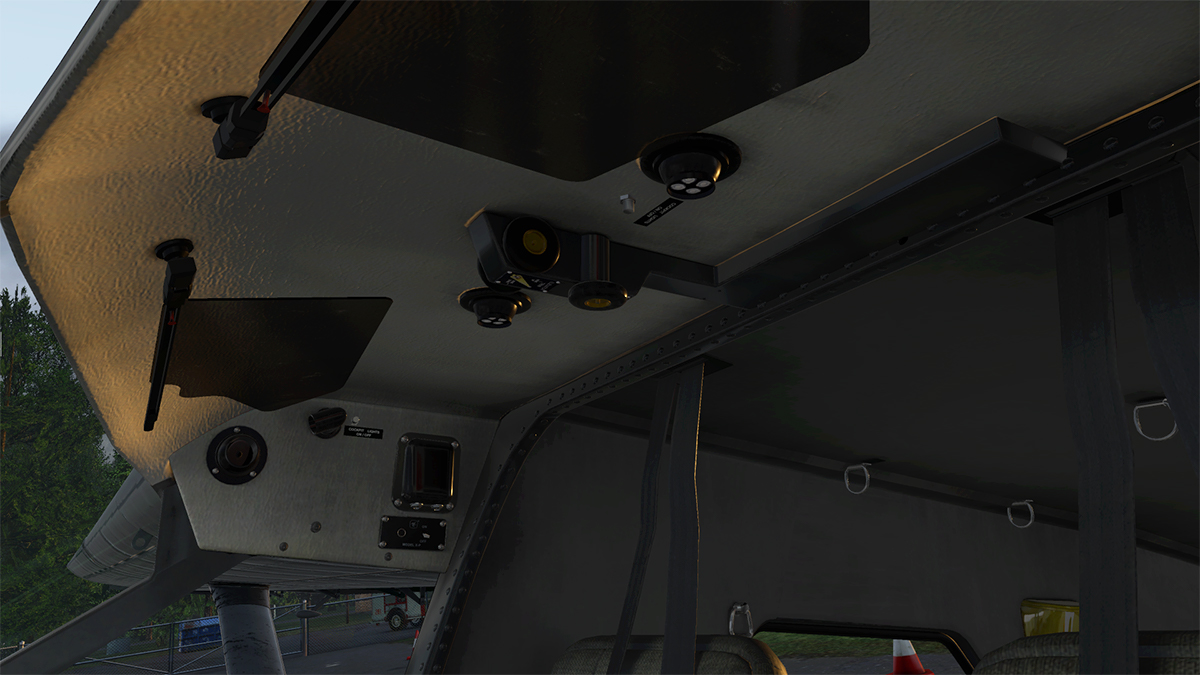
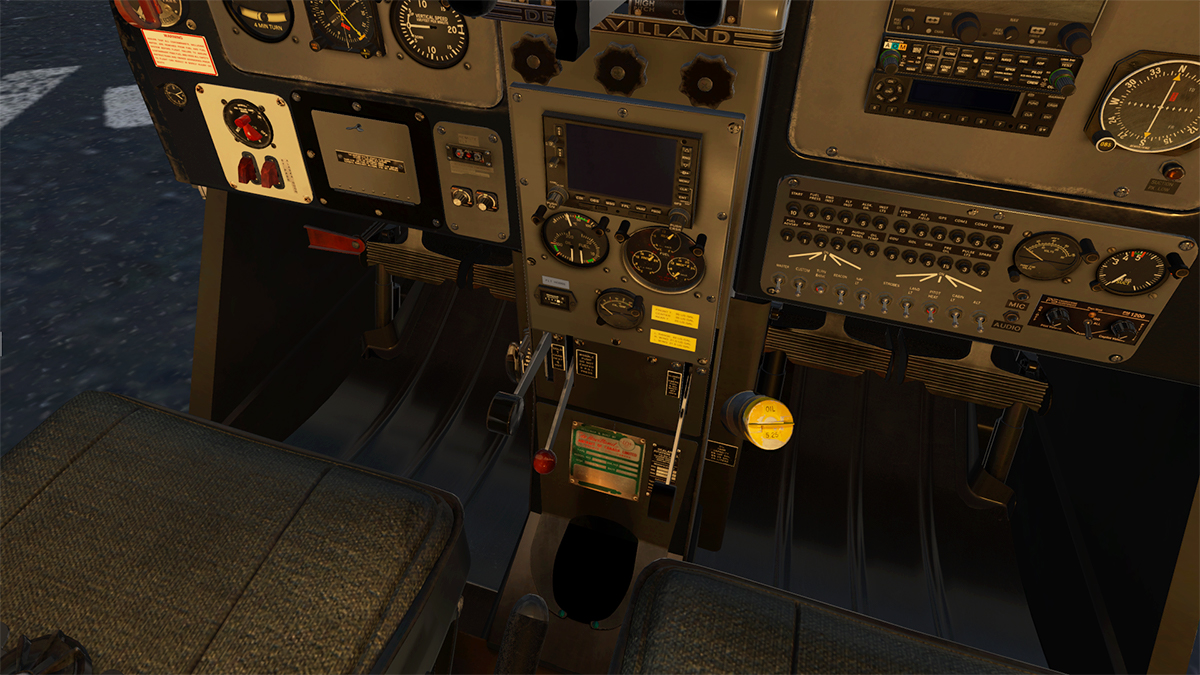
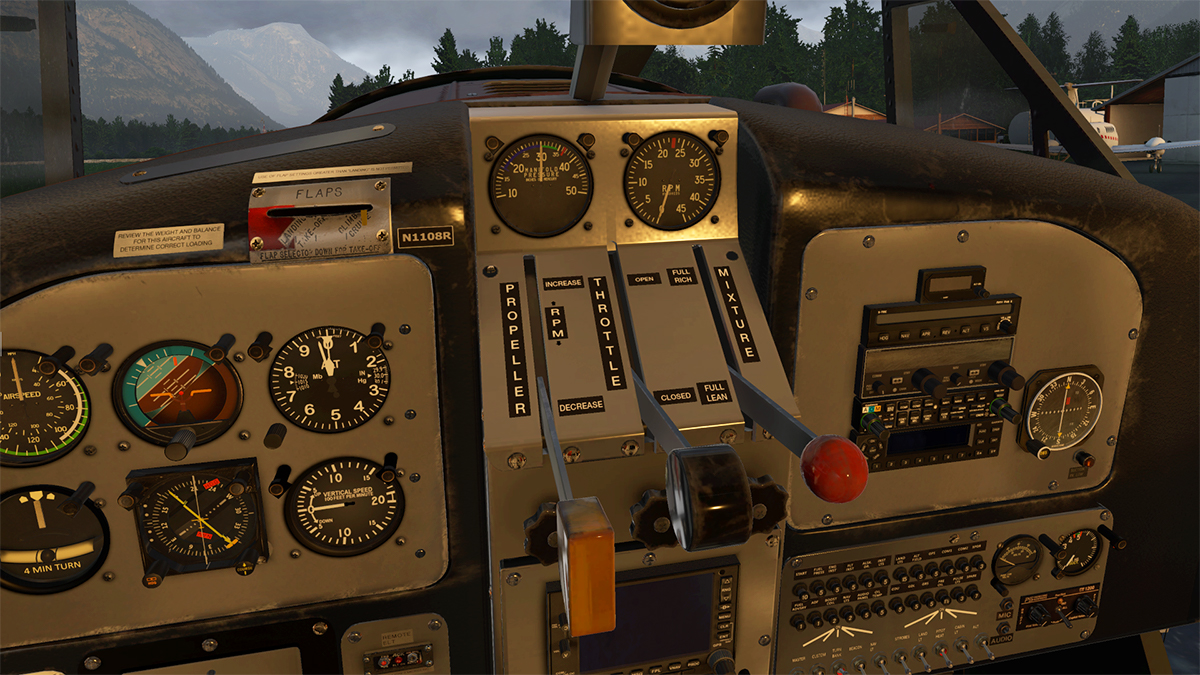
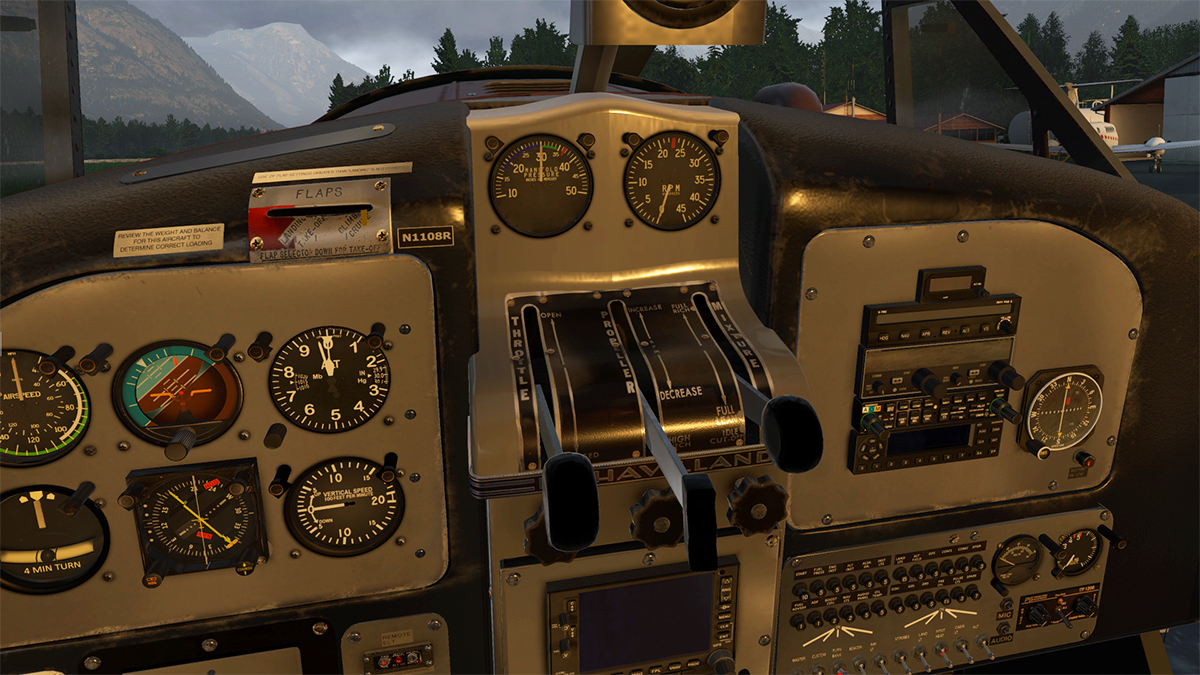
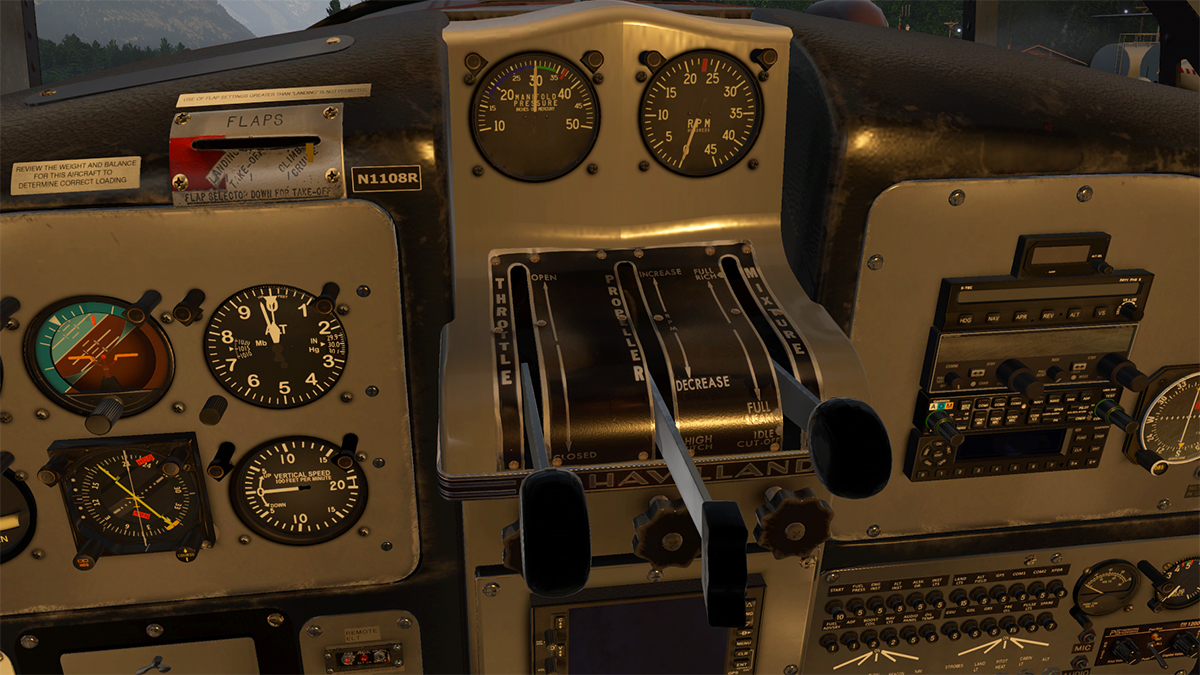
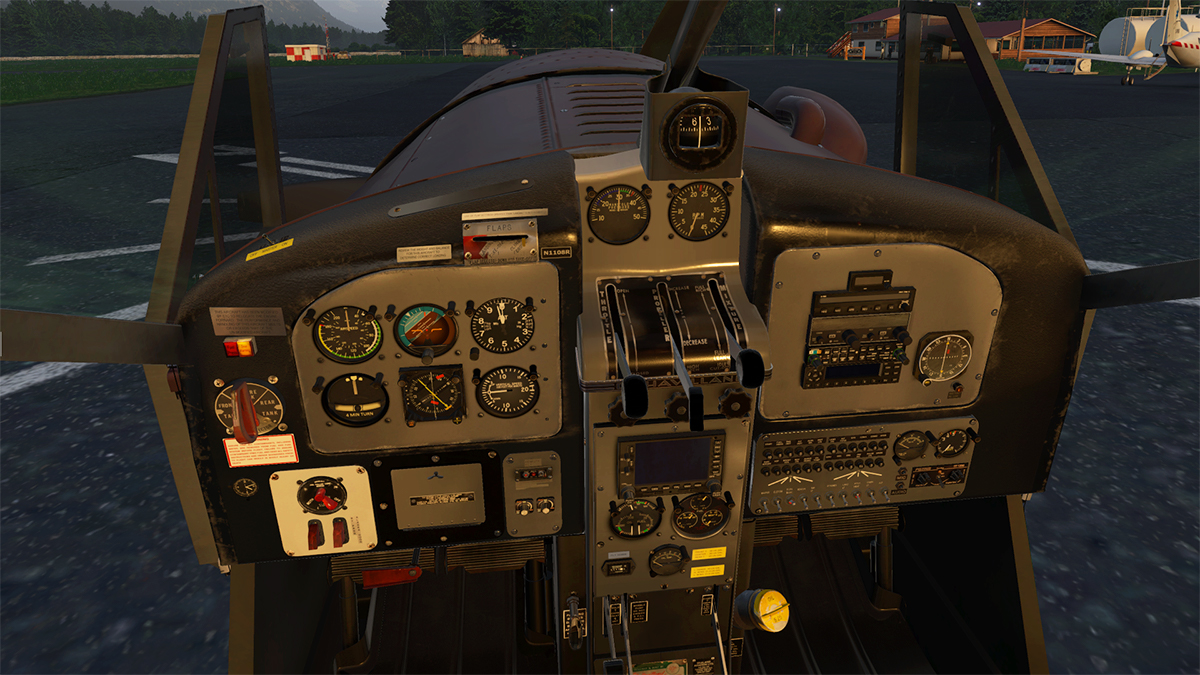
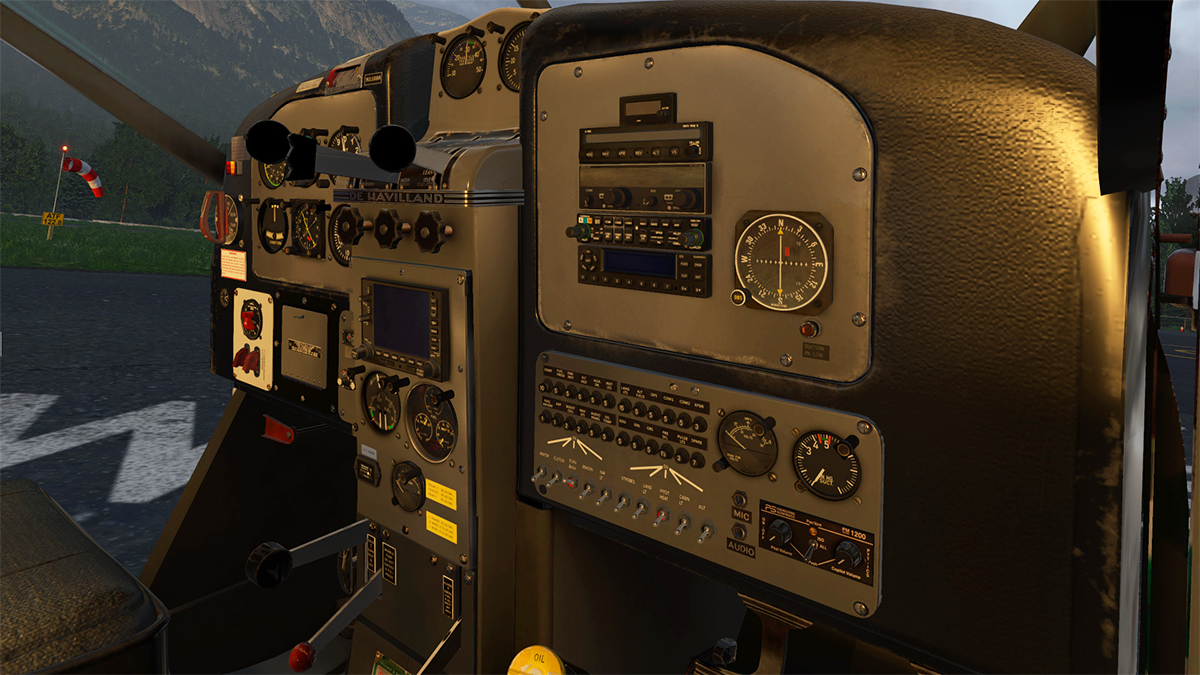
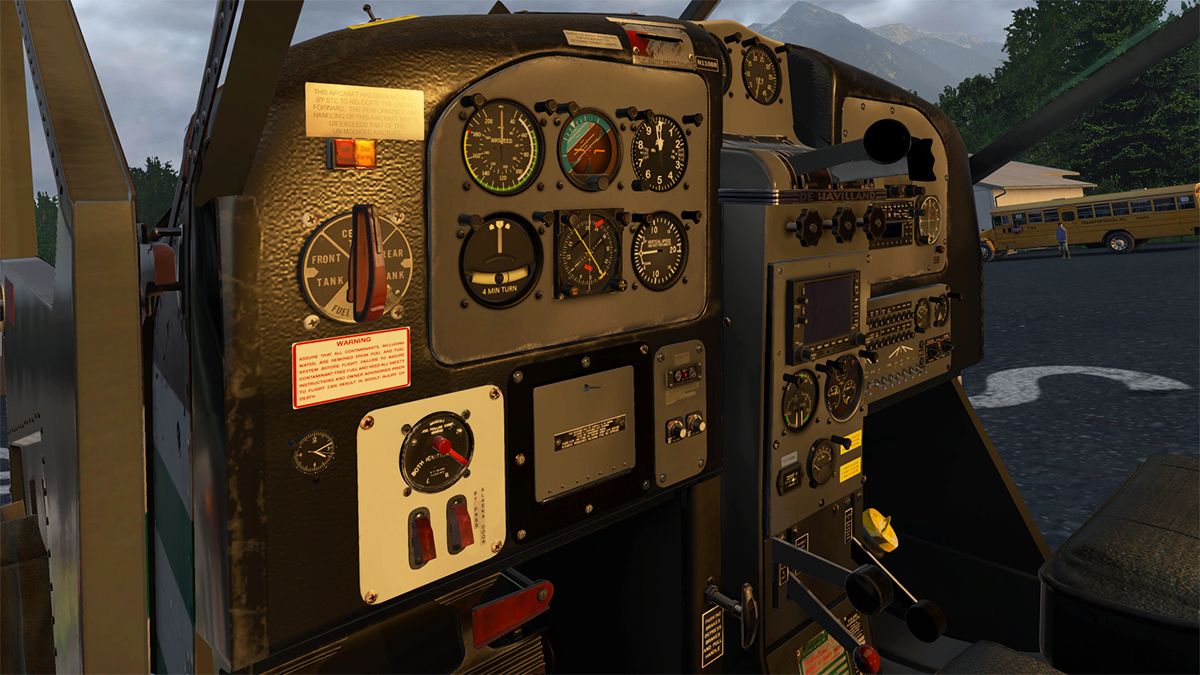
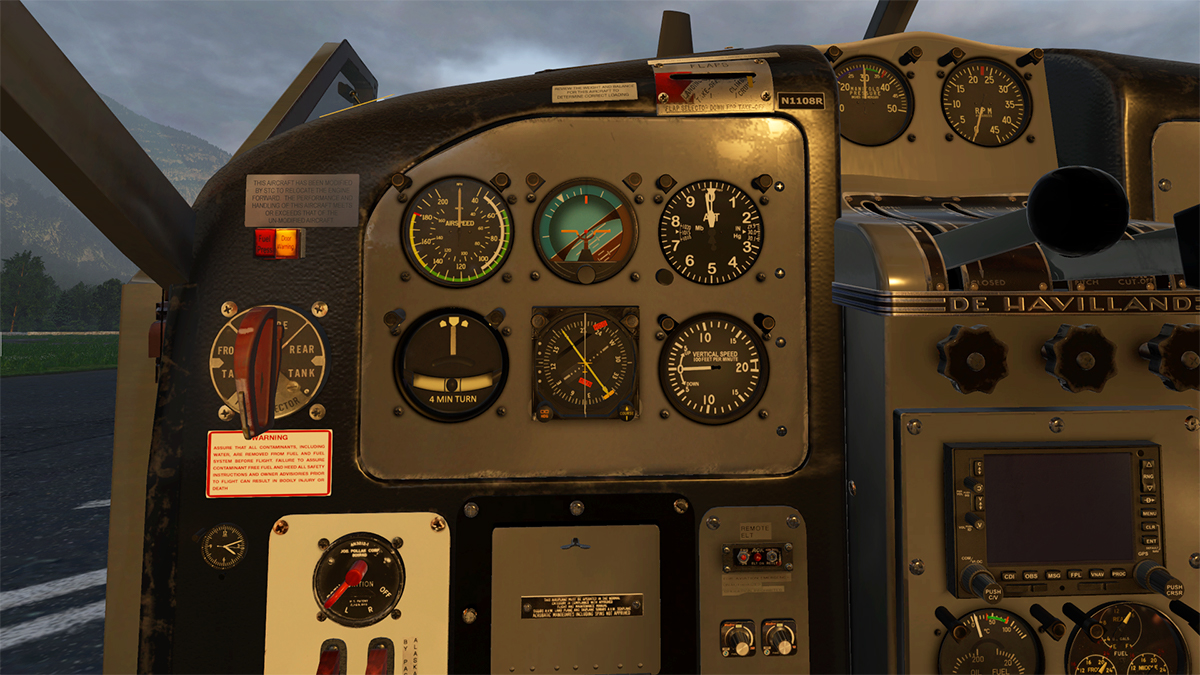
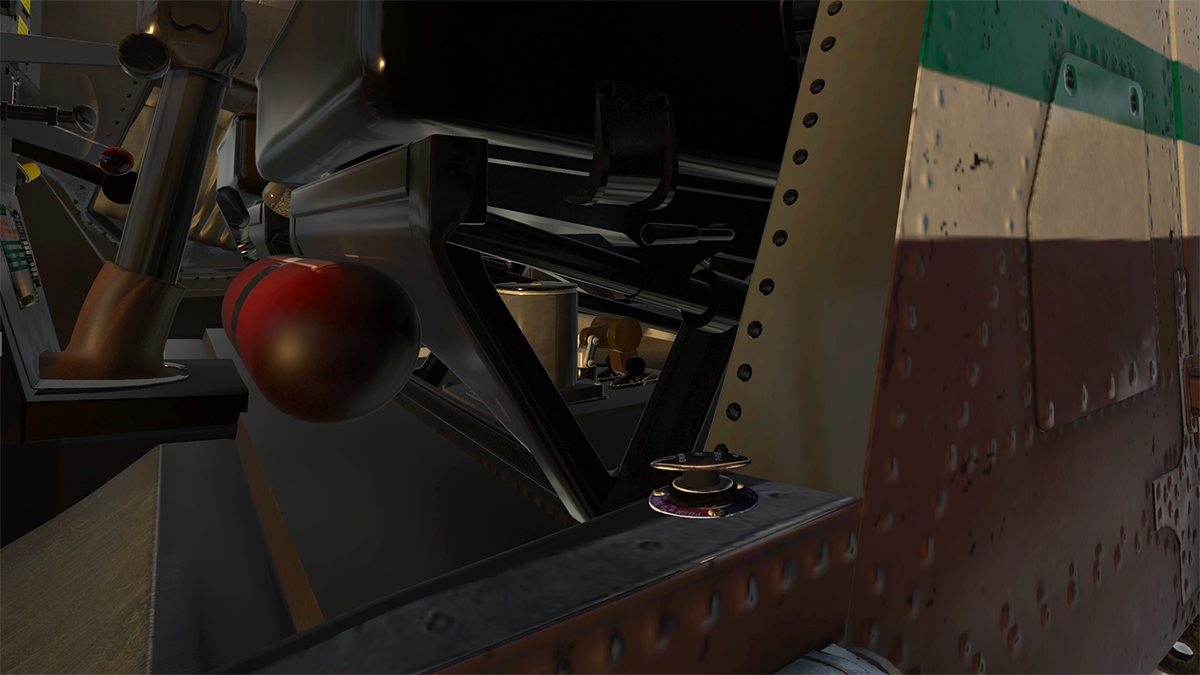
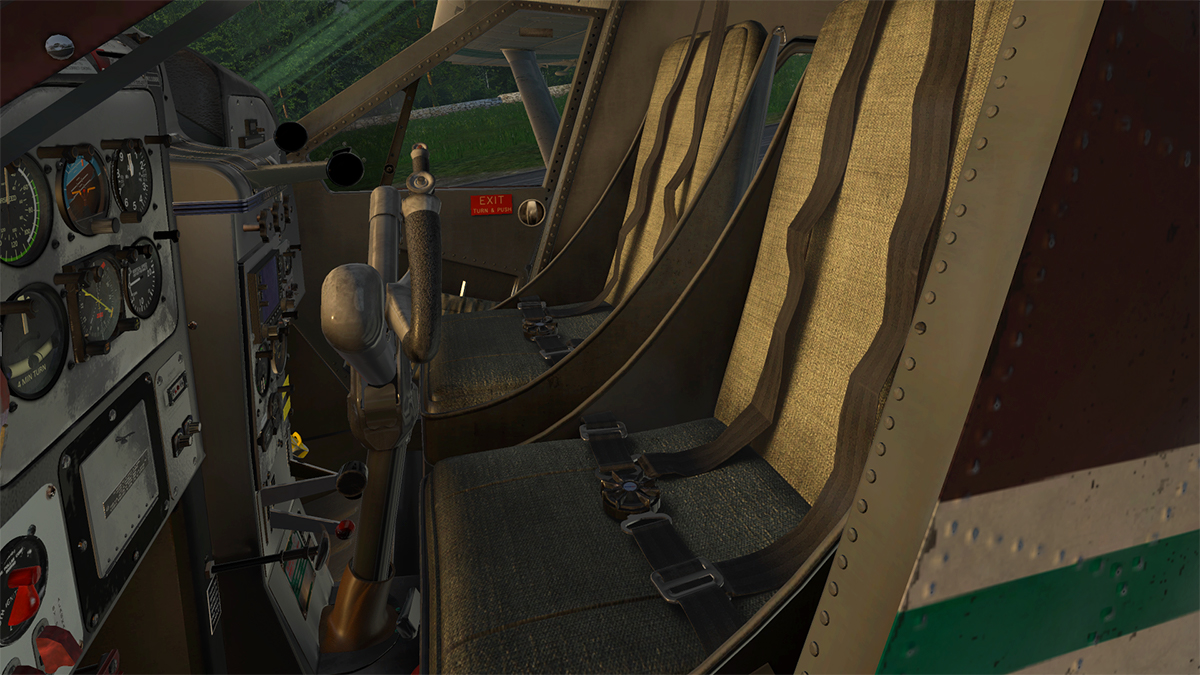
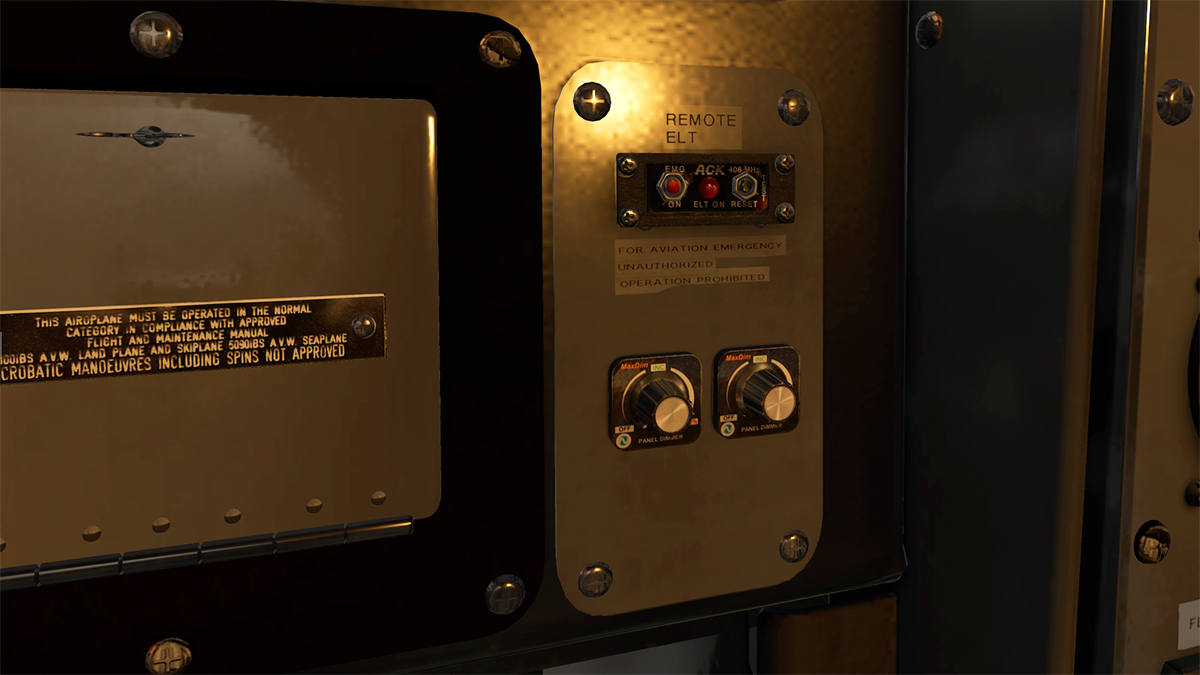
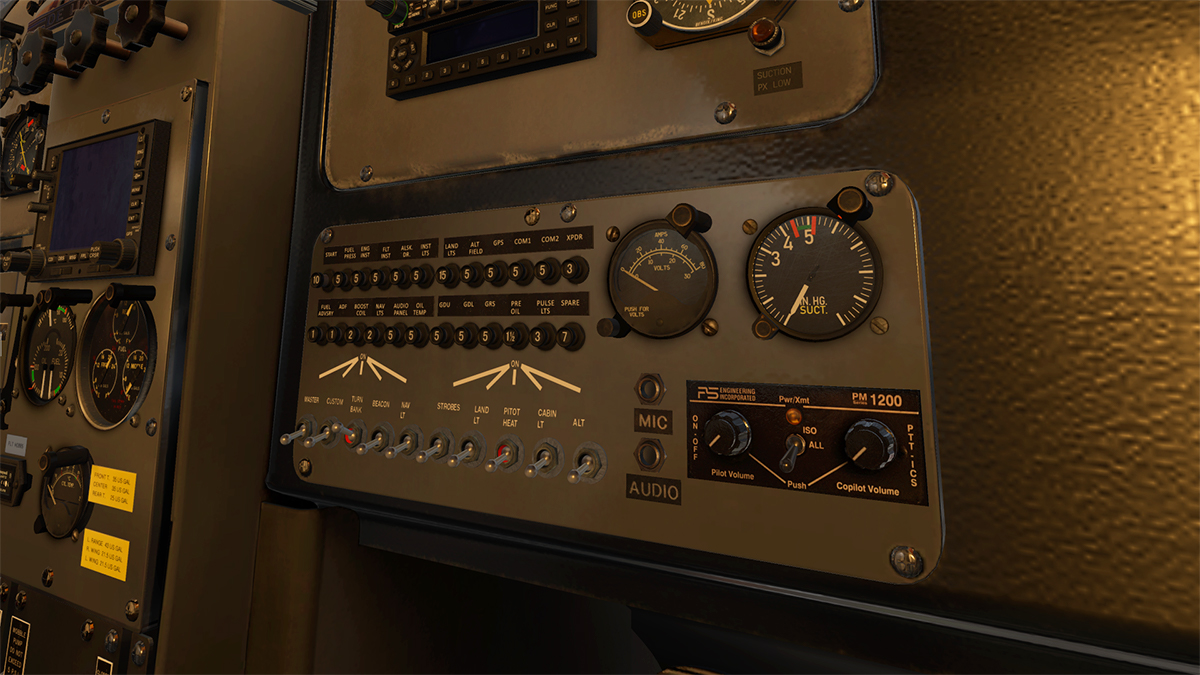
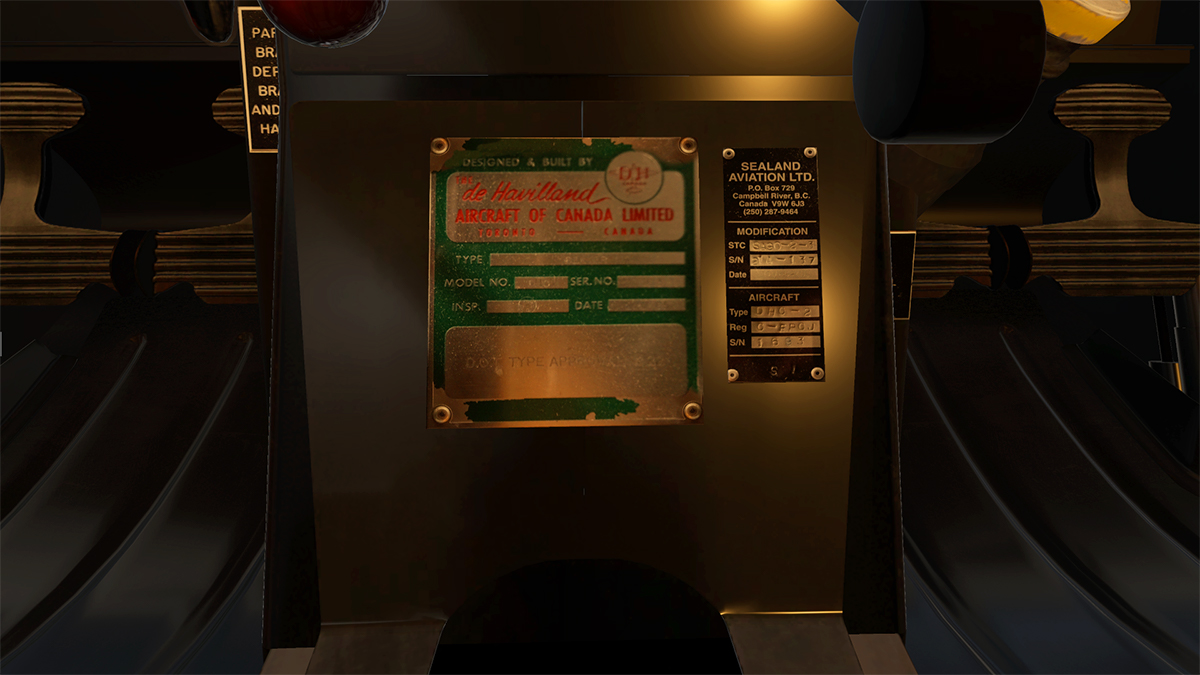
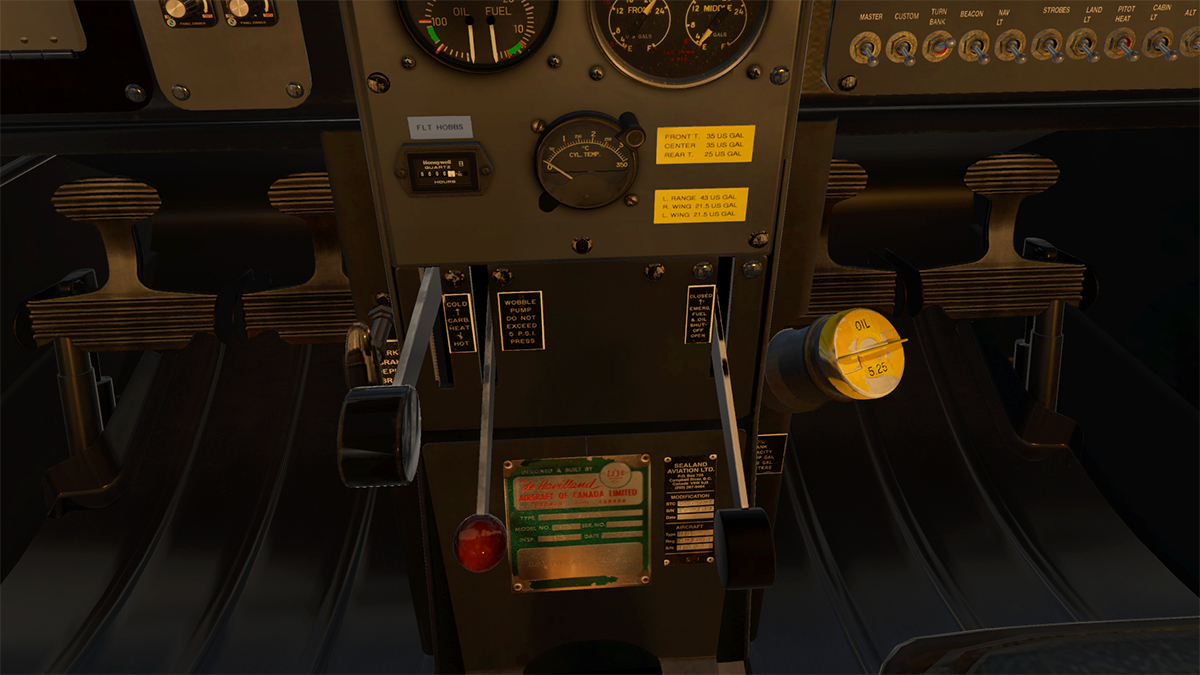
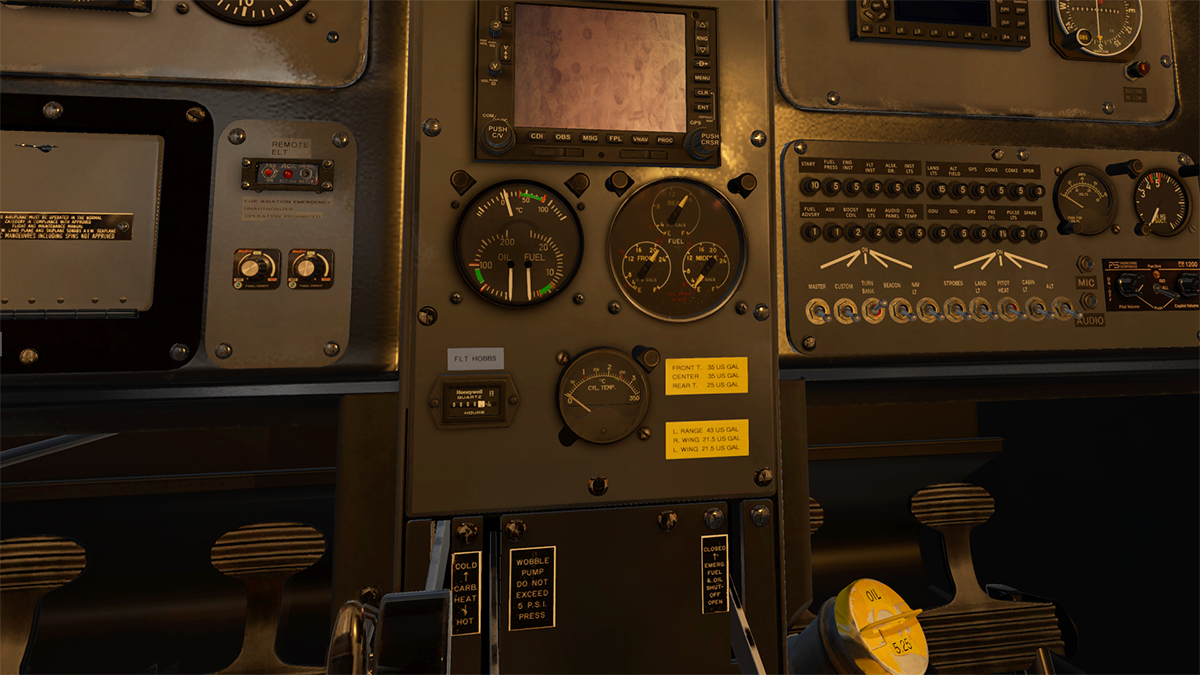
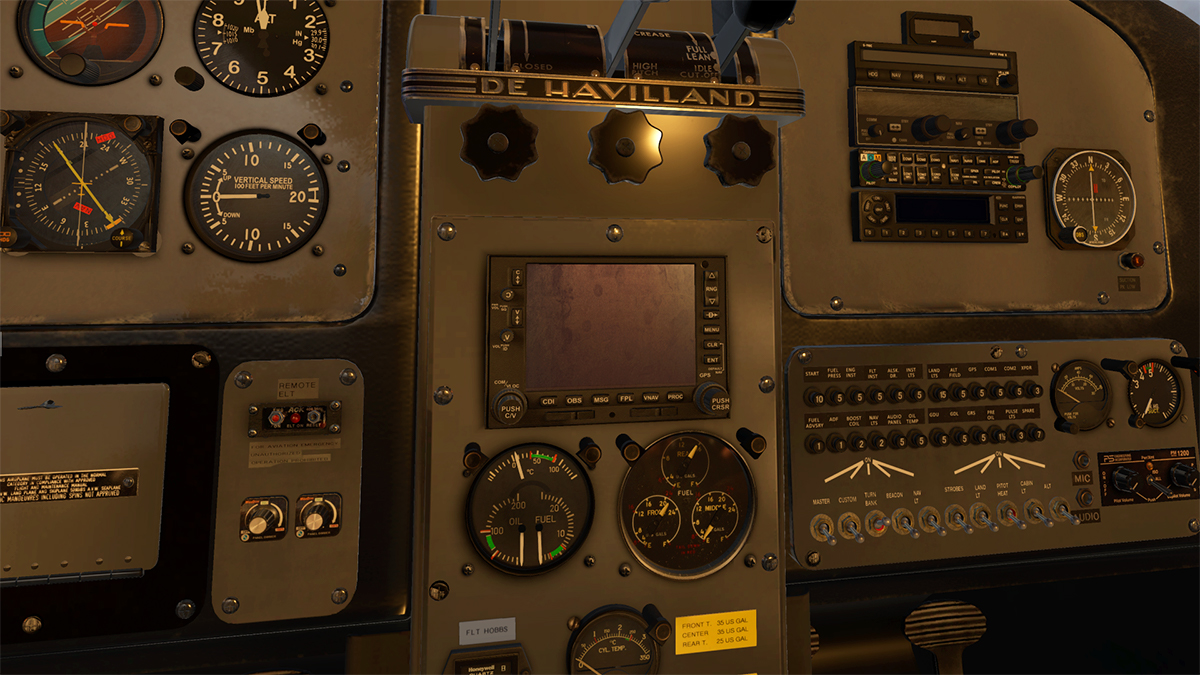
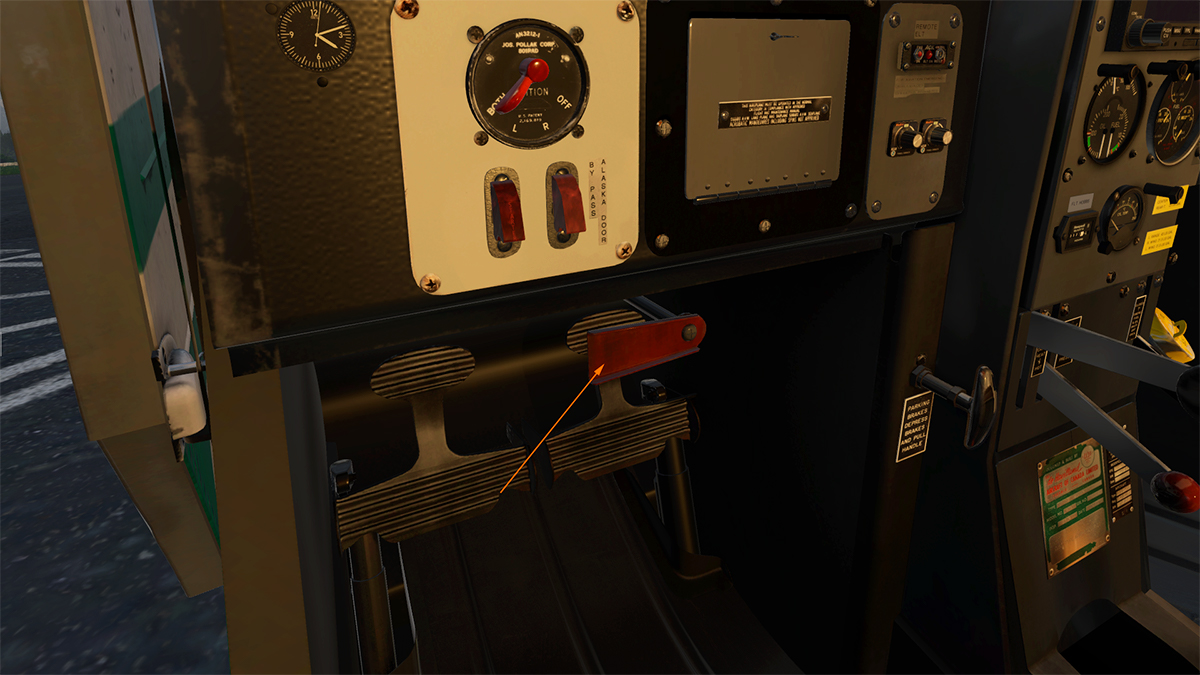
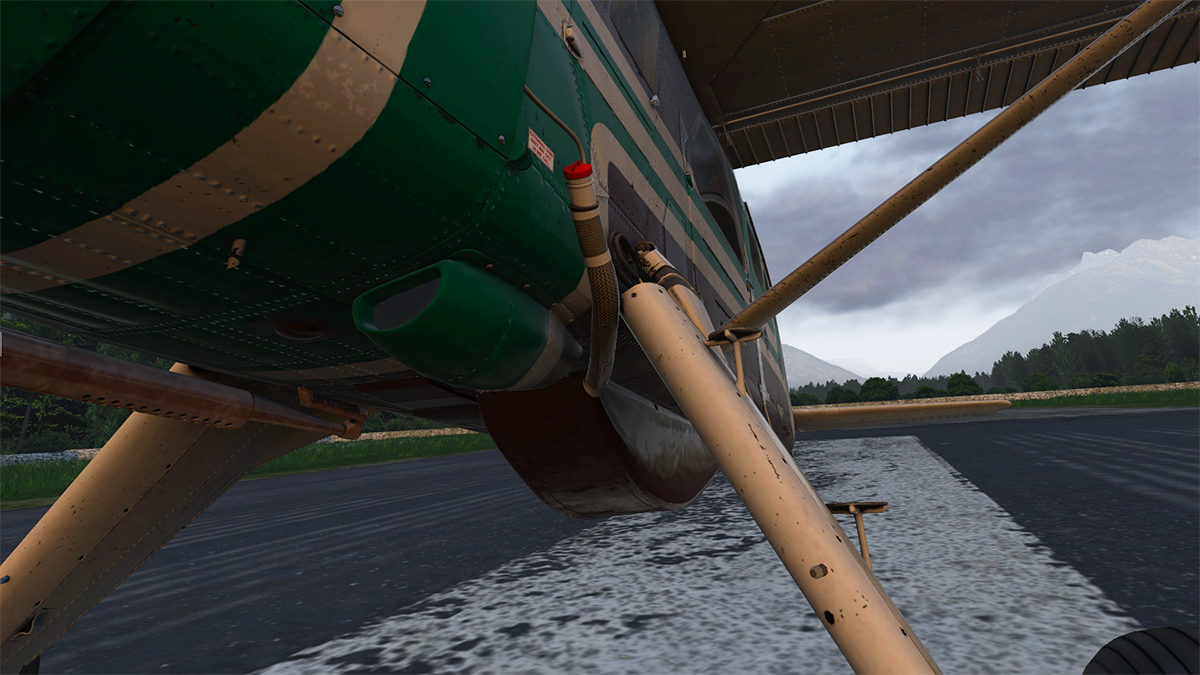
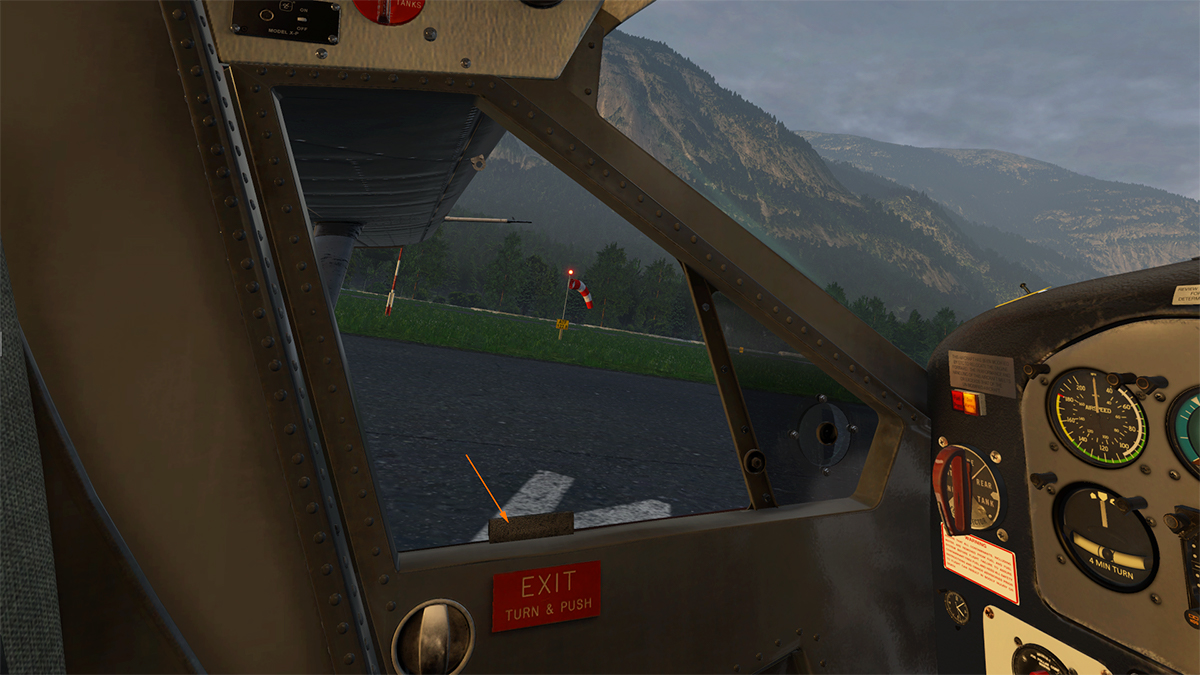
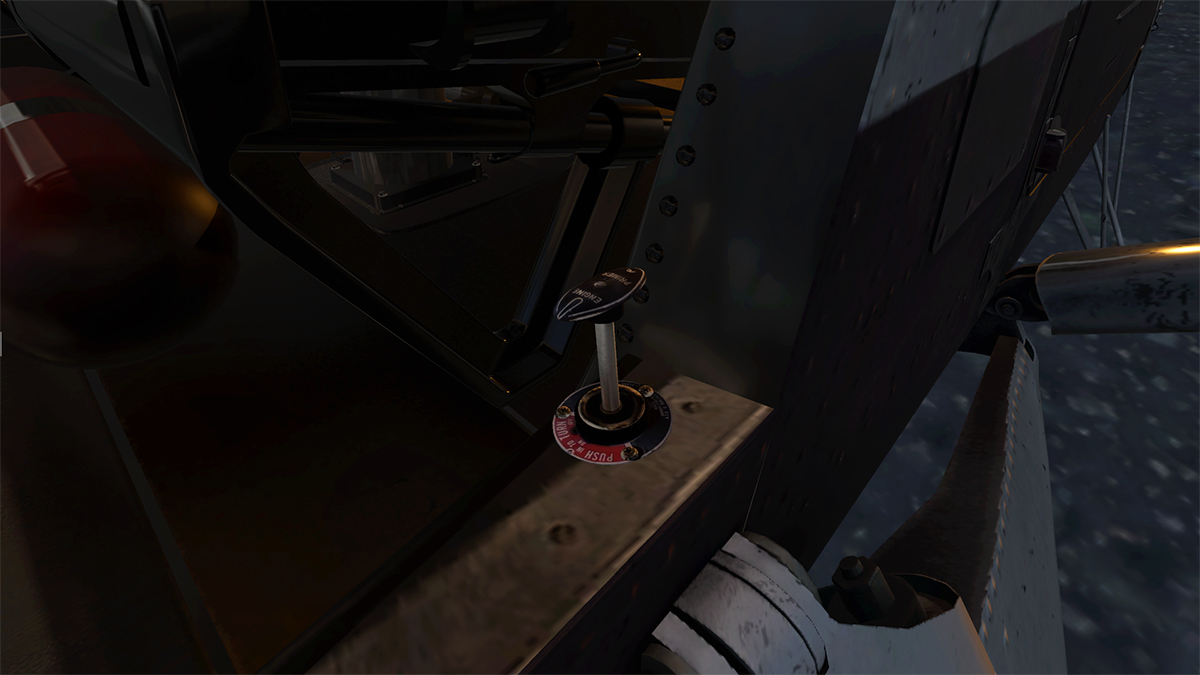
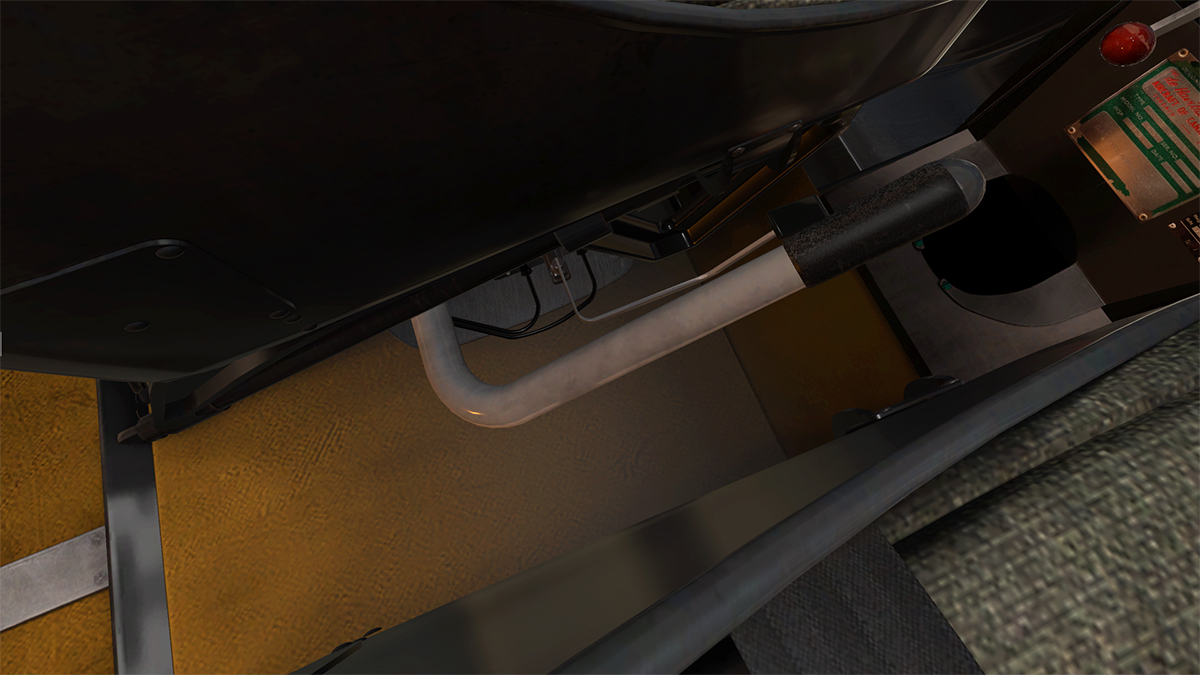
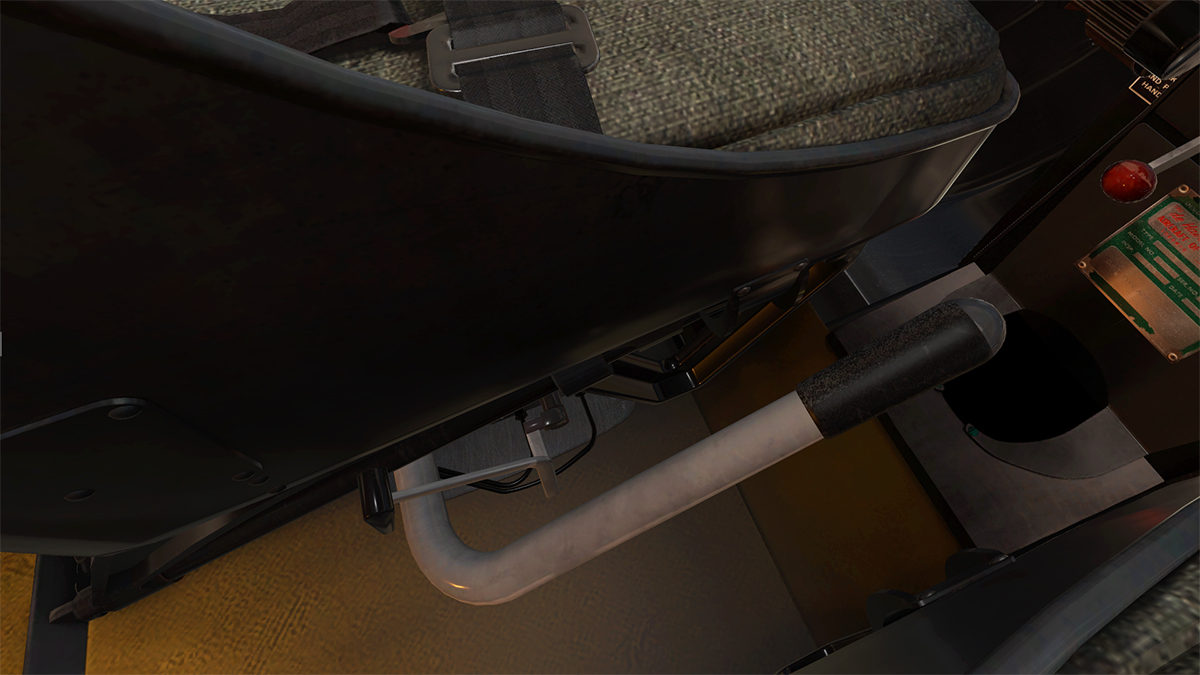
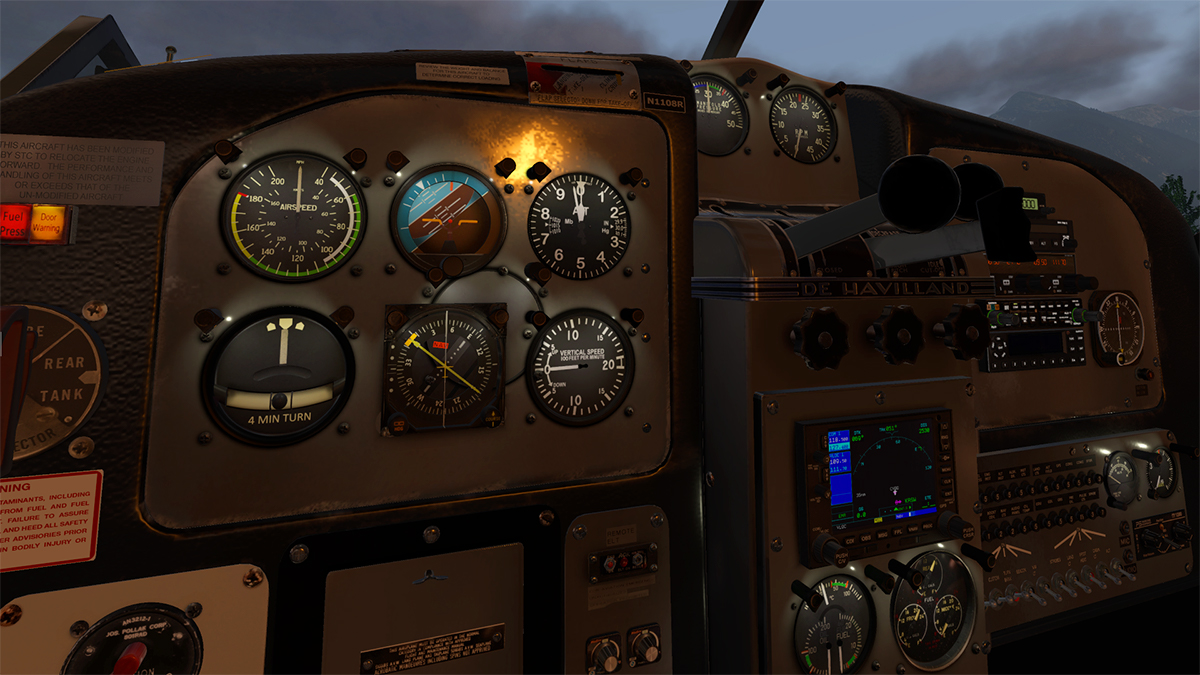
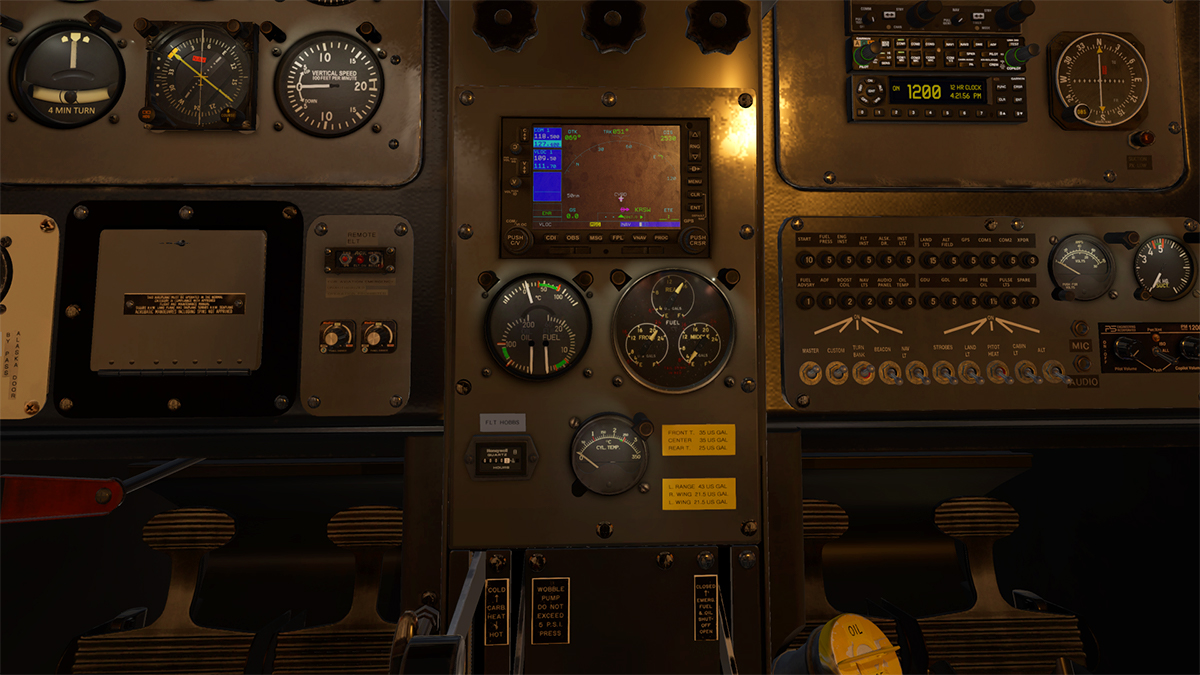
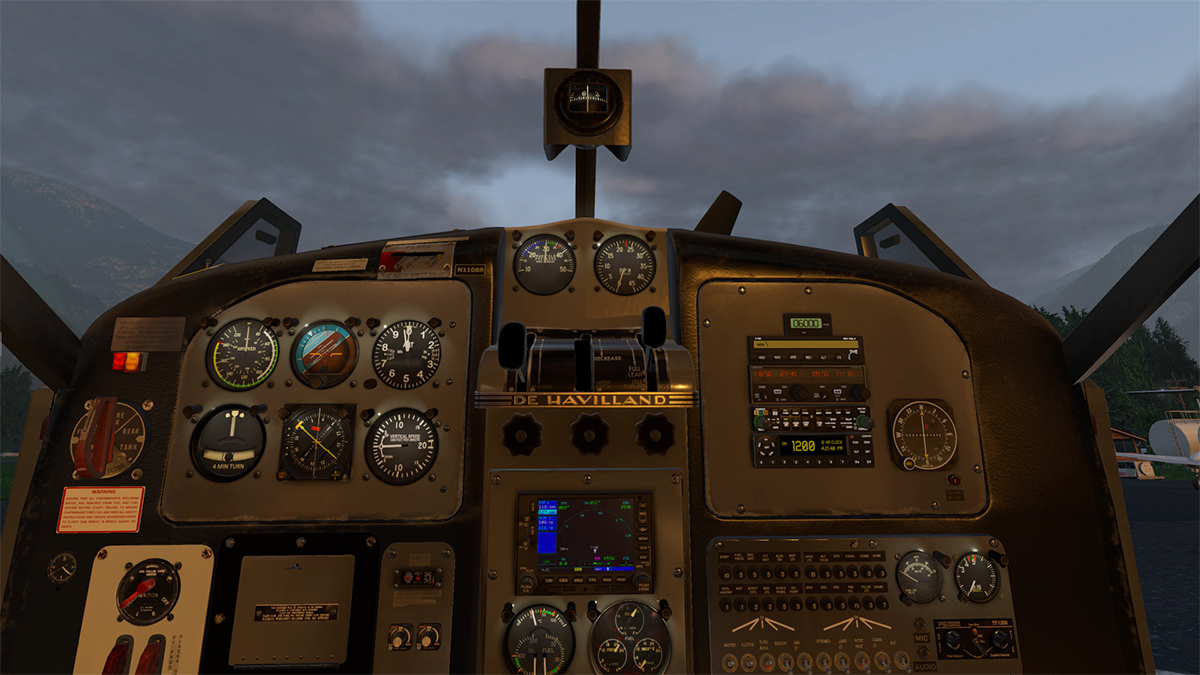
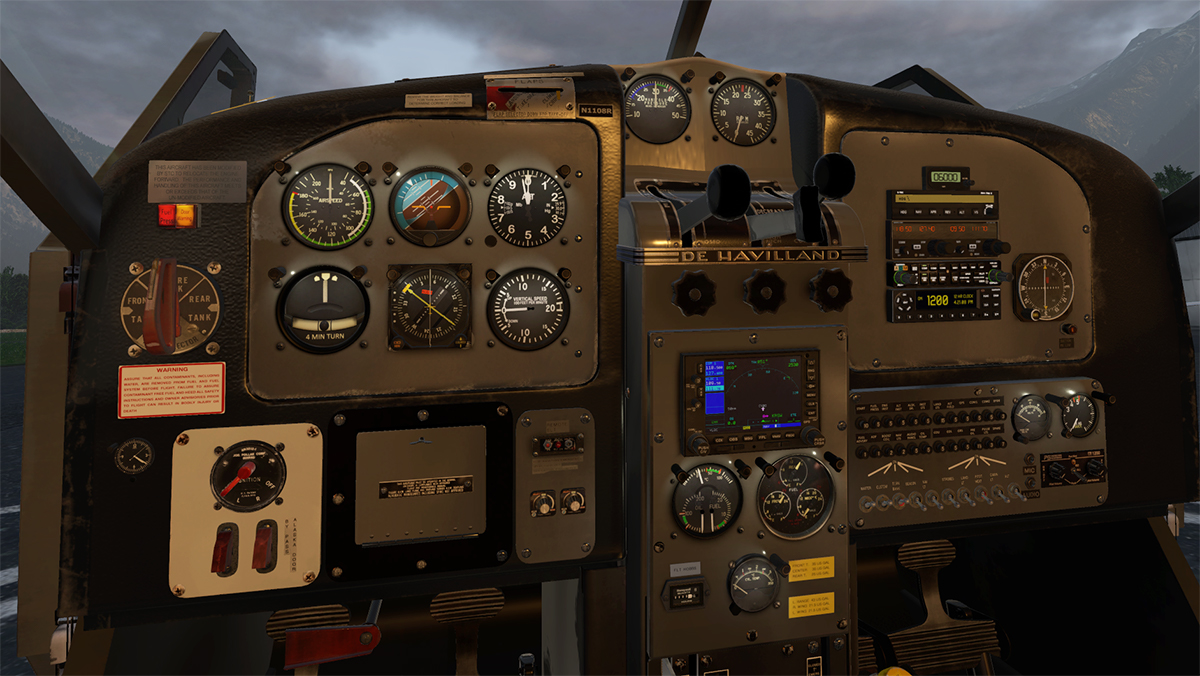
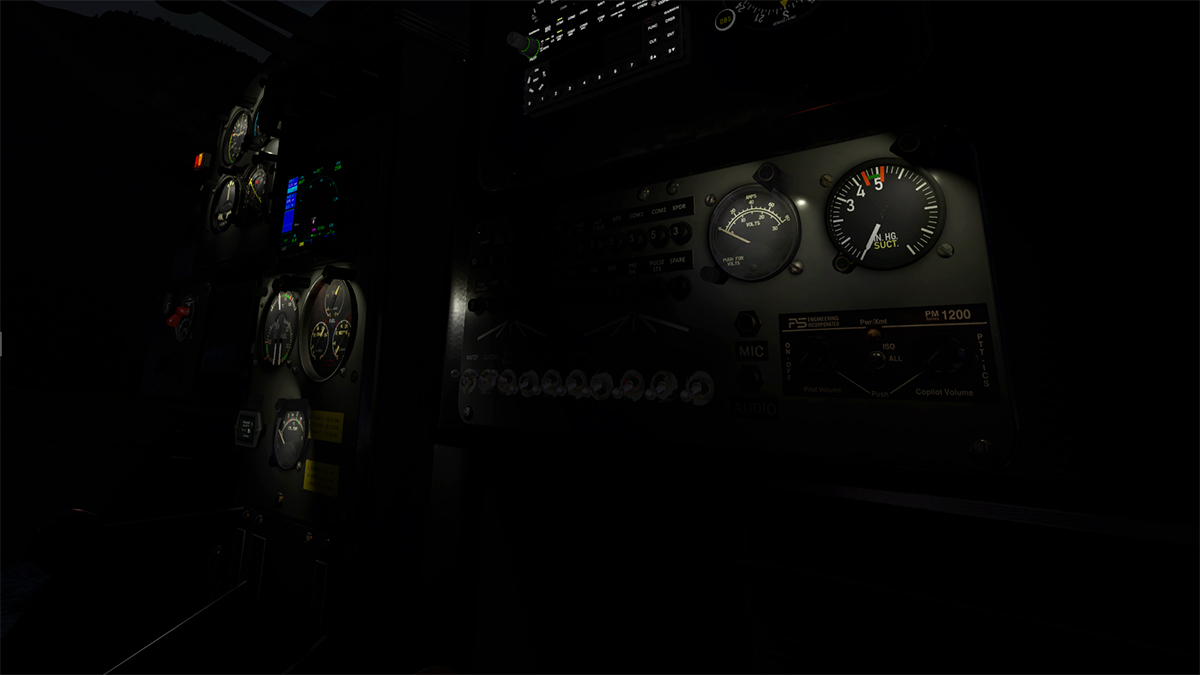
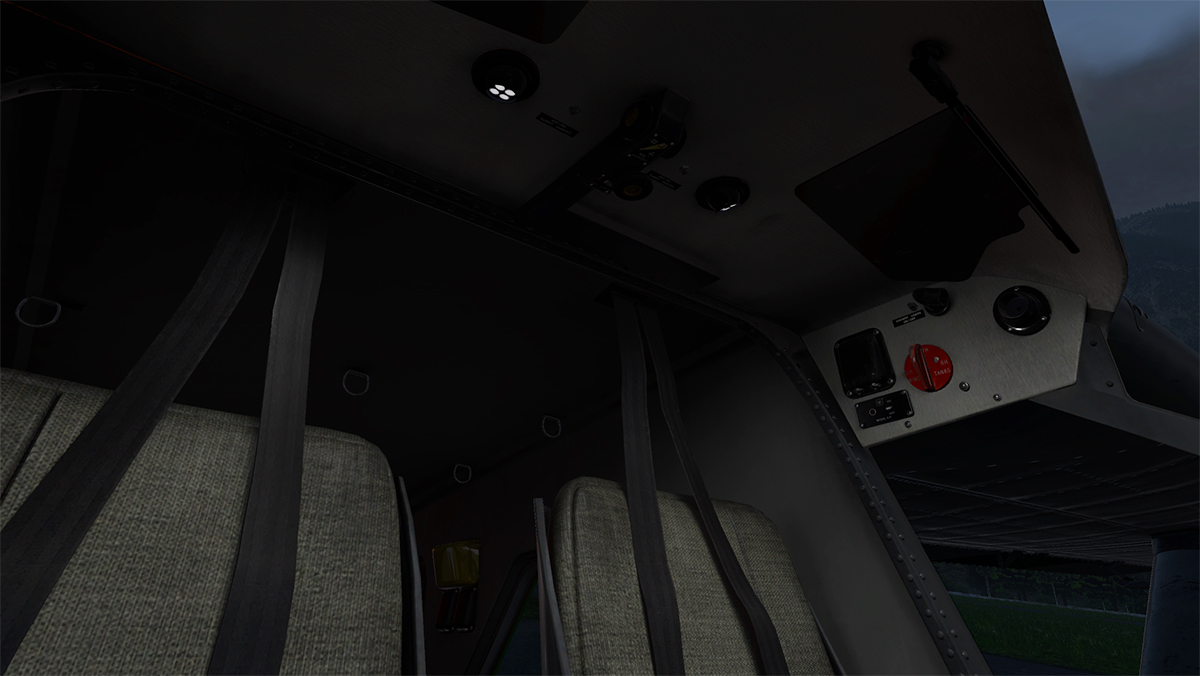
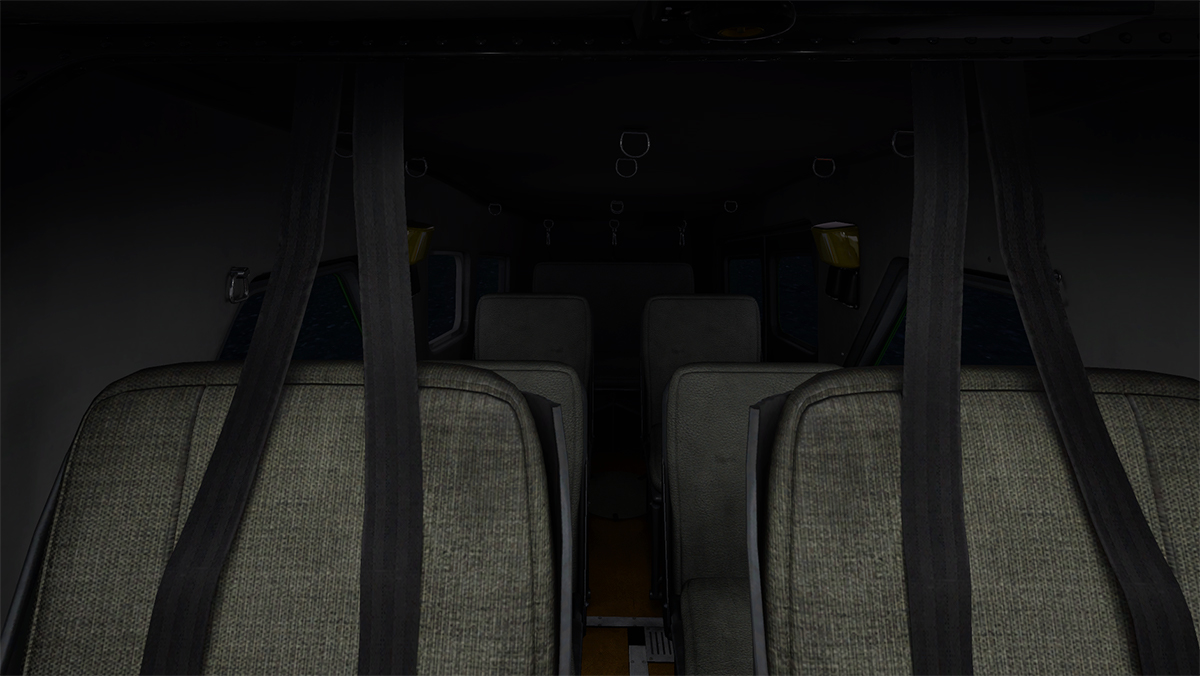
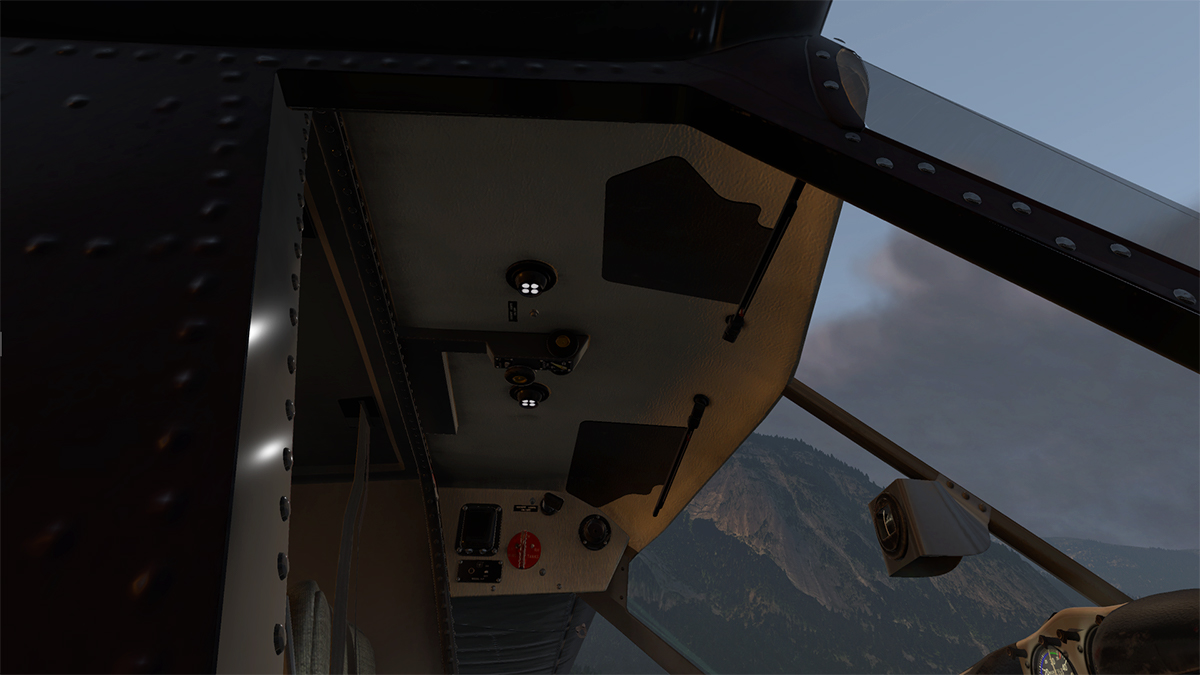
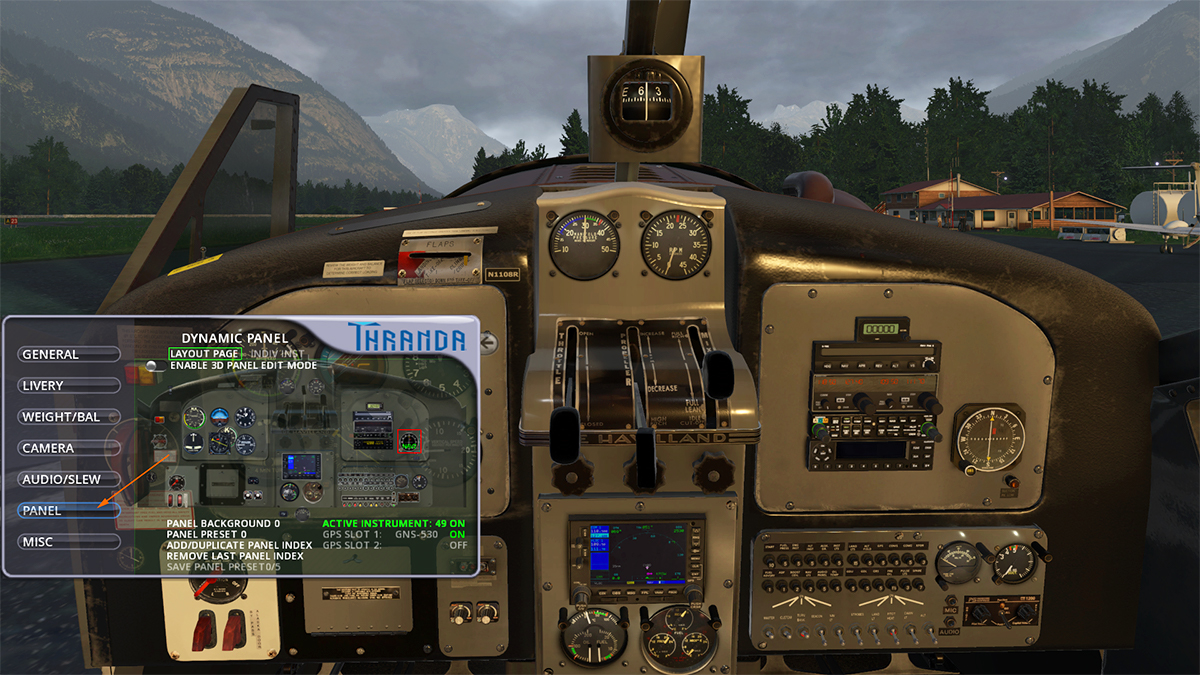
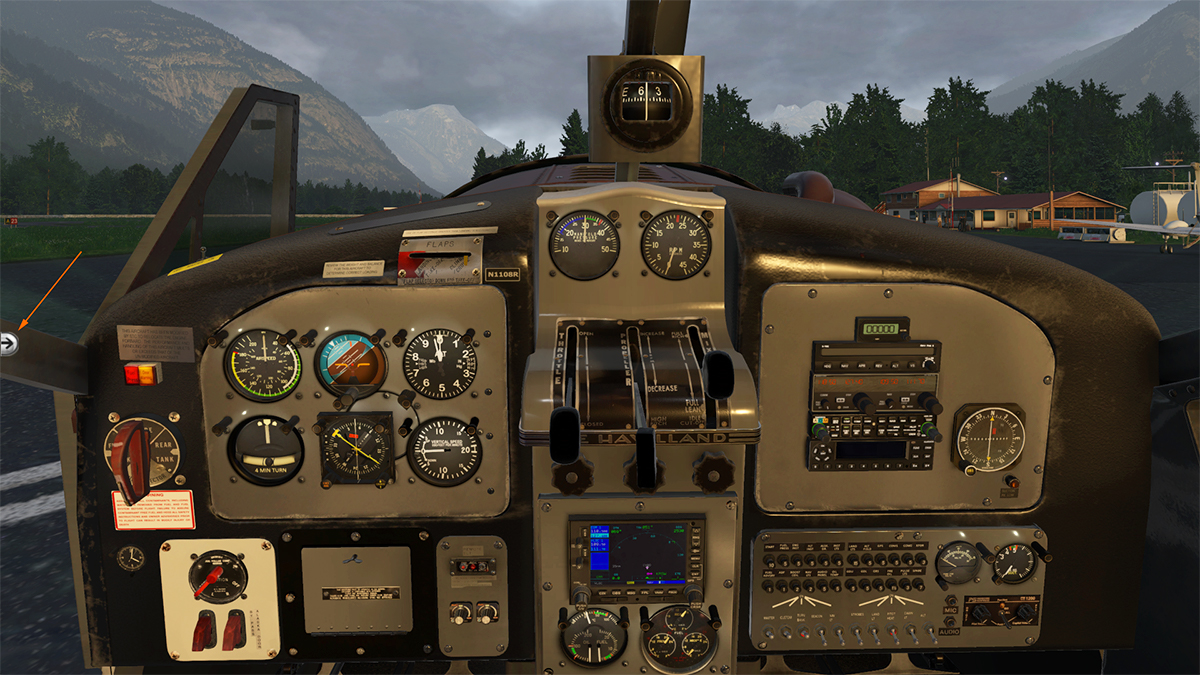
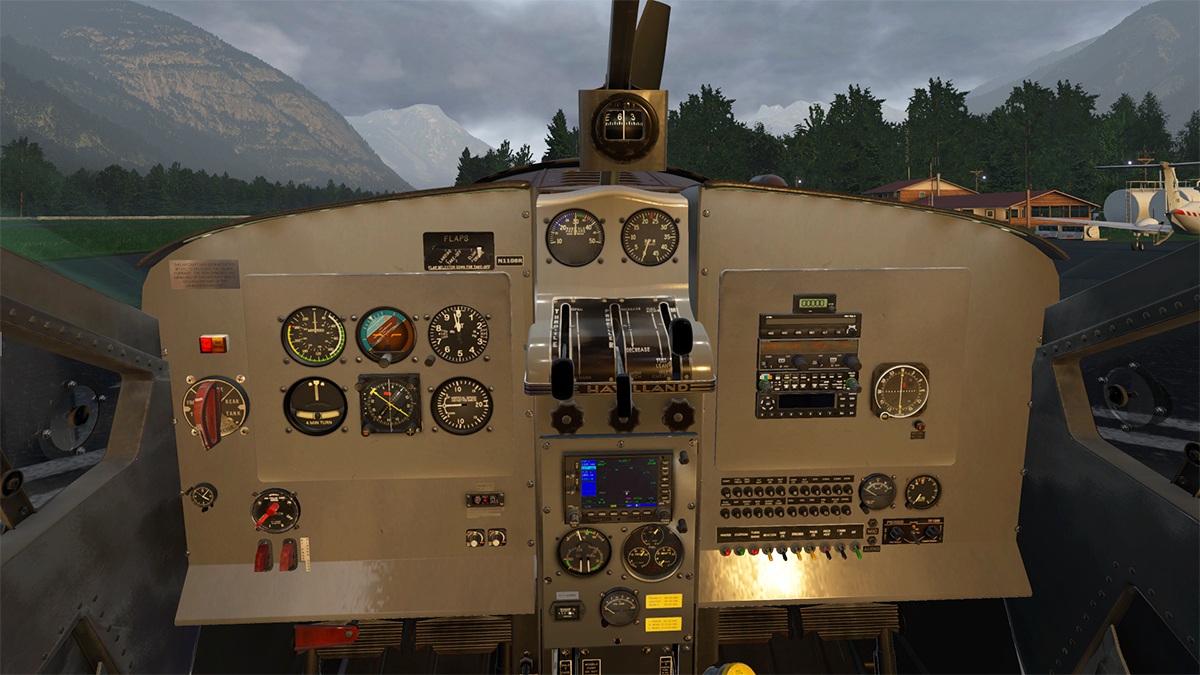
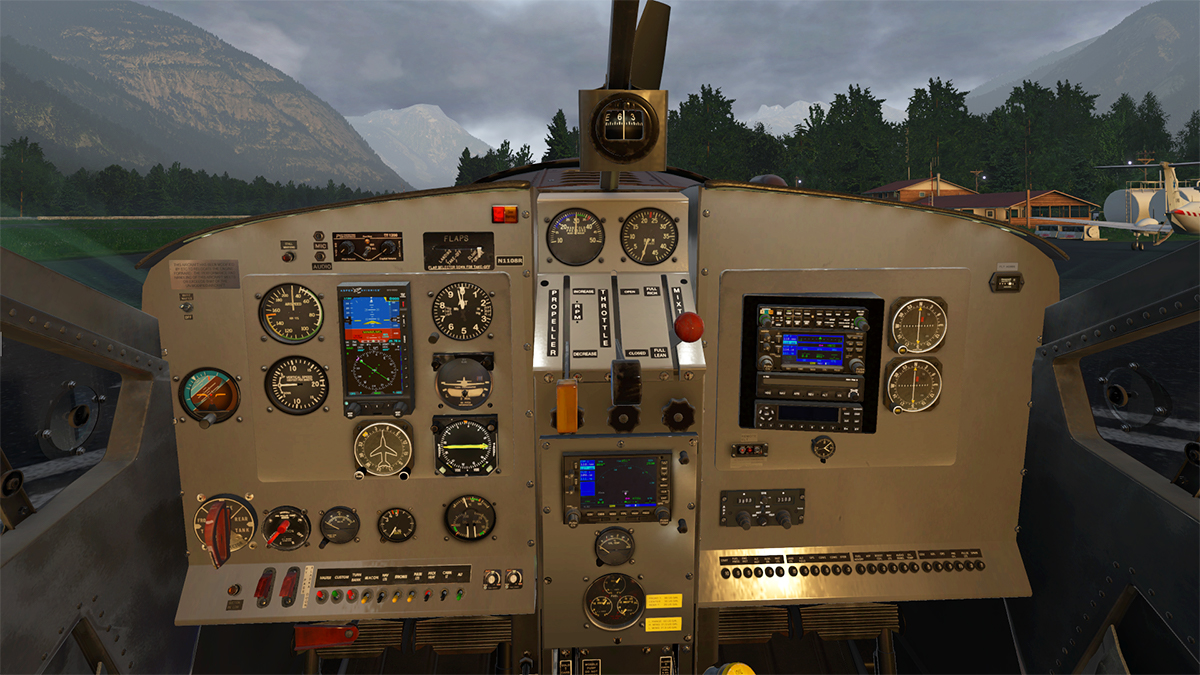
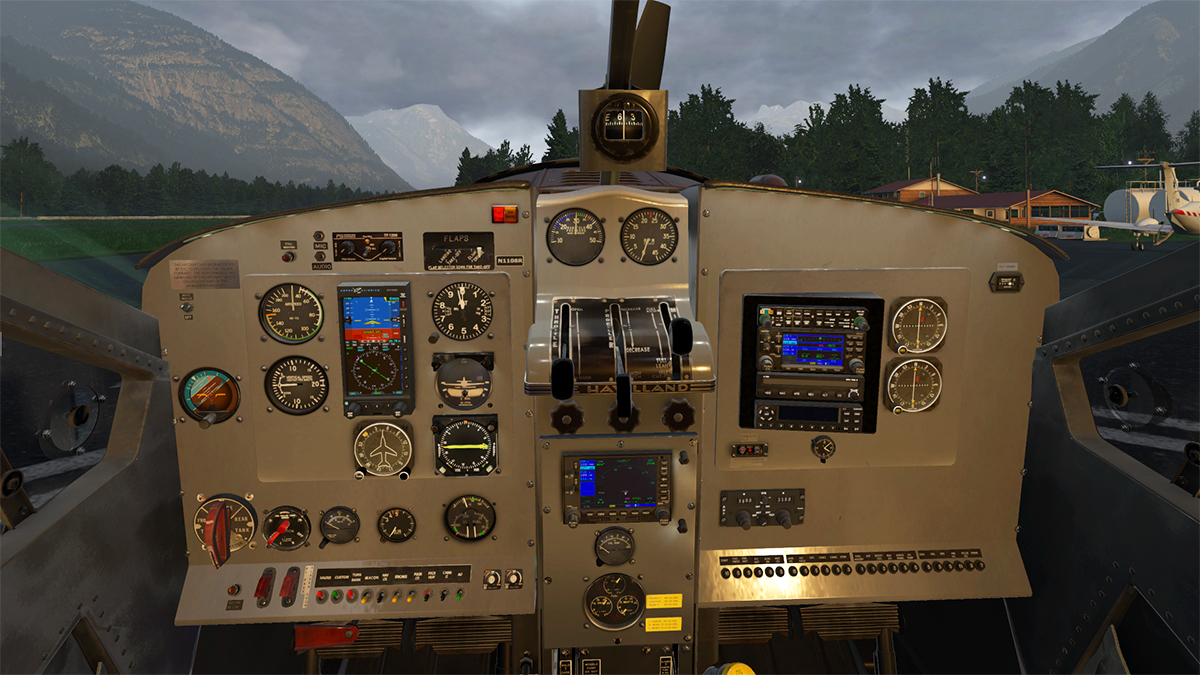
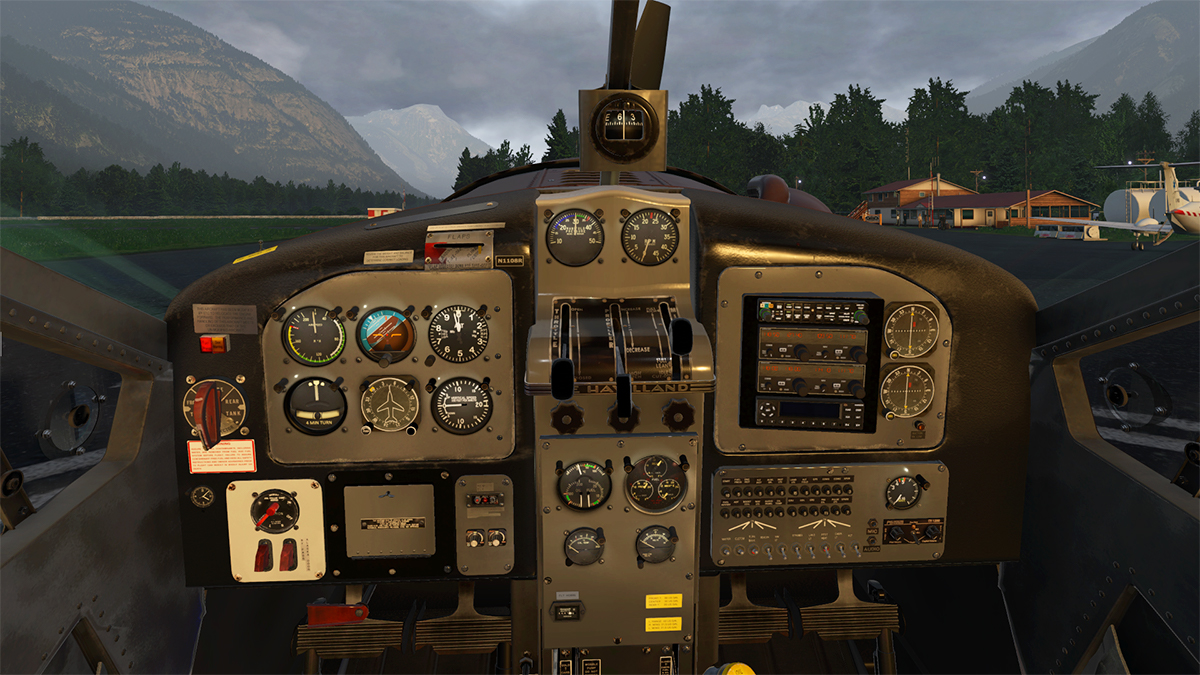
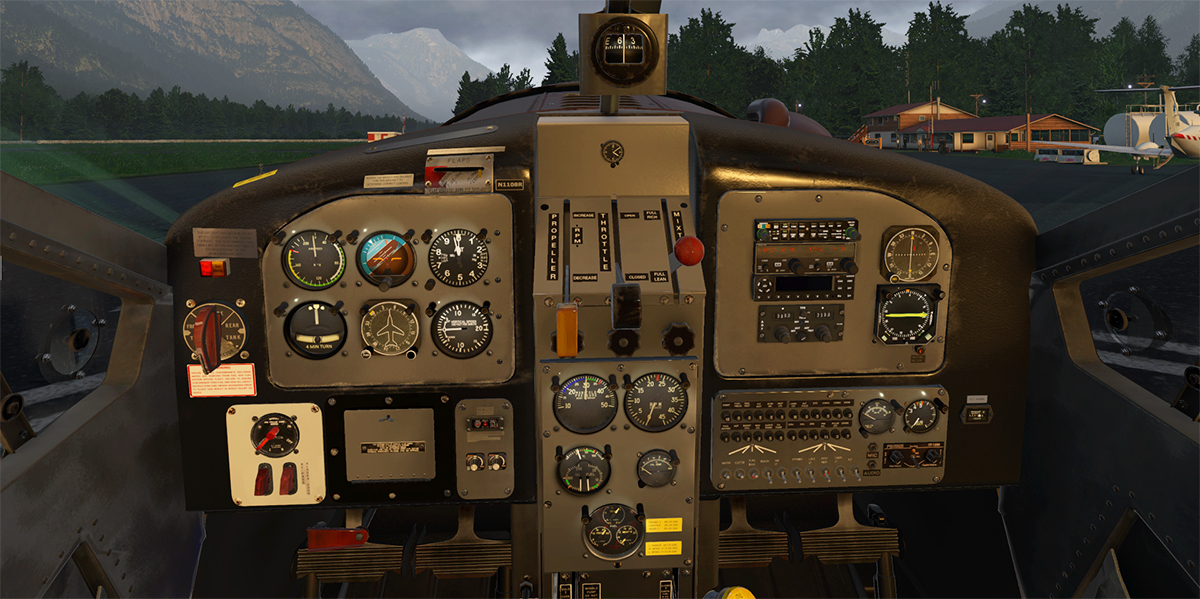
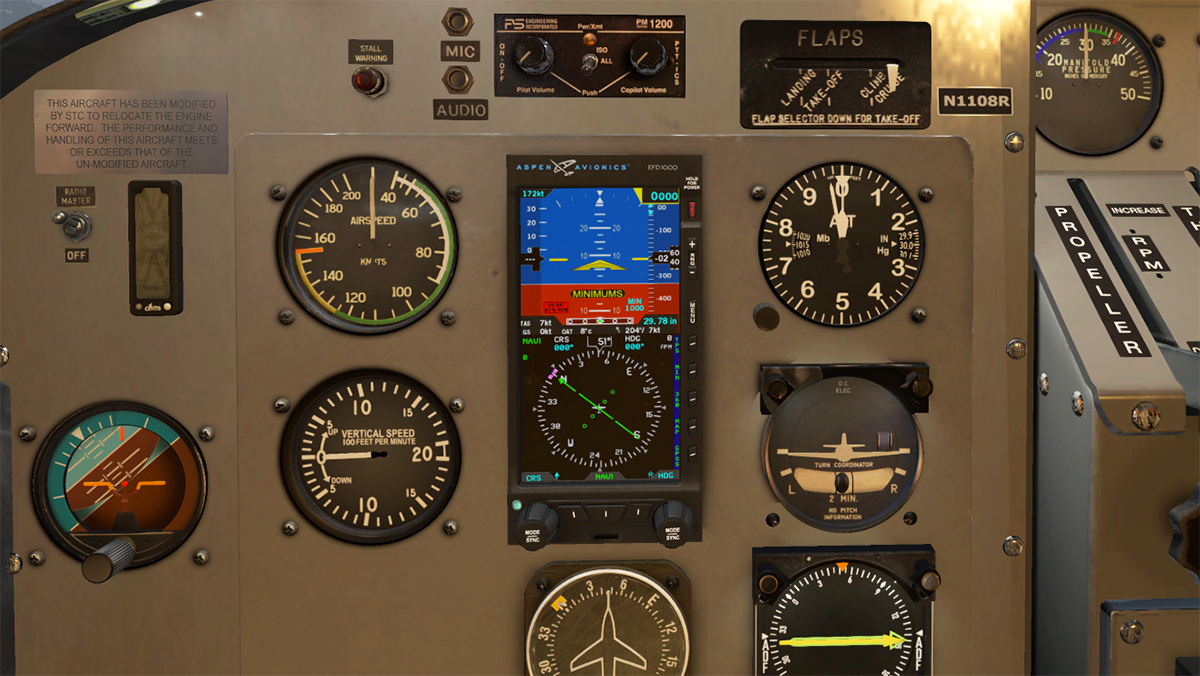
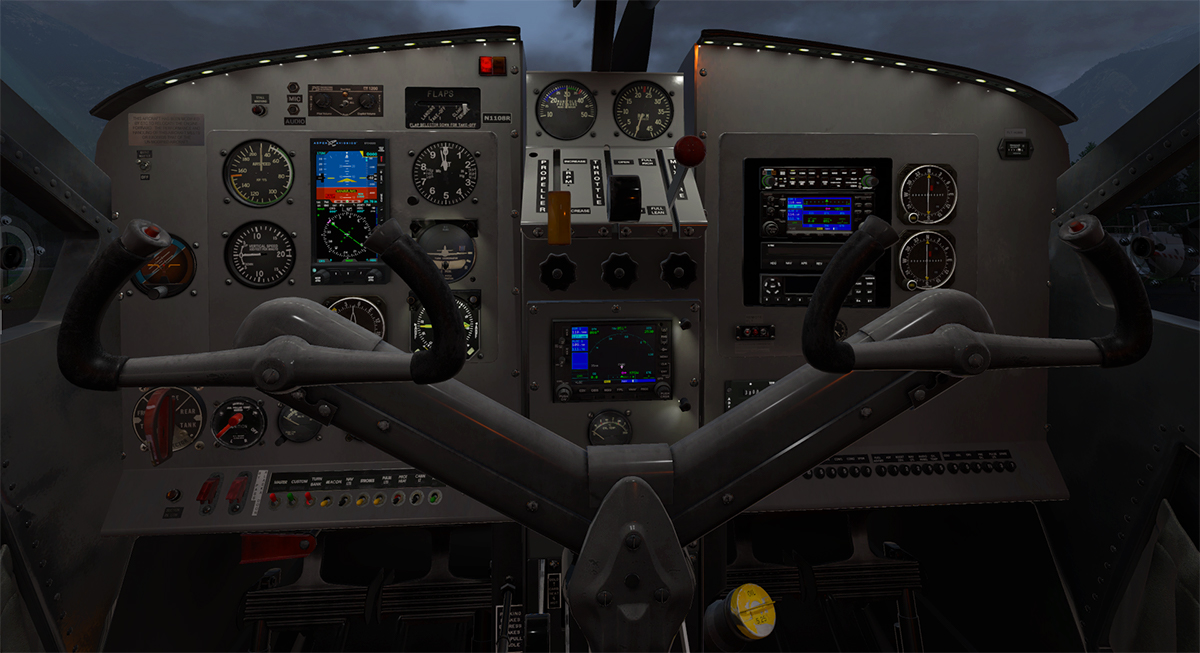
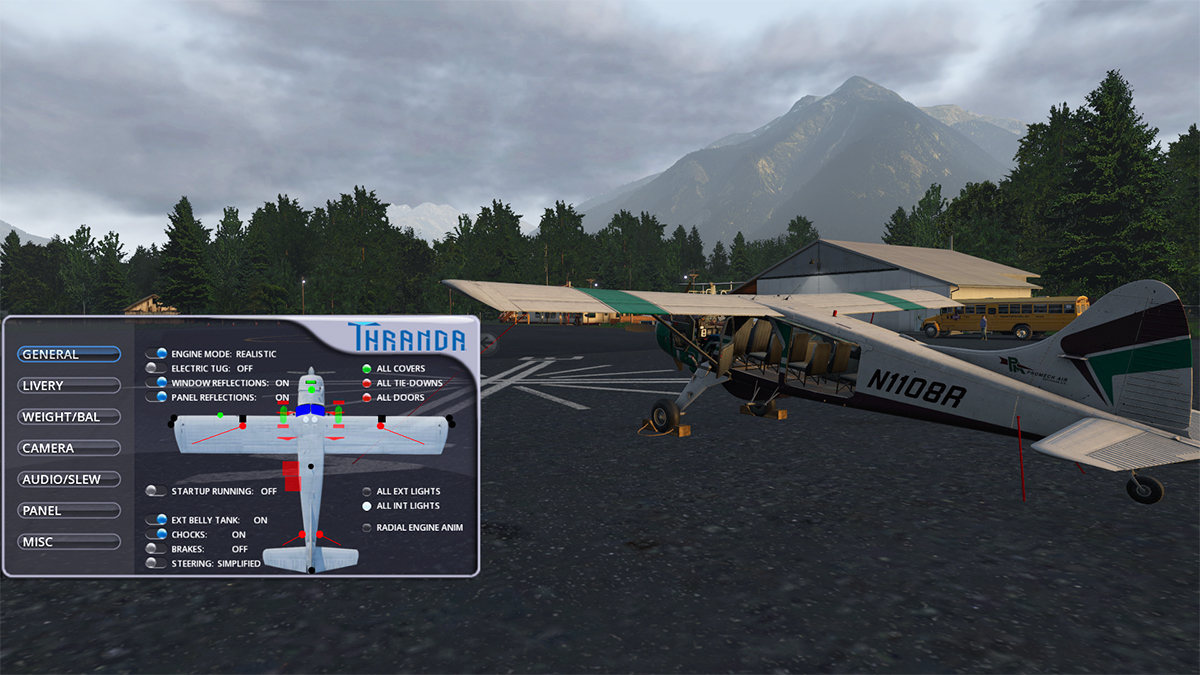
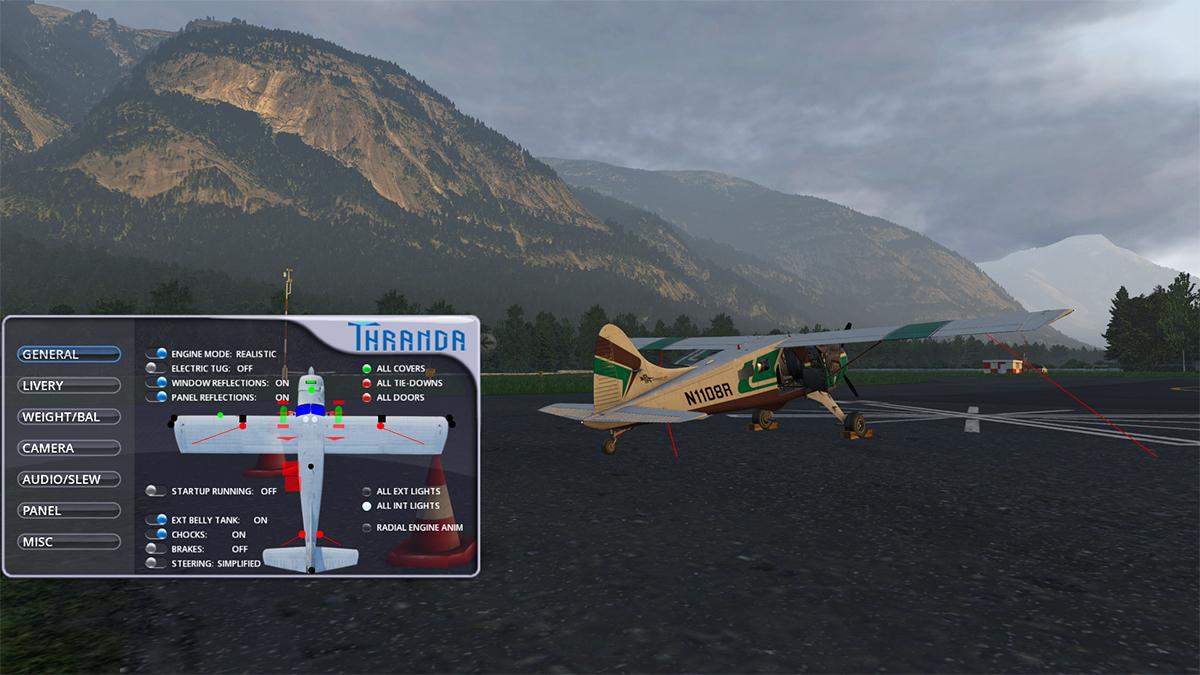
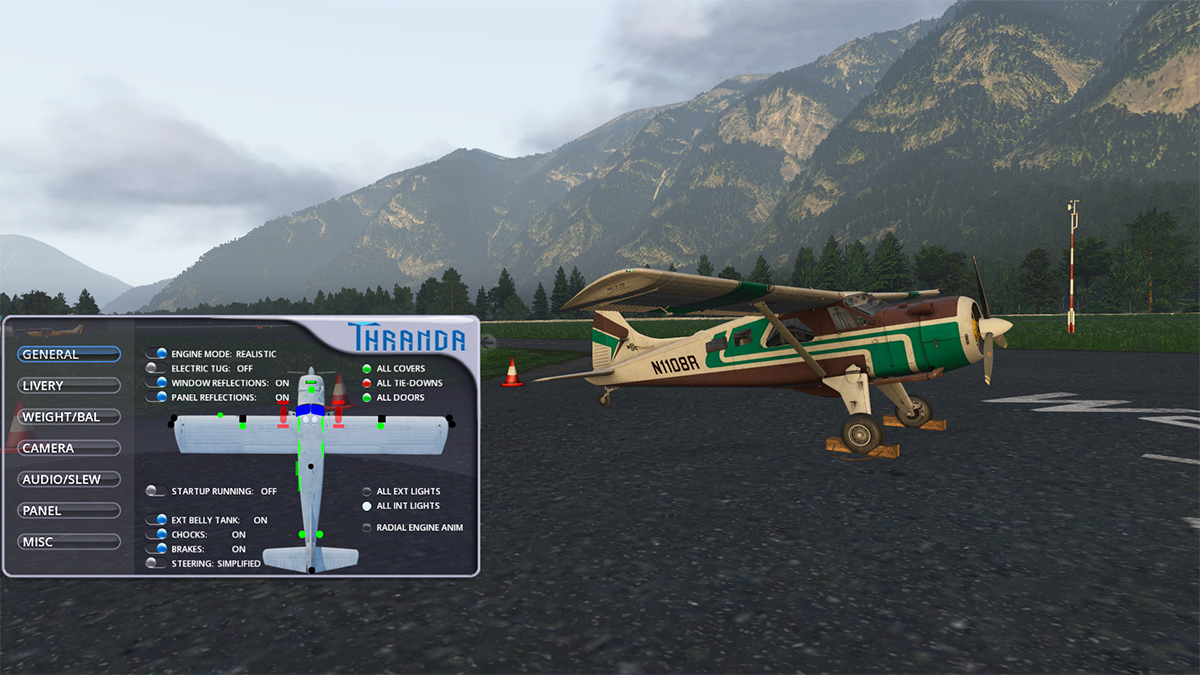
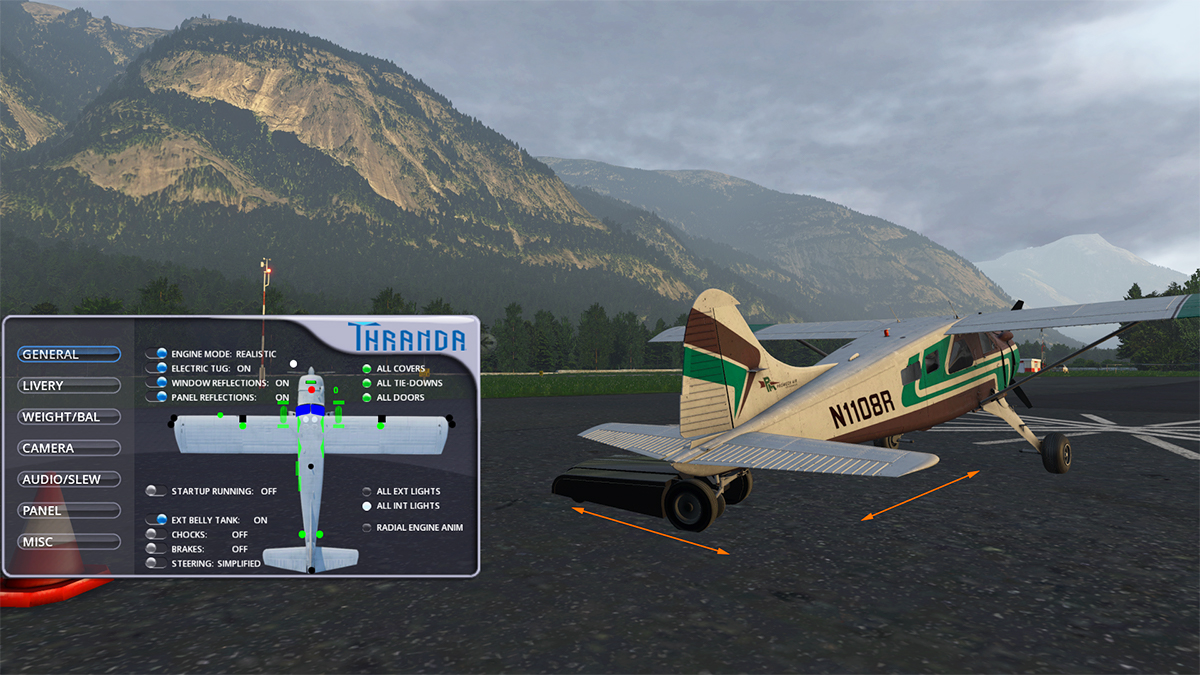
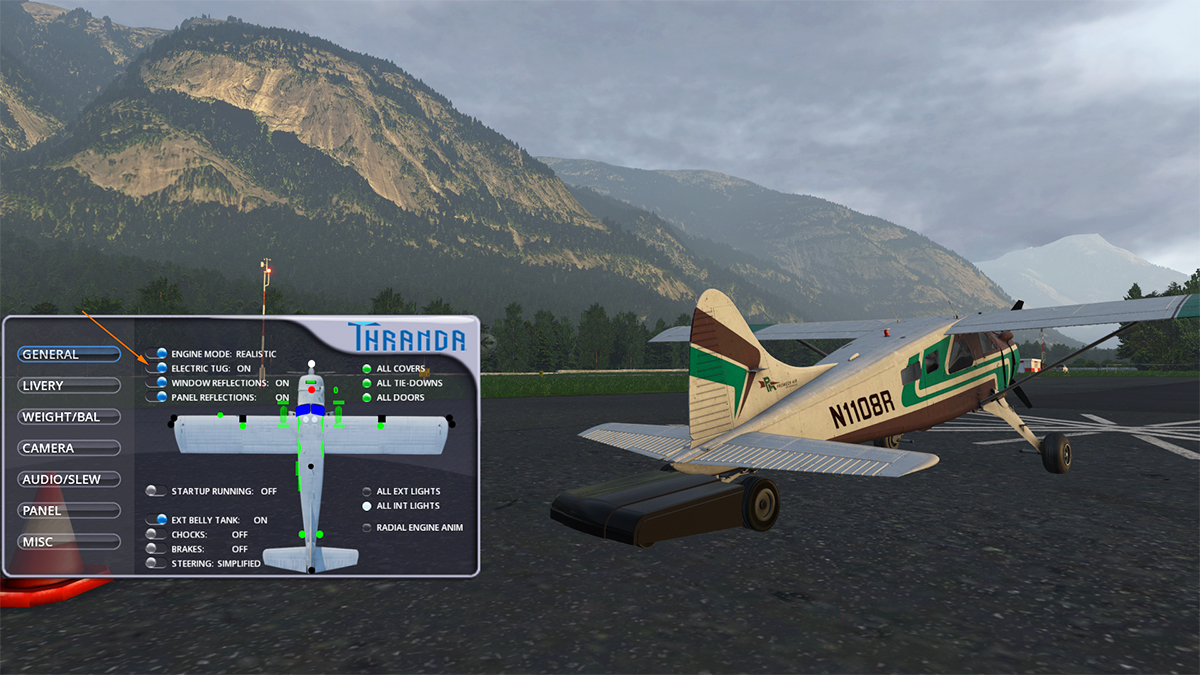
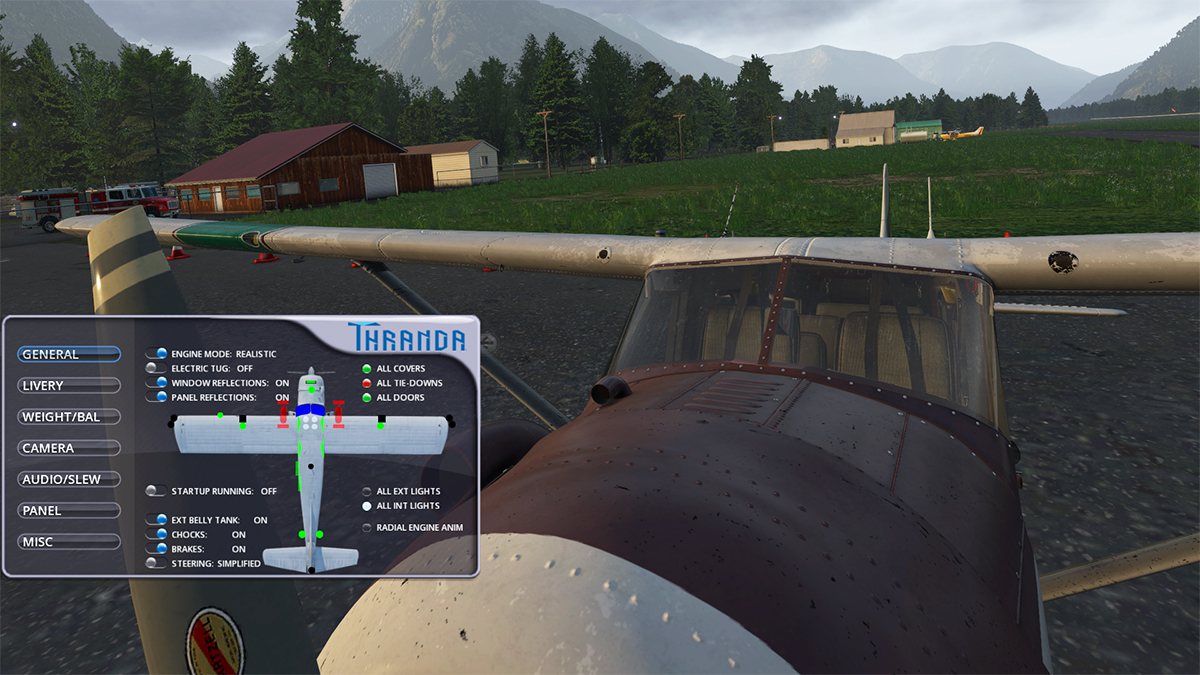
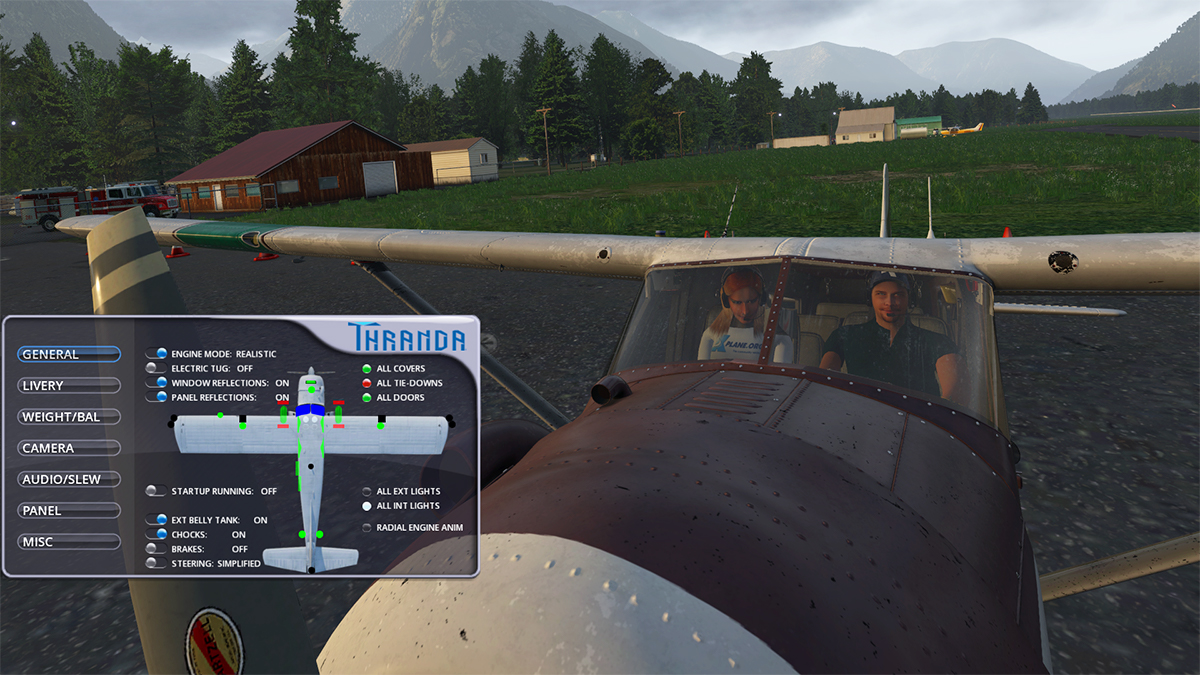
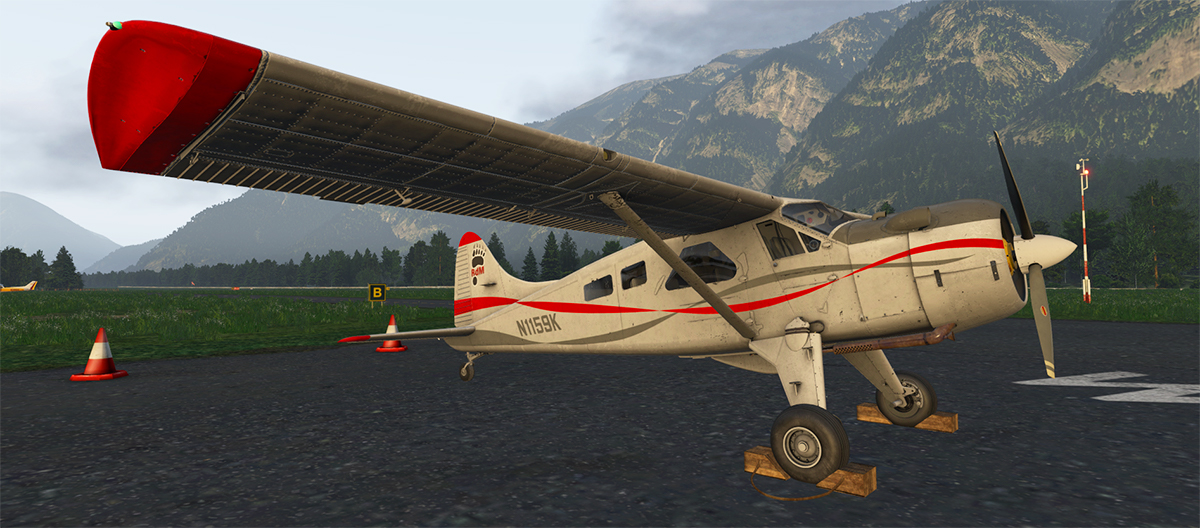
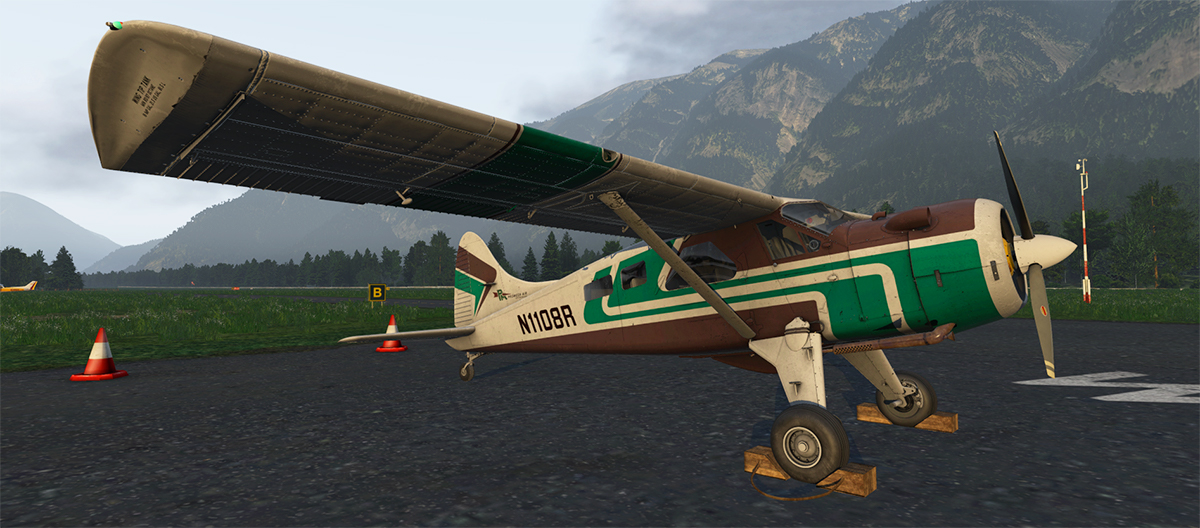
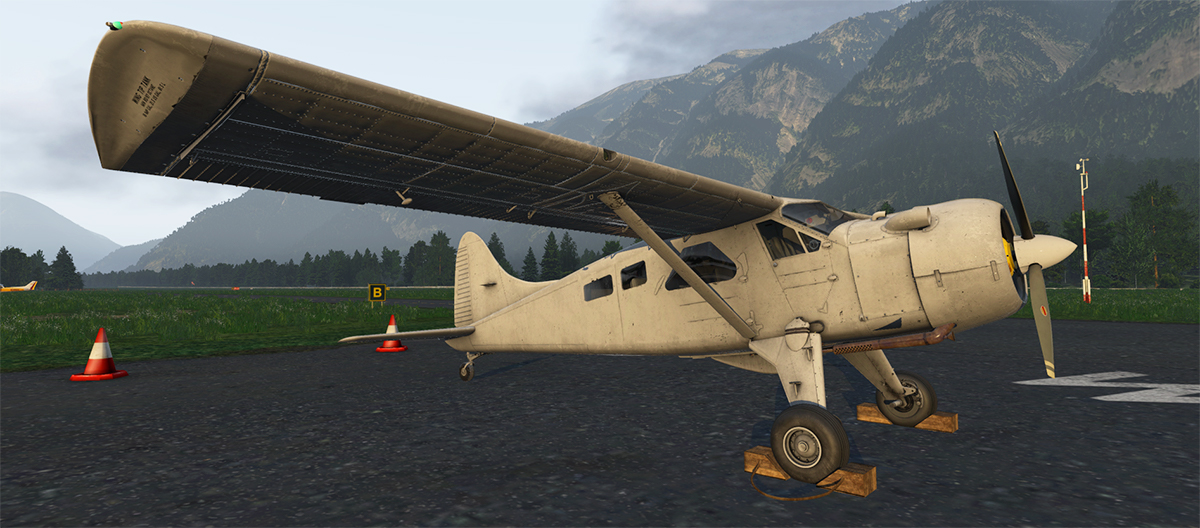
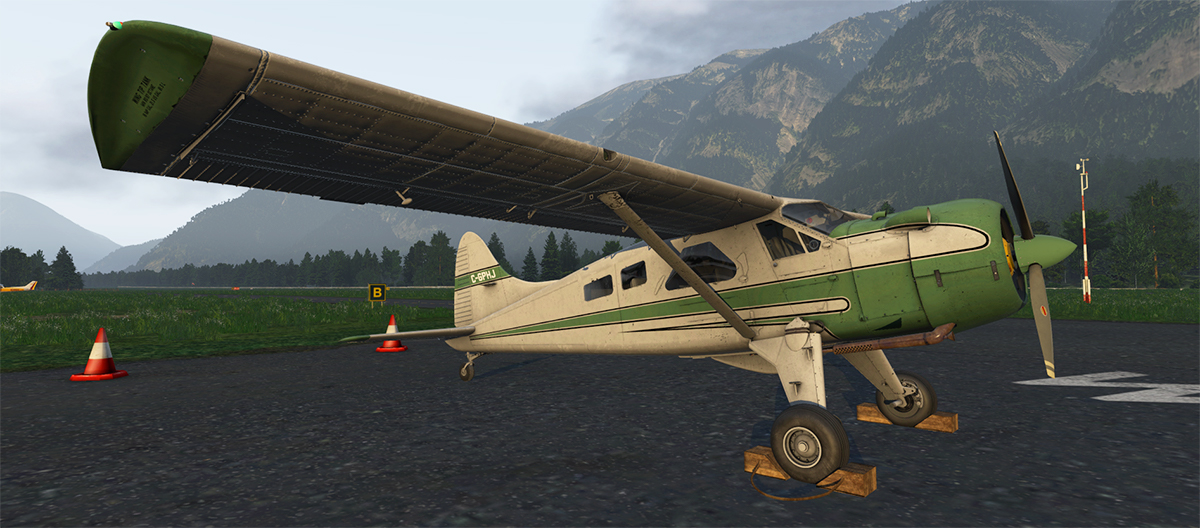
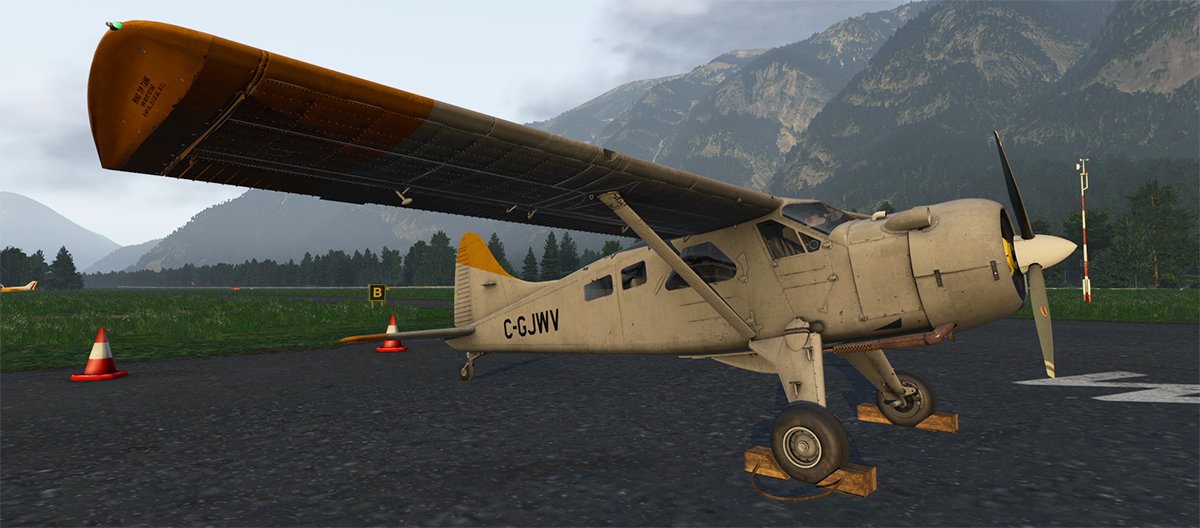
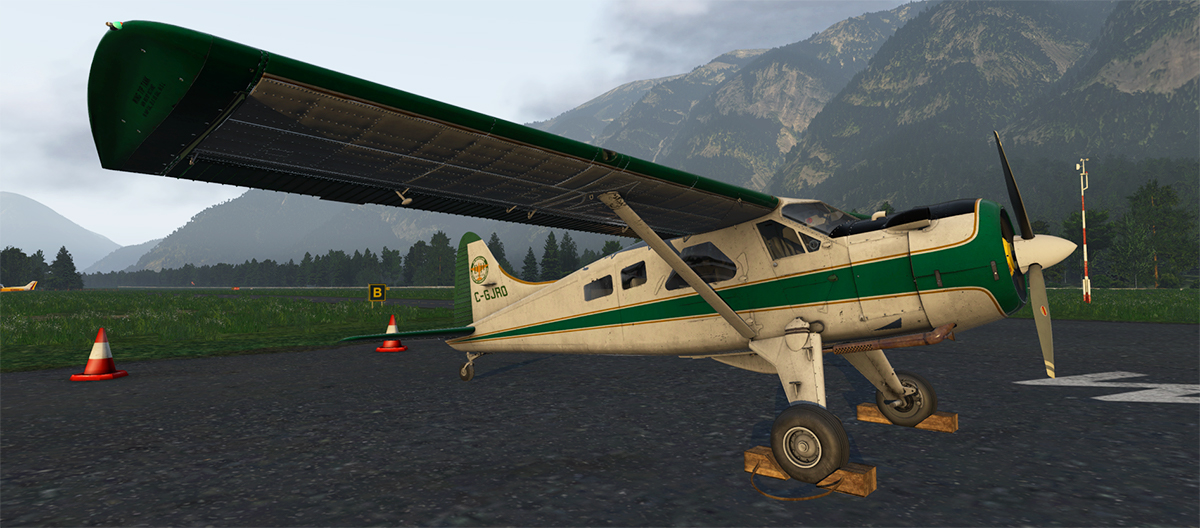
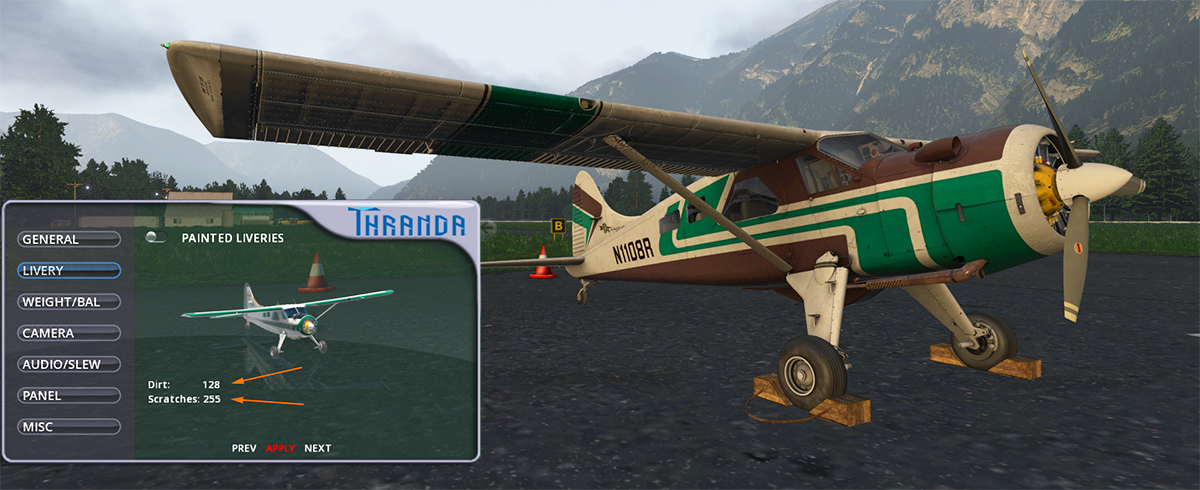
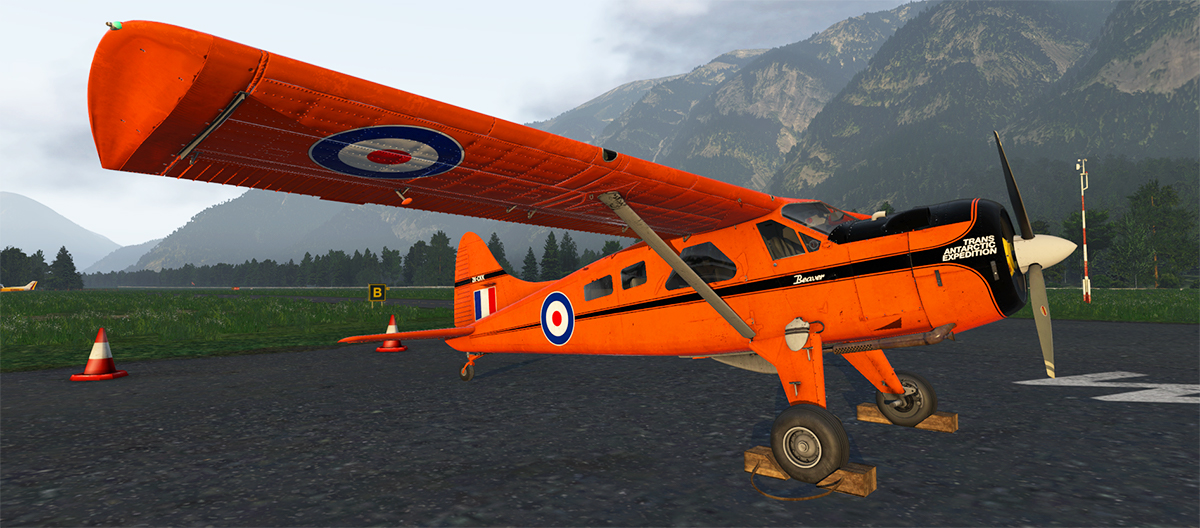
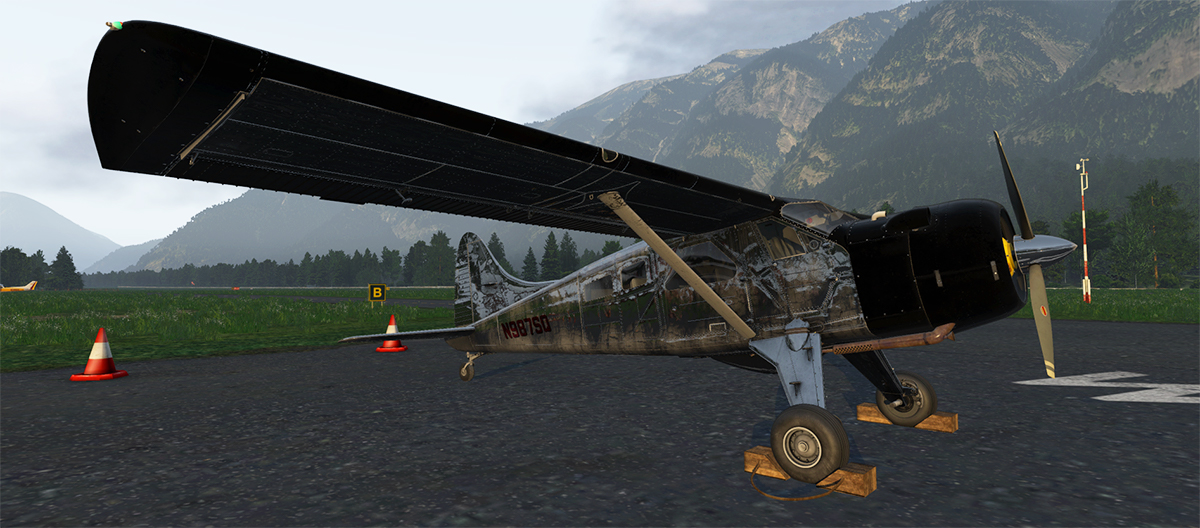
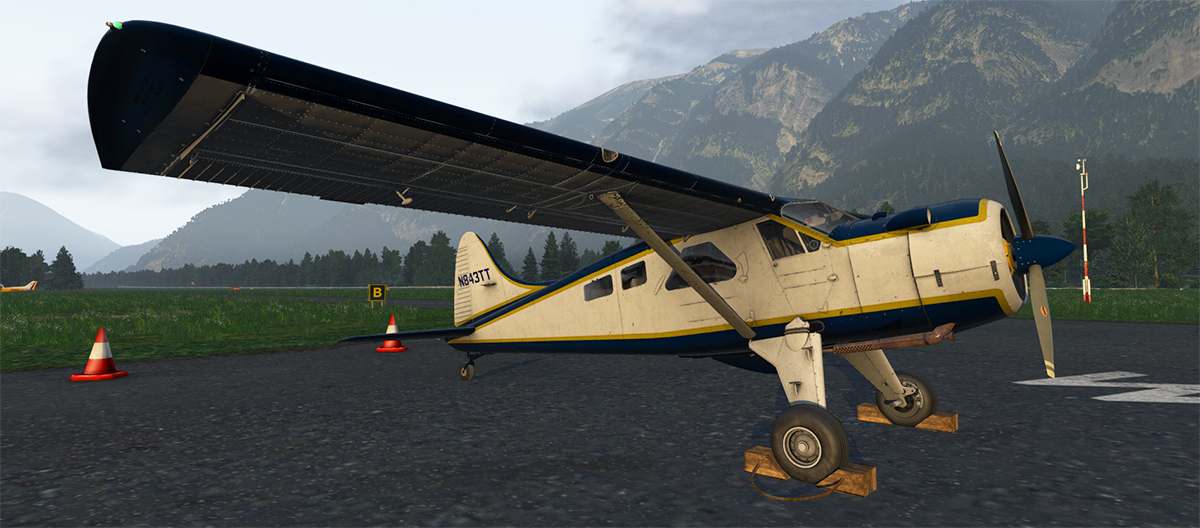
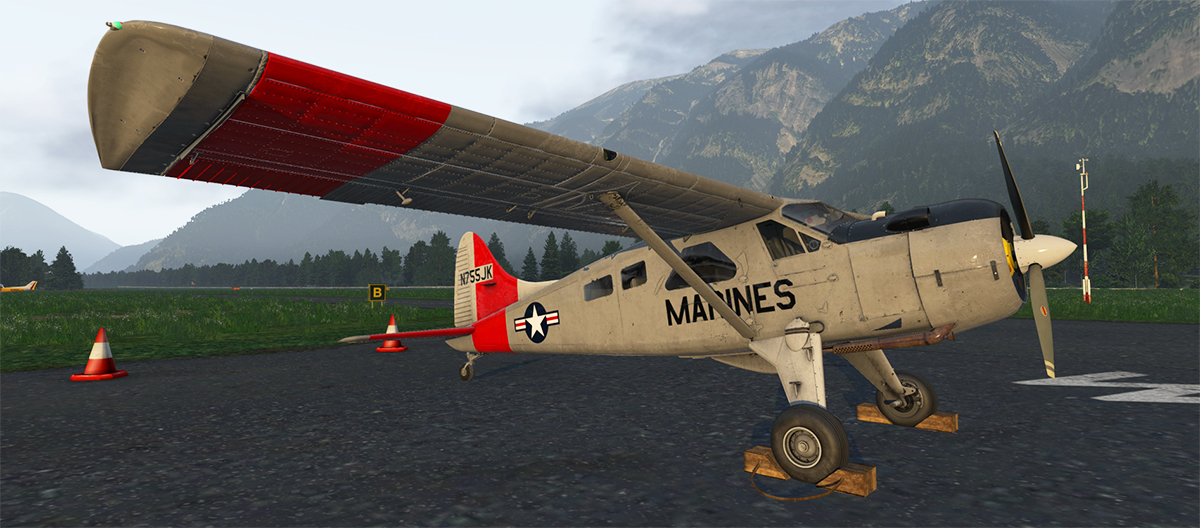
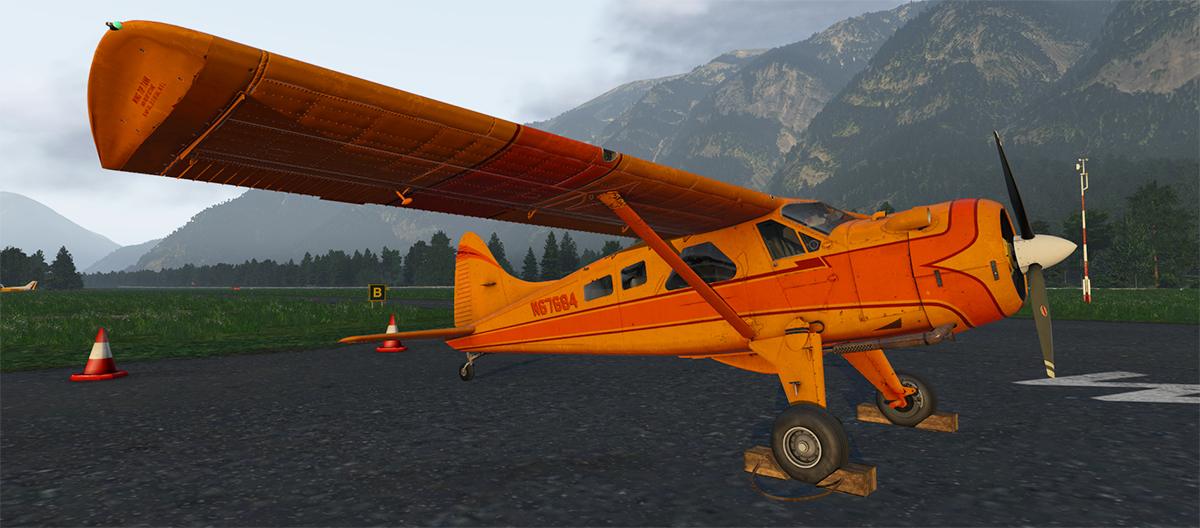
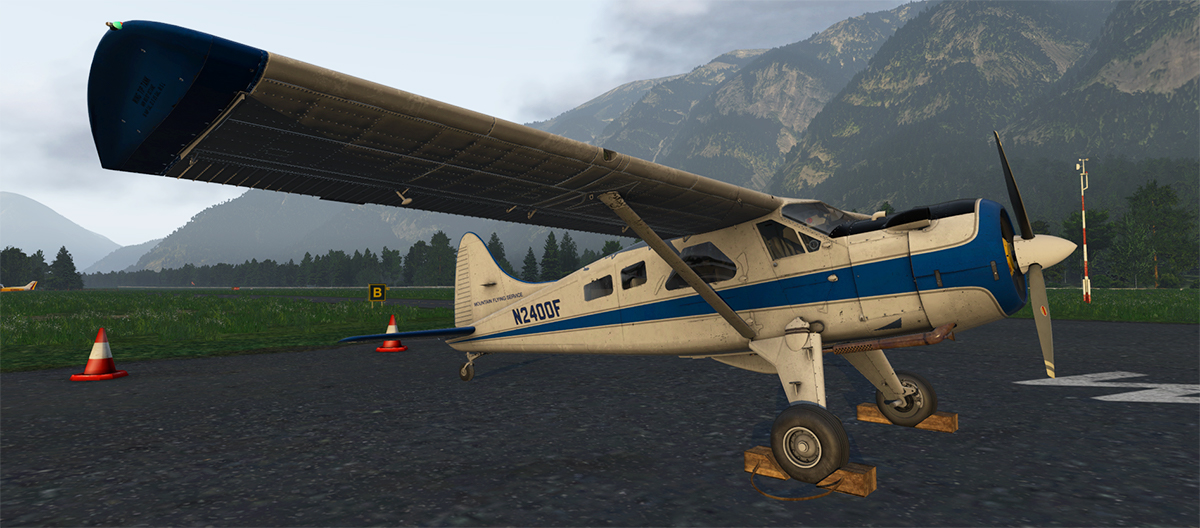
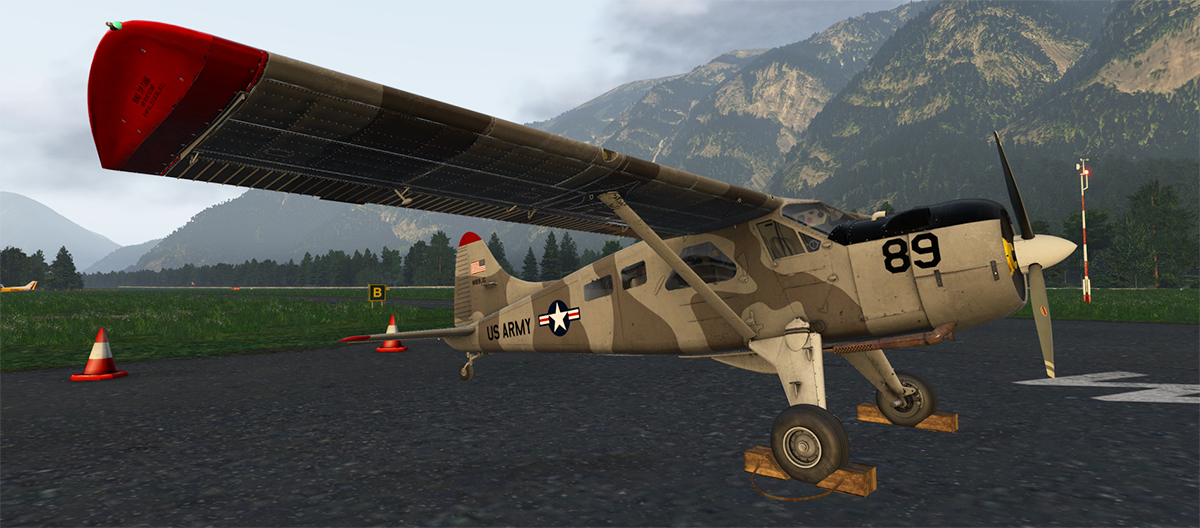
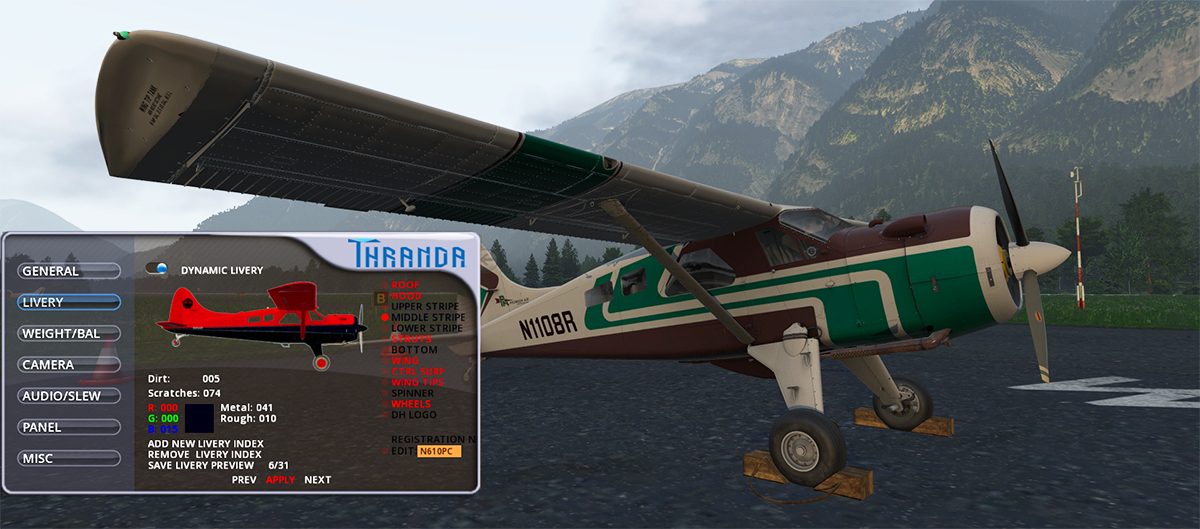
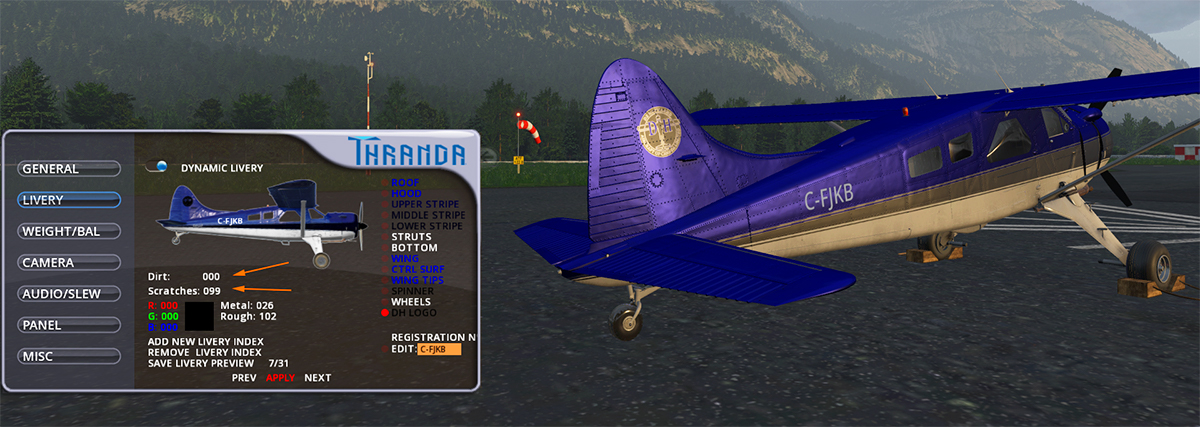
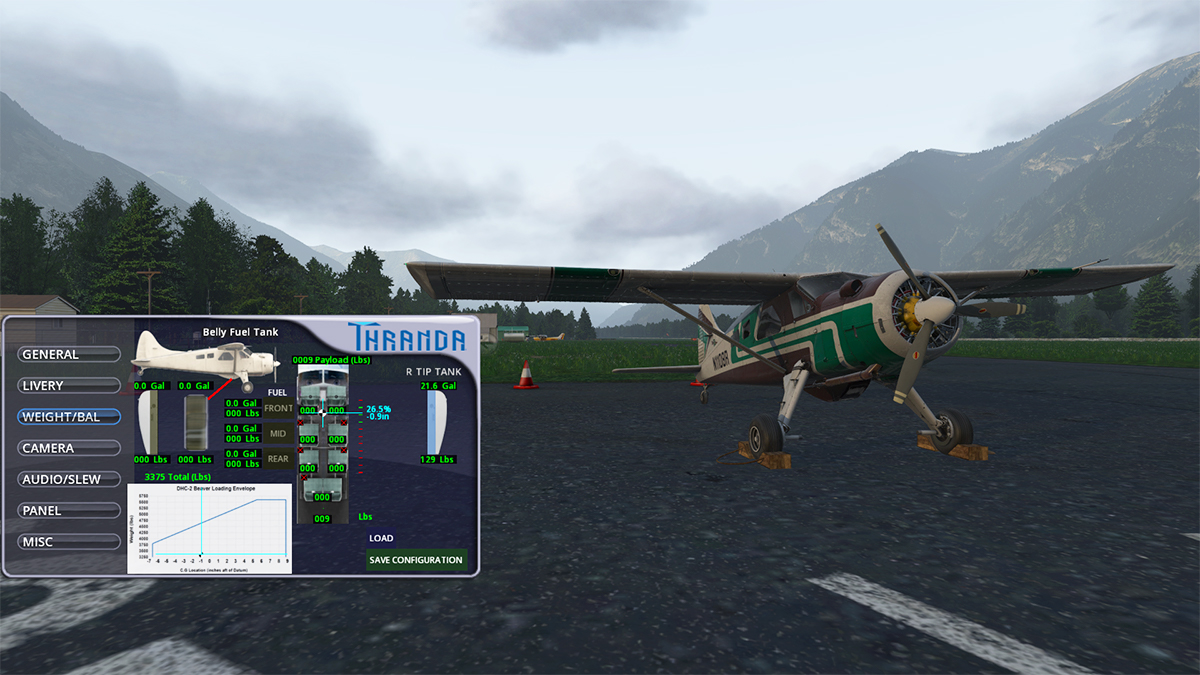
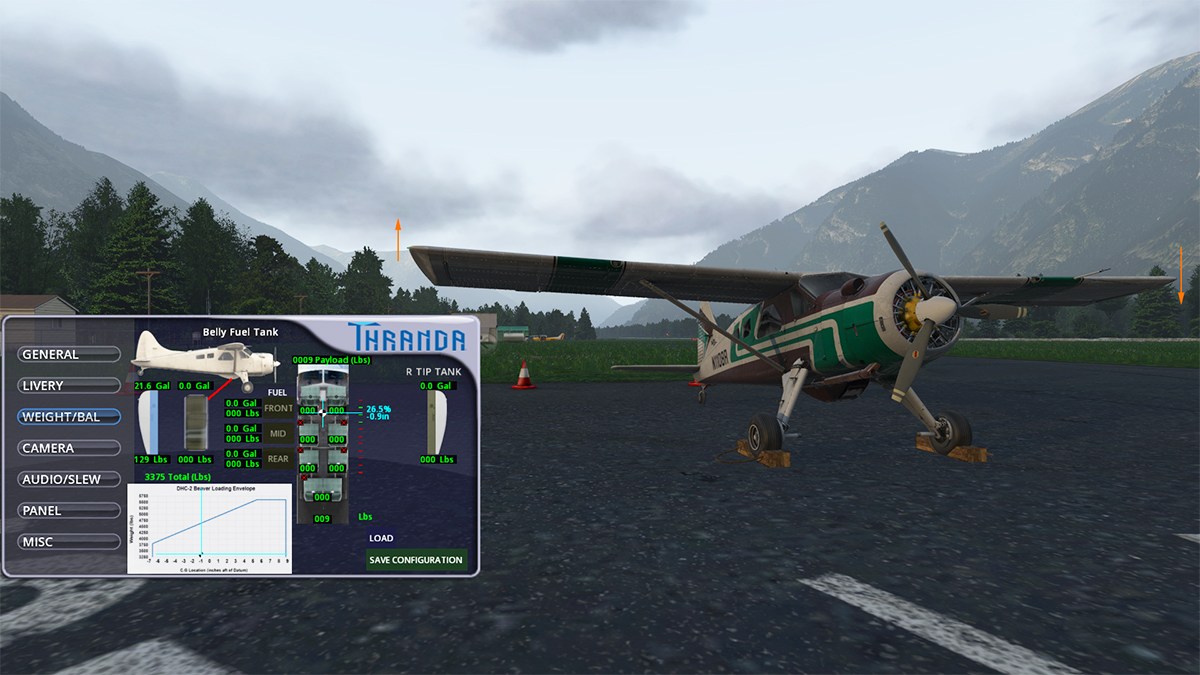
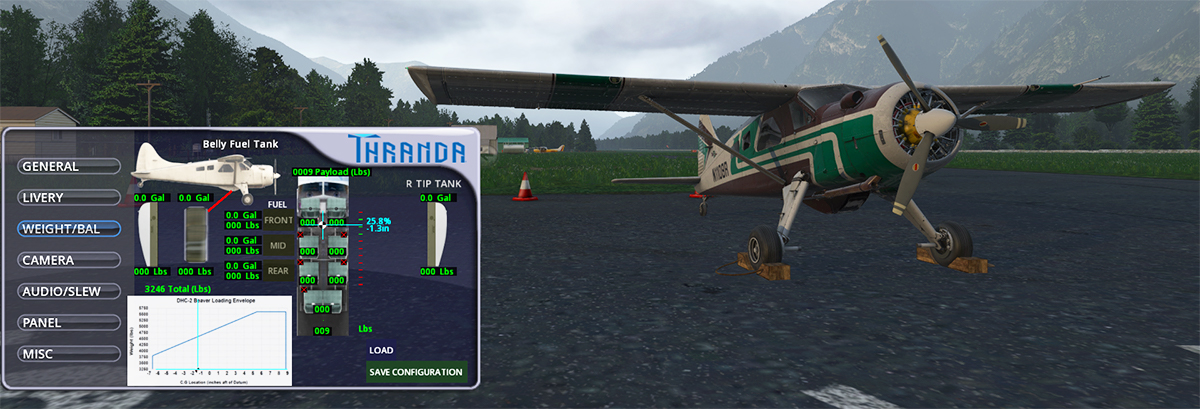
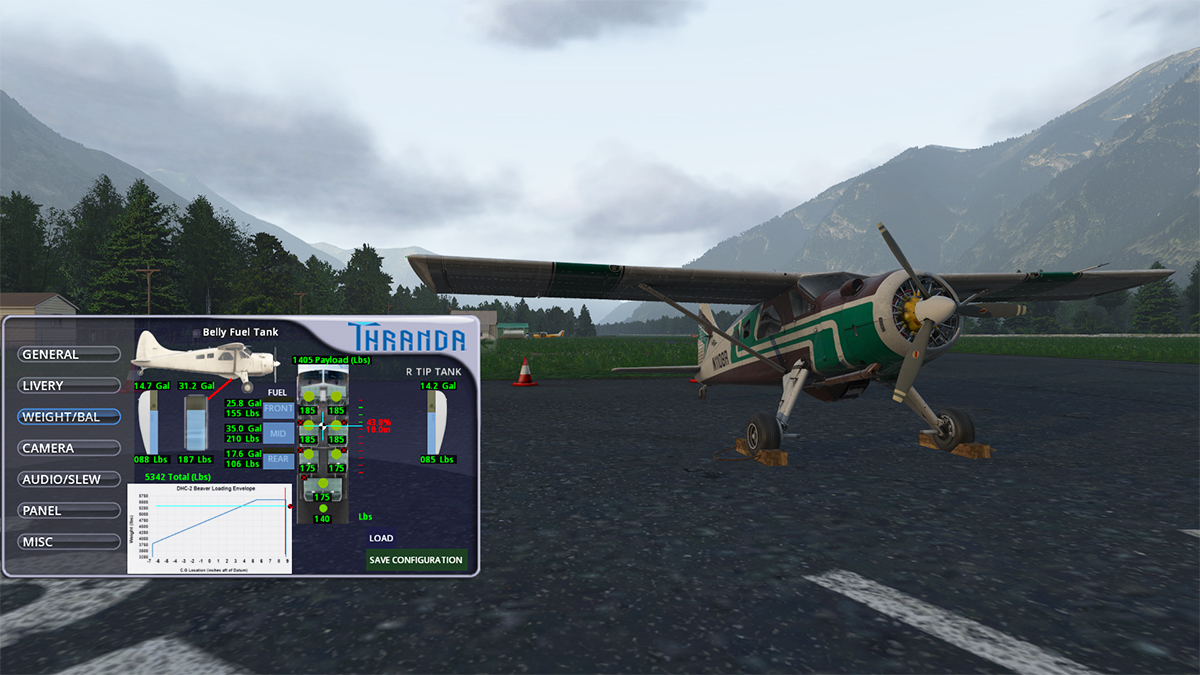
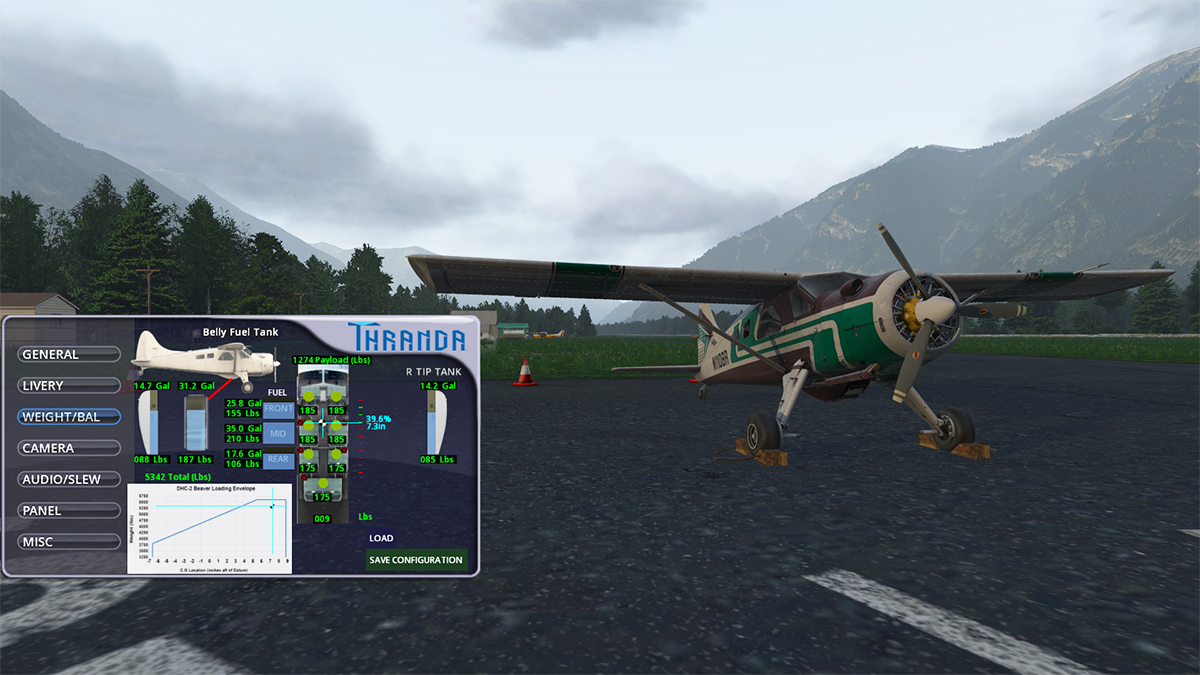
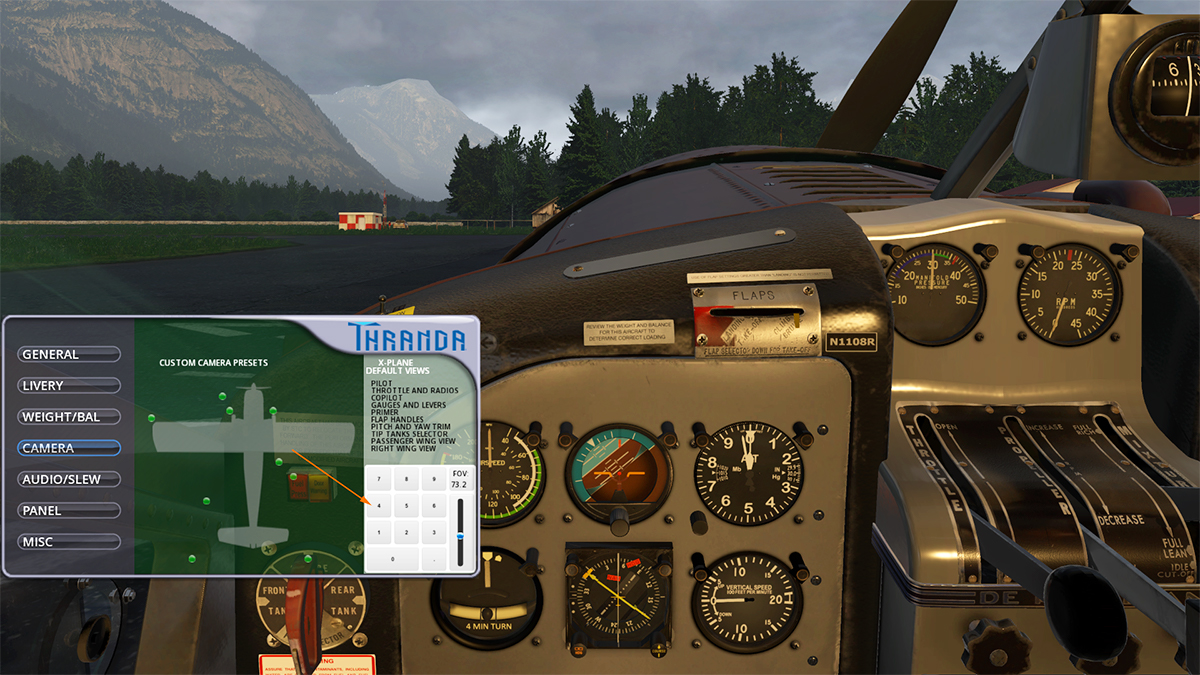
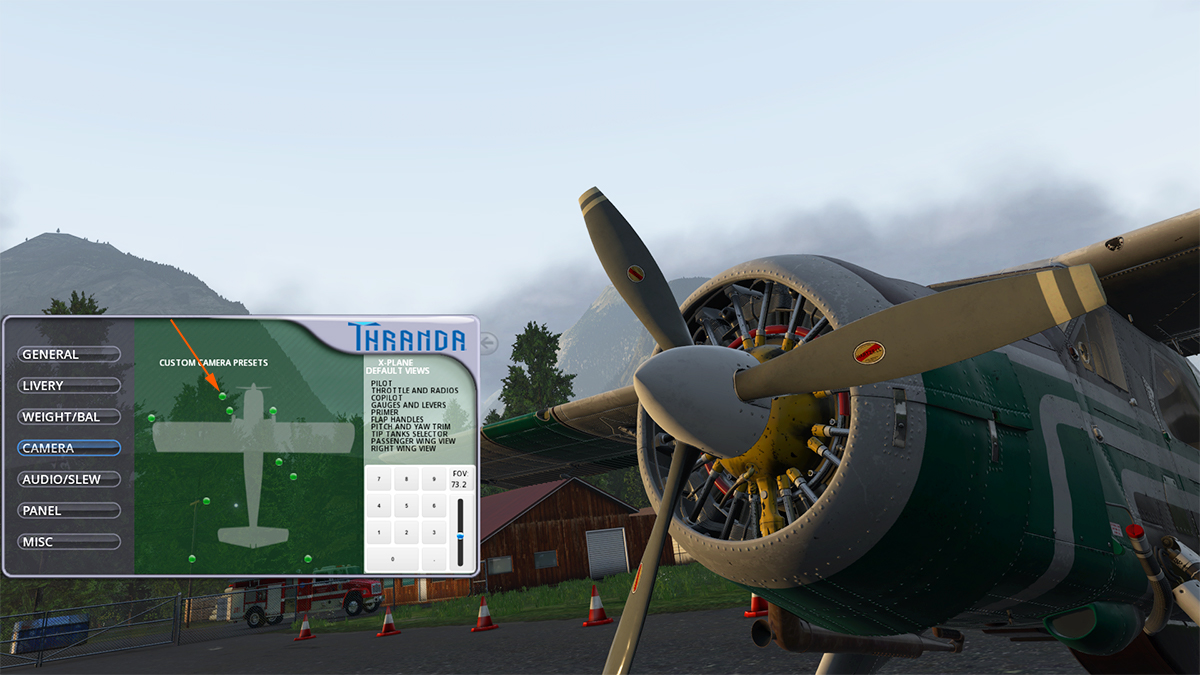
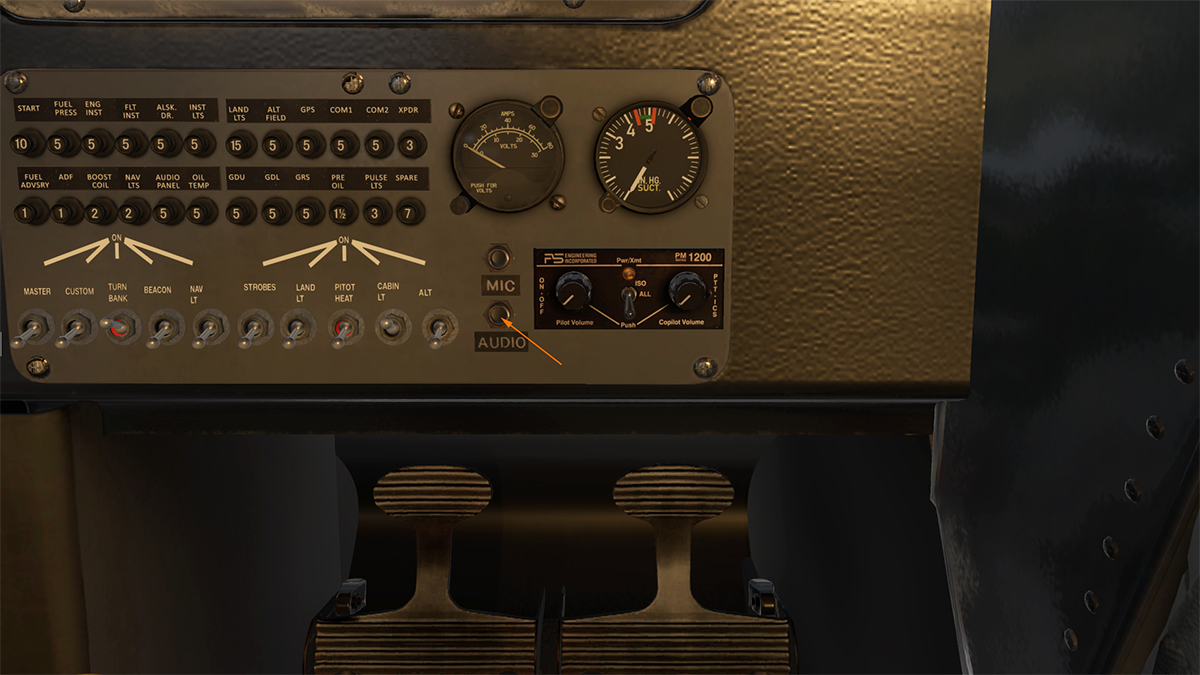
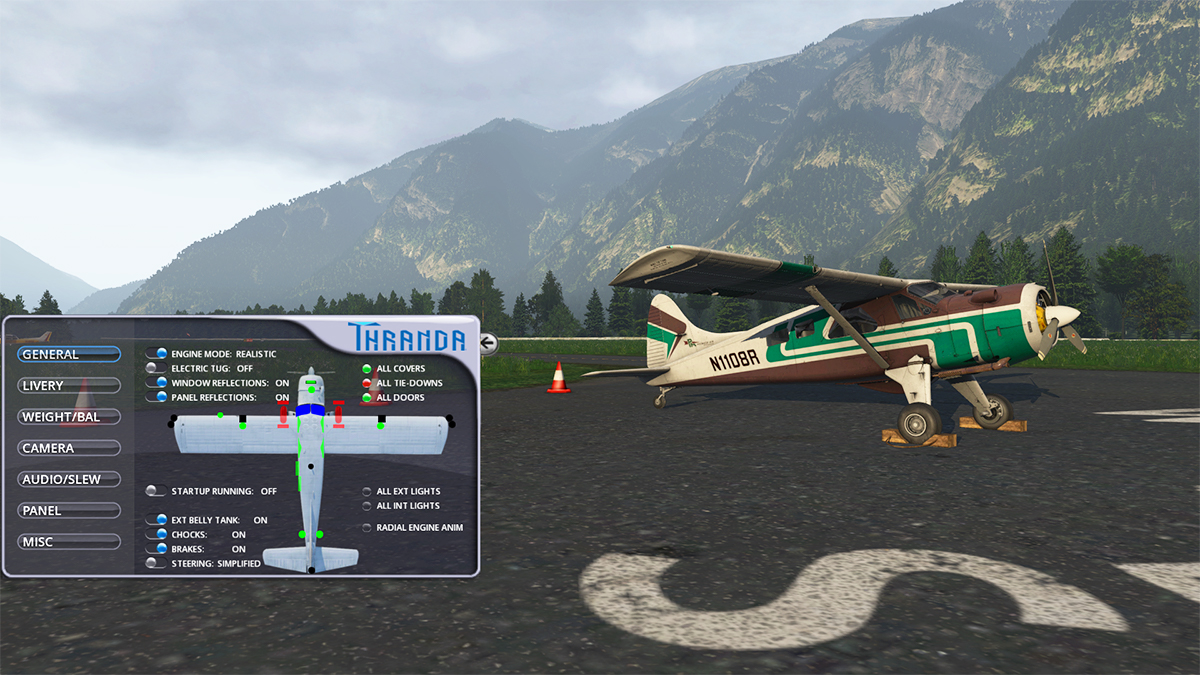
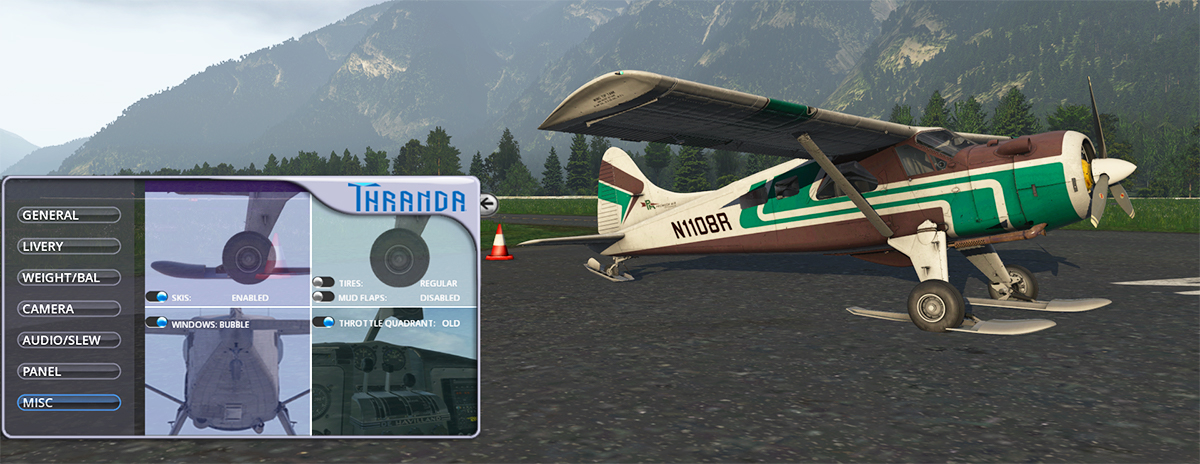
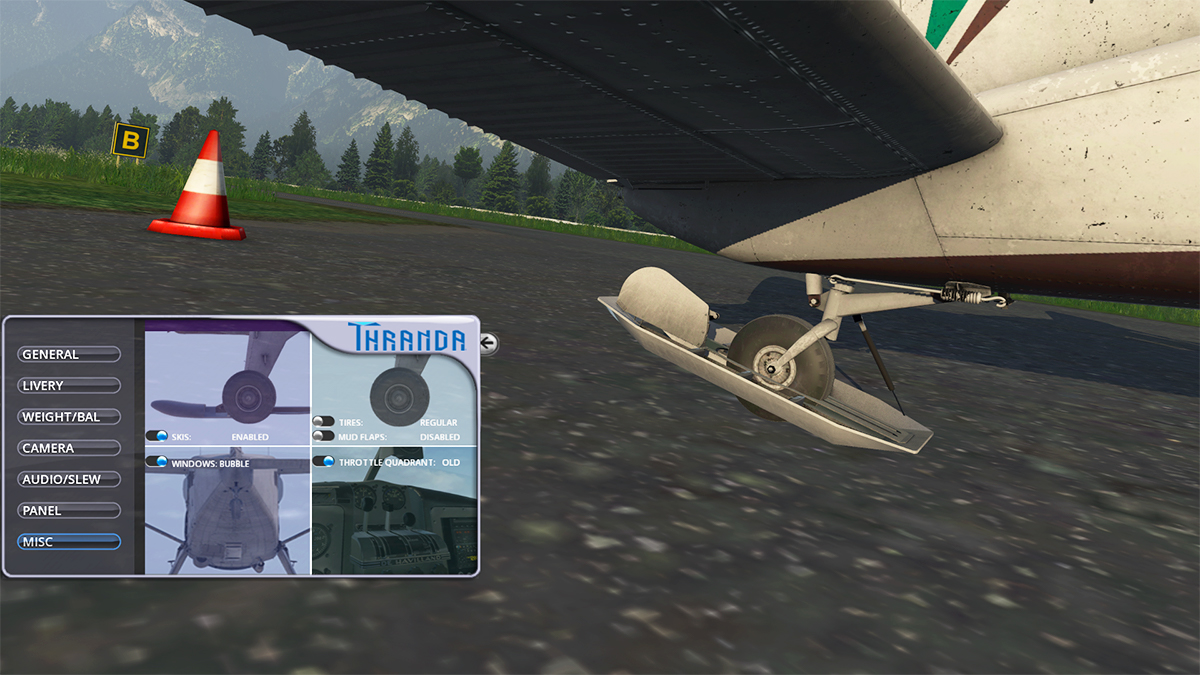
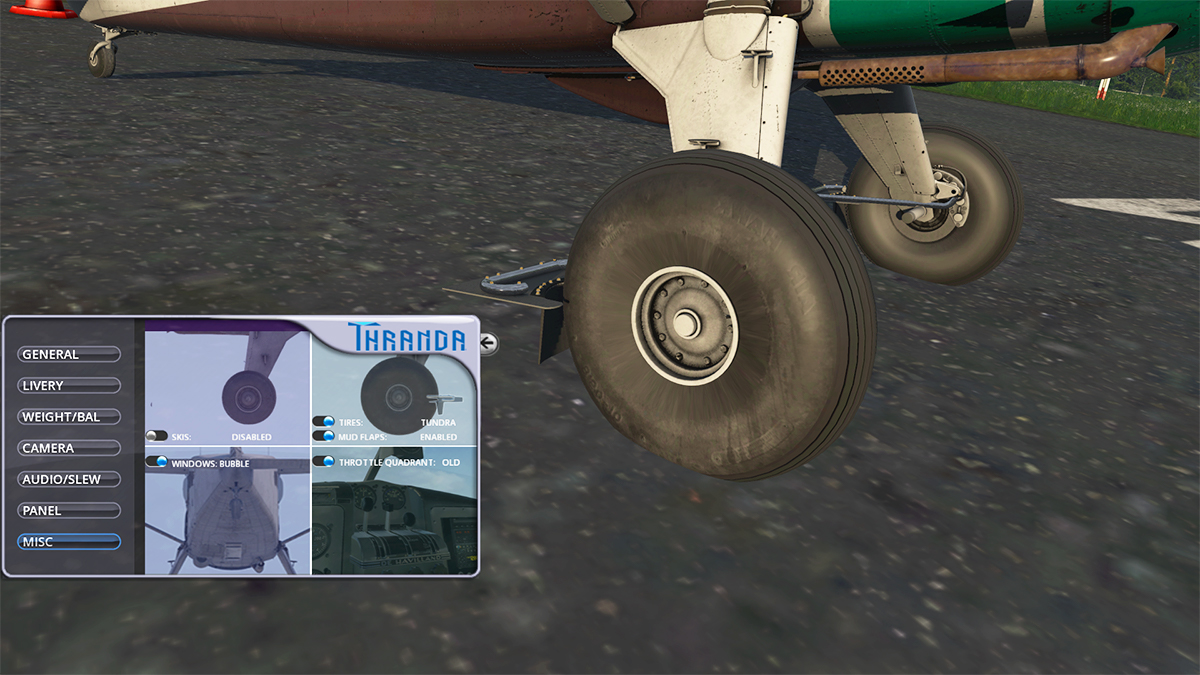
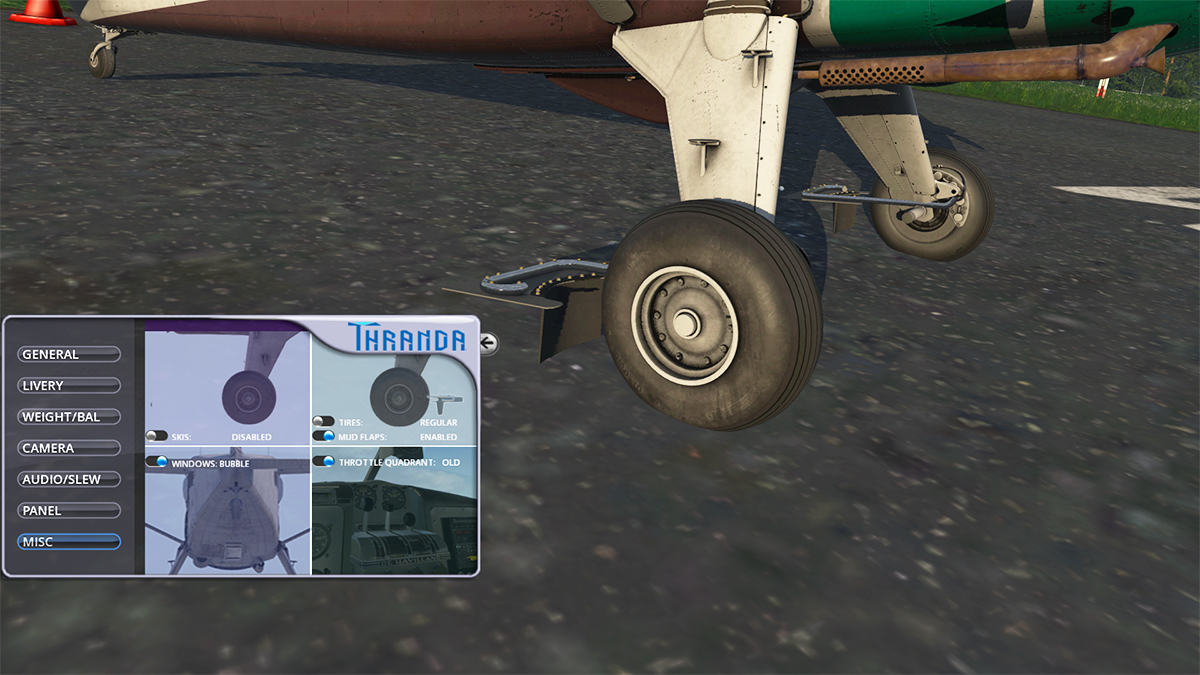
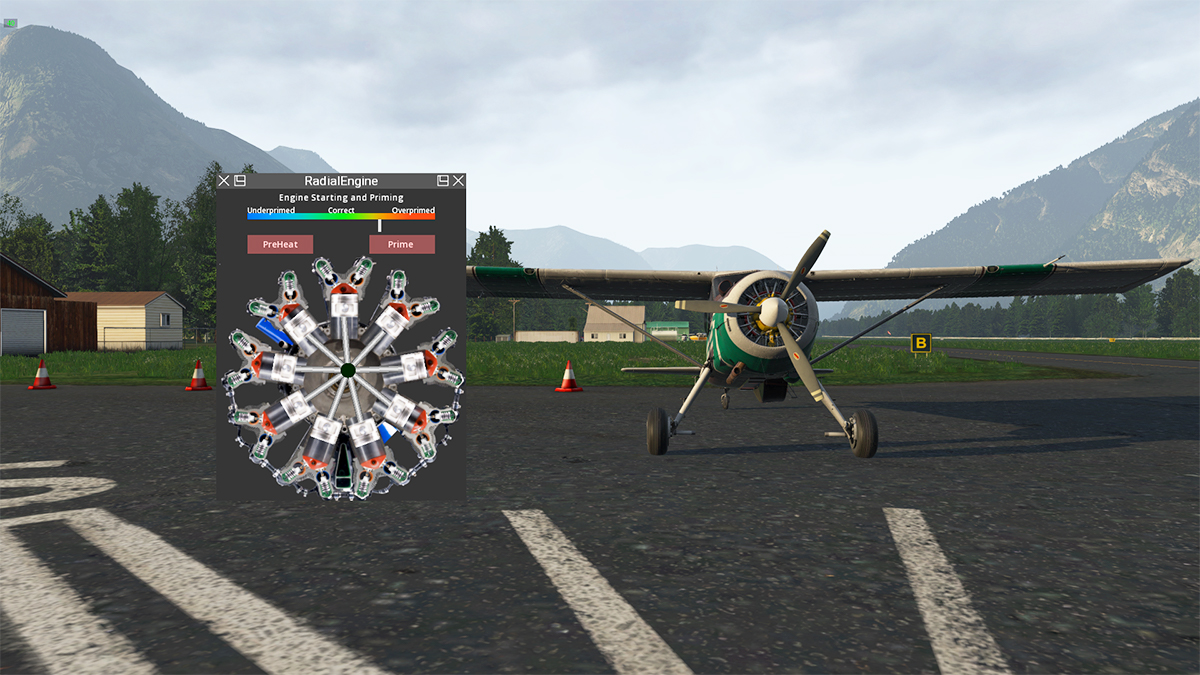
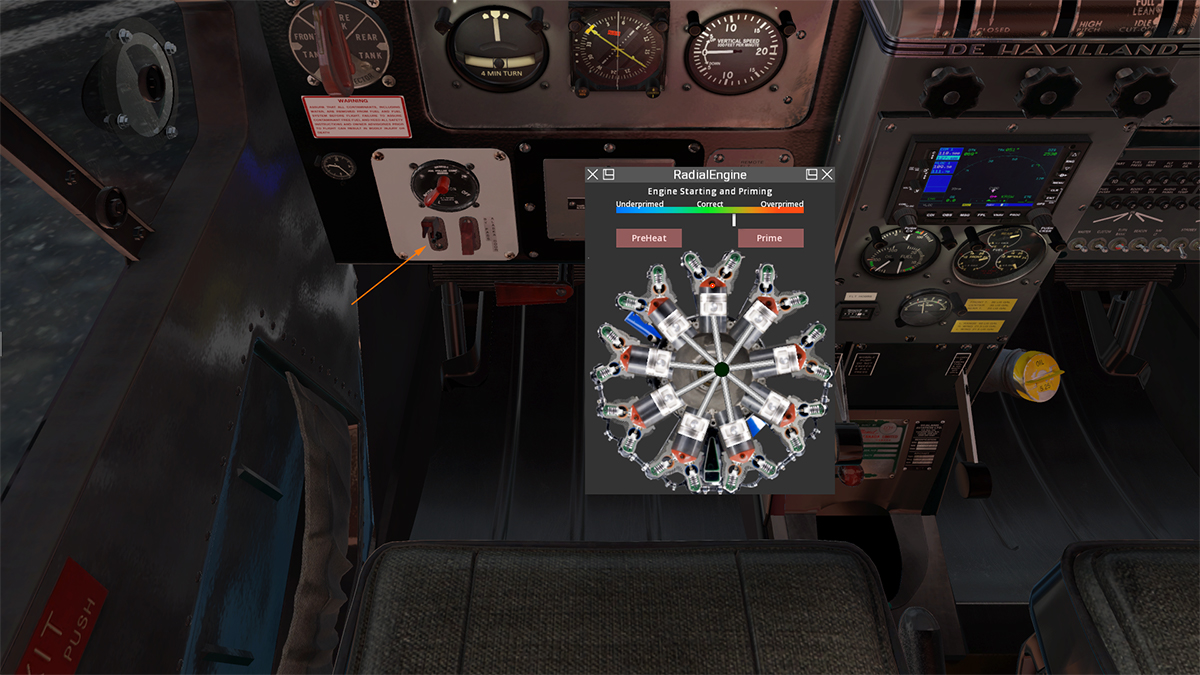
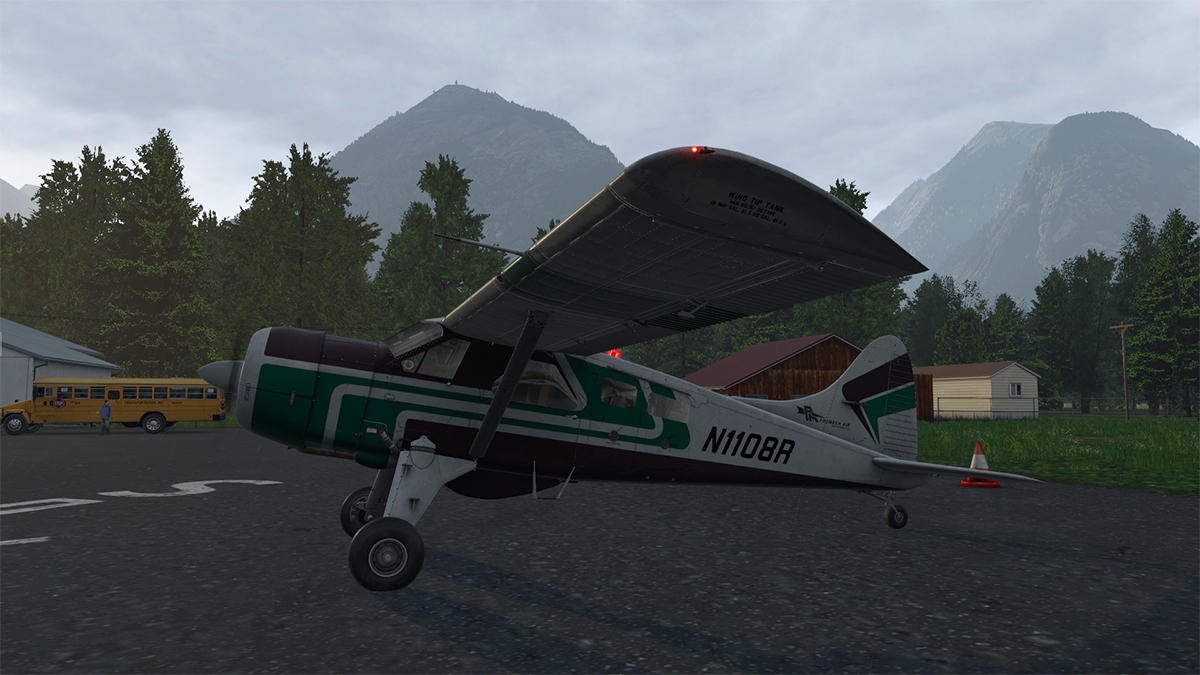
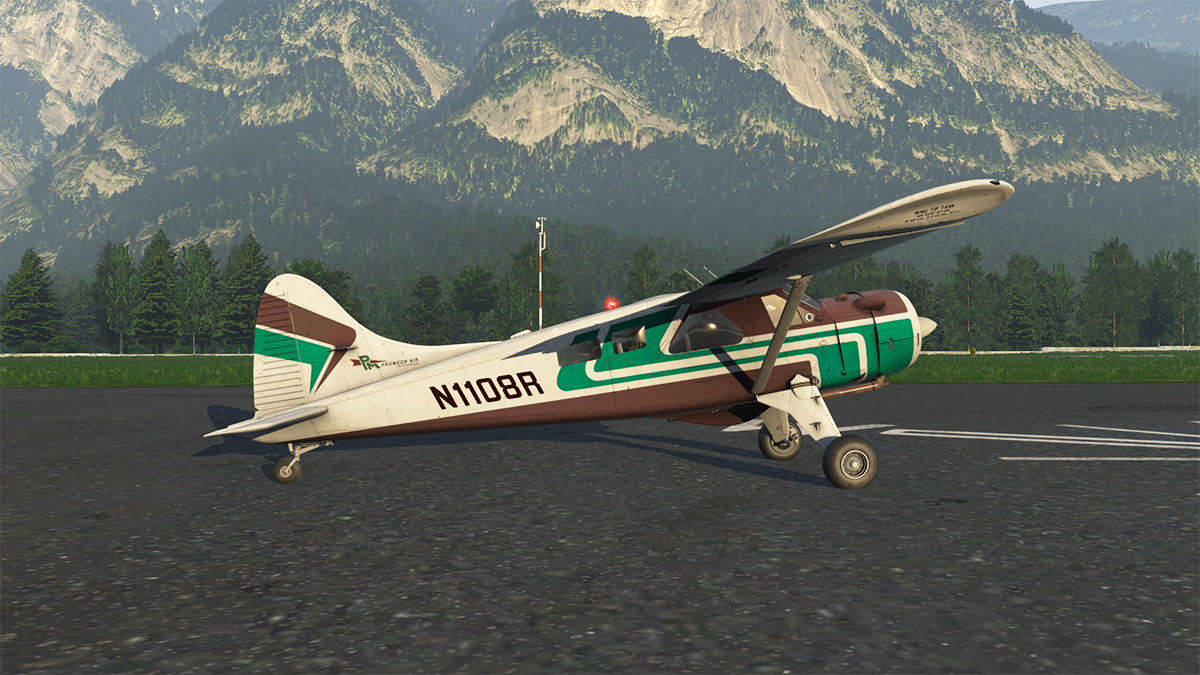
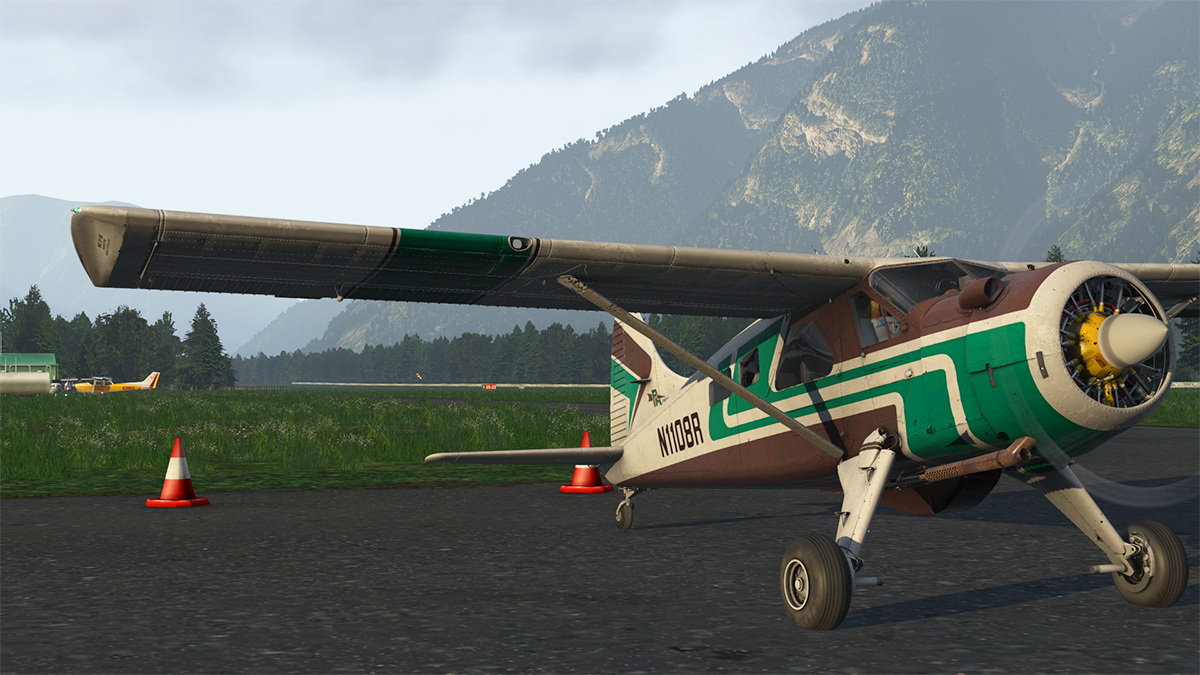
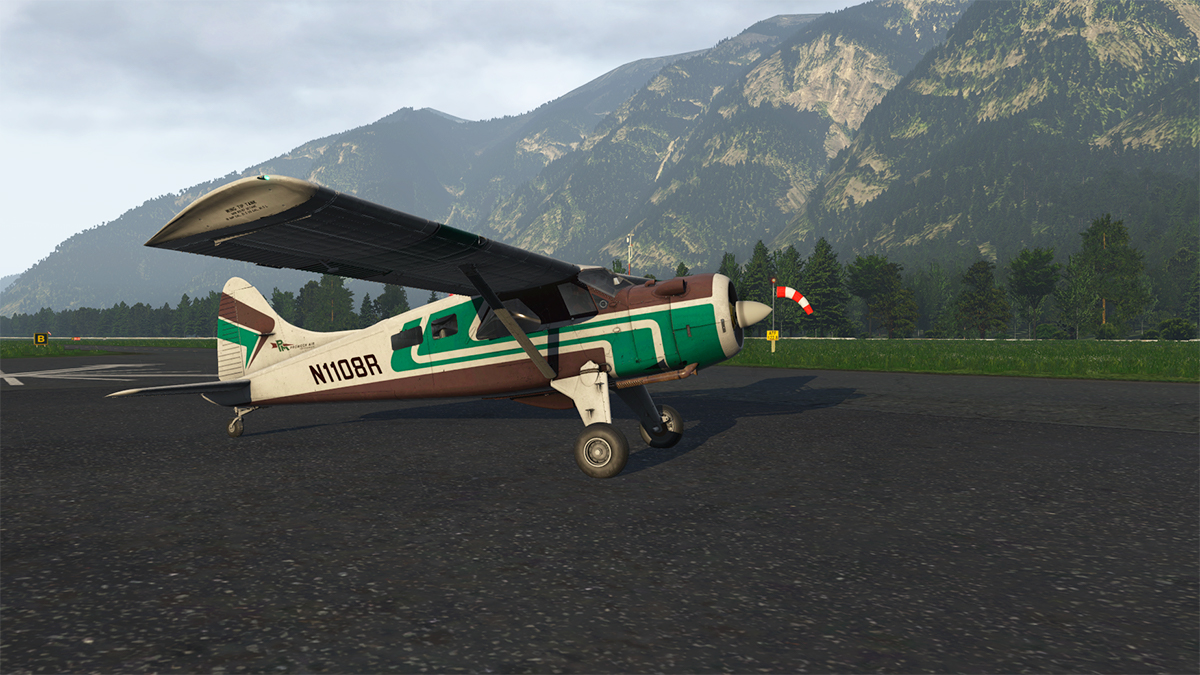
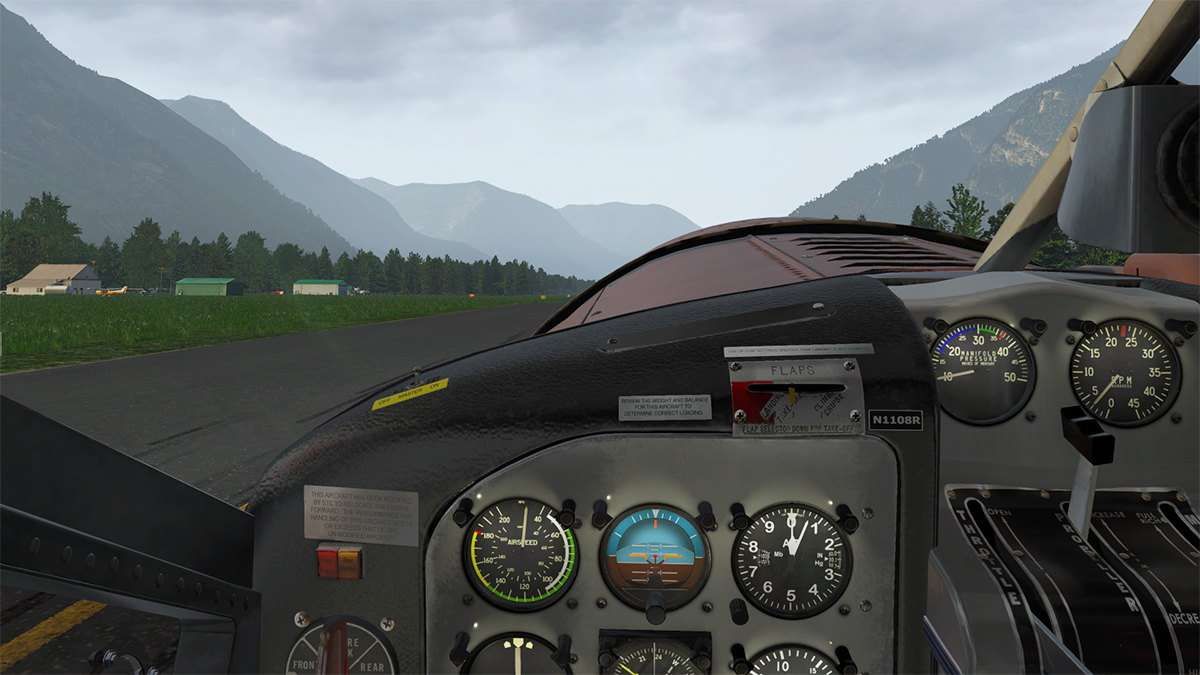
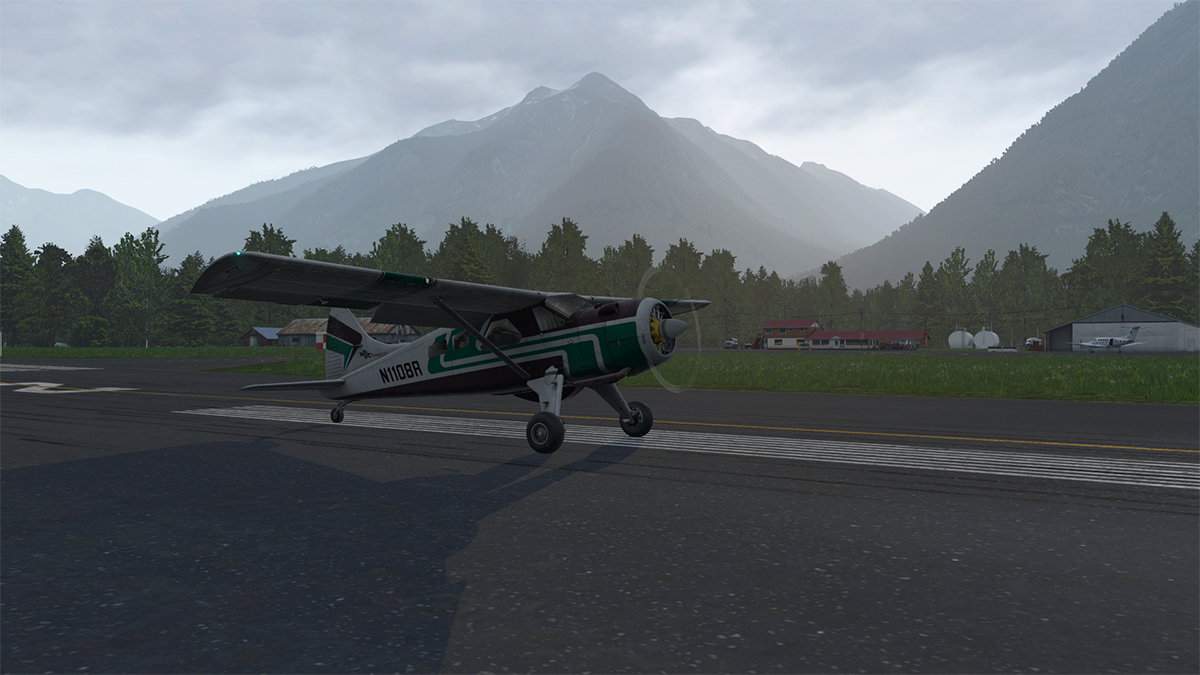
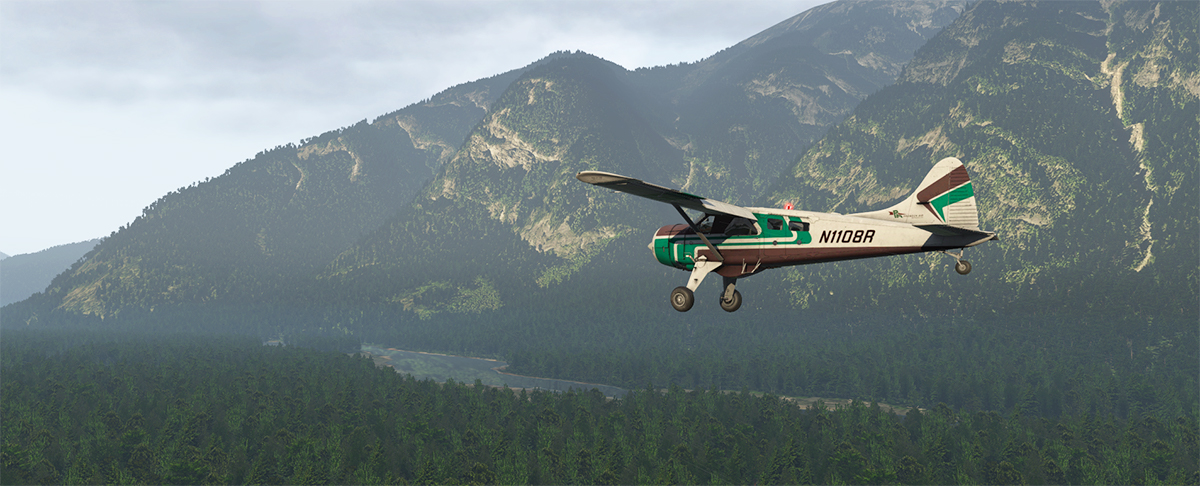
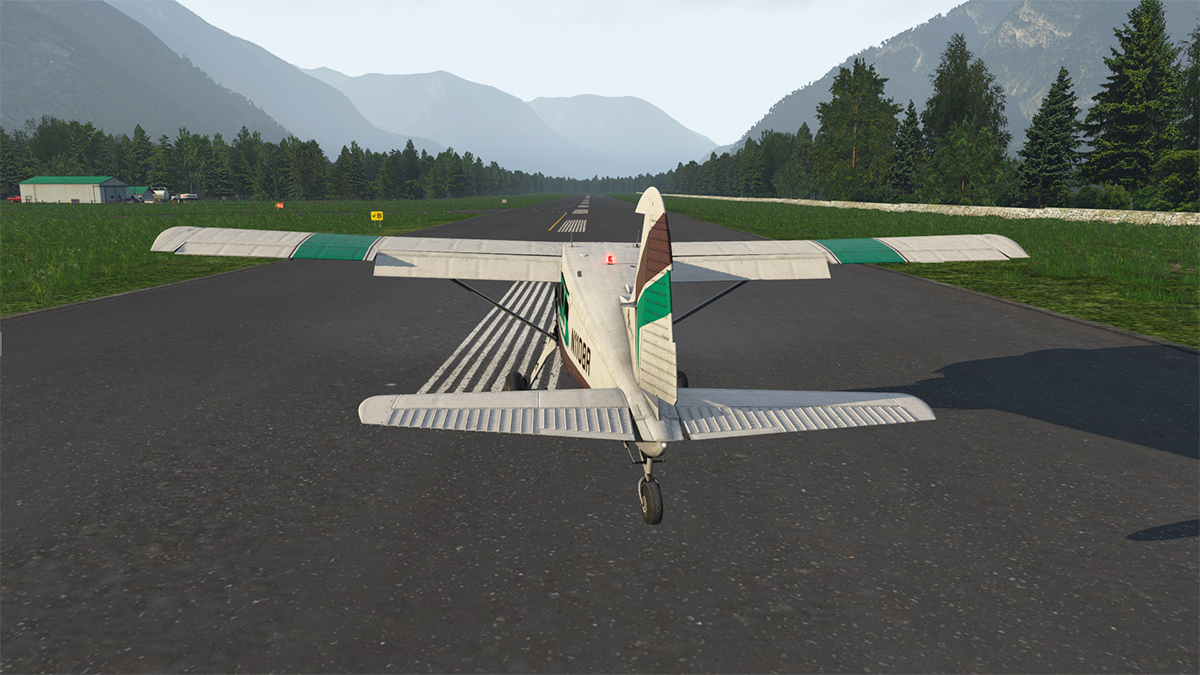
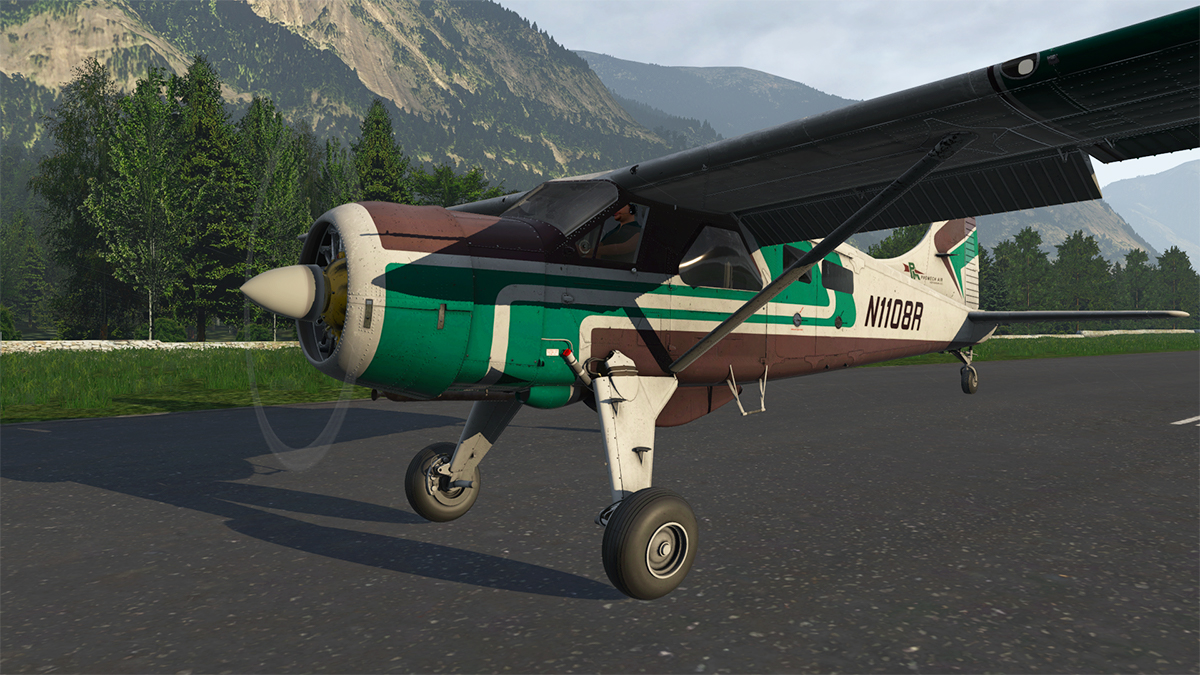
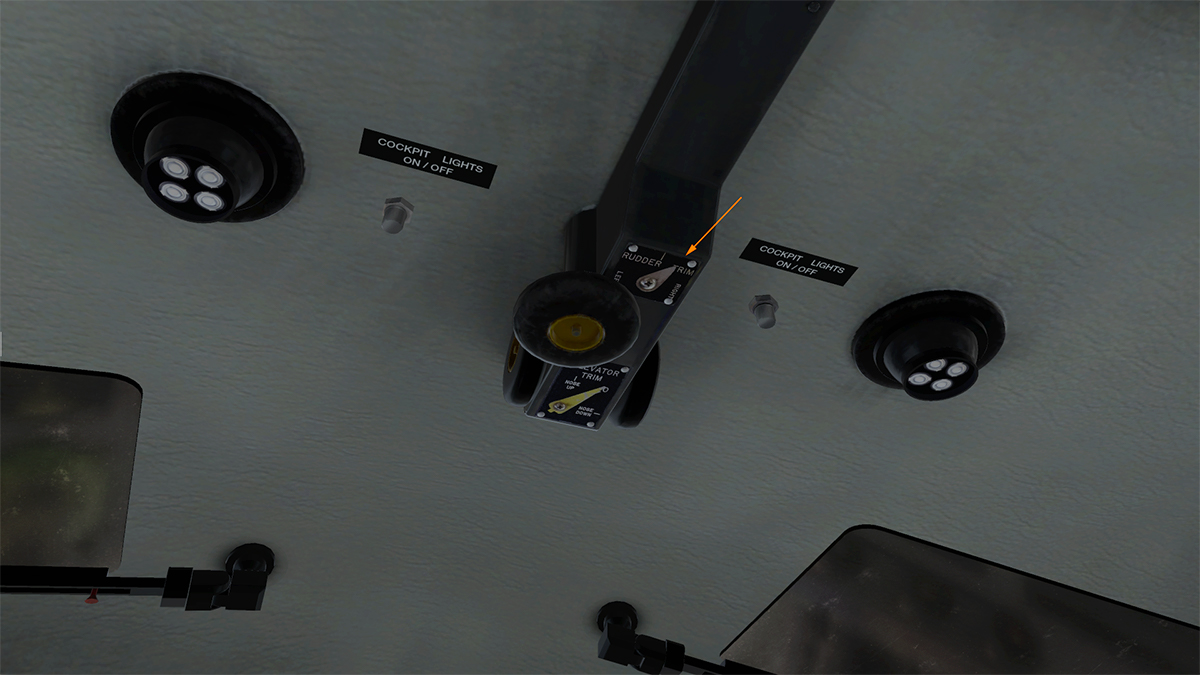
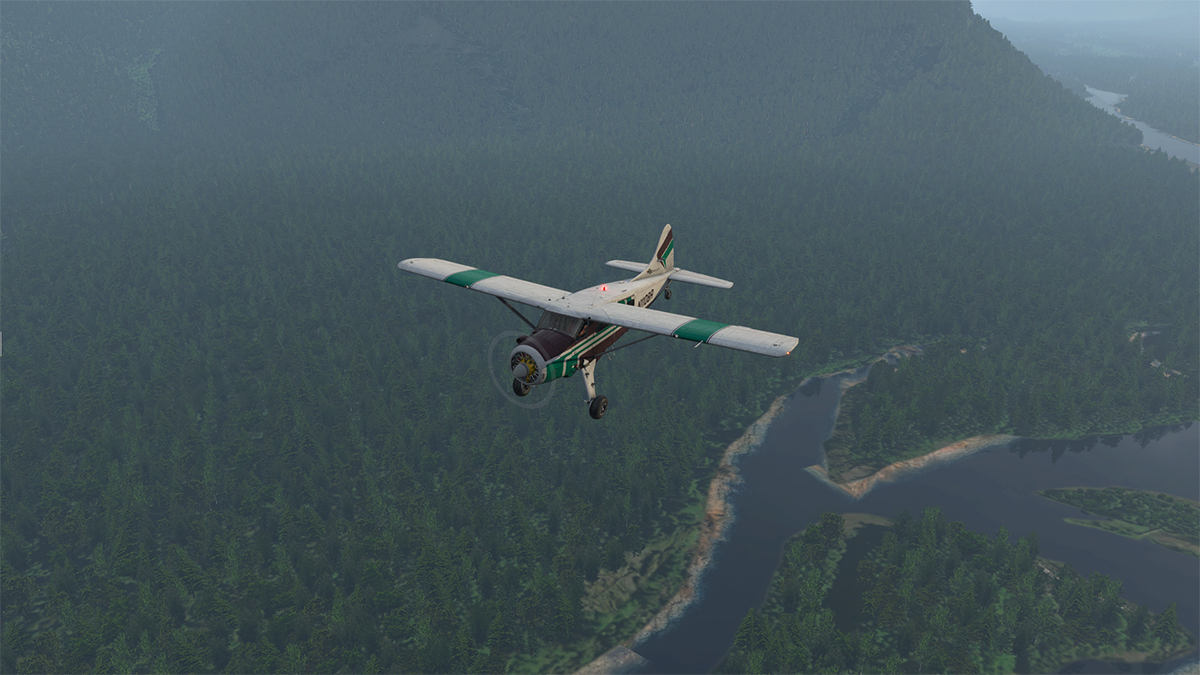
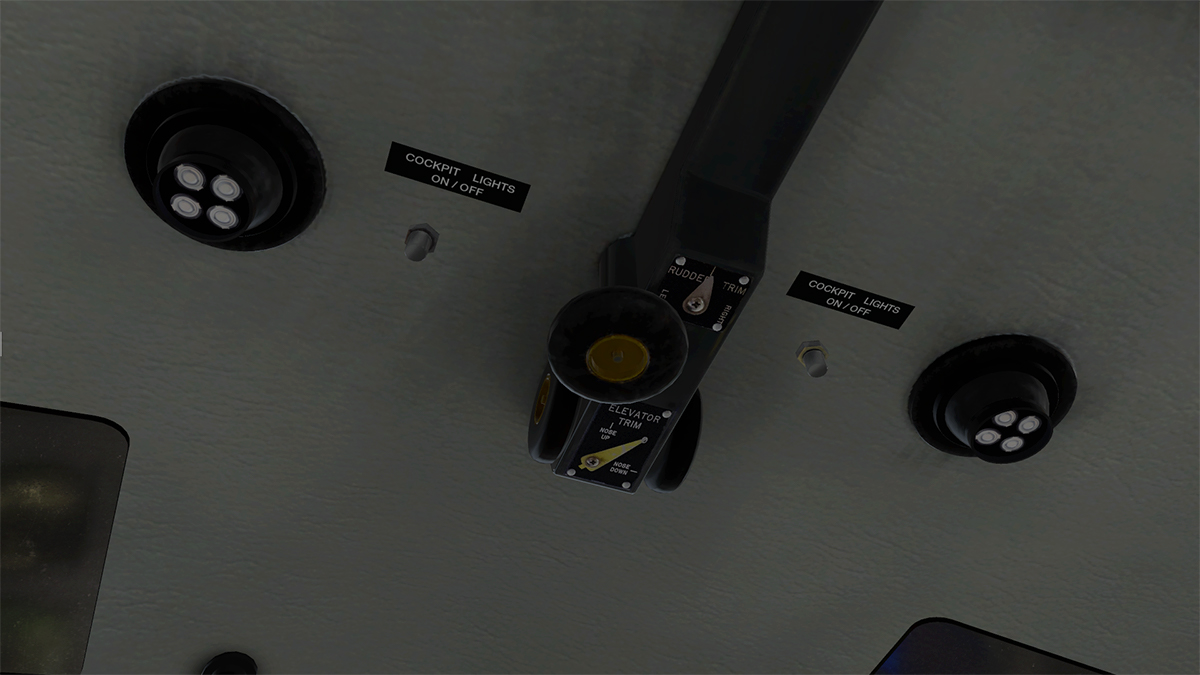
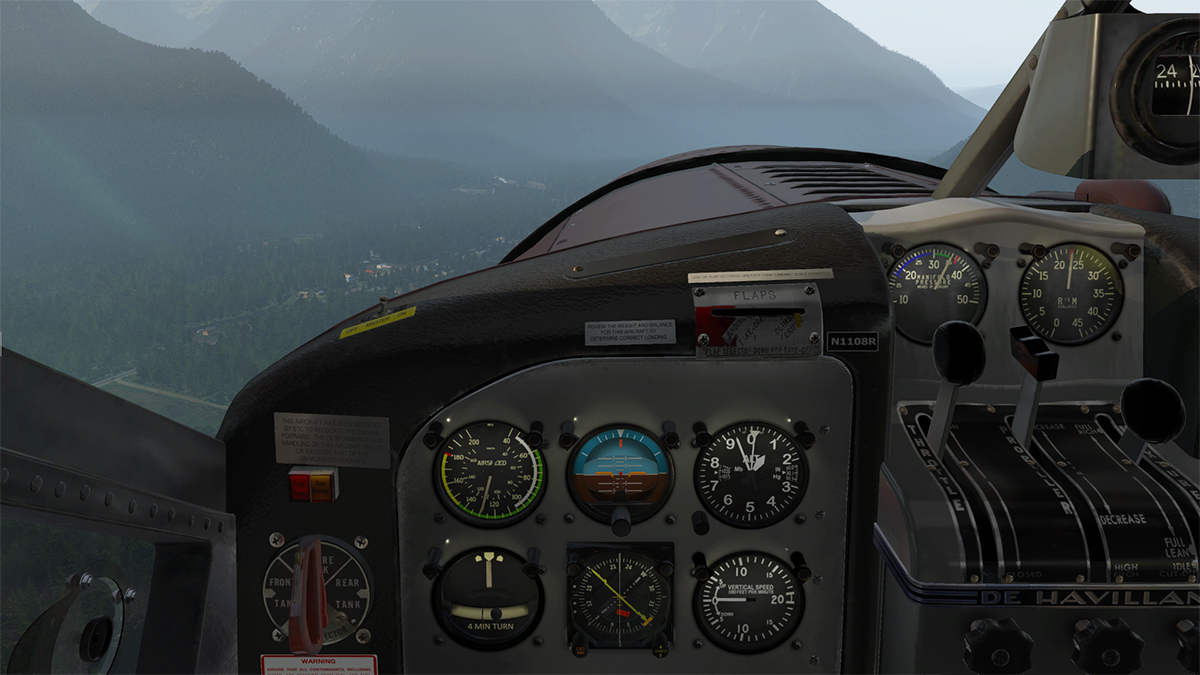
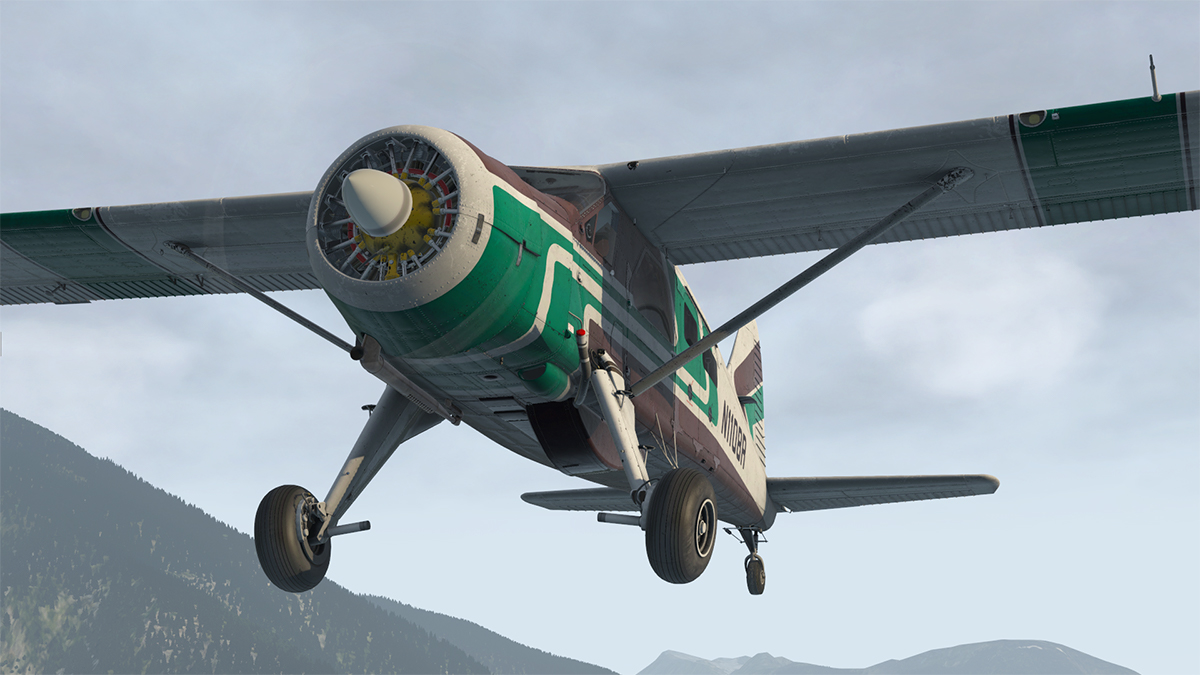
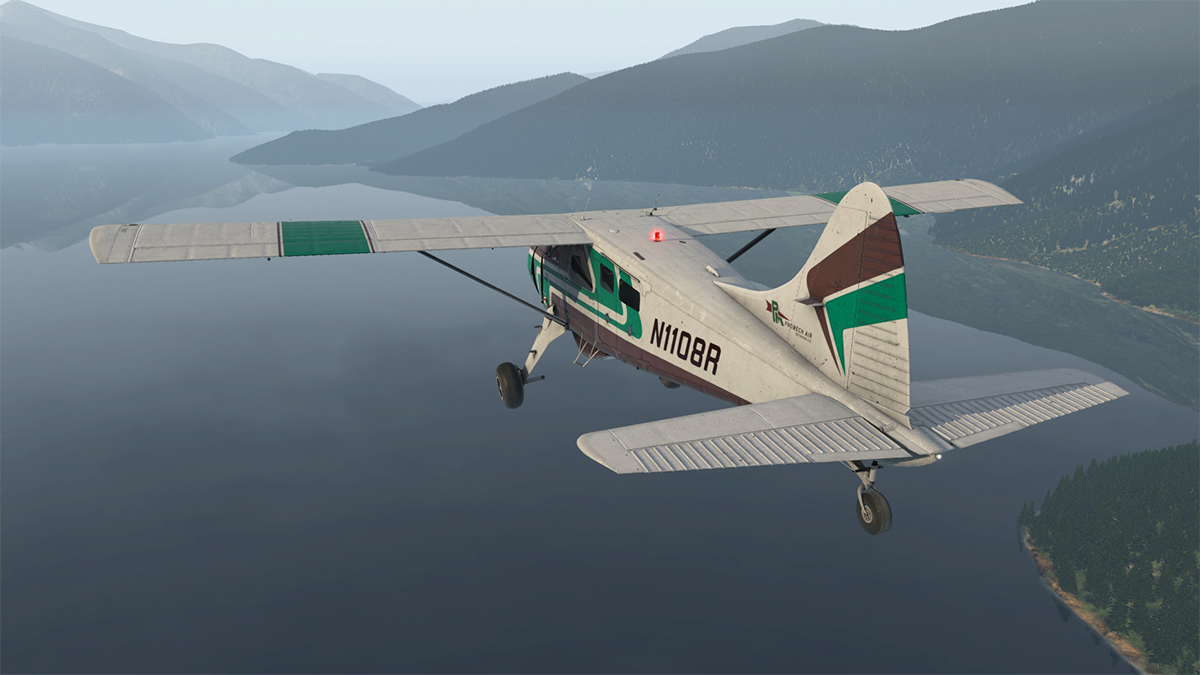
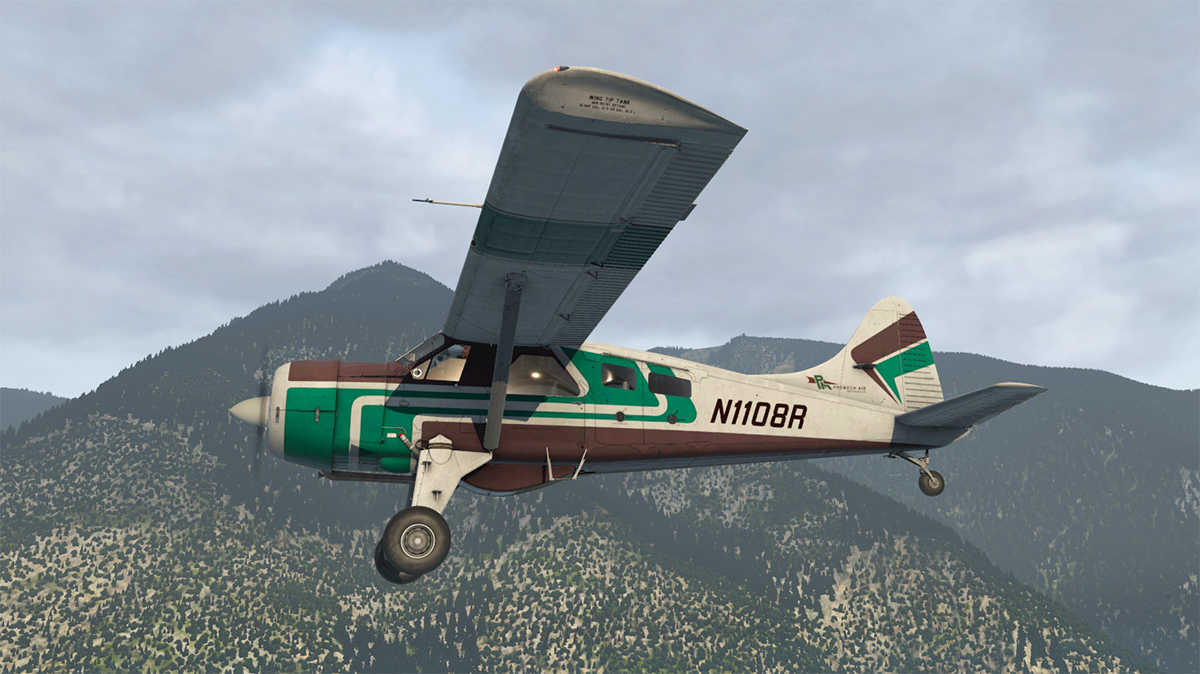
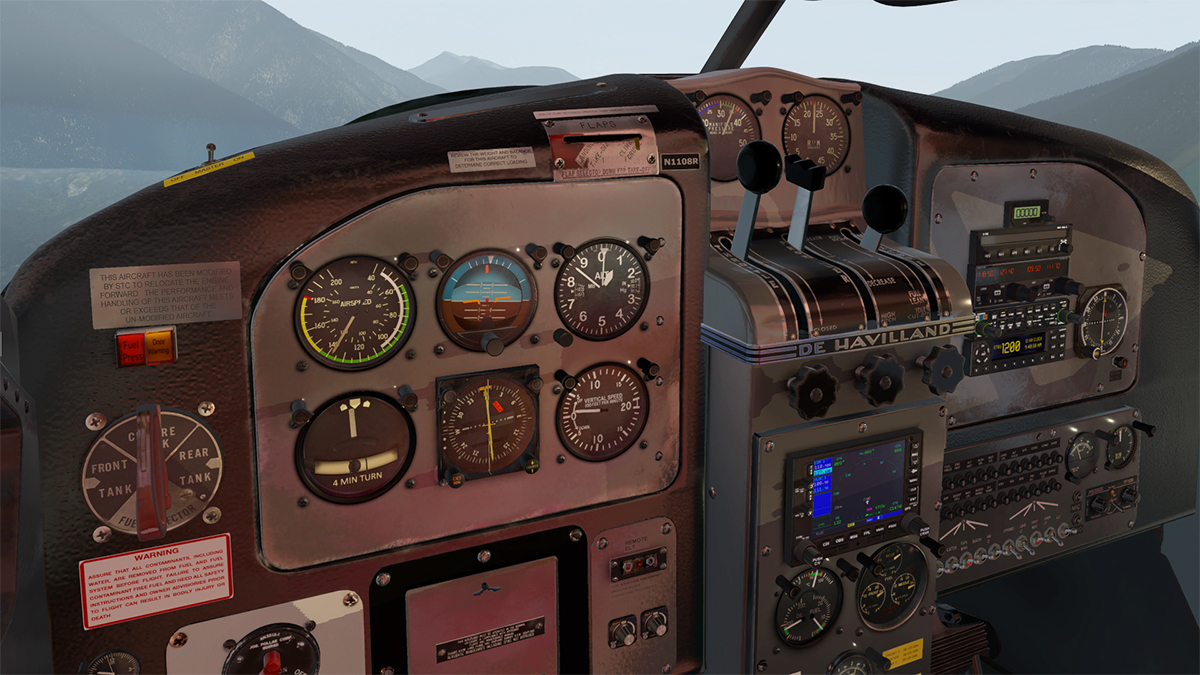
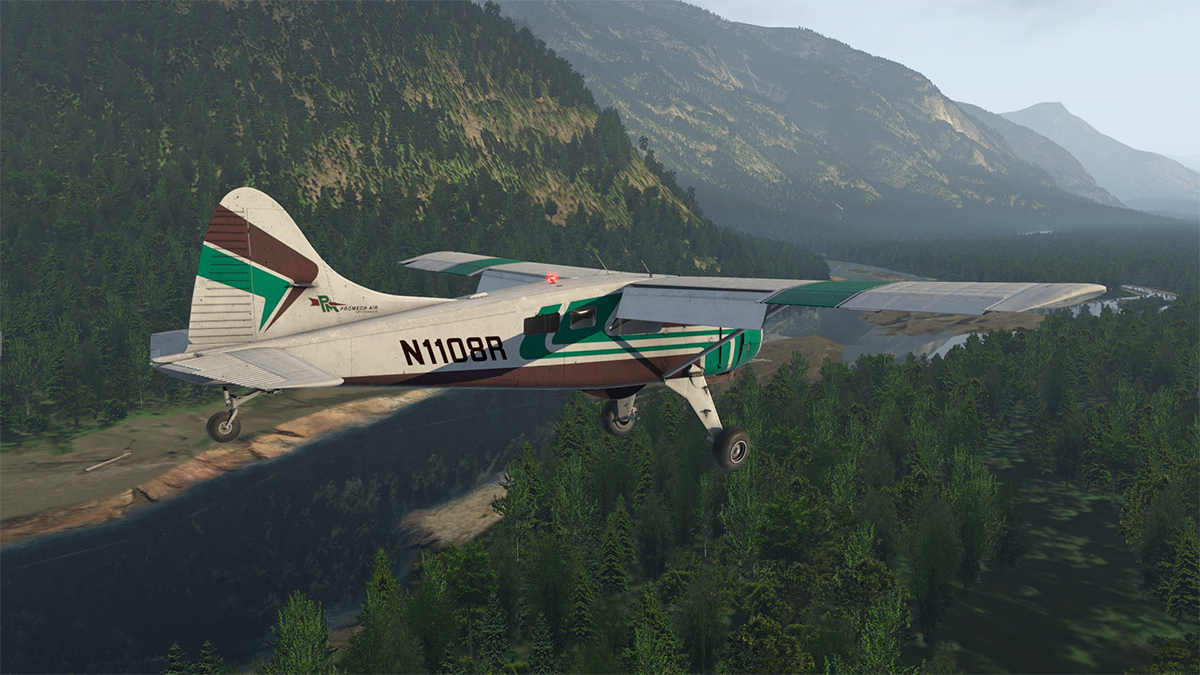
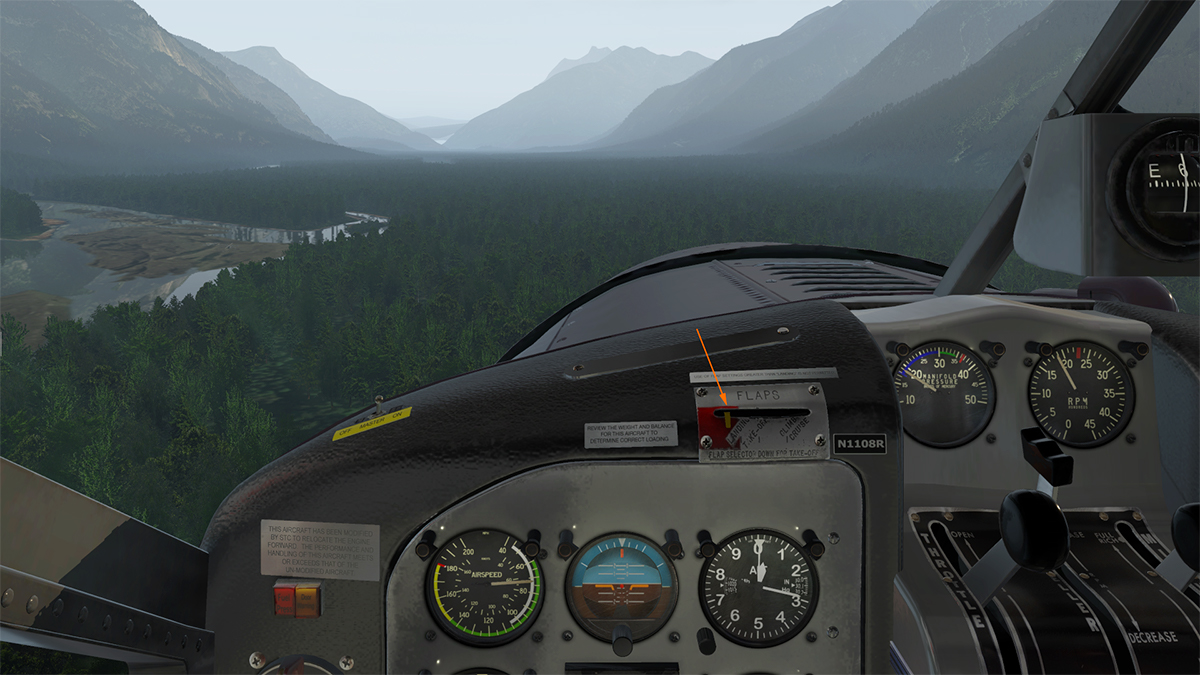
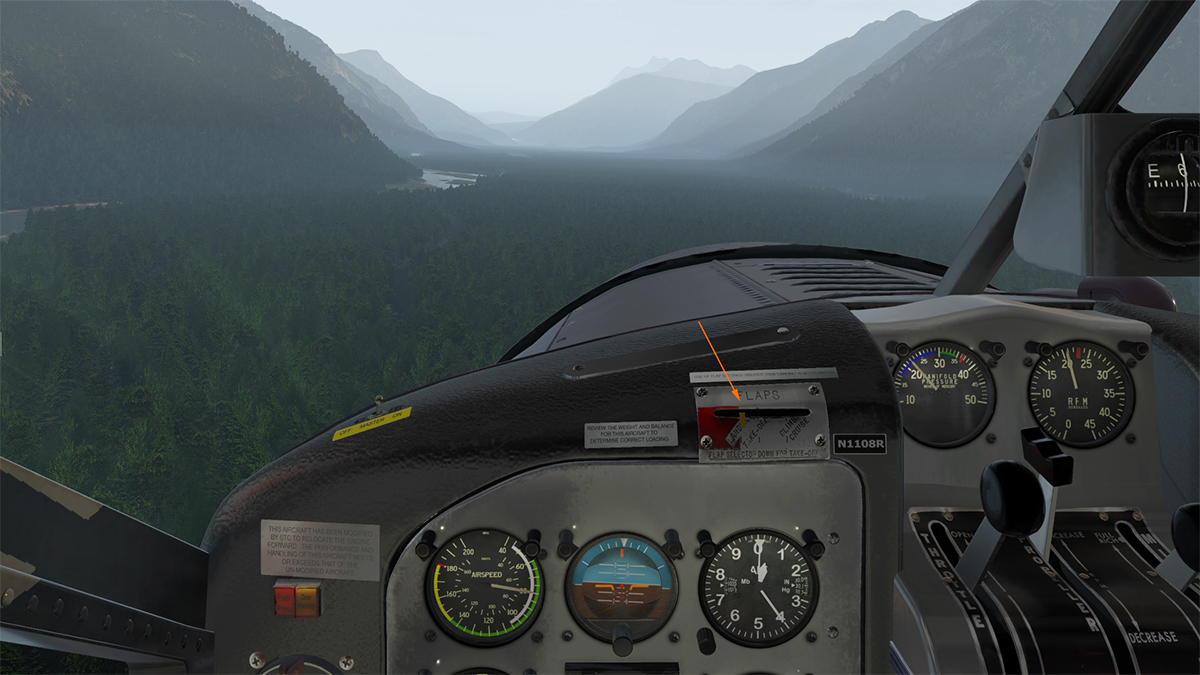
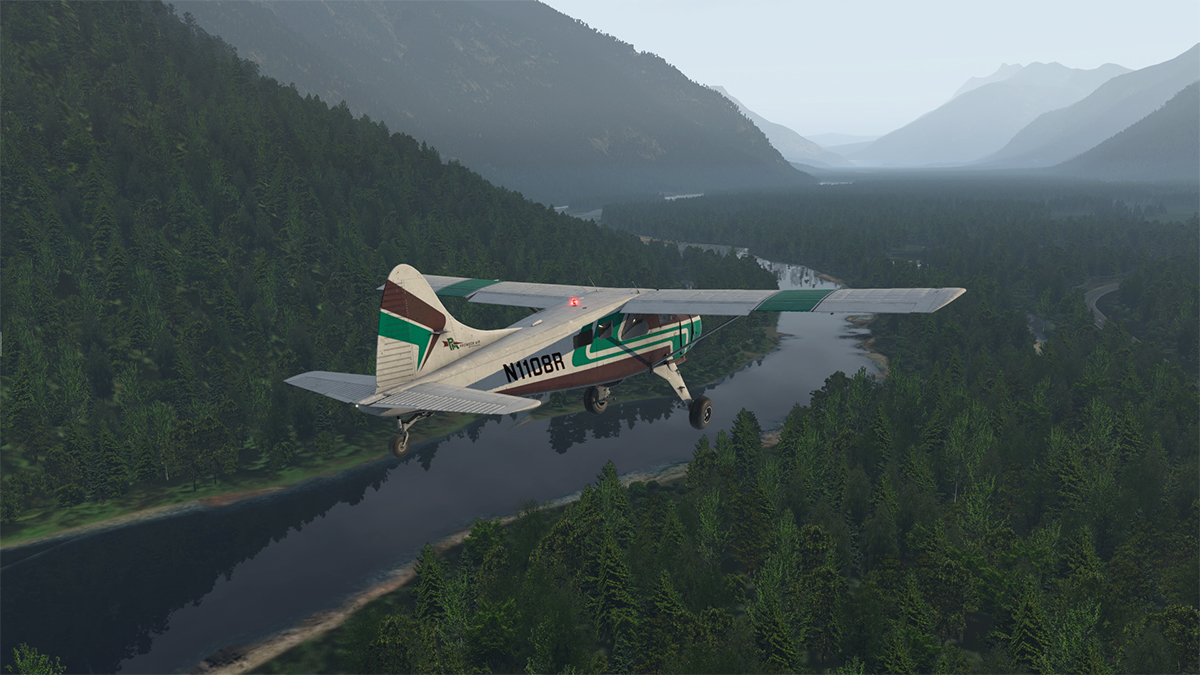
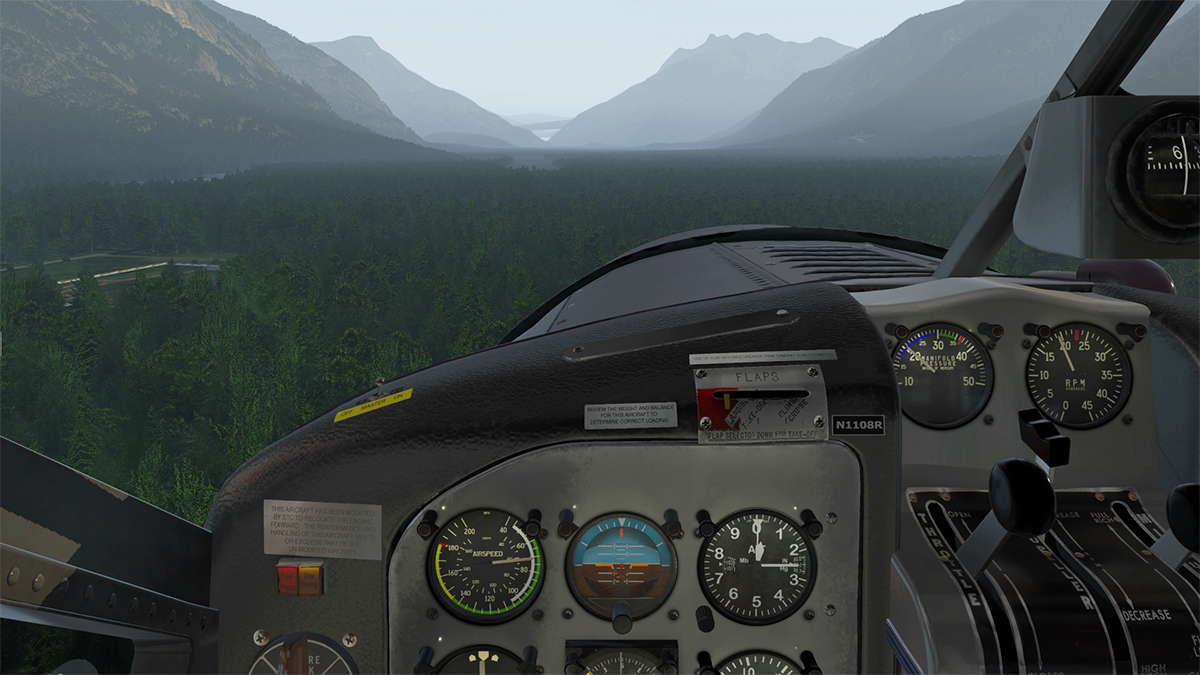
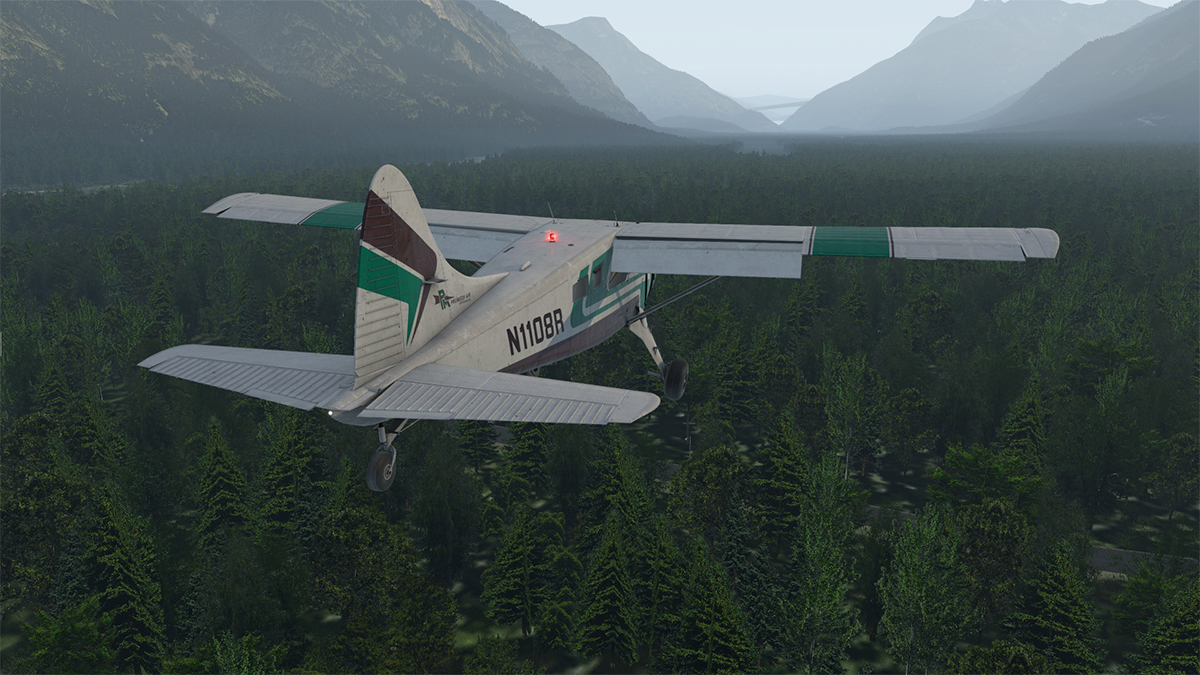
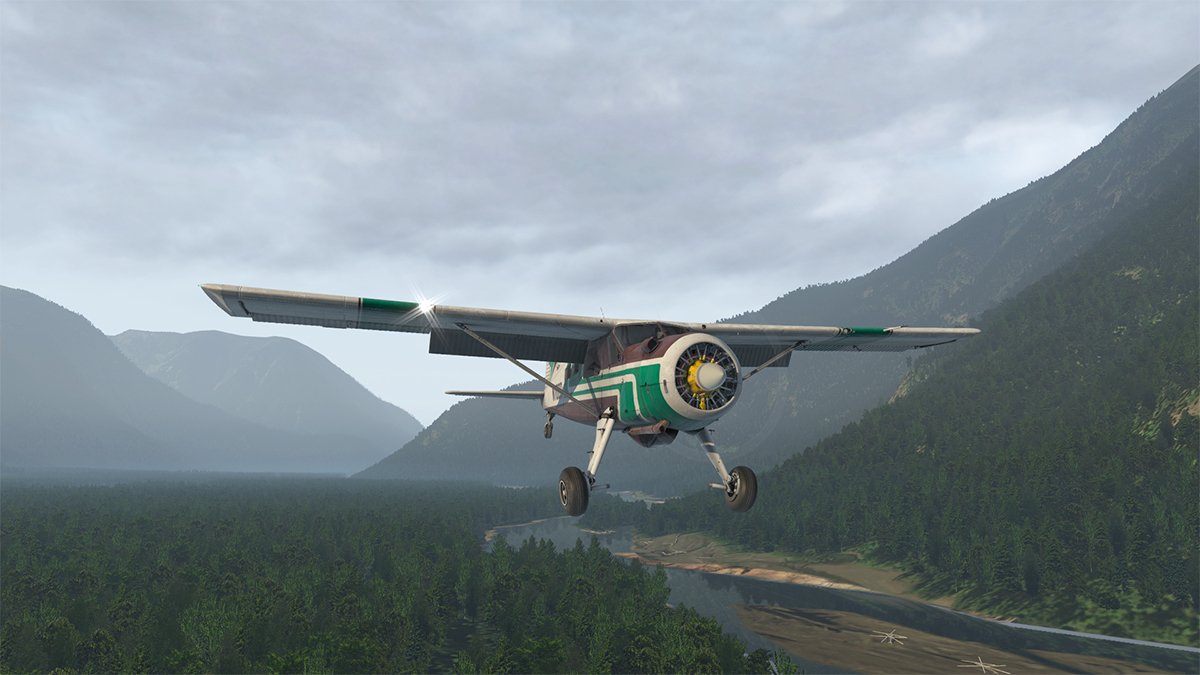
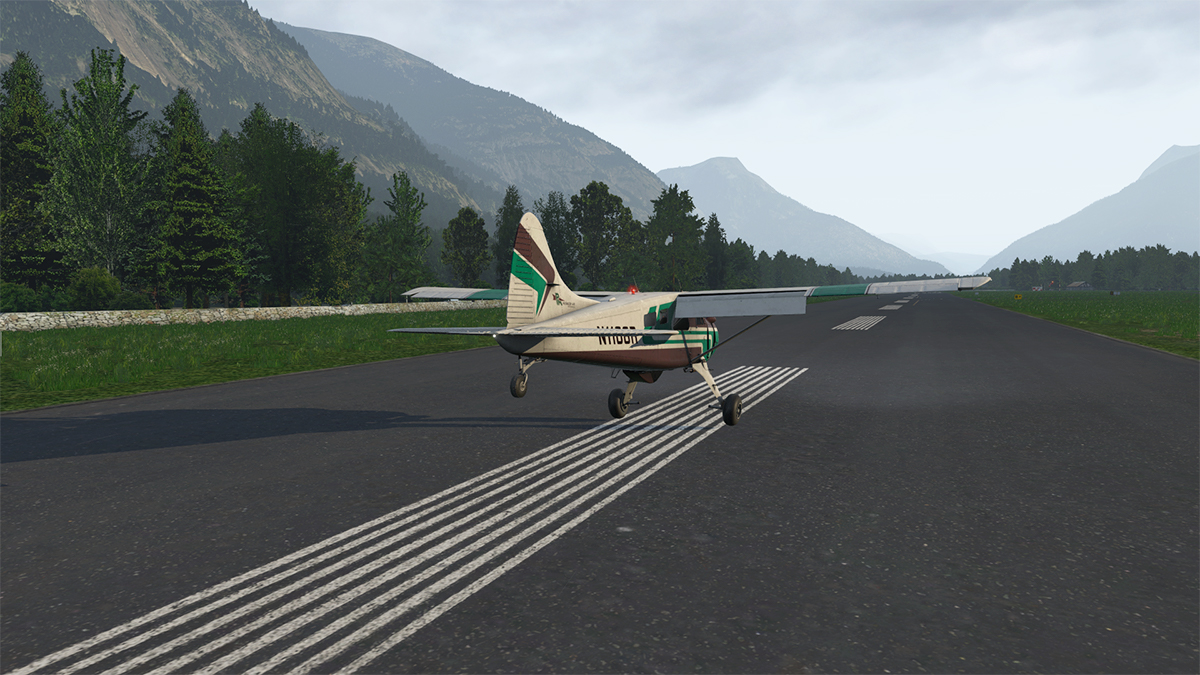
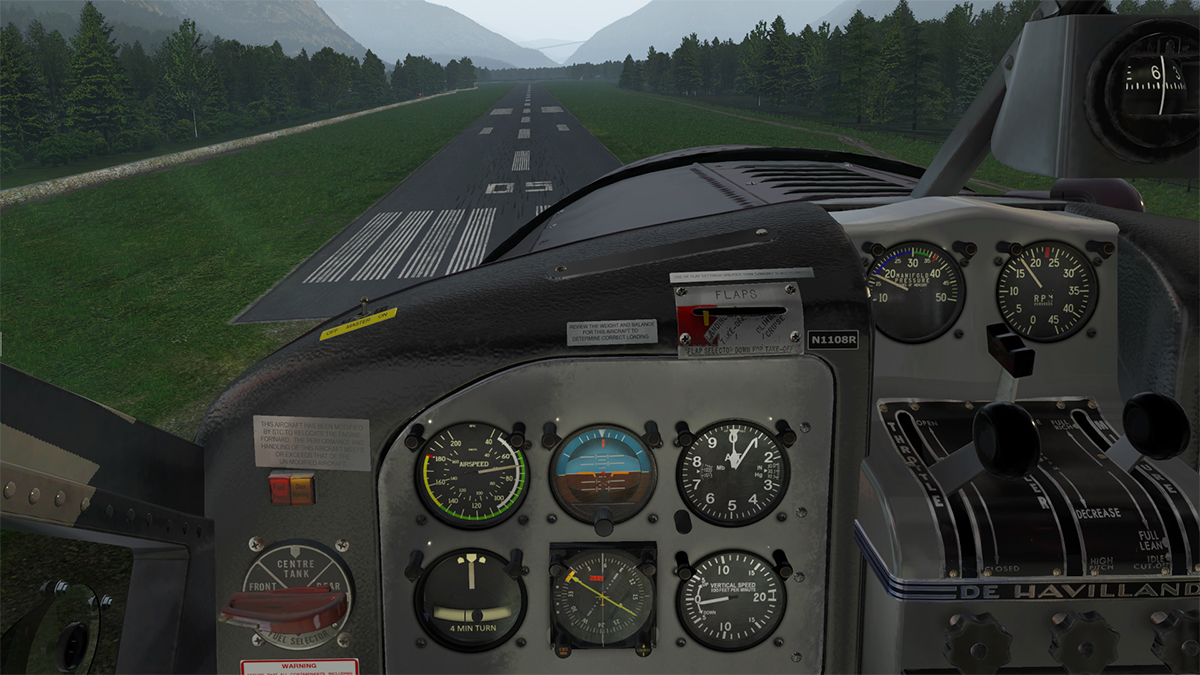
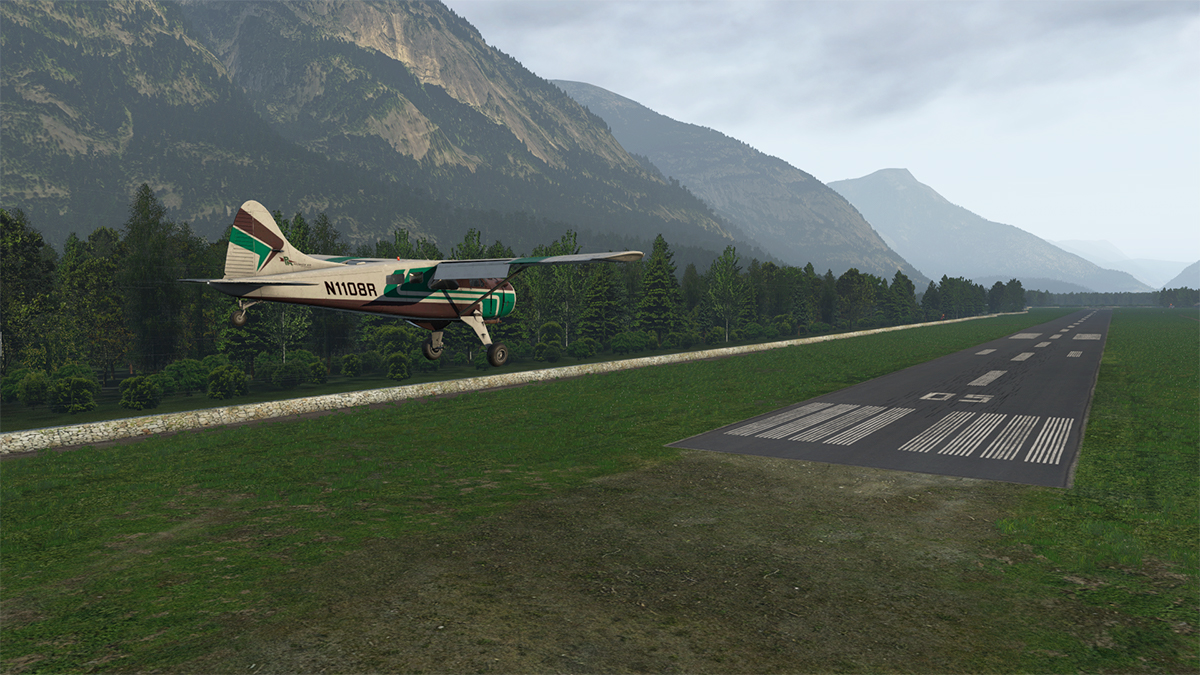
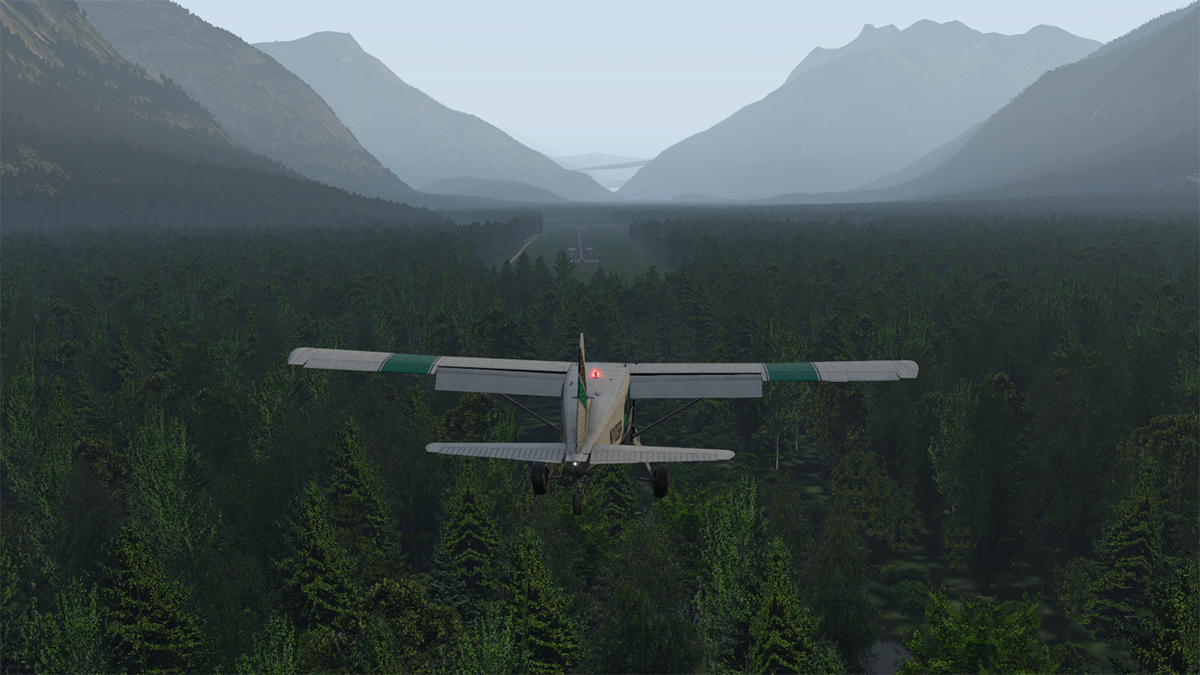
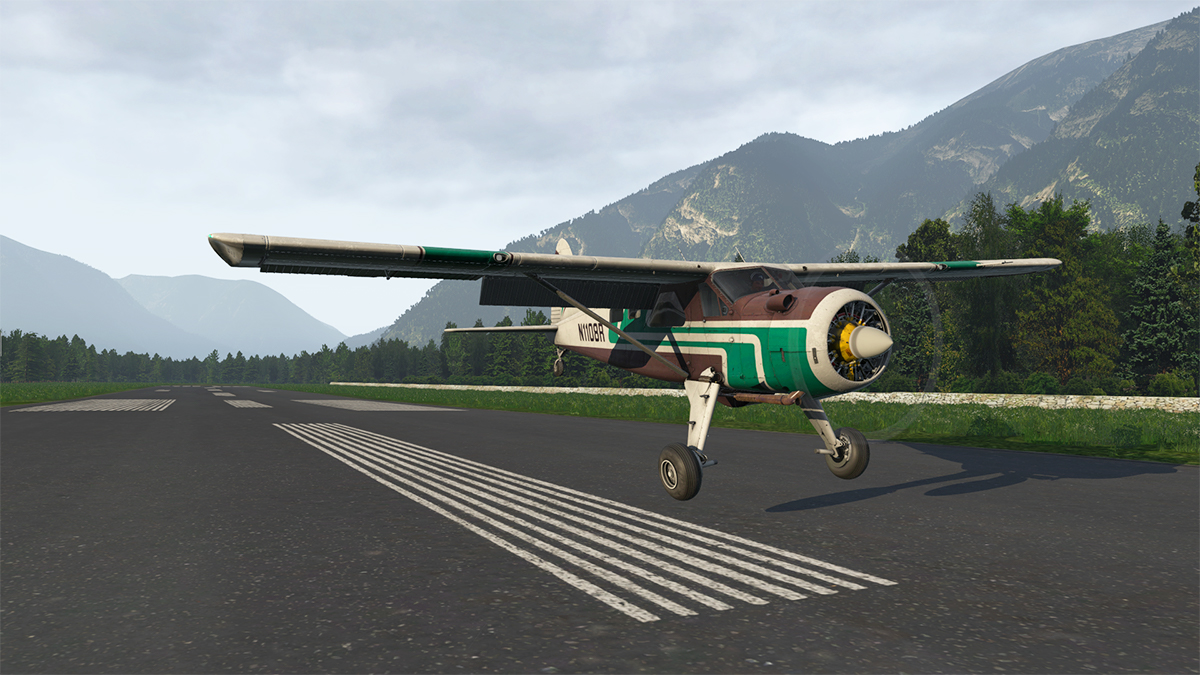
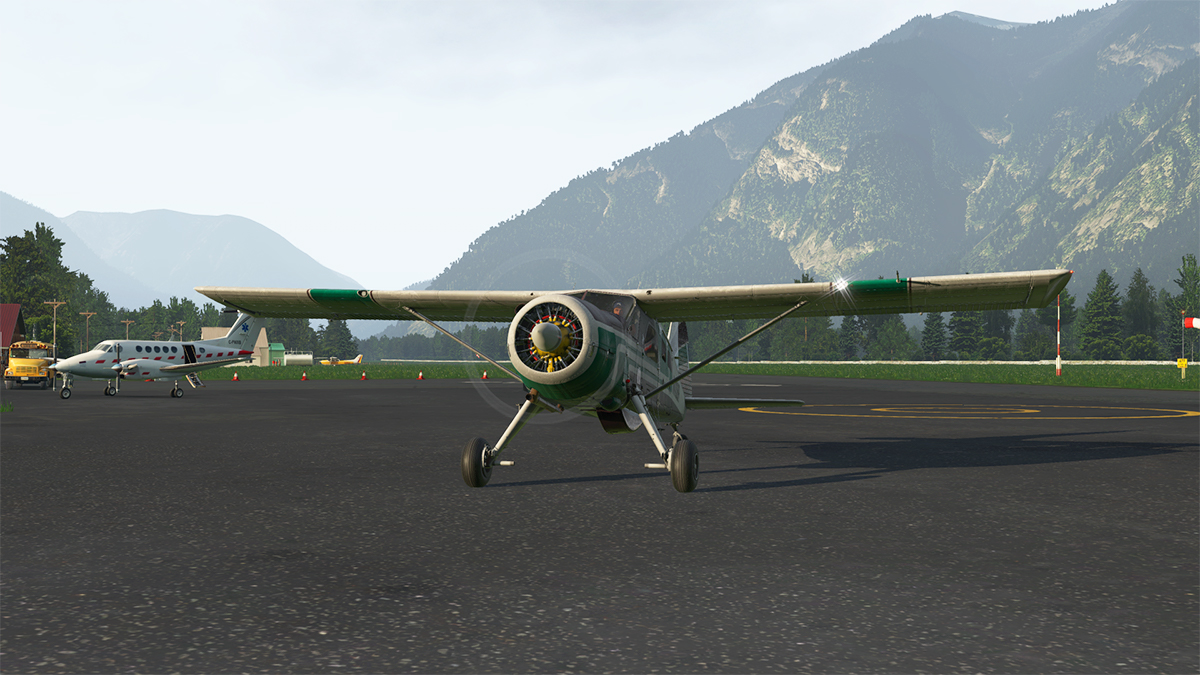
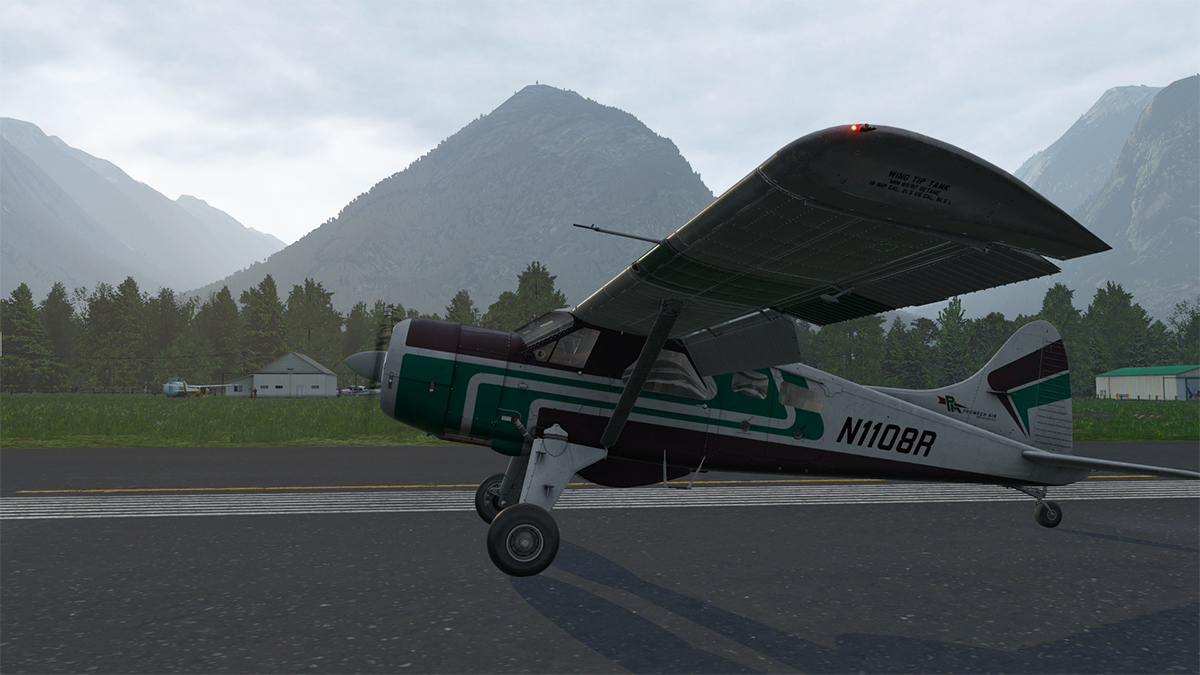
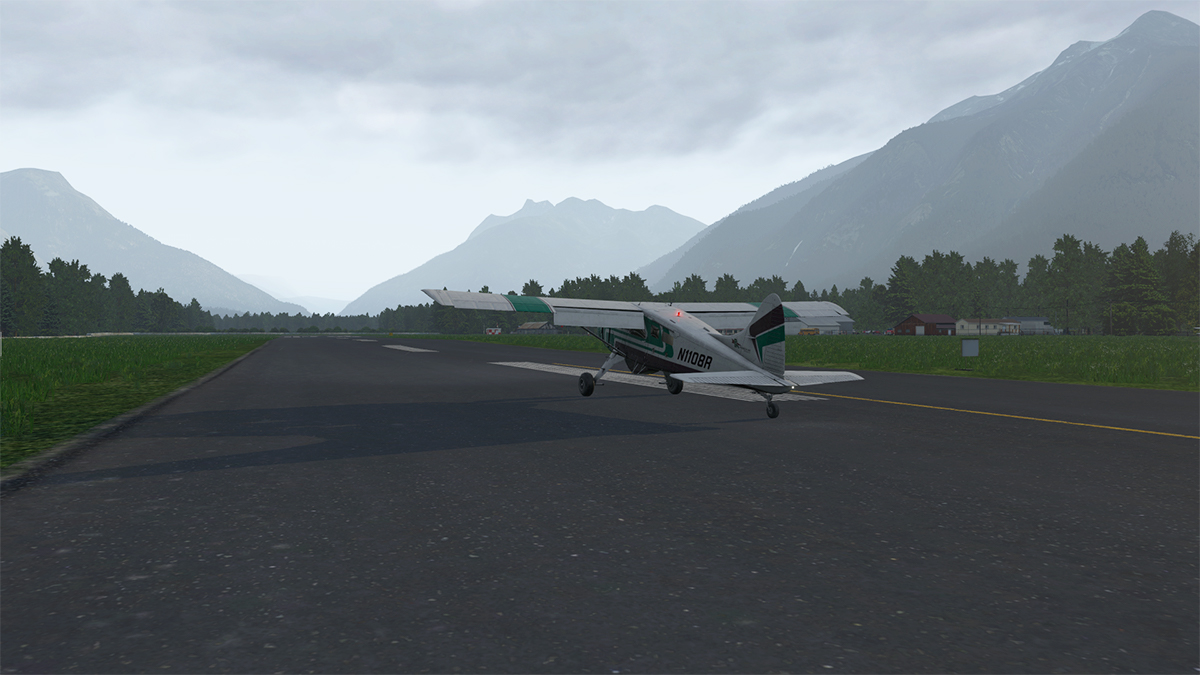
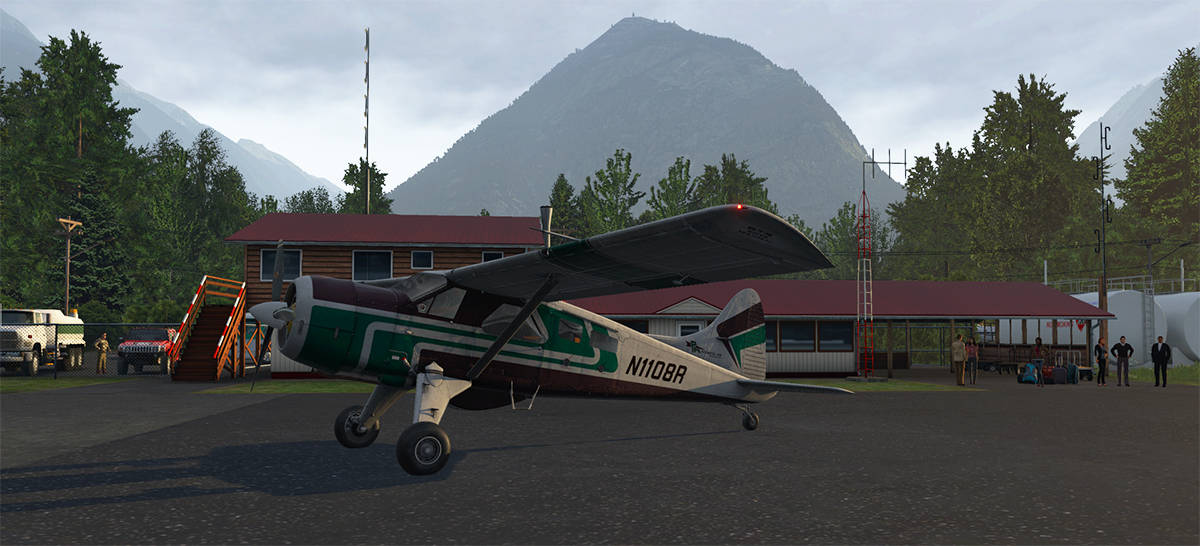
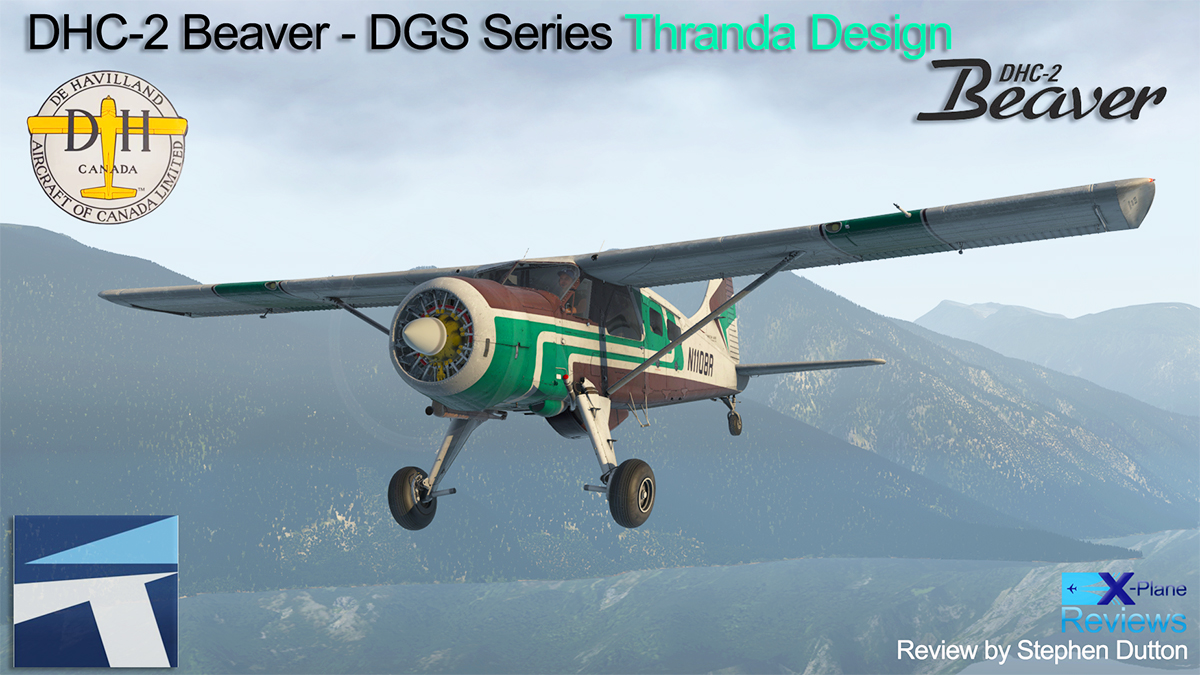
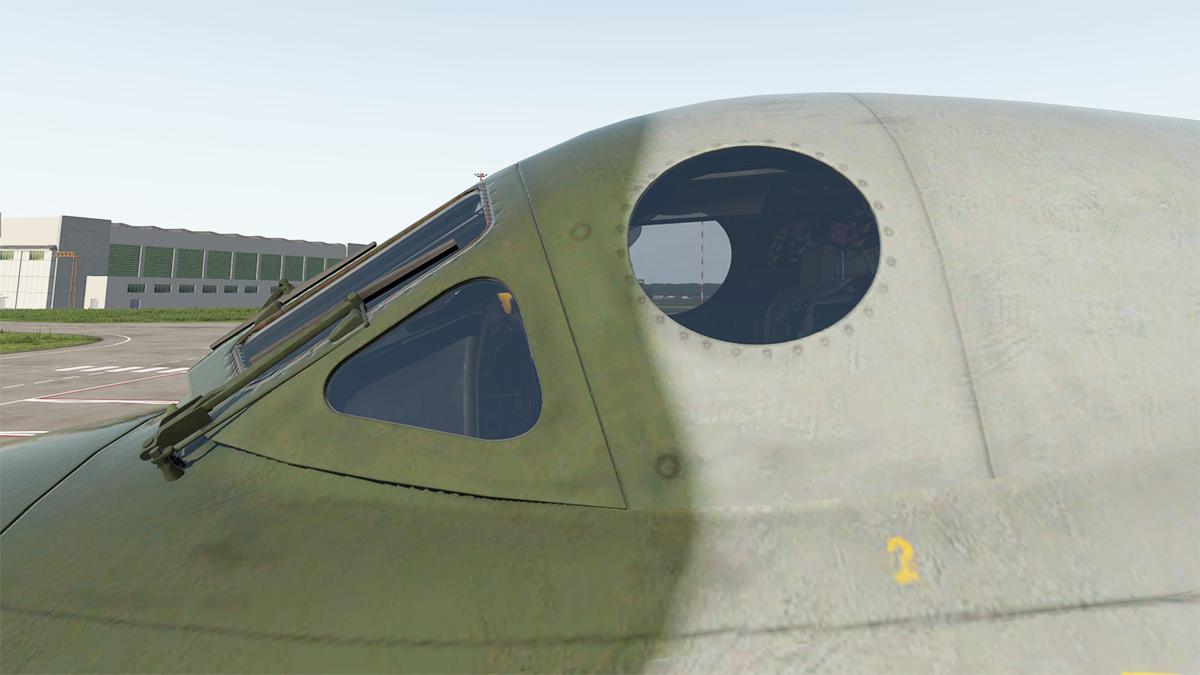
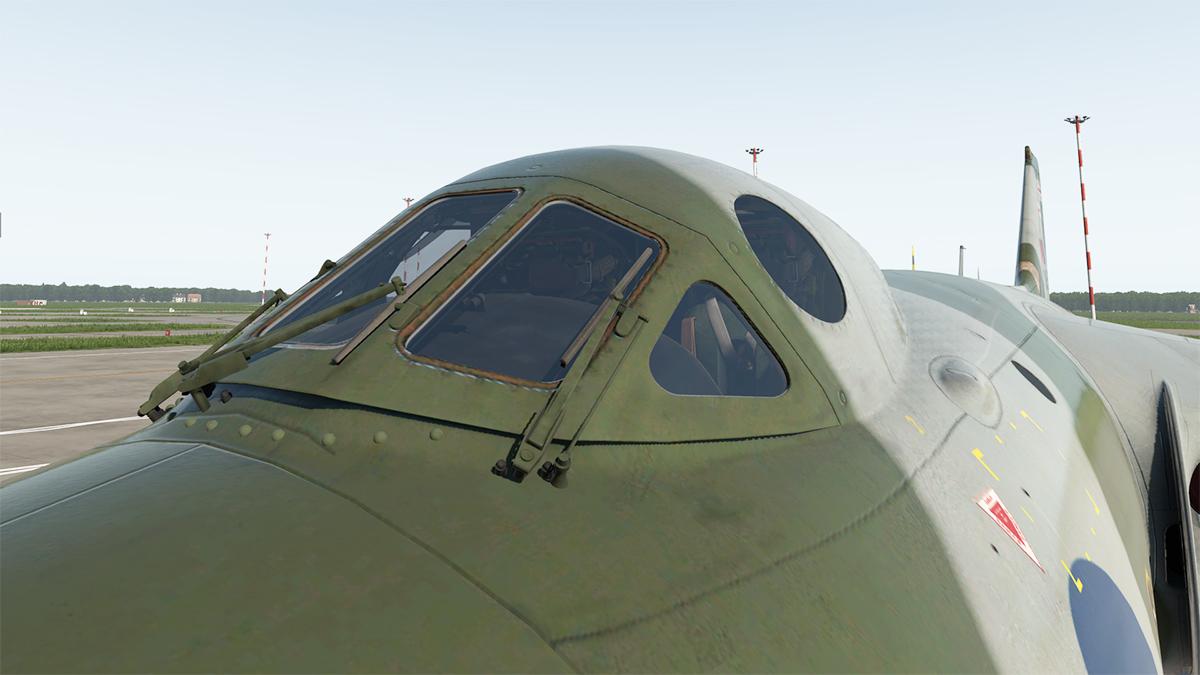
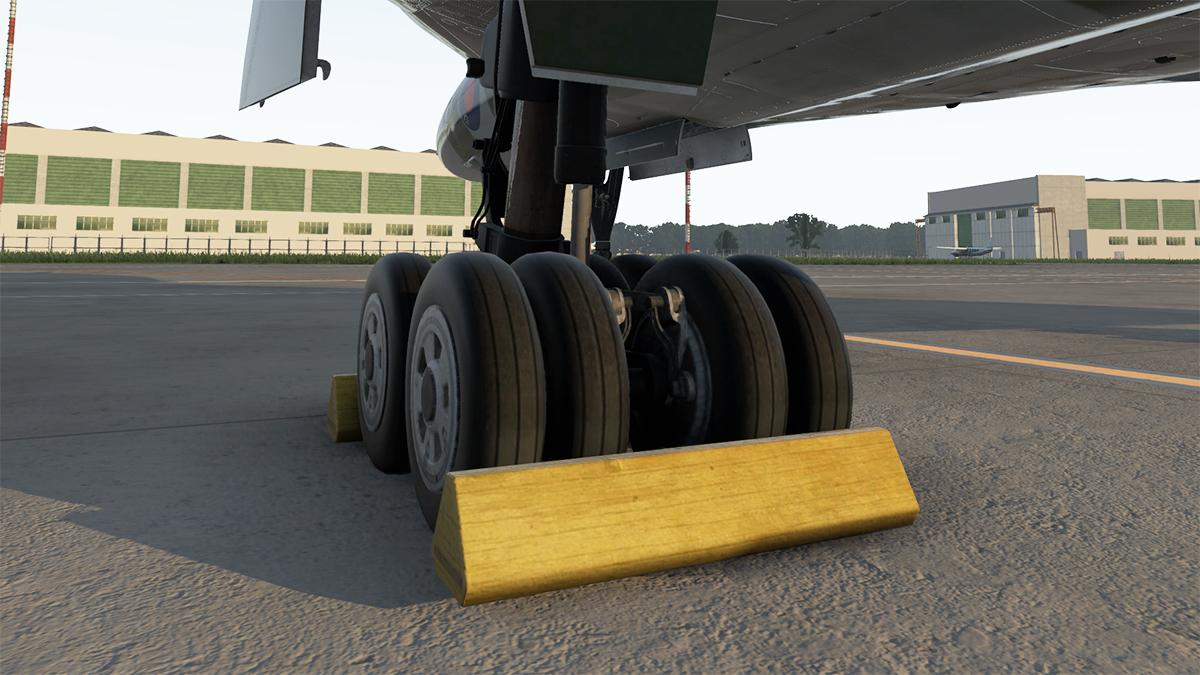
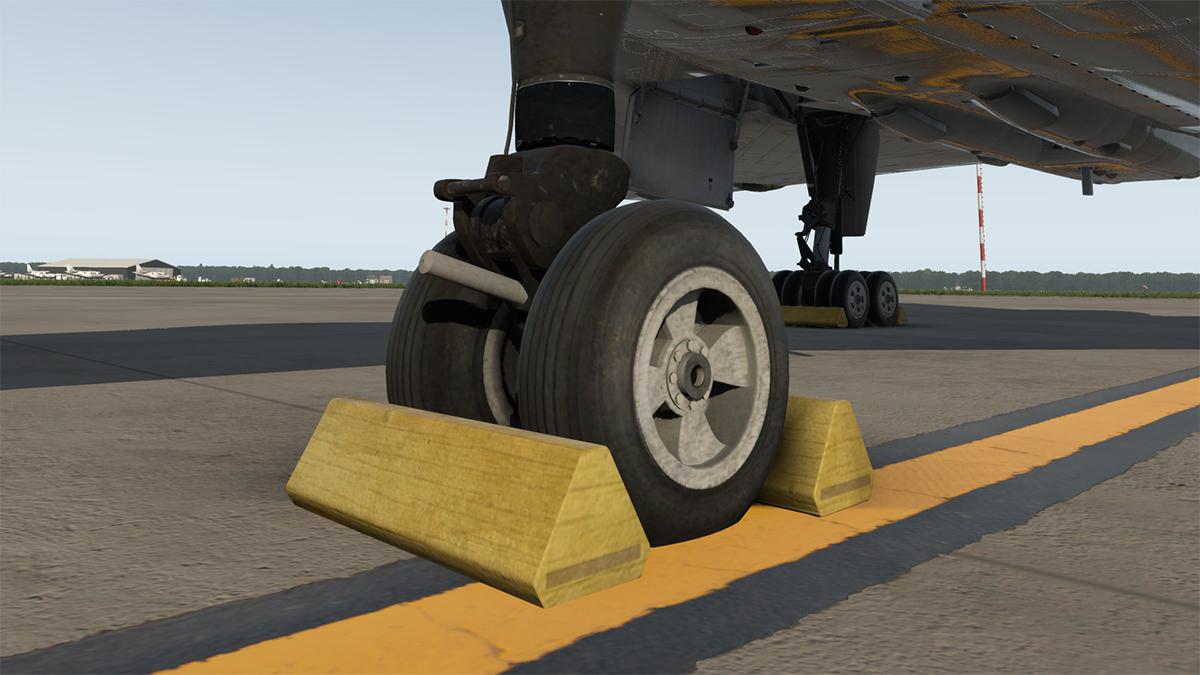
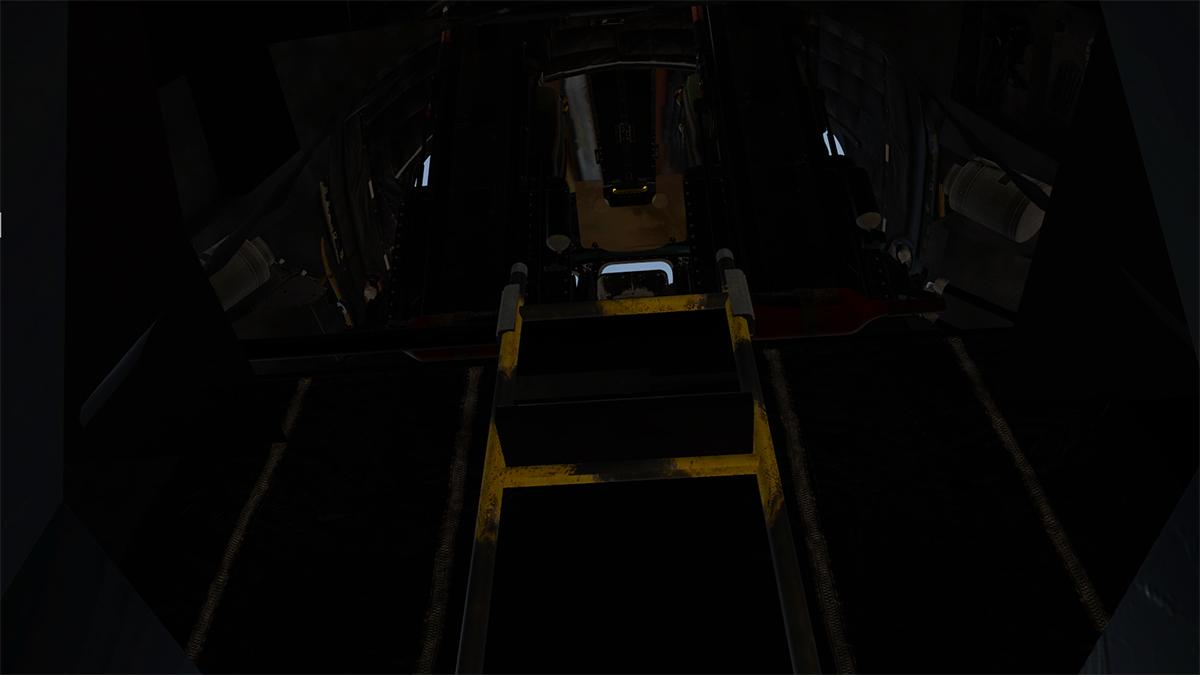
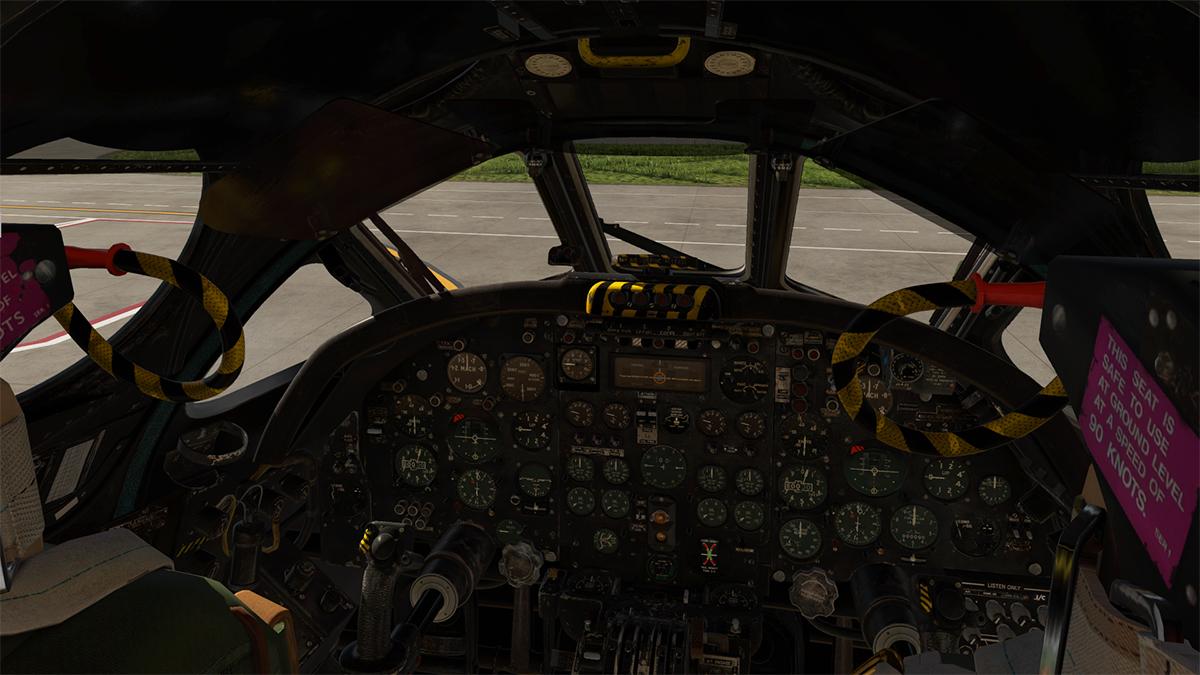
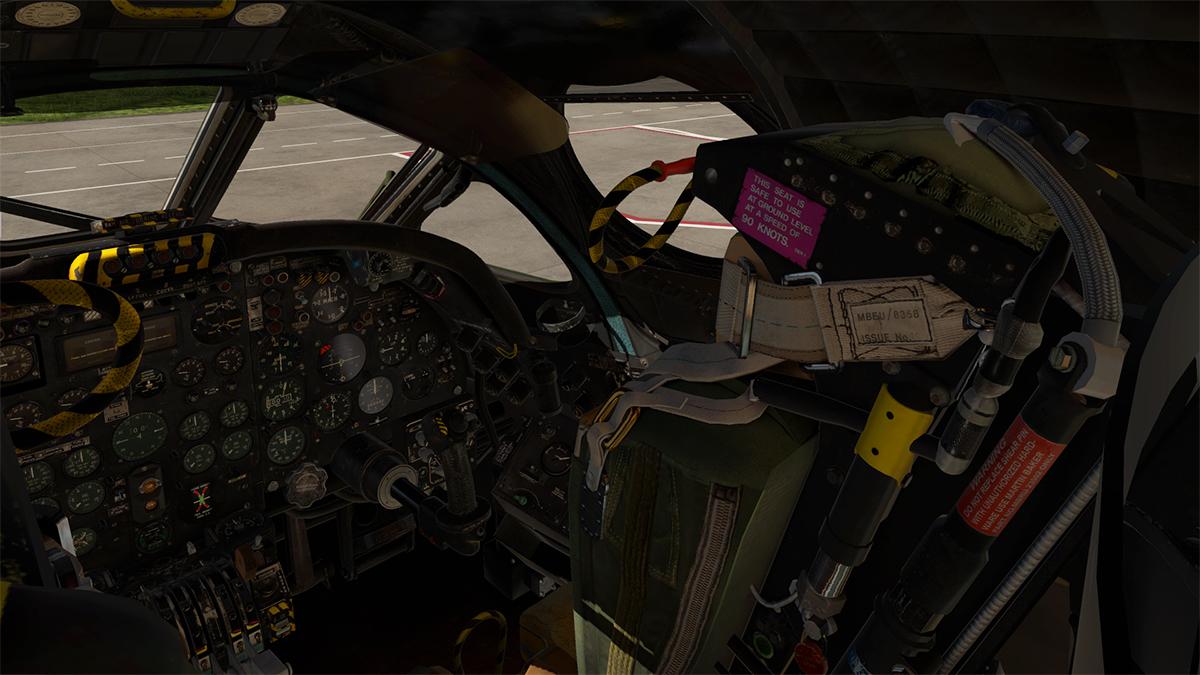
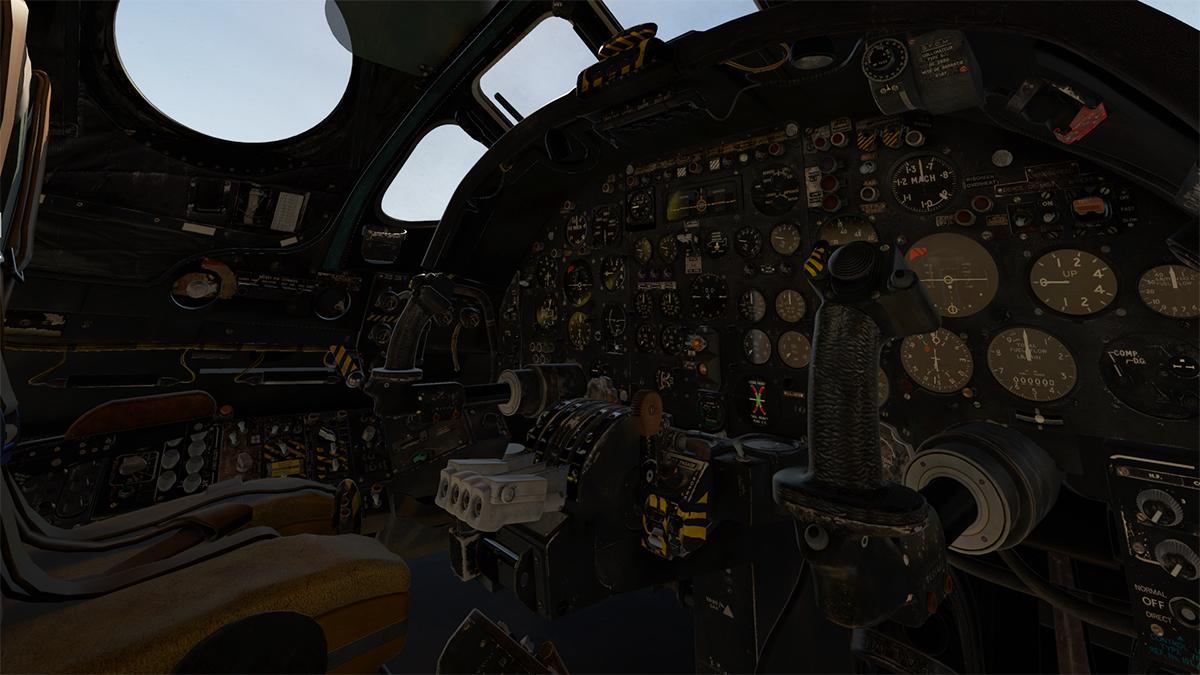
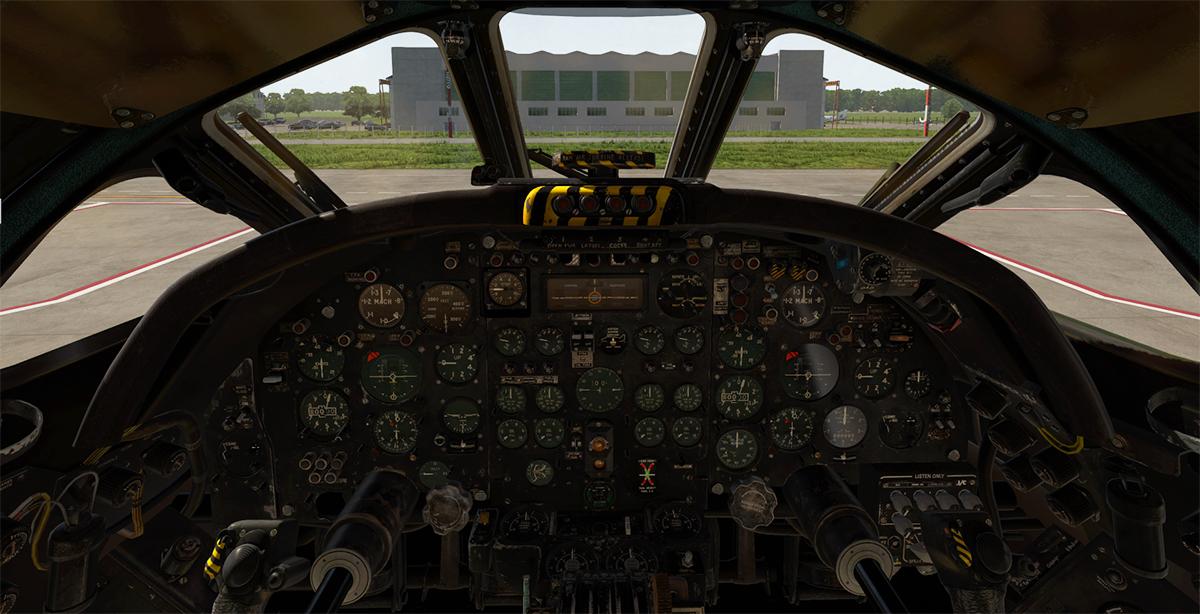
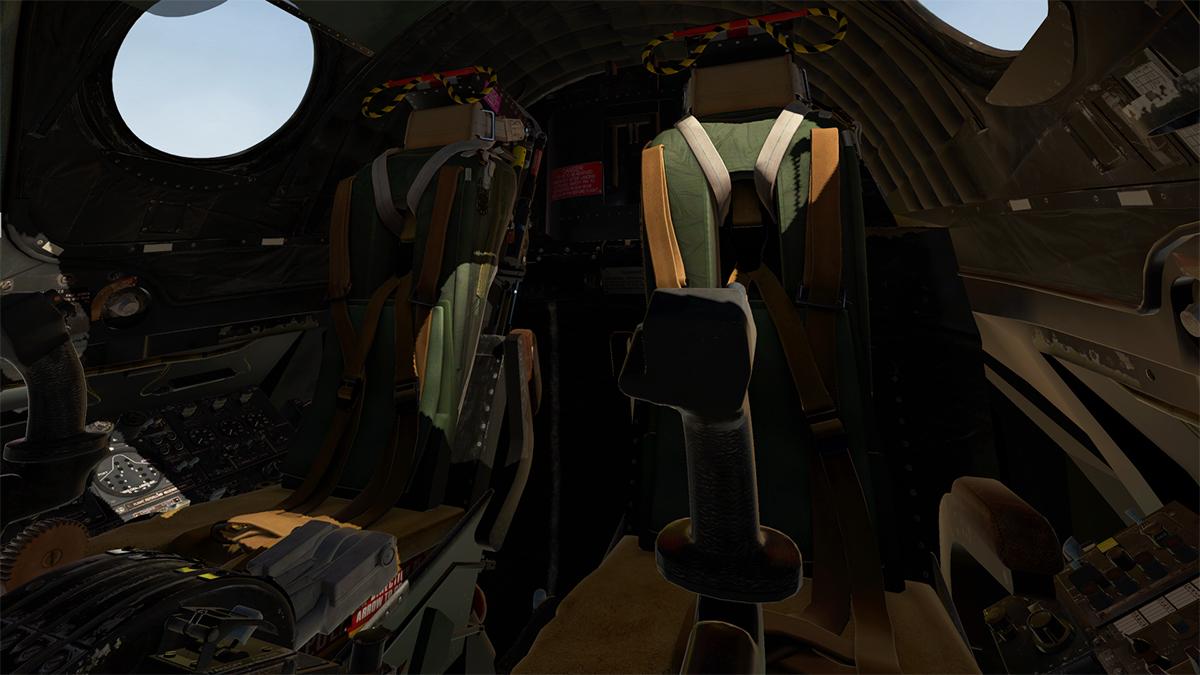
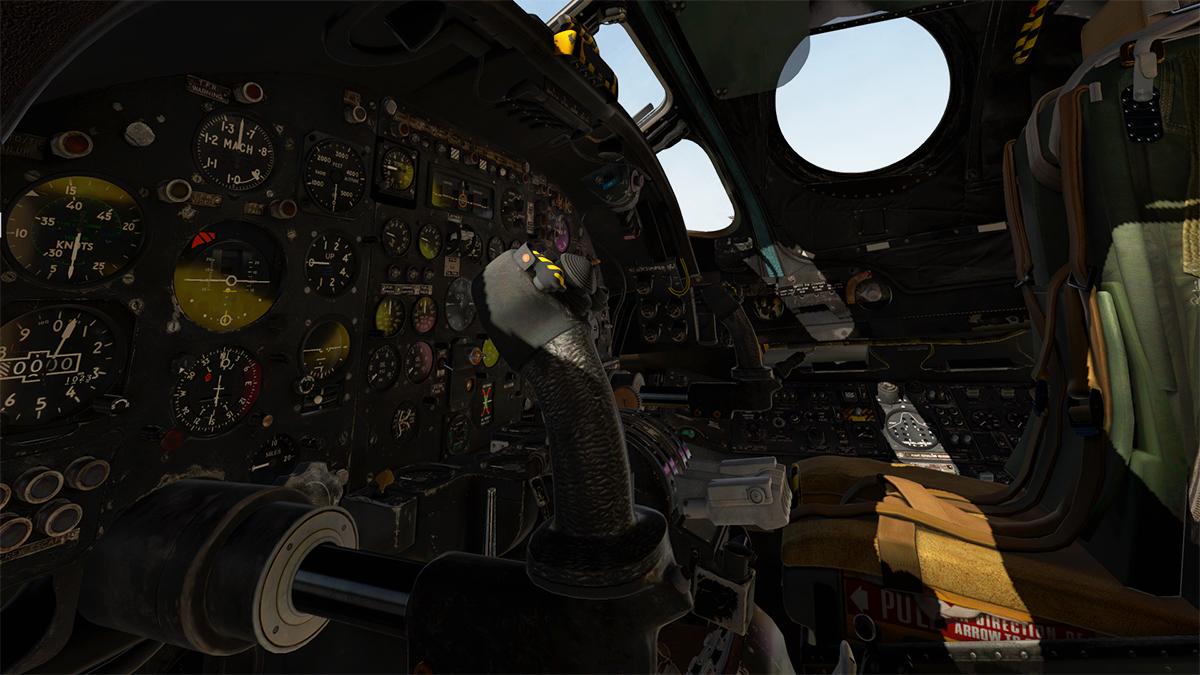
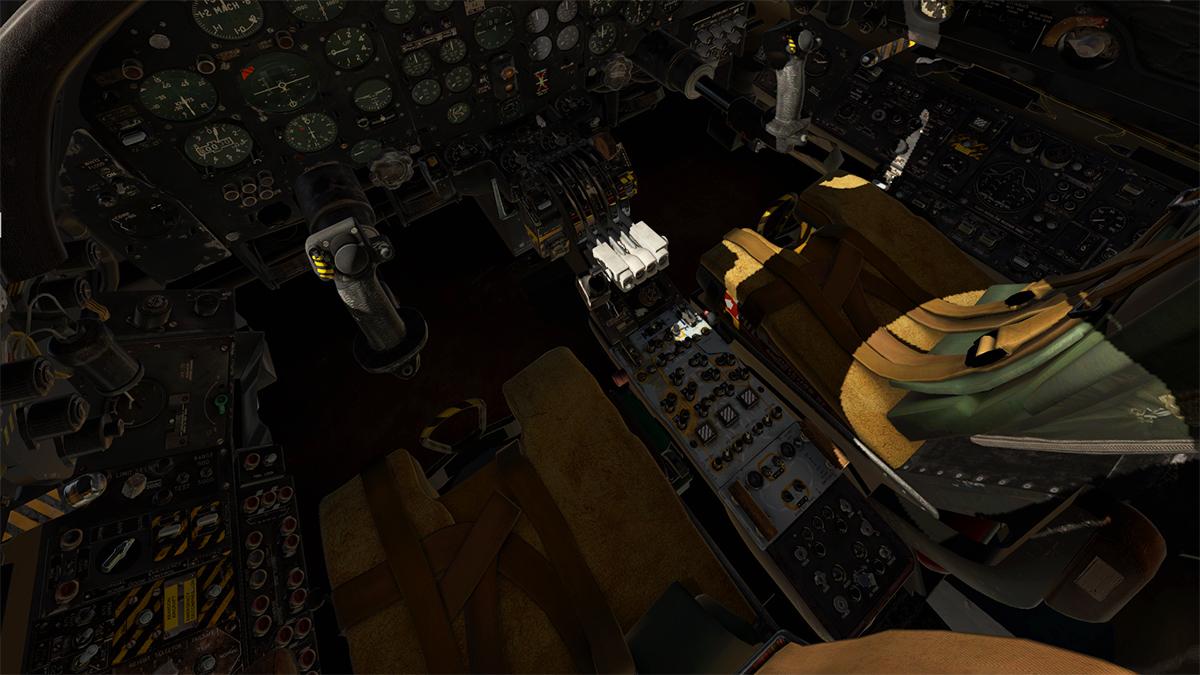
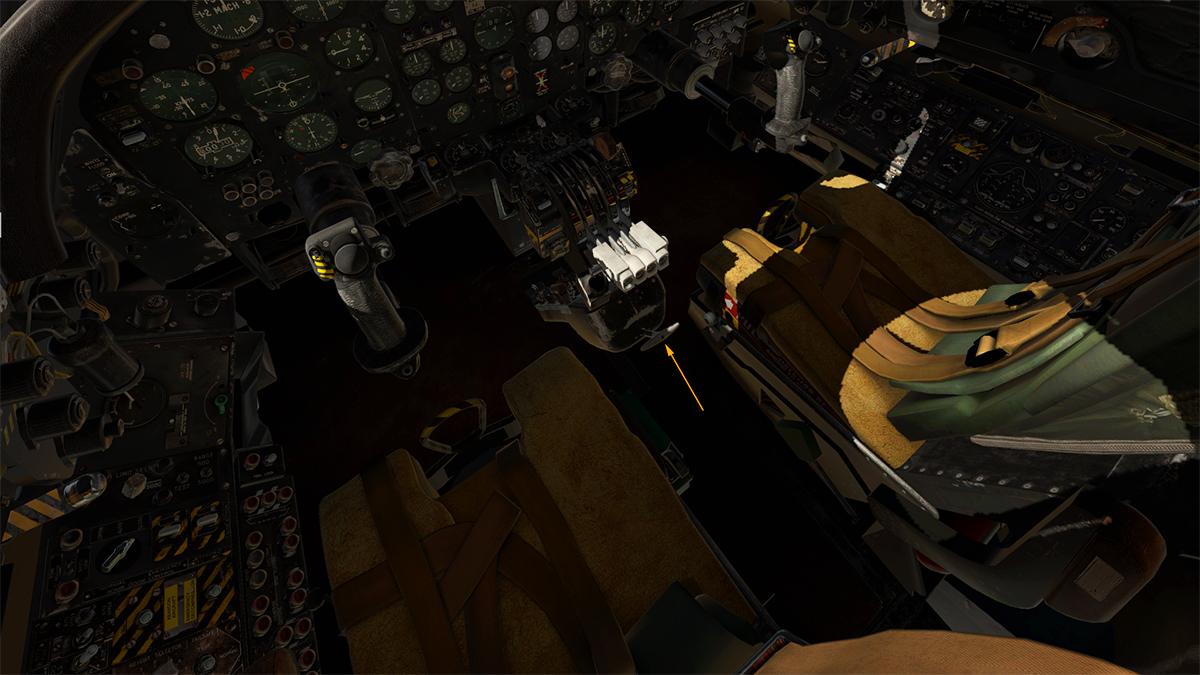
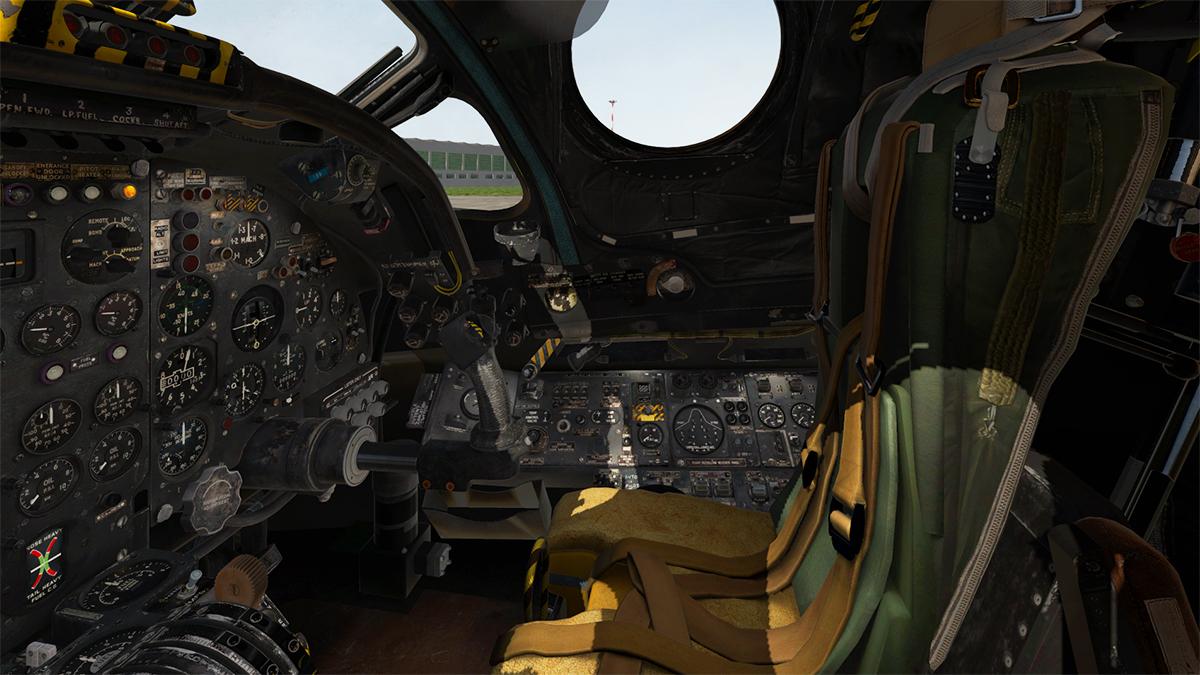
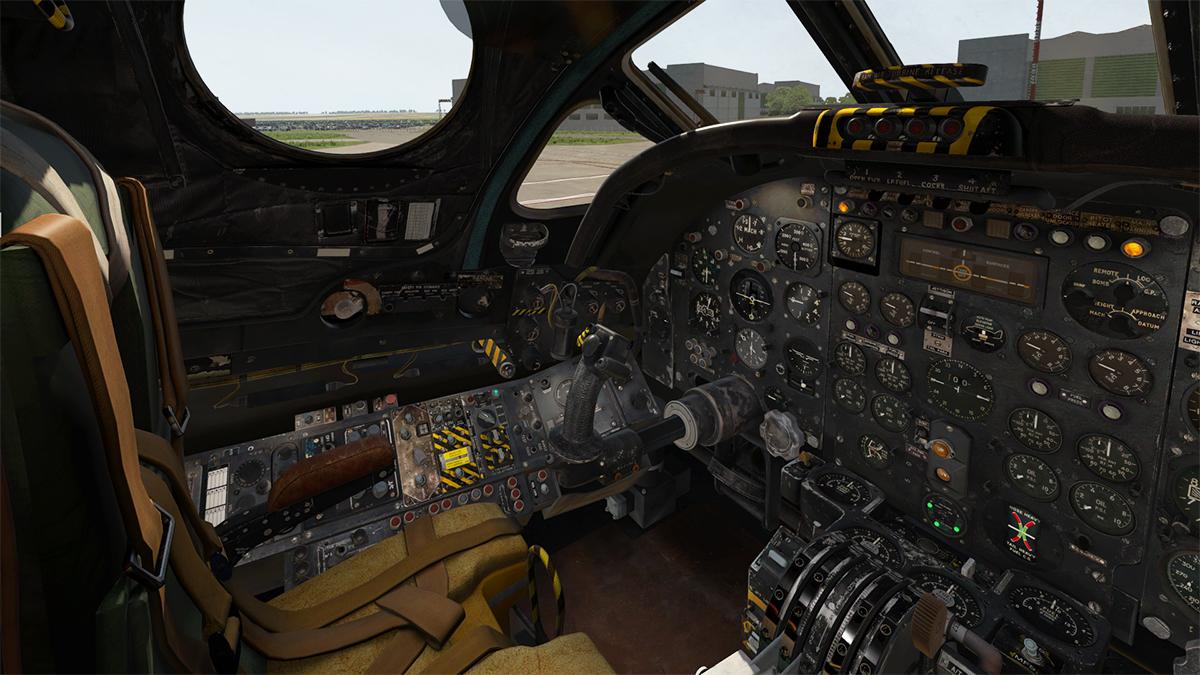
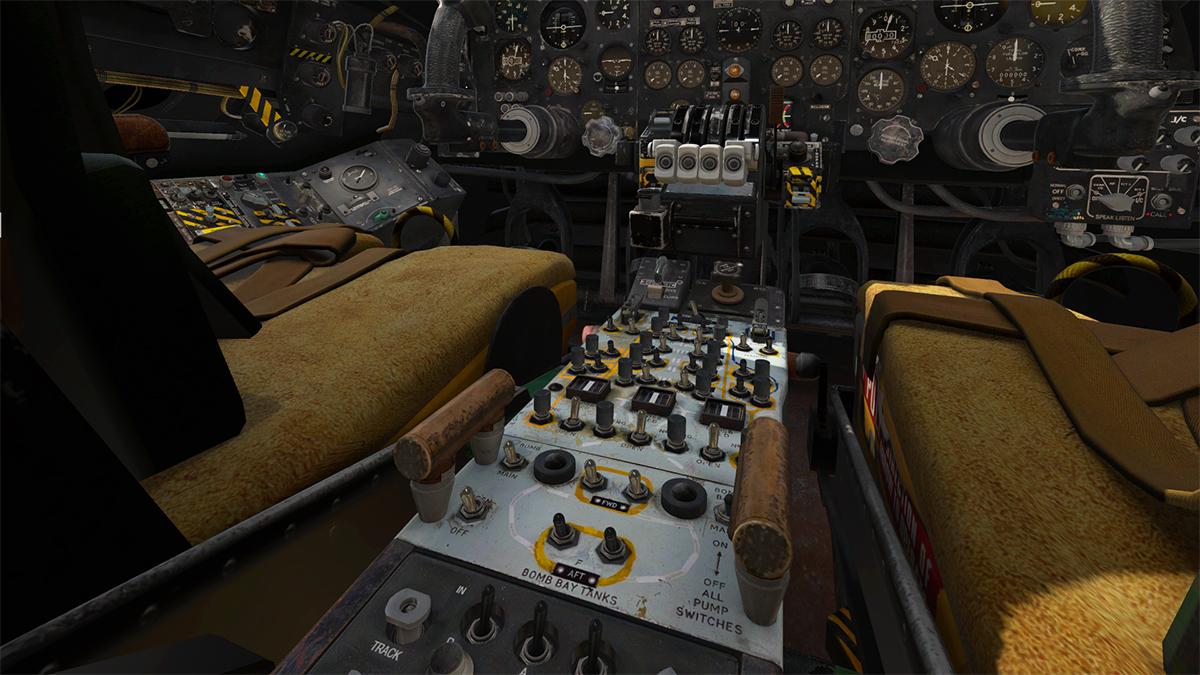
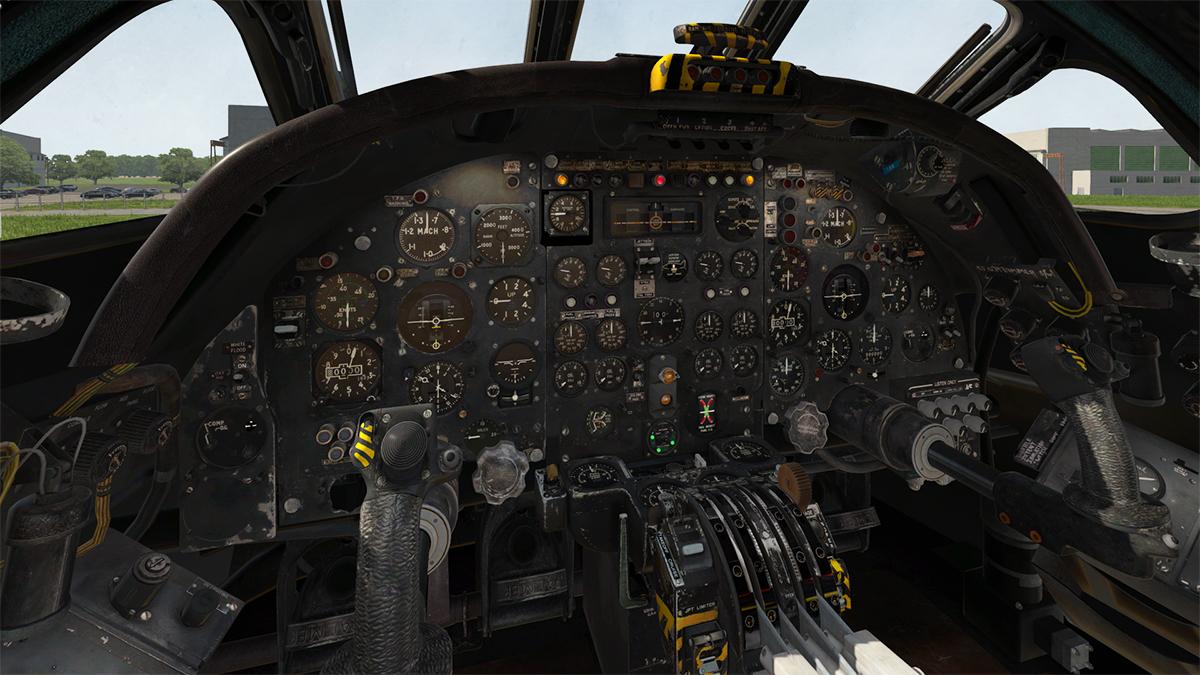
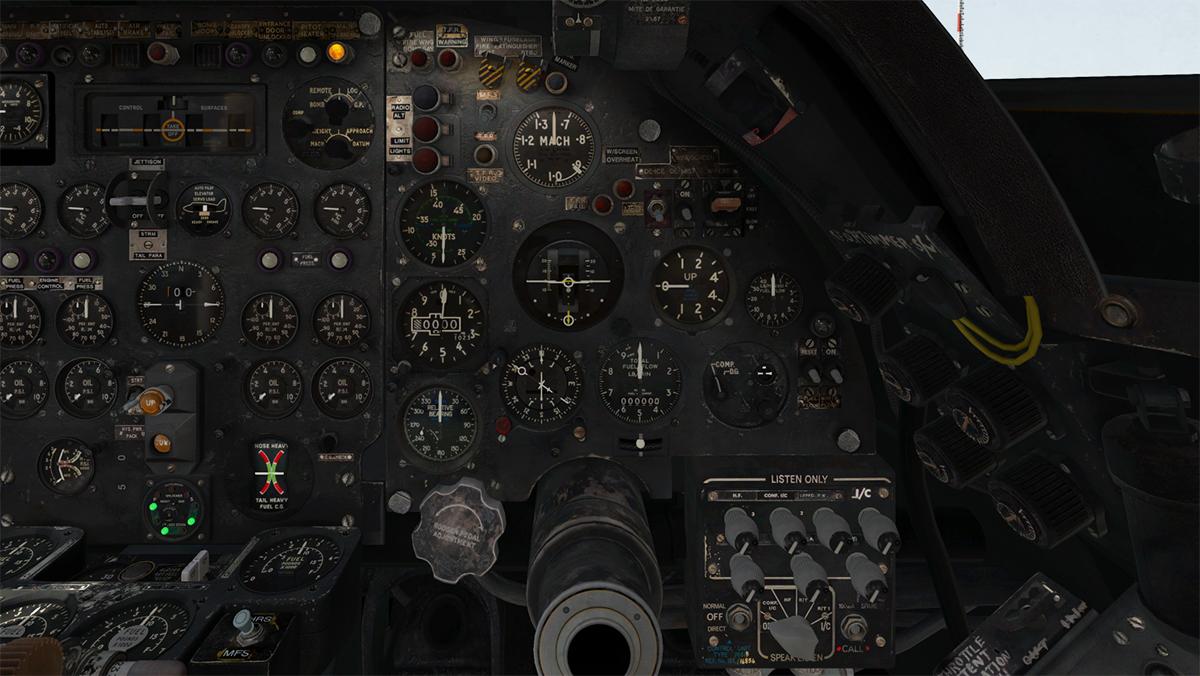
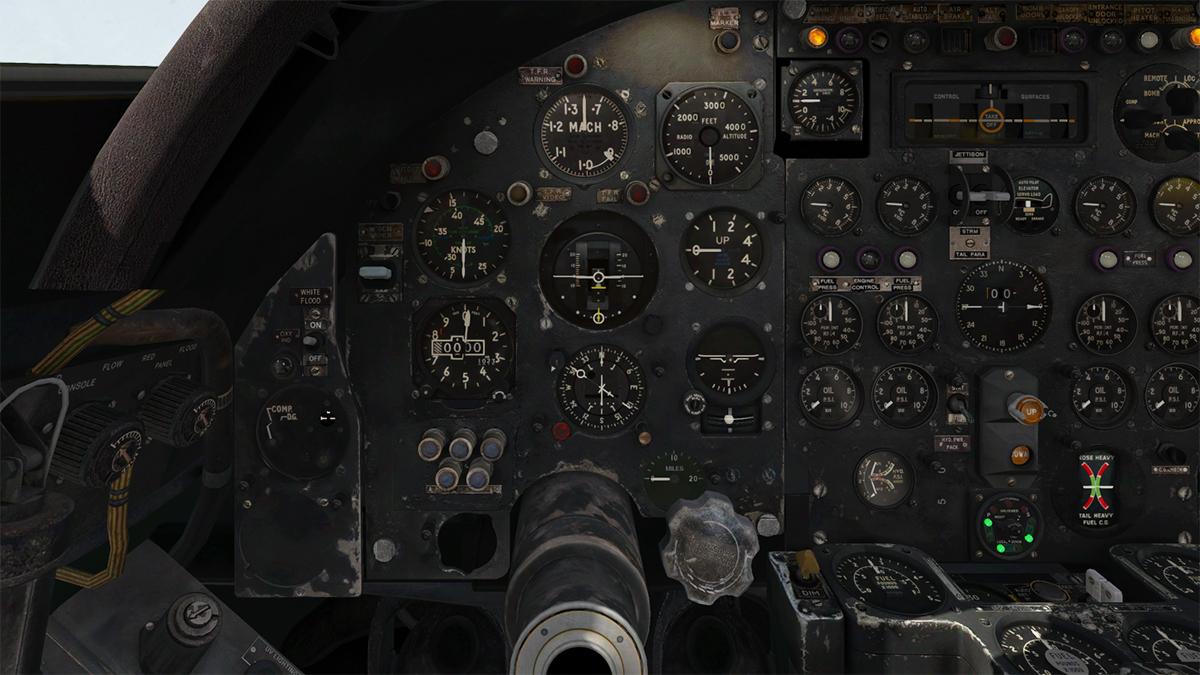
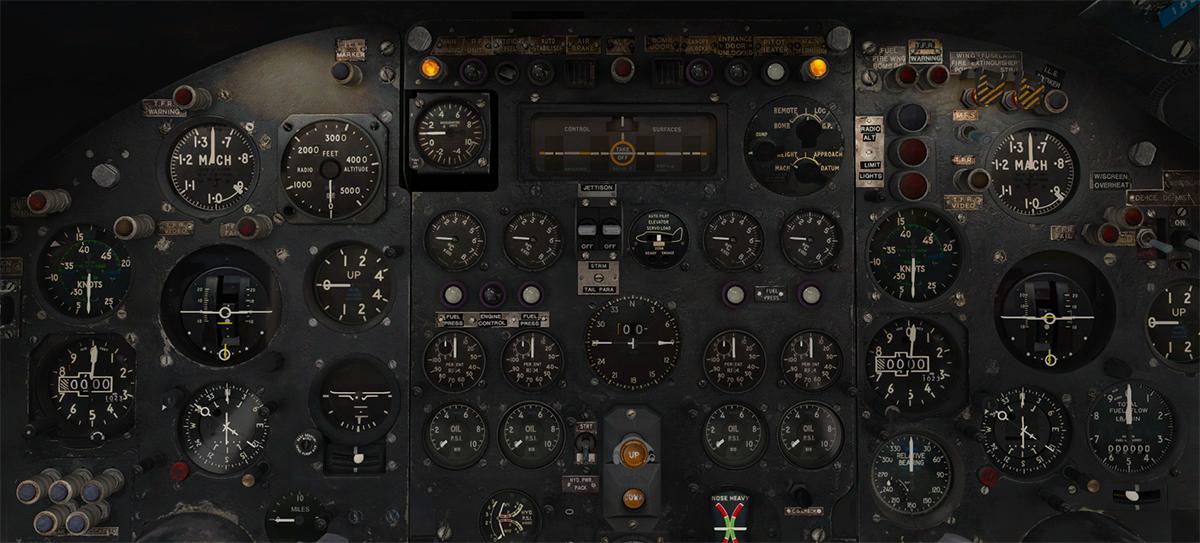
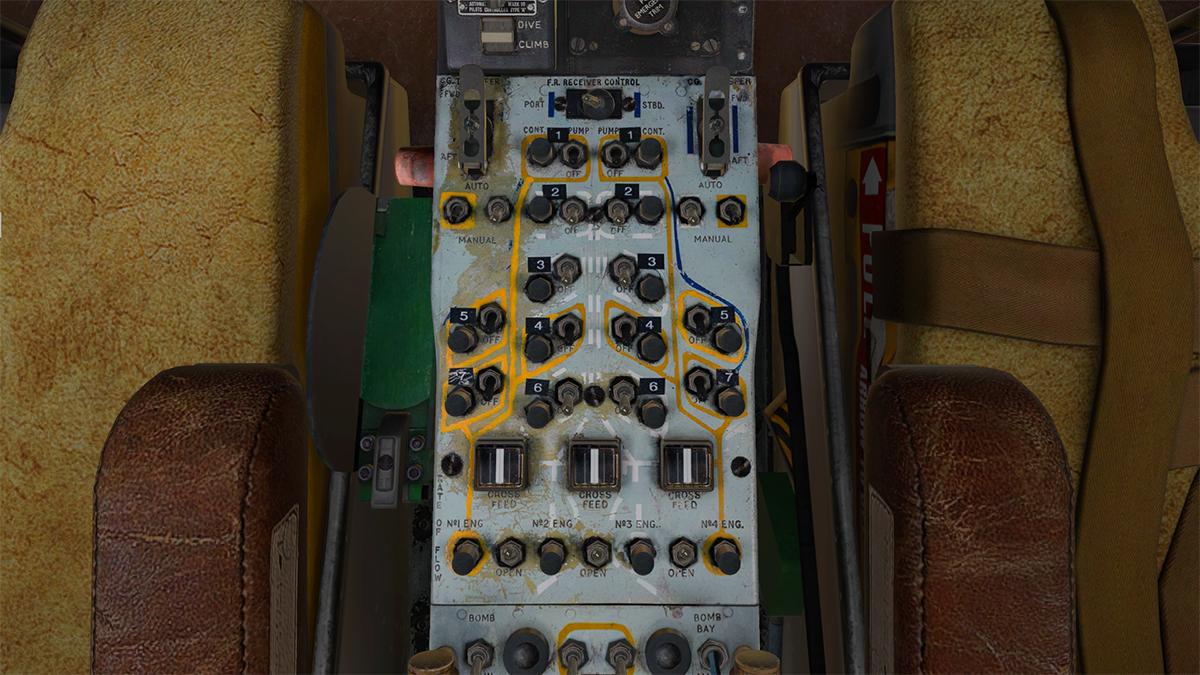
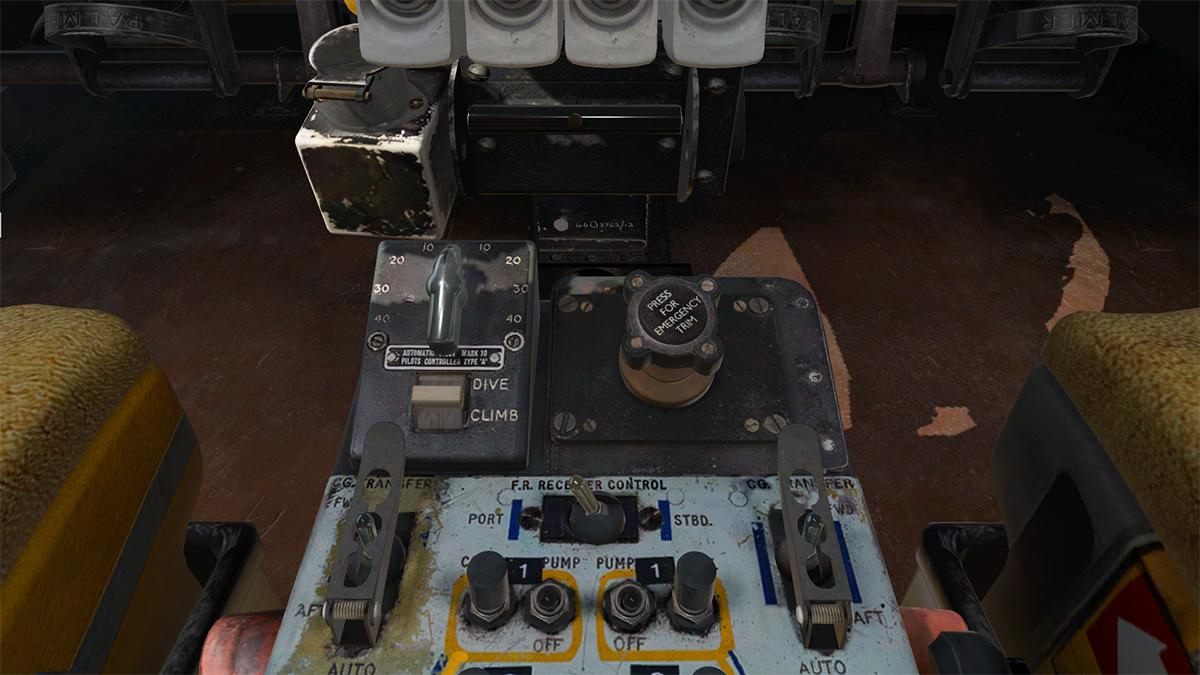
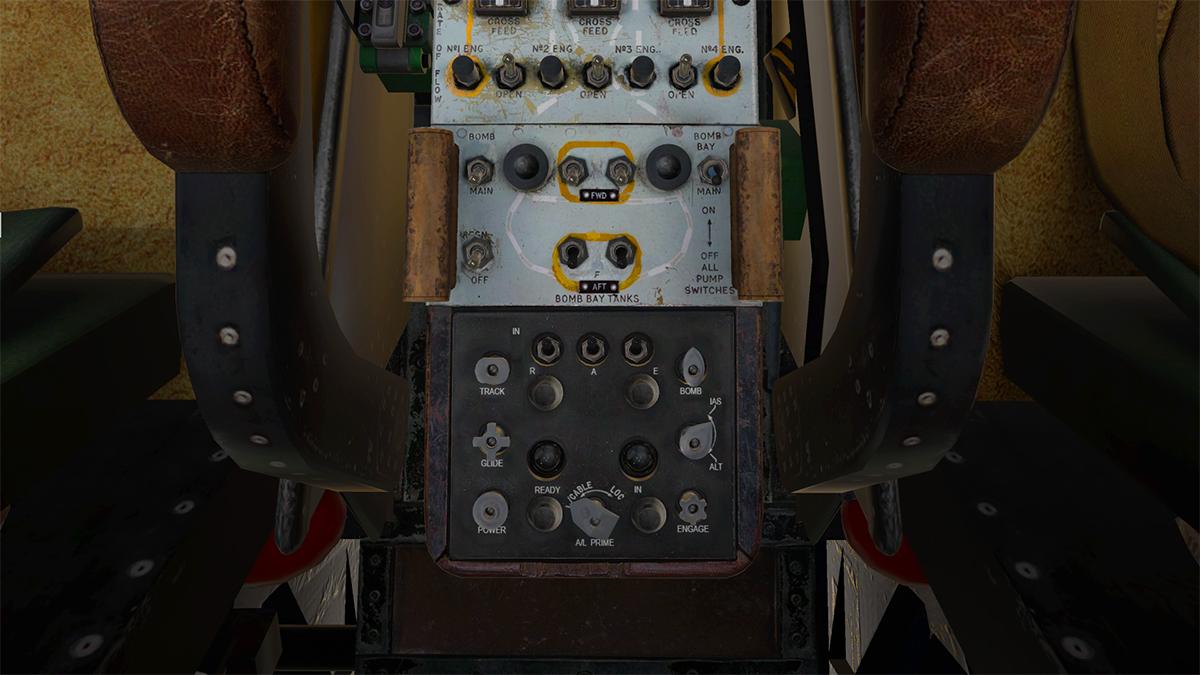
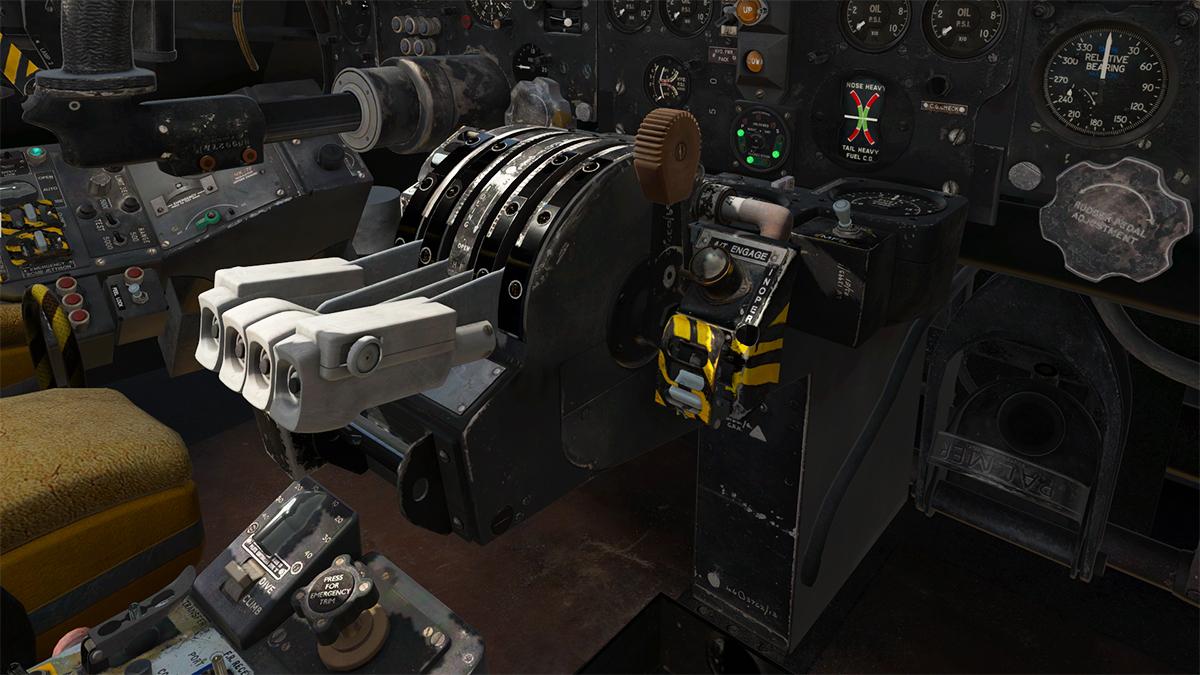
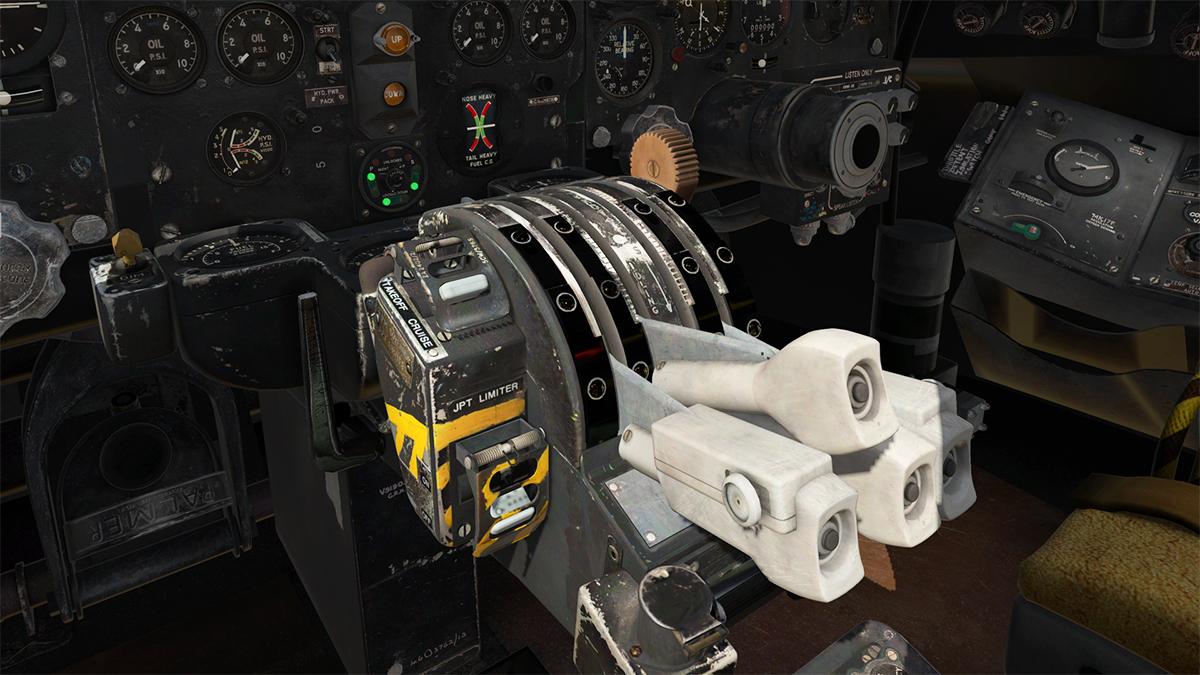
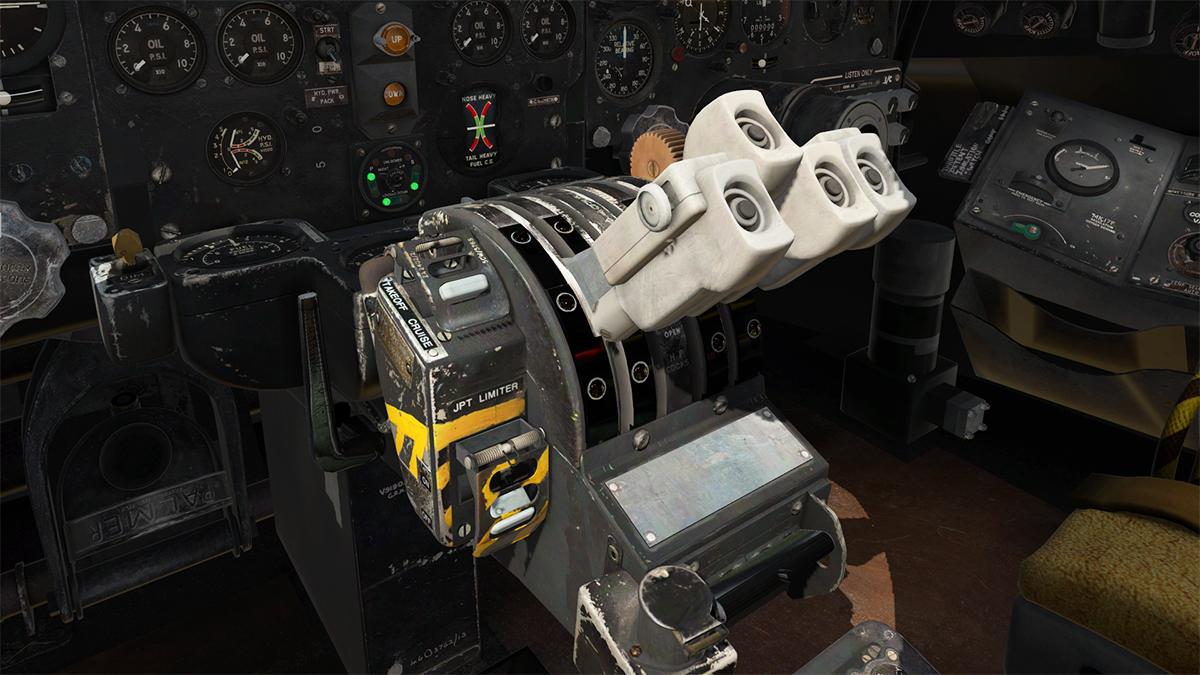
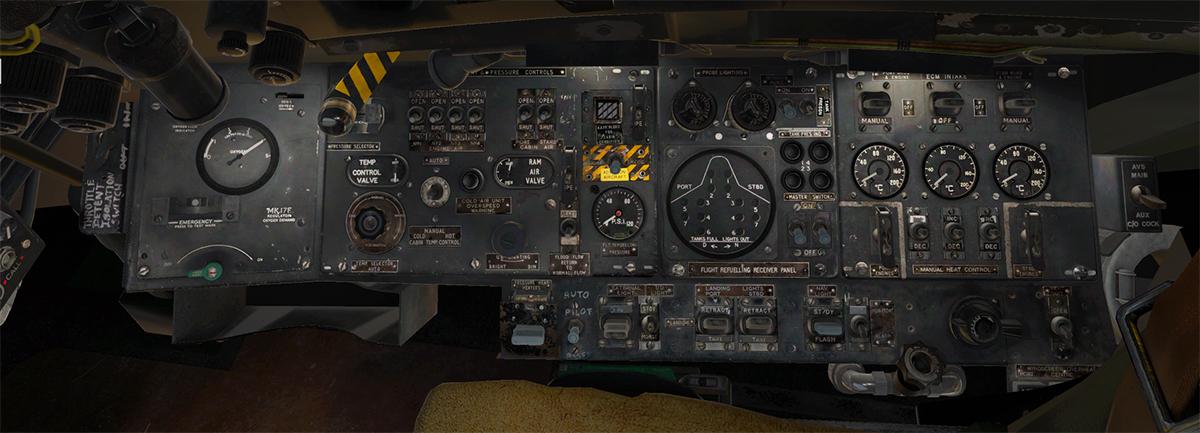
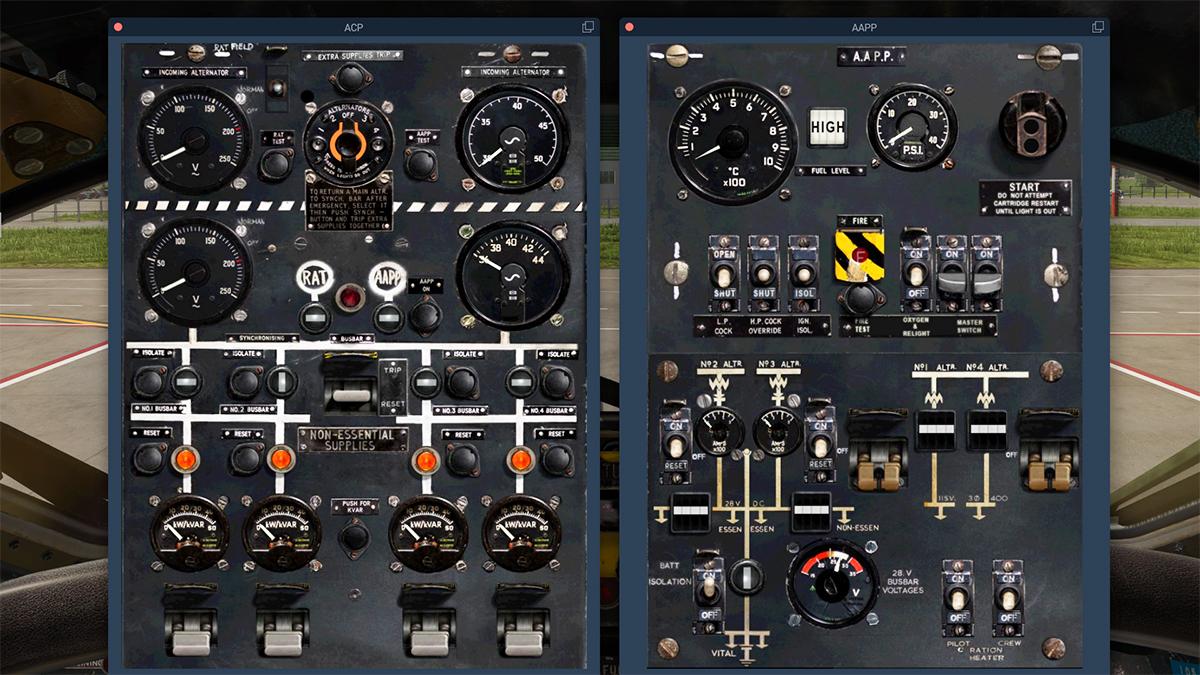
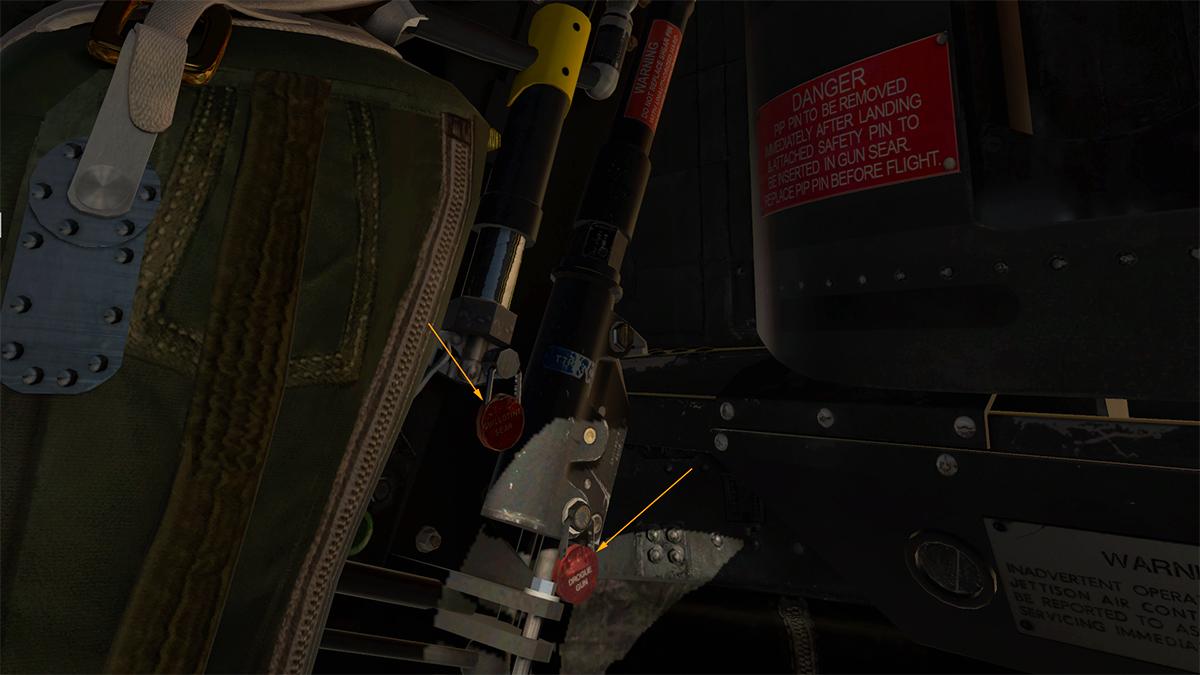
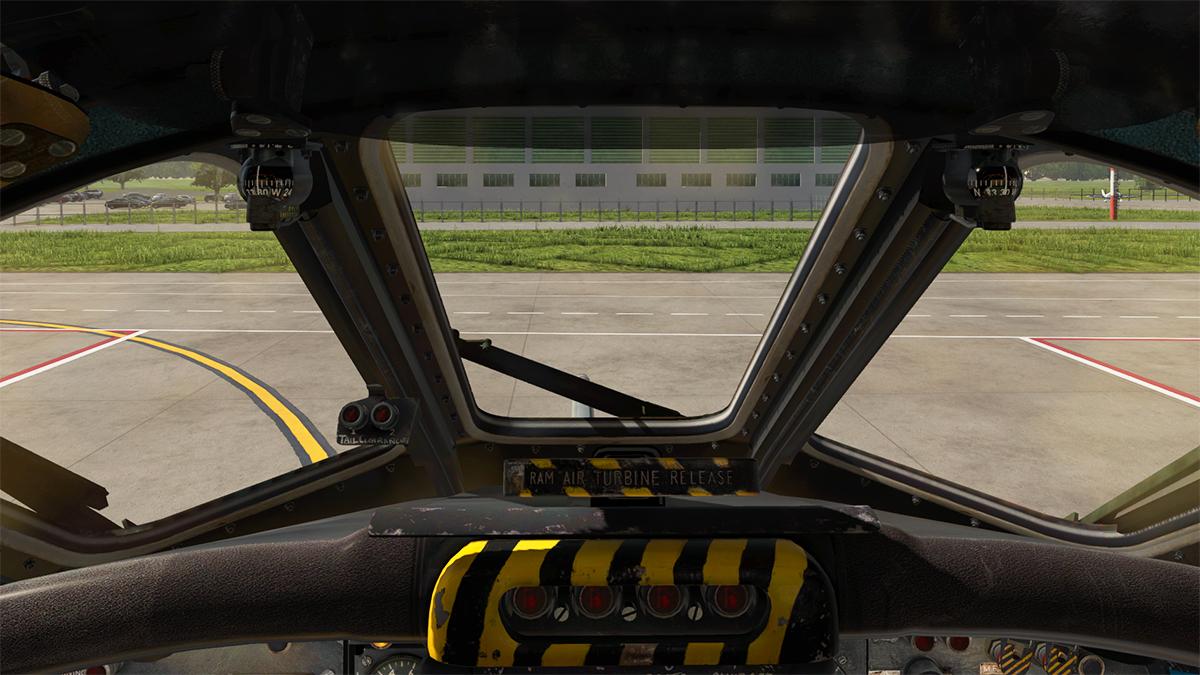
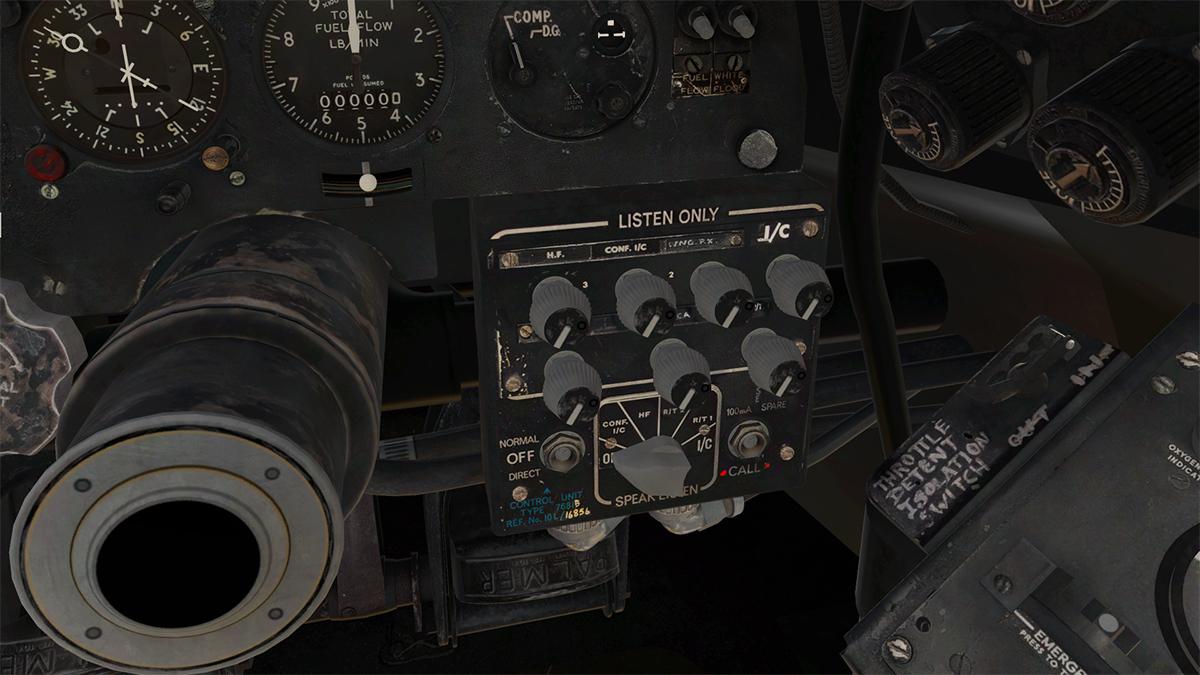
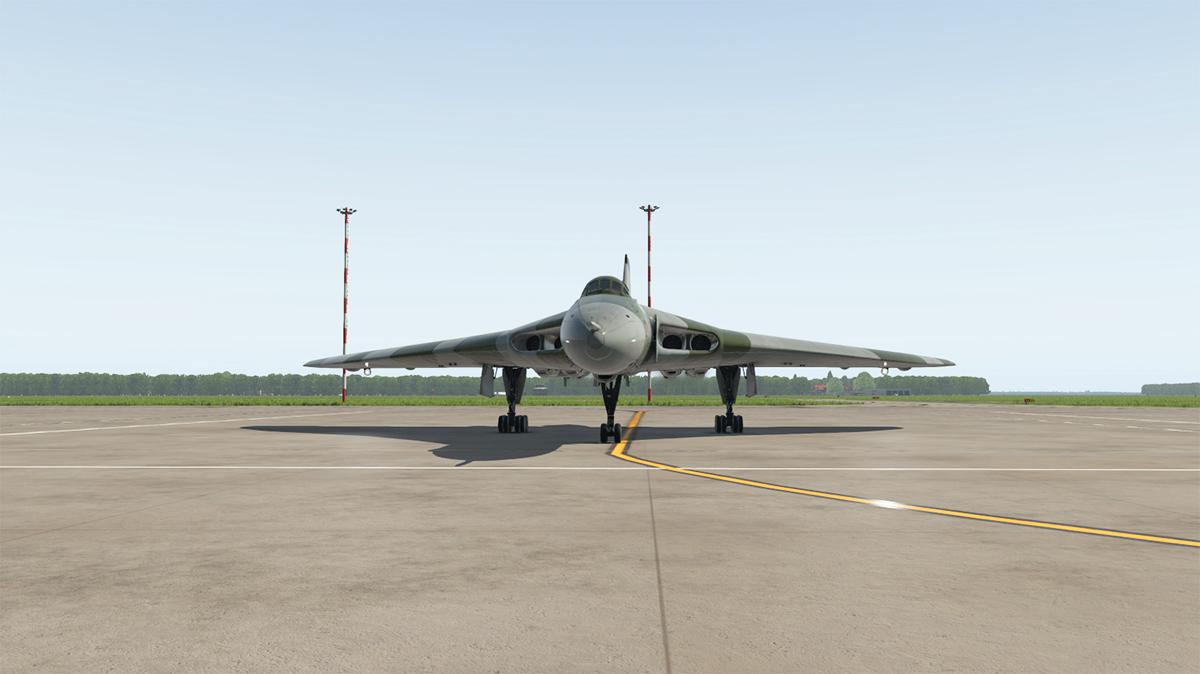
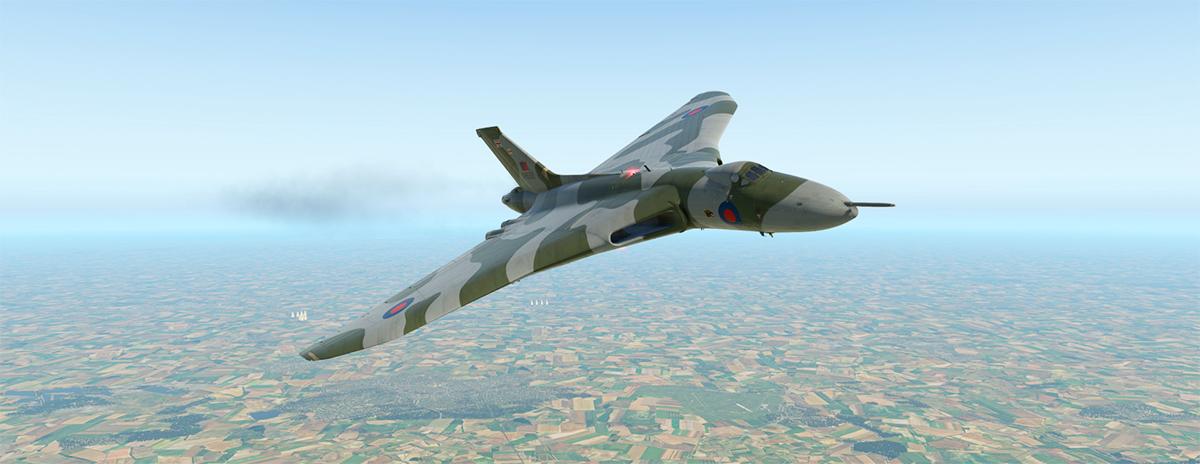
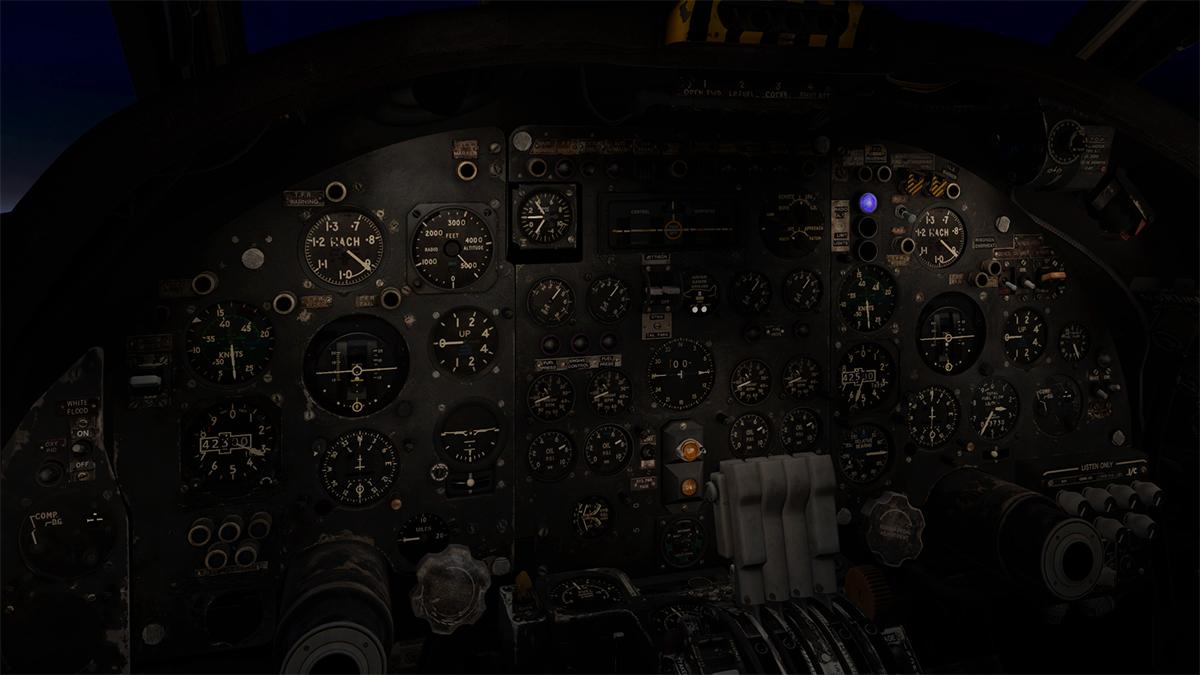
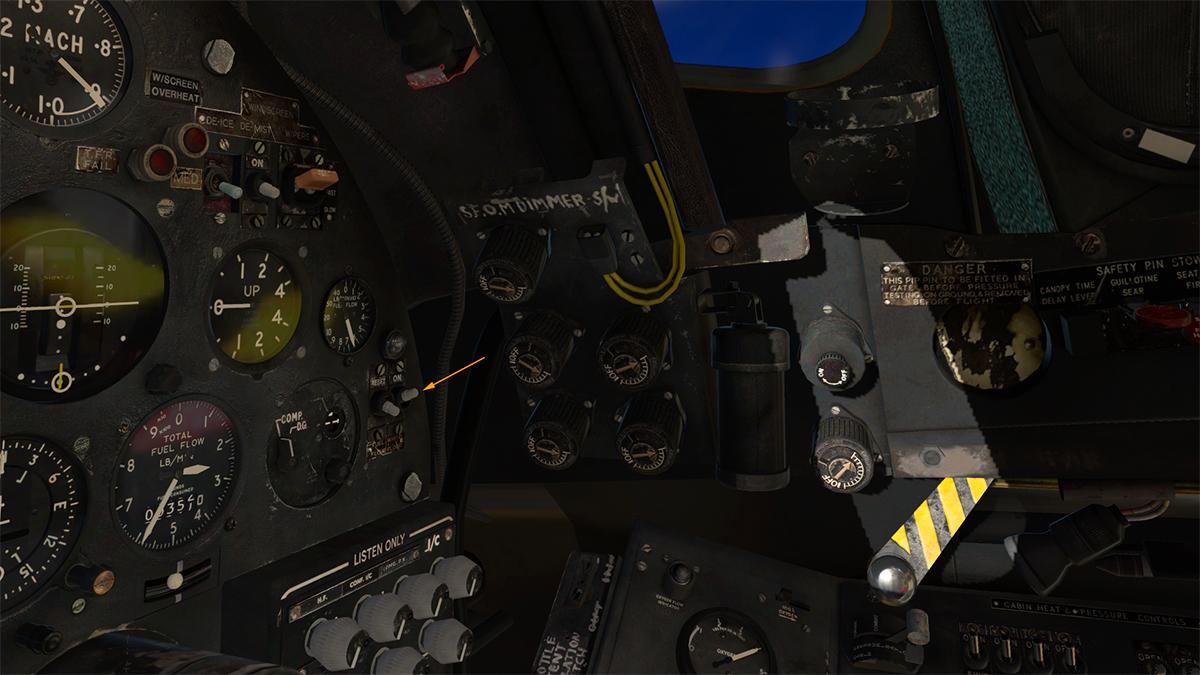
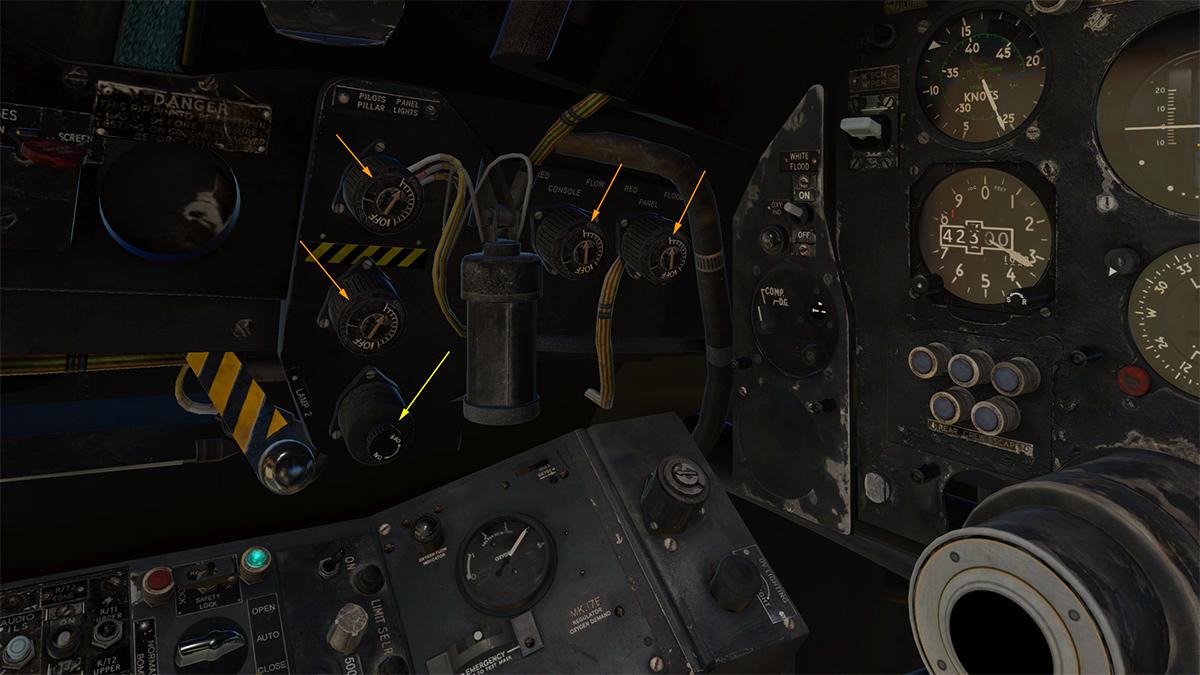
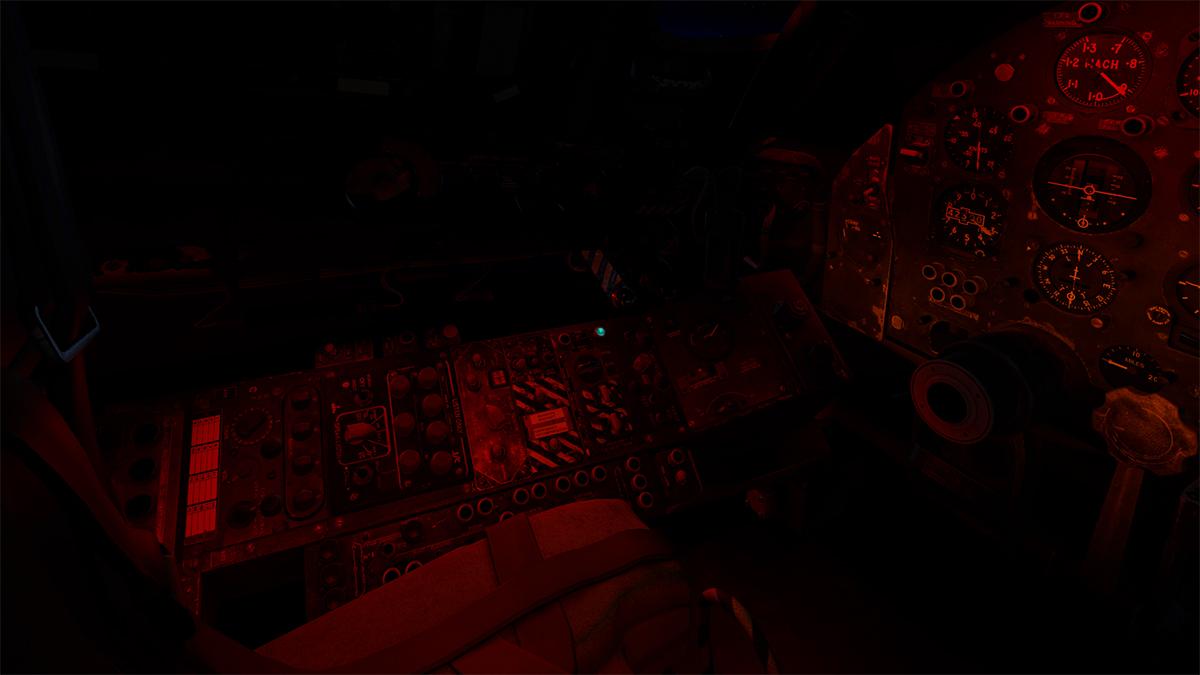
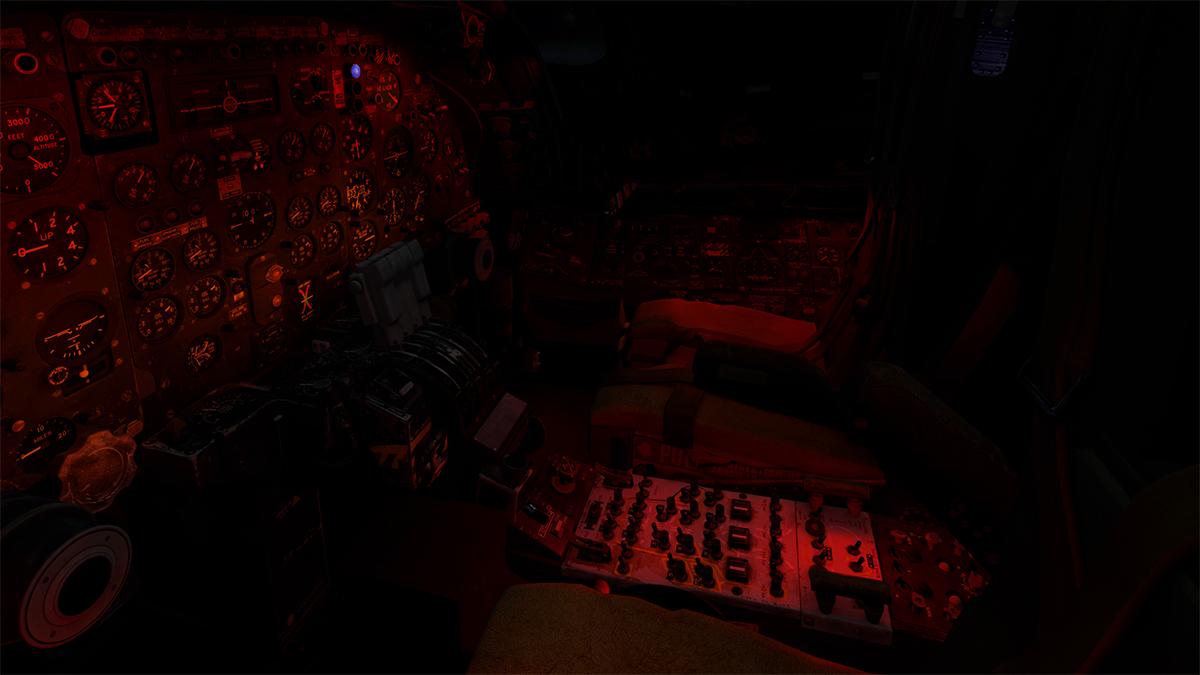
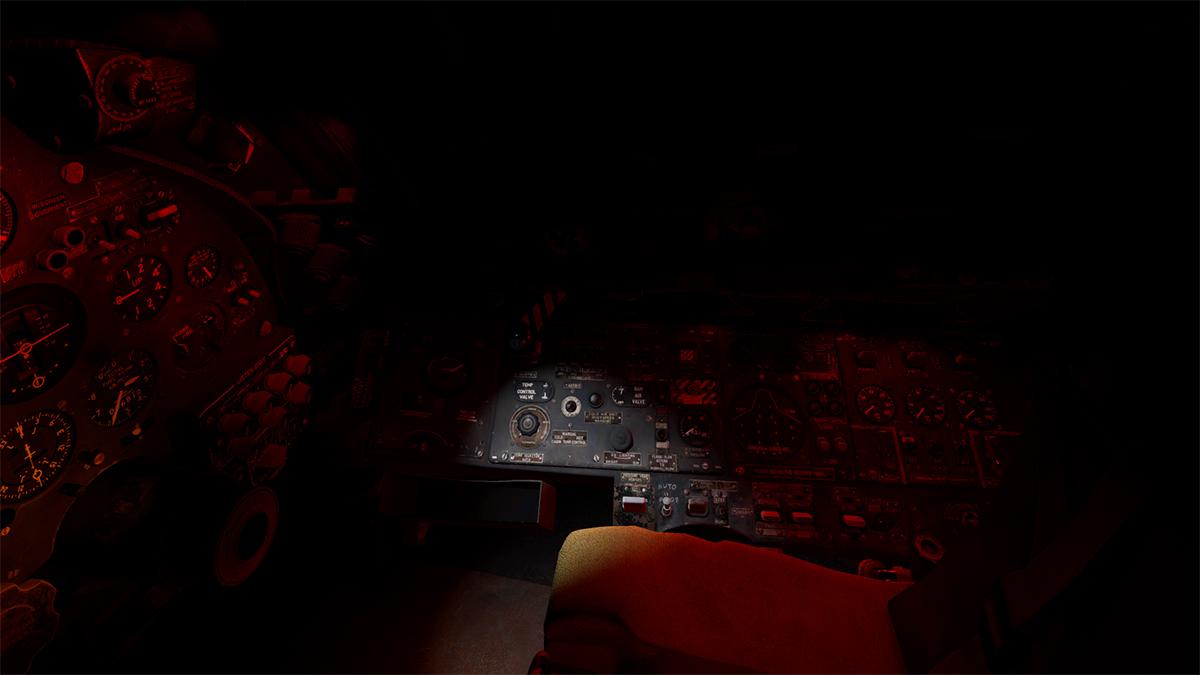
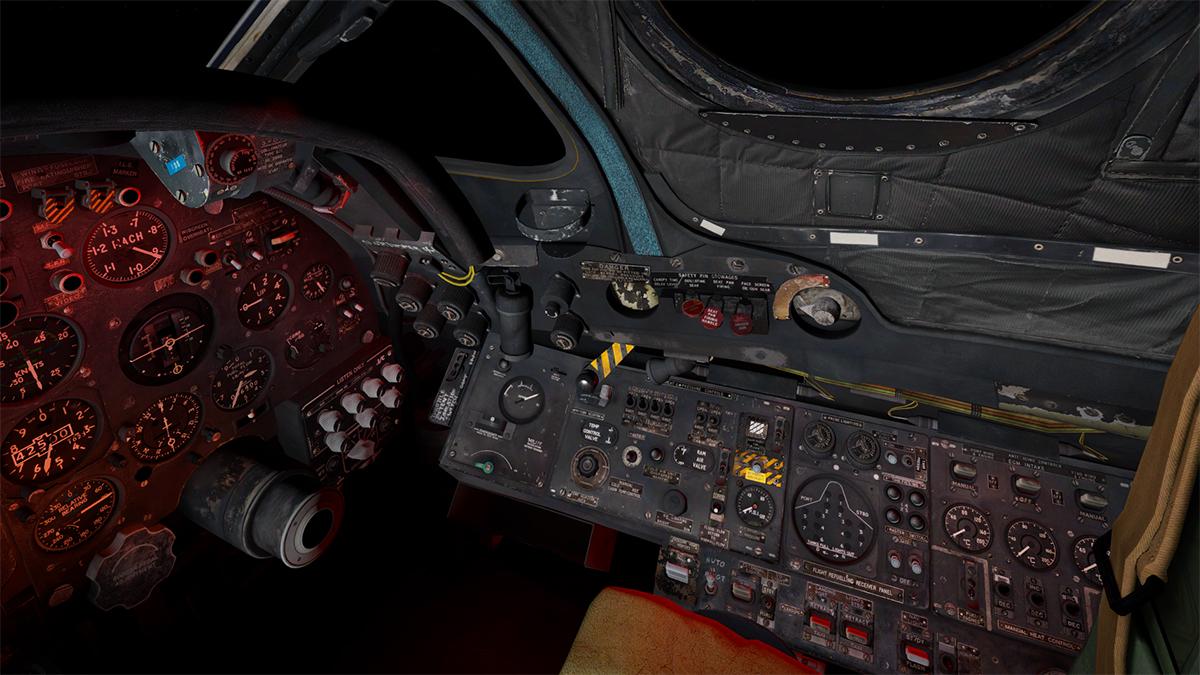
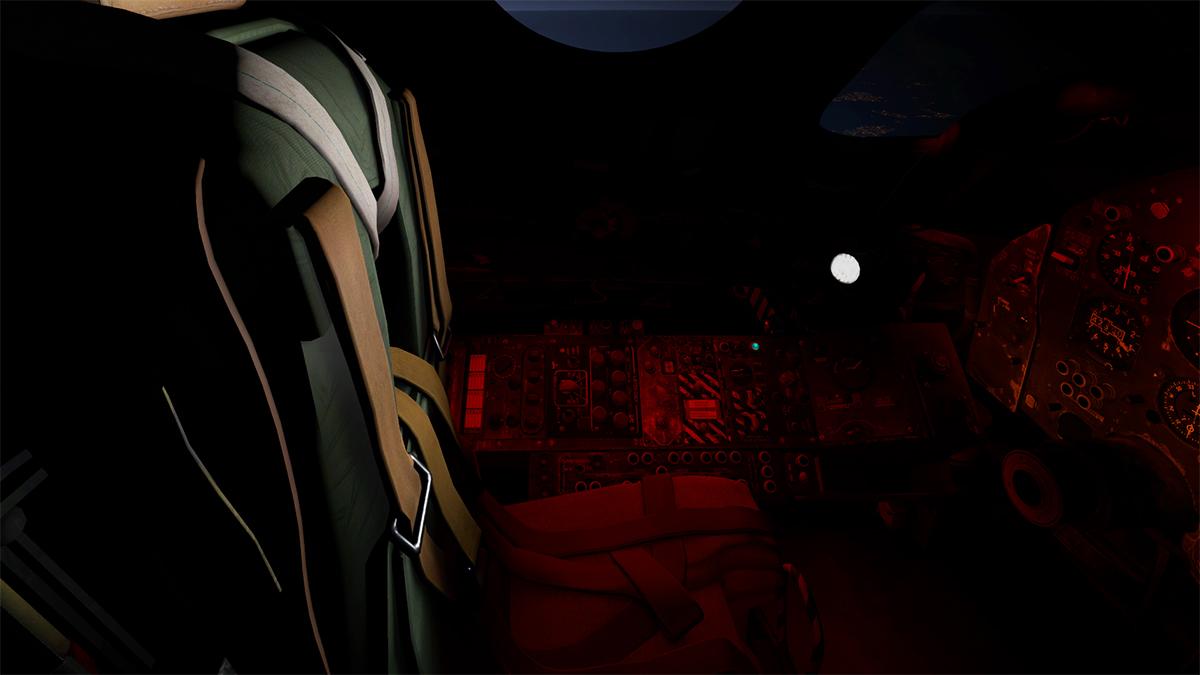
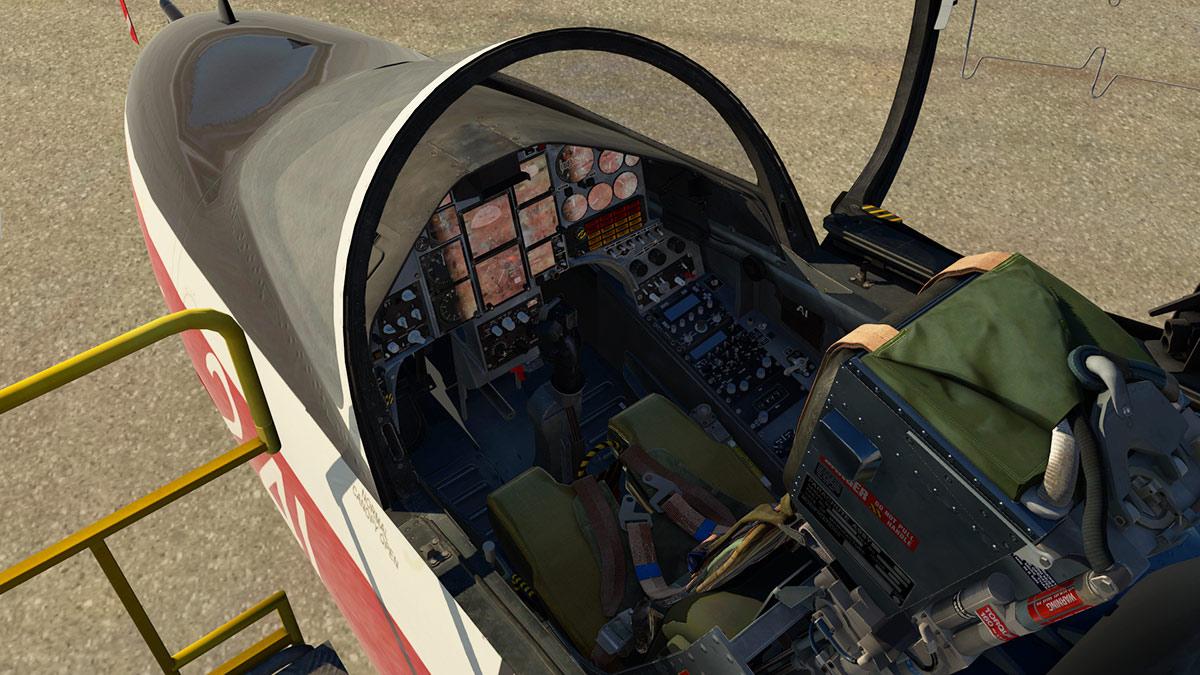
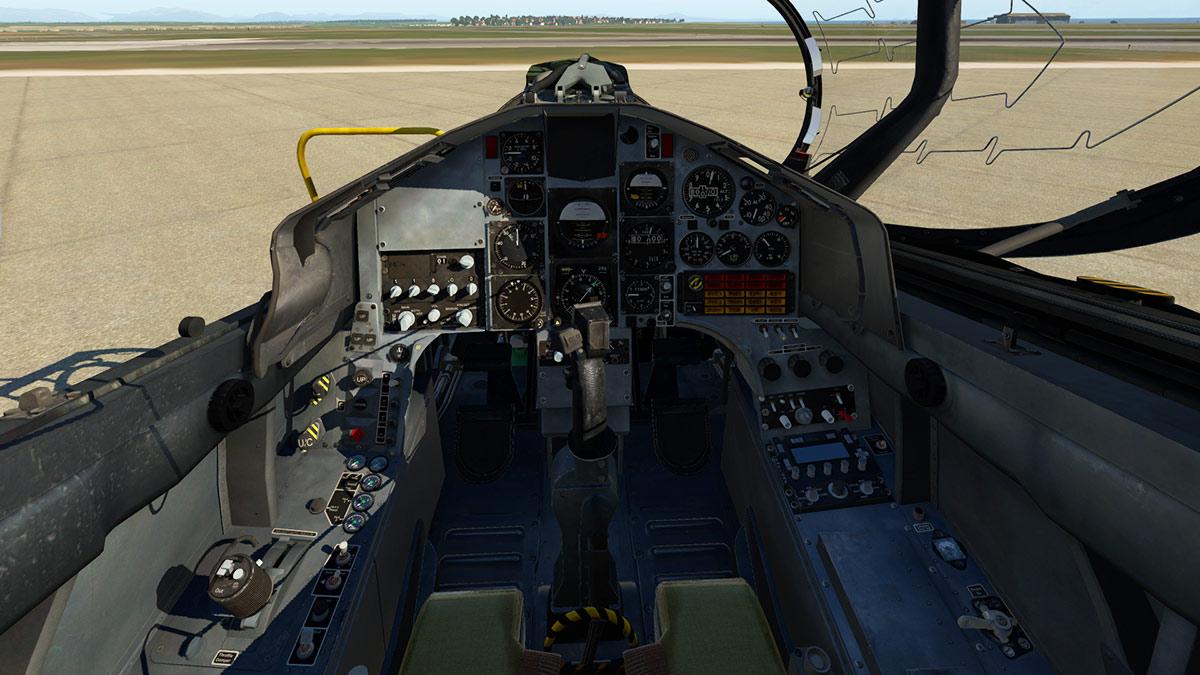
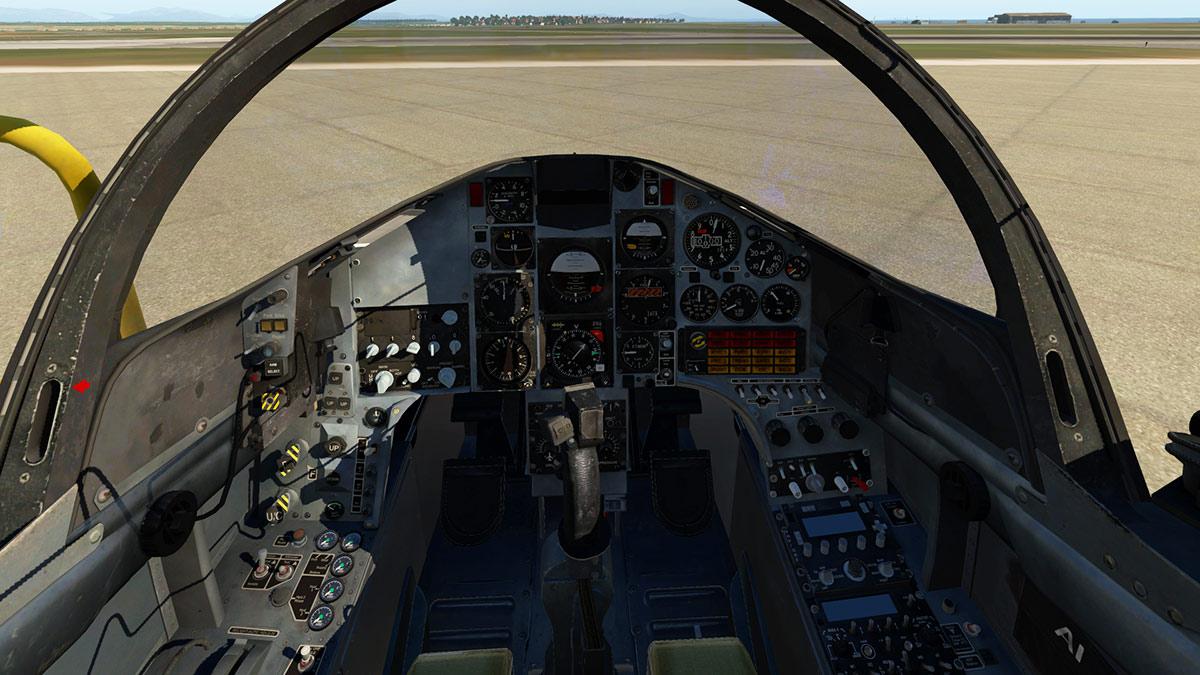
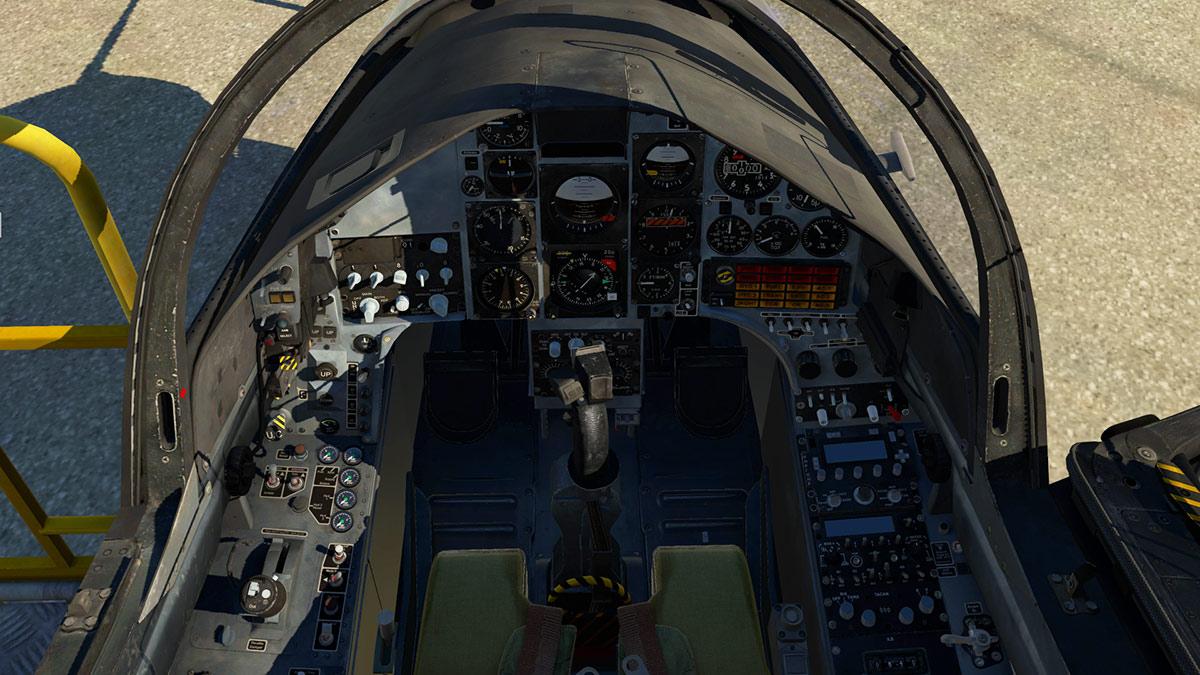
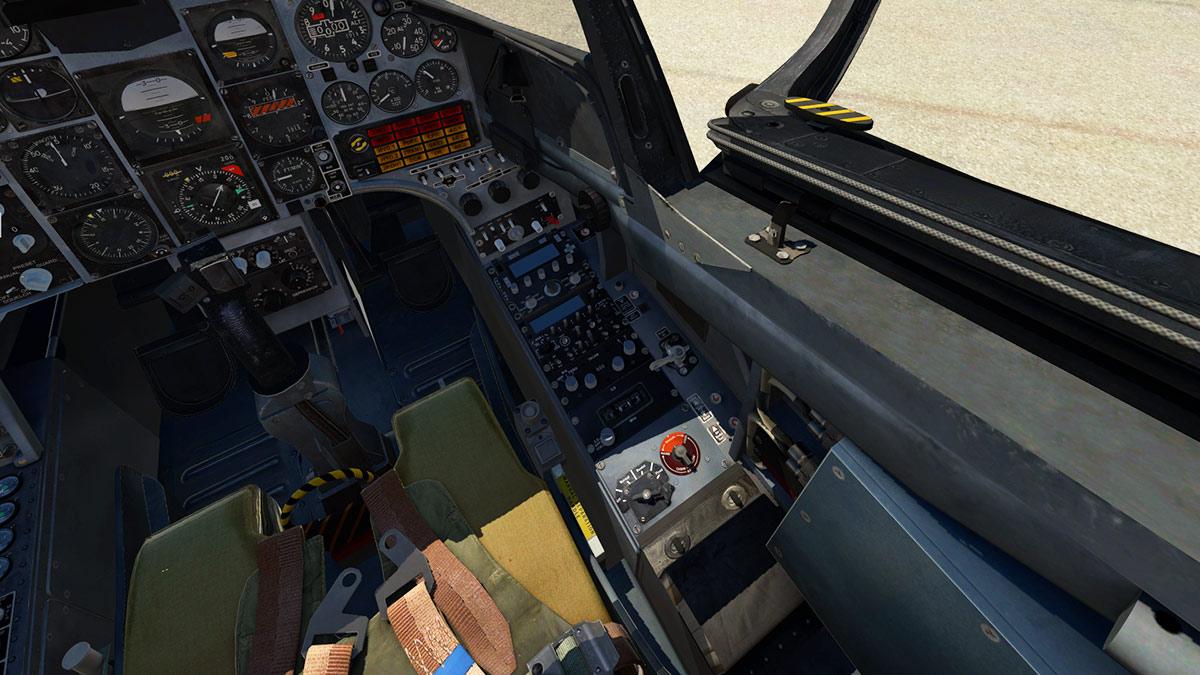
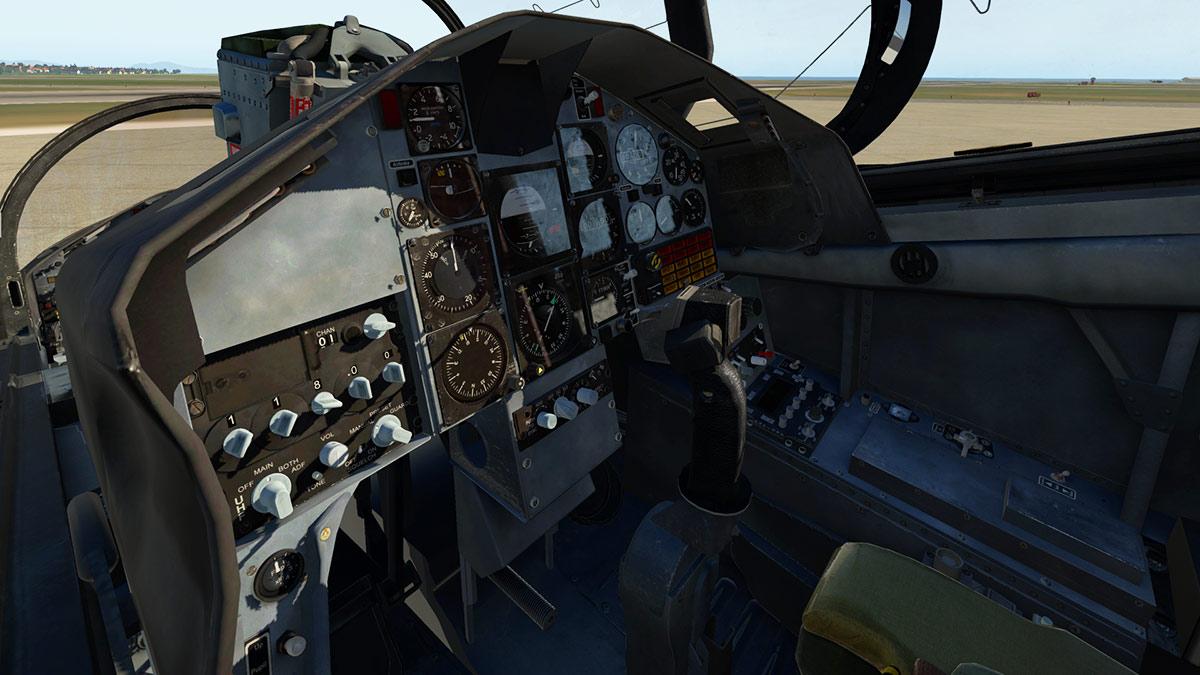
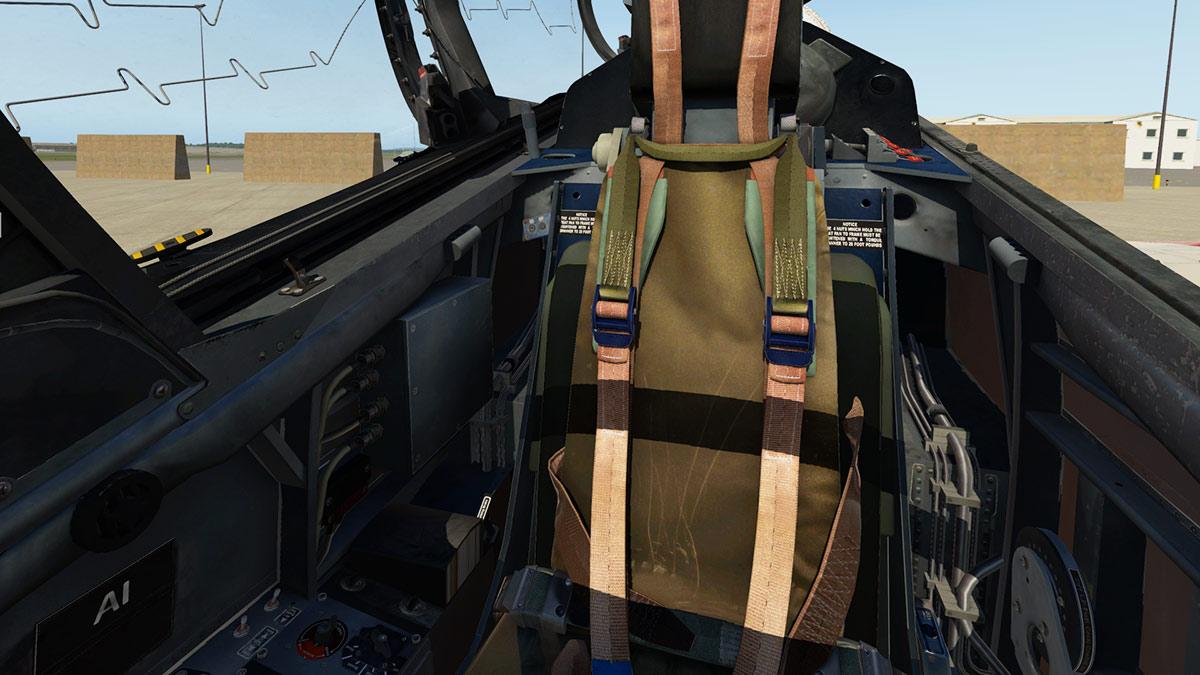
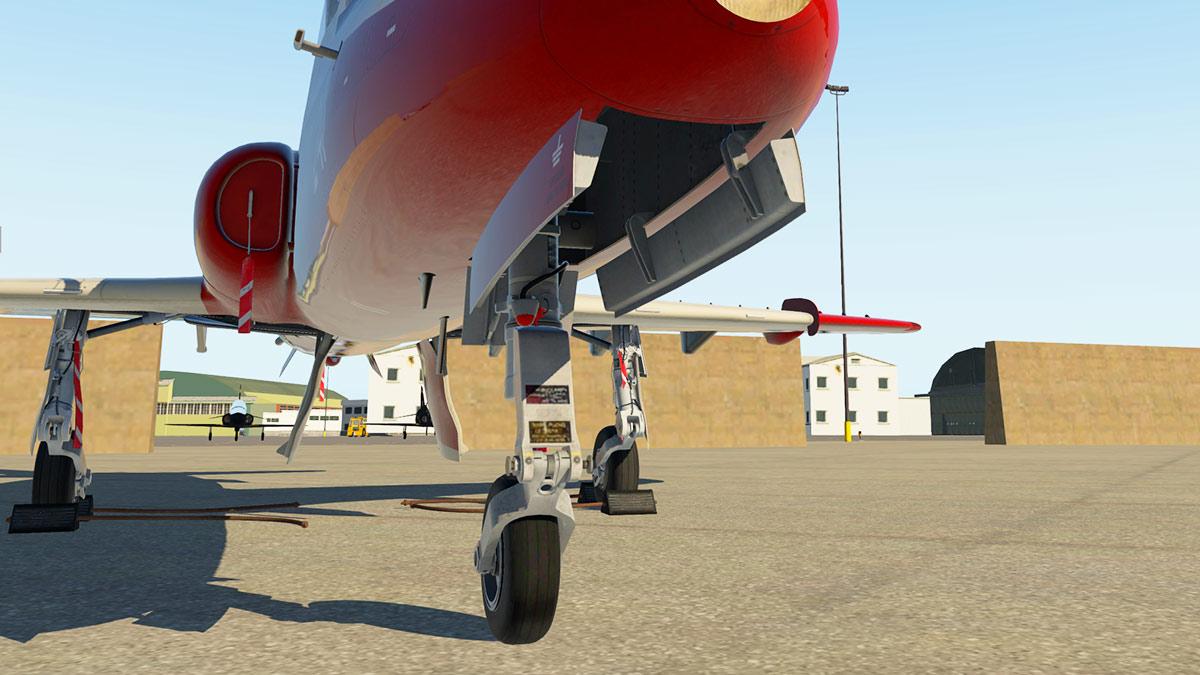
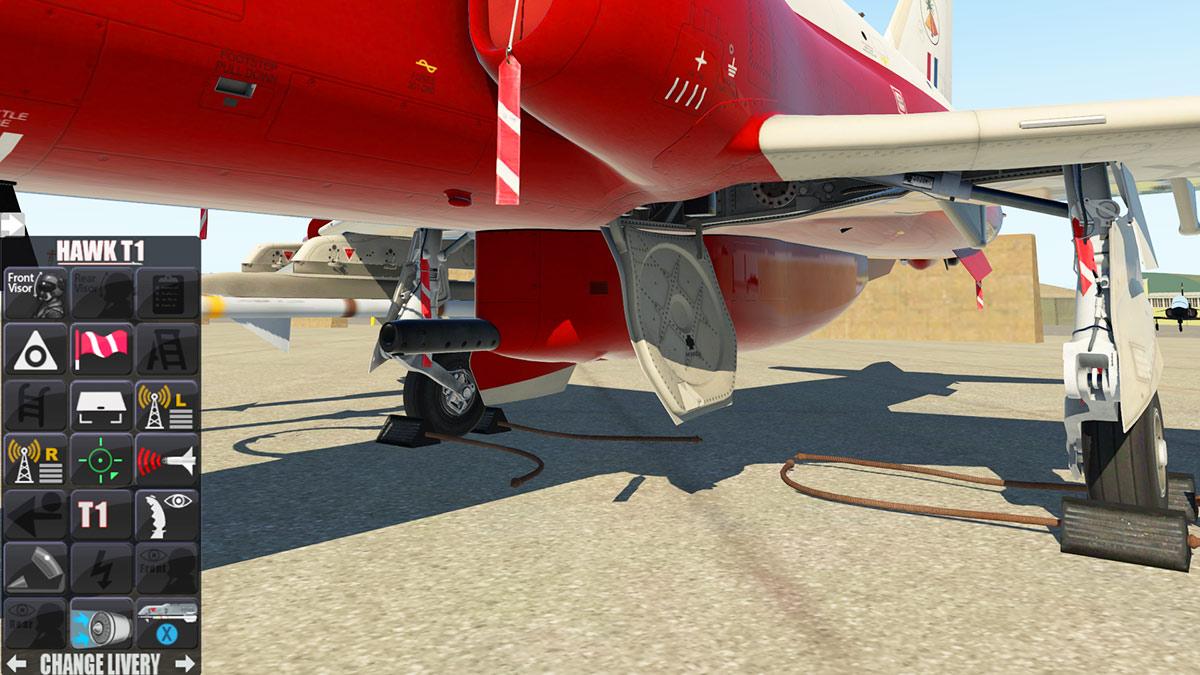
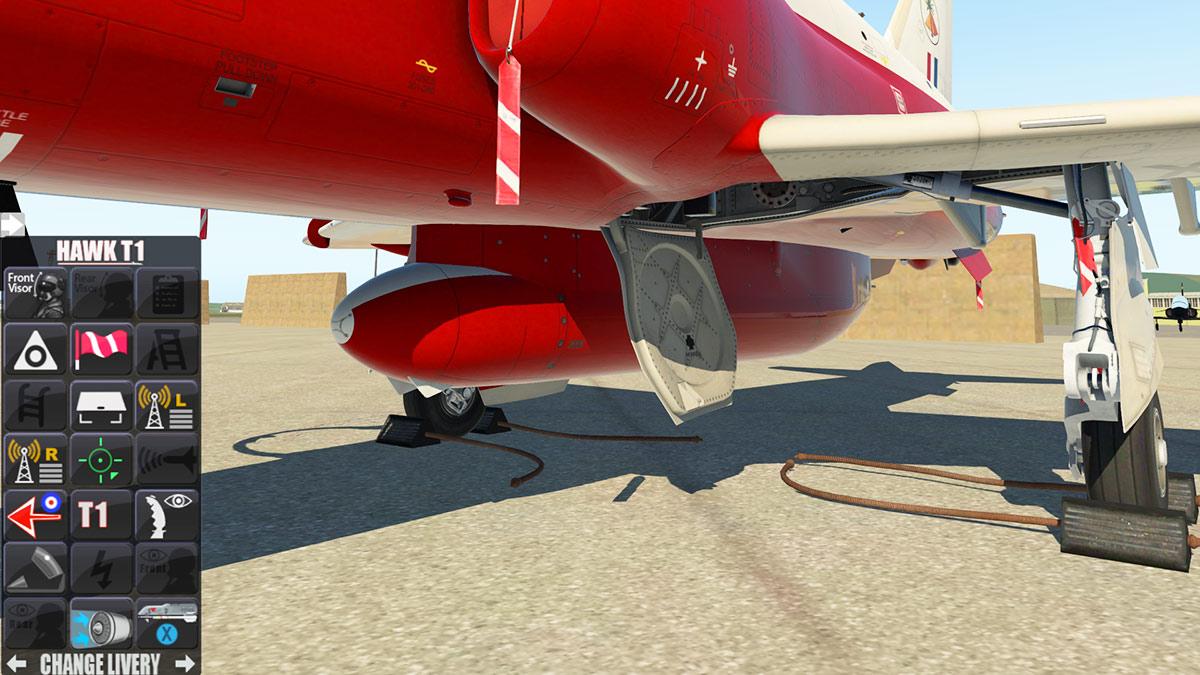
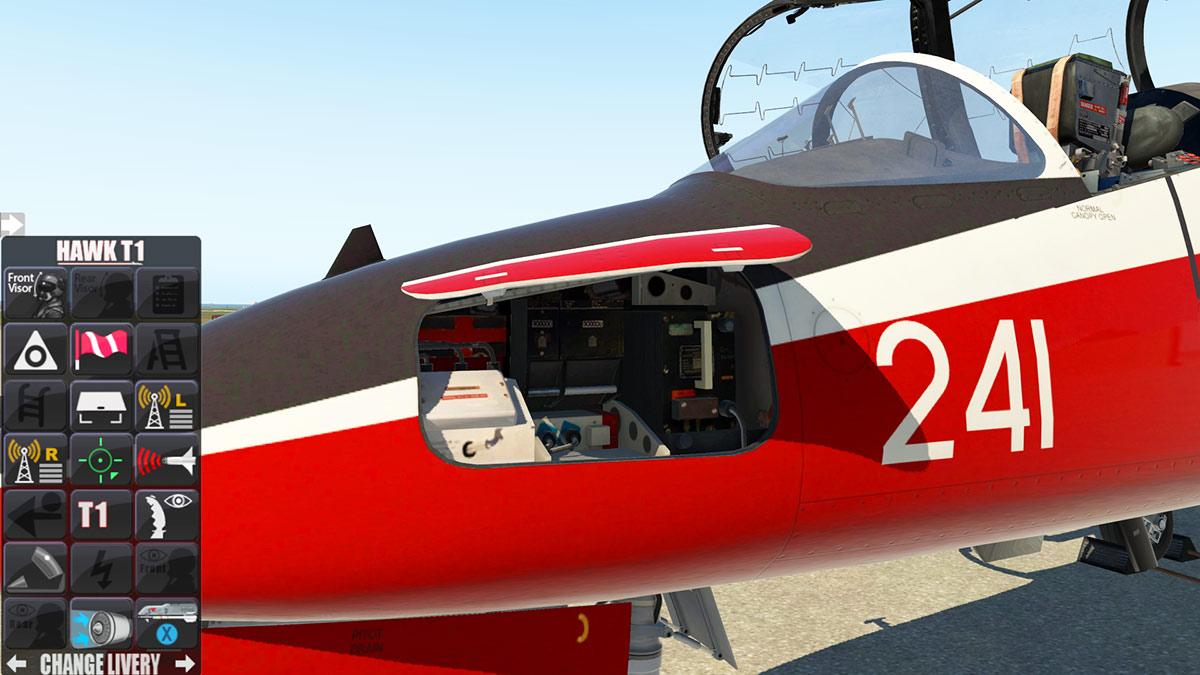
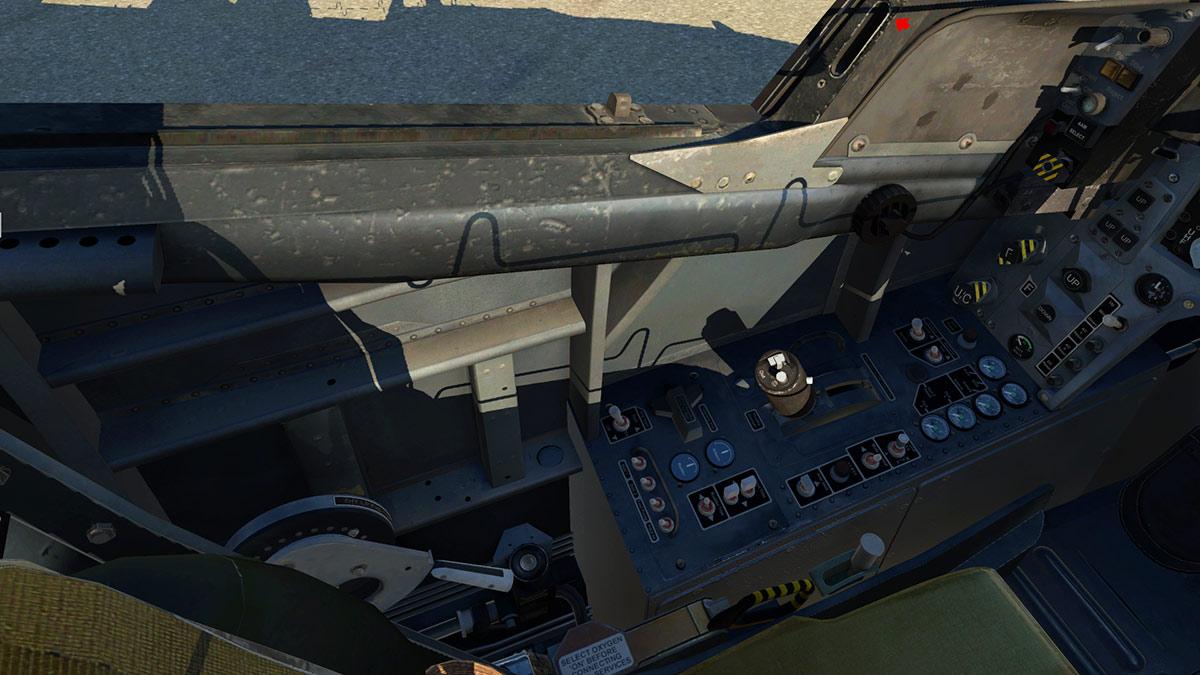
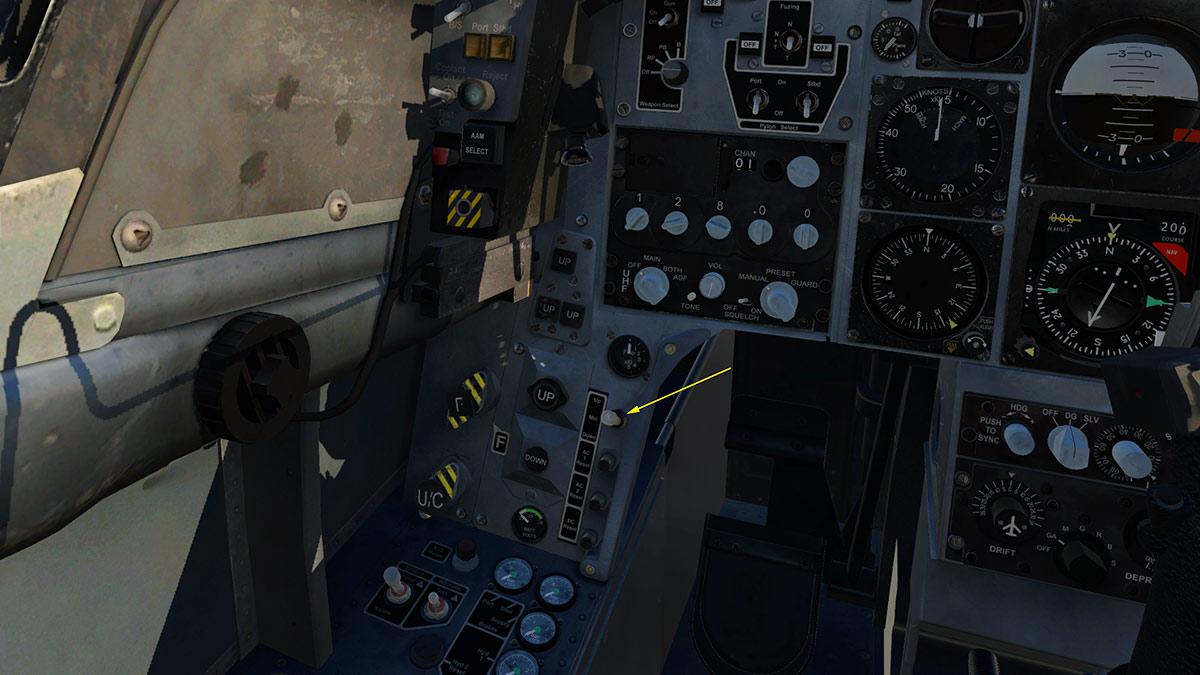
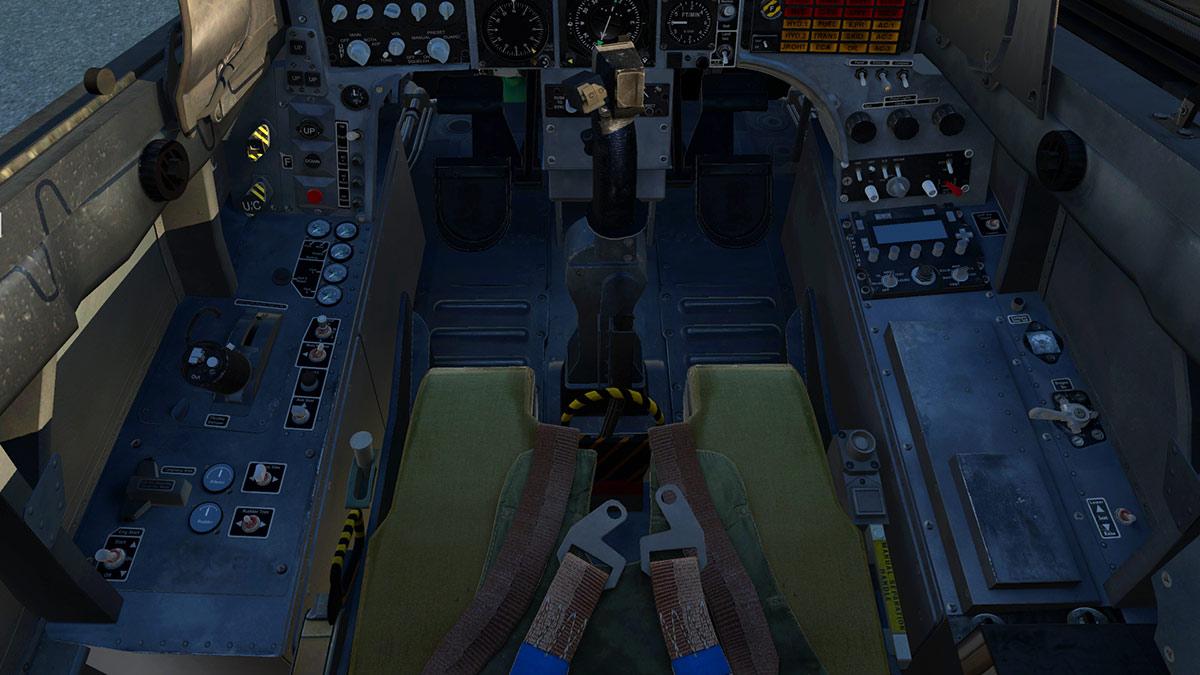
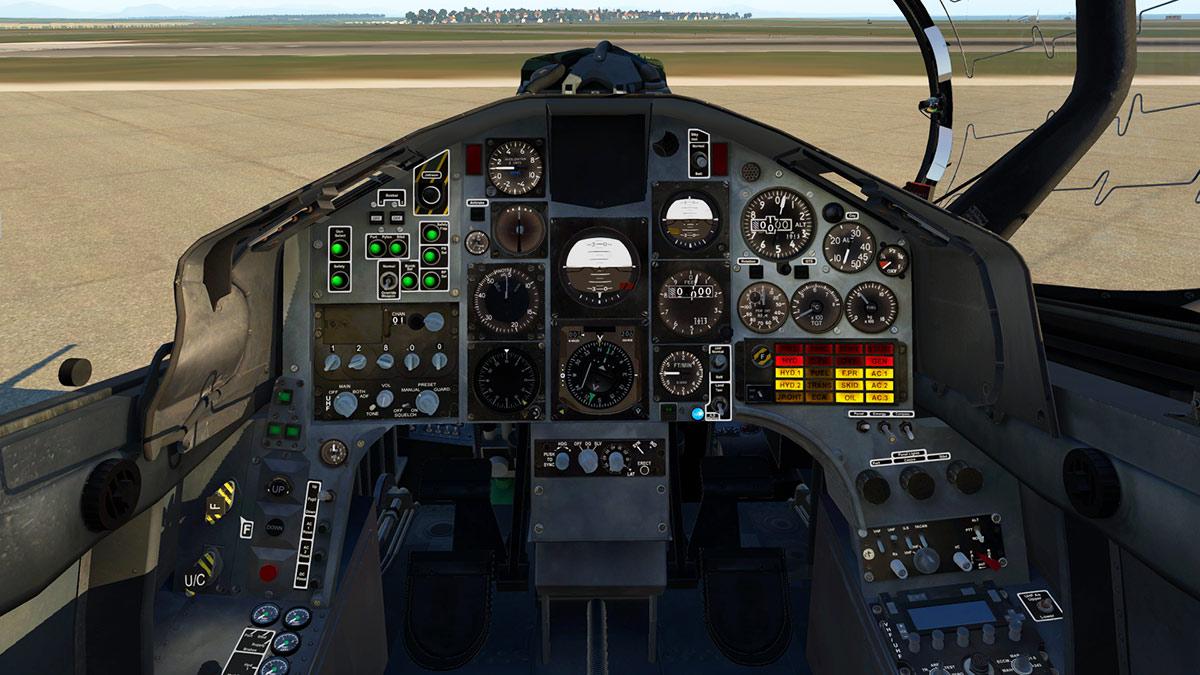
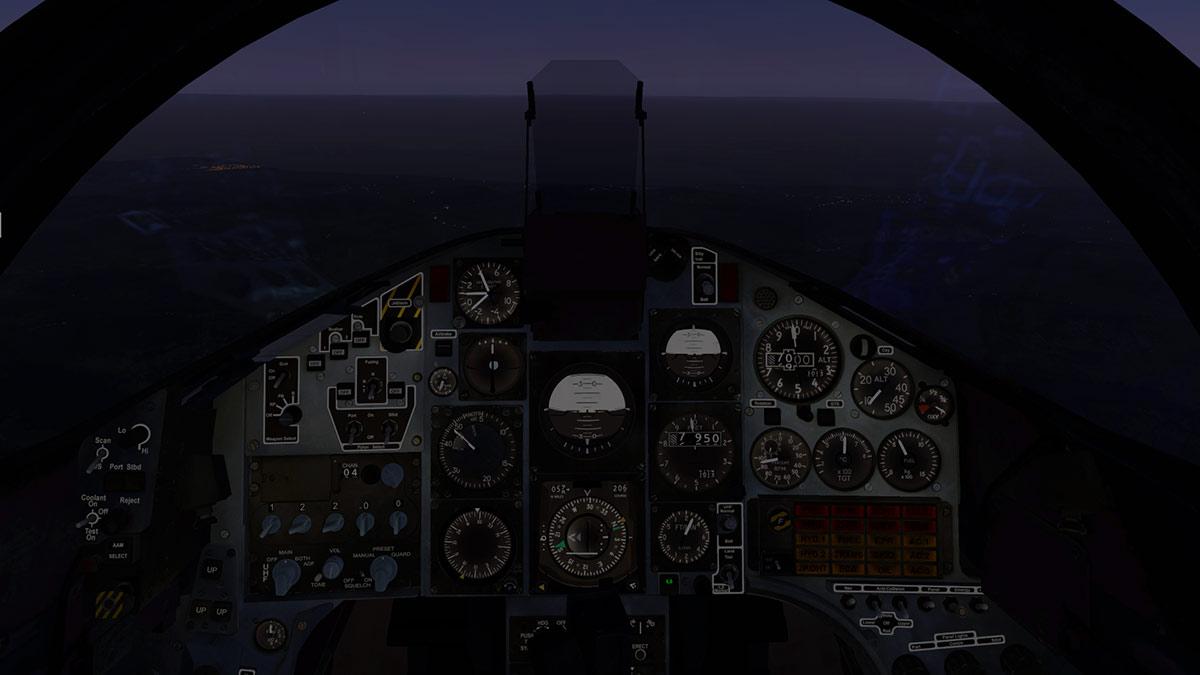
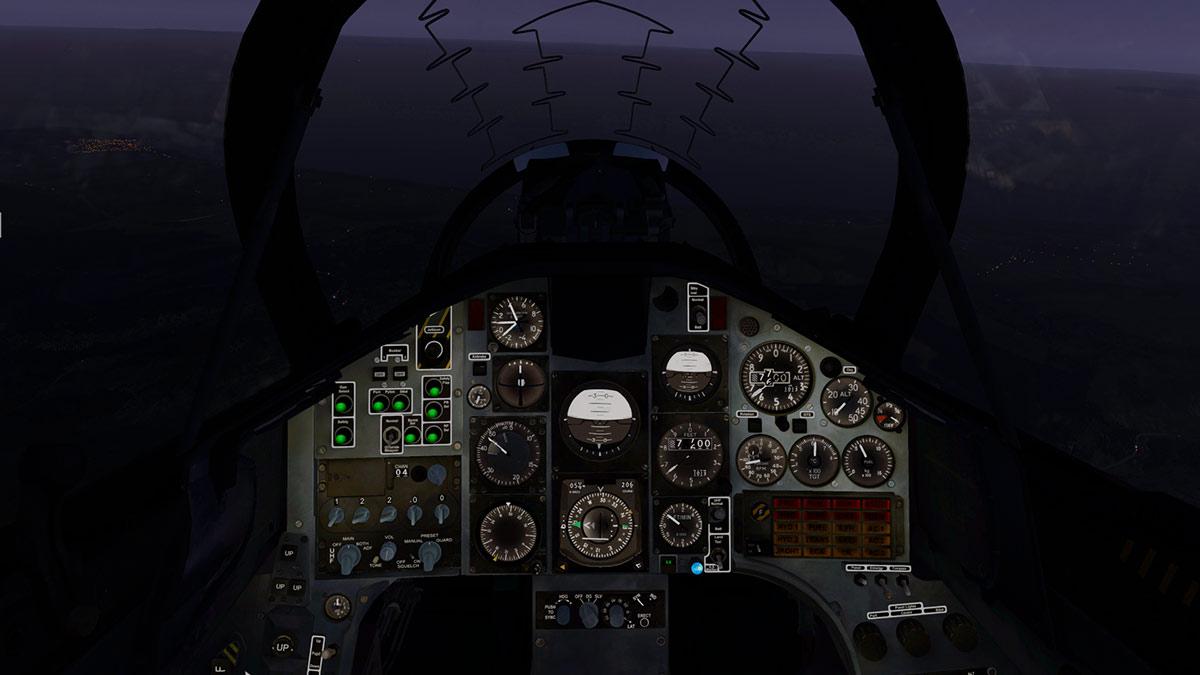
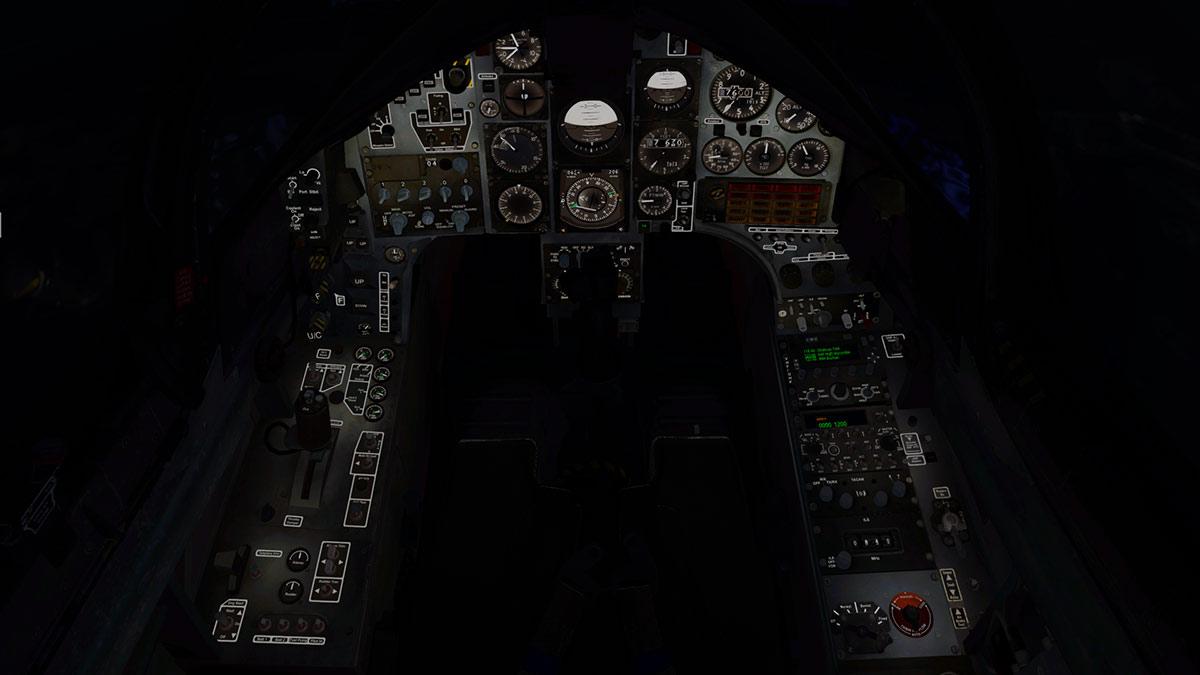
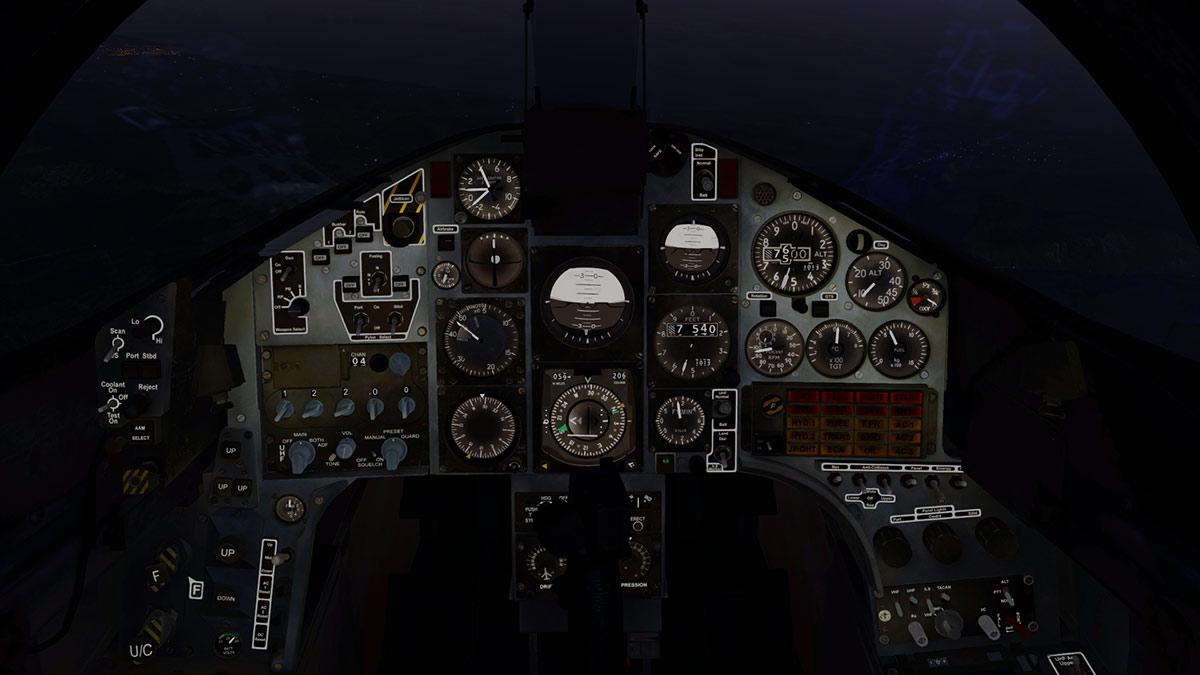
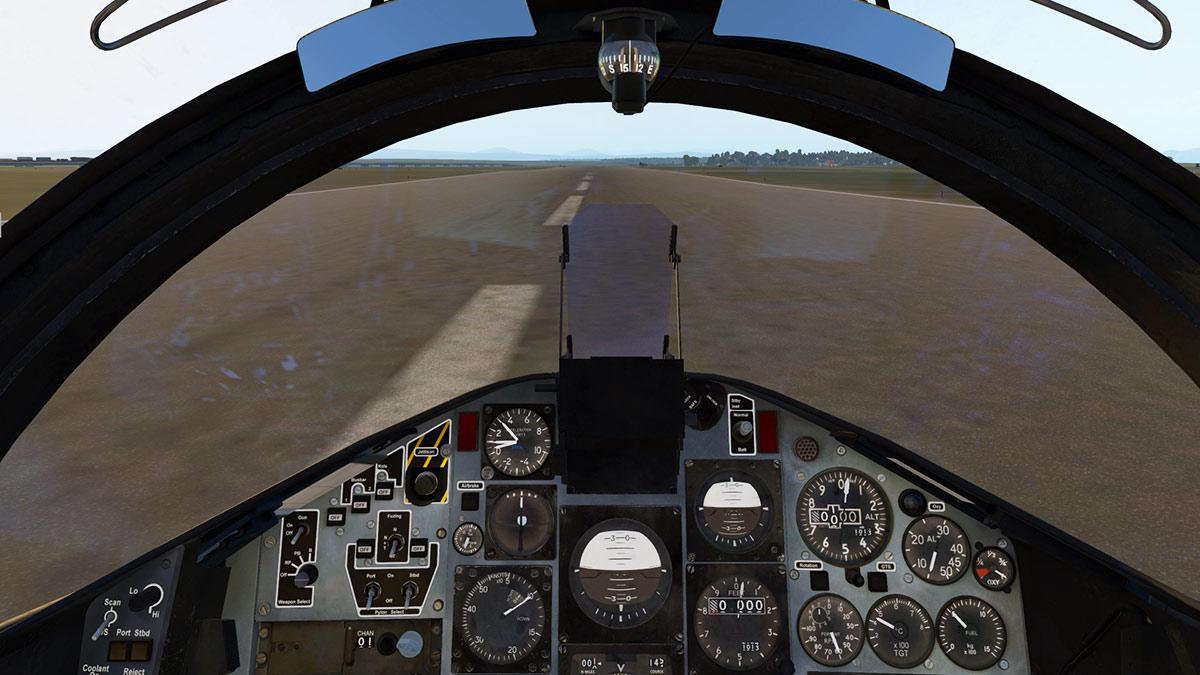
 Aircraft Review : DHC-2 Beaver - DGS Series by Thranda Design Mention the word "Beaver" and "de-Havilland" and any pilot will go misty eyed, and gaze at you blindly lost in cloud of personal memories, it is an emotive aircraft. The DHC-2 Beaver is a single-engined, high-wing, propeller-driven, STOL aircraft that was developed by de Havilland Canada in 1946, and is known as a bush plane, in fact one of the most highly regarded bush aircraft ever created. There was 1,657 Beavers built between 1947–1967 and half are actually still flying and working hard. In fact you can currently buy a zero-time frame and just rebuild your current aircraft and keep the machine flying as long as you can afford the new airframes... so why replace perfection. History de Havilland Canada hired Punch Dickins, a famous bush pilot, as Director of Sales who began an extensive program of collecting requests from other pilots and to understand what they needed in a new type of aircraft. Almost without variation, the pilots asked for tremendous extra power and STOL performance, in a design that could be easily fitted with wheels, skis or floats. When de Havilland engineers noted that this would result in poor cruise performance, one pilot replied "You only have to be faster than a dog sled". Other suggestions that seemingly sound mundane but important in the bush plane world; full-sized doors were installed on both sides of the aircraft so it could be easily loaded no matter which side of a dock it tied up on. The large doors (known as Alaska doors) were also made wide enough to allow for a 45 Imperial gallon drum to be rolled directly up and into the aircraft. On September 17, 1946, de Havilland officially put together a design team consisting of Fred Buller, Dick Hiscocks, Jim Houston and W. Jakimiuk, led by Phil Garratt. The new aircraft was designed to be all-metal in using "steel from the engine to the firewall, heavy aluminum truss frames with panels and doors throughout the front seat area, lighter trusses toward the rear and all monocoque construction aft". At the time de Havilland Canada was still a British-owned company and there were plans to fit the evolving design with a British engine. This limited power, so the wing area was greatly increased in order to maintain STOL performance. When Pratt & Whitney Canada offered to supply war-surplus 450 hp (340 kW) Wasp Jr engines at a low price, the aircraft ended up with extra power as well as the original long wing. The result was unbeatable STOL performance for an aircraft of its size. it was decided that the new bush plane was much like the hard-working beaver and so as many aircraft at the time were named after animals, the aircraft was designated after this industrious animal. The first flight of the DHC-2 Beaver was in Downsview, Ontario by Second World War flying ace Russell Bannock on August 16, 1947. The first production aircraft was delivered to the Ontario Department of Lands and Forests, a design partner, in April 1948. The Beaver was designed for flight in rugged and remote areas of the world. Its short takeoff and landing capability made it ideal for areas normally only accessible only by canoe or foot. Because it often flies to remote locations, often in cold climates, its oil reservoir filler is located in the cockpit and the oil can be filled in flight. A series of upgrades to the basic design were incorporated. One major customer introduced the use of flat steps replacing the earlier tubes, a feature that is now almost universal. In 1987, the Canadian Engineering Centennial Board named the DHC-2 one of the top ten Canadian engineering achievements of the 20th century. The current ownership of the certificates and tooling gives Viking Air of Victoria, Canada the exclusive right to manufacture new Beavers. Viking now sells a remanufactured and rebuilt DHC-2T Turbo Beaver upgraded with a Pratt & Whitney Canada PT6A-34 680 hp (507 kW) turboprop engine. With a maximum gross takeoff weight increased to 6,000 lb (2,700 kg) it can carry 2,450 lb (1,110 kg) of freight. However, Viking Turbo Beavers are only rebuilt from existing air frames, and are not new-builds, unlike Viking's own DHC-6 Series 400 Twin Otter, which is manufactured from a completely new airframe. (wikipeida) Performance - Maximum speed: 158 mph (255 km/h) - Cruise speed: 143 mph (230 km/h) - Range: 455 miles (732 km) - Service ceiling: 18,000 ft (5,486 m) - Rate of climb: 1,020 ft/min (5.2 m/s) DHC-2 Beaver - DGS Series by Thranda Thranda Design seem to want to develop, strong rugged utility aircraft, first was the Caravan like Quest Kodiak, then the excellent Pilatus PC-6 Turbo Porter and now the greatest of them all in the DHC-2 Beaver. This version is the Beaver that incorporates the "Holmes Extended Engine Mount", which moves the 917lbs engine forward by almost 10 inches. This modification then moves the center of gravity of the plane forward, and in then allowing additional loads to be carried in the back without exceeding the aft CG limit. Comparisons are going to be made with the original X-Plane Beaver from SoulMade Simulations DHC-2 version a few years back, that aircraft is a pure DHC-2, were as this version is a more slightly modernised version, the SMS version is also now slightly older with only a few updates, were as this version is all completely wizz-bang and up to the current state of X-Plane dynamic standards. A first look at the aircraft reveals a very nice and very authentic feeling aircraft, you know that this DHC-2 is going to be really good... even when covered over to protect the aircraft from the elements, that rugged engine/window cover is a brilliant start. Those first impressions are highly important, you know that certainly the Thranda Design ethics are always going to be some of the very best in X-Plane, that is always a religious known, but that extremely high standard we always expect from Thranda does not come easy either... but there is always value and quality abound, and again here you feel every aspect of that as well as see it. Time to pull the cover off, and see the aircraft below... That is better, "Magnificent" isn't it! The detailing is exceptional, the mapping of the precision of the rivets are simply excellent, and I love the gap in the cowling, actually done twice with the extended engine mount if you look closely. The Pratt & Whitney R-985 Wasp Junior engine, is rated at 450 BHP at sea level. This is an air-cooled, carburetted, 9-Cylinder radial engine, incorporating dual magnetos and an engine-driven single-stage supercharger. And the engine detail really jumps out at you with the coloured inner components, that aspect should not work on such an old aircraft, but it looks simply brilliant here... ... note the chrome valve guides and oil circulation, insanely good, and detail to die for. The Wasp Jr is connected to a single 3-bladed constant speed propeller mounted at the front. The aircraft will easily support the most discerning eye, the detail is so, so good, note the upper engine vents, exhaust, and the excellent landing gear support detailing as it is mounted on the fuselage. You can look at the landing gear assemblies is absolute detail, because the quality will support your critical eye, note the lovely disk brake assembly and it's attachments. Your paying for minute detail and you are certainly getting your money's worth here. Cast your eyes over the rear, the elevator detail is excellent with great mapping detail and note the fine elements of only a few simple metal rods (arrowed) that control the vertical aerodynamic surfaces... these rods are all there is between you and certain death. The rear tailwheel is also highly detailed with excellent control cable animations for realism. Tailwheel can be either free castoring or locked to the rudder. There is a complete lovely raw roughness and wear to all the surfaces with again that excellent rivet mapping that gives you such a heightened realism... lovely stuff. One of the requirements was that the DHC-2 had great STOL (Short Takeoff and Landing) performance, the depth of drop of the flaps at a 58º degree show this performance, again the detail is very good. Thranda pioneered great glass and reflections in X-Plane, and that same skill is on show here. Main windshield is a work of art, but so are the amazing bubble windows in shape, and wear (note the excellent glass streaks). You also have the option of either bubble or flat side windows. DHC-2 Internal Looking up into the cockpit and you know this is going to be good, and the detail even from seen down here is excellent. On the left side there are four opening doors, cockpit, underwing side door and a twin set of "Alaska" doors that are made wide enough to allow for a 44 Imperial gallon drum to be rolled up and inserted into the aircraft. On the right side is the Co-Pilot front door, and another underwing door. All doors can be opened via the internal latches, or from the menu. Cabin is in a dark grey, and highlighted by some nice chrome support rings. Seats are basic but beautifully modeled in detail, all seats have metal plate cushion supports. There are four forward seats and a twin-bench seat rear, the cabin fit-out is a bit drab, but very authentic to the period... .... note the very large rear and curved side (bath) metal construction of the Pilot and Co-Pilot seats, the metal construction and floor supports is simply extremely well done, with even with wear and tear on the metal surfaces. Note the nice individual door trim screws. Up onto the foot support and a look into that iconic cockpit... and wow! The Thranda Beaver cockpit is not like the antique cream version like on the SoulMade Solutions DHC-2, that is very much beloved by me as to it's reference to an early Beaver. But this version is very much a more relative version to most of the working Beavers out there and it is extremely well done. The SMS version had a single left side Yoke, but here you get the TwinBar Y double version that disappears if you press the base, so well done. Roof trim and blinds and under seat (metal seat bucket frame is also insanely great) detail is excellent. The famous name plate says it all. There is a leather surround with the internal metal facias. The polished metal reproduction is simply extraordinary, just outstanding... and in the right lighting conditions it just glows and shines like it has just been lovingly and newly polished. There is real craftmanship here, You wonder if ever you would get aircraft detail like this to fly in Microsoft FlightSim, if aircraft detail is what you want, you could never get this extreme quality over there, but you can access it in X-Plane. There are two choices of the famous throttle quadrant, the older original classic version with the Throttle Lever left, with in order Propeller lever and Mixture right... or the more modern squared off version with the Throttle centre, Prop left and Mixture right. Cenrte top are the magnificent large DHC-2 iconic Manifold Pressure and RPM gauges and the mid-screen mounted whiskey compass. The pilot gets all the flying instruments in the form of the six standard flight instruments in the Airspeed, Artificial Horizon, Altitude, Turn/Slip Indicator, Heading Indicator and the Vertical Speed, left is the main fuel tank selector It has positions of OFF, FRONT, CENTRE, REAR. Cosmetic detail is astounding, metal flaps indicator is a work of art, and you can't believe in intimate authentic detail here, like the ACK ELT and the logos MaxDim panel lighting knobs lower left panel, the metal plate storage box opens as well. Right side panel has the avionics and electrical panel... There is an altitude selector top, then an S-Tec Fifty-Five x Autopilot, KX 155 NAV/COMM Radio (NAV 1/COM 1), Garmin GMA 340 Comm radio, and a Garmin GTX 325 Transponder lower... it is to be noted that these items are the default set of avionics, but as we shall see, you can use more different units if you want to. To the far right is an OBS Course Deviation Indicator (CDI) - VOR NAV 2. Lower right panel is an active (Fuse) Circuit Breaker panel, with the relevant electrical switches set below for power and lighting (Avionics power switch is high up on the left side panel facia). Next to the Fuses is the AMPs gauge, and Suction Gauge, and below is a lovely PS radio volume panel. Centre panel is a default X-Plane GNS 530, but it can be replaced with a Reality XP GTN 750 if you own the extra feature. Mid-Panel are the engine gauges, with the Oil temperature shown on the top of the gauge, oil pressure on the left, and fuel pressure on the right. Next right is the sublime gauges to indicate the quantity of fuel remaining in the three primary internal fuel tanks. From left to right these gauges indicate the Front tank, Rear tank, and Middle tank, and below is a CYL. (Cylinder) Temperature gauge, with a Hobbs hour meter. Three lower levers cover (LtoR) the carburetor heat control lever, the famous Fuel Wobble Pump Lever and the Fuel and Oil Emergency Shutoff Lever. To the right is the internal Oil filler (yellow cap). Detail again comes to the fore with the Manufacture's and Aircraft registration plates. The authenticity is simply mind-blowing and it keeps on coming with the ratcheting carb heat lever, the manually pumped flap system (with direction valve), and the primer system that are all faithfully modelled for maximum immersion. The fuel system is complicated, with three internal tanks Front (35 GAL/132 Lts), Centre (35 GAL/132 lts) and Rear (25 GAL/95 lts), two wing tanks (21.6 GAL/85 Lts each) and an optional Belly Fuel Tank (43.1 GAL/163 Lts)... for a total of 181 GAL/685 Lts of fuel. The main internal tanks are controlled via the red switch left panel, the wing tip tanks via a red switch upper door left, and the belly tank via a handle under the instrument panel (Vacuum air pressure is required). Another notable feature in the cockpit is that you can open or lower both front door windows, and into any position you like... ... and the forward window air vent can also be rotated. There are loads of pumps and levers on the Beaver, one is the pump handle for the flaps, down right of the pilot's seat and another is the engine primer pump on the left of the pilot's seat, the actions of both are really well done and authentic. Internal Lighting Turn on the power and adjust the instrument lighting and it is.... "oh WOW, WOW!" "Totally stunning" is the one set of words you can find, "blown away" is another, the panel lighting is simply gorgeous, as there is a real depth to the lighting and in the detail. Overhead lighting is provided by two fixed side spot lights... and two highly adjustable LED roof mounted lights... ... oddly there is no lighting in the cabin? But you can turn the roof LEDs right backwards to give some illumination, but a few rear lights in the cabin would be nice, it is just a little too dark back there. Customising If you have the Thranda PC-6 Porter, then you will be aware of the instrument panel customising feature to suit your own tastes. So in reality there is no default instrument setup... and that same system is available also here in the Beaver and it is called DGS or "Dynamic Generation Series". Menu is selected via an arrow tab left screen (it can be scrolled clear), on the menu is the "PANEL" selection. This brings up the dynamic panel options... There are two basic panel selections, the iconic version we know so well, but also a flat metal grey facia version. Panel choices become endless, angled avionics, better fuel switch positions, and both either the GNS 430 or GNS 530 can be used... .... and the grey flat panel is far better with the more modern squared off throttle quadrant to which gives you even more layout variations... Optional Items include; Aspen EFD 1000, S-Tec 55x autopilot, RealityXP GTN 750/650 Touch 3D bezels (these are optional addons) and a lovely Collins 614-12 ADF... There are over 50 instruments to select from or to rearrange around on the panel facias... .... basically you can even start with a completely blank panel and then create your own unique or personal instrument layout... and have up to or you can save 14 different layouts and there are five defaults to get you started... for absolute layout choice it is simply crazy! Menus The menu is selected via the arrow (the arrow can be scrolled translucent) on the left side of your screen... ... and there are seven tab selections; General, Livery, Camera, Audio/Slew, Panel and Misc. The menu PANEL selection has already been covered above, the rest of the selections are covered below. Menu - General The menu "General" sections covers quite a lot of options, the layout is highly detailed and very comprehensive. Three selections cover group items but any one separate item via "Click Spots" can be individually selected or hidden via the aircraft graphic. "ALL COVERS" will select the huge engine canvas cover and pitot cover, "ALL TIE-DOWNS" for propeller and wing tie-downs and "ALL DOORS" for both cockpit doors, both cabin underwing and twin "Alaska" doors. The Engine can be set into two modes... SIMPLIFIED or REALISTIC In Simplified mode the engine will be automatically limited the engine and engine start up is instant start. In Realistic mode it will be up to the pilot to avoid exceeding the engine limitations, and go through the full procedure of starting the Pratt & Whitney R-985 Wasp Junior radial engine, which means a lot of lever and knob setting and a lot of hand pumping. Other General menu selections cover Window and Instrument Panel Reflections on/off, Startup Running on/off, Use the External Fuel Tank, Chocks and brakes on/off. All EXT - External Lights can be switched on and off as can ALL INT - Internal lights. The lights activation can also be accessed on the aircraft graphic and finally the "Radial Engine Animation" of which we will look at soon. The Electric Tug is attached to the rear tailwheel, that is controlled via your joystick (for motion forward or backwards), with the yaw turning the rear tailwheel and the attached tug. There are an fully animated pilot (actually Dan Klaue) and his lady friend (actually his wife) as a Co-Pilot, both will disappear if the power is off and the wheel chocks are set, if you don't select a Co-Pilot, then Dan flies alone. Menu - Liveries Second Menu option is liveries, there are two options here with the first being "PAINTED LIVERIES". There are altogether 14 liveries or one blank and thirteen designs, and all are of extremely high quality and creative flare. One is a ZZTEMP that is just totally clear (not shown). Note the Dirt and Scratches (arrowed) numbers, as they are important later. Dynamic Liveries Not happy with any of those designs, then why not create your own! With their earlier release of their Kodiak then Thranda also introduced a clever feature to design your own livery.This is done by switching from PAINTED LIVERIES to DYNAMIC LIVERIES top. You have a menu to select on the right that can colour a certain part of the aircraft, like the Roof, Wing, Tail or Wing tips. Select which one you want and then adjust the RGB colours for that area, it looks hard but you can easily design a very nice livery in about twenty minutes... ... when done you can "save" the livery and then "APPLY" it to the aircraft. It was quite easy, but I found the dash symbol - couldn't be inserted in the registration except for the lower case version? So I had to take it out. This is why there is an transparent aircraft in the liveries? There are also four effects you can apply. The said "Dirt" and "Scratches", and also "Metal" and "Rough(ness)" this gives the aircraft a dirty rough appearance. So applying these Dirt and scratches on the airplane will make the surfaces rougher, this is giving you the full PBR control in creating stunning metallic liveries, or matte, sand-blasted look, and these aspects will also slightly affect the Beaver's drag, and therefore it's cruise speeds. With full dirt and scratches you can expect a loss of 2 to 3 mph of cruise speed. Cleaning the plane by setting both values back to 0 will give you a smoother and slightly faster plane. Two extras can also be added with DH logo which is very nice and the said registration number, the final result is excellent. Menu - Weight/Bal The DHC-2 has a great Weight and Balance menu. Both Lbs and Kgs weights are shown... Fill one wingtip tank full and the Beaver will seriously lean, and so will the other tank... this shows how sensitive you are going to have to be to balance out the aircraft. .... Fuel can be added to all the tanks in the three internal, twin-wingtips and the Aux external tank and they are all shown and are adjustable as well in the menu (above). Pilot, passengers and cargo can all be set for individual weights and the CofG (Centre of Gravity) parameters are also all shown on a graph, when done you can save the configuration and reload it. Working out that right CofG balance is critical, setting just inside the parameters is just not really good enough, you need for the aircraft to be balanced in it's fuel and load weights, or you will have difficulty flying the aircraft, put too much (cargo) weight aft and you are tail heavy. Note in that taking out the Co-Pilot here will make her disappear in the cockpit, but pilot Dan stays. Menu - Camera There is a camera feature under the menu "Camera" selection. To the right is the internal default views to be selected via a menu, or press the keypad to select the view. The FOV or Field of View is adjustable via a slider. The left side of the panel is the "Walkaround" views, just pick the dot viewpoint you want to see to rotate around the aircraft. Menu - Audio/Slew Sound can be adjusted via the sound menu. There are seven slider selections with: Master, Aircraft External, Aircraft Internal, CoPilot, Radios, Environmental and User Interface... press the Audio slot and you get a audio simulation of an active noise canceling headset, which is seen as wearing a headset. Sound quality is excellent. Slew mode Slew mode is experimental, but allows you to manually move the aircraft around in X-Plane. It functions by temporarily overriding the various aerodynamic and physical forces on the plane, it is to allow the user to reposition the plane as desired. This feature is however highly touchy! In reality you don't use "Slew Mode" on the ground, it is mostly for manoeuvrability on water and for docking... If you want to see this in action then check out the PC-6 Adventure pack review. Menu - MISC The Misc page covers options on the Beaver, and there are four options; Skis, Tyres, Windows, and Throttle Quadrant. We have seen the Bubble Windows and Throttle Quadrant options above in either "Flat" or "Bubble Windows", and the "Old" or "New" quadrants. Skis Ski quality and design is again exceptional, with no ordinary straight planks here, they are all highly realistic and the same as on the PC-6. Bush (Tundra) Tyres and Mud Flaps Another option is for the larger Bush tyres or "Tundra" tyres, the over-sized wheels also come with another option of having "Mud Flaps" attached (The mud flaps can be used on both the Normal and Tundra tyre options). Flying the DHC-2 Beaver There are two options to starting the DHC-2, the (very) easy way via the option in the Menu/General panel... and the long winded way. The full engine start up procedure is in the manual. Did you always want to look inside your engine? Well now you can and the idea is to see how the engine is primed to start... Dan Klaue genius strikes again! There is the option via a menu selection "Radial Engine Animation" that brings up an animated Wasp Radial engine, you can PreHeat and Prime your Wasp ready for start, but you have to be careful not to "OverPrime" the Cylinders. The starter switch can be hard to find because it is not labeled, but it is under the left red switch cover, if primed correctly then switch on the starter (no more than 15secs a try) until the Wasp finally coughs and powers up, the animation can give you exciting feedback on what is going on in the ignition phase of the engine, and then when it runs it is another "Wow" moment... yes. Pistons are exploding, and the animation is amazing beyond belief, adjust the throttle for a some serious movement, but the animation will also react to the adjustment of not only the throttle inputs, but the fuel mixture from "Rich" to 'Lean" adjustments as well. These movements and the running of the DHC-2 also compliment the amazing sound range as well, there is a consistent adjustment of the excellent engine sounds to the condition of the running of the engine, that is the "Ugh, Ugh" of low lean to the high power "roar" of the full throttle. The sounds actually give you clues as to what's happening under the hood as is for the shear band of extensive sound patterns available here that show no gaps or same patterns that just gets you all tinkly down your back... it is highly, highly aurally realistic... well like a full throated real 450 hp Wasp Jr engine sounds like, and the hope that your neighbour and you are on (very) good terms. So yes the sounds are good, or totally excellent. External lighting is very good, but on an aircraft like the Beaver quite limited to the basics, there is a nice red beacon top fuselage, and the navigation lights are nice and pert as is the tiny wing strobe lights. Main landing lights are both LED, and very good in the distance, but can't be seen close up on the wing? As noted you can have a freewheeling rear or locked to the rudder yaw, You really need a set of rudder pedals with built in toe brakes to use the freewheeling option, which I don't have, so I have to use the yaw option. Your have to find a nice balance with the mixture and throttle levers so there is a need to experiment to find that right balance... but it is there to be found and highly realistic, and the feel is excellent. So a bit of throttle and you are moving, the Beaver is excellent on the ground as taildraggers can be twitchy, but you can actually feel the weight and the aircraft is quite smooth in it's movements. You sit high, and the view out is quite good for a taildragger, but a slight glance to the left will align you up with the runway... flaps set (to Takeoff) and your ready to go. Speed builds gradually then suddenly the tail unstick's and you need a kick-full of right rudder to maintain the straight ahead line... ... but don't get me wrong, the aircraft is not twiddly in this phase but beautifully controlled as it is all very easy tail up to steer directly on the centreline, most taildraggers are nasty and nervy at this point, but not the DHC-2... Takeoff is around 90 knts, but you don't need to pull back the stick as the Beaver just glides into the air on lift alone, to climb only requires a little pitch to meet the 600 fpm climb you need. You can climbout at a 1,000 fpm, but the 600 fpm is perfect, the one thing that should be highly noted is the aircraft's weight feel, this is a huge bonus in me holding that centreline, but also when you lift you really feeeel that WEIGHT of the aircraft, and that is rare in X-Plane, it is so very, very good is this DHC-2. Unlike other aircraft you can use the flaps and even in level flight, most aircraft need the flaps in and clean as soon as possible, but not the Beaver, as if you have a slightly uneven balance (front to rear) in the aircraft you can use the flaps to even out the balance without touching the trim, it is a tool every Beaver pilot's use. Obviously you don't go very fast... 158 mph (255 km/h) or 140 knts is max and your cruise speed is only 143 mph (230 km/h) or 125 knts, but you don't really care about that factor, this aircraft is an absolute dream to fly. Trimming the DHC-2 out is easy, the trims are set up up on the roof (But I use keyboard commands), and the Beaver trims out the pitch beautifully, now just small stick and rudder inputs keeps DHC straight, but better still yet is if you trim out the rudder as well, and now you can take both hands and feet off the controls and the Beaver will still fly like a dream straight and level.... this is one amazing simulation of a real aircraft. So for any novice pilot, this is a brilliant aircraft to learn to fly on, even if it is a taildragger (all the better), as it's balance is second to none, but you also feel the aircraft weight in every manoeuvre that you do, but this is not an aerobatic machine, it is a workhorse only, like a large Clydesdale horse it is heavy, slow and incredibly docile... that is the word to note here in docile, but I simply love it as the aircraft is very comforting and I have had enough nervy aircraft lately to last me a lifetime.... this is a true pilot's aircraft in every form... and I simply love it. The DHC-2 is so docile and neutral I am am not quickly reaching for the autopilot (S-Tec in this case), as the Beaver is just nicely (but noisily) cruising through the air and I certainly don't need any artificial help in flying the aircraft at all... open the side window to get the full throaty roar of the Wasp Jr, it is certainly noisy but exciting as well, I note the aircraft as docile, but that is in it's character, it is still however an immensely exciting aircraft to fly because it is "that good". Do a hard turn and the DHC-2 needs a little more power and a slight pitch back to slightly compensate for a loss of speed and altitude, but these reflexes come naturally each time you manoeuvre the aircraft in large variations. Thranda have already noted that an Amphibious version of this DHC-2 is coming and soon, maybe in the new year (2021), that will be another worthy add-on, and give the aircraft an even greater capability and versatility (if it is anything like the recent PC-6 version). Cockpit is stunning in the air. We are soon back over Bella Coola and heading back to the strip at CYBD... Interesting are the flaps... lower the flaps and you don't need to change your throttle position either, the Beaver just slows down to the lower speed of the flap position, with any or no sudden expected lift (Interesting though would be the aircraft at a very light loading weight, I didn't try that aspect out).... the Beaver is known as a "flap-happy" aircraft and you can see and feel that aspect of why here... That is the "Landing" setting, but you can go even slower if you go deeper with more flap and into the red zone to the full 58º degrees... Approach speed is around 70 knts, here your altitude is controlled only via your throttle, more power to go up and less power to go down, but even the mixture adjustments can even have an effect, so be aware if you are leaning out the engine more while reducing power. Final approach and you are under complete control of the aircraft, you and the machine are as one, even slight reductions of power and you lose height, but you also have uttermost confidence in the aircraft, in other words it is easy, but skillful in the same aspect. One note I will say is that the touchdown speed is still around 70 knts, dropping to 60 knts on the runway, and that feels a tad fast at full flap? but the speed does still give you full aerodynamic control on the landing and you can finely follow the centreline as good as when you took off, the question begs is that could a headwind change the aspects of a landing such as this... ... so the big trick is rubbing off the speed without touching the brakes, tricky, and that aspect may need a bit of practise is needed before getting it right, I would be more happy with a landing speed of around 50 knts or less in these circumstances. But let us be thankful, this is an amazing experience of an aircraft... the best aircraft of the year 2020? _______________ Summary This is the third aircraft in a series of rugged utility aircraft from Thranda Design, the first being the Kodiak, then the excellent Pilatus PC-6 Turbo Porter and now here comes the most iconic and the most famous bush aircraft of them all in the DHC-2 Beaver. This version has the "Holmes Extended Engine Mount", which moves the 917lbs Wasp Jr engine forward by almost 10 inches for a better rear load balance (Centre of Gravity). Any aircraft coming from Thranda Design is usually full of amazing features and outstanding quality design, and certainly you are not disappointed here. In the design aspect the aircraft is extremely the best yet from Thranda, the quality is overwhelming to the point of ridiculous... the DHC has full hi-res PBR realistic effects, featuring true-to-life plate deformation and to-the-rivet precision, not to mention the high quality materials internally and externally. Detailing and the modeling is absolutely first rate, this is an outstanding Beaver. Not only is the instrument Panel one of the best yet in X-Plane, it is also fully customised via the "Dynamic Generation Series" in not only giving you your own control over the way the instruments are laid out, but to swap and change other instruments as well including; Aspen EFD 1000, S-Tec 55x autopilot, RealityXP GTN 750 (these are optional addons) and a Collins 614-12 ADF. Fourteen liveries are provided, but also again you can create and design your own liveries with the DGS system. Options include, Skis, mud flaps, Old and New quadrants and bubble windows, and an amphibious version is noted as coming soon. Notable is the instrument lighting, it is simply awe-inspiring. Sounds are outstanding, with High fidelity, multi-track sounds with smooth transitions and amazing atmospheric effects, 3D audio effects, including "blade slapping" sound when view is perpendicular to propeller, start up and engine mixture variance is also highly realistic. Menus are also extensive, with sound adjustments, weight and balance manager with visual chart, lighting, doors, views, reflections and an amazing radial engine visualisation in a pop-up window, which showcases the inner workings of the engine. Again like the PC-6, you would want, or like a cargo option? and there is no lighting in the rear of the cabin? Yes I have been gushing in this review, extraordinary and brilliant are full of the praise of what is delivered here from Thranda Design, not only in the options, effects and in the sheer experience available, but also in the way this Beaver flies as well... it is the full package and in my guess for the aircraft of the year in 2020. So the note here is to the converts of Microsoft's "ground breaking" new simulator, because aircraft like this coming out of X-Plane changes the dynamics of simulation. Yes MSFS may have pretty scenery, but it will never have aircraft such as this iconic Beaver as in depth, with as much quality and come with the sheer force of ideas available here, and in reality isn't that is what simulation is really all about, brilliant aircraft with exceptional quality and flying dynamics and a huge feature list, and only top level developers like Thranda Design will be in the X-Plane simulator and not the other one, so if you really want the very best then here it is.... Highly, Hugely Recommended. _______________________________ Yes! the DHC-2 Beaver-DGS Series by Thranda Design is NOW available from the X-Plane.Org Store here : DHC-2 Beaver-DGS Series Price is US$39.95 (Currently only US$34.95) Features Special features: FULLY configurable 3D instrument panel. Over 50 instruments to choose from! (Including Aspen EFD 1000, and support for RealityXP GTN750) Move any instrument to any location on the panel, or even between pilot and copilot's panel! Comes with 6 panel presets, but can easily be expanded by moving instruments around, using simple and intuitive interface. Save your own presets, and even share them with the community! Instruments can be moved in 3D directly, on a 2D pop-up preview window, or by numerical entry for precise placement. Intricate, realistic fuel tank system, featuring tip tanks and removable belly tank. Overflow logic when transferring too much fuel from other tanks to primary tanks. GNS430 and 530 can be swapped out, but a restart of the plane is required, as 430s and 530s are mutually exclusive in terms of compatibility in X-Plane Dynamic livery editor (like in the Kodiak and the Pilatus PC-6) Full PBR control! Create stunning metallic liveries, or matte, sand-blasted look in mere seconds! Additional control over dirt/grime, scratches/nicks, adjustable in real-time to dial in the exact desired amount of wear and tear. Affects airspeed. Clean plane will fly 2-3 MPH faster. Create "virtual" liveries, based on one common design layout, and assign any colour to any available paint segment. Quickly create preview of livery in real-time, using intuitive controls. Previews now include visualization of metallic materials and dirt overlays. Apply selected livery in real-time, right in the sim, without the need to even touch a 3rd party image editor! Option to include/hide manufacturer logo on tail, and control its colour. Option to change the tail number in real-time, or disable it altogether. (Enter a "space" instead of a callsign number to create a blank tail number.) Easily and quickly create dozens of paint schemes in-sim! Also supports 12 traditionally painted liveries, all visible in a convenient pre-selection preview window. Uses SkunkCrafts Updater. Option to participate in Beta program, via check box in SkunkCrafts Updater. Excellent hi-res PBR realistic materials, featuring true-to-life plate deformation and to-the-rivet precision. Feature-rich elegant fly-out menu with the following features: Realism settings for engine and tail wheel (simplified vs. realistic modes) Radial engine visualization in pop-up window, which showcases the inner workings of the engine. Real-time primer and pre-heat logic, with visualization indicating correct priming range Innovative electric tug, with in-panel controls to move forward/backward at the desired speed, and steer proportionally Control over chocks, individual tie-downs, covers, internal lights, external lights, etc. Option to enable/disable Belly Tank, with realistically simulated weight, momentum, rotational inertia, and drag characteristics. Option to start up running (all systems ready), or cold-and-dark, for realistic startup procedures. Option to run engine in a simplified manner (no pre-heat, no priming, easier starts) Control landing lights, strobes, beacon, and nav lights via pop-up window Detailed weight and balance manager with visual chart, individual passenger seat weight control, Lbs/KG unit toggle, CG control, external tank control, and the option to save and load configuration. Multiple camera snap points, above and beyond what's available by default in X-Plane, so you can perform your walk around checks. Adjust your camera's Field of View without having to go to an X-plane menu, allowing for real-time adjustments. Audio mixer: individually control audio channels in real-time, so you can adjust volumes while hearing them play. Slew control: move your plane around the world, temporarily bypassing flight physics. Includes ground mode and air mode. Dynamic panel control page, with a separate view for the entire panel layout preview, or a per-instrument view, allowing for fine-tuning of instrument position, as well as copy-paste function to quickly replace instruments. The "Misc" page in the fly-out window contains options to customize the plane, such as: skis tundra tires mud flaps bubble windows throttle quadrant model (choose between classic and new design) Flight dynamics and systems: The Beaver has unique flight dynamics, characterized by being a "flap-happy" plane. This is faithfully reproduced in the sim version. (Can require slight flap extension during cruise, depending on conditions). The Beaver is the quintessential Canadian classic STOL workhorse, whose flight characteristics and excellent STOL capabilities are calibrated to maximum precision in the sim. Details, such as the wobble pump, the ratcheting carb heat lever, the manually pumped flap system (with direction valve), and the primer system are faithfully modelled for maximum immersion. Tie-downs and chocks actually keep the plane from moving, even in high winds. Advanced FMOD-based sound system: Pioneer in procedural engine sounds. (No two starts sound alike: coughing, sputtering, and clanking valves all contribute to a nuanced, rich, immersive sound experience.) High fidelity, multi-track sounds with smooth transitions and amazing atmospheric effects. Individual volume control over different aspects of the sound experience, adjustable in real-time (while listening to the sounds) Different sounds for front of plane than for back of plane Panning around the plane in exterior view yields awesome 3D audio effects, including "blade slapping" sound when view is perpendicular to prop Individual buttons and switches in the cockpit each have their own unique sound. Sounds actually give you clues as to what's happening under the hood Outside wind intensity is affected by slip and AoA. (The more the surface area of the fuselage is hit by oncoming wind, the louder the sounds Requirements X-Plane 11 Windows, Mac or Linux 4 GB VRAM Minimum. 8 GB+ VRAM Recommended Download Size: 988 MB Current and Review version 1.0.2 (November 23rd 2020) The aircraft comes with an auto-updater. Free auto updates for the life-cycle of X-Plane 11 _______________________________________________________________________ Installation and documents: Download is 998.10Mb and the aircraft is deposited in the "General Aviation" X-Plane folder. Installation key is required on start up and is supplied with the purchased download file. Documents supplied are: Changelog.txt Thranda DHC-2 Beaver Joystick Settings.pdf Thranda DHC-2 Beaver Graphics Settings XP11.pdf X-Plane G430 Manual.pdf Thranda DHC-2 Beaver Documentation.pdf X-Plane G530 Manual.pdf A Blank Livery (PNG) of four files are provided for painting. Checklists and loads of Performance graphs are provided in the manual. ______________________________________________________________________ Aircraft Review by Stephen Dutton 25th November 2020 Copyright©2020 : X-Plane Reviews (Disclaimer. All images and text in this preview are the work and property of X-PlaneReviews, no sharing or copy of the content is allowed without consent from the author as per copyright conditions) Review System Specifications: Computer System: Windows - Intel Core i7 6700K CPU 4.00GHz / 64bit -32 Gb single 1067 Mhz DDR4 2133 - ASUS GeForce GTX 1080 8Gb - Samsung Evo 1TB SSD Software: - Windows 10 - X-Plane 11.51 Plugins: Skunkcrafts Updater Scenery or Aircraft - CYBD - Bella Coola by XPORG (formally Beti-x) (X-Plane.OrgStore) - US$17.50
-
Aircraft Review : Avro Vulcan B Mk.2, K.2 and MRR by JustFlight The Avro Vulcan (officially Hawker Siddeley Vulcan from July 1963), is a four-engined jet-powered delta wing strategic bomber, which was operated by the Royal Air Force (RAF) from 1956 until 1984. The Vulcan B.1 was first delivered to the RAF in 1956; deliveries of the improved Vulcan B.2 started in 1960. The B.2 featured more powerful engines, a larger wing, an improved electrical system and electronic countermeasures (ECM); many were modified to accept the Blue Steel missile. As a part of the V-force, the Vulcan was the backbone of the United Kingdom’s airborne nuclear deterrent during much of the Cold War. Although the Vulcan was typically armed with nuclear weapons, it was capable of conventional bombing missions, a capability which was used in Operation Black Buck during the Falklands War between the United Kingdom and Argentina in 1982. Aircraft manufacturer A.V. Roe and Company (Avro) designed the Vulcan in response to Specification B.35/46. Of the three V bombers produced, the Vulcan was considered the most technically advanced and hence the riskiest option. Several reduced-scale aircraft, designated the Avro 707, were produced to test and refine the delta wing design principles. The other V Bombers were the Vickers Valiant and the Handley Page Victor. The aircraft produced here also includes Avro Vulcan B Mk2 modeled on XH558 "The Spirit of Great Britain". Which is the last flying Vulcan that is flown by the Vulcan to the Sky Trust and the aircraft XH558 and is currently based at EGCN - Doncaster/Sheffield of which X-PlaneReviews covered in a review just earlier this year. The project here is a collaboration between JustFlight and Thranda Design, JustFlight with the initial modeling and design, and Thranda with the excellent X-Plane conversion, sounds, flight dynamics and systems. This is not the First Avro Vulcan however for X-Plane, there is an old FlightSim version that was converted to X-Plane and released as freeware back in 2014; Freeware Release : Avro Vulcan BMk2 by Daniel G and for the time period this Vulcan version was pretty good, but In reality you can't compare that aircraft to this ground up built X-Plane version, certainly not in the high detail. There are three variants of the Vulkan covered here, in the Mk.2, K.2 and the MRR Mk.2 Standard Vulcan in Mk.2 guise. K.2: Six B.2s were converted for air-to-air refuelling with the Mark 17 Hose Drum Unit (HDU) mounted semi-recessed in tail cone. The TFR was deleted. The Three tanks are positioned in the bomb bay giving the K.2 a fuel capacity of almost 100,000 lb (45,000 kg). The six aircraft were converted to used as an aerial bridge to the Falkland Islands after the War, as the Victors had by that date had more limited capacity and airframe (old) limitations. MRR: Nine B.2s were converted to the Maritime Radar Reconnaissance role, these aircraft came with the underwing MRR - (sniffer) Pods for taking samples of the upper air for scientific analysis and nose blade aerials. There are also seven individual optional equipment choices (done from the livery/‘config.json’ file) that includes: Inflight Refueling probe, Both 201 and 301 Rolls Royce Olympus engines (201 - 17,000 lbf (76 kN) thrust) - (301 - 20,000 lbf (89 kN) thrust), TFR Dome (Terrain-Following Radar ), Modern Aerials, ECM (Electronic Counter-Measure) tail cone, K.2 Drum Kit and the MRR air sampling pods and nose blade aerials. Detail In this price range you do expect great modeling detail. In fact JustFlight set themselves a very high level with their excellent BAe Systems Hawk T1/A, and a supreme high-quality machine that was... But they have done just as well here also with the Vulcan Mk2. This is respectfully a far a harder aircraft to get detail into, because basically the Vulcan is all wing, and not much aircraft per se... ... that full wing shape also created inadvertently a large advantage in that it also had a very small radar signature, In being a cold-war bomber that is certainly a bonus in warfare and the start of the race to create very low radar signatures on most current designs, with the F-17 Nighthawk being the most extreme example. The JustFlight modeling team had full access to Vulcan M655 based at Wellesbourne Mountford and is the default livery of the series, and that intimate detail is certainly shown here, but the aircraft noted is in it's current restoration state, and that is good in creating the right feel we would want from these old cold-war birds. So note the worn window surrounds and tired glass, this is not a new aircraft but a very authentic reproduction of XH588. It is all very well done. Gear detail is the same in aged, slightly corroded, but highly realistic. Internal wheel wells are filled out with great detail, so nothing is hidden here or missed. Complex, but original... the gear construction is first rate (so are the animations) with all struts and supports well modeled, and note the huge wheel well box sizes. That wing leading edge is complex with a big C from a modellers perspective. So it is very easy to take the easy way out and just do the straight wing, but here it is all the complex curves interacting with each other and the work is extremely well done. Wingtips are really art in the way they are created with such smoothness... impressive. Lovely bulbous tailcone is really again well modeled, note the engine exhausts that are neatly set into the wing, small details abound to again create that authentic feel, the Olympus engines are buried within the wings, sadly, but their internal shapes are well seen... .... again the tired worn glass of XH588 is seen on the tail, but this is a beautifully rendered tail, lots of shape and highly realistic. So the modelling overall is excellent and a great representation of this great old (cold) warbird. Note if the power is selected off and the parking brake is on then the Vulcan displays the static elements. They include engine inlet and exhaust covers, chocks, flags and the two pilots disappear in the cockpit (hard to see). Menu The JustFlight menu is to the left of the screen, the arrow tab can be hidden via a scrolling your mouse over the tab. There are 18 selections including the 2D pop-up panels: Checklist, Flight computer, Payload menu, Alternator control panel Secondary supplies panel/AAPP control panel and Autopilot control panel. And button selections for: Toggle cold and dark, or engines running (WARNING - Also totally resets the flight), Air refuelling hose (K.2 variant only), Pilot’s helmet sun visor, RAT deployment, (show/hide) ground equipment, (show/hide) control sticks, Deploy drag parachute, Instrument reflections, Window reflections, Show/hide the co-pilot, (open/close) Bomb bay doors and (open/close) Crew access door Checklist, Flight computer: Here you have a 16 page checklist that covers most aspects of starting up and shutting down the Vulcan. Second is a Flight Computer display that covers: Outside air temperature (OAT) – Celsius and Fahrenheit, Groundspeed (GS) – nautical miles per hour, statute miles per hour and kilometres per hour, Endurance – hours and minutes, Range – nautical miles, statute miles, kilometres, Nautical miles per gallon and statute miles per gallon, Density altitude and pressure altitude (feet), True airspeed (knots), track (degrees) and drift (degrees), Fuel flow – gallons and litres, Fuel used – total fuel burn (gallons), Crosswind component (knots), Headwind/tailwind component (knots) and the total fuel burn can be reset by clicking on the lower RESET FUEL BURN button. Payload menu: Next is an excellent Payload menu for easily setting up the aircraft of what type or combination of weapons and equipment you require for the mission. It is extremely easy to use (the menu looks nice as well) you can set your loads to match your mission. Choices are: Blue Steel... The Avro Blue Steel was a British air-launched, rocket-propelled nuclear armed standoff missile, it was built to arm the V bomber force. It allowed the bomber to launch the missile against its target while still outside the range of surface-to-air missiles (SAMs). The missile proceeded to the target at speeds up to Mach 3, and would trigger within 100 m of the pre-defined target point, it was a forerunner of the current Cruise Missiles. MK13 bombs: Three racks of Mk13 bombs. The Mark 13 is a nuclear bomb and its variant, the W-13 nuclear warhead. Mark 13 design used a 92-point nuclear implosion system (see Nuclear weapon design). It is a similar 92-point system was used in later variants of the Mark 6 weapon and the Mark 13 nuclear bomb design was tested at least once, in the Operation Upshot–Knothole Harry test shot conducted on May 19, 1953. The estimated yield of this test was 32 kilotons. WE.-177: The WE.177, originally styled as WE 177, and sometimes simply as WE177, was a series of tactical and strategic nuclear weapons equipping the Royal Navy (RN) and the Royal Air Force (RAF). WE.177A weighed 272 kilograms (600 lb), and had a variable yield of 10 kt (42 TJ) or 0.5 kt (2 TJ) and WE.177B weighed 457 kilograms (1,008 lb), with a fixed yield of 450 kt (1900 TJ). Both WE.177 A/B were flown on the Vulcan. With the JustFlight Vulcan you get two WE.177 nuclear bombs to play with. MRR-PODS: As seen in the MRR version above. The K.2 or MRR version is required for this option. Saddle Tanks and Cylinder Fuel Tanks: There are two 5,000 lbs of fuel Saddle Tanks available, these compare to the 8,000 lbs Cylinder Tanks used for refueling, but both sets can be carried. Other visual Menu items include: Alternator control panel Secondary supplies panel/AAPP control panel and Autopilot control panel. The alternator control panel features the following controls and indicators: Voltmeter and frequency meter for the selected incoming alternator. RAT and AAPP test push-buttons, used to obtain the readings for these supplies on the meters. Alternator selector switch, incorporating a push-button to facilitate synchronisation of alternators. Use the mouse scroll wheel to rotate it and left-click to push in on the centre push-button. EXTRA SUPPLIES TRIP push-button, used to trip any extra supply (RAT, AAPP, 200-volt ground supply) from the synchronising busbar. Mimic diagram of the 200-volt system. The diagram incorporates a voltmeter and a frequency meter to show supplies at the synchronising busbar, magnetic indicators which show continuity when an S breaker is closed and amber lights to show when an alternator is not connected to its own busbar. Magnetic indicators for the RAT and AAPP show continuity when they are connected to the synchronising busbar. Centrally positioned red alternator failure warning light (duplicated on the centre instrument panel) which illuminates steadily if one alternator fails and flashes if two or more fail. AAPP ON push-button. Beside each S breaker indicator is an alternator ISOLATE button. Beside each amber light is an alternator RESET button. NON-ESSENTIAL SUPPLIES TRIP/RESET switch, spring-loaded to the central (guarded) position. This switch can be used to trip non-essential supplies without releasing the RAT and to reset non-essential supplies once power has been restored. Left-click the switch to move it up to TRIP; right-click to move it down to RESET. Four KW/KVAR meters, one for each alternator; normally read KW with a centrally positioned button labelled PUSH FOR KVAR to read KVAR. Four ON/OFF switches, one for each alternator. The AAPP - Airborne Auxiliary Power Plant consists of a gas turbine driving a 40 KVA alternator in a bay aft of the starboard wheel bay. It can provide a 200-volt supply for use in emergency or for use on the ground when an external power unit is not available. On the ground it can provide bleed air to the cabin conditioning and air-ventilated suits. A Mk.10 autopilot is installed as part of the Military Flight System. The autopilot uses 115-volt AC and 28-volt DC. Power to the autopilot is controlled by a switch on the right console. It is a relatively basic autopilot, but missing on this panel are the direction controls in lateral direction and pitch. RAT deployment: The Vulcan is fitted with a Ram Air Turbine (RAT) under the left wing, that will drop down to give the aircraft power. Refueling Hose and Drag Parachute: Both the Refueling hose (K.2 Version required) and the drag parachute can be applied from the menu, both items are far more easier to activate than trying to find the switches in the cockpit. Ground Equipment:The Houchin ground power unit (GPU) can be used to provide electrical 28-volt ground supply power to the aircraft whilst on the ground. The GPU is parked underneath the port wing and is plugged into the aircraft just aft of the bomb bay. Also there is a Palouste compressor which is used to provide compressed air to the engine air starter motors, facilitating engine start whilst on the ground. The Palouste is parked underneath the starboard wing and the air supply hose is connected to the aircraft just aft of the starboard landing gear. Bomb bay doors and Crew access door: Both the Bomb Bay Doors and the forward Crew access (Hatch) Door can be operated from the menu. There are a few other menu items but we will look at them whist in the cockpit. _________________________ Cockpit The underbelly hatch is the access up to the cockpit... .... it is quite a climb all the way up there, or a long fall way back down if you slip! It is quite dark and foreboding in here, but eventually you see the twin huge Martin-Baker ejection seats. In the prototype they wanted an escape pod, a la the F-111, but that was seen as too costly and too heavy. Only the cockpit is modeled? The rear crew area is not in here, and so you are missing the other rear facing ejection seats and the pull-down 5th crew member seat, There are five member Vulcan crews including; Pilot, Co-Pilot, AEO - Air Electronics Officer, Navigator Radar and Navigator Plotter, and their rear area installed and their stations would have certainly added in a another dimension to the aircraft. But finally you are up here and into the cockpit... .... and how impossibly small it all is, on how everything is crammed into this small space and it is simply an ergonomic nightmare! But you have to admit is is a reproduction marvel, you can almost smell the musty tired leather of an old aircraft, lovely reflections come off the authentic gauges (did I mention the access to XH558, well that aspect is certainly on show here). One of the most interesting aspects is that once you have manoeuvred yourself into your seat, you can then pull back (pull up) the centre console with the fuel and autopilot panels attached by the rear handle. If we are in need to see anything inside this cockpit then we will need the power connected and switched on... Instrument Panels Obviously there will be a need to study the instrument layouts on the Vulcan Mk 2. JustFlight (thankfully) provide a very comprehensive manual, listing all the instruments and systems, so it is well worth your time in studying the manual and all the related details to the aircraft. Systems like Fuel, Electrical and Hydraulics are simplistic in a complicated layout, if you sort of know what I mean... so there is a need to work them out and of which button does what... this Vulcan is not your common Boeing 737, and throw in a military layout known as the MFS (Military Flight System) as well and so there is a lot to learn. Pilots main Flying instruments are quite standard, Centre line has the excellent Artificial Horizon (Director Horizon) centre, Beam Compass (heading) below and a Mach meter above. Left instruments are Speed (kts) and Altitude. Right instruments are Radio Altitude, VSI - Vertical Speed Indicator and lower a standby Artificial Horizon and slip indicator. Co-Pilot right hand side has the same MFS layout but with some additional instruments... these include (left) a ADF indicator, (right) a Fuel Flow Indicator, Total Fuel Flow (with reset switch) and Oxygen Flow Indicator. Middle panel is for the four engine instruments, which have that lovely post-war clockwork dial system. Non-Engine related instruments include: Accelerometer (G-meter - top left), Control surfaces position indicator (centre) and TACAN indicator (shows bearing to NAV 1 VOR). Note the MFS selector Panel (top right). This navigational selector has five positions: BOMB – non-functional REMOTE – the heading information is controlled by the default GPS Central (normal) – all heading indications by the heading pointer are magnetic LOC – ILS localiser beam or NAV 1 signals are fed into the system. The BEAM flag on the director horizon shows and the beam bar on the beam compasses indicates the aircraft position relative to the beam. GP – both localiser and glidepath signals are fed into the system. Both the BEAM and the GP flag show on the director horizons and the glidepath pointer moves relative to the centre dot to show the relative position of the glidepath to the aircraft. Top panel is: RAT release handle and the Engine fire warning lights and extinguisher buttons... below are the four main fuel cocks. Under are twelve warning indicator lights and doors (Canopy, Bomb and Entrance) unlocked warnings. Fuel in the Vulcan is carried in fourteen pressurised tanks, five in each wing and four in the fuselage, above and to the rear of the nose-wheel bay. The tanks are divided into four groups, each group normally feeding its own engine. A cross- feed system enables the various groups to be interconnected. Automatic fuel proportioning is normally used to control the fuel CG position. The Fuel contents gauges, one for each tank group, are situated on a panel forward of the throttle levers. The fuel switchgear is set just below on the retractable centre console, Cross-feed cocks and indicators are usable. The Bomb Bay Auxiliary tanks are controlled via a panel below the main Fuel Panel, and remember these tanks are also used in the air-to-air refueling system, so they have twin uses. Lower is the Autopilot Panel (Pop-up available via the Menu)... ... but these AP switches are used in conjunction with the actual direction controls in lateral direction and pitch that are situated directly under the throttles on the retractable console. Throttle Quadrant The four throttle levers are a work of art, as is the whole quadrant... note the built in engine relight buttons that actually work. To shutdown the Olympus engines the levers are pulled out and then pulled down to the shut-off position.... ... lower is the Airbrake selector switch, note the missing flap lever, as the delta wing does not require such flying surfaces. The really nice Control Sticks have four switches; Nose-wheel steering engage button, Elevator and aileron feel relief switch, Aileron and elevator trim switch and a Press-to-transmit switch, both Control Sticks disappear together either by selection or by the menu. Pilot's left side panels consist of (right to left): Oxygen Regulator, Radio altimeter controller, Store safety-lock and warning lights, Bomb doors control, RT2 tone switch, ILS/TACAN/ADF audio switch and TFR controller.... ... Audio warning isolation and audio warning test button, RT1 tone switch, V/UHF radio and the engine start buttons with Rapid start, Normal start selector, ignition switch, Air cross-feed indicator, Start master switch and finally the air-ventilated suits temperature controls. Lower panel are switches for; PFC and artificial feel start buttons (x3), Yaw Damper, PFC stop buttons, Mach Trimmer and Artificial feel warning and lock switches. On the Co-Pilot's right side (left to right): Oxygen Regulator, Temperature switches for Cabin, Cabin Control, Cold air unit, Ram air, Ram air Valve, AAPP air bleed, Cabin AAPP indicator, Abandon aircraft switch and Air-to-Air refueling panel... .... far right is the Anti-icing temperature gauges and Engine anti-icing switches. Lower panel are the pitot and external lighting switches - Lighting Master switch, Identification/Morse switch, Landing/Taxi Lights and Navigation Steady/Flash switch. As there is no rear compartment with an engineers station, the Electrical Panels are both pop-up: Noted both as ACP (Alternator Control Panel) and A.A.P.P. (Airborne Auxiliary Power Plant) which is an onboard Auxiliary Power Unit or APU. The lower section of the AAPP is a "Secondary Supplies Panel" or a continuation of the main electrical board. Other cockpit notes include... The Co-Pilot's station box (Radio) is right lower panel, and you have two very nice E2B compasses on each central window frame. The Wiper controls are hard to find, but they are high each side of the main instrument panel and are speed reversed, in faster first then slower in the third bottom position. Left switch is Pilot and central window, Right switch is Co-Pilot only. You have to remove the Martin Baker ejector seat pins before any flight (and yes the ejector seats actually work, so don't pull the handle?) The pins are positioned high on the side of the seats, and when selected they move to the side of each pilot on to the "Safety Pin Stowages" hooks panel. One option you don't have on a commercial airliner are "Flash Shields" or Nuclear FLASH shields. These are two sets of blinds set above the pilots and each can be separately pulled down to cover over the large circular side windows to provide protection from nuclear weapon flashes and radiation... .... the outer metallic one is still semi-visible, but the inner (heavy one) completely covers and blacks out the window, very handy to have when you need it. Flying the Vulcan Mk.2 It is known as the "Vulcan howl" which is a distinctive sound made by the engines are at approximately 90 percent power, due to the arrangement of the air intakes. It is a misconception is the fact that although the Vulcan shares the same name as the Concorde Olympus engines the versions are quite different, here we have the Olympus 301 were as the Concorde has the Olympus 593 with afterburner (or reheat), the only commonality is the two-spool axial-flow turbojet core... but it is known that the Olympus 593 did fly on a Vulcan airframe as a test bed for the engine (but not actually for Concorde but for the abandoned TR.2 Fighter). You get that lovely familiar whine as you sit ready to go, strangely there is not a lot of settings to set, no flap position, speed selection or altitude. But there is a lot of selection of switches to set like the ENGINE AIR and CABIN AIR switches, which you tend to change quite frequently... all selections are covered in the tutorial part of the provided manual. The Vulcan is quite a powerful aircraft (for the period). So depending on your mission weight it will taxi quite easily. Being in the cockpit though is bit like trying to fly from inside a post box and looking through the slot? It is dark in here and tight, it feels far more tighter than a fighter which will have that open glass canopy around you, but in here you do feel restricted as most Vulcan pilot's note... try this with a flying helmet on as well and then hope you are not the screaming claustrophobic personality type. The Beam Compass (heading) needs to be set... pull the knob (arrowed) out to turn the outer heading ring to your current heading. (note this ring will not turn as the aircraft changes direction, so you fly to the heading on the ring), push the knob in again to set the autopilot heading pointer. It takes some getting used to if you fly modern aircraft. You can move/hide the lovely armrests as they get in the way of the side panels, then check if there is oxygen flow... The VOR radio is on the left panel, you set it via the knobs and a very modern looking frequency, that disappears quickly. Time to fly, but the Vulcan is a past era dirty mongrel. The aircraft will gain speed very quickly and even with a heavy fuel and weapon load, rotate is around 155 kts at a pitch of 45º angle which can be maintained all the way up to the flight level.... .... and you really feel the huge lift from this flying wing, it will lift off anyway but you need to keep in control via holding the stick forward. Pitch is extremely pivotal, it is like the you are balancing the aircraft directly in the center with a very light nose and tail.... so you need to control the pitch movements with very small inputs and with smooth pitch changes, a few flights and you are usually ready next time, but it doesn't get any easier. Gear animations are excellent and cleaning up the underbody airflow helps with the handling and noise factors. The aircraft is surprisingly very nice under manual control, setting the trim is required, but it can upset the autopilot (AP) when switched on, so you have a choice... trim and fly manually or leave the trim alone if you are going straight to the autopilot. You can set the Autopilot ready via the switch on the Co-Pilot console and then pulling out the "power" switch on the AP panel, the white light comes on to show you the AP is active and ready. Level off and then "ENGAGE" then select TRACK to follow the set heading. You can select climb via IAS or hold the ALT (recommended). The forward panel then controls your lateral direction and pitch directions, remember this is a very basic 2-Axis system. The lower AP control are out of sight and too a point out of reach, it would have been nice to have had them on the pop-up panel with the rest of the AP controls, press the centre of the knob to lock in the trim... up or down is in 1000 fpm selections which are big movements in pitch. Specifications are impressive... Cruising speed is Mach 0.86 indicated and Max is Mach 0.93 (301 Engines), to note the early straight wing Mk 1 version was faster at Mach 0.95 indicated. Ceiling is 45,000 to 56,000 ft (14,000 to 17,000 m) which is high, but this is a nuclear bomber... Range is 1,500 nautical miles (1,700 mi; 2,800 km), but you do have the extra tankage available and that extends the range out to 4,603 mi (4,000 nmi / 7,408 km) or allow you to stay on station for hours. Getting up to 45,000ft is the easy part, then you have to come down again.... and it is a long way down without a decent Vertical Speed tool... ... helpful are the twin upper and single lower (originally double both upper and lower) airbrakes which are highly effective. Do you cheat by using a moving map to locate your position or try to do it the authentic navigation way, remember these aircraft had a dedicated Navigation Crew Member to do just that specific job. 3,000ft approach and the lights of EGCN - Doncaster are in the postbox slot... eh windows. Approach speed is around 170 kts but there is the known factor of a Pre-Stall buffet between 160 kts to 180 kts and that requires more rudder input in turns, but you still have to keep that tight, and remember the huge amount of lift this aircraft's wing can generate and with that also comes the huge ground effect reflection as you get down closer to the runway. Slowly you reduce your speed to around 150 knts over the threshold, but it is a fine line between going too fast and stalling... Vulcan's don't naturally stall in the slight nose up position, the ground effect gets too strong and they tend to seriously wobble on the large cushion of air then simply fall out of the sky as noted in a few Vulcan accidents, but touch down is around 140 kts. RAF Finningley (at EGCN-Doncaster) has a long 2,893m (9,491ft) runways as did all nuclear bomber airports, it is required as even at 140 kts as you fight the aircraft to slow it down. The manually operated airbrakes do help, but even then the parachute is still required to run off the excess speed. Overall the Vulcan is a terribly interesting aircraft to fly, and in many way quite different from your average commercial airliner... you must approach the Vulcan this way and expect time to understand and even plan each mission when you fly the aircraft, it will take time and study but in that aspect the Vulcan really delivers, it is certainly not a jump in and do a circuit sort of aircraft... it is a full mission aircraft with areas like said planned and be detailed ready from the start. Lighting UPDATED : this section of the review is updated to v1.1 that now includes large changes to the Vulcan's internal lighting. Before the Internal lighting was quite simple, one switch to light up the instrument panel and the side panels.... In v1.1 the side lighting knobs which were static before now work... The four lighting knobs are now active (orange arrows), but so also now is the functional swivel lights between the knobs, the swivel light illumination is controlled by the lower knob (yellow arrow) The same panel light knobs are on the Co-Pilot's side as well as is the same functional swivel light. Changed also is the main instrument panel lights which are now split for each side of the panel, the Co-Pilot's panel switch is on the panel far right (arrowed). The rotating knobs now give you two options, the original WHITE lighting or the very Cold War RED hue, it is very realistic... .... Main panels (separate) both side panels and the centre console are all fully adjustable individually, just like with the white hue. The functional swivel lights are very good as well, totally adjustable and not only for illumination, but also for compete axis movement... you can illuminate any part of the cockpit you desire.... .... turn the swivel light to light up the other side of the cockpit and it is highly effective, with almost daylight illumination. Externally there are options for ID Lights in STDY (Steady) and MORSE (Flashing) and Navigation lighting in ST/DY and FLASH. Three red beacons flash on the top of the aircraft or a steady in one single red beacon on the belly... navigation is wing and twin lower tail, strobes in the wings, in reality you don't want your nuclear bomber light up like a fairground do you, so it is very good... .... twin Landing/Taxi lights are build into the end of each wing and they are both retractable and have also been updated with refined functionality in v1.1 Liveries The scale of the liveries is quite impressive at seventeen, but many a registration are doubled for both Mk.2 standard and K.2 Tanker or MRR. USA and KIwi (New Zealand) and White Flash white nuclear test aircraft XL361 and XL426 are all represented as is XL426 in it's usual Camo livery... XM655 is default. Operation Black Buck had seven operations... During the 1982 Falklands War, Operations Black Buck 1 to Black Buck 7 were a series of seven extremely long-range ground attack missions by Royal Air Force (RAF) Vulcan bombers of the RAF Waddington Wing, comprising aircraft from Nos. 44, 50 and 101 Squadrons against Argentine positions in the Falkland Islands, of which five missions completed attacks. The objective of the missions was to attack Port Stanley Airport and its associated defences. The raids, at almost 6,600 nautical miles (12,200 km) and 16 hours for the return journey, were the longest-ranged bombing raids in history at that time. The Operation Black Buck raids were staged from RAF Ascension Island, close to the Equator. The Vulcan was designed for medium-range missions in Europe and lacked the range to fly to the Falklands without refuelling several times. The RAF's tanker planes were mostly converted Handley Page Victor bombers with similar range, so they too had to be refuelled in the air. A total of eleven tankers were required for two Vulcans (one primary and one reserve), a daunting logistical effort as all aircraft had to use the same runway. The Vulcans carried either twenty-one 1,000-pound (450 kg) bombs internally or two or four Shrike anti-radar missiles externally. Of the five Black Buck raids flown to completion, three were against Stanley Airfield's runway and operational facilities, while the other two were anti-radar missions using Shrike missiles against a Westinghouse AN/TPS-43 long-range 3D radar in the Port Stanley area. Shrikes hit two of the less valuable and rapidly replaced secondary fire control radars, causing some casualties among the Argentine crews. One Vulcan was nearly lost when a fuel shortage forced it to land in Brazil. Black Buck 1- Port Stanley Airport runway 30 April–1 May - XM598 (Reeve)XM607 (Withers)Performed; primary aircraft cabin failed to pressurise shortly after takeoff, replaced by reserve Black Buck 2 - Port Stanley Airport runway 3–4 May - XM607 (Reeve) XM598 (Montgomery) Performed Black Buck 3 - Port Stanley Airport runway 13 May - XM607XM612 - Cancelled before takeoff due to weather conditions Black Buck 4 - Anti-aircraft radar 28 May - XM597 (McDougall) - XM598Cancelled 5 hours into flight, due to a fault in the Victor fleet Black Buck 5 - Anti-aircraft radar 31 May - XM597 (McDougall) - XM598 (Montgomery) Performed Black Buck 6 - Anti-aircraft radar3 June - XM597 (McDougall) - XM598 (Montgomery) Performed; primary aircraft forced to divert to Brazil due to a broken refuelling probe Black Buck 7 - Port Stanley Airport stores and aircraft 12 June - XM607 (Withers)- XM598 (Montgomery) Performed My personal experience was with Avro Vulcan XL391, that sat at Blackpool Airport for years. I saw the aircraft on a visit home, but by this time the bomber was not in a great condition. Vulcans maybe prepared for nuclear attacks, but Blackpool's corrosive sea air did a lot of more serious damage to the aircraft. One aspect is that you could get very close and even look internally and the engines were still installed, but the aircraft was certainly never going to flown again... it was scrapped quite ingloriously on the June 20th, 2013. Summary This is a reproduction of the Avro Vulcan Mk.2, that was a 60's Cold War Nuclear bomber from the United Kingdom. Based on the last fully operative version of the aircraft XH558 "The Spirit of Great Britain", this same aircraft was used to create a very realistic rendition of this classic airframe. The aircraft comes in three variants with the standard Mk.2, K.2 Air to Air refueling tanker and the MRR - Maritime Radar Reconnaissance role aircraft. Detail and modeling is hugely impressive, so are the complex post-war systems. And the Vulcan comes with a lot of choices and features including the choice of the different Mk.2, K.2 and MRR setups via the liveries (can also be set manually), the range also is impressive in the liveries provided for the Vulcan's different mission roles including nuclear bomb testing flash white. Extensive menu is very good as is the choices of weapons (mostly nuclear with Blue Streak) and different belly fuel tank options. Sounds include the famous "Vulcan Howl" and are very immersive and 180º dynamic with 3D audio effects, atmospheric and distance effects and adaptive Doppler. Instrument panel, side panels, throttle quadrant and retractable centre console in detail is overwhelming, but missing is the rear crew cabin with stations for the other three crew members and importantly parts of the aircraft electrical systems panel, they are provided here only on pop-up panels from the menu? Internal lighting was also impressively updated in v1.1 In some ways the Vulcan is very easy to fly in a manual mode, and this flying wing has a huge amount of lift, but the ergonomic post-war instruments and 2-way axis Autopilot do require a lot of study and practice, so to fly the Vulcan in a serious mission role does require a lot of skill and practise on the airframe, but you don't doubt the authenticity of the Vulcan package to the high calibre and serious simulator user. Overall brilliant, but for the serious fliers only. _______________________________ The Avro Vulcan B Mk.2, K.2 and MRR by JustFlight is now AVAILABLE at the X-Plane.Org Store: Also available from JustFlight Avro Vulcan B Mk.2, K.2 and MRR Priced at US$49.99 Features MODEL Accurately modelled Avro Vulcan B Mk2, K.2 and MRR built using real-world aircraft plans and comprehensive photography of the real aircraft (XM655) K.2 air-to-air refuelling variant with Hose Drum Unit (HDU) and animated hose Maritime Radar Reconnaissance (MRR) variant with air sampling pods and nose blade aerials Many detailed animations, including: - Crew door - Bomb bay doors (with realistic deployment speed) - Multi-position airbrakes (accurately linked to landing gear position) - Drogue and main brake-chutes - Deployable ram-air-turbine (RAT) - Variable-speed wipers - Tilting main landing gear - Flying controls (including elevons) - Animated pilots - Retractable taxi/landing lights (with realistic ‘blowback’ above 180 knots) A range of payload options, selectable via a custom 2D panel: - Blue Steel nuclear stand-off missile - 1,000lb bombs - WE.177 nuclear bomb - Saddle bomb bay tanks - Cylindrical bomb bay tanks Ability to configure external model options for each livery – refuelling probe, 201/301 engines, TFR dome, modern aerials and tail fin ECM, HDU, air sampling pods and aerials Olympus 201 and 301 engine nozzle types Ground equipment, including Houchin GPU and Palouste compressor for engine start, and engine covers and chocks 4096x4096 textures are used to produce the highest possible texture clarity PBR (Physically Based Rendering) materials with real-time environment reflections for superb quality and realism Detailed normal mapping for down-to-the-rivet precision of aircraft features COCKPIT A truly 3D virtual cockpit right down to accurately modelled ejection seats and screw heads - every instrument is constructed fully in high polygon 3D with smooth animations Cockpit textures feature wear and tear, with PBR effects, based on reference photos taken in the real aircraft to produce an authentic environment Interactive engine start checklist Checklists for every stage of flight Panel state system which will automatically save the panel state whenever a flight is saved and reload the panel state whenever that flight is loaded Aircraft configuration system that will allow you to choose between 'cold & dark' or 'ready for take-off' Realistic V/UHF radio unit – save and recall commonly used frequencies Fully functioning magnetic indicators, warning lights and push-to-test buttons Numerous interactive animated blinds and visors Realistic flight instruments, including direction horizon, beam compass, control surface and CG indicators Option to activate flashlight from within pop-up window, to aid in those pitch-black cold and dark starts at night Option to remove window and instrument reflection effects All knob, switch and button animations routed through plugin logic, for optimum movement fidelity and sound synchronisation No detail is too small – even the option to switch between day and night modes on the landing gear indicator is included! AIRCRAFT SYSTEMS Numerous custom-coded systems: - Fuel system – fuel tank groups, transfer and cross-feed - Electrical system – alternators, Airbourne Auxiliary Power Plant (AAPP), Ram Air Turbine (RAT), synchroniser busbar and 2D AEO panels for controlling the AAPP, RAT and secondary supplies - Flying controls system – Powered Flying Controls (PFCs), Mach trimmer and auto-stabilisers - Engine start system – Rapid or normal engine starting, cross-bleed and Palouste external air supplies - Hydraulic system, including the electrically-operated hydraulic power pack unit (EHPP) - Oxygen system, including oxygen regulator system with realistic consumption based on altitude – watch the oxygen quantity drop with usage - Air conditioning system – cabin pressurisation and air conditioning, emergency depressurisation controls - Thermal anti-icing system, including airframe and engine anti-icing - Autopilot, including pitch and bank hold Airbrakes, bomb doors and brake-chute can be operated using standard control assignments for ease of use OTHER FEATURES Realistic and accurate flight dynamics based on real world performance and handling data Authentic sound set, generated using X-Plane's state-of-the-art FMOD sound system, including the distinctive Olympus 301 howl! Custom sounds for bomb doors, airbrakes, entrance door, switches, wipers and more, featuring accurate location placement of sounds in the stereo spectrum, 3D audio effects, atmospheric and distance effects, adaptive Doppler, exterior sounds spill in when the crew door is open, different sound characteristics depending on viewing angle etc. Dedicated pop-up window for sound mixing, allowing for individual adjustment of the volume of exterior sounds, in-cockpit sounds and various effects Comprehensive manual with panel guide and performance data PSD Paint Kit included so you can create your own paint schemes Interactive logbook panel for logging your flight details (X-Plane native) Custom external light logic with custom strobe light pattern and custom light halos for added realism Requirements X-Plane 11 CPU: Intel Core i5 6600K at 3.5GHz or faster 8GB RAM or more DirectX 12-capable graphics card from nVidia, AMD or Intel with at least 4GB VRAM (GeForce GTX 1070 or better or similar from AMD) Windows 10 / 7 / Vista / XP, MAC OS 10.10 (or higher) or Linux 2GB hard drive space Current and Review version: v1.1 (April 29th 2020) Installation and documents: Download for the Avro Vulcan B Mk.2 is 2.3Gb and the unzipped file is deposited in the aircraft "Fighters" X-Plane Aircraft folder at 2.37Gb. optional equipment choices can be done from the livery/‘config.json’ file. Librain (rain effects) plugin is required, get it here and install in your plugins folder: Click Here Documentation: Documentation consists of a 89 page overview and tutorial for the Vulcan Bomber, details available cover most areas including the complex systems. EULAstandardcommercialandacademic2019.pdf Avro Vulcan B Mk2 X-Plane manual.pdf ________________________________ Review by Stephen Dutton 29th April 2020 (updated) Copyright©2020 : X-Plane Reviews (Disclaimer. All images and text in this preview are the work and property of X-PlaneReviews, no sharing or copy of the content is allowed without consent from the author as per copyright conditions) Review System Specifications: Computer System: Windows - Intel Core i7 6700K CPU 4.00GHz / 64bit - 32 Gb single 1067 Mhz DDR4 2133 - ASUS GeForce GTX 1080 8Gb - Samsung Evo 1TB SSD Software: - Windows 10 - X-Plane 11.41 - tested v11.50.b4 (fine) Addons: Saitek x56 Rhino Pro system Joystick and Throttle : Sound - Bose Soundlink Mini Plugins: Traffic Global (Just Flight) US$52.99 Scenery or Aircraft - EGCN - Doncaster Sheffield by FlyX (X-Plane.OrgStore) US$17.99
-
Aircraft Review : BAe Systems Hawk T1/A Trainer by JustFlight - Thranda Design The Folland Gnat T.1 was the mainstay of RAF jet training onwards from 1959. The aircraft was a nimble and extremely good training aircraft for pilots moving into military jet aircraft and then moving on upwards to the heavier Hawker Hunters and English Electric Lightings. But in the early 70's the RAF realised that the next generation of jet fighters would require a more advanced trainer and a two-seater to accommodate the Sepecat Jaguar and the Panavia Tornado. The result was the Hawker Siddeley Hawk T1 (Trainer Mk1). In reality the relationship of the Hawk to it's predecessor the Gnat is actually very close and highly related. Hawker Siddeley had bought out Folland in 1959, as British Aerospace Systems (BAe) would also merge with Hawker Siddeley in 1977, however the Hawk was built and still assembled in Hamble at the old Folland factory where the Gnat had also been produced. The Hawk also followed the Gnat in being the mainstay of the RAF British Aerobatic Team, known as the "Red Arrows" and still holds that coveted position today. JustFlight - Thranda Design It is just under a year in that the partnership of JustFlight and Thranda Design released their first aircraft for X-Plane11, that was the PA28R Piper Arrow III and since then there has also been the PA28R Turbo Piper Arrow III/IV in February and the TB10 Tobago & TB20 Trinidad in May and finally the excellent Cessna 152 ll in June. All aircraft I thought brought far more to X-Plane in features and to the general aviation category, but more so in the highly realistic handing of the aircraft. They are not cheap aircraft and all sit on the top of the scale in price for general aviation aircraft, but they also do deliver in another level in quality as well. This is JustFlight's and Thranda's next release with the BAe Systems Hawk T1. First it is a radical change from the usual general aviation style of aircraft and it also took a long time to get released? The aircraft was initially first announced back in February earlier this year, then another promotion in the middle of the year sent our heart's a flutter again but then it all went very quiet, this time it is actually here... so was it worth the wait? That is what reviews are for, so let us see. BAe Systems Hawk T1/A Trainer We have come to now expect a very high quality aircraft from JustFlight/Thranda, as it should be in this price range as that is what you are paying for, in high very high quality and for loads of features. There is no doubt the Hawk stands out there in the quality stakes, the level here is extremely high, if the best fighter/trainer now in in X-Plane11. To be fair there is not a lot of competition to compare the Hawk with as very few modern fighters have yet made the transition from X-Plane10, coming and in the same category is X-Trident's Harrier AV8B, so that aircraft will be a better benchmark. Would this aircraft pass the Airshow walkaround test? you know the one where you walkaround the aircraft noting it's details and equipment points, take a few pictures to remind you of the aircraft... in this case yes. The quality of the detailing is phenomenal, and I am set at a lower resolution setting. Another level of detail again for X-Plane? If not then it is close... aircraft modelling is absolutely first rate, perfection, not a 3d bump out of place. In realism you have glass and reflections that really deliver (note the explosive cord for seat ejection on the canopy glass)... again are you looking into a real jet at an airshow? if not then you are pretty well close to it. It is the smaller details that create a believable realism, note the slightly worn landing light nose glass and wingtip lighting enclosures, the tail leading edge material and the correct accurate layout of rivets and paneling. As a note, the Hawk uses the Rolls-Royce/Turbomeca "Adour 151" non-afterburning turbofan with 2,360 kilograms (5,200 pounds) thrust. It is a more expensive engine, but also more economical to use; like the Specate Jaguar it also uses the "102" version of the Adour in a twin-engine installation. The engine drops down out of the Hawk's belly just behind the wings for service, and in principle can be replaced in one and a half hours. The Hawk is built with ease of serviceability in mind, and almost a third of the aircraft's surface is covered by access panels. There is a "Microturbo 047 Mark 2 Gas Turbine Starter/Auxiliary Power Unit (GTS/APU)" that is installed above the engine to permit self-starting, and to assist in relights after an in-flight flameout. If the aircraft loses power in flight, a ram-air turbine can also automatically pop up in front of the vertical tailplane to provide emergency electrical power and the RAM is featured here and works realistically on the aircraft. The Hawk has two main and one forward strut trailing link undercarriage assemblies... .... detailing is the very best as you would expect in this class, but even more so. Every joint, component, hydraulic line, hydraulic piston, nut and bolt is here, even the strut labels and markings are also correctly applied. Animations in ground movement and retraction/extraction are perfect, even more so as the trailing link assembly can give the taxiing of the aircraft a feel that is quite different from normal, but perfectly authentic. Back to the airshow... usually you stand in line, and usually for a long wait. But your turn does come and you have a fleeting few moments... ... you can look of course but can't touch! but what would you give to sit in there? "sit in the real jet"... The aim of the ultimate in simulation is break down that barrier, and to be able to not only sit in the aircraft but to actually flying this expensive complex machine as well, to live the dream. But for to that to work in simulation then the detail must above and beyond, you thought what was excellent even a few years ago, but here with this Hawk you see the level go higher again, and in a few years it will go even higher... but for now this is the best of the best current standard. First glance inside the Hawk cockpit is the usual overwhelming complexity. But usually as you decipher and break the detail up and work it all out it all comes to make sense... Panels are grouped as: Left console – throttle, engine starting, electrical and flying control systems Left main panel – weapon selection and radio Centre main panel – flight instruments and weapon sighting Right main panel – engine instruments Right console – avionics equipment You can't expect every switch or button and knob to work in the cockpit, but I would guess the number is still very high in here at around 90%. In the rear seat that percentage is around 70%, not bad, but you still miss a few things you would like to control. Cockpit detail is to the extreme. Many fighter cockpit have been exceptional in detail, but don't convey that realism factor, but that is not the case here, it is about as real as it gets, every seat belt, material stitching, pipe, metal panel, screw, nut and bolt is visible and all have highly realistic textures... ... the highlight is the instrument panel glareshields, they have that dusty, not touched since installed look about them, you just want to move your fingers in the dust to create a mark, perfection. Menu/Features The menu is fully featured and positioned via the usual JustFlight left screen side arrow, scrolling on the arrow will make it transparent. This menu layout is far better than the earlier menus, as they had just a red transparency when selected and they looked very dated. This version has coloured items for selection and looks the business. There are 21 selections and features to choose from, and not in any order we will start with the pilots. There are two animated realistic pilots that you can select via the menu, you can also select if you want their visors up or down... ... one note is that if you put the front seat pilot's visor down the screen image goes slightly darker, but the rear visor does not create the same effect? also the pilots selection is only external, so if you are seated in the front or rear seat, then the other seat internally is empty, which is a bit odd as you can select if you want this feature or not? (arrowed) Why not show the internal pilot if you so wish for realism? Overall the pilots are excellent in detail. Selections include static elements like: chocks (rear wheels), tags and pitot and engine inlet/outlet covers, and a very nice work maintenance step frame... ... another ingress option is the aircraft's built in steps, or pop out extensions that are well done (arrowed above). Options include the external diesel tank carried by display aircraft, or the M61A1-Vulcan 6,000 rounds per minute centre mounted cannon... Four armament racks allow a variety of weapons, that are selected via the X-Plane "Weapons" menu, here we have the AIM-9 Sidewinder and AIM120-AMRAAM, but bombs can be carried as well, but just watch their excessive weight are balanced! Nice detailing on the armament racks that will change to the correctly selected armament. Forward locker opens to reveal the avionic equipment racks. There are two Hawk versions to choose from in the T1 or the T1a. This is noted via the extension over the exhaust outlet... ... but in reality it is a bit useless? The difference between the T1 and T1a versions is that the T1 is the trainer, and the T1a is the armed or fighter version? so why not use the selection to denote the different types by having the armament off for the T1 and the aircraft armed for the T1a version? Menu options internally include the aiming gunsight, and two left and right flip up frequency display panels... ... they don't actually display any frequencies? but there is a fix by MatthewM that adds in the frequencies via an texture file. The same display fix is also in the Red Arrows display livery by Christophe, and here you also get with the livery the lovely Red (Arrows) flying suits as well! With the external diesel tank attached you get a double panel of a set of coloured lights on top of the glareshield (yellow arrows), but there are no notes on if they work, or why? There is a good kneeboard for checklists that pops up. It can be moved around the screen, but it is not scalable, which makes it a bit of a blocking visual distraction in the air (as you can't see anything forward!) as the menu itself is also locked to the left side of the screen and again not scalable.... joysicks front and rear can be hidden and note the "Rudder Lock" (arrowed) Final menu options include a "Cold and Dark" to ready (electrical on/off) and a full engine start up that starts the engines and configures hydraulic and electrical systems so that you are ready to taxi feature, you could call it a "Scramble mode!". There is a feature that configures the aircraft so that weapons are live (ready to fire) and you can select/change the livery from the menu. Instrument panels Power up and the Hawk comes to life. Panel lighting is excellent and adjustable for the left, right and main instrument panels. Annunciator warning panel (CWS - Central Warning System) can be tested. Main cluster of flying instruments covers clockwise... Turn-and-slip indicator, Main Artificial Horizon, Backup Artificial Horizon. Main Altimeter, Vertical speed indicator (VSI), Horizontal situation indicator (HSI) or heading indicator, Directional gyro indicator (DGI), Combined speed indicator (CSI)... top centre left is the Accelerometer. Right front panel is clockwise: Standby altimeter, Cabin Altimeter, Oxygen supply contents, Fuel gauge, TGT indicator (Turbine Gas Temperature), Engine LP shaft rotation indicator/RPM indicator. The Oxygen flow indicator will flip on and off if the oxygen is flowing correctly. lower right is the electrical switchgear and panel lighting adjustment knobs. Depending on if the Hawk is armed or not (T1a) then the firing panel is located upper left... The Lock/Live switch is upper right (magenta arrow). Pylon (rack) selection and armament selection is on the Weapon Control panel, but don't for "heaven's sake" fire it off on the ground like I did... ... as it is not pretty and I suppose that is what the "Safety" is for! The Hawk has a CCS or Communications Control System which provides overall control of the elements of the communications system. The CCS integrates the VHF transmit facilities and the audio signals from this equipment and from the ILS and TACAN receivers. It also integrates the audio tone of the tone generator in the Central Warning System. The radio below the weapons panel is the UHF radio set, but with X-Plane11 you can't access UHF, so the Hawk uses regular VHF frequencies. This radio will control the COM 1 frequencies. It is very nicely done anyway, and super easy to set and use. There are also 20 preset frequencies you can use and if you want a certain frequency, it can be set via the ‘manifest.json’ file with a text editor. Right Console Right panel has the other radio set and this unit is again a UHF unit, but set to the regular VHF (X-Plane) frequencies. This radio controls the COM 2 frequencies. Again the radio can be preset to frequencies and details on the correct insert order (‘manifest.json’) can be found in the manual. The radio panel layout and detail here really good and quite authentic (to a point with X-Plane restrictions). An ILS installation is comprised of a localiser and glideslope receiver and a marker receiver, there is no autopilot, so the ILS is a visual reference only. The Hawk is fitted with an IFF/SSR (Identification Friend or Foe/Secondary Surveillance Radar) system which provides identification facilities and IFF, and civil SSR including ‘Mode S’. The system provides facilities for an IFF or SSR ground radar station to interrogate the aircraft and for the aircraft to rapidly and automatically transmit an identifying reply. The system replies to Mode 1, 2, 3/A, 4, C and S interrogations, including civil and military emergency interrogations. The IFF/SSR control display unit (CDU) is used to control the operation of the IFF/SSR transponders. It works in this aircraft in the MODE 4 interrogations 4A and 4B and for civilian M3/A or auto selection. Note the oxygen valve (yellow arrow above right). Lower panel known as the "Leg" panel is on the upper panel is the AHRS (Attitude and Heading Reference System) control unit, and the lower is the ISIS control unit (Ferranti ISIS Century Series Gunsight). The AHRS is used to calibrate the artificial horizon or align, and if the balls (both main and standby) are lazy then you haven't done this before flying the aircraft. The Ferranti ISIS Century gunsight is adjusted via the left and right knobs (arrowed above right), but I can't see any brightness adjustment, so the sight is quite hard to see? Mode selections include: GA – for air-to-air firing, G – this mode is for air-to-ground gun attacks. With G selected, the aiming mark is then depressed to cater for the gravity drop of the shell, R – same as G, but drift control will adjust the horizontal position of the sight, B – when B is selected, the sight is initially depressed, but can still be moved with the depression control. S – same as B, but the sight is not initially depressed. M - air-to-air missile attack mode is not available. Left Console On the left the console covers the aircraft's throttle, engine starting, electrical and flying control systems. Note first the rearward and slightly hidden main fuel cock lever. Engine start and aircraft (electric) trim switches are rear panel. The lovely stubby throttle is excellent, but note the catch? (arrowed), to move the throttle and the catch needs to set in the up position, but be careful if you hit the catch in flight to click down, as then if you go back to idle the throttle will then lock, unless you release the catch again to up... not the best idea to do if you are on an approach? A set of five gauges cover: No. 1 and No. 2 hydraulic system pressure, Brakes supply pressure and Left and right brake pressures. Left lower main panel are buttons to raise and lower the undercarriage, "UP" is retraction, and "DOWN" is extraction, very different from the usual lever... a manual gear release for both the nosewheel and main gear is here as well. More unusual is a switch (arrowed above right) to lower the flaps between: Up - Mid - Down. and confusing is the flap setting of 0 -5 x10 (degrees). The battery "Volts" gauge is on this side panel as well. Rear position has a few items removed... ... with the ISIS Gunsight panel which is missing and AHRS is disconnected, and the left upper armament panel (T1a) shows the weapon activity, but there is no access to the switchgear.... side consoles lose the IFF/SSR panel right and the engine startup panel left. Overall I think the aircraft finds the right balance on providing a realistic immersion in the cockpit, without that overkill of the minute of details. Flying the BAe Hawk T1a Back to the airshow... you know when the air display is going to start, and everyone runs to the fence by the runway. Usually I go the other way and run to the parc fermé, as there is nothing, I mean nothing like a jet aircraft or helicopter starting up it's engine(s). (hint turn up your sound volume a little) Starting up the Hawk is actually quite easy. The T1 has a Microturbo 047 Mark 2 Gas Turbine Starter/Auxiliary Power Unit (GTS/APU) installed above the engine to permit ground self-starting and to assist in relights after an in-flight flameout. So there is no ground power cart (GPU). The system is comprised of a gas turbine air producer and a free turbine starter motor. The air producer (GTS) is at the top of the fuselage, forward of the ram air turbine. It supplies air via a solenoid-operated start valve, and when the dump valve is closed it supplies air to the starter motor which is fitted to the engine external gearbox and drives the HP shaft through the gearbox. It is really a bleed system, but a sort of that it builds up the pressure and then blows it into the starter motor, and that then turns the engine. The GTS also automatically supplies fuel to the nozzles in the combustion chamber containing two igniter plugs, then when you light the match.. oh, ignite the fuel it starts up the Adour jet engine. So fuel cock off, and switch on the fuel pump... Then you press the Start/Relight button forward on the throttle, which is a sort of primer button, but it is building up the air pressure ready to flow it into the turbine starter, and priming the fuel into the engine. When ready or primed you get a green light GTS lit up ready on the right panel... Then you just flick the start switch to "Start". The Adour's startup sounds and start sequence is amazing, highly realistic and the sort of a grin of ear to ear of excitement! Loud, keep it loud... bugger the neighbours sort of loud. Engine LP shaft rotation indicator and RPM indicator wizz around into action... then you get a "Rotation" light come on! At this point you need to nudge the throttle slightly forward, and you get the same sort of fire up that you get in an airliner when you turn on the fuel switches at around 18-20 N2, but then the Adour powers up to full power. The CWS will show HYD and AC (1-3) warnings so you have to reset them on the upper left panel by pressing the buttons (arrows upper right). And you are good to go... remember there is an easy start feature in the menu that does all this for you, but in reality it isn't that hard... If you get the start sequence wrong though it is 3 min wait to retry for another engine start. Remember to turn on the oxygen (switch right middle console), if working correctly the flow is seen via a flicking on/off flow meter upper right panel... however the rear seat oxygen switch and flow meter does not work? Ready to fly... The parkbrake lever is hard to access (or find) far right down by the seat. When moving then be aware of the front nosewheel. First it has a very long trailing link, but it can be very flickery as well (It flickers badly even when standing still?), and so it is very easy for it to go quickly at an odd angle... it works and works fine, but you have to get used to it when taxiing, it is a bit like the A320's remote tiller feel. Sounds when taxiing are excellent, with all that turbine power but whistle flow aural. Note the mirror reflections of the explosive cord. Usually I find these internal mirrors are quite poor, but in here they are the opposite and have very good and realistic reflections. Flaps are set to "Mid" for takeoff, and required if you are carrying a lot of fuel and full armaments. Your forward view is quite restricted at the normal FOV setting (73º), you could make it higher, but that is not realistic either, but it is hard to look forward and read the lower instruments at the same time at this FOV... ... throttle up and you give the aircraft about 80% RPM, not too much to make sure at first the front gear is tracking correctly... gradually to 90% then a third down the runway you give the Hawk the full 100% thrust. You want to feel that punch in the back, you certainly get the thrust but it is more slower building up speed than you would think it would be... ... I found 160 knts to rotate (officially JF note 190 knts?), and you quickly need to get the flaps to zero 0º (500 ft!) and the gear up, so I flick both switches at the same time, but remember to counter the flap lift loss! Ground and air gear animations are excellent, aural retraction (and extraction) gear sounds are also top notch, and the aircraft's excellent FMOD 360º sound externally and in the cockpit is as expected at this level are extremely good.... and yes the hairs on you neck will stand up and get quickly prickly. The Hawk's feel depends on the weight, you feel the extra weight of the T1a fully loaded compared to the far lighter T1 trainer, and although you felt it a bit sluggish on the ground the aircraft will accelerate very quickly to 300 knts in the air, and even while climbing set at 90% thrust. The T1 can climb at a whopping usual 9,300 fpm and one aircraft was known to climb at 11,800 feet per minute, light of course, but that is still phenomenal. Other statistics are still overwhelming with a maximum speed of 1,040 Kph 658 Mph/572 Knts and a service ceiling of 50,000ft and a range of (with only internal fuel) 2,400 kilometers 1,490 MI/1,295 NMI. That acceleration can deceive you, if you don't watch your artificial horizon, as with a quick glance at the Vertical speed indicator it will surprise you, for when you think you are flying nice and level as but the Hawk is still actually climbing easily upwards, so you will need to be aware of the aircraft's tendency to keep on lifting even when you want level flight and the required need adjust to that flight pitch angle and thrust requirement. There are no helpers in here to fly the aircraft for you, so this is all stick and rudder flying. To make it a bit more easy than relaxing then adjust the trim... ... the main tailplane trim is hidden under a safety cover rear left console (arrowed) and it is tricky to use as it is electric, but to be honest I have struggled with all JustFlight trims as the Arrow lll was a nightmare to trim easily. The far back position makes it hard to use as well visually (Any keyboard/joystick trim ideas are even worse), but if you do finally get the vertical trim set then the Hawk feel nicely balanced and requires only slight adjustments to it's flight path, but still watch those wide vertical speed swings with any adjustment of thrust (certainly more power). This is an aircraft to fly in the focus and fine movements as than the chucking it all around the sky, although it is a lovely almost aerobatic machine. If you want to fulfill your Airshow fantasies then this is the best aircraft into doing so... Approaching EGOV (RAF - Valley) RWY 14, you keep the Hawk at 170 knts and 200 ft off the deck, and don't forget to wave as you flypast, then just power up and climb away at 2000fpm, yes it is all as good as you thought it would be! Getting the speed down can be tricky though. You do have a two-stage airbrake far rear under the fuselage, but remember if the wheels are down, it doesn't activate? So any serious rub off of speed has to be done before you extend the gear. The aircraft systems included here are very comprehensive. Most of the major systems are covered including... Fuel system, Electrical systems, Central Warning systems (CWS), Hydraulic systems, Flight Control systems, Communications Control System (CCS), Air-Conditioning systems and Oxygen systems, Engine systems (Including the comprehensive start up system) and all systems have built in failures, and in most cases more than one system can fail at a single time. Full details of each system are well detailed in the manual. Lighting Internal cockpit lighting is excellent, as three knobs adjust the main panel and the two side consoles front and rear... ... there is "Emergy" panel dim switch, but in reality you adjust the panel lighting down anyway from the very bright full panel setting. Note the great night glass canopy reflections and to also note the reflections on the instruments and glass cannot be switched off, which may annoy a few fliers. External has both (the same) taxi and landing light in the nose, that X-Plane wise is highly visible, navigation lights and selectable Anti-Collision red or white strobes. The white flashing strobes at night are highly visible in the cockpit, but realistic. Landing Time to land... fighter jets can be tricky to land, as they are built for the extremes of speed and manoeuvrability and not the basic areas of flying. 150 knts is a nice approach speed clean, but once the flaps are down full and the gear is extended then your goal is 130 knts, but be aware of the fall in performance below the 130 knt zone as it is severe... .... I have found several times at this point in the approach the aircraft will start to behave oddly, of which I call the "Wobbles", power percentage is critical in staying out of the zone, because if the aircraft starts doing the "wobble" then in over correcting, you can lose it... more power or stopping the stall doesn't really fix it either, but helps, so the best way to get out of it is just to abandon the landing, go around and get it better and cleaner in the next approach and not in trying to fight it. It is groove thing in that when you get the aircraft into that fine groove of approach and then controlling the speed, then it can all come clean... power off to around 110knts and let the Hawk sink down, but be aware that the final stall speed is around 106 knts which is very close to the 110 knts required. Flare and touchdown has to be smooth as the gear is very supple, get it wrong or hit the tarmac to quickly or too hard and the T1 will bounce, so there is a fair bit of skill required to land the Hawk smoothly and professionally, but then again this aircraft is not for the average flier. Liveries There is a bonanza of liveries available. Twelve are provided with the aircraft package, and another twelve are available as a separate livery pack. Focus is totally on the RAF and RAF Valley, with a few international airforce users, but no Australian livery version, which is an odd one? Blank is default... The free Christophe Red Arrows "Flag" is noted here (below right) as it is a great livery. _________________________________________________ Livery pack has some excellent RAF celebration and production factory designs... Summary X-Plane has had some very good fighters or military aircraft of this category, the best is the AMX jet, FA-18F Super Hornet, X-Trident Panavia Tornado and MiG-29. But all fall short mostly now, as in most cases they are still all X-Plane10 (or with minor X-Plane11 modifications) aircraft and in reality all are very dated, only the GR4 Tornado is really what you would call modern... also they are all not in this price range or quality class, so that leaves this Hawk T.1 all in a category on it's own. The price in the mid-40's of US Dollars is to be considered in this summary. Again no fighter has cost this much, so you are expecting a high level of quality and a load of features. Yes you get both, as the quality here is exceptional and there is a realism with the cockpit from the external and internal views that is certainly a new level of real world reflection and hence the exceptional glass. So the aircraft in design is certainly top notch, and so does the custom sounds live up to their high expectations as well, the start up engine noises are simply the best yet for a small jet engine. Features are very good as well, with the expected static elements, quick engine starts, aircraft stands, opening canopy and equipment bay and yes the animated pilots are also highly lifelike and can be inserted or not, and you can also have their visors up or down, shame you can't have one in the other seat while you are flying in the front or the rear. Also the menus are good, and better than the earlier JustFlight/Thranda menus, but are not movable or scalable. The version change from T1 to the T1a is a bit of an odd one, where as the T1 is the trainer, the T1a is the armed version, the menu option just adds on a small tail extension? So there are a few quirks with the aircraft, but all are rather minor. Aircraft dynamics are excellent, but require skill and focus, but that is what you need when flying a fast small jet, and it is all physical manual flying as well... the aim here is to out fly yourself, and fly the aircraft to the best of your ability to do so, then the rewards will come. It would have been or even will become even more interesting when the aircraft acquires the X-Plane 11.30 new particle effects, as that was one feature that really kept on coming back to me as I reviewed the aircraft.. I hope we don't have to wait too soon for an 11.30 update for the Hawk as those dynamics would be excellent here. The development process for this Hawk was quite long, but the results have been well worth the wait, and the aircraft is certainly more highly refined for that wait, and overall JustFlight/Thranda are bringing a very much more highly refined and detailed aircraft to X-Plane, yes they cost more, but to have this level of quality and design, then that is also required in the new higher level of simulation that is now available to X-Plane, and it is a level we only dreamed of a few years ago, and more so. So to that person who stood looking at an aircraft and wonders what is it REALLY like to sit in that display aircraft at an airshow, and to actually fly it... well now and here with this excellent JustFlight/Thranda Hawk Trainer you now finally have that answer... Highly Recommended. _____________________________________________________________________________________ The BAe Systems Hawk T1/A Trainer by JustFlight - Thranda Design is a new release for X-Plane11 and NOW available here at the X-Plane.OrgStore BAe Systems Hawk T1/A Trainer Price is US$44.95 Hawk T1/A Advanced Trainer Livery Pack is also available... Price is US$14.99 This aircraft is a noted aircraft for X-Plane11 only. The aircraft is directly available from JustFlight as well. Features Model Accurately modelled Hawk T1 and T1A, built using real-world aircraft plans Numerous animations including a storage hatch, ram air turbine (RAT), canopy and crew ladder Ground equipment including chocks, access steps and engine intake covers 4096 x 4096 textures are used to produce the highest possible texture clarity PBR (Physically Based Rendering) materials with real-time environment reflections for superb quality and realism Detailed normal mapping for down-to-the-rivet precision of aircraft features Cockpit A truly 3D virtual cockpit right down to accurately modelled ejector seats and screw heads - every instrument is constructed fully in 3D with smooth animations Cockpit textures feature wear and tear based on reference photos taken in the real aircraft to produce an authentic environment Interactive checklists for every stage of flight Aircraft configuration system that will allow you to choose between 'cold & dark' or 'ready for take-off' (if aircraft is stationary on the ground) Fully functional and comprehensive IFR-capable avionics fit, including AN/ARC 164 UHF radio, plus a retrofitted modern AN/ARC-232 UHF/VHF unit and TACAN/ILS radio units Authentic head-up display (HUD) Interactive logbook panel for logging your flight details (X-Plane native) GoodWay compatible Adjustable canopy mirrors with real-time reflections of the environment Animated toe brakes Radio knob animations routed through plug-in logic, for optimum movement fidelity and sound synchronisation Aircraft systems Custom-coded electrical system with AC and DC resets and loads Realistic landing gear with slow/fast tyre rotation animation (blurry when rotating fast), precise shock absorber animation and wheel chocks Custom-coded hydraulic systems, including functioning RAT Realistic lighting system with rheostat controls Custom external light logic with custom strobe light pattern and custom light halos for added realism Capable of loading and firing X-Plane's default weapons. The currently selected loadout is automatically saved for the next flight. Requirements: X-Plane 11 CPU: Intel Core i5 6600K at 3.5GHz or faster 8GB RAM or more DirectX 12-capable graphics card from nVidia, AMD or Intel with at least 4GB VRAM (GeForce GTX 1070 or better or similar from AMD) Windows 10 / 7 / Vista / XP, MAC OS 10.10 (or higher) or Linux 2GB hard drive space _____________________________________________________________________________________ Installation: Download for the BAe Systems Hawk T1/A Trainer is 629.40mb and the unzipped file is deposited in the "General Aviation" X-Plane folder at 1.12gb (including all 24 liveries) Key authorisation and a restart is required. Documents: Highly detailed manual covers installation and all instrument notes, systems details, panel and menu guides and a basic tutorial flight. Hawk X-Plane manual (93 pages) ____________________________________________________________________________________ Review by Stephen Dutton 29th September 2018 Copyright©2018: X-PlaneReviews (Disclaimer. All images and text in this review are the work and property of X-PlaneReviews, no sharing or copy of the content is allowed without consent from the author as per copyright conditions) Review System Specifications: Computer System: Windows - Intel Core i7 6700K CPU 4.00GHz / 64bit - 16 Gb single 1067 Mhz DDR4 2133 - ASUS GeForce GTX 1080 8Gb - Samsung Evo 512gb SSD Software: - Windows 10 - X-Plane 11.25 Addons: Saitek x56 Rhino Pro system Joystick and Throttle : Sound - Bose Soundlink Mini Environment Engine by xEnviro v1.07 US$69.90 : XPRealistic Pro v1.0.9 effects US$19.95 Scenery or Aircraft- EGOV - RAF Valley for X-Plane 11 1.0.0 by RCMarple (X-Plane.Org) - Free!
-
News! - Released : Hawk T1/A Advanced Trainer by JustFlight/Thranda The sensational Hawk T1/A Advanced Trainer was announced by JustFlight/Thranda Design back in February earlier this year. And usually with such announcements then the release usually follows with a month or so? So the gestation period for the Advanced Trainer has been unusually long... The feature list (below) and the detailing quality is huge... Noted release comments: "The Hawk T1 has been modelled to an exceptional level of detail, featuring PBR materials with real-time environment reflections for superb quality and realism, 4096 x 4096 textures for the highest possible texture clarity, a variety of paint schemes (including the RAF and Red Arrows) and numerous animations. The aircraft features realistic payloads (including guided missiles, rockets, bombs, 30mm ADEN cannon gun pod, external fuel tanks, reconnaissance pod and Red Arrows diesel/dye smoke pod). Both the front and rear pilot positions are included, and the aircraft features a truly 3D virtual cockpit with smoothly animated 3D instruments and fully functioning custom-coded systems and avionics." Model Accurately modelled Hawk T1 and T1A, built using real-world aircraft plans Numerous animations including a storage hatch, ram air turbine (RAT), canopy and crew ladder Ground equipment including chocks, access steps and engine intake covers 4096 x 4096 textures are used to produce the highest possible texture clarity PBR (Physically Based Rendering) materials with real-time environment reflections for superb quality and realism Detailed normal mapping for down-to-the-rivet precision of aircraft features Cockpit A truly 3D virtual cockpit right down to accurately modelled ejector seats and screw heads - every instrument is constructed fully in 3D with smooth animations Cockpit textures feature wear and tear based on reference photos taken in the real aircraft to produce an authentic environment Interactive checklists for every stage of flight Aircraft configuration system that will allow you to choose between 'cold & dark' or 'ready for take-off' (if aircraft is stationary on the ground) Fully functional and comprehensive IFR-capable avionics fit, including AN/ARC 164 UHF radio, plus a retrofitted modern AN/ARC-232 UHF/VHF unit and TACAN/ILS radio units Authentic head-up display (HUD) Interactive logbook panel for logging your flight details (X-Plane native) Flight computer panel with useful information such as fuel burn, endurance, speed and wind speed/direction GoodWay compatible Adjustable canopy mirrors with real-time reflections of the environment Animated toe brakes Radio knob animations routed through plug-in logic, for optimum movement fidelity and sound synchronisation Aircraft systems Custom-coded electrical system with AC and DC resets and loads Realistic landing gear with slow/fast tyre rotation animation (blurry when rotating fast), precise shock absorber animation and wheel chocks Custom-coded hydraulic systems, including functioning RAT Realistic lighting system with rheostat controls Custom external light logic with custom strobe light pattern and custom light halos for added realism Capable of loading and firing X-Plane's default weapons. The currently selected loadout is automatically saved for the next flight. Liveries The Hawk T1 is supplied in the following twelve paint schemes: Hawk T1 Royal Air Force Early trainer livery, XX241 Hawk T1 Empire Test Pilots School livery, XX341 Hawk T1 Royal Air Force Valley, Central Flying Squadron, XX176 Hawk T1 Royal Air Force Camouflage scheme, XX353 Hawk T1 Royal Air Force 4 FTS, Welsh Dragon livery, XX172 Hawk T1 Royal Air Force 19 Squadron, RAF Leeming – XX329 Hawk T1 Royal Air Force Red Arrows 2011 livery XX260 Hawk T1A Royal Air Force 100 Squadron, Black livery, XX331 Hawk Mk 51 Finnish Air Force, HW-346 Hawk Mk 53 Indonesian Air Force, LL-5320 Hawk Mk 63 Royal Saudi Air Force, 79034 Hawk Mk 63 Swiss Air Force, U-1252T1 Other features Realistic and accurate flight dynamics based on real-world performance and handling data, and input from Hawk pilots Authentic sound set, generated using X-Plane's state-of-the-art FMOD sound system Custom sounds for switches, canopy, warnings and more, featuring accurate location placement of sounds in the stereo spectrum, 3D audio effects, atmospheric effects, adaptive Doppler, exterior sounds spill in when canopy is opened, different sound characteristics depending on viewing angle etc. Comprehensive manual with panel guide and performance data PSD Paint Kit included so you can create your own paint schemes Dedicated pop-up window for sound mixing, allowing for individual adjustment of the volume of exterior sounds, in-cockpit sounds and various effects System Requirements: X-Plane 11 CPU: Intel Core i5 6600K at 3.5GHz or faster 8GB RAM or more DirectX 12-capable graphics card from nVidia, AMD or Intel with at least 4GB VRAM (GeForce GTX 1070 or better or similar from AMD) Windows 10 / 7 / Vista / XP, MAC OS 10.10 (or higher) or Linux 2GB hard drive space Price is noted as ... £29.99 / €37.95 / $44.99 Now Available Just Flight Full X-PlaneReviews review to follow! ________________________________________ Product details and images are courtesy of JustFlight News by Stephen Dutton 25th September 2018 Copyright©2018: X-Plane Reviews Disclaimer. All images and text in this review are the work and property of X-PlaneReviews, no sharing or copy of the content is allowed without consent from the author as per copyright conditions)