Jump to content
  • Search By Tags

    Type tags separated by commas.
  • Search By Author

Content Type

Forums

  • Airplane Reviews
    • Airliners Reviews
    • General Aviation Aircraft Reviews
    • Classic Aircraft Reviews
    • Freeware Aircraft Reviews and Developments
    • Military Aircraft Reviews
  • Helicopter Reviews
    • Helicopter Reviews
  • Scenery Reviews
    • Payware Airports and Scenery Reviews
    • Freeware Airport and Scenery Reviews
  • Designers News
    • News! The latest developments in X-Plane
    • Interviews
    • Aircraft and Scenery Releases and Developer Annoucements
  • Plugin and Simulator addons
    • X-Plane Plugins and Simulator Addons
  • Laminar Research
    • X-Plane Version and Beta Releases
    • X-Plane12
    • X-Plane11
  • Comments and Announcements
    • Comments and Announcements
    • Behind The Screen
  • Images
    • Images

Categories

There are no results to display.

Find results in

Find results that contain...

Date Created

  • Start

    End

Last Updated

  • Start

    End


Filter by number of...

Found 10 results

  1. Aircraft Review : Sopwith F.1 Camel by NHAdrian Your in Clairmarais in the Pas-de-Calais region of northern France in 1917, a step and throw from the WW1 battlefield of Ypres Salient on the Western Front. The position is temporary with basic hangars, wooden and canvas structures, and basic support facilities, reflecting its status as a rapidly deployed wartime installation. This is the replica scenario created by NH-Adrian to highlight his next release for the X-Plane Simulator, a very famous aircraft in the Sopworth F.1 Camel The Sopwith Camel is a British First World War single-seat biplane fighter aircraft that was introduced on the Western Front in 1917. It was developed by the Sopwith Aviation Company as a successor to the Sopwith Pup and became one of the best-known fighter aircraft of the Great War. Pilots flying Camels were credited with downing 1,294 enemy aircraft, more than any other Allied fighter of the conflict. Towards the end of the war, Camels lost their edge as fighters, and were then later used as a ground-attack aircraft to great effect. The name "Camel" wasn't official, but rather a nickname given by pilots due to the distinctive hump over the machine guns, which housed the breech mechanisms. This hump, along with the forward placement of the engine, fuel tank, and pilot, concentrated most of the aircraft's weight towards the front. This design characteristic gave the Camel exceptional maneuverability, particularly in righthand turns, which it could execute much tighter than its adversaries. The Clairmarais Aerodrome, is a fictional WWI X-Plane 12 scenery based on historical archives. This scenery as a historical exhibition for the public, and to create the replica environment of the WW1 period, and to highlight the Sopworth in it's own natural setting, the scenery is available here; Clairmarais Aerodrome - WWI historical airport for free. The WW1 scenery alone is very impressive, and totally recreates the wartime era. The setting has replica models of more Sopworth F.1 aircraft, so well done it is very hard to pick out the actual flying version (it is the one with the pilot). Located just a few kilometers west of Saint-Omer and within striking distance of the Ypres Salient, Clairmarais was ideally positioned to support offensive and defensive operations on the Western Front. It served as a hub for squadrons of the Royal Flying Corps (RFC) and, after its formation in April 1918, the Royal Air Force (RAF). Throughout its active years, Clairmarais hosted several prominent RFC and RAF squadrons, including No. 1 Squadron, No. 29 Squadron, No. 54 Squadron, and No. 65 Squadron, among others. These units flew a variety of aircraft such as the Nieuport 17, Sopwith Camel, SE5a, and Airco DH.2. Their missions ranged from reconnaissance and artillery spotting to offensive patrols and dogfighting with German aircraft. The aerodrome played a critical role in maintaining air superiority and gathering battlefield intelligence. You may have noticed in the Clairmarais scenery modern vehicles and people walking around in modern clothes? The scenery is a clever idea to do a recreation of the original airfield as a "Historical Exhibition" of the WW1 1917 period as an open day... brilliant. One of the most famous pilots to operate from Clairmarais was Canadian ace Captain William Avery "Billy" Bishop of No. 60 Squadron. Bishop launched several of hislegendary solo patrols from Clairmarais during 1917, including a daring dawn raid on a German airfield that reportedly earned him the Victoria Cross. His actions, often conducted from primitive airstrips like Clairmarais, highlighted both the personal valor and tactical importance of air combat in the war. Due to its operational significance, Clairmarais was occasionally targeted by German bombing raids and artillery. Nonetheless, it remained a key node in the RFC/RAF network until the end of the war in November 1918. As front lines shifted and more advanced airfields that were built further east, Clairmarais gradually saw reduced activity before being decommissioned shortly after the armistice. X-Plane 12 detail is today excellent, and this F.1 Camel is seriously well presented. The F.1 designation used up to 5 engine types across production, as multiple contractors created slight build variations between aircraft, there was also some variations in gun types and placement and the F.1 spawned shipboard, night fighter, and trench (warfare) variants. The Camel was powered by a variety of rotary engines, typically the Clerget 9B or the Bentley BR1, producing around 130-150 horsepower. These rotary engines, where the entire engine block spun with the propeller, provided a good power-to-weight ratio but also contributed to the aircraft's gyroscopic effects, further influencing its handling characteristics... the engine installed here is the Clerget 9B, 9-cylinder rotary, 130 hp (97 kW) @ 1250 RPM. Remarkably engine on the Sopwith Camel rotates as it used a rotary engine, which is different from a radial engine in a key way... with a rotary engine, the entire engine spins around a fixed crankshaft and the crankshaft is mounted to the airframe, and so the cylinders and propeller spin together. This action helped cool the engine, since the movement improved airflow over the cylinders, but also the the spinning mass created a strong gyroscopic effect, significantly influencing the aircraft’s handling. The reconstruction and animation of this Clerget 9B, 9-cylinder rotary is simply sensational by NH-Adrian, a masterpiece of modeling and texturing, other highlights include the 2-blade wooden laminated propeller and the superb aluminum cowling, though in WWI it was often referred to as duralumin or just “light alloy.” There is another clever animation effect here, as you can (via a hopspot on the propeller) Rotate the prop by hand to start the aircraft. This is a true spar and wire aircraft with a wood-and-fabric biplane construction, typical of WWI-era fighters, with some metal fittings and lightweight alloy components. The Structure was built with a wooden framework, primarily ash and spruce, then wrapped in fabric (usually doped linen) that was tightened with aircraft dope (a type of lacquer) to create a taut, aerodynamic surface. The Formers & Stringers was used to give the fuselage its rounded shape. The wings were Spruce spars and ribs again covered with doped linen fabric and the Steel tension wires gave the whole aircraft it's structural strength and adjusted wing alignment. And you have a perfect replica here of the F.1 Camel, with all the aileron, horizontal stabiliser and rudder cable controls are all very well animated. There is no tail wheel, just a basic skid... note the excellent fabric detail. The Sopworth used a "Palmer Cord Aero Tyre" on a fixed undercarriage with a cross-axle between the two main wheels. The “Cord” refers to the internal reinforcement made from woven fabric cords (usually cotton or linen). and these cords were laid in layers at alternating angles and bonded with rubber, providing strength and shape and were much stronger than earlier bias-ply or “woven fabric” tire designs of the day. You can set wheel chocks by a hotspot by the wheels. Now lets get in... first note the lovely wooden cockpit, yes this an original cockpit of Mahogany-Stained Plywood, and it is beautiful here. A lovely (if deadly) detail are bullet holes, in the cockpit and fabric. Situated behind the pilot are the two fuel tanks, The Main tank 26 gallon (98 liter), pressurised to 1.5 – 2.5 psi, and an secondary Aux tank 6 gallon (22.7 liter), gravity feed. Spinning to your right on a rear strut is the wind-driven "Air Pump" that keeps the main fuel system pressurised, to compensate for the fuel level decrease, the airspeed is measured by an early pitot tube on the right outer strut. The cockpit forward is dominated by the twin synchronized 0.303 in (7.7 mm) Vickers machine guns, that fired forward through the propeller. Some Camel aircraft could carry up to four 25 lb (11 kg) Cooper bombs under the fuselage. (but these are not yet simulated in X-Plane) There is a quality non-animated pilot in the cockpit, he is visible if the viewpoint is out of the pilot’s head 50mm radius, and if payload weight is more than 110 lbs (50kg). Your seat is a wicker chair! Well done here... the inside of the cockpit is a lot of wood, brass piping, wire and wooden blocks to put your feet on. The "Joystick" forms into a triangle at the top. The button is NOT the guns firing selection, but the blip switch, as with many other WWI aircraft with rotary engines, it was a simple but vital cockpit control used to momentarily cut engine ignition without shutting down the engine by Interrupted the ignition system by grounding the magneto. So when pressed, it stopped the spark plugs from firing, so the engine temporarily stopped producing power. The two lower claw switches are the gun triggers. Note the bar rudder pedals connected to the rear rudder via cables, sheer simplicity. All the Joystick movements are excellent with all the cables from the controls (Joy/Rudder) moving with your actions. To your left are the Tank selector (Fuel), Throttle quadrant and Mixture Lever. I found I could set both to the Honeycomb Bravo, for a very authentic setup of the controls... note the fuel in the gauge upper right4 To the right is an Engine primer pump, and a lovely bag rammed between the wooden frame, and you can hide the bag by adjusting it's weight. There are two extras here... first is a radio which you select by pressing the right strut, it works in selecting frequencies you can use. Second is the Map on the right side floor, press to use, which opens up behind the Joystick. It is basically the AviTab Map (AviTab plugin required), but simply invaluable in the air for locating your position, without it you can easily get lost quickly. The instrument panel is partly buried between the aircraft's frame... but it is quite comprehensive for the period. Going clockwise is the RPM indicator, Compass, Slip indicator, Airspeed (mph), Main tank fuel system pressure, Main tank pressure release valve. A Clock (local time), Altitude indicator (feet), Altitude adjust knob, Magneto switches and Oil pressure indicator. A nice authentic touch is the manufacturing plate between the guns. So NH-Adrian's Sopwirth Camel is extremely highly detailed and very well animated to be totally authentic to the aircraft and the era... exceptional ______________ Flying the Sopworth F.1 Camel You have to understand that the "Camel" is a very basic aircraft, but that was also it's advantages, and there was a lot of them built in nearly 6,000 aircraft in only the last few years of the First World War. First there is a simple menu on the X-Plane Banner "Sopworth F.1 Camel", and there are two items on here for; "Rudder Assistance" and "Guns Armed". Starting the Sopworth is very easy... Fuel valve selected to the main tank, Mixture is set to rich. Then you have to create the Main fuel system pressure if under 1.5 psi, and this is done by using the handpump right lower, only one pump is actually required to pressurise the system, then the twin Magnetos on (instrument switches lower left) Make sure before you turn the propeller that there are chocks in place! The Sopworth actually has no brakes, so if you start the Clerget 9B with no restraint, the Camel will head off into the field or hedgerow with no assistance or stopping power... Watch the excellent rotation of the rotating engine with the propeller! Extremely well done by NH-Adrian. The engine sounds are also excellent of a early war nine piston engine, LOUD as well... First shock is that you can't see anything? the view forward is almost zero, and dominated by the Vickers guns, so you will need to set a view to the side to see where you are going? Taxiing is not as bad as I thought it would be, yes you can use the "Rudder Assistance" (menu), with at low-speed regimes the augmentation holds direction while in high-speed regimes (over 50mph) and then it acts as a yaw damper and tries to avoid side slipping. This function dampens also precession on the yaw axis as well. But you also don't have a twirly wheel at the rear, just a wooden skid, so the skid's drag keeps you sorta straight and narrow, obviously you can't do tight turns with no brakes... the same effect's work when taking off (unless you have very high winds), as the skid keeps you in a pretty straight line... ... at 40 mph the tail lifts, and now you need to use your rudder to keep the line correct... only 4 mph more (44 mph) and your flying! Being a biplane, you have a HUGE amount of lift, and can climb quite easily at 70 mph, and climb at 900 fpm, a sort of billowing lift from the twin wings which are very representative in feel from most biplanes, so the feel from this NH-Adrian machine feels absolutely spot on and authentic. Yes the Sopworth is extremely nose heavy, but you can use the (X-Plane) trim to quickly balance the aircraft... and you then quickly gather speed, still you can also keep on climbing for only 10 minutes to reach 10.000 feet, to an impressive ceiling of 19,000 ft, or if you pass out before! So the Sopworth is very agile in early combat situations, climbing and dominating the altitude very quickly (for the period). Maximum speed is 117 mph (102 kts). The Sopworth has an exceptional Right-Hand Turn. This is due to the gyroscopic effect of the rotating engine and propeller, combined with the aircraft's weight distribution, the Camel could execute remarkably tight and fast right-hand turns. This was its primary offensive maneuver in dogfights, allowing skilled pilots to quickly get onto the tail of unsuspecting enemy aircraft. The best procedure is in a slight dive and then a tight turn to the right.... so you always favour a right-hand turn However there is the very difficult Left-Hand Turn, so conversely, left-hand turns are significantly wider and less responsive. The same gyroscopic forces that aided right turns now hindered the left ones. So Pilots had to learn to compensate with rudder and aileron inputs, and even then, the turn was comparatively sluggish, get it wrong and the aircraft stalls, badly, even flips wing over wing.... and down you go. But I'm out here for a mission... soon I'm looking around for a victim, scouring the landscape for a KILL! Soon I find one, a Train! "ha HA" I cry... and arm my Vickers guns. You do that via the menu "Guns Armed", as on the side of the guns are two labels "INOP" when not armed, when ready the labels disappear. Note the gunsight that can be covered with a cap (hotspot), or active. You will need to set the X-Plane Command “Fire armed guns" to the firing trigger... then just let loose on your target. Soon I'm bursting fire on the moving train, but missing it completely? so I climb out and set lurking and looking for a new victim. Sopwith Camel serial number B7406 served with No. 4 Squadron of the Australian Flying Corps (AFC) during the First World War. A distinctive feature of some of the squadron's aircraft, including B7406, was the application of white "boomerang" markings on the fuselage. These markings were a unit identifier, reflecting the strong Australian composition of the squadron. The primary pilot associated with Sopwith Camel B7406 was Herbert Gilles Watson. Born in New Zealand but residing in Australia at the outbreak of the war, Watson enlisted in the Australian Army before transferring to the AFC. He became a highly accomplished fighter pilot, ultimately achieving 14 aerial victories. Flying with 4 Squadron AFC, Watson frequently piloted Sopwith Camels adorned with the unit's boomerang insignia. Notably, on 19 April 1918, while flying B7406, Watson was also credited with driving down an Albatros D.V enemy aircraft east of Loos. This victory contributes to his overall tally and highlights the operational service of this specific aircraft. Notable there is no lighting on the aircraft, no electrics either! and as noted no brakes to stop you? talk about basics... now the really hard part? Landing is tricky, no impossible... Approach is at 60 knts, and the throttle set at idle, that large wing area lift is incredible even at these low speeds. Your aim is for the coming edge of the field as you can achieve, basically you want to touch as soon as you are over the fence. Then reduce the speed to 50 knts with a slight flare, but not too much as the Camel will simply fly again! It is impossible to stop with no brakes? your only option is to slowly pull the stick back to create drag on the upturned vertical stabliser to push the rear down into the ground... but your still moving fast, and any wrong move and you will either.... fly, or tip heavy nose forward and break the propeller. I can't stop, so I try a trick in rudder to the left and try to drag the tail around to slow down, the Sopworth drags a little then heads off into another direction, but the manoeuvre worked and the speed dropped to zero... ... all that is needed now is a taxi back to the parking position. It's hard to do, and will need a lot of practise runs to get it right. But overall a lot of fun, but I would love some or any brakes at all. Liveries There are three liveries provided, the famous (Boomerang) B7408, a Olive Green and a Dark Green. There is also a tool that allows to to change the decals on the aircraft. You can use the DECAL file mask and placement map provided within <Aircraft folder>/Documents. _______________ Summary You really never know what to expect next from NH-Adrian, the past releases have a broad church from Sporty light aircraft, Flying cars, and even NASA Training vehicles... and here we now have an unexpected release of a WW1 vintage if very famous fighter in the Sopworth F.1 Camel. In lots of ways the Sopworth it is a simple aircraft, no lighting, no electrics and even no brakes! But it was a deadly killer, with approximately 1,294 aerial victories during World War I, making it the most successful Allied fighter aircraft in terms of enemy aircraft destroyed. Including the famous "Red Baron" although the kill was disputed. Modeling and period detail is absolutely first rate here, the design and reproduction is absolutely perfect, certainly in the lovely X-Plane 12 environment, there are a couple of modern additions like a Radio and AviTab map, but otherwise it is a pure and recreated design of this 1917 biplane, with great hotspots to start the engine, place chocks, arm guns, working guns and give you an assisted rudder. Sounds are early great war fabulous, with authentic rotary engine period noises. Tricky to fly with that rotating engine, andthe colossal weight set forward, but the dynamics here are highly rewarding with authentic flight dynamics, yes the Sopworth is fun, but deadly at the same time. NH-Adrian has released with the Sopworth F.1 Camel a clever scenery Clairmarais Aerodrome, "Historical Exhibition" of the WW1 1917 period as an open day. This scenery alone is worth the download with the Sopworth Camel. So it's brilliant, a timewarp Simulation to love and use for a fun day away from the usual flight simulation offerings, I simply loved the "Sopworth" enjoyed the history and reveling in the flying... a must have! _______________ Yes! - the Sopwith F.1 Camel by NHAdrian is NOW available from the X-Plane.Org Store here : Sopwith F.1 Camel Price is US$19.95 Requirements X-Plane 12 (not compatible with XP11) Windows. Mac or Linux 8 GB+ VRAM Recommended Download Size: 703MB Current Version : 1.0 (May2nd 2025) Designed by NH-Adrian Support forum for the FPS 175 Documentation There is excellent full coverage documentation and installation details for the Sopworth Camel and Clairmarais Airfield, including; Sopworth Camel Users Manual.pdf Clairmarais Aerodrome_ Manual.pdf _____________________ Review System Specifications:  Windows - 12th Gen IS1700 Core i7 12700K 12 Core 3.60 GHz CPU - 64bit -32 Gb single 1067 Mhz DDR4 2133 - PNY GeForce RTX 3080 10GB XLR8 - Samsung 970 EVO+ 2TB SSD Software: - Windows 11 Pro - X-Plane Version 12.2.0 Beta 4 (tested in 12.1.4) Plugins: JustFlight-Traffic (X-Plane.OrgStore) US$52.99 : Global SFD plugin US$30.00 Scenery or Aircraft - XCM1 - Clairmarais Aerodrome - WWI historical airport (X-Plane.Org) - Free Aircraft Review by Stephen Dutton 3rd May 2025 Copyright©2025: X-Plane Reviews (Disclaimer. All images and text in this review are the work and property of X-PlaneReviews, no sharing or copy of the content is allowed without consent from the author as per copyright conditions) All Rights Reserved
  2. Now Freeware! - NASA LLTV - Lunar Landing Training Module by NHAdrian I loved this escapism to the NASA 60's era. It is a training machine for the NASA Astronaut to practice LEM (Lunar Module) landings on the moon, history shows that the "Flying Bedstead" as it was called, nearly killed the first man on the moon in a training accident. Neil Armstrong survived the accident of course, but this strange vehicle is a big part of the Apollo era history.... try it out for yourself! Here is X-PlaneReviews full release review; Experimental Vehicle Review : LLTV - Lunar Landing Training Vehicle by NHAdrian Project features The project is built for X-Plane 12 Highly detailed geometry based on archive photos and documentation Accurate flight model tuned for XP12 latest features Accurate engine and systems modelling Realistic cockpit layout based on archive imagery Real attitude rocket based control system Special “Lunar landing simulation” flight mode implementation Full FMOD sound package 4K high-definition cockpit textures Custom particle system for rocket engines Full PBR implementation XP12 rain effect implemented Volumetric interior lights VR Ready Note: for users of the original payware and now freeware aircraft; please update to the latest version as there is an "CTD with error messages about no wings". This bug has been rectified in the latest download. The NASA LLTV by NHAdrian is now available for download from the X-Plane.Org here. NASA LLTV - Lunar Landing Training Module Now Free of course, courtesy of the X-Plane.OrgStore Compatibility, requirements X-Plane 12.1+ Windows, Mac (native support) or Linux 4GB VRAM Minimum - 8GB+ VRAM Recommended ______________________ NEWS! by Stephen Dutton 9th January 2025 Copyright©2025: X-Plane Reviews (Disclaimer. All images and text in this review are the work and property of X-PlaneReviews, no sharing or copy of the content is allowed without consent from the author as per copyright conditions)
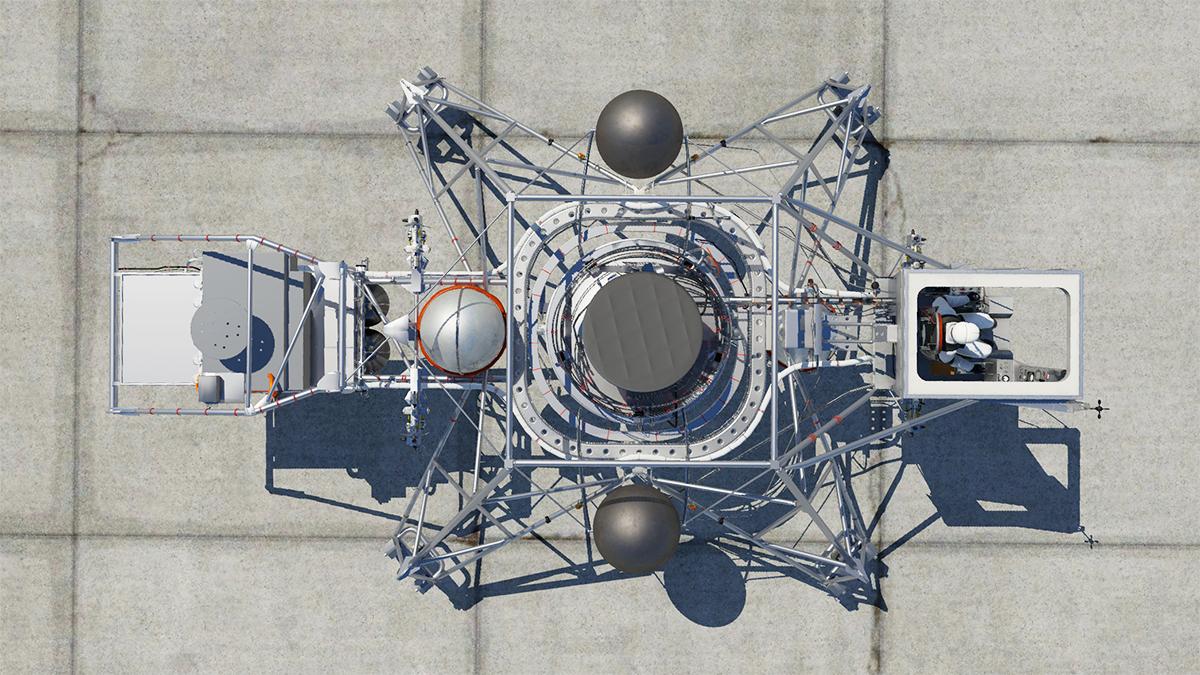
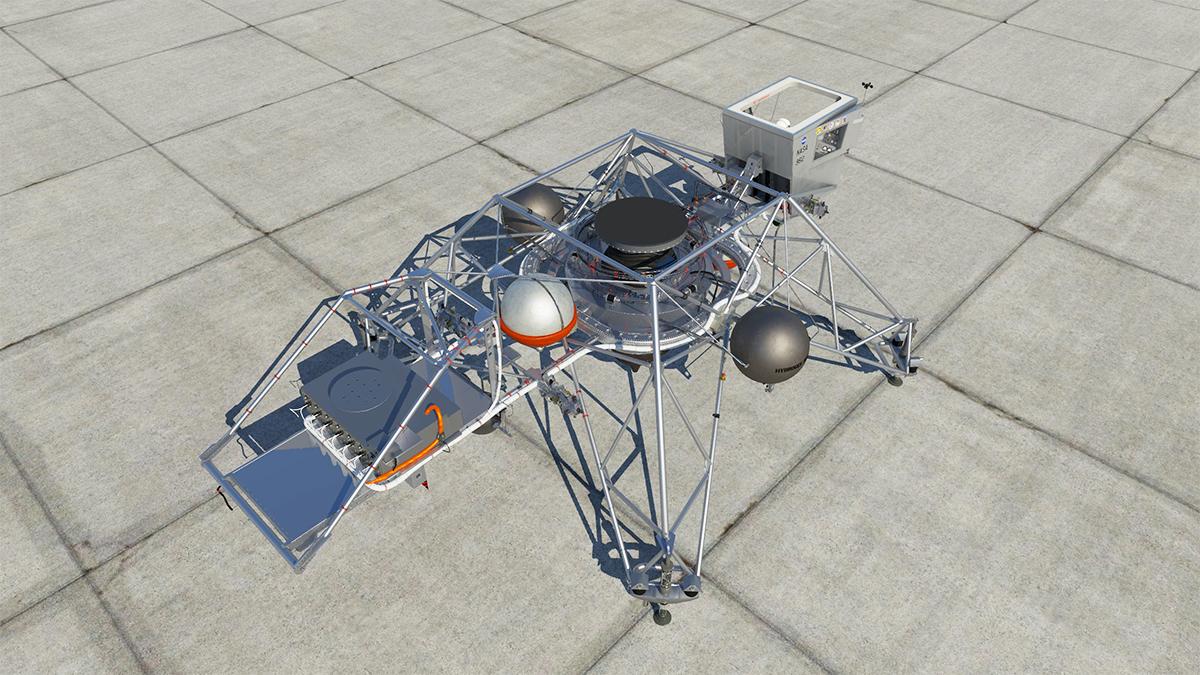
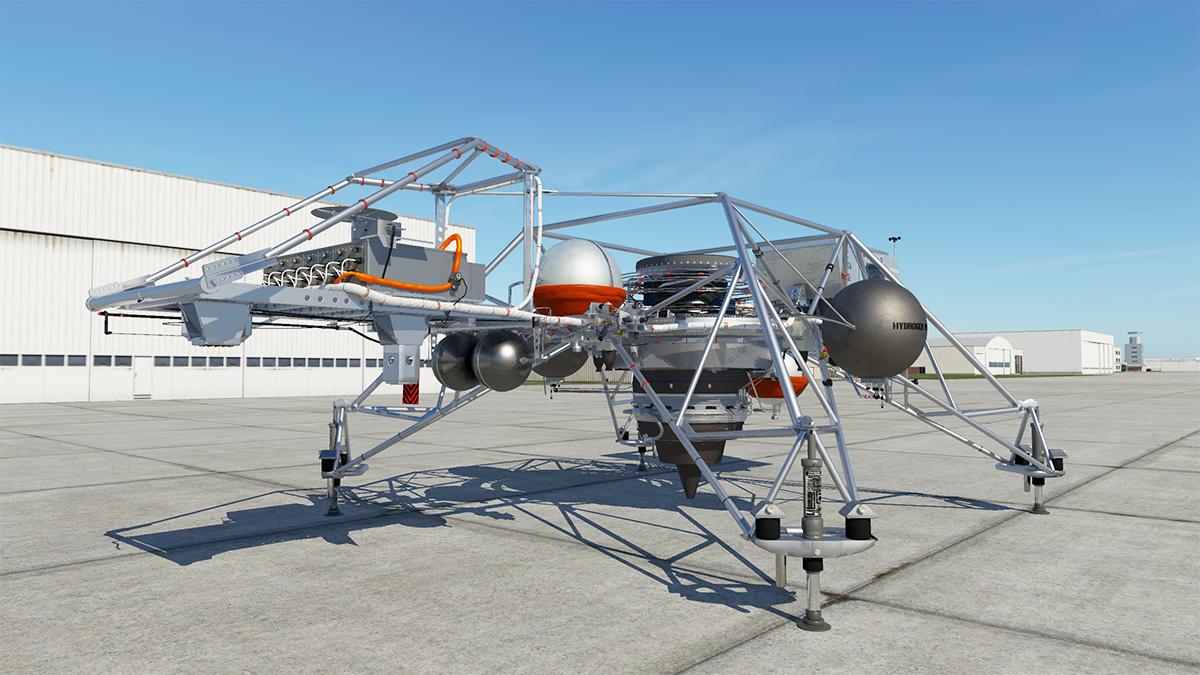
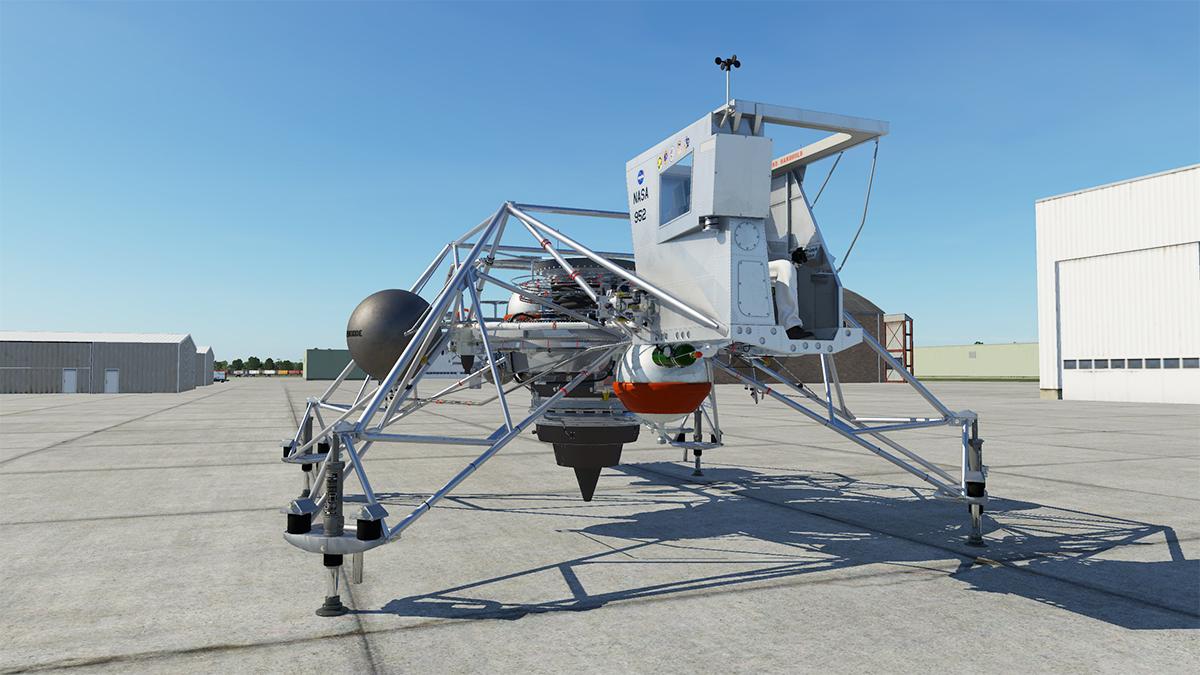
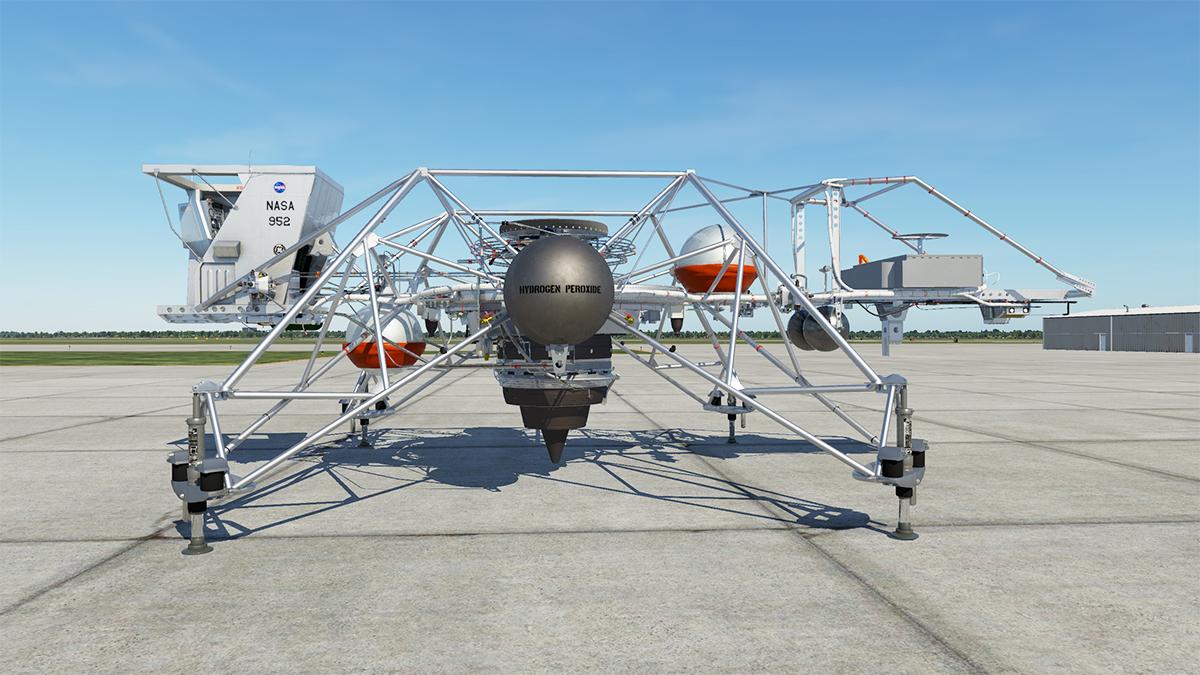
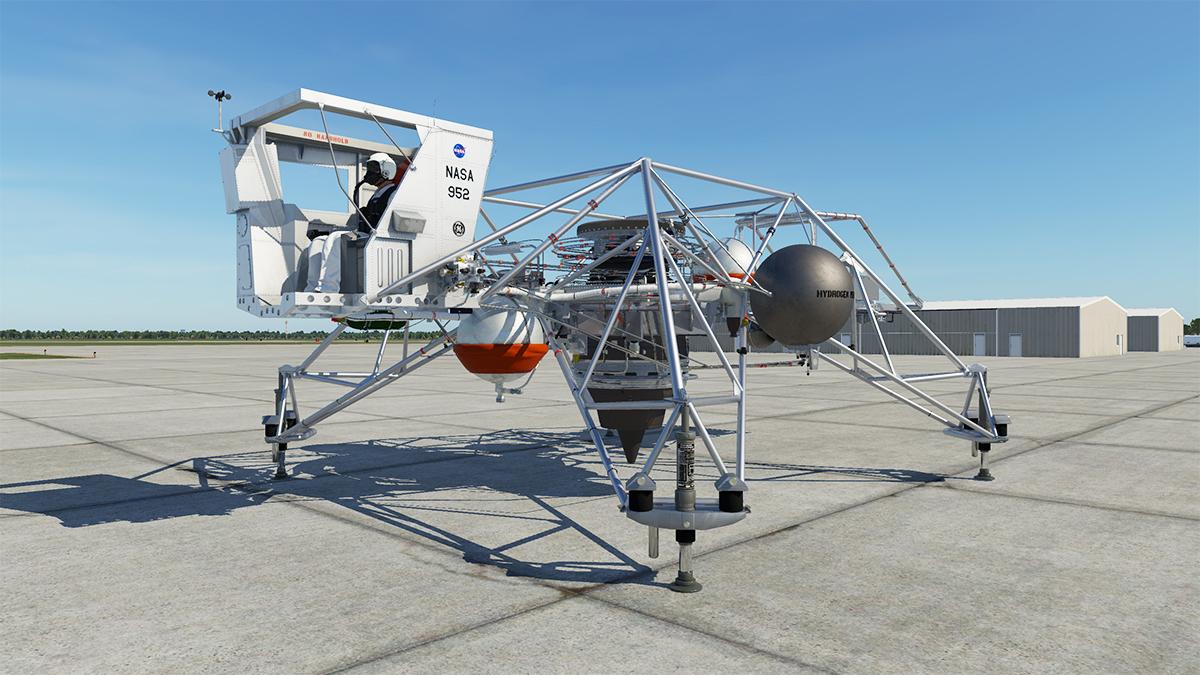
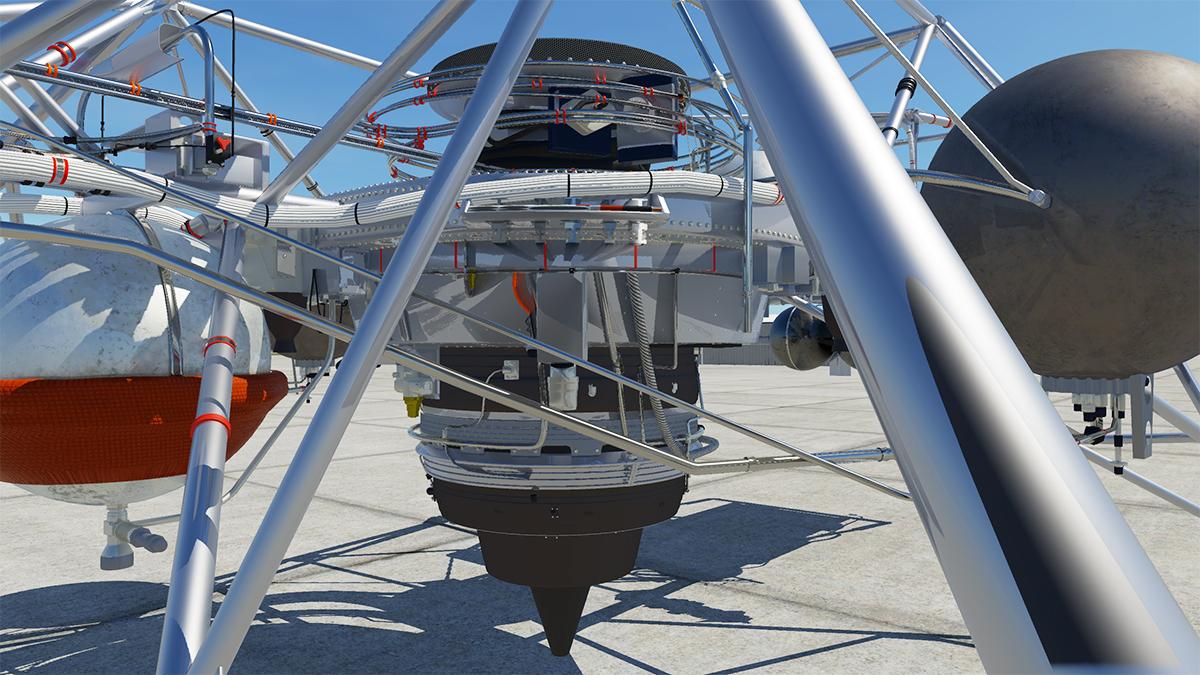
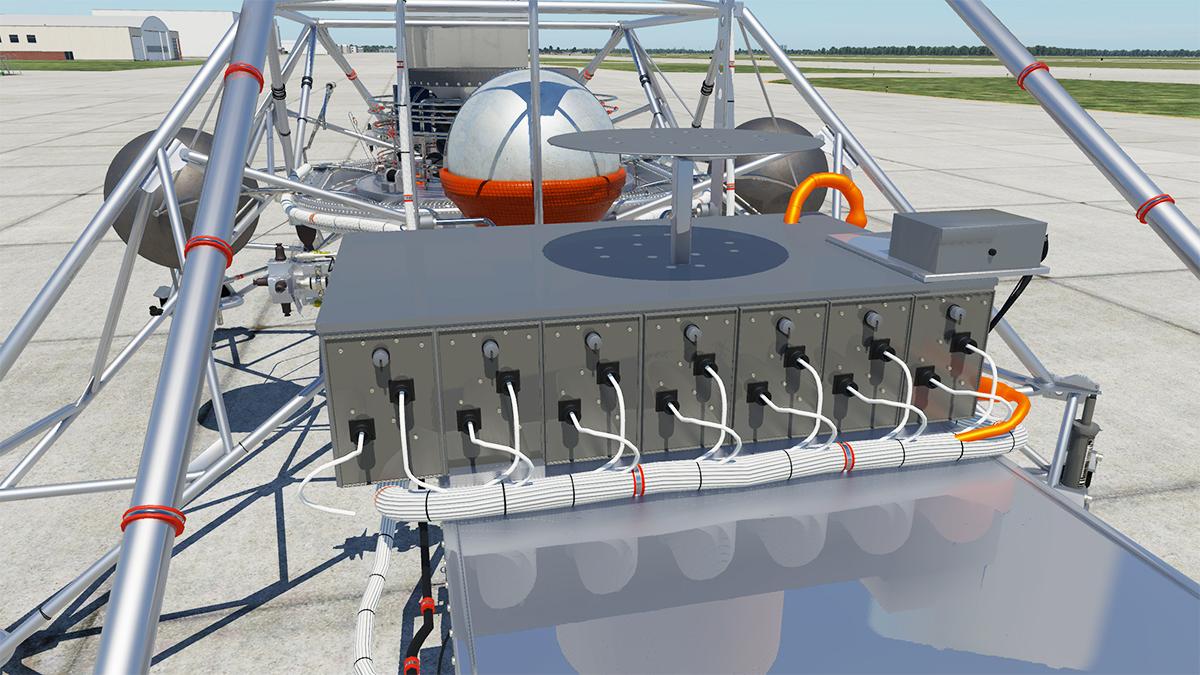
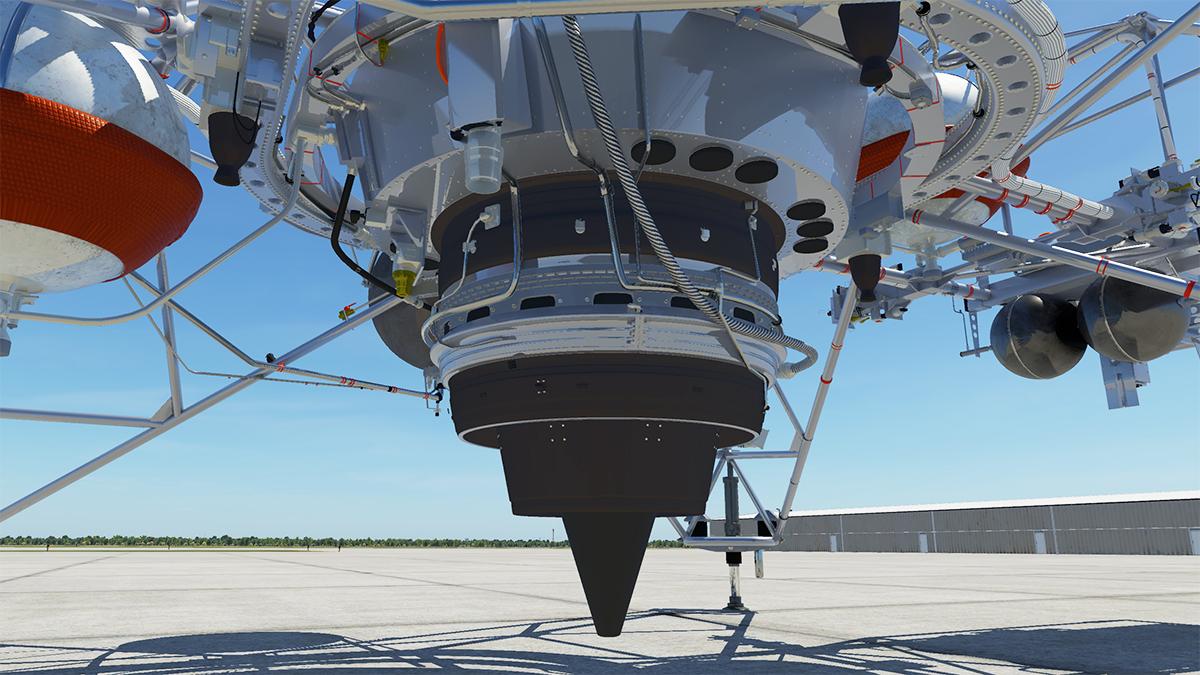
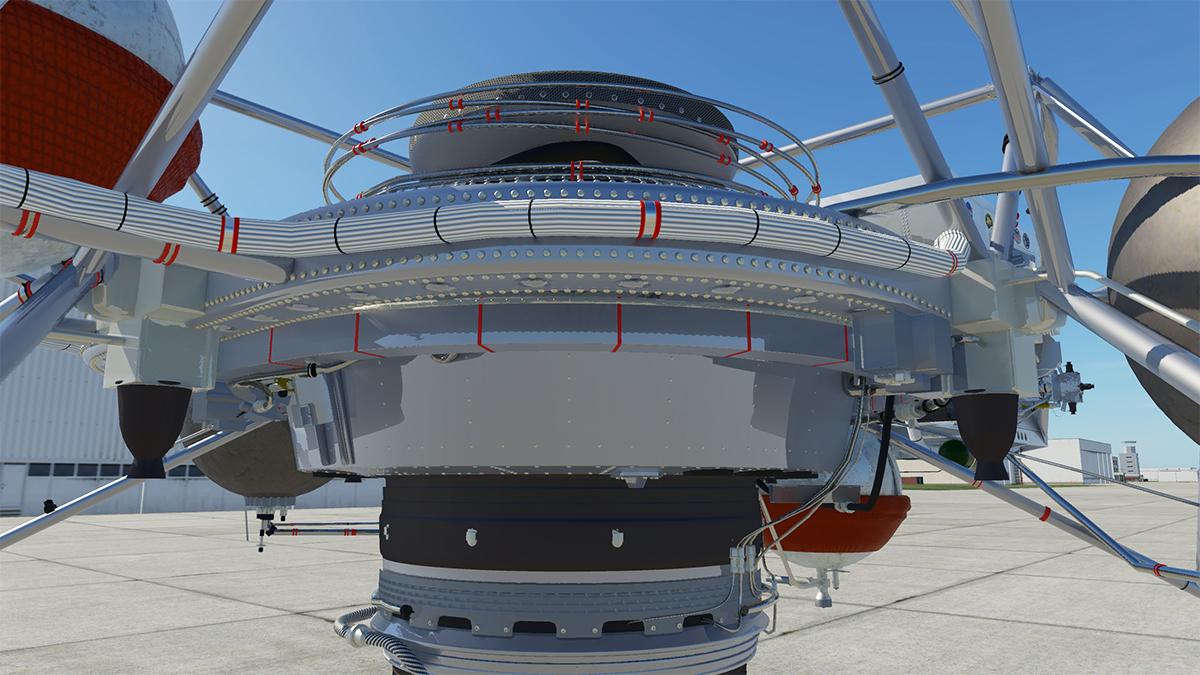
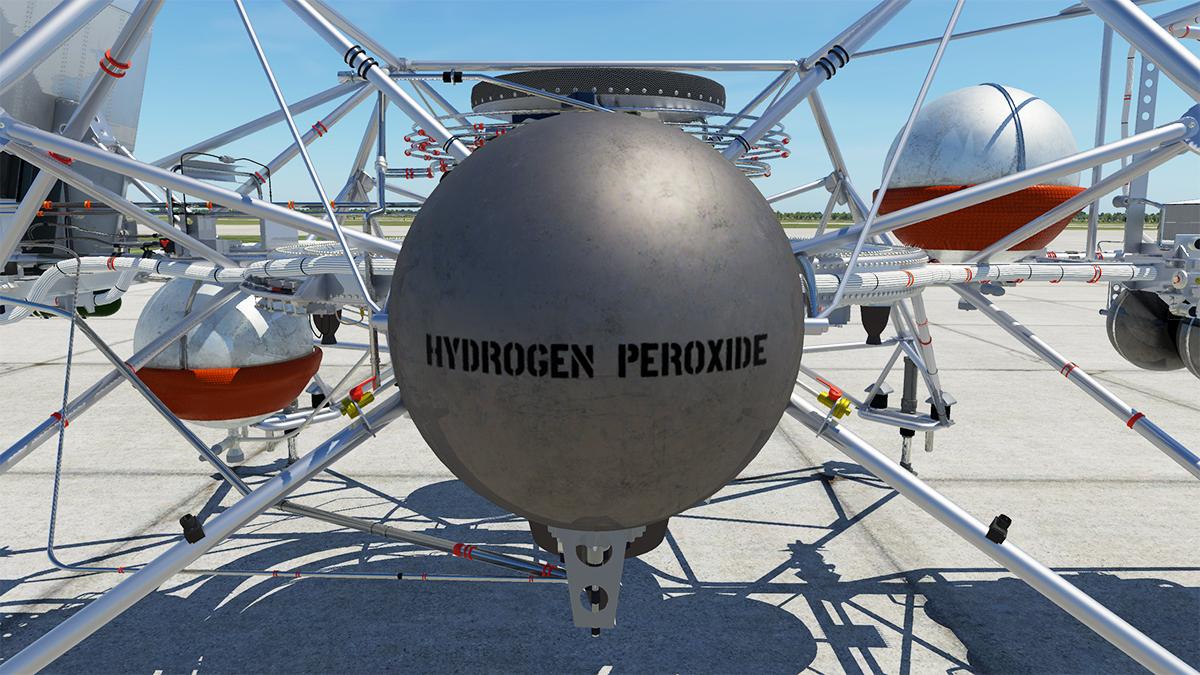
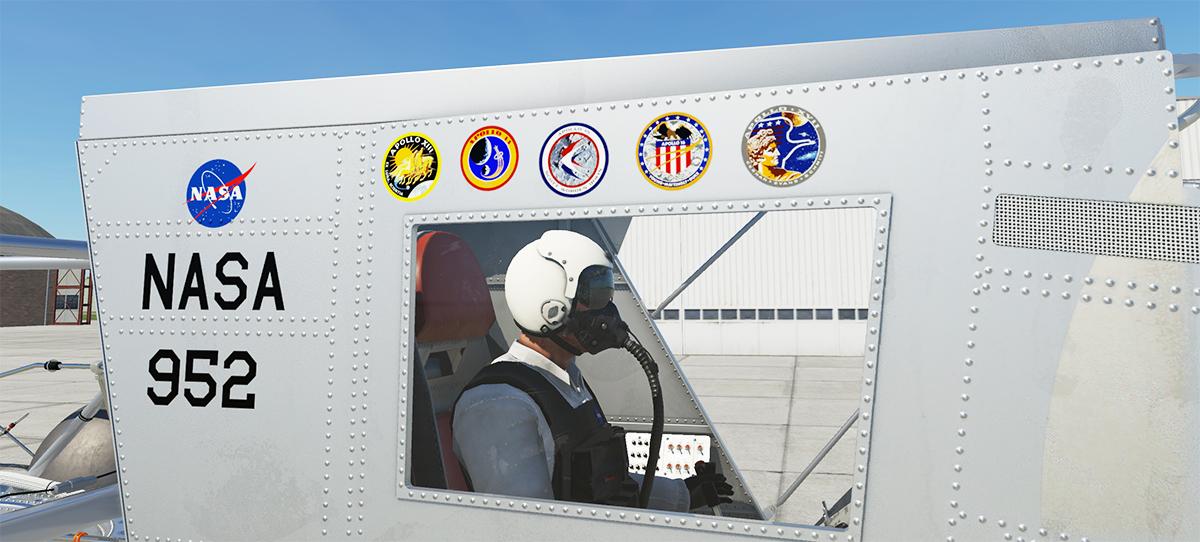
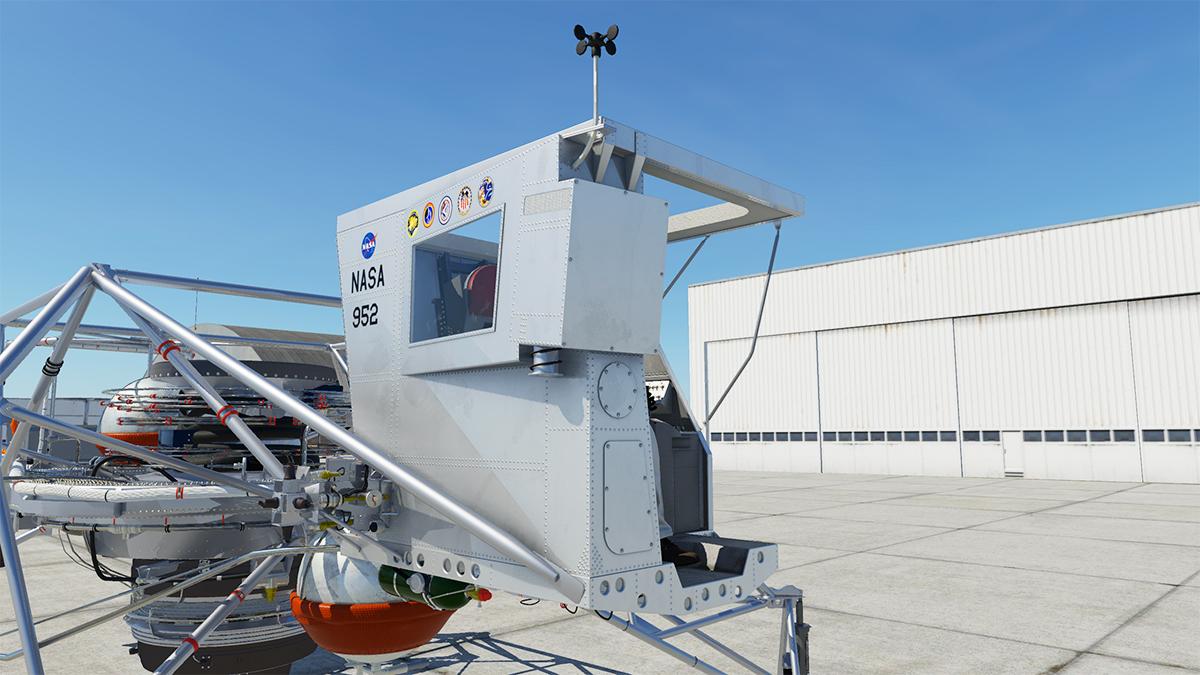
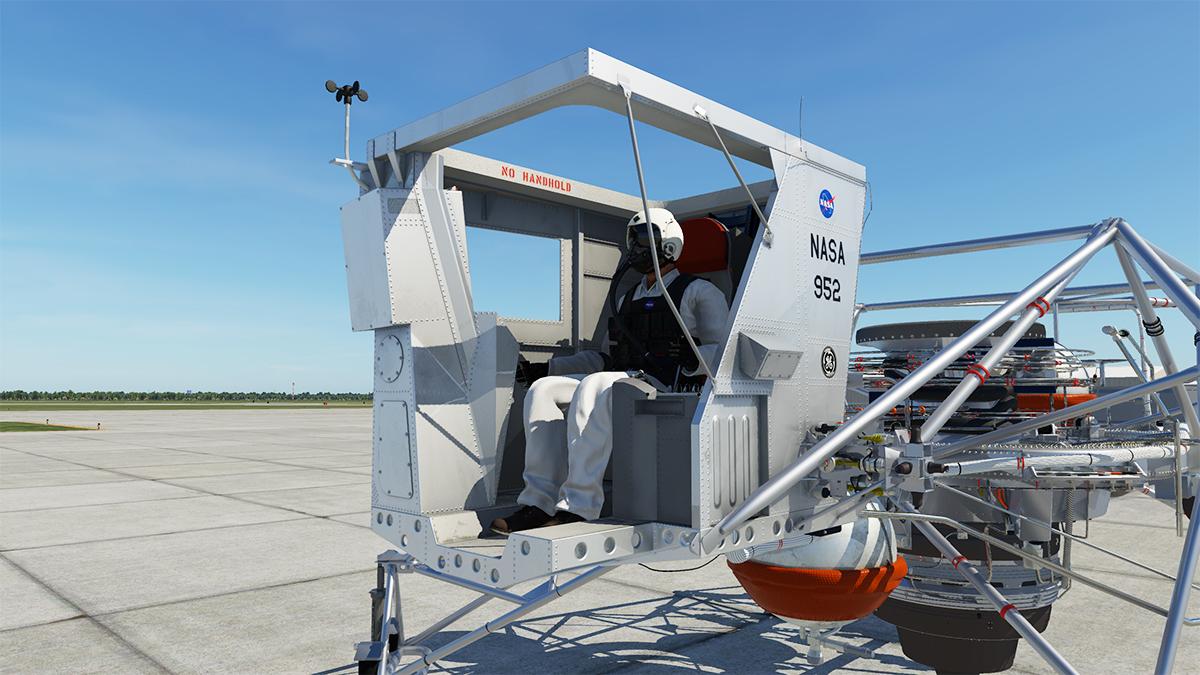
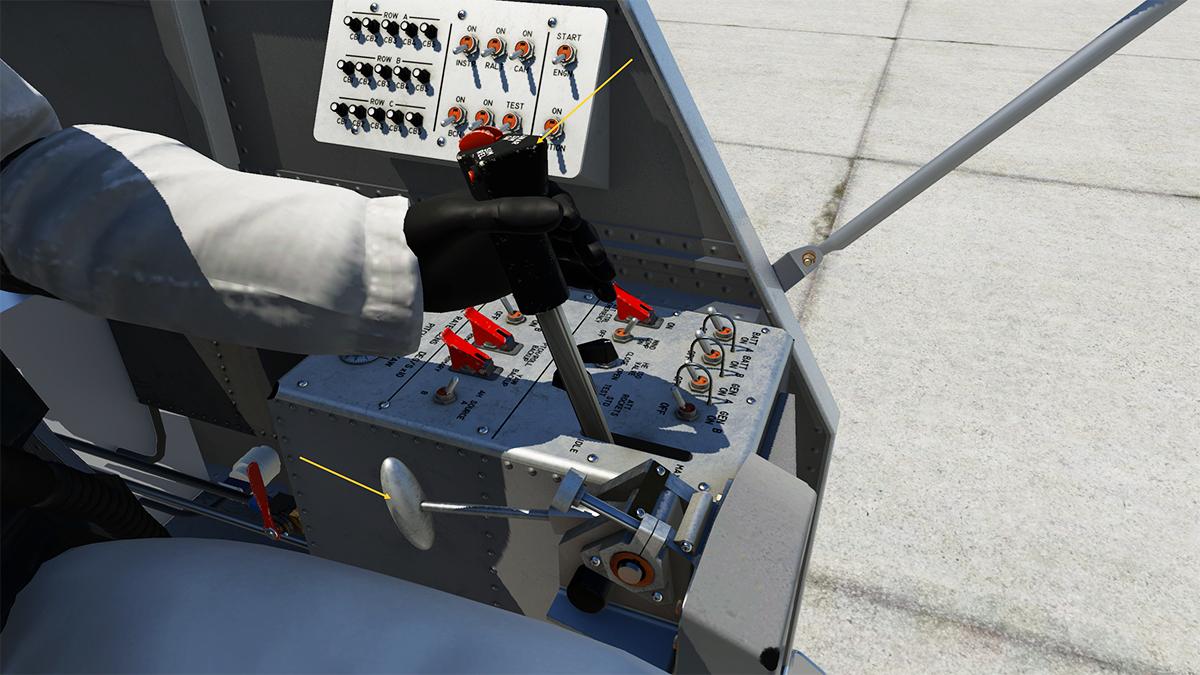
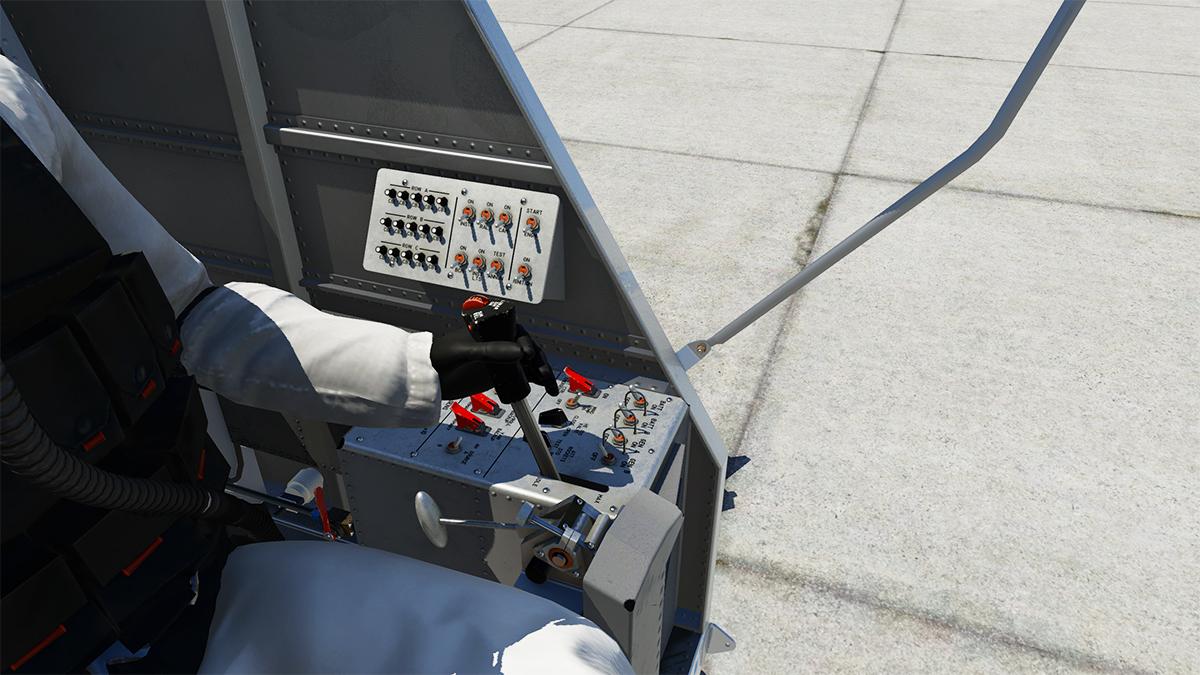
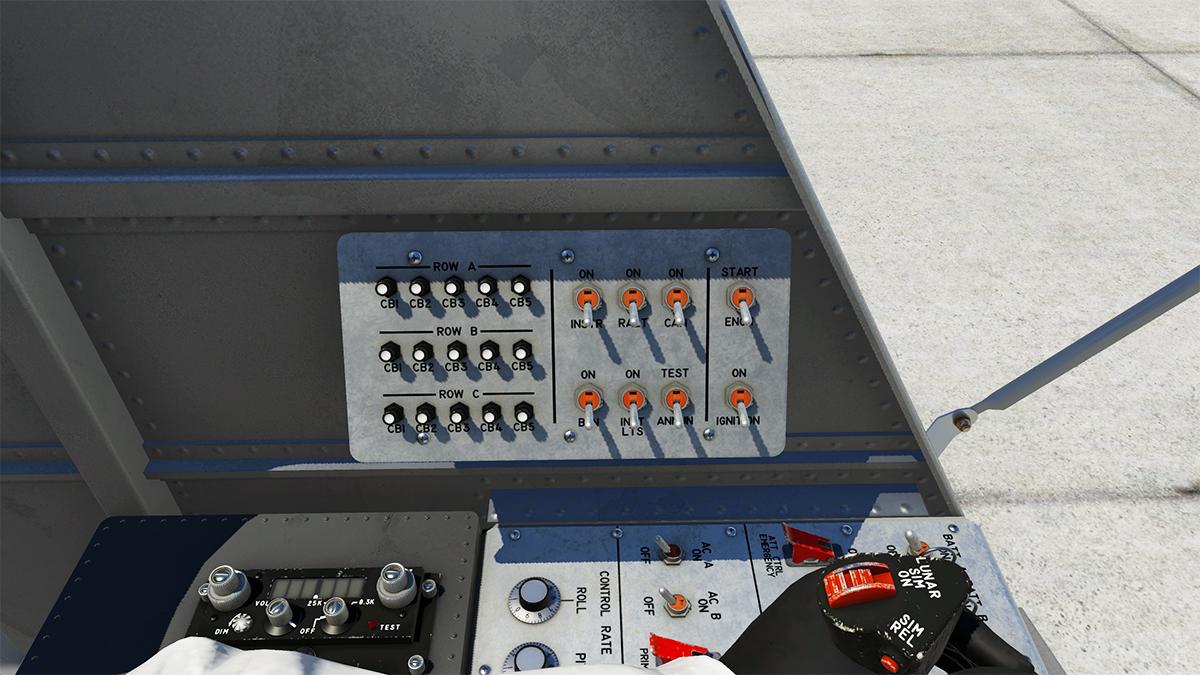
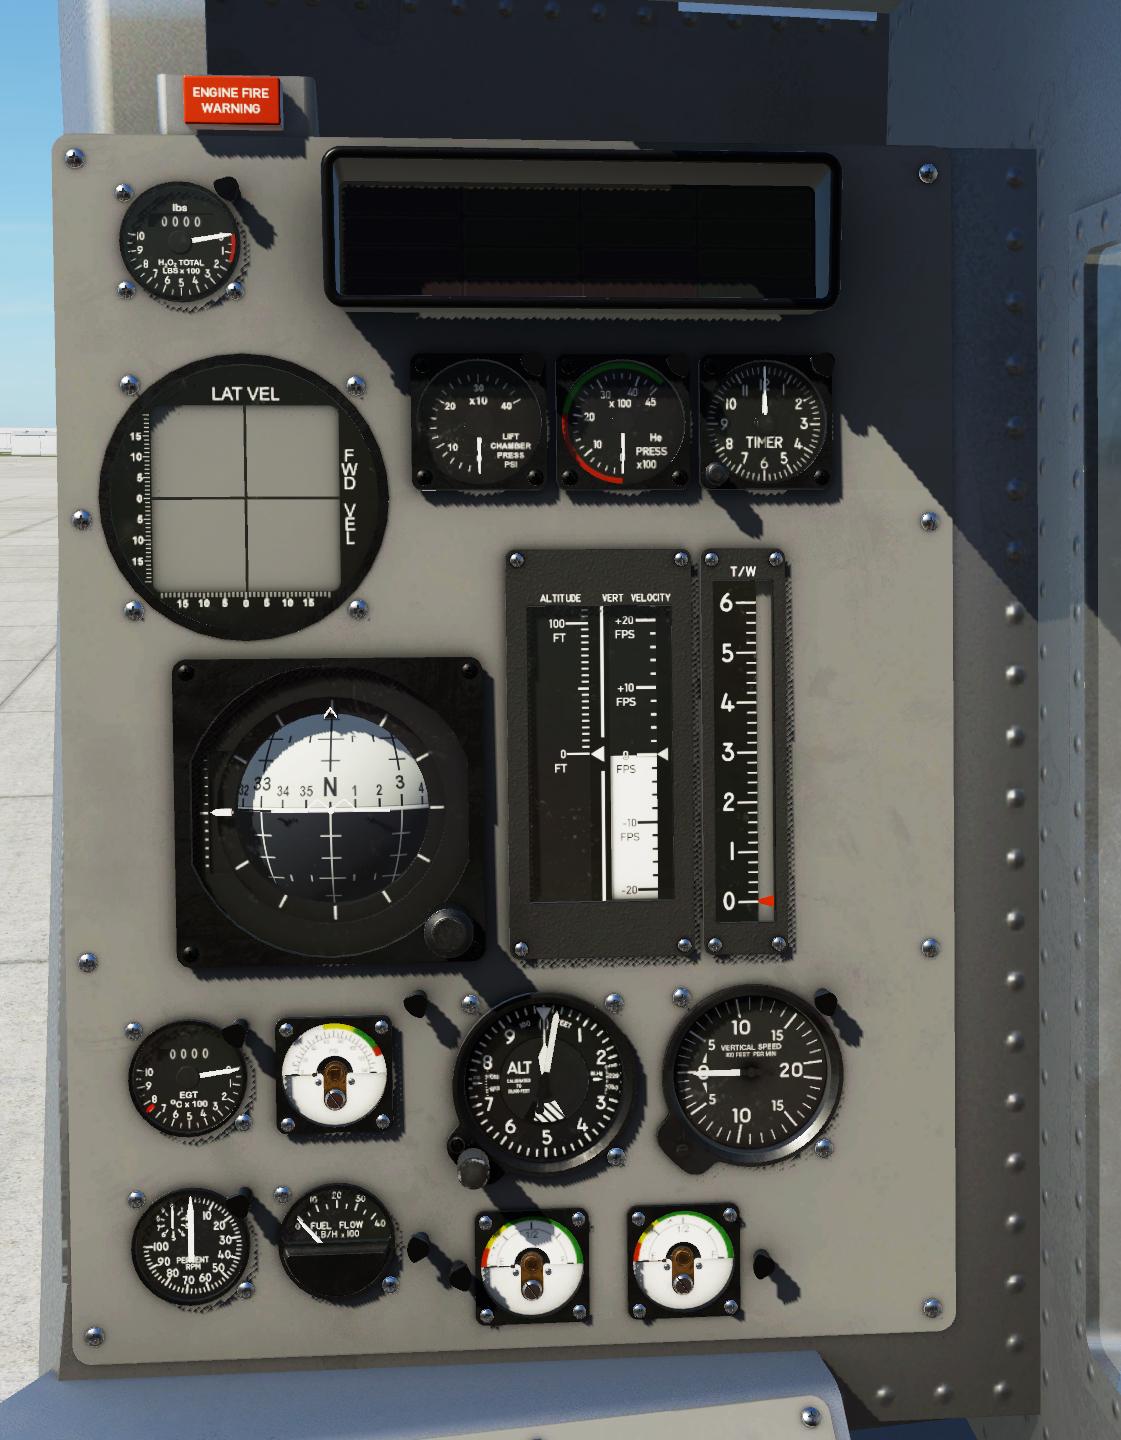
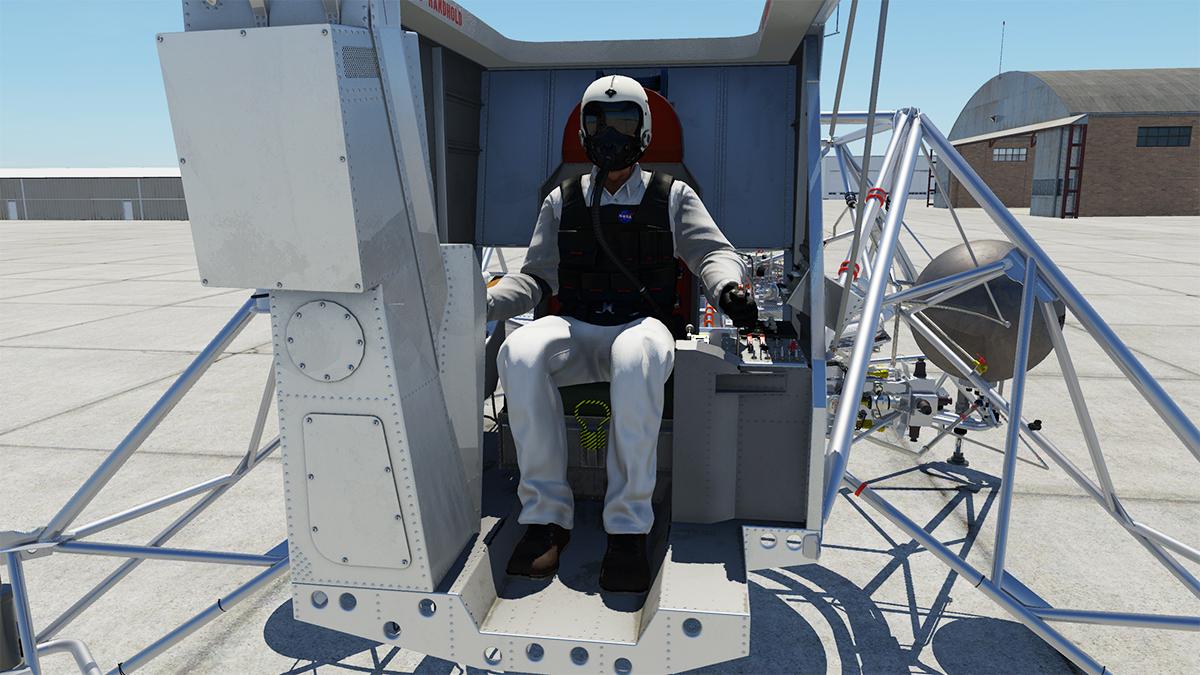
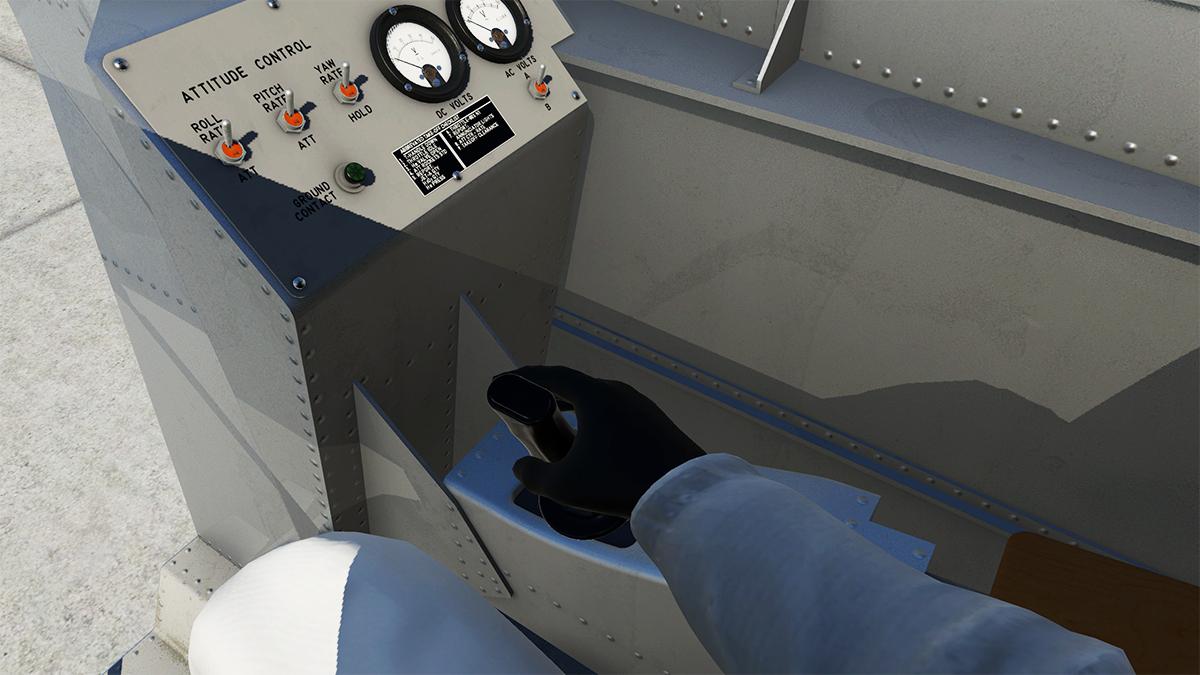
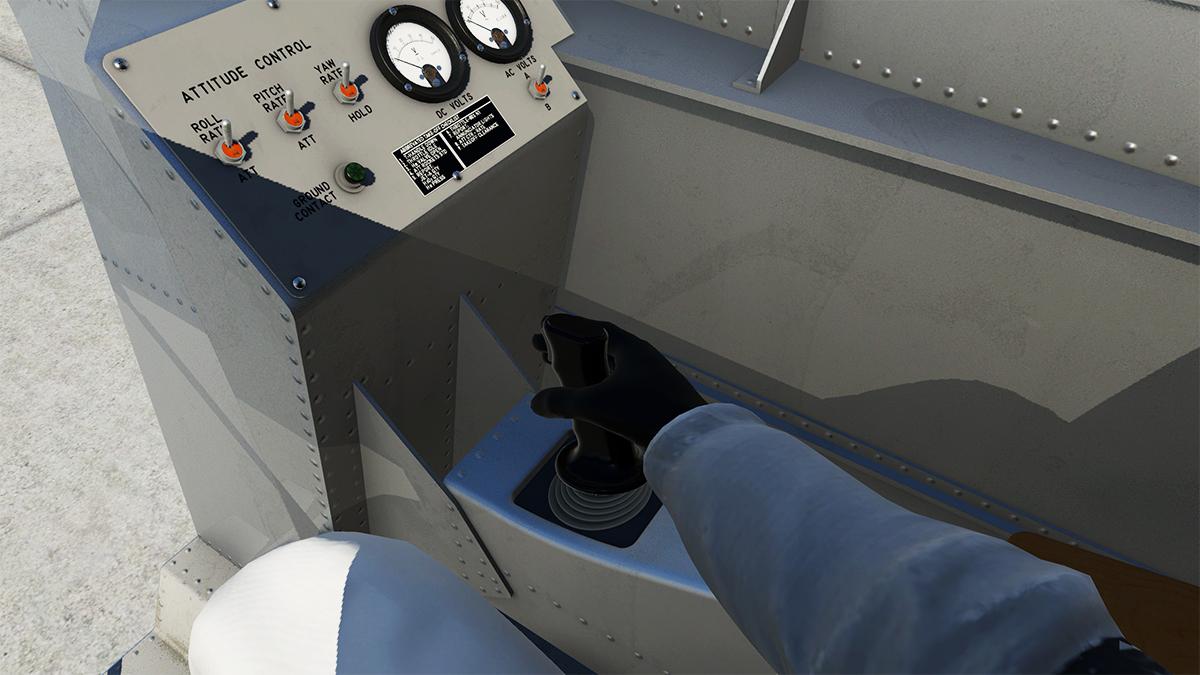
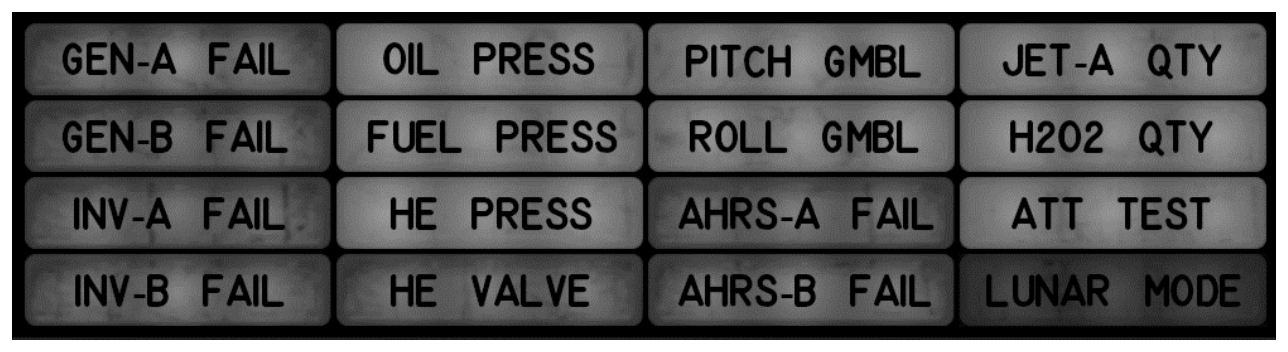
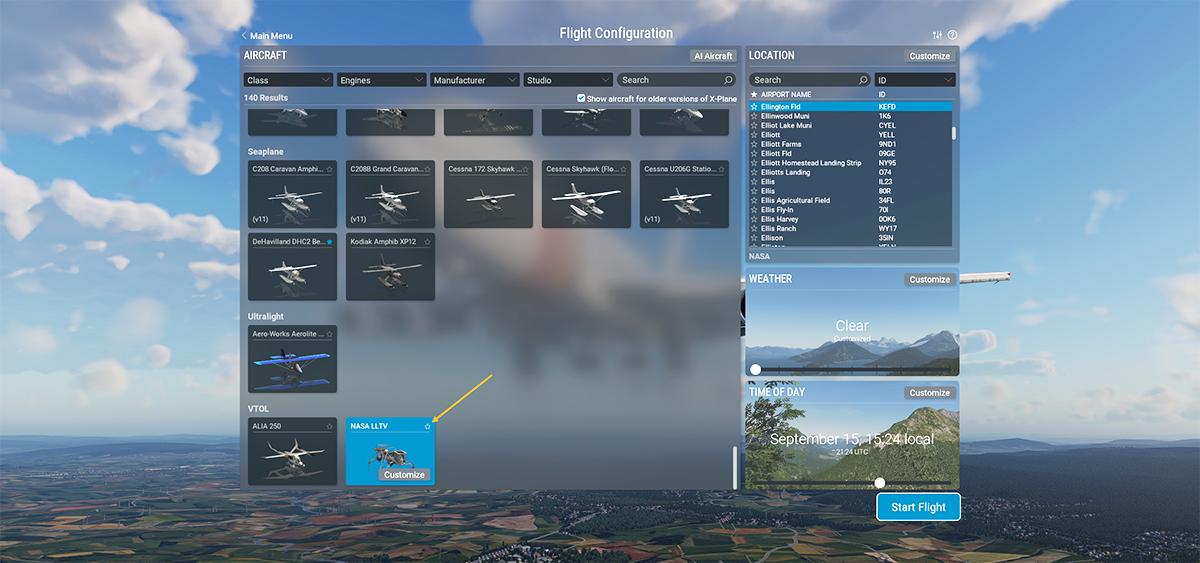
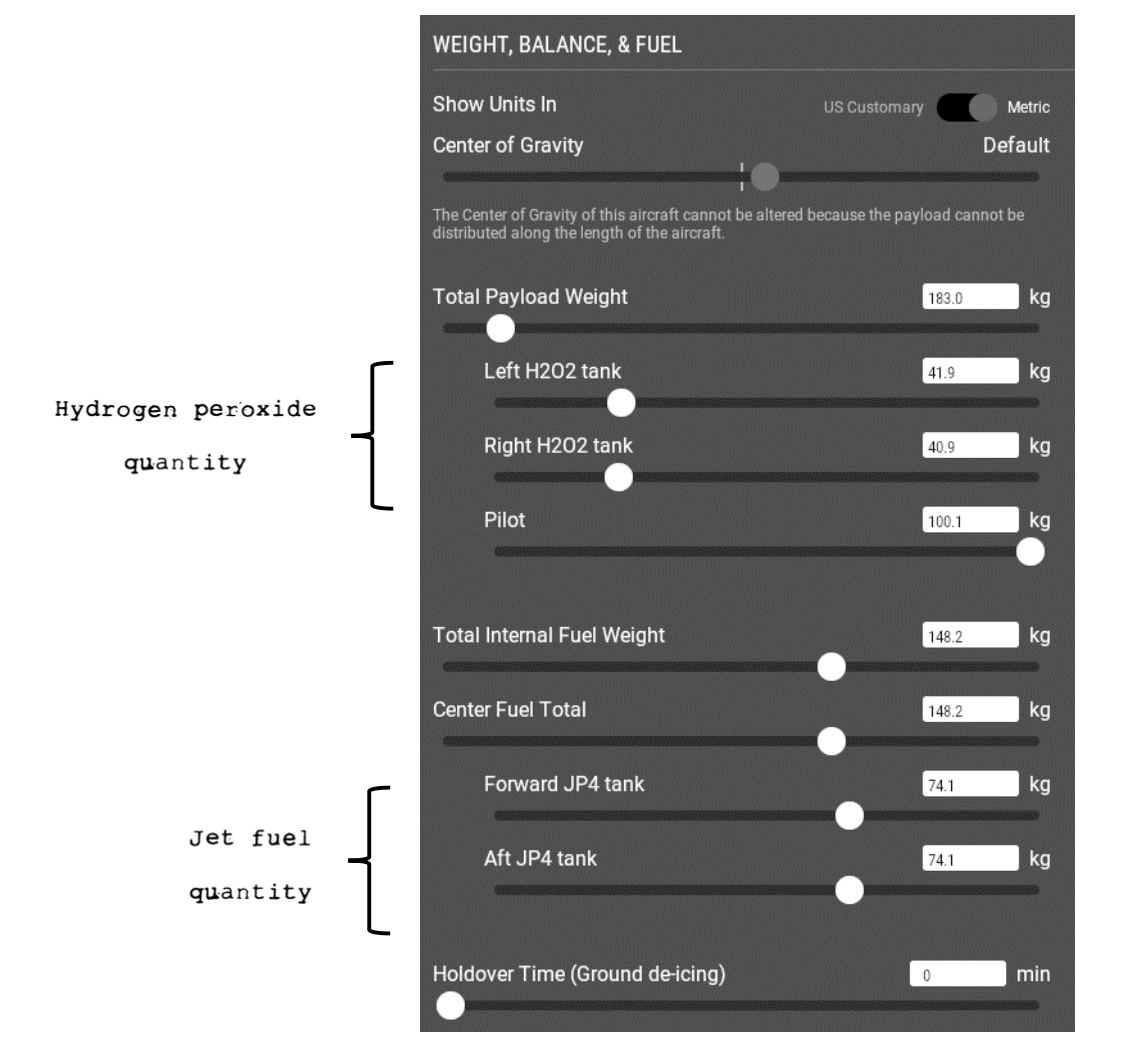
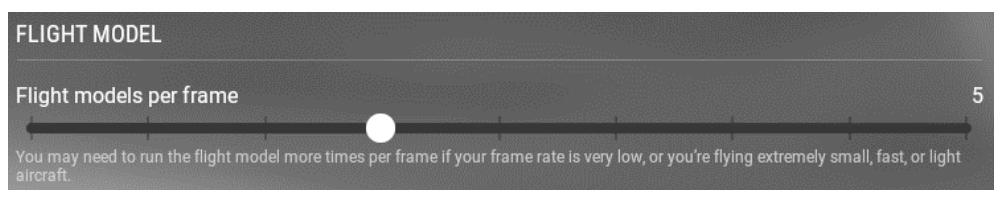
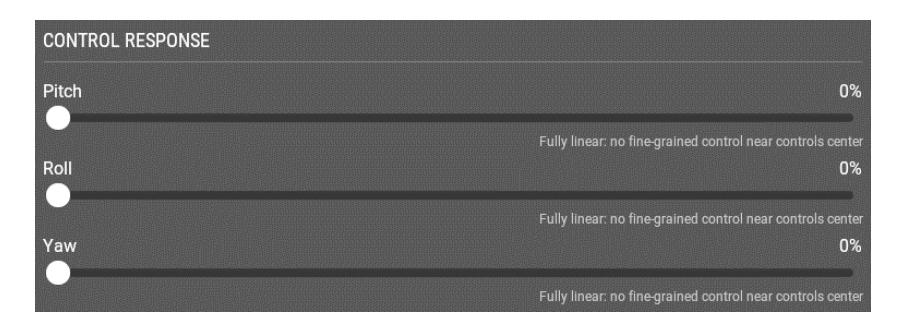
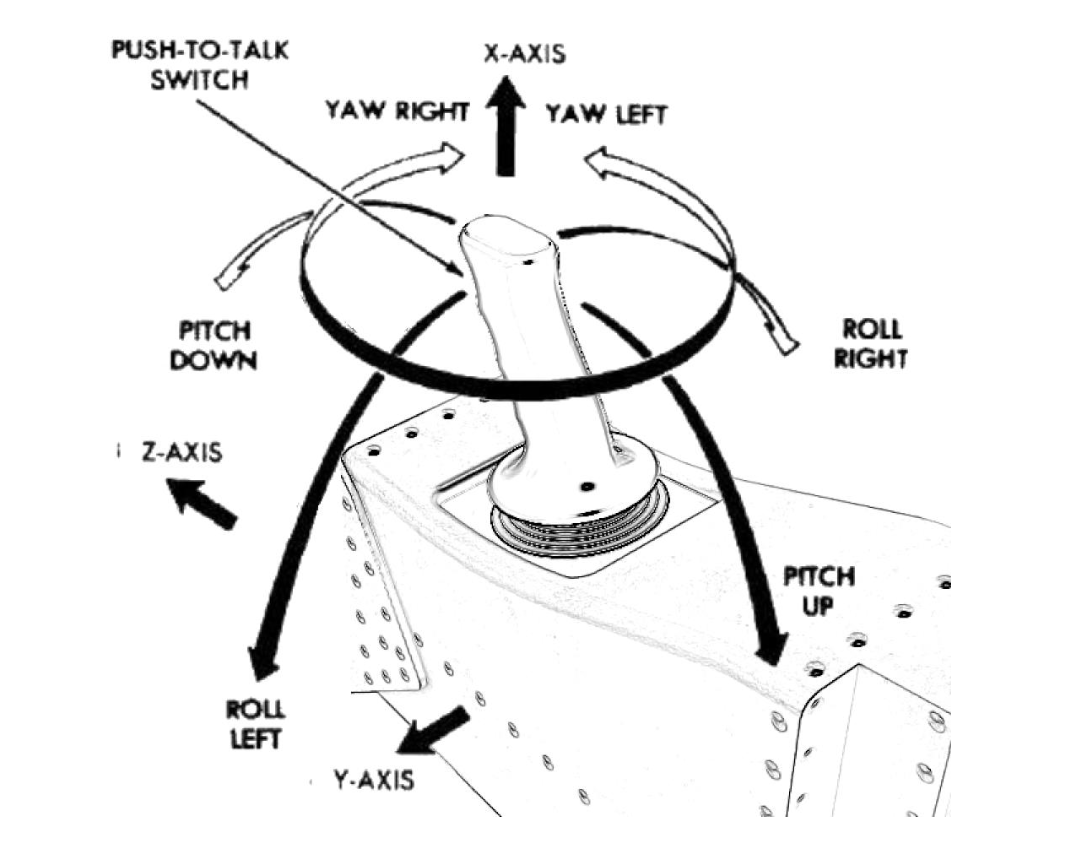
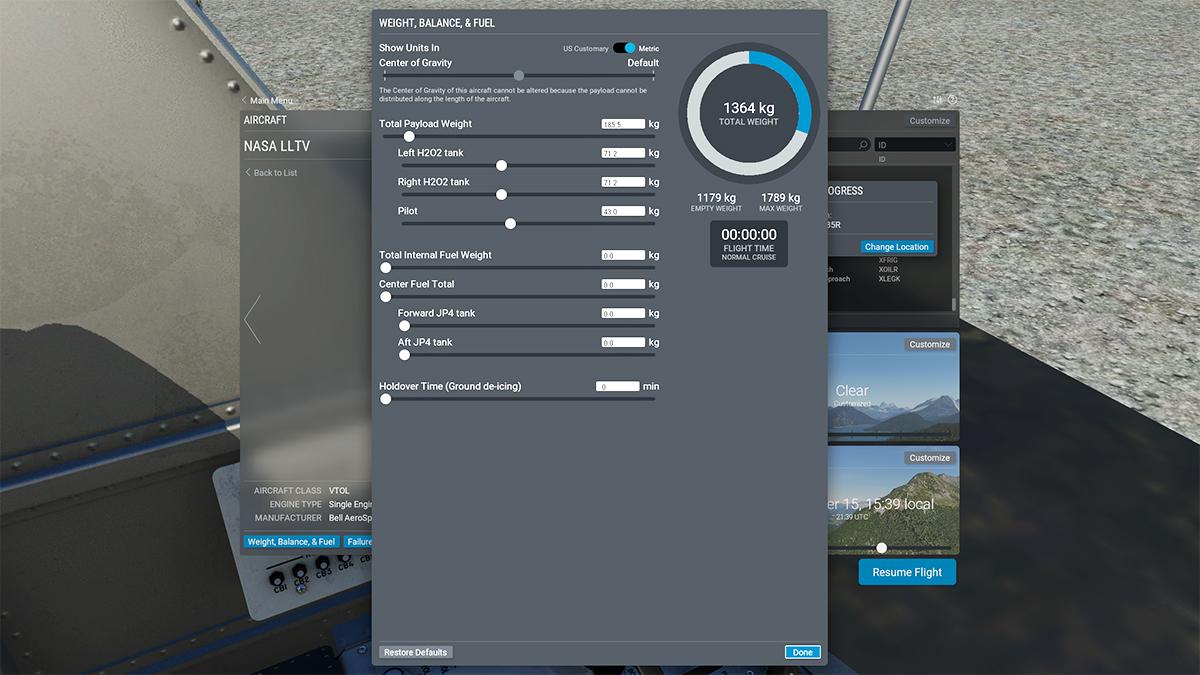
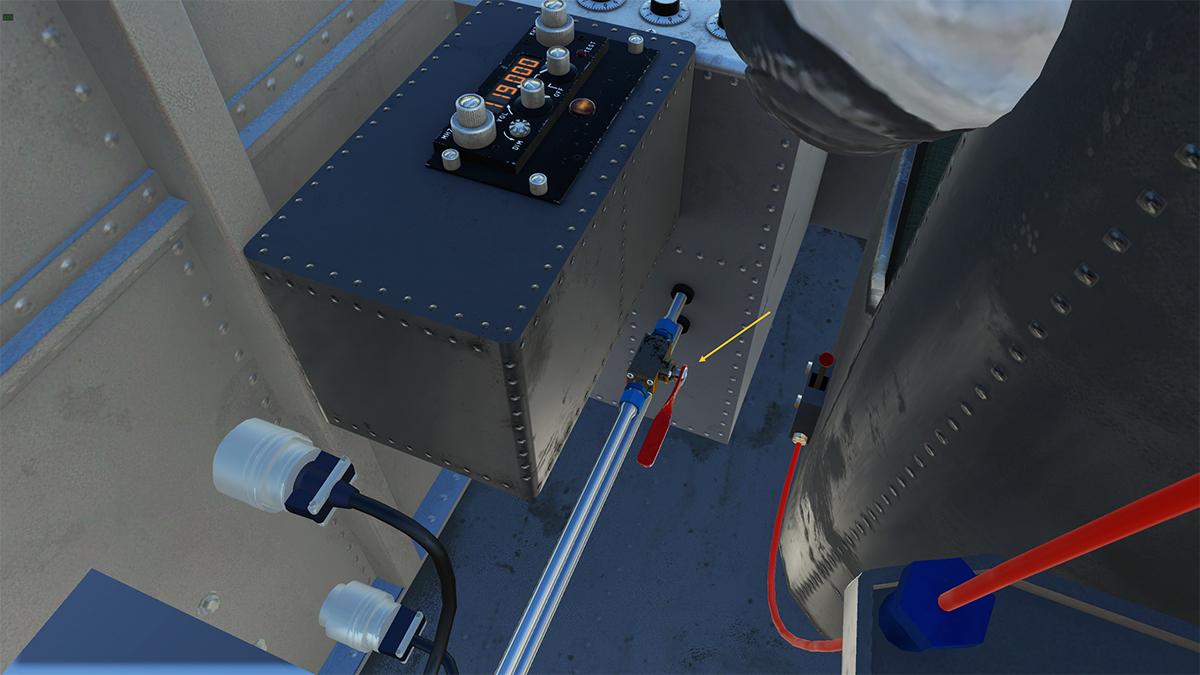
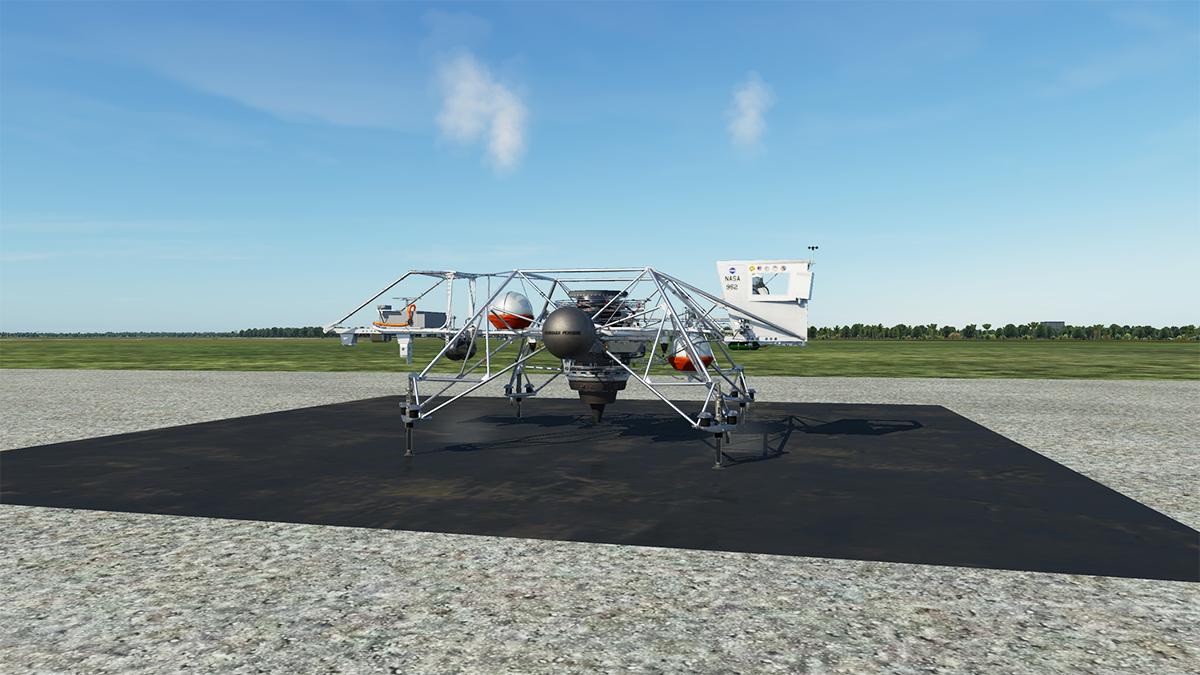
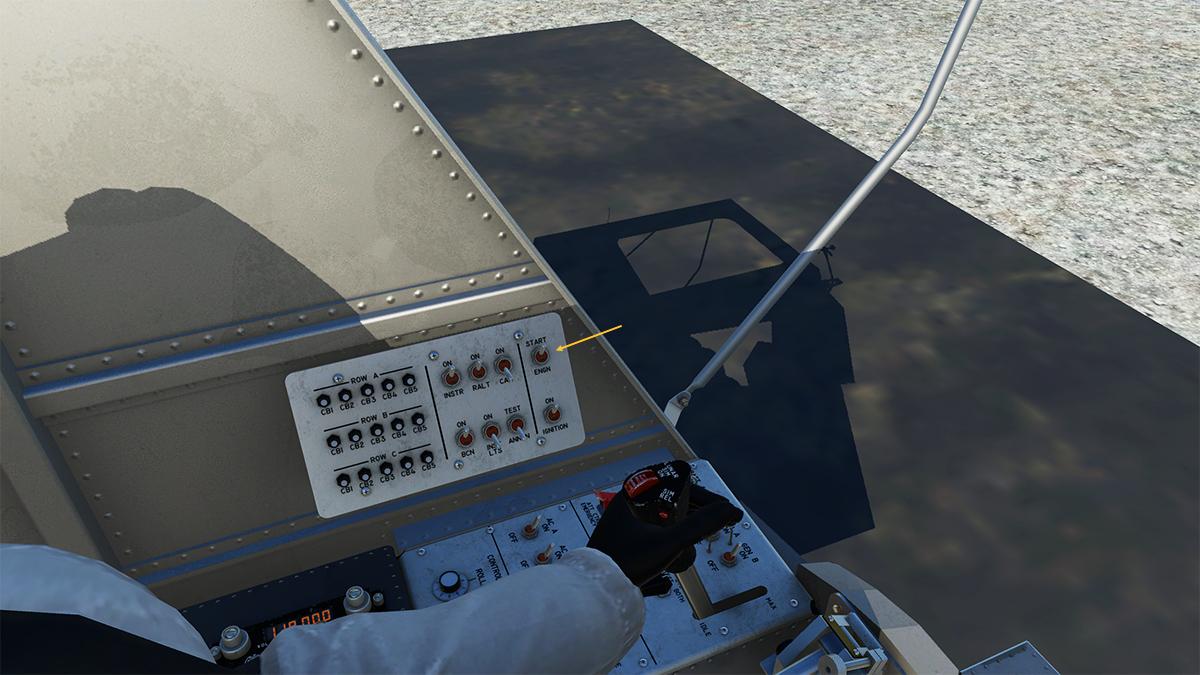
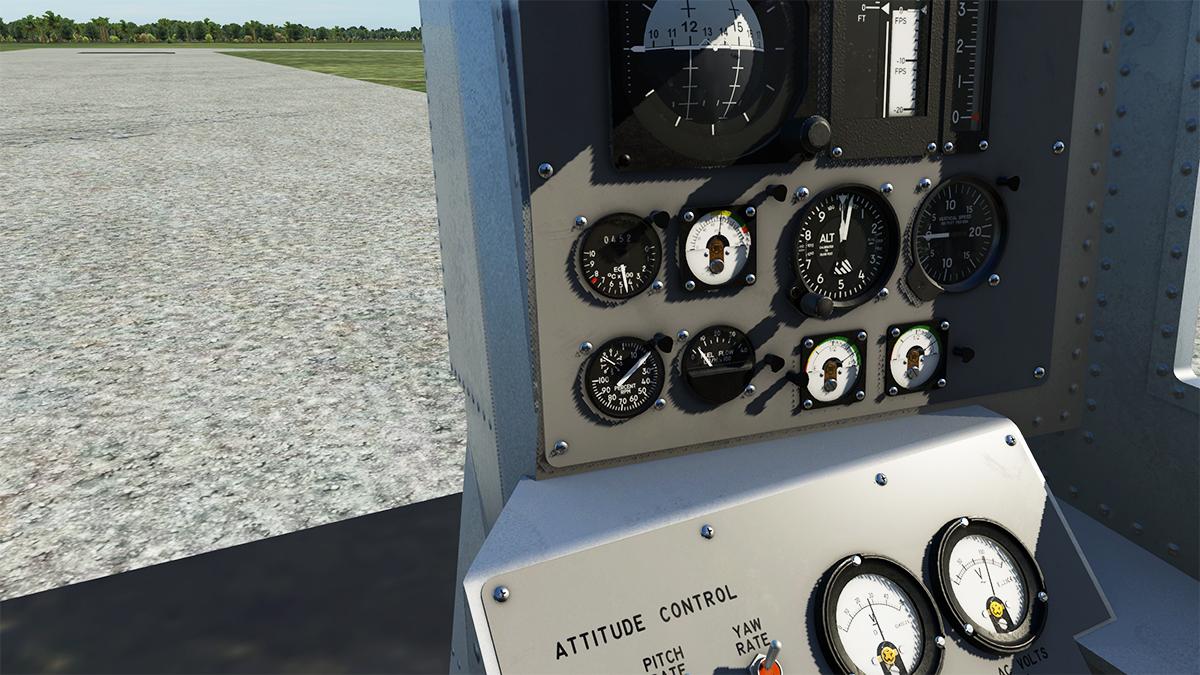
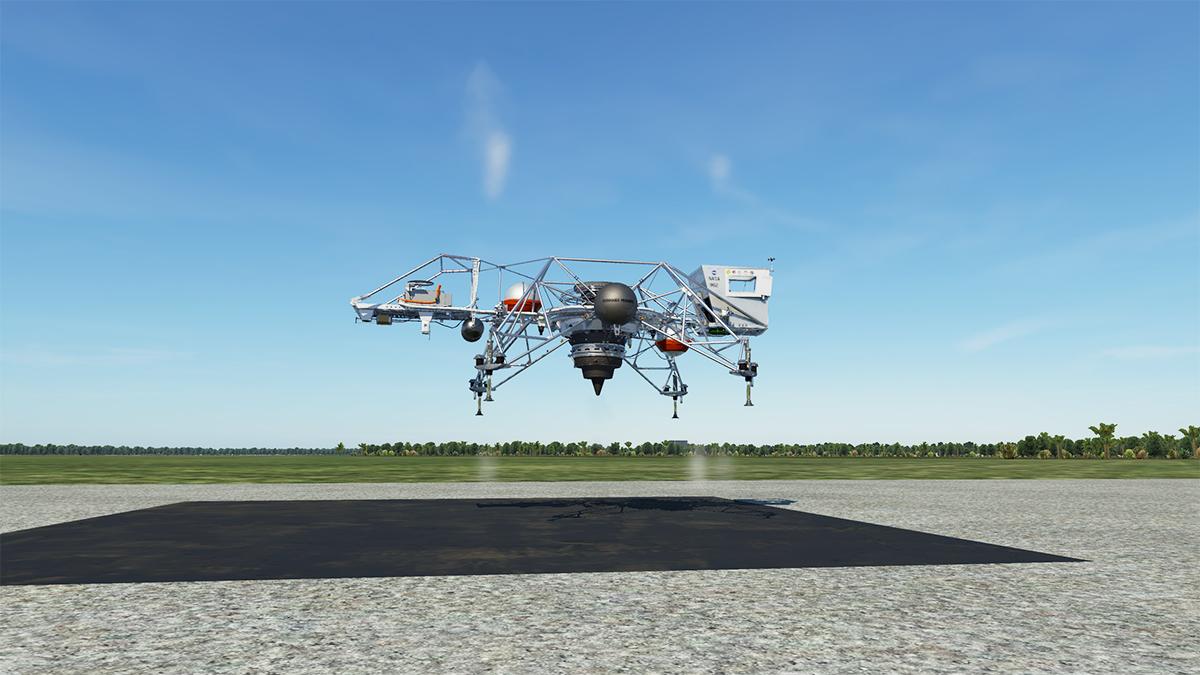
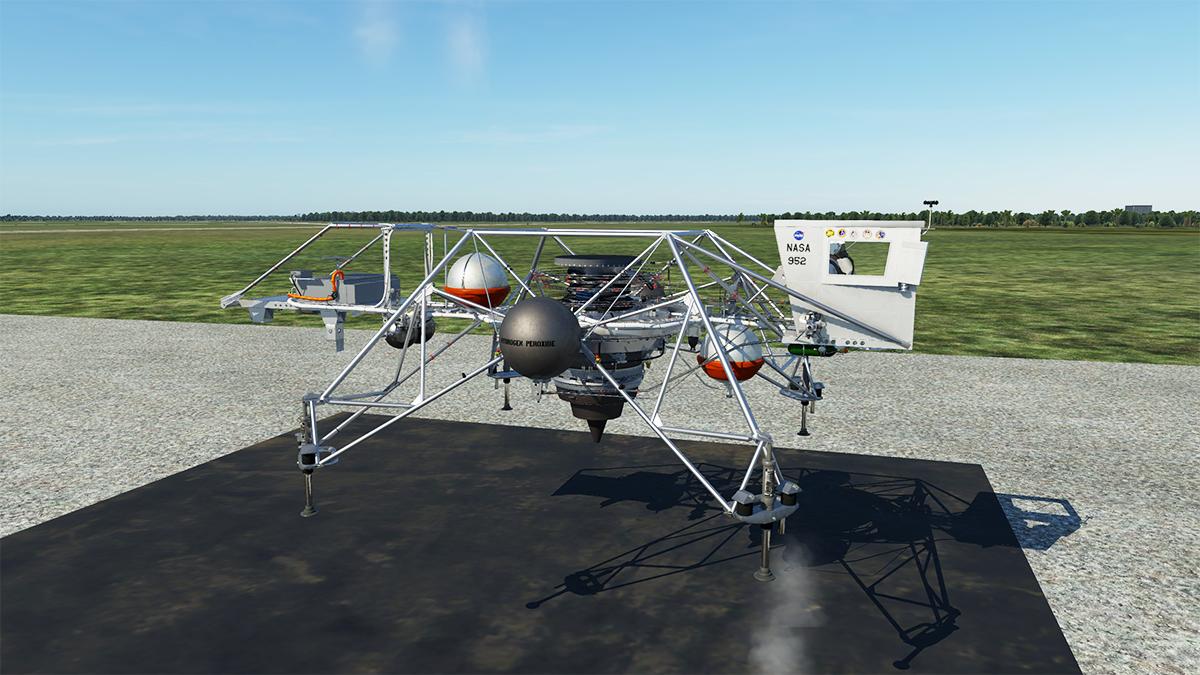
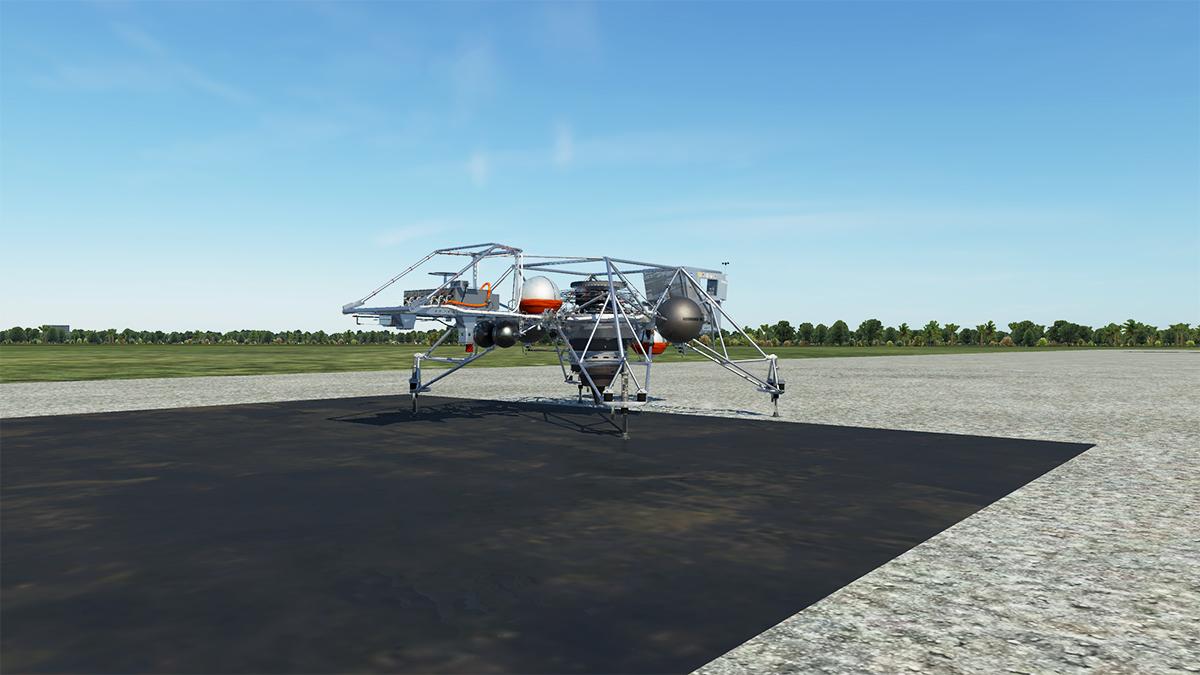
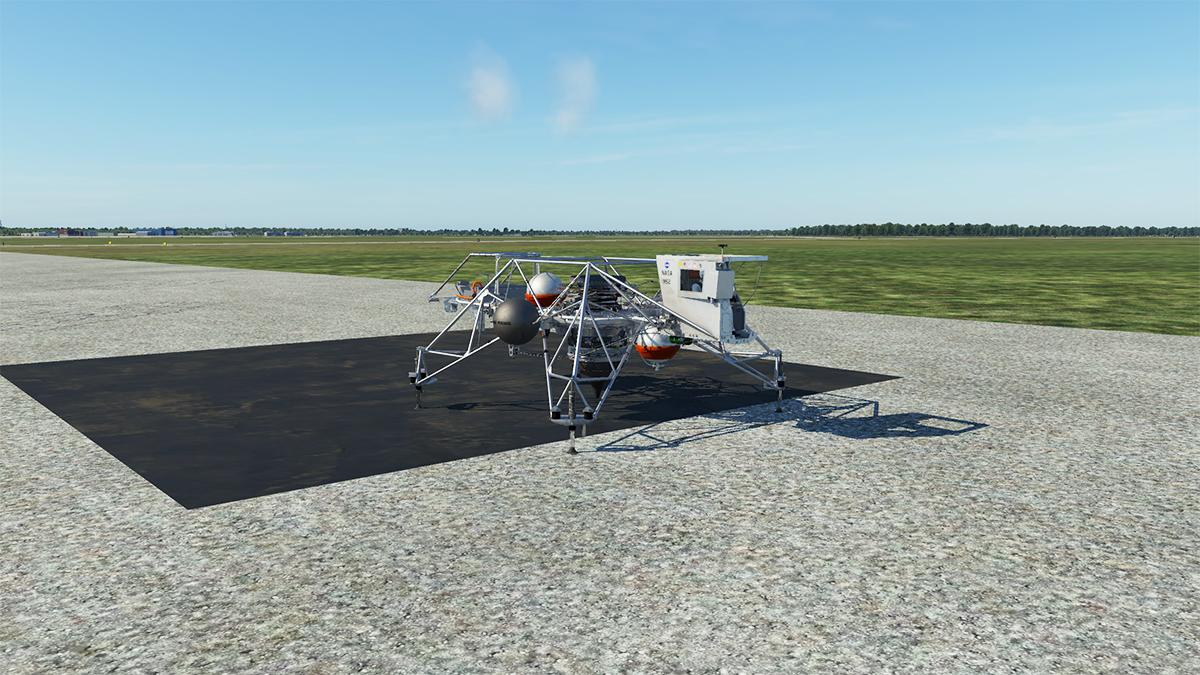
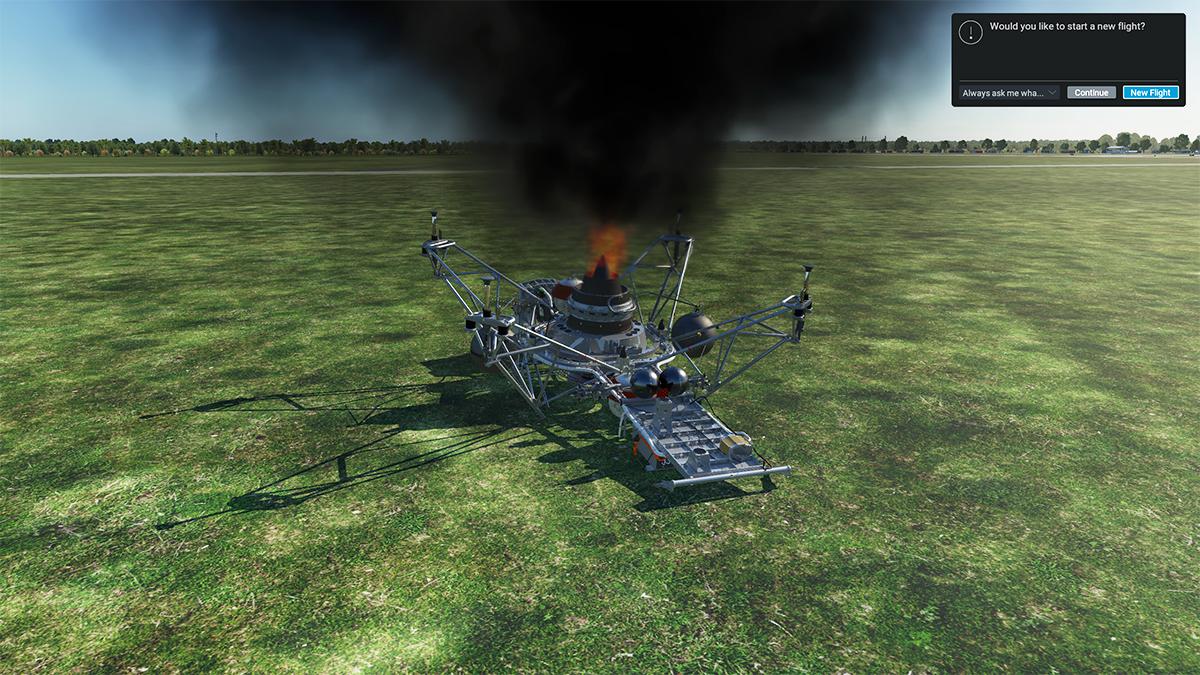
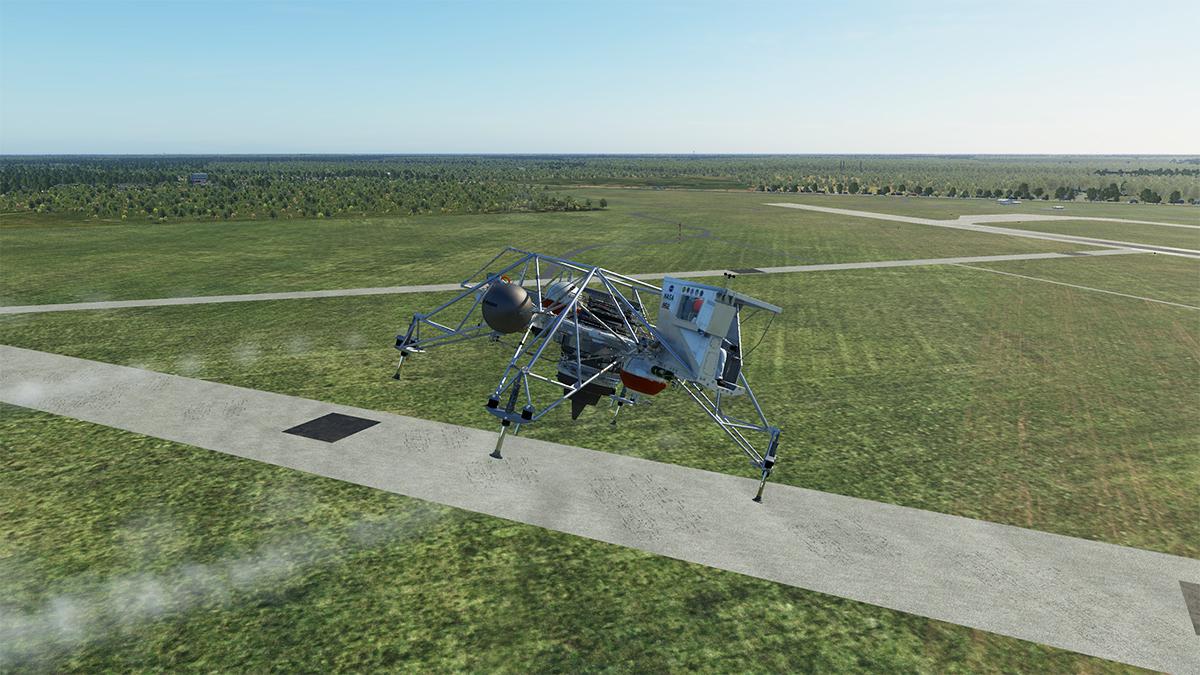
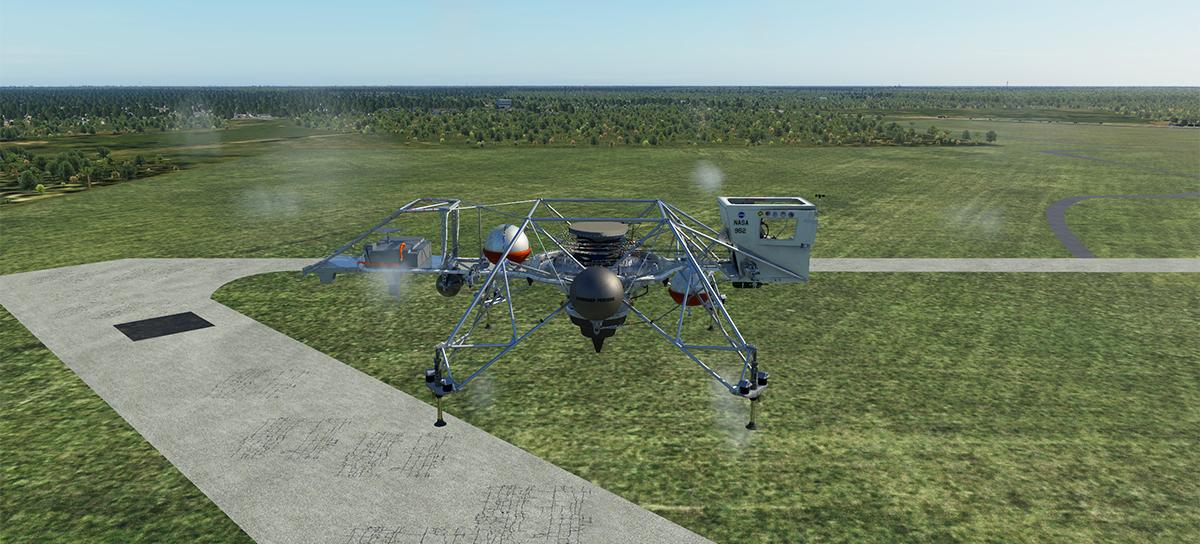
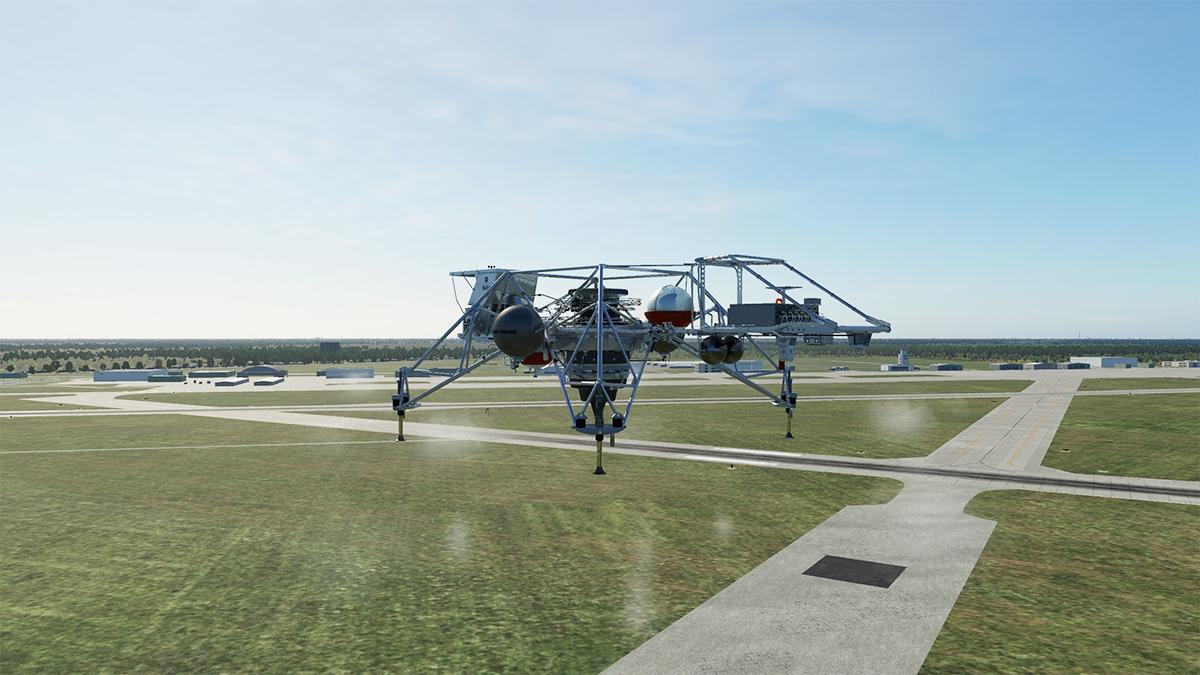
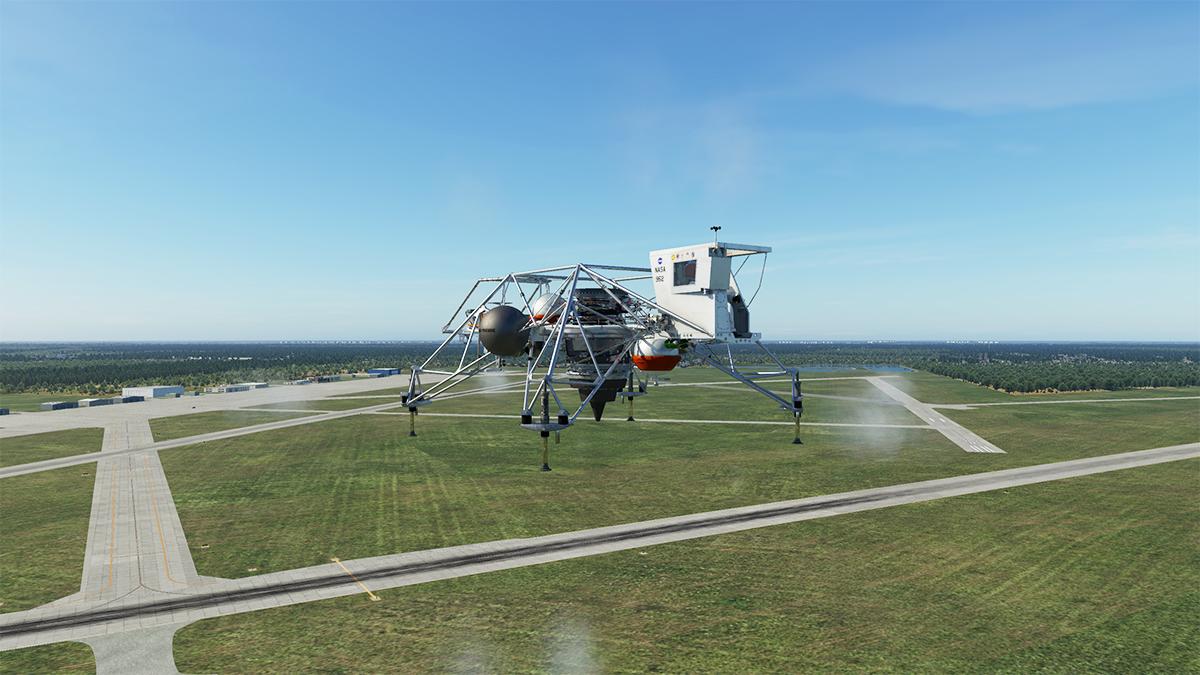
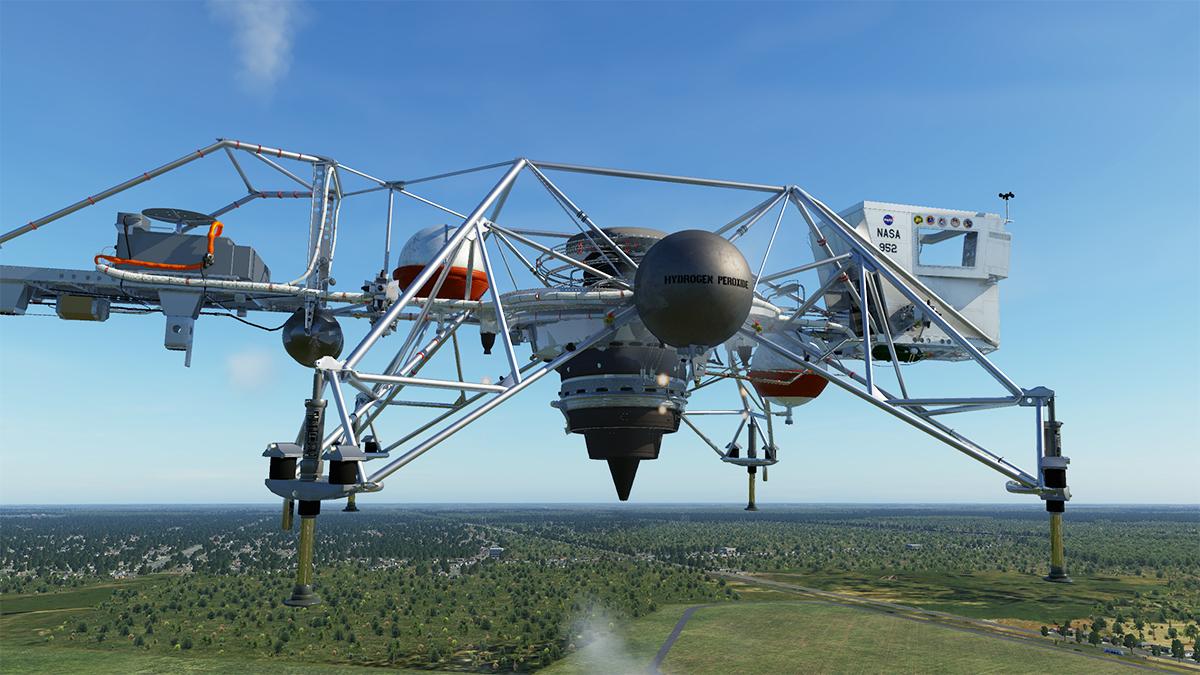
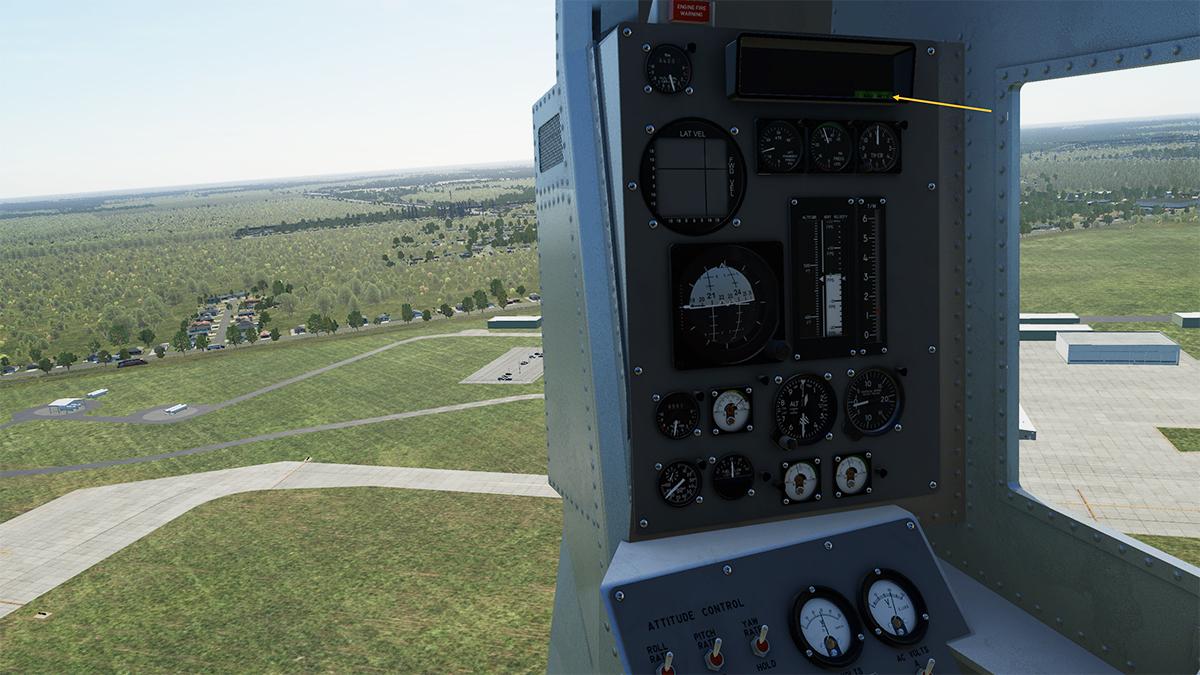
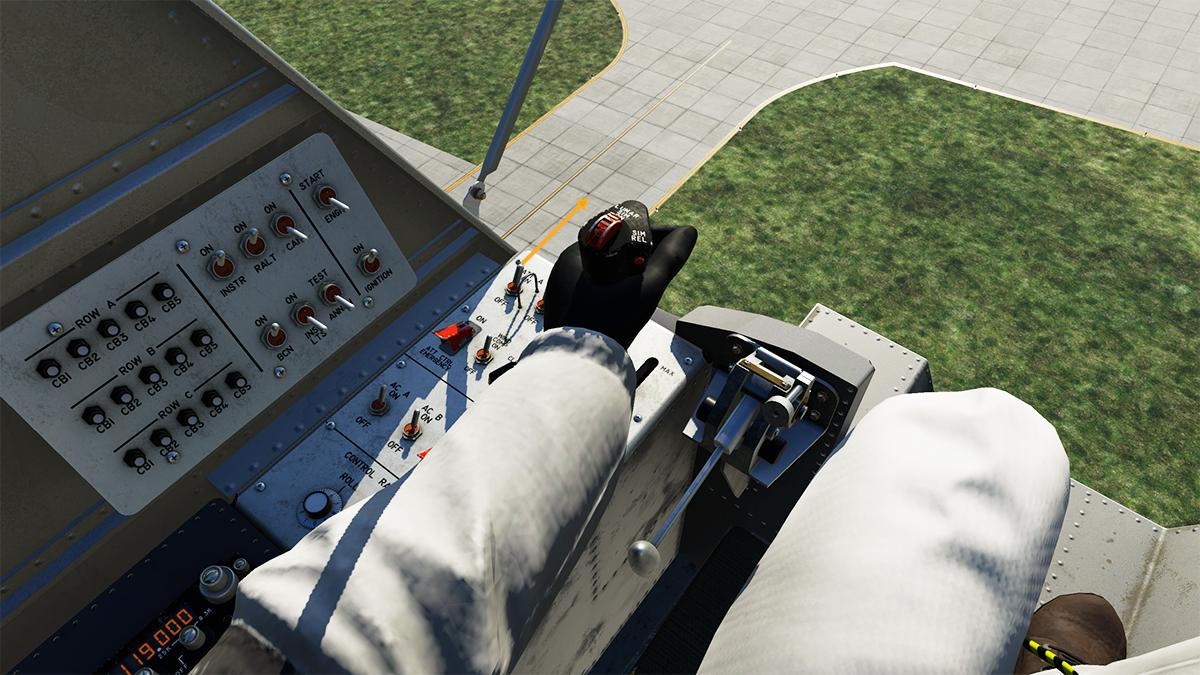
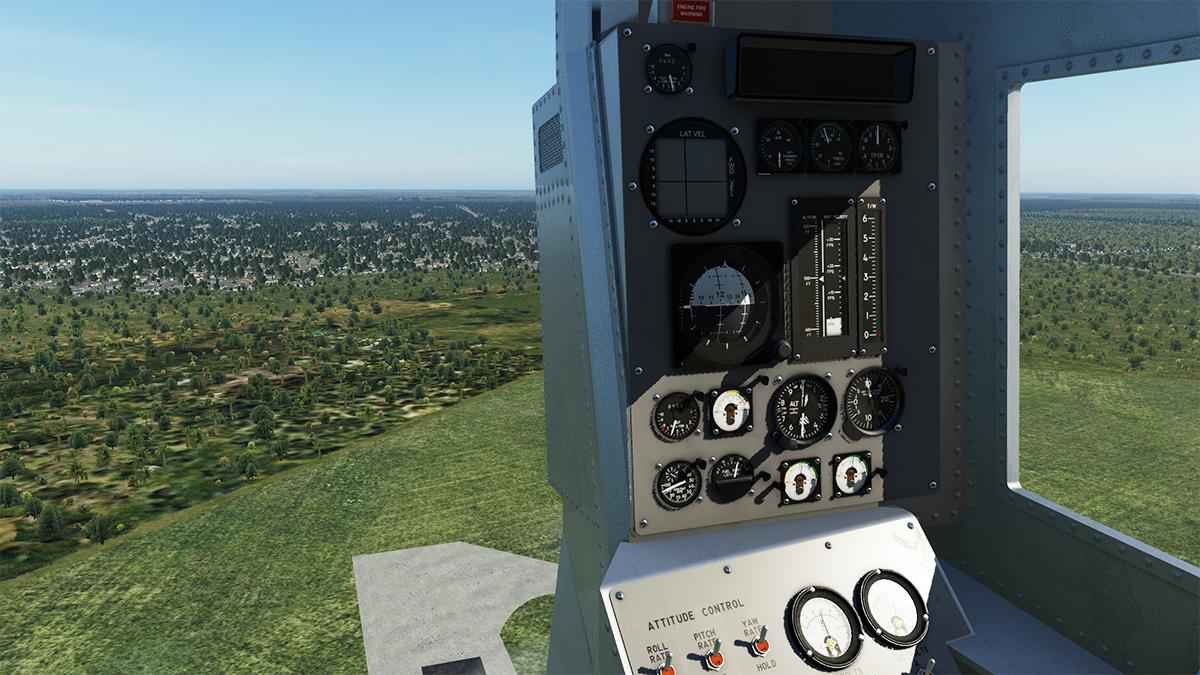
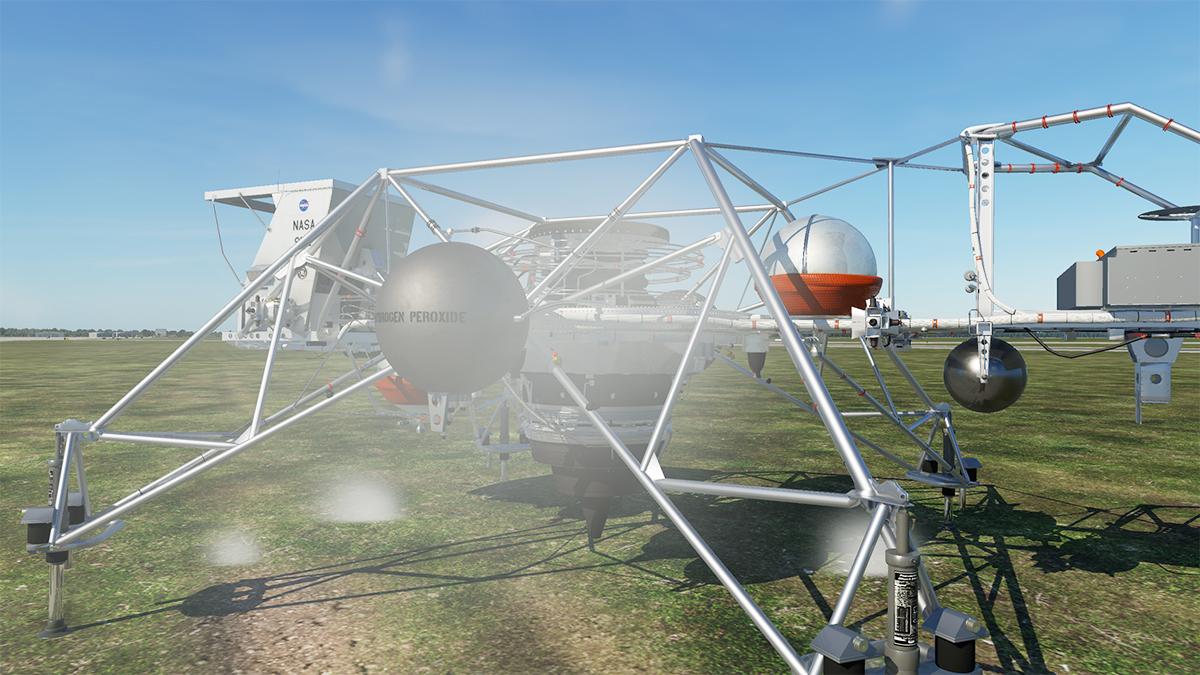
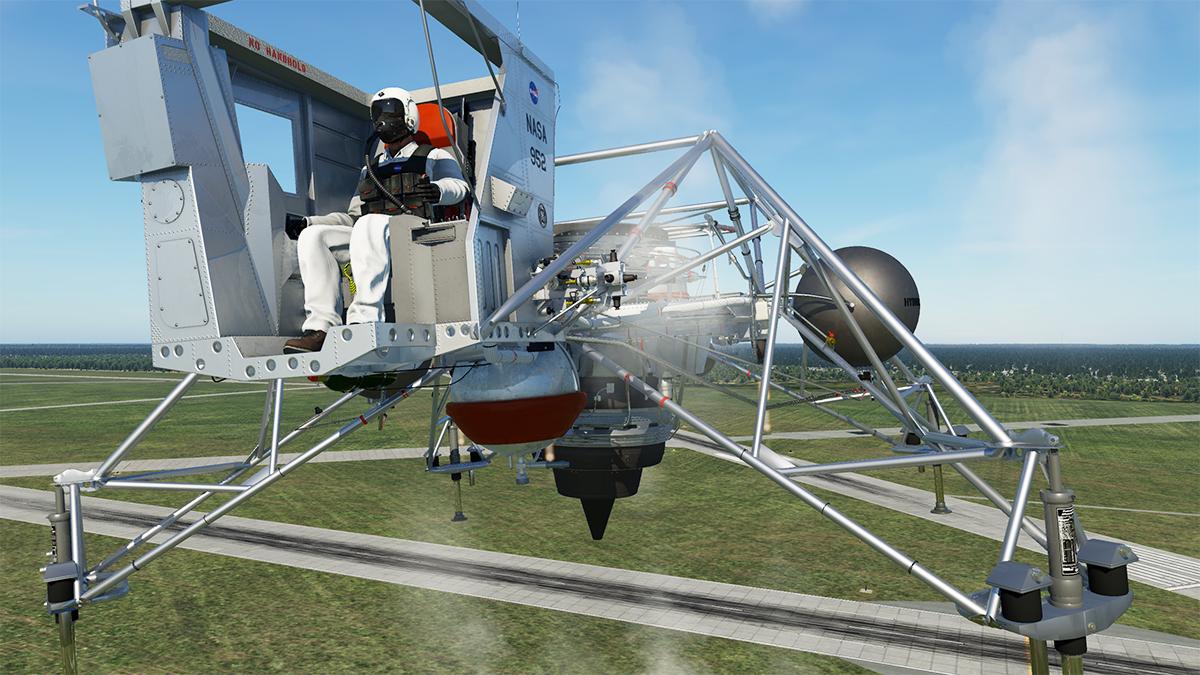
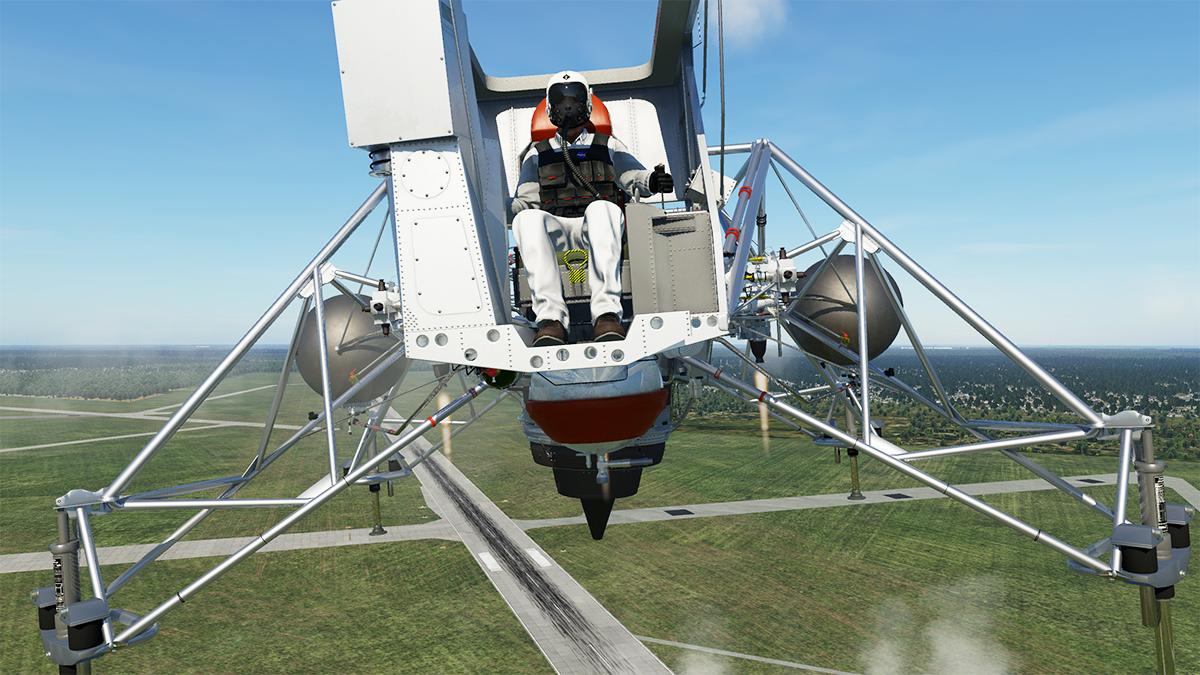
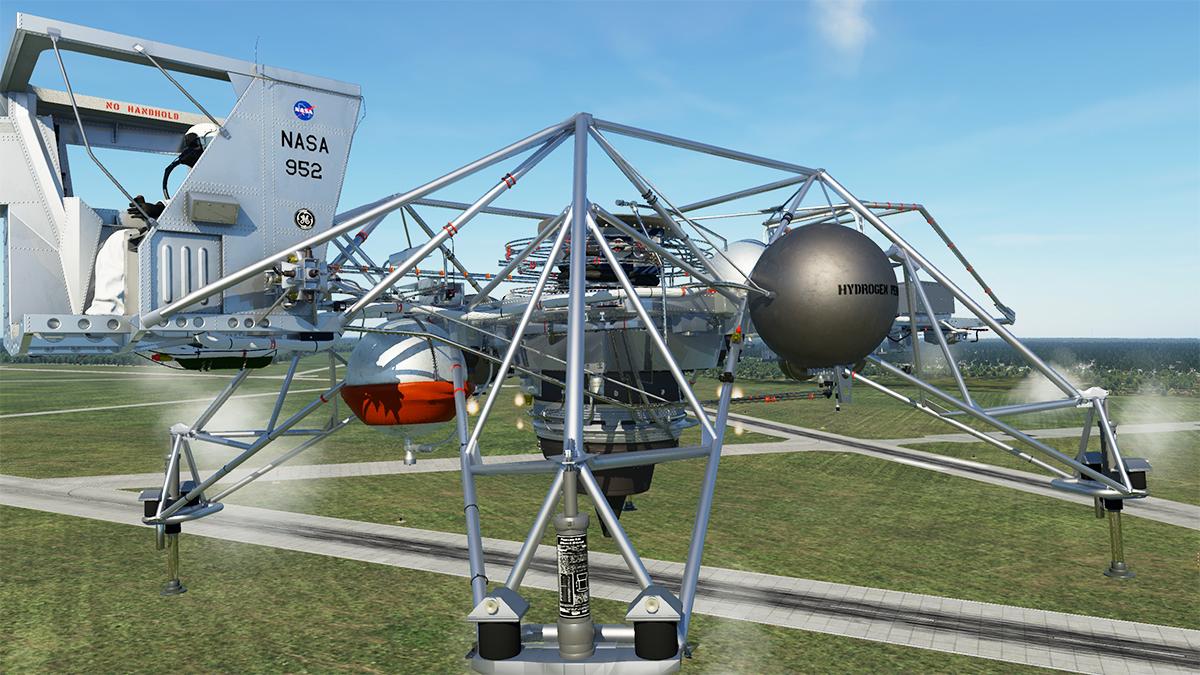
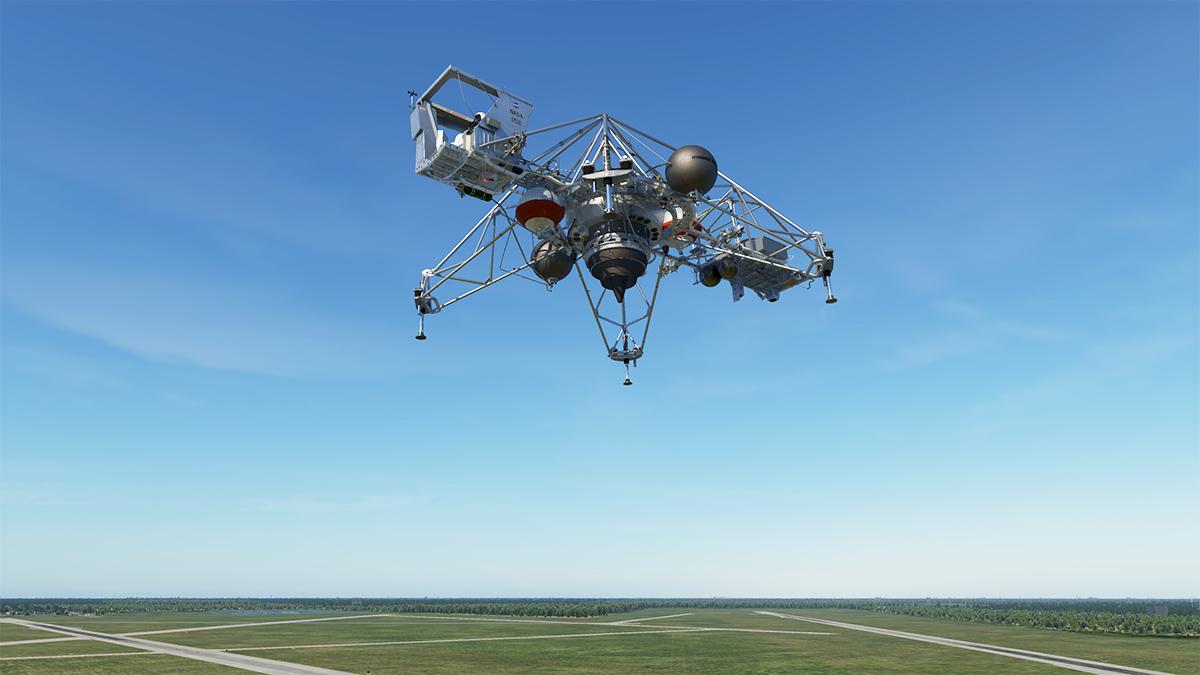
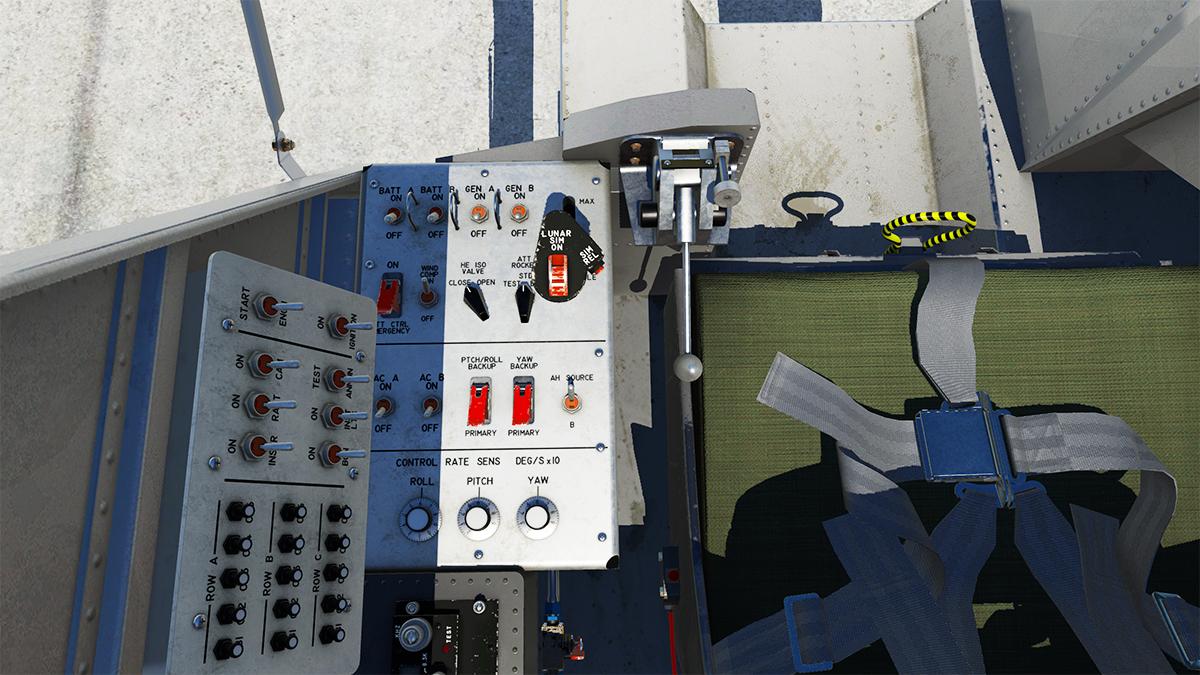
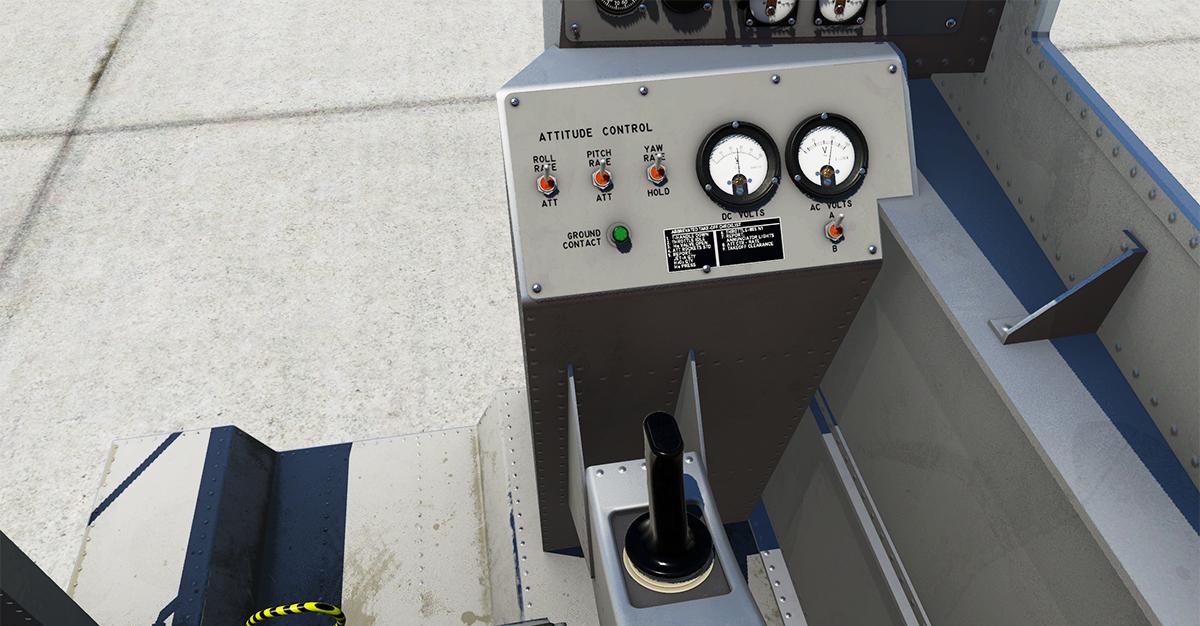
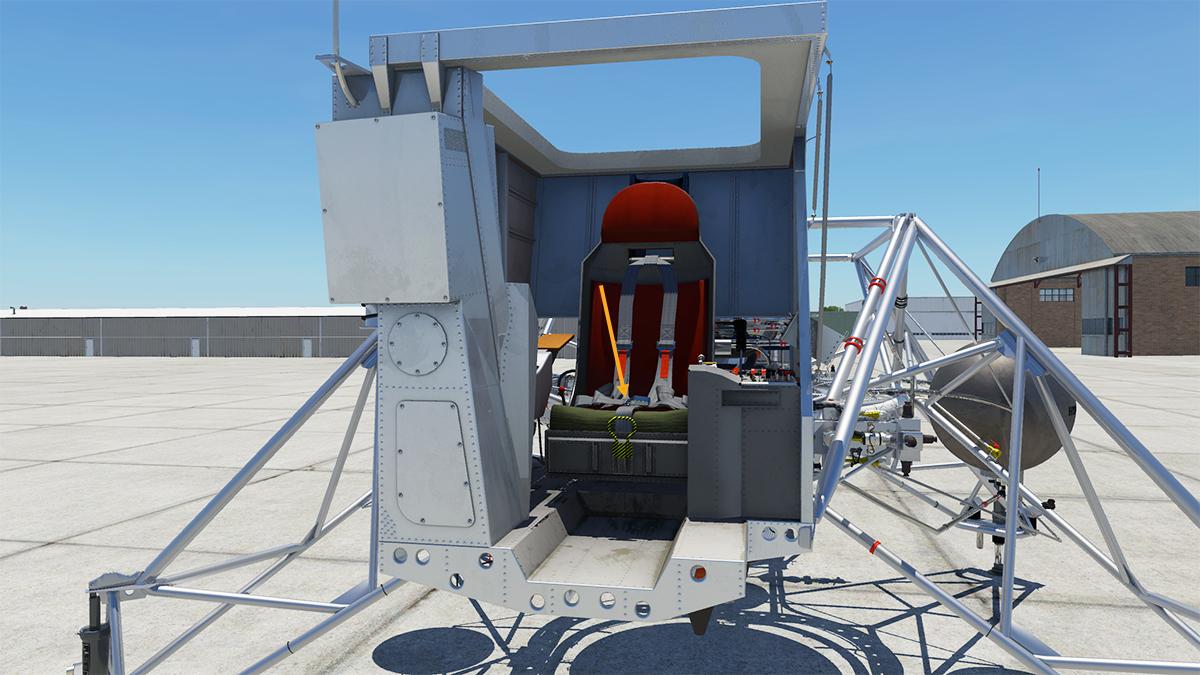
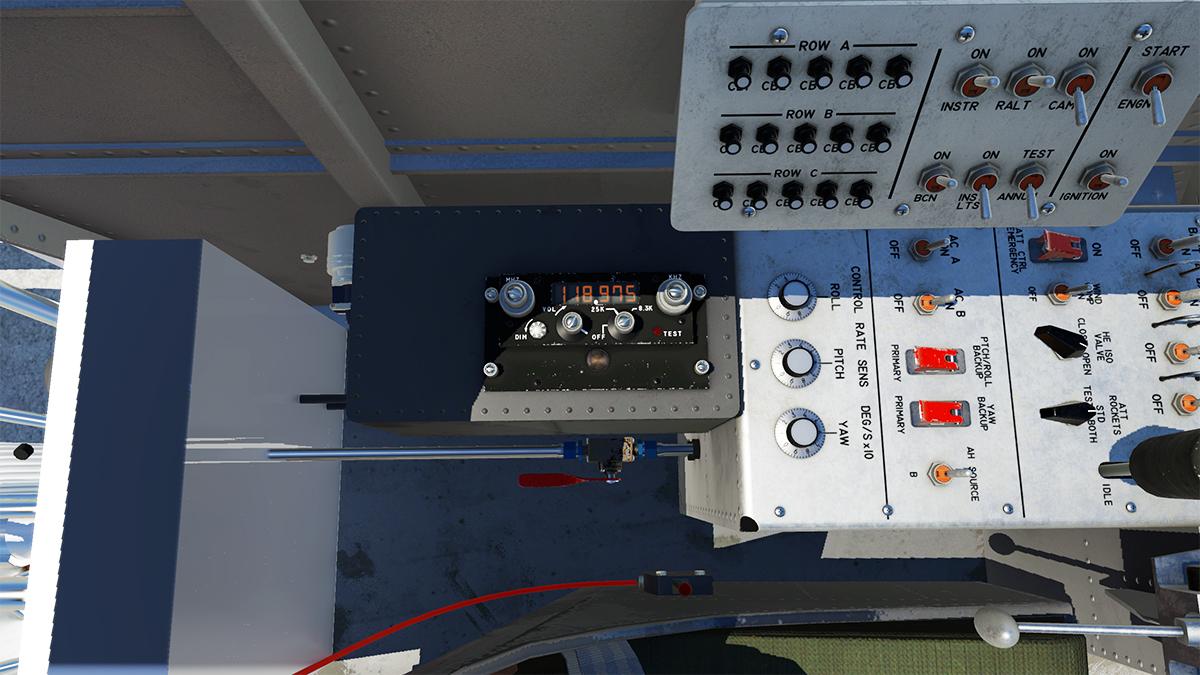
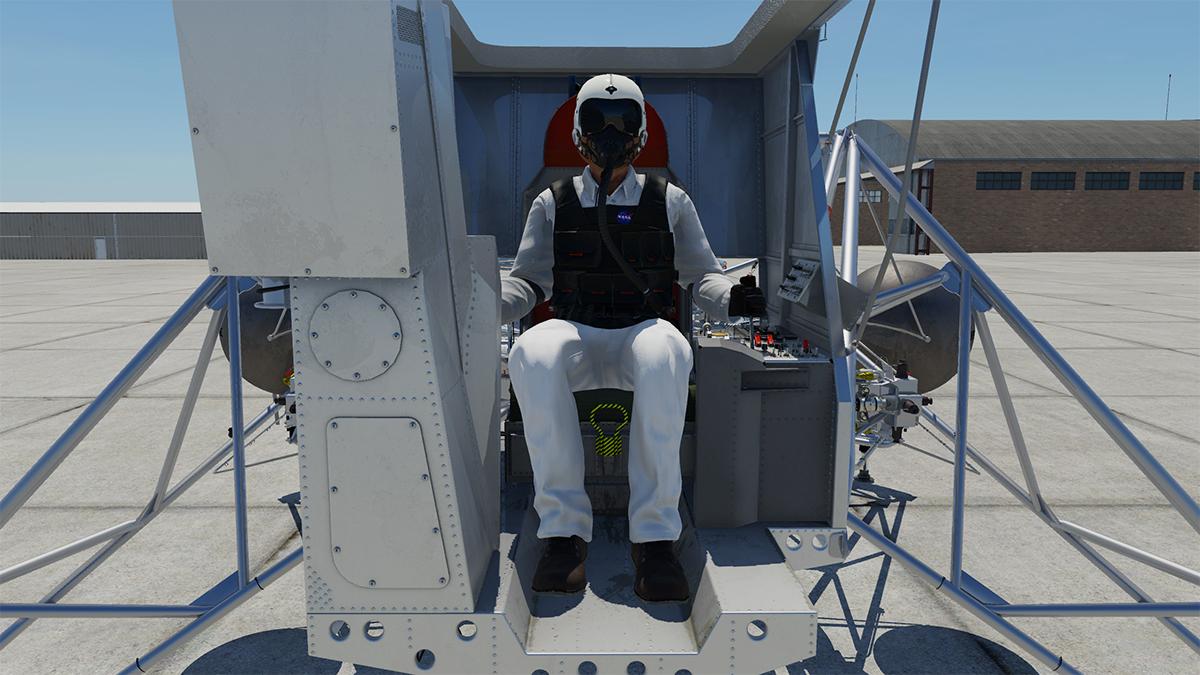
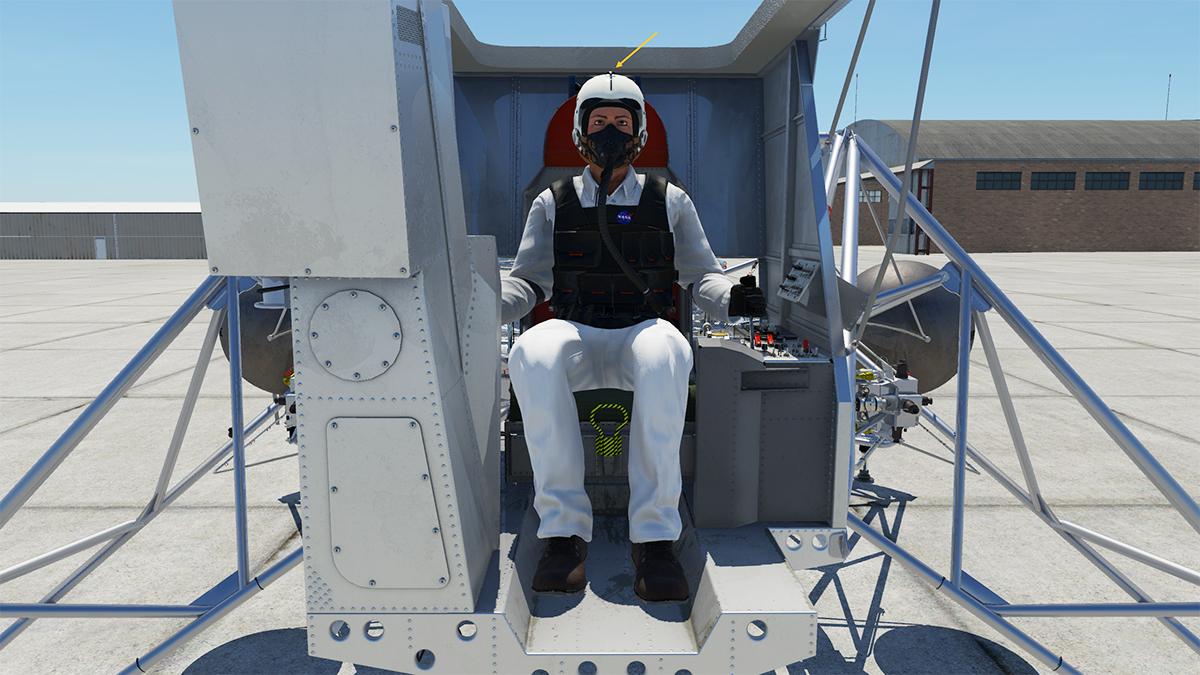
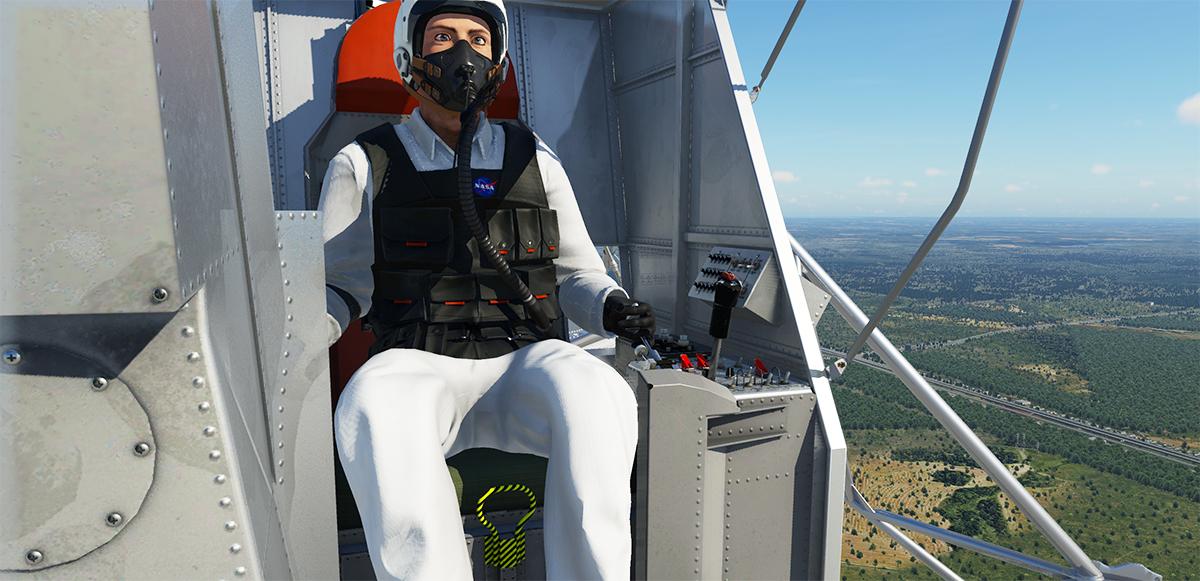
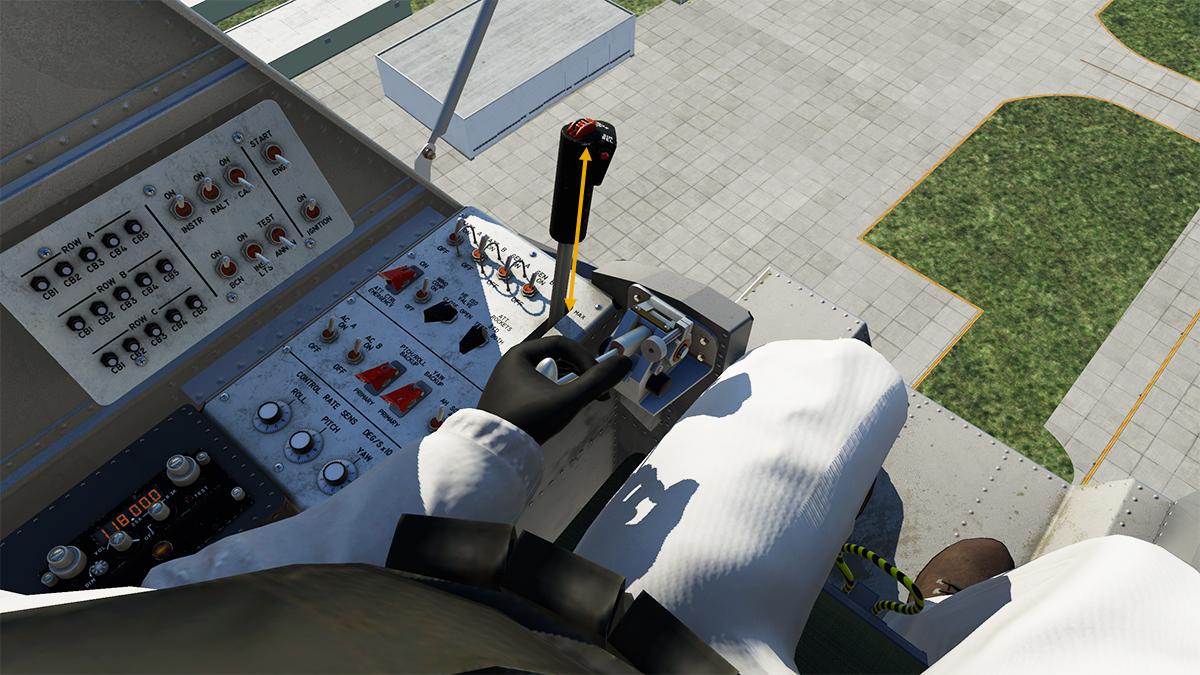
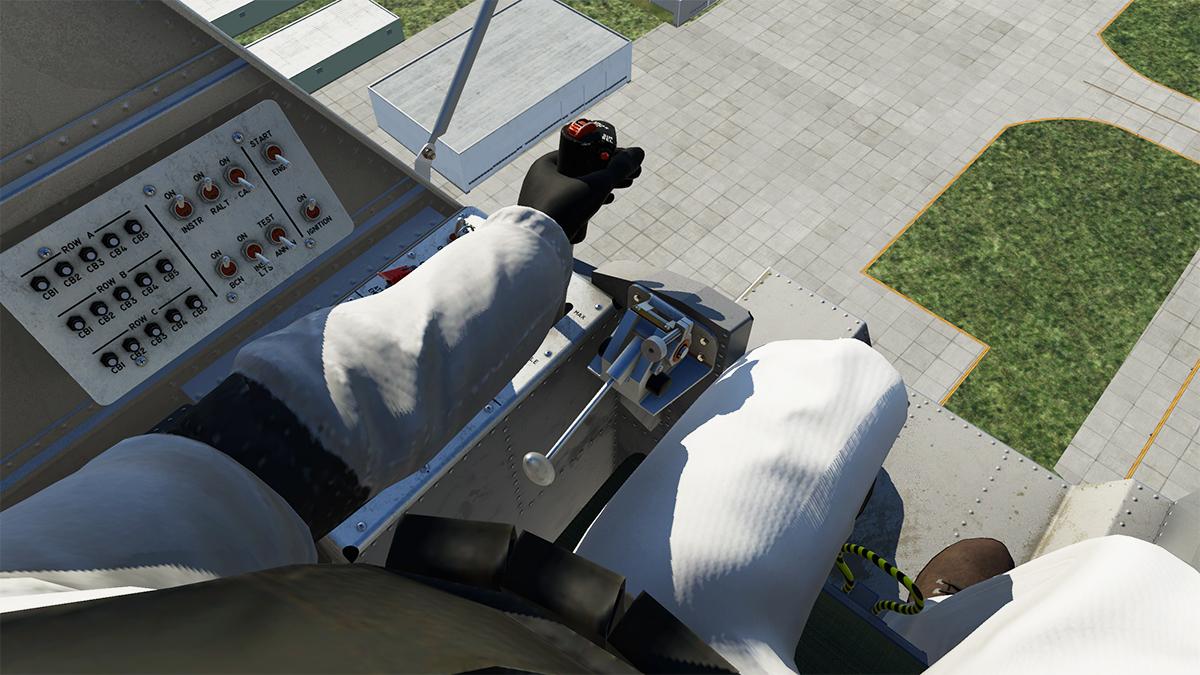
  3. Experimental Vehicle Review : LLTV - Lunar Landing Training Vehicle by NHAdrian It was a moment of inertia. A pause in the air that could have changed history as we know it. It is 6th May 1968 at Houston’s Ellington Air Force Base (AFB) in Texas. As the strange web framed vehicle was now suddenly frozen at 200ft above the ground with the sudden loss of helium pressure, that then caused the depletion of the hydrogen peroxide that was used for the reserve attitude thrusters. The pilot only had one option, "to get the hell out of there", he did so by ejecting upwards as the machine twirled downwards into the ground and violently exploded beneath him, he landed safely by parachute with only a few aches to his back and a bit tongue from the intense jerk upwards... in two hours he was back at his desk at the Houston Space Centre, doing paperwork. The pilot in question here was Neil Alden Armstrong. The same person that commanded the Apollo 11 mission, during which he became the first man to set foot on the moon (20th July 1969). That infamous moment was captured on film, observing it closely, you saw the nerves of steel to defeat the jaws of death, just like Armstrong had done a few times before. In Korea, as he was making a low bombing run at 350 mph (560 km/h) when 6 feet (1.8 m) of his wing was torn off after it collided with a cable that was strung across the hills as a booby trap. He planned to eject over the water and await rescue by Navy helicopters, but his parachute was blown back over land. A jeep driven by a roommate from the flight school picked him up. Then again in a Boeing B-29 Superfortress, which was to air-drop a Douglas D-558-2 Skyrocket. Climbing to 30,000 feet (9 km), the number-four engine stopped and the propeller began windmilling (rotating freely) in the airstream, then the propeller disintegrated. Pieces of it damaged the number-three engine and hit the number-two engine. Butchart and Armstrong were forced to shut down the damaged number-three engine, along also with the number-one engine, due to the torque it created. They then made a slow, circling descent from 30,000 ft (9 km) using only the number-two engine, and landed safely. Then the most dangerous moment of all in orbit in Gemini 8. While out of contact with the ground, the docked spacecraft began to roll, and Armstrong attempted to correct this with the Gemini's Orbit Attitude and Maneuvering System (OAMS). Following the earlier advice of Mission Control, they undocked, but the roll increased dramatically until they were turning rotations about once per second, indicating a problem with Gemini's attitude control. Armstrong engaged the Reentry Control System (RCS) and turned off the OAMS. Mission rules dictated that once this system was turned on, the spacecraft had to reenter at the next possible opportunity. Armstrong was a cat that had 10 lives, so they sent him to the moon, were he saved the long landing in the LEM (Lunar Excursion Module) and made history, which brings us to our weird looking machine in this review. The Bell Aerosystems Lunar Landing Research Vehicle LLTV (nicknamed the "Flying Bedstead") was a Project Apollo era program to build a simulator for the Moon landings. But lets clear something up first. There was five of these vehicles built, the first two were the LLRV or "Research Vehicle". Then later three more were commissioned and called LLTV or "Training Vehicle", they are in design almost identical, but the LLTV's were slightly improved and the forward Styrofoam cockpit enclosure (to simulate the LEM's cockpit) had also the roof removed, to stop an excessive yawing force. Secondly they also had a new mode introduced, called "Lunar Simulation Mode"... of which we will see later. Built of aluminum alloy trusses, the LLRVs (and LLTV) were powered by a General Electric CF700-2V turbofan engine with a thrust of 4,200 lbf (19 kN), mounted vertically in a gimbal. The engine lifted the vehicle to the test altitude of 500ft, and was then throttled back to support five-sixths of the vehicle's weight, simulating the reduced gravity of the Moon. Two hydrogen peroxide lift rockets with thrust that could be varied from 100 to 500 lbf (440 to 2,200 N) handled the vehicle's rate of descent and horizontal movement. Sixteen smaller hydrogen peroxide thrusters, mounted in pairs, gave the pilot control in pitch, yaw and roll. The LLTV is an ungainly insect like machine. Really well designed and produced here by NHAdrian, a developer known for his quirky but very interesting machines, a flying AirCar anybody? The LLRV evolved out of the Bell X-14 (Bell Type 68) experimental VTOL aircraft, but it had problems with ground effects. The X-14 had the reverse effects of helicopters, in that when close to ground, a helicopter needs less power to stay aloft, were as the X-14 needed exactly the opposite in a huge amount of downward thrust. The LLRVs were built by Bell Aerosystems and were used by the FRC (Flight Research Centre) now known as the NASA Armstrong Flight Research Center, at Edwards Air Force Base, California, to study these VTOL dynamics. Helicopters were the obvious choice to simulate Lunar Control Characteristics. And astronauts at the time who were very familiar with helicopters, pushed heavily for them to be used as the LEM training vehicles. But Dick Day the simulations expert at the FRC, pushed heavily for the LLRV to become the better (or correct) vehicle to do the LEM simulations. The person put in charge of the conversion was no other person than Neil Armstrong (the reason he was not on the Apollo 1 fire committee) and was and in the early part of the LLTV "Design Engineering Inspection" that was the selection committee for the program. He quickly deduced that to build a fully modified LEM Trainer, which he called "prohibitively time consuming and expensive" was not the answer, and noted that the characteristics of the LLRV was not at all that different in physical size, and had the same control rocket geometry from the Lunar Lander. When the earlier VTOL program had been completed, the two LLRV's were shipped to Houston in December (12th) 1966, and three new vehicles in trainers with modifications were ordered by NASA, these were the LLTVs, all five machines were used in Lunar training. The earlier LLRV's were reassigned as LLTV A1 and LLTV A2, the new LLTV's were designated LLTV B1, B2 and B3. Neil Armstrong's strong views against Helicopters was against the current normal thinking. This was because Armstrong was noted as a "Engineer Pilot", and not a "Training Pilot", so basically Helicopter pilots were flying Lunar Simulations on Earth, were as Neil Armstrong was studying and flying Lunar Simulations on the Moon. It was a critical assignment that produced an Historic moment. He of course later had that vexatious moment in LLTV A1 in the final 100 ft of descent going into land when his controls had suddenly degraded. By a rule Apollo Commanders had twenty-two flights to certify them for the mission, but for backup commanders in the later stages of the program, these numbers of flights were reduced to maybe a dozen. The LLTV's design is beyond simple, a frame holds the CF700-2V and surrounding it are the four downward facing HP thrusters (earlier LLRV had only two), then the clusters of HP directional thrusters are positioned on the outer frame, it is all a very spacecraft LEM like in design. Tanks hold the Jet-A1 fuel and the twin globes of Hydrogen Peroxide (HP) are outer centre, rear is balance weights and the large equipment/avionics pack. The whole design has been intricately recreated for your flying pleasure, everything is perfectly done here, like noted, very simple, but intricate at the same time to get it all perfectly authentic... and yes you can spend a lot of time just looking at all of the design and on how it all works, this is one clever aspect of a Simulator, as you have almost the real thing on view for your inspection. Can this be called a cockpit? sort of. The original LLRV just had the pilot hanging out on the front on the frame, in the LLTV version is was boxed in to recreate the feeling of the inside of the LEM. The light metal frame construction and riveting is totally excellent, and note the nice touch of the Apollo mission patches... but there is an important one missing? An oversight or just a small trivia question by the developer? The cockpit layout is very familiar if you are also familiar with the LEM's controls. The hand controls both sides, and the instrument box right. Left side here are two levers, the "Lift Engine Control Lever", and the secondary "Lift Thrusters Control Lever" known as the "T-Stick". Top left panel is the CB Control Panel, with Circuit Breakers (fuses) and system switches. Note the rear COM Radio with 25khz and 8.33 khz modes and fuel cock lower. The "Main Control Panel" covers Battery A/B and Generator A/B switches, Altitude Controller over-ride, Lunar Simulation wind compensation switch, Helium Isolation valve, Altitude Thrusters operations mode, Inverter A/B switches, Pitch/Roll AHRS source, Artificial Horizon source and Altitude controller rate sensitivity adjustment knobs for; Pitch, Roll and Yaw. Right side is the "Main Instrument Panel", from top; Engine Fire annunciator and test button, HD quantity indicator, Annunciator Panel, Lateral/Forward velocity indicator, lift rockets chamber pressure, Helium Pressure, analog stop-watch/button cycle, Artificial Horizon, Radio Altimeter and V/S (vertical Speed) indicator, Thrust-to-Weight ratio indicator LSM mode, EGT (Exhaust Gas Temperature gauge), Oil Pressure, Analog Altimeter, Analog Variometer, N1 Indicator, Jet fuel quantity and aft Jet fuel quantity. On the right is the actual LEM panel for comparison, and the main flying instruments in layout are almost identical. The Annunciator panel has 4x4 block of warnings and failures. Note the "LUNAR MODE" selection. Bottom right is the "Right Control Panel". It includes; "Attitude Control mode switches", DC Volts and AC Volts, "Source Switch A/B and finally the same famous "Ground Contact" light. Right hand joystick is fully animated in forward-back and left/right movements, as is the well done NASA pilot in his arm movements... let us call him "Neil". You can hide "Neil" by pressing the seat base, but be careful, it is very easy to mix up the hotspot of the "Ejection Seat", and just disappear. If you move the slider on the pilot's helmet... it will push down the visor, also then go into "Sunglasses" mode, in dimming the view, honestly I'm not sure about this while flying, as you need as much a clear view as possible, and an option to turn it off, but the idea is very clever. _____________ Installation and Settings In X-Plane, you will find the LLTV in the "VTOL" section at the bottom of the "Flight Configuration" page. There are no liveries (laughs) LLTV Authorization is standard with a key, then a restart is required. Control settings are for all the "Control Response" (Pitch,Roll and Yaw) sliders to be at the minimum setting, and at least "5 Flight Models" per frame, it is highly recommended to have at least a 30 frames or more capacity, if not it will struggle to simulate. The LLTV fuel and weights are setup via the X-Plane "Weight, Balance & Fuel" Page, the HP is top, and the Jet Fuel is set lower, note the correct CoG (Centre of Gravity). If you have (or I recommend) a 3-Axis Joystick... then move your Yaw axis to the Joystick X-Axis from the rudder pedals for an authentic feel of the machine, the LEM did not have rudder pedals as both pilots stood up side by side together. A final tip is to set the "Lunar Simulation Mode" to a Toggle or "On/Off" switch, I used the hat on my joystick, the custom command is available and as all the usable "Custom Commands" are noted in the manual. This action will reduce the distraction of the switch between the different modes, and keep your hands on the controls. ____________________ Flying the Lunar Landing Training Vehicle I found that before every flight you have to set your fuel quantity, it resets back to zero if you don't, in other times also top up the H202 tanks, the LLTV guzzles fuel like nothing else, so this is always your first action. The fuel cock is down under the COM Radio, and this needs to be horizontal for fuel flow, then it is the simple need just to flick up the Ignition switch, then the START ENG switch, the system does the rest of the startup sequence, when done it will settle down around 20% RPM and EGT around 450º The startup whine and thrust from the CF700-2V is very good, then becomes a roar if you add in a bit of throttle, plus there is the puffs and blasts of Hydrogen Peroxide all around the vehicle, and you haven't done anything yet? Increasing the throttle increases the noise and the activity from the thrusters as they intensely fire off (really well done) the HP, and slowly your off the ground... and your first target is just to hover. Honestly it's not that hard, just like flying a drone in every aspect... up/down... hover. Then your just glad to lower the LLTV back onto the ground... safety. Confidence restored, "Lets try that again". This time I hovered far higher, the limits are 500 ft and 2 minutes of fuel, and the clock is ticking. Again it was easy to climb and hold, twist the throttle grip and turn easily in the yaw, left or right... then front or back with a slight dip in each direction... "easy peasy" Trickier is sideways... any slip has to be carefully coordinated, and keeping the vehicle almost upright. Push too far in angle or speed and you will easily lose the LLTV, and there is no coming back, except for an explosive crash on the ground. A note that there is an "Ejection" to do an "Armstrong" and get the "hell out of there". There are two modes, the first is really the "Drone" mode were the LLTV flies basically just like a drone. Second flying mode is called "Lunar Simulation Mode" that is activated on the joystick. The difference between them is that with the first (drone) mode the CF700-2V is locked in it's cradle, so the thrust is completely downwards. In Lunar Simulation Mode (LSM)" the engine is now loose on a Gimbal to still produce the balance thrust, but the vehicle angle can now change, however the engine (thrust) stays relative to the ground to simulate the Moon's gravity (1.625 m/s2, about 16.6% to that on Earth's surface or 0.166 ɡ), to replicate the same propulsion system on the LEM. Several other actions also happen when you initiate LSM, first you change levers to the T-Stick, this lever now controls the downward thrusters and in giving you only control over them (disengages the Jet Engine) and lifts the rockets thrust between 20% and 100% power range. Note... there has been an update, v1.01 now has the animation working that moves "Neil's" hand from the throttle to the T-Stick, and the T-Stick movements are now animated as well... The LSM system won't work unless you are at 500ft (or slightly more), then you flick the switch to change the modes... Then the "Luna Mode" light is illuminated to show you are in the active mode. The transition between modes is seemless, initially you can't tell the difference, but adjust the T-Stick and you are quickly aware of the more heavier thrust at your disposal, with both the Jet engine and thrusters now producing lift, actually altitude control is far more easier, you as you have significantly now more control over the machine, but there is more and more lag in reactions the closer you get to the ground. Yaw and slip is still the same, so be careful... but the flying of the "Bedstead" was far easier than I had imagined, you would love to stay here in this controlled environment all day, but your now guzzling fuel at a ferocious rate, so it is time to descend and do a nice controlled landing. The amount of thrust power is excellent, and in reality you do feel what piloting the LEM would actually be like, I was amazing on the amount of power that was available to you, even on the moon! The trick here of course is to learn an actual moon LEM sequence landing, moving forward and picking your landing spot, controlling the flow of the descent and the angle of approach to a hover position and then a "Contact". It would take a fair bit of practice and familiarity with the LLTV to get that all right, but the adrenalin rush would be worth it, remember the old "Lunar Lander" game, well this is far more better and in 3d, you also have the same limited amount of fuel as well! Armstrong noted on his return from the moon. "Eagle (the Lunar Module) flew very much like the Lunar Landing Training Vehicle which I had flown more than 30 times at Ellington Air Force Base near the Space Center. I had made from 50 to 60 landings in the trainer, and the final trajectory I flew to the landing was very much like those flown in practice. That, of course, gave me a good deal of confidence — a comfortable familiarity" Considering the traumatic events on 6th May 1968, then the LLRV and the later LLTV, were actually very reliable over thousands of test flights. Actually only two crashed, the LLTV A1 (Armstrong) and Test pilot Stuart Present ejected again safely from crashing LLTV-2, 29th January 1971, the surviving rest are listed below LLRV-2 (LLRV NASA 951) is on display at the Air Force Flight Test Museum at Edwards Air Force Base. It was lent to the museum by NASA in 2016. LLTV-3 (LLTV NASA 952) is on display at the Johnson Space Center. A Replica of NASA 952 is in a partially complete state in the aircraft boneyard at the Yanks Air Museum. __________________ Summary So how do you replicate landing on the Moon when you have never actually been there? This was the problem facing NASA in 1966. To build a full trainer of the Lunar Excursion Module, or LEM, that was the lunar descent vehicle, was considered then be too expensive and even impractical. Then came the idea to convert two VTOL experimental aircraft at the FRC (Flight Research Centre) now known as the NASA Armstrong Flight Research Center, at Edwards Air Force Base, California. These were LLRVs, later renamed LLTVs (A1/A2) and to build three more for training lunar astronauts in the skills of using the lunar lander in B1/B2 and B3. The LLTV vehicle is reproduced here by NHAdrian, and brilliantly good it is. This is not a helicopter, more drone in skills, but the "LUNAR MODE" is replicated in absolute realism, in allowing you to practise Lunar Landings on Earth, or to practise this significant skill set, and actually get the feel of what flying the LEM was really like. Sounds and the feel of the machine are simply excellent here (it's very loud), the rocket pulses perfectly synchronised, there are no extras or liveries, but a very well detained machine. The LLTV is also fully VR (Virtual Reality) ready, for an even more authentic immersion. With the update v1.01, the T-Stick in "Lunar Mode" is now also animated as well as the throttle control... It is all very clever, very X-Plane as well, and the modeling detail and systems recreated here are exceptional, it is also very Lunar Lander, the 1979 video game, you get addicted to it, and try over and over again to achieve your goal... of landing on the Moon. Highly recommended, and great authentic fun. __________________________ Yes! - the LLTV - Lunar Landing Training Vehicle by NHAdrian is NOW available from the X-Plane.Org Store here : LLTV - Lunar Landing Training Vehicle Price is US$19.95 Requirements X-Plane 12 Windows, Mac (using Rosetta) or Linux 4GB VRAM Minimum - 8GB+ VRAM Recommended Download Size: 331 MB Current Version : 1.0 (December 1st 2023) Important note for MAC OS X users: please read this article about enabling Rosetta: https://www.x-plane.com/kb/using-x-plane-11-addons-with-x-plane-12-on-mac-systems/ Designed by NHAdrian - Support forum for the LLTV by NHAdrian Installation Installation of LLTV is done via a download of 296 Mb... With a total installation size of 566Mb into the Aircraft Folder. Authorization is required, then a full X-Plane restart. As noted above there is a requirement to use Rosetta on the Mac System There is one basic highly detailed Manual pdf (29 pages) with an install, set up, description of the LLTV, plus full checklists. The menu design is to replicate an official NASA document. Review System Specifications Windows - 12th Gen IS1700 Core i7 12700K 12 Core 3.60 GHz CPU - 64bit -32 Gb single 1067 Mhz DDR4 2133 - PNY GeForce RTX 3080 10GB XLR8 - Samsung 970 EVO+ 2TB SSD Software: - Windows 11 Pro - X-Plane 12.08b3 (This is a Beta review). Plugins: Traffic Global - JustFlight-Traffic (X-Plane.OrgStore) US$52.99 : Global SFD plugin US$30.00 Scenery or Aircraft - KEFD - Ellington Field - X-Plane default - Free ___________________________ News by Stephen Dutton 1st December 2023 Copyright©2023: X-Plane Reviews (Disclaimer. All images and text in this review are the work and property of X-PlaneReviews, no sharing or copy of the content is allowed without consent from the author as per copyright conditions) All Rights Reserved
  4. NEWS! - Aircraft Released : Rand Robinson KR-2S by NHAdrian The Rand Robinson KR-1 is a single-seat, single-engine sport aircraft designed in the United States in the early 1970s and marketed for homebuilding (Kit Aircraft). A two-seat version is marketed as the KR-2. It is a low-wing cantilever monoplane of conventional design with an enclosed cockpit and tailwheel undercarriage. As originally designed, the main undercarriage units of the KR-1 and basic KR-2 were manually retractable, folding backwards into the wings, while the KR-2T tandem-seat version had fixed tricycle undercarriage. This particular release for The X-Plane Simulator is based as a reference of an airframe built by Marcel Driessen in 2016, registered as PH-KRS. The Developer has a personal connection to the aircraft, and has flown the KR-2S many times. This brings you accurate feedback in all phases of flight, and the excellent sound environment that is based on real life recordings of the same KR-2S to increase immersion to the maximum. This an X-Plane 12 aircraft only, X-Plane 11 is not available here... and there is a note for all MAC OS X users, they will need read this article about enabling Rosetta: https://www.x-plane.com/kb/using-x-plane-11-addons-with-x-plane-12-on-mac-systems/ Product features The project is built for X-Plane 12 Design was made based on a real set of Rand Robinson KR-2S building plans Accurate flight model tuned for XP12 latest features Accurate engine and systems modelling Fully operational circuit brakers system Accurate radio, transponder, EFIS and EIS instrument simulation incl. realistic screen content and functionality Automatic toe brake assistance for users without toe brakes assigned to joystick axes Full FMOD sound package 4K high-definition PBR textures XP12 rain effect implemented Detailed simulation of all aviation lights FMOD sound system VR Ready Designed by NHAdrian Support forum for the KR-2S Rand Robinson KR-S2 is now available from the X-Plane.OrgStore... priced at only US$24.95! Images courtesy of NHAdrian ___________________________ Yes! - the Rand Robinson KR-2S by NHAdrian is NOW available from the X-Plane.Org Store here : Rand Robinson KR-2S Price is US$24.95 Requirements X-Plane 12 (not compatible with XP11) Windows. Mac or Linux 4 GB VRAM Minimum - 8 GB+ VRAM Recommended Download Size: 736 MB Current Version : 1.0 (July 15th 2023) ___________________________ News by Stephen Dutton 16th July 2023 Copyright©2023: X-Plane Reviews (Disclaimer. All images and text in this review are the work and property of X-PlaneReviews, no sharing or copy of the content is allowed without consent from the author as per copyright conditions) All Rights Reserved
  5. Aircraft/Car Review : AirCar Project by NHAdrian This review is starting in a driveway, on a street, amongst the X-Plane Autogen, yet we are going flying? An unusual concept. There was always the concept of driving to the airport, converting the road vehicle to an aircraft configuration, then go flying... coming back to do the reverse, stow the wings and then drive home. It has been on television, remember "Supercar", or the more better concept of the "MAC Jet Air Car", that could convert from a road car to either a plane or a boat in the Joe 90 TV Series 1968, by Gerry (Thunderbirds) Anderson. Then so the oddities of home grown Car/Aircraft, of which most of them never really got off the ground, in this new drone era, is the same idea going to go back to the future, and obviously they will try again to create the road/fly concept, but this time without the heavy engine that bulks up the idea. But an Air-Car concept does exist... it's called KleinVision, and the founder is Stefan Klein a Slovakian. He has devoted the last twenty years converting his flying-car dream into reality. Currently he has completed the flying prototype of an AirCar that has also been tested successfully at Nitra airport in October 2019. This review is that same concept brought to life in the X-Plane Simulator by talented developer NHAdrian. We will look at the car aspect first. The forward area is a bit Porsche 917 in the canopy and nose, even the rear to a point is the same shape in the 917 Long-tail variant, and you don't see the steering front wheels as they are hidden by aerodynamic covers. And you open the canopy via the door switch externally, or lock handle on the roof. The AirCar is a two seater, or a pilot and a passenger. You feel the shell internal design (probably carbon fibre) so it feels a bit "Boaty". Inlaid on the shell are the twin leather seats with red inserts and seatbelts, the quality is perfect to the real car/aircraft. Fuel Selector ON/OFF is set high between the seats. For an hybrid machine, and a part aircraft, there isn't a lot of instruments, more like a car layout arrangement than aviation focused, there is even no rudder pedals for simplicity? Turning on the power will give you the AIRCAR logo on the screens (a nice touch), there are three, instruments left, engine and control positions centre, backup instrument EFD and AviTab right (Plugin required). First is the steering wheel... but in reality it is a Yoke, but in CAR Mode it will only move left right and not forwards or backwards. It is well done and nicely detailed, with a PTT (Push-To-Talk Switch) left and right a car horn! Directly ahead of the driver/pilot is the main instrument binnacle. Here there are four instruments, the first dial left in car mode is blank... then there are the main flight instruments of SPEED, VERTICAL SPEED (V/S) and ALTITUDE, the air pressure adjustment BARO and indicator is built in. To the left are the switches to cover... Trim Adjustment (Elevator) and marker, Fuel Pump, INOP, Battery (Power) and START - ON - OFF, the large red handle is the BRS (Ballistic Recovery System) or parachute. Note top centre Dashboard is the Whisky Compass. Centre display covers the Engine Instruments. Here again in CAR Mode. The large main dial is the RPM graph, with the direction indicator in the middle that covers D (Drive), N (Neutral) and R (Reverse). Left three bar indicators cover... Manifold Pressure, Water Temperature and Battary Voltage, below is the Flaps indicator. The right side covers the current time and date, Fuel Levels, RPM value. Annunciators (very car like) cover Taxi Lights, Landing (Driving) Lights, Oil Pressure, Parking Brake, Tire Blown, Generator Fault, Emergency Lights, ESP (Skidding), Turn Right and Left signals. Below the display is the Flap selector switch (two stage), and a Simple COMM radio. Right display panel has an EFD (Electronic Flight Display) with Airspeed and Altitude Tapes, and Artificial Horizon, Slip, Bank Angle, Turn Coordinator, V/S and Groundspeed indicator, the full backup instrument package. I like the AIRCAR logo below. Left is the AviTab display that can be used with Navigraph charts (Subscription), or moving map... and if you put the CAR into reverse it will show a "Reverse Camera". The lower Circuit Breaker (Fuses) panel are all static, but are well done. Last panel far left is the lighting switch panel, with; Strobe Lighting, Cockpit Light (Dome), Emergency Light (Car hazard lights), Turn Signals and the main front lights in Taxi Lights - Landing Lights. The Centre Console has three levers... Throttle, Parking Brake and Hand Brake, and Direction Lever. This lever is used only in CAR Mode, Neutral, or Forwards (Drive) and Reverse. The detail in the cockpit is excellent and is a very high quality, overall a very nice place to be. Put the weight above 50 kgs for the passenger and a woman will appear, click on her and she will change to a male. Both the Pilot and Male passenger are fluidly animated, but the woman is not. Not really about the AirCar, but it is interesting to sit in a street rather than an airfield. X-Plane 12 trees sway in the background, filter light, and look very realistic... It is quite easy to drive... well like a car. Fuel Pump on, and the starter switch up to START, you have to hold the switch up for a while until it catches and runs, then settles down around 650 rpm. Power is provided by a 1.6 litre BMW road car engine, running on automotive petrol or gasoline and delivering 104 kilowatts (139 hp). Engine is set mid-vehicle for balance. Put the "Direction Lever" into D or Drive, and release the brake... as there are no foot-pedals, you have to have "Regular" Brake set in either a "Key" Command, or like me use my "Pinky" Joystick lever as my braking, throttle is by the throttle lever not a car pedal... Turning circle is atrocious, so you have to plan your speed when turning, but only then it is still doable... In the Car mode it is basically like driving a car, feels like driving a car, very easy, very, very realistic! I'm driving with a joystick, so only small movements are needed, just like fast Taxiing... "Oh dear... Some people just don't know the road rules! tut, tut". Building speed is interesting, you have to think ahead, but with only one small slip and you can easily lose it... focus. I have to think harder, as I drive on the (English) left, not the American right, this way or that way? I find the freeway/motorway to go west on the Polk Parkway (570). Overall most of the driving is sound, but there are weird curve-balls coming from X-Plane. Motorway off ramps can quickly change to dirt? and then you can get stuck? Motorway sections that go under other roads can also make you become undone, as they will easily flip the AirCar... But generally you can drive around quite easily. In joining the motorway, you can up the speed more, but traveling at nearly 100 kmh it requires a lot of focus and concentration, but it also gives you a smile, a mile wide on your face... it is serious fun! You power along... focused, extremely focused, a slight nudge of the stick, and your gone? Navigation is tricky? The X-Plane "MAP" sort of shows you were you are, but to navigate roads the AviTab moving map is actually far better. Time to come off at "Supnik" Obviously the signage does not match the map? Off ramp and then I am at Lakeland Linder International Airport, or in ICAO speak KLAL. And the home of "Sun 'n Fun" airshow. "This is certainly not the usual way I arrive at KLAL?" I turn in, and then make my way around the perimeter road to my usual Lakeland "Office". Now I am at the point I usually START the aircraft review, but first we have to do something to fly! Set into the rear of the vehicle are a set of folded wings... ... put the car in neutral, parkbrake ON, and the canopy has to be CLOSED. Then open up a flap on the right side panel. Flip up the (red) switch to transfer the power supply, then click downwards the other switch from CAR to AIRPLANE, when the light goes green, then the conversion happens! First twin doors open mid-section to reveal the mechanism, which has been faithfully internally reproduced in detail... ... then the tail section will extend out rearwards. Then the internal mechanism will lift out the wings vertically.... ... then drop them to the horizontal position, then the wing unfolds into the full wing. The twin mid-section doors will then close, and you can now shut the side flap to lock everything ready for flight. You can watch it convert a hundred times and still not get bored. Now you have AIR side of CAR, in an aircraft. Several changes have also happened on the instrument panel. One a AOA (Angle of Attack) instrument is now shown in the far left dial. The direction lever is now locked with an A to denote you are in aircraft mode, also noted on centre display as AIRPLANE... .... also the steering wheel now becomes a full left/right - in/out Yoke. "But how to use the rudder without rudder pedals" you ask? Well they work (a bit like X-Plane without a yaw or pedal input) in by being connected to the ailerons, turn left/right and rudders turn in unison to the ailerons. The huge stabiliser works with the in/out Yoke inputs. Two stage flaps are built into the underside of the wings, an old-fashioned way of working flaps (think DC-3), but well done here. Air propulsion is via a huge WOODCOMP s.r.o.68 [in] 1,720 [mm] twin composite blade, ground adjustable propeller, sitting aft between the twin-booms. And there now you have an AirCar ready to fly... Flying the AirCar In Aircraft mode, starting the AirCar is exactly the same, fuel pump on, pushup the STARTER switch and the rpm rises to 650, and your ready to go... more weird is that you just let go of the park brake and push up the throttle, and "Drive" to the runway? Is it "Taxiing", no not really as it doesn't feel like taxiing, but like really driving around the taxiways of an airfield in your own car? Lighting forward is again very car like, Taxi and Landing lights are built in the same way Sounds, well a low "brrm brrm" in Car mode, and a sort of very, very smooth General Aviation modern sound, almost electric feel in Aircraft Mode, and the BMW engine sounds like a high performance lamborghini when you put the power on... weird, but extremely realistic. So the transition from driving on the roads to in being an aircraft is seemless, even in both modes. More weird is the very low CofG or Centre of Gravity, so your sitting low, not high, almost flat to the ground, more weird again there are no rudder pedals? you look and want to feel them, but they are obviously not there. Brake off, power up... the takeoff roll is different, your very low down with a lot of width. Your very used to high and narrow like in a Cessna, it feels ODD? It tracks very nicely, because you are low and wide, then at 150 km/h (81 knts) you pull back on the yoke, note that once you get within the white.. then moving into the green band you are at rotate speed... and then fly! The AirCar will leave the ground quite cleanly, but once you hit the air, then you will quickly need to orientate the way you handle the machine, or feel it... It's not an aircraft with a separate rudder control, it's flat in design, so the air or wind tend to lift the flat wide underside of the machine, slight movements are required to keep it steady and level... Rate of climb is actually a very good 980 fpm ( 4.97 m/s), almost 1000 ft per minute as with the best angle of climb speed of 83 kts (155 km/h), the best overall rate of climb speed is actually 89 kts (165 (km/h)... ... but your flying, if still trying to work out the best way to do so, keeping it simple is one aspect, and don't try to over think it, or try any silly maneuvers, it's not a fully fledged aerodynamic machine, but a large mass flying through the air. Soon I'm trimming the AirCar out, and it responds quite nicely to trim changes. Now your straight and level... Top speed is 115 Kts (213 km/h), but you cruise around 75% power at 2,000 ft or 105 Kts (195 km/h), but you can't go to far, as the range is 158 Nm (300 km), or about 1:30 h:mm flying time, and the fuel tanks empty very, very quickly, even this small circuit gulped a third of a tank(s) of fuel. Full service ceiling is 16,404 ft (5,000 m), but you would never ever use that. Under side is really well sculptured, with the exhausts well modeled, but it looks like a flying wing. Sounds are nice in flight, 360º doppler with a great direct rear prop wash noise... it all feels very authentic. The AirCar is approved for normal and these listed maneuvers: Steep turns not exceeding 60° bank, Lazy eights, Chandelles and even Stalls (except whip stalls), but basically you wouldn't go there. You get knocked around a lot in gusty conditions, no Autopilot either to relieve the workload, basically overall you just trim-out and fly. Soon I'm over Lakeland Linder, then following my earlier path back up the Polk Parkway (570). I'm going to admit I miss my aircraft instruments, VOR pointers, Course pointers... there is the EFD (Electronic Flight Display) which is very handy, but it's hard to work out circuits and finding the correct runway angles. Now I'm over the house that I was parked at only an hour ago. Approach is tricky... The AirCar will descend, but only by putting the nose down, of course you then go too fast, so you have to plan your landing a fair way out. I found 400 ft @ 147 kmh, about 80 knts to be the right height and approach speed... ... almost anything will cause the AirCar to balloon, rise... like the wrong angle of attack, dropping the flaps, strong winds, so it needs steady pair of hands to get the approach right... even then the AirCar will create a massive ground effect boundary as you get closer to the runway... Go down!, Go down!, but the cushion of air just keeps you airborne... more odd is the view out of the AirCar... ... there is the moment you feel the normal landing point, and so high off the runway, but the AirCar just keeps on dropping down, then your sitting scary low! You eyes are saucers as you feel your body is going to actually touch the runway, but then the rear wheels thankfully touch, a small flare works well, and so you let the nose down gently... touch is around 135 kmh, or 72 knts, and the braking is really good, the wide low width keeps you steady as well as the speed runs off... It was a very interesting landing. But one I feel you could master with a bit of practise. Lighting Lighting is basic, but well tuned for X-Plane 12. As noted there are the Taxi/Landing lights in the nose, and also the flashing "Hazard" lights which could be used as a beacon effect. Standard Navigation lights and Strobes (nice) are both LED. Notable are the twin red rear lights for the Car, with brighter braking lights that look realistic on the road, in the air they are the Navigation lights... clever! Instrument panel lighting is one setting (bright) with no adjustment, there are also two red set "Dome" lights up of the seats for reading map/navigation... There is the long taxi... or drive back to the apron. Once there you just flip a couple of switches, and the Air-Car conversion happens in reverse. Restart the engine, and off you go on to drive home, great isn't it. And all very Gerry Anderson! There are no Menus, or Liveries with the package. ____________________ Summary The concept of driving to the airport, converting the road vehicle to an aircraft configuration, and then go flying. Has been around for as long as the aircraft has existed, there has been a lot of crazy odd-ball designs in trying to convert a Car into an Aircraft and most if not all ideas have failed, the AirCar is a concept that really has just stayed a concept. But a Slovakian called Stefan Klein has created the KleinVision, or AirCar, and it really does convert from a road car into a flying machine, and has really flown successfully at Nitra airport in October 2019. Naturally anything "Experimental" will work it's way into the X-Plane Simulator. This AirCar is that concept brought to life in the X-Plane Simulator by the talented developer NHAdrian. And extremely well done it is... it works in simplicity as a Car, but can covert to Aircraft Mode with the touch of two switches. Detail is excellent as the AirCar is reproduced here in full, with both the internal and external detail as per the real machine, yes you can drive it on X-Plane's roads, which is a lot of fun, but also fly and feel the concept as well. The attention even to the smallest detail is astounding, but remember, it is not an aircraft with full aircraft instruments, there is even no rudder pedals! But it does fly and is also great fun to practise and master this hybrid machine. There are no Menus or Liveries. X-Plane is the foundation of "Experimental" machines, and this AirCar certainly fills out that brief, it's clever, but as noted also a lot of fun, I loved it... Highly Recommended. ____________________ The AirCar Project - Experimental Road/Air vehicle by NHAdrian is NOW available here at the X-Plane.OrgStore AirCar Project - Experimental Road/Air vehicle Price is US$29.95 This aircraft is only X-Plane12 and not X-Plane 11 supported Requirements X-Plane 12 Only Windows, Mac (using Rosetta) or Linux 4GB VRAM Minimum - 8GB+ VRAM Recommended Download Size: 302 MB Current Version : 1.0 (March 29th 2023) Download for the AirCar by NHAdrian is 288Mb Installation is 383Mb in your X-Plane General Aviation Folder. Documentation: AirCar_Users_Manual_1.0.0 Full description of the AirCar and how to drive/fly the machine The AviTab plugin is also required to use this aircraft, and it is deposited in your X-Plane Plugins folder. For MAC OS X users: please read this article about enabling Rosetta: https://www.x-plane.com/kb/using-x-plane-11-addons-with-x-plane-12-on-mac-systems/ _____________________ Aircraft Review by Stephen Dutton 14th April 2023 Copyright©2023: X-Plane Reviews Review System Specifications:  Windows - 12th Gen IS1700 Core i7 12700K 12 Core 3.60 GHz CPU - 64bit -32 Gb single 1067 Mhz DDR4 2133 - PNY GeForce RTX 3080 10GB XLR8 - Samsung 970 EVO+ 2TB SSD Software: - Windows 11 Pro - X-Plane 12.05b3 (This is a beta review). Plugins: JustFlight-Traffic (X-Plane.OrgStore) US$52.99 : Global SFD plugin US$30.00 Scenery or Aircraft - KLAL - Lakeland Linder Regional Airport 1.0 by Nicolas (Airport by NAPS) - (X-Plane.Org) - Free (Disclaimer. All images and text in this review are the work and property of X-PlaneReviews, no sharing or copy of the content is allowed without consent from the author as per copyright conditions) All Rights Reserved
  6. NEWS! - Aircraft update X-Plane 12 : Let L-200D Morava by PWDT&NHAdrian This aircraft was one of the most interesting machines of 2021, it is a classic aircraft... it also won my best (Classic) category of the year 2020 Best Classic Aircraft : Let L-200D Morava by PWDT&NHAdrian 🏅 A really interesting aircraft with an extremely high quality design and... er, interesting features. The quality was off the wall, but so were the interesting details and designs. Too far in some cases, in the aircraft was a bit tricky to fly, but since resolved and simplified. The full release review is here: Classic Aircraft Review : Let L-200D Morava by PWDT&NHAdrian. So if the Let Morava was so very good in X-Plane 11, then this now refined machine should be exceptional in X-Plane 12. This is an update, not an upgrade to X-Plane 12, meaning free to current purchasers... nice! The update v1.4.0. basically covers the requirements of the aircraft to conform to the newer X-Plane 12 effects and features... Version 1.4.0 (Jan 5th 2023) New version for X-Plane 12 Implemented XP12 rain effect Updated cockpit volumetric lights Updated flight model Updated PBR textures to match XP12 rendering capabilities Updated external lights to use XP12 new effects The Let L-200 Morava is a retractable landing gear four seat light twin which was one of the few light aircraft to be exported from behind the Iron Curtain during the Cold War era, albeit in small numbers. The Morava is distinguishable by its twin tails, standard thermal wing deicing equipment and inverted inline engines. The prototype XL-200 Morava flew for the first time on April 8 1957. The XL-200 prototype and a series of preproduction. L-200s were powered by 120kW (160hp) Walter Minor 6-III inline sixes. The L-200D remained in production until 1969, and 5 aircraft were licence built in Slovenia (then part of Yugoslavia) by Libis. Most L-200 production aircraft was sold to customers within the Soviet Bloc - Aeroflot for example operated a large number in a range of different roles. However small numbers were exported to western Europe, the USA and Australia. Please be aware, Morava is a multi engine aircraft without autopilot, so not an easy-to-fly aircraft! Images and video courtesy of PWDT&NHAdrian ________________________________________ The Let L-200D Morava by PWDT&NHAdrian is now available from the X-Plane.OrgStore!... Here: Let L-200D Morava Price is US$25.95 Requirements X-Plane 12 or X-Plane 11 Windows, Mac or Linux 4 GB VRAM minimum - 8 GB+ VRAM Recommended Download Size: 1.3 GB Current version: 1.4 (January 5th 2023) ________________ NEWS! by Stephen Dutton 6th January 2023 Copyright©2023: X-Plane Reviews Disclaimer. All images and text in this review are the work and property of X-PlaneReviews, no sharing or copy of the content is allowed without consent from the author as per copyright conditions) All Right Reserved.
  7. NEWS! - Add-on : PiperSport Expansion Pack - XP12 With Carenado not updating or even really having no involvement with X-Plane over the last three years, then what happens to all that hanger full of aircraft that was at last count 45 Aircraft, and with some very beloved machines which are in there to lose with the transition over to the X-Plane 12 Simulator? And you wouldn't you also like your Carenado/Alabeo aircraft to fly in X-Plane 12 as well? Well here is an interesting one. With Carenado not responsive, NHAdrian has created an expansion package that will remove the older non-working files and replace them with new X-Plane 12 files for the Alabeo PiperSport... and the results are quite spectacular! Product features Accurate flight model tuned for XP12 latest features Accurate engine and systems modelling Fully operational avionics and circuit breakers system Realistic BRS system with custom physics to match real behavior Animated crew and bags with show/hide animations according to weight configuration Full FMOD sound package 4K revamped high-definition PBR textures Missing cockpit objects replaced Many cockpit items re-modelled New volumetric external- and cockpit light system XP12 rain effect implemented Full VR compatible Detailed flight manual included New stunning livery by Nhadrian Plain white livery for painters The quality and detail is simply off the planet... is this really an old faded Carenado/Alabeo aircraft? It flies like it looks with the X-Plane 12 dynamics, and I spent a fair while tumbling around in the sky with glee with this Sports aircraft. There is a clever installer supplied to do the conversion process, but you will need the original Alabeo PiperSport to install the package. Go try it now, and you will be as amazed as I was on the quality conversion... okay that is one Carenado/Alabeo aircraft down, only 44 to GO! Designed by NHAdrian - Popular Freeware developer and co-designer of the L-200 Morava. Designer of the Acro Racer Support forum for the Pipersport Expansion Pack ________________ Yes! the PiperSport Expansion Pack - XP12 by NHAdrian is available from the X-Plane.Org Store here : PiperSport Expansion Pack - XP12 Price is US$14.90 Requirements Alabeo PiperSport is required . This is an add-on pack. It will not run by itself. X-Plane 12 (not compatible with XP11) Windows. Mac or Linux: Mac or Linux user need to run the .exe installer in Wine 4 GB VRAM Minimum - 8 GB+ VRAM Recommended Download Size: 467 MB Current Version : 1.0 (September 29th 2022) ________________ News by Stephen Dutton 30th September 2022 Copyright©2022: X-Plane Reviews Disclaimer. All images and text in this review are the work and property of X-PlaneReviews, no sharing or copy of the content is allowed without consent from the author as per copyright conditions) All Right Reserved.
  8. Aircraft Review : NHRacer by NHAdrian FutureTech is coming. The dream of flying cars and the conceivability of "Blade Runner" Spinners is of science fiction. But the advent of Drones, even if on currently a small scale are creating a revolution. Now suddenly we have Uber and others already prophesying the futuristic notions, that yes even in a few years we will all be simply flying around up there as Deckards. There is a big difference between a "Flying Car" and a Drone. Flying cars have actual wings or rotor blades (Gyrocopter) and travel on normal roads, but can fly. Drones are altogether different, not even a helicopter, but are multi-bladed lifting machines and there is a big difference in being called a Multicopter. My personal take on this is that with any futuristic speculation, there has to be an element of realism or realistic expectations on these hundreds of Multicopters twirling fast around above your heads. For one regulation would be required. As humans can't even drive sensibly on roads, never mind letting us all loose in the air, and then there is the high noise factor, as they are called "Drones" for a noisy reason. Then the biggest variable is the weather... Drones can easily fly in calm controlled conditions, but not within the usual changeable weather patterns... however I do think that passenger drones will become reality, and will one day shuttle you from point A to Point B, but I doubt (unless homemade) you will park one in your garage. X-Plane in Laminar Research has however noted that Drone aircraft will be part of the future of the Simulator. Again I find this category very exciting, and there is now also a category now set out in the "Flight Configuration" menu ready for the coming onslaught, called "VTOL". In reality X-Plane has already, and to point, to the core of the simulator's ideal to do experimental aircraft in the Simulator, so this is not a completely new area to us. But it is acknowledging the coming realisation of the new category in aviation, and that aspect is again very exciting. NHRacer by NHAdrian This Multicopter by NHAdrian of Let L-200D Morava fame is still more in the "experimental aircraft" category than a real world machine. But it does create a sort of insight on how these aircraft will fly and the feel of flying them in the future. The NHRacer looks like a bathtub with six pylons connected, or more a airborne Bobsled in it's racer guise... The bobsled... sorry fuselage has six pylons attached with twin-blade propellers, but only the two central pylons rotate... .... this action creates the "Yaw" movement of the aircraft as the four other blades are fixed. The directions are created in say the pitch action by tilting your Multicopter forward and titling backwards and in the same manner as rolling left or right. By adjusting the pitch, your drone will sag down in the front causing it to go forward, or sag down in the back causing it to go backwards. So there is no rotor head or collective movement adjustment like you find on a helicopter. The pylon detail is very good, with an exposed 40kW motor on each pylon with a built in Navigation lighting. Blades are composite carbon fibre weaves that look very and highly realistic. Carbon Fibre weaves are also used on the four leg stands (not the usual helicopter skids). Under a panel at the rear there is the Electrical recharge socket, just press the socket to instantly recharge the NHRacer's batteries... I would have liked an external charger and cable with both the same instant recharge or slow recharge options. There are also four landing lights built into the shark like nose. The Pilot (Racer?) is animated with the excellent head movements and with both left (throttle), right (joystick) arm movements... Your view though is constrained as being placed within the pilot's helmet, and there is the optional (hotspot) to hide this helmet effect or to move to a full screen view directly above the left throttle lever. You can hide the pilot also via a hotspot on the right leg (but not from the external view). Instrument Panel The instrument panel is basic, but very interesting from an aviation point of view... in fact there are only three instruments that are primary aircraft instruments on the panel. The big centre left switch is the main power switch, and turning it on will start up a lot of system checks, including left a Garmin G5 AH (Artificial Horizion) that is more like a fully Integrated Standby Flight Display (ISFD). The "Garmin" logo comes up on startup. Far right is the NHAdrian Flight Controller status display, that also has a great test and startup procedure. Turn on the avionics and then two large display screens start up with the COM device (radio) to the right. The left large display is the Electric Drive Management System (EDMS), and the right display is the Battery Data Management System (BDMS). Final large instrument centre left lower is the Davtron M850 Chronometer. The four centre switches cover MASTER (Power), AVIONICS, NAV (Navigation) LIGHT and LANDING LIGHT. Below is the three setting FLIGHT MODE SELECTOR with ACROBATIC, STABILIZED and ALTITUDE HOLD modes. There are five (working) Circuit Breakers far left and a Main ARMING power switch far right. In reality it is the motors start/stop switch under the red cover. Finally lower right are the ACRO MODE RATES that adjust the ROLL, PITCH and YAW rates. These adjustments allow you to adjust maximum rotating rate in either the Roll, Pitch and Yaw directions for maximum roll control input. STABILIZED left mode banking limit will also adjust the roll and pitch control inputs to be scaled to this banking range. There is a Samsung branded AviTab Tablet, that can be accessed via a hotspot on the far left main circuit breaker module. Flying the NHRacer Starting up the NHRacer is almost a joke... all power on and ready, just flip up the Red ARMED cover and flip up the switch, and instantly all six blades are in action.... Sounds are very fast twirly blade noises, but very realistic (the only other sounds are wind noises). To fly just advance the throttle (could it be called a throttle here, or a power stick?) and up you go! The aircraft is very stable, you go up and down within the same space, movements in any direction are minute, just teeny-weeny adjustments on the joystick is all that is required to move in the direction you want to go. So the question is, is the Multicopter like flying a helicopter? Well yes and no. Like a helicopter you still adjust the directions via small input movements, and there is still the side-slip feel... but the unlike a rotor based aircraft the platform is extremely stable... hovering in a chopper is a challenge, but here it is a complete doddle. So in reality anyone should easily fly the NHRacer. As a side note I did set up my external throttle lever in the reverse direction to get the same feel as flying in a helicopter (collective), the throttle setting the other way around messed up my flying brain. The power of each motor is shown in the EDMS, and note how very quickly the power usage creates a very real "Range Anxiety" feeling, as you can't fly too far away from base, or for long. Range or time flying is noted around 10-15 minutes only with today’s Li-HV battery cells. Huge fun is just spinning or Yawing on an axis, but don't get carried away and start twirling around too fast or you will lose the Multicopter, said the same for just pulling the power down too quickly, as the plummet to the ground is quick and quite deathly... You can't be aggressive here like in a helicopter. To move forward fast you can drop the nose and wind up the collective and the chopper will move forward and quickly... try that with a multicopter and it just sorta stalls, as the blades don't move in a thrust vectoring way (or to pitch or roll into the direction you action). So a slight dip of the nose is far more effective, and you will very quickly gain speed... secondly there is no front or back... the Multicopter will go as fast sideways as forwards, even fast straight backwards if you are brave enough. The trick here is in the need to use the yaw to keep the nose pointing forwards in the right direction. So the Multicopter is very, very easy to fly, but be aware if it goes wrong, it goes really wrong in a big way. So you fly it like flying a flat wide pancake, keeping it level and smooth in the air. 5º nose down is the most effective (same going backwards!). Move the stick to the right and the aircraft will roll, but will not actually bank to the right, but instead only tilt? To get a change of direction then you bring the yaw in, and a bit more power to push you in the direction you want to go. It is a little tricky as all aircraft have a central balance point (CofG) that you fly around, but not in the Multicopter? There are the three different flying modes... STABILIZED is the the default and the standard setting for basic flying. AEROBATIC changes the behavior In the flight controller system allows the roll/pitch/yaw input controls in the desired rotation rate which can now be adjusted (scaled) with the appropriate knobs. The more command input the more rotational rate applies. The throttle behavior is linear in this flight mode, the center throttle position is about the hover throttle required. Inverted maneuvers are also available in this flight mode like loop and roll, although continuous inverted flight is not possible because of always positive throttle direction. ALTITUDE HOLD FLIGHT MODE will simply hold your current altitude, so it is a sort of Autopilot function... ... in the HOLD mode you have to be careful not to adjust your throttle position to much, as the hold mode will not move around much, but your power will. So when you come back into the default STABILIZED mode the aircraft will suddenly jump or revert to the new power setting. Flight controller display also gives you feedback on the actual state of the Flight Controller (FC) system. It shows information on the bootup procedure. FC screen has different background colors depending on the actual current state of the system; Blue – system startup, green – system ready, red – error status Lighting There are only two lighting adjustments available for the Instruments, one knob that adjusts the instrument brightness, and another knob that adjusts the panel LED light strip under the glareshield. Overall the panel lighting is excellent. External lighting has a navigation light on each pylon (Four forward green, and two rear red), and four very weak "Landing Lights" in the nose. Again your descent has to be controlled. Pitching your nose down like in a helicopter won't simply lower your altitude, it is a combination of lower lift thrust and angling the NR Racer to deliver a realistic descent rate, note the increasing or decreasing "Range Anxiety". Drag of course can slow you down, but the Multicopter is so very slippery in the air, in being very light and aerodynamic. That a slight yaw can help to takeaway the streamlined nose on approach, so you have to approach the field carefully, and yawing to keep the vehicle straight. Control can be tricky, not helicopter tricky but different tricky... the inputs to move forwards, slow down and adjust are the same in a way to a helicopter, but you have a more flat lift aspect, so your platform overall is far more stable... still very small movements in any direction helps. 7 Min of lift remaining and I go into the below 30% yellow warning zone... "Gulp". So you have to be in a "Cool" mindset, don't panic, but fly the machine.... .... Interesting is that you can fly the Racer in spaces that you would never ever consider in a Helicopter, better still you can hover totally in control, then maneuver around that situation without fear and adjust your position with precision. Be very aware of the X-Plane boundary... it will grab you and pull you down very violently and quickly, so a lift adjustment is required to hold the slow rate of descent when going through the boundary... and slow, slow going down is very good, unless you want that "pit of your stomach" falling feeling. Touch of a hover slightly above the ground is a worthwhile idea, then control the final lowering to touchdown. The Racer does give you so much control, and it is far easier than it looks. You are of course supposed to push the envelope, I am just flying the Multicopter around, and not mastering the extreme dynamics or as the name suggests... racing. But I doubt any racing or course flying would give you very long, before the power supply starts to go into critical red mode... so keep it tight and fast. Supplied are object elements to create you own racing course in WED, provided are six Flags and six Gates to fly around. Emergency Parachute We know your power can sort of deflate rather quickly. So what if to say, your at 5400ft above planet earth, and your numbers are not looking real good? Certain death awaits! Well thankfully the NHRacer has a safety tool built in, with a parachute situated just rear of the pilot... ... there is a pull lever under the instrument panel that releases a lifesaving parachute from the rear bay... boom! and the six electric engines all immediately also stop at the same time. Nicely done are the support cables from the NHRacer to a central bracket, then to the extended cables upwards to the bright red&white parachute. From 4500ft it is a long slow way down, but safe. Landing is with a "Thump"... but worse is the very long walk back to the airfield. Liveries There are eight funky liveries, including three camouflage, some very carnival, Mighty 8 and a bold red racer. There is also a blank white (default) and a painkit to create your own racing design. Summary A new aviation category is now being born out of the unexpected success of Drones. VTOL, or multi-bladed lifting machines are not really a helicopter or an aircraft per-se, but a completely new dimension to flying. Multicopters, do have some areas in common with helicopters, in being mostly vertical flight machines. But there are also significant differences in the way you fly these a more sturdy fixed propeller machines, only the Yaw axis is manoeuvrable in a dynamic sense. NHAdrian in context has created a sort of flying bobsled, a machine to race through a created race course... that is in itself a very exciting aspect of this machine drone. But the really interesting area is on how you learn and fly this exciting coming of age (and a neighbourhood) near you drone style machine... and very interesting concept, and to learn it is. NHAdrian has certainly given you all the fundamentals to create a very realistic machine to understand and even to enjoy immensely the future of local airspace flying. The design presented here is clever, with highly realistic instrument and the correct details to understand these machines. Modeling is straightforward but excellent, and highly detailed for the realistic element. Negatives are few, but an external recharger would be nice, to hide the always present pilot, and very weak landing lights would all benefit in future changes. There is no doubt that over the next few years this new VTOL category will blow open with loads of interesting and exciting machines. This NHRacer is one of the first quality ones to surface and excellent to explore this new and exciting dimension. _______________________________ Yes! the NHRacer by NHAdrian is NOW available from the X-Plane.Org Store here : NH Racer - Manned Racing Multicopter Price is US$19.99 Product features Custom flight controller system with multiple flight modes using X-Plane’s experimental flight model as base Realistic engine, ESC and battery model incl. temperatures, battery curve, etc. Custom avionics Permanently stored user settings Realistic BRS system Realistic prop stalling effect Visual + audio “Helmet” effect Full FMOD sound package 4K high-definition PBR textures 8 stunning liveries incl. 4 exclusive liveries by PWDT Full VR compatible Detailed flight manual included Complete paint kit for livery creators Racetrack elements for scenery builders Requirements X-Plane 11 Windows, Mac or Linux 4GB VRAM Minimum - 8GB+ VRAM Recommended Download Size: 1 GB Current and Review Version : 1.0 (November 5th 2021) NHRacer uses a custom flight controller system that stabilizes the multicopter during flight, working together with X-Plane’s own flight model, therefore at least stable 30 fps is mandatory! If you plan to do lot of acrobatic flights, 45+ fps is recommended. _____________________________ Installation and documents: Download is 1.02gb and the aircraft is deposited in the "General Aviation" X-Plane folder. Installed Aircraft is 1.03Gb Documents supplied are: NHRacer_Users_Manual.pdf Supplied are: RACETRACK elements (6 Flags-6 Gates) PAINTKIT Designed by NHAdrian - Popular Freeware developer and co-designer of the L-200 Morava Support forum for the NH Racer _____________________________ Aircraft Review by Stephen Dutton 17th November 2021 Copyright©2021: X-Plane Reviews Review System Specifications:  Computer System: Windows - Intel Core i7 6700K CPU 4.00GHz / 64bit -32 Gb single 1067 Mhz DDR4 2133 - ASUS GeForce GTX 1080 8Gb - Samsung Evo 1TB SSD - Sound : Yamaha Speakers YST-M200SP Software: - Windows 10 - X-Plane 11.55 Plugins: Global SFD plugin US$30.00 : Environment Engine by xEnviro US$69.90 : RK Apps XPRealistic v2 - US$34.99 Scenery or Aircraft- EGGD - Bristol International Definitive by Pilot+Plus (X-Plane.OrgStore) - US$25.95 (Disclaimer. All images and text in this review are the work and property of X-PlaneReviews, no sharing or copy of the content is allowed without consent from the author as per copyright conditions) All Rights Reserved
  9. Classic Aircraft Review : Let L-200D Morava by PWDT&NHAdrian Lots of time you wander around an airfield or museum and you see an aircraft... It sorta looks familiar, but at the same time it doesn't look like anything you know about all the certain types of aircraft, it is an oddity and In most cases it is usually an Eastern-Bloc or Russian in design. The Ruskies had looked at a western aircraft design, took the basics and then built it into their own design paradigm. So the design looks the same but in reality it is a copy of the real thing. Some Eastern-Bloc designers take another angle, as they look at current aircraft designs and mesh them together to create a sort of hybrid aircraft, and one that looks like one aircraft design but is in reality many aircraft in cohesion, again it is an oddity. So your first view of the Let L-200D Morava reminds you of all of these sort of elements at work... It certainly does not look like a western design, and areas like the spread twin-tail arrangement, there is even a bit of World War Two look about it or even an early Lockheed aircraft. But the lovely smooth shaped cabin is from another era, the jet aircraft era... Twin-engined, tri-cycle landing gear, and large wing-tip fuel tanks, lovely machine, but it all looks a bit odd with all these different elements at play. The Let L-200 Morava is a retractable four seat light twin, that was one of the few light aircraft to be exported to the west from behind the Iron Curtain during the Cold War era, albeit in small numbers. Ladislav Smrek of the Czechoslovakian State Aircraft Factory (Let) designed the L-200 in the mid 1950s to develop a replacement for the very successful early postwar vintage Aero 45 and 145 light twins. His resulting design is similar in many ways to its contemporary western twins, with a four or five seater cabin, a low wing, wingtip tanks, metal construction and retractable undercarriage. However the Morava is highly distinguishable by its twin tails, standard thermal wing deicing equipment and inverted inline engines. This excellent Let L-200 Morava aircraft for the X-Plane Simulator is by developers Pannon Wings Design Team (PWDT) and NH Adrian, in having already developed a Zlin Z-142, a Yak 18T, also done a C152 Mod and also created the ASK21 in freeware, their latest is probably their most ambitious project yet with the iconic Let L-200D Morava which is their first payware aircraft. First impressions count a lot, the look and feel of the aircraft (certainly a vintage or classic aircraft) can set the tone not only for the way you like the aircraft but how it also comes through in the review... In this case it is exceptional, not totally perfect as nothing ever is, but you know there has been a lot of love and time spent on creating and bringing this particular machine to life. Realism is the key... I know, the two words I write consistently in reviews are usually "realism" and "authentic", sometimes these comments are even overused, but that is ultimate goal we are all aiming for, in that real world look and authenticity. We will take the excellent canvas cover off and look at the aircraft under it. Lovely cabin shape isn't it, there is some great modeling work here, and look at those unusual blue side windows, and yes they are real, and I am showing my age in remembering them. The intricate work is a nice feast on the eyes everywhere you look as there is some great detailed elements... Overall many designs can look very good, but the differential in the higher quality stakes goes into the intimate details, any developer can do a nice fuselage and wings, but it is in the details that really count. Detailed instances around the engines are quite spectacular, note the propeller installation with detailed filament, noted highly shaped engine inlet(s) and excellent detailed exhaust with securing circlip... ... propellers are fully animated in pitch and feather modes, panel screws are nice work, with slight wear rust. Aileron control rods are also animated and are beautifully recreated. All the wing construction is perfectly realised, gaps between the panels and perfect rows of rivets to hold them all in place, you totally feel this aircraft and not just look at the details. Aerodynamic wingtip tanks are also beautiful to the eyes, note the detailed lower drain panel, excellent modeling. As a throwback to another era, those twin-tails are simply gorgeous, with its built in fine lateral trim tabs and left horizontal trim tab on that wide elevator. All mapping is excellent to bring out the surfaces and the strengthening ribbing down and around the fuselage, lovely stuff to feast on. I really love the shape of this cabin, so teardrop and even 50's jet in shape and design... Intimate design is very evident, with lovely handholds and the flush door latch.. that actually works. Highly visual is the inserted left screen access window (yes it opens as well). Single (left) wiper and right side gauge are again highly visible, GA 35 GPS Antenna for the Garmin avionics is also very authentic, and again beautifully done. All the cockpit glass is excellent, thick and reflective... there is also a glass feature that builds up dirt and bugs on the screen, from clear to dirty (adjustable) The flies and dirt also collects on the engine intakes and the wings leading edges. There is another detailed "King" antenna on the lower fuselage, and the tail skid and higher rear wing brackets are all again excellent detail. The main trailing link landing gear sits (very) very close to the ground underside of each of the engine pods, so it is quite hard to see them, but the link and strut detail is again first rate, worn and and very realistic, the correct era tyres are also very, very good, inside gear bay door looks modeled, but it is an image, but a very good and realistic one at that... .... the gear highlight is that extraordinary single nose wheel structure and assembly, incredibly realistic and expertly recreated, yes it is worth a few moments of your attention to take in all the excellent work done here. Nose wheel tyre is unusual in that it has a concave tread structure. There is so much detail to absorb on this aircraft, fair and good kudos to the developers on their attention to absolute detail. Before for we inspect the cabin, lets see the features presented externally. Only a few of these features are accessed by the menu, as most of the items (or actions) are accessed directly by touch, but notably only from the internal view and not from the external view, so if you want a closer look you have to move internally to the external view manually.... Touch the rear mains tyres for wheel chocks (very nice) and the pitot left wing for a pitot cover... touching the rear right side engine will give you a Battery pack ground power unit. The most exciting feature is in touching the engine panels... they open to reveal an extremely detailed Walter M337 (Avia M 337) air-cooled six-cylinder straight engine of 160 kW (210 hp) each. Opening the engine cowls will also make a beta work trolley and cones appear.... sensational work, no doubt. Another access point are the fuel tanks... Open the tank flap on the wing (each wing) and turn off the fuel cap, and it springs up to reveal a fuel gauge. You can set the amount of fuel you want into each tank by moving a pair of arrows up or down the gauge (There is the choice of Imperial or Metric quantities), the same can be done on each of the wing tanks and the cap (filler), the detail is again extraordinary. More features include a propeller spinner (required to start the engines)... touch the prop and it will turn (cold turn) to remove the accumulated oil known as "Hydrolock" or hydraulic lock, you have to turn each prop 10 times, it can be done via the pilot's seat. You can also move the aircraft around engines off on the ground... select the puller via touching the nosewheel, then move the aircraft via moving your mouse in the direction you want to go. Both cabin doors can be opened by the external latches or internal door levers... The extremely realistic cabin cover is toggled via the second screw on the inner door (that was not mentioned in the manual, and yes I lost a precious whole 15 minutes of my valuable life looking for the damn hot spot!) First view of the cabin shows the aircraft's age, it has a sort of Carenado heavy detailed heavy feel about the space, the same sort of materials and details, but done very well here... A nice blue and tan trim is expertly done, with great seat patterns and lovely well shaped seats, with a sort of huge lounge room couch for the rear, the seatbelt detail is also expertly and casually done... The main switchgear is mounted on the roof, with two headsets for both the pilot and co-pilot. It is the feel of the space that is interesting to convey here, great authenticity to the eastern-bloc feel but also to the western influences injected in there... two worlds in one, that it works so well in feel is a credit to the developers and their extreme focus on the detailing. The quality of the era fittings is really outstanding, like mentioned you don't just look at the items but feel the era around you, it must be amazing in VR. Pressing/selecting the map in the left door lower pocket will bring up the X-Plane Local Map. Menu The menu book is positioned under the instrument panel on the left side... hard to again find and only noted as the "setup-sheet" in the manual... it pops up VR-Virtual Reality style in front of you to the right. Left page is your setup (options) and on the right side is the checklist... Top left is the "Aircraft Properties", with Fuel "Metric" or "Imperial", AviTab, Instrument reflections, Static Elements (chocks and pitot cover), then the interesting "Dirtyness" slider. You get dirty speckles on the windscreen and the leading wing edges, very nice, but I expected more "Dirtyness" dirty than this to be honest? but still a nice to have feature. Then a choice of Cockpit Language with; Hungarian, English and Czech available (changes text details). Here is English and Czech. Like the non-direction of the aircraft canvas cover hot-spot... the menu has another quirk as well? There are the Master Volume and Field of View sliders, but they appear blank with no adjustment knobs? As is also the lower small Weight & Balance setup sliders... top includes Pilot, Co-Pilot, and a Passenger (child)... finally is baggage weight and all of these sliders are blanked out as well? The trick is to select the Pilot, tickbox... then all the sliders appear for use. A great feature to close up the aircraft to allow the aircraft to be nicely completely empty and parked up, but annoying as well if you don't how it works? (and no it is not mentioned in the manual... again). Selecting the Pilots and passenger puts very nicely created people in the aircraft, the Co-Pilot is animated as is the girl in the rear seat... ... weights of each are shown with two bags put in the baggage locker rear left side... again the hot-spot can be hard to find to open the locker door (Baggage weight is restricted if you have a passenger in the rear selected). Finally are the fuel tanks were you can set (as well as the external way) the fuel quantities of the inner and wingtip tanks, full capacity is 103 Gal (389 lt). The CG (Centre of Gravity) is shown (MAC), and the total weight (Gross) of the aircraft loaded. Left side is a basic but an easy to use checklist. Instrument Panel The instrument panel is not the most ergonomic layout for the ease of use, but then what was 60 years ago... The main upper panel is generally well laid out, but the lower area resembles a WW2 era twin-engined bomber layout with all the multiple levers. The really nice styled yokes are again beautifully rendered and feel authentic to the era, and both (not individually) can be hidden by pressing the centre button brings up the X-Plane ATC panel! Sitting left in front of the panel there a bit of claustrophobia with the very large LUN 1222 Whiskey Compass jutting out above the panel, and the restricting view of the access window (again the internal access window detailing and animation is excellent). The panel is mostly flying instruments left and aircraft operating dials and gauges right, there are no flying instruments for the Co-Pilot... except an odd altitude dial. Dead centre in front of the Pilot is an LUN 1202 Artificial Horizon (noted incorrectly in the manual as a Attitude Indicator?) It has two knobs for (left) an horizon marker of which can be adjusted, and right a Cage knob noted A and brings up a red flag A in the instrument. Also note the Sky and Ground colours are reversed here or upside down on the AH. Below is the Bendix-King KL-525A HSI (Horizontal Situation Indicator), the HSI has a built-in ILS indicator, but to note as it is a guide only, as there is no Autopilot or APP function on the aircraft. To the left of AH is a Variometer or Vertical Speed indicator, far left is a Airspeed indicator in both metric and Imperial speeds, still on the far left lower is an Altimeter (ft), and to it's right is a LUN 1213-8 Slip indicator. Right of the centre is top a Bendix-King KI203 Course Deviation Indicator (CDI). Below the CDI is a Bendix-King KI 229 ADF pointer, and that pretty well covers the main flight instruments. Top of the panel is a LUN 1694 landing gear indicator (very nice) and next to it is a Bendix-King KDI-574 DME panel, then a LUN 1685 Flap Indicator dial 0º-15º-30º degree settings, but the flap setting is actually variable... Two more instruments make up the rest of the left side panel with top right a really lovely ACS-Stopwatch (timer) and clock, and it is fully workable, and below LUN 1315 RPM Twin-engine indicator. Centre panel lower is the standard Garmin GNS 430 GPS unit. The RealityXP GNS430 v2 is also supported in the same slot if you have that payware addon. Right side of the instrument panel covers the aircraft's systems in gauges and dials. Starting top is a LUN 2741 Volt/Amper indicator, then a row of four gauges covers (LtoR); a MV 18M Manifold Pressure gauge (both engines), then a LUN 1394 Cylinder Head Temperature gauges unit, then a Fuel Quantity left side (inner-top and wingtip-lower), and finally the same Fuel Quantity setup on the right side. Lower row is the both left the engines parameters in Temperatures ºC and Pressure. Right two gauges cover left the (Engine) Heating ºC temps and far right is another Altimeter, but oddly in km. I do like the layout, but you need to study it to know which gauge is which, in that most detailed text is in Czech. The lower left panel is a busy place. First to note the way that the button switches work in here, larger bottom button is the activate button, and the smaller button above it then deactivates the button by clicking it out again, yes I have used this style of switchgear, but again showing my age, but the system is really well done here for authenticity. Far left are the two ignition switches (buttons), then a standard Bendix-King KMA 24 Audio panel, and below is a Bendix-King KX-155 radio (NAV2/VOR2). Next centre is a really nice authentic Landing Gear and Flap lever panel and below is a six pack of switch buttons... A note currently on the six-pack buttons, as they are set the WRONG way around? OUT for active and IN for off, very confusing? They will be fixed in the first update. Next is the Feather/Propeller indicator (green light is feathered). Two dials now cover; MA-100 Hydraulic Pressure top and the MG-60 Brake Pressure bottom, note the nice three diamond warning lights for the left and right Generators. The left lower panel is more simple, with centre top a Bendix-King KT 76A Transponder, and below a Bendix-King KR 87TSO ADF receiver, there are a few circuit breakers (fuses) far right but they are not active. The monster mash of levers on the centre console can be at first a bit confusing, but in reality it is simply to operate. Blue levers are the two Propeller (Prop) levers (LandR), and the tall black ones are the twin throttle levers, and the right twin light tan levers are the Mixture levers. The outer red levers are the Fuel selection and closed valves levers, the rest are engine cooling and air vent levers. Between the front seats is another collection of levers and knobs... dominating is the large Hydraulic pump lever, then the Parking Brake lever and Emergency Release lever for the landing gear and flaps. Rear right is the propeller de-ice regulator knob with the rudder trim on the left, forward is the lovely Elevator Trim wheel with the amazing green trim diamond lights for noting the neutral position... rear are left and right engine fire extinguisher levers. There are two headsets hanging from the overhead switchgear panel. One is clickable to dilute the sounds, the other moves to the Co-Pilot when he is selected.... The switches are really well modeled and are nice to use, top row covers cockpit and external lighting, comm and XPDR (Transponder) and De-Icing. Centre row are the engine switches and the bottom row are the main electrical switches. Forward are two dropdown instrument panel lights. The AviTab Plugin is available in Morava. It is installed very nicely on the centre of the left Yoke, handy and easily used, and a bit of modernity in a classic aircraft. Flying the Let 200D Morava The Morava is basically a ritual aircraft, as you have to do certain procedures repeatably to get the aircraft into the air and keep it there. First is the interesting hydraulic pressure system.. it is manual. To do even simple things like setting the parking brake or using the landing gear, then you have to build up hydraulic pressure in the lines. This is done via the lever between the seats, and the pressure is shown on the lower mid-panel gauge. First you have to set the parking brake lever to "Parking" or the centre position (if not the hydraulic pressure in the system won't work, then click the centre handle to pump up the pressure as shown on the centre lower gauge... You will need to pump above the 40 kgs/sm2 line and then switch the packing brake lever to "Fixed" (or Park) to contain the pressure in the system... ... if not the hydraulic pressure will fall back to zero, if correct it should hold the hydraulic pressure at the 40 kgs/sm2 point, easy... no. Next is starting the twin Walter M337's. Setting the levers correctly is important, and note the turn bar (arrowed below left) on the Prop levers, so you can't feather the props by mistake, a nice touch. Turn the prop x 10, which can be done via the internal view, then prime the pumps (turn them on) and hit the the starter... The M337's are not the easiest engines to start, but finally the engine will blaze into life... then start the procedure all over again to start engine 2. Although the manual is very nicely detailed, it is a bit lukewarm as well... aircraft like this Let need very detailed instructions on how to do these complex procedures correctly, some bits are there, but a lot of the needed required detail here is seriously missing? which can be very frustrating if you are new to the aircraft. Once the engines are running, you need to wait while the fluids hot up and the systems settle down, but the Let L-200D feels extremely Alive, it is an excellent place to be in control in here. Note the red diamond warning lights for the generators (arrowed above), they will stay on until the engines get more power. Sounds are excellent, the external engine noise is extremely high compared to the internal, but note if you have the pilot's headset hung up on it's bracket, if not it is almost impossible to hear the internal sounds... by default the headset is on the pilot's head! There is a really low vibration grunt from these gutsy engines, and they sound brilliantly from the pilot's seat. A bit of throttle and the L-200D will pull away with a nice weighty feel. Taxiing is slightly tricky as the protruding front nosewheel will weave around quite easily, the trick is to keep your taxi speed low and steady... god I really love those mechanical piston throbbing engine sounds Like most things you can set the flap postion anywhere you want it, but it is a bit of a trick to do so, in one click down and a quick click up again to hold the degree position you want, here I have set a 9º flap. If you want to again use the parking brake, yes you have to pump up the pressure and click the parking brake lever twice just to hold your position. Throttles up and your moving... it is best to give far, far more throttle to the right engine than the left to keep the L-200D in a straight line down the centre of the runway and avoid the massive asymmetrical thrust to the left... it can be seen here on the RPM gauge (both indicators are on the same dial), however you can easily find the right RPM feel to go straight. Takeoff sounds are fantastic... noisy ground vibrations, wind and high engine sounds create a cacophony of realism, then around 90 knts you can pull back on the yoke and leave the runway, quickly pushing up the left throttle to match out the right for more thrust. Can something as simple as putting up the gear become a massive headache... well in my early case yes? The Let uses the same systems as most Eastern-Bloc aircraft in that engine pumps keep the pressure solid in the lines to operate the gear and the flaps, so when you use one system or the other you have to seal the valves again by putting the lever back mid-way to the centre, easy yes... no The problem can be caused by your angle of view... what is the actual centre point for the levers? The left image below looks like the levers are correct and centred, but the valve centre right (arrowed) is actually open... So the levers look in the down position, even if they are actually centred as there are no centering markings on the panel, however set here the valve is now closed. A trick is to use the set gear (toggle) G command to centre the gear handle, the flaps can be centred by using the opposite selection to reset the lever (meaning if you switch down the flaps, then switch up directly again to centre, and vise-versa via key commands). The rate of climb is 6.4 m/s (1,260 ft/min), and so climbing around 1,000 ft/min is about perfect. The Morava is simply a sensational aircraft to fly... but you will need your expert flying skills in setting up the aircraft trims perfectly, as once leveled out you need to find that sweet central balance between both the pitch and rudder trims to set the aircraft up naturally, it needs to be perfect as there is no autopilot to take over the reins. So the trick is to find that perfect neutral balance and use your yoke for just the minor corrections to keep a straight flight line, this is essential over a long distance, if not the L-200D will tire you out with it's consistent corrections to both the rudder and the yoke.... basic flying stuff, but really essential here. Maximum speed of the Let is 290 km/h (180 mph, 160 kn) at sea level, Cruise speed is around 256 km/h (159 mph, 138 kn) at 2,500 m (8,200 ft) (known as econ cruise), the Range is a respectable 1,710 km (1,060 mi, 920 nmi) and the Service ceiling: 5,700 m (18,700 ft) Up to now the sounds have been exemplary, but in a stable cruise... you only get an odd rushing wind noise in the cockpit? (the pilot's headset is hung up on the bracket, so it is not the hiding any of those sounds?) to be honest it is really annoying in that it disconnects you from the aircraft, from the reality and no engine noises... and I don't like it at all? On trying the gear lever (down) and the gear extended, I was not going to throw a gift landing away, so I turned straight around and headed back to Bristol Airport, I also put on full flap to slow the speed and headed straight for Rwy 27... The L-200D will easily fly very nicely at around 80 knts full 30º flap (note the variable adjustment). The double twin-rudders and the huge whale tail of elevator gives the L-200D a tail control feel, you love the flying and amazing control you have over the aircraft, and even a strong cross-wind can be controlled and focused more here, as any other aircraft would be crabbing far more right in this stiff breeze. 70 knts is your descending approach speed, throttle control is excellent in height and descent adjustment, but to note the X-Plane "Experimental flight model" has to be OFF here. Gradually reduce the throttle, but be careful not to pitch the nose too high... speed is critical on approach, come in too fast and the Morava will weave when down, but fly in too slow and you get a nasty nose up approach, so you have to find that small sweet spot in the middle and closer to the 65 knt mark... ... down and speed rubs off nicely, but you will need to get the power down quickly and evenly. There is no doubt about the exceptional feel of this aircraft, every limb is working to feel the controls and fly the aircraft the best way possible, and the feedback is excellent, one thing the developers really got right here was the feel and control of the aircraft... it is quite outstanding in that respect. oh... and the internal engine sounds came back on approach? Lighting Like the aircraft the lighting is quirky? The main panel lighting is great, but the main flying instruments are actually completely dark... very odd? for as old Russian instruments have illuminescence paint that glows in the dark, but only lighting the actual needles and not the whole dials... so it is authentic but very hard to read in the dark. There are however two above vivid bright red drop down spot-lights, but they overwhelm the instrument panel so completely it would be hard to fly the aircraft in this state, but this what you have to use on approach if you want to read the main flying instruments?... In the rear there is a single overhead light. External lighting has an upper landing light in the nose globe housing, and a lower strut light that shines through the undercarriage front panel... very nice. The rest are the standard navigation lights and a beacon under the cabin and set to the left. Liveries There are four liveries and blank white. All are very good, but you feel there should be a couple more at least. G-ARYJ is default. Summary The Let L-200D Morava was one of the few light aircraft to be exported to the west from behind the Iron Curtain during the Cold War era, albeit in small numbers and was built in the Czechoslovakian State Aircraft Factory LET in the late 60's. The L-200D is a Twin-Engined four or five seater cabin aircraft, in a low wing with wingtip tanks complete with a metal construction and retractable undercarriage. However the Morava is highly distinguishable by its twin tail configuration. The developers are the Pannon Wings Design Team (PWDT) and NH Adrian, in having both parties already developed a Zlin Z-142, a Yak 18T, also done a C152 Mod and also created the ASK21 in freeware, so they are Eastern-Bloc aircraft specialists, this is their first payware. The quality and detail in the L-200D is extraordinary, it is no doubt a labour of love attention to detail of the era. Quirky sums it up in the way the aircraft is and also in the way you access and fly the machine. Modeling is excellent, with great detailing and attention to even the smallest details, it feels and it is a vintage aircraft, but in a modern sense as well, if that makes sense. Features are outstanding, but again all are very much hands on to activate. Opening doors and baggage locker, opening engine cowls with detailed Walter M337 (Avia M 337) engines, Beta trolleys, opening fuel caps and fuel settings, turning propellers, push/pull bar, opening access window and a lovely cover over it all. Internally it is simply gorgeous in an Eastern-Bloc 60's way, lovely trimmed cabin, with authentic LUN instruments that can be noted in either Hungarian, English or Czech, dirty windscreens and wings, Pilot, Co-Pilot and passenger with all fuel and passenger weights adjustable, and a nice if brief checklist. Both Avitab and RealityXP GNS430 v2 are also suppported. Sounds are very, very good, but notably in cruise, were they switch and just become some weird wind noises, and some switchgear is currently set the wrong way around (confusing if you don't know). Undercarriage can be troublesome if you don't know how it works and can stop working altogether if the lever settings are wrong, the Russian/Czech detail is very good, but can be also confusing until you work out the quirky methods, and that can in many ways sum up the aircraft... the Let certainly needs time and attention to understand it's quirks and oddities. The manual although very authentic, is just a bit too light for the require details wanted here in the complex systems and the ways of the machine, it needs far more explaining and more diagrams to help out the new and inexperienced on these sort of exotic aircraft (even I struggled as an expert reviewer). To sum up, exceptional! Yes there are a few real oddities to be refined, and also even a few bugs in there to be rectified, but there is no doubt of the quality and authenticity of this amazing machine in the X-Plane Simulator. The developers have done a very decent and though job, even a bit too though in some aspects. The price of this aircraft is also a major bonus, US$25.99 is a shockingly low price for the detail and quality of an aircraft you get here.. but overall it is in the sheer involvement that you get in every aspect with this aircraft, is why I love it so much and in the authenticity it delivers, just watch out for it's odd quirks, and you will love it as well.... Highly Recommended! ___________________ Yes! the Let L-200D Morava by PWDT&NHAdrian is now available from the X-Plane.Org Store here : Let L-200D Morava Price is US$25.99 Amazing Details Full PBR materials in 4K resolution Blank livery for talented painters Amazing Night Illumination with dynamic lighting system. Incredible amount of detail on internal and external model Lot of custom animations Accurate flight dynamics tested by real L-200 pilots and instructors Accurate system modelling Incredible VFR sensations Virtual Reality (VR) compatibility 4 Liveries Custom FMOD Sounds Immersive Virtual Cockpit Seats (pilot / copilot / passenger) are modeled Use of manipulators throughout Easy to read high quality panel AviTab support RealityXP GNS430 v2 support Full 3D instruments with real 3D lights All switches, arms, levers, knobs are functional 3 different cockpit language (English / Hungarian / Czech) Checklists Requirements: X-Plane 11 Windows, Mac or Linux 4 GB VRAM minimum - 8 GB+ VRAM Recommended Download Size: 1GB Current and Review version: 1.0 (July 13th 2021) The AviTab Plugin is required for this aircraft RealityXP GNS430 v2 install available Installation and documents: Download is exactly 1Gb. Installation size in your Aircraft folder is 1.6Gb. Documents A very pretty and authentic manual, but not much on real detail considering the unusual systems installed on the L-200D (13 Pages) Readme_PWDTL200DXPL Design by Pannon Wings Design Team and NH Adrian (authors of the top-rated freeware Z Lin Z-142) Support forum for the L-200D _____________________ Aircraft Review by Stephen Dutton 22nd July 2021 Copyright©2021: X-Plane Reviews Review System Specifications:  Computer System: Windows - Intel Core i7 6700K CPU 4.00GHz / 64bit -32 Gb single 1067 Mhz DDR4 2133 - ASUS GeForce GTX 1080 8Gb - Samsung Evo 1TB SSD - Sound : Yamaha Speakers YST-M200SP Software: - Windows 10 - X-Plane 11.55 Plugins: Global SFD plugin US$30.00 : Environment Engine by xEnviro US$69.90 : RK Apps XPRealistic v2 - US$34.99 Scenery or Aircraft - EGGD - Bristol International Definitive by Pilot+Plus (X-Plane.OrgStore) - US$25.95 (Disclaimer. All images and text in this review are the work and property of X-PlaneReviews, no sharing or copy of the content is allowed without consent from the author as per copyright conditions) All Rights Reserved
  10. NEWS! - Aircraft Release : Let L-200D Morava by Pannon Wings Design Team (PWDT) and NH Adrian Let, sounds Eastern Bloc doesn't it, and it is. Aircraft Industries, a.s., operating as LET, n.p., is a Czech (formerly Czechoslovak) civil aircraft manufacturer and its most successful design has been the L-410 Turbolet. Formally LET initially built gliders, but moved into full aircraft production with the LET Aero Ae-45, a teardrop shaped machine that sold very well. Now released is the LET L-200D Morava, which was produced between 1957 and 1963, it was a two-engine touring, twin-tail and light passenger aircraft designed and produced by Let Kunovice and the first pure LET aircraft, for the period the L-200D was simply an revolutionary aircraft in design and performance. The developers are not actually new, as Pannon Wings Design Team (PWDT) and NH Adrian having already developed a Zlin Z-142, a Yak 18T, also done a C152 Mod and also created the ASK21, their latest is probably their most ambitious project yet with the iconic Let L-200D Morava. Features Full PBR materials in 4K resolution Blank livery for talented painters Amazing Night Illumination with dynamic lighting system. Incredible amount of detail on internal and external model Lot of custom animations Accurate flight dynamics tested by real L-200 pilots and instructors Accurate system modelling Incredible VFR sensations Virtual Reality (VR) compatibility 4 Liveries Custom FMOD Sounds Immersive Virtual Cockpit Seats (pilot / copilot / passenger) are modeled Use of manipulators throughout Easy to read high quality panel AviTab support RealityXP GNS430 v2 support Full 3D instruments with real 3D lights All switches, arms, levers, knobs are functional 3 different cockpit language (English / Hungarian / Czech) Checklists The Let L-200 Morava is a retractable landing gear four seat light twin which was one of the few light aircraft to be exported from behind the Iron Curtain during the Cold War era, albeit in small numbers. The Morava is distinguishable by its twin tails, standard thermal wing deicing equipment and inverted inline engines. The prototype XL-200 Morava flew for the first time on April 8 1957. The XL-200 prototype and a series of preproduction. L-200s were powered by 120kW (160hp) Walter Minor 6-III inline sixes. The L-200D remained in production until 1969, and 5 aircraft were licence built in Slovenia (then part of Yugoslavia) by Libis. Most L-200 production aircraft was sold to customers within the Soviet Bloc - Aeroflot for example operated a large number in a range of different roles. However small numbers were exported to western Europe, the USA and Australia. Please be aware, Morava is a multi engine aircraft without autopilot, so not an easy-to-fly aircraft! Always use appropriate checklists when you fly. The Let L-200 Morava is now available from the X-Plane.OrgStore There is a Support forum for the L-200D Images are courtesy of Pannon Wings Design Team and NH Adrian _____________________________________ Yes! - Let L-200D Morava by Pannon Wings Design Team (PWDT) and NH Adrian is NOW available from the X-Plane.Org Store here : Let L-200D Morava Price is US$25.99 Requirements X-Plane 11 Windows, Mac or Linux 4 GB VRAM minimum - 8 GB+ VRAM Recommended Download Size: 1GB Current version: 1.0 (July 13th 2021) ___________________________ News by Stephen Dutton 14th July 2021 Copyright©2021: X-Plane Reviews (Disclaimer. All images and text in this review are the work and property of X-PlaneReviews, no sharing or copy of the content is allowed without consent from the author as per copyright conditions) All Rights Reserved