Dominic Smith
-
Posts
143 -
Joined
-
Last visited
-
Days Won
52
Content Type
Profiles
Forums
Articles
Everything posted by Dominic Smith
-

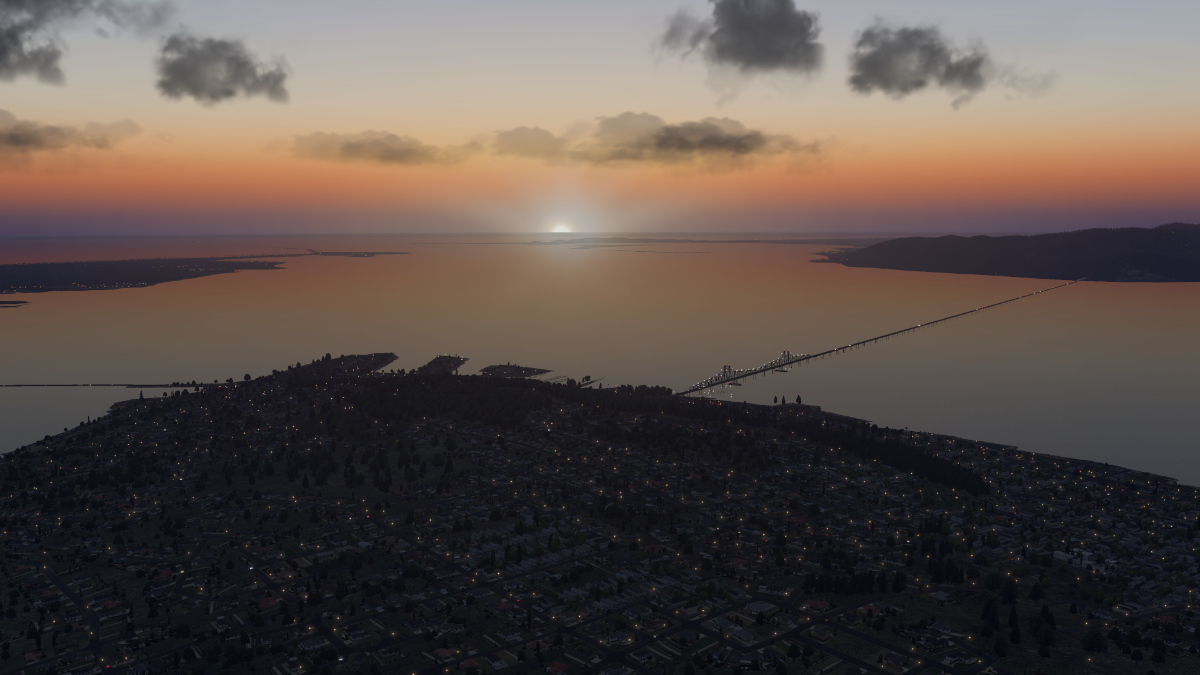
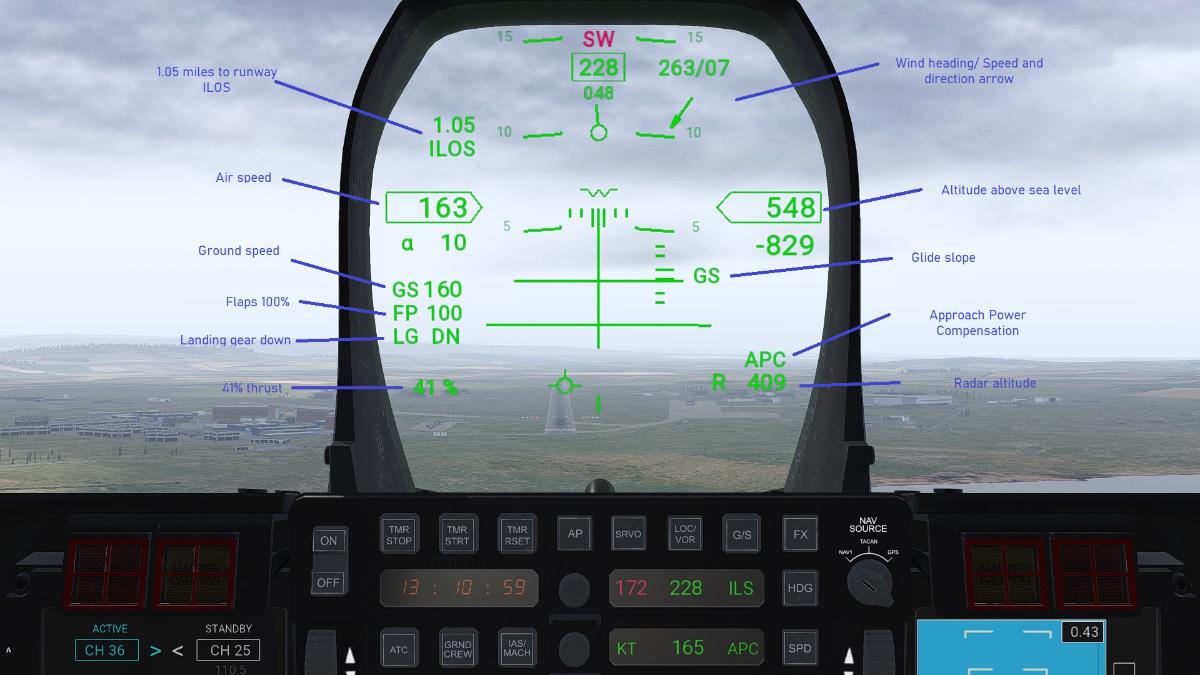
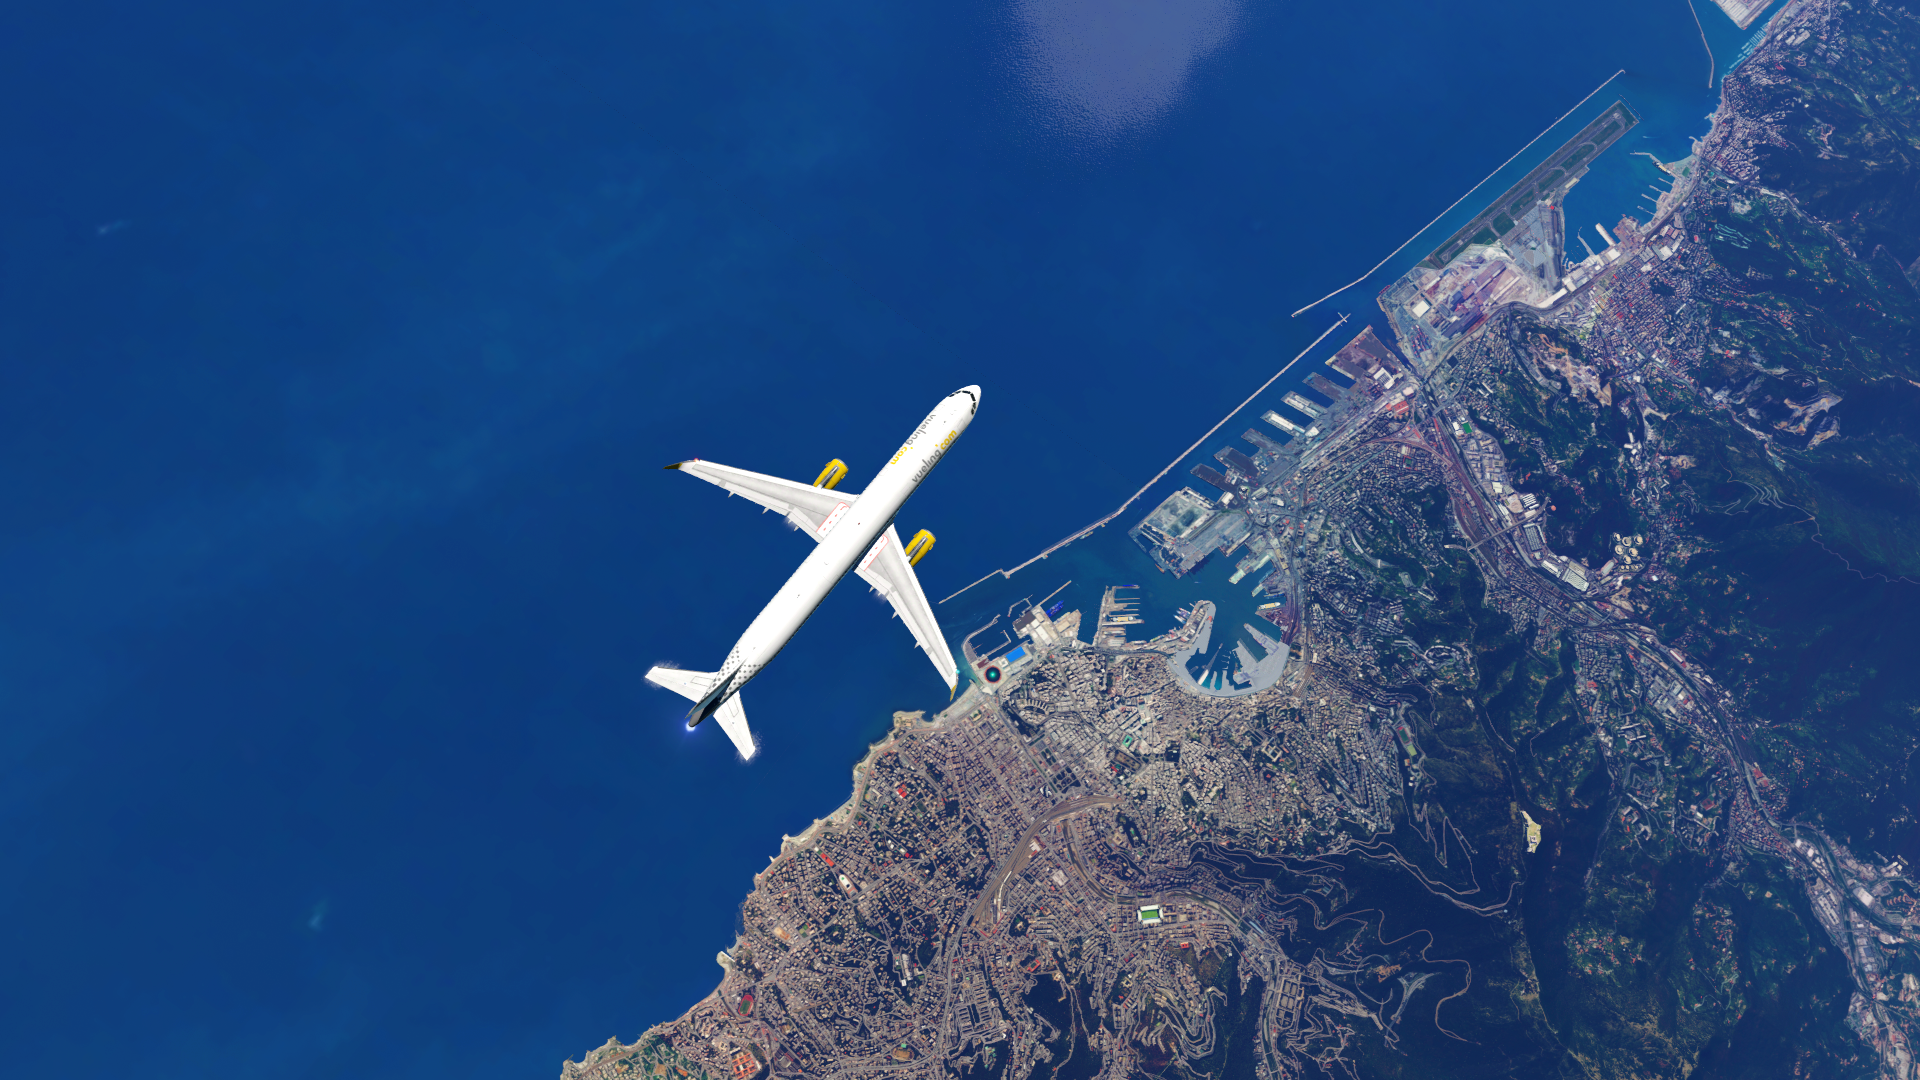
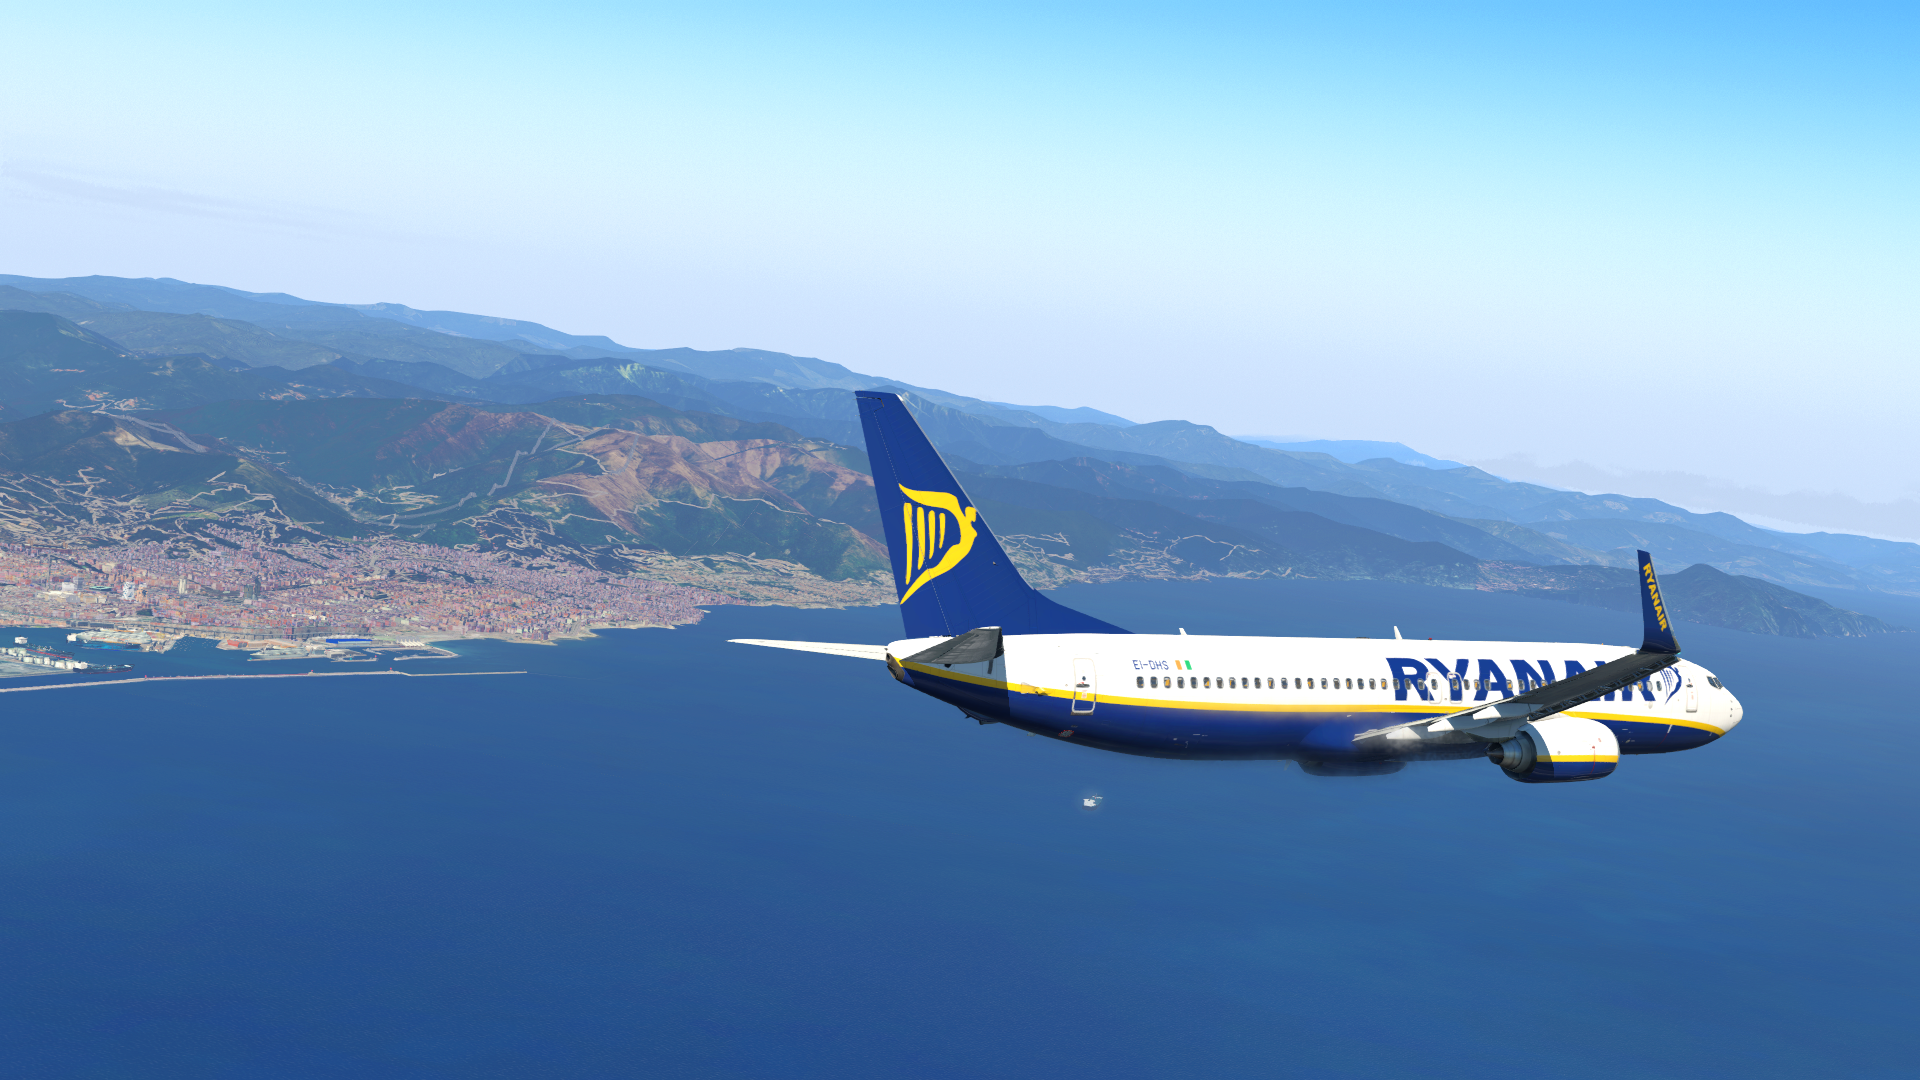
X-Plane 12 - Next Generation X-Plane Beta release "Early Access"
Dominic Smith replied to Stephen's topic in X-Plane12
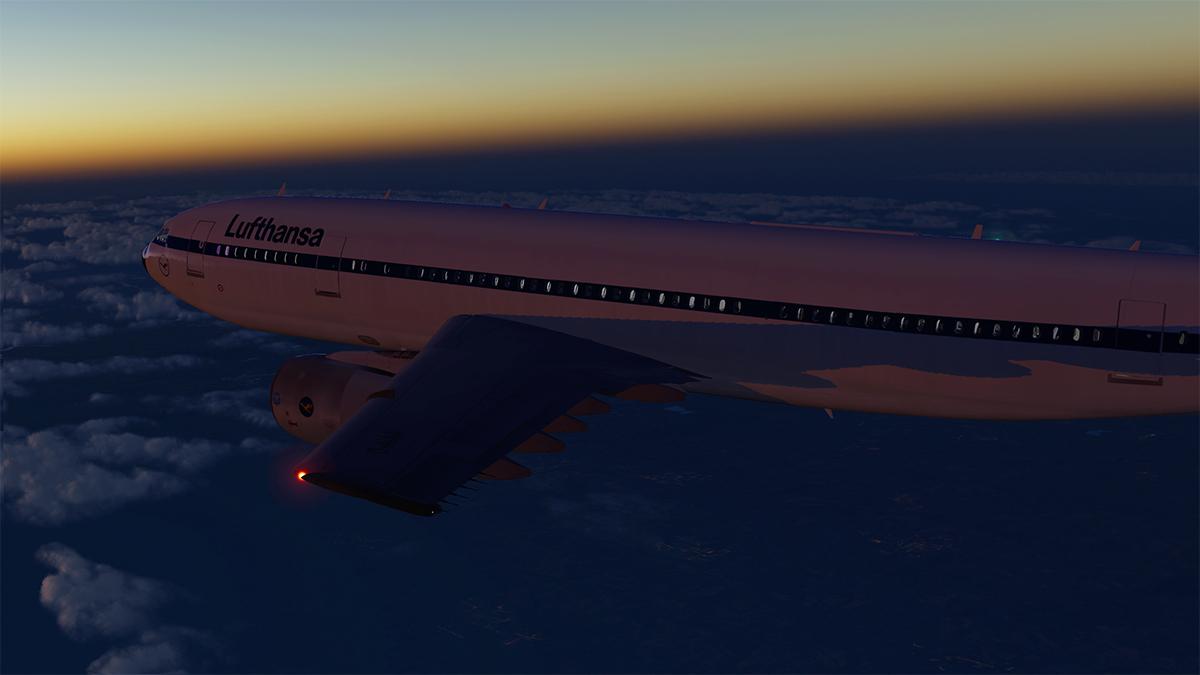
Brilliant article Stephen, I thoroughly enjoyed the read. If X-Plane 12 sticks to what it's always done best (forget about MSFS), then we'll be in for a real treat down the road. After all, the journey is half the fun. Thanks again! Dom -
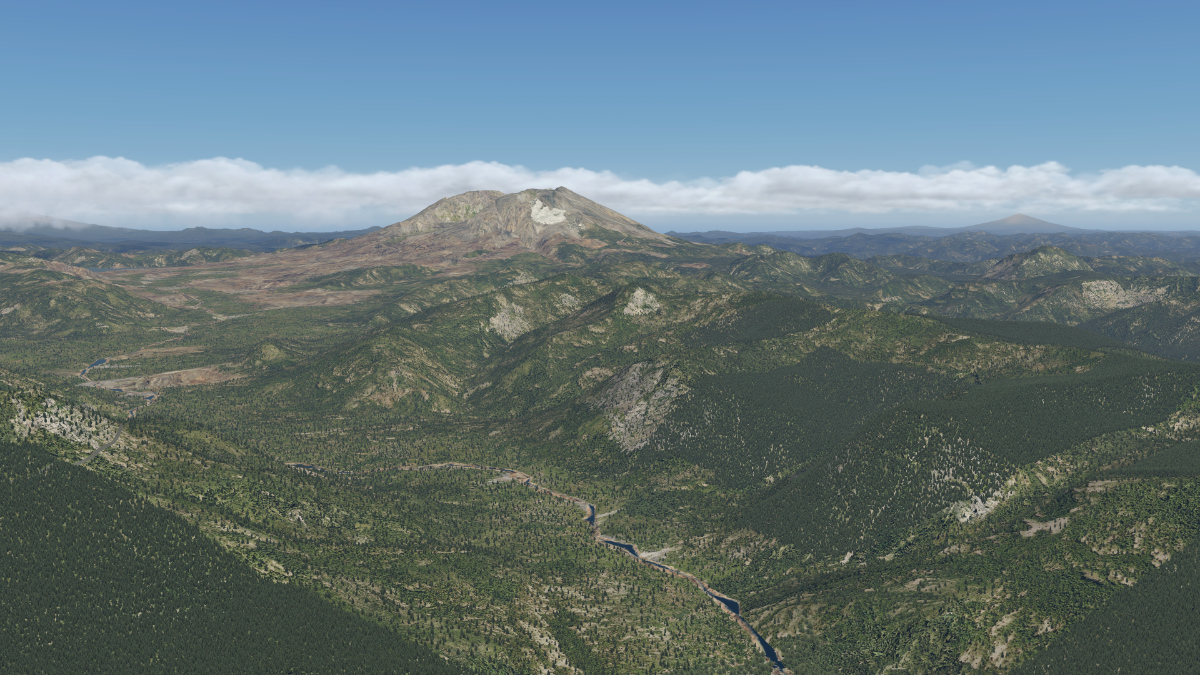
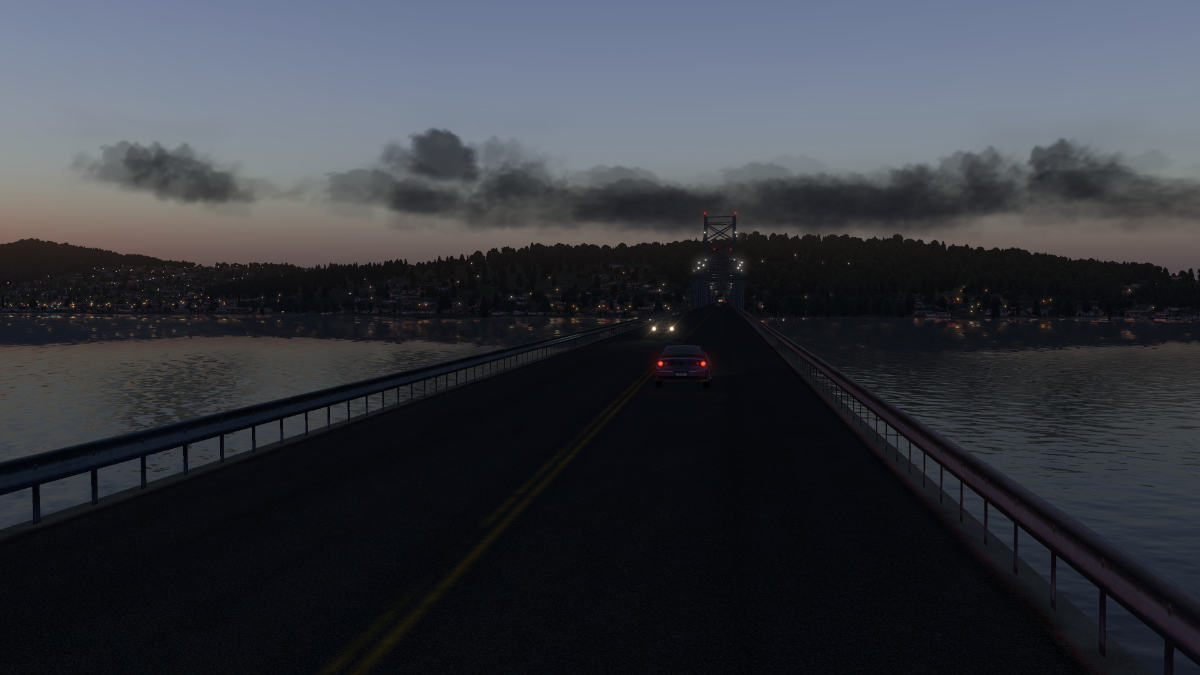
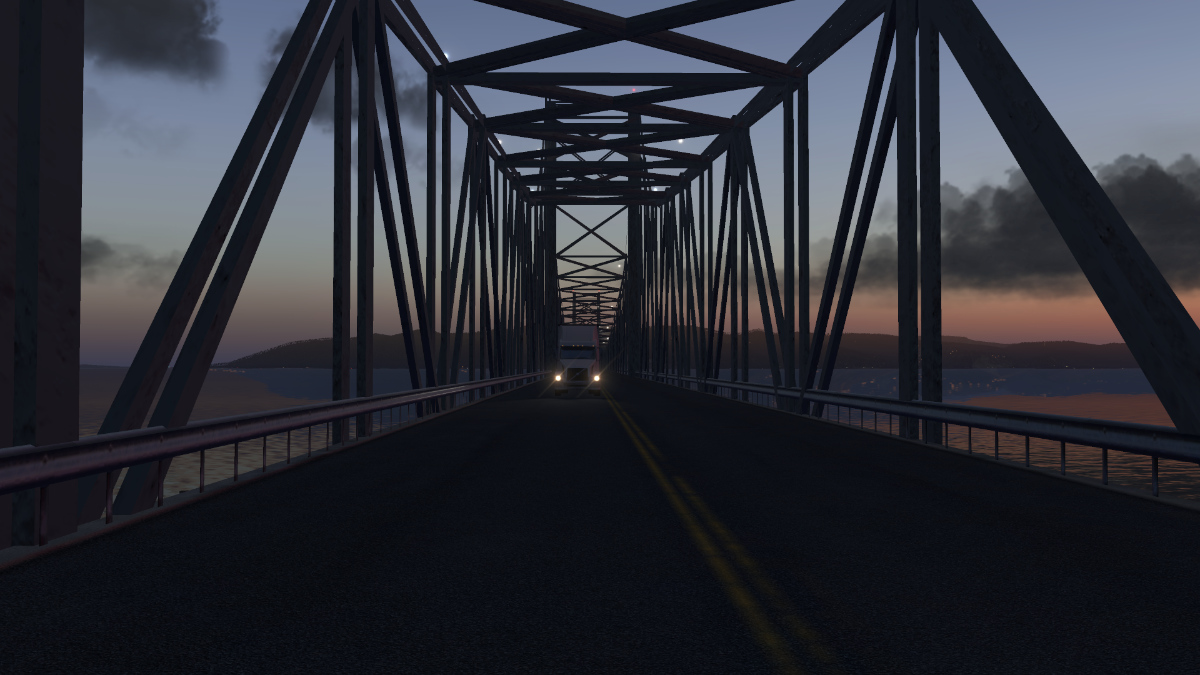
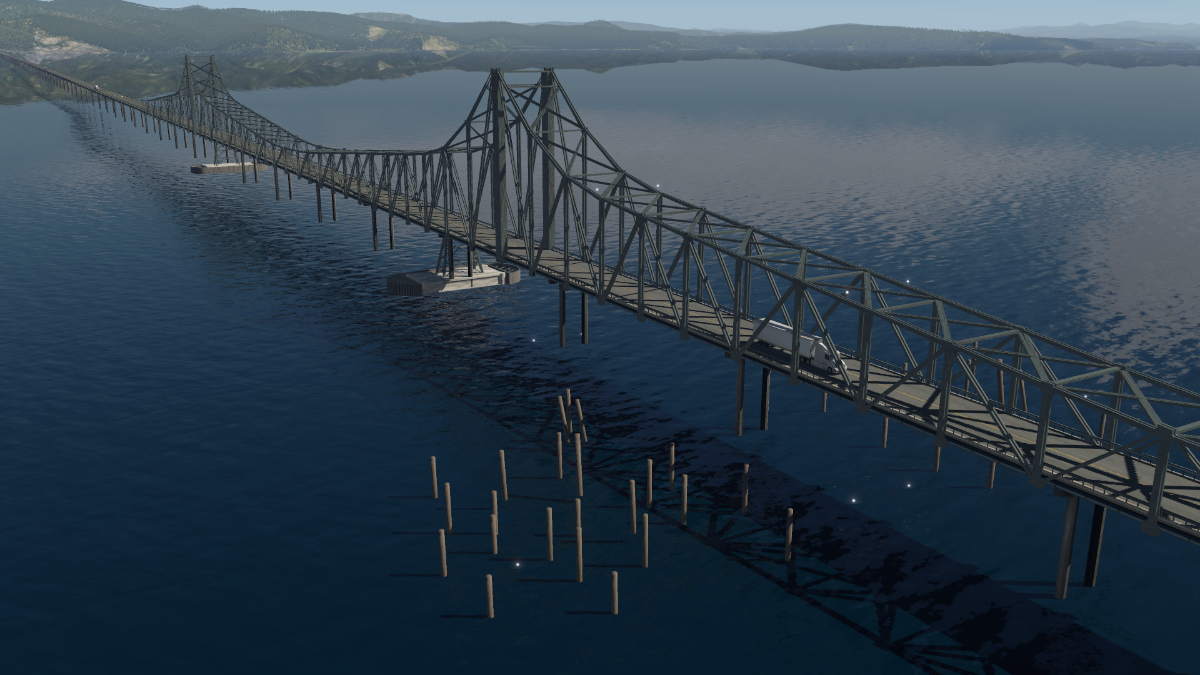
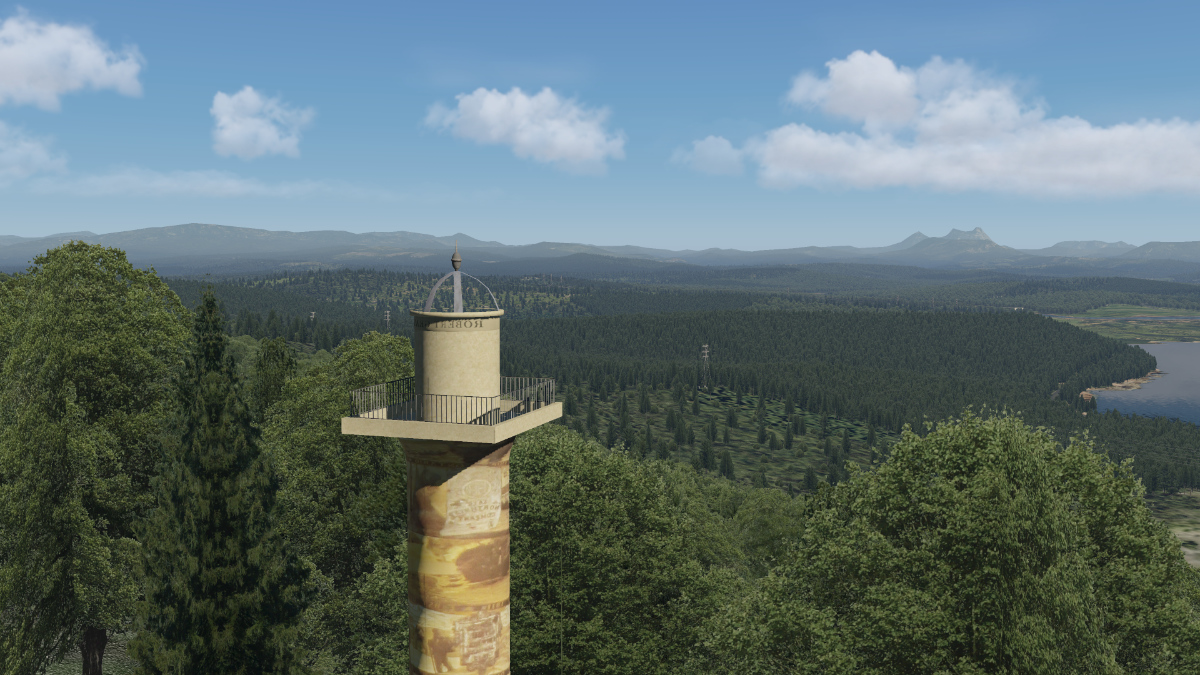
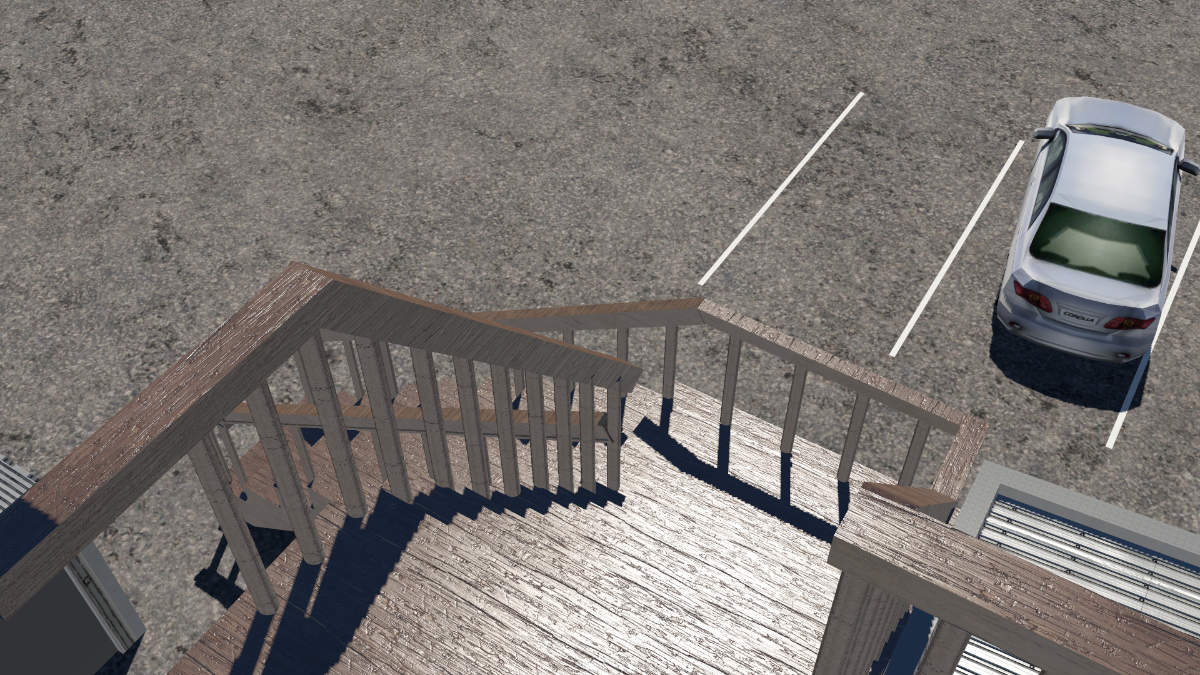
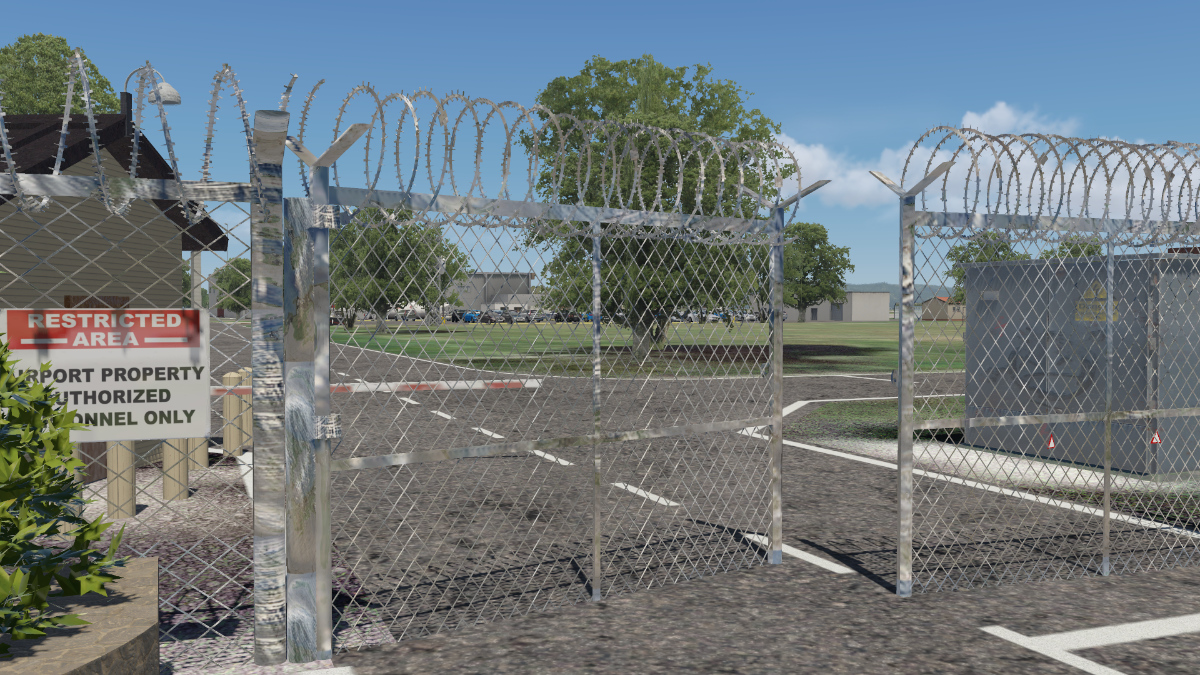
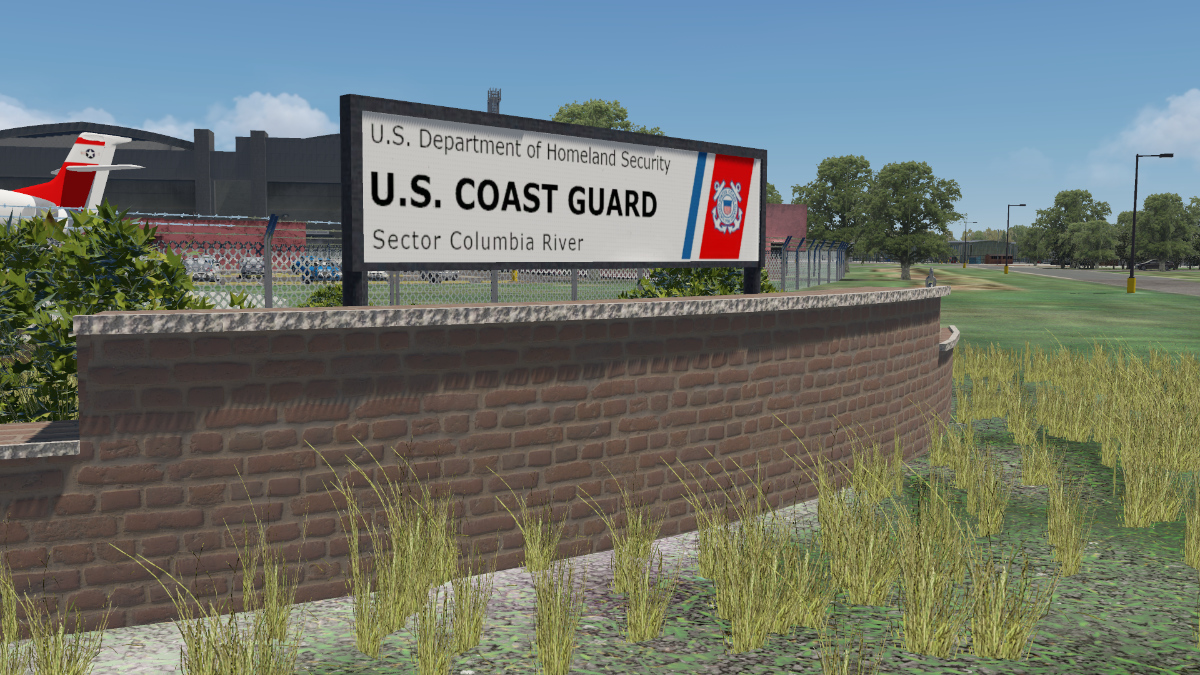
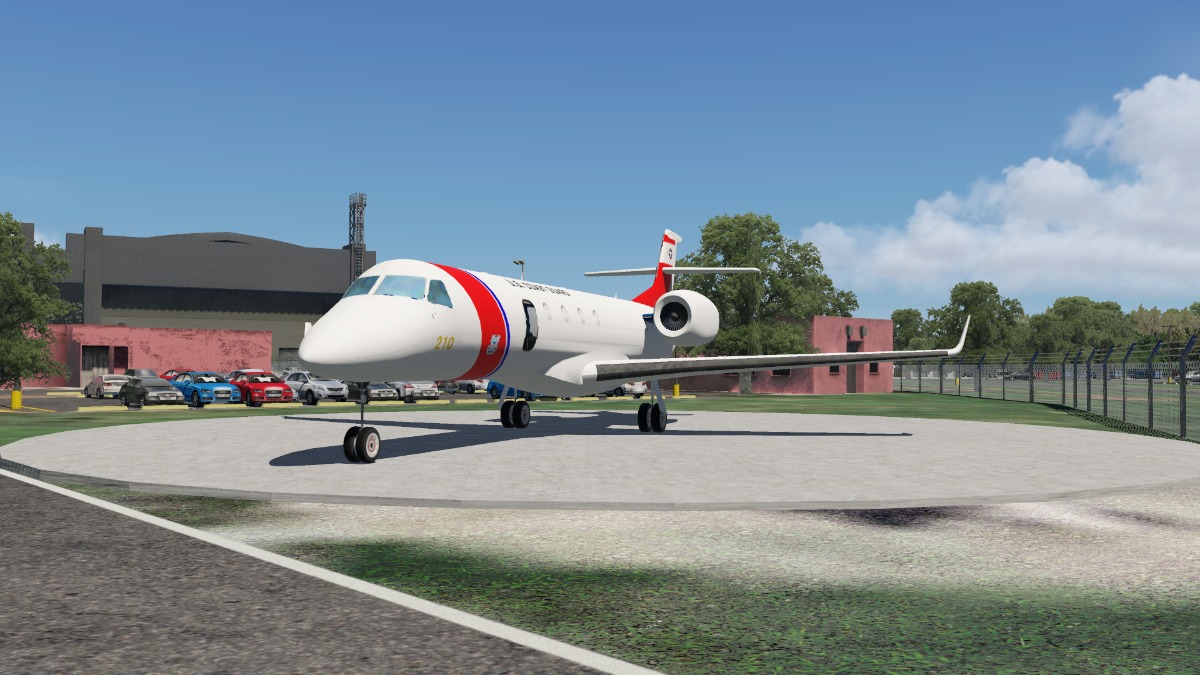
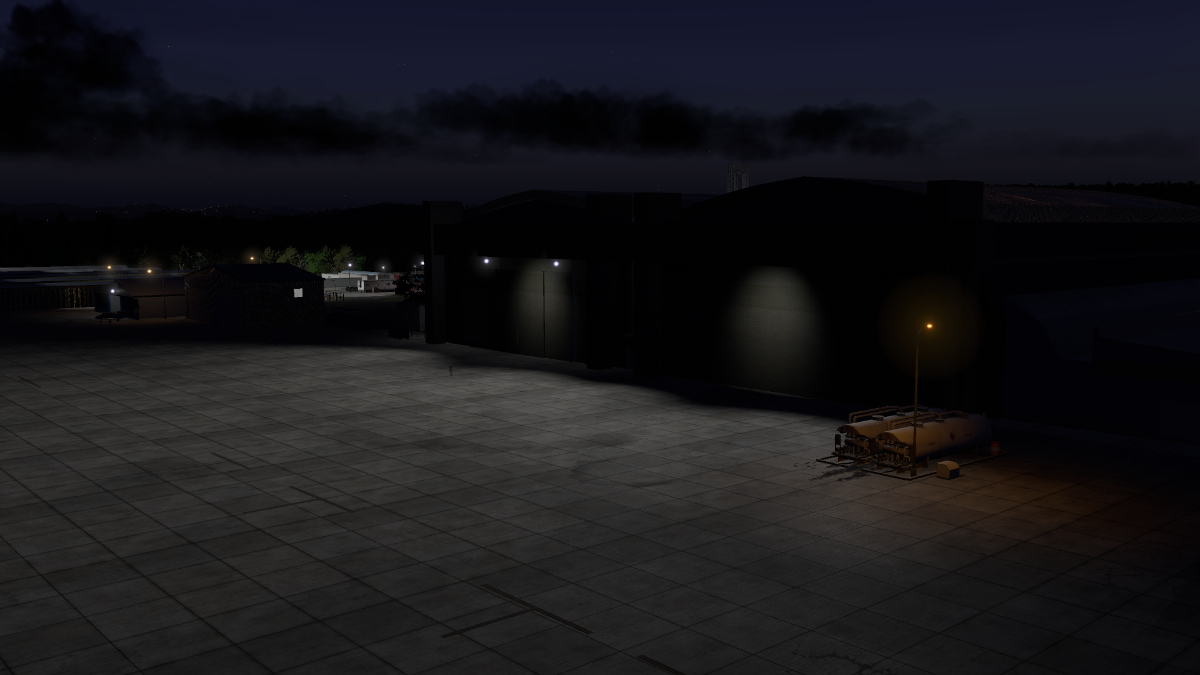
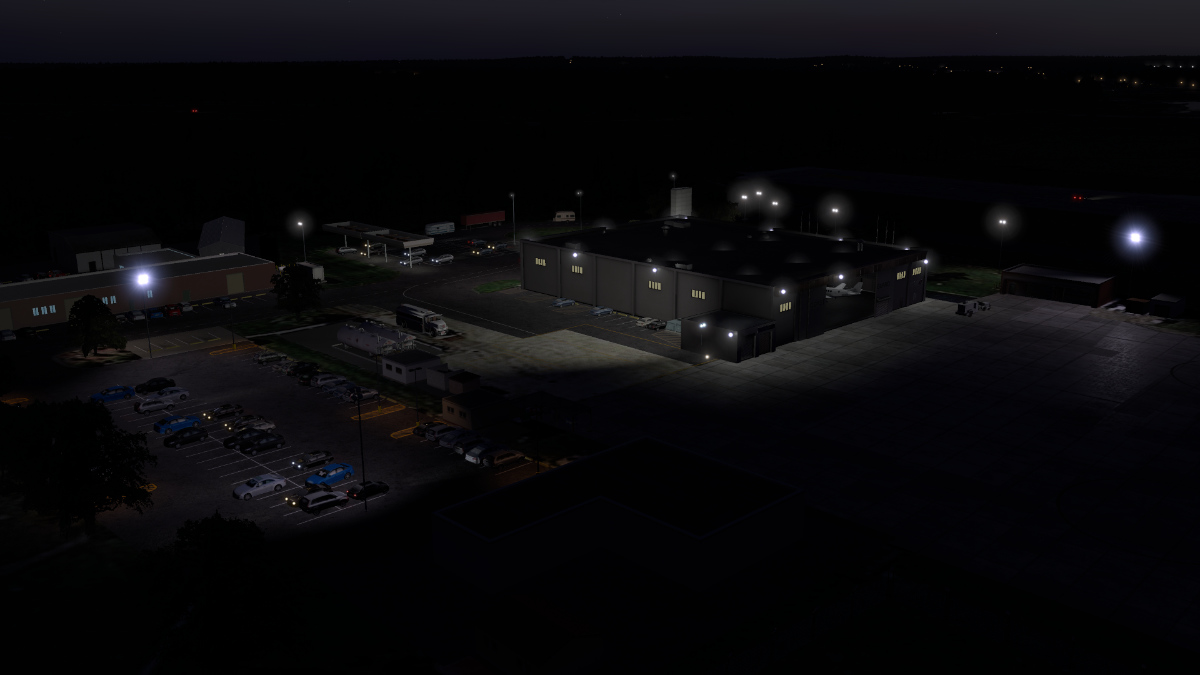
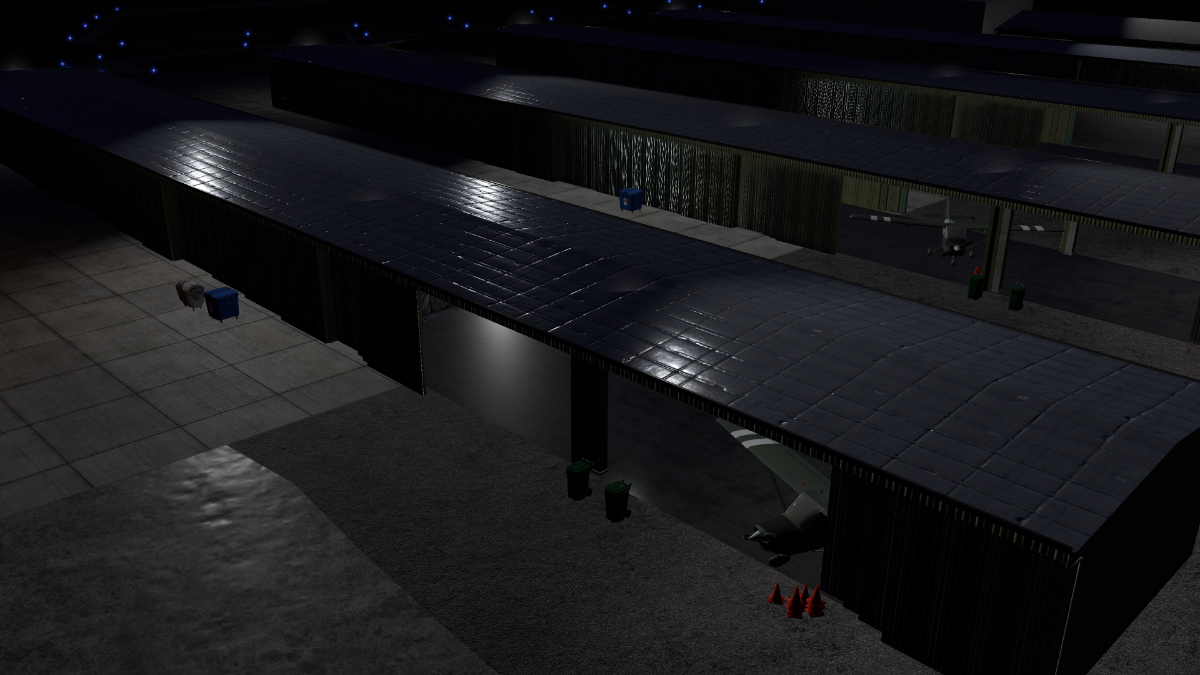
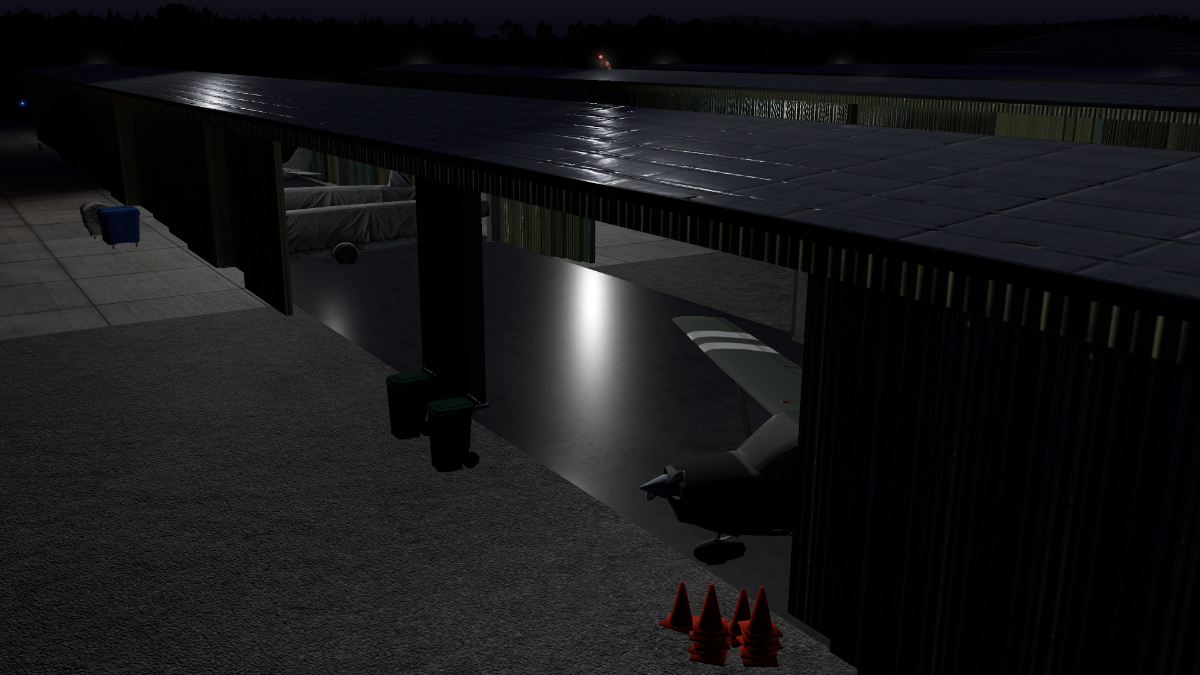
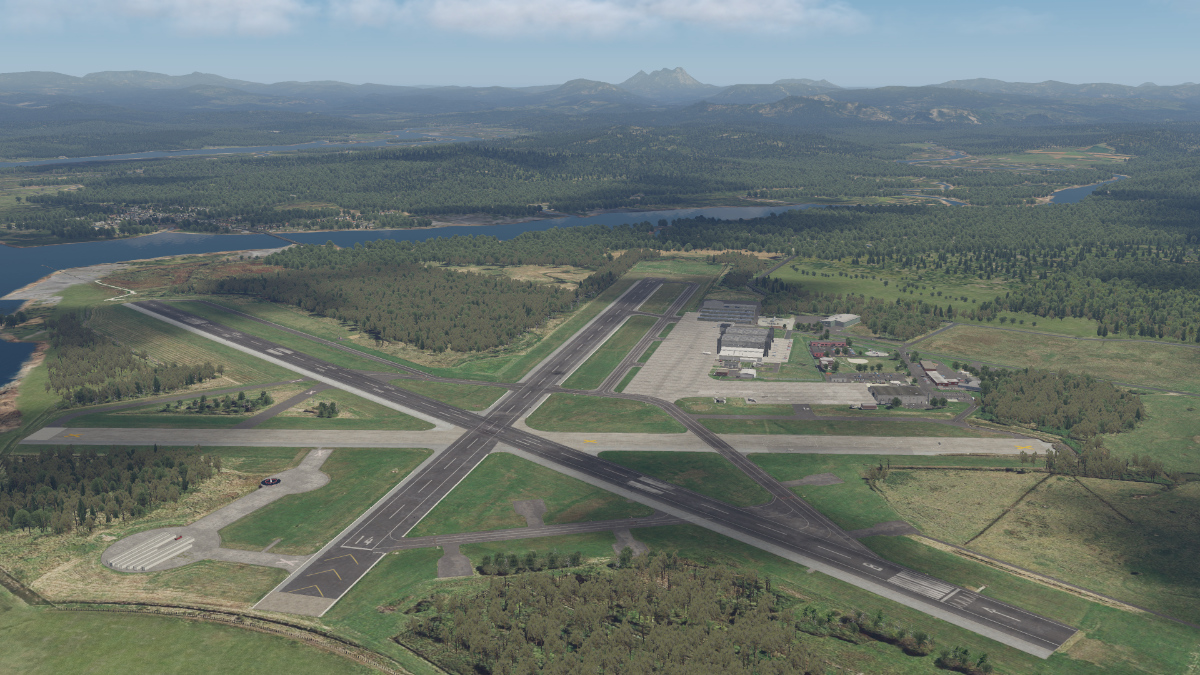
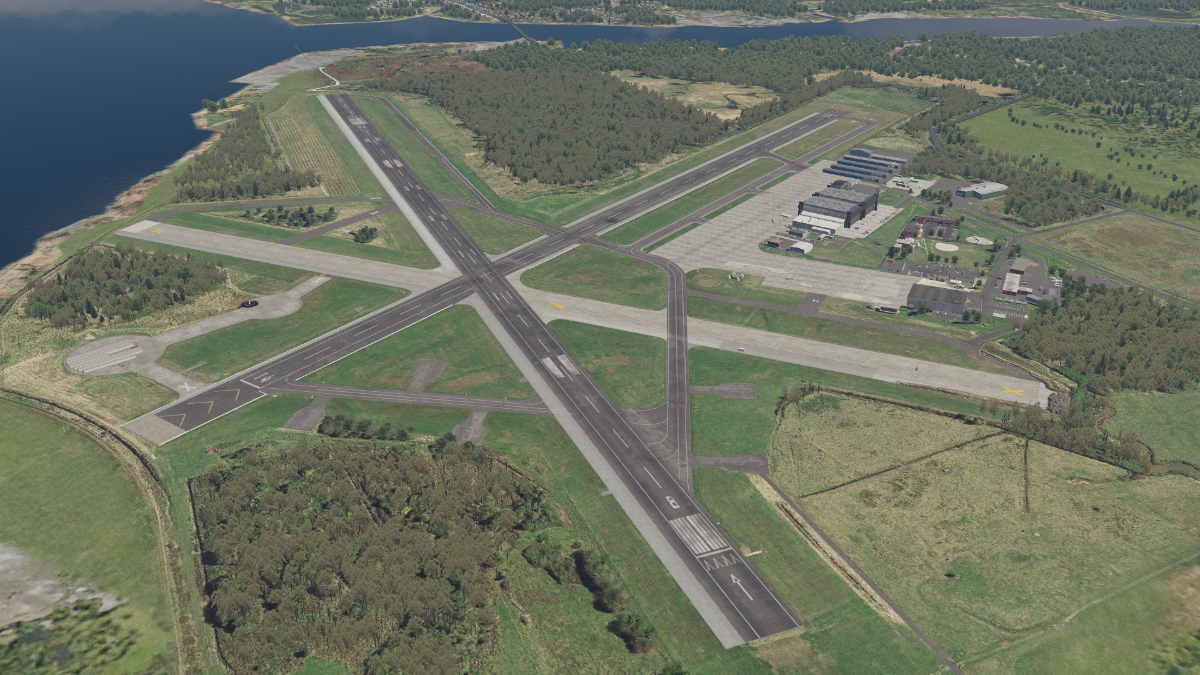
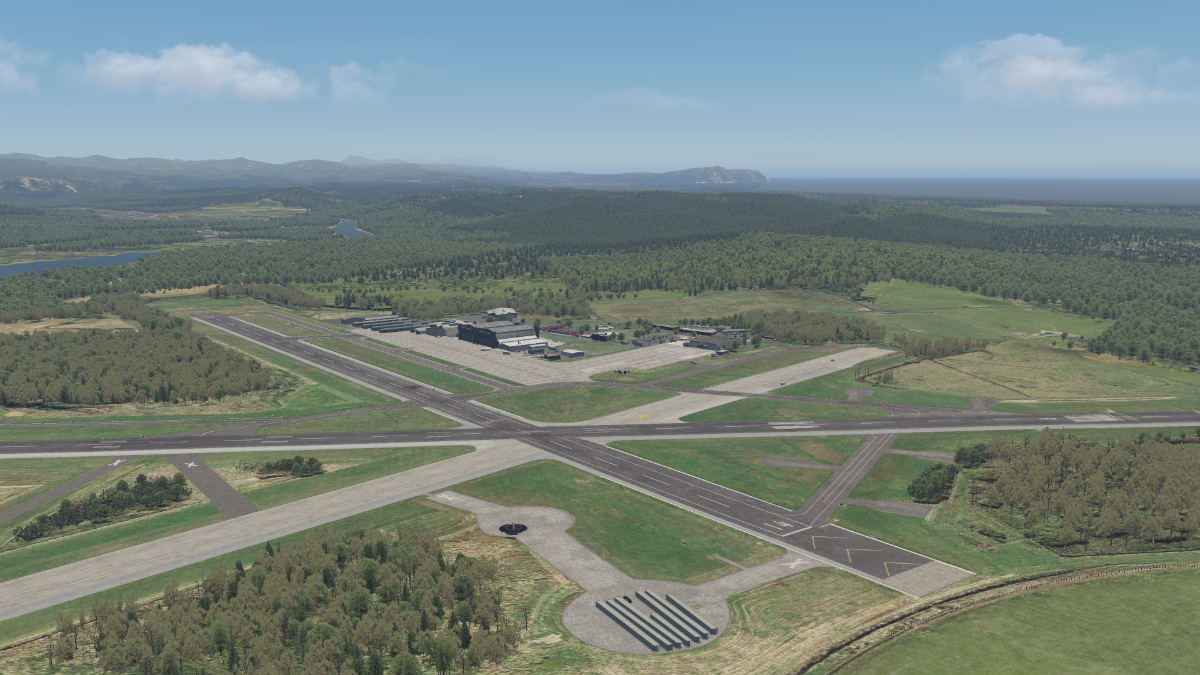
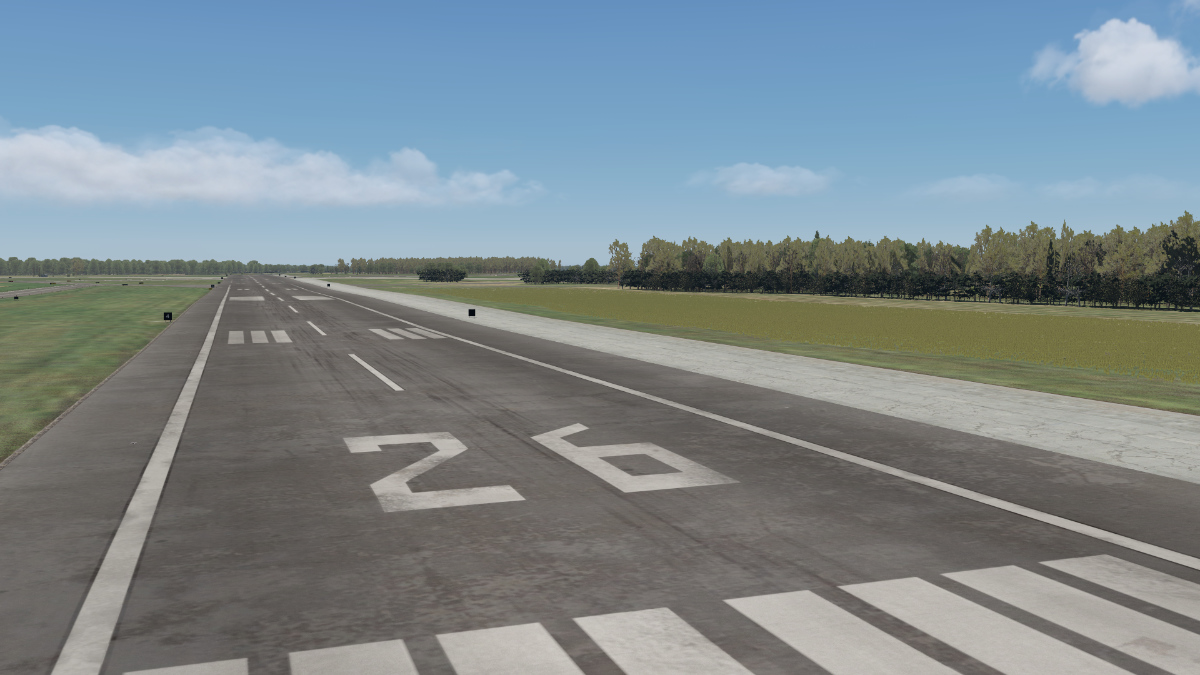
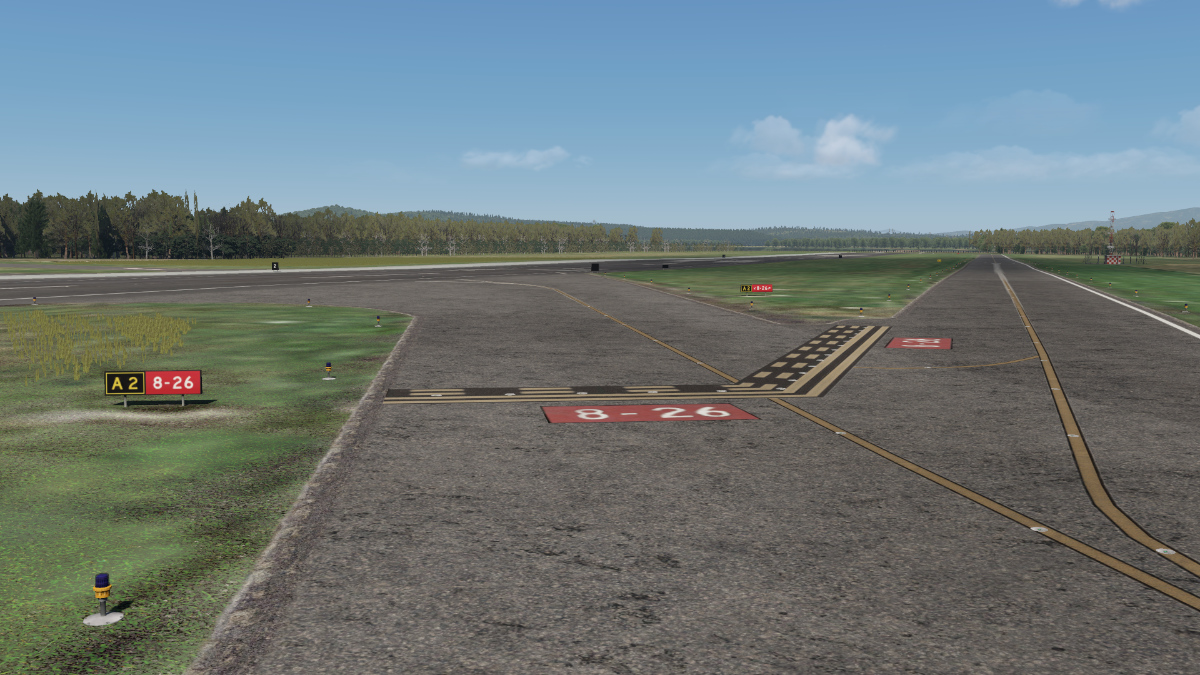
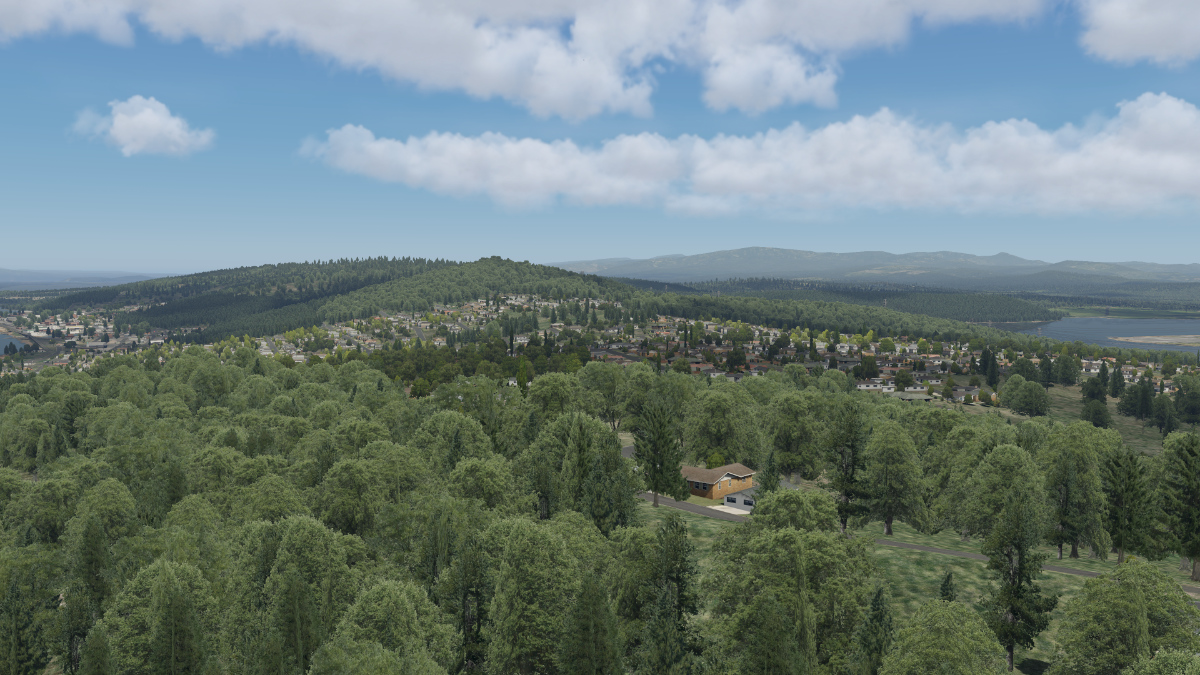
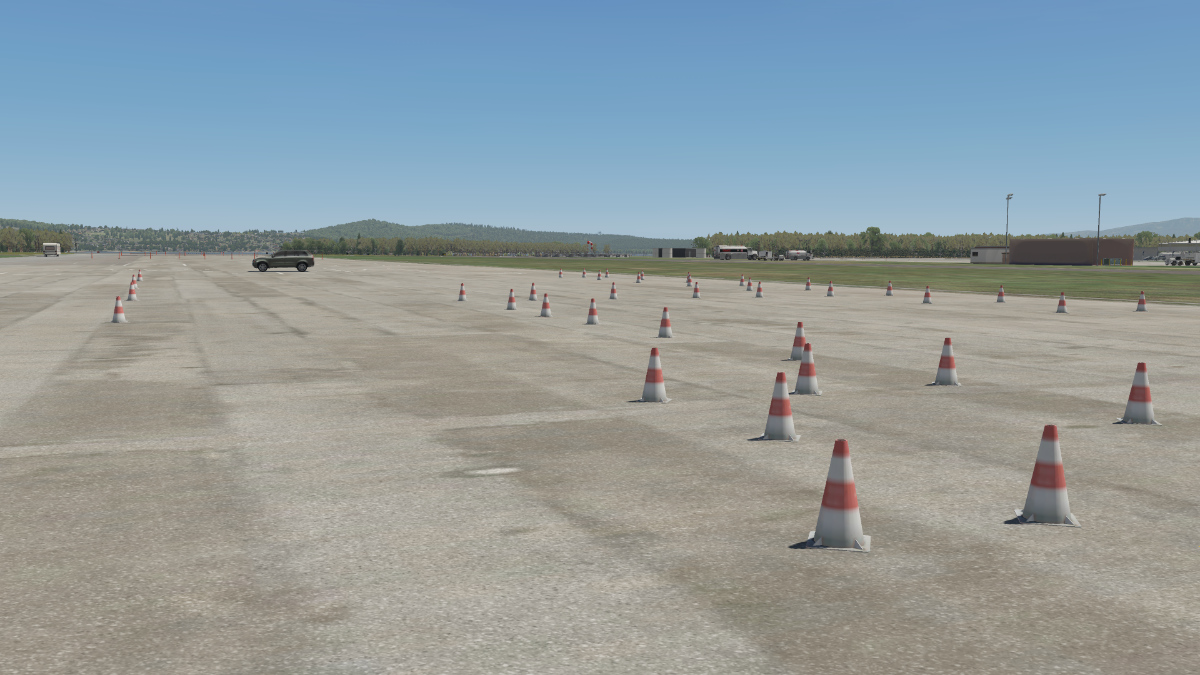
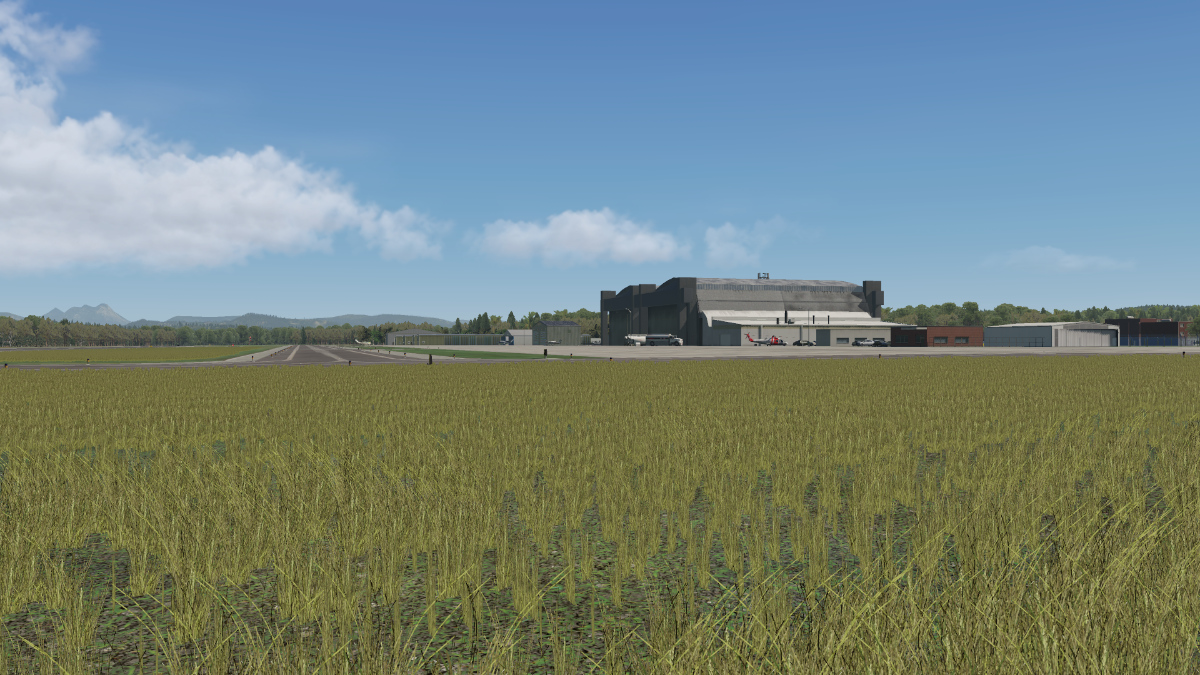
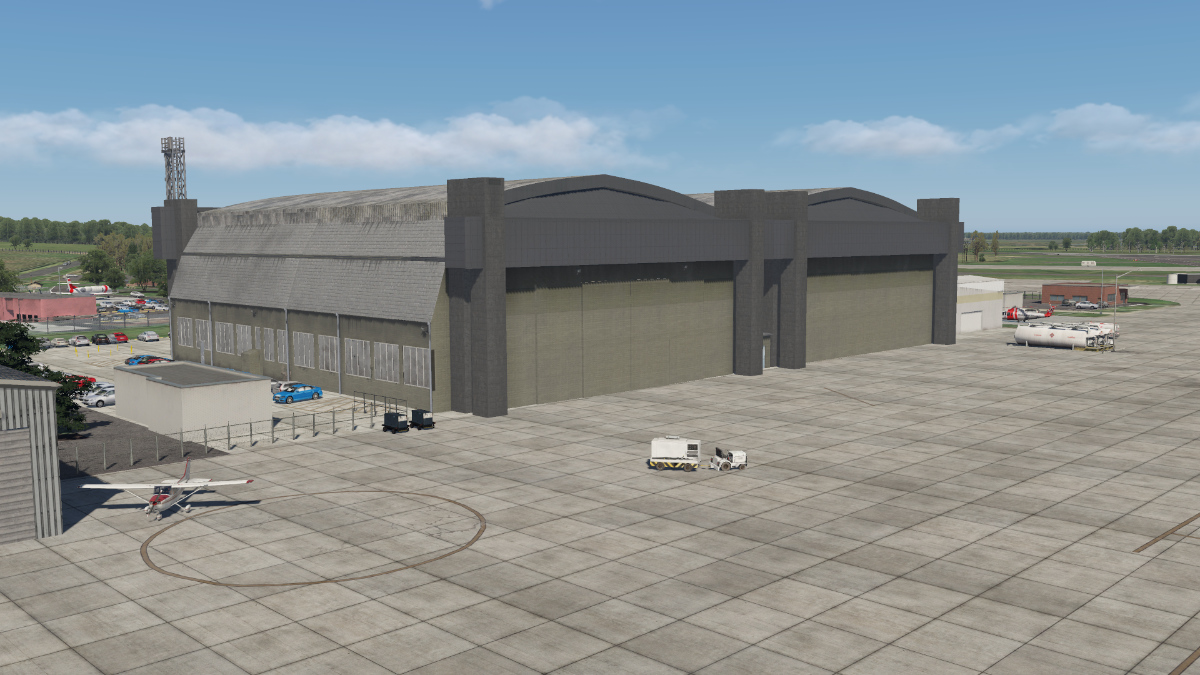
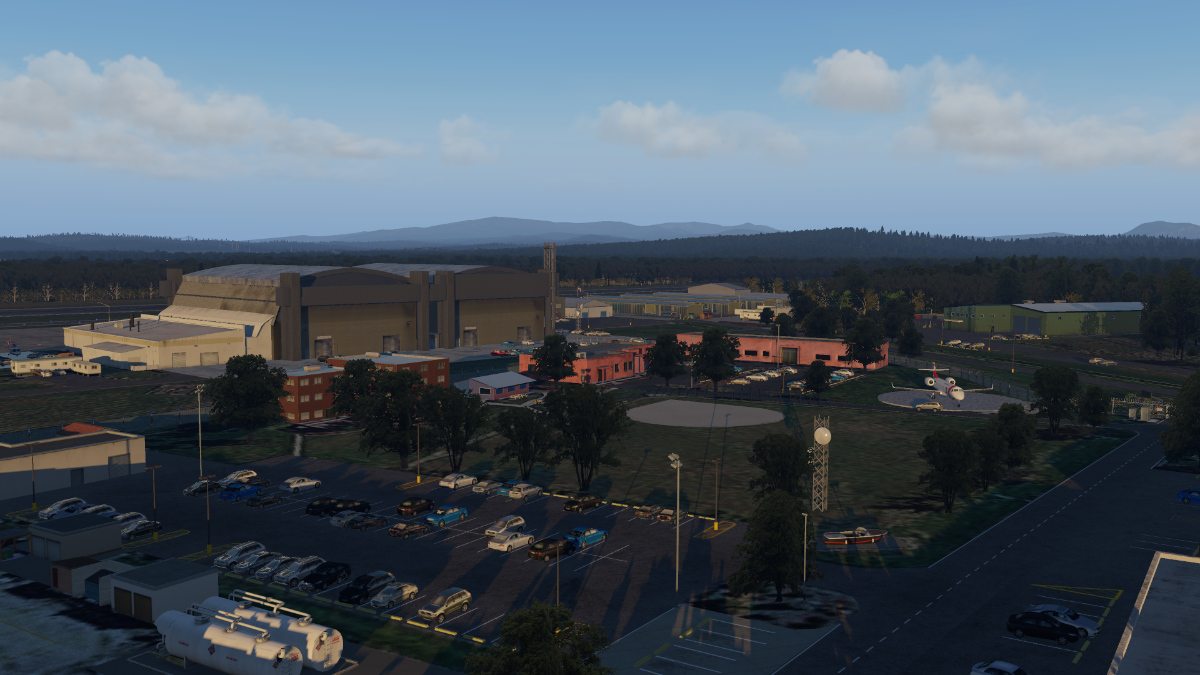
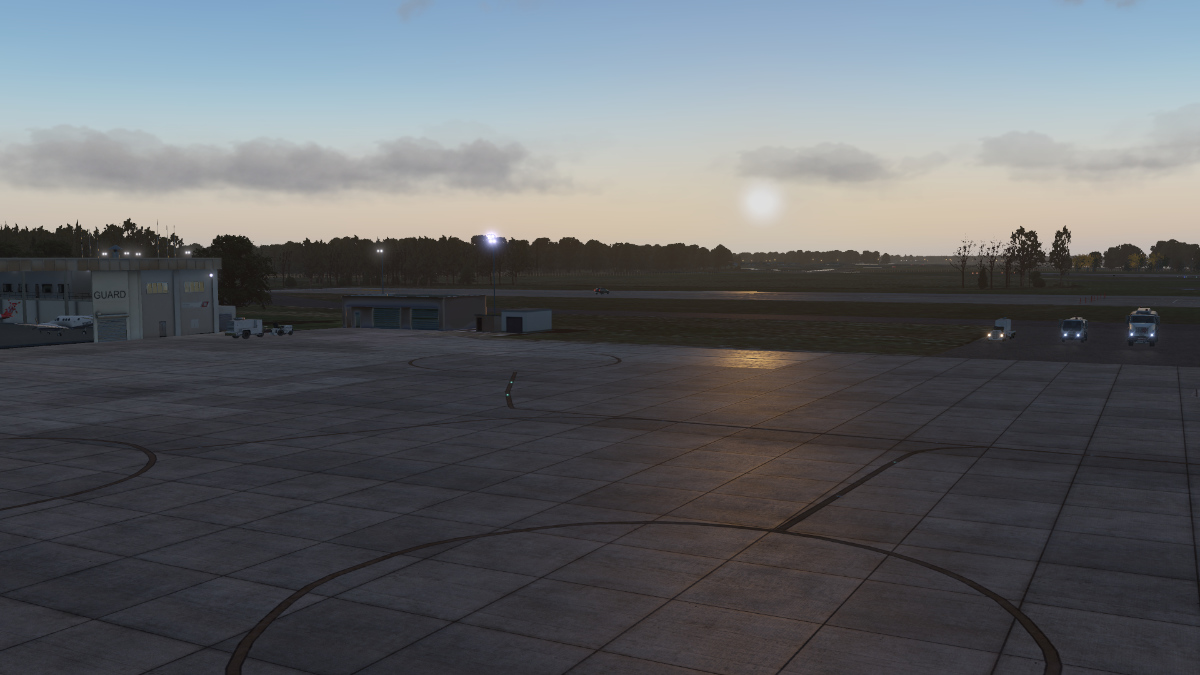
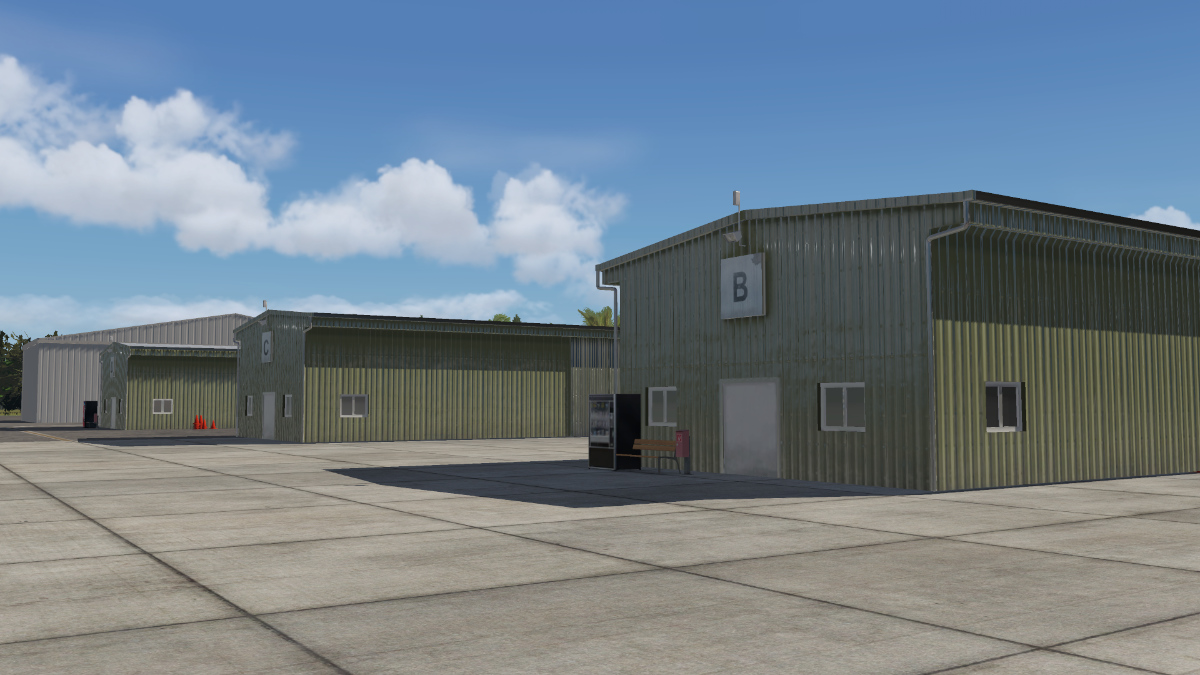
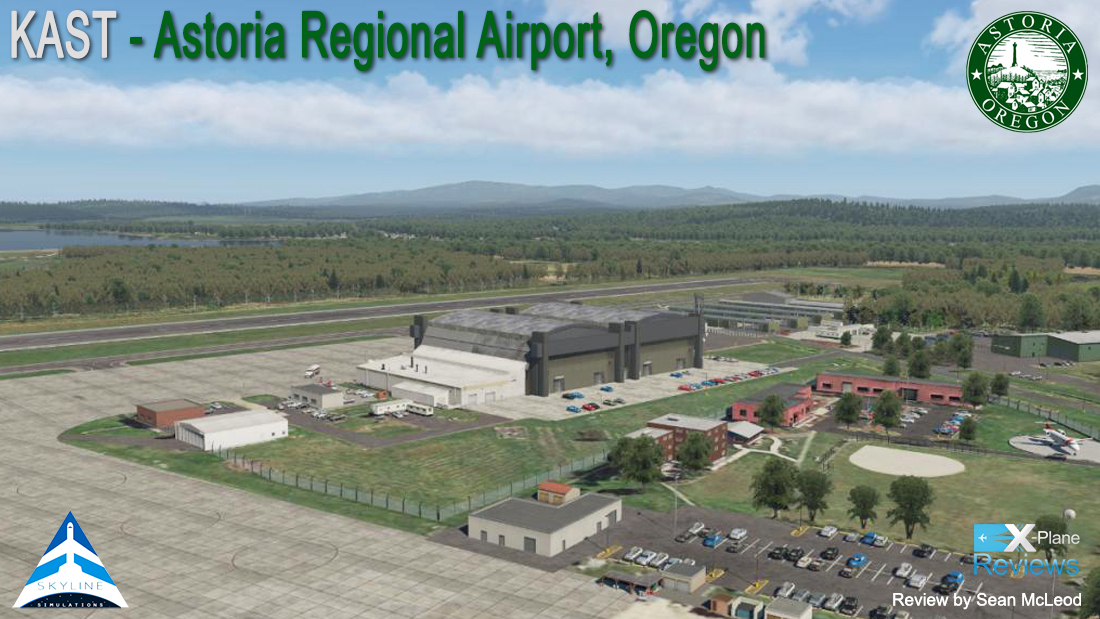
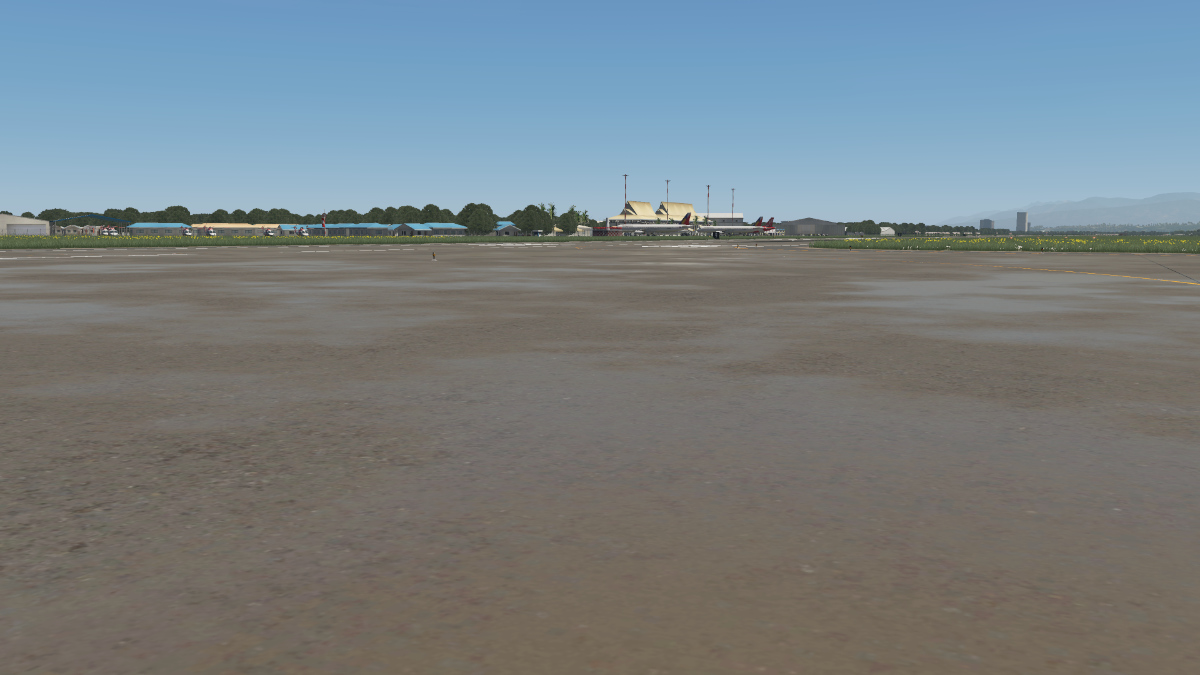
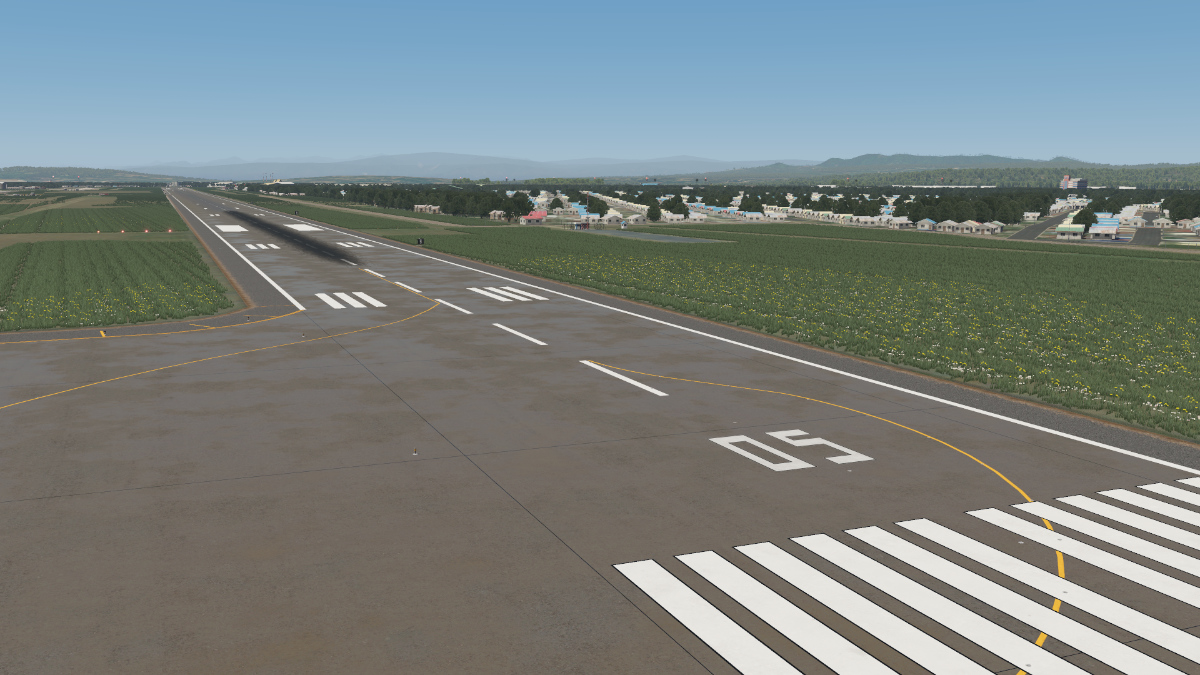
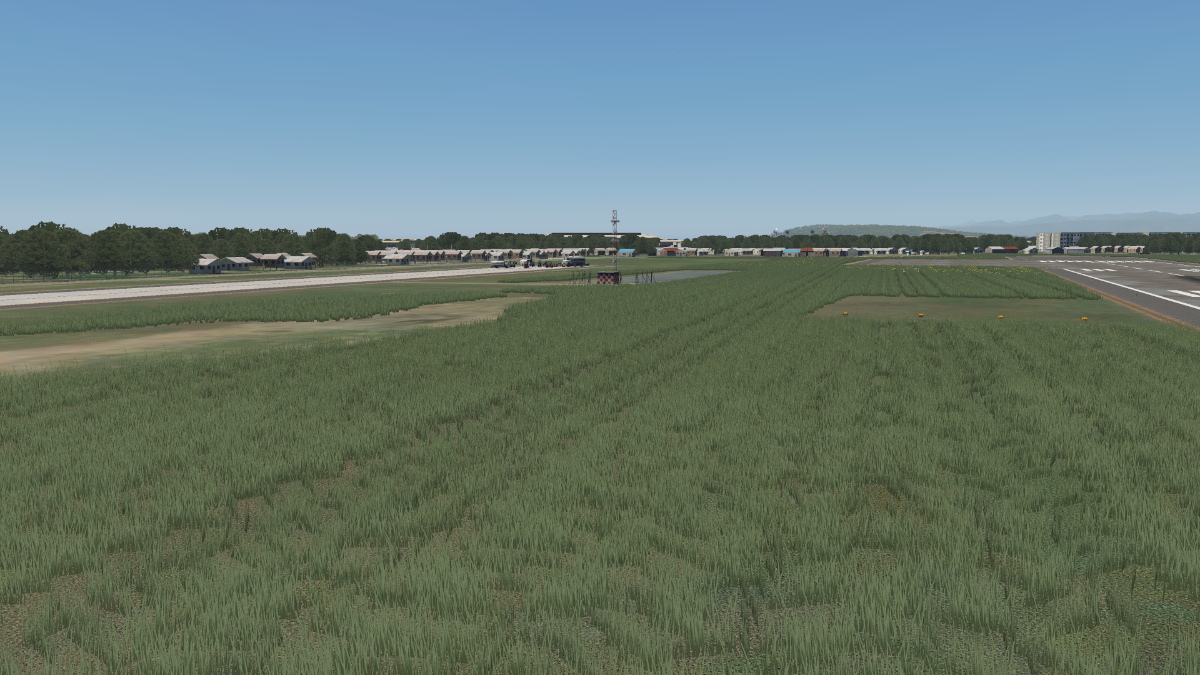
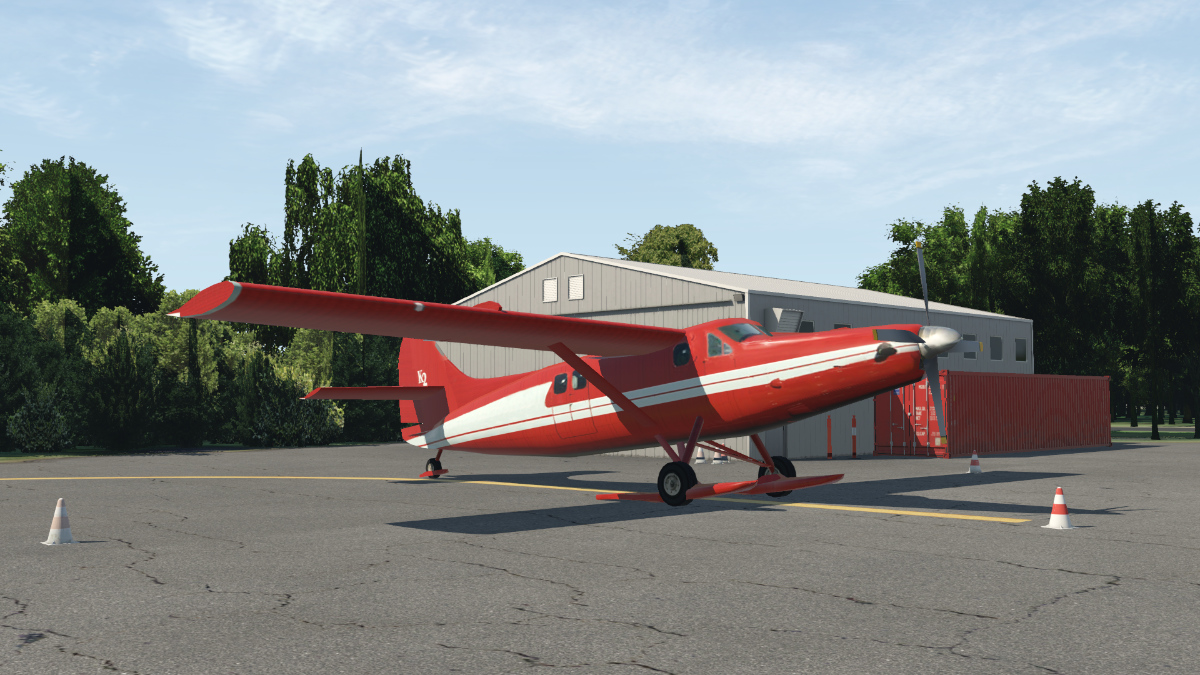
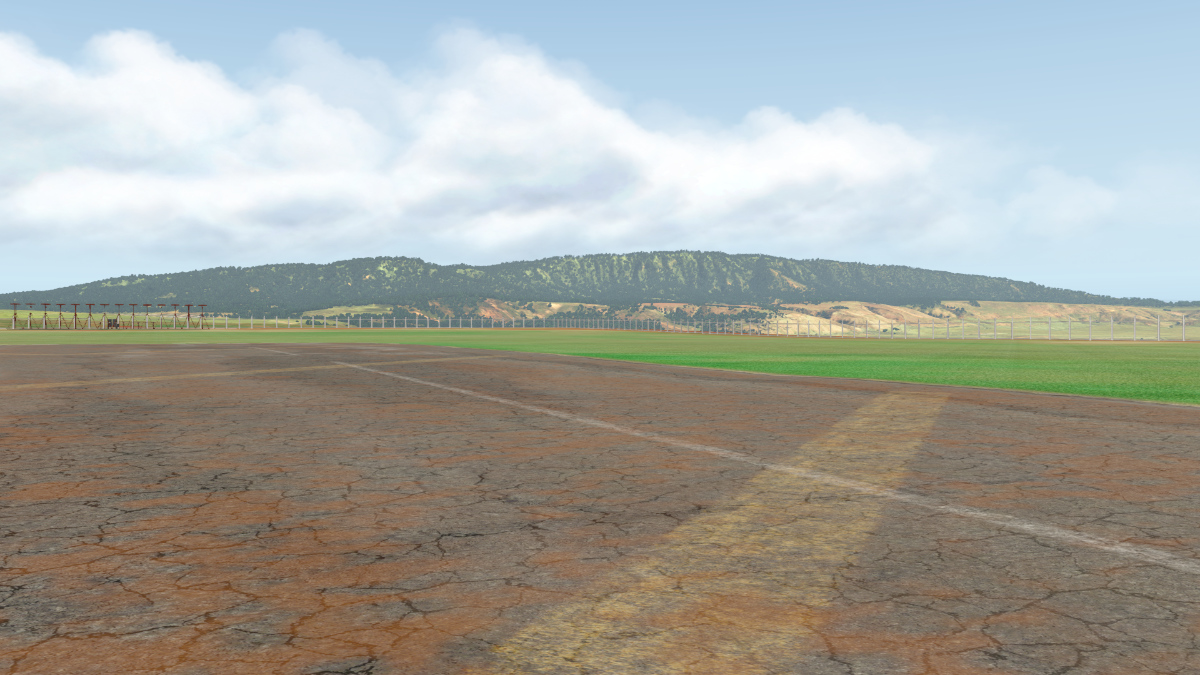
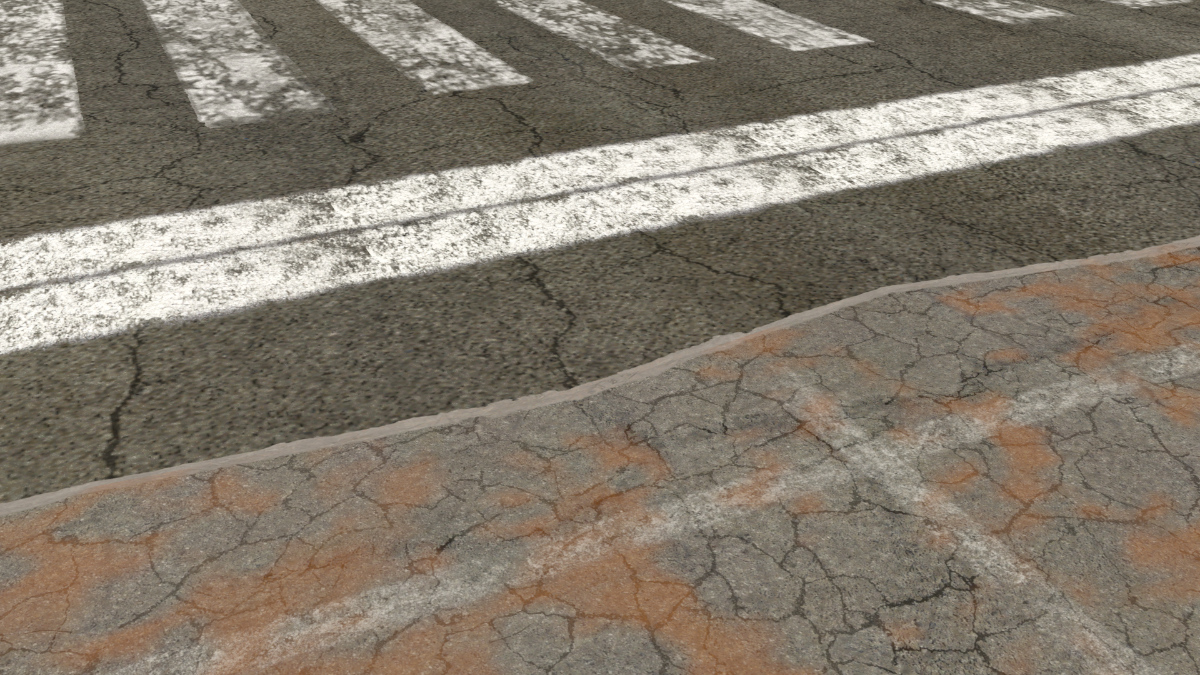
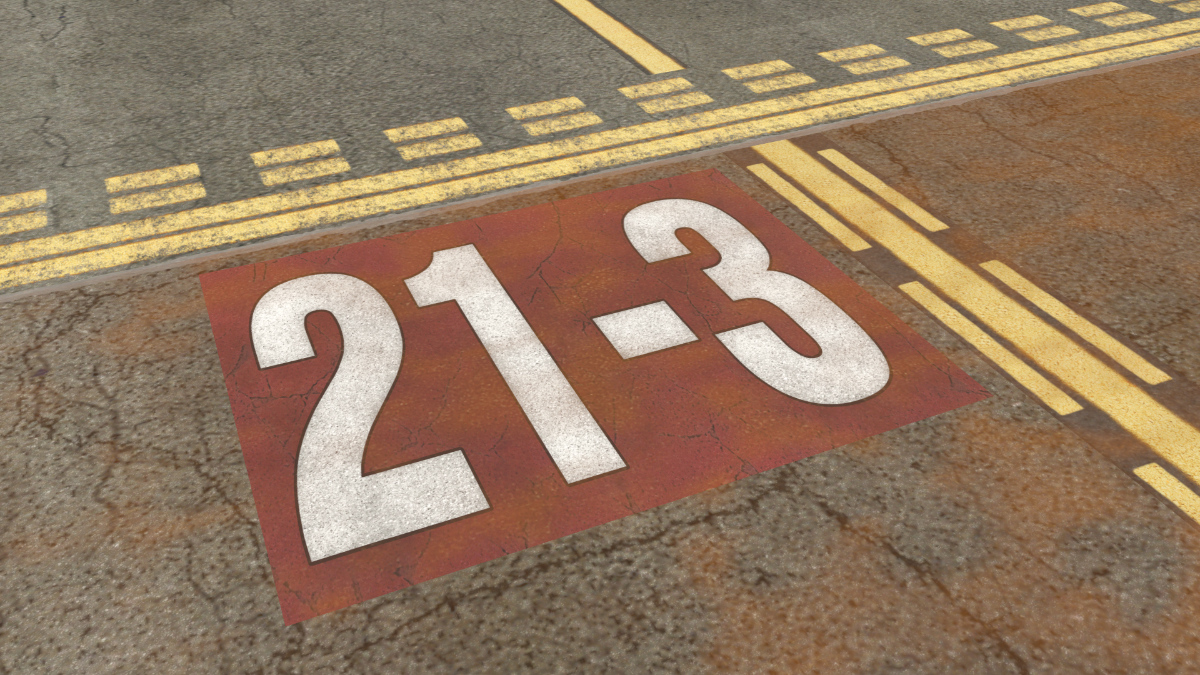
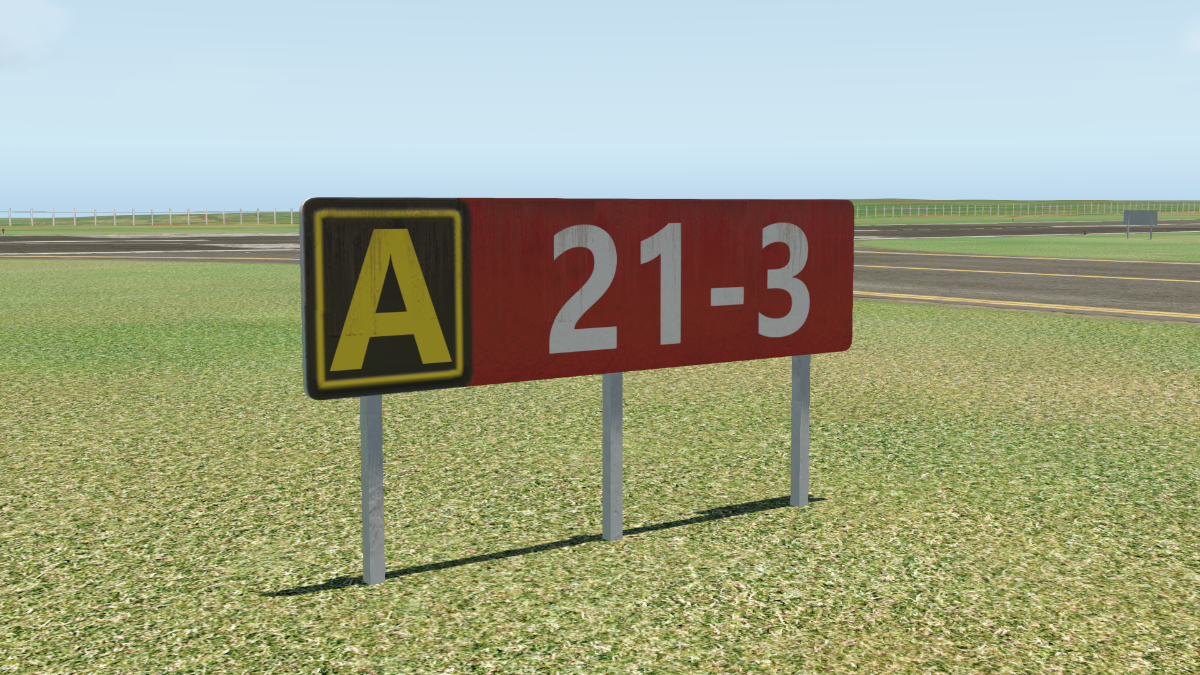
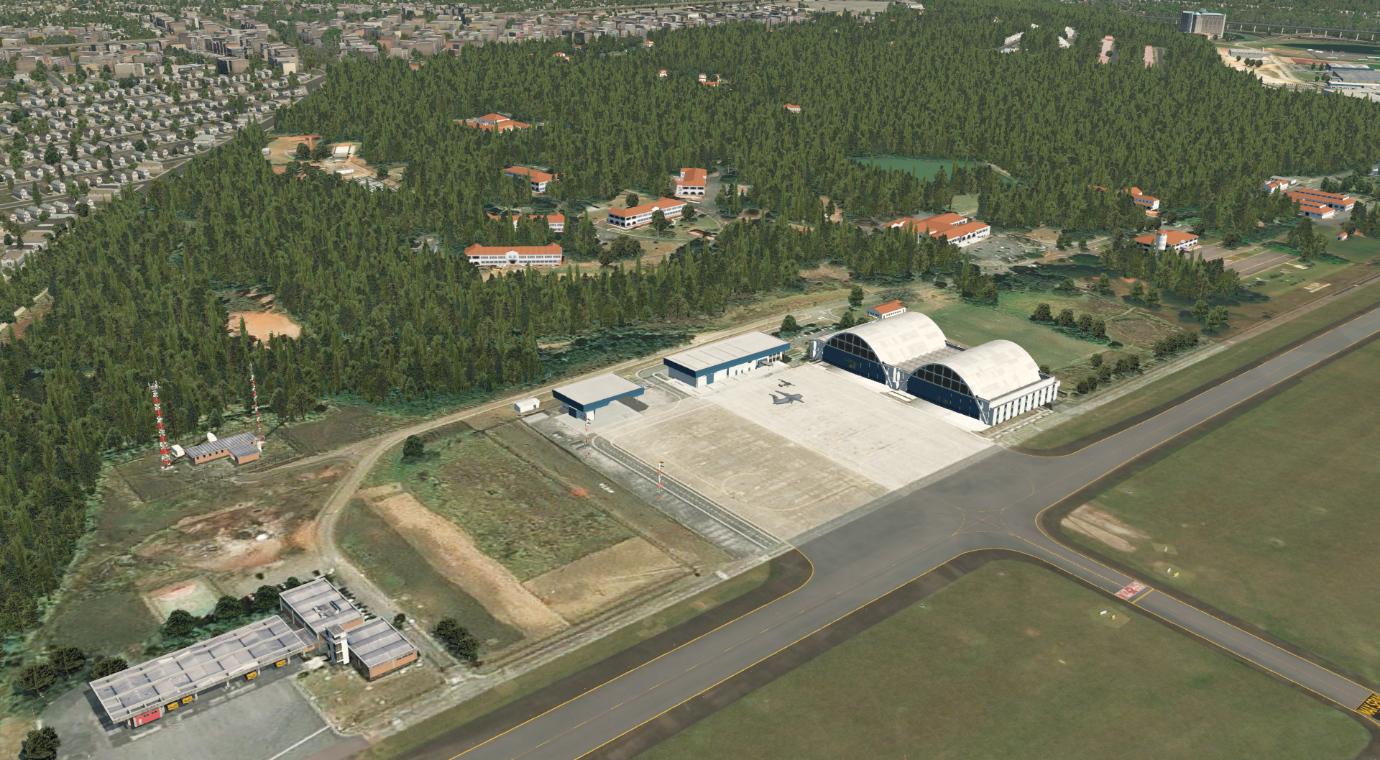
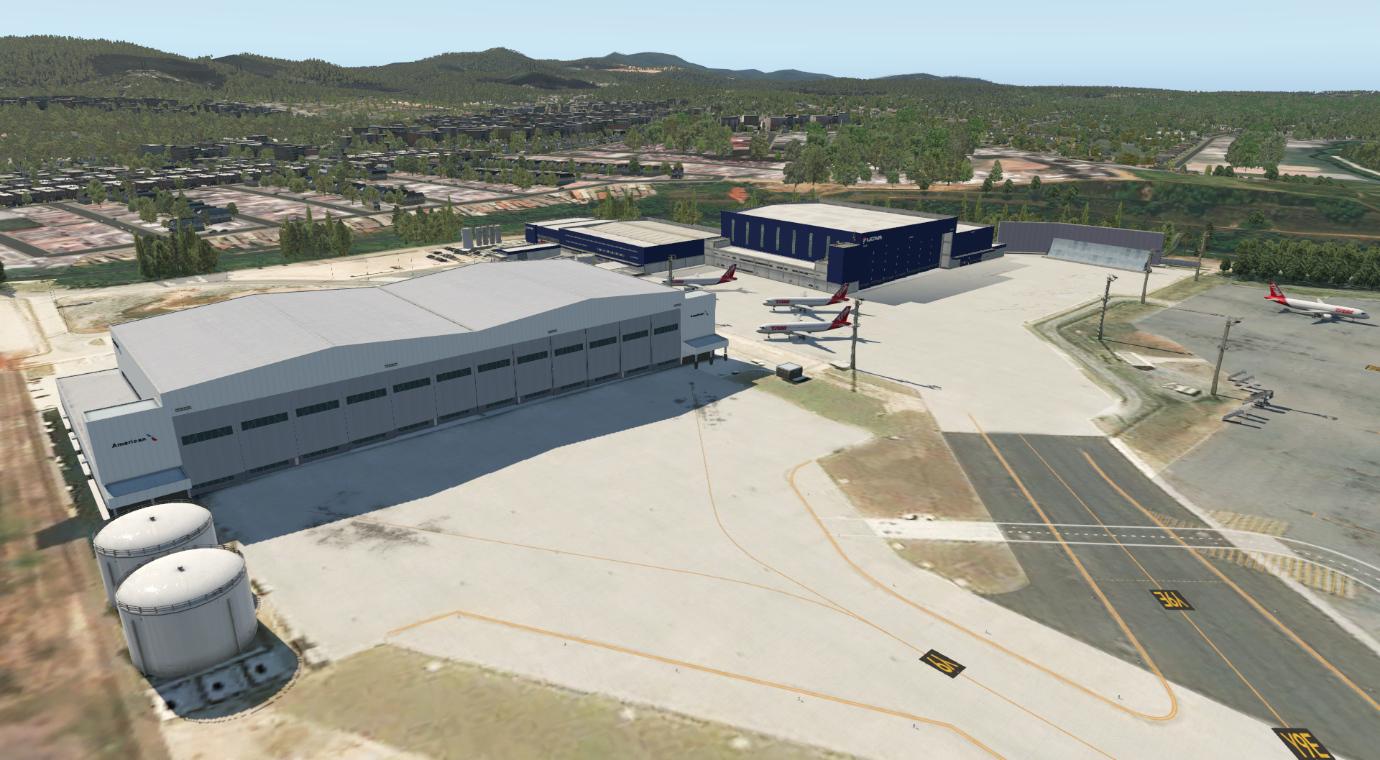
Scenery Review: KAST - Astoria Regional Airport, Oregon Introduction Welcome to beautiful Astoria, Oregon USA, recreated for your X-Plane adventures by developers, Skyline Simulations. Founded in 1811, Astoria is the oldest city in the state of Oregon and was the first American settlement west of the Rocky Mountains. Astoria is located on the south shore of the Columbia River, where it flows into the Pacific Ocean. The city is named for John Jacob Astor, an investor and entrepreneur from New York City, whose American Fur Company founded Fort Astoria at the site and established a monopoly in the fur trade in the early nineteenth century. Astoria Regional Airport, much like the city, is again located on the south shore of the Columbia River. This General Aviation airport sits directly at the border of two US states - to the north is Washington and south lies Oregon - divided by the mouth of the Columbia River. It’s not a particularly busy airport for commercial traffic - it’s not presently served by a scheduled commercial airline - but it’s certainly dynamic and active. KAST is home to a US Coast Guard service station - Coast Guard Air Station Astoria - that serves the Oregon and Washington coasts. Also of note, portions of the popular classic adventure movie The Goonies was filmed in the town of Astoria. Download & Installation I purchased and downloaded my copy of Astoria through the X-Plane.Org Store (other outlets available). The 3.3GB file size (unzipped) is what I consider to be substantial, but others may see it as the norm these days. Upon expansion, you will have one folder that contains two subfolders and the PDF manual, with the total file size rising to 5.03GB. Installation instructions are nothing out of the ordinary; move(cut-paste) the folders into your Custom Scenery folder. Launch X-Plane and go to the Graphics settings tab, adjust the Number of World Objects to Maximum. Since the art assets of the scenery package are high-definition and utilize PBR materials, it’s also important to make sure you have Visual Effects slider set to at least High (HDR). The Airport The largest structures at the airport are the two large hangars which date back to World War II. Both the 3D modelling and texture work is of a high standard, and when viewed up close, you really get a sense of their size. Situated nearby are numerous smaller buildings, such as the FBO terminal and T-hangars. Runway 26, the longest of the runways measured at 5773 x 100 feet, is served by an ILS (modelled by default in X-Plane) and RNAV(GPS) approach for when the wet West coast weather closes in. The other runways lack precision approaches but are served by PAPI & VASI visual approach aids as well as non-precision RNAV(GPS) and VOR approaches. The Skyline team has used a large number of decals and textured polygons to give tons of detail to the airport environment, such as cracks in the asphalt and concrete surfaces, stains from oil and dirt, tire skids, water puddles, and grass in the infield and surrounding areas. Everything is very high fidelity, crisp and clearly textured. The downside to all this detail is that users with low to middle-end systems might possibly experience slowdowns at certain parts of the scenery. Even though the scenery demands higher spec’d computer hardware, the details of specific elements of the airport area impressed me, such as the gateway and hangar of the Coast Guard station, the general aviation hangars with high-resolution signage, plus other nicely detailed exterior features such as wooden staircases. There appears to be a driving school that uses one of the decommissioned runways as a training area, and there is liberal usage of 3D grass objects that help to add a lot of character to this airport scenery. Surrounding Area Away from the airport, you can find landmarks specifically modelled by Skyline, such as the Astoria Column and the Astoria-Megler bridge which are nicely detailed. There is mention of a lighthouse, but I haven’t found it yet, which gives me one more reason to keep on exploring this scenery! PBR & Night Lighting During the evening and late-night hours, the scenery really comes alive with the vehicle traffic lights moving through the airport's various areas. Around the hangars, I noticed a few parked vehicles with their lights on which was a nice touch and helped create a sense of realism. The airport environment is well lit with some especially nice areas, but I found the interior lighting from the general aviation hangars unfortunately shines through their roofs and creates a floodlight effect that doesn’t strike me as particularly realistic. However, the custom-made landmarks, such as the Astoria-Megler bridge, shine beautifully across the river, and when the Astoria Column is lit, the lights are really well done, as they are omnidirectional and not simply focused spotlights on the column. Performance During my testing, I have to say that I have spent more time than I wished working on finding an optimal balance with my existing scenery collection and Skyline’s KAST package. If you haven’t already done it by now, you can safely use the HD/UHD scenery meshes created by Alpilotx. Also, if you have the HDD space, I recommend installing the orthophoto overlays created by Forkboy or generating your own using Ortho4XP. There are many small GA airstrips nearby to KAST that can be enhanced by other available free third-party scenery packages. If you haven’t yet discovered simHeaven, they create freely available add-ons that can enhance the surrounding area nicely, but I’ve found there are some object conflicts and anomalies when combined with this scenery package. When compared with their other offerings, I’ve found Skyline’s KAST scenery detail isn’t quite as deep, i.e., the omission of building interiors and human figures, but then again, the size of this package is considerably smaller than the others. A couple of words of caution for prospective customers; the installation requirements stated in the enclosed support documents mention you need to set the X-Plane object density to Maximum. I was able to do this, but due to my system being on the low end, really strained by computer systems. However, I found that I could use medium density, but it did detract from the overall look of the geographical area, i.e., fewer trees in the forests and a smaller amount of building objects in the populated areas. If you have the Orbx Washington SD/HD orthophoto scenery package installed, you will see object conflicts and anomalies. If you want to fly around this specific area with orthophoto overlays, I recommend those created by Forkboy. Conclusion One of the reasons why Astoria Regional Airport has such a pull, is due to its beautiful location in the Pacific Northwest. There are just so many amazing places to explore, such as the Gifford Pinchot National Forest to the east and the Olympic National Park to the north. And if you’re a Goonies fan, then there’s a bit of nostalgia thrown in for good measure! Even with the issues I encountered with my system, I have to say the developers have done an excellent job at recreating this airport for the enjoyment of X-Plane pilots. It really did bring a smile to my face as I explored the airport grounds and surrounding areas. Keeping in mind my concerns about this scenery offering (do your homework), I really do think you'll enjoy exploring KAST Astoria Regional Airport by Skyline Simulations. _______________________________ Astoria Regional Airport by Skyline Simulations is available from the X-Plane.Org Store here: Astoria Regional Airport Priced at US$20.00 Features Designed with the latest airport updates UHD Realistic Custom Textures Detailed HD Ground with PBR and decals Landmarks. Bridge, Column, Super Detailed 3D modeling PBR Materials on every building Thousands of 3D custom static objects Amazing and detailed night textures FSEco-subsystem Accurate City using original OSM data Ground Traffic Requirements X-Plane 11 - X-Plane 12 (when available) Windows , Mac or Linux 4 GB VRAM Minimum. 8GB+ VRAM Recommended Download size: 3.3 GB Current version: 1.0 (May 16th 2022) Review by Sean McLeod 8th Sept 2022 Copyright©2022: X-Plane Reviews Review System Specifications Windows 10, i7-2600K @ 3.9Ghz, 32GB DDR3 RAM, Gigabyte GTX1070 G1 8GB RAM, SATA HDD. (Disclaimer. All images and text in this review are the work and property of X-PlaneReviews, no sharing or copy of the content is allowed without consent from the author as per copyright conditions) All Rights Reserved

-
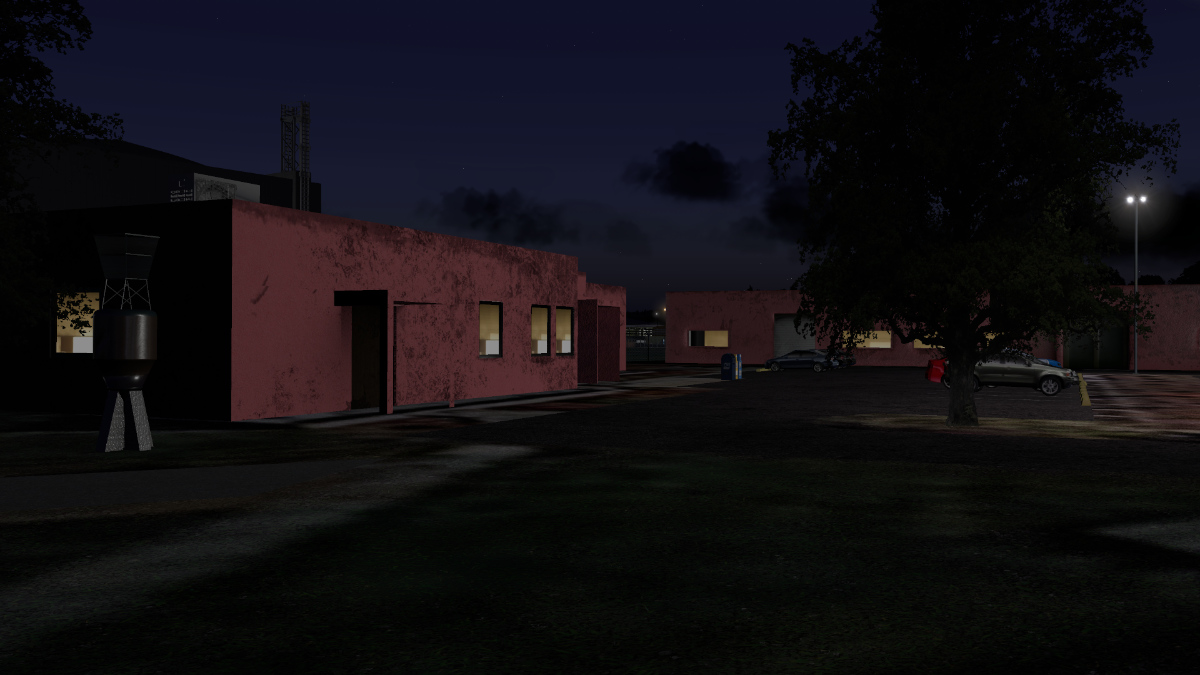
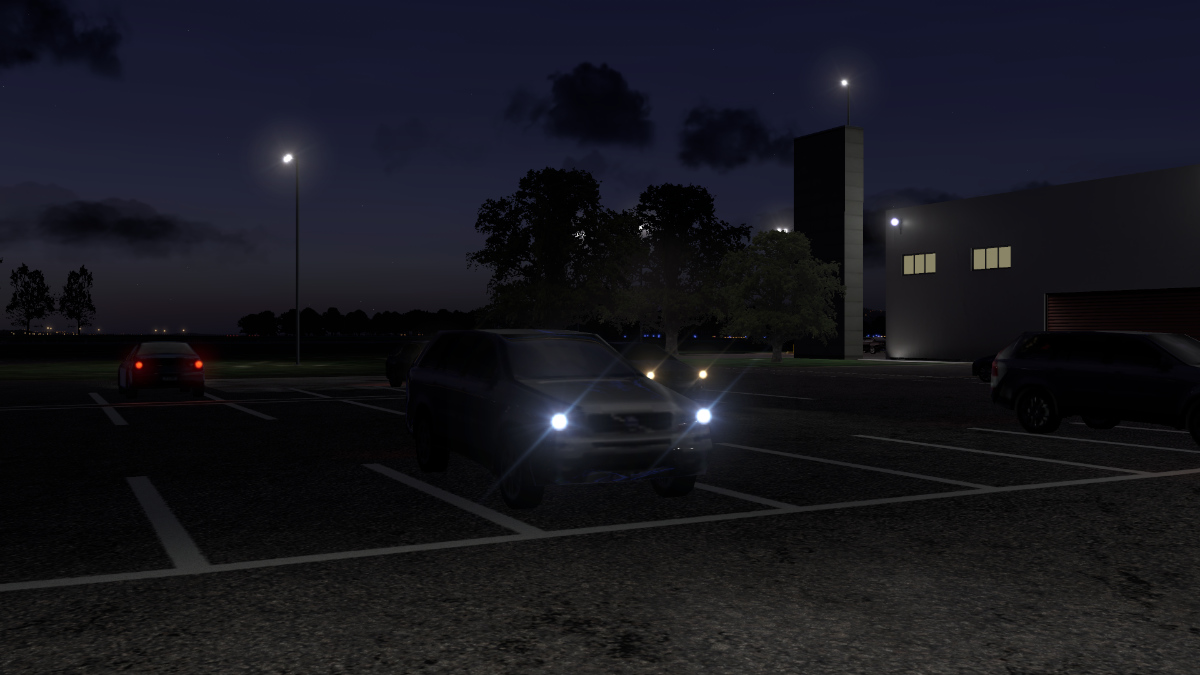
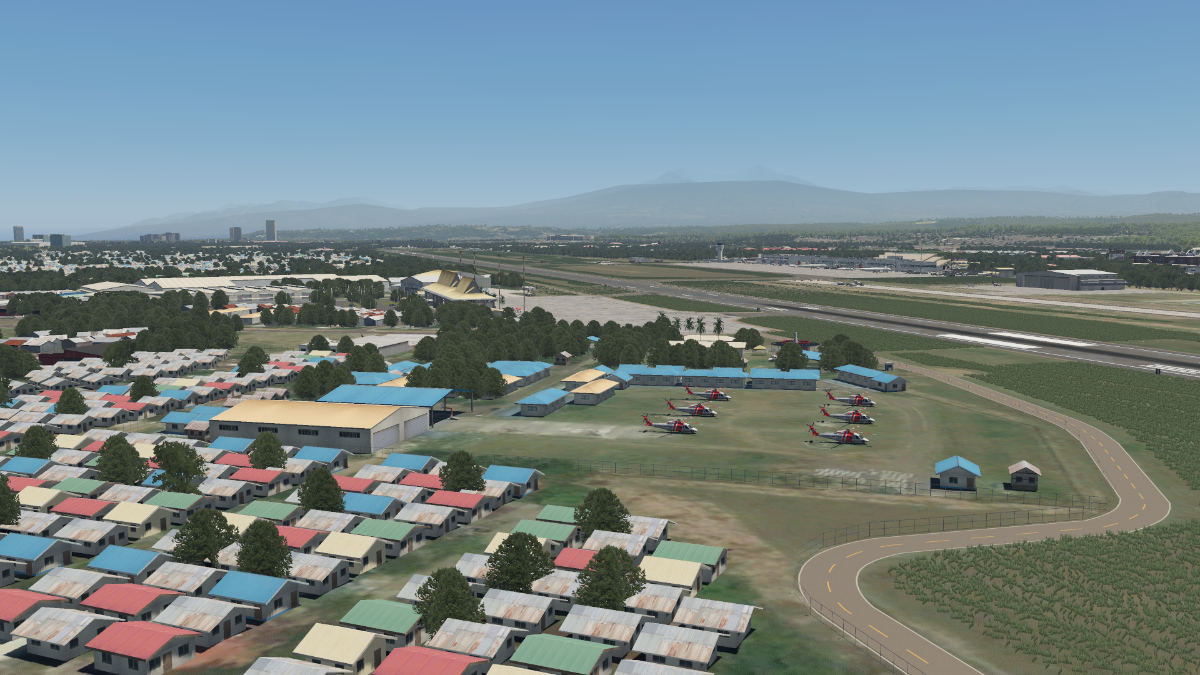
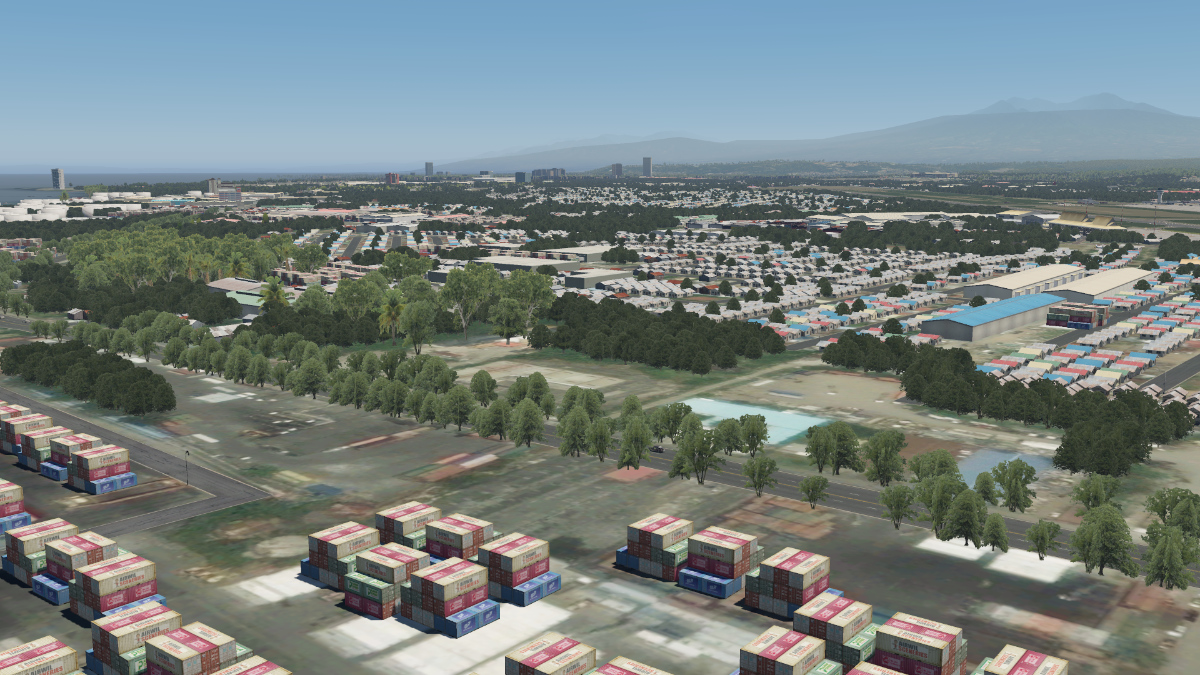
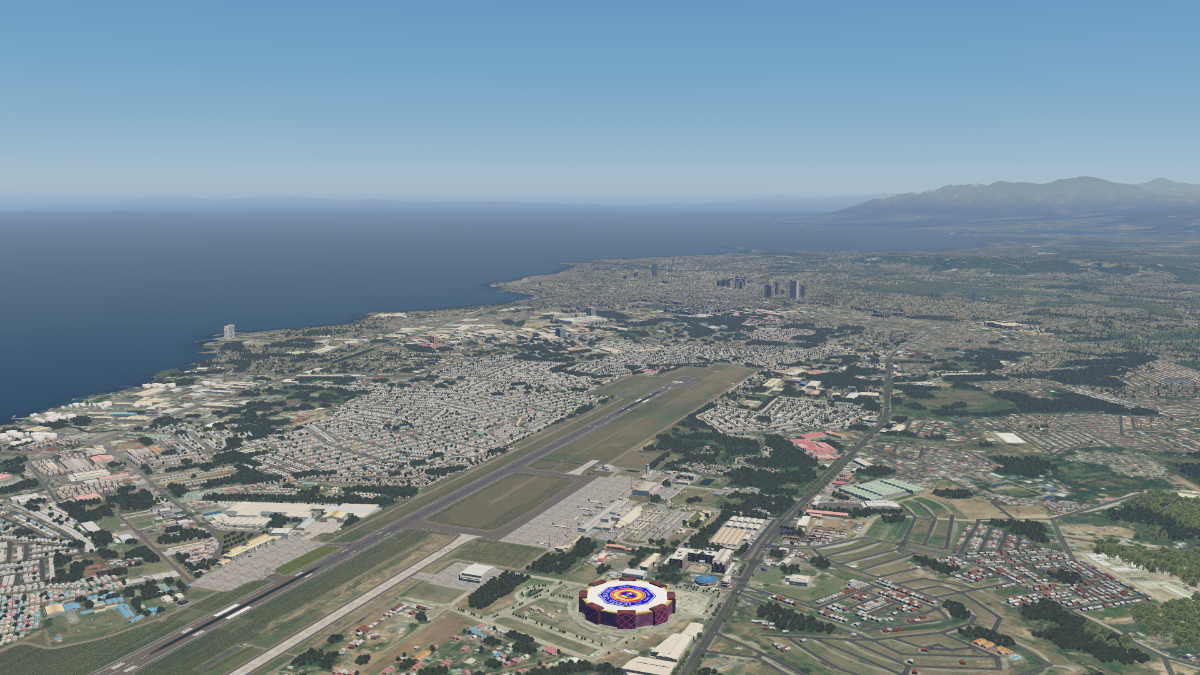
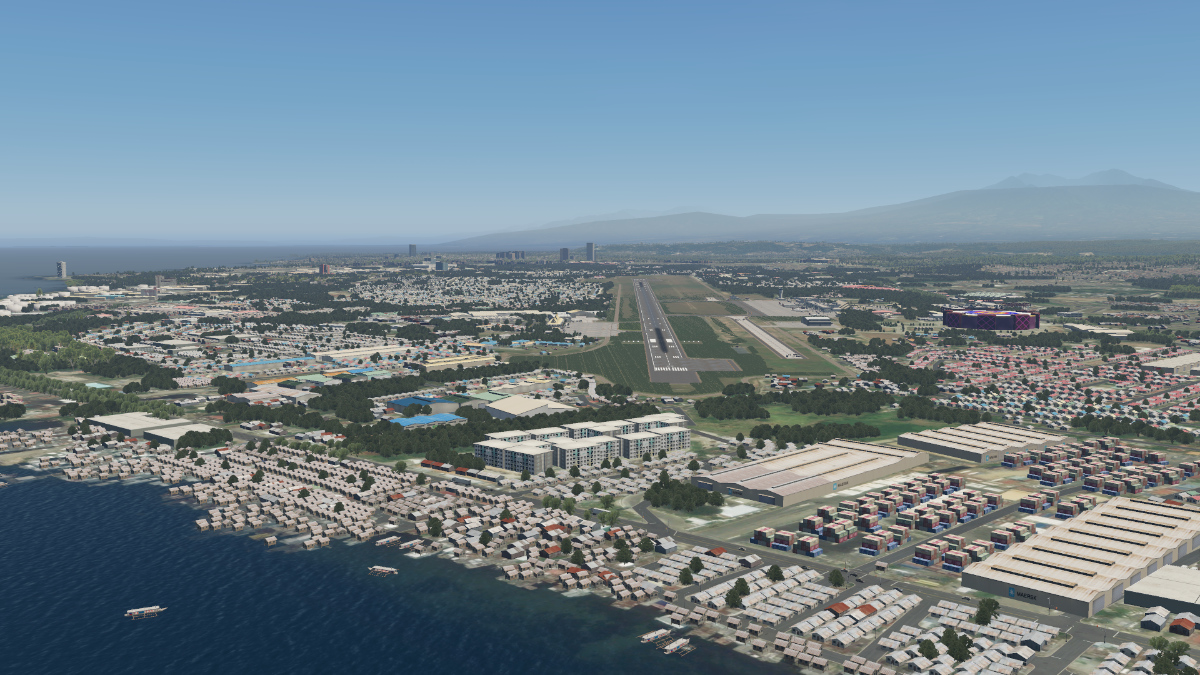
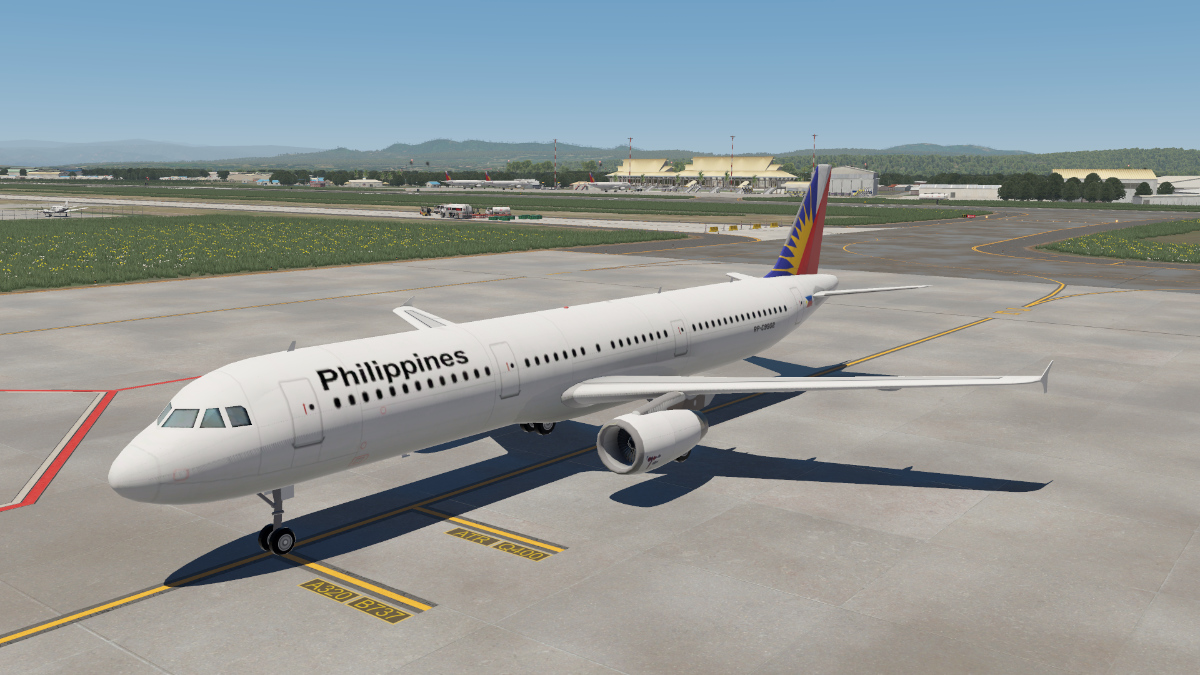
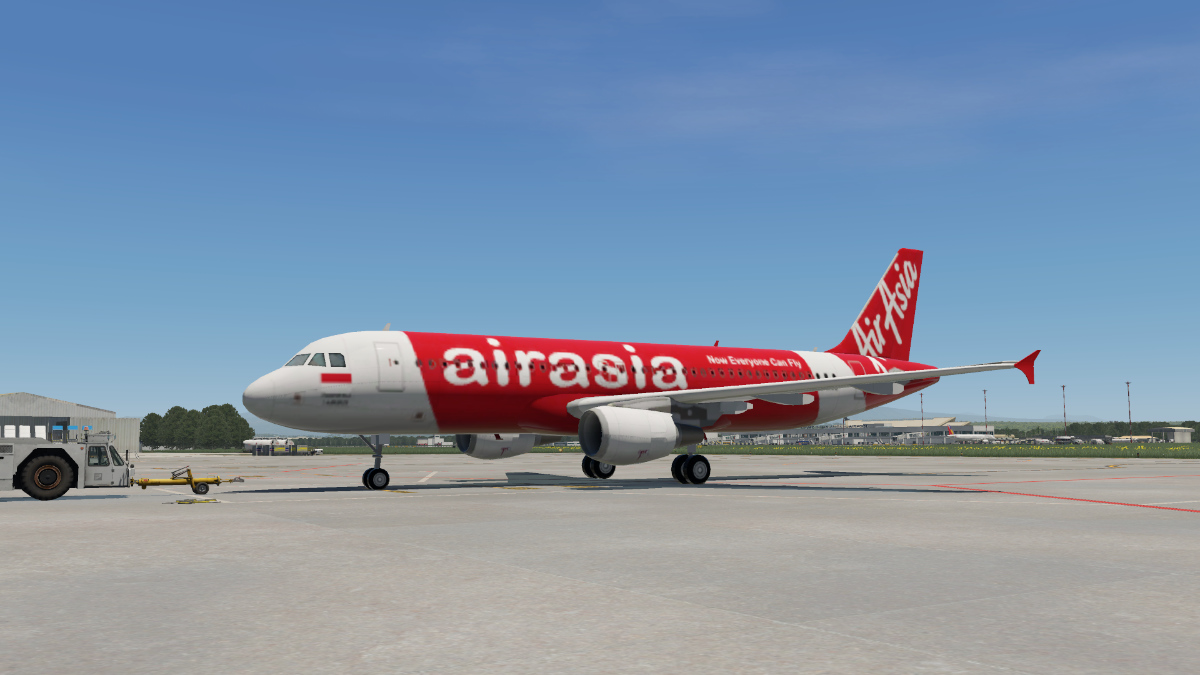
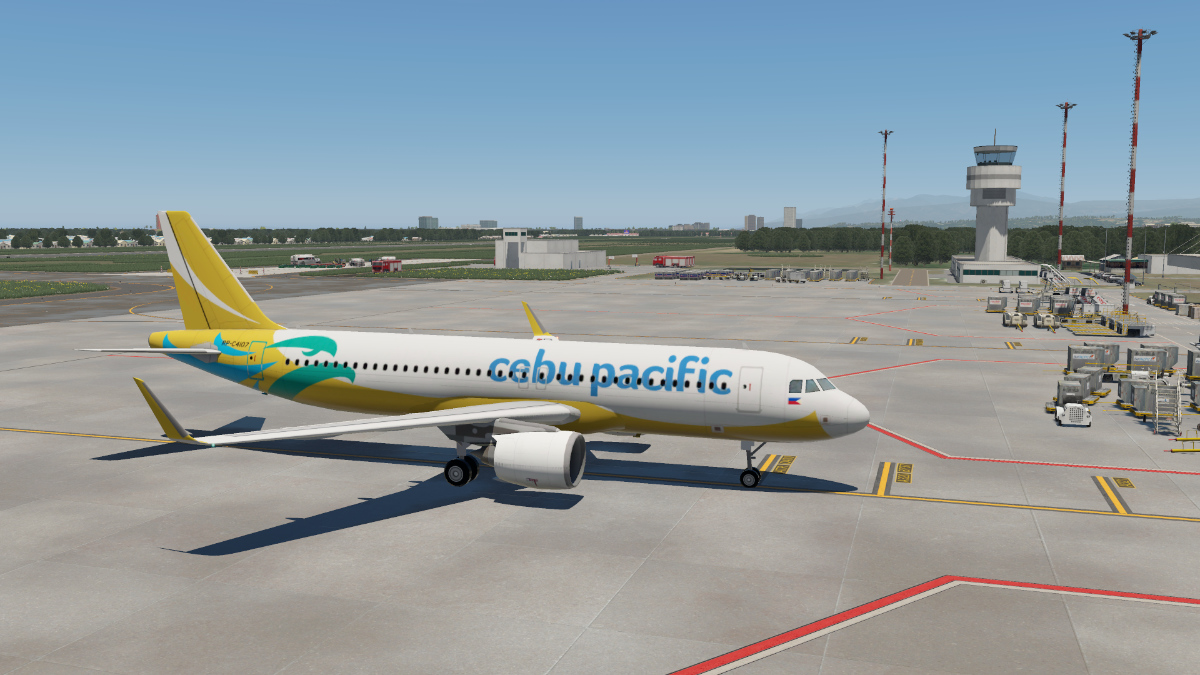
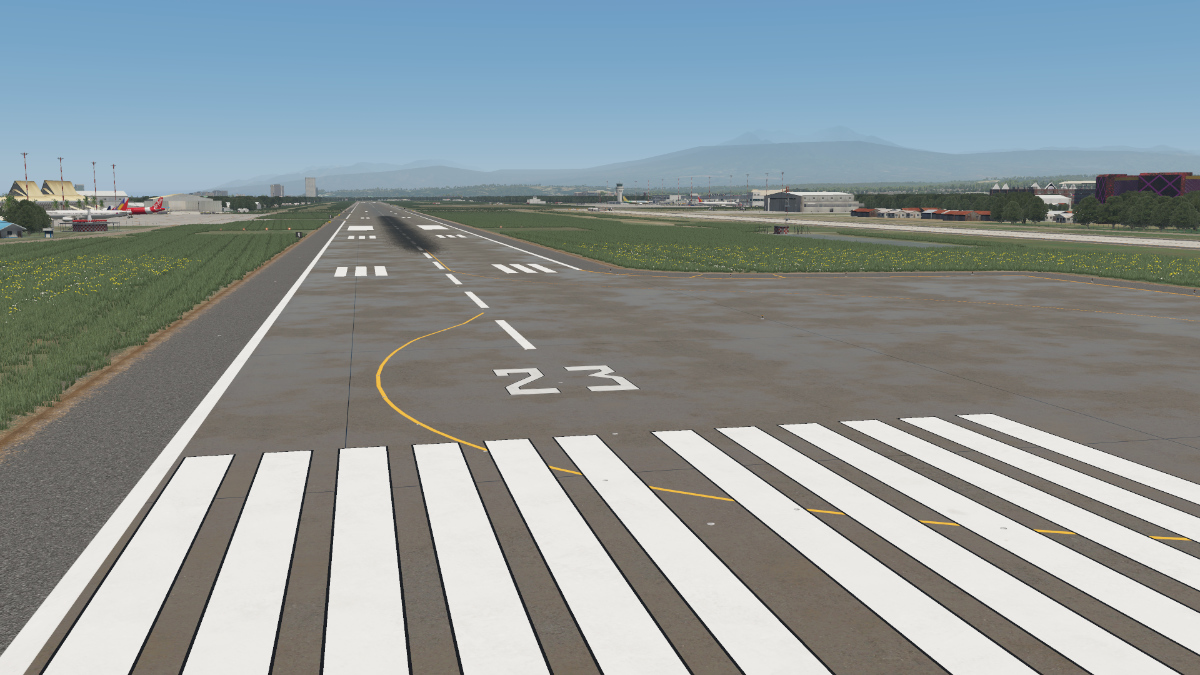
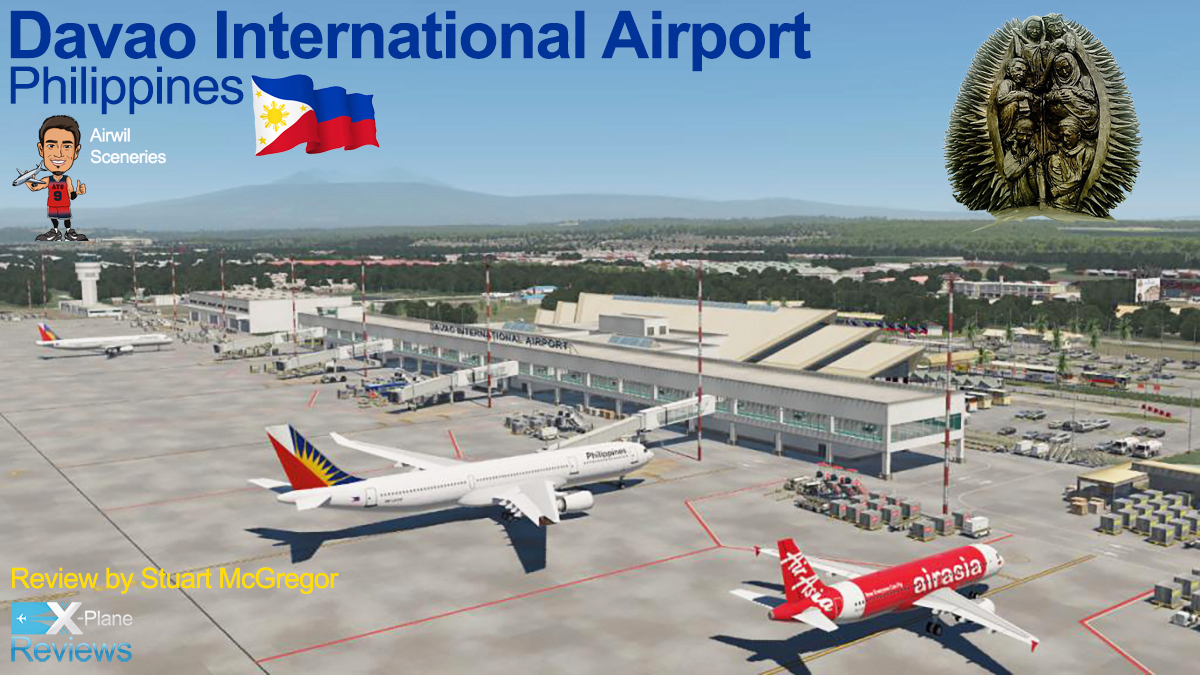
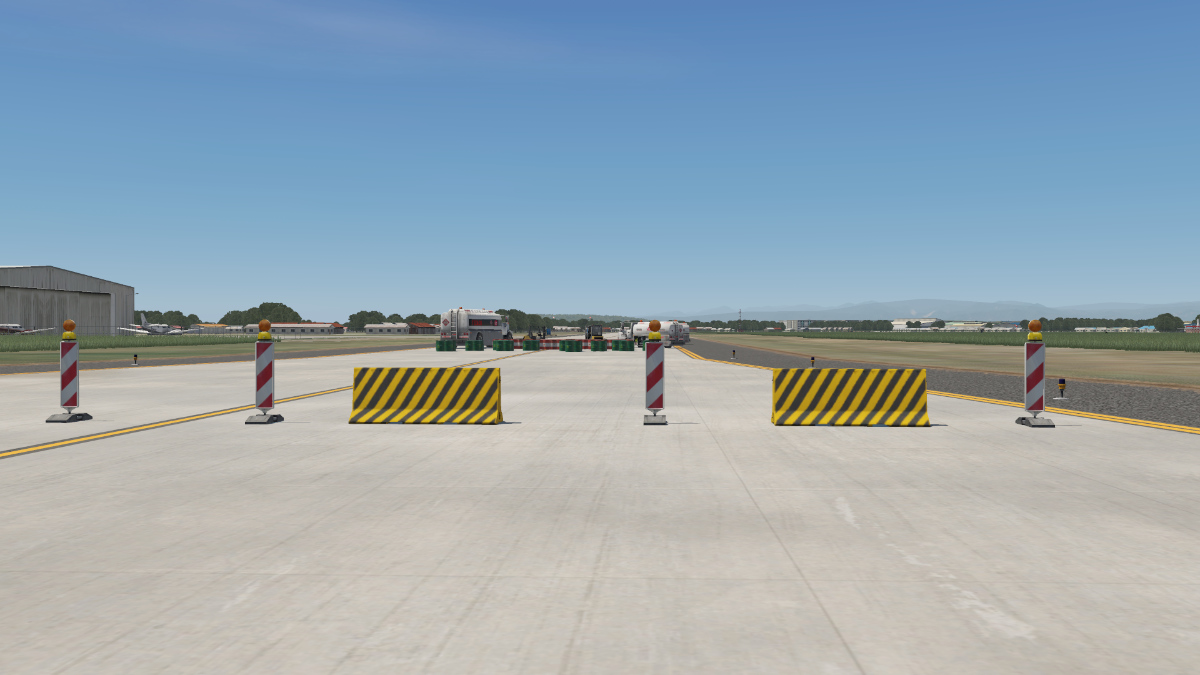
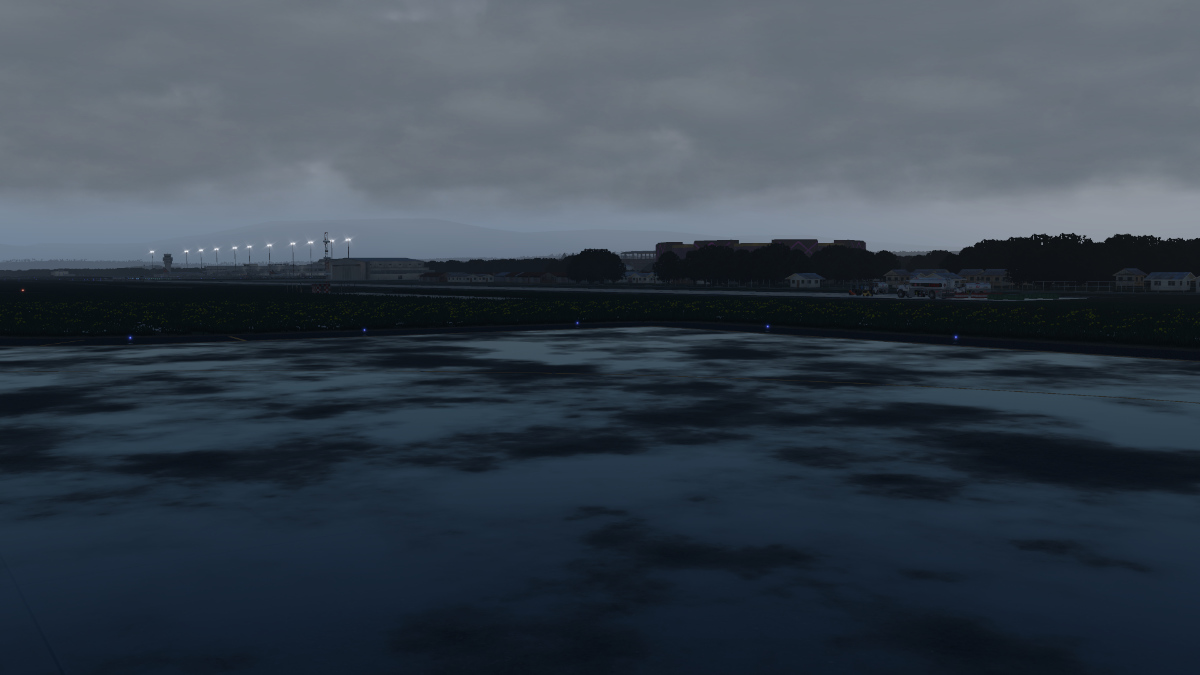
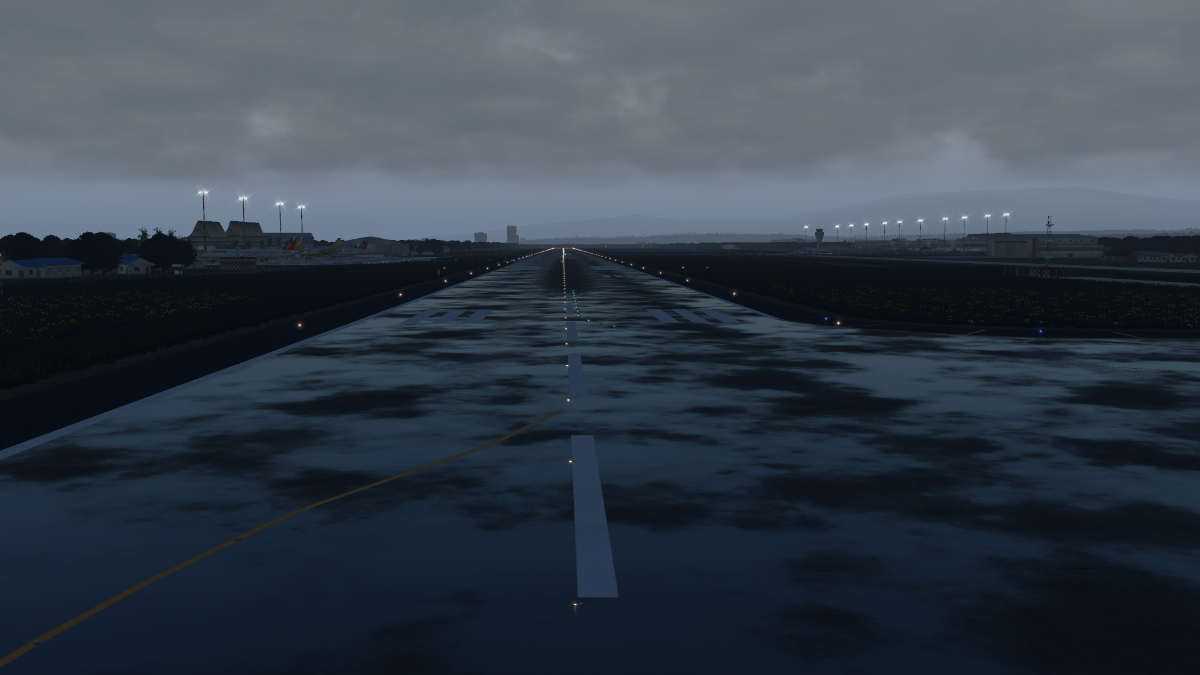
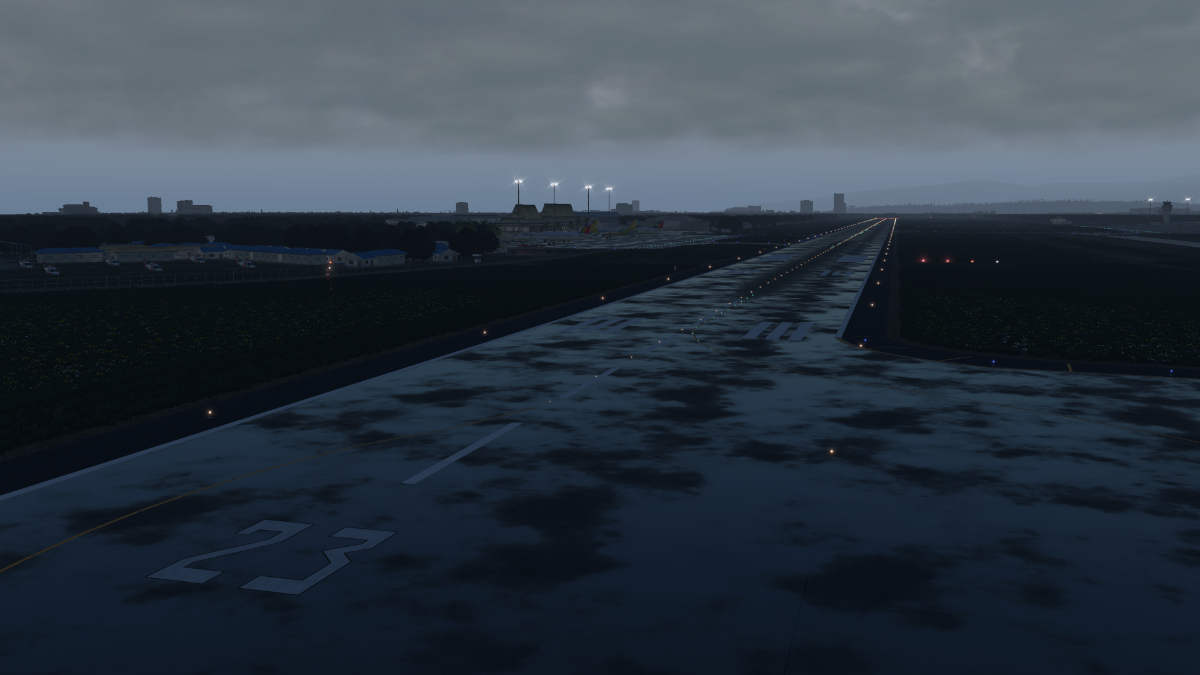
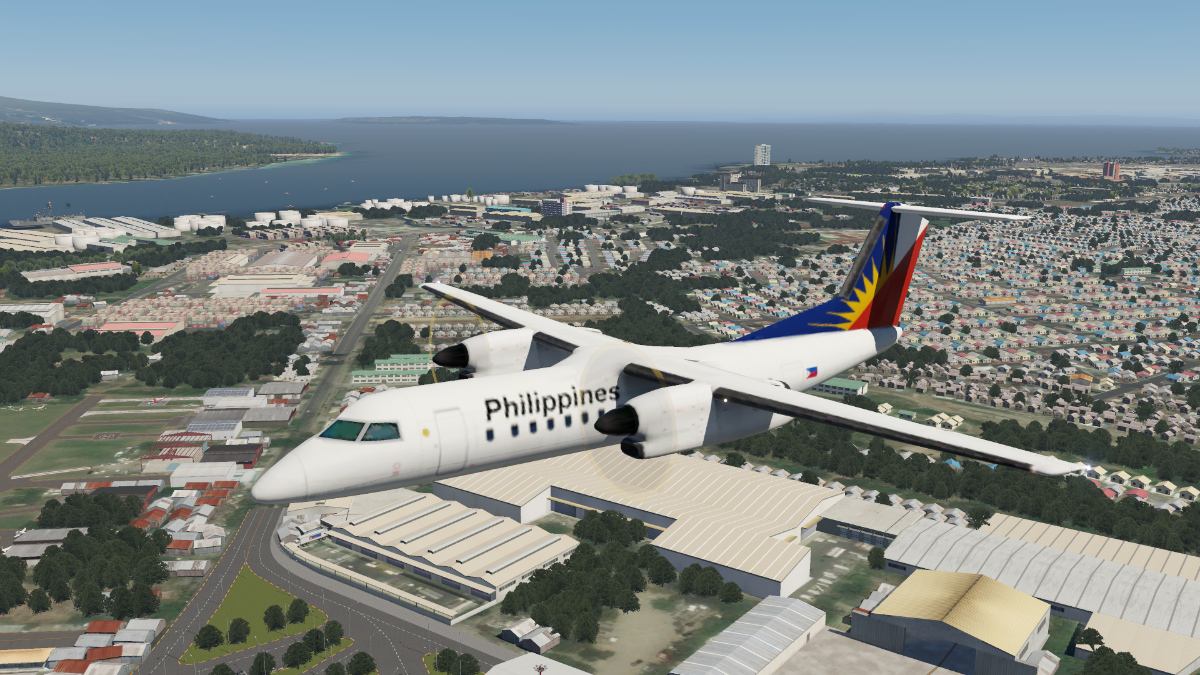
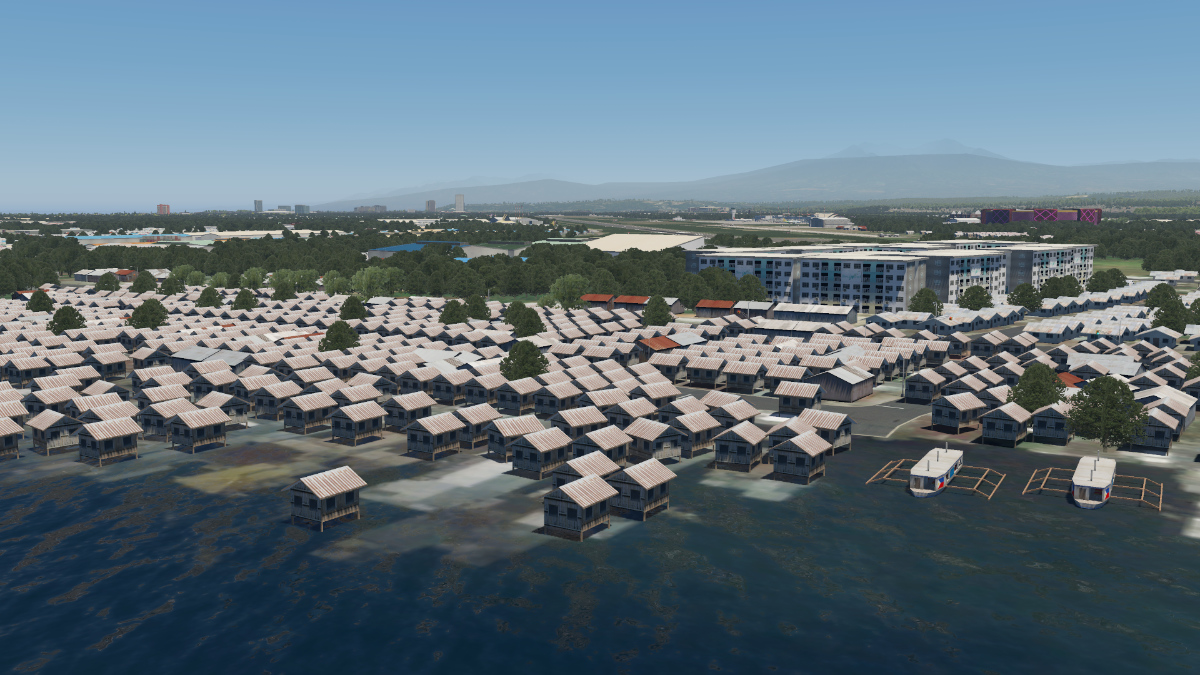
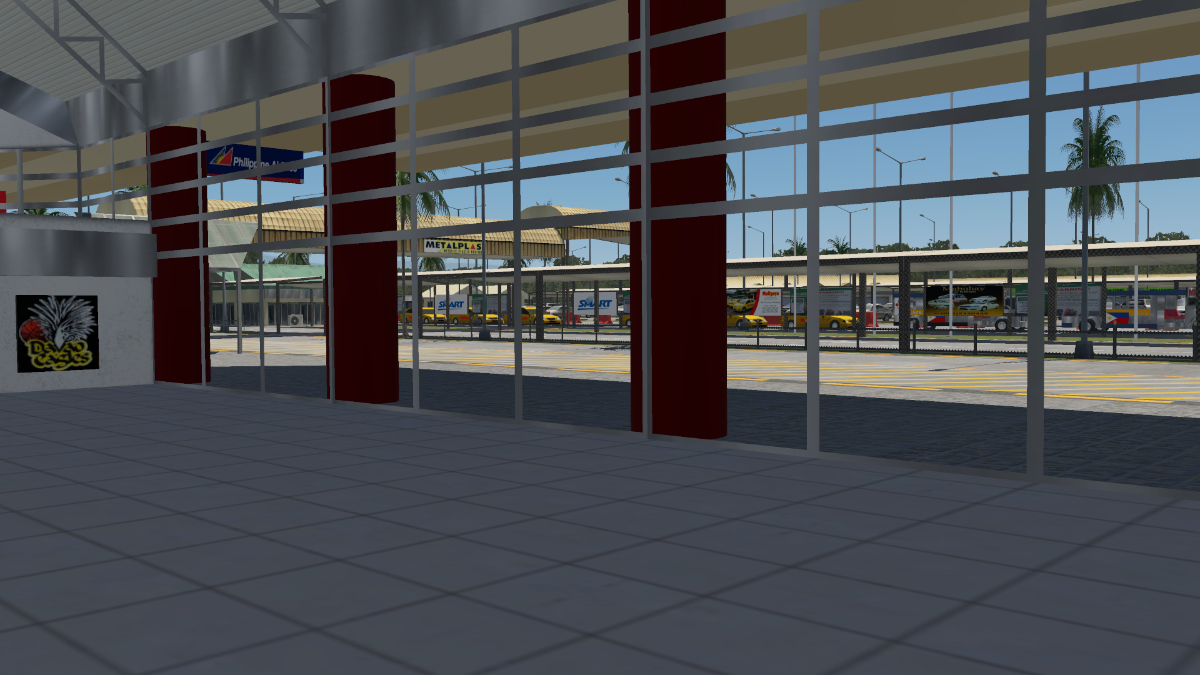
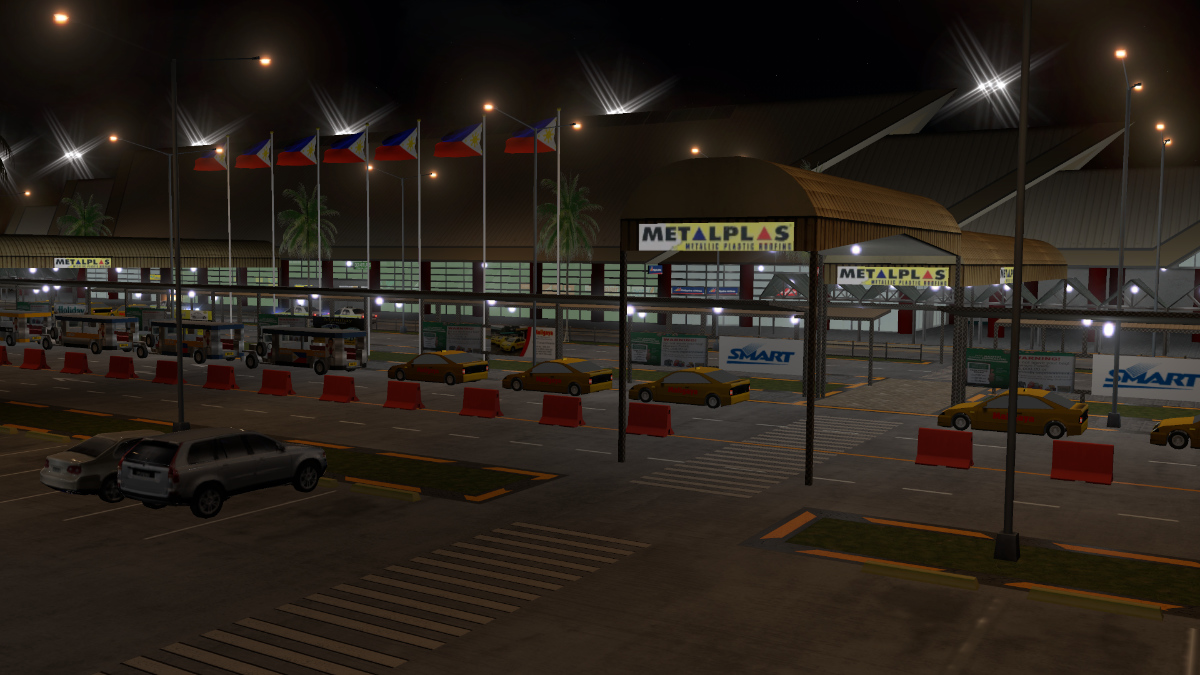
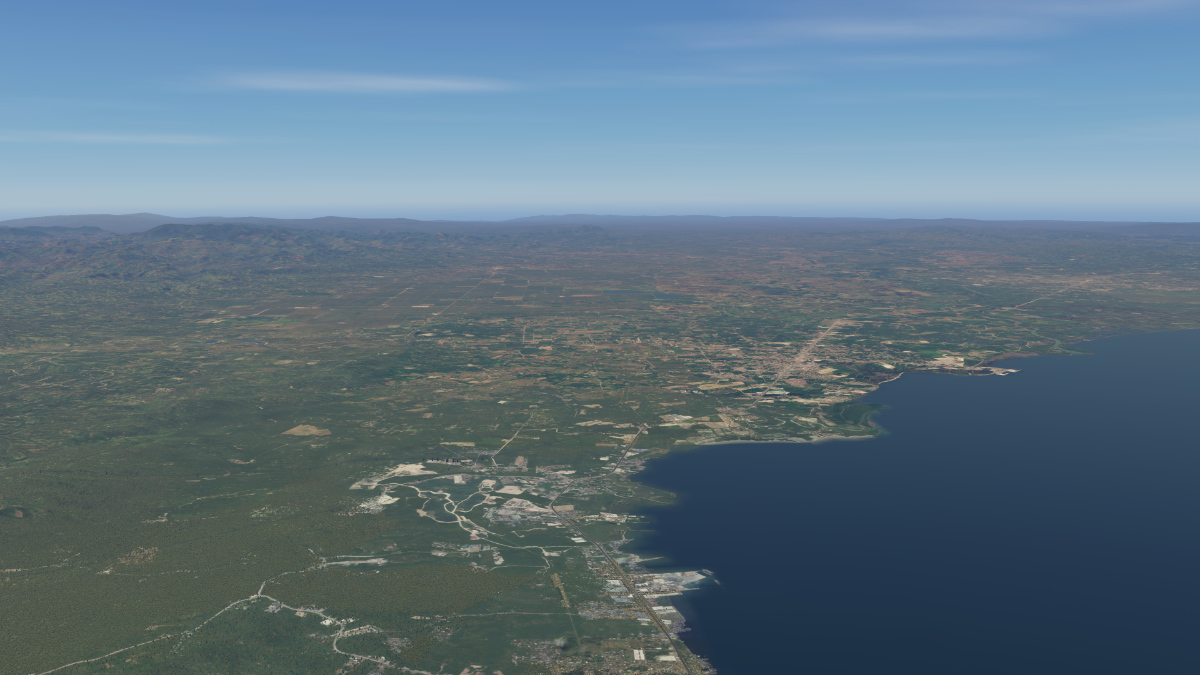
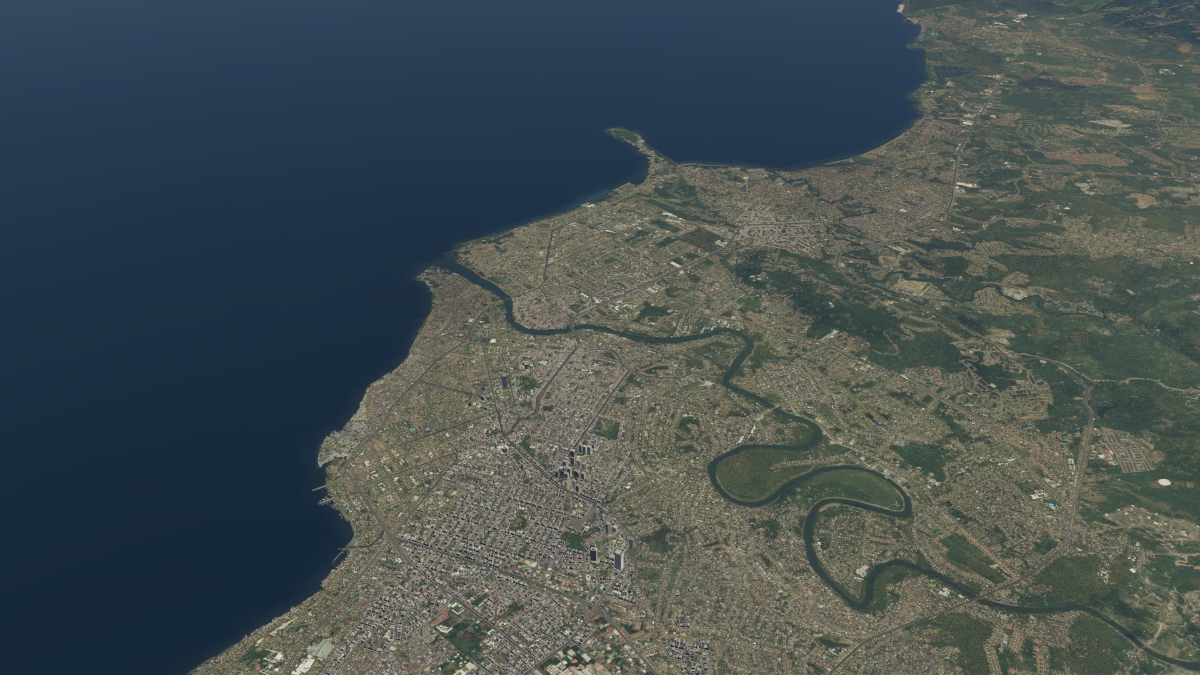
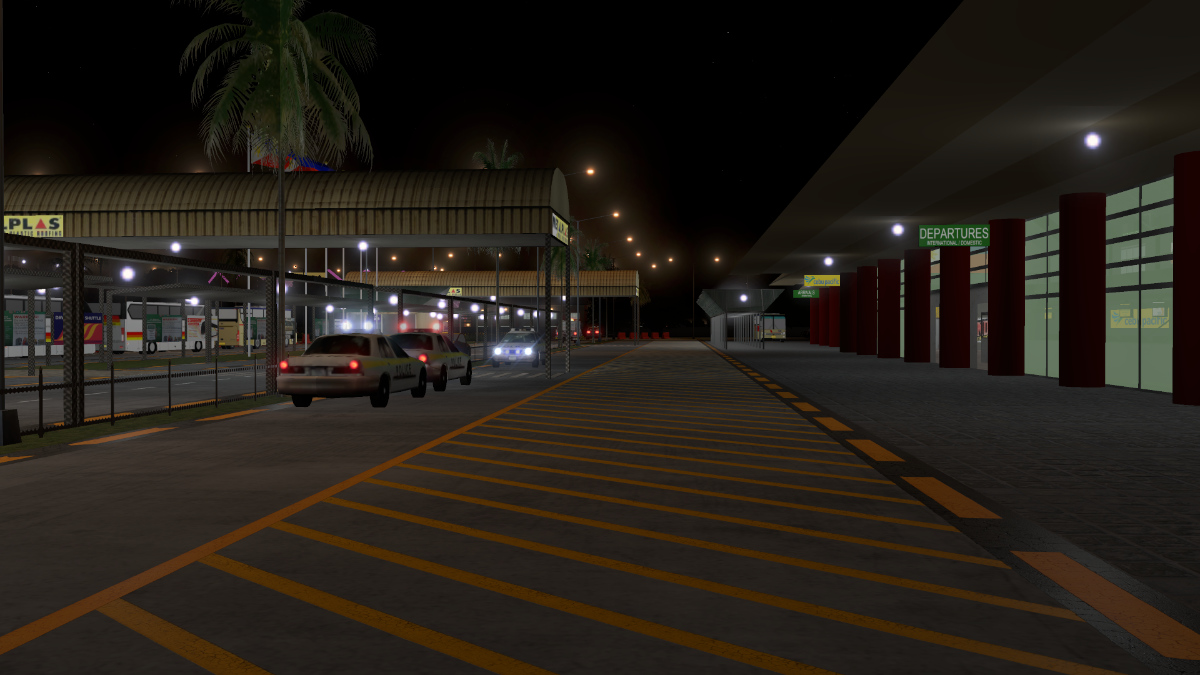
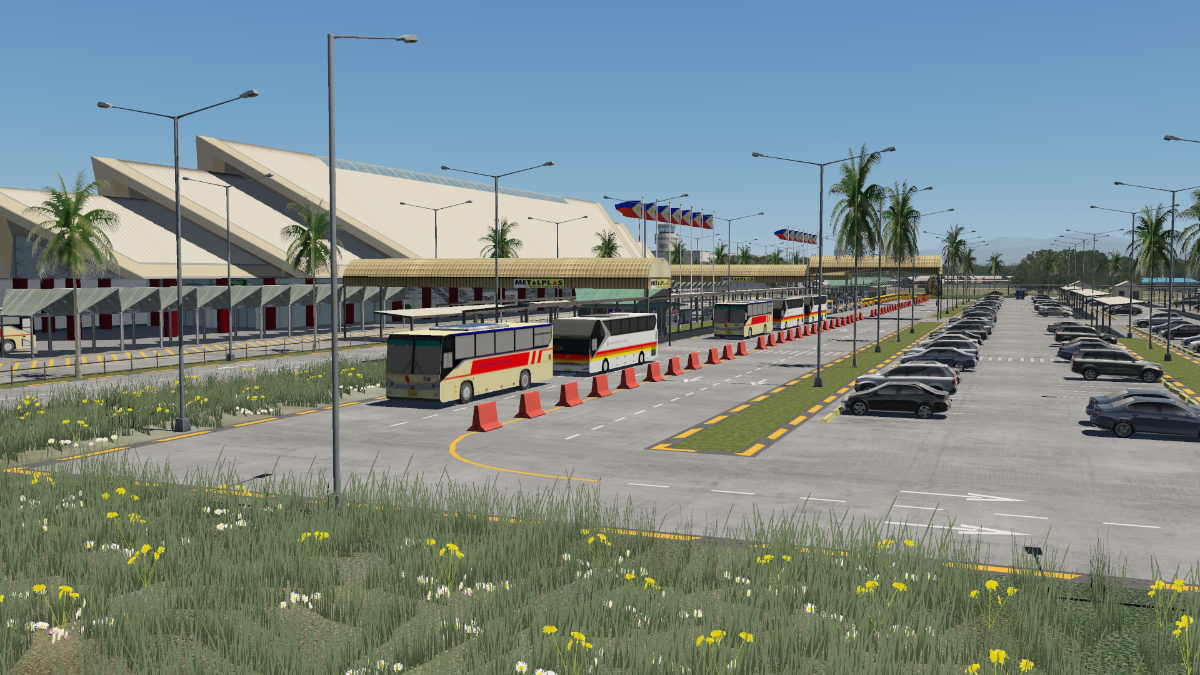
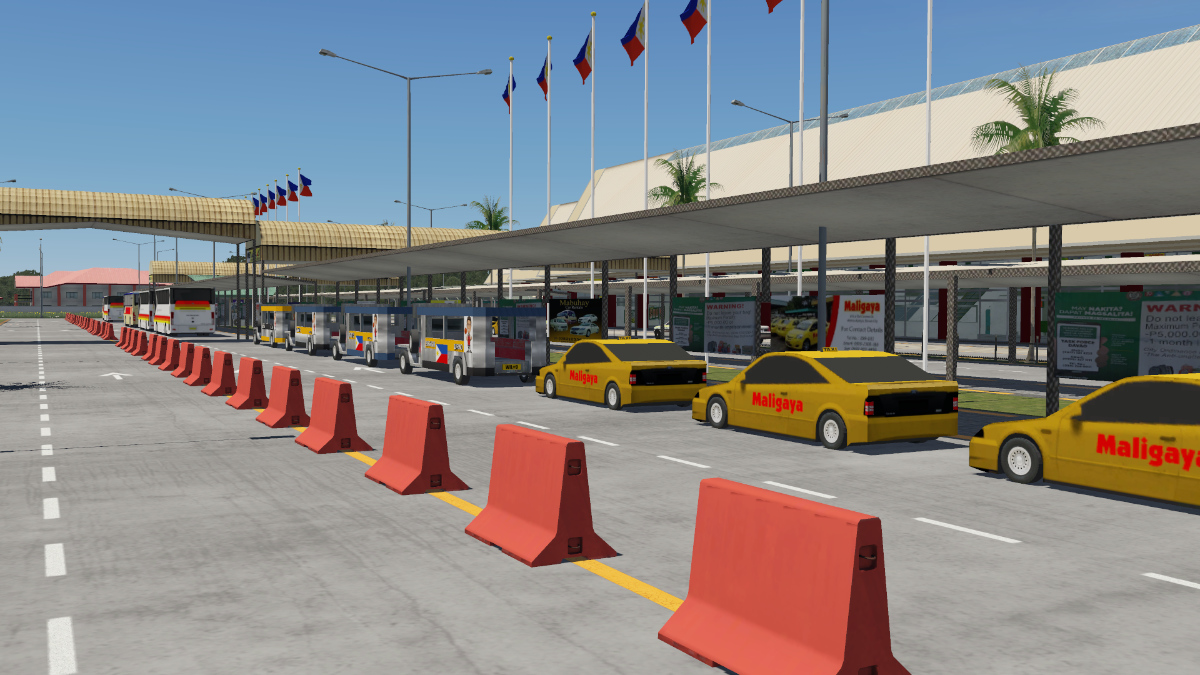
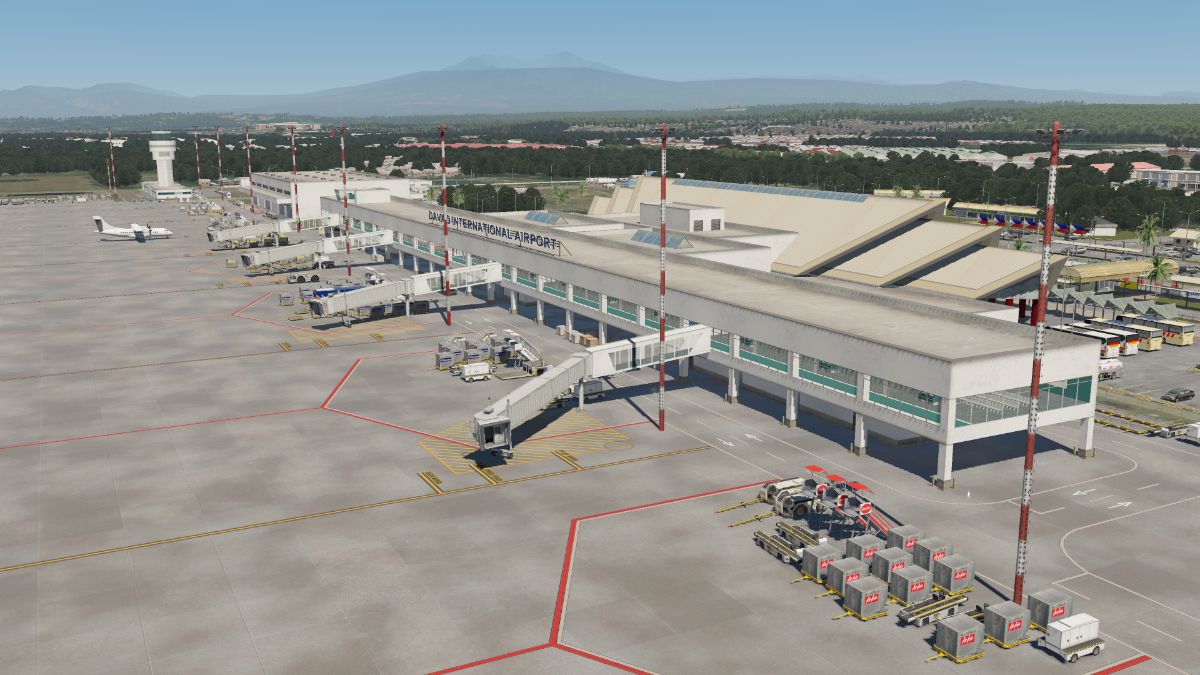
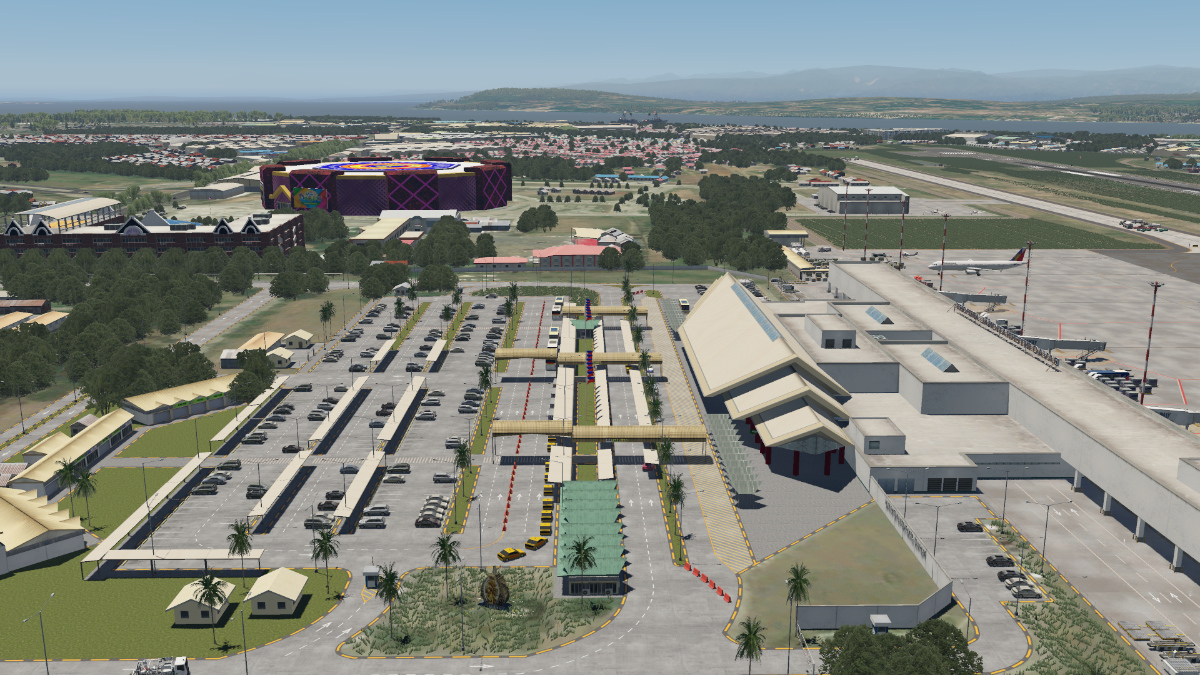
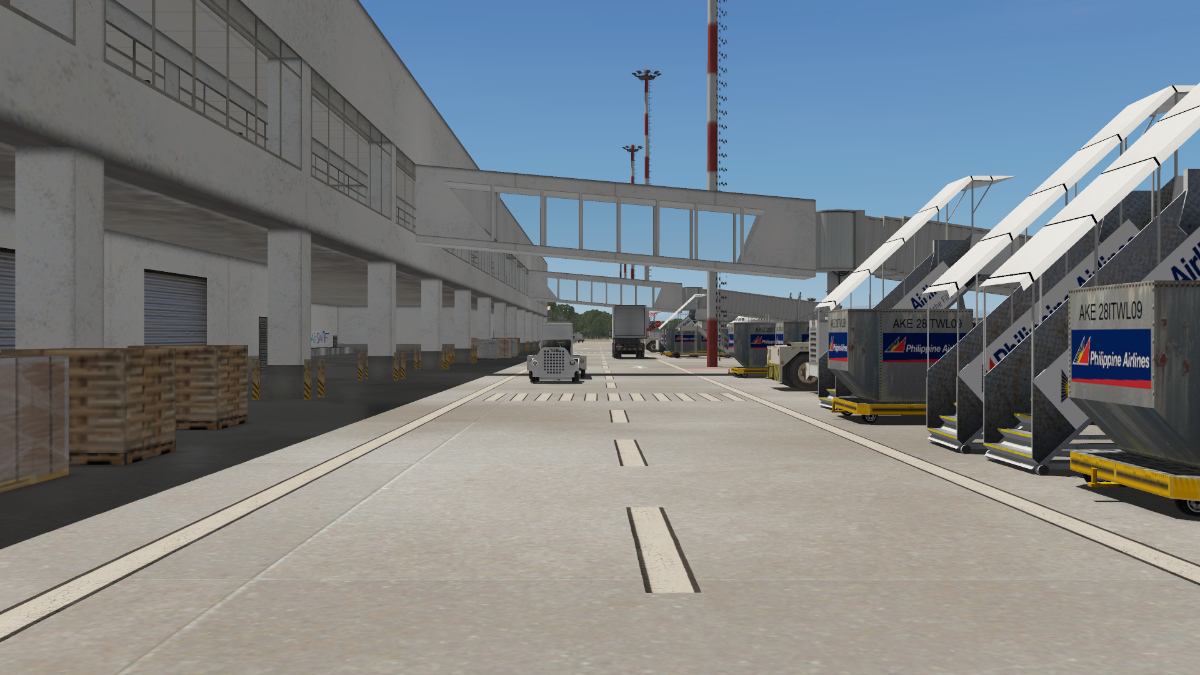
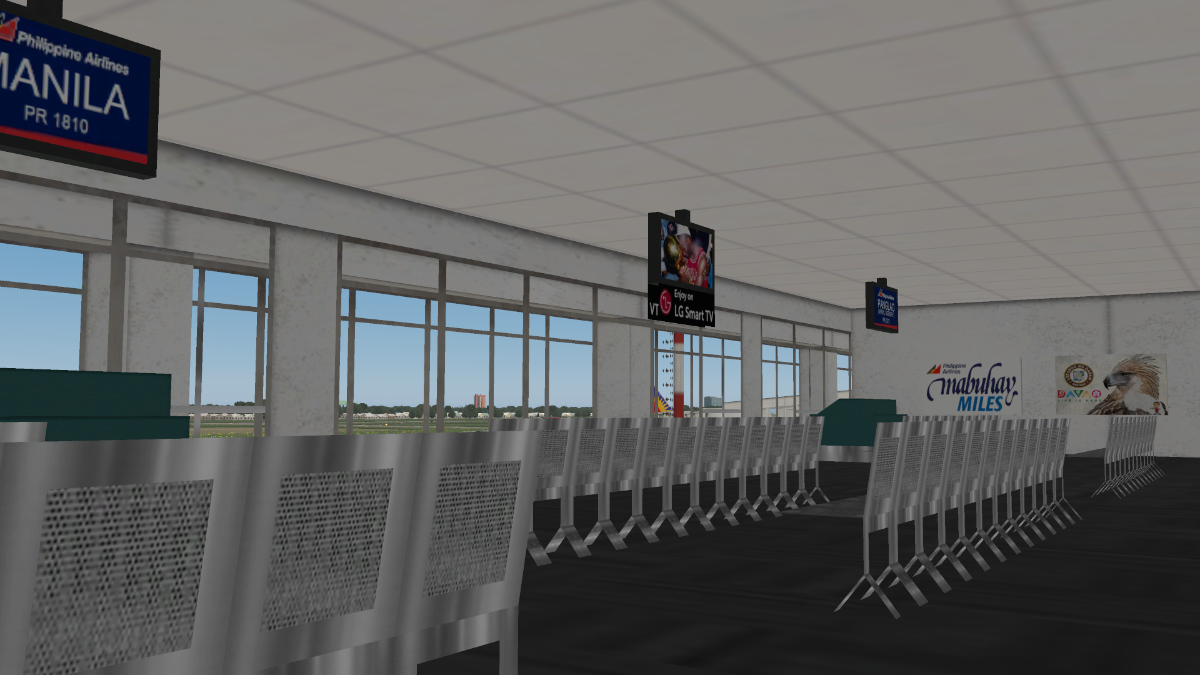
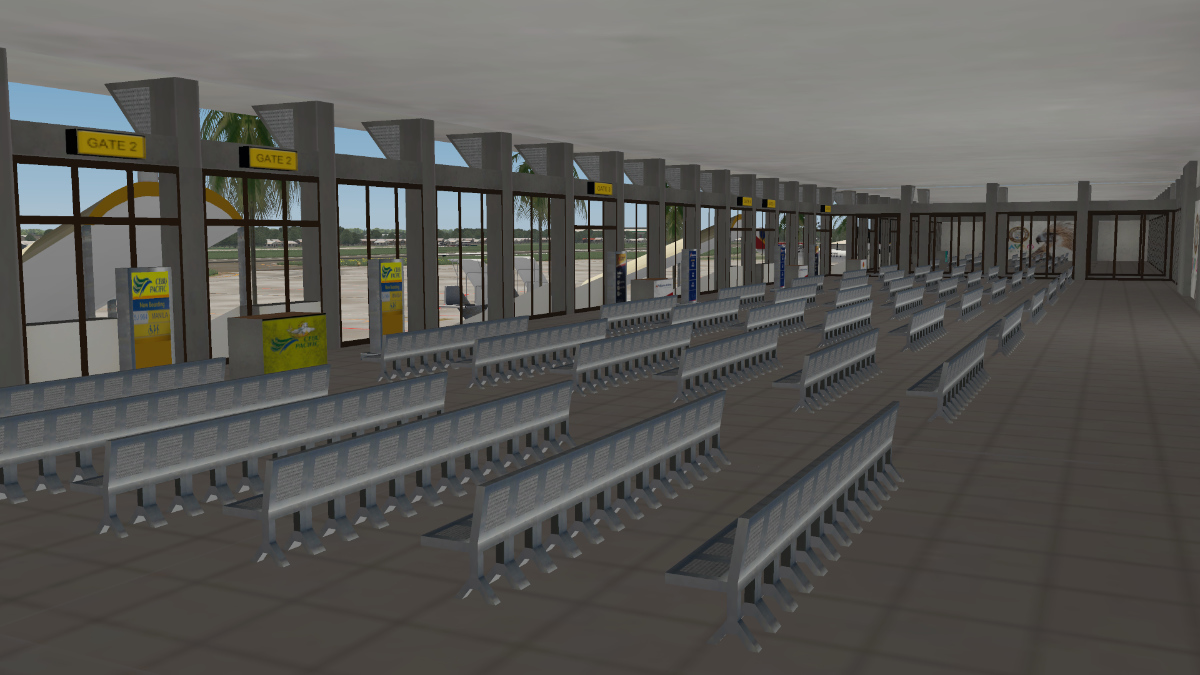
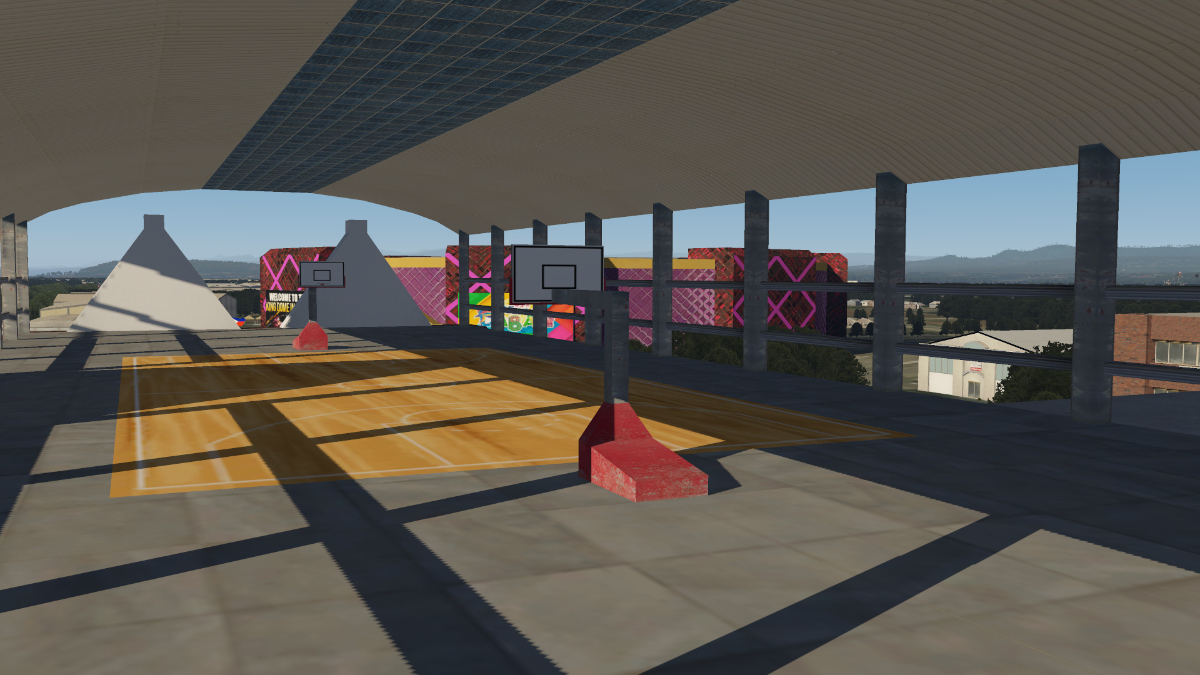
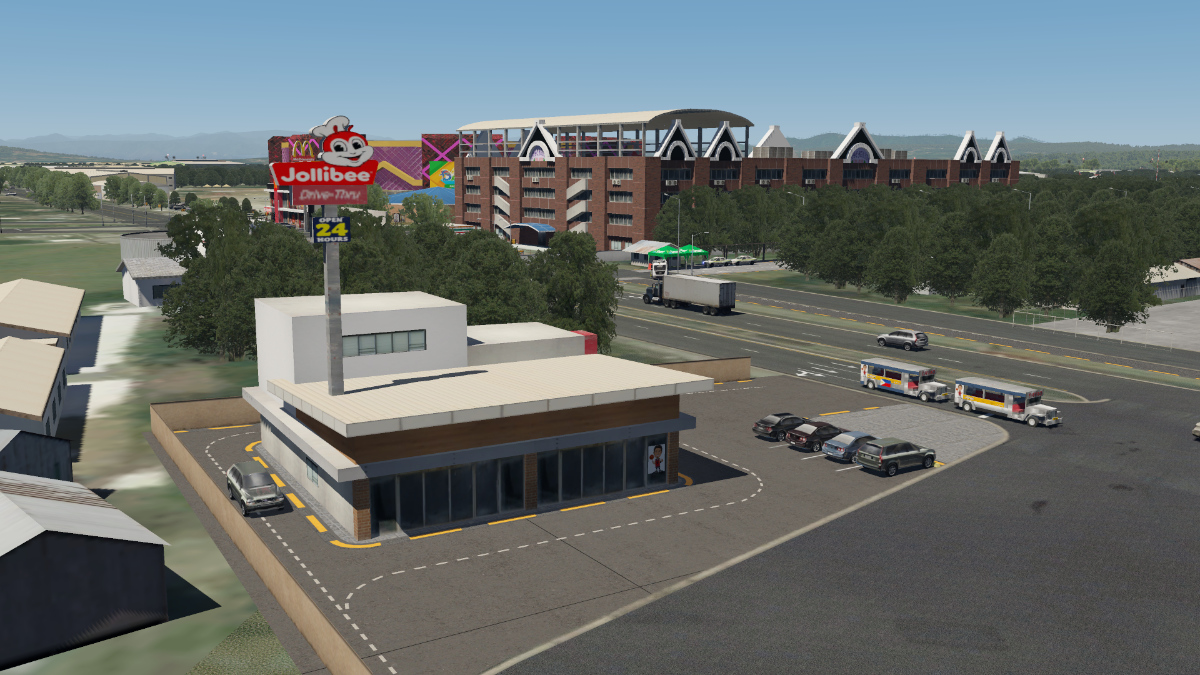
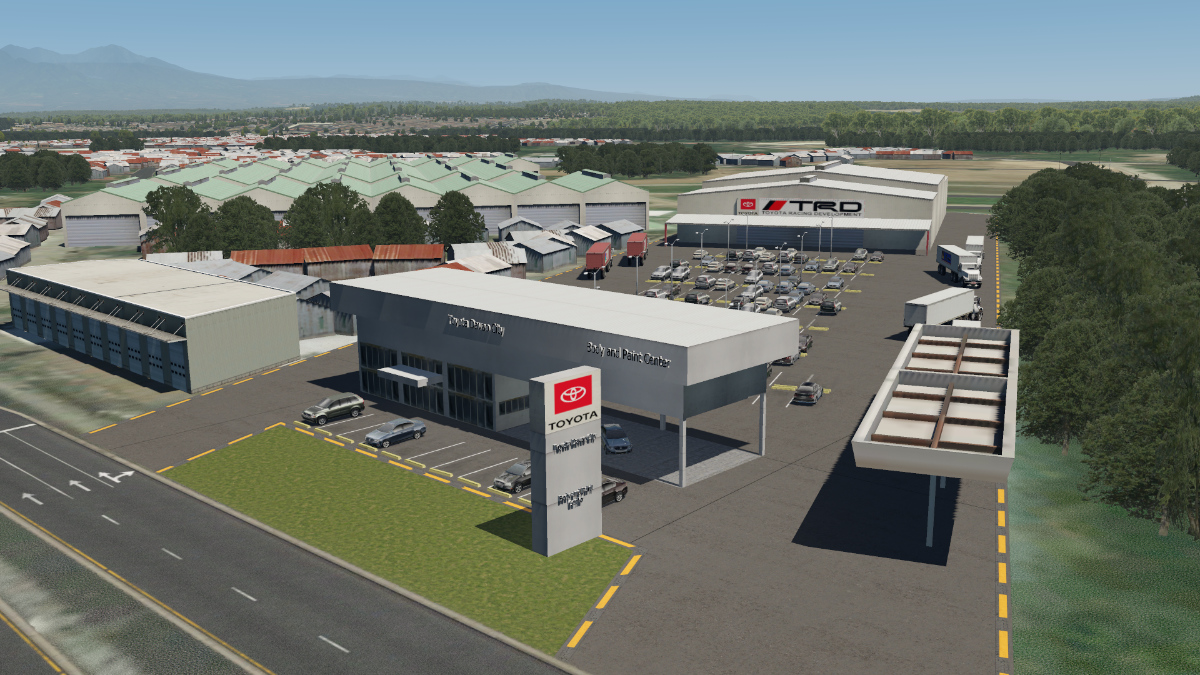
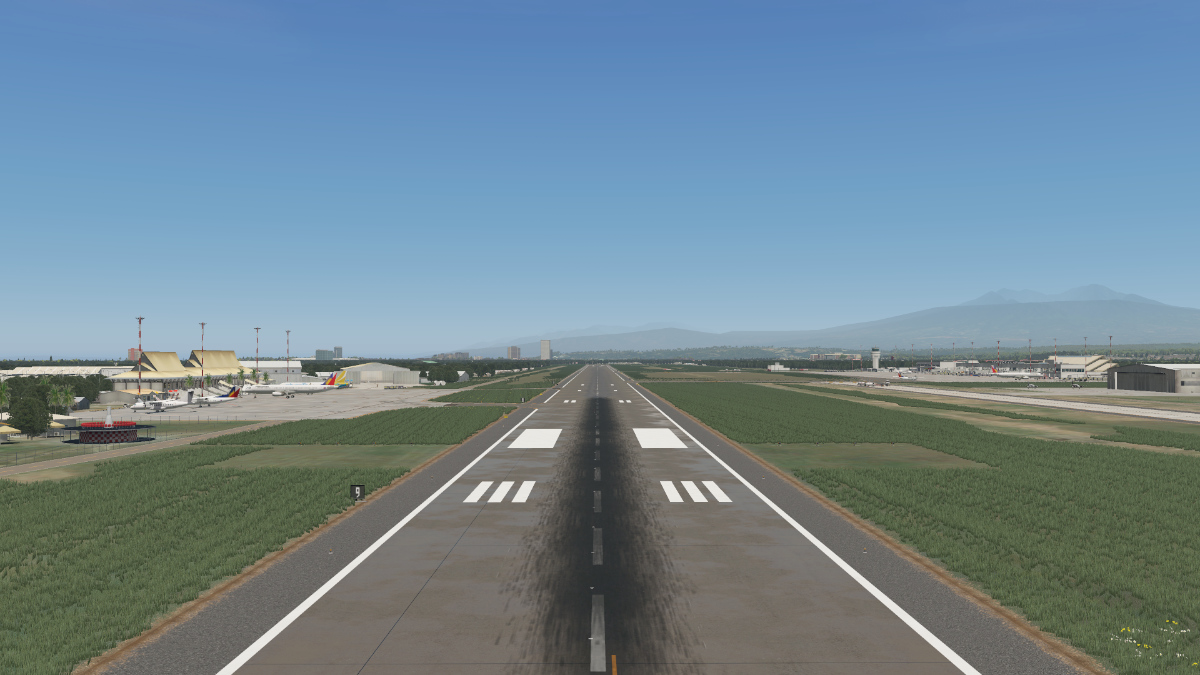
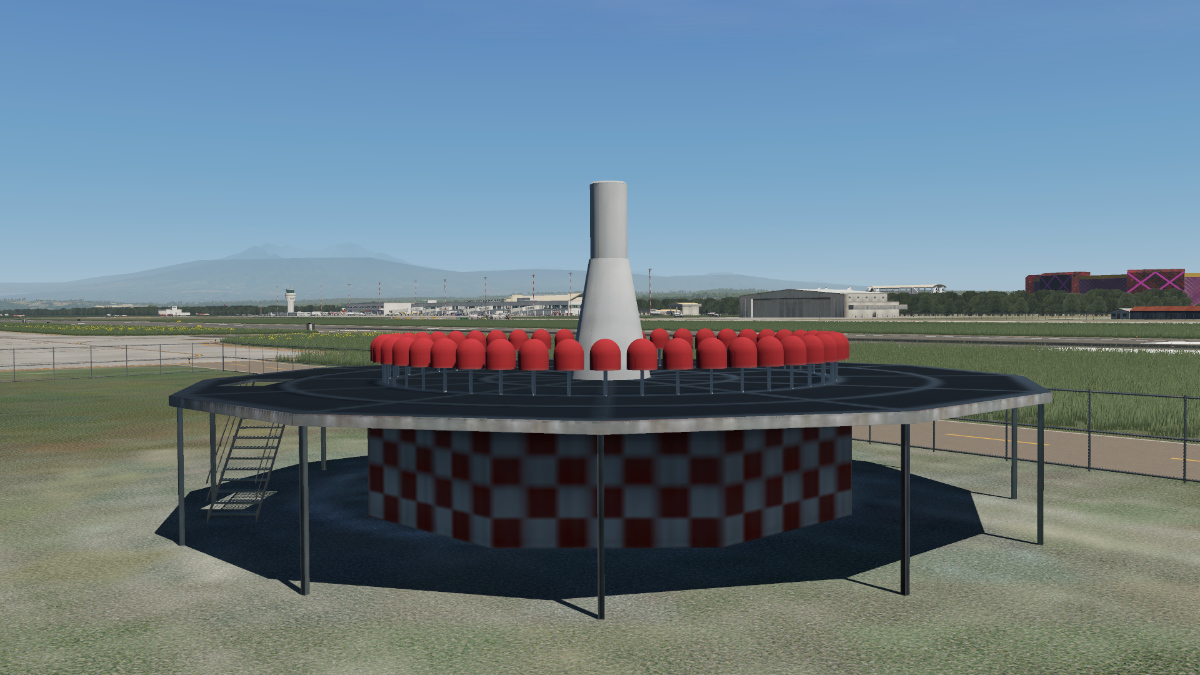
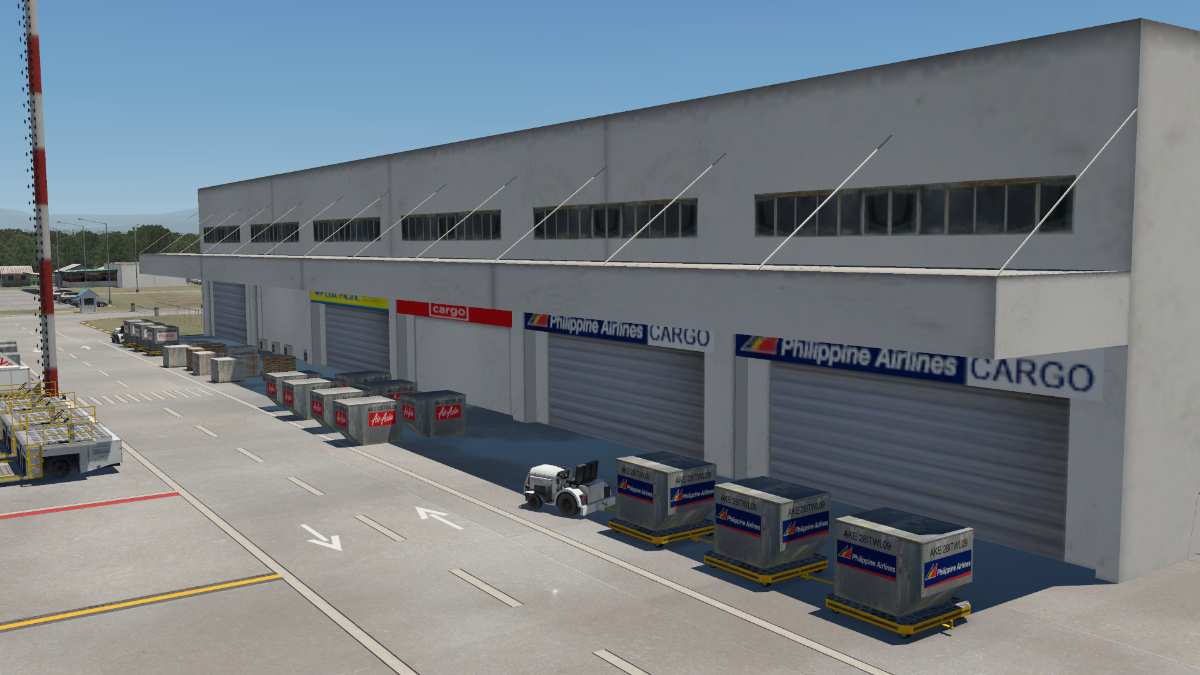
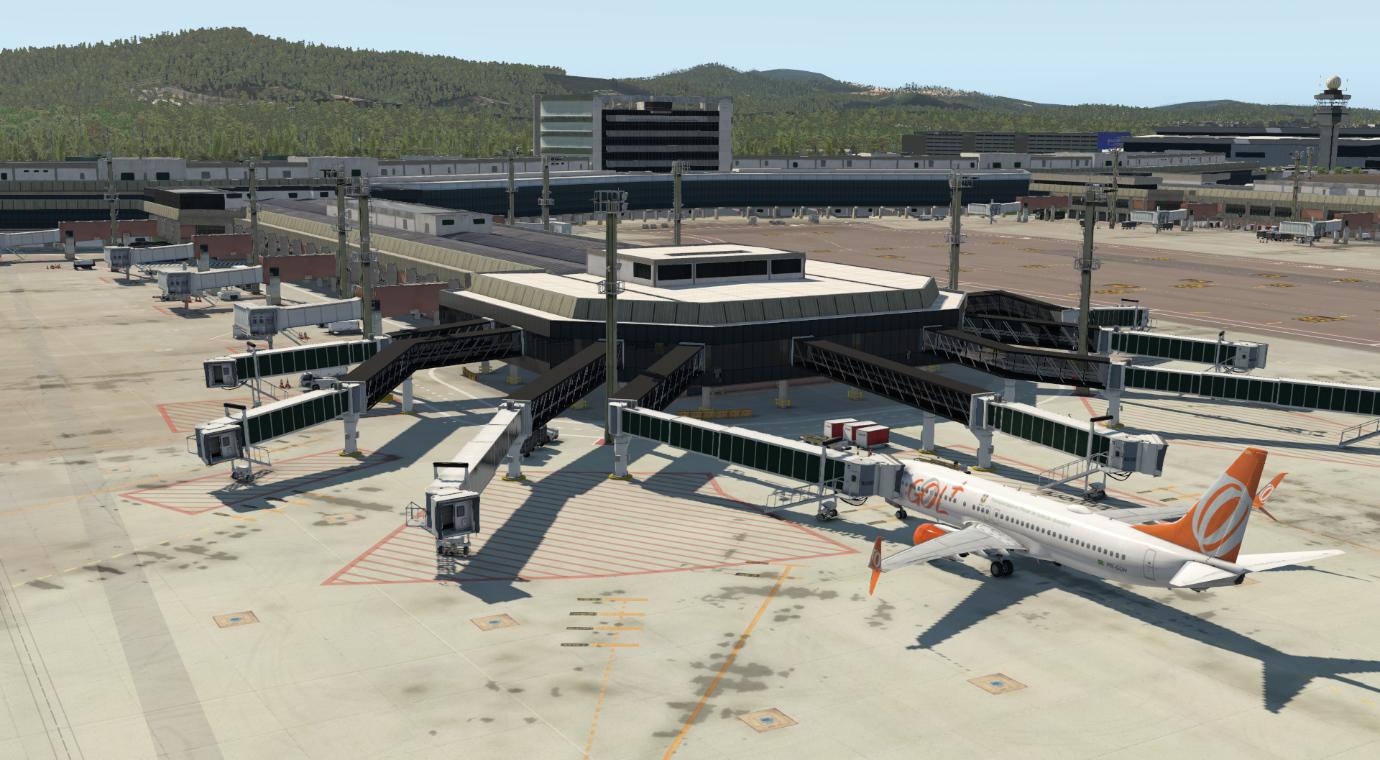
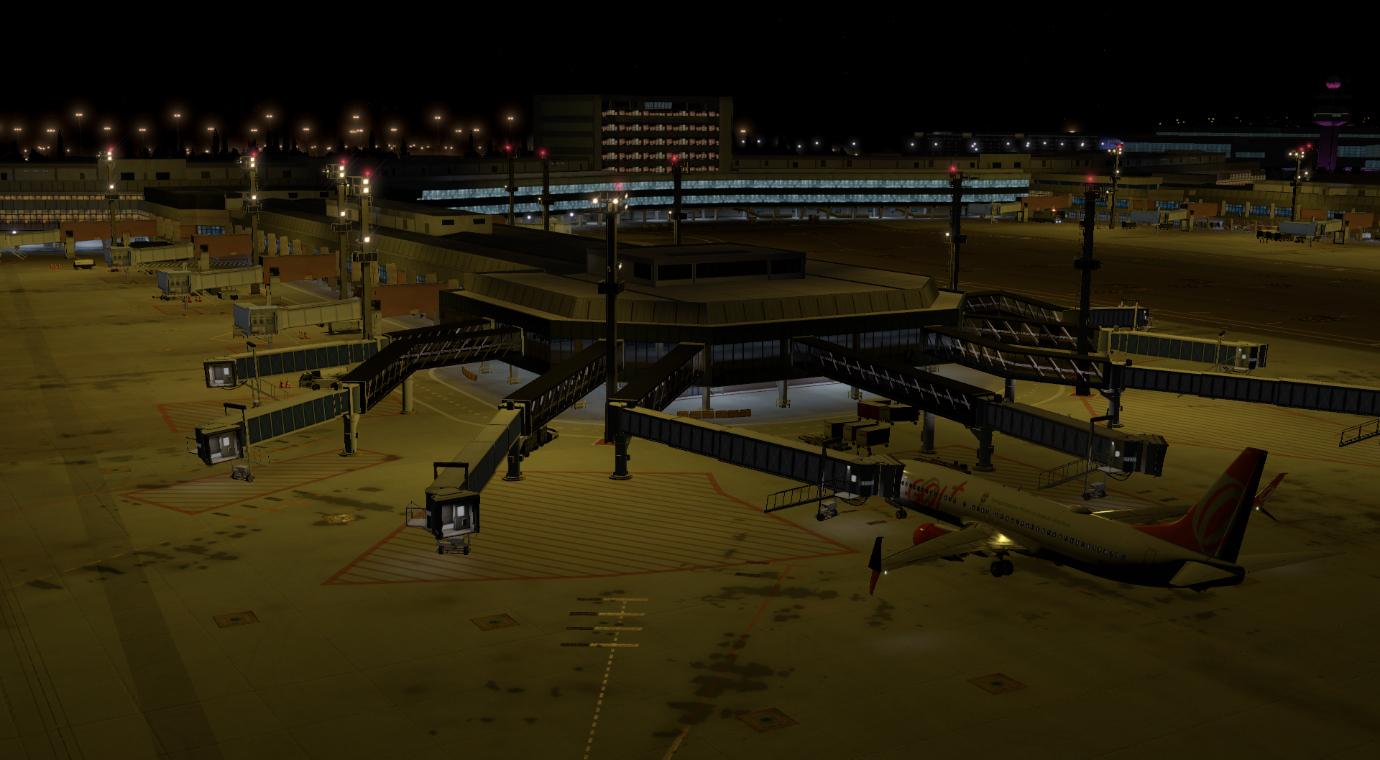
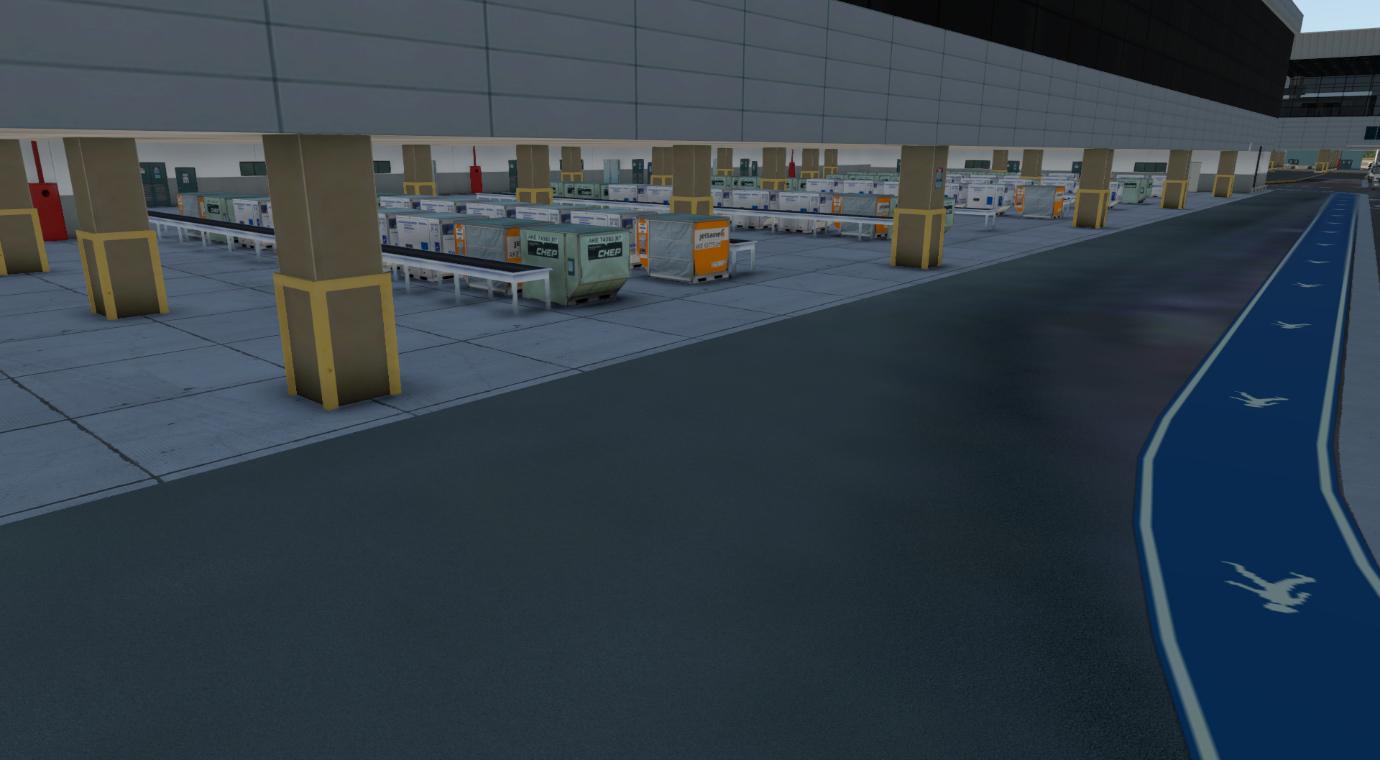
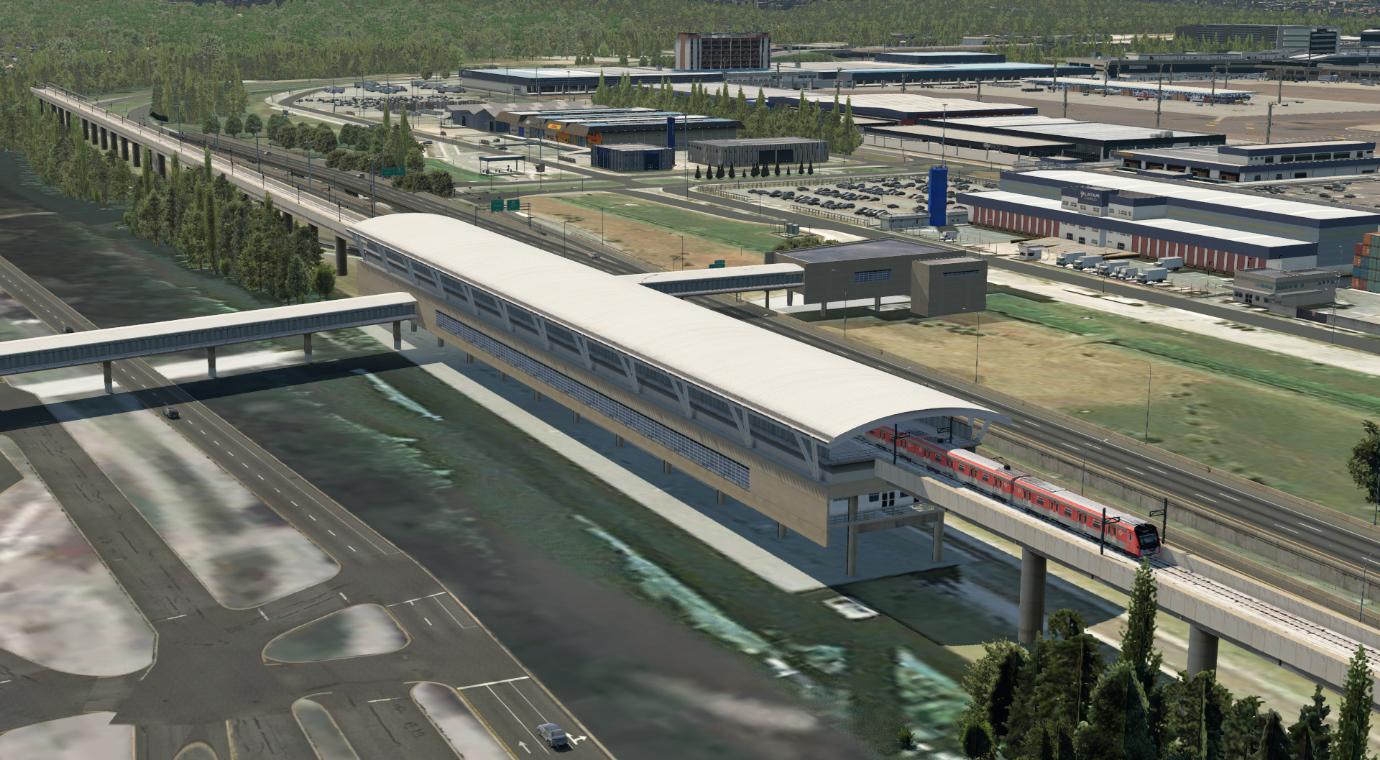
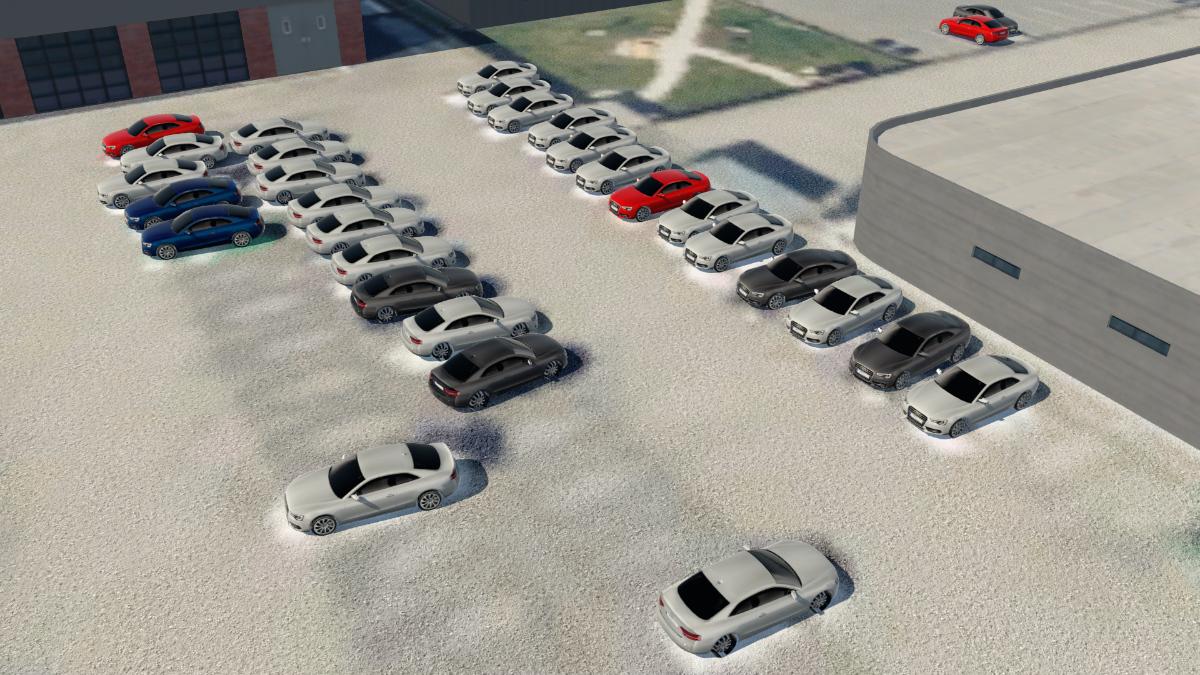
Scenery Review: Davao International Airport by Airwil Sceneries Introduction Davao International Airport is one of three airports in the Philippines being offered by AirWil Sceneries, the others being RPVE Boracay and RPSP Bohol Panglao, and it retails on the X-Plane Org Store for $11.99. The download is 5GB in size, so you will need plenty of space to store it, and as you read on, I am sure you will see why. In the download, there are three folders including the airport details, the overlay and the ortho tiles, all pretty easy to install. The real-life airport is on the island of Mindanao in the Southern part of the Philippines, some 800 miles (1300km) from the country’s capital Manilla, and the airport is known locally as Francisco Bangoy International Airport. It is the third busiest in the Philippines, and from the information provided, I read this to be the hometown airport of the developers. Today, Davao International carries more than half a million passengers annually to destinations within the Philippines, as well as internationally to Singapore, however, pre-pandemic this number was significantly higher with almost 4.5 million passenger movements recorded in 2019. That is a serious number of suitcases for both Philippines Airlines and Cebu Pacific who use Davao as a regional hub. The airport has a single asphalt and concrete runway of approximately 3000m in length and the developer has modeled the ongoing construction of a new parallel taxiway, so we should expect updates in the future as the new taxiway is completed in the real airport. At present, turning pads are provided at each end of the runway to allow aircraft to turn, however, having a parallel taxiway will certainly make life much easier for the pilots operating out of there. The developers have also included the original terminal building as it was in operation prior to the new terminal being opened in 2003. Both terminals are worth checking out as they have a very distinctive design, very common for the region. The scenery is described as having more than 250 bespoke objects, as well as numerous features such as interior modelling of the terminals and control tower, many local liveried ground vehicles, compatibility with SAM Jetways and ALES Ground Textures (the wet appearance is fabulous), not to mention many objects quintessentially Filipino, such as Jeepneys, Filipino styled houses and many Davao local landmarks. I couldn’t resist taking a sneak peek at what lies behind the scenes using Laminar’s World Editor (WED), and wow, there are an insane number of individual objects in the scenery, hence the 5GB. A huge number of buildings are included, including local houses, warehouses, fast food outlets, car garages, convenience stores and fuel stations, the list goes on and on, not to mention placing all of these by hand, now that is impressive! Hats off to the developers, as this must have taken hours and hours of work and dedication to complete. They even have a Jollibee, and anyone who has been to that corner of the world will know what I am talking about, if not, go Google it. You got to try it…. I loved the use of Laminar’s massive X-Plane neon sign across from the main terminal, and the way the developers have combined it with a local add board is clever. I did enjoy watching it illuminate and change colour at night, a very nice touch. The night lighting is generally very well done inside and out, and it feels very realistic, particularly as the various retail outlets light up nicely after dark. I highly recommend exploring a little on foot after dark to get the most out of both the airport and the local town. Based on what I observed as I went for a walk around, the developers really have put some effort into this, and this is a side of flight simulation that I have always enjoyed. Being able to move around and get a feel for a place, particularly if you are in the VR world is truly special. There really is way more to X-Plane than just flying, and if you have never tried it, just hit that ‘C’ button on your keyboard and get those arrow keys working. I should also mention that the scenery comes with its own ortho tile which again adds a little more authenticity to the pack, and teaser photos available at the org store give you a flavour of what to expect if you are thinking of purchasing the scenery. From what I have experienced, it certainly has the feel of a Southeast Asian regional airport, so if you are looking for your next purchase in this part of the world, then this may be the one for you. The Airport & Surroundings So, what was it like inside the boundary fence? Well in simple terms, it is a very nice rendition of the actual airport from available photos I found on the internet. The buildings are well presented, and I loved the fact that the internals of the main buildings are also modelled. I appreciate that for some, this type of detail may not be top of your priority list when deciding on which scenery to purchase, however, I really enjoy features like this as it is nice just to take some time to explore more than just the apron, taxiways and runway. You really do get a sense of what it must be like to visit this part of the world, from parking, to checking in, through to sitting in departures enjoying a coffee whilst waiting for your flight. The interior details are very nice, and the quality of the textures are well done; from the TV display screens in the departure hall, to the various airline signs and advertisements. This level of detail gives the terminal a genuine feel, and again shows that the developer is committed to creating a great product. As in real life, the outside ramp areas are also packed out with lots of objects such as baggage containers, and in addition, you will find numerous animated ground vehicles going about their business. The developer has also taken the time to model the new taxiway that is currently being constructed, so as you taxi past you will see the work in progress. Outside of the fence, the general locality is very well modelled with lots of local houses and features in the nearby town, including stilt houses and boats around the water village. You will also find a few naval ships loitering near the shoreline and again the developers really have done a marvelous job of capturing the spirit of this part of the world with the bespoke local buildings and vegetation. I very much like the fact that the developers have gone beyond the airport boundary, and I guess being the developer’s hometown gives them a unique insight and access to all the local details. Back inside the airport, the SAM Jet ways worked well from the ones I tried, and Traffic Global which I used for AI traffic, peppered the apron with loads of regional aircraft, filling the stands and taxiways. The ALES ground textures add an extra layer of richness to the overall look and feel of the airfield, particularly the wet tarmac, and I can genuinely imagine the humidity and the puddles after a thunderstorm crashes on by. You will also find lots of grass and vegetation around the taxiways and within the airfield and this creates a softer overall look and feel to airside which I always enjoy. Sceneries in my experience can range from basic runways and a few simple features, all the way through to bespoke layouts and masses of detail, and I would say that Davao on offer here is very much on the right side of that mental model. Having dabbled a little myself in the world of scenery creation, there clearly has been lots of love, attention to detail and not forgetting sheer hard work gone into creating Davao International, and I am totally respectful of the craft of others as I can appreciate what is involved. However, I am sorry to say, there is one thing that just takes the shine off what is otherwise a very nice airport scenery. There is a distinct lack of people! There I’ve said it….it’s out… The airport just feels empty and has a little bit of an eerie feel to it which is odd in my opinion, although to be fair to the developer, they are not alone in this, as many sceneries I have come across are devoid of human life. Is this perhaps because there is just a lack of good quality objects out there, or some other reason, who knows, however, if this can be fixed, this would be very much appreciated. It is not so much the cherry on the cake is missing, it is more like the eggs are missing from the mix. People are a very important part of any scenery in my opinion, particularly now that X-Plane 11 has come so far, and X-Plane 12 is just around the corner, and I really hope the developers can find a way to fill in the blanks. Other than that, they have done a very nice job and their scenery is well worth checking out. Performance As far as performance goes, no issues to report on my system (RTX2080Ti, i9), as I was able to move around the airport and surroundings with framerates in the plus 50s and often up in the 80s, even when up close to the numerous ground objects or vegetation. Final Thoughts The Airwil Sceneries team have developed a very nice addition to the X-Plane world in Davao International and have really brought one of the main airports in the Philippines to life. It is great to see another new developer joining the growing number of teams that are creating great content for us all to enjoy. Airwil’s attention to detail is superb, and clearly, lots of care and craft has gone into creating this airport, which bodes well for the future of our hobby. The more developers that get involved and the more parts of the world that get attention the better, and I do hope this review provides insight into some of the scenery features as you browse the org store for your next purchase. Whether you decide to buy or not, is as always, a personal choice based on what you are looking for, however, I have totally enjoyed my time in the Philippines, and if the developers can just find out where all the people went, I am sure I will be back for more… _______________________________ Davao International Airport by Airwil Sceneries is available from the X-Plane.Org Store here: Davao International Airport Priced at US$11.99 Features More than 250 custom modelled 3D objects Old Davao Airport Terminal (with interior modelling) New Davao Airport Terminal (with interior modelling) Davao Control Tower Cab (with interior modelling) SAM Jetways (Authorized by Stairport Sceneries) ALES Ground Textures (Licensed by Pyreegue Dev Co.) Moving ground vehicles at the ramp area Moving ground vehicles at the terminal parking area Highly detailed terminal parking area Work in progress RPMD parallel taxiway Popular Davao City Landmarks (Gaisano, Grand Regal Hotel, SM Lanang, etc2 just to name a few) Filipino Houses Filipino Jeepneys Maligaya Taxi Davao Metro Shuttle Bus Mindanao Star Bus Highly detailed vicinity surrounding the airport to capture that Davao City feel Color corrected orthophoto And many many many more! We hope you enjoy the most detailed airport from Airwil Sceneries to date. Requirements X-Plane 11 - X-Plane 12 (when available) Windows, Mac or Linux 4GB VRAM Minimum - 8GB+ VRAM Recommended Download Size: 5GB Review by Stuart McGregor 1st Sept 2022 Copyright©2022: X-Plane Reviews Review System Specifications: Windows 11, a Phanteks Evolve X ATX Case, ASUS Z390 ROG Maximus XI Formula Motherboard, Intel i9 9900K 3.6Ghz CPU, RTX2080Ti 11GB GPU, 64GB DDR4 Kingston RAM, 1TB Samsung SSD, 2TB WD HHD, Thermal Take Ring RGB 360 TT Cooler, Honeycomb Alpha Yoke, Thrustmaster Pendulum Pedals, SAITEK TPM and an Oculus Rift S. (Disclaimer. All images and text in this review are the work and property of X-PlaneReviews, no sharing or copy of the content is allowed without consent from the author as per copyright conditions) All Rights Reserved
-
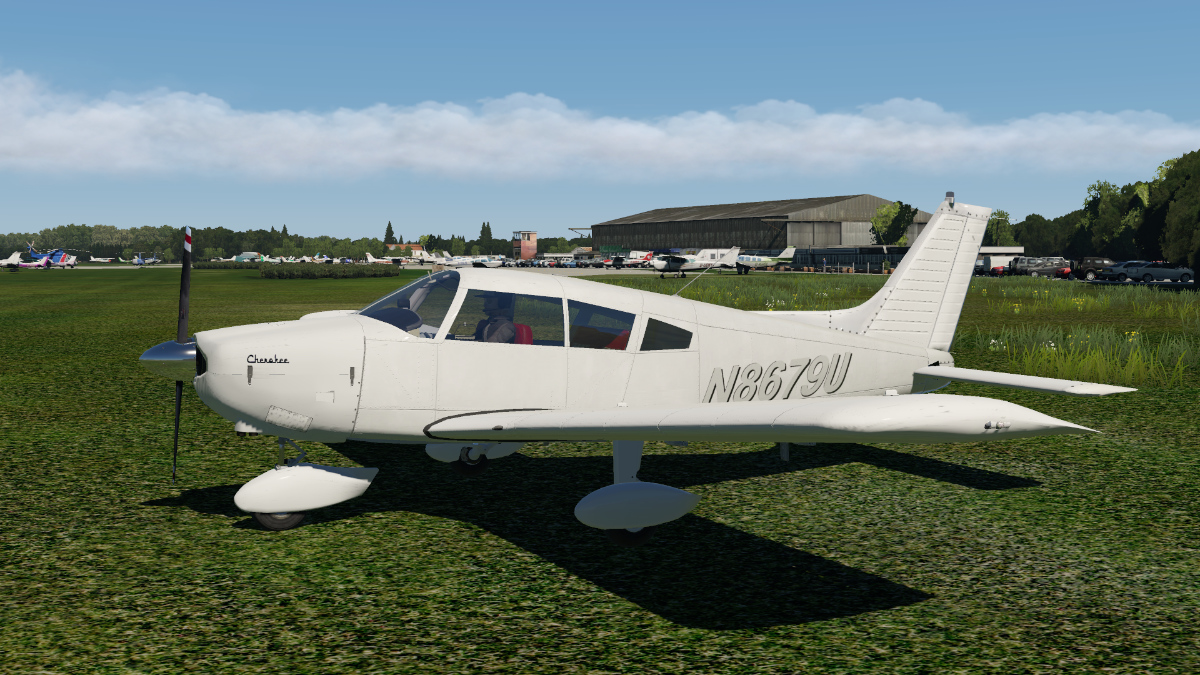
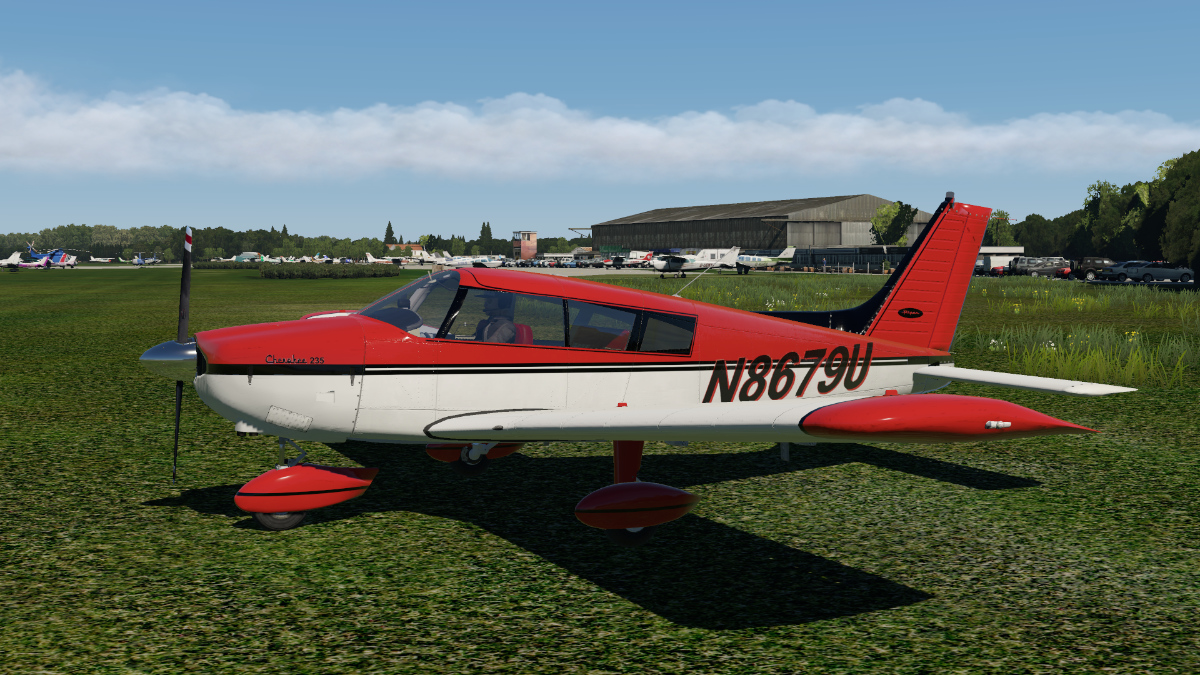
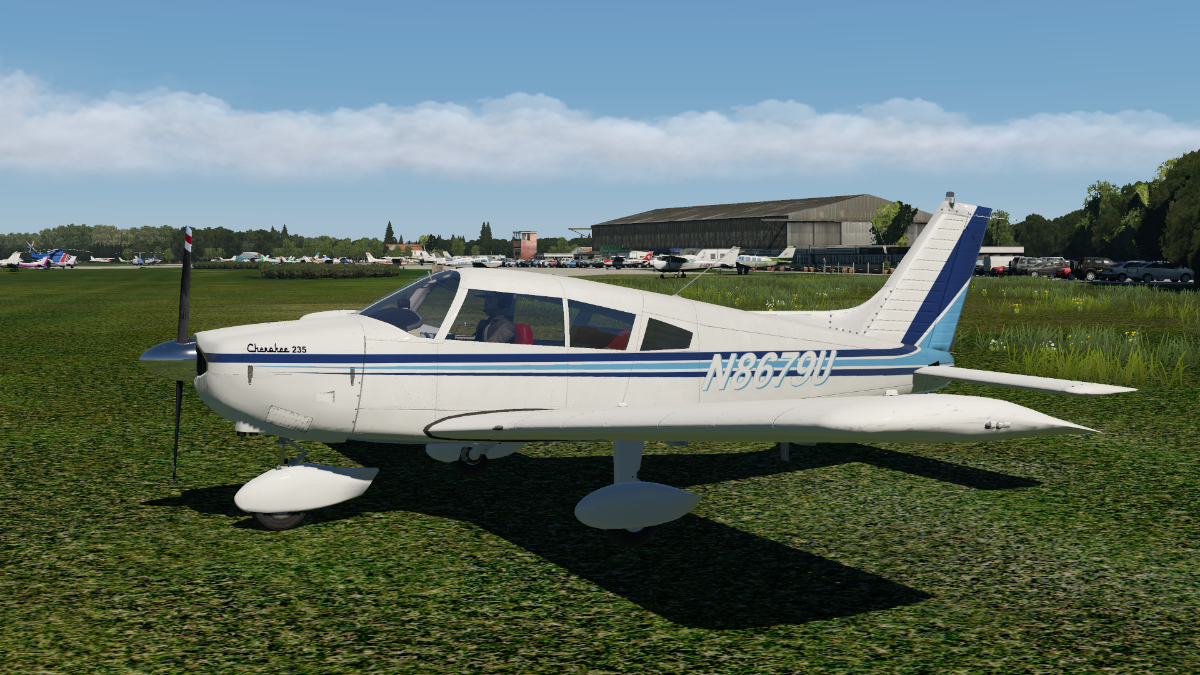
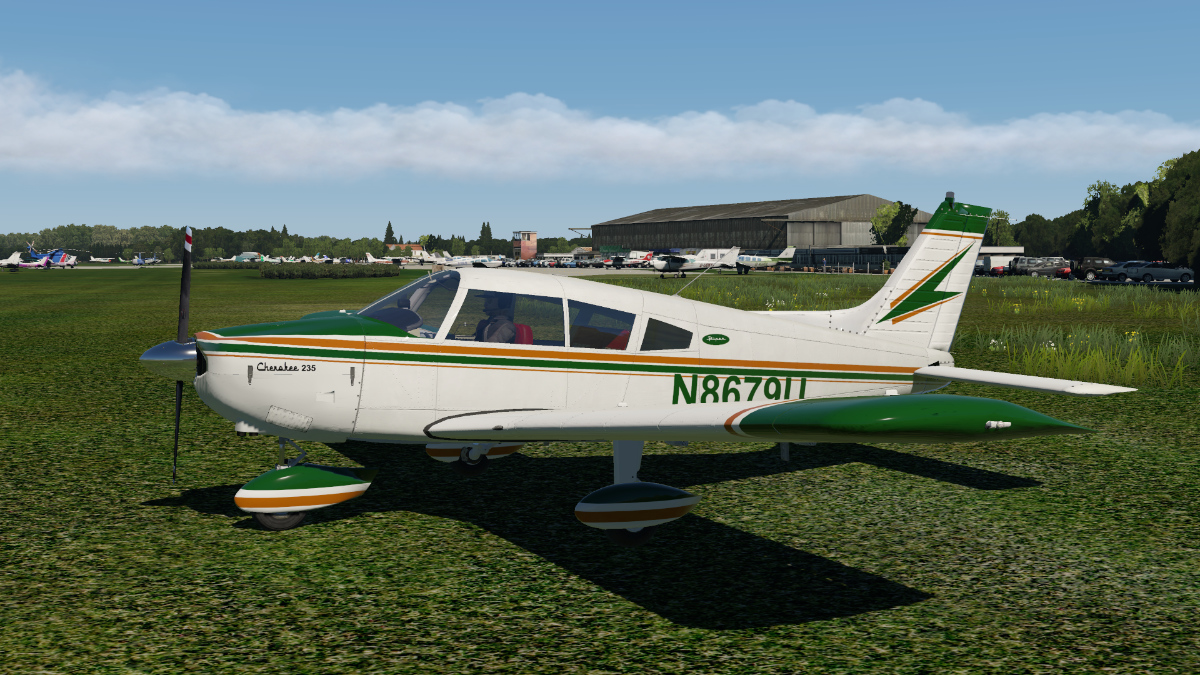
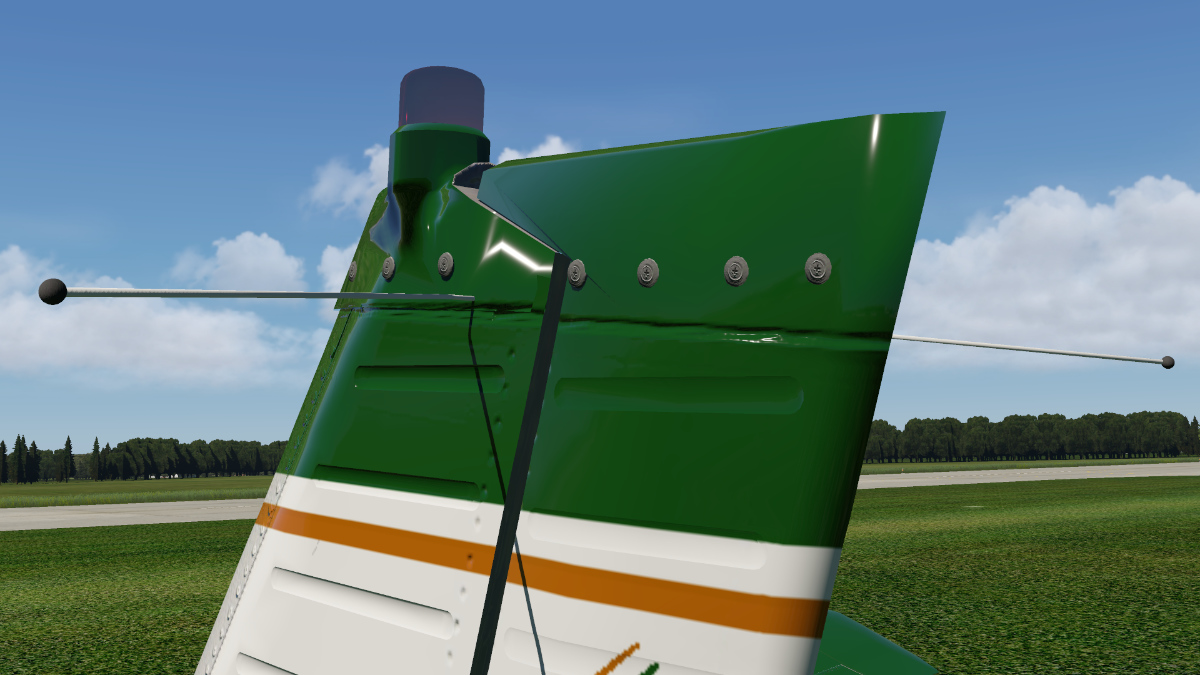
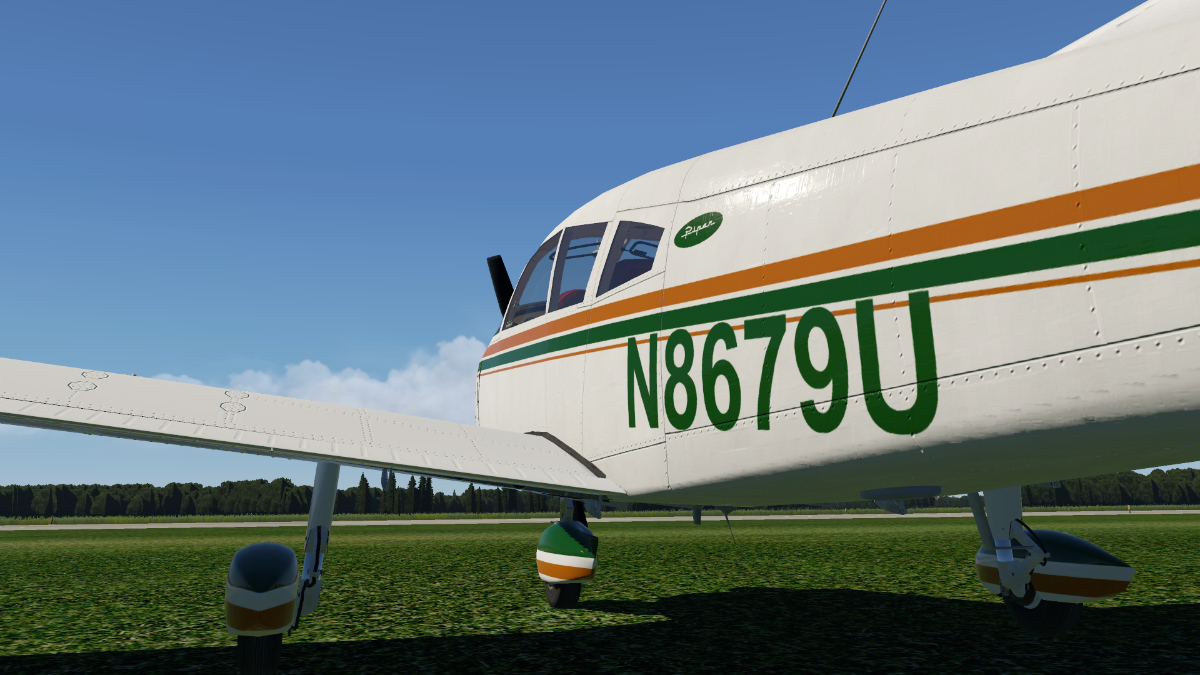
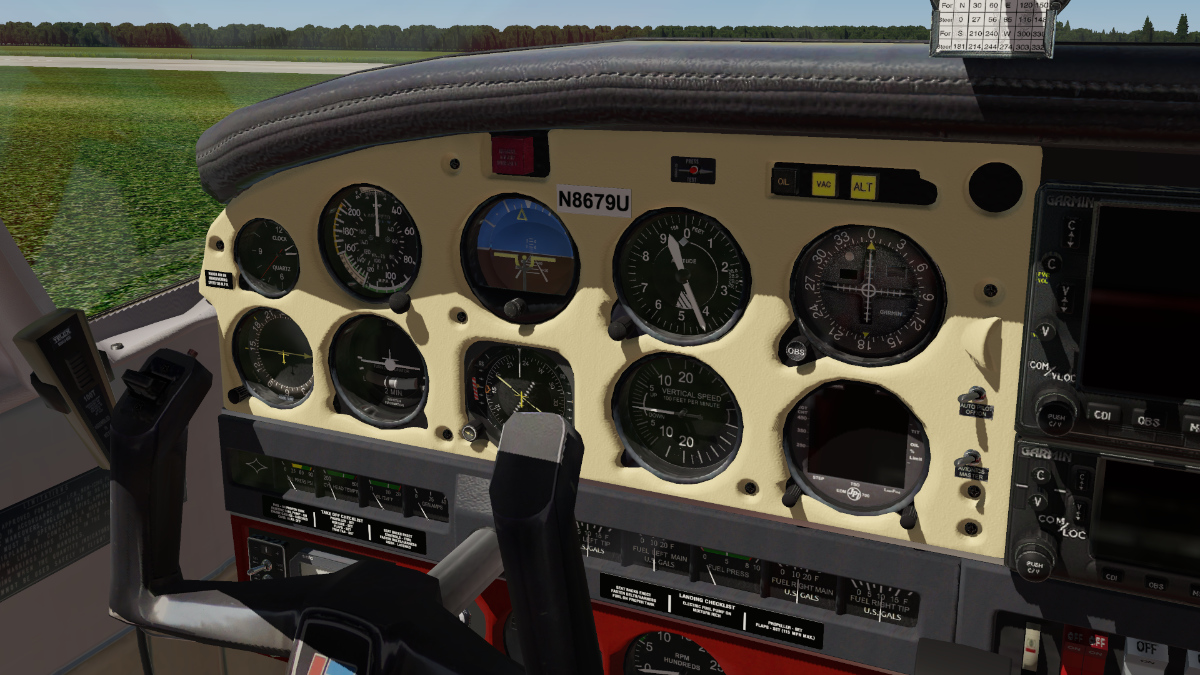
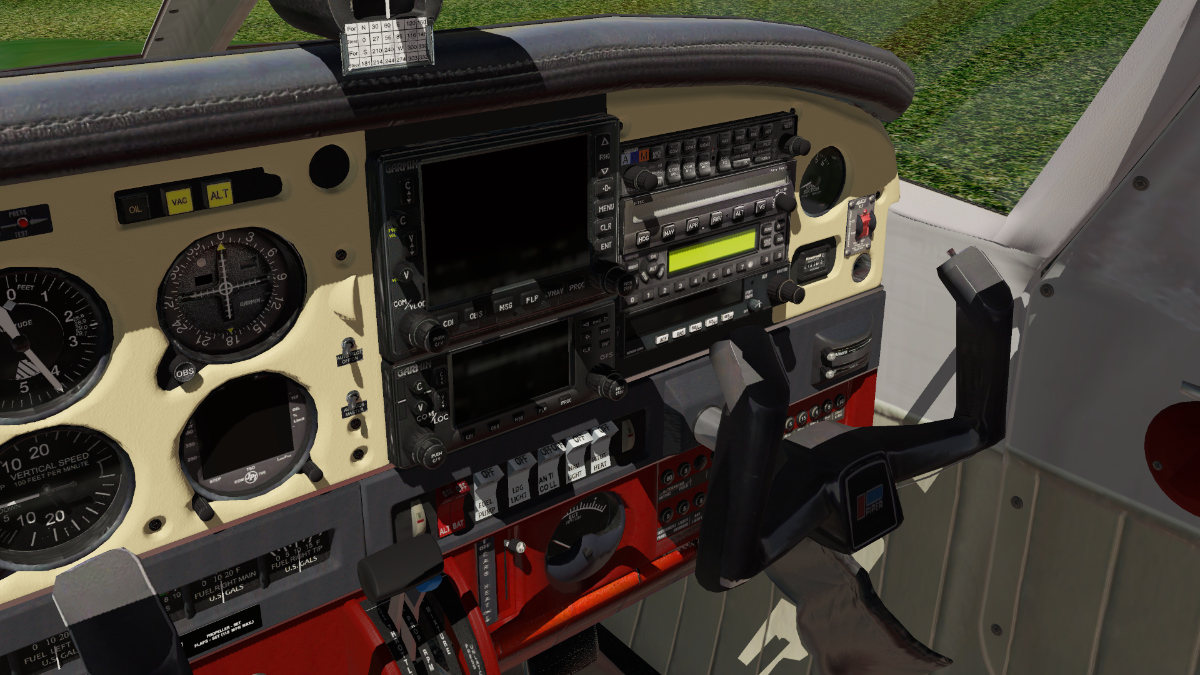
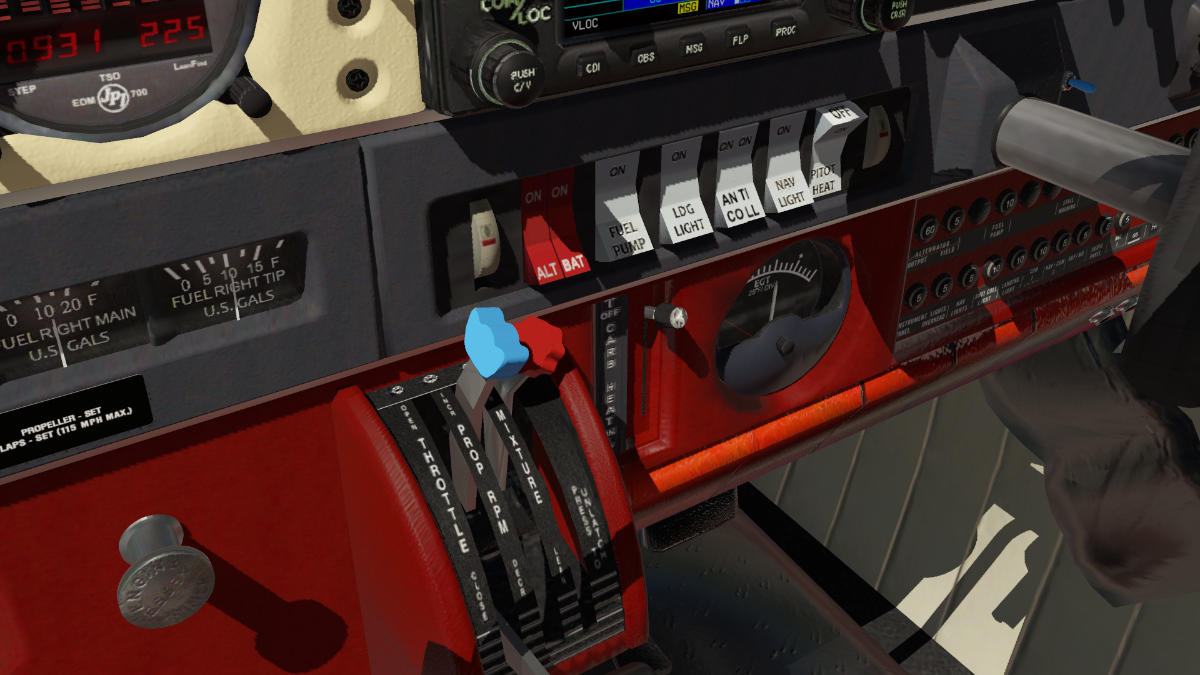
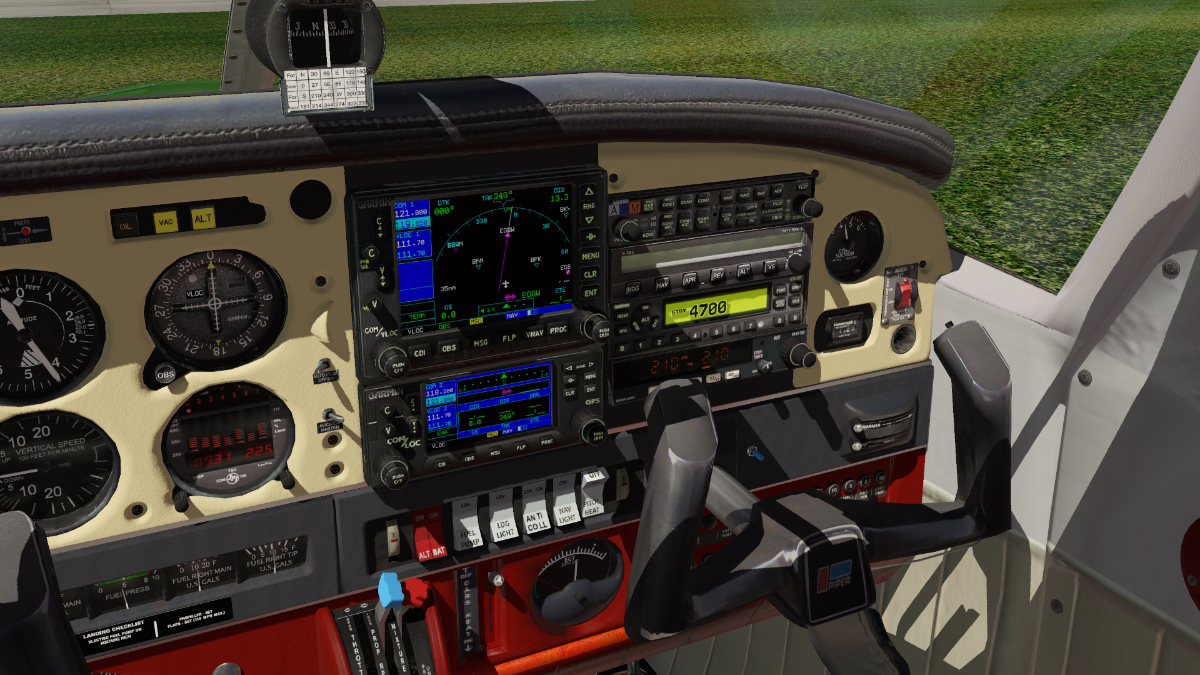
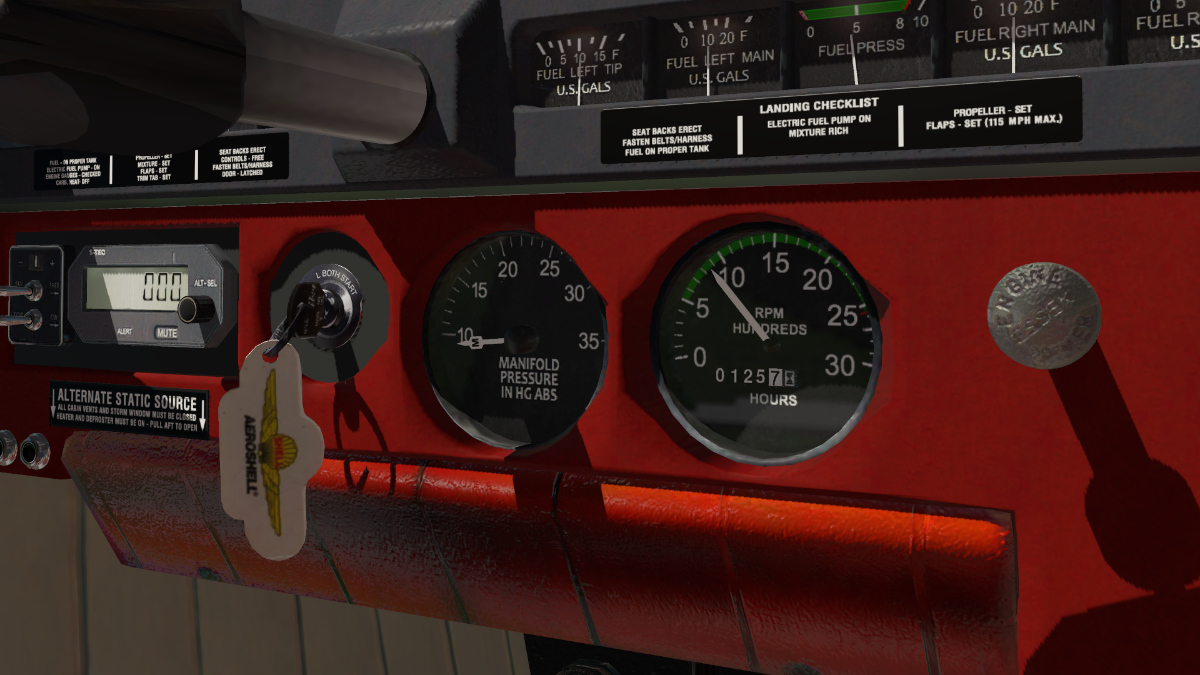
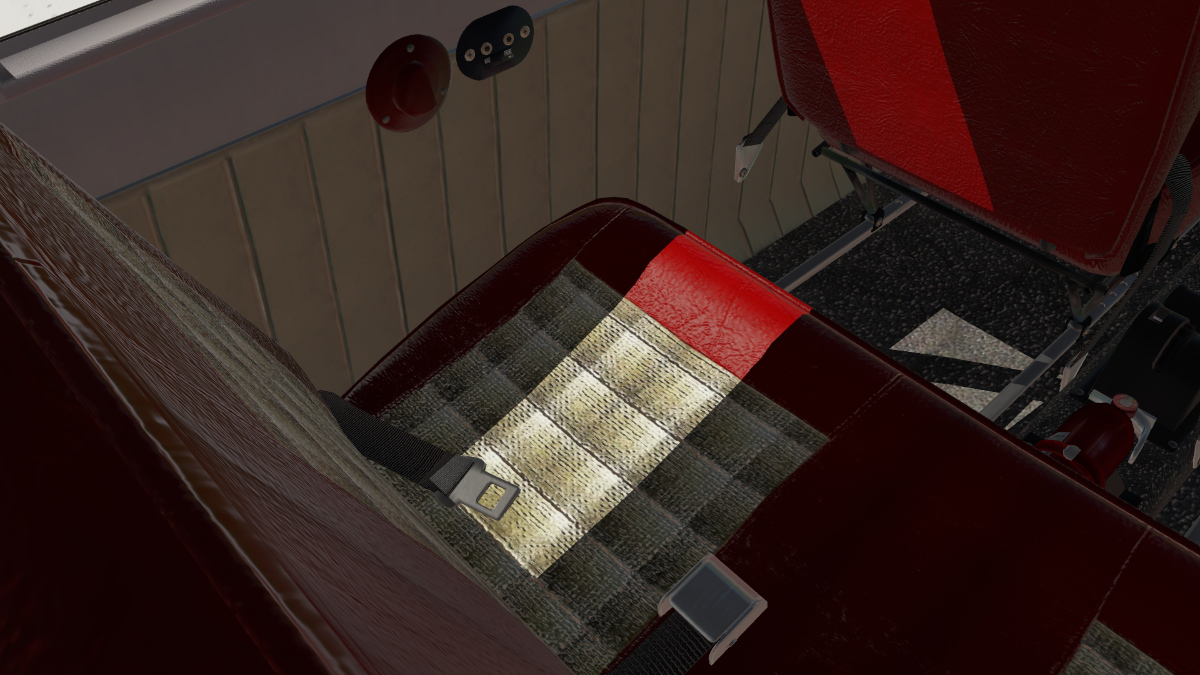
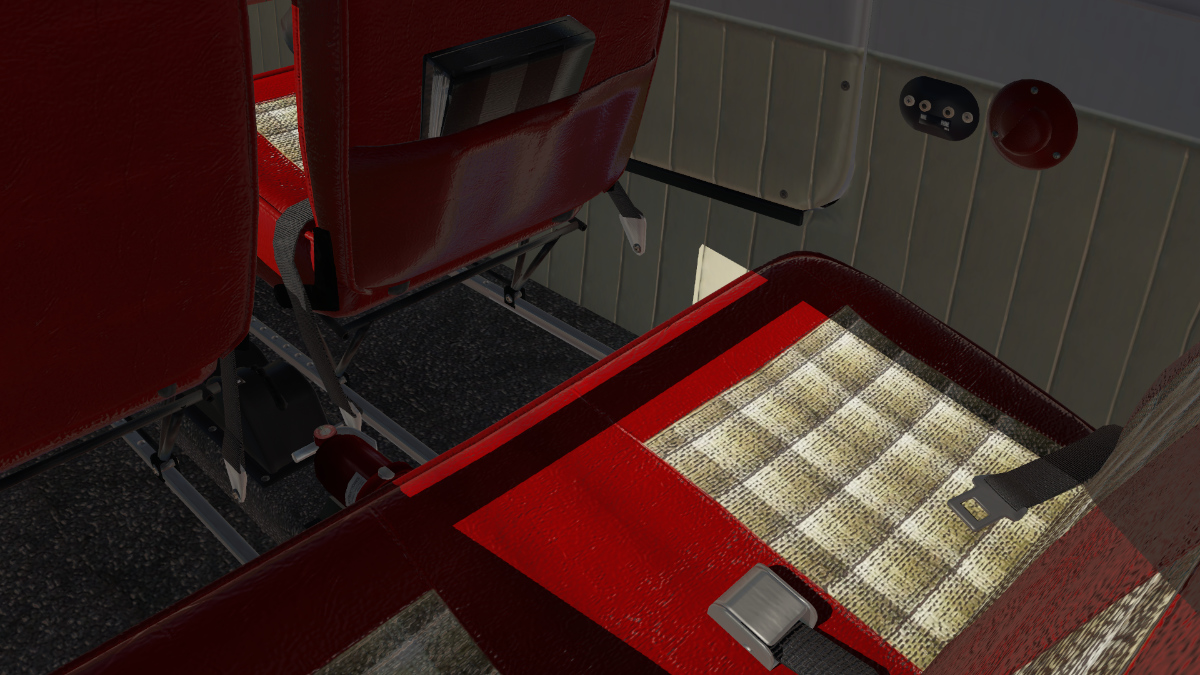
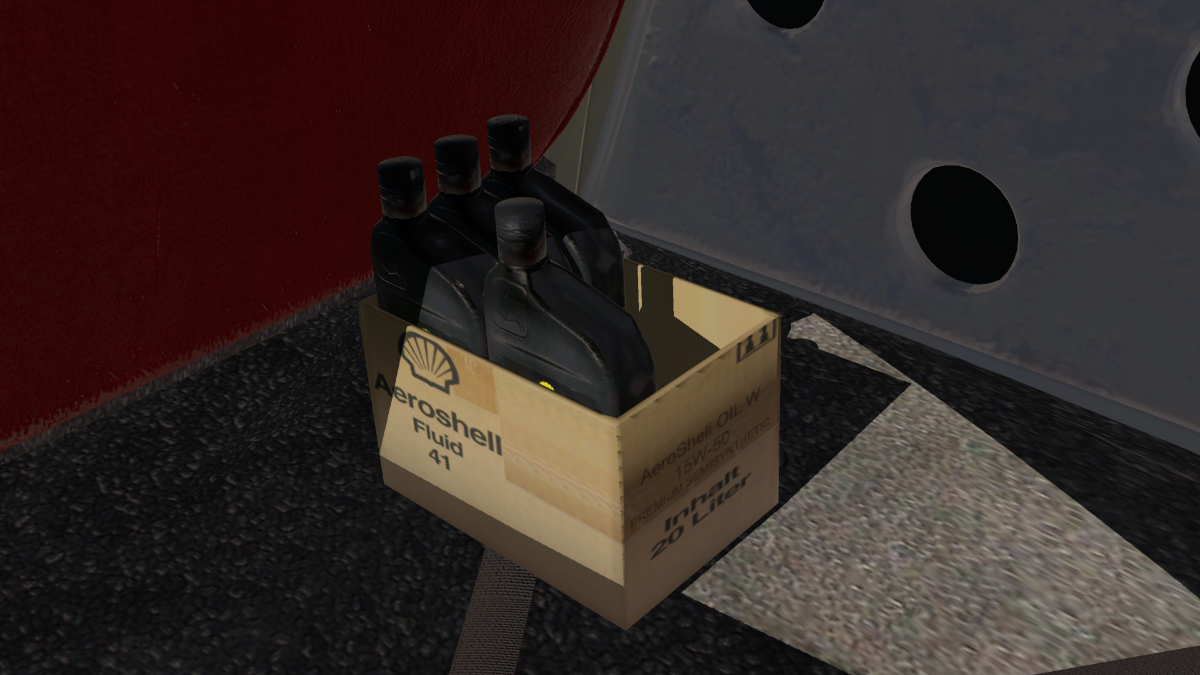
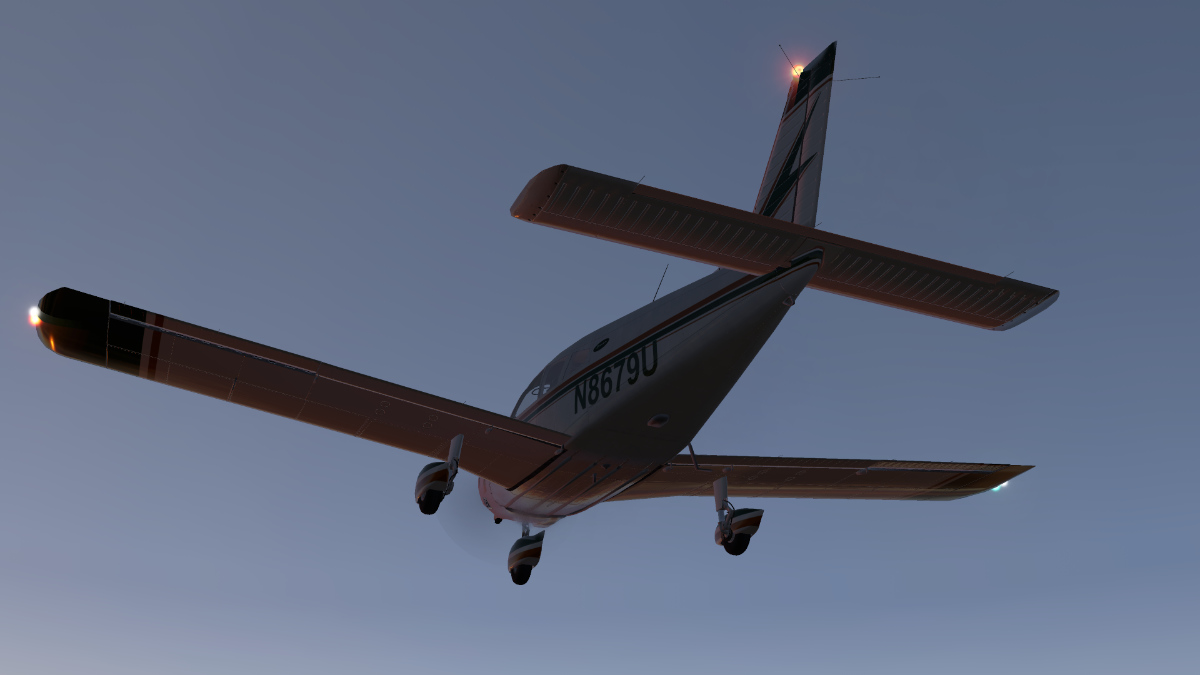
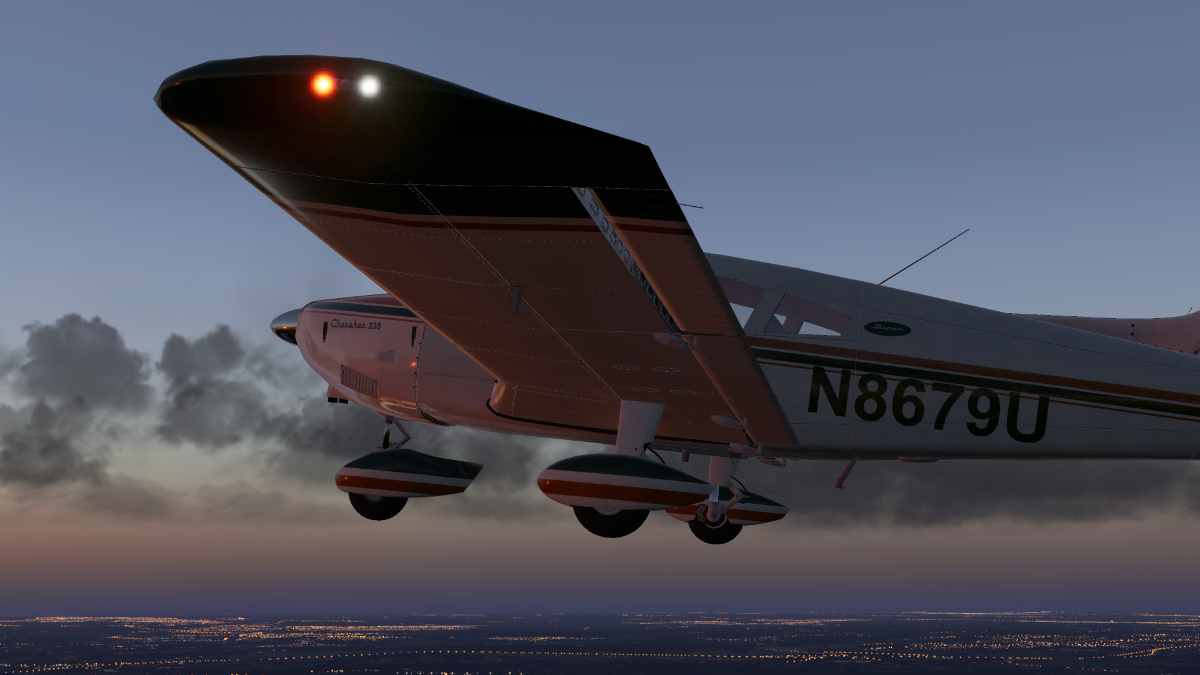
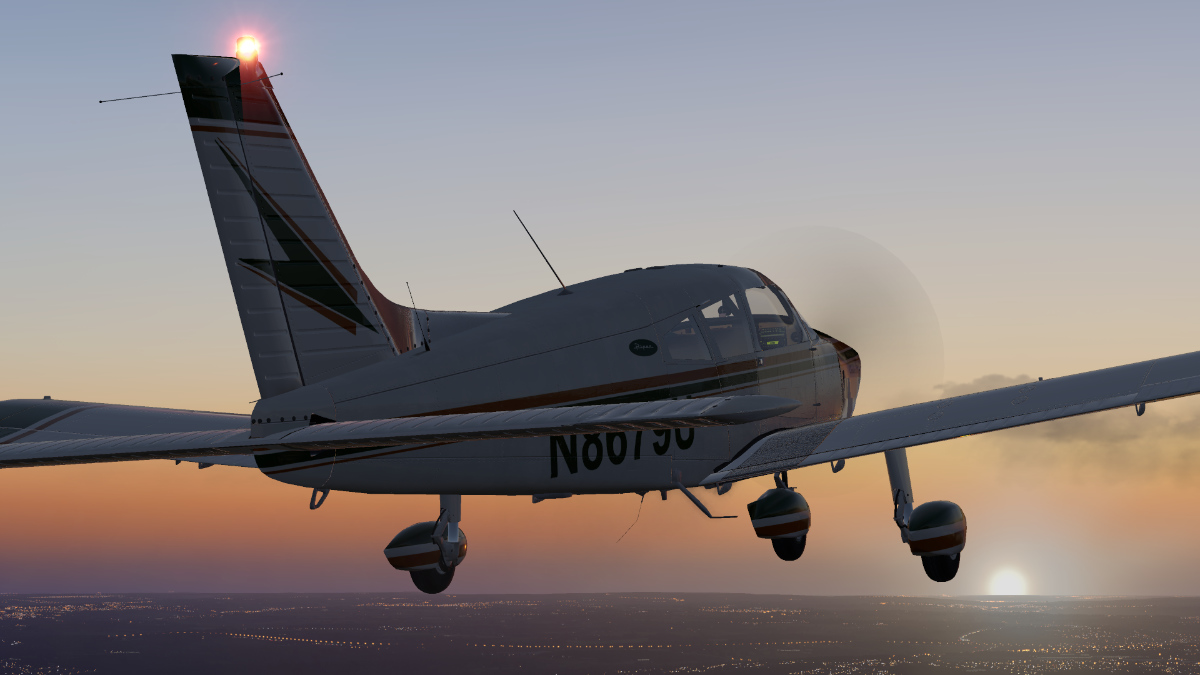
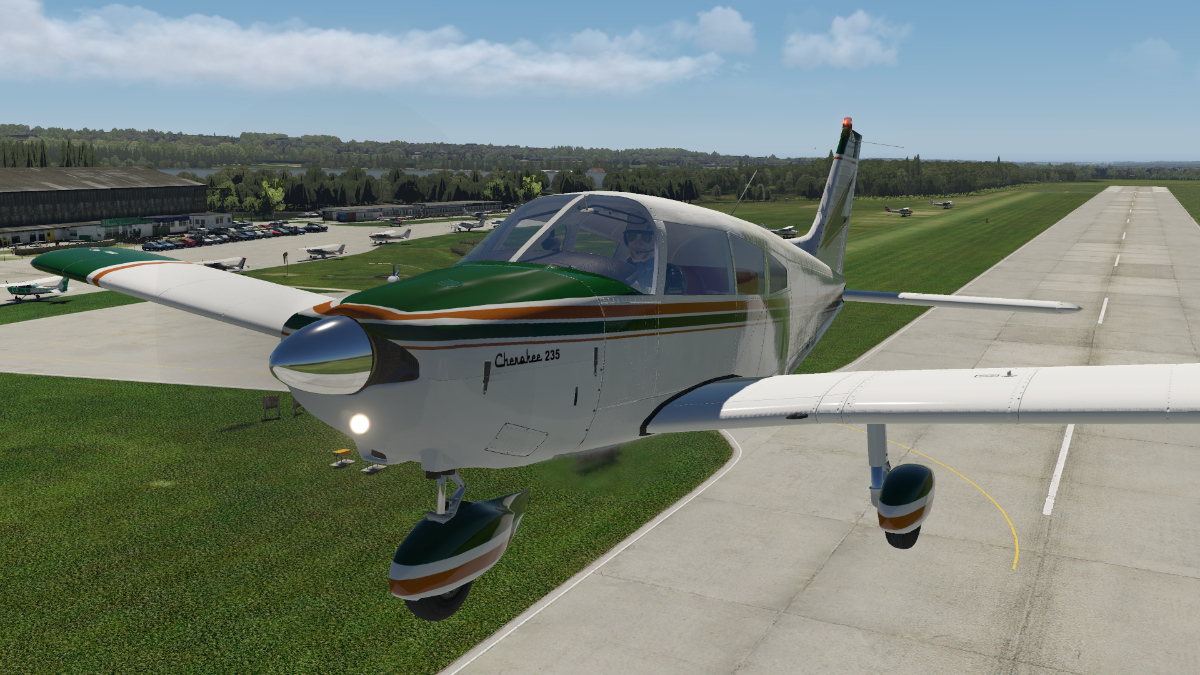
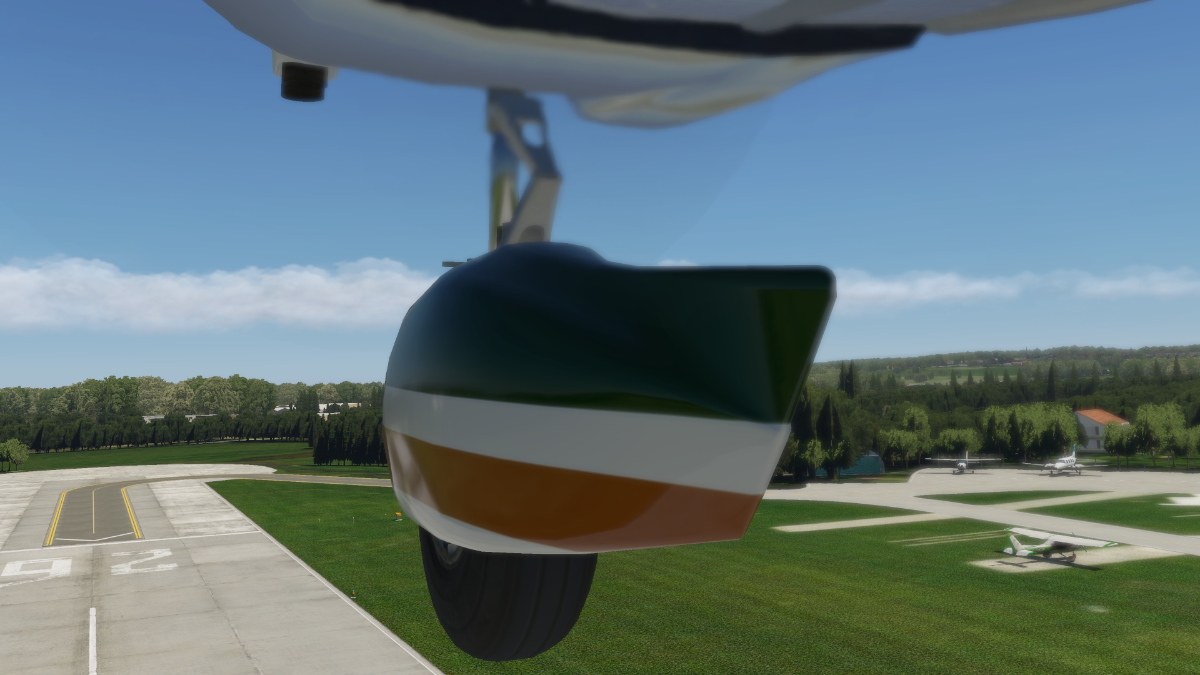
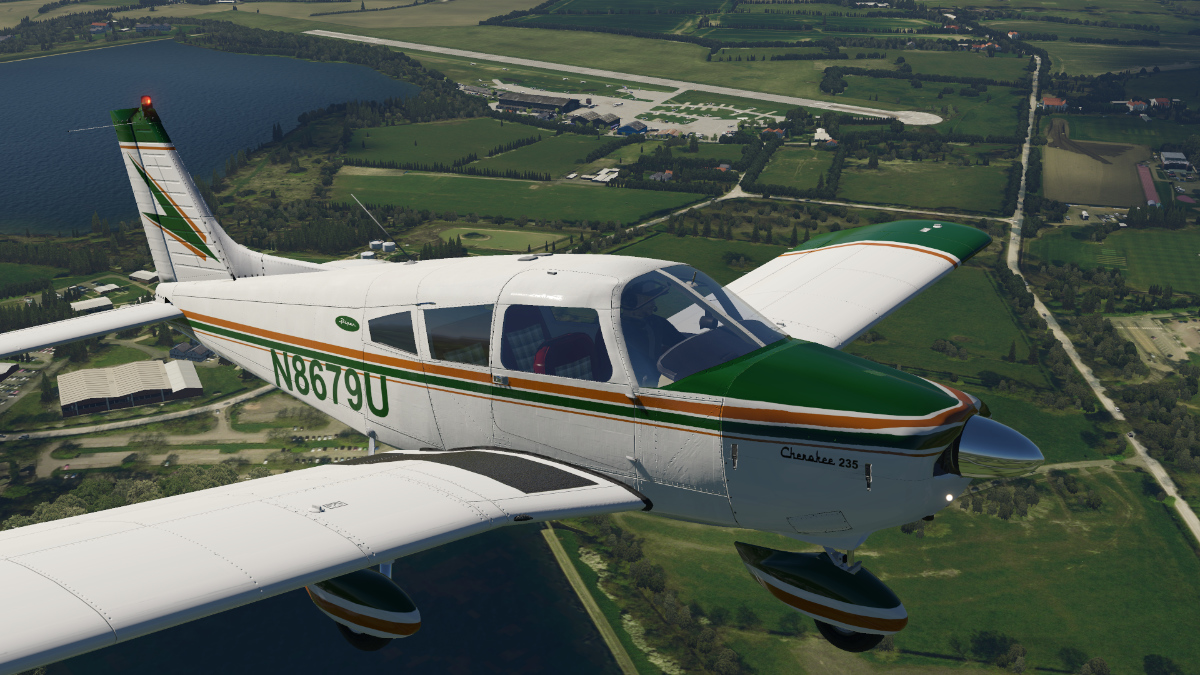
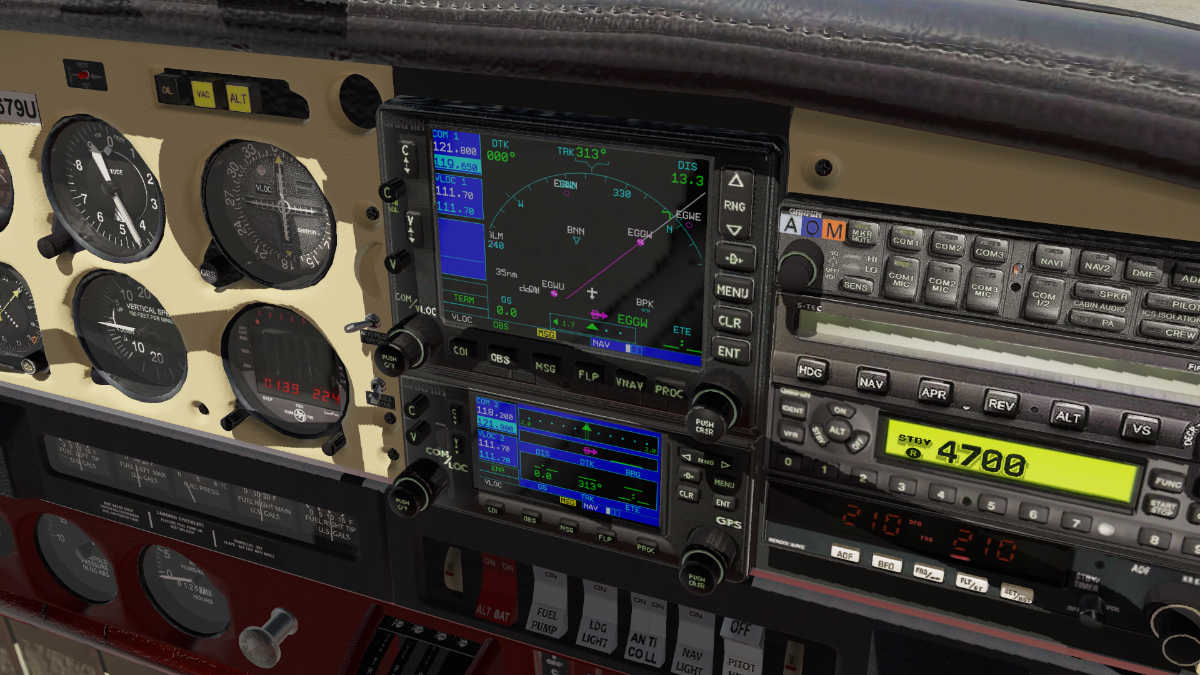
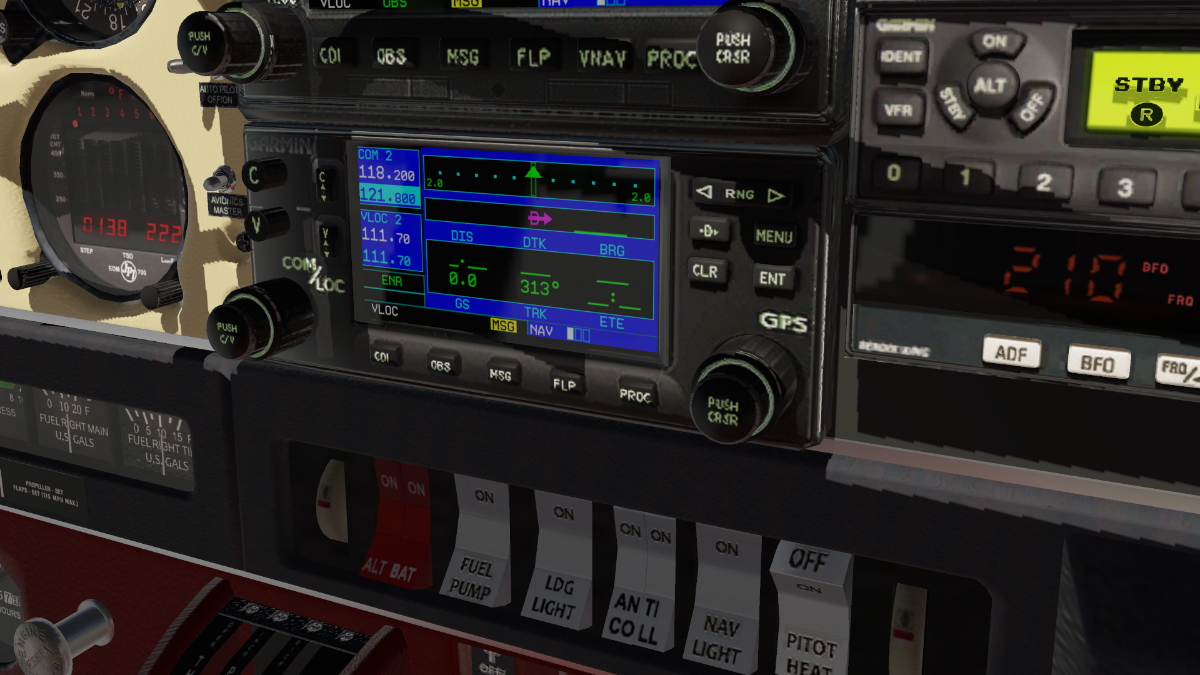
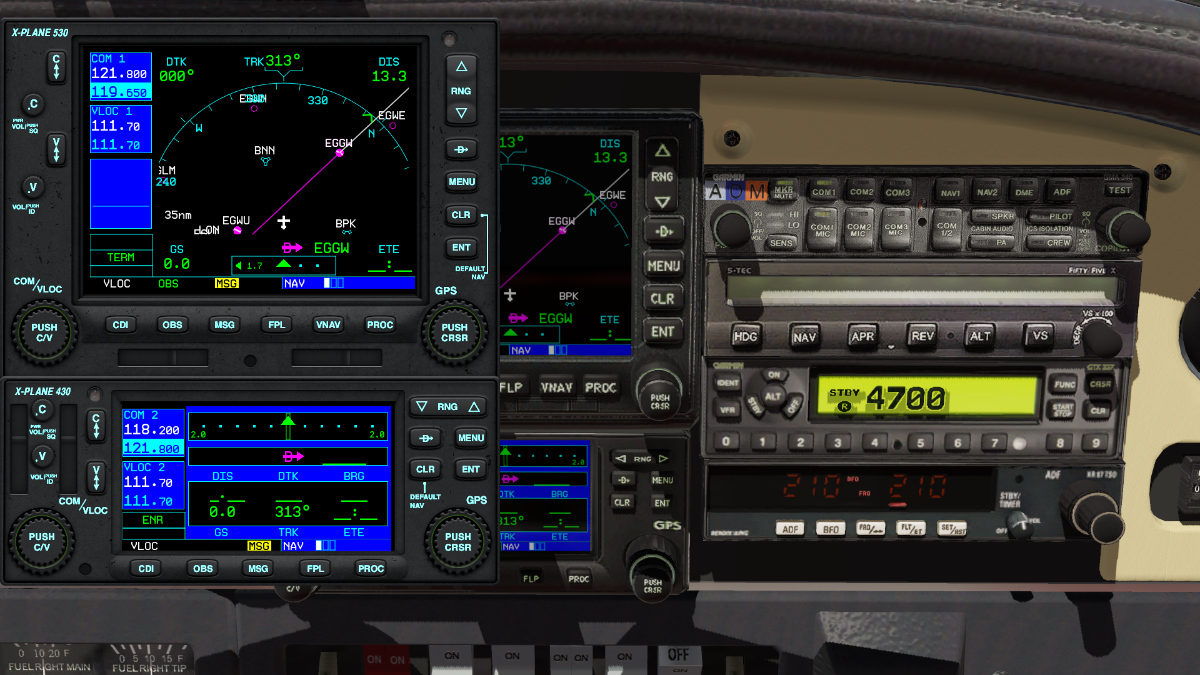
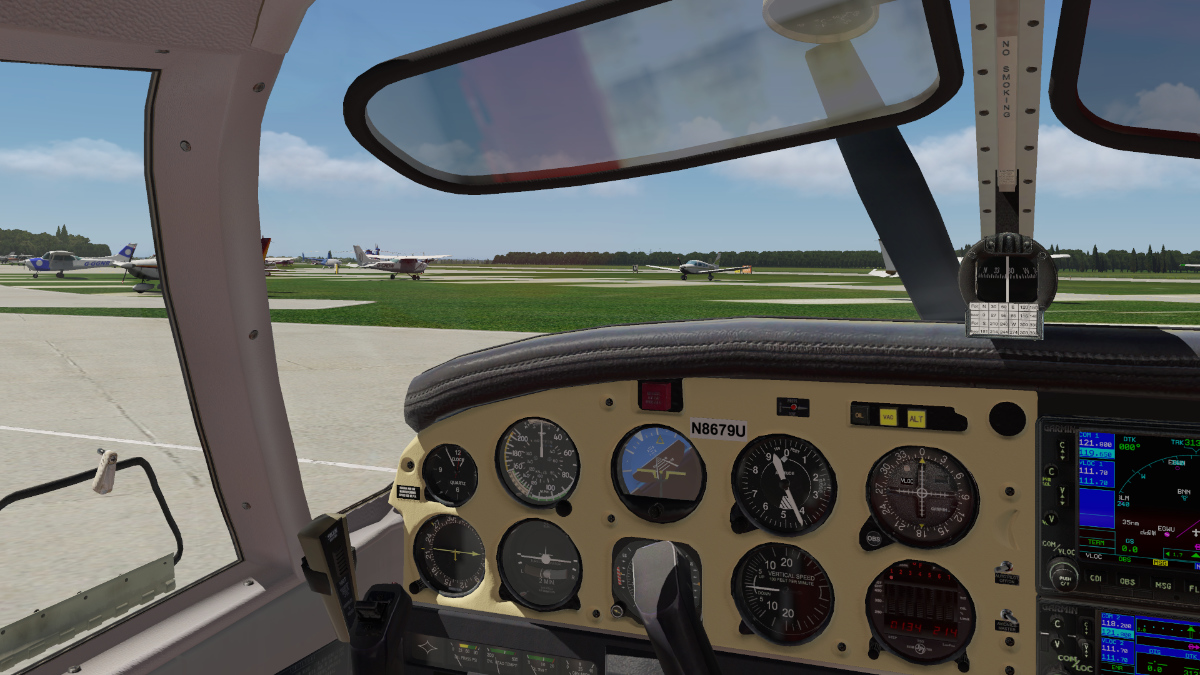
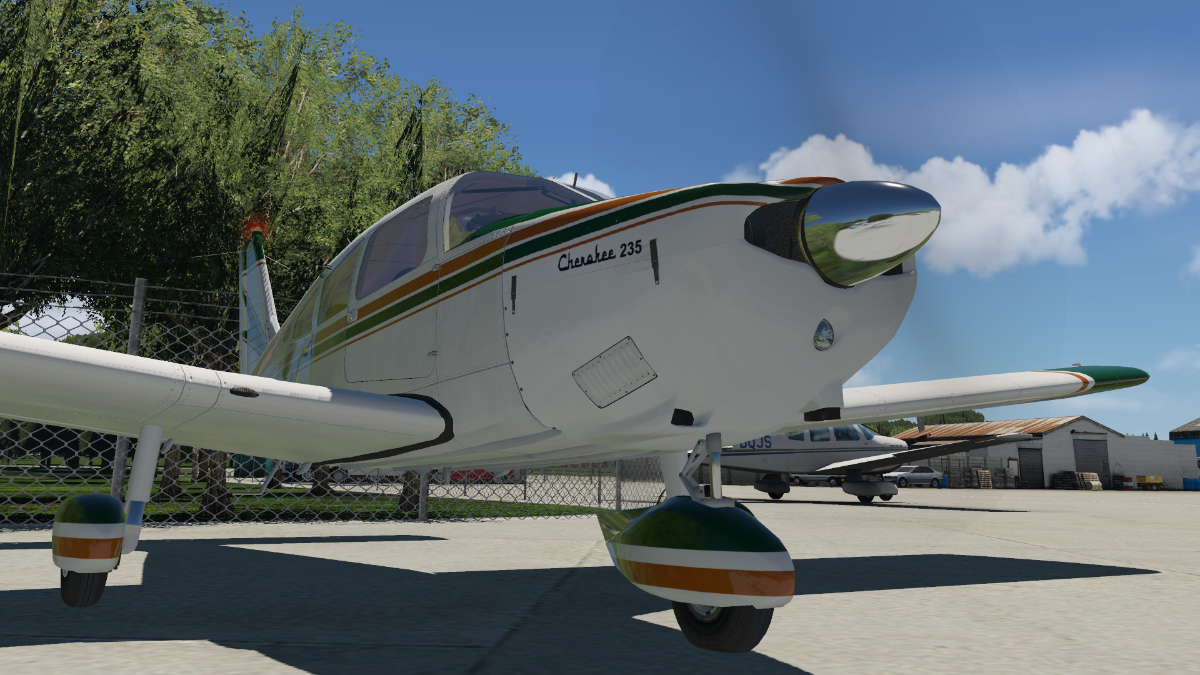
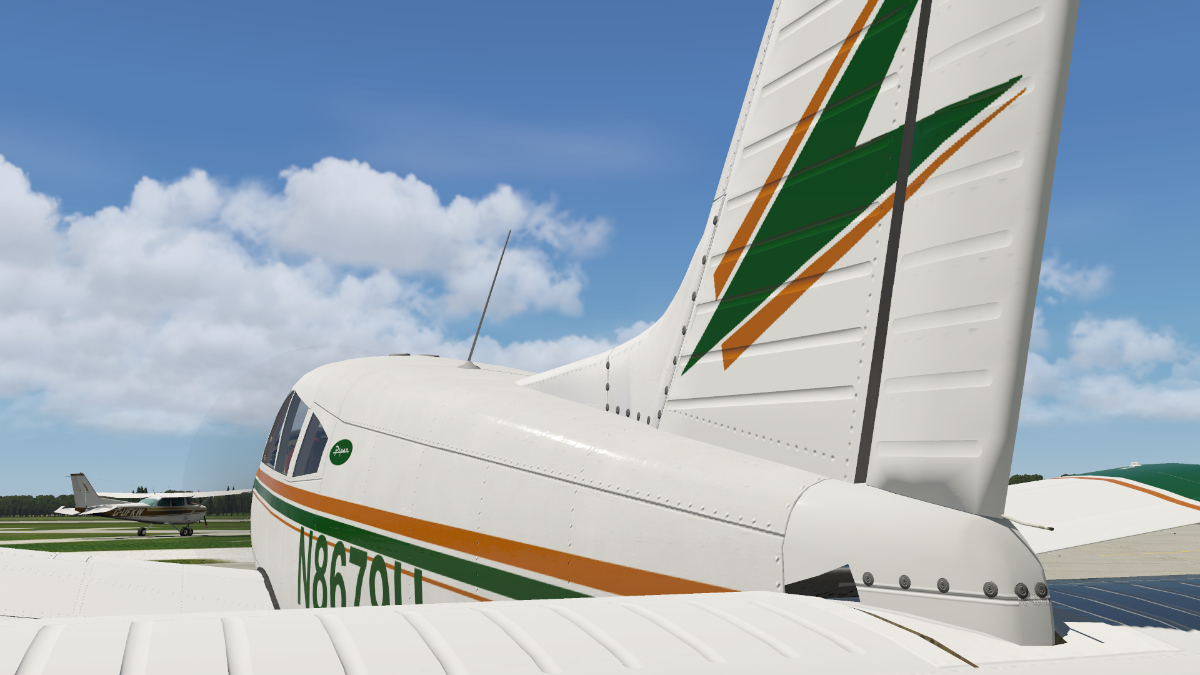
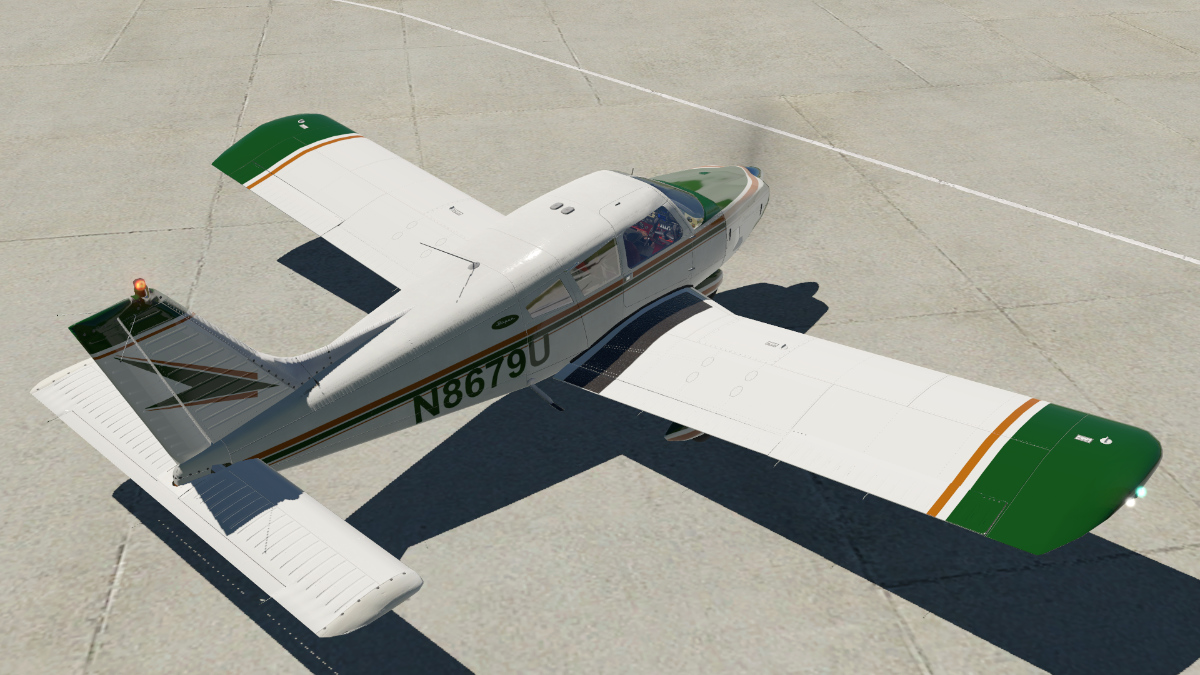
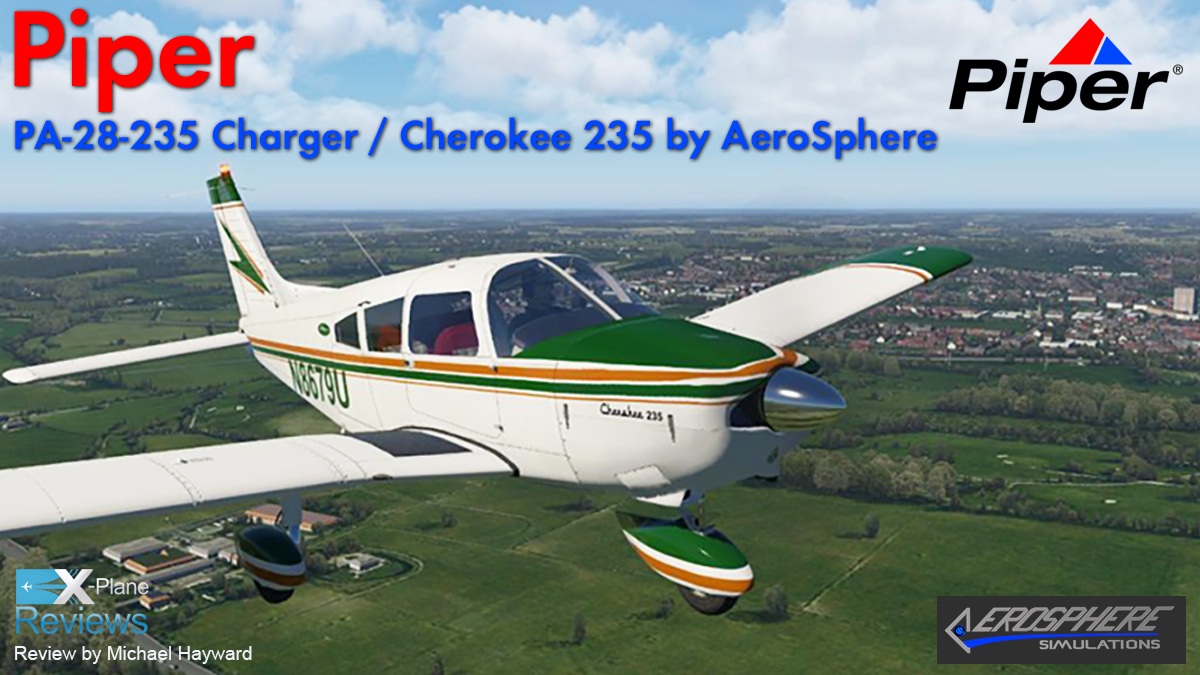
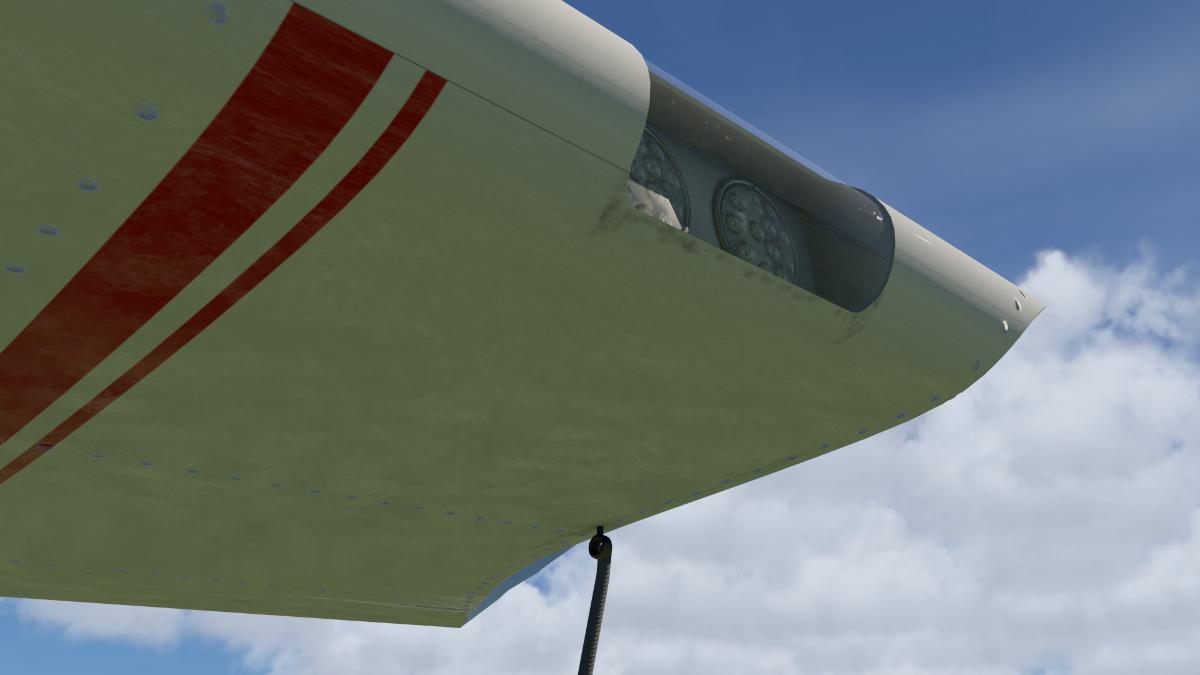
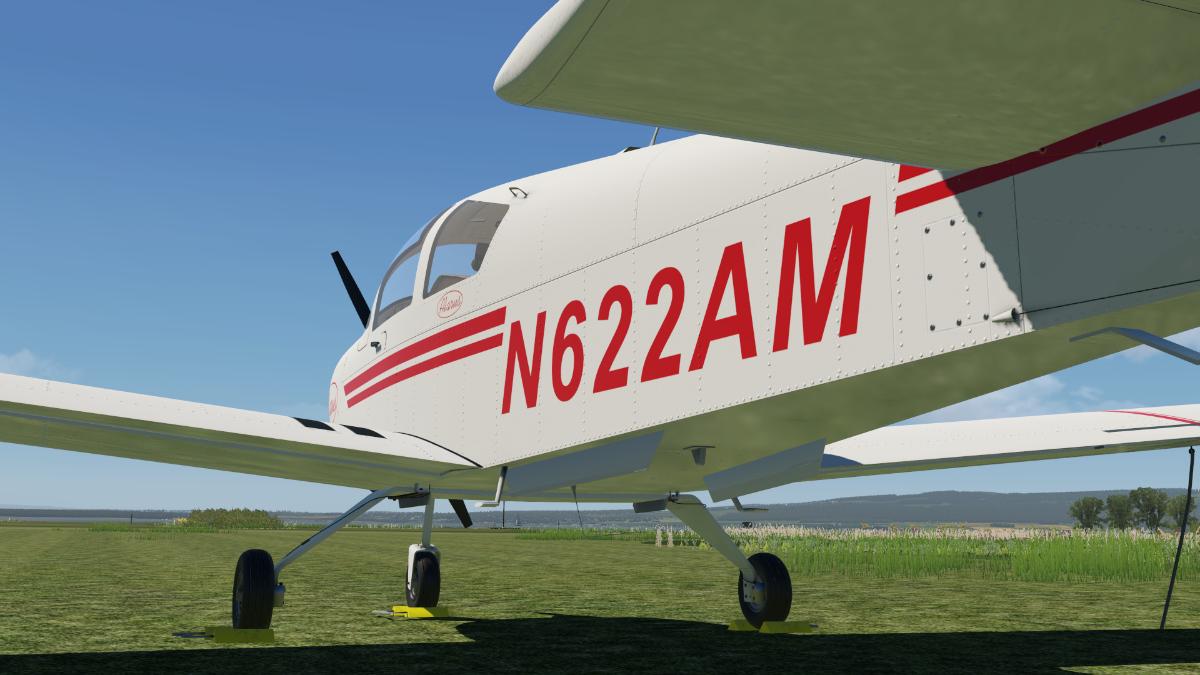
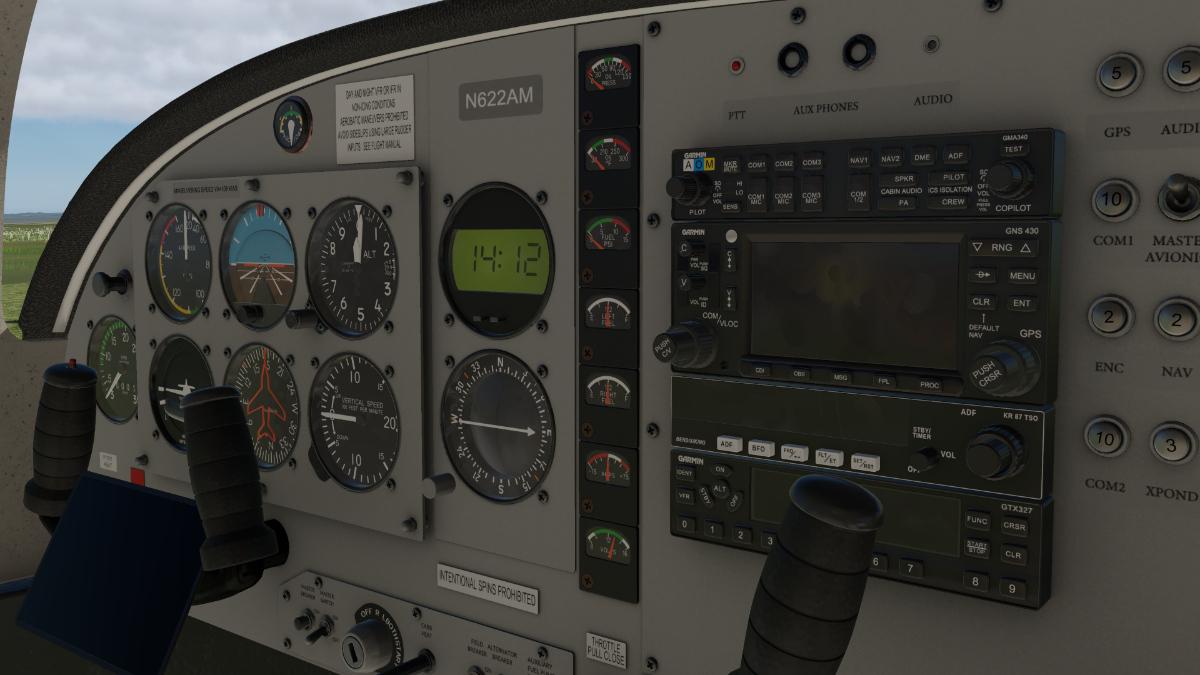
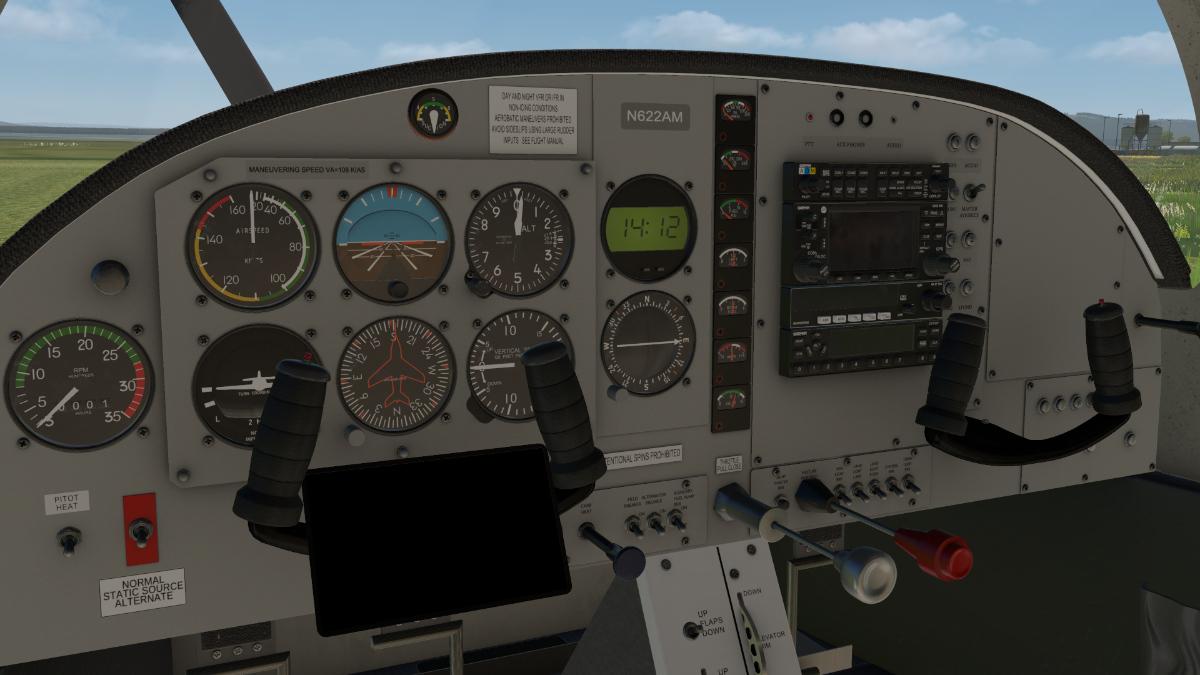
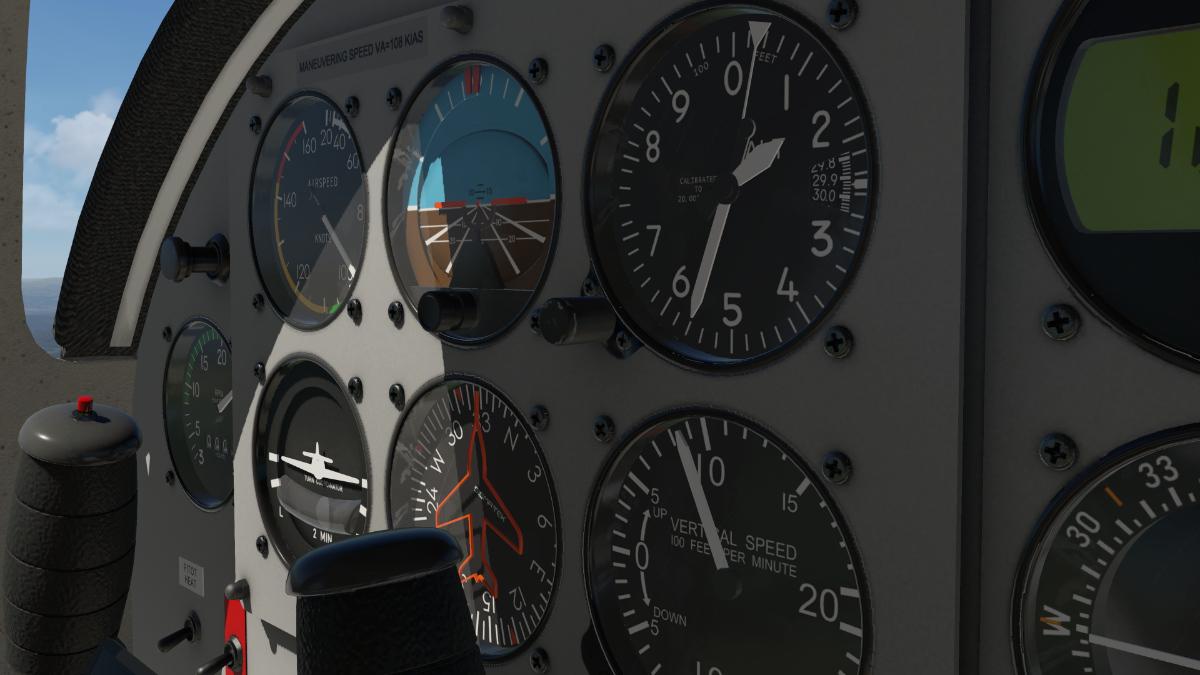
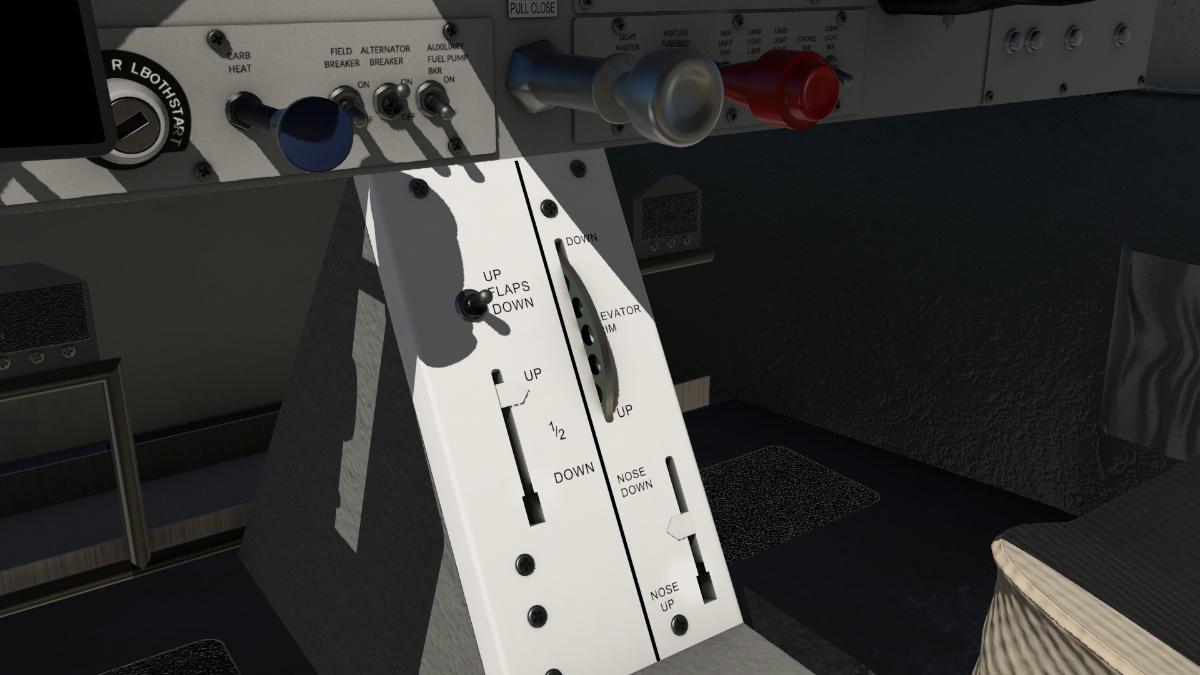
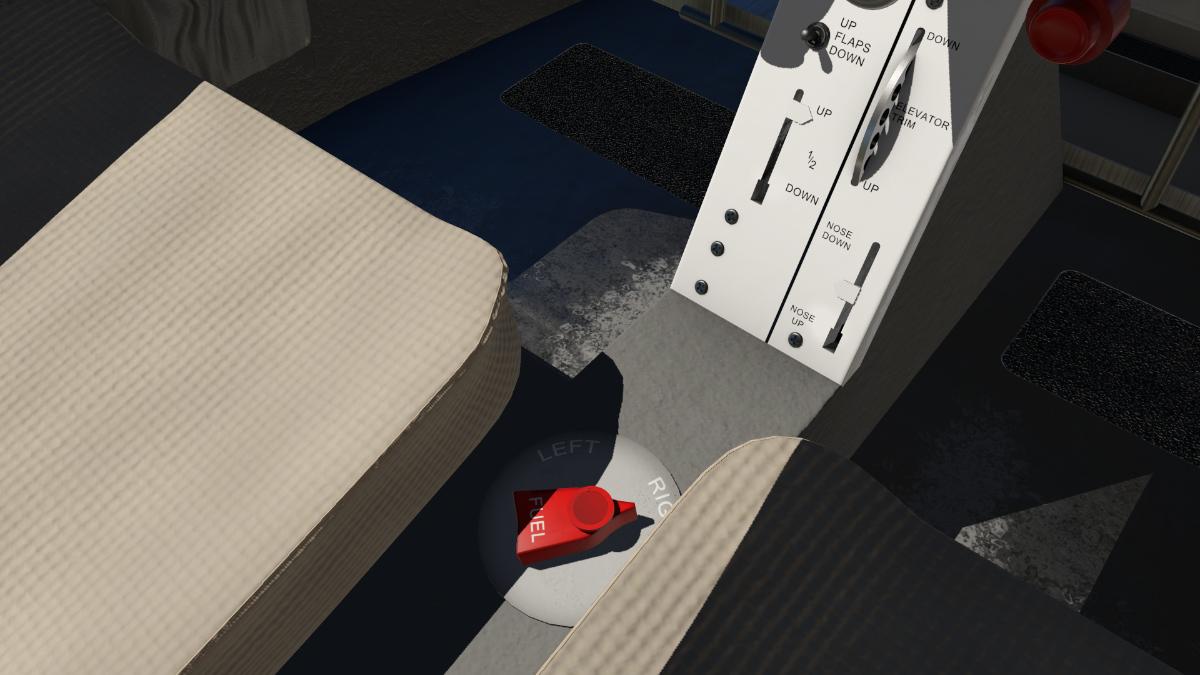
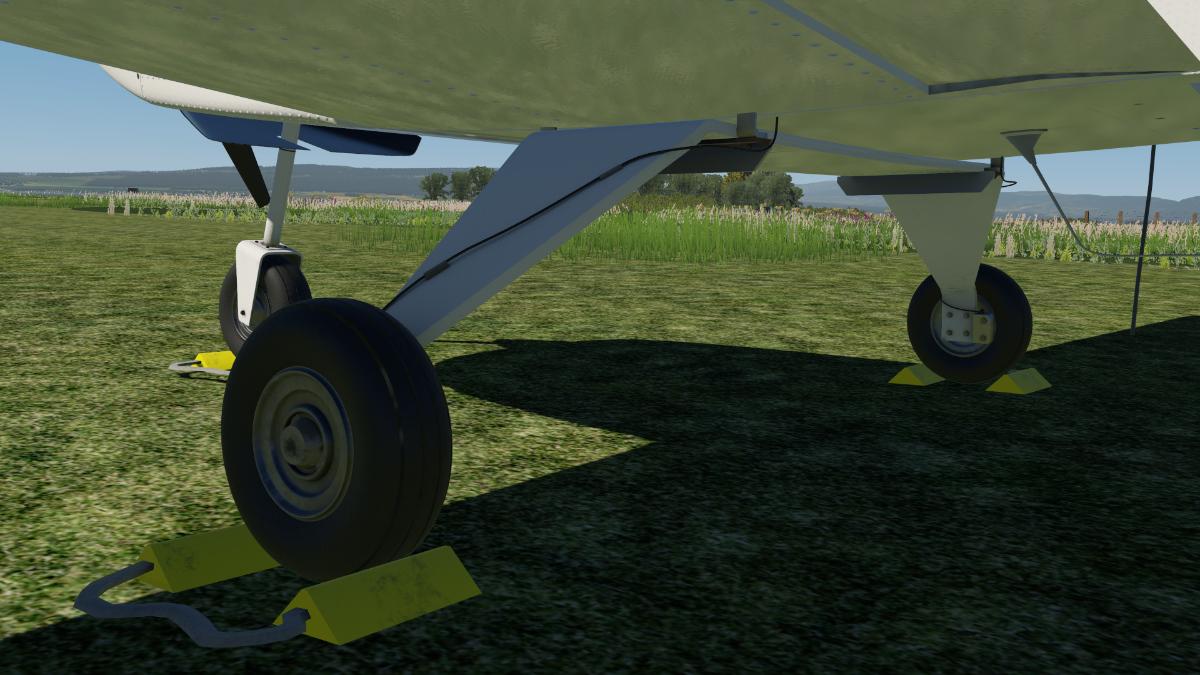
Aircraft Review: Piper PA-28-235 Charger / Cherokee 235 by AeroSphere The Piper PA-28 Cherokee is a family of two-seat or four-seat light aircraft built by Piper Aircraft and designed for flight training, air taxi and personal use. The PA-28 series competes with the high-winged Cessna 172 and the similarly low-winged Grumman American AA-5 series and Beechcraft Musketeer designs. The first Cherokees produced were the Cherokee 150 and Cherokee which began production in 1961. In 1963, Piper introduced the even more powerful Cherokee 235 (PA-28-235), which competed with the Cessna 182 Skylane. The Cherokee 235 featured a Lycoming O-540 engine, albeit with lower power output (235 horsepower) and a longer wing. It also included tip tanks of 17 gallons each, bringing the total fuel capacity of the Cherokee 235 to 84 gallons. In 1973, the aircraft’s name was changed from "235" to "Charger". AeroSphere has developed several popular Piper aircraft for X-Plane in the past, with the Charger being their latest release. Known for their true-to-life representations, in this review we take a closer look at this aircraft and see just how good it really is. Download & Install Purchasing the product off the X-Plane.org store, and then adding the aircraft to your virtual hangar is a simple and straightforward task, as all you need to do is download the files from your account, extract the zip, and then add the model to your Aircraft folder. There is no activation key required, meaning you are ready to fly from the get-go. The aircraft also comes with a three-page readme document which goes through the history of the Charger, features included with the model and copyright information. Exterior Model The Piper Charger has the classic Cherokee shape with a slightly extended nose to sit the engine, and the AeroSphere version follows this trait with a highly authentic and well-modelled look. Finer details such as rivets and panel gaps have been bump mapped into the fuselage and further increase the realism, making the Charger an aesthetically pleasing aircraft to look at. Six different liveries are included with the aircraft. These are different colours and trims, typical for what you would see on this type of aircraft. Each has its own style and is pleasing to the eye in the virtual skies of X-Plane. All textures are created in 4k resolution, allowing for smaller details such as decals and warning labels to be clear and easy to read. The Charger also includes all the lights you would expect to find on the aircraft. The strobe and landing lights are very bright and can certainly illuminate your surroundings, especially when flown at night! This makes it easy for airfield hopping in the later hours of the day where perhaps a grass strip or unlit runway may not always be easy to spot! Cockpit & Functionality The Charger’s dashboard is a mix of cream and red panelling and is your classic 70s look, which suits the cockpit well. This has been modelled to a fair degree, helped by the indentation of the gauges. While it could perhaps do with a bit of weathering to add age to the Charger, it certainly fits the part and looks good no matter where you are sitting within the aircraft. All gauges are 3D and modelled into the aircraft dashboard. The dials and textures are taken directly from images of the real aircraft and placed into their correct positions. By utilizing actual photos, the developers have managed to combine authenticity and a small part of the real aircraft directly into their X-Plane model. Moving to the back of the cockpit, you have two seats and a small cargo bay to occupy your needs, and just like the view upfront, this too is well modelled. I have a custom camera key set in one of the rear seats which allows me to look outside to the ground below! The cockpit also includes both the Garmin 530 and 430 GPS units. These allow for ease of use for navigation while keeping to the core of this predominantly steam-gauge aircraft. Both are based on the well-established default X-Plane systems which have always been well maintained by Laminar. Animations within the aircraft also include all doors within the aircraft for people and cargo, as well as an animated storm window which can be opened and viewed out of. It’s a small extra detail but one that adds to the ambient life of the aircraft. The only thing I feel is missing is perhaps needle vibrations based on the engine’s output. It’s something I know has been done to good effect in X-Plane, including default aircraft, and can make the whole thing feel a little less ‘static’. Other than that, flying from the cockpit has been a real joy! Sound AeroSphere have recorded sounds from the real aircraft and incorporated this within the add-on. Throwing the throttle up to full power sounds good, with a good headset it really puts you in the seat of the cockpit. External sounds are also well mixed and take me back to spotting Cherokee aircraft at Denham and Elstree. The Charger has a distinct high-pitch buzz which this add-on portrays perfectly. FMOD really helps bring this aircraft to life too, as it allows for the sound to change as you alternate between views and where you are positioned in relation to the aircraft. This allows for a far more lifelike distribution of audio, rather than the usual static ‘plane noise’ we often experience. When testing aircraft, I always keep an ear open for poor audio cutting and noise loops, but on this occasion, I haven’t been able to notice anything in the Charger, which means a lot of time and care went into making this model sound the best it could. Flight Dynamics The Charger feels good to fly, as it’s nimble on the yoke and can manoeuvre with ease, but with enough trim adjustment, is super smooth in cruise, and I also found the prop drift easy to manage too. There is a small movement to the left which you can certainly feel on the ground, less so whilst airborne, but it only requires a little movement on the yoke to keep it steady and flying level. Landing the Charger is also a breeze, due in part to the powerful engine up front, which requires only fine throttle adjustments to keep the aircraft going, before pulling back for a held-off landing. I must say, I really enjoy flying this aircraft as it brings back happy memories of flying lessons I took a couple of years back. The fact that AeroSphere have managed to replicate the flight dynamics so well, is only further testament to their modelling credentials. Opinion & Closing Remarks Overall, I’ve really enjoyed taking the Charger out for a spin. AeroSphere have done a fantastic job putting this aircraft together, and this shows in the amount of care and detail they have added to make this model as true to life as possible. Like any Cherokee, it’s a simple aircraft, but a lot of fun to fly. The aircraft model certainly looks good and with a few little tweaks, such as adding weathering to the gauges (as mentioned earlier), I’m certain it would be up there with the very best of what X-Plane can offer in the GA department. When you factor in the high-quality audio samples (not to mention FMOD), plus an enjoyable flight model, you know you're on to a winning formula. At $29, the model is also competitively priced, so if you’re looking for an opportunity to fly the PA-28-235 or are looking for an older Piper Cherokee with a beefier engine up front, then AeroSphere’s Charger is a great place to start! _______________________________ The Piper PA-28-235 Charger/Cherokee 235 by AeroSphere is available from the X-Plane.Org Store here: Piper PA-28-235 Charger/Cherokee 235 Price is $29.00 Requirements X-Plane 11 Support for XP12 when available Windows, Mac or Linux 4 GB VRAM Minimum - 8 GB+ VRAM Recommended Download Size: 198 MB Current Version : 1.0 (June 20th 2022) Review by Michael Hayward 26th August 2022 Copyright©2022: X-Plane Reviews Review System Specifications: Windows 10 Professional, AMD Ryzen 5 3600 Processor, 32GB RAM, Palit GeForce RTX™ 3080 GamingPro (Disclaimer. All images and text in this review are the work and property of X-PlaneReviews, no sharing or copy of the content is allowed without consent from the author as per copyright conditions) All Rights Reserved
-
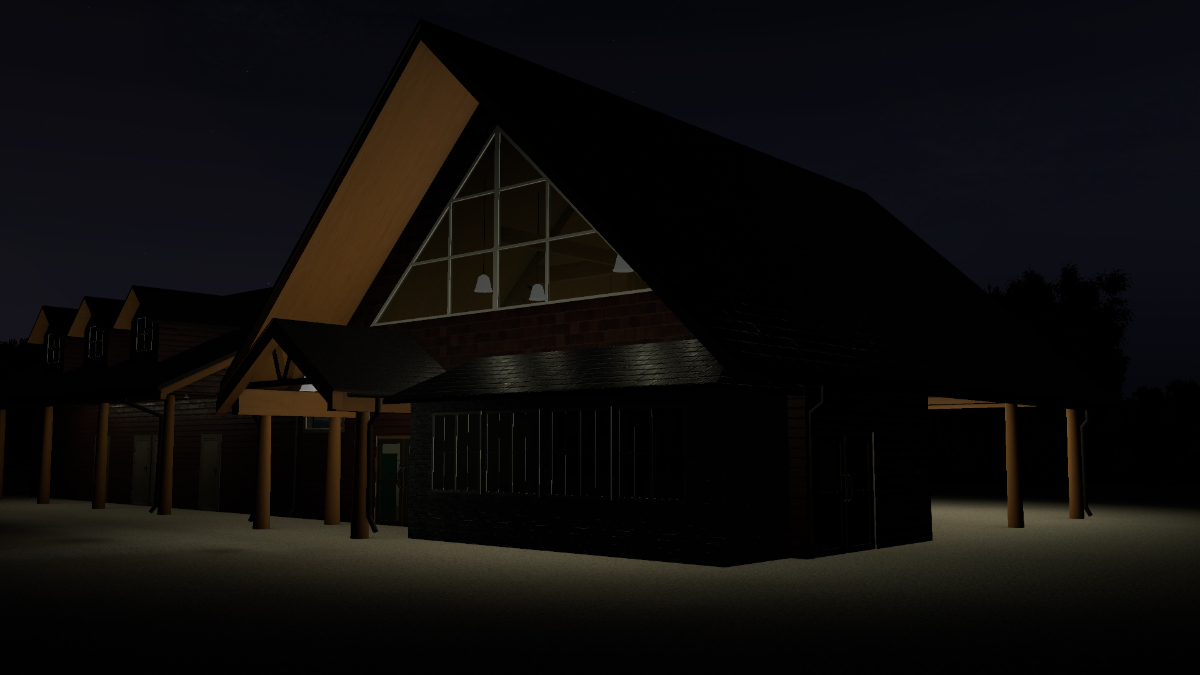
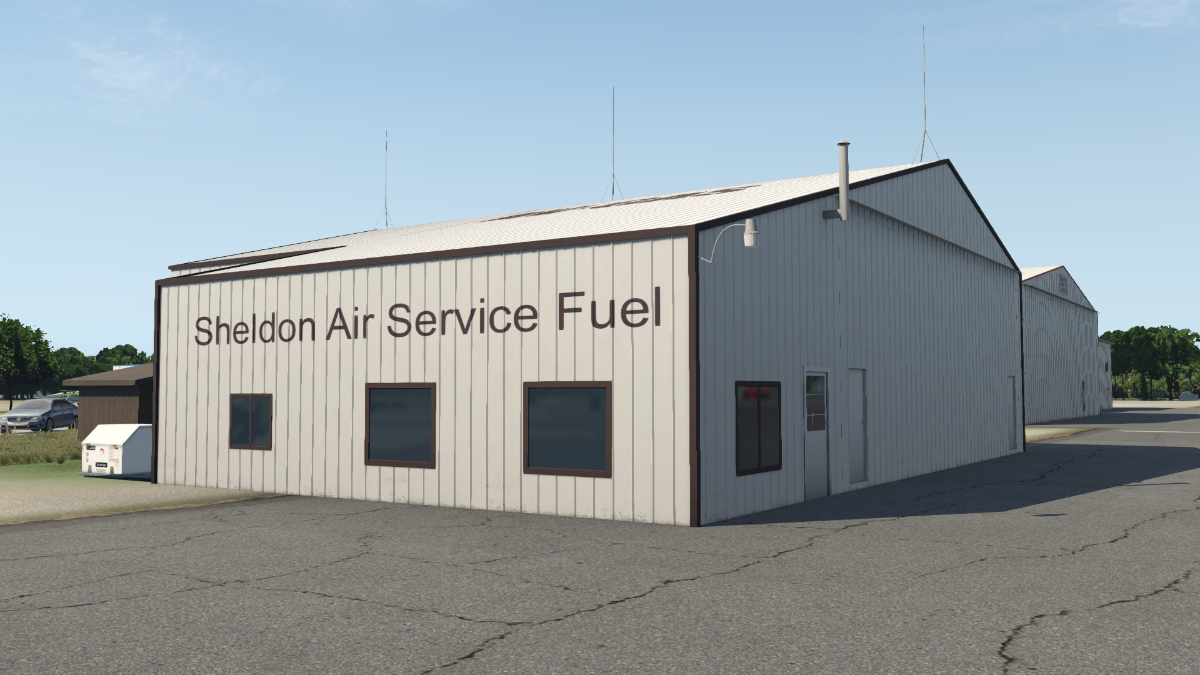
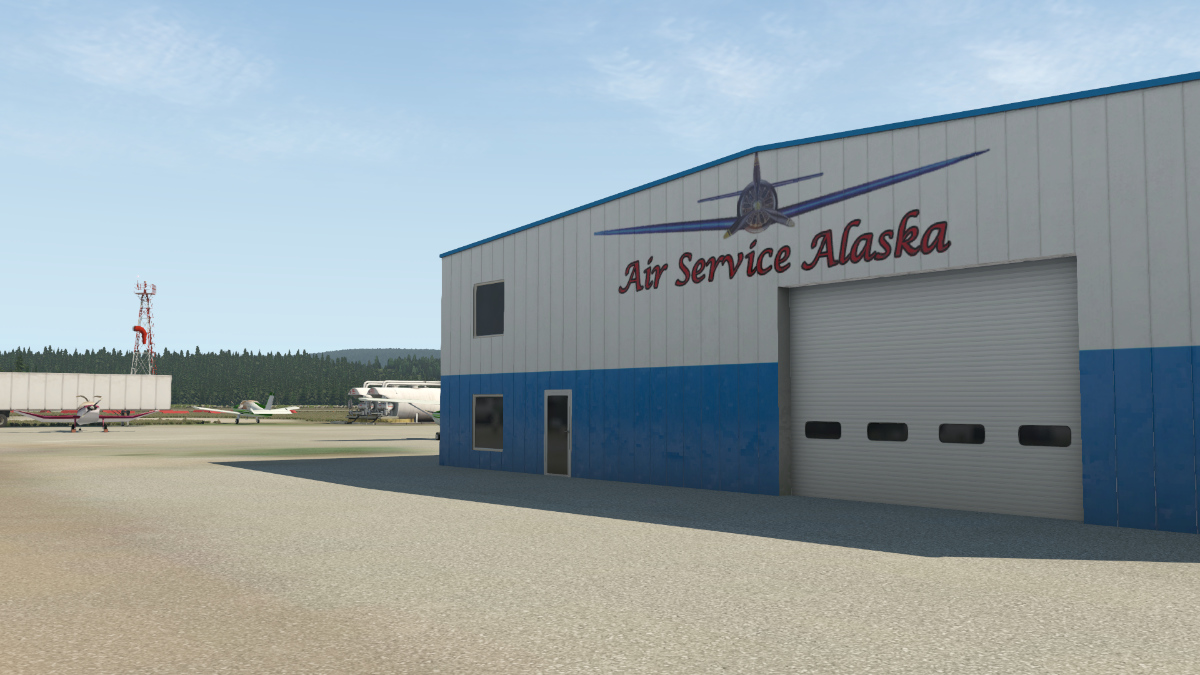
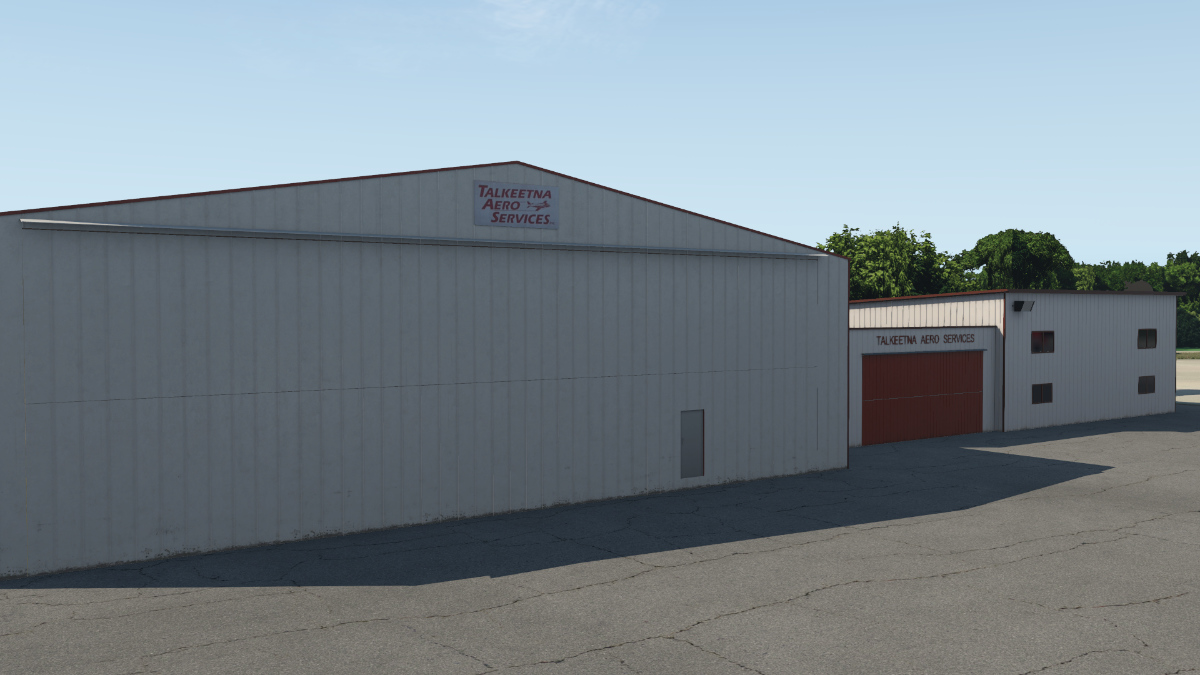
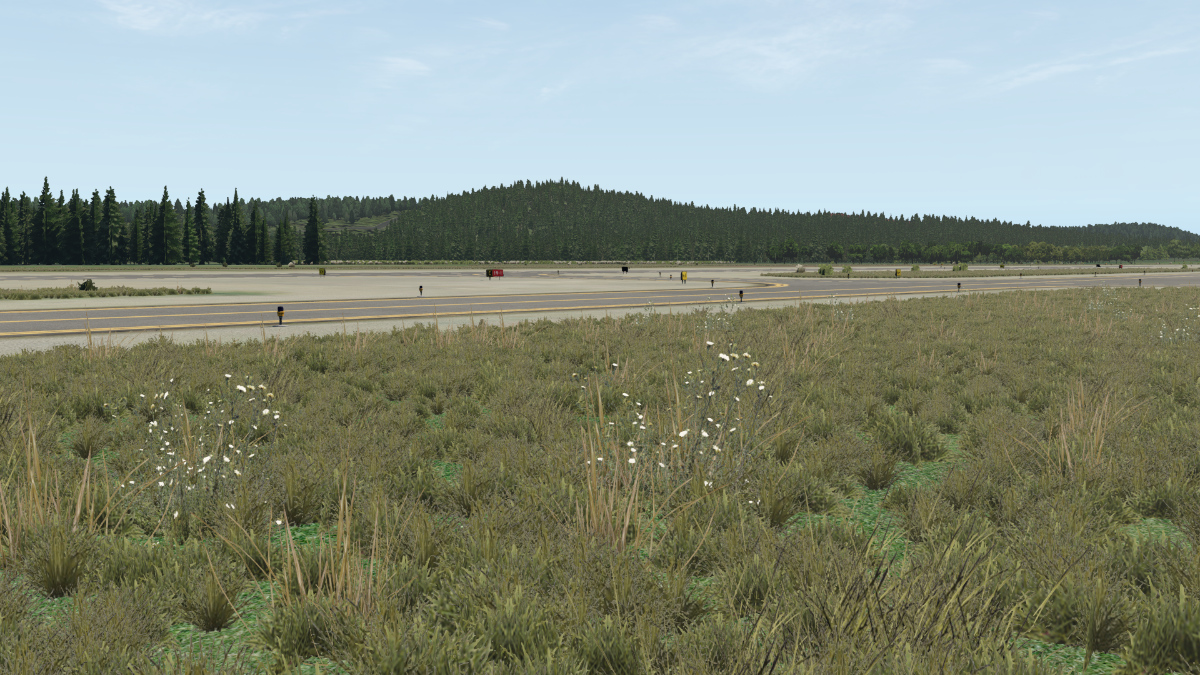
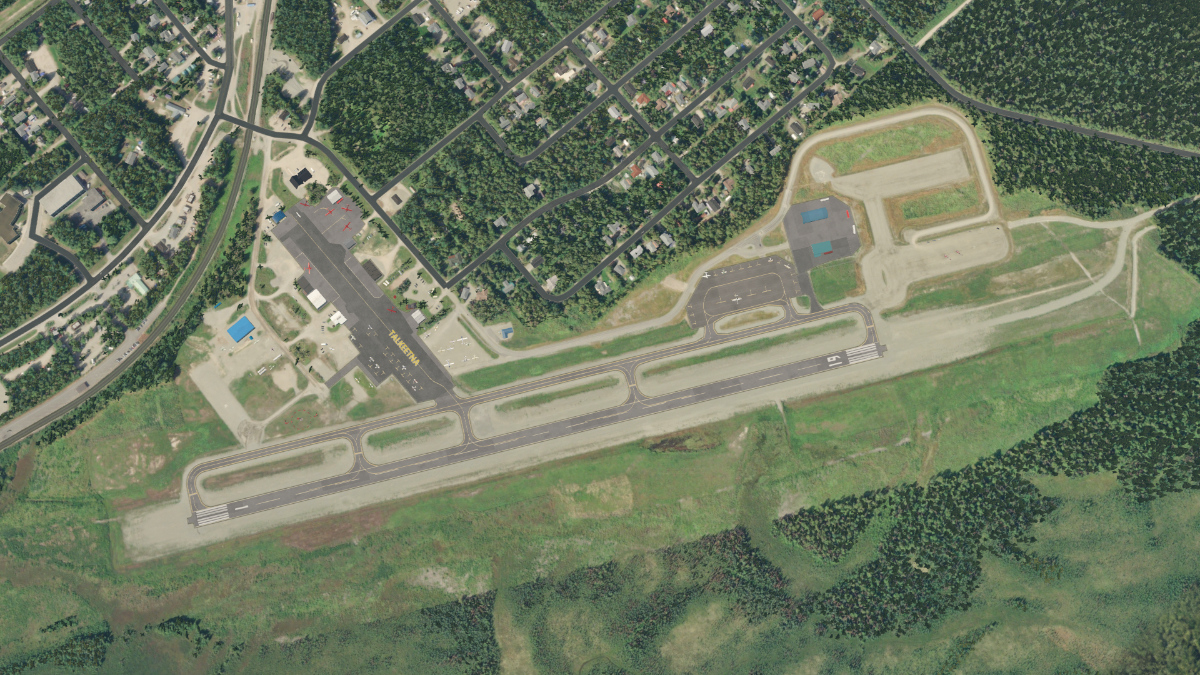
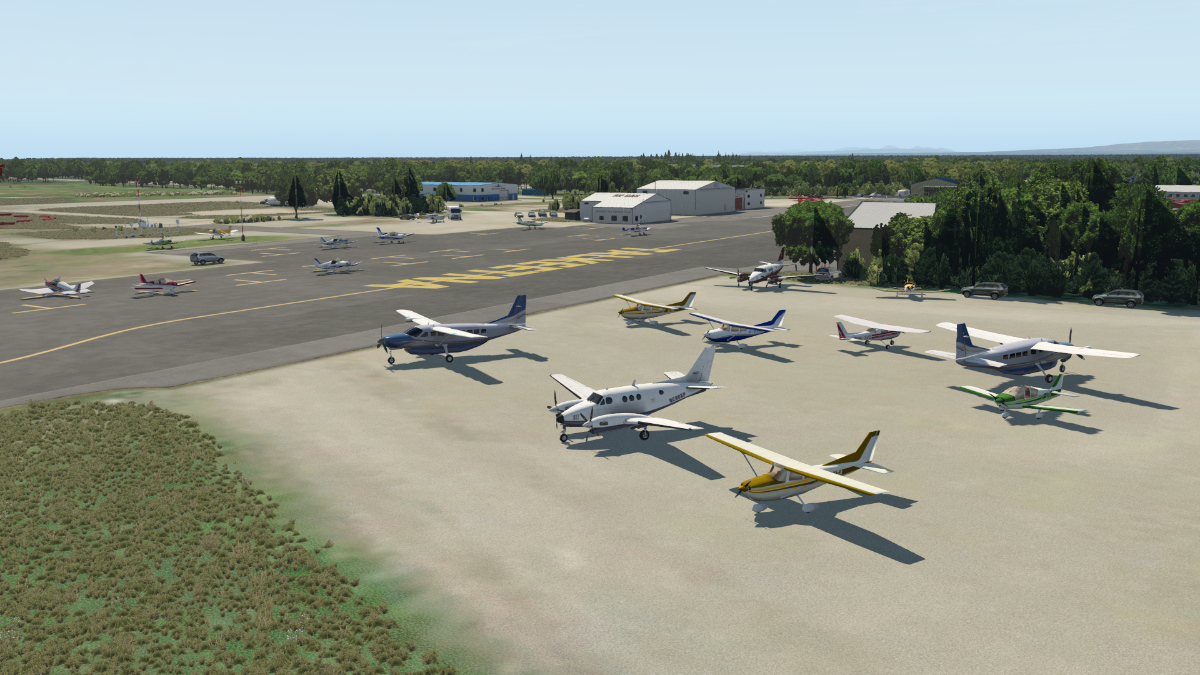
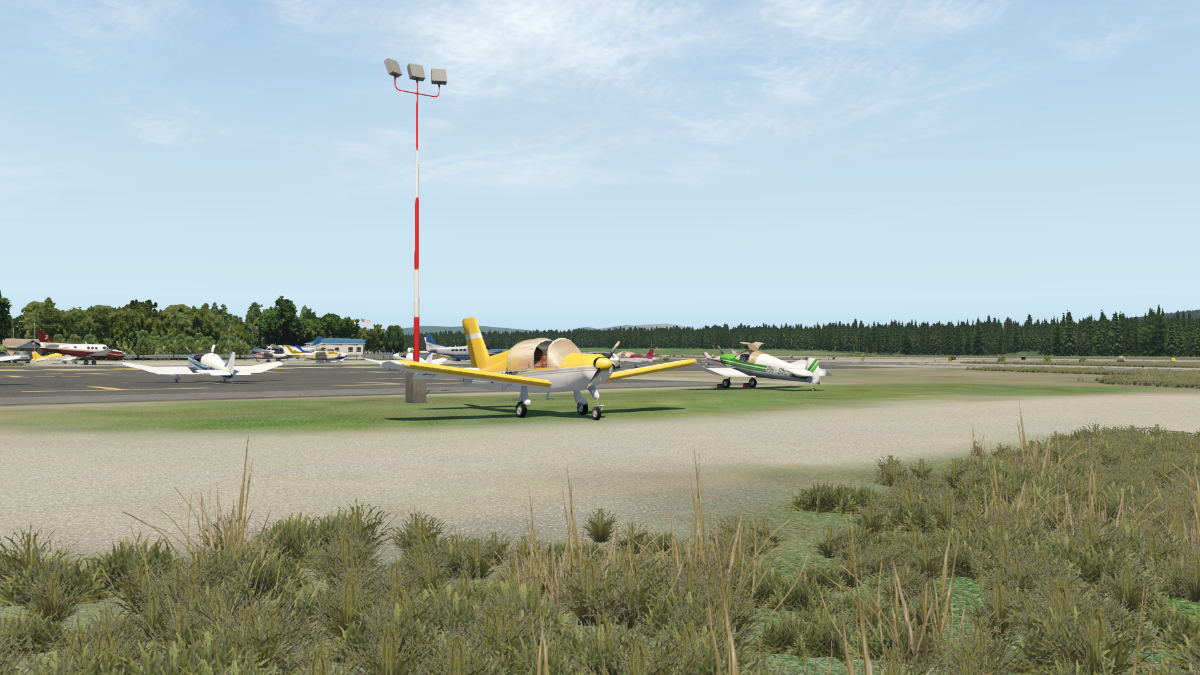
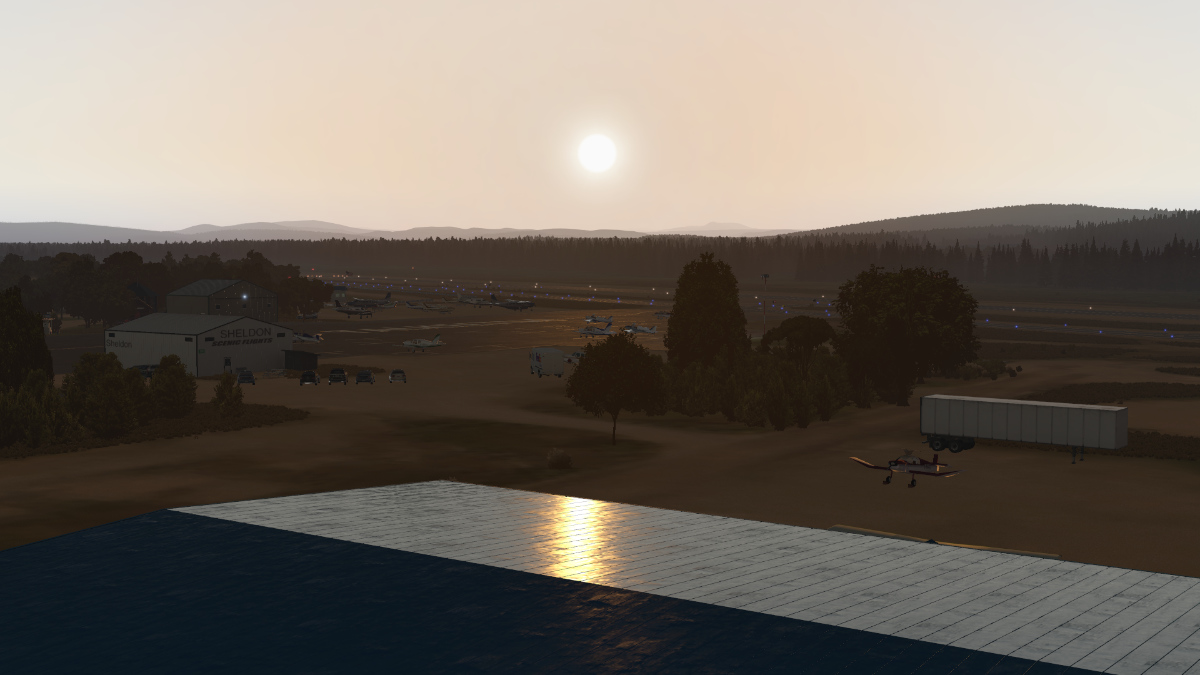
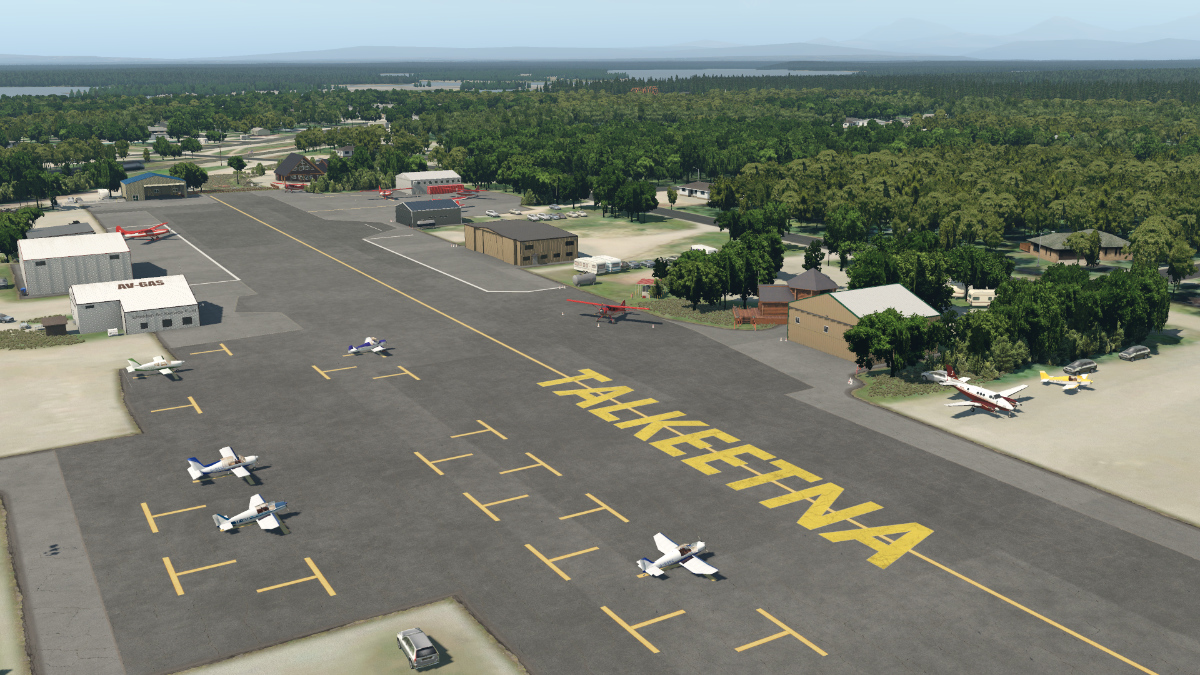
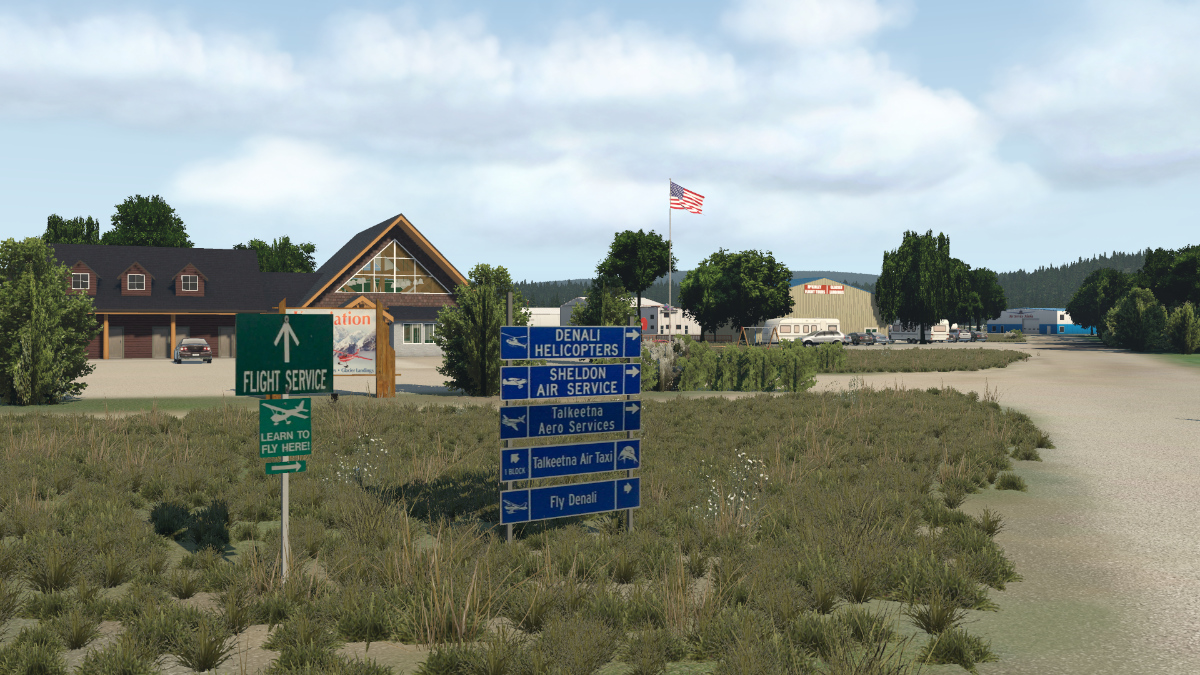
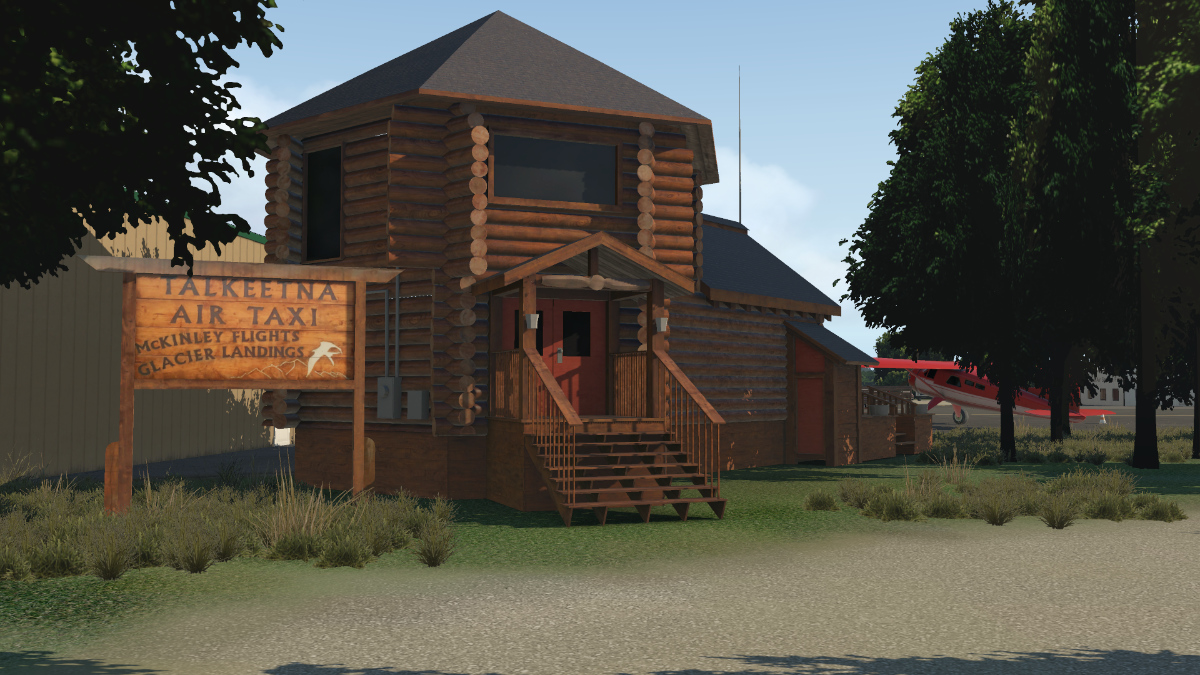
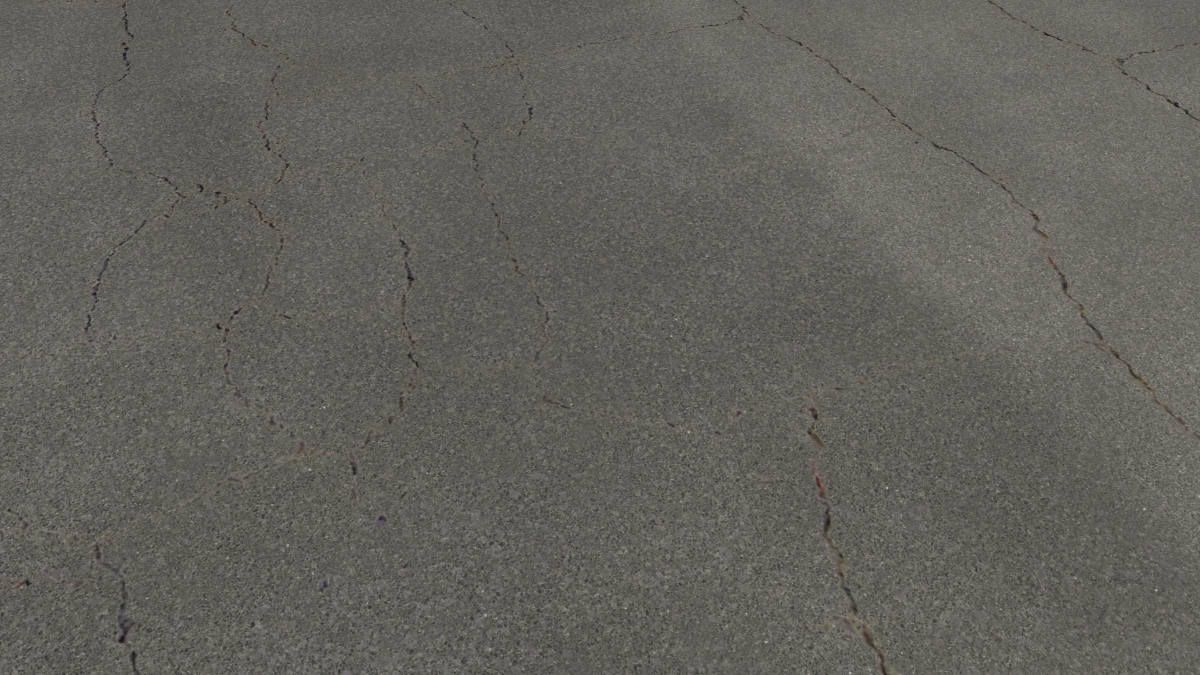
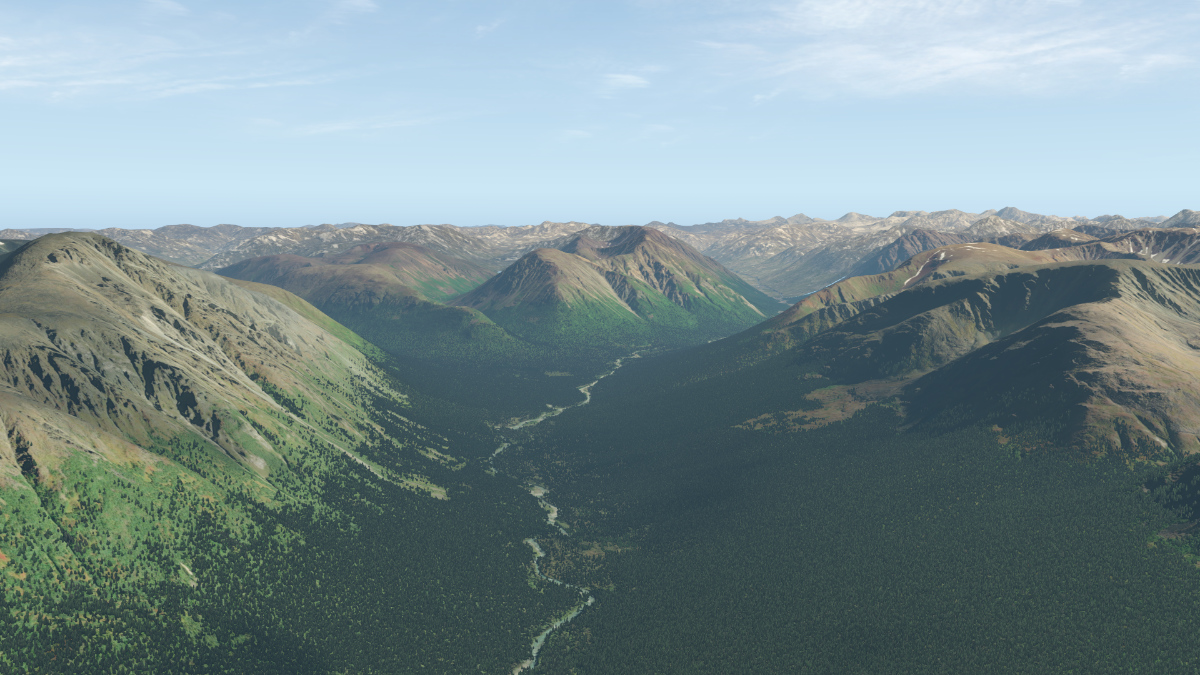
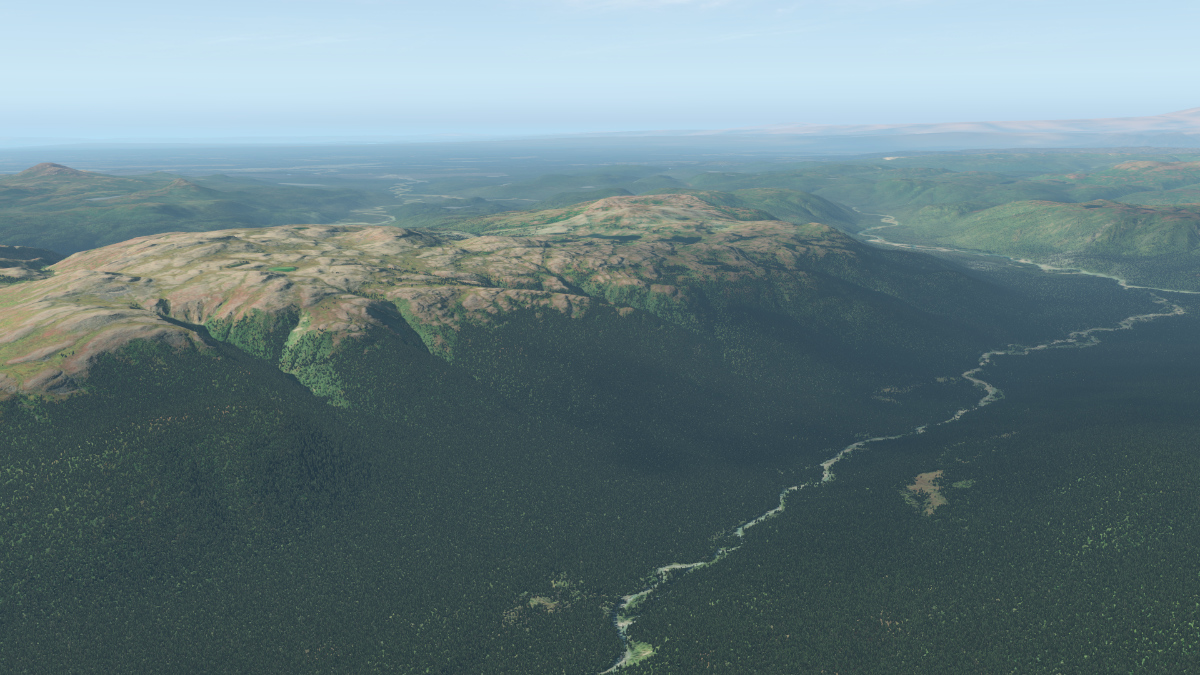
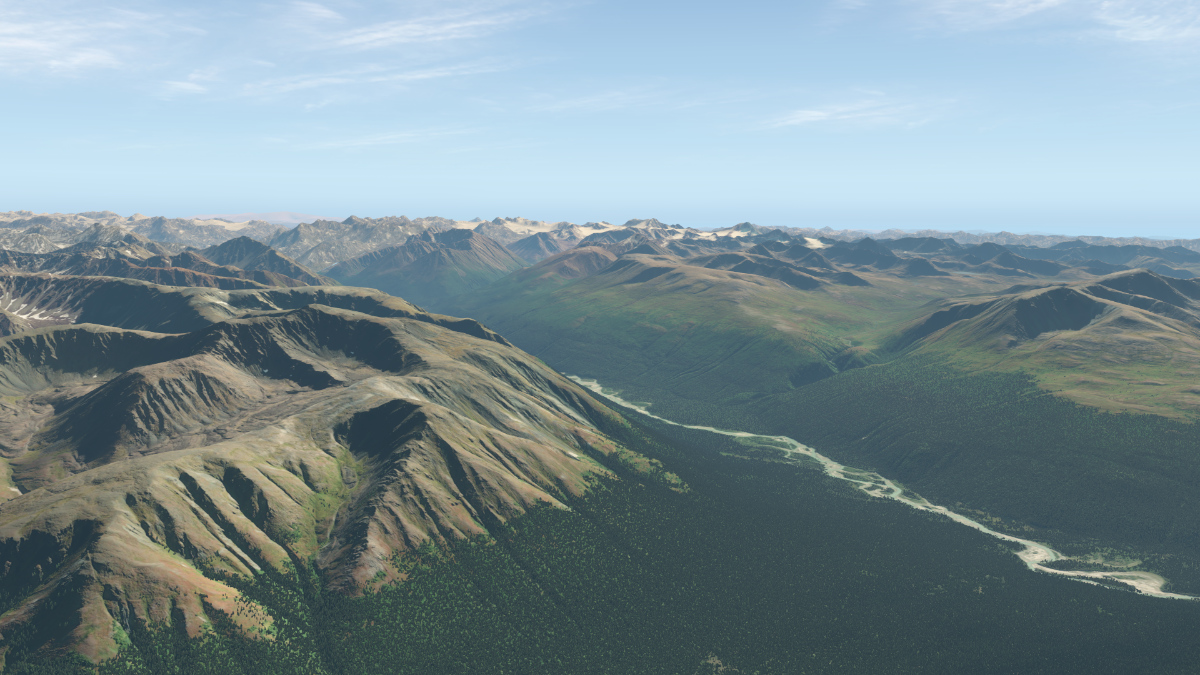
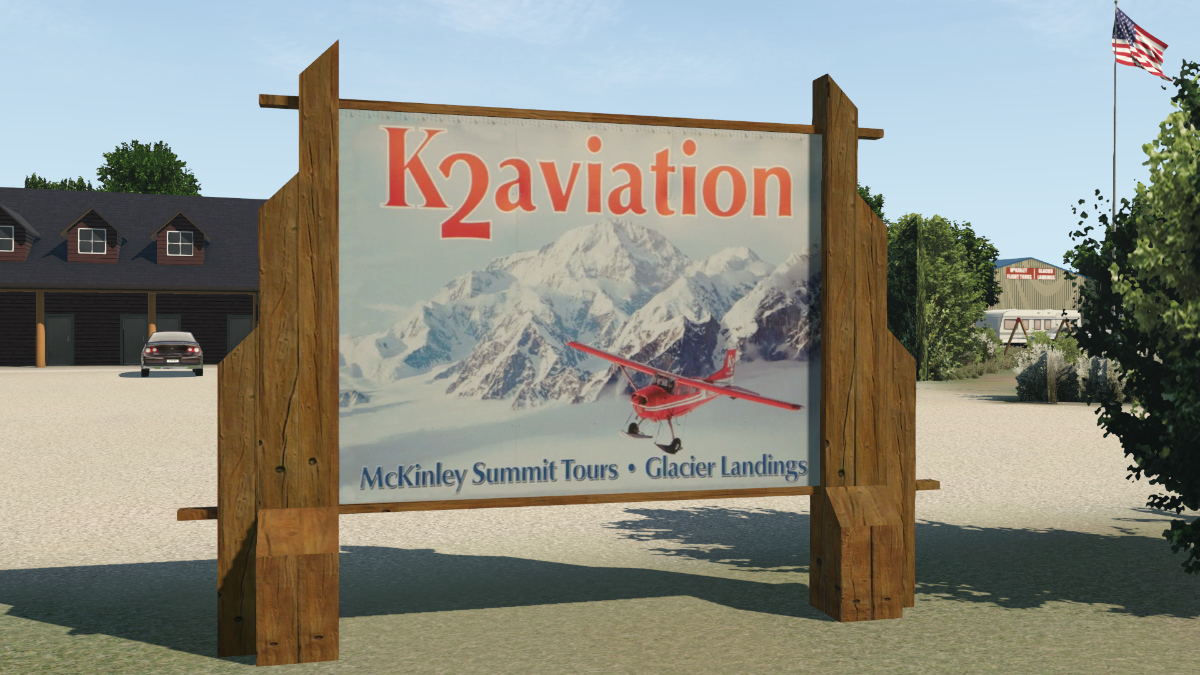
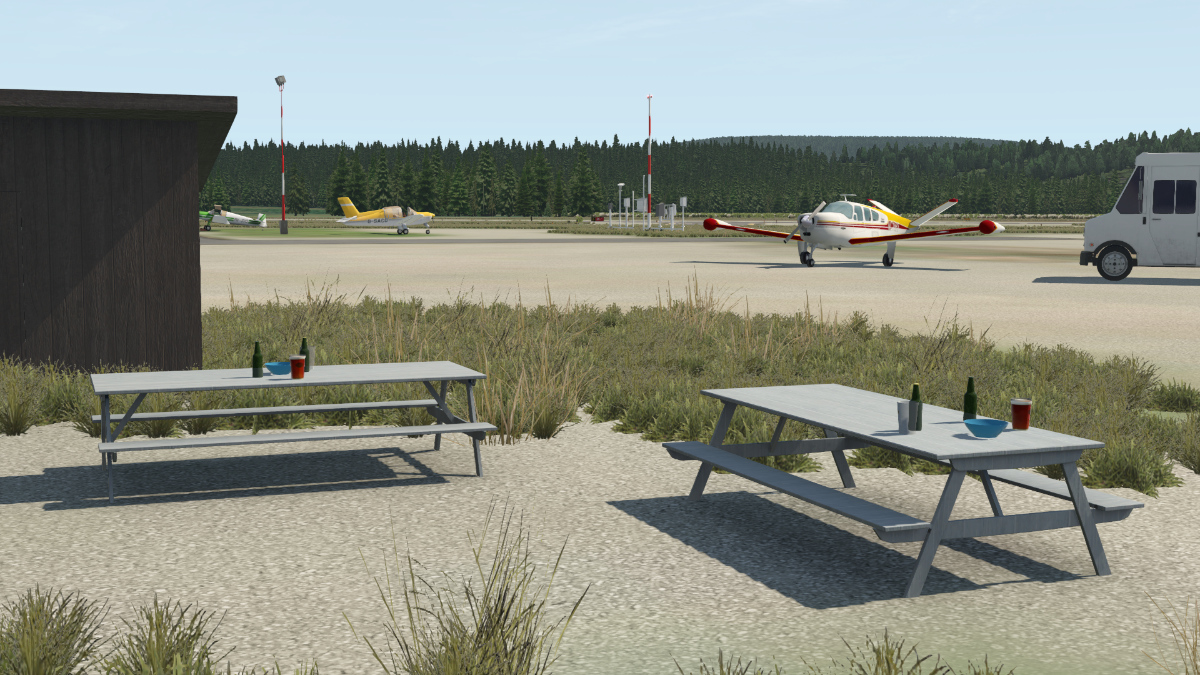
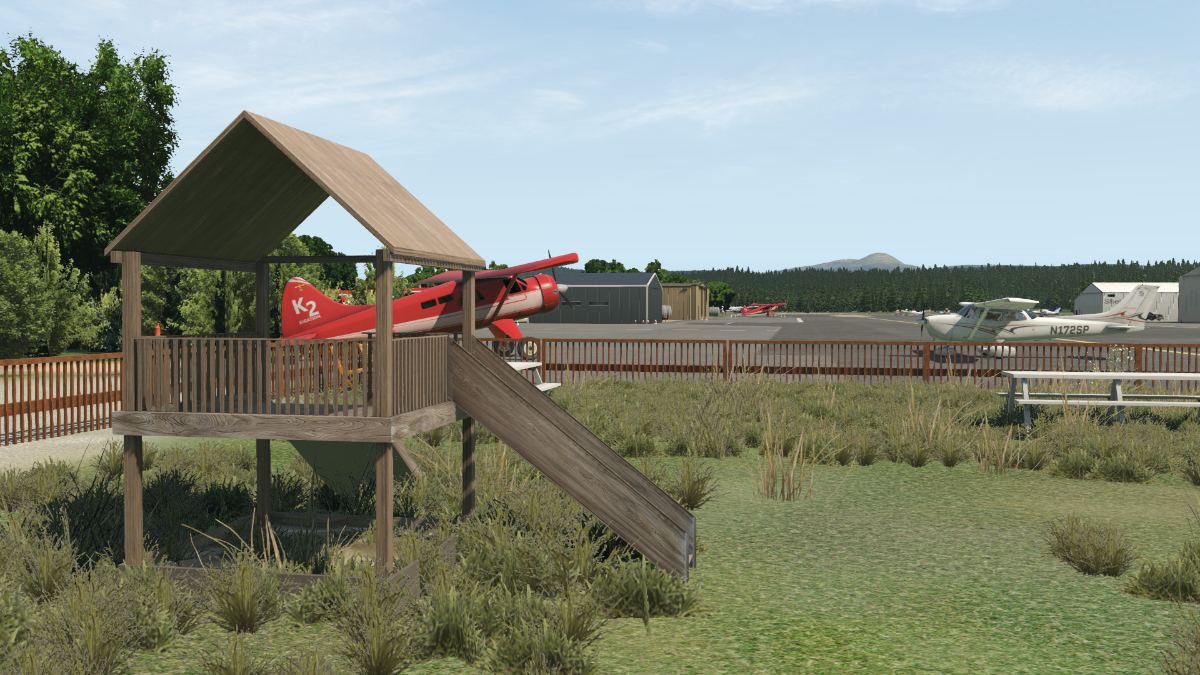
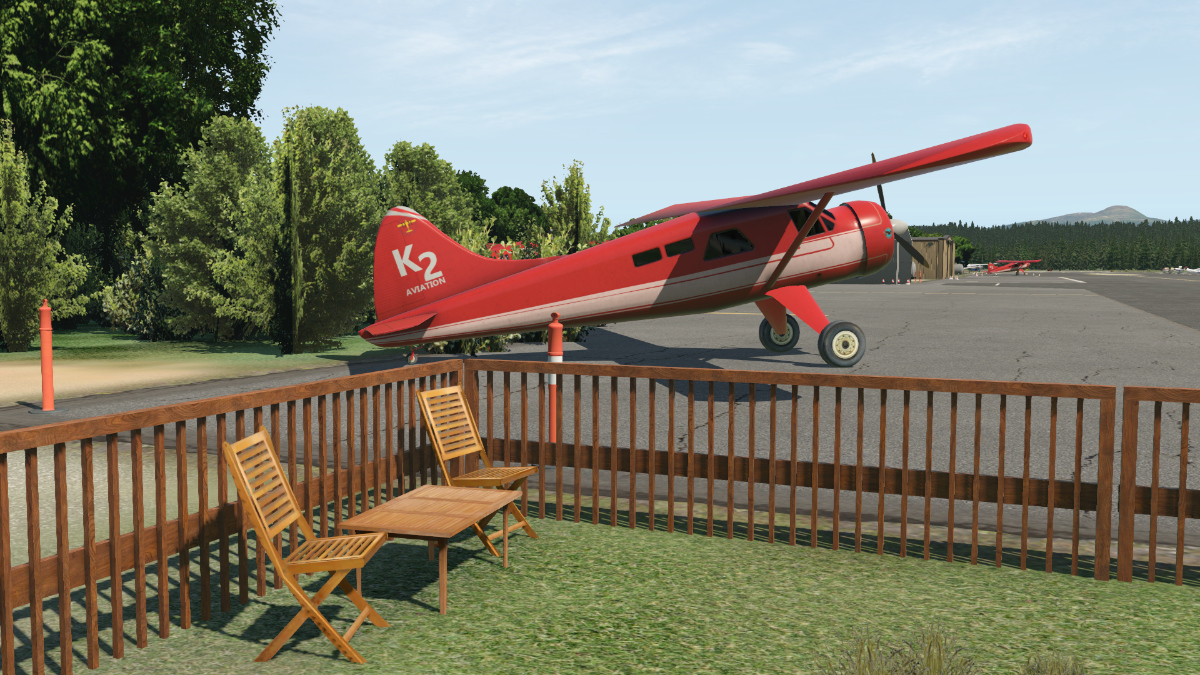
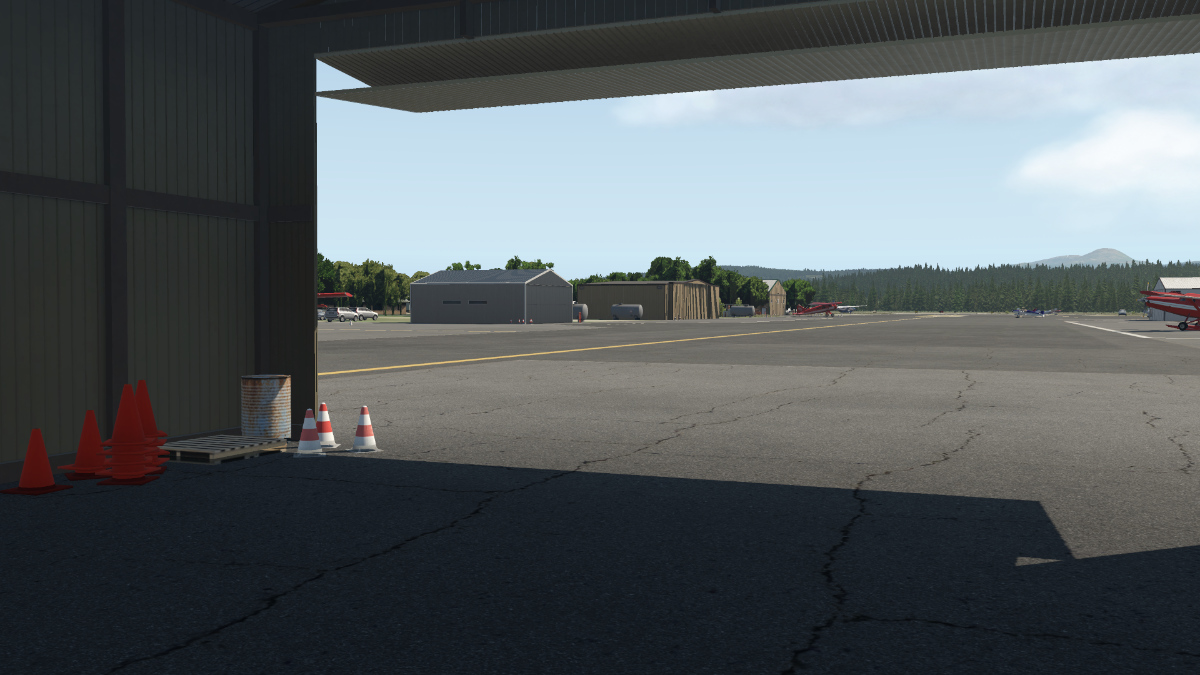
Scenery Review: PATK Talkeetna Airport, Alaska by NorthernSky Studio Introduction Hello and welcome to my review of Northern Sky Studio’s Talkeeta Airport. Talkeeta Airport, for those of you who are not familiar with it, is situated in a beautiful area of Alaska, about 100 miles north of Anchorage. Located near Denali State Park, a popular tourist destination, it’s an airport that usually gets incredibly busy during the holiday season. As may be slowly becoming apparent, especially if you read my last review, I prefer flying from the smaller, quaint airports when firing up X-Plane, and Talkeeta is no exception. The airport itself only covers 624 acres, which, by airport standards is pretty compact. Its single asphalt runway measures 3500 ft by 75 ft (1067 m by 23 m), and its single gravel helipad (designated H1) measures 480 ft by 85 ft (146 m by 28 m). Having been categorized as a general aviation airport in the National Plan of Integrated Airport Systems, its passenger turnover figure was numbered at 1500, as per the Federal Aviation Administration records. It is currently home to seven air taxi operations including Sheldon Air Service, Talkeetna Aero Services, K2 Aviation, and Talkeetna Air Taxi. Download & Installation After completing my purchase at the X-Plane.Org Store, I was presented with a download link for the scenery. This weighs in at just over 500MB, but once extracted, increases to 1.3GB. When done, it’s just a simple case of copying the folder into your X-Plane’s Custom Scenery directory. In terms of documentation, there wasn’t a lot, just a single text document going over the installation process. Walkabout The airport, due to its location, is surrounded almost entirely by forest, such is the landscape of Alaska. To the west of the airport, the Susitna River snakes past, and if you follow it south, will eventually lead you down to the city of Anchorage. If city life doesn’t take your fancy, then perhaps try upstream and visit the Denali State Park. Don’t fancy either one (you are picky)? Well, whether you fly east or west, the mountainous scenery surrounding the airport is bound to give you cause for adventure…just watch out for the weather which can be unpredictable to say the least! As mentioned previously, Talkeerna Airport offers a single lit asphalt runway for your pleasures and one helipad for the more adventurous types out there. The textures used for the runway are of high quality and feature a reasonable amount of weathering, such as cracks and a few rubber marks. To increase the realism and look of the scenery even further, the developers have used a photographic overlay for the entire airport, and whilst it only goes out a short distance, works incredibly well. In fact, if you use ortho scenery files like I do, then you’ll find that the airport’s overlay will almost seamlessly blend in. In terms of airport vegetation, you’ll find an abundant amount of grass as you head on up toward the airport proper, which whilst nice to look at, may cause issues for those X-Plane users with lower end graphics cards, such as myself. There are also quite a number of GA aircraft present, and whilst not particularly detailed, help bring the airport to life. Having first checked out the layout of the airport on Google Maps, I was pleased to see that the developers had pretty much got everything spot on in terms of placement. There is no main terminal building to speak of, rather the airport is made up of several air taxi operations. These include Sheldon Air Service, Talkeetna Aero Services, K2 Aviation, and Talkeetna Air Taxi. The buildings for each of these are nicely modelled and reasonably well textured, and whilst not of photographic quality, are more than adequate for the price (more on that later). The airport’s main entrance includes signposts to each one of these operators, along with some nice artwork. From above, you get a clear view of the airport’s name painted onto the tarmac, and this was something I really enjoyed seeing. Call me old fashioned, but I think it just adds to the airport’s personality. Airport ground clutter consists of storage boxes, cones, bins, plus a few picnic tables, but sadly no people. This is a real shame, because due to the number of static aircraft and facilities on offer, having a few figures (animated or not), would really help bring the airport to life. PBR & Night Lighting PBR and night lighting is reasonably good at this price point, and whilst not up there with the best I have seen, it’s certainly not bad. There is a degree of dynamic lighting coming from a few of the buildings, but not all of them, which seems slightly strange. The main runway and taxiways are sufficiently lit, but I would have liked to have seen a little bit more lighting. However, there are some quite good uses of dynamic lighting on show, such as the maintenance hangar and the airport’s main entrance, as seen below. Performance Compared to some of you reading this, my setup isn’t the latest flashiest machine out there. It consists of an AMD Ryzen 5 2600 and a 4GB Nvidia GTX 1650, and for the most part, runs X-Plane 11 well…as long as I am sensible with my settings, and this is true for Talkeetna Airport. The only issue I ran into was a slight framerate drop when viewing the 3D grass from above. Apart from this one issue, the airport performed flawlessly and was silky smooth. Conclusion So, having spent the last few days exploring Talkeeta Airport, what did I think of it? Well, I have to say I really did enjoy my time there. It’s one of those little airports which has plenty of character without having too much on show if you know what I mean. Yes, it’s not perfect, as there are a few areas which could be improved on, namely, the inclusion of human lifeforms, better night lighting, and the ability to perhaps choose the level of grass detail for those on lower end systems. However, when you factor in the low price of the scenery (just under ten US dollars), then I think it deserves a bit of slack. Hopefully Northern Sky Studio’s will offer updates to the scenery, perhaps even implementing fixes to some of the issues I have mentioned in this review. As it stands though, due to its location, aesthetics, and general appeal, this is a scenery I think you will greatly enjoy. Happy flying, safe living! _______________________________ Talkeetna Airport, Alaska by Northern Sky Studio is available from the X-Plane.Org Store here: Talkeetna Airport Price is US$9.75 Requirements X-Plane 11 - X-Plane 12 (when available) Windows, Mac or Linux 4 GB VRAM Minimum - 8 GB+ VRAM Recommended Download Size: 530 MB Current version : 1.0 (May 23rd 2021) Review by Felicity Smith 18th August 2022 Copyright©2022: X-Plane Reviews Review System Specifications: Windows 10, AMD Ryzen 5 2600 (overclocked to 4.1GHz), 1650 4Gb, 32GB RAM, 256 M.2 SSD, 2TB HD (Disclaimer. All images and text in this review are the work and property of X-PlaneReviews, no sharing or copy of the content is allowed without consent from the author as per copyright conditions) All Rights Reserved
-
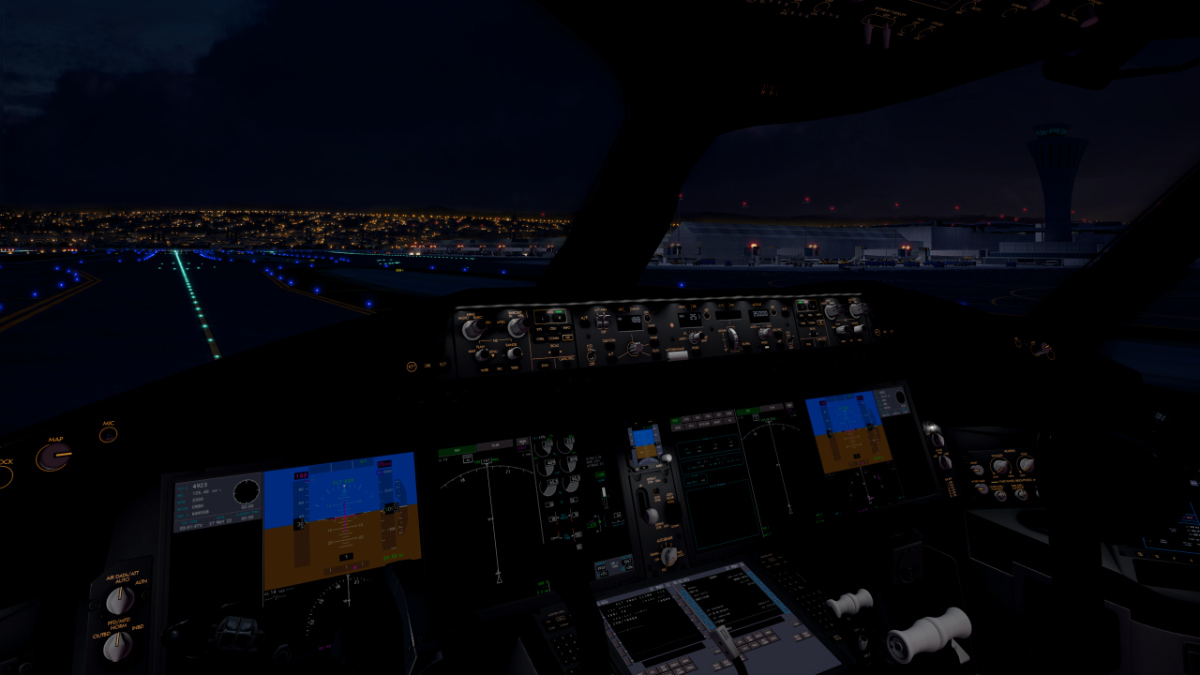
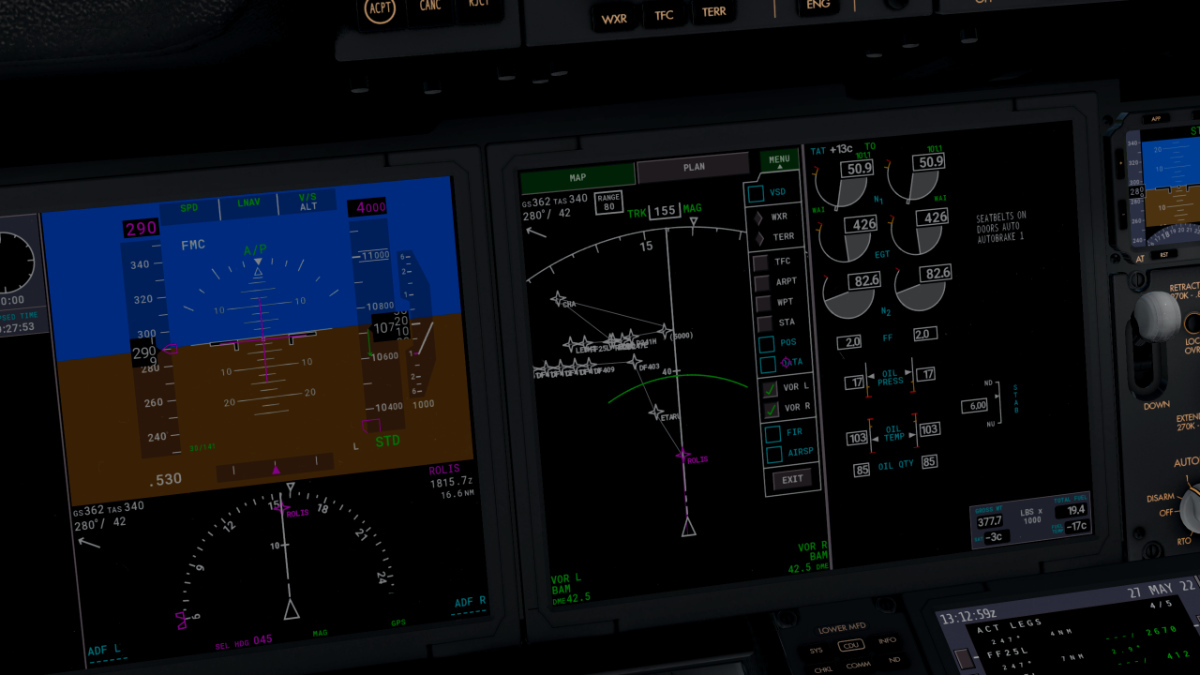
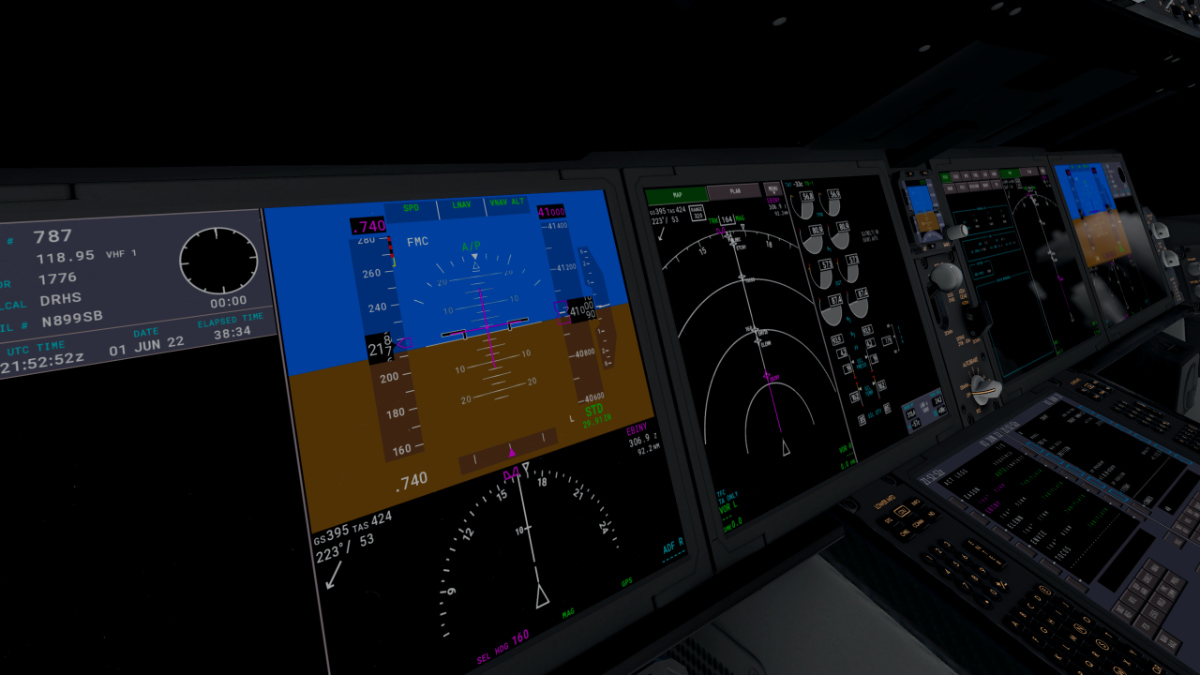
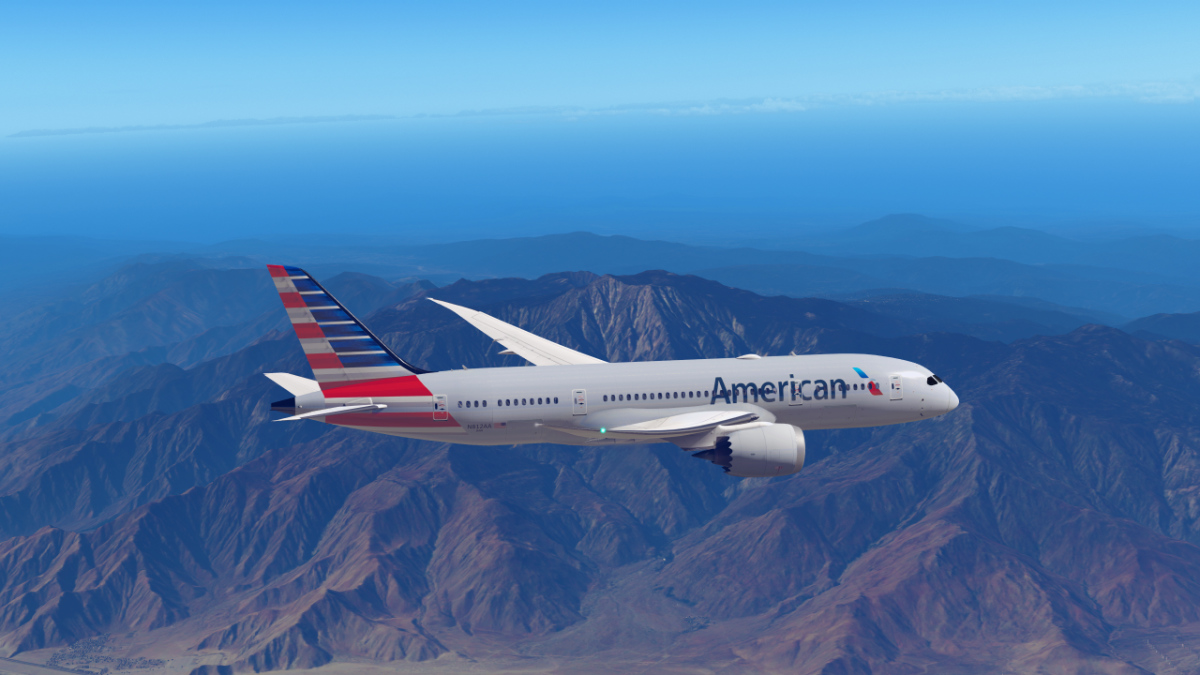
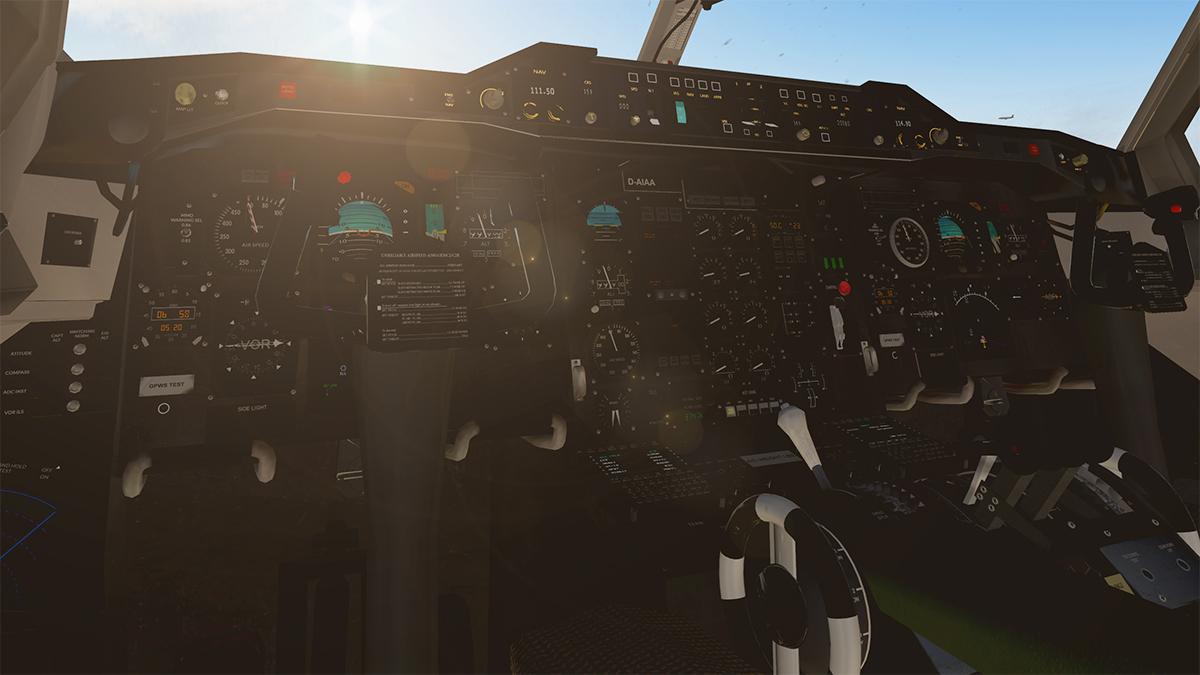
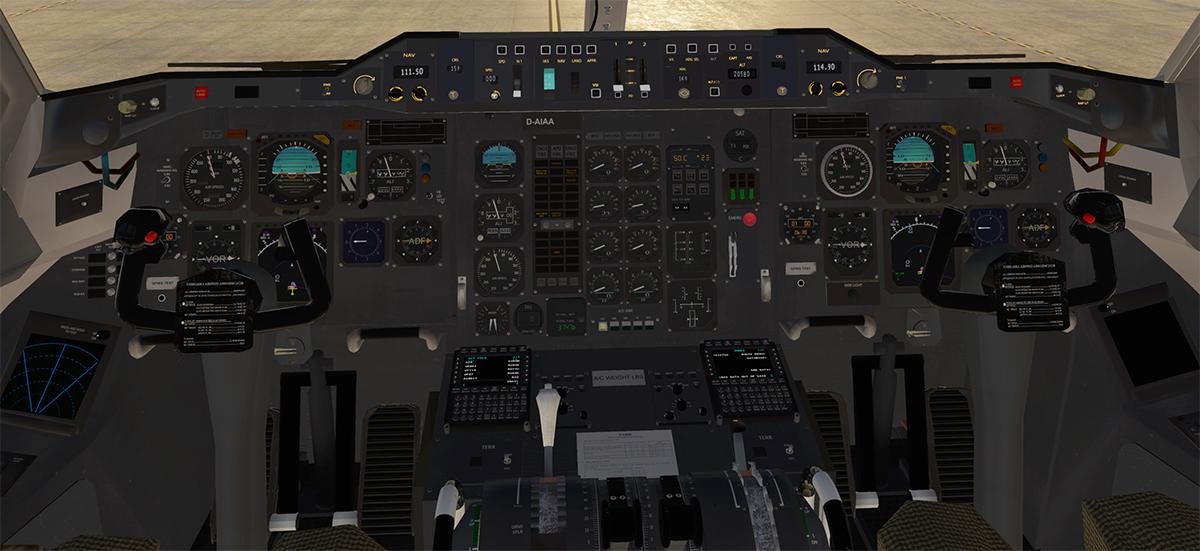
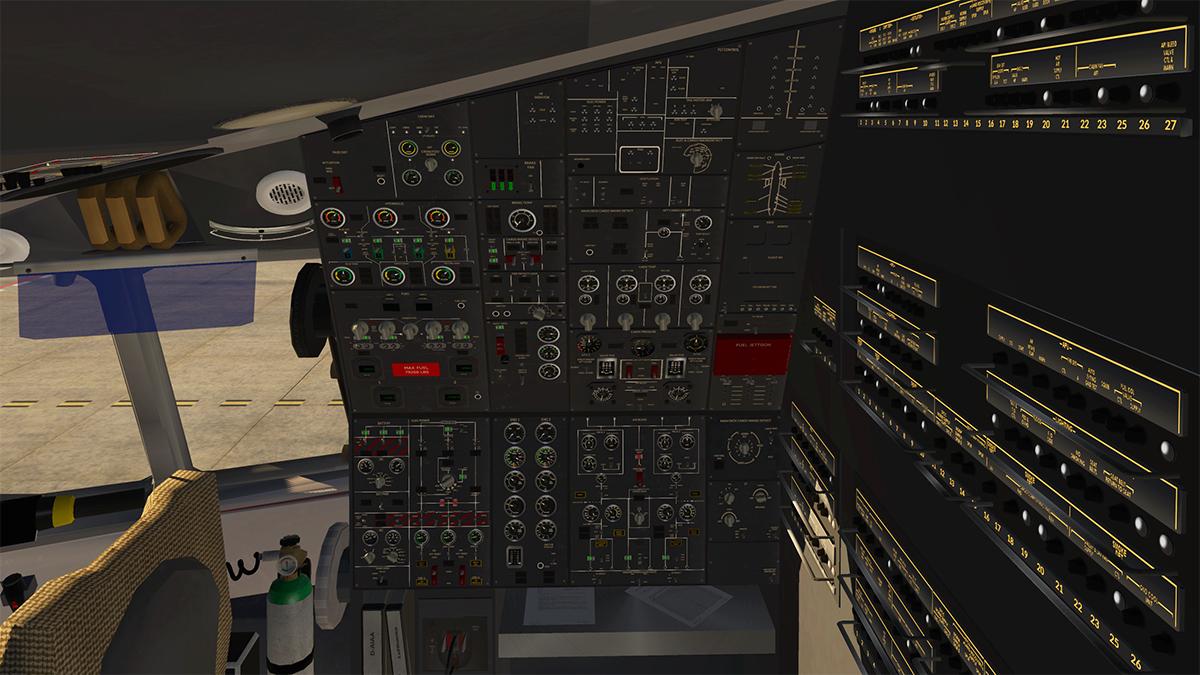
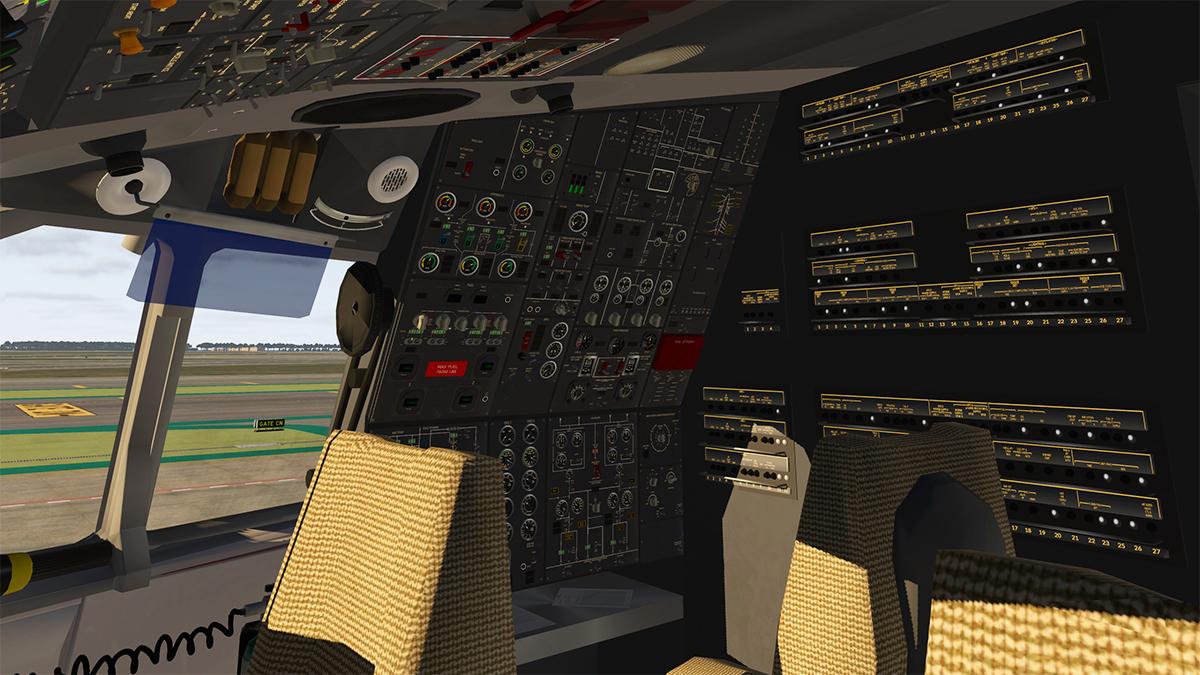
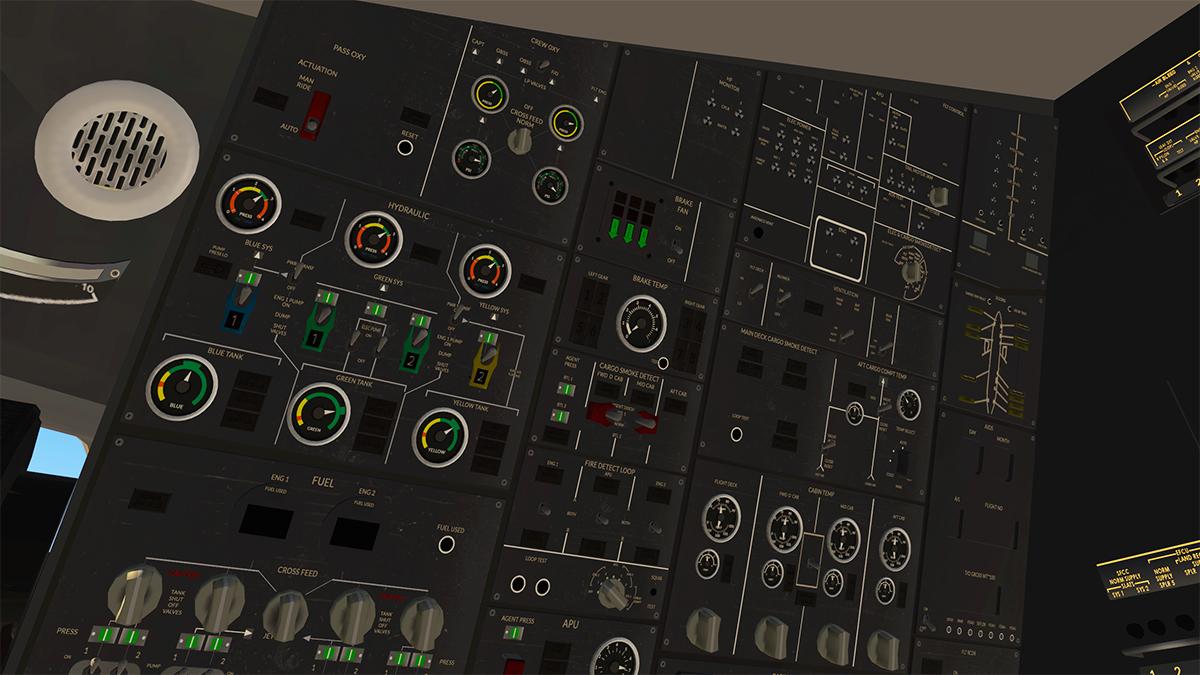
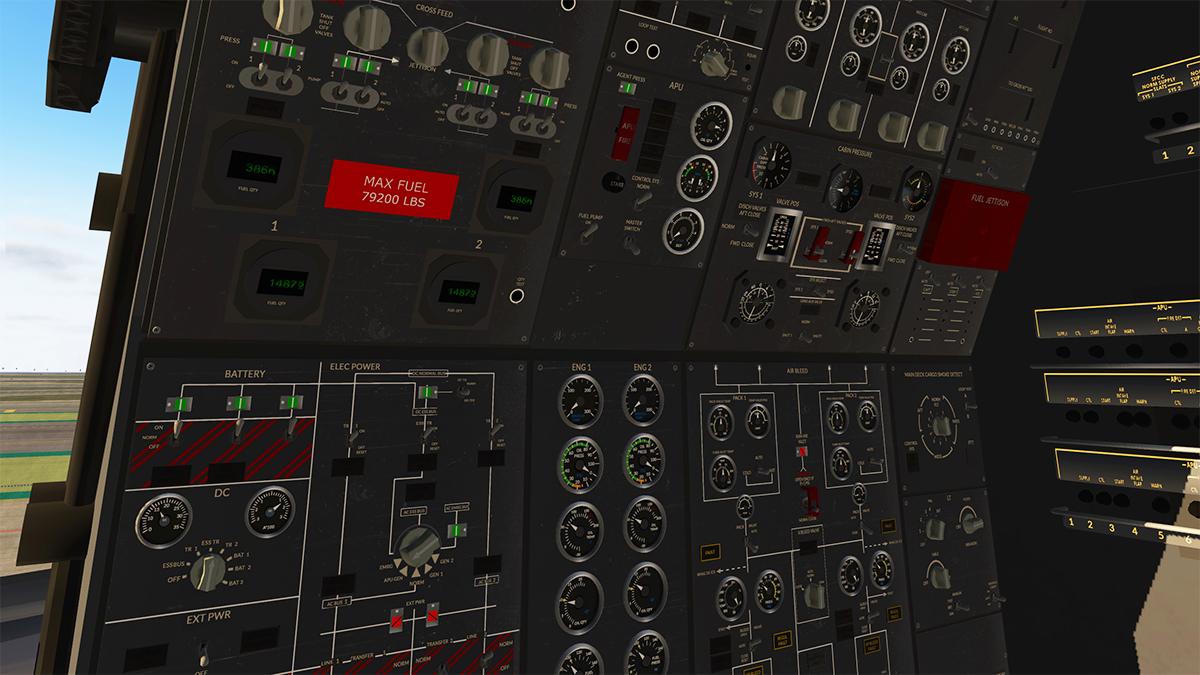
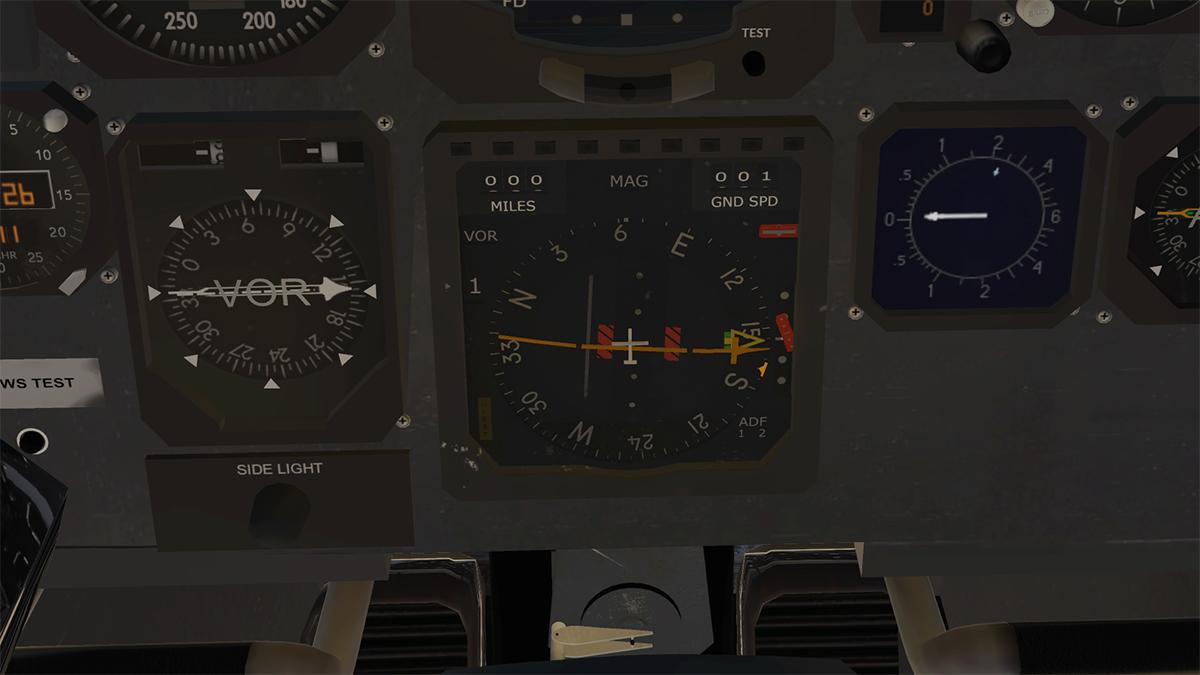
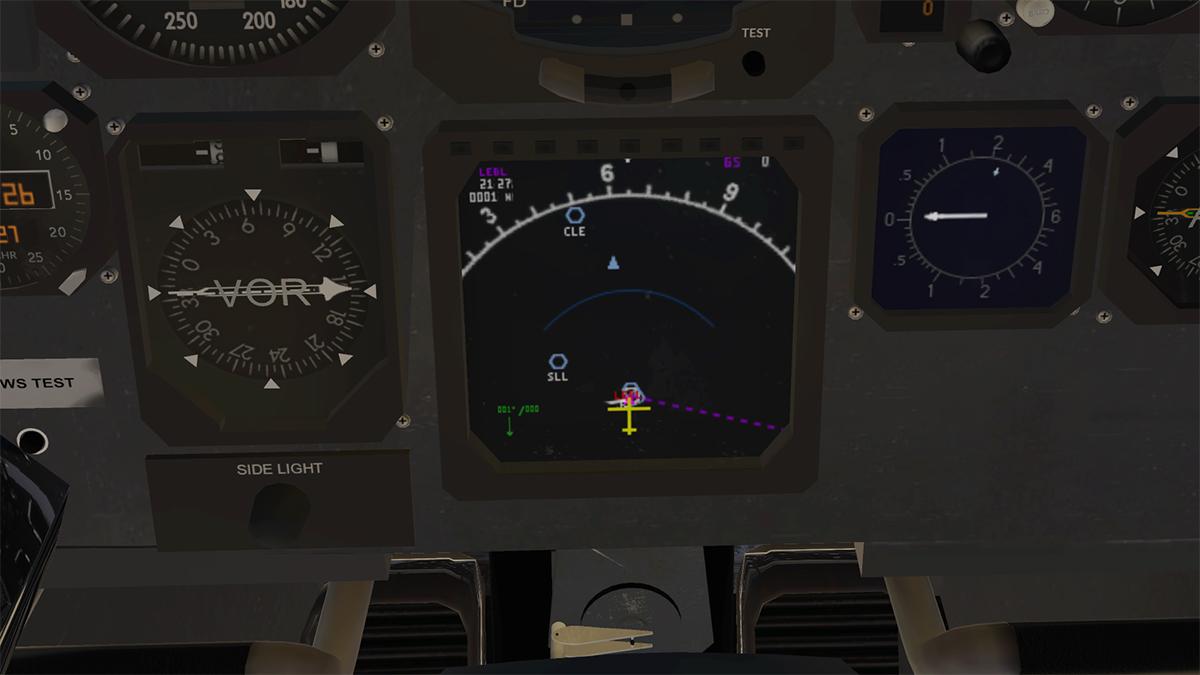
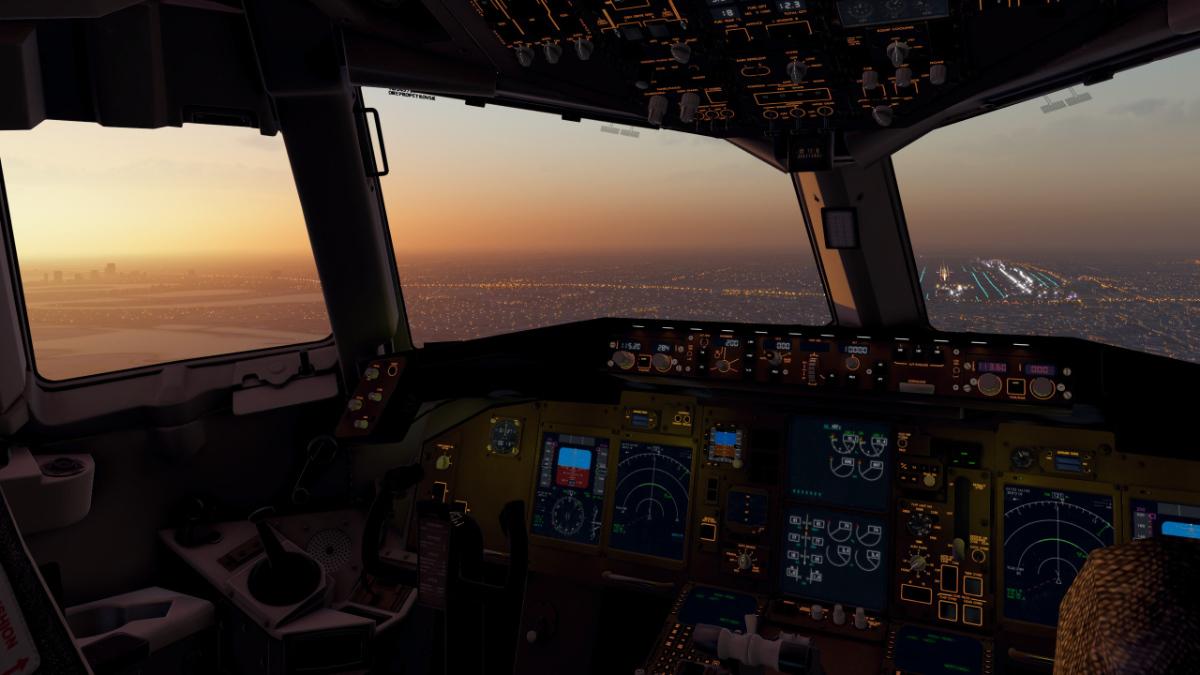
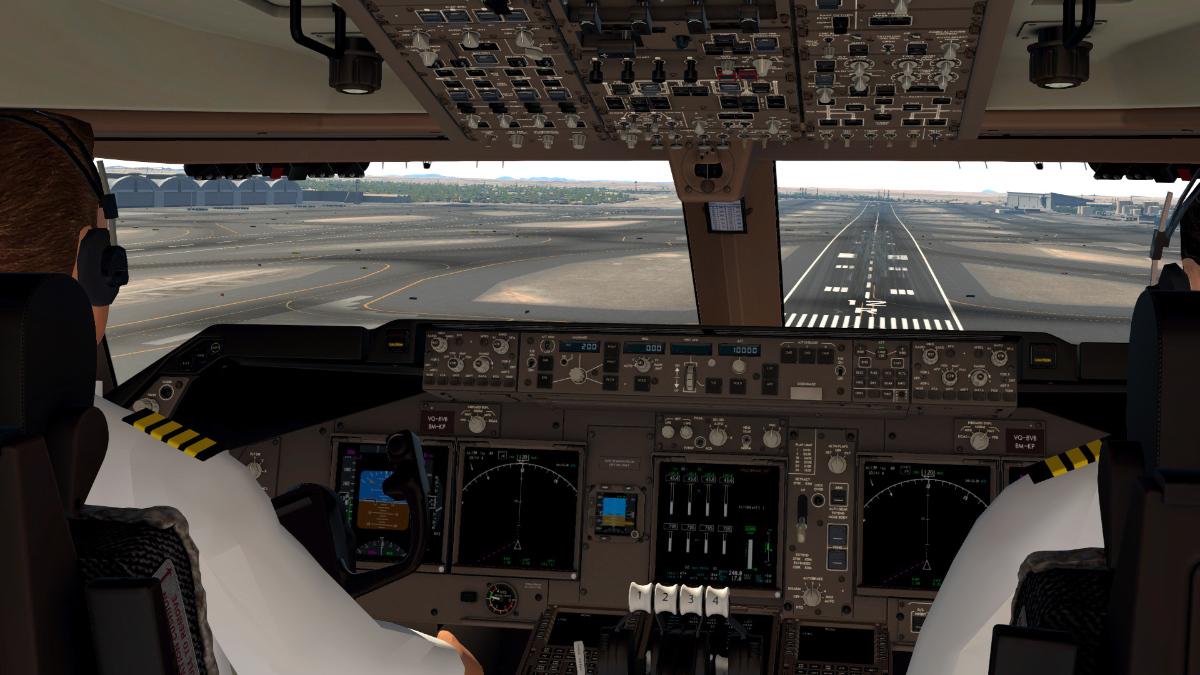
Aircraft Update Review: Magknight 787 v1.8 Introduction & History The Boeing 787 Dreamliner is perhaps one of the more well-known aircraft of the 21st century. Designed from the ground up as a replacement for the existing 767 line, its goal was to be the dream plane for pilots, operators, and passengers alike. With its streamlined flight deck, large screen displays, and perhaps the nicest feature, the brand new HGS displays for both the Captain and FO, a first in commercial airliners. For the passenger experience, the large windows, sweeping wings, and state-of-the-art pressurization system, it was certainly a welcomed improvement over its older 767 predecessor. For the airlines, the Dreamliner opened the doors to point to point flights, plus new direct flights to airports previously only reached by connecting flights, and with a range of 7,300 and 7,560nm for the 787-8 and -9, it has opened the doors to direct point to point flights. The Magknight 787 has been in continuous development since 2018, and it has certainly shaped into a real promising representation of the 787, however, there are still major issues which haven’t been redone yet, but we will go over these in the review. Let’s get started! Documentation & First Impressions The download and installation of the Magknight 787 is standard to that of almost any aircraft for X-Plane 11, with the aircraft being self-contained in a single folder. Version 1.8 brings the addition of the shorter 787-8, and upon first loading the flight I am greeted with the very familiar cockpit of the 787 with its unmistakable features, including that HGS, which I was quite excited to use as the only other HGS equipped airliner in the sim is the 737 by Zibo or Levelup and it is sadly not the most usable. My hopes were immediately dashed however as it turns out the HGS isn’t modelled in X-Plane 11 and will only be added for X-Plane 12, so the waiting game to use it begins, and I can only hope it gets the collimated treatment that it so deserves. Upon first inspection, the cockpit looks fantastic, and the exterior even better, so I’ve got no complaints there! Electronic Flight Bag The 787 like all new generation Boeing wide bodies is equipped with an EFB to the left knee of the pilot, and I was eager to check it out to compare with the Boeing EFB I know from the PMDG 747 and 777. Powering it on I was greeted with a somewhat decent representation and at first, it looked great, however, I quickly realized it was missing some features. It did still have the TO and LDG performance calculator which I could use to pull the data to plug into the FMC which is the main feature I use. Exterior Model & Texturing The exterior model of the 787 is for me one of the highlights of the aircraft. It looks really well done, with a well-detailed bump map, the details of the composite fuselage really stand out, and the wings look fantastic. The shaping of the nose has much improved over previous versions, and the overall look of the airplane has come up to a new level for Magknight. The overall shape of the airplane is really really well done and I appreciate the work that has gone into the airplane’s overall shape. The details are where it degrades in quality however, and the landing gear is especially lacking in detail compared with its realworld counterpart. The main struts and bogeys were simplified, and it sadly shows, but with a revamp of the gear that can be resolved. The other issue with the shaping I noticed was the jagged edges of the fuselage and engine shaping. I haven’t noticed it on other aircraft as much as on the Magknight, but it’s only visible when you’re looking for it. Overall, they did a good job with the exterior model. Interior Model & Texturing The Interior model and texture which was redone in v1.6 looks far better than its predecessor and I’m happy to say it still looks fantastic. I really like the look of the real 787 cockpit, and this modeled version does it justice. The modeling of the switches, levers and other small items is done to a payware quality. The overall cockpit geometry is quite accurate though I don’t have a way to measure it, sorry. The best part that makes the cockpit stand out is the texture work; it looks simply awesome, and really brings the already good cockpit model to life, but sadly it gets let down by the next section. Avionics Options & Systems While still being continuously updated, the Magknight 787 is in the end a work in progress payware and the avionics and systems depth really solidifies that, even with the beautiful looking exterior and interior model. First the positives. The displays look crisp, and the main systems are modeled allowing you to make a full flight, however too far outside the limits of a simple flight and the issues start showing. The aircraft is improving, however it still uses the default X-Plane FMC, and that really limits its functionality, and it is quite evident in the FMC’s abilities. When inputting the flight data, the FMC works fine and like I’d expect it to. The PERF page isn’t really modeled that well, the Thrust LIM page isn’t modeled at all, and the TO page isn’t either. This really threw me through a loop as coming from the Qualitywings 787 it was quite a different experience. The Vspeeds are inputted through the EFB rather than the FMC, which is incorrect but oh well, hopefully, it will be corrected in the future. The next issue was the ND. While it looks good, the ND’s are limited in functionality. The well-known large screen map display in the 787 hasn’t been added yet, and it is impossible to pull it up, leaving you only the half display map option. Plan view isn’t yet implemented either which makes it a bit of a guessing game when planning your flight to find a waypoint if you need to. The options for displaying info on the ND is also quite limited and your options are not great. The last major issue I found with the ND is the path drawing on your flightplan. With the Magknight, only the line to your next waypoint is in magenta, with all following lines being white which is incorrect. These are the large issues I found on my flights with the 787 in terms of displays and systems, but the autopilot has issues from time to time, though not often, and on my flight from KSFO to EDDF, it didn’t have any problems. I hope these issues will be corrected with time and I fully believe they will, but they are for the time being still large issues that hinder the experience. Flight Characteristics & Sounds The flight model is quite interesting for me. On one hand, it feels quite solid, and yet on the other, it feels very mushy and hard to control. At slow speeds, namely on approach, it likes to wander and twist when adding aileron input, so keep that in mind on your approaches. In most other areas of flight, it feels quite good but still different from the Qualitywings 787 I came from. That is a different bag however and it’s not completely fair to compare the two. I do think it has a few issues with the aileron control but all in all, it’s not half bad and is easily flyable which is a good plus, especially if you like to hand fly your approaches. Conclusion The Magknight 787 is going to be difficult to sum up for me. It has a great model, and beautiful VC, yet the systems let it down so much. The overall experience could be so much better if Magknight put their resources into improving the avionics and flight deck of the 787, and that’s what this addon deserves. I will certainly continue following this aircraft, but I can only wonder what Magknight has planned to improve this aircraft and keep it competitive for X-Plane 12, especially with the 787 in development from Flight Factor. So, the big question is, is this aircraft worth the $44.95 price tag? That I will leave up to you the consumer to decide. I really think it’s quite a good looking aircraft, but if that is all it is right now, then it sadly falls into a category many developers have slumped into with MSFS, eye candy with bad systems simulation. The shortcoming of the Magknight 787 is its reliance on default X-Plane 11 systems, and if they free themselves from that, I see this airplane becoming way better than it currently is. I would treat this as an investment, much in the same way as the SSG 747-8. You’re buying a work in progress addon, one that is flyable, but not to the quality of Flight Factor, or Toliss, etc. I want to be honest in my reviews, and I really hope Magknight can upgrade their avionics, and add that HGS so that it does justice to the amazing model they built for it. _______________________________ The Magknight 787: Aviator's Edition v1.8.0 is now available from the X-Plane.Org Store here: Magknight 787: Aviator's Edition Price at time of writing US$44.95 Requirements X-Plane 11 Free update to X-Plane 12 - when available Windows, Mac or Linux 4 GB VRAM Minimum - 8 GB+ VRAM recommended Download Size: 1 GB Current version : 1.8 (May 23rd 2022) Review System Specifications Windows 11 Ryzen 5800x RTX3070ti, 32GB RAM Changelog v1.8.0 Changelog v1.8.txt Full changelog details are here __________________________________ Aircraft Review by Joshua Moore 11th August 2022 Copyright©2022: X-Plane Reviews (Disclaimer. All images and text in this review are the work and property of X-PlaneReviews, no sharing or copy of the content is allowed without consent from the author as per copyright conditions.
-
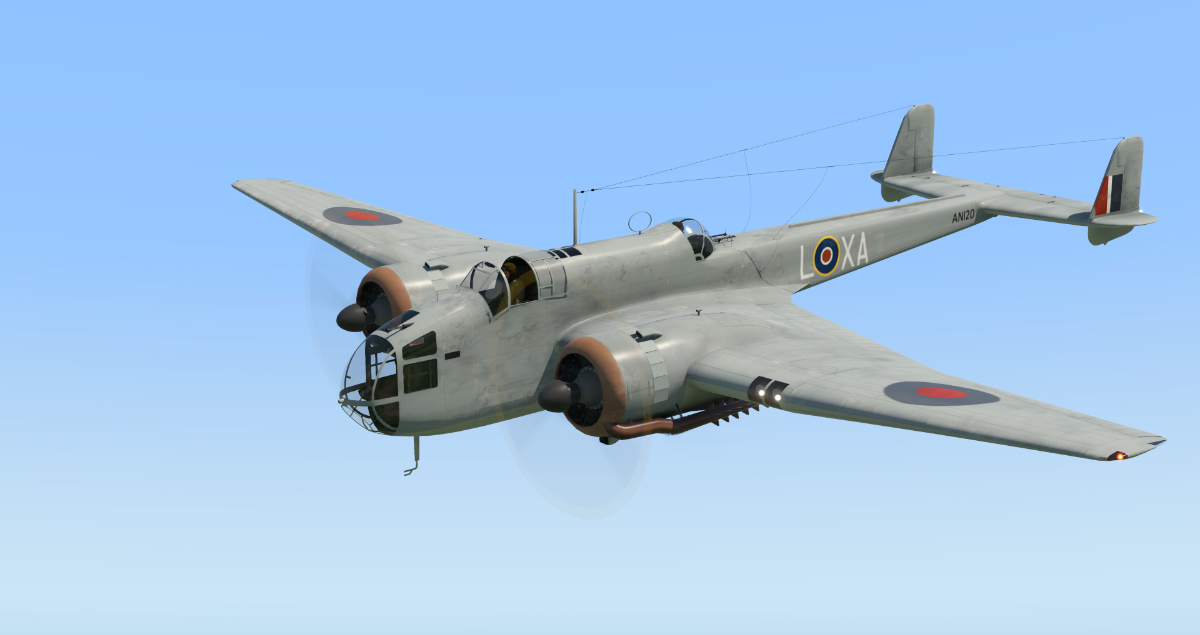
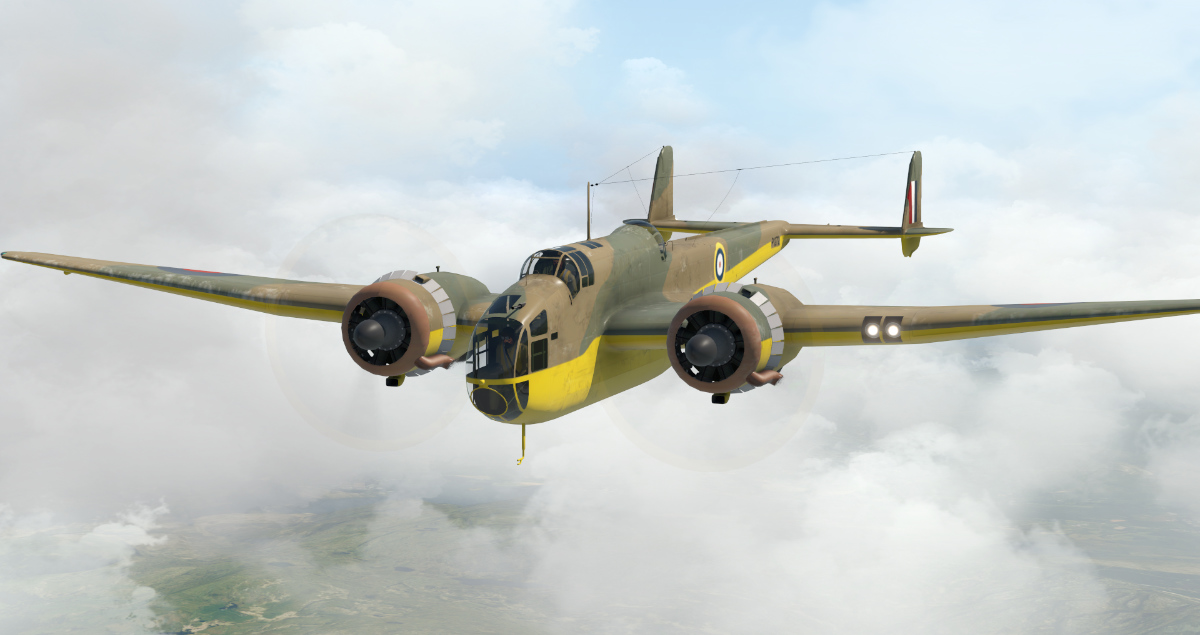
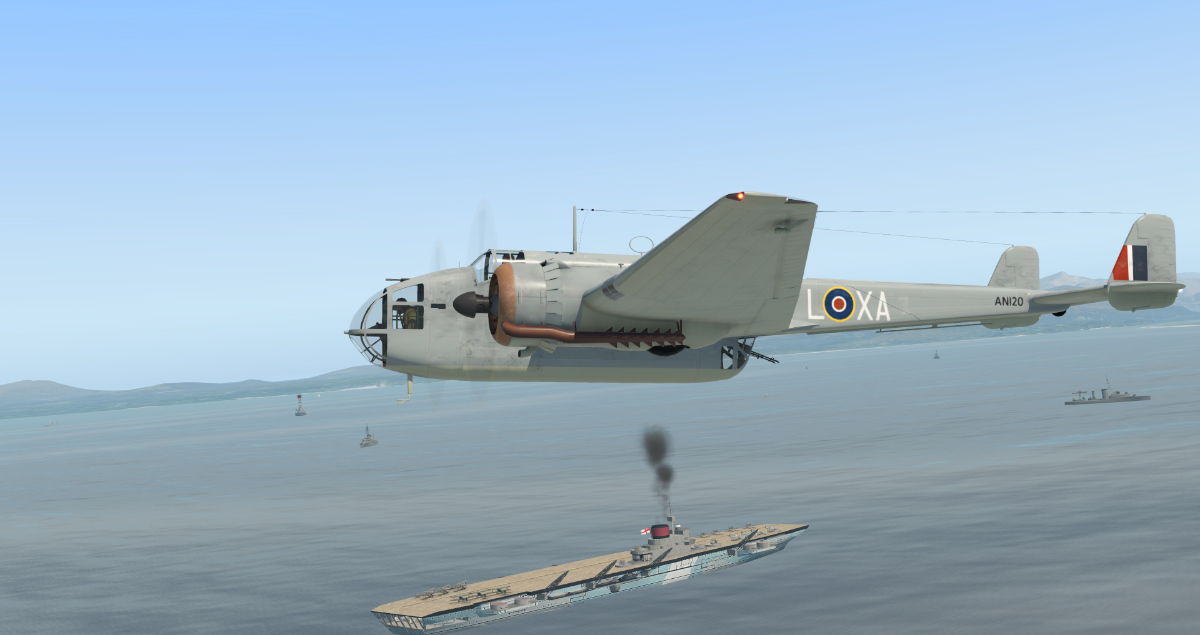
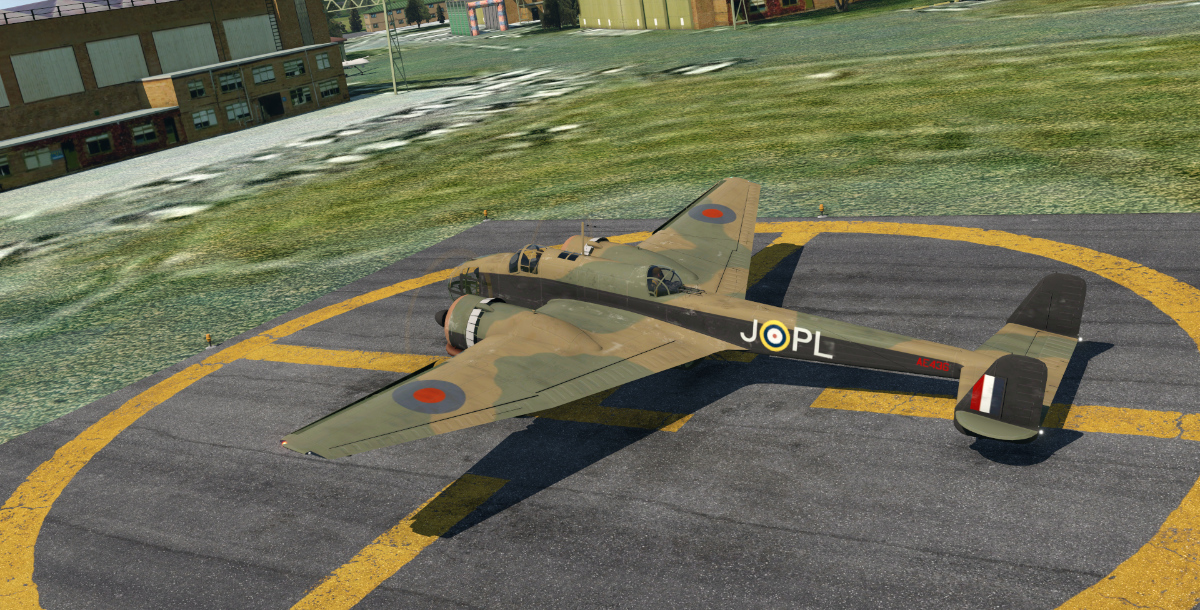
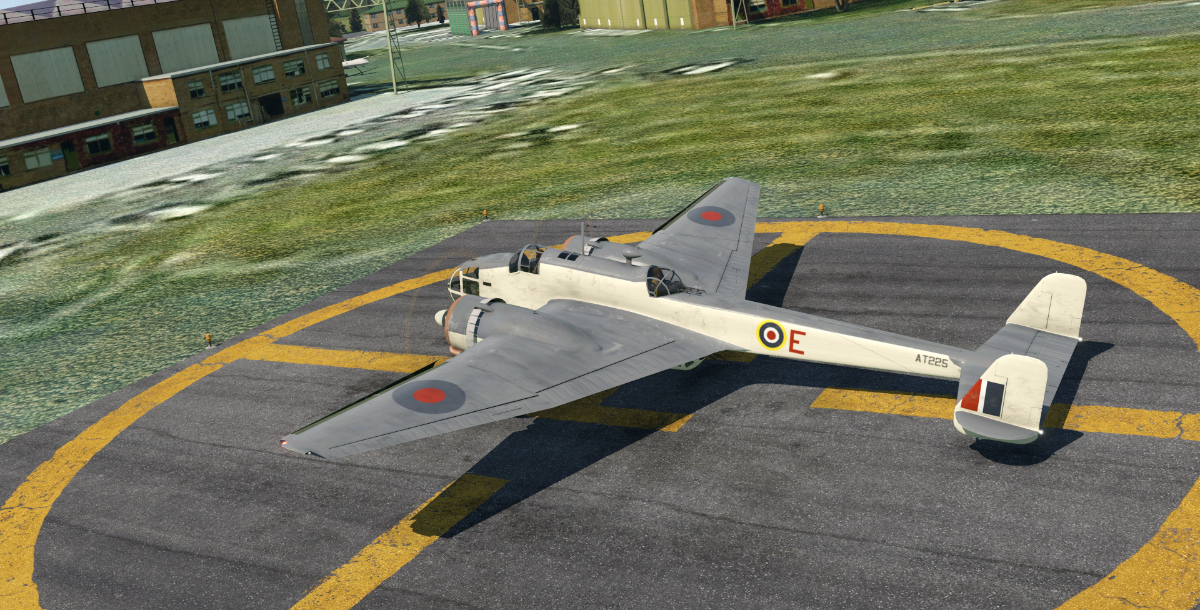
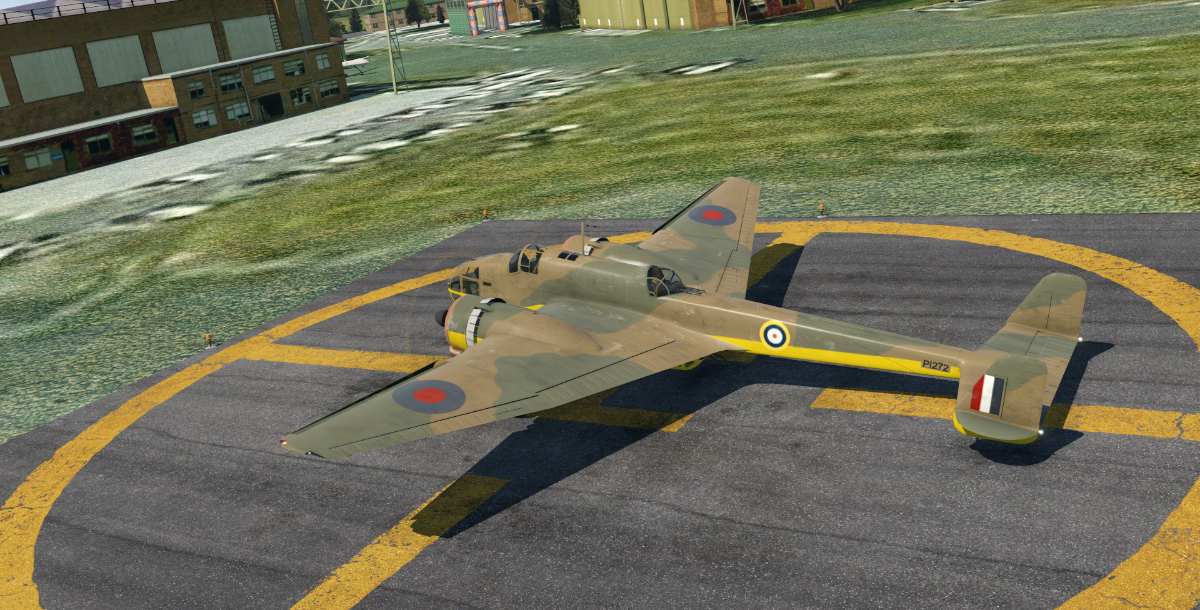
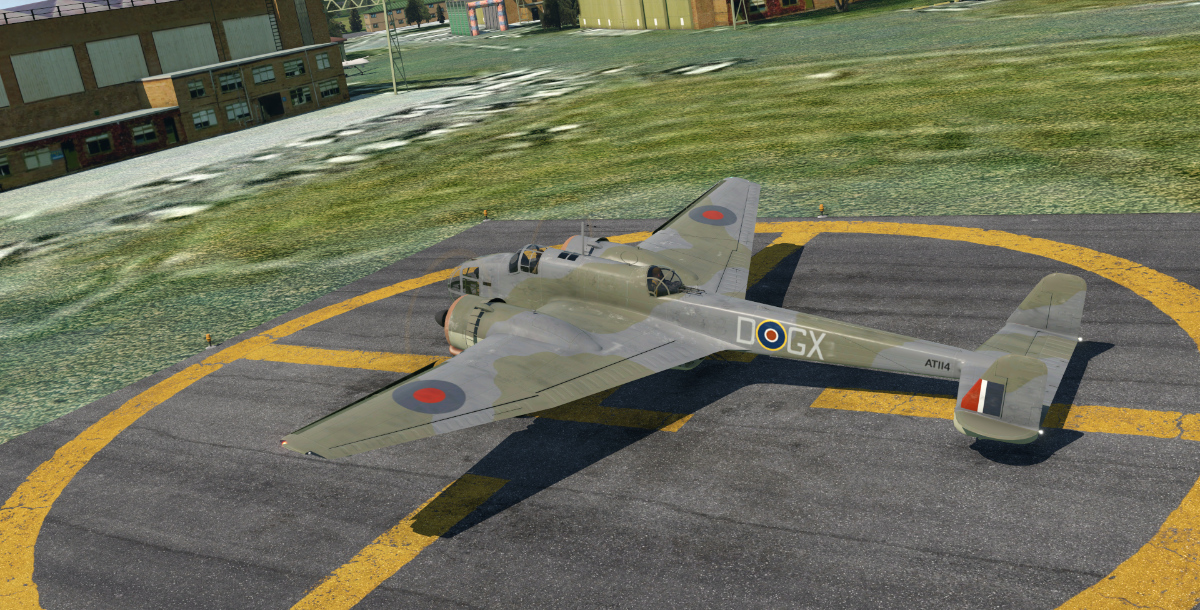
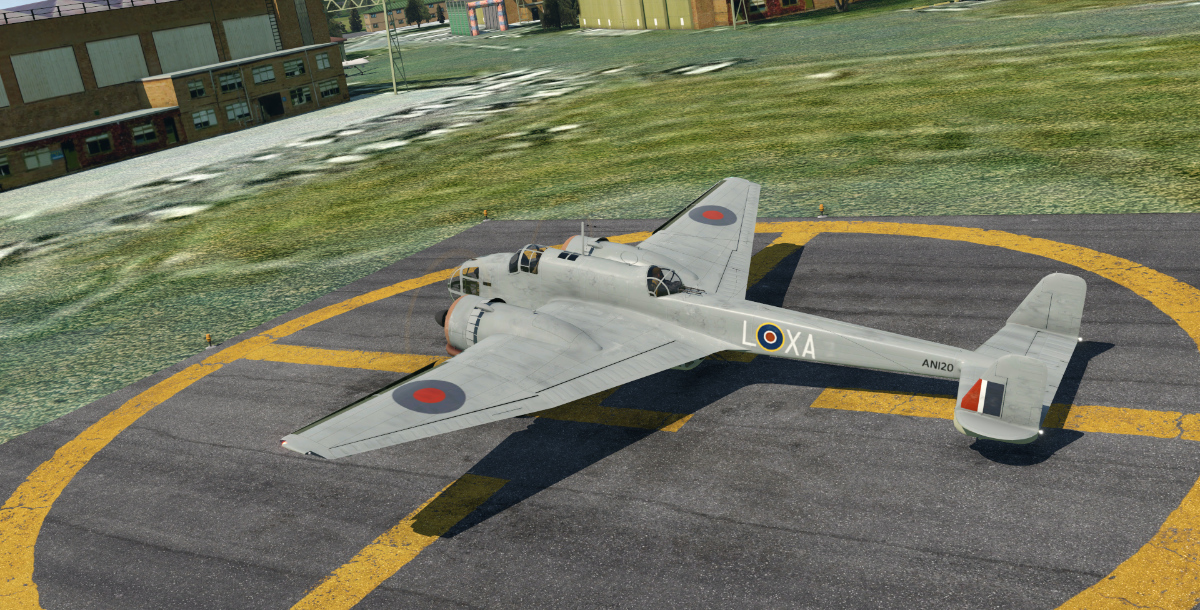
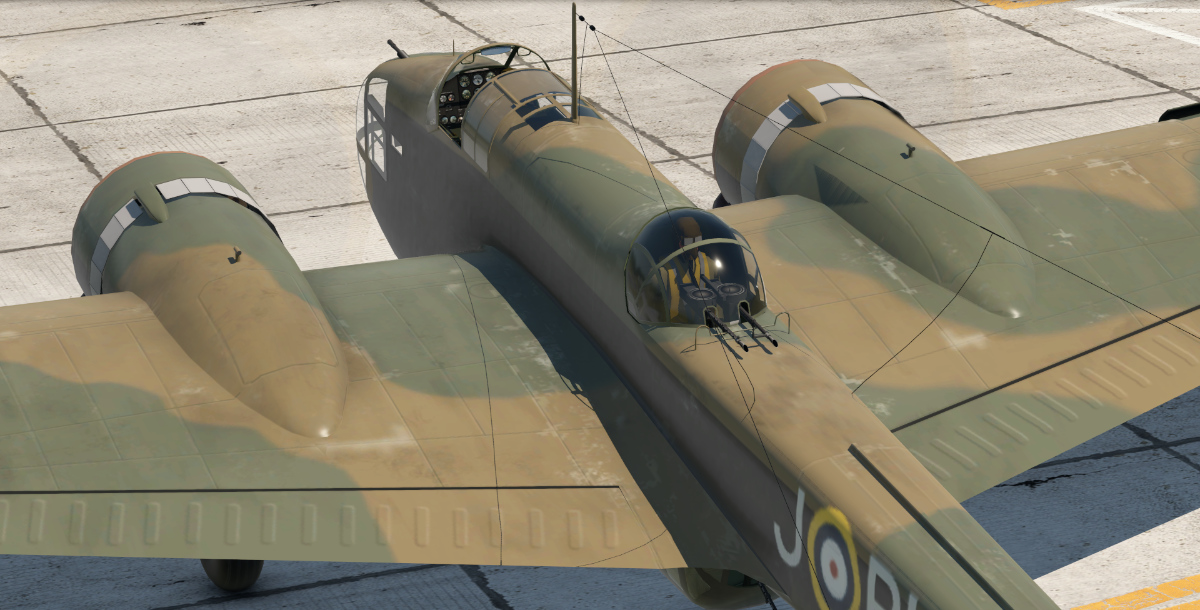
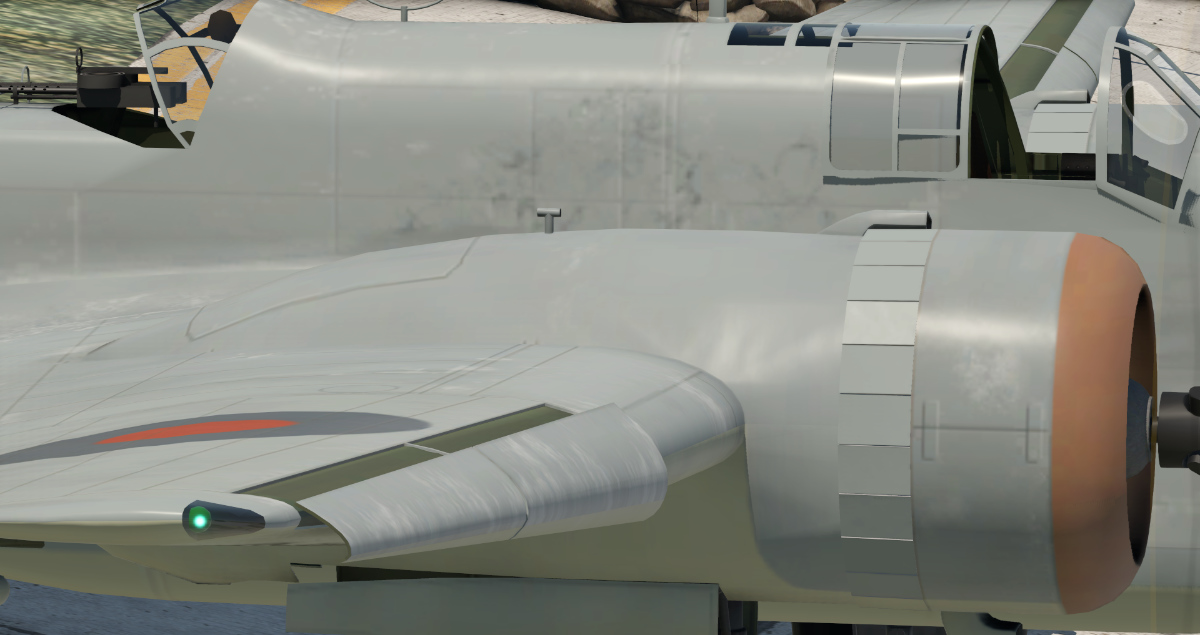
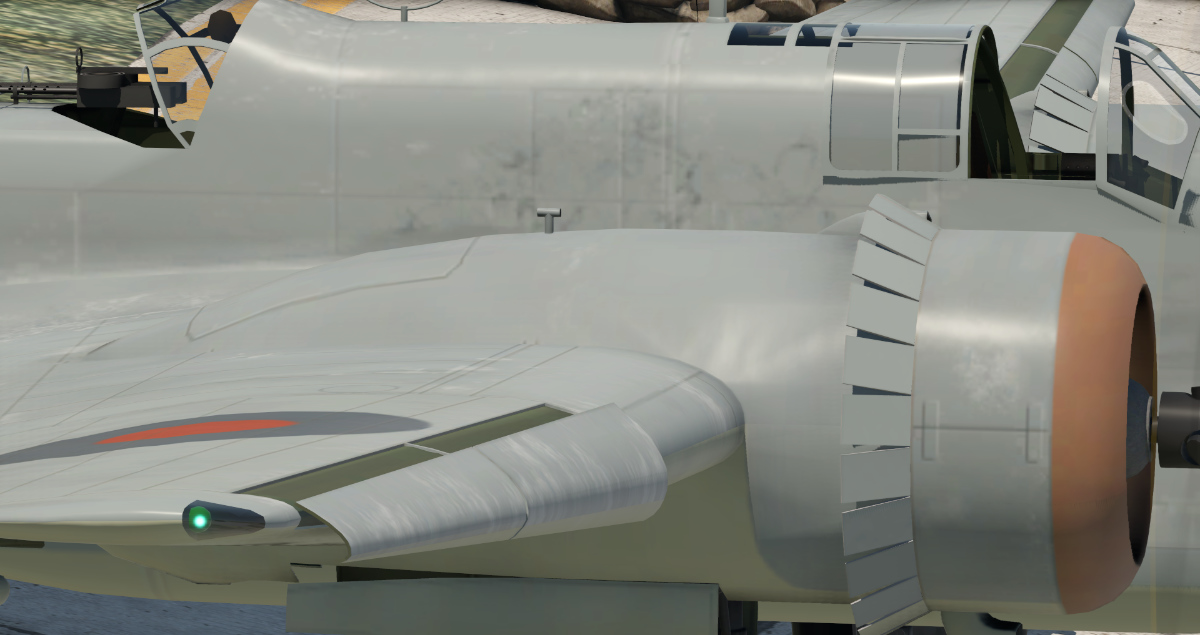
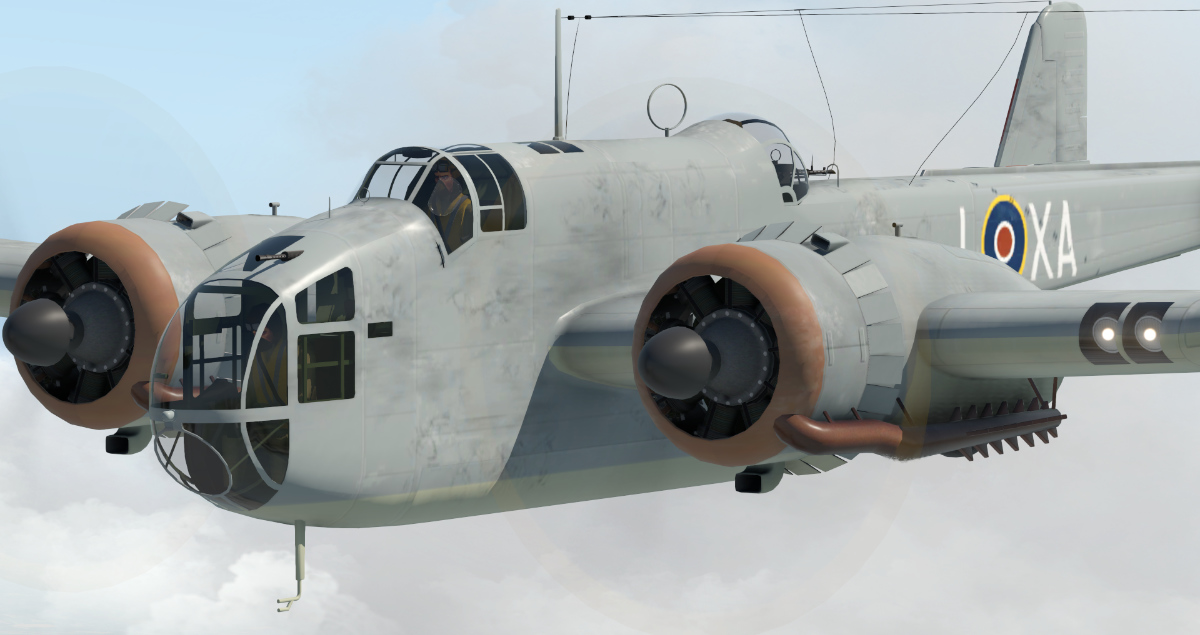
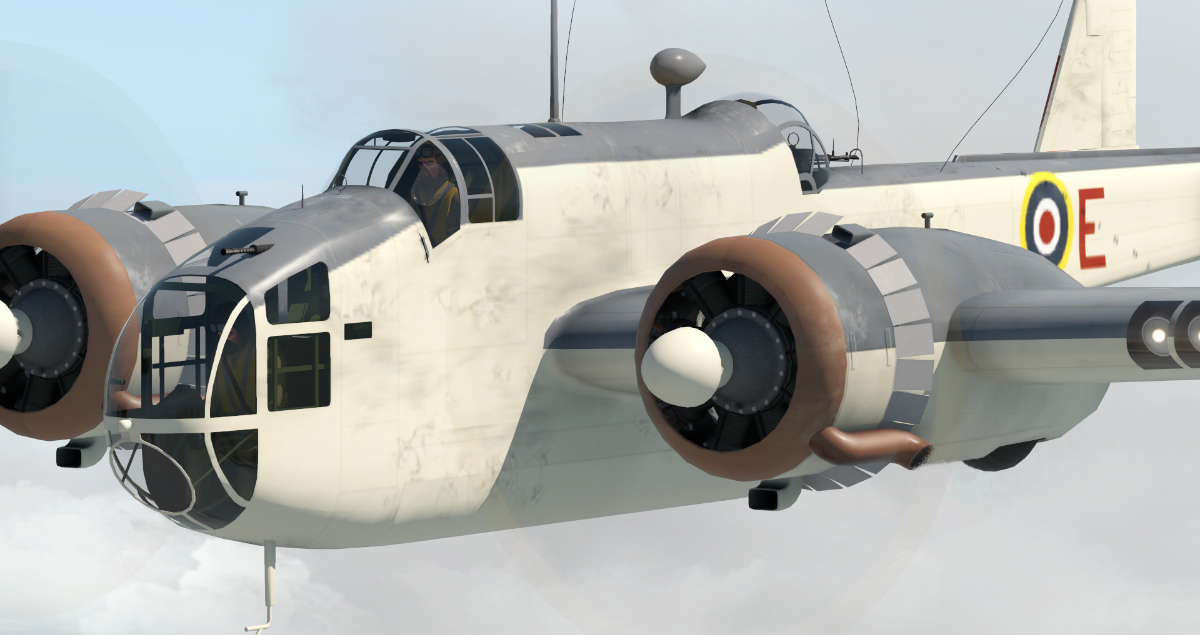
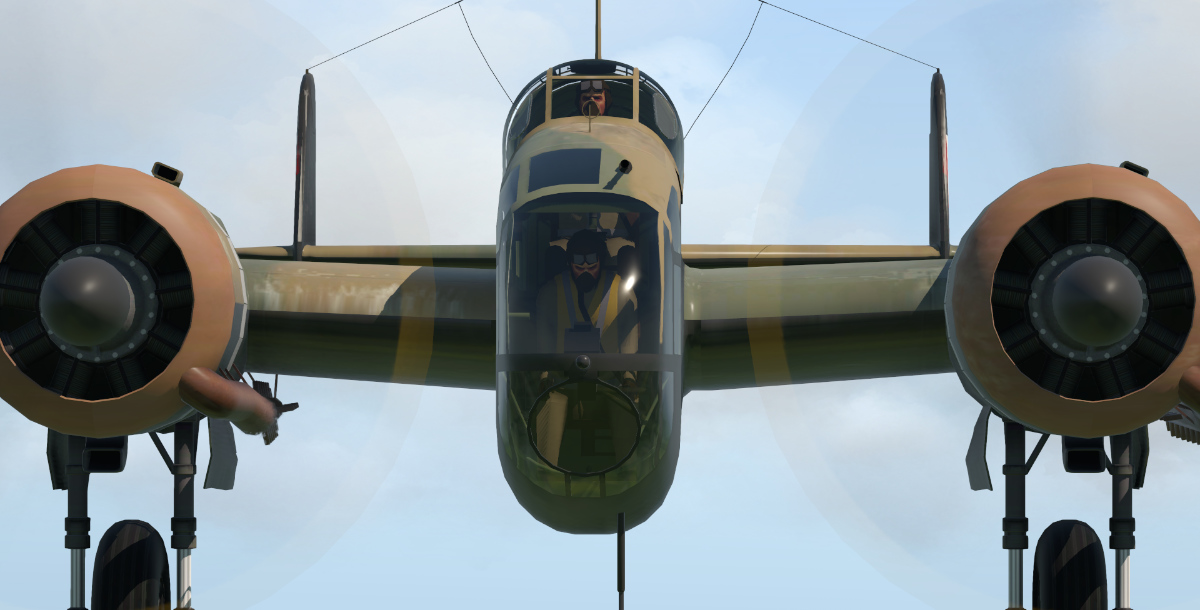
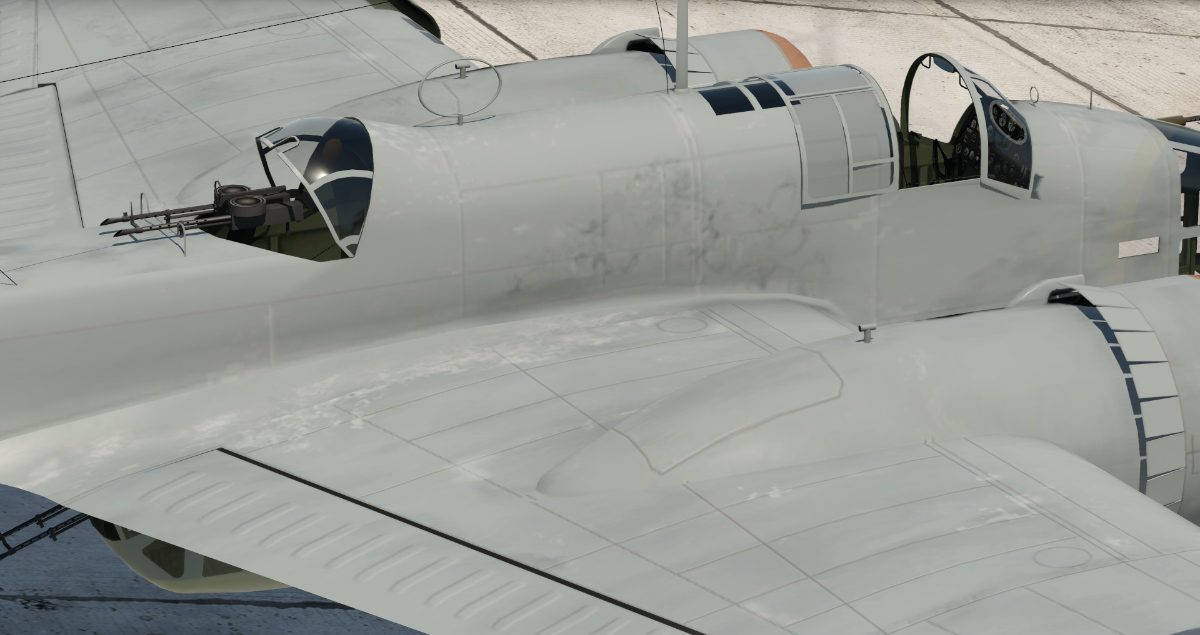
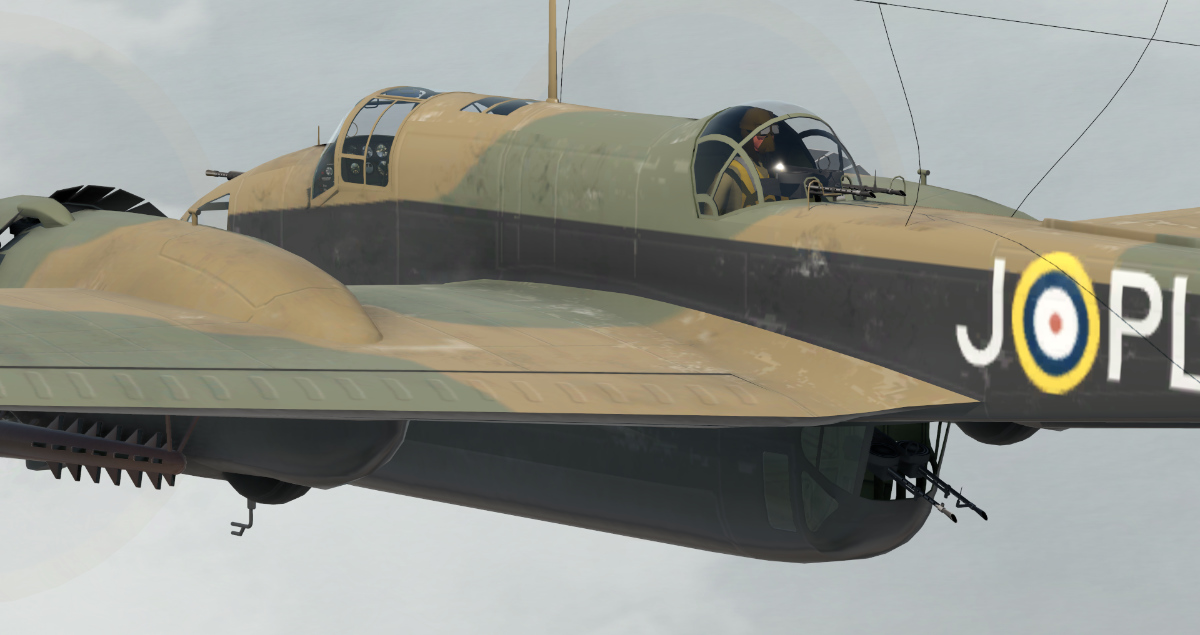
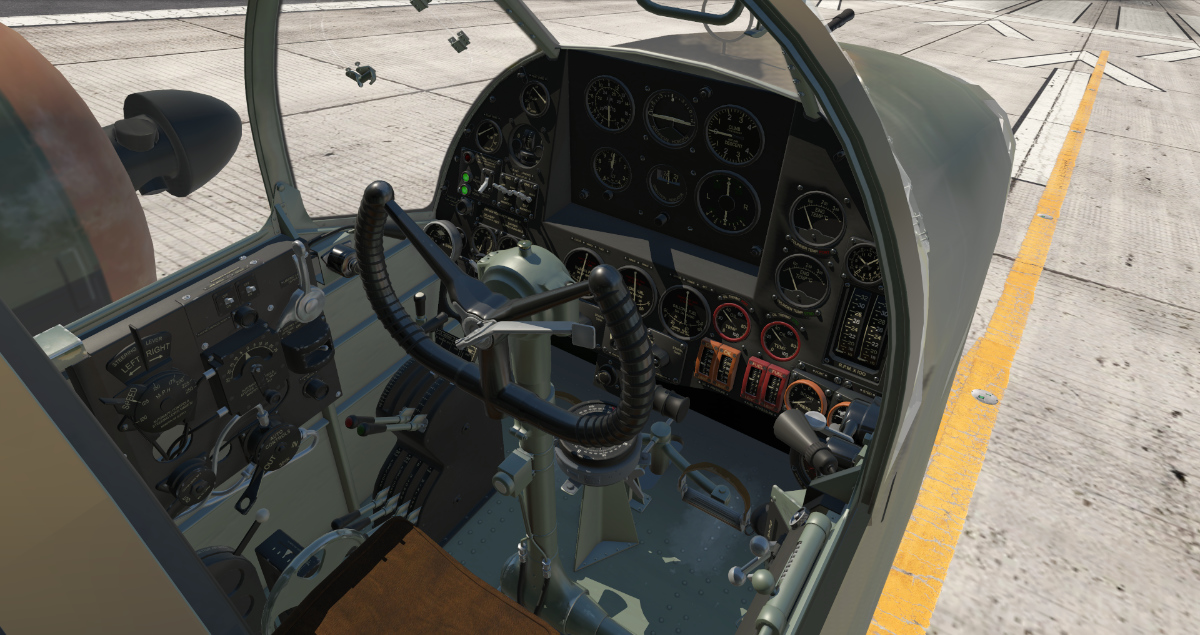
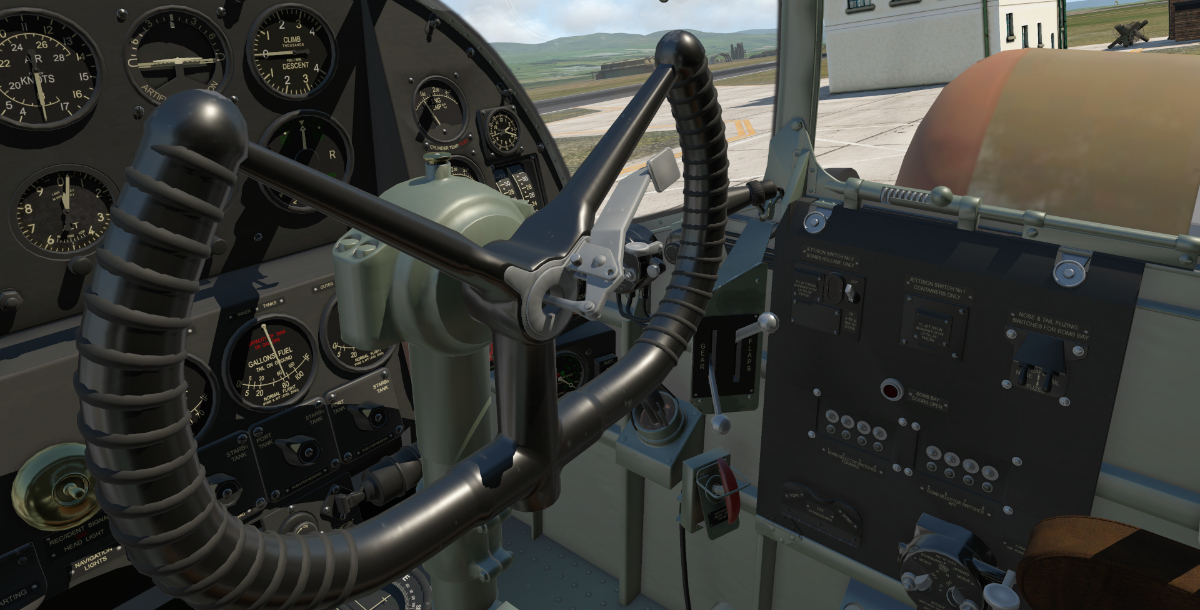
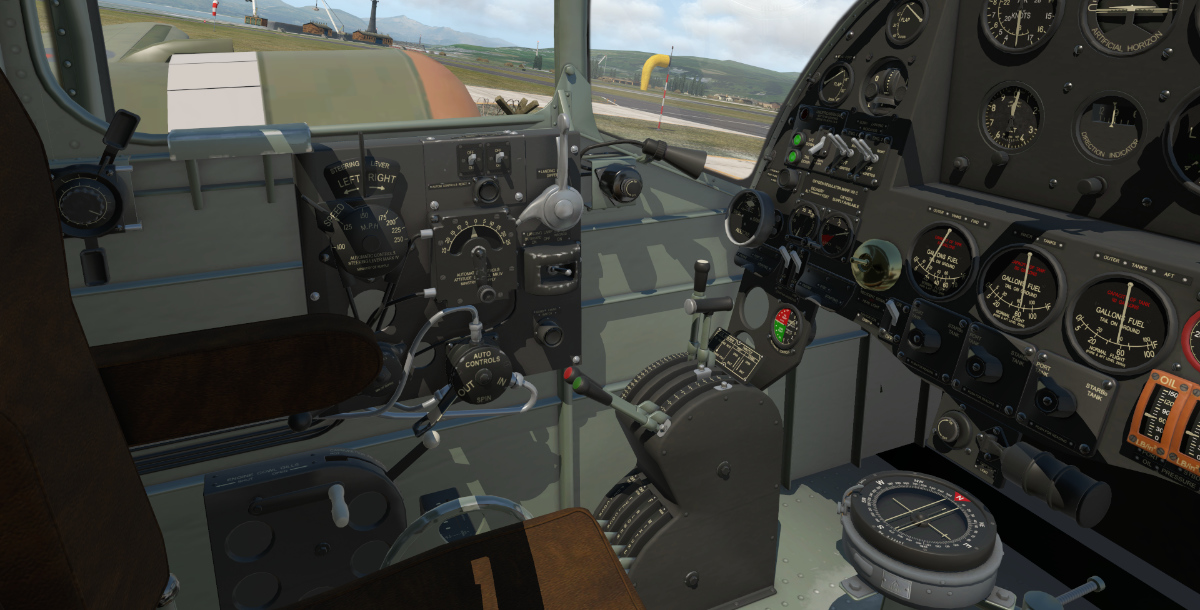
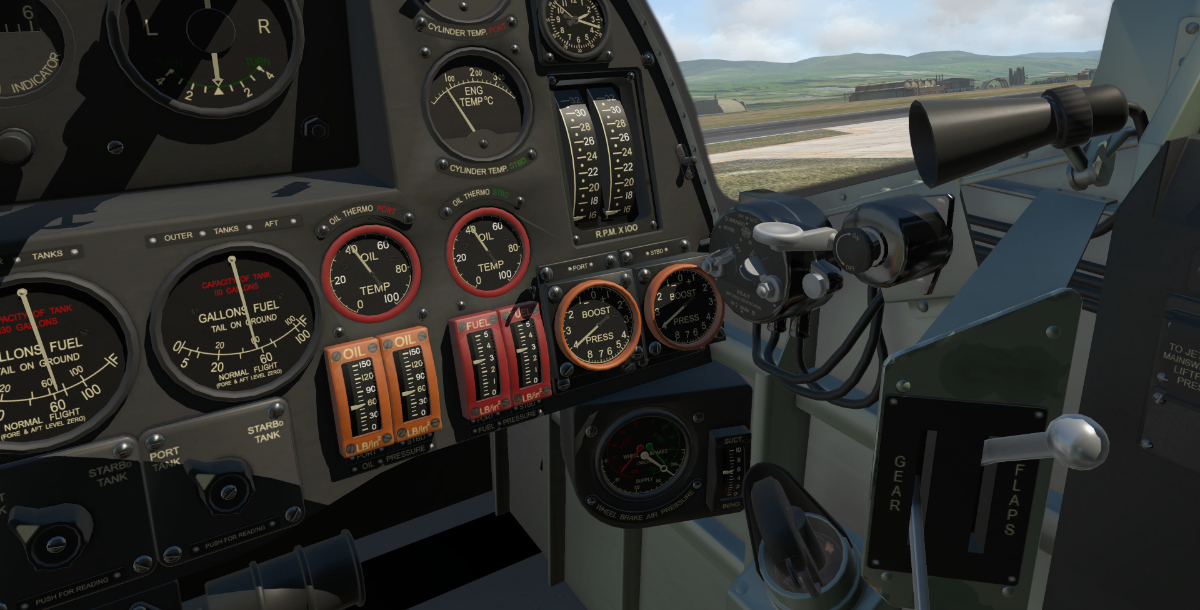
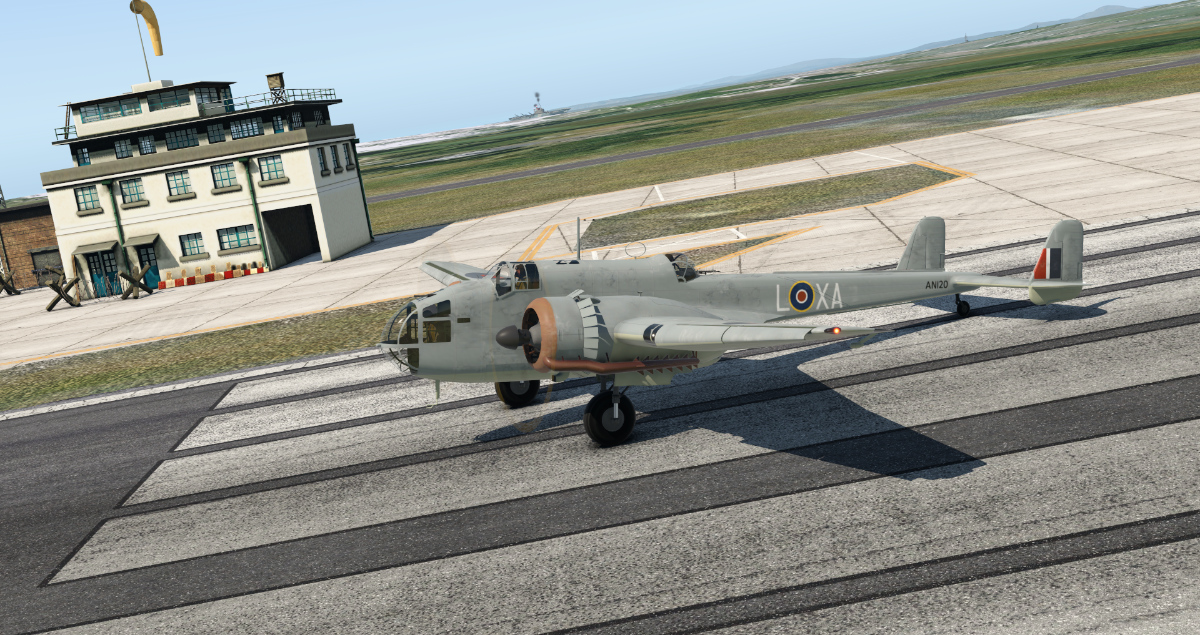
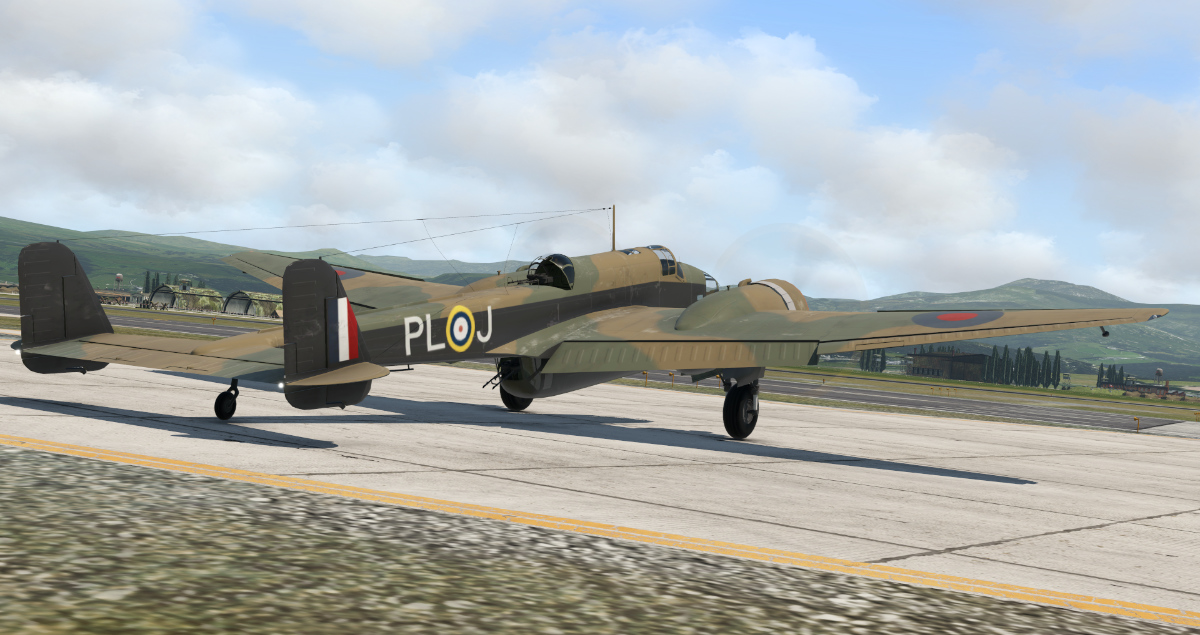
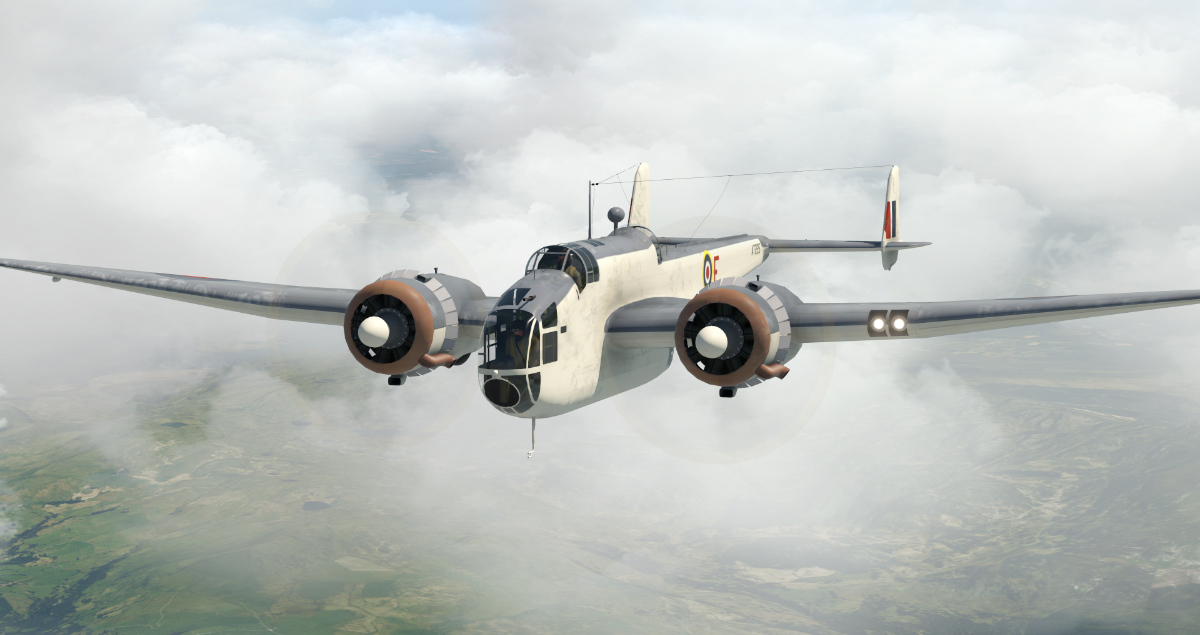
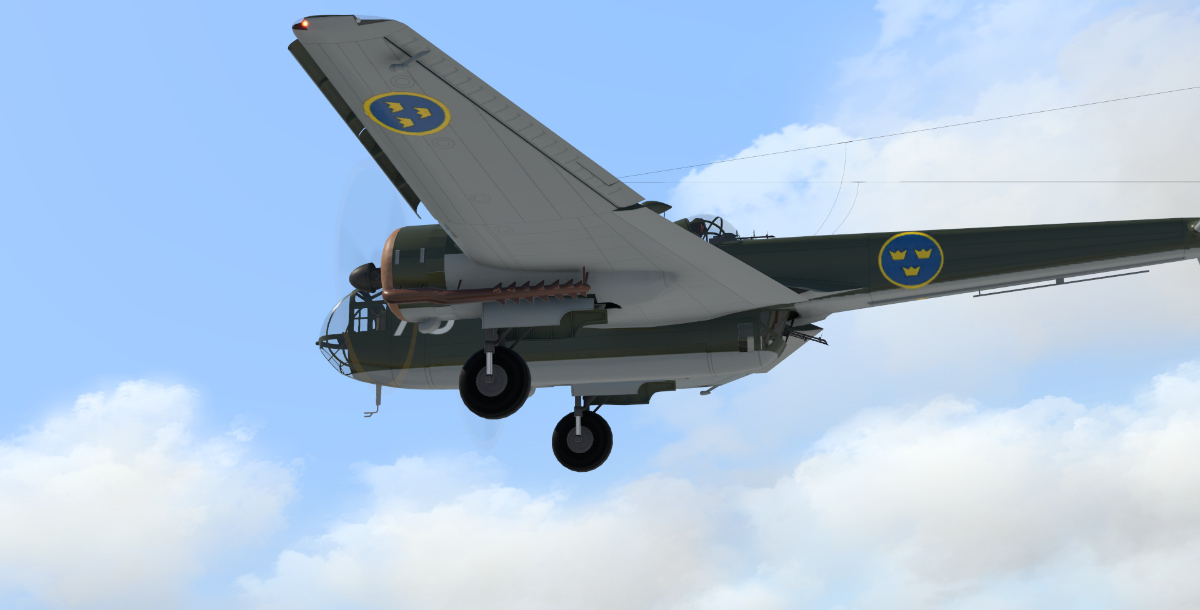
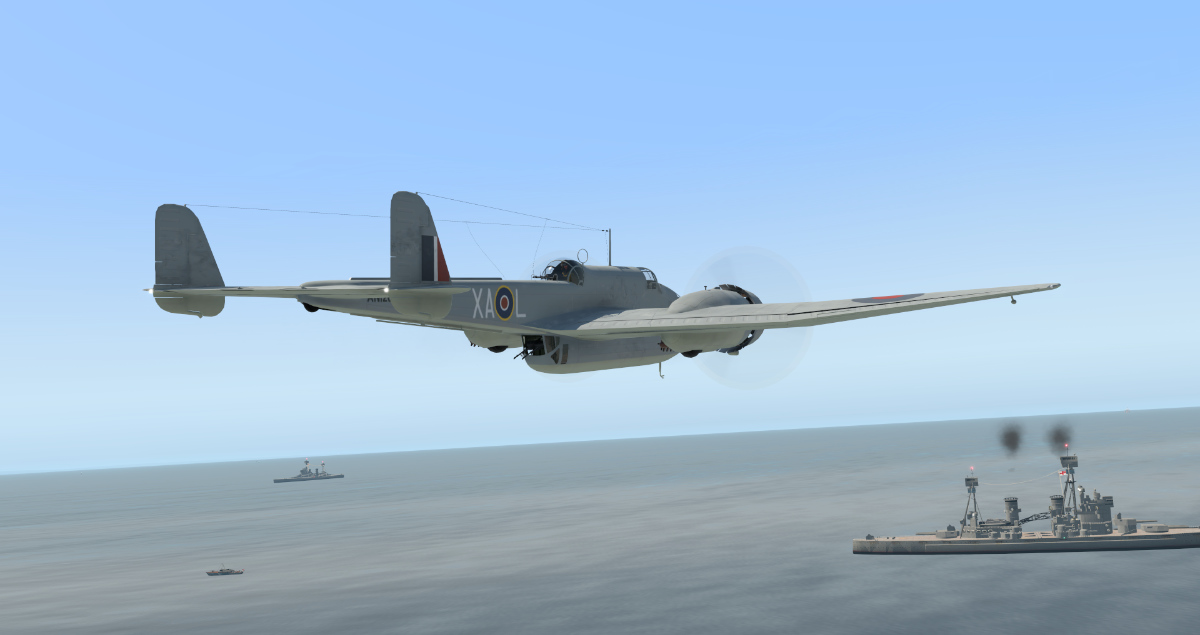
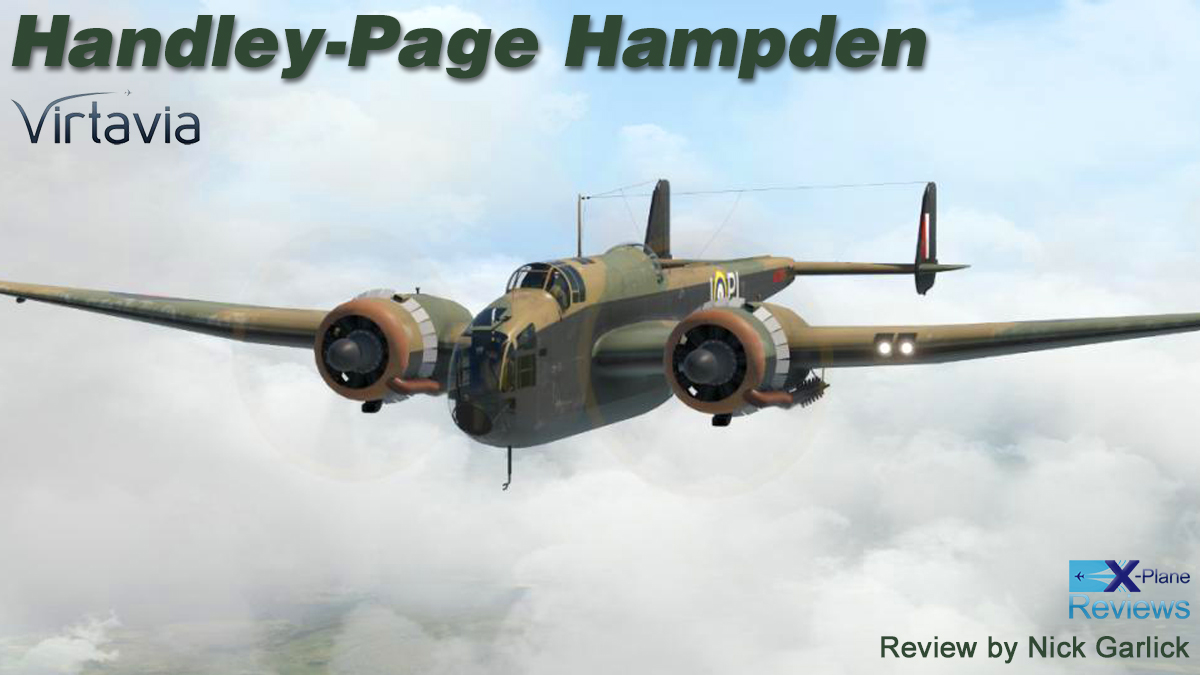
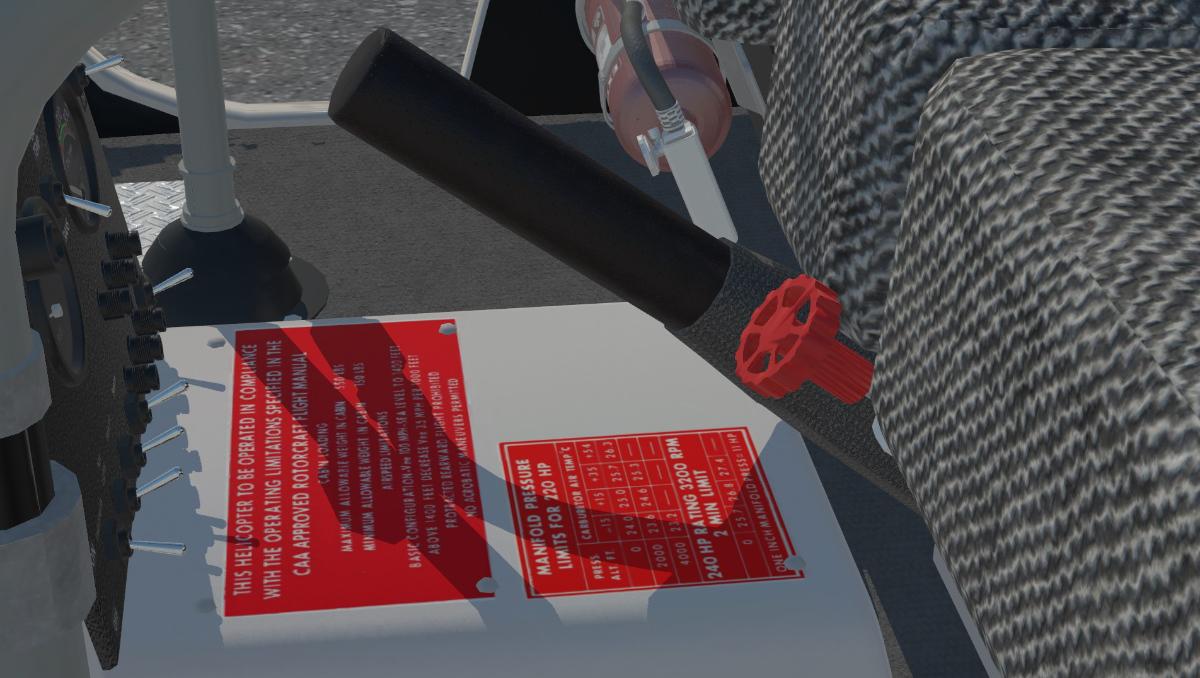
Aircraft Review: Handley Page Hampden by Virtavia Introduction The 1930s was a great period for military aircraft development. At Handley Page one of their best examples during this time was the Heyford bomber, which went into service with the Royal Air Force in 1934. The Heyford was a biplane with an open cockpit and gun positions, had a fixed undercarriage and used a mixed construction of metal and fabric. The Heyford was the last biplane heavy bomber operated by the RAF. When you compare the Heyford to the Hampden, the differences between them were huge, especially when you consider there were only four years between them. History has a great way of recounting how good or bad an aircraft performed during its lifetime, with some even being regarded as a bit of a joke or totally abysmal. Unfortunately, the Handley Page Hampden could fall into that category. A certain Charles G Grey, the founder of the magazine “The Aeroplane”, described the Hampden (without considering some of its ground-breaking assets) as a flying suitcase! Sadly, this is the nickname that stuck with the aircraft during its whole service career. The Hampden was designed and conceived by Gustav Lacmann, Chief Designer at Handley Page in a response to a request from the British Air Ministry for a new twin-engined medium bomber under the Air Ministry specification B9/32. The specification set by the ministry was quite demanding, which specified among many other requirements that it should have higher performance than any preceding bomber aircraft. The first HP2 prototype flew for the first time on 21st June 1936, and shortly thereafter the Air Ministry placed an initial order for 180 Mk.1 Hampdens. The first production aircraft took to the sky on 24th May 1938. The Hampden was quite a modern aircraft for its time as it utilised a stressed metal skin. Fitted with the most advanced wing available at the time, the Hampden had a remarkably low landing speed of just 73 mph, quite impressive for an Aircraft of its size. The Hampden was powered by a pair of 980 hp air-cooled Bristol Pegasus 9-cylinder Radial engines. These engines, along with the aircraft’s slim design, resulted in the Hampden achieving a top speed of 265 mph, as well as an impressive climb rate. Armament on the Hampden was abysmal as it only featured a fixed Vickers K machine gun on the nose, plus two in each of the rear dorsal & ventral positions. The aircraft featured an internal bomb bay capable of carrying 4,000 lbs of bombs, mines, or a single 18-inch torpedo. The crew of four consisted of a pilot, navigator/bomb aimer, radio operator/dorsal gunner, ventral gunner. Due to its design, the crew were crammed into a tight fuselage with almost no room to move and were typically cold and extremely uncomfortable during long missions. Aircrews soon referred to the Hampden by various nicknames, such as the flying Panhandle, and Flying Tadpole. The Hampden entered service with RAF No.49 Squadron between September and November 1938. While based at RAF Scampton, they were allocated the hazardous task of low-level minelaying and attacking ships during the outbreak of World War Two. Purchase and installation For this review, I am running the latest version of X-Plane 11, along with a shadow tweak to make the shadow lines in the game appear much sharper. My chosen graphics API is Vulcan, not OpenGL. The Intel I7 4790K CPU is overclocked to 5Ghz complete with liquid cooling. I have 32GB RAM, with my GPU being an Asus Cerberus 1070ti. The sounds are provided through a Creative Titanium HD audiophile card, all of which is sat on an Asus Motherboard. At the time of writing, the Hampden from Virtavia is available from the Org Store for $21.95, and upon completion of your purchase, 44 reward points will be allocated to your store account. The stated system requirements are Windows, Mac or Linux and the model requires a minimum of 4 GB VRAM but recommends 8 GB or greater. The model currently sits at version: 1.0 (December 6th, 2021) and is for use in X Plane 11 only. Virtavia indicates that the model is fully VR-ready, however, I am not able to confirm this as I do not possess a VR headset. Once purchased, you simply download the compressed files to your chosen location on your PC. No automatic installation exe is included with the product, but installation is quite straightforward, as you simply extract the compressed files to your Aircraft folder. Once extracted, the size comes to 64.8MB. Documentation The model includes a comprehensive 19-page PDF full-colour manual which is split into several sections. It contains a procedures list and makes extensive use of screen captures which feature annotations to the relevant controls being demonstrated. Another feature that impressed me was the use of instructional videos as a reference relating to various procedures such as a cold and dark start. By double clicking on the AVI symbol, a copy of the instruction video will be downloaded to your pc where you can view them as and when required. First Impressions The original model of this Handley Page Hampden stems from an FSX/P3D variant. Whilst the aircraft systems and handling in this X-Plane version are significantly better than those found in the earlier FSX version, the Hampden is still not a particularly complex aircraft, which suits casual flight simmers such as myself. The package features two variants, these being the Hampden B. Mk1 and the TB. Mk1. 1. The Hampden B. Mk1 ships with four liveries and are as follows: 185 Sqn. at RAF Cottesmore from 1939 and 144 Sqn. stationed at North Luffenham during 1942. Whilst the other two liveries feature aircraft from No. 1404 (Meteorological) Flight RAF at St. Eval during 1942 and the Torpedo Development Unit of 1939 The Hampden TB. Mk1. ships with three liveries and are as follows: 415 Sqn. Royal Canadian Air Force during 1943, 489 Sqn. of the Royal NZ Air Force of 1944 and finally, the TB. Mk.1. of the Swedish Air Force. Exterior The exterior detailing faithfully captures the quirky lines synonymous with the Hampden’s airframe. From the narrow deep-seated fuselage to the thin tapering rear leading to the twin tail, Virtavia have faithfully captured these features. With the extensive use of PBR textures throughout both the exterior and the cockpit, the whole model shines (in all the right places) thanks to X-Plane’s superior global lighting. The surface of the model also features nicely rendered panel lines and subtle weathering. The flying controls and surfaces are fully animated and work very smoothly, including the forward wing slats which are automatically operated. The cooling grills (cowl flaps) can be opened and closed by clicking the relevant control in the cockpit. The model also features a reasonably detailed undercarriage as well as two different exhaust types that were fitted to the different variants of the aircraft. Overall, the exterior model is almost worth the price by itself. However, despite all the gloss of PBR and the improvements across the model, I did feel there was something still slightly lacking with the exterior model. In short, the Handley Page Hampden was amongst the first mono-winged aircraft to feature a flush-rivetted stressed metal skin, reinforced with a mixture of bent and extruded sections in an all-metal design. Whilst the panel lines are faithfully represented in this model, the detail relating to the flush riveting and stressed skin effects are missing. It doesn’t affect the functionality of the model in the slightest, but if you know your aircraft history, you’ll notice it. A feature I particularly liked was the ability to have the crew visible or not. The crew can be toggled on or off by pressing Shift-F5 as seen below. You can select to have the upper rear gunners’ canopy open or closed, and this is achieved by pressing Shift-F2. Both gunners’ positions (dorsal and ventral) included representations of the 303 Vickers K machine gun which are adequately detailed but are not operable. The crew access hatch can be toggled open or closed by pressing Shift-F3. Another nice feature of the model is the bomb bay which features operable bay doors which can be toggled open or closed by pressing shift-F4. Alternatively, there is a switch for this on the right side of the cockpit. The internal detail of the bomb bay is rather weak but acceptable, however, there is no ordinance within the bay and no loadout options are provided with the model. It would have been a nice touch if the developer had included such an option. Perhaps in a later update? Interior Moving onto the interior and it’s clear to see that this is where Virtavia pulled out all the stops. When sitting in the cockpit, you are presented with a rich and diverse environment. It’s a complete click fest of the highest order, all laced with lush PBR textures and clear annotations to both instruments and dials. Aside from the normal functioning controls, there are numerous features available to you in the cockpit, so many in fact that it would take too long to describe in this short article. However, all I can say is that if you do decide to go out and purchase the Hampden, you won’t be disappointed with how the cockpit looks, it’s simply exquisite. Handling Like many of you reading this, I am just a desktop pilot and a casual simmer at heart, so I am not particularly well qualified to say if the flight model is accurate or not. The task becomes even harder when you consider there are no airworthy Hampdens left anywhere in the world. However, that said, in X-Plane, the Handley Page Hampden being a tail dragger, has all the usual traits associated with this type of aircraft, and as such can be quite a handful on the ground. In other words, don’t open the throttles too quickly as the aircraft will run away with you, and your flight (what there was of it), will end in tears! Once in the air and all trimmed out, the aircraft is quite responsive and is in no way sluggish. The developers appear to have replicated the response rate of the engines quite well, in that there is no instant change in tone when you reduce or increase the throttle, instead it slowly changes tone which is far more realistic. The Handley Page Hampden was one (if not the first) medium bomber to feature forward wing slats. These reduced the aircraft’s landing speed to just 73mph. The forward wing slats are operated automatically, and I found landing the aircraft in my X-Plane world, a considerably more relaxed experience than taking off. Sounds When X-Plane allowed for the introduction of FMOD sound packages for aircraft models, the sound environment changed for the better. The included FMOD sound samples in this package are simply outstanding, and in my opinion, faithfully capture the dynamic sounds of a pair of 980 hp air-cooled Bristol Pegasus 9-cylinder radial engines. This starts with the slow, rattling, popping, spitting and stuttering of the engines during a cold and dark start-up. As you slowly increase power, the engine note changes, and you can really feel the deep rumbling gentle growl as the engines come to life. When you open and close the cockpit canopy (again sampled), the sounds of the engine are subtly subdued, but still audible through the canopy. In all, the included soundset of this model is simply music to your ears! Conclusion As you can no doubt tell from this review, flying this aircraft has been a great deal of fun for me, with some of its highlights being: The massive 3D modelling improvements and increased functionality in the cockpit over its earlier FSX/P3D variant. The cockpit environment is enriched by the extensive application of PBR textures, which really makes it shine, especially when you factor in the price point. The introduction of an impressive FMOD sound pack. The inclusion of a comprehensive PDF manual, which employs links to a series of downloadable instructional videos. Looking at areas for possible improvement, it would have been nice if Virtavia had included the flush riveting and stressed panel details on the exterior model. I would also have liked to have seen various loadout options for the bomb bay, but as I mentioned, maybe these can be added in future updates. I was just a little disappointed that some of the other notable characteristics were not given the same attention to detail as they lavished in the cockpit environment. In summing up, I have to say the Handley Page Hampden by Virtavia is a quirky, yet remarkable aircraft, and in my view will deliver a lot of nostalgic fun for not much money. So, why not be like me, and pack yourself into a flying suitcase and relive a bit of history! ___________________ The Handley-Page Hampden package by Virtavia is now available from the X-Plane.Org Store here: Virtavia Handley-Page Hampden Price at time of writing US$21.95 Requirements: X-Plane 11 Windows, Mac or Linux 4 GB VRAM Minimum - 8 GB+ VRAM Recommended Current version: 1.0 (December 6th 2021) Review System Specifications: Windows 10 64 Bit Intel I7 4790K 32GB RAM NVIDIA GTX 1070Ti Aircraft Review by Nick Garlick 4th August 2022 Copyright©2022: X-Plane Reviews (Disclaimer. All images and text in this review are the work and property of X-PlaneReviews, no sharing or copy of the content is allowed without consent from the author as per copyright conditions)
-
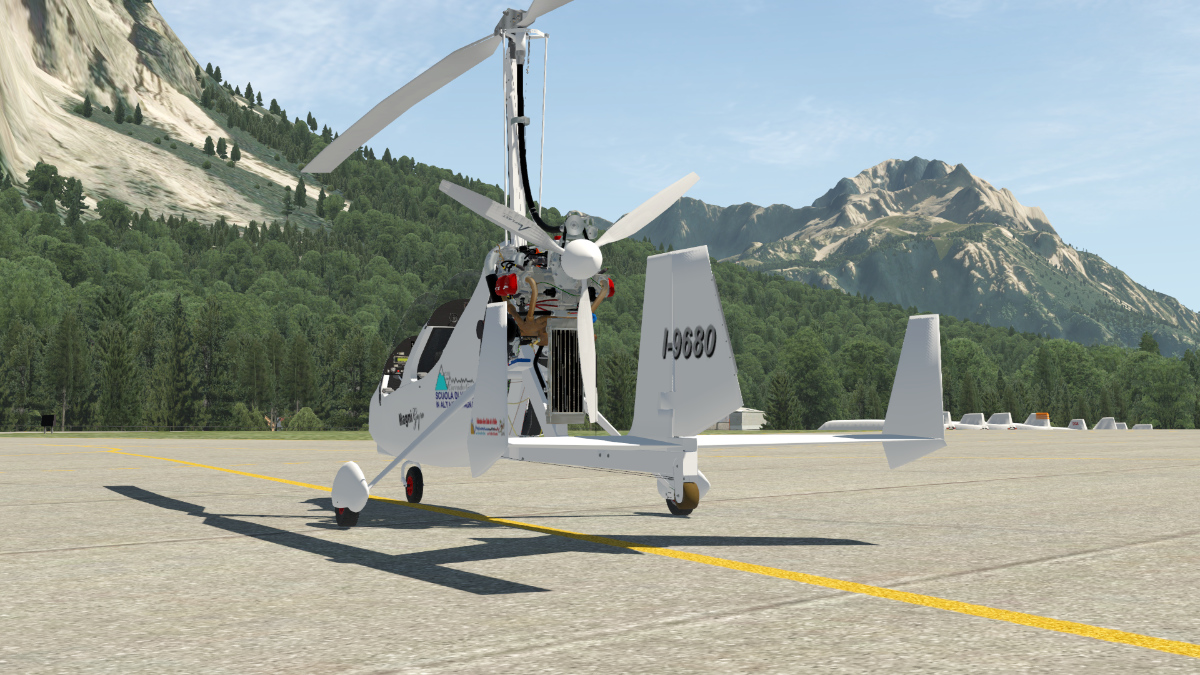
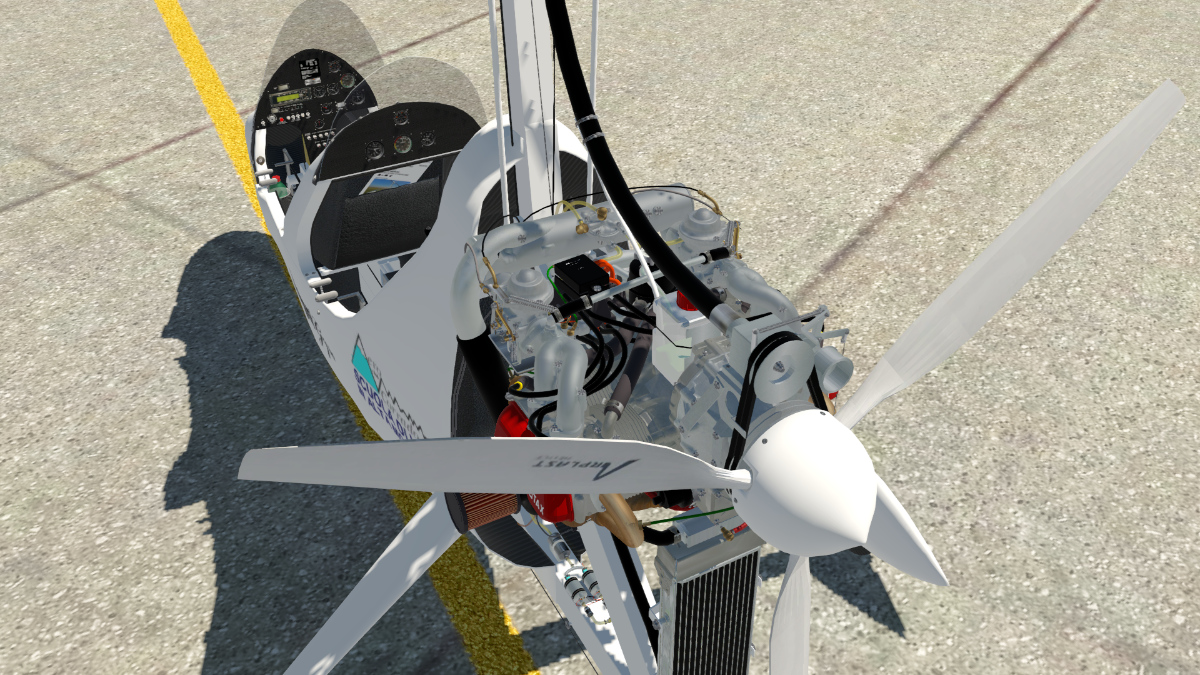
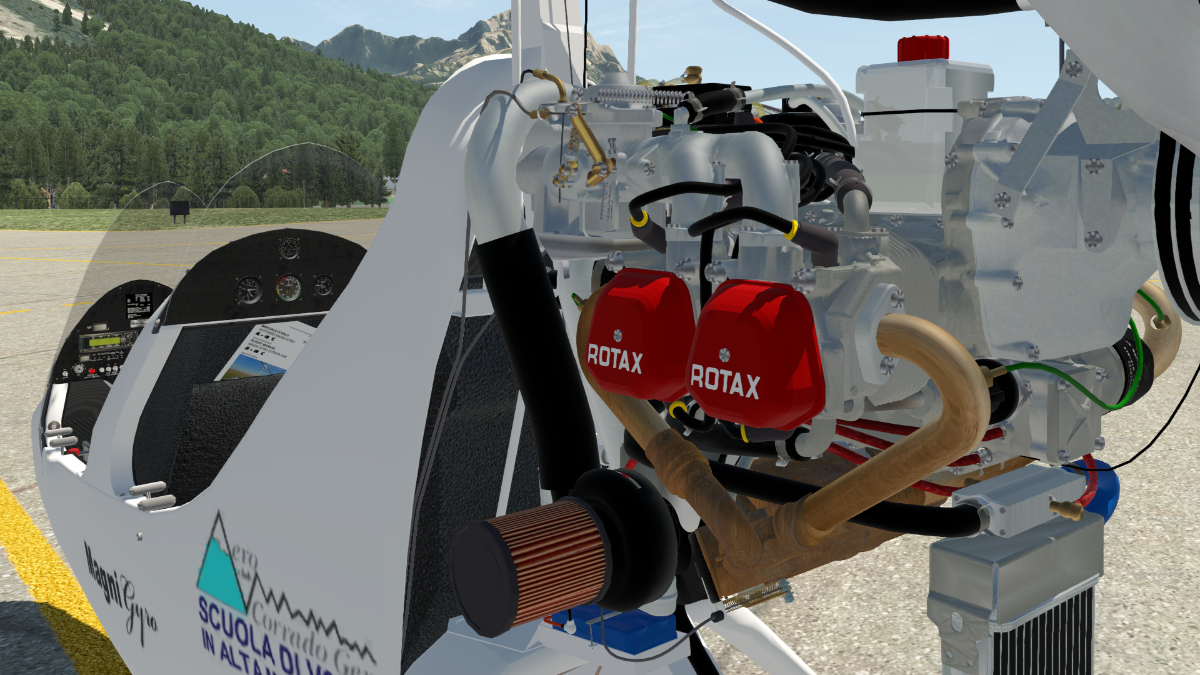
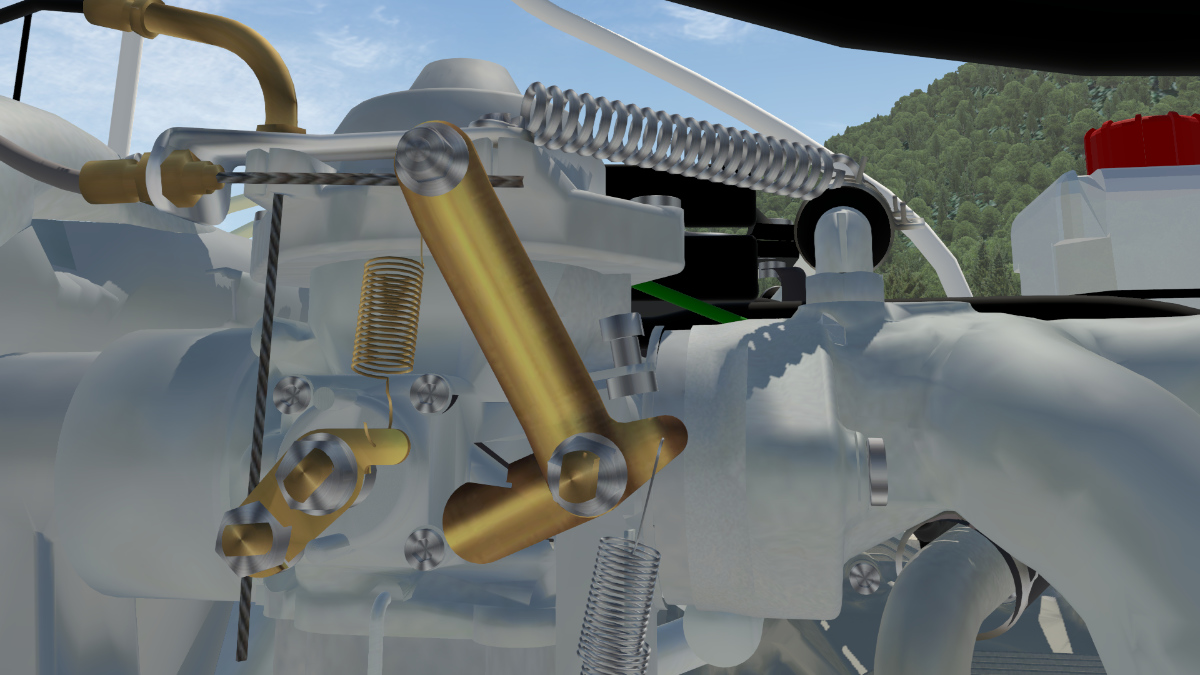
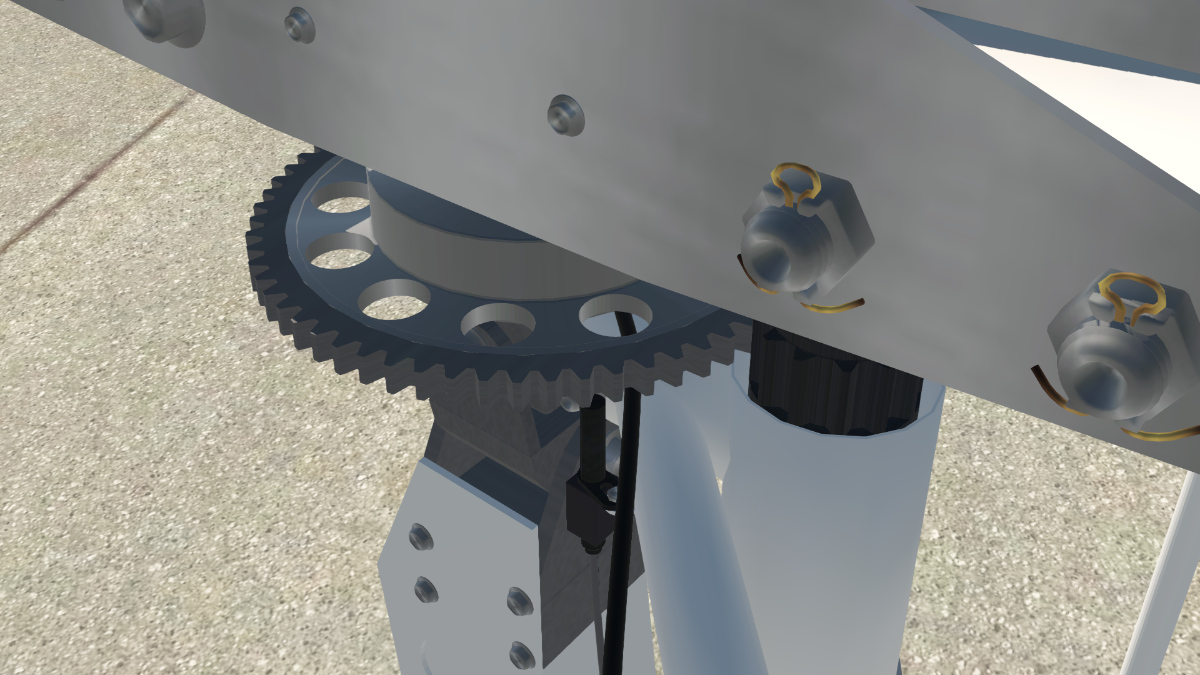
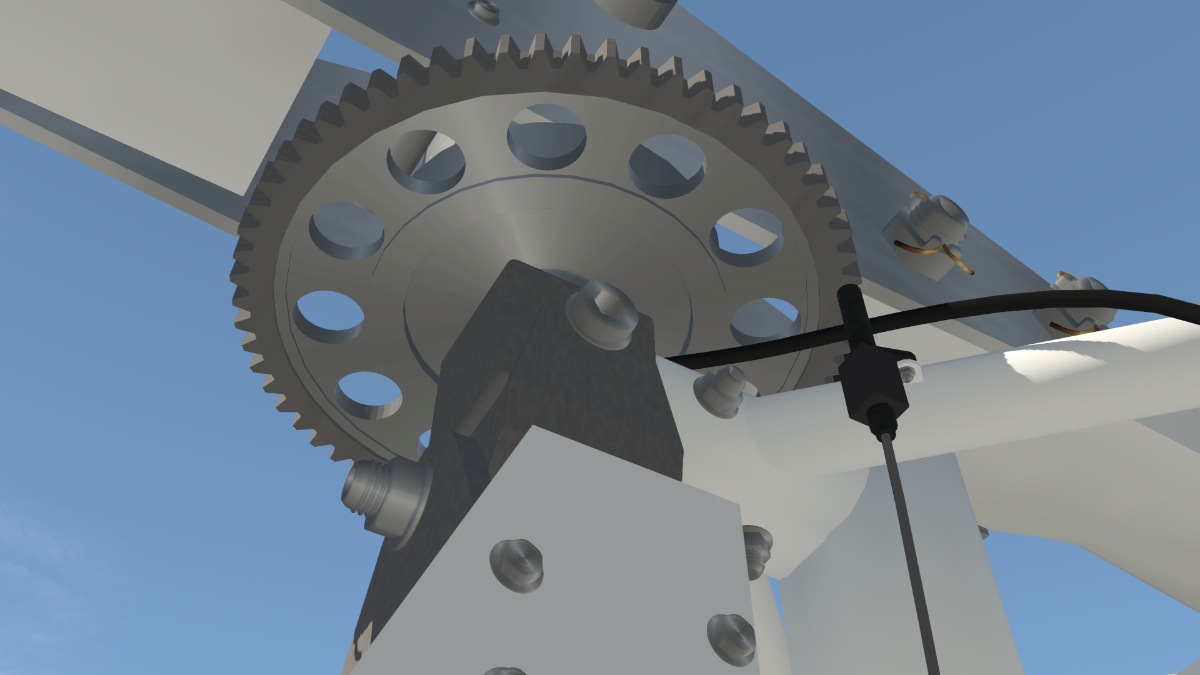
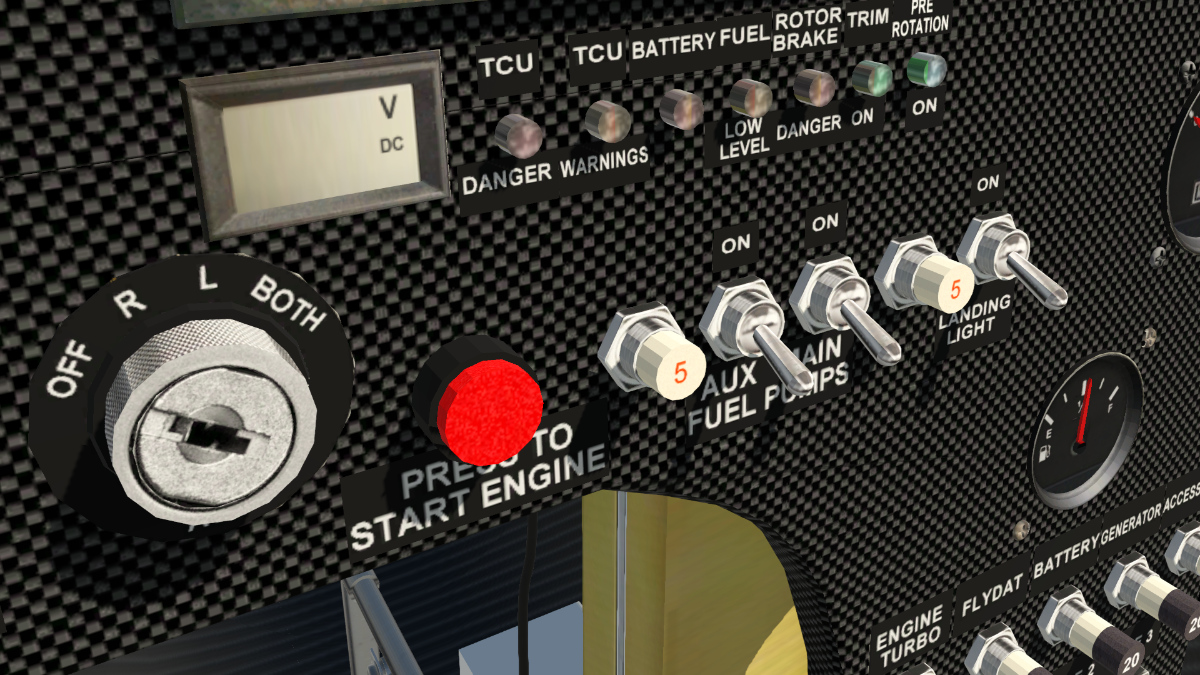
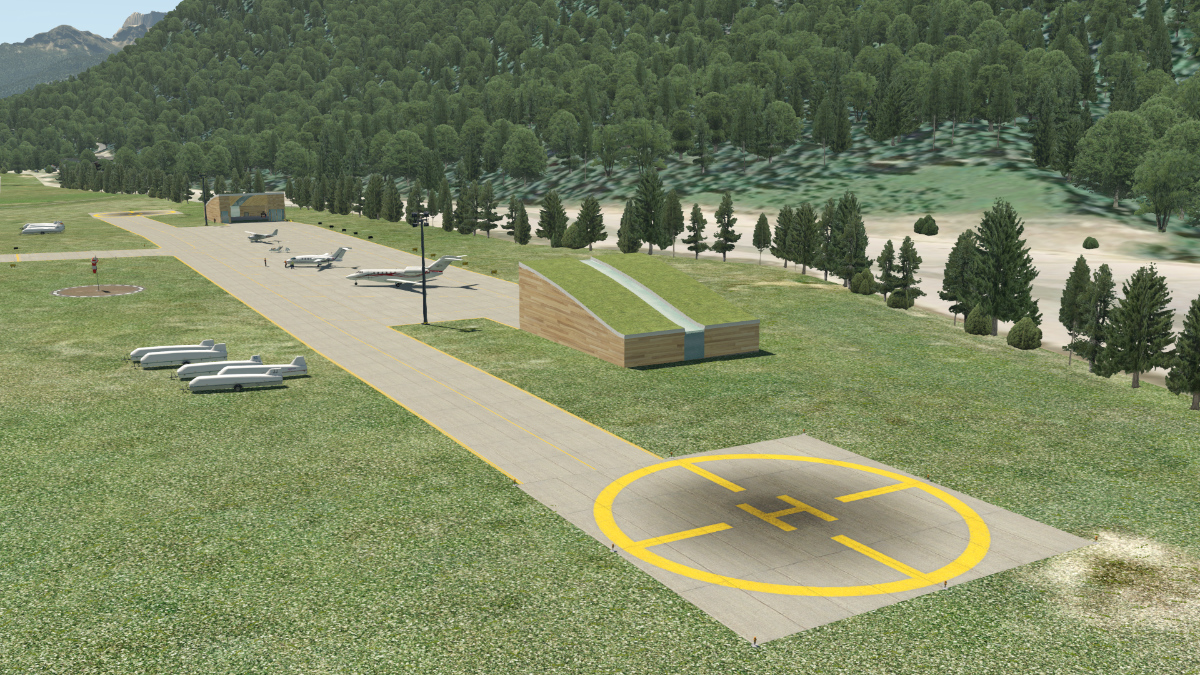
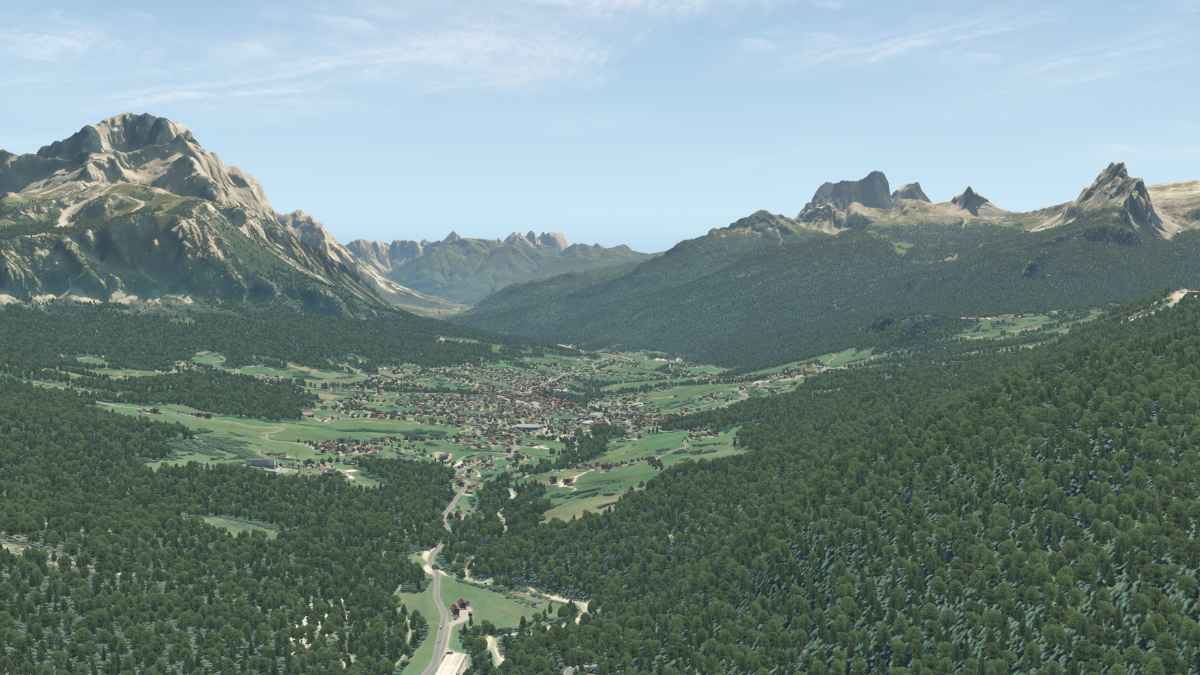
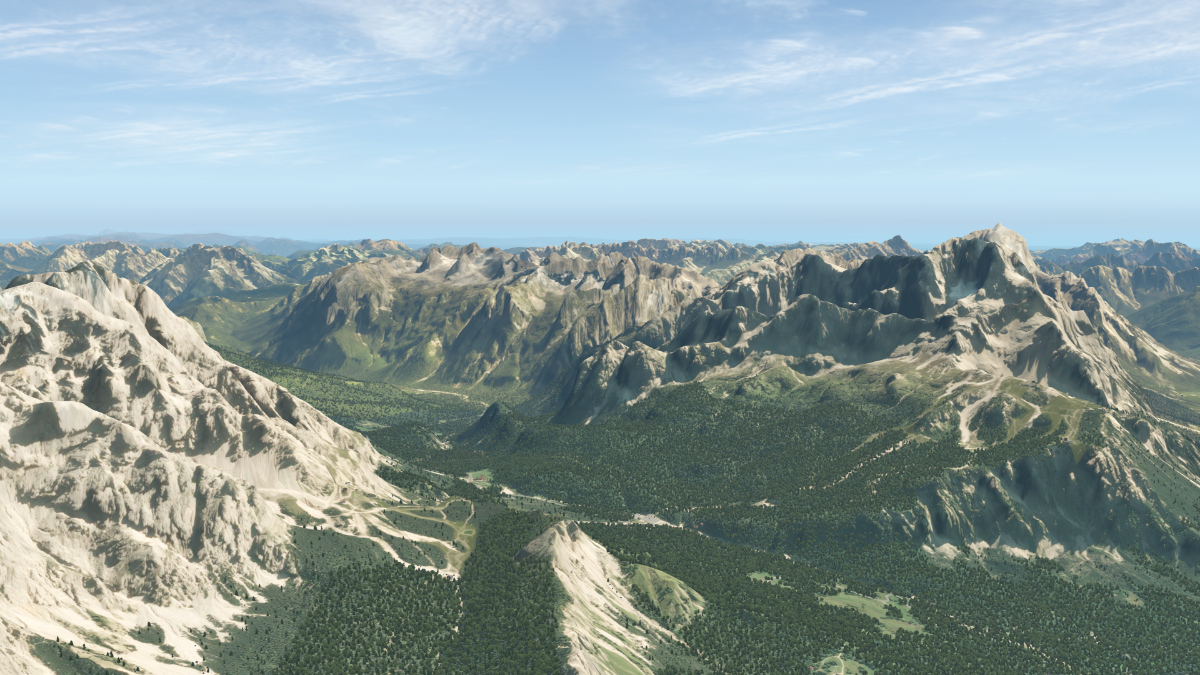
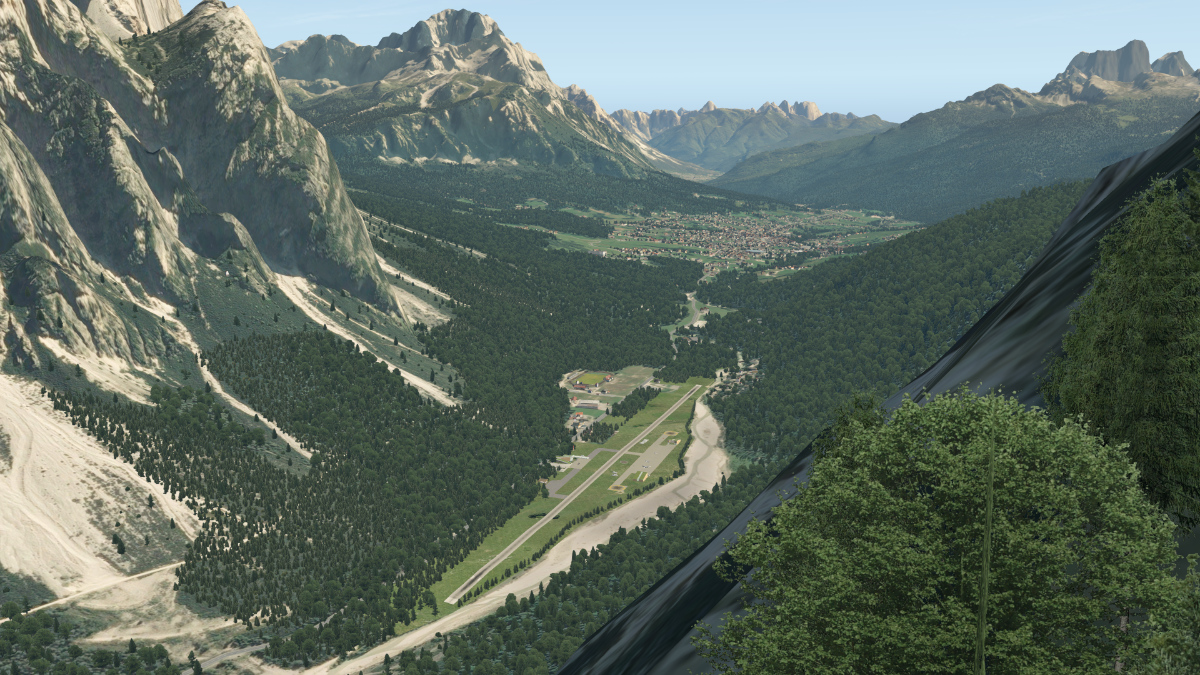
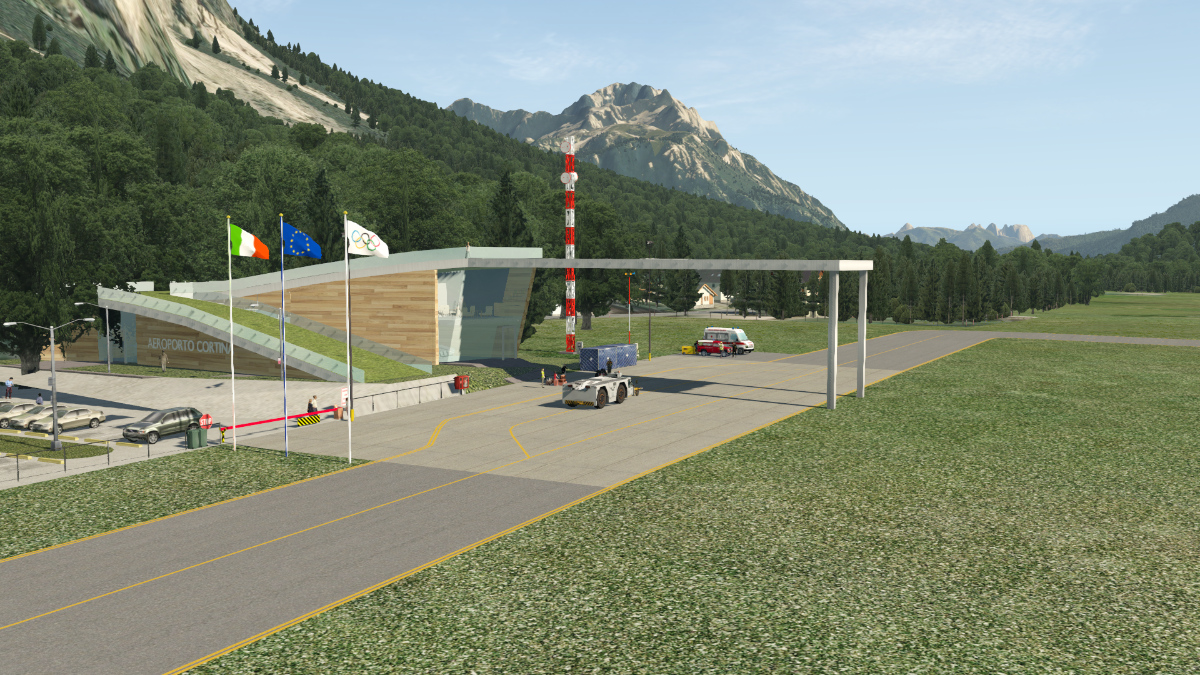
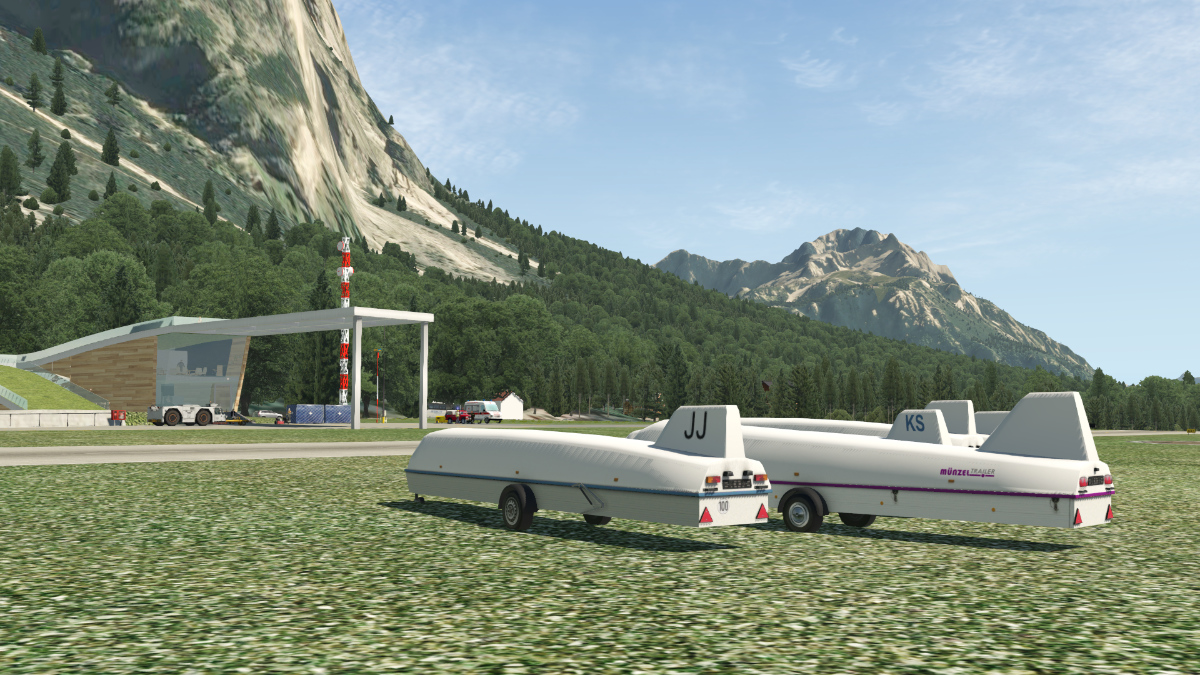
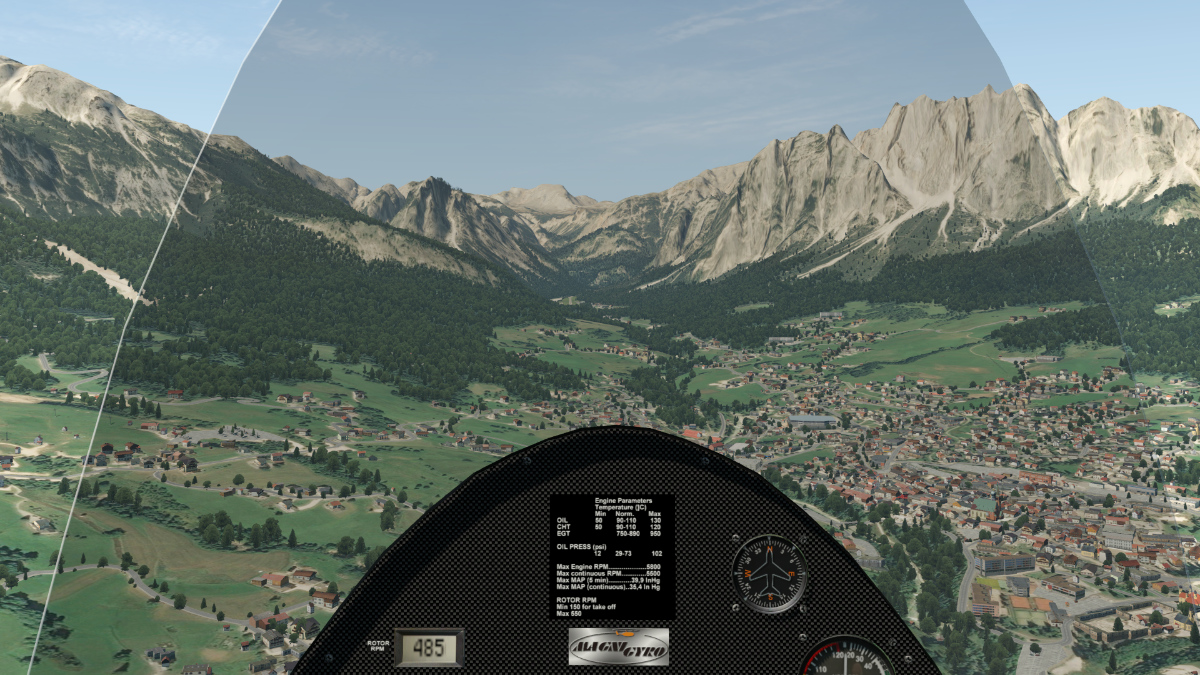
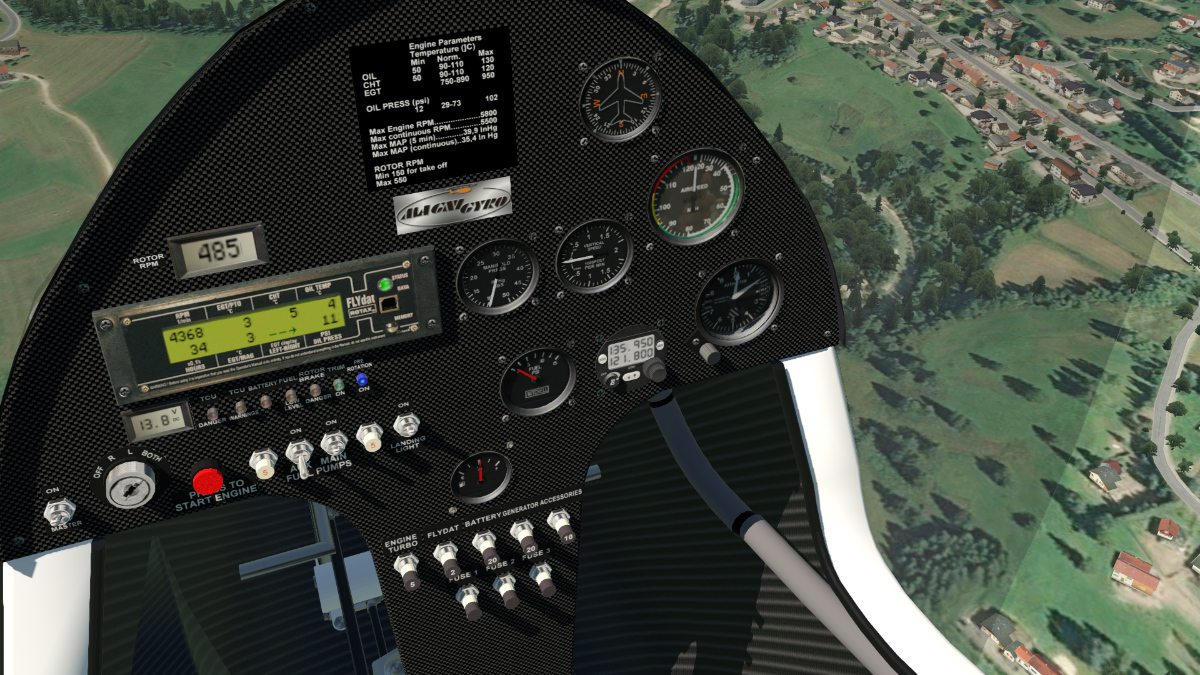
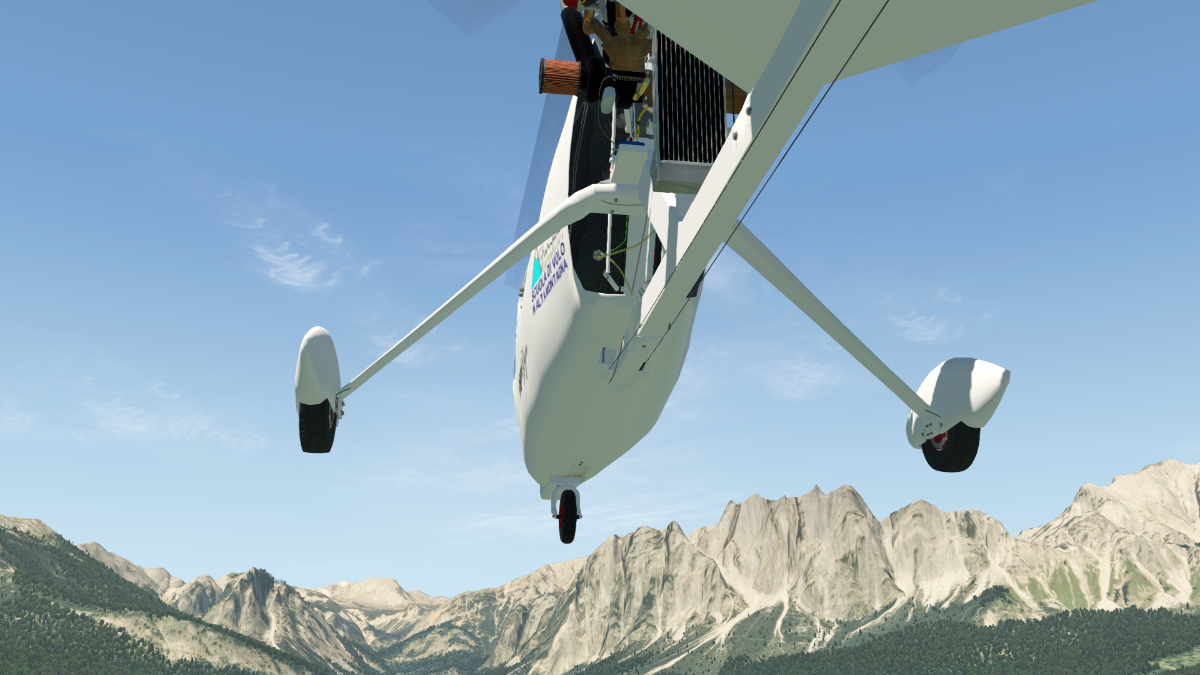
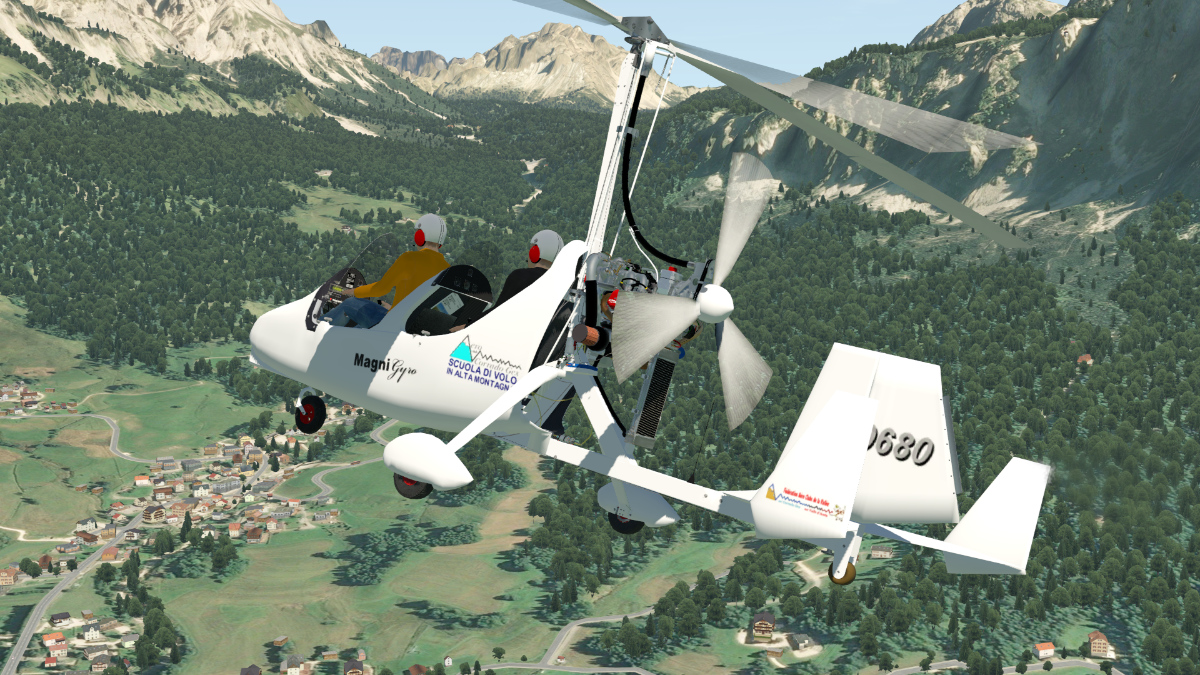
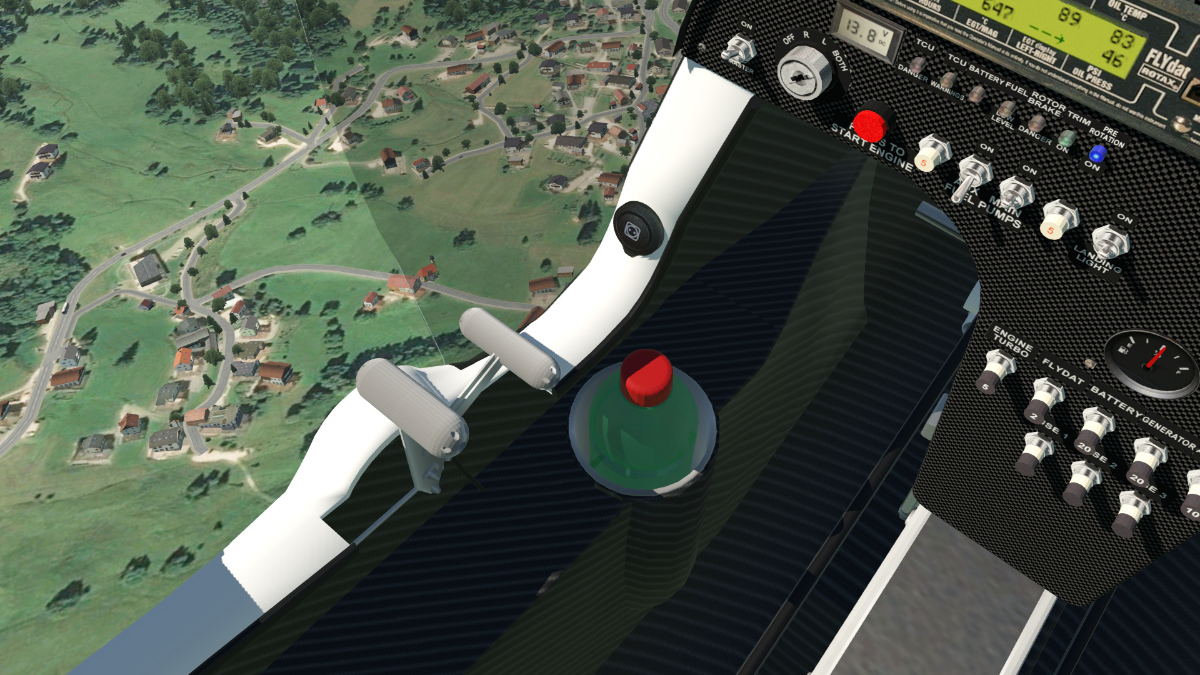
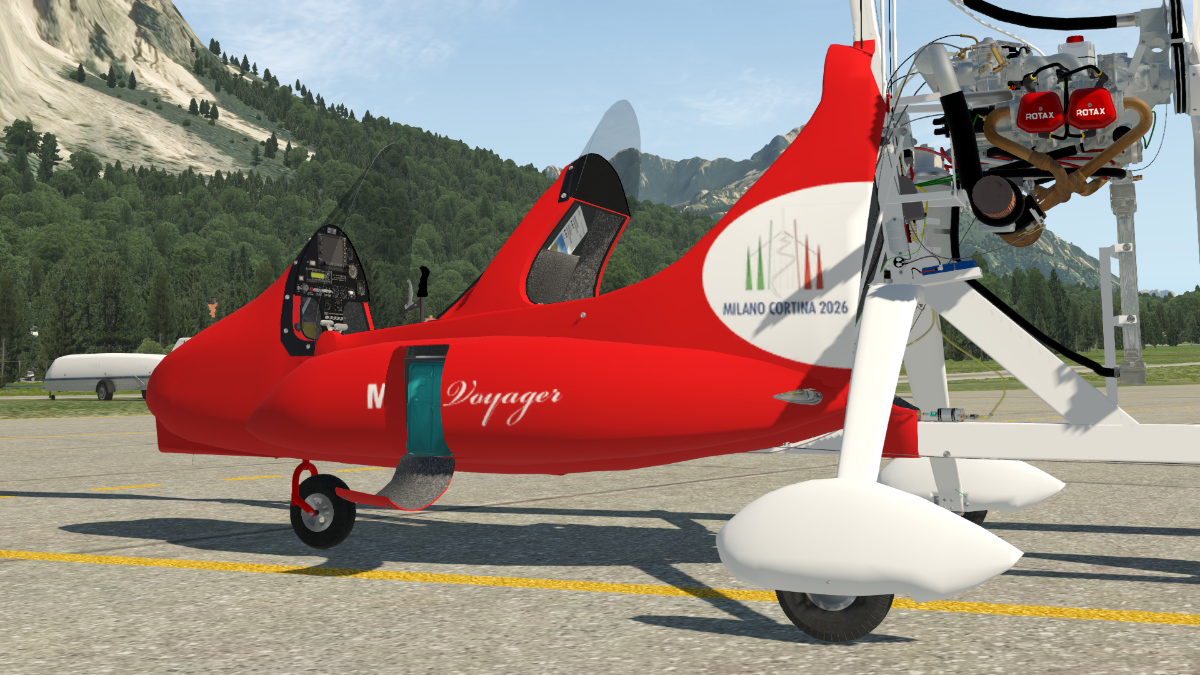
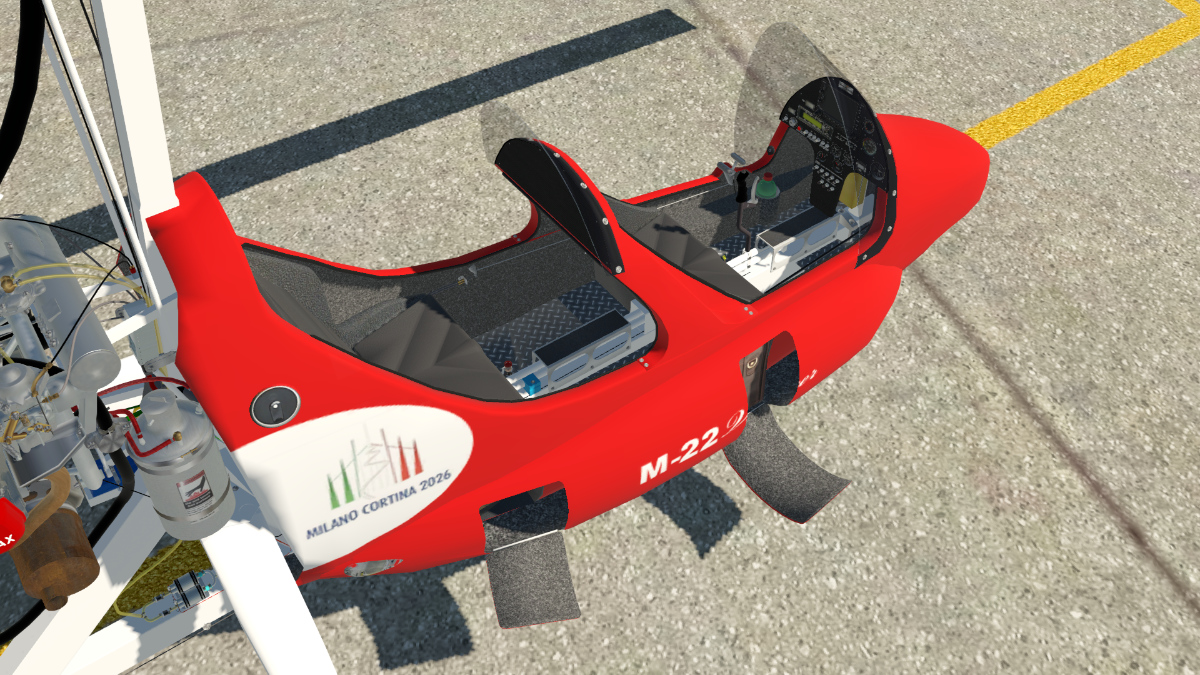
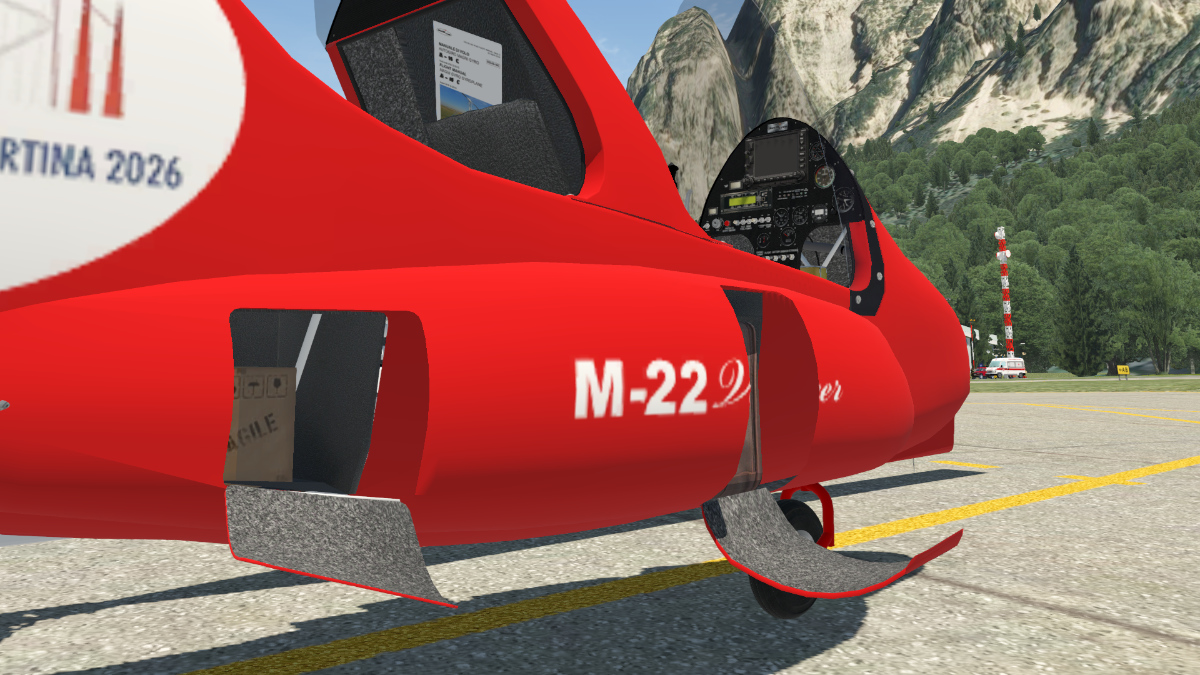
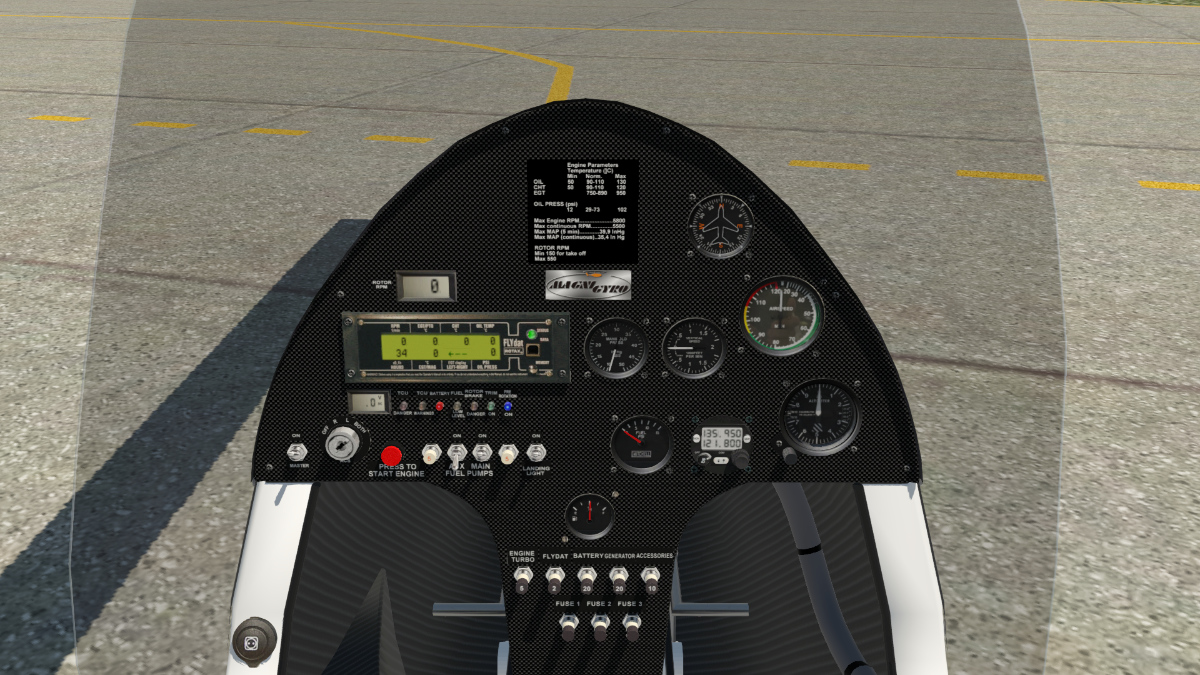
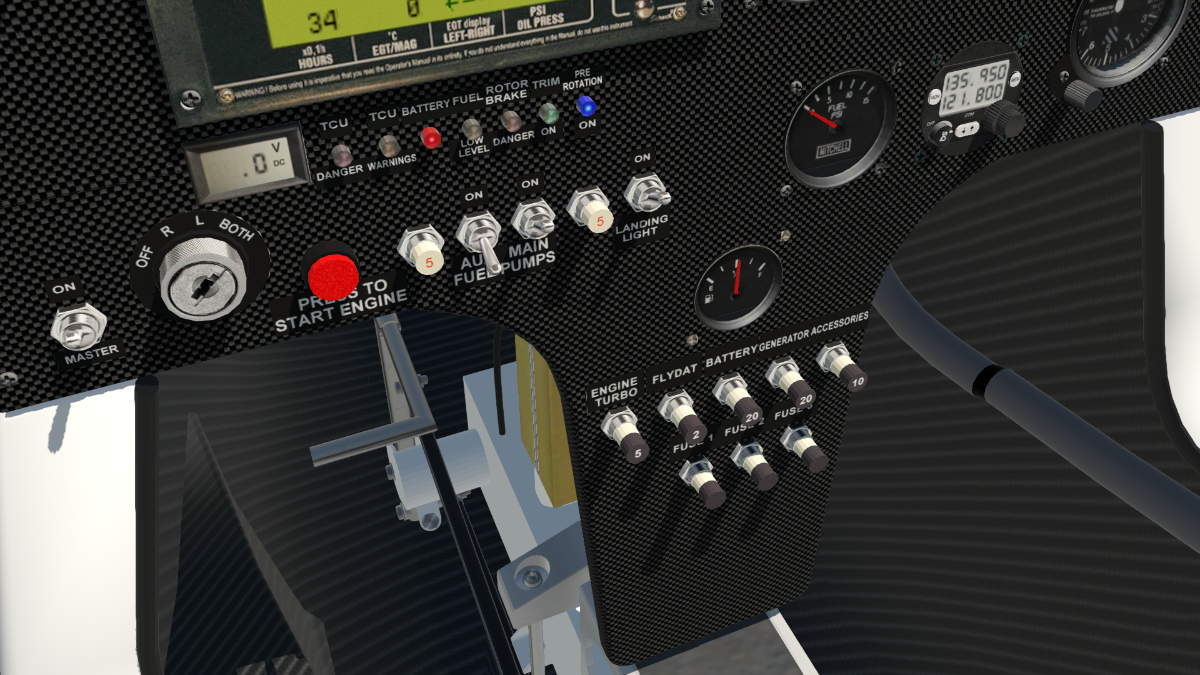
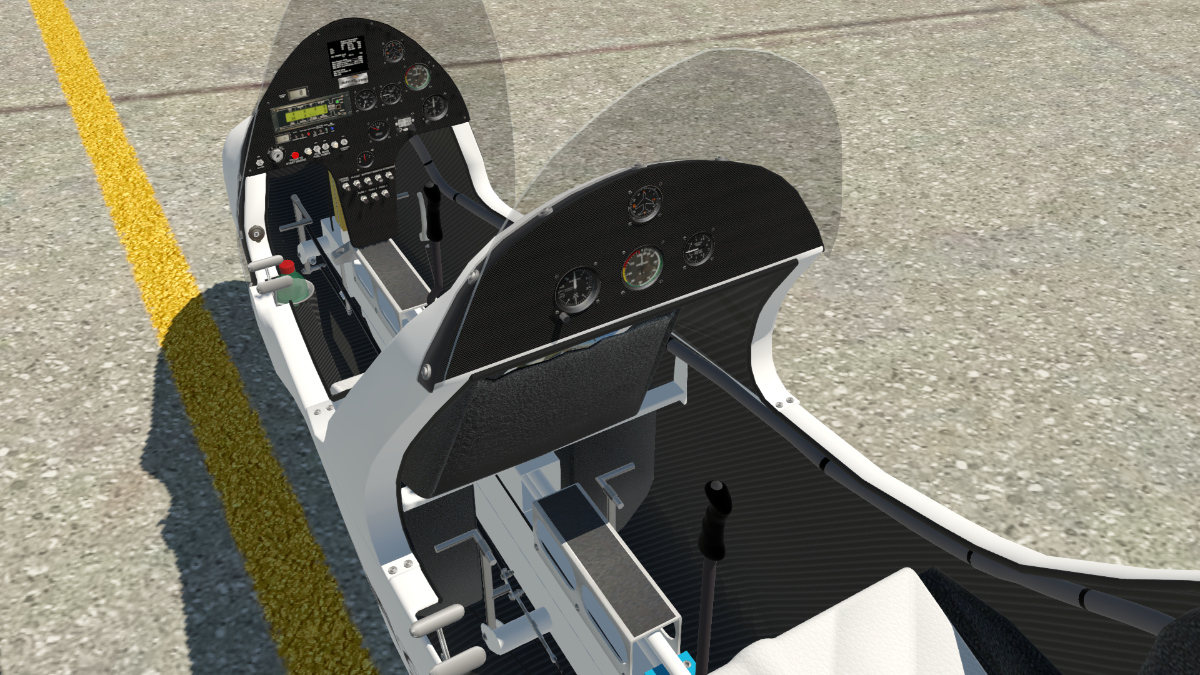
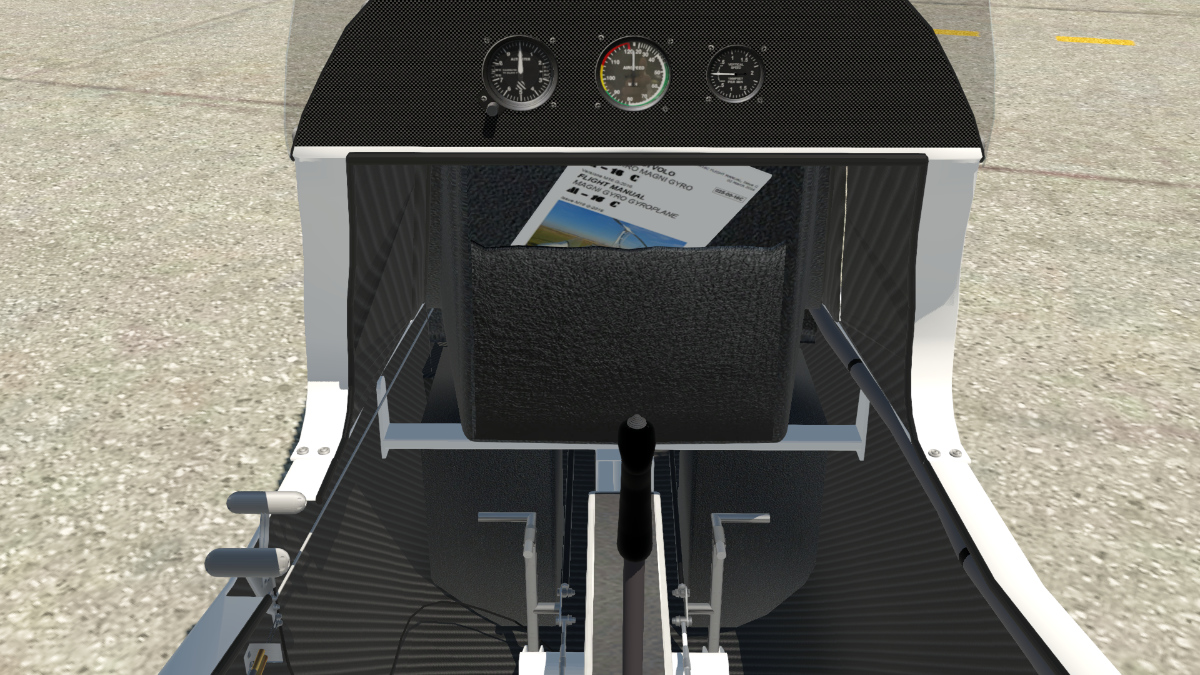
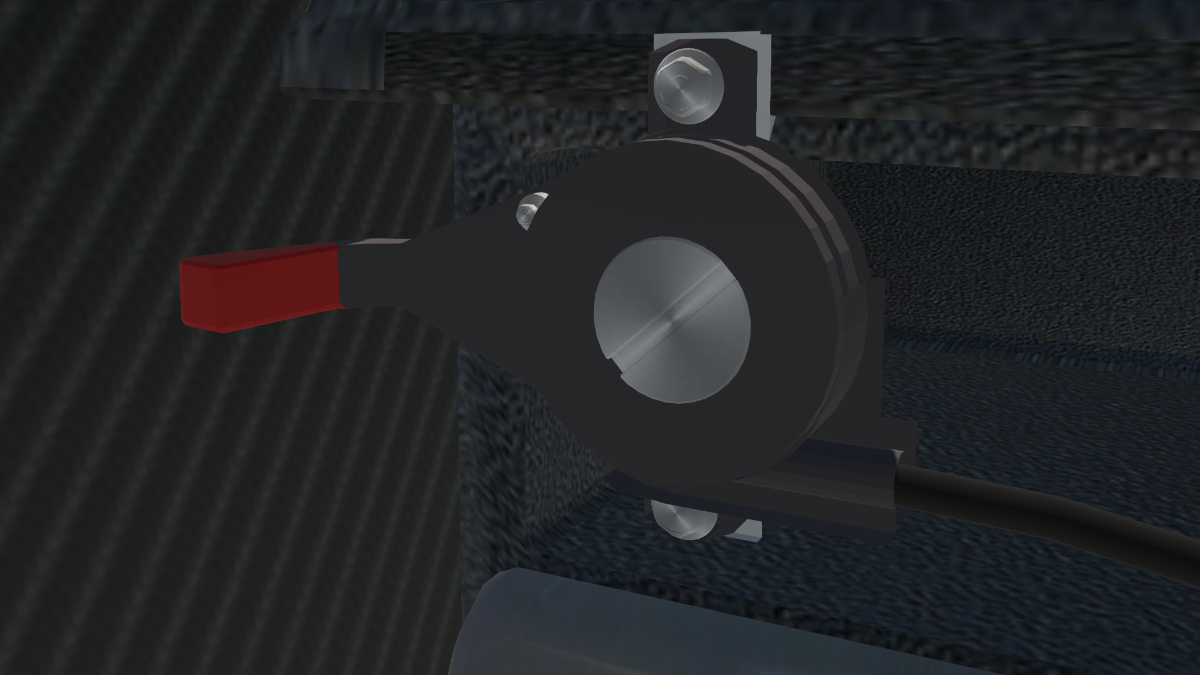
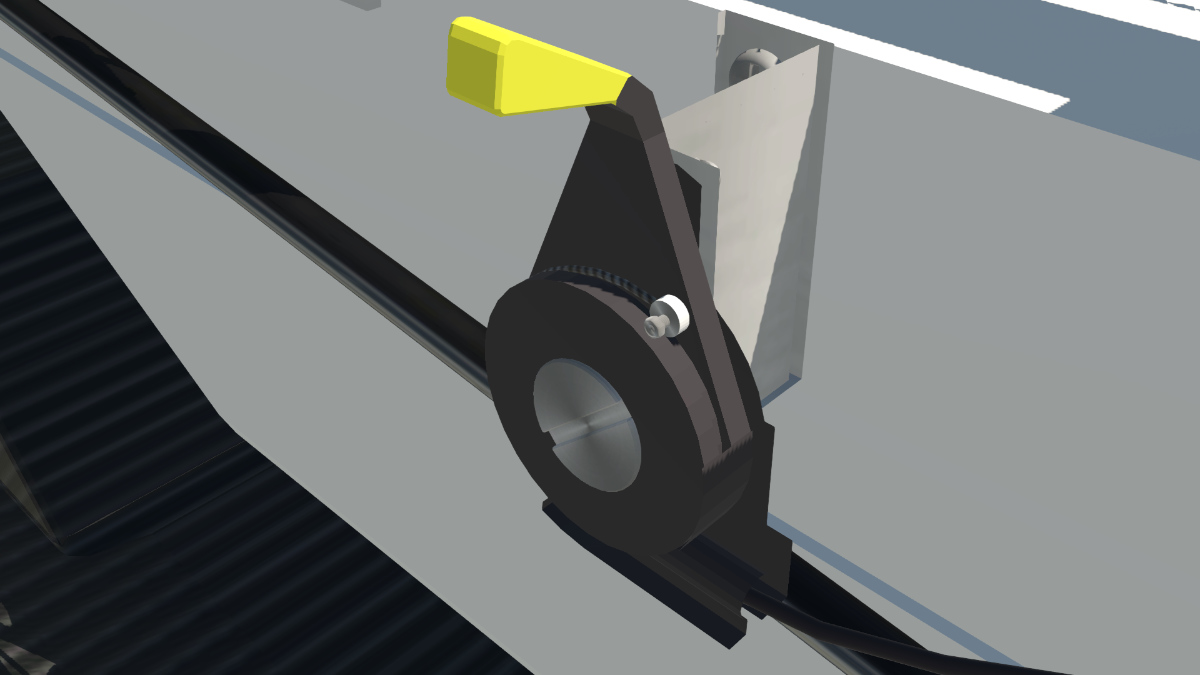
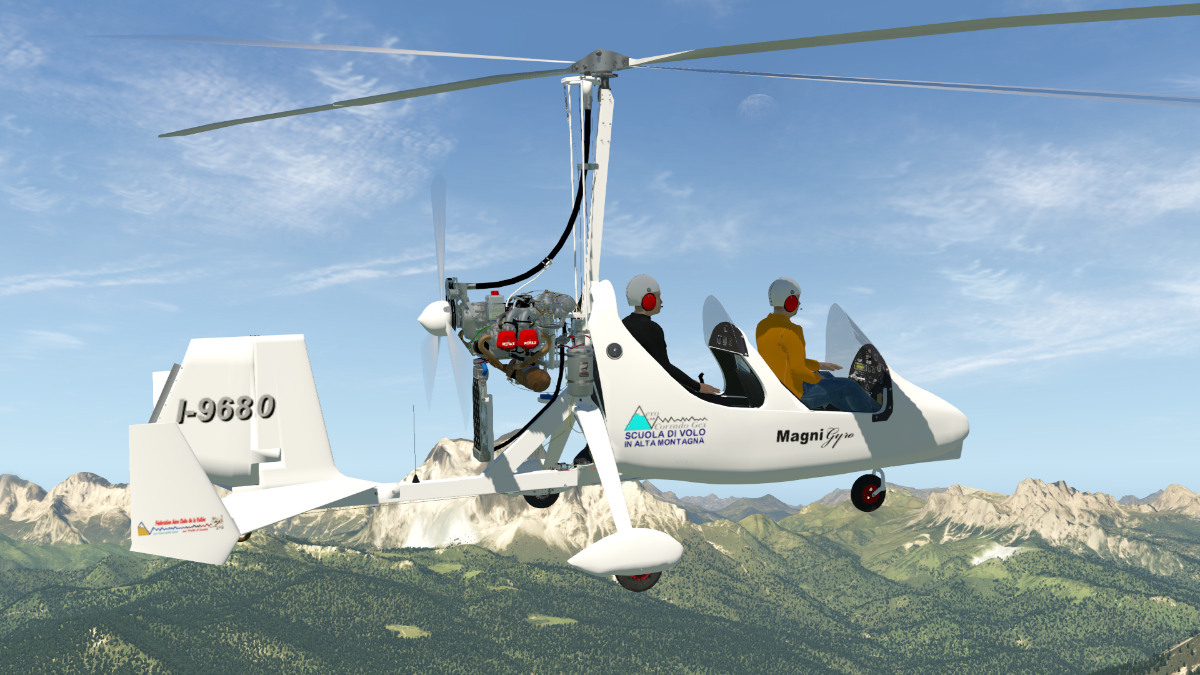
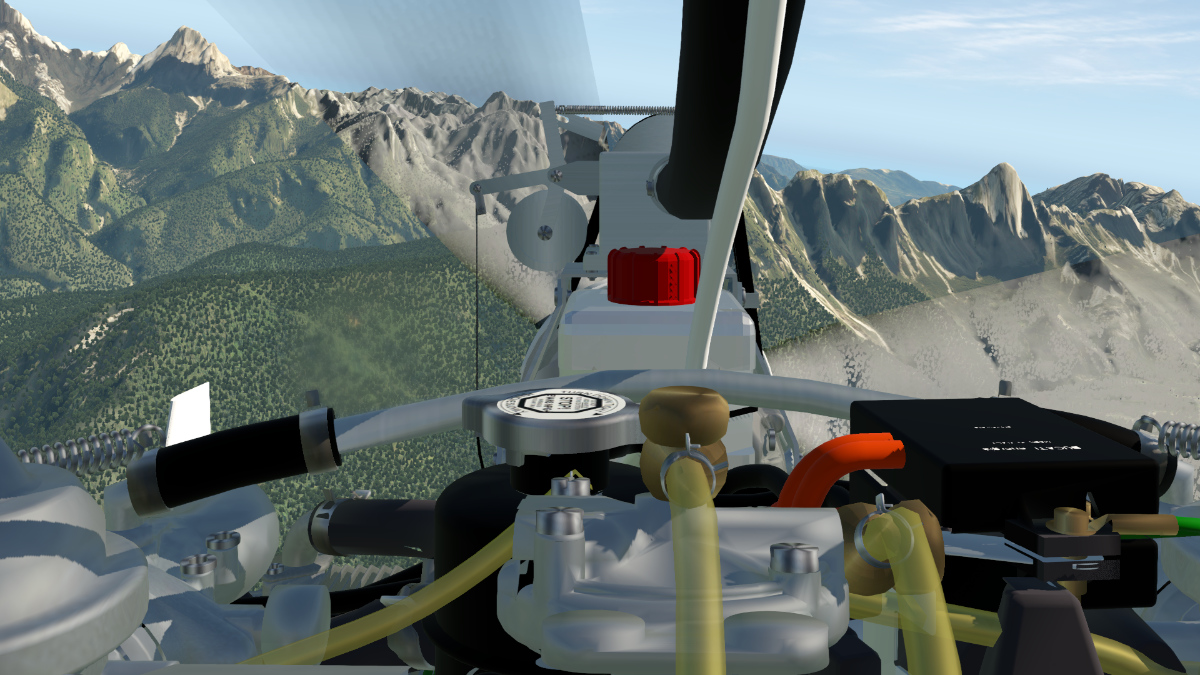
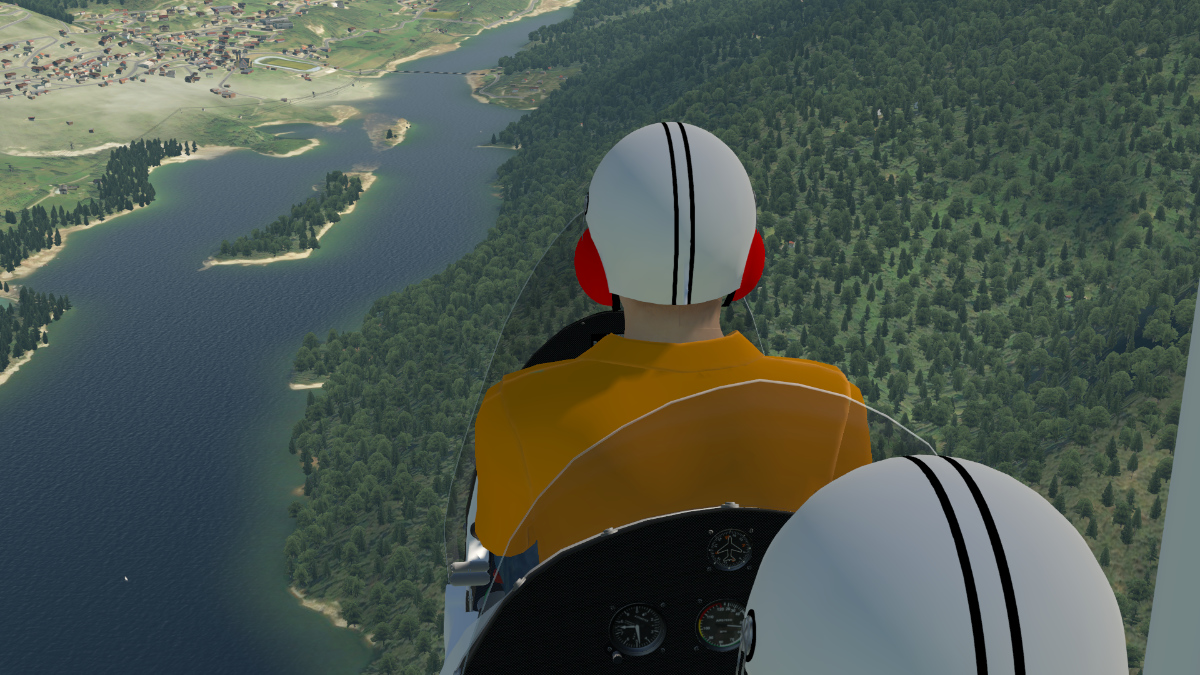
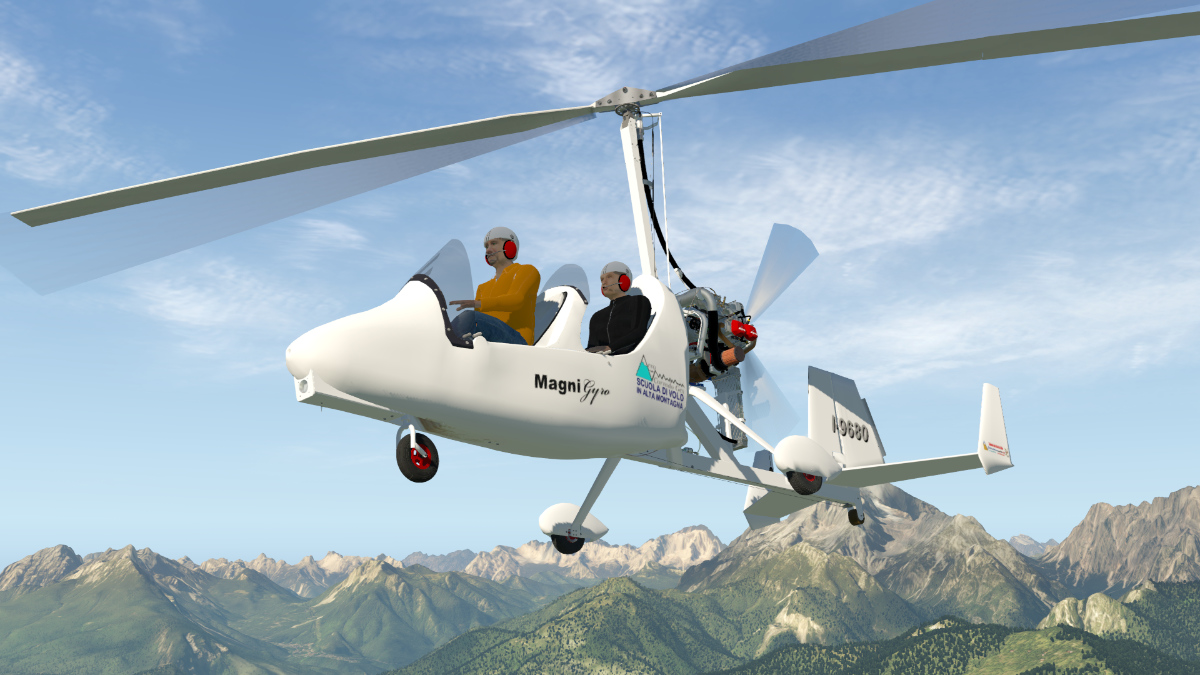
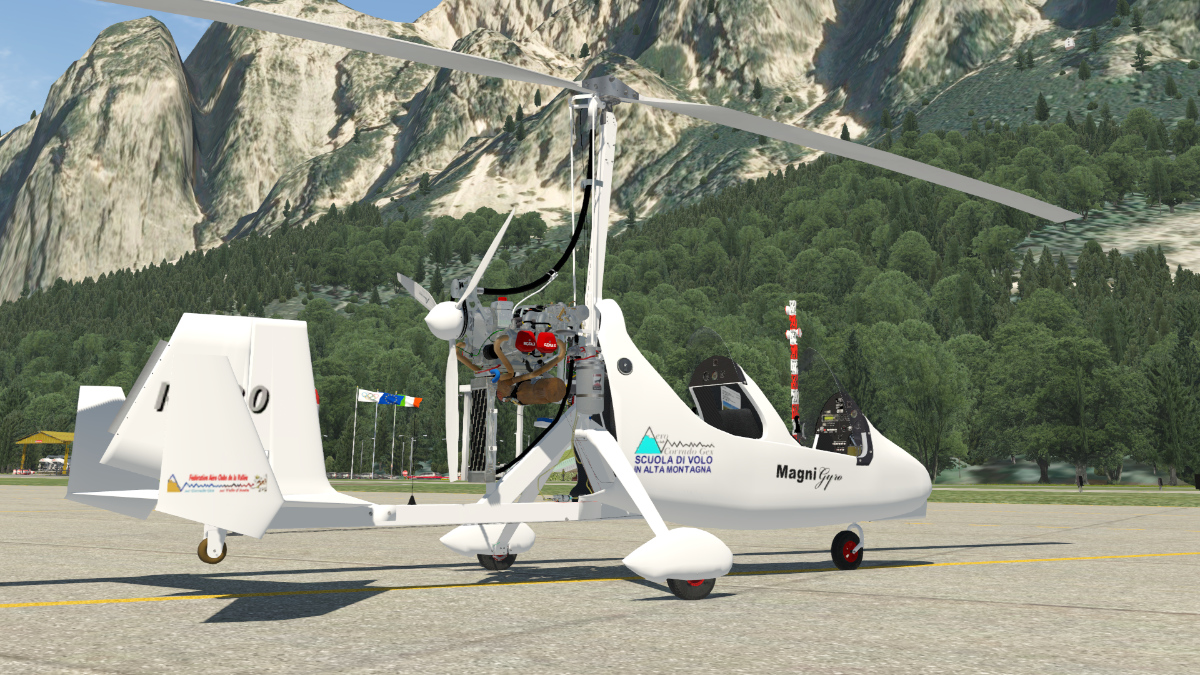
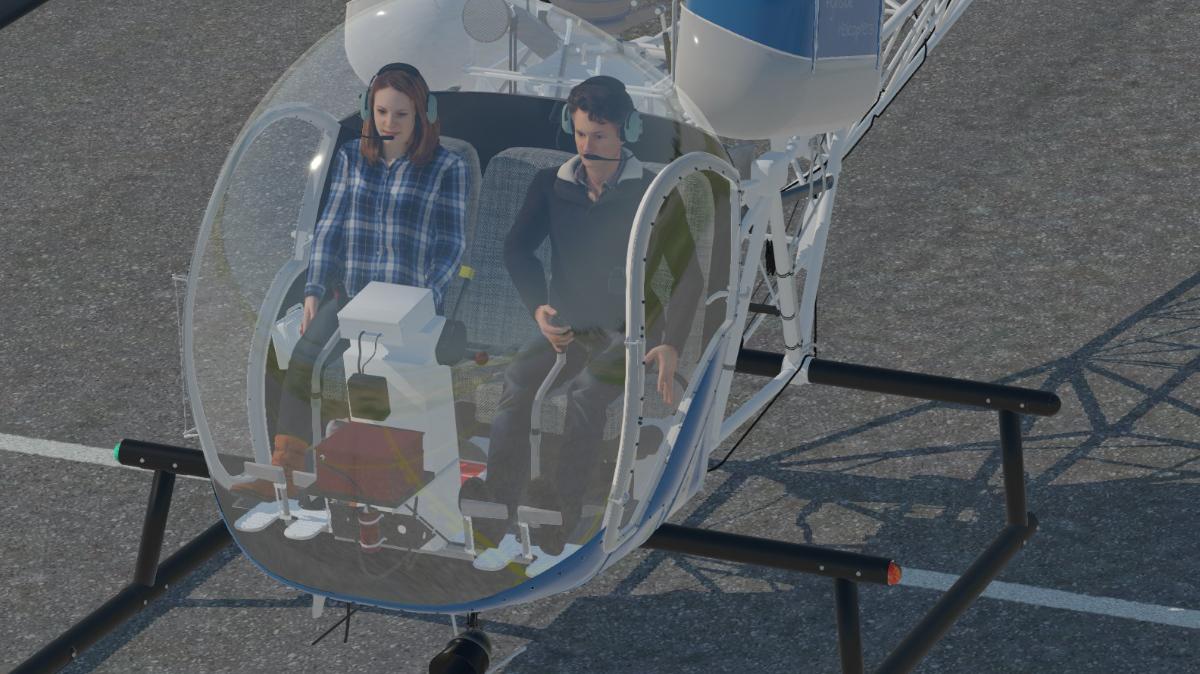
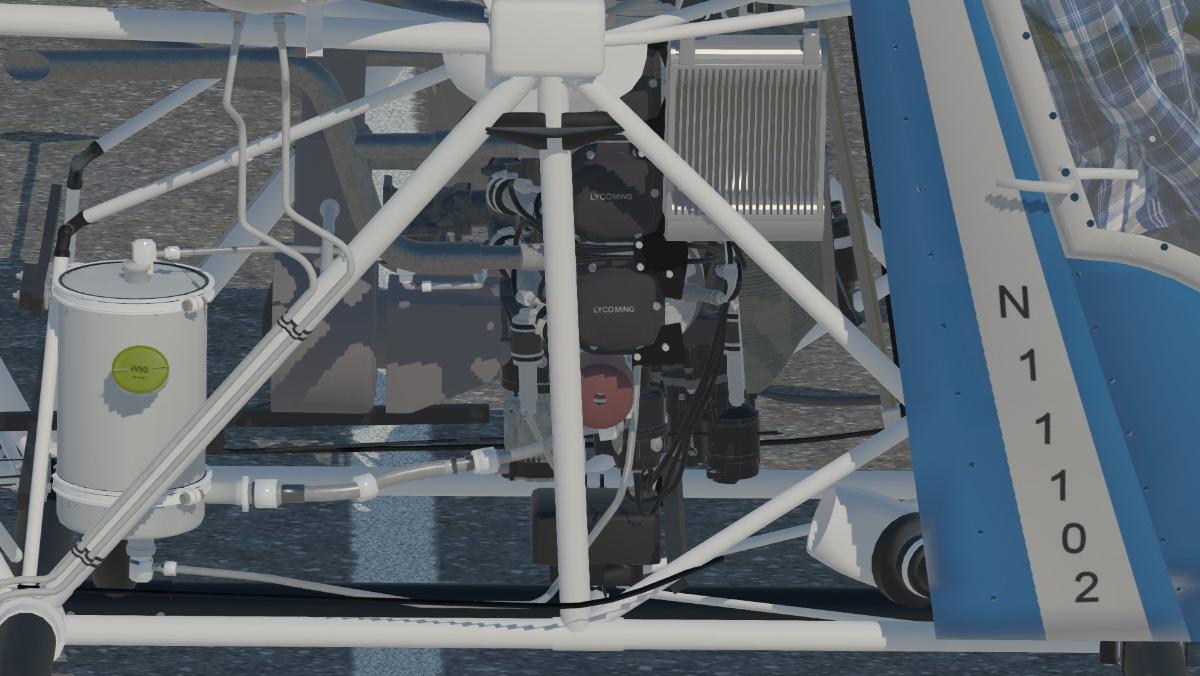
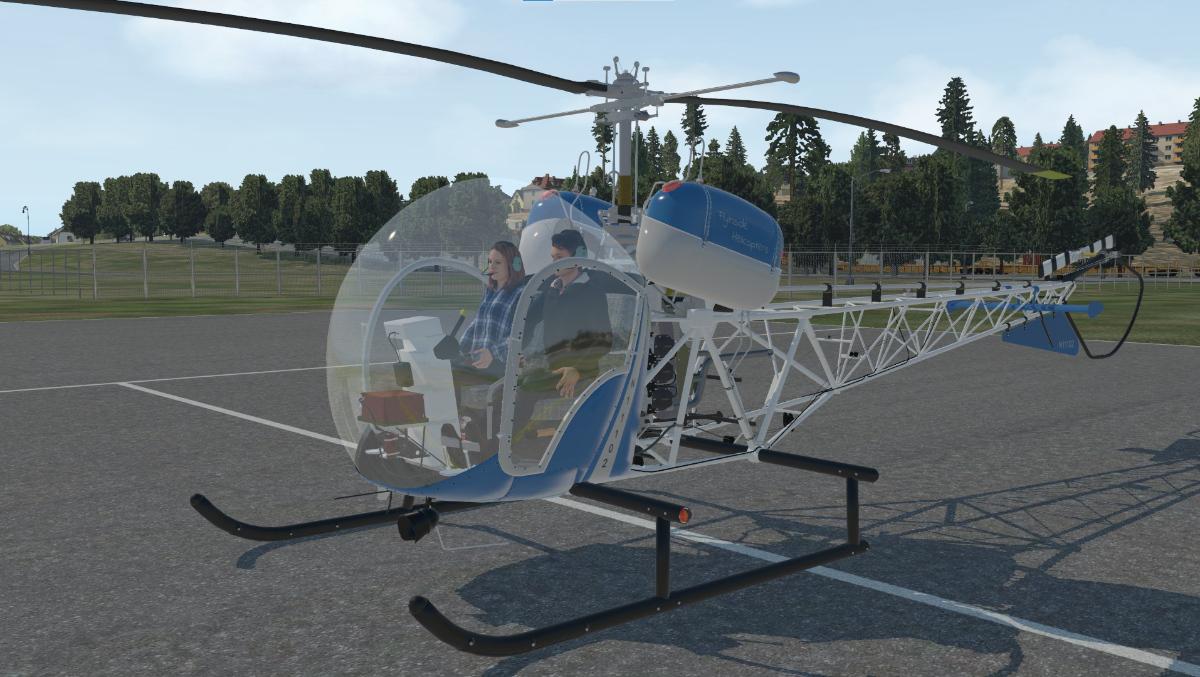
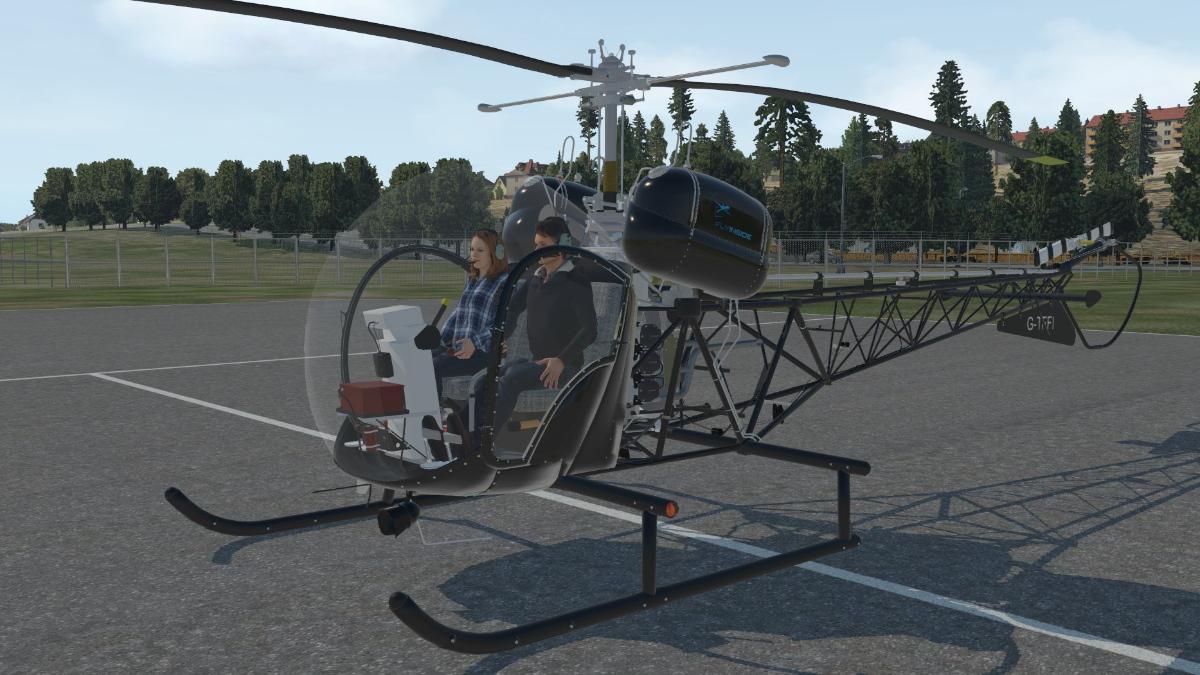
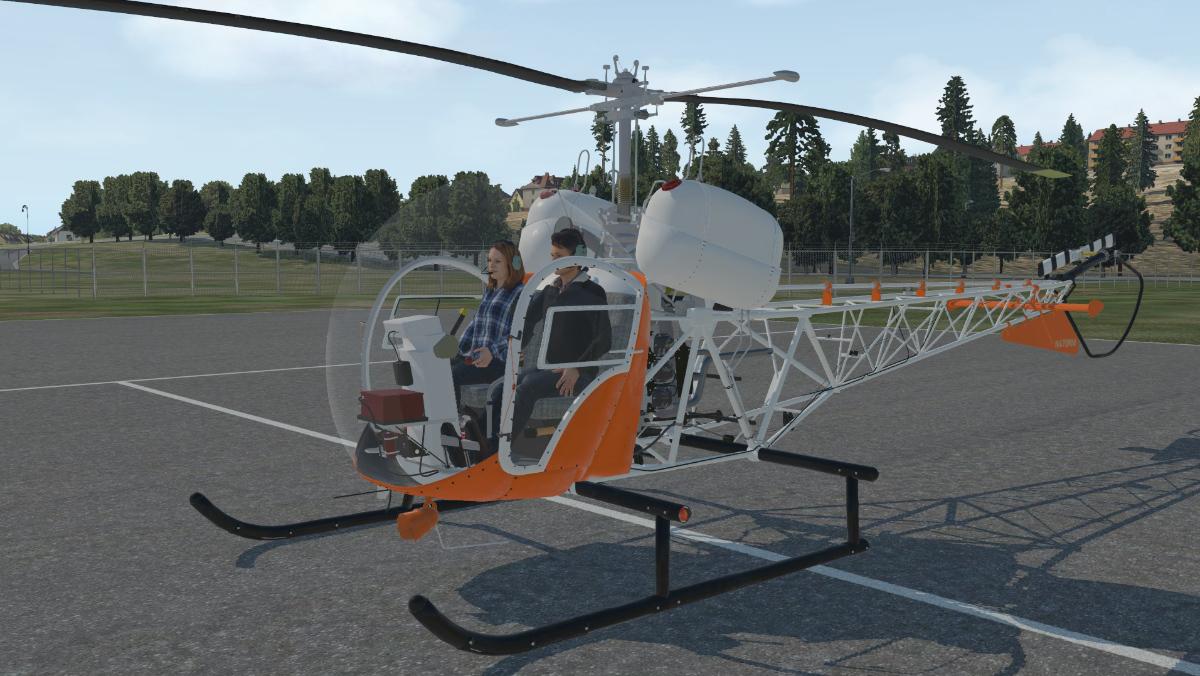
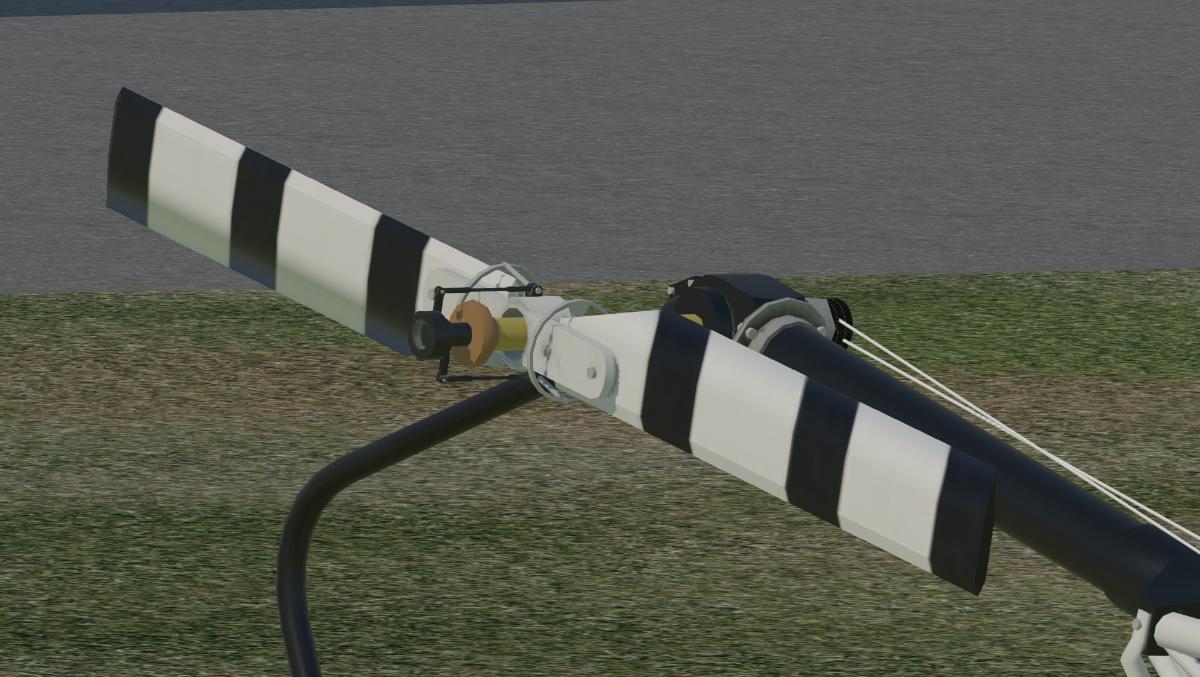
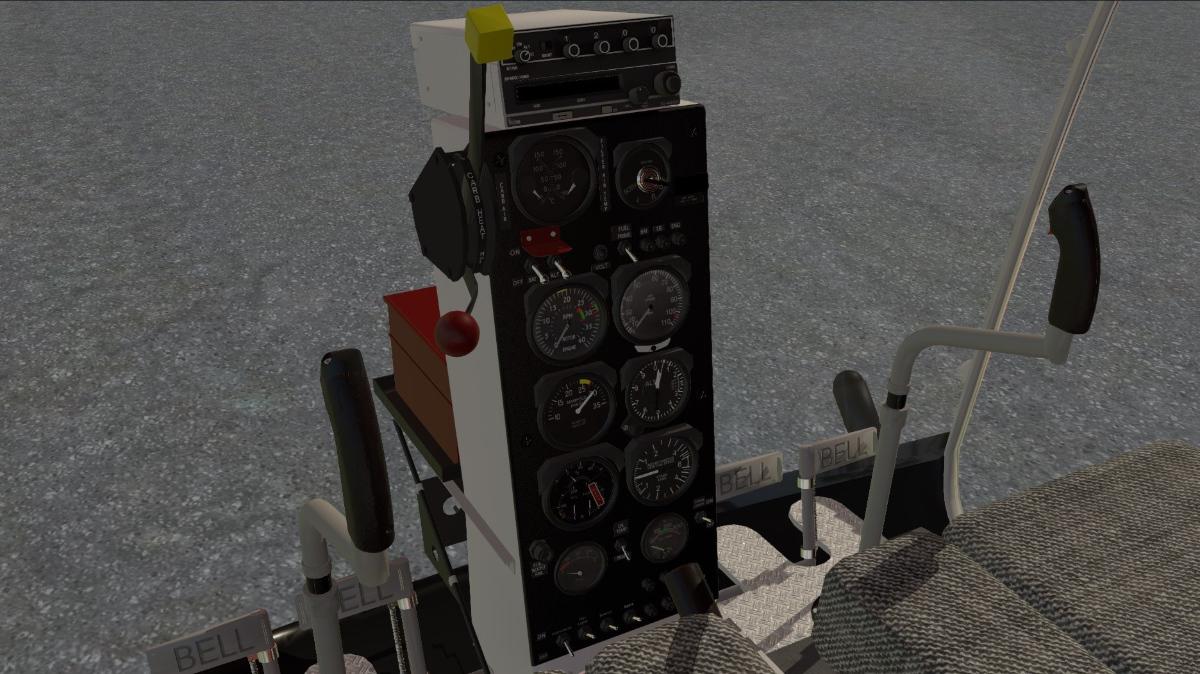
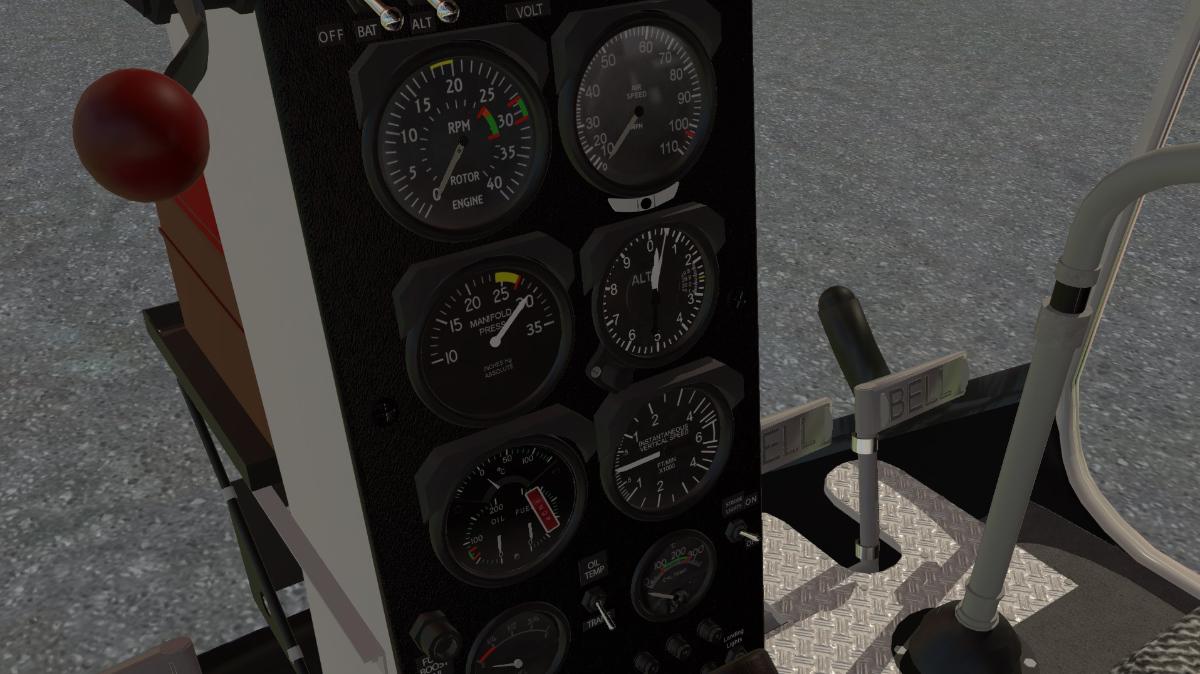
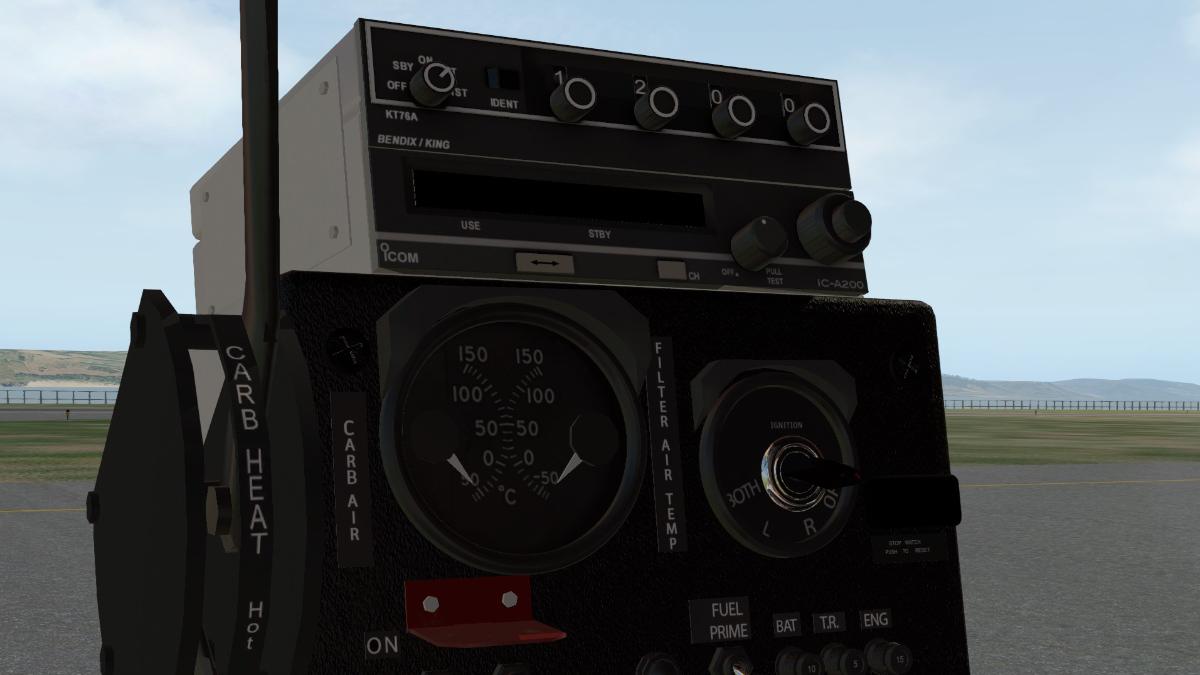
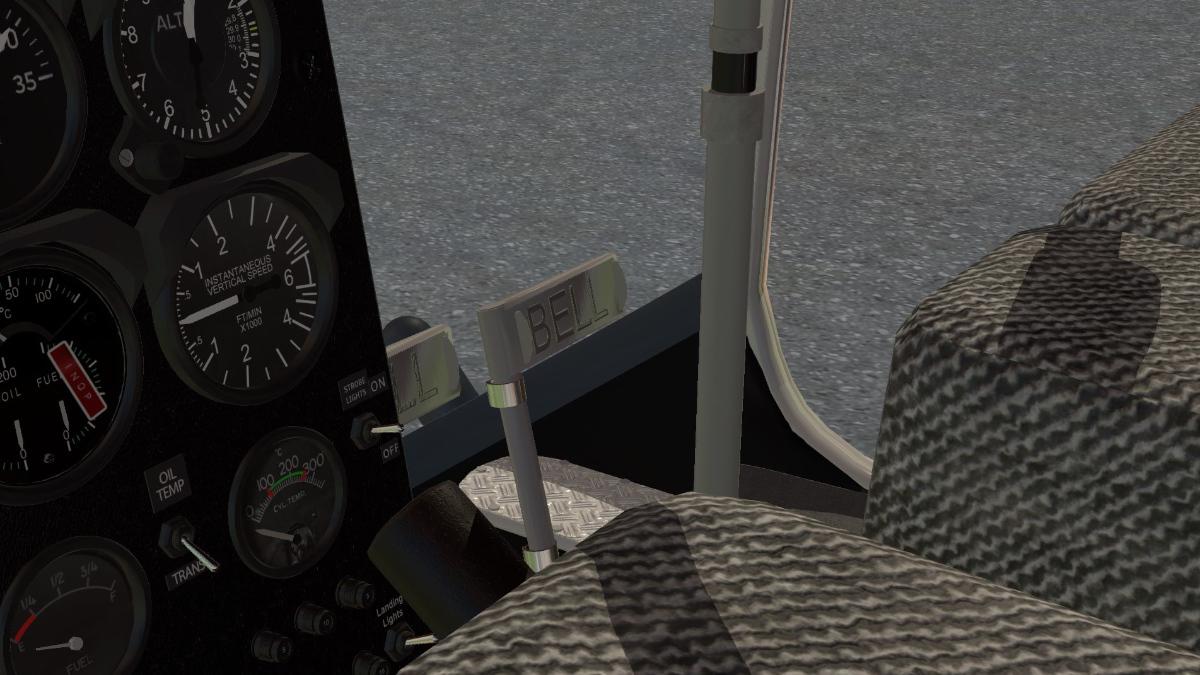
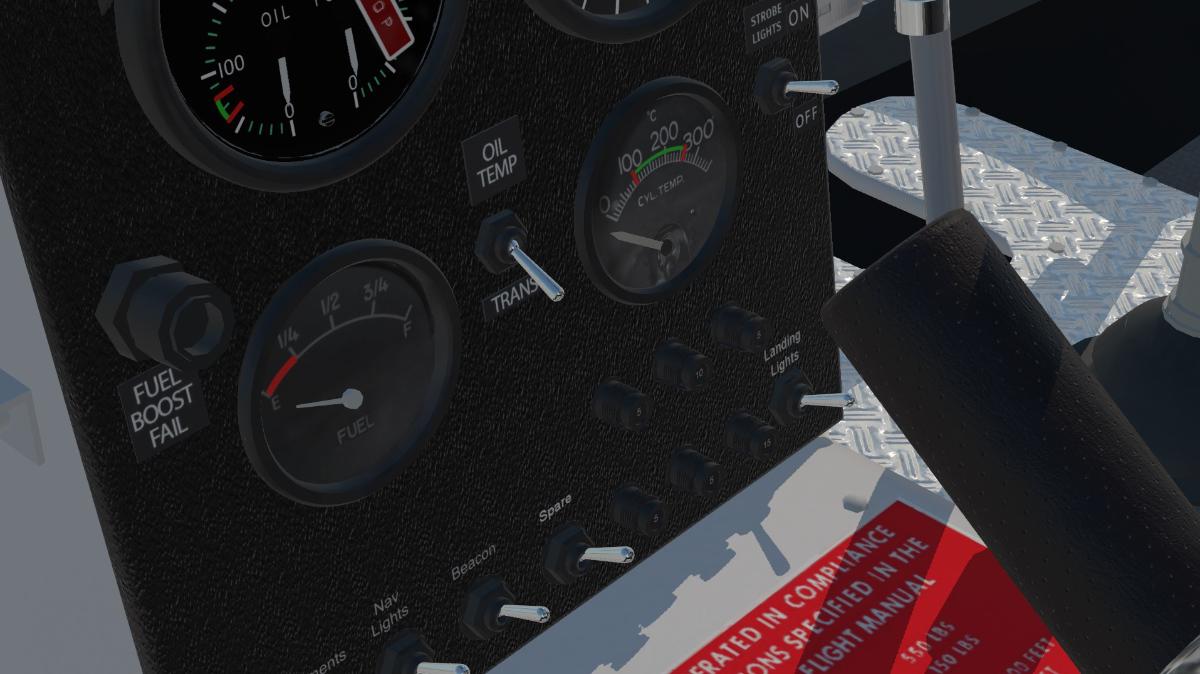
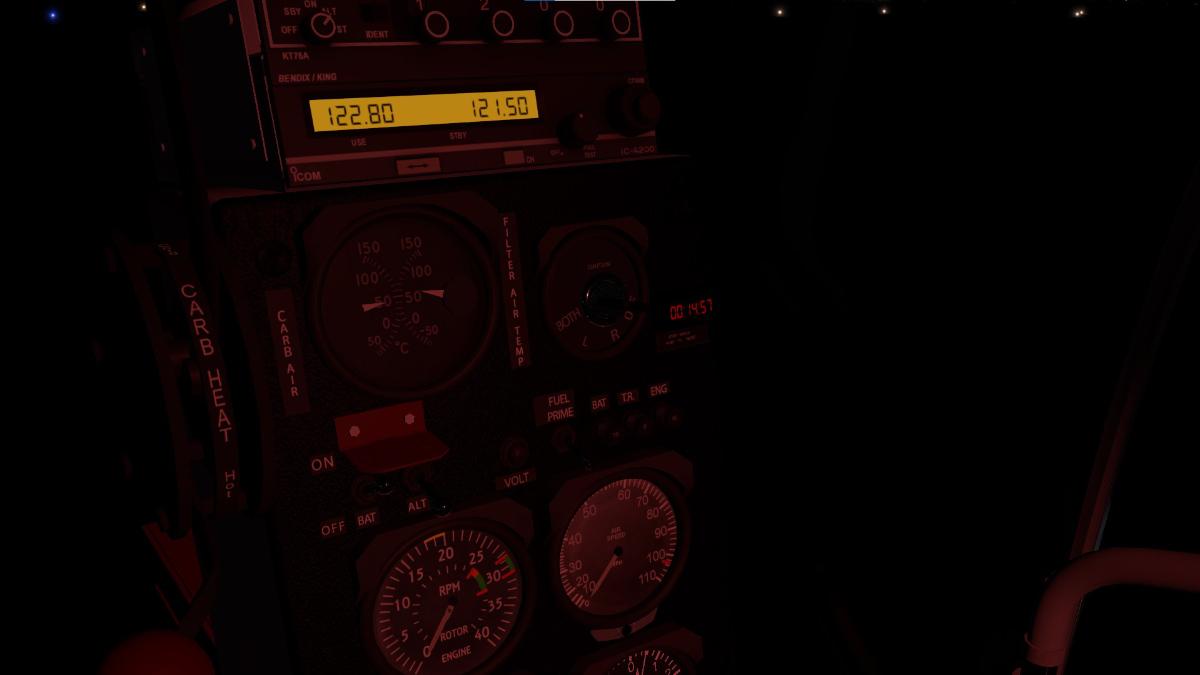
Aircraft Review: Magni M-16 and M-22 Gyrocopters Introduction Hello, and welcome to my second review here at X-PlaneReviews. This time around, and quite a departure from my previous scenery review, I will be sharing my thoughts on an autogyro which I have been testing out for the last couple of weeks. The package in question includes the Magni M-16 and M-22 by 3Dreal. The M-16 Tandem and M-22 Voyager are two single-engine two-seat gyroplanes equipped with a fixed front tricycle landing gear which can transport two crew members in a semi-fairing fuselage. As I’m a huge fan of low and slow aircraft, I was eager to see what this package offered, so with my order placed, I was ready to rock and roll… Purchase & Installation Once purchased from the Org store, it was just a simple case of downloading the provided zip file. This weighed in at just under 250MB, so not a bad size considering two models are being offered. With the file extracted, the package comes to 1.5GB, so quite a considerable increase, but…don’t forget, this also includes two additional sceneries. Yes, you heard correctly, if having two autogyros wasn’t enough, the developer has also provided sceneries of Chatelair airfield and Cortina d’Ampezzo airport, both situated in the Alps. Adding both the models and the included sceneries was a doddle, as according to the documentation, all I had to do was copy the two autogyros into X-Plane’s Aircraft folder, and the sceneries into…you guessed it, my Custom Scenery folder (making sure they were placed in the right order in my scenery_packs.ini). With these tasks done, I was ready to start X-Plane… First Impressions Having loaded up X-Plane, I decided that it would be only fitting to use one of the included two sceneries to begin this review, this being the larger Cortina d’Ampezzo airport. Due to its location, the airfield makes for an ideal starting point in which to explore this beautiful mountain region of Europe. The airport itself is nicely done and includes several custom buildings. There are numerous people situated around the airport, along with varying degrees of clutter. When used with simHeaven’s X-Europe and decent ortho imagery, the result is quite pleasing to the eye. M-16 Tandem Trainer & M-22 Voyager Note: For this review, I will be concentrating on the M-16 Tandem Trainer. The included M-22 is a touring variant with baggage space and increased endurance, but apart from that, it is basically the same as the M-16, as you can see from the images below. Moving on to the M-16 Tandem Trainer, and it’s clear to see that this is where the developer spent most of their time on, and rightly so. The exterior 3D modelling of the autogyro is some of the best I have seen in X-Plane. Considering its size and relatively simple shape, the detailing is impressive, especially where the engine is concerned. The power unit is composed of a piston engine (turbocharged) 115hp Rotax 914UL, and it looks fantastic, with even the smallest details being modelled. The high level of detailing continues to the main fuselage section, with all control surfaces, rotors, winglets, etc also being modelled. As with the 3D engine, the detailing of the rotor also includes the rotor head, rods, gear, speed sensor, and looks highly impressive, even when viewed close up. Notable animations, away from the obvious, include the opening and closing of the baggage compartments, and this is done via handles on the hatch. M-16 Tandem Trainer Interior The interior of the M-16 Tandem Trainer is again nicely laid out, with the main instrument display being its standout feature. You may be thinking (just as I did) that due to its relative simplicity, the M-16 would have a rather basic instrument cluster, and to a degree, you’d be right, but it’s not as simple as you might have first imagined. As well as your usual standard set of instruments and dials, you also get a FLYdat (monitors the Rotax engine via sensors), plus on the M-22, a rather handy Garmin 530. Altogether, for such a small aircraft, there are plenty of levers, switches, and buttons to keep you occupied during your flight! On the left and to the side of the cockpit, you’ll find an animated throttle lever, brake lever, rotor trim switch, pre-rotation lever, pitch and roll stick, mixture lever, and a rotor brake lever. These all have varying levels of animation included and are relatively easy to access. Texturing is done to a reasonably high standard and whilst certainly not the best I have seen, is perfectly adequate for this type of aircraft. Metallic, plastic and fibreglass components are all distinguishable from each other, with my only real complaint being that they are slightly low in resolution. Overall, sitting in the cockpit of the M-16 is a highly enjoyable and authentic experience. Flight Model I’ve never actually flown in an autogyro before, so I have no idea what their real-world flight characteristics are like, but if their performance is anything like the M-16, then it’s no wonder people enjoy flying them! I must say, it did take quite a few attempts to learn how to control the model, but once I got a rough idea of how things worked, I found the aircraft remarkably stable in the air and easy to fly. Taking off in the autogyro is probably the most difficult phase of flight to master, as is landing, but with practice, I can see it becoming almost second nature. I would advise against using the mouse and keyboard for your control inputs as it will only cause frustration. In my opinion, a dedicated flight controller makes the most sense, as it allows you to control more things at once. So yes, whilst the M-16 looks simplistic, be prepared to spend some time learning how to control the model. Sounds Only a few sound samples are included in the package, but what there are, worked well. I observed no engine looping and at no time did the drone of the engine get in the way of my enjoyment. Documentation Contained within the package are three high-quality PDF documents, the first of which covers the model in X-Plane, whilst the other two are related to the real M-16. I found all three to be very helpful as they guided me through the initial stages of operating the autogyro. Again, considering the relatively simplistic nature of the model, I was pleasantly surprised by their overall quality. Conclusion This was an interesting package to review as I was unfamiliar with both the autogyros and the airports contained within. However, having now had time to try out both thoroughly, I now feel I am reasonably qualified to provide an accurate summing up of each. Starting with the M-16 Tandem Trainer and I must say I was impressed with how this model both looked and performed. Initially, I was unsure of how I would get on with the model, especially considering my lack of knowledge or flight experience regarding autogyros. However, after only a few flights, my doubts and fears disappeared, as I found the M-16 incredibly enjoyable. I would be lying if I said there wasn’t a learning curve involved, but you know what they say…the best things come to those who wait. So, what about the two included sceneries in the package? Well, Cortina d’Ampezzo airport is certainly the most impressive of the two, not only by looks but also by its location. In fact, most of my flights in the M-16 Tandem Trainer were from this airport, so this should give you some idea. Overall, I thoroughly enjoyed this package as it offered something quite different to what I am used to. In many ways I found this to be quite refreshing, as it provided a challenge that other larger aircraft would perhaps fail to meet. As a result, if like me you fancy trying and exploring something different, then I highly recommend this little addition by 3Dreal. ___________________ The Magni M-16 and M-22 Gyrocopters package by 3DReal is now available from the X-Plane.Org Store here: Magni M-16 and M-22 Gyrocopters Price at time of writing US$21.00 Requirements: X-Plane 11 Windows, Mac or Linux 4 GB VRAM Minimum - 8 GB+ VRAM Recommended Download Size: 250 MB Current Version: 1.0 (August 11th 2021) Review System Specifications: Windows 10 64 Bit Intel Core i5-3350p CPU @ 3.10 GHz 16GB RAM NVIDIA GTX 1050Ti Aircraft Review by Paul Mort 28th July 2022 Copyright©2022: X-Plane Reviews (Disclaimer. All images and text in this review are the work and property of X-PlaneReviews, no sharing or copy of the content is allowed without consent from the author as per copyright conditions)
-
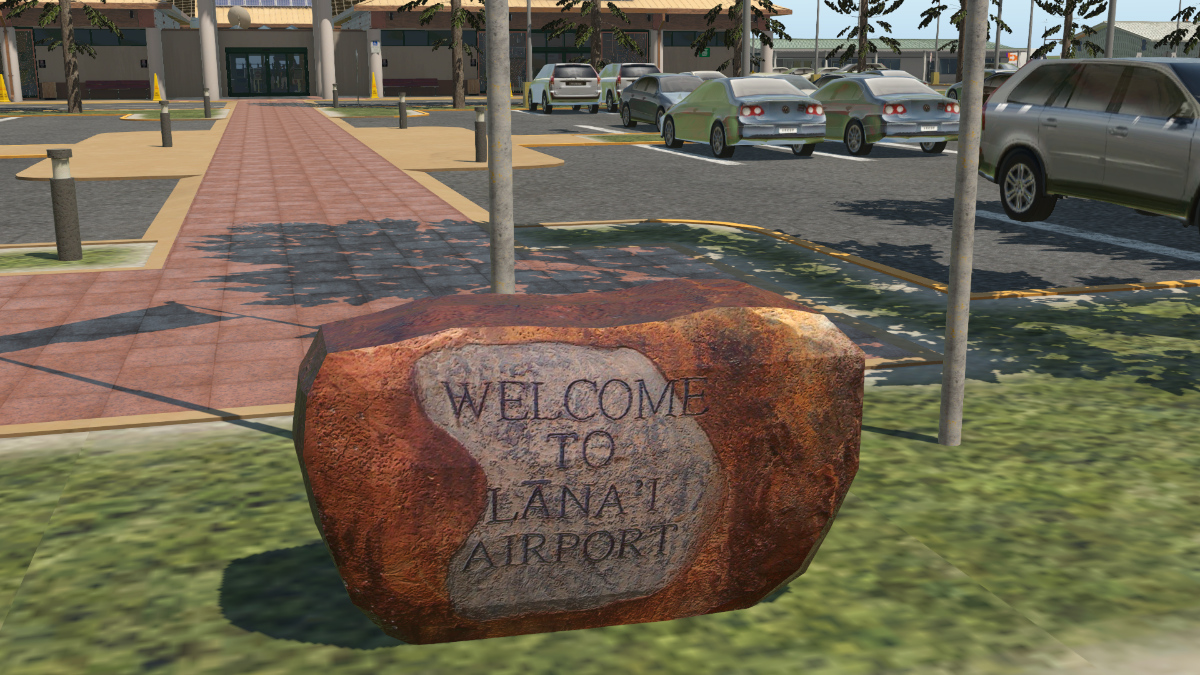
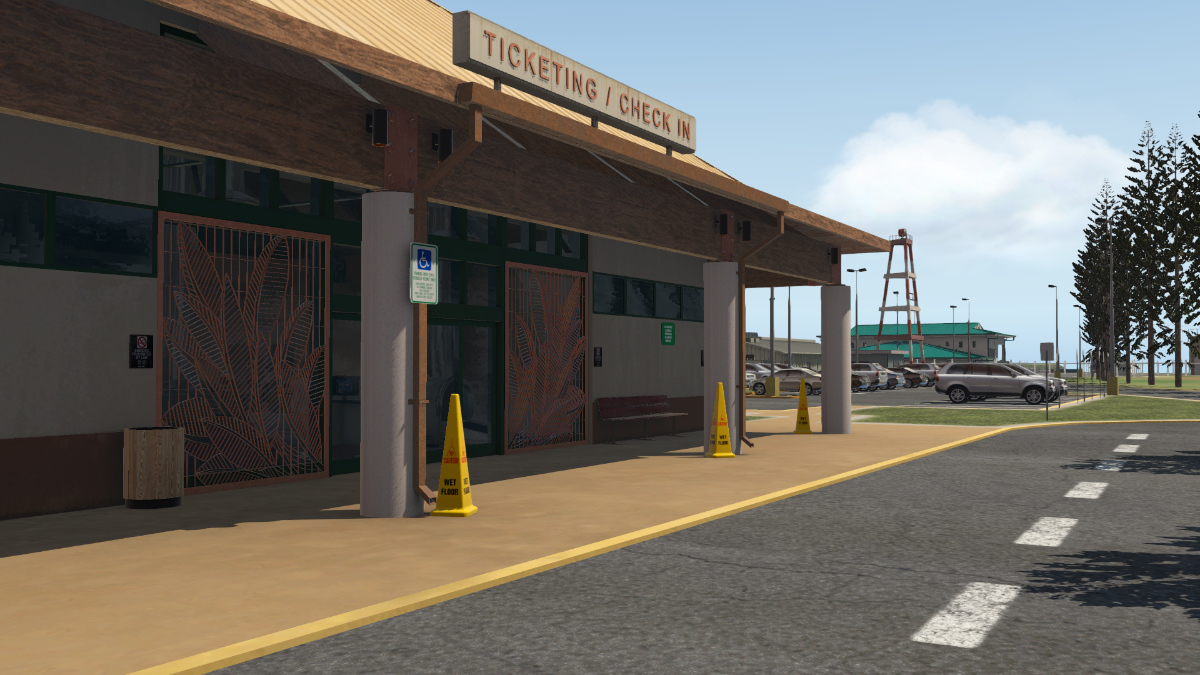
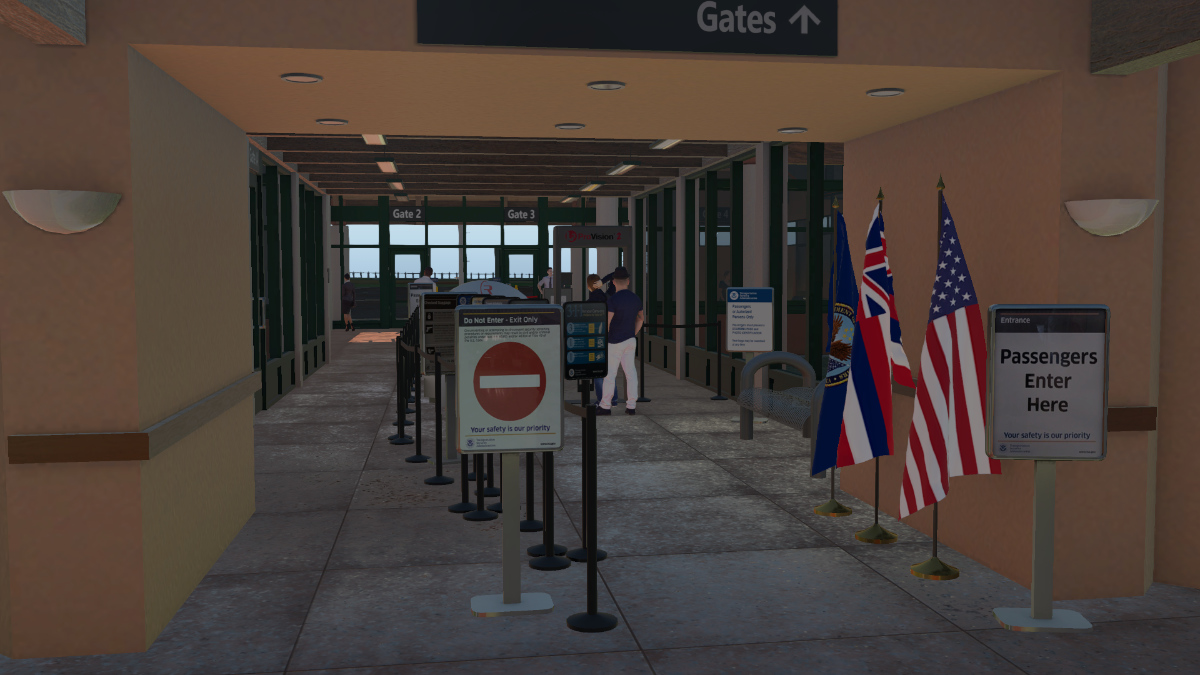
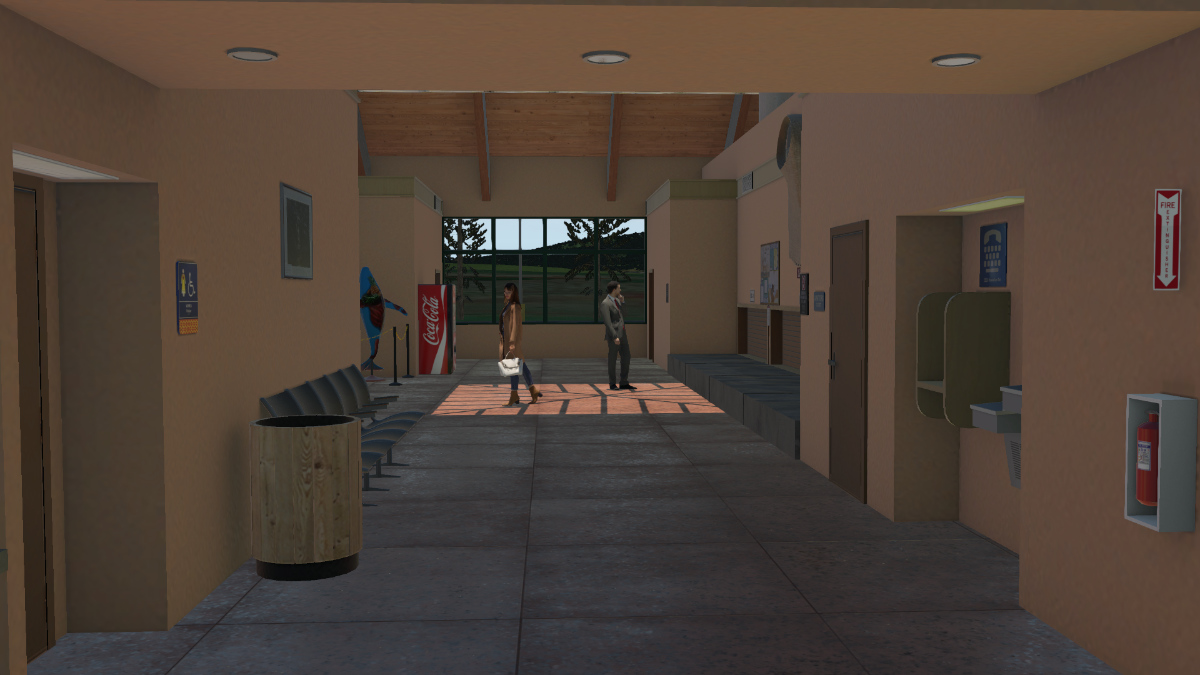
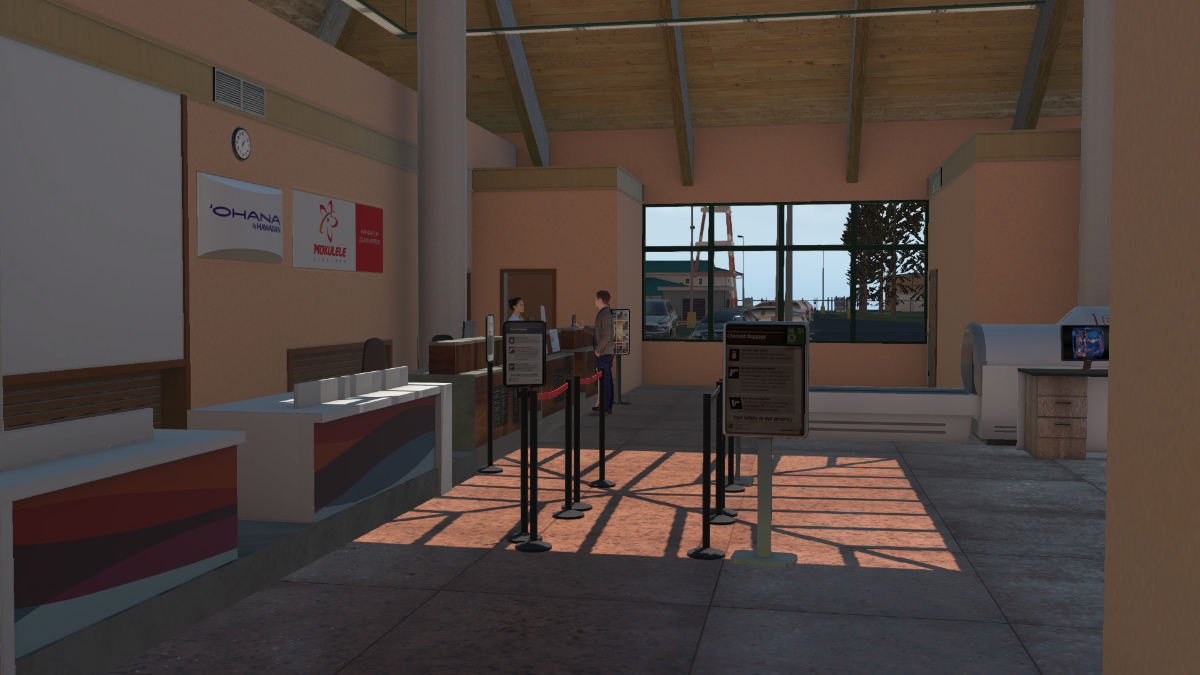
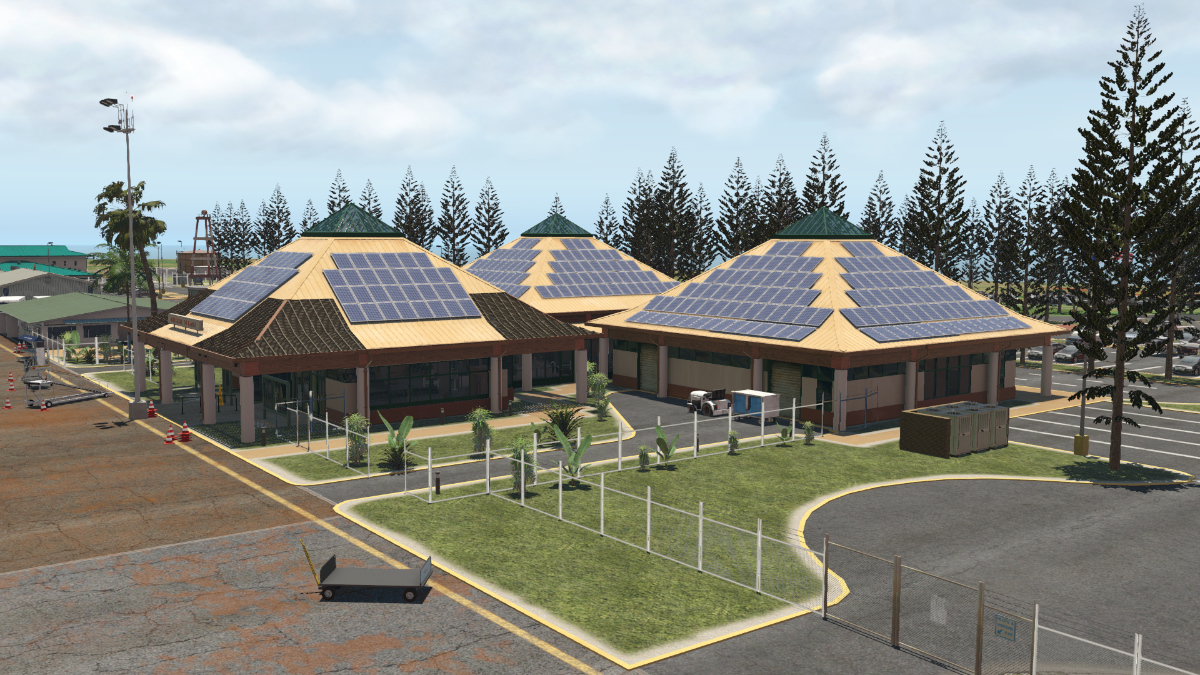
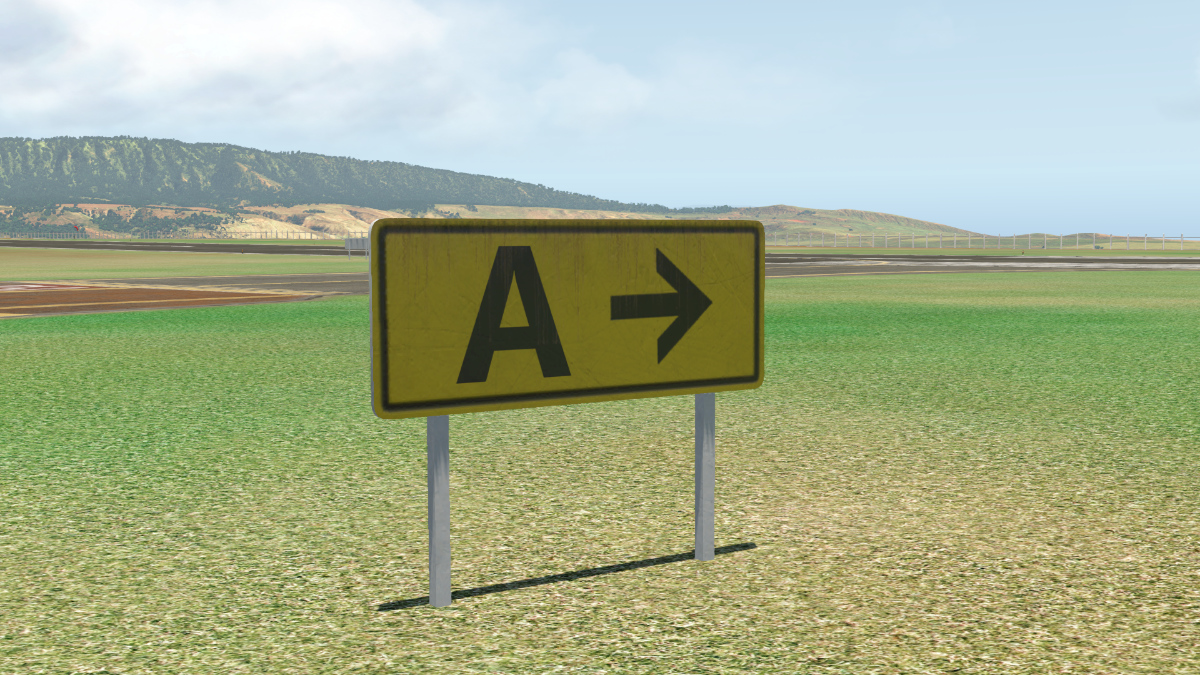
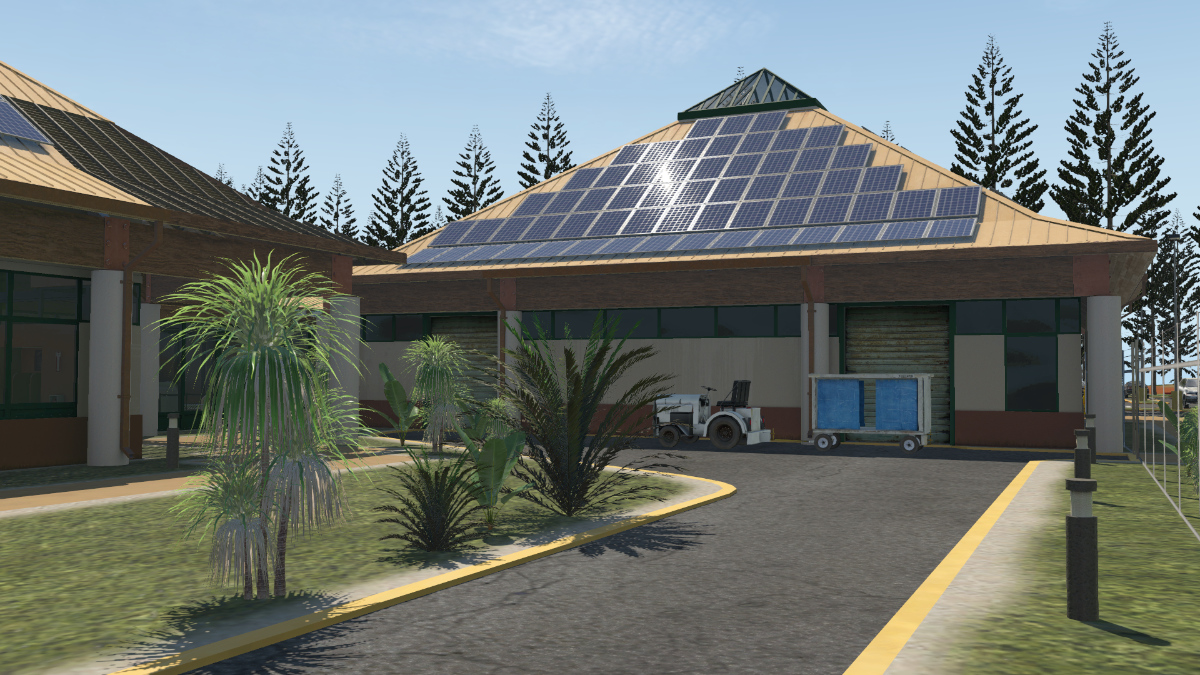
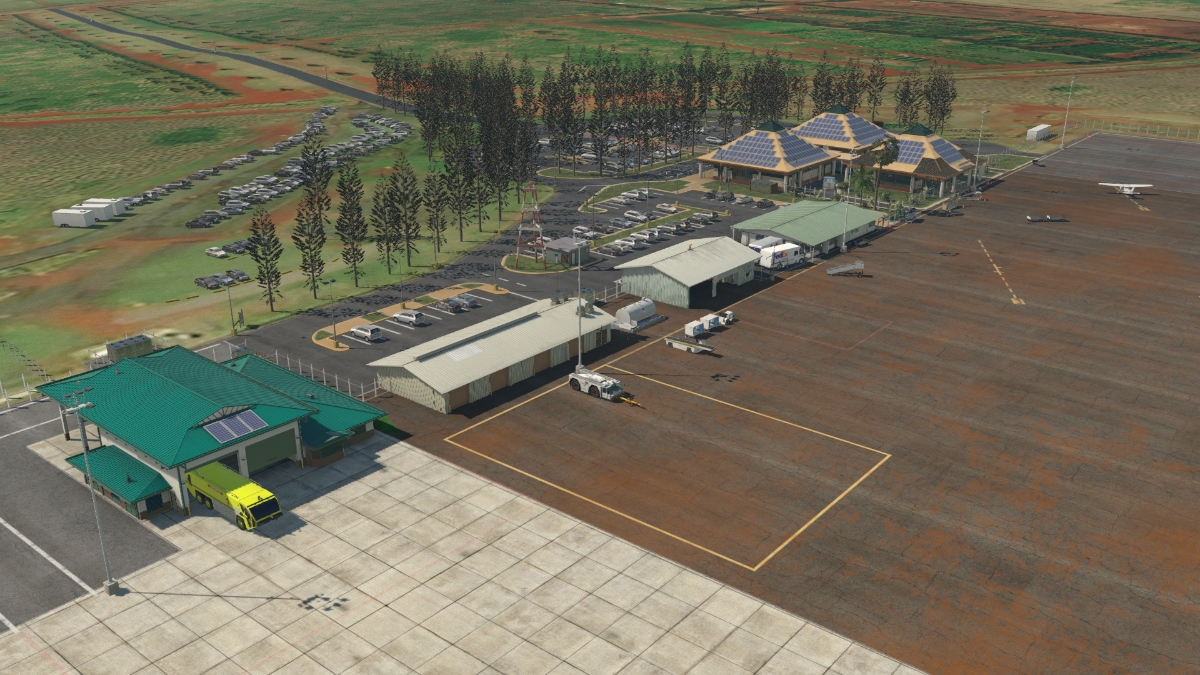
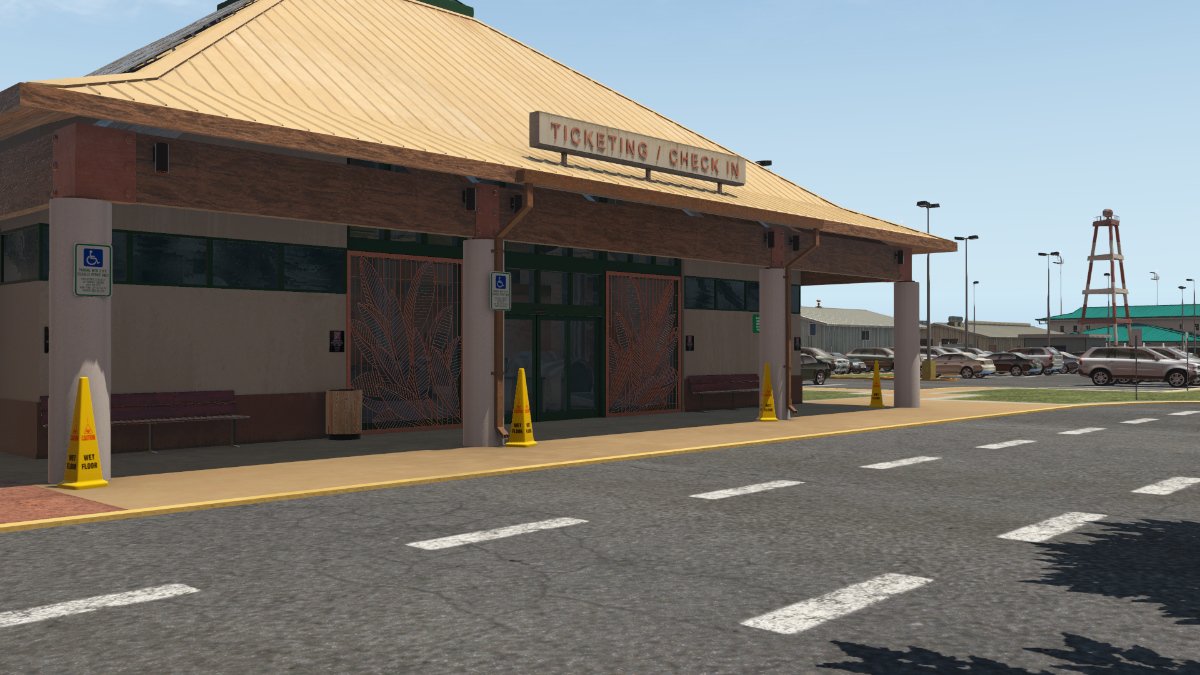
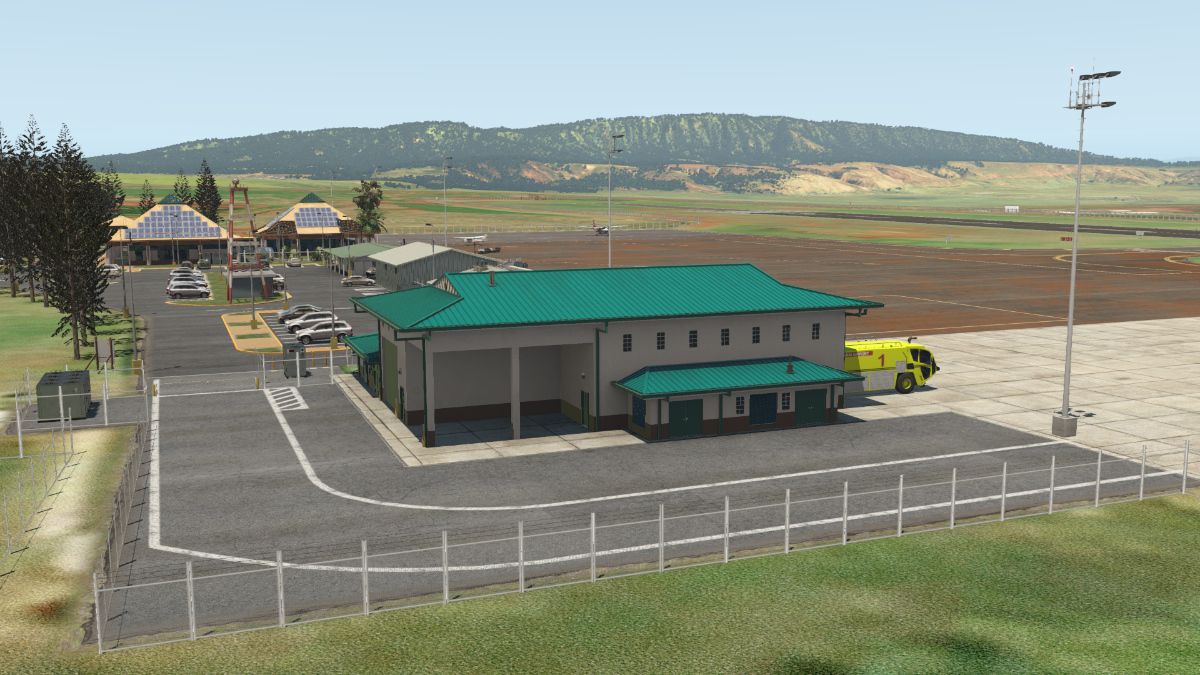
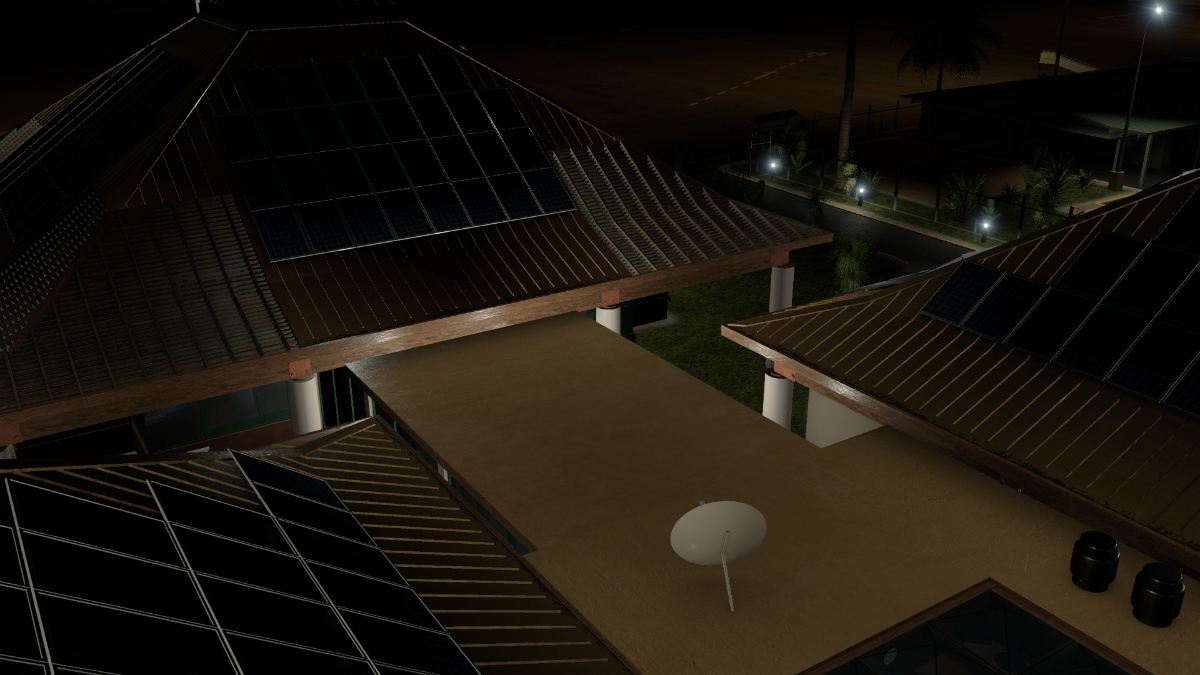
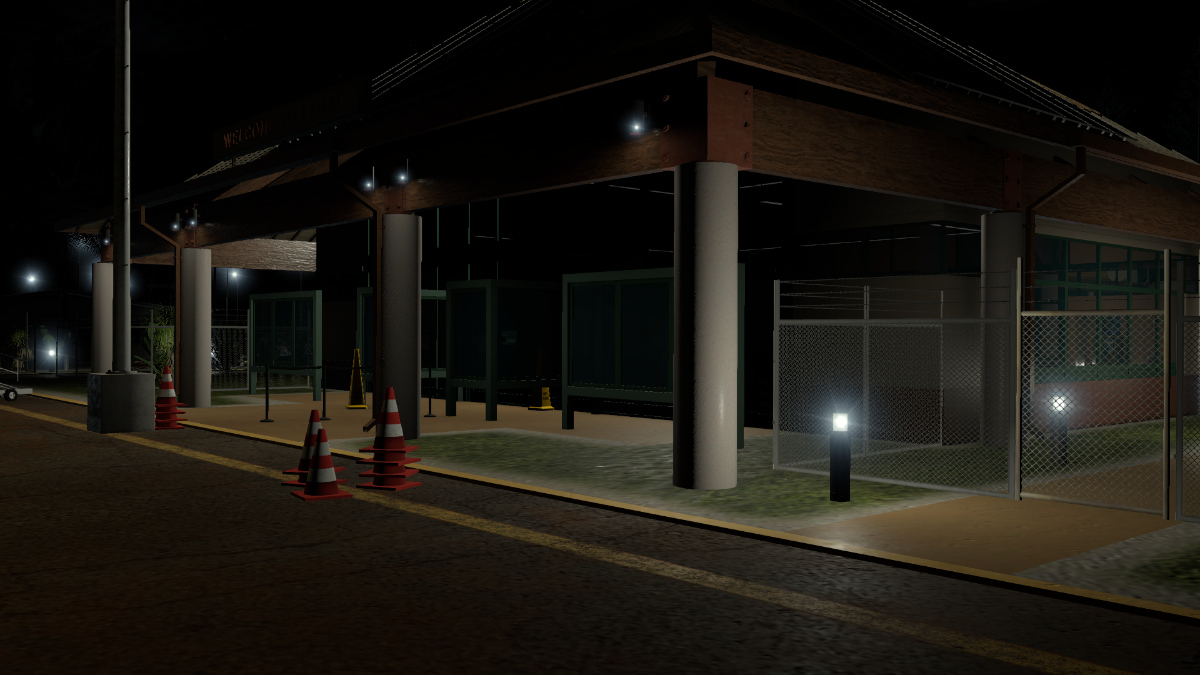
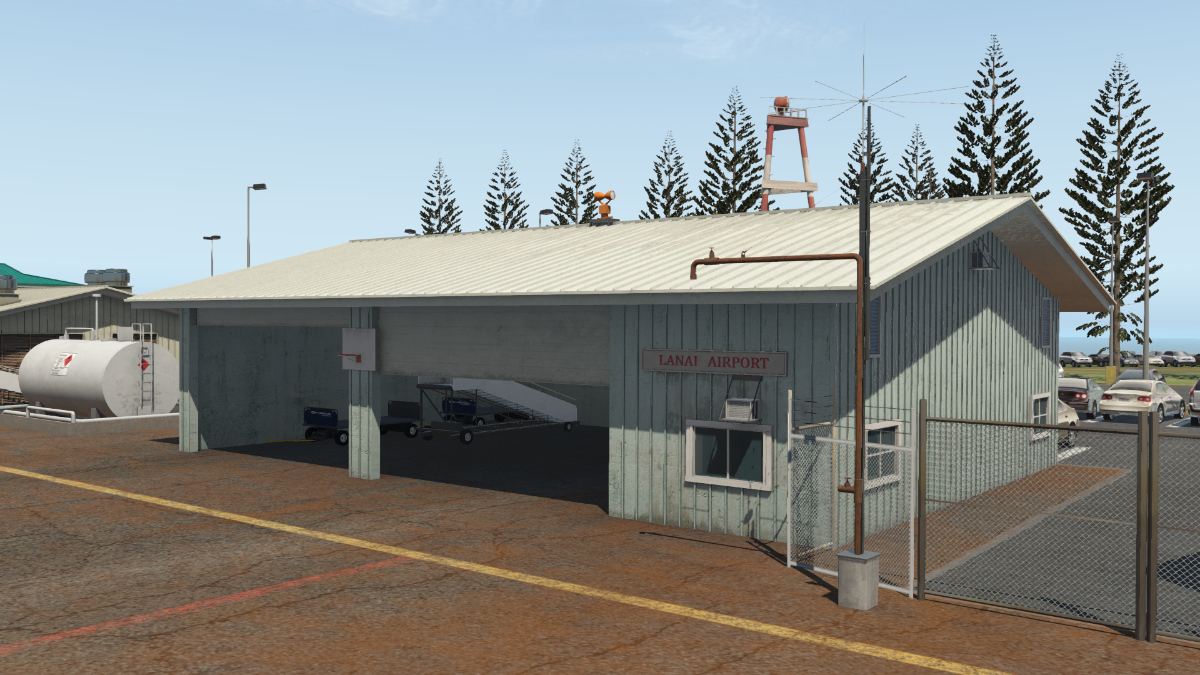
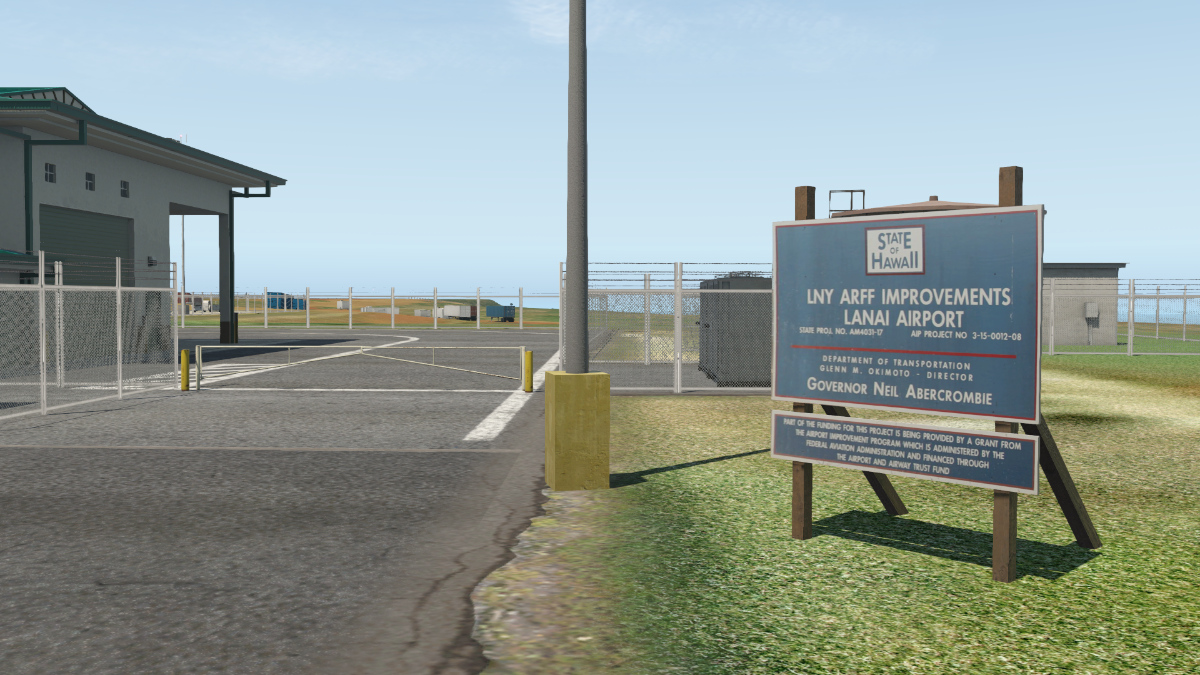
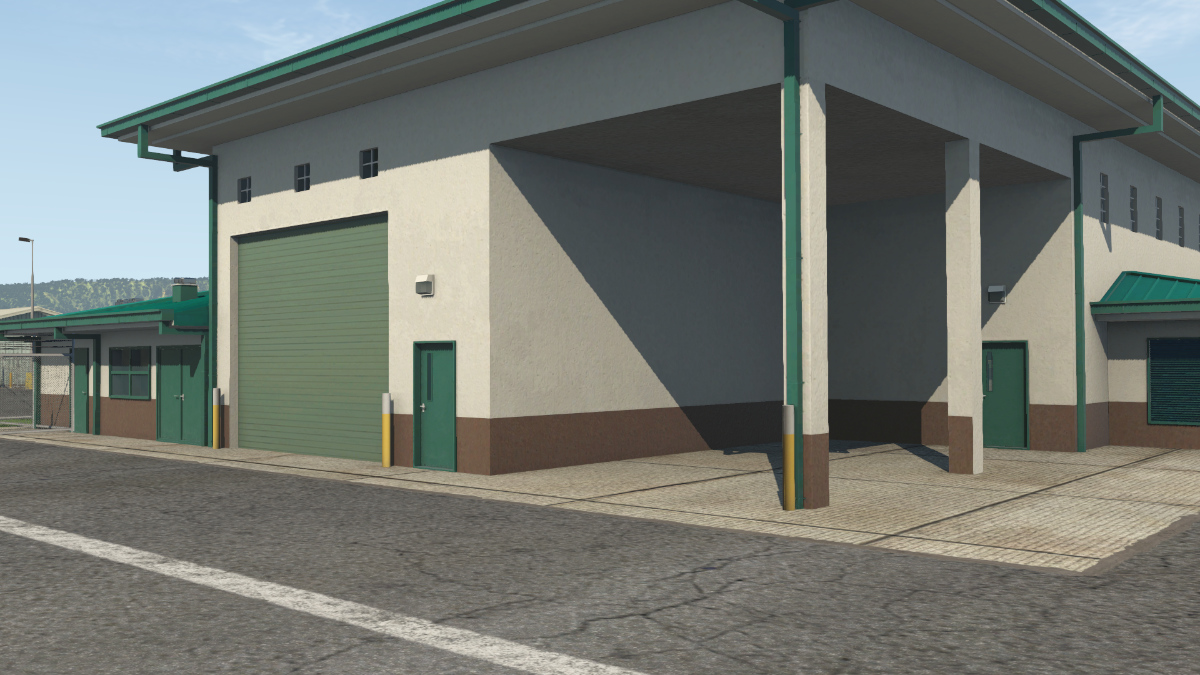
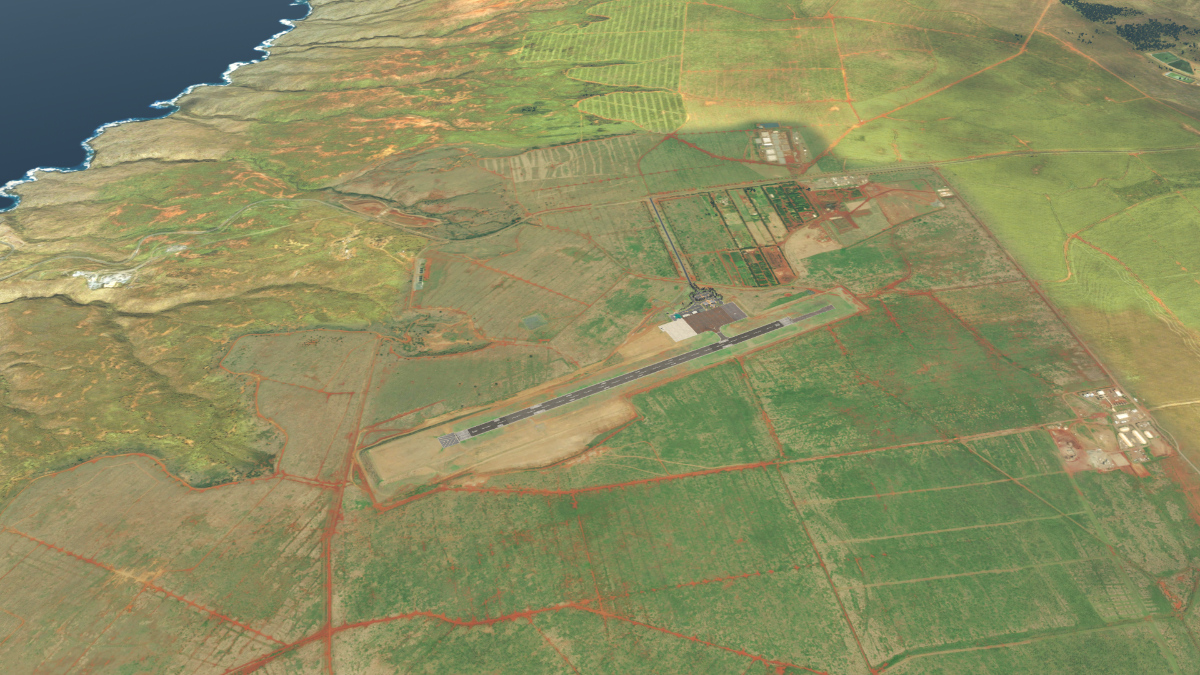
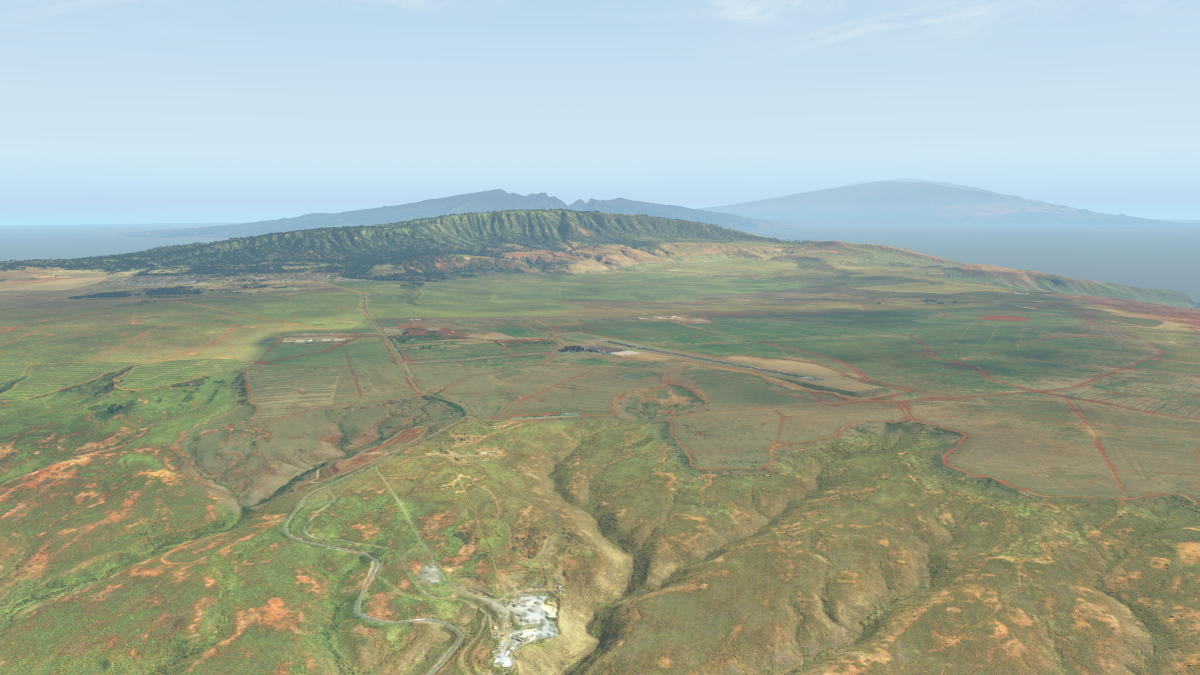
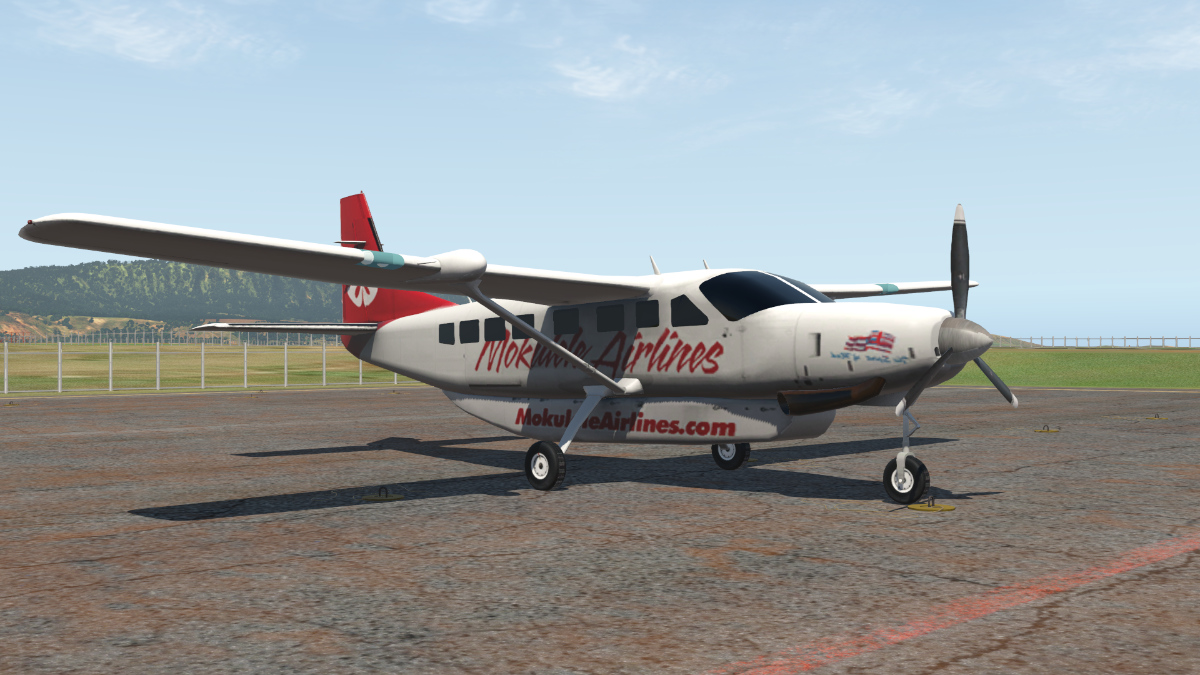
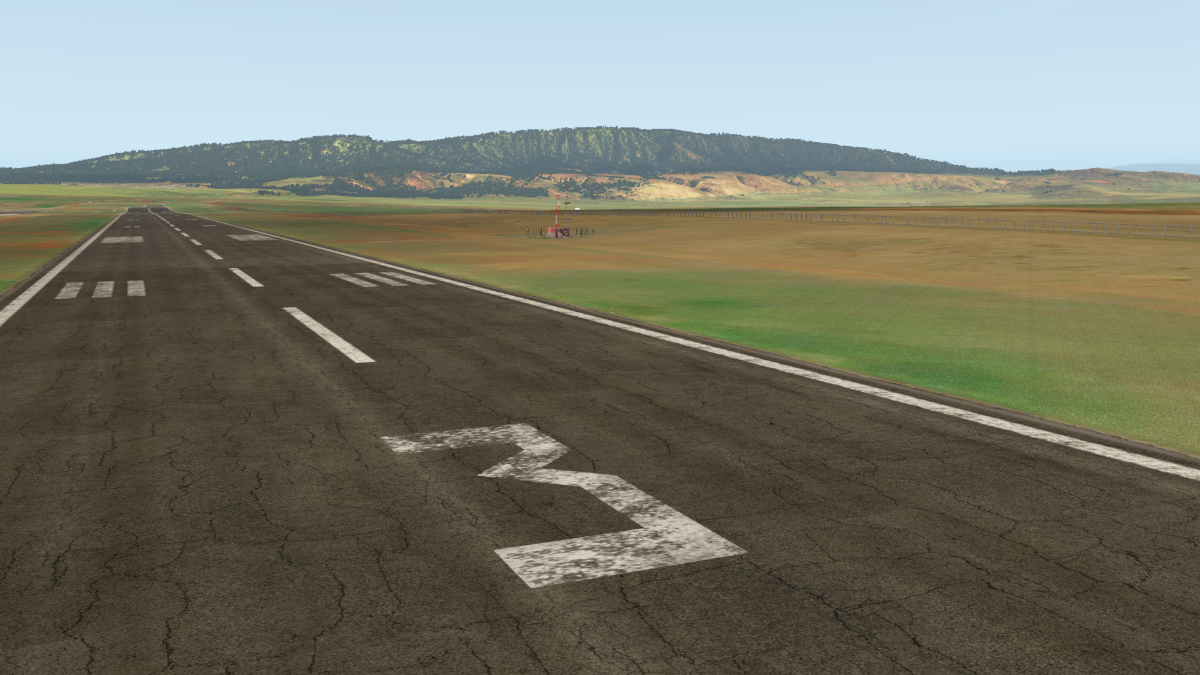
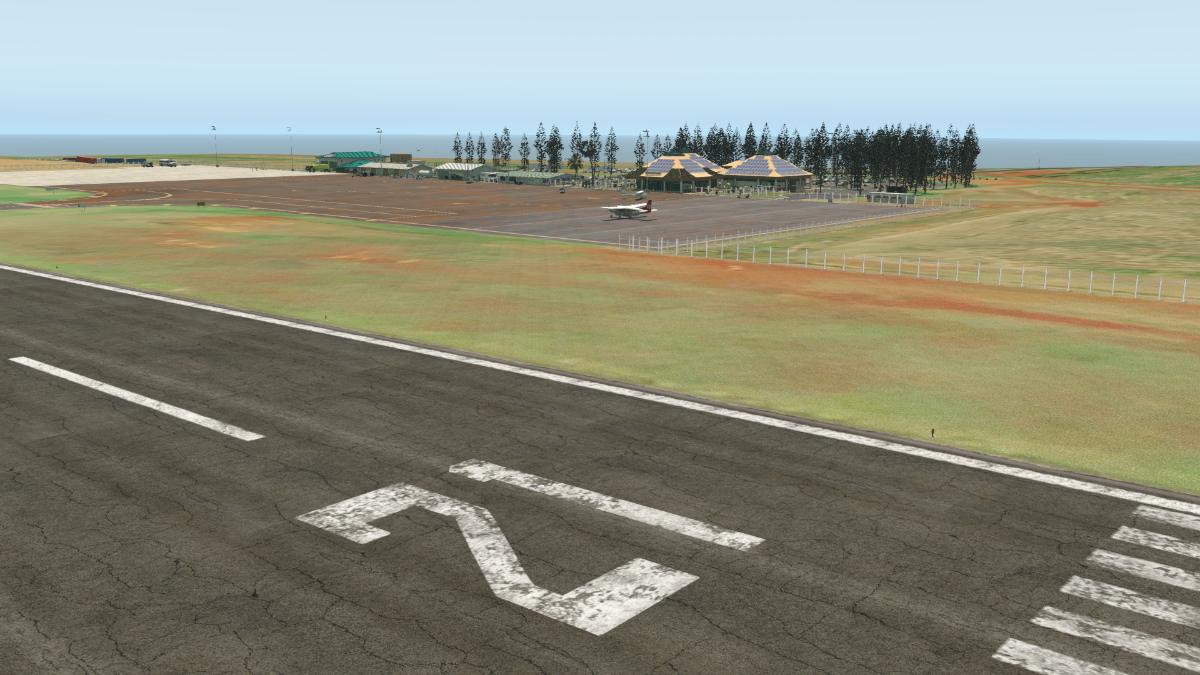
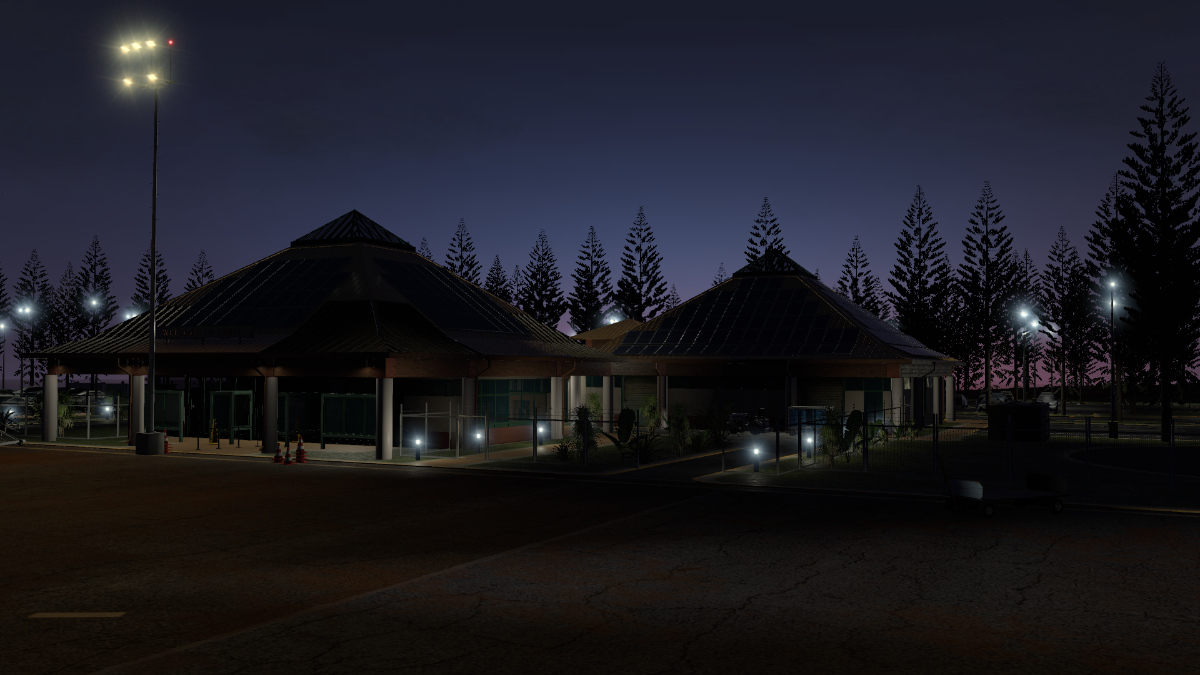
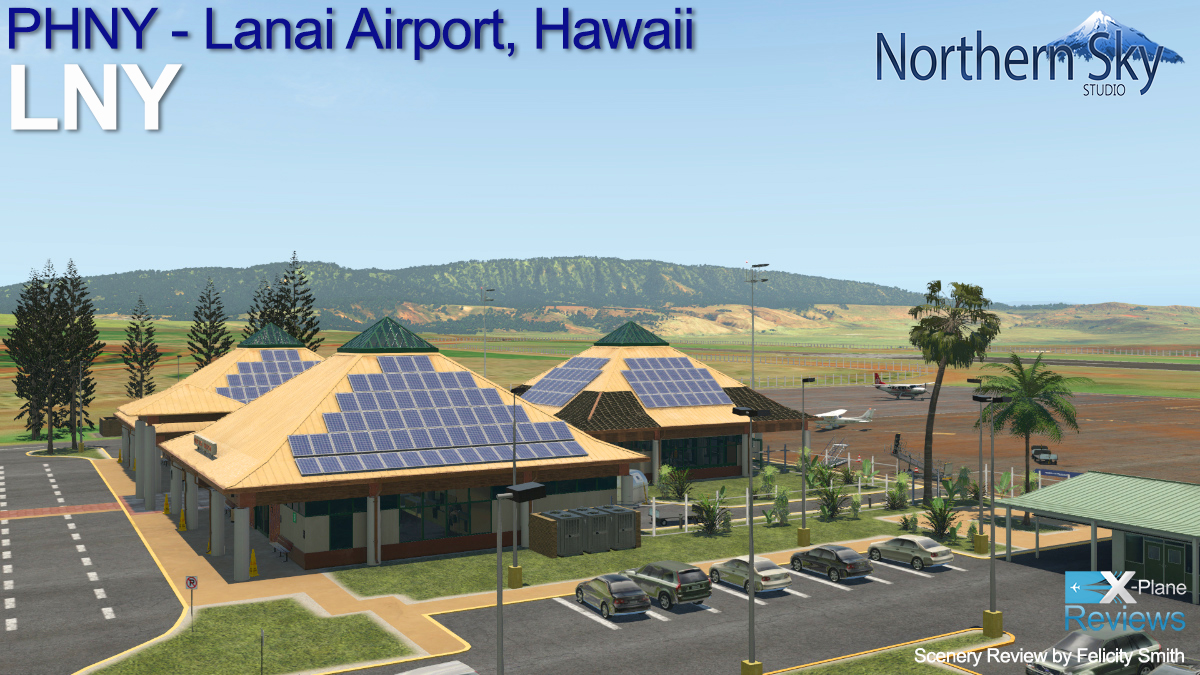
Scenery Review: PHNY - Lanai Airport, Hawaii Hello, and welcome to my review of Northern Sky Studio's Lanai Airport for X-Plane 11. Located in Maui County, Hawaii, Lanai Airport (or Kahua Mokulele o Lāna‘i, as it is sometimes known) is a mere 3.4 miles (6 km) southwest of the central business district of Lanai City. Having begun regular operations in 1930, to date it is the only airport serving the beautiful island of Lanai. I for one would love nothing more - especially after the last few tough years we’ve had as a global population – than to go and visit this airport for…erm…’research’ purposes. Who knows, someone might even be able to convince me, with some ease I should probably add, to blend in with all the other tourists ‘researching’ everything Lanai has to offer. It would be a hard job, but I think I’d be up for the challenge! Unfortunately, this review is not about Lanai as a whole, just the little airport with a big heart, so let’s get on with it. The download itself was relatively large for such a small airport, just over 800MB, and even larger when you include the optional photographic scenery mentioned in the documentation. This is an additional 1.3GB, but one I highly recommend downloading as it adds a lot to the surrounding area. Installation of the main airport is automated, with only a serial number to enter. When done, it’s just a simple case of starting X-Plane and you’re good to go! Lanai Airport’s layout is thus: On approach, there is a passenger car park to the front. Here you will find a spattering of cars; enough of a variety to not feel like a ‘cut and paste’ effort. Directly behind the car park is the main terminal building, and to the right of that, a larger employee car park. Sitting in front of this car park are four hangars. Starting from the far right, we have the ARFF station. Beside that are the cargo bays and some handy public toilets. Then you will find the maintenance hangar, and lastly, closest to the main terminal, you will find the office building in which you will find a conference room, TSA, Security, Bradley, FedEx, USDA, Air Service, and finally, Operations. Ok, now here come the geographical statistics for those of you who may be interested. Sitting on the southwestern side of the island of Lanai, it has an elevation of 1308 ft/399 m above mean sea level, and the airport itself covers an area of 505 acres. It has just one asphalt runway (designated 3/21) which measures 5,001 by 150 ft (1524 by 46 m). Once serving as a base for 6,326 aircraft operations, as of April 2022, it no longer serves as a base for any aircraft operations, and indeed, Mokulele Airlines are the only commercial airline that actually operates a small number of aircraft into Lanai. Unsurprisingly, this cessation of base status has sadly led to a dramatic fall in passenger numbers, but happily it is still surrounded by the same mesmerizing beauty. So, what does this airport, re-created for X-Plane by Northern Sky Studio, have to offer? Well, the first thing to say is that it is polar opposites to any large, or even medium-sized airport. Instead of the shoulder-shoving hustle and bustle of modern life barging its way through the doors, there is a small, gentle meandering. Of course, everyone has a place they need to be, places to go, but this airport suggests a refusal of admittance to the hardcore ‘must dash, no time to waste, I’m late, I’m late!’ feel. No need for shoulder shoving here! In fact, as one drives up to the airport towards the car park, it doesn’t have the coldness of many larger airports. Instead, it seems to say, ‘Come my friend, let me take you to where you want to go.’ I suspect if it had hands, it would probably carry your luggage for you too! They even have a pleasing frontage to ticketing and check-in. And have you seen those queues? No, neither have I! Just look at that remarkably short queue to ‘the other side.’ If you are like me, and you hate feeling like a sardine squashed into a box with too many others, this airport will be for you. I suppose if I was to be critical of anything here, it is the fact that although it is meant to be a small airport, it somehow feels too empty. However, what you do have is nice texturing and lighting, and the modelling of both objects and people is to a good standard. If we turn our attention to the exterior, enviro-savvy passengers will immediately be happy to see the number of solar panels draped down the side of many of the roof sides. Then you have the other various shades and textures of different materials on the roof, from glass to wood to solar panelling. Whilst easily overlooked or minimised by some, the importance of such accurate re-modelling to detail has not been so by Northern Sky Studio. That attention to detail extends to a number of other ‘icing-on-the-cake’ objects such as well-modelled trees, trailers, signage, hangars and terminals. However, the one thing I would have liked to have seen, but is sadly lacking, is people. Without a population, it just feels rather…lonely. Focusing on the exterior textures, the runway and surrounding paving areas are done well. There is enough shading and texture in the asphalt to indicate accurate wear and tear for an airport of this size, and the paving slabs that act as parking areas for the aircraft are suitably weather-worn. The grass is one area that I personally would like to see improved though, as it has a very flat, ‘rolled-out’ look to it. Better shading and texture would greatly enhance the grass, because at the moment it just feels a little flat. When darkness sets in, you'll be glad to know that the airport provides varying degrees of lighting techniques to set the scene, both externally and internally and the results are most pleasing to the eye. Conclusion Now we come to it; would I recommend Northern Sky Studio’s Lanai Airport to you? Well, at a fairly priced US$12.00, it is certainly one you should give serious consideration to if you like the smaller airport. Not only is it a lovely airport to explore, but the surrounding scenery is also beautiful, and Northern Sky Studio have created a wonderful little package with an equally matching price tag. What about value for money? With everyone being affected by the cost of living crisis, price is definitely a consideration for a great many people, and this foresight has not been overlooked by Northern Sky Studio. Given the quality of the package you get with Lanai Airport, it is certainly value for money. As such, it pays dividends in the quite moments of R&R that so few of us get enough of these days. In short, weighing up all the pros and cons of this airport, yes, I would recommend purchasing this quaint little airport nestled in the islands of Hawaii. Happy flying, safe living! _______________________________ Lanai Airport by Northern Sky Studio is available from the X-Plane.Org Store here: Lanai Airport Price is US$12.00 Requirements X-Plane 11 (or X-Plane 12 when available) Windows, Mac or Linux 4 GB VRAM Minimum - 8 GB+ VRAM Recommended Download Size: 563 MB Current version : 1.0 (June 21st 2022) Review by Felicity Smith 21st July 2022 Copyright©2022: X-Plane Reviews Review System Specifications: Windows 10, AMD Ryzen 5 2600 (overclocked to 4.1GHz), 1650 4Gb, 32GB RAM, 256 M.2 SSD, 2TB HD (Disclaimer. All images and text in this review are the work and property of X-PlaneReviews, no sharing or copy of the content is allowed without consent from the author as per copyright conditions) All Rights Reserved
-
Aircraft Review - AMD Alarus CH2000 by SimSolutions Introduction The AMD Alarus CH2000 is not an aircraft I had heard of up until SimSolutions released their model for X-Plane 11, so I was delighted to be given the opportunity to try it out. The aircraft itself is a single engine general aviation aircraft, with two seats, fixed tricycle landing gear, and was designed by the Aircraft Manufacturing and Design Co based in Georgia USA. It was in production from 1995 to 2011 and came in two variants. The civilian one being reviewed here, and interestingly, a military option, complete with state-of-the-art communications systems and an infrared multi sensor. For the civilian market, the aircraft was designed primarily as a low wing trainer, so if you are looking for an alternative to the more common trainers available today, this is well worth a look. The X-Plane 11 version of the CH2000 retails for $23.95 and is available via the X-Plane.org Store. It can be used on Windows, Mac and Linux, although as I am a Windows only user I can’t vouch for its performance in the other platforms. It is extremely easy to install, just download the 332MB zip file, unzip and drag into your Aircraft folder, and that’s it. No activation codes, no fuss, no hassle. In the download you will find a small pdf manual that accompanies the CH2000, and in here you will find all sorts of interesting information about the aircraft and some of the key features. There are brief descriptions of the navigation systems, such as the Garmin GNS430, the Bendix KR87ADF and the Garmin GTX327 Transponder. The very straightforward engine start procedure is also outlined, as well as other instruments and controls, such as the clock and the outside air temperature gauge, and there is also information on how to adjust the flaps using the switch in the center panel. In my opinion, it is well worth taking some time to read through the manual if you do decide to purchase the aircraft, as there are a few novel characteristics about this aircraft that may not be that obvious at first glance. One rather unusual feature is the lack of a parking brake in real life, so the developer has included animated and removable chocks and tie downs. The chocks can be easily removed by clicking on each of them manually, or by assigning a button to park brake which removes them all in one go. For the tie downs in Vulkan you still need to click on them individually or assign keyboard keys (External, Show/Hide ground object 1, 2, 3….) to do this. There is a slight difference here if you run in OpenGL compared to Vulkan, as when in OpenGL, both the chocks and tie downs are removed together when the park brake button is assigned. I believe the developer is aware of this as this is mentioned in the forum support page SimSolutions - X-Plane.Org Forum. I observed several recent posts responding to comments and observations since the aircraft was released in May 2022, and I also had cause to contact him directly as I found that the toe brakes were not functioning in the version 1.01. The tow brake issue has now been fixed I see as of version 1.03. It was nice to see a responsive payware developer actively working to improve their product. The CH2000 comes with six liveries, including the default white texture, and a mixture of USA (3), Canada (1) and the Dominican Republic (1), and I am sure having a white blank texture will allow any avid painters to use their creative juices to dream up all sorts of designs. Thoughts and Observations on the Ground My initial impressions were of a well-proportioned and well modeled sim aircraft. As it is a trainer, there is not a huge amount of detail to be seen if I am being entirely honest, however, what is there is well presented in my opinion. From the rivets on the aircraft skin, to the door handles on the gullwing cabin doors, to the landing gear, landing lights and through to the prop and radio antennae, they are all very crisp and clean in their textures. The same goes for the decals on the aircraft fuselage and wings. Both cockpit doors open by clicking on the door handles from the outside, or by assigning to a controller, and in my case, I used a couple of the switches on my Saitek TPM (this worked a treat). The aircraft surfaces have a nice but subtle shine to them, and the pilot is very well modelled and realistic. So overall, once I had the chance to view the CH2000 from the outside, I was quite taken with it. One thing to note is that if you are using your mouse to remove the tie downs, you do have to be very specific and click on the fastening on the aircraft, otherwise nothing happens. Once I moved inside, the cabin is very small as in real life I assume. However, it appears well-proportioned from what I observed from photos on the internet. The good news is that the instruments are large and easy to read, with the standard six panel dead ahead, as well as the RPM indicator and air suction gauge. The control yoke I really liked, as its design is a little different to that in other trainers I have used, and as with most aircraft, it can easily be removed if you would like an unobstructed view of the instrument panel. If you do decide to remove it, it is worth noting that this will remove the AVI Tab which nestles neatly on the control yoke. When you look around the cabin you will come across the navigation equipment to your right as well as the clock which shows sim time, and several gauges providing info on fuel, oil temp and pressure, battery amps and volts. There are two switches on the clock that allow you to change the sim time forward or back if you so choose. That can be handy and being able to do this from inside the aircraft rather than the sim menu is a nice touch. The gauges are all nicely textured and I found them easy to read. Moving down to the center console you will come across the flap switch, just a simple up down switch, and the trim wheel. Nothing fancy, but they both do what they need to. From there, if you firstly look to the floor, you will find the fuel selector switch. If you then look up, you will find the outside air temperature gauge above your head and the whiskey compass at the top middle of the windscreen. Located above and behind the cabin seats are two adjustable red night lights that will illuminate the cabin once dark, and the angle of these can be adjusted, which I thought was a nice touch. There is also a plethora of switches along the bottom of the instrument panel, and all are functional, although I had mixed success with my Saitek panels. It appears that a script will be required to get everything to align and sync, as although the Saitek switches did switch on an off the various external features like lights, the switches in the cabin did not all move. What was nice is for those with a Honeycomb Bravo throttle unit; the action of the flaps switch works very nicely with animation in the aircraft. The remainder of the cabin textures are well done, have the feel of a well-used aircraft with many hours of use. As far as the sounds were concerned, I would say there were just about OK, but not the best I have heard to be honest. The subtle click of the cabin switches was nice; however, it would have been nice to have sound associated with the cabin doors opening and closing. The engine start-up was abrupt and a bit on/off in my opinion, and from inside the cabin, there was no noticeable difference in engine volume when the doors were opened and closed. The volume did go up considerably when you moved outside the aircraft, however there was the same repeating noise within the engine sound, and this was most noticeable when the engine is at idle. I did like the actual engine sound and how it changed with changes in the throttle, however I just felt the overall sound package could do with a bit of improvement to bring it up to the quality of the rest of the aircraft. Thoughts and Observations in the Air With the engine running, I found the CH2000 very easy to taxi when using my Thrustmaster pedals, the toe brakes worked just fine, and I was able to move around the airfield with no issues (all very smooth). Getting airborne was very easy, in fact the CH2000 pretty much lifted off without much input from me, as all I had to do was keep it straight as I sped down the runway. Again though, the repeating engine tone when inside the cabin was a bit off-putting, and I feel this would really stop me from taking any kind of longer flight. From the outside it was less noticeable, however as I do spend most of my time in the cockpit, this was a little bit of a concern. In contrast, flying the CH2000 I found very enjoyable, and the aircraft responded well to my controls. Turns and level changes were smooth, and I particularly enjoyed the largely unobstructed view from the cabin. The wide curved windows provide a great way to do some VFR flying as you do get a good all-round view from either seat. If on the other hand IFR is more your thing, then the suite of navigation instruments can help you there. I liked the multiple functions built into the Garmin GTX327 Transponder, as in addition to just setting your transponder code, there are up and down count timers, as well as pressure altitude display and a Zulu time indicator. It is probably a good time to mention that although there is no mention of being VR ready in the supporting documents, I now pretty much fly all the time in VR with my Oculus Rift S, and I really enjoyed my time in the CH2000. With the relatively large windows to the right and left, as well as the curved windscreen, you get an all-round view from the pilot’s seat. The dials were all very easy to read, and I had a real sense of being onboard, and just how small the cabin is in an aircraft like this. You don’t get this feeling in 2 dimensions. The exterior also comes into its own in VR as you can get up close and check out all the details. At first glance, the CH2000 is understated, however once you dig a bit deeper there is a lot more to meet the eye. In VR I was able to manipulate all the various switches that I tried, and it worked well with my hardware, which consists of a Honeycomb Alpha yoke, a Saitek TPM and as I mentioned earlier my Thrustmaster pendulum pedals. I have been doing a bit of rationalization and simplification of my hardware now that I have moved to VR, and I am thoroughly enjoying the overall experience. It does take a while to get used to it, and long flights of more than an hour are still a bit of a challenge, however for aircraft like the CH2000 and short hops around the countryside, it really adds a whole new dimension to my flight sim experience. The feeling of the ground falling away below you as you head down the runway is something that I never get tired of. Overall The CH2000 from SimSolutions is just a little bit different to the multitude of trainers I have tried over the years and in my opinion is worth considering if you do want to try a different trainer experience. It is well built, looks and flies great and has several nice touches and features. If I am honest though, the only thing that detracts a little is the soundset, and in my opinion could do with a little further improvement just to add a cherry to a very fine cake. The team from SimSolutions have indeed done a pretty good job of bringing the CH2000 to life in X-Plane 11 and they already have a solid model there, and with the developer continuously upgrading and improving the aircraft, all bodes well for the future. Is it worth buying? As always this is a personal choice, and with so many fine aircraft available these days it is not easy to decide where to put your hard-earned cash, however if you are wanting to try out a trainer that is a little different to the many Cessnas and Pipers out there, then hopefully this review has been helpful. _______________________________ The AMD Alarus CH2000 by SimSolutions is available from the X-Plane.Org Store here: AMD Alarus CH2000 Price is US$23.95 Requirements X-Plane 11 Free Updates to X-Plane 12 (when available) Windows, Mac and Linux 4 GB+ VRAM minimum Download Size: 335 MB Current version: 1.0.3 (July 10th 2022) Review by Stuart McGregor 14th July 2022 Copyright©2022: X-Plane Reviews Review System Specifications: Windows 11, a Phanteks Evolve X ATX Case, ASUS Z390 ROG Maximus XI Formula Motherboard, Intel i9 9900K 3.6Ghz CPU, RTX2080Ti 11GB GPU, 64GB DDR4 Kingston RAM, 1TB Samsung SSD, 2TB WD HHD, Thermal Take Ring RGB 360 TT Cooler, Honeycomb Alpha Yoke, Thrustmaster Pendulum Pedals, SAITEK TPM and an Oculus Rift S. (Disclaimer. All images and text in this review are the work and property of X-PlaneReviews, no sharing or copy of the content is allowed without consent from the author as per copyright conditions) All Rights Reserved
-
Aircraft Review/Tutorial: Lockheed Martin F22A Raptor Version 1.3 by AOA Simulations Hello and welcome to my flight review/tutorial of the AOA F-22A Version 1.3 for X-Plane 11.55. For an overall view and first look of the F-22A, please check out Stephen Dutton’s excellent write-up found here. In this article, I will be looking at the model from a general user perspective, covering both start options, from engines running and from “cold and dark”. The F-22 Raptor entered service with the USAF in December 2005 as the F-22A, with the program producing 187 operational production aircraft, the last F-22 being delivered in 2012. The current X-Plane 11 model by AOA of the F-22A at the time of writing, is version 1.3. Three versions of the Raptor are available, and these are as follows: A2A (air to air) equipped with 6 AMRAAM’s, and two Sidewinders. A2G (air to ground) equipped with 6 JDAM’s (1000lb bombs) 2 AMRAAM’s and 2 Sidewinders. EFT (external fuel tanks) equipped with 2x 4000lb drop tanks, 6 AMRAAM’s and 2 sidewinders. The installed file size is 405MB and comes with an excellent 93-page manual and the 1.3 update notes. Only the default livery comes in the download, which reduces its size, but a further thirteen are available on the X-Plane.org forum. External & Internal Appearance The external body is very realistic, and really does justice to this fantastic stealth fighter, and has many small details for you to enjoy, for instance in cold and dark, the external red covers with streamers that blow in the wind (a lovely touch), the engine covers front and rear, the ladder, the small Luneburg lens that appears below the fuselage when IFF is set to on, the two APU cooling doors which open and close, even the pilot’s name is faintly visible on the front wheel door. Just like the real aircraft, the canopy is coloured in a cool reflective gold and looks great. In addition, there is the IFR (refuelling) port at the top centre of the fuselage, the gun port on the top right, plus the two fuselage side doors, which open to release the chaff and flares countermeasures. Internally, the modelling of the F22 follows a similar vein in terms of visual fidelity. Looking around the cockpit you’ll find the pilot’s seat complete with rippled textures, along with the associated safety harness, vents, fire extinguisher etc, plus light weathering on the side panels. All the switches and screens are clear to see and use from the pilot’s position, and from the very first moment you lay eyes on it, you can tell it’s a premium product. Engines Running Start Many of you will probably want to try out this Jet fighter straight away, and only later begin studying the manual in which to learn its systems, and to fly it properly as AOA intended. So, let’s start with engines running, (I’ll assume you know how to set this up in X-Plane). To begin with, you’ll find all the assists are “On” by default, these being auto flaps, auto gear, ground collision protection, auto air brakes and auto afterburner, and here we need to turn them all off! Why? Because they will trip you up until you know exactly what they do. Also, located in the centre of the dash, the upfront control panel, turn off R2C (Roll to See) as this will control where you look (very useful later on when you want to see where the enemy or tanker is), and switch off the stick braking because it will keep turning off your normal brakes. Its best use is below 50kts and is very useful for gently taxying from the stand to the runway. Now that the aircraft is completely in your hands, you’ll get a far better understanding and feeling of its flight characteristics. Tip: To fill the fuel tanks, apply the parking brake, next to the eject seat handle in front of you, (move forward to see), then throw the IFR switch on the right panel. You’ll find the F22 has Mach 2 performance, an approach speed of 200/250kts and a landing speed of about 160kts with full flaps. When flying under 250kts, be gentle on the stick, as the aircraft can lack directional stability. However, this can be corrected with a little rudder input. The F22’s flaps are infinitely adjustable, so simply hold your default flaps key down. No cockpit handle is present to adjust the flaps, as the real aircraft adjusts these automatically. Hopefully, if you’ve flown modern fighters before, you’ll be able to understand the basics of the HUD, plus operate the autopilot, radios, and Sat-Nav. For now, simply enjoy the incredible performance and flight dynamics of the F-22. For example, try putting the model into a slow flat spin, then with the massive rudder authority on offer, come out of it in full control, with opposite rudder and increase thrust. As you do, just listen, and take in the wonderful FMOD sound samples as the mighty Pratt & Whitney F119 engines propel you up to 70,000+ feet. Cold & Dark Start Having enjoyed the F-22 in a fun, yet basic way, now let’s start to enjoy all the features that AOA have implemented in Version 1.3. Start the F-22 with engines off. On the upfront control panel is the CHK LST button, press and use its arrow keys to move to each new page. As you do, you’ll notice the words are both written and spoken, with their volume being adjusted in X-Plane’s sound/radio slider, along with the pilot’s breathing and grunting when pulling more than 4G’s. Tip: The F-22’s parking brake is hard to spot, so move your view forward and look left of the eject seat pull. Right, let’s talk about fuel (and not the price of it). Generally speaking, you should fill the tanks to the 18,500lb maximum, but with EFT’s you get an extra 8,000lb, for a total of 26,500lb of fuel. The F-22 has a normal all-up weight of 64,000lb for takeoff, but you want a landing weight of 50,000 to 55,000lb, and so if needed, a fuel dump button will slowly reduce fuel to 4,000lb, which is released from under the left wing (try not to drop flares at this point!). AOA, to their credit, have gone to great lengths and provided three different methods in which to fill up with fuel. They have even supplied an adjustable starting fuel LUA script (found in F-22/plugins/ F-22/ data/ modules/custom module/start fuel). It would have been handy to have a shortcut for this, but it’s a simple task to make one yourself. There’s also a FOV script there too, which allows you to change the field of view of each camera. The first fuelling method is when stationary on the ground, and with the parking brake on, just throw the IFR switch (which opens the refuelling hatch on top of the fuselage), and your tanks start to fill. The second method is inflight, called the virtual method, because no tanker is actually used. Here it’s just a simple case of flying level at either 20,000ft or 30,000ft and at 300kts, throw open the IFF, and you’ll take on fuel. The third method is the most realistic and can use any aircraft as a tanker, (I use a modded KC-10 tanker to reduce height, speed and vortex, available here. Set it as the first AI aircraft and make it non-combatant (the manual wrongly states to make it friendly, but it won’t work if you do). When done and the sim is loaded, attempt to fly between 150 and 400ft to its rear. Doing this is not easy, so don’t be surprised if you happen to need a bit of practice. Open the IFR and set radar mode to TRG TRK. This will provide you with an accurate distance reading which is just what you need. These three pictures show each of these methods in action. There are many fuel gauges in the cockpit, but the main one is on the top right MFD, which is a blue bar until you’re down to 4,000lb of fuel, at which point it turns yellow, and then red when it goes down to 2,000lb. The APU start dial, like almost all the dials in the cockpit, can be turned with the mouse wheel. The APU will start with a howl, and the fuselage vents will open, letting out shafts of hot air, which is a really cool effect. Wait for it to spool up to 100% speed before switching on its generator. With the battery charging up, engine one can be started as long as the battery power is more than 95%. Hold the starter down until N2 on the lower central MFD is showing at least 54%. Next, put engine one generator on (this switches the APU gen off) and switch on fuel two. Start engine two in the same way and switch its generator on. Only now can you turn off the APU, otherwise you wouldn’t be able to start engine two. Continue following the CHK LST, and then load your destination into the Sat-Nav centre G1000 unit. This is easy to do as it can pop out, or perhaps even simpler, download the freeware GpsFPLInput plug-in (Windows only) found at the Org by Gtagentleman. This allows you to just type in the airport code, enter it into the GPS, and bingo, it’s now your destination. If you’re taking off and landing at the same airbase, still load it into the Sat-Nav, because it will show on the HUD, with distance and direction on the tadpole. By doing this, you’ll know where your home base is at all times. Also, when flying with an ILS loaded in Nav1, you might get an IM/MM or OM warning as you fly over the runway markers, they stand for inner, middle, and outer markers, and most runways just have one or two. These pictures show some of the additional info on the HUD. If taxiing to the runway from a stand, use the stick brake option, it works great below 50kts and allows for fine control. I would however turn it off for landings as I find that if you leave it on and use the B or C commands (default brake and max brakes), they keep getting turned off, and if you use the stick break over 50kts, the aircraft will nosedive. Takeoff with full thrust, rotate above 120kts and let the auto gear and auto flaps do their thing. If you read the manual, it has a couple of extra things for you to try. One is the in-flight engine shutdown and restart, which has its own checklist when it detects an engine has stopped, and the other is the Auto GCAS flight test. The Ground Collision Avoidance System is just one of the many highlights of the systems offered by AOA. In this case, two arrows merge from left and right to warn you that an impact is near and that GCAS will have to take control of the aircraft. When the two arrows meet in the middle, the AP is activated and levels the aircraft, as well as maintaining the heading shown on the bug (as long as the descent is less than 18,000ft per minute). This happened to me during one of my first ever flights with the F-22, as I was fighting the AP which kept turning the heading bug, and again shows why you must read and learn from the supplied manual. Weapons & Combat I’m pleased to say the AA radar and missiles work fantastically well, combined with the R2C (which turns your head to look at the target) and the 2D panel switch (default XP ALT+W), which brings your view forward to the panel/HUD. To test this, I had my tanker KC-10 in AI Aircraft slot one, and an enemy MiG-23 in slot three. The MiG will detect you as soon as you takeoff and turn towards you, there’s no stealth yet in X-Plane 11. I changed the target (keyboard command) to highlight the MiG, and changed the radar from Nav, down to gun, and down again to track the target which provided me with his altitude and closing speed. Finally, I changed radar down once more, to the A2A setting, and once the target was within 50 miles, launched an AMRAAM, and then another for good measure. The first missile hit and sent the MiG down in flames, fun virtual combat. For the next test, I set up a flight with the F22-A2G, armed with 6 JDAM bombs. These 1,000lb bombs will take you out if dropped below about 1,500 to 2,000ft. The JDAM is a satellite-guided bomb, and totally stealthy, but the limited combat in X-Plane 11 means it’s really just an unguided bomb to drop on large static ground targets. Still fun though and looks pretty cool. Final Thoughts So, there you have it, a short guide on how to get the best out of the AOA F-22. In all, I have found the model to be a wonderful addition to my hangar as it has everything I enjoy in a modern fighter jet; high performance, manoeuvrability with its vectoring nozzles, and some very innovative ideas from the AOA team, which altogether, provides a thrilling and full experience of an F-22 in X-Plane. With its many systems, it is a complicated aircraft to learn, so give yourself time, and learn at your own pace, as reading the 93-page manual is vital for you to get the most enjoyment from this aircraft. My verdict? Absolutely wonderful! _______________________________ The Lockheed Martin F22A Raptor by AOA is available from the X-Plane.Org Store here: Lockheed Martin F22A Raptor Price is $40.00 Requirements X-Plane 11 4 GB VRAM Video Card Minimum - 8 GB+ VRAM Recommended Download Size: 350 MB Current version: v1.3 (May 22nd 2022) Review by Alan Ashforth 7th July 2022 Copyright©2022: X-Plane Reviews Review System Specifications: Windows 11, Intel i7 Processor, 32GB RAM, 2TB SSD, GeForce RTX™ 2070 (Disclaimer. All images and text in this review are the work and property of X-PlaneReviews, no sharing or copy of the content is allowed without consent from the author as per copyright conditions) All Rights Reserved
-
Aircraft Review ASSP Airbus A300B2 Airbus entered the aviation scene in October 1972 with the first flight of their all-new A300 jetliner, and the first two-engine wide body to ever take to the skies. Formed as a conglomerate of UK, French and German aviation manufacturers, the A300 was built to compete with the rising US competition from Douglas (DC-10) and Lockheed Martin (L-1011 Tristar). ASSP are a new developer on the X-Plane scene with the A300 being their first aircraft for the platform. As is the case with any new developer, the first release is usually the most important as it sets the bar for future product releases. Let’s take a closer look… Aircraft Specification ● Crew: 3 (Captain, First Officer & Flight Engineer) ● Length: 53.61m (175.9ft) ● Wingspan: 44.84m (147.1ft) ● Height: 16.72m (54.9ft) ● Empty Weight: 88,505kg (195,120lbs) ● Maximum Takeoff Weight: 165,000kg (363,763lbs) ● Powerplant: General Electric CF6-50C/CF6-50C2R Aircraft Performance ● Range: 2,900nmi (5,375km) ● Service Ceiling: 40,000ft ● Max Cruising Speed: Mach 0.78 (450kts) Download & Install Installation of the ASSP A300B2 was an extremely simple affair. After purchasing it from the X-Plane.org store, you are provided with a download link and an unlock key for the product. Just drag and drop the A300 into your aircraft folder (I have created a separate ‘Addons’ folder alongside the ‘Laminar Research’ and ‘Extra Aircraft’ folder for neatness) and the aircraft is available in your virtual hangar. On first loading, you are asked to paste in your unlock key. This will activate the aircraft systems and upon reloading the sim, you are ready to fly. The A300 comes with a 9-page document that outlines the airframe limitations of the aircraft. This is handy to refer to, especially when navigating the aircraft and ensuring that you are not pushing the airframe over any defined limitations it may have. Rather than a manual, ASSP has put together a series of tutorial videos which you can find on YouTube. These videos walk you through the different stages of flight, and whilst this may not be the most popular way of doing things, I found it refreshing as video tutorials are by far the most visual way to display things. As a content creator myself, I find they show users exactly where to look and face when starting up, so kudos to them! Exterior Model The A300 features a standard wide-body base with two engines mounted, one on each wing. In the 1970s this was revolutionary as at the time three was considered the magic number when it came to wide bodies going long haul. The reasoning behind this was that if one engine was to fail, then you had the third as a failsafe. The ASSP model is a faithful recreation of the real aircraft, with key details including the enlarged side windows in the cockpit and additional vents and vanes found on the wing, common with the Hawker Siddeley design ethos at the time. Animations on the aircraft exterior are also really well reproduced, with the landing gear struts raising and dropping at a relatively steady pace, while all flight surfaces follow the pilots' input. Smaller details have also been added to the aircraft, such as the sensors and pitot tubes on the nose. The A300 comes with ten liveries. You have an ASSP ‘house’ livery and the following real-world airlines: - Airbus House - Air France - Alitalia - Iran Air - Lufthansa - Mahan Air - Onur Air - Olympic - Singapore Airlines Cockpit & Interior The ASSP A300 features a fully modelled cockpit which is very pleasing to look at. It’s a dark, grey cabin with two yokes (this was the time before baby blue and fly-by-wire) with a mix of both glass and steam gauges. Only the A300 and A310 from Airbus featured yokes, as come the release of the Airbus A320, everything moved over to sidesticks with electrical signals controlling the aircraft axis from smaller inputs. The A300’s gauges, buttons, and switches are clear to read, and simple to understand, making them invaluable during flight. Text and labels are also of good clarity, including those situated in the overhead panel. Textures are done to a 4k resolution, which means that even when viewed close up, they still remain crisp and clear. The aircraft is well optimised too, running at a solid 60fps in overpopulated areas on my 4k resolution monitor. I am yet to come across any lag spikes or major drops, making this an excellent choice for simmers on modest hardware The A300 also features a fully modeled passenger cabin, allowing you to walk through the aircraft and take a seat with your passengers. This is modeled to quite a high level of detail, with each livery featuring a custom cabin based on that particular airline. Buttons, Gauges & Functionality The aircraft features a fully functional cockpit with an engineer's bay included. You can manipulate and control everything from the pilot flying console, while I find the engineer’s bay to have 50% functionality. For a mid-level plane, this is enough to get you flying while following realistic checklists and good enough for those looking to fly something with a reasonable amount of detail. You can manage the aircraft's hydraulics, electrical and pressurisation systems, as well as a functioning fuel jettison feature, which may come in handy alongside the custom failures menu that you can play around with. You can also select and ‘age’ the aircraft which will affect how it performs in relation to speed and fuel burn. ASSP has also included an EFB tablet which gives you access to AviTab, several speed calculators, a loading manager and ground operations, as well as a settings page that lets you customise the aircraft and cockpit state. It does miss out on an ‘engines on ready to depart’ quick start mode, but you can toggle from cold and dark to a turnaround state. I would however like to see one added at some point in the future as I don’t always want to go through the startup process; just spawn in and take flight on a joyride. The HSI can be toggled from wide to bearing modes, or new to the older instruments. The A300 uses X-Plane’s Universal FMC which allows it to fully integrate with the default navigation database and systems. I have always found it easy to use and so seeing it within the A300 is a welcomed addition. This also works well with the custom autopilot unit fitted to the aircraft, allowing you to fly from either unit or switch between Navigation and FMS modes onboard. That’s not to say I don’t have an issue with a few aspects of functionality. For example, you cannot use the mouse wheel to scroll the gauges and dials within the cockpit. This means setting altitudes and speeds on your autopilot requires you to manually click and hold the numbers to reach your desired setting. This can be a drawn-out process, especially in descent where you want to quickly manage your speed reduction and descent. It can be tedious, but it’s something you can get used to, especially those that came from X-Plane 10 and previous editions of the platform where this was not a feature available. The aircraft also insists that you start with the engines off. This means you cannot spawn in on an approach to an airport as they will always power down, regardless of how you have the ‘Start with engines running’ checkbox. Overall, cockpit simulation is to a satisfactory level, but don’t expect it to revolutionise the way you fly within the simulator. Sound Sounds are one of the strong points of this product as ASSP has incorporated FMOD to the A300, and it sounds great from both within the cockpit and externally. The General Electric CF6 engines give a soft whine when powered and this has been faithfully recreated within the simulator using sound samples from the real thing. I often find myself sitting back in the cabin looking down at my ORBX TrueEarth scenery while listening to the engines whisper mid-way through my cruise. Spooling the engines up and down also changes the pitch and wave of the whine, giving you the feeling of power when you’re on your takeoff run. Within the cockpit, ASSP has included sound samples from the original Airbus GPWS which is a welcomed addition. When on final approach, you’ll hear the real Airbus voice counting you down as you approach the runway, as well as any errors you may encounter, such as overspeed and stall alarms. Flight Dynamics The ASSP A300 is smooth to fly and very stable once in the air. This makes it extremely easy to manage during takeoffs and landings, before sending it over to autopilot to take you on your way. With the lack of fly-by-wire on the A300, this means you need to start your flare a lot closer to the ground, and don’t expect a ‘Retard’ callout on the way in either. You certainly have to add a lot more control input when compared to newer Airbus aircraft to fly it on the route you want, but that’s something you’ll learn the feel of after your first few test flights. You do need to get used to the feeling of landing, but after a few circuits and approaches, it’s something that you can easily manage. I flew with my TCA Boeing Yoke from Thrustmaster (sorry Airbus sidestick, this one is not for you!) and found its handling to be very even. In a nutshell, the A300 is a steady beast to fly and one I have really enjoyed. Opinion & Closing Remarks ASSP's version of the Airbus A300 may not be study level, but then they never claimed it would be. What we have is a good, simplistic recreation of Airbus’ first jetliner and one that is a joy to fly. Strong points are certainly the audio and model design, the A300 looks and sounds great. You also have enough systems functioning to take you on a realistic flight from A to B, following checklists and managing your aircraft systems along the way. It’s definitely IVAO & VATSIM capable, giving you another aircraft to enjoy alongside your ATC. In the numerous short flights I’ve made with this model, I’ve come to appreciate the functionality and use of the plane, with many good landings along the way. While it may not be the most advanced A300 on the market, it’s a great base for those that want to look at the older generation of jetliners and see how they function with the flight engineer also in position. ASSP’s first release is a truly good start. I would certainly like to see more added to it in the future as well as an option to have engines on from start. With that said, what we have so far is a decent A300 that will certainly provide a smile to the average flight simmer looking to try something different. _______________________________ The Airbus A300 Classic B2-200 by ASSP is available from the X-Plane.Org Store here: Airbus A300 Classic B2-200 Price is $49.99 Requirements X-Plane 11 Windows, Mac or Linux 4 GB VRAM Minimum - 8 GB+ VRAM Recommended Download Size: 760 MB Current version: 1.6 (March 17th 2022) Review by Michael Hayward 30th June 2022 Copyright©2022: X-Plane Reviews Review System Specifications: Windows 10 Professional, AMD Ryzen 5 3600 Processor, 32GB RAM, Palit GeForce RTX™ 3080 GamingPro (Disclaimer. All images and text in this review are the work and property of X-PlaneReviews, no sharing or copy of the content is allowed without consent from the author as per copyright conditions) All Rights Reserved
-
Thanks for spotting this, it was actually an error on my part 🙂
-
Scenery Review : OMDB – Dubai International Airport by FeelThere Introduction Feelthere have been active in the world of flight simulation for quite some time now, with my introduction to them being the E-Jet series for FS2004, which I greatly enjoyed. Unfortunately, a few of their products hit below the bar, so when I saw their rendition of Dubai Airport for X-Plane 11, I was intrigued to see how it would fare. Dubai International Airport is the primary international airport serving Dubai, United Arab Emirates, and is the world's busiest airport by international passenger traffic, with eighty-eight million passengers in 2017. Spread over an area of 7,200 acres of land, Terminal 3 is the second-largest building in the world by floor space and the largest airport terminal in the world. The Emirates hub is the largest airline hub in the Middle East as it handles 51% of all passenger traffic and accounts for approximately 42% of all aircraft movements at the airport. If you're a fan of the mighty A380, then this is the airport to visit. First Impressions Upon first loading the airport, I was greeted with a beautiful-looking runway, however, I immediately noticed some lack of textures, specifically a ground base texture. I will discuss this in a later section, as well as a fix, plus other enhancements. The airport itself is a bit more up to date, featuring the new gates on the north side, and an updated airport layout. Exploring The Scenery Starting off with the main terminals, the design is quite basic, yet Feelthere have modeled the exterior to an acceptable quality, albeit without any interior details, which are (of late) becoming a standard in today’s airport environments. The tower seems accurate enough when compared to photos of its real-life counterpart, and overall, if one is happy enough just looking at the exterior, then the modelling here is perfectly sufficient. Moving towards the clutter around the airport, there is plenty of it to be found, with lots of crates, carts, and other airport objects scattered throughout the airport. This comes at a cost however, and for my system, which can handle X-Plane 11 in almost any scenario above 30FPS, (save for DD Design Chicago Airports) this particular scenery did take its toll, dropping the framerate to the high twenties and low thirties in OpenGL, with all my settings cranked up, minus the AA which is set at a conservative two times. When switching over to the Vulkan API, I saw a slight increase into the thirties, but it rarely went into the forties. This would be something to think about when you are looking to purchase this scenery, as it is a hard hitter even on a powerful PC. Textures Going back to something I mentioned at the start of the review, and I must say that when it came to the texture work, I found the textures themselves to be quite repetitive. This was later confirmed when I happened to view the airport’s scenery files. Feelthere shipped Dubai with a total of 132 textures for the entire airport, of which fifty-two of them are Normal files for PBR, eighteen are LIT files for the night lighting of the terminal textures, twenty-seven files for stains, dirt, and runway markings/textures, and just thirty-five files that are used to texture the vast majority of the models. This means that there is a sad lack of variation in the airport 3D model textures, and it really shows. The runway and taxiways look great, and credit where credit is due, Feelthere impressed me with the runway, with the skid marks reflecting the light perfectly and giving it the rubbery appearance it should have. This sadly is one of the highlights of the texture work, and it leads me into part two of the textures. Feelthere Dubai has no ground poly for a texture. It instead sits upon the default X-Plane 11 airport texture, leaving the entire airport looking very out of place and flat. I noticed this on the first load and immediately exited the simulator to correct this. Using Ortho4XP, I created tiles for the entire peninsula of Dubai, with the immediate vicinity of OMDB being created in zoom level 19. This gave the airport its much-deserved ground texture and allowed the runways and taxiways to shine in their new background. I also installed the X-Asia freeware enhancement pack so as to bring the entire city to life, and this included new buildings, autogen, and custom landmarks. These two changes helped the airport look much more in place and I would highly recommend using them together. Lighting The lighting at OMDB was nothing overly special but it does make use of X-Plane’s impressive global lighting effects by default. I’ll leave the photos to show how it looks as there was nothing of note that stood out. The terminal's interior lighting is very basic and consists of textures that “glow” at night, and though the effect isn’t overly convincing, it does the job. Conclusion Dubai airport by Feelthere is one of those airports that came out late, but which is a little cheaper than other offerings. Sadly, it does not stand up to the quality of other versions of Dubai, as it is hard on performance, only covers the airport and nothing else, and sadly lacks detail and texture work. For $19.99, it needs some updates to become a better representation and make it worth the money. If you’re looking at adding Dubai Airport to your collection, I would highly recommend first looking at other options at the Org before going for this rendition. In saying that, with a bit of work from Feelthere, I do believe it could be pushed up a notch, but as it stands in its current form, I would have to say, think carefully before purchasing. __________________________________ OMDB – Dubai International Airport by FeelThere is now available from the X-Plane.Org Store here: OMDB – Dubai International Airport Price at time of writing US$19.99 Features: SAM animated jetways (SAM 3 is required-free) Custom terrain mesh Custom lighting Custom ground textures with specular reflections Custom ground lines, runway markings, and detail textures. High quality PBR building textures with night lighting Requirements: X-Plane 11 Windows, Mac or Linux 4 GB VRAM Minimum - 8 GB+ VRAM Download Size: 1.1 GB Current version : 1.0 (April 6th 2022) __________________________________ Scenery Review by Joshua Moore 16th May 2022 Copyright©2022: X-Plane Reviews (Disclaimer. All images and text in this review are the work and property of X-PlaneReviews, no sharing or copy of the content is allowed without consent from the author as per copyright conditions.
-
Scenery Review SBGR- São Paulo/Guarulhos International Airport Globall Art – SBGR São Paulo / Guarulhos International Airport – X-Plane Looking back through the stamps in my old passports reveals that the first time I set foot in Brazil was 17th May 1996. If memory serves me correctly, that flight was on a British Airways 747-400 which had departed from Heathrow some twelve hours previously, and which had made a brief stopover in Rio de Janeiro on its two-stop round trip to South America. Since that date some twenty-six years ago, I’ve had the privilege of visiting that amazing country tens of times, flying with many different airlines and on many different airframes, but the one thing that all my visits have in common is that my entry point to Brazil has always been through Guarulhos International Airport. In those 26 years, I’ve seen plenty of change in the airport, especially in the past ten years as domestic air travel has become more ubiquitous, and as Brazil has welcomed visitors for both the 2014 World Cup and 2016 Olympic Games - although the latter were admittedly in Rio, a relatively ‘short’ five-hour drive away. The COVID pandemic has prevented my regular trips for the past few years, so the opportunity to visit again, this time in X-Plane through Globall Art’s ‘SBGR – Guarulhos Airport’ scenery package, was one that I eagerly jumped at. Figure 1 - A view of Guarulhos Airport’s Northern Side, including the freight terminal, and terminals 2 and 3. A Brief History The São Paulo Air Force Base (Base Aérea de São Paulo), some 28km from downtown São Paulo, was built on the land of Cumbica Farm (Fazenda Cumbica) which had been donated to the Ministry of Aeronautics by Eduardo Guinle. The Air Force Base was opened in January 1945, and at the time, it housed the 2nd Air Base Corps which had previously, since its inception in May 1941, been headquartered at Campo de Marte airport only 22km away. Air transport flourished after the end of the Second World War, and it was in June 1967 that the Brazilian government started looking into renovation of the airport infrastructure in Brazil. As a result of these studies, it was decided that new passenger facilities would be located at the site, although construction of the first terminal wasn’t to start for another 13 years. At that time, Congonhas was São Paulo’s main airport, but its short runways were unable to cater for the long-haul jets serving intercontinental travellers, and passengers to the city had to either change to a domestic flight in Rio de Janeiro, or fly instead to Viracopos airport in Campinas, almost 100km from São Paulo. Work was started on the new passenger facilities at the airport in August 1980, and they were inaugurated in January 1985. Perhaps unsurprisingly, it wasn’t long before Guarulhos had overtaken Congonhas as the city’s primary airport although the proximity of the latter to the city’s major commercial centres mean that it is still a favourite of domestic business travellers. In 1989, runway 09L/27R was extended to the east to cater for the larger jets that were being brought into service, and the passenger terminals renovated and enlarged to cater for the growing passenger numbers with terminal 2 coming into service in 1993. It was in 2001 that the need for a third terminal was first mooted, but the political and economic situation in the country delayed the start of construction until 2011. Not a moment too soon as in 2010, the airport served in excess of 30% more than its rated passenger capacity. To alleviate congestion whilst the new terminal 3 was being built, Infraero, the Brazilian company charged with managing its airports, announced that two former cargo terminals at the west of the airport would be renovated and converted into terminal 4 for temporary domestic passenger use – leaving the original two terminals for international passengers – and they opened fully in June 2013. Despite the intention that they would be a transient facility, their status has now become permanent. In 2012 operation of the airport was granted for an initial period of twenty years to a consortium of private companies which form the ‘Concessionária to Aeroporto Internacional de Guarulhos S.A.’. One of the first things that they did during the handover was to rebrand the airport ‘GRU Airport’ Figure 2 - Rebranded as 'GRU Airport' from 2012 Terminal 3 was opened in 2014 – just in time for the World Cup – having taken just one year and nine months after ground was first broken to complete. And in 2015 (in a move which confused me at the time and which I’ve only now worked out whilst researching the history for this review) the terminals were renumbered with the temporary terminal 4 becoming terminal 1, and the original terminals 1 and 2 merging to become terminal 2. Most recently, the São Paulo metro system has been extended to the airport on an elevated section with a bus providing the ‘last mile’ transport to and from the terminals. This is a far cry from the original intention for the airport to sit on a high-speed rail link from São Paulo to Rio de Janeiro; a project which was cancelled before it really started. It does however mean that at less than one US dollar, a rail transfer from the airport to the city is probably one of the cheapest in the world! Guarulhos airport is now the largest airport in Brazil and one of the busiest in Latin America, being second to Mexico City International Airport in terms of passenger numbers, and second to El Dorado International Airport (in Bogotá, Columbia) in terms of freight transport. That the airport is now operated as a private enterprise has upset the descendants of the original donor of the land, Eduardo Guinle, and they are arguing that this violates the spirit in which the donation was made. They have initiated legal proceedings demanding return of the land, or compensation to the tune of around 1 billion US dollars! The government’s defence rests on their assertion that the land to the south of the airport continues to operate as an Air Force base even though no permanent flying units are based there. Guinle’s descendants lost their original case, and it has now been referred to the Federal Council of Justice (Justiça Federal) on appeal. This, and no doubt other events, may well shape the development of the airport in the years to come. Installation The package I downloaded from the X-Plane.org store was a single 777Mb ZIP file which contains a couple of manuals – one in English and the other in Portuguese (not Spanish, which many people believe is spoken in Brazil as it is in the rest of South America), and a couple of folders – one containing the Airport scenery, and the other a bespoke mesh. Figure 3 - Package Contents There’s no automatic installer here, so I made a check of the manual to make sure that there are no installation gotchas, and it seemed straight-forward enough in that stand-alone installation requires that just the Airport and Mesh scenery folders are copied to the X-Plane ‘Custom Scenery’ folder; the names of the files will ensure that they’re loaded in the correct order by the simulator. Whilst not included in the downloaded package the manual offers the opportunity to download a high resolution OrthoPhoto for the whole of the São Paulo urban area extending out to Guarulhos airport. At around 5.2Gb it’s a huge download but given that it’s advertised in the manual I elected to use it whilst reviewing the package. Again, if you just copy this to the ‘Custom Scenery’ folder, the names will ensure that scenery is loaded correctly. Additionally, the manual recommends the download and installation of MisterX’s ‘Airport Environment HD’ scenery library, and the Auto Gate and SAM plugins to ensure that all animations work correctly. I already had these installed so there was no action required on my part. If you already own Globall Art’s nearby ‘SBSP – Congonhas’ scenery package and / or Paulo Ricardo’s Mega São Paulo package(s), then installation is still a manual process but much more involved requiring deletion of some the Mega São Paulo folders that contain the airport and mesh definitions, and manual edits to the scenery-packs.ini file to ensure the correct ordering of the scenery layers contained in the different products. Some elements of the installation instructions where you own multiple packages do seem a little ambiguous, so it is worth making sure that you understand fully what you’re going to do before you forge ahead. The system requirements for the package are stated simply as X-Plane 11, and 4Gb of VRAM as a minimum, although 8Gb or more is preferred. A system whose components meet the recommended requirements was used to capture the images contained in this review. Figure 4 - SBGR - Guarulhos International Airport seen from the North-West Package Features Globall Art’s ‘SBGR – Guarulhos Airport’ scenery package boasts a long list of features, claiming to accurately represent the airport as it existed in 2022, this being supported by customised textures, HDR lighting, static objects, vehicles and aircraft, and rendered interiors for some of the terminals. Additionally, the package claims compatibility with multiple third-party plugins, including custom jetways controlled by both SAM and Marginal’s Auto Gate plugins and their accompanying VDGS (visual docking guidance system) installations, taxi routes for World Traffic 3, and vehicle traffic controlled by Marginal’s Ground Traffic. And of course, the Mega São Paulo scenery package. The manual contains links to SAM and Auto Gate which are both free plugins – whether you choose to install them is up to you, but they were installed and enabled when this review was written. To avoid incompatibilities between the two plugins, the jetway serviced gates at the airport work with only one of the two systems – so if you have a preference, then you’ll need to make sure that you park at a suitably equipped gate. A look around the Airport So… with all the… ‘administration’ out of the way, it’s time to look around the airport. Initial impressions? Well… from the terminal side, I’m reasonably familiar with what are now terminals 2 and 3 and can honestly say that had you dropped me in this scenery package outside at either the departures drop-off or arrivals-pick-up areas of either of them it wouldn’t have taken me long to work out where I was, not least of which because the signs are replicas of those that you’ll find at the real airport, but also because of the modelling of the terminal buildings. And that bodes well! Figure 5 - Departures Drop-off at Terminal 2 – the quietest I’ve ever seen it! Time to start exploring, and rather than the logical clockwise roam around the airport that I usually take, I thought I’d mix it up a little, and follow the chronological development of the airport. On the south-west side of the field, the full extent of the Air Force base has been modelled, and with it extending to the limits of the forest in the screenshot it’s a lot bigger than I thought it was! Figure 6 - The São Paulo Air Force Base (Base Aérea de São Paulo) Custom objects representing the various building across the base have been developed and placed which adds to the feel of the airport as you approach it from the air. The only disappointment here, and it is a minor one, is that the X-Plane roads don’t follow their true paths, and consequently some of the buildings and trees encroach on them but you’re going to be too busy getting your landing or take off right to be able to notice! As you get closer to the runways in those spaces that you may find yourself taxiing, the attention to detail improves significantly with the buildings of the main military apron sporting the typical “welcome” and the official blazon of the 4th Air Transport Squadron that was based there, and a couple of static military aircraft stationed out front. Figure 7 - The São Paulo Air Force Base (Base Aérea de São Paulo) Main Apron Moving back across the airfield now to what was terminal 1, parking my trusty Zibo 737-800 sporting a rather splendid – and appropriate – ‘Gol’ livery on stand 212R. Just looking around the apron markings and stains on the tarmac shows how much work has gone into making it look ‘real’. It would have been easy to replicate the same marking pattern at all the gates, and whilst there does appear to be a finite set of patterns, there are enough of them to make this very difficult to spot – unless you’re looking for it of course. And, for comparison, the same shot in the dead of night. Gate 212 is one of those that’s compatible with the SAM plugin, so why not give that a go? The VGDS does provide all the cues necessary for accurate parking of the aircraft allowing the jetway to extend to the front left door. But look at the rest of the view. You can see through the glass into the terminal (more of that later), but the modelling of the airport building and its furniture together with the equipment and other objects that you can see on the small part of the apron that’s visible below give the impression of a busy airport. Figure 8 - Arriving at Gate 212R I’m a sucker for looking around inside a terminal building to see if it’s modelled and in this package the developers have claimed that this is the case. It certainly is – at least in the part of the terminal that sits at the end of the pier. The windows here are clear and from the cockpit of your aircraft parked at the gate, it is possible to see inside the building. Standing on the inside, remembering that most of us would never bother standing in the terminal building of a simulated airport, it’s a passable facsimile with rows of seats modelled, gates marked and high-resolution images of representative restaurant and store fronts. I would have liked to have seen the interior modelling extend back along the pier to the terminal building, however the windows on that part of the structure are bitmaps that look a lot better at night than they do in the daytime. Figure 9 - Inside terminal 2 Compared to the other terminals, the converted cargo facility that now operates as the domestic terminal 1 is quite bland – as it is in the real-world. There are no jetways here but there appears to have been no scrimping on the quality of the model. The different departure doors are uniquely labelled with their gate number, the arrivals entrance equally well marked and walkways between the terminal the aircraft parking spots look as if they’re freshly painted onto the tarmac. Figure 10 - The converted cargo building that now operates as terminal 1 The opening of terminal 3 in 2014 added 12 million passengers a year to the capacity of the airport. Looking at the size of it, it’s not difficult to understand how. The unusual design that was finally chosen wasn’t that originally proposed by Infraero, but one which the 2012 consortium selected at late notice. Unusually for Guarulhos, in that previously the car parks serving the other terminals are large open air car parks at ground level (not ideal in the scorching Brazilian sun), a multi-storey car park accessible through covered walkways was built alongside the terminal. All of this is of course faithfully reproduced in the scenery package. Figure 11 – The distinctive terminal 3, and its car park, from the landside. Changing our vantage point from landside to airside, the huge amount of real estate given over to serving the large jets that ply the long distant routes to São Paulo can be seen, and the terminal can manage up to ten such aircraft at the pier, and 7 more with remote boarding. From this viewpoint, you can also see the variety of surface types and markings (including those that have been painted over as the taxi and parking configuration has evolved) that have been employed to build as realistic an experience as possible for pilots visiting the airport. I’d be lying if I said I hadn’t taken a walk around inside terminal 3 as well, and from a passenger perspective its recognisable. The full length of the pier is modelled this time though, providing a view into the terminal from all the gates, and there’s a wider variety of shop fronts, restaurants and advertising boards throughout. Figure 12 – Terminal 3 with its adjacent aprons seen from the airside When you’re close to the main terminal building, it’s even possible to see the baggage handling facilities underneath it. This degree of detail shows the lengths to which the developers have gone to produce an airport that looks authentic in every respect, even if it doesn’t materially add to the ‘flight’ experience. Figure 13 - Terminal 3's baggage handling area The elevated rail link to São Paulo, complete with trains that look just like those you’ll see on the São Paulo Metrô, is modelled too. Because the airport is the last stop on the line, the track really does just stop in space like it does in the screenshot, providing just enough room beyond the station for trains to change to the opposite track for the return journey, although the trains in the simulator just change direction! Figure 14 - Aeroporto Guarulhos station on the Jade line of São Paulo's Metrô system Whilst that concludes the trip around those parts of the airport that feature in the history outlined at the start of the review, there are plenty of other things to enjoy in this scenery package. The detail doesn’t drop away when you look at the rather distinctive airport fire station, opened in 2015, to the south of the airfield. The letters that make up the sign on the front of the building are full 3D models and they cast shadows on the façade of the building – although having taken another look around the whole airport, that’s the case throughout. The garage contains fire trucks of a type that is deployed at the airport, and which sport the logo of Infraero. It’s not evident from the screenshot, but I can report that the level of detail on the model means that you can also see the gym equipment in the window of the block that’s behind the garage. Figure 15 - The Airport Fire Station Immediately next to terminal 1, Guarulhos’ cargo facilities are vast at almost 100,000 m2, and they’re capable of handling all manner of goods including refrigerated and hazardous shipments. The various warehouses at the airport are all present in the scenery – modelled of course to the same high standard as the adjacent former cargo warehouse. Figure 16 - The cargo terminal at Guarulhos To the west of terminal 3 is the maintenance facility at Guarulhos which was constructed in 2017 at a combined cost of 230m US dollars. The American Airlines facility can house two wide-bodied jets of the types that they use on their routes to São Paulo (typically 777 and 787), and the LATAM facility behind it one. Both are recreated in the scenery package in the level of detail present that I’m starting to become accustomed to. Figure 17 - The American Airlines and LATAM maintenance hangars at Guarulhos Moving slightly off the airfield now, and onto the approach road connecting the airport to Rodoviária Presidente Dutra – the main road that runs between São Paulo and Rio de Janeiro – a hotel that I’ve always wanted to visit but have never found the time always being either on my way to or from the airport terminals. Figure 18 - The Pullman Hotel on the road approach to the airport And finally, as another testament to the pride that the developers have put into this package, the default tower view has more detail than I’ve ever seen in a tower before – even if their screens do show them controlling a different airport! Figure 19 - The Default Tower View In conclusion… I’ve seen quite a few different aircraft scenery packages from several different developers over the years, and I have to say that Globall Art’s SBGR – Guarulhos Airport ranks up there amongst the best. The hard work that has gone into making the aircraft movement areas look realistic and the terminals true-to-life replicas of their real-world counterparts is evident, but what stands out for me is that it’s a blend of instantly recognisable detail in all the right places which extends beyond the immediate limits of the core airport buildings and infrastructure. This ensures that it’s not an oasis of accuracy surrounded by a desert of out of the box land-class and autogen scenery and this works wonders in enhancing the illusion of reality that we, as simulator pilots, all seek. If Guarulhos Airport is one that’s of particular interest to you, as it is to me, then I’d recommend Globall Arts’ representation wholeheartedly. If you’re a collector of good airports, and São Paulo falls within the criteria that you use to select what goes on your list of desired acquisitions, then make sure there’s a spot on that list for this package; I don’t think you’ll be disappointed. If you’re just looking for a reason to start flying somewhere you haven’t explored so far, then South America, Brazil and SBGR – Guarulhos International Airport is, in my view at least, a great place to start. I’ve tried to cover off everything but there’ll inevitably have been something I’ve missed in the tour that I’ve taken you on. Ultimately, only you will know whether it’s right for you though! For me, it’s staying installed on my system, and I’ll be flying in and out of there until I can get back to Brazil for real. __________________________________ SBGR- São Paulo/Guarulhos International Airport by Globall Art is now available from the X-Plane.Org Store here: SBGR- São Paulo/Guarulhos International Airport Price at time of writing US$24.95 Features: Accurate replica São Paulo International Airport, Guarulhos, updated 2022. Precise modeling, based on original references, plans and other studies. Fully customized pavement, with ambient occlusion included in textures. Custom Jetways compatible with SAM plugins. Auto Gate Marginal Compatible Custom Jetways. Standard VGDS system. Controlled by Dataref Marginal Plugins. Controlled by Dataref SAM Plugins Static objects, vehicles and aircraft are present in the scene. Avenues and streets with custom and standard vehicle traffic. Controlled by the Marginal Ground Traffic Plugin HDR lighting with custom night textures. Custom textures with ambient occlusion. X-Plane standard animated traffic service. Standard Approach Light Systems (ALS). Included taxi routes for aircraft, “taxi route". Compatible taxi routes configured for World Traffic (WT3) and other plugins. Ramp Start set for airlines. Terminal 2 and 3 with rendered interior. Compatible with Mega São Paulo – Paulo Ricardo. Compatible with SBSP Congonhas Globall Art. Requirements: X-Plane 11 Windows. Mac or Linux 4 GB VRAM Minimum. 8 GB+ VRAM Recommended Download Size: 830 MB Current version: 1.1 (May 13th 2022) Review System Specifications: Windows 11 Intel i7-9700KK 32 GB RAM Nvidia RTX 2080 Super Scenery Review by Andrew Parish 9th May 2022 Copyright©2022: X-Plane Reviews (Disclaimer. All images and text in this review are the work and property of X-PlaneReviews, no sharing or copy of the content is allowed without consent from the author as per copyright conditions.
- 1 reply
-
- 1
-

-
Aircraft Review : Bell 47G-2A1 by FlyInside The Aircraft The aircraft under review is FlyInside’s Bell 47G-2A1. The version in question is the latest update 1.71, released on the 25th of February 2022. The B47 is a single-engine multipurpose light helicopter, manufactured by the Bell Helicopter Corporation, and first flew in the mid-1940s. It has a Lycoming VO-435 piston engine, and in real life, several engine variants were available over time, and the model from FlyInside is based on the A1 variant. The aircraft has twin blade main and tail rotors and is designed to typically carry three people. One in the left pilot seat, with space for two passengers seated on the right seat, side by side. Very cosey… With its iconic bubble canopy, it is still one of the most recognised helicopters even today. It definitely has that 1940/50’s retro look and feel, so if you like a bit of nostalgia this is worth a look, particularly if you were a fan of the TV series M*A*S*H from the 1970s and 80s. Who can forget that opening scene with the two B47s flying in through the hills… Initial Thoughts I obtained my copy via the X-Plane.Org Software Store and it is priced at $34.95, and although it can be purchased directly from the developer, the price is the same. Installation is simple, just a case of downloading the pack from the org store then dragging to your aircraft folder, and you are done. There is a security key required and it is provided with your purchase, and you will need to activate the B47 once installed. This is done via the Heli Manager app which is accessed via the X-Plane menu bar once in the sim. There is also an installer that you can get via the Flyinside website, although I didn’t find the need to use it. The documentation provided on the website and in the download is nice & simple, and gives you everything you need to know regarding installation, how to set up the flight controls, the flight model options, the advised cold and dark start-up procedure and a few other bits and pieces, such as how to deal with a few of the common issues that may be encountered. I found the documentation clear and easy to read and follow, and I highly recommend you read it prior to your first flight, as then I am sure you will have no issues with the initial setup. On the Ground The exterior details are very nicely done, in fact when doing my very first external walk around, I was really impressed. The clarity and quality of the texturing, combined with the attention to detail is quite simply excellent. One fabulous example of this is the rotating tail rotor drive shaft and the animation of the tail and main rotor heads. The open nature of the fuselage really gives the user a great opportunity to get up and close to the B47 and allows you to get a good feel for what is going on inside. The detailing of the Lycoming piston engine is really something to behold, the texturing is exquisite. The same can be said for the main rotor assembly and the tail rotor, both are enhanced even further because of the animation on inputs from the main controls. Move the respective cockpit controls and the rotor assemblies move accordingly. It really is worth just taking some time when cold and dark to take in the exterior modelling and textures. They are simply stunning! The iconic bubble canopy gives a fabulous view of the front of the aircraft, and both pilot and passenger are very nicely modelled, with both being visible from the outside, and the passenger visible inside. There is a click spot on the passenger seat to allow you to remove or add the passenger if you wish. The cockpit doors can also be removed by clicking a hot spot on the pilot’s door, which is great if you want a completely open ‘seat of your pants’ view. The fabric textures of the seat covers and floor coverings, as well as the clothing and even the shoes being worn by the pilot and passenger, are another fabulous example of the developer’s eye for detail. I honestly do not believe I have ever seen flight crew so beautifully modelled in a flight sim. Really impressive, and therefore this model really deserves to be inspected at close quarters. The stock model comes with several different coloured liveries (by my count ten including the default), although no paint kit was provided, which was a little disappointing as I do love to do a bit of painting from time to time. A livery modelled on the famous 4077 M*A*S*H TV series is provided, and this variant comes with the added side stretchers, one on each side. The civilian pilot and passenger do look a little odd in that scenario, but I guess you can’t have everything, and it is still a very nice add-on, nevertheless. As you look around the cockpit, you will find a very well modelled interior. All the switches and levers I tried are animated, and the feel of the cockpit is fantastic. I did notice that at this time the various fuses are modelled but not animated, perhaps something for a future update just to add another level of realism. The cockpit dials I found to be easy and clear to read, and I really liked the red night illumination provided by the cabin spotlight, very nice effect. Looking up from the cockpit to the rotor head assembly above, is another view I particularly enjoyed, as you really get a sense of movement of the twin rotors and rotor head assembly whirring around just above your head. When this is combined with the rich FMOD engine sounds, I can only imagine what it must be like to sit in the real thing. This I have the feeling comes very close. The collective friction wheel at the right of the pilot’s seat is animated, although I could not really tell if it was doing anything or not. In real life the B47 has no autopilot, so as I understand it, this is basically how real pilots maintain straight and level flight as best they can. I use several SAITEK panels (switch, 2 x radio, multi) and I was able to connect these to the sim with no issues. From my SAITEK switch panel, I could easily operate the various switches on the instrument panel in the B47, and from my MaxFlightStick the cyclic, collective and throttle, no issues at all. From what I have read, the real-life B47 does not come with an engine governor, however as many people do not have dedicated helicopter controls, the developers have provided a governor option to make life a little easier when maintaining the rotor RPM. In my case, I was able to test out both features and they worked extremely well, as I do have a separate throttle twist grip on my collective. Starting from cold and dark was extremely easy (for a change…) when getting the heli ready for a flight. Instructions are provided in the manual, however with the flick of only a few switches and levers, you can have the engine and rotors up and running in an instant. The sounds as the Lycoming piston engine splutters to life and the rotors spin up, I found to be authentic, as you would expect from a piston engine like this. However, as I have never been beside the real thing, I can only base my observations on internet clips of B47’s I found. Either way, the sounds are believable in my opinion. So, with my walk-around done, everyone on board, and engines and rotors running, it was time to take the B47 for a spin. In the Air The package comes with FlyInside’s Heli Manager, an app that allows you to control a few features including the flight model. It is accessed from the X-Plane menu bar, from where you can adjust the flight dynamics to suit your current skills level. There are three options, Easy, Medium, and Realistic, and in each, the settings for Cyclic Sensitivity, Helicopter Stability, and Tail Stability can be adjusted. The differences are quite marked, and based on my experience, I estimate it will take quite some time and effort to master the Medium and Realistic settings, as the B47 is sensitive to control inputs, a trait in real life I believe. For my test flights, I just left the settings on Easy and notched the sensitivity down a little bit, primarily so I could really enjoy the B47 without having to fight with it too much. Having the in-model option to adjust these features I believe is important because this will allow everyone from absolute beginners right up to pros to be able to enjoy the B47. In my opinion, there is nothing worse than buying an aircraft that is just so unstable that you give up before you get started. The Heli Manager allows you to ramp up your proficiency over time as your confidence and piloting skills develop. During my numerous flights, I found the B47 very responsive to the input controllers without being too sensitive, and I was able to control my rate of climb & descent, airspeed, and direction. Once in my cruise, the feel of the B47 was excellent. I should also add that I also use TrackIR as my headtracking device, and this I believe makes a big difference in the user experience and immersion. The B47 was built for head tracking in my opinion, as the bubble canopy gives essentially unobstructed views of the surroundings and is, therefore, an ideal aircraft if you just want to do some low-level VFR flying and simply look out the window. This probably is a good time to point out that my assessment was using Windows 10 and X-Plane 11, and I had no issues at all, with smooth flying all the way. Typically, I was getting FPS rates in the low to high 30s with my i9 and RTX 2080Ti and high graphics settings. From the information provided, I understand that the B47 will also run on Linux and Mac, although not having either of these I was unable to test this. Although I have never flown in a real B47, I have flown many helicopters across several flight sim platforms over the years, and I can safely say this is one of the most enjoyable flying experiences I have had in a rotary wing aircraft. Everything provided sets you up for success, and I just loved the simplicity and beauty of the B47. If there was one small criticism to make, and I am being a little pedantic, the view as the pilot is a little awkward to get just right in my experience. This is largely due to the fact that the instrument panel is long and thin, and therefore it is not that easy to get a view that allows you to see the instruments, and what I like is to see straight ahead. Having TrackIR definitely helped with this, and as I said I am being a little pedantic. Final Thoughts I have been a flight sim helicopter fan for almost ten years now, mainly because I love the freedom and challenge that helicopters provide the pilot. You can really get into all the nooks and crannies of a location that you just can’t with fixed wing aircraft, and having an aircraft with such a panoramic view, really is as good as it gets for a VFR addict like myself. This is particularly the case if you use easy mode and just want to explore. For more seasoned pilots you can easily up the ante to test your skills, and this feature I really liked because the developers are clearly catering for all levels. Helicopters are a real challenge to fly, particularly if you don’t have cyclic and collective controls. However, the way the B47 is presented, I believe gives even absolute beginners a chance to enjoy the unique nature of helicopter flight. All I can honestly say is that I was not disappointed by what I have experienced, and the overall package on offer from the FlyInside team is well thought out and executed. From the design, the textures, the features, through to the flight dynamic options and the general feel of the aircraft, everything is done incredibly well. Even if you are a seasoned helicopter fan or someone thinking about sticking their toe into this market for the first time, the B47G-2A1 from Flyinside is well worth considering in my opinion. As I said, the freedom you can experience in a helicopter will take you to places that I am sure you will never see if you stick to fixed-wing aircraft, especially the larger ones. X-Plane 11 for me, is still very much the place to go if you wish to fly helicopters, and having the iconic B47 now in my hangar, really adds yet another layer to my enjoyment. So, should you buy it? Well, as always that is something of a personal choice, however, I certainly am glad I have had the opportunity to spend some time in the bubble canopy, and I can easily see the B47 being a firm favourite of mine for some time to come. Stuart McGregor __________________________________ Bell 47G-2A1 by FlyInside is now available from the X-Plane.Org Store here: Bell 47G-2A1 Price at time of writing US$34.95 Features: Revolutionary and realistic flight model, developed and tested by an experienced Bell 47 pilot Support for full helicopter flight physics including effective translational lift, ground effect, transverse flow, flap-back, auto-rotation, and more Support for failures and dangerous regions of the flight envelope including vortex ring state, engine failure, and retreating blade stall Extremely detailed 3D model with high quality PBR textures and animated drive and control systems Realistically modeled engine parameters, including full start-up and shutdown procedures Highly customizable realism settings allow for a smooth, easier flight model for those who are less experienced, and a hardcore, realistic flight model for the veterans experienced with the complex and challenging flight dynamics of helicopters Interior Features: Detailed 3D cockpit model 100% operational switches, levers, and gauges Removeable doors Realistic night-lighting High-quality sound design Exterior Features: Beautiful exterior model Fully modeled engine Animated mechanics including swashplate, rotor-head linkages, tail torque shaft, and more Functional lights and beacons Ten distinct liveries Requirements: 4 GB VRAM Minimum - 8 GB+ VRAM Recommended Download Size: 1 GB Current Version: 1.71 (February 25th 2022) Review System Specifications: Windows 10 64 Bit CPU Intel i9 64GB RAM NVIDIA RTX 2080 Ti Helicopter Review by Stuart McGregor 1st June 2022 Copyright©2022: X-Plane Reviews (Disclaimer. All images and text in this review are the work and property of X-PlaneReviews, no sharing or copy of the content is allowed without consent from the author as per copyright conditions)
-
Scenery Review: EHRD Rotterdam Airport by RDPresets Introduction Hello and welcome to my very first X-Plane writeup for XPlaneReviews. Some of you probably know me from my PM library here at the org, so it gives me great pleasure to write a review on something dear to my heart…scenery design. Rotterdam The Hague Airport, is an international airport serving Rotterdam, the Netherlands' second largest city, and The Hague, its administrative and royal capital. It is located 3 NM north northwest of Rotterdam in South Holland and is the second busiest airport in the Netherlands. The airport handled over 2.1 million passengers in 2019 and features scheduled flights to European metropolitan and leisure destinations, Transavia being the largest operator at the airport. It is also used extensively by general aviation and there are several flying clubs, a skydiving club, and a flight training school located at the airport. Installation After purchasing the product from the store, I downloaded the zip file and promptly extracted it. The size of the zip was about 2.6 GB which is quite large for an airport scenery. After extracting the file, I ran the exe file contained within the folder. The installation process requires you to insert your serial number, which is supplied to you via email and once done it's just a simple case of installing the scenery into X-Plane’s Custom Scenery directory. Upon loading Rotterdam for the very first time, I noticed there were no objects of any kind to be seen. Having experienced this before, I had a good idea of the reason behind it. A quick look at my scenery_pack.ini confirmed my suspicions, the library which was needed for the scenery to work was installed above the airport. As we all know, scenery libraries (due to how X-Plane works), need to be installed below any airports. Unfortunately, in the case of Rotterdam, this had not happened, and the scenery had loaded without any objects. After a quick and simple edit of the scenery_packs.ini file, I loaded up the scenery again, and lo and behold there was the airport in all its glory. Strangely I did get an error message informing me that the scenery might not display correctly but decided to ignore it as all the assets were installed. Walkabout One of the first things I like to do when looking at a new airport scenery is to view it from above, and this is what I did with Rotterdam. The scenery itself comes with its very own ortho, but for the purpose of this review, I have also included a larger ortho of the surrounding scenery, plus simHeaven's excellent X-Europe enhancement. If you've never used this freeware add-on before, then I highly recommend checking it out as it really enhances X-Plane, especially if you use ortho tiles. Rotterdam airport looks pretty good when viewed from above, and the included ortho works well. All of the buildings, including the main passenger terminal, hangars, and maintenance facilities seem to be accurately placed. One aspect of the airport which I was surprised by, was the large solar array running the length of the runway (let’s hope they get plenty of sunshine). Going down to ground level allows us to see the airport in more detail. Here you will see maintenance vehicles, including fuel trucks and Ford Transits, plus the usual airport clutter. Whilst the vehicles themselves look good; it would have been nice to have seen a bit more variety as they all look the same. Texturing for the apron area was good with plenty of weathering on show to make the airport look used. Unfortunately, it was here that I witnessed one of my pet hates, there were no people present! An airport such as Rotterdam should have people. You don't have to have a lot, maybe just some marshallers, or perhaps a few passengers getting on a plane. Unfortunately, I didn't see any and it was a real shame because the airport could really do with them. Perhaps in future updates, the developer could look at this and include a few people as it would greatly enhance the scenery. The main airport terminal of Rotterdam has been recreated reasonably well in terms of its 3D modelling. However, the texturing is not the best I have seen. From a distance, they look quite good, but when viewed up close, the textures soon begin to lose clarity. They could also do with some weathering as they look too clean and artificial. Again, perhaps this is something the developer could look at. Many of the other buildings situated close to the terminal exhibit the same kind of modeling and texturing, and while it’s good enough for a freeware scenery, for a payware product, I think it needs to be upped a notch. Don't get me wrong, the modeling is good, it's just that the texturing could really do with being worked on. The photographic ortho tile on which the buildings have been placed is of good quality and for the most part, works well. Trees are positioned in their corresponding areas as are signs along the road, and from above these areas look good. However, there are a few places where the ortho doesn't work, namely the airport car parks. In my humble opinion, using ortho imagery for these areas is notoriously difficult, as to make them believable, you have to place numerous (and varied) vehicles over the area in question. Unfortunately, in the case of Rotterdam, the result was not as good as it could have been. Night Lighting Night lighting was a bit of a mixed bag as there were some parts of the scenery that looked good, but there were also plenty of areas where improvement was needed. Dynamic lighting around the main apron worked reasonably well, albeit a bit dim. The biggest problem I encountered was with the lit textures for some of the main buildings as they just don’t look good in X-Plane 11. Performance I found the performance at Rotterdam (for the most part) very good, especially on my low-end system. The only issue I encountered was if I ventured over to the side of the runway where large amounts of 3D grass had been placed. For higher-end users, this area would no doubt not be an issue, but for users with aging systems, it’s something to bear in mind as you cannot disable it. Overall, the scenery ran very smoothly, and I was pleased with its performance. Documentation Unfortunately, try as I might, I could find no documentation whatsoever. Conclusion As an amateur who has occasionally dabbled in creating freeware scenery, I know how difficult it is to recreate an airport in X-Plane, especially a large one such as Rotterdam, and as such, it’s not for the faint-hearted. When you factor in custom-made 3D objects, plus ortho imagery, it suddenly gets beyond my pay grade. However, Rotterdam airport is not a freeware scenery, it's payware, which means you are parting with your hard-earned cash. Priced at $21, the scenery (compared to quite a number I have purchased in the past), is on the higher end of the scale, so with that factored in, do I recommend you go out and purchase this scenery? Well, in its current state I would have to say no, as unfortunately there are just too many areas where the scenery requires work. However, in saying that, if the developer made the necessary changes, then I honestly believe Rotterdam Airport would make for a highly enjoyable scenery and one that I would have no hesitation in recommending. Regards Paul __________________________________ EHRD - Rotterdam Airport by RDPresets is now available from the X-Plane.Org Store here: EHRD - Rotterdam Airport Price at time of writing $21.99 Features: Highly detailed version of Rotterdam the Hague Airport. Handcrafted 3D Objects Accurate night lighting. Accurate vliegclub area and new aeroclub building. Hoog-Zestienhoven Industrial area modelled. Airport Hotel Rotterdam Brand new Fletcher Hotel in front of the Wings Hotel modelled. Simple terminal interior. Optimized performance. Custom highly detailed ground textures. Accurate area in front of the airport, featuring billboards, monument, flags, fuel station, full car parks. Accurate taxiway, runway and apron featuring the recently added (Q) parkings. PBR Materials throughout. Requirements: X-Plane 11 Windows Only at this time 4 GB VRAM Minimum - 8 GB+ VRAM Recommended Download Size: 2.7 GB Current version : 2.0 (May 12th 2020) Review System Specifications: Windows 10 64 Bit Intel Core i5-3350p CPU @ 3.10 GHz 16GB RAM NVIDIA GTX 1050Ti Scenery Review by Paul Mort 19th May 2022 Copyright©2022: X-Plane Reviews (Disclaimer. All images and text in this review are the work and property of X-PlaneReviews, no sharing or copy of the content is allowed without consent from the author as per copyright conditions)
-
Scenery Review: Genova COMPLETE 5 - The Revolution by Grifo Creations Introduction Having been rated as one of Italy’s most underrated cities, Genova has been an established maritime trade center for centuries, and its location on the Ligurian Sea, makes it a prominent maritime hub to transport products to northern Italy. It is also the birthplace of Christopher Columbus, the famous explorer who is credited with finding the North American continent on his way to finding a quicker route to India in which to compete with the East India trading company, the undisputed power of its day in transporting goods to Europe from India. Today, Genova serves as a maritime port city and Italy’s 6th most populous city. The airport is not the largest or the busiest, but is home to some beautiful approaches, including the RNP 28 with a banking right turn over the port to the runway, and the ILS 10, with its sweeping views of the city and low approach over another nearby port. Without further ado, let’s give this new scenery a go and see what it has to offer! First Impressions The installation process was both simple and easy to do, with you only needing to extract the 5 folders containing the scenery to your custom scenery folder. At almost 6GB, this scenery takes up a considerable amount of hard drive space, but the scope of the area covered, rivals that of FlyTampa Las Vegas. A quick glance around presents a nicely modeled city and port, as well as a well-modeled airport terminal and buildings. A quick flight proved that even with all the custom objects, the scenery is not overly harsh on FPS, and is quite well optimized. Note: thanks to not having my main PC for a couple more weeks, this was reviewed on my gaming laptop, which while powerful, is not sufficient to run XP11 at max settings without becoming a slideshow and unusable. With that said, the compromise is that there are no scenery shadows, parked aircraft, or uncompressed textures. Sorry for that in advance folks! Exploring the Scenery Starting off with the terminal, it’s modeled to an acceptable standard level, being only let down a bit by the textures. Air-side the terminal features an interior with some interesting looking people, including one poor bloke who seems to be having a bit of trouble figuring out what kind of pop to get! Outside the airport, you can find an abundance of ships, boats, hundreds of custom buildings, and objects all building up the overall feel of the city and approach, and I must say it does look quite nice! The only complaint I have are the textures, but I will discuss this in the next section. Textures When it comes to textures, there seems to be lots of variation in the overall quality and coloration, with some textures being quite sharp, and others very muddied. The airport itself has most textures in a good resolution, with a couple of exceptions, however, the city lacks a bit in texture quality in the buildings. This is not really noticed much on the approach and didn’t bother me at all, though I wouldn’t mind at all if they got a resolution boost! In terms of the static and moving people around the airport, I’m not sure what to think. I want to say they add to the feeling of life around the terminal, but then as soon as I look a bit harder the illusion falls off completely. I think that if they earned some faces, it would be a good improvement for their well-being! As for the ortho texture, for the most part, it is quite good, with some discoloration here and there. In all, the texture work could use some upgrades, but is a good starting point and won’t be overly obvious when flying to and from the airport. Lighting The lighting around the airport and city is really a highlight of the entire scenery, with the night lighting being custom and bringing the entire scene to life after dark. Approaches with all the lights really bring another level to the scene and I really enjoy that! Conclusion Genova Airport and city is a really good scenery for those who are looking for a good destination to fly to and want the full experience of the approach included. Though a little steeper on price at $32.00 US, it has a lot of value for the money and is from what I saw in my sim, ortho compatible with a few minor hitches in the city. I look forward to flying into Genova in its fullest when I get home in a few weeks, and it will be a great addition to my European destination list! _________________________________________ Genova COMPLETE 5 - The Revolution by Grifo Creations is now available from the X-Plane.Org Store here: Genova COMPLETE 5 - The Revolution Price at time of writing $32.00 Scenery Features I want to thanks with the heart Marcogrifo for his lighthouse, the breakwater and cranes models (very high detailed and complicated models) and of course the entire UHD fair area with its helipad and many landmarks. Overall I thanks Marco for his UHD San Giorgio Bridge (former Morandi bridge). 243 square kilometer city of Genova, 850 square kilometers outback of Genova (mountains and coasts). And the international city airport Genova Cristoforo Colombo (LIMJ). The city contains hand recoloured ground textures (50cm, 1m/pixels) and is filled of HD landmarks (hundreds of models), the outback contains the hand recoloured ground textures (50cm, 1m, 2m) and hand placed forests, for the buildings in outback, the scenery relies on X-Plane or third party autogen. In the city there are 3D modeled residential areas (16.000 buildings). They have generic facades and real roofs (PBR material for the roofs). The airport is very high detailed with all HD buildings and architectural complexes. Further there are custom ground services moving near the Terminal. Also in and out the Terminal there are moving (walking) people. I've rebuilded the Terminal that now is updated to the next 2023 year (in real life there are currently works on expansion of the Terminal). In the Terminal there are five autogate jetways (Autogate by Marginal required). The Terminal and the control tower has partial generic prerendered interiors. In the city and in the outback there is car traffic on the roads, the 3D modeled elevated roads and the San Giorgio bridge (former Morandi bridge). In the city and in the airport there is a dedicated (optional) mesh (the default mesh modified to increase scenery quality - now the scenery features 3D docks in all the city and airport). The mesh is not compatible with Ortho4XP scenery. In the Ancient Port (near the Galata Sea Museum), there is a submarine (Nazario Sauro S 518) ultra high detailed. Photographic night environment. In the city there are thousands of objects like cranes, containers, ships, boats, parked trucks, parked trains. In the city there are also the flyover roads with interchanges (with traffic) and the Bridge San Giorgio (former Morandi bridge) with car traffic. Sea from photoreal textures. Helipads in the airport and in the fair (Eastern of the city). High detailed APRON in airport area and realistic grass near the runway and taxiways. Changing parked aircrafts in airport. Moving X-Plane ground services in the airport. Use of PBR materials for the ground textures at the airport and on the roofs of the buildings in the residential areas. Static and moving people (with natural movements) in the airport area (especially in and out of the terminal). Two good detailed railway stations. Realistic and accurate ILS offset of 2 degrees. The airport is been tested with World Traffic 3.0. Extensive documentation for the airport (by ENAV) and the city (wikipedia). Plus some detailed maps of the parkings and helipads in the airport and in the city. Requirements: X-Plane 11. 4 GB RAM Minimum - 8Gb+ VRAM Recommended Download size: 4.5 Gb Current Version: 5.0 (May 9th 2022) Scenery Review by Joshua Moore 12th May 2022 Copyright©2022: X-Plane Reviews (Disclaimer. All images and text in this review are the work and property of X-PlaneReviews, no sharing or copy of the content is allowed without consent from the author as per copyright conditions)