Search the Community
Showing results for tags 'flightsim studio'.
Found 2 results
-
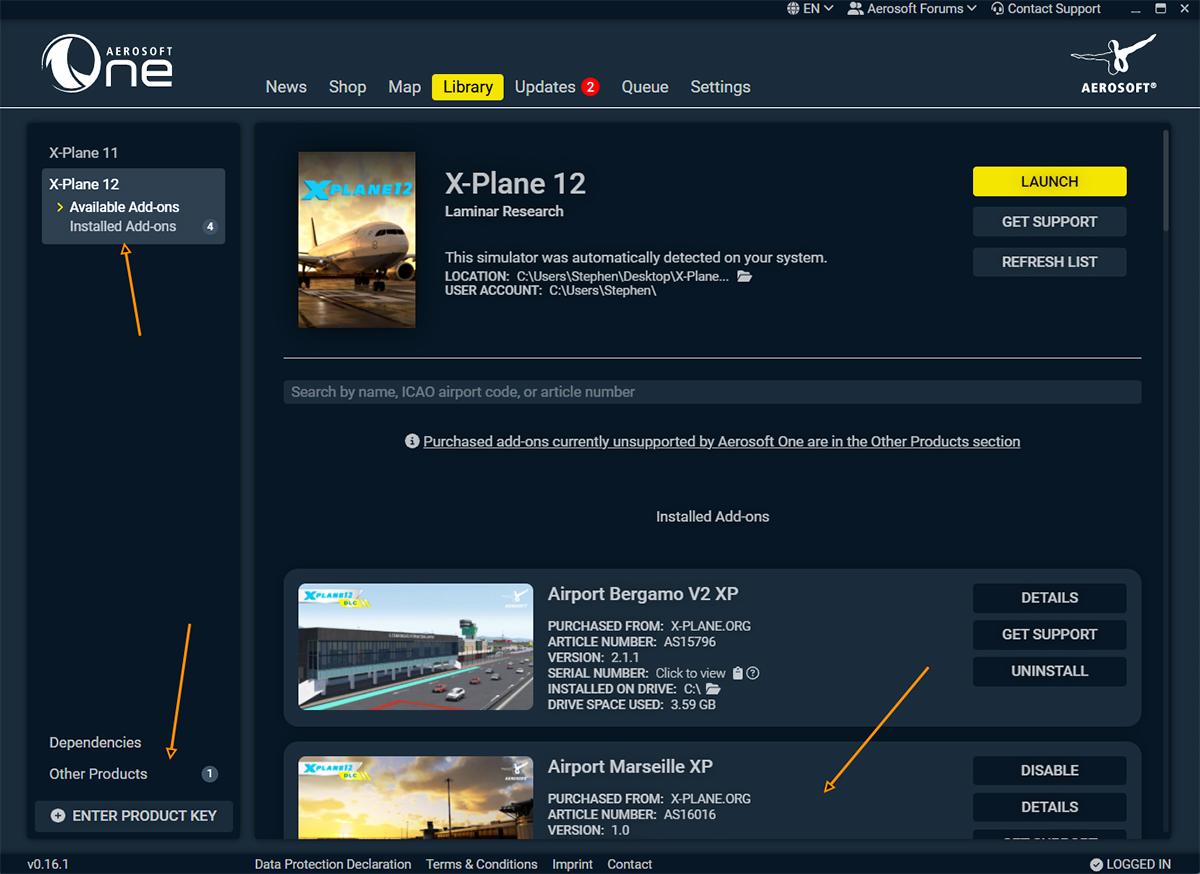
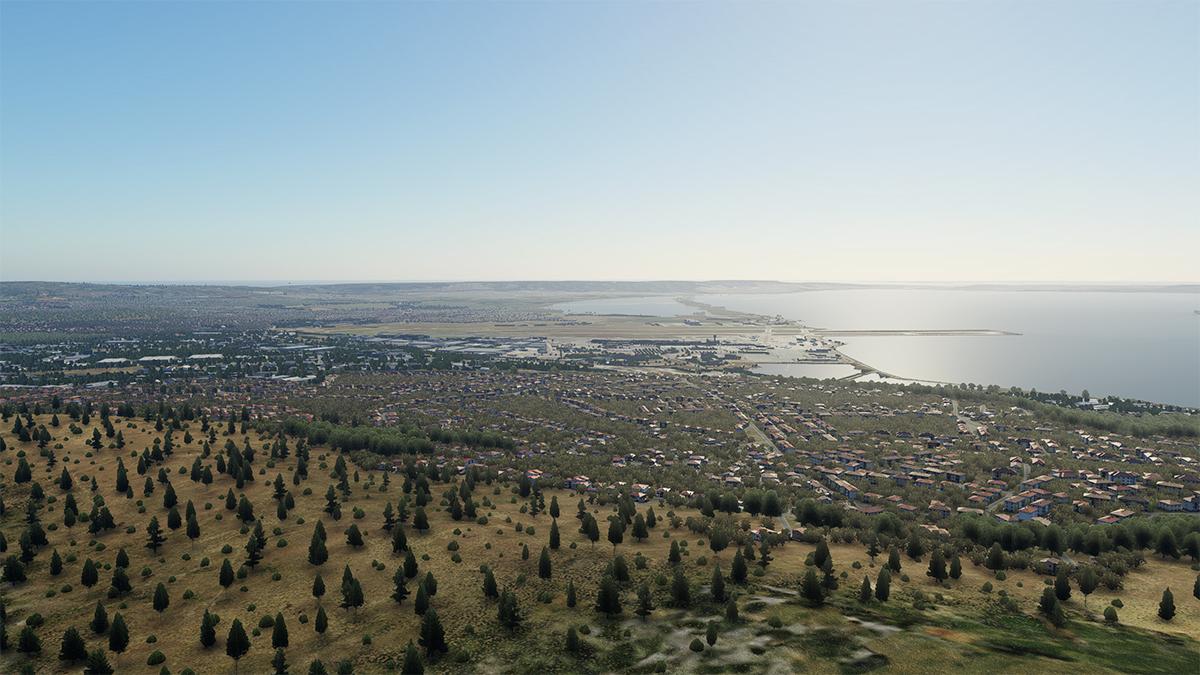
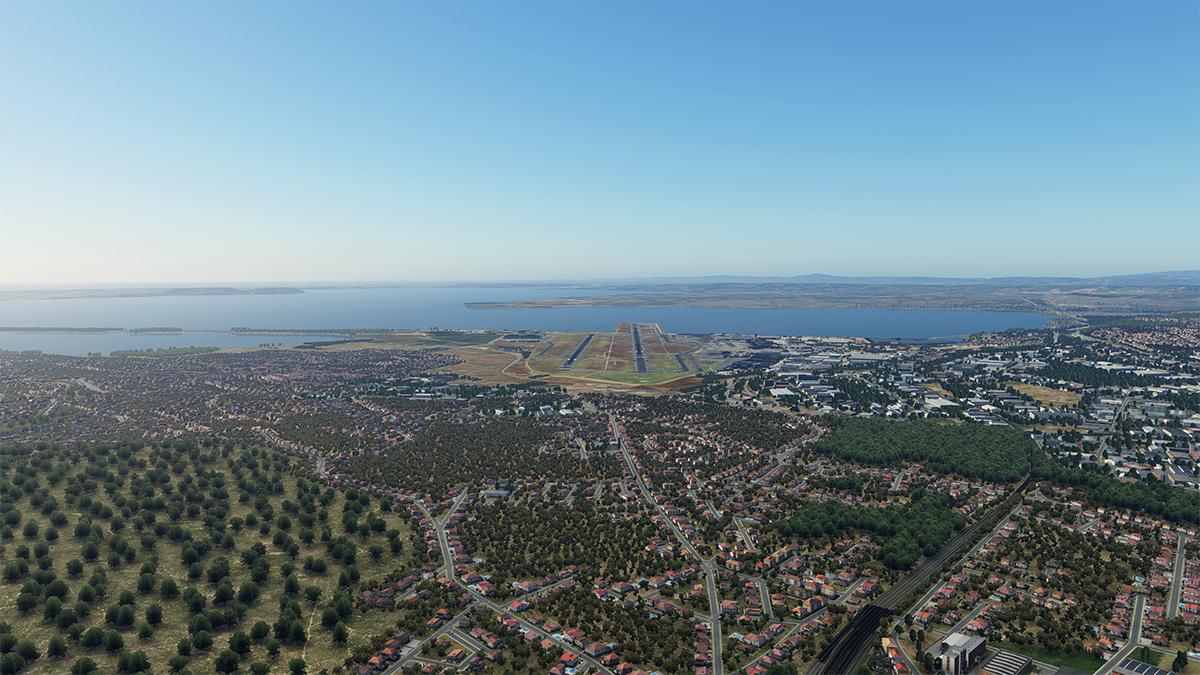
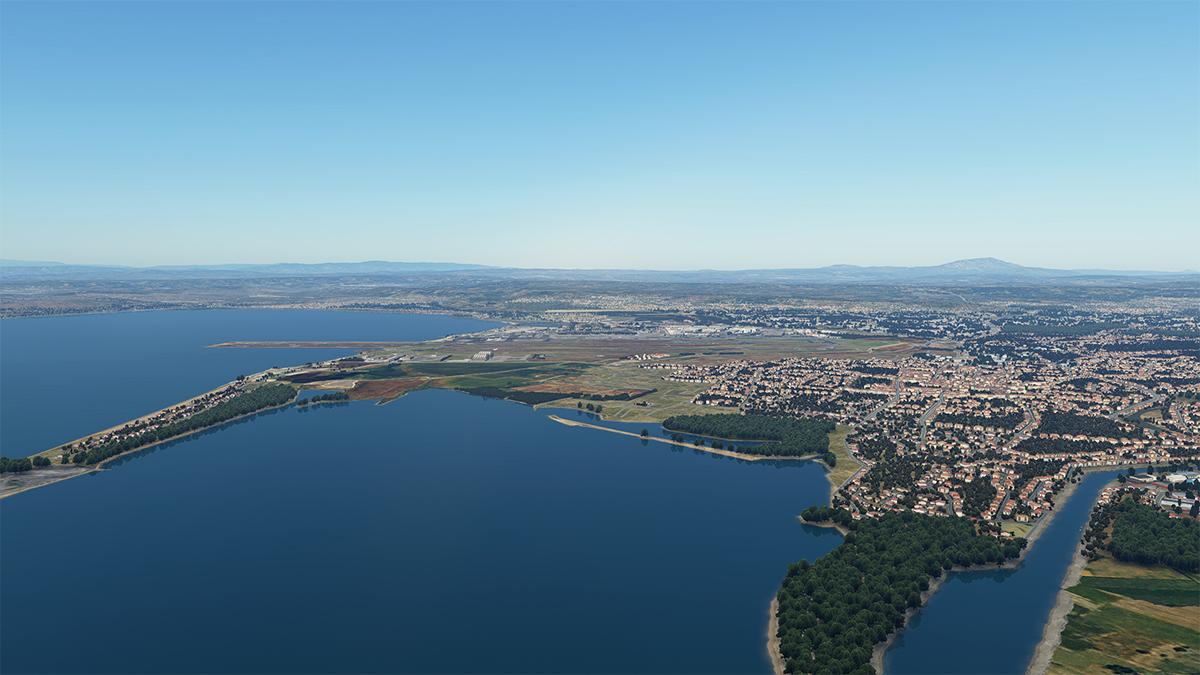
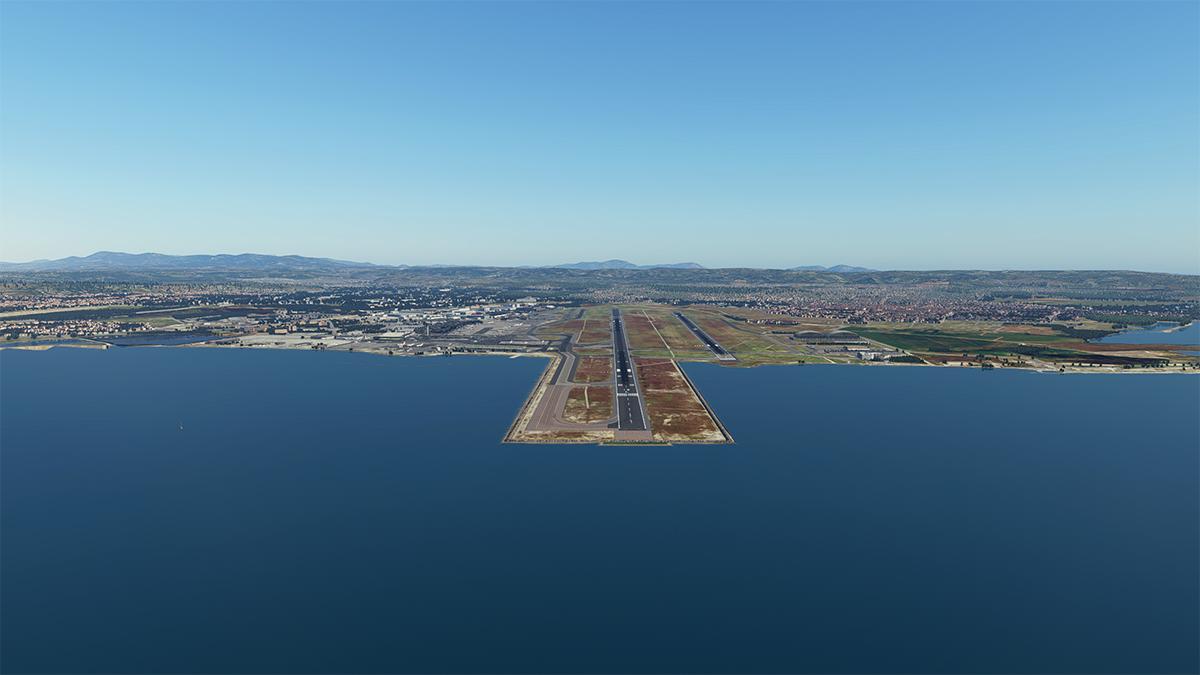
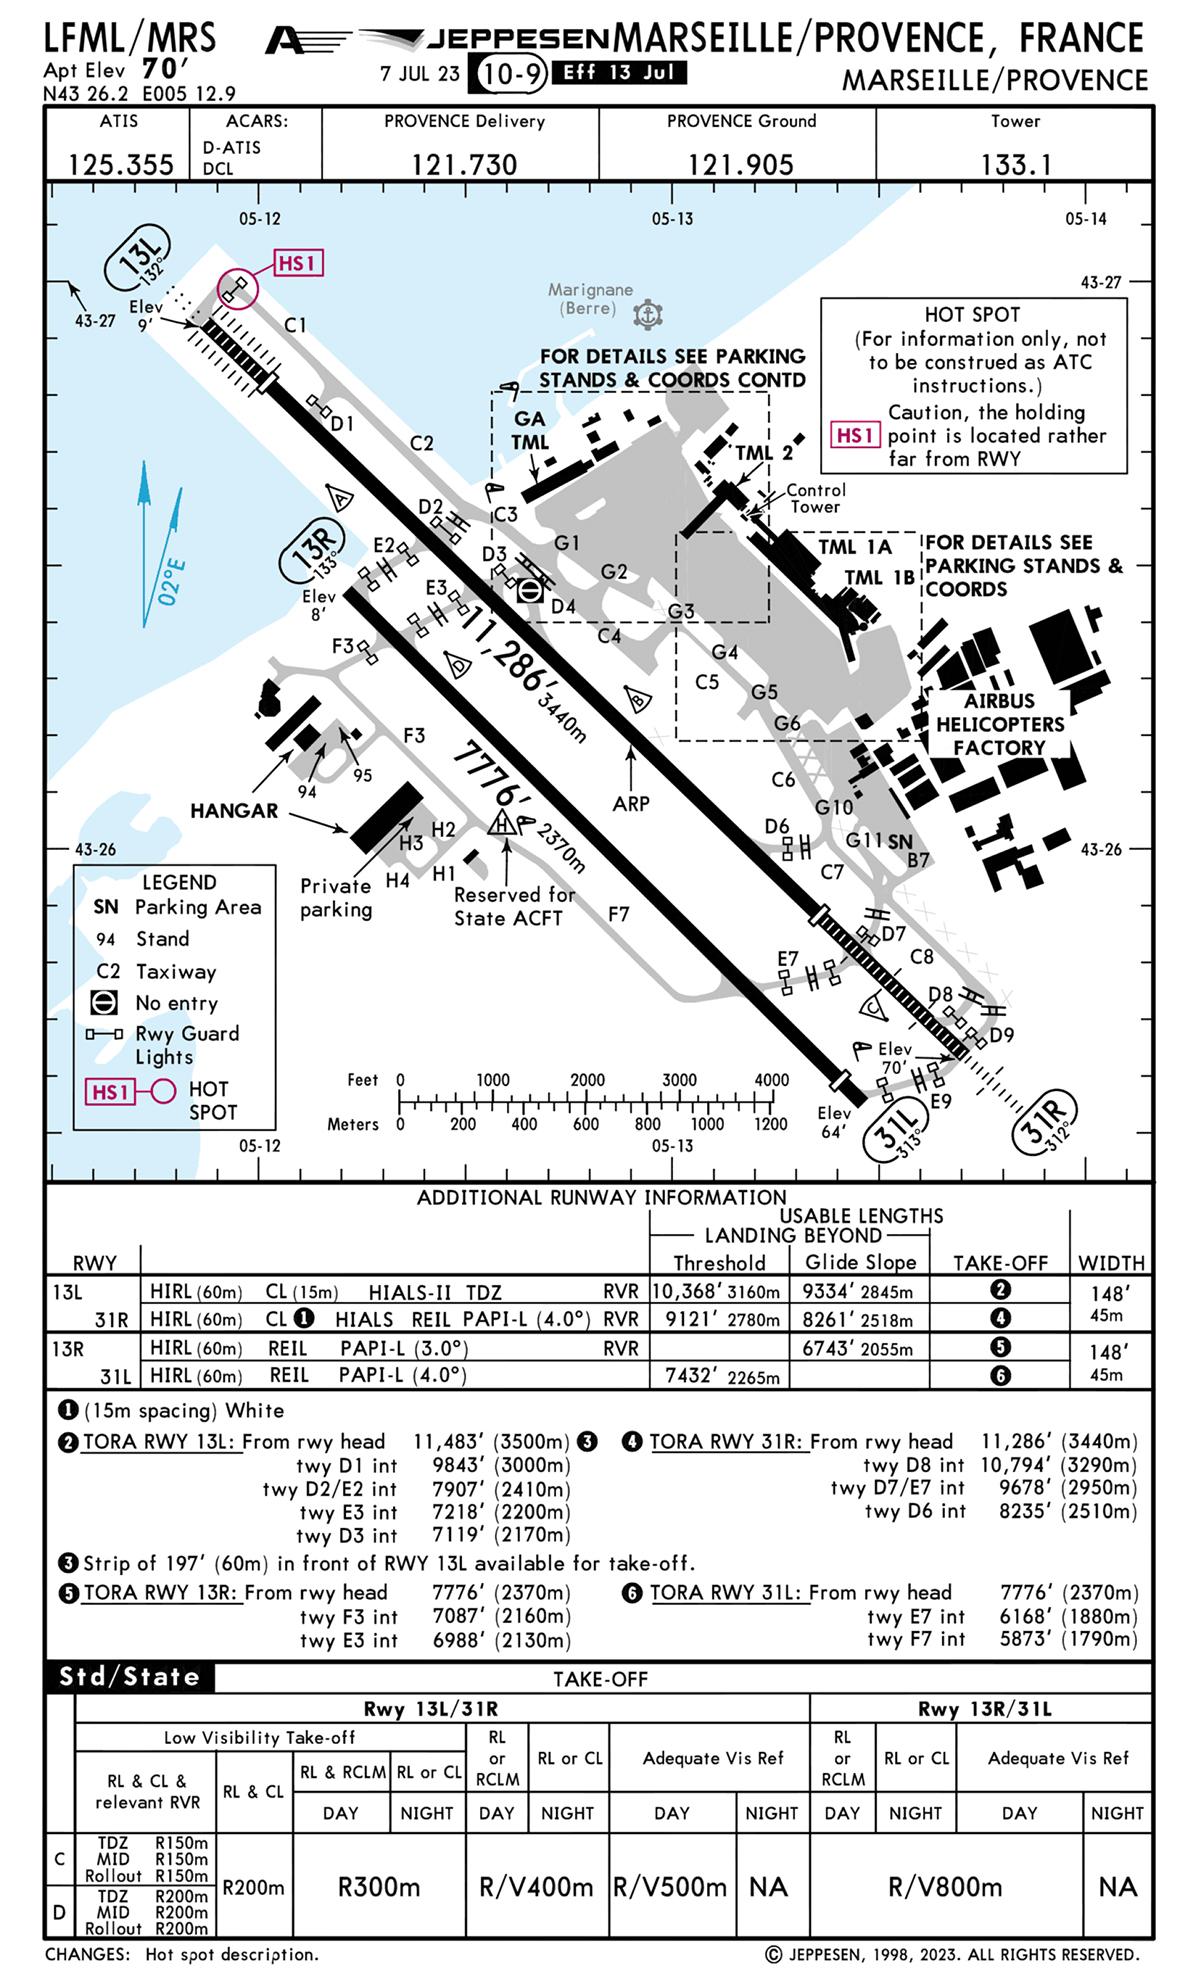
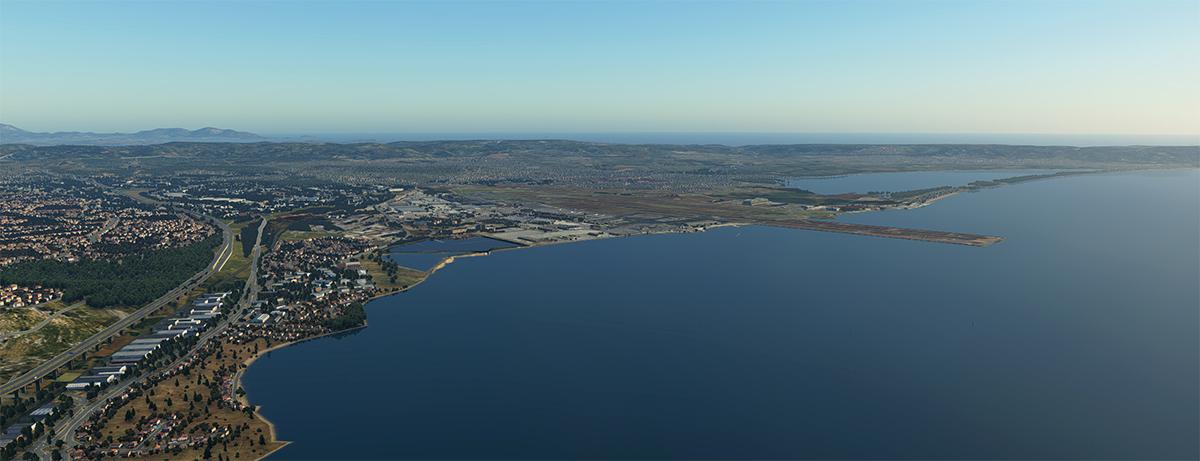
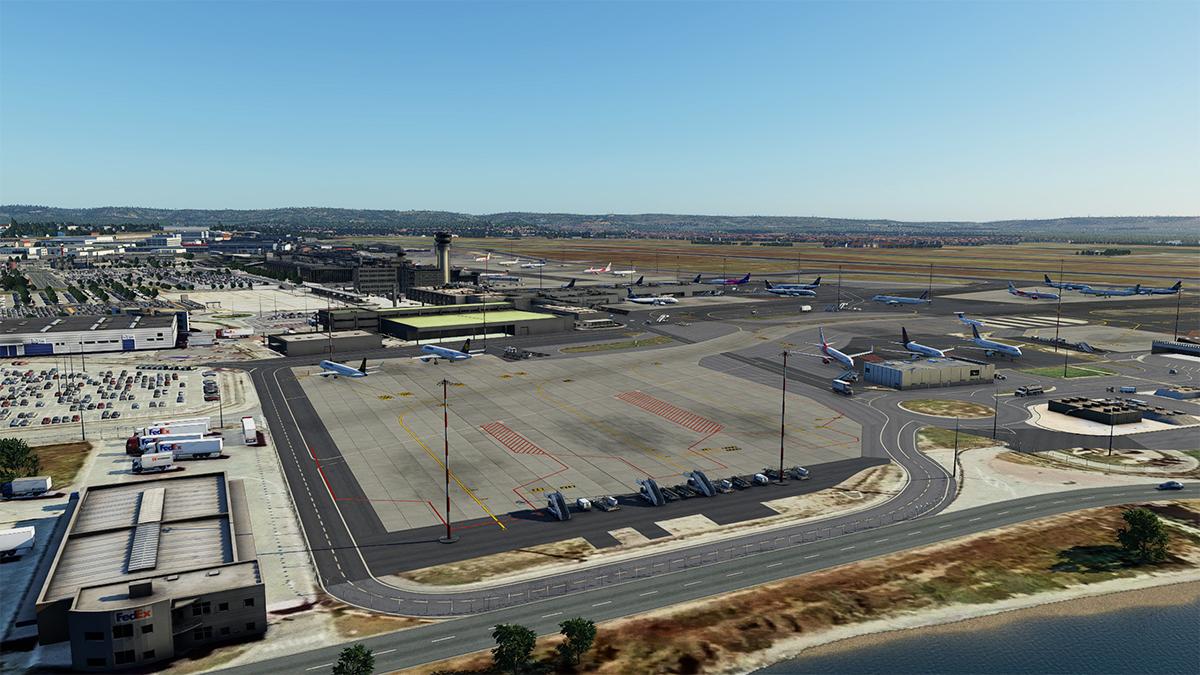
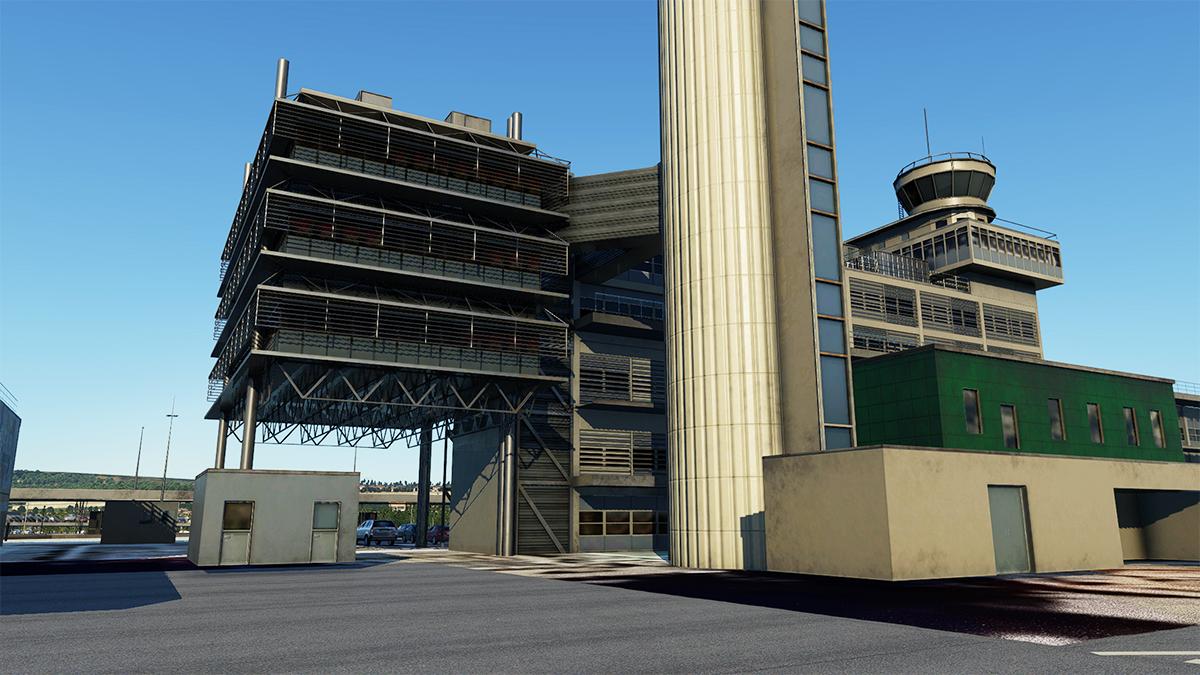
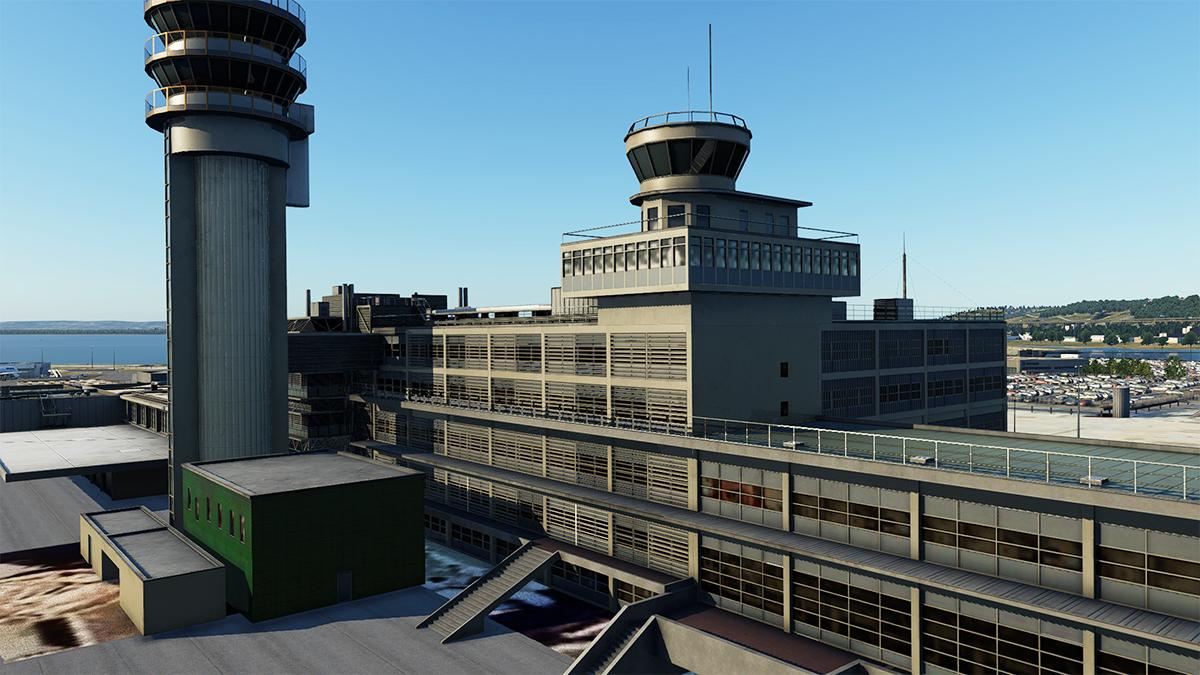
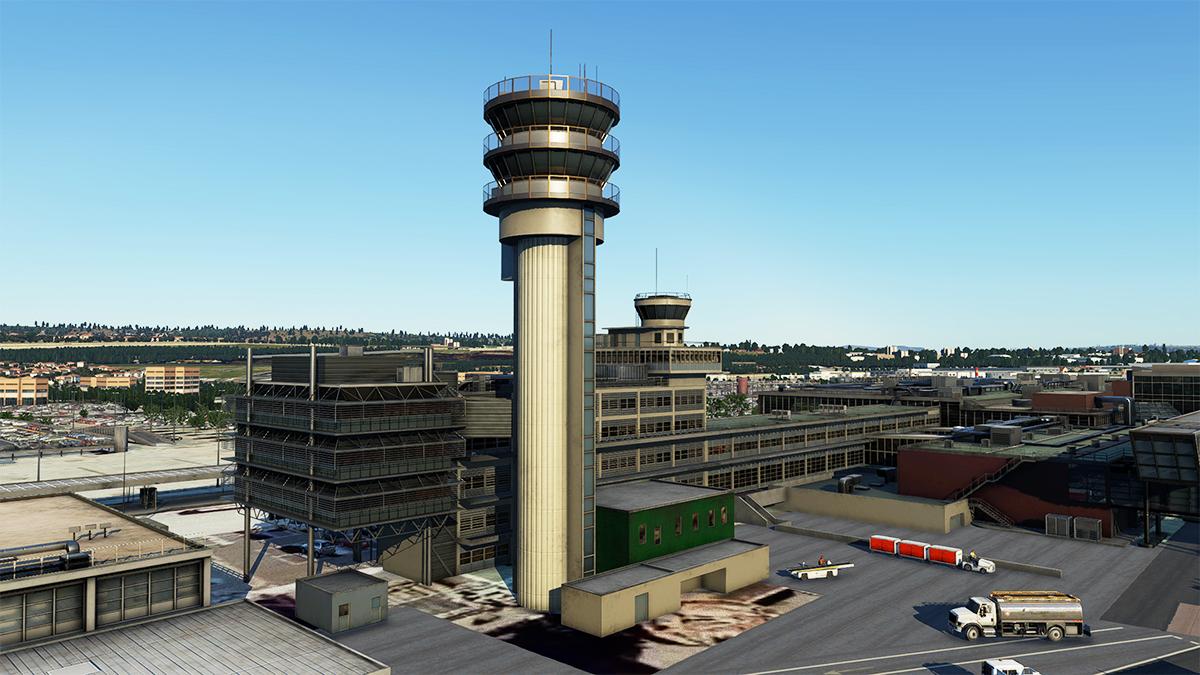
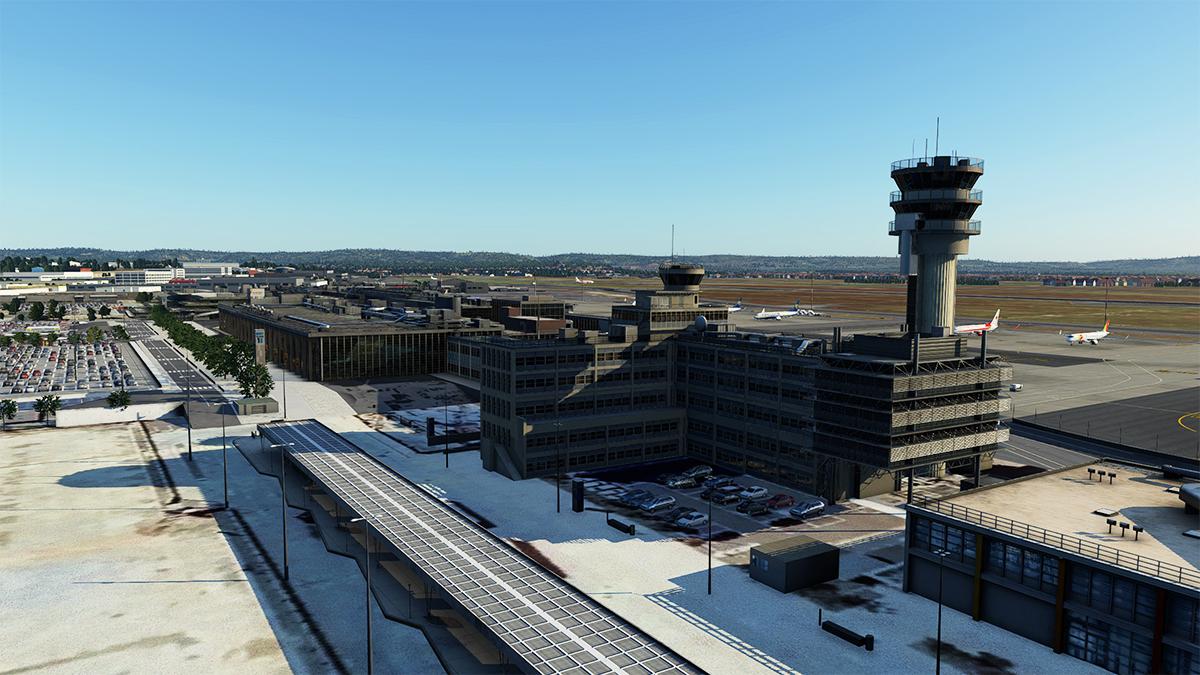
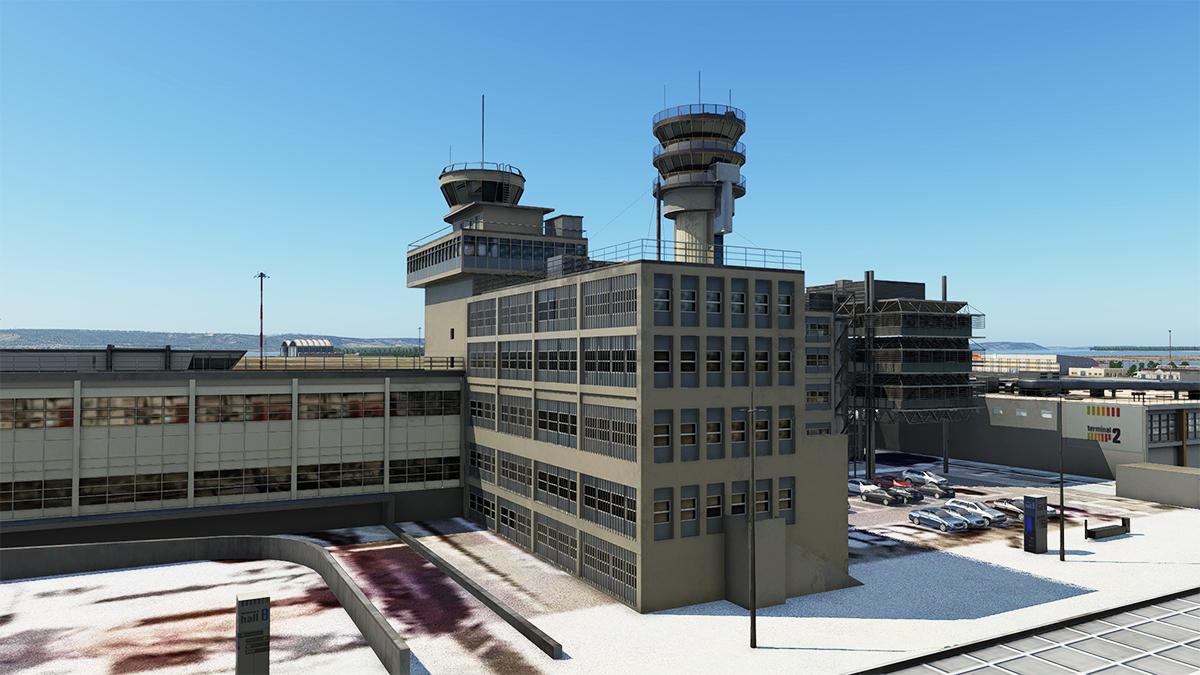
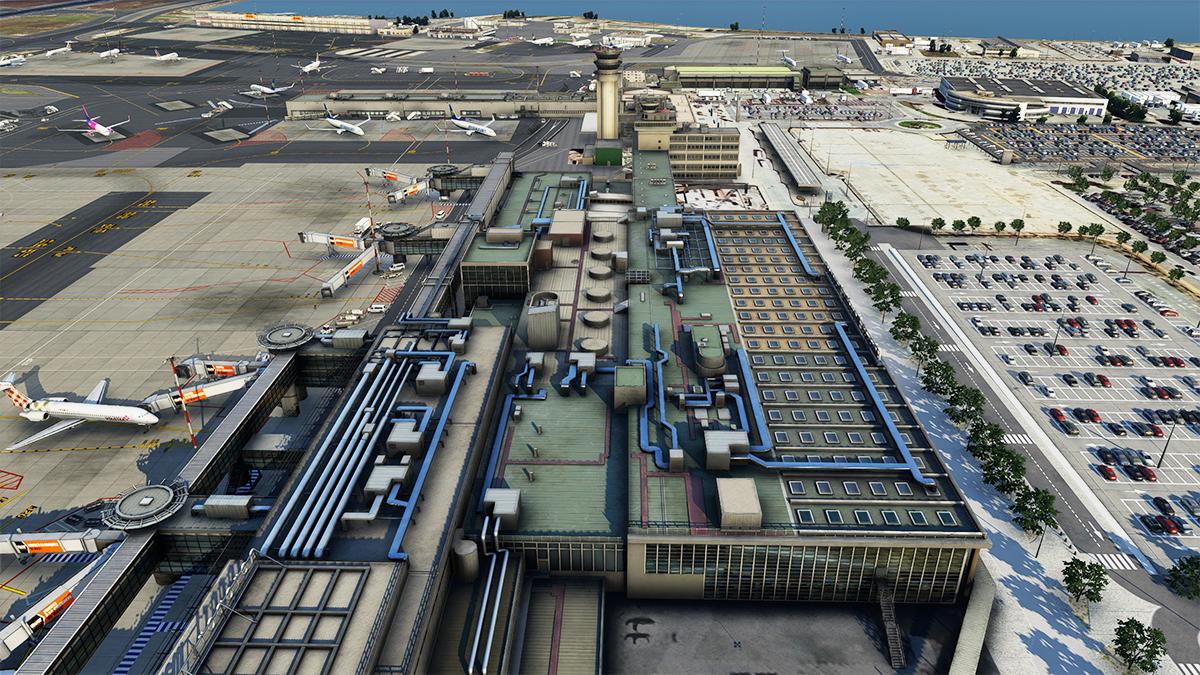
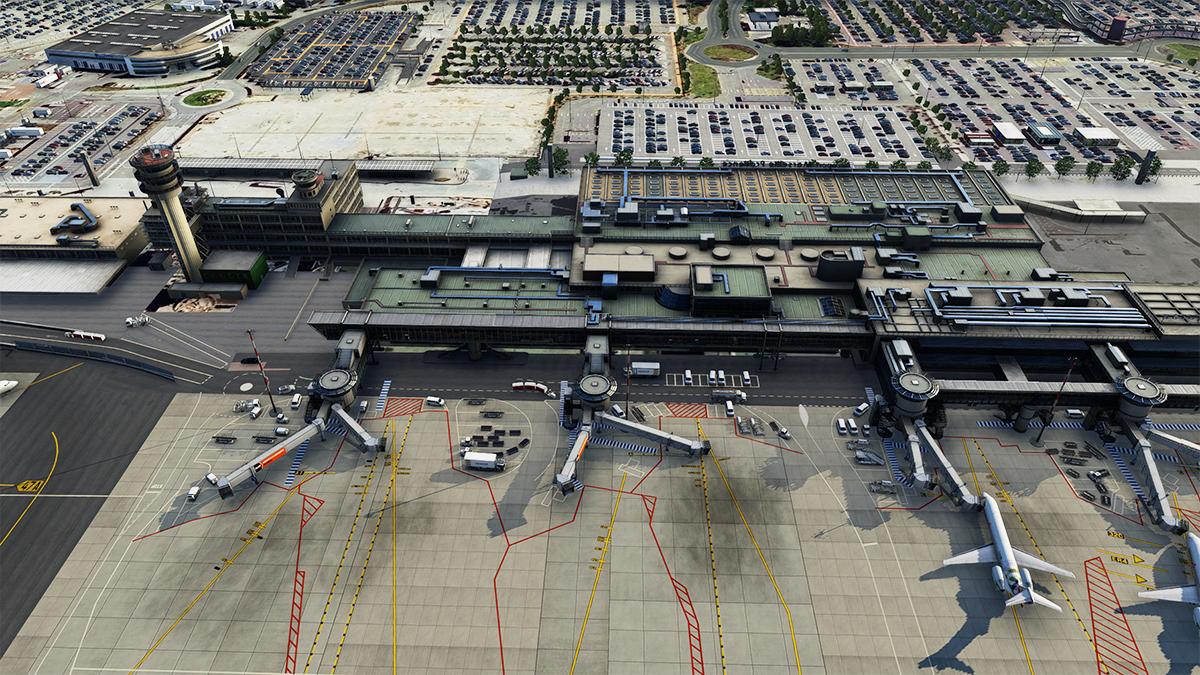
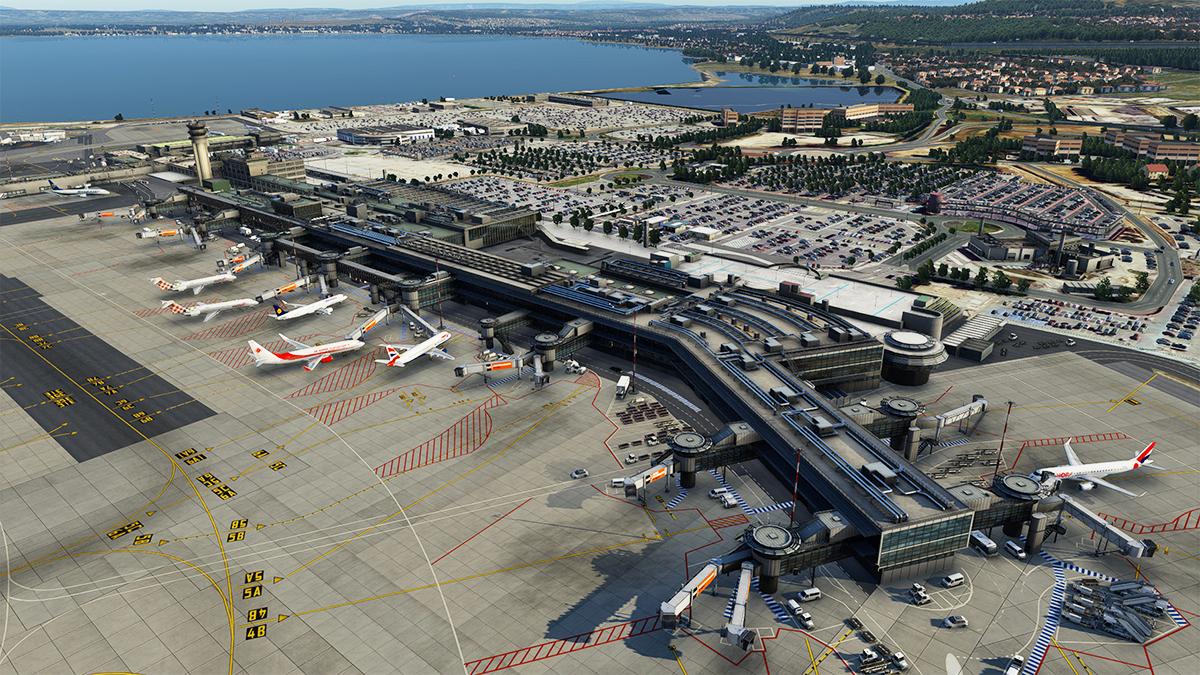
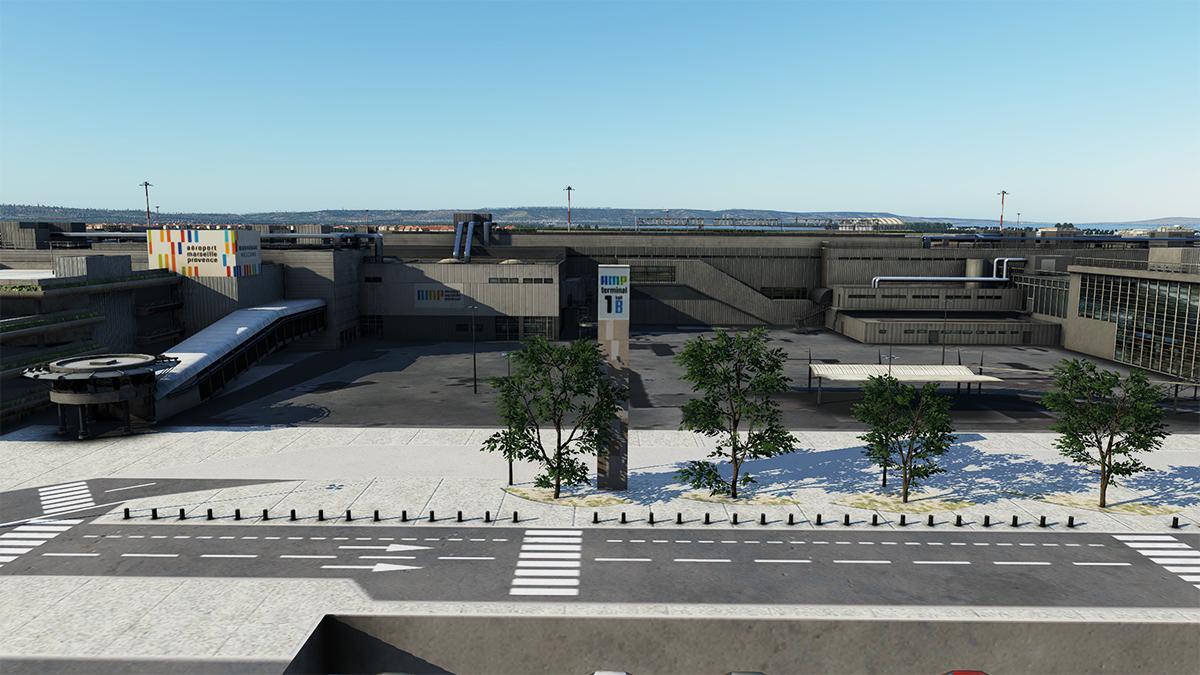
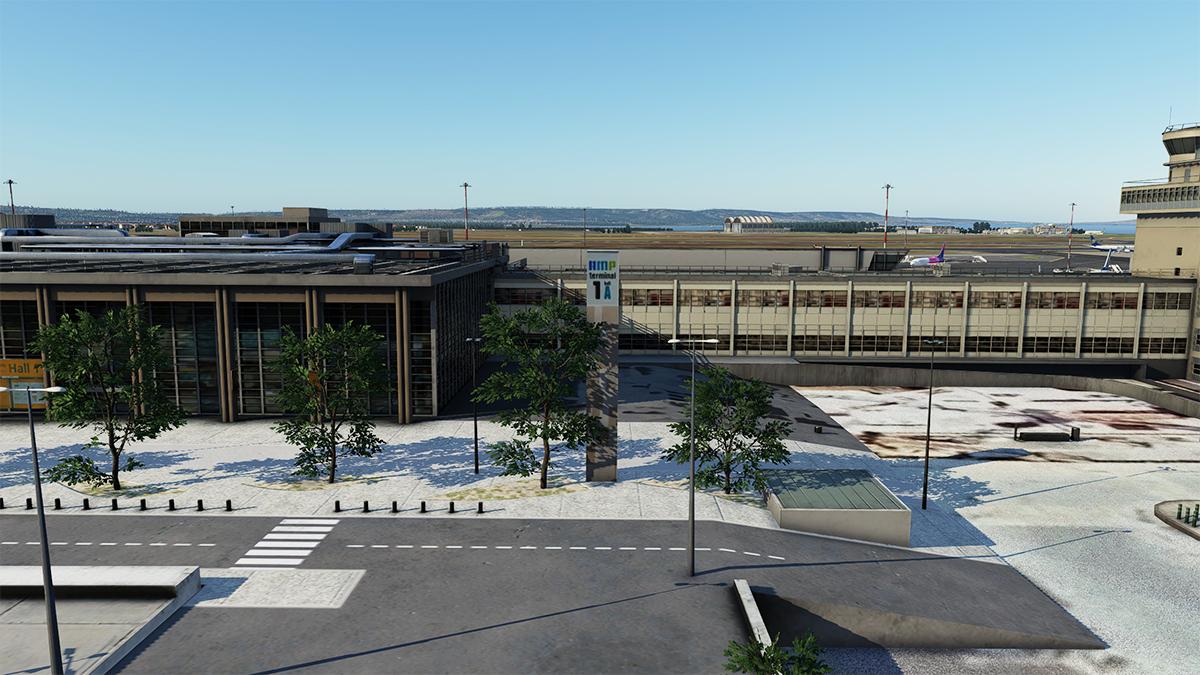
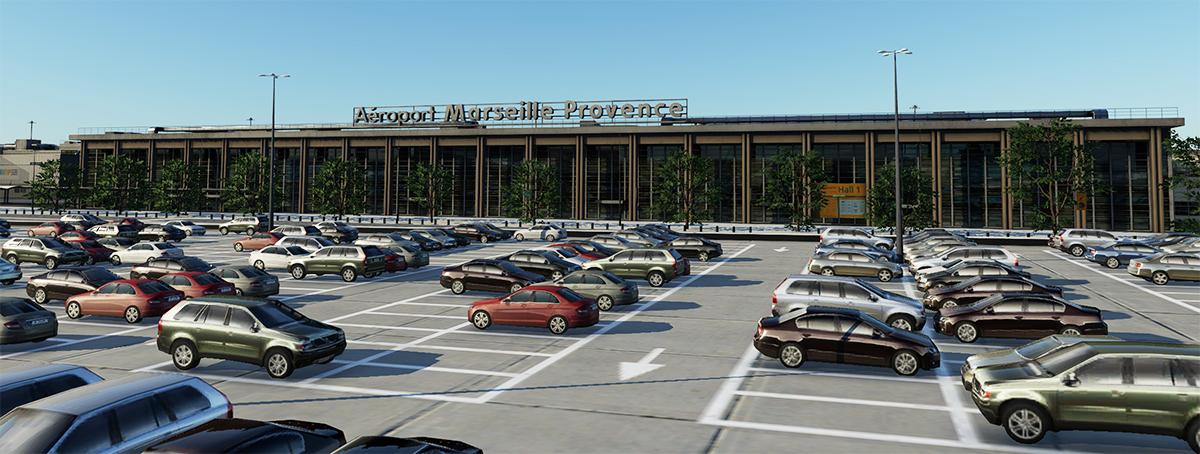
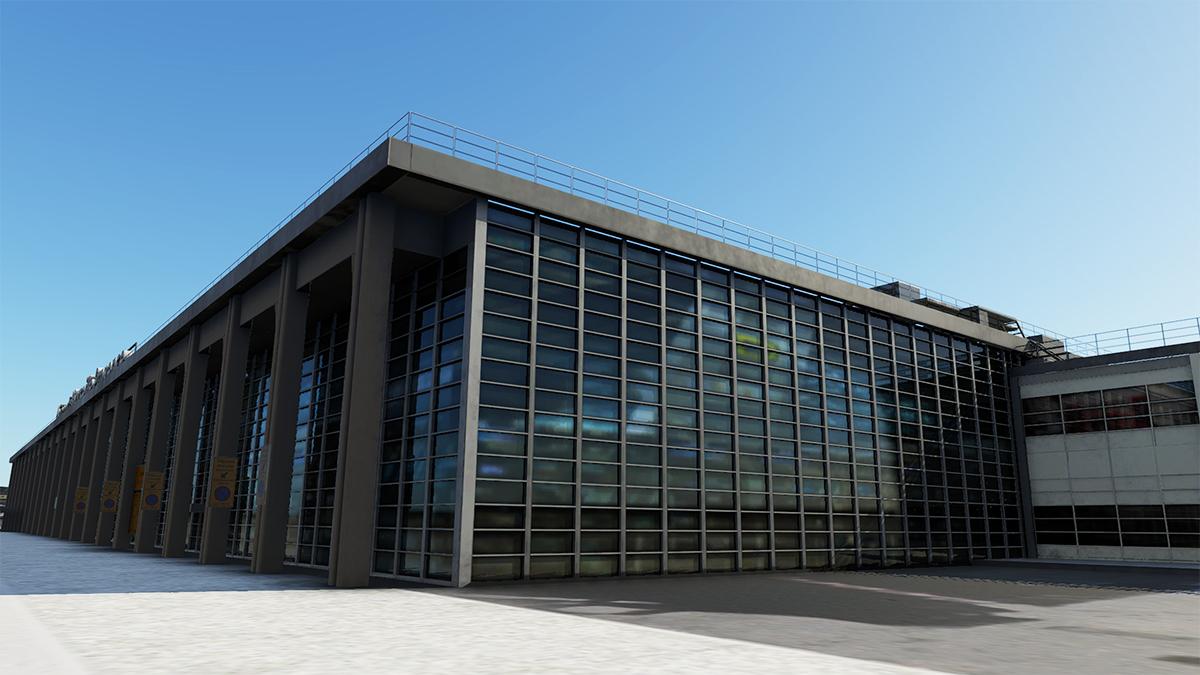
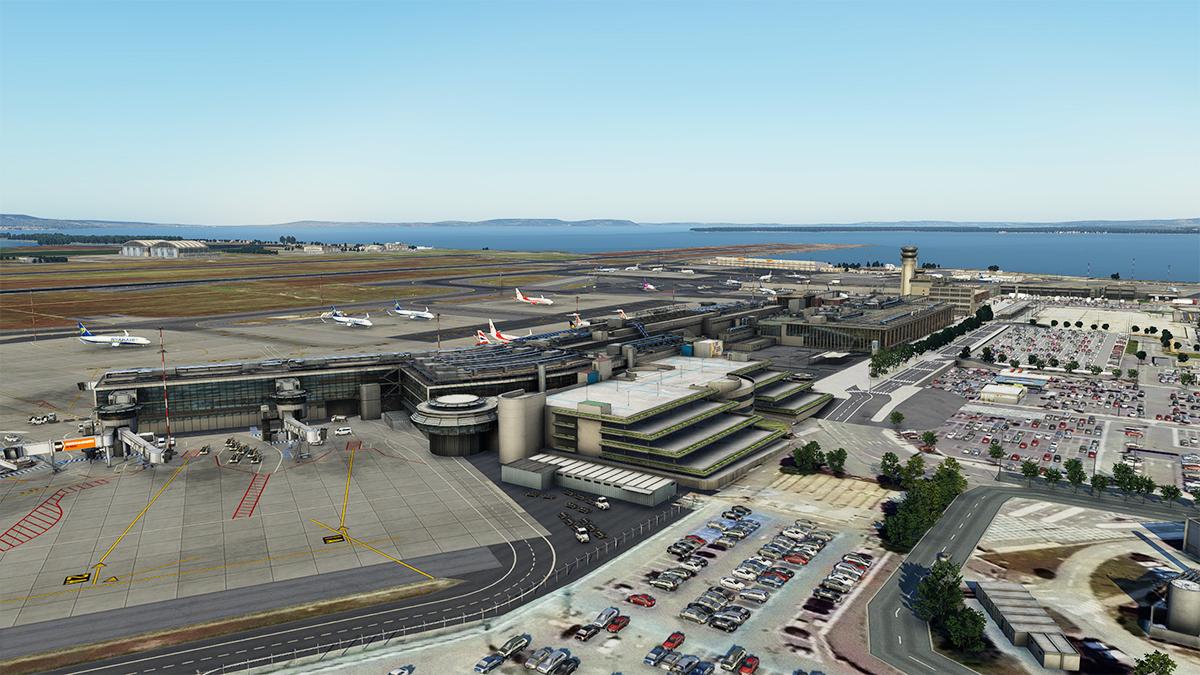
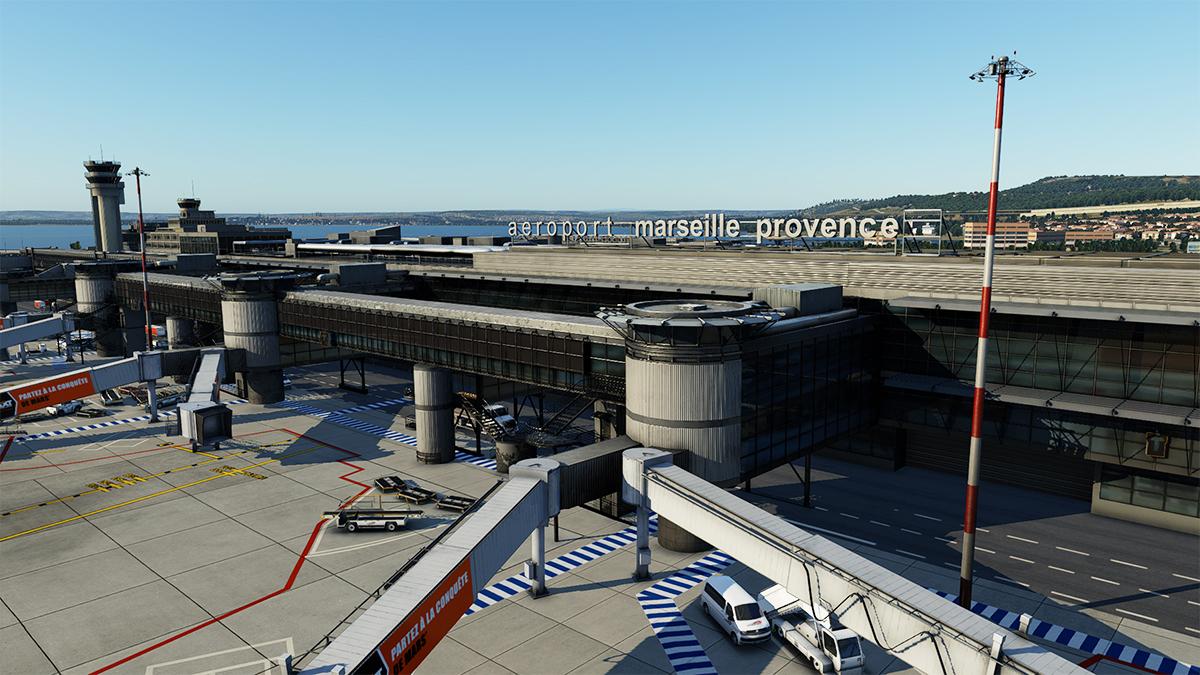
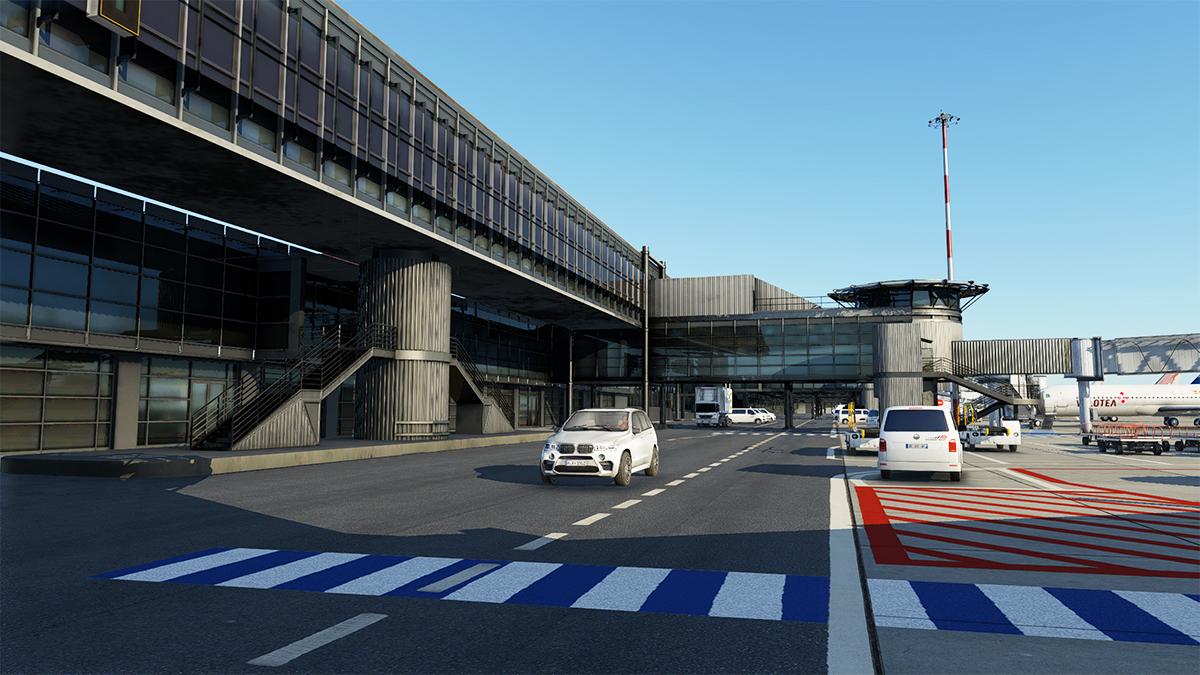
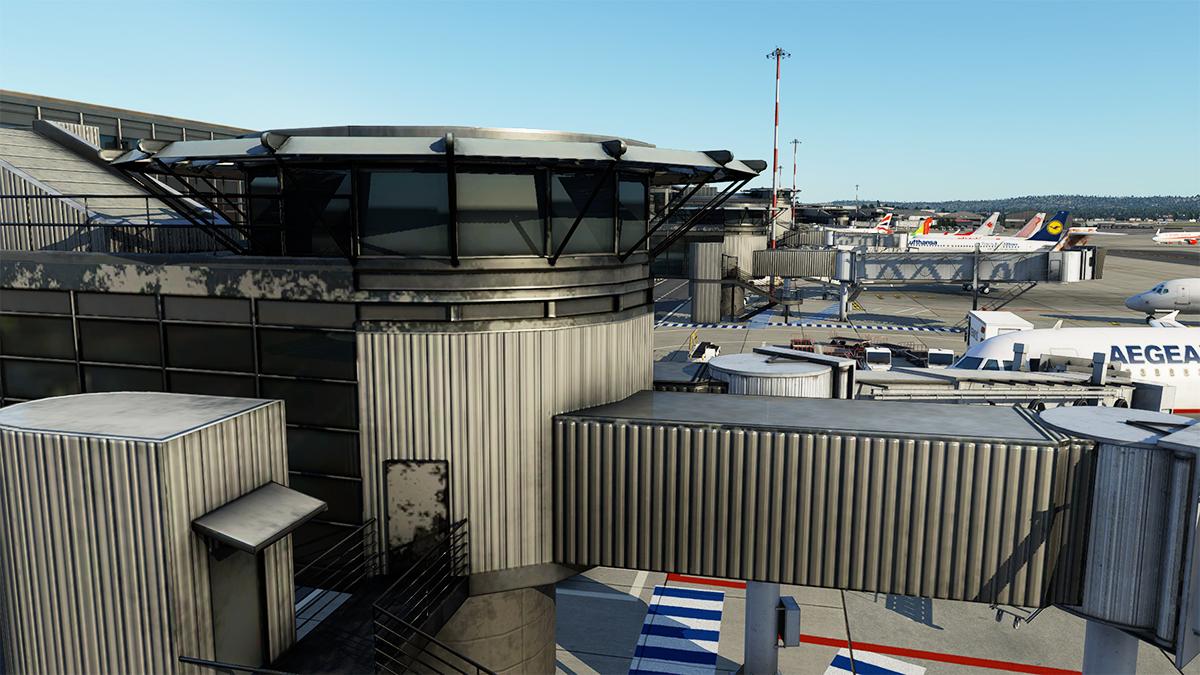
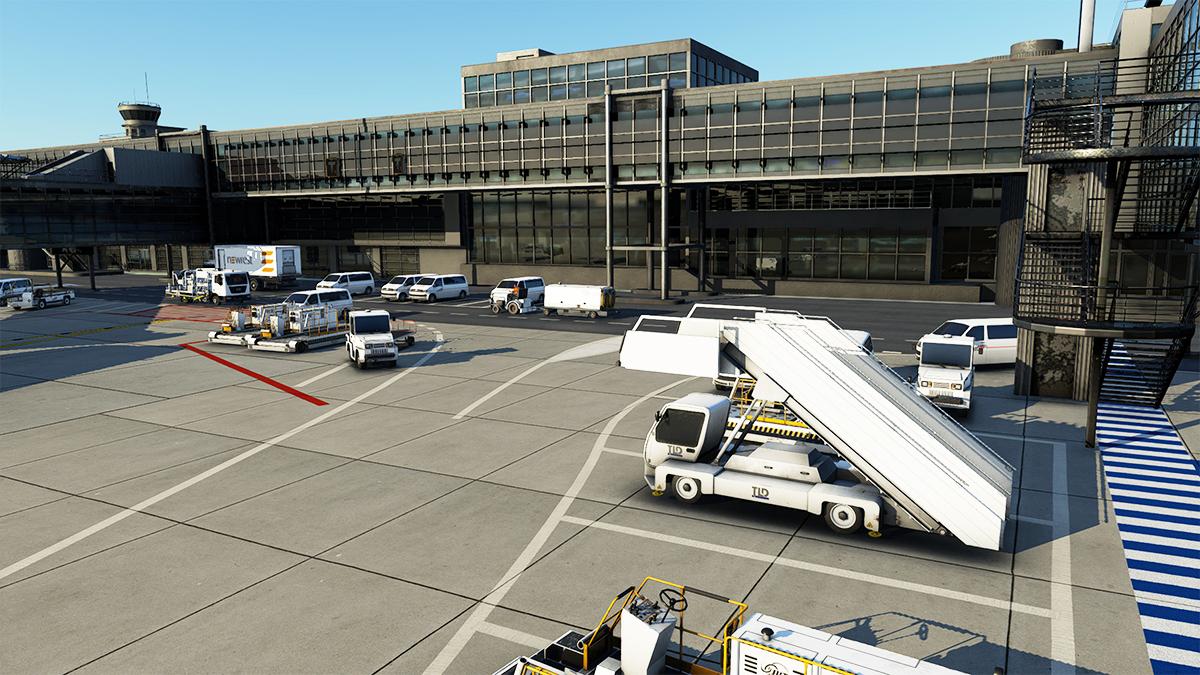
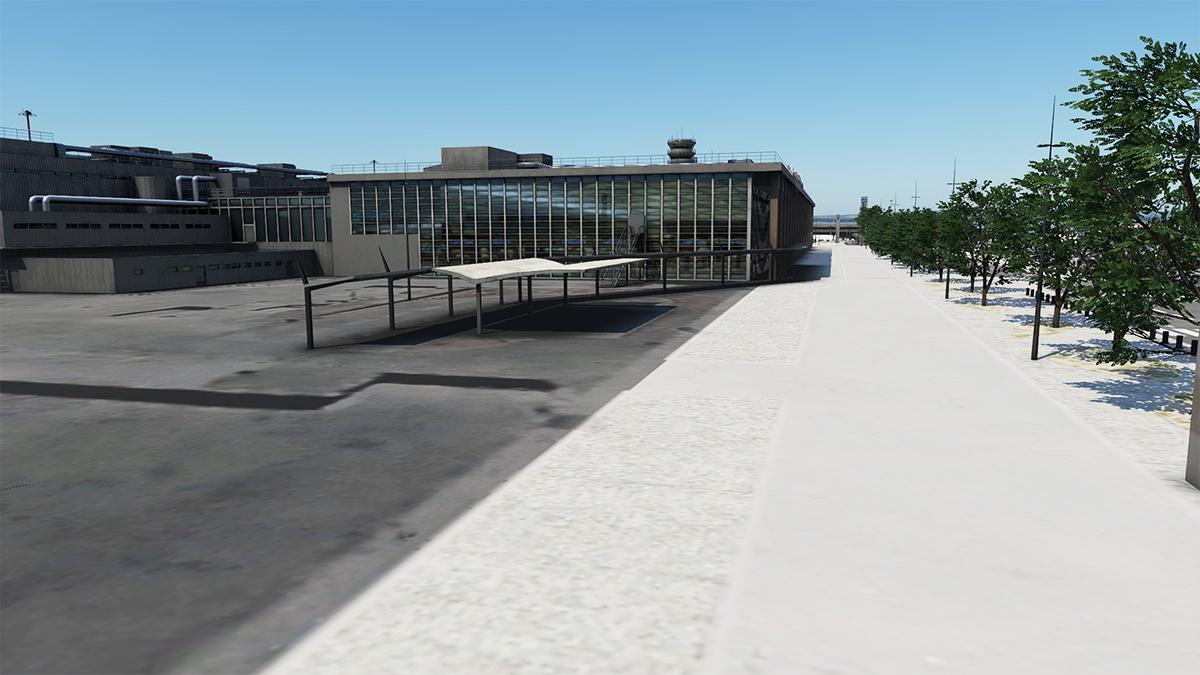
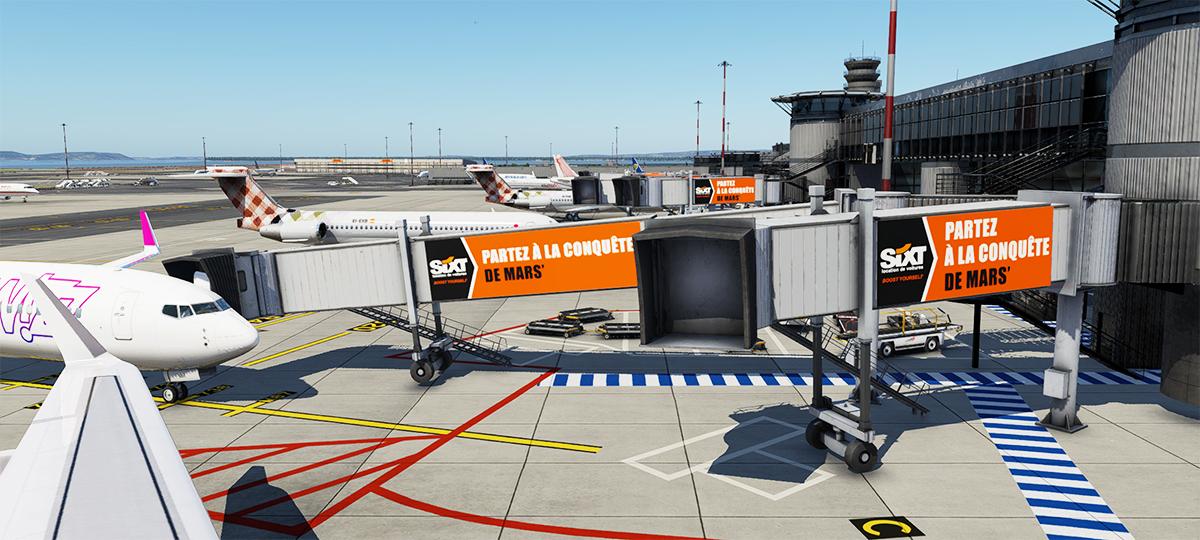
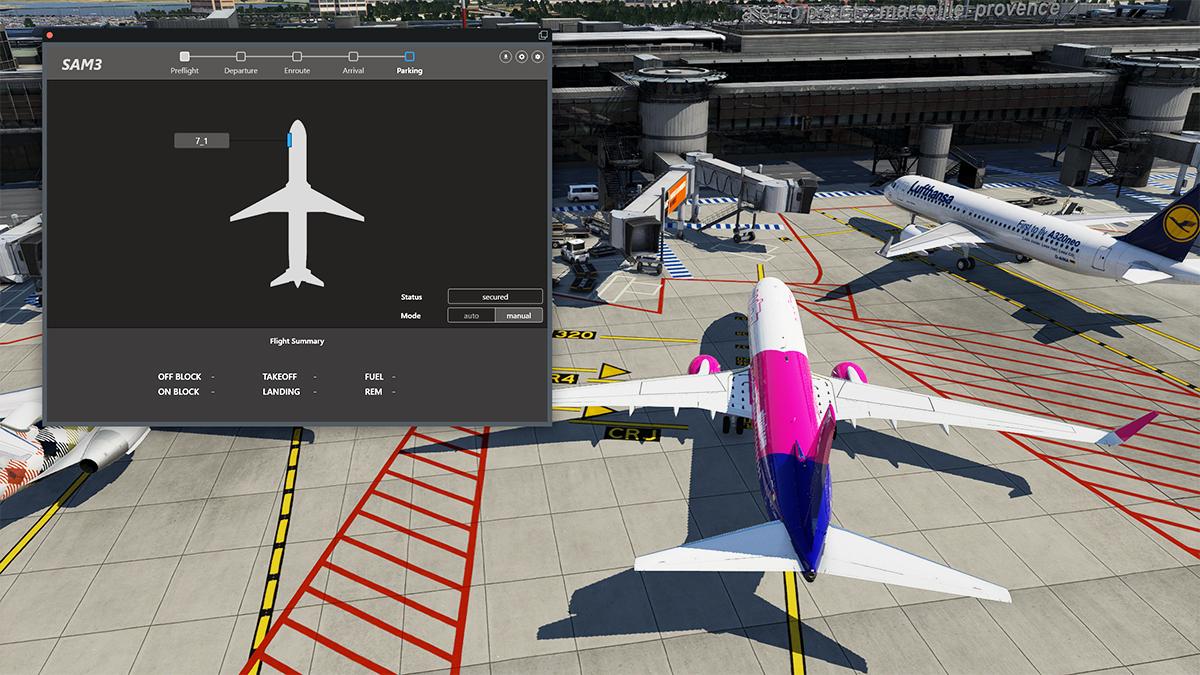
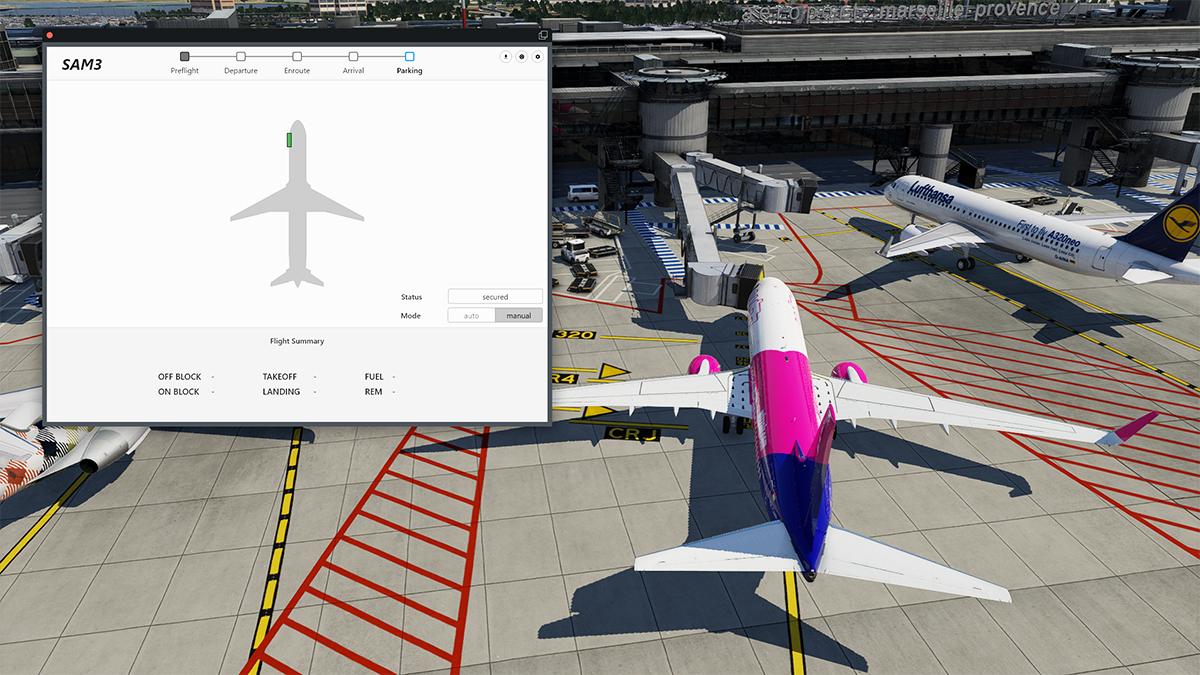
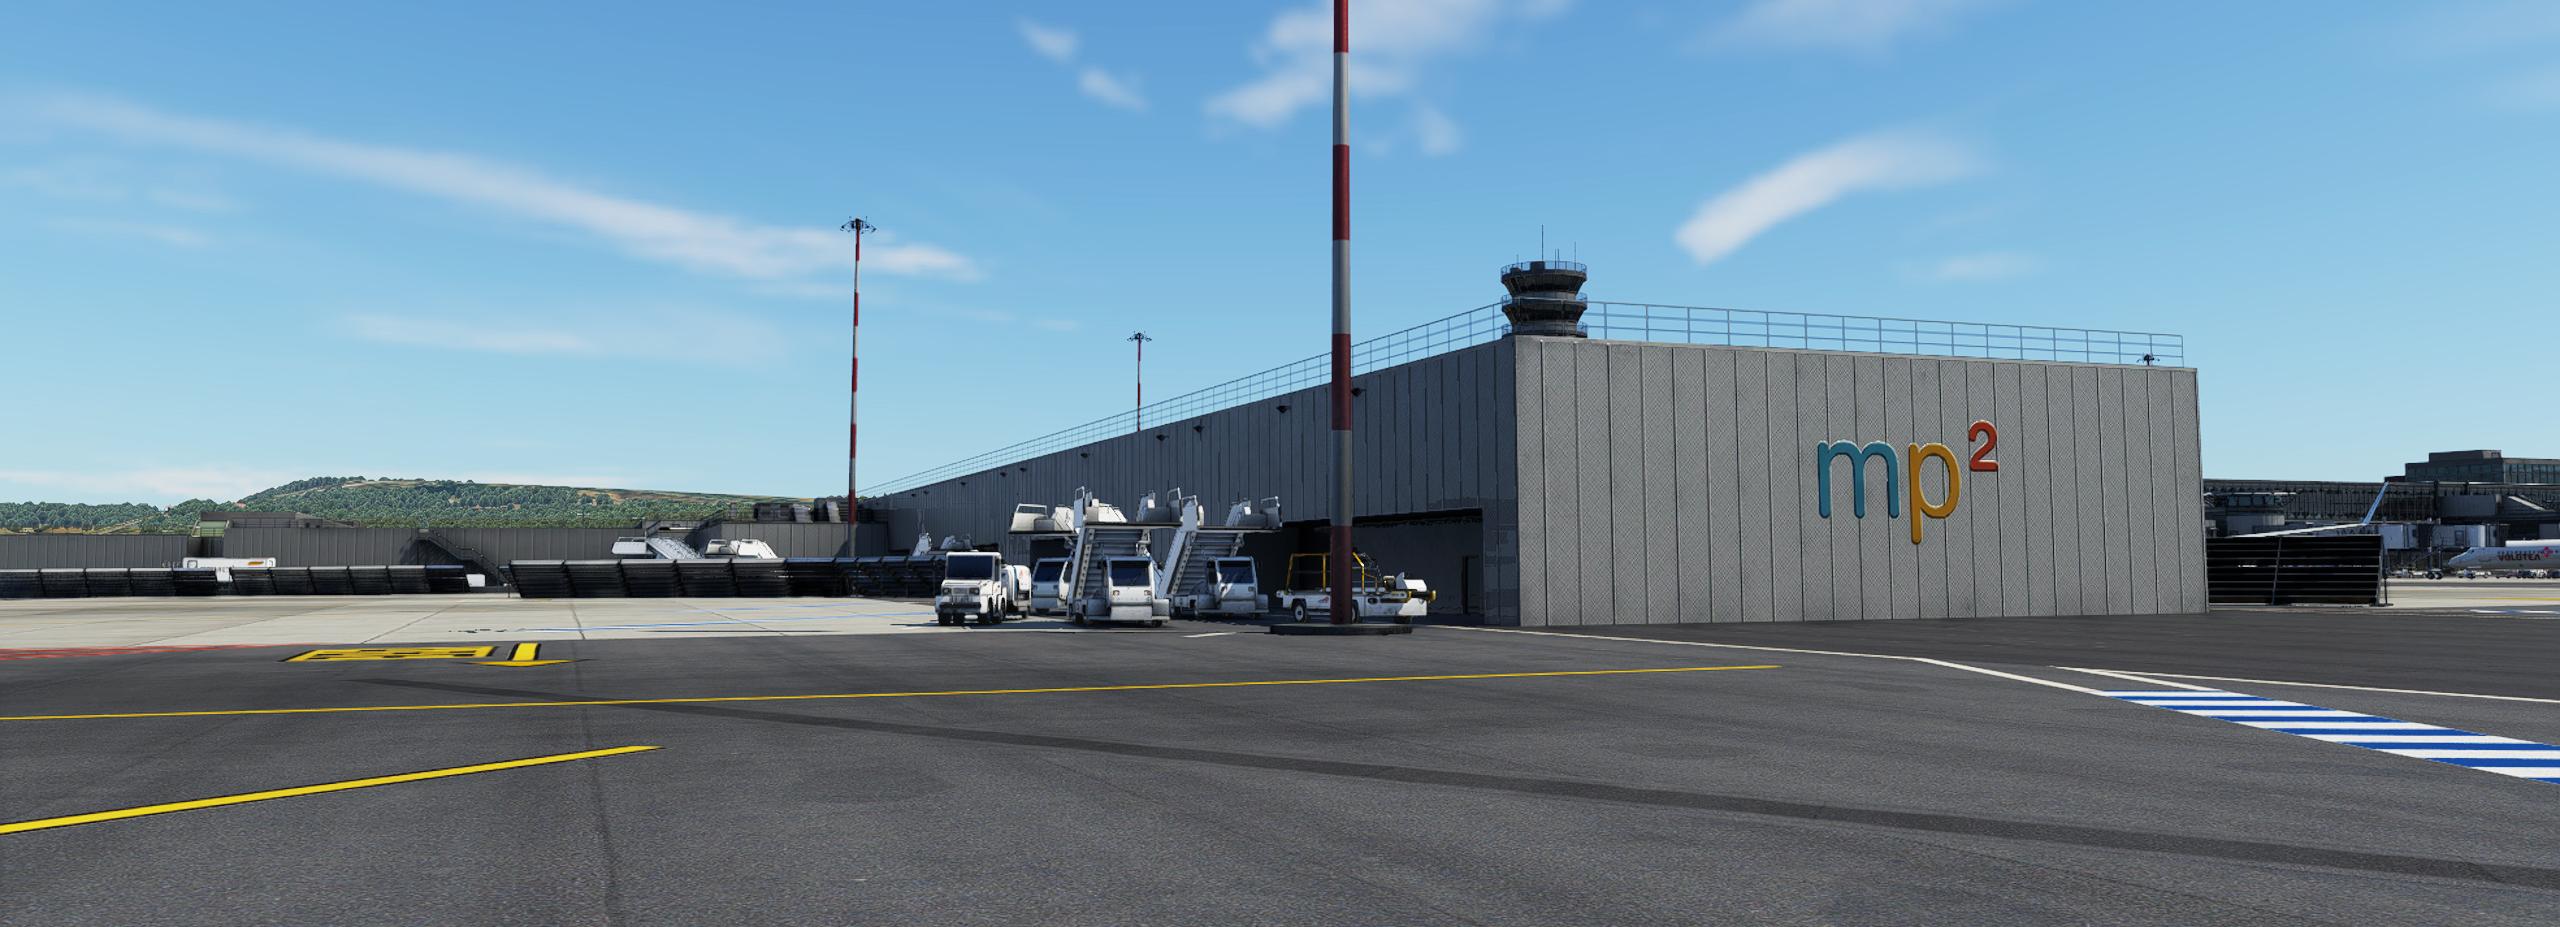
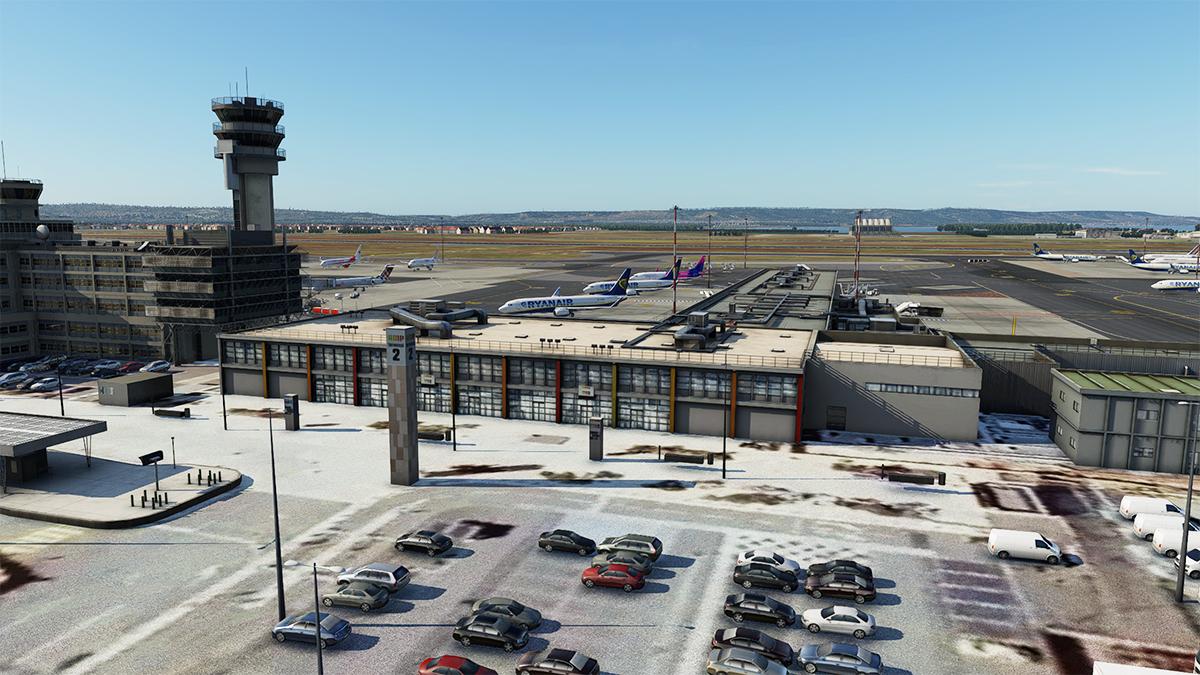
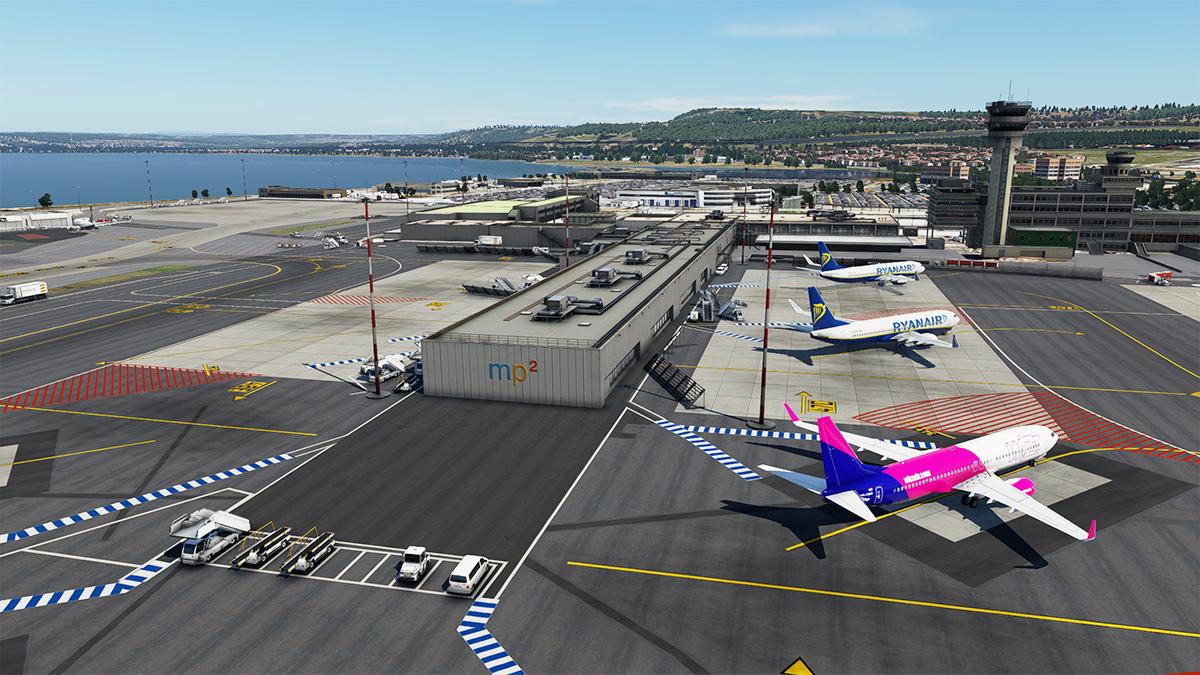
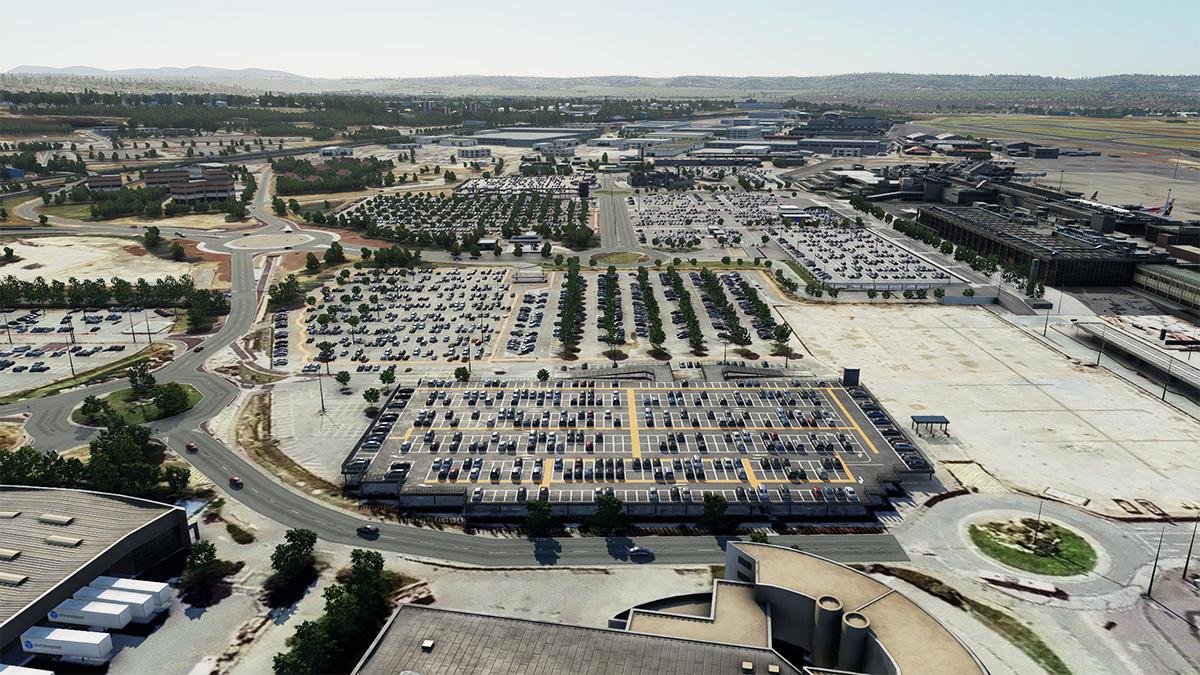
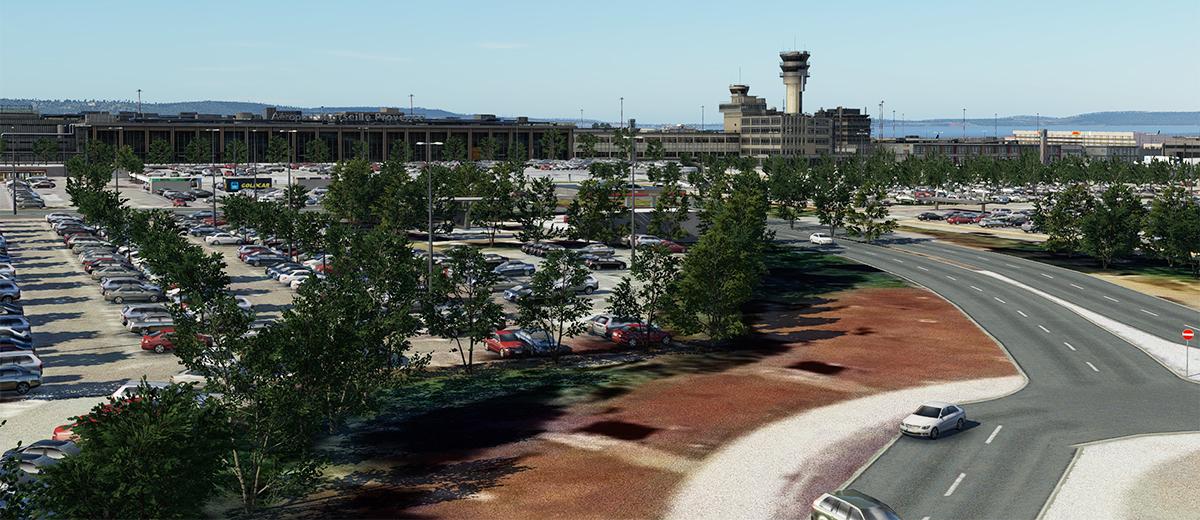
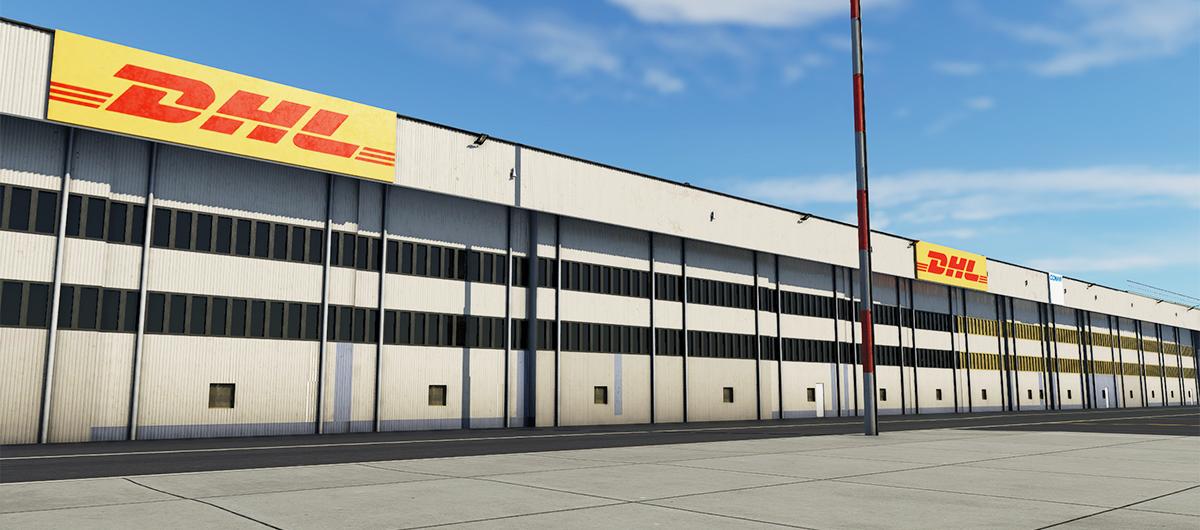
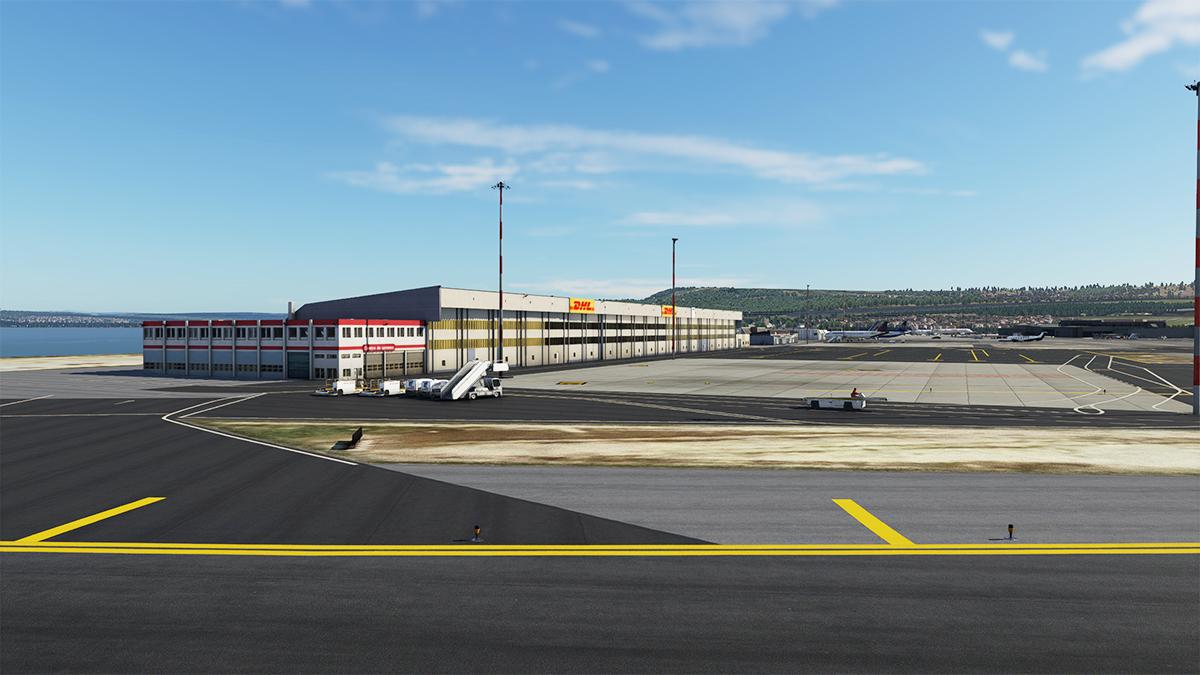
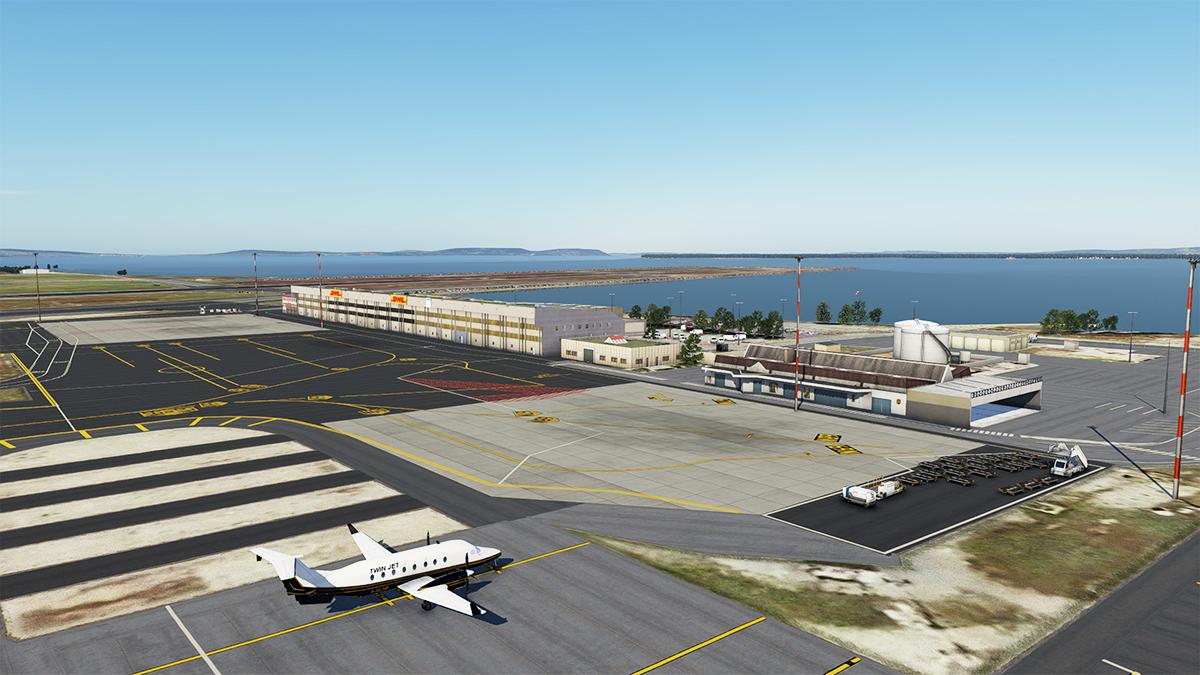
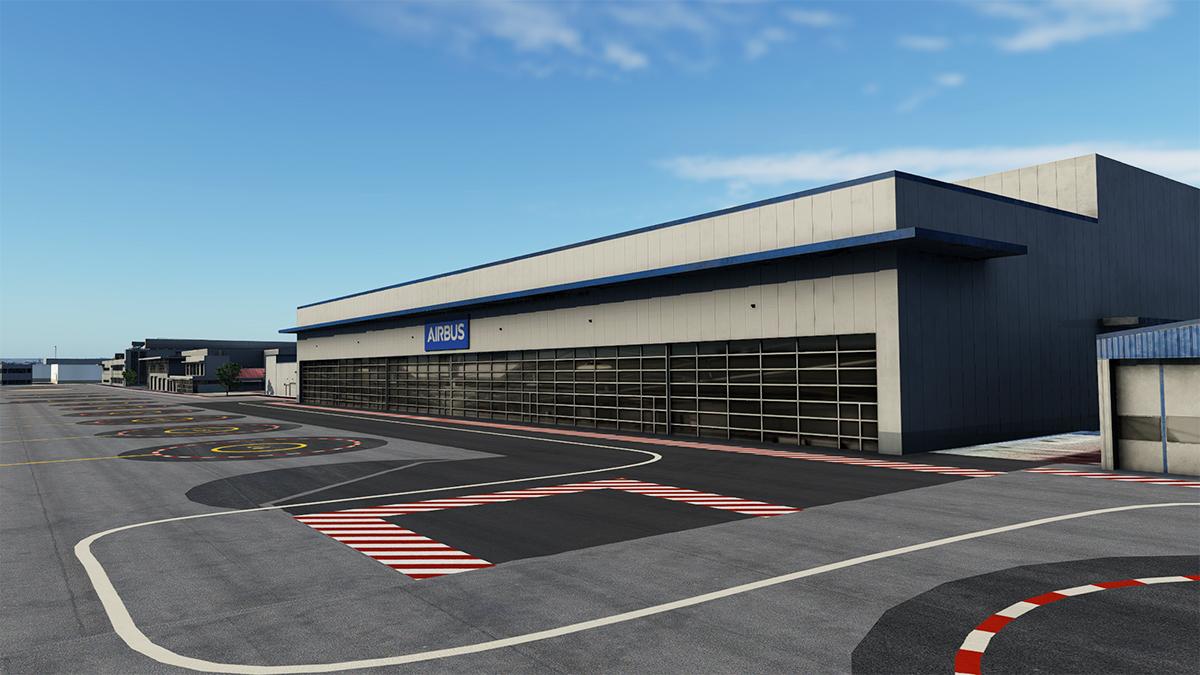
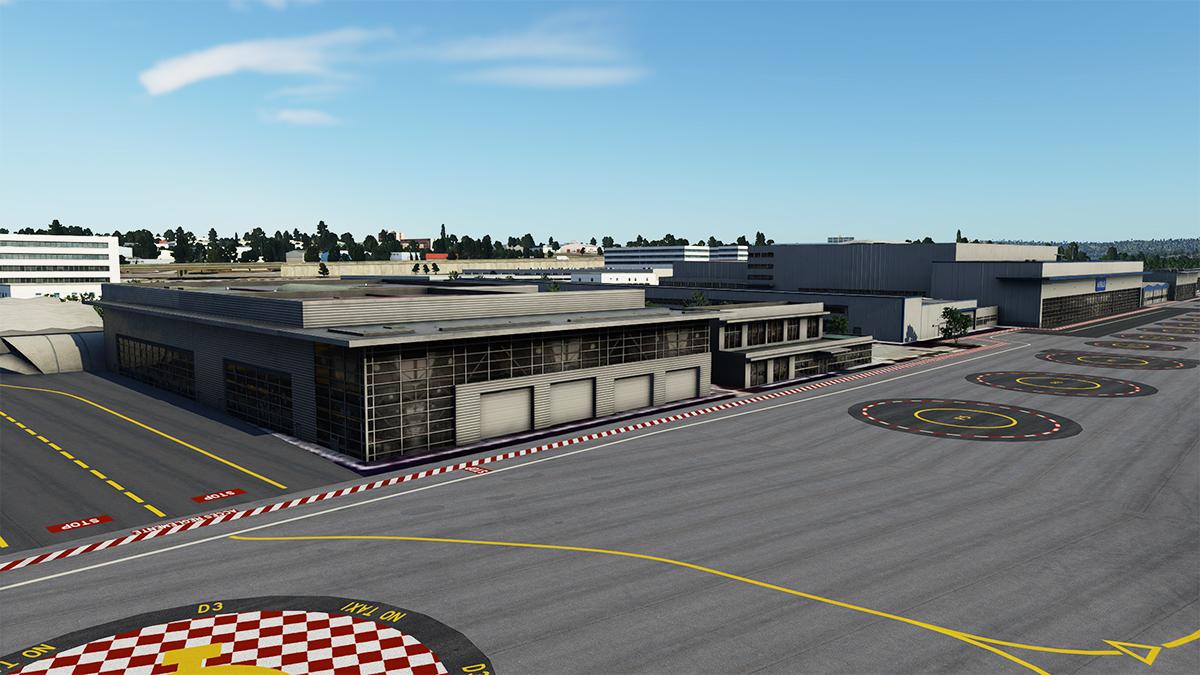
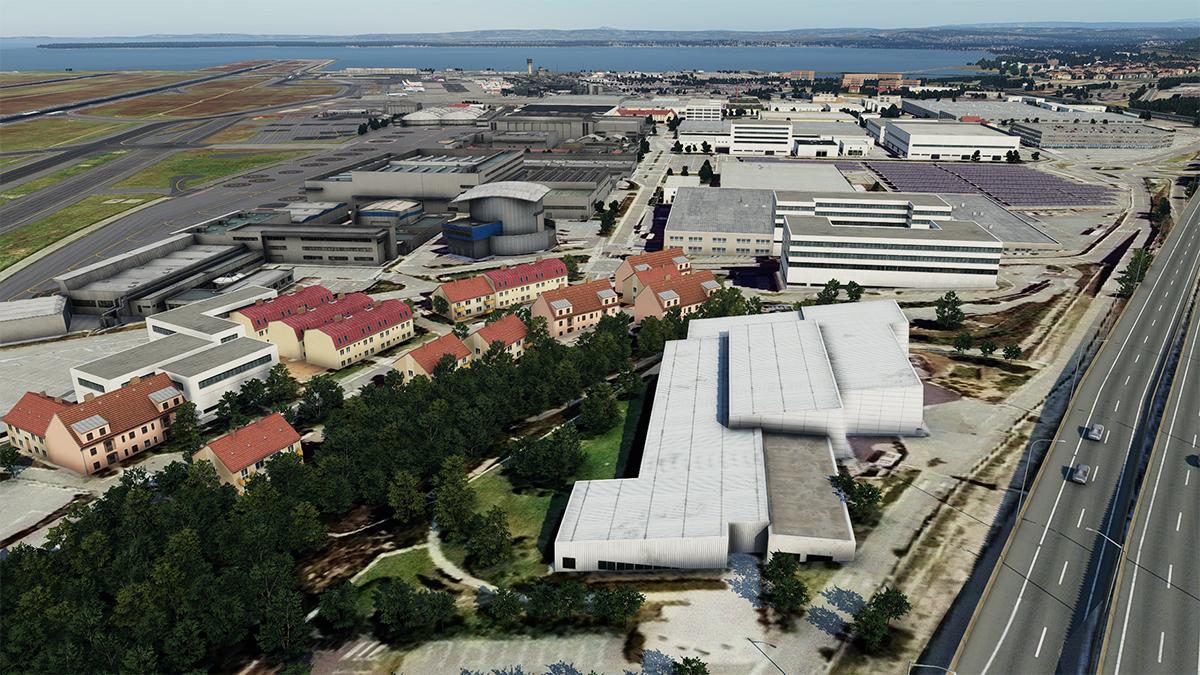
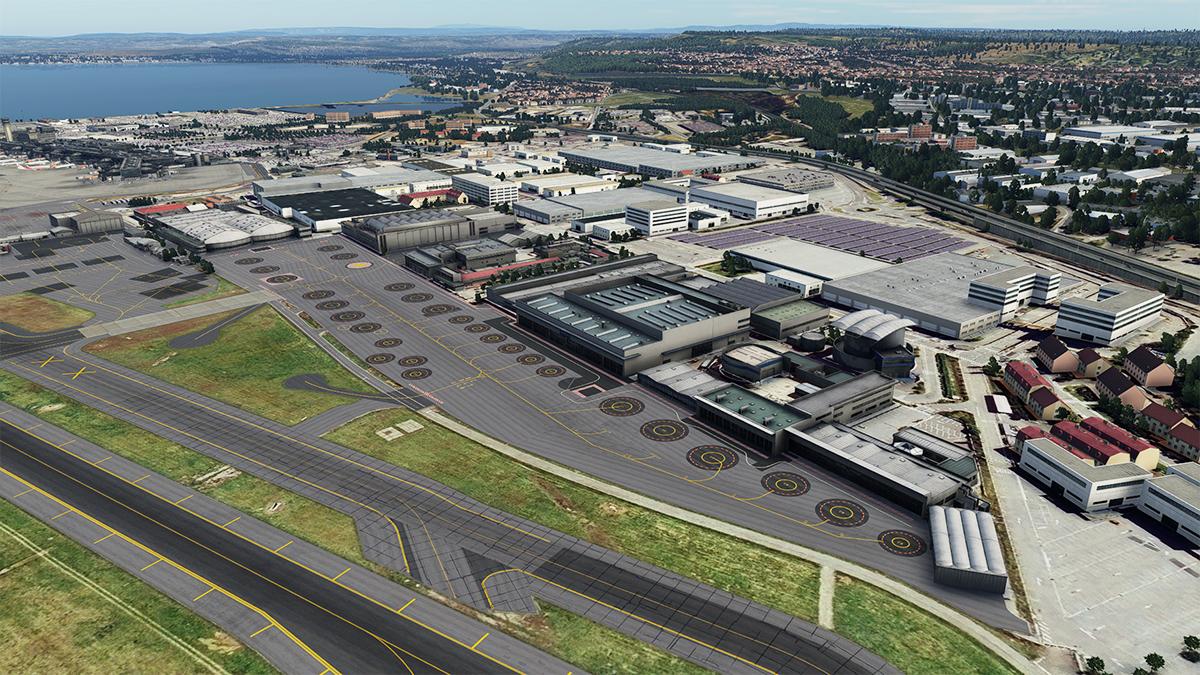
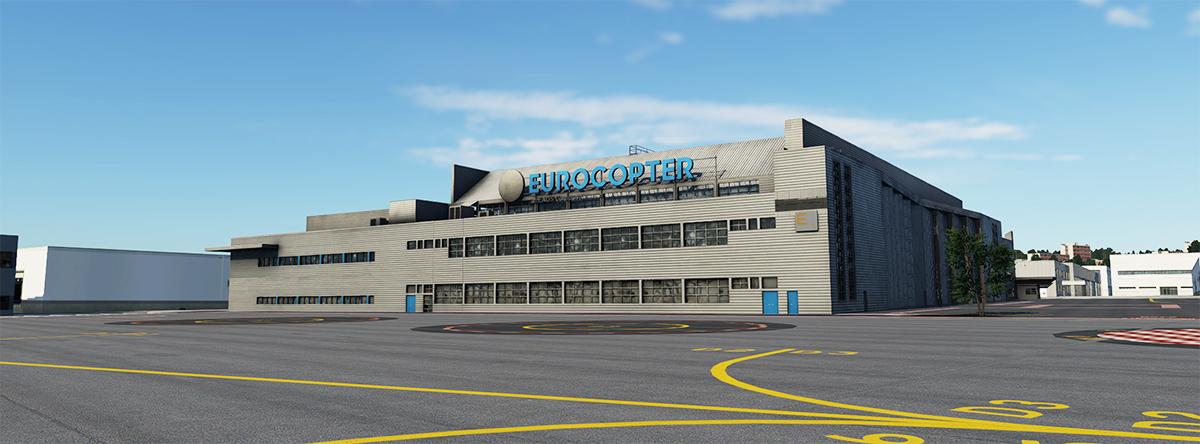
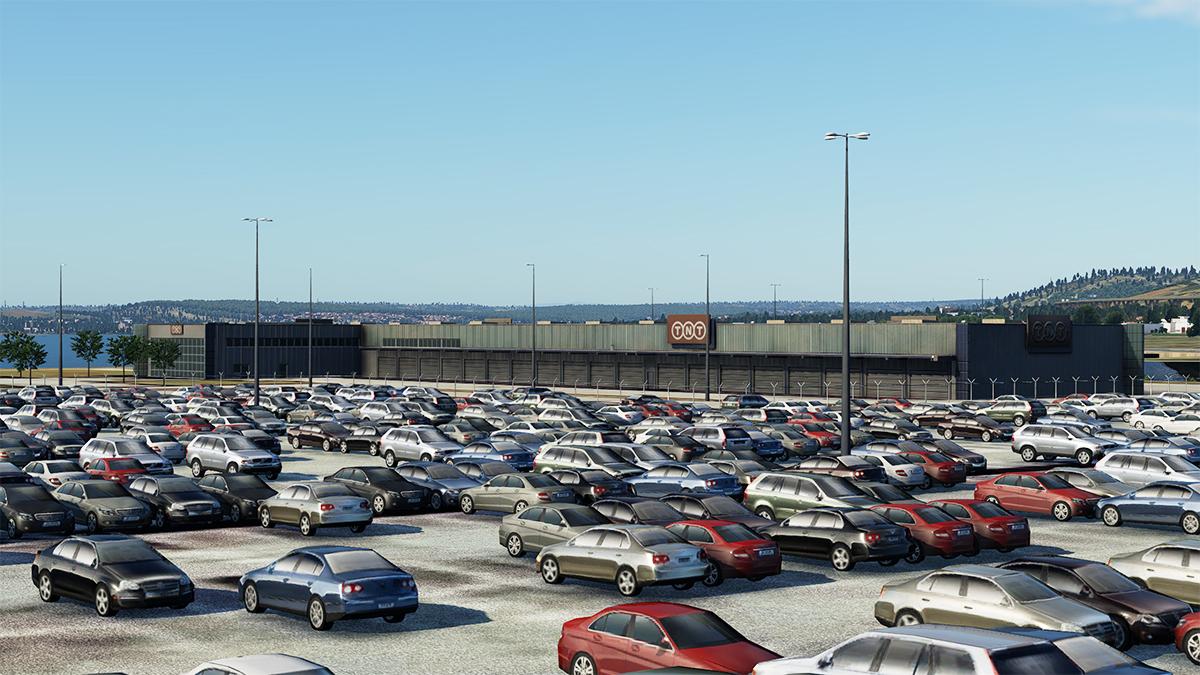
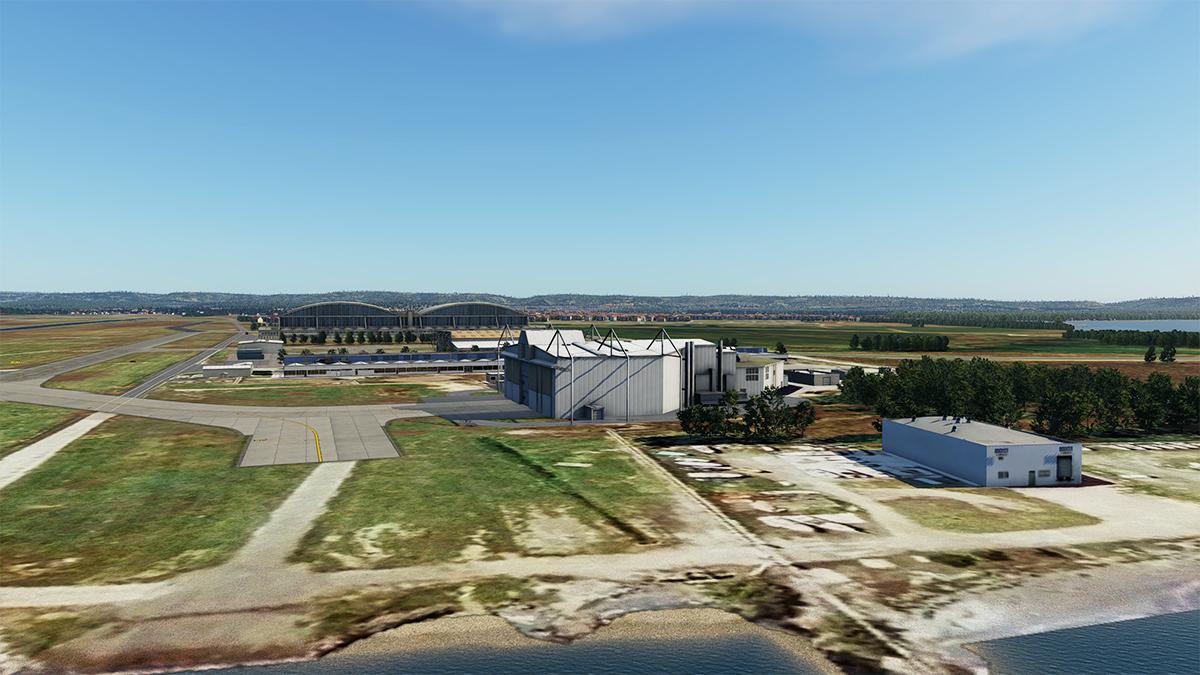
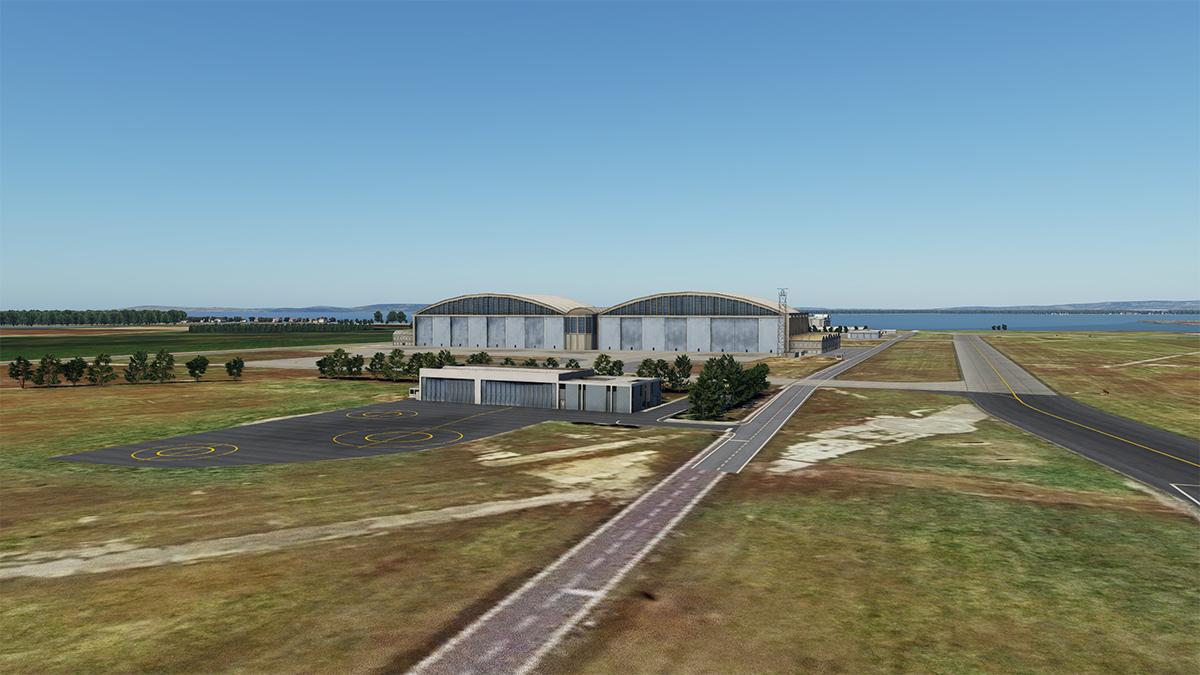
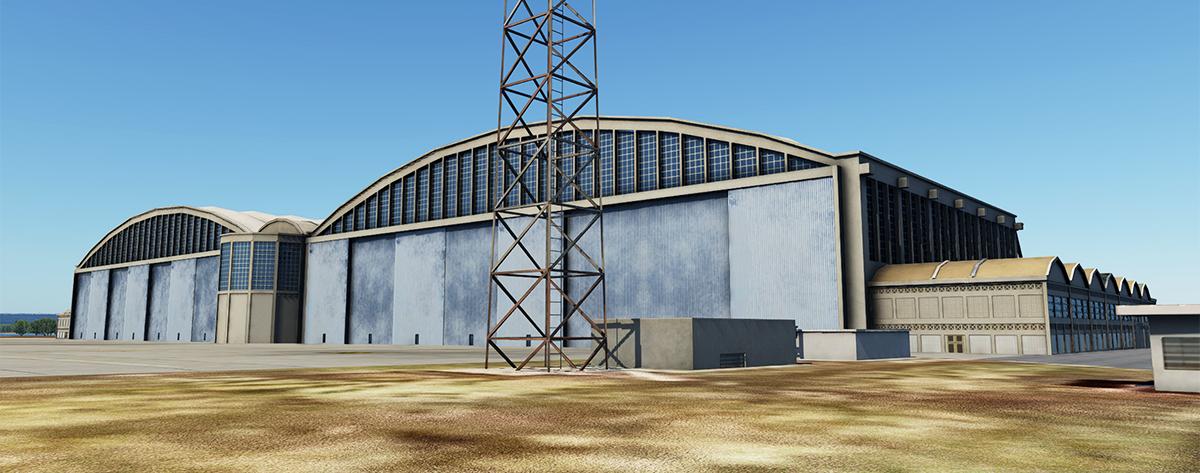
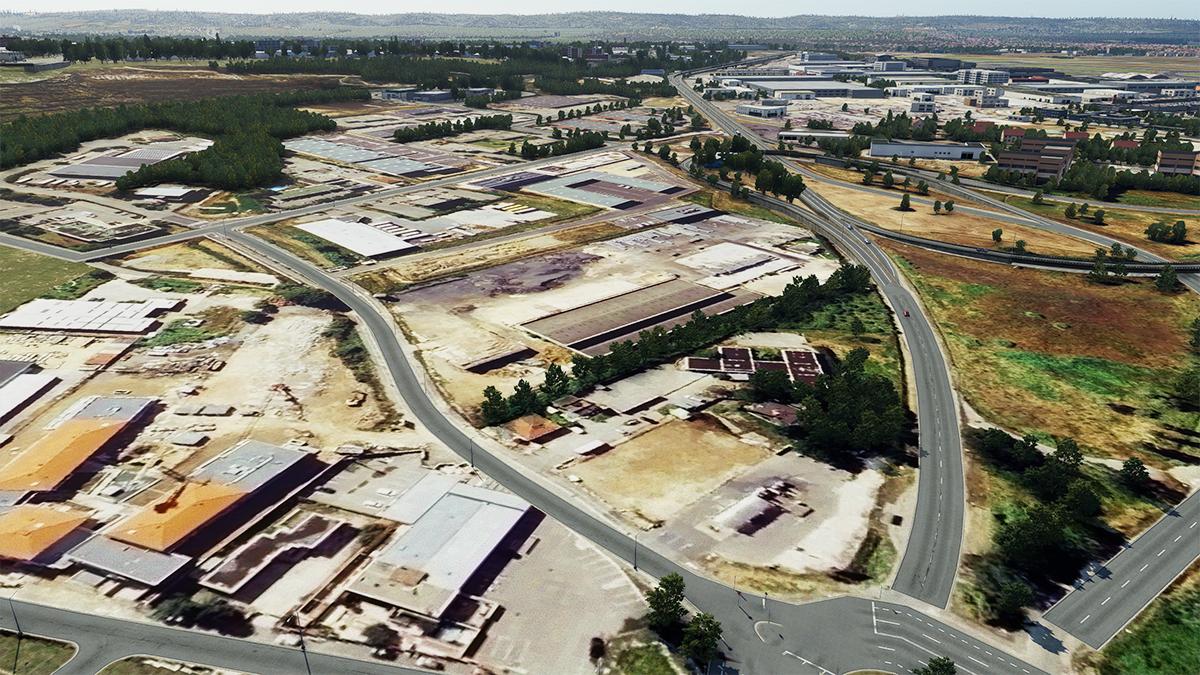
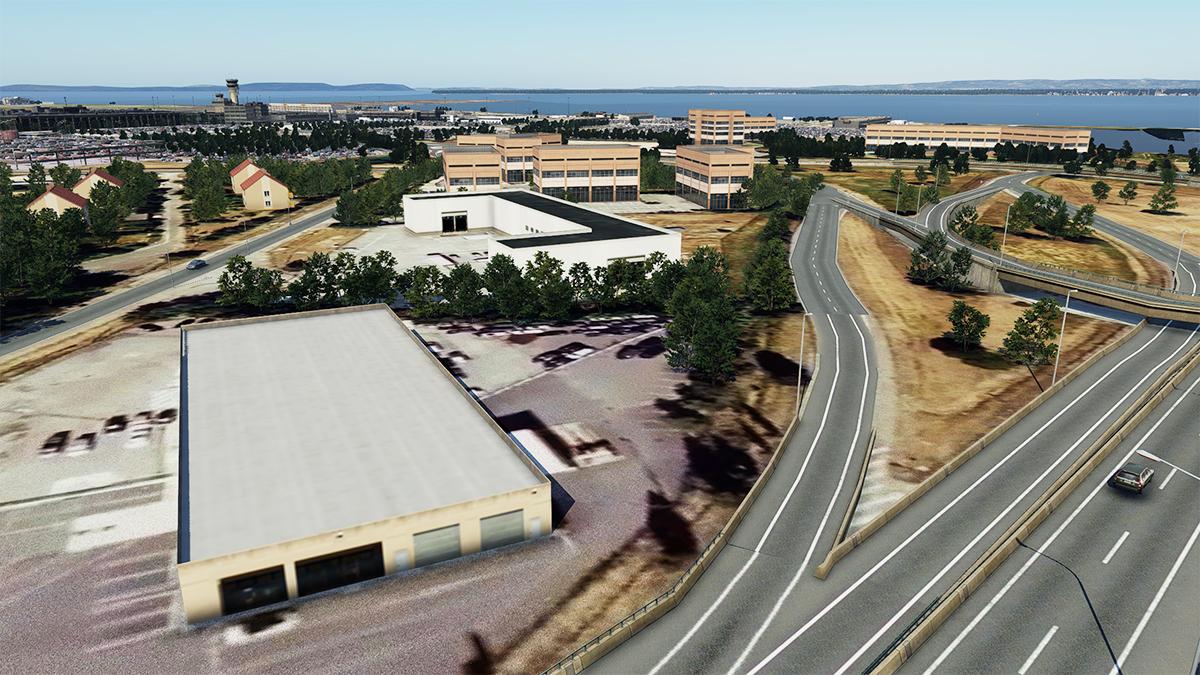
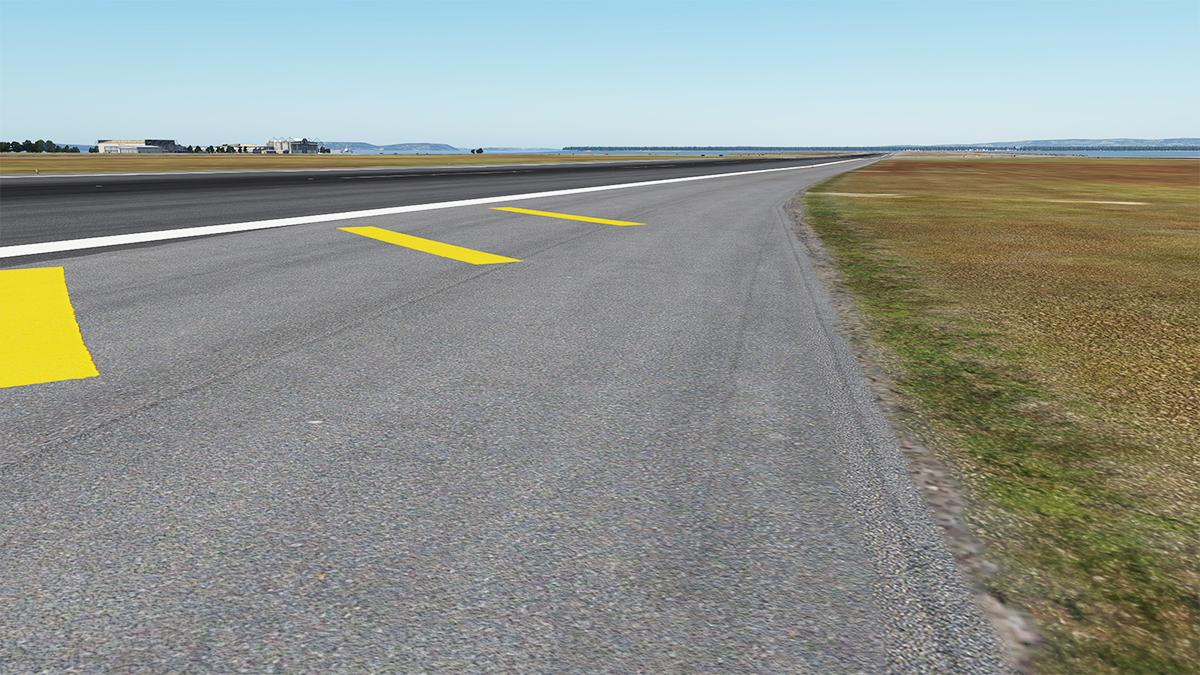
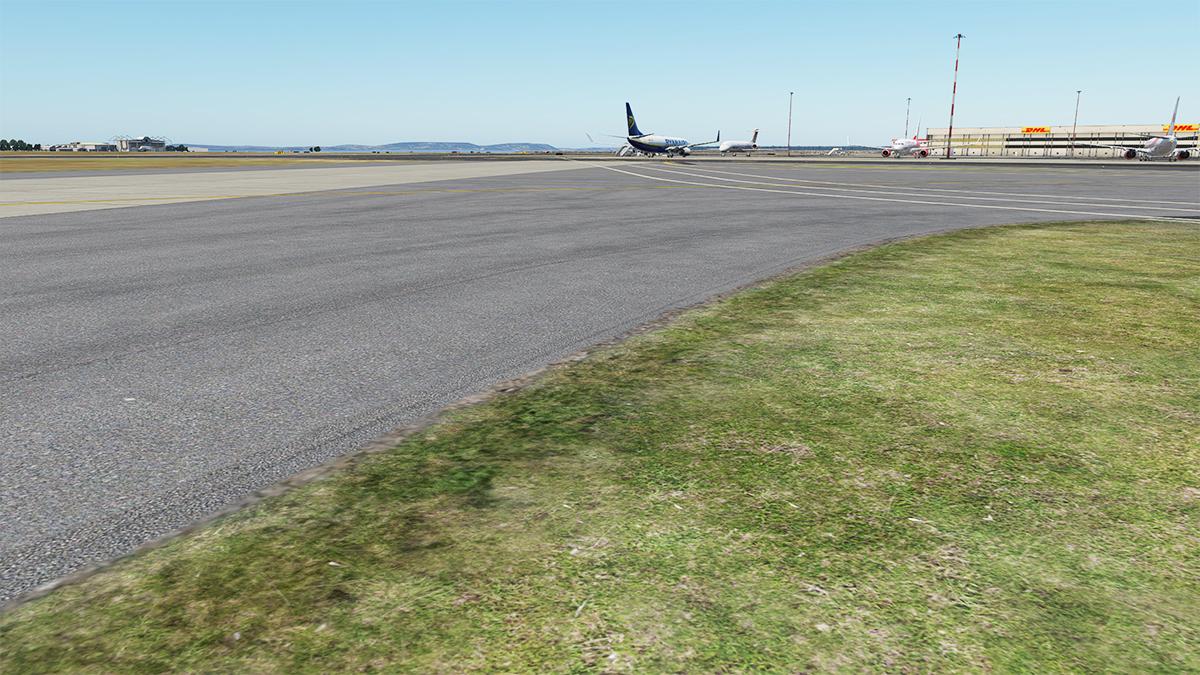
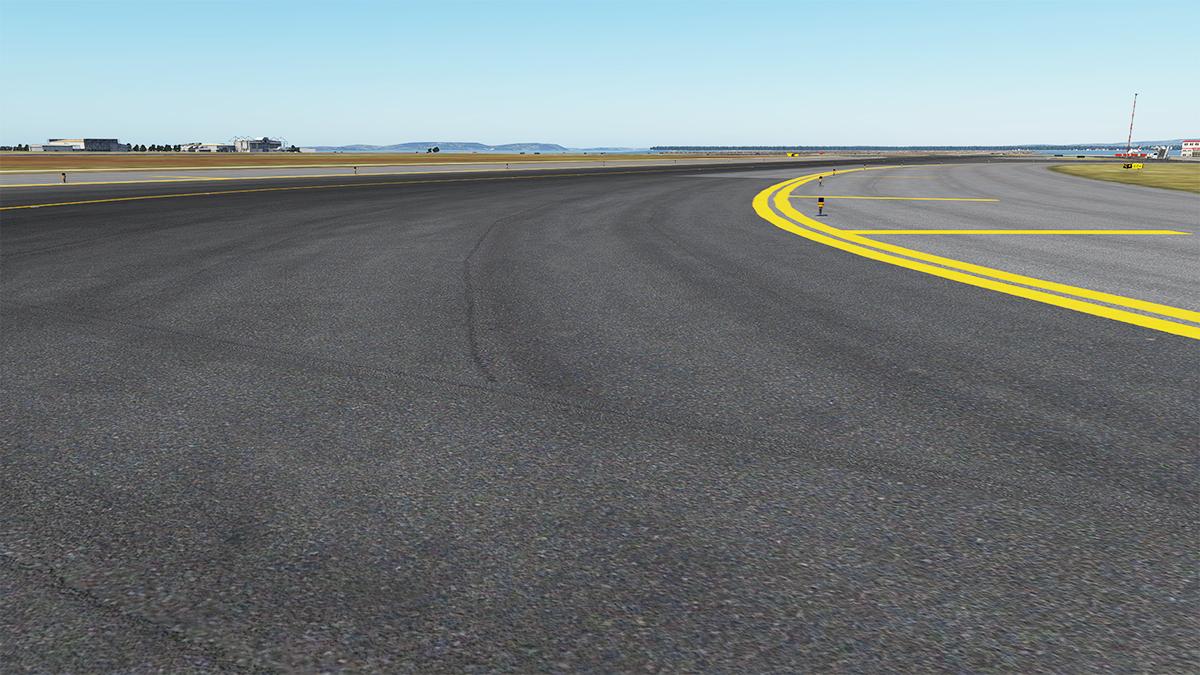
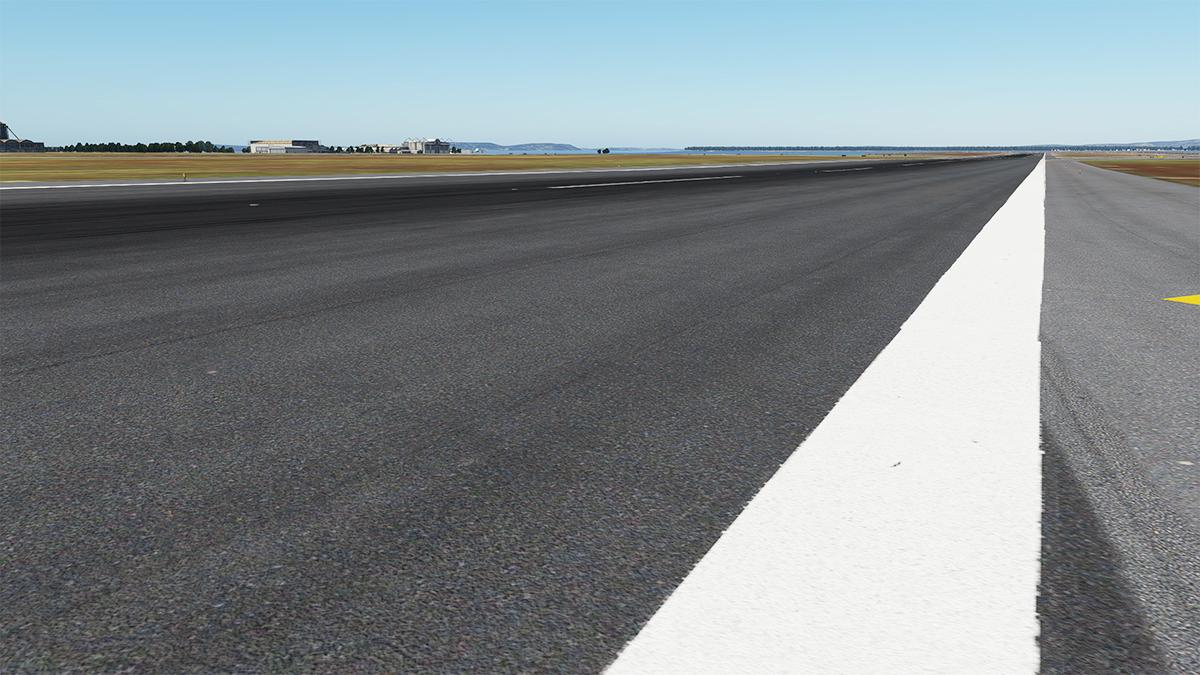
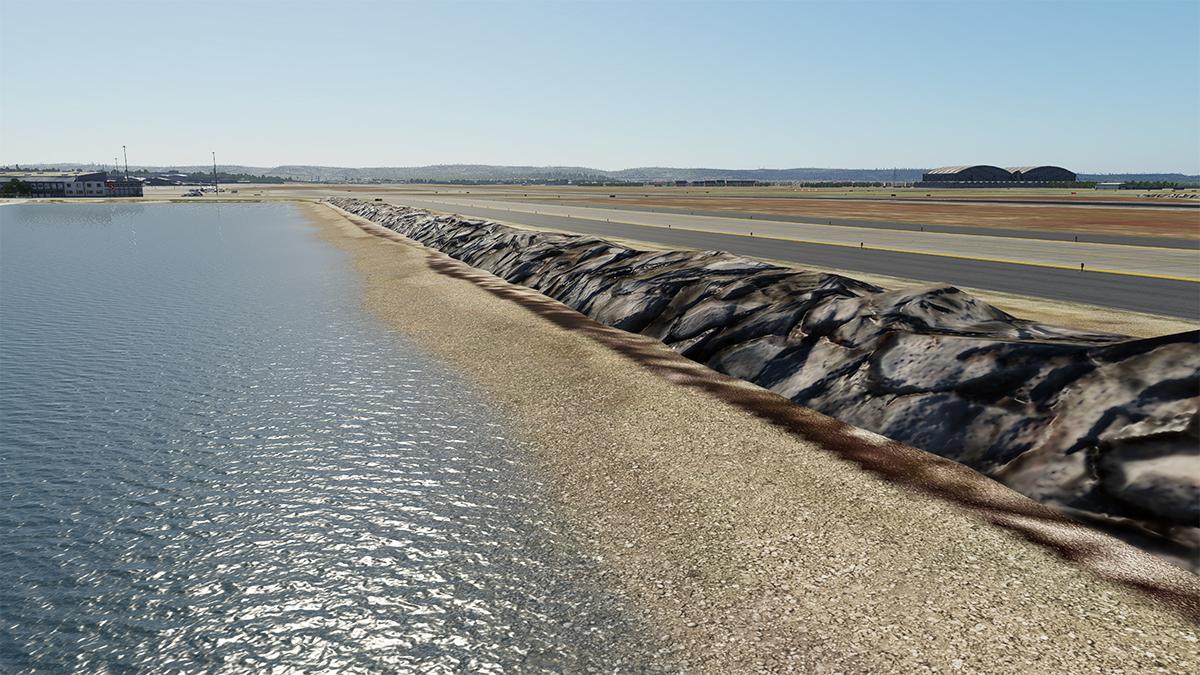
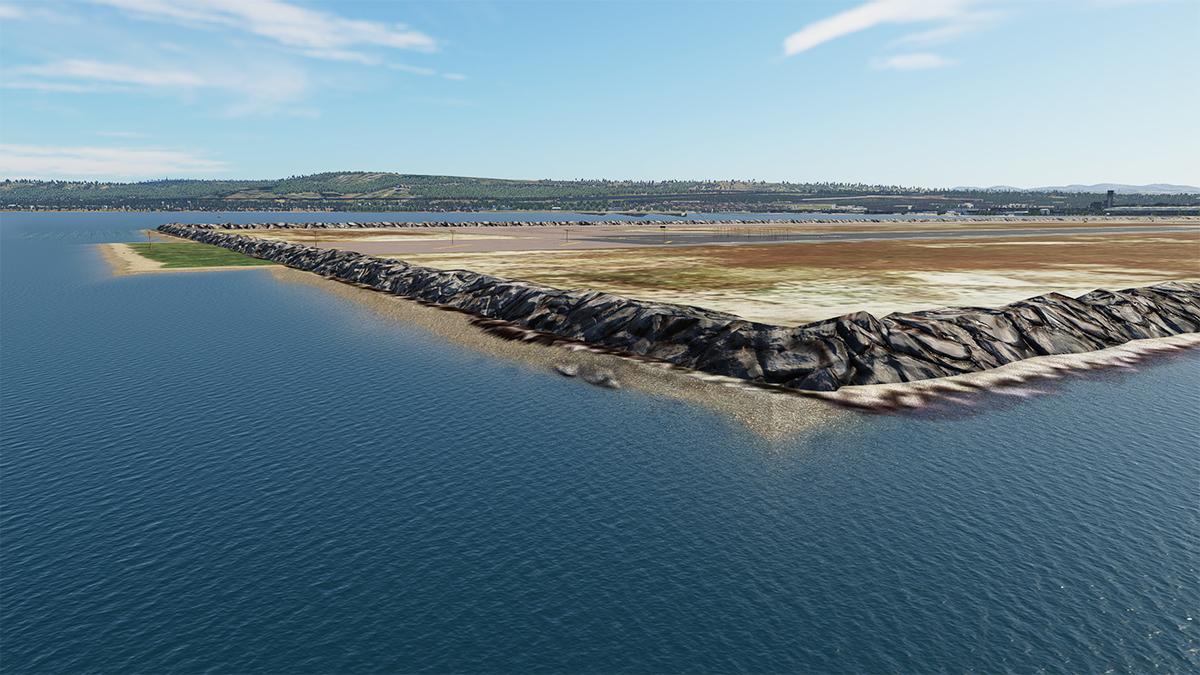
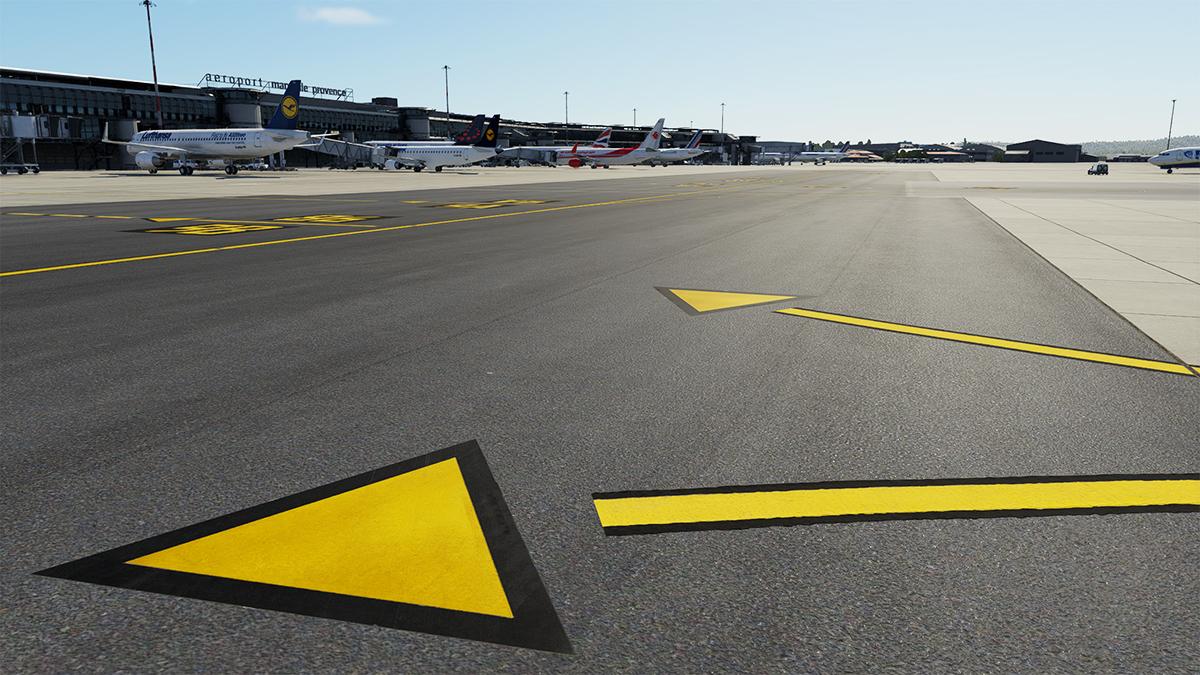
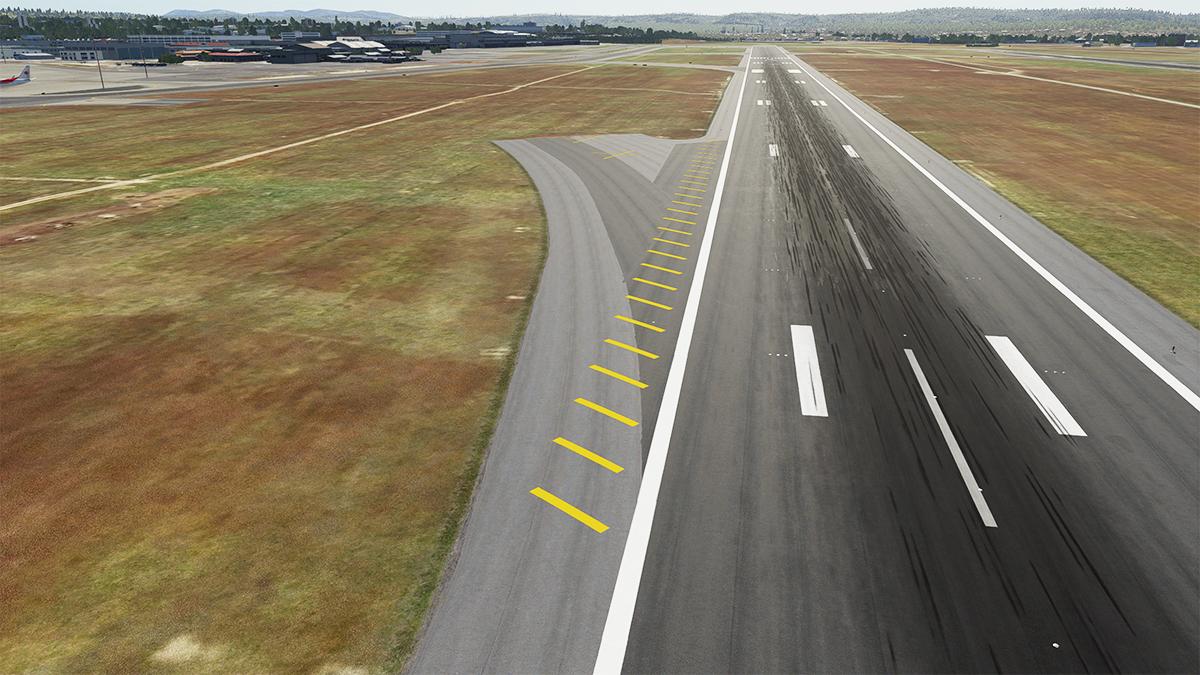
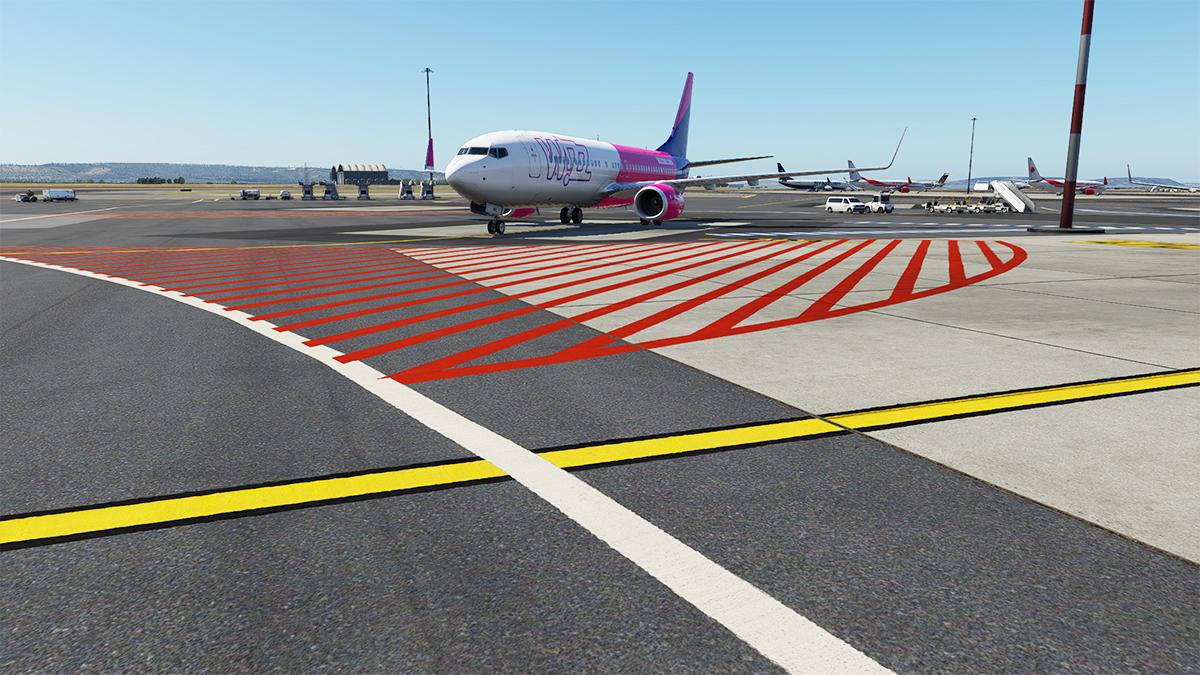
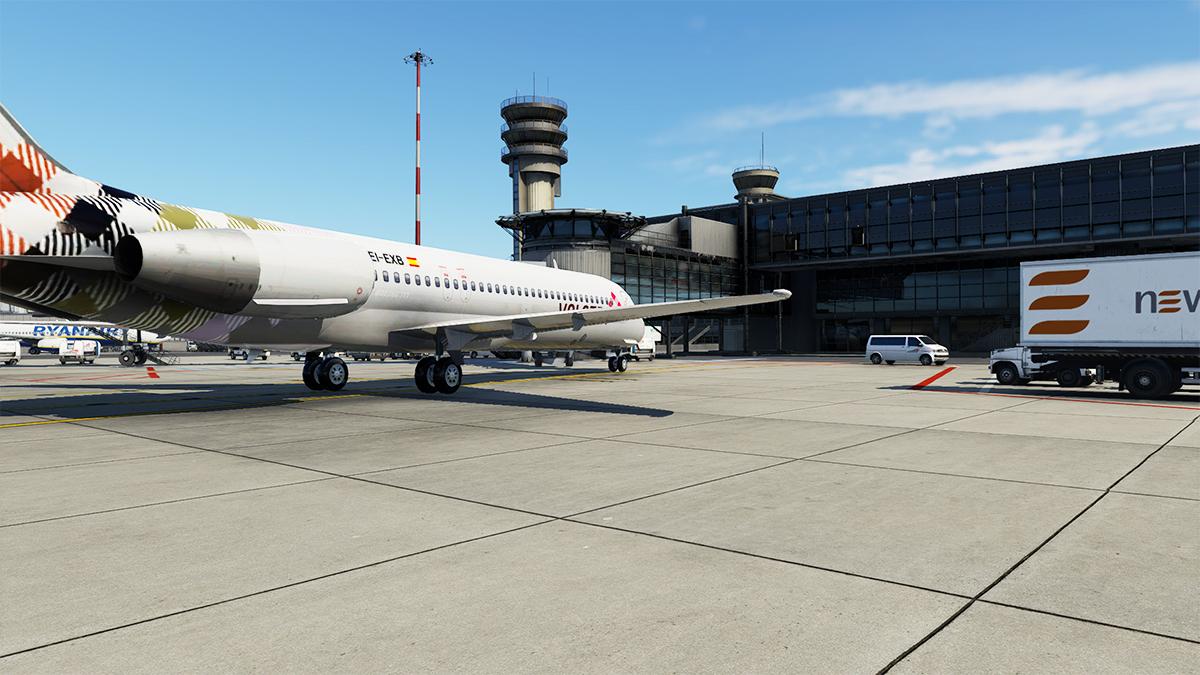
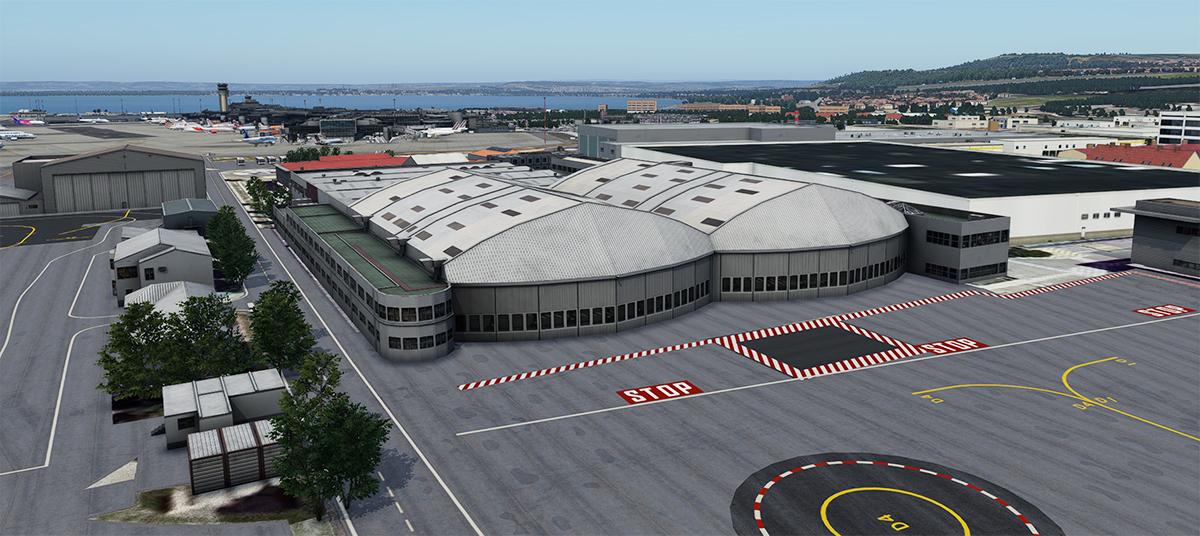
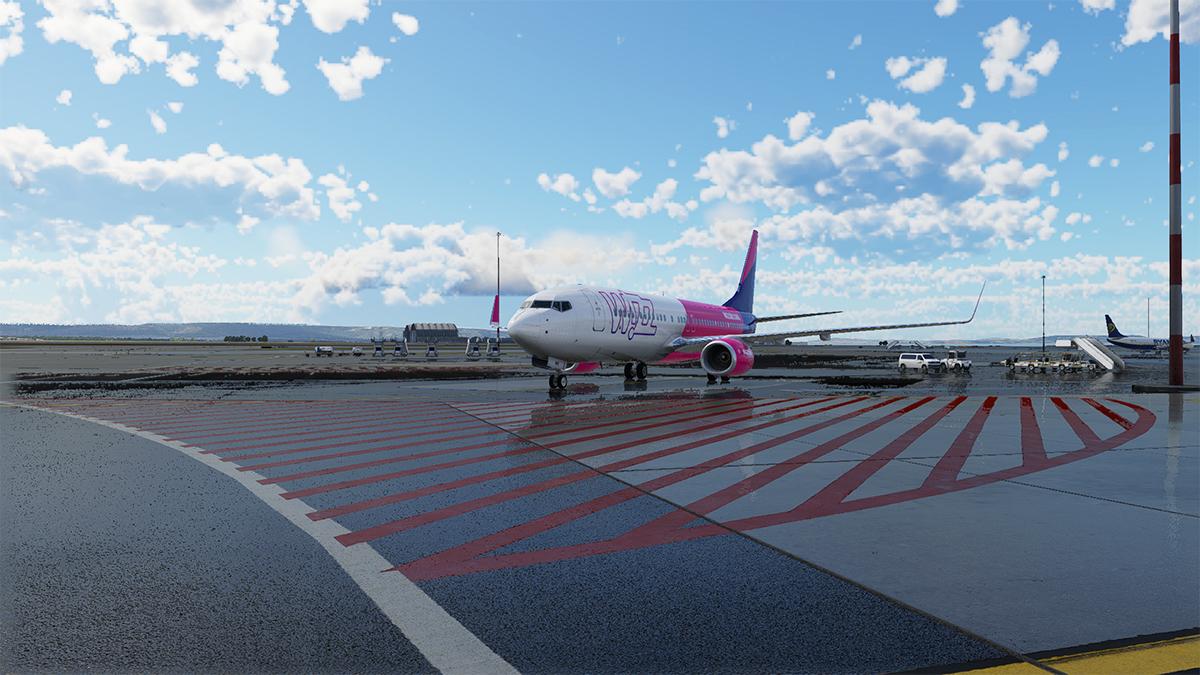
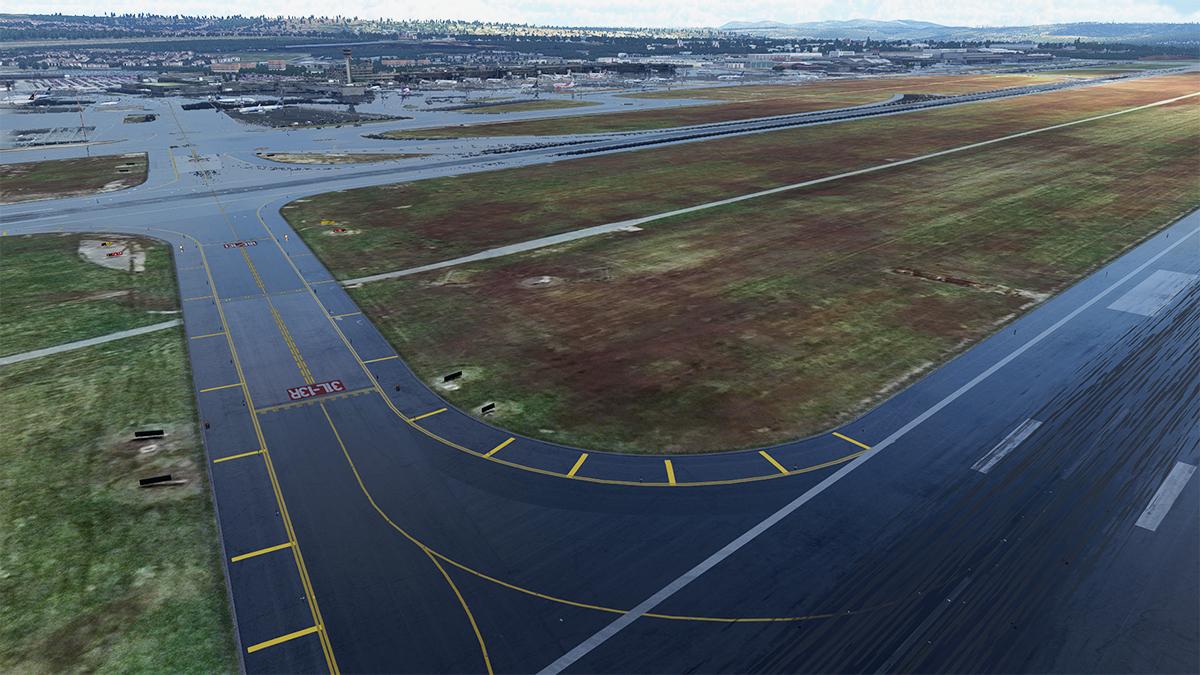
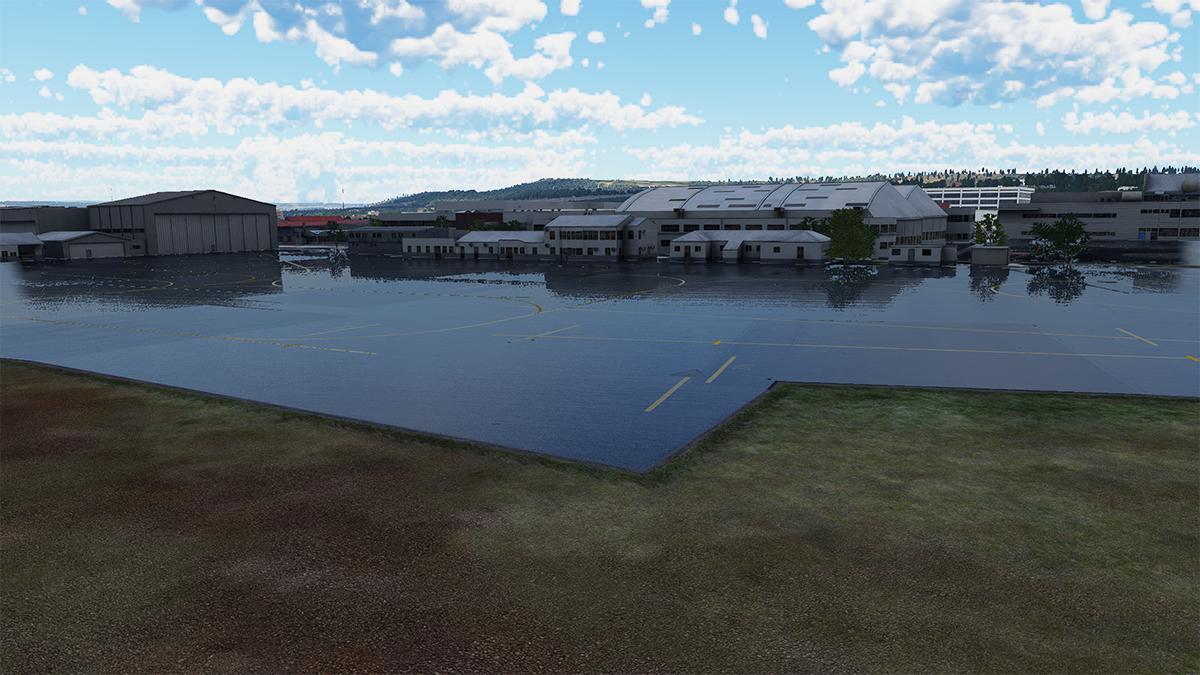
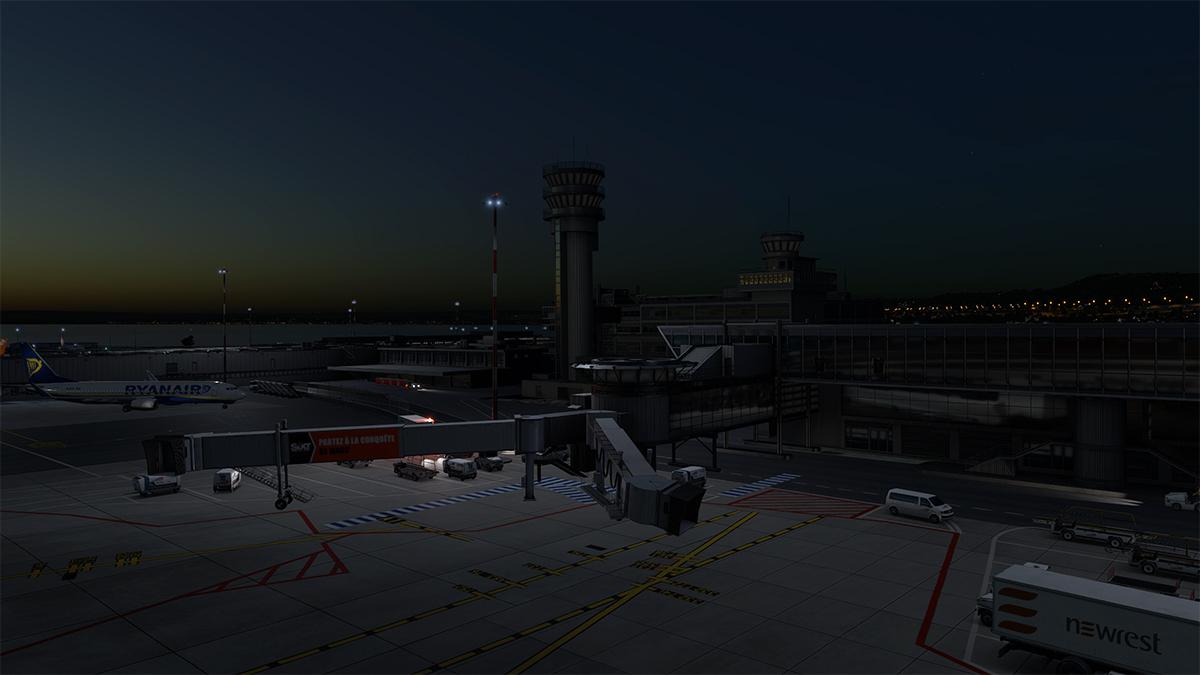
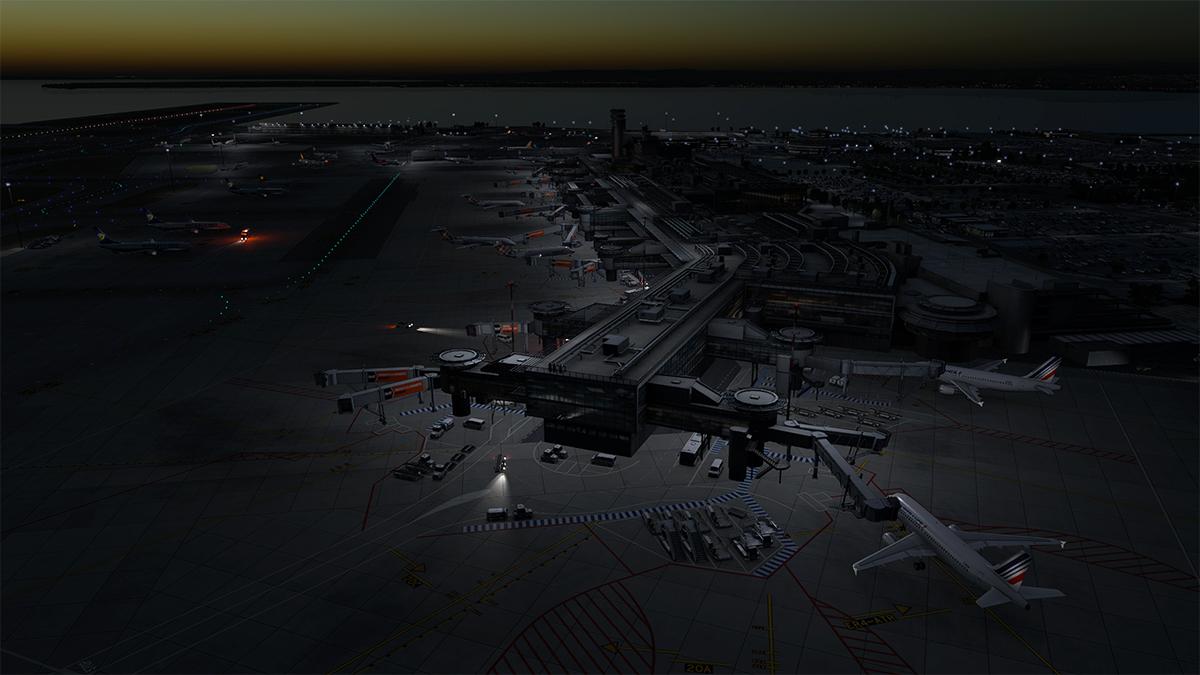
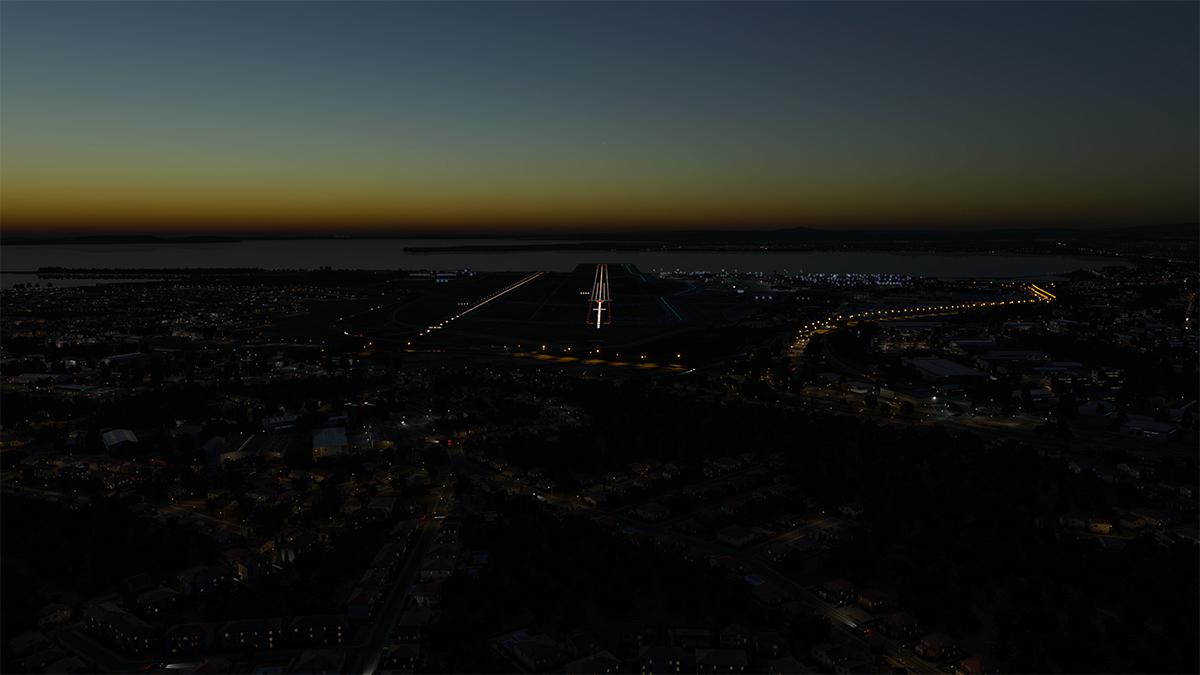
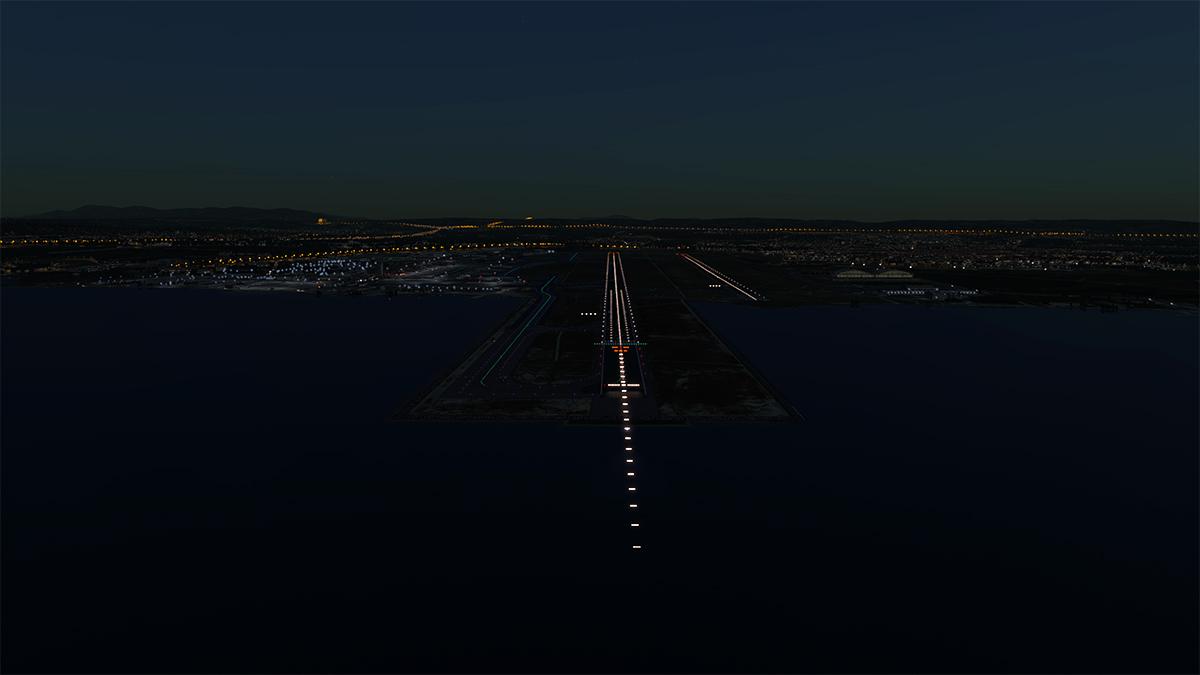
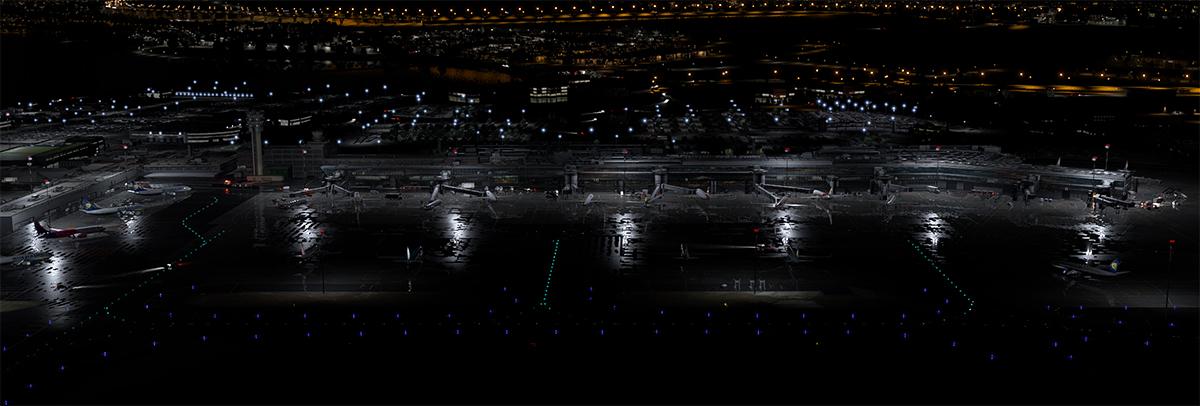
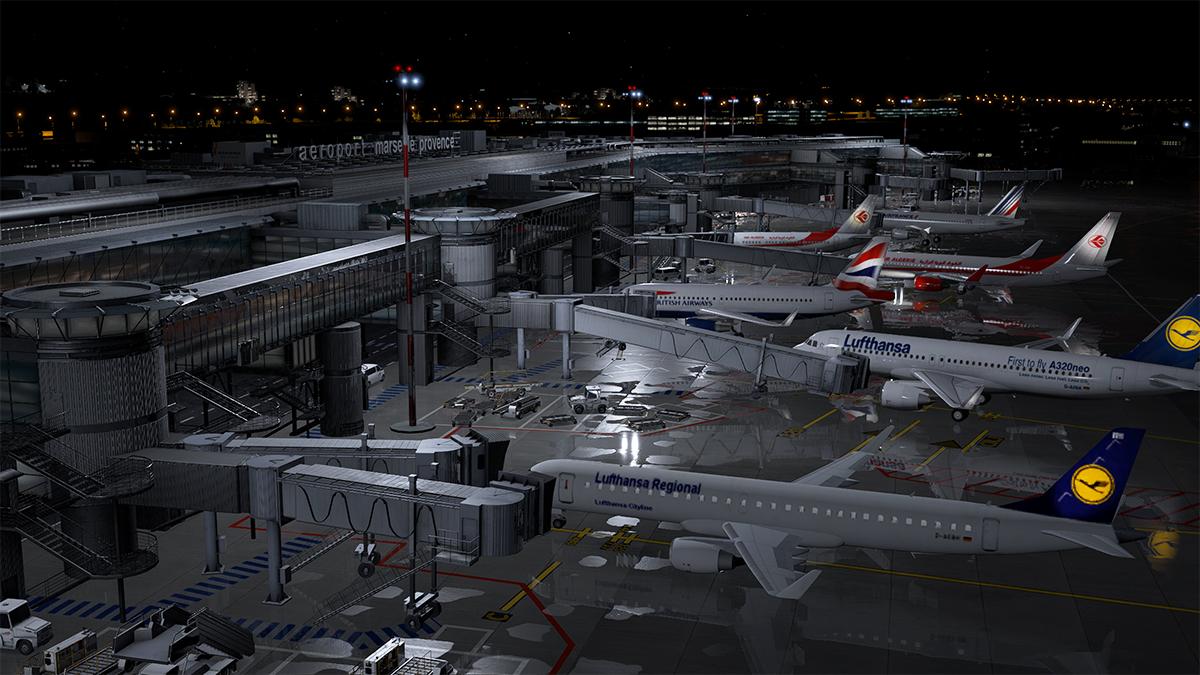
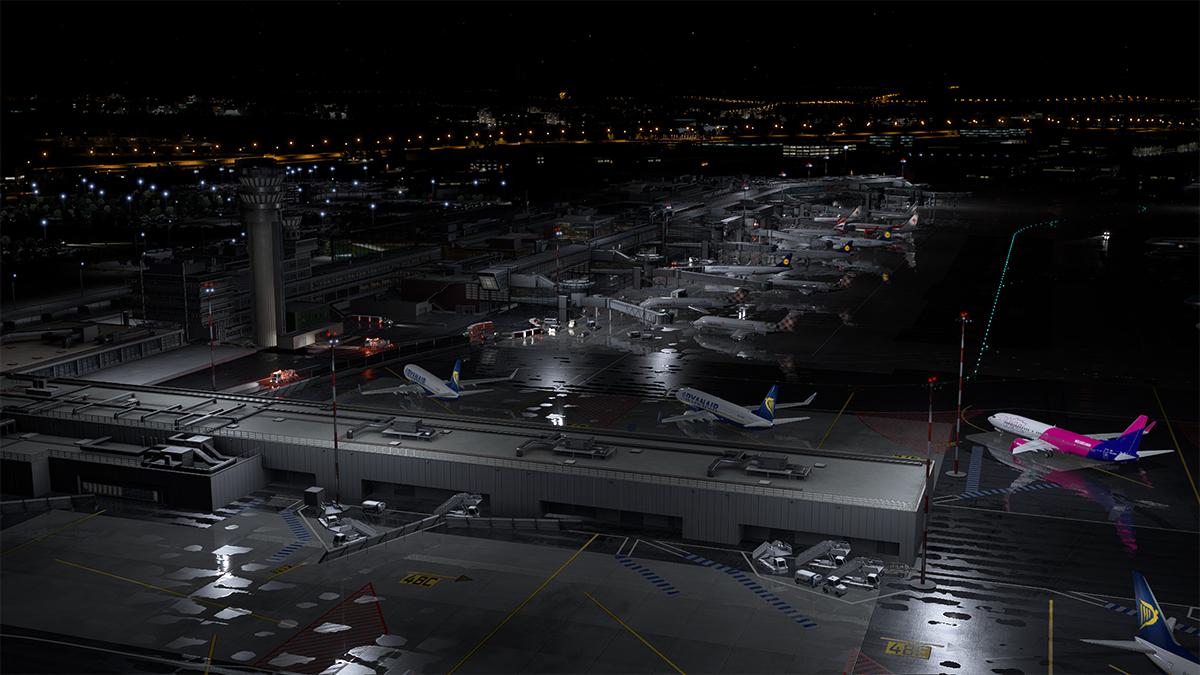
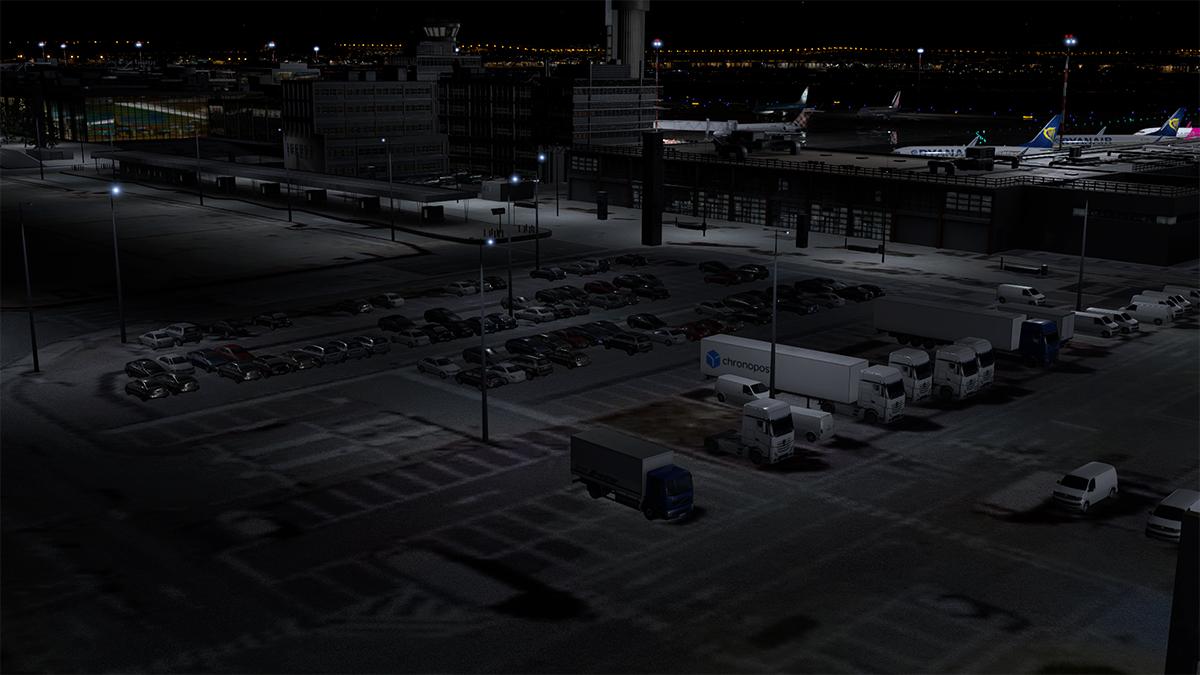
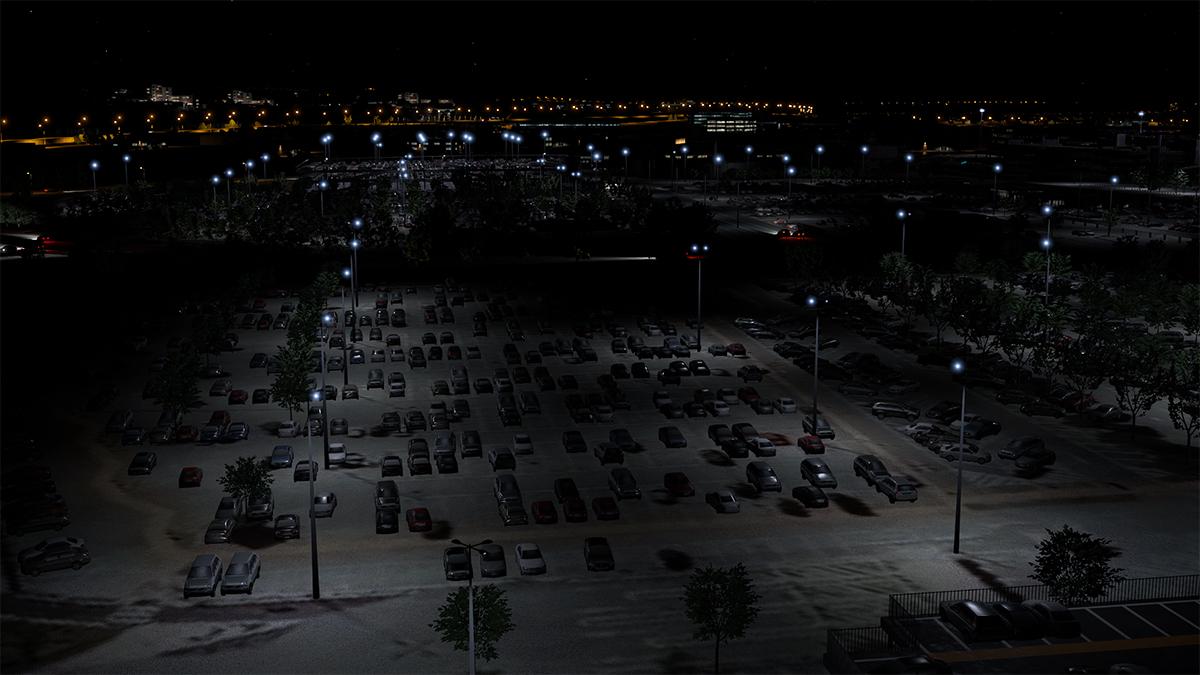
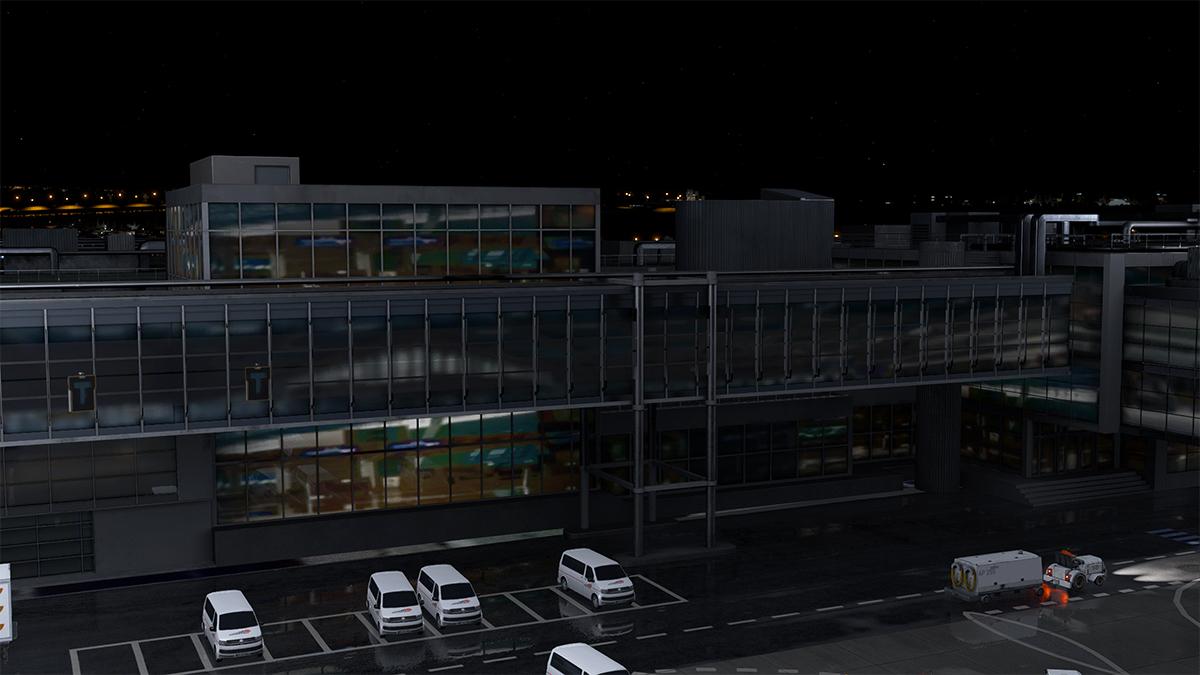
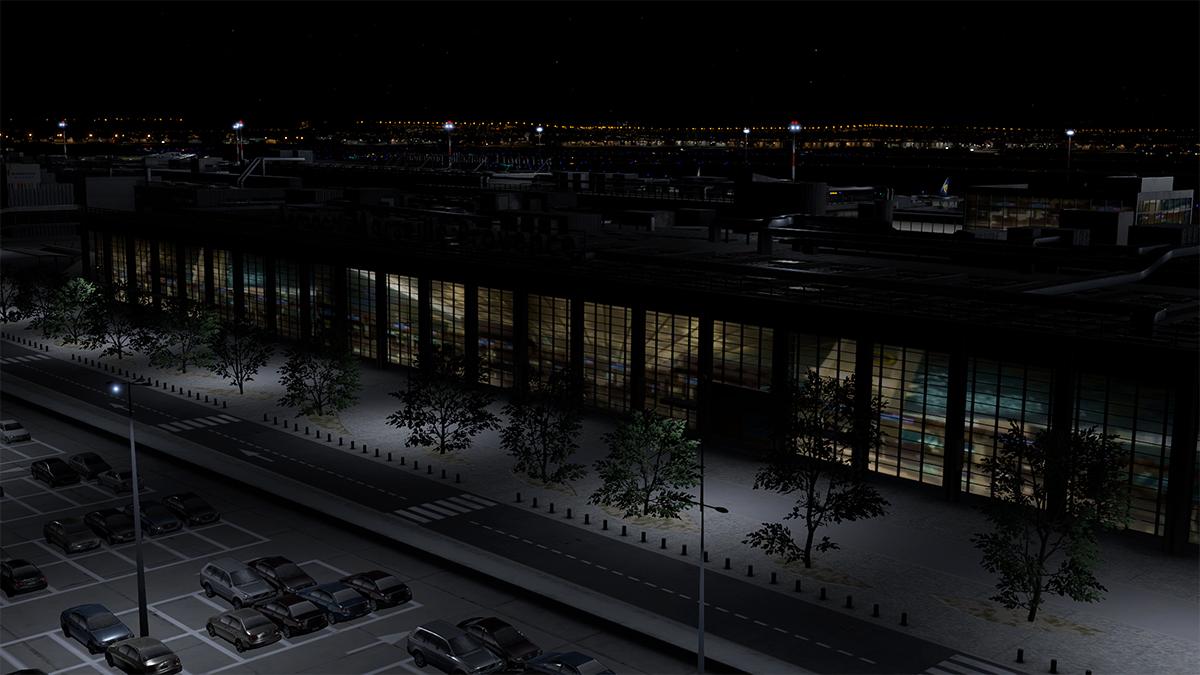
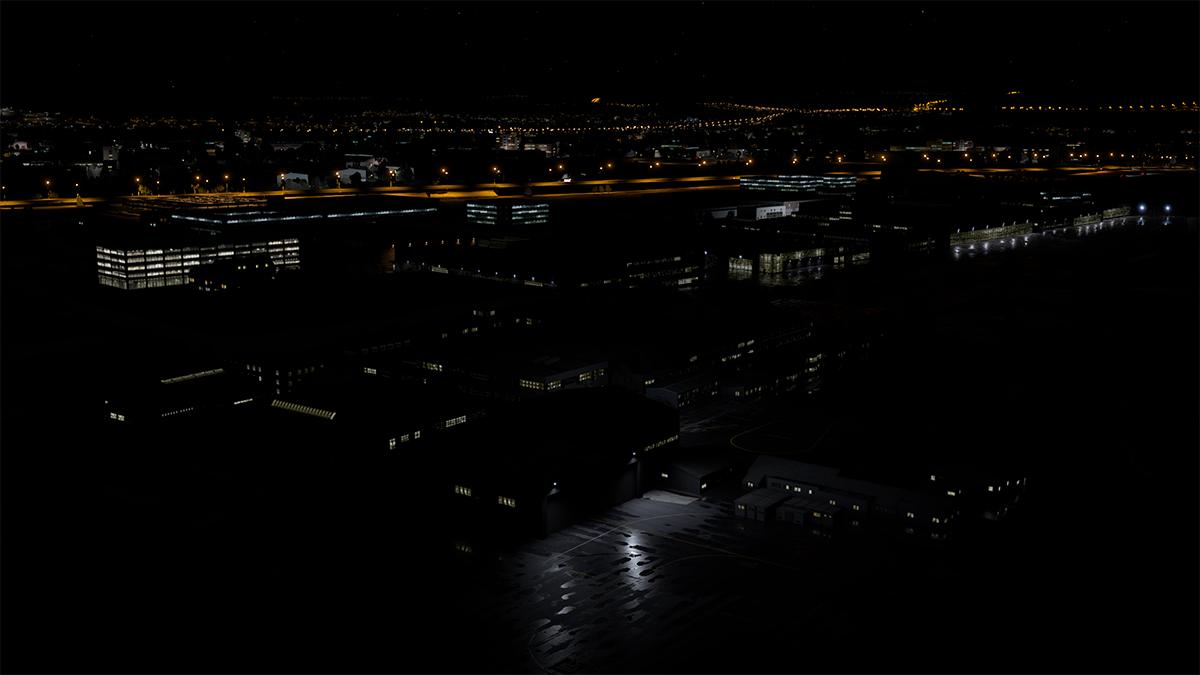
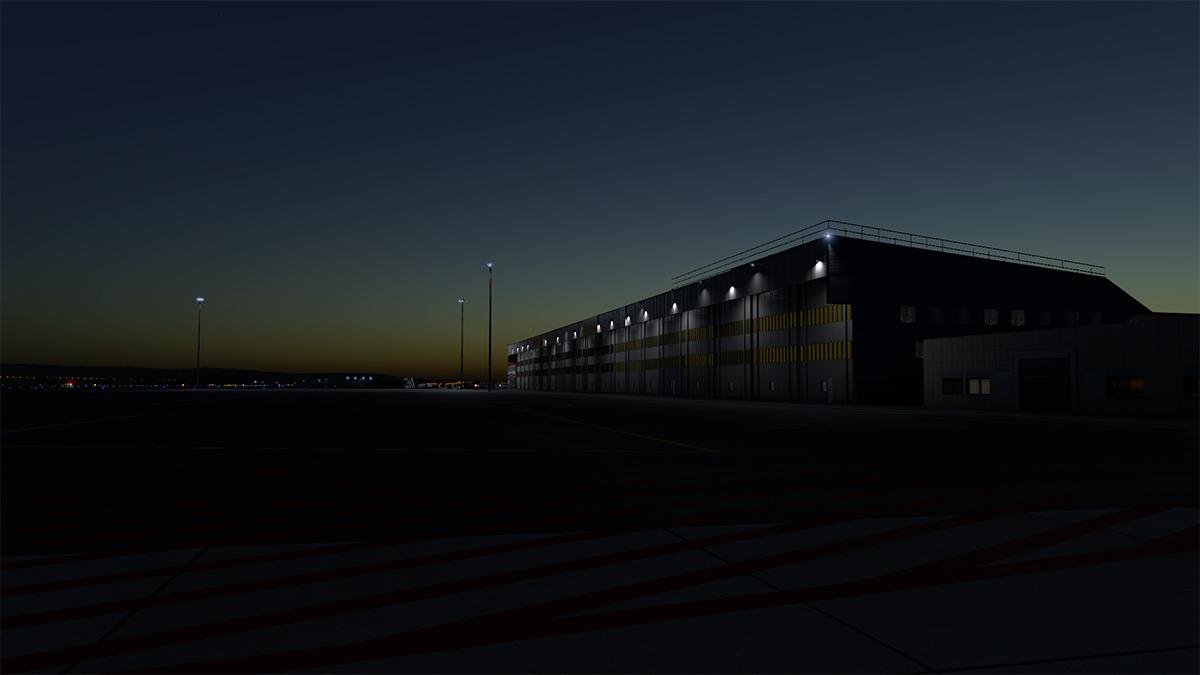
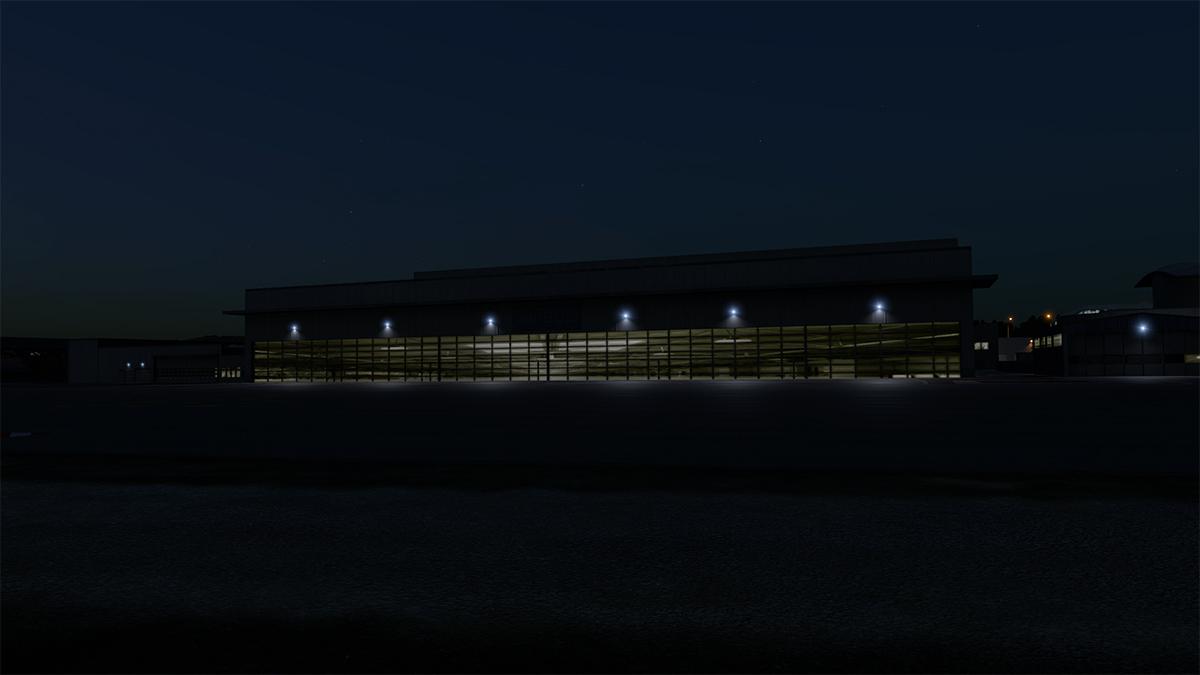
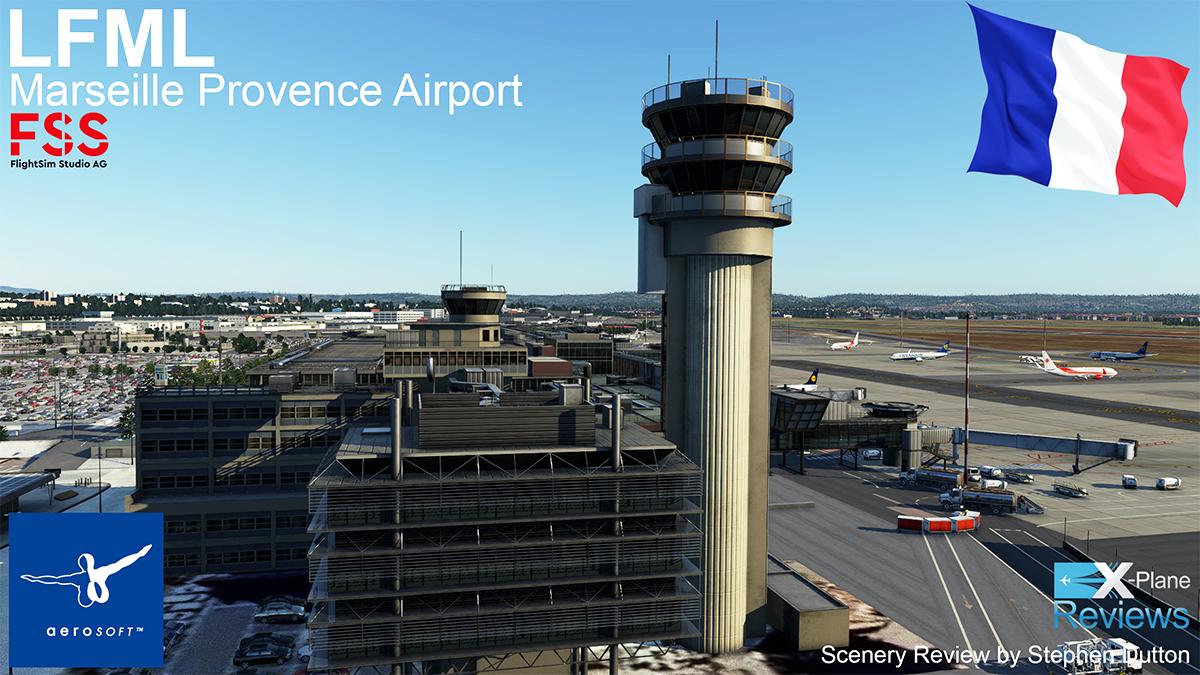
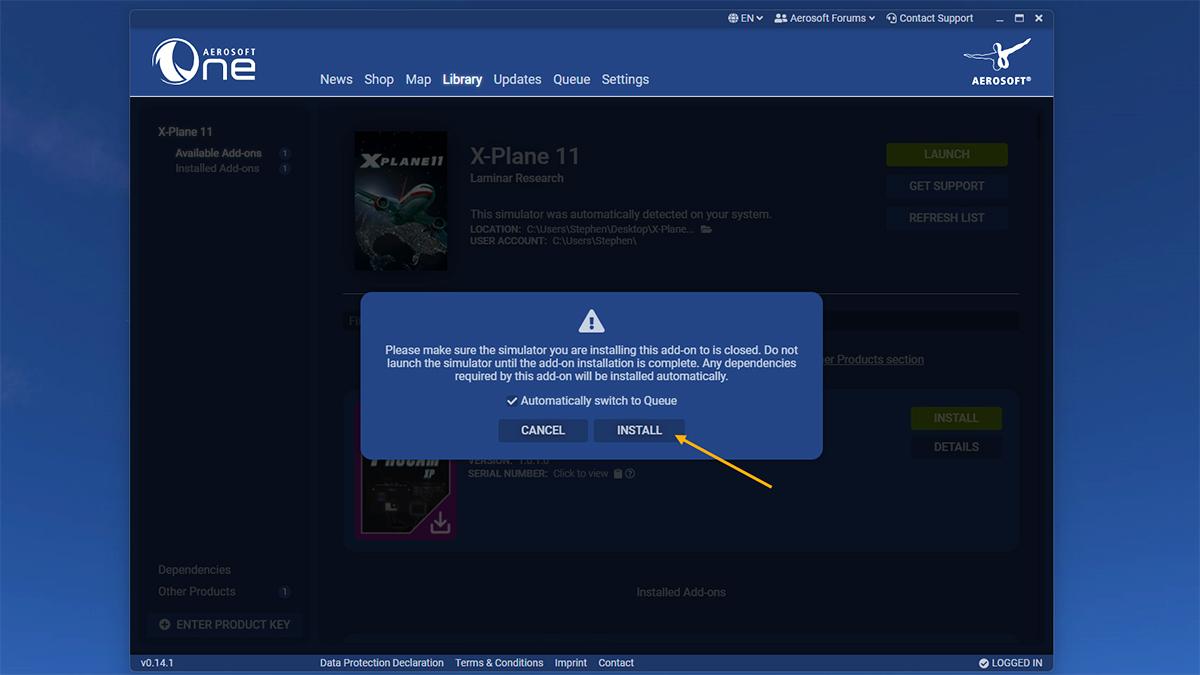
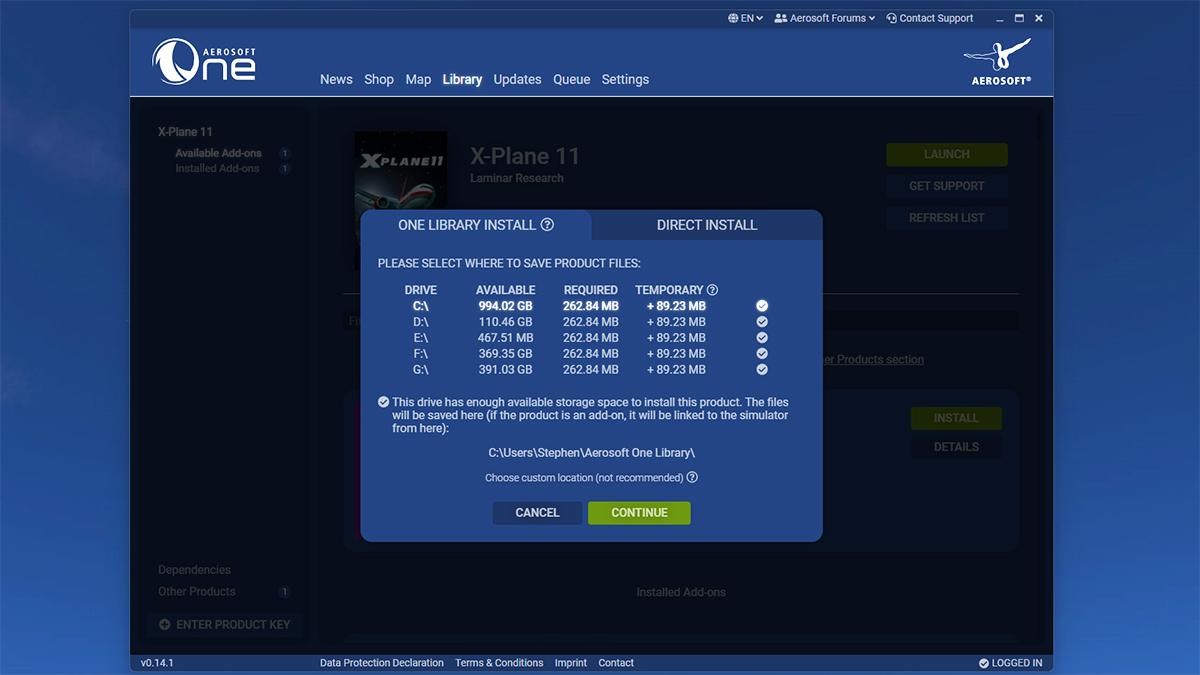
 Scenery Review - Airport Marseille XP by Aerosoft I've always had a strange relationship with Aerosoft Scenery. For one, on first glance they are in many ways quite basic sceneries, as you don't usually get a lot of frills with them... the really odd thing is on how much they have been used consistently over the years, even many from over a decade ago are still not to be beaten in quality and as a representation of the area. Notably a few are now showing the strain of only a few updates from Aerosoft, and so are struggling to be current in X-Plane 12. But don't take away the value here of an investment that has delivered for over a long period of time. That aspect is important, as you are getting a lot of value for your money. So here is one of the very few releases lately from Aerosoft in Marseille XP for X-Plane 12, an airport that is positioned in Southern France. As usual with a lot of Aerosoft releases. It is that in reality Aerosoft is only the host for the developers that create the scenery. In this case it is the Swiss developers of FSS or FlightSim Studios, in collaboration with ShortFinal Design. Marseille Provence Airport is an international airport located 27 km (17 miles) northwest of Marseille, on the territory of Marignane, both communes of the Bouches-du-Rhône département in the Provence-Alpes-Côte d'Azur region of France. The airport's hinterland goes from Gap to Arles and from Toulon to Avignon. Scenery Installation Installation is via the "Aerosoft One" application. You get a serial number when you purchase the scenery, and then you register the product in the app, which then adds it to your collection to download and install the scenery directly into X-Plane 11 or X-Plane 12. Note here the position of the Serial/Product Key Number box (lower left), X-Plane version (11/12, top left) and the product to install. The scenery is installed, not in your usual Custom Scenery Folder, but in a dedicated folder "Aerosoft One Library" on your system, under a file (gameDirectory) via a shortcut, Install size is 2.72Gb. Marseille Provence Airport Aéroport Marseille-Provence Advanced Landing Ground (ALG) Y-14 IATA: MRS - ICAO: LFML 13L/31R - 3,500m (11,483ft) Asphalt 13R/31L 2,370m (7,776ft) Asphalt Elevation AMSL70 ft / 21 m The airport's position is not set on a harbour, but on a lake, Étang de Berre. This was because in the early days of the 1920s and 1930s, Marseille-Marignane was one of France's main points of operation for flying boats. It even briefly served as a terminal for Pan American World Airways Clipper flying boats. Other flying boat operators were Aéropostale and Air Union, the latter moving over from Antibes in 1931. I really love French and Italian airports because they build their terminals like monuments, you know you are either in France or Italy, just by the architecture sitting outside the aircraft's windows, and so it is at Marseille-Provence. The original administration control tower complex has been added to with a new control taller tower built in front of the old. Sensational is the work here. I love the older elements of a legacy airport, blended in with the new, and you certainly get that here. The Terminal itself is an extension of the administration complex. The hosted added section behind the control tower is a visual focal point, its very well done and very realistic. The interesting part, and certainly well conceived here by FSS, is the old terminal has had extensions built not only in the front, but also behind the old earlier terminal, and in so sandwiching the original building in the middle. The main Terminal 1 is split between "Hall 1A" and Hall 1B"... The design and detail of the main infrastructure is simply excellent, HUGE detail and all very well executed, glass is highly realistic as well. Great as well are the Turrets design of the gates/airbridge, intricate front terminal modeling is also sensational... you can spend a lot of time exploring around these airside areas and feel like you are really there. There has to be a trade-off, and so there is. Clutter airside is excellent, every bay is full of service vehicles, and there is a lot of animated vehicles running around as well. Landside and carparks are also full of vehicles, but there are areas like in front of the terminals, and with the storied carparks that are empty of vehicles and landside clutter (i.e. bustop objects, signage, even the buses themselves). SAM3 is used as the interaction between the aircraft and the animated airbridges, and the design of the animated airbridges is again excellent and authentic, with lovely SIXT car rental (french) branding. SAM vehicles/SAM follow is also available in the scenery. With the expansion of LCC or Low Cost budget carriers, then Marseille-Provence opened in September 2006 a dedicated LCC terminal in MP2, or Terminal 2. Positioned northwest of the Tower/Terminal 1 complex, it is a simple walk-on/walk-off terminal with 8 stands. Nicely done and excellent for regional services. Landside is dominated with long and short term carparks, which are nicely filled in and come with branded rental car areas, but there are still small open areas of just the underlying ortho-photo images, overall it works fine. A small note are the trees, they are the new X-Plane 12 3d trees, that move around in the wind, and in so adding quality to the scenery. Cargo here is small with two heavy stands 60N -61N/62N and the rest small regional stands, dominated by DHL, Conair and UPS also have receiving warehouses. Along the lake and FedEx and TNT are also represented by their own facilites. Airbus Helicopters SAS (formerly Eurocopter Group) is the helicopter manufacturing division of Airbus, and they have to the southeast a massive Manufacturing and training complex at Marseille–Marignane (they still use the old name). It is the largest in the industry in terms of revenues and turbine helicopter deliveries. The complex is huge in size, even bigger in size than the commercial airport. All the building and plants are very well produced, but there isn't a lot of smaller clutter detail, even a few nice static helicopters of the huge but impressive flightline would be nice. There has been an airport on this site since 1922 (they celebrated the 100 year anniversary last year). There are the few older elements to be found. But like the huge double hangars in the southwest, most of the older facilities have been upgraded, and are still used for helicopter training or testing. Other infrastructure is well done to fill-in the far landside areas, but a lot is a slight delusion in using ortho-photo images to create a realistic scene og hotels and airport infrastructure, it works very effectively, but go low and the non-3d buildings show... overall it is not an issue. Ground Textures First a note.... On my earliest flight into LFML Marseille, I flew the ToLiSS Airbus A319. As you know you can create a route in Simbrief, then load it directly in the Airbus's MCDU. Problem was the loaded route was missing the LFML runway data, and you couldn't insert it either via the MCDU radio? My AIRAC data for both aircraft and airports are both up to the current date. The A319's system worked at other airports (routes) but not to Marseille. So it's an odd business. I was able however to land using the Runway 13L (110.30 ML) ILS by inputting the frequency directly into the main radio's on the console and I landed fine, in other aircraft it also worked fine on the same approaches? X-Plane is just plain weird sometimes. The ground textures at LFML are bit bland, not bad, but not brilliant either with a slight flat sheen, tarmac (asphalt) edges are however very good, but there is no grass, which is odd for Aerosoft as it is their speciality So all the areas in ramps and aprons come across as a bit flat and dull, very little, if any grunge or noticeable oil and rubber dirt isn't present either. Signage feels too large in scale, but it is correct to Google Earth, maybe it is because again it is too clean and not at all worn in or degraded. The rocky seawall around the 13L threshold is very good, if you don't get in to close. Made up of photo images it looks the part, but odd when inspecting very intimately, overall the idea works. The X-Plane 12 water effect and the lake side feel is excellent here. PBR reflective (wet) active textures and burnt-in ambient occlusion is excellent here, and actually transforms the bland textures in something of depth and realism, it brings out the surfaces far better than the dry feel and look, snow is possible here, but this is the south of France, and the cold and dry strong Mistral winds would usually keep the snow away. Lighting Aerosoft is not known for its excellent lighting in X-Plane, as mostly it is usually a Flight Simulator look and feel, it is the same here at Marseille. Approach lighting has to conform to ICAO standards, which it does here, as does the taxiway lights. You have to be at full darkness before the lighting really kicks in, then the ramps are very workable. But Landside is very poor, the 1B Hall carparks are in full darkness with no lighting at all with the lights placed, in leading to the question if the area is not actually finished... Terminals use an old idea of images behind the windows, it does look dated, but also effective, problem also it's not consistent, so there are many dark areas. Cross field hangars are very FlightSim, meaning boring, and the Airbus Helicopter complex is building lighting only, and no fills. Other buildings have some lighting including down lights, but overall I would rate the lighting about a poor four, as it is just passable and all quite dull. Navigation signage is good, bright but with no reflections... except if it is raining and the reflections then look brilliant. _______________ Summary Even though most Aerosoft scenery is branded under the house name, in fact the product is usually created by a wide and varied developer studio, sometimes several in cooperation together. This release is Airport Marseille XP, for LFLM Marseille-Provence in the south of France by FSS or FlightSim Studios, is in collaboration with ShortFinal Design. Generally all Aerosoft product has a familiar look and feel, modeling is usually highly detailed, but the smaller tighter detail is usually ignored, a lot of FlightSim elements in X-Plane are also used. In short that sums up this Marseille Airport scenery from Aerosoft. The main Tower(s) complex and twin terminals are brilliantly conceived and designed, and it has great airside clutter and animated traffic, also added here is the massive Airbus Helicopters SAS (formerly Eurocopter Group) the helicopter manufacturing division of the Airbus complex. Like said airside has loads, even tons of detail, but landside is not as complex or as finely detailed, granted it is still visually a filling viewpoint, with excellent carkparks, rental areas and buildings, but it also relies heavily on the underlay ortho-photo images to fill out the areas, creating blank areas Landside. SAM3 is well done and airbridges are SIXT branded with SAM vehicles/SAM follow also active. The scenery is well inserted into the X-Plane mesh environment and has a very good realistic element and feel. Ground textures and lighting however are here all very average, but oddly the ground textures come really alive with the PBR and burnt-in ambient occlusion effects of X-Plane 12, the lighting however is old-fashioned and dull, even with most being classically aged FlightSim windows. If you have invested a lot in Aerosoft sceneries, then you will know they deliver mostly were it counts. As a great representation of Marseille-Provence Airport is very good here, even excellent, as the scenery feels and looks very authentic, it will be a scenery that will be around and used for a longtime into the future (MRS has already seen and done a lot of services on my own network since it's release, which is a very good omen). So importantly the airport will fill in your collection very nicely if you like and use quality custom scenery, so that evaluates the excellent value here, and the LFML airport comes also with all the X-Plane 12 features and effects... sounds like a real winner to me. __________________________ Yes! Airport Marseille XP by Aerosoft is now Available from the X-Plane.Org Store here : Airport Marseille XP Price Is US$24.99 Requirements: X-Plane 12 or X-Plane 11 Windows, Mac or Linux 4GB+ VRAM Recommended Download Size: 2.6 Gb (Using Aerosoft One) Current Version: 12 (June 23rd 2023) Installation Installation of Menorca/Marseille XP is done through Aerosoft one installer: Aerosoft One Universal After you have installed Aerosoft One, click on ENTER PRODUCT KEY (under the Library Tab) enter the Serial Number provided in this order. This will give you the option to download the airport. Note the different X-Plane 11 and X-Plane 12 installations. The Marseille scenery is downloaded into a dedicated folder "Aerosoft One Library" on your system, under a file (gameDirectory) via a shortcut, Install size is 2.72Gb. Documents There are no documents Review System Specifications Windows - 12th Gen IS1700 Core i7 12700K 12 Core 3.60 GHz CPU - 64bit -32 Gb single 1067 Mhz DDR4 2133 - PNY GeForce RTX 3080 10GB XLR8 - Samsung 970 EVO+ 2TB SSD Software: - Windows 11 Pro - X-Plane 12.07r1 (This is a Release Candidate review). Plugins: Traffic Global - JustFlight-Traffic (X-Plane.OrgStore) US$52.99 : Global SFD plugin US$30.00 Scenery or Aircraft -No additions_ ____________________________ Scenery Review by Stephen Dutton 28th September 2023 Copyright©2023: X-Plane Reviews (Disclaimer. All images and text in this review are the work and property of X-PlaneReviews, no sharing or copy of the content is allowed without consent from the author as per copyright conditions) All Rights Reserved
-
- 1
-

-
- aerosoft
- flightsim studio
- (and 1 more)
-
Plugin Review : ProCam XP by Aerosoft
Stephen posted a topic in X-Plane Plugins and Simulator Addons
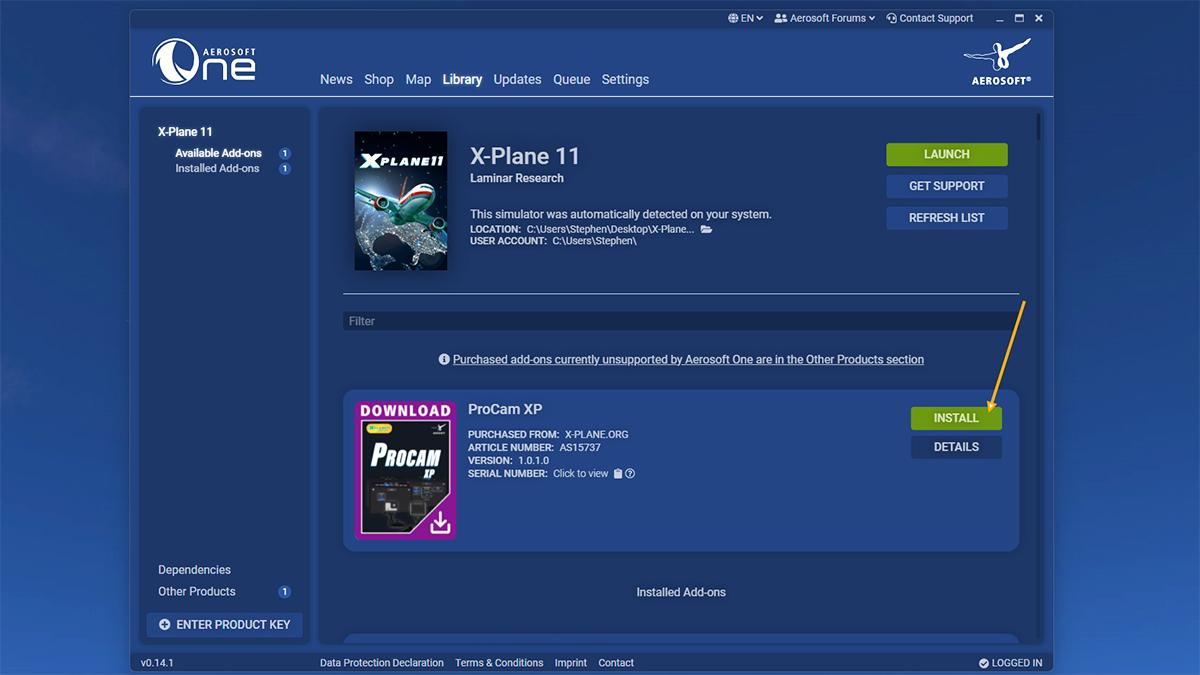
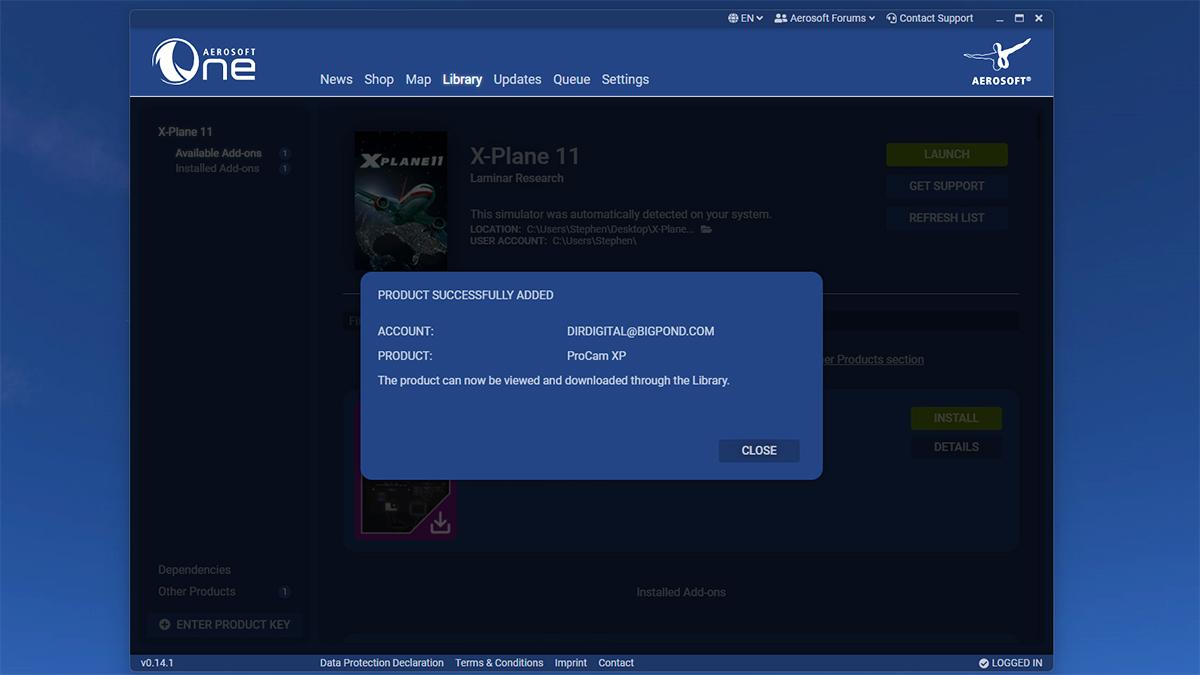
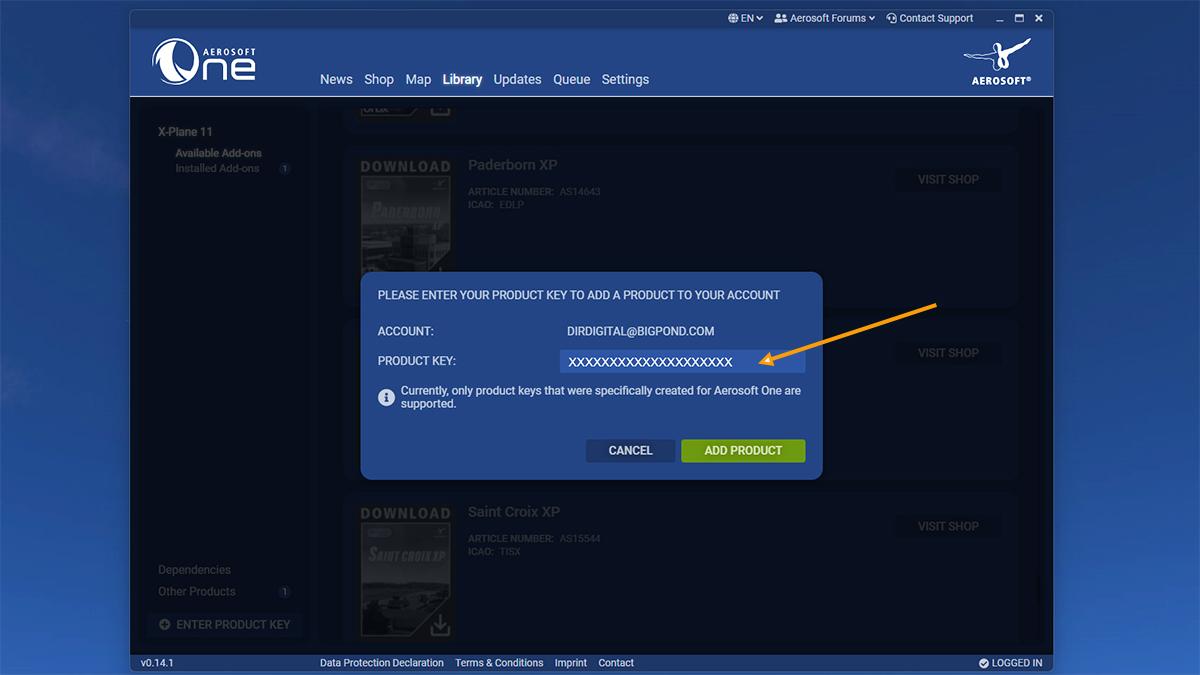
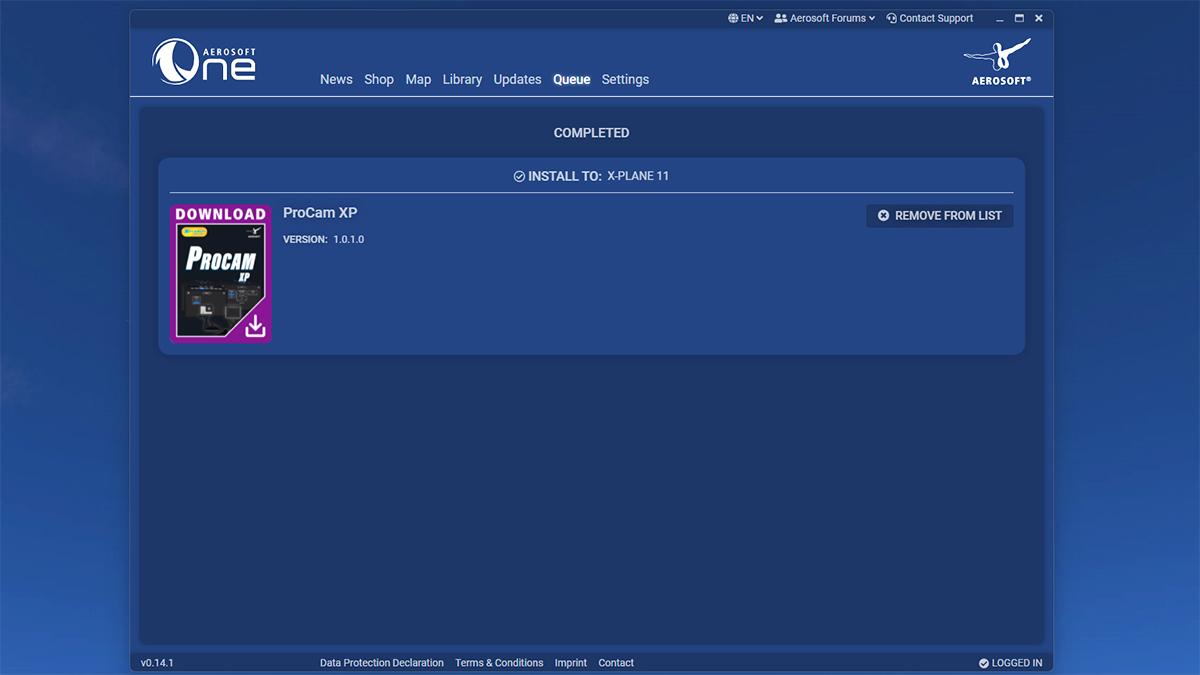
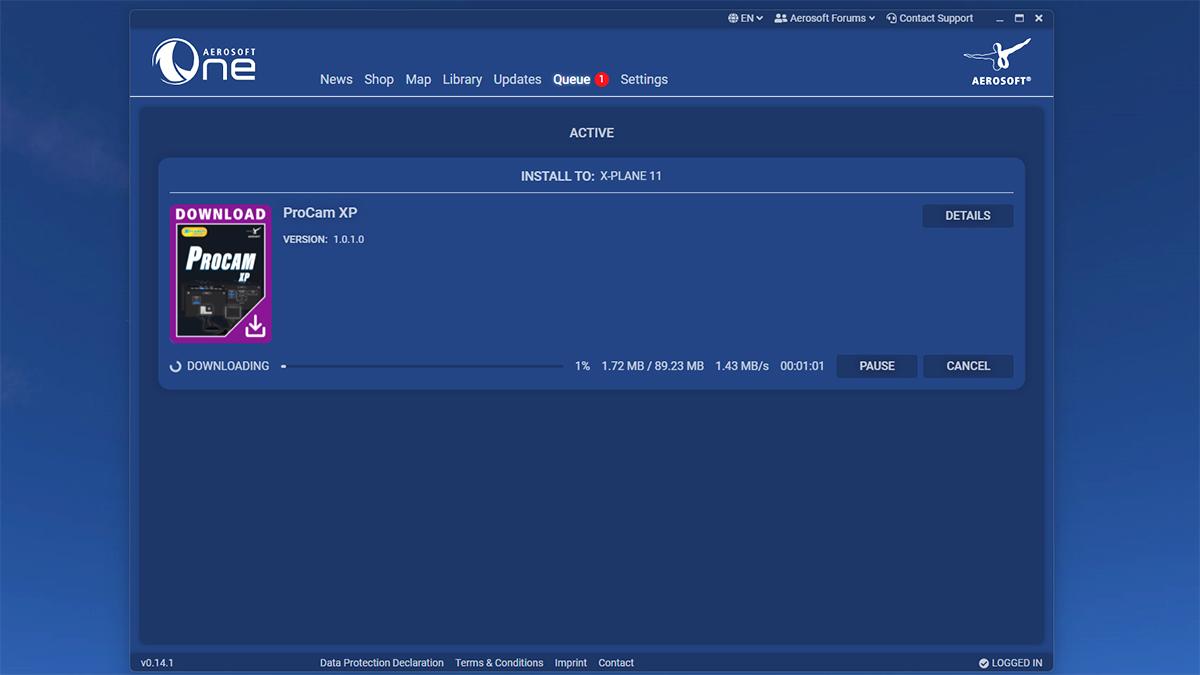
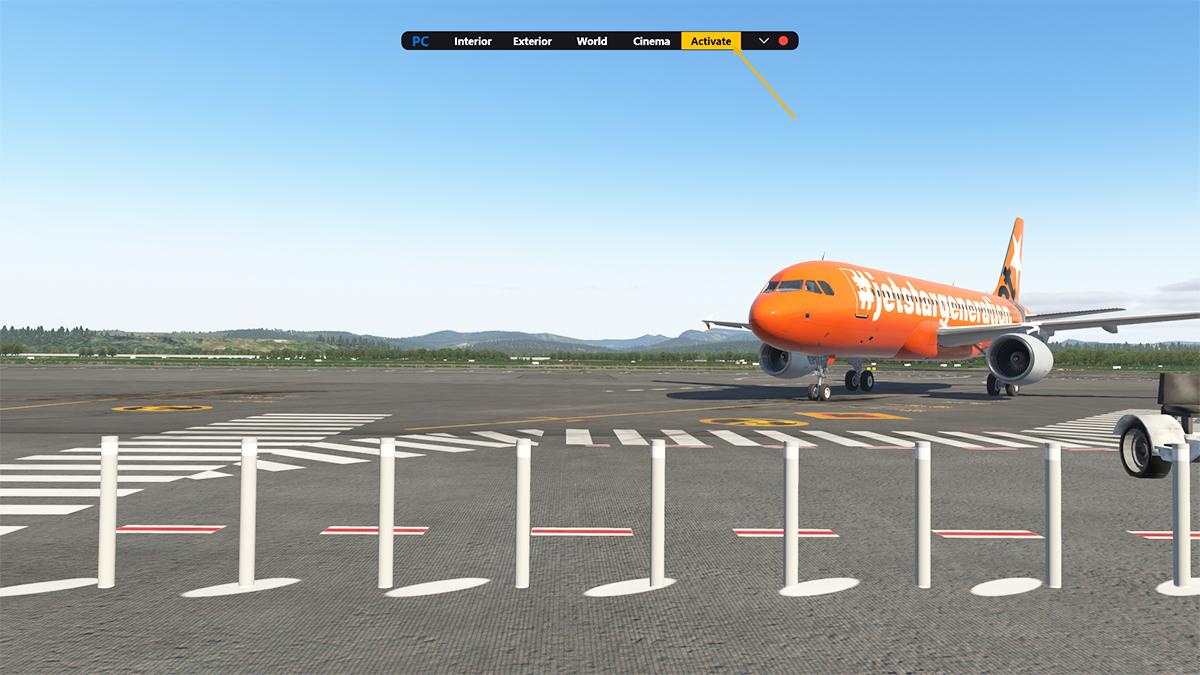
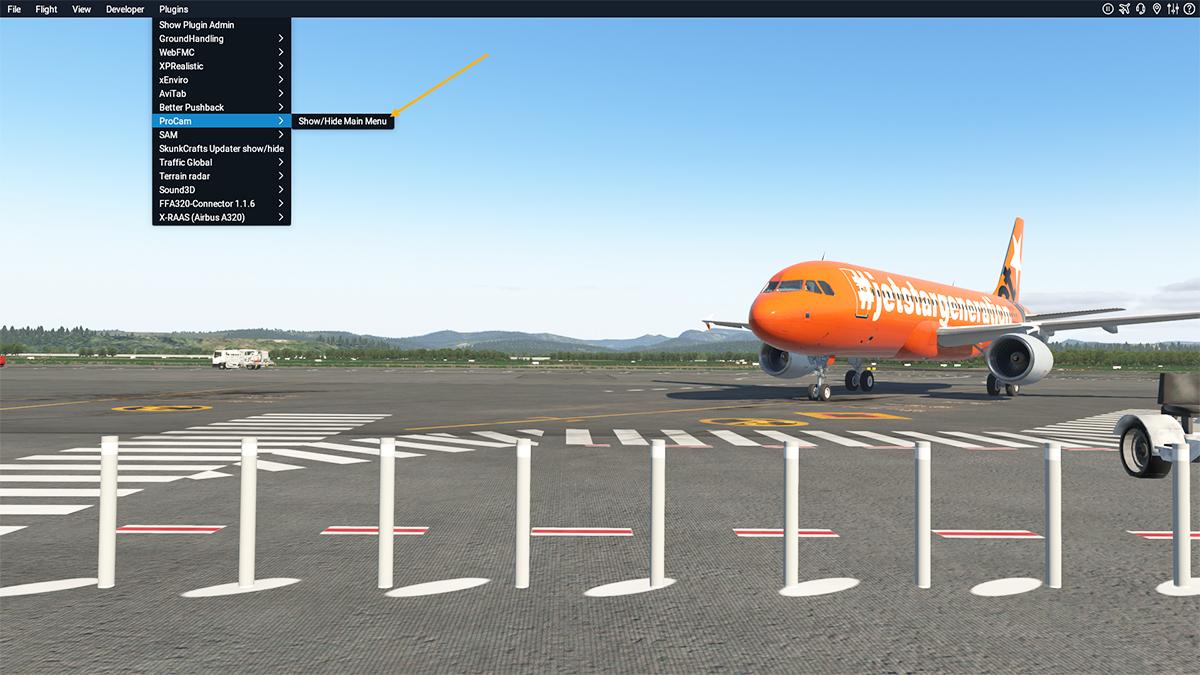
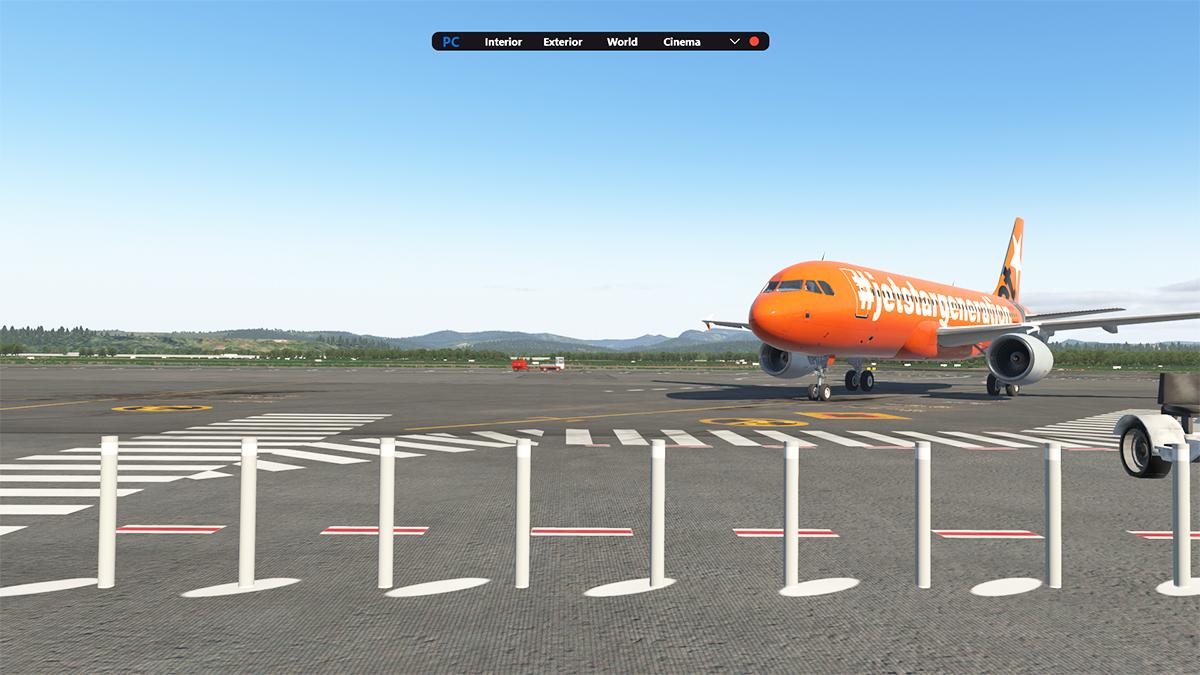
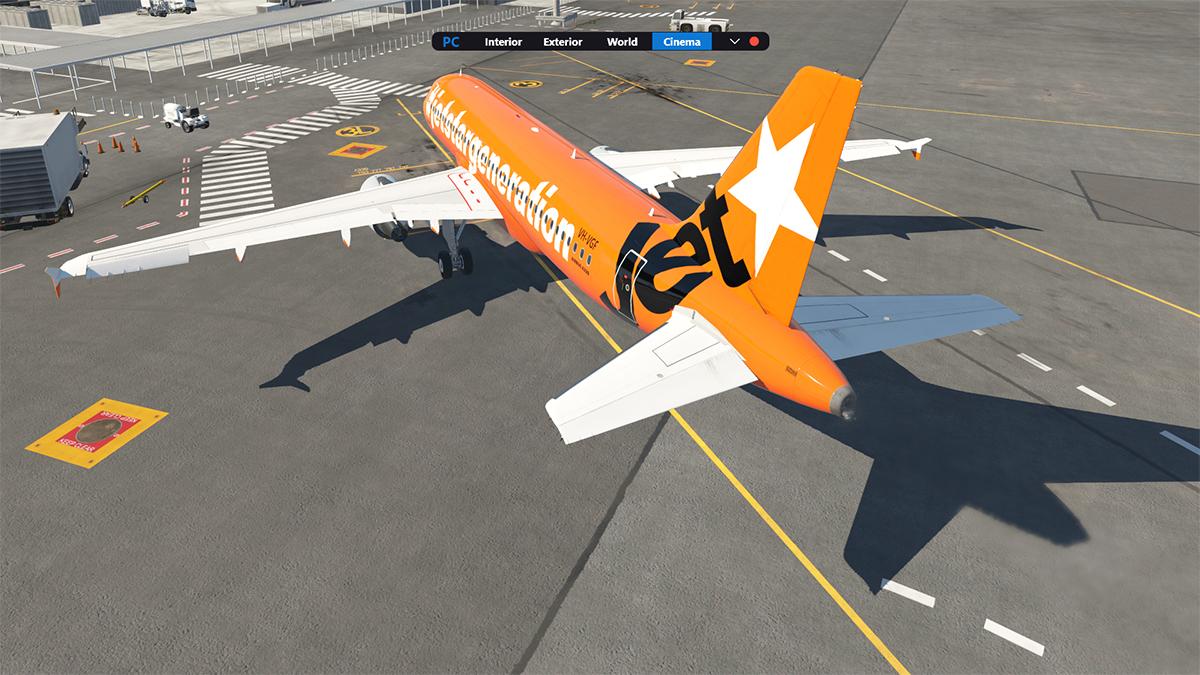
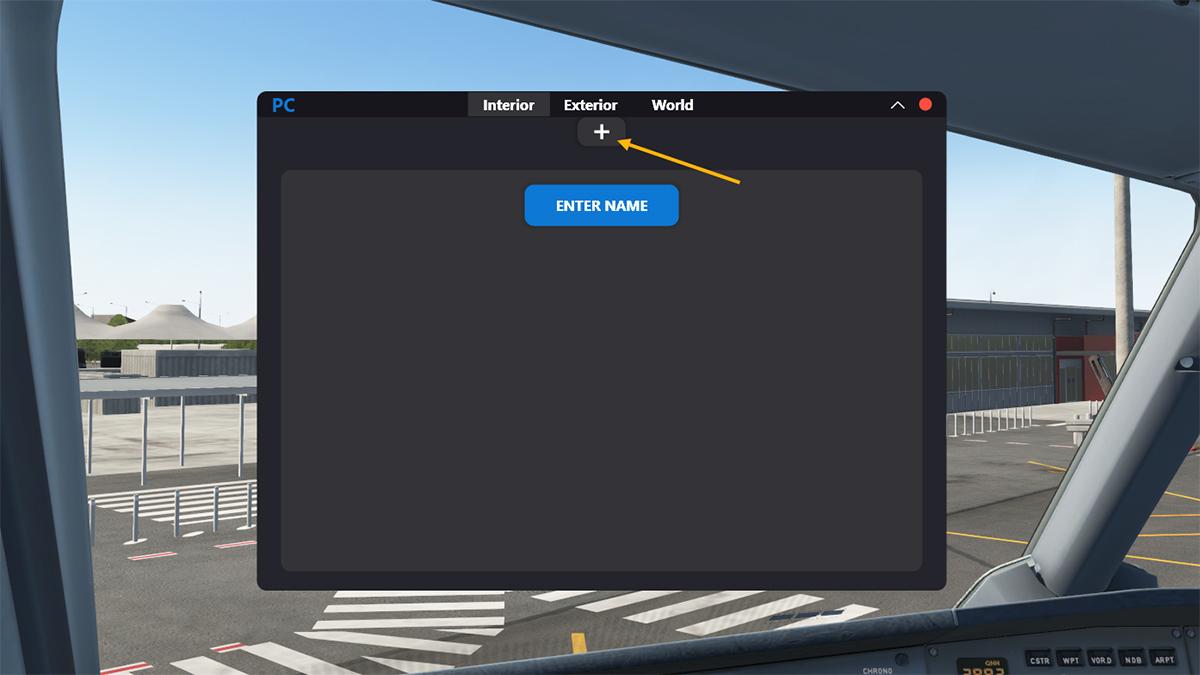
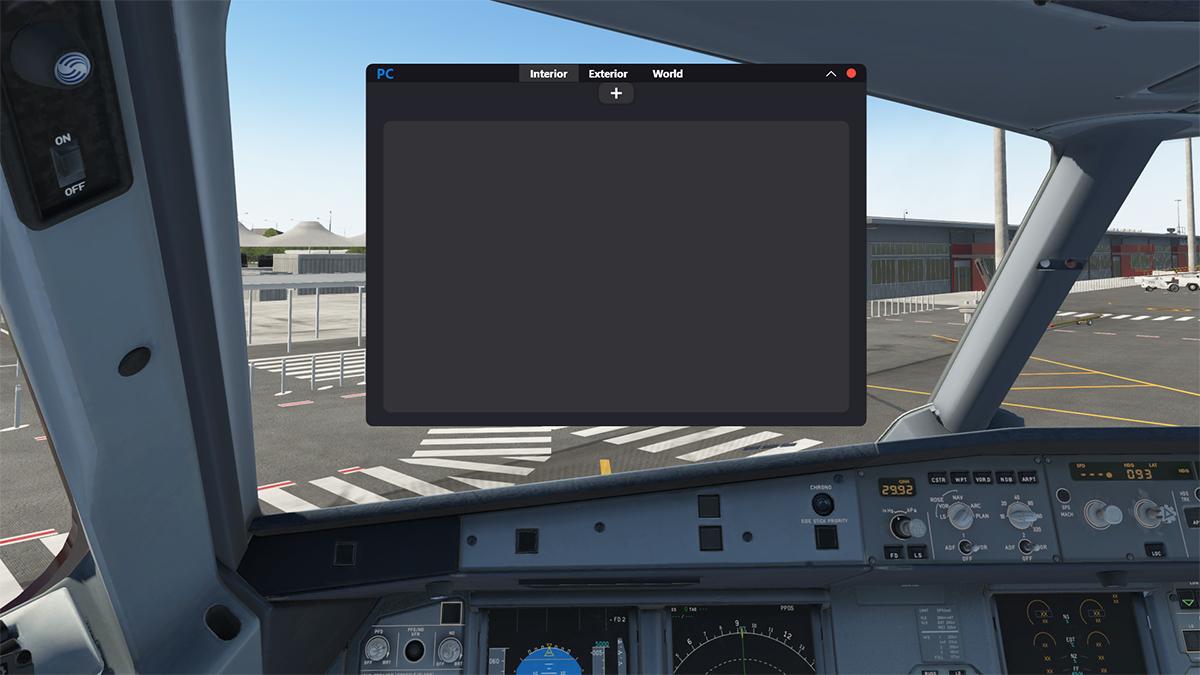
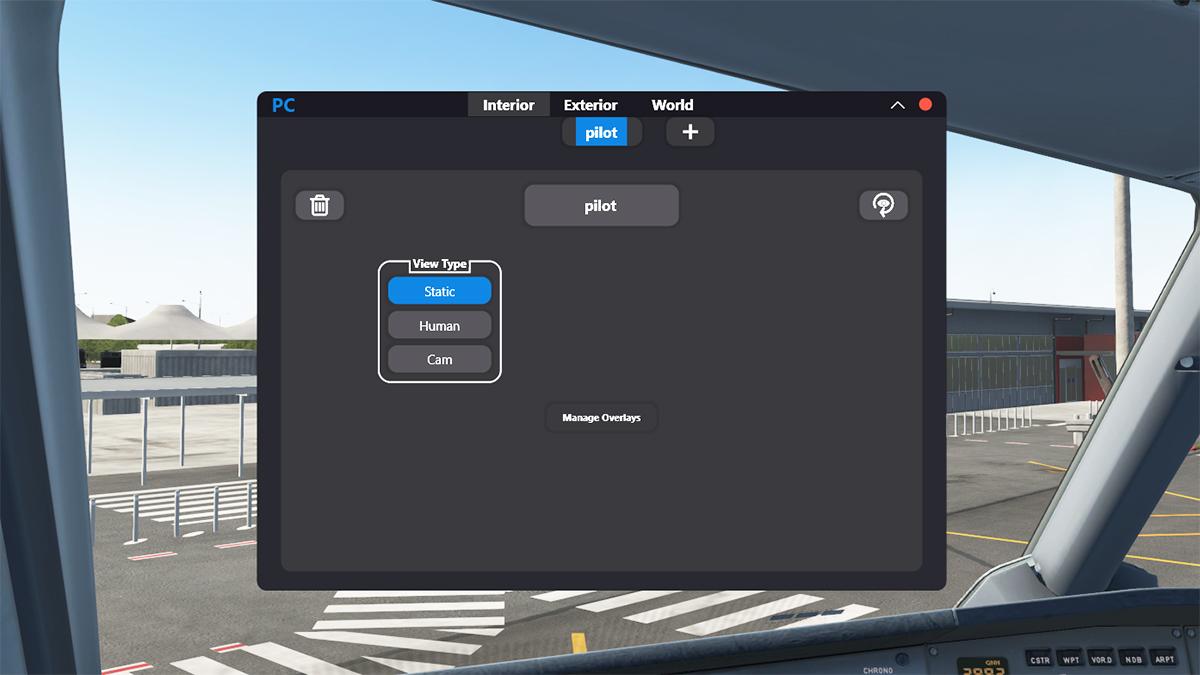
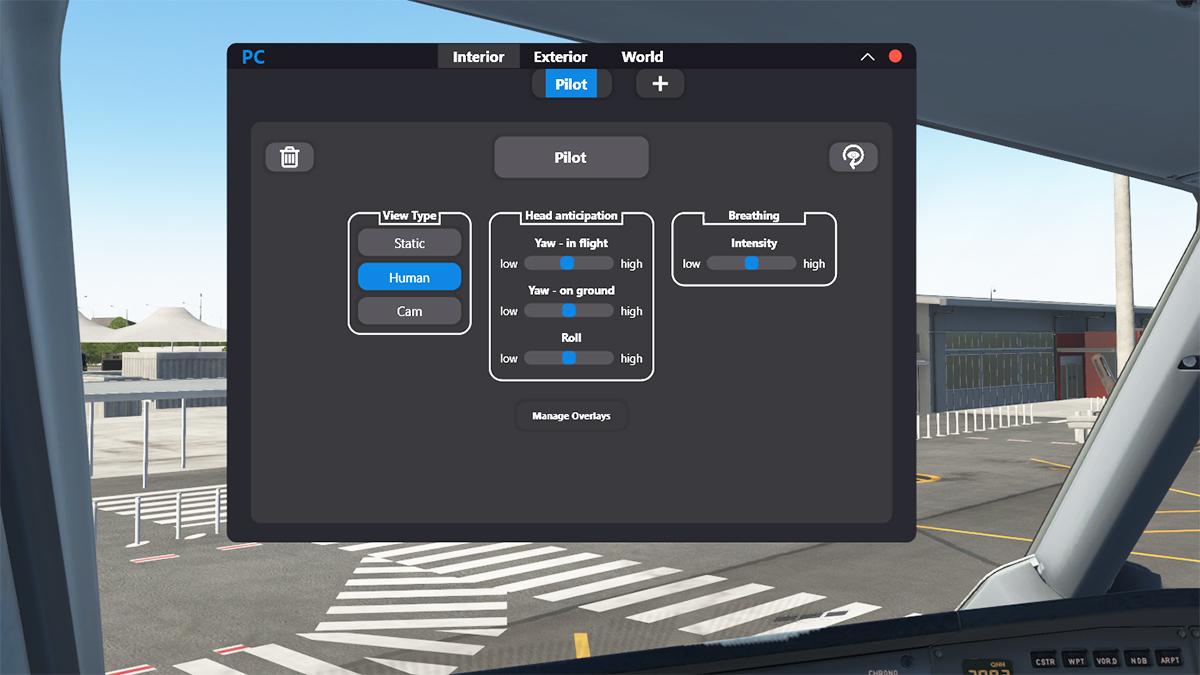
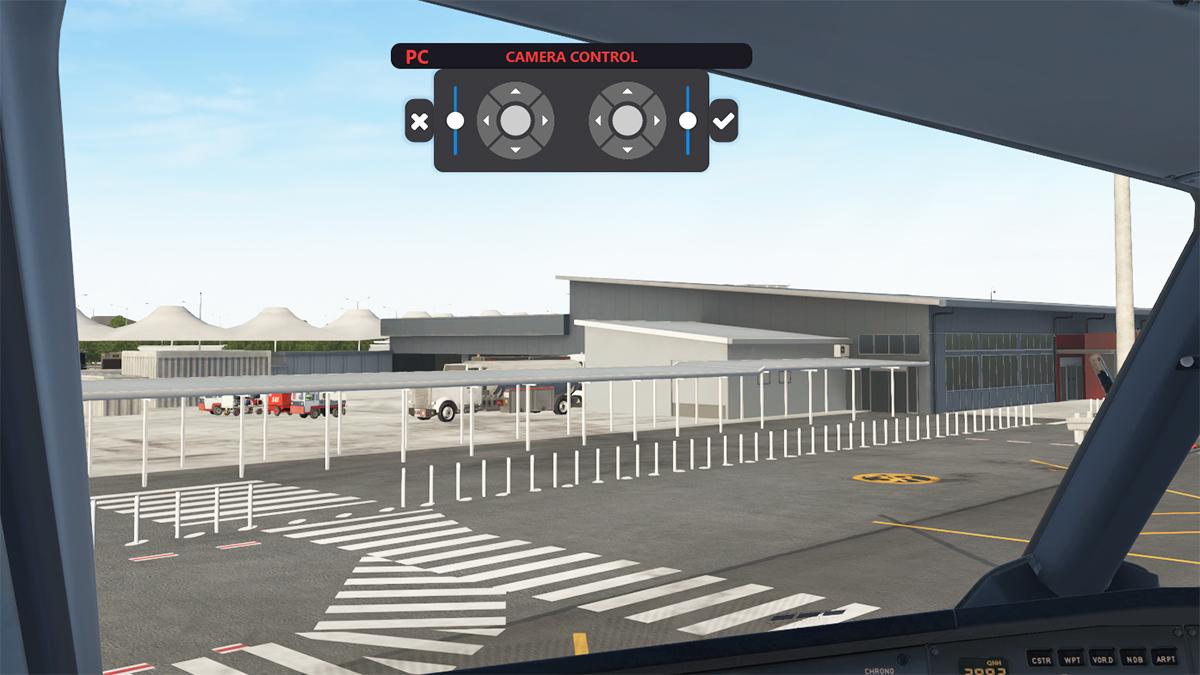
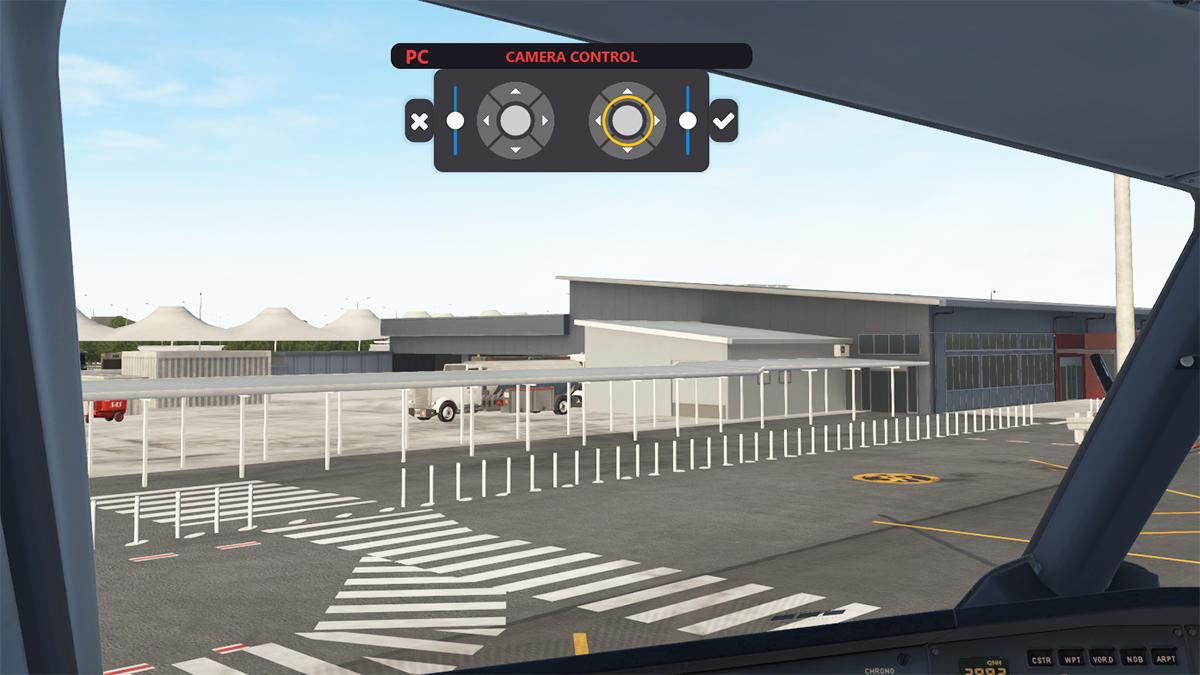
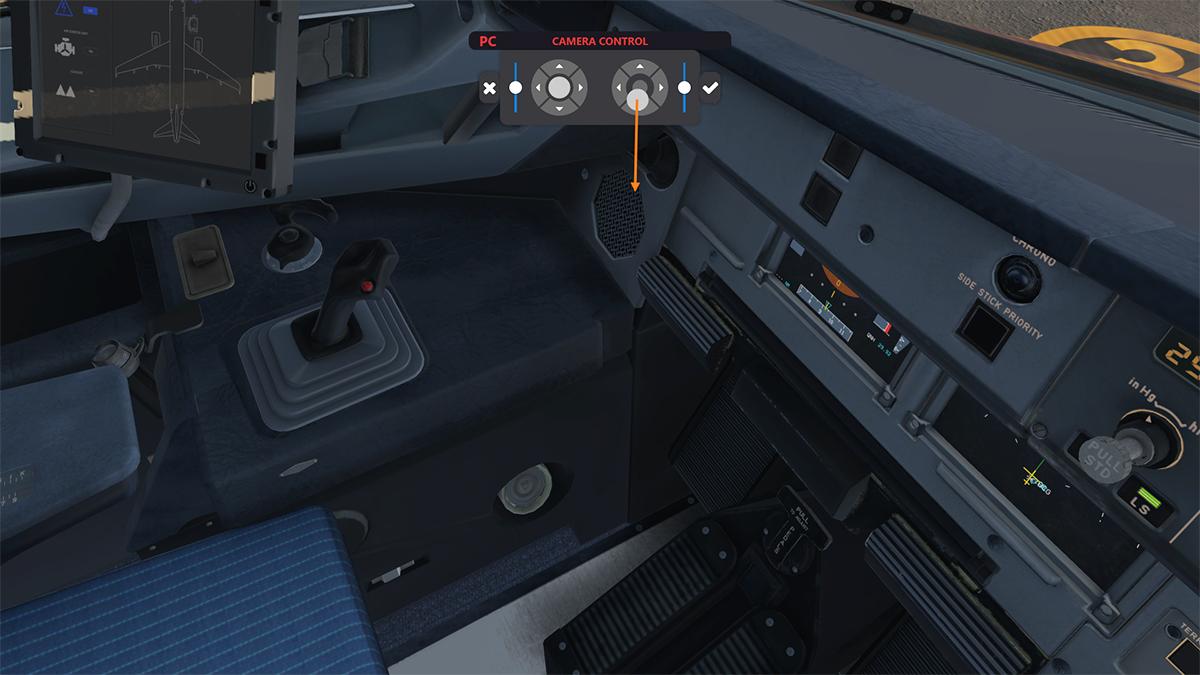
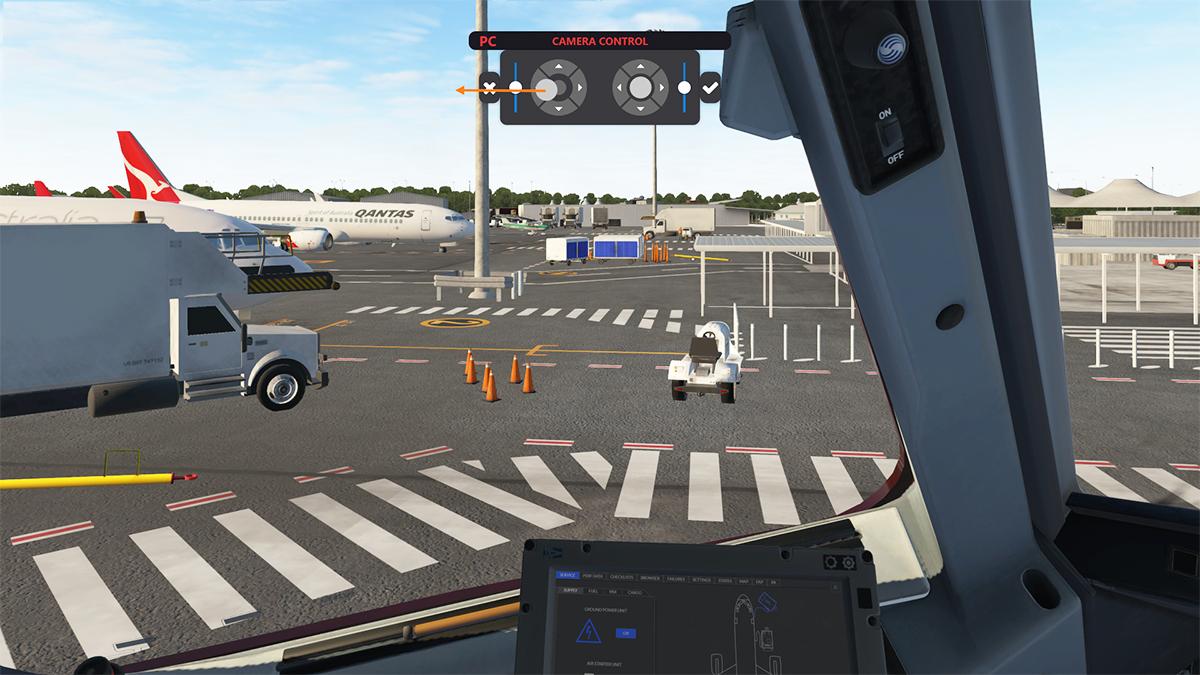
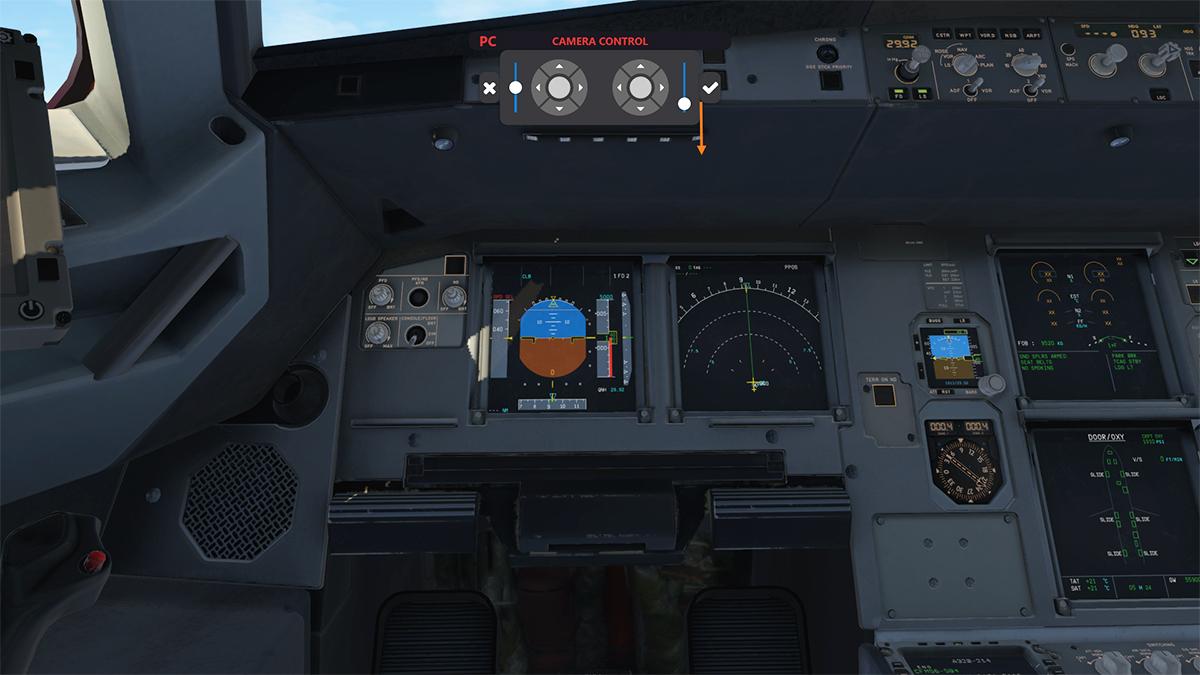
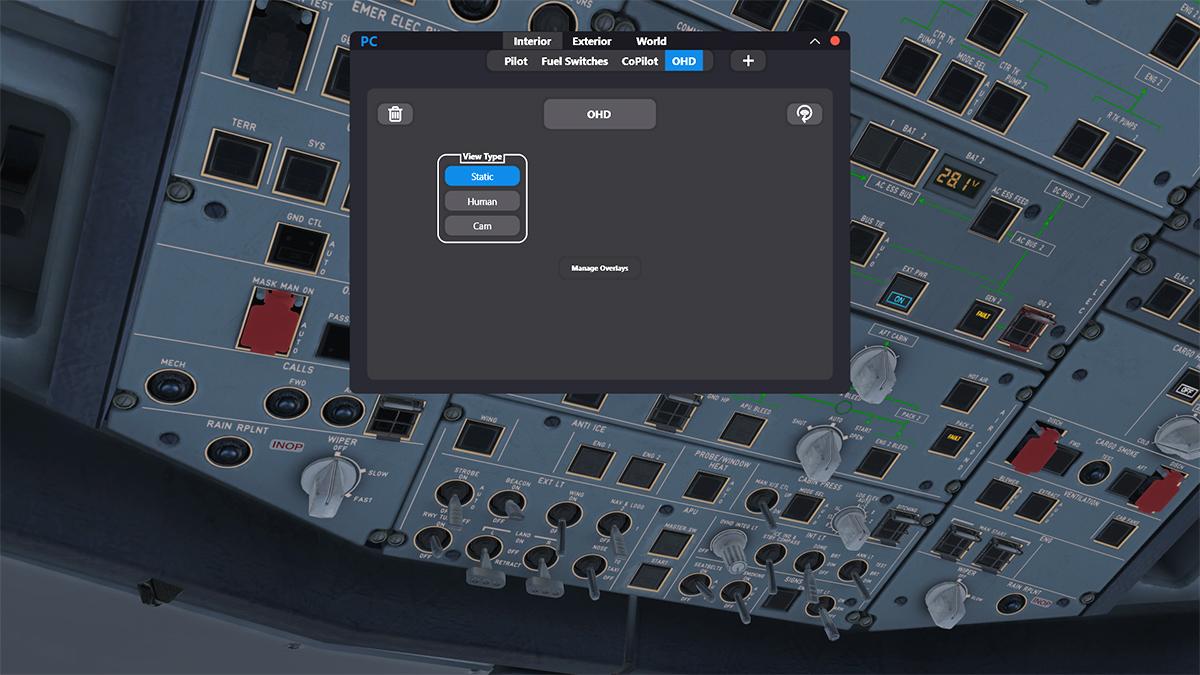
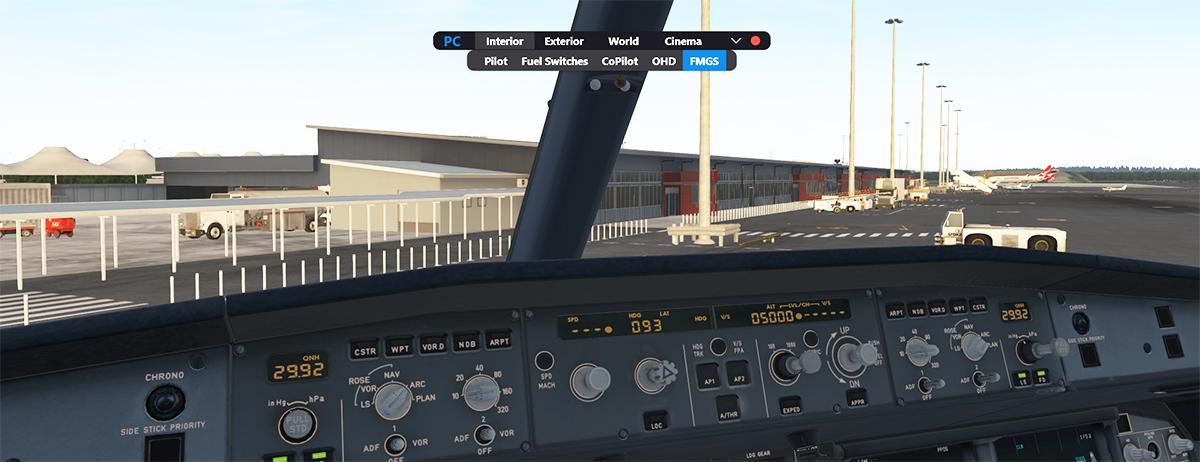
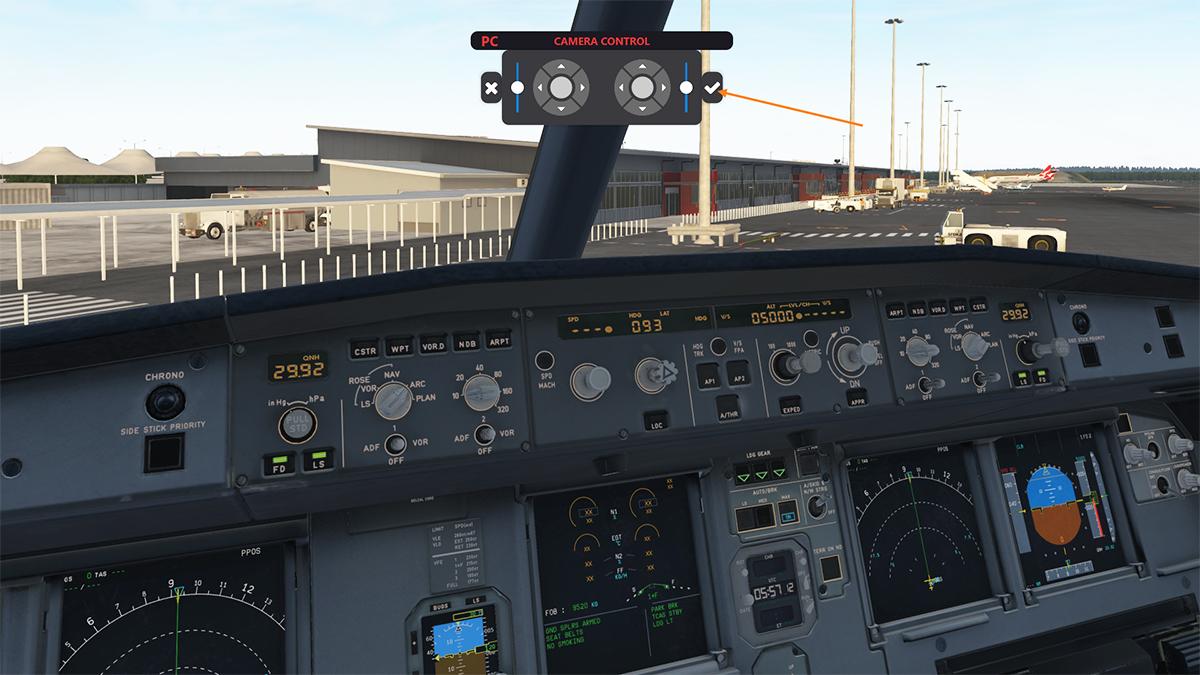
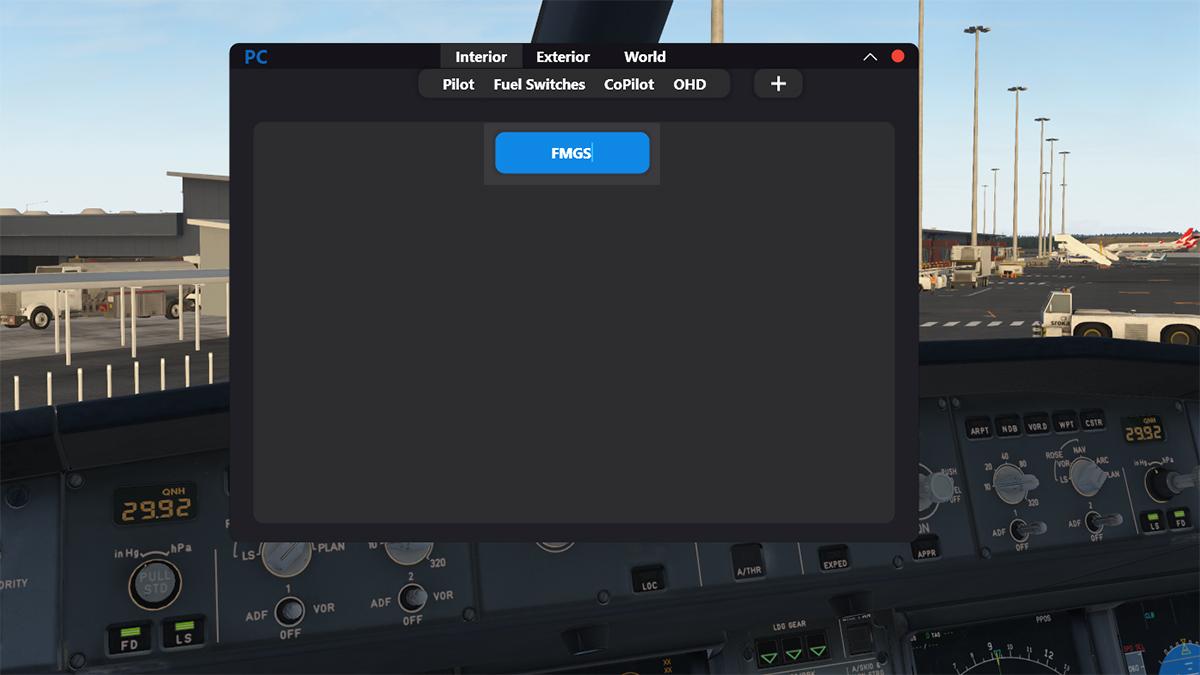
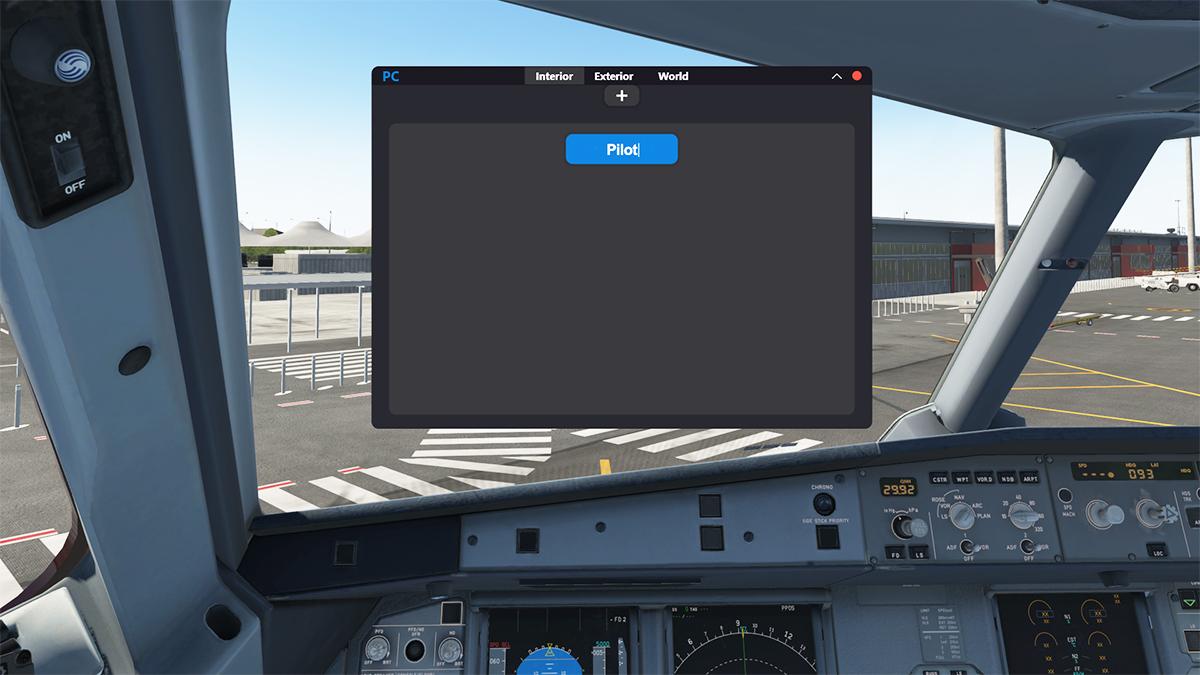
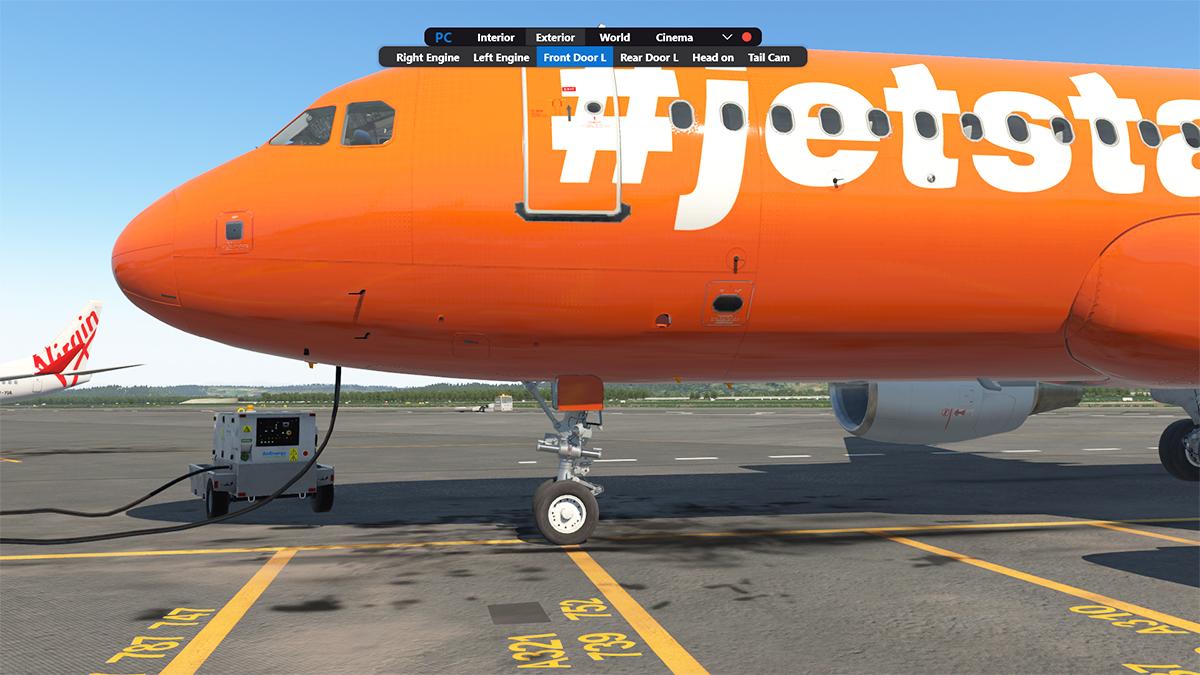
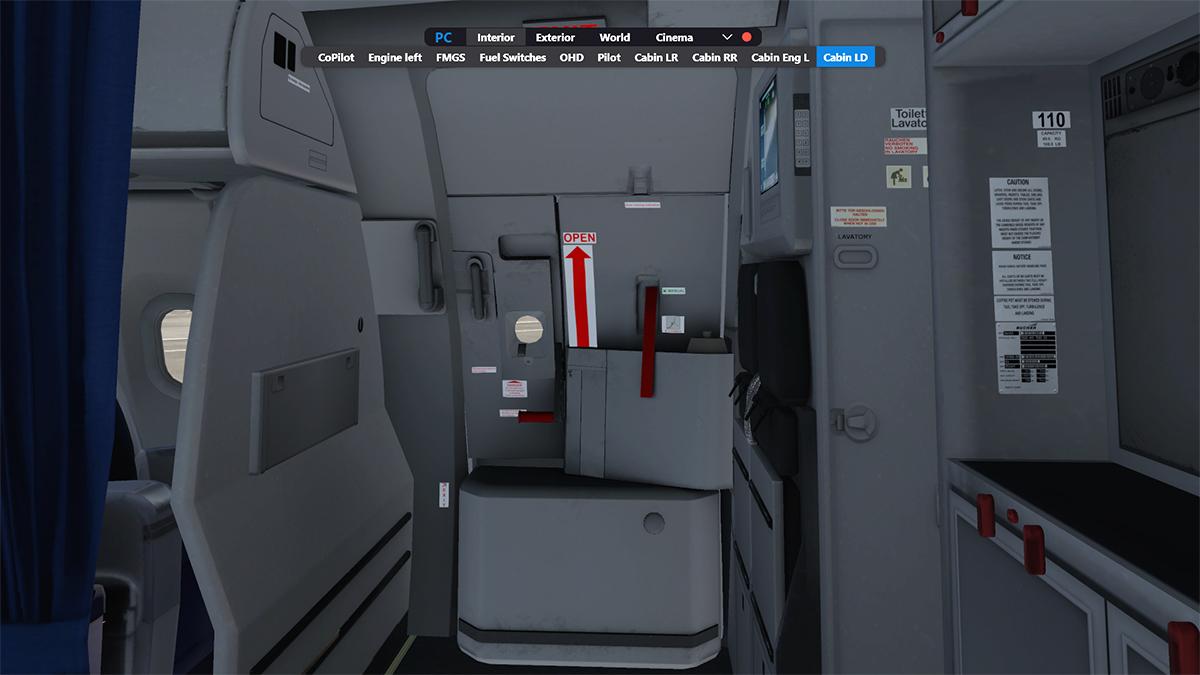
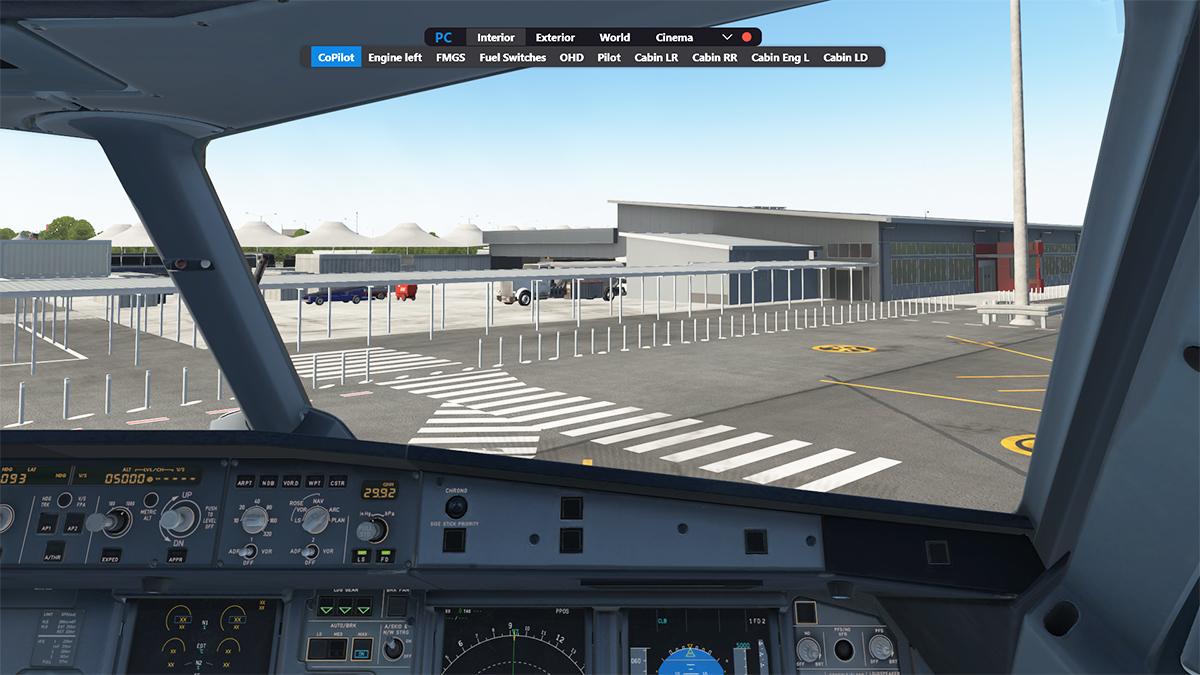
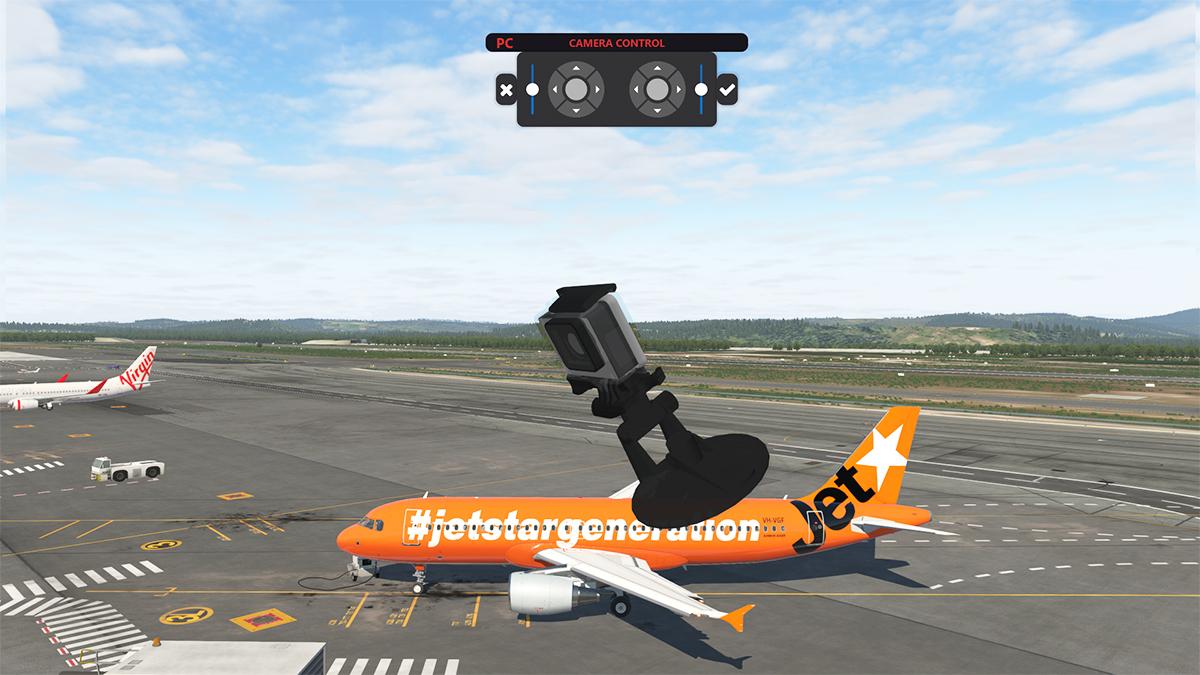
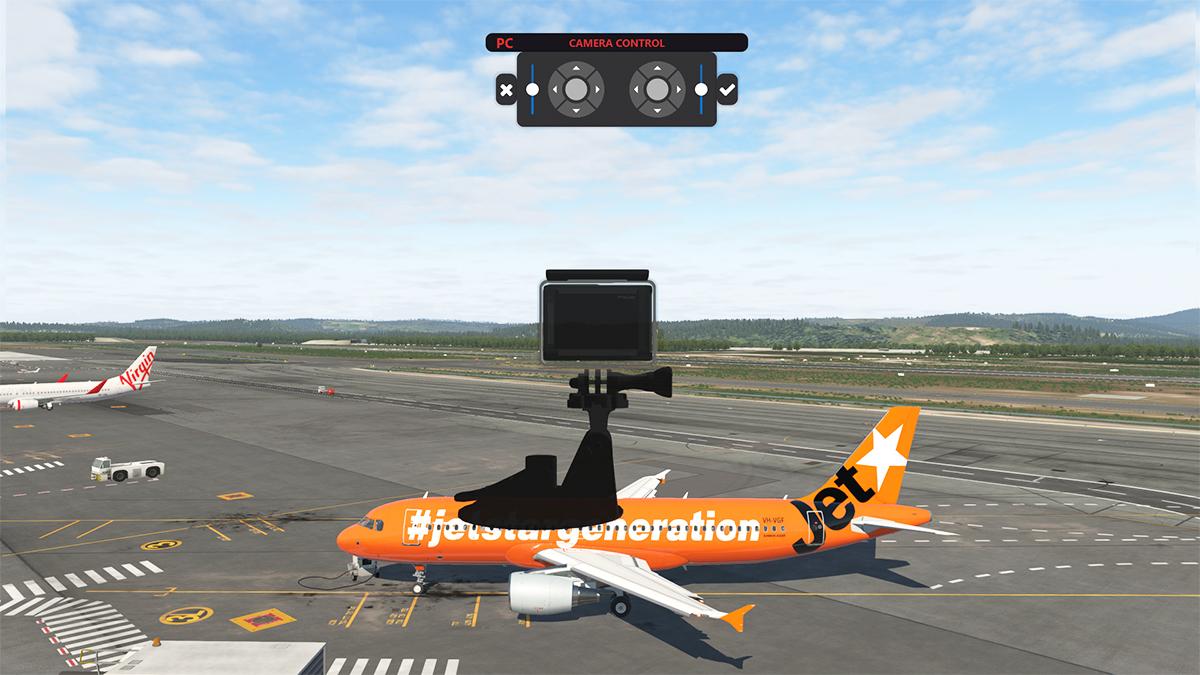
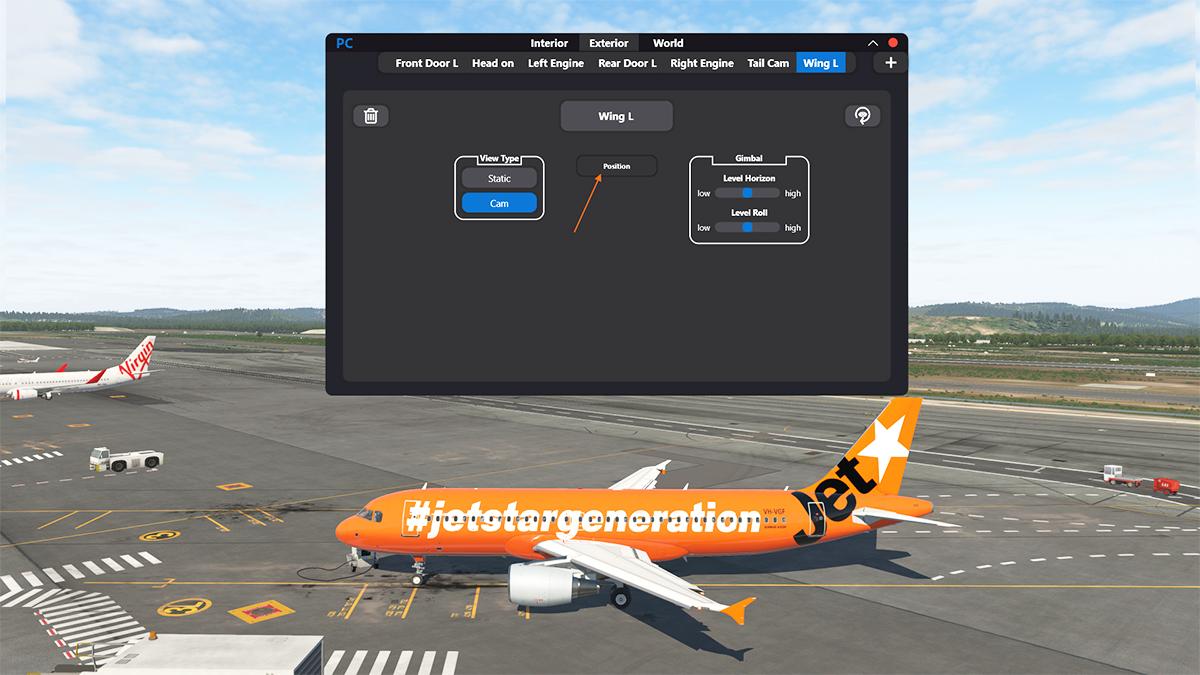
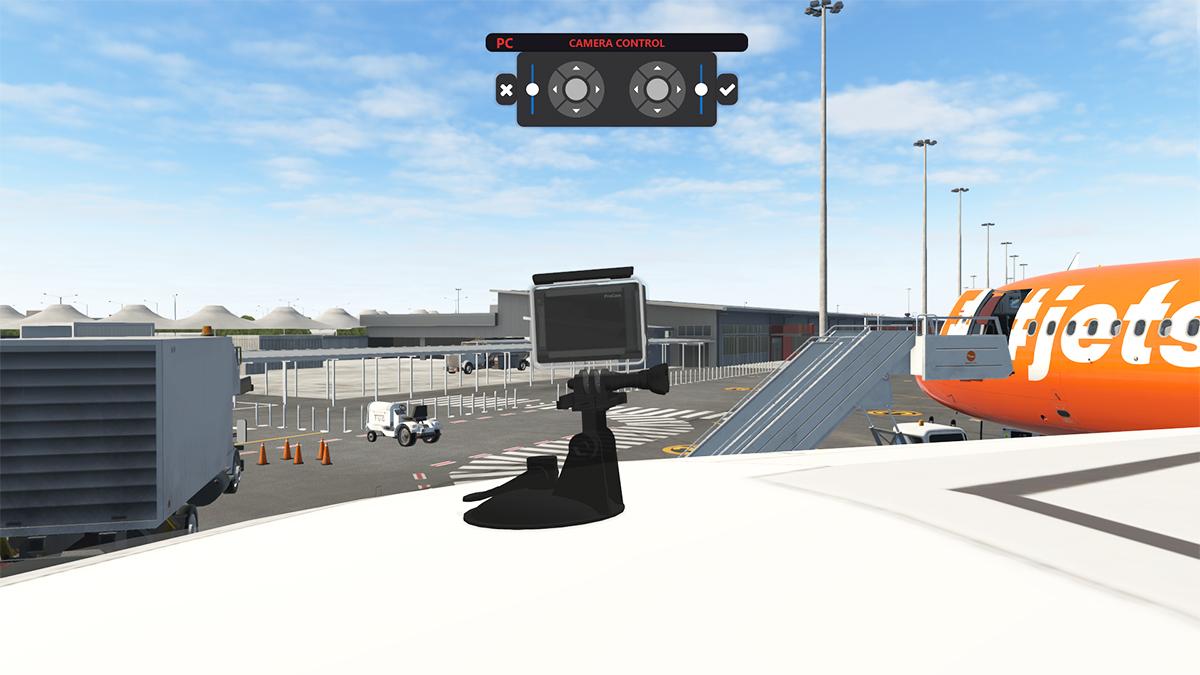
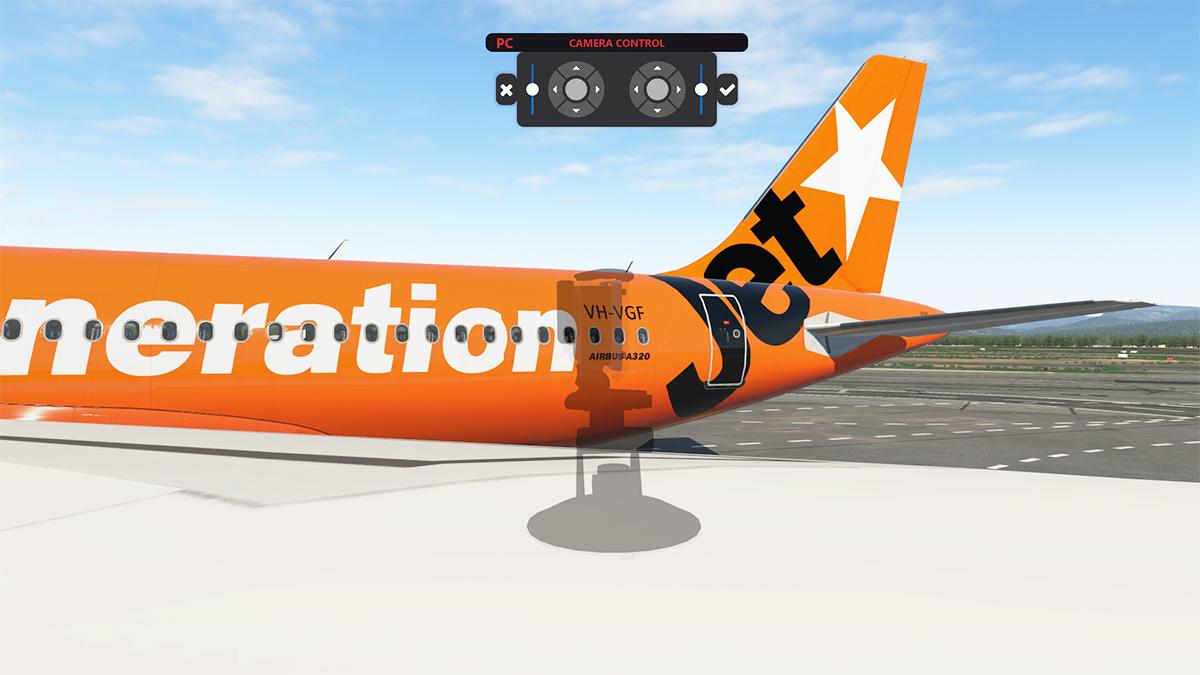
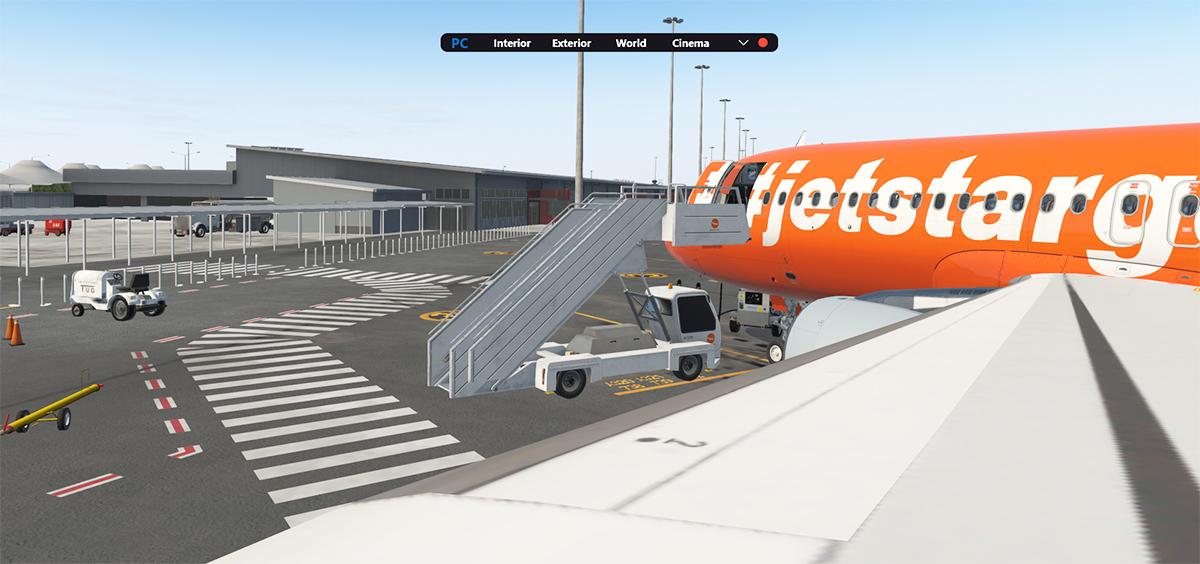
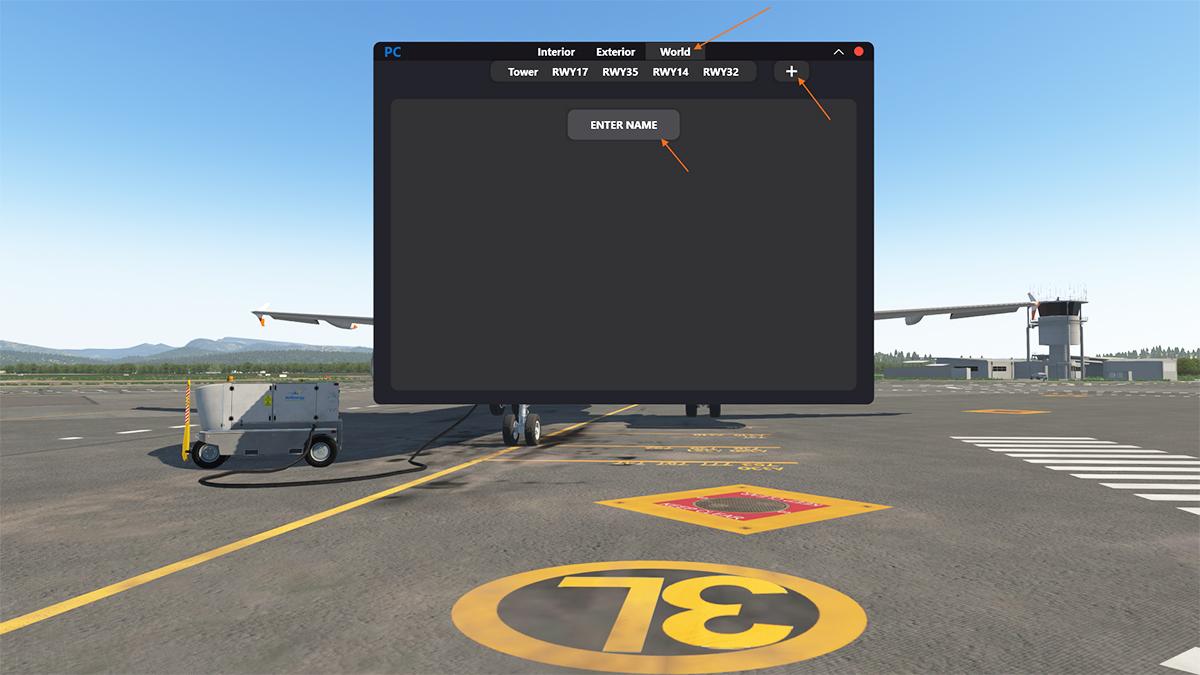
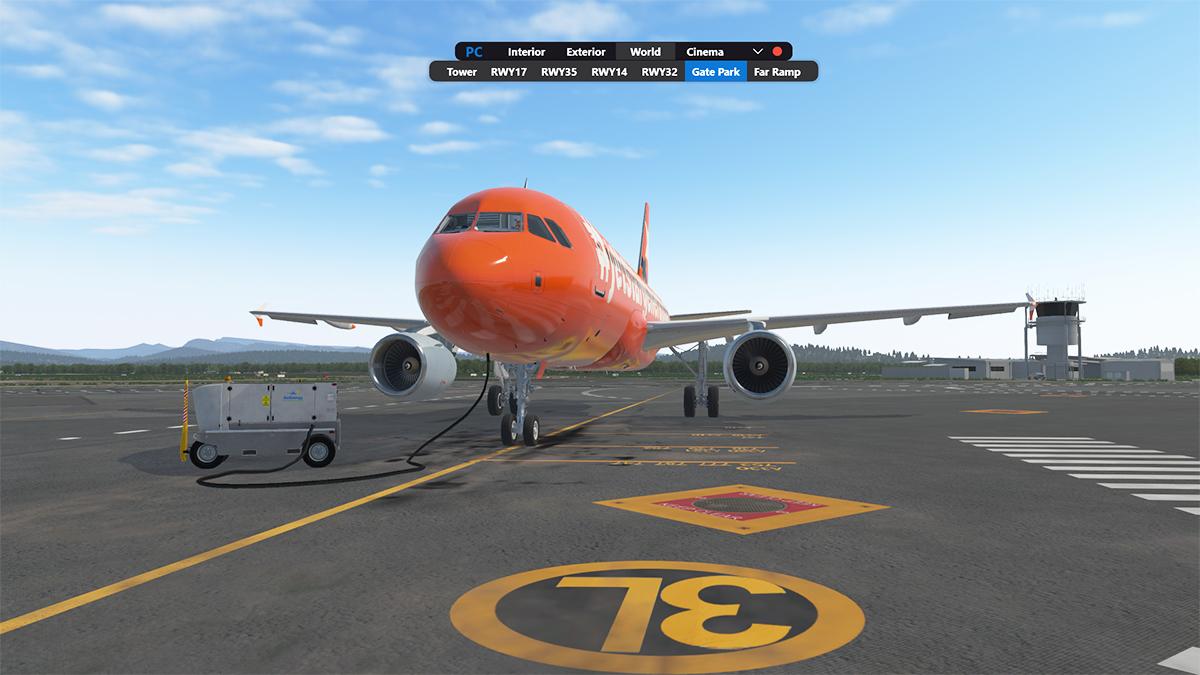
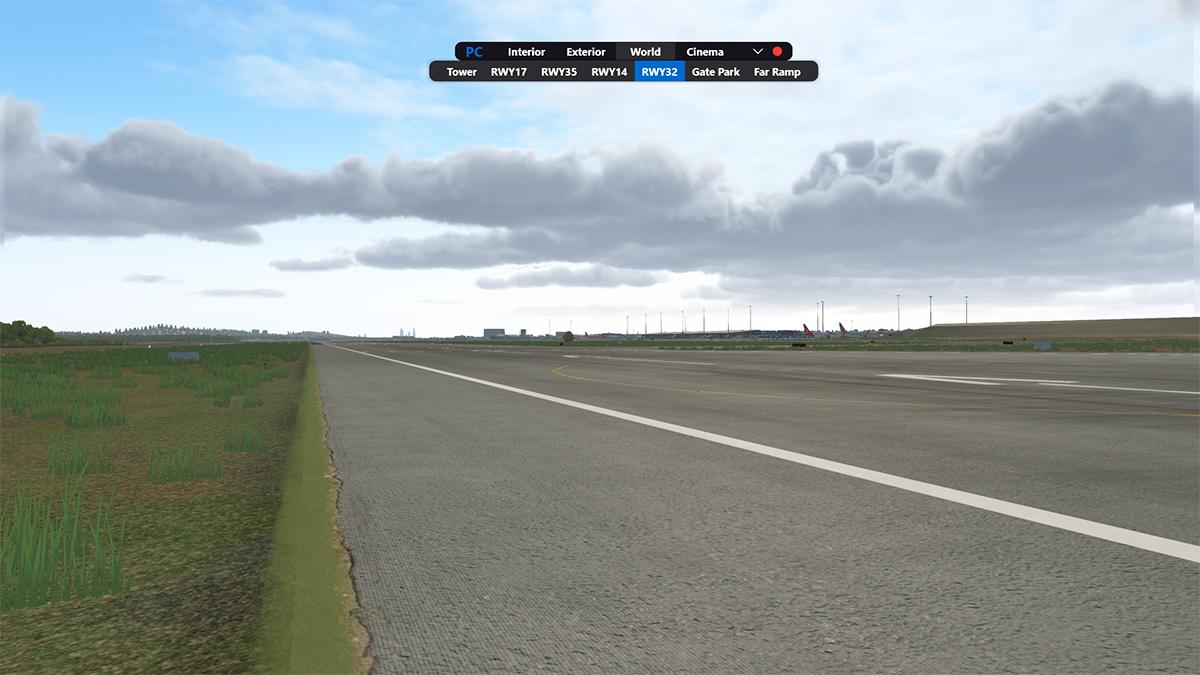
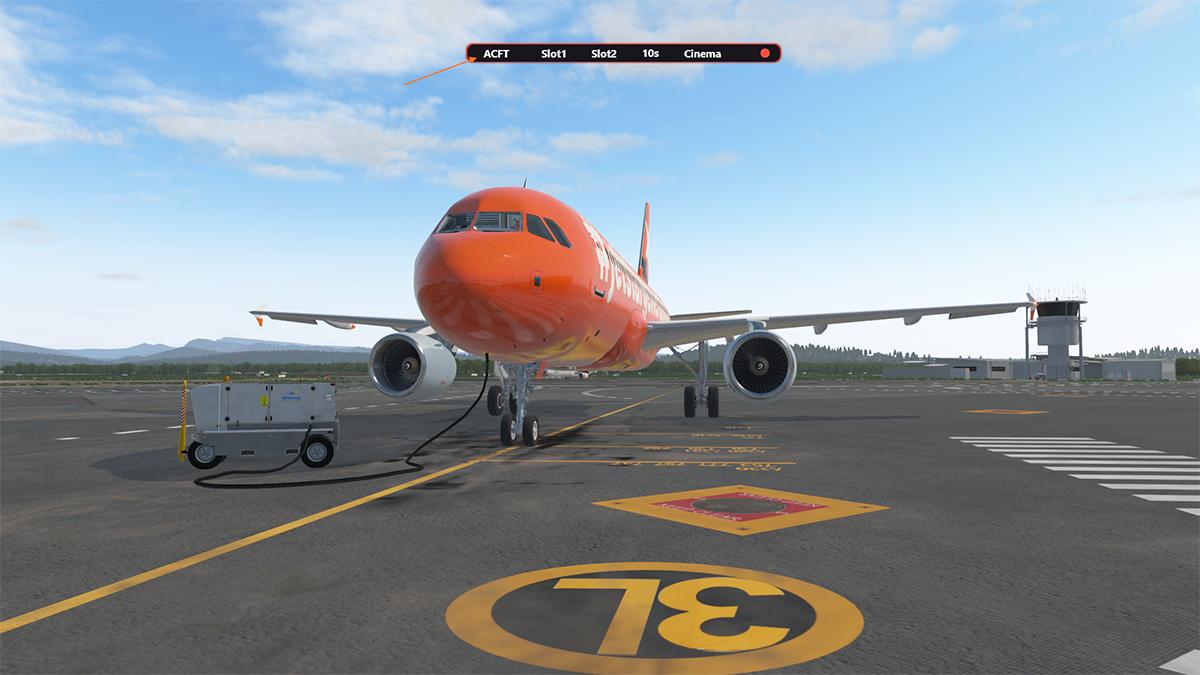
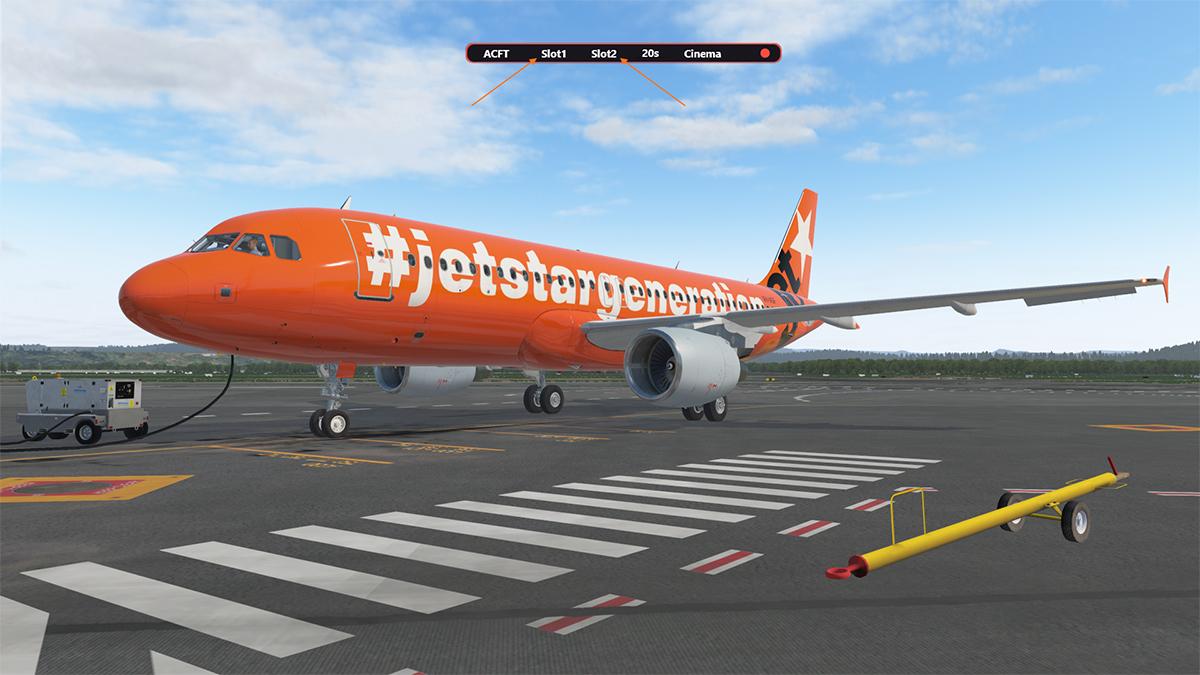
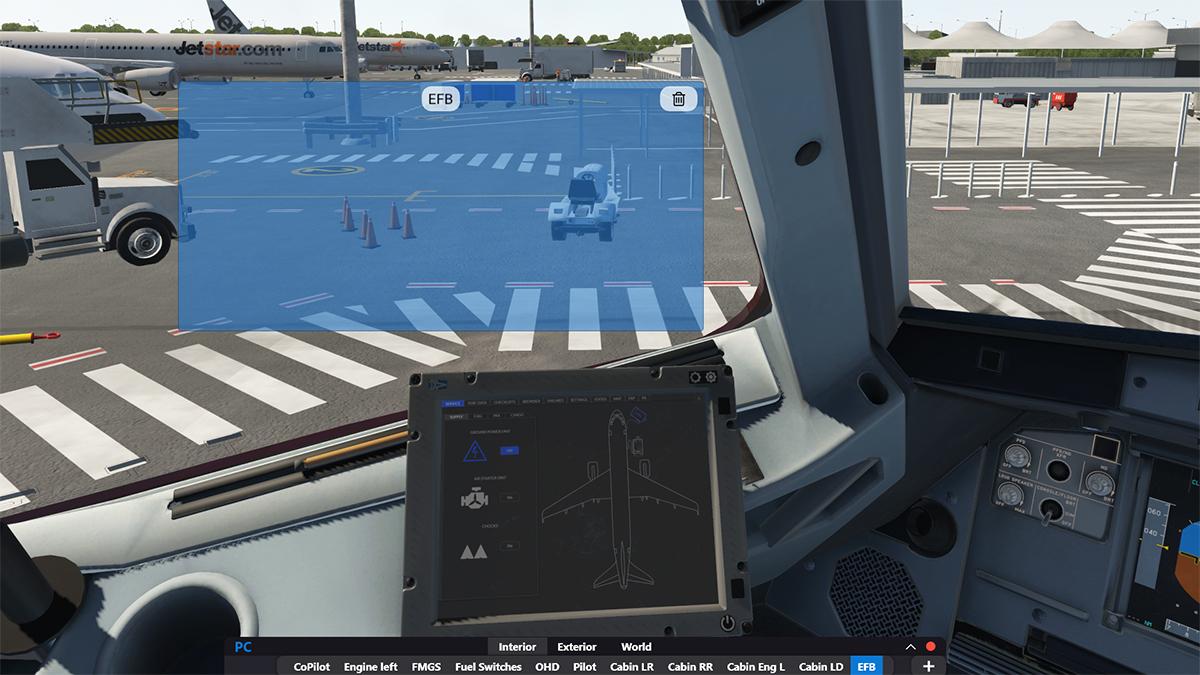
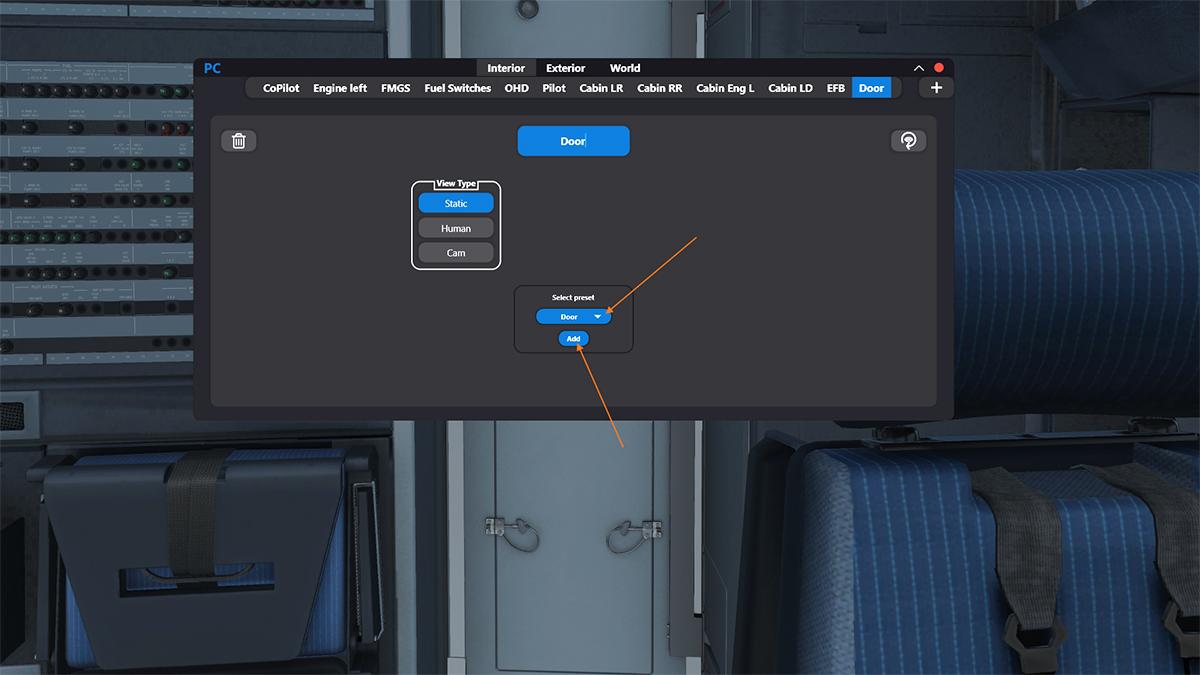
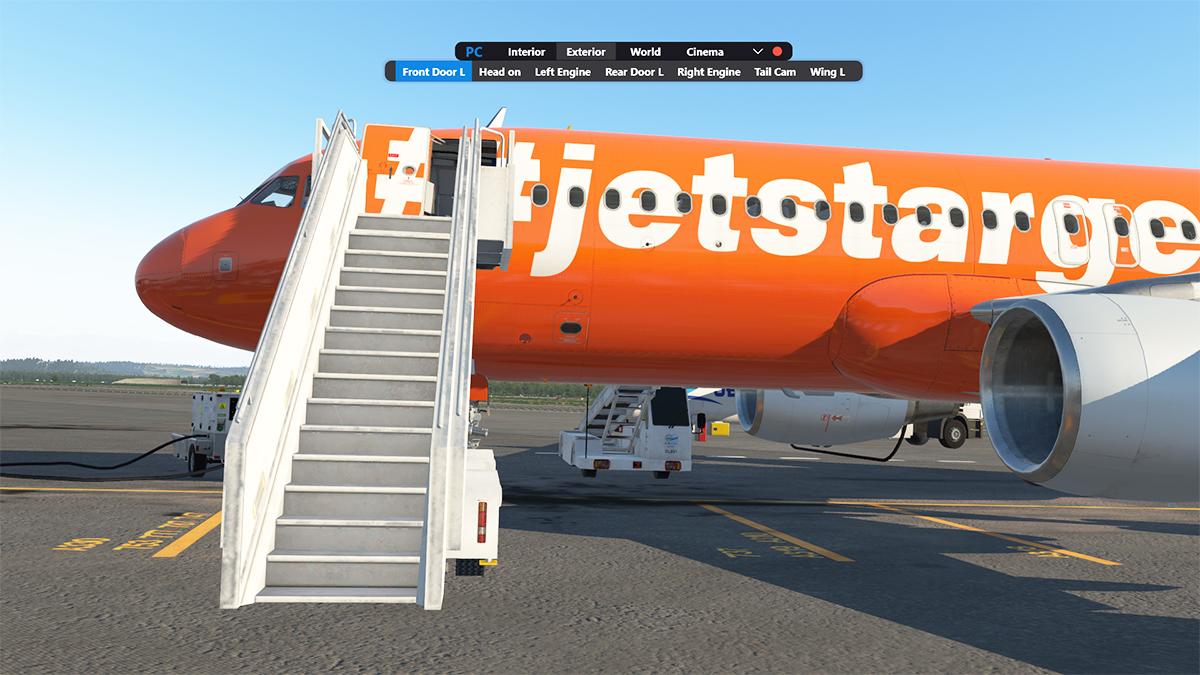
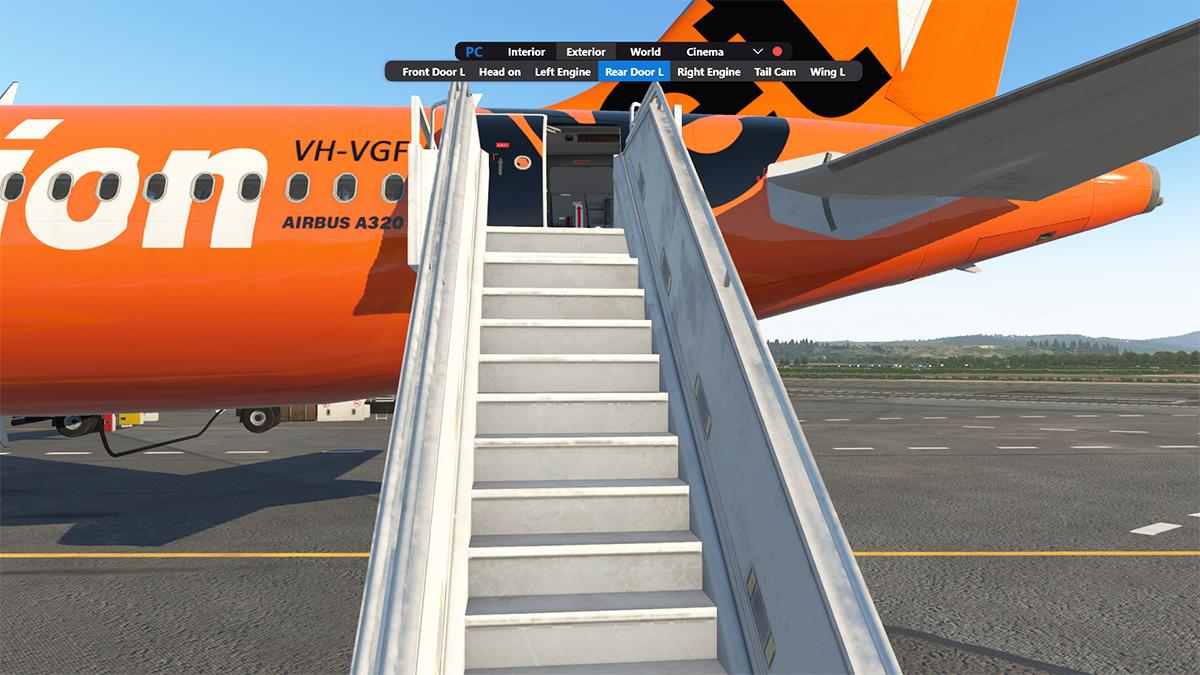
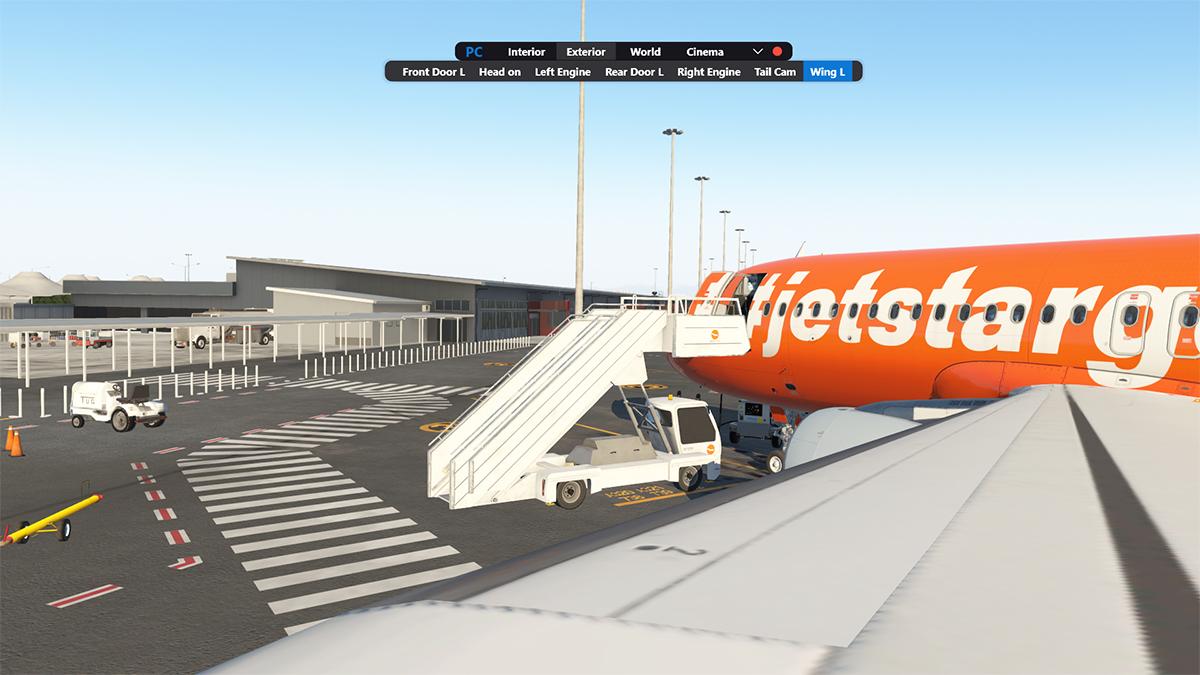
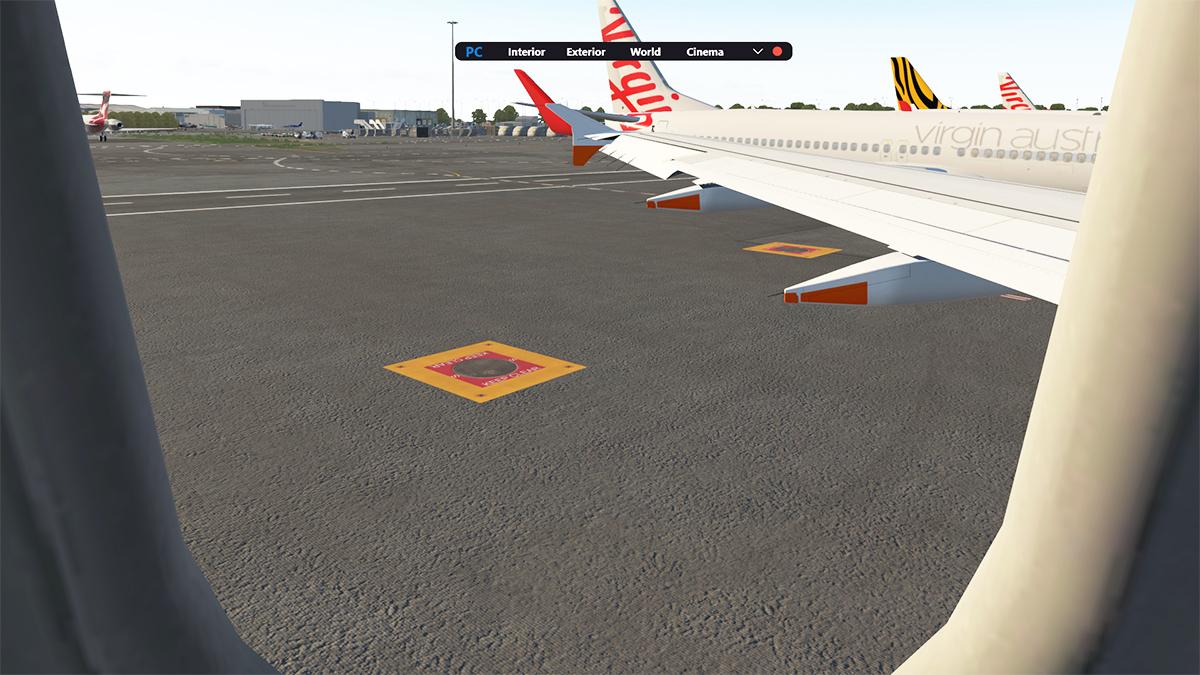
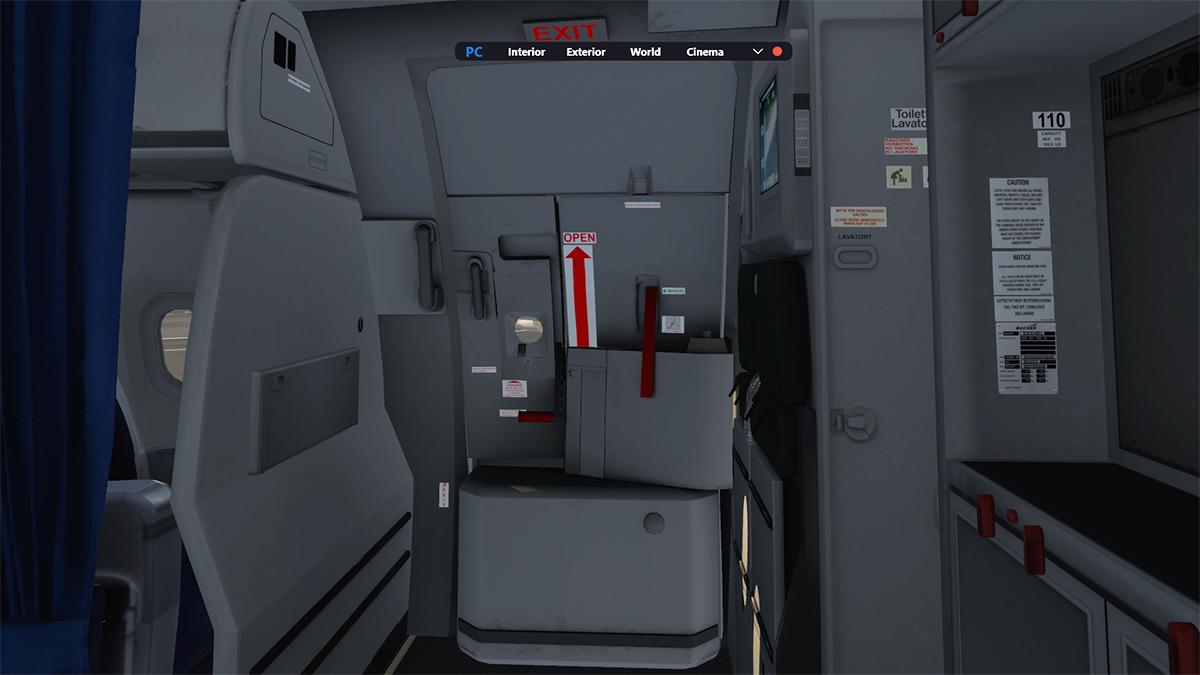
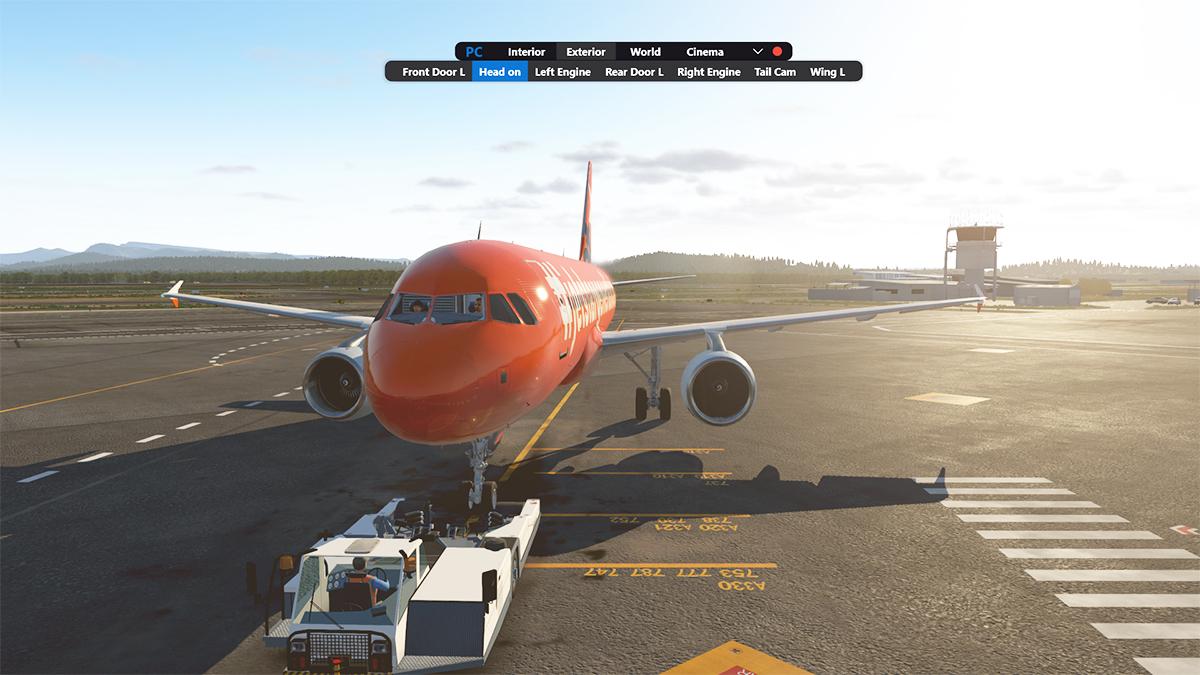
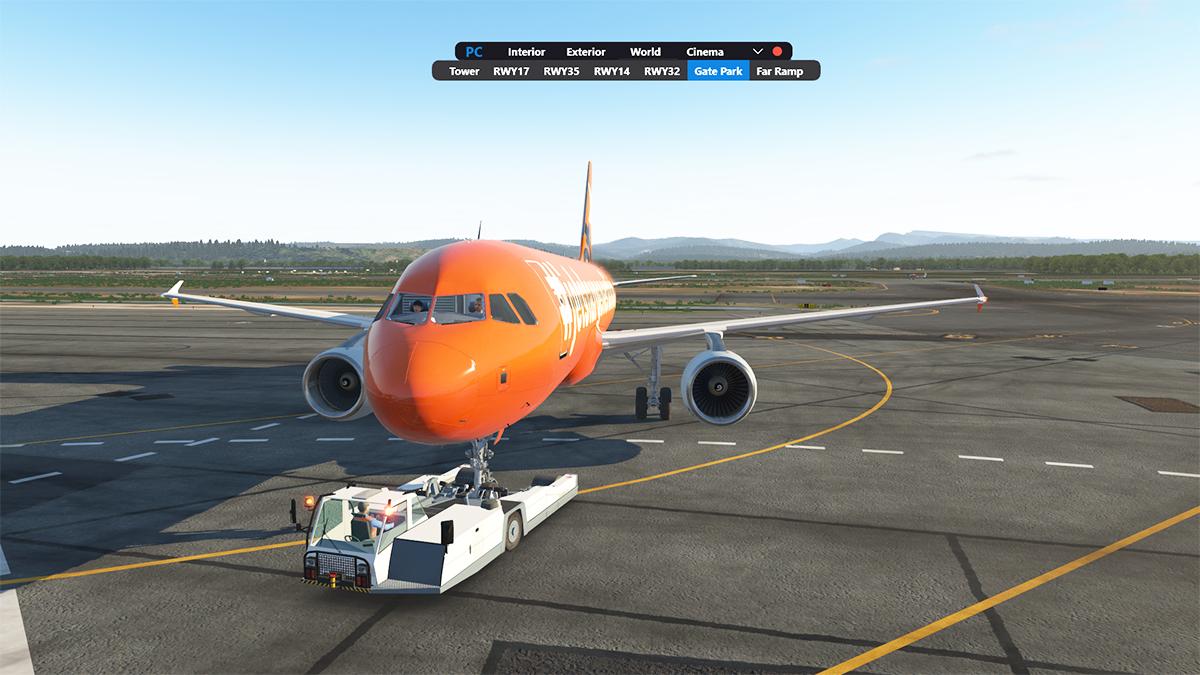
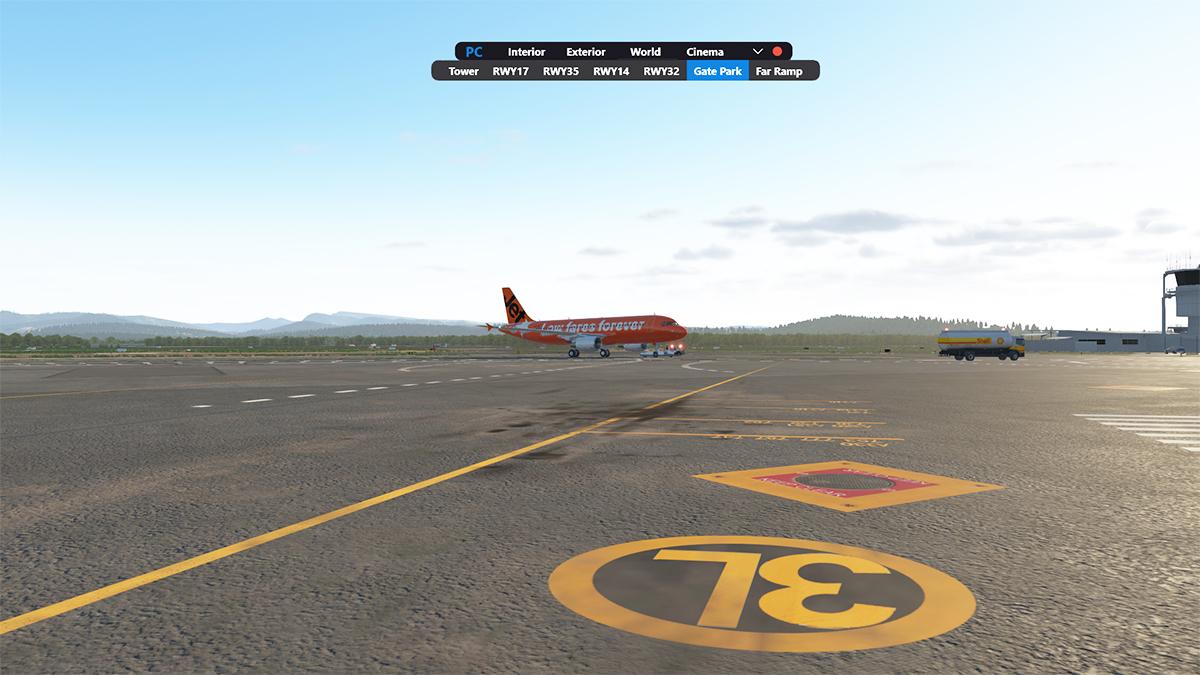
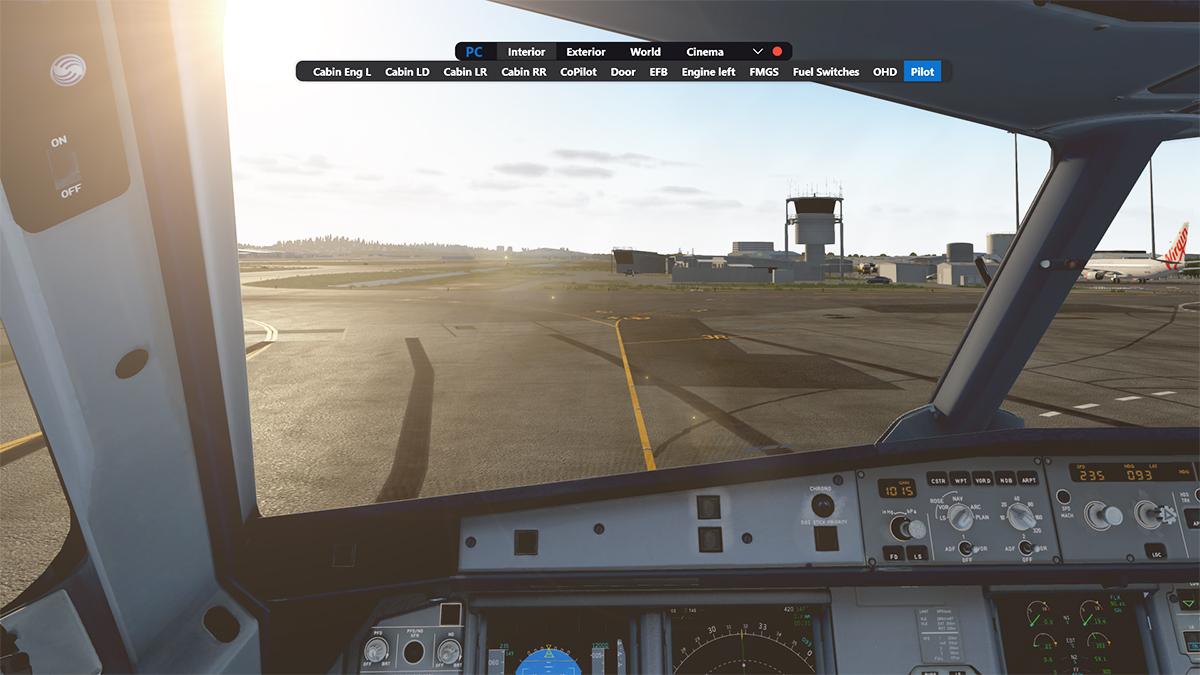
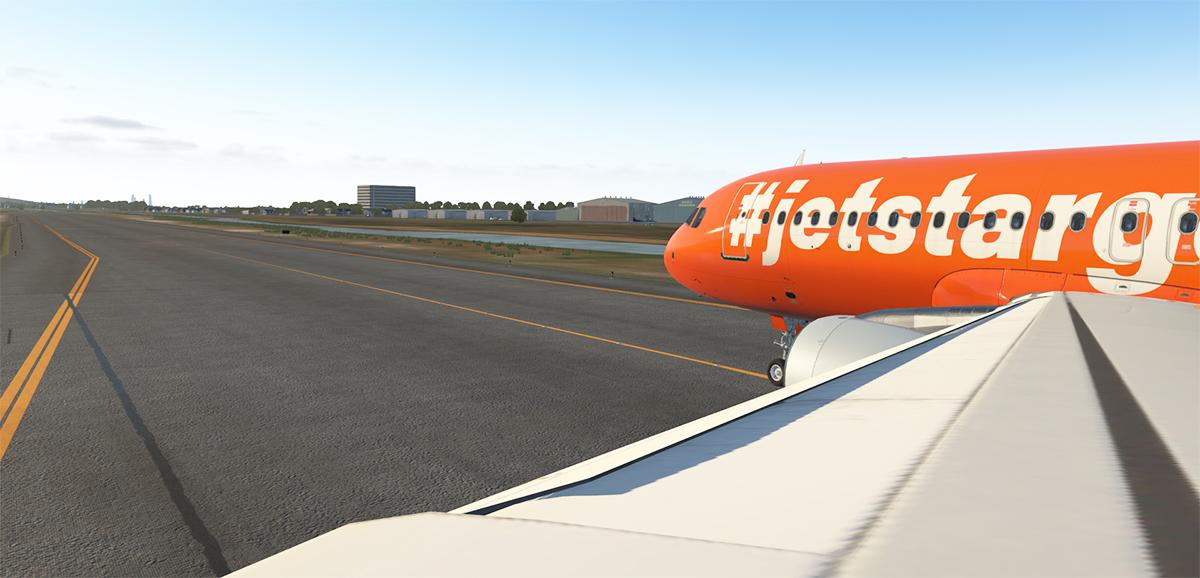
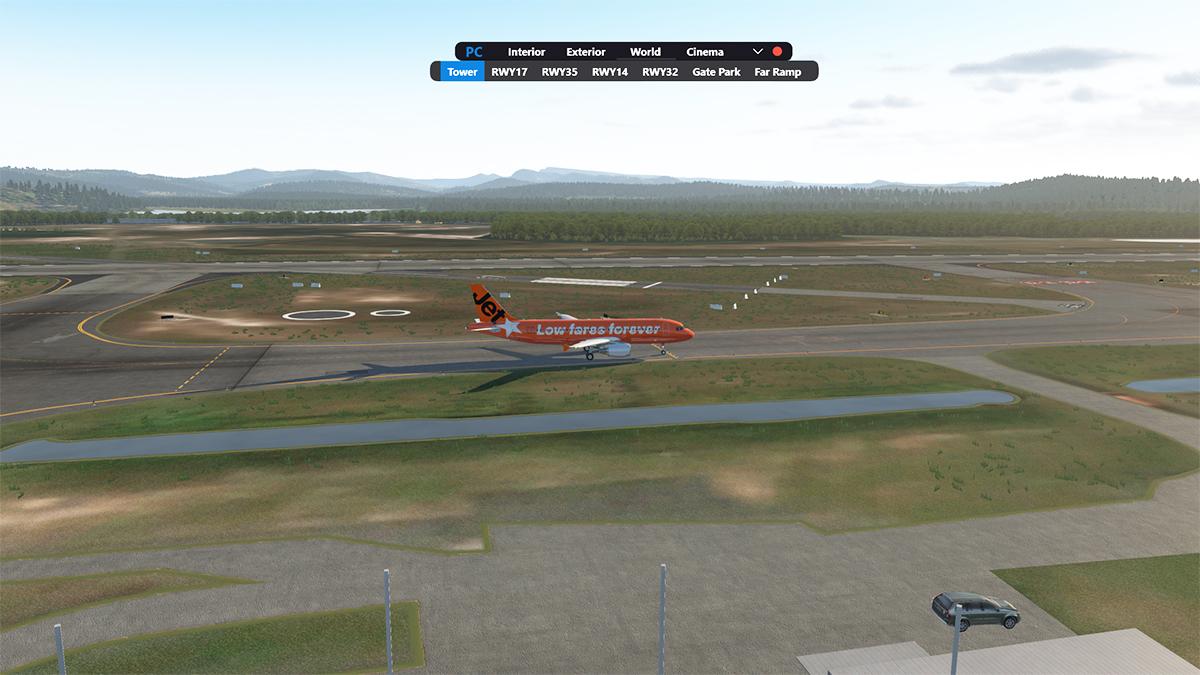
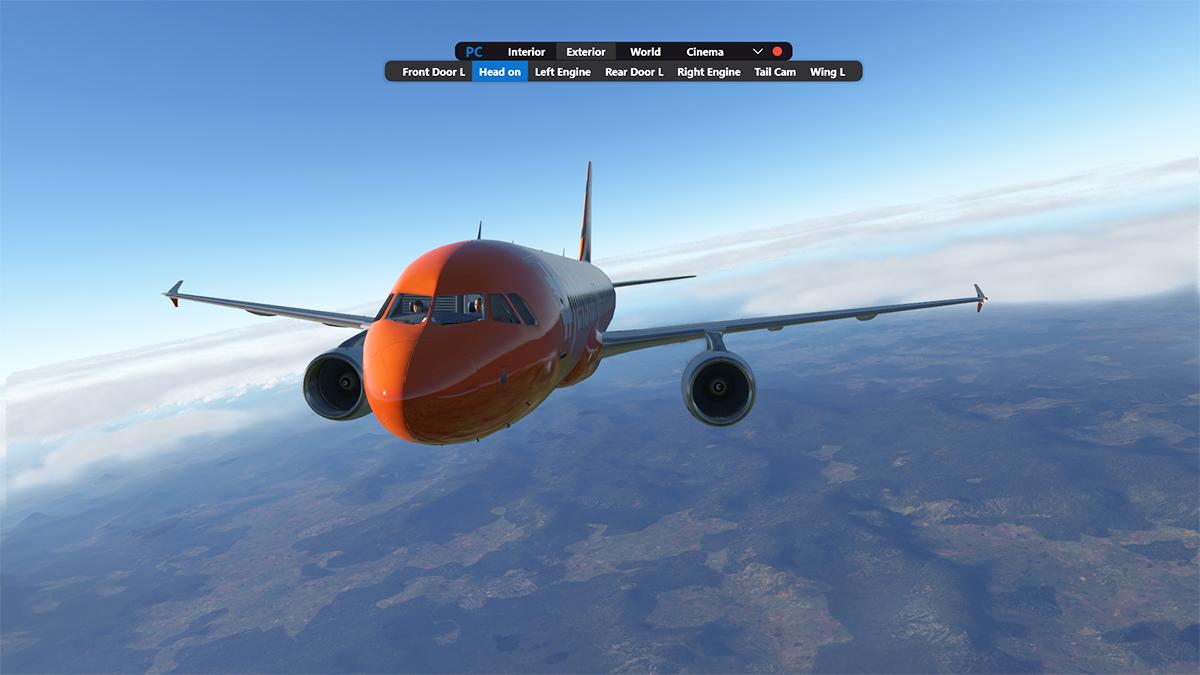
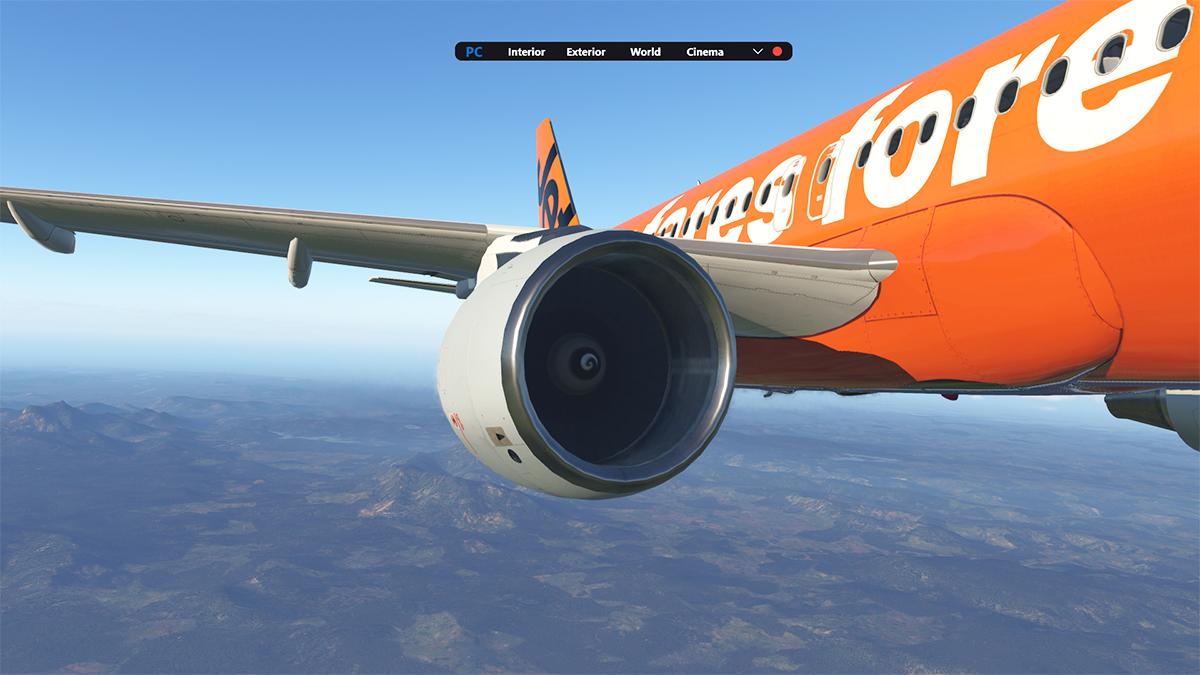
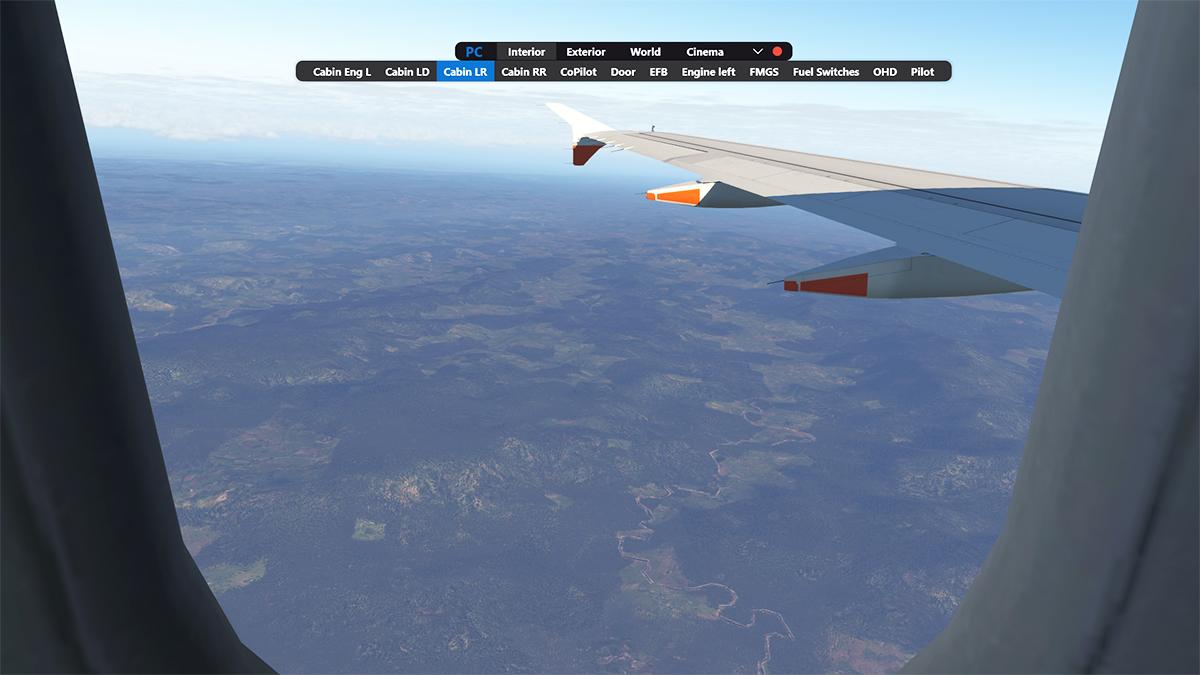
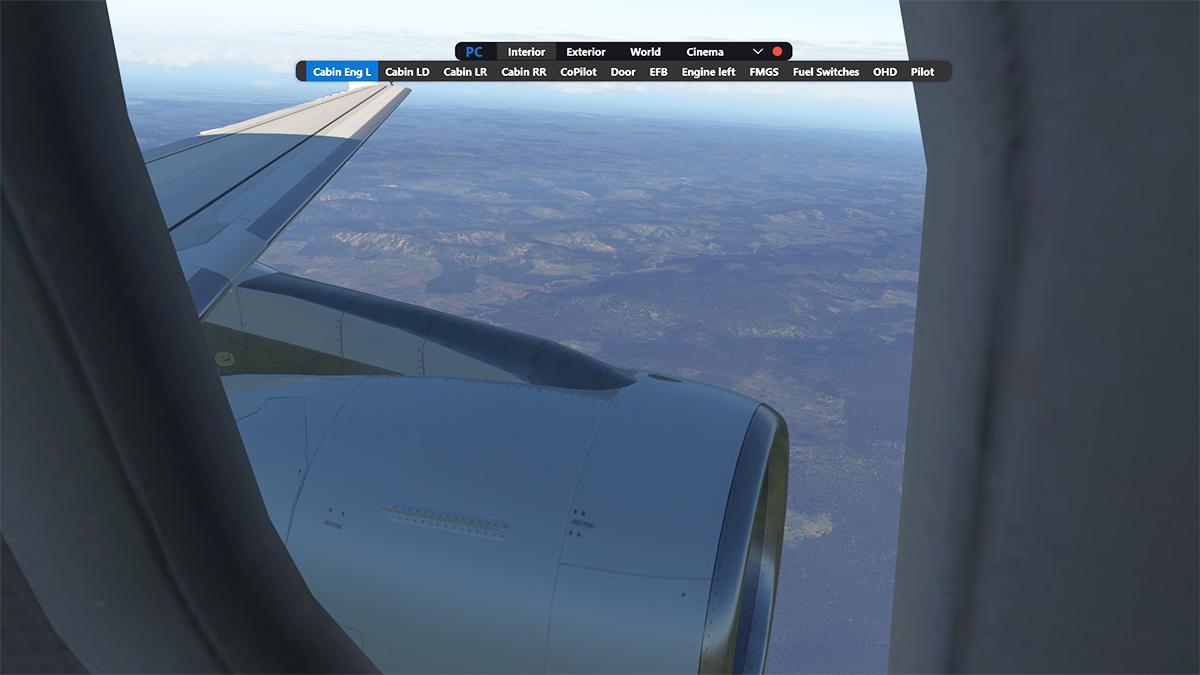
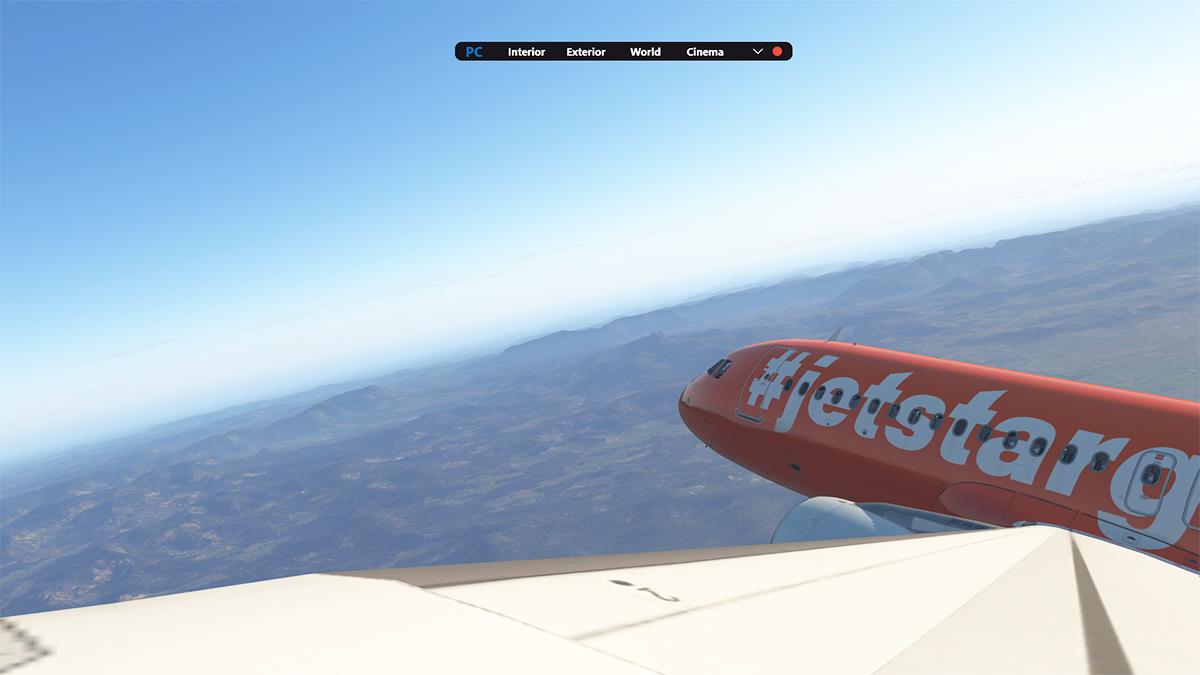
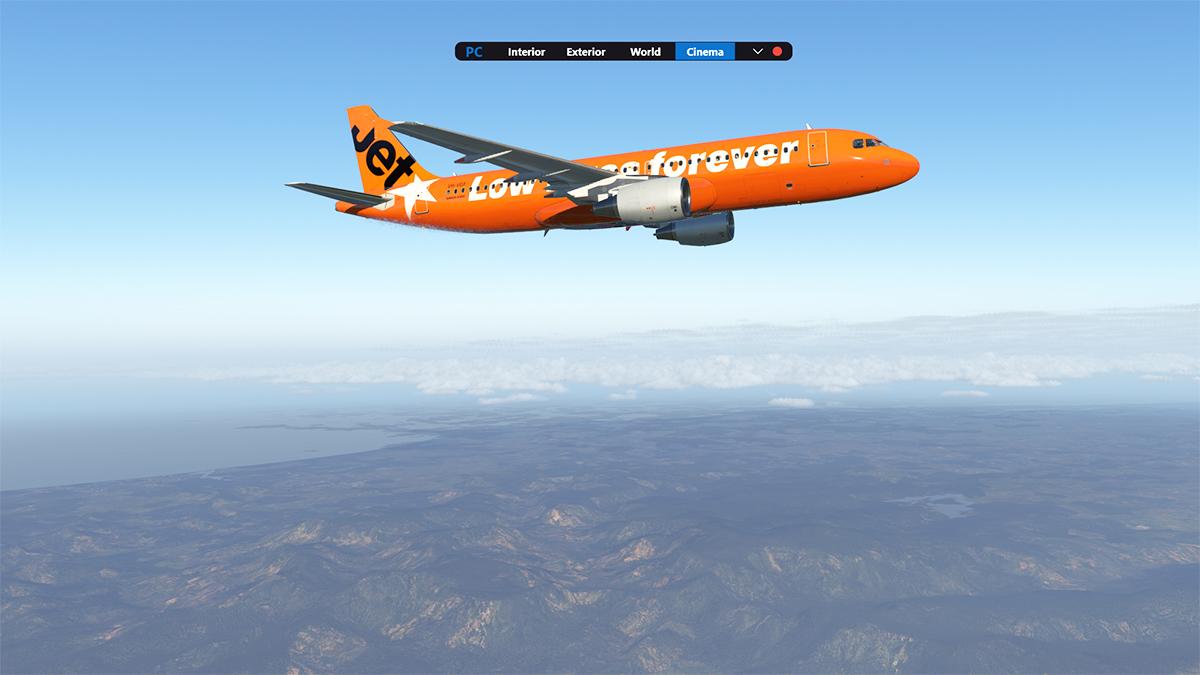
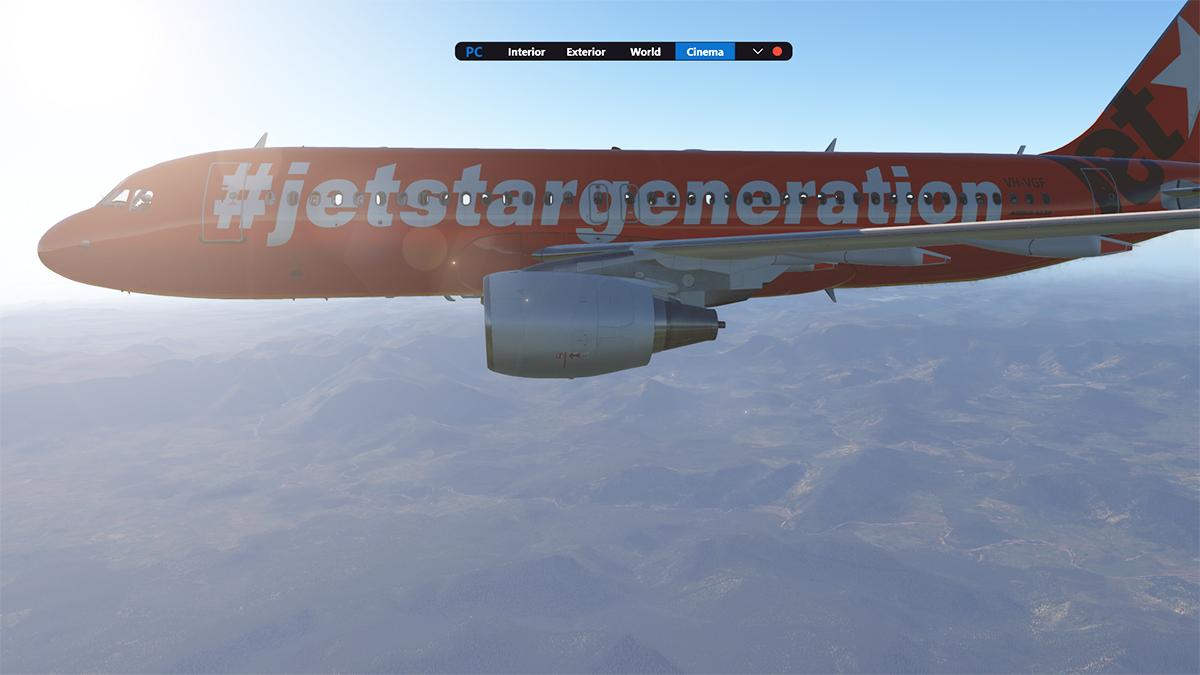
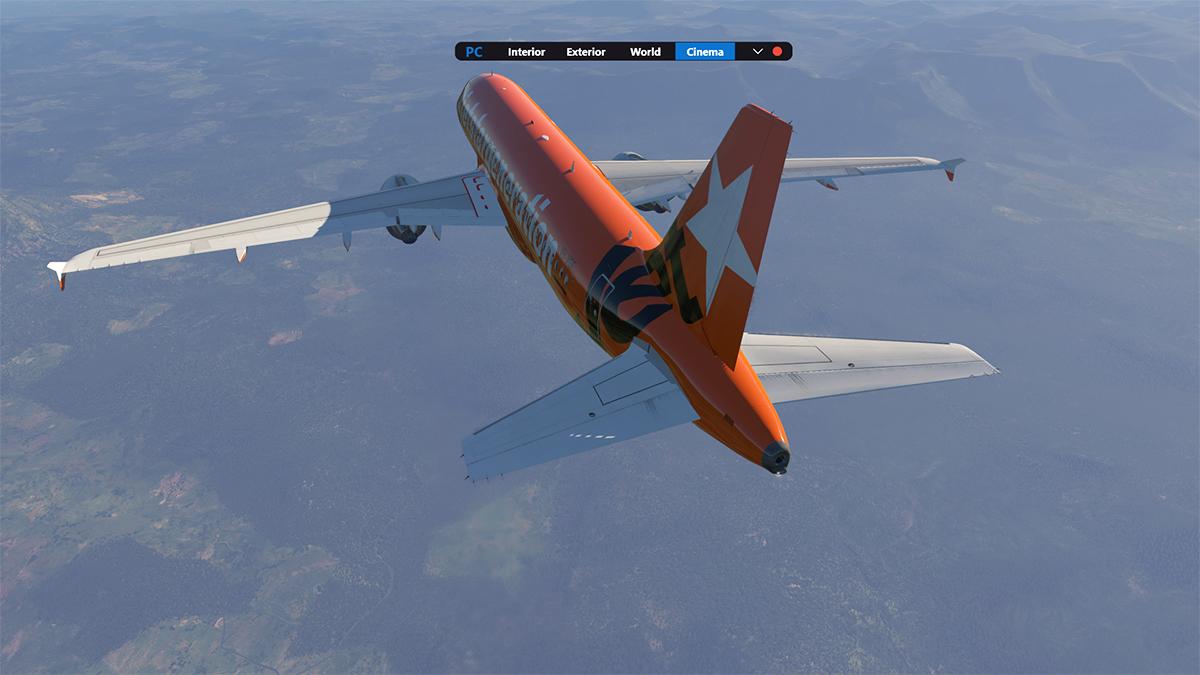
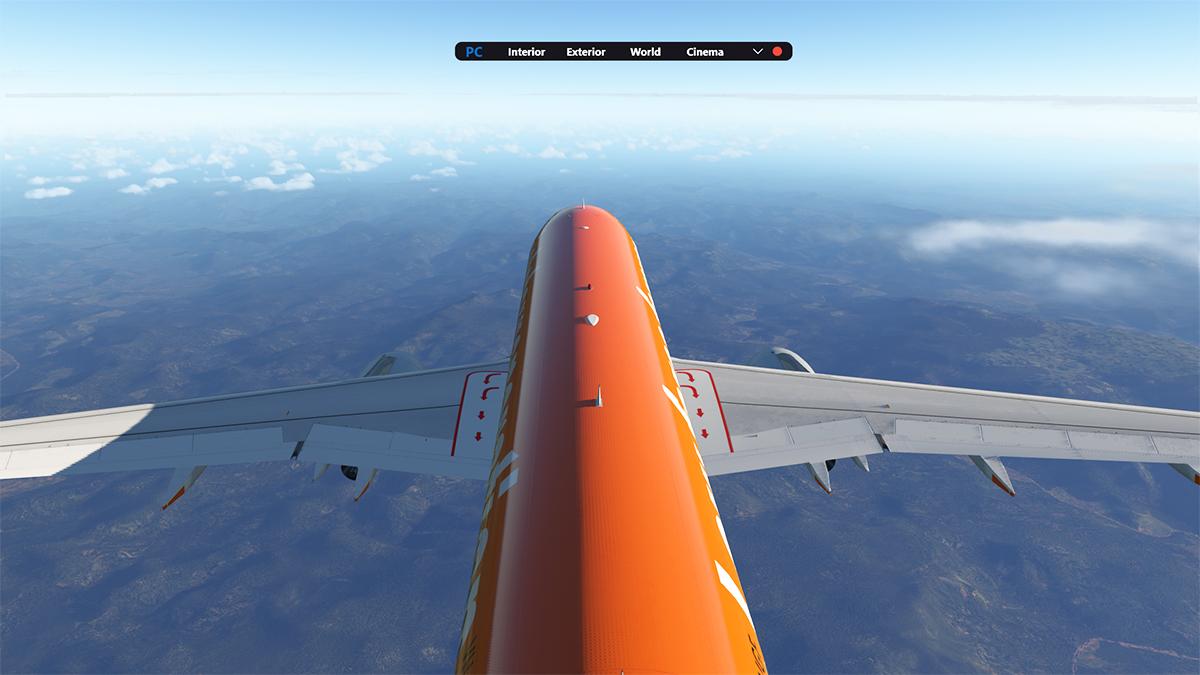
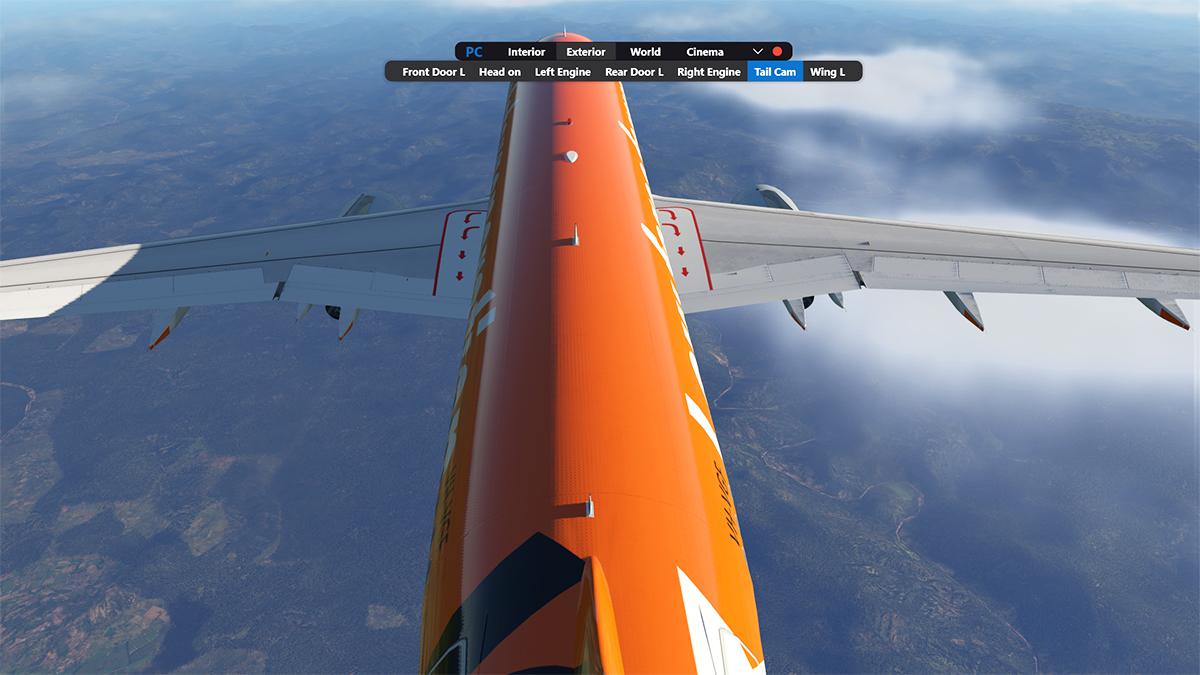
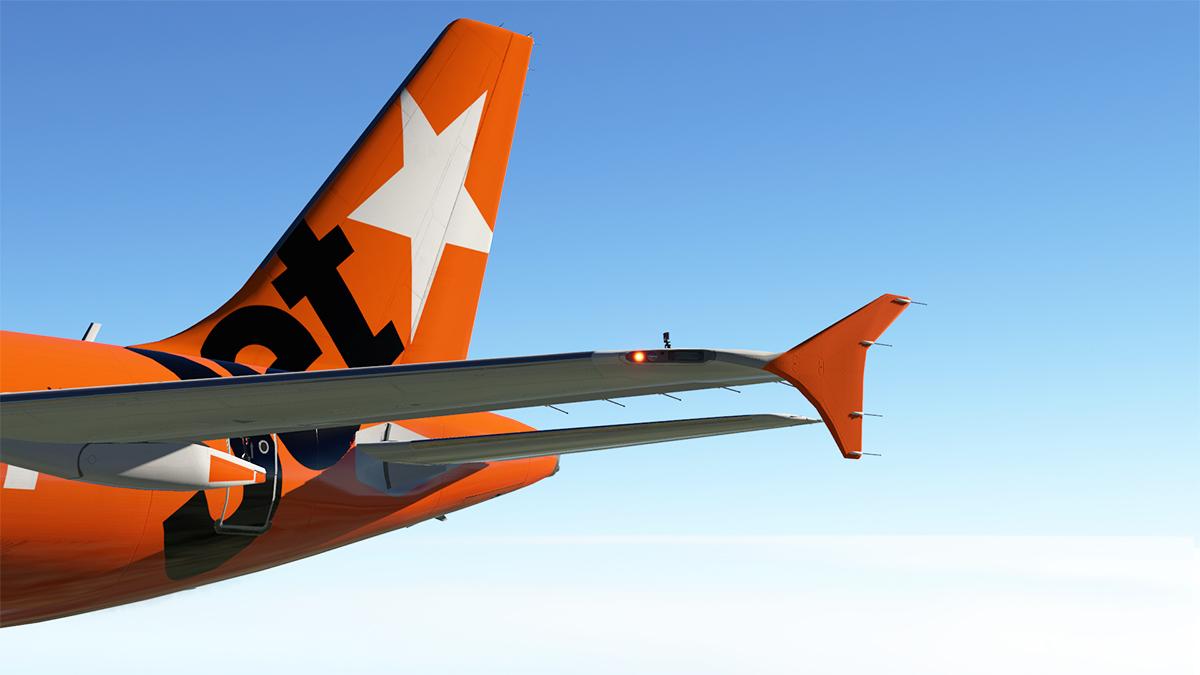
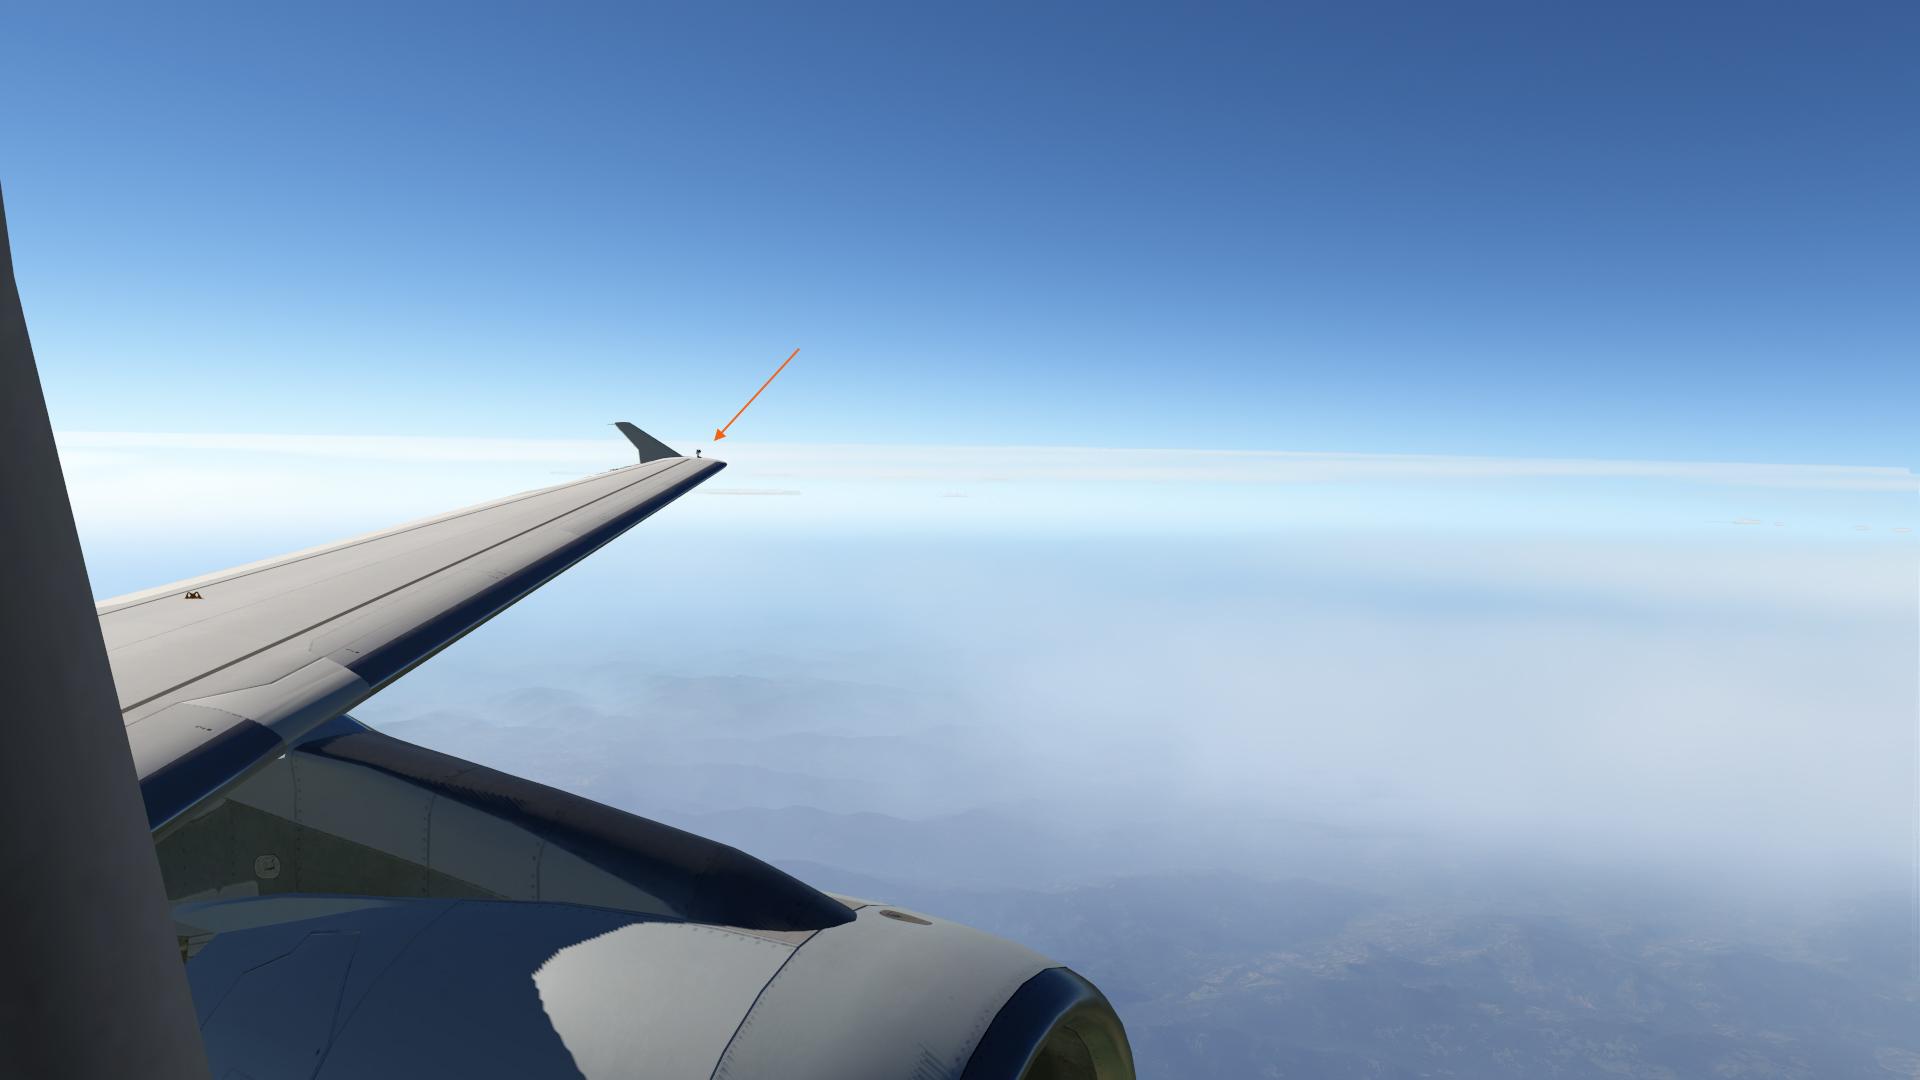
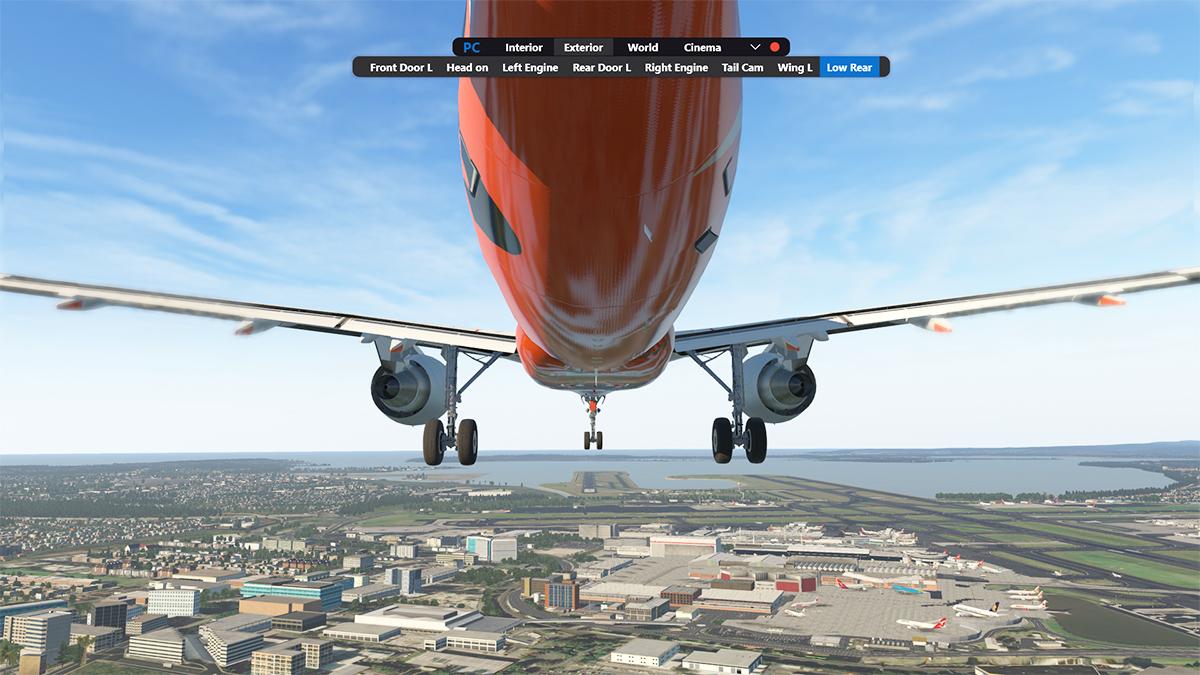
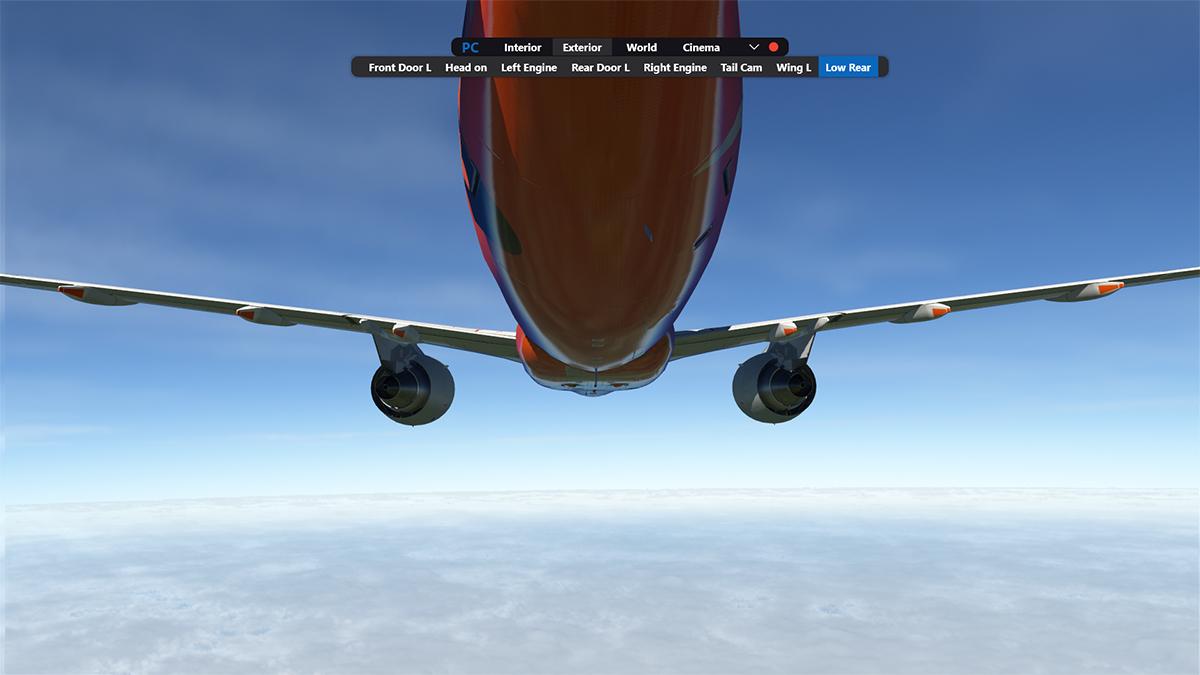
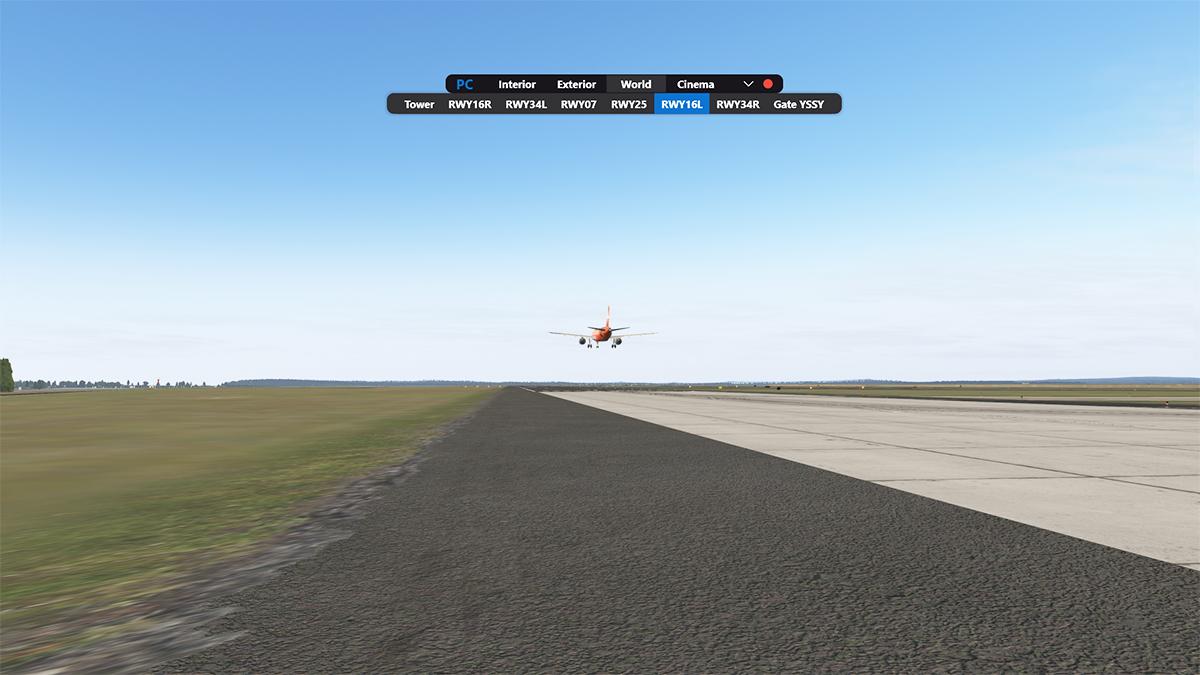
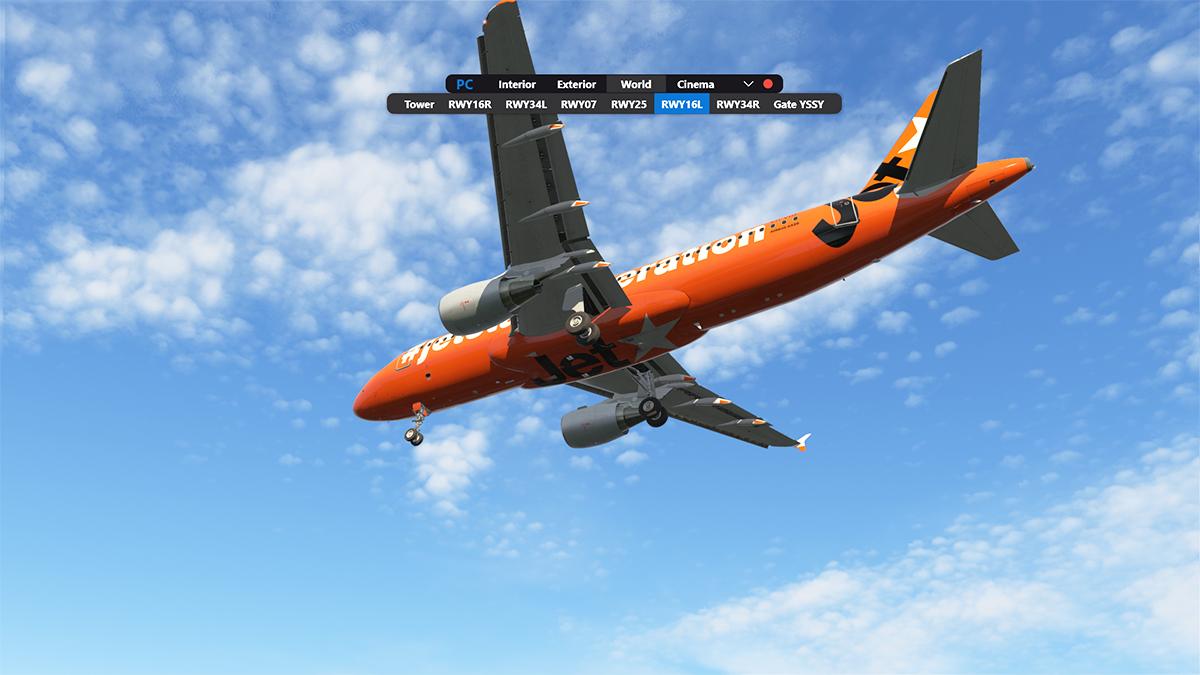
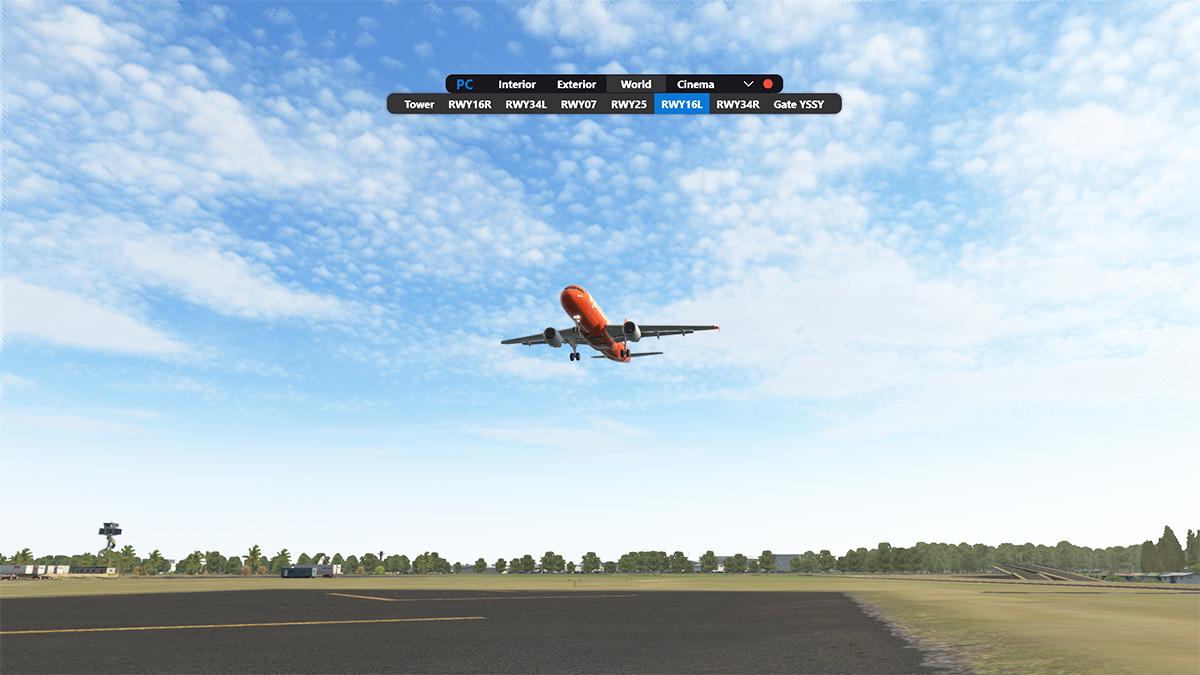
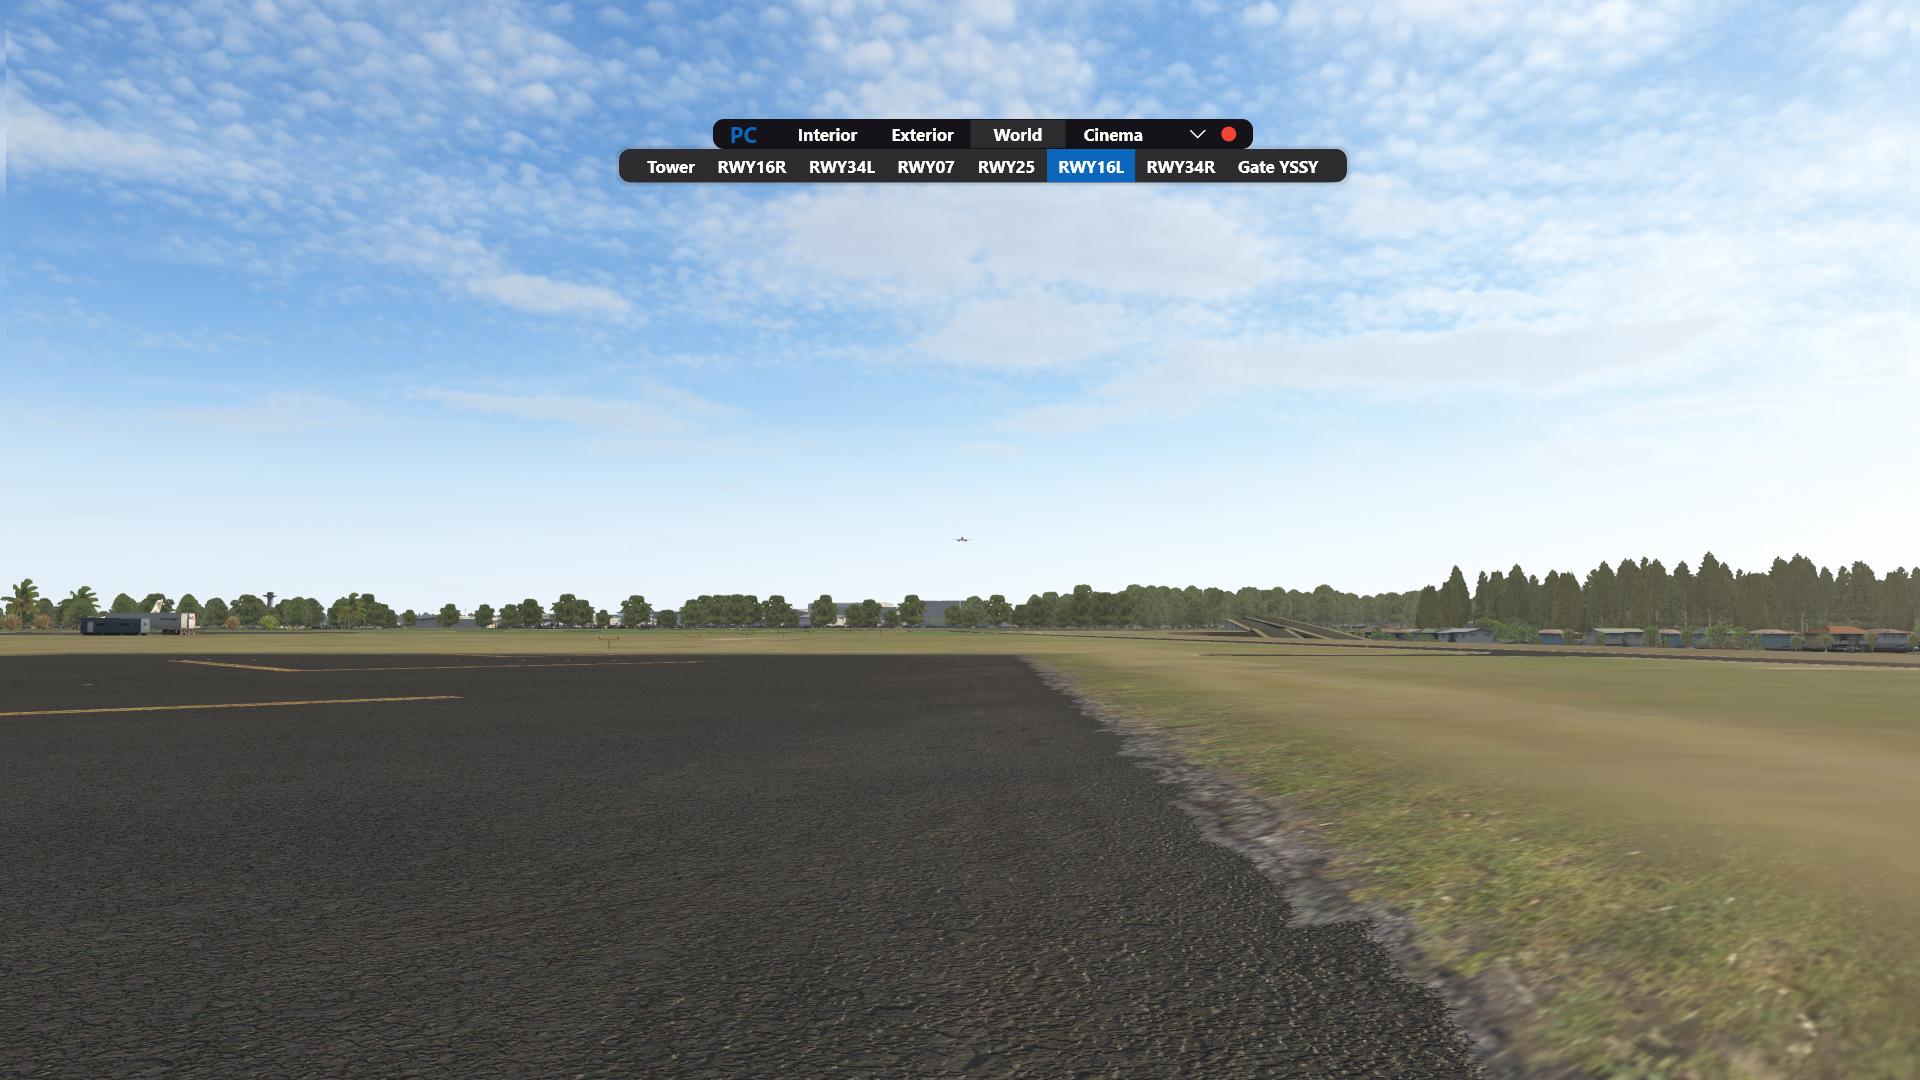
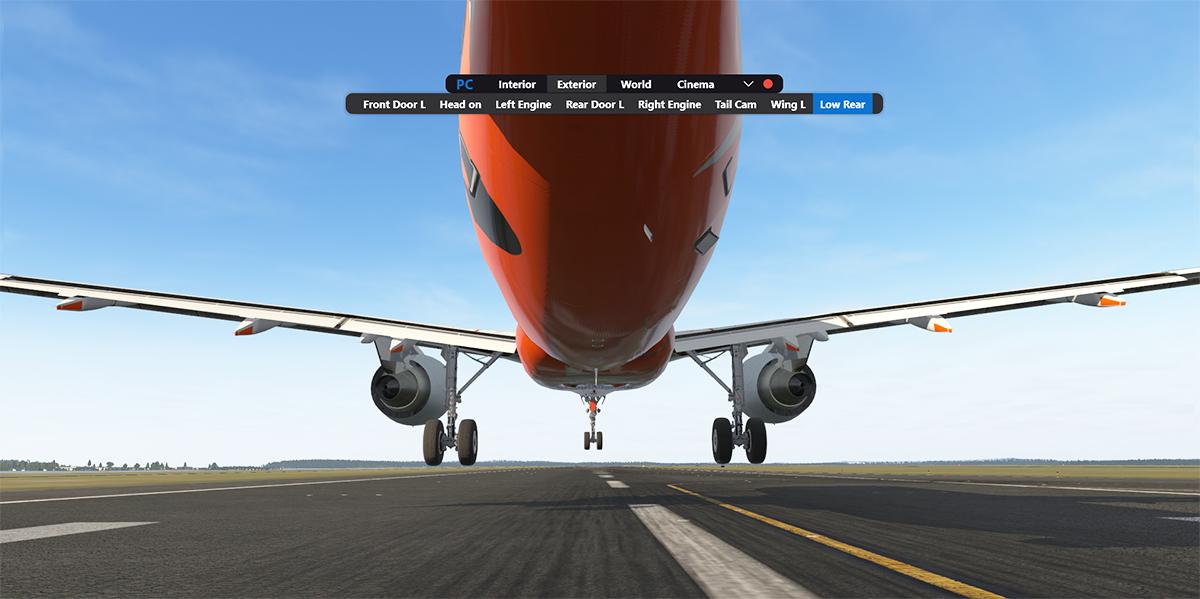
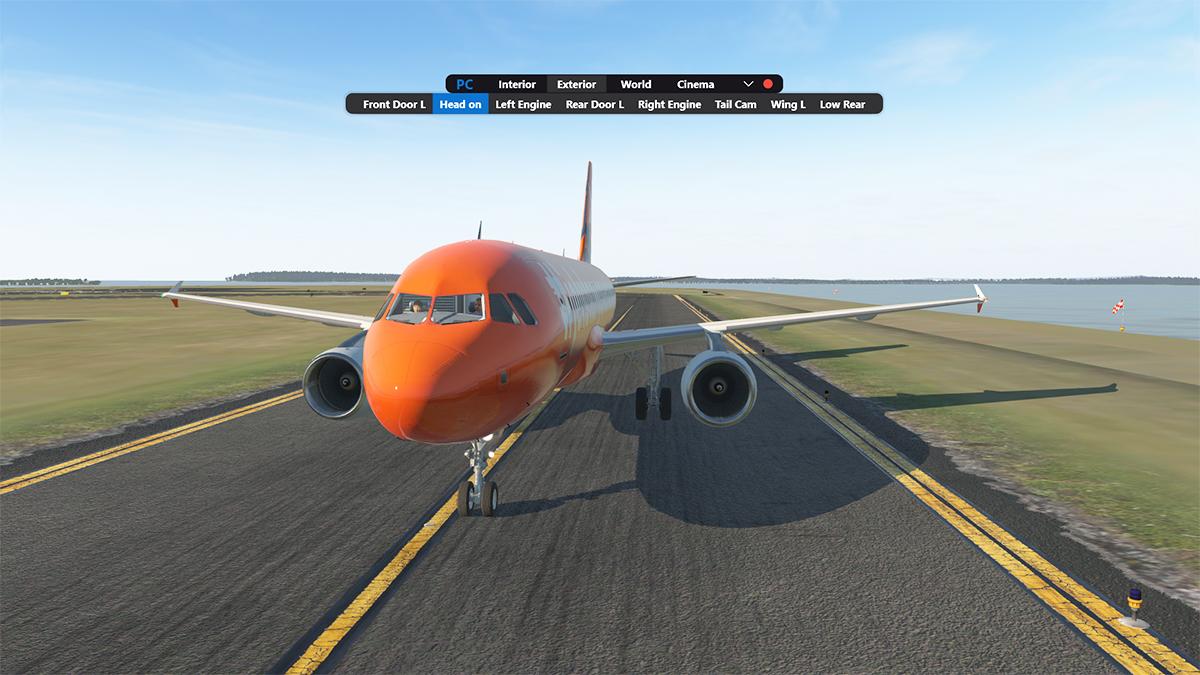
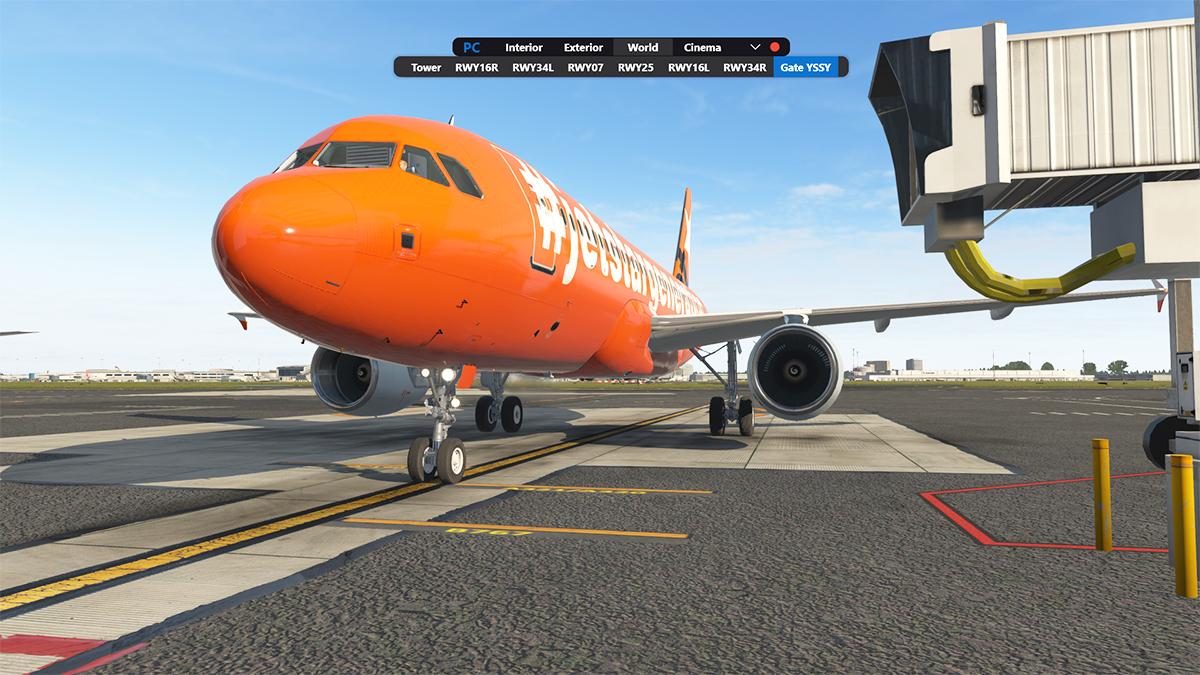
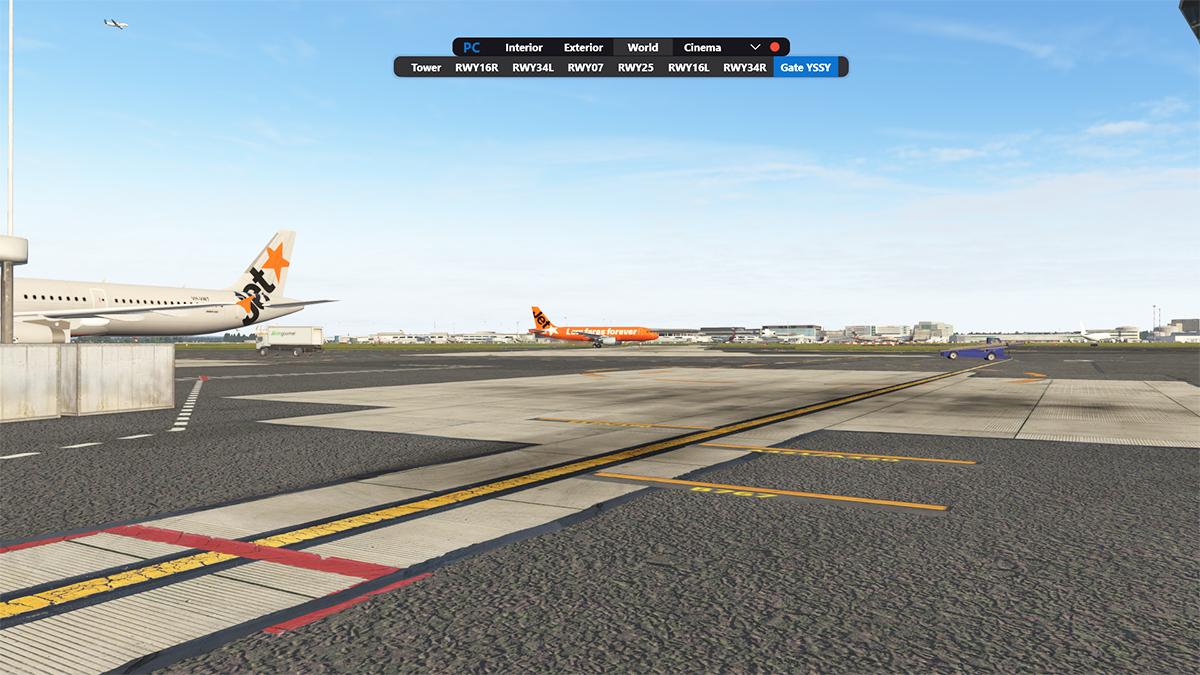
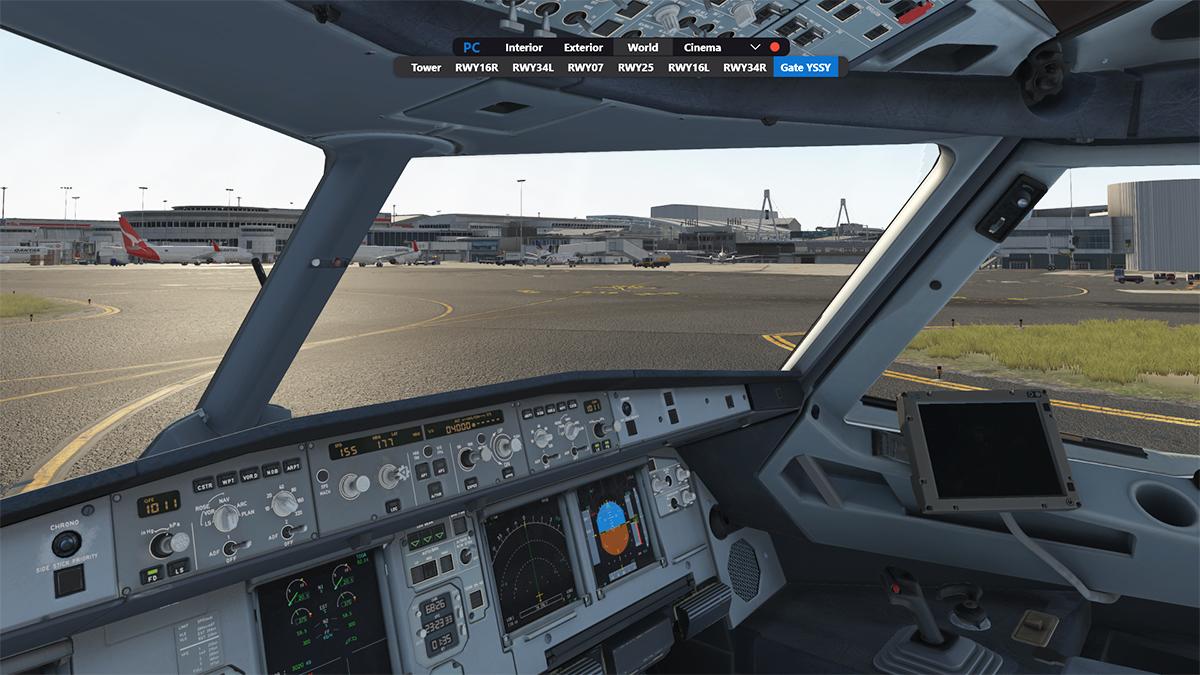
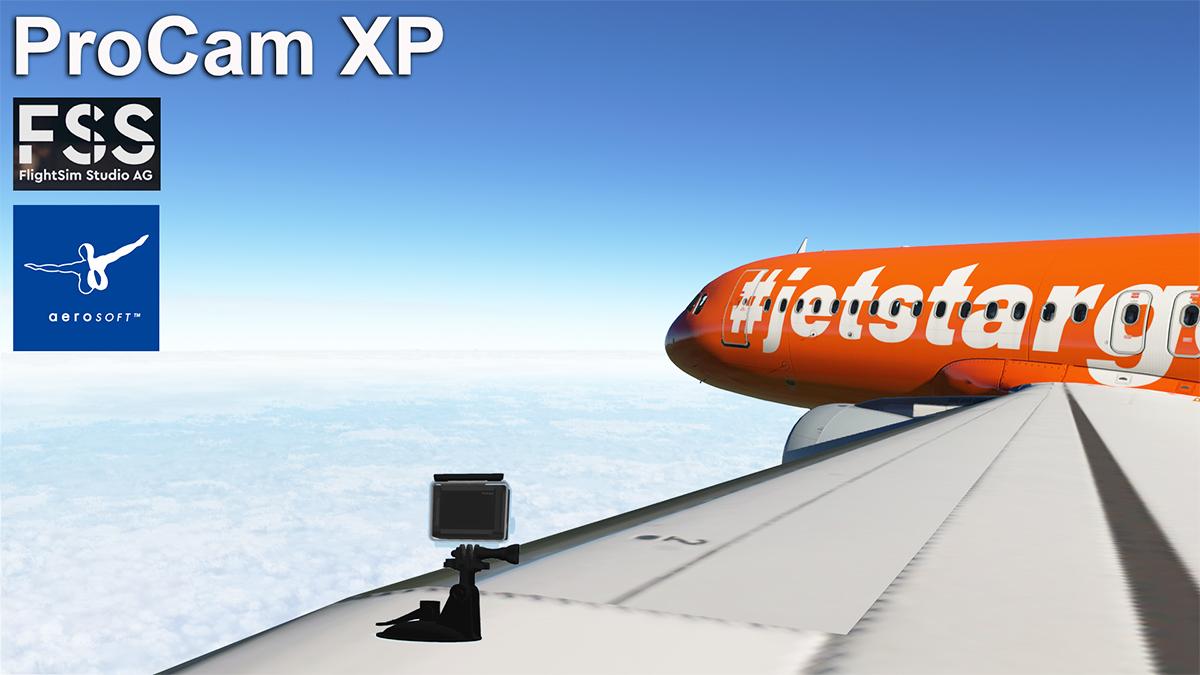
Plugin Review : ProCam XP by Aerosoft I remember back a long time ago, wouldn't it be nice just to see your aircraft arrive at the arrival airport. There are several built in view features in the X-Plane Simulator that can sort of do this... "Runway View", "Tower View", but if you use them then they jump from airport to airport (the view closest to the aircraft), until you finally got to the actual airport you were landing at. I hated that and wanted a static camera view where I wanted it. That said I do like the X-Plane view, the view (Linear Spot) that tracks your aircraft as the aircraft changes it's heading, and it curves away sweetly into the distance... spent hours watching that view in a flight. So views are important in getting the most out of your Simulation, also are handy tools for creating video sequences. But the overwhelming issue was always the complicated interfaces, mostly X axis,Y axis and Z axis angles and distances to place the camera, and some views took hours to set up correctly, I don't want to spend hours just setting up a camera. The default go to tool currently is X-Camera by StickAndRudder Studio's and that sells for US$15. And it is powerful, but also has a complicated X,Y and Z user interface, but there is a free version in that you can't save the settings for the advanced features, in meaning you can't save your views, which is a big handicap unless you buy the Pro version. There were however a few other camera/view tools available, DynamicCam, IZICam and lately ChaseView Deluxe. FSS-FlightSim Studio have now created ProCam XP, and it is being distributed under the Aerosoft banner, it is a more hands on and simpler way of creating specialist views than the older placement systems. Installation To install ProCam XP is via the Aerosoft One installer application. So if you haven't got the Aerosoft One installer installed, you will have to do that first, it will be to you supplied from the X-Plane.OrgStore. Note the ProCam XP is Windows and Linux only at this time as MAC OSX is not currently supported. On purchase of the product you should be sent via email the application "Product Key". This product key is entered into the authorisation window, found lower left of Aerosoft One. Then you enter in the supplied key and add the product to your Aerosoft product list. An account with Aerosoft is obviously required. Once added you can download and INSTALL the product via the library of which the product (ProCam XP) is now listed. It will check your computers specifications and see if you have enough storage space to install the product, if correct you can press CONTINUE to install the plugin... it will require 262.84 Mb of space to be installed and X-Plane must not be running to do the installation. Then Aerosoft One's app will download and install the ProCam XP plugin, and when done add ProCam XP to your product list as active. The current version of ProCam XP is also shown (Version 1.0.1.0)... and your now ProCam XP installed. Menu Starting X-Plane, you will find ProCam XP in the Menu/Plugin list... "Show/Hide Main Menu", but you can also set this to key command (recommended). On the first startup, you again have to authorise the key to "Unlock the Full Version". There is a "Demo" version you can download that runs for 10 Minutes, again you have to unlock the full version to get the use of the tool. You can't type in your details and key directly, but only indirectly by cut and pasting from your clipboard, when done and to authorise, you press the ✓ If authorised you should then have a clean menu bar, and the red dot at the right end hides the menu bar. There are four menu tabs; "Interior", "Exterior", "World" and "Cinema"... World shows options for; Tower and the Runway views available (RWY17, RWY35, RWY14, RWY32). Cinema gives you very snazzy custom aircraft circles and passes... Create a view There is nothing there to really use until you create a few viewpoints, Click the right arrow down to open the editor, then select first if you want an Interior view, or an Exterior view from the top banner... then Press the + to select a new view. Where is says "ENTER NAME" that is the title of your view. Oddly the first view is set up to name the view early, later however you do the view naming after you set your viewpoint? When you have created a "Name", here "Pilot" and enter, it will then display options for that view. There are three "View Types" in; Static, Human and Cam. We will look first at "Static" and "Human". "Static" is what is says it is, it is just a static viewpoint. "Human" adds in human movement elements in "Head Anticipation" and "Breathing", the same elements you would find in the XPRealistic movement plugin, personally I'm not a big fan of these exaggerated movements and here it also denies you of the left-right pan movements (the up-down movements do still however work). On the top-right is a trash can (UK Bin) to delete the current view. On the top-left is a tool logo to adjust the current view selection.... ... this brings up the "CAMERA CONTROL" panel that is modeled on a gaming console. Initially the console panel totally confused me? Originally I kept pressing the <> or ⌃⌄ arrow pads, but that didn't work? The trick is to use it like a game controller and move the centre stick around (circled) in the direction you want to go... personally I would have rather preferred to have just touched the easier <> or ⌃⌄ arrow pads to move the viewpoint around the screen... .... but the game stick controllers do however work in moving you around the screen and in finding the view you want with all the various axis via the two sticks, but they can be a bit tricky to use as they can move at points very fast on the right stick. ... additionally the right slider moves the viewpoint directly UP and DOWN, the left slider increases the movements SPEED on the screen. Missing is a "Reset", but you can sort of reset by going out of the controller by pressing the X, and then coming back in again. You can also set the same controller view movements by keyboard commands, which gives you actually more intuitive control than the game style knobs, a tool I prefer. The only other problem there is the commands then take up a lot of the keys for using the controls on your keyboard, but it helps. To SAVE the view you press the ✓ on the controller and this sends you back to title card to add in your view name (Pilot), then "Enter" to save the view... then it enters the view under the "Interior" menu list (or the Exterior view list if selected). A real time-saving trick is to use your X-Plane "Hotkey" commands to set up the view you want, then press + for a new view, that will take you straight to the Camera Control to press ✓, then to just name your view (here FMGS), and that way it saves you hours of twiddling the knobs or setting up key commands. This trick however works only on the X-Plane internal view, otherwise you have to use the console. Now you can build up your views quickly, and by clicking the up arrow it will take you out of edit mode. And now also have a banner of the views you have created under the selected menu title (Interior/Exterior). And at anytime you can go back into the selected/named view by pressing the down arrow, and reedit it, or remove it (trash/bin). Flipping between the views is extremely fast, unlike the "Hotkey" view movements that actually travel between each view, here it moves to the viewpoint instantly, so it very, very fast to switch around the various viewpoint internally (like the cabin views) and switching out to the exterior view. So you can build up a large assortment of internal and external views... ... but you can't rearrange the order on the menu... as they are only ordered in the line you create them or can you not even create group types into certain groups (say, instruments, windows or cabin)? So to fix that set list you will have delete them all, then create the new views in the order that you want, but otherwise it works well. Overlays You can create an "Overlay" to create invisible "Click Spot" regions that you can set to quickly move between views. First you press "Manage Overlays" and it creates a blue overlay in the view you want, that can be sized in any axis, when done you go through your set list and "Add Overlay", and then you can use these overlays in any view. Personally I was completely flummoxed on how this overlay feature works, pressing the hidden overlay didn't change the view, or the explanation in the manual on using keyboard short cuts to go to that view is not at all explained at all either, so I couldn't get it to work? The click spot idea is great, but doesn't work in practise. CAM The third selection is "CAM". Here you can create a camera view like with a GoPro camera. To create a (CAM) camera then press "Position" button centre. and this will display the GoPro camera for you to fix to attach to the aircraft. Again you have the (gamers) console to position the camera on the aircraft, which again is quite tricky, but you can attach the camera in almost any angle or degree, like upside down or on the slanting angle of the fuselage... ... to help if you have positioned the camera close to your set place, then go out via a save and then go back via the "Position" and you get a closer view of the camera to fine tune the view's position and angle. You can fine tune the Gimbal in the "Level Horizon", and "Level Roll", (these items are again not explained in the manual?) When done, you now have a 3d GoPro camera sitting on the aircraft, positioned here on the outer left wing, and very cool it is... But I don't think that the Jetstar management would be too happy about me putting a camera on the wing of their aircraft? But the CAM view is excellent! Note you can move the menu banner around the screen to where it does not interfere with your required screen view, but you can't scale it smaller. World You can also set views away from an Aircraft, in "World". You can create a ground based view like an aircraft view, but you will already have the automatically generated cameras for the Tower and the airport's Runway views available (At YBCG - RWY17, RWY35, RWY14, RWY32) set in the "World" menu. These are the X-Plane default Tower and Runway views. Open the editor (down arrow) then select "World", then press + for a new view, then name your new view in "Enter Name". This will bring up a new menu of the choice of either a; Static, Free or Follow Aircraft choice of views... "Static", is what it says it is, a none moving view, "Free" view is that the camera can be moved via your left click button on your mouse, or by your left/right keys, but as this is in Interior view the external movement is very slow. "Follow Aircraft', will follow the aircraft as it departs or arrives. Here "Gate Ramp" is set to "Follow Aircraft", and "Far Ramp is set to "Free", and I can move the camera view upwards. All the automatic views like here "Tower" and "RWY32" are set in "Follow Aircraft" modes. So yes, if I set up a camera at any of my arrival airports, I can now see my arrival from a long distance away or at any gate I choose to view. These view settings are all saved in your X-Plane/Preferences/ProCam folder, including the Aircraft and Airport camera locations. And as a scenery developer you can include your custom scenery presets within your scenery, with the link Custom Scenery/Scenery Name/ProCam/presets/ICAO. Set also are the 14 X-Plane11 default aircraft to use anytime. Cinema We have already covered that if you press "Cinema" you get nice tracking shots around your aircraft. But you can also create your own tracking shots via an Editor. To access the Editor you right/click on the "Cinema" title, and the banner turns red. You are given two choices for your views "WRLD" (World) and "ACFT" (Aircraft). you change them by clicking on the first menu option. To set the start of the tracking shot, you select "Slot1", then use your keys to create the tracking shot you want, when finished you select "Slot2" to end. You have the option to set the speed of the tracking shot in the fourth menu option (20 seconds)... to see your tracking shot you press left/mouse/key on Cinema. The tracking is easy and simple to use, but basically it is useless. Number one problem you can't save your tracking shots? go out of the editor and your work also disappears, worse is the the angles you created are different from the tracking version (aircraft too high in the frame). And overall all you can do is a left to right or in or out track... it is not very good. FSS note this effect is caused by using OpenGL, but I was in Vulcan all the time and it still did the wrong positioning of the aircraft? ProCam XP in use You can set commands keys to go back and forward between the views so you don't have to go through the menu each time. They are grouped in; Interior (forward/back), Exterior (forward/back) and World (forward/back). Another key command option is to display or hide the menu bar which I highly recommend to save you time going up to the X-Plane/plugins menu. Time to go... A quick check of my left front and rear doors says I am now loaded... the wing (GoPro) camera view makes sure the aircraft from that angle is loaded.... yes I like that! Time to go... first a section of images on me checking around the aircraft before pushback, easy peasy in flicking around the views. On pushback I could stay on the "Gate View" as the aircraft is pushed way back to the taxi line, really loved that as well... ... so you can flip around all the views instantly, but without being able to edit the list, then "PILOT" my main view forward is however at the end and not the start of the list which I found frustrating in it not being closer and more handy... Still my "Gate Park" view delivers, framing the departure. A flip around the external views sees the engine start and the aircraft configuration for takeoff... nice. Tower and Runway views are good, but they not part of the slideshow change via the key inputs, sadly as they are the usual X-Plane default views. The left wing view is exceptional when ready for the takeoff run. Better still is the view in the air. Once airborne I could rotate through the Internal cabin views of the climbout that like I usually do, but instead of being restricted to only a few views via the HotKey, I can now have as many as I like, the speed is brilliant between the different views as well. Then a few External views... The rotating "Cinema" views in flight are sensational... But not long enough (too fast may be?) or are out of position as the aircraft set too high in the screen, the idea still needs more work? Checking out the tail view Cam, I think it needed a bit of editing, of which you can do and even in flight by adjusting via the Games Console and then pressing the ✓ to lock the new viewpoint in. It looked a far, far better view with more forward sky. The GoPro style camera is still sitting out there on the wing which is a little cool... In flight I decided to add in adding another new view, a belly cam view from the low and rear to watch the gear go down and the approach... Approaching YSSY (Sydney) you can select the runway (16L) camera for the approach... This is still however the X-Plane default runway camera, so the runways and tower views change as you change airports to the default views... but if you want to, you can still place a ProCam custom view were you want for the next approach (the view will be saved under the airport's ICAO for next time), and that camera view will be more stable and give a deeper, longer view of the approach.. And you have to admit, this is a killer view of the landing... and it can be used also in the replay mode. Another click through the views while in the taxi... ... I was enjoying myself so much I decided to do another "World" custom view. This view is set at the arrival Gate 49. And I then watched my own arrival from the receiving gate perspective... and that was so brilliant! ________________ Summary The X-Plane Simulator comes with a set of programmable keys to set "Hotkey" view commands on your extended keyboard number pad. There is also available custom view tools with currently X-Camera by StickAndRudder Studio's being the most versatile, and DynamicCam, IZICam and lately ChaseView Deluxe as other options. But most have complicated interfaces, mostly X axis,Y axis and Z axis angles and distances to place the camera. So ProCam XP, has been created by FSS-FlightSim Studio and being distributed under the Aerosoft banner, with a much more easier interface and control panel, but to also note it is a more simpler tool as well. The Aerosoft distribution is via it's own client tool Aerosoft One. So with ProCam XP you can create Internal, External and World custom views, place GoPro cameras on any part of the the aircraft or in a ground position. All views are saved, not only for the individual aircraft but for the different airports as well. Notable is that the default X-Plane Tower and Runway views are changed from airport to airport, but custom airport views can also be created and saved under that airport's ICAO. Other features include Cinema tracking shots and an editor to create your own tracking shots, and overlay click points. The GoPro cameras are excellent and 3d realistic... all view and camera placement is via a Game Console style on screen tool. All views also come with movement elements (Head Anticipation and Breathing). So creating views is extremely easy, and there are no end of ideas on what views to create and place not only on the aircraft, but on the ground as well. Overall ProCam XP is really really good if you want to create great views to instantly go to... but there are a few drawbacks with this version. For one you can't reorganise your menu list, and you have to create the view lists in order, so if you want a particular order you would have to plan ahead. Editing after creating the view is hard as well (not the actual view though, that as can be done via the console). Too many views can also create long lists across your screen as there is no menu scaling. You can't do group views either. Cinema custom (edited) views are also very (if too) simple with only one tracking shot that can't be saved, which is useless for pro-video creators, and the custom tracking doesn't centre the aircraft correctly either when in replay mode. Overlays to create invisible Click Spots just does not work, but you can't work it out either because the manual is simply diabolically bad in providing any information and details on how to set up and use this tool correctly, there is no video either. I had a few CTD as well or Vulcan freezes while using the plugin. So more work is obviously needed for a few elements of this plugin. Mac OS is also currently not supported. Overall here ProCam XP it still needs some development. So what is the main attraction to this view tool plugin... Overall you still can't beat for it's sheer simplicity that is the default X-Plane HotKey view system, but that said you only really have a set of 10 numbered HotKeys. Which is far too few. So ProCan XP is brilliant in building far, far more bigger and extra sets views to use in the background to expand out your view options, plus the choice to add on really clever viewing angles via the GoPro cameras and siting views at airports for unique viewpoints to heighten your simulator experience. Once started I was creating views for everything, so that shows the idea works, and I had a huge amount of fun using it (once I had worked it all out) So overall ProCam XP in that context is a great addition to my plugin toolbox.... recommended? Yes highly. _____________________ Yes! the ProCam XP by Aerosoft is NOW available from the X-Plane.Org Store here : ProCam XP Price is US$$16.99 Features: Presets for cockpit, exterior and world category Optional 3D camera object in cockpit/exterior Presets for XP default aircraft included Different view types Cockpit: static Cockpit: human Cockpit: cam Exterior: static Exterior: cam World: fixed World: free World: follow aircraft Manual camera control Key combination / joystick / controller mapping are possible Various effects Head rotation based on control inputs Simulated breathing (pilot view) Gimbal control (horizon/tilt) Invisible clickspots Individual clickspot overlay setup Cinema Mode for each aircraft size category Presets can be included in add-on sceneries Cinema presets can be included in add-on sceneries Limitations: MacOs as operating system for the ProCam plugin is currently not supported If you are using OpenGL, there may be an offset when placing the 3D camera object Requirements X-Plane 11 Windows, and Linux. (MAC OSX not supported at this time) Serial Number sent in a separate email, a few minutes after order is placed Installation Download and installation is via the Aerosoft One application, the plugin is deposited into your X-Plane/Resources/Plugin Folder. Documents Provided are two manuals in English and German. Manual (15 Pages) is simply absolute crap for a plugin tool of this nature, they should hang their heads in shame. ProCam_Manual_EN ProCam_Manual_DE _____________________ Plugin Review by Stephen Dutton 4th June 2022 Copyright©2022: X-Plane Reviews Review System Specifications: Computer System: Windows -S1700 Core i7 12700K 12 Core 3.60 GHz CPU / 64bit -32 Gb single 1067 Mhz DDR4 2133 - ASUS GeForce GTX 1080 8Gb - Samsung Evo M2 2TB SSD - Sound : Yamaha Speakers YST-M200SP Software: - Windows 11 - X-Plane 11.55 Plugins: Global SFD plugin US$30.00 : Environment Engine by xEnviro US$69.90 : RK Apps XPRealistic v2 - US$34.99 Scenery or Aircraft - A320 Ultimate by FlightFactor Aero (X-Plane.OrgStore) - US$89.95, but currently on sale US$69.95 - YSSY - Sydney International Airport by Taimodels (X-Plane.OrgStore) - US$28.00 - Scenery Review : YSSY - Sydney International Airport by Taimodels - YBCG - Gold Coast International by Axonos (Disclaimer. All images and text in this review are the work and property of X-PlaneReviews, no sharing or copy of the content is allowed without consent from the author as per copyright conditions) All Rights Reserved