Search the Community
Showing results for tags 'rw designs'.
Found 8 results
-
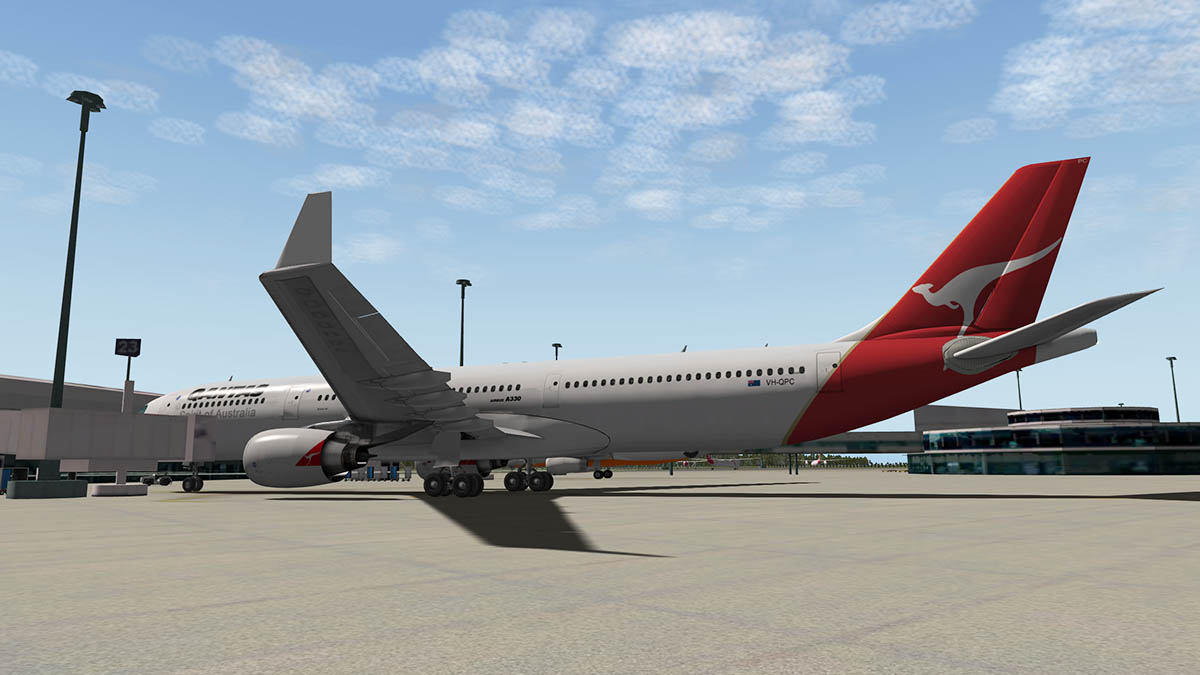
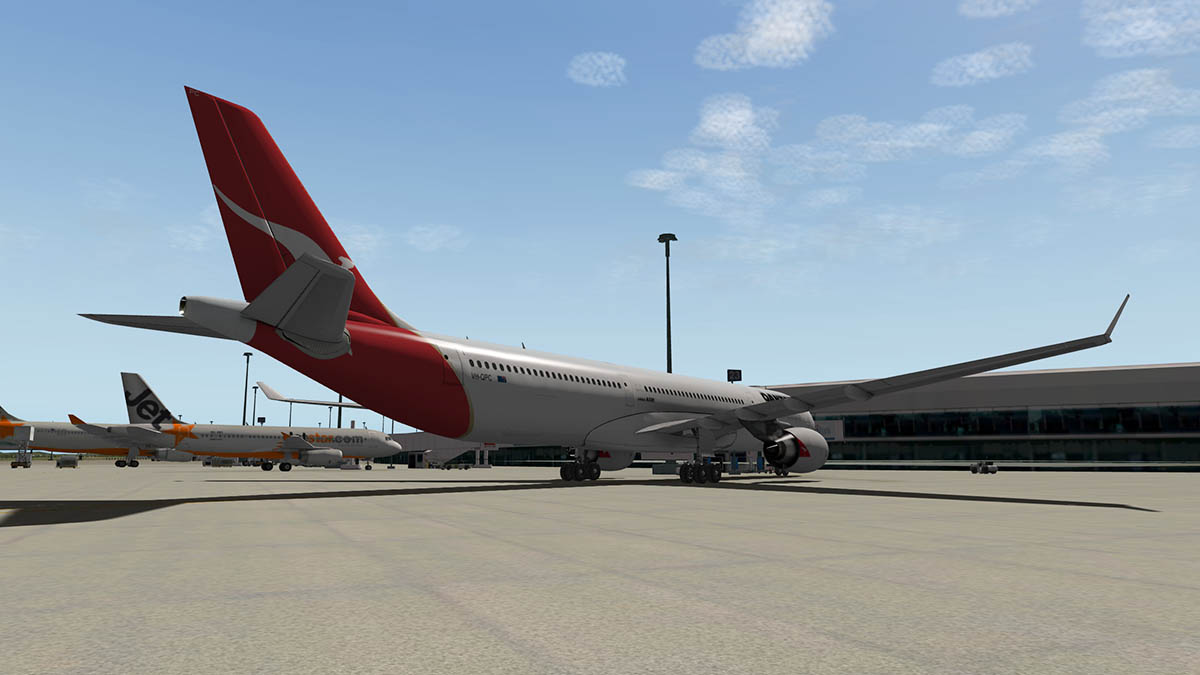
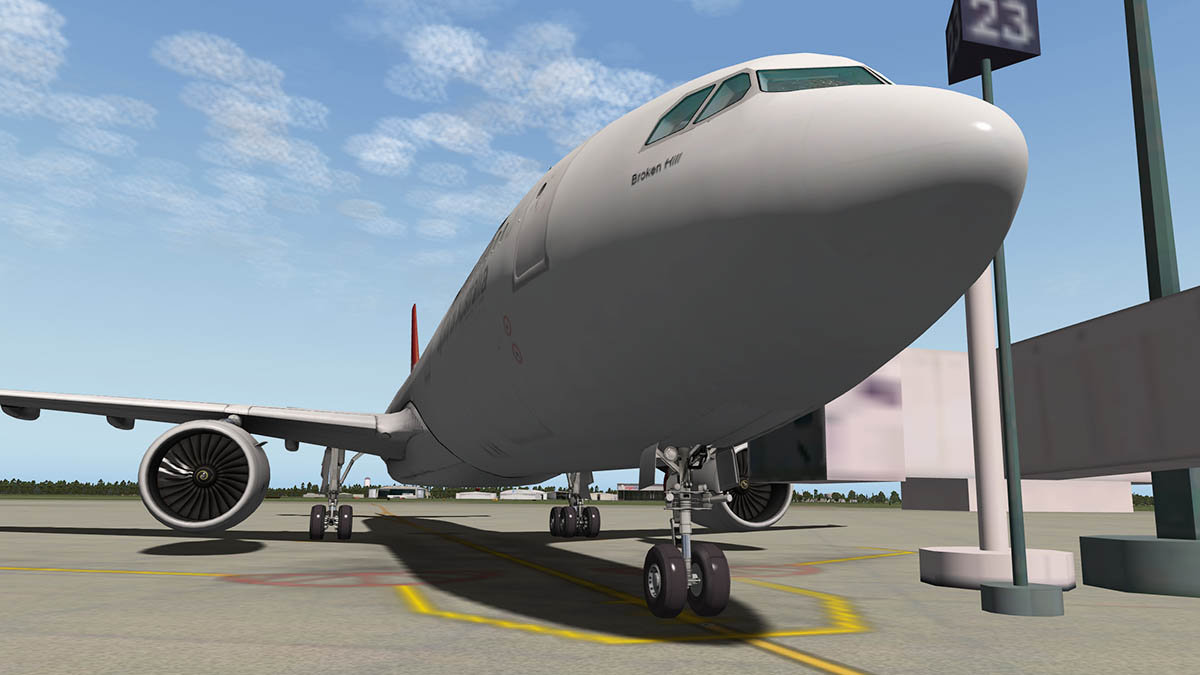
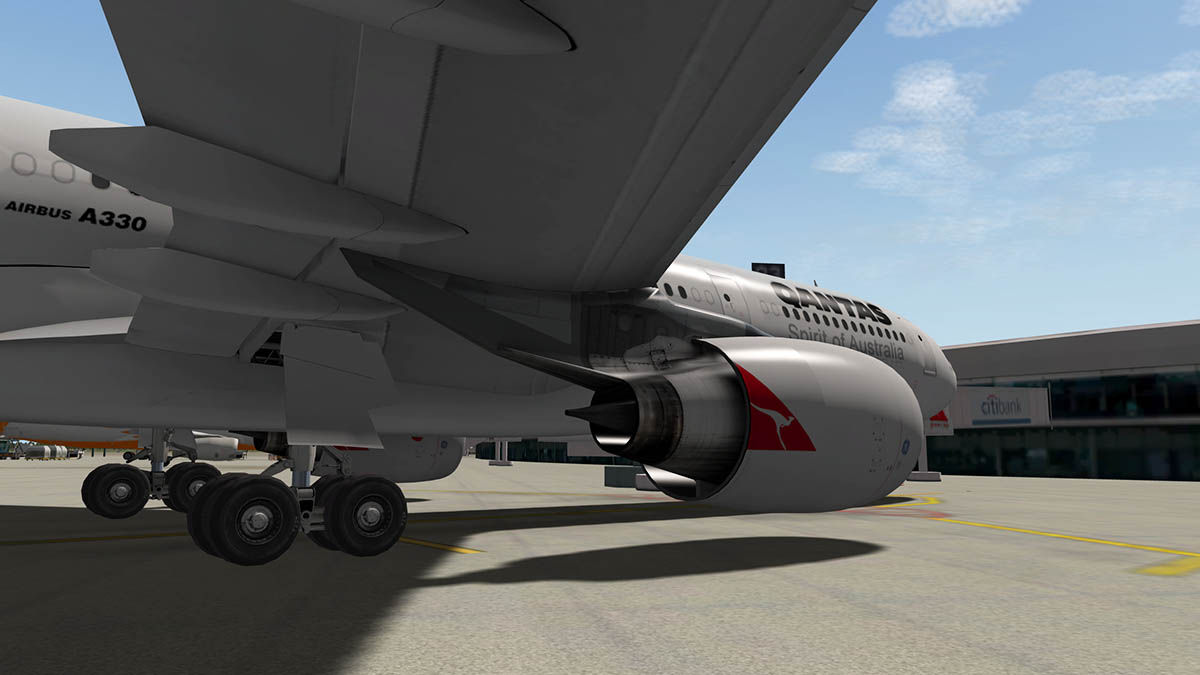
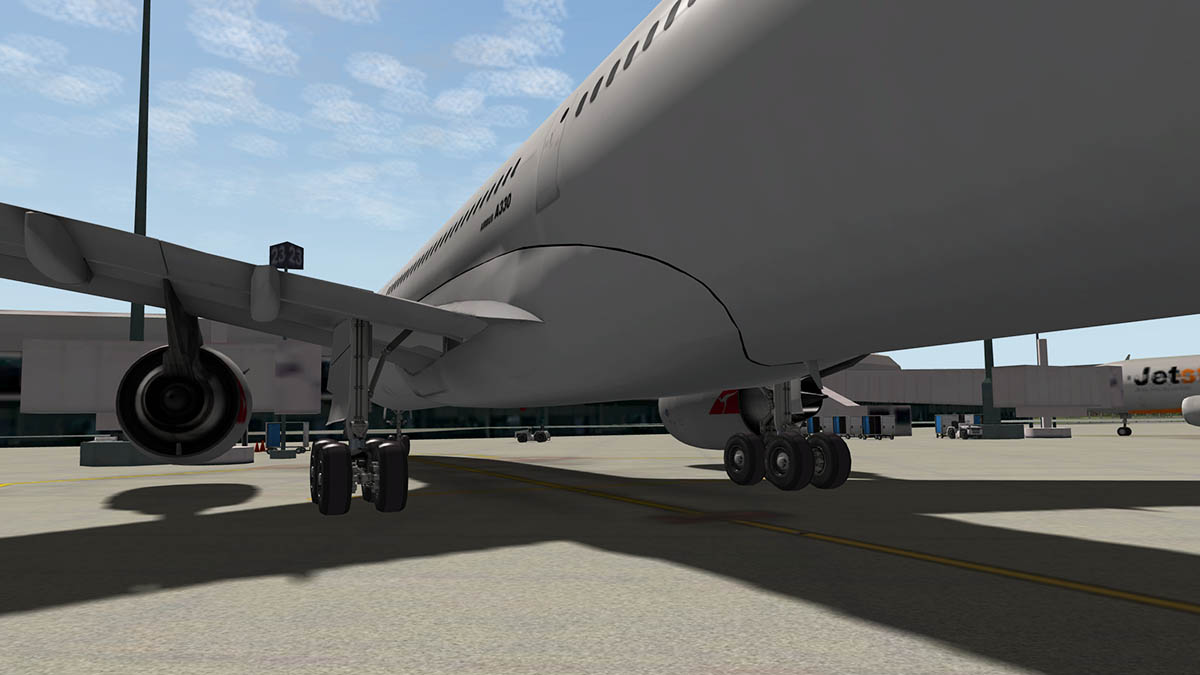
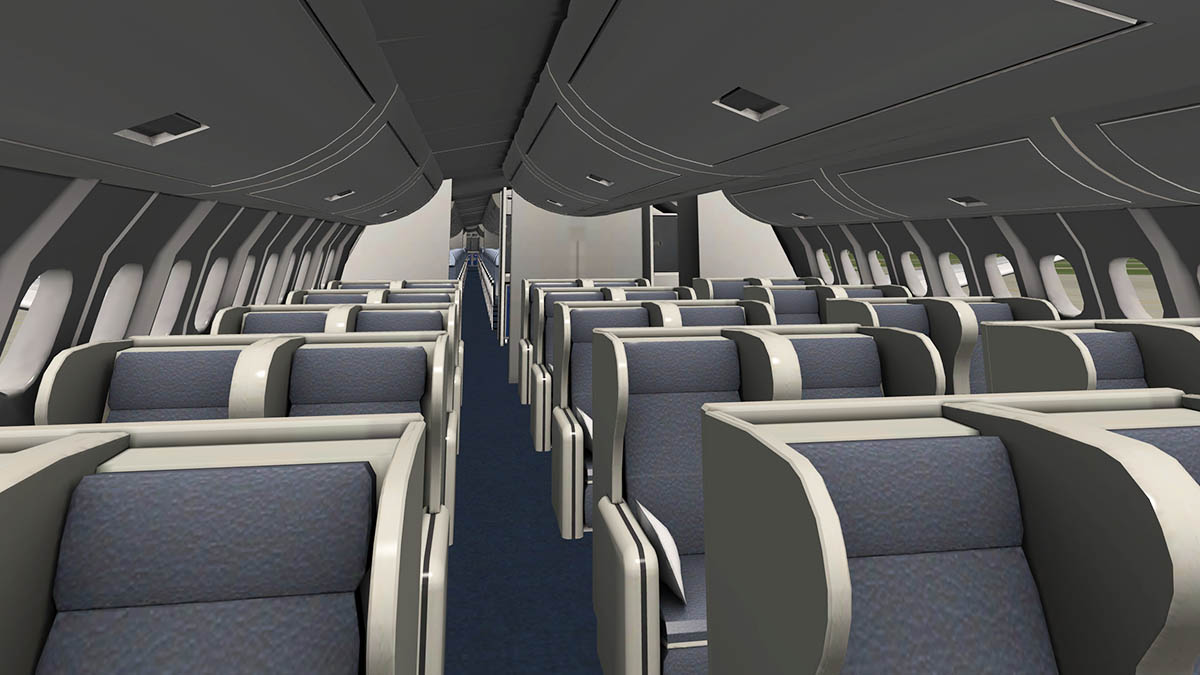
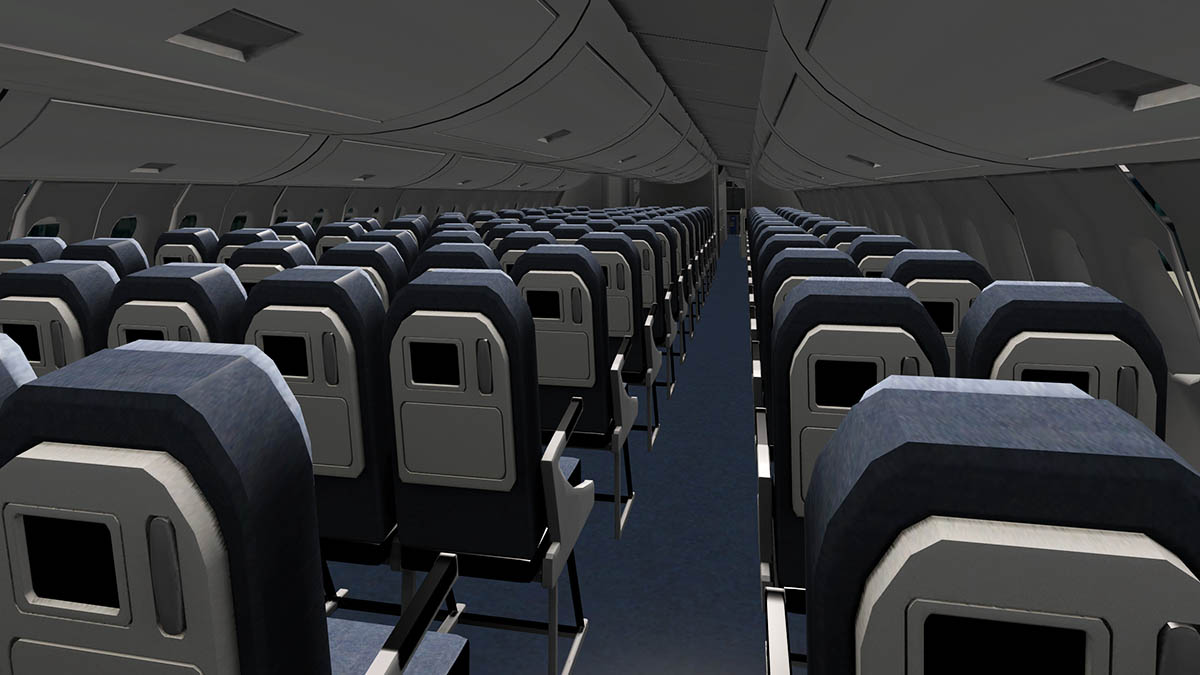
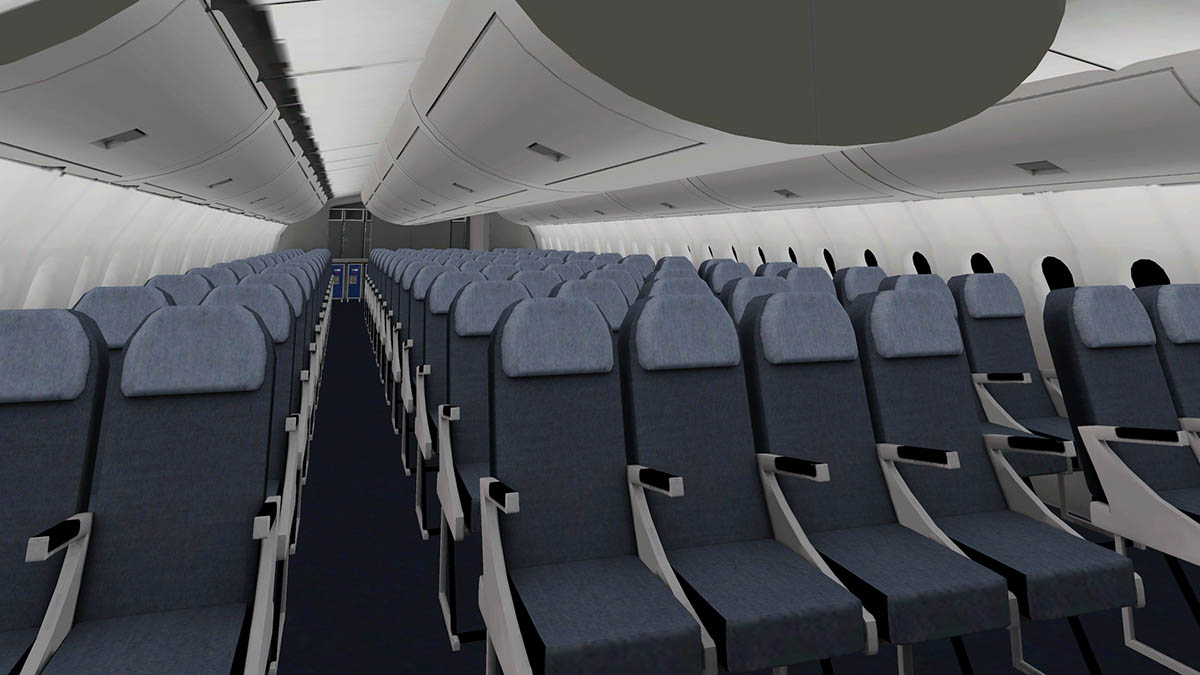
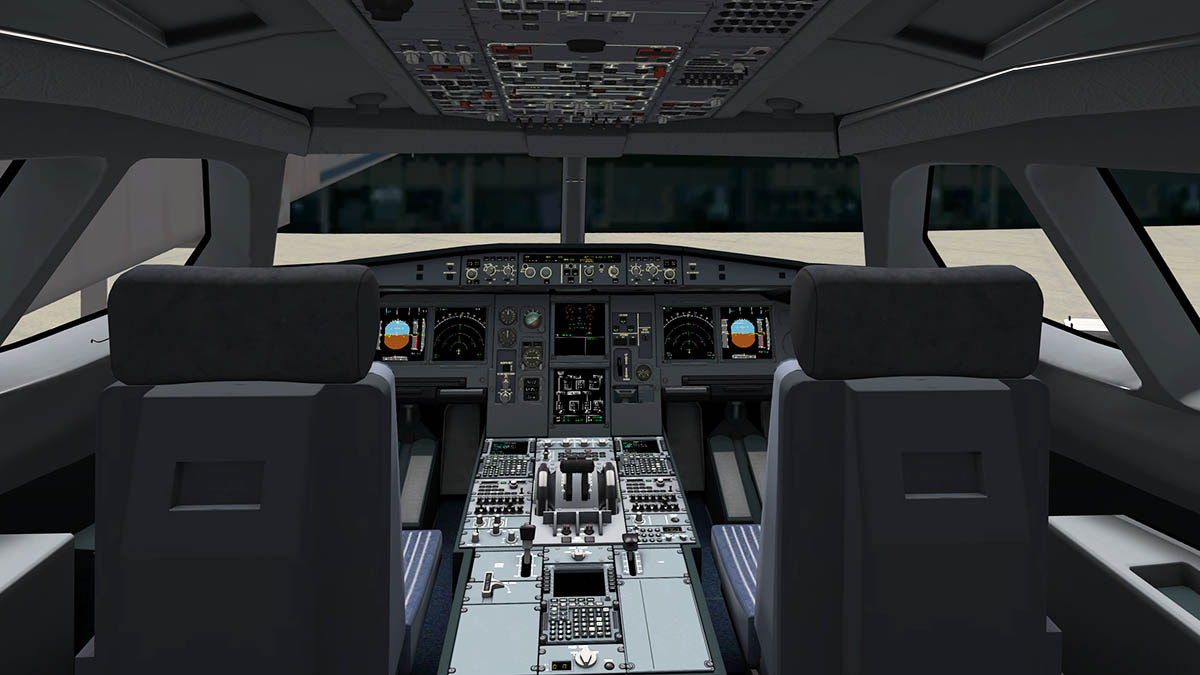
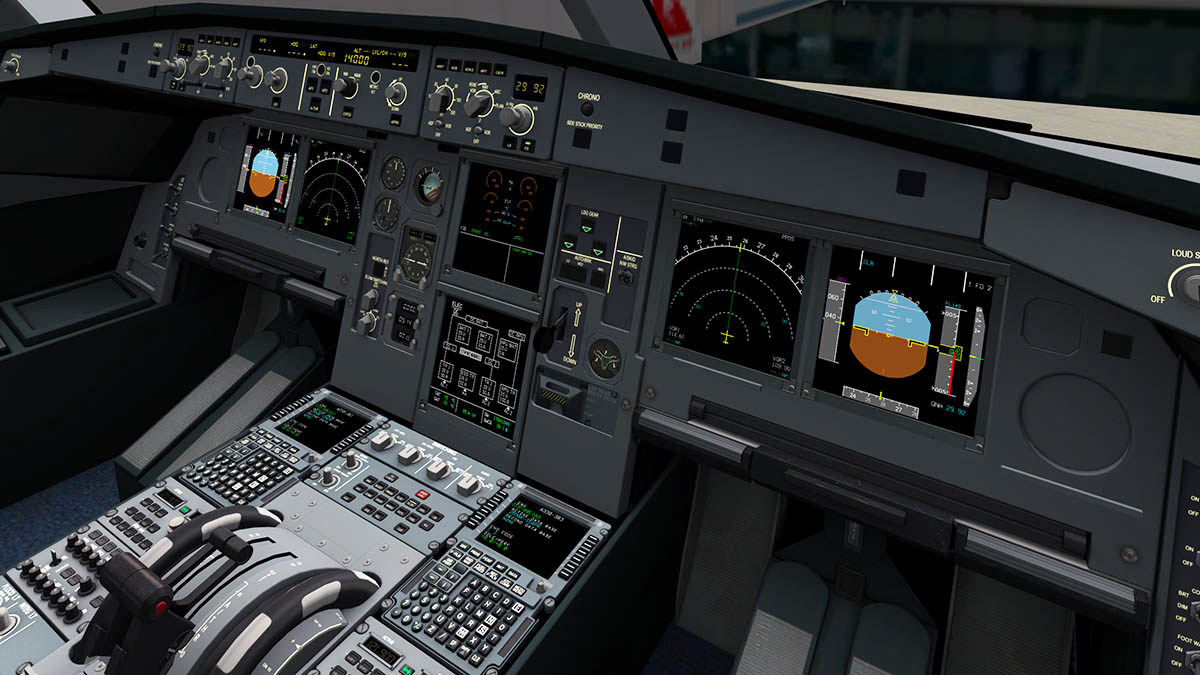
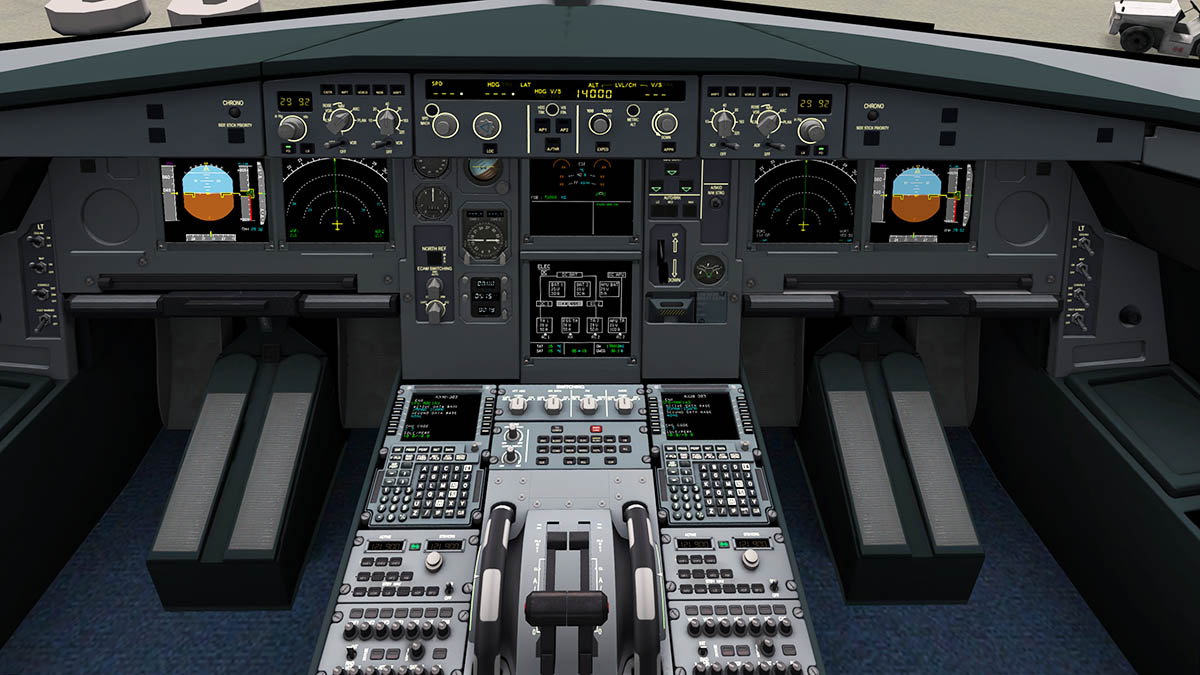
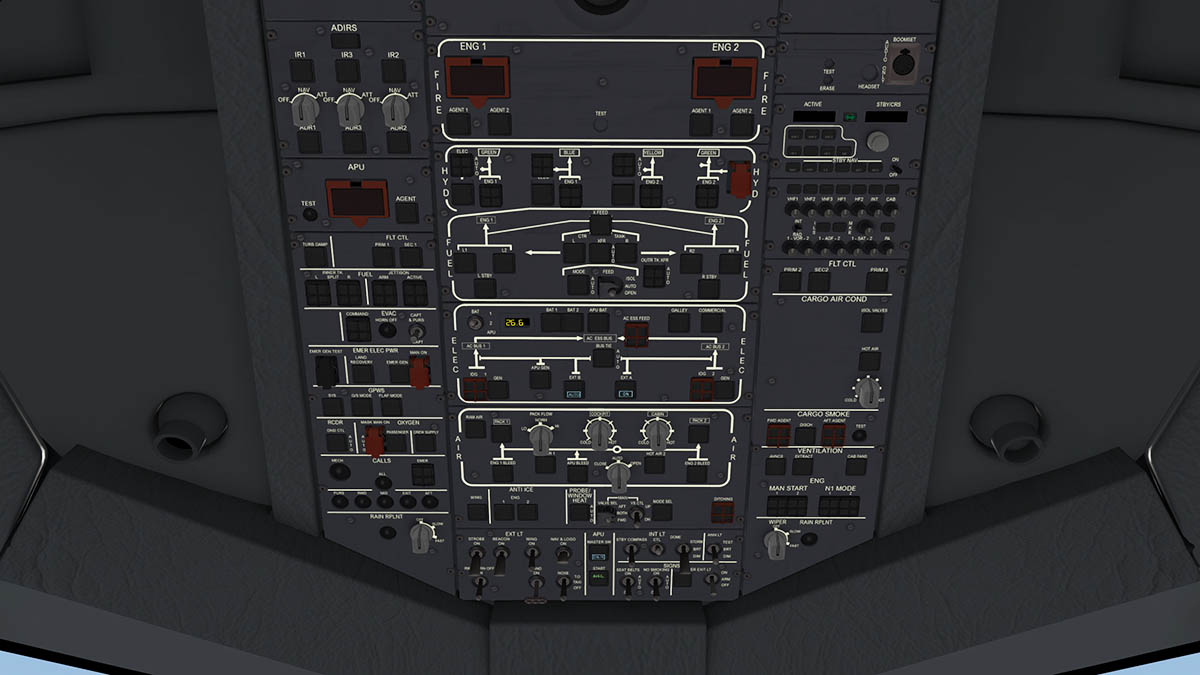
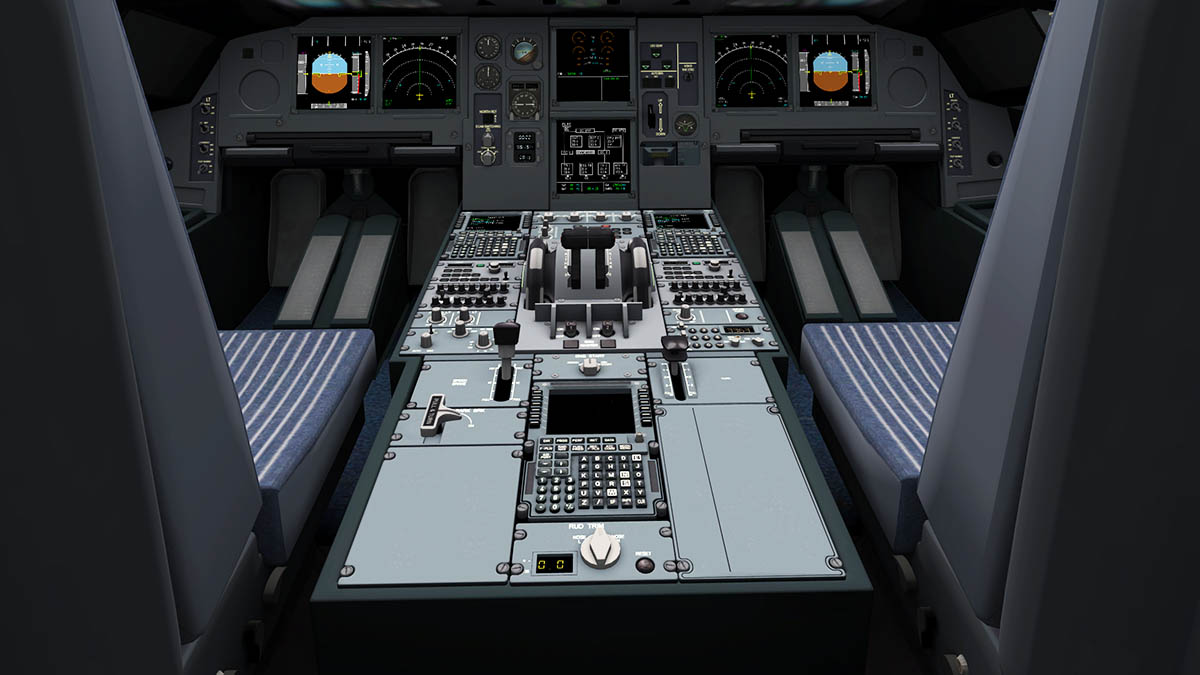
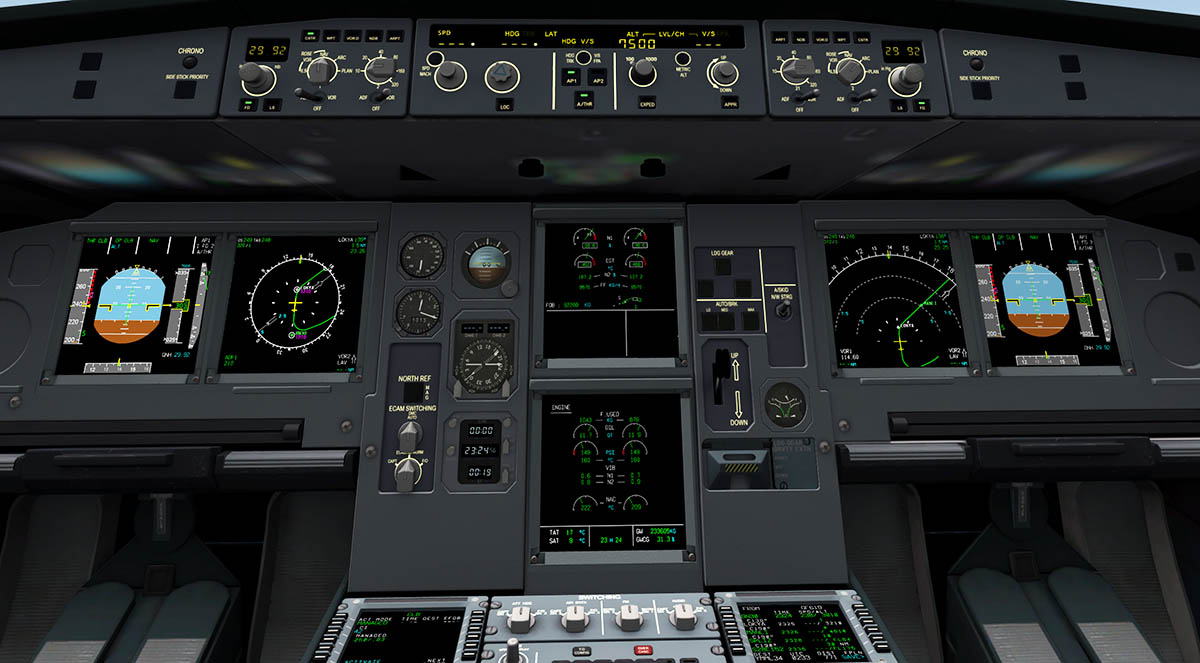
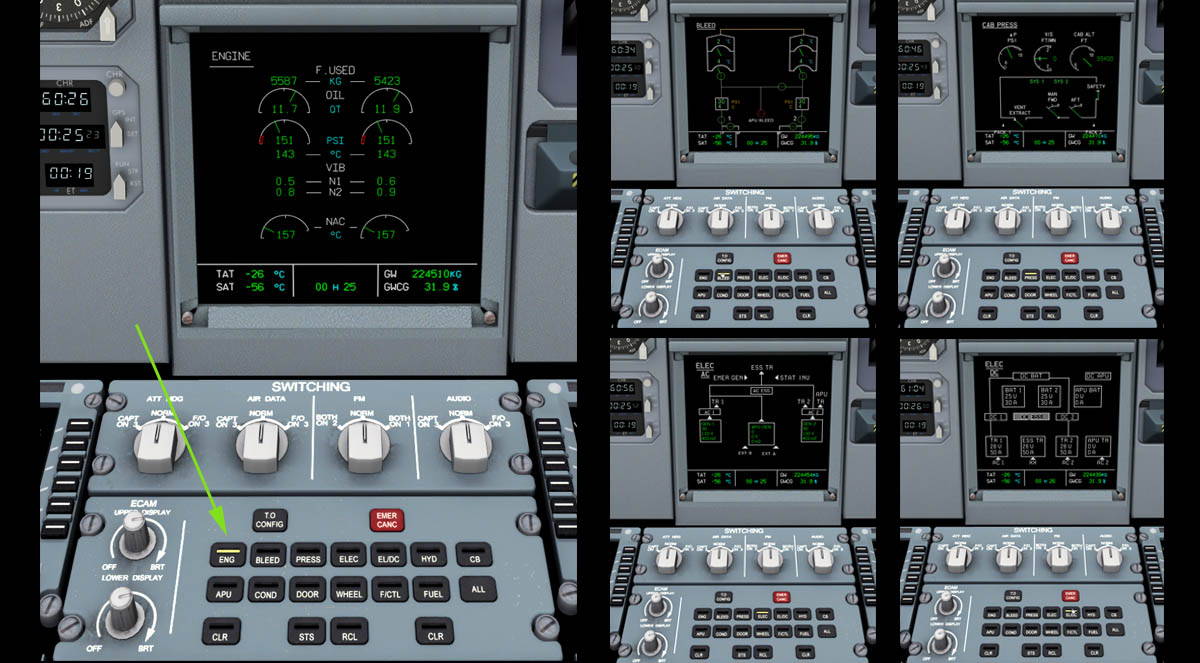
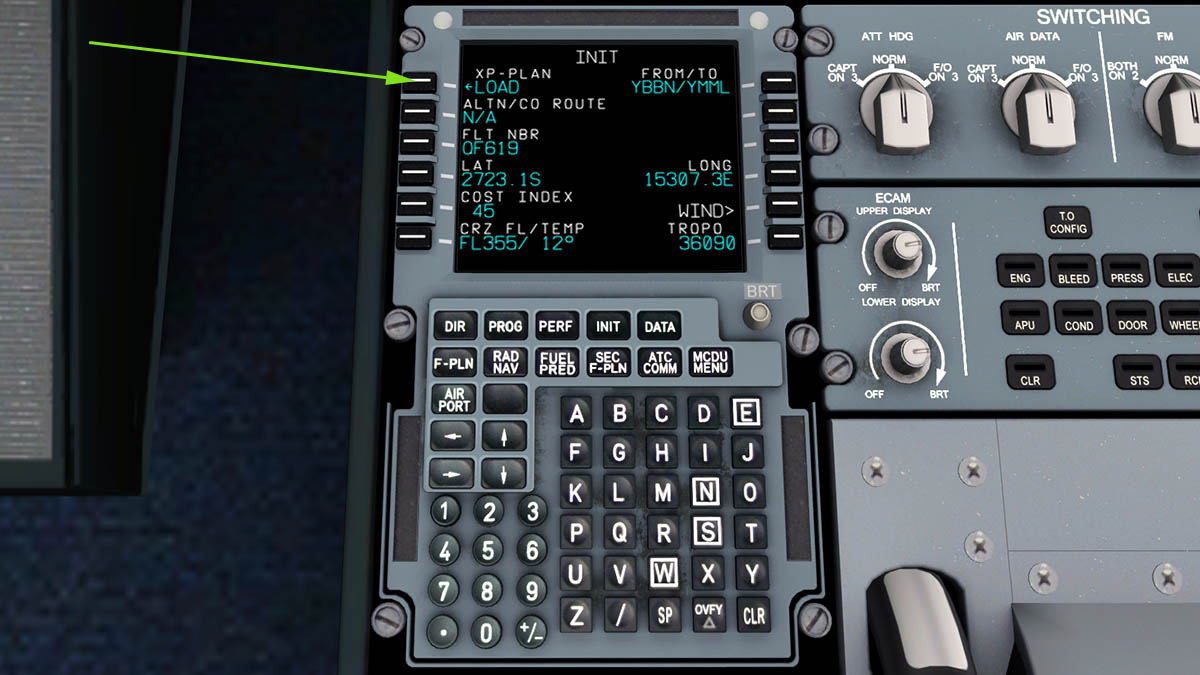
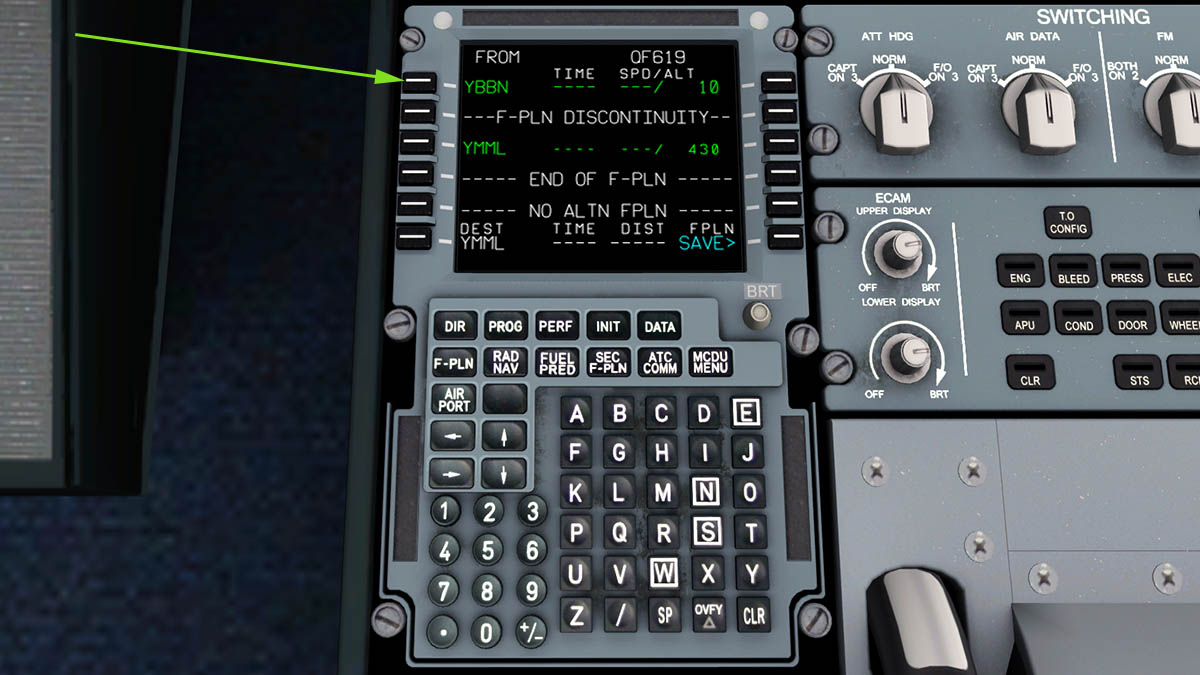
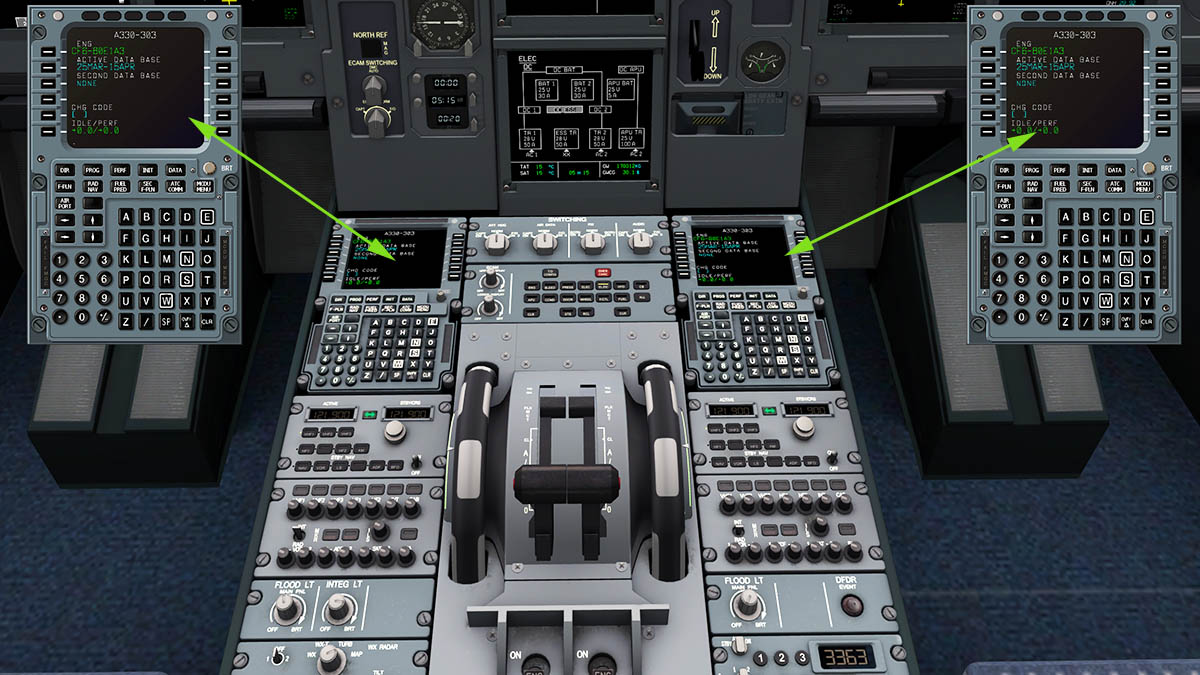
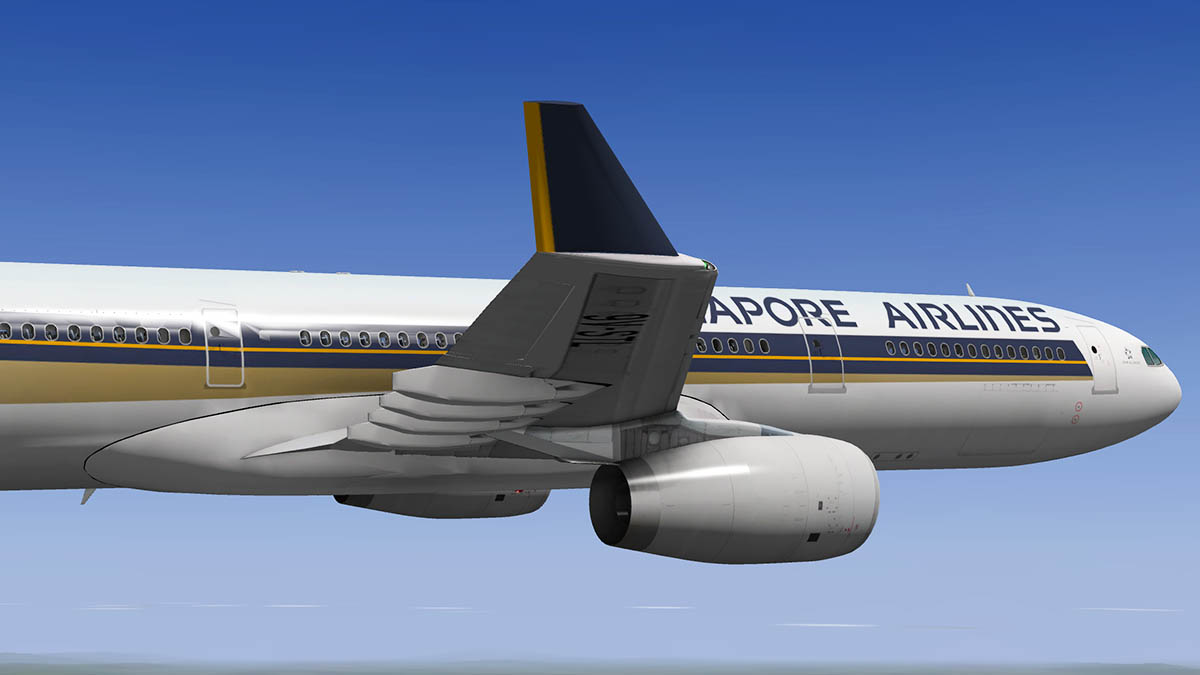
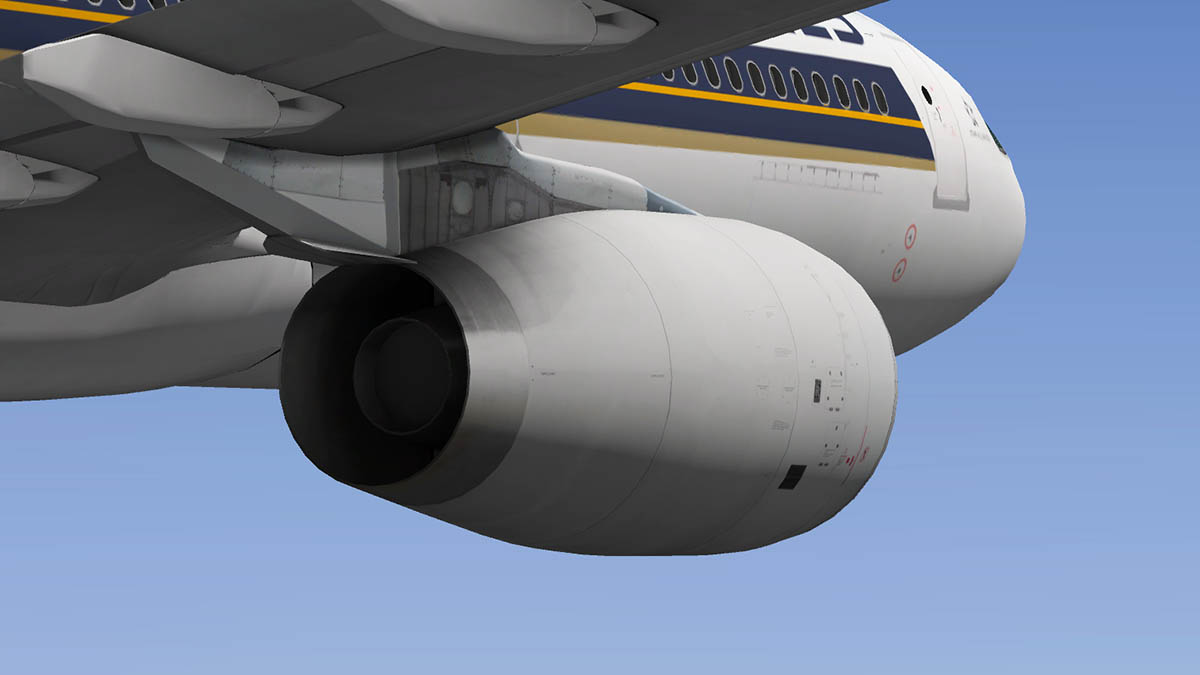
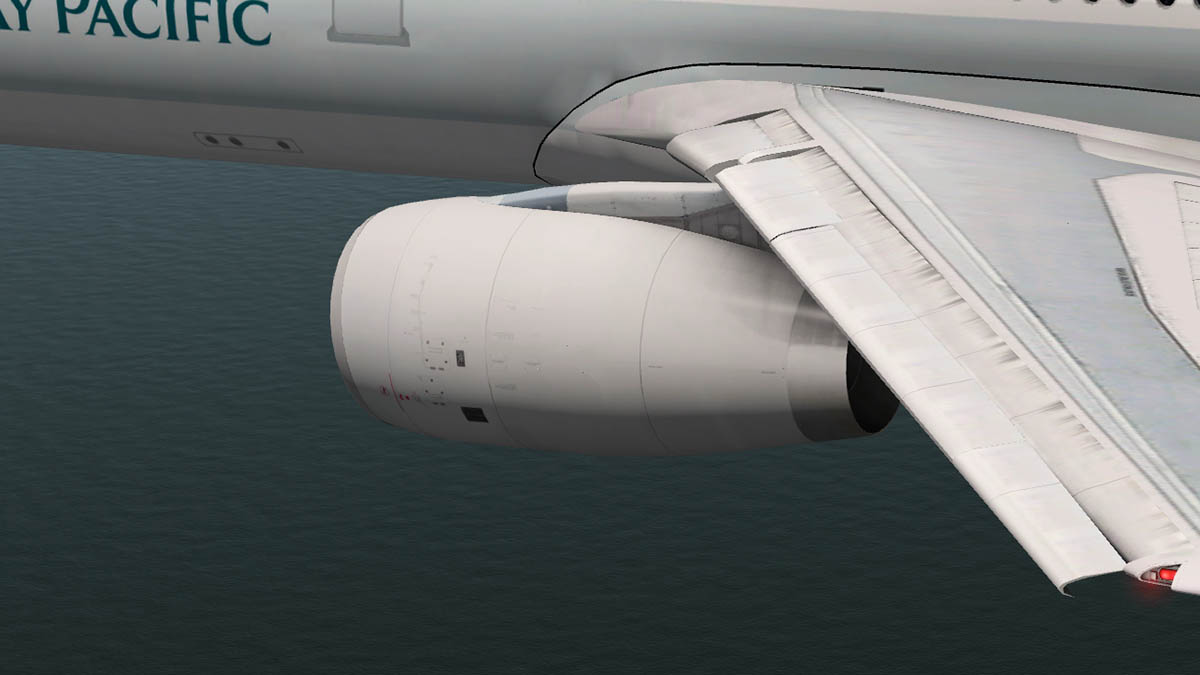
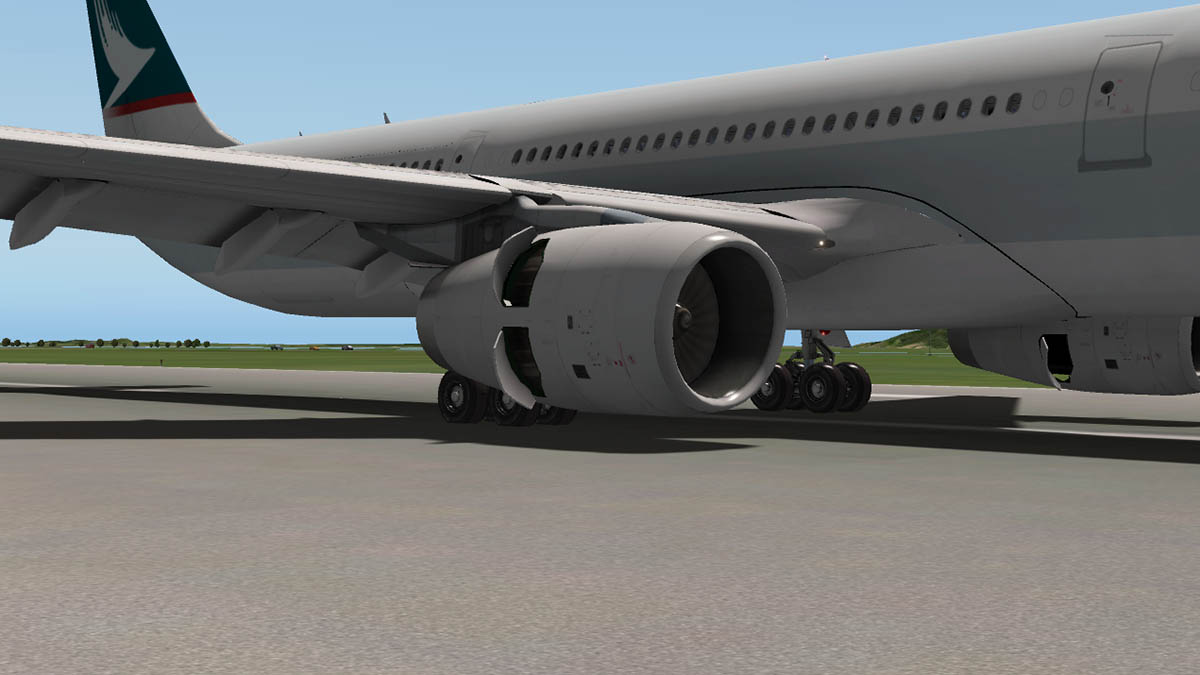
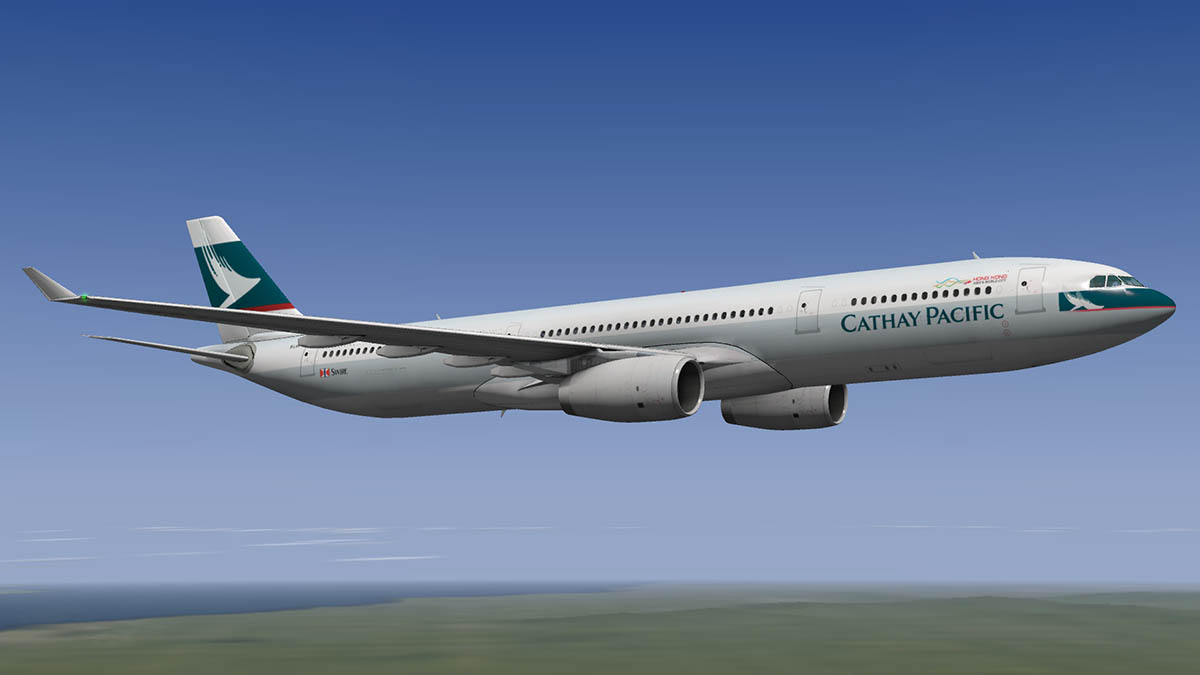
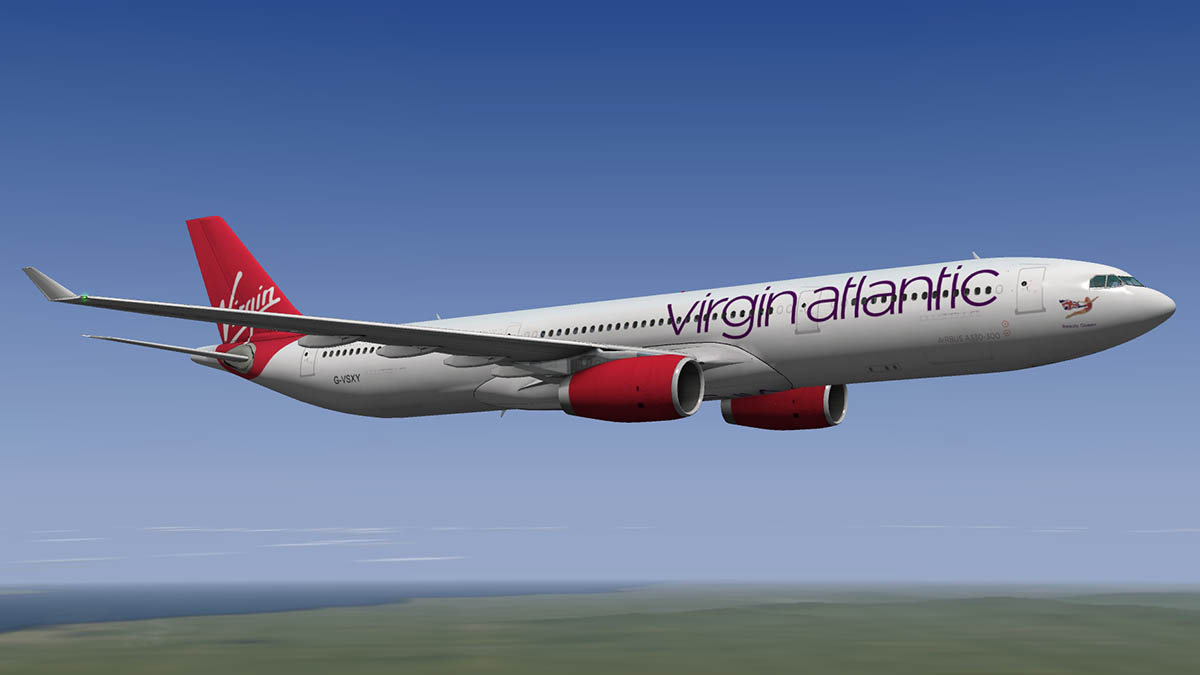
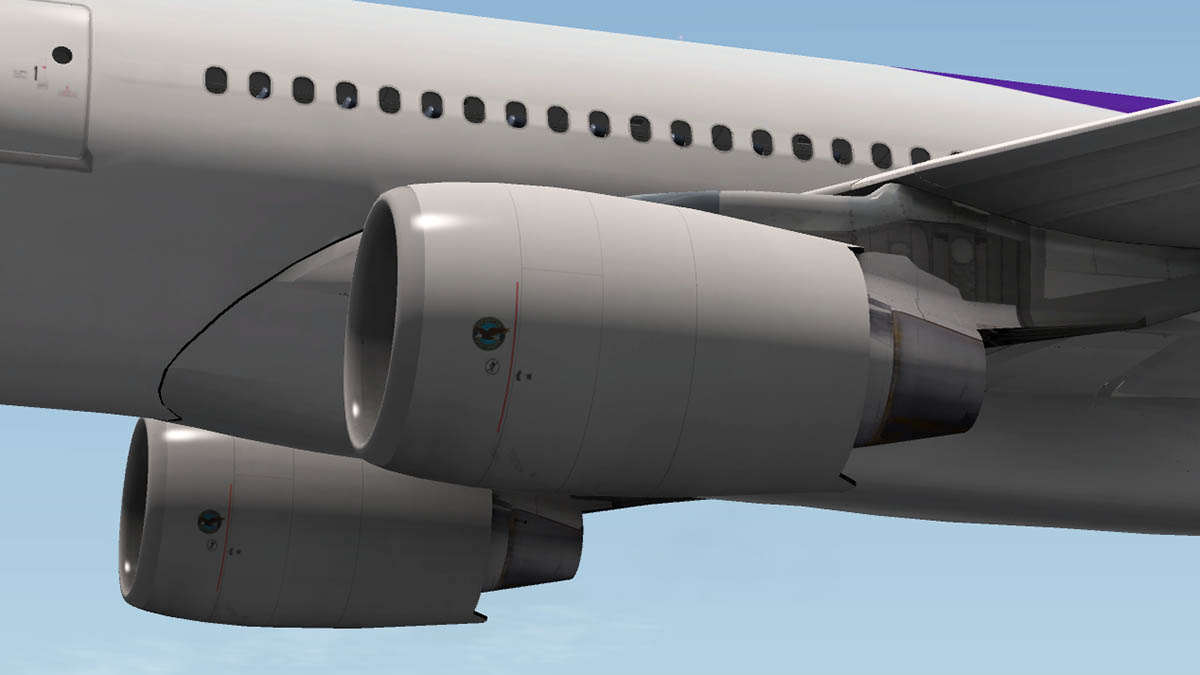
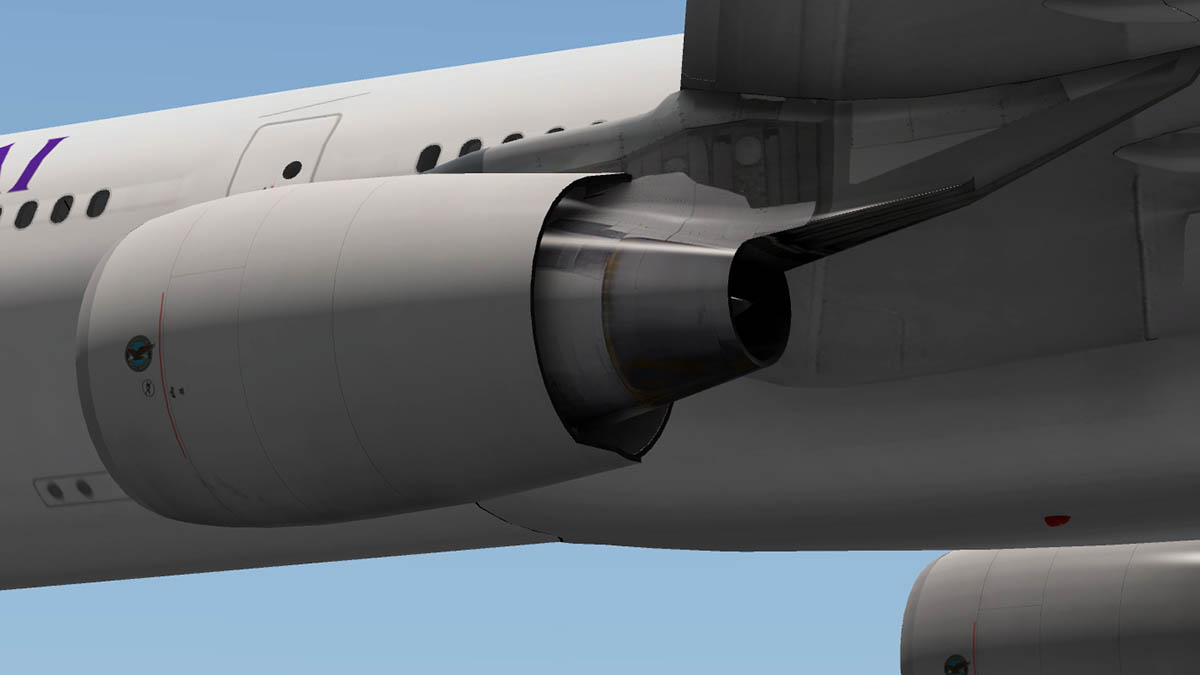
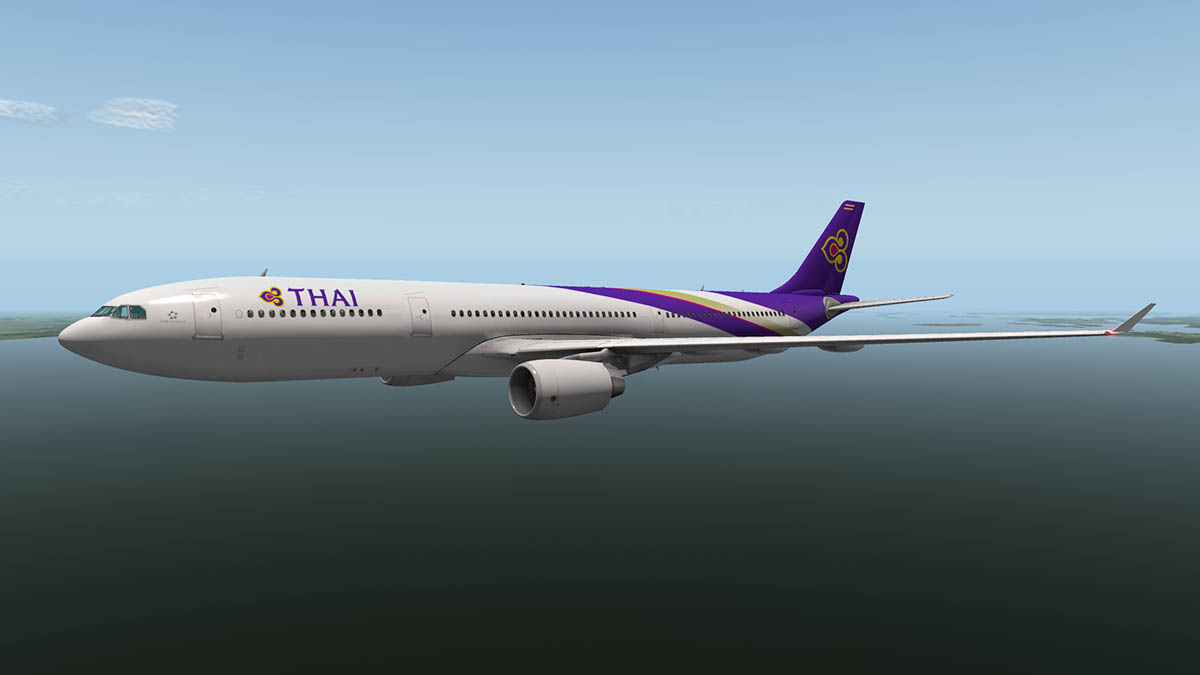
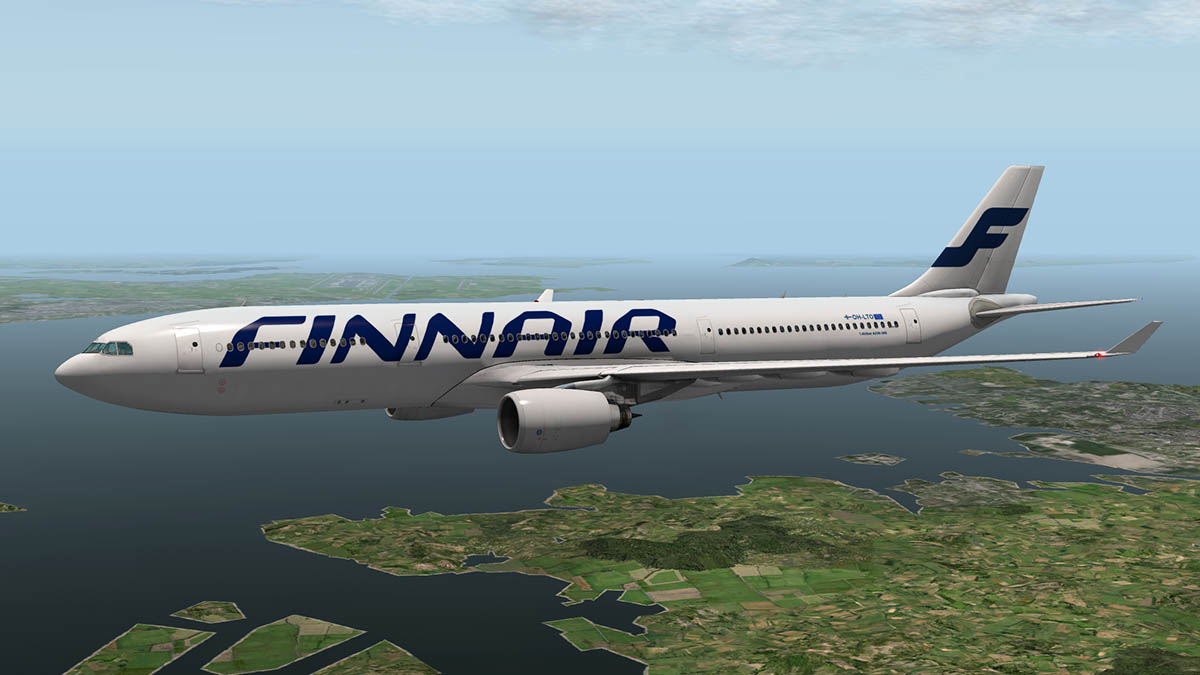
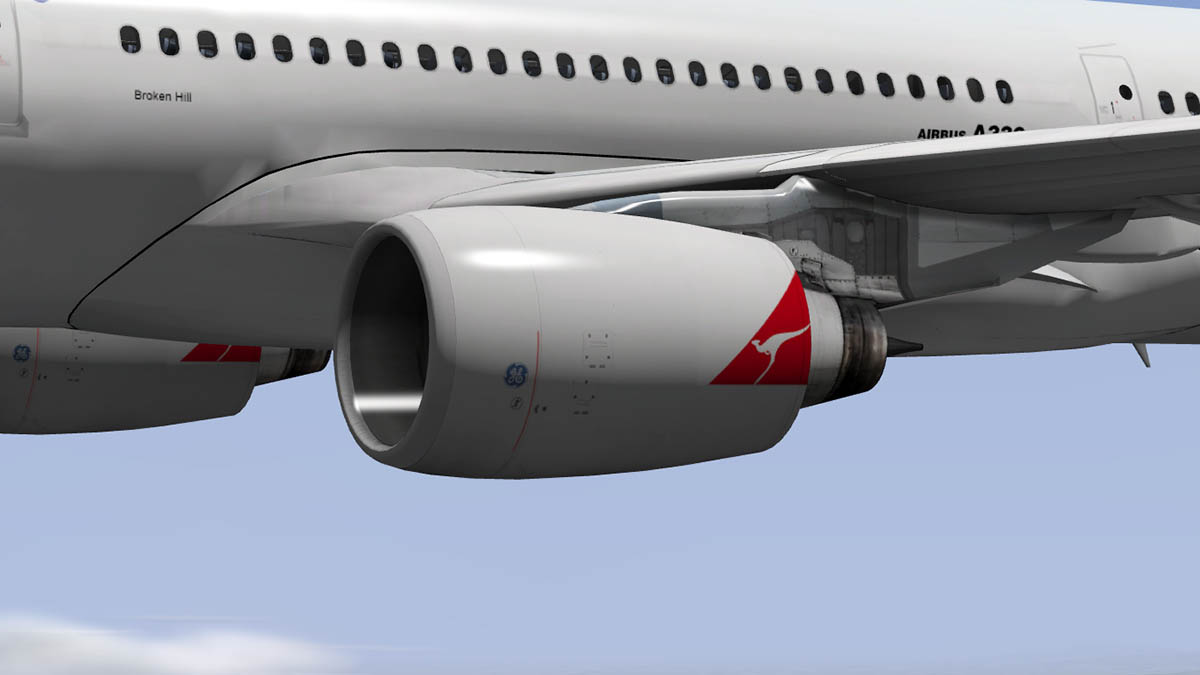
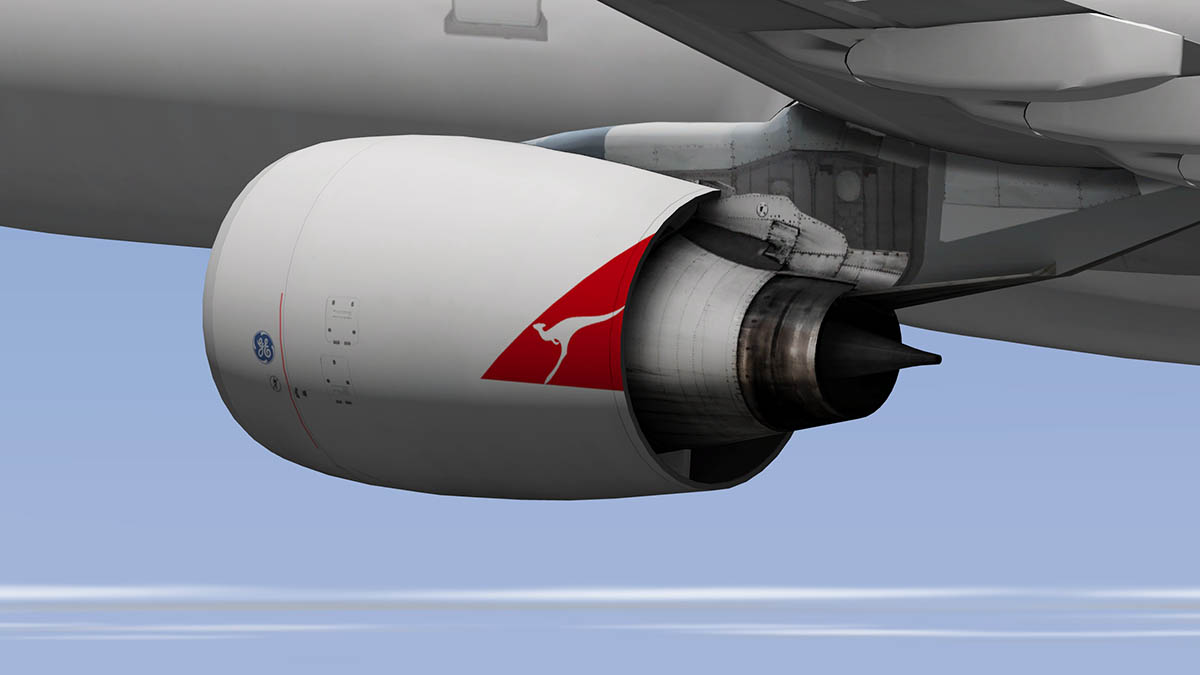
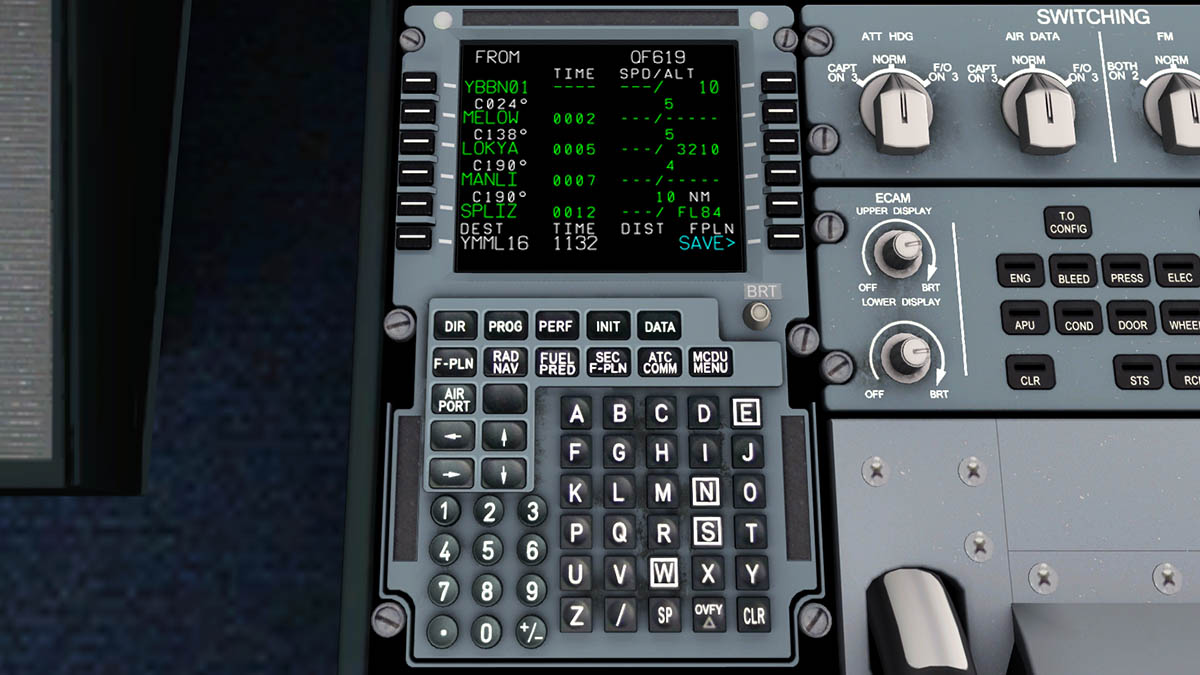
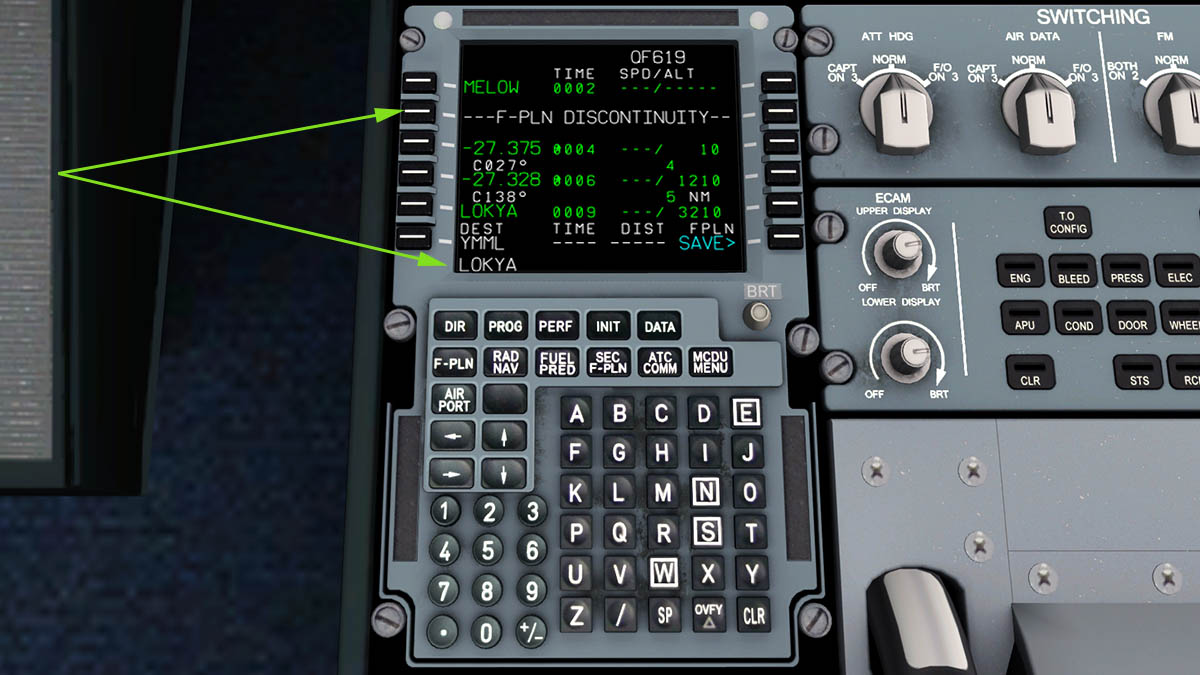
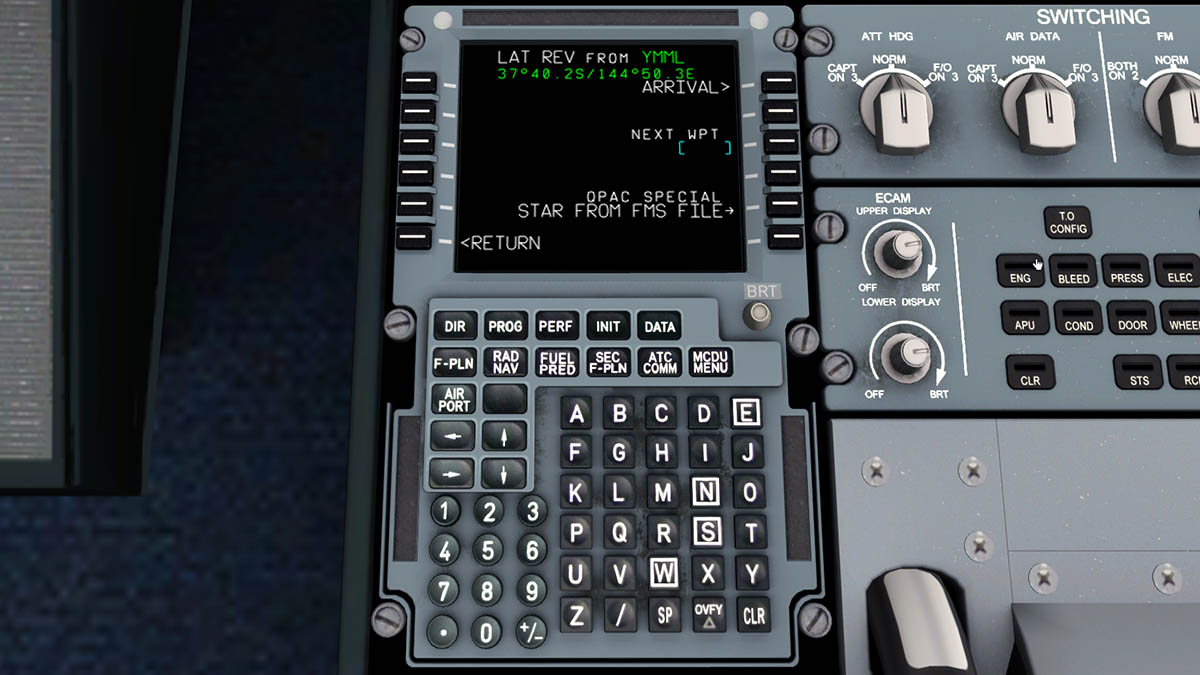
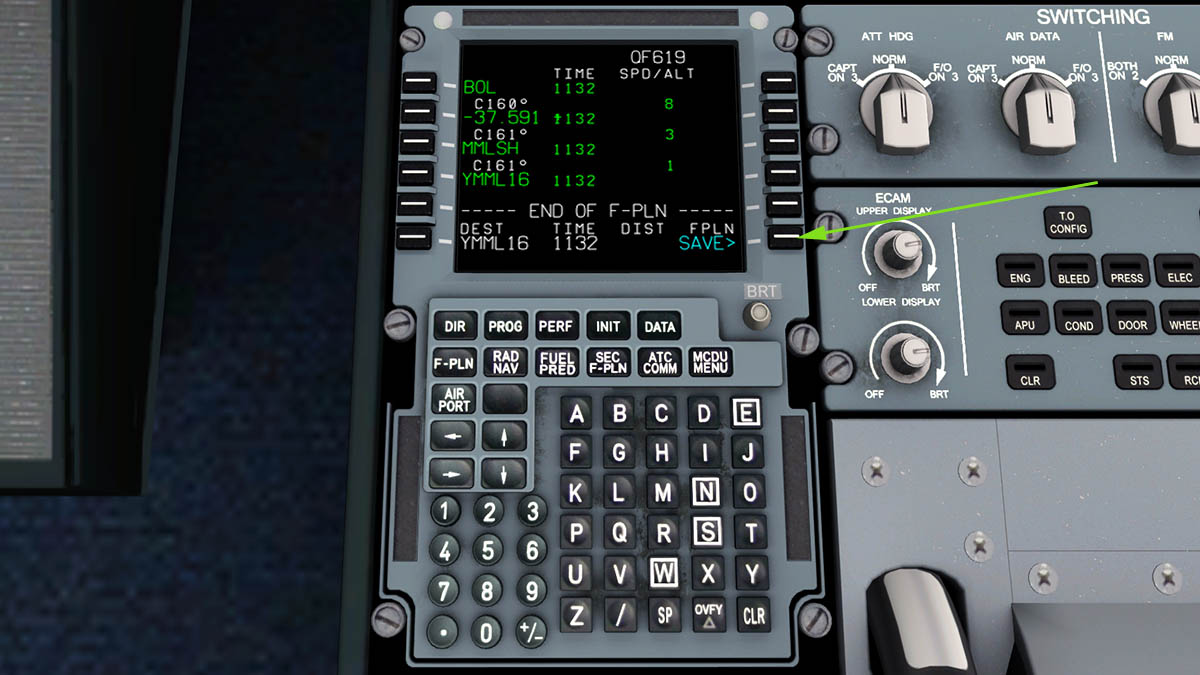
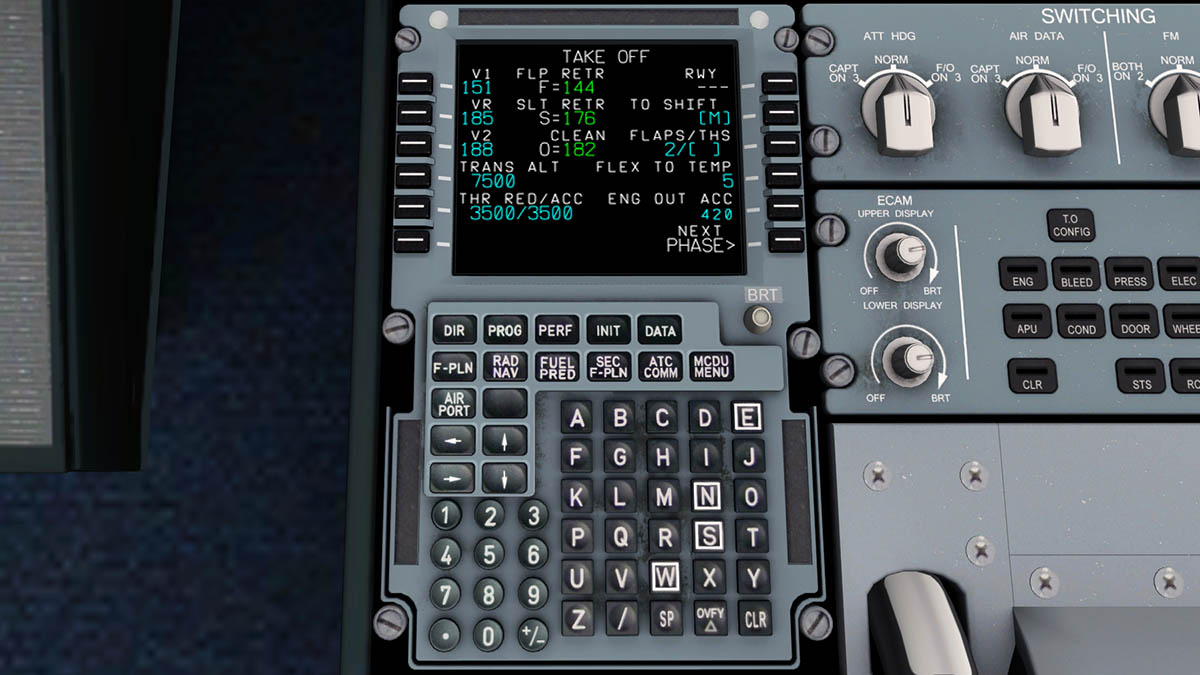
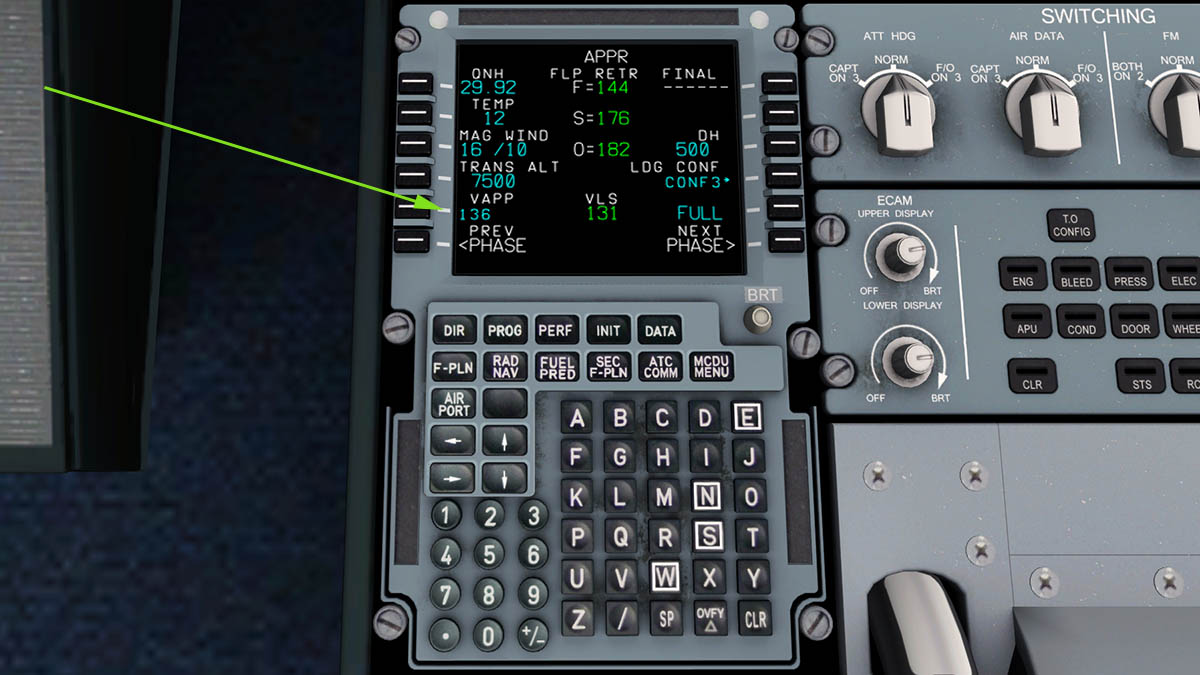
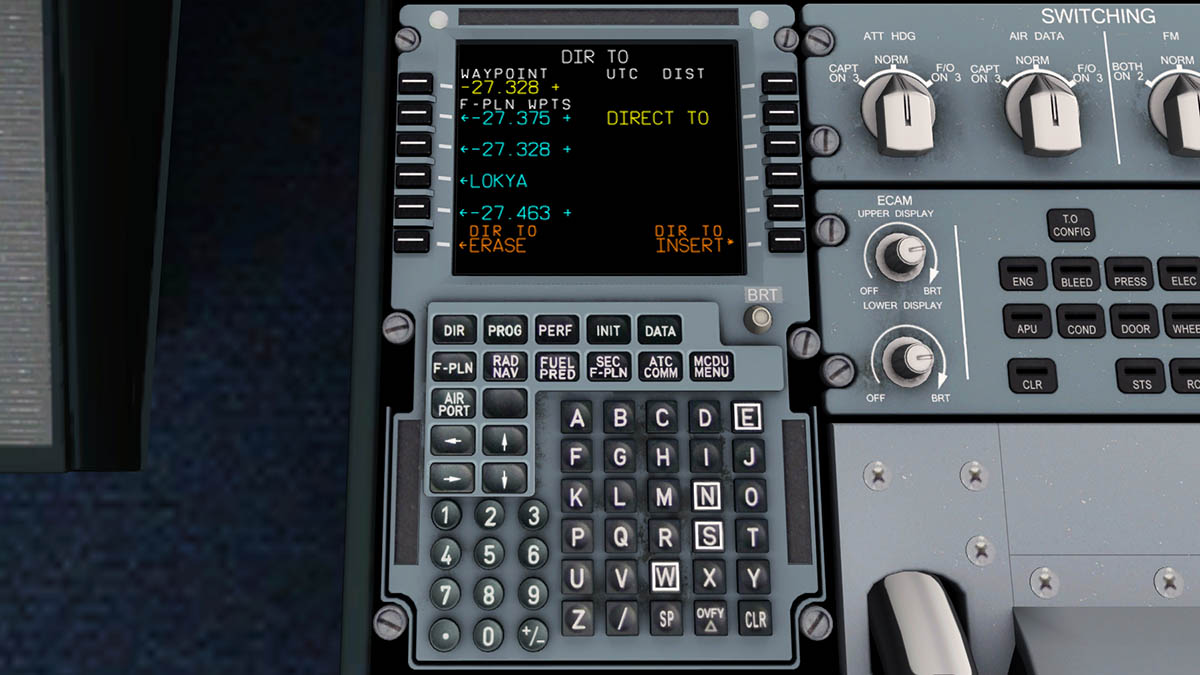
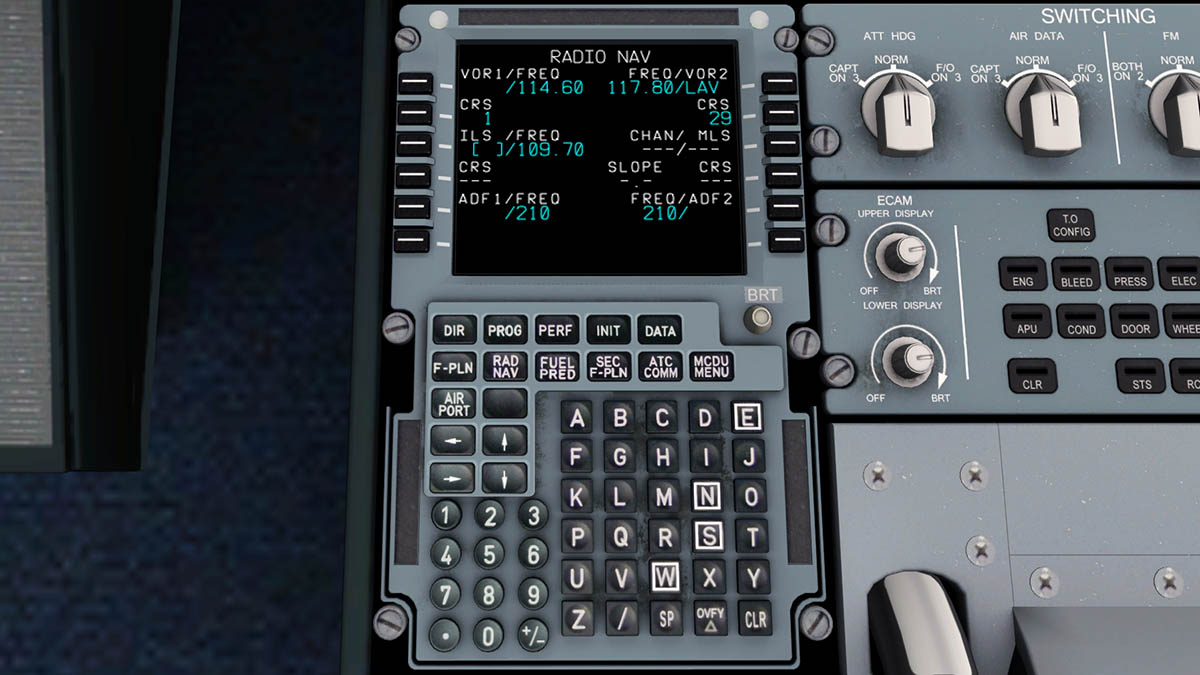
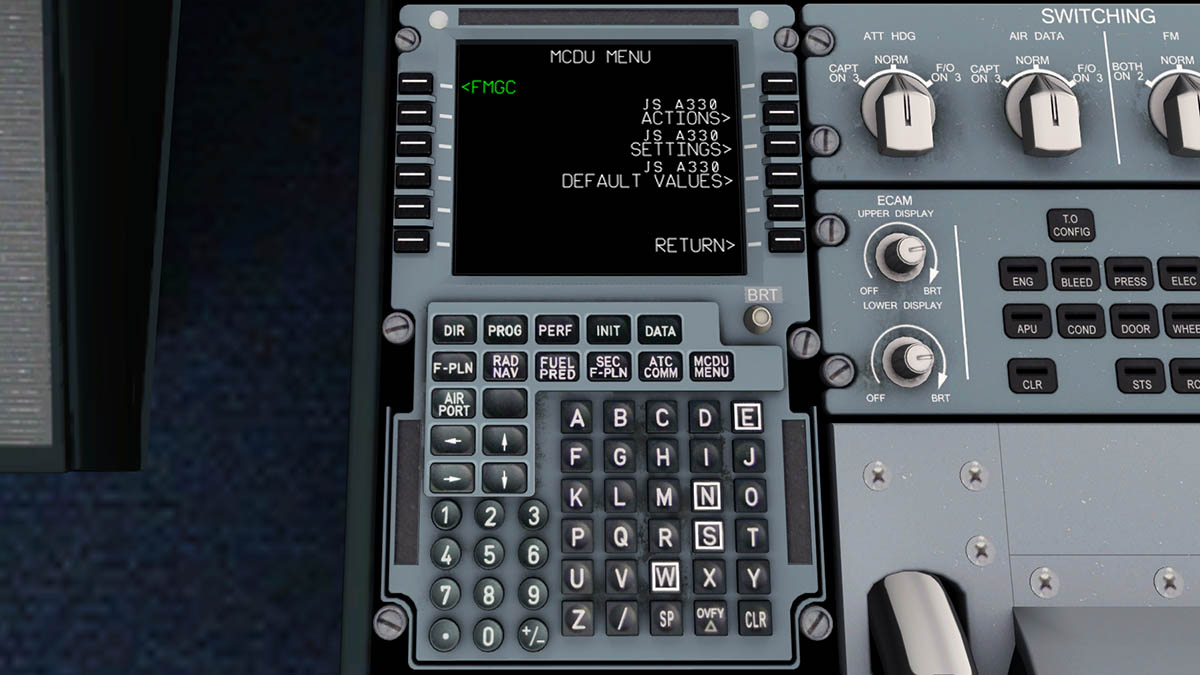
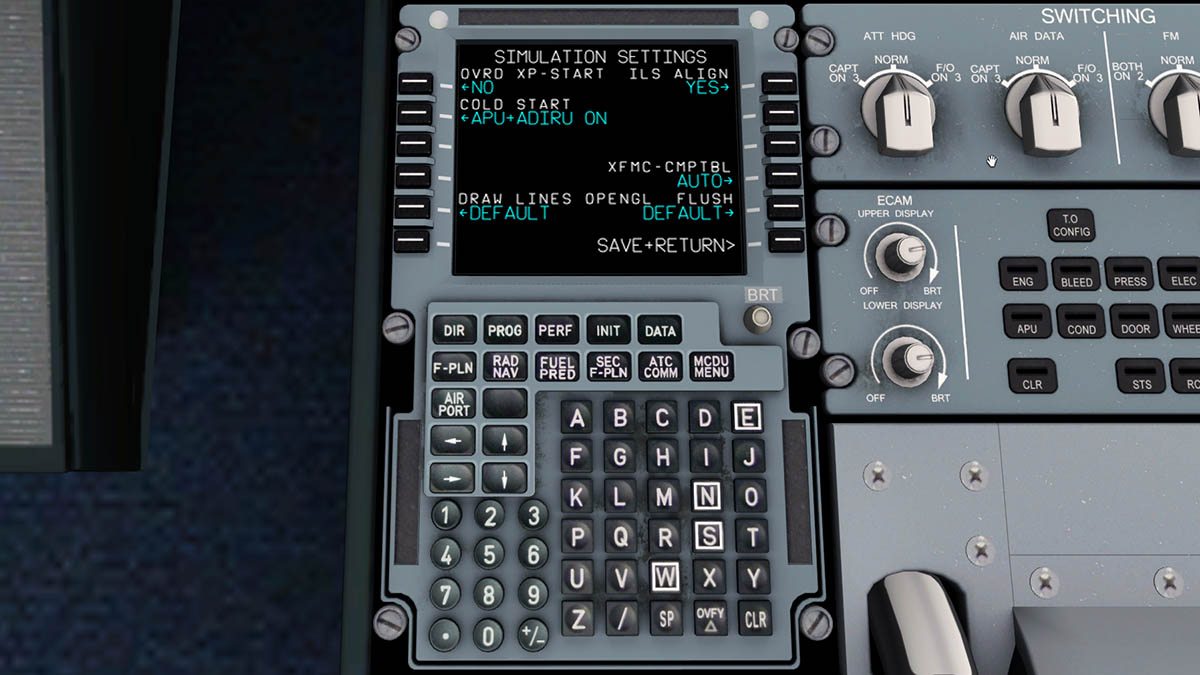
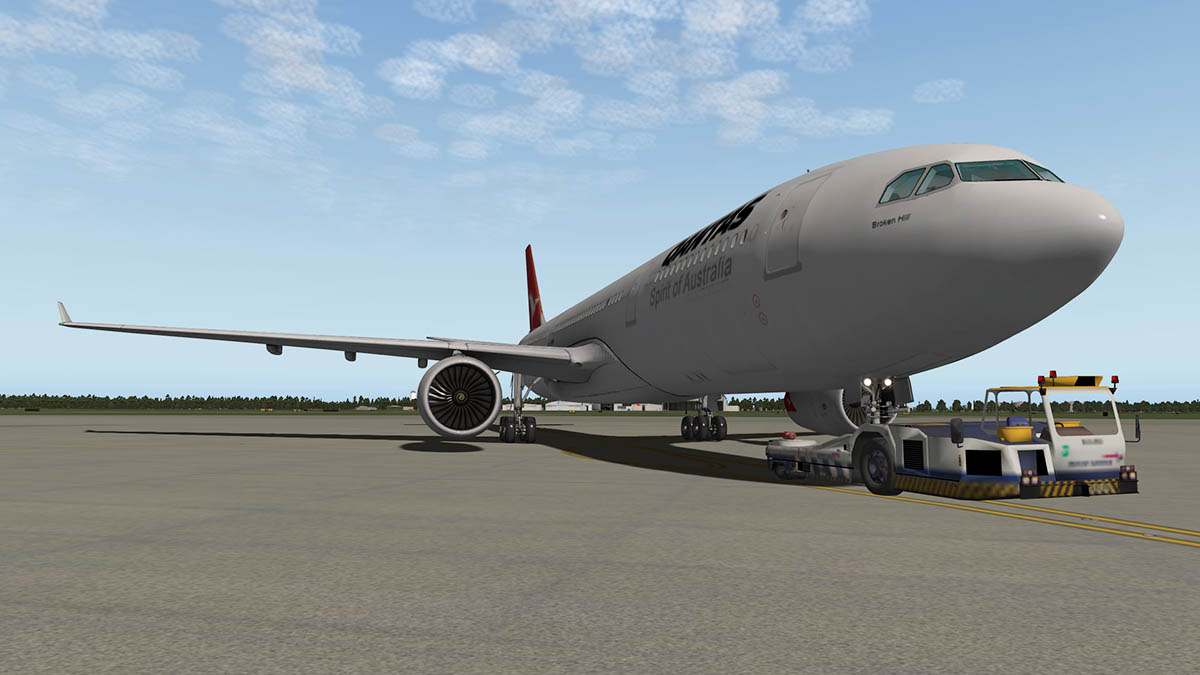
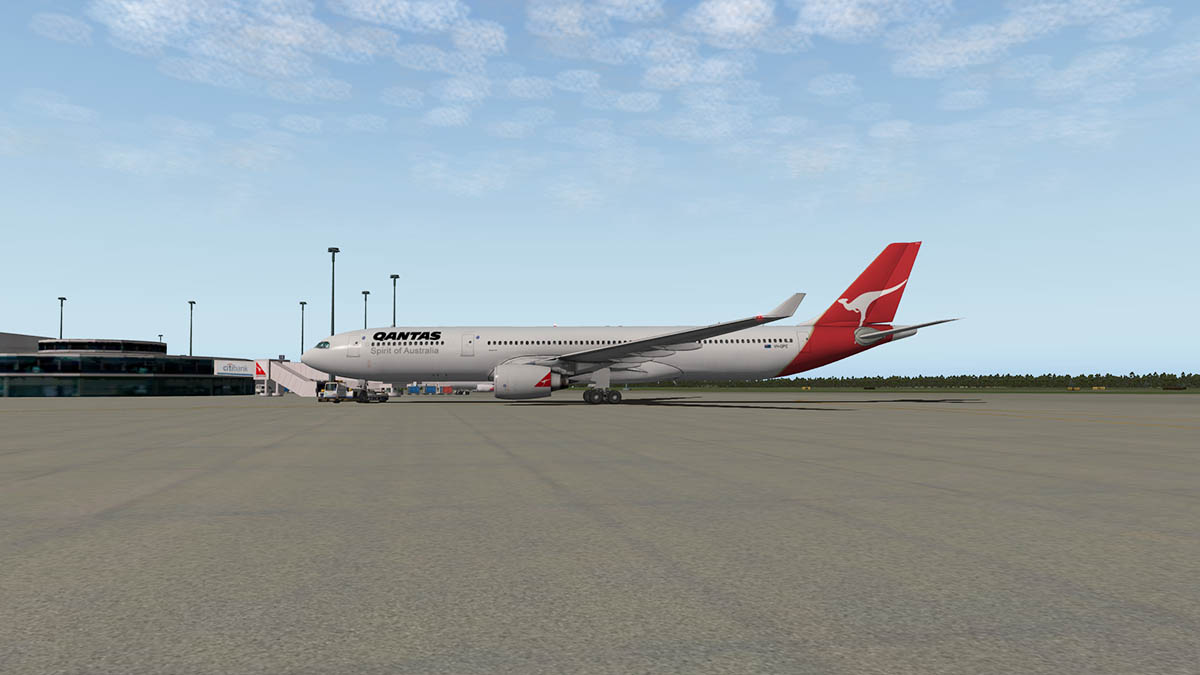
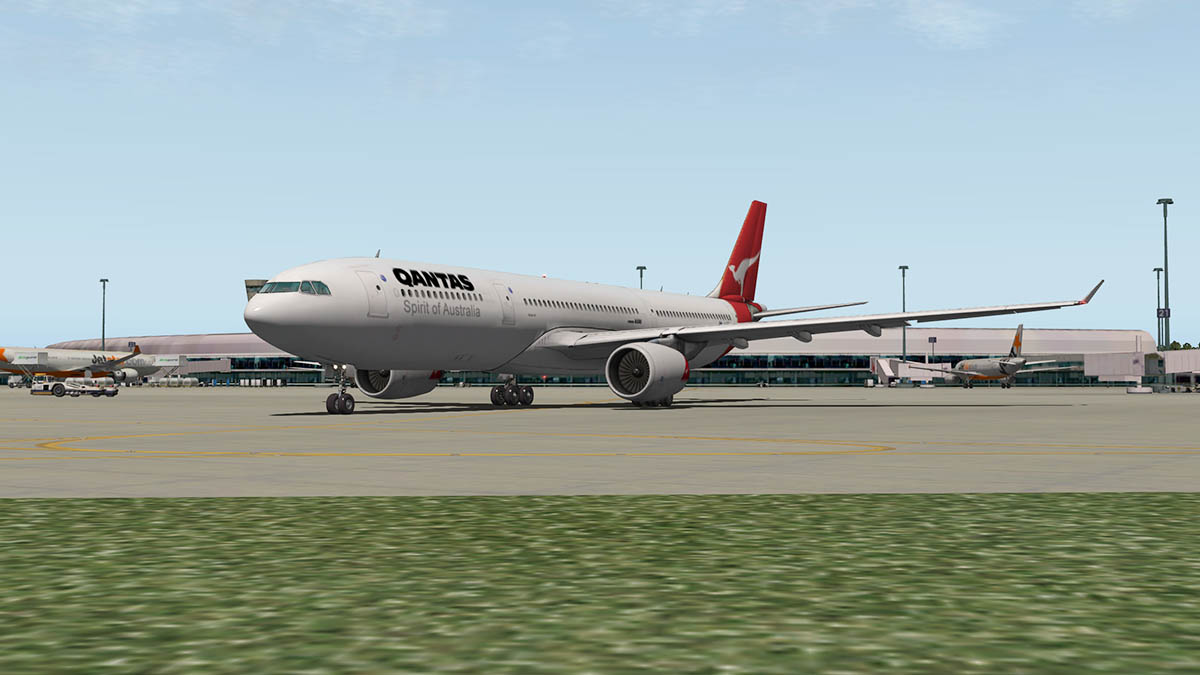
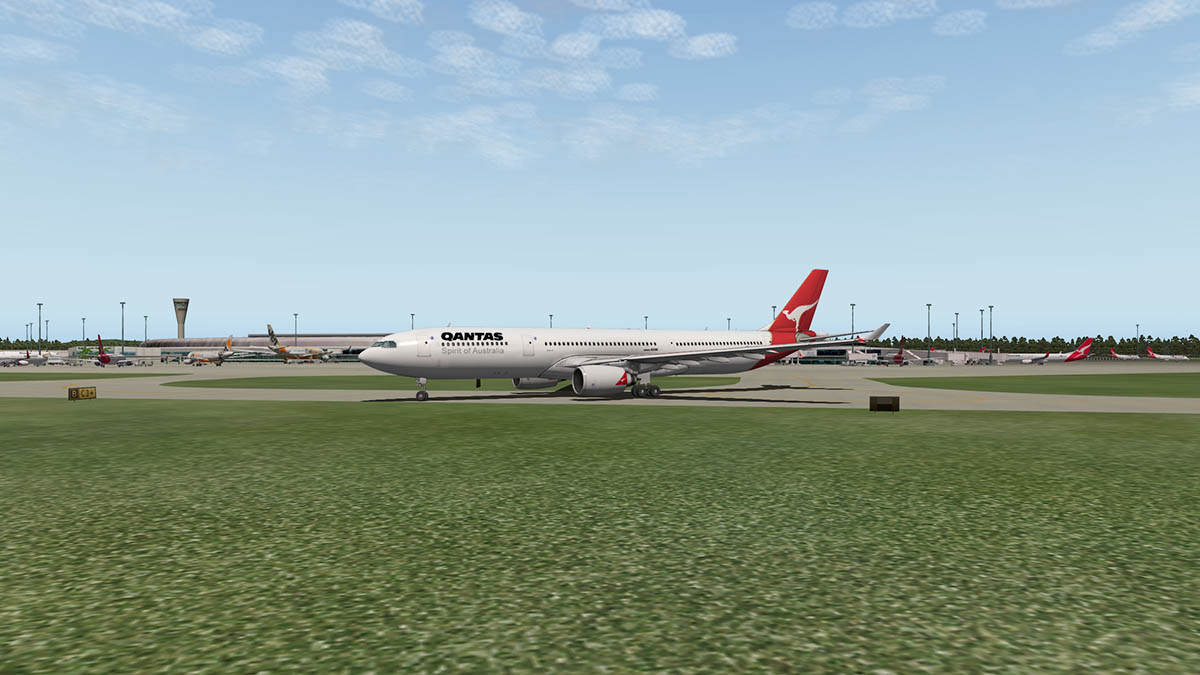
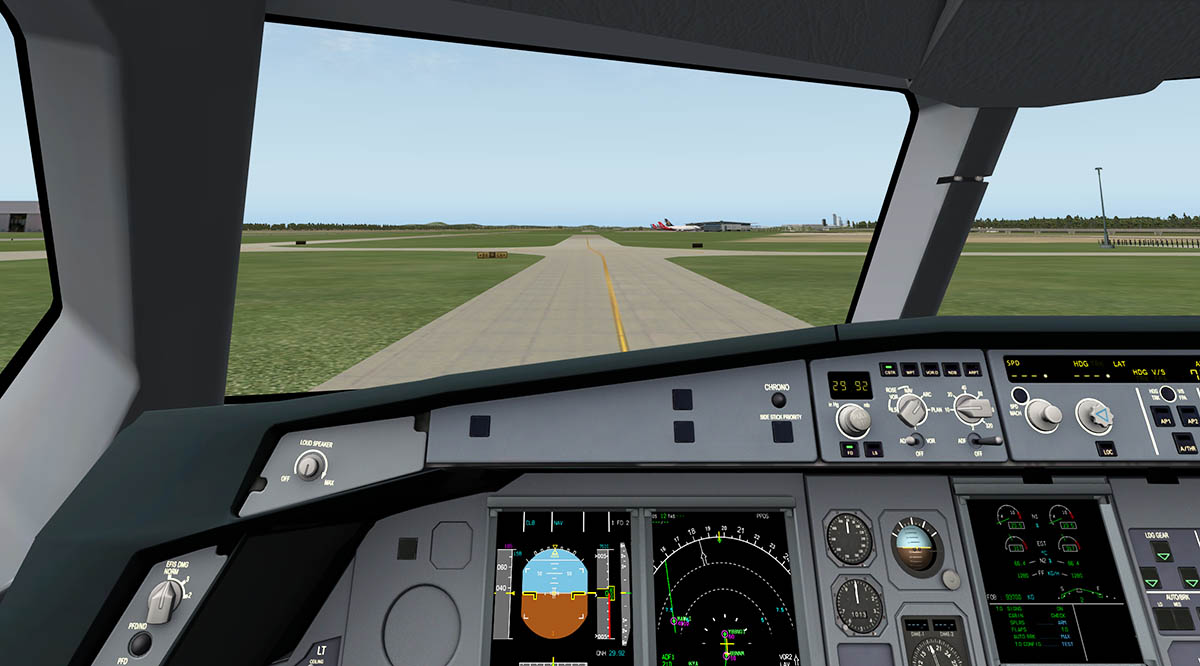
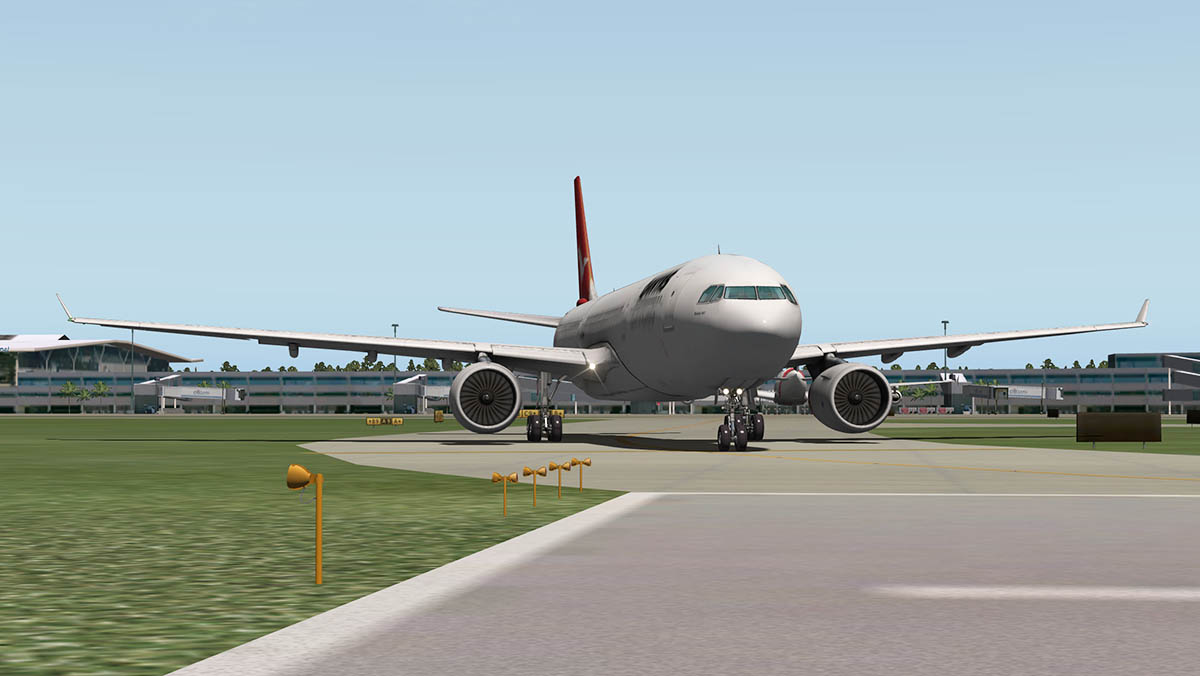
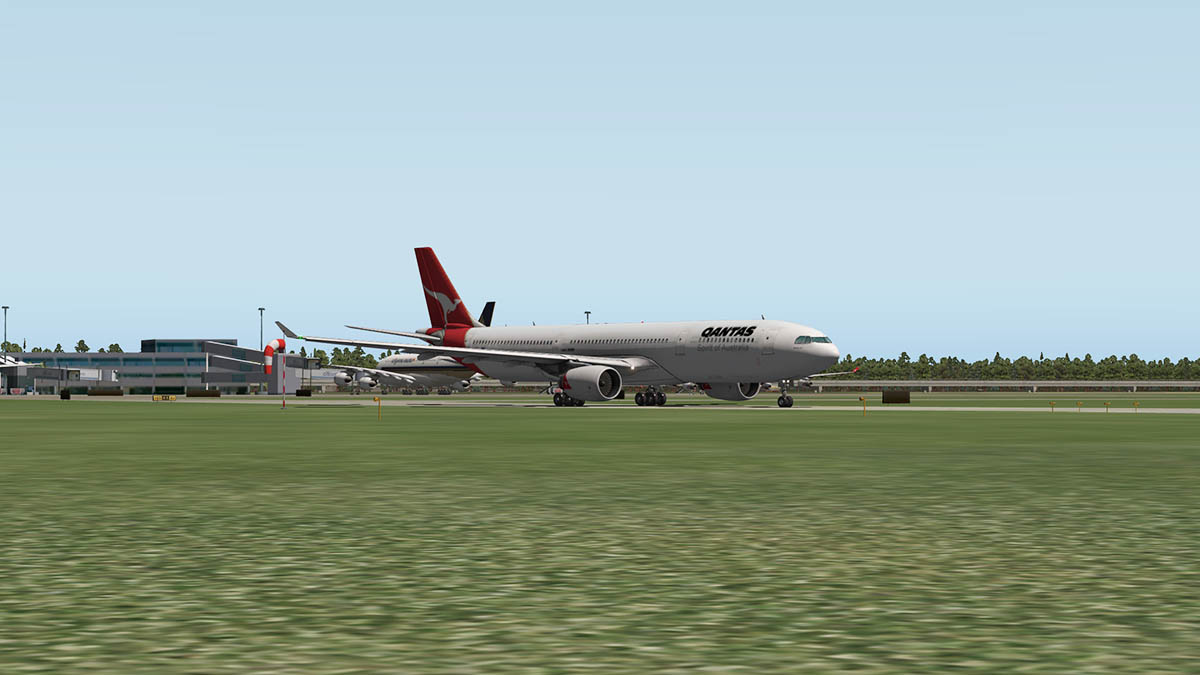
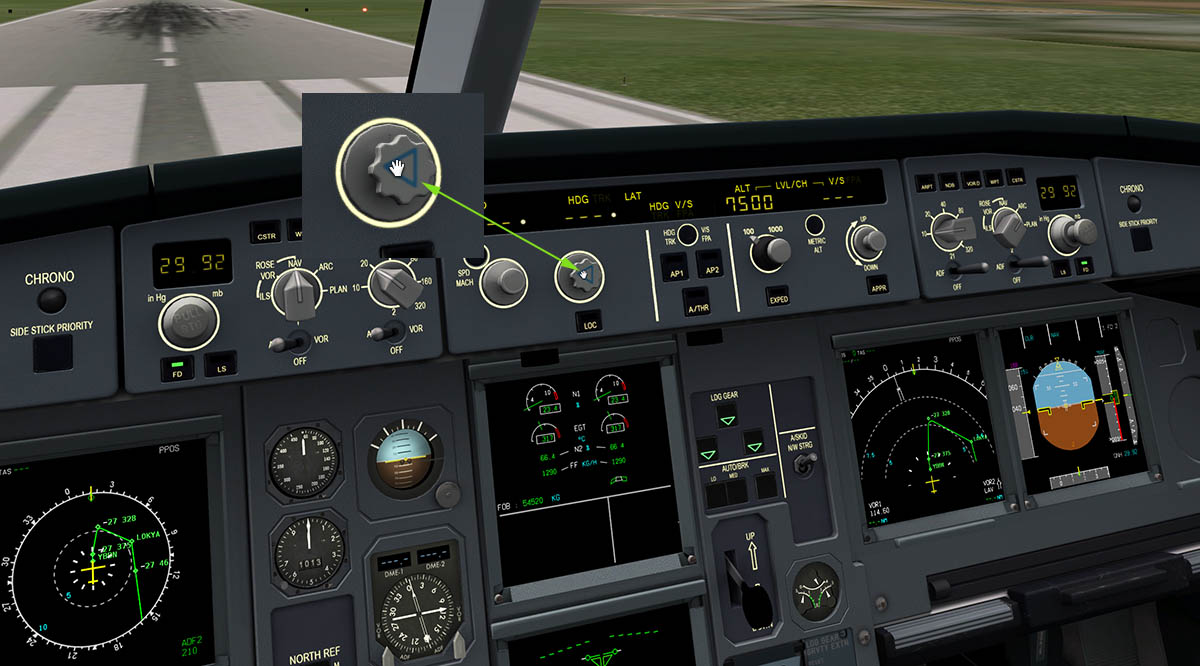
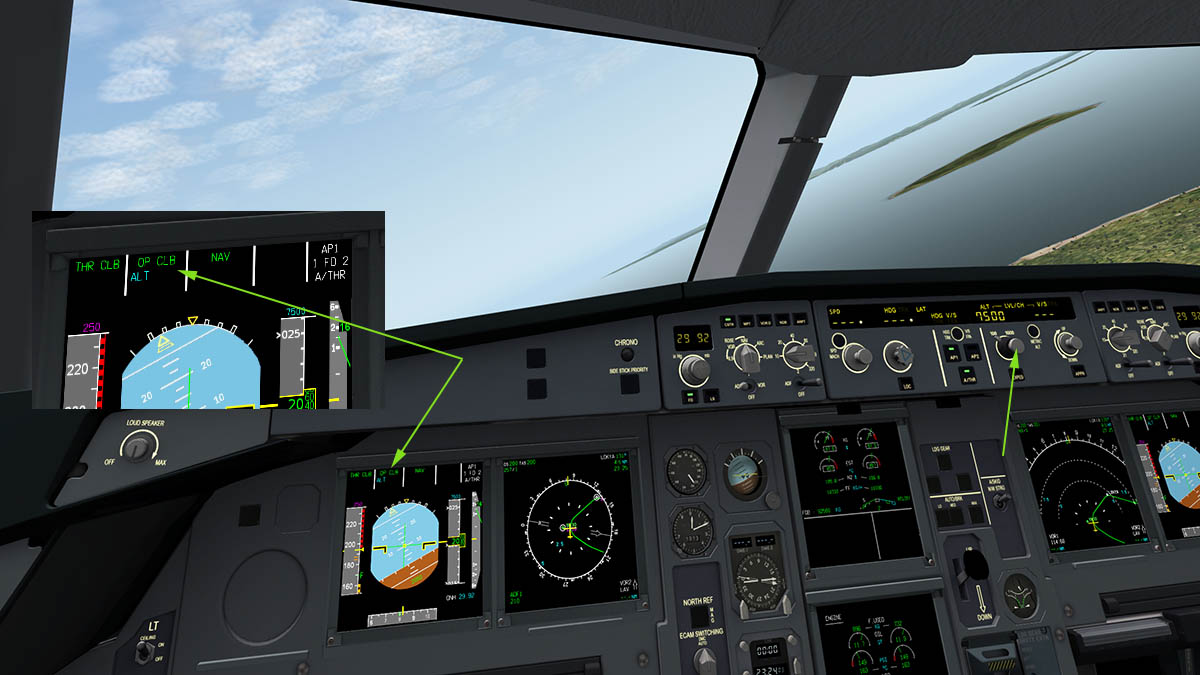
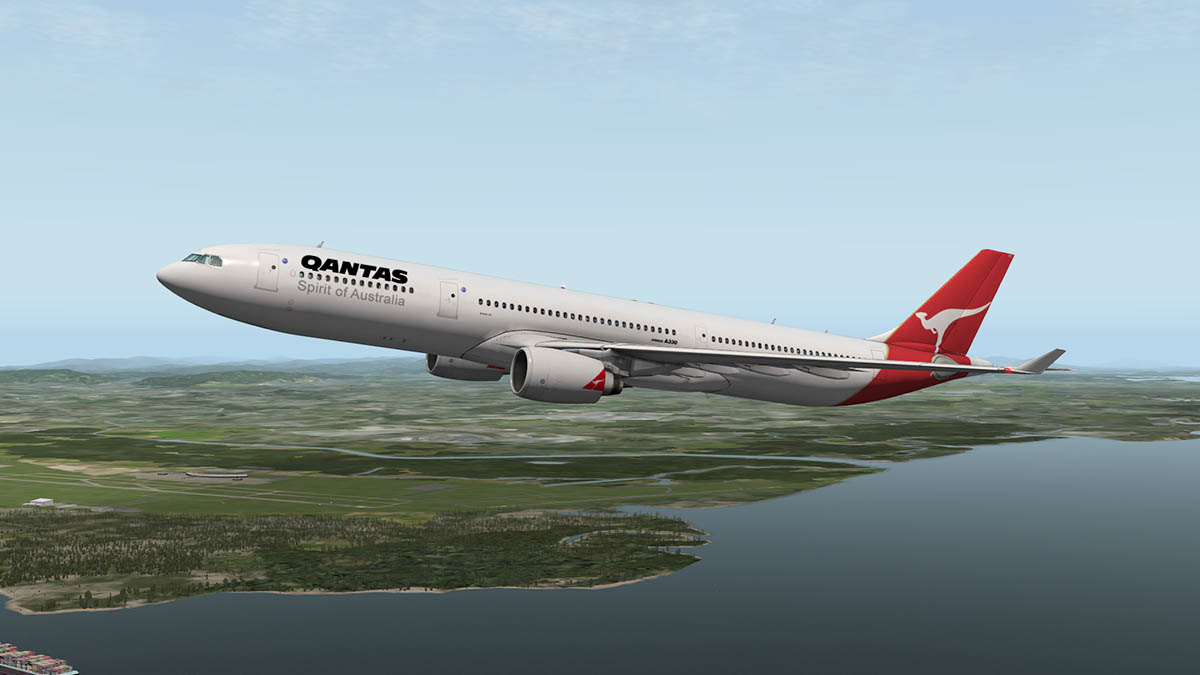
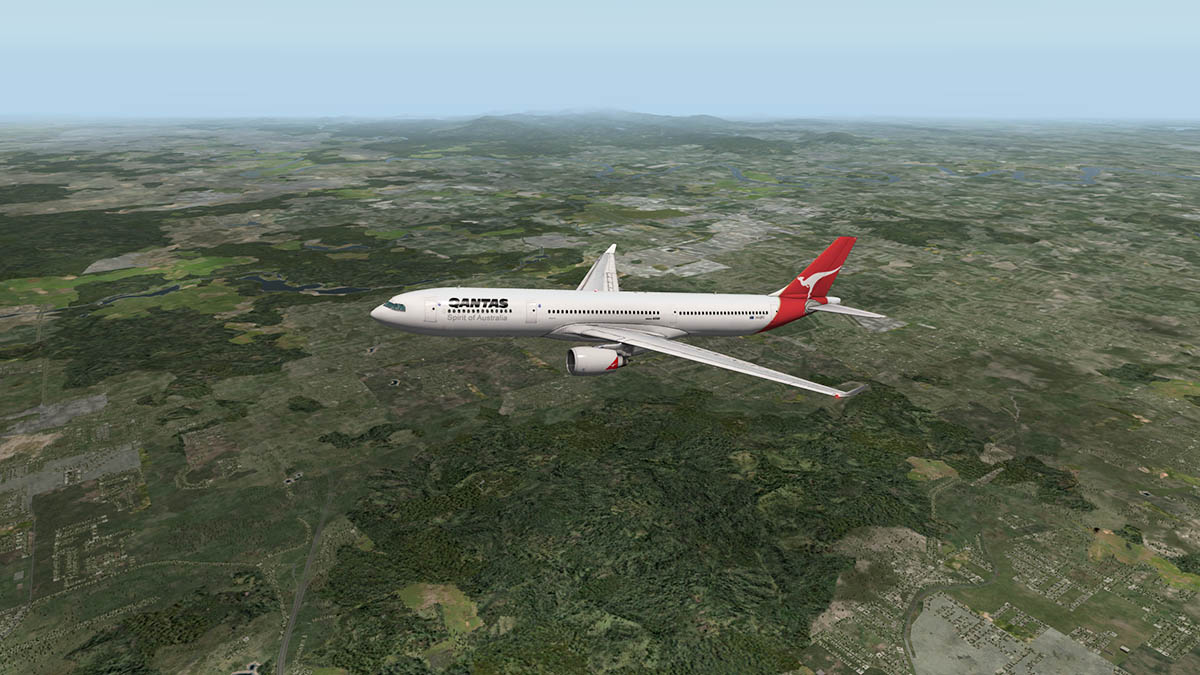
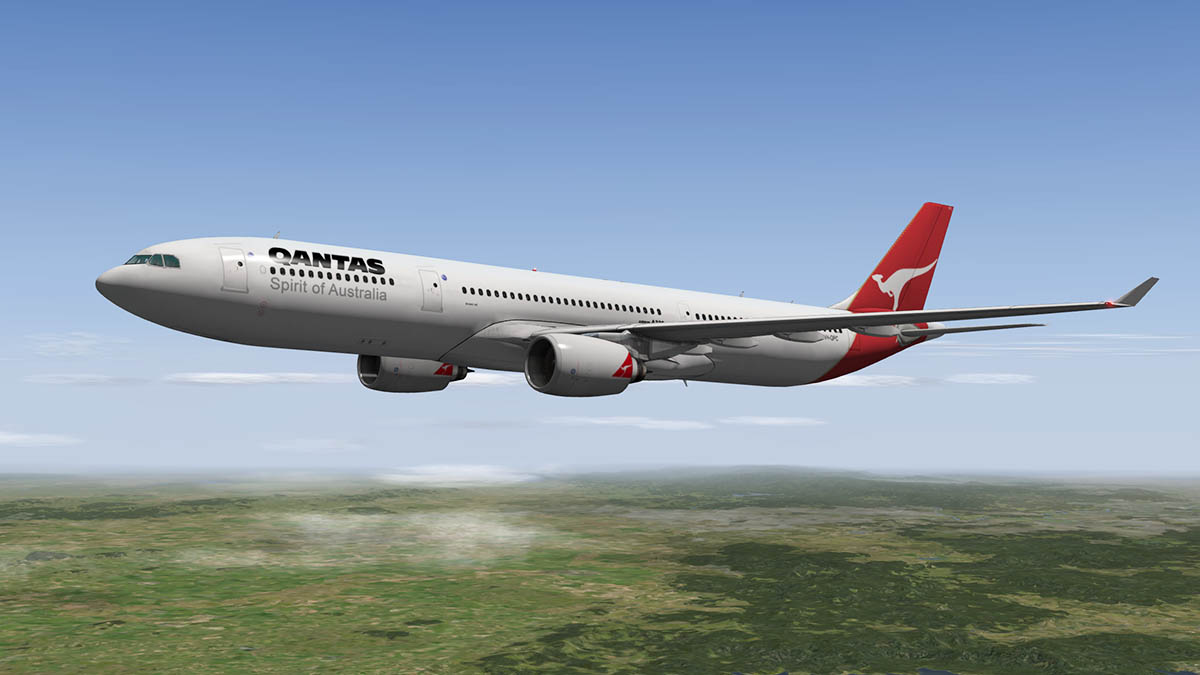
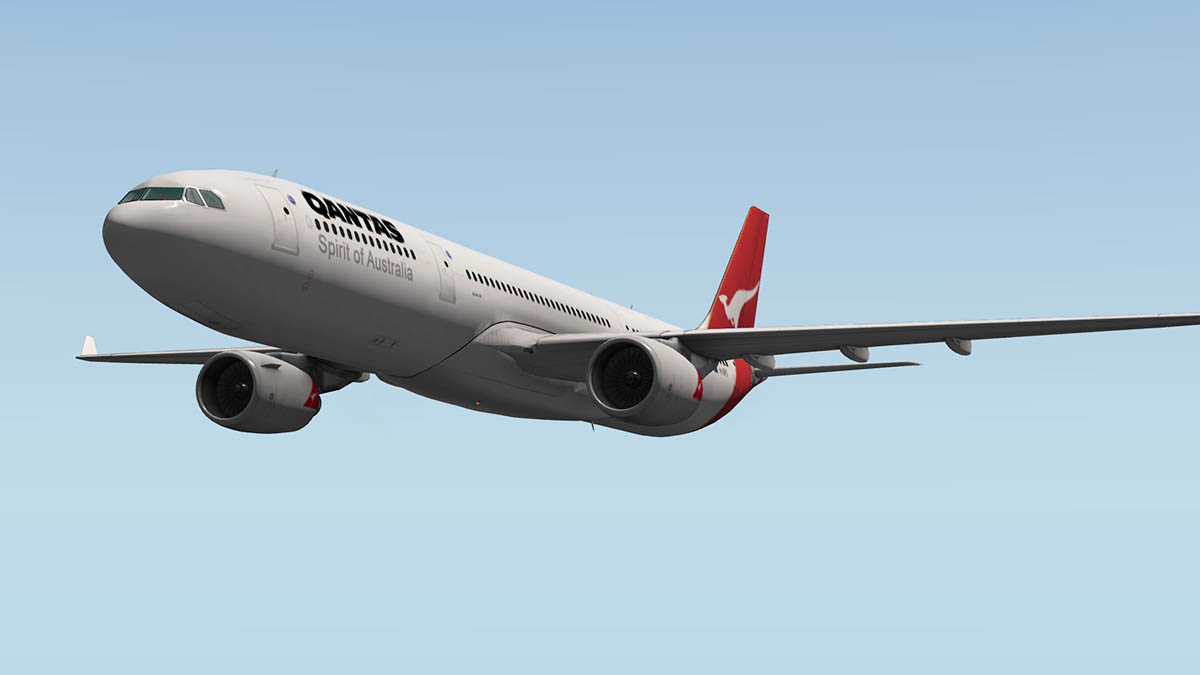
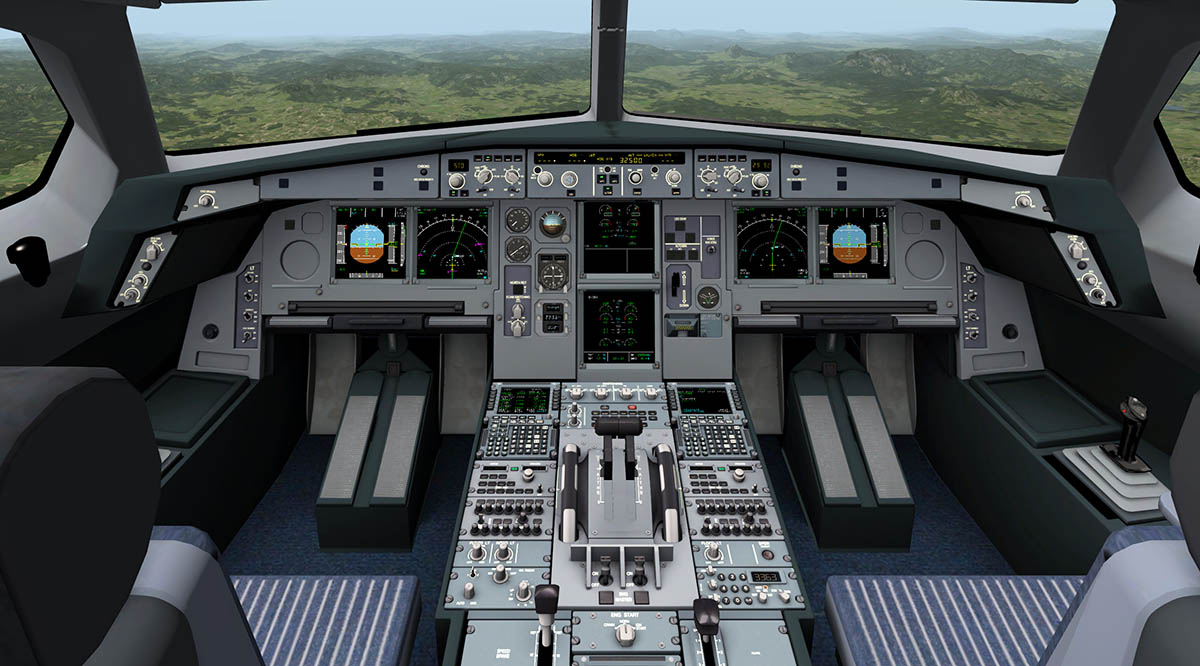
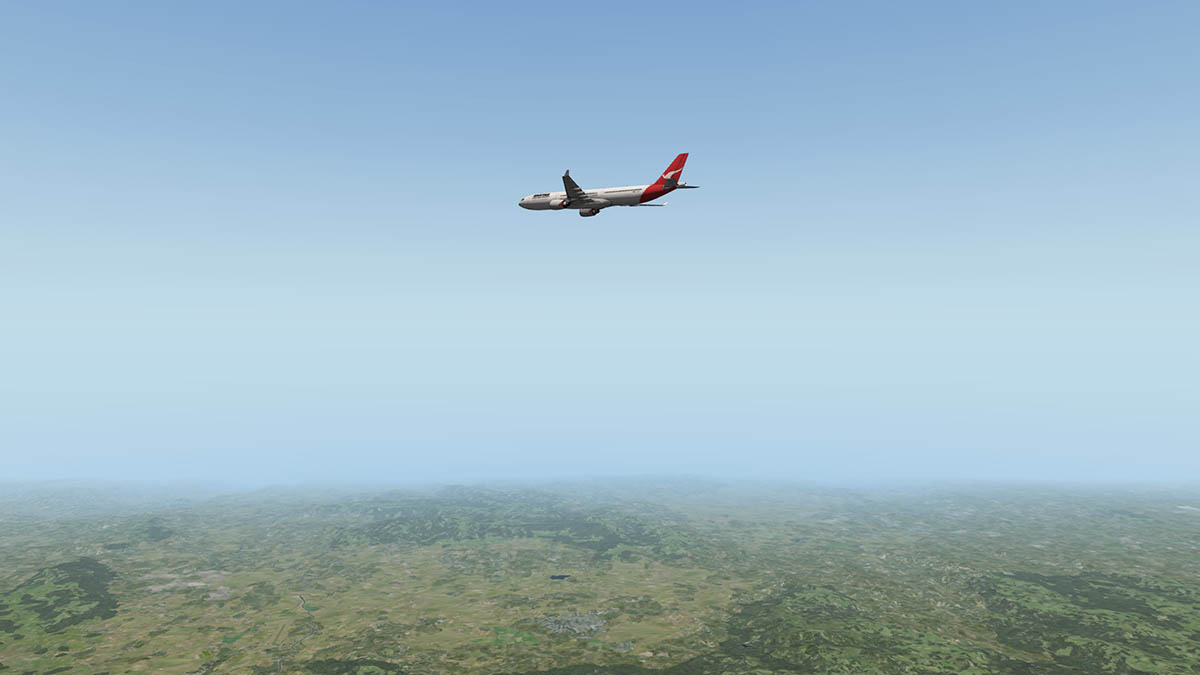
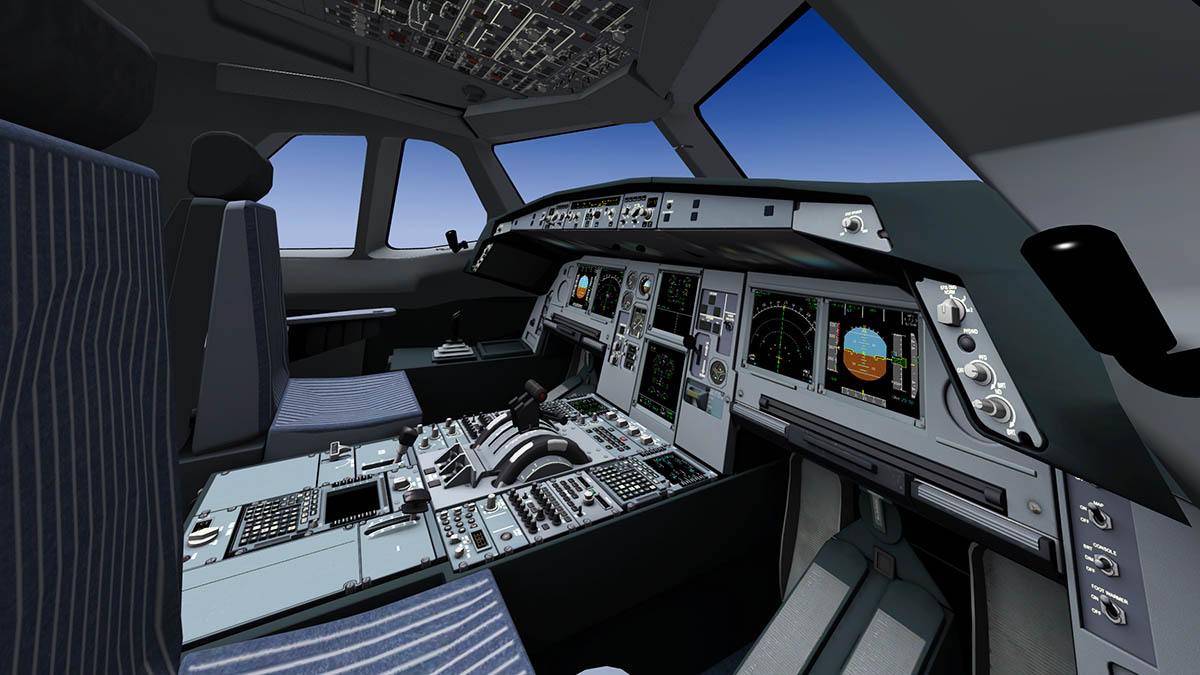
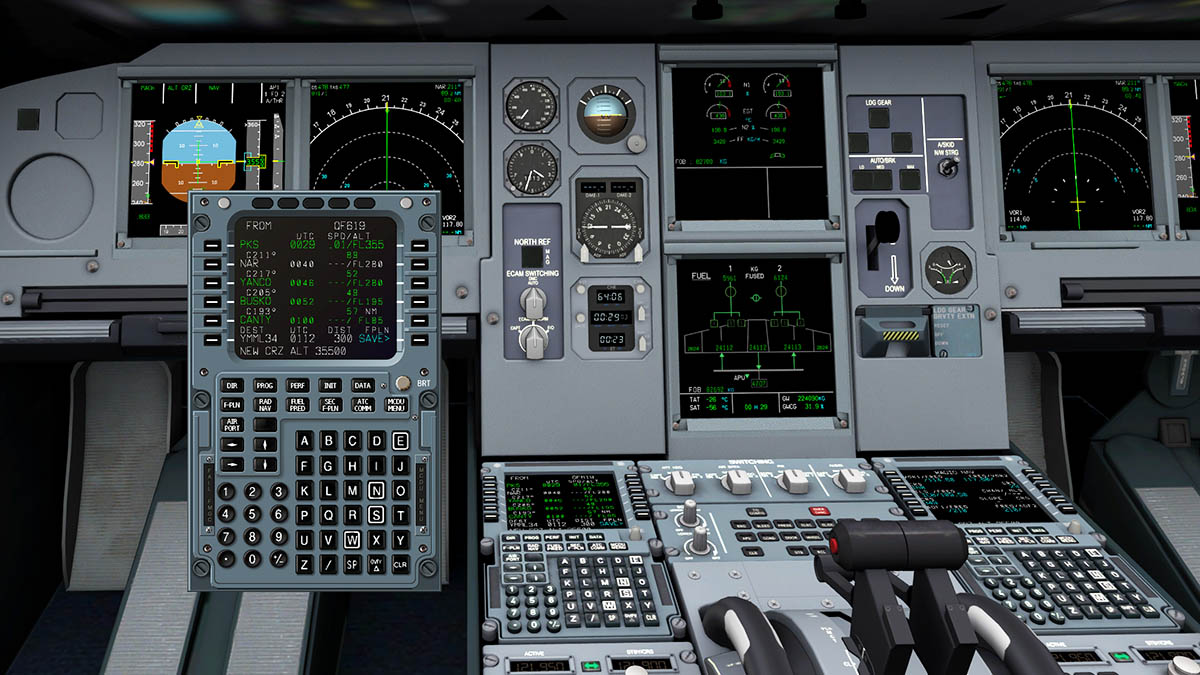
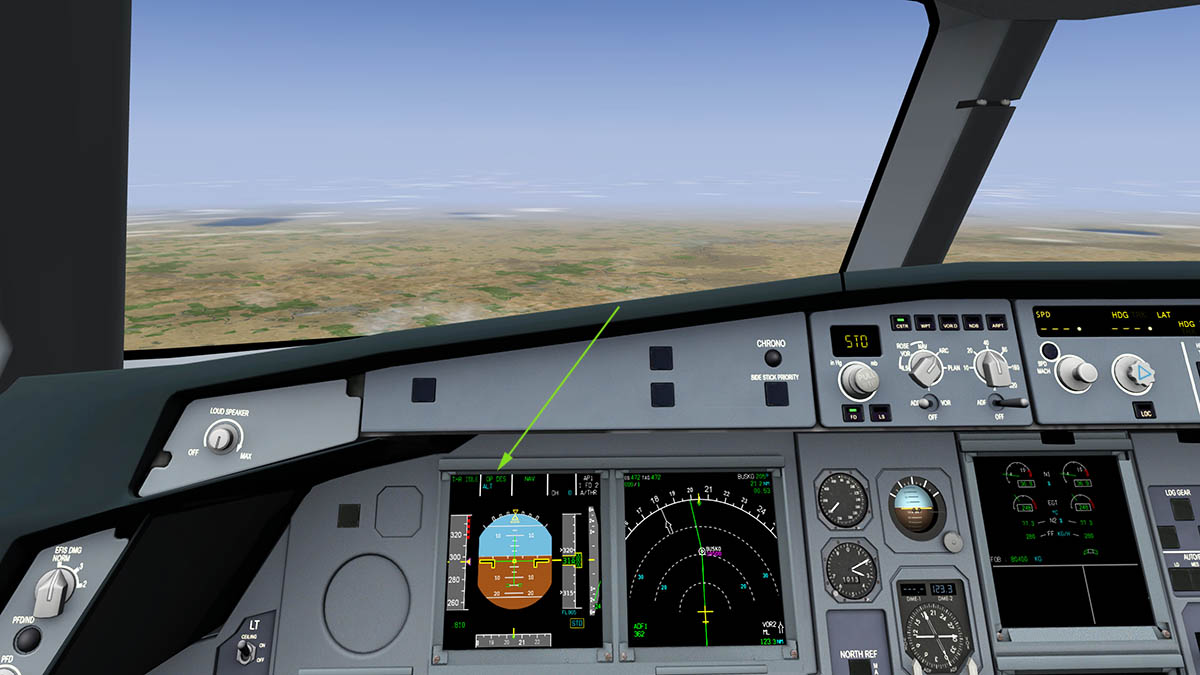
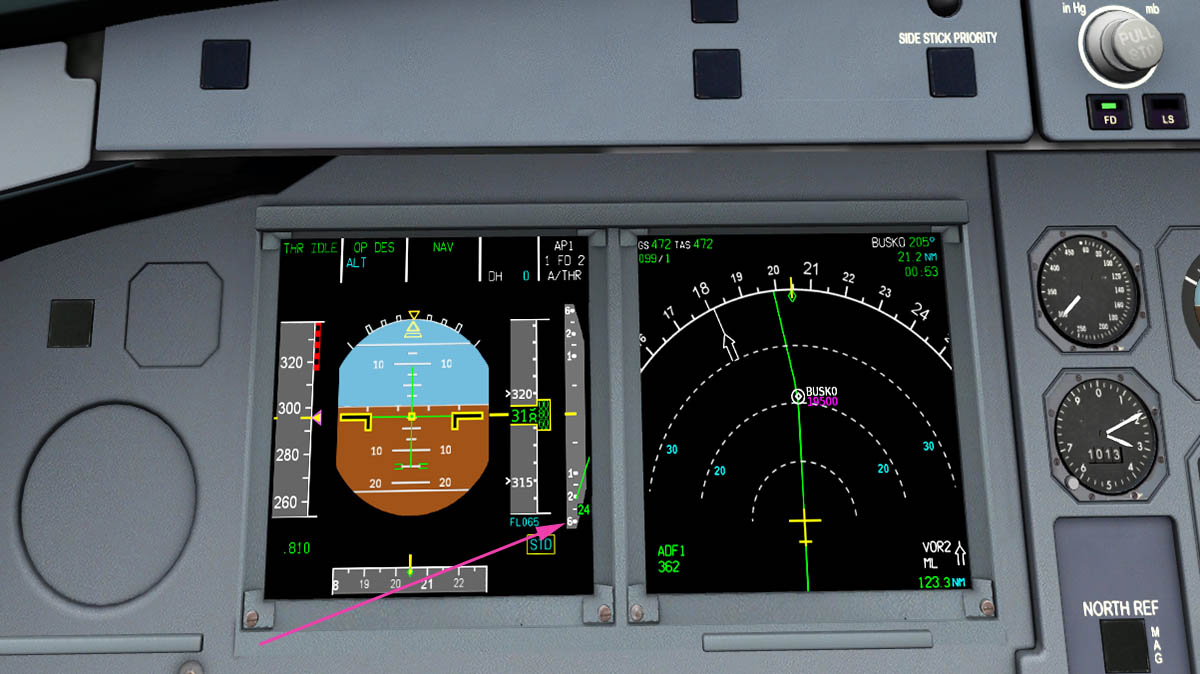
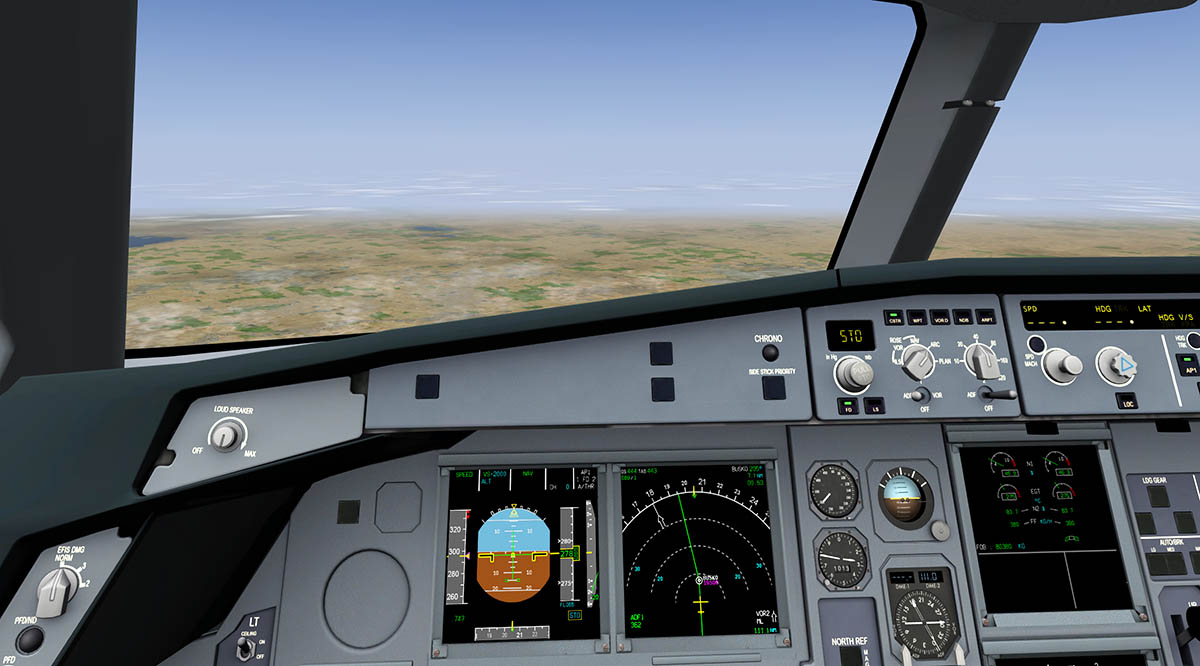
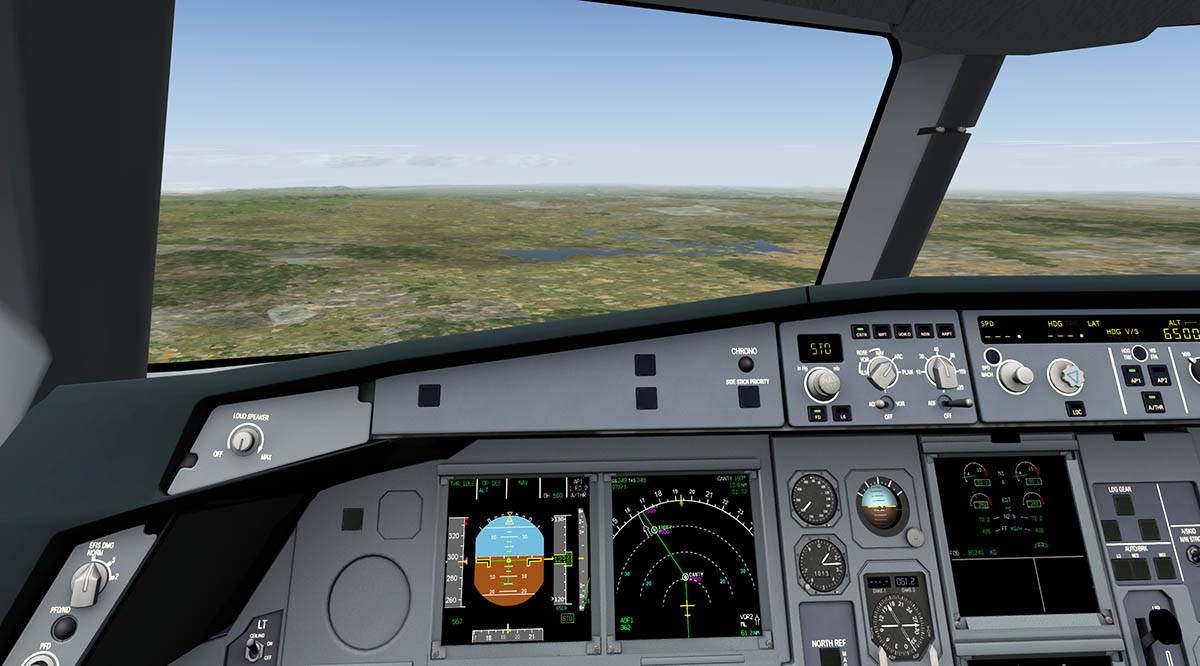
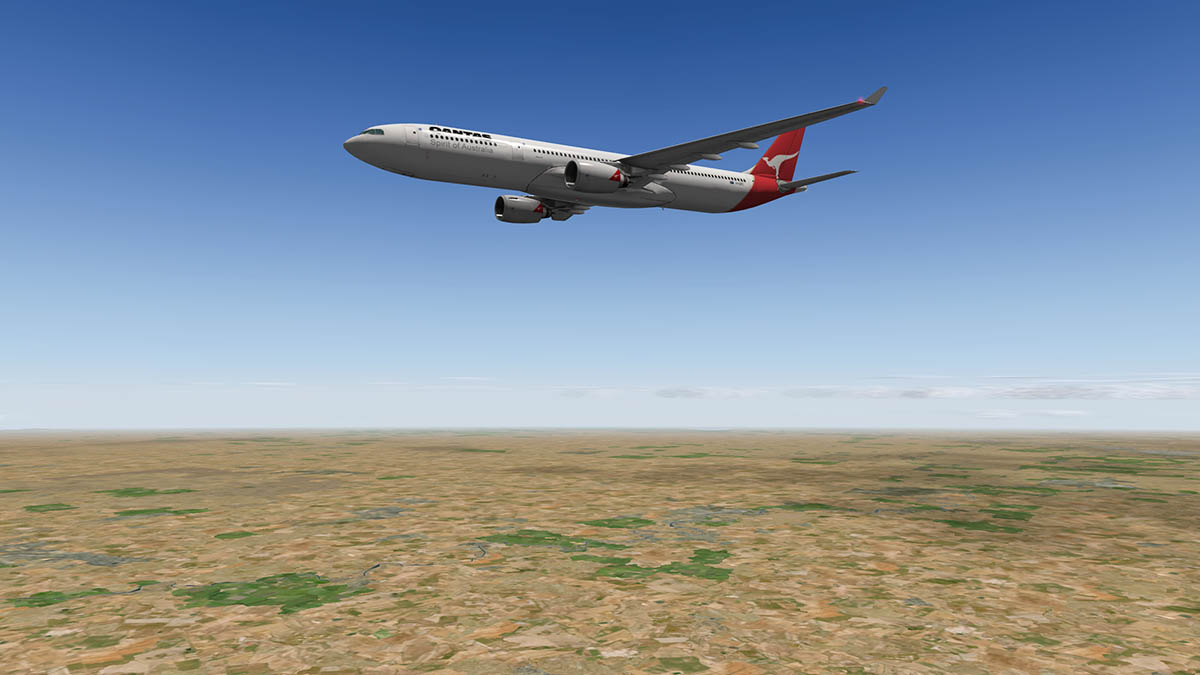
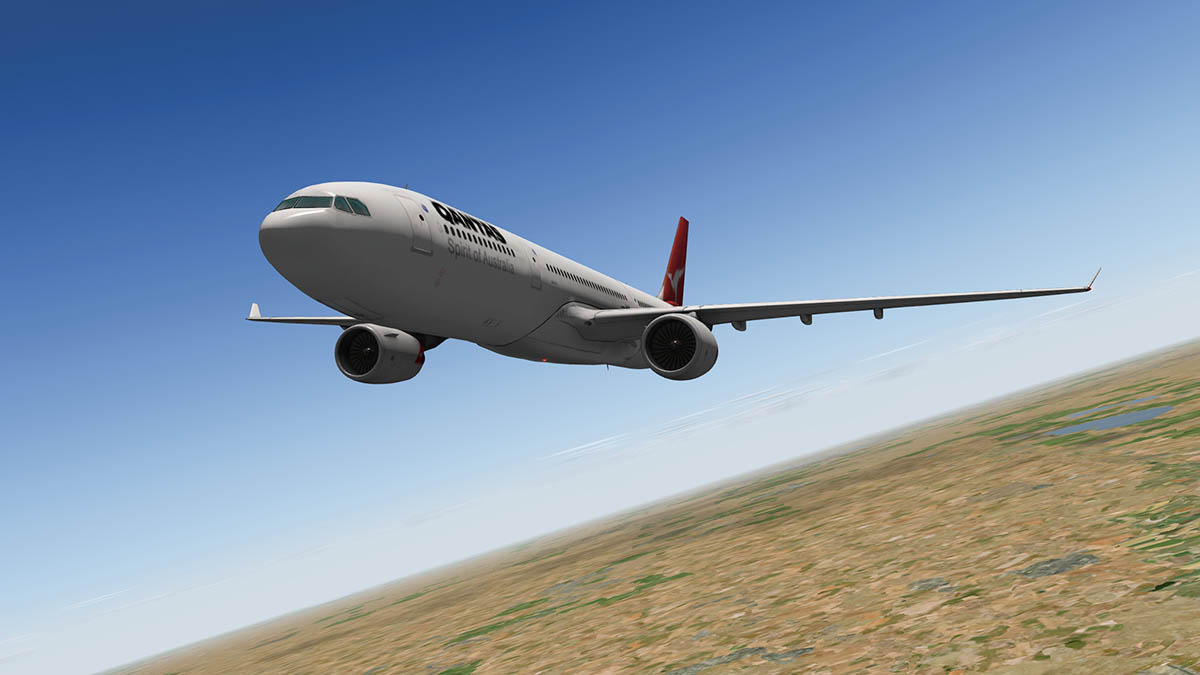
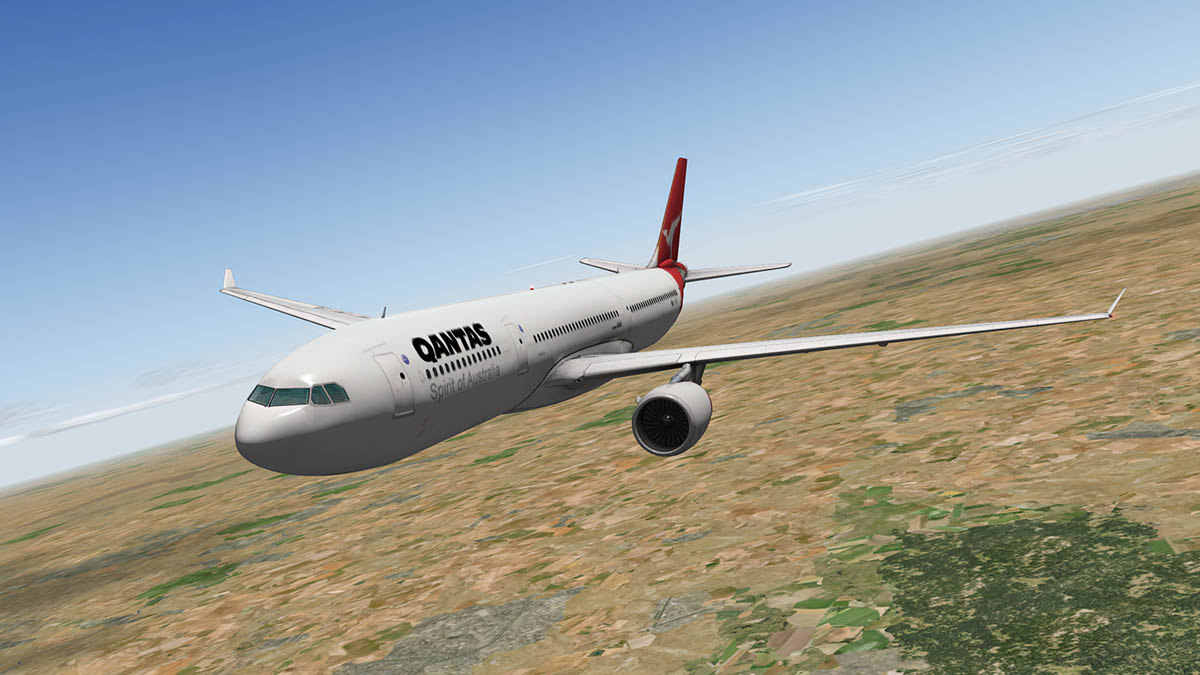
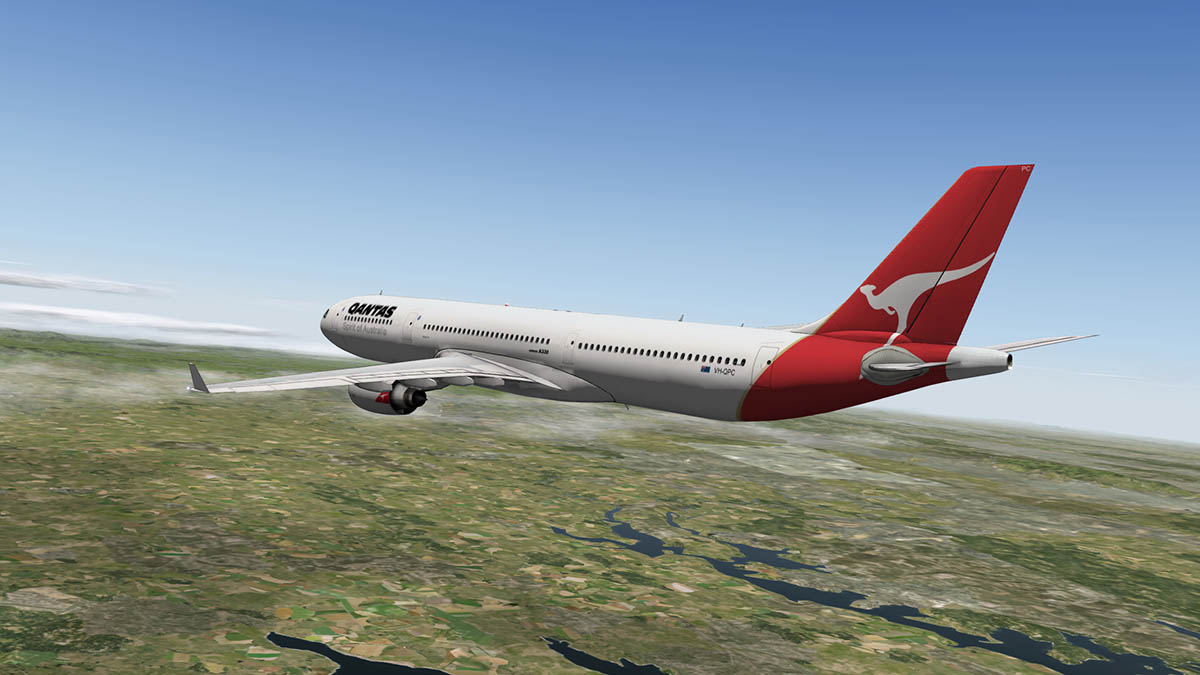
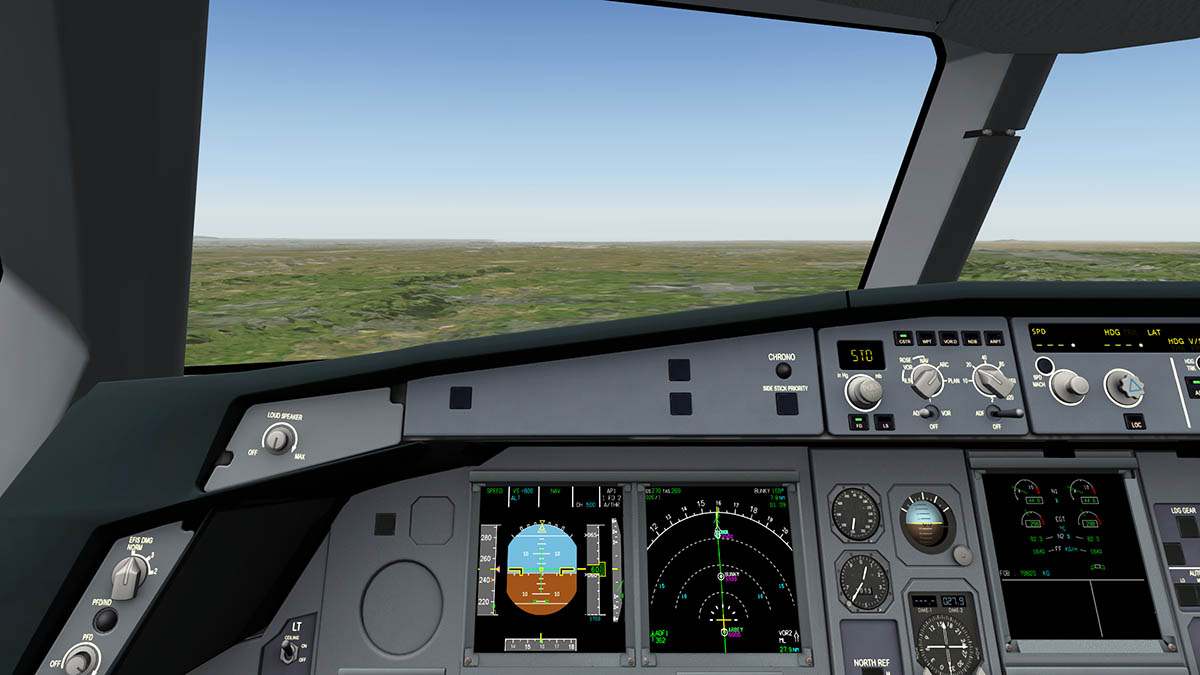
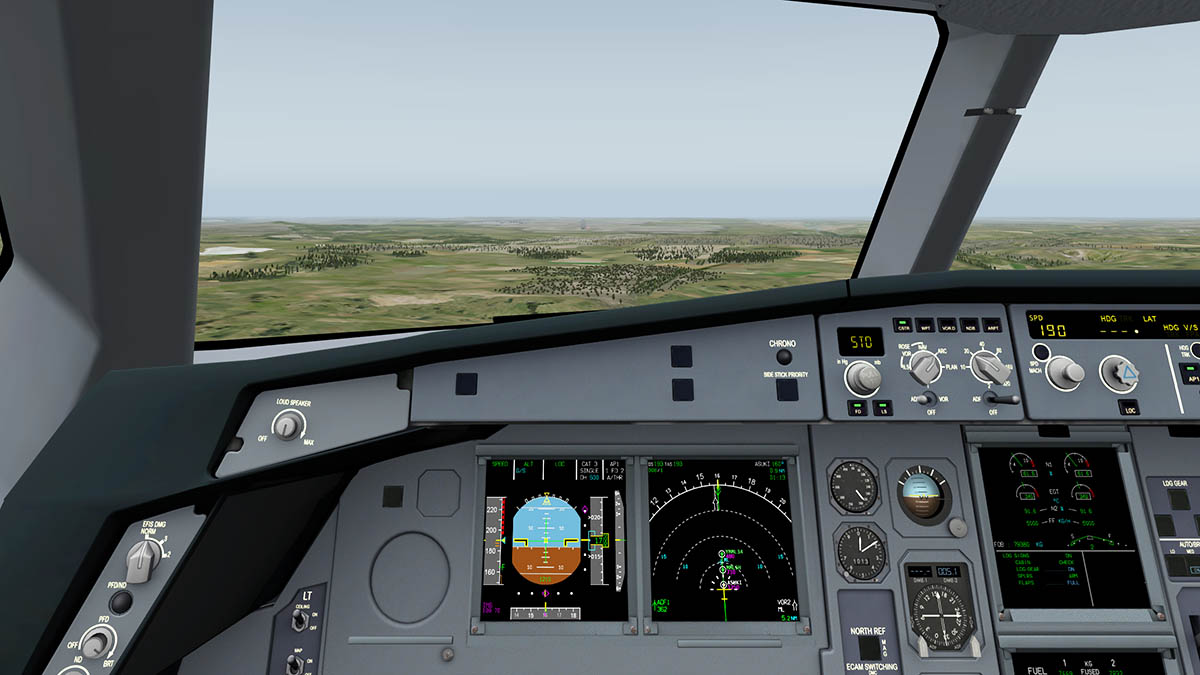
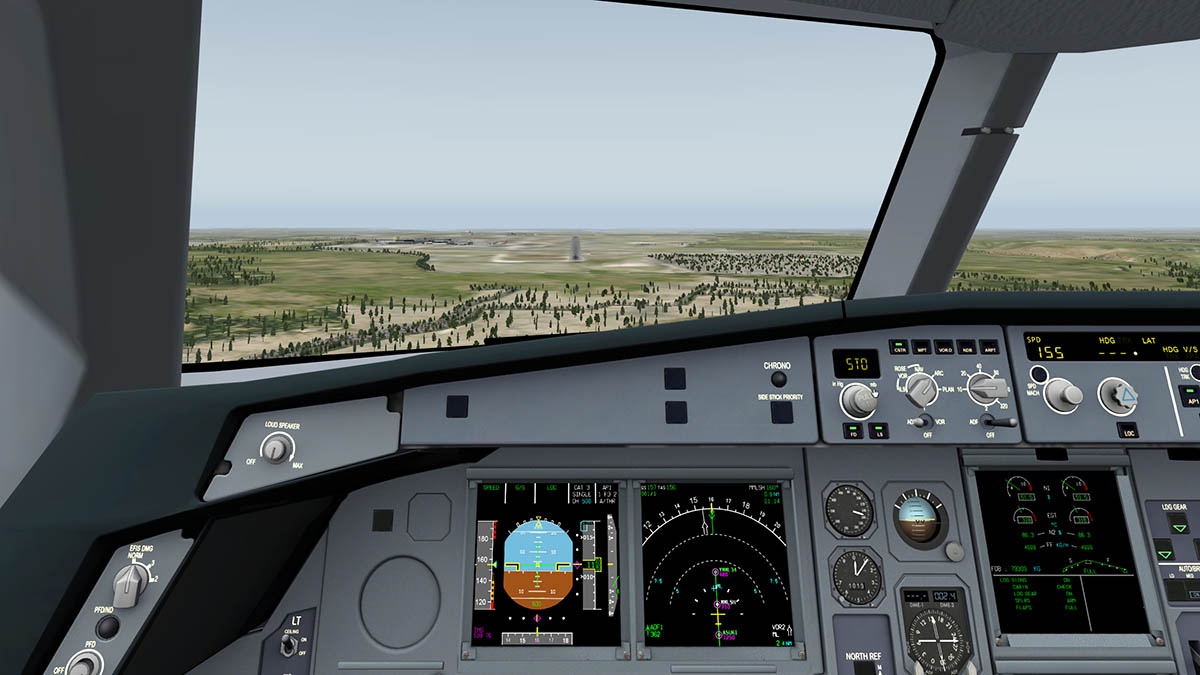
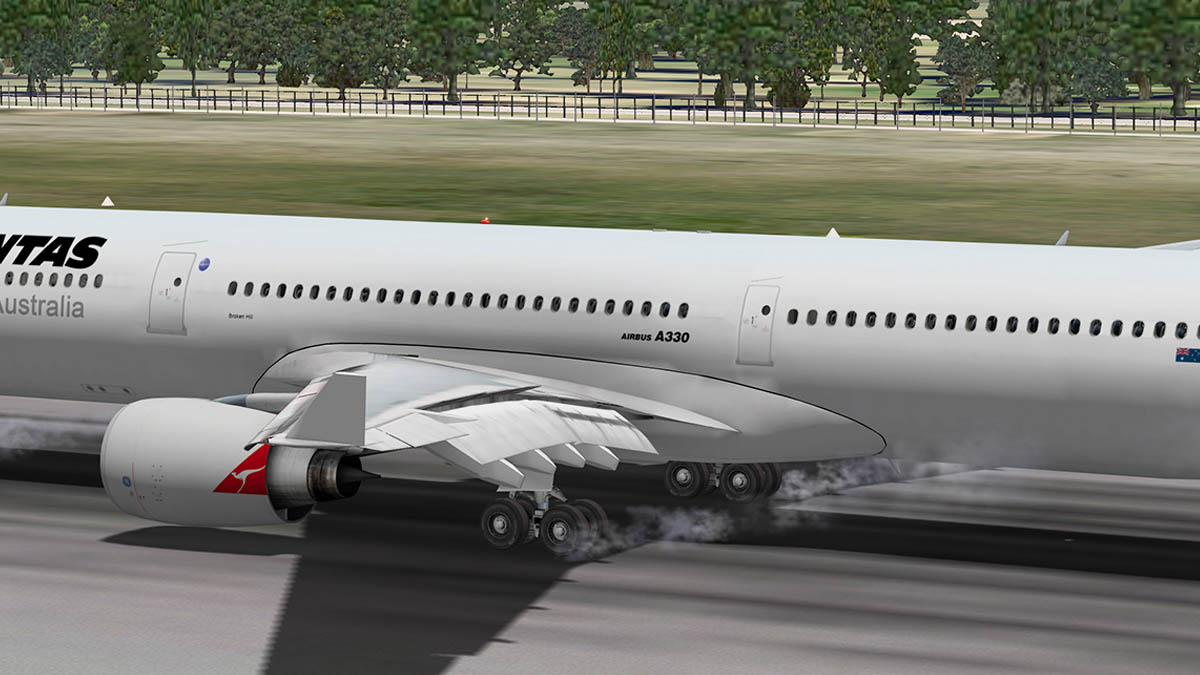
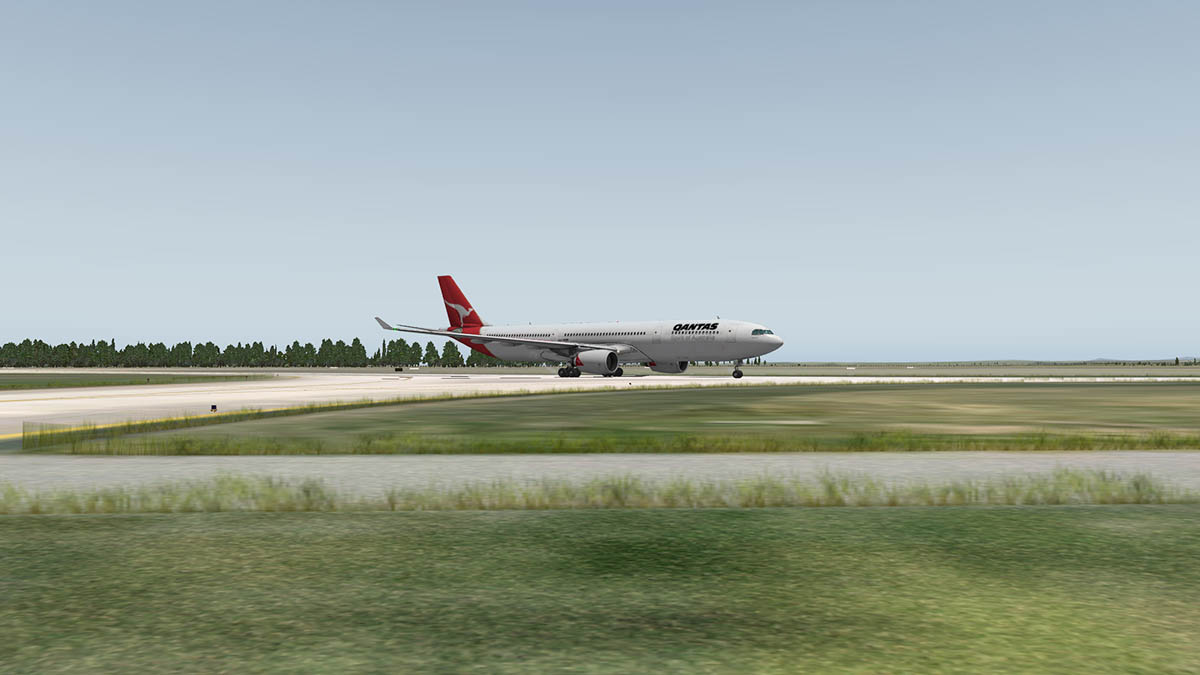
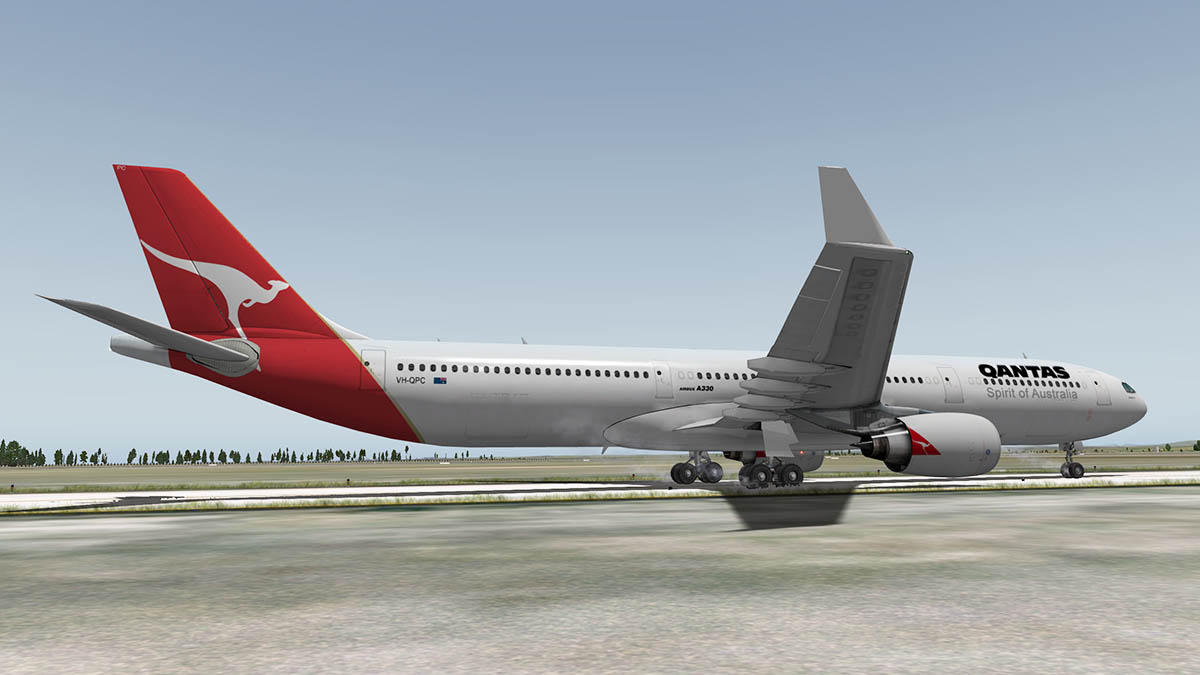
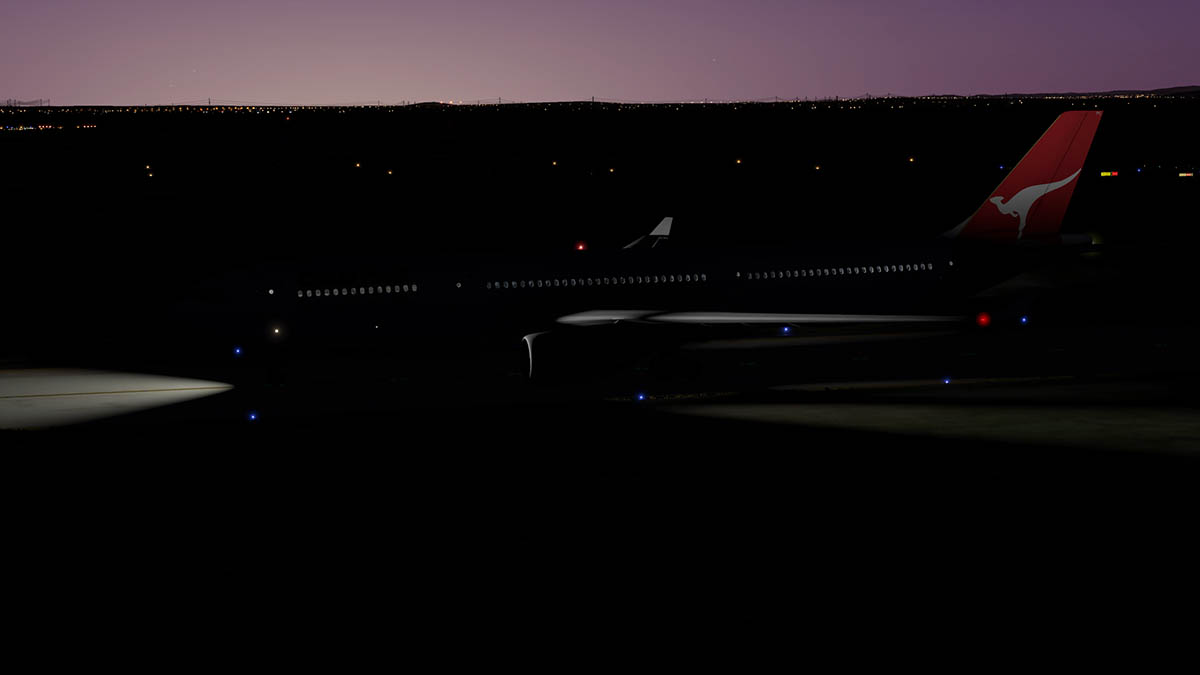
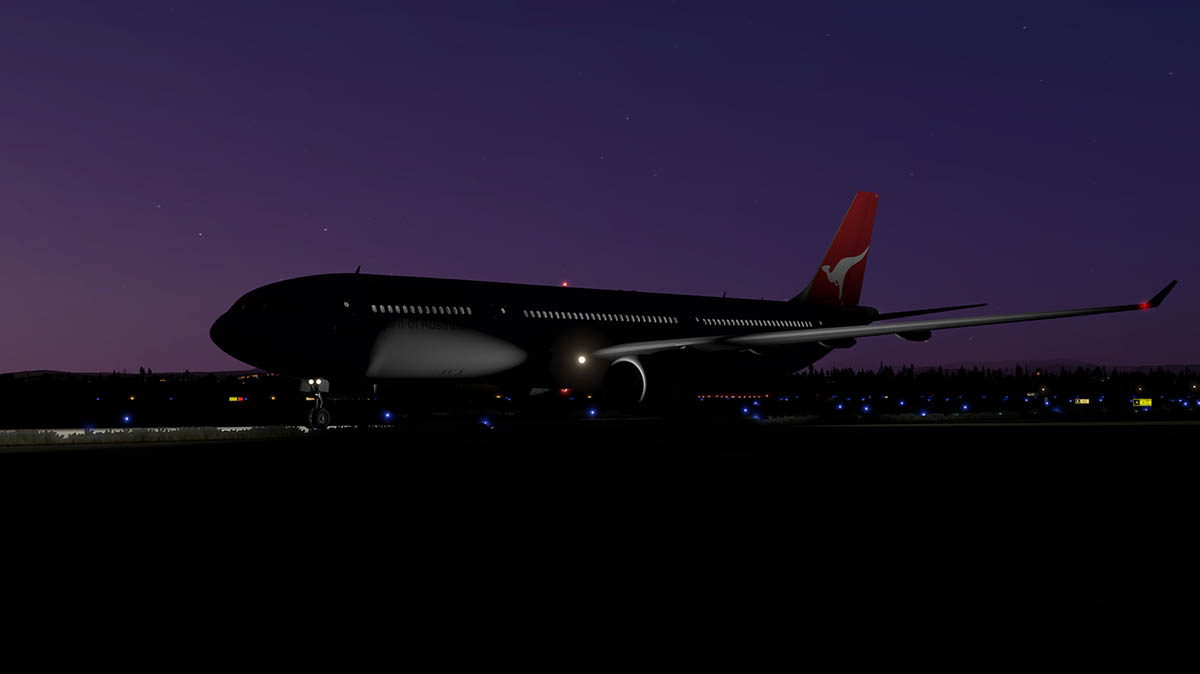
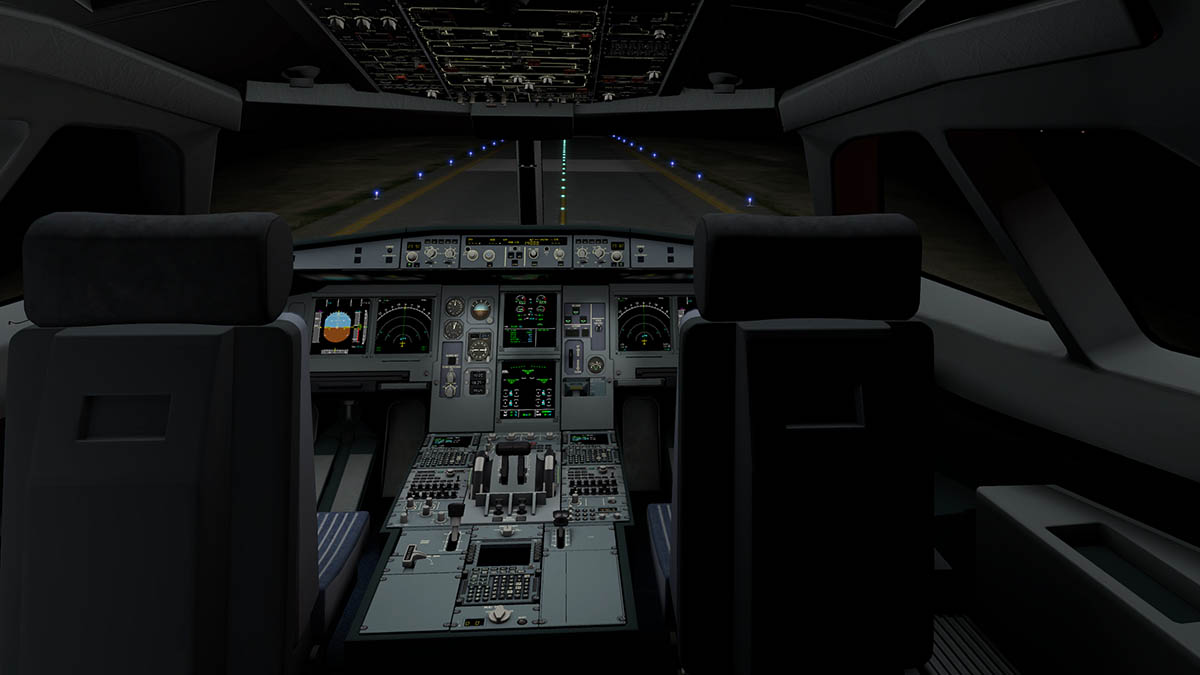
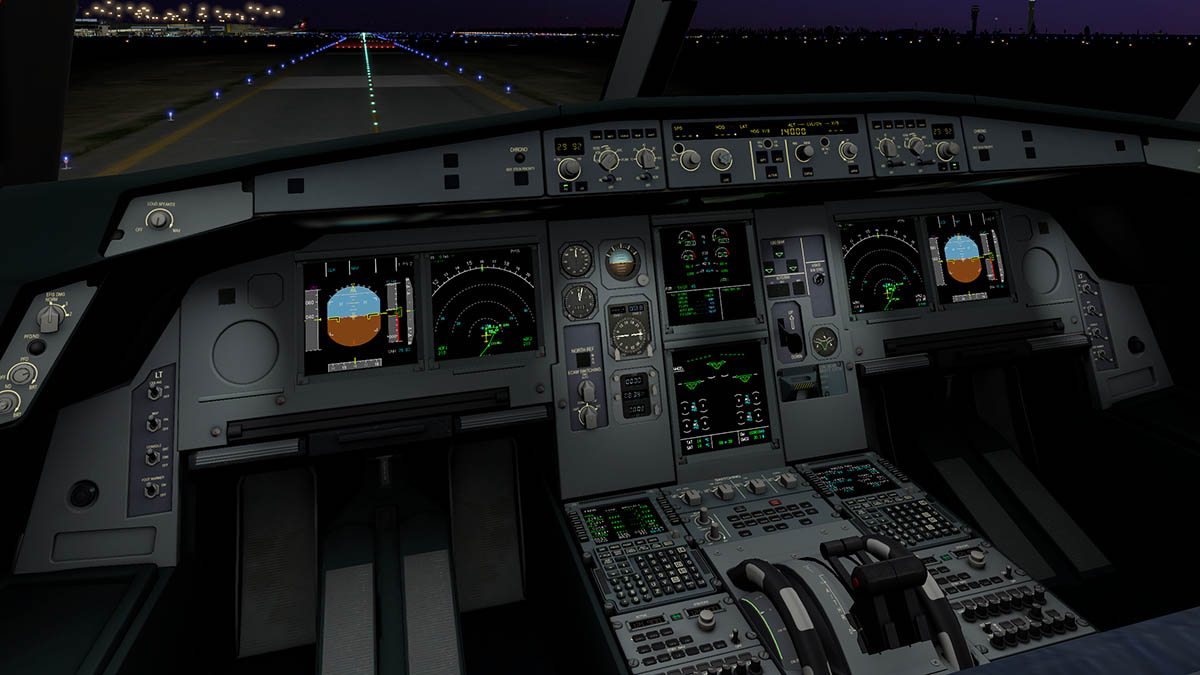
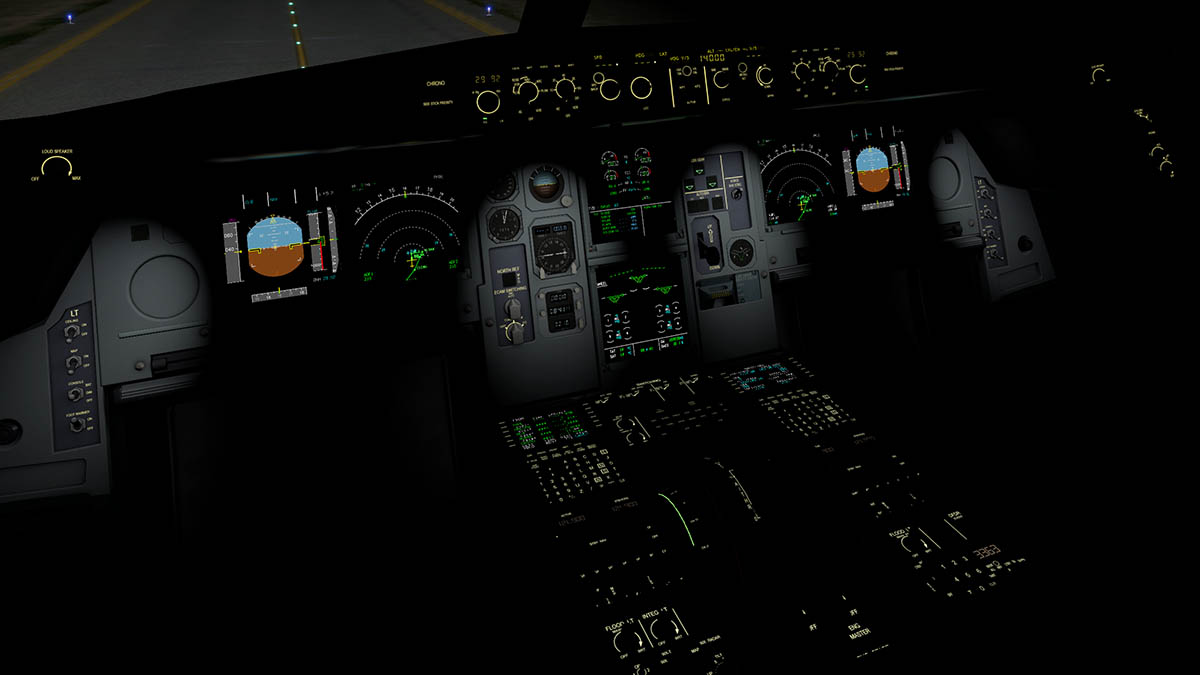
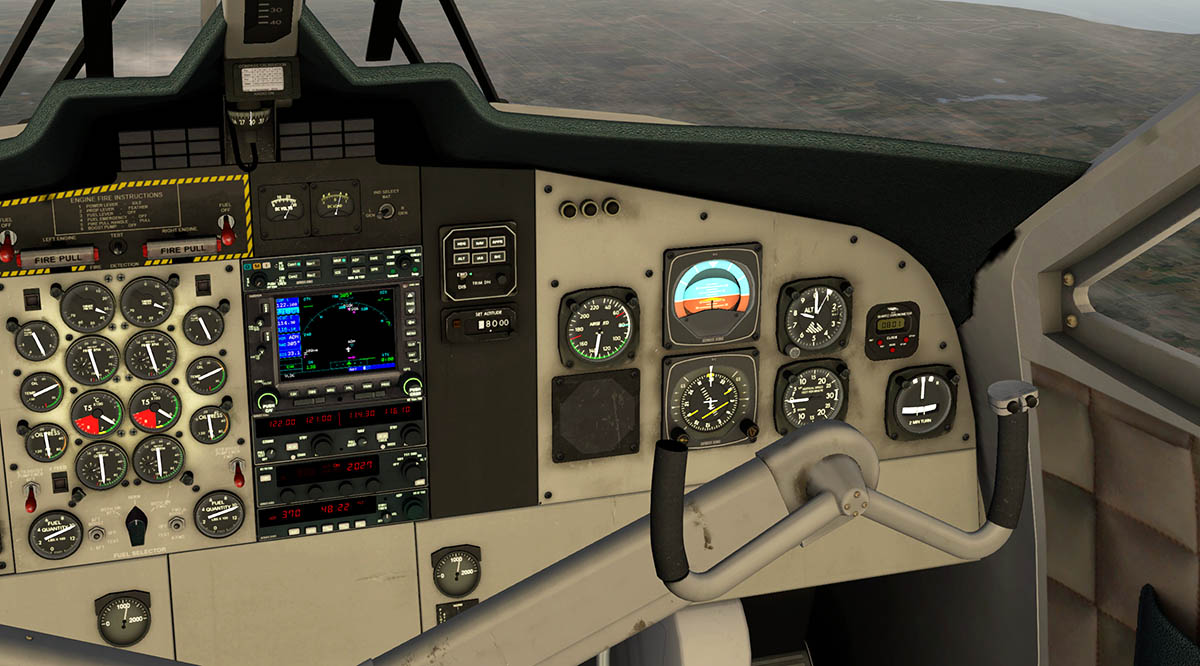
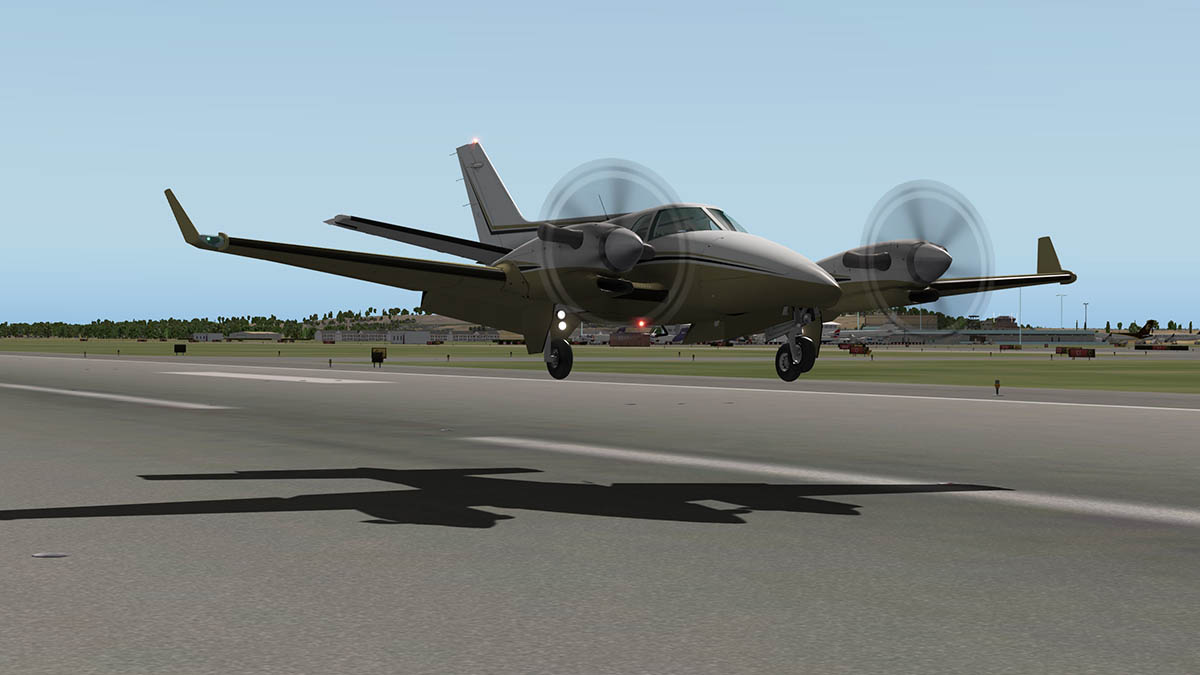
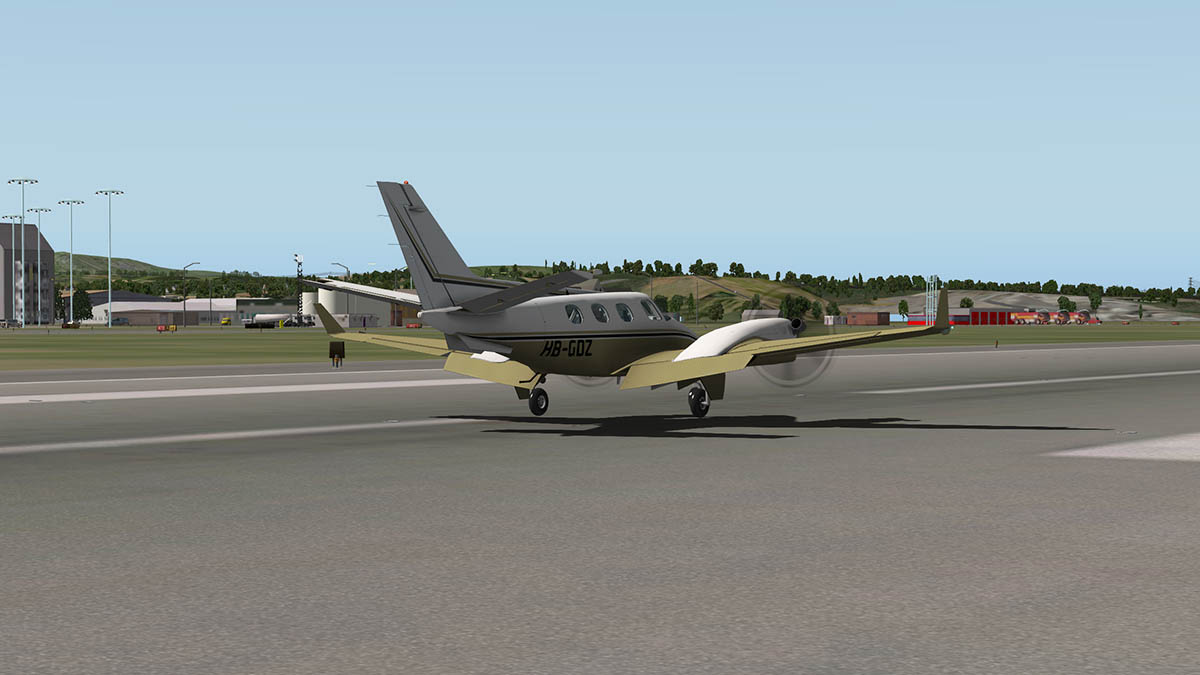
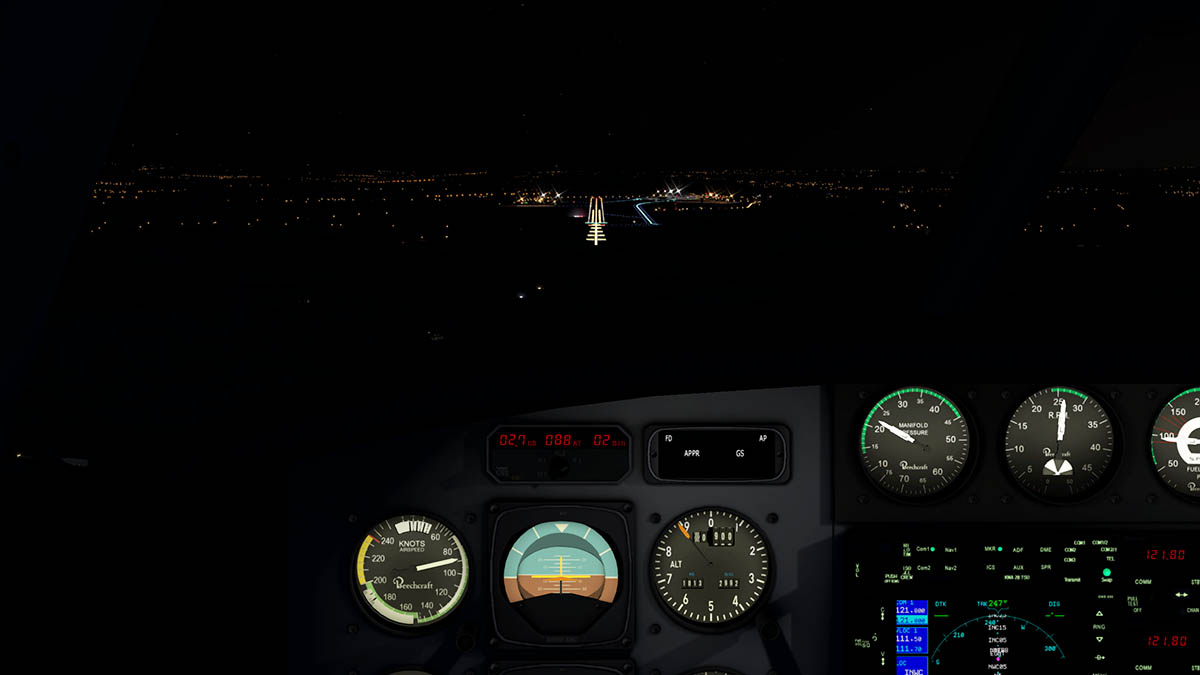
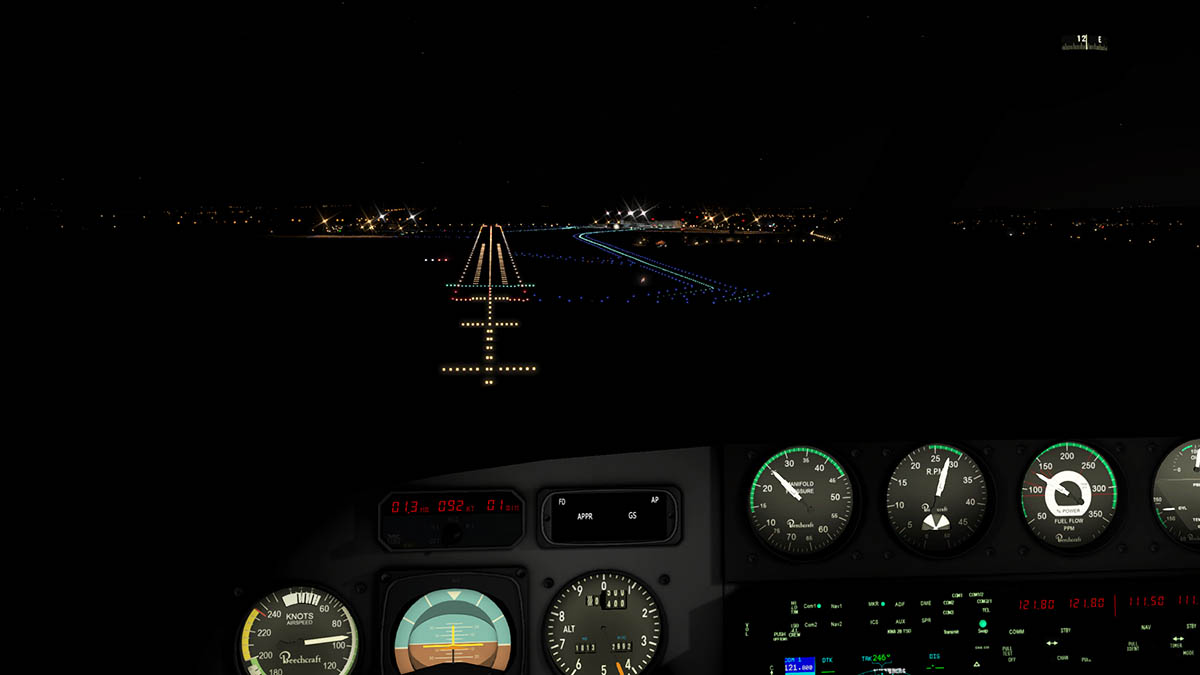
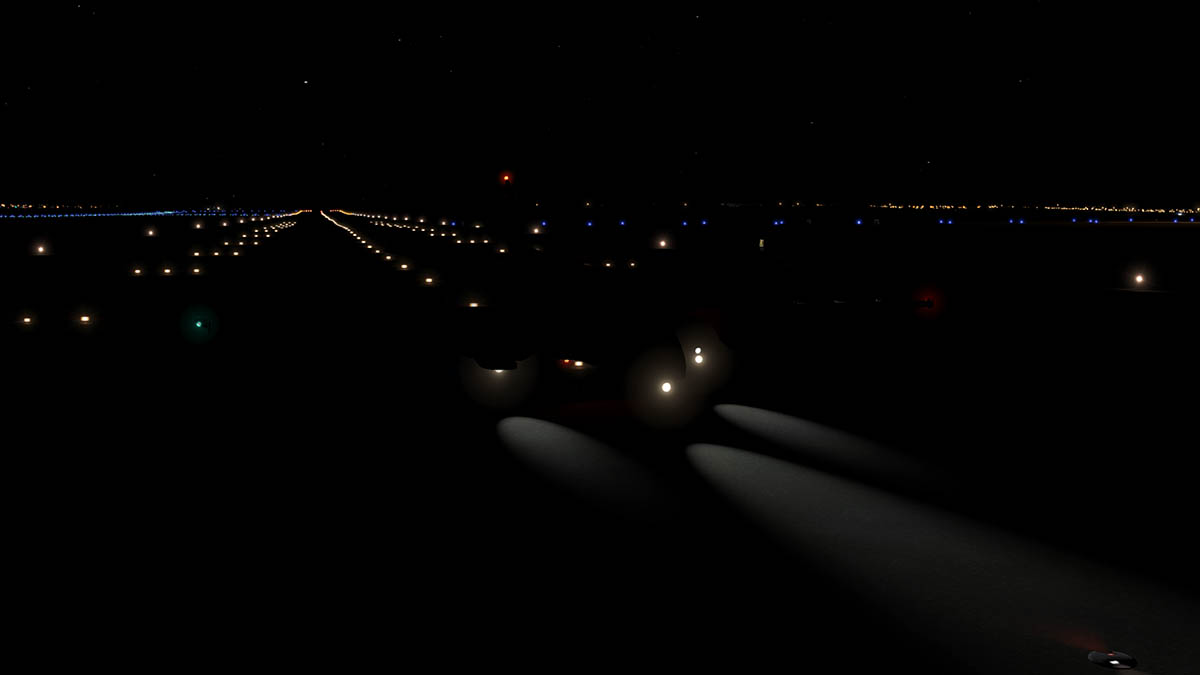
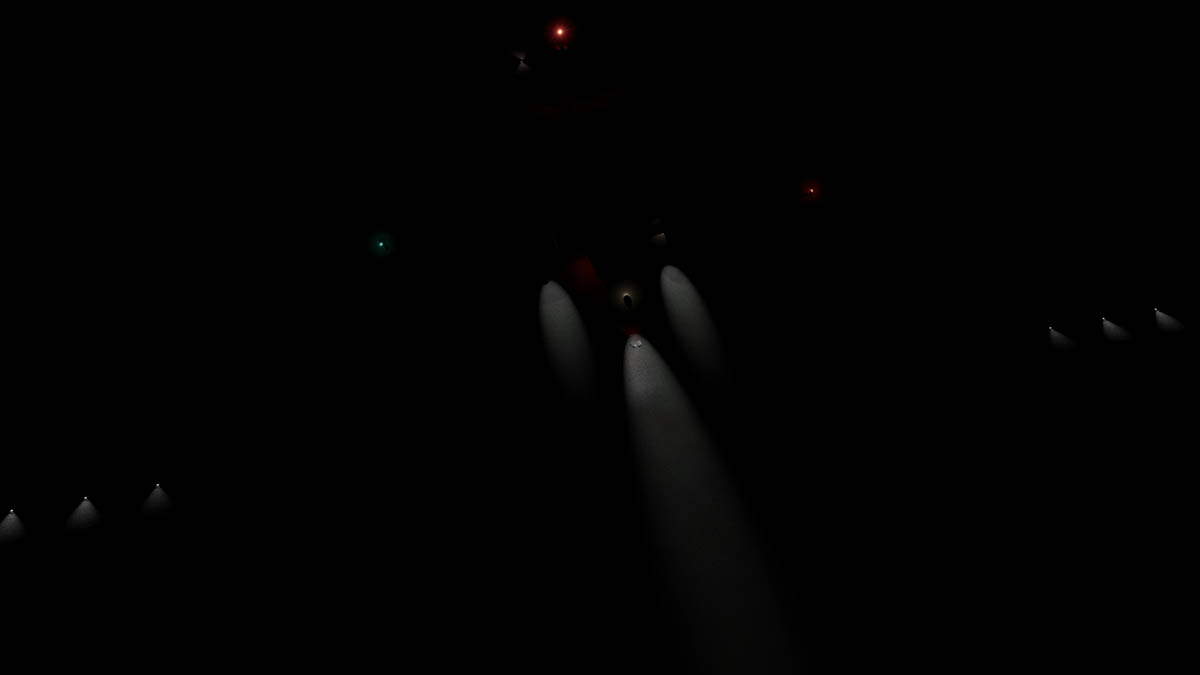
Aircraft Review - Airbus A330-300 v2 by RW Designs On the 1st October 2014, Jetsim (now RW Designs) released their version of the Airbus 330-300. Until that time Airbus A330 series aircraft where quite rare or poor (except the converted FS versions from Samen) and the aircraft certainly had a needed presence on our X-Plane airways, because the A330 Series was one of the best medium range aircraft on the market until the A350/Dreamliner B787 came along and now it is still a market winner because its base cost is quite low, efficient and airlines will purchase on that basis. I noted the A330-330 as raw and slightly quirky on release, and that summed it up correctly. I always give a developer a little leniency on a first ever release because they don't have the background and experience to understand everything that it takes to develop and deliver a top flight aircraft to a demanding audience. Having said that the aircraft has to still show that it has what it takes as an investment and the developer can fulfill that investment with upgrades. But was the A330 - 300 too raw? To a point it was and it felt untested and slightly underdeveloped, but as I noted in the review it did have great qualities as well, but overall the expectations of the market overall were not met. It is the reaction of the developer to deliver a good aircraft that can be the making of their reputation and credibility with their users, It is not that things can go wrong but in the way you react and fix them when they do that makes you a great developer. Make no doubt that Jetsim could have easily reacted and just quickly patched up this aircraft and made it work. But they decided not to choose that route and that is brave but ultimately a more clever thing to do. Outwardly the Version 2 (v2) Airbus A330-300 looks exactly the same as the original release. Because it is still the same and there was nothing really wrong with the external and internal design anyway. v2 is otherwise a very different aircraft than the "original release" version. The aircraft has been gutted and rebuilt around Torsten Liesk's Airbus plugin system which is symbolic with all the best Airbus aircraft available in X-Plane from Peters Aircraft A380/A321/A319 series of aircraft, FlightFactor's A350 has the same input as does QPAC's original A320-232. So the aircraft may look the same as before but it is significantly different. My familiarity with the A330-300 is with Qantas in Australia, and until recently it has been used mostly on the international routes and mostly to Asia. But in the last few years as competition grew (Virgin Australia) in the East coast (BNE/SYD/MEL) to West Coast (PER) market these aircraft have been refitted and used on these long domestic hauls, and now as Jetstar is receiving its first B787 Dreamliners the aircraft is now also replacing the already departed Boeing 767's that were for decades the backbone of the twin-aisle domestic fleet on the "Golden Triangle" of BNE - MEL -SYD that are some of the most heavily populated routes in the world. The external design is very good. Its not detail, detailed in the extreme if you know what I mean but it is still well done, and all the fixtures and fittings in the wings and undercarriage assemblies are well designed and close up you can find the small stuff that you like to look at while kicking the tyres on a walkaround. Only the slightly too shiny tyres are a visual note. Only thing that is not on the aircraft are any opening doors in passenger or cargo hatches, and they are sadly missed here. More so when you see the cabin interior... Most developers create very basic interiors for passenger aircraft, but these seats look the best of the lot and are very well detailed for the filler items they are, so for the users that like the cabin window views it is a nice (if lonely) place to be. The overhead bins are for once crafted very well and the whole three classes of cabins look realistic, there are a few gaps though with the wall panels were you can see outside that needed not to be there. The cabin also looks good at night as well and overall it is a very good cabin design. Cockpit At first glance the cockpit and the panel looks the same as the original. The design is good, very good and the aircraft is well appointed. But it is different... The older smaller CRT displays are gone and have been replaced with the more modern larger standard flat displays, I don't know if that is better? As I liked the different style of cockpit panel from most Airbuses. But there is no doubting the better efficiency and clearer layout of the change. Full systems on the overhead panel are available and cover Electrical, APU, Fire Protection, Fuel, three independently operating Hydraulic systems in GREEN, BLUE and YELLOW, Ice/Rain Protection, pneumatic systems for - Air conditioning - Engine starting - Wing anti icing and aircraft lighting You have the standard Airbus six display arrangement, with PFD (Primary Flight Display) and ND (Navigation Display) for both Captain and First Officer positions (switchable on the pedestal). Central are the two main aircraft information displays with the EFIS (Electronic Flight Instrument System) top and ECAM (Electronic centralized aircraft monitor) lower. There are twelve pages of displays altogether in the ECAM display including... Cruise (default), Engine, Bleed (engine/APU), Cab Pressure, Electrics AC and DC, HYD Hydraulics, APU (Aircraft Power Unit), Condition (air/temp systems), Doors (not really useful here), Wheels, F/CTL, Fuel, and Status. These pages are selected by the rows of keys on the pedestal (airbus standard). So all your systems are active and are well modeled, and any action will be noticed on the ECAM display page for that operation. There is missing on the EFIS general display items as "Seatbelt On", No Smoking on" but "park brake" is on there. FMC/MCDU The DW Design A330 comes with a working MCDU (Multifunctional Control Display Unit ), and it is a sort of derivative of the Smiths Thales FMC that is used in Airbus aircraft. Both MCDU's pop out and are totally independent of each other (which is very nice) as are the ND (Navigation Displays) for showing different variants of the same information like either route or plan. The aircraft comes with three different engine options and as this is relevant to the MDCU we will look at those. Engine options are selected by selecting a certain livery and the engine option is shown on the MDCU display when you start up the aircraft.... _____________________________________________________________________________________ Rolls-Royce Trent 700 : Rated: 71,100 lbf (316 kN) - ETOPS-180 rated Rolls-Royce Engine selections include airlines... Air Canada, Cathay Pacific, Singapore Airlines and Virgin Atlantic. _____________________________________________________________________________________ Pratt & Whitney PW4000 : Rated: 70,000 lbf (311 kN) - ETOPS-180 rated Pratt & Whitney Engine selections include airlines... Delta, NWA (NorthWest Airlines) and Thai Airlines. _____________________________________________________________________________________ General Electric CF6-80E1 : Rated: 72,000 lbf (320 kN) - ETOPS-180 rated General Electric Engine selections include airlines... Qantas, Finnair and Qatar. _____________________________________________________________________________________ So you need to select the right engine (livery) option before you programme the FMC (Flight Management Computer) because the engine preferences on performance are different in each selection. INIT On the INIT (Initial) page you can if required load in an already completed or used X-Plane FMS flightplan, obviously this is not an Airbus standard. But it does save you a lot of time to programme in a route into the aircraft systems. You can move on with inserting the rest of your FMC data on the INIT page with on the Left side ... Co Route (Company), Altn Co Route, Flight number (QF 619, Cost/Index, Crz/flightlevel (just input 355 for 35,000ft) - then on the right side is Route (YBBN/YMML), ALTN and alternate Airport if required. F-PLN Once you have inserted your departure and arrival ICAO airports YBBN/YMML (note. if loading a fms flightplan, this is done automatically) you can change or select your departure runway (01) by pressing the airport ICAO key (LK-1) (YBBN). This brings up the "Departure" page with the option to insert a SID (Standard Instrument Departure) In reality it is not a built in SID, but one you create as a small bookend file with the same set of arrival points for an Arrival STAR (Standard Terminal Arrival Route) at the other end of the route. It works quite well as you then only have to fill in the middle waypoints or fixes to complete your flightplan, but for me I have usually completed my flightplans with my SID and STAR already inserted and that allows me just to load in the complete flightplan from the start. You have a selection of departure runways to select from and once selected the runway is noted on the flightplan next to the ICAO departure airport. Then you can add in manually all your waypoints (fixes) until you arrive at your Arrival airport (YMML). if you have a break or need to jump to a certain fix then just type in the scratchbox the fix you want to use (LOKYA) and insert it at the F-PLN DISCONTINUITY key point, and this will tighten up the flightplan correctly. When you have completed all your waypoints (fixes) you can then add in your STAR (if required) and select your arrival runway by pressing the key next to the Arrival airport ICAO (YMML), and selecting your required runway (16). You can also save the flightplan for another time by pressing "SAVE" on the lower right key (RK 6). PERF (Performance) Once you have set up your engine choice and completed your flightplan, you can set your preformance (Perf) or parameters in which runway you are taking off from (01), your flap retraction setting (Flap 2) and your TRANS alt (Transition Altitude - 7500ft). The V1,Vr, V2, speed markers, Flap/slat retraction speeds RETR, Thrust reduction altitude (3500ft) and Flex temp. Other phases covered are CLB (Climb), CRZ (Cruise), DES (Descend) and APPR (Approach). APPR you will need to note the computed data of the APP Flap extension speeds and most important VAPP (Target Speed) for landing (136knts) and the final flap position (FULL). Decision height (DH) and transition Altitude is also set here. Once all the Perfs are completed in the F-PLN mode you will see on the bottom of the display the DEST airport with the landing runway YMML16 - Time 1132 - DIST (Distance to go) Other page selections give you DIR - Direct to waypoint, RAD/NAV Navigation Radio choices. MCDU MENU The MCDU Menu gives you the choices of SETTINGS and DEFAULT options in Actions, Settings and Default Values. Mostly this covers startup items and aircraft default settings (DH). If you have become familiar with the original A330-300 FMC process then this is completely different setup and far more polished and thankfully more forgiving. It is still a hybrid but anyone familiar with any of Peters Aircraft or the QPAC A320-232 and even the FF A350 will feel right at home. Pedestal Central pedestal is very well done, with radio (COMM) and lighting adjustments. Centre is an excellent throttle (beautifully complete) and trim wheels adjustment. Engine startup switches and "Engine Start" select knob are to the rear. Far rear is the Flap lever (Right) and Spoiler (air-brakes) with arm (left) (however it it does not note the spoliers are armed on the display?) Park brake and another MCDU (dummy) and Rudder trim completes the rear. Airbus A330-300 The Airbus A330 series is a medium wide-body twin-engine jet airliner made by Airbus, a division of European Airbus Group. Versions of the A330 have a range of 7,400 to 13,430 kilometres (4,000 to 7,250 nmi) and can accommodate up to 335 passengers in a two-class layout or carry 70 tonnes (150,000 lb) of cargo. The origin of the A330 dates to the 1970s as one of several conceived derivatives of Airbus's first airliner, the A300. The A330 was developed in parallel with the four-engine A340, which shared many common airframe components but differed in number of engines. Both airliners incorporated fly-by-wire flight control technology, first introduced on an Airbus aircraft with the A320, as well as the A320's six-display glass cockpit. In June 1987, after receiving orders from various customers, Airbus launched the A330 and A340 as a replacement for less economical trijets in the DC-10 and L1011 Tristar. The A330 was Airbus's first airliner that offered a choice of three engines: General Electric CF6, Pratt & Whitney PW4000, and Rolls-Royce Trent 700. The A330-300, the first variant, took its maiden flight in November 1992. The A330-300 is based on a stretched A300 fuselage 63.69 m (208 ft 11 in) long but with new wings, stabilisers and fly-by-wire systems. The −300 carries 295 passengers in a three-class cabin layout, 335 in two-class, or up to 440 in an all-economy layout. It has a range of 10,500 km (5,700 nmi). It has a large cargo capacity, comparable to that of early Boeing 747s. It is powered by the choice of two General Electric CF6-80E, Pratt & Whitney PW4000, or Rolls-Royce Trent 700 engines, all of which are ETOPS-180 rated. The −300 version entered service with Air Inter in January 1994. Performance A330-300 - Cruise speed: Mach 0.82 (871 km/h or 470 kn or 541 mph at 11,000 m or 36,000 ft cruise altitude) : Maximum range, fully loaded 11,300 km (6,100 nmi) : Takeoff Distance at MTOW 2,770 m (9,090 ft) : Maximum fuel capacity 97,530 L (25,760 US gal) : Service ceiling 12,527 m (41,100 ft) : Maximum service ceiling 13,000 m (42,651 ft). Flying the RW Design Airbus A330-300 I gauge an aircraft by how it goes through the procedures in to not only getting the aircraft ready for flight but also the way it performs as it is used and acted. Although the MCDU is not a totally real completely Airbus item, it is certainly also very quick to program and set up. As is the engine start and final checks, items done are noted on the EFIS. One engine started and you will notice the Push-back truck feature on the original has been dropped, It wasn't that great anyway, so I used Joan's "Ground Services". Engine two and flap select to 2 and clearance to taxi means we are on our way to Brisbane's Rwy 01. The -300 version is a long 207ft aircraft and it shows when taxiing around tighter sized taxiways. BNE's taxiways are very familiar to me but the turns are tight and moving through C2 to B and A taxiways to go west is a slow process as you have nose over the grass to turn and keep the main wheels on the hard stuff, and A taxiway goes on forever... Final turn on to A9 take you the hold point. It is important to understand the way Airbuses are being controlled in X-Plane, It is not a new idea but it is now being used in a more forefront fashion than before like with the A350 from FlightFactor and JARDesigns A330/A320 series. Before you pressed the space above the knob to (push) or let the aircraft's computers fly the systems (Managed) and grabbed the knob (pull) to manually control the aircraft (Selected Mode). Now you use the finger to "push" and the hand to grab to "pull" out. That is great and really a two point action in either "push" or "pull". But there is another action in here as well in activate the system. So it is a three way action and not just two. I like to use a rose style navigation display but it is great to have another choice on the First Officers position, as noted both are fully switchable in selection and screen display position. Clearance and the power goes up. I am heavy at near full gross weight so the speed builds up to v1 slowly. A-THR (autothrust) is armed. Vr is just over 180kts, high but I am heavy, rotate and initial pitch of 7º then 10º when the long fuselage is clear of the runway. You have to know everything about an Airbus aircraft's performance to get the best flight profile out of it, but then don't actual fly it! Once over 300ft clear of RWY01, you pull the throttles back to the THR CLB detent (CL-A/THR) and turn on the Autopilot (AP) with the "Push" or Managed mode activated for both the SPD (Speed) and HDG (Heading) which is your A-THR connect and FMC flightplan activation. There is another managed mode to use as well and this is activated on the ALT - Altitude knob (push - manage) and that selects OP CLB (OPEN CLIMB), which is noted on you PFD. You must be in the THR CLB mode to use OP CLB as it takes the aircraft and finds the best vertical speed to your selected altitude. So once all the three modes are running you are mostly just going along for the ride as the aircraft is doing the hard stuff. In most cases I like to set the V/S, Vertical speeds to get the best profile (lifting profile I calI it) I can, and I am pretty good at it. And the graphic of the OP CLB was very close to the profile I would use. The thrust reduction altitude and transition altitude went smoothly and I made my first altitude to 7500ft so the aircraft can build a little more speed before climbing to my cruise altitude and again the OP CLB was reactivated and adjusted to the new speed and climb profile. Yes you miss adjusting the V/S all the way to heaven, but this is what flying an Airbus is about... management. So this is a completely different aircraft than the original release in the software business, full Alpha protection and Airbus laws come with the package, so even if "good lord" you want to fly the A330 manually the protections are built in there. Sounds Sounds have been carried over from the original release, and not bad in the lower areas of startup, taxi and climb they are not great in cruise and quite whiny. But this is only a makeshift till a new sound system can be built into the plugin. The cause of Mac failures in the FFA350 and Jardesign A330 have been traced to this complex issue, so for now the same sounds are a fill in so Mac uses don't get the crashes that come with moving to the new flight plugin system. The RW Design cockpit is a nice place to be in, you don't get that worn in look, its clean and plainish with no high totally realistic detailing but still very well completed and really well put together, where it counts it is very nice to use and look at. MCDU pops out for any changes and to check your route and recheck your landing radio frequencies. Descent and Approach Like climbing up with OP CLB you also have OP DES (Open Descent) for managing the descent phase, when ready to descend you set your target altitude and press (push) the ALT knob to start OP DES. Setting your own Vertical Descent speed V/S means you can compute your target altitude and distance from your pitch, but OP DES does not give you that target approach, it just drops you and in this case by 3100fpm so you can reach your target way to early or even late. It settled down around 2300fpm but still to fast for my needs (or the passengers) so I set the V/S manually at 200fpm. I reset the OP DES at 12,00ft and it was more in line with what I required. I don't doubt OP DES would work well, you would just have to work out its calibration to reach your target altitude correctly. Flight instruments are clear and totally airbus standard, full speed and altitude tapes with V/S strip on the right. Roll rate and heading are built in, as is the approach guides when the LS is activated on the panel glarescreen and the LS activation does not move your ILS guides on the PFD anymore to fit. Horizontal horizon and pitch are all standard and clear. Standby instruments include Horizontal horizon ball, VOR/ADF switchable, Altitude and Speed dial, and are slightly older in design. Fix "ARBEY" is the entrance STAR for the arrivals from the North into Melbourne Intl. And I usually cross at 6000ft to the NDB BOL 362 (Bolinda) approach to Rwy16. A check of your approach notes will give you your flap extension speeds and your final VAPP Speed (Target speed) of which mine is 155kts at Full Flap. This correct speed should give you the correct approach pitch of 3º, But I did find on a couple of earlier flights to YMML that it dropped under managed mode to 132knts which is too slow, if needed you may have to correct the speed manually like I did to the correct VAPP. Noted speeds are: Flaps limits (441,405 lbs GW) Flap setting positions 1 - 1+f - 2 - 3 - full Maneuvering 220 - 210 - 190 - 175 - 165 Vref 179 - 170 - 167 - 161 - 148 Vapp 184 - 175 - 172 - 166 - 153 Extended Flaps and animation is excellent as is the animation on the undercarriage. The thrust reversers are set on the setting "Open Thrust Reversers" and you control the throttle to give the thrust power and it is highly effective, the older original buggy thrust reverser action is gone. Like noted you can arm the airbrakes and they work as required but there is no notice on the EFIS that they are armed... Once the aircraft is cleaned up you can easily taxi to the gate, again the length of the -300 is noticeable around the tight terminal areas. Lighting Aircraft external lighting is good with landing, taxilights and runway turn-off lighting. There is logo lighting and wing (Ice) lighting and the aircraft is easy to navigate around dark taxiways. Standard Navigation, strobe and top and bottom beacon is standard. Cockpit HDR lighting is also very good. standard dome and main lighting will give you good preparation light at startup. There is Map and side spot lighting and the panel can be adjusted well to meet you needs and minimum reflection at the approach and landing phases, cabin is well lit but not adjustable... overall the lighting is excellent. _____________________________________________________________________________________ Summary In many ways the original release of DW Designs A330-300 was certainly raw and to be frank a bit rushed to release too early. It was a brave choice to not only to just fix up the aircraft to a quality product, but to take the time and get it right and bring in a plugin that brings the aircraft up to a quality standard in the way it performs and handles. Torsten Liesk is one of the very best at Airbus systems intergration and it shows and anyone that has already flown other aircraft with this airbus system will feel right at home here. To a first glance over the aircraft it looks not any different at all, but it is significantly different under the skin and in operation, It still needs a few more refinements and there is not a lot of extra features that come with these aircraft like ground support, menus and all those nice little knick-knacks that we like to play with, but even just opening passenger doors and cargo doors would be very nice. The three engine variants and their liveries are excellent for choice and perform to their different categories of performance. and the lighting and cabin are all excellent. The A330-300 has only a hybrid FMC, but it works in the case of a very quick but effective setup that will get you on the taxiway and flying within minutes when you know it well and to just load a standard X-Plane .fms flightplan and have the bonus of preferences with that flightplan is a bonus, so the aircraft closer to the philosophy of Peters Aircraft A320/A321/A319 series than say the full bang and whistles of JARDesigns A330-243 and is aimed at the user that just wants to load a flightplan and fly, without spending 30-40minutes in flight preparation before even starting the engines. The DW Designs A330 is still a very good simulation but it is also more useable I use it like Peters A320 series and just want to do a route and then fly right now with limited time to spare. The A330-300 is now also good value at $38.00 in its category as it is now a good A330 and a -300 version at that. So yes it needed it to be and it is an excellent update to v2 and really buries the poor original release version in its wake, in fact this aircraft version will soon make the original fade quickly into the past and disappear. _____________________________________________________________________________________ The Airbus A330-300 v2 by RW Designs is available now from the New X-Plane.org Store : Airbus A330-300 Price is US$37.95 If you already own the DW Designs A330-300, then go to your X-Plane.OrgStore account to get the v2 upgrade which is free. For a full Original X-Plane Reviews then go here... Aircraft Review Airbus A330-300 by Jetsim Features included: Detailed modeling 3D Cockpit - HD Texturing Full 3D exterior model Aircraft Systems Electrical - Hydraulic Complete ADIRU modeled ILS and VOR work together Customized ECAM with Airbus flight phase logic ILS auto-align Autopilot All Airbus AP modes modeled (except non-precision approach and LOC backcourse) Complete HDG-VS and TRK-FPA modes 2 independent autopilots (AP1, AP2) MCDU and Flight Management Custom MCDU Based on XP native data Both MCDUs are modeled Curved trajectories with the turn radius properly computed based on speed and angular turn distance. Pop-up MCDUs Fly-by-wire - Highly realistic implementation of the Airbus fly-by-wire system. 3 engines variants Rolls Royce Trent 700 General Electric CF6-80E1 Pratt & Whitney PW4000 10 paint schemes included _____________________________________________________________________________________ Documents : Download: 418.30mb : Installed 527.20mb Support Thread : RWD support - A330 _____________________________________________________________________________________ Technical Requirements: Windows, Mac, Linux (64 bit Operating System) - X-Plane 10.30+ 64 bit (Any edition) - 2,4Ghz Multi-core CPU.8 GB RAM. Video Card: 1Gb VRAM. Current version: 2.0 (last updated August 8th 2015) ______________________________________________________________________________ Update review by Stephen Dutton 8th August 2015 Copyright©2015: X-Plane Reviews Review System Specifications: Computer System: - 2.66 Ghz Intel Core i5 iMac 27” - 6 Gb 1067 Mhz DDR3 - ATI Radeon HD 4850 512mb Software: - Mac OS Mavericks 10.9.4 - X-Plane 10 Global ver 10.30 (final) Addons: - Saitek x52 Pro system Joystick and Throttle - Bose Soundlink WiFi Speaker Scenery YBBN - VOZ - Australian Scenery Packages - Barry Roberts - Free (Australian Scenery Packages) YMML - Melbourne - ISDG (Chris K) - Free (X-Plane.Org)

-
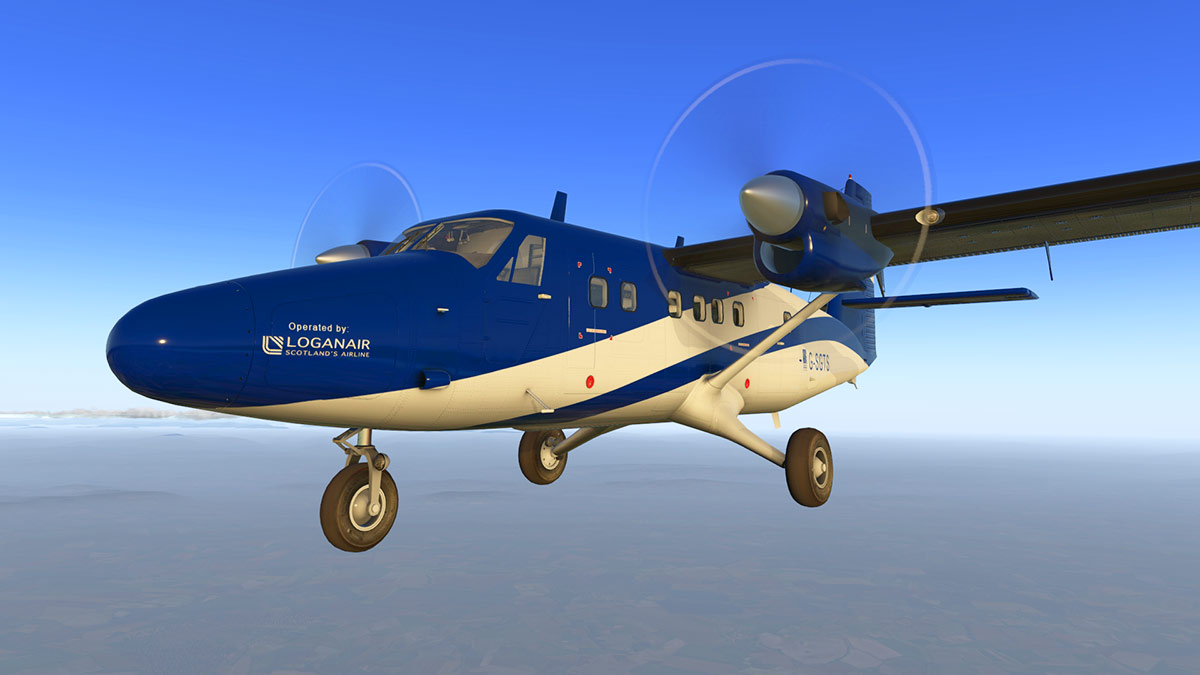
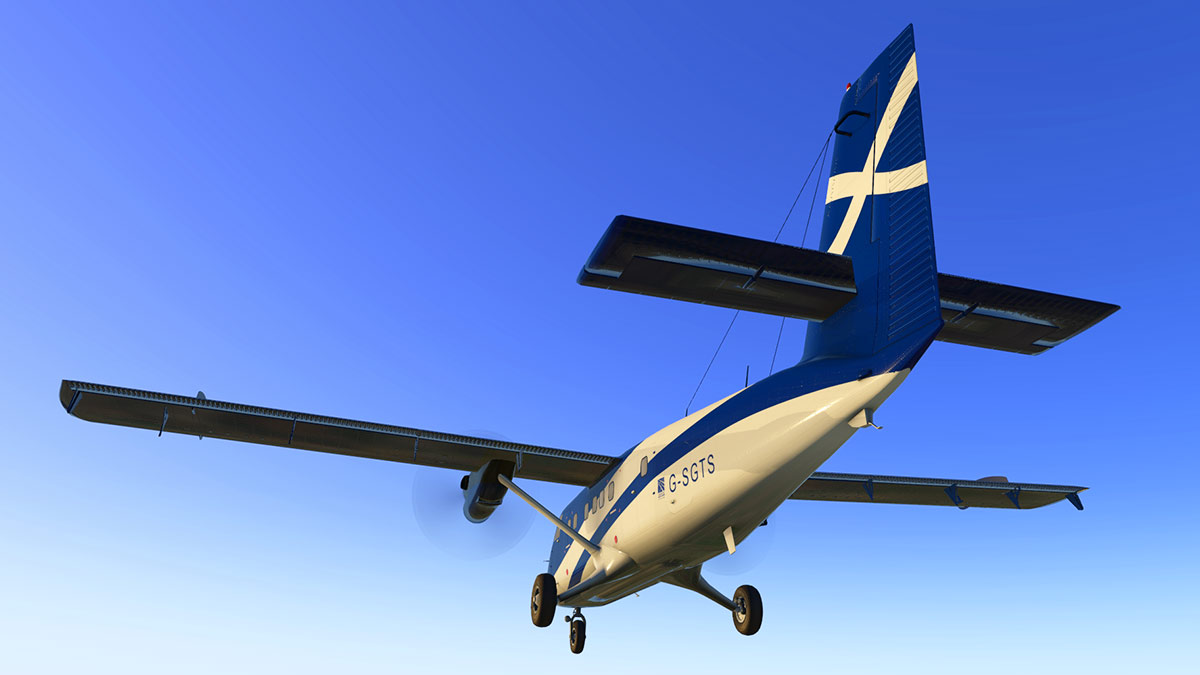
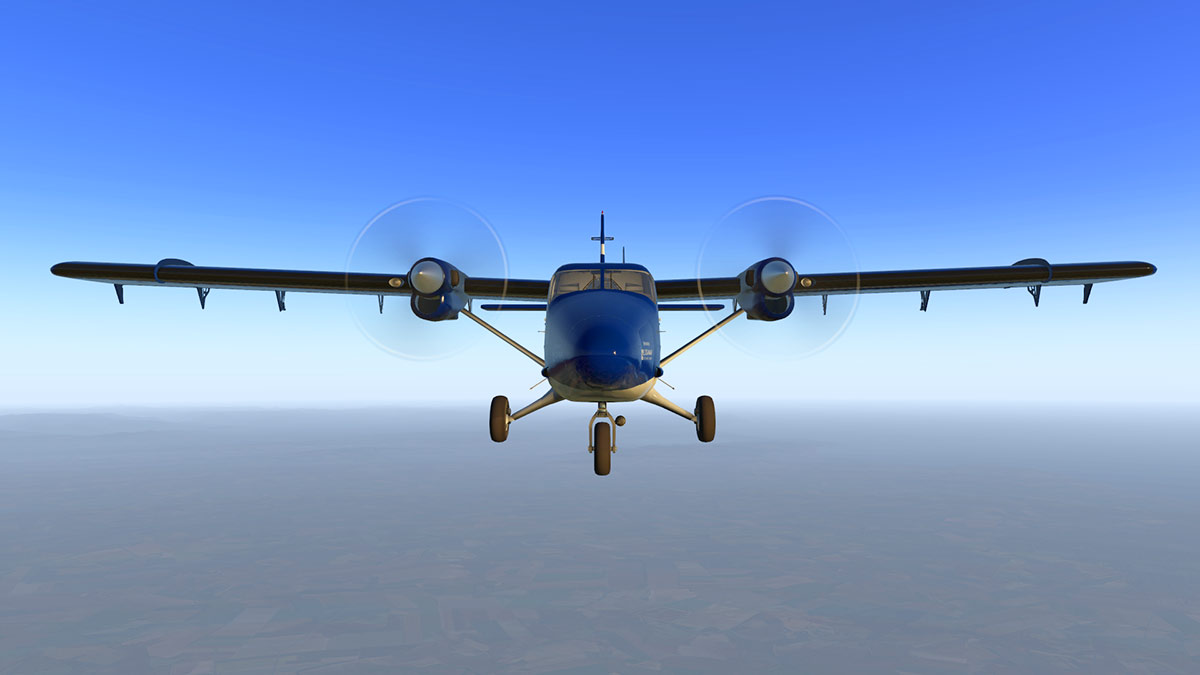
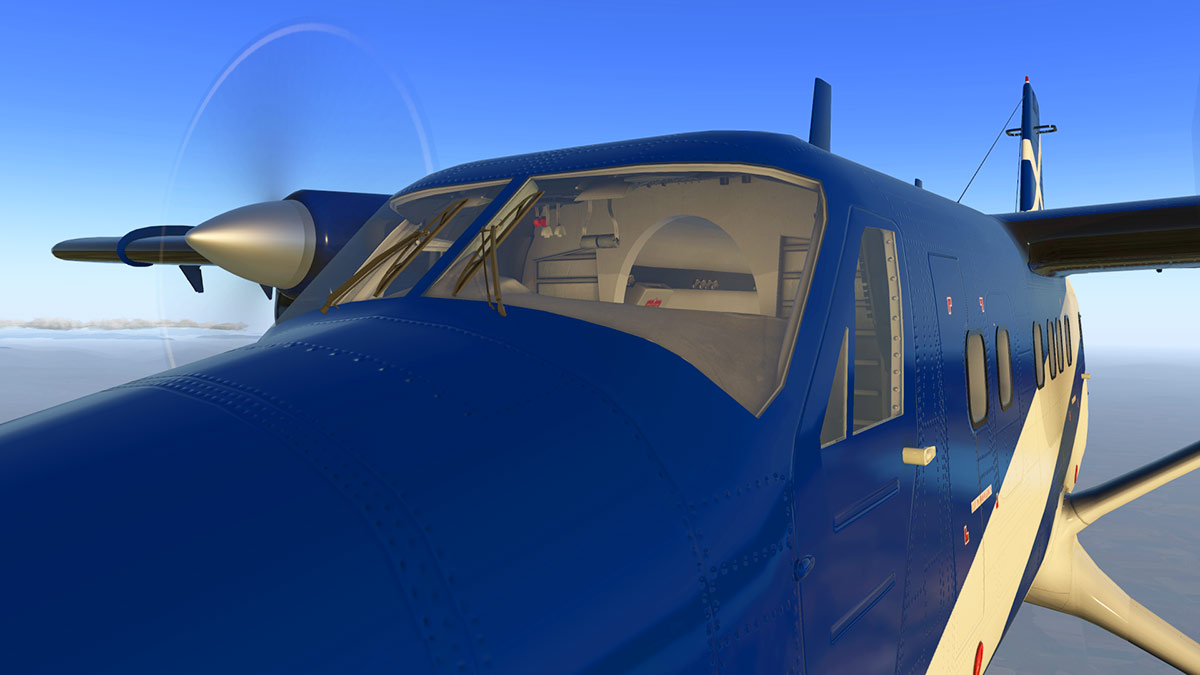
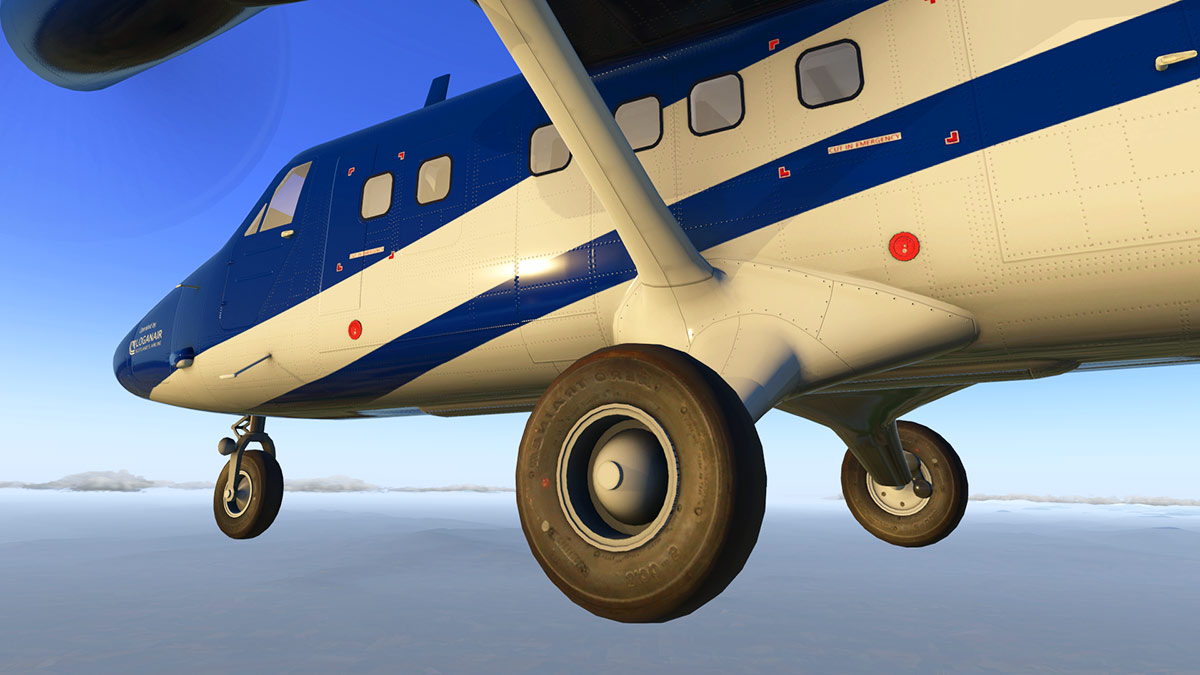
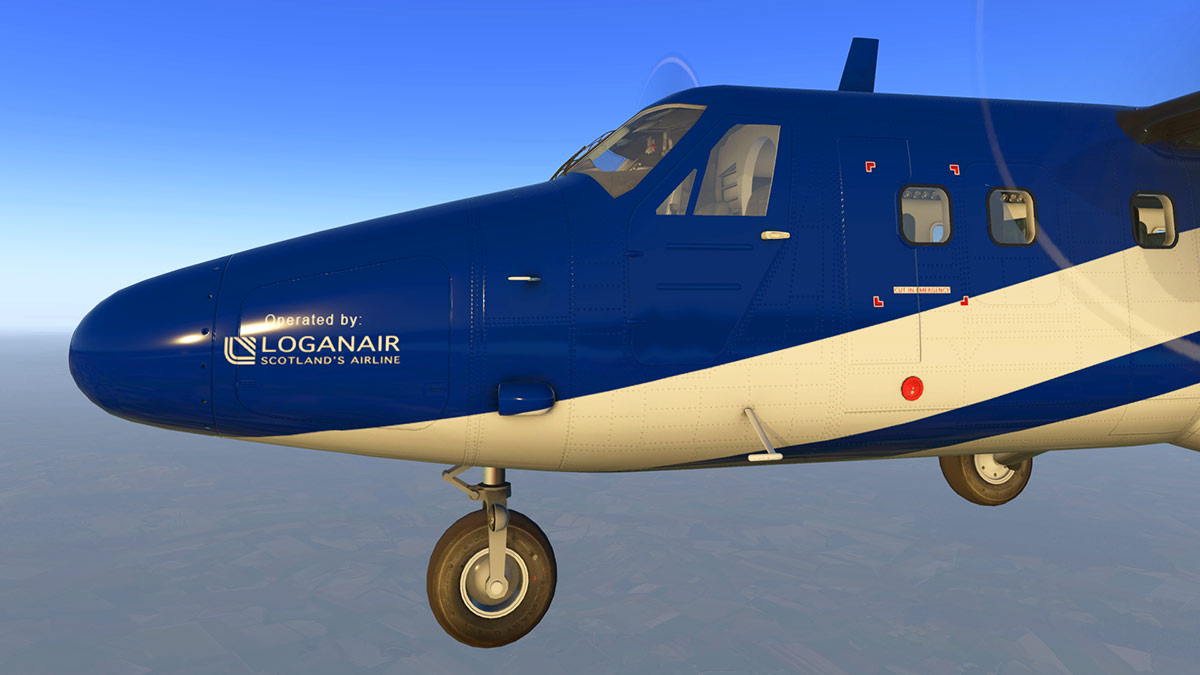
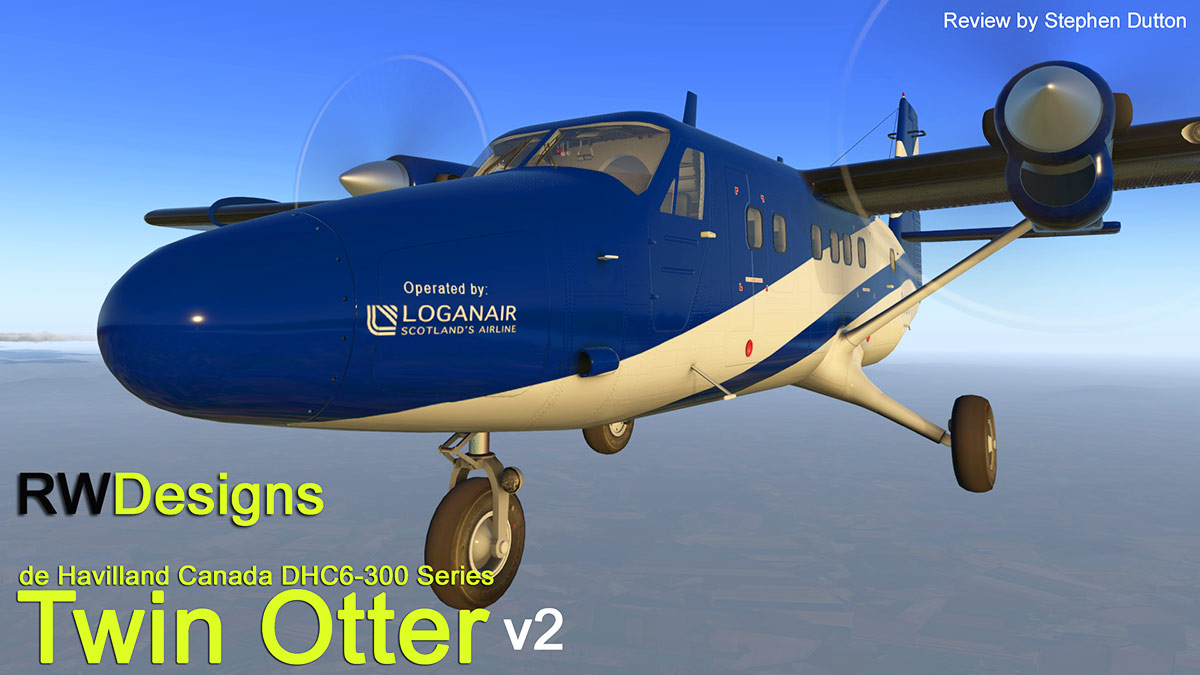
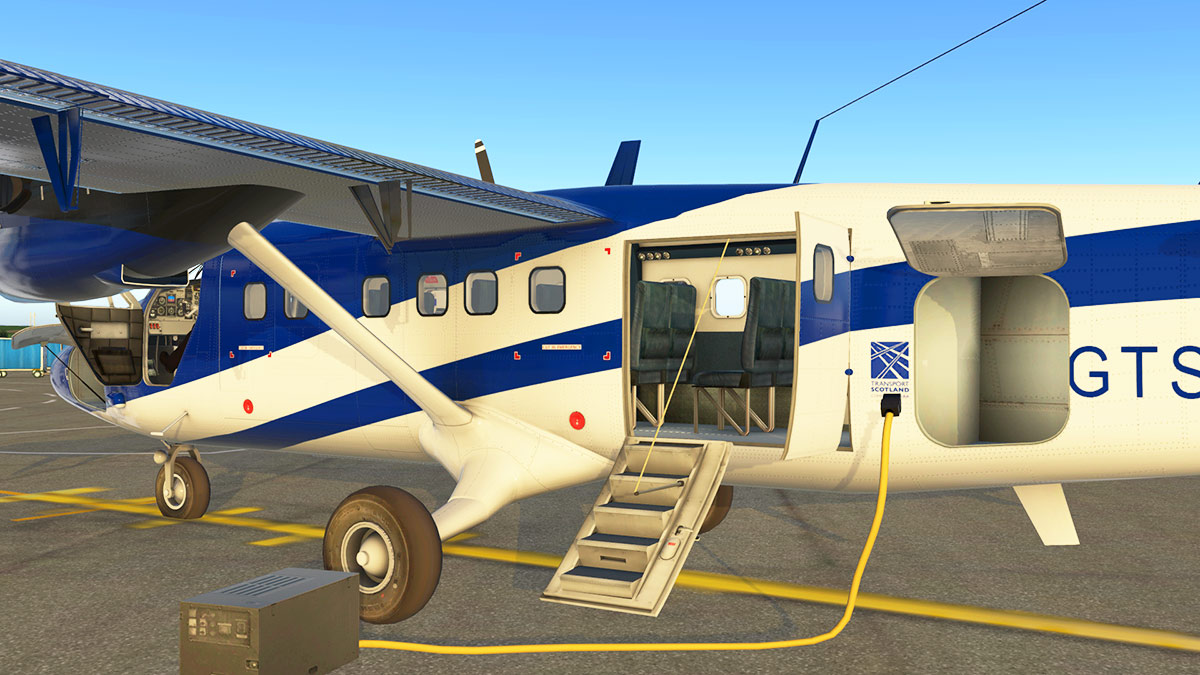
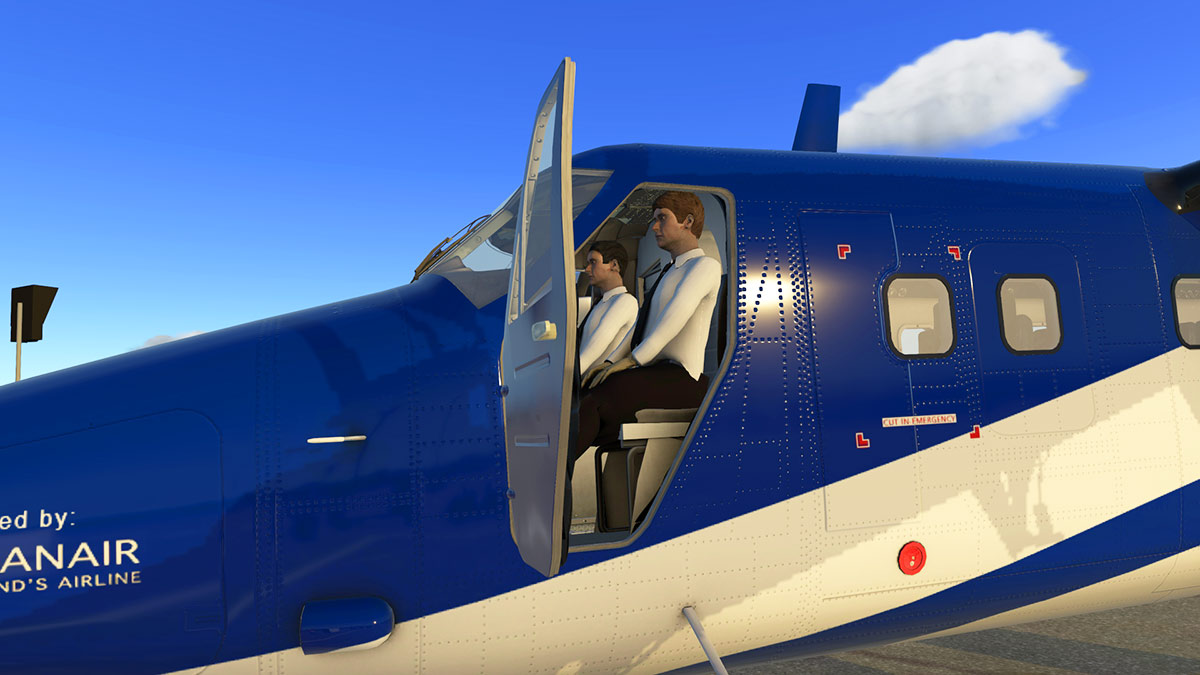
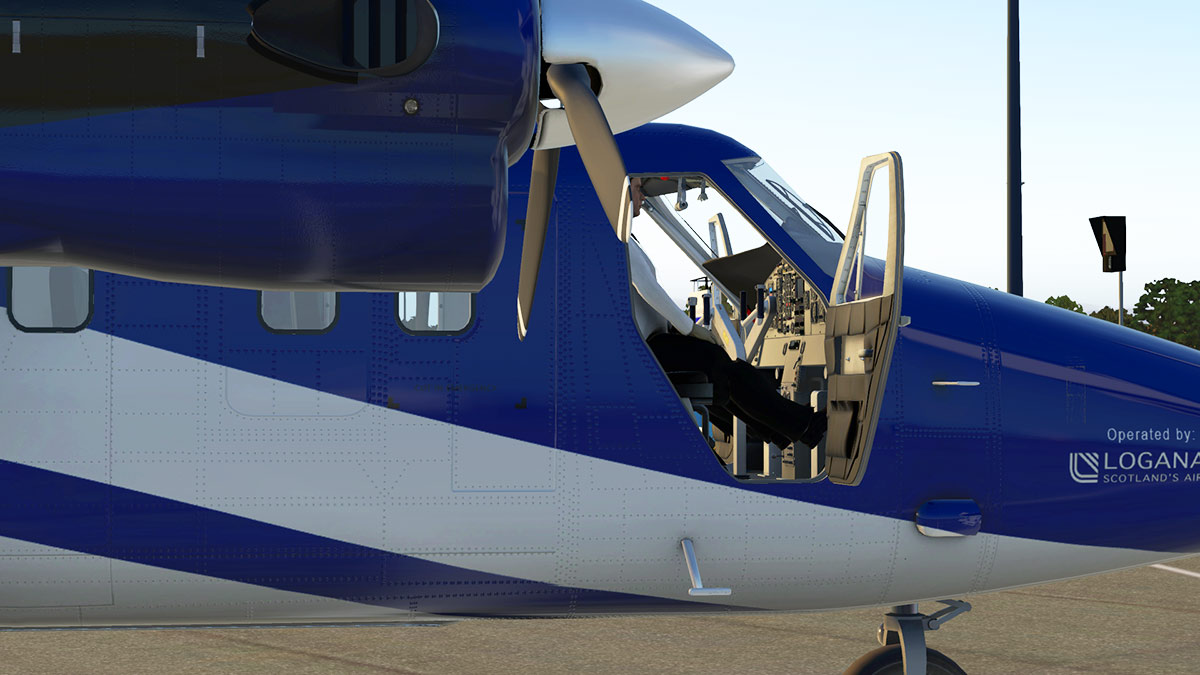
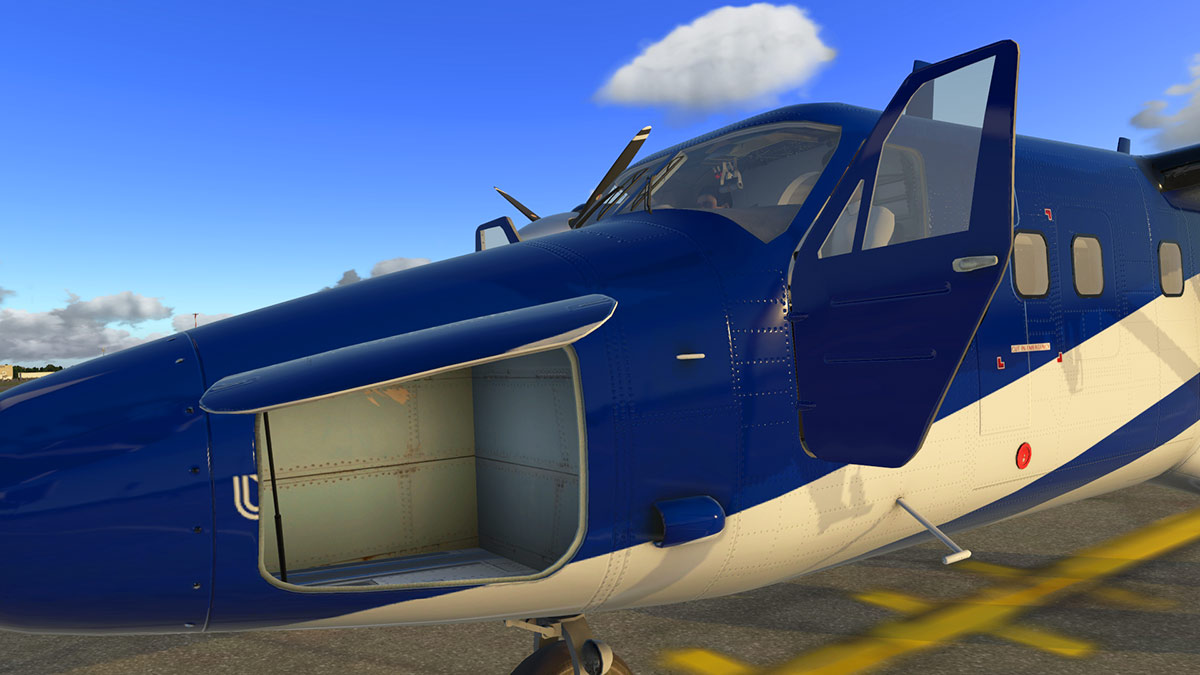
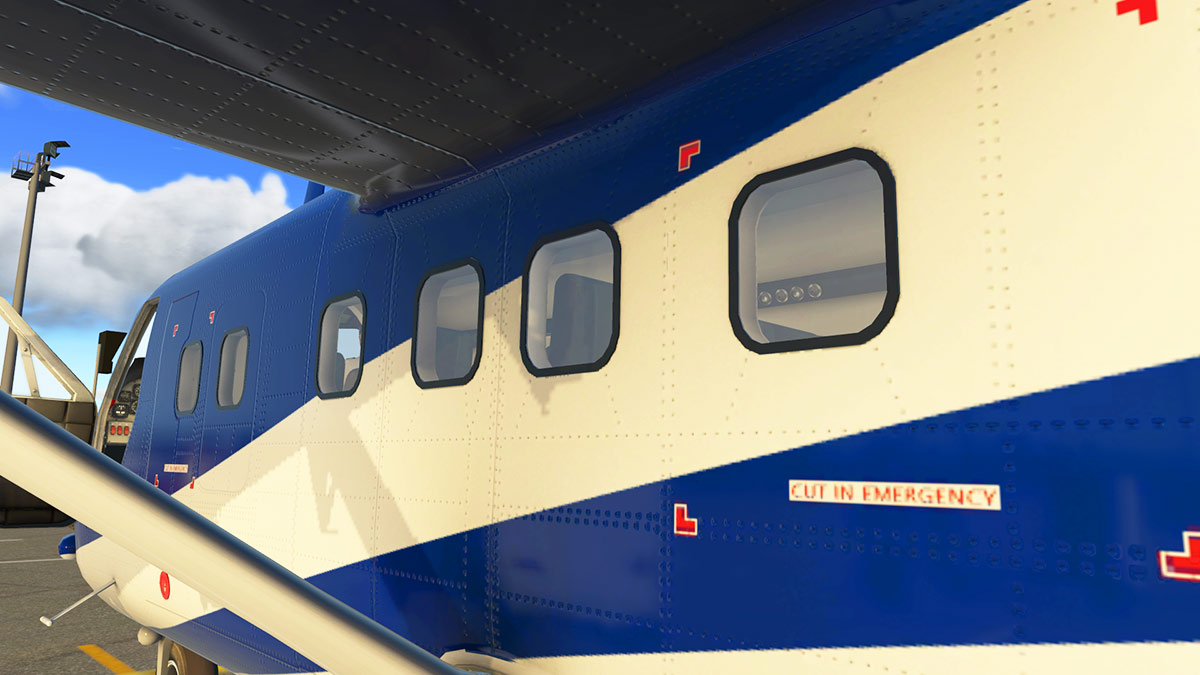
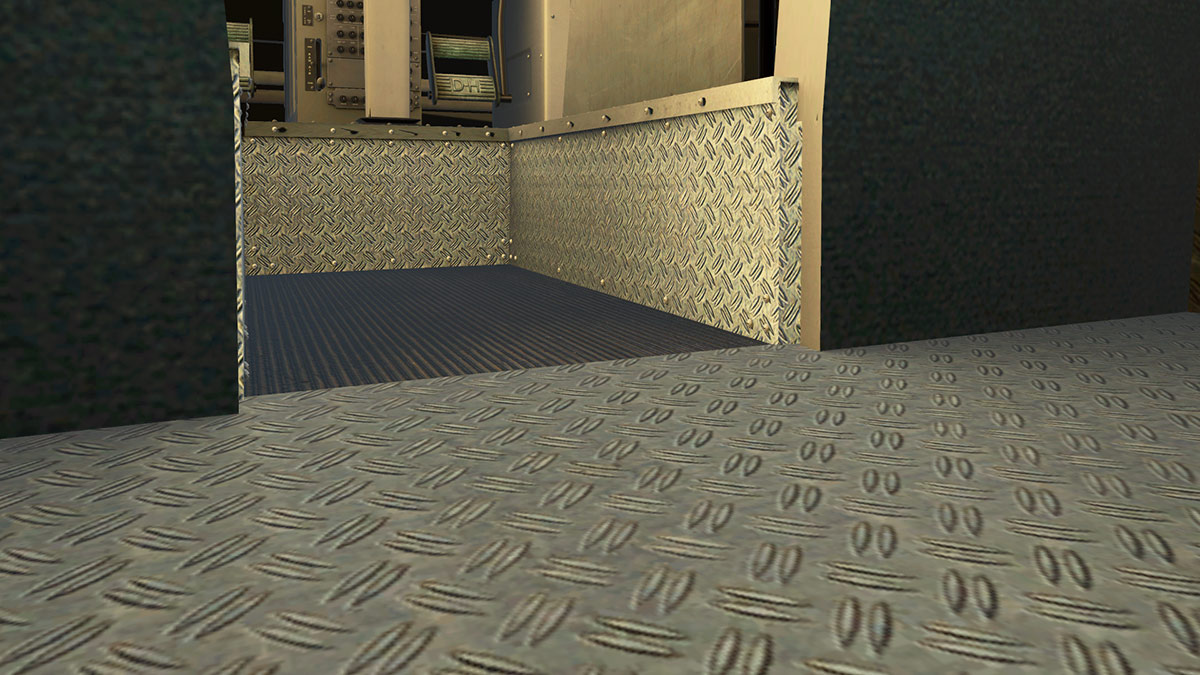
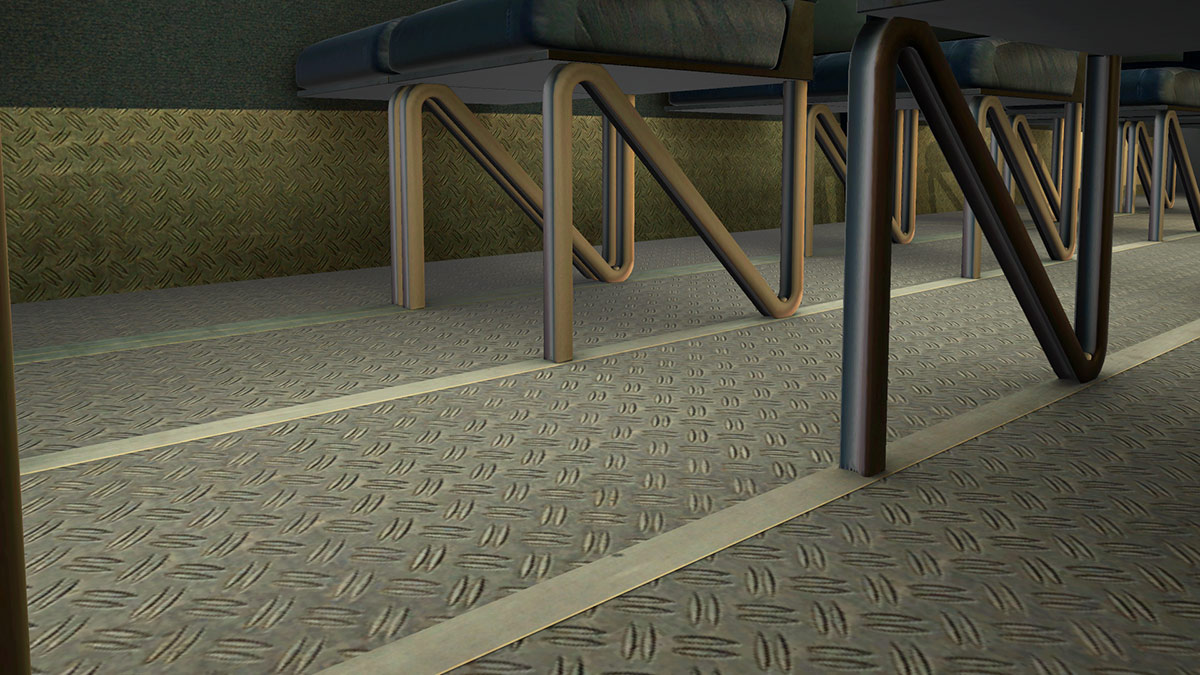
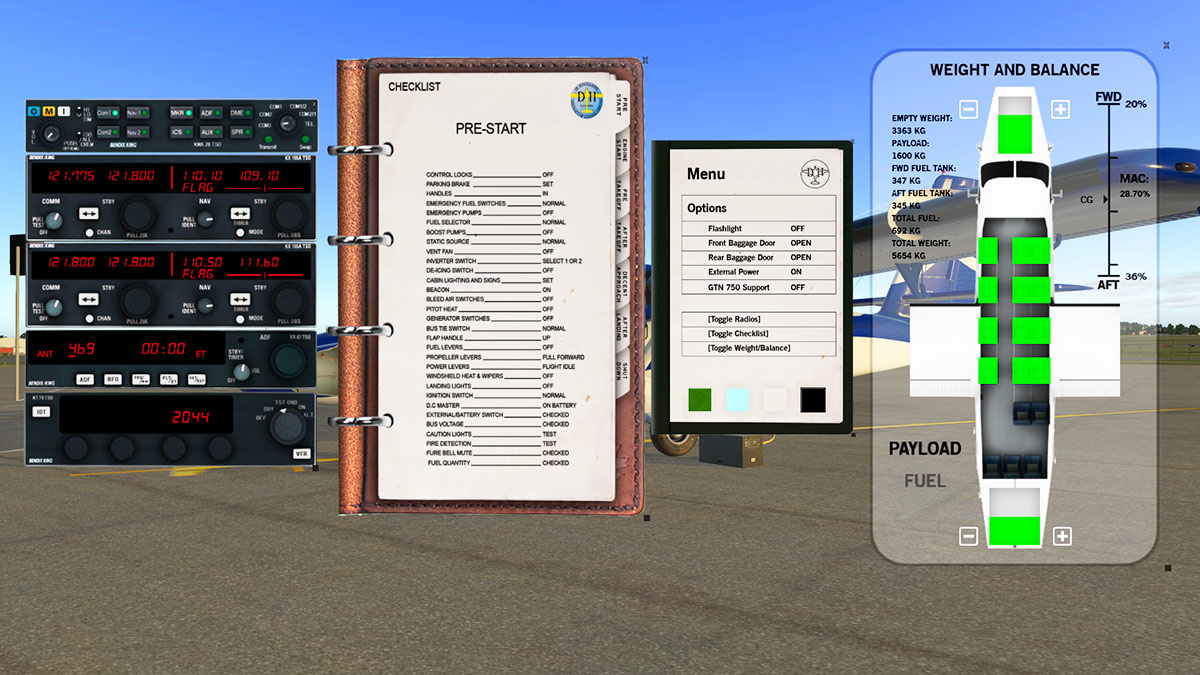
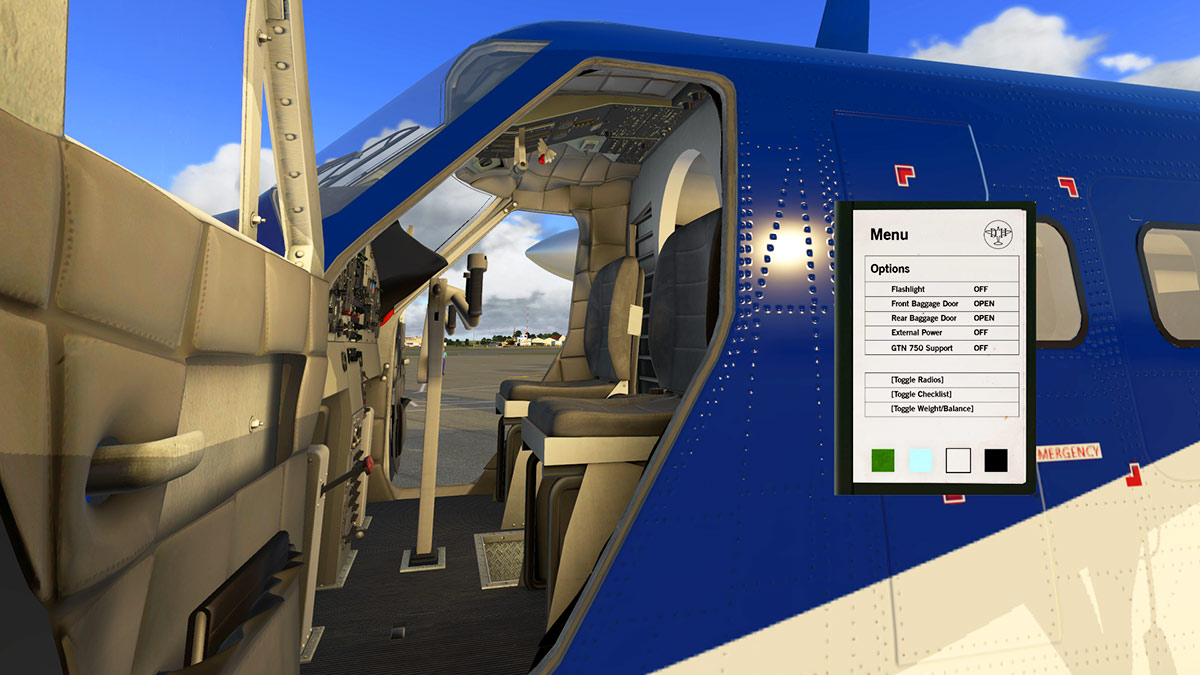
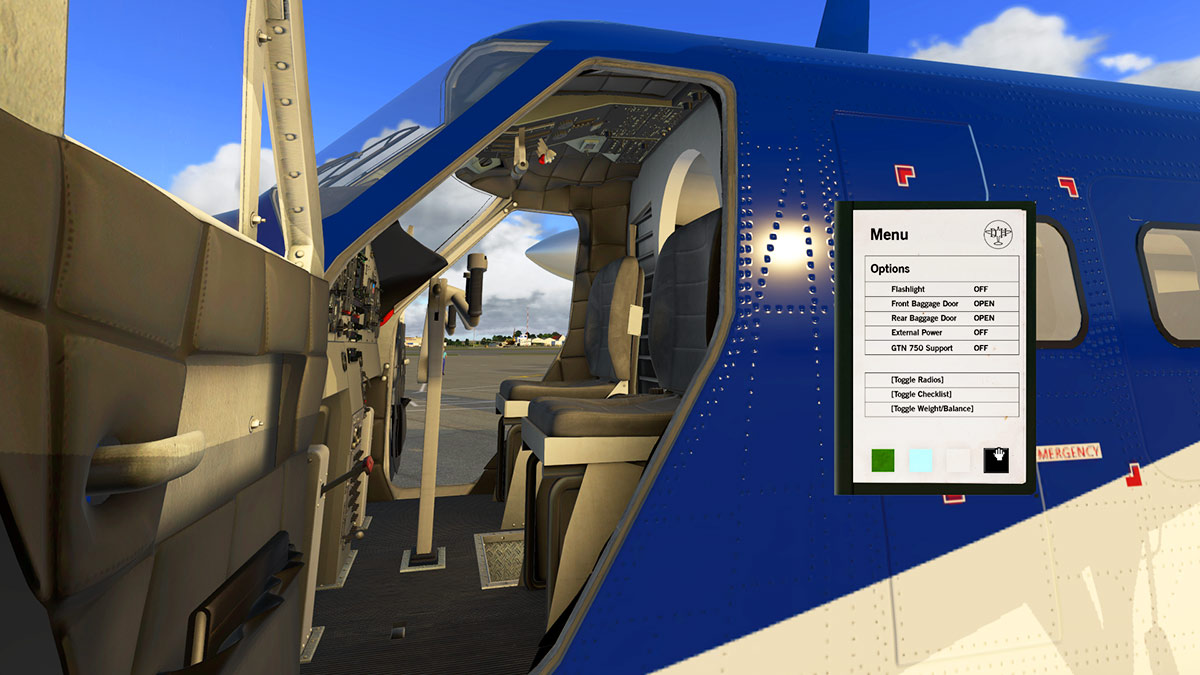
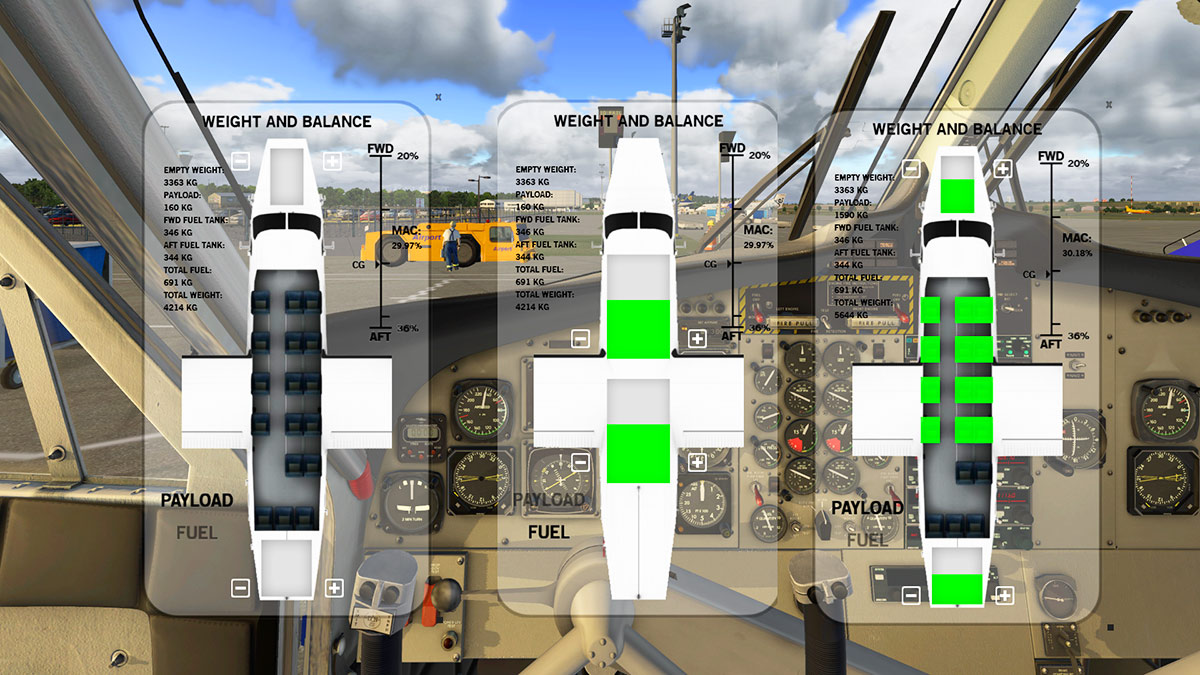
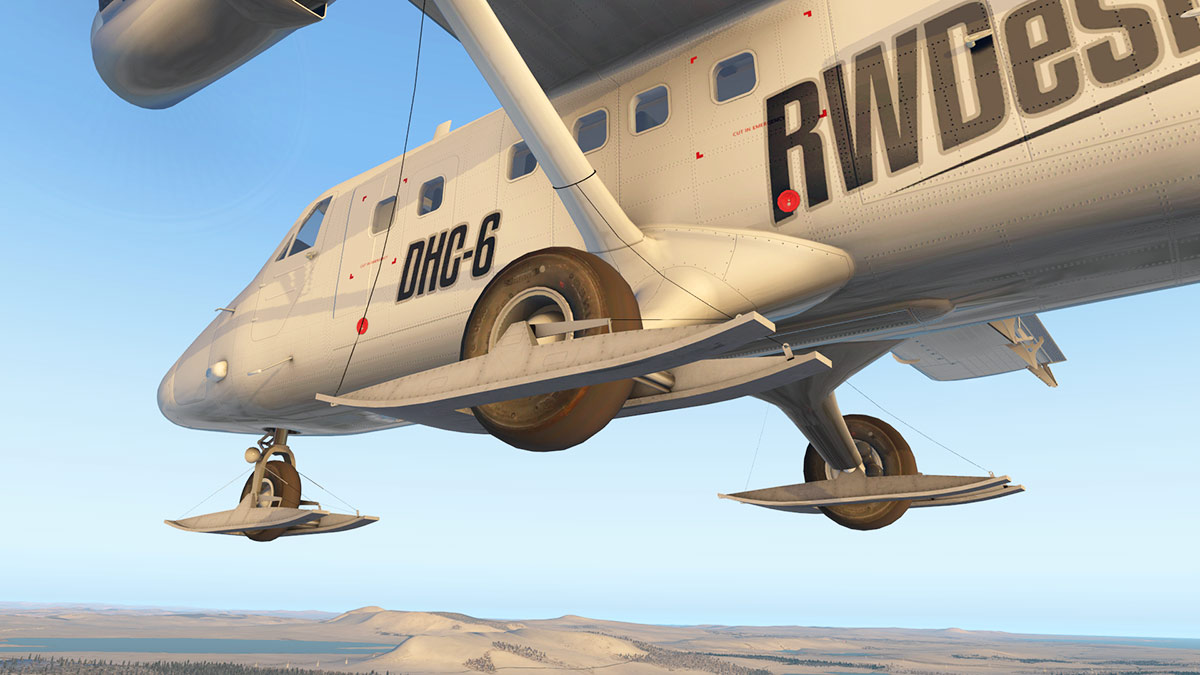
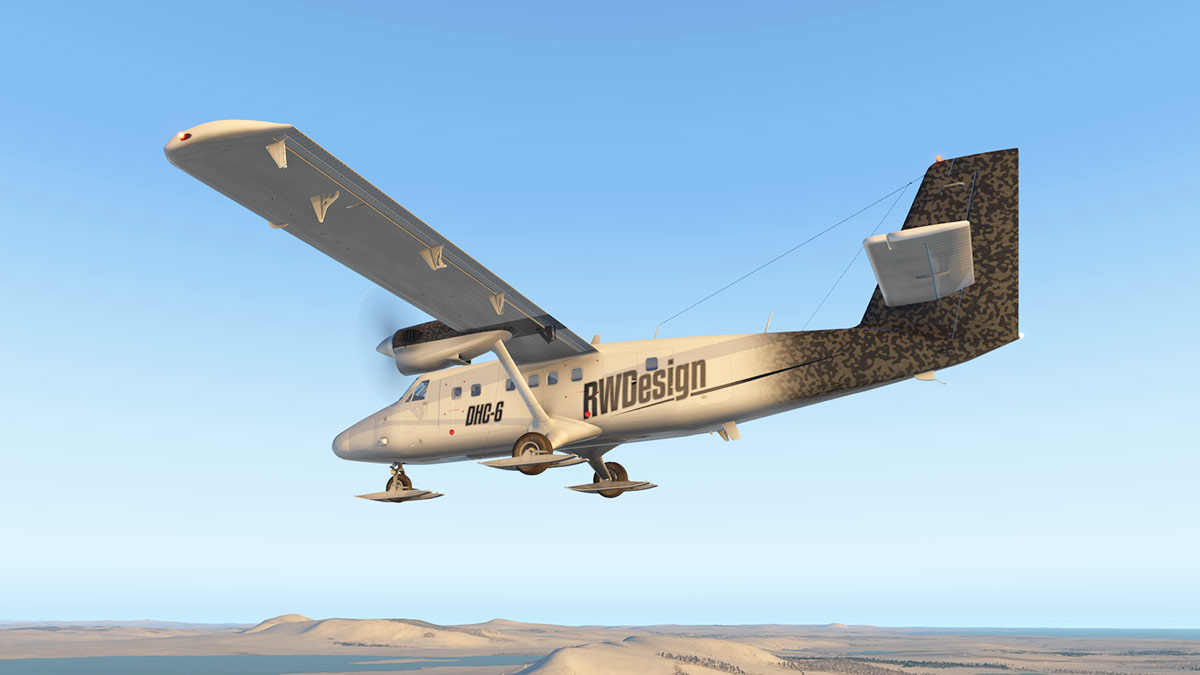
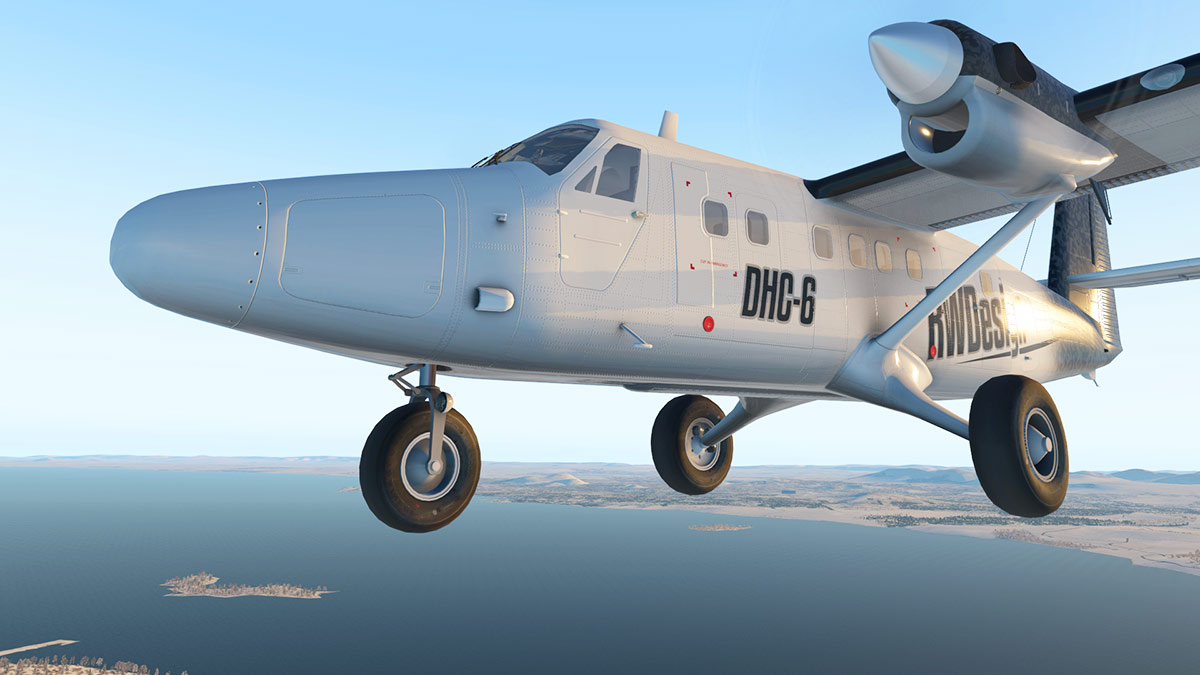
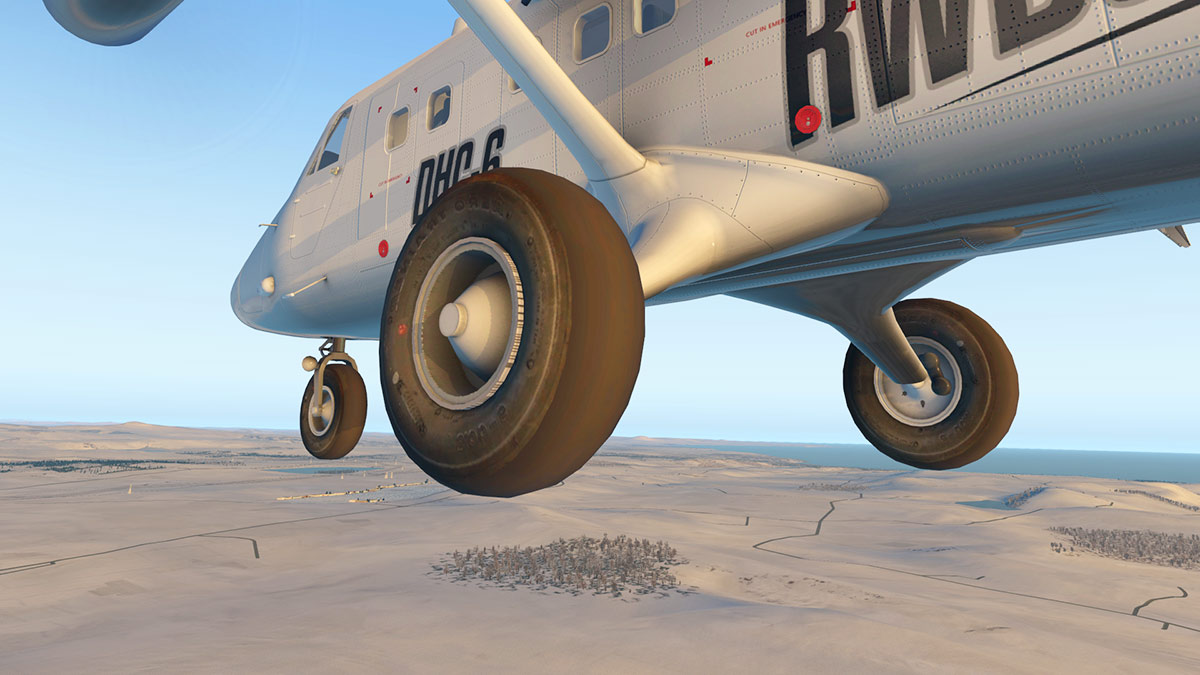
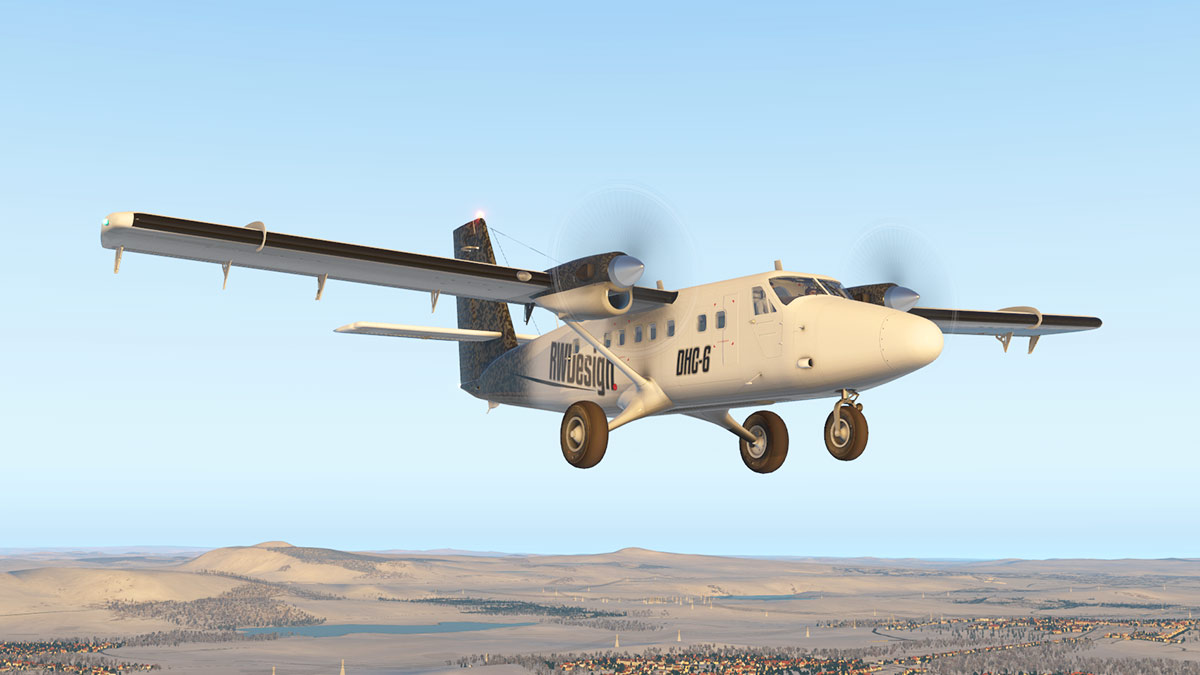
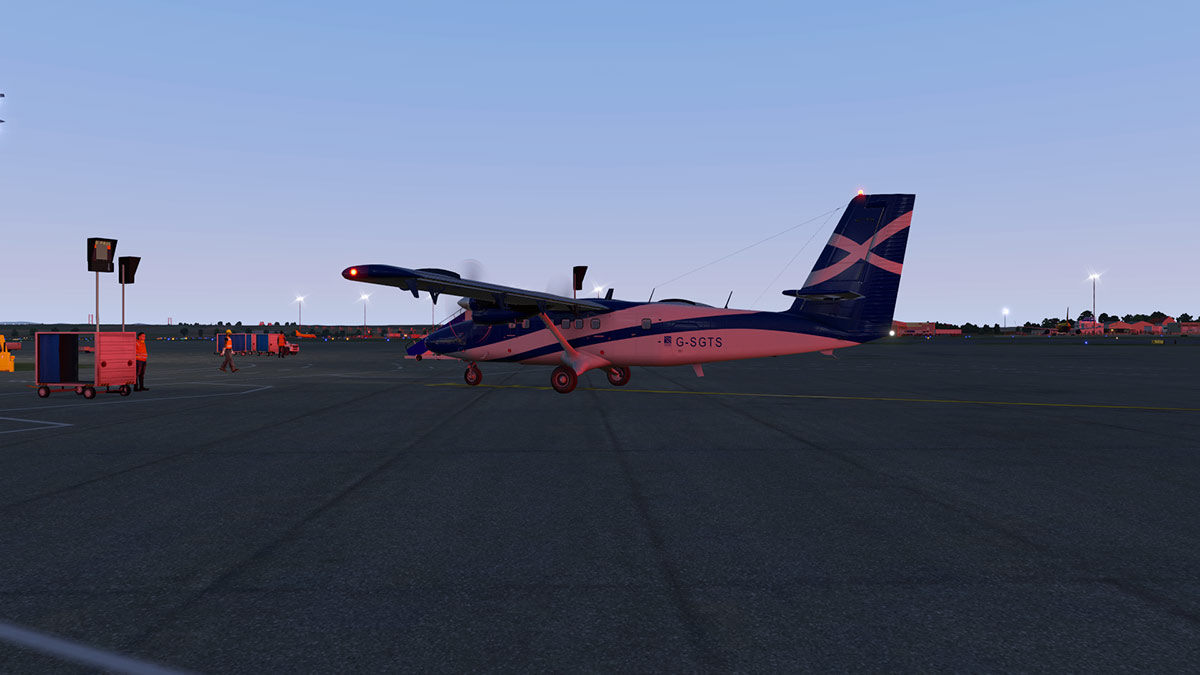
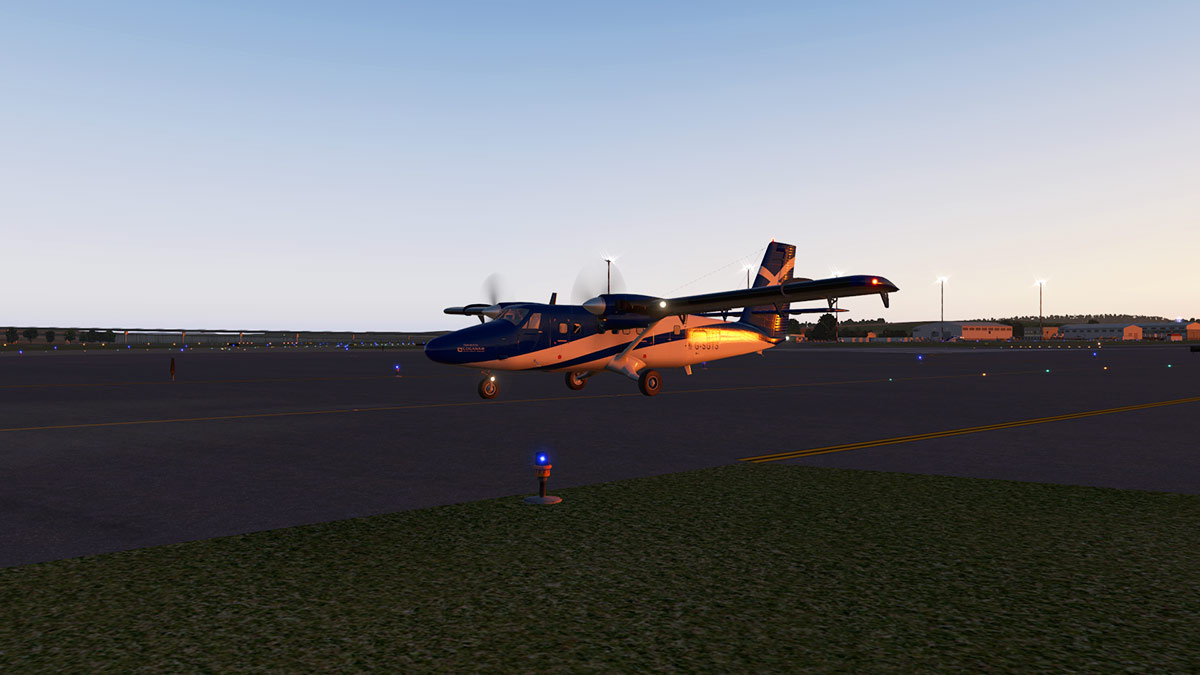
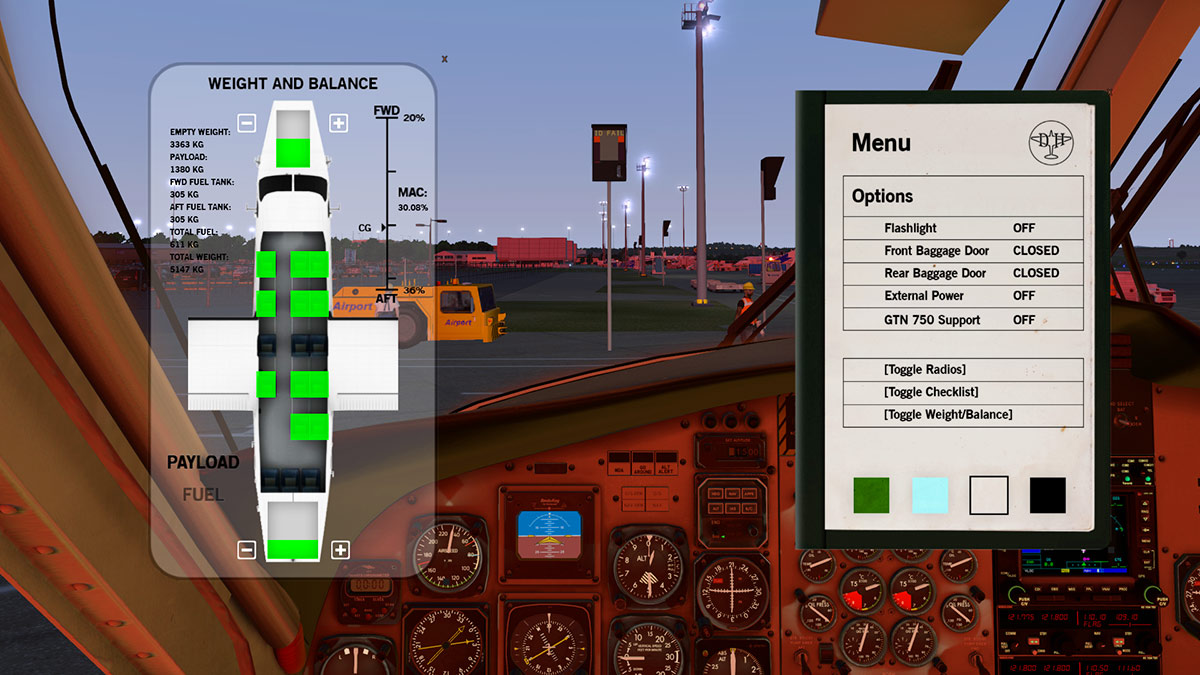
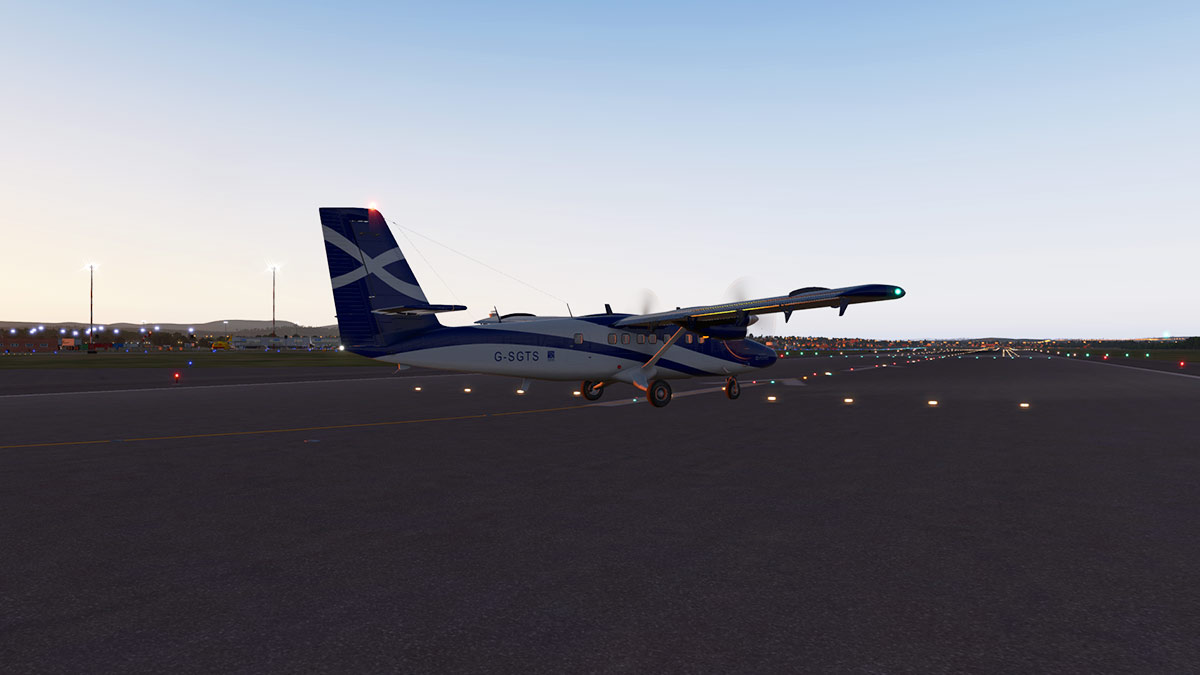
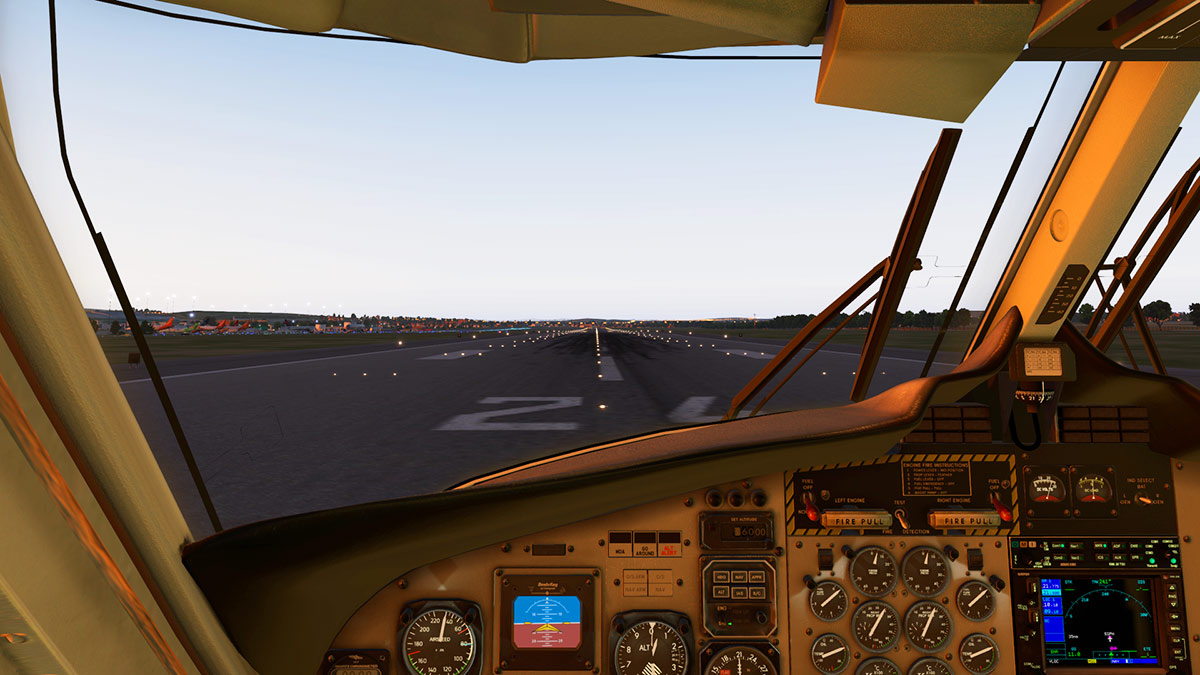
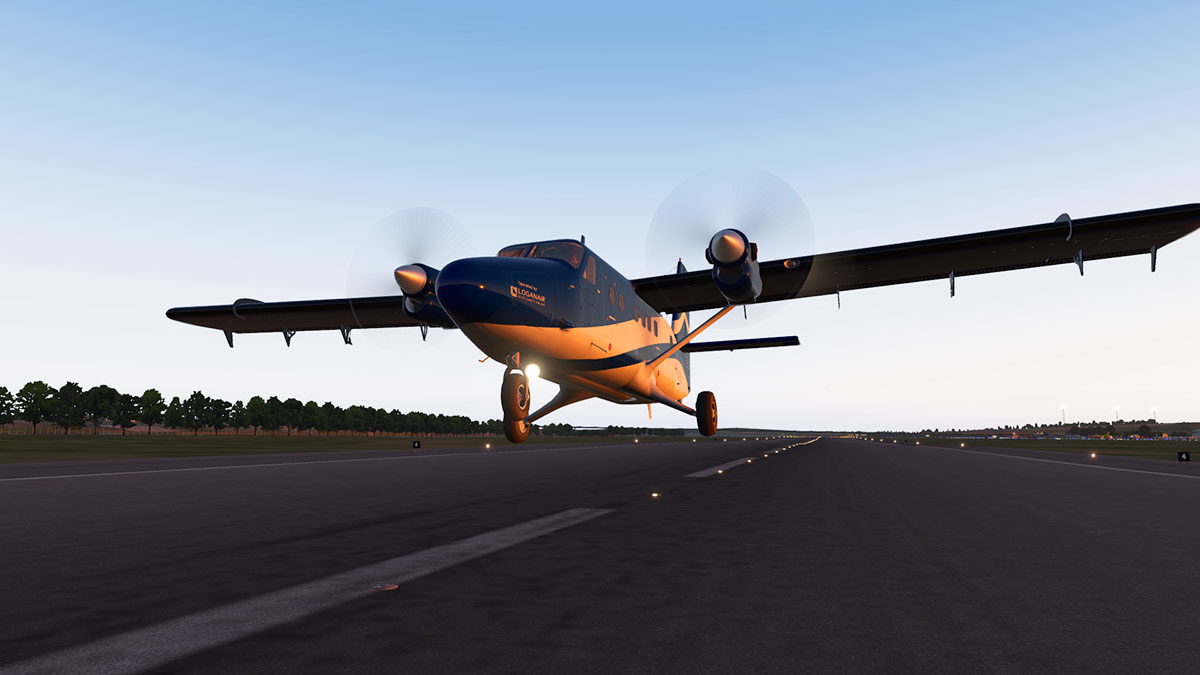
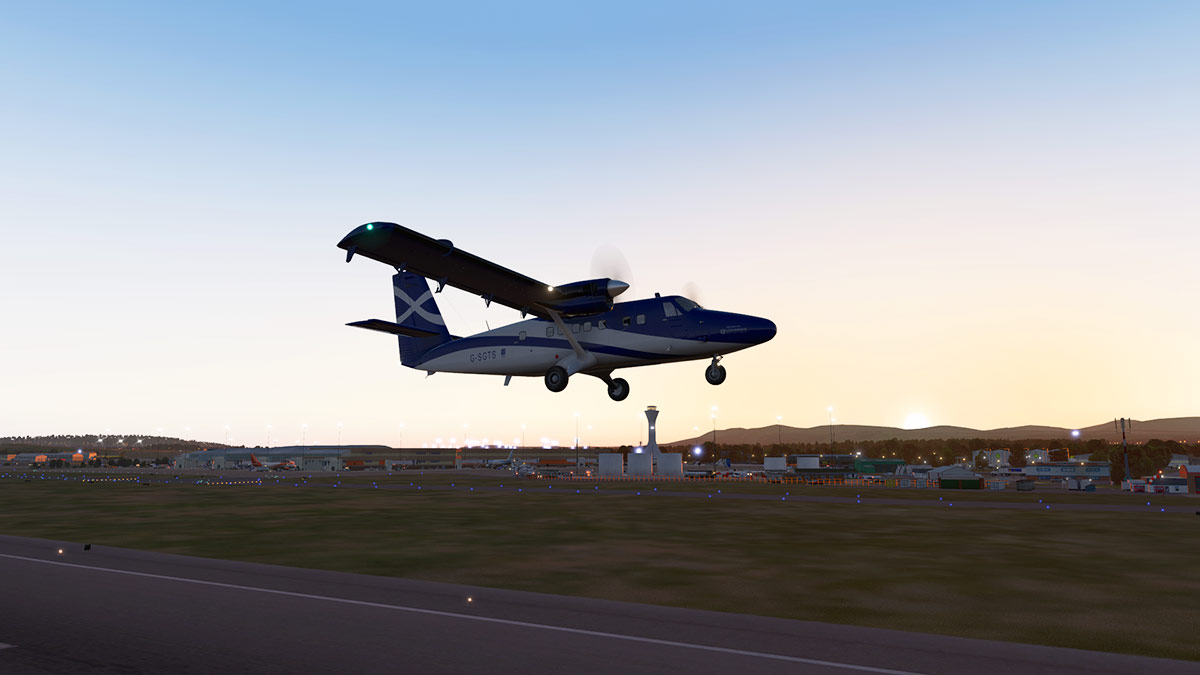
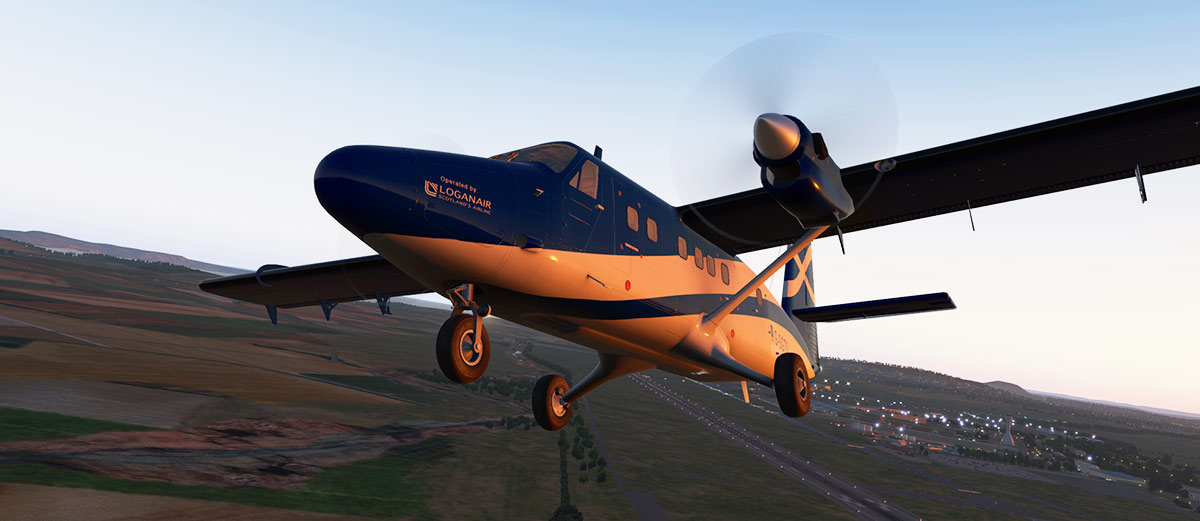
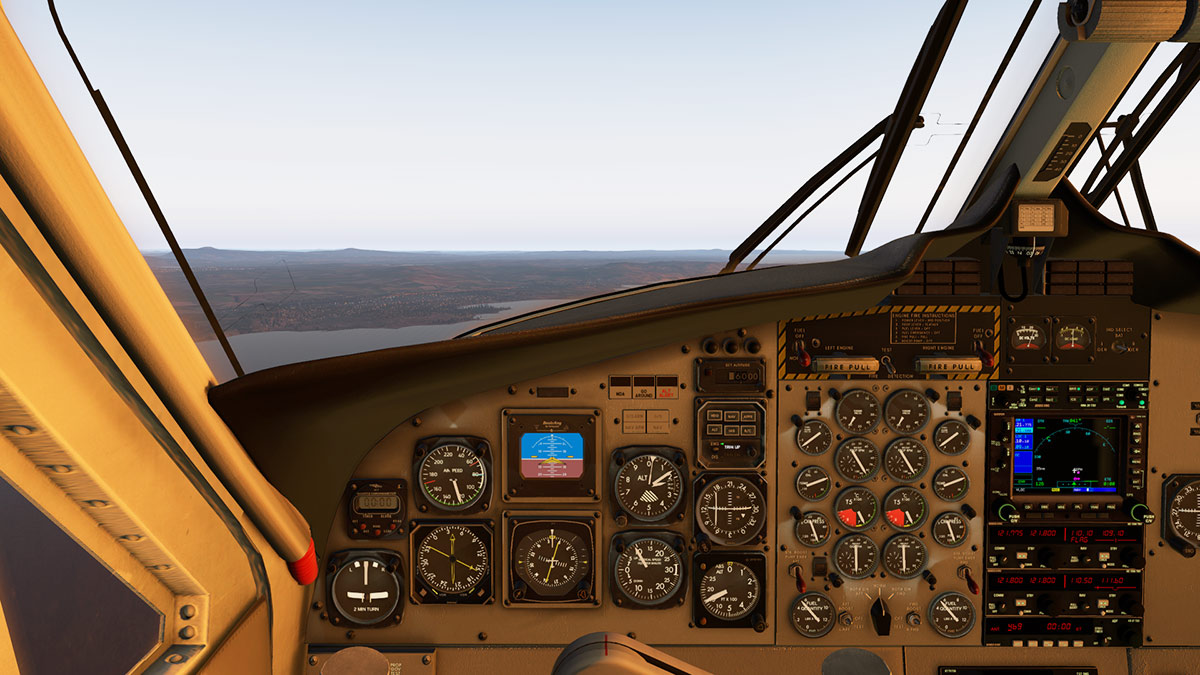
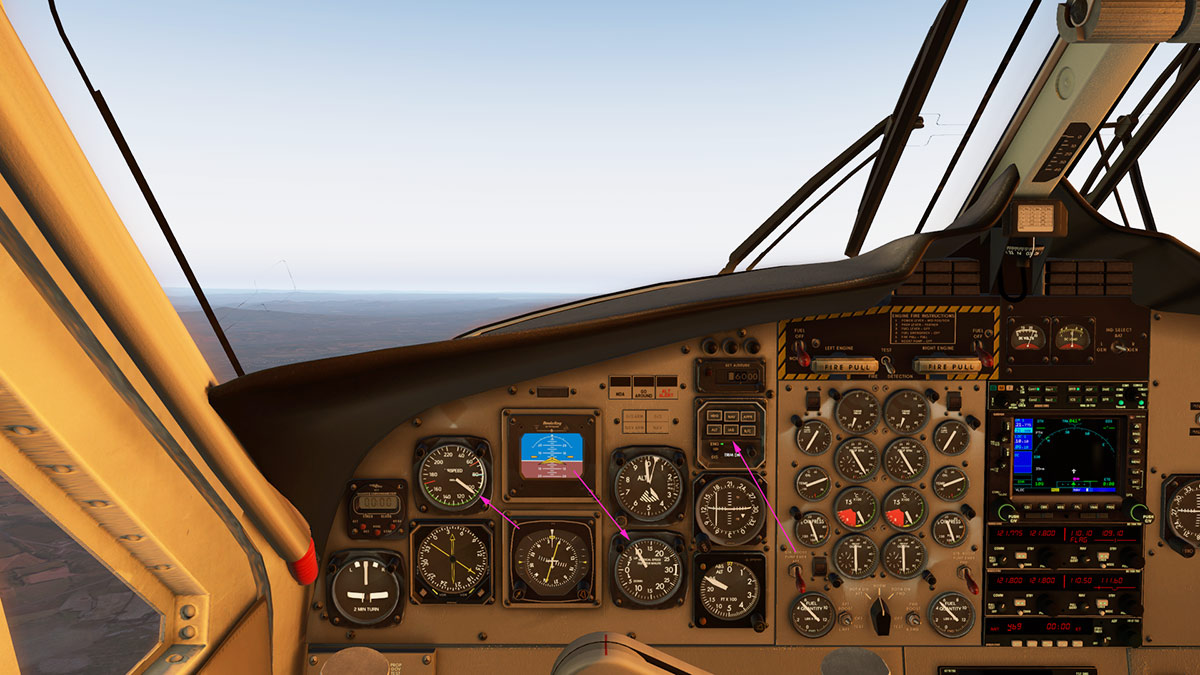
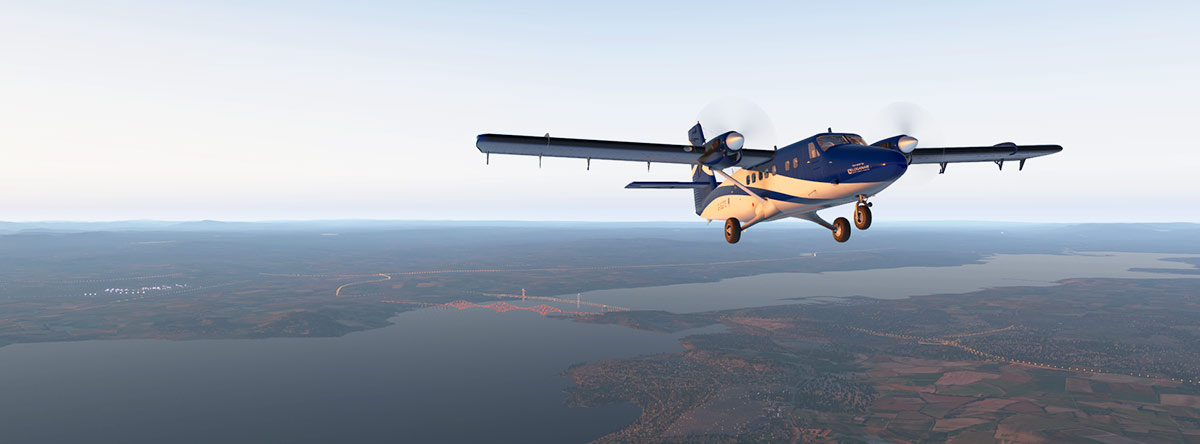
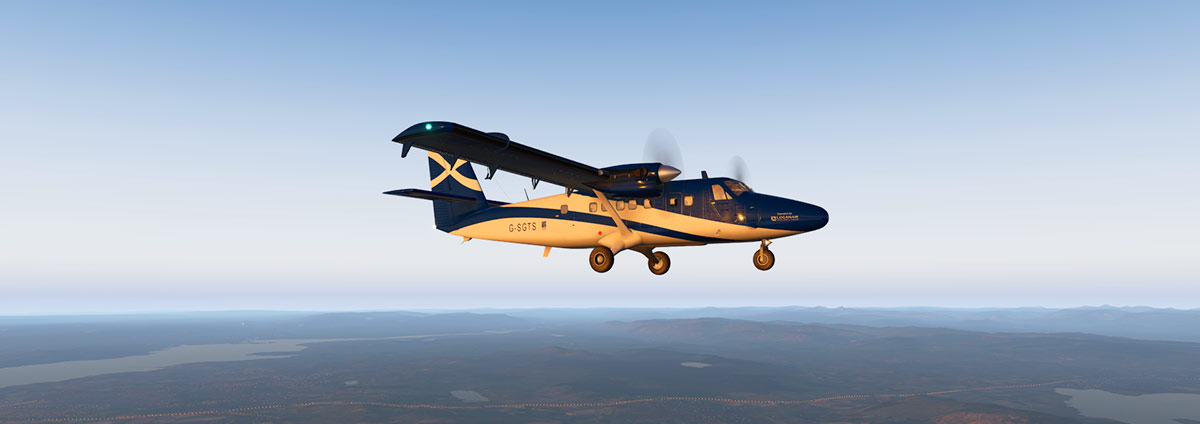
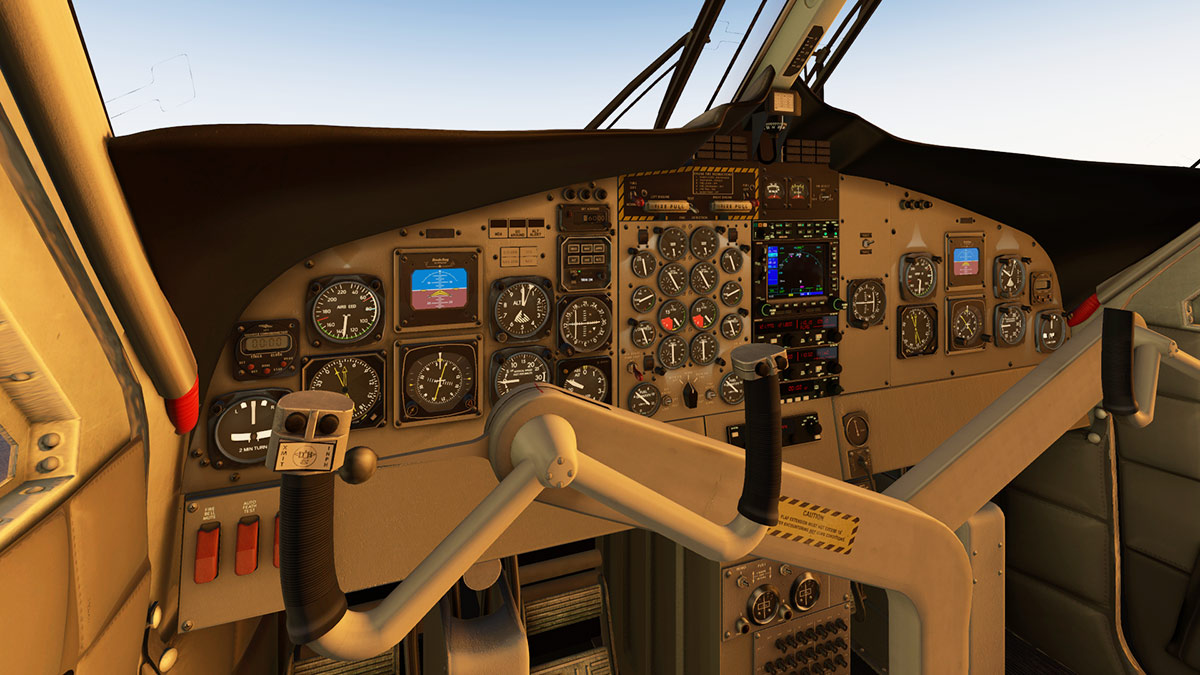
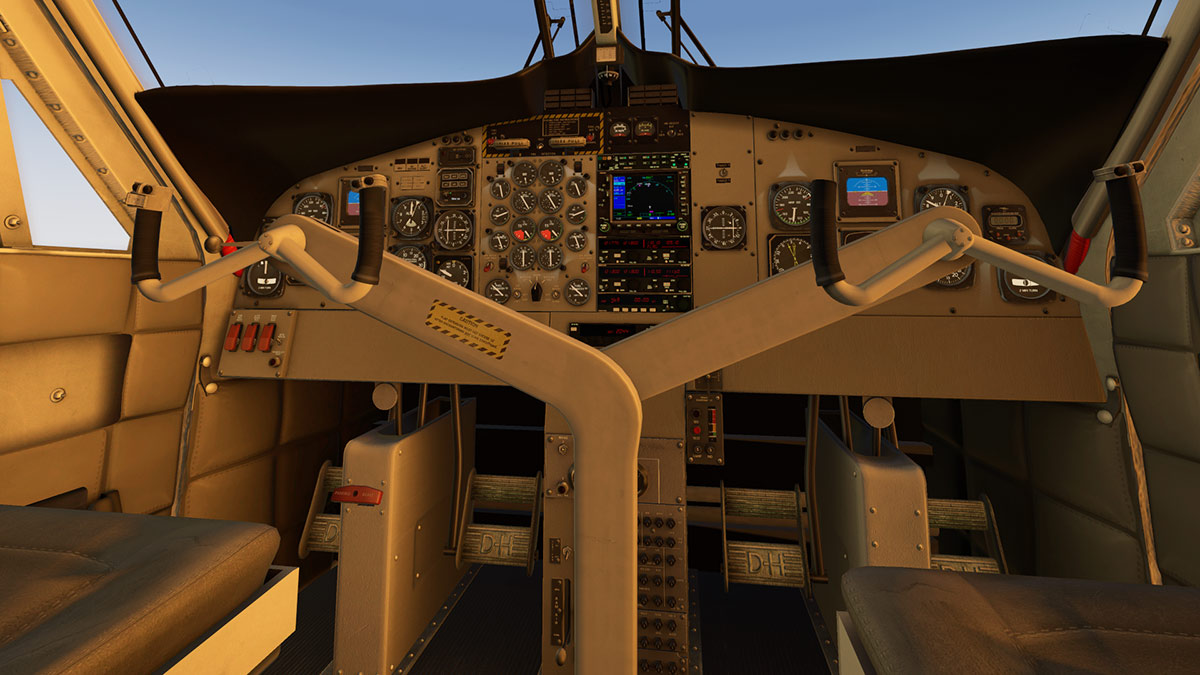
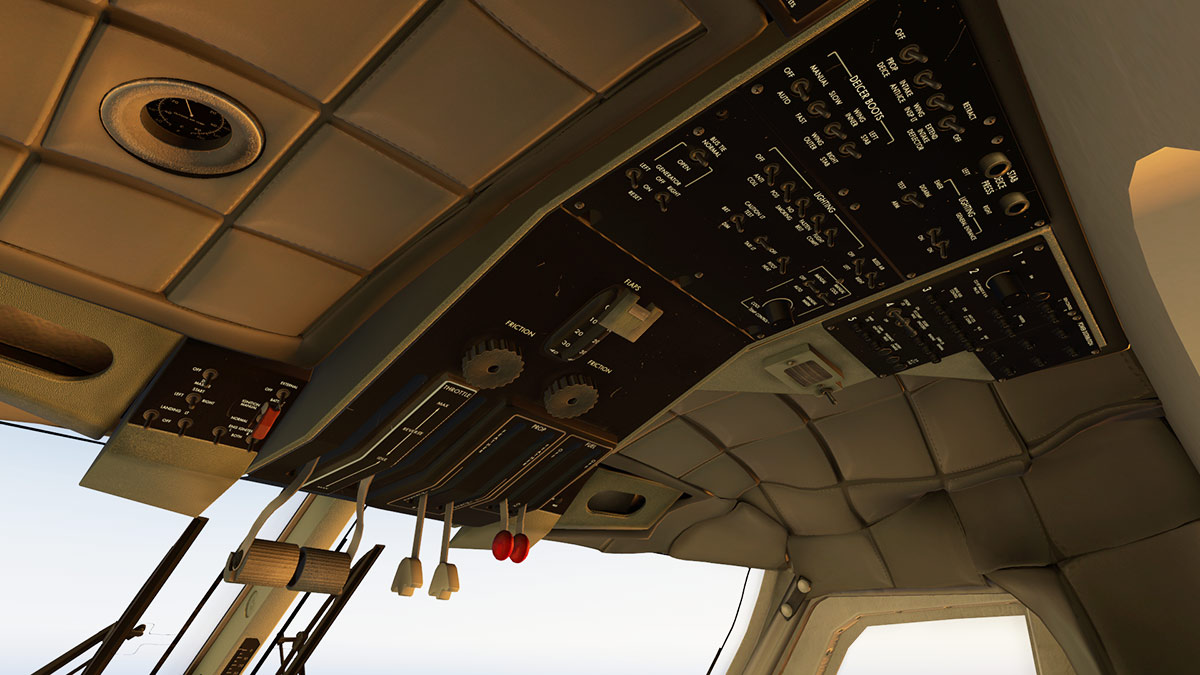
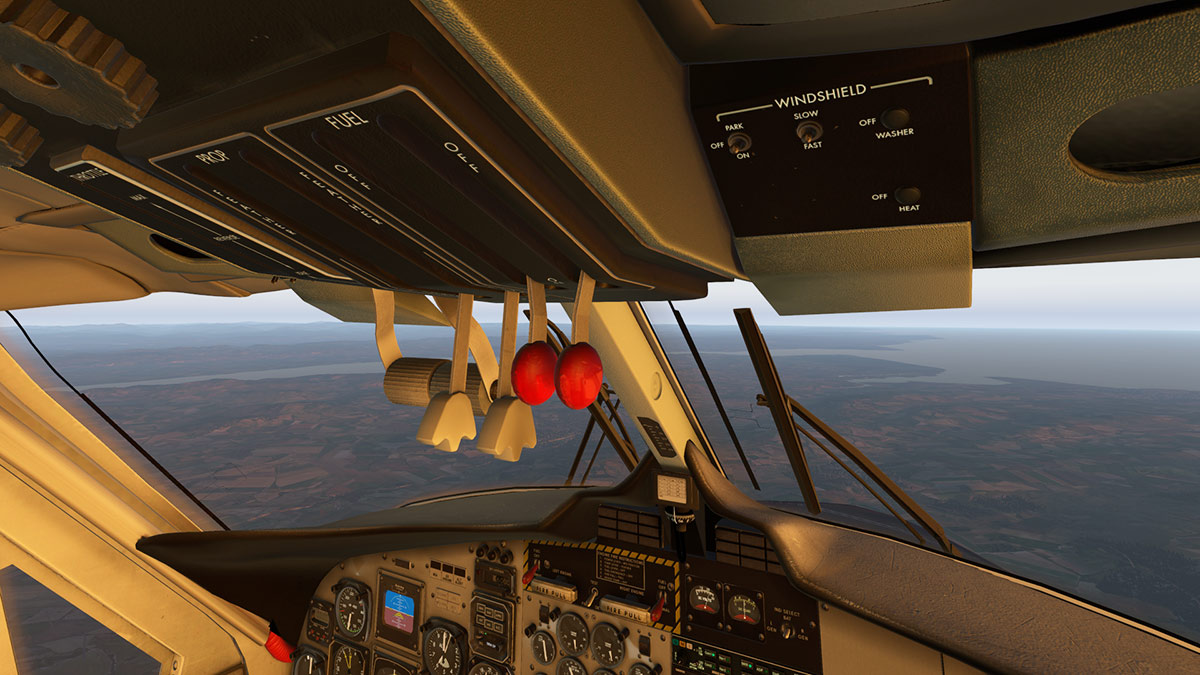
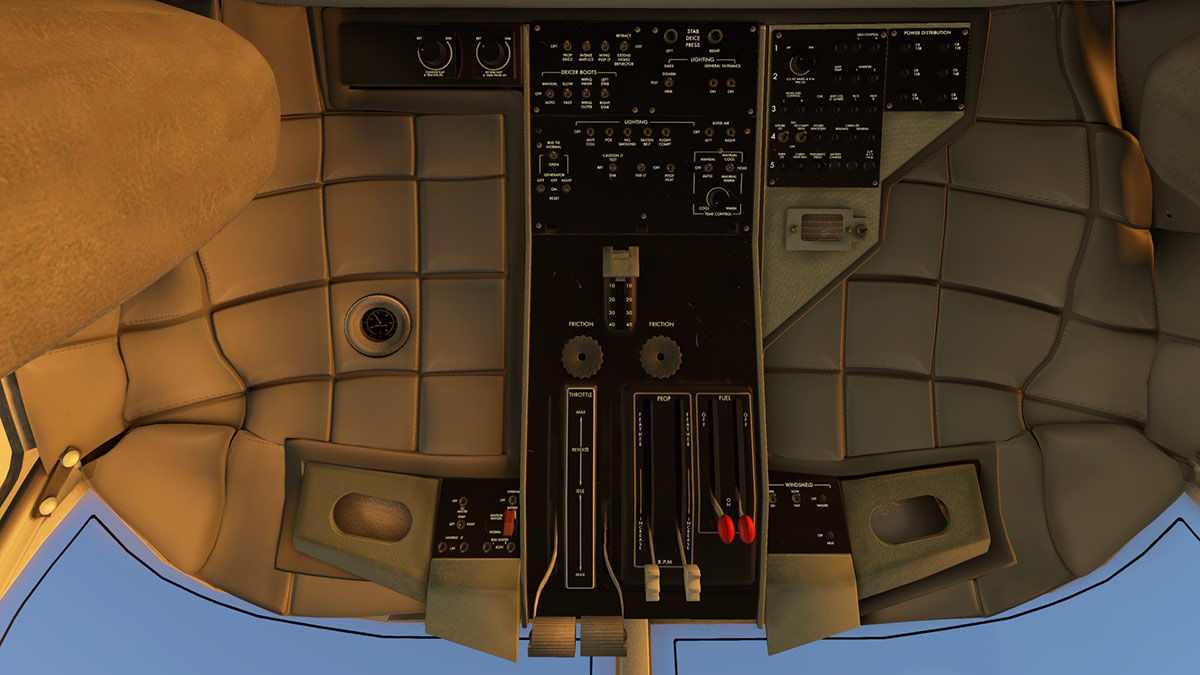
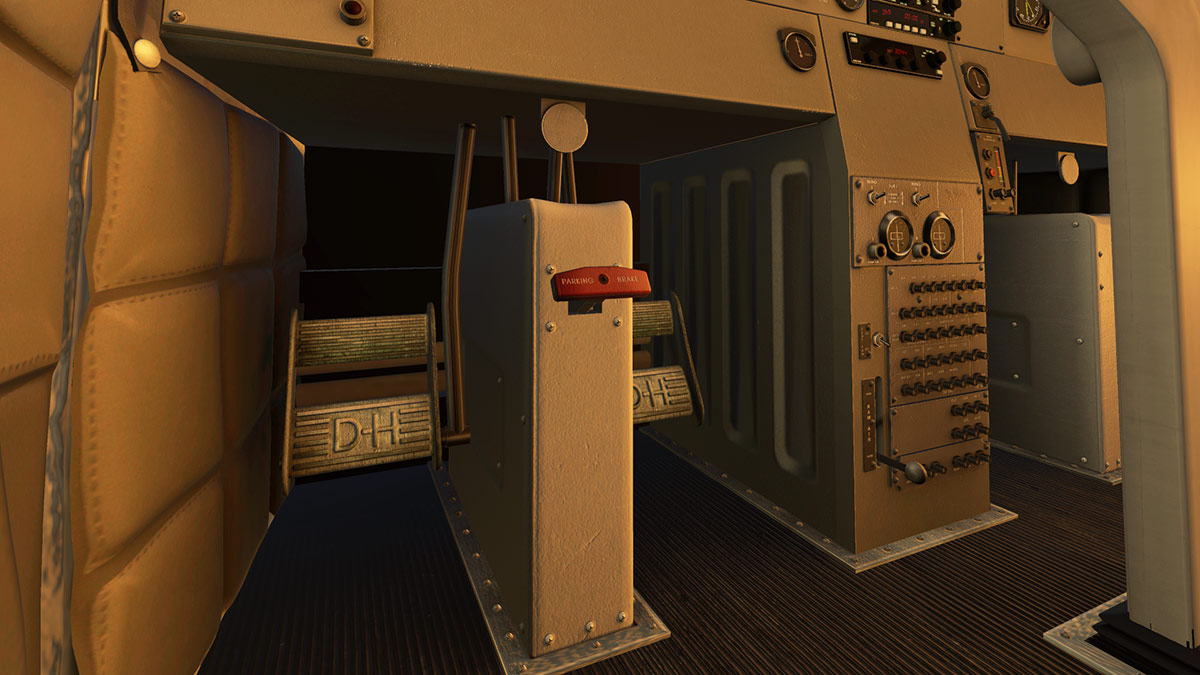
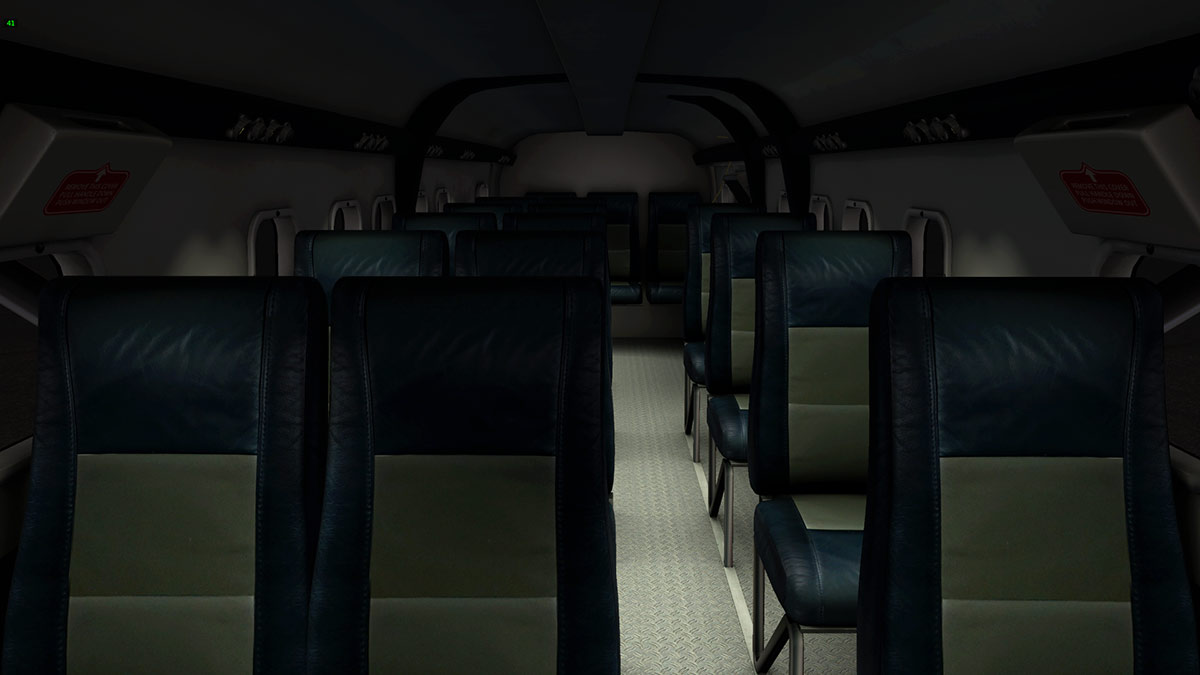
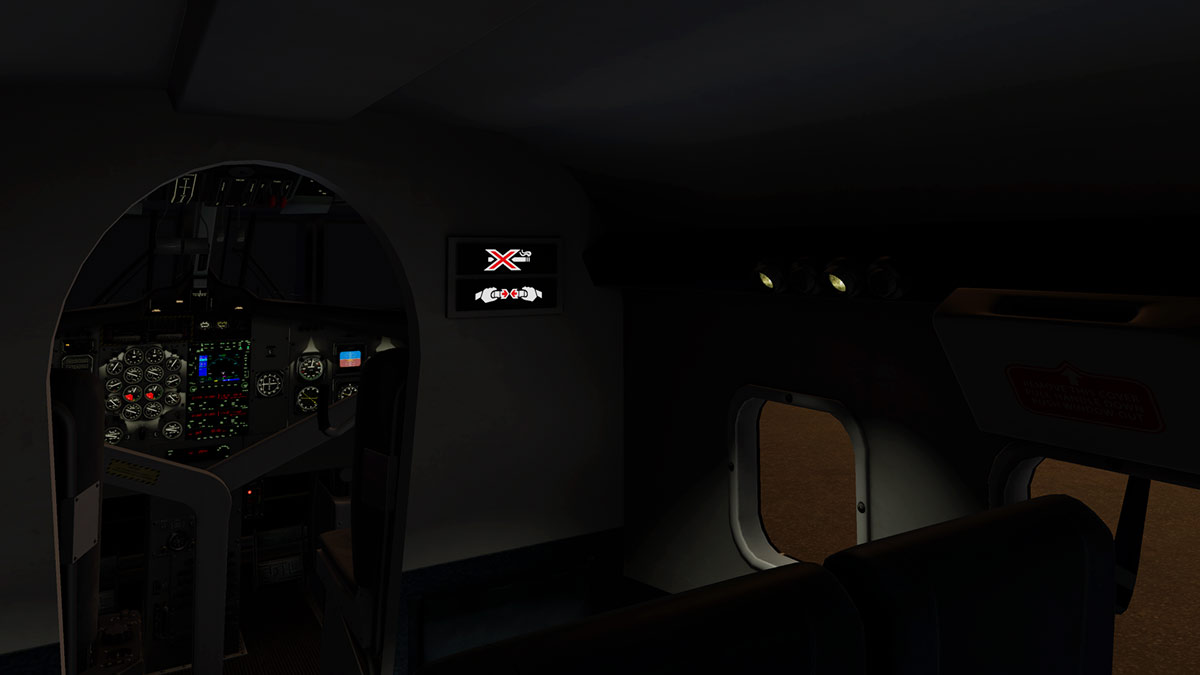
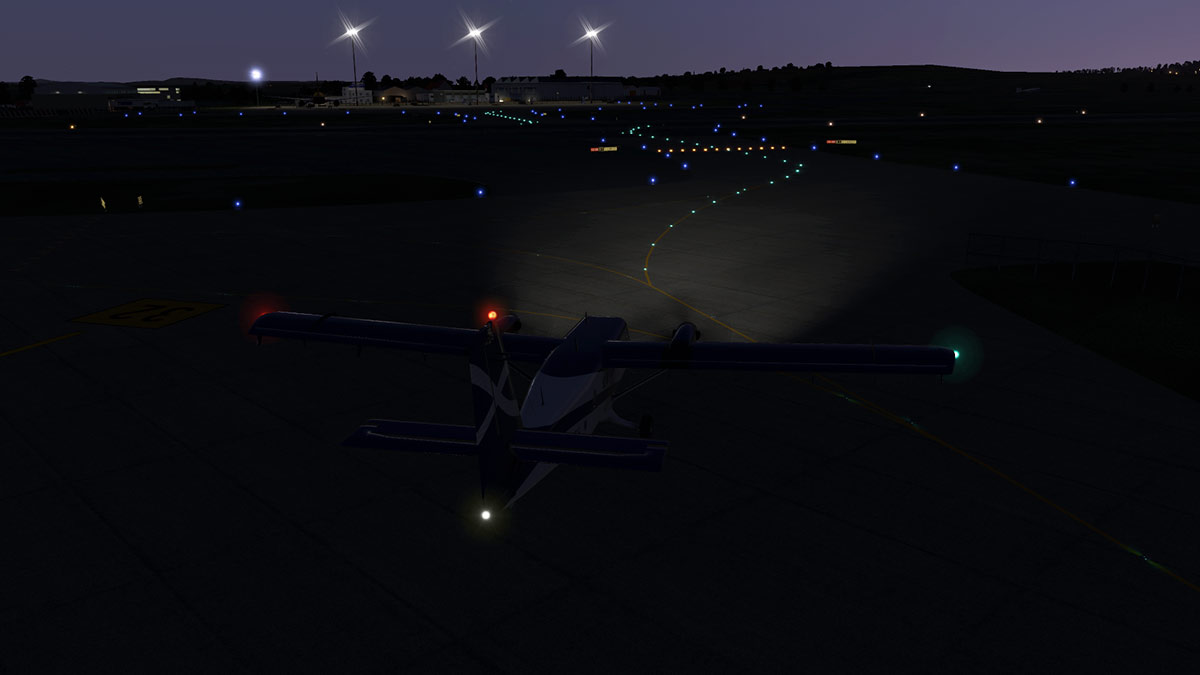
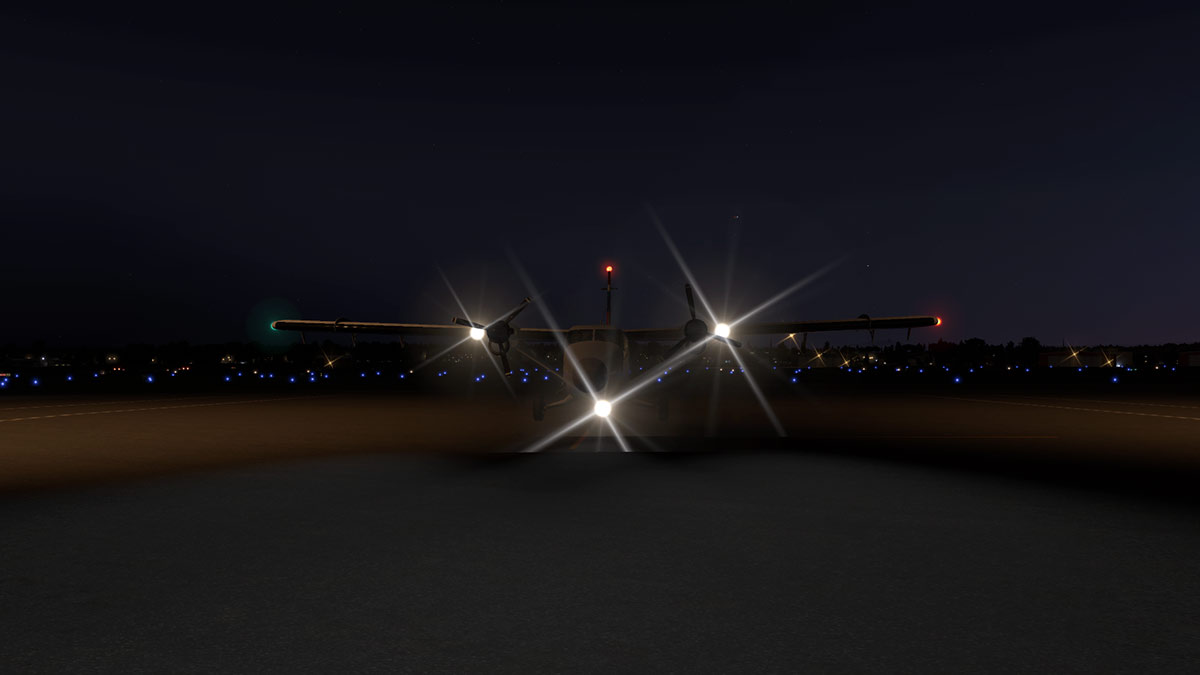
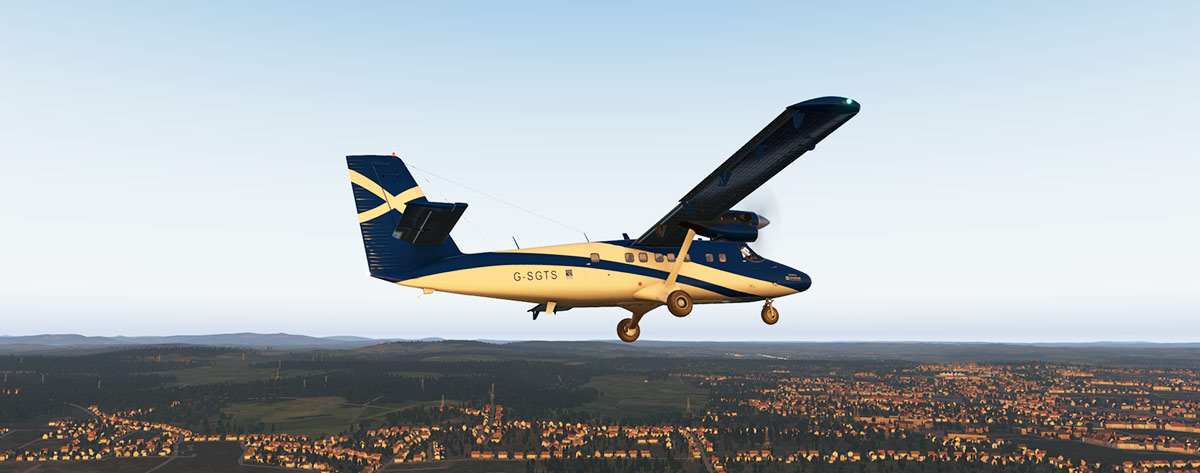
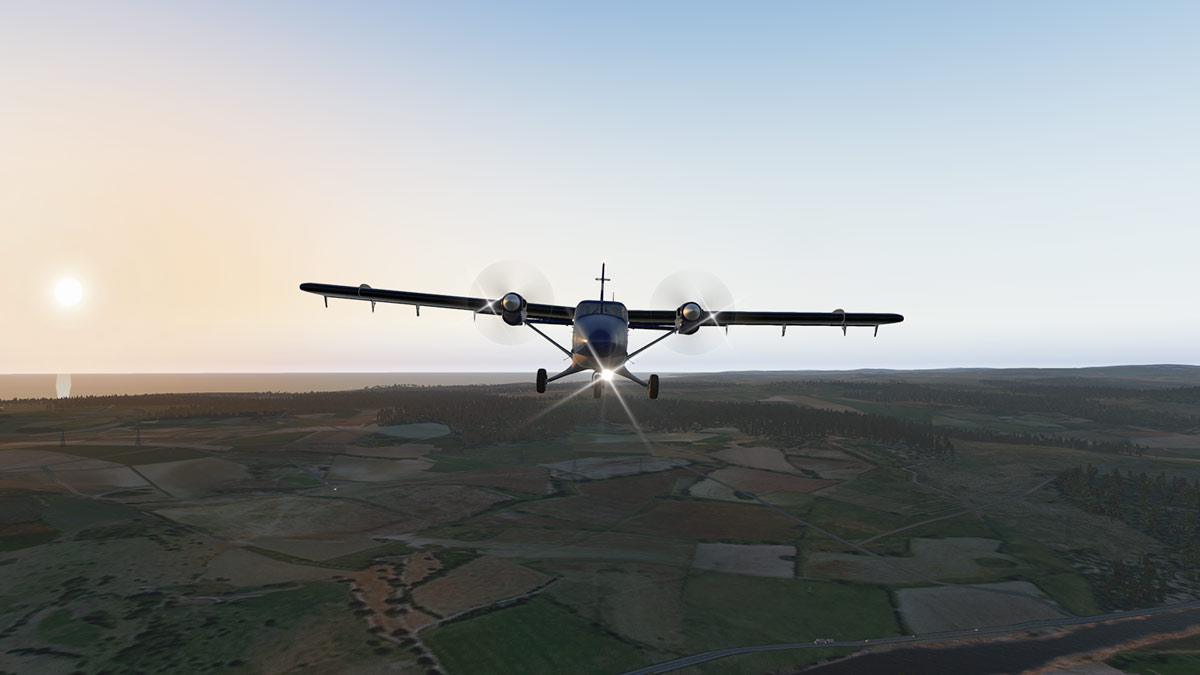
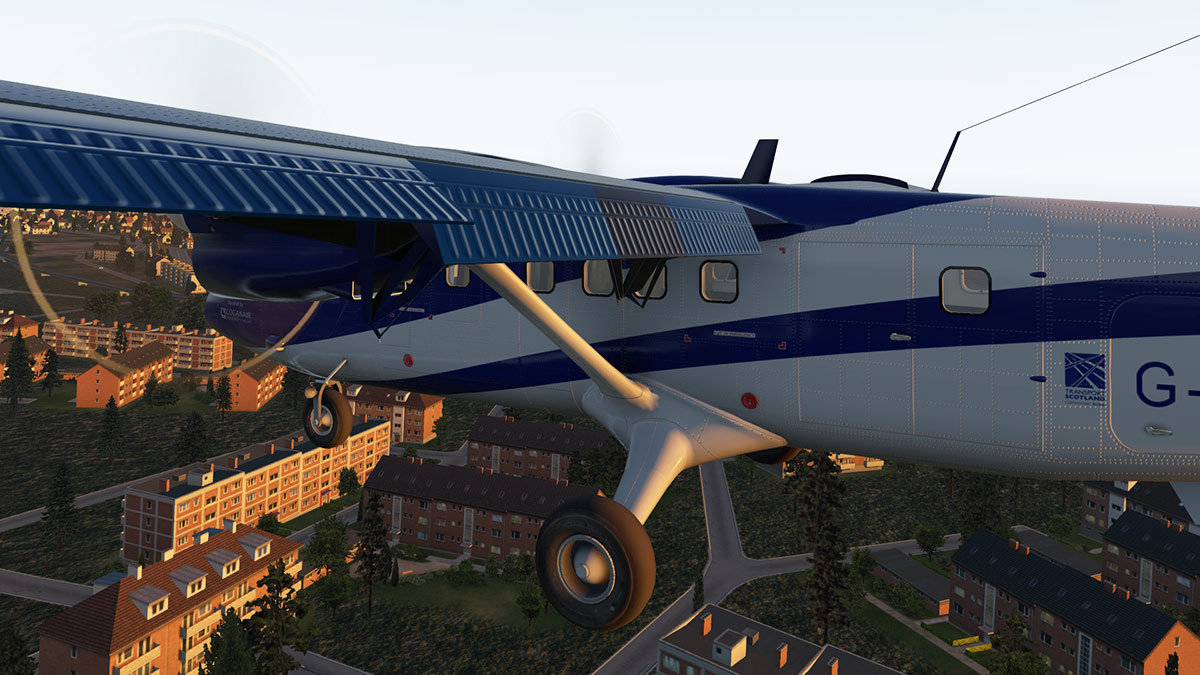
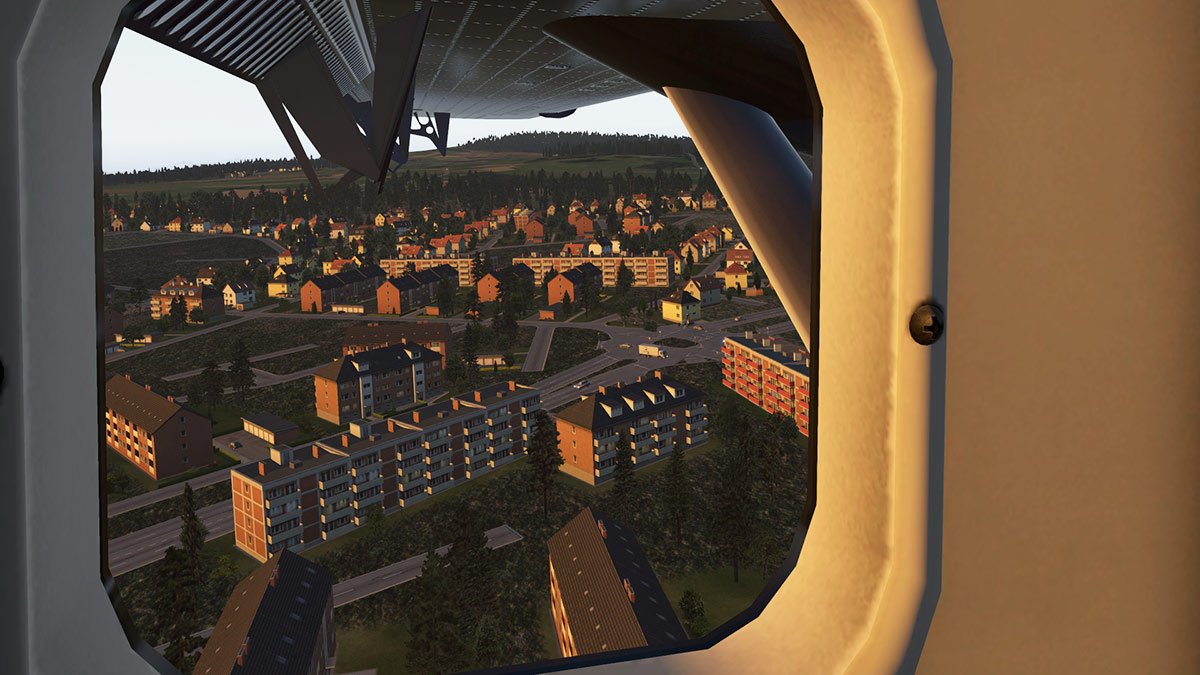
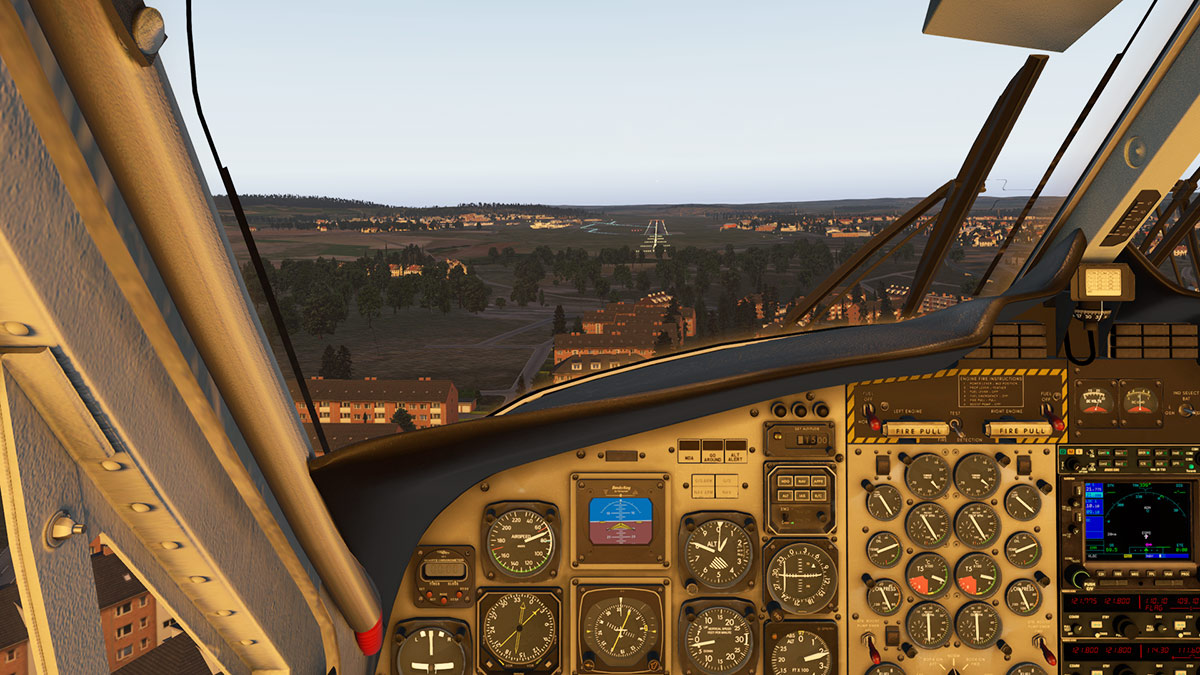
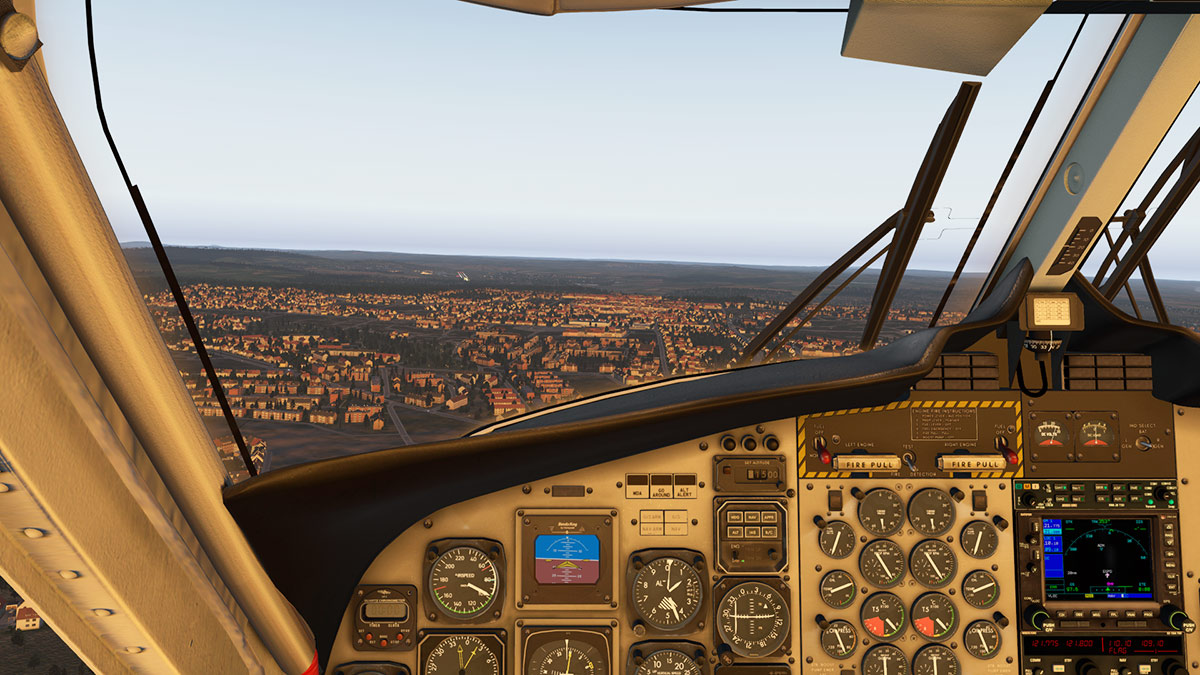
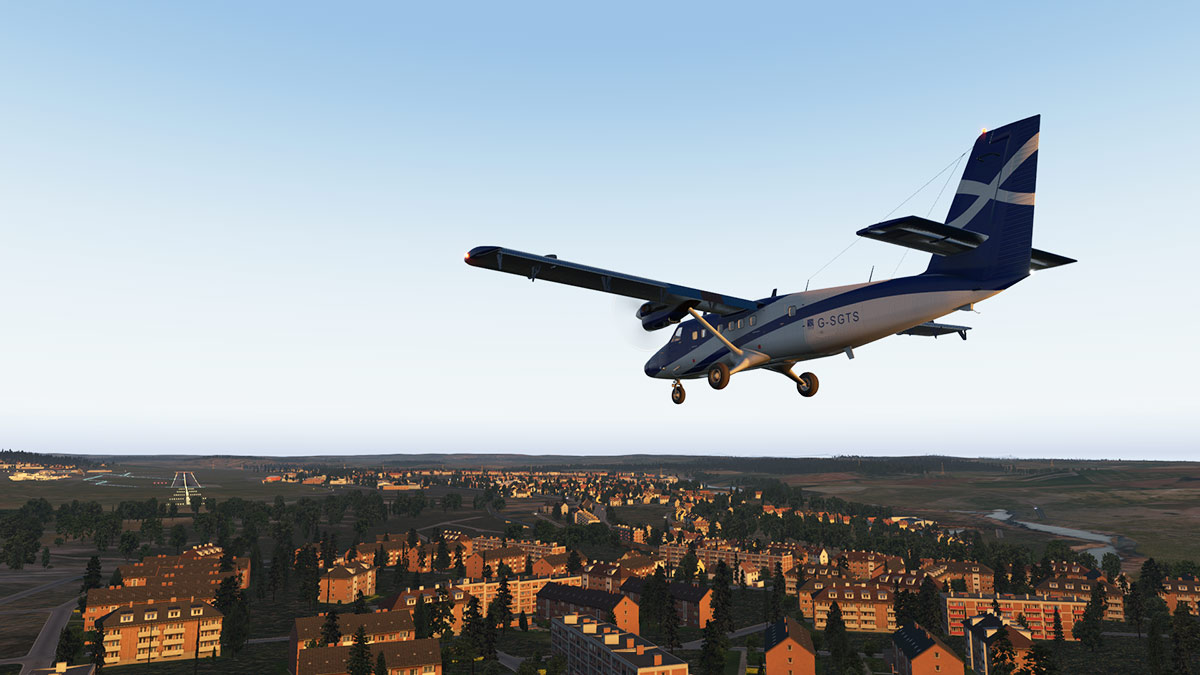
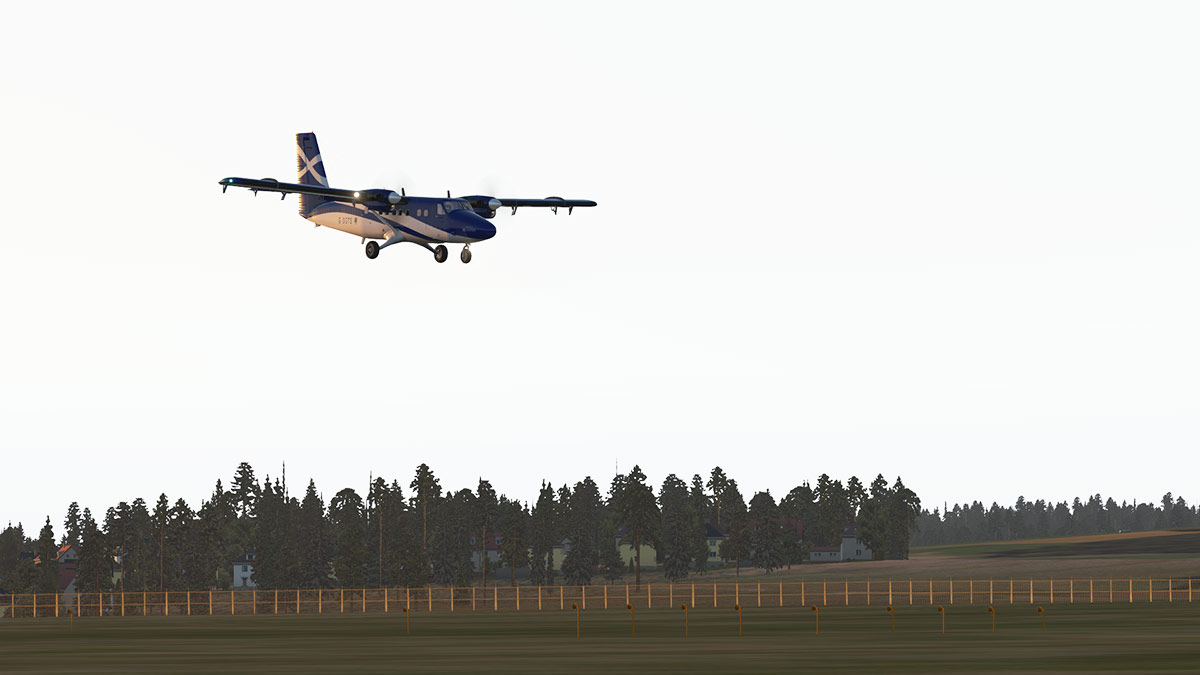
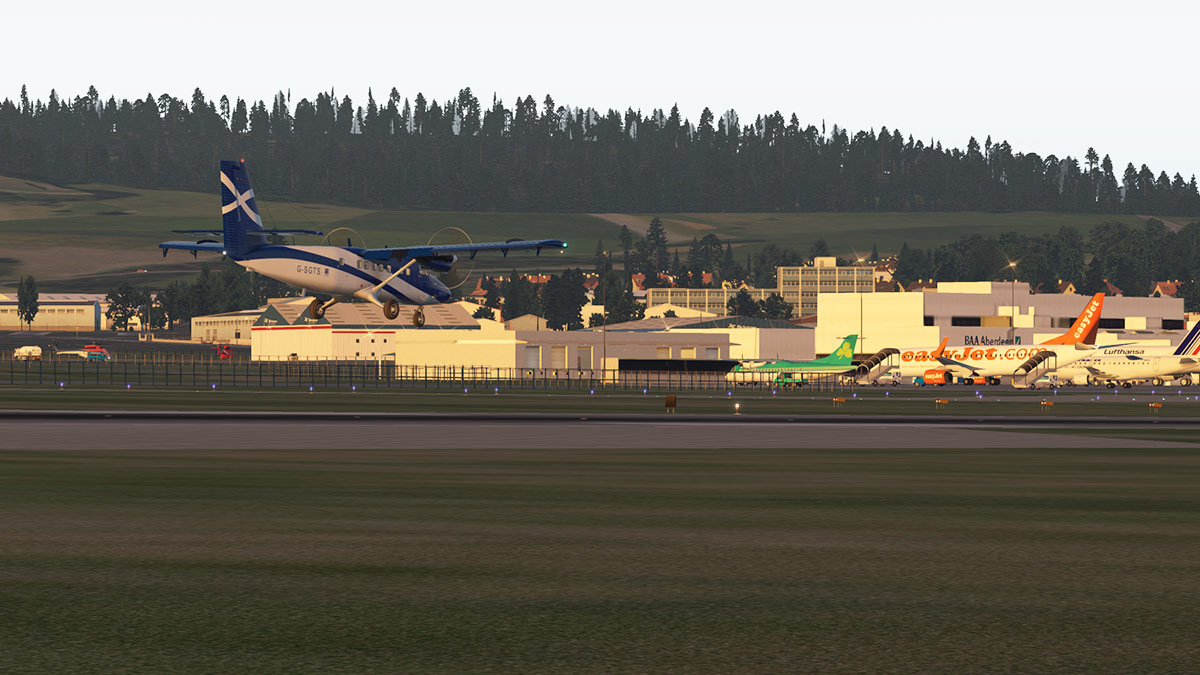
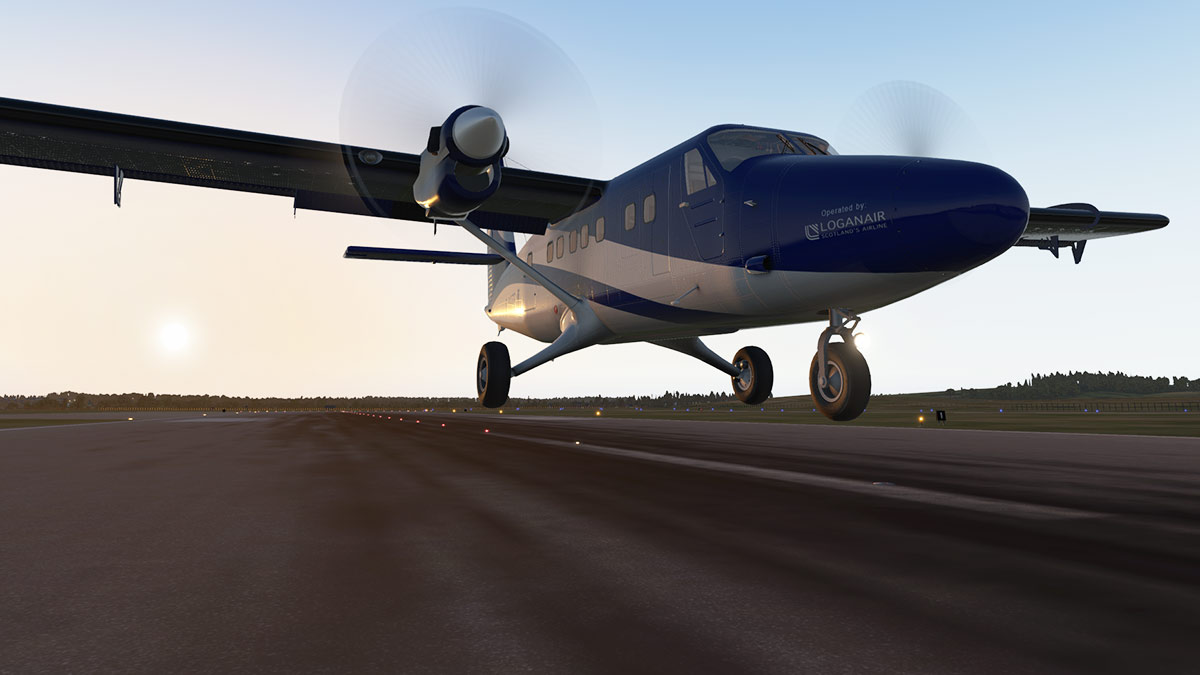
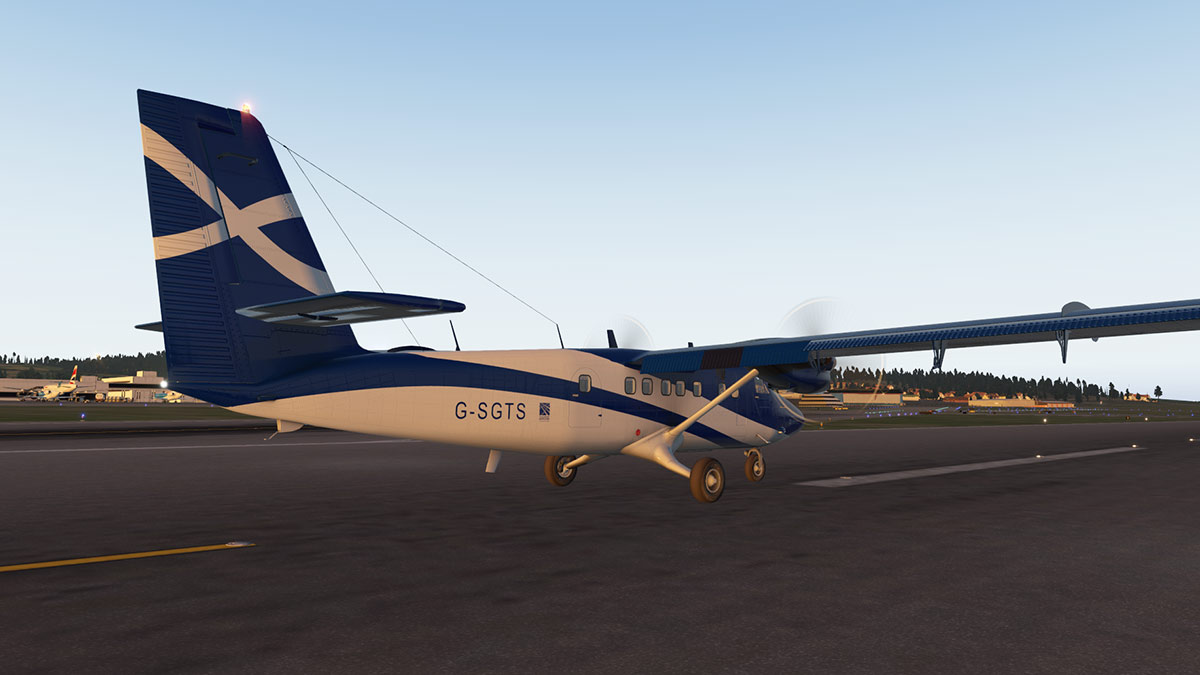
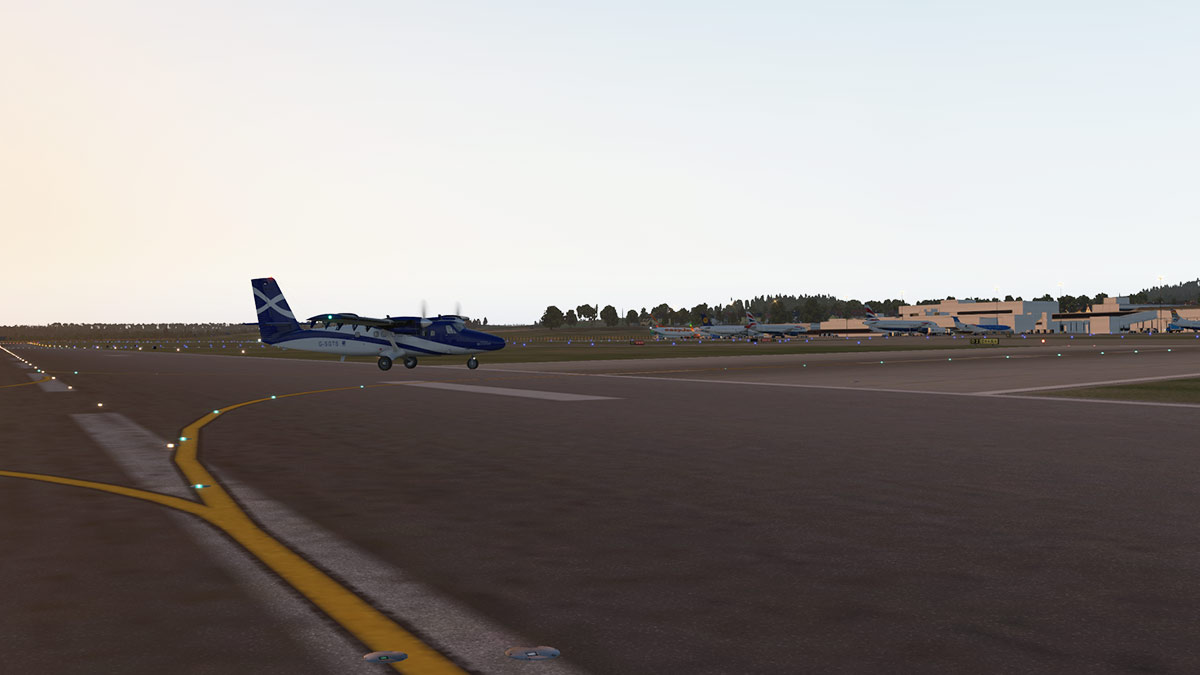
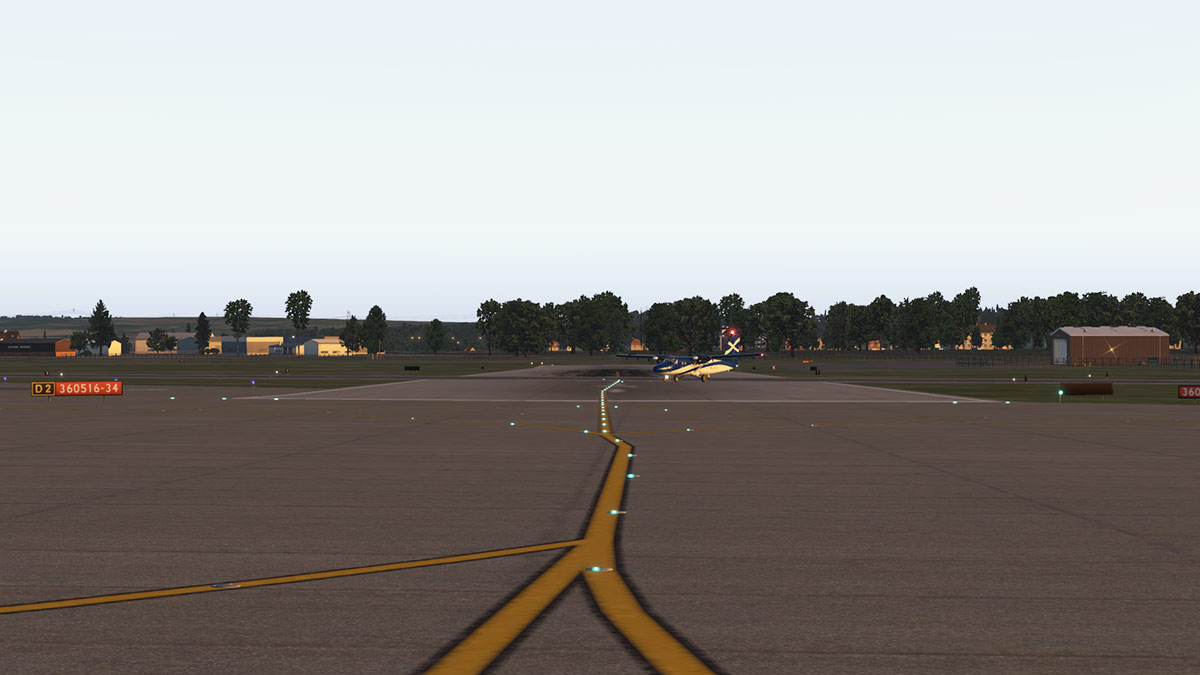
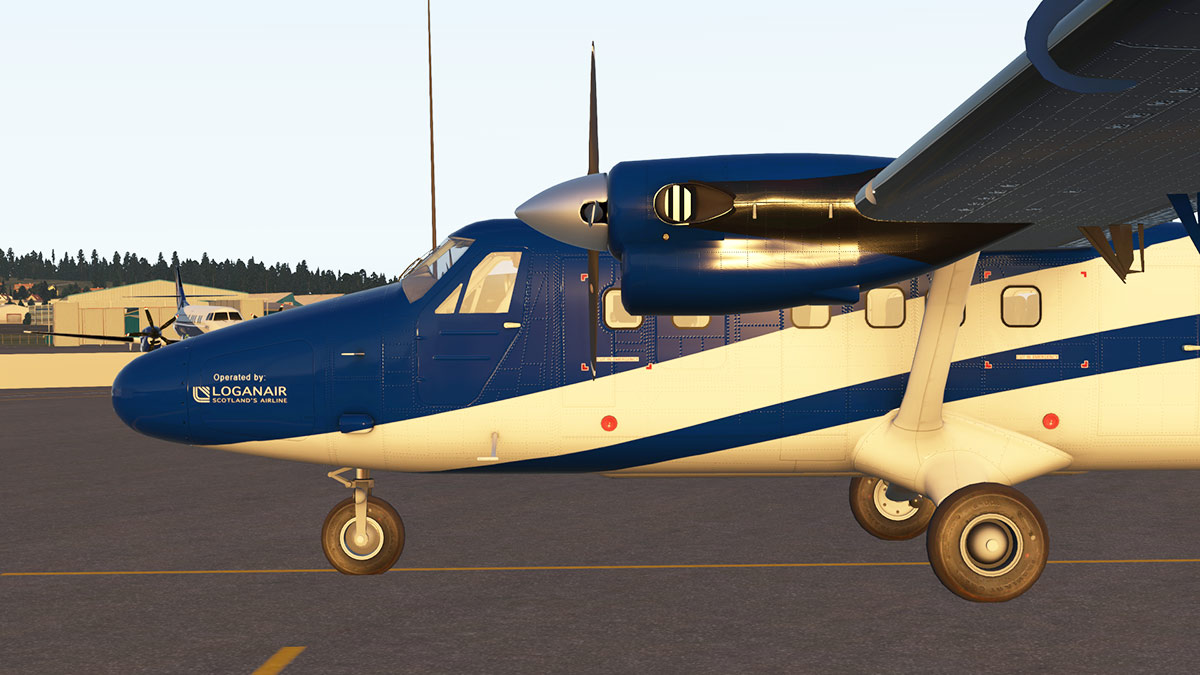
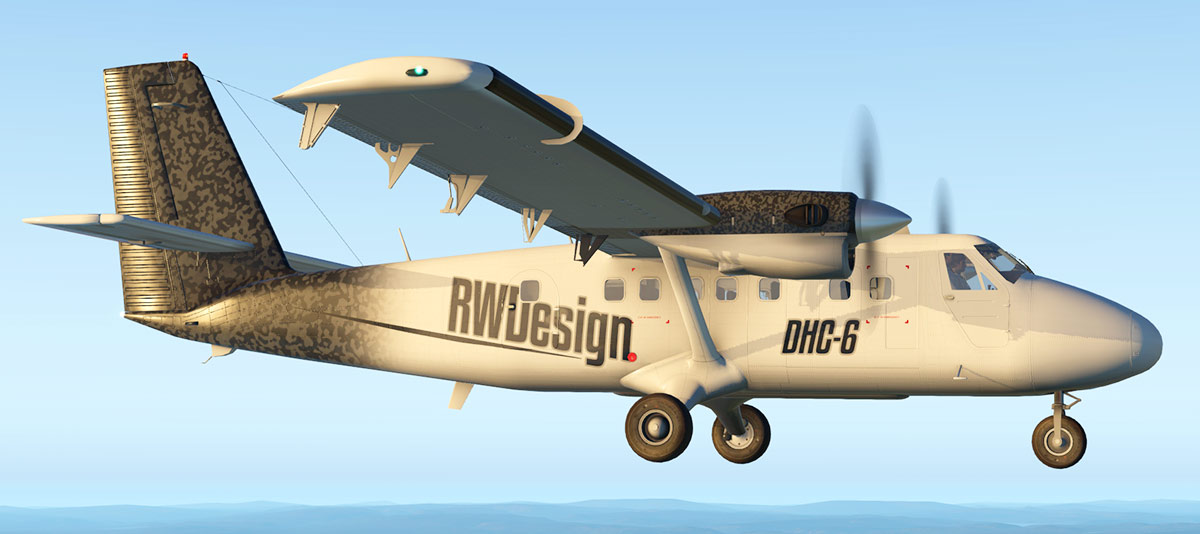
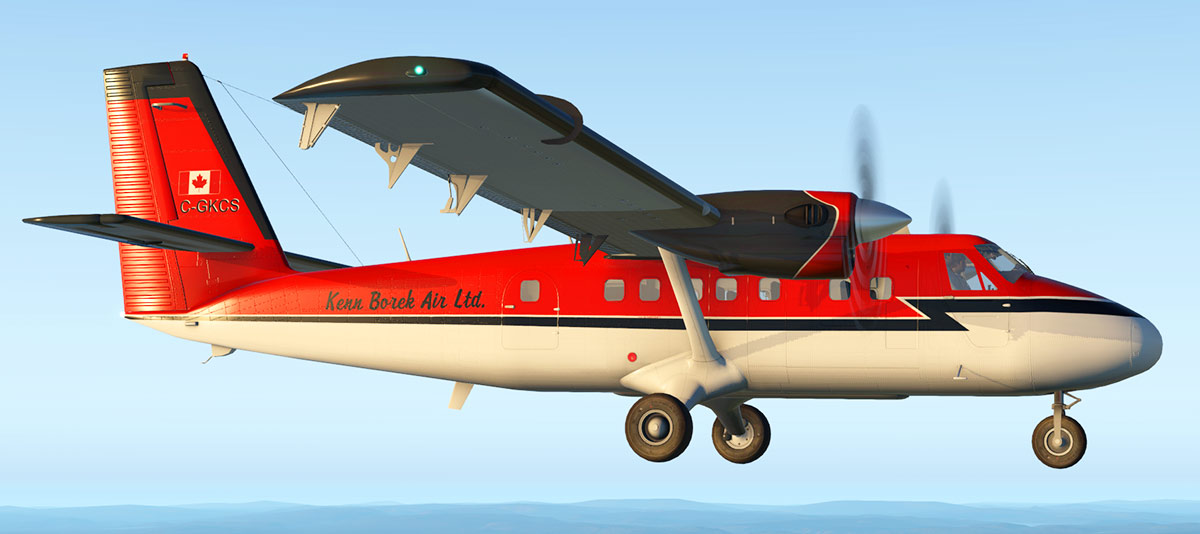
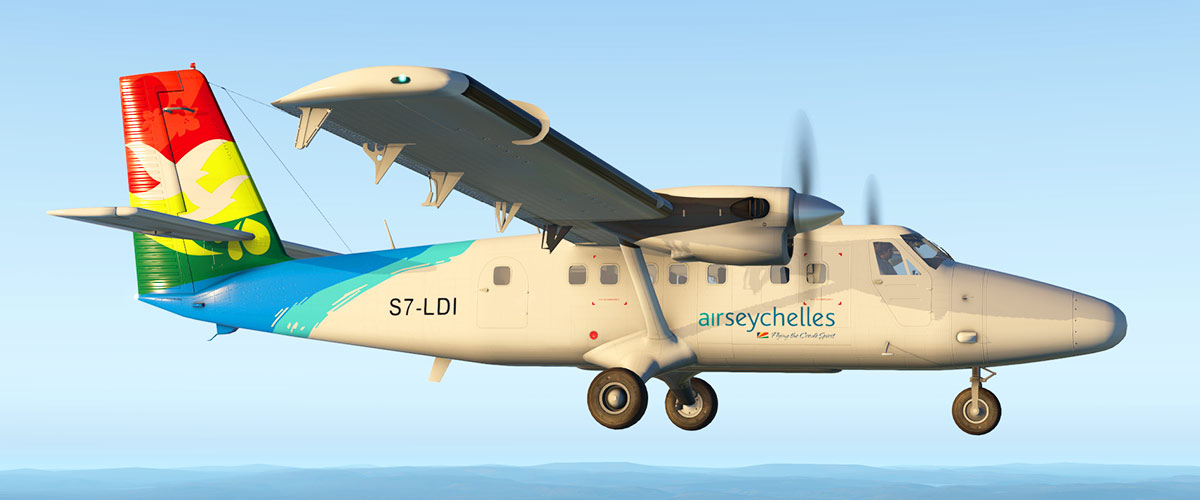
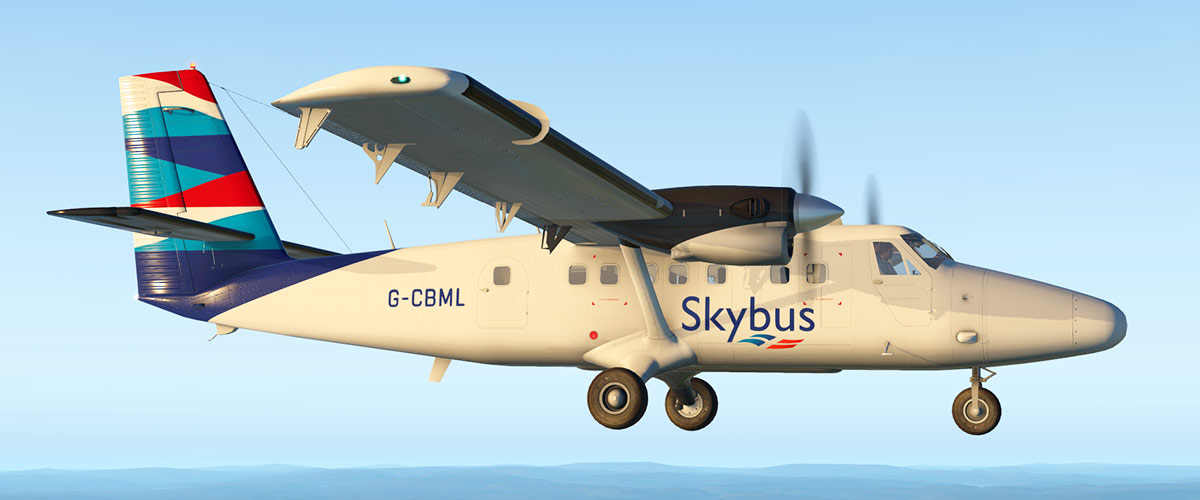
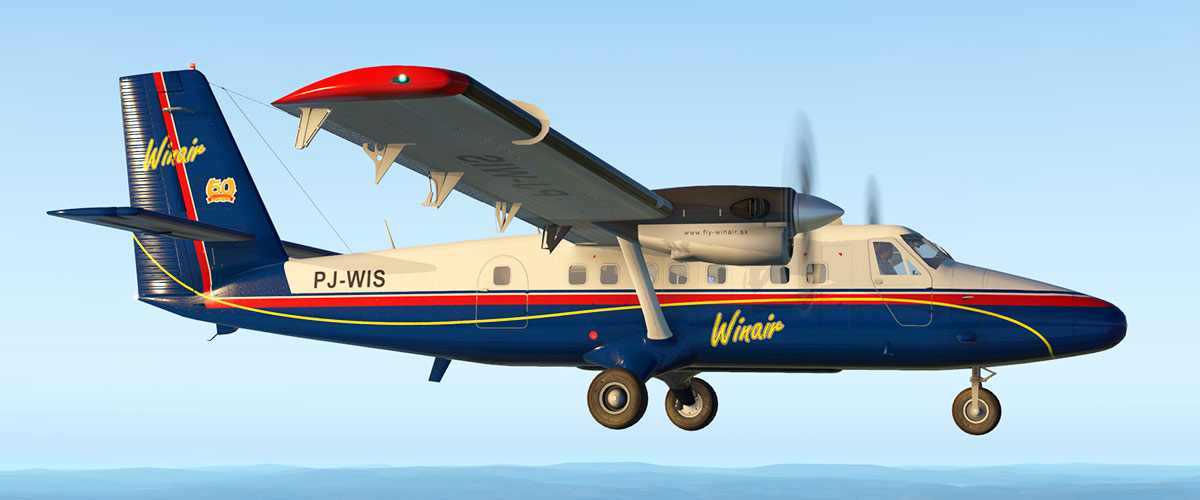
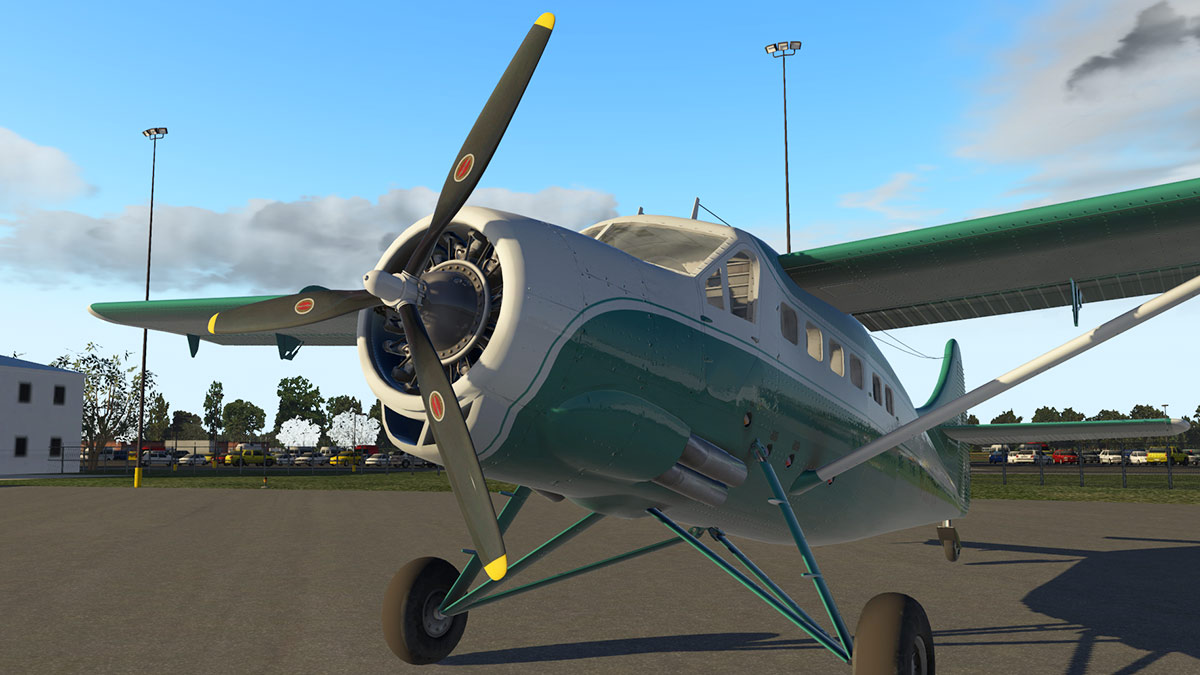
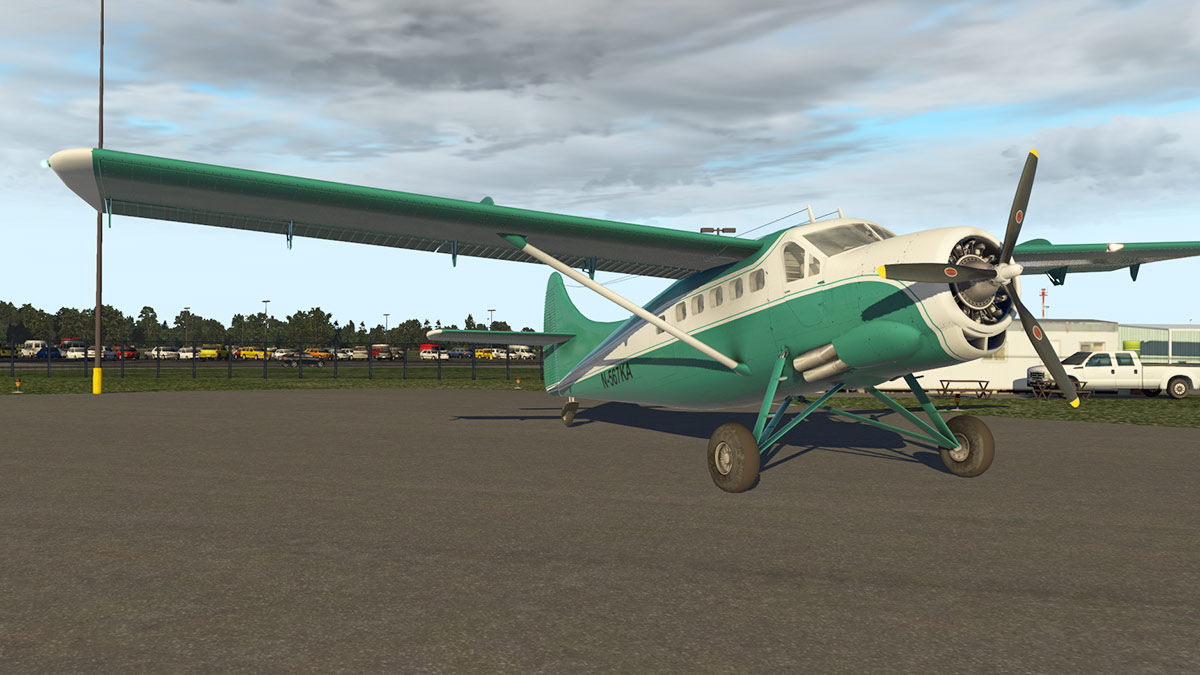
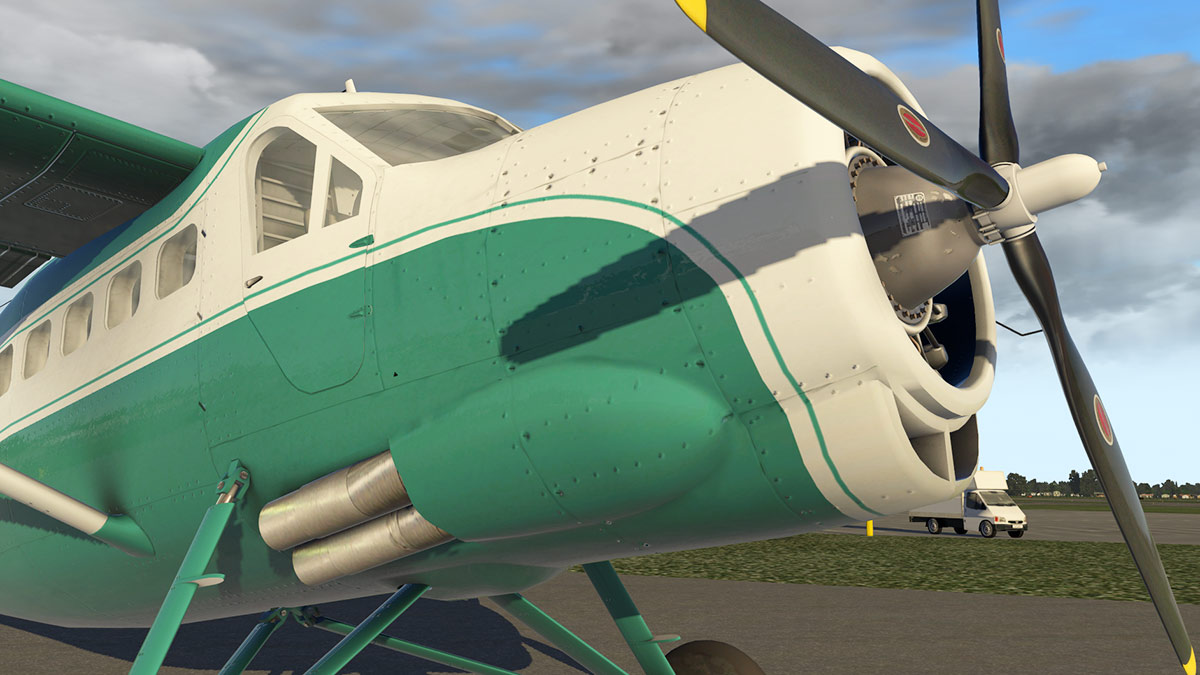
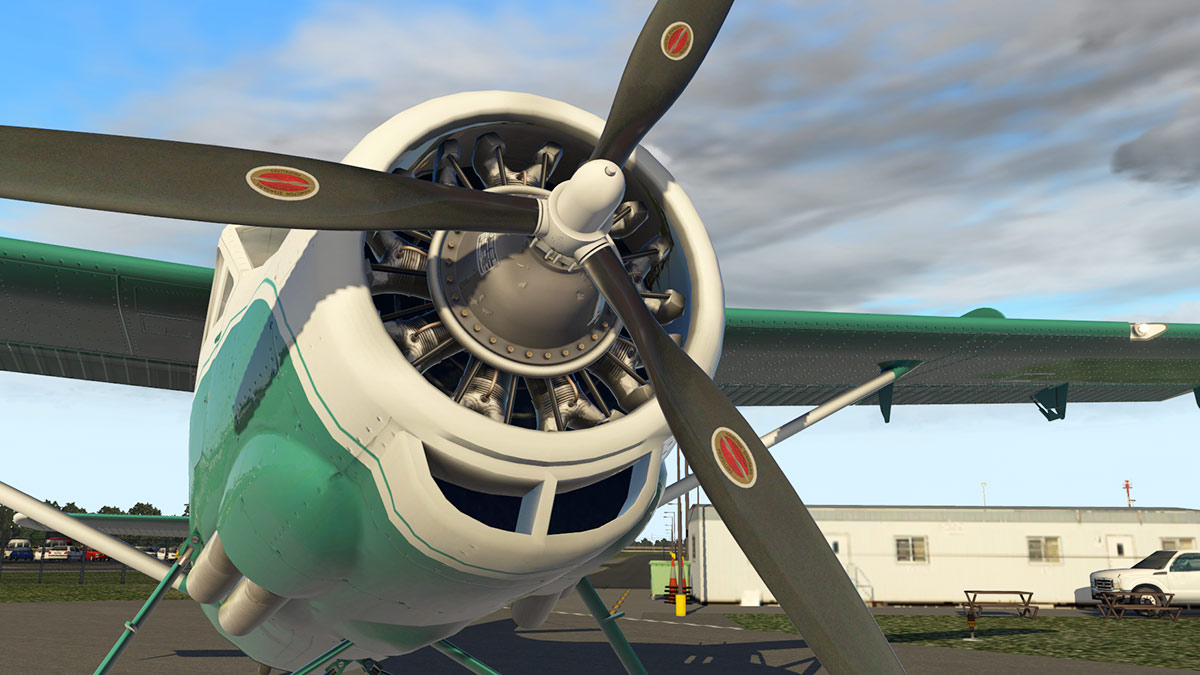
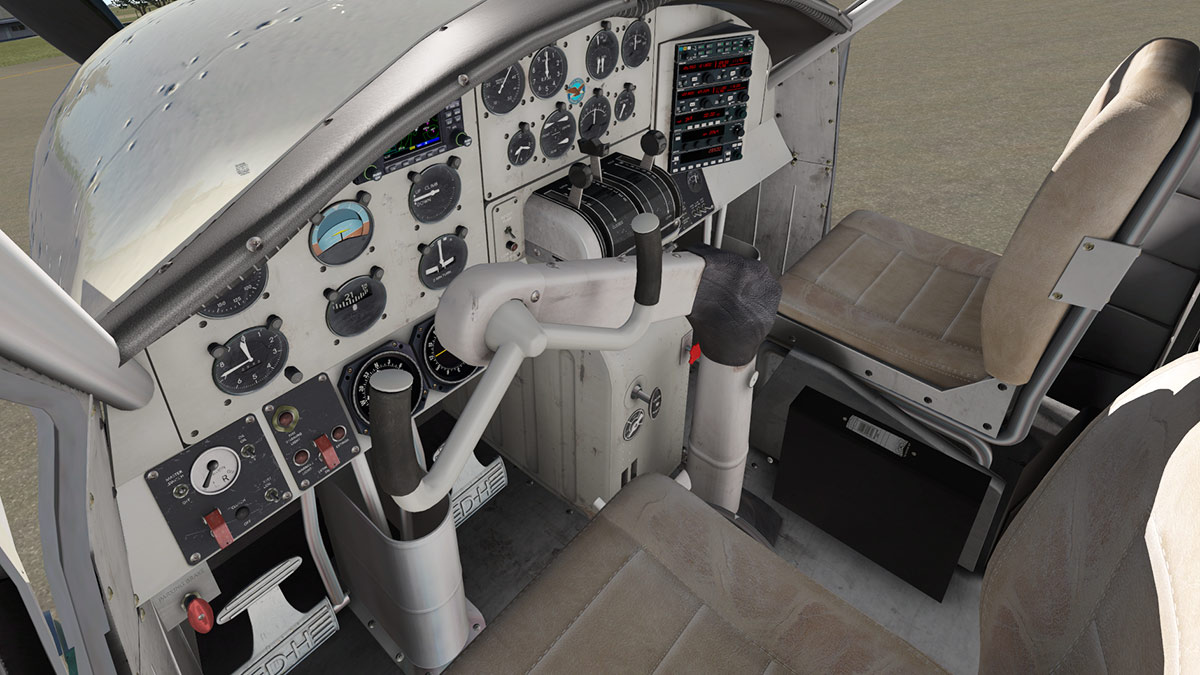
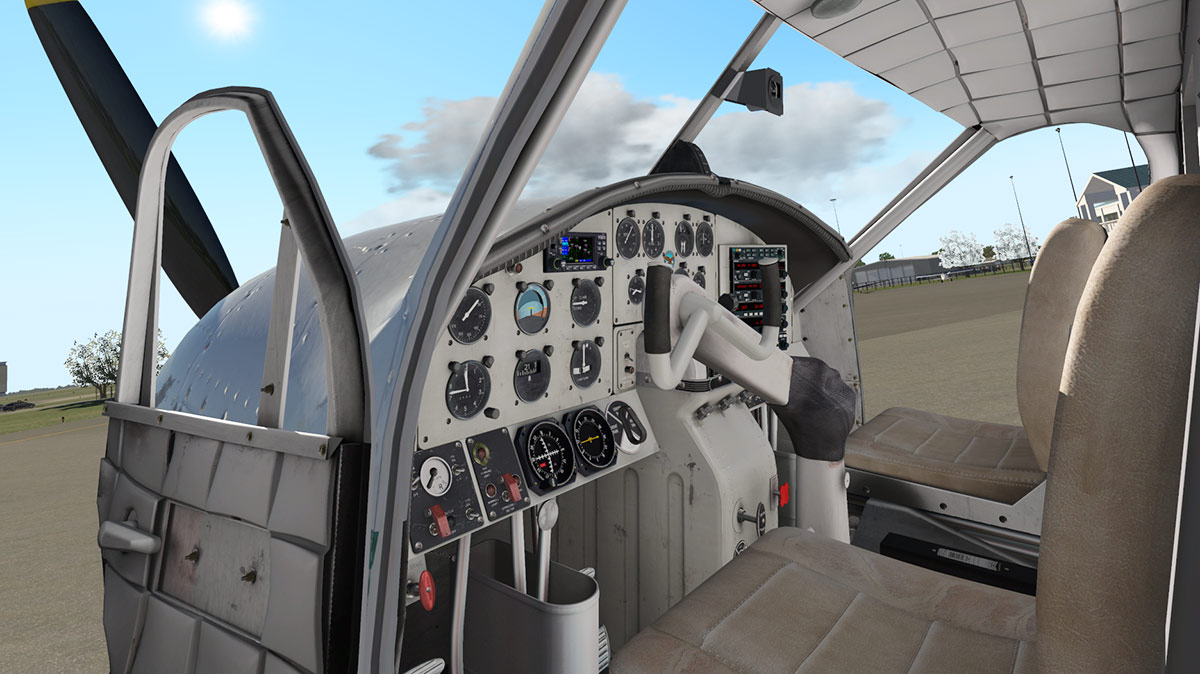
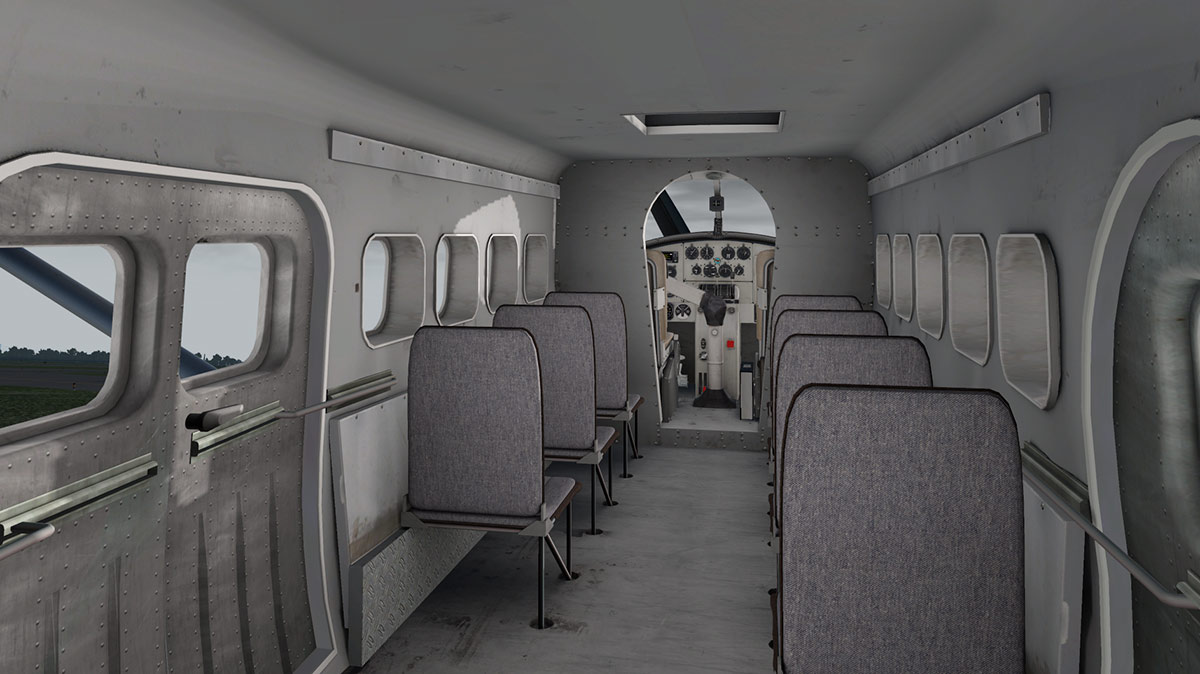
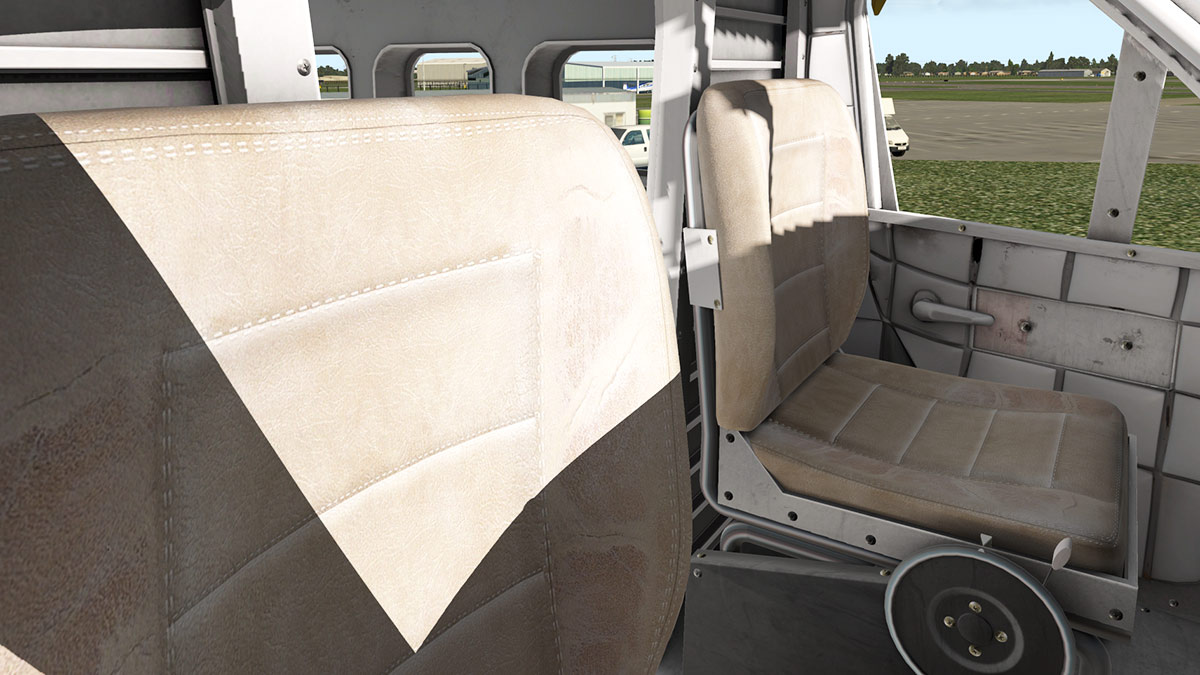
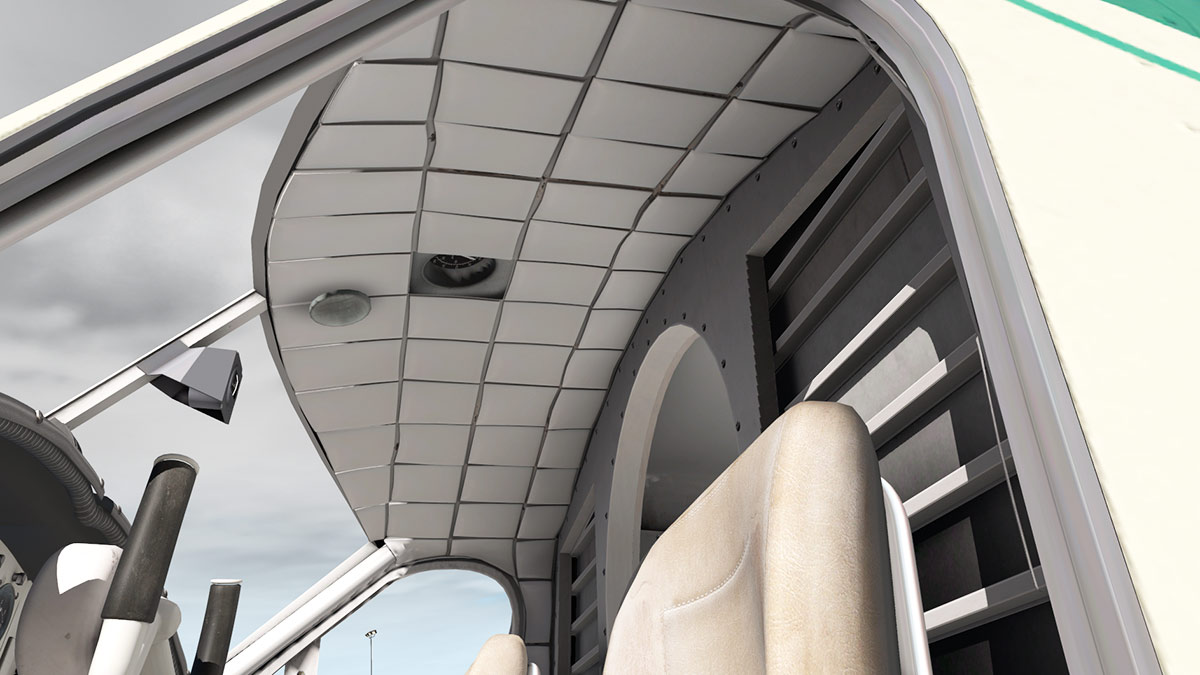
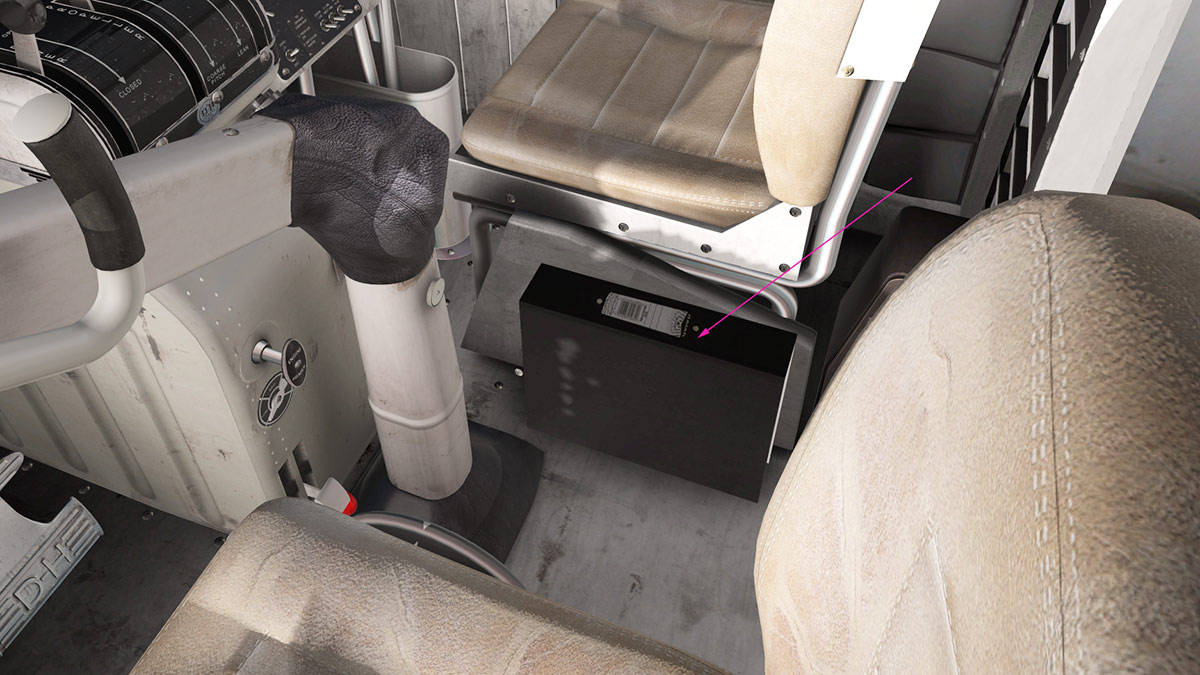
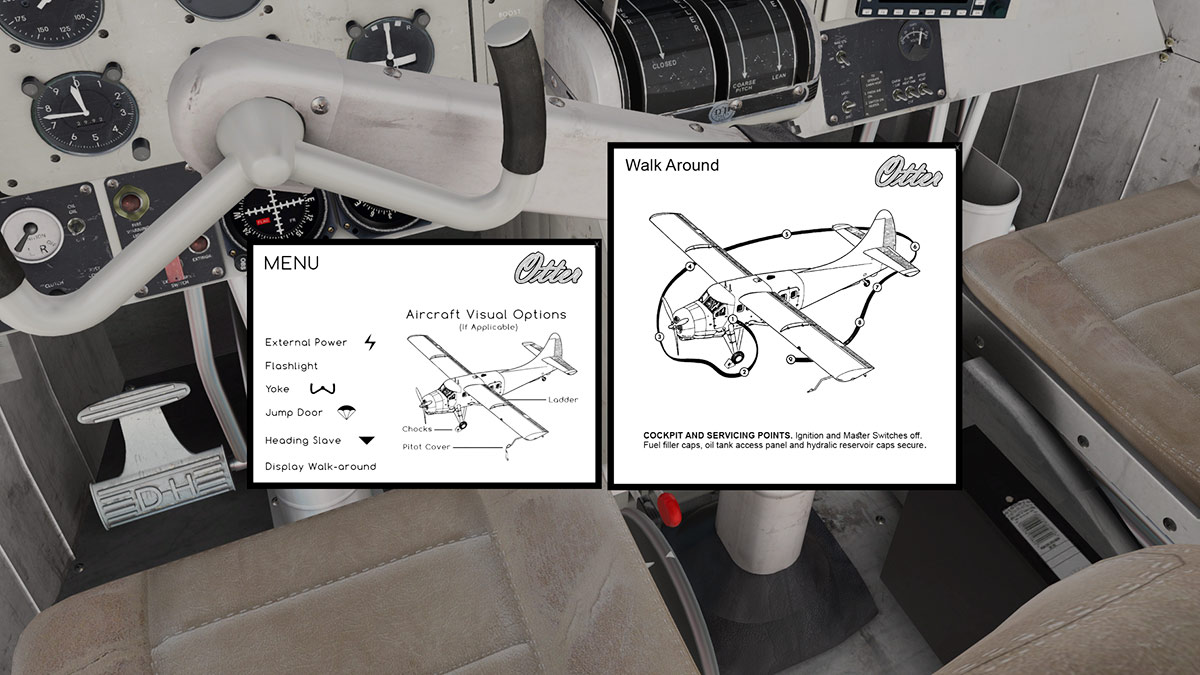
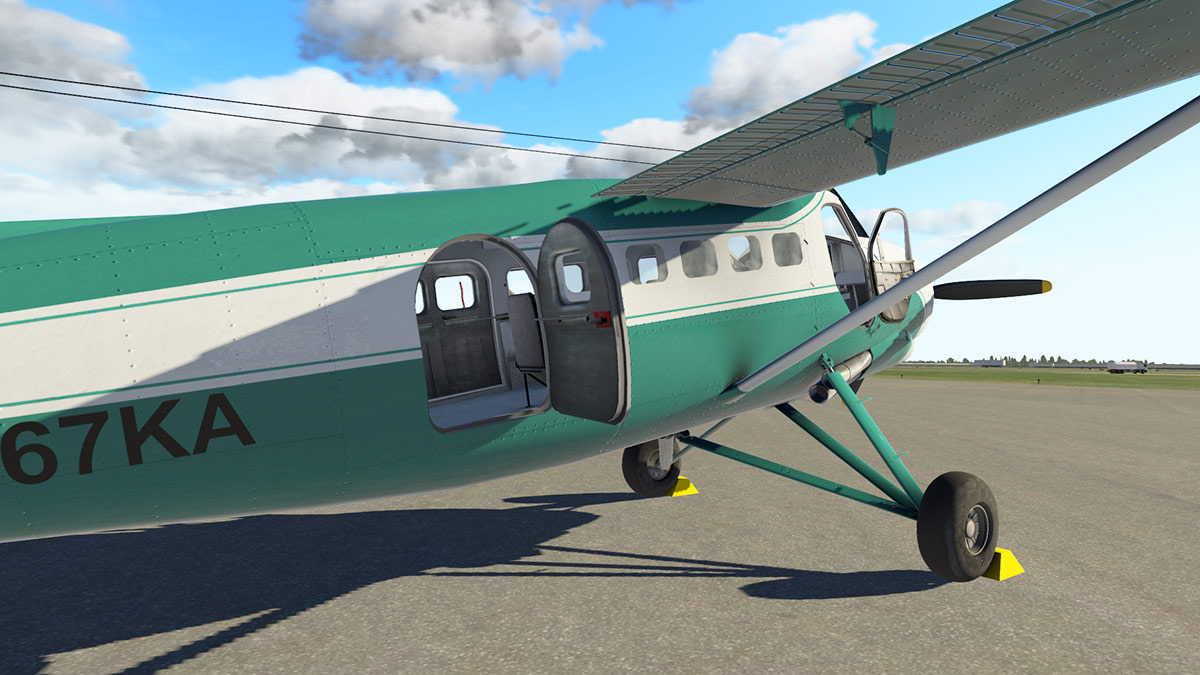
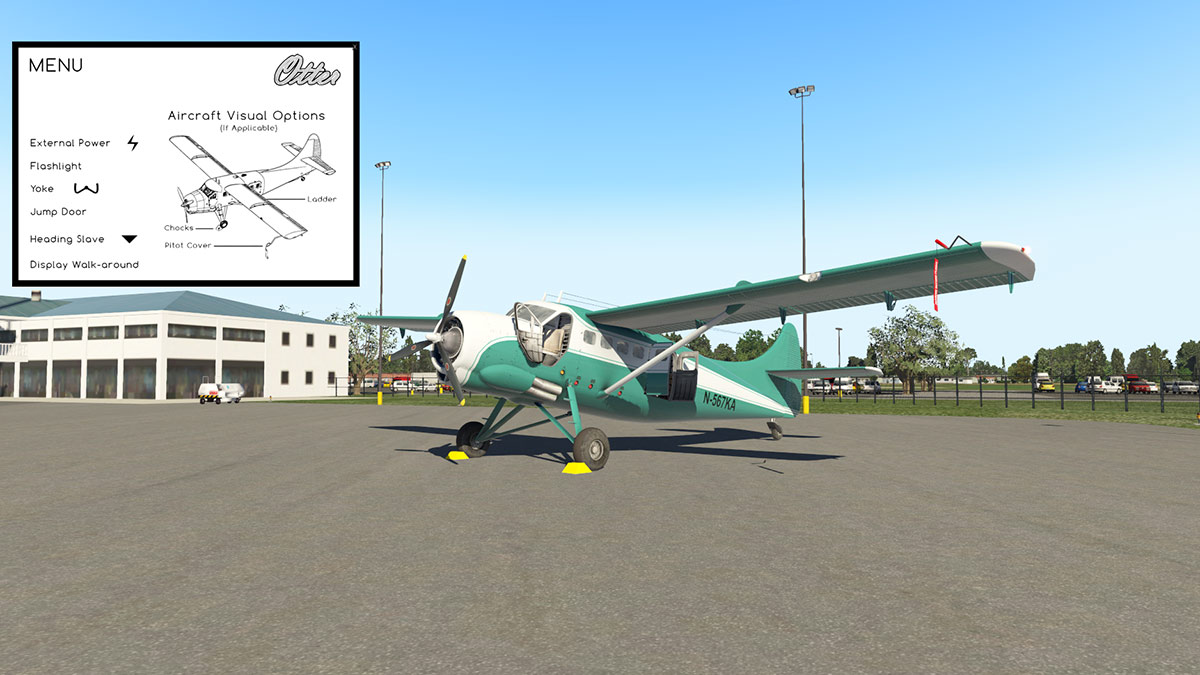
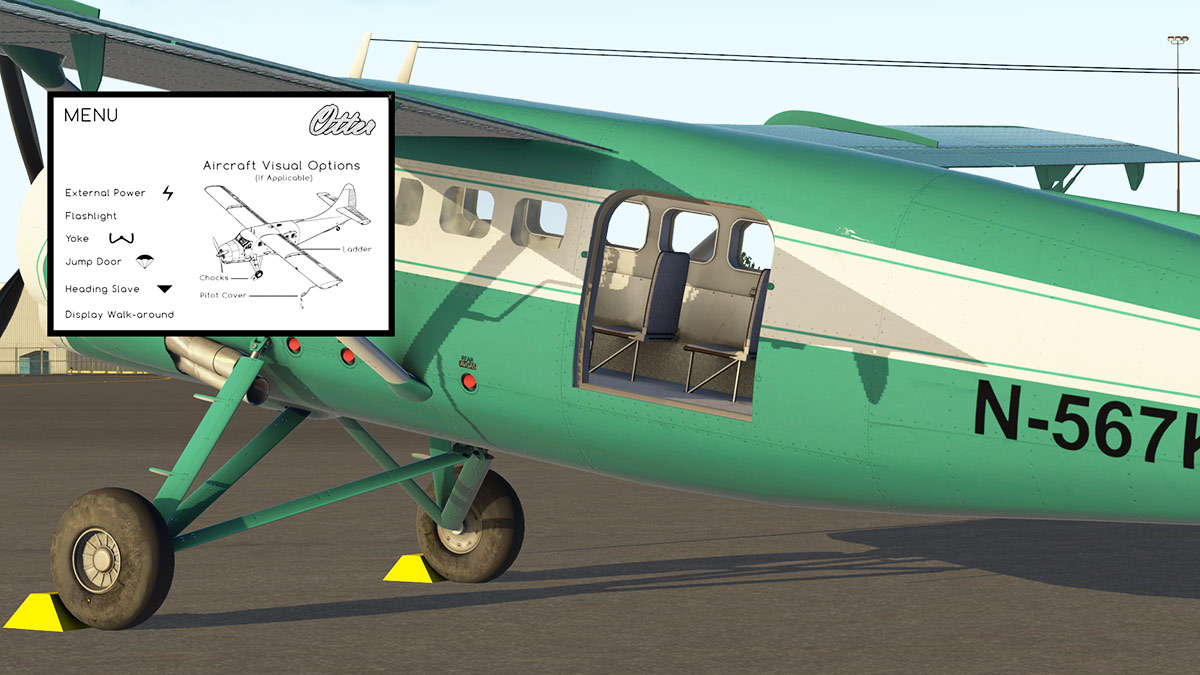
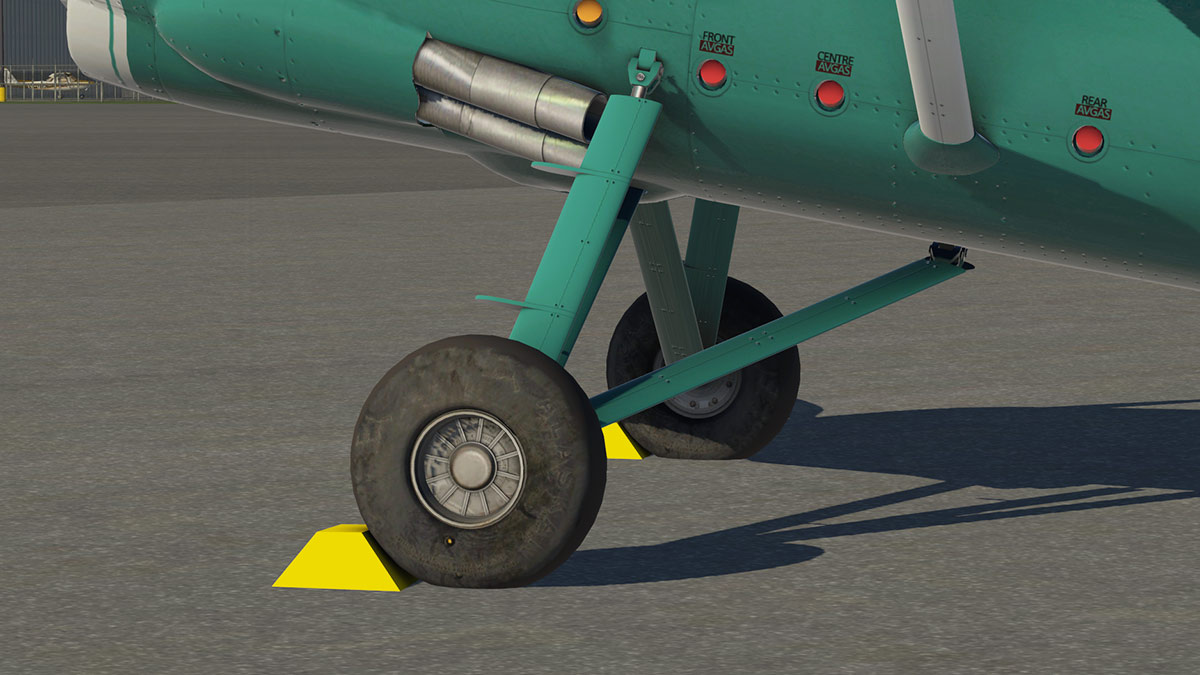
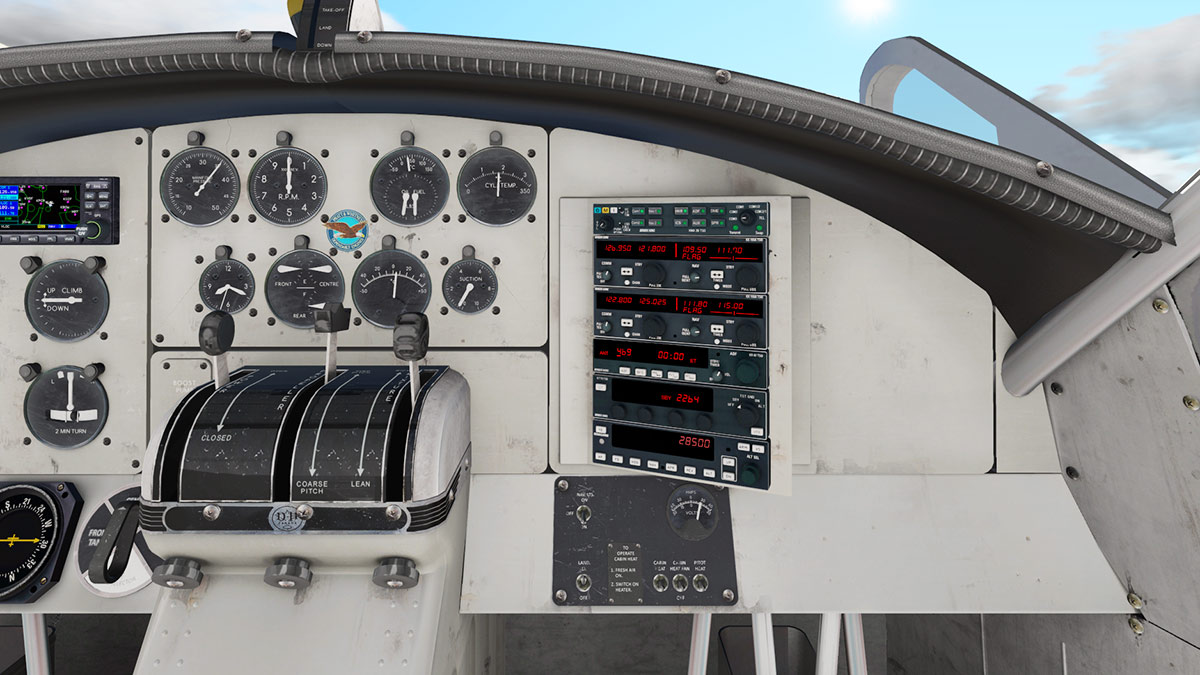
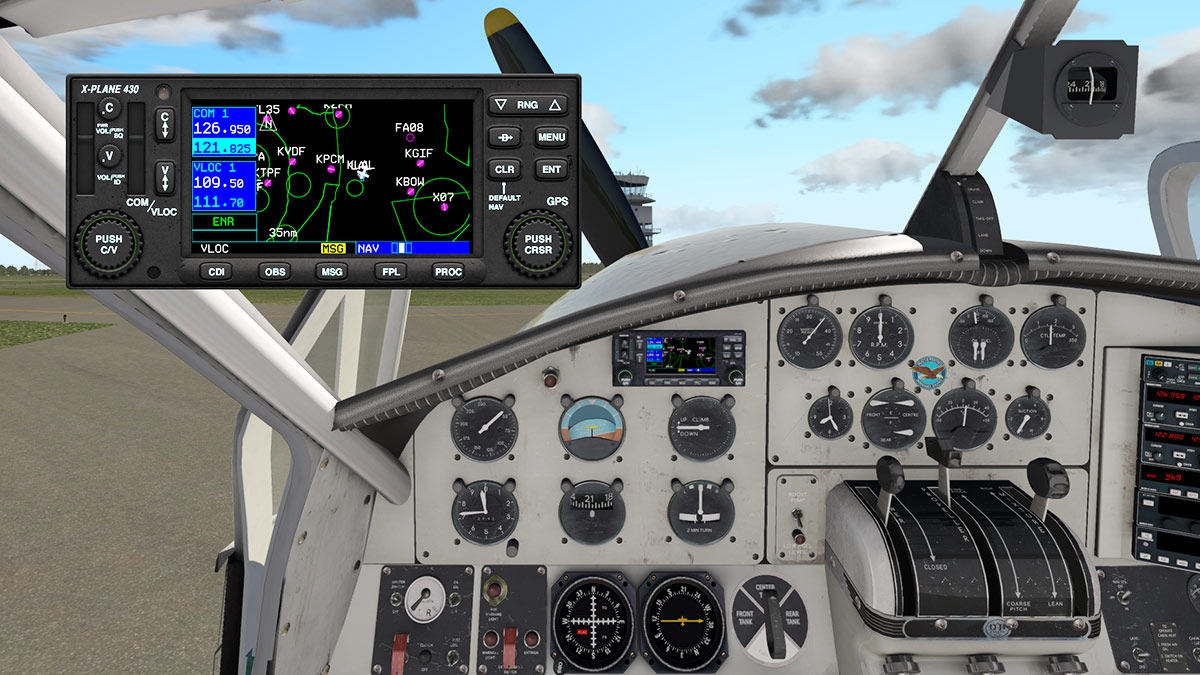
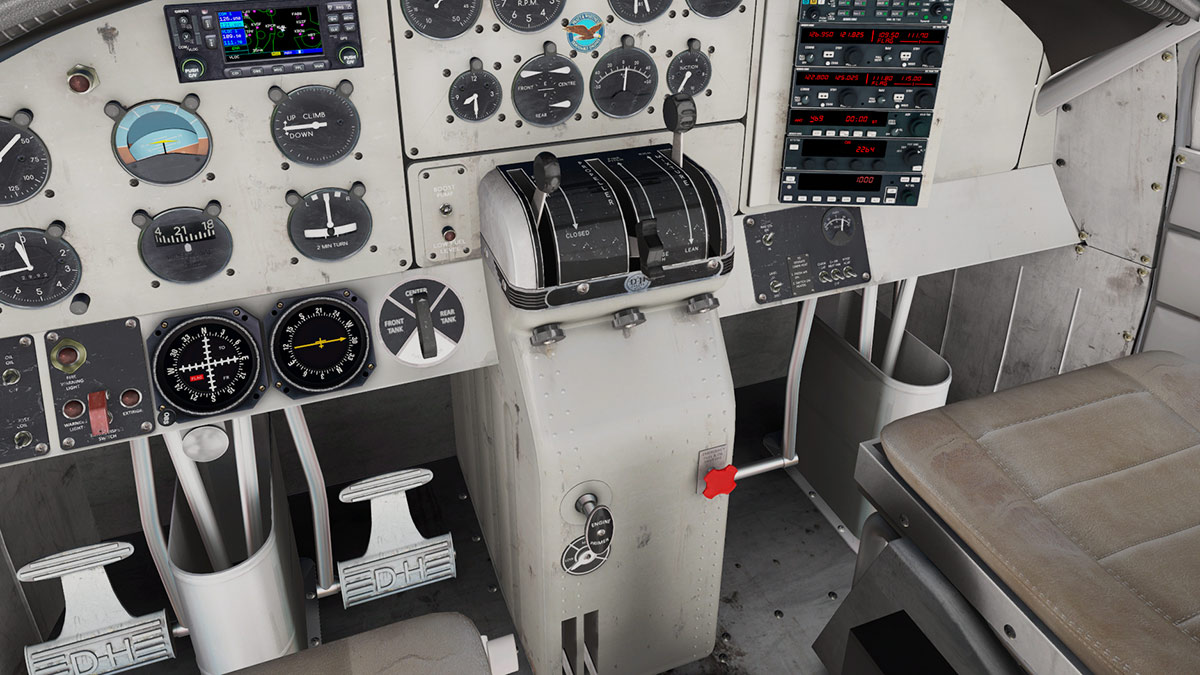
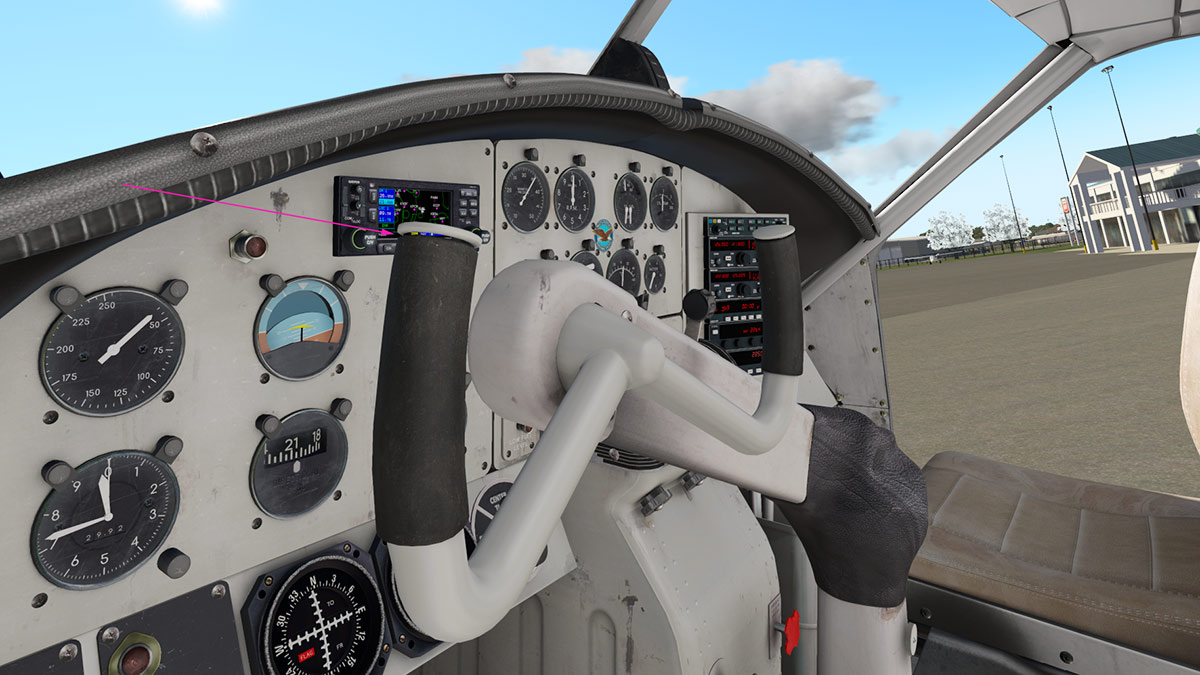
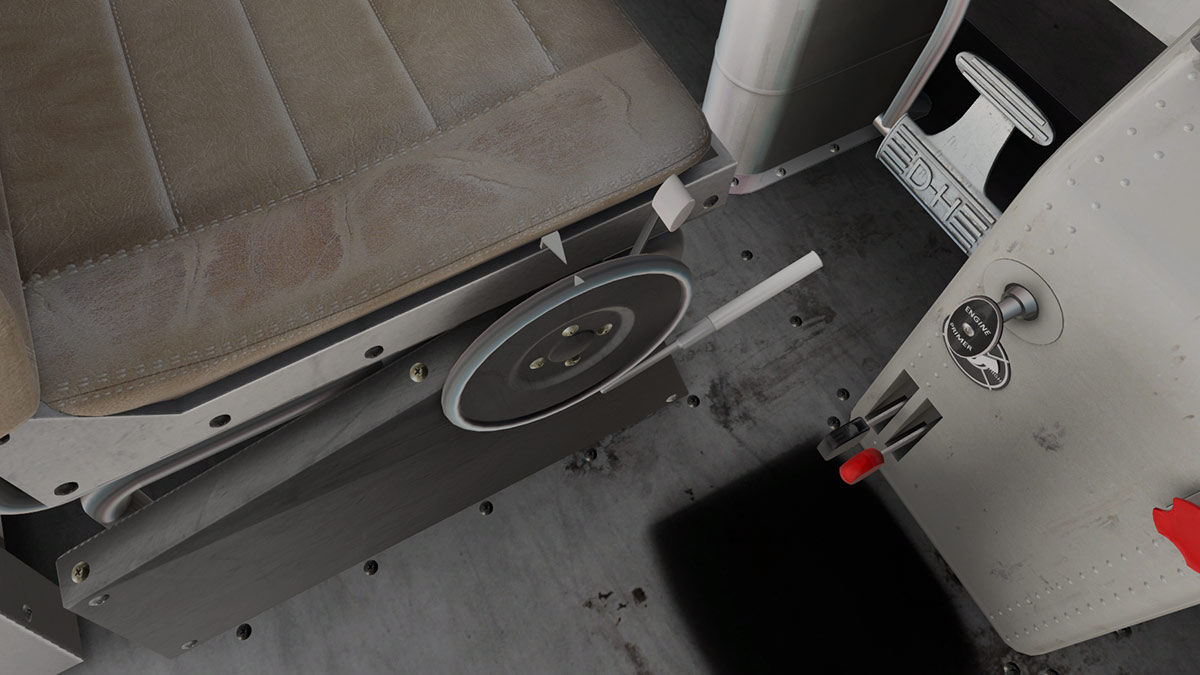
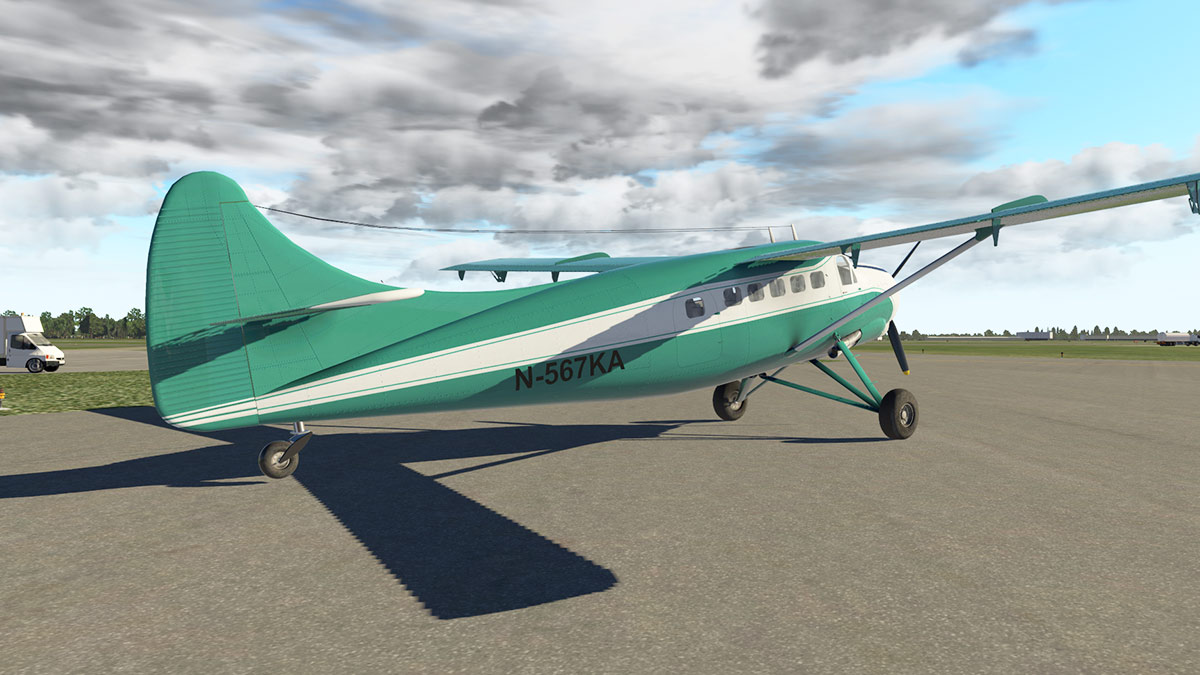
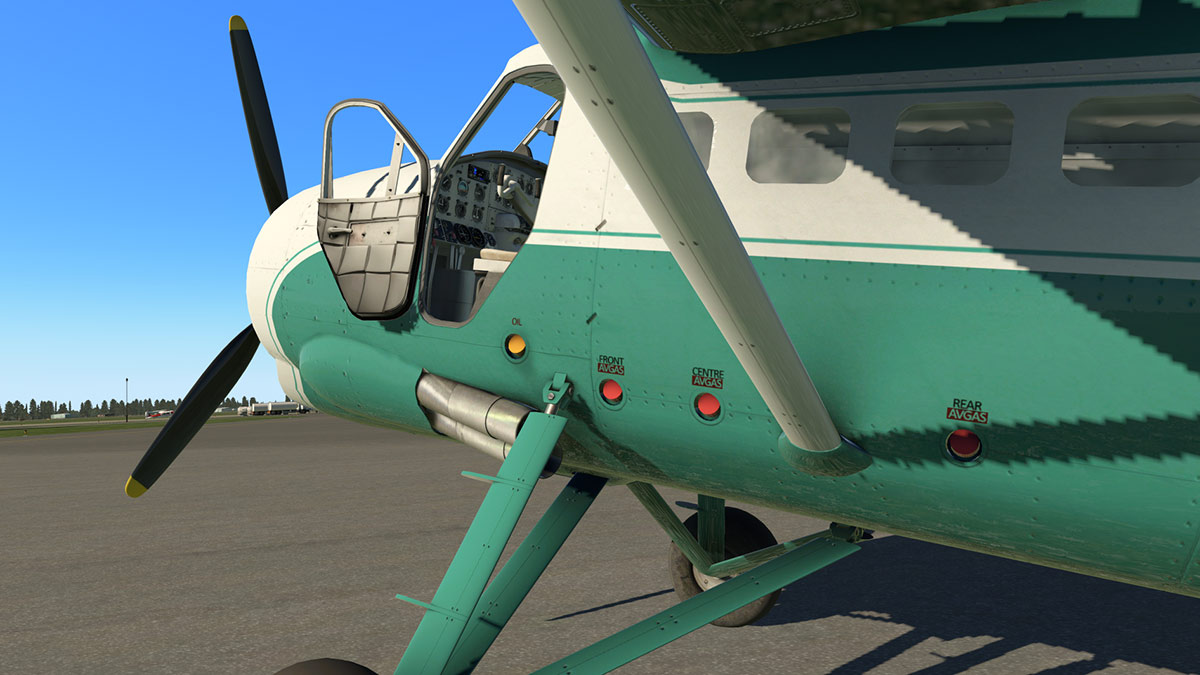
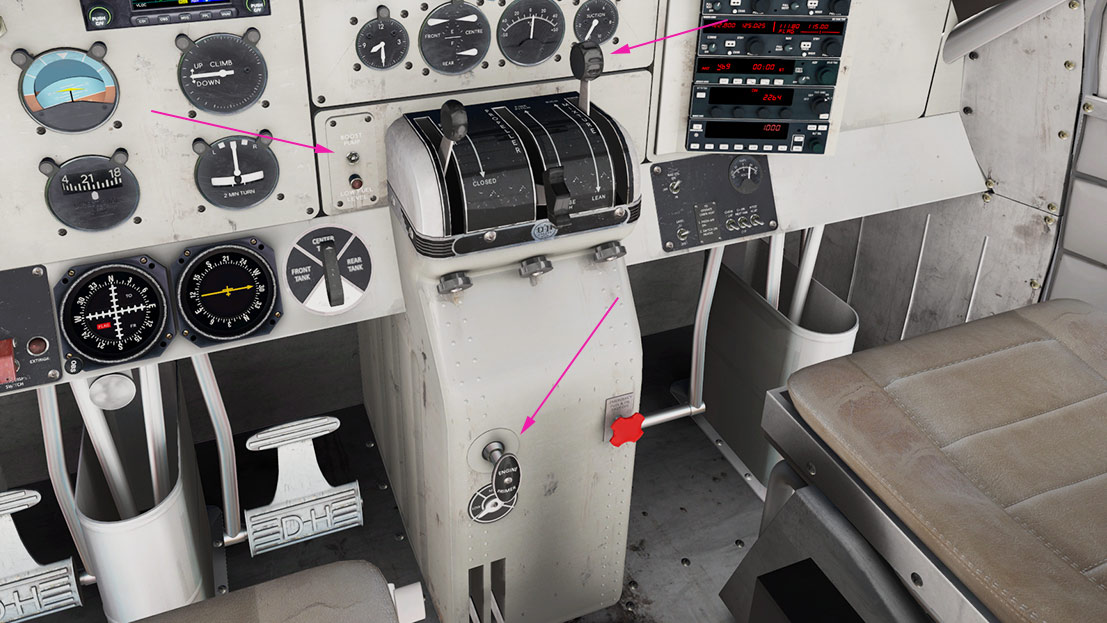
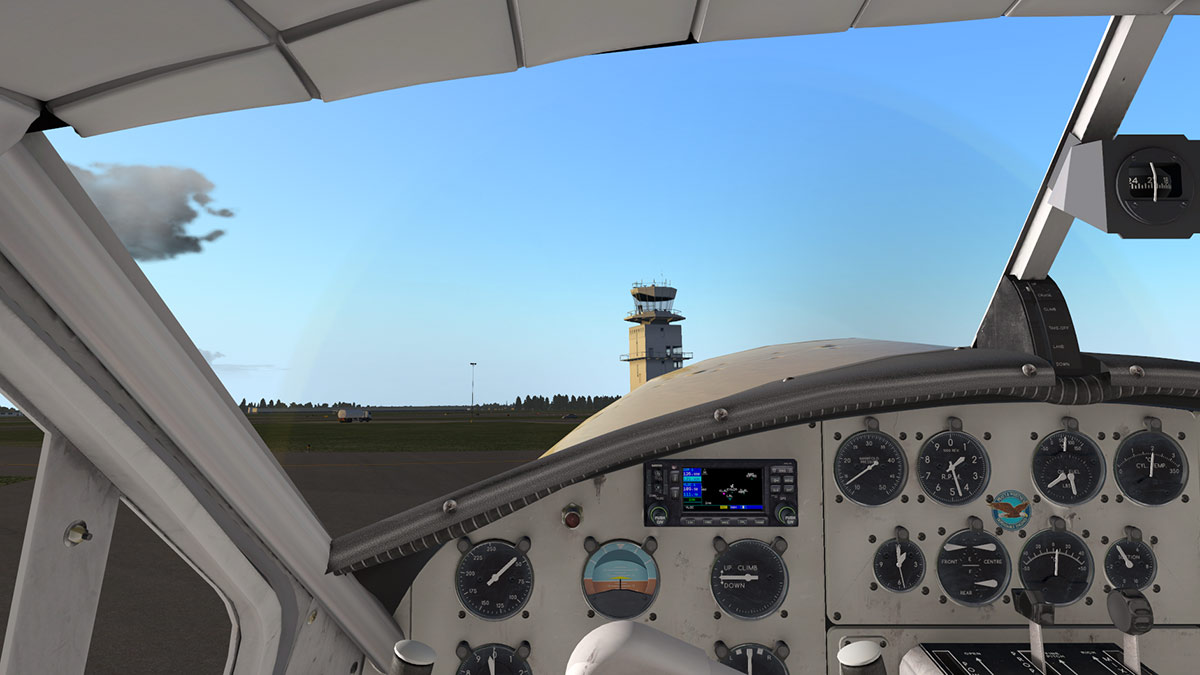
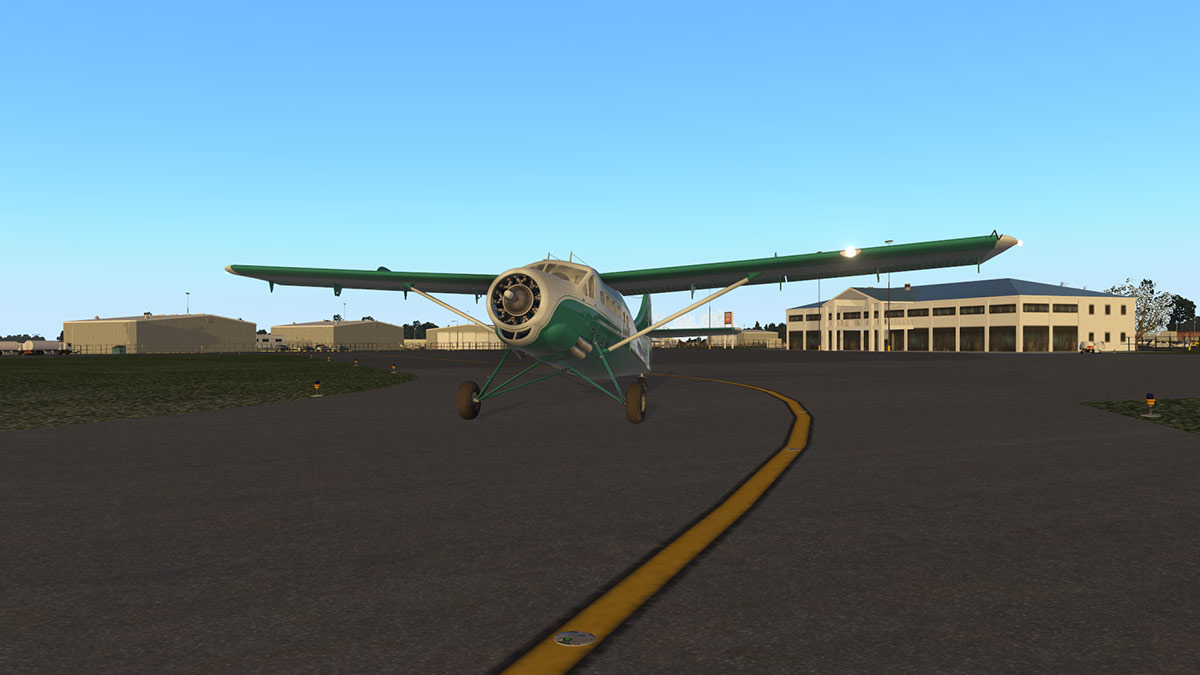
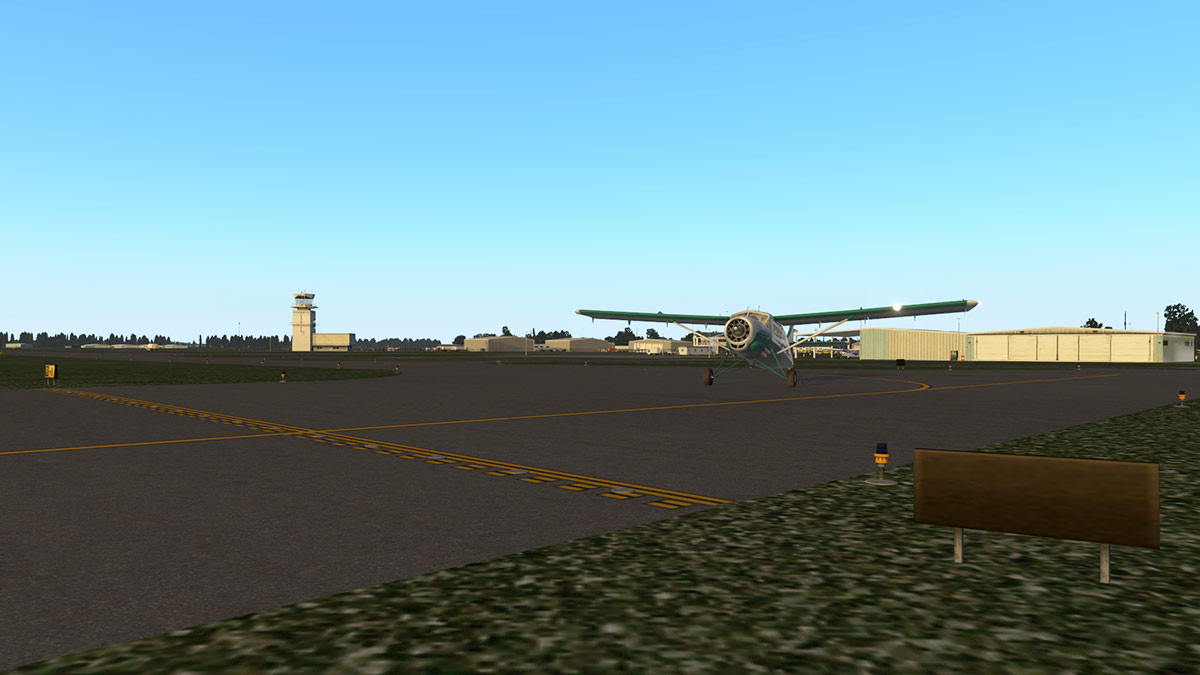
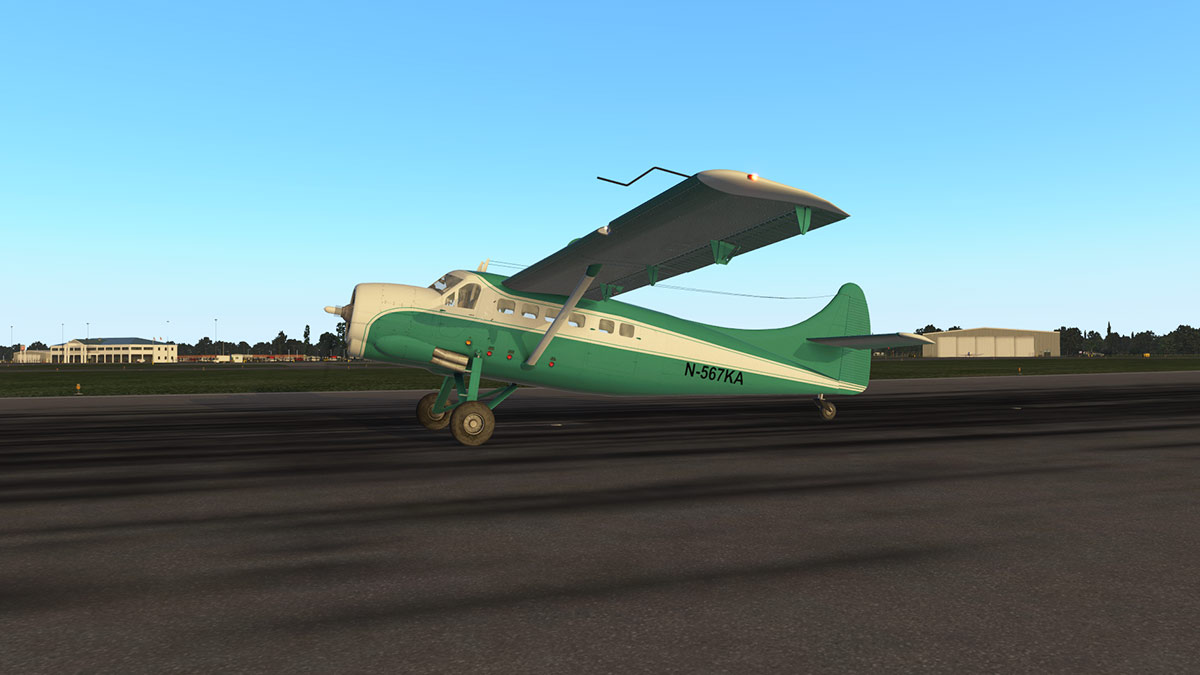
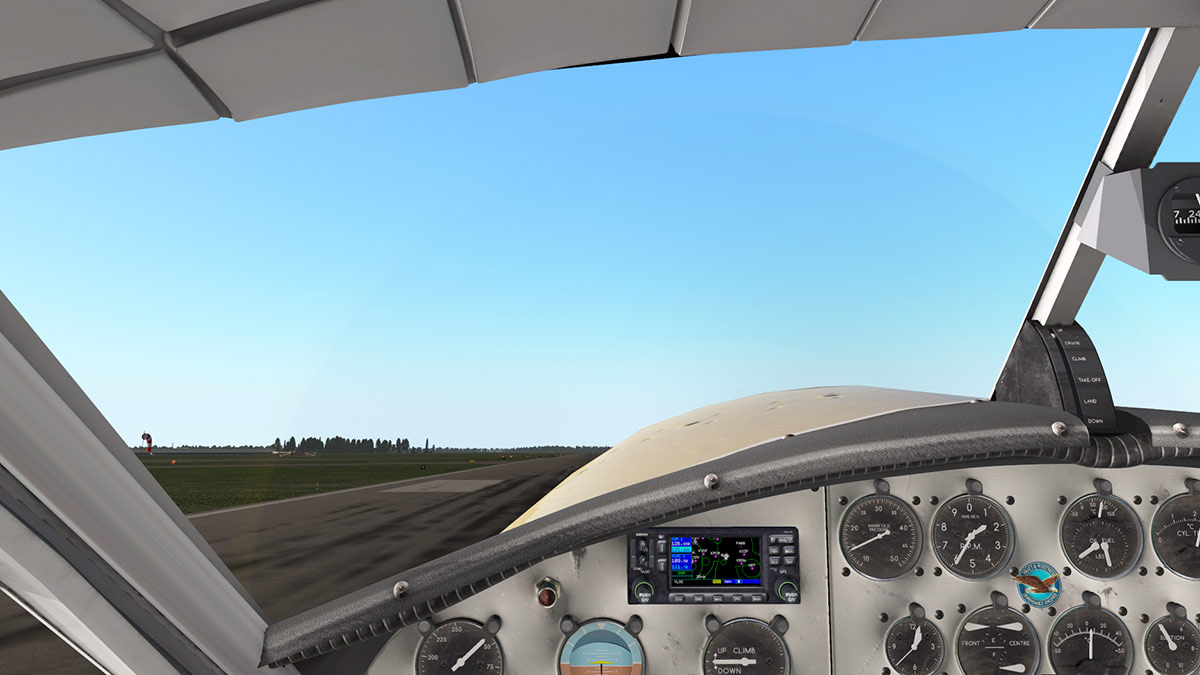
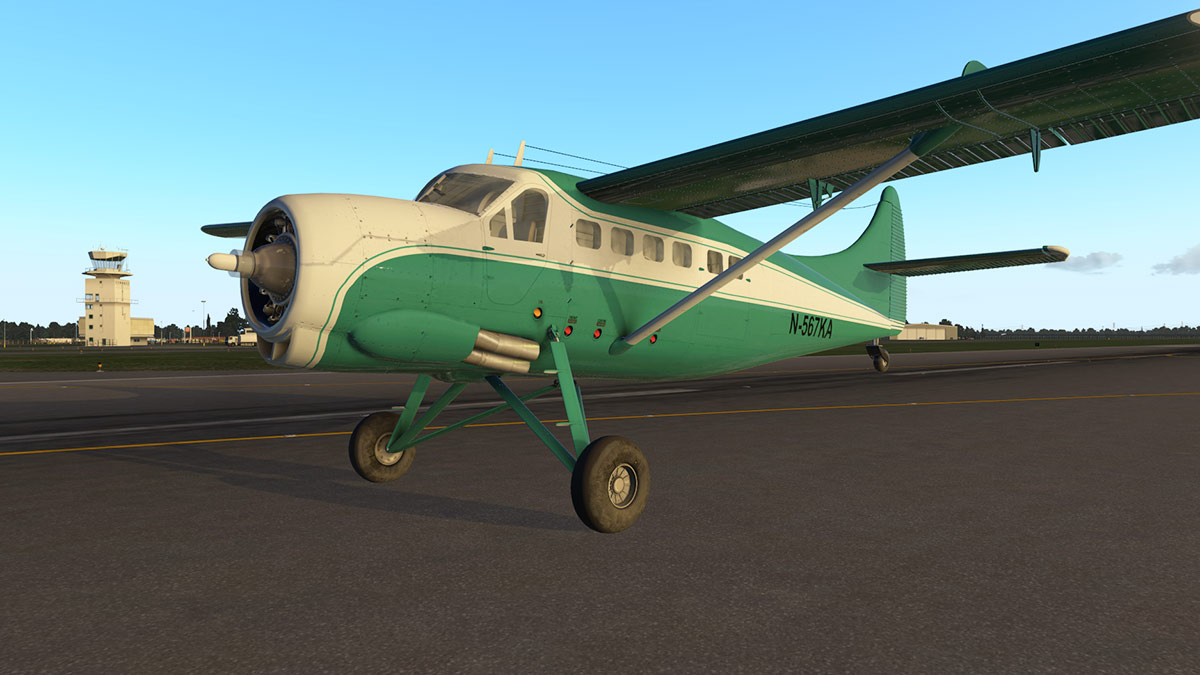
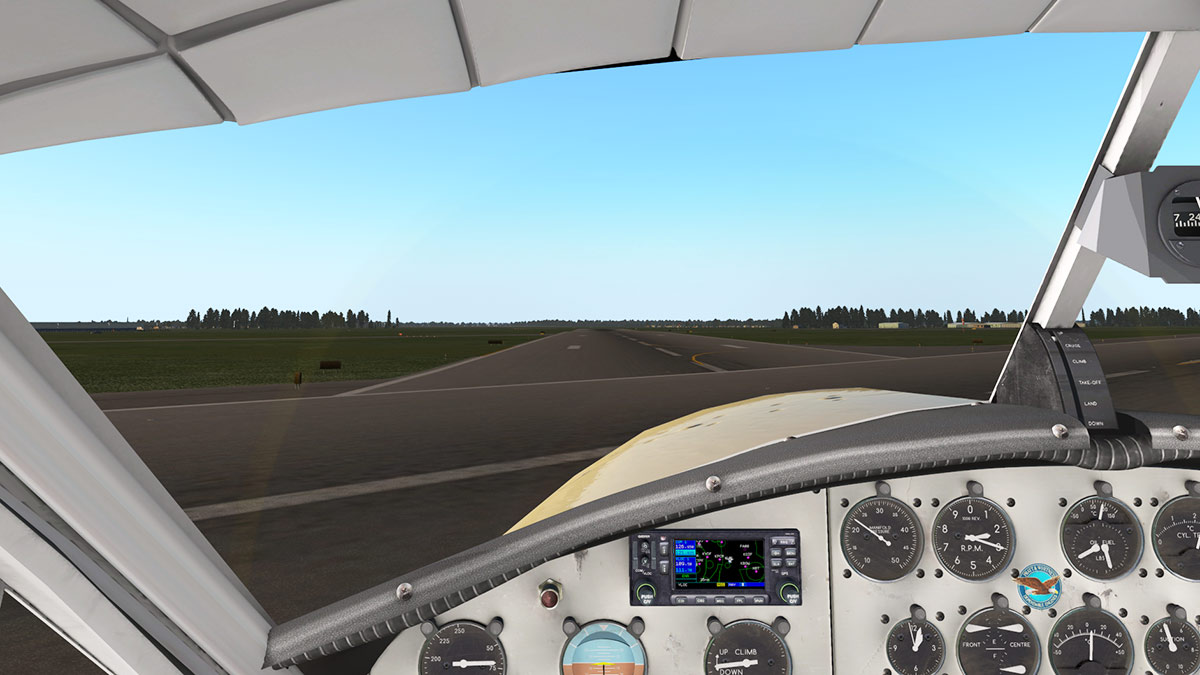
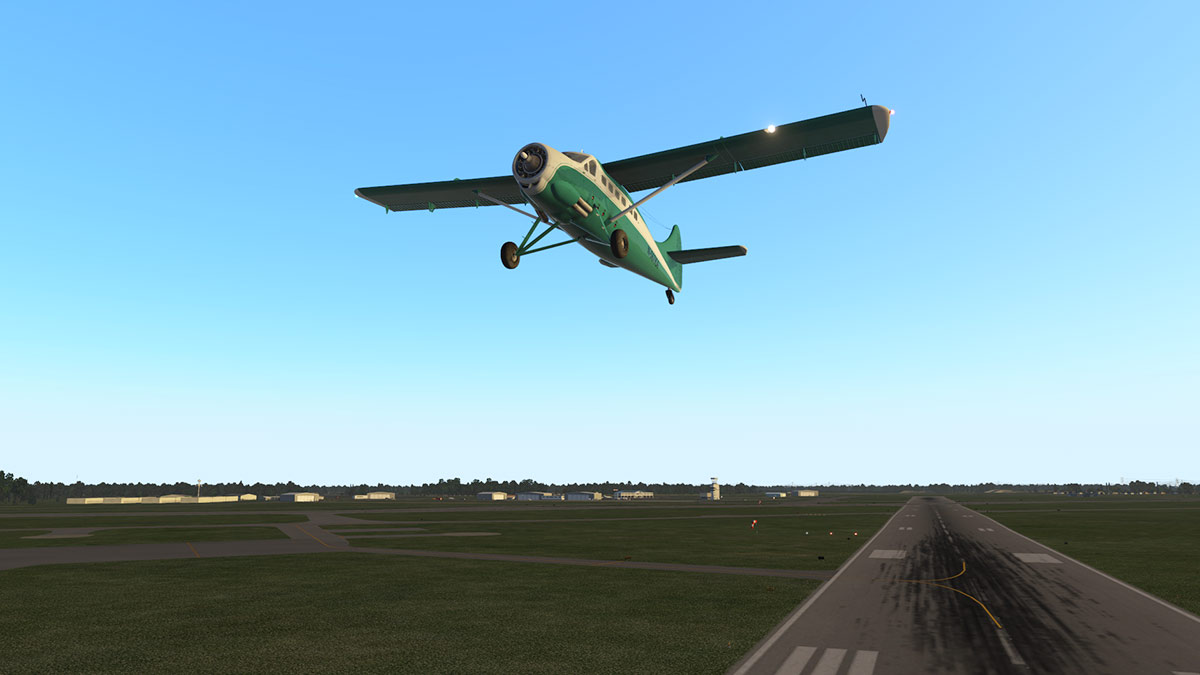
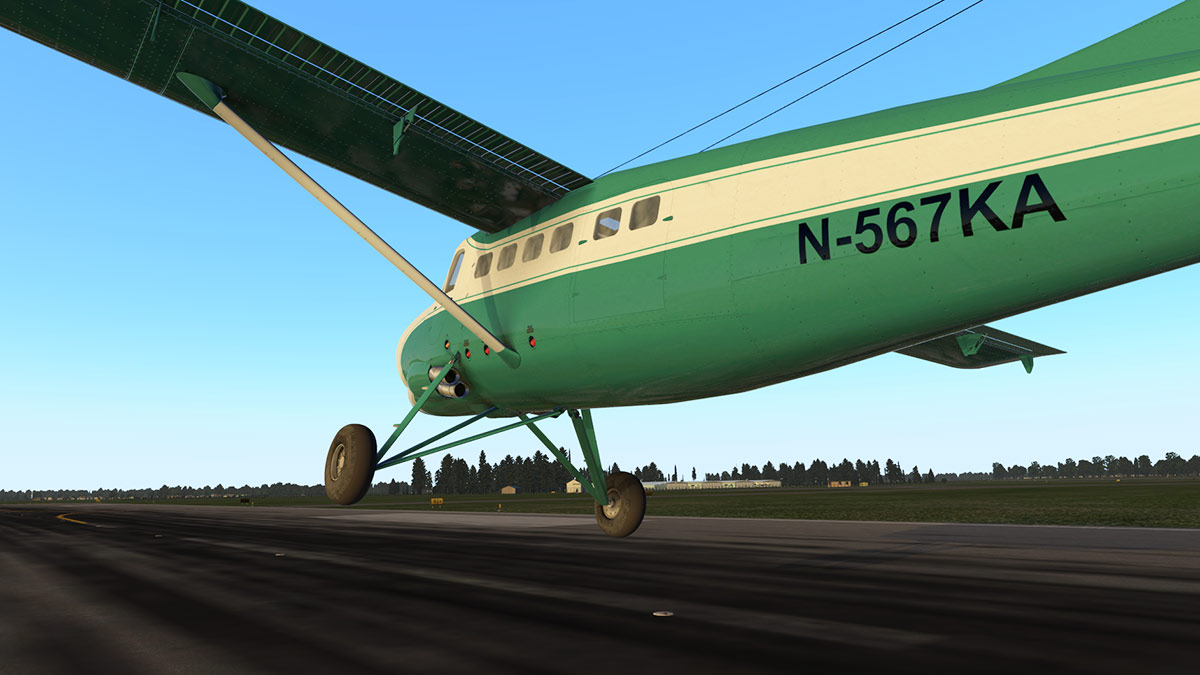
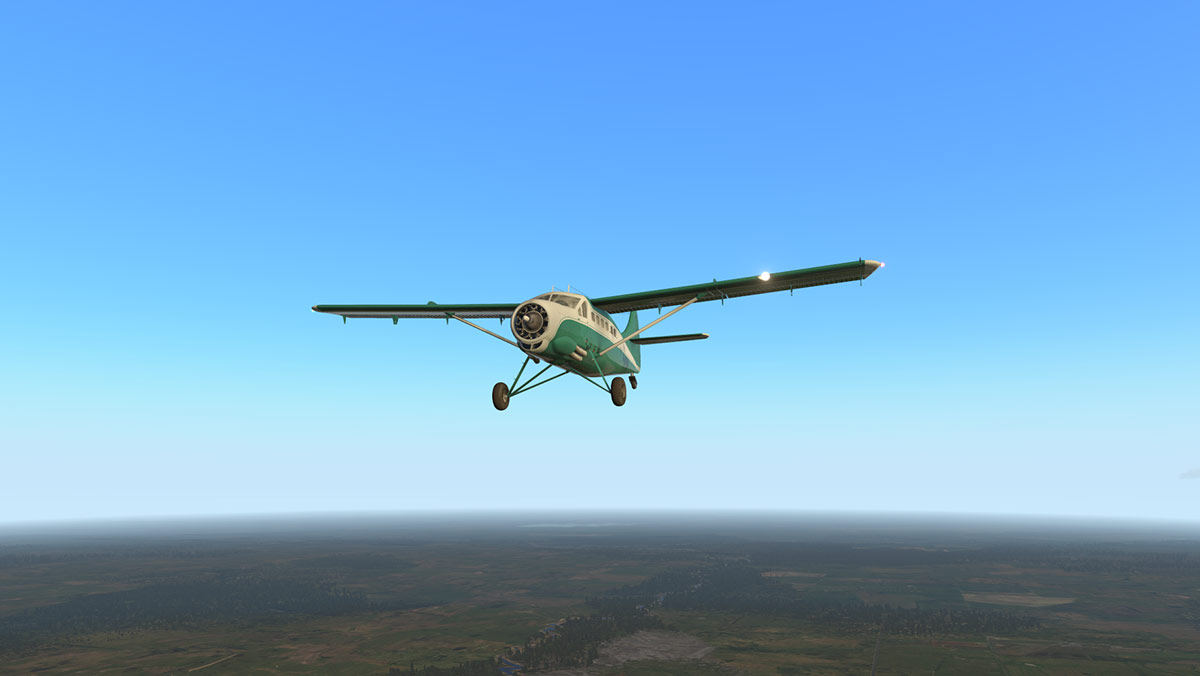
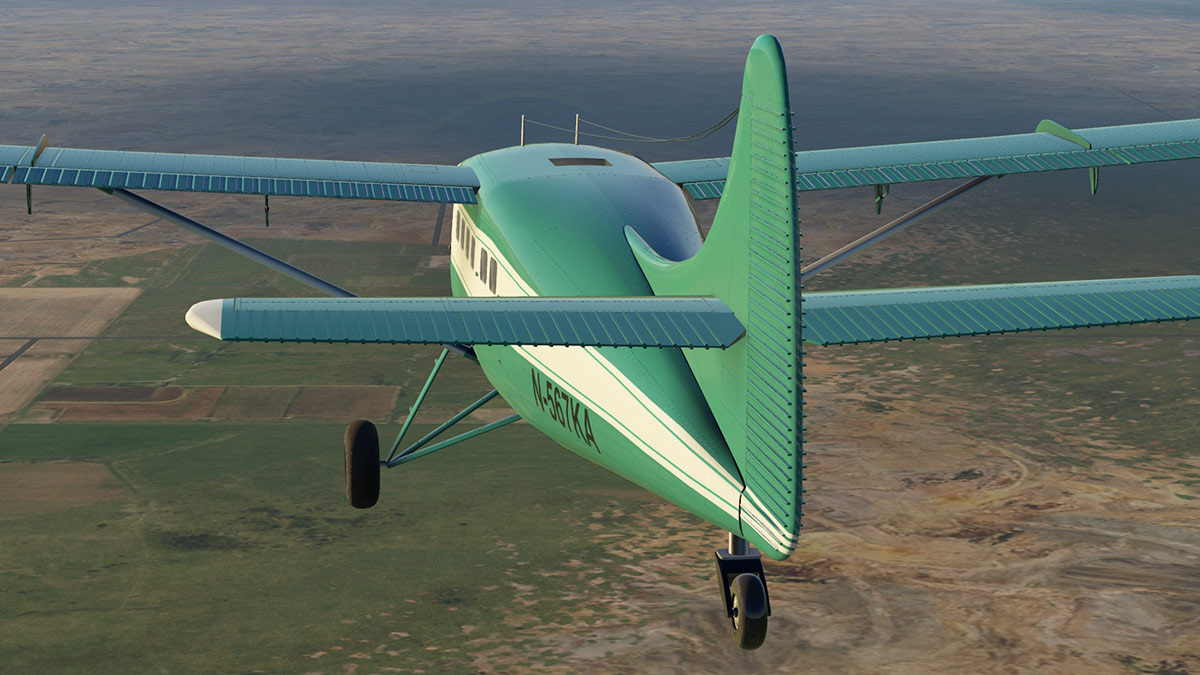
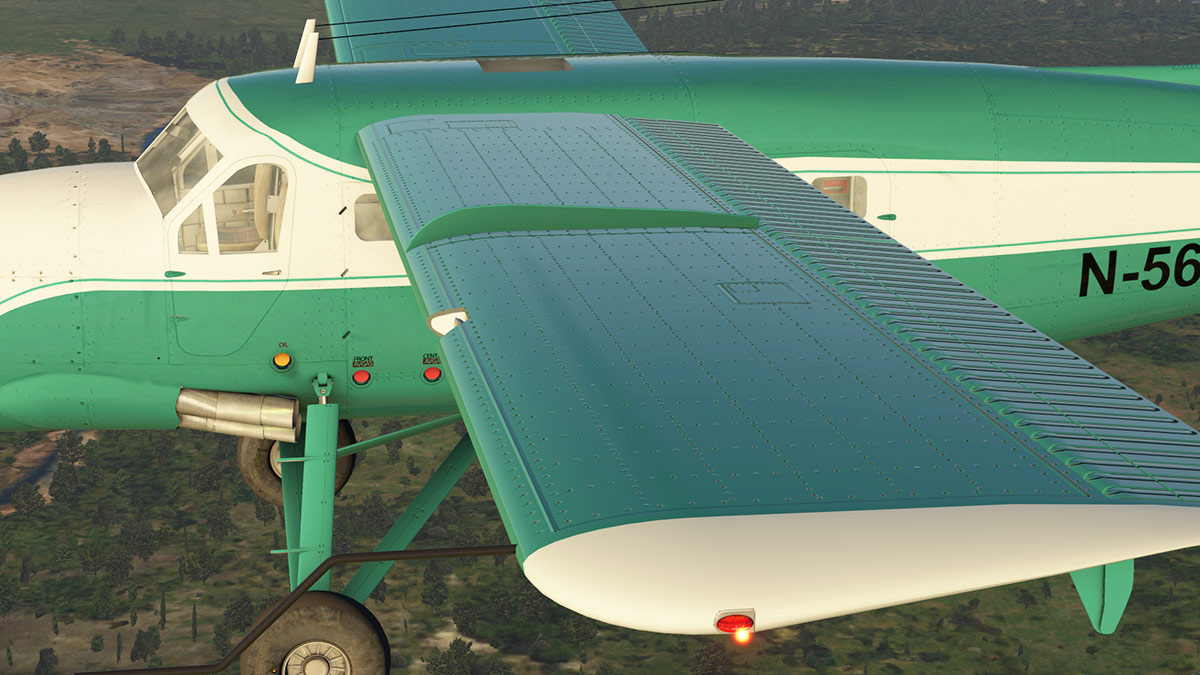
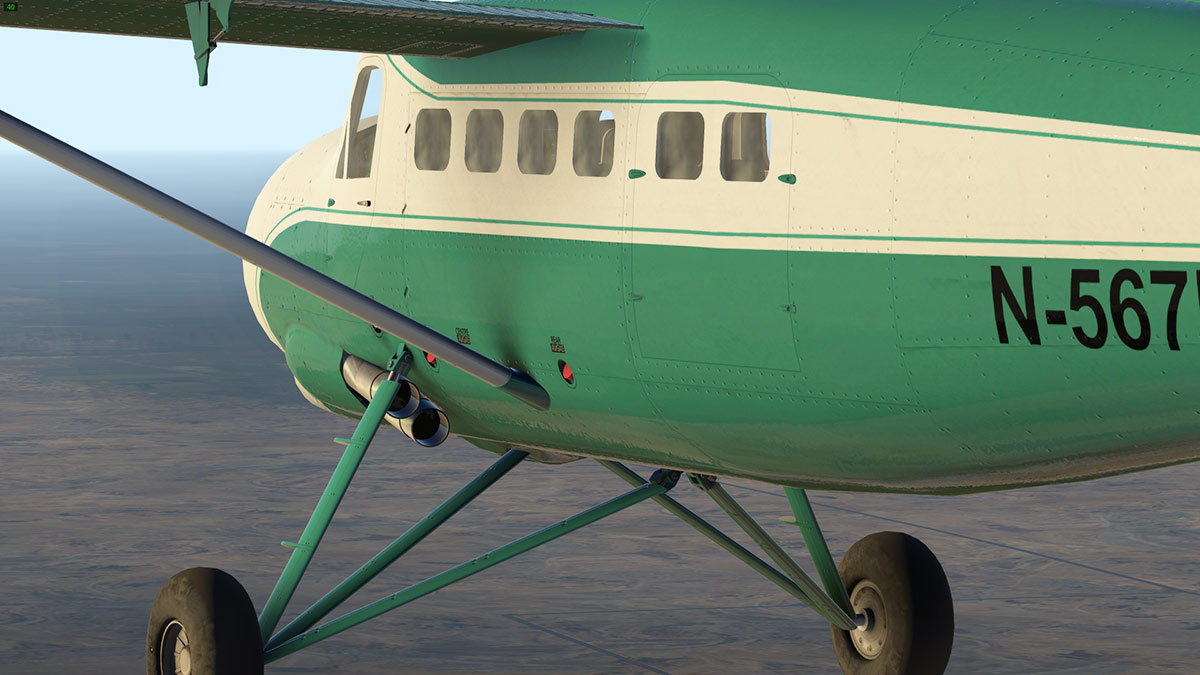
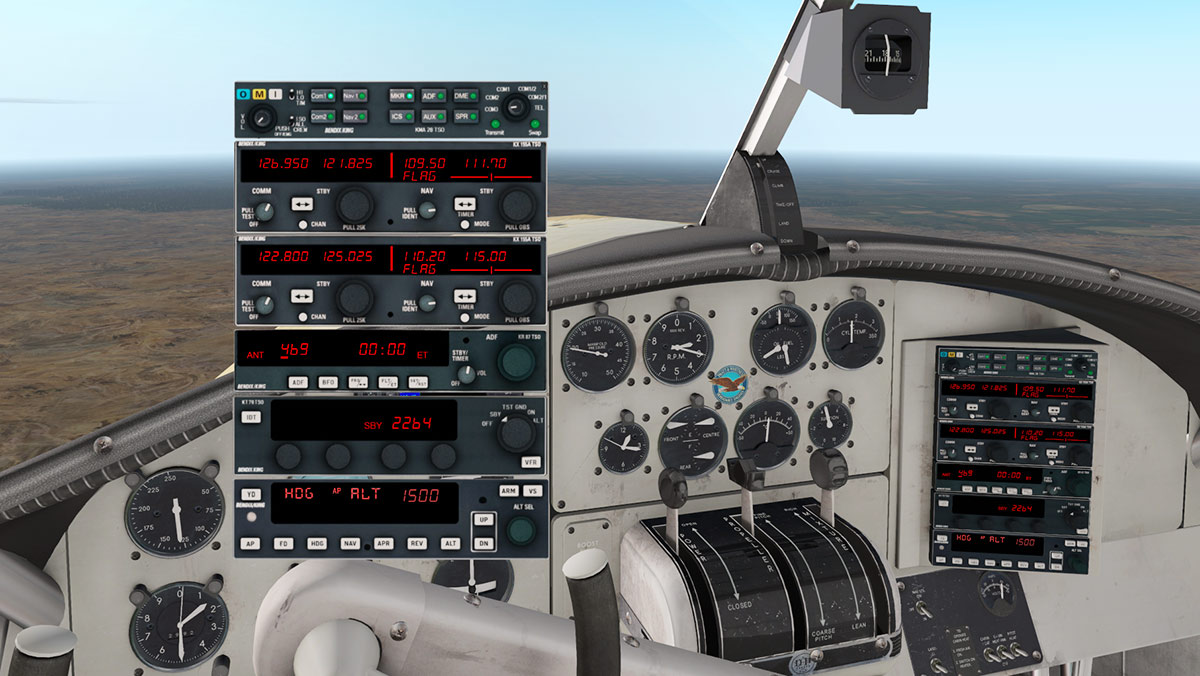
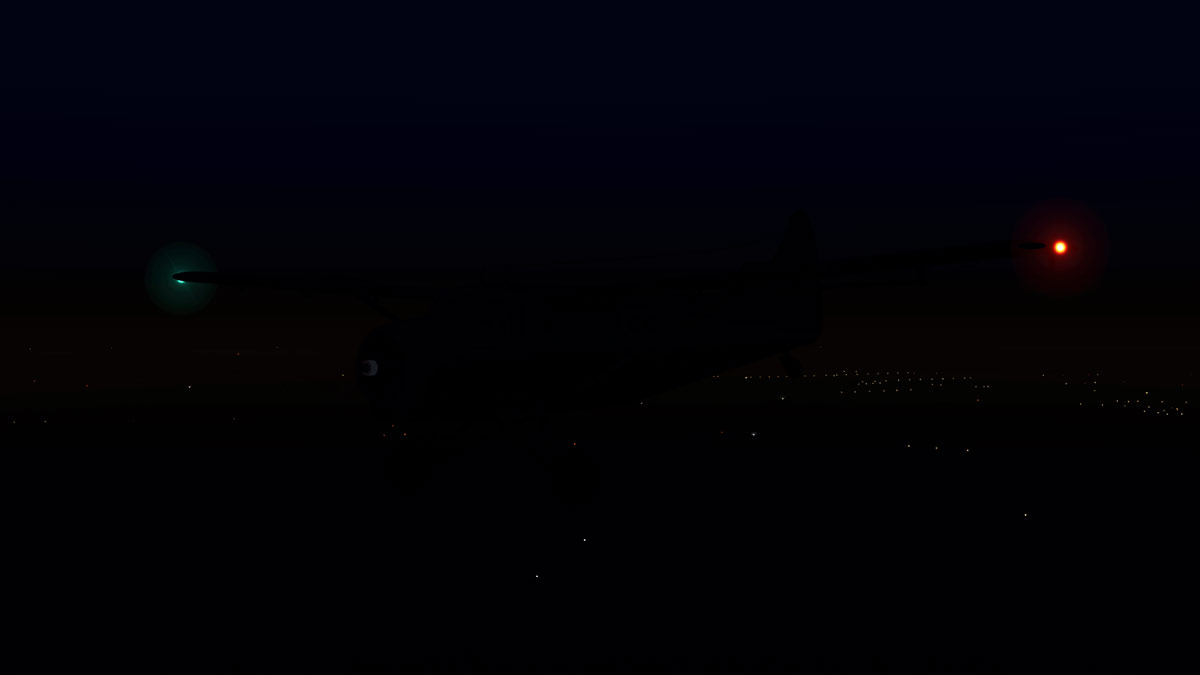
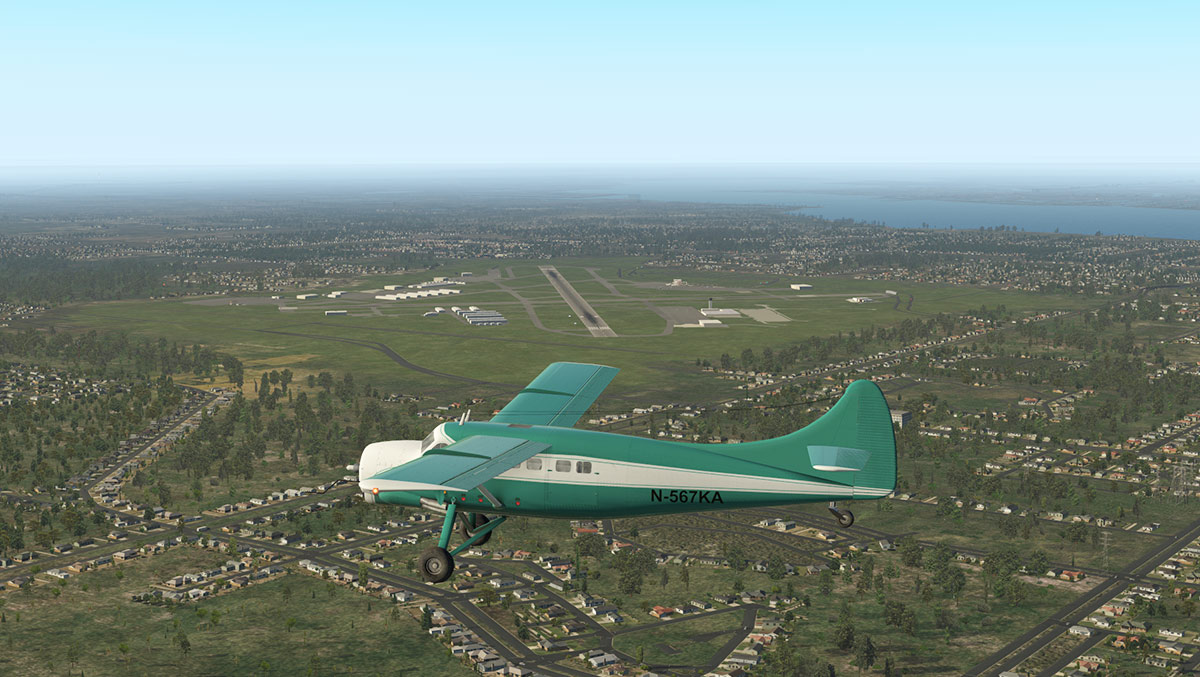
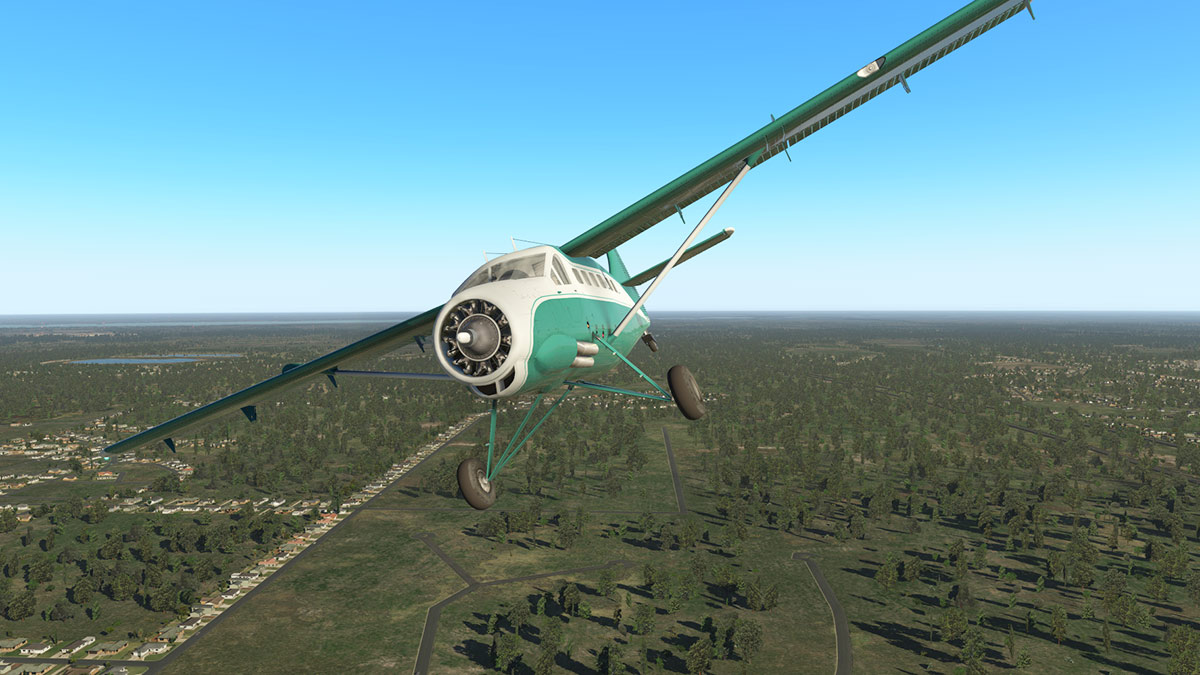
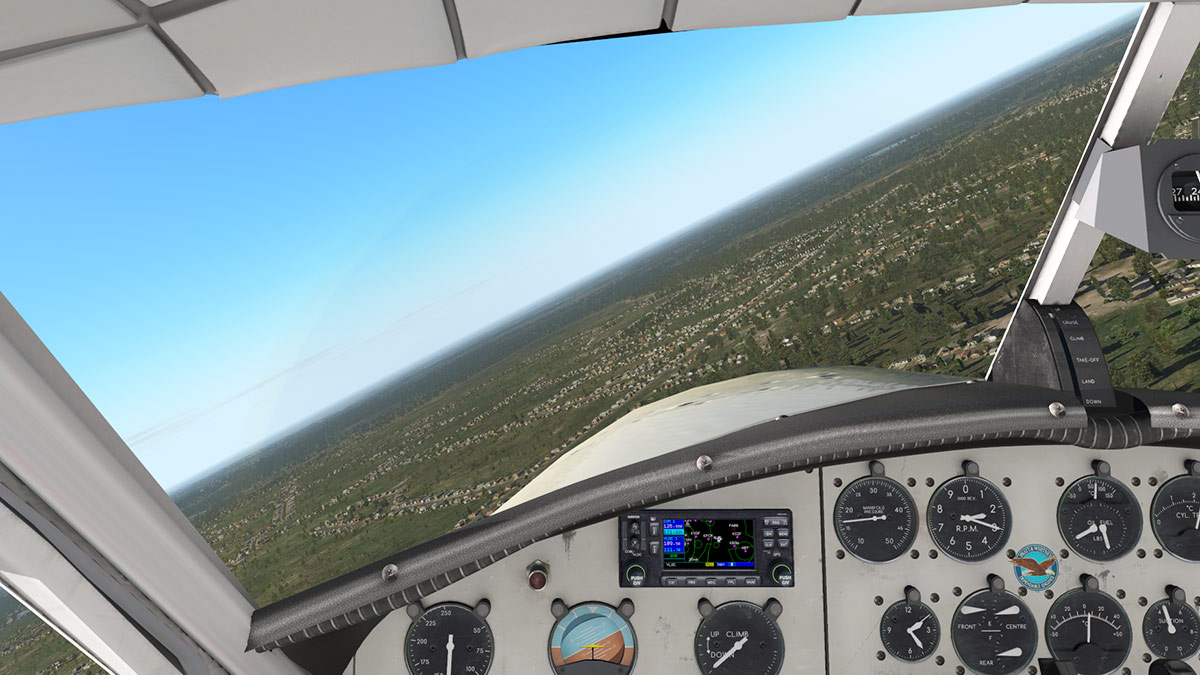
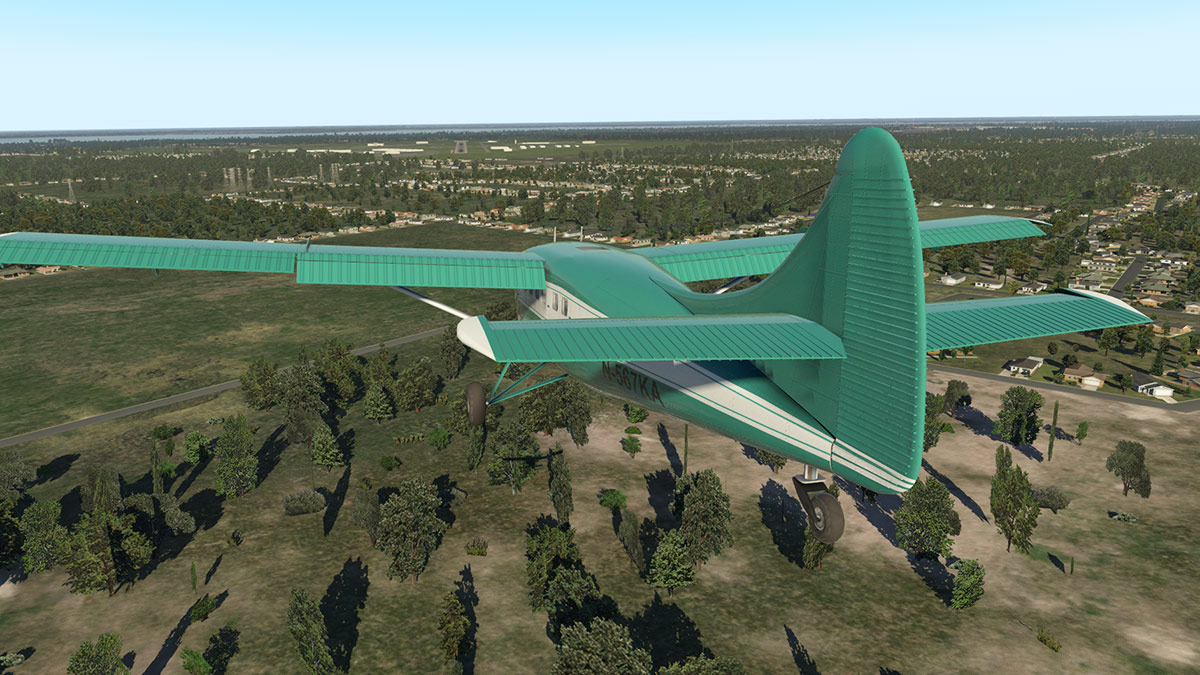
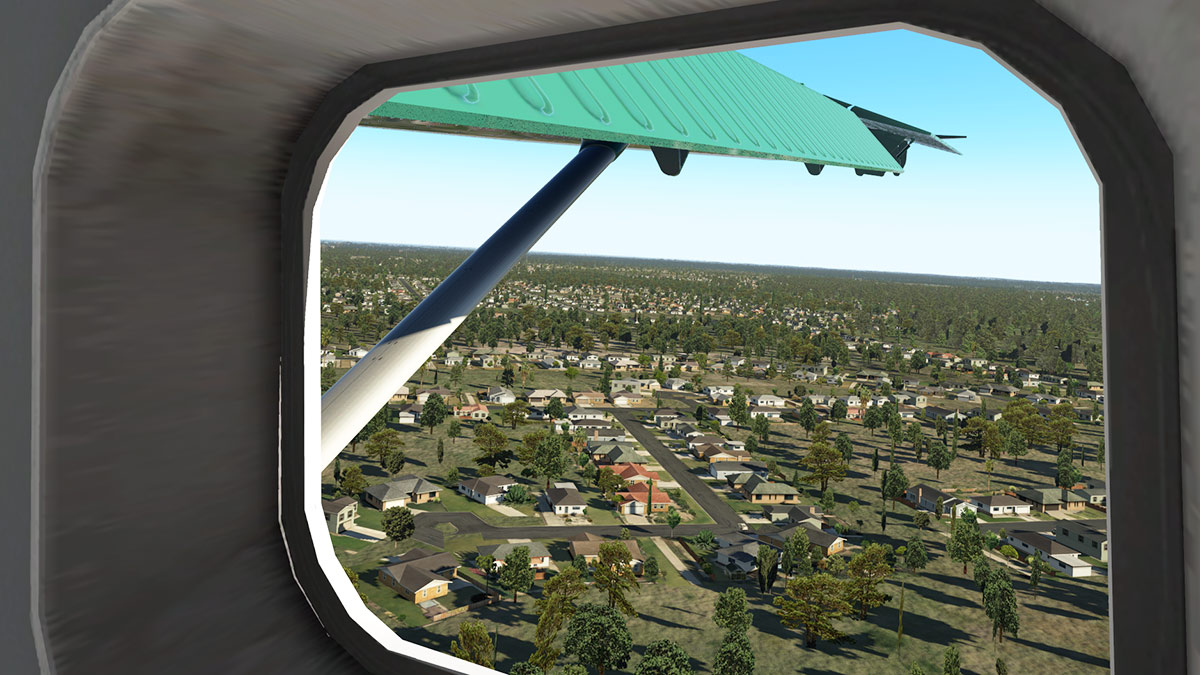
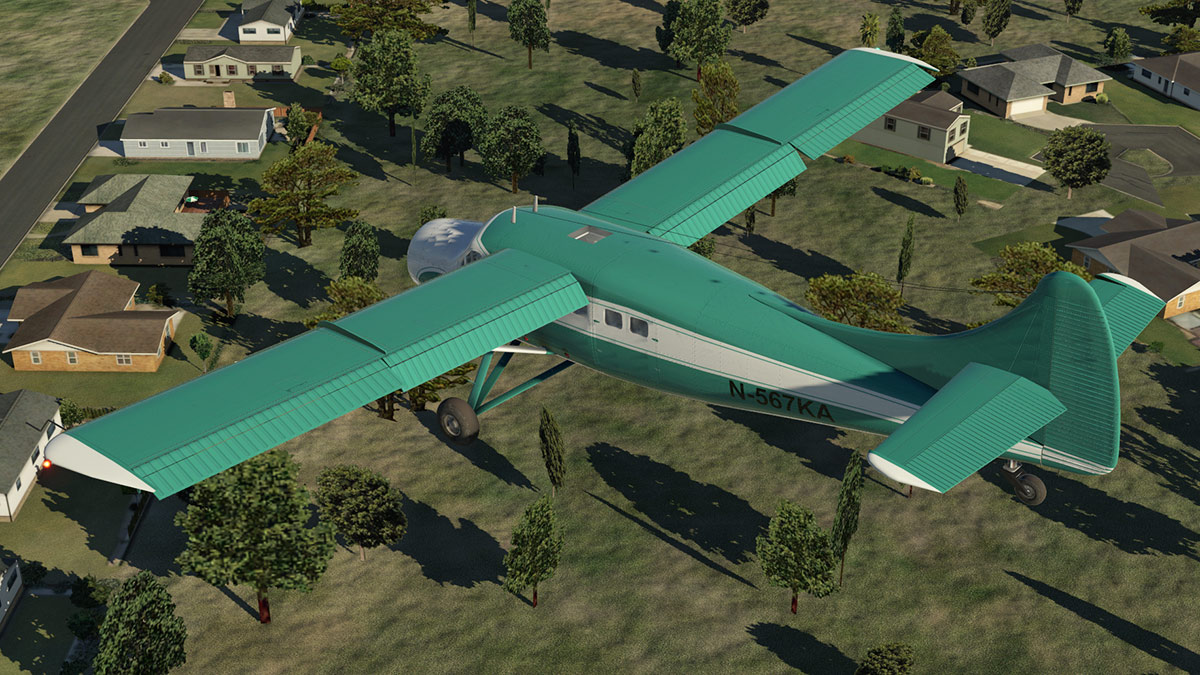
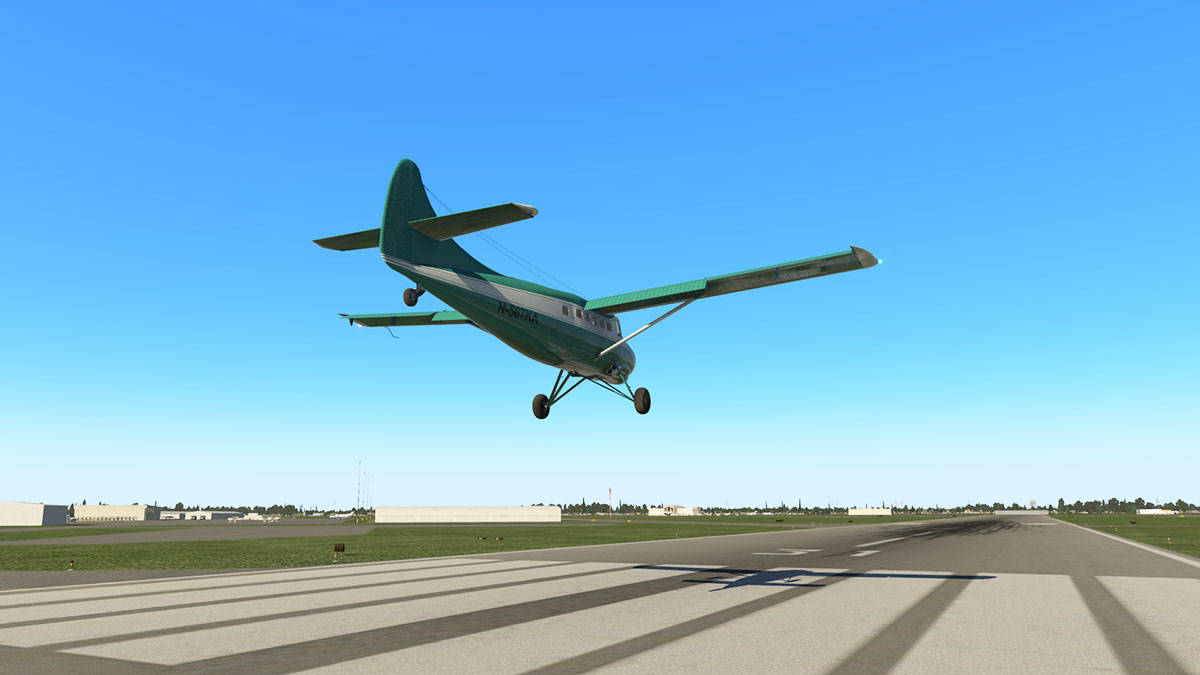
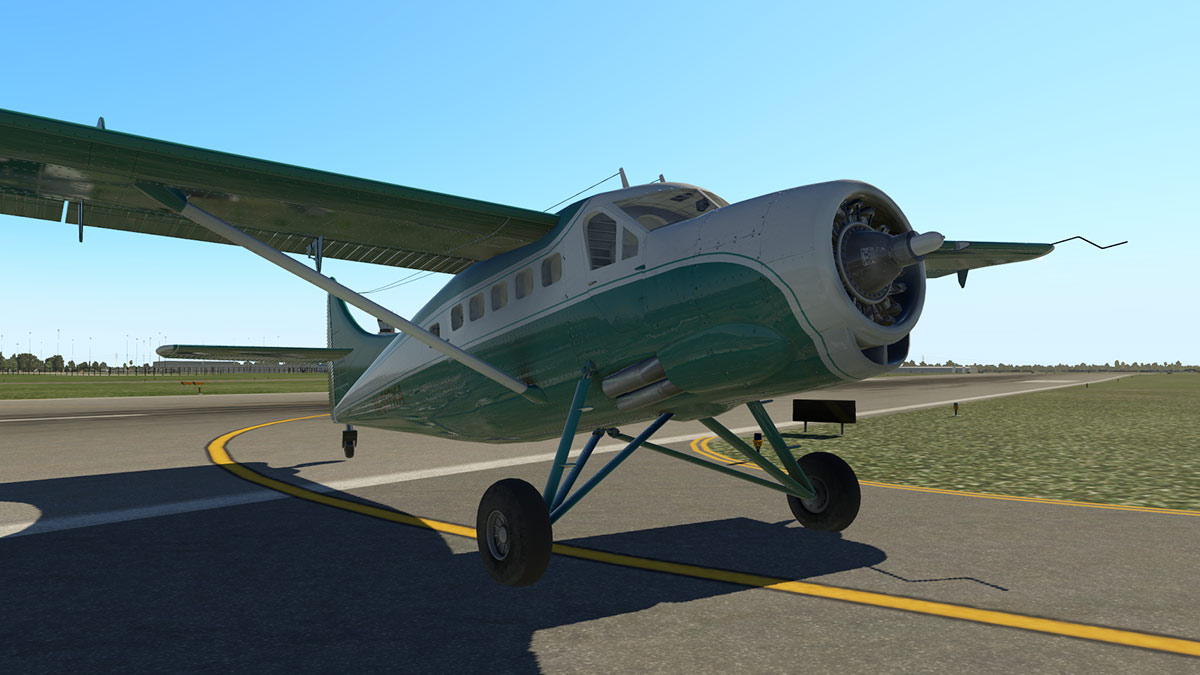
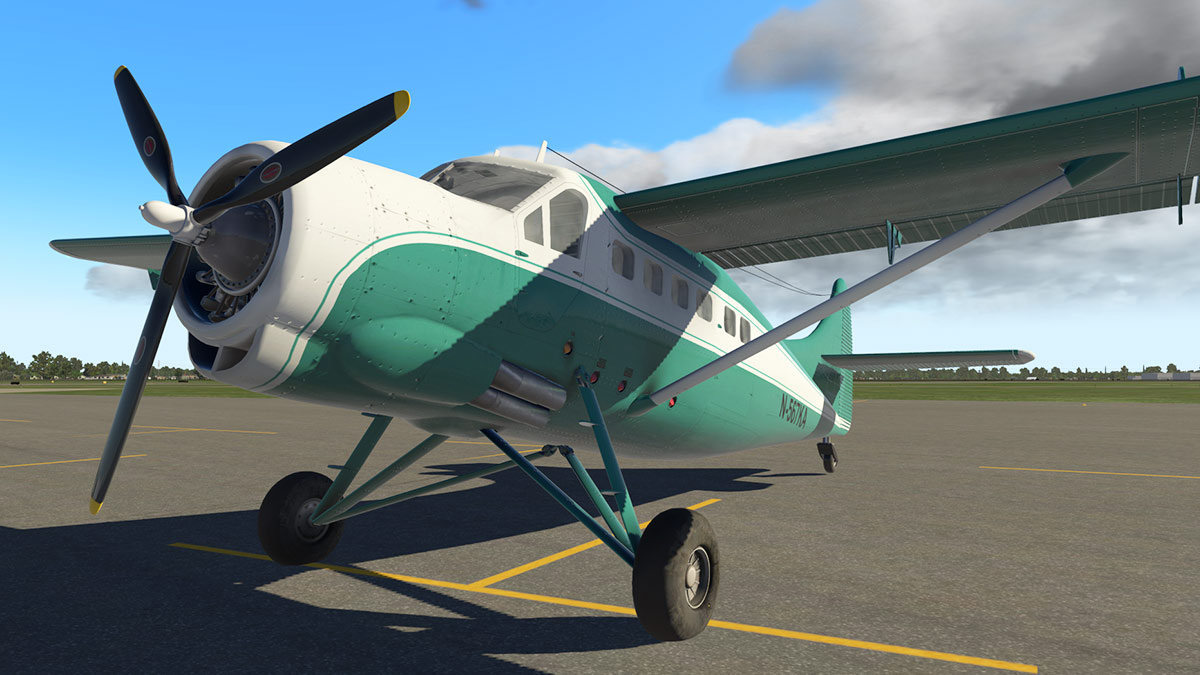
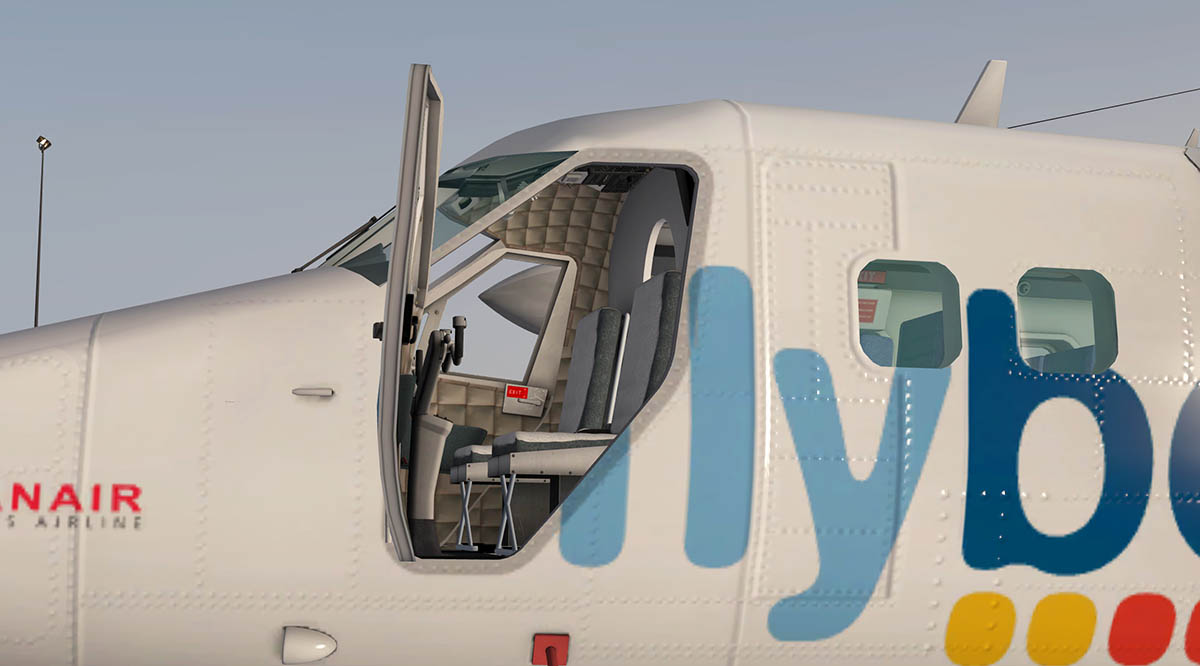
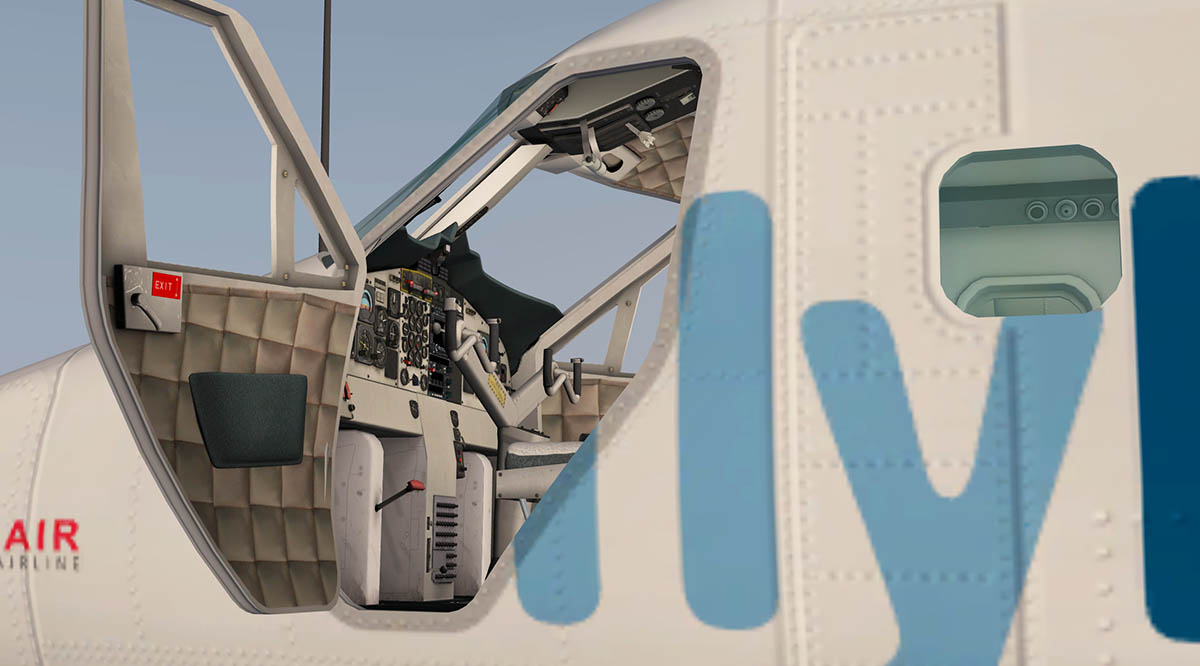
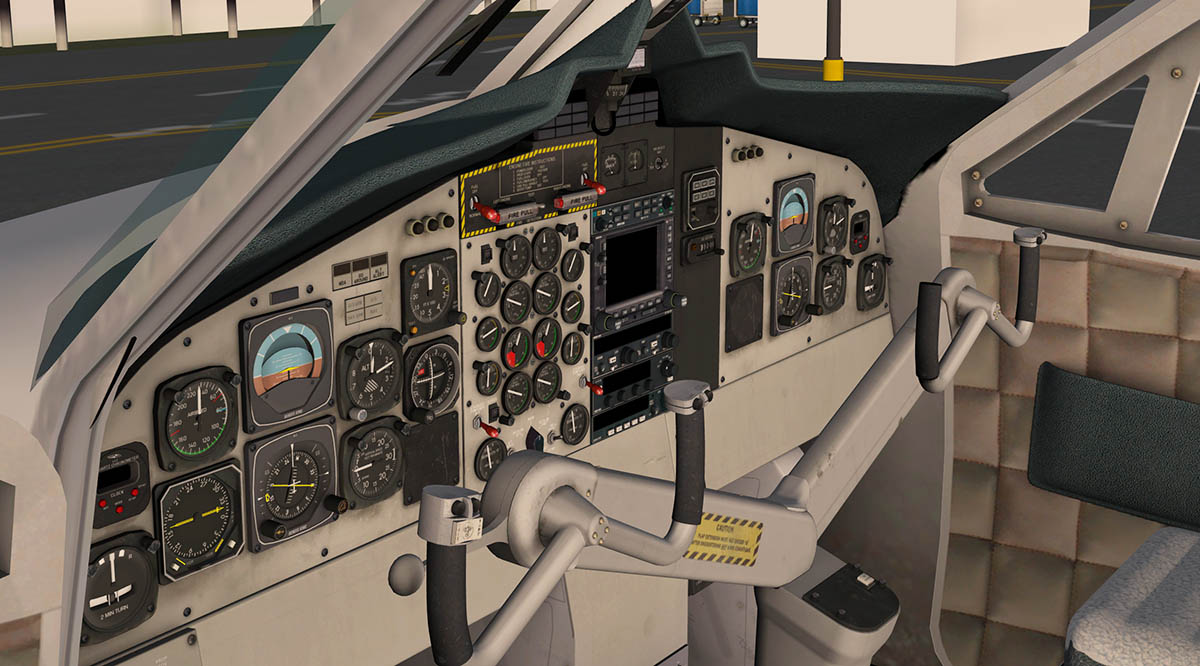
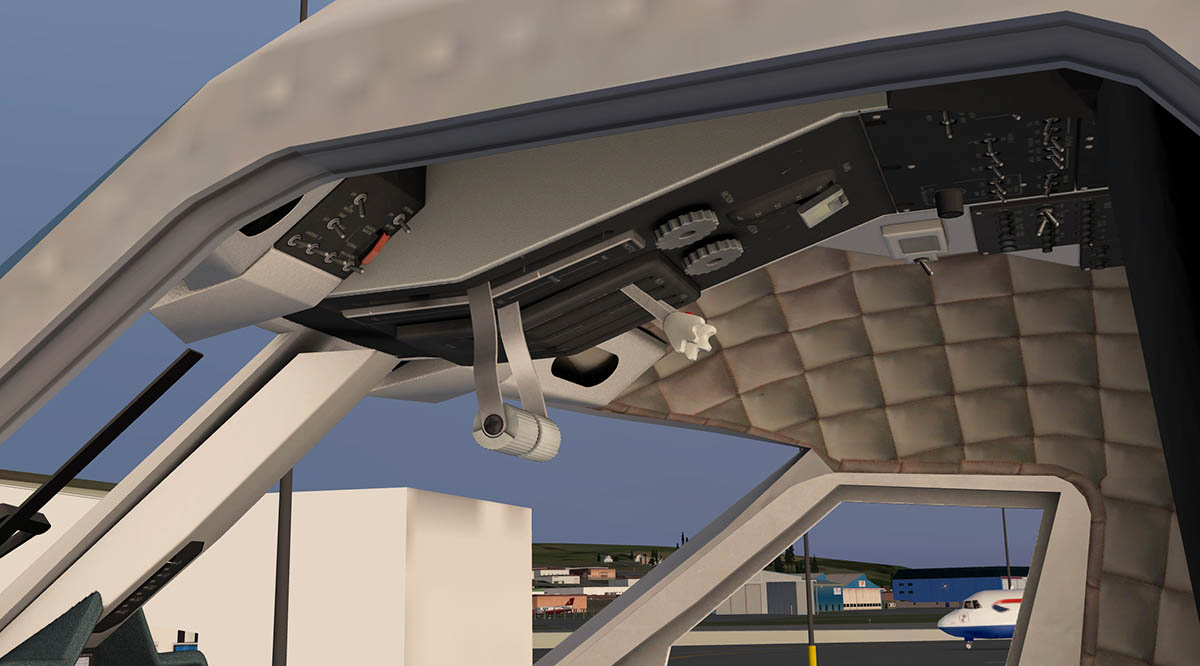
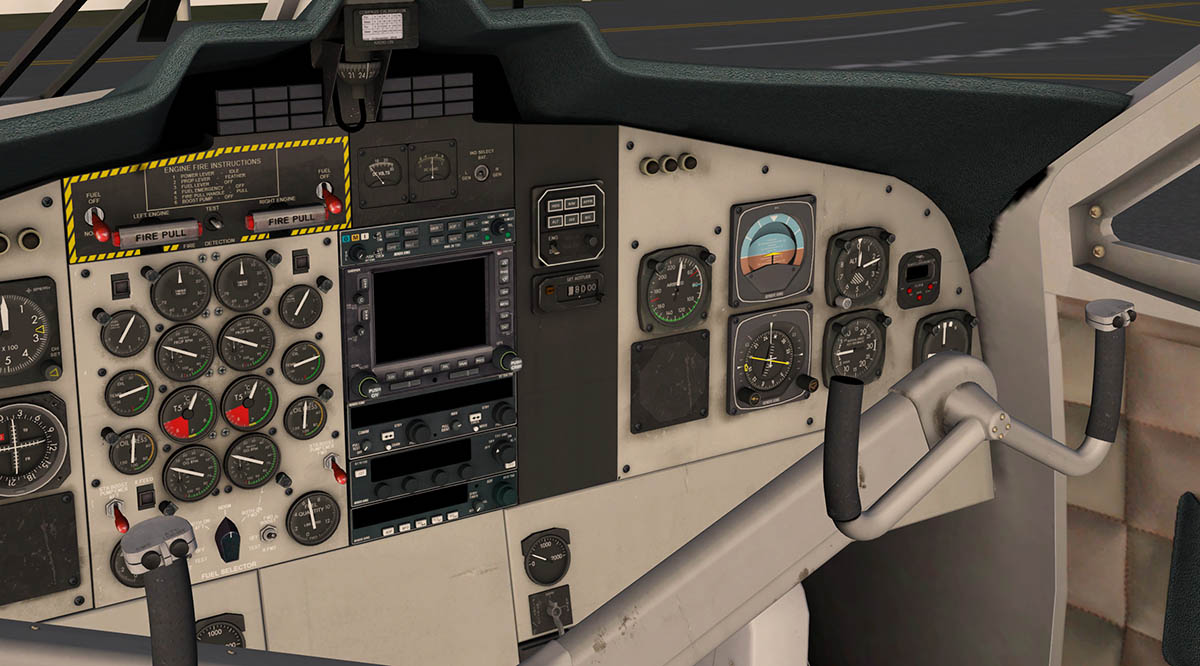
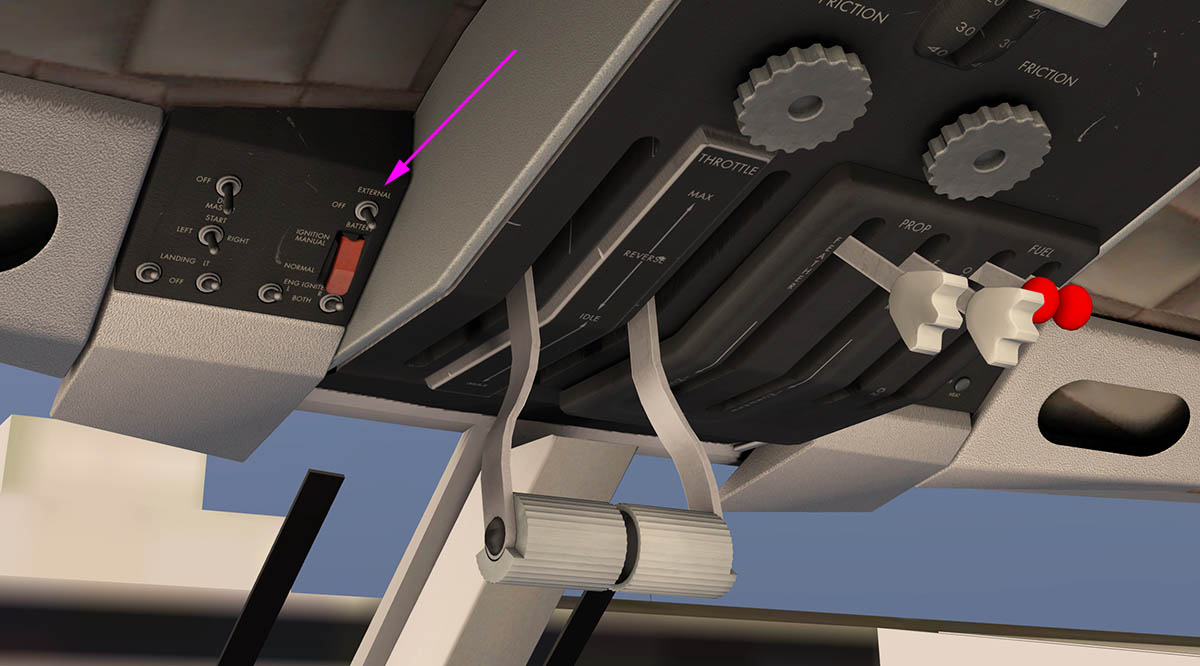
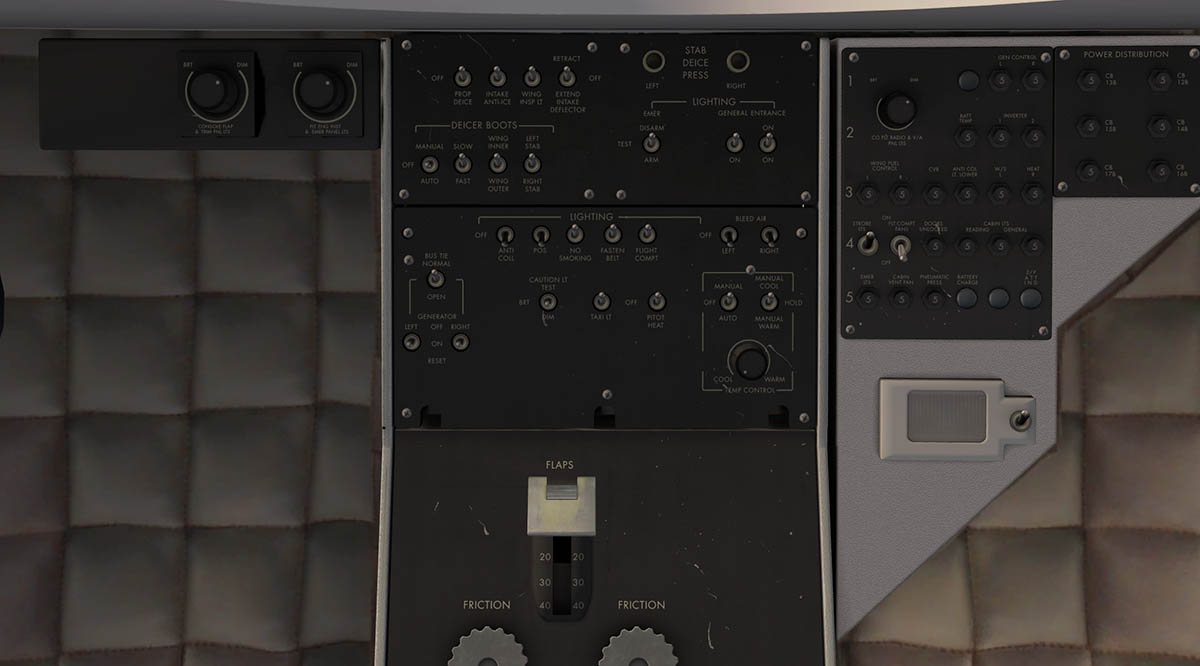
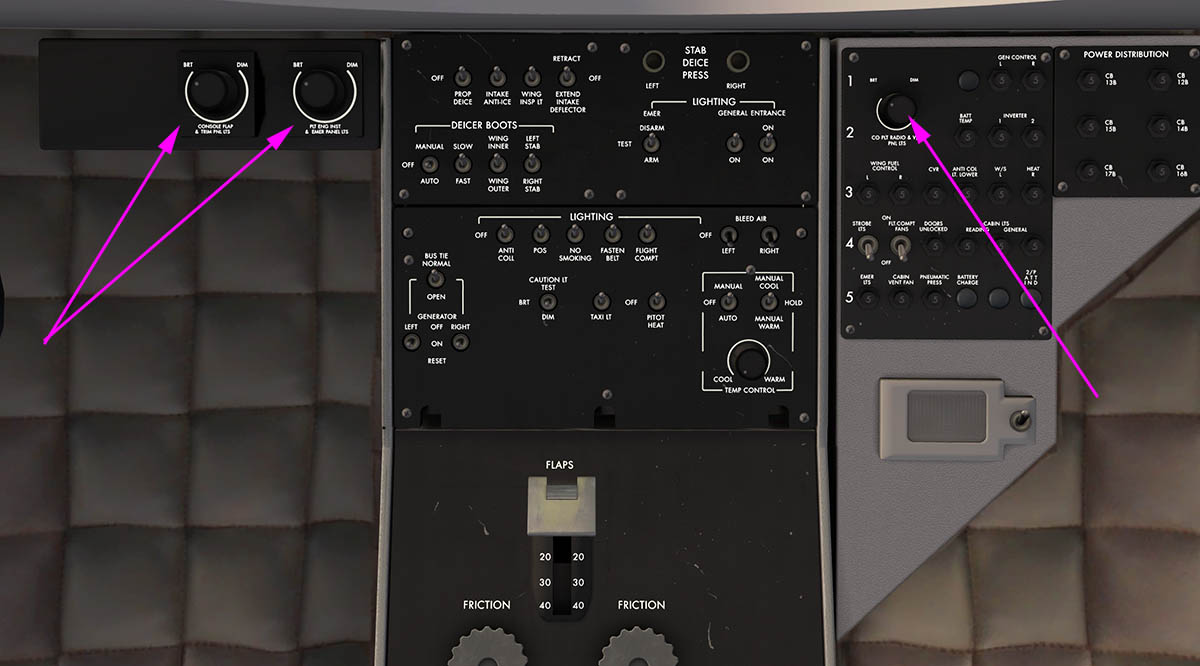
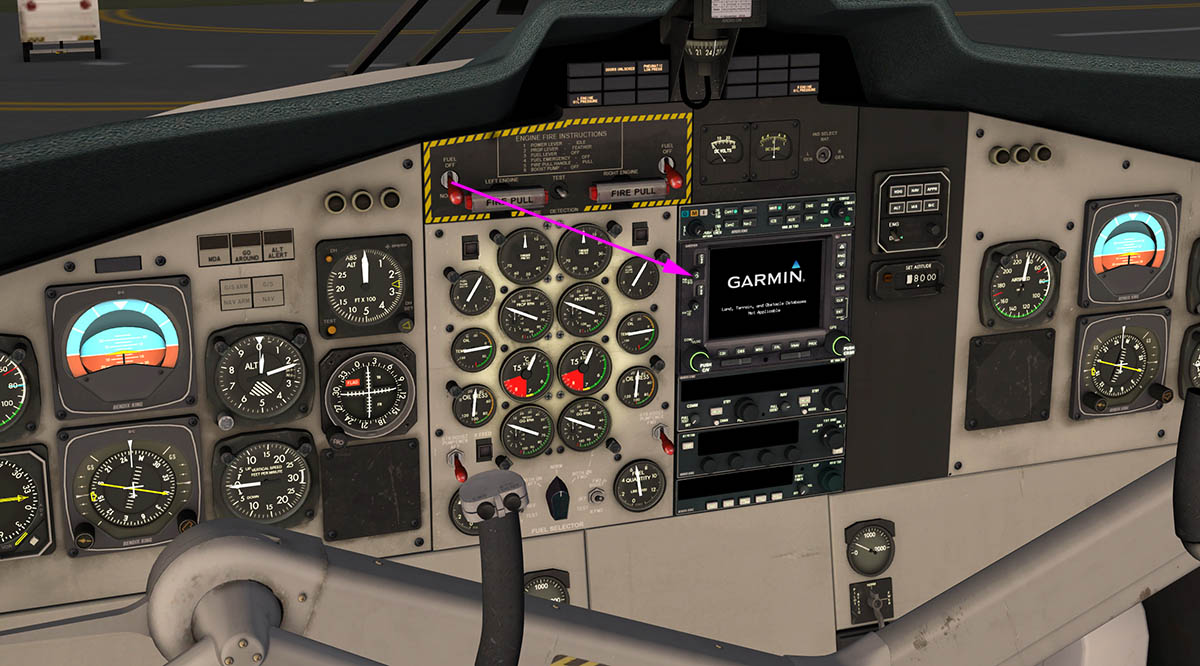
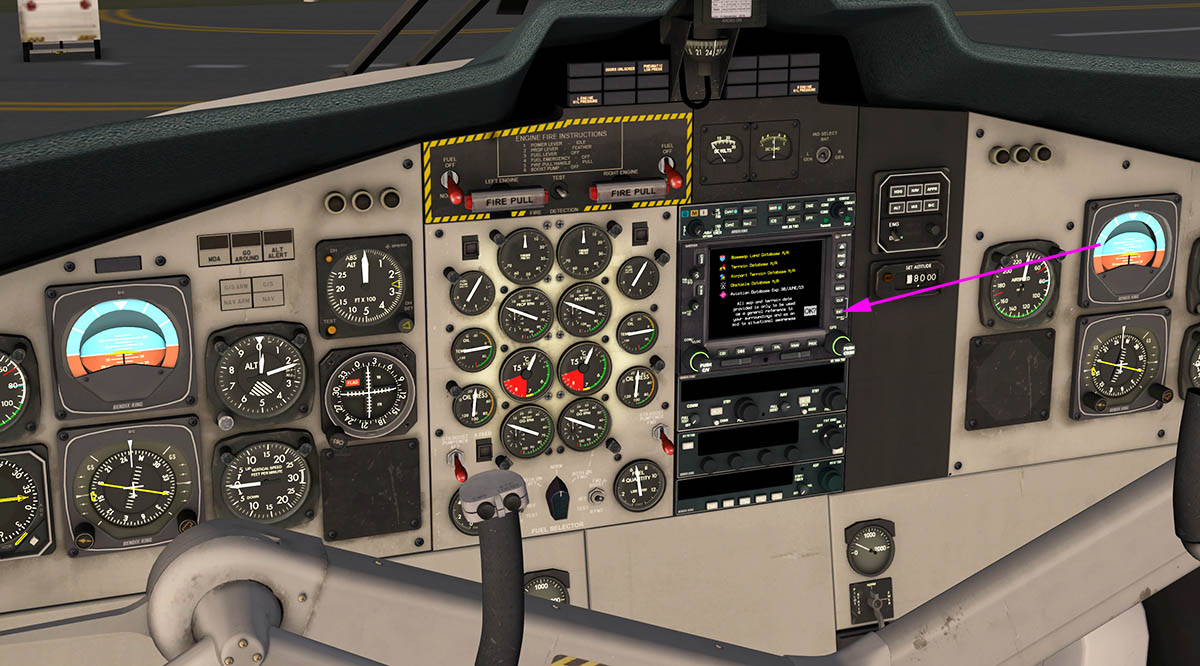
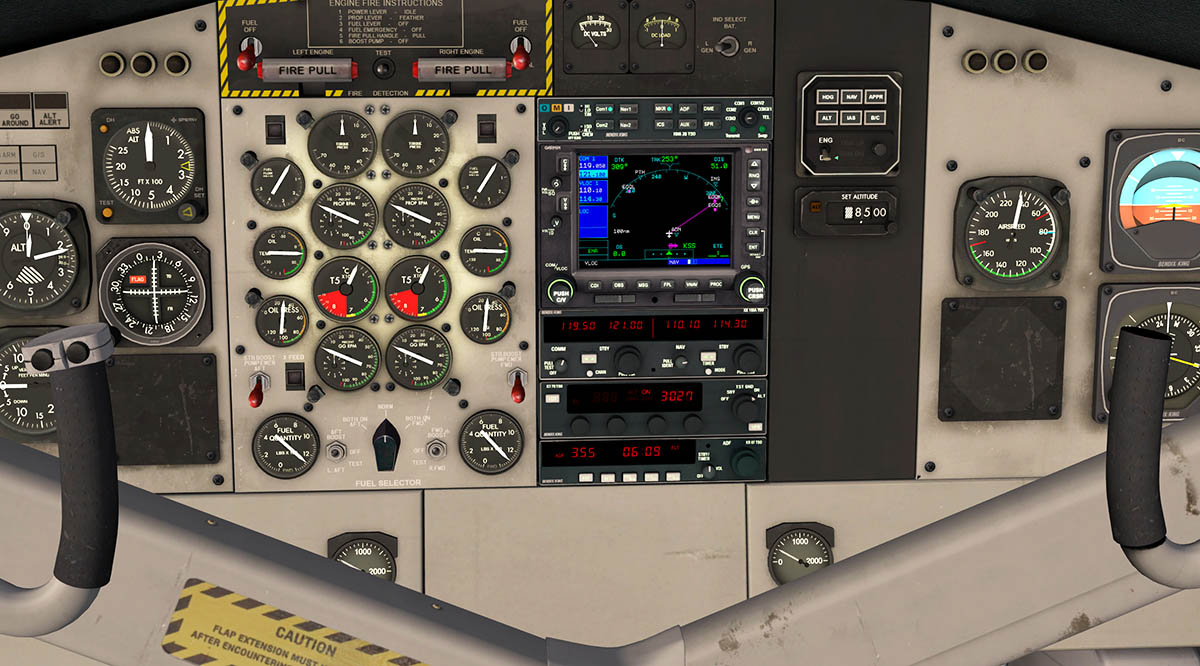
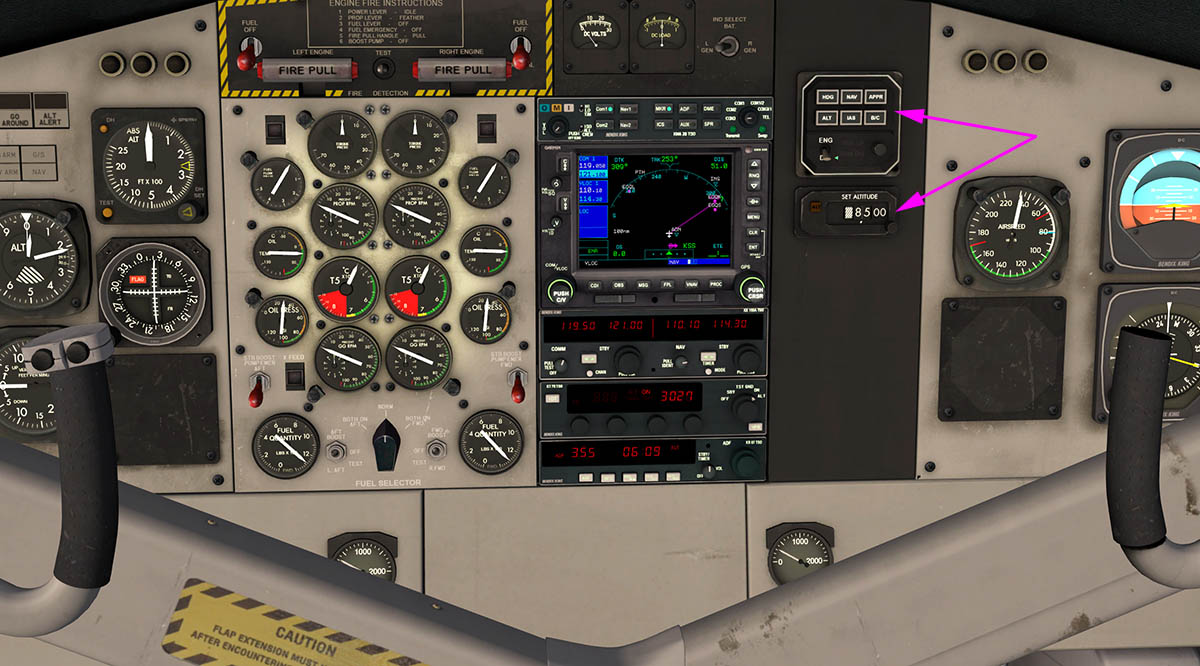
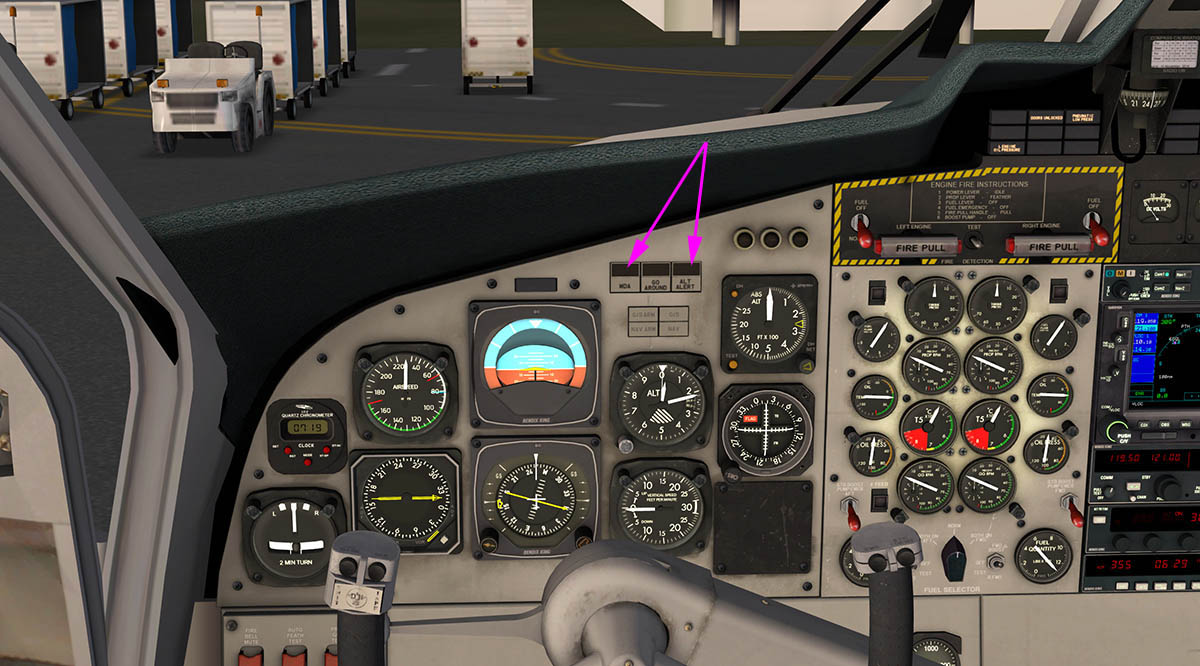
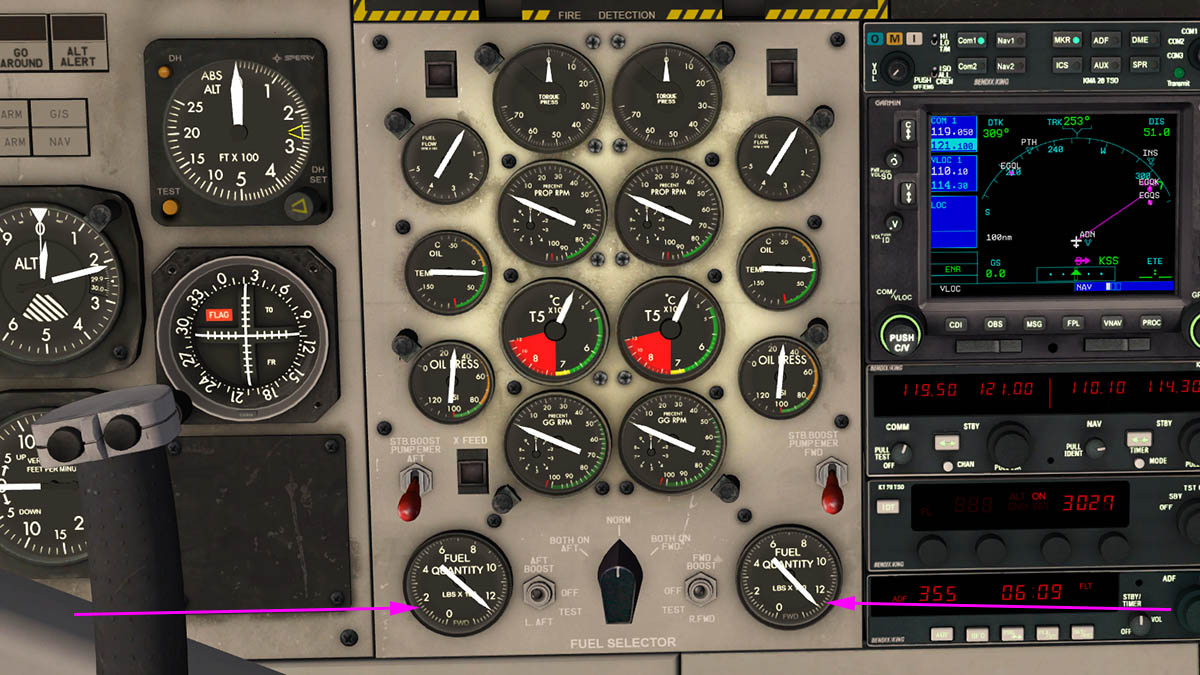
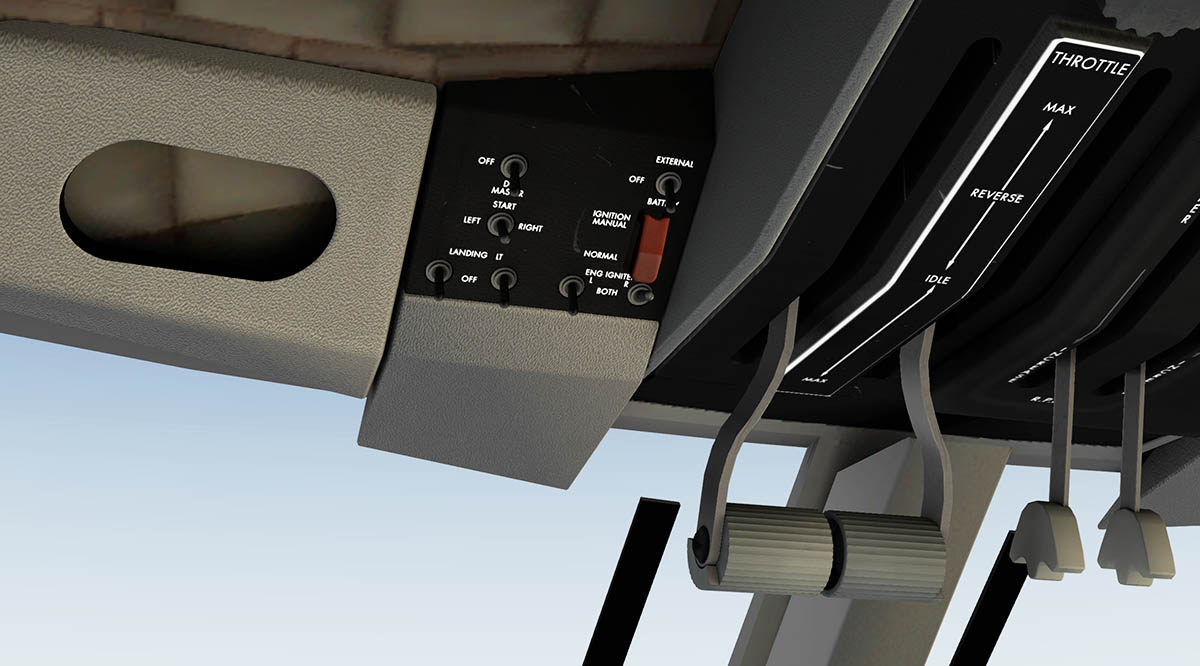
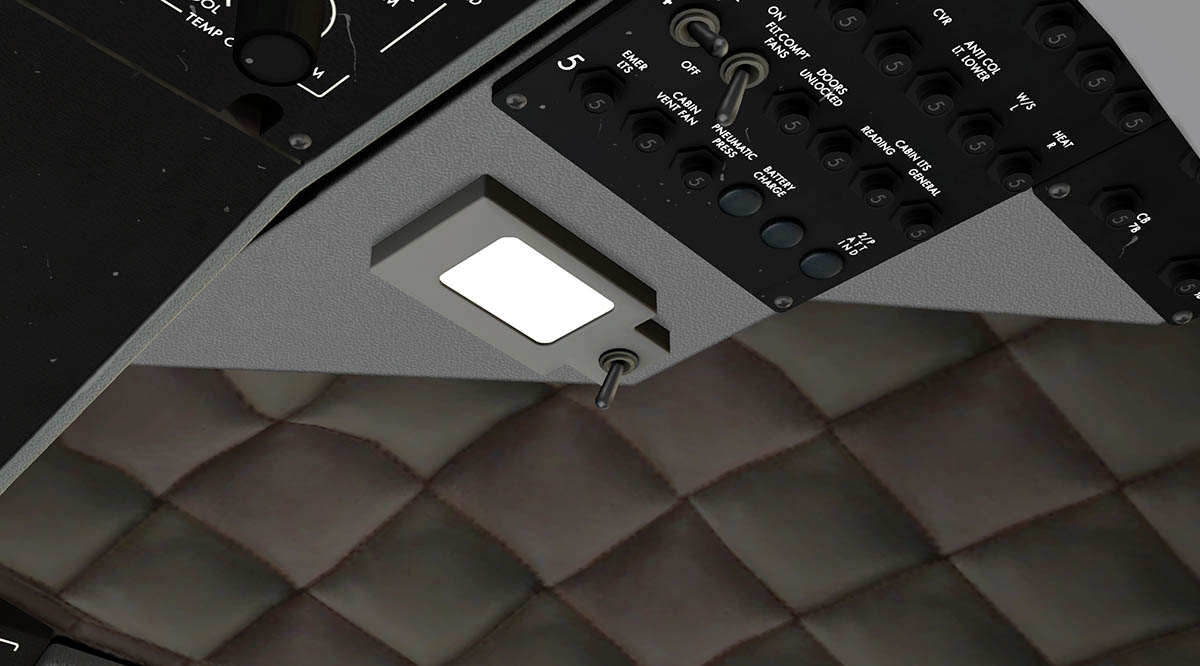
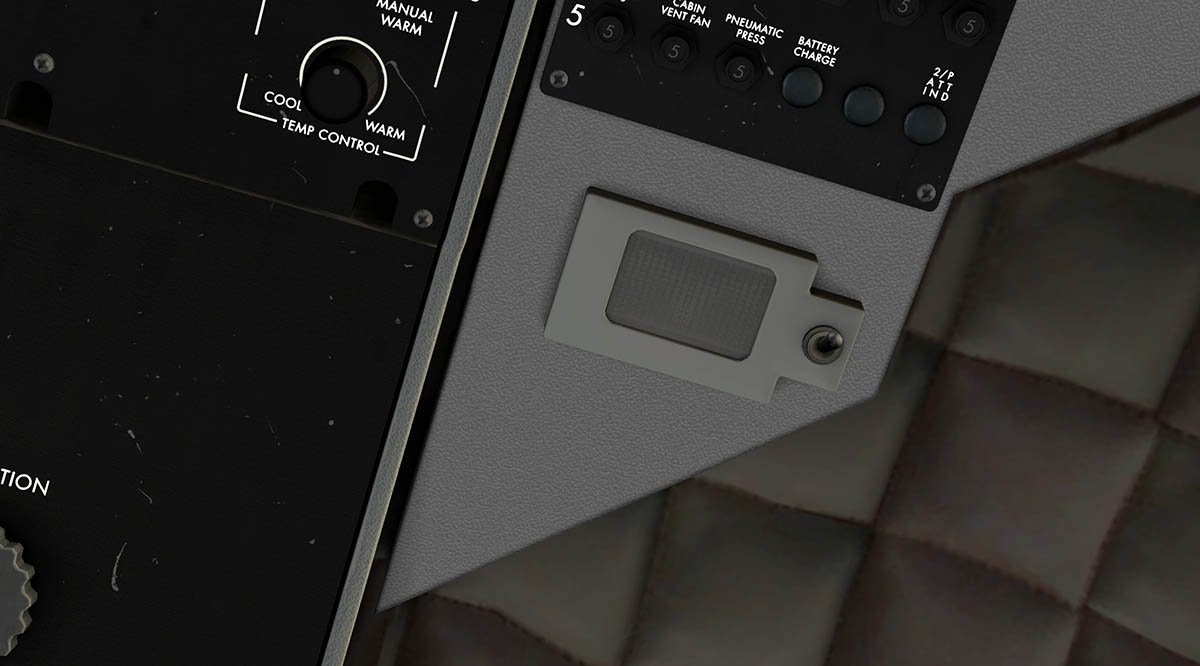
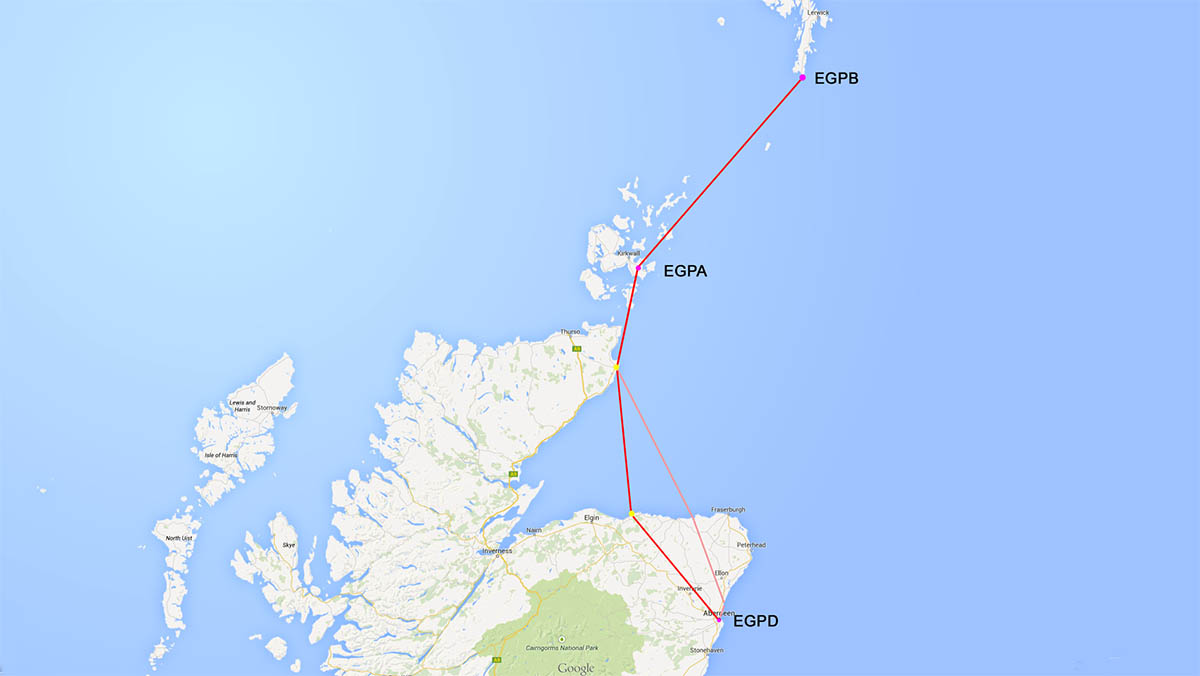
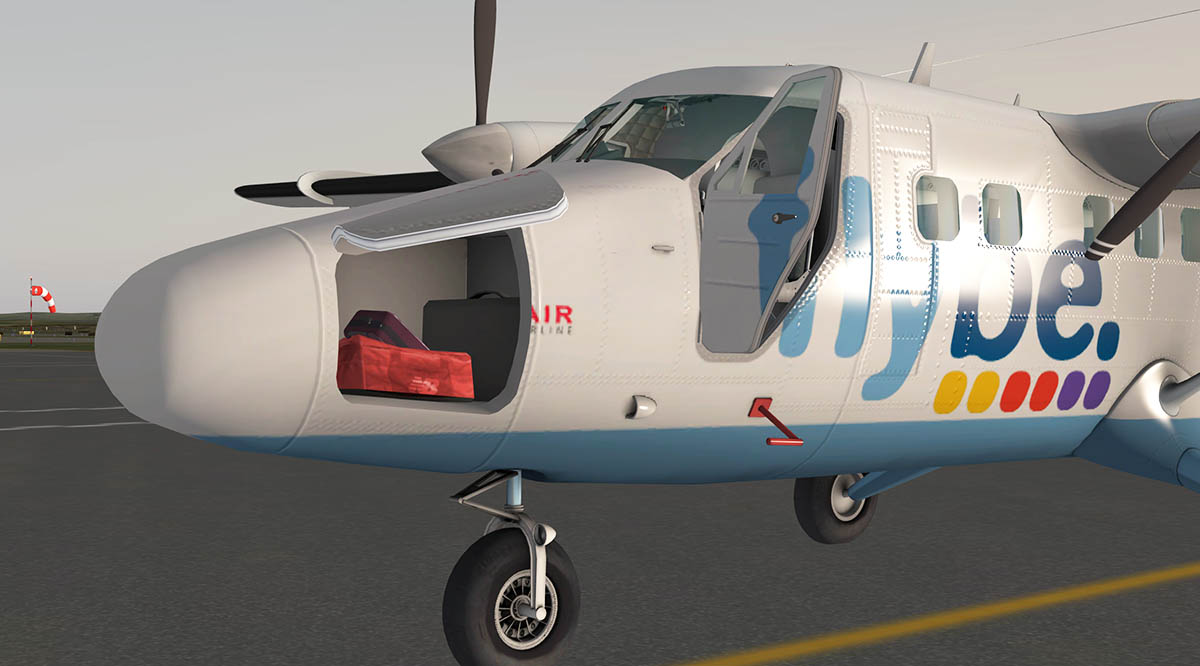
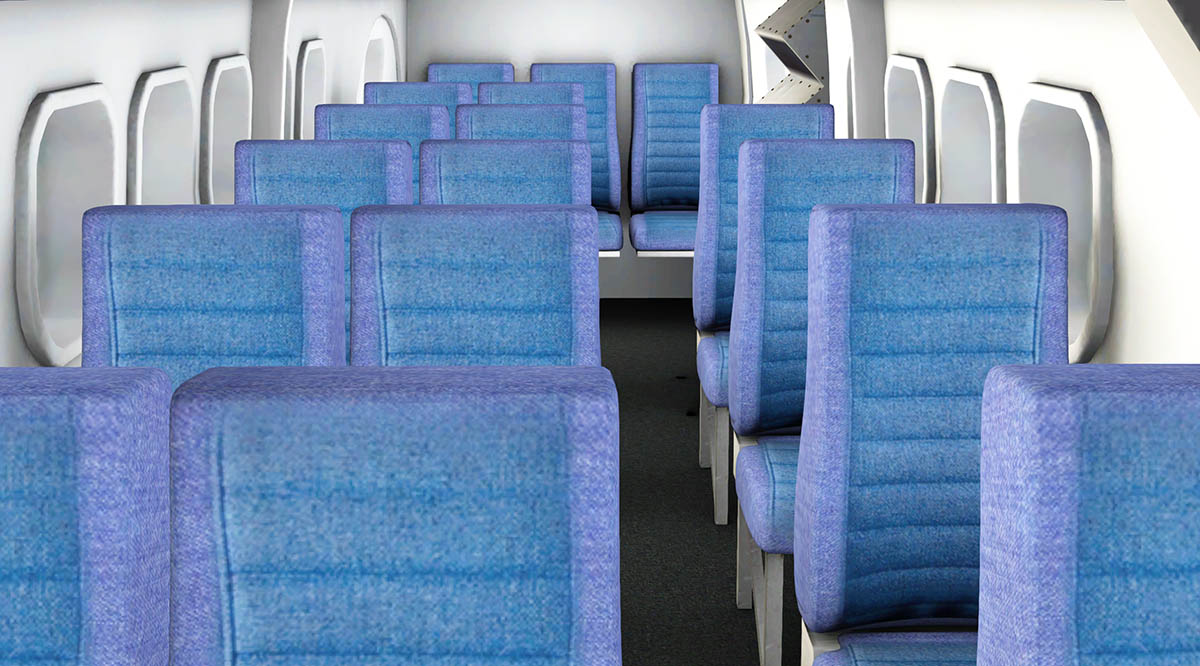
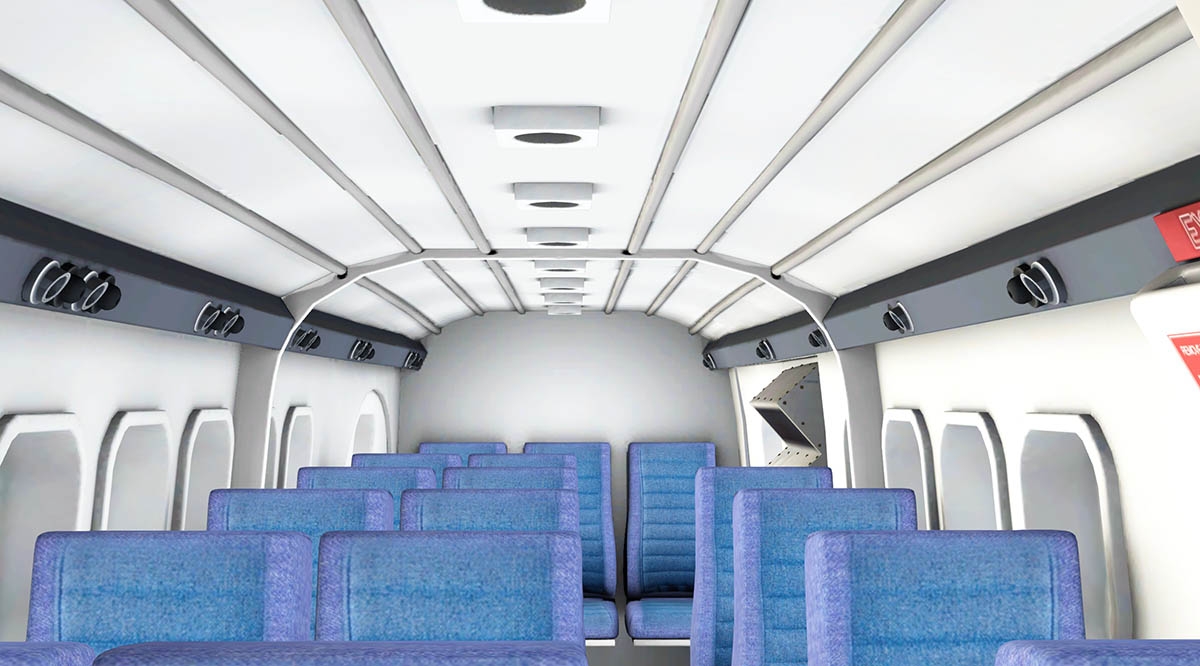
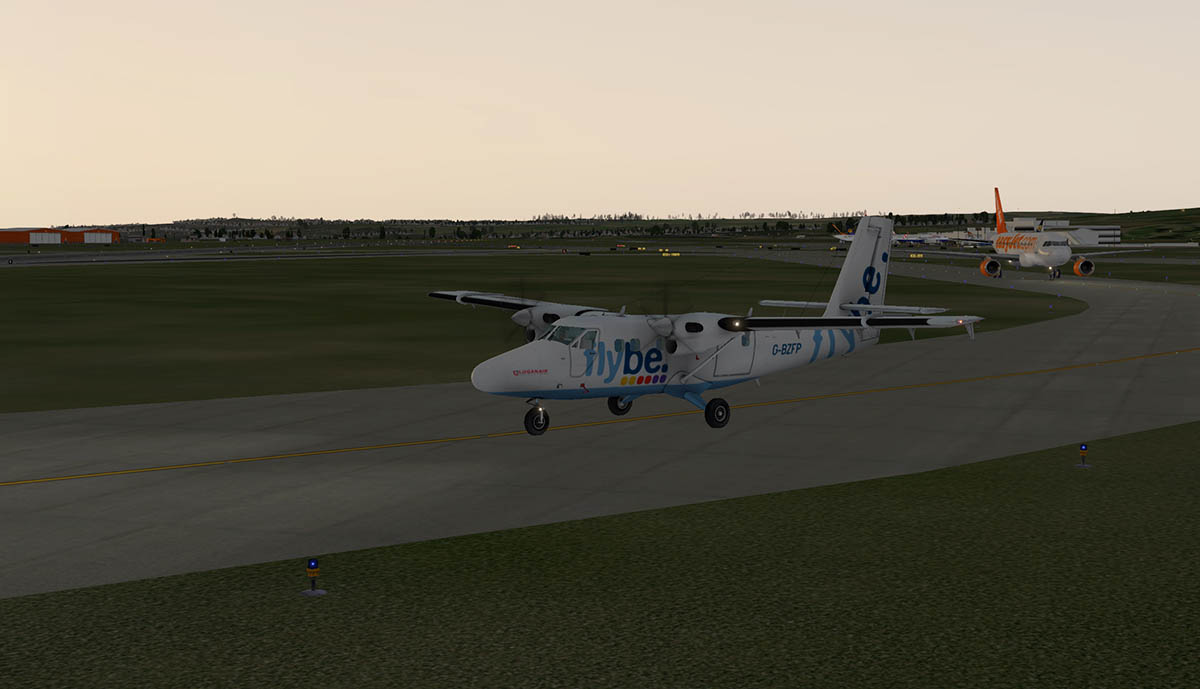
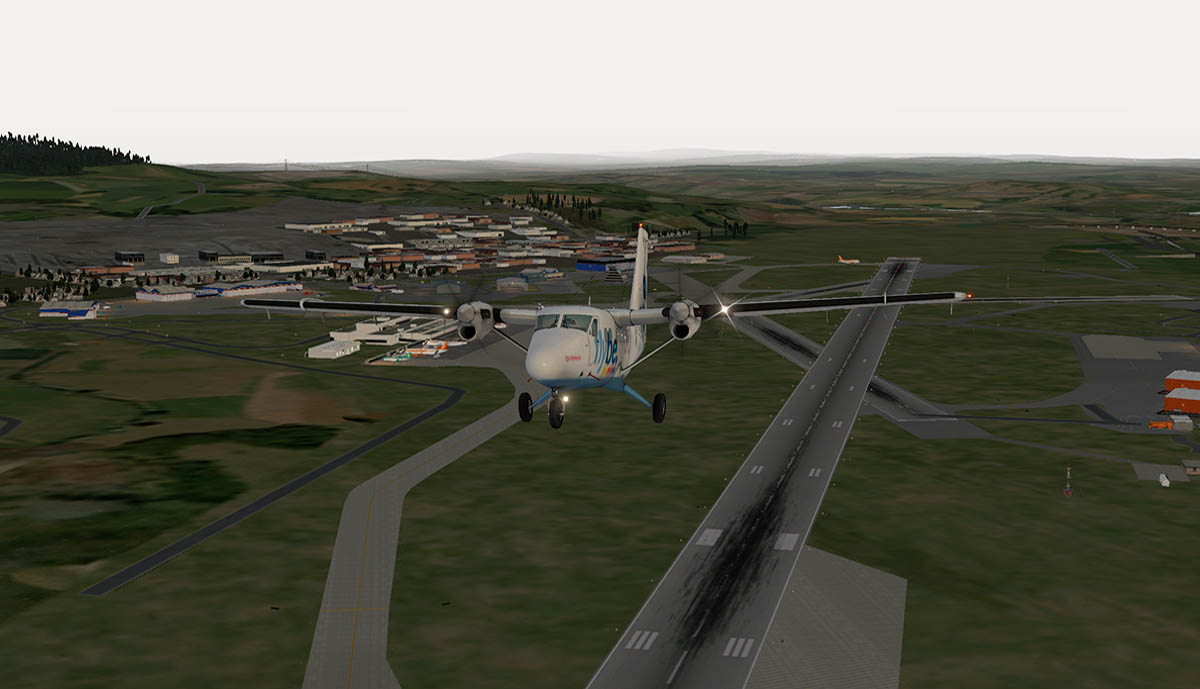
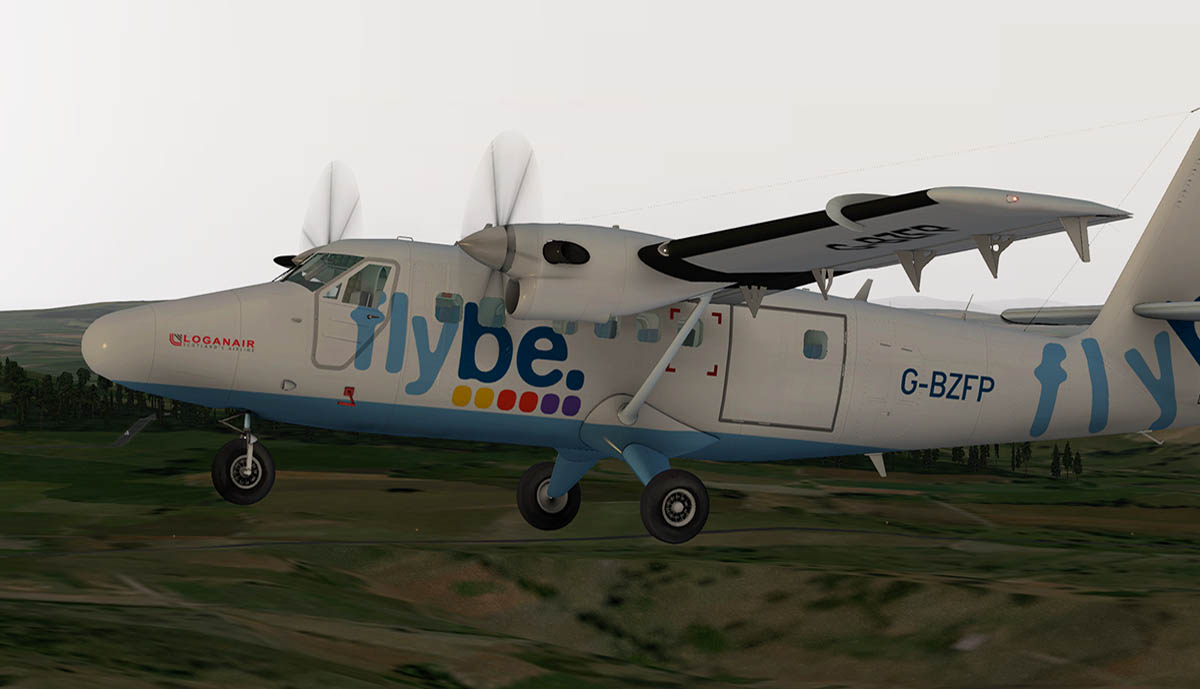
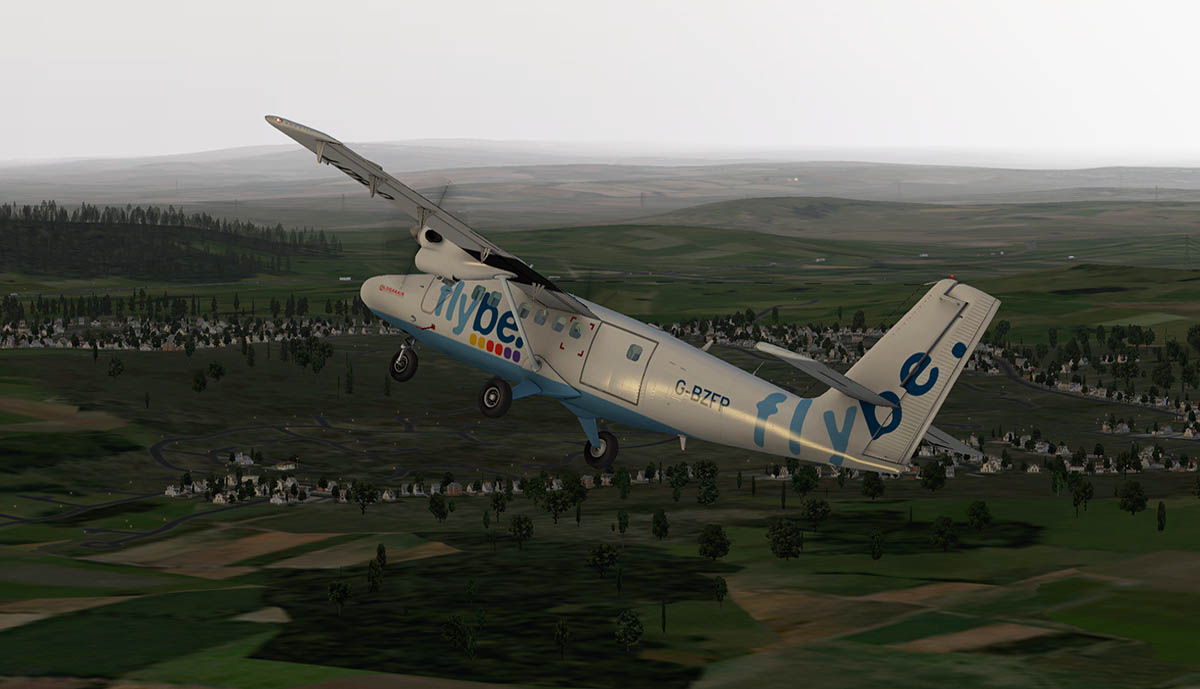
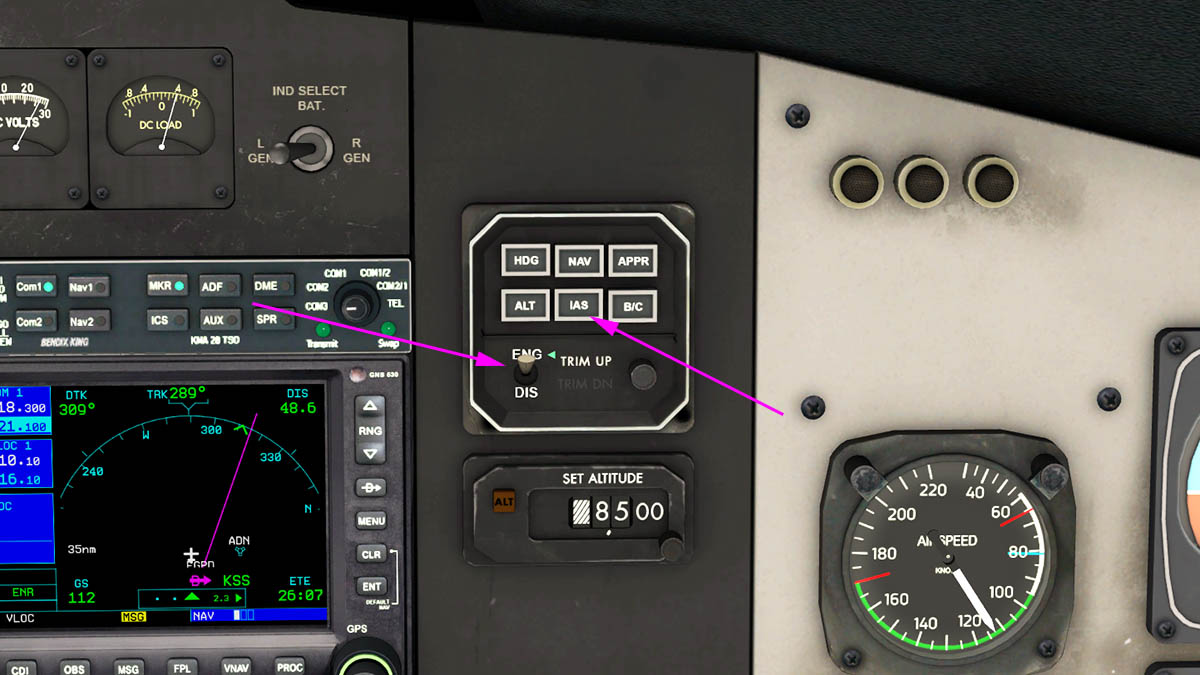
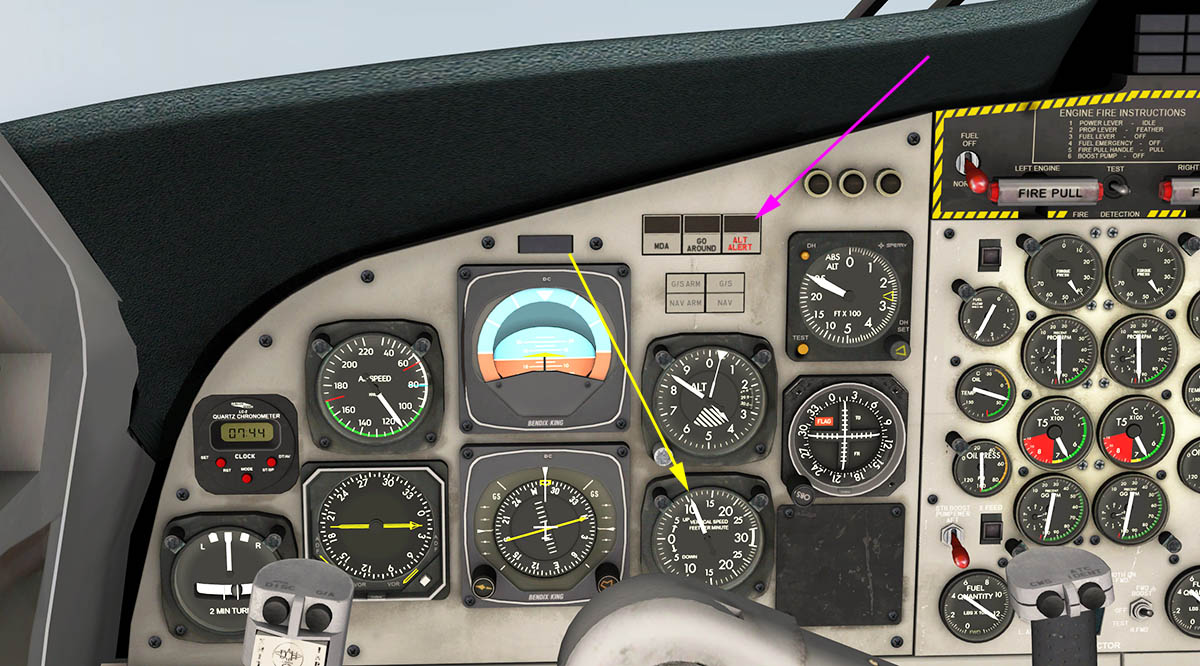
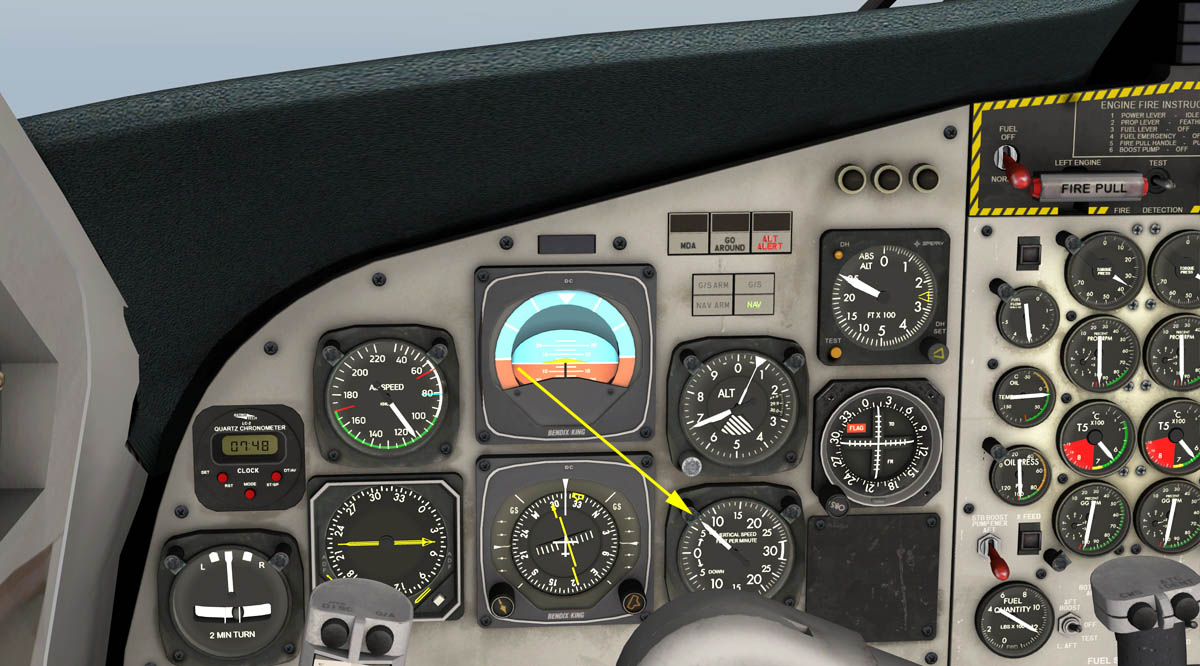
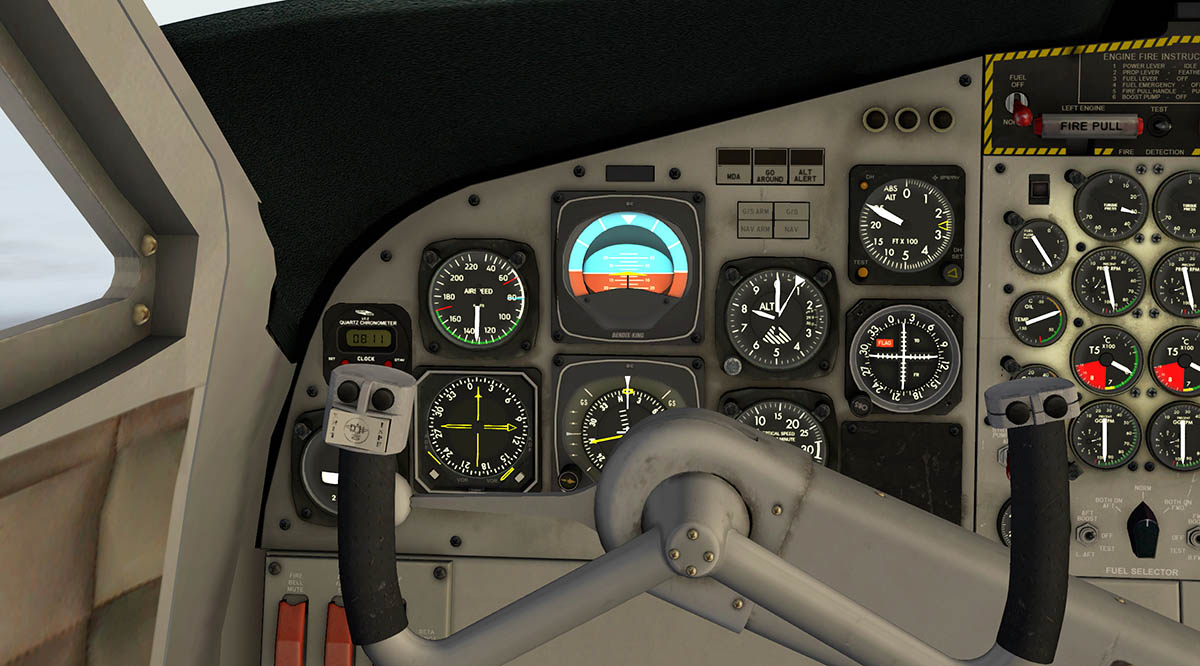
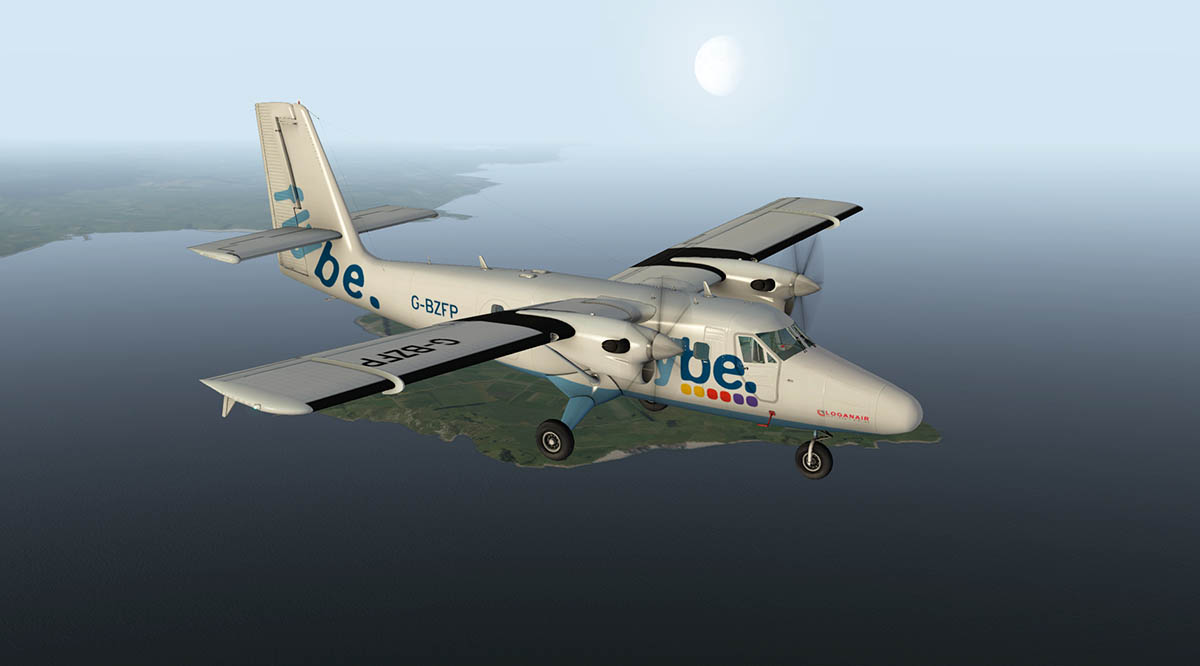
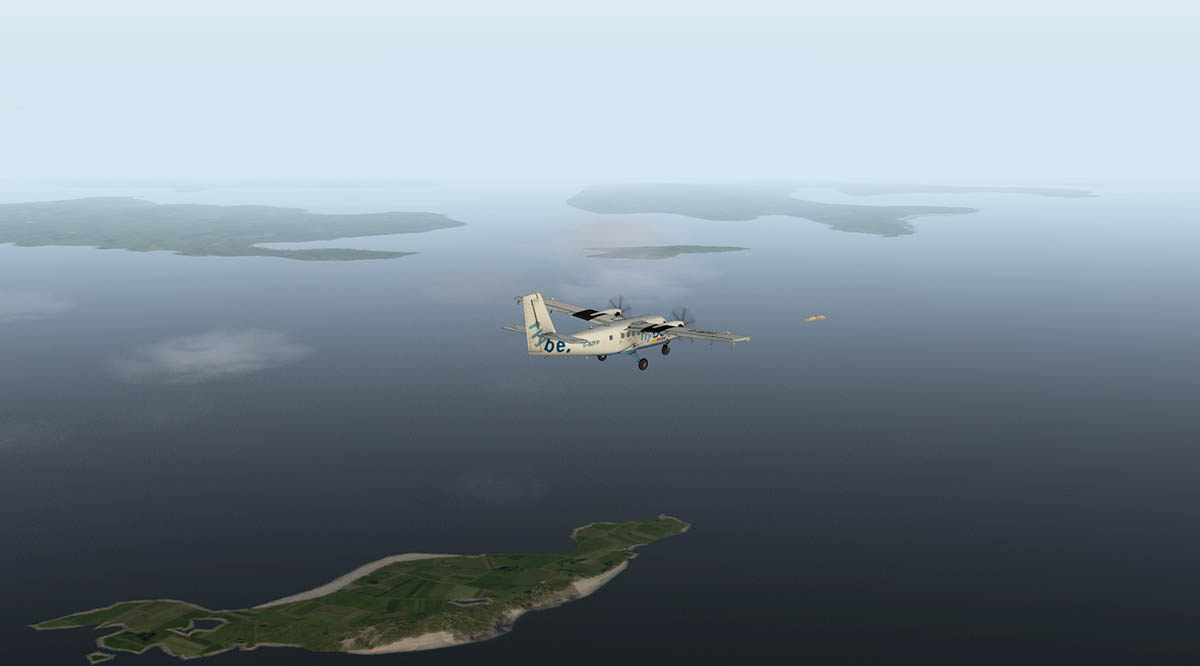
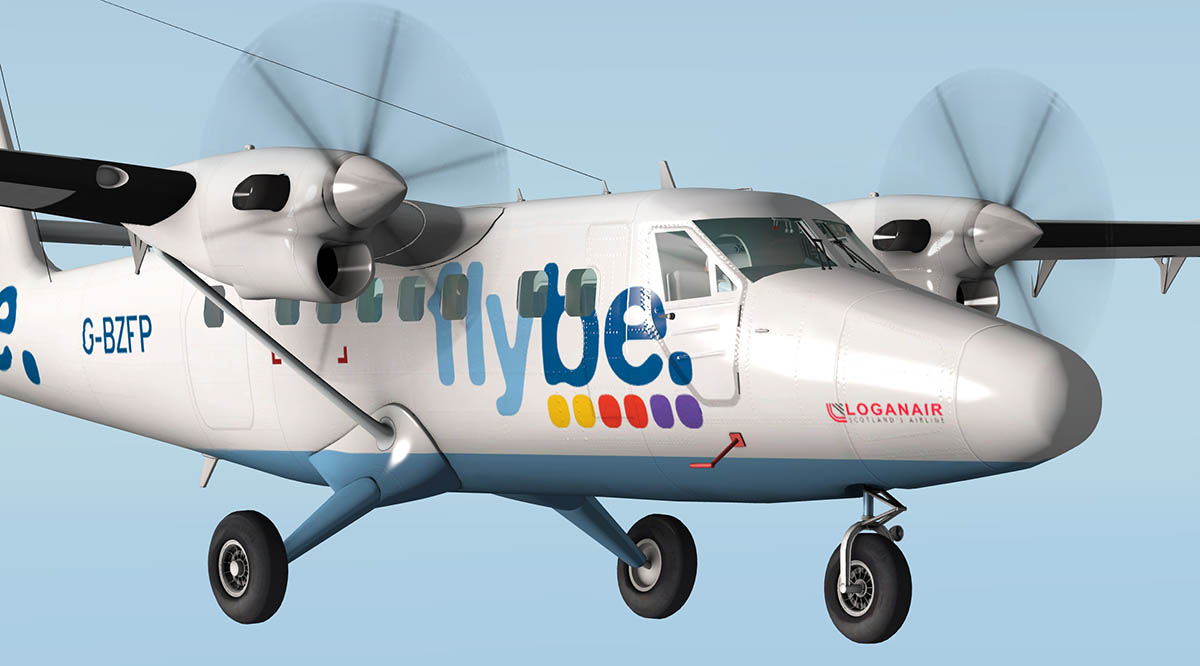
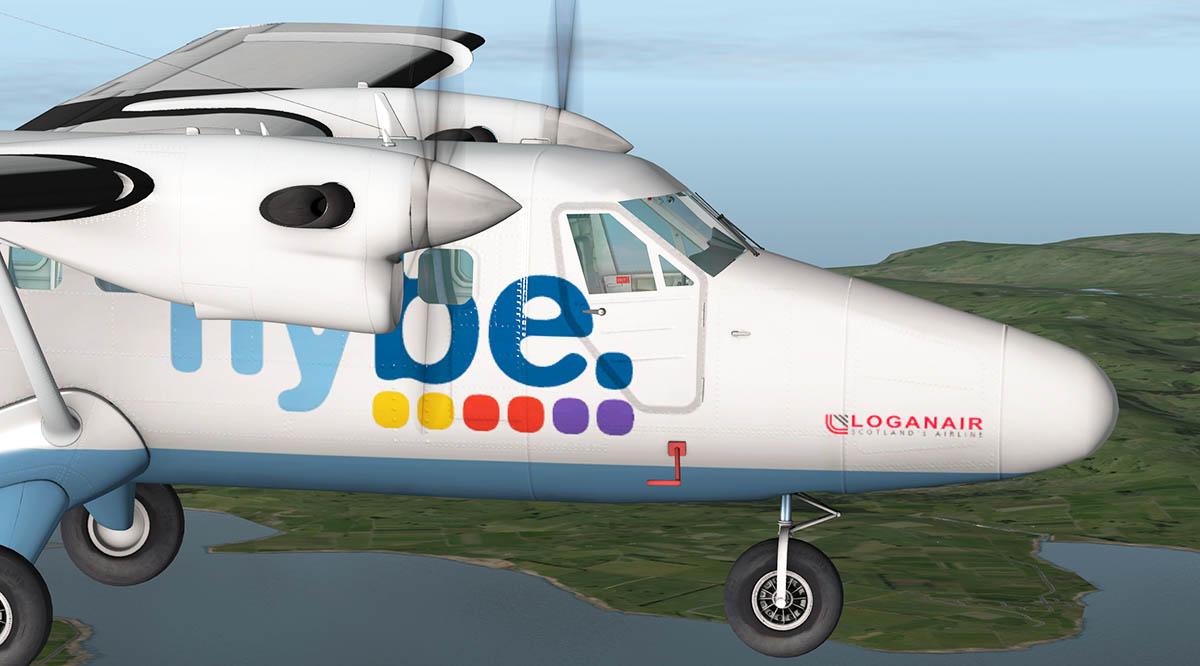
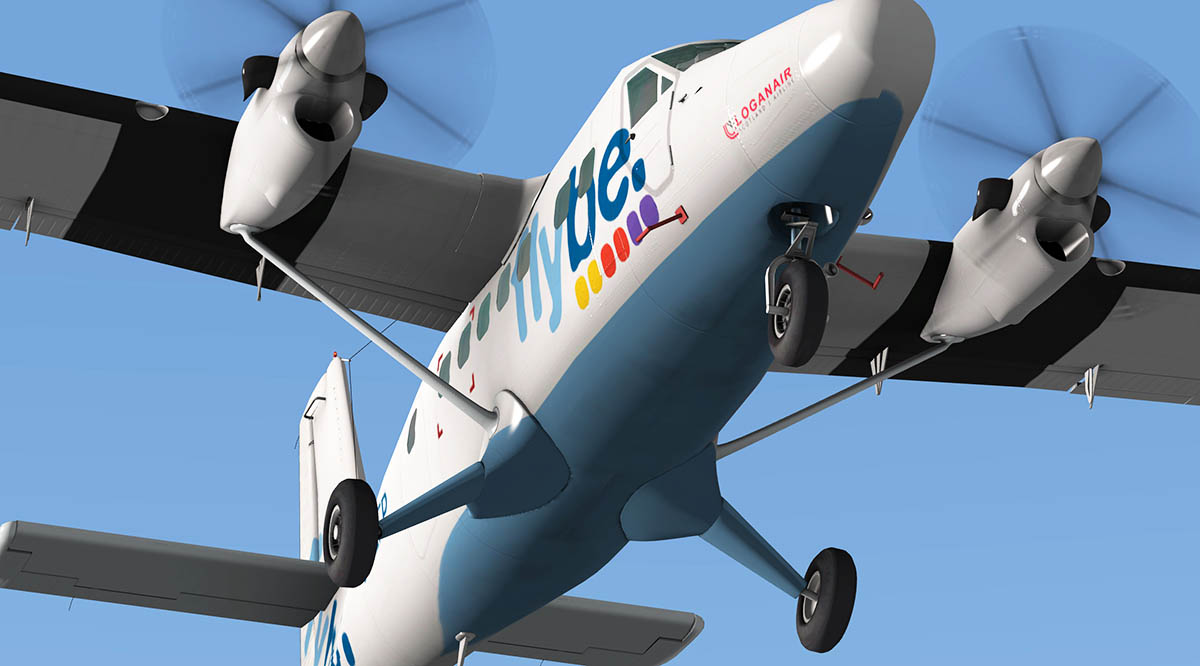
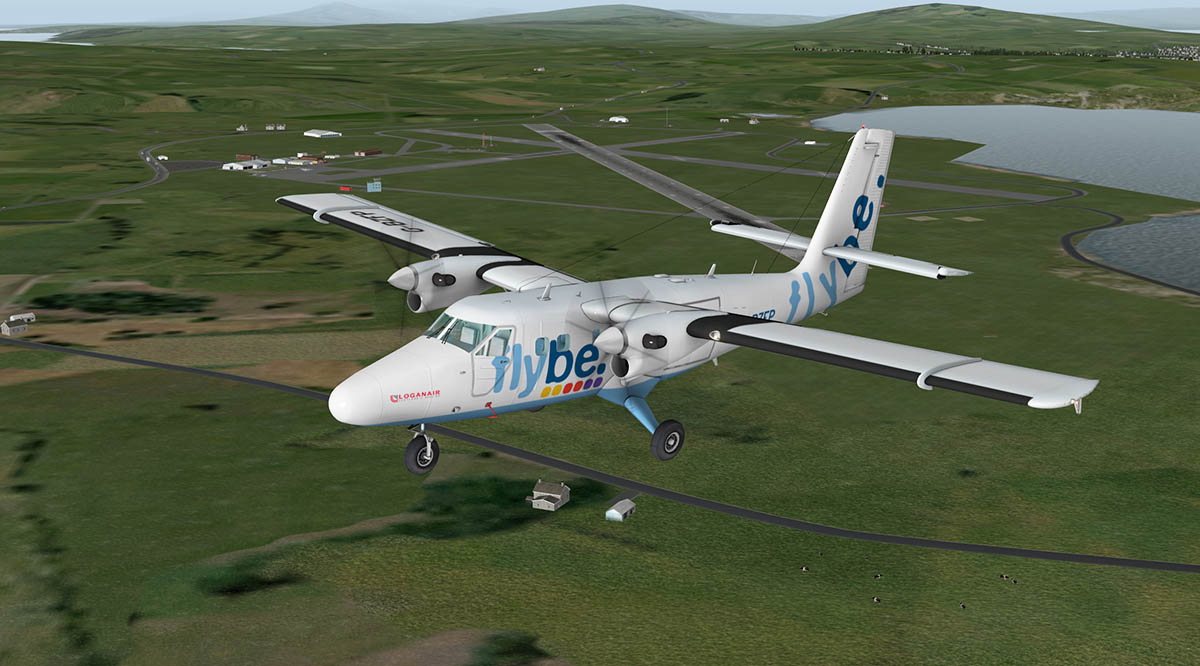
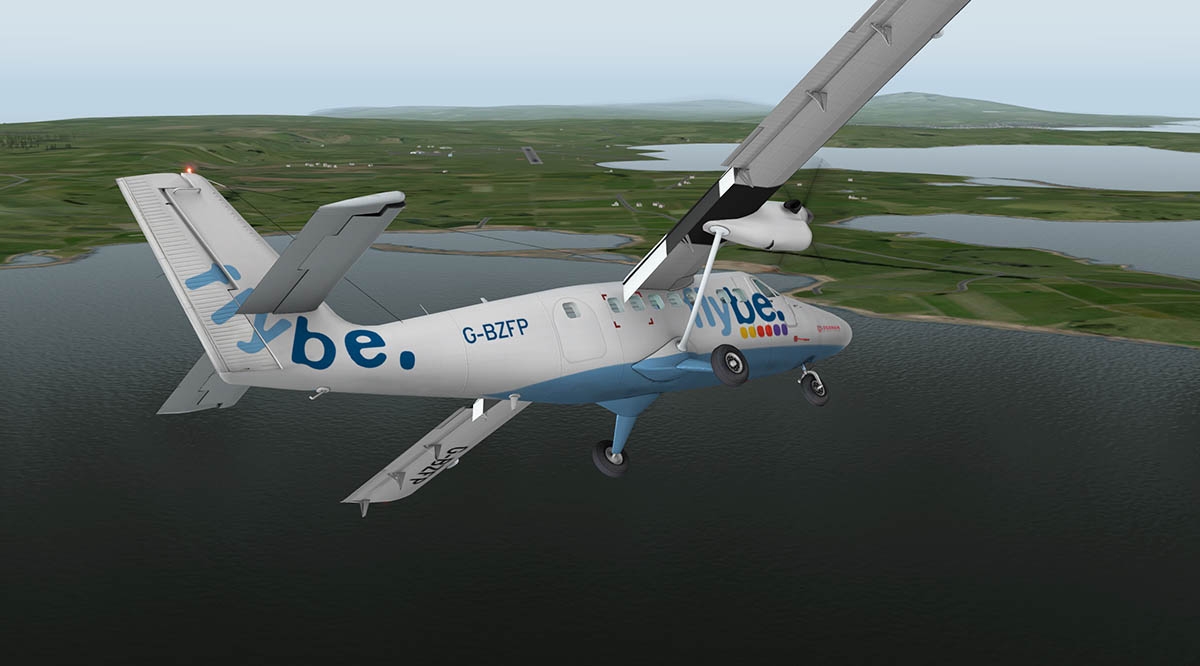
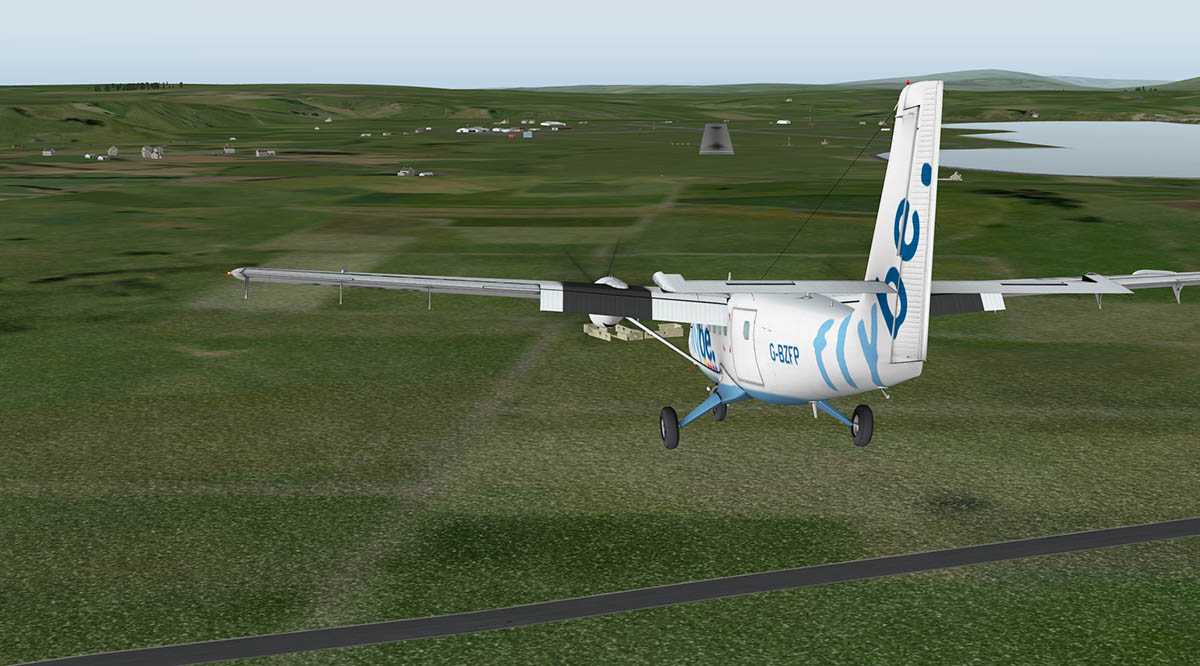
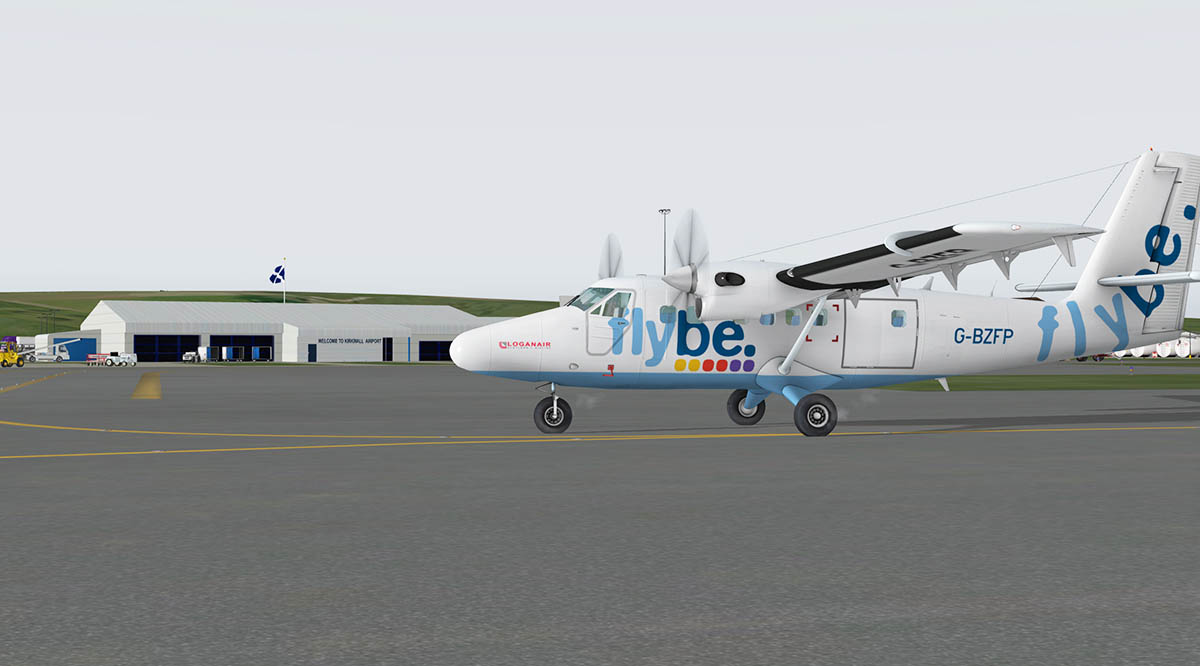
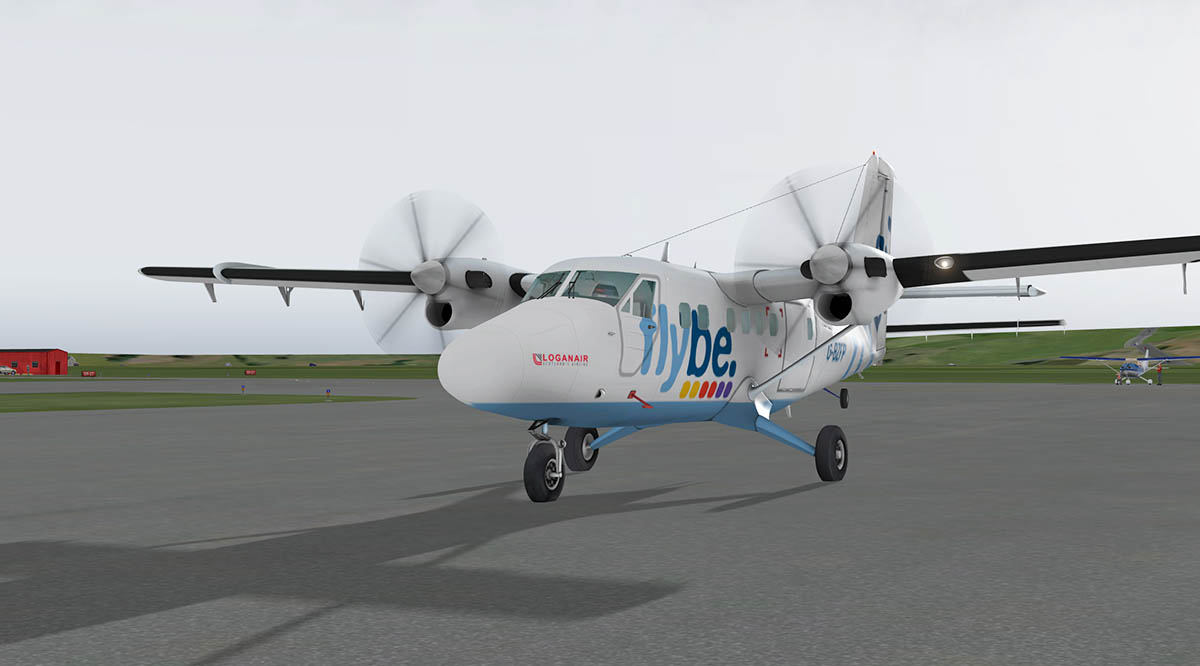
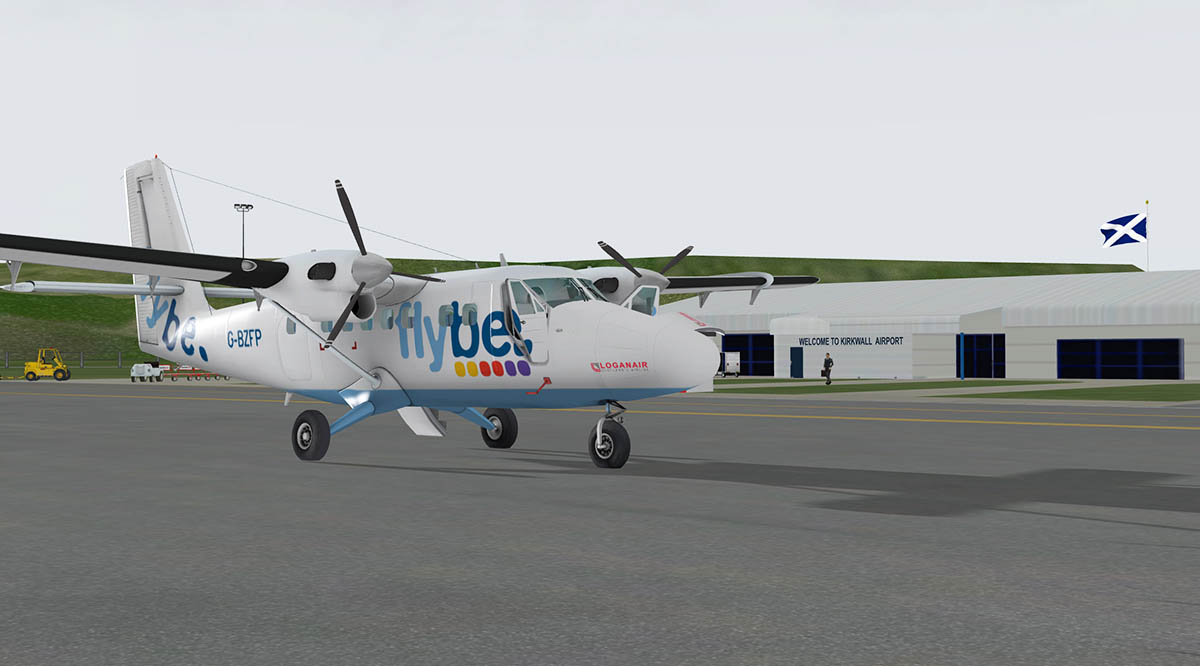
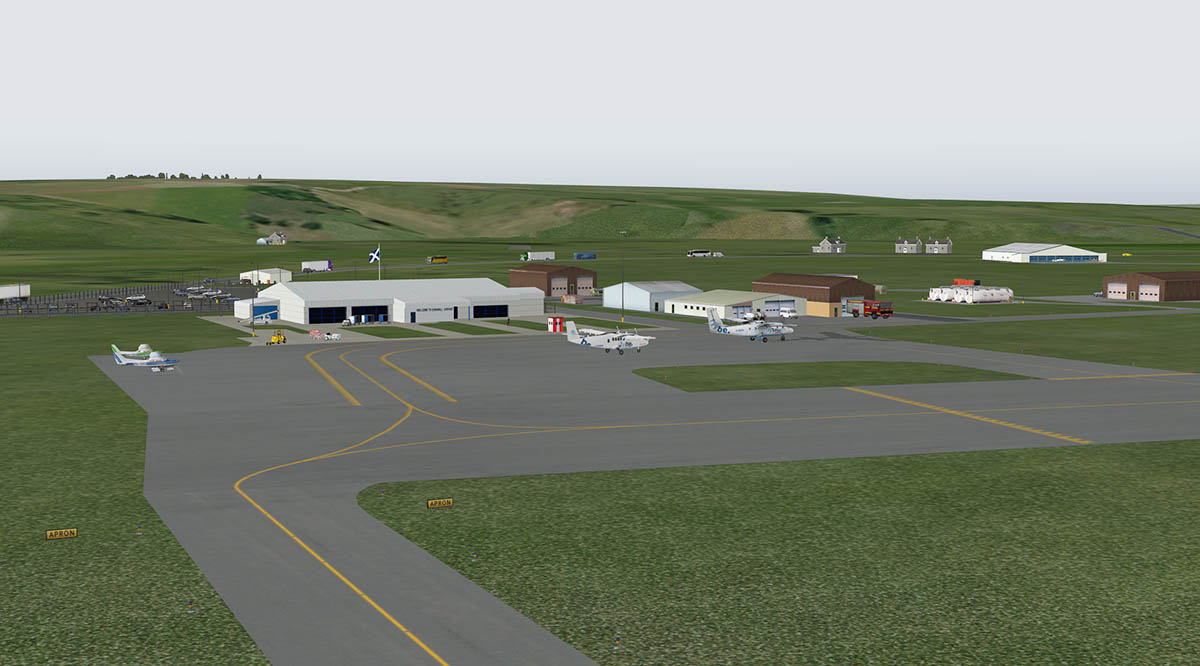
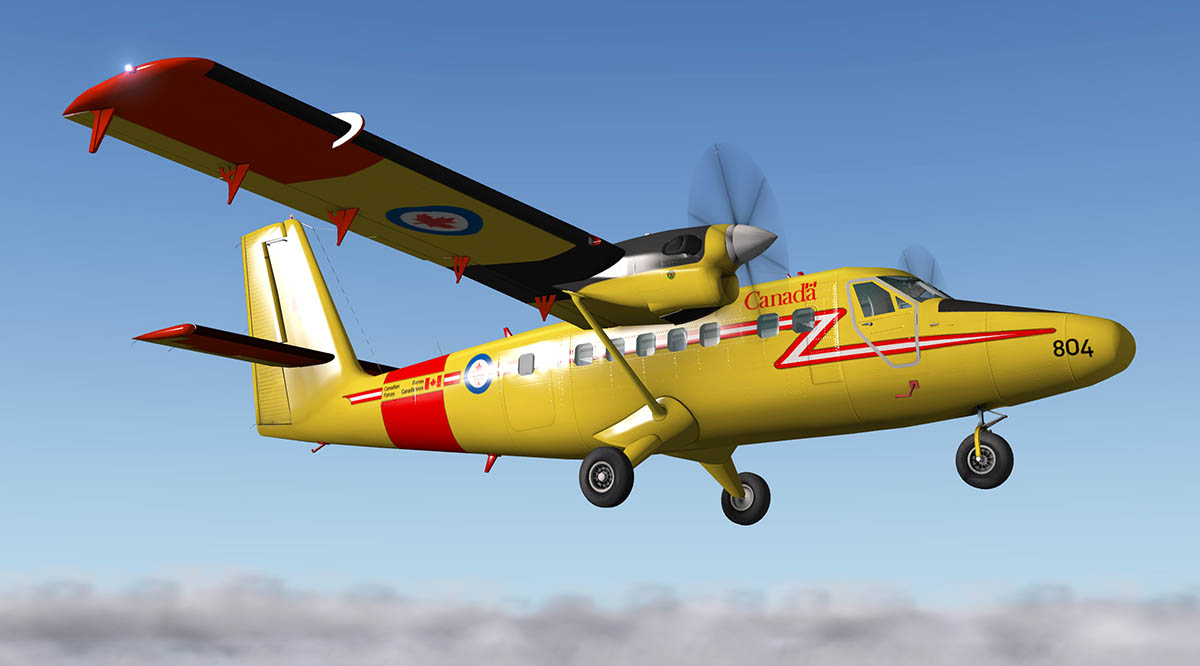
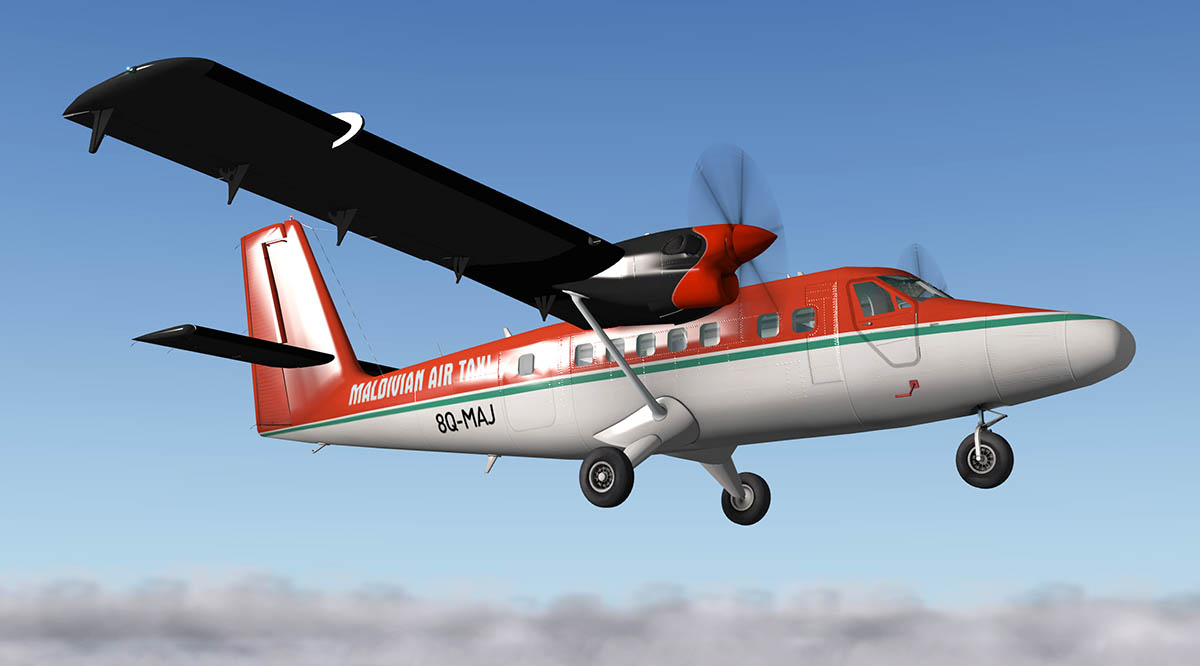
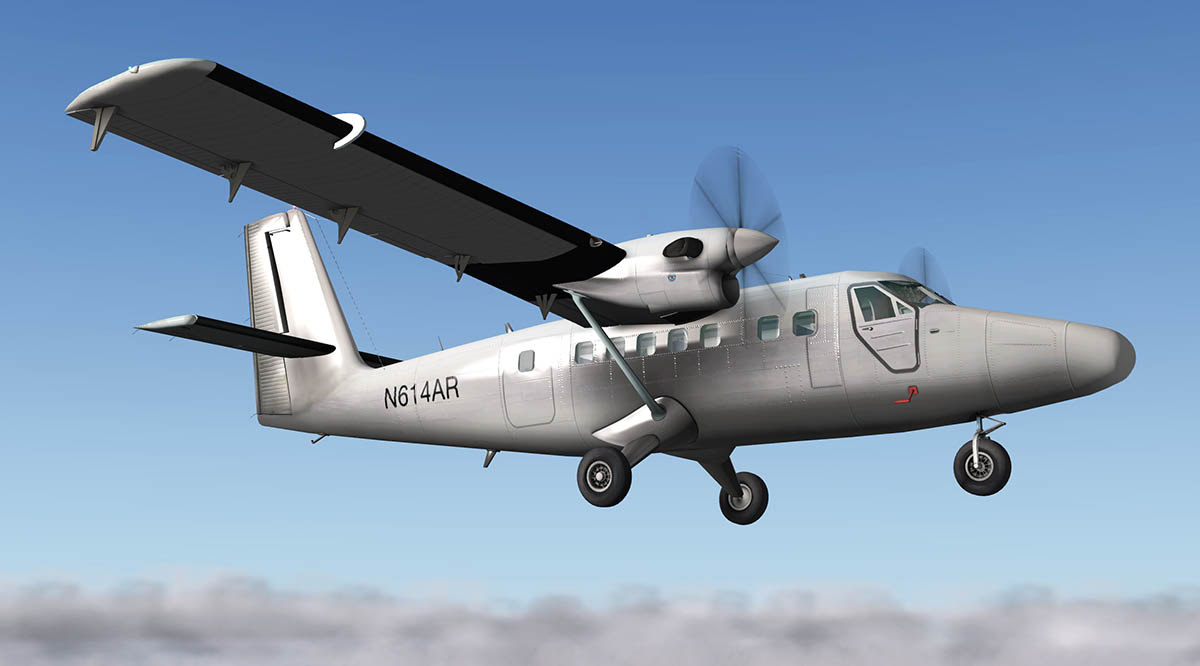
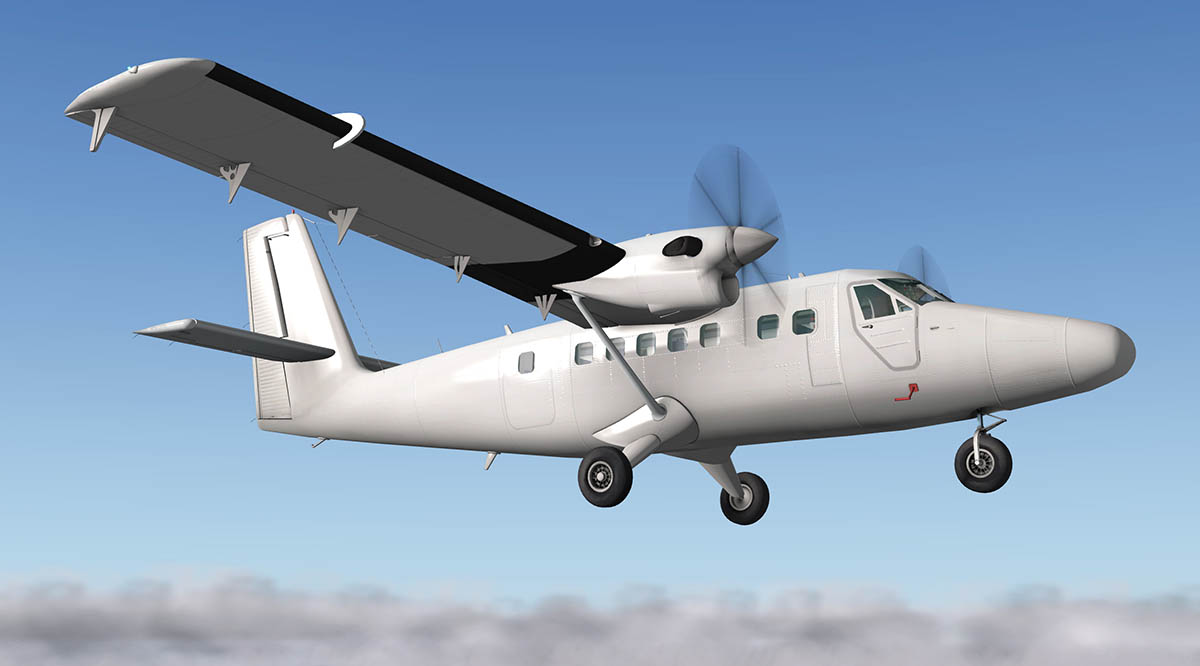
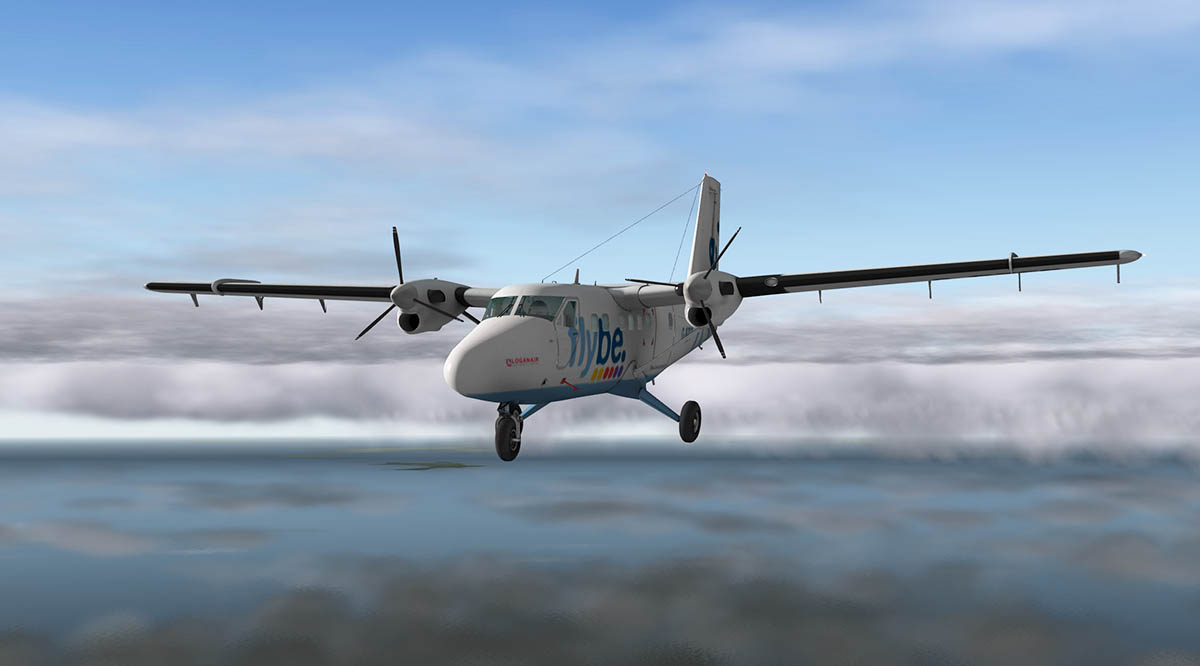
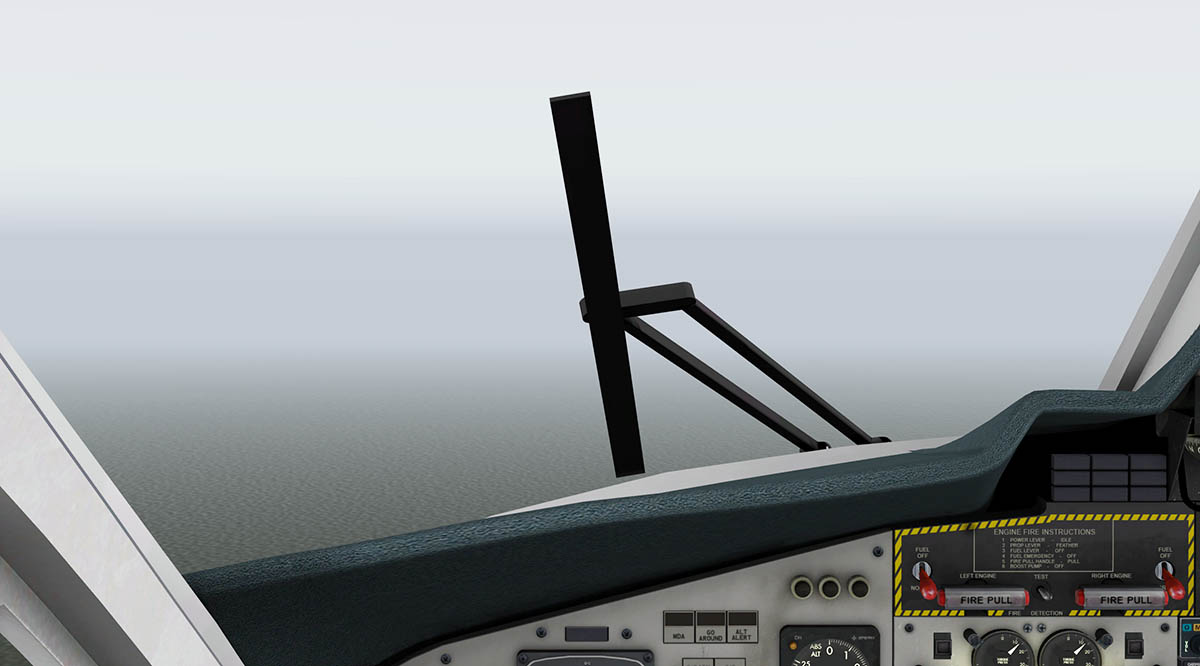
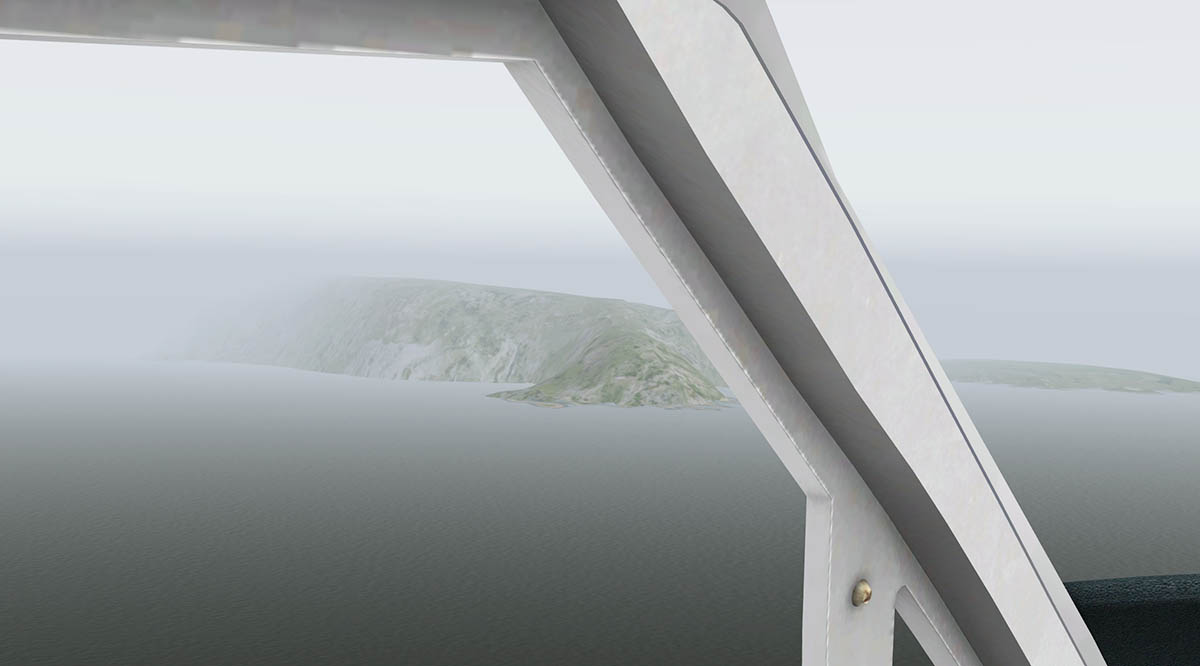
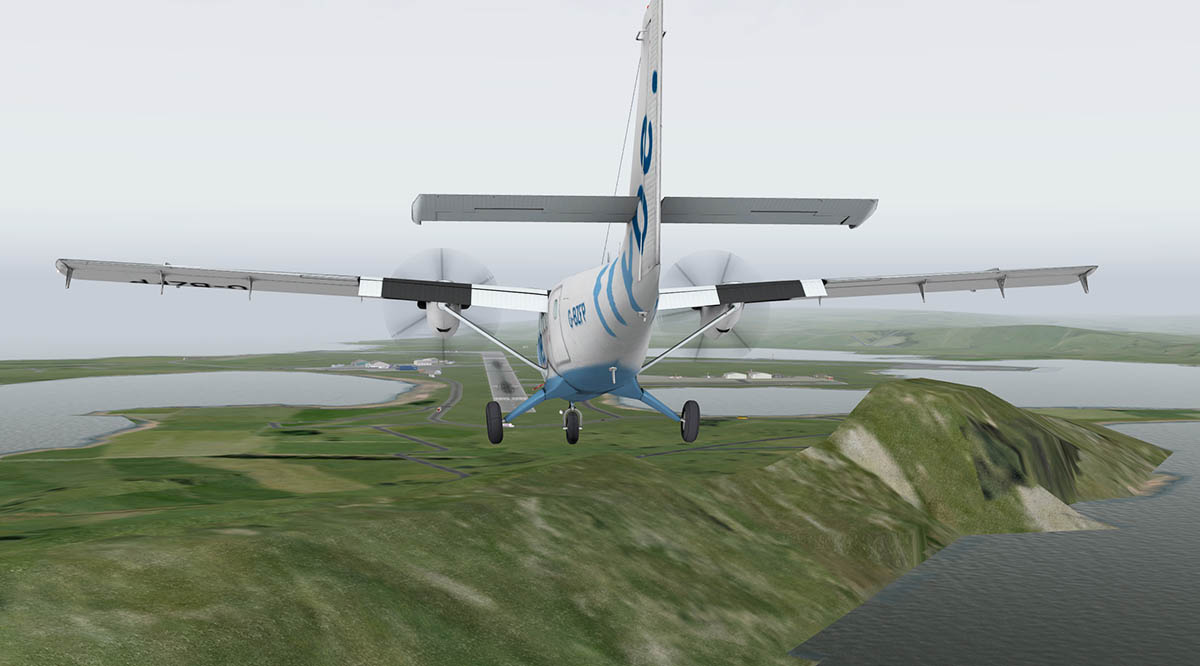
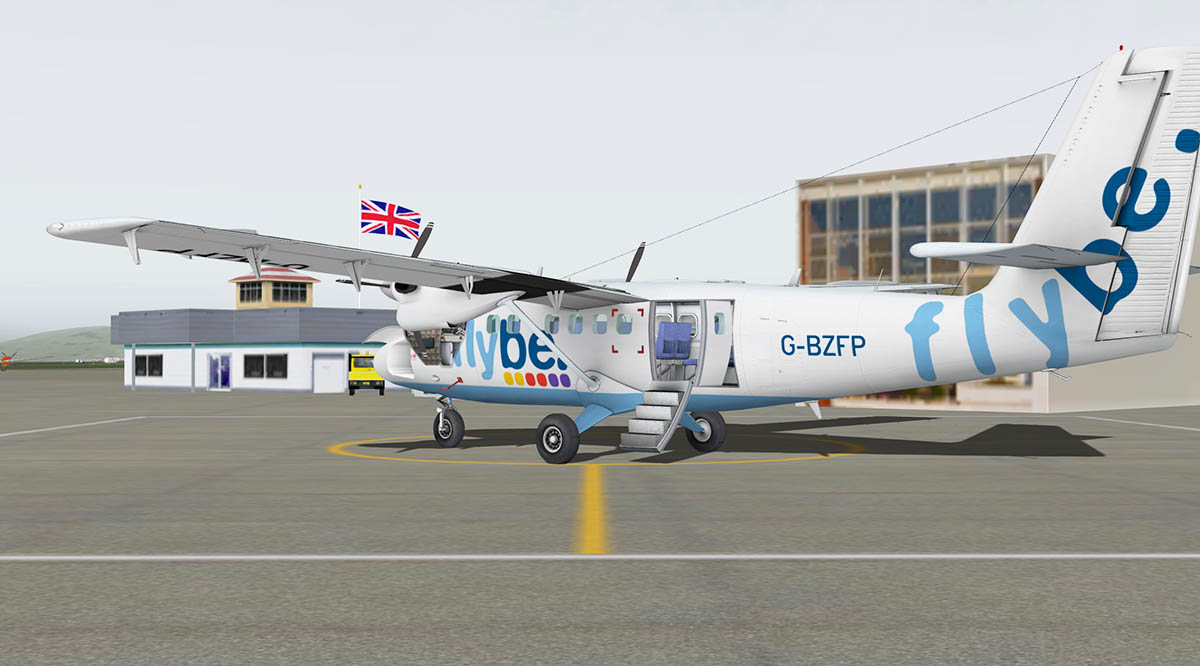
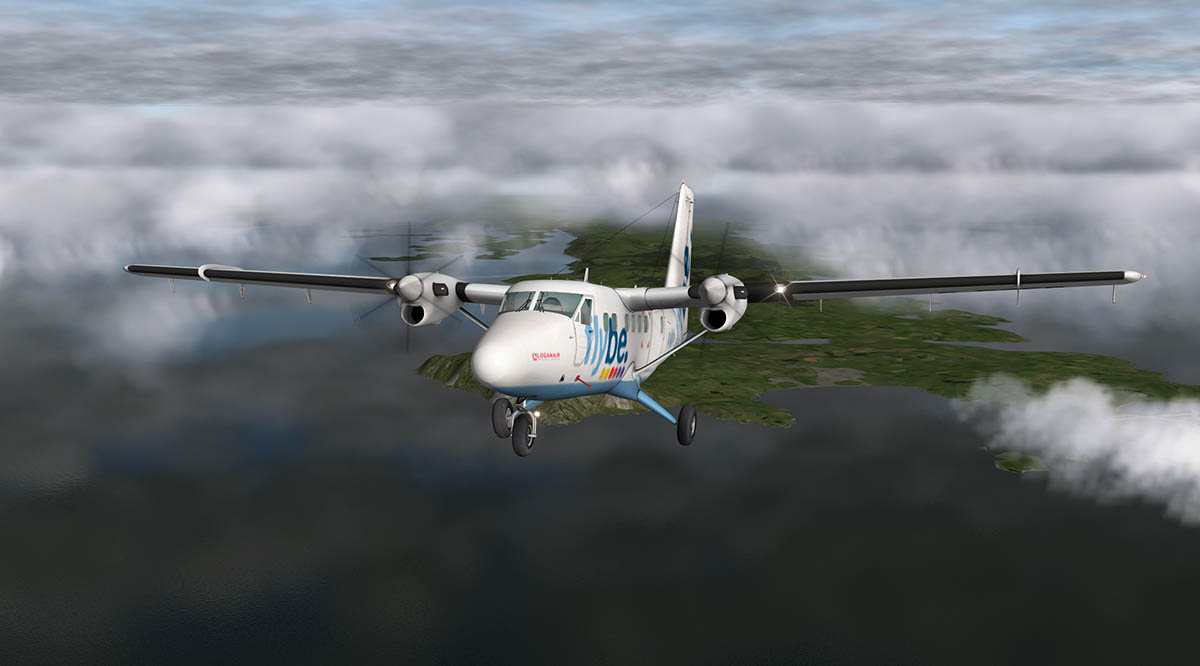
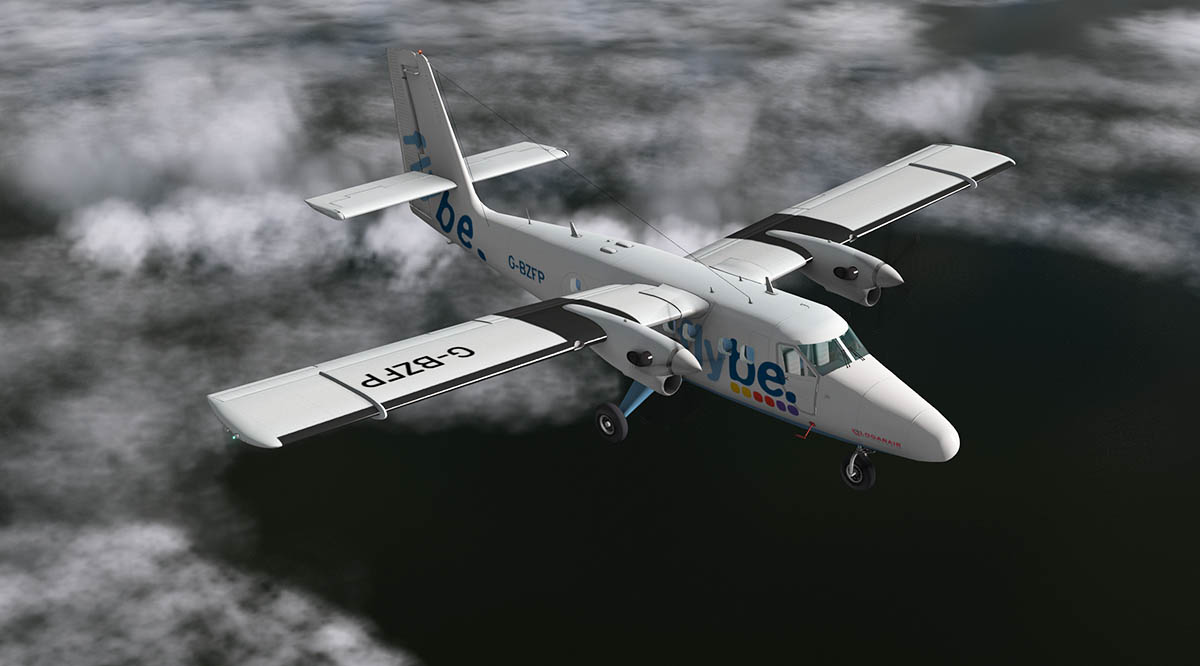
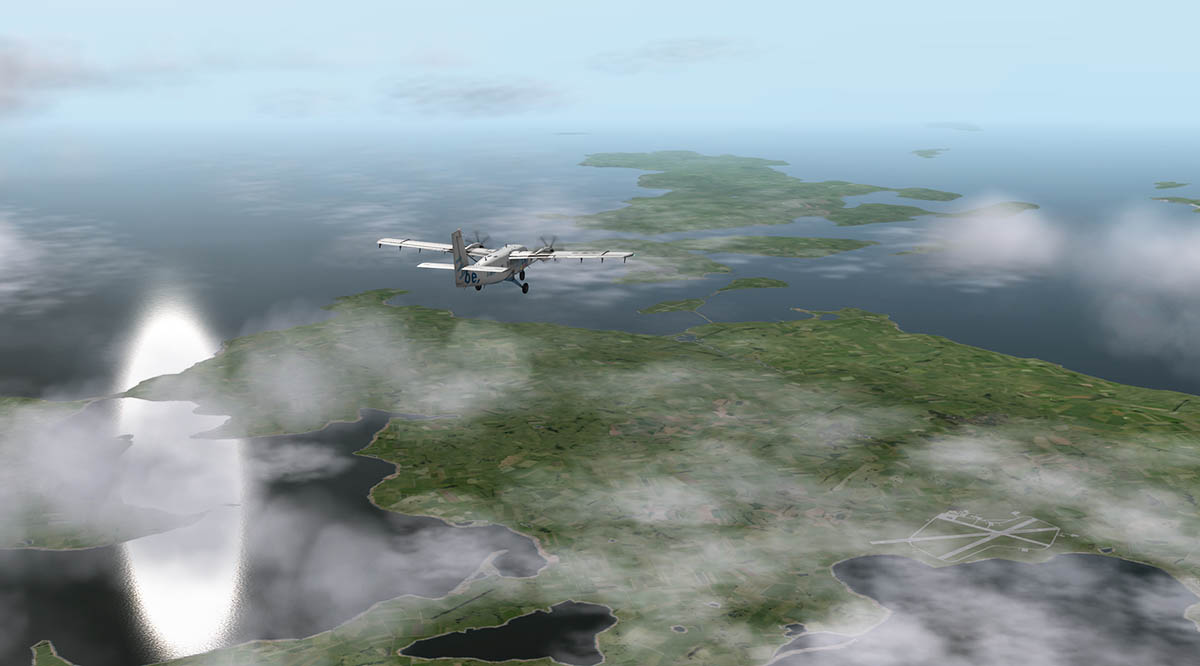
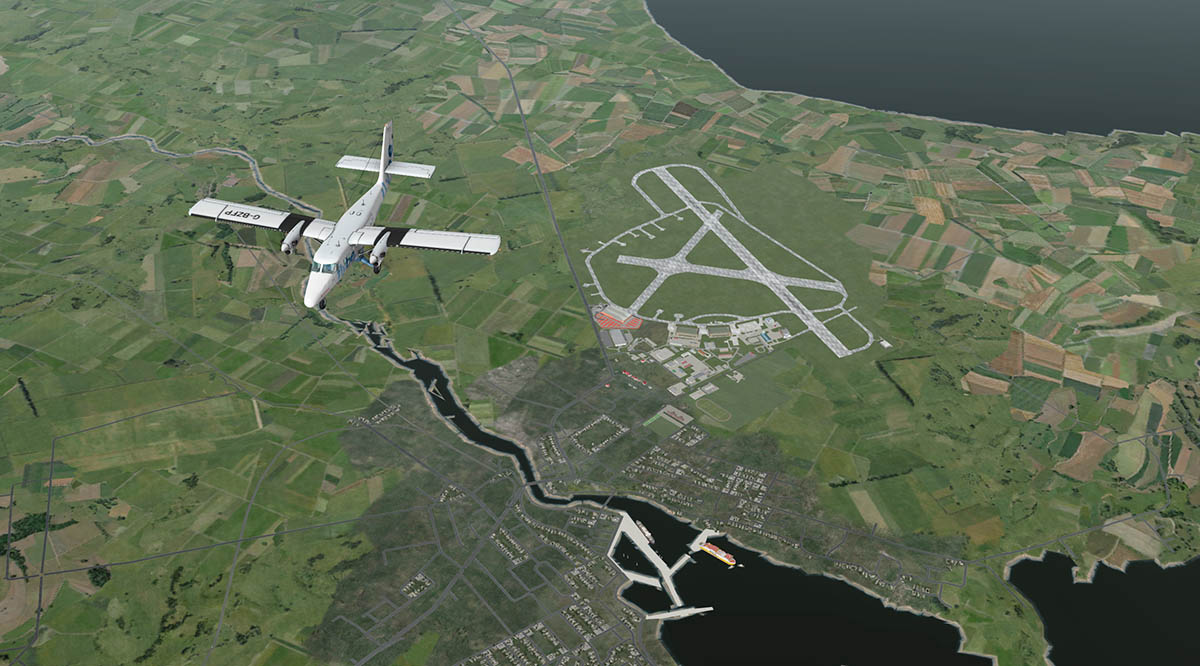
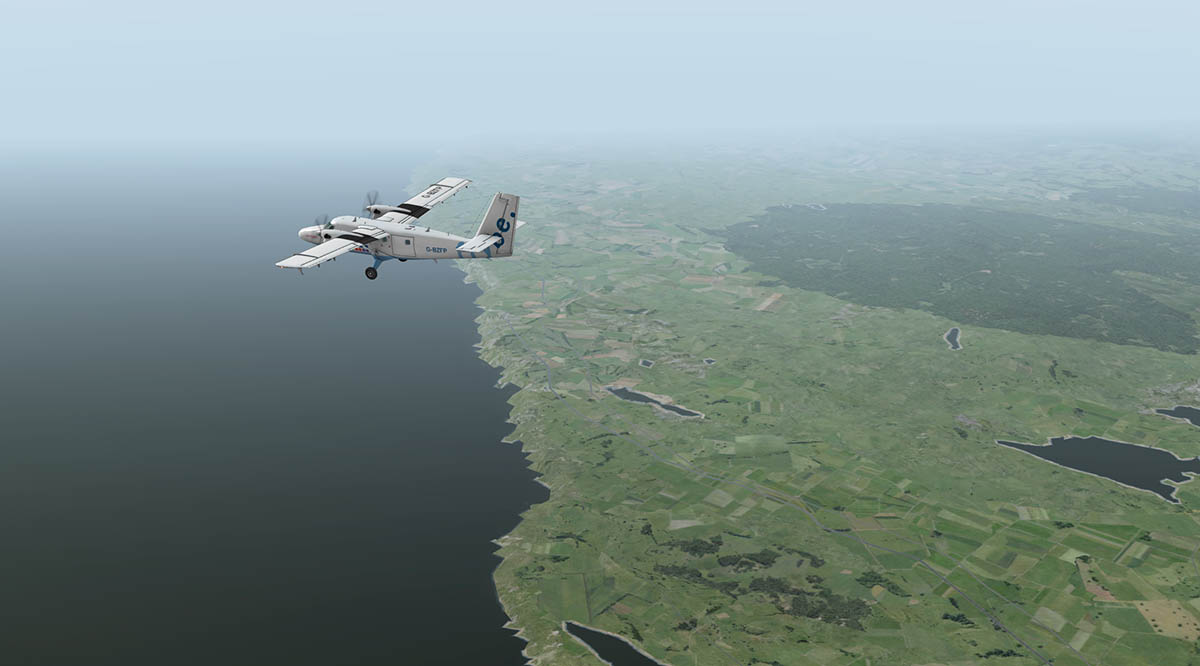
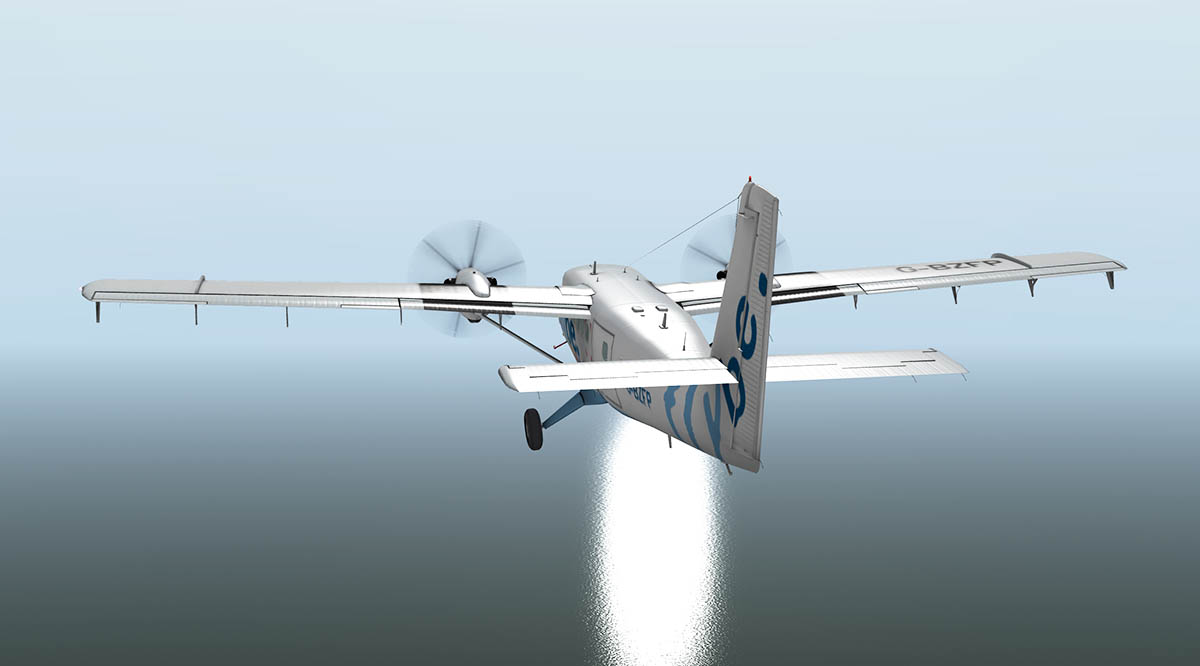
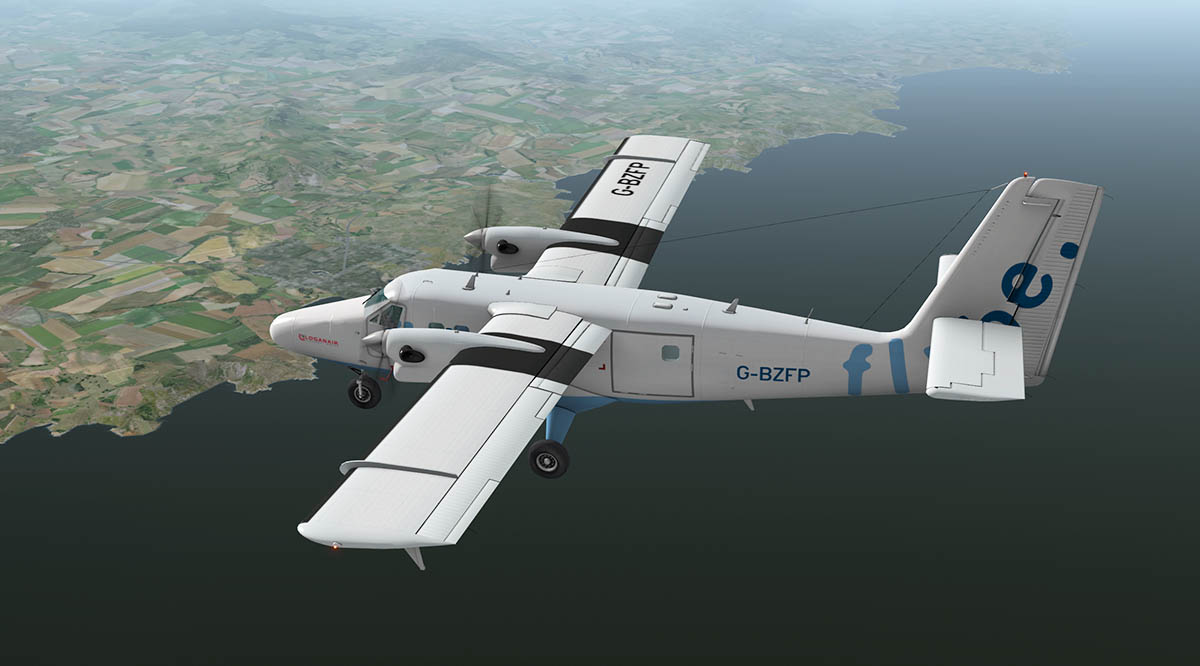
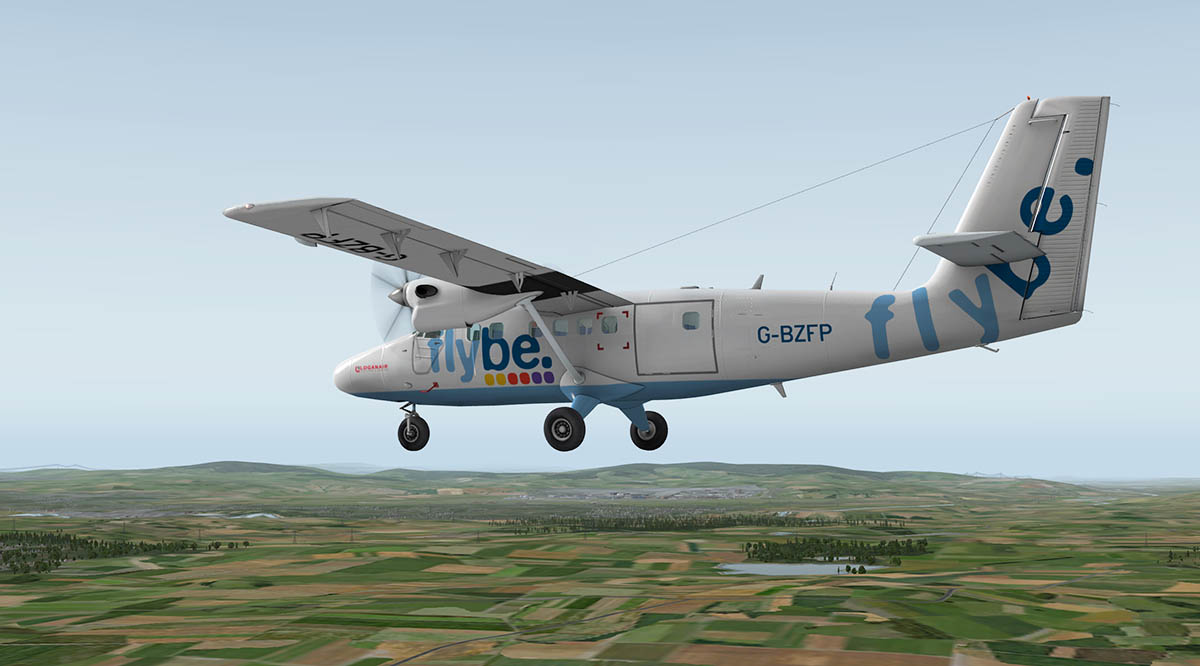
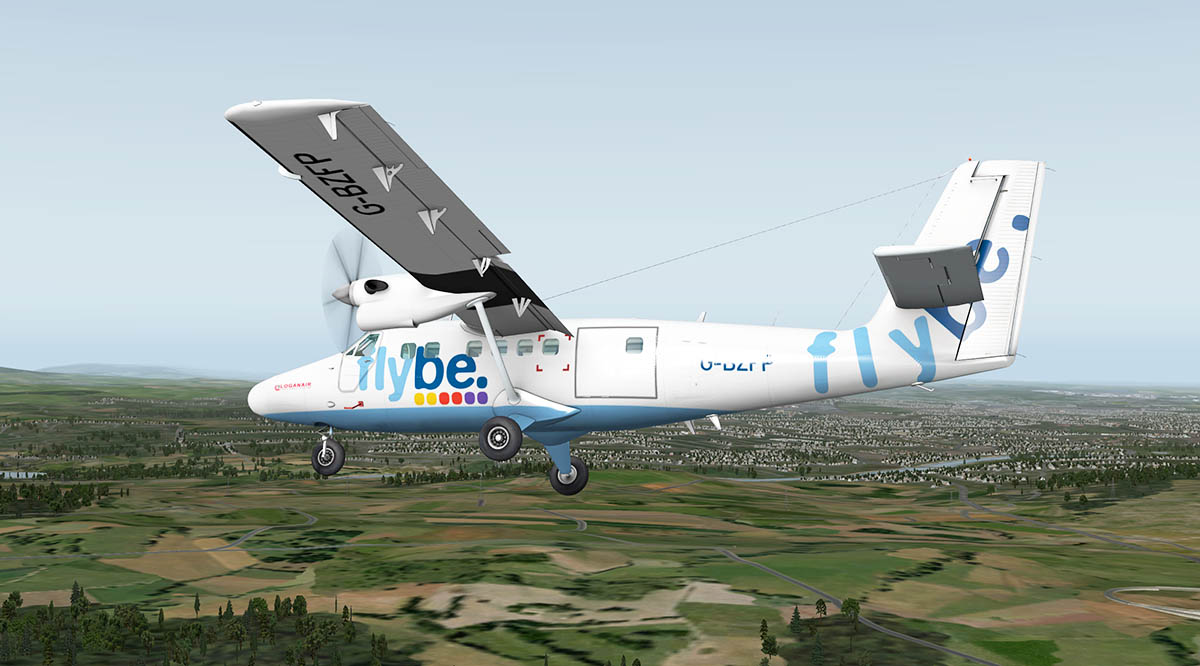
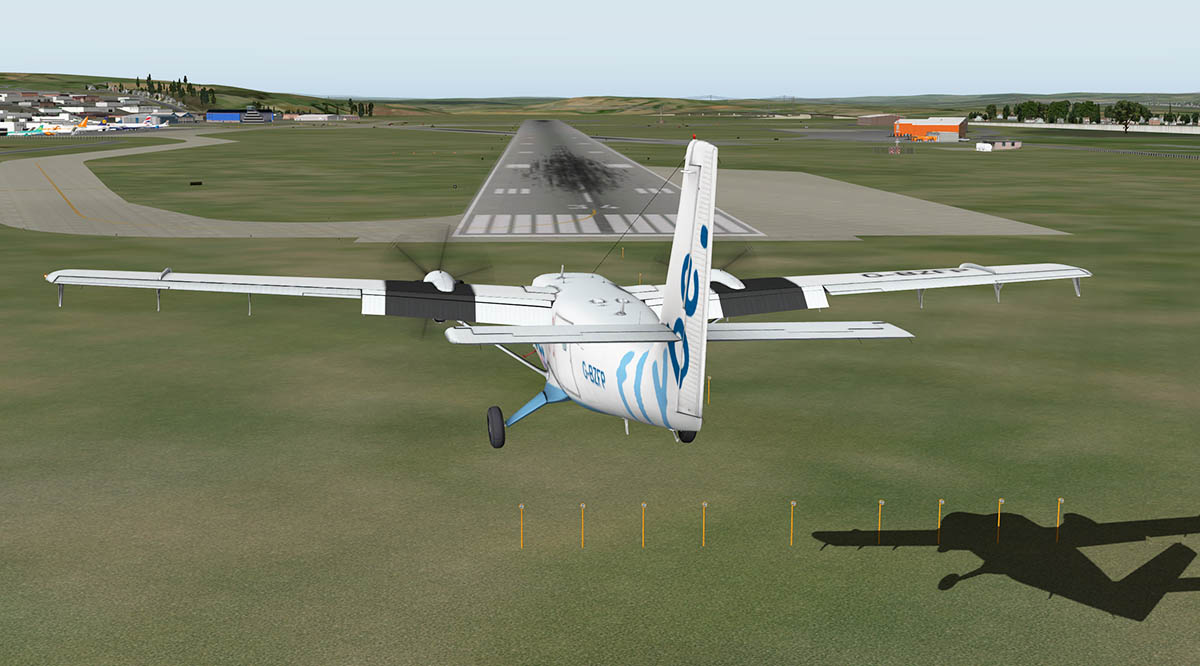
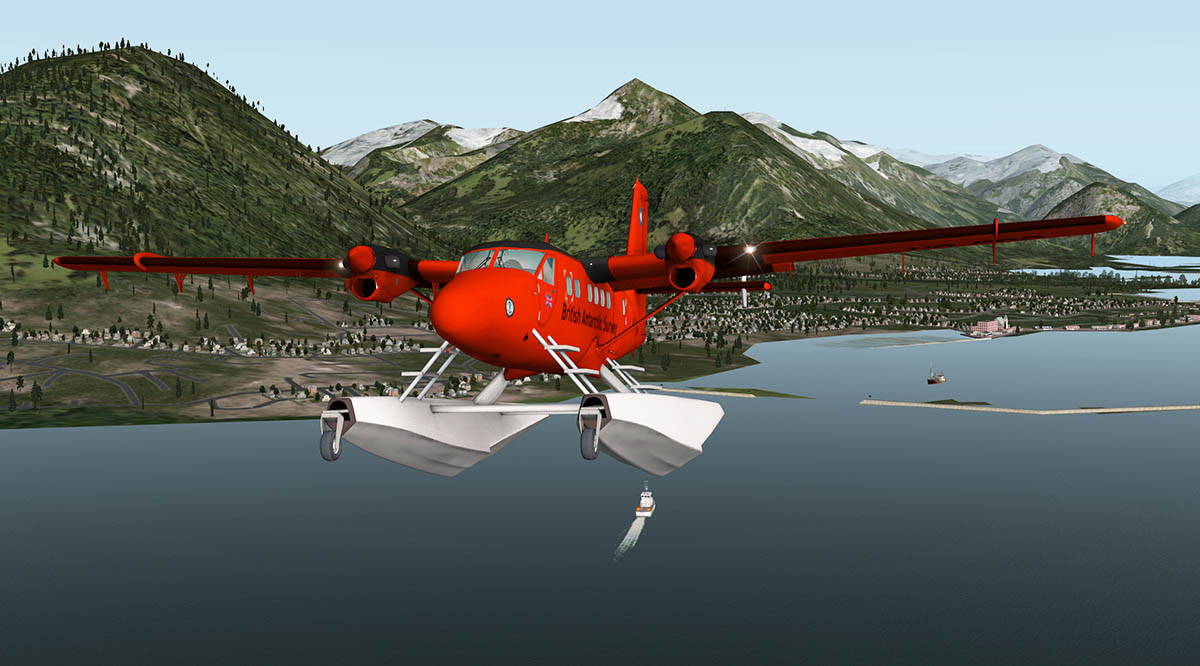
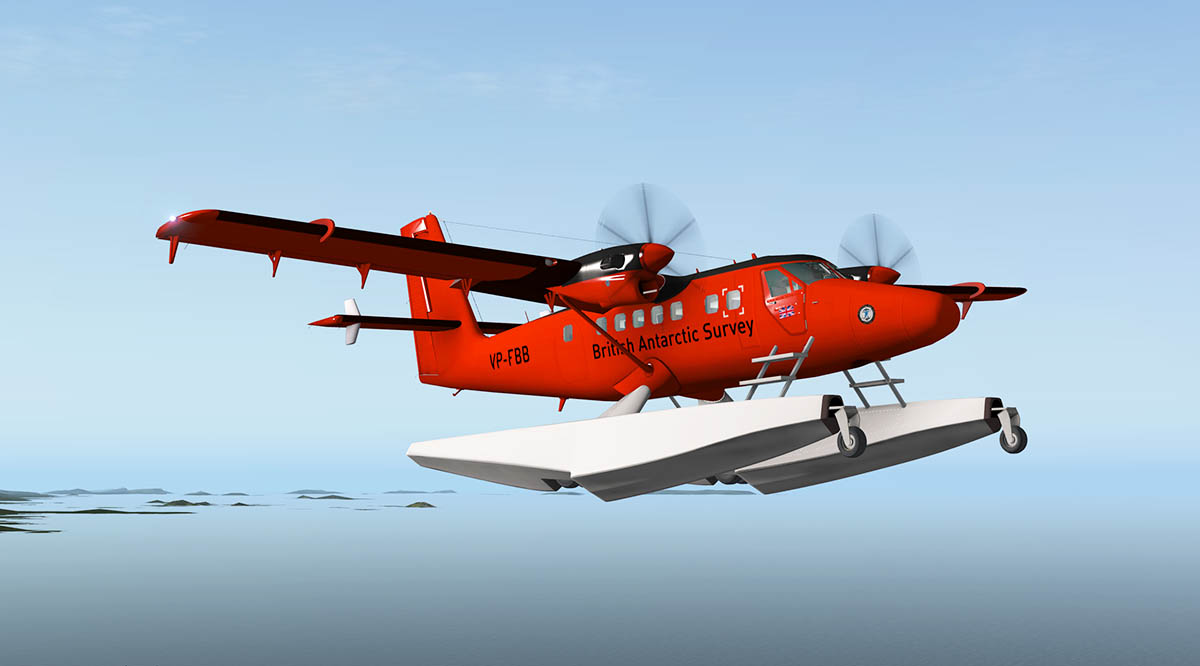
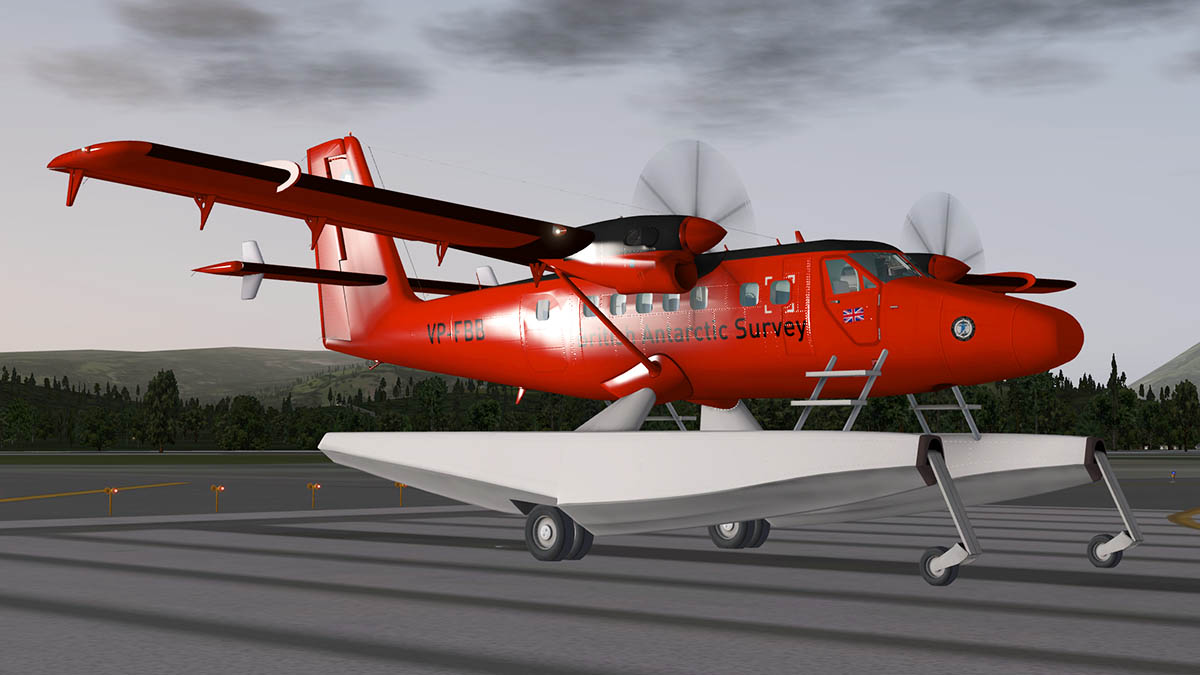
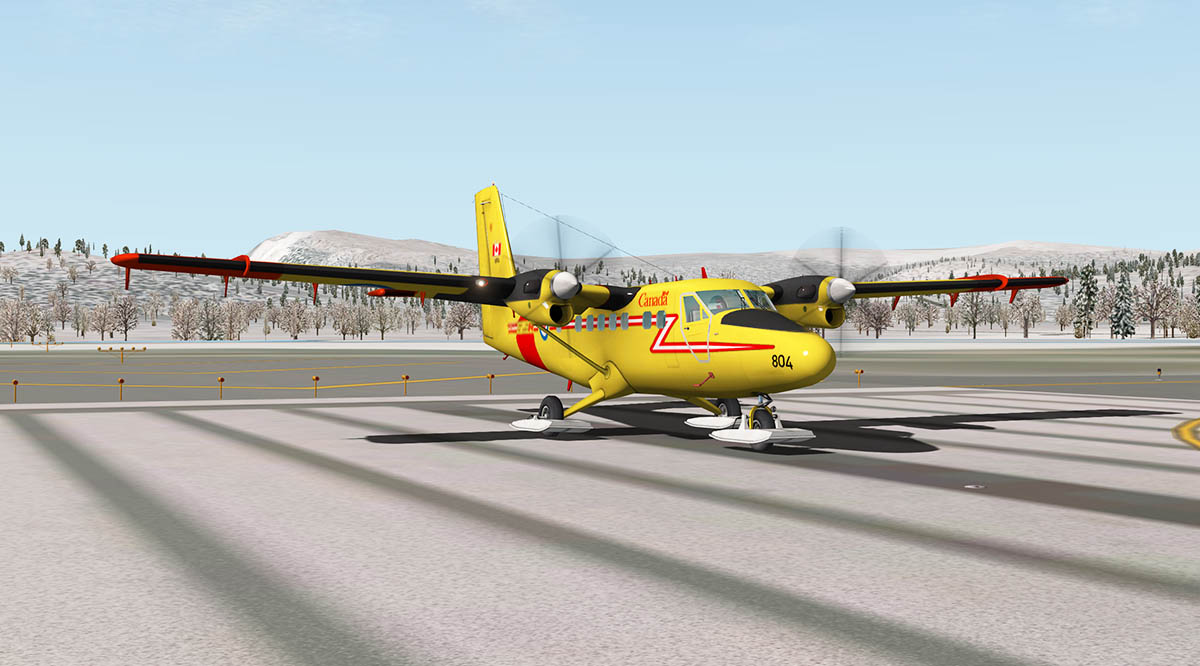
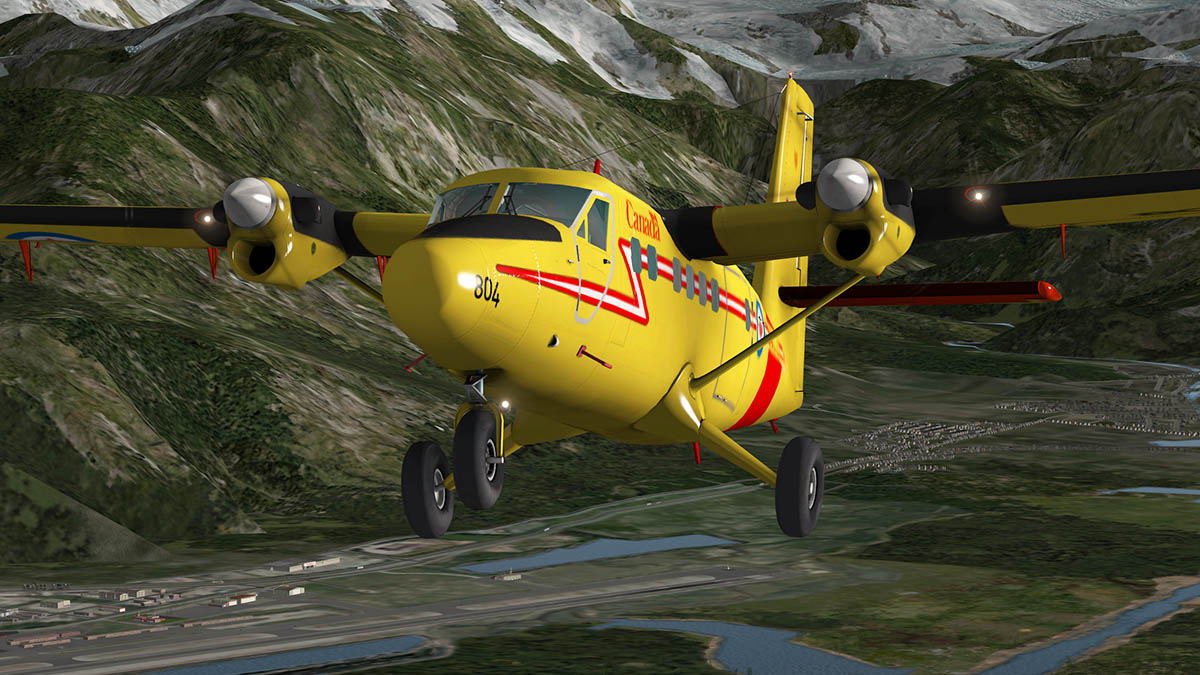
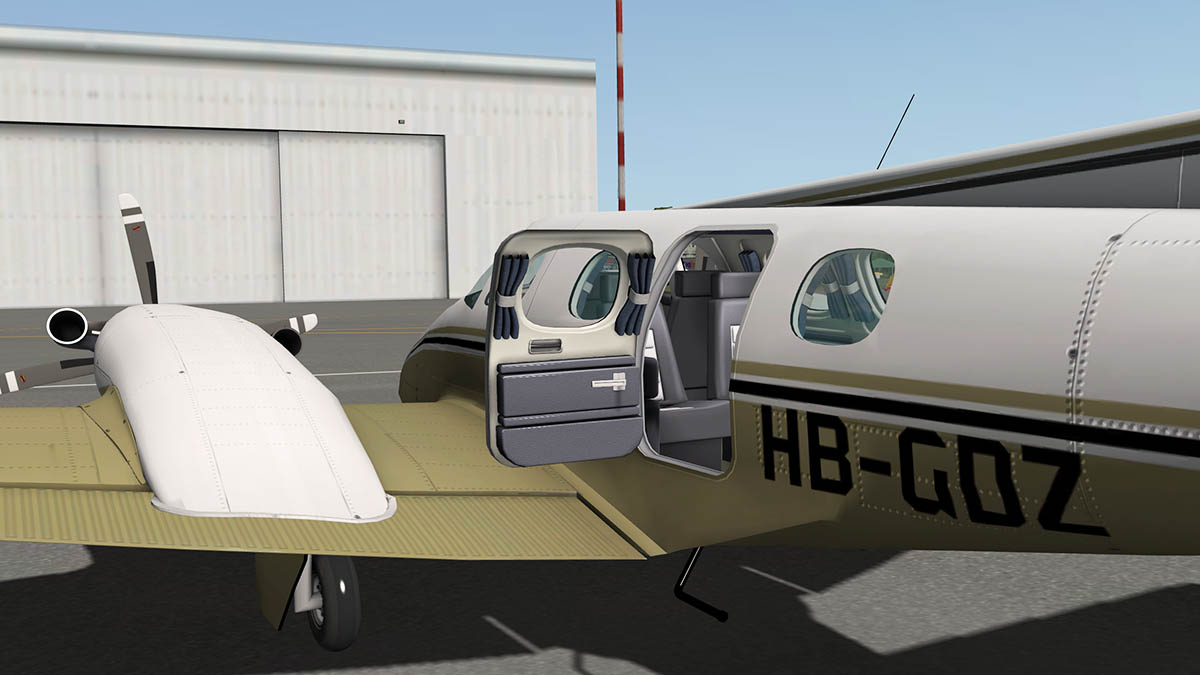
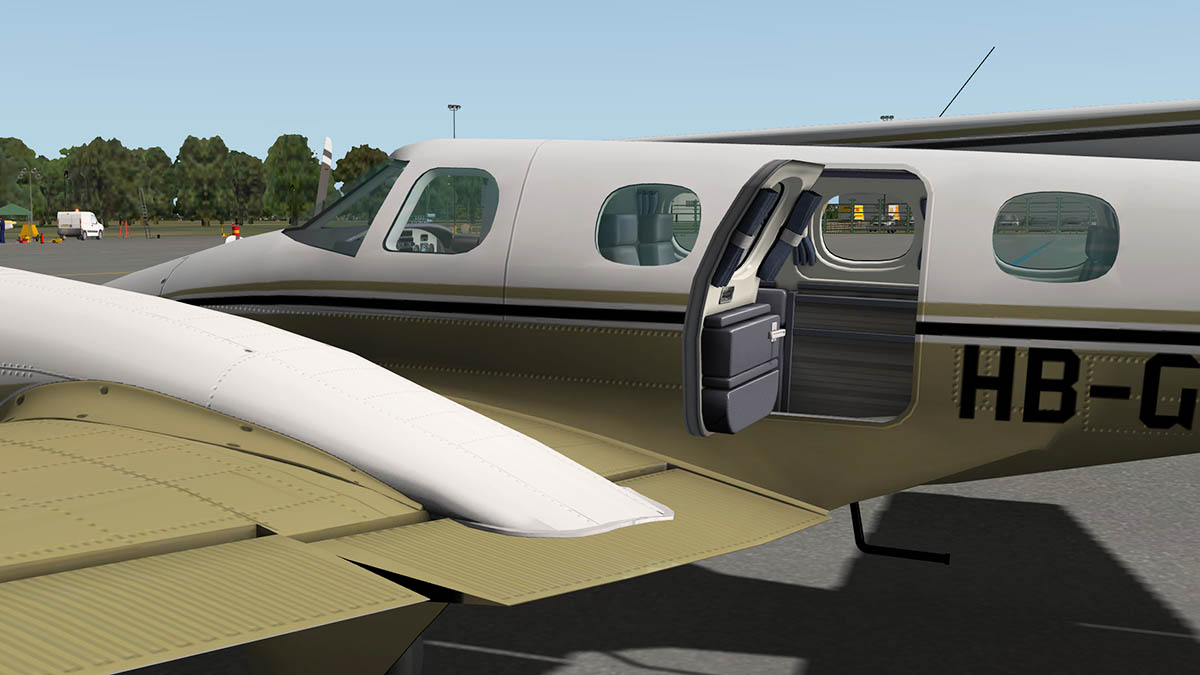
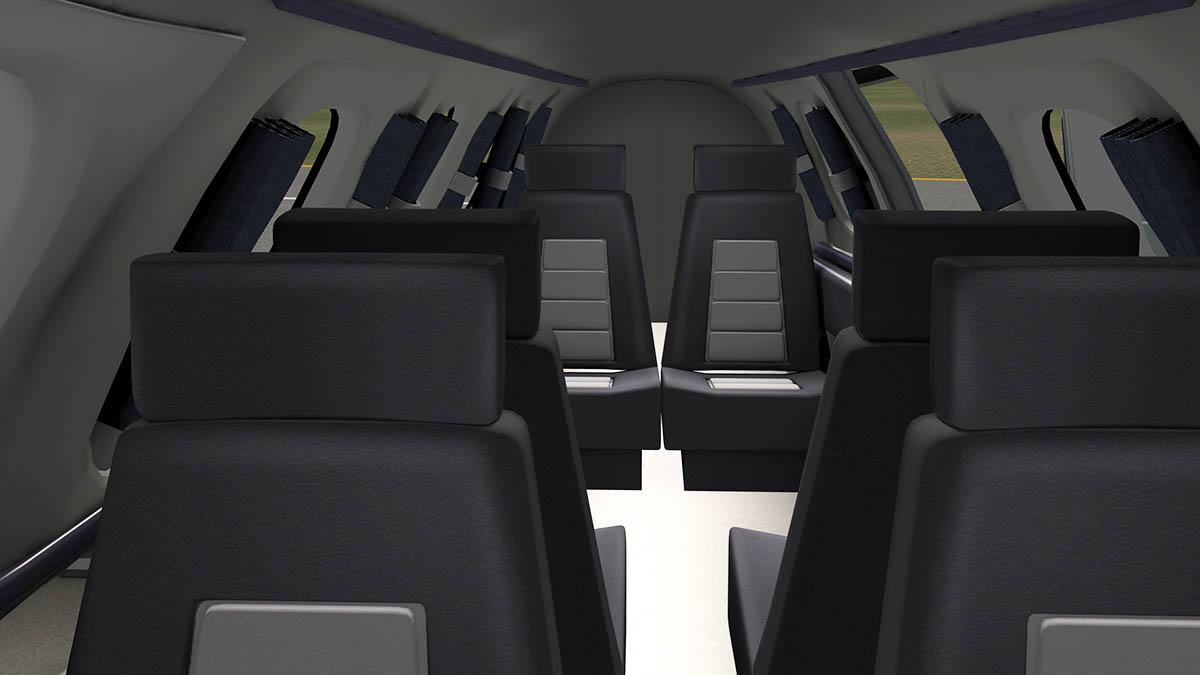
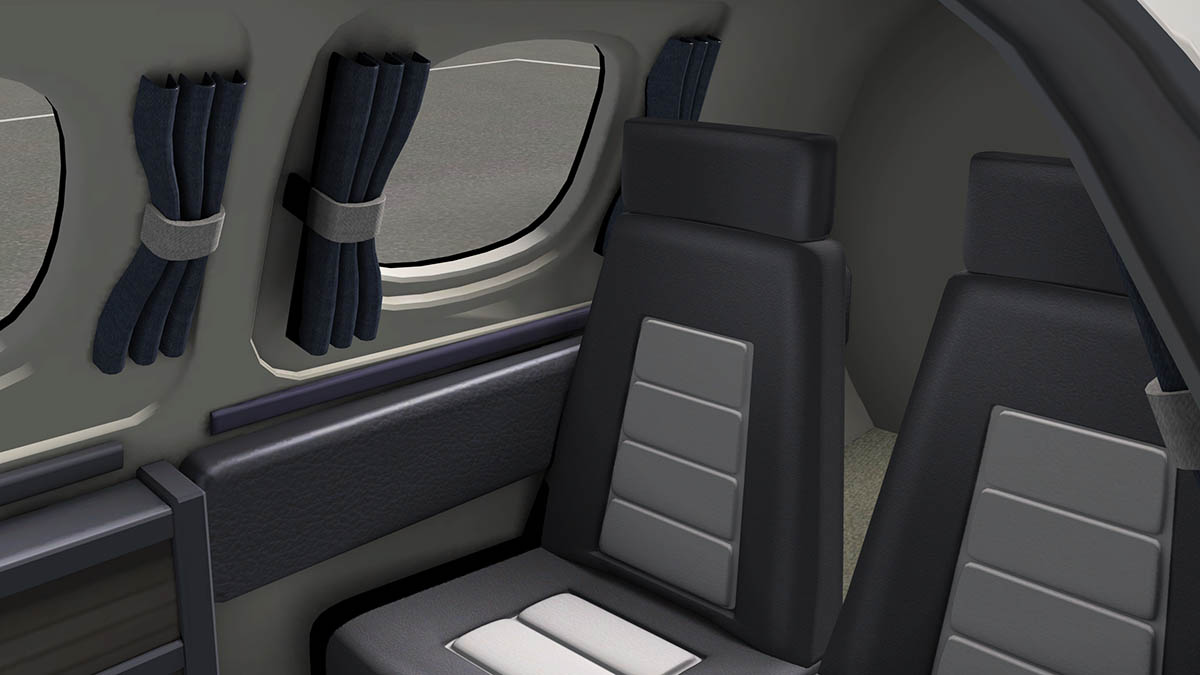
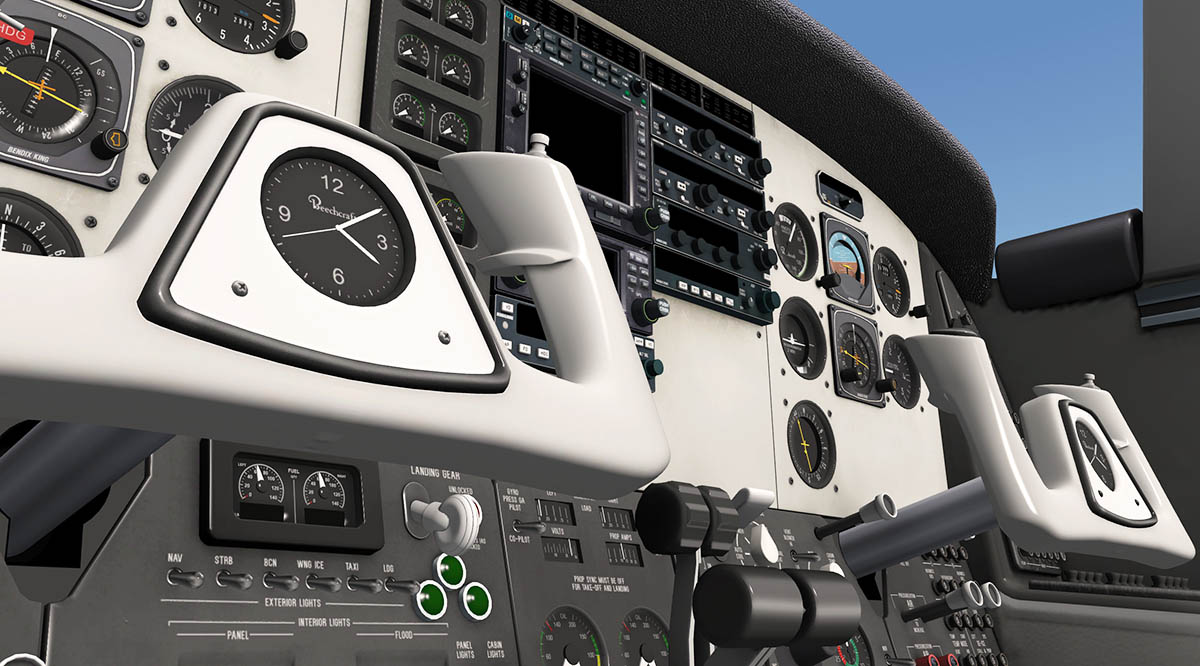
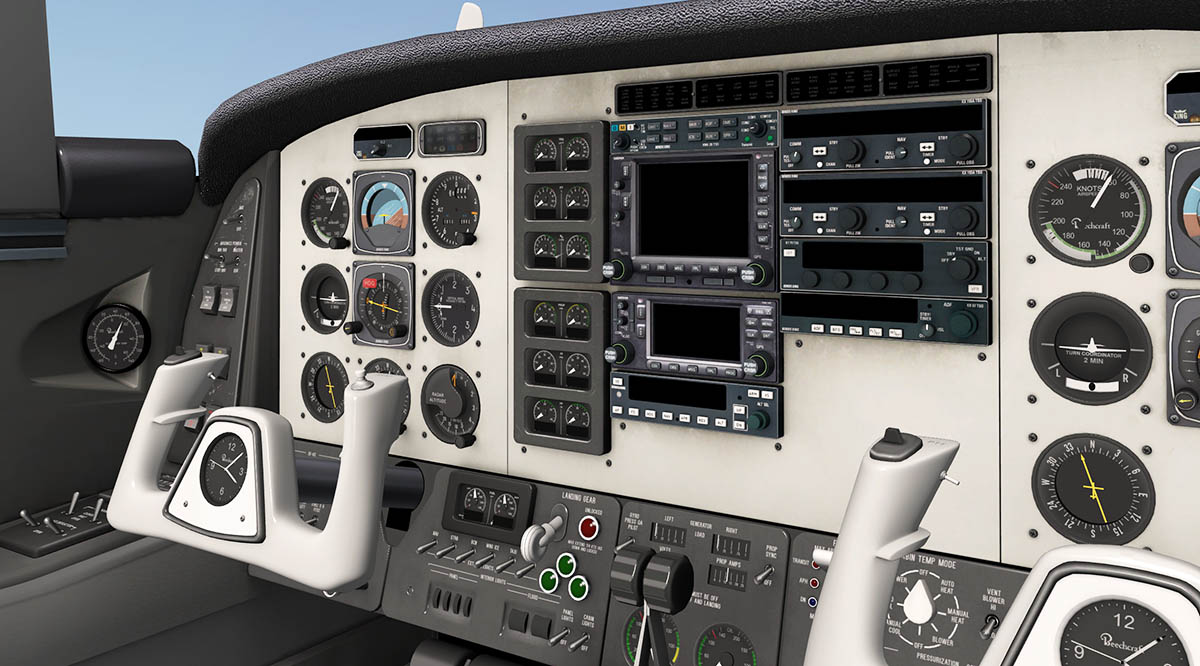
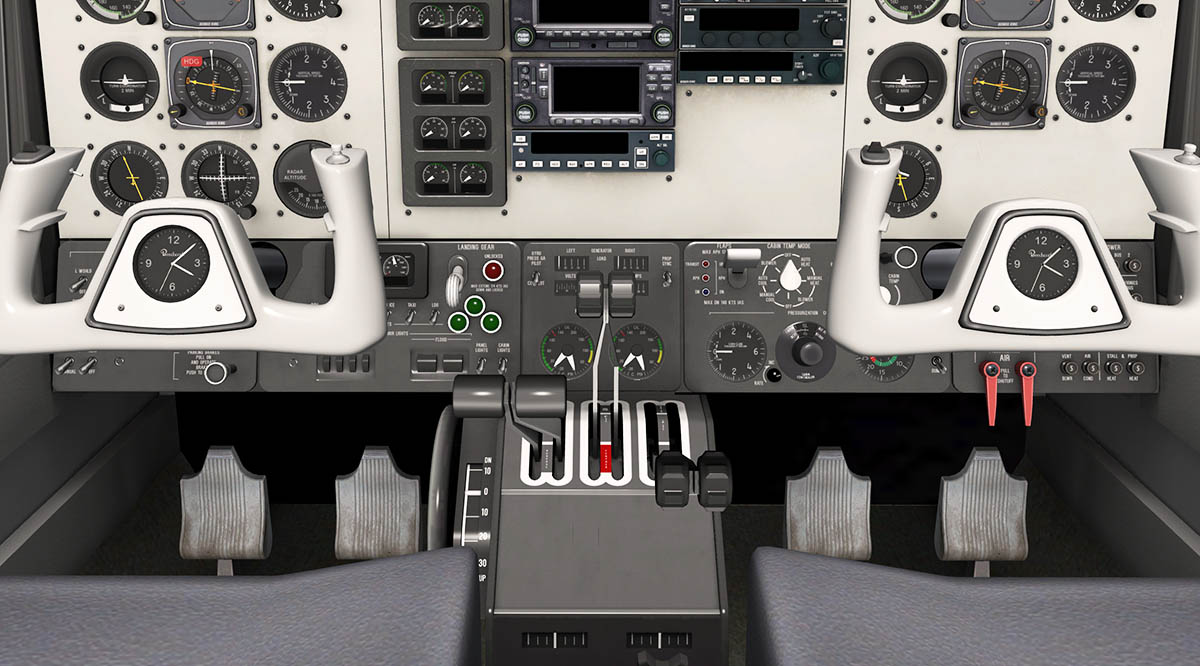
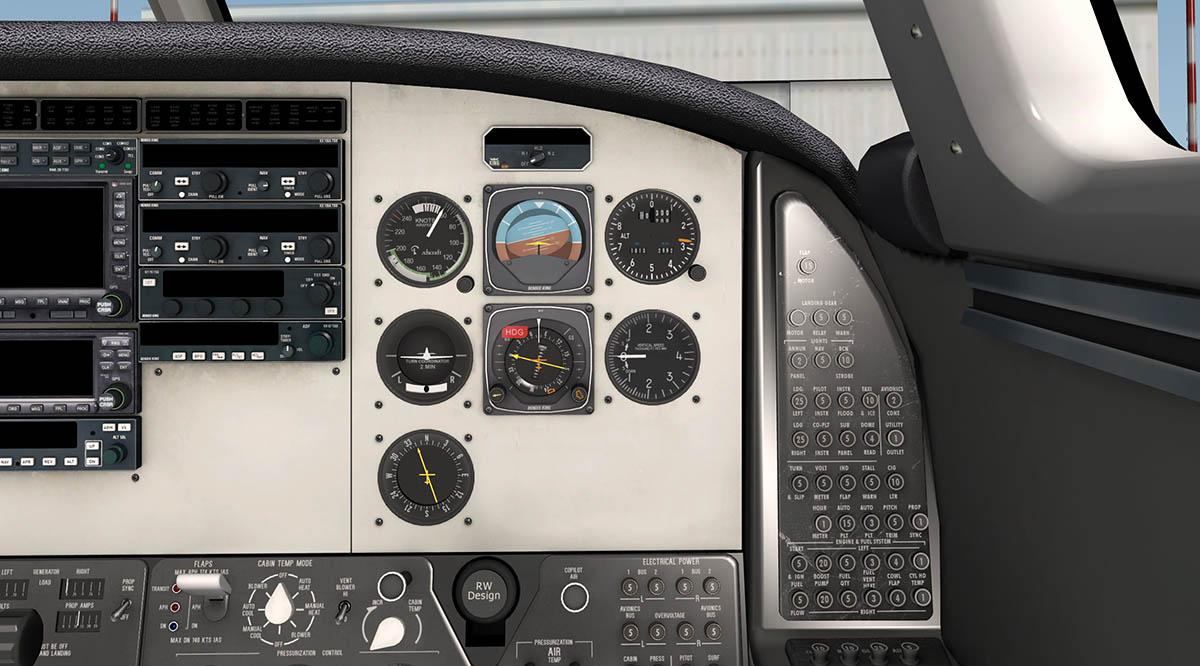
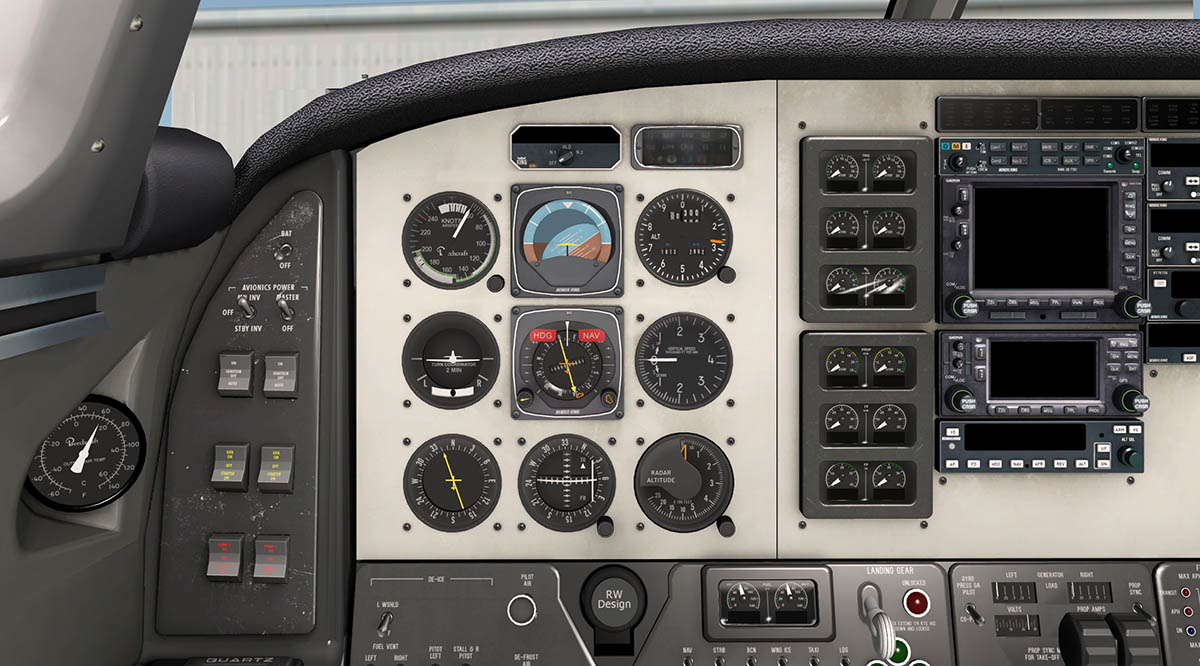
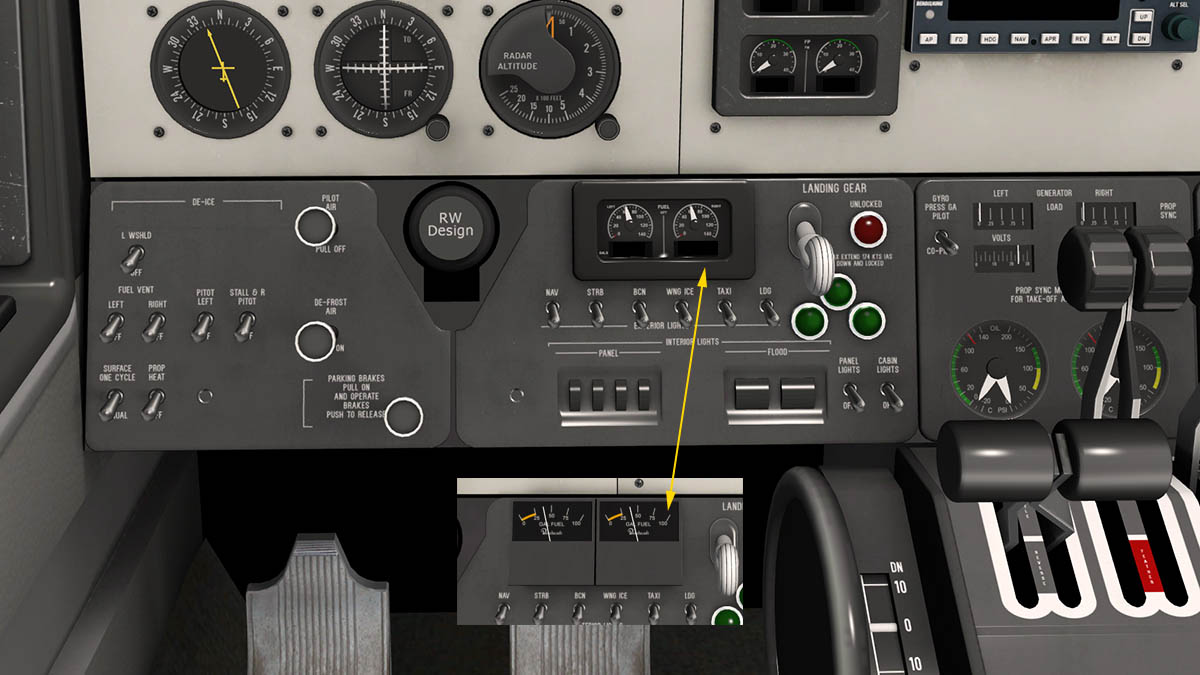
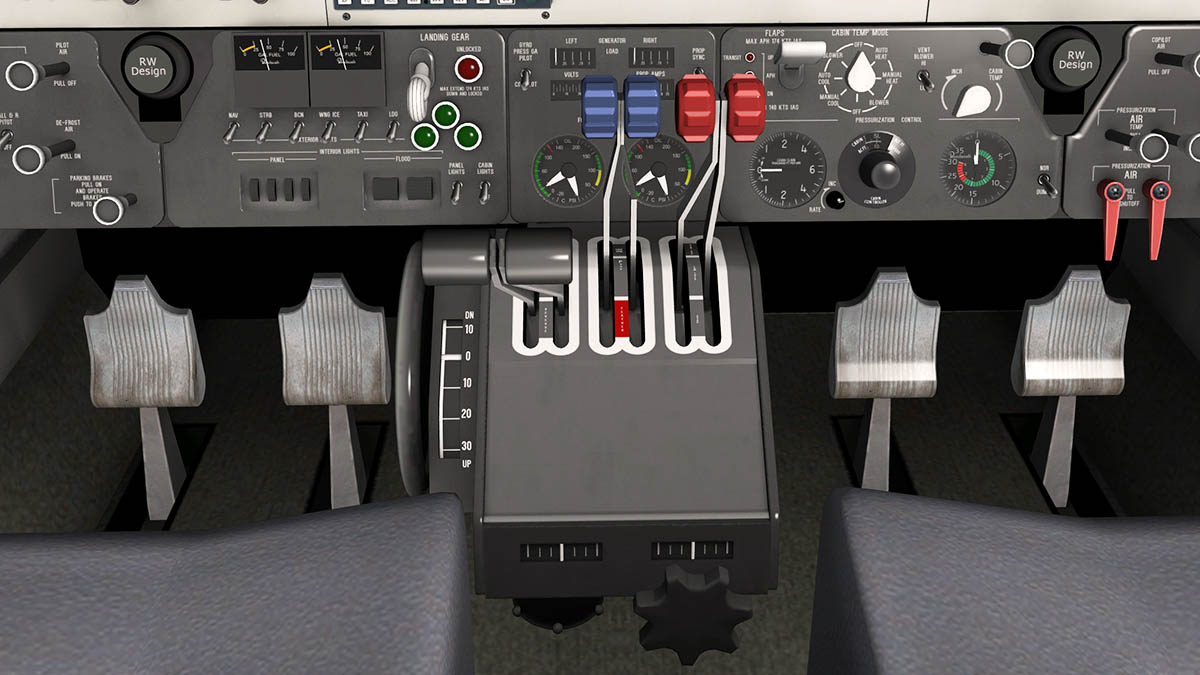
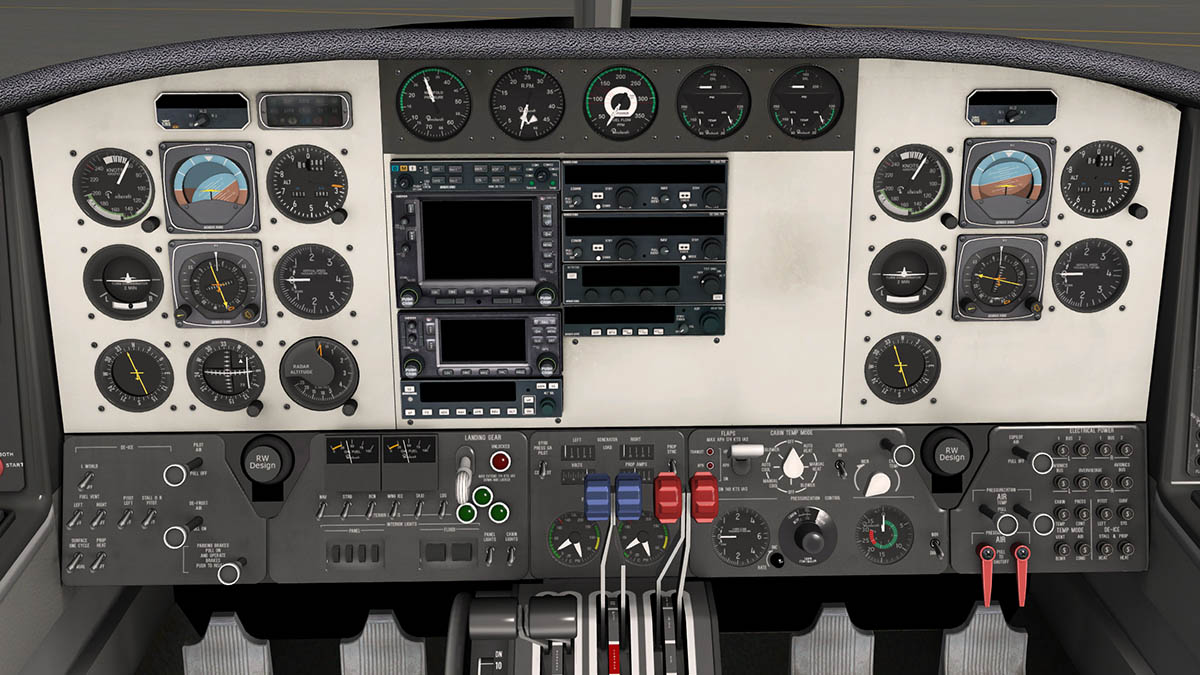
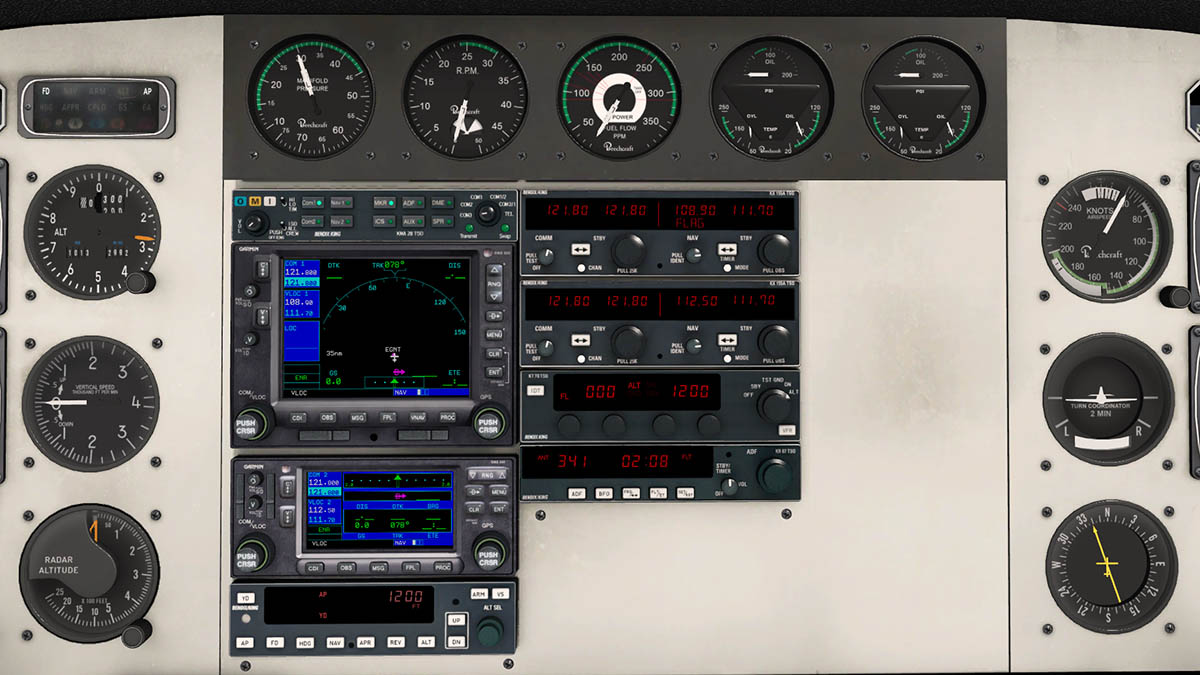
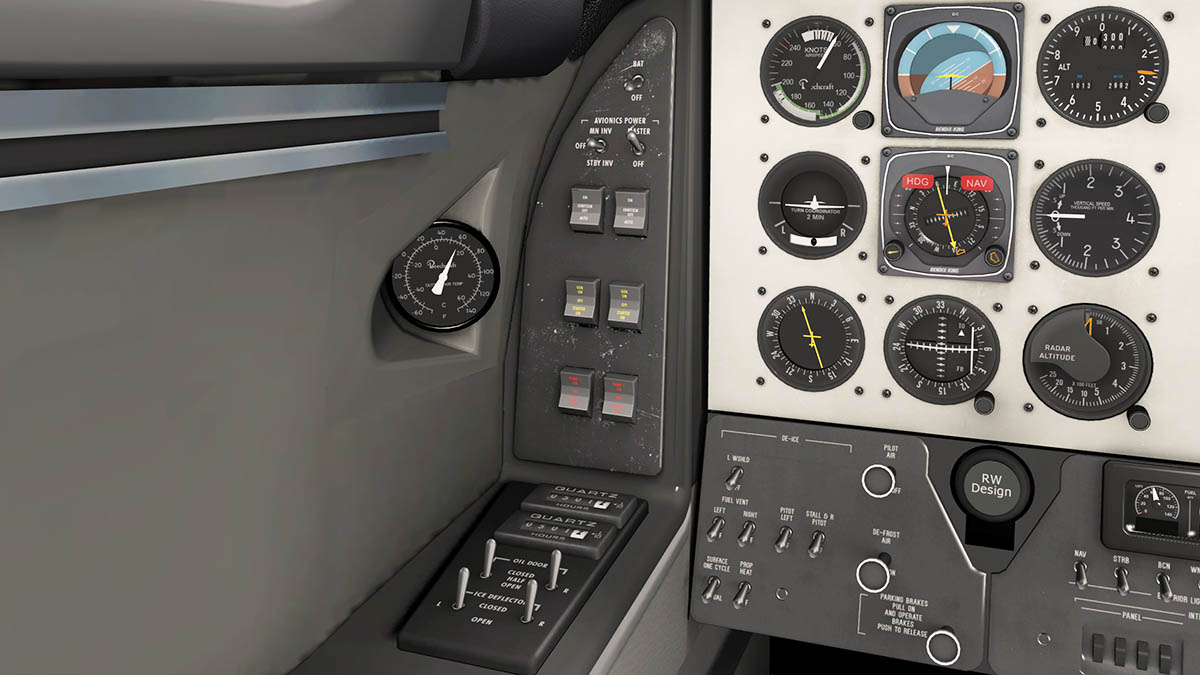
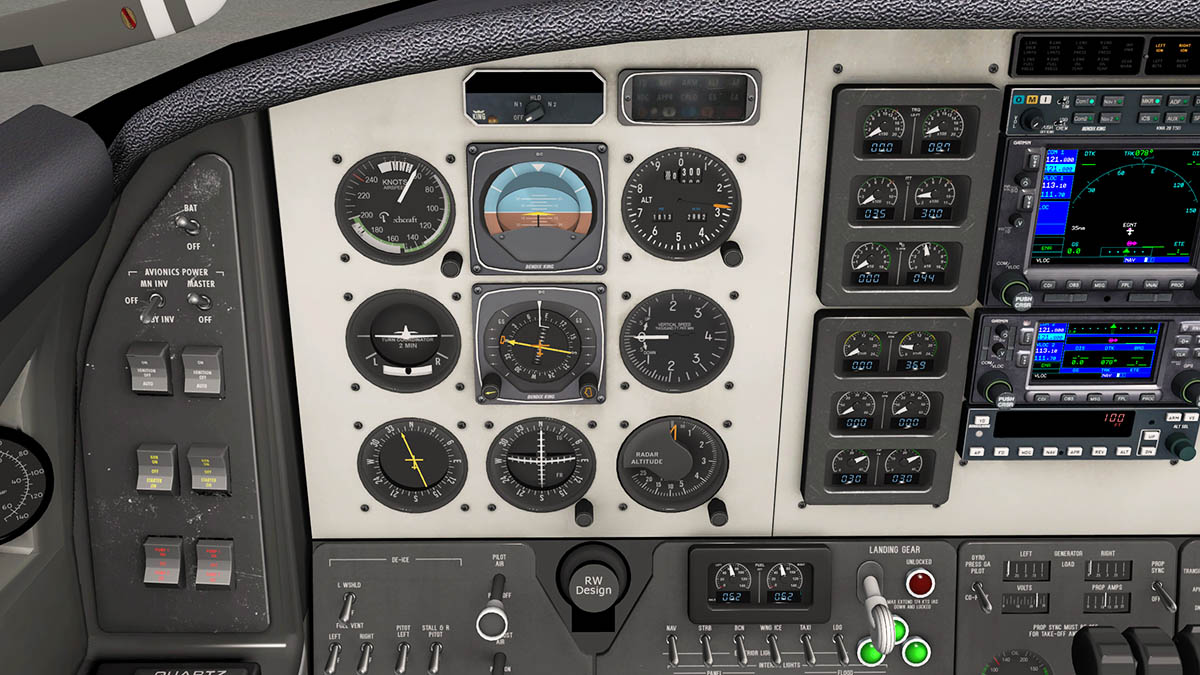
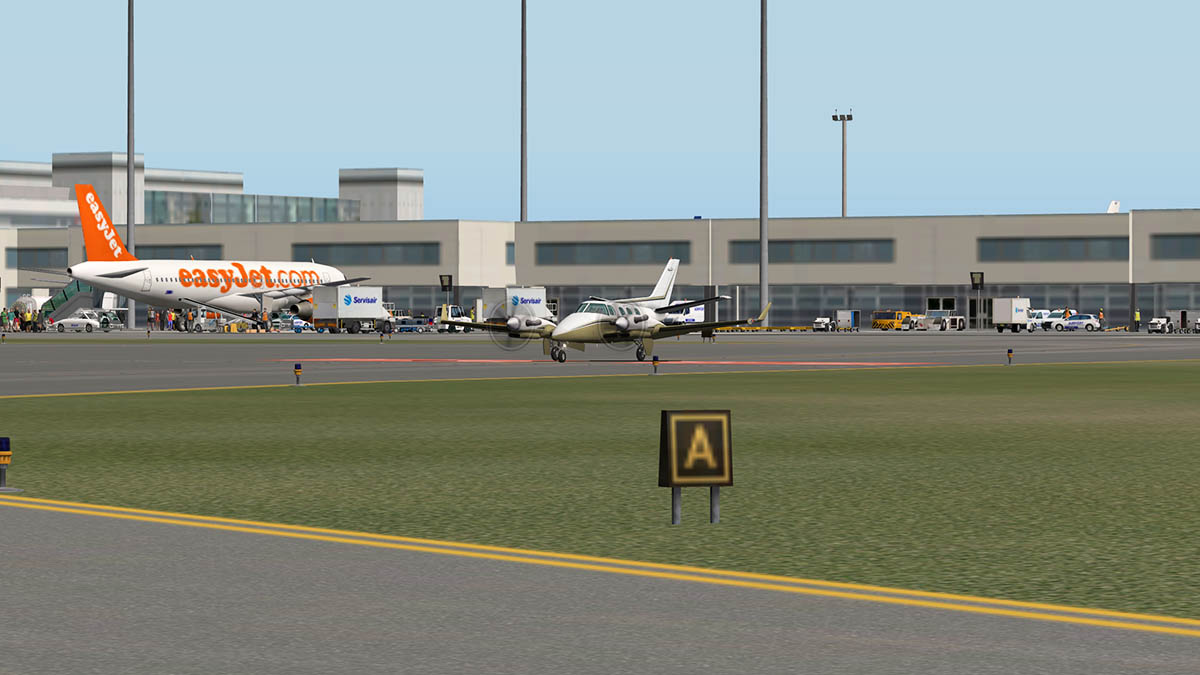
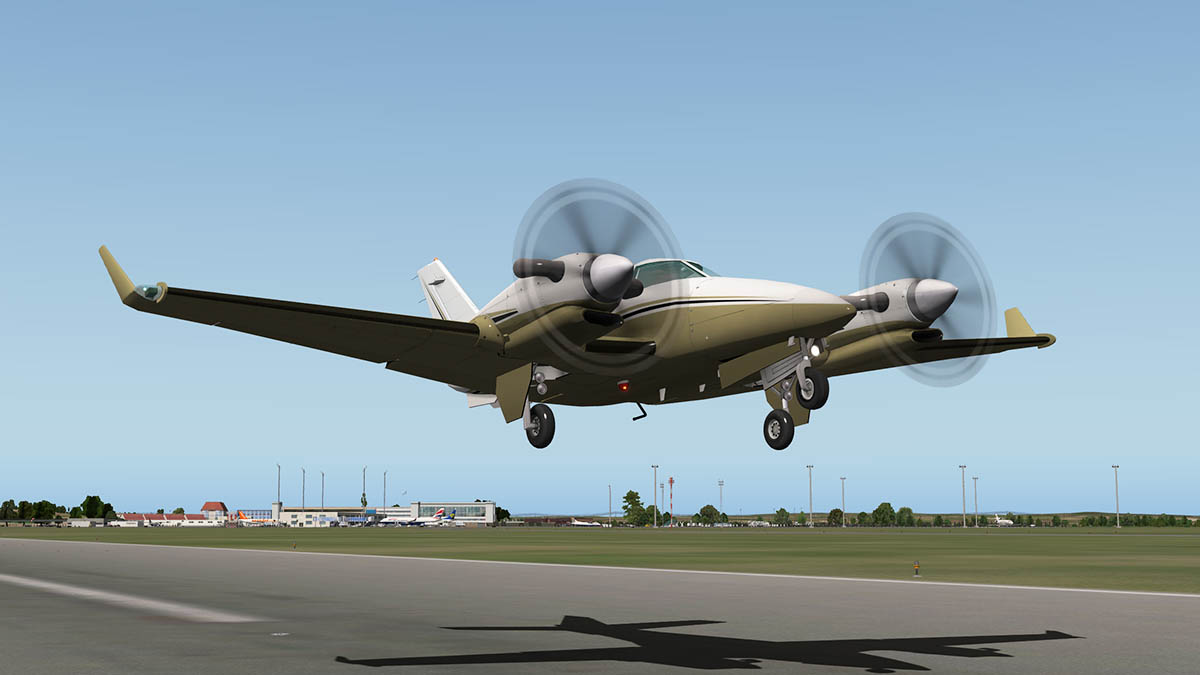
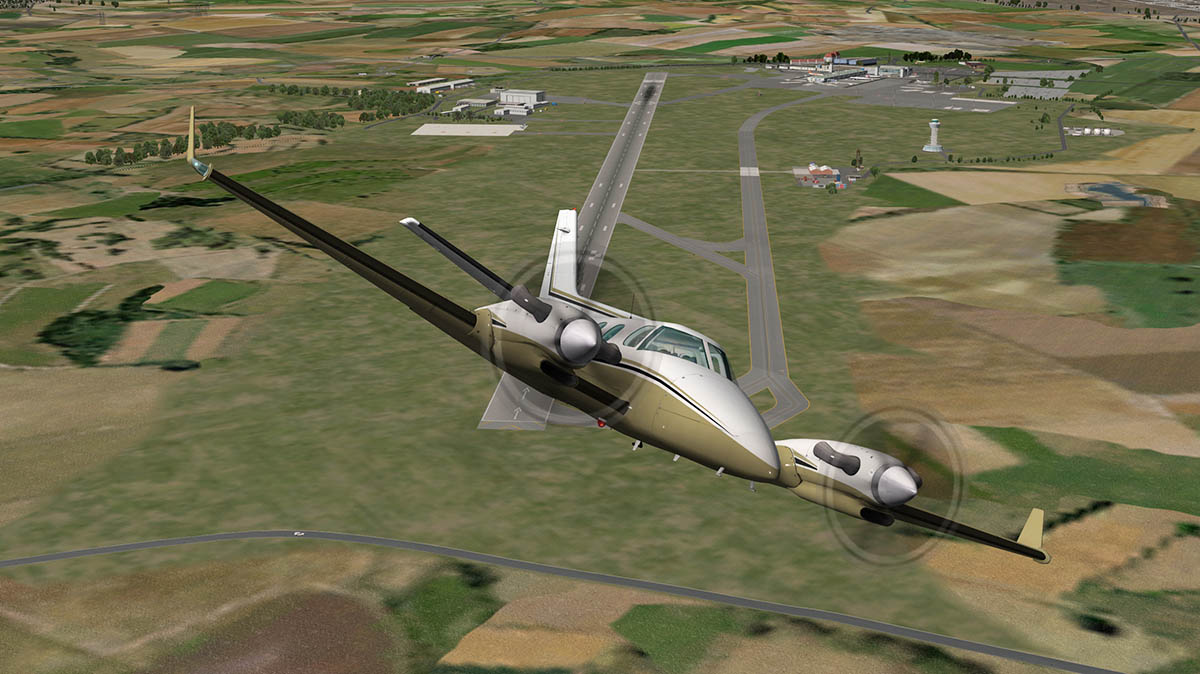
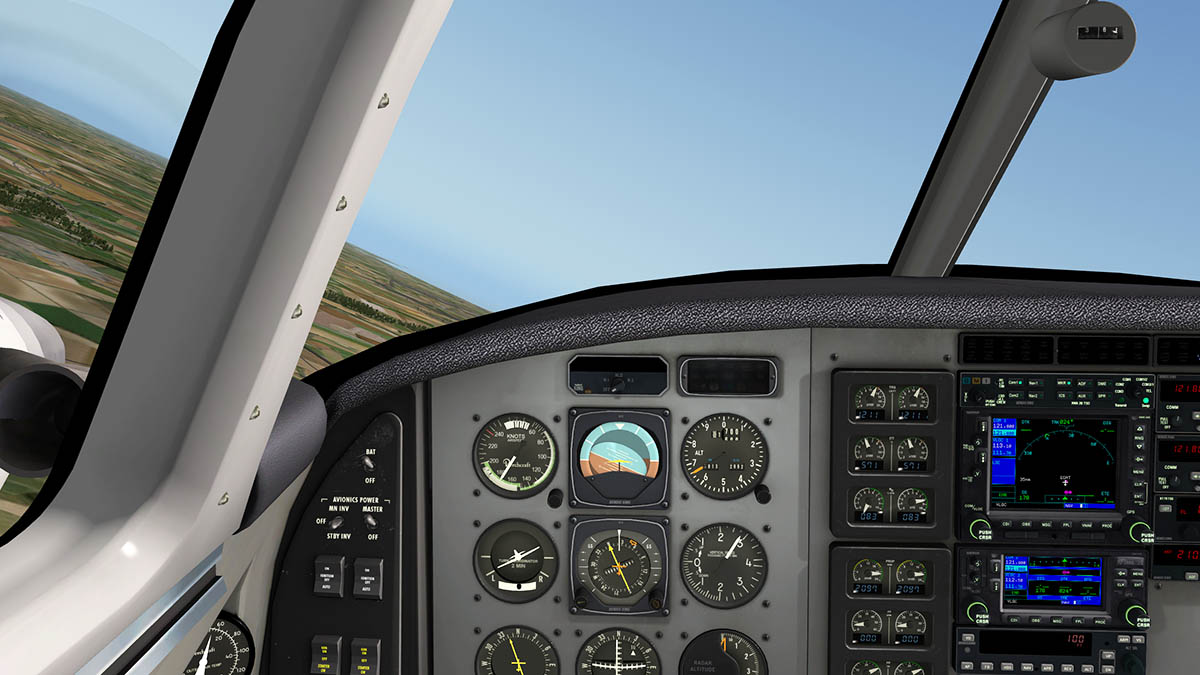
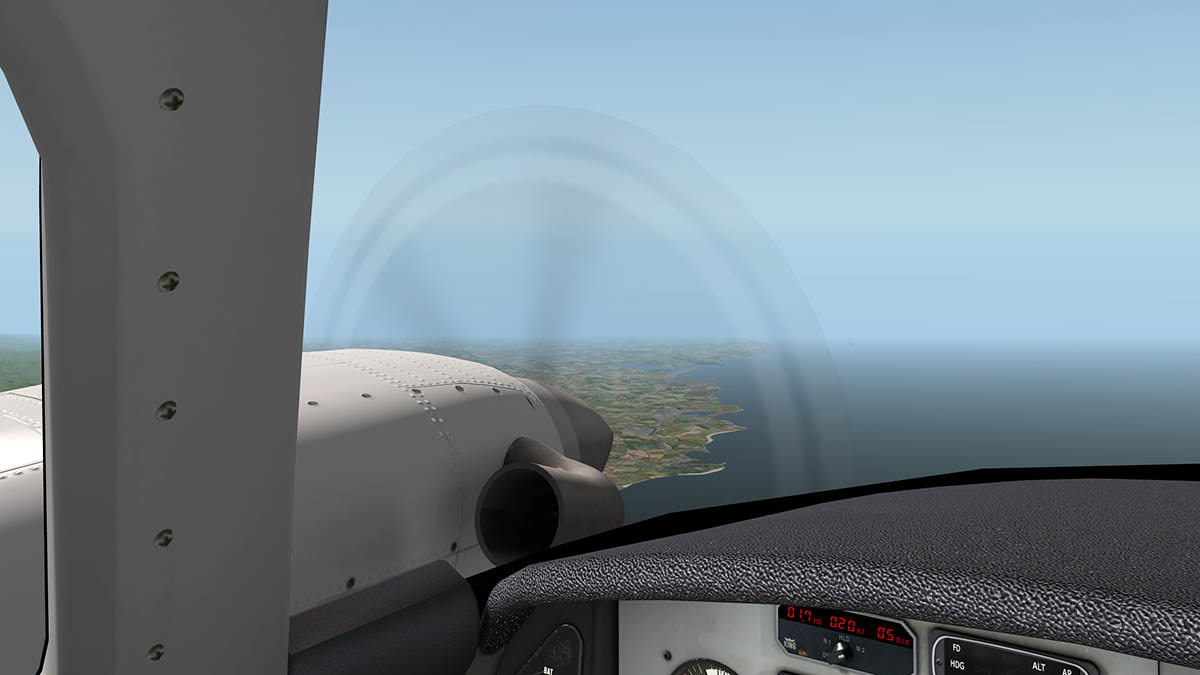
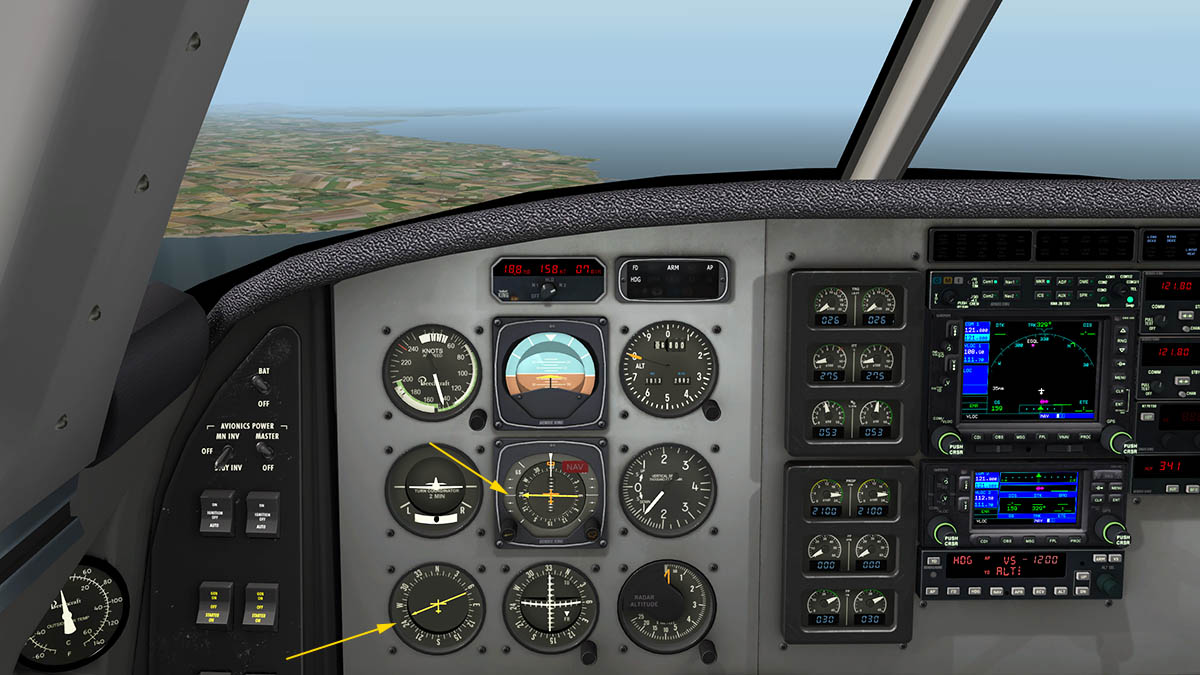
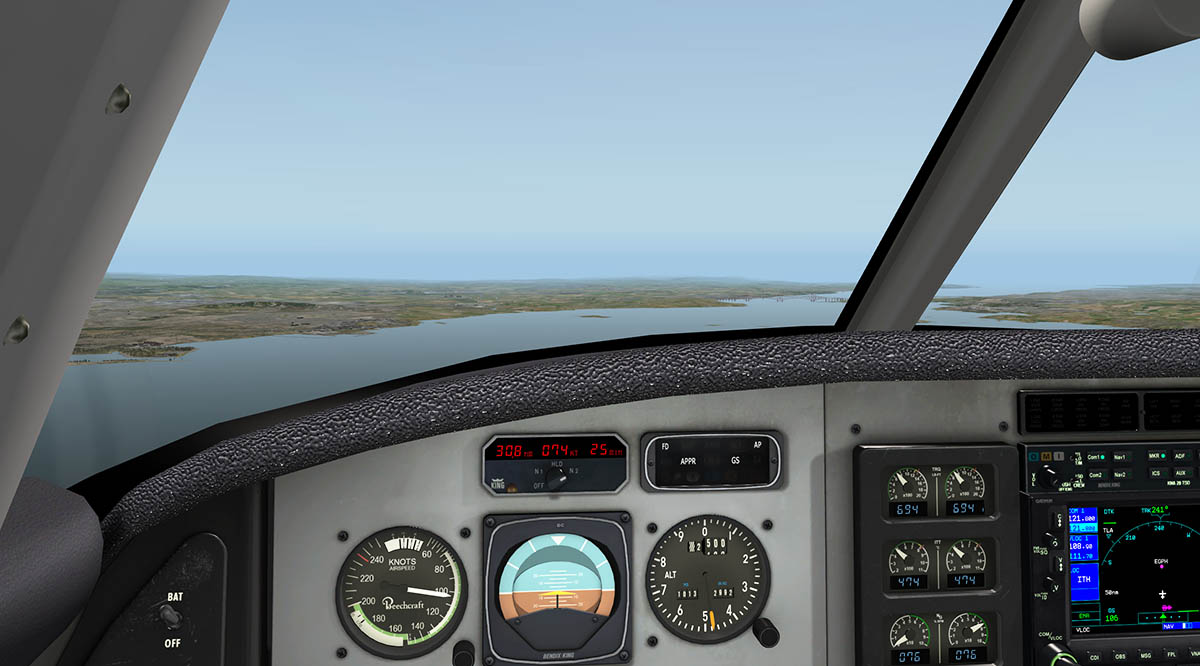
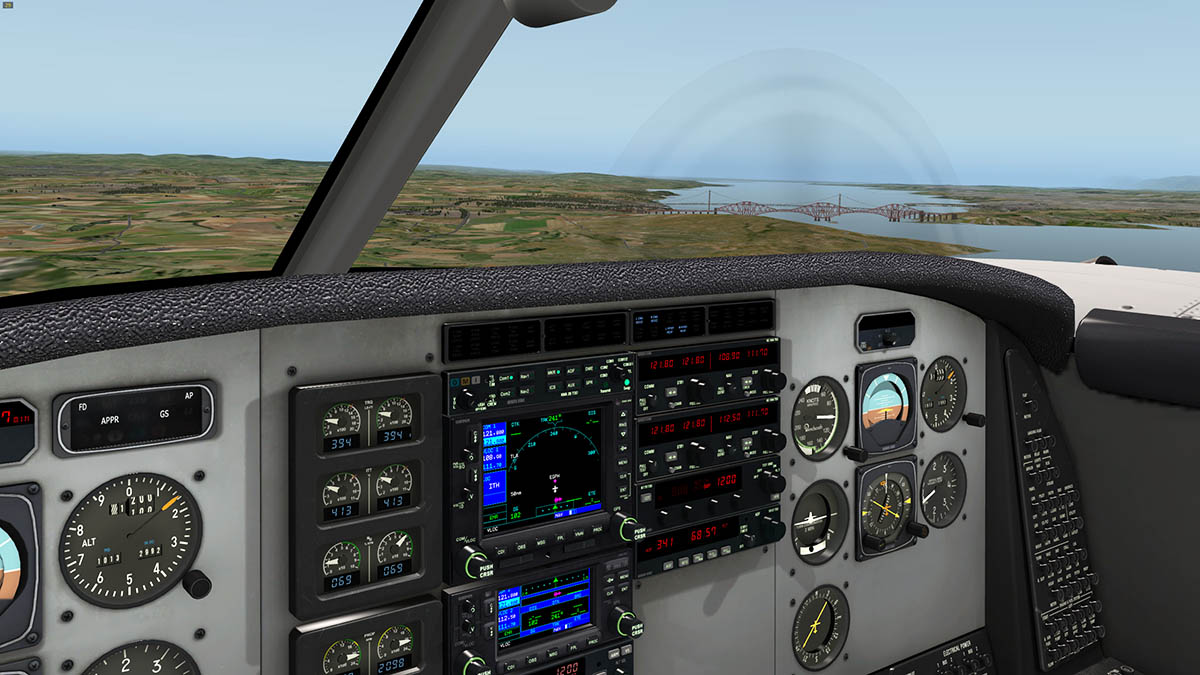
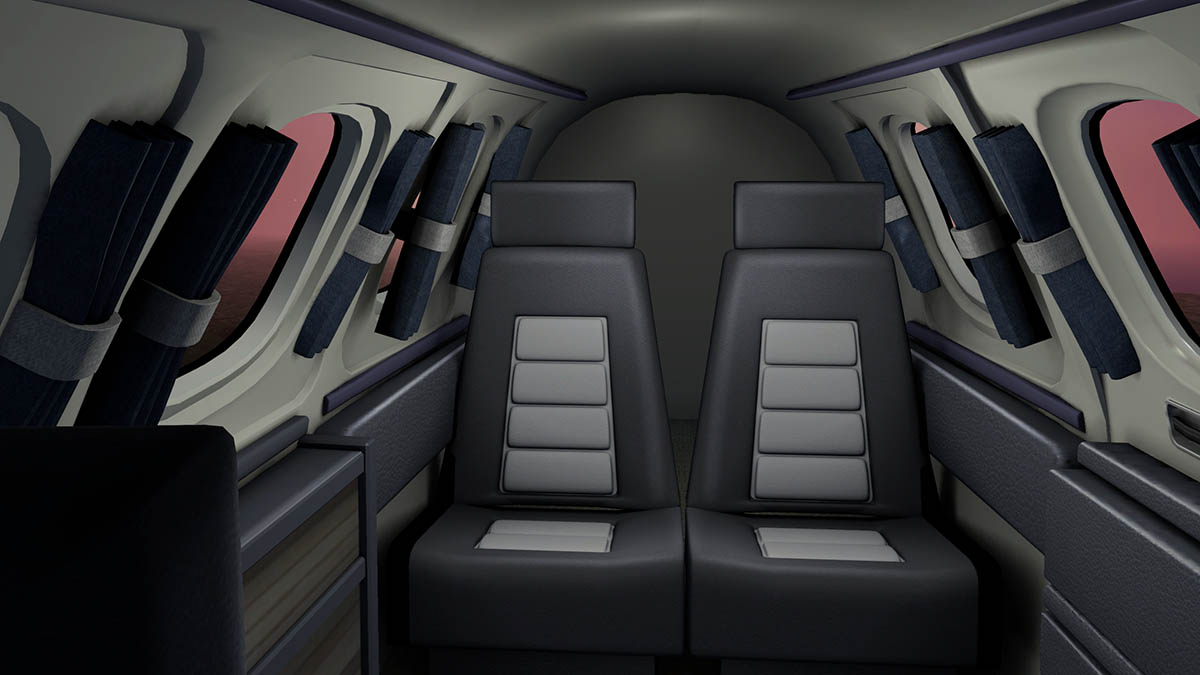
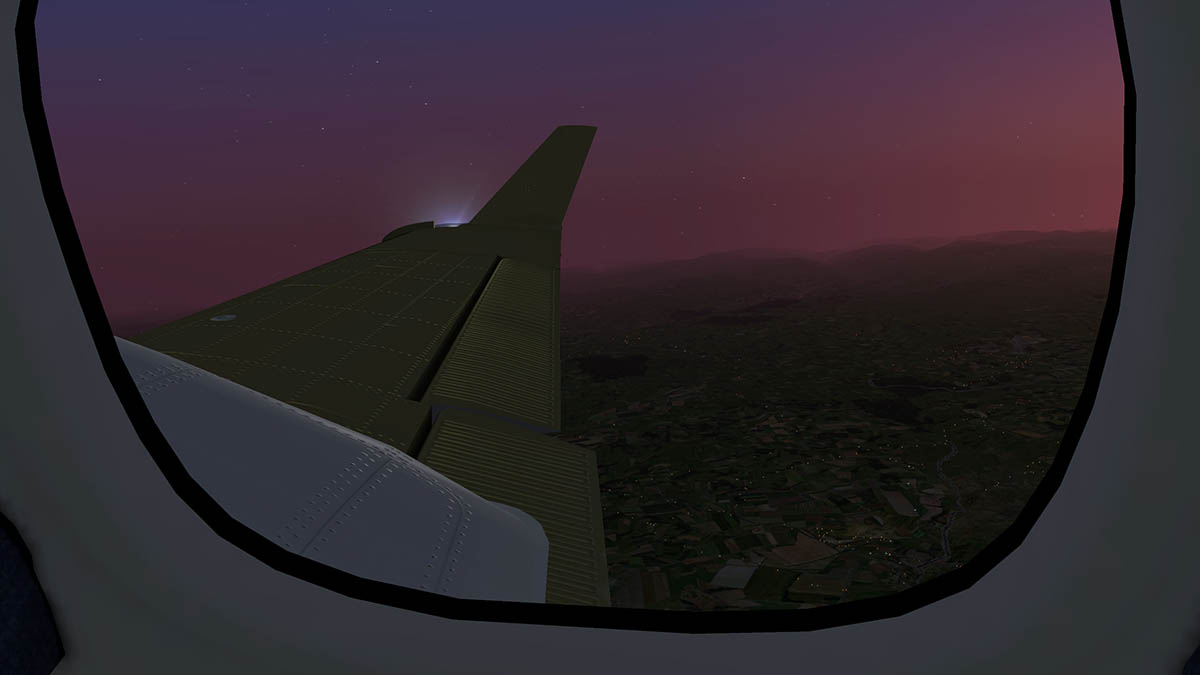
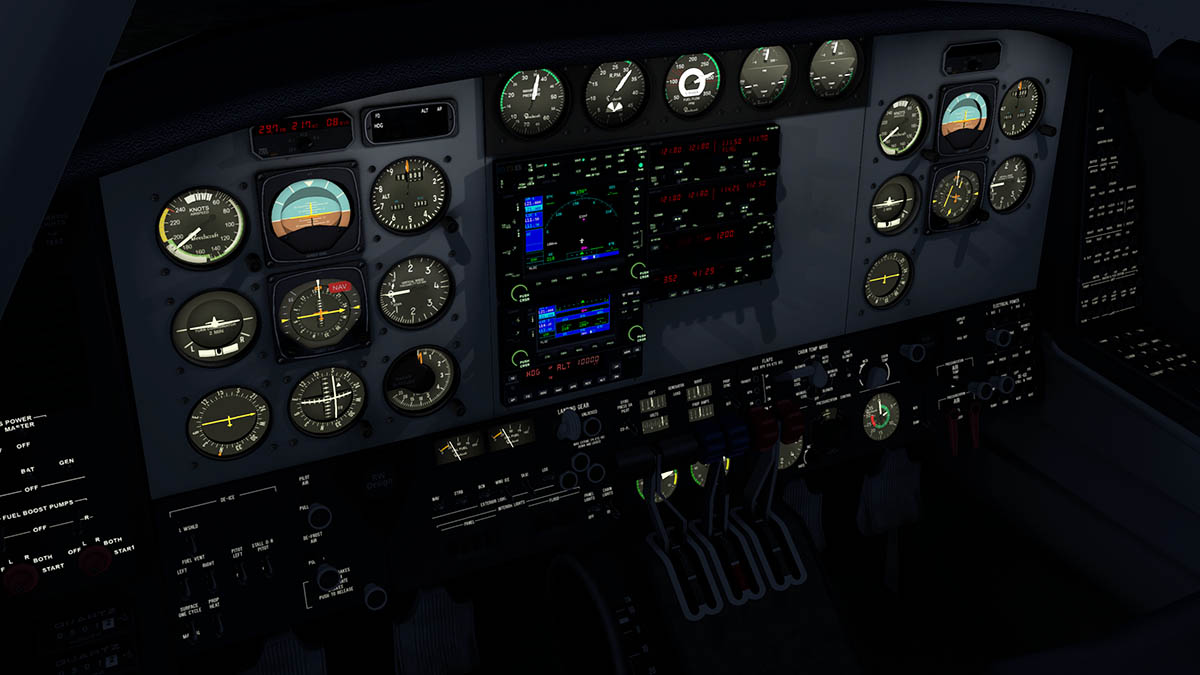
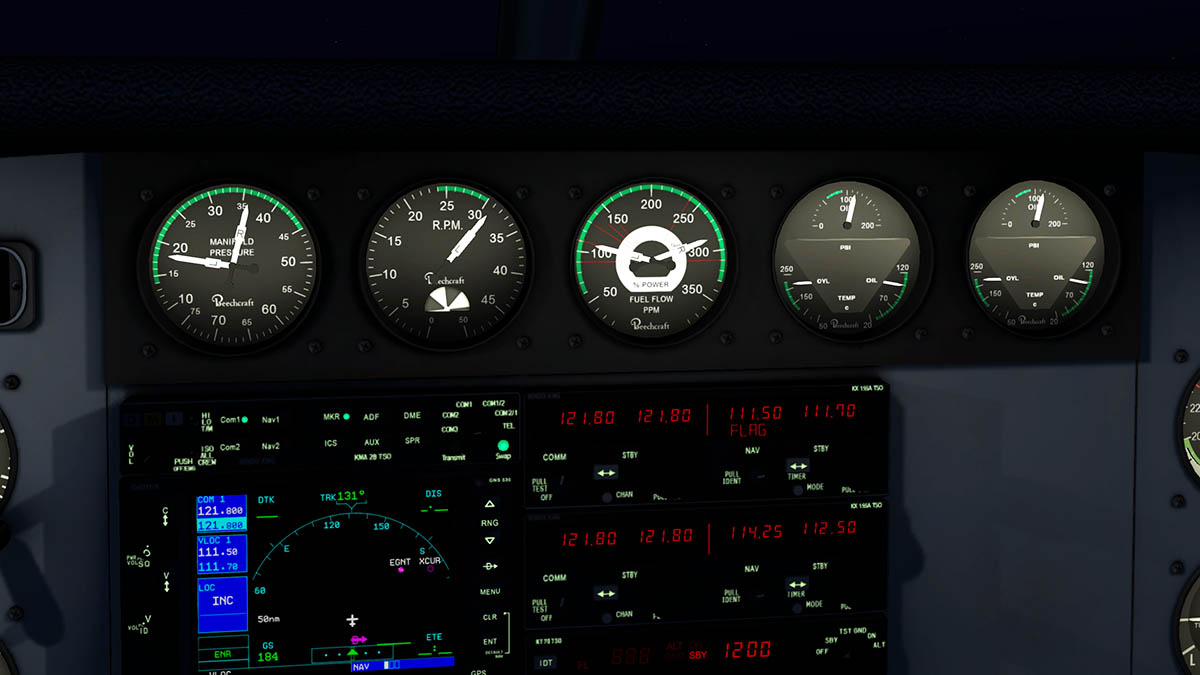
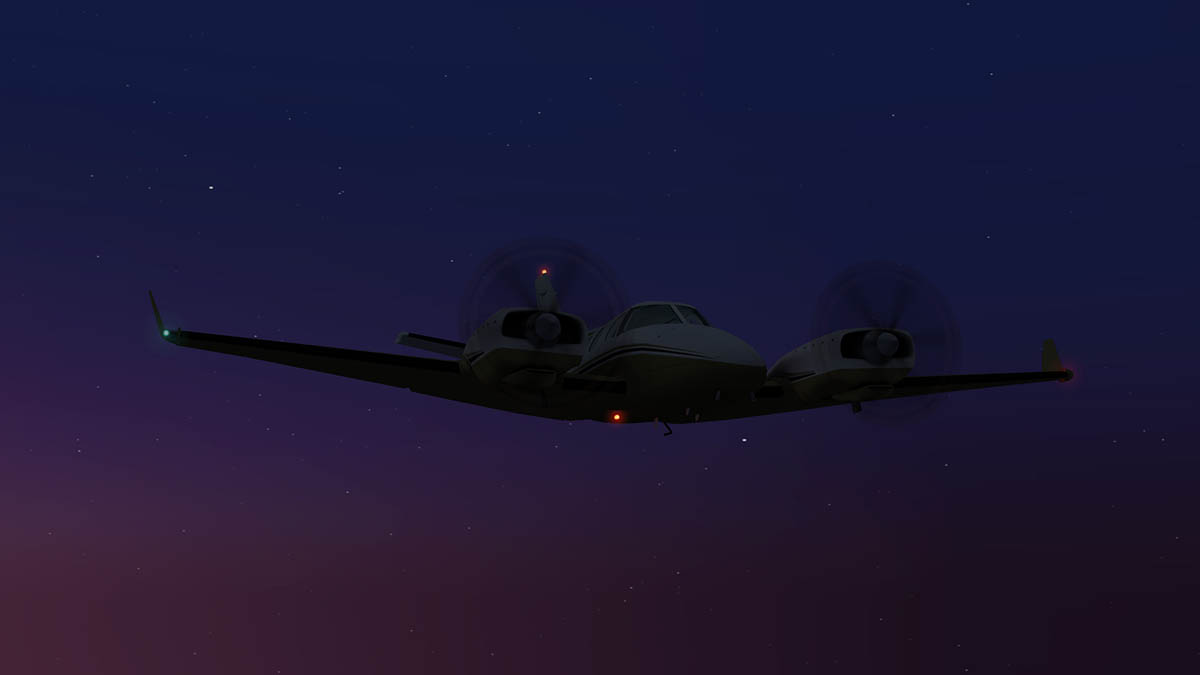
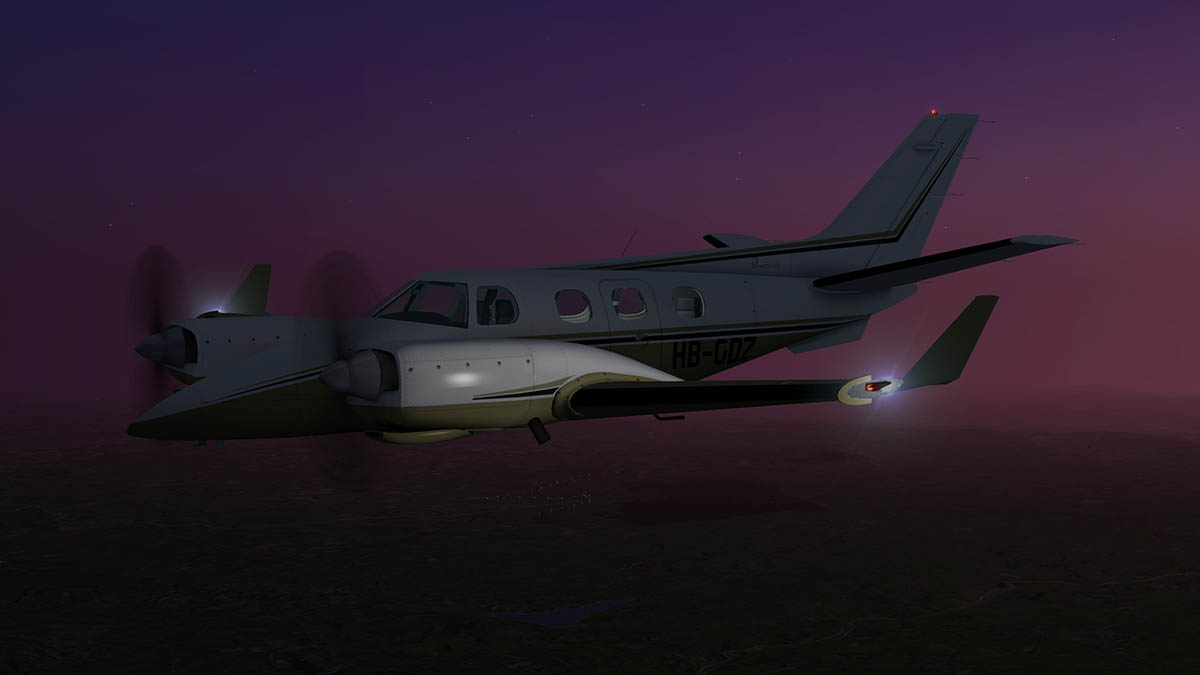
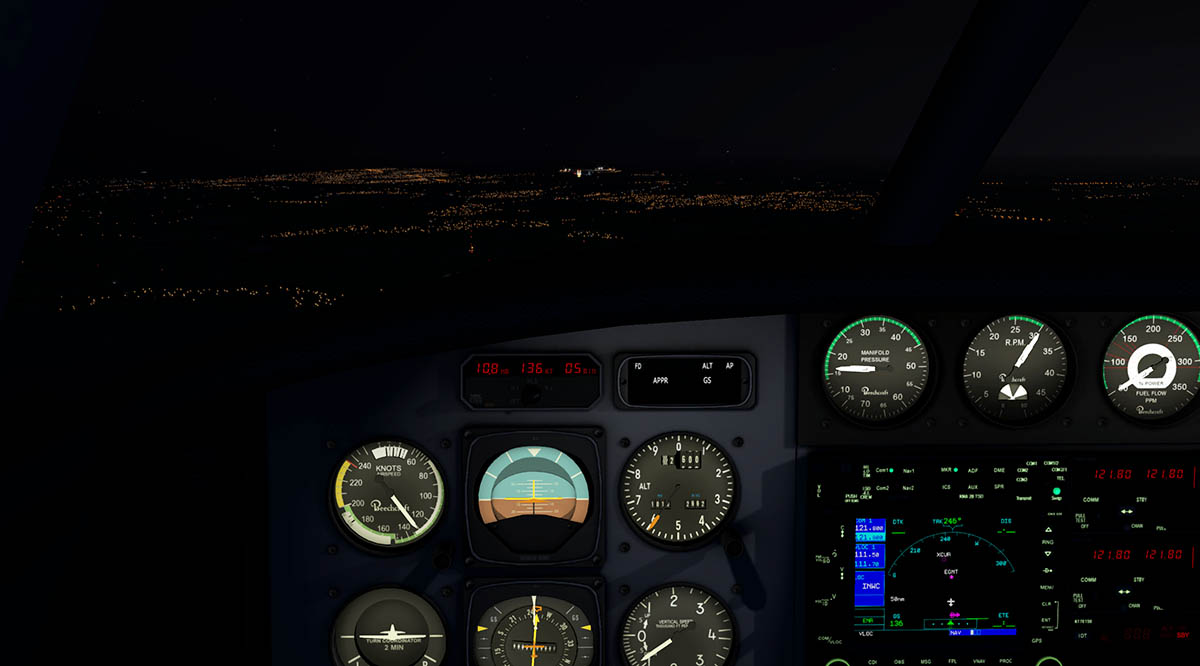
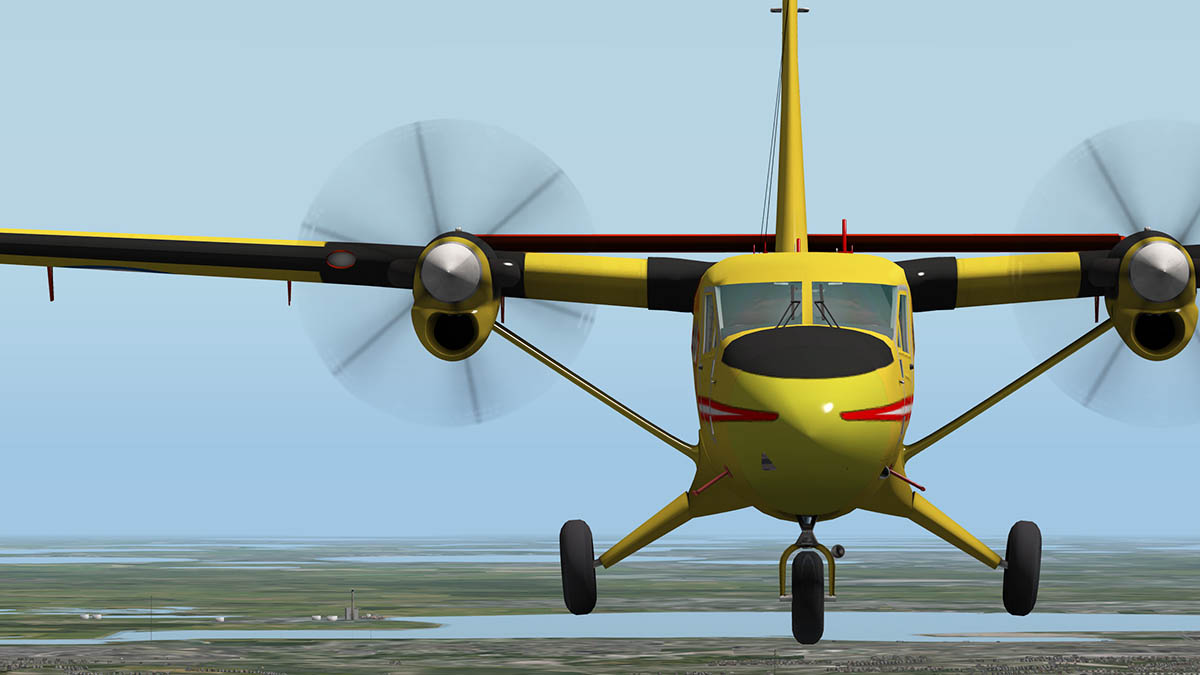
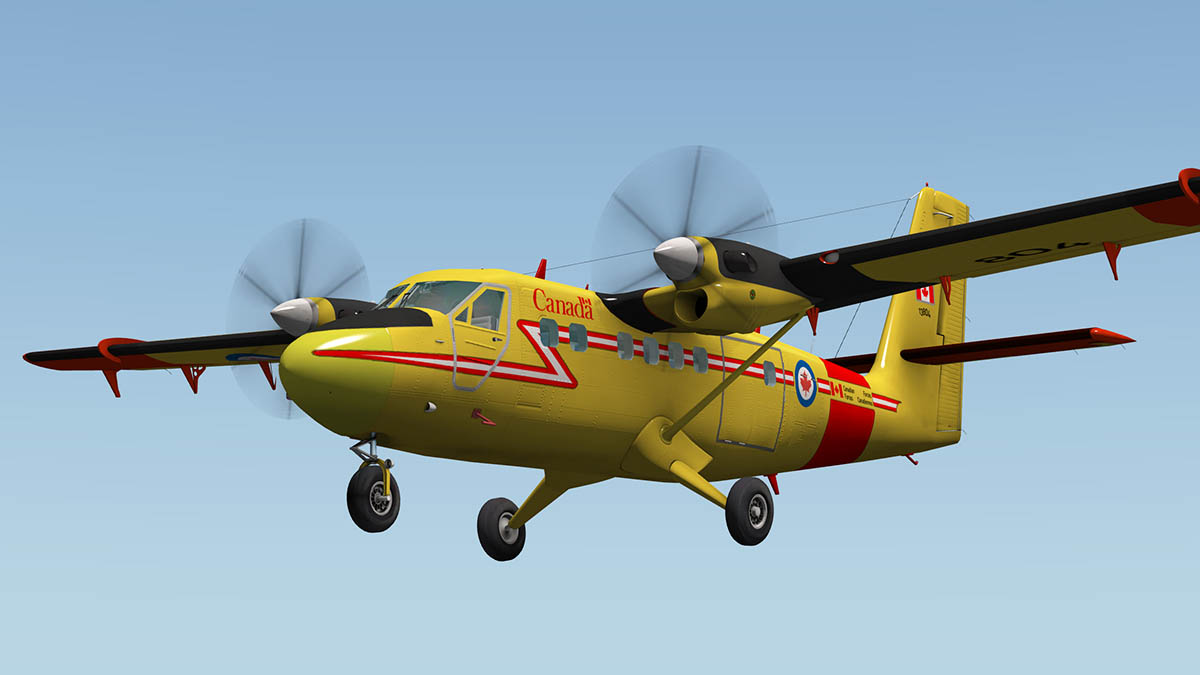
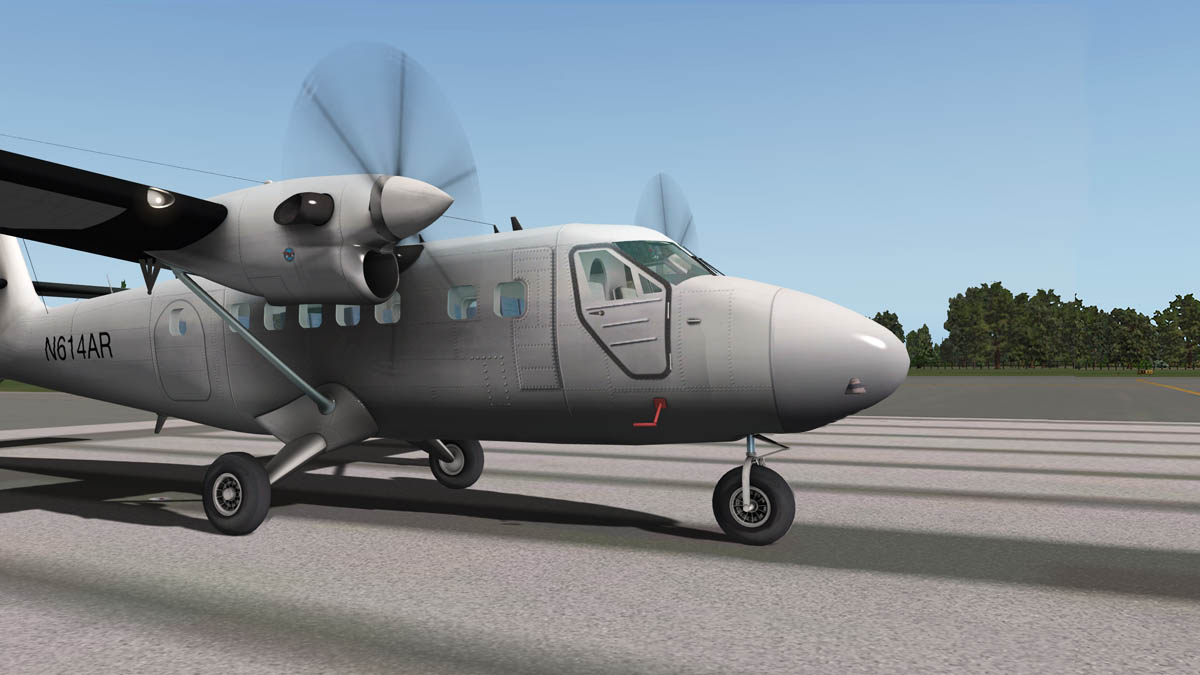
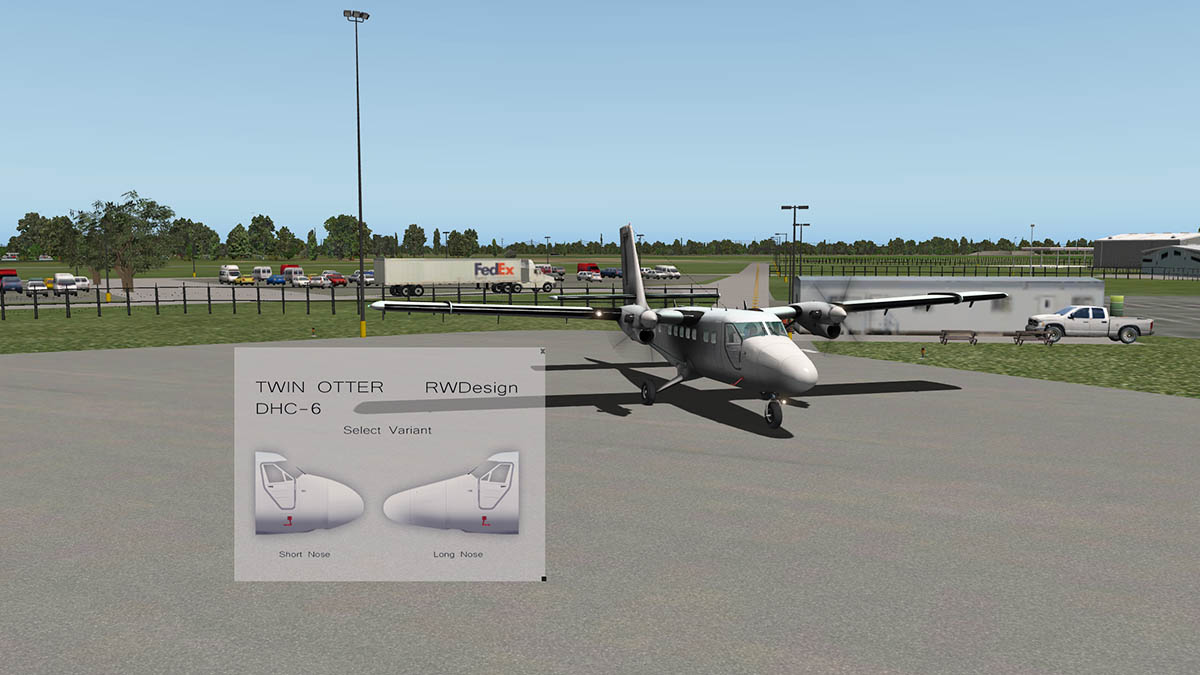
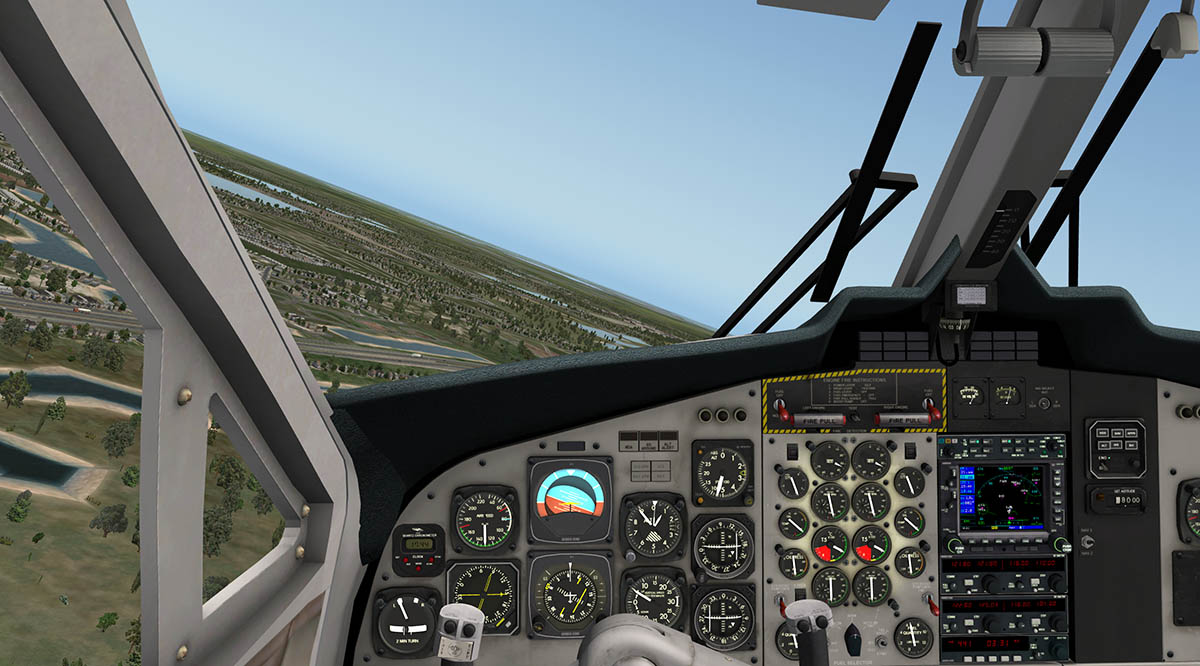
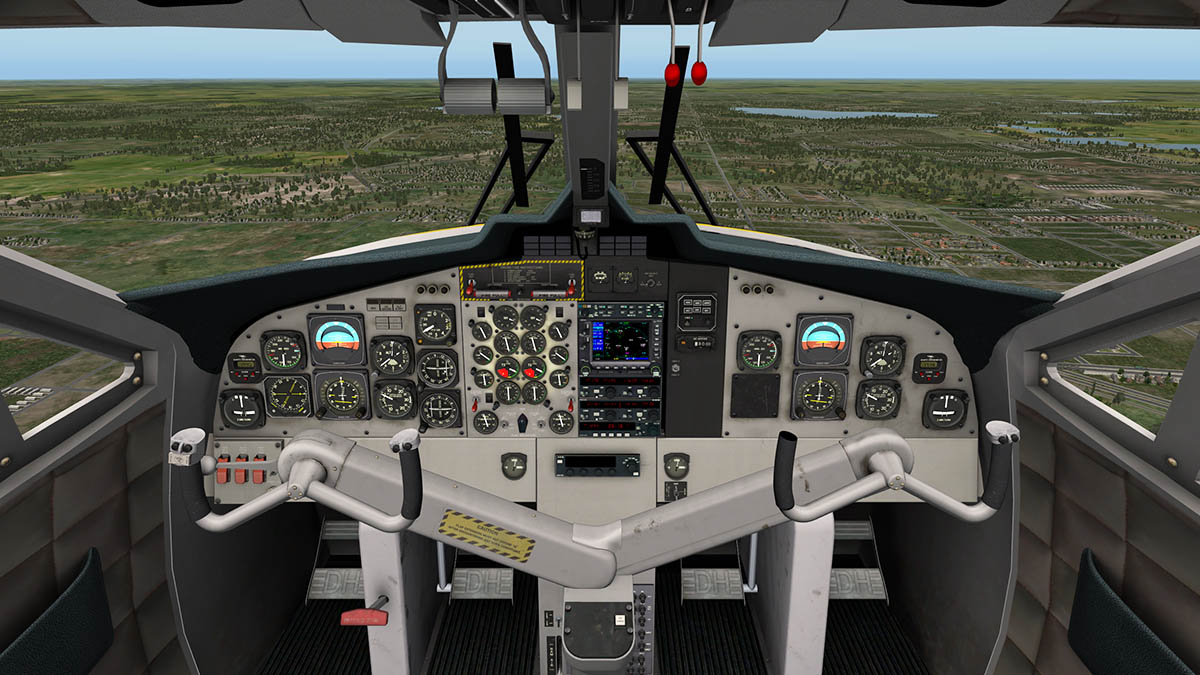
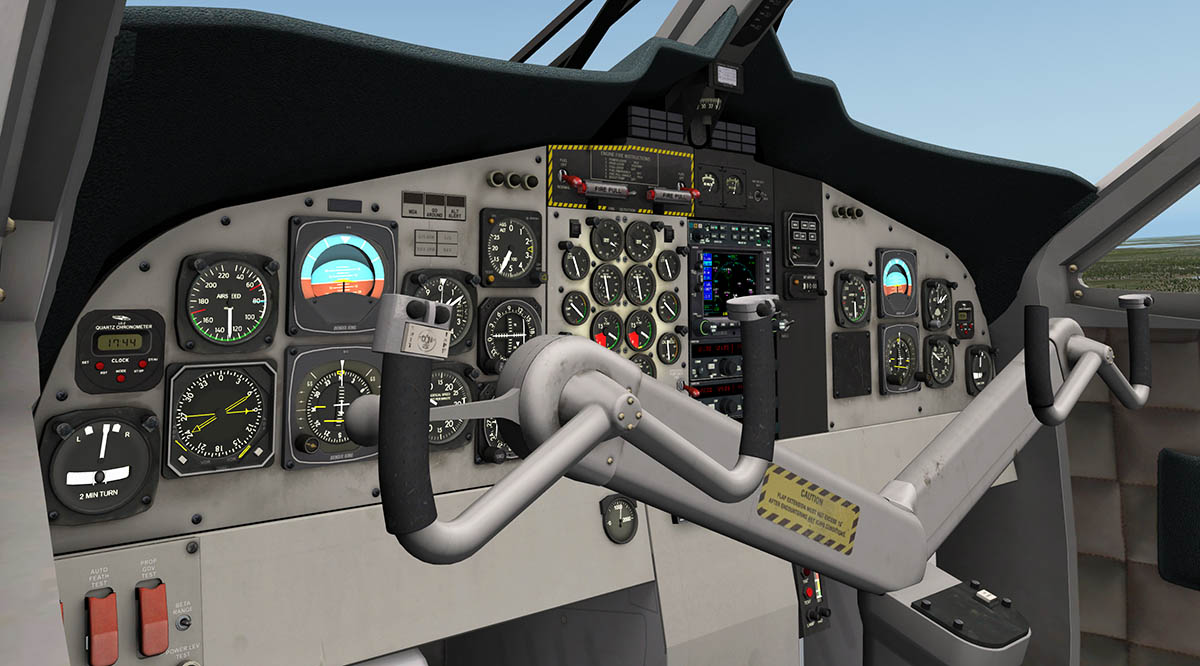
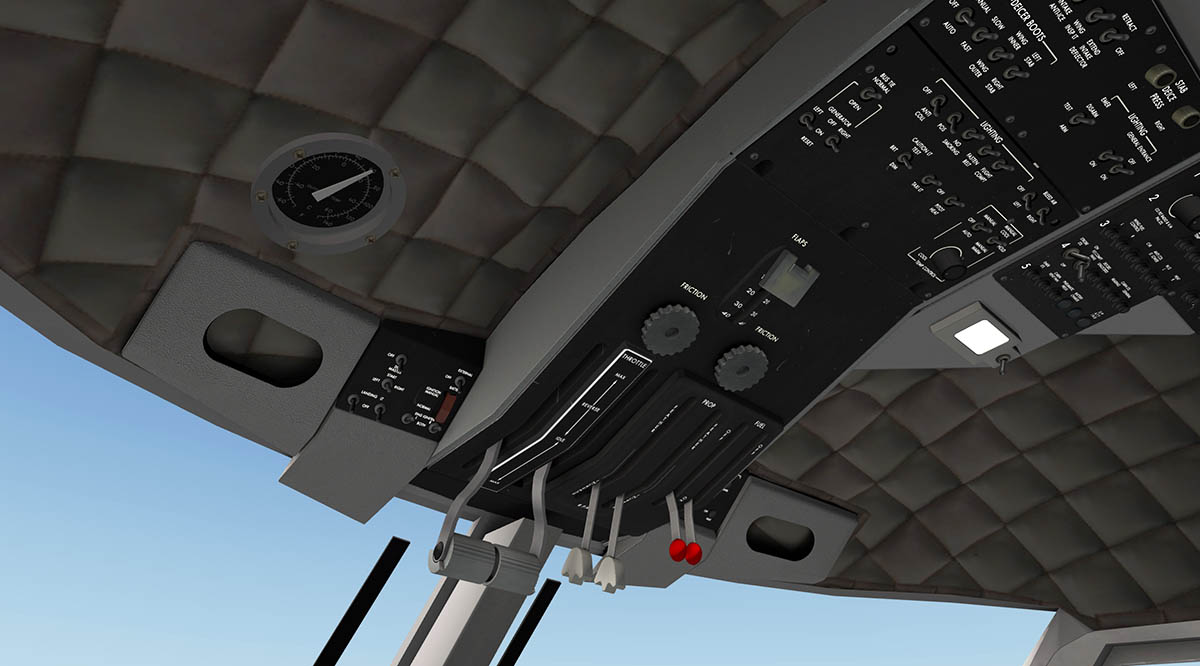
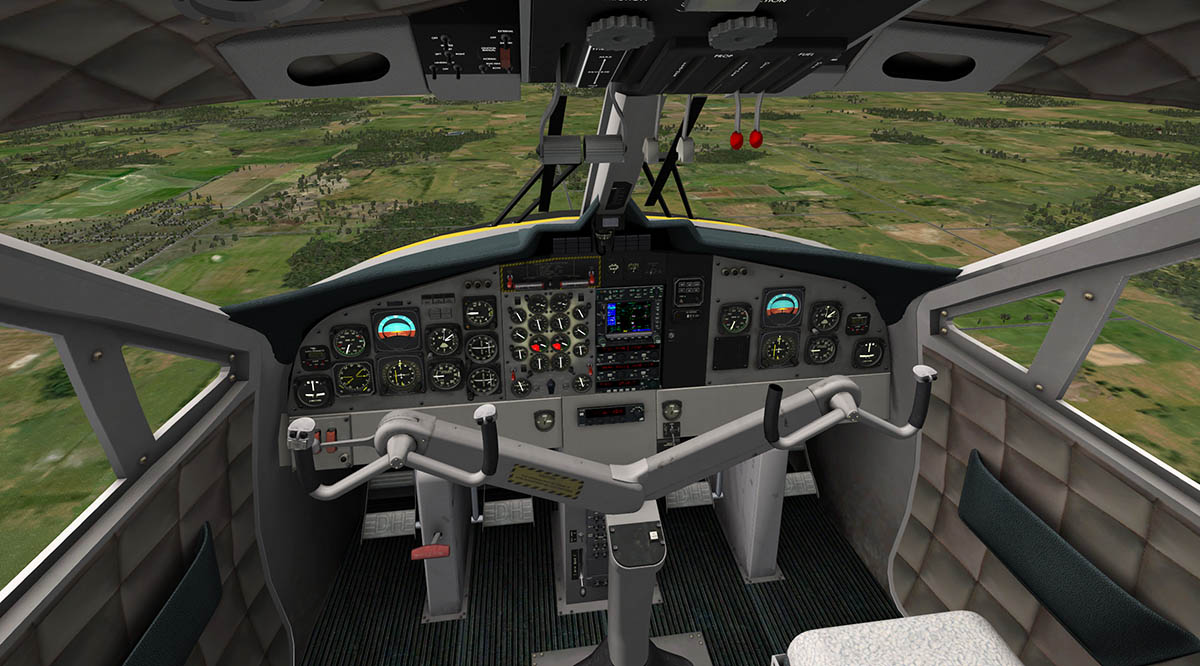
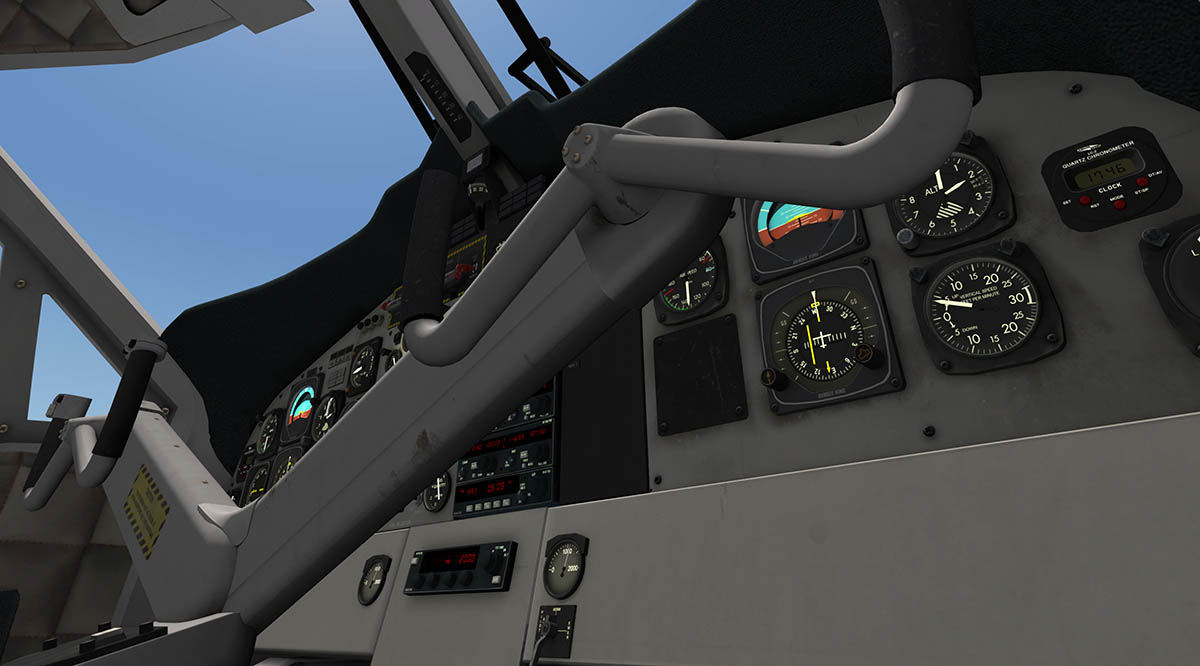
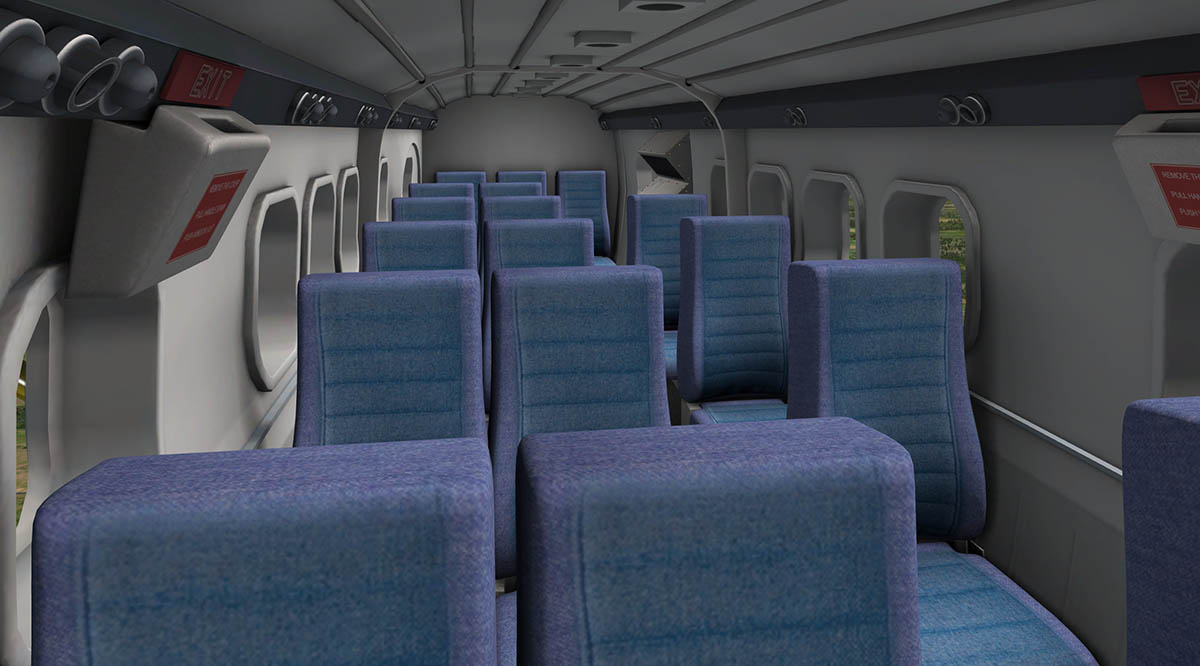
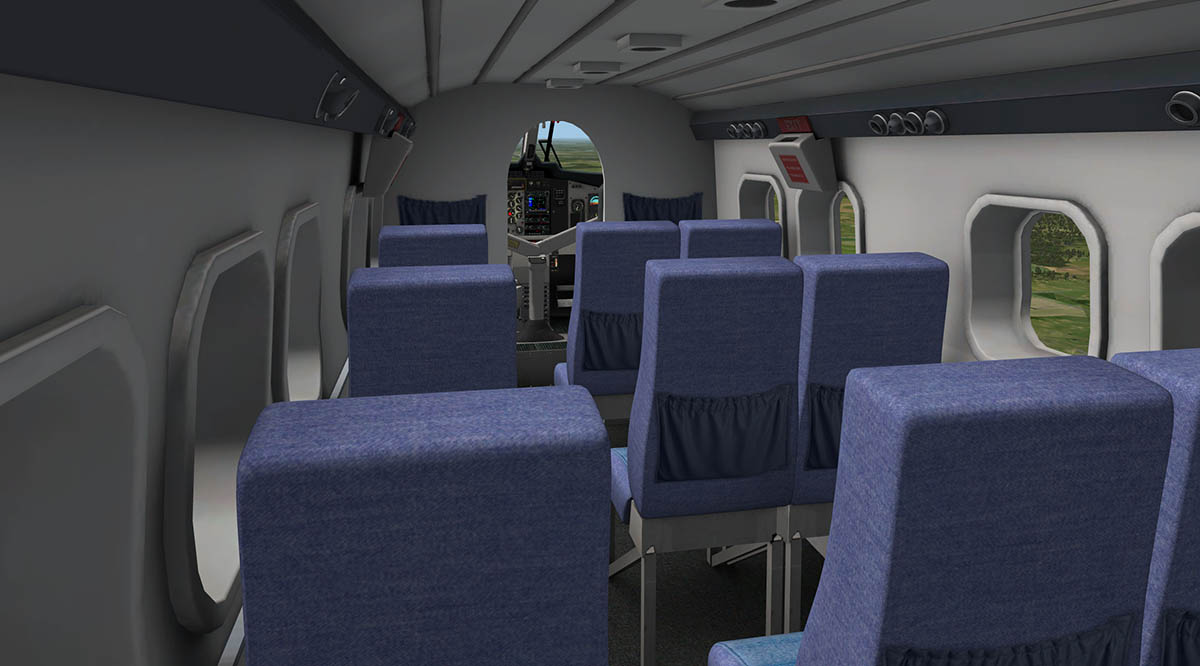
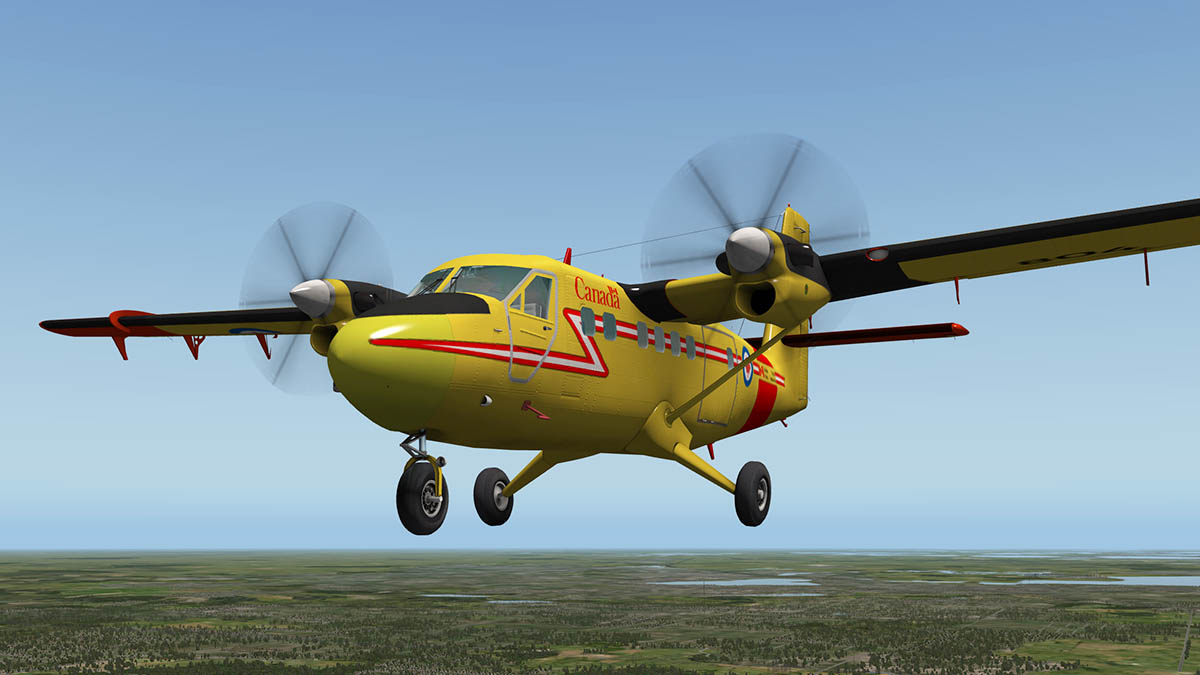
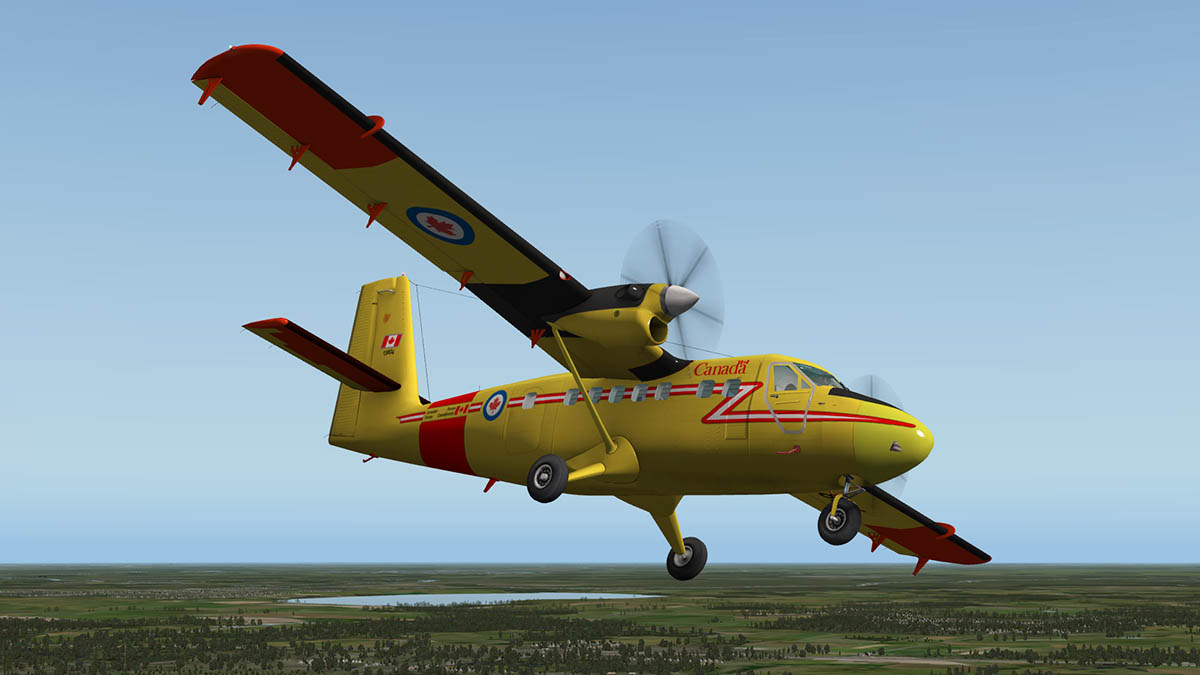
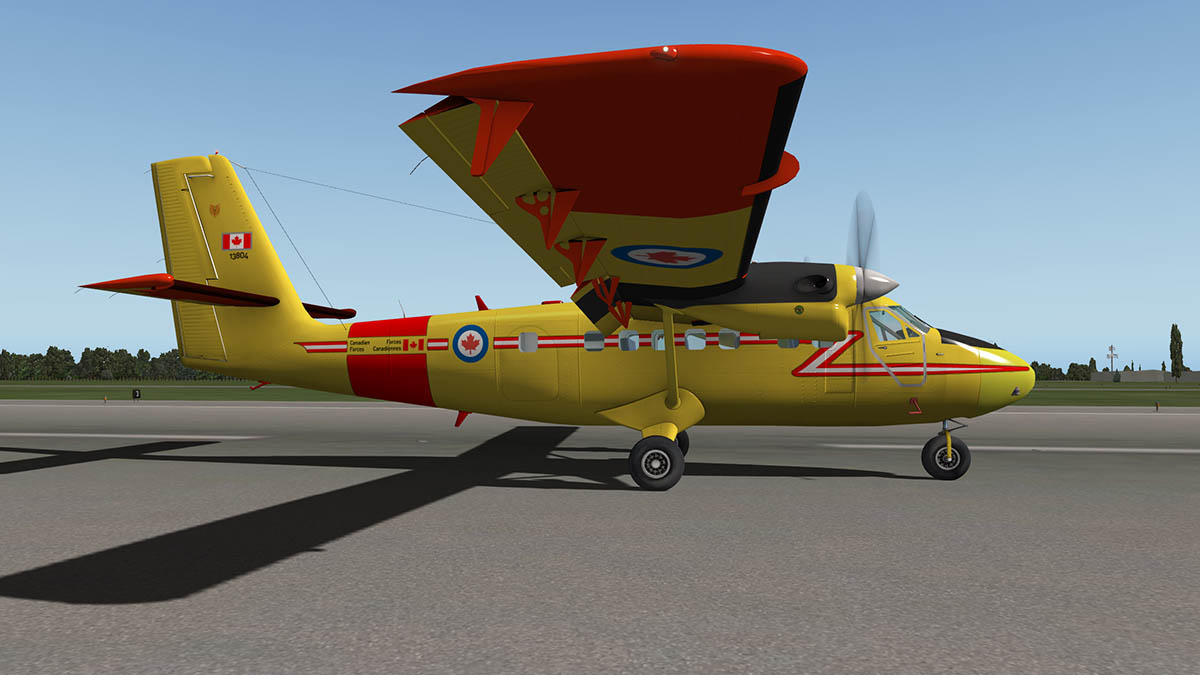
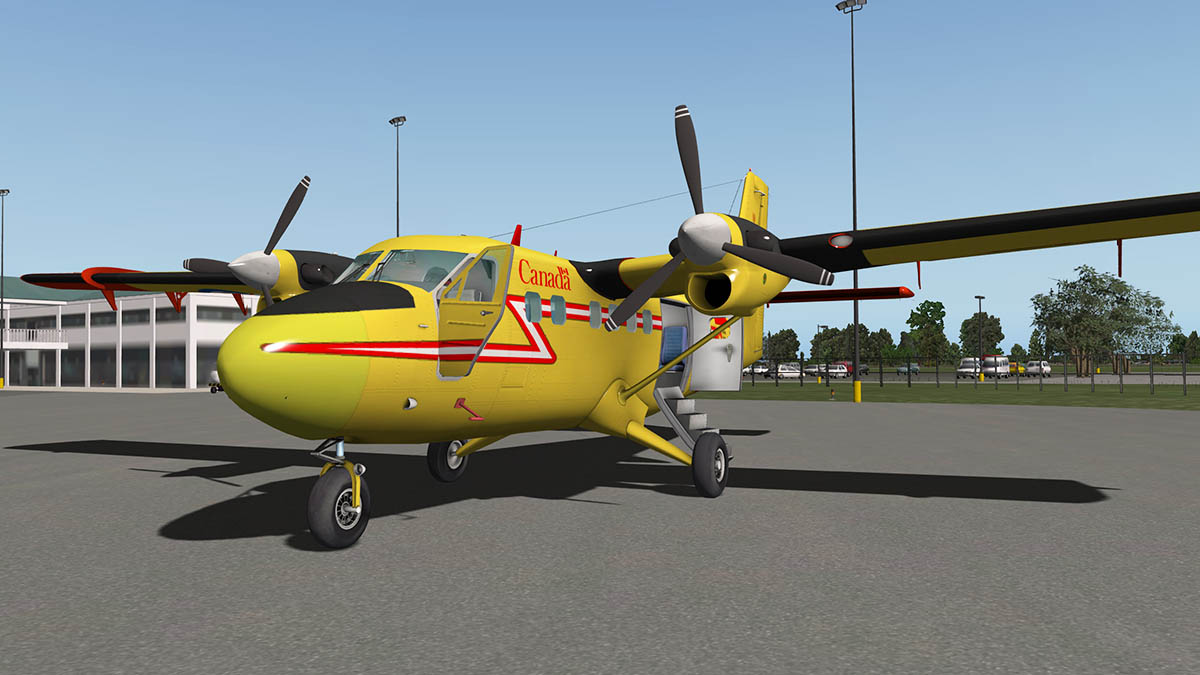
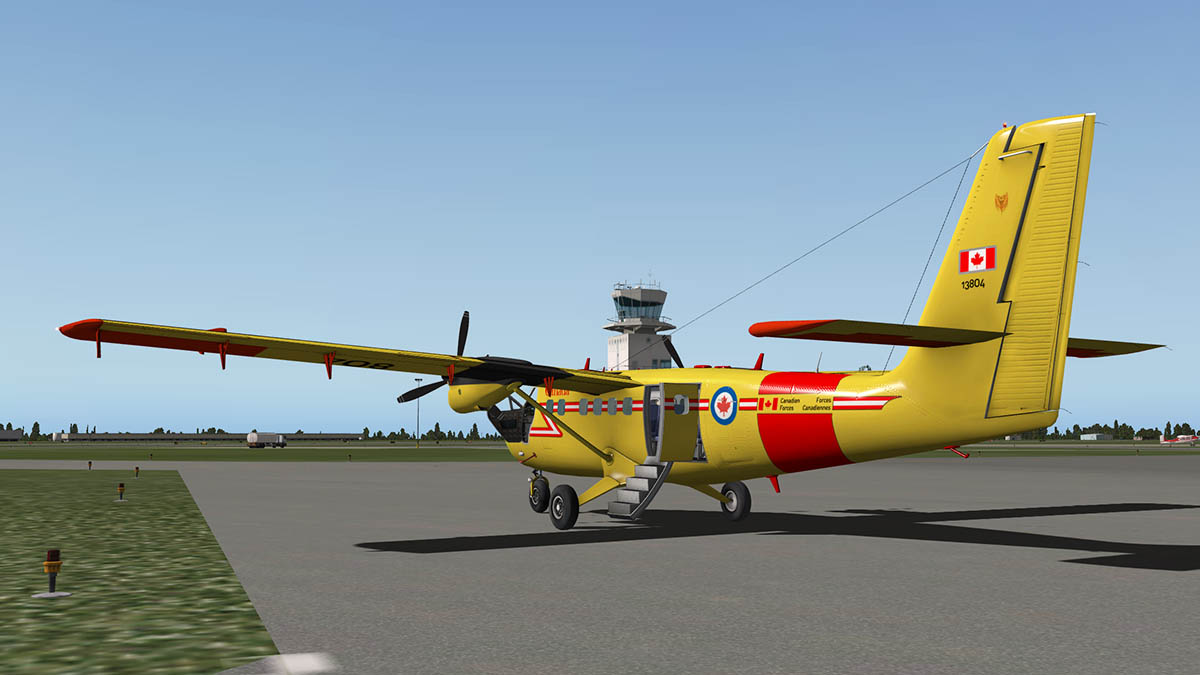
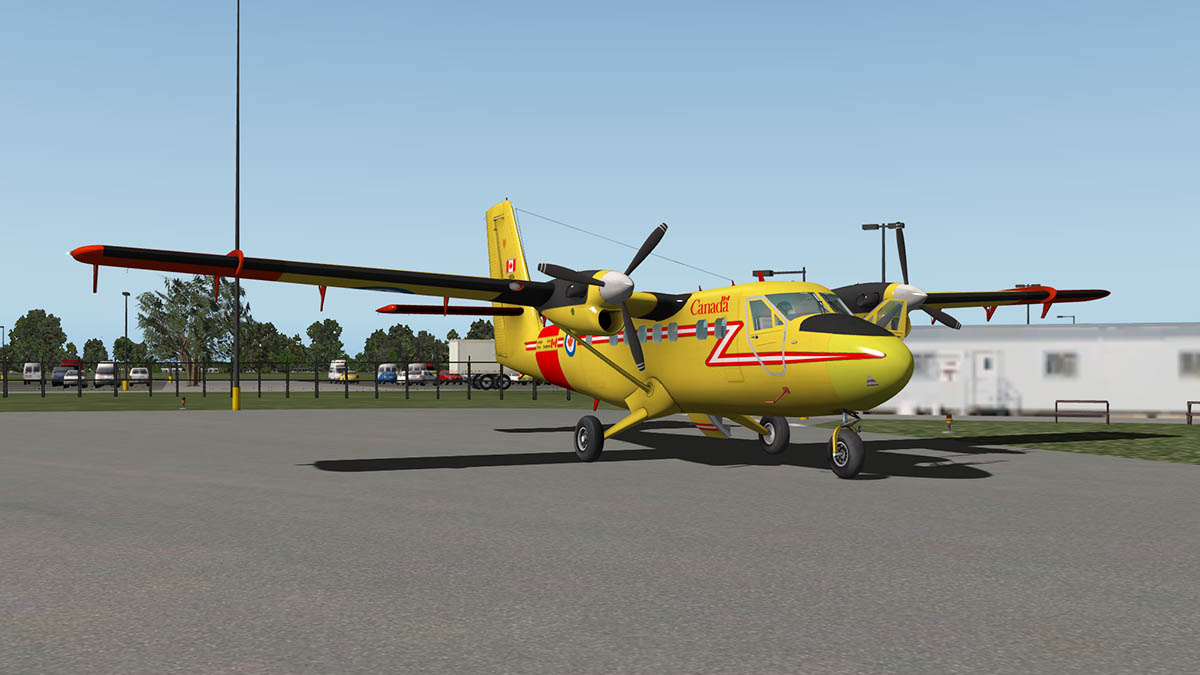
 Aircraft Review : de Havilland Canada DHC-6 Twin Otter -300 Series v2 by RW Designs It is just under three years ago in Feb 2015 was when RW Designs first released their version of the DHC-6-300 or the Twin Otter. It was a competent design as we saw in the review : Aircraft Review : de Havilland Canada DHC-6 Twin Otter -300 Series by RW Designs. The aircraft did however have some traits that divided the purchasers into the "very much like" and the "missing something" divisions, I personally didn't mind it as it was at least a decent Twin Otter to fly. And here now is v2 or the X-Plane11 version of the aircraft and at first glance it looks like the the next update for X-Plane11 for the aircraft. But to think that and you would be wrong, and in fact completely wrong as this Twin Otter is a completely new design from the ground up, and only a few elements have been passed over from the original design. Everything has been completely remodeled, from the actual aircraft, its systems and its features and it is also X-Plane11 tuned and uses X-Plane11 features in its design. So this DHC-6-300 is a full upgrade, not an update. And what you are purchasing here is a completely new aircraft, but there is also a discount for users to update from the original version to this all new v2 aircraft that allows access without the full cost of the purchase price. The overall external design of the original was very good with great detailing of rivets and paneling from the X-Plane "draw per pixel lighting" shading effects and the aircraft body fittings, but there was also a few clunky areas of like the thick rear doors and the average cabin, but overall in the right lighting conditions the original DHC-6 did look very nice. But that was three years ago, and an eon of ages in X-Plane terms and with all the changes to X-Plane11. It was a smart decision to not to try to and simply adjust the design to this new era, but to create a completely new version directly for the changes. Yes that does create a lot of work, extra work, but it also puts you in a far better position because you will have raised the quality standard at the same time and also the intimate quality of your own work. Yes starting afresh allows you do it better and with a better design and a far better approach than just trying to fix up those poor kinks that would be hard to fix anyway. So looking closely at the v2 aircraft the distinct quality is certainly far better, and the aircraft more far more detailed. Certainly the X-Plane11 PBR features help any developer, but to use them effectively still takes skill, and you see that here on the excellent external area and flying surfaces, and also where it counts and this new aircraft can look spectacular in the right lighting conditions. Here is the original design... ... and the new v2 design. The quality and detailing is quite significantly modeled far better with the specular lighting effects bringing out the quality. Baggage areas (front and rear) are now lined, but we have lost the bags in transit? The cabin window detailing is now excellent and they are a huge difference from the original bulky frame idea. And were as the cabin in the original felt like an after thought, the v2 cabin is now excellent. For the insanely beautiful steel floor and the exquisite leather seats. Now this Twin Otter feels like a complete aircraft. Menus The aircraft also now has menus... The menus are located in a flight book down in the pilot's door pocket. The main menu also opens up three more menus in Radios, Checklist and Weight/Balance The main contents include a flashlight (X-Plane native) opening the front and rear baggage doors, external power supply and GTN 750 Support... but no menu options to open the main cockpit and cabin doors, of with which with the rear doors being hard to move to every time you want to open/close them is a bit of a side head scratching moment. Lower menu is four cockpit colour options... In Green, Blue, White and Black. Green is green, but the Blue feels like very light Grey, White feels Grey and Black feels light brown. Only the cockpit colours change and not the cabin textures including the seats, which would have been a nice touch. The Checklist is excellent and covers all aspects of operation from start up to shut down, and the binder is moveable and scalable for ease of use. There is a very good "Weights&Balances" menu as well. You can set the fuel in kg's and the weights of baggage and passengers (Payload). Your aim is to keep the CoG (Centre of Gravity) around 30% of MAC. The full Empty Weight and Total Weights are all shown. Nose versions There are both the "Long" and "Short" nose versions available. They are switched via the liveries with "LN" denoting the Long Nose and "SN" denoting the Short Nose. Besides the Standard wheel version there are three other variants in Float, Ski and Tundra tyres. Float The float version is well done and the undercarriage can be raised up into the float via the undercarriage lever, but there are no rear float rudders for water steering to raise or lower... ... the aircraft handles nicely on the water (without a high swell) and with the opening rear doors, they both open out and not down for exit and entrance. Ski The ski's are fastened on tight, as some developers make them raise or lower below the wheels. Overall the quality is very good. Tundra The huge balloon Tundra tyres are very well done here, and you don't get that bouncy floaty movement on landing but a nice grounded feel. Flying the DHC-6 Twin Otter v2 The early morning service today is the from EGPH (Edinburgh) to EGPD (Aberdeen) a simple hop of 93nm. Aircraft was set up with 611kg of fuel and 1380kg of payload (passengers and baggage), for a gross weight of 6147kg. You need a bit of thrust to get the aircraft mobile, but once moving you can mostly keep it back in the idle position, and contain any speed with the brakes. Flaps are set at 10º and the indicator is on the centre windscreen bar. A final check and it is power up or power forward with the twin overhead drop down levers. Rotation is around 95kt to 100kts depending on the wind direction, but the aircraft is nice in the pitch and then the bank... .... The differences with the X-Plane11 performance is quite considerable. The original was not in performance as close as it should have been, certainly in the handling as this Twin Otter feels far much better as of the simulator changes. As with a lot of moving over to XP11 style flying, you need a short time to adjust to different feel and reaction, so any first flights won't give you the feeling you would expect from the aircraft straight away, but it does come in time and then and only you start to really love what you then have to fly, and after a few flights you will really understand what I mean. In the original DHC-6 we were a little confused by the Collins AP106 system and as you will notice there is no V/S (Vertical Speed) button or V/S climb or descend knob? Only an Altitude (ALT) and Heading (HDG) buttons. As the Collins system does not use that type of system to climb or descend. The AP106 is tricky to still use, but as the actual aircraft performance is better, then it works better in here now as well. The trick is to find the right speed in your throttle position and then lock that speed in via the IAS button. The system works by then adjusting the throttle to climb or descend. You aim or goal is for a speed of around 105kts to 110knts and a climb rate of around 1000fpm as noted here for the best of both worlds, and the specified climb rate is around 1600fpm. To descend you do the reverse in reducing and locking in the speed around 80knts and descend around the same 1000fpm. This is a big change over the original version as the aircraft wouldn't descend at all unless you went to extreme measures like even setting the throttle to idle and then even feathering the propellers to go down, which was ludicrous. ALT ALERT button is really the altitude hold button for the selected required altitude, and it works in both modes of ALT and IAS disconnect when the set altitude is attained, but it can be tricky to set sometimes. A note on to have the trim correctly set is now important, not only for the initial takeoff but for the AP106 interaction... if the trim is out, then the AP106 will do silly things like climb or descend too quickly. so a set trim and a level aircraft helps in AP106 transition. An item to note is that you have to manually disconnect the AP106 by both the buttons and the switch. If you use a key or in my case a joystick button to disconnect the autopilot then here it doesn't deactivate the AP. Debatable is the sound package on the aircraft. It is a FMOD setup and has 3d surround sounds and good variation in sound. The package uses a professional PT6A soundpack, which is noted as one of the best for the Twin Otter. And in most areas like start up, idle and takeoff power the sound is very good, but the in flight internally sounds are very buzzy, light and don't have much depth or even drone and the sound pitches don't change much with any throttle changes. The sounds do come well regarded and so I am going to put the aural question out there as some aircraft like the Twin Otter do have a particular feel and sound, so feedback is welcome, but they did grow on me. Another point to make is that the RW Design's Twin Otter doesn't like the xEnviro weather plugin very much in the visual stakes, the view from the cockpit is fine, but if you look at the propellers at any time they show the real scenery through the movement. This of course an X-Plane/xEnviro issue and not the developer's issue, but it is currently not the best external view with xEnviro active and the normal X-Plane weather is used here in this review. Although a few of the original elements like instruments have been moved over and updated, in context this is a completely new cockpit and instrument panel. The main panel does feel slightly duller and flat, than the lighter smoother approach on the original, but the quality is far, far higher and detailed. We are used now to excellent metal style instrument panels, but here it is authentic to the flat grey used on the aircraft. The excellent glareshield is really well modeled and textured, so overall it works very well. The classic dual yoke is well reproduced, but it can't be hidden. The iconic Twin Otter overhead panel (OHP) is excellent, fully featured and really well produced. The OHP was good before, but this complete redesign is now even more authentic and realistic, but you do have to set a key "quickview" to get a quick upside down view of the rear of the panel if you want to access the switchgear, overall it is all really well done. Under the panel and floor is also very well completed and realistic, with lovely crafted DHC rudder pedals, centre upright fuse panel with built in fuel gauges. And note the great Brake Temperature display panel. Cockpit quality and seats are as good as the cabin, and the only noticeable point is the cockpit/cabin divider is not a clean arch. The excellent trim controls on the pilot's right seat arm, are however beautifully created and authentic and very nice to use.. The Instrument panel layout has had a few changes. First up is the completely new BendixKing electronic Artificial Horizon, replacing the flat (awful) design of the original on both sides is a huge improvement there. The Collins AP106 system's button panel has been moved from the right-centre instrument panel to the pilot's side for easier use, and there is now both a VOR(2) and ADF dial bottom left (only a single ADF dial before). The Course Deviation Indicator (OBS) looks like it was moved, but in fact it is still in the same place, as the Radar altitude has been moved below it to allow the fitting of the AP106 button panel above. The equipment avionics stack is different as well. The KMA 28 audio panel is top, with the GNS 530 below. The radios are more basic, but also more realistic with two KX 155As for COMM1/VOR1 and COMM2/VOR2 receivers. A KR 87 is your ADF and centre below is a KT 70 BenedixKing Transponder. You can if you have purchased the (expensive) RealityXP GTN 750 or GTN 530, use them in the aircraft and replacing the native GNS 530. The GNS 530 and the radio panels all pop-out for ease of use. All instrument and radio panels have nice reflections, real, but not overly done. Panel lighting is indirect, but looks great even in the daytime. On the lighting theme, the cockpit is very good, in a black and white way. But the dials are very clear and concise for night landings. All instrument lighting is adjustable and the cockpit is lit by only one light above your head. The cabin is sensational with pairs of spot lights for each set of seats... ... The seatbelt and no-smoking sign is nice touch. External lighting is very good, with a single front strut taxi light and two wing mounted landing lights, standard tail-beacon and navigation lights and excellent strobes. Landing light throw is very good as is the powerful single centre taxi light. Aberdeen is waking up as we arrive at Dyce. After doing the controlled descent, with the IAS set at 80knts and around 1000fpm to 1500ft. You set the approach speed with 20º flap and just in the green zone at 90knts. Remember this is a STOL (Short TakeOff and Landing) machine, so those flaps act like barn doors when lowered, but give you super slow control. Full flap at 40º will give you a slow speed of around 70knts, but if the sea breeze is strong you have to work the rudders hard to keep the runway alignment as that large DHC tail works for you and against you at the same time. I took me a few landings to get the feel just right... ... it is an aircraft to get into the right groove with, but once there you are really into the aircraft and it comes to you. Landing speeds can border on the 60knt stall, but you seem to hold it fine to gently touch down, the speed is so slow you can just roll the speed off more, but if you need it then there is reserve prop thrust by setting the "Full reverse thrust" setting, but I never did. As the propellers wind down, you notice the animated feathering of the blades, they are really well done... ... but is quickly time to load up and return to Edinburgh, not a bad way to make a living is it... Liveries There are nine liveries with two as the short nose version with a very nice RWDesign logo (default) and a Kenn Borek Air The rest of the liveries are all long nose and every livery works with every variant in Float, Ski and Tundra. All are excellent Hi-Def quality with the lovely Air Seychelles a highlight. Summary First glance is that the Twin Otter from RW Design's is just an update, but this aircraft is very, very different from that fact. This is a complete rebuild of the aircraft and only a few of the original elements are actually present. This comprehensive upgrade is really an all new aircraft and with the excellent quality to match the better detailing. Highlights are many with an excellent cabin with lovely well done textures and realistic metal flooring, and luminescent lighting. A menu system that can change the cockpit colours and an easy to use Weights&Balance page, Checklists and pop-up radios. The depth of the quality grows with every flight. X-Plane11 features have made the aircraft far more dynamic, not only in the way the aircraft uses the PBR, but with the better X-Plane11 performance dynamics, something in performance was missing on the original release aircraft, but fully restored here and the images here in this review don't lie as the aircraft looks brilliant in great lighting. Four variants with the Standard Wheels, Float, Ski's and Tundra tyres is a value four aircraft, with also Short and Long Nose versions available. Overall this is an outstanding upgrade, but I question the sounds, and they are FMOD great, and they do actually grow on you, but can be tiring over long distances. More menu options would be a nice option and certainly for opening all the doors (the rears can be hard to reach), hiding the Yoke, static elements and making the change of the colour scheme to cover the cabin as well as the cockpit. A cargo version with that metal floor would be nice as well. Currently if you own the original version v1 then you can get an upgrade to this excellent v2 for 50% off, which is great deal, so be quick. Overall this is a comprehensive upgrade to a classic aircraft, in reality it is completely different design in every area, but a very good one. It is also a significant upgrade of quality and design from RW Designs, who was good before, but design is now at that much more a higher level... It was a brave thing to do to completely redesign an aircraft in time and dedication, but that has paid off in spades here... and that is in making this DHC-6 Twin Otter -300 v2 an excellent aircraft to own, fly and use. ______________________________________________________________________ Yes! the de Havilland Canada DHC-6 Twin Otter -300 Series v2 by RW Designs is NOW available from the X-Plane.Org Store here : DHC-6 Twin Otter 300 Series v2 Price is US$29.95 Note - If you have already purchased the DHC-6 Twin Otter v1 you can purchase this new v2 Twin Otter for 50% off. Find your coupon code under your DHC-6 Twin Otter invoice at the store (doesn't apply to Twin Otters from other designers). Features Four versions included in the package ! Standard Tundra Floats (with the ability to remove gear entirely) Skis All of which work with both short and long nose variants! High Resolution 3D Model Brand new model built from scratch for X-Plane 11 X-Plane 11 specular lighting Detailed exterior model New high resolution 4K textures Interactive night-lighting Choose interior color Rain effects Superior Interaction New scroll manipulators for finer tuning of interaction New menu's allowing extended interaction and choice of aircraft parameters Radio pop-up with improved 3D input methods. Mutli-phase checklist Real-time weight and balance manager Improved Sounds FMOD Powered 3D sound High quality source files recorded from the real Twin Otters High fidelity flight model Custom airfoils Developed in conjunction with Twin Otter pilots Custom Systems Custom electrical and anti-ice systems Programmed radios RealityXP Compatible GNS 530 GTN 750 AutoUpdater Always fly the recent aircraft version! AutoUpdater Licensed from STMA Requirements X-Plane 11+ Windows, Mac Linux 2Gb VRAM Minimum - 4Gb+ VRAM Recommended Current version: 2.0 (January 20th 2018) Installation Download of the DHC-6 Twin Otter -300 Series v2 is a huge 547mb and it is installed in your Aircraft Folder as a 671mb folder. There are four different aircraft files in the aircraft menu to access depending on the variant that you want to fly in : Standard Wheels, Float, Ski's and Tundra Documents Documentation is excellent with a AOM (Aircraft Operating Manual), Aircraft performance charts and Flight Tutorial included: AOM.pdf Charts.pdf Flight Tutorial.pdf _____________________________________________________________________________________ Review by Stephen Dutton 20th January 2018 Copyright©2018: X-PlaneReviews (Disclaimer. All images and text in this review are the work and property of X-PlaneReviews, no sharing or copy of the content is allowed without consent from the author as per copyright conditions) Review System Specifications: Computer System: Windows - Intel Core i7 6700K CPU 4.00GHz / 64bit - 16 Gb single 1067 Mhz DDR4 2133 - ASUS GeForce GTX 1080 8Gb - Samsung Evo 512gb SSD Software: - Windows 10 - X-Plane 11.05 Addons: Saitek x56 Rhino Pro system Joystick and Throttle : Sound - Bose Soundlink Mini Plugins: XPRealistic Pro v1.0.9 effects US$19.95 Scenery or Aircraft - EGPH - Edinburgh Airport UK 1.0.1 by tdg (X-Plane.Org) - Free - EGPD - Aberdeen Dyce for XP10 4.1 by anthony_d (X-Plane.Org) - Free - Forth River Crossings 1.2.2 by John M D (X-Plane.Org) - Free
-
Classic Aircraft : de Havilland Canada DHC-3 Otter by RW Designs The de Havilland Canada company of Canada (DHC) had a huge success with their DHC-2 Beaver utility aircraft that was and still is the one of the greatest bush aircraft ever built. And so if you are on to a good thing then being an aircraft manufacturer is that what you usually do with the next aircraft is to build a bigger, faster and better one than the original success story. This is the original DHC-2 Beaver (by Soul Made Simulations) and this is the size of the first aircraft and the blueprint for the larger DHC-3 Otter. The design work on the "King Beaver" (the Otter's original name) began in January 1951, and it was noted as an aerial "One Ton Truck" to the Beavers "Half Ton Truck" capability. The new design incorporated a longer fuselage, greater-span wings, a cruciform tail, and it is much heavier. Seating in the main cabin is for 10 or 11 passengers, whereas the Beaver can seat six. Power is supplied by a 450-kW (600 hp) Pratt & Whitney-1340 geared radial. The new version used in the Otter was geared for lower propeller revolutions and consequently a lower airspeed, but flies the same speed as the Beaver. The electrical system was 28 volts D.C. and Like the Beaver, the Otter can be fitted with skis or floats. This Otter also served as the basis for the very successful Twin Otter which featured two wing-mounted Pratt & Whitney Canada PT6 turboprops. The Otter received Canadian certification in November 1952 and entered production shortly thereafter. A total of 466 have been manufactured since. RW Design's DHC-3 Otter Design wise RW's aircraft is very good, certainly not in the Carenado class but then what other aircraft is in that class any way. You don't get the that extreme really fine, fine detailing here, but otherwise it is pretty well put together. And that is highlighted by the great wasp 9-cylinder air-cooled radial engine detailing, and its lovely 3-bladed Hamilton Standard propeller. Exhaust Augmenter Tubes Those huge two exhaust tubes on both sides of the fuselage are called "Exhaust Augmenter Tubes", which are located below the cockpit doors and are a special design feature of the DHC-3. In the exhaust augmenter tubes, the exhaust gases produce suction that is strong enough to pull cooling air around the engine and from behind the engine compartment while at the same time providing a measurable amount of thrust in cruising flight. The engine is thus effectively cooled during steep climbs when the forward air speed is low and the engine out-put near its maximum. The exhaust tubes have been expertly modeled here, and are quite beautiful to look at (If you are into that sort of thing). The undercarriage and fuselage attachment points are also very nicely detailed. A look into the cockpit and you instantly see the Otter's original Beaver heritage as the layout and the detailing are quite similar, with that huge crossover yoke dominating the panel. The worn seating is good and well created, but not the really well worn, torn and dirty look you would expect from a working utility aircraft it feels to light. And I am not sure what the tiles are on the roof, canvas, rubber or metal... plastics were not a basic commodity in the early 50's, if at all it looks plastic. But I think it is to replicate a padded rooflining? The same effect is on the insides of the doors. Cabin is also good, but a little basic. I like the cloth seating but there are no seatbelts to hold you down and I wouldn't want to fly seated on them for very long. At the rear is a netted cargo section with a selection of cargo (three crates). Menus There is a menu pop-up that works when you tap the file folder by the Co-Pilot's seat. One is the main menu that covers: External Power (no showing power unit) Flashlight (needed) Yoke (show/hide) Jump Door Heading Slave Walk-around There is an "Aircraft Visual Option" that shows: Chocks, Pitot Cover and a ladder. All the doors open, with the two front cockpit doors, right side passenger door and left side double cargo doors. All the doors have to be opened internally which can take time moving around the cockpit and cabin to do all the handles... an easier door menu selection would have been nice? Rear left cargo doors can be set two ways with the double doors in position, or "Jump Door" (or no doors). The ladder option only works with the opened double-doors, and not with the "Jump Door" option. Walk-around There is a walk-around feature in that if you press the items on the menu car you are postioned at the point of inspection and with notes on the card of what to look for... The action of pointing at the card does not actually point you at the item in question? so you have scroll your view to find the item you want to inspect, it works but not perfectly. Panel The panel by today's standards is very basic. The Standard six instruments are all there just for the pilot. Top left is the Airspeed Indicator, with the Attitude Indicator or Artificial Horizon middle, right is the Vertical Speed Indicator with the Altimeter is lower left. Heading dial is basically compass style is centre with the Turn Coordinator lower right. Bottom knee panel is from left with a electrical and engine starter panel, Fire panel, then a VOR2 OBS CDI (course deviation indicator) and a ADF pointer. far right on the panel is the tank selector with Front - Center - Rear tanks available. Co-Pilot side you have one lower knee panel with the lighting, heating switches and volt dial. Engine panel is top centre with (top row) Manifold Pressure, R.P.M., Oil/Fuel pressure/temp, Cylinder (CYL) Head Temp. (bottom Row) Clock, Fuel gauges for the three tanks, Temperature Gauge ºC and Suction gauge. There is the lovely DHC pedestal with all three levers for Throttle, Propeller and Mixture. Equipment Stack Far right on the Co-Pilot's side is an angled "Equipment Stack" The stack pops-out for ease of use but you can't change the scale. It covers a: Benedix/King KMA 28 TSO Audio Panel, Two Benedix/King KX 155A TSO's COM1/VOR1 and COM2/VOR2 frequency tuners, Benedix/King KT 70 TSO Transponder, Benedix/King KR 87 TSO ADF Tuner and a Benedix/King KFC 225 Autopilot. The default X-Plane Garmin GNS 430 gps is positioned on the top of the panel and as per usual use pops-out. This Otter looks like it is to reflect the more modern variant than the older earlier model, hence the more lighter paneling and design. There is scruff marks and general dirtying down of the aircraft, but it feels like it needs a lot more hard work and a through beating to make it more totally realistic. Note the beautiful DH rudder pedals (below). Overall the design and work here is very good, but there are a few noticeable items that should have not passed the fine tuning stage... like the gap between the yoke handles and the yoke caps. There is a nice trim wheel down by the pilot, but it doesn't work? unless the autopilot is controlling the trim? So no trim adjustment is available including the yaw located up above the windscreen. There is a very nice outside temperature gauge built into the roof... ... and an usual skylight built into the cabin ceiling, and you don't see one of them on the average Airbus. Variants There are three variants with the Otter package. The "Wheeled" version above, a "Ski" version and a "Float" version. The different variants are well done, but they are all separate aircraft, and so you have to set your preferences on each aircraft separately. The Float version has a retractable gear panel on the lower pedestal, the animation is very good and the float version looks very nice in flight. Liveries There are one blank and seven liveries and most registrations here are Canadian based. Livery quality is very good, but not HD (High Definition) deep. The New Zealand VAS is a nice touch. All the liveries work on all the variants. Flying the Otter! Time to climb up on board and take the Otter for a ride. Starting that old radial wasp as you would expect is a bit of "How's your father" and a lot of praying. In short you need to set the electric pump to on, then a few pumps to prime the cylinders (more if cold) from the manual pump on the front of the pedestal, electric pump off again and then set the mixture to not so full rich and a bit of throttle.... Then a fingering of your rosary beads (I'm not a Catholic, but it still helps) and click the start switch, If god loves you on this day the radial will churn and fire into life and you will need to steady the idle once you get a few numbers on the needles. If god is not on your side then you will churn the motor forever and flood the pistons with too much fuel... So a cup of coffee is needed while it all settles down again and give it another churn in a while. Get a really bad day and just go and fly something else. If the praying worked then you are in the flying business. Sounds are very waspy mechanical knockingly real, or very good, but not the total high quality sounds you can now get, but still very good considering how few of these aircraft are still around or in working condition. The view out from the pilot's perspective is quite expansive compared to the tight cabin of the Beaver, but this is still a tail-dragger which means a sky high nose and a taxi by looking to the left and down. But the view is very good. Engine warmed up and a better idle means you are ready to go. For a tail-dragger the DHC-3 is nice to taxi (or it actually does go in the direction you want it to). You need the odd extra bit of throttle if you have a tighter corner to manoeuvre around or swinging around on the ramp, but this is par course for any tail-dragger anyway. The Otter is a STOL aircraft which is short for "Short TakeOff & Landing". If you give the aircraft a fair bit of flap (half) it will leap into the air quite quickly, but a little flap is more controllable at slower speeds, but you still get airborne very quickly. The tail thankfully for the view forward pops up early and you are ready to fly at just over 100knts. The aircraft will track quite well but lift the wheels off the ground and the DHC-3 will bank with the rotating engine thrust to the right quite suddenly and you have to catch it (only the first time as you are ready the next time). This event may let you think the Otter is hard to fly, but in reality it is however completely the opposite, as it is very easy and very docile in your hands. A very nice aircraft to fly and it was tested by real life Otter pilots and I feel they got it exactly right. Although there is no trim available (it is noted in the manual?) it does settle to a balance quite quickly, but you still wish for that manual adjustment. You are not going to break the sound barrier in an Otter, with a maximum speed of 160 mph (139knots, 257km/h) and a cruise speed of only 121 mph (105knots,195km/h)... range is an amazing 945 mi (822 nmi, 1,520 km) and your ceiling is 18,000ft, so slow and high it is. In speed the Otter is the same as the Beaver, but it feels a little faster and more sprightly overall. In the air the detailing is more highlighted than on the ground, and the aircraft looks very nice in the right light. The autopilot is a change and stick type, or point it in the direction you want the aircraft to go and then select the heading to hold you on that course to get there. But the AP didn't exactly hold the heading as tight as I would want it to, I found I had to correct it often to keep the aircraft on course? Altitude can be changed with a Vertical Speed setting and a target altitude can be also set. The manipulators on the pop-up panel are not as exact or the same as the ones on the panel and they work slightly differently, but overall the panel is very good. The big windscreen forward view is excellent and even bigger than the Beaver version. At night it is dark in here. Panel lighting is certainly there, but I couldn't find the switches or adjustment? (not in the manual either). On the Beaver they are two large adjustment dials on the Co-Pilot's side, but they are absent here? Externally it is also quite stark, with just the navigation lights. You can tootle along up here for ages, the firing of the radial pistons banging away in the nose, and the slow movement of the scenery passing away below you. My destination airport in Page Field (Ft Myers), Florida (KFMY) comes up on my right and so you reset your mind and enjoy the feeling of your hands on the controls again... The DHC-3 is a very versatile and lively aircraft to control, docile and the low speed allows steep banking and you are easily into a quick turn back to the airport with a touch of the rudder to control the high wing lift.. Landing is cleared to Page Field's RWY 31. It is time to slow the speed right down and drop the flaps, but in doing so it is like hitting an invisible wall. The DHC-3 as a STOL aircraft was built and designed to land on very poor surfaced and short strips. This is what makes the Otter so versatile and attractive to bush pilots and the aircraft gives you access to airports and in some case just places with no runways but just a rough flat section of ground to deliver or service a community. The flaps gear arrangement here is exquisite and really well designed, it is all well animated as well with great linkages to not only the flaps, but also the outer ailerons. The passengers have a great view of the flap animated action and the great detailing. The Flap indicator is situated on lower center windscreen divider post. If you use a Saitek (nee Logitech) system it only gives you a continuous movement of flap travel, but there are instructions in the manual to give you the position notches if you need them (but I am not fussed there). You approach the threshold at only just under a 100kts and easily then adjust down to 65knts. The aircraft is so docile and stable you use the slight headwind like a seagull to hold your hover position and to look at the point you want to touch down as your speed drop to only 55knts... ... focusing on your landing point you just slowly descend and land right at the point you want too, easy and totally in control, it is these flying qualities made the Beaver and Otter the legends they are today. With two wheels on the ground you are still in control and the drag will allow you to easily settle the tail without any braking or sudden movements. This landing was in a controlled hard surface setting, but the Otter would be just as at home anywhere really. Brilliant! Summary In many ways the DHC-3 Otter from RW Design's is a total contradiction. It is in many, many areas exquisitely designed with beautiful features and has great details. But in other areas the details are missing like the views and door actions in the menus, The lighting systems that I know do work, but there is no information on how to adjust or find the switches or knobs, and also the wheels that will rotate from one airport to another. There is such great design in here and yet there are gaps like on the yokes that you can see through while flying the aircraft. There are no pilot's from the outside views also and it looks quite odd without them, a sort of a freaky aircraft flying all on it's own feeling. The none working trim that is noted in the manual but didn't work in practise, and I am not sure of the bathroom tiling of the ceiling and doors. All small stuff but... X-Plane today is now getting very demanding in the sheer photographic detailing it can now reproduce and this aircraft and with certainly the external detailing it does pass that level and test. This is also lower Carenado territory in value and price and so it also delivers at that level as well, but if you are looking for the sheer detail and the quality of the SoulMade Simulation Beaver style aircraft here then this Otter just not up to that extreme class or level... it is though very good. The aircraft is at this point X-Plane11 compatible, but not a fully compliant X-Plane11 aircraft, in other words it flies and works fine in X-Plane11, but will be updated to the correct compliancy level when X-Plane11 is made into a full release version. This is a classic aircraft, and very worthy of it's status. It flies very well and it is a great adventure aircraft. And pilot's who like this sort of rough strip or island hopping flying will absolutely love it. ______________________________________________________________________ Yes! the de Havilland Canada DHC-3 Otter by RW Designs is NOW available from the X-Plane.Org Store here : DHC-3 Otter Price is US$26.95 Features: Nice Package with 3 Different Versions: DHC-3 Wheel DHC-3 Float DHC-3 Ski Interchangable liveries between versions Great Visuals and Ultra-High Definition Aircraft Professionally developed 3D interior and exterior Hundreds of animations Night lighting UHD 4K textures Normal mapping 8 Liveries in Ultra High Definition Paintkit included Custom sounds and systems powered by SASL Flight model developed in conjunction with Otter pilots Pop-up Menus Base menu Walk-around Radio Stack Requirements: X-Plane 11+ or X-Plane 10.50+ Windows, Mac, Linux - Running in 64 bit mode 2GbVRAM Video Card. 3Gb+ VRAM Recommended ______________________________________________________________________ Installation : Download v1.0 is 310.60mb which is unzipped to your X-Plane aircraft folder at 364.40mb. Documentation : includes Avionics Manual Checklist Otter Manual ______________________________________________________________________ Stephen Dutton 7th March 2017 Copyright©X-Plane Reviews: X-PlaneReviews 2017 Review System Specifications: Computer System: Windows - Intel Core i7 6700K CPU 4.00GHz / 64bit - 16 Gb single 1067 Mhz DDR4 2133 - GeForce GTX 980/SSE2 - Samsung Evo 512gb SSD Software: - Windows 10 - X-Plane 11beta13 / Checked install in X-Plane10.51 Addons: Saitek x52 Pro system Joystick and Throttle : Sound - Bose Soundlink Mini Plugins: Headshake by SimCoders (free) : Environment Engine by xEnviro US$69.90 Sceneries: - KLAL - Lakeland Linder Regional Airport 2.01 by Drankum (X-Plane.Org) - Free (note: personal added items in an office (okay demountable building and vehicles) - KFMY - Page Field, Fort Meyers by Timbenedict3 (X-Plane.Org) - Free
-
Aircraft Review : de Havilland Canada DHC-6 Twin Otter -300 Series by RWDesigns DHC-6 Twin Otters were quite thin on the ground for X-Plane a few years ago, but now that has all changed. First there was a great conversion of Syd Adam's version by Pedro van Leeuwen into his own freeware aircraft, and this was a great conversion. But it still had mostly default X-Plane switchgear and instruments and considering this the aircraft has still been overwhelmingly very popular. Now Jetsim has released their own payware version and this version is a complete ground up built aircraft of the veritable famous "Twotter". The DHC-6 is a Canadian 19-passenger STOL (Short Takeoff and Landing) utility aircraft developed by de Havilland Canada and is currently produced by Viking Air. Some places note the aircraft is not in production anymore, but it is. After Series 300 production had ended in 1988, the remaining tooling was then purchased by Viking Air of Victoria, British Columbia, who manufactured replacement parts for all of the out-of-production de Havilland Canada aircraft. On February 24, 2006, Viking purchased the type certificates from Bombardier Aerospace for all the out-of-production de Havilland DHC-1 through DHC-7 aircraft. The ownership of the certificates gives Viking the exclusive right to manufacture new aircraft. Currently the production restarted on July 17, 2006, at the Farnborough Air Show as Viking Air announced its intention to offer a Series 400 Twin Otter. On April 2, 2007 production of the Viking Twin Otter, equipped with a more powerful Pratt & Whitney Canada PT6A-34 engine was initiated and construction began and Zimex Aviation of Switzerland received the first new production aircraft, serial number 845, in July 2010. As of summer 2014 Viking has already built 55 new Series 400 aircraft at their Calgary facility. Serial number 900 took flight in spring 2014. The production rate as of summer 2014 is approximately 24 aircraft per year. To date there has been just under a 1000 Twin Otters of all series produced. Development of the aircraft began in 1964, with the first flight on May 20, 1965. A twin-engined replacement for the single-engined DHC-3 Otter retaining DHC's renowned STOL qualities, design features included double-slotted trailing edge flaps and ailerons that work in unison with the flaps to boost STOL performance. The availability of the 550 shp (410 kW) Pratt and Whitney Canada PT6A-20 propeller turboprop in the early 1960s made the concept of a twin more feasible. To bush operators, the improved reliability of turboprop power and the improved performance of a twin-engined configuration made it an immediately popular alternative to the piston-powered Otter which had been flying since 1951. The first six aircraft produced were designated Series 1, indicating that they were prototype aircraft. The initial production run consisted of Series 100 aircraft, serial number seven to 115 inclusive. In 1968, Series 200 production began with serial number 116. Changes made at the beginning of Series 200 production included improving the STOL performance, adding a longer nose that was equipped with a larger baggage compartment (except for aircraft fitted with floats) and fitting a larger door to the rear baggage compartment. All Series 1, 100 and 200 aircraft and their variants (110, 210) were fitted with the 550 shaft-horsepower PT6A-20 engines. In 1969, the Series 300 was introduced, beginning with serial number 231. Both aircraft performance and payload were improved by fitting more powerful PT6A-27 engines. This was a 680 hp (510 kW) engine that was flat-rated to 620 hp (460 kW) for use in the Series 300 Twin Otter. The Series 300 proved to be the most successful variant by far, with 614 Series 300 aircraft and their sub-variants (Series 310 for United Kingdom operators, Series 320 for Australian operators, etc.) sold before production in Toronto by de Havilland Canada ended in 1988. (wikipedia). Performance : Maximum speed 160 knots (297 km/h at cruise altitude) 170 knots (314 km/h at cruise altitude) : Cruise speed 150 knots (278 km/h at cruise altitude) : Stall speed 58 knots (107 km/h at cruise altitude) : Range (Max fuel, no payload) 771 nmi (1,427 km) 775 nmi (1,434 km) 799 nmi (1480 km) 989 nmi (1832 km) with long range tankage : Service ceiling 25,000 ft (7,620 m) RWDesigns de Havilland Canada DHC-6 Twin Otter Yes this is a great looking Twin Otter from RWDesigns (formerly Jetsim). It is the long nose version (no notes on if a short nose version will happen?) and finally we have a quality version of this great and versatile aircraft. These short distance regional aircraft are some of the best to fly in X-Plane, because they are just that... very versatile. They give you great flexibility in island hopping or airport hopping around touristy areas and delivering people and cargo to remote areas and even supplying supplies to people who have a habit of doing badly planned adventures and even then saving them from themselves (or mostly getting them back to the nearest hospital). In most cases you need an aircraft like the Twin Otter in most or all of those scenarios. Modelling wise the Twin Otter is pretty good, with great detailing of rivets and paneling from the X-Plane "draw per pixel lighting" shading effects and aircraft body fittings, although it is still a high step up into the cockpit. looking up the cockpit looks excellent in detail. This is the office and you will spend a lot of time in here and so you will require it to be very good... thankfully it is. The Twin Otter cockpit is quite short as the pilot's and co-pilots seats are resting closely to the rear cockpit bulkhead, there is not much room in there or space. the two yokes are on a V central column and are expertly created. the main power (throttle), feather and fuel (cutoff) levers with the flap selector set out behind are all arranged on the centre overhead box structure. Once up in the left hand pilot's seat the panel looks quite basic for a two engined regional aircraft. The pilot gets most of the instruments and the co-pilot really gets only the standard six instrument pack and a turn indicator. Power "on" is on one of two small switch panels on the left and right side of the main overhead structure. If you want the main switchgear then it is directly above your head and right up against the rear cockpit bulkhead. Main panel lighting are three rotary knobs right above you rear with two for the Panel/Eng-Inst pilot (left) and one for the radio/co-pilot (right). twirl them all up and the overhead and panel comes to life. And it all looks really great. Point to be aware of is you need to set your X-Plane views to cater for this straight up extreme switch and knob position, you will go up here quite a lot and you need to get there and back quickly. Not everything though is now switched on... you have to also now switch on the equipment stack one radio set at a time. A feature I really like, because it is very realistic. You have the 10.30 Garmin GNS 530 gps with a pop-out screen, to turn on it is a two button press activation with the .C button first and then an "OK?" by pressing the "ENT" button. Below is Bendix/King KX155A TSO which is COMM 1/NAV 1 only (sorry no COMM 2/NAV 2). Next down is the KT 70 TSO Transponder and finally a KR 87 TSO ADF radio set. You will find the equipment here more interactive with more changes than the standard radio sets fitted to X-Plane aircraft, button work and settings can be changed more than the basics... The KR 87 TSO X-Plane manipulators however are quite difficult to use, the worse are the smallest -/+ adjustments, they are also very hard to find sometimes. Top of the equipment stack is the standard KMA 28 TSO audio selection panel. No NAV2/VOR 2 direction finding is a real loss in an aircraft of this type? The NDB setting doesn't give you enough range and as we will see you have to take short routes across open water. I found a trick around this by using the GNS 530... Find the VOR radial that you want and put it into the GNS gps as a "direct" position. In this case it is "SSR" TACAN RAF Lossiemouth, Scotland. It will give you range, direction and your position. The good news is that the GNS can accept VOR radials. The autopilot in the DHC-6 is a Collins AP106. the system is centre right on the panel and the altitude selection is just below. The altitude selection works with two buttons on the upper top of the pilot's station panel. There is an activation and adjustment button and knob missing from the AP panel... I'll let you think about that one for a moment. Engine display panel is beautiful, with great lighting. Dials include - Torque Pressure Gauges - Prop RPM Percentage Gauges - T5 Temperature Gauges - Gas Generator RPM Gauges - Fuel Flow Gauges - Oil Temperature Gauges - Oil Pressure Gauges and Fuel Quantity Gauges LEFT gauge is AFT and RIGHT gauge is FWD. An excellent Fire protection panel and DC Volts/Load Indicators. As my route today was quite long, I have put in 13 X 100 Ibs of fuel in each tank On the centre yoke support column is your "Yaw" damper button and the trim knobs are down by your right arm rest. Overhead is the twin throttle levers and propeller feather levers, far right the two fuel valve levers, all are excellent with the throttles levers having built in reverse thrust. Small panels either side cover electrics/landing lights and starters on the left and wiper switches on the right. The lighting switches are set out all over the rear of the overhead panel so you have to remember their placement, De-iceing and heating switches and controls are all up here as well. Detailing is great with attention to detail like with this overhead light and switch. Flying the DHC-6 Twin Otter One of the most highly used routes of the talents of the Twin Otter are found in the upper top reaches of Scotland and the accompanying northern islands of Orkney and Shetland. So my route was from Aberdeen/Dyce (EGPD) to Kirkwall (EGPA) via Lossiemouth and Wick, then on to Sumburgh (EGPB) in the lower Shetlands. The return route was a nonstop flight back to Aberdeen/Dyce via Kirkwall and Wick and then direct back over the water to EGPD. The area is suited well for the Twin Otter, but it is also known for its constantly variable changeable weather and add in a mid-February winter period and it was going to be interesting flying. There are two baggage compartments with one in the nose and a larger one aft of the passenger cabin. All doors open by a hand on the inside of each door (including the pilots/co-pilots doors), here a door menu would be a better fit, as the two baggage doors are quite hard to open, as you have to find the doors from the inside to open/close them? At least you can just twist around in the cockpit to open/close the main passenger doors through the cockpit/cabin opening. Passenger cabin is bright and cheerful, but a bit too bright with the cabin lighting switched on. Great baggage seen in the compartments and with the passengers on board we are ready to depart to Kirkwall. Engine start is quite easy. Ignition "on" for each engine and make sure the fuel and feather/prop levers are forward, then flick the starter switch on which engine you want to start. The process is automatic and it will take a little while to turn over and power up. You will need a little power to get the aircraft moving, but in the taxi mode it is quite easy to control, just make sure to control the taxi speed. Lighting is fine with two landing lights in the wings and a small taxi light on the front nose gear. It's not brilliant but good enough for what you need. The landing lights will work on/off by the X-Plane menu (set on my joystick), but the taxi light has to be switched off manually... which means a visit to the overhead panel every time to just do that. You set the flaps by the positioner on the overhead panel and the flap position is shown on the central window strut. The system is not notched but a continuous linear movement up or down, so you can set them where you like within the flap range of 0º to 40º Most aircraft are built to a compromise. In the Twin Otter's case it is it's low speed and STOL (Short,TakeOff and Landing) capabilities. These aspects are great in their right situations, but can work against you in other areas. In the Twin Otters case it is its speed and climbing ability, so this aircraft is not going to win any awards in either of those areas. That huge tail works against you in other ways as well. I found the aircraft is not great in cross winds, so taking off in a stiff crosswind North Sea breeze is going to make the aircraft a handful. You will have your work cut out at low speeds until that tail starts to bite the air. So your yoke is a blur and your working the throttle to get the best compromise of keeping the aircraft sorta straight. Once you get to a certain built up movement of speed the aircraft settles down quite nicely and once in the air is also nice and easy under the yoke and rudders. You are not going to do aerobatic turns or somersaults in a utility aircraft like this but it will turn and climb well within reason. A small annoyance is that after leaving the runway the wheels will continue to rotate? they will go on turning like this for ages unless you use your brakes to stop them, If you do use the brake then make sure that it is off again to land... or you may go and burst your tyres. If you have looked closely at the Collins AP106 system you will notice there is no V/S (Vertical Speed) button or V/S climb or descend knob? The Collins system does not use that type of system to climb or descend, instead it works this way. You set your speed and pitch (usually at 1000fpm) and then turn on the Collins AP system by the switch, then to activate you then press the IAS (speed) button to maintain the climb (pitch) and lock in the speed you have chosen. The aircraft maintains the pitch and holds that speed, and once it has settled its position you can actually change the pitch up or down by using more or less throttle... but the speed stays the same. It works quite well once you are familiar with how it works and how it adjusts your pitch, the tricky part is getting the right pitch and speed to be locked in at the right point so the transition from manual control to auto control is smooth and the aircraft does not go nose down and then pick up speed to adjust itself. At first I didn't like it or was simply not used to that way of adjusting my climbing vertical speed. But time and practise and I can now easily set the system smoothly, it is just getting both pitch and speed correct. As the aircraft climbs and the speed stays constant then the vertical speed will adjust to the power available and your pitch will decrease from usually 1000fpm to around 500fpm, and it works very well when you are used to it. You set the "ALT ALERT" on the panel to tell the system when the set altitude (8500ft) is achieved and the aircraft will then level off and release the throttle hold, you then need to adjust your throttle speed to the airspeed you require. The speed band is quite small with 90knts minimum and 140knts the usual cruising speed or 160kts if you are really lucky. Once in the (slow) cruise Scotland turned on an early cold morning soft misty light show. And as the sun rose more I headed north. The cockpit is a nice place to be. You work hard in the office of the Twin Otter, but the rewards are there. Those big Pratt & Whitney PT6A-27 turbine turboprop engines are right there powering away in the background. Sound from them is not extreme but still constantly slightly high. Overall the sound is very good but not exceptional. Sound is also 3D directional and non-adjustable. With the Scottish Mainland behind me I headed up to Wick and then the islands started to flow under the aircraft. Close up detail of the aircraft in flight shows good detailing of the wings, tail and I like the external metal plates that strengthen the hold of the wings on to the fuselage... gives you good feeling that they won't blow off. Arriving at my first port of call in Kirkwall, Shetland and I found it difficult to lose height? Pulling back the power and pushing the yoke full forward still means the aircraft was slow to drop down, holding the IAS button on and no power didn't work either? I finally got the aircraft down to a 1000ft and studied Kirkwall below from a bypass, before looping back around to RWY27. I had good reasons to check out the lay of the land, as the blustery North Sea wind at Aberdeen was now a full blown gale of 20kts, I didn't so much land at EGPA but crab in totally sideways. The low Twin Otter 75knt landing speed gives you more space and it is very wide. once down reverse propeller thrust can stop you within a very short distance, it looks and sounds great from the cockpit as well. I was down and my passengers still were on friendly terms with me as well. But I was not happy with my approach or landing at all, at least the route did not end here so I would get more chances to put things right. It was mostly going to be all over water to the next stop at Sumburgh (EGPB) lower Shetland. And almost when I had reached my height of 12,500ft and as quick as a throwback of a dram of Scotch the weather turned even worse and darker. I climbed more up to 10,000ft to get above the cloud tops, but the Twotter did what it was best at... just kept on Twottering along. Liveries There is not a great selection of liveries, because the Twin Otter has so many operators it would be impossible to cover even a few of the best... The painters are going to have a field day with this aircraft. There are seven liveries, two white in clean and dirty, A British Airways, British Antarctic Survey and Royal Canadian Forces designs and a Maldivian Air Taxi. The other one is the Flybe livery in use. It was time to descend and I checked out the manual to see if I had done anything wrong, as this Collins AP system is quite different from the standard V/S versions. Well I had missed something and that was you had to not only set your throttles to idle... but also feather your propellers as well? I did this and down slowly I descended. It was odd (and slightly disconcerting) just having the props just windmilling around out there with only the sound of the wind showing you your speed. You have to get you distance to height right as you drop usually at 1000ft per minute. I found that if you adjust your feather angle (I have mine set up on my keyboard) you could adjust the pitch from 1000ft to 200ft per minute to get the best glide down. The IAS switch on the Collins has to be on and you select the "MDA" button (minimum descent altitude) to target the set altitude like you did earlier before when going up. I pulled the throttle power back in to give me more power as the MDA reached clickoff point to get a smooth transition from descending to powered forward flight. Down at 1500ft I couldn't see anything in front of me though the foggy windows, and I knew on the approach to EGPB that there was a big dirty mountain of a rocky point to the left of me. I saw it finally through the gloom and used the ILS Horizontal Situation Indicator alignment to guide me to end of the runway 09. The ILS beam is actually offset on RWY09 and too tricky to use in these conditions, so I just used the beam to align the Twin Otter with the runway and flew down the runway to get the correct bearing and wind direction, which I found that RWY33 would give me a direct approach with the wind directly behind me which is hard enough, but at least the bluster is not throwing me stupidly sideways. A clear 90º to 90º circuit to RWY33 and the approach was perfect and I was soon down and parked up. The Twin Otter comes with full systems including Electrical, pneumatic, hydraulic, Anti-Ice and Fuel System. Return to Aberdeen Dyce was a straight through route. So I set up the Garmin GNS to cover all the bases including a few waypoints over the water section. I like to fly VOR to VOR but here I wanted to test out the NAV gps system. My route was just under 250nm and I was going to fly at 12.500ft. Just a quick ride home was the idea... but coming over Kirkwall you could see my problem? I had a 22knt headwind, and at that point only a 120knt groundspeed, it was going to take hours to get back to EGPD and it did. But that is not a bad thing in here. I just sat back and enjoyed the flight back, I had become quite smitten with this aircraft and you can see easily why it is so popular. Over Wick I turned out over the North Sea and headed for the Scottish mainland. Once the coast was in view I was ready to feather the props and pull back the power and head down to the coast to fix "NOBAL" then down the coast to Aberdeen/Dyce NDB "ATF" which gives you an almost 160º turnback to runway 34. As with everthing else today I was not going to get off easily as there was another heavy crosswind approach to the airport, but by now I was pretty confident of my abilities to touch this Twotter down as smoothly as possible. Wind, it had caused me havoc today, but I had flown well and the smile on my face proved all the hard work had not been in vain. There are four variants in the RWDesigns Twin Otter package... The standard version as flown above. A "Float" version. A "Ski" version with large ski's on the wheels. And a "Tundra" large tyre version. Summary At its heart the DHC-6 Twin Otter is a bush pilot's aircraft. It was built in Canada for the Canadian wilderness, and that makes it a tough no nonsense sort of machine. Speed is not the issue here, getting in and out of tight areas in bad weather with passengers and cargo is what it does best. At first it is an aircraft that will take a bit of time to master, that Collins autopilot is different but interesting and also quite easy once you understand it and use it. By the time this review was completed I found how much I really like this aircraft. It has some small comparisons to the FlyJSim Dash 8 in that it is an aircraft to master to fly really, really well. But once you get there it rewards you. As a design the Twin Otter is excellent from RWDesigns, but remember this developer is still very new to X-Plane (They also designed the A330 last year), and few areas still need some polishing. The missing COMM2/VOR2/NAV2 radio is strange when you have two COMM1/NAV1 settings with the one already in the GNS530. There are no menus and they are really required for the door operations, likewise there are no static ground objects that would go very well with the aircraft. Liveries are few, but good and some modeling work is still a bit chunky and some panels are bare and not textured, like the bulkhead behind the pilots and parts of the cabin... the wipers are a bit chunky as well. But where it is good it very good... The panel and instruments are excellent and so is all the switchgear including the equipment designs. Overall the modeling is very good and this is certainly the quality Twin Otter we have all been waiting for. Detailing is very good and the aircraft is a challenge to fly like a professional. As an investment the Jetsim Twin Otter is a great addition to your flying career, if you like to fly around the tough areas of the world like Alaska, Africa, Northern Europe and Australia... then this aircraft is invaluable to have. My first reaction on first seeing the Twin Otter was "wow, finally a great usable Twotter.... I love it" Now after spending sometime with the aircraft "I really love it!".... It is a great aircraft. The de Havilland Canada DHC-6 Twin Otter -300 Series by RWDesigns is now available from the X-Plane.Org Store here : DHC-6 Otter 300 Series and is priced at only US$27.95 Features: High-Resolution 3D Model 3D Cockpit Hi Res 4K textures Full 3D exterior model HD Night Lighting Interchangable liveries between versions. 7 paint schemes Custom Prop/Engine sounds Custom Systems Programmed Radios Customized GNS 530 Custom airfoils and flightmodel Custom electrical and de-Icing systems Installation : Download is 273.70mb that is unzipped to 368.80mb. And a Serial Number is required for installation. Documents : DHC-6 AOM (Aircraft Operating Manual) and DHC-6 Flight Tutorial _____________________________________________________________________________________ Requirements: X-Plane 10.30+. Windows, Mac Linux 4Gb RAM. 1Gb+ VRAM Video card Serial Number required during installation RWDesigns - Are the same team that brought you the A330 _____________________________________________________________________________________ Review by Stephen Dutton 20th February 2015 Copyright©2015: X-Plane Reviews _____________________________________________________________________________________ Review System Specifications: Computer System: - 2.66 Ghz Intel Core i5 iMac 27” - 6 Gb 1067 Mhz DDR3 - ATI Radeon HD 6970M 2048 mb - Seagate 256gb SSD Software: - Mac OS Yosemite 10.10.1 - X-Plane 10 Global ver 10.35 (final) Addons - Saitek x52 Pro system Joystick and Throttle - Bose - Soundlink Mini Scenery - EGPD Aberdeen Dyce for XP10 4.1 by anthony_d (X-Plane.Org) - Free - EGPA Kirkwall Airport 2.3 by dkm (X-Plane.Org) - Free - EGPB Sumburgh (sorry I can't find this original scenery?) EGPB is however included the X-Plane "Global Airports" 10.35b2 - Final Frontier version 10.2 by Tom Curtis (X-Plane Store $24.95) X-PlaneReviews review of Tom Curtis's "Final Frontier" here: Developer Update : Final Frontier version 10.2 by Tom Curtis
-
News! - Coming Soon! : Hawker 4000 by RW Designs Payware Biz jets are very thin on the ground in X-Plane, in fact there is only one really top notch aircraft in DDen's excellent Challenger 300 but that is all about to change with another aircraft from DDen in the form of the Bombardier Global 6000, and before that JW Designs have announced coming very soon is their Hawker 4000, which was formally known as the Hawker Horizon. Rumors are that it is very good, very detailed and the aircraft comes with an adapted version of the Tekton FMS, the same type of FMS that is in the X-Crafts E175 v2.0, this will be the first Biz jet with a built in FMS in X-Plane. Cockpit looks very functional and well designed, but system details are still thin on the ground. If more images or information is forthcoming we will post it here. Release is due soon, maybe around Mid-October, and no price has been announced but expect around the US$30-$35 dollar mark. ______________________________________________________________________ Stephen Dutton 28th September 2016 Copyright©X-Plane Reviews: X-PlaneReviews 2016
-
Aircraft Review - Beechcraft Duke B60 by RW Designs The Beechcraft Duke was originally created as a gap filler in between the Beechcraft Baron and the Beechcraft QueenAir in the Beechcraft Twin-Engine sales lineup, but the aircraft never became a big sales hit (only 598 Aircraft were produced), and many commentators noted that overall Beechcraft didn't want to take sales away from their highly successful (and profitable) KingAir lineups, so the aircraft became really just a small niche aircraft in Beechcraft's history. That is not taking away that the aircraft was not popular, because it was. As many are still flying and is still very popular amongst the owners who treat the aircraft as others treat their classic car collections. That is mainly because the aircraft was very advanced in its time, with Electro-mechanical systems when the aircraft was introduced, but the aircraft does has its downsides in that it has a very poor drag factor, and crash one and they were impossible (meaning very expensive) to repair. Two factors however kept the aircraft flying with an update that included an improved pressurized cabin that utilised a advanced bonded honeycomb construction, lighter and more efficient turbochargers and improved elevators over the Baron it competed with, this was the B60 as represented here and this aircraft was powered by the Lycoming TIO541-B4 engines that develop 380 hp each, and a second development, Rocket Engineering of Spokane, Washington, replaced the Lycoming reciprocating engines with Pratt & Whitney Canada PT6A-21 or -35 turbine engines that gave the aircraft the sort of performance it should have had in the first place. As noted the Turbine upgrades the take-off length required by over 1,500 feet to only 1,000 feet and the landing distance is reduced by over 2,000 feet to only 900. The maximum rate of climb is increased from 1,600 feet per minute to whopping 4,000 feet per minute, reducing the time to climb to 25,000 feet from 25 minutes to 9 minutes. The cruise speed is increased to 290 knots at 29,000 feet. The modification does have some disadvantages as it increases fuel burn from 56 gallons per hour to 66 and lowers the certified ceiling from 30,000 feet to 28,000. The Duke first flew on 29th December 1966 when the prototype made its first flight. On 1st February 1968 the FAA issued the type certificate for the aircraft. Performance B60 version: Never exceed speed: 235 knots (434.5 km/h, 270 mph) (IAS) - Maximum speed: 248 kts (460 km/h, 286 mph) at 23,000 ft (7,010 m) - Cruise speed: 178 knots (330 km/h, 205 mph) 45% power, 20,000 ft (6,100 m) - Stall speed: 73 knots (135 km/h, 84 mph (IAS) - Range: 1,227 nmi (2,274 km, 1,413 mi) 45% power at 20,000 ft (6,100 m), 45 min reserves - Service ceiling: 30,000 ft (9,145 m) - Rate of climb: 1,601 ft/min (8.1 m/s). RW Designs - Beechcraft B60 Duke You have to give some credit to RW Designs that they are not if anything give you a lot variety in their choice of aircraft. First it was the Airbus A330-300 (updated to Version 2) and then the workhorse DHC-6 Twin Otter -300, and now here is a general aviation aircraft in the Beechcraft Duke B60. The B60 is without doubt a striking looking aircraft, mostly because of that tall sharkfin tail and long snouty nose, but it is roomy aircraft as well for its size. You could call it a big twin aircraft, but a medium twin would be closer to the mark. So the aircraft has a real presence sitting on the parking area. The external detailing is very good of the Duke. lines and panels are really well done, with all the riveting in place to conform the panels. That distinctive tail is excellent, with main and trim rudders. Most designs today really have to live up to even a basic high standard that users now expect, certainly the Duke delivers in that area. And the minor detailing is well done in aerials, static-dischargers, undercarriage assemblies and the glass transparency is also first rate. DW Designs does not here give you any special features. So there are no Menus (tabs), static elements, Ground Power Units (GPU) or weight, fuel or aircraft load sheets. In that area it is a basic aircraft... so it is WYSISWYG. The aircraft has only one door on the left rear, it opens via the inside latch to give access to the cabin. The aircraft is set out in a four seat club arrangement and two more forward seats for the pilot/co-pilot, so six seats in all. There is a built in table but it doesn't flip up (or out). There is a sense of space in the cabin and the seat design and textures are very good, but the cabin looks very new and there is not a lot of wear or tear, so it looks a little plain compared to some of the grotty worn Carenado's we are used to. There is a baggage area behind the rear seats but no luggage. Cockpit and Duke Versions. The RW Designs Duke comes with the choice of two variants The variant is selected by choosing a different aircraft in either the: Original : Lycoming TIO541-B4 Royal Turbine : Pratt & Whitney Canada PT6A-21 ... versions, so you really get two very different aircraft in the one package. Outwardly and externally the aircraft are identical except for the different propellers, as on the Lycoming it is a standard 3-bladed propeller and on the Turbine it a newer 4-bladed Hartzell propeller (reversible), but in the cockpit and certainly in performance they are quite different. Basically it is analogue for the Lycoming (left) and digital for the Turbine (right) in the context of engine displays, the Turbine also has a few rows of annunciator indicator or warning lights under the centre glareshield. I am flying the Turbine version, but will note the analogue version differences as we go along. Pilot and Co-Pilot instrument panels are quite basic in both having the main standard instruments. The standard six instruments (Airspeed Indicator, Attitude Indicator or Artificial Horizon, Altimeter, Turn Coordinator and Vertical Speed Indicator) are central large and clear on both sides. I like the idea of putting the navigation instruments on the below the standard six, but this arrangement can also hide them behind the excellent yoke and you need navigation dials clear and easy to glance at. The Navigation instruments are the ADF pointer (both sides), CDI (course deviation indicator) for VOR OBS (Nav2) and Radar Altitude. Above the standard six is the VOR1/VOR2 distance/speed/time (both sides) and Autopilot annunciators (pilot side only). Most of the main switch gear and dials are on the lower panel. It is quite a crowded set of panels, but well laid out. On the far left are the main "De-Ice" switchgear including pitot heating. Middle-left is the Fuel gauges, which are dials and digital on the Turbine and analogue gauges on the Lycoming. Below are the main lighting switchgear with two lighting adjustment scroll panels below. Undercarriage position lights are under the lever. In the centre panel are the gauges and dials for electrical loads, Volts and Prop-Amps.and two large dials for Oil Pressure. On the right side lower panel are flaps (3 stage - UP- APH (Approach) - DN) and the rest of the panel is for your controls and dials for the aircraft's pressurization system, shutoff valves and cabin temperatures. The rest of the right side of the panel and the far right is your sets of electrical fuse poppers. A small and compact centre pedestal has your Throttle, Propeller and Mixture (Rich/Lean) levers, noted is they are all dark grey in the Turbine, but the Lycoming uses the Blue (Propeller) and Red (Mixture) standard colored knobs, which are more attractive. Great trim wheels with the main large pitch on the left side and the main and fine trim wheels on the rear. Fuel Tank selection is between the front seats on the floor. Engine Instrumentation and Equipment Stacks As noted there are differences between the Turbine and Lycoming variants on the left of the pilot panel and the main central panel. Turbine Variant There is an aftermarket fit-out of dials and digital readouts for engine performance in TRQ (Torque), ITT (Interstage Turbine Temperature), Ng (compressor speed), RPM, FF (Fuel Flow), FP (Fuel Pressure) for each engine. A full set of annunciators are set across the top of the panel under the glareshield. Bendix King equipment Stacks consist (left stack) of the standard KMA 28 TSO Audio set with both a Garmin 530 and Garmin 430 GPS units (X-Plane standard), below is a KFC 225 autopilot unit that covers the actions of HDG, NAV, APR, ALT, VS, ARM (altitude) and Yaw Damper. Right stack has two KX 155A TSO Radios top with one for COM1/NAV1, and the lower one covers COM2/NAV2 settings. Then the KT 70 TSO Transponder and the lower ADF - KR 87 TSO with built in flight timer (FLT) and elapsed timer (ET). The Turbine side panel has switches for "Bat" (Battery) Avionics "Master" and a standby inverter as well as a primary inverter. The GPS Units (Both GNS 430 and GNS 530) are controlled by a Master Avionics Switch. All other Radio’s are connected by directly to the battery by switches Bat - Gen (1,2) finally their are two fuel boost switches. To start you just hold the lower part of each rocker switch down for an engine and then when the engines are running push the rocker up to activate the generators. Below there are two Hobb's meters and cowl flap switches which I don't think work. Above is a lovely large "outside temp gauge". Lycoming Variant The Lycoming panel is dominated on the top by a large set of five analogue dials and gauges, that cover left to right: Manifold Pressure, Prop RPM, Fuel Flow and one gauge for each engine for CHT (cylinder head temperature), Oil Temp, Oil PSI. A note on the dials is that there are two needles per dial for each engine. If both are running together in the same performance then they are together as one indicator, but slow one engine down and you will see them separate to show both engine parameters. The Equipment Stacks are set out exactly the same as on Turbine, but with the add-on digital dials removed the whole set up is moved over to the left of the central panel area. The main annunciators are moved to the side panel on the Lycoming. with the "Avionics" standby inverter as well as a primary inverter switches top and then the "Gen" - "Bat" - "Gen" switches below. Then the two fuel boost switches and starters are a (nice) red twist knob for each engine. Below two Hobb's meters and cowl flap switches are the same as the Turbine. Flying the Duke, or should I say Duke's! I decided to fly the Turbine version up the coast from EGNT - Newcastle to EGPH - Edinburgh and then back again in the Lycoming to get the feel of each variant. Power up and with the VOR2 set to "ST ABBS" VOR (112.50) and the prop/mixture levers full up, a push of each rocker switch starts the turbine whine of each P&W PT6A-35 turbocharged engine that pushes out 580 hp. I like the blue glow of the digital readouts, it makes the cockpit look more modern and efficient. Plenty of power to move the aircraft but it is hard to find that sweet spot between moving too fast and the aircraft rolling to stop in the taxi, I found it but the range is very narrow. The windscreen is very tall for a GA, so the view forward is quite good, but the glareshield is high as well, so you sort of peek over it. With over 1100 hp the aircraft easily moves forward and you are very quickly at rotate speed of 130knts, the aircraft tracks centered as well and you feel the air and control the vertical speed of 1800fpm with no effort at all. Speed will still build quickly if you level out early so you need to pull back the power to keep the best V/S and the climb rate. The Duke looks nice in the air "Stately" like its name is a good statement. The huge engines set far forward out of the wing can really block the view from the pilot's perspective. You have to crane forward and look through the main window to see features or navigation landmarks. Because the aircraft is pressurized, you can climb easily to the high 20's (30,000ft is the ceiling) and the noted "1,227 nmi (2,274 km, 1,413 mi) 45% power at 20,000 ft (6,100 m), 45 min reserves". So it is no doubt this is an aircraft for extended cruising and distance covering, but I would recommend the Turbine version for the extra power in covering distances. The panel lighting is good but it took me awhile to get the right combination of roller adjustment to get the one I liked, not too dark or too bright. The ADF needle is on a set compass so it can look odd against the other navigation instruments and looks out of alignment, but you soon use it the way it is supposed to be used and it worked well with my set course needle to align up EGPH RWY24. The aircraft does not like tight turns at speed, I'm surmising that the airframe has now engines of too much power in the turbines that it was not designed for. Banking on the autopilot and you get a very pronounced - or + vertical speed fluctuation, back off the power a little and it does quell the bouncing a little, but you have to give the yoke a bit of forward and back adjustment to soften out the fluctuations, you get used to it and are prepared when you need a turn, but it can get wild if you are not on your game. The excellent John MD River Forth Crossings (Bridges) shows you the approach to EGPH. With the flaps down you can easily stay around the 100knt approach speed. The drag is there, but to more in your favor than having to push the power to the wall to get through the drag, so it is a usable approach in that the turbine power can allow you to finely adjust your approach speed. The stall speed is noted at 73knts, which is quite, low, but around 85knts is ideal on final's, and the aircraft is quite stable. You get reverse prop on the Turbine, but not a "beta" setup, and on contact with the runway you can easily run off the speed, and taxi to the GA ramp. EGPH to EGNT, Lyncoming and lighting There is a lot of panel and cabin lighting adjustments, 4 small scroller's, two larger scroll wheels and two switches. Here it is set to the overhead lighting so I can set up the aircraft, it looks good and the area is workable. Starting is via the two red knob switches but otherwise there is not much difference between the two variants. But pull away and it is very evident that the power is now not there. You are a full 200hp down on each engine (380hp) and your throttle is now traveling a lot more up its gate to get the aircraft moving, its slightly sluggish as well and even more trickier to taxi power wise. Takeoff is also going to need more nerve as your takeoff run to the 130kts rotate speed, only it now takes forever to build up the speed, you use a lot more runway to do exactly the same thing, a bonus however is once airborne the aircraft is more docile with less power and slight better feel in the yoke and rudder pedals, banking and a slower rate of climbing is smoother and less frantic than the over powered Turbine. You are not going to climb fast either, you have 1800fpm at your disposal, but if you are going to climb to the high 20's then it is going to be a long afternoon as 1200fpm to a maximum of 1500fpm is going to be your best effort. Lighting A bit more fiddling and you can get the panel to look really good in the right balance of feel and look, and very attractive it is. It is debatable if the Turbine digital look is better than the glowing analogue dials, but I feel the analogue version is better at night. Note the separate needles for each engine performance on the dials. Rear cabin is well lit and looks nice, but there is no actual light fitting, so the lighting seems to glow out of the ceiling. External lighting is good. Beacons, Nav and Strobe look good in the dark, there is wing light switch (Ice) but I couldn't see and lighting on any wing. Cockpit has a nice feel at night and you get good visuals out of that tall windscreen. Outside the landing and taxi lighting only works when the wheels are down, they look good, but are hopeless in operation. Runway approach is dark, so it is hard to gauge the depth to the tarmac. Once down and there is no reverse thrust in the Lycoming Duke and you bleed off speed far slower on a dark runway. That done and you then have to taxi around with no lighting either. They are three beams out there but they are not seen from the cockpit. More grunt is needed to keep the flow right to taxi to the GA area, but I have found myself more familiar now with getting the aircraft around the traps. Shut down the piston version of the Duke and you are thinking of how you like the aircraft. Sounds are well improved and now Sasl plugin driven and better than the older standard X-Plane sounds. There is a slighter higher whine to the Turbine but my Carenado Caravan sounds more turbine than the Duke. Liveries There is one blank white and four design liveries, and all liveries work on both aircraft types. All are good and 4K resolution but the range is small for an aircraft of this design. There is a paintkit included. Summary Overall the Beechcraft Duke B60/Royal Turbine is very good. There is a slight basic feel to the aircraft, no nitty gritty details or visual realism in depth, but then again those aircraft are in another higher price range. No special features here either like menus or static elements and animations that you can play around with to enhance the fun factor. But the Duke is an interesting aircraft to fly and for the investment you get really two quite different aircraft for the price of one, so it is good value. In design the aircraft is well done, and the different panel versions add in a change of scenery without changing aircraft. And it is wholly debatable of which version you will like the most, with the Lycoming more challenging to fly with less power but the Royal Turbine having the legs and thrust to fly higher and faster further. I'll let you decide on that, as overall the Beechcraft Duke is a very interesting aircraft to put in your hangar, and by history a niche design to wonder if it should have been more successful than it was. The Beechcraft Duke B60 by RW Designs is available from the New X-Plane.Org Store here : Beechcraft B60 Duke And is priced at only US$26.95 _____________________________________________________________________________________ Features: 2 versions of the engine Beechcraft Duke: Lycoming TIO-541-E1C4: 380 hp variantRoyal Turbine PT6A-21: 580 hp variantHighly detailed Model High-Resolution 3D ModelEach variant has its own true to life cockpitUltra-High Resolution 4K texturesFull 3D exterior modelNight lightingOptimised for both HDR and non-HDRLiveries 5 paint schemes in 4KThe Paintkit is included so you can paint your own liveriesInterchangable liveries between engine variantsCustom Systems Programmed RadiosCustomized Garmin 430 and Garmin 530Custom flightmodel using SASL for ultra realism.SASL powered sound authentic to the engine variantsInstallation : Download file size is 186.90mb to your X-Plane - GA Aircraft Folder. Installed file size is 266.40mb Notes: None Documents : Two sets of Checklists for both variants (Lycoming and Turbine) and POH (Pilots Operational Handbook) for the B60 and supplemental for the Royal Turbine. Requirements : X-Plane 10.30+. Windows, Mac Linux - 4Gb RAM. 1Gb+VRAM Video card Current version: 1.02 (Last updated September 17th 2015)Developer Support Site : (RW Designs X-Plane.Org Support) _____________________________________________________________________________________ Review by Stephen Dutton 24th September 2015 Copyright©2015: X-Plane Reviews Review System Specifications: Computer System: - 2.66 Ghz Intel Core i5 iMac 27”- 9 Gb 1067 Mhz DDR3 - ATI Radeon HD 6970M 2048 mb- Seagate 512gb SSD Software: - Mac OS Yosemite 10.10.1 - X-Plane 10 Global ver 10.40 ( RC3 is close enough to final) Addons - Saitek x52 Pro system Joystick and Throttle : Sound - Bose Soundlink Mini Scenery or Aircraft - EGNT - Newcastle Airport 2.0 by tdg (X-Plane.Org) - Free - EGPH - Edinburgh, Scotland by Joyfulsongster ((X-Plane.Org) - Free - Forth River Crossings by John MD (X-Plane.Org) - Free
-
Aircraft Review : Supermarine Spitfire Mk.1 by RW Designs "I either go up, or blow up... Which one do you want" Says an irascible Sir Michael Caine in the 1969 file "Battle of Britain" as he sat in a Supermarine Spitfire waiting to get back into the fight with some annoying Germans that wanted to invade the United Kingdom in the long summer of 1940. Forever the Spitfire will be associated with those few months of desperation to counter the German advance across the English Channel. To a point that is unfair as the aircraft was very successful in many other European, Mediterranean, Pacific and the South-East Asian theatres of war including Burma (Myanmar) of where it was in a ground attack role helping to defeat a Japanese breakout attempt in the last battle of WW2. Much loved by its pilots, the Spitfire served in several roles, including interceptor, photo-reconnaissance, fighter-bomber and trainer, and it continued to serve in these roles until the 1950s, and was also a World Record Speed holder when a modified Spitfire XI reached 606 mph (975 km/h, Mach 0.891) in a 45° dive, which was just a touch under the sound barrier. Even in the Battle of Britain it was actually the Hawker Hurricane that shot down more aircraft than the Spitfire. Namely in the higher numbers of aircraft of Hurricanes and it's ability to quickly be turned around on the ground in 9min compared to the Spitfire's time of 26min to rearm and refuel. But the Spitfire's fame came from its interceptor role and its ability to out turn the German main fighter escort the Messerschmitt BF109 at 212 m (700 ft) in radius while the 109E's was estimated as 270 m (890 ft) radius at 3,657 m (12,000 ft). The Bf109 had an counter advantage of fuel-injection that allowed steep attacking dives against the Spitfire's carburettors that would dry up against similar negative "G" forces. Speeds were relatively the same with the Spitfire having a slight advantage of 355 mph with the Bf109 at 342 mph. So overall both fighters were very close in performance, so what was the deciding factor that made the Spitfire famous and the Hurricane to shoot down the numbers. It was the Bf109's range. The Bf109 could only stay on station over the South English countryside for twenty minutes before having to turn tail and head home, while the Spitfire had the speed and agility to make the German aircraft fight to survive and burn more of those precious pounds of fuel. No doubting the immense bravery on both sides and that created a classic battle of survival of which could have easily gone either way... the rest as the say is "history". The film makers even in the late 60's battled to get flyworthy aircraft to make the "Battle of Britain" which even if the actual film is by drama standards just good, it was the aerial filming that makes the film a unique record of the period and the only chance to see real Spitfires doing what Spitfires do best in the air. To an impressionable 12 year in myself I followed the making of the film more intently than actually watching it. Most aerial footage was filmed from a North American B-25 Mitchell N6578D, flown by pilots John "Jeff" Hawke and Duane Egli of the Confederate Airforce fame, and in that 27 Spitfires were available for the aerial flying although only 12 could be made flyable. secondly use of six Hawker Hurricanes, of which three were only actually used for flying. Altogether 100 aircraft was used in the film's aerial sequences which was mostly filmed off the coast of Spain and Malta. Two double seat Spitfires were also used for internal aircraft filming and the huge cost of all this would certainly mean a film that would never make any actual money at the boxoffice in its release in 1969 (It has in time and through multiple VHS/DVD sales over the years the film has finally made a profit). Most of the World War 2 field airfields have now past well into history in the lower counties of the United Kingdom. 75 years gone now and very few of the "Few" remain. The aircraft themselves are also slowly disappearing, a few crash and a few just disappear and lost to time. But still many of the machines of that significant battle do still remain in our lives if only now housed mostly in museums and private owners. One place to see the best collection of Spitfires is the Biggin Hill Heritage Hangar in Kent UK, that was once home to two Spitfire Squadrons 32 and 79 and three Canadian Squadrons No 213, No 229 and No 242 that were active at the airfield during the Second World War. Currently in flying or restoration condition there is noteworthy list of aircraft including a classic Spitfire Mark I X4650, Mark XVI RW382, MKIX TD314 with MKIX LZ842, MKIX BR601 and MK V EE602 aircraft and a rare airworthy Hawker Hurricane Mk I. So I though that Biggin Hill would be the best place to checkout X-Plane's latest release of the classic Supermarine Spitfire from RW Designs. RW Designs Supermarine Spitfire RW Designs are a bit like Forrest Gump and his box of chocolates in that you "Just don't know what you are goin' to get next" With first an airliner in the Airbus A332, The excellent Twin Otter and then the Beechcraft Duke B60 and now a WW2 fighter in the form the Supermarine Spitfire Mk.1. So there is no recurring theme in there other than they are all great aircraft. Modeling of the aircraft is very good, but not overly detailed. The rivets are well done but overall you would expect more harder detail and a more worn war weary model. Panels do look like panels but there are no dirt noted joins or rough edges. Where there is good detailing is around the cockpit, frames and the glass (glass canopy is a highlight) are excellent. (a removable engine cover and Merlin engine would have been a great feature). But that classic Spitfire silhouette is unmistakable, a Spitfire is a great looking aircraft. Cockpit In the cockpit the 3-D work is excellent, but a few worn through areas would have helped in the authenticity. The aircraft looks brand new, with a straight out of the factory look. But you can't deny it is all very well done. Like any aircraft cockpit it looks at first very complex, but when you break the areas down to there working places it all quickly falls into place. The Spitfire uses a spade grip style control column, which is the one of the signature visual clues of the aircraft. The wing armament cannon trigger is perfectly right thumb placed for instinct quick firing. A P8 Navigation computer is installed deep behind the control column, hard to see and use while flying. Throttle and mixture levers are to the left as is the large trim wheel or elevator control. Airscrew control lever is here as well which changes the pitch of the propellers. The main instrument panel is very pre-war in design but very effective. Main centre panel has six instruments in speed (MPH), Artifical Horizion, Rate of climb/descent (Thou/feet), Two dial altimeter, Heading Compass and Turn/Side Slip indicators (L-R). Top left row are the Navigation Lights and Flap switch (up or Down). Below is the Oxygen regulator of which you have a mask situated back right besides your seat. Clock and Landing Gear Indicators are down next and the final lower row are the two Magneto switches, Brake Supply and Elevator position indicator. Right side top is a huge RPM dial with engine boost pressure and fuel pressure gauges below. Oil Temperature and the vital Radiator temperature dials are next to the Oil Quantity gauge. Lower right panel are the two top and lower fuel tanks in Gallons. There is 48 gallons in the larger top while the smaller bottom tank carries 37 gallons, note they are both read with different settings as with sitting tail down on the ground and level in the air. There is a starting heat switch lower right. High right is a Volt dial and generator switch. Directly in front of you is the gun sight, huge thing it is with two adjustment wheels which we will use in flight. The view forward is certainly restrictive. So how do you start a Spitfire There are certainly no electronic engine management system or any other modern gizmos on a Spitfire, so you have to coax and be very patient when bringing Pre-War aircraft into life. If you have owned a really old car with carburettors you would know how the deal works. First you need to switch on the top and bottom fuel switches (1.), then open the throttle (2.) a little (half-an-inch). Then set the mixture (3.) to full on (forward). The Airscrew pitch needs to also be full forward (4.). Right lower is the Fuel pressure switch (5.) and the two far left magneto switches (6.) have to be on. The important lever in the Spitfire cockpit is the radiator flap control (7.) Full forward or open to start. You can check your tanks fuel load (8.) by pressing the button to activate the dial. For start magneto power (9.) switch on the far right switch and the fuel and oil pressures (10.) should respond. You have to prime the fuel system to start. To do this you nudge the fuel primer pump handle (11.) and out it pops, touch again to pump. The amount of strokes depend on the air temperature (cº) which is noted in the tutorial. I gave the pump (12.) handle 5 strokes and then lifted the guard on the starter switch (13.) which is situated on the lower panel behind the stick, push to start. The Spitfire Should then fire up in a cloud of white smoke, adjust the idle with the throttle to smooth the rotation out. You can switch off the start magneto and switch on the engine generator switch (14.) on the top right next to the volt indicator. Note how quickly the engine heats up (15.), you can't sit on the ground for very long with a running Merlin and that is why Sir Michael became very agitated and cursed his ground operations crew. On your left are three switches to cover lower (16.) Heading heat and Radio power. You have a basic COMM radio and a transponder (17.) and you will need to turn them both on. There is also higher a fuel pump switch (18.) and left lower is a pitot heat switch that is not marked. Here in this left side area is also a MENU popup. It is quite basic and is really only a view and two setting menu. Three views cover the "Pilot's (forward) view, The hard to see "P8 Navigation Computer" and the "Radio". Settings include Engine vibration (very good) and Engine Heat Management. Flying the Supermarine Spitfire You keep the canopy open while on the ground and until you are in the air. In the real aircraft it is cooler, but it is really required open to see where you are actually going... this is a tail dragger of course. But visually it is hard, if not impossible to see out of the aircraft on the ground. You are totally relieved to get some air going into the Merlin to cool it down, but easy on the power and feel the aircraft into the air. It's efficient wings don't need any flap. But practise is needed to keep the aircraft on the centre line, myself I took off to the right of the centre lines to see them. You unstick from the ground around 150mph and there is a lot of power for the age of the aircraft. Spitfires have a handpump mechanism to raise and lower the landing gear. There is a pump handle you move backwards and forwards to do the job, but in X-Plane the work is done for you. Just move the lever to RAISE or LOWER. In the air the Spitfire it is like a formula one car, just you closed in there and all that power. The biggest factor is not to get fixated on the panel dials. If you do you find yourself flying around keeping the speeds level and then also slightly climbing and lowering your altitude in following around the clever artificial horizon instrument. It is best just too relax and fly the aircraft, forget the instruments and balance everything out of the real horizon and settle the speed. Although you do feel the fear of a17 year old, thrown into a Spitfire cockpit for the first time and wondering what the hell they had got themselves into, difference between them and me is that there is no Bf109 coming down at me from inside the sun trying to kill me. What can kill me is the engine overheating? It is a strange process to keep that Merlin happy and cool. Keeping the radiator flaps open creates huge drag, close them and the engine overheats. There is a strange equation of the faster you go the cooler the engine gets. problem is to go faster means closing the flaps and lessening the drag, but do that and heat spirals again. So you have to go faster slower until the speed cooling over-rides the radiator cooling than you can go to the Spitfires maximum speed. Same on slowing down in the opposite way to keep the heat at bay. No doubt it the Spitfire is a pilot's aircraft, the machine is light and putty in your hands and you can see why it was such a great interceptor with speed one moment and flipping around in a graceful if lethal curve to kill the next, just watch out for any carburettor starvation. You have two panel lights, one situated either side of the cockpit that throws a red glow over the instruments (Canopy has to be closed for the lights to work), adjustment for each panel light are the rheostat knobs deep behind the control column next to the starter switch. There is a landing light on the right wing which you drop down which is feeble thing and nice navigation lights. The gunsight is turned on by a switch to the left of the sight, the twin wheels are your adjustment... but the cannons do fire as per X-Plane's armament system (A note that the review copy did not have the firing cannons, so I could not see the fire power delivered. But RW Design's says this is now working on the release version). Except for straight ahead the view is very good all round, although real Spitfire pilots complained of early poor perspex warping that made other aircraft trying to kill you hard to find. Flying out fast over the coast of the English Channel you can't but give refection of the bravery of Spitfire pilots, the real diamonds were the intelligence gathering souls. Flying many hours solo alone in the dark over enemy territory finding targets to photograph or changes to the enemies defences. Their own best defence was speed and the Spitfire was the best aircraft for such missions, but many of those gallant souls never came back... Liveries There are five liveries in JZ-E (G-AIST) - J (G-MKIA) - KL-A (G-CGUK) - PR-O (X4586) - QV-I (G-CCCA) of which I gather are still active flying Spitfires. JZ-E is default. A paintkit is also supplied. Time to head back to the Biggin Hill airfield. Low and fast is always fun and you feel the speed of the aircraft. Twisting left and right, the right to rule the skies over the Kent countryside has long gone, this is now not a war footing area, as peace and bureaucracy now presides... But I still got permission to do a flyover of the Biggin Hill control tower and its original vintage passenger terminal. I powered over low and very fast before breaking off left to slow right down to circuit land on RWY21 from the North-East. The Spitfire is a blunt instrument, so you have to watch coming off the throttle and settling down at a slow speed (and yes the engine gets hot again, this time going through the roof in temperature) worse is that the wing will stall at the root, but there is more lift at the edges. Flaps are simply "up" or "down" which is easy and again you tune the speed with the throttle power. Pump... pump... gear down and 10mph is quite easy to achieve for a slow landing. But you will need all of that slow speed to check out exactly were you are going to place down the aircraft in flying almost blind to the runway edges, those spindly legs of the undercarriage will mean you will need to keep the aircraft very level to land and not hop from one wheel to the next. Down and a taxi to the area in front of the old Fighter Command base area. Fancy flashy Private Jets now dominate EGKB, as today it the an reinvented airport to cater for the rich classes and their expensive toys. But without doubt the true heart of Biggin Hill still sits here. On the grass in front of the old apron in retirement, here is an old warrior reflecting in the afternoon sun of her glory days. The the long gone days when she with her sister the Hawker Hurricane defended the realm still can be heard if you listen closely into the wind... Rule Britannia. Summary A Supermarine Spitfire Mk 1. is a beautiful aircraft, A single seater fighter of its time of simple perfection. loved then and beloved now. RW Designs have done a great Spitfire, the cockpit detailing, instrumentation and replication of the aircraft's systems and their actions is excellent. From the inside of the aircraft it is very, very good. Externally you want a little more? Opening hatches, engine covers just things to interact with the machine more and the certainly the external aircraft modeling is good, but you feel it is slightly bland and needs a bit more dirt and oil to make it more realistic and not look like a museum piece. For the users that just want to fly then the Spitfire is very good, but if you want interaction with the aircraft (ground power, restocking armaments, static elements) then you are missing those items here. Overall the Supermarine Spitfire is a great classic aircraft, really great to fly and you can really interact with the aircraft in setting and starting up the machine and the distinctive Spitfire eccentricity foibles are all in there to master, and you get a big part of history to fly around in as well... A truly great war hero of an aircraft, even Sir Michael Caine would totally agree with you on that one. ______________________________________________________________________ Yes! the Supermarine Spitfire Mk.1 by RW Designs is available from the new X-Plane.Org Store here : Supermarine Spitfire Mk.1 Price is US$22.95 Features : Detailed and complete 3D model 4K texturing Normal maps Custom lights 3D night lighting 3D engine vibration Reflective gun sight Over 150 animations Systems Period accurate navigation computer Oxygen Electrical Retro-fitted radios Custom Sounds 7 different sounds to replicate the roar of the Merlin Engine Sounds powered by SASL Custom systems modeled with sound Installation : Download file size is 241.50mb to your X-Plane - Fighter Aircraft Folder. Installed file size is 355.00mb Notes: None Documents : An Aircraft Manual (23 Pages) and a Flight Tutorial (6 Pages) Requirements : X-Plane 10.40+ (any edition) Windows 7+, MAC OS 10.7 (or higher) or Linux 1GB VRAM - 2Gb+ VRAM Recommended Version 1.0 (last updated January 16th 2016) Developer Support Site : (RW Designs X-Plane.Org Support) _____________________________________________________________________________________ Review by Stephen Dutton 16th January 2016 Copyright©2016: X-Plane Reviews Review System Specifications: Computer System: - 2.66 Ghz Intel Core i5 iMac 27”- 9 Gb 1067 Mhz DDR3 - ATI Radeon HD 6970M 2048 mb- Seagate 512gb SSD Software: - Mac OS Yosemite 10.10.1 - X-Plane 10 Global ver 10.42 Addons - Saitek x52 Pro system Joystick and Throttle : Sound - Bose Soundlink Mini Scenery or Aircraft - EGKB - Biggin Hill (XP10) 1.3 by Chars (X-Plane.Org) - Free
-
News! - Coming soon - DHC-6 Twin Otter -300 series update v1.2 by RW Designs The Twin Otter DHC-6 -300 Series by RW Design's is getting an upgrade soon to v1.2. On of the most visual changes in v1.2 will be the choice of either the original long-nose version... or the new short nose version. The different noses will be available with every variant, including the standard wheel version (above), Ski, Float and Tundra version. Choice of nose is via a popup panel at your change of variant. Sounds have been completely overhauled and are now plugin SASL driven and not basic X-Plane sourced sounds. Great cockpit now has VOR 2 direction needles, these were missing on the origiinal releast version and were sorely missed, certainly when hopping island to island and you need a heading bearing. Flight model has had some fine tuning and the aircraft behaves far better under climb and far, far better under descent conditions... All the features are still here, and this is a great short-sector aircraft. No date has yet been given on the v1.2 update release, but it is noted as... soon. You can read X-PlaneReviews full v1.0 release review here: Aircraft Review : DHC-6 Twin Otter - 300 Series by RWDesigns And the current version can be purchased here: The de Havilland Canada DHC-6 Twin Otter -300 Series by RWDesigns is now available from the New X-Plane.Org Store here : DHC-6 Otter 300 Series and is priced at only US$27.95 Features include: 4 versions of the DHC-6 Otter Wheels (standard) Tundra - Land in the bush Floats - For lakes and oceans Skis - For glacier operations High-Resolution 3D Model 3D Cockpit Hi Res 4K textures Full 3D exterior model HD Night Lighting Interchangable liveries between versions. 7 paint schemes Custom Prop/Engine sounds Custom Systems Programmed Radios Customized GNS 530 Custom airfoils and flightmodel Custom electrical and de-Icing systems _____________________________________________________________________________________ Stephen Dutton Updated 2nd November 2015 Copyright©2015: X-PlaneReviews